Sterling Selling And Fulfillment Foundation Distributed_Order_Management_User_Guide Distributed Order Management User Guide
User Manual: Distributed_Order_Management_User_Guide user guide pdf - FTP File Search (13/20)
Open the PDF directly: View PDF ![]() .
.
Page Count: 244 [warning: Documents this large are best viewed by clicking the View PDF Link!]
- Contents
- Chapter 1. Distributed Order Management Overview
- Chapter 2. Entering a Resource's Route
- Chapter 3. Adding or Removing Service Tools to a Service Work Order
- Chapter 4. Determining Whether an Area is Serviced
- Chapter 5. Taking an Appointment on a Service Work Order
- Chapter 6. Managing Team Members on Service Work Order Appointments
- Chapter 7. Handling Procurement Requests
- Chapter 8. Answering Permit or Address Questions
- Chapter 9. Create Order Screens
- Chapter 10. Order Console Screens
- Order Search By Status Screen
- Order Search By Item Screen
- Order Search By Date Screen
- Order Search By Address Screen
- Order Search By Draft Orders Screen
- Order List Window
- Detailed Order List Screen
- Order Detail Screen
- Modify Ship To Address Screen
- View Availability Notes Screen
- Order Alerts Screen
- More Order Attributes Screen
- Order Releases for Order Screen
- Work Orders Screen
- Work Order Audits Screen
- Order Invoices Screen
- Invoice Details Screen
- Order Shipment Items and Containers Screen
- Order Shipments Screen
- Order Instructions Screen
- Notes Screen
- More Order Addresses Screen
- Order Negotiations Screen
- Order Negotiation Details Screen
- Order Negotiation History Screen
- Types of Related Orders
- Related Orders Screen
- Order Audits Screen
- Order Audit Details Screen
- Order Dates Screen
- Receiving Discrepancies Screen
- Using Schedule Order
- Schedule Order Screen
- Release Order Screen
- View Holds Screen
- Add Holds Screen
- View History Screen
- Returnable Order Lines Screen
- Associate Delivery Request Screen
- Add Delivery Request Screen
- Work Order Entry Screen
- Copy Order Screen
- Order Status Breakup Screen
- Order's Tag Number Details Window
- Modifying an Order's Carrier and Carrier Service
- Order Charge and Tax Summary Screen
- Overall Order Charges Screen
- Overall Order Taxes Screen
- Remaining Order Charges Screen
- Remaining Order Taxes Screen
- Modifying an Invoiced Order Charge
- Invoiced Order Charges Screen
- Invoiced Order Taxes Screen
- Order Payment Information Screen
- Add Order Payment Information Screen
- Modify Order Payment Information Screen
- Create Credit Memo Screen
- Create Debit Memo Screen
- Order Collection Details Screen
- Charge Screen
- Authorize Screen
- Refund Screen
- Order Line Search By Status Screen
- Order Line Search By Item Screen
- Order Line Search By Date Screen
- Order Line Search By Draft Orders Screen
- Order Line List Screen
- Order Line Detail Screen
- Order Releases for Order Line Screen
- Order Line Instructions Screen
- Bundle Components Screen
- Kit Components Screen
- More Order Line Addresses Screen
- Viewing an Order Line's Chained Order Lines
- Related Order Lines Screen
- Item Attributes Screen
- Order Line Dates Screen
- Inventory Information Screen
- Associated Service Requests Screen
- Add Service Requests Screen
- Order Line Audits Screen
- Line Availability Screen
- Create Dependency Screen
- View Dependency Screen
- Item Substitution Screen
- Add Kit Line Screen
- Overall Order Line Charges Screen
- Overall Order Line Taxes Screen
- Remaining Order Line Charges Screen
- Remaining Order Line Taxes Screen
- Modifying an Order Line Charge
- Invoiced Order Line Charges Screen
- Invoiced Order Line Taxes Screen
- Order Line Status Breakup Screen
- Order Release Search By Status Screen
- Order Release Search By Item Screen
- Order Release Search By Date Screen
- Order Release Search By Logistics Screen
- Order Release List Screen
- Order Release Details Screen
- Order Release Shipments Screen
- More Order Release Addresses Screen
- Notes Screen
- Order Release Dates Screen
- Backordering an Order Release
- Order Release Status Breakup Screen
- Order Release Line Status Breakup Screen
- Service Request Search By Item Screen
- Service Request Search By Draft Orders Screen
- Service Item List Window
- Service Request List Window
- Service Request Details Screen
- Service Request Instructions Screen
- More Service Request Addresses Screen
- Service Request Dates Screen
- Service Request Additional Attributes Screen
- Service Request Status Breakup Screen
- Overall Service Request Charges Screen
- Overall Service Request Taxes Screen
- Remaining Service Request Charges Screen
- Remaining Service Request Taxes Screen
- Invoiced Service Request Charges Screen
- Invoiced Service Request Taxes Screen
- Delivery Request Search By All Attributes Screen
- Delivery Request Search By Draft Orders Screen
- Delivery Request List Screen
- Delivery Request Details Screen
- Additional Product Lines Screen
- Delivery Request Instructions Screen
- More Delivery Request Addresses Screen
- Delivery Request Dates Screen
- Delivery Request Additional Attributes Screen
- Overall Delivery Request Charges Screen
- Overall Delivery Request Taxes Screen
- Remaining Delivery Request Charges Screen
- Remaining Delivery Request Taxes Screen
- Invoiced Delivery Request Charges Screen
- Invoiced Delivery Request Taxes Screen
- History Order Details Screen
- Modification Reason Screen
- Organization Details Screen
- Organization Address Details Screen
- Questions
- Chapter 11. Create Outbound Shipment Screens
- Chapter 12. Outbound Shipment Console Screens
- Outbound Shipment Console Screens
- Outbound Shipment Search By Status
- Outbound Shipment Search By Date
- Outbound Shipment Search By Carrier
- Outbound Shipment Search By Item
- Outbound Shipment Search By Wave
- Outbound Shipment Search By Profiling
- Shipment List
- Shipment Details
- Special Services List
- Modify Shipment
- Address Details
- Charges
- Shipment Loads
- Shipment Containers
- Shipment Instructions
- Shipment Status Audits
- Shipment Dates
- Alerts
- Additional Attributes
- Shipment Activity Demand
- Shipment Audits
- Logical Kits
- Pack Containers
- Packing a Container
- Cancel Selected Shipments
- Split Shipment
- Split Shipment Lines
- Create Alerts
- Ship Node Detail
- Organization Details
- Select Delivery Plan
- Shipment Line Details
- Add Release
- Create Wave
- Containers
- Container Search By All Attributes
- Container Search By Status
- Container List
- Container Details
- Container Return Tracking Numbers
- Serial Details
- Container Status Audits
- Container Activity List
- Pack or Unpack
- Delete Selected Containers
- Modify Containerization
- Resolve Short Picked Containers
- Dock Appointment Search By All Attributes
- Dock Schedule Details
- Dock Appointment
- Dock Group Details
- View Holds
- Add Holds
- View History
- Chapter 13. Service Work Order Console Screens
- Service Work Order Console Screens
- Work Order Search By All Attributes
- Work Order List
- Work Order Details
- Work Order Alerts
- Work Order Status Audits
- Work Order Instructions
- Work Order Notes
- Service Tools
- View Holds
- Add Holds
- View History
- Service Location
- Plan Work Order Appointment
- Product Availability
- Change Nodes
- Resource Availability
- Record Completion
- Record Service Failure
- Work Order Appointments
- Execution Details
- Add Service Lines
- Add Products Being Delivered
- Modify Work Order
- Cancel Work Order
- Questions
- Chapter 14. Accept/Reject Transfer Console Screens
- Chapter 15. Serviced Area Search Screens
- Chapter 16. Route Entry Screens
- Notices
- Index
Sterling Selling and Fulfillment Foundation
Distributed Order Management User Guide
Release 9.1
Sterling Selling and Fulfillment Foundation
Distributed Order Management User Guide
Release 9.1

Note
Before using this information and the product it supports, read the information in “Notices” on page 227.
Copyright
This edition applies to the 9.1 Version of IBM Sterling Selling and Fulfillment Foundation and to all subsequent
releases and modifications until otherwise indicated in new editions.
© Copyright IBM Corporation 1999, 2011.
US Government Users Restricted Rights – Use, duplication or disclosure restricted by GSA ADP Schedule Contract
with IBM Corp.

Contents
Chapter 1. Distributed Order
Management Overview ........1
IBM Sterling Distributed Order Management
Overview ...............1
Understanding the Sterling Distributed Order
Management User Interface Icons .......1
Chapter 2. Entering a Resource's Route 5
Entering a Resource's Route .........5
Searching for Service Work Order Appointments . . 5
Viewing Service Work Order Appointments ....5
Assigning Stop Numbers To Appointments for a
Resource................5
Chapter 3. Adding or Removing Service
Tools to a Service Work Order .....7
Adding or Removing Service Tools to a Service Work
Order.................7
Searching for a Service Work Order.......7
Viewing Service Tools for a Service Work Order . . 7
Adding Service Tools to a Service Work Order . . . 8
Removing Service Tools from a Service Work Order . 8
Chapter 4. Determining Whether an Area
is Serviced .............9
Determining Whether an Area is Serviced ....9
Searching for a Serviced Area.........9
Viewing the Available Time Slots for the Service . . 9
Chapter 5. Taking an Appointment on a
Service Work Order .........11
Taking an Appointment on a Service Work Order. . 11
Searching for a Service Work Order ......11
Viewing Planned Appointments .......11
Taking an Appointment ..........11
Selecting the Time Slot for Service Work Order
Appointments ............12
Chapter 6. Managing Team Members on
Service Work Order Appointments . . . 15
Managing Team Members on Service Work Order
Appointments .............15
Changing the Team Members for Service Work
Order Appointments ...........15
Searching for a Service Work Order .....15
Viewing the Team Members ........16
Adding a Team Member .........16
Removing a Team Member ........16
Overriding Team Members for Service Work Order
Appointments .............17
Searching for Service Work Order Appointments 17
Viewing Service Work Order Appointments . . 17
Creating the New List of Team Members . . . 17
Chapter 7. Handling Procurement
Requests..............19
Handling Procurement Requests .......19
Viewing Pending Procurement Requests .....19
Accepting a Procurement Request .......19
Rejecting a Procurement Request .......20
Chapter 8. Answering Permit or
Address Questions .........21
Answering Permit or Address Questions ....21
Searching for an Order ..........21
Viewing the Questions and Answers for an Order 21
Answering Questions on an Order.......22
Chapter 9. Create Order Screens . . . 23
Order Entry Screen ............23
Chapter 10. Order Console Screens . . 25
Order Search By Status Screen ........25
Order Search By Item Screen ........26
Order Search By Date Screen ........27
Order Search By Address Screen .......28
Order Search By Draft Orders Screen ......29
Order List Window ............29
Detailed Order List Screen .........31
Order Detail Screen............32
Modify Ship To Address Screen........39
View Availability Notes Screen ........40
Order Alerts Screen............40
More Order Attributes Screen ........41
Order Releases for Order Screen .......43
Work Orders Screen ...........43
Work Order Audits Screen .........45
Order Invoices Screen ...........45
Invoice Details Screen ...........46
Order Shipment Items and Containers Screen . . . 47
Order Shipments Screen ..........48
Order Instructions Screen ..........49
Notes Screen ..............49
More Order Addresses Screen ........50
Order Negotiations Screen .........50
Order Negotiation Details Screen .......51
Order Negotiation History Screen .......54
Types of Related Orders ..........56
Related Orders Screen ...........56
Order Audits Screen ...........57
Order Audit Details Screen .........58
Order Dates Screen ............58
Receiving Discrepancies Screen ........59
Using Schedule Order ...........59
Schedule Order Screen...........60
Release Order Screen ...........60
View Holds Screen ............61
Add Holds Screen ............61
© Copyright IBM Corp. 1999, 2011 iii
View History Screen ...........62
Returnable Order Lines Screen ........62
Associate Delivery Request Screen.......63
Add Delivery Request Screen ........64
Work Order Entry Screen ..........65
Copy Order Screen ............66
Order Status Breakup Screen ........66
Order's Tag Number Details Window......67
Modifying an Order's Carrier and Carrier Service . 68
Order Charge and Tax Summary Screen .....68
Overall Order Charges Screen ........70
Overall Order Taxes Screen .........71
Remaining Order Charges Screen .......71
Remaining Order Taxes Screen ........72
Modifying an Invoiced Order Charge......72
Invoiced Order Charges Screen ........73
Invoiced Order Taxes Screen.........73
Order Payment Information Screen ......74
Add Order Payment Information Screen .....79
Modify Order Payment Information Screen ....82
Create Credit Memo Screen .........86
Create Debit Memo Screen .........86
Order Collection Details Screen........87
Charge Screen .............90
Authorize Screen ............90
Refund Screen .............91
Order Line Search By Status Screen ......91
Order Line Search By Item Screen .......92
Order Line Search By Date Screen .......93
Order Line Search By Draft Orders Screen ....93
Order Line List Screen...........94
Order Line Detail Screen ..........95
Order Releases for Order Line Screen......99
Order Line Instructions Screen .......100
Bundle Components Screen.........100
Kit Components Screen ..........101
More Order Line Addresses Screen ......101
Viewing an Order Line's Chained Order Lines . . 102
Related Order Lines Screen .........102
Item Attributes Screen ..........103
Order Line Dates Screen..........104
Inventory Information Screen ........104
Associated Service Requests Screen ......105
Add Service Requests Screen ........106
Order Line Audits Screen .........107
Line Availability Screen ..........108
Create Dependency Screen .........109
View Dependency Screen .........110
Item Substitution Screen ..........111
Add Kit Line Screen ...........112
Overall Order Line Charges Screen ......112
Overall Order Line Taxes Screen .......113
Remaining Order Line Charges Screen .....113
Remaining Order Line Taxes Screen ......114
Modifying an Order Line Charge .......115
Invoiced Order Line Charges Screen ......115
Invoiced Order Line Taxes Screen.......116
Order Line Status Breakup Screen ......116
Order Release Search By Status Screen .....117
Order Release Search By Item Screen .....118
Order Release Search By Date Screen .....120
Order Release Search By Logistics Screen ....120
Order Release List Screen .........121
Order Release Details Screen ........122
Order Release Shipments Screen .......124
More Order Release Addresses Screen .....125
Notes Screen .............125
Order Release Dates Screen.........126
Backordering an Order Release .......126
Order Release Status Breakup Screen .....126
Order Release Line Status Breakup Screen ....127
Service Request Search By Item Screen .....127
Service Request Search By Draft Orders Screen . . 127
Service Item List Window .........128
Service Request List Window ........129
Service Request Details Screen........129
Service Request Instructions Screen ......131
More Service Request Addresses Screen ....132
Service Request Dates Screen ........132
Service Request Additional Attributes Screen . . . 133
Service Request Status Breakup Screen .....133
Overall Service Request Charges Screen ....134
Overall Service Request Taxes Screen .....134
Remaining Service Request Charges Screen . . . 134
Remaining Service Request Taxes Screen ....135
Invoiced Service Request Charges Screen ....136
Invoiced Service Request Taxes Screen .....136
Delivery Request Search By All Attributes Screen 137
Delivery Request Search By Draft Orders Screen 137
Delivery Request List Screen ........138
Delivery Request Details Screen .......139
Additional Product Lines Screen .......141
Delivery Request Instructions Screen .....142
More Delivery Request Addresses Screen ....142
Delivery Request Dates Screen .......143
Delivery Request Additional Attributes Screen . . 143
Overall Delivery Request Charges Screen ....143
Overall Delivery Request Taxes Screen .....144
Remaining Delivery Request Charges Screen . . . 144
Remaining Delivery Request Taxes Screen ....145
Invoiced Delivery Request Charges Screen....146
Invoiced Delivery Request Taxes Screen ....146
History Order Details Screen ........147
Modification Reason Screen ........147
Organization Details Screen ........147
Organization Address Details Screen .....148
Questions ..............149
Chapter 11. Create Outbound
Shipment Screens .........151
Create Outbound Shipment Screens ......151
Shipment Entry for Outbound Shipments ....151
Shipment Supervisory Overrides for Outbound
Shipments ..............152
Chapter 12. Outbound Shipment
Console Screens ..........153
Outbound Shipment Console Screens .....153
Outbound Shipment Search By Status .....153
Outbound Shipment Search By Date......154
Outbound Shipment Search By Carrier .....155
iv Sterling Selling and Fulfillment Foundation: Distributed Order Management User Guide
Outbound Shipment Search By Item......155
Outbound Shipment Search By Wave .....156
Outbound Shipment Search By Profiling ....157
Shipment List .............158
Shipment Details ............159
Special Services List ...........164
Modify Shipment ............164
Address Details ............165
Charges ...............165
Shipment Loads ............166
Shipment Containers ...........167
Shipment Instructions ..........168
Shipment Status Audits ..........168
Shipment Dates ............169
Alerts ................170
Additional Attributes ...........171
Shipment Activity Demand.........172
Shipment Audits ............173
Logical Kits ..............175
Pack Containers ............176
Packing a Container ...........178
Print ................178
Cancel Selected Shipments .........178
Split Shipment .............179
Split Shipment Lines ...........180
Create Alerts .............180
Ship Node Detail ............180
Organization Details ...........181
Select Delivery Plan ...........181
Shipment Line Details ..........182
Add Release..............183
Create Wave..............183
Containers ..............183
Container Search By All Attributes ......184
Container Search By Status .........184
Container List .............185
Container Details ............186
Container Return Tracking Numbers .....189
Serial Details .............189
Container Status Audits ..........190
Container Activity List ..........191
Pack or Unpack ............192
Delete Selected Containers .........192
Modify Containerization..........192
Resolve Short Picked Containers .......194
Dock Appointment Search By All Attributes . . . 194
Dock Schedule Details ..........195
Dock Appointment ...........196
Dock Group Details ...........198
View Holds ..............198
Add Holds ..............200
View History .............200
Chapter 13. Service Work Order
Console Screens ..........201
Service Work Order Console Screens .....201
Work Order Search By All Attributes .....201
Work Order List ............202
Work Order Details ...........202
Work Order Alerts............206
Work Order Status Audits .........207
Work Order Instructions..........208
Work Order Notes............208
Service Tools .............208
View Holds ..............209
Add Holds ..............210
View History .............210
Service Location ............210
Plan Work Order Appointment .......211
Product Availability ...........214
Change Nodes .............215
Resource Availability ...........215
Record Completion ...........216
Record Service Failure ..........216
Work Order Appointments .........217
Execution Details ............218
Add Service Lines ............218
Add Products Being Delivered .......219
Modify Work Order ...........219
Cancel Work Order ...........219
Questions ..............220
Chapter 14. Accept/Reject Transfer
Console Screens ..........221
Accept/Reject Procurement Requests .....221
Chapter 15. Serviced Area Search
Screens ..............223
Serviced Area Search Screens ........223
Serviced Area Search ...........223
Serviced Area List ............223
Chapter 16. Route Entry Screens . . . 225
Route Entry Screens ...........225
Work Order Appointments Search ......225
Route Entry ..............225
Override Team Members .........226
Notices ..............227
Index ...............231
Contents v
vi Sterling Selling and Fulfillment Foundation: Distributed Order Management User Guide
Chapter 1. Distributed Order Management Overview
IBM Sterling Distributed Order Management Overview
Distributed Order Management enables you to manage the lifecycle of sales orders.
The Sterling Selling and Fulfillment Foundation: Product Concepts Guide introduces
concepts regarding sales orders. This document builds on that guide and explains
how to use the Order consoles.
The Distributed Order Management module consists of the following components:
vCreate Order Console - enables you to create order, draft orders and transfer
orders. The screen level information is explained in Create Order Screens.
vOrder Console - enables you to view order details, order alerts, order releases,
order invoice details, order shipments, order instructions and notes. The screen
level information is explained in Order Console Screens.
vCreate Outbound Shipment - enables you to create a outbound shipment and
setting up shipment supervisory overrides. The screen level information is
explained in Chapter 11, Create Outbound Shipment Screens.
vOutbound Shipment Console - enables you to track outbound shipments and
container, create picklist, splitting shipments and so on. The screen level
information is explained in Chapter 12, Outbound Shipment Console Screens.
vService Work Order Console - enables you to view the service work order
related information. You can plan new appointments, add provided or delivery
services or modify existing work orders. The screen level information is
explained in Chapter 13, Service Work Order Console Screens.
vAccept/Reject Transfer Console - enables you to viewing pending transfers from
your location. You can accept or reject transfers. The screen level information is
explained in Accept/Reject Transfer Console Screens .
vServiced Area Search - enables you to search by zip code and determine
whether a service is available for a specific area. The screen level information is
explained in Chapter 15, Serviced Area Search Screens.
vRoute Entry - enables you to enter a resource's route. The screen level
information is explained in Chapter 16, Route Entry Screens.
Understanding the Sterling Distributed Order Management User
Interface Icons
The following table describes the icons used in the Sterling Distributed Order
Management user interface.
Table 1. Sterling Distributed Order Management User Interface Icons
Icon Name Description
Activity Demand Enables you to view the activity demand for a
shipment, container and so on.
Add Enables you to add an instruction line,
charges, and so on.
Add Preferred Indicates the preferred time slot for the
customer.
© Copyright IBM Corp. 1999, 2011 1
Table 1. Sterling Distributed Order Management User Interface Icons (continued)
Add Provided
Service
Enables you to associate a provided service
request with an order or order line.
Additional
Attributes
Enables you to specify additional attributes
for identification, shipping and so on.
Additional
Questions
Enables you to answer questions about the
address.
Additional
Questions Check
Indicates one or more questions about the
address have been answered.
Address Enables you to add or modify an address.
Address Details Enables you to view, modify, or add an
address.
Alert Enables you to view the alerts for an order,
shipment and so on.
Audit Enables you to view the list of audits for the
order, container and so on.
Calendar Enables you to select a date from the calendar.
Chained Orders Enables you to view related orders or order
lines.
Charges and Taxes Enables you to add, modify, or view the
charges and discounts for an order, shipment,
and so on.
Containers Enables you to view all packed containers
included in the shipment.
Delete Enables you to remove a team member, time
slot and so on.
Delivery Item Enables you to view the delivery service
request associated with the order or order
line.
Dependent Child Enables you to view the order line's
dependency.
Dependent Parent Enables you to view the order line's
dependency.
Gift Indicates an order line that is a gift.
Instructions Enables you to view, modify, or add
instructions for a work order, shipment and so
on.
Instructions URL Enables you to specify the instruction URL.
Inventory
Information
Enables you to add the tag identifiers and tag
attributes for the order line.
Invoices Enables you to view the order invoices.
Kit Components Enables you to view the order line's kit
components or bundle components.
Line Has
Constraints
Indicates the line has some associated
constraints.
2Sterling Selling and Fulfillment Foundation: Distributed Order Management User Guide
Table 1. Sterling Distributed Order Management User Interface Icons (continued)
Load Enables you to view the loads that are
carrying the shipment.
Lookup Enables you to search for shipments, team
members and so on.
Negotiations Enables you to view the list of order
negotiations.
Nonworking Day Indicates the line's nonworking days.
Notes Enables you to add notes or contact
information for an order, work order and so
on.
Notes Check Indicates notes or contact information have
already been entered for the order, work order
and so on.
Order Releases Enables you to view the list of releases for the
order, based on the release number, ship node
and status.
Payment Collection Enables you to view collection details for the
order.
Payment Types Enables you to view the payment information
for the selected payment rule. You can also
add or create payment types, debit or credit
memos.
Permit Questions Enables you to answer permit questions for an
order.
Permit Questions
Check
Indicates one or more permit questions have
already been answered.
Plus Enables you to alternatively view and hide
details about the selected object, such as tag
details or sequence details.
Provided Item Enables you to view or cancel the service
requests associated with the order or order
line.
Reservations Indicates the item availability date.
Return Receipt Enables you to view receipt information for
the order.
Return Receipt
History
Enables you to record any discrepancies found
when receiving an order.
Service Tools Enables you to add or remove the service
tools associated with the work order.
Shipment Data
Types
Enables you to view or modify shipment
dates and delivery dates.
Shipments Enables you to view the shipment and
container details of the order release.
Shipping Cartons Enables you to view the expected ship date.
Timestamp Enables you to enter the time.
Toggle Enables you to enter the serial range of the
items for pack containers.
Chapter 1. Distributed Order Management Overview 3
Table 1. Sterling Distributed Order Management User Interface Icons (continued)
View History Enables you to view the history of the
shipments that are held.
Warning Indicator Indicates the item is waiting for acceptance
from a store or node.
Work Order Hold Enables you to view holds that are applied to
the shipment.
Work Orders Enables you to view the related work orders
associated with the sales order, delivery
request and so on.
The following table describes the color icons used in the Dock Appointment
Calendar.
Table 2. Color Icons in the Dock Appointment Calendar
Icon Name Description
Blue Indicates an appointment for the searched
criteria.
Click a slot to modify an existing
appointment.
Cyan Indicates appointments that do not match the
searched criteria.
Click a slot to modify an existing
appointment.
Gray Indicates free slots for which new
appointments can be taken.
Click a slot to create a new dock appointment.
Black Indicates the unavailable slots due to the
calendar constraints.
4Sterling Selling and Fulfillment Foundation: Distributed Order Management User Guide

Chapter 2. Entering a Resource's Route
Entering a Resource's Route
Typically, a resource has to perform more than one service on a given day. The
sequence in which services are completed can be determined ahead of time to
ensure an optimal route with the minimum amount of time and distance in
between each stop.
If you have already determined your resource's route for a day, you can use the
route entry functionality of Sterling Selling and Fulfillment Foundation to record
which stop number corresponds to which appointment.
This can be done in the following steps:
1. Search for service work order appointments
2. View service work orderappointments
3. Assign stop numbers to appointments for a resource
Searching for Service Work Order Appointments
About this task
To search for service work order appointments:
Procedure
1. From the navigation bar, select Order >Route Entry. The Work Order
Appointments Search screen displays.
2. Enter the search criteria for the service work order as applicable. For more
information about the search criteria, see the Work Order Search By All
Attributes Table.
3. When you've entered the applicable information, click Search. This takes you to
the Route Entry screen.
Viewing Service Work Order Appointments
If no resource pool has been selected as part of the search criteria in the Work
Order Appointments Search screen, all the appointments for all resource pools are
listed for the selected date. Each inner panel corresponds to a resource pool, with
the pool's name as the title.
Assigning Stop Numbers To Appointments for a Resource
About this task
To assign stop numbers for appointments:
Procedure
1. In the Resource column, select the resource that carries out this appointment
from the drop-down list.
2. In the Stop # column, enter the stop number for the appointment.
© Copyright IBM Corp. 1999, 2011 5
3. In the Expected Start Time column, enter the time when the appointment is
expected to start, or click the Timestamp icon and select it from the pop-up
window.
4. In the Expected End Time column, enter the time when the appointment is
expected to end, or click the Timestamp icon and select it from the pop-up
window.
5. Once you are satisfied with your route, click Save.
6Sterling Selling and Fulfillment Foundation: Distributed Order Management User Guide
Chapter 3. Adding or Removing Service Tools to a Service
Work Order
Adding or Removing Service Tools to a Service Work Order
Some service work orders may require special tools such as a ladder or a tool kit
to perform the service. Sterling Selling and Fulfillment Foundation lets you
associate one or more service tools to a service work order. The task assumes that a
service work order has already been created. Service tools can be added to the
service work order before the appointment, as a planning activity, or afterwards, to
keep track of which tools service work orders generally require.
About this task
This can be done in the following steps:
Procedure
1. Search for a service work order.
2. View service tools for a service work order.
3. Add or remove service tools for a service work order.
Searching for a Service Work Order
About this task
To search for applicable service work orders:
Procedure
1. From the navigation bar, select Order > Service Work Order Console. The Work
Order Search By All Attributes screen displays.
2. Enter the search criteria for the work order as applicable. For more information
about this search criteria, see Table 306 on page 201.
3. When you've entered the applicable information, click Search. The Work Order
List screen displays.
4. Select the checkbox of the service work orders for which you want to view
details, and click the View Details action. The Work Order Details screen
displays where you can view details for the service work order you selected.
Viewing Service Tools for a Service Work Order
About this task
From the Work Order Details screen, you can view the service tools that can be
associated with the service work order.
In the Primary Information inner panel, click the Service Tools icon. The Service
Tools screen displays. The Service Tools inner panel displays the service tools that
can be associated with the service work order.
© Copyright IBM Corp. 1999, 2011 7

Adding Service Tools to a Service Work Order
About this task
From the Service Tools Tools screen, you can add service tools for the service work
order. To add a service tool to a service work order:
Procedure
1. Check the checkbox next to the identifier of the service tool.
This enables the Required Quantity and Comments text boxes.
2. If necessary, enter the required quantity, and any additional comments.
3. Click Save.
Removing Service Tools from a Service Work Order
About this task
From the Service Tools Tools screen, you can remove service tools for the service
work order. To remove a service tool from a service work order:
Procedure
1. Uncheck the checkbox next to the identifier of the service tool you want to
remove.
2. Click Save.
8Sterling Selling and Fulfillment Foundation: Distributed Order Management User Guide

Chapter 4. Determining Whether an Area is Serviced
Determining Whether an Area is Serviced
If a customer walks into your store and wants to know whether his postal code is
serviced by your store for a given type of service, you can use the Serviced Area
Search console to find out that information.
This assumes that you are able to map the requested service to a service type as
defined in the Applications Manager.
This can be done in the following steps:
1. Search for a serviced area
2. View the available time slots
Searching for a Serviced Area
About this task
To search for a serviced area:
Procedure
1. From the navigation bar, select Order > Serviced Area Search. The Serviced
Area Search screen displays.
2. Enter the search criteria for the service work order as applicable. For more
information about the search criteria, see Table 345 on page 223.
3. When you have entered the applicable information, click Search. The Serviced
Area List screen displays.
Viewing the Available Time Slots for the Service
You can view the available time slots for the requested service and postal code
combination in the Serviced Area List screen.
Sterling Selling and Fulfillment Foundation looks for capacity across all the
resource pools for the specified Enterprise. If slots are available for the requested
postal code, the Available Slots inner panel displays.
Each time slot displays as a row, and each day of the week as a column. The boxes
show whether or not the requested postal code can be serviced for each time slot,
each day, as follows:
vIf the requested postal code is serviced for the day of the week, and capacity is
available, a green checkmark appears.
vIf the requested postal code is serviced for the day the week, but capacity is not
available, a red cross appears.
vIf the requested postal code is not ever serviced for the day of the week, a grey
background appears, with no icon on top of it.
© Copyright IBM Corp. 1999, 2011 9
10 Sterling Selling and Fulfillment Foundation: Distributed Order Management User Guide
Chapter 5. Taking an Appointment on a Service Work Order
Taking an Appointment on a Service Work Order
Once a service work order has been created, an appointment has to be taken for
the service to be completed.
When taking the appointment, there can be additional factors such as considering
supplemental capacity or trying to schedule a customer’s appointments against his
preferred time slots.
This can be in done in the following steps:
1. Search for a service work order
2. View planned appointments
3. Take an appointment
Searching for a Service Work Order
About this task
To search for applicable service work orders:
Procedure
1. From the navigation bar, select Order > Service Work Order Console. The
Table 306 on page 201screen displays.
2. Enter the search criteria for the work order as applicable.
3. When you've entered the applicable information, click Search. The Work Order
List screen displays.
4. Select the checkbox of the service work orders for which you want to view
details, and click the View Details action. The “Work Order Details” on page
202 screen display where you can view details for the service work order you
selected.
Viewing Planned Appointments
About this task
To view planned appointments:
Procedure
1. In the Work Order Details screen, go to the Open Appointments inner panel.
2. If you are in a multiple appointments context, select the appropriate work
order and click the View Execution Details action. Otherwise, click the View
Execution Details action. This takes you to the "Execution Details" screen.
Taking an Appointment
When taking an appointment for a service work order, there are some
considerations you might want to think about. For example, supplemental capacity,
node notification time, or preferred customer slot.
© Copyright IBM Corp. 1999, 2011 11
Considering Supplemental Capacity
The Supplemental capacity may be defined for the selected resource pool.
Sterling Selling and Fulfillment Foundation can be configured to automatically
consider that extra capacity every time an appointment is taken for certain
preferred customers. If that is not the case, however, and you want to consider
supplemental capacity on a single appointment, check the Consider Supplemental
Capacity checkbox in the Override inner panel.
Considering Node Notification Time
Ship nodes generally require a certain notification time for them to be able process
a service request. If this is a high priority service request, you can ignore that
minimum notification time for the node. To do this, check the Ignore Node
Notification Time checkbox in the Override inner panel.
Considering Product Availability
Sterling Selling and Fulfillment Foundation considers product availability when
displaying the available appointment slots. If there is no product availability
during an appointment slot, that slot is not available.
Clicking on the Product Availability action in the Constraints inner panel takes you
to the Product Availability screen, where you can use the Change Nodes action to
specify a different ship node or procure from node if there is no product
availability at the current ship node.
You can also check the Ignore Product Availabilty checkbox in the Override
inner panel to remove this restraint and plan appointments without considering
product availability.
Awaiting Procurement Confirmation
If configured, Sterling Selling and Fulfillment Foundation enables the procure from
node to manually confirm transfer requests. While product lines are awaiting
confirmation from the procure from node, the message "Few Prod Lines Are
Awaiting Procurement Confirmation" is displayed in the Constraints inner panel.
Clicking on the Product Availability action in the Constraints inner panel takes you
to the Product Availability screen, where you can use the Change Nodes action to
specify a different procure from node that may not require procurement
confirmation.
You can also check the Ignore Product Availabilty checkbox in the Override
inner panel to remove this restraint and plan appointments without considering
product availability.
Selecting the Time Slot for Service Work Order Appointments
About this task
To select the date from which you want to start looking at available appointment
slots:
12 Sterling Selling and Fulfillment Foundation: Distributed Order Management User Guide
Procedure
1. In the Available Slots inner panel, click the Calendar icon in the Start Date
field.
2. Enter how far you into the future you want to look for appointments in the
Number Of Days To Consider field.
3. Once you are satisfied with the search parameters, click GO. A grid with time
slots and days displays.
4. Select any time slot on the grid where an Add icon is displayed. If the buyer
on the order is a preferred customer and preferred time slots have been defined
for that customer, they are marked by an Add Preferred icon instead.
5. Once you have selected the appropriate appointment slot, click the Save
Appointment action in the Work Order inner panel, and the appointment is
saved.
Results
If a Preferred Resource Pool ID and a Preferred Resource ID were specified on the
Capacity Information panel of the Work Order Details screen, they are populated
in the Override inner panel in this screen. You may, however, change them if no
available slots are found, or if the slots that were found did not accommodate the
customer's schedule.
Chapter 5. Taking an Appointment on a Service Work Order 13
14 Sterling Selling and Fulfillment Foundation: Distributed Order Management User Guide
Chapter 6. Managing Team Members on Service Work Order
Appointments
Managing Team Members on Service Work Order Appointments
A team member is an individual to whom the execution of the service work order
appointment is assigned.
Typically, a service resource is composed of several team members. These team
members are defined for each resource in the Applications Manager. When taking
service work order appointments, Sterling Selling and Fulfillment Foundation
automatically assigns the resource's team members to the appointment, if they
have been defined, and the resource has been selected in the service work order
details.
Managing team members on your service work order appointments can offer
benefits such as facilitating integration with financial systems to ease payroll
processing.
This task assumes that a service work order has already been created and an
appointment has already been taken for it.
You have, however, the flexibility to change the assigned team members on service
work order appointments.
This can be accomplished by:
vChanging the team members for service work order appointments
or
vOverriding team members for service work order appointments
Changing the Team Members for Service Work Order Appointments
About this task
Changing team members on an appointment involves adding or removing a team
member to or from an existing list for any number of appointments in a single
service work order. For instance, this could be used to replace a team member that
is on sick leave with another member.
This can be done in the following steps:
Procedure
1. Search for a service work order
2. View the team members
3. Add or remove the team members
Searching for a Service Work Order
About this task
To search for applicable service work orders:
© Copyright IBM Corp. 1999, 2011 15
Procedure
1. From the navigation bar, select Order > Service Work Order Console. The Work
Order Search By All Attributes screen displays.
2. Enter the search criteria for the work order as applicable. For more information
about the search criteria, see Table 306 on page 201.
3. When you have entered the applicable information, click Search. This takes you
to the Work Order List screen.
4. Select the checkbox of the service work orders for which you want to view
details, and click the View Details action. This takes you to the Work Order
Details screen for the service work order you selected.
Viewing the Team Members
About this task
To view the team members currently assigned to an appointment:
Procedure
1. From the Work Order Details screen, go to the Open Appointments inner panel.
2. Click the View Execution Details action.
In the case of multiple appointments, select the appointments for which you
want to manage team members, and click the View Execution Details action.
The Execution Details screen displays in a pop-up window.
The Team Members inner panel displays the team members currently assigned
to this appointment. If a Resource Pool ID and a Resource ID have been
specified in the Capacity Information inner panel of the Work Order Details
screen, and team members have been defined for that resource in the
Applications Manager, they are automatically populated in the Execution
Details screen.
Adding a Team Member
About this task
To add a team member to an appointment:
Procedure
1. Click the Add icon in the Team Members inner panel.
2. In the text box, enter the identifier of the team member or click the Lookup
icon to look it up.
3. If you are ready to add the team member, click Save. If you do not want to add
the team member, click the Delete icon.
Removing a Team Member
About this task
To remove one or more team members from this appointment:
Procedure
1. Select the checkbox of the team members you want to remove.
2. Click the Remove action in the Team Members inner panel.
16 Sterling Selling and Fulfillment Foundation: Distributed Order Management User Guide

Overriding Team Members for Service Work Order Appointments
About this task
Overriding team members for service work order appointments overwrites the
current list of members with a new one. Therefore, this feature cannot be used to
add or remove a team member from a pre-existing list. However, you can do this
for a number of appointments for different service work orders at once.
This can be done in the following steps:
Procedure
1. Search for service work order appointments
2. View service work order appointments
3. Create the new list of team members
Searching for Service Work Order Appointments
About this task
To search for service work order appointments:
Procedure
1. From the navigation bar, select Order >Route Entry. The Work Order
Appointments Search screen displays.
2. Enter the search criteria for the service work order as applicable. For more
information about the search criteria, see the Work Order Search By All
Attributes Table.
3. When you've entered the applicable information, click Search. This takes you to
the Route Entry screen.
Viewing Service Work Order Appointments
About this task
If no resource pool has been selected as part of the search criteria in the Work
Order Appointments Search screen, all the appointments for all resource pools are
listed for the selected date. Each inner panel corresponds to a resource pool, with
the pool's name as the title.
Creating the New List of Team Members
About this task
To override Team Members for appointments and create a new list:
Procedure
1. Select the appointments for which you want to override the team members.
2. Click the Override Team Members action. The Override Team Members screen
displays in a pop-up window.
3. In the Override Team Members screen, click the Add icon. In the text box, enter
the identifier of the team member or click the Lookup icon to look it up. If you
want to remove a team member from your new list, click the Delete icon.
4. Once you are satisfied with your list, click Save.
Chapter 6. Managing Team Members on Service Work Order Appointments 17
18 Sterling Selling and Fulfillment Foundation: Distributed Order Management User Guide
Chapter 7. Handling Procurement Requests
Handling Procurement Requests
Certain nodes require you to manually confirm transfer requests before a
procurement order is placed. This allows you to determine whether the desired
inventory is physically available and prevent the possible reservation of
unavailable inventory due to an incorrect inventory picture. This functionality is
used based on your configuration defined in the Applications Manager, and
appears in the Application Console if applicable to your node.
This task assumes that a procurement request has already been placed against your
node and that your node has been configured to require manual transfer
acceptance. As an Application Console node user, you can accept or reject these
requests.
Viewing Pending Procurement Requests
About this task
To search for pending procurement requests.
Procedure
From the navigation bar, select Order > Accept/Reject Transfers. The Accept/Reject
Procurement Requests screen displays all requests currently awaiting reservation
acceptance.
Accepting a Procurement Request
About this task
From the Accept/Reject Procurement Requests screen, you can accept or reject
pending procurement requests after determining whether the requested inventory
is physically available at your node. You can also accept or reject multiple requests
at once.
When accepting a procurement request, you have the ability to accept all of the
requested quantity or only part of the requested quantity. To accept a procurement
request:
Procedure
1. Identify the requests you want to accept.
2. From the Action dropdown, select Accept.
3. In the Action Quantity field, enter the amount you want to accept. On default,
the action quantity is the total requested quantity.
4. Click Save to confirm your acceptance. The screen updates with your changes.
Note: When accepting less than the total requested quantity, the remaining
quantity is rejected.
© Copyright IBM Corp. 1999, 2011 19

Rejecting a Procurement Request
About this task
From the Accept/Reject Procurement Requests screen, you can accept or reject
pending procurement requests after determining whether the requested inventory
is physically available at your node. You can also accept or reject multiple requests
at once.
When rejecting a procurement request, all of the requested quantity is rejected. To
reject a procurement request:
Procedure
1. Identify the requests you want to reject.
2. From the Action dropdown, select Reject.
3. The Action Quantity field is displays the total requested quantity. This field
cannot be changed.
4. Click Save to confirm your rejection. The screen updates with your changes.
20 Sterling Selling and Fulfillment Foundation: Distributed Order Management User Guide
Chapter 8. Answering Permit or Address Questions
Answering Permit or Address Questions
Certain orders may require you to answer permit or address questions. Questions
can be pre-configured in the Applications Manager and appear for an order in the
Application Console.
This task assumes that an order has already been created and that questions and
answer options are used in your service processes.
As an Application Console user, you can add or modify answers on the
questionnaire.
Searching for an Order
About this task
To look for the applicable orders:
Procedure
1. From the navigation bar, select Order > Order Console. The Order Search By
Status Screen screen displays.
2. Enter the search criteria for the order as applicable. When you have entered the
applicable information, click Search. This takes you to the Order List Window
screen.
3. Select the checkbox of the orders for which you want to view details, and click
the View Details action. This takes you to the Order Detail Screen screen.
Viewing the Questions and Answers for an Order
From the Order Detail Screen screen, you can view the questions that can be
answered for the order.
Table 3. Viewing Questions and Answers for the Order
Type of Question Description
Address questions In the Ship To panel, clicking the Additional Questions icon
takes you to the Address “Questions” on page 149 screen,
which displays the address questions that can be answered
for this order.
The Additional Questions Check icon displays in the Ship To
panel if any answers to address questions currently exist for
this order.
Permit questions Clicking the Permit Questions icon takes you to the Permit
“Questions” on page 149 screen, which displays the permit
questions that can be answered for this order.
The Permit Questions Check icon displays in the Ship To
panel if any answers to permit questions currently exist for
this order.
© Copyright IBM Corp. 1999, 2011 21

The “Questions” on page 149 screen also displays any answers that have been
previously entered.
Answering Questions on an Order
About this task
From the “Questions” on page 149 screen, you can add answers or modify
previous answers for questions on the Order.
The address or permit questions and answer options that display are
pre-configured. Once you have selected or entered your necessary answers, click
Save.
Note that answer to address questions may have capacity impact, that affect the
calculated capacity required to perform the service. Therefore, address questions
should be answered to ensure that appropriate capacity is calculated to perform
the service.
22 Sterling Selling and Fulfillment Foundation: Distributed Order Management User Guide
Chapter 9. Create Order Screens
Order Entry Screen
You can create a sales order or a transfer order using this screen.
You can also create an order by copying an existing order. For more information
about copying orders, see Copy Order Screen.
Table 4. Order Entry
Field Description
Document Type Select the type of order document you are creating. For
example, Sales Order or Transfer Order.
Enterprise Select the Enterprise that is to handle the order.
Buyer Enter the Buyer placing the order.
Seller Enter the Seller that the order is being placed from.
Order # Enter the order number.
Type This field can be customized as needed.
Date Enter the date the is placed.
Currency Select the currency with which any transactions are to be
handled in.
Once the field details are entered, click the Create Order button. The Order Detail
Screen screen displays.
© Copyright IBM Corp. 1999, 2011 23
24 Sterling Selling and Fulfillment Foundation: Distributed Order Management User Guide
Chapter 10. Order Console Screens
Order Search By Status Screen
You can search for orders that fall under a particular status with the help of this
screen.
Do not use spaces before or after any text you enter in the search fields, as this
may result in inconsistent or inaccurate results.
Table 5. Order Search By Status
Field Description
Document Type Select the appropriate document type to search for, if
applicable.
Enterprise Choose the field and lookup option to find the specific
Enterprise you want use.
Choose Across Enterprises to search across all Enterprises in
the system.
Note: If you belong to a team, the system only searches
across the Enterprises allowed by that group. For more
information about teams, see the Sterling Selling and
Fulfillment Foundation: Application Platform Configuration Guide.
Order Number Enter the order number you are searching for, if applicable.
Buyer Enter the Buyer of the orders you want to search for, if
applicable.
Seller Enter the Seller of the orders you want to search for, if
applicable.
Exchange Order With Type Check this if the order you want to search for is an exchange
order
If this is checked, you can select from the drop-drown list the
exchange type of the order for which you want to search. If
no exchange type is selected, Sterling Selling and Fulfillment
Foundation searches for all the exchange order types.
Buyer Account Number Enter the Buyer's account number you want the orders you
are searching for to be associated with, if applicable.
Order Line Status Select the status range of the orders you want to search for, if
applicable.
Payment Status Select the payment status the orders you are searching for are
in, if applicable.
Held Orders Select if the orders you are searching for are being held.
Sale Voided Orders Select if the orders you are searching for are voided.
Hold Type If you selected Held Orders, select the hold type with which
the orders you are searching for are associated.
© Copyright IBM Corp. 1999, 2011 25
Table 5. Order Search By Status (continued)
Field Description
Order State Select to search for orders in one of the following conditions:
vOpen - orders that have not been closed
vRecent - all orders (open and closed) that have not yet been
sent to the history tables
vHistory - orders that have been sent to the history tables
vAll - all orders (open, recent, and history)
Max Records Enter the maximum number of orders you want returned
from your search.
The Order List Window screen is displayed as a result of this status search.
Order Search By Item Screen
You can search for orders based on the item information such as product class, unit
of measure, item ID and so on.
Do not use spaces before or after any text you enter in the search fields, as this
may result in inconsistent or inaccurate results.
Table 6. Order Search By Item
Field Description
Document Type Select the appropriate document type to search for, if
applicable.
Enterprise Choose the field and lookup option to find the specific
Enterprise you want use.
Choose Across Enterprises to search across all Enterprises in
the system.
Note: If you belong to a team, the system only searches
across the Enterprises allowed by that group. For more
information about teams, see the Sterling Selling and
Fulfillment Foundation: Application Platform Configuration Guide.
Order Number Enter the order number you are searching for, if applicable.
Buyer Enter the Buyer of the orders you want to search for, if
applicable.
Seller Enter the Seller of the orders you want to search for, if
applicable.
Item ID Enter the item ID to search for orders containing a specific
item, if applicable.
Product Class Select an item product class to search for orders containing an
item that has a specific product class, if applicable.
UOM Select an item unit of measure to search for orders containing
an item that has a specific unit of measure, if applicable.
Item Description Enter the item description you want the orders you are
searching for to be associated with, if applicable.
Customer Item ID Enter the customer's item ID to search for orders containing
an item that has a specific customer item ID, if applicable.
26 Sterling Selling and Fulfillment Foundation: Distributed Order Management User Guide
Table 6. Order Search By Item (continued)
Field Description
Customer PO Number Enter the customer's purchase to search for orders containing
an item that has a specific customer purchase order number,
if applicable.
Max Records Enter the maximum number of orders you want returned
from your search.
The Order List Window screen is displayed as a result of the order search by item.
Order Search By Date Screen
You can search for orders that fall within a particular date range for shipments and
delivery with the help of this screen.
Do not use spaces before or after any text you enter in the search fields, as this
may result in inconsistent or inaccurate results.
Table 7. Order Search By Date
Field Description
Document Type Select the appropriate document type to search for, if
applicable.
Enterprise Choose the field and lookup option to find the specific
Enterprise you want use.
Choose Across Enterprises to search across all Enterprises in
the system.
Note: If you belong to a team, the system only searches
across the Enterprises allowed by that group. For more
information about teams, see the Sterling Selling and
Fulfillment Foundation: Application Platform Configuration Guide.
Order Number Enter the order number you are searching for, if applicable.
Buyer Enter the Buyer of the orders you want to search for, if
applicable.
Seller Enter the Seller of the orders you want to search for, if
applicable.
Buyer Account Number Enter the Buyer's account number with the orders you want
to search for, if applicable.
Order Date Enter the order date range through which you want to search
for orders, if applicable.
Requested Ship Date Enter the requested shipping date range through which you
want to search for orders, if applicable.
Requested Delivery Date Enter the requested delivery date range through which you
want to search for orders, if applicable.
Max Records Enter the maximum number of orders you want returned
from your search.
The Order List Window screen is displayed as a result of this order search by date.
Chapter 10. Order Console Screens 27
Order Search By Address Screen
You can search for orders that belong to a billing or shipping address with the help
of this screen.
Do not use spaces before or after any text you enter in the search fields, as this
may result in inconsistent or inaccurate results.
Table 8. Order Search By Address
Field Description
Document Type Select the appropriate document type to search for, if
applicable.
Enterprise Choose the field and lookup option to find the specific
Enterprise you want use. Or choose Across Enterprises to use
of all the Enterprises.
Order Number Enter the order number you are searching for, if applicable.
Buyer Enter the Buyer of the orders you want to search for, if
applicable.
Seller Enter the Seller of the orders you want to search for, if
applicable.
Item ID Enter the item ID to search for orders containing a specific
item, if applicable.
Address Lookup Select an address by clicking on the address lookup. Select
any one of the following options for the order search:
vShip To - Select "Ship To" to search for orders that has
either the order level or the order line level ship to address
as the specified address.
vBill To - Select "Bill To" to search for orders that has bill to
address as the specified address.
vEither - Select "Either" to search for orders that either has
order level or the order line level ship to address or has bill
to address as the specified address.
Carrier Service Enter the Carrier Service Code of any order line for the order
you want to search for, if applicable.
Order State Select to search for orders in one of the following conditions:
vOpen - orders that have not been closed
vRecent - all orders (open and closed) that have not yet been
sent to the history tables
vHistory - orders that have been sent to the history tables
vAll - all orders (open, recent, and history)
Max Records Enter the maximum number of orders you want returned
from your search.
Because zip codes are mandatory for a search by address, addresses that do not
contain a zip code, such as those that are defined within a region that services an
entire country or region, are not listed.
The Order List Window screen is displayed as a result of this order search by
address.
28 Sterling Selling and Fulfillment Foundation: Distributed Order Management User Guide
Order Search By Draft Orders Screen
You can search for draft orders with the help of this screen. Draft orders are orders
in the process of being entered that have not been confirmed.
Do not use spaces before or after any text you enter in the search fields, as this
may result in inconsistent or inaccurate results.
Table 9. Order Search By Draft Orders
Field Description
Document Type Select the appropriate document type to search for, if
applicable.
Enterprise Choose the field and lookup option to find the specific
Enterprise you want use.
Choose Across Enterprises to search across all Enterprises in
the system.
Note: If you belong to a team, the system only searches
across the Enterprises allowed by that group. For more
information about teams, see the Sterling Selling and
Fulfillment Foundation: Application Platform Configuration Guide.
Order Number Enter the order number you are searching for, if applicable.
Buyer Enter the Buyer of the draft orders you want to search for, if
applicable.
Seller Enter the Seller of the draft orders you want to search for, if
applicable.
Buyer Account Number Enter a Buyer account number to search for draft orders
containing a particular Buyer account number, if applicable.
Max Records Enter the maximum number of orders you want returned
from your search.
The Order List Window screen is displayed as a result of this draft order search.
Order List Window
The Order List window displays the results of an order search. You can perform
actions on a single order or multiple orders by selecting the check boxes of the
orders you want to perform an action on and choosing the applicable action from
the action bar.
Table 10. Order List
Action Description
View Details This action takes you to the Order Detail Screen screen to
view the details for the selected orders.
View Alerts This action takes you to the Order Alerts Screen screen where
you can view the alerts raised for the selected orders.
View Releases This action takes you to the Order Releases for Order Screen
screen where you can view the order releases.
View Invoices This action takes you to the Order Invoices Screen screen to
view the invoices associated with the order.
Chapter 10. Order Console Screens 29
Table 10. Order List (continued)
View Shipments This action takes you to the Order Shipment Items and
Containers Screen screen to view the shipments and shipment
containers for the selected orders.
View Instructions This action takes you to the Order Instructions Screen screen
to view, add, modify or delete the order instructions.
View Notes This action takes you to the Notes Screen screen to view,
modify or add the order notes.
View Audit This action takes you to the Order Audits Screen screen to
view the audits for the selected orders.
Schedule This action schedules the selected orders based on the rules
defined in the Sterling Selling and Fulfillment Foundation:
Distributed Order Management Configuration Guide.
Release This action releases the selected orders that are in a Scheduled
Status.
Cancel This action takes you to the Modification Reason Screen
screen to cancel the selected orders. Enter the reason code
and the reason text to confirm the cancellation, and click OK.
The selected orders will be cancelled.
Remove This action can be used to remove the selected Draft orders
only.
Create Return This action takes you to the Returnable Order Lines Screen
screen where you can create returns for order lines that are
returnable.
Restore This action can be used to restore the selected History orders
only.
Confirm This action can be used to confirm Draft orders only.
View Holds This action takes you to the View Holds Screen screen to
view, add or remove the holds for the selected orders.
Copy Order This action takes you to the Copy Order Screen screen where
you can create a copy of the selected order. Only a single
order can be copied at a time.
Field
Order # The order number. Click this link to view the Order Detail
Screen screen.
Status The current status of the order. If a lock icon appears here,
the order is on hold. If a history icon appears here, the order
is a history order.
Enterprise The Enterprise associated with the order.
Buyer The Buyer organization that placed the order.
Order Date The date the order was placed.
Total Amount The order's total amount.
The order list screen can also be viewed in detail by selecting the Detailed Order
List Screen screen from the drop-down option next to the screen name.
30 Sterling Selling and Fulfillment Foundation: Distributed Order Management User Guide
Detailed Order List Screen
This screen can be viewed with the help of the drop-down button in the Order List
Window screen.
Table 11. Detailed Order List
Action Description
View Details This action takes you to the Order Detail Screen screen to
view the details for the selected orders.
View Alerts This action takes you to the Order Alerts Screen screen where
you can view the alerts raised for the selected orders.
View Releases This actions takes you to the Order Releases for Order Screen
screen where you can view the order releases.
View Invoices This action takes you to the Order Invoices Screen screen to
view the invoices associated with the order.
View Shipments This action takes you to the Order Shipment Items and
Containers Screen screen to view the shipments and shipment
containers for the selected orders.
View Instructions This action takes you to the Order Instructions Screen screen
to view, add, modify or delete the order instructions.
View Notes This action takes you to the Notes Screen screen to view,
modify or add the order notes.
View Audit This action takes you to the Order Audits Screen screen to
view the audits for the selected orders.
Schedule This action schedules the selected orders based on the rules
defined in the Sterling Selling and Fulfillment Foundation:
Distributed Order Management Configuration Guide.
Release This action releases the selected orders that are in a Scheduled
Status.
Cancel This action takes you to the Modification Reason Screen
screen to cancel the selected orders. Enter the reason code
and the reason text to confirm the cancellation, and click OK.
The selected orders will be cancelled.
Remove This action can be used to remove the selected Draft orders
only.
Create Return This action takes you to the Returnable Order Lines Screen
screen where you can create returns for order lines that are
returnable.
Restore This action can be used to restore the selected History orders
only.
Confirm This action can be used to confirm Draft orders only.
View Holds This action takes you to the View Holds Screen screen to add
or remove the holds for the selected orders.
Copy Order This action takes you to the Copy Order Screen screen where
you can create a copy of the selected order. Only a single
order can be copied at a time.
Field
Order # The order number. Click this link to view the Order Detail
Screen screen.
Chapter 10. Order Console Screens 31
Table 11. Detailed Order List (continued)
Status The current status of the order. If a lock icon appears here,
the order is on hold. If a history icon appears here, the order
is a history order.
Enterprise The Enterprise associated with the order.
Buyer The Buyer organization that placed the order.
Order Date The date the order was placed.
Order Type The type of the order.
Order Name The name of the order.
Total Amount The order's total amount.
Order Detail Screen
The order detail screen provides various information about a single sales order.
The actions that can be performed in the order detail screen are explained in the
following tables.
Table 12. Order Detail Screen, Order
View Icons Description
Alert This icon takes you to the Order Alerts Screen screen where
you can view the alerts for the order.
Additional Attributes This icon takes you to the More Order Attributes Screen
screen where you can specify additional attributes for
Identification, Shipping and Financials.
Order Releases This icon takes you to the Order Releases for Order Screen
screen where you can view the list of order releases based on
the release number, ship node and status.
Work Orders This icon takes you to the Work Orders Screen screen where
you can view the related work orders associated with this
sales order.
Invoices This icon takes you to the Order Invoices Screen screen to
view the order invoices.
Shipments This icon takes you to the Order Shipment Items and
Containers Screen screen where you can view the shipment
and container details.
Instructions This icon lets you view the Order Instructions Screen screen
where you can add, modify or delete the instructions for a
order.
Notes This icon lets you view the Notes Screen where you can add
the notes for an order.
If notes have been added, the Notes Check icon is displayed
instead.
Address This icon takes you to the More Order Addresses Screen
screen where you can add or modify forwarding address.
Negotiations Click this icon to go to the Order Negotiations Screen screen
to view the list of order negotiations.
Chained Orders This icon lets you view the Types of Related Orders screen.
For example you can view the Return Orders created from
the order console by clicking this icon.
32 Sterling Selling and Fulfillment Foundation: Distributed Order Management User Guide
Table 12. Order Detail Screen, Order (continued)
Audit This icon takes you to the Order Audits Screen screen where
you can view the list of audits done for that order.
Shipment Data Types This icon takes you to the Order Dates Screen screen to view
the requested, expected and actual date type for the given
order.
Return Receipt History This icon takes you to the Receiving Discrepancies Screen
screen where you can record any discrepancies found when
receiving an order.
Actions
Schedule You can schedule an order using this action. This action takes
you to the Using Schedule Order screen where you can
provide the necessary information to schedule the order.
Release You can release an order using this action. This action takes
you to the Release Order Screen screen where you can
provide information for releasing the order.
View Holds This action lets you view and manage order holds. For more
information refer to View Holds Screen screen for field level
descriptions of the screen.
Cancel This action enables you to cancel the sales order. It pops up a
Modification Reason Screen screen to enter the reasons for
cancellation.
Confirm This action lets you confirm the Draft orders.
Create Return This action enables you to create returns for the returnable
order lines. This action takes you to the Returnable Order
Lines Screen screen to create a return.
Unschedule This action unschedules a scheduled order. Upon selecting
this action the screen refreshes and any order line that is in
the schedule status in unscheduled. If an order cannot be
unscheduled, an error reason is displayed.
Add Delivery Request This action takes you to the Add Delivery Request Screen
screen where you can add the necessary delivery requests
that are not associated with a product item.
Associate Delivery Request This action takes you to the Associate Delivery Request
Screen screen where you can associate the necessary delivery
requests with a product item.
Add Service Request This action lets you add stand alone (not associated with
order lines) provided service items. Upon clicking this action
you are taken to the Service Request Search By Item Screen
screen where you can search for service requests to add as a
stand alone service.
Create Work Order This action lets you create service work order for the order
lines. Upon clicking this action you are taken to the Work
Order Entry Screen screen where you can enter the relevant
information for creating a work order.
Copy Order This action takes you to the Copy Order Screen screen where
you can create a copy order for the sales order.
Manage Special Services This action takes you to the Special Services List screen where
you can select special services for the carrier.
Fields
Enterprise The Enterprise associated with the order.
Chapter 10. Order Console Screens 33

Table 12. Order Detail Screen, Order (continued)
Buyer The Buyer organization that placed the order. This field can
be edited if the order is in Draft Order Created status. In any
other status, click this link to view the Organization Details
Screen screen of the buyer.
Seller The Seller organization that is handling the order. This field
can be edited if the order is in Draft Order Created status. In
any other status, click this link to view the Organization
Details Screen screen of the seller.
Order # The order number.
Status The current status of the order. Click this link to view the
associated Order Status Breakup Screen screen.
Order Date The date the order was placed.
Order Type This field can be customized as needed.
Carrier/Service The carrier (such as UPS) and service (such as Ground or
Next Day Air) for the order.
Requested Delivery Date The date on which the Buyer wants the order to be delivered.
Exchange Type Select the exchange type from the drop-down list. The option
of changing the type of an exchange is only available when
the order is in Draft Order Created status. Once the order is
confirmed, you are not able to edit this field.
Note: This field is only displayed for exchange orders.
Created For Return # The return order number for which the exchange was created.
Click on the hyperlink to see that return order.
Note: This field is only displayed for exchange orders.
Document Type The document type associated with the order. For example,
Sales Order is a document type.
Table 13. ShipTo
View Icon Description
Address Details Choose this icon to view or modify the ShipTo addresses. For
more information about the screen that is displayed, see the
Modify Ship To Address Screen screen.
Additional Questions Choose this icon to view or modify answers to address
questions for this ship to address.
If any questions have already been answered, a Additional
Questions Check icon is displayed.
For more information about the screen that is displayed, see
the Questions screen.
Permit Questions Choose this icon to view or modify answers to permit
questions for this ship to address.
If any questions have already been answered, a Permit
Questions Check icon is displayed.
For more information about the screen that is displayed, see
the Questions screen.
This icon is only available at the order level.
The name and address of the person or organization where the order is shipped.
34 Sterling Selling and Fulfillment Foundation: Distributed Order Management User Guide
Table 14. BillTo
View Icon Description
Address Details Choose this icon to view or modify the BillTo addresses.For
more information about the screen that is displayed, see the
Organization Address Details Screen screen.
The name and address of the person or organization being debited.
Table 15. Order Detail Screen, Charges
View Icon Description
Charges and Taxes This icon takes you to the Order Charge and Tax Summary
Screen screen to view the summary of the order charges,
discounts and their tax breakup.
Fields
Line Sub-Total The total of all of the line item totals.
Total Charges The total amount of extra charges for the order. For example,
shipping, handling, and personalization charges.
Total Tax The total tax amount for the order.
Total Discount The total Discount amount that is being applied to the order.
Grand Total The final total, including all extra charges, taxes, and
discounts.
Table 16. Order Detail Screen, Payment Info
View Icons Description
Payment Types This icon takes you to the Order Payment Information Screen
screen where you can view the payment information for the
selected payment rule. You can also add or create payment
types, debit or credit memos in this screen.
Payment Collection This icon takes you to the Order Collection Details Screen
screen where you can view the collection details for the order.
Fields
Status The order's payment status.
Type The Buyer's payment type, for example, credit card. If
multiple payment types exist for the order, the word
MULTIPLE is displayed.
Authorized The amount of credit that has been authorized.
Collected The amount of credit that has been collected.
The view icons shown in the Order Detail Screen, Order Lines table appear along
the side of each order line before the line number.
Table 17. Order Detail Screen, Order Lines
View Icons Description
Add Provided Service Line has Service Requests that can be added - This icon
identifies an order line that can be associated with one or
more provided service requests. By clicking this icon, you can
associate a provided service request with the order. For more
information, refer to Add Service Requests Screen.
Chapter 10. Order Console Screens 35
Table 17. Order Detail Screen, Order Lines (continued)
Provided Item Line Has Associated Service Request - This icon identifies an
order line that has one or more service requests associated
with it. By clicking this icon, you can view the provided
service requests associated with the order. For more
information, refer to Associated Service Requests Screen.
Delivery Item Delivery Request needs to be added - This icon identifies an
order line that must be associated with a delivery request. By
clicking this icon, you can view the delivery service requests
that can be associated with the order. For more information,
refer to Associate Delivery Request Screen.
Work Orders View Work Orders - This icon identifies an order line that
has one or more work orders associated with it. By clicking
this icon, you can view the work orders associated with this
order. For more information, refer to Work Order Details.
Chained Orders Related Lines - This icon identifies an order line that is
related to one or more other order lines. By clicking this icon,
you can view the associated related order line's related order
lines. For more information, refer to Viewing an Order Line's
Chained Order Lines.
Gift This is a Gift Line - This icon identifies an order line that is
a gift.
Instructions Instructions - This icon identifies an order line that has one
or more instructions associated with it. By clicking this icon,
you can view the order line's instructions. For more
information, refer to Order Line Instructions Screen.
Kit Components Kit Components and Bundles - This icon identifies an order
line item that is a kit or a bundle. By clicking this icon, you
can view the order line's kit components or bundle
components. For more information about kits, see Kit
Components Screen. For more information about bundles, see
Bundle Components Screen.
Dependent Child Dependent Child - This icon identifies the child order line in
an order line dependency. By clicking this icon, you can view
the order line's dependency. For more information, refer to
View Dependency Screen.
Dependent Parent Dependent Parent - This icon identifies the parent order line
in an order line dependency. By clicking this icon, you can
view the order line's dependency. For more information, refer
to View Dependency Screen.
Actions
View Details This action takes you to the Order Line Detail Screen screen
for the selected order lines.
View Instructions This action takes you to the Order Line Instructions Screen
screen to view the instructions for each order line.
View Kit Components This action takes you to the Kit Components Screen screen
where you can view the kits that are associated with the
product line.
View Audits This action takes you to the Order Line Audits Screen screen
which stores the audit information for the selected order line.
Line Availability This action takes you to the Line Availability Screen screen
where you can view the product availability and the expected
ship date.
36 Sterling Selling and Fulfillment Foundation: Distributed Order Management User Guide
Table 17. Order Detail Screen, Order Lines (continued)
Remove Line This action lets you remove order lines that are in the Draft
status. Select the order lines that you want to remove and
click this action. An alert screen pops up to confirm the
removal of the order line.
Create Dependency This action lets you create dependency between two order
lines. For more information refer to Create Dependency
Screen.
Substitute Item This action takes you to the Item Substitution Screen screen
where you can add substitute items for the selected product
line.
Unschedule Line This action unschedules the selected order lines.
Associate Service Requests This action takes you to the Add Service Requests Screen
screen where you can associated service requests for the
selected order lines.
View Associated Services This action takes you to the Associated Service Requests
Screen screen where you can view the associated service
requests for the selected product lines.
Add Logical Kit This action lets you add a logical kit line in the order. For
more information refer to Add Kit Line Screen screen.
View Availability Notes This action takes you to the View Availability Notes Screen
screen.
Fields
Line The order line number.
Item ID The item ID.
PC The item classification such as first quality, second quality, or
finished good.
UOM The item's unit of measurement.
Description A description of the item.
Recv Node The node that is receiving the order line.
Ship Node The node that is shipping the order line.
Delivery Date The date by which the item should be delivered.
Line Qty The quantity of the line item. Entering 0 indicates a quantity
of zero. Leaving this field blank indicates you want to ignore
the line.
Amount The amount the Buyer is charged for the line.
Status The current status of the order line.
You can view the service and delivery requests associated with the product line in
this screen. The view icons shown in the Order Detail Screen, Service Requests and
the Order Detail Screen, Delivery Request tables appear along side of each service
request before the line number.
Table 18. Order Detail Screen, Service Requests
View Icons Description
Work Orders View Work Orders - This icon identifies the work orders
associated with the service request. For more information,
refer to Work Order Details.
Chapter 10. Order Console Screens 37
Table 18. Order Detail Screen, Service Requests (continued)
Instructions Instructions - This icon identifies one or more instructions
associated with the service request. For more information,
refer to Service Request Instructions Screen.
Chained Orders Related Lines - This icon lets you view the Types of Related
Orders screen. For example you can view the Return Orders
created from the order console by clicking this icon.
Actions
View Details This action takes you to the Service Request Details Screen
screen for the selected service request.
View Instructions This screen takes you to the Service Request Instructions
Screen screen where you can create, modify or delete
instructions for the order.
Cancel This action lets you cancel the selected service requests. A
modification reason screen pops up, after you enter the
reason code and press OK, the service request is cancelled.
Remove This action lets you remove service requests when they are in
the Draft Status.
Fields
Line The order's line. Click this link to view the Service Request
Details Screen screen.
Item ID The service item's ID.
Ship Node The node from which this service is carried out.
Description The description of the service.
Appointment The date and time of the service.
Amount The amount of the service.
Status The status of the service line. Click this link to view the
Service Request Status Breakup Screen screen.
Line Quantity The quantity used to measure the service. For a service that is
not associated to a product, this quantity can be changed by
entering a new value and clicking Save.
Table 19. Order Detail Screen, Delivery Request
View Icons Description
Work Orders View Work Orders - This icon identifies the work orders
associated with the delivery request. For more information,
refer to Work Order Details.
Instructions Instructions - This icon identifies one or more instructions
associated with the delivery request. For more information,
refer to Delivery Request Instructions Screen.
Chained Orders Related Lines - This icon lets you view the Types of Related
Orders screen. For example you can view the Return Orders
created from the order console by clicking this icon.
Actions
View Details This action takes you to the Delivery Request Details Screen
screen for the selected delivery request.
View Instructions This screen takes you to the Delivery Request Instructions
Screen screen where you can create, modify or delete
instructions for the delivery request.
38 Sterling Selling and Fulfillment Foundation: Distributed Order Management User Guide
Table 19. Order Detail Screen, Delivery Request (continued)
Cancel This action lets you cancel the selected delivery requests. A
modification reason screen pops up, after you enter the
reason code and press OK, the delivery request is cancelled.
Add Line This action takes you to the Additional Product Lines Screen
screen where you can associate additional product lines to the
delivery service.
Remove This action lets you remove delivery requests when they are
in the Draft Status.
Fields
Line The order's line. Click this link to view the Delivery Request
Details Screen screen.
Item ID The delivery item's ID.
Ship Node The node from which this delivery is carried out.
Description The description of the delivery.
Appointment The date and time of the delivery.
Line Quantity The quantity on the delivery line. For a delivery item not
associated to a product, this quantity can be changed by
entering a new value and clicking Save.
Amount The amount of the delivery.
Status The status of the delivery line.
Modify Ship To Address Screen
You can modify the ship to address in this screen.
Table 20. Modify Ship To Address
Fields Description
Address Line 1 The ship to address line 1.
Address Line 2 The ship to address line 2.
Address Line 3 The ship to address line 3.
Address Line 4 The ship to address line 4.
Address Line 5 The ship to address line 5.
Address Line 6 The ship to address line 6.
City The city where the service has to be performed.
State The state to which the city belongs to.
Postal Code The postal code of the city.
Country/Region The country or region where the service has to be performed.
First Name The vendor's first name.
Middle Name The vendor's middle name.
Last Name The vendor's last name.
Company The company name of the vendor.
Day Time Phone The vendor's day time phone number.
Evening Phone The vendor's evening time phone number.
Mobile Phone The vendor's mobile number.
Chapter 10. Order Console Screens 39
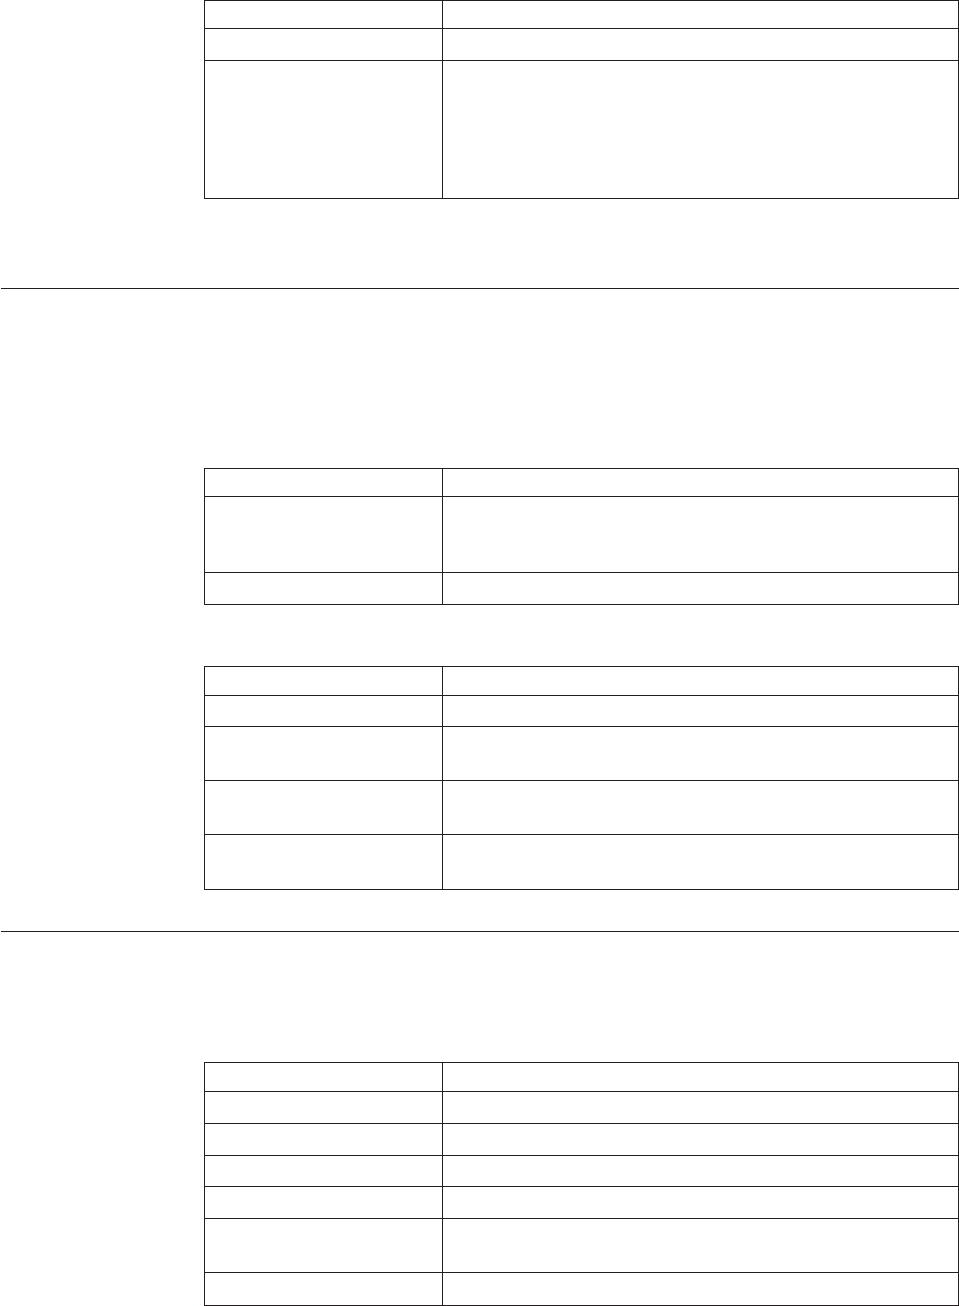
Table 20. Modify Ship To Address (continued)
Fax The fax number.
E-mail The vendor's e-mail address.
Additional Address and /
or Permit Questions have
been answered for this
address.
This field is shown when additional address and/or permit
questions have been answered for this address.
Selecting the Retain Existing Answers radio button saves the
answers for this address. Selecting Clear Answers clears all
answers for this address.
Click Save to update any modifications in the screen.
View Availability Notes Screen
You can view availability notes for an item in this screen.
The order line field descriptions are explained in the Order Line table.
Table 21. View Future Availability Screen, Future Availability
Fields Description
Future Availability Date The future date currently displayed. To change this date,
enter a new date or select the Calendar icon and select a date
from the calendar.
Comments You can view or enter comments in this text area.
Table 22. View Future Availability Notes, Nodes Disabled For Sourcing Or Procurement
Fields Description
Node The disabled node.
Suppress Procurement This field indicates whether the node has been suppressed for
Procurement.
Suppress Sourcing This field indicates whether the node has been suppressed for
Sourcing.
Reason Text The reason why this node has been suppressed for
Procurement or Sourcing.
Order Alerts Screen
You can view the alerts associated with an order in this screen.
Table 23. Order
Fields Description
Enterprise The Enterprise associated with the order.
Buyer The Buyer organization that placed the order.
Seller The Seller organization that is handling the order.
Order # The order number.
Status The current status of the order. Click this link to view the
associated Order Status Breakup Screen screen.
Order Date The date the order was placed.
40 Sterling Selling and Fulfillment Foundation: Distributed Order Management User Guide

Table 23. Order (continued)
Fields Description
Order Type This field can be customized as needed.
Carrier/Service The carrier (such as UPS) and service (such as Ground or
Next Day Air) for the order.
Requested Delivery Date The date on which the Buyer wants the order to be delivered.
Exchange Type Select the exchange type from the drop-down list. The option
of changing the type of an exchange is only available when
the order is in Draft Order Created status. Once the order is
confirmed, you are not able to edit this field.
Note: This field is only displayed for exchange orders.
Created For Return # The return order number for which the exchange was created.
Click on the hyperlink to see that return order.
Note: This field is only displayed for exchange orders.
Table 24. Order Alerts Screen, Alerts
Actions Description
View Details This action takes you to the order alert detail screen where
you can view the details of the order alert. For more
information about order alerts, see the Sterling Selling and
Fulfillment Foundation: Application Platform User Guide.
Fields
Alert ID The alert ID. Click this link to view the alert details.
Type The type of alert raised. For example, ON_FAILURE or
FAILED_AUTH.
Description A brief description of the alert.
Queue The queue the alert has been assigned to.
Priority The alert priority.
Owner The user who is handling the alert.
Raised On The date the alert was raised.
The alert screen provides information about the various alerts raised for a
particular order.
More Order Attributes Screen
You can view additional information related to an order in this screen.
The order header field descriptions are explained in the Order table.
Table 25. More Attributes Screen, Identification
Fields Description
Enterprise The Enterprise associated with the order.
Order Name The name used to identify the order.
Division This field can be customized as needed.
Requested Cancel Date The date the customer has requested the order to be canceled
by if the order is not fulfilled.
Priority Code The priority that the Buyer has given to the order.
Chapter 10. Order Console Screens 41
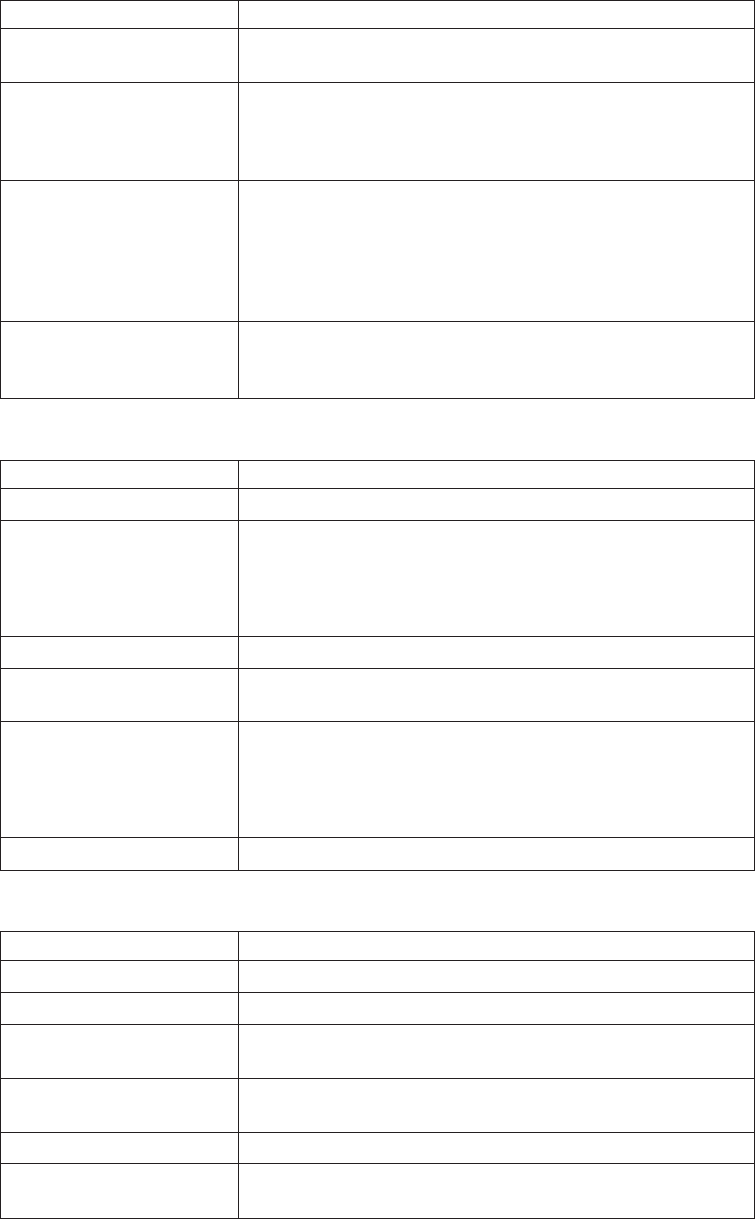
Table 25. More Attributes Screen, Identification (continued)
Fields Description
Requested Ship Date The date by which the customer has requested the order to be
shipped.
Scheduling Rule The scheduling rule that is used when the order is scheduled.
For more information about scheduling rules, see the Sterling
Selling and Fulfillment Foundation: Distributed Order
Management Configuration Guide.
Currency The monetary currency used for the order. A different
currency can be selected from the drop-down list if the order
is in Draft Order Created status. Upon currency change,
Sterling Selling and Fulfillment Foundation re-prices the
order automatically. Pre-existing charges and taxes, however,
are not converted automatically.
Customer PO Number Enter the customer's purchase to search for orders containing
an item that has a specific customer purchase order number,
if applicable.
Table 26. More Attributes Screen, Shipping
Fields Description
Freight Terms The terms used for calculating transportation costs.
Charge Actual Freight If the check box is selected, the Buyer is charged exactly what
it costs to ship the order.
If the check box is not selected, additional charges can be
added in addition to the actual cost to ship the order.
Shipping Paid By The organization that pays for the shipping costs.
Carrier Account # The Carrier organization's account number with your
organization.
Ship Complete If the check box is selected, the order must be shipped as one
complete shipment.
If the check box is not selected, the order can be shipped in
multiple shipments.
Ship Node The ship node the order is shipped from.
Table 27. More Attributes Screen, Financials
Fields Description
Terms Code The terms code.
Price Program The price program used for order pricing.
Taxpayer ID The Buyer's tax payer identification number. This number
identifies the organization as a tax paying entity.
Tax Exempt If the check box is selected, the Buyer is exempt from paying
taxes.
Tax Exemption Certificate The ID of the exemption certificate.
Tax Jurisdiction The tax jurisdiction that the exemption certificate was issued
in.
42 Sterling Selling and Fulfillment Foundation: Distributed Order Management User Guide
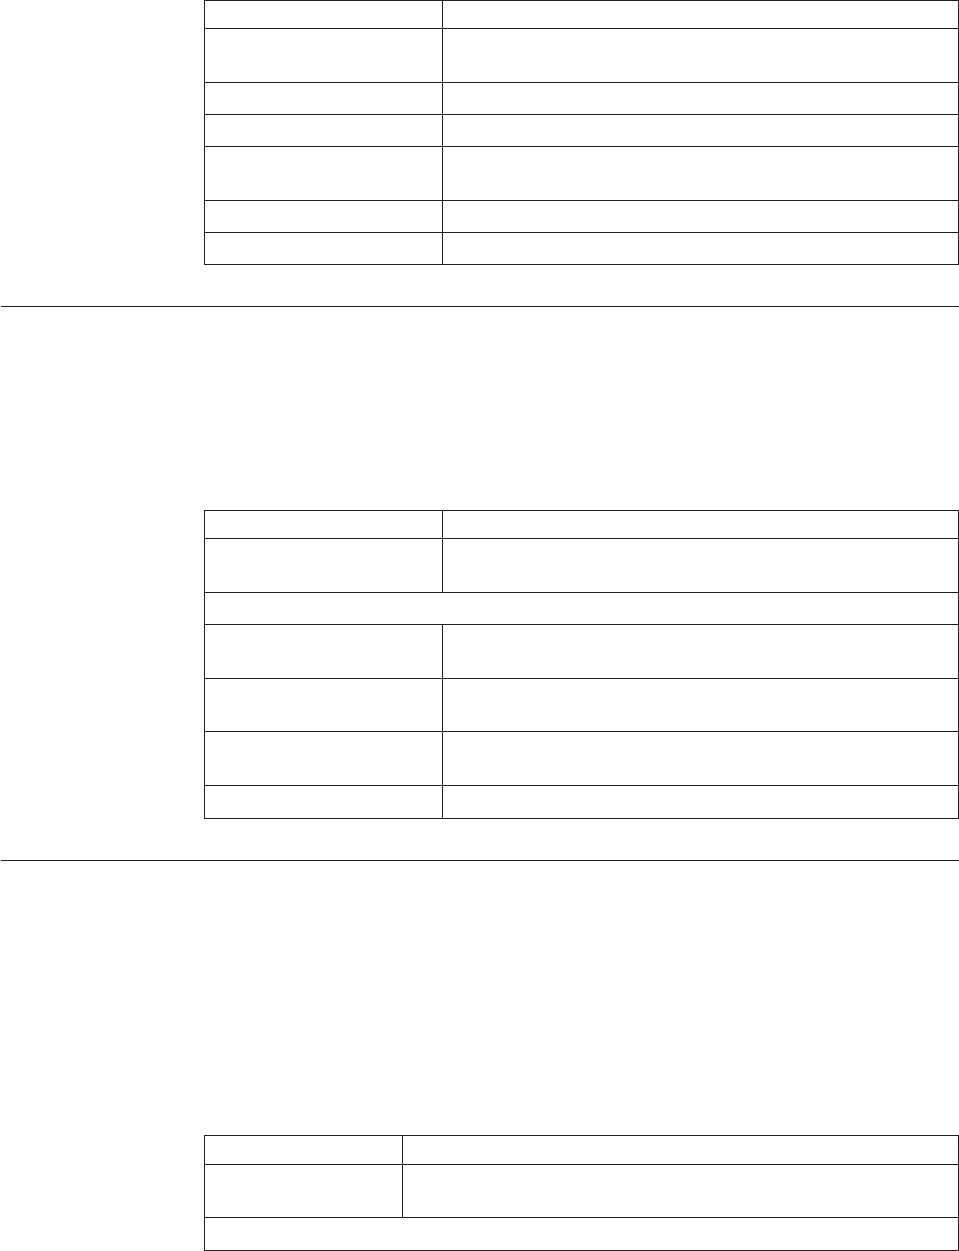
Table 28. More Attributes Screen, Other Attributes
Fields Description
Entered By This field displays the user ID of the user who entered the
order.
Source The method of order entry. For example, web site, kiosk.
Customer ID The customer's ID.
Notification Type Indicates the method through which users are notified of
special instructions. For example, e-mail.
Notification Reference A description of the notification.
Vendor ID The vendor's ID.
Order Releases for Order Screen
You can view the individual releases that have been sent to the nodes scheduled to
fulfill an order.
The order header field descriptions can be referred from the Order table.
Table 29. Order Releases for Order Screen, Order Releases
Actions Description
View Details This action takes you to the Order Release Details Screen
screen where you can view the details of the order releases.
Fields
Release # The release number. Click this link to view the order release
details.
Ship Node The ship node the order has been released to. Click this link
to view the Ship Node Detail screen.
Requested Ship Date The date on which the Buyer wants the order release to be
shipped.
Status The current status of the order release.
Work Orders Screen
You can view the work orders related to the order through the order details screen.
The order header field descriptions can be referred from the Order table.
The Service Work Orders inner panel provides information about the service work
orders that are associated with the order. Please note that this inner panel only if
service work orders are associated with this order.
Table 30. Work Orders Screen, Service Work Orders
Actions Description
View Details This action takes you to the Work Order Details screen where you
can view the details of the selected work orders.
Fields
Chapter 10. Order Console Screens 43
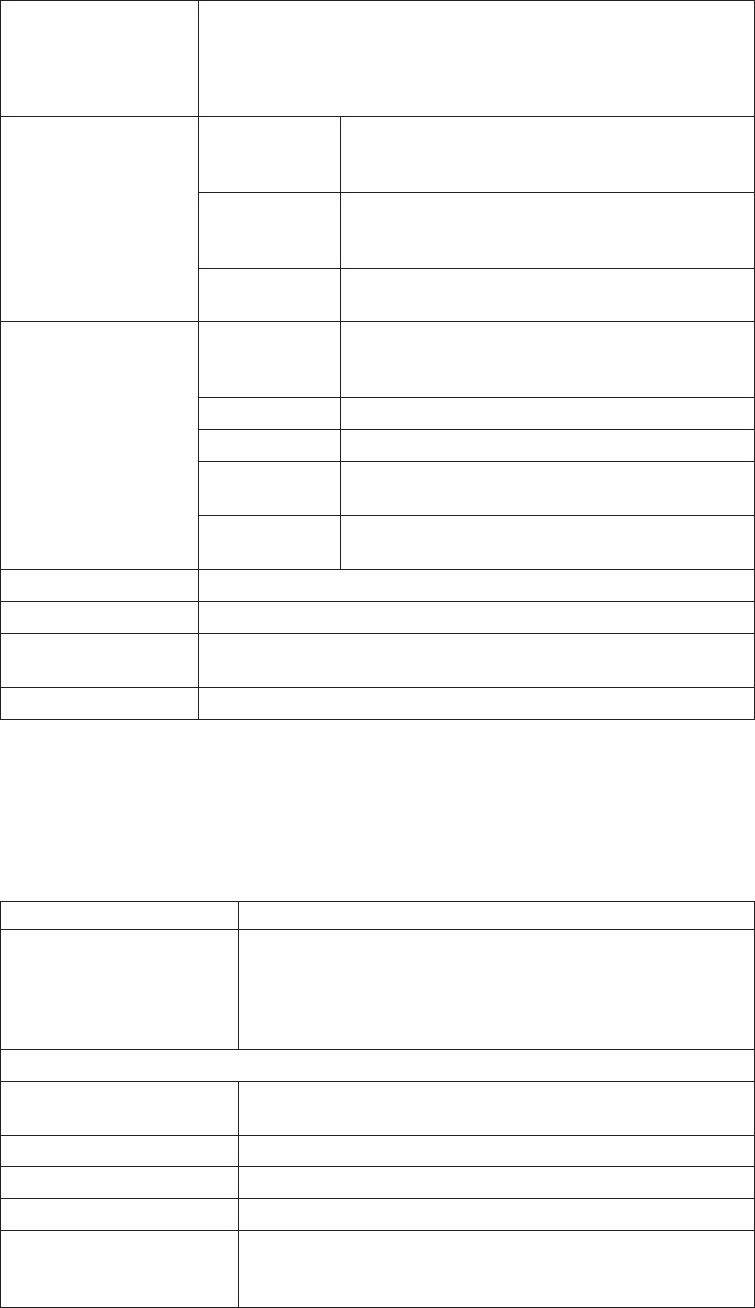
Table 30. Work Orders Screen, Service Work Orders (continued)
Work Order # The work order number. Click this link to view the work order
details. Click the Expand All button to show the details for each
work order. Click the Collapse All button to hide the details for
each work order. Click + or - to show or hide the details for a
specific work order.
Service Lines Order Line
Related Info
The information related to the service item.
Displayed values are item ID and item
description.
Item Group
Code
The group code of the item. For example, if the
service is a provided service, then item group
code is Provided Service.
Required
Quantity
The quantity of the service items required.
Products being
Delivered
Item Related
Info
The information related to the service item.
Displayed values are item ID and item
description.
PC The product item's product class.
UOM The product item's unit of measure.
Required
Quantity
The quantity of the product item on the work
order.
Delivered
Quantity
The quantity of the delivery item on the work
order.
Ship Node The node from which the resource is originating.
Status The status of the work order.
Appointment If applicable, the date and time of appointments taken for that
work order.
Pre-call Status The status of the pre-call, if applicable.
The Value Added Service Work Order inner panel provides information about the
WMS work orders that are associated with this order. Please note that this inner
panel is only be displayed if value-added service work orders are associated with
this order.
Table 31. Work Orders Screen, Value-Added Services
Action Description
View Details This action takes you to the value-added services work order
details screen where you can view the details of the selected
work orders. For more information about viewing this screen,
see the Sterling Selling and Fulfillment Foundation: Warehouse
Management System User Guide.
Fields
Work Order # The work order number associated with the work order. Click
this link to view the work order details.
Ship Node The node from which the resource is originating.
Service Item Group The service item group associated with the work order.
Priority The work order priority.
Segment Type Segment type of the item. A segment type indicates an
inventory category. Typical values are MTC - Made To
Customer or MTO - Made to Order.
44 Sterling Selling and Fulfillment Foundation: Distributed Order Management User Guide
Table 31. Work Orders Screen, Value-Added Services (continued)
Segment # Segment number of the item. A segment holds either the
specific buyer or specific order number that requires
dedication.
Status The work order status.
Work Order Audits Screen
You can view audits logged against a work order in the Work Order Audits Screen.
An audit is logged against a work order when any type of modification is made to
the work order.
You can reference the work order header field descriptions from the following
table.
Table 32. Work Order Audits Screen
Fields Description
Sequence # The sequence identification number. Click on the Expand All button to
expand the sequence details for each sequence. If you click on the
Collapse All button, the sequence details for each sequence are
collapsed.
Attribute The number associated with attributes of the work order
that have been changed.
Old Value The previous value of the attribute.
New Value The updated value of the attribute.
Audit time The time at which the audit occurred.
Action The type of action or modification that was carried out on the work
order.
Modified By The user who performed the modification.
Reason The reason the modification occurred and any additional information
explaining the modification entered by the user.
Comments Any comments entered by the user regarding the modification.
Order Invoices Screen
You can view the invoices that have been created from the order for payment
collection purposes.
The order header field descriptions can be referred from the Order table.
Table 33. Order Invoices Screen, Invoices
Action Description
View Details This action takes you to the Invoice Details Screen screen
where you can view the invoice summary details.
Fields
Invoice # The invoice number for this order. Click this link to view the
Invoice Details Screen screen.
Chapter 10. Order Console Screens 45
Table 33. Order Invoices Screen, Invoices (continued)
Invoice Type The type of invoice created. For example, Credit Memo is a
type of an invoice.
Total Amount The total amount for which the invoice was recorded.
Amount Collected The amount of invoice collected.
Invoice Details Screen
The invoice details for an order can be viewed in this screen.
Table 34. Invoice
Fields Description
Order # The order with which the invoice is associated.
Collected Through AR? Indicates if the payment was collected through accounts
receivable.
Currency The currency used on the invoice.
Invoice # The invoice number.
Invoice Type The type of invoice. For example, shipping invoice, debit
invoice, or credit invoice.
Reference This field can be customized as needed.
The Bill To panel can be used to edit the billing addresses. For more information
about the panel details, see Table 14 on page 35.
The summary panel is tabulated for the order header and order line invoices. The
field descriptions for each of these is as follows:
Table 35. Invoice Details Screen, Summary
Fields Description
Price The price at the order header and order line levels before any
discounts, charges, or taxes have been applied to it.
Discount Any discounts at the order header and order line levels.
Note: At the header level, this charge is applied when the
final shipment has been received, in case of multiple
shipments.
At the line level, this charge is applied to the first shipment
received, in the case of multiple shipments.
Charges Any additional charges at the order header and order line
levels.
Taxes Any additional taxes at the order header and order line
levels.
Totals The total invoice amount at the order header and order line
levels after discounts, charges, or taxes have been applied to
the original price.
Table 36. Invoice Details Screen, Balance
Field Description
Invoiced The total amount of the invoice.
46 Sterling Selling and Fulfillment Foundation: Distributed Order Management User Guide

Table 36. Invoice Details Screen, Balance (continued)
Field Description
Collected The amount that has currently been paid towards the invoice.
Click this link to view the Collection Details screen.
Amount Collected Through
AR
The amount paid towards the invoice through accounts
receivable, if applicable.
Balance The amount remaining to be collected.
The invoice line summary panel provides the line level charges and taxes.
Table 37. Invoice Details Screen, Line Summary
Fields Description
Line # The order line number associated with the invoice. Click this
link to view the Order Line Detail Screen screen.
Item ID The item ID associated with the invoice.
PC The product class associated with the item.
Quantity/UOM The quantity and unit of measure of the items invoiced.
Unit Price The unit price of the item.
Extended Price The extended price of the item.
Charges - Discount The invoiced charges for the item. Click this link to view the
Modifying an Order Line Charge screen.
Taxes The invoiced taxes for the item. Click this link to view the
Invoiced Order Line Taxes Screen screen.
Line Total The total amount of invoices.
Order Shipment Items and Containers Screen
If an order has been shipped you can view it's shipment details.
The order header field descriptions can be referred from the Order table.
Table 38. Order Shipment Items and Containers Screen, Shipment Items
Fields Description
Order # The order number associated with this shipment.
Order Line The order line number that is shipped.
Item The line item that is shipped.
Unit of Measure The item unit of measure.
Product Class The item product class.
Actual Ship Date The date the order line shipped.
Tracking # The tracking number for the shipped order line.
Carrier/Service The carrier service used to ship the order line.
Shipment # The shipment the shipped order line belongs to. Click this
link to view the shipment details in the Shipment Details
screen.
Shipper's Ref. # The shipment company's shipment reference identifier.
Chapter 10. Order Console Screens 47
Table 39. Order Shipments Items and Containers Screen, Shipment Containers
Action Description
View Details This action takes you to the Container Details screen of the
selected shipments where you can print the carrier labels and
void the tracking number.
Fields
Tracking Number The tracking number for the container.
Carrier/Service The carrier service used to ship the container.
Expected Ship Date The date the container should ship on.
Actual Ship Date The date the container does ship on.
Ship Node The node shipping the container.
Recv Node The node receiving the container.
Shipment # The shipment the container belongs to. Click this link to view
the Shipment Details screen for the selected shipment
number.
Status The container status.
You can also use the Shipments window for:
vViewing Order Shipments Screen screen - This is a drop-down option in the
order shipment items and containers window.
For history orders, all actions on the Order Shipments screen are prevented if the
shipments are requested for a history shipment. All actions are allowed if the
shipments are from the recent shipment table.
Order Shipments Screen
You can view a more consolidated view of the order shipment information by
selecting the drop-down menu next to the displayed screen name.
The order header field descriptions can be referred from the Order table.
Table 40. Order Shipments Screen, Shipments
Action Description
View Details This action takes you to the Shipment Details screen where
you can view the details about the selected shipment.
Fields
Shipment # The shipment number. Click this link to view the Shipment
Details screen.
Shipper's Ref. # The shipment company's shipment reference identifier.
Expected Ship Date The date the shipment is expected to ship.
Ship Mode The ship mode used to ship the order.
Ship Node The ship node shipping the order.
Recv Node The node receiving the order.
Status The shipment status.
48 Sterling Selling and Fulfillment Foundation: Distributed Order Management User Guide

Order Instructions Screen
You can view information related to the personalization of an order, such as the
attachment of a gift message or the style of wrapping paper to be used when
packing an item.
The order header field descriptions can be referred from the Order table.
Table 41. Instructions Window
Action Description
Delete Instruction This action enables you to delete the selected instructions.
Upon clicking this action, an alert window appears to confirm
the deletion of instructions.
Fields
Instruction Type The type of instruction, such as Gift, Pick, Pack, Ship, or
Other.
Text The specific instructions to be performed on the order.
Specify the instruction URL next to the Instructions URL
icon.
You can also use the Instructions window for:
vAdding an Instruction - Select the Add icon to add the instruction lines and
enter the relevant information in the fields as discussed in the Instructions table.
vModify an Instruction - The information in the Order Instructions screen can be
modified by entering the modified information and selecting Save.
Notes Screen
You can add notes to an order by selecting the Notes icon in the order header
panel of Order Detail Screen screen.
The order header field descriptions can be referred from the Order table.
Table 42. Notes Screen, Notes
Fields Description
Contact Time The time at which this note was added to the work order.
This is defaulted to the creation time of the Notes pop-up
window.
Contact User The user who created this note. This is defaulted to the
logged on user.
Reason Code The reason code for this note.
Contact Type The type of contact information on this note, for example
phone or e-mail.
Contact Reference The contact information on this note. For example, if contact
type is phone, the contact's phone number can be entered
here. If contact type is e-mail, the contact's e-mail address can
be entered.
Add Note The note for this work order.
Chapter 10. Order Console Screens 49
More Order Addresses Screen
You can view any additional addresses as needed by your business. For more
information about defining additional address types, see the Sterling Selling and
Fulfillment Foundation: Distributed Order Management Configuration Guide.
The order header field descriptions can be referred from the Order table.
Table 43. ForwardTo
View Icon Description
Address Details Address Details - Choose this icon to view or modify the
ForwardTo addresses. For more information about the screen
that is displayed, see Organization Address Details Screen.
The name and address of the person or organization where the order is to be forwarded.
Order Negotiations Screen
If your business has been set up to have a negotiation process, you can view
previous or existing negotiations. The negotiation process can begin at any time
within the order pipeline dependent on its configuration. A negotiation always
occurs between the order's Buyer (initiator) and Seller (negotiator) organizations.
The Buyer and Seller can negotiate various attributes of an order such as price,
delivery date, or freight terms.
The order header field descriptions can be referred from the Order table.
Table 44. Order Negotiations Screen, Negotiation
Fields Description
Negotiation # The negotiation number.
Initiator The organization that made the initial offer.
Negotiator The organization that can accept, counter-offer, or reject the
initiators offer.
Status The current status of the negotiation.
The default negotiation statuses are:
vOffered - The last response on the negotiation was from the
initiator organization. The initiator can send another offer
before the negotiator organization responds to the original
offer.
vCounter Offered - The last response on the negotiation was
from the negotiator organization. The negotiator can send
another counter-offer before the initiator organization
responds to the original counter-offer.
vCompleted - The header and line terms on all of the lines
have been negotiated by the two organizations.
vPublished - The negotiated terms have been published and
applied to the original document.
You can use the Order Negotiations window for viewing the Order Negotiation
Details.
50 Sterling Selling and Fulfillment Foundation: Distributed Order Management User Guide
Order Negotiation Details Screen
You can view the negotiation offers and counter offers made between the
negotiation initiator and negotiator organizations. You can use this information to
make a counter-offer, accept the terms of the negotiations, or cancel the
negotiations.
If DEFAULT_QUANTITY has been selected as a Negotiation Rule in the
Applications Manager, only the line quantity can be negotiated.
Table 45. Order Negotiation Details Screen, Negotiation
Fields Description
Order # The order number the negotiation is being performed against.
Negotiation # The negotiation number.
Status The status of the negotiation.
The default negotiation statuses are:
vOffered - The last response on the negotiation was from the
initiator organization. The initiator can send another offer
before the negotiator organization responds to the original
offer.
vCounter Offered - The last response on the negotiation was
from the negotiator organization. The negotiator can send
another counter-offer before the initiator organization
responds to the original counter-offer.
vCompleted - The header and line terms on all of the lines
have been negotiated by the two organizations.
vPublished - The negotiated terms have been published and
applied to the original document.
Enterprise The Enterprise that owns the negotiating organizations.
Initiator The organization that made the initial offer.
Negotiator The organization that counter-offered the initiators offer.
Table 46. Order Negotiation Details Screen, Header
Fields Description
Last Action By The organization that performed the last negotiation action.
Chapter 10. Order Console Screens 51

Table 46. Order Negotiation Details Screen, Header (continued)
Fields Description
Action The last negotiation action performed.
If you are performing a negotiation, select the appropriate
action.
The following actions can be performed against a negotiation:
vOffer - An offer from the initiator. Only the initiator
organization can perform this action.
vCounter Offer - A counter offer from the negotiator. Only
the negotiator organization perform this action.
vReject - A rejection from the negotiator. Only the negotiator
organization can perform this action.
vRemove - The initiator wants to remove the line from
negotiation. Only the initiator can perform this action. This
response is available only at the line level. Once a line is
removed, it is assumed that the line has been negotiated
and no further negotiation is allowed on that line.
vAccept - The sending organization accepts the other
organization's terms. Both the initiator and negotiator can
perform this action. Once a header or line is accepted, it is
assumed that the header or line has been negotiated and
no further negotiation is allowed on that header or line.
Attribute The attribute being negotiated at the header level. For
example, freight terms.
Note: When Counter Offer is selected, the fields become
modifiable allowing you to enter your counter offer terms.
Negotiator The negotiator's offer for a particular attribute.
Initiator The initiator's offer for a particular attribute.
Response The counter-offering organizations counter-offer.
If you are performing a counter-offer action, select your
counter-offer as it pertains to the attribute you are
counter-offering.
Table 47. Order Negotiation Details
Fields Description
Line The order line being negotiated.
Action The last negotiation action performed.
When performing a negotiation, select the appropriate action
for each negotiation line.
Organization Code The organization code of the organization performing the
negotiation action.
Resp # The response number.
For Resp # The response number against which the negotiation action
was performed.
52 Sterling Selling and Fulfillment Foundation: Distributed Order Management User Guide
Table 47. Order Negotiation Details (continued)
Fields Description
Item ID The item ID of the negotiated line item.
You can modify this field if you are performing a
counter-offer, if applicable.
Note: If DEFAULT_QUANTITY has been selected as a
Negotiation Rule in the Applications Manager, this field
cannot be modified.
PC The product class of the negotiated line item.
You can modify this field if you are performing a
counter-offer, if applicable.
Note: If DEFAULT_QUANTITY has been selected as a
Negotiation Rule in the Applications Manager, this field
cannot be modified.
UOM The unit of measure of the negotiated line item. You can
modify this field if you are performing a counter-offer, if
applicable.
Note: If DEFAULT_QUANTITY has been selected as a
Negotiation Rule in the Applications Manager, this field
cannot be modified.
Freight Terms The terms used for calculating transportation costs of the
negotiation line.
You can modify this field if you are performing a
counter-offer, if applicable.
Note: If DEFAULT_QUANTITY has been selected as a
Negotiation Rule in the Applications Manager, this field
cannot be modified.
Delivery Date The date by which the order line must be delivered.
You can modify this field if you are performing a
counter-offer, if applicable.
Note: If DEFAULT_QUANTITY has been selected as a
Negotiation Rule in the Applications Manager, this field
cannot be modified.
Price The price of the order line.
You can modify this field if you are performing a
counter-offer, if applicable.
Note: If DEFAULT_QUANTITY has been selected as a
Negotiation Rule in the Applications Manager, this field
cannot be modified.
Quantity The quantity of the order line.
When counter-offering, you can split a negotiation line in
order to negotiate different terms for different quantity of a
line. For example, if a negotiation line has the quantity of 10
that was offered with a price of $5.99 and you want to
counter-offer a different price for 5 of the line items, you can
split this line by choosing the Add icon and entering a
quantity of 5 with a price of $5.99 and the other quantity of 5
with your desired price.
You can use the Negotiation Details window for viewing an order's negotiation
history.
Chapter 10. Order Console Screens 53
Order Negotiation History Screen
You can view a negotiation's history.
Table 48. Negotiation Details
Field Description
Negotiation
Order # The order number the negotiation is being performed against.
Negotiation # The negotiation number.
Status The status of the negotiation.
The default negotiation statuses are:
vOffered - The last response on the negotiation was from the
initiator organization. The initiator can send another offer
before the negotiator organization responds to the original
offer.
vCounter Offered - The last response on the negotiation was
from the negotiator organization. The negotiator can send
another counter-offer before the initiator organization
responds to the original counter-offer.
vCompleted - The header and line terms on all of the lines
have been negotiated by the two organizations.
vPublished - The negotiated terms have been published and
applied to the original document.
Enterprise The Enterprise that owns the negotiating organizations.
Initiator The organization that made the initial offer.
Negotiator The organization that counter-offered the initiators offer.
Negotiation Header
Date The date the action was performed.
Resp # The response number.
For Resp # The response number against which the negotiation action
was performed.
Action The last negotiation action performed.
54 Sterling Selling and Fulfillment Foundation: Distributed Order Management User Guide
Table 48. Negotiation Details (continued)
Field Description
Action The last negotiation action performed.
If you are performing a negotiation, select the appropriate
action.
The following actions can be performed against a negotiation:
vOffer - An offer from the initiator. Only the initiator
organization can perform this action.
vCounter Offer - A counter offer from the negotiator. Only
the negotiator organization perform this action.
vReject - A rejection from the negotiator. Only the negotiator
organization can perform this action.
vRemove - The initiator wants to remove the line from
negotiation. Only the initiator can perform this action. This
response is available only at the line level. Once a line is
removed, it is assumed that the line has been negotiated
and no further negotiation is allowed on that line.
vAccept - The sending organization accepts the other
organization's terms. Both the initiator and negotiator can
perform this action. Once a header or line is accepted, it is
assumed that the header or line has been negotiated and
no further negotiation is allowed on that header or line.
Freight Terms The terms used for calculating transportation costs of the
negotiation line.
Payment Terms The payment terms to be used when settling the order.
User The user that performed the action.
Reason The reason the action was performed.
Negotiation Lines
Line # The order line being negotiated.
Date The date the action was performed.
Resp # The response number.
For Resp # The response number against which the negotiation action
was performed.
Action The last negotiation action performed.
Item ID The item ID of the negotiated line item.
PC The product class of the negotiated line item.
UOM The unit of measure of the negotiated line item.
Freight Terms The terms used for calculating transportation costs of the
negotiation line.
Delivery Date The date by which the order line must be delivered.
Price The price of the order line.
Quantity The quantity of the order line.
User The user that performed the action.
Reason The reason the action was performed.
Chapter 10. Order Console Screens 55
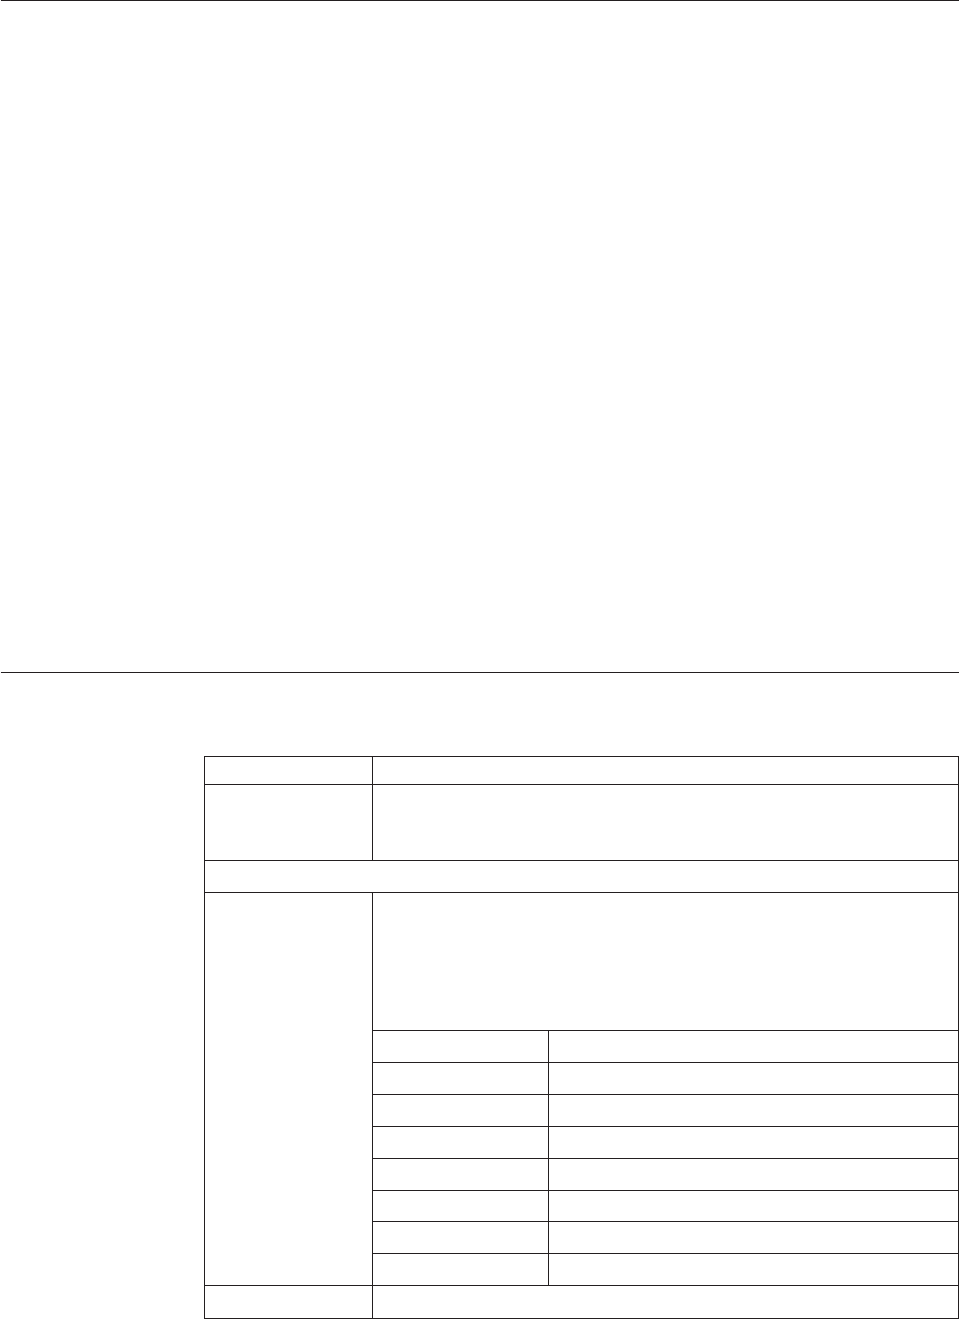
Types of Related Orders
A related order is an order that is either chained to or derived from a different
order.
A chained order is linked to a parent order and the lifecycle of one affects the
other. For example, if an order is placed with a Seller who must source an item
from a ship node that they do not own, the Sales Fulfillment pipeline may be
configured to create another "chained" order that differs from the Seller's regular
release process. This allows the owner of the ship node to handle the order
according to their own business practices while also allowing the original Seller
organization to maintain visibility of the order and in turn reflect any changes such
as delivery dates and carrier services in the original order.
Note: Chained orders can be created for product items that belong to a delivery
request. Chained orders can be created for provided service items and delivery
service items.
In some business scenarios, the Seller of the parent order may become the Buyer of
the child order. Therefore, the Seller organization associated with the chained order
must also be configured as a Buyer organization through the Applications
Manager.
A derived order is associated with a parent order and the lifecycle of one does not
necessarily impact the other. Examples of a derived order include a return order
that is derived from a sales order and an exchange order that is derived from a
return order.
Related Orders Screen
Table 49. Related Orders Screen, Related Order Lines
Action Description
View Details This action takes you to the details screen for the selected orders. For
example, if you have a return order related to this order line, you can
view the return order details.
Fields
Order # The related order number. Click this link to view the order details. For
more information, refer to the Sterling Selling and Fulfillment
Foundation: Reverse Logistics User Guide or the Sterling Selling and
Fulfillment Foundation: Supply Collaboration User Guide.
Click the expand button to view the related order lines.
Line # The related order line number.
Item ID Description The item ID and its description.
Product Class The item's product class
UOM The items unit of measure.
Reason Code The reason code for return.
Quantity The quantity of items to be returned.
Amount The total amount.
Status The status of the return line.
Relationship The relationship of the related order with the sales order.
56 Sterling Selling and Fulfillment Foundation: Distributed Order Management User Guide
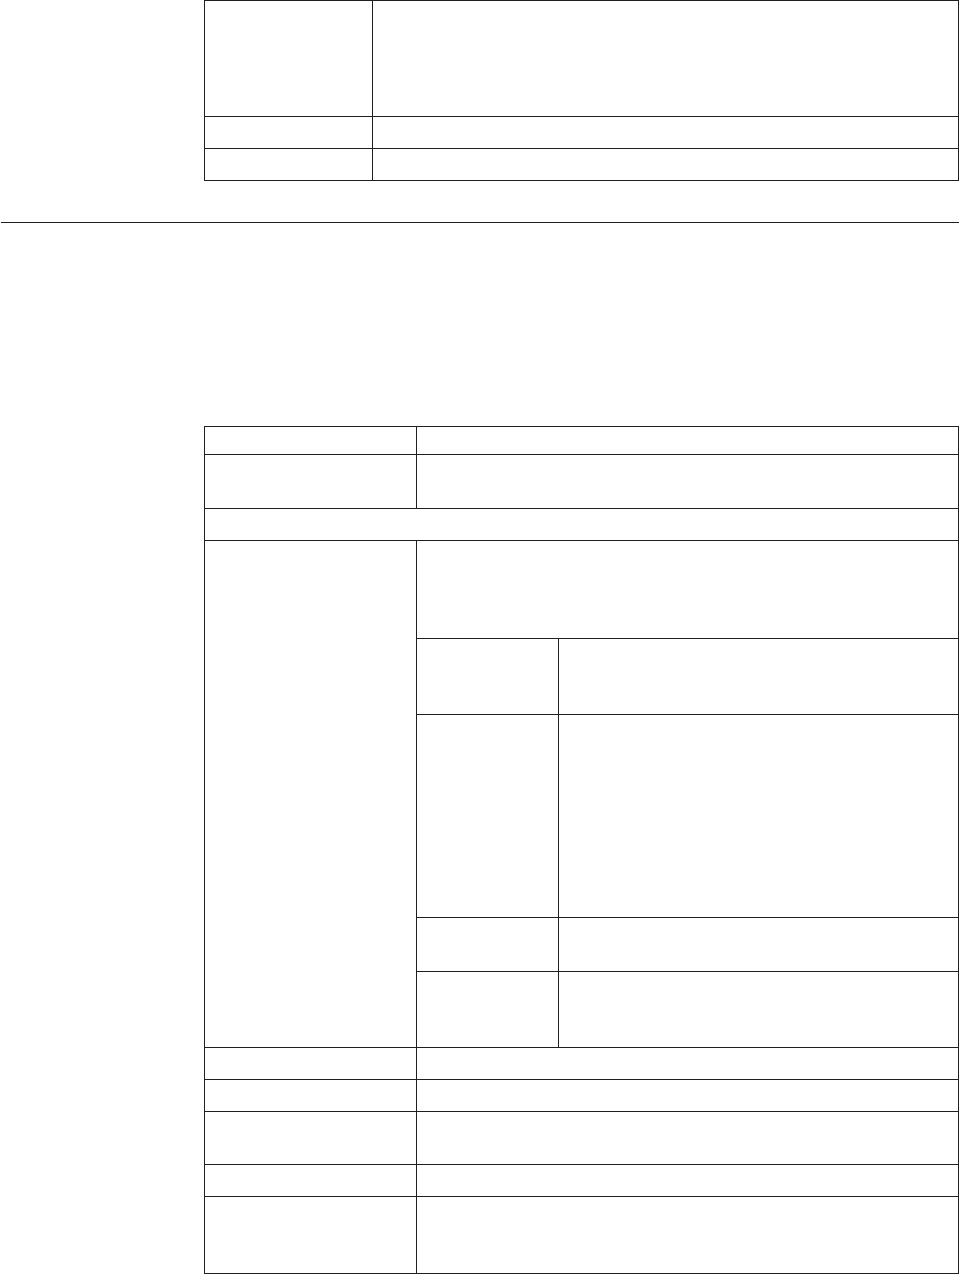
Table 49. Related Orders Screen, Related Order Lines (continued)
Status The status of the related order line. For example, for return orders,
this link takes you to the related order status breakup. For more
information, refer to the Sterling Selling and Fulfillment Foundation:
Reverse Logistics User Guide or the Sterling Selling and Fulfillment
Foundation: Supply Collaboration User Guide.
Buyer The Buyer organization of the order.
Seller The Seller organization of the order.
Order Audits Screen
You can view audits logged against an order. An audit is logged against an order
when any type of modification is made to the order.
The order header field descriptions can be referred from the Order table.
Table 50. Order Audits Screen, Audits
Action Description
View Details This action takes you to the Order Audit Details Screen screen
for the selected audits.
Fields
Audit # The audit identification number. Click on the Expand All button,
the audit details for each audit are expanded. If you click on the
Collapse All button, the audit details for each audit are
collapsed.
Detail # The audit details identification number. Click
this link to go to the Order Audit Details
Screen screen.
Order Line
Related Info
Any information related to order lines
impacted by the modification, including:
vItem ID - the item associated with the audit.
vItem Description - a brief description of the
item.
vLine Number - the line number associated
with the audit. Click this link to view the
Order Line Detail Screen screen.
Modification
Level
The level of modification for the corresponding
audit detail such as header or line.
Modification
Type
The type of modification, such as change
payment status or change carrier, for the
corresponding audit detail.
Date The date and time the modification was carried out.
Modified By The user that performed the modification.
Reason The reason the modification occurred and any additional
information explaining the modification entered by the user.
Modification Levels A comma separated list of all levels of modification for the audit.
Modification Types A list of the types of modifications for the audit. There is a
maximum of three items shown with an ellipsis on the third line
if there are more items.
Chapter 10. Order Console Screens 57
Order Audit Details Screen
You can view more details of an order's audit.
Table 51. Order Audit Details Screen, Order Audit
Fields Description
Order # The order number the modification was performed on.
Enterprise Code The Enterprise that owns the order.
Audit Date The date the audit was created.
Modification Level The level the order was modified at. For example, order or
order LINE.
Line # The line number associated with the audit.
Item ID The item ID for which the audit was made.
Unit of Measure The unit of measure for the audited item.
Product Class The item ID's product class.
Description The description of the item that is being audited.
Modification Type The type of modification performed on the order.
Reason Code The reason code detailing why the modification was
performed.
Reason Text Additional details about why the modification was
performed.
Reference #1 Reference information about the order audit.
Reference #2 Reference information about the order audit.
Reference #3 Reference information about the order audit.
Reference #4 Reference information about the order audit.
Table 52. Order Audit Details Screen, Order Audit Details
Fields Description
Audit Type The type of audit performed.
Identifier The audit identifier.
Name The attribute that was modified.
Old Value The value of the modified attribute prior to modification.
New Value The value of the modified attribute after modification.
Order Dates Screen
You can view any custom dates that have been configured for monitoring. For
more information about monitoring, see the Sterling Selling and Fulfillment
Foundation: Distributed Order Management Configuration Guide.
The order header field descriptions can be referred from the Order table.
Table 53. Order Dates Screen, New Date
Fields Description
Date Type The custom date type.
58 Sterling Selling and Fulfillment Foundation: Distributed Order Management User Guide
Table 53. Order Dates Screen, New Date (continued)
Fields Description
Requested The date this date type has been requested to be met.
Expected The date this date type is expected to be met.
Actual The date this date type is to be met.
Receiving Discrepancies Screen
You can record any discrepancies found when receiving an order. For example, if
you discover broken items, overages, or shortages, you can account for those
discrepancies and categorize those situations.
The order header field descriptions can be referred from the Order table.
Table 54. Manage Order Receiving Discrepancies
Fields Description
Shipment # The shipment number associated with the discrepancy.
Line The line associated with the discrepancy.
Item ID The item ID associated with the discrepancy.
Product Class The product class associated with the discrepancy.
Unit of Measure The unit of measure associated with the discrepancy.
Discrepancy Type The type of discrepancy, for example, shortage.
Discrepancy Quantity The quantity of the line's discrepancy.
Discrepancy Reason The reason for the discrepancy. If multiple reasons are
applicable for a single line, the line can be split.
Reason Quantity The quantity associated with the Discrepancy Reason. The
sum of the Reason Quantity entries should equal the value of
the Discrepancy Quantity.
Using Schedule Order
Order scheduling indicates that a node or nodes have sufficient inventory to fulfill
an order. Once an order is scheduled it can be released to the applicable node or
nodes. A scheduling rule determines the node or nodes that the order can be
scheduled with based on inventory availability and node preferences. For more
information about scheduling rules, see the Sterling Selling and Fulfillment
Foundation: Distributed Order Management Configuration Guide.
While performing this action from the Order Console, you can select a scheduling
rule. This function can only be performed if the payment status of the order is 'Not
Applicable' or 'Authorized'. You can also choose to release the order immediately
after scheduling it. If you do so, you can also choose to override the release date of
the order if you want to release it at that moment, regardless of the calculated
release date.
For example, an order is using a scheduling rule that schedules the ordered item to
a node 100 miles from the ship to address. However, a new node has been added
to your Enterprise that supplies the order line items and is only 50 miles away
from the ship to address. A new scheduling rule has been created for this node.
Chapter 10. Order Console Screens 59
You may decide that the order should be shipped from a shorter distance and
change to the scheduling rule for the new node.
Note: If you face problems while creating a work order for MTC, verify that the
following configuration settings are set up in the Applications Manager:
vIn Catalog Management, ensure that the VAS Compliance Service item with
service activities is configured.
vIn IBM®Sterling Application Platform, ensure that the attribute "Requires VAS
Compliance" for Buyer Organization is enabled, and the Compliance Service is
configured with required item classification and run quantity.
vIn IBM Sterling Warehouse Management System, ensure that the retrieval
strategy is configured for locations associated with VAS activities.
Schedule Order Screen
The Schedule Order screen allows you to select a scheduling rule for nodes.
Table 55. Schedule Order Screen, Schedule Information
Fields Description
Scheduling Rule Select the scheduling rule you want to use to schedule the
order.
Release Immediately Check Release Immediately to automatically release the order
to the scheduled node or nodes. If you do not check Release
Immediately, you can manually release the order later or
allow it to be released via the regular release agent.
Override Release Date Check Override Release Date if you want the current release
date to be overridden by the date calculated by the rule you
have selected.
Choose OK to schedule the order.
Release Order Screen
Once an order has been scheduled to a specific node, you can release the order to
that node. When you release an order, all of the necessary information (such as
ship to address, line item quantity, and carrier service to be used) is sent to the
node. Depending on the pipeline, the information may be sent as a release or as a
chained order.
Table 56. Release Order Screen, Release Information
Fields Description
Scheduling Rule Select the scheduling rule you want to use to schedule the
order.
Override Release Date Check Override Release Date if you want the current release
date to be overridden by the date calculated by the rule you
have selected.
Choose OK to release the order.
60 Sterling Selling and Fulfillment Foundation: Distributed Order Management User Guide
View Holds Screen
Orders can be placed on hold, preventing them from being processed by certain
transactions, and preventing certain modification types from being applied. Using
the Applications Manager, you can configure which transactions and modification
types are disallowed for an order on a particular hold type. Additionally, hold
types can be configured to be applied automatically, for instance on order creation,
or upon resolution of another hold. For more information about defining and
configuring hold types, see the Sterling Selling and Fulfillment Foundation: Distributed
Order Management Configuration Guide.
The order header field descriptions can be referred from the Order table.
Table 57. View Holds Screen, Order Holds
View Icons Description
View History This icon takes you to the View History Screen screen, where
you can view the hold's history.
Action
Add Holds This action takes you to the Add Holds Screen screen, where
you can add holds to an order.
Fields
Hold Type The description of the hold.
Hold Status The status of the hold. Holds can either be in created,
resolved, or rejected status.
Hold Comment The reason for applying this hold to the order, or changing
the status of the hold.
Action Select from the drop-down list the status to which you want
to move this hold.
Reason Enter the reason for changing the status of this hold.
Table 58. View Holds Screen, Resolved Holds
View Icons Description
View History This icon takes you to the View History Screen screen, where
you can view the hold's history.
Fields
Hold Type The description of the hold.
Reason The reason for changing this hold to resolved status.
Click Save to update the changes made in the screen, and close it.
Add Holds Screen
You can add a hold to an order, if that hold is not already being applied to the
order in created or rejected status. If you add a hold that was previously applied
and now in resolved status, it removes that hold from the list of approved holds,
and reset its status to created. That hold maintains its previous history records for
that order, and further status modifications are added on to that history.
Chapter 10. Order Console Screens 61
Table 59. Add Holds Screen, Order Holds
Fields Description
Hold Type Select the hold type you want to apply to the order from the
drop-down list.
Reason Enter the reason for adding this hold to the order.
Click Save to close this screen and apply the selected hold to the order.
View History Screen
Every time the status of an order hold changes, useful information regarding the
status change is recorded in Sterling Selling and Fulfillment Foundation. You can
view, in this screen, the history of an order hold.
The primary information header field descriptions can be referred from the Order
table.
Table 60. View History Screen, Order Holds
Fields Description
Hold Type The hold type for which the history is being displayed.
Date/Time The date and time when the hold's status changed.
User ID The user who performed the change on the hold.
Status The status that the hold was moved to.
Comment The reason for the hold's creation or status change, if
applicable.
Hold Transaction The transaction responsible for the hold's status change.
Returnable Order Lines Screen
If a return must be created for an order that was shipped through Sterling Selling
and Fulfillment Foundation, you can create a return against the order through the
Order Console. For returns on inbound orders shipped through Sterling Selling
and Fulfillment Foundation, use the Inbound Order Console.
Table 61. Returnable Order Lines Screen, Return
Fields Description
Document Type The document type associated with the return.
Enterprise The Enterprise that is to handle the order.
Buyer The Buyer returning the order.
Seller The Seller that the order is being returned to.
Return # Enter the return number.
Return Date Enter the date the return is placed.
Return Type This field can be customized as needed.
Currency The currency with which any refunds are to be handled in.
Return Against Order Yes indicates that the return is derived from an order.
Return To Node Enter the node the return is sent to.
62 Sterling Selling and Fulfillment Foundation: Distributed Order Management User Guide

Table 61. Returnable Order Lines Screen, Return (continued)
Fields Description
Return By Gift Recipient Check this if items are being returned by the gift recipient of
the original order.
Table 62. Returnable Order Lines Screen, Returnable Order Lines
Fields Description
Line The return line number being authorized.
Item ID The the item ID of the return item being authorized.
PC The return item's product class.
UOM The return item's unit of measure.
Description The return item's description.
Tag # This column displays only if the item is tag-controlled. The
column label that displays is the name of the unique
identifier you have defined (for example, Lot #). If you have
defined more than one unique identifier, the label that
displays is Tag #. To view the details associated with the
inventory batch number the return line belongs to, click the
hypertext link.
Ship By Date The date by which the return item should be shipped.
Available To Return The quantity of the return item available to be returned.
Return Qty Enter the quantity of the item being returned in the return
line.
Line Type From the drop-down, select the line type.
Reason Code From the drop-down, select the reason for the item being
returned.
Return To Node Enter the node handling the return line.
After entering the information in the fields, click Save to create a return order.
Associate Delivery Request Screen
Items that cannot be transported by common carriers (for example, heavy,
oversized, or fragile items) can be associated with a delivery service through the
Applications Manager. Piano moving is an example of a delivery service.
Typically, in the Application Console, items that have an associated delivery service
are indicated by a Delivery Item icon.
Note: Delivery lines cannot be split. However, you can split a product line that has
associated delivery service, which results in the following recalulations:
vDelivery line quantity
vPricing
vCapacity requirements for the delivery line
When you create delivery requests, you are associating delivery items (intangible
services) with product items (tangible items).
Chapter 10. Order Console Screens 63

One table appears for each set of items that have the same Ship Node, Receiving
Node, and Ship To Address.
The order header field descriptions can be referred from the Order table.
Table 63. Add Delivery Request Screen, Delivery Request
Fields Description
Line The product item's line number on the order.
Item ID The product item's ID.
PC The product item's product class.
UOM The unit of measure for the delivery service.
Description Displays the description of the delivery service.
Delivery Request
Description
Choose the radio button in the column heading and the specific
radio button for the applicable item.
Options Table The Options table displays only when a delivery service has any
optional services available, such as clean up or old appliance
removal.
Option
Checkbox
Choose the checkbox of the services that you want
to enable.
Option ID Displays the ID of the delivery service option.
Description Displays the short description of the delivery
service option.
Price Displays the price of the delivery service option.
Add Delivery Request Screen
You can add a delivery request that does not require product association.
The order header field descriptions can be referred from the Order table.
Table 64. Add Delivery Request Screen, Delivery Request
Actions Description
Add to Order Check a delivery item listed and select this action to add the
item to the order.
This takes you to the Delivery Request Details Screen screen.
Fields
Item ID The delivery item.
UOM The unit of measure for the delivery item.
Short Description The short description of the delivery item.
64 Sterling Selling and Fulfillment Foundation: Distributed Order Management User Guide
Work Order Entry Screen
You can create a work order from an order if it contains a Provided or Delivery
Service line. Choose Create Work Order from the Order Detail Screen screen.
Table 65. Work Order Entry Screen, Header Details
Fields Description
Enterprise The name of the enterprise that owns the work order.
Work Order # Enter the work order number.
Ship Node If the work order contains a provided service, this designates
the ship node from which the resource is originating. If the
work order contains a delivery service and no provided
service, this designates the ship node from which the product
is being delivered.
Multiple Appointments Check this if you are using multiple appointments for this
work order.
Table 66. Work Order Entry Screen, Provided Services
Fields Description
Line The order line number.
Item ID The ID of the provided service item.
Description The description of the provided service item.
Ship Node The node from which the resource is originating.
Line Qty The quantity of work required to complete the provided
service line.
Table 67. Work Order Entry Screen, Delivery Services
Fields Description
Line The order line number.
Item ID The ID of the delivery service item.
Description The description of the delivery service item.
Ship Node The node from which the product is being delivered.
Line Qty The quantity of work (distance, time, or an arbitrary unit)
required to deliver the product.
Table 68. Work Order Entry Screen, Products Being Delivered
Fields Description
Line The order line number.
Item ID The ID of the product being delivered.
PC The product class of the product being delivered.
UOM The unit of measure of the product being delivered.
Description The description of the product being delivered.
Ship Node The ship node that the product is being delivered from.
Ship Date The requested ship date of the product on the order line.
Delivery Date The requested delivery date of the product on the order line.
Required Quantity The quantity of the product being delivered.
Chapter 10. Order Console Screens 65
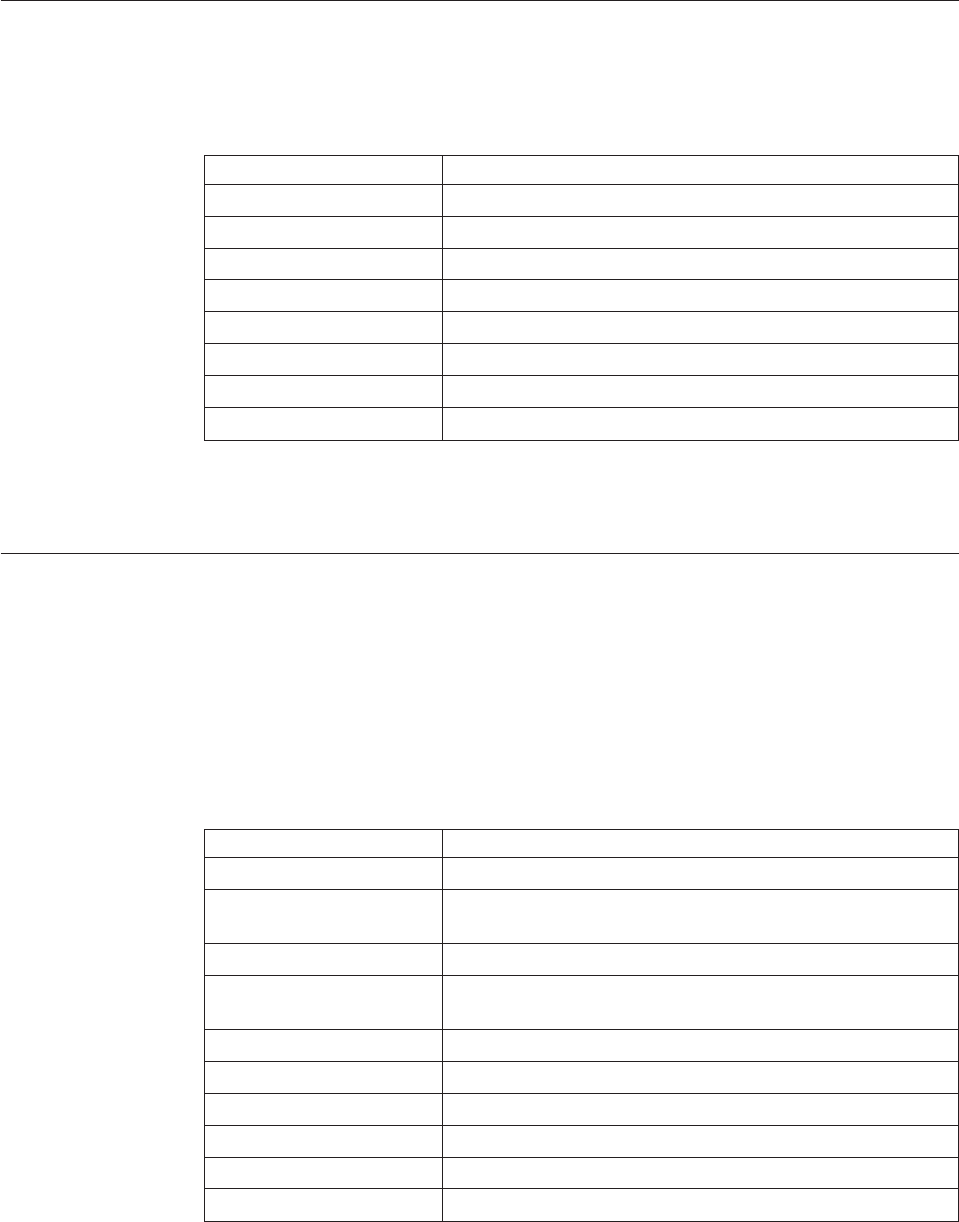
Copy Order Screen
You can copy an order through the order details screen. The new order is copied
into the Draft Order Created status.
Table 69. Copy Order
Fields Description
Copy From Order # The number of the order that is being copied
Document Type The document type of this order.
Enterprise The enterprise associated with the order.
Buyer The buyer organization that placed the order.
Seller The seller organization that is handling the order.
Order # The number of the new order.
Order Name The name of the new order.
Order Date The date for the new order.
The only editable fields on this screen are Order #, Order Name and Order Date.
All other fields displayed cannot be modified.
Order Status Breakup Screen
The status breakup enables you to view the status of an order. An order can be in
multiple statuses at the same time. For example, one order line can be in Sent to
Node status while another order line is in the Backordered status. You can view
the order status breakup screen by viewing the hyperlink in the Status field of the
Order Detail Screen screen.
The order header field descriptions can be referred from the Order table.
Table 70. Order Status Breakup Screen, Order Lines By Status
Fields Description
Line the order line number.
Release # The order line release number, if the order line has been
released to a node.
Item ID The item ID.
PC The item classification such as first quality, second quality, or
finished good.
UOM The line item's unit of measure.
Ship Node The node that is shipping the order line.
Procure From Node The node that the item is being procured from.
Last Changed On The date the line last had a status change.
Status The current status for that part of the order line.
Quantity The quantity of the line item ordered.
66 Sterling Selling and Fulfillment Foundation: Distributed Order Management User Guide
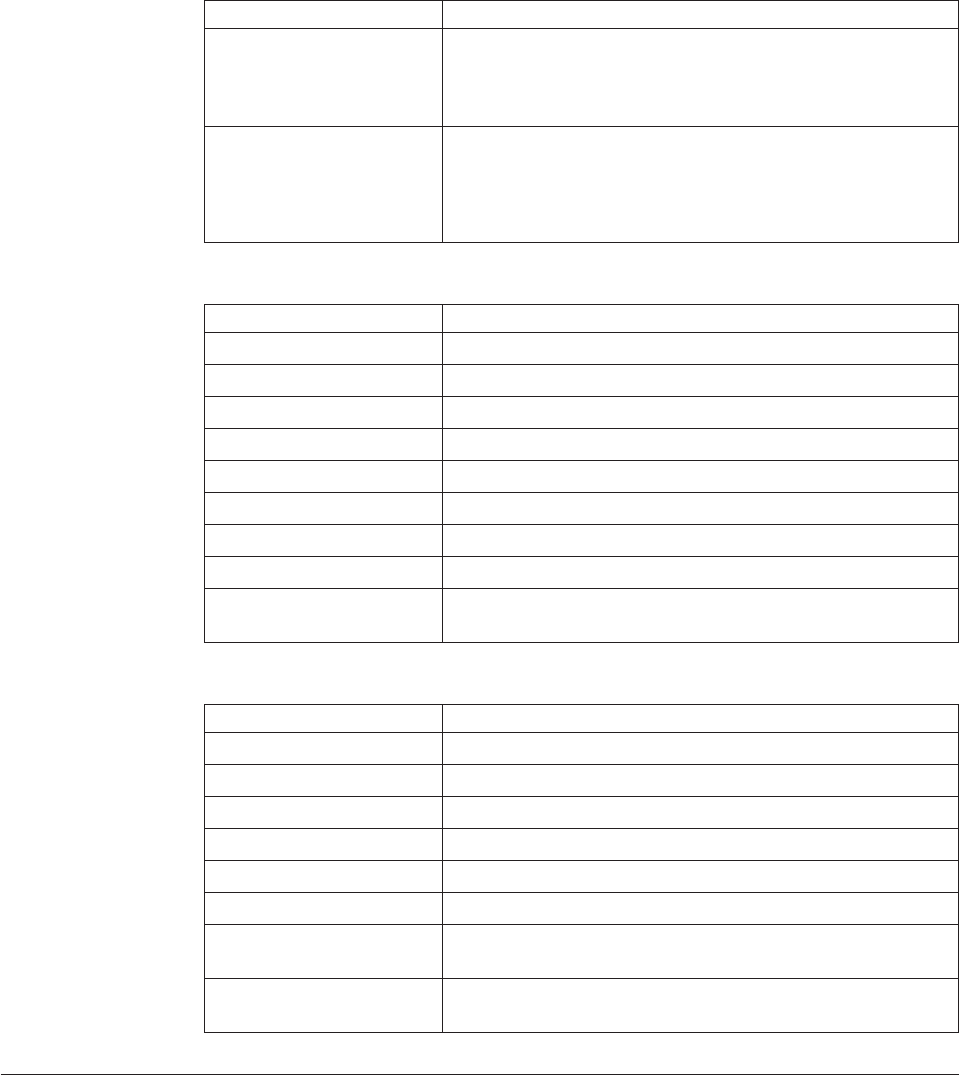
Table 70. Order Status Breakup Screen, Order Lines By Status (continued)
Fields Description
Tag # The tag number with which the order line is associated. Click
the hyperlink to view the tag number details.
Note: This field is only applicable if the item is tag
controlled.
ETS The estimated time of shipment.
To modify, enter the quantity you want to change the
estimated time of shipment of in the Quantity field and the
new estimated time of shipment in the ETS field.
Table 71. Order Status Breakup Screen, Service Requests Status
Fields Description
Line The line associated with the service request.
Release # The release number associated with the service request.
Item ID The item ID associated with the service request.
UOM The unit of measure associated with the service request.
Ship Node The ship node associated with the service request.
Last Changed On The last changed on date associated with the service request.
Status The status associated with the service request.
Quantity The status of the quantity associated with the service request.
Appointment Date The status of the appointment date associated with the
service request.
Table 72. Order Status Breakup Screen, Delivery Requests By Status
Fields Description
Line The line associated with the delivery request.
Item ID The item ID associated with the delivery request.
UOM The unit of measure associated with the delivery request.
Ship Node The ship node associated with the delivery request.
Last Changed On The last changed on date associated with the delivery request.
Status The status associated with the delivery request.
Quantity The status of the quantity associated with the delivery
request.
Appointment Date The status of the appointment date associated with the
delivery request.
Order's Tag Number Details Window
The tag number of an item is the combination of its three tag identifiers: lot
number, batch number, and revision number. For more information about tag
numbers, see the Sterling Selling and Fulfillment Foundation: Catalog Management
Concepts Guide.
You can view the tag number details by clicking the Tag # hyperlink in the Order
Status Breakup Screen screen. The Tag Number Details window appears.
Chapter 10. Order Console Screens 67
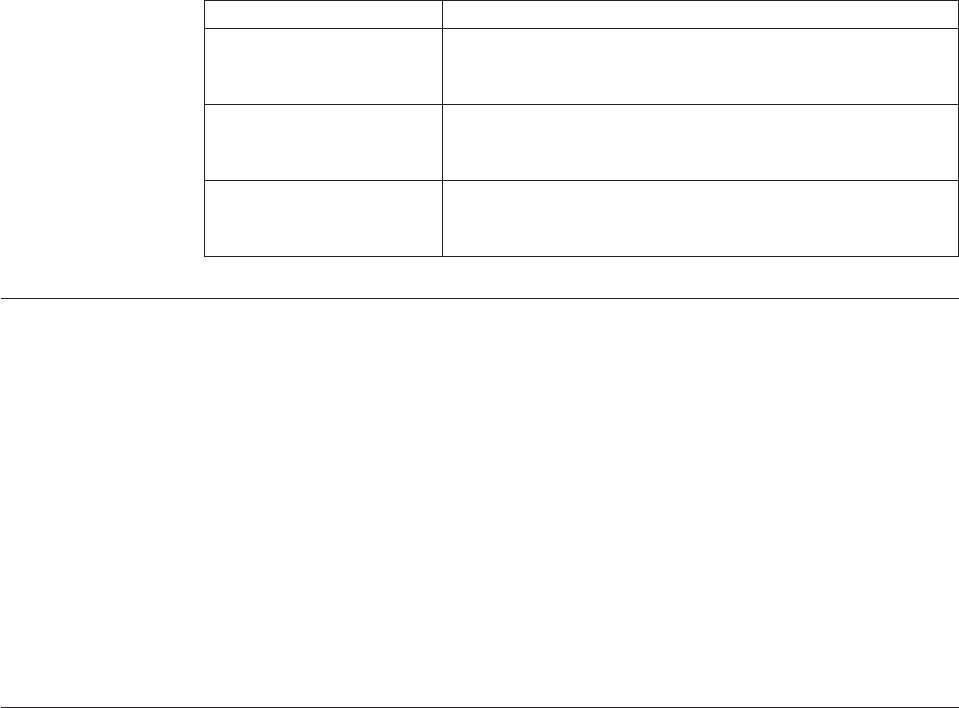
Table 73. Tag Number Details
Fields Description
Lot # The item's lot number.
Note: This field only appears if a lot number has been set for
this item.
Batch # The item's batch number.
Note: This field only appears if a batch number has been set
for this item.
Revision # The item's revision number.
Note: This field only appears if a revision number has been
set for this item.
Modifying an Order's Carrier and Carrier Service
A Carrier is an organization that provides carrier services between buyers, sellers,
and customers. Services, such as Next Day Air, can be offered dependent on the
Carrier. For example, UPS, Federal Express®, and the United States Postal Service
are all Carrier organizations.
You may want to change Carrier or service details. For example, an order may be
associated with a Carrier that only provides Ground delivery. The customer
decides that they need to have the order delivered as soon as possible. You may
decide to change to a Carrier that provides Next Day Air service.
You can modify an order's carrier and carrier service from the Order Detail Screen
screen and make any modification to the Carrier/Service field. Then save your
changes. The Modification Reason window appears. Enter the reason code and text
and choose OK.
Order Charge and Tax Summary Screen
You can view any charges, taxes, and discounts that have been applied to the base
amount of an order at both the header and line level.
The order header field descriptions can be referred from the Order table.
Note: This window displays all order charges and discount charges against the
order header.
68 Sterling Selling and Fulfillment Foundation: Distributed Order Management User Guide
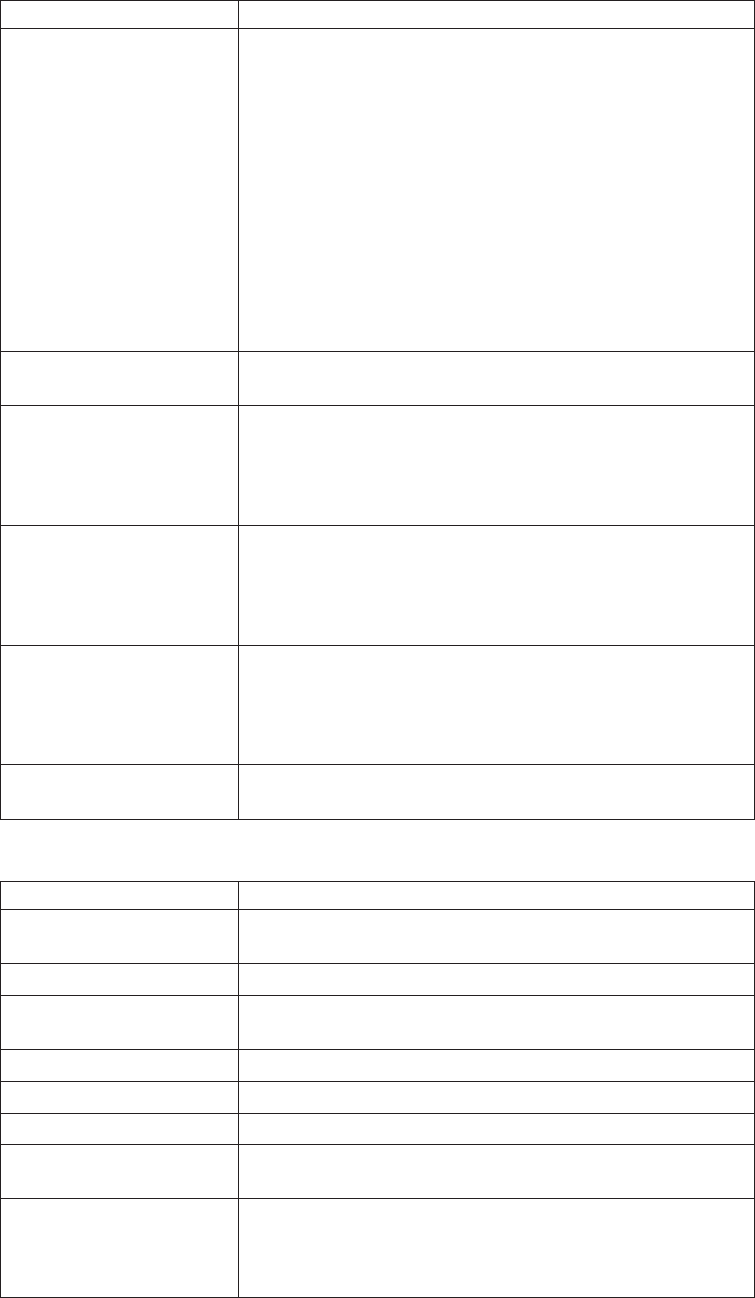
Table 74. Order Charge and Tax Summary Screen, Summary
Fields Description
Summary The summary panel provides the price, discount, charges and
taxes for an order and the order line.
You can view all of the charges that exist against an order by
selecting Overall.
You can view only the charges that are still open against the
order by selecting Open.
You can view only the charges that have been invoiced for
the order by selecting Invoiced.
Important: If you have selected the Overall view, be aware
that the amounts displayed are subject to change due to
cancellations, over-shipments, over-receipts, and so on.
Price The price at the header and line levels before any discounts,
charges, or taxes have been applied to it.
Discount Any Discount at the header and line levels. Click the link
under the Header level row to view the order charges and
select the link under Line level to view the line charges. This
link takes you to different screens based on the type of
summary selected.
Charges Any additional charges at the header and line levels. Click
the link under the Header level row to view the order charges
and select the link under Line level to view the line charges.
This link takes you to different screens based on the type of
summary selected.
Taxes Any additional taxes at the header and line levels. Click the
link under the Header level row to view the order taxes and
select the link under Line level to view the line taxes. This
link takes you to different screens based on the type of
summary selected.
Totals The total of Price, Discount, Charges, and Taxes at the header
and line levels.
Table 75. Order Charge and Tax Summary Screen, Line Summary
Fields Description
Line # The line number. Click this link to view the Order Line Detail
Screen screen.
Item ID The item ID.
PC The item classification such as first quality, second quality, or
finished good.
UOM The item's unit of measure.
Quantity The quantity of the line item that has been ordered.
Unit Price The price of the line item.
Extended Price The extended price represents the total of quantity multiplied
by the unit price.
Discount The discount price applied to the associated line. Click the
hyperlink to view the Overall Order Line Charges Screen,
Remaining Order Line Charges Screen and Modifying an
Order Line Charge.
Chapter 10. Order Console Screens 69
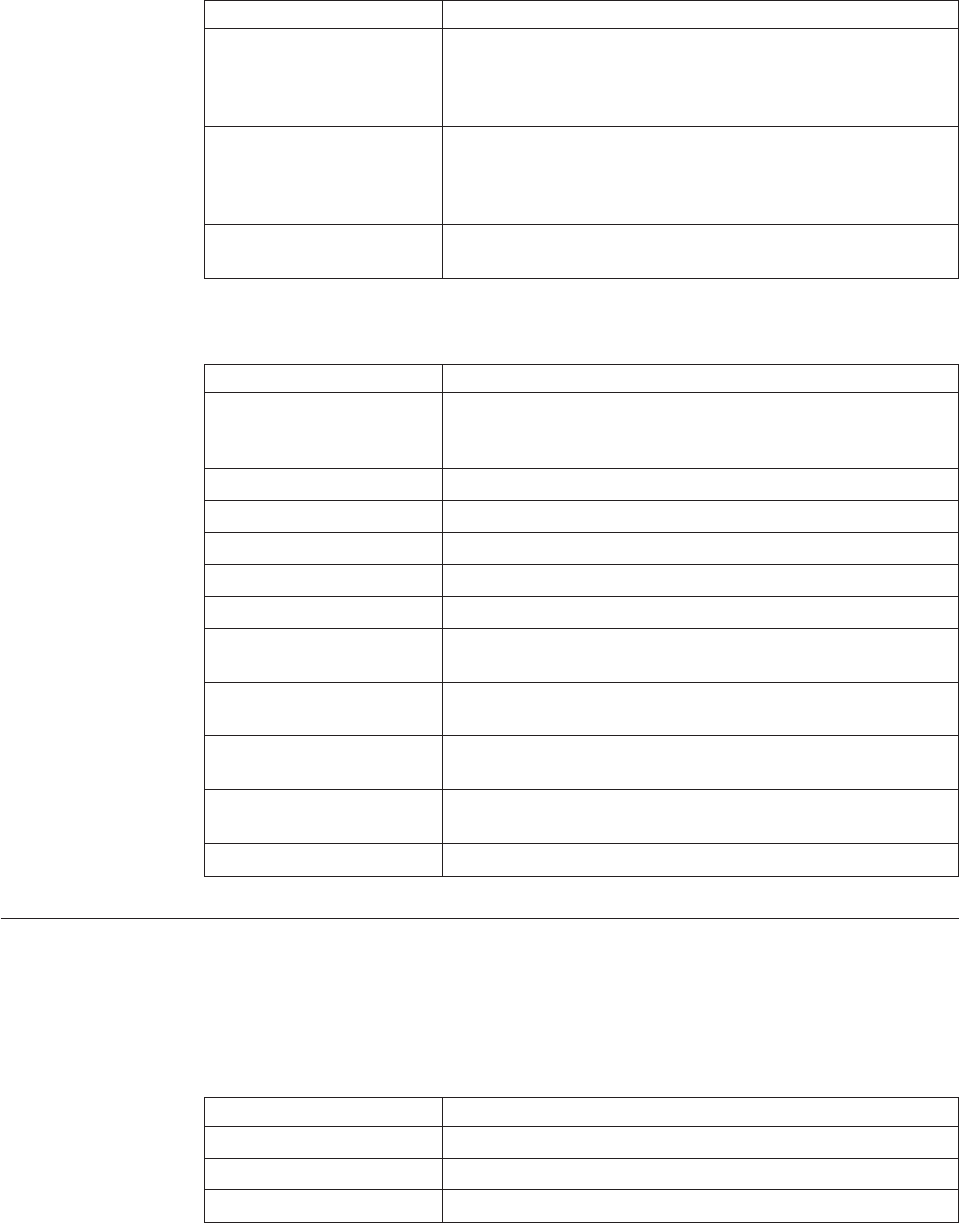
Table 75. Order Charge and Tax Summary Screen, Line Summary (continued)
Fields Description
Charges The total charges applied the associated line. Click the
hyperlink to view the Overall Order Line Charges Screen,
Remaining Order Line Charges Screen and Modifying an
Order Line Charge.
Tax The total taxes applied to the order line. Click the hyperlink
to view the Overall Order Line Taxes Screen, Remaining
Order Line Taxes Screen and Invoiced Order Line Taxes
Screen.
Line Total The total cost of the order line after any additional charges,
taxes, and discounts have been applied.
Table 76. Order Charge and Tax Summary Screen, Service Request or Delivery Request
Summary
Fields Description
Line Number The service or delivery request's line number. Click this link
to view the Service Request Details Screen screen, or Delivery
Request Details Screen screen.
Item ID The service or delivery request's item ID.
UOM The service or delivery request's unit of measure.
Quantity The service or delivery request's quantity requested.
Unit Price The service or delivery request's unit pricing.
Extended Price The service or delivery request's extended price.
Option Price The price of any additional service options associated with
the service or delivery request.
Discount The service or delivery request's discount. Click this link to
view the Remaining Order Line Charges Screen screen.
Charges The service or delivery request's charges. Click this link to
view the Remaining Order Line Charges Screen screen.
Taxes The service or delivery request's taxes. Click this link to view
the Remaining Order Line Taxes Screen screen.
Line Total The service or delivery request's line grand total charges.
Overall Order Charges Screen
You can view the header level charges of an order.
The order header field descriptions can be referred from the Order table.
Table 77. Overall Order Charges Screen, Charges
Fields Description
Charge Category The name of the charge category.
Charge Name The name of the charge name.
Charge Amount The amount of the charge that is applied to the header level.
70 Sterling Selling and Fulfillment Foundation: Distributed Order Management User Guide

Overall Order Taxes Screen
You can view the header level tax information associated with an order.
The order header field descriptions can be referred from the Order table.
Table 78. Overall Order Taxes Screen, Taxes
Fields Description
Charge Category The charge category with which the tax is associated.
Important: An order header level tax must be associated with
a charge, otherwise it is calculated as 0.
Note: An order header level tax cannot be applied to a price
value.
Charge Name The charge name with which the tax is associated.
Important: An order header level tax must be associated with
a charge, otherwise it is calculated as 0.
Note: An order header level tax cannot be applied to a price
value.
Charge Amount The charge amount that is taxed.
Tax Name The name of the tax. For example, International Tax.
Tax Percentage The percentage of tax that is applied to the header price.
Tax Amount The amount of the tax that is applied to the header level.
Remaining Order Charges Screen
You can use the Remaining Order Charges Detail window for adding or modifying
the order charges.
vAdding Remaining Order Charges - From the Charges table, choose the Add
icon. A new row appears in the Charges table. From the Charge Category
drop-down list, select the category of the new charge.
Note: This drop-down displays all order charges and discount charges. Consult
your system administrator to determine which charges should be used as order
charges and which should be used as discount charges.
Table 79. Remaining Order Charges Screen, Charges
Fields Description
Charge Category The name of the charge category. Select an option from the
drop-down menu.
Charge Name The name of the charge name. Once the charge category is
selected, this field is populated by a drop-down menu. Select
the appropriate charge name.
Charge Amount The amount of the charge that is applied to the header level.
Click Save after making changes to the charges panel to update the remaining
order charges. The Modification Reason Screen screen appears, enter the
appropriate reason code and text and click OK.
Chapter 10. Order Console Screens 71
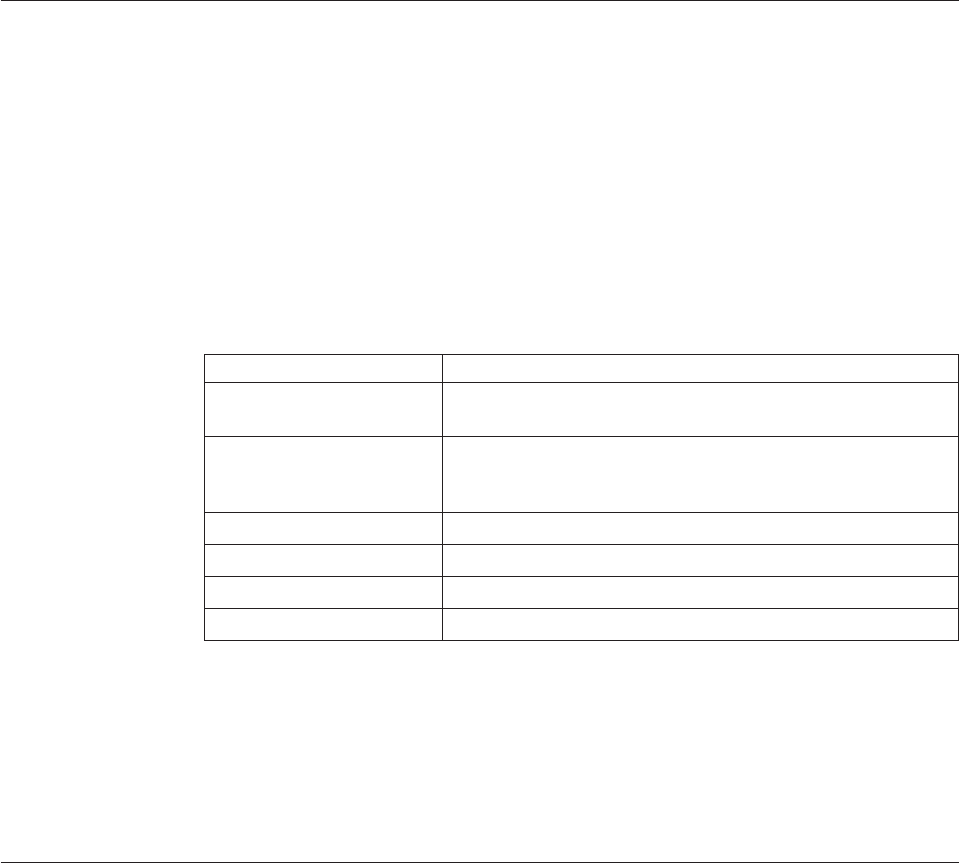
vModifying Remaining Order Charges - Locate the charges you want to modify.
In the charges panel enter the amount of the charges and click Save. The
Modification Reason Screen screen appears, enter the appropriate reason code
and text and click OK.
Remaining Order Taxes Screen
You can use the Remaining Order Taxes window for adding or modifying the
order taxes.
vAdding Remaining Order Taxes - From the Taxes panel, choose the Add icon. A
new row appears in the Taxes panel. From the Charge Category drop-down list,
select the category of the new charge and from Tax category select a new tax
name and enter the relevant information as defined in the following table.
Note: This drop-down displays all order taxes and discount taxes. Consult your
system administrator to determine which charges should be used as order taxes
and which should be used as discount taxes.
Table 80. Remaining Order Taxes Screen, Taxes
Fields Description
Charge Category The name of the charge category. Select an option from the
drop-down menu.
Charge Name The name of the charge name. Once the charge category is
selected, this field is populated by a drop-down menu. Select
the appropriate charge name.
Charge Amount The amount of the charge that is applied to the header level.
Tax Name The name of the tax. For example, International Tax.
Tax Percentage The percentage of tax that is applied to the header price.
Tax Amount The amount of the tax that is applied to the header level.
Click Save after making changes to the taxes panel to update the remaining
order taxes. The Modification Reason Screen screen appears, enter the
appropriate reason code and text and click OK.
vModifying Remaining Order Taxes - Locate the taxes you want to modify. In
the taxes panel enter the amount of the taxes and click Save. The Modification
Reason Screen screen appears, enter the appropriate reason code and text and
click OK.
Modifying an Invoiced Order Charge
About this task
You can view the invoice level charges of an order.
Note: This window displays all order charges and discount charges against the
order header.
Order
If you want to modify a order charge after the invoice is created, you need to
complete the following steps:
72 Sterling Selling and Fulfillment Foundation: Distributed Order Management User Guide
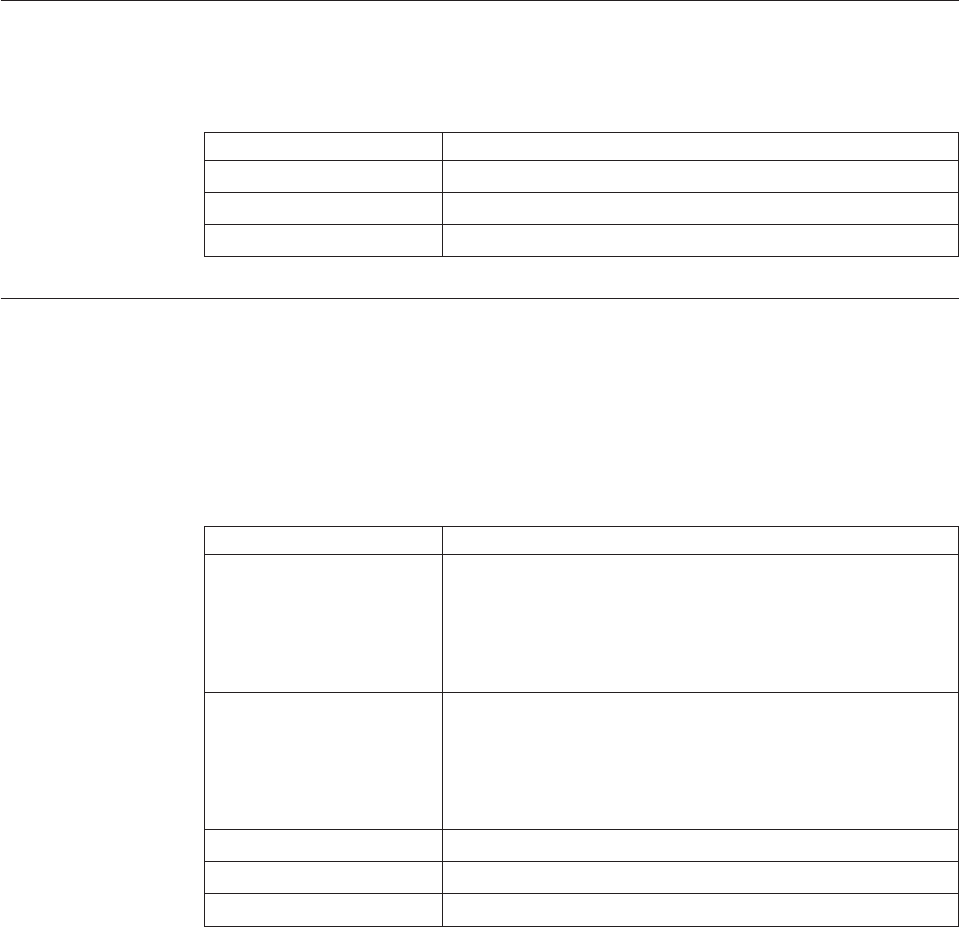
Procedure
1. Check to see if the "Apply Price Change To Invoiced Quantity" is selected in
the sales order financial attributes in the Applications Manager.
2. In the Order details, enter the total amount of the charge and not just the
difference.
Results
The above steps are necessary if you want to make modifications after an invoice
has been created for the charges and taxes from the "Order Detail Screen" and the
"Order Line Detail Screen" screens.
The order header field descriptions can be referred from the Order table. If you
view the invoiced order charges from the Order Invoices Screen screen the order
header panel is replaced with fields described in the Invoice table.
Invoiced Order Charges Screen
The Invoiced Order Charges screen allows you to view invoiced order charges.
Table 81. Invoiced Order Charges Screen, Charges
Fields Description
Charge Category The name of the charge category.
Charge Name The name of the charge name.
Charge Amount The amount of the charge that is applied to the header level.
Invoiced Order Taxes Screen
You can view the invoice level tax information associated with an order.
The order header field descriptions can be referred from the Order table. If you
view the invoiced order taxes screen from the Order Invoices Screen screen the
order header panel is replaced with the fields described in the Invoice table.
Table 82. Invoiced Order Taxes Screen, Taxes
Fields Description
Charge Category The charge category with which the tax is associated.
Important: An order header level tax must be associated with
a charge, otherwise it is calculated as 0.
Note: An order header level tax cannot be applied to a price
value.
Charge Name The charge name with which the tax is associated.
Important: An order header level tax must be associated with
a charge, otherwise it is calculated as 0.
Note: An order header level tax cannot be applied to a price
value.
Charge Amount The charge amount that is taxed.
Tax Name The name of the tax. For example, International Tax.
Tax Percentage The percentage of tax that is applied to the header price.
Chapter 10. Order Console Screens 73

Table 82. Invoiced Order Taxes Screen, Taxes (continued)
Fields Description
Tax Amount The amount of the tax that is applied to the header level.
Order Payment Information Screen
You can view the payment information related to an order, including the methods
of payment, charge sequence, and collection amounts.
Payment transactions can be in any one of the following states:
vAwaiting Authorization - Sterling Selling and Fulfillment Foundation is waiting
for a third-party payment processing application to authorize the Buyer's
payment method before the order can move any further through the pipeline.
vAwaiting Payment Information - Sterling Selling and Fulfillment Foundation is
waiting for a third-party payment processing application to receive the Buyer's
payment information before the order can be authorized.
vAuthorized - The third party payment processing application has authorized the
Buyer's payment method and the order continues through the pipeline.
vAuthorization Failed - The third party payment processing application did not
authorize the Buyer's payment method and manual intervention is required.
vInvoiced - An invoice has been created and distributed to the necessary parties.
vFailed Charge - A problem occurred when payment collection was attempted
and manual intervention is required.
vHold - For some reason the order must be put on hold until a payment issue is
resolved.
vPaid - The settlement has been received and the order can be closed.
vNot Applicable - Payment status is not applicable. For example, if the order is a
draft order.
The order header field descriptions can be referred from the Order table details.
Table 83. Order Payment Information Screen, Payment Information
Actions Description
Add Payment Type This action takes you to the Add Order Payment Information
Screen screen.
Create Credit Memo This action takes you to the Create Credit Memo Screen
screen where you can create credit memos for the payment
types.
Create Debit Memo This action takes you to the Create Debit Memo Screen screen
where you can create debit memos for the payment types.
View Collection Details This action lets you view the Order Collection Details Screen
screen where you can view the collection details for the order.
Fields
Payment Rule The payment rule used for invoicing, settlement, and
collection. For more information about payment rules, see the
Sterling Selling and Fulfillment Foundation: Distributed Order
Management Configuration Guide.
Total Adjustments The total adjustments made to the amount after credits and
debits have been taken into consideration.
74 Sterling Selling and Fulfillment Foundation: Distributed Order Management User Guide
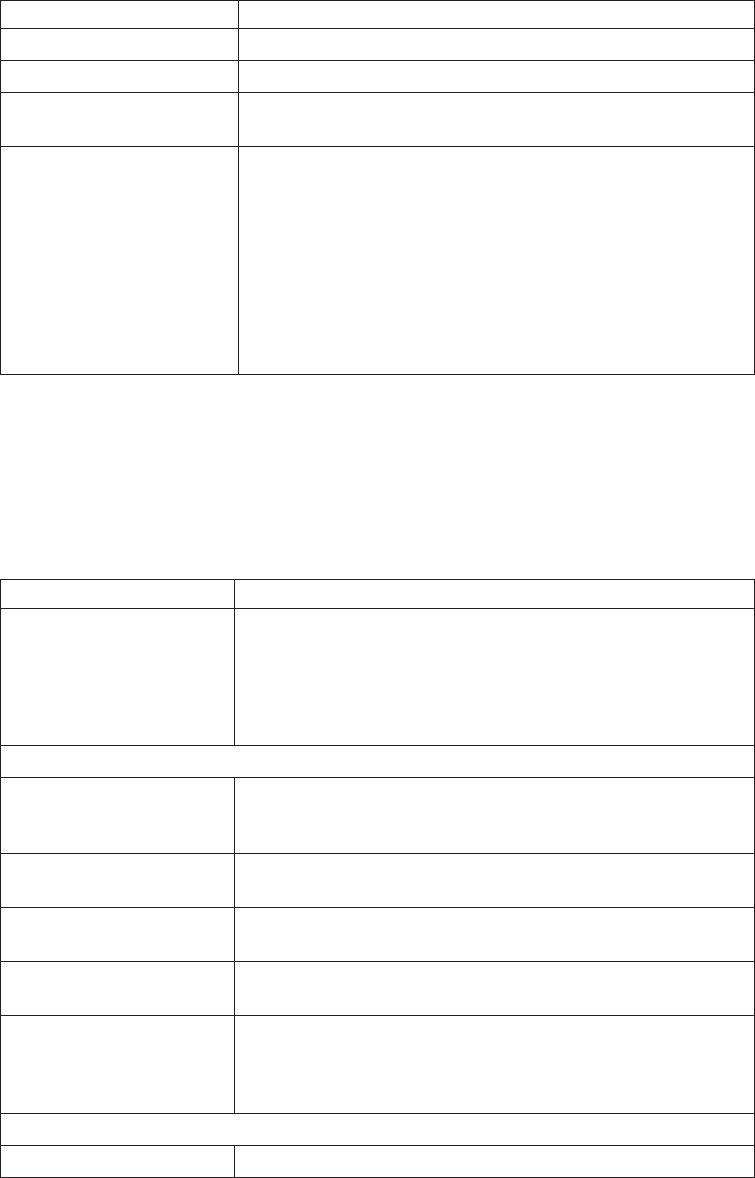
Table 83. Order Payment Information Screen, Payment Information (continued)
Total Collected The total amount of the order that has been collected.
Open Authorized The amount that has been authorized.
Total Refunded The total amount of the order that has been refunded.
Total Cancelled The total amount of the order that has been cancelled as a
result of cancelling the order lines.
Funds From Return The total funds that can potentially be transferred from the
return that originated the exchange.
The funds from the return are broken down as follows:
vTotal Transferred: The total of the funds that have been
transferred from the return.
vPending Transfer: The total of the funds that have not yet
been transferred from the return.
Note: This field is only displayed for exchange orders.
The payment information can have the following fields if a payment type has been
defined.
If the payment type displayed is in the credit card payment type group the
following fields are defined:
Table 84. Order Payment Information Screen, Credit Card
View Icons Description
Address Details Address Details - This icon takes you to the Address Details
screen where you can view the Bill To address on this credit
card.
This action is only available when you have specified an
override bill to address for this credit card.
Actions
Modify If the payment method is incomplete, this action lets you
modify payment information in the Modify Order Payment
Information screen.
Charge This action lets you charge the payment amount in the Charge
Screen screen.
Authorize This action lets you authorize the payment in the Authorize
Screen screen.
Refund This action lets you refund the amount in the Refund Screen
screen.
Delete This action deletes the payment information belonging to a
certain payment type. An alert window pops up confirming
the deletion of the payment type. Click OK and the payment
type is deleted.
Fields
Payment Type The payment type. For example, Credit Card.
Chapter 10. Order Console Screens 75
Table 84. Order Payment Information Screen, Credit Card (continued)
Charge Sequence When multiple payment types are specified, Charge Sequence
specifies the default payment type.
For example, if a Buyer uses a gift certificate and a credit
card, by specifying the Charge Sequence of gift certificates as
1 and credits cards as 2, you can collect against any gift
certificates before the credit card is collected against.
Note: The charge sequence configured for this payment type
overrides any value entered in this field. However, if two
configured charge sequences have the same sequence number,
the value entered in this field is used as a tie breaker.
Collected Amount The amount of the order that has been collected against this
payment type.
Refunded Amount The amount of the order that has been refunded against this
payment type.
Credit Card # The credit card number.
Note: Credit Card numbers are displayed with asterisks (*)
for all but the last four digits.
Unlimited Charges Select Unlimited Charges if the payment type has no charge
limit.
Authorized Amount The amount that has been authorized to collect with this
payment type.
Expiration Date The expiration date on the credit card.
Max Charge Limit The maximum amount this payment type can be charged.
Awaiting Collections The amount waiting to be collected against this payment type.
Credit Card Type The type of credit card, such as VISA or MasterCard.
Awaiting Authorizations The amount waiting to be authorized.
Name On Card The name exactly as it appears on the card.
Payment Type Status This field provides the current status of the payment type.
Suspended for
Charge
If selected, payment collections are frozen,
but refunds can still be performed for the
specified payment type. Reactivate payment
collections by choosing Active.
Suspended for
Charge and
Refund
If selected, payment collections and refund
credits are frozen for the specified payment
type. Reactivate payment collections and
refunds by choosing Active.
Active If selected, payments can be collected and
credits can be refunded for the specified
payment type.
The actions and the payment type status are the same in all the panels. However
the primary information for each payment type differs.
Table 85. Order Payment Information Screen, Customer Account
Actions Description
For the list of actions refer to the Order Payment Information Screen, Credit Card table.
Fields
Payment Type The payment type. For example, Credit Card or Check.
76 Sterling Selling and Fulfillment Foundation: Distributed Order Management User Guide
Table 85. Order Payment Information Screen, Customer Account (continued)
Charge Sequence When multiple payment types are specified, Charge Sequence
specifies the default payment type.
For example, if a Buyer uses a gift certificate and a credit
card, by specifying the Charge Sequence of gift certificates as
1 and credit cards as 2, you can collect against any gift
certificates before the credit card is collected against.
Note: The charge sequence configured for this payment type
overrides any value entered in this field. However, if two
configured charge sequences have the same sequence number,
the value entered in this field is used as a tie breaker.
Collected Amount The amount of the order that has been collected against this
payment type.
Refunded Amount The amount of the order that has been refunded against this
payment type.
Customer Account # The Buyer's account number.
If encryption is turned on, the Customer Account number
field displays asterisks (*) for all but the last four digits,
unless you have the necessary permissions.
Unlimited Charges Select Unlimited Charges if the payment type has no charge
limit.
Authorized Amount The amount that has been authorized to collect with this
payment type.
Customer PO # The purchase order number placed for the order.
Max Charge Limit The maximum amount this payment type can be charged.
Awaiting Collections The amount waiting to be collected against this payment
type.
Payment Reference #1 This field can be customized as needed.
If encryption is turned on, this field displays asterisks (*) for
all but the last four digits of the Payment Reference number,
unless you have the necessary permissions.
Payment Reference #2 This field can be customized as needed.
Awaiting Authorizations The amount waiting to be authorized.
Payment Type Status Refer to the Order Payment Information Screen, Credit Card
table for the payment type status details.
Table 86. Order Payment Information Screen, Stored Value Card
Actions Description
For the list of actions refer to the Order Payment Information Screen, Credit Card table.
Fields
Payment Type The payment type, for example, gift card.
Stored Value Card # The stored value card number.
Note: SVC numbers are displayed with asterisks (*) for all
but the last four digits.
Chapter 10. Order Console Screens 77
Table 86. Order Payment Information Screen, Stored Value Card (continued)
Charge Sequence When multiple payment types are specified, Charge Sequence
specifies the default payment type.
For example, if a Buyer uses a gift certificate and a credit
card, by specifying the Charge Sequence of gift certificates as
1 and credit cards as 2, you can collect against any gift
certificates before the credit card is collected against.
Note: The charge sequence configured for this payment type
overrides any value entered in this field. However, if two
configured charge sequences have the same sequence number,
the value entered in this field is used as a tie breaker.
Collected Amount The amount of the order that has been collected against this
payment type.
Refunded Amount The amount of the order that has been refunded against this
payment type.
Payment Reference #1 This field can be customized as needed.
If encryption is turned on, this field displays asterisks (*) for
all but the last four digits of the Payment Reference number,
unless you have the necessary permissions.
Unlimited Charges Select Unlimited Charges if the payment type has no charge
limit.
This field is not displayed if the ChargeUpToAvailable flag
has been enabled in the Applications Manager.
Authorized Amount The amount that has been authorized to collect with this
payment type.
Payment Reference #2 This field can be customized as needed.
Max Charge Limit The maximum amount this payment type can be charged.
Awaiting Collections The amount waiting to be collected against this payment
type.
Payment Reference #3 This field can be customized as needed.
Awaiting Authorizations The amount waiting to be authorized.
Funds Available Amount of funds available on this card. This field displays
'Not Applicable' if the query to get available funds has been
disabled.
Payment Type Status Refer to the Order Payment Information Screen, Credit Card
table for the payment type status details.
Table 87. Order Payment Information Screen, Other
Actions Description
For the list of actions refer to the Order Payment Information Screen, Credit Card table.
Fields
Payment Type The payment type. For example, Check.
78 Sterling Selling and Fulfillment Foundation: Distributed Order Management User Guide
Table 87. Order Payment Information Screen, Other (continued)
Charge Sequence When multiple payment types are specified, Charge Sequence
specifies the default payment type.
For example, if a Buyer uses a gift certificate and a credit
card, by specifying the Charge Sequence of gift certificates as
1 and credit cards as 2, you can collect against any gift
certificates before the credit card is collected against.
Note: The charge sequence configured for this payment type
overrides any value entered in this field. However, if two
configured charge sequences have the same sequence number,
the value entered in this field is used as a tie breaker.
Collected Amount The amount of the order that has been collected against this
payment type.
Payment Reference #1 This field can be customized as needed.
If encryption is turned on, this field displays asterisks (*) for
all but the last four digits of the Payment Reference number,
unless you have the necessary permissions.
Unlimited Charges Select Unlimited Charges if the payment type has no charge
limit.
Authorized Amount The amount that has been authorized to collect with this
payment type.
Payment Reference #2 This field can be customized as needed.
Max Charge Limit The maximum amount this payment type can be charged.
Awaiting Collections The amount waiting to be collected against this payment
type.
Payment Reference #3 This field can be customized as needed.
Awaiting Authorizations The amount waiting to be authorized.
Payment Type Status Refer to the Order Payment Information Screen, Credit Card
table for the payment type status details.
Add Order Payment Information Screen
You can add one or more payment types to collect against an order.
If the payment type selected is in the credit card payment type group, the
following fields are displayed:
Table 88. Add Order Payment Information Screen, Credit Card Payment Type
Fields Description
Charge Sequence When multiple payment types are specified, Charge Sequence
specifies the default payment type.
For example, if a Buyer uses a gift certificate and a credit
card, by specifying the Charge Sequence of gift certificates as
1 and credits cards as 2, you can collect against any gift
certificates before the credit card is collected against.
Chapter 10. Order Console Screens 79
Table 88. Add Order Payment Information Screen, Credit Card Payment Type (continued)
Fields Description
Credit Card # Enter the credit card number.
If the yfs.ssdcs.tokenize.cc property is set to Y, the entry field
will be served from the IBM Sterling Sensitive Data Capture
Server. For information about using the IBM Sterling Sensitive
Data Capture Server to tokenize credit card numbers, refer to
the Sterling Selling and Fulfillment Foundation: Sterling Sensitive
Data Capture Server, Release 1.1: Configuration Guide. For
information about overriding properties using the
customer_overrides.properties file, refer to the Sterling
Selling and Fulfillment Foundation: Properties Guide.
Unlimited Charges Select the Unlimited Charges if the payment type has no
charge limit.
Expiration Date Enter the expiration date on the credit card.
Max Charge Limit Enter the maximum amount that can be collected against this
payment type.
Credit Card Type Enter the type of credit card, such as VISA or MasterCard.
Name On Card Enter the name exactly as it appears on the card.
Override Bill To Address Check this box to override the bill to address on the order.
For more information about address details, see Table 202 on
page 148.
If the payment type belongs to customer account payment type group, the
following fields are displayed:
Table 89. Add Order Payment Information Screen, Customer Account Payment Type
Fields Description
Charge Sequence When multiple payment types are specified, Charge Sequence
specifies the default payment type.
For example, if a Buyer uses a gift certificate and a credit
card, by specifying the Charge Sequence of gift certificates as
1 and credit cards as 2, you can collect against any gift
certificates before the credit card is collected against.
Customer Account # The Buyer's account number.
Unlimited Charges Select Unlimited Charges if the payment type has no charge
limit.
Customer PO # The purchase order number placed for the order.
Max Charge Limit Enter the maximum amount that can be charged against this
payment type.
Payment Reference #1 This field can be customized as needed.
Payment Reference #2 This field can be customized as needed.
If the payment type is check or others then both payments fall under the Others
payment type group. The field descriptions of both payment types are same.
80 Sterling Selling and Fulfillment Foundation: Distributed Order Management User Guide
Table 90. Add Order Payment Information Screen, Check or Other Payment Type
Fields Description
Charge Sequence When multiple payment types are specified, Charge Sequence
specifies the default payment type.
For example, if a Buyer uses a gift certificate and a credit
card, by specifying the Charge Sequence of gift certificates as
1 and credits cards as 2, you can collect against any gift
certificates before the credit card is collected against.
Payment Reference #1 This field can be customized as needed.
Unlimited Charges Select Unlimited Charges if the payment type has no charge
limit.
Payment Reference #2 This field can be customized as needed.
Max Charge Limit Enter the maximum amount that can be collected against this
payment type.
Payment Reference #3 This field can be customized as needed.
If the payment type selected is in the Stored Value Card (SVC) payment type
group, then the following fields are available:
Table 91. Add Order Payment Information Screen, Stored Value Card Payment Type
Fields Description
Charge Sequence When multiple payment types are specified, Charge Sequence
specifies the default payment type.
For example, if a Buyer uses a gift certificate and a credit
card, by specifying the Charge Sequence of gift certificates as
1 and credits cards as 2, you can collect against any gift
certificates before the credit card is collected against.
Stored Value Card # Enter the stored value card number.
If the yfs.ssdcs.tokenize.svc property is set to Y, the entry
field will be served from the IBM Sterling Sensitive Data
Capture Server. For information about using the IBM Sterling
Sensitive Data Capture Server to tokenize stored value card
numbers, refer to the Sterling Selling and Fulfillment
Foundation: Sterling Sensitive Data Capture Server, Release 1.1:
Configuration Guide. For information about overriding
properties using the customer_overrides.properties file,
refer to the Sterling Selling and Fulfillment Foundation:
Properties Guide.
Unlimited Charges Select Unlimited Charges if the payment type has no charge
limit.
This field is not displayed if the ChargeUpToAvailable flag
has been enabled in the Applications Manager.
Payment Reference #1 This field can be customized as needed.
Max Charge Limit Enter the maximum amount that can be collected against this
payment type.
Payment Reference #2 This field can be customized as needed.
Payment Reference #3 This field Can be customized as needed.
Chapter 10. Order Console Screens 81

Click Save after entering the necessary information for adding a payment types.
The Order Payment Information Screen screen is populated with the added
payment types.
Modify Order Payment Information Screen
You can modify one or more payment types to collect against an order.
If the payment type selected is in the credit card payment type group, the
following fields are displayed:
Table 92. Modify Order Payment Information Screen, Credit Card Payment Type
Fields Description
Charge Sequence When multiple payment types are specified, Charge Sequence
specifies the default payment type.
For example, if a Buyer uses a gift certificate and a credit card,
by specifying the Charge Sequence of gift certificates as 1 and
credits cards as 2, you can collect against any gift certificates
before the credit card is collected against.
Collected Amount The amount of the order that has been collected against this
payment type.
Credit Card # Enter the credit card number.
If the yfs.ssdcs.tokenize.cc property is set to Y, the entry field
will be served from the IBM Sterling Sensitive Data Capture
Server. For information about using the IBM Sterling Sensitive
Data Capture Server to tokenize credit card numbers, refer to
the Sterling Selling and Fulfillment Foundation: Sterling Sensitive
Data Capture Server, Release 1.1: Configuration Guide. For
information about overriding properties using the
customer_overrides.properties file, refer to the Sterling
Selling and Fulfillment Foundation: Properties Guide.
Unlimited Charges Select the Unlimited Charges if the payment type has no
charge limit.
Refunded Amount The amount of the order that has been refunded against this
payment type.
Expiration Date Enter the expiration date on the credit card.
Max Charge Limit Enter the maximum amount that can be collected against this
payment type.
Authorized Amount The amount that has been authorized to collect with this
payment type.
Credit Card Type Enter the type of credit card, such as VISA or MasterCard.
Awaiting Collections The amount waiting to be collected against this payment type.
Name On Card Enter the name exactly as it appears on the card.
Awaiting Authorizations The amount waiting to be authorized.
82 Sterling Selling and Fulfillment Foundation: Distributed Order Management User Guide
Table 92. Modify Order Payment Information Screen, Credit Card Payment Type (continued)
Fields Description
Payment Type Status This field provides the current status of the payment type.
Suspended for
Charge
If selected, payment collections are frozen,
but refunds can still be performed for the
specified payment type. Reactivate payment
collections by choosing Active.
Suspended for
Charge and
Refund
If selected, payment collections and refund
credits are frozen for the specified payment
type. Reactivate payment collections and
refunds by choosing Active.
Active If selected, payments can be collected and
credits can be refunded for the specified
payment type.
If the payment type belongs to customer account payment type group, the
following fields are displayed:
Table 93. Modify Order Payment Information Screen, Customer Account Payment Type
Fields Description
Charge Sequence When multiple payment types are specified, Charge Sequence
specifies the default payment type.
For example, if a Buyer uses a gift certificate and a credit card,
by specifying the Charge Sequence of gift certificates as 1 and
credit cards as 2, you can collect against any gift certificates
before the credit card is collected against.
Collected Amount The amount of the order that has been collected against this
payment type.
Customer Account # The Buyer's account number.
Unlimited Charges Select Unlimited Charges if the payment type has no charge
limit.
Refunded Amount The amount of the order that has been refunded against this
payment type.
Customer PO # The purchase order number placed for the order.
Max Charge Limit Enter the maximum amount that can be charged against this
payment type.
Authorized Amount The amount that has been authorized to collect with this
payment type.
Awaiting Collections The amount waiting to be collected against this payment type.
Awaiting Authorizations The amount waiting to be authorized.
Payment Reference #1 This field can be customized as needed.
Payment Reference #2 This field can be customized as needed.
Chapter 10. Order Console Screens 83
Table 93. Modify Order Payment Information Screen, Customer Account Payment
Type (continued)
Fields Description
Payment Type Status This field provides the current status of the payment type.
Suspended for
Charge
If selected, payment collections are frozen,
but refunds can still be performed for the
specified payment type. Reactivate payment
collections by choosing Active.
Suspended for
Charge and
Refund
If selected, payment collections and refund
credits are frozen for the specified payment
type. Reactivate payment collections and
refunds by choosing Active.
Active If selected, payments can be collected and
credits can be refunded for the specified
payment type.
If the payment type is check or others, then both payments fall under the Others
payment type group. The field descriptions of both payment types are the same.
Table 94. Modify Order Payment Information Screen, Check or Other Payment Type
Fields Description
Charge Sequence When multiple payment types are specified, Charge Sequence
specifies the default payment type.
For example, if a Buyer uses a gift certificate and a credit card,
by specifying the Charge Sequence of gift certificates as 1 and
credits cards as 2, you can collect against any gift certificates
before the credit card is collected against.
Collected Amount The amount of the order that has been collected against this
payment type.
Payment Reference #1 This field can be customized as needed.
Unlimited Charges Select Unlimited Charges if the payment type has no charge
limit.
Refunded Amount The amount of the order that has been refunded against this
payment type.
Payment Reference #2 This field can be customized as needed.
Max Charge Limit Enter the maximum amount that can be collected against this
payment type.
Authorized Amount The amount that has been authorized to collect with this
payment type.
Payment Reference #3 This field can be customized as needed.
Awaiting Collections The amount waiting to be collected against this payment type.
Awaiting Authorizations The amount waiting to be authorized.
84 Sterling Selling and Fulfillment Foundation: Distributed Order Management User Guide
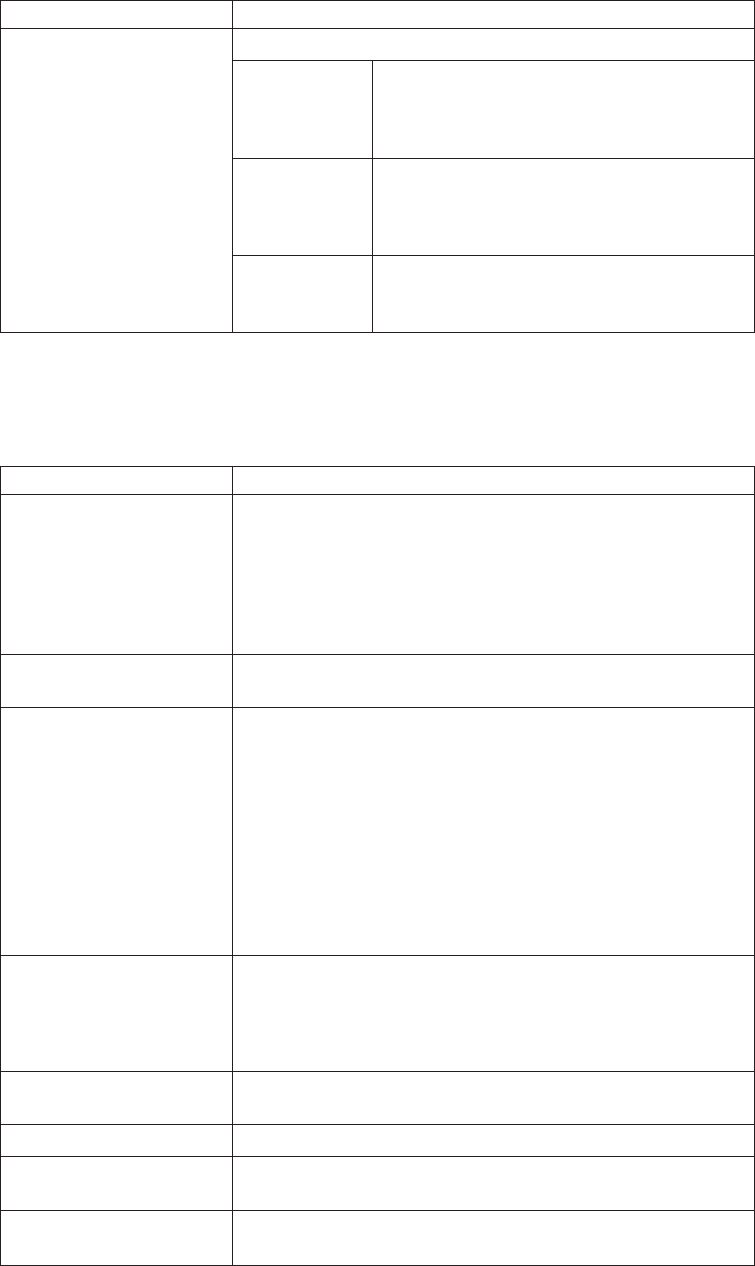
Table 94. Modify Order Payment Information Screen, Check or Other Payment
Type (continued)
Fields Description
Payment Type Status This field provides the current status of the payment type.
Suspended for
Charge
If selected, payment collections are frozen,
but refunds can still be performed for the
specified payment type. Reactivate payment
collections by choosing Active.
Suspended for
Charge and
Refund
If selected, payment collections and refund
credits are frozen for the specified payment
type. Reactivate payment collections and
refunds by choosing Active.
Active If selected, payments can be collected and
credits can be refunded for the specified
payment type.
If the payment type selected is in the Stored Value Card (SVC) payment type
group, then the following fields are available:
Table 95. Modify Order Payment Information Screen, Stored Value Card Payment Type
Fields Description
Charge Sequence When multiple payment types are specified, Charge Sequence
specifies the default payment type.
For example, if a Buyer uses a gift certificate and a credit card,
by specifying the Charge Sequence of gift certificates as 1 and
credits cards as 2, you can collect against any gift certificates
before the credit card is collected against.
Collected Amount The amount of the order that has been collected against this
payment type.
Stored Value Card # Enter the stored value card number.
If the yfs.ssdcs.tokenize.svc property is set to Y, the entry field
will be served from the IBM Sterling Sensitive Data Capture
Server. For information about using the IBM Sterling Sensitive
Data Capture Server to tokenize stored value card numbers,
refer to the Sterling Selling and Fulfillment Foundation: Sterling
Sensitive Data Capture Server, Release 1.1: Configuration Guide.
For information about overriding properties using the
customer_overrides.properties file, refer to the Sterling
Selling and Fulfillment Foundation: Properties Guide.
Unlimited Charges Select Unlimited Charges if the payment type has no charge
limit.
This field is not displayed if the ChargeUpToAvailable flag has
been enabled in the Applications Manager.
Refunded Amount The amount of the order that has been refunded against this
payment type.
Payment Reference #1 This field can be customized as needed.
Max Charge Limit Enter the maximum amount that can be collected against this
payment type.
Authorized Amount The amount that has been authorized to collect with this
payment type.
Chapter 10. Order Console Screens 85
Table 95. Modify Order Payment Information Screen, Stored Value Card Payment
Type (continued)
Fields Description
Payment Reference #2 This field can be customized as needed.
Payment Reference #3 This field can be customized as needed.
Awaiting Collections The amount waiting to be collected against this payment type.
Awaiting Authorizations The amount waiting to be authorized.
Payment Type Status This field provides the current status of the payment type.
Suspended for
Charge
If selected, payment collections are frozen,
but refunds can still be performed for the
specified payment type. Reactivate payment
collections by choosing Active.
Suspended for
Charge and
Refund
If selected, payment collections and refund
credits are frozen for the specified payment
type. Reactivate payment collections and
refunds by choosing Active.
Active If selected, payments can be collected and
credits can be refunded for the specified
payment type.
Click Save after entering the necessary information for modifying a payment types.
The Order Payment Information Screen screen is populated with the added
payment types.
Create Credit Memo Screen
You can create a credit memo to add additional credit charges to an order.
Table 96. Create Credit Memo Screen, Credit Memo Details
Fields Description
Amount Enter the amount for which you wish to create the credit
memo.
Reference Enter the reference number.
Create Debit Memo Screen
You can create a debit memo to add additional credit charges to an order.
Table 97. Create Debit Memo Screen, Debit Memo Details
Fields Description
Amount Enter the amount for which you wish to create the debit
memo.
Reference Enter the reference number.
86 Sterling Selling and Fulfillment Foundation: Distributed Order Management User Guide
Order Collection Details Screen
You can view collection details associated with an order.
The order header field descriptions can be referred from the Order table.
Table 98. Order Collection Details Screen, Collection Details
Fields Description
Total Collected The amount of credit collected.
Total Invoiced The amount the Buyer account has been debited or charged.
Total Refunded The amount that has been refunded on the order.
Return Invoiced Amount The amount that has been invoiced for a return charge for an
order.
Open Authorized The amount for which authorizations have been carried out.
Open Order Amount The amount remaining to be collected on the order.
Total Cancelled The amount for which cancellation has been done on order
lines on an order.
Funds From Return The total funds that can potentially be transferred from the
return that originated the exchange.
The funds from the return are broken down as follows:
vTotal Transferred: The total of the funds that have been
transferred from the return.
vPending Transfer: The total of the funds that have not yet
been transferred from the return.
Note: This field is only displayed for exchange orders.
Table 99. Order Collection Details Screen, Invoice Collection Information
Fields Description
Invoice # The invoice number.
Invoice Date The date and time that the invoice was created.
Amount Collected The amount that has currently been paid towards the
invoice.
Total Invoice Amount The total amount of the invoice.
There are two views in this screen. One is the Charge and Authorization Summary
View and the other is the Advanced Collection Details. Use the drop-down menu
to select either one of the option. In the Charge and Authorization Summary view
only the transaction types CHARGE and AUTHORIZED related details would be
available. If you want to view the the adjustments due to refunds, change of
prices, choose the Advanced Collection Detail view.
If you click on the Expand All button, the charge transaction details for each
charge transaction are expanded. If you click on the Collapse All button, the charge
transaction details for each charge transaction are collapsed.
The following Collection Summary panel provides field descriptions for both the
views.
Chapter 10. Order Console Screens 87

Table 100. Order Collection Details Screen, Collection Summary
Fields Description
Date The date that authorization/charging or adjustments was
carried out.
Transaction Type The transaction type for which the payment authorization or
charge was carried out.
When you expand the transaction types the following
payment information can be viewed:
vCustomer Account Information Expanded
vCredit Card Information Expanded
vStored Value Card Information Expanded
vPayment Type Information Expanded
The transaction type in the case of advanced collection details
are: Adjustments, Change Price etc.
Open Order The remaining amount to be collected on the order.
Authorized The amount that has been authorized.
Pre Settled Amount The amount that has been pre-settled.
Invoiced The amount that is owed by the Buyer to the Enterprise.
Collected The amount collected on the transaction.
Pending Execution The amount that is pending authorization.
Status Indicates if the collection is still OPEN, CHECKED or
CLOSED.
Table 101. Customer Account Information Expanded
Fields Description
Payment Type The payment type.
Customer Account # The customer account #.
If encryption is turned on, this field displays asterisks (*) for
all but the last four digits of the Customer Account number,
unless you have the necessary permissions.
Customer PO # The purchase order number placed for the order.
Payment Reference #1 This field can be customized as needed.
If encryption is turned on, this field displays asterisks (*) for
all but the last four digits of the Payment Reference number,
unless you have the necessary permissions.
Payment Reference #2 This field can be customized as needed.
Authorization ID The authorization ID necessary to begin authorization of the
credit card.
Authorization Expiration
Date
The date the payment must be collected by before the amount
has to be manually authorized again.
Pending Execution Amount The amount that is pending authorization.
Authorization Code The authorization code.
Authorization AVS AVS Authorization code.
Authorization Message Authorization message.
88 Sterling Selling and Fulfillment Foundation: Distributed Order Management User Guide
Table 102. Credit Card Information Expanded
Fields Description
Payment Type The payment type i.e. credit card.
Credit Card # The credit card number. This field displays displays asterisks
(*) for all but the last four digits of the Credit Card number.
Expiration Date The expiration date on the credit card. This field may be
encrypted.
Credit Card Type The type of credit card, such as VISA or MasterCard.
Name on Card The name exactly as it appears on the card. This field may be
encrypted.
Authorization ID The authorization ID necessary to begin authorization of the
credit card.
Authorization Expiration
Date
The date the payment must be collected by before the amount
has to be manually authorized again.
Pending Execution Amount The amount that is pending authorization.
Authorization Code The authorization code.
Authorization AVS AVS Authorization code.
Authorization Message Authorization message.
CVV Authorization Code CVV Authorization code.
Table 103. Stored Value Card Information Expanded
Fields Description
Payment Type The payment type i.e. gift card.
Stored Value Card # The stored value card number. This field displays asterisks (*)
for all but the last four digits of the Stored Value Card
number.
Payment Reference #1 This field can be customized as needed. If encryption is
turned on, this field displays asterisks (*) for all but the last
four digits of the Payment Reference number, unless you
have the necessary permissions.
Payment Reference #2 This field can be customized as needed.
Payment Reference #3 This field can be customized as needed.
Authorization ID The authorization ID necessary to begin authorization of the
credit card.
Authorization Expiration
Date
The date the payment must be collected by before the amount
has to be manually authorized again.
Pending Execution Amount The amount that is pending authorization.
Authorization Code The authorization code.
Authorization AVS AVS Authorization code.
Authorization Message Authorization message.
Table 104. Payment Type Information Expanded
Fields Description
Payment Type The payment type i.e. check.
Chapter 10. Order Console Screens 89
Table 104. Payment Type Information Expanded (continued)
Fields Description
Payment Reference #1 This field can be customized as needed. If encryption is
turned on, this field displays asterisks (*) for all but the last
four digits of the Payment Reference number, unless you
have the necessary permissions.
Payment Reference #2 This field can be customized as needed.
Payment Reference #3 This field can be customized as needed.
Authorization ID The authorization ID necessary to begin authorization of the
credit card.
Authorization Expiration
Date
The date the payment must be collected by before the amount
has to be manually authorized again.
Pending Execution Amount The amount that is pending authorization.
Authorization Code The authorization code.
Authorization AVS AVS Authorization code.
Authorization Message Authorization message.
Charge Screen
You can manually enter an amount to be charged with a particular payment type.
Table 105. Charge
Fields Description
Authorization ID Enter the authorization ID for the charge.
Code Enter a code for the charge.
Expiration Date Enter the expiration date for the charge.
Amount Enter the amount being charged.
Authorize Screen
You can manually enter an amount to be authorized with a particular payment
type.
Table 106. Authorize
Fields Description
Authorization ID Enter the authorization ID for the authorization.
Code Enter a code for the authorization.
Expiration Date Enter the expiration date for the authorization.
Amount Enter the amount being authorized.
90 Sterling Selling and Fulfillment Foundation: Distributed Order Management User Guide
Refund Screen
If the payment rule you are using against this order requires authorization, you
can manually refund an amount to be collected with a particular payment type.
Table 107. Refund
Fields Description
Authorization ID Enter the authorization ID for the refund.
Code Enter a code for the refund.
Expiration Date Enter the expiration date for the refund.
Amount Enter the amount being refunded.
Order Line Search By Status Screen
You can search for order lines based on the order line status.
Do not use spaces before or after any text you enter in the search fields, as this
may result in inconsistent or inaccurate results.
Table 108. Order Line Search By Status
Fields Description
Order Number Enter the order number of the order line you are searching
for, if applicable.
Document Type Select the appropriate document type to search for, if
applicable.
Enterprise Choose the field and lookup option to find the specific
Enterprise you want use.
Choose Across Enterprises to search across all Enterprises in
the system.
Note: If you belong to a team, the system only searches
across the Enterprises allowed by that group. For more
information about teams, see the Sterling Selling and
Fulfillment Foundation: Application Platform Configuration Guide.
Buyer Enter the Buyer of the order lines you want to search for, if
applicable.
Seller Enter the Seller of the order lines you want to search for, if
applicable.
Buyer Account Number Enter a Buyer account number to search for order lines of a
draft order containing a particular Buyer account number, if
applicable.
Order Line Status Select the status range of the order lines you want to search
for, if applicable.
Payment Status Select the payment status the order lines you are searching
for are in, if applicable.
Held Orders Select this if the order lines you are searching for are being
held.
Hold Type If you selected Held Orders, select the hold type with which
the orders you are searching for are associated.
Chapter 10. Order Console Screens 91
Table 108. Order Line Search By Status (continued)
Fields Description
Max Records Enter the maximum number of order lines you want returned
from your search.
The Order Line List Screen screen is displayed as a result of this search.
Order Line Search By Item Screen
You can search for order lines based on the available item information.
Do not use spaces before or after any text you enter in the search fields, as this
may result in inconsistent or inaccurate results.
Table 109. Order Line Search By Item
Fields Description
Document Type Select the appropriate document type to search for, if
applicable.
Enterprise Choose the field and lookup option to find the specific
Enterprise you want use.
Choose Across Enterprises to search across all Enterprises in
the system.
Note: If you belong to a team, the system only searches
across the Enterprises allowed by that group. For more
information about teams, see the Sterling Selling and
Fulfillment Foundation: Application Platform Configuration Guide.
Order Number Enter the order number of the order line you are searching
for, if applicable.
Buyer Enter the Buyer of the order lines you want to search for, if
applicable.
Seller Enter the Seller of the order lines you want to search for, if
applicable.
Item ID Enter the item ID to search for order lines containing a
specific item, if applicable.
Product Class Select an item product class to search for order lines
containing an item that has a specific product class, if
applicable.
UOM Select an item unit of measure to search for order lines
containing an item that has a specific unit of measure, if
applicable.
Item Description Enter the item description you want the order lines you are
searching for to be associated with, if applicable.
Customer Item ID Enter the customer's item ID to search for order lines
containing an item that has a specific customer item ID, if
applicable.
Customer PO Number Enter the customer's purchase to search for order lines
containing an item that has a specific customer purchase
order number, if applicable.
Max Records Enter the maximum number of order lines you want returned
from your search.
92 Sterling Selling and Fulfillment Foundation: Distributed Order Management User Guide
The Order Line List Screen screen is displayed as a result of this search.
Order Line Search By Date Screen
You can search for order lines based on the order line creation, shipping dates
information.
Do not use spaces before or after any text you enter in the search fields, as this
may result in inconsistent or inaccurate results.
Table 110. Order Line Search By Date
Fields Description
Document Type Select the appropriate document type to search for, if
applicable.
Enterprise Choose the field and lookup option to find the specific
Enterprise you want use.
Choose Across Enterprises to search across all Enterprises in
the system.
Note: If you belong to a team, the system only searches
across the Enterprises allowed by that group. For more
information about teams, see the Sterling Selling and
Fulfillment Foundation: Application Platform Configuration Guide.
Order Number Enter the order number of the order line you are searching
for, if applicable.
Buyer Enter the Buyer of the order lines you want to search for, if
applicable.
Seller Enter the Seller of the order lines you want to search for, if
applicable.
Buyer Account Number Enter the Buyer's account number with the order lines you
want to search for, if applicable.
Order Date Enter the order date range through which you want to search
for order lines, if applicable.
Requested Ship Date Enter the requested shipping date range through which you
want to search for order lines, if applicable.
Requested Delivery Date Enter the requested delivery date range through which you
want to search for order lines, if applicable.
Max Records Enter the maximum number of order lines you want returned
from your search.
The Order Line List Screen screen is displayed as a result of this search.
Order Line Search By Draft Orders Screen
You can search for order lines which are in the draft status in this screen.
Chapter 10. Order Console Screens 93
Do not use spaces before or after any text you enter in the search fields, as this
may result in inconsistent or inaccurate results.
Table 111. Order Line Search By Draft Orders
Fields Description
Document Type Select the appropriate document type to search for, if
applicable.
Enterprise Choose the field and lookup option to find the specific
Enterprise you want use.
Choose Across Enterprises to search across all Enterprises in
the system.
Note: If you belong to a team, the system only searches
across the Enterprises allowed by that group. For more
information about teams, see the Sterling Selling and
Fulfillment Foundation: Application Platform Configuration Guide.
Order Number Enter the order number of the draft order you are searching
for, if applicable.
Buyer Enter the Buyer of the order lines you want to search for, if
applicable.
Seller Enter the Seller of the order lines you want to search for, if
applicable.
Buyer Account Number Enter a Buyer account number to search for order lines of a
draft order containing a particular Buyer account number, if
applicable.
Max Records Enter the maximum amount of order lines you want returned
from your search.
The Order Line List Screen screen is displayed as a result of this search.
Order Line List Screen
The Order Line List window displays the results of an order line search. You can
perform actions on a single order line or multiple order lines by selecting the check
boxes of the order lines you want to perform an action on and choosing the
applicable action from the action bar.
Table 112. Order Line List
Actions Description
View Details This action takes you to the Order Line Detail Screen screen
where you can view the details for the selected order lines.
View Releases This action takes you to the Order Releases for Order Line
Screen screen where you can view the releases for the order
line.
View Instructions This action lets you view the Order Line Instructions Screen
screen where you can create, modify or delete the order line
instructions.
View Kit Components This action lets you view the Kit Components Screen screen.
View More Addresses This action lets you view the More Order Line Addresses
Screen screen.
View Work Orders This action takes you to the Work Orders Screen screen where
you can view the related work orders.
94 Sterling Selling and Fulfillment Foundation: Distributed Order Management User Guide
Table 112. Order Line List (continued)
View Audits This action takes you to the Order Line Audits Screen screen
where you can view the audits of individual lines.
Unschedule Line This action unschedules the selected order lines.
View Future Availability This action takes you to the View Availability Notes Screen
screen.
Fields
Order # The unique identifier of the order.
Line # The line number of the order. Click this link to view the
Order Line Detail Screen screen.
Item ID The product item's ID.
PC The item's product class.
UOM The item's unit of measure.
Item Description The item's description
Recv Node The destination node name.
Ship Node The shipping node name.
Line Qty The quantity used to measure the service.
Amount The total amount charged for the order line.
Status The status of the order line.
Order Line Detail Screen
Table 113. Order Line Details Screen, Order Line
View Icons Description
Order Releases This icon takes you to the Order Releases for Order Line
Screen screen where you can view the list of order releases
based on the release number, ship node and status.
Instructions This icon lets you view the Order Line Instructions Screen
screen where you can add, modify or delete the instructions
for a order line.
Kit Components This icon takes you to the Kit Components Screen where you
can view the kit components associated with the order line.
Address This icon takes you to the More Order Line Addresses Screen
screen where you can add or modify forwarding address.
Chained Orders This icon lets you view the Viewing an Order Line's Chained
Order Lines screen. For example you can view the Return
Orders created from the order console by clicking this icon.
Additional Attributes This icon takes you to the Item Attributes Screen screen
where you can specify additional attributes for item and
delivery.
Shipment Data Types This icon takes you to the Order Line Dates Screen screen to
view the requested, expected and actual date type for the
given order line.
Inventory Information This icon takes you to the Inventory Information Screen
screen where you can enter the tag identifiers and tag
attributes for the order line.
Chapter 10. Order Console Screens 95
Table 113. Order Line Details Screen, Order Line (continued)
Provided Item This icon takes you to the Associated Service Requests Screen
screen where you can view or cancel the services associated
with this order line.
Work Orders This icon takes you to the Work Orders Screen screen where
you can view the related work orders associated with this
order line.
Audit This icon takes you to the Order Line Audits Screen screen
where you can view the list of audits done for that order line.
Actions
Unschedule Line This action unschedules the order line.
Add Service Requests The action takes you to the Add Service Requests Screen
screen where you can add any service requests associated
with this product line.
Line Availability This action takes you to the Line Availability Screen screen
where you can view the availability of the order line.
View Future Availability This action takes you to the View Availability Notes Screen
screen.
Fields
Order # The unique identifier of the order. Click this link to view the
Order Detail Screen screen.
Item ID The product item's ID. Click this link to view the inventory
details for the item. For more information about screen
reference, see the Sterling Selling and Fulfillment Foundation:
Global Inventory Visibility User Guide.
Description The description of the item.
Receiving Node The destination node of the order line.
Document Type The document type associated with the order line.
Line # The line number of the order line.
Unit of Measure The units of measure in which the order line is calculated.
Ship Node The node from which the order line is carried out.
Line Quantity The quantity used to measure the ordered item.
Product Class The item's product class.
Status The status of the order line. Click this link to view the Order
Line Status Breakup Screen screen.
Requested Delivery Date The date on which the Buyer wants the order to be delivered.
Exchange Type Select the exchange type from the drop-down list. The option
of changing the type of an exchange is only available when
the order is in Draft Order Created status. Once the order is
confirmed, you are not able to edit this field.
Note: This field is only displayed for exchange orders.
Created For Return # The return order number for which the exchange was created.
Click on the hyperlink to see that return order.
Note: This field is only displayed for exchange orders.
Table 114. Order Line Detail Screen, Charges and Taxes
Fields Description
All the fields are tabulated against the overall, open and invoiced prices.
96 Sterling Selling and Fulfillment Foundation: Distributed Order Management User Guide
Table 114. Order Line Detail Screen, Charges and Taxes (continued)
Fields Description
Extended Price The total of quantity multiplied by unit price.
Option Price The price of any additional options associated with the item
ordered.
Discount The discount price applied to the associated line. Click the
hyperlink to view the Overall Order Line Charges Screen,
Remaining Order Line Charges Screen and Modifying an
Order Line Charge.
Charges The total charges applied the associated line. Click the
hyperlink to view the Overall Order Line Charges Screen,
Remaining Order Line Charges Screen and Modifying an
Order Line Charge.
Tax The total taxes applied to the order line. Click the hyperlink
to view the Overall Order Line Taxes Screen, Remaining
Order Line Taxes Screen and Invoiced Order Line Taxes
Screen.
Totals The total amount of the associated line after any charges and
taxes have been applied.
The Ship To and Forward To panels display the shipping and the forwarding
address. For modifying the addresses refer to the ShipTo and the ForwardTo table
descriptions.
Table 115. Order Line Detail Screen, Additional Attributes
Fields Description
Unit Price The price of the line item listed by the Seller.
List Price The price the item is listed at by the manufacturer.
Invoiced Quantity The quantity of the line item that has been invoiced.
Retail Price The selling price at which the item is listed.
Pre-settled Quantity The quantity of the line item that has been pre-settled.
Pre-settlement occurs when any quantity is collected prior to
an order reaching a point in its lifecycle when collections are
actually configured to be made.
Pre-settled Amount The amount for which the line has been pre-settled.
Pre-settlement occurs when any amount is collected prior to
an order reaching a point in its lifecycle when collections are
actually configured to be made.
For example, an order is made for a $100 item. The customer
plans to pay with a $20 gift card and a credit card. Your
organization collects for amounts on an order at the time of
shipment.
In this example, the $20 gift card is accepted as a pre-settled
amount and the additional $80 is collected from the credit
card at the time of shipment. Therefore, anytime in the
order's lifecycle before shipment occurs, this field displays
$20 as the pre-settled amount.
Requested Ship Date The date by which that the order line must be shipped.
Chapter 10. Order Console Screens 97
Table 115. Order Line Detail Screen, Additional Attributes (continued)
Fields Description
Requested Cancel Date The date the order line should be cancelled by if it is not
fulfilled.
Line Type This field can be customized as needed.
Minimum Fill Quantity The quantity of the order line item that must be scheduled
from a single node for the line to begin shipping. For
example, if there are 4 items in the order line and the
Minimum Fill Quantity has been set to 3, the order line can
begin shipping once 3 items have been scheduled to the
order.
Distribution Rule The distribution rule used for ship node determination. For
more information about distribution rules, see the Sterling
Selling and Fulfillment Foundation: Distributed Order
Management Configuration Guide.
Reservation ID If the line is being reserved, an ID for the reservation is
displayed.
Packlist Type The packlist type.
Department Code This field can be customized as needed.
Inventory UOM The unit of measure for which inventory of the item is stored.
Customer PO # The purchase order number given to the Buyer for the order.
Customer PO Line # The purchase order line number given to the Buyer for the
order.
Pricing UOM The unit of measure used to calculate the price of the order.
Shipped Quantity The quantity of this order line that has been shipped.
Received Quantity The quantity of the order line that has been received.
Procure From Node
Lookup
If this is a procurement transfer order, this field indicates the
node from which the procurement order lines are fulfilled.
For more information about procurement transfer orders, see
the Sterling Selling and Fulfillment Foundation: Distributed Order
Management Configuration Guide.
Fulfillment Type The fulfillment type is used to determine if there are any
custom requirements used to determine sourcing locations
associated with this order. For example, you are creating an
order for a special promotion. According to your business
practices, items involved with this promotion are to be
sourced from a particular node called Node 1. To handle this
scenario, a fulfillment type called 'Promotion' has been
defined and a sourcing rule has been configured to source all
orders with a fulfillment type of Promotion from Node 1. For
more information about fulfillment types and sourcing rules,
see the Sterling Selling and Fulfillment Foundation: Distributed
Order Management Configuration Guide.
Gift Check this if the order line is a gift.
Intentional Backorder If this field is set to Y, it means that the order was
intentionally placed into backordered status at order creation.
98 Sterling Selling and Fulfillment Foundation: Distributed Order Management User Guide
Table 116. Order Line Detail Screen, Delivery Attributes
Field Description
Delivery Method The method in which this order line reaches its final
destination:
vDelivery - specialized carrier services, such as piano
movers.
vPickup - hold items for the customer to retrieve.
vShipping - typical carrier services, such as UPS.
Carrier Account # The Carrier organization's account number with your
organization.
Associated Delivery Line
Number
The line number and link to the associated delivery service
order line, if applicable.
Shipping Paid By The organization that pays for shipping the order line.
Carrier/Service The carrier (such as UPS) and service (such as Ground or
Next Day Air) for the order line.
Freight Terms The freight terms used by the carrier.
Order Releases for Order Line Screen
If some or all of the line has been released, you can view a list of releases
including the line.
Table 117. Order Line
Fields Description
Order # The unique identifier of the order. Click this link to view the
Order Detail Screen screen.
Item ID The product item's ID. Click this link to view the inventory
details for the item. For more information about screen
reference, see the Sterling Selling and Fulfillment Foundation:
Global Inventory Visibility User Guide.
Description The description of the item.
Receiving Node The destination node of the order line.
Line # The line number of the order line.
Unit of Measure The units of measure in which the order line is calculated.
Ship Node The node from which the order line is carried out.
Line Quantity The quantity used to measure the ordered item.
Product Class The item's product class.
Status The status of the order line. Click this link to view the Order
Line Status Breakup Screen screen.
Requested Delivery Date The date on which the Buyer wants the order to be delivered.
Exchange Type Select the exchange type from the drop-down list. The option
of changing the type of an exchange is only available when
the order is in Draft Order Created status. Once the order is
confirmed, you are not able to edit this field.
Note: This field is only displayed for exchange orders.
Created For Return # The return order number for which the exchange was created.
Click on the hyperlink to see that return order.
Note: This field is only displayed for exchange orders.
Chapter 10. Order Console Screens 99
Table 118. Order Releases for Order Line Screen, Order Releases
Action Description
View Details This action takes you to the Order Release Details Screen
screen for the selected order lines.
Fields
Release # The line release number. Click this link to view the Order
Release Details Screen screen.
Ship Node The node that is shipping the order release. Click this link to
view the Ship Node Detail screen.
Requested Ship Date The date on which the Buyer wants the order release to be
shipped.
Status The current status of the order release. Click this link to view
the Order Release Status Breakup Screen screen.
Order Line Instructions Screen
You can add special instructions, such as packaging or handling instructions, to a
specific line item.
The order line panel field level descriptions can be referred from Order Line table
descriptions.
Table 119. Instructions Window
Action Description
Delete Instruction This action enables you to delete the selected instructions.
Upon clicking this action, an alert window appears to confirm
the deletion of instructions.
Fields
Instruction Type The type of instruction, such as Gift, Pick, Pack, Ship, or
Other.
Text The specific instructions to be performed on the order.
Specify the instruction URL next to the Instructions URL
icon.
You can also use the Instructions window for:
vAdding an Instruction - Select the Add icon to add the instruction lines and
enter the relevant information in the fields as discussed in the Instructions table.
vModify an Instruction - The information in the Instructions screen can be
modified by entering the modified information and selecting Save.
Once the instructions are added, the Instructions icon appears in the
corresponding order line in the Order Detail Screen screen.
Bundle Components Screen
If the order line item is a bundle, you can view the component items that make up
the bundle.
100 Sterling Selling and Fulfillment Foundation: Distributed Order Management User Guide
See Table 117 on page 99for field values descriptions for the order line panel.
Table 120 provides field value descriptions for the bundle components.
Table 120. Bundles
Fields Description
Kit Code The item's kit code is bundle.
Item ID The bundle item's identifier. Click this link to view the ship
node details. For more information about this screen, see the
Sterling Selling and Fulfillment Foundation: Global Inventory
Visibility User Guide.
PC The bundle item's classification such as first quality, second
quality, or finished good.
UOM The bundle item's unit of measure.
Description A brief description of the bundle item.
Qty Per Kit The quantity of the item per one bundle.
Component Quantity The total quantity of components in the order line.
Kit Components Screen
If the order line item is a kit item. You can view the component items that make
up the kit in the screen.
The order line panel field level descriptions can be referred from Order Line table
descriptions.
Table 121. Kit Components
Fields Description
Kit Code The item's kit code such as physical kit, logical kit or
dynamic physical kit
Item ID The kit item's ID. Click this link to view the ship node
details. For more information about this screen, see the
Sterling Selling and Fulfillment Foundation: Global Inventory
Visibility User Guide.
PC The kit item's classification such as first quality, second
quality, or finished good.
UOM The kit item's unit of measure.
Description A brief description of the kit item.
Qty Per Kit The quantity of the item per one kit.
Component Quantity The total quantity of components in the order line.
More Order Line Addresses Screen
You can view any additional addresses that pertain to a line as per your business
practices. For more information about defining additional address types, see the
Sterling Selling and Fulfillment Foundation: Distributed Order Management
Configuration Guide.
The order line panel field level descriptions can be referred from Order Line table
descriptions.
Chapter 10. Order Console Screens 101

Viewing an Order Line's Chained Order Lines
About this task
The order line panel field level descriptions can be referred from Order Line table
descriptions.
You can create chained orders for order lines and service lines such as provided
service and delivery service. The service lines can be a stand alone or associated
with a product item.
Note: A chained order cannot be created if the service line is included in a work
order.
To view an order line's chained order lines:
Procedure
1. From the navigation bar, select Order.
2. Choose the Order Console. The Order Search window appears.
3. Search for the applicable orders.
4. From the list, select the check boxes of the applicable orders.
5. From the action bar, choose View Details. The Order Detail window appears.
6. From the Order Lines table, select the check boxes of the applicable lines.
7. From the Order Lines action bar, choose View Details. The Order Line Detail
window appears.
8. From the Order action bar, choose the Chained Orders icon. The Related
Orders window displaying any lines the specific line is chained to or derived
from.
Results
If you have a return order line associated with the selected order line the following
table is displayed.
Related Order Lines Screen
The Related Order Lines screen allows you to create chained orders for order lines
and service lines.
Table 122. Related Order Lines Screen, Return Order Lines
Action Description
View Details This action takes you to the Return Line Detail screen for the
selected return order lines. For more information about the
Return Line Detail screen, see the Sterling Selling and
Fulfillment Foundation: Reverse Logistics User Guide.
Fields
Return # The return order number. Click this link to view the Return
Detail Screen. For more information about this screen, see the
Sterling Selling and Fulfillment Foundation: Reverse Logistics User
Guide.
102 Sterling Selling and Fulfillment Foundation: Distributed Order Management User Guide
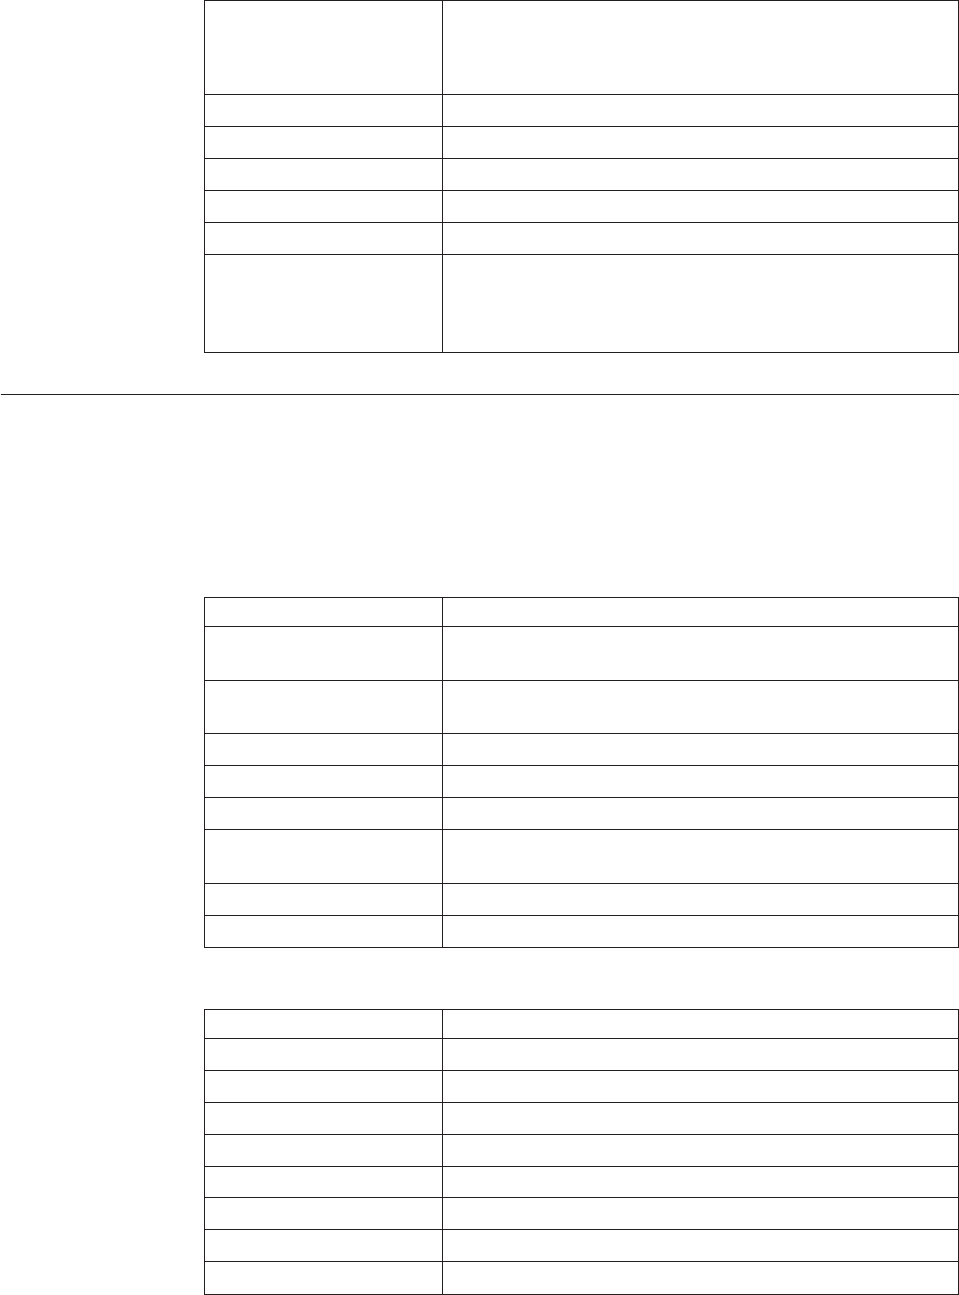
Table 122. Related Order Lines Screen, Return Order Lines (continued)
Line # The return line number. Click this link to view the Return
Line Detail Screen. For more information about this screen,
see the Sterling Selling and Fulfillment Foundation: Reverse
Logistics User Guide.
Date The date the return was created.
Relationship The relationship of this return line with the sales order line.
Reason Code The reason for the return of the item.
Quantity The quantity returned.
Amount The total amount of the return line.
Status The status of the return line. Click this link to view the
Return Line Status Breakup Screen. For more information
about this screen, see the Sterling Selling and Fulfillment
Foundation: Reverse Logistics User Guide.
Item Attributes Screen
You can add item classifications and additional item attributes in this screen.
The order line panel field level descriptions can be referred from Order Line table
descriptions.
Table 123. Item Attributes Screen, Item Attributes
Fields Description
Classifications This panel is described in the Item Attributes Screen,
Classifications table.
Other Attributes This panel is described in the Item Attributes Screen, Other
Attributes table.
Customer Item The customer's item ID.
Customer Item Description The customer's item description.
Manufacturer Item The manufacturer's item ID.
Manufacturer Item
Description
The manufacturer's item description.
Supplier Item The supplier's item ID.
Supplier Item Description The supplier's item description.
Table 124. Item Attributes Screen, Classifications
Fields Description
NMFC Class The NMFC Class.
NMFC Code The NMFC code.
NMFC Description The NMFC description.
ISBN The ISBN number.
Harmonized Code The harmonized code.
Tax Product Code The tax product code.
ECCN No The ECCN number.
Schedule B Code The schedule B code.
Chapter 10. Order Console Screens 103

Table 124. Item Attributes Screen, Classifications (continued)
Fields Description
UPC Code The UPC code.
Table 125. Item Attributes Screen, Other Attributes
Fields Description
Country/Region of Origin The country or region the item is manufactured in.
Import License No The import license number.
Import License Validity The date the import license is valid through.
Product Line The product line.
Manufacturer The item's manufacturer.
Unit Cost The manufacturer's price per unit.
Item Weight The item's weight.
Item Weight UOM The weight unit of measure used for the item.
Enter necessary information in the fields and click Save.
Order Line Dates Screen
You can enter new custom dates for the order line in this screen.
The order line panel field level descriptions can be referred from Order Line table
descriptions.
Table 126. Order Line Dates Screen, New Dates
Field Description
Date Type The custom date type.
Requested The date this date type has been requested to be met.
Expected The date this date type is expected to be met.
Actual The date this date type is to be met.
.
Inventory Information Screen
You can view an order line's segment information in this screen. Also, if the order
line item is tag-controlled, you can view and modify the line item's tag attributes.
For the order line panel field value descriptions, refer to Order Line table
descriptions.
Table 127. Inventory Information Screen, Inventory Information
Fields Description
Segment Type The segment type with which the order line is associated.
Segment The identifier of the segment with which the order line is
associated.
104 Sterling Selling and Fulfillment Foundation: Distributed Order Management User Guide
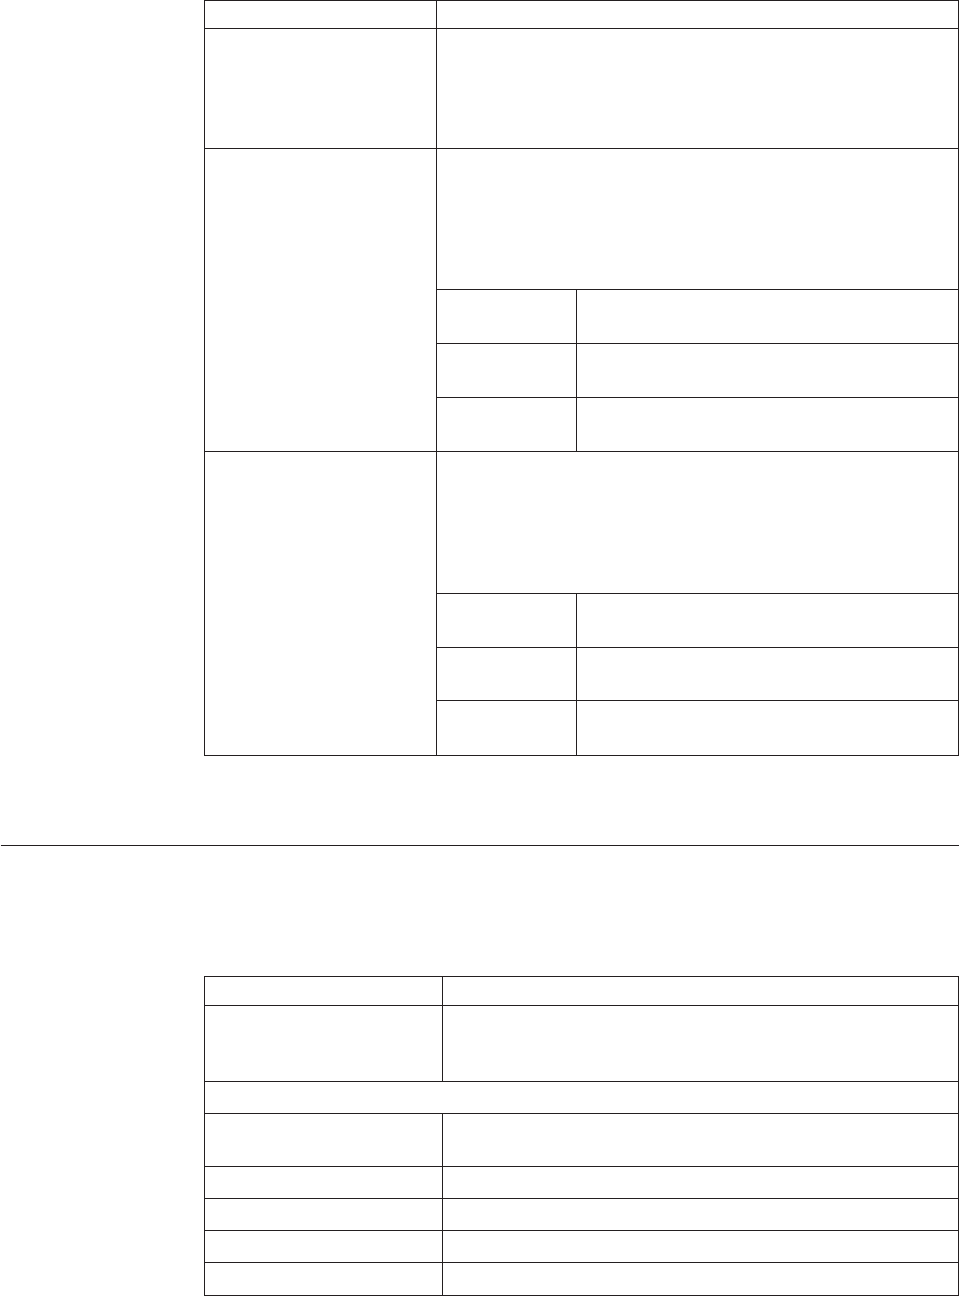
Table 127. Inventory Information Screen, Inventory Information (continued)
Fields Description
Serial # The order line item's serial number.
Note: This field appears only if the item is defined as having
serial numbers tracked in inventory. For more information
about serial-tracked items, see the Catalog Management:
Configuration Guide.
Tag Identifiers Displays the unique tag identifiers you have specified for the
item (for example, Lot #).
Note: This field only appears if the item is defined as being
always or sometimes tag controlled. For more information
about tag-controlled items, see the Sterling Selling and
Fulfillment Foundation: Catalog Management Concepts Guide.
Lot # Enter the Lot number associated with this
tag identifier.
Batch # Enter the Batch number associated with this
tag identifier.
Revision # Enter the Revision number associated with
this tag identifier.
Tag Attributes Displays any descriptive identifiers you have specified (for
example, Manufacture Date).
Note: This field only appears if the item is defined as being
always or sometimes tag-controlled. For more information
about tag-controlled items, see the Sterling Selling and
Fulfillment Foundation: Catalog Management Concepts Guide.
Lot Key
Reference
Enter the Lot key reference associated with
this tag attribute.
Manufacturing
Date
Enter the manufacturing date for this tag
attribute.
Lot Attribute 1 Enter the lot attribute 1 with this tag
attribute.
.
Associated Service Requests Screen
You can view the service items associated with a product item.
Table 128. Associated Service Requests Screen, Order Line
View Icon Description
Add Provided Service Add Service Requests - This icon takes you to the Add
Service Requests Screen screen to add the required service
requests associated with the product line.
Fields
Order # The unique identifier of the order. Click this link to view the
Order Detail Screen screen.
Item ID The product item's ID.
Description The description of the item.
Receiving Node The destination node.
Line # The line number of the service.
Chapter 10. Order Console Screens 105
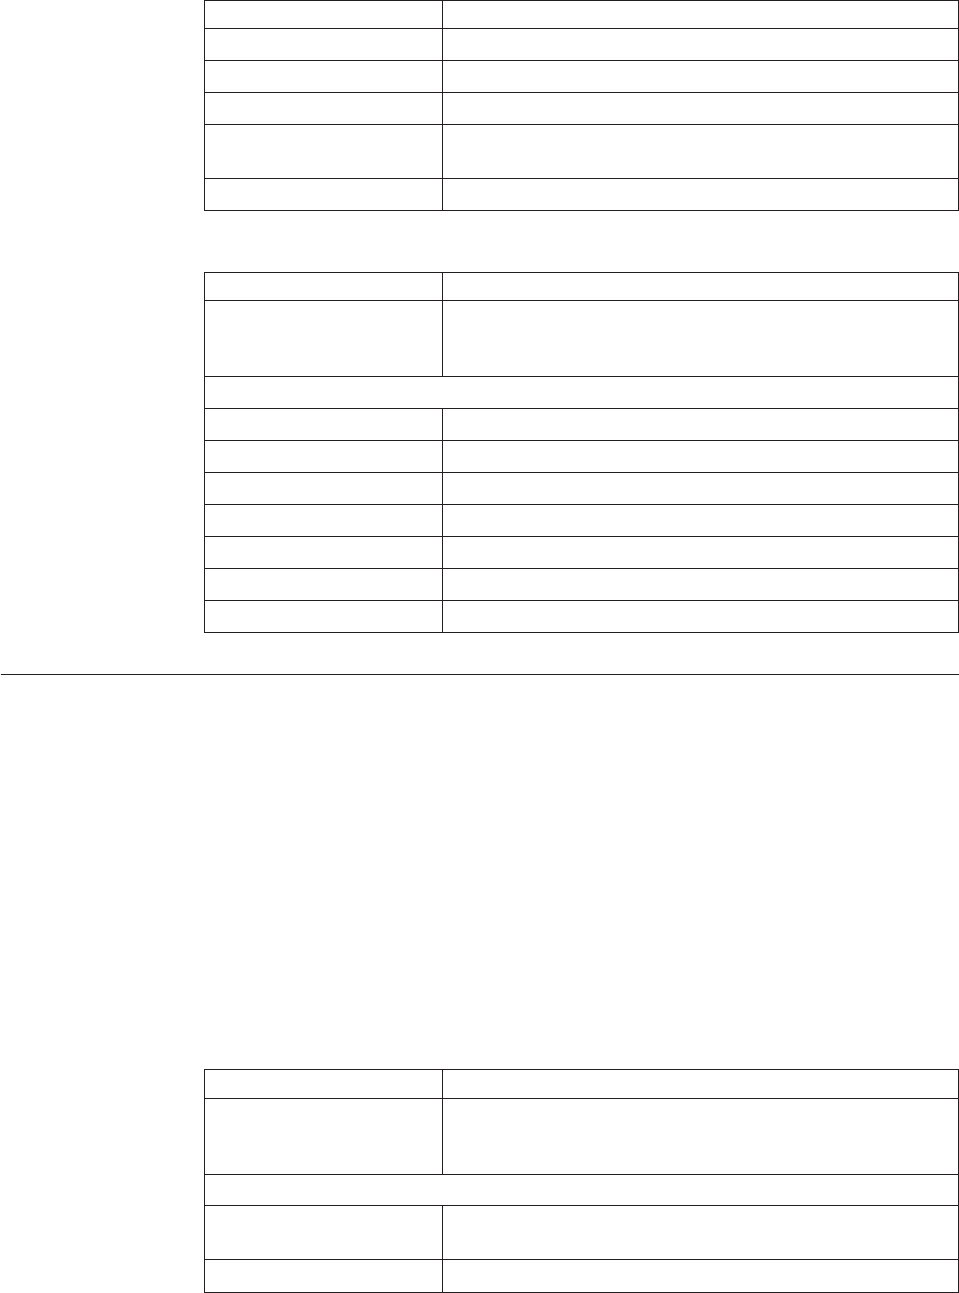
Table 128. Associated Service Requests Screen, Order Line (continued)
Unit of Measure The units of measure in which the service is calculated.
Ship Node The node from which the service is carried out.
Line Quantity The quantity used to measure the service.
Product Class The item's product class.
Status The status of the service request. Click this link to view the
Service Request Status Breakup Screen screen.
Requested Delivery Date The date on which the Buyer wants the order to be delivered.
Table 129. Associated Service Requests Screen, Service Request
Action Description
Cancel This action lets you cancel the selected service requests. Upon
clicking this button a Modification Reason Screen screen pops
up to enter the cancellation reason.
Fields
Line Number The service's line number.
Item ID The service's ID.
Item Description The description of the service.
Appointment The date and time of the service.
Service Offset (Hrs) The number of hours which the service is offset to.
Amount Amount of the service.
Status The current status for the service.
Add Service Requests Screen
Items that require specialized post-delivery handling (for example, installation) can
be associated with a provided service through the Applications Manager. When
you create a service request for an order, a return, you are associating services
(intangible items) with products (tangible items).
Note: Product items with associated service items are indicated by:
Add Provided Service icon - Provided services can be added to this product line.
After you add the first provided service, the icon changes to a Provided Item icon.
Provided Item icon- Additional provided services can be added to this product
line.
Table 130. Add Service Requests Screen, Order Line
View Icon Description
Provided Item View Associated Service - This icon takes you to the
Associated Service Requests Screen screen to view the service
requests associated with the product line.
Fields
Order # The unique identifier of the order. Click this link to view the
Order Detail Screen.
Item ID The product item's ID.
106 Sterling Selling and Fulfillment Foundation: Distributed Order Management User Guide
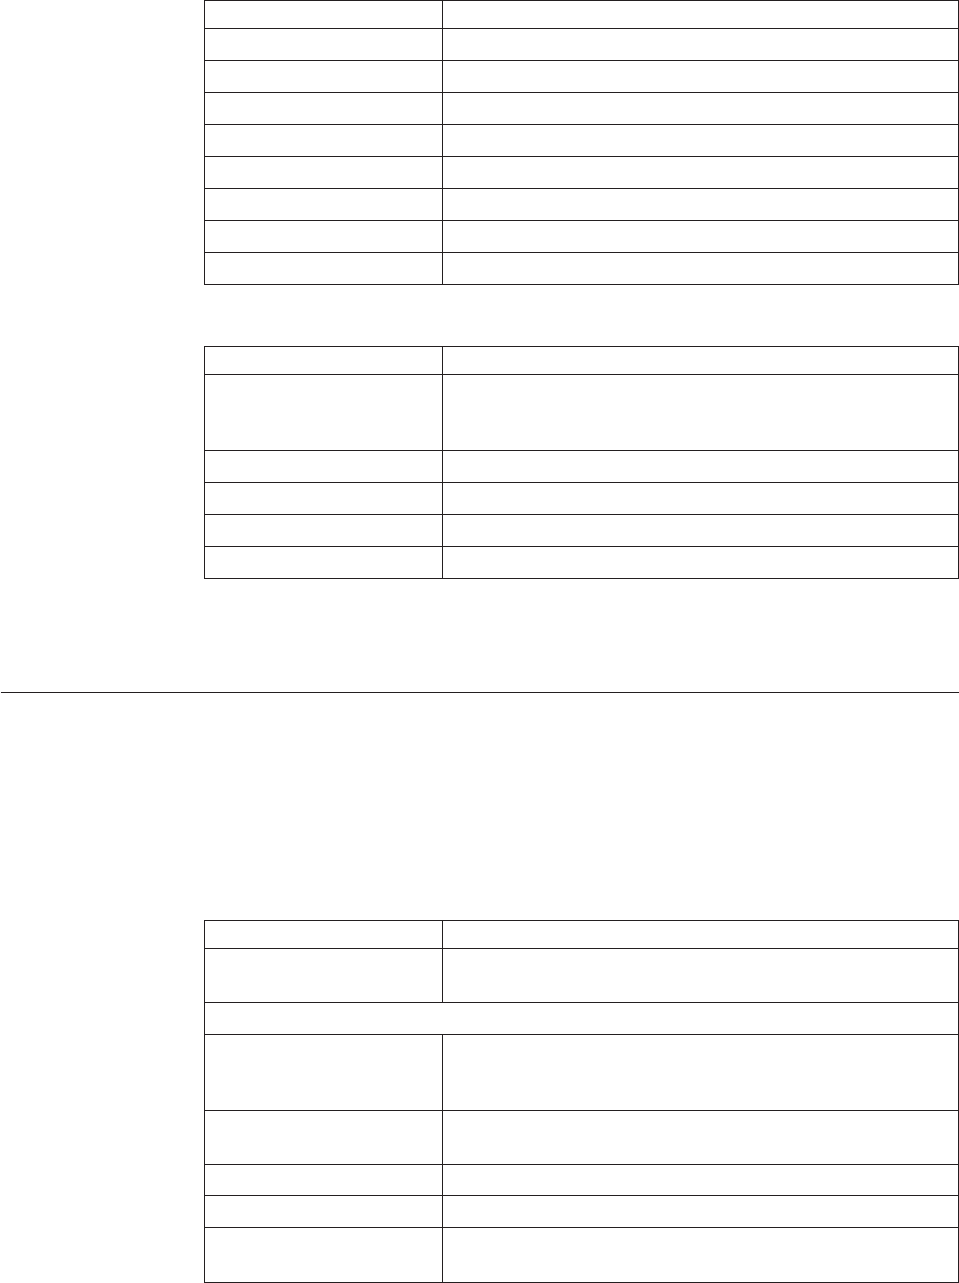
Table 130. Add Service Requests Screen, Order Line (continued)
Description The description of the item.
Receiving Node The destination node.
Line # The line number of the service.
Unit of Measure The units of measure in which the service is calculated.
Ship Node The node from which the service is carried out.
Line Quantity The quantity used to measure the service.
Product Class The item's product class.
Status The status of the service request.
Requested Delivery Date The date on which the Buyer wants the order to be delivered.
Table 131. Add Service Requests Screen, Service Request
Field Description
Options The Options table displays only when a provided service has
any optional services available, such as clean up or old
applicancy removal.
Item ID The service item's ID.
UOM The unit of measure for the service.
Item Description Displays the description of the service.
Price The cost of the service item.
When you add a service, a Service Requests table is added to the Order Detail
screen.
Order Line Audits Screen
You can view audits logged against an Order line. An audit is logged against an
Order line when any type of modification is made to the Order line.
The order line panel field level descriptions can be referred from Order Line table
descriptions.
Table 132. Order Line Audits Screen, Order Line Audits
Action Description
View Details This action takes you to the Order Audit Details Screen
screen for the selected order lines.
Fields
Order Created in Sterling
Selling and Fulfillment
Foundation
The date and time the order was created in our system.
Audit # The audit identification number. Click the audit identification
number to view the Order Audit Details Screen screen.
Date The date and time the modification was carried out.
Modified By The user that performed the modification.
Reason The reason the modification occurred and additional
information explaining the modification entered by the user.
Chapter 10. Order Console Screens 107
Table 132. Order Line Audits Screen, Order Line Audits (continued)
Modification type The type of modification performed.
Line Availability Screen
This screen provides the availability of the product line. It also provides an
expected delivery date along with any constraints that are present in the order.
The order panel field level descriptions can be referred from Order table.
The following table enables you to fine-tune your shipping preferences. Enter the
appropriate search criteria in the following fields and choose the Search button.
Table 133. Line Availability Screen, Order Lines Being Shipped
Action Description
Schedule This action schedules the order line shown in the shipment
panel.
Note: This action ignores any holds that are meant to prevent
schedule from occurring.
Fields
Optimize On vDate - Finds the best options for shipping the product as
early as possible.
vNumber of Shipments - Finds the best options for
minimizing the number of shipments.
Delay Window Enter any delay against the delivery date that can be accepted
for adequate sourcing, if applicable.
Distribution Rule Select the distribution rule you want to use for locating the
ship nodes the line item ID can be sourced from, if
applicable.
SCAC And Service Select the carrier service you want to use, if applicable.
The Order Lines Being Delivered panel displays the shipment information for each
set of items that share the same ship node address and the same delivery address.
The following shipment and delivery information is displayed in the Order Lines
Being Delivered or Order Lines Being Shipped panels.
The shipment and delivery title bar displays the shipment and delivery number
within the set and the date the delivery is expected to be shipped. The icons
placed in the calendar is also explained in the following table:
Table 134. Line Availability Screen, Shipment or Delivery
View Icons Description
Reservations This icon signifies the product availability date.
Shipping Cartons This icon signifies the expected ship date
Shipments This icon signifies the expected delivery date.
Warning Indicator This icon signifies that the line is awaiting procurement
acceptance from a node.
Line Has Constraints This icon specifies that the line has some associated
constraints.
108 Sterling Selling and Fulfillment Foundation: Distributed Order Management User Guide

Table 134. Line Availability Screen, Shipment or Delivery (continued)
Nonworking Day This icon specifies the line's nonworking days.
Fields
Line The order line number. Click this link to view the associated
Order Line Detail Screen screen.
Item ID The item ID of the product or delivery item.
Quantity The line quantity of the ordered item.
Calendar The calendar shows the days the item is available for
shipping or delivery.
The Unscheduleable order lines are represented in the following table if they
cannot be scheduled for any reason.
Table 135. Line Availability Screen. Unscheduleable Order Lines
Fields Description
Line The order line number.
Item ID The item ID of the product or delivery item.
PC The item's product class.
UOM The item's unit of measure.
Quantity To Schedule The line quantity of the ordered item.
Reason The condition that prevents the item from being schedulable.
Create Dependency Screen
You can create a shipping dependency between two or more order lines. A line
dependency indicates whether order lines are shipped together or delivered
together.
Note: You can only create one level of dependency through the user interface.
The order header field descriptions can be referred from the Order table.
Table 136. Create Dependency Screen, Dependent Order Lines
Fields Description
Parent Select the order line to be identified as the parent line. All
other lines in the dependency are dependent on this line. No
shipment or delivery (depending on the dependency type)
can be made for any of the dependent lines until the parent
line is fulfilled according to its minimum fill quantity.
Line The order line number.
Item ID The item ID.
PC The product class.
UOM The order line item's unit of measure.
Description A description of the order line item.
Recv Node The node the order line is received at.
Ship Node The node the order line is shipped from.
Ship Date The date the order line is shipped.
Chapter 10. Order Console Screens 109
Table 136. Create Dependency Screen, Dependent Order Lines (continued)
Fields Description
Line Qty The quantity of the line item.
Note: Entering 0 indicates a quantity of zero. Leaving this
field blank indicates you want to ignore the line.
Amount The cost of the order line.
Status The order line status.
The dependency properties are specified in the following table:
Table 137. Create Dependency Screen, Dependency Properties
Fields Description
Ship Together Select ship together if you want all of the dependent order
lines to be shipped at the same time as the parent order line.
Deliver Together Select Deliver Together if you want all of the dependent order
lines to be delivered at the same time as the parent order line.
Merge Node If you have order lines coming from multiple nodes and want
to consolidate them into one load, enter a node at which you
want all of the dependent order lines to be consolidated with
the parent order line.
Note: Merge Node is only relevant in a Deliver Together
dependency.
Once the details are entered select the Create Dependency button and you are
returned to the Order Detail screen. The parent and child order line now have a
dependency icon before the Line #.
View Dependency Screen
If an order line has dependency on another line, you can view the dependency
details. Select the child or parent dependency icons (Dependent Parent icon,
Dependent Child icon) shown in the order lines panel of the Order Detail Screen
screen to view the dependency details.
The parent order line panel field level definitions can be referred from Order Line
table descriptions.
Table 138. View Dependency Screen, Dependent Order Lines
Action Description
Break Dependency This action breaks the dependency of the selected child order
lines with the parent order line.
Fields
Line The order line number.
Item ID The item ID.
PC The product class.
UOM The order line item's unit of measure.
Description A description of the order line item.
Recv Node The node the order line is received at.
Ship Node The node the order line is shipped from.
110 Sterling Selling and Fulfillment Foundation: Distributed Order Management User Guide

Table 138. View Dependency Screen, Dependent Order Lines (continued)
Ship Date The date the order line is shipped.
Line Qty The quantity of the line item.
Note: Entering 0 indicates a quantity of zero. Leaving this
field blank indicates you want to ignore the line.
Amount The cost of the order line.
Status The order line status.
Dependency Properties The dependency properties that were defined while creating
the dependency can be modified in this screen. Refer to the
"Create Dependency Screen, Dependency Properties" table.
Item Substitution Screen
You can substitute items for an existing order line item. For example, if the
customer has an item on backorder and they would rather get another similar item
instead of waiting, you may substitute the existing order line item with the new
item.
An item must be associated with other items as configured in Catalog Management
in the Applications Manager to perform a substitution. For more information about
configuring item substitutions, see the Sterling Selling and Fulfillment Foundation:
Catalog Management Concepts Guide.
The order line panel field level definitions can be referred from Order Line table
descriptions.
Table 139. Item Substitution Screen, Substitution
Fields Description
Status If you want to substitute only the quantity of a line that is in
a certain status, choose the appropriate status here and
choose the GO button.
Quantity The line quantity of the ordered item.
Quantity To Substitute Enter the quantity of items you want to substitute and choose
the GO button.
Item ID The substitution item's item ID.
PC The substitution item's product class.
UOM The substitution item's unit of measure.
Description A description of the substitution item.
Priority The substitute item's priority.
Associated Qty The quantity that has been configured for the associated item
in the Applications Manager.
Substitution Qty The quantity of the new order line if you choose to substitute
with this item.
Chapter 10. Order Console Screens 111
Add Kit Line Screen
You can add logical kits in this screen. Select Add Logical Kit in the order line
panel of the Order Detail Screen screen.
Table 140. Add Kit Line Screen, Order Line
Fields Description
Order # The order number. Click this link to view the Order Detail
Screen screen.
Item ID Enter the item ID for adding a logical kit.
Unit of Measure Select the unit of measure.
Product Class Select the product class.
Line Quantity Enter the line quantity.
Description Enter the description of the item
Receiving Node Enter the node that is receiving the product.
Ship Node Enter the node that is shipping the product.
Requested Delivery Date Enter the requested delivery date.
Table 141. Add Kit Line Screen, Kit Components
Fields Description
Item ID Enter the items that make up the kit.
PC Select the kit component's product class.
UOM Select the kit component's unit of measure.
Description Enter a brief description of the kit component.
Quantity Enter the quantity of the kit component in the kit.
Overall Order Line Charges Screen
You can view the header level charges of an order line in this screen.
Note: This window displays all order charges and discount charges against the
order header.
The order line header field descriptions can be referred from the Order Line table.
Table 142. Overall Order Line Charges Screen, Charges
Fields Description
Ordered Quantity The quantity of the line item that has been ordered.
Pricing UOM The pricing's unit of measure.
Unit Price The price of the line item.
Extended Price The total of quantity * unit price.
Charge Category The name of the charge category.
Charge Name The name of the charge name.
Charge Amount The amount of the charge that is applied to the header level.
112 Sterling Selling and Fulfillment Foundation: Distributed Order Management User Guide
Overall Order Line Taxes Screen
You can view the header level tax information associated with an order.
The order header field descriptions can be referred from the Order table.
Table 143. Overall Order Line Taxes Screen, Taxes
Fields Description
Ordered Quantity The quantity of the line item that has been ordered.
Pricing UOM The pricing's unit of measure.
Unit Price The price of the line item.
Extended Price The total of quantity * unit price.
Apply to Price Select Apply To Price to create a tax that applies to the unit
price of the line
Note: A line tax can be applied to either a charge or the
price. If you select Apply To Price, charges are not accessible.
Charge Category The charge category with which the tax is associated.
Important: An order header level tax must be associated with
a charge, otherwise it is calculated as 0.
Note: An order header level tax cannot be applied to a price
value.
Charge Name The charge name with which the tax is associated.
Important: An order header level tax must be associated with
a charge, otherwise it is calculated as 0.
Note: An order header level tax cannot be applied to a price
value.
Charge Amount The charge amount that is taxed.
Tax Name The name of the tax. For example, International Tax.
Tax Percentage The percentage of tax that is applied to the header price.
Tax Amount The amount of the tax that is applied to the header level.
Remaining Order Line Charges Screen
You can view specific line level charges details in this screen.
Note: This panel displays all order charges and discount charges against the order
line.
The order line panel field level definitions can be referred from Order Line table
descriptions.
Table 144. Remaining Order Line Charges Screen, Charges
Field Description
Open Quantity The quantity of the line item that has been ordered.
Pricing UOM The pricing's unit of measure.
Unit Price The price of the line item.
Extended Price The total of quantity * unit price.
Chapter 10. Order Console Screens 113
Table 144. Remaining Order Line Charges Screen, Charges (continued)
Field Description
Charge Category The category of the charge. Select the appropriate charge
category for calculating the remaining order line charges.
Charge Name The name of the charge.
Per Unit Enter the amount of the charge applied to an individual line
item.
Per Line Enter the amount of the charge applied to the entire order
line.
Charge Amount The amount of the charge that is applied to the order line
level. This is calculated from the unit price and line price.
You can also use the Remaining Order Line Charges Detail window for:
vAdding Remaining Order Charges - From the Charges table, choose the Add
icon. A new row appears in the Charges table. From the Charge Category
drop-down list, select the category of the new charge.
Note: This drop-down displays all order charges and discount charges. Consult
your system administrator to determine which charges should be used as order
charges and which should be used as discount charges.
Click Save after making changes to the charges panel to update the remaining
order charges. The Modification Reason Screen screen appears, enter the
appropriate reason code and text and click OK.
vModifying Remaining Order Charges - Locate the charges you want to modify.
In the charges panel enter the amount of the charges and click Save. The
Modification Reason Screen screen appears, enter the appropriate reason code
and text and click OK.
Remaining Order Line Taxes Screen
You can add or modify the open order line taxes in this screen.
The order line panel field level definitions can be referred from Order Line table
descriptions.
Table 145. Remaining Order Line Taxes Screen, Taxes
Field Description
Remaining Quantity The quantity of the line item that has been ordered.
Pricing UOM The pricing's unit of measure.
Unit Price The price of the line item.
Extended Price The total of quantity * unit price.
Apply to Price Select Apply To Price to create a tax that applies to the unit
price of the line
Note: A line tax can be applied to either a charge or the
price. If you select Apply To Price, charges are not accessible.
Charge Category The category the tax is associate with, if applicable.
Charge Name The name the tax is associated with, if applicable.
Charge Amount The charge amount that is taxed, if applicable.
Tax Name The name of the tax. For example, International Tax.
114 Sterling Selling and Fulfillment Foundation: Distributed Order Management User Guide

Table 145. Remaining Order Line Taxes Screen, Taxes (continued)
Field Description
Tax Percentage The percentage of tax that is applied to the order line price.
Tax Amount The amount of the tax that is applied to the order line level.
vAdding Remaining Order Taxes - From the Taxes panel, choose the Add icon. A
new row appears in the Taxes panel. From the Charge Category drop-down list,
select the category of the new charge and from Tax category select a new tax
name and enter the relevant information as defined in the table above.
Note: This drop-down displays all order taxes and discount taxes. Consult your
system administrator to determine which charges should be used as order taxes
and which should be used as discount taxes.
Click Save after making changes to the taxes panel to update the remaining
order taxes. The Modification Reason Screen screen appears, enter the
appropriate reason code and text and click OK.
vModifying Remaining Order Taxes - Locate the taxes you want to modify. In
the taxes panel enter the amount of the taxes and click Save. The Modification
Reason Screen screen appears, enter the appropriate reason code and text and
click OK.
Modifying an Order Line Charge
About this task
You can view the invoice level charges of an order line.
If you want to modify a order line charge after the invoice is created, you need to
complete the following steps:
Procedure
1. Check to see if the "Apply Price Change To Invoiced Quantity" is selected in
the sales order financial attributes in the Applications Manager.
2. In the Order Line details, enter the total amount of the charge and not just the
difference.
Results
The above steps are necessary if you want to make modifications after an invoice
has been created for the charges and taxes from the "Order Detail Screen" and the
"Order Line Detail Screen" screens.
The order line header field descriptions can be referred from the Order Line table.
Invoiced Order Line Charges Screen
The Invoiced Order Line Charges screen lets you view the invoice-level charges of
an order line.
Table 146. Invoiced Order Charges Screen, Charges
Fields Description
Invoiced Quantity The quantity of the line item that has been invoiced.
Chapter 10. Order Console Screens 115

Table 146. Invoiced Order Charges Screen, Charges (continued)
Fields Description
Pricing UOM The pricing's unit of measure.
Unit Price The price of the line item.
Extended Price The total of quantity * unit price.
Charge Category The name of the charge category.
Charge Name The name of the charge name.
Charge Amount The amount of the charge that is applied to the header level.
Invoiced Order Line Taxes Screen
You can view the invoice level tax information associated with an order line.
The order line header field descriptions can be referred from the Order Line table.
Table 147. Invoiced Order Taxes Screen, Taxes
Fields Description
Invoiced Quantity The quantity of the line item that has been invoiced.
Pricing UOM The pricing's unit of measure.
Unit Price The price of the line item.
Extended Price The total of quantity * unit price.
Apply to Price Select Apply To Price to create a tax that applies to the unit
price of the line
Note: A line tax can be applied to either a charge or the
price. If you select Apply To Price, charges are not accessible.
Charge Category The charge category with which the tax is associated.
Important: An order header level tax must be associated with
a charge, otherwise it is calculated as 0.
Note: An order header level tax cannot be applied to a price
value.
Charge Name The charge name with which the tax is associated.
Important: An order header level tax must be associated with
a charge, otherwise it is calculated as 0.
Note: An order header level tax cannot be applied to a price
value.
Charge Amount The charge amount that is taxed.
Tax Name The name of the tax. For example, International Tax.
Tax Percentage The percentage of tax that is applied to the header price.
Tax Amount The amount of the tax that is applied to the header level.
Order Line Status Breakup Screen
You can view the order line's breakup by status.
116 Sterling Selling and Fulfillment Foundation: Distributed Order Management User Guide
The order line panel field level descriptions can be referred from Order Line table
descriptions.
Table 148. Order Line Status Breakup
Field Description
Order Line
Order # The order with which the order line is associated.
Line # The order line number.
Line Quantity The quantity of the order line item ordered.
Item ID The item ID.
UOM The line item's unit of measure.
Product Class The item classification such as first quality, second quality, or
finished good.
Description A brief description of the line item.
Status The current status of the order line.
Receiving Node The node that receives the shipped order line.
Ship Node The node that is shipping the order.
Procure From Node The node that the item is being procured from.
Requested Delivery Date The date on which the Buyer wants the order line to be
delivered.
Status Breakup
Release # The line release number.
Ship Node The node that is shipping the order line.
Receiving Node The node that is receiving the order line.
Last Changed On The date the status was last changed.
Status The current status of the order line.
ETS The estimated date the order line is to be shipped.
Quantity The quantity of the order line item ordered.
Tag # If the item is tag controlled and tag details were requested for
the order, the tag number associated with the order line is
displayed.
ETD The estimated time the order line is to be delivered.
Order Release Search By Status Screen
You can search for order releases based on the status in this screen.
Do not use spaces before or after any text you enter in the search fields, as this
may result in inconsistent or inaccurate results.
Table 149. Order Release Search By Status
Fields Description
Document Type Select the appropriate document type to search for, if
applicable.
Chapter 10. Order Console Screens 117

Table 149. Order Release Search By Status (continued)
Fields Description
Enterprise Choose the field and lookup option to find the specific
Enterprise you want use.
Choose Across Enterprises to search across all Enterprises in
the system.
Note: If you belong to a team, the system only searches
across the Enterprises allowed by that group. For more
information about teams, see the Sterling Selling and
Fulfillment Foundation: Application Platform Configuration Guide.
Order Number The order number of the order line you are searching for, if
applicable.
Release Number The order release number of the order release you are
searching for if applicable.
Buyer The Buyer of the order releases you want to search for, if
applicable.
Seller The Seller of the order releases you want to search for, if
applicable.
Ship Node The ship node associated with the order releases you want to
search for, if applicable.
Receiving Node The receiving node associated with the order releases you
want to search for, if applicable.
Product Releases / Service
Releases
Choose whether to search for releases containing the product
items or service items.
Delivery Method Choose the delivery method used to get the product items to
the recipient, if applicable.
Order Release Line Status The status range of the order releases you want to search for,
if applicable.
Max Records The maximum number of order releases you want returned
from your search.
Click on Search after entering the relevant information and the Order Release List
Screen screen is displayed.
Order Release Search By Item Screen
You can search for order releases based on the item information in this screen.
Do not use spaces before or after any text you enter in the search fields, as this
may result in inconsistent or inaccurate results.
Table 150. Order Release Search By Item
Fields Description
Document Type Select the appropriate document type to search for, if
applicable.
118 Sterling Selling and Fulfillment Foundation: Distributed Order Management User Guide
Table 150. Order Release Search By Item (continued)
Fields Description
Enterprise Choose the field and lookup option to find the specific
Enterprise you want use.
Choose Across Enterprises to search across all Enterprises in
the system.
Note: If you belong to a team, the system only searches
across the Enterprises allowed by that group. For more
information about teams, see the Sterling Selling and
Fulfillment Foundation: Application Platform Configuration Guide.
Order Number Enter the order number of the order line you are searching
for, if applicable.
Release Number Enter the order release number of the order release you are
searching for if applicable.
Buyer Enter the Buyer of the order releases you want to search for,
if applicable.
Seller Enter the Seller of the order releases you want to search for, if
applicable.
Ship Node Enter the ship node associated with the order releases you
want to search for, if applicable.
Receiving Node Enter the receiving node associated with the order releases
you want to search for, if applicable.
Product Releases / Service
Releases
Choose whether to search for releases containing the product
items or service items.
Delivery Method Choose the delivery method used to get the product item to
the recipient, if applicable.
Customer PO The customer's purchase order number.
Item ID Enter the item ID to search for order releases containing a
specific item, if applicable.
Product Class Select an item product class to search for order releases
containing an item that has a specific product class, if
applicable.
UOM Select an item unit of measure to search for order releases
containing an item that has a specific unit of measure, if
applicable.
Item Description Enter the item description you want the order releases you
are searching for to be associated with, if applicable.
Customer Item ID Enter the customer's item ID to search for order releases
containing an item that has a specific customer item ID, if
applicable.
Customer PO Number Enter the customer's purchase to search for order releases
containing an item that has a specific customer purchase
order number, if applicable.
Max Records Enter the maximum number of order releases you want
returned from your search.
Click on Search after entering the relevant information and the Order Release List
Screen screen is displayed.
Chapter 10. Order Console Screens 119

Order Release Search By Date Screen
You can search for order releases based on the release dates in this screen.
Do not use spaces before or after any text you enter in the search fields, as this
may result in inconsistent or inaccurate results.
Table 151. Order Release Search By Date
Fields Description
Document Type Select the appropriate document type to search for, if
applicable.
Enterprise Choose the field and lookup option to find the specific
Enterprise you want use.
Choose Across Enterprises to search across all Enterprises in
the system.
Note: If you belong to a team, the system only searches
across the Enterprises allowed by that group. For more
information about teams, see the Sterling Selling and
Fulfillment Foundation: Application Platform Configuration Guide.
Order Number Enter the order number of the order line you are searching
for, if applicable.
Release Number Enter the order release number of the order release you are
searching for if applicable.
Buyer Enter the Buyer of the order releases you want to search for,
if applicable.
Seller Enter the Seller of the order releases you want to search for, if
applicable.
Ship Node Enter the ship node associated with the order releases you
want to search for, if applicable.
Receiving Node Enter the receiving node associated with the order releases
you want to search for, if applicable.
Product Releases / Service
Releases
Choose whether to search for releases containing the product
items or service items.
Delivery Method Choose the delivery method used to get the product item to
the recipient, if applicable.
Order Date Enter the order date range through which you want to search
for order releases, if applicable.
Requested Ship Date Enter the requested ship date range through which you want
to search for order releases, if applicable.
Requested Delivery Date Enter the requested delivery date range through which you
want to search for order releases, if applicable.
Max Records Enter the maximum number of order releases you want
returned from your search.
Click on Search after entering the relevant information and the Order Release List
Screen screen is displayed.
Order Release Search By Logistics Screen
You can search for order releases based on the logistics in this screen.
120 Sterling Selling and Fulfillment Foundation: Distributed Order Management User Guide
Do not use spaces before or after any text you enter in the search fields, as this
may result in inconsistent or inaccurate results.
Table 152. Order Release Search By Logistics
Fields Description
Document Type Select the appropriate document type to search for, if
applicable.
Enterprise Choose the field and lookup option to find the specific
Enterprise you want use.
Choose Across Enterprises to search across all Enterprises in
the system.
Note: If you belong to a team, the system only searches
across the Enterprises allowed by that group. For more
information about teams, see the Sterling Selling and
Fulfillment Foundation: Application Platform Configuration Guide.
Order Number Enter the order number of the order line you are searching
for, if applicable.
Release Number Enter the order release number of the order release you are
searching for if applicable.
Buyer Enter the Buyer of the order releases you want to search for,
if applicable.
Seller Enter the Seller of the order releases you want to search for, if
applicable.
Ship Node Enter the ship node associated with the order releases you
want to search for, if applicable.
Receiving Node Enter the receiving node associated with the order releases
you want to search for, if applicable.
Product Releases / Service
Releases
Choose whether to search for releases containing the product
items or service items.
Delivery Method Choose the delivery method used to get the product item to
the recipient, if applicable.
Carrier Enter the carrier associated with the order releases you want
to search for, if applicable.
Shipping Paid By Select the organization that paid for the shipping of the order
releases you want to search for, if applicable.
Carrier Account Number Enter the carrier account number you want the order releases
to be associated with, if applicable.
Max Records Enter the maximum number of order releases you want
returned from your search.
Click on Search after entering the relevant information and the Order Release List
Screen screen is displayed.
Order Release List Screen
The Order Release List window displays the results of an order release search. You
can perform actions on a single order release or multiple order releases by
selecting the check boxes of the order releases you want to perform an action on
and choosing the applicable action from the action bar.
Chapter 10. Order Console Screens 121

Table 153. Order Release List
Actions Description
View Details This action takes you to the Order Release Details Screen
screen for the selected order releases. You can view the details
of the release, back order items or create shipments in this
screen.
View Shipments This action takes you to the Order Release Shipments Screen
screen where you can view the shipments for the order
releases.
View More Addresses This action takes you to the More Order Release Addresses
Screen screen where you can add or modify the addresses for
releases.
View Notes This action takes you to the Notes Screen screen to add or
modify the notes for the selected releases.
Create Shipment This action lets you create the shipments for selected order
releases.
Fields
Order # The sales order number of the selected release.
Release # The release number. Click this link to view the Order Release
Details Screen screen.
Ship Node The source node the product is shipped from.
Ship To The destination node the product is shipped to.
Expected Delivery Date The expected delivery date of the order release.
Status The status of the order release.
Order Release Details Screen
The order release details screen lets you create shipments, view shipments,
backorder items and view associated addresses and dates.
Table 154. Order Release Details Screen, Order Release
View Icons Description
Shipments Shipments - This icon takes you to the Order Release
Shipments Screen screen where you can view the shipment
details of the order release.
Address More Addresses - This icon takes you to the More Order
Release Addresses Screen screen where you can add or
modify order releases addresses.
Notes Notes - This icon lets you view the Notes Screen screen
where you can add the notes for an order release.
If notes have been added, the Notes Check icon is displayed
instead.
Shipment Data Types Order Release Dates - This icon takes you to the Order Dates
Screen screen to view the requested, expected and actual date
type for the given order.
Actions
Back Order This action lets you backorder the selected order releases.
122 Sterling Selling and Fulfillment Foundation: Distributed Order Management User Guide
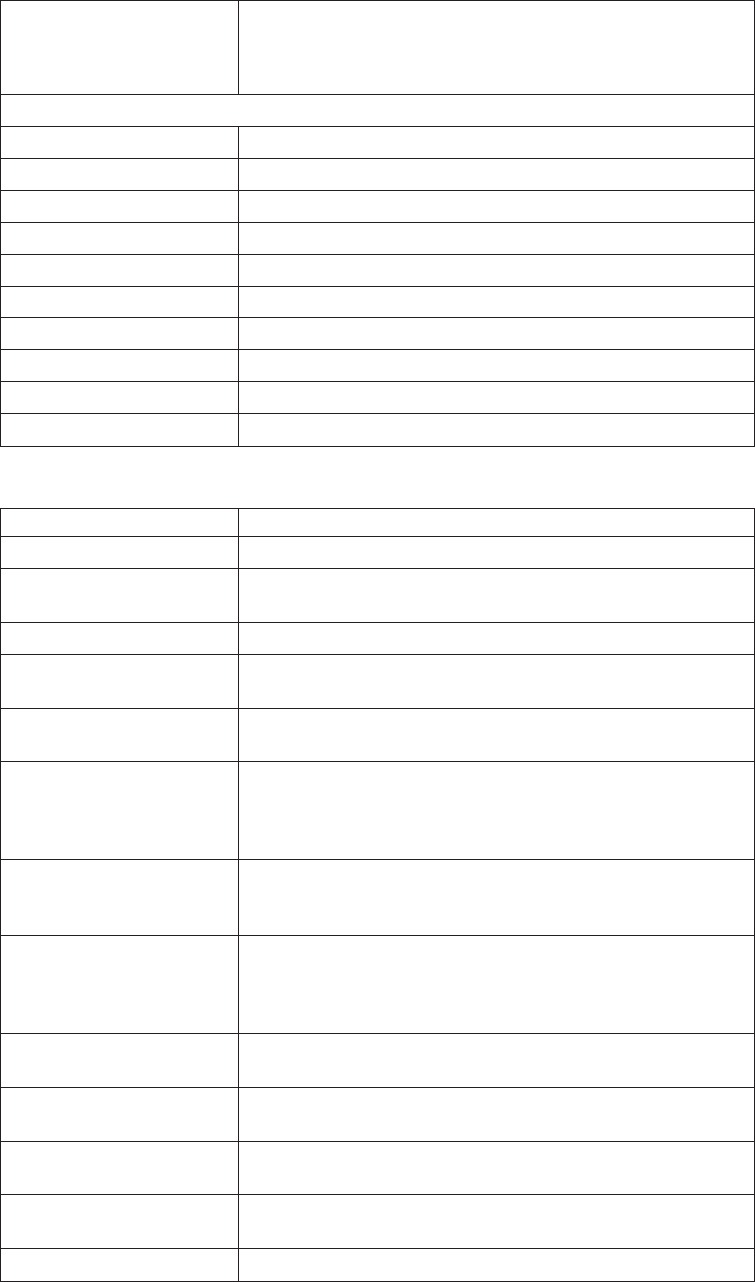
Table 154. Order Release Details Screen, Order Release (continued)
Create Shipment This action lets you create shipments for the order releases.
Upon clicking this action you are taken to the Shipment
Details screen where you can enter the shipment details and
click Save to create the shipment.
Fields
Enterprise The Enterprise associated with the order release.
Buyer The Buyer organization that placed the order.
Seller The Seller organization that is handling the order.
Order # The order that the release belongs to.
Status The current status of the release.
Created On The date the release was created.
Order Type This field can be customized as needed.
Release # The release number.
Ship Advice # The ship advice number.
Document Type The order document type. For example, Sales Order.
Table 155. Order Release Details Screen, Additional Attributes
Fields Description
Ship Node The node the order return has been released to.
Receiving Node The node that receives the shipped order (if release is being
shipped).
Packlist Type The packlist type (if release is being shipped).
Requested Delivery Date The date on which the Buyer wants the order release to be
delivered (if release is being shipped).
Requested Ship Date The date on which the Buyer wants the order release to be
shipped (if release is being shipped).
Ship Together Indicates whether an order line dependency has been created
for the release lines to be shipped together (if release is being
shipped). For more information about order line
dependencies, see Create Dependency Screen screen.
Ship Line Complete Indicates whether or not the entire line must be shipped
together or as items become available (if release is being
shipped).
Merge Node If order lines are coming from multiple nodes and are being
consolidated them into one load, this field displays the node
at which all of the dependent order lines are consolidated
with the parent order line (if release is being shipped).
Carrier/Service The carrier and carrier service used for shipping the order (if
release is being shipped).
Carrier Account # The Carrier organization's account number with your
organization (if release is being shipped).
Shipping Paid By The organization that pays for shipping the order line (if
release is being shipped).
Freight Terms The freight terms used by the carrier (if release is being
shipped).
Gift Indicates if this release line is a gift.
Chapter 10. Order Console Screens 123
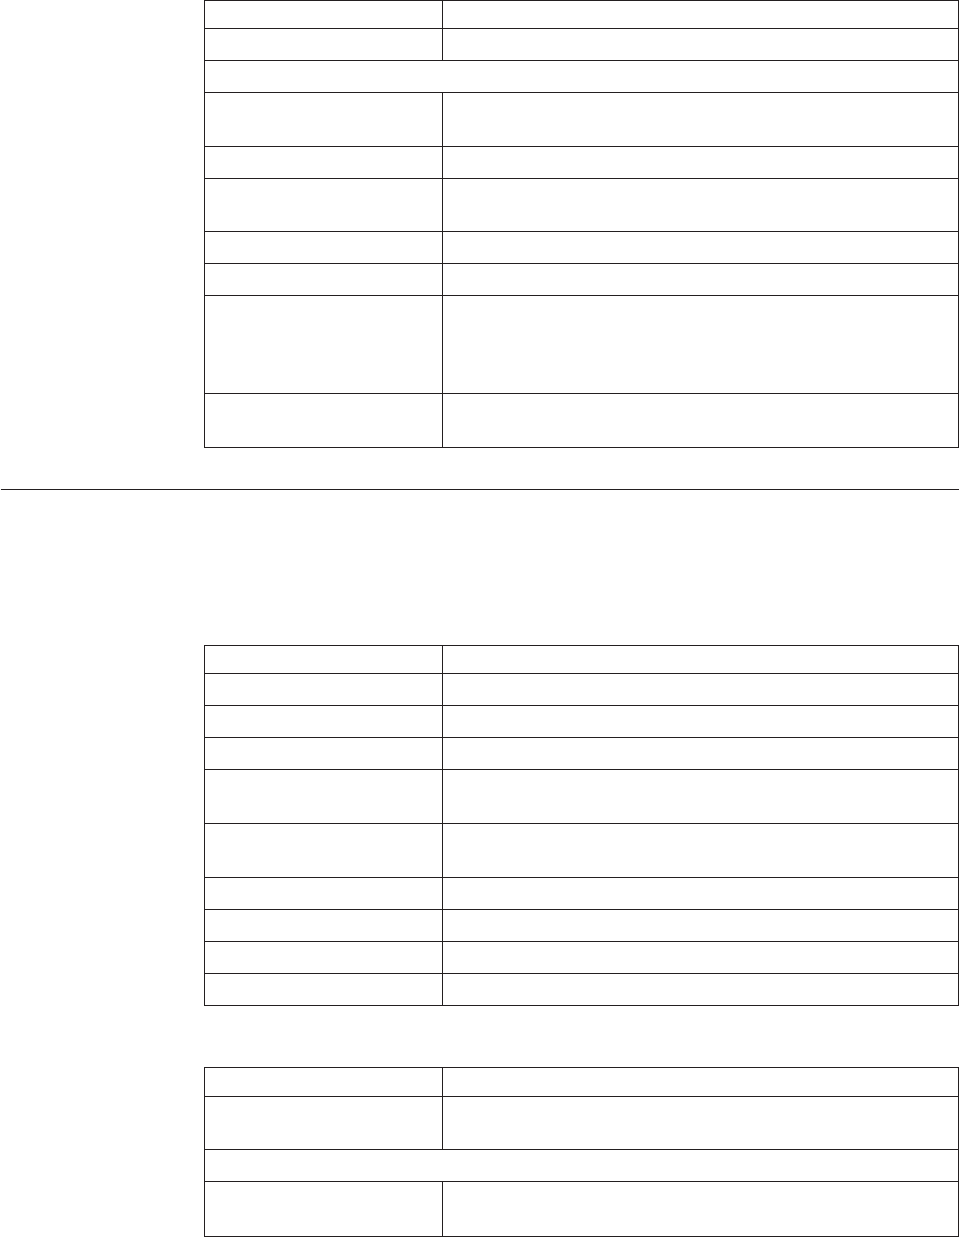
The Ship To panel can be used to edit the shipping addresses. For more
information about the Ship To panel, see Table 13 on page 34.
Table 156. Order Release Details Screen, Order Release Lines
Action Description
View Details This action takes you to the Order Line Detail Screen screen.
Fields
Line The order release line number. Click this link to view the
Order Line Detail Screen screen.
Item ID The item ID.
PC The item classification such as first quality, second quality, or
finished good.
UOM The item's unit of measure.
Description A description of the item.
Line Qty The amount of line items that have not yet been scheduled
and released.
Note: Entering 0 indicates a quantity of zero. Leaving this
field blank indicates you want to ignore the line.
Status The current status of the order line. Click this link to view the
Order Release Line Status Breakup Screen screen.
Order Release Shipments Screen
As soon as any part of a release has shipped, you can view the details of that
shipment.
Table 157. Order Release
Fields Description
Enterprise The Enterprise associated with the order release.
Buyer The Buyer organization that placed the order.
Seller The Seller organization that is handling the order.
Order # The order that the order release belongs to. Click this link to
view the Order Detail Screen screen.
Status The current status of the order release. Click this link to view
the Order Release Status Breakup Screen screen.
Created On The date the order release was created.
Order Type This field can be customized as needed.
Release # The release number.
Ship Advice # The ship advice number.
Table 158. Order Release Shipments Screen, Shipments
Action Description
View Details This action takes you to the Shipment Details screen where
you can view the details of the selected shipments.
Fields
Shipment # The shipment number. Click this link to view the Shipment
Details screen.
124 Sterling Selling and Fulfillment Foundation: Distributed Order Management User Guide
Table 158. Order Release Shipments Screen, Shipments (continued)
Shipper's Ref. # The shipper's reference number.
Expected Ship Date The expected ship date for the order release.
Ship Mode The mode of shipping.
Ship node The node to which the shipment is being shipped.
Recv Node The node receiving the shipment.
Status The status of the shipment.
More Order Release Addresses Screen
About this task
You can view any additional addresses that pertain to a release as per your
business practices. For more information about defining additional address types,
see the Sterling Selling and Fulfillment Foundation: Distributed Order Management
Configuration Guide.
The order release header panel can be referred from the Order Release table.
In this screen locate the address you want to modify and choose the Address
Details icon. The Modify Address window appears. Modify the applicable
information and click OK.
Notes Screen
You can view notes detailing any additional information about a release.
The order release header panel can be referred from the Order Release table.
Table 159. Notes Screen, Notes
Fields Description
Contact Time The time at which this note was added to the work order.
This is defaulted to the creation time of the Notes pop-up
window.
Contact User The user who created this note. This is defaulted to the
logged on user.
Reason Code The reason code for this note.
Contact Type The type of contact information on this note, for example
phone or e-mail.
Contact Reference The contact information on this note. For example, if contact
type is phone, the contact's phone number can be entered
here. If contact type is e-mail, the contact's e-mail address can
be entered.
Add Note The note for this work order.
Chapter 10. Order Console Screens 125

Order Release Dates Screen
You can view any custom dates that have been configured for monitoring. For
more information about monitoring, see the Sterling Selling and Fulfillment
Foundation: Distributed Order Management Configuration Guide.
The order release header panel can be referred from the Order Release table.
Table 160. Order Release Dates
Fields Description
Date Type The custom date type.
Requested The date this date type has been requested to be met.
Expected The date this date type is expected to be met.
Actual The date this date type is to be met.
Backordering an Order Release
You can backorder an order release when there is not enough inventory at your
node to fulfill it. The release remains backordered until inventory becomes
available.
Order Release Status Breakup Screen
You can view a release's breakup by status.
The order release header panel can be referred from the Order Release table.
Table 161. Order Release Status Breakup Screen, Order Release by Status
Fields Description
Line # The order release line number. Click this link to view the
Order Line Detail Screen screen.
Item ID The item ID.
PC The item classification such as first quality, second quality, or
finished good.
UOM The line item's unit of measure.
Ship Node The node that is shipping the order line.
Last Changed On The date the line last had a status change.
Status The current status for that part of the order line.
Quantity The quantity of the line item ordered.
Tag # The batch with which the order line is associated.
Note: This field is only applicable if the item is lot controlled.
ETS The estimated time of shipment.
To modify, enter the quantity you want to change the
estimated time of shipment of in Quantity and the new
estimated time of shipment in ETS.
126 Sterling Selling and Fulfillment Foundation: Distributed Order Management User Guide
Order Release Line Status Breakup Screen
You can view a release's line breakup by status. For more information about the
order release header panel, see Table 157 on page 124.
Table 162. Order Release Line Status Breakup Screen, Release Line Status Breakup
Fields Description
Ship Node The node that is shipping the order line.
Receiving Node The node that is receiving the order line.
Last Changed On The date the line last had a status change.
Status The current status for that part of the order line.
ETD The estimated time of delivery.
Quantity The quantity of the line item ordered.
Tag # The batch with which the order line is associated.
Note: This field is only applicable if the item is lot controlled.
ETS The estimated time of shipment.
To modify, enter the quantity you want to change the
estimated time of shipment of in Quantity and the new
estimated time of shipment in ETS.
Service Request Search By Item Screen
The Provided Service Request Search window enables you to view a list of
provided service request order lines that contain specialized labor requirements,
based on the search criteria that you supply. In this screen you can search for
service requests by item.
Do not use spaces before or after any text you enter in the search fields, as this
may result in inconsistent or inaccurate results.
Table 163. Service Request Search By All Attributes
Fields Description
Organization The organization associated to this order.
Item ID Enter the item ID to search for.
Unit of Measure Enter the unit of measure for the provided service item.
Short Description Enter the short description to search for.
Max Records Enter the maximum number of service requests you want
returned from your search.
Click on Search after entering the relevant information and the Service Item List
Window screen is displayed.
Service Request Search By Draft Orders Screen
The Provided Service Request Search window enables you to view a list of
provided service request order lines that contain specialized labor requirements,
based on the search criteria that you supply. In this screen you can search for
service requests that were made for draft orders.
Chapter 10. Order Console Screens 127

Do not use spaces before or after any text you enter in the search fields, as this
may result in inconsistent or inaccurate results.
Table 164. Service Request Search By Draft Orders
Fields Description
Document Type Select the appropriate document type to search for, if
applicable.
Enterprise Choose the field and lookup option to find the specific
Enterprise you want use.
Choose Across Enterprises to search across all Enterprises in
the system.
Note: If you belong to a team, the system only searches
across the Enterprises allowed by that group. For more
information about teams, see the Sterling Selling and
Fulfillment Foundation: Application Platform Configuration Guide.
Order Number Enter the order number you are searching for, if applicable.
Buyer Enter the Buyer of the service requests you want to search
for, if applicable.
Seller Enter the Seller of the service requests you want to search for,
if applicable.
Buyer Account Number Enter a Buyer account number to search for service requests
of a draft order containing a particular Buyer account
number, if applicable.
Max Records Enter the maximum number of service requests you want
returned from your search.
Click on Search after entering the relevant information and the Service Request
List Window screen is displayed.
Service Item List Window
The Service Item List window displays the results of a provided service item
search. You can perform actions on one or more requests by selecting the check
boxes of the requests you want to perform an action on and choosing the
applicable action from the action bar.
Table 165. Service Item list
Actions Description
Add to Order Select an item from the list and click this action to add the
item to an order. This takes you to the Service Request Details
Screen screen.
Fields
Item ID The provided service item ID.
UOM The unit of measure for the provided service item.
Short Description The short description for the provided service item.
128 Sterling Selling and Fulfillment Foundation: Distributed Order Management User Guide
Service Request List Window
The Service Request List window displays the results of a provided service search.
You can perform actions on one or more requests by selecting the check boxes of
the requests you want to perform an action on and choosing the applicable action
from the action bar.
Table 166. Service Request List
Actions Description
View Details This action takes you to the Service Request Details Screen
screen where you can view the details of the service requests
and the associated order lines for the selected service
requests.
View Instructions This action takes you to the Service Request Instructions
Screen screen where you can enter instructions for the
selected service requests.
More Addresses This action takes you to the More Service Request Addresses
Screen screen where you can add, modify or view additional
addresses for the selected service requests.
Remove This action removes the selected Draft service requests only.
Cancel This action can be used to remove the selected service
requests.
Fields
Order # The sales order associated with the service request.
Line # The line number of the service request in the sales order.
Click this link to view the Service Request Details Screen
screen.
Status The status of the service request.
Enterprise The enterprise owner of the order.
Order Date The date on which the order is placed.
Total Amount The total cost involved for this service request.
Service Request Details Screen
You can view the service request details in this screen.
Table 167. Service Request Details Screen, Service Request
View Icons Description
Work Orders View Work Order - This icon takes you to the Work Order
Details screen where you can view the related work order
associated with this service request.
Instructions Instructions - This icon lets you view the Service Request
Instructions Screen screen where you can add, modify the
instructions for the service request.
Address More Addresses - This icon takes you to the More Service
Request Addresses Screen screen where you can add or
modify address.
Shipment Data Types Service Request Dates - This icon takes you to the Service
Request Dates Screen screen to view the requested, expected
and actual date type for the given request.
Chapter 10. Order Console Screens 129
Table 167. Service Request Details Screen, Service Request (continued)
Chained Orders Related Orders - This icon lets you view the Viewing an
Order Line's Chained Order Lines screen. For example you
can view the Return Orders created from the order console by
clicking this icon.
Additional Attributes Additional Attributes - This icon takes you to the Service
Request Additional Attributes Screen screen where you can
specify additional attributes for fulfillment.
Actions
Cancel Select this action to cancel the service request. It pops up a
Modification Reason Screen screen where you should enter
the reason and code before cancelling the service request.
Fields
Order Number The unique identifier of the order. Click this link to view the
order details.
Item ID The service item's ID.
Description The description of the service.
Appointment The date and time of the service.
Line Number The line number of the service.
UOM The units of measure in which the service is calculated.
Ship Node The node from which this service is carried out.
Status The status of the service request. Click this link to view the
Service Request Status Breakup Screen screen.
Line Quantity The quantity used to measure the service.
If the request is not associated with a product line, you can
edit the quantity by entering a new value and clicking Save.
Document Type The document type associated with the service request.
Table 168. Charges and Taxes
Fields Descripton
All the fields are tabulated against the overall, open and invoiced prices.
Extended Price The total of quantity multiplied by unit price.
Option Price The price of any additional options associated with the item
ordered.
Discount The discount price applied to the associated line. Click the
hyperlink to view the Overall Service Request Charges
Screen, Remaining Service Request Charges Screen and
Invoiced Service Request Charges Screen.
Charges The total charges applied the associated line. Click the
hyperlink to view the Overall Service Request Charges
Screen, Remaining Service Request Charges Screen and
Invoiced Service Request Charges Screen.
Tax The total taxes applied to the order line. Click the hyperlink
to view the Overall Service Request Taxes Screen, Remaining
Service Request Taxes Screen and Invoiced Service Request
Taxes Screen.
Totals The total amount of the associated line after any charges and
taxes have been applied.
130 Sterling Selling and Fulfillment Foundation: Distributed Order Management User Guide
Table 169. Options
Fields Description
The Options table displays only when a provided service has any optional services
available, such as clean up or old appliance removal.
If the request is not associated with a product line, you can add or remove options using
the checkboxes, and clicking Save.
Option ID The option's ID
Description The option's description.
Quantity The quantity of the option.
Price The option's price.
For more information about the shipping address screen, see Table 13 on page 34.
Table 170. Service Request Details Screen, Associated Order Lines
Action Description
View Details This action takes you to the Order Line Detail Screen screen
where you can view the associated order line details.
Fields
Line Number The item's line number. Click this link to view the order
details.
Item ID The order line item's ID.
PC The item classification such as first quality, second quality, or
finished good. Orders are placed for a particular
classification.
UOM The order line item's unit of measure.
Description The order line item's description.
Line Quantity The quantity of the line item ordered.
Total Amount The order line item's total amount.
Status The current status for that part of the order line.
For a request that is not associated with a product line, this panel does not contain
any lines.
Service Request Instructions Screen
You can add instruction to the service request in this screen.
Table 171. Service Request
Fields Description
Order Number The unique identifier of the order. Click this link to view the
Order Detail Screen screen.
Item ID The service item's ID.
Description The description of the service.
Appointment The date and time of the service.
Line Number The line number of the service.
UOM The units of measure in which the service is calculated.
Chapter 10. Order Console Screens 131
Table 171. Service Request (continued)
Fields Description
Ship Node The node from which this service is carried out.
Status The status of the service request. Click this link to view the
Service Request Status Breakup Screen screen.
Line Quantity The quantity used to measure the service.
Document Type The document type associated with the service request.
Table 172. Instructions Window
Action Description
Delete Instruction This action enables you to delete the selected instructions.
Upon clicking this action, an alert window appears to confirm
the deletion of instructions.
Fields
Instruction Type The type of instruction, such as Gift, Pick, Pack, Ship, or
Other.
Text The specific instructions to be performed on the order.
Specify the instruction URL next to the Instructions URL
icon.
You can also use the Instructions window for:
vAdding an Instruction - Select the Add icon to add the instruction lines and
enter the relevant information in the fields as discussed in the Instructions table.
vModify an Instruction - The information in the Order Instructions screen can be
modified by entering the modified information and selecting Save.
Once the instructions are added, the Instructions icon appears in the
corresponding service request line in the Order Detail Screen screen.
More Service Request Addresses Screen
About this task
You can view any additional addresses that pertain to a service request as per your
business practices. For more information about defining additional address types,
see the Sterling Selling and Fulfillment Foundation: Distributed Order Management
Configuration Guide.
The service request header panel can be referred from the Service Request table.
In this screen locate the address you want to modify and choose the Address
Details icon. The Modify Address window appears. Modify the applicable
information and click OK.
Service Request Dates Screen
You can view any custom dates that have been configured for monitoring. For
more information about monitoring, see the Sterling Selling and Fulfillment
Foundation: Distributed Order Management Configuration Guide.
132 Sterling Selling and Fulfillment Foundation: Distributed Order Management User Guide
The service request header field descriptions can be referred from the Service
Request table.
Table 173. Service Request Dates Screen, New Dates
Fields Description
Date Type The custom date type.
Requested The date this date type has been requested to be met.
Expected The date this date type is expected to be met.
Actual The date this date type is to be met.
Service Request Additional Attributes Screen
You can set the fulfillment type for a service request. The fulfillment type is used
to determine if there are any custom requirements used to determine sourcing
locations associated with this order. For example, you are creating an order for a
special free service promotion. According to your business practices, the service
involved with this promotion is to be sourced from a particular node called Node
1. To handle this scenario, a fulfillment type called 'Promotion' has been defined
and a sourcing rule has been configured to source all services with a fulfillment
type of Promotion from Node 1. For more information about fulfillment types and
sourcing rules, see the Sterling Selling and Fulfillment Foundation: Distributed Order
Management Configuration Guide.
The service request header panel descriptions can be referred from Service Request
table.
Table 174. Additional Attributes
Field Description
Fulfillment Type Select the fulfillment type associated with this service request.
Service Request Status Breakup Screen
The status breakup enables you to view the status of a service request.
The service request header panel descriptions can be referred from Service Request
table.
Table 175. Service Request Status Breakup Screen, Status Breakup
Fields Description
Release # The order line release number, if the order has been released
to a node.
Ship Node The node that performs the service request.
Last Changed On The date the line last had a status change.
Status The current status for that part of the service request.
Quantity The quantity of the service request.
Chapter 10. Order Console Screens 133
Overall Service Request Charges Screen
You can view the header level charges of a service request in this screen.
The service request header panel descriptions can be referred from the Service
Request table.
Table 176. Overall Service Request Charges Screen, Charges
Fields Description
Charge Category The name of the charge category.
Charge Name The name of the charge name.
Charge Amount The amount of the charge that is applied to the header level.
Overall Service Request Taxes Screen
You can view the header level tax information associated with a service request.
The service request header panel descriptions can be referred from the Service
Request table.
Table 177. Overall Service Request Taxes Screen, Taxes
Fields Description
Charge Category The charge category with which the tax is associated.
Important: A service request header level tax must be
associated with a charge, otherwise it is calculated as 0.
Note: A service request header level tax cannot be applied to
a price value.
Charge Name The charge name with which the tax is associated.
Important: A service request header level tax must be
associated with a charge, otherwise it is calculated as 0.
Note: A service request header level tax cannot be applied to
a price value.
Charge Amount The charge amount that is taxed.
Tax Name The name of the tax. For example, International Tax.
Tax Percentage The percentage of tax that is applied to the header price.
Tax Amount The amount of the tax that is applied to the header level.
Remaining Service Request Charges Screen
You can use the Remaining Service Request Charges Detail window for adding or
modifying the service request charges.
The service request header panel descriptions can be referred from the Service
Request table.
vAdding Remaining Service Request Charges - From the Charges table, choose
the Add icon. A new row appears in the Charges table. From the Charge
Category drop-down list, select the category of the new charge.
134 Sterling Selling and Fulfillment Foundation: Distributed Order Management User Guide
Note: This drop-down displays all service request charges and discount charges.
Consult your system administrator to determine which charges should be used
as service request charges and which should be used as discount charges.
Table 178. Remaining Service Request Charges Screen, Charges
Fields Description
Charge Category The name of the charge category. Select an option from the
drop-down menu.
Charge Name The name of the charge name. Once the charge category is
selected, this field is populated by a drop-down menu. Select
the appropriate charge name.
Charge Amount The amount of the charge that is applied to the header level.
Click Save after making changes to the charges panel to update the remaining
service request charges. The Modification Reason Screen screen appears, enter
the appropriate reason code and text and click OK.
vModifying Remaining Service Request Charges - Locate the charges you want
to modify. In the charges panel enter the amount of the charges and click Save.
The Modification Reason Screen screen appears, enter the appropriate reason
code and text and click OK.
Remaining Service Request Taxes Screen
You can use the Remaining Service Request Taxes window for adding or
modifying the order taxes.
The service request header panel descriptions can be referred from the Service
Request table.
vAdding Remaining Service Request Taxes - From the Taxes panel, choose the
Add icon. A new row appears in the Taxes panel. From the Charge Category
drop-down list, select the category of the new charge and from Tax category
select a new tax name and enter the relevant information as defined in the
following table.
Note: This drop-down displays all service request taxes and discount taxes.
Consult your system administrator to determine which charges should be used
as service request taxes and which should be used as discount taxes.
Table 179. Remaining Service Request Taxes Screen, Taxes
Fields Description
Charge Category The name of the charge category. Select an option from the
drop-down menu.
Charge Name The name of the charge name. Once the charge category is
selected, this field is populated by a drop-down menu. Select
the appropriate charge name.
Charge Amount The amount of the charge that is applied to the header level.
Tax Name The name of the tax. For example, International Tax.
Tax Percentage The percentage of tax that is applied to the header price.
Tax Amount The amount of the tax that is applied to the header level.
Chapter 10. Order Console Screens 135
Click Save after making changes to the taxes panel to update the remaining
order taxes. The Modification Reason Screen screen appears, enter the
appropriate reason code and text and click OK.
vModifying Remaining Service Request Taxes - Locate the taxes you want to
modify. In the taxes panel enter the amount of the taxes and click Save. The
Modification Reason Screen screen appears, enter the appropriate reason code
and text and click OK.
Invoiced Service Request Charges Screen
You can view the invoice level charges of an service request in this screen.
Note: This window displays all service request charges and discount charges
against the service request header.
Order
The service request header panel descriptions can be referred from the Service
Request table. If you view the invoiced service request charges screen from the
Order Invoices Screen screen the service request header panel is replaced with the
fields described in the Invoice table.
Table 180. Invoiced Service Request Charges Screen, Charges
Fields Description
Charge Category The name of the charge category.
Charge Name The name of the charge name.
Charge Amount The amount of the charge that is applied to the header level.
Invoiced Service Request Taxes Screen
You can view the invoice level tax information associated with an service request
in this screen.
The service request header panel descriptions can be referred from the Service
Request table. If you view the invoiced service request taxes screen from the Order
Invoices Screen screen the service request header panel is replaced with the fields
described in the Invoice table.
Table 181. Invoiced Service Request Taxes Screen, Taxes
Fields Description
Charge Category The charge category with which the tax is associated.
Important: An service requestservice request header level tax
must be associated with a charge, otherwise it is calculated as
0.
Note: An service request header level tax cannot be applied
to a price value.
Charge Name The charge name with which the tax is associated.
Important: An service request header level tax must be
associated with a charge, otherwise it is calculated as 0.
Note: An service request header level tax cannot be applied
to a price value.
136 Sterling Selling and Fulfillment Foundation: Distributed Order Management User Guide
Table 181. Invoiced Service Request Taxes Screen, Taxes (continued)
Fields Description
Charge Amount The charge amount that is taxed.
Tax Name The name of the tax. For example, International Tax.
Tax Percentage The percentage of tax that is applied to the header price.
Tax Amount The amount of the tax that is applied to the header level.
Delivery Request Search By All Attributes Screen
The Delivery Request Search window enables you to view a list of delivery request
order lines, based on the search criteria that you supply. In this screen you can
search for delivery requests by all attributes.
Do not use spaces before or after any text you enter in the search fields, as this
may result in inconsistent or inaccurate results.
Table 182. Delivery Request Search By All Attributes
Fields Description
Document Type Select the appropriate document type to search.
Enterprise
Choose the field and lookup option to find the specific
Enterprise you want use.
Choose Across Enterprises to search across all Enterprises in
the system.
Note: If you belong to a team, the system only searches
across the Enterprises allowed by that group. For more
information about teams, see the Sterling Selling and
Fulfillment Foundation: Application Platform Configuration Guide.
Order Number Enter the order number you are searching for, if applicable.
Buyer
Enter the Buyer of the delivery requests you want to search
for, if applicable.
Seller
Enter the Seller of the delivery requests you want to search
for, if applicable.
Item ID
Enter the item ID to search for orders containing a specific
delivery service item, if applicable.
Appointment
Enter the appointment date range through which you want
to search for service requests, if applicable.
Max Records Enter the maximum number of delivery requests you want
returned from your search.
Click on Search after entering the relevant information and the Delivery Request
List Screen screen is displayed.
Delivery Request Search By Draft Orders Screen
The Delivery Request Search window enables you to view a list of delivery request
order lines, based on the search criteria that you supply. In this screen you can
search for delivery requests by draft orders.
Chapter 10. Order Console Screens 137
Do not use spaces before or after any text you enter in the search fields, as this
may result in inconsistent or inaccurate results.
Table 183. Delivery Request Search By Draft Orders
Fields Description
Document Type
Select the appropriate document type to search for, if
applicable.
Enterprise
Choose the field and lookup option to find the specific
Enterprise you want use.
Choose Across Enterprises to search across all Enterprises in
the system.
Note: If you belong to a team, the system only searches
across the Enterprises allowed by that group. For more
information about teams, see the Sterling Selling and
Fulfillment Foundation: Application Platform Configuration Guide.
Order Number Enter the order number you are searching for, if applicable.
Buyer
Enter the Buyer of the delivery requests you want to search
for, if applicable.
Seller
Enter the Seller of the delivery requests you want to search
for, if applicable.
Buyer Account Number
Enter a Buyer account number to search for delivery
requests on draft orders containing a particular Buyer
account number, if applicable.
Max Records Enter the maximum number of delivery requests you want
returned from your search.
Click on Search after entering the relevant information and the Delivery Request
List Screen screen is displayed.
Delivery Request List Screen
The Delivery Request List window displays the results of a provided service
search. You can perform actions on one or more requests by selecting the check
boxes of the requests you want to perform an action on and choosing the
applicable action from the action bar.
Table 184. Delivery Request List
Actions Description
View Details This action takes you to the Delivery Request Details Screen
screen where you can view the details of the requests and the
associated order lines for the selected delivery requests.
View Instructions This action takes you to the Delivery Request Instructions
Screen screen where you can enter instructions for the
selected delivery requests.
More Addresses This action takes you to the More Delivery Request Addresses
Screen screen where you can add, modify or view additional
addresses for the selected delivery requests.
Add Line This action lets you add a product delivery to the request. For
more information refer to Additional Product Lines Screen.
Remove Line This action removes the selected Draft delivery requests only.
138 Sterling Selling and Fulfillment Foundation: Distributed Order Management User Guide
Table 184. Delivery Request List (continued)
Cancel This action can be used to remove the selected delivery
requests.
Fields
Order # The sales order associated with the delivery request.
Line # The line number of the delivery request in the sales order.
Click this link to view the Delivery Request Details Screen
screen.
Status The status of the delivery request.
Enterprise The enterprise owner of the order.
Appointment This field provides the appointment date and time of the
delivery request.
Total Amount The total cost involved for this delivery request.
Delivery Request Details Screen
The Delivery Request details screen displays all product items associated with a
specific delivery request.
Table 185. Delivery Request Details Screen, Delivery Request
View Icons Description
Work Orders View Work Order - This icon takes you to the Work Order
Details screen where you can view the related work order
associated with this delivery request.
Instructions Instructions - This icon lets you view the Delivery Request
Instructions Screen screen where you can add, modify the
instructions for the delivery request.
Address More Addresses - This icon takes you to the More Delivery
Request Addresses Screen screen where you can add or
modify addresses.
Shipment Data Types Delivery Request Dates - This icon takes you to the Delivery
Request Dates Screen screen to view the requested, expected
and actual date type for the given request.
Chained Orders Related Order Lines- This icon lets you view the Viewing an
Order Line's Chained Order Lines screen. For example you
can view the Return Orders created from the order console by
clicking this icon.
Additional Attributes Additional Attributes - This icon takes you to the Delivery
Request Additional Attributes Screen screen where you can
specify additional attributes for fulfillment.
Actions
Cancel Select this action to cancel the delivery request. It pops up a
Modification Reason screen where you should enter the
reason and code before cancelling the delivery request.
Add Line This action takes you to the Additional Product Lines Screen
screen where you can add any product lines to the delivery
request.
Fields
Order Number The unique identifier of the order. Click this link to view the
Order Detail Screen screen.
Chapter 10. Order Console Screens 139
Table 185. Delivery Request Details Screen, Delivery Request (continued)
Item ID The delivery service item's ID.
Description The description of the delivery service.
Appointment The date and time of the delivery.
Line Number The line number of the delivery service.
UOM The units of measure in which the delivery service is
calculated.
Ship Node The node that carries out the delivery.
Status The status of the delivery request.
Line Quantity The quantity used to measure the delivery service.
If the delivery request is not associated with a product line,
you can edit the quantity by entering a new value and
clicking Save.
Document Type The document type associated with the delivery request.
Table 186. Charges and Taxes
Fields Description
All the fields are tabulated against the overall, open and invoiced prices.
Extended Price The total of quantity multiplied by unit price.
Option Price The price of any additional options associated with the item
ordered.
Discount The discount price applied to the associated line. Click the
hyperlink to view the Overall Delivery Request Charges
Screem, Remaining Delivery Request Charges Screen and
Invoiced Delivery Request Charges Screen.
Charges The total charges applied to the associated line. Click the
hyperlink to view the Overall Delivery Request Charges
Screem, Remaining Delivery Request Charges Screen and
Invoiced Delivery Request Charges Screen.
Tax The total taxes applied to the order line. Click the hyperlink
to view the Overall Delivery Request Taxes Screen,
Remaining Delivery Request Taxes Screen and Invoiced
Delivery Request Taxes Screen.
Totals The total amount of the associated line after any charges and
taxes have been applied.
Table 187. Options
Fields Description
The Options table displays only when a delivery service has any optional services
available, such as clean up or old appliance removal.
If the delivery request is not associated with a product line, you can add or remove
options using the checkboxes, and clicking Save.
Option ID The option's ID
Description The option's description.
Quantity The quantity of the option.
Price The option's price.
140 Sterling Selling and Fulfillment Foundation: Distributed Order Management User Guide
For more information about viewing the shipping address details, see Table 13 on
page 34.
Table 188. Delivery Request Detail Screen, Associated Lines
Action Description
Remove Association This action pops up the Modification Reason Screen screen to
enter the relevant reason and code before removing the
association with the order line.
Fields
Line Number The delivery item's line number. Click this link to view the
Order Line Detail Screen screen.
Item ID The order line item ID.
PC The item classification such as first quality, second quality, or
finished good. Orders are placed for a particular
classification.
UOM The order line item's unit of measure.
Description The order line item's description.
Line Quantity The quantity of the line item ordered.
Total Amount The order line item's total amount.
Status The current status for that part of the order line.
For a delivery request that is not associated with a product line, this panel does
not contain any lines.
Additional Product Lines Screen
You can add additional product lines to an existing delivery service request.
Table 189. Delivery Request
Fields Description
Order Number The unique identifier of the order. Click this link to view the
Order Detail Screen screen.
Item ID The delivery service item's ID.
Description The description of the delivery service.
Appointment The date and time of the delivery.
Line Number The line number of the delivery service.
UOM The units of measure in which the delivery service is
calculated.
Ship Node The node that carries out the delivery.
Status The status of the delivery request.
Line Quantity The quantity used to measure the delivery service.
Document Type The document type associated with the delivery request.
Table 190. Additional Product Lines Screen, Order Lines
Action Description
Chapter 10. Order Console Screens 141
Table 190. Additional Product Lines Screen, Order Lines (continued)
Add To Delivery Request This action lets you add the selected order lines to the
delivery request. A Modification Reason Screen window pops
up to confirm the reason code.
Fields
Line Number The product line's line number.
Item ID The product line's item ID.
UOM The product line's unit of measure.
Description The product line's description.
Delivery Request Instructions Screen
You can add instructions to a delivery request in this screen.
The delivery request header field descriptions can be referred from the Delivery
Request table descriptions.
Table 191. Instructions Window
Action Description
Delete Instruction This action enables you to delete the selected instructions.
Upon clicking this action, an alert window appears to confirm
the deletion of instructions.
Fields
Instruction Type The type of instruction, such as Gift, Pick, Pack, Ship, or
Other.
Text The specific instructions to be performed on the order.
Specify the instruction URL next to the Instructions URL
icon.
You can also use the Instructions window for:
vAdding an Instruction - Select the Add icon to add the instruction lines and
enter the relevant information in the fields as discussed in the Instructions table.
vModify an Instruction - The information in the Instructions screen can be
modified by entering the modified information and selecting Save.
Once the instructions are added, the Instructions icon appears in the
corresponding delivery request line in the Order Detail Screen screen.
More Delivery Request Addresses Screen
About this task
You can view any additional addresses that pertain to a delivery request as per
your business practices. For more information about defining additional address
types, see the Sterling Selling and Fulfillment Foundation: Distributed Order
Management Configuration Guide.
The delivery request header panel can be referred from the Delivery Request table.
142 Sterling Selling and Fulfillment Foundation: Distributed Order Management User Guide
In this screen locate the address you want to modify and choose the Address
Details icon. The Modify Address window appears. Modify the applicable
information and click OK.
Delivery Request Dates Screen
You can view any custom dates that have been configured for monitoring. For
more information about monitoring, see the Sterling Selling and Fulfillment
Foundation: Distributed Order Management Configuration Guide.
The delivery request header field descriptions can be referred from the Delivery
Request table.
Table 192. Delivery Request Dates Screen, New Date
Fields Description
Date Type The custom date type.
Requested The date this date type has been requested to be met.
Expected The date this date type is expected to be met.
Actual The date this date type is to be met.
Delivery Request Additional Attributes Screen
You can set the fulfillment type for a delivery request. The fulfillment type is used
to determine if there are any custom requirements used to determine sourcing
locations associated with this order. For example, you are creating an order for a
special free delivery promotion. According to your business practices, the delivery
service involved with this promotion is to be sourced from a particular node called
Node 1. To handle this scenario, a fulfillment type called 'Promotion' has been
defined and a sourcing rule has been configured to source all delivery services
with a fulfillment type of Promotion from Node 1. For more information about
fulfillment types and sourcing rules, see the Sterling Selling and Fulfillment
Foundation: Distributed Order Management Configuration Guide.
The delivery request header field descriptions can be referred from the Delivery
Request table descriptions.
Table 193. Additional Attributes
Field Description
Fulfillment Type Select the fulfillment type associated with this delivery
request.
\
Overall Delivery Request Charges Screen
You can view the header level charges of a delivery request in this screen.
Chapter 10. Order Console Screens 143

The delivery request header panel descriptions can be referred from the Delivery
Request table.
Table 194. Overall Delivery Request Charges Screen, Charges
Fields Description
Charge Category The name of the charge category.
Charge Name The name of the charge name.
Charge Amount The amount of the charge that is applied to the header level.
Overall Delivery Request Taxes Screen
You can view the header level tax information associated with a delivery request.
The delivery request header panel descriptions can be referred from the Delivery
Request table.
Table 195. Overall delivery request Taxes Screen, Taxes
Fields Description
Charge Category The charge category with which the tax is associated.
Important: A delivery request header level tax must be
associated with a charge, otherwise it is calculated as 0.
Note: A delivery request header level tax cannot be applied
to a price value.
Charge Name The charge name with which the tax is associated.
Important: A delivery request header level tax must be
associated with a charge, otherwise it is calculated as 0.
Note: A delivery request header level tax cannot be applied
to a price value.
Charge Amount The charge amount that is taxed.
Tax Name The name of the tax. For example, International Tax.
Tax Percentage The percentage of tax that is applied to the header price.
Tax Amount The amount of the tax that is applied to the header level.
Remaining Delivery Request Charges Screen
You can use the Remaining Delivery Request Charges Detail window for adding or
modifying the delivery request charges.
The delivery request header panel descriptions can be referred from the Delivery
Request table.
vAdding Remaining Delivery Request Charges - From the Charges table, choose
the Add icon. A new row appears in the Charges table. From the Charge
Category drop-down list, select the category of the new charge.
Note: This drop-down displays all delivery request charges and discount
charges. Consult your system administrator to determine which charges should
be used as delivery request charges and which should be used as discount
charges.
144 Sterling Selling and Fulfillment Foundation: Distributed Order Management User Guide
Table 196. Remaining Delivery Request Charges Screen, Charges
Fields Description
Charge Category The name of the charge category. Select an option from the
drop-down menu.
Charge Name The name of the charge name. Once the charge category is
selected, this field is populated by a drop-down menu. Select
the appropriate charge name.
Charge Amount The amount of the charge that is applied to the header level.
Click Save after making changes to the charges panel to update the remaining
delivery request charges. The Modification Reason Screen screen appears, enter
the appropriate reason code and text and click OK.
vModifying Remaining Delivery Request Charges - Locate the charges you want
to modify. In the charges panel enter the amount of the charges and click Save.
The Modification Reason Screen screen appears, enter the appropriate reason
code and text and click OK.
Remaining Delivery Request Taxes Screen
You can use the Remaining Delivery Request Taxes window for adding or
modifying the order taxes.
The delivery request header panel descriptions can be referred from the Delivery
Request table.
vAdding Remaining Delivery Request Taxes - From the Taxes panel, choose the
Add icon. A new row appears in the Taxes panel. From the Charge Category
drop-down list, select the category of the new charge and from Tax category
select a new tax name and enter the relevant information as defined in the
following table.
Note: This drop-down displays all delivery request taxes and discount taxes.
Consult your system administrator to determine which charges should be used
as delivery request taxes and which should be used as discount taxes.
Table 197. Remaining Delivery Request Taxes Screen, Taxes
Fields Description
Charge Category The name of the charge category. Select an option from the
drop-down menu.
Charge Name The name of the charge name. Once the charge category is
selected, this field is populated by a drop-down menu. Select
the appropriate charge name.
Charge Amount The amount of the charge that is applied to the header level.
Tax Name The name of the tax. For example, International Tax.
Tax Percentage The percentage of tax that is applied to the header price.
Tax Amount The amount of the tax that is applied to the header level.
Click Save after making changes to the taxes panel to update the remaining
order taxes. The Modification Reason Screen screen appears, enter the
appropriate reason code and text and click OK.
Chapter 10. Order Console Screens 145
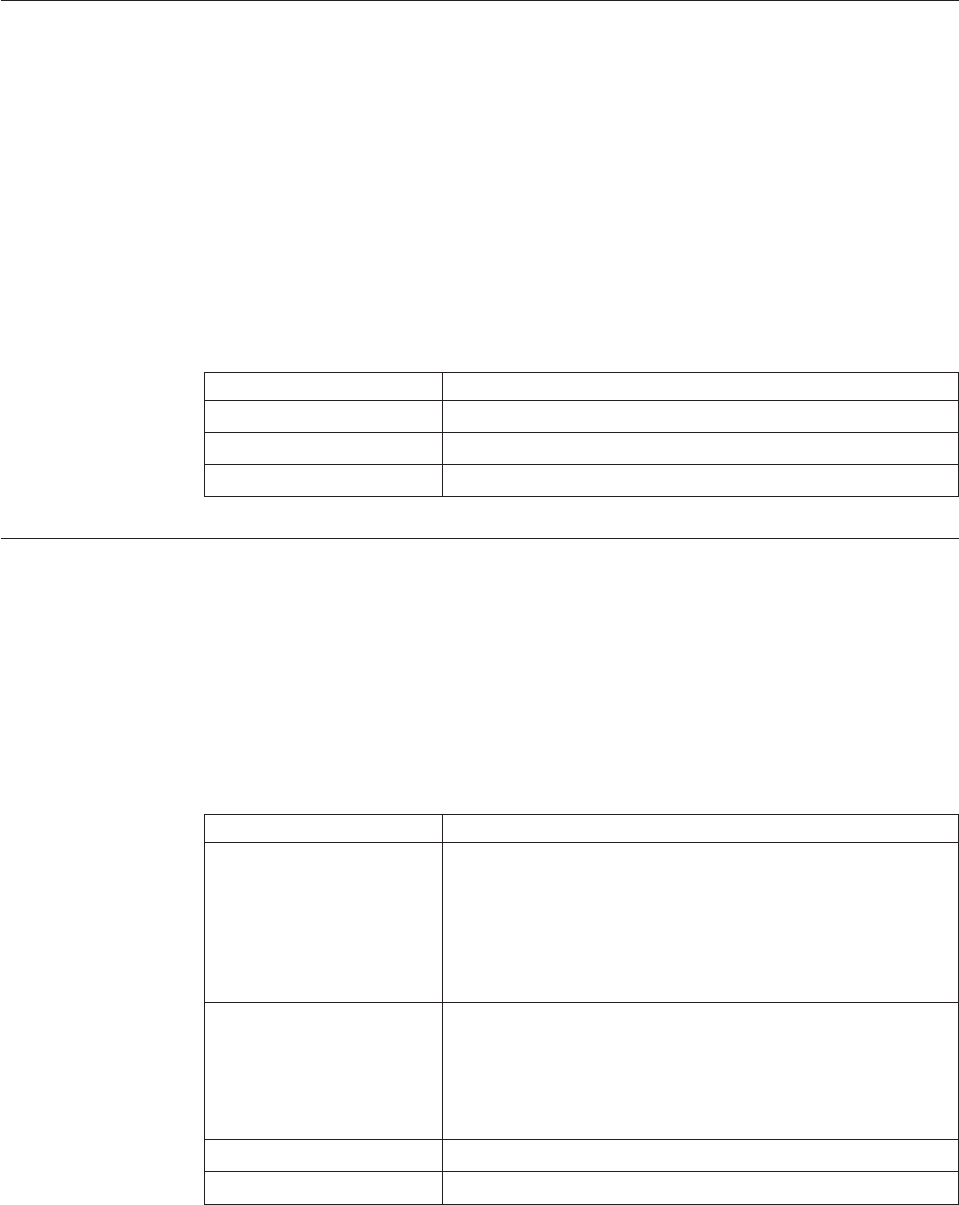
vModifying Remaining Delivery Request Taxes - Locate the taxes you want to
modify. In the taxes panel enter the amount of the taxes and click Save. The
Modification Reason Screen screen appears, enter the appropriate reason code
and text and click OK.
Invoiced Delivery Request Charges Screen
You can view the invoice level charges of an delivery request in this screen.
Note: This window displays all delivery request charges and discount charges
against the delivery request header.
Order
The delivery request header panel descriptions can be referred from the Delivery
Request table. If you view the invoiced delivery request charges screen from the
Order Invoices Screen screen the delivery request header panel is replaced with the
fields described in the Invoice table.
Table 198. Invoiced Delivery Request Charges Screen, Charges
Fields Description
Charge Category The name of the charge category.
Charge Name The name of the charge name.
Charge Amount The amount of the charge that is applied to the header level.
Invoiced Delivery Request Taxes Screen
You can view the invoice level tax information associated with an delivery request
in this screen.
The delivery request header panel descriptions can be referred from the Delivery
Request table. If you view the invoiced delivery request taxes screen from the
Order Invoices Screen screen the delivery request header panel is replaced with the
fields described in the Invoice table.
Table 199. Invoiced Delivery Request Taxes Screen, Taxes
Fields Description
Charge Category The charge category with which the tax is associated.
Important: An delivery requestdelivery request header level
tax must be associated with a charge, otherwise it is
calculated as 0.
Note: An delivery request header level tax cannot be applied
to a price value.
Charge Name The charge name with which the tax is associated.
Important: An delivery request header level tax must be
associated with a charge, otherwise it is calculated as 0.
Note: An delivery request header level tax cannot be applied
to a price value.
Charge Amount The charge amount that is taxed.
Tax Name The name of the tax. For example, International Tax.
146 Sterling Selling and Fulfillment Foundation: Distributed Order Management User Guide

Table 199. Invoiced Delivery Request Taxes Screen, Taxes (continued)
Fields Description
Tax Percentage The percentage of tax that is applied to the header price.
Tax Amount The amount of the tax that is applied to the header level.
History Order Details Screen
About this task
To view sales history order details:
Procedure
1. From the navigation bar, select Order.
2. Choose the Order Console. The Order Search window appears.
3. Search for the applicable history orders.
4. From the list, select the check boxes of the applicable history orders.
5. From the action bar, choose View Details. The History Order Detail window
appears.
Results
All actions that result in the order modification or status change are not allowed
for history orders. Modifications to an order are only allowed after restoring a
history order.
Modification Reason Screen
When you modify any information in the order console screen and click Save, the
modification reason window pops open for you to select the reason code and enter
a reason text. The reason code is specified in the modification reasons tree in
Distributed Order Management node of the Applications Manager. For more
information about specifying the reason codes, see the Sterling Selling and
Fulfillment Foundation: Distributed Order Management Configuration Guide.
Table 200. Modification Reason
Fields Description
Reason Code Select the reason code for the modification. The reason code
can be specified in the Applications Manager. For more
information, refer to the Sterling Selling and Fulfillment
Foundation: Distributed Order Management Configuration Guide.
Reason Text Enter the reason text for the modification.
Organization Details Screen
You can view an organization's details.
Table 201. Organization Details
Field Description
Organization Information
Chapter 10. Order Console Screens 147
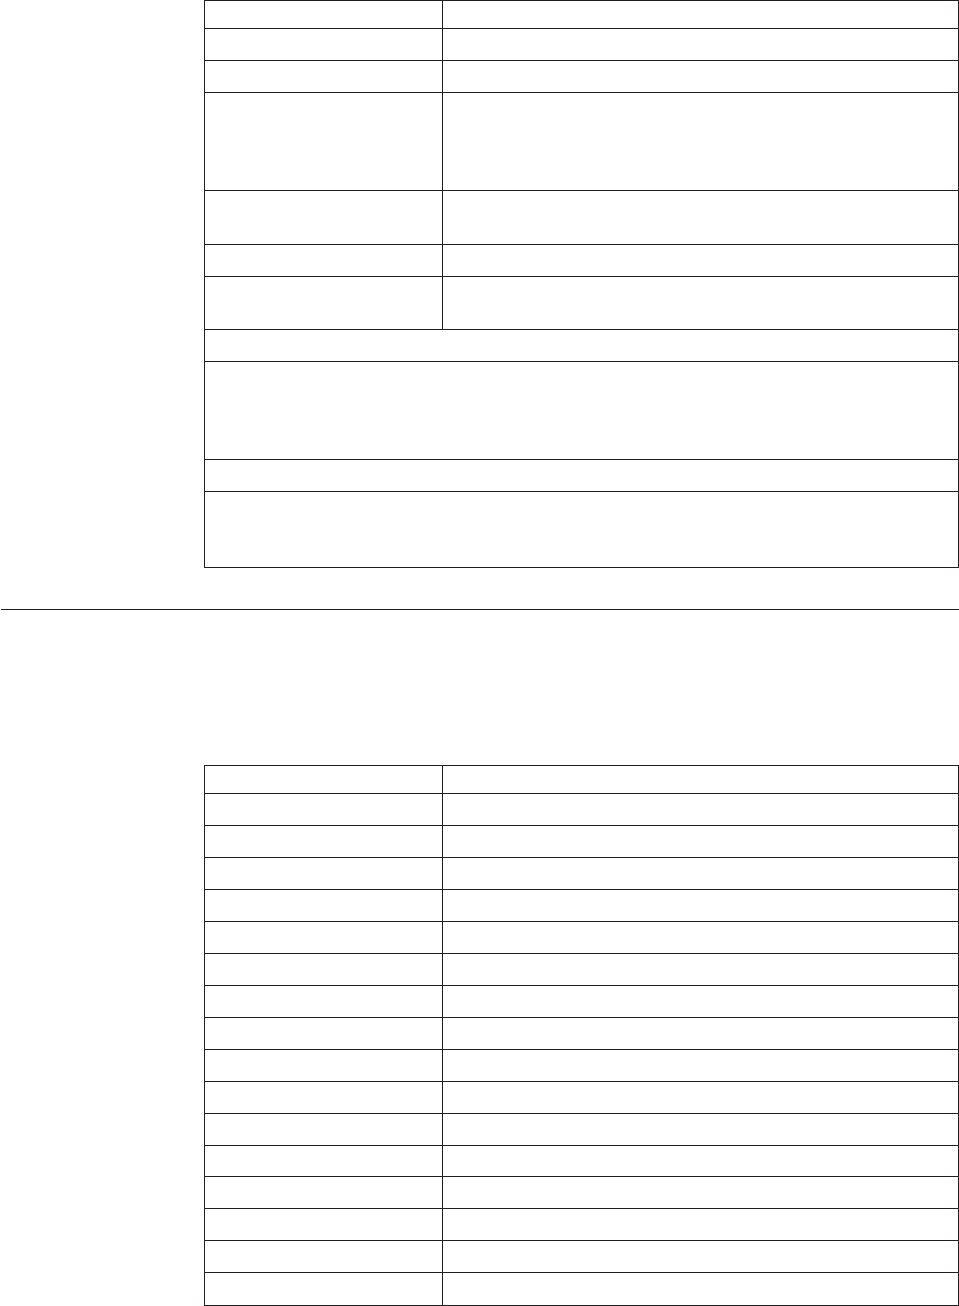
Table 201. Organization Details (continued)
Field Description
Organization Code The code that identifies the organization.
Organization Name The name of the organization.
DUNS Number The unique nine-digit identification sequence which provides
unique identifiers of single business entities. Sterling Selling
and Fulfillment Foundation does not associate any logic with
the DUNS number.
Account Number With Hub If the organization is not the Hub, the account number that
the organization has with the Hub.
Primary Enterprise The primary enterprise of the organization.
Primary URL Enter the URL of the organization's Internet address, if
applicable.
Primary Contact Address
This inner panel displays the current primary contact address for this organization. Click
the Address Details icon to view the Primary Contact Address Details. For more
information about the Primary Contact Address Details window, see Organization Address
Details Screen.
Corporate Address
This inner panel displays the current corporate address for this organization. Click the
Address Details icon to view the Corporate Address Details. For more information about
the Corporate Address Details window, see Organization Address Details Screen.
Organization Address Details Screen
You can modify shipto, billto, forwardto and any additional addresses in this
screen.
Table 202. Address Details
Fields Description
First Name The first name.
Middle Name The middle name.
Last Name The surname.
Company The company.
Day Time Phone The day time phone number.
Evening Phone The evening phone number.
Mobile Phone The mobile phone number.
Fax The fax number.
E-Mail The e-mail address.
Address Line 1 The first address line.
Address Line 2 The second address line, if applicable.
Address Line 3 The third address line, if applicable.
Address Line 4 The fourth address line, if applicable.
Address Line 5 The fifth address line, if applicable.
Address Line 6 The sixth address line, if applicable.
City The city.
148 Sterling Selling and Fulfillment Foundation: Distributed Order Management User Guide

Table 202. Address Details (continued)
Fields Description
State The state.
Postal Code The postal code.
Country/Region The country or region.
Questions
The address or permit questions and answer options displayed on this screen are
preconfigured. For more information about configuring questions and answer
options, refer to the Sterling Selling and Fulfillment Foundation: Distributed Order
Management Configuration Guide.
Once you have selected or entered your necessary answers, click Save.
Chapter 10. Order Console Screens 149
150 Sterling Selling and Fulfillment Foundation: Distributed Order Management User Guide
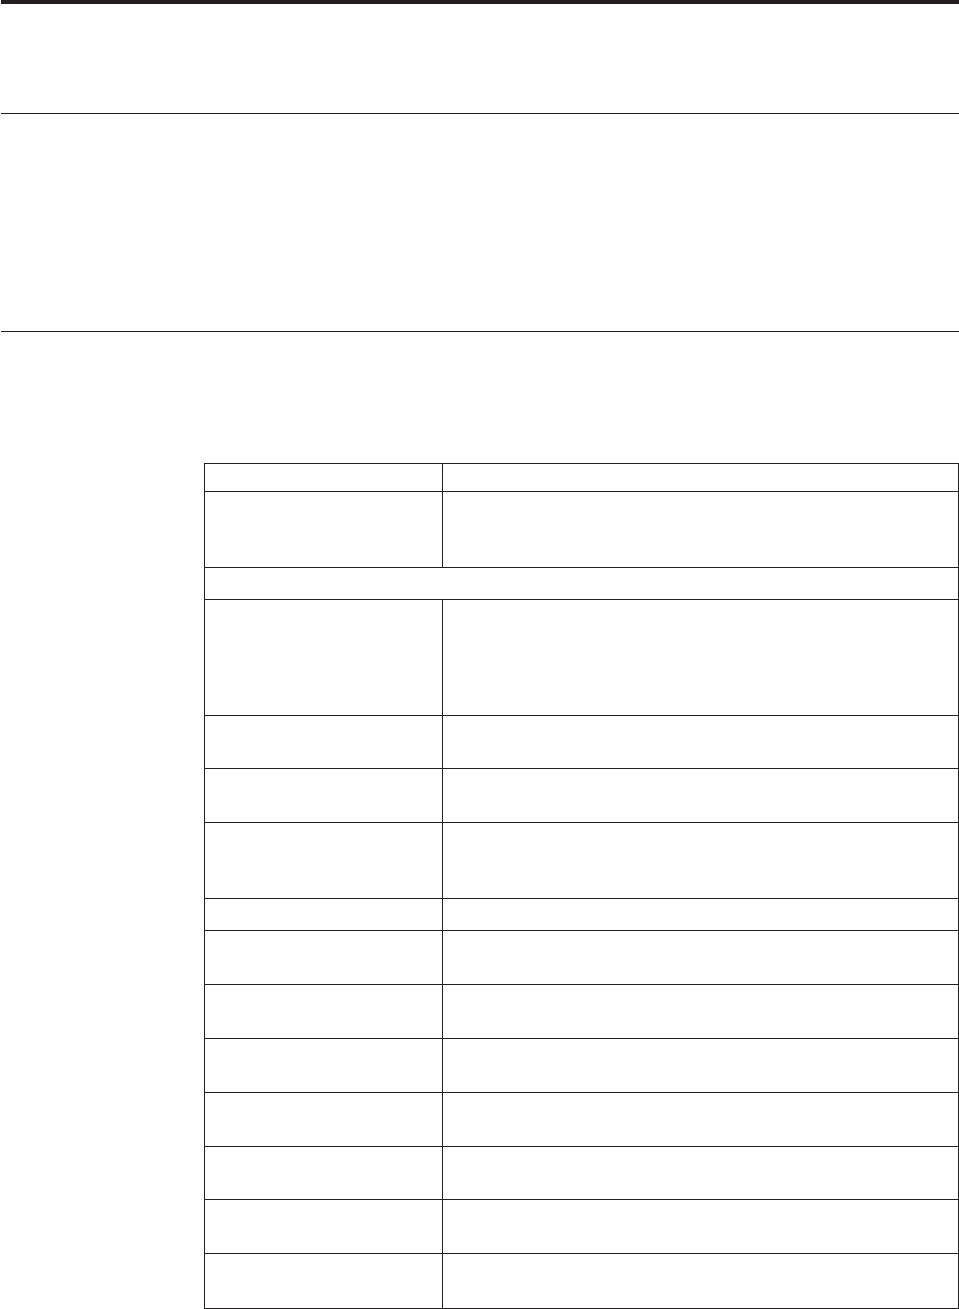
Chapter 11. Create Outbound Shipment Screens
Create Outbound Shipment Screens
Shipments (ASN) are transmitted to warehouses through EDI downloads, fax, or
e-mail, and also when a trailer arrives with no prior notice.
The shipment entry console enables you to manually create shipments from fax,
e-mail or telephone conversations, and also for those trailers that arrive with no
prior notice.
Shipment Entry for Outbound Shipments
You can create outbound shipments for a sales or transfer order in this screen.
Table 203. Shipment Entry
Action Description
Supervisory Overrides This action takes you to the Shipment Supervisory Overrides
for Outbound Shipments screen where you can specify
whether the shipment can have overages.
Fields
Document Type Select the document type associated with the shipment you
are creating.
Valid values are 'Sales Order' or 'Transfer Order'. For an
outbound shipment, valid value is 'Sales Order'
Ship Node The shipping node associated with the shipment. This
represents the seller's ship node.
Enterprise Select the enterprise associated with the shipment you are
creating for, if applicable.
Shipment # Enter the shipment number for the shipment you are creating,
if applicable. A unique number is automatically generated by
the system, if number is not specified.
Receiving Node Select node where the receipt is being performed.
Buyer Enter the buyer associated with the shipment you want to
create, if applicable.
Seller Enter the seller associated with the shipment you want to
create.
Order # Enter the order number, if there is only order on the
shipment.
Release# Enter the release number of the order against which the
shipment is being created, if applicable.
Pro# Enter the PRO number assigned by the carrier to track the
shipment you are creating, if applicable.
Carrier/Service Select the carrier service availed for transporting the
shipment, if applicable.
BOL# Enter the bill of lading number of the shipment you are
creating, if applicable.
© Copyright IBM Corp. 1999, 2011 151

Table 203. Shipment Entry (continued)
Action Description
Trailer# Enter the trailer number of the shipment you are creating, if
applicable.
After entering the relevant information in the fields a shipment is created and you
are taken to the Shipment Details screen.
Shipment Supervisory Overrides for Outbound Shipments
This screen allows you to create overages for the shipment being created.
Table 204. Shipment Supervisory Overrides
Field Description
Allow Overage Select to allow overage for the outbound shipment.
152 Sterling Selling and Fulfillment Foundation: Distributed Order Management User Guide
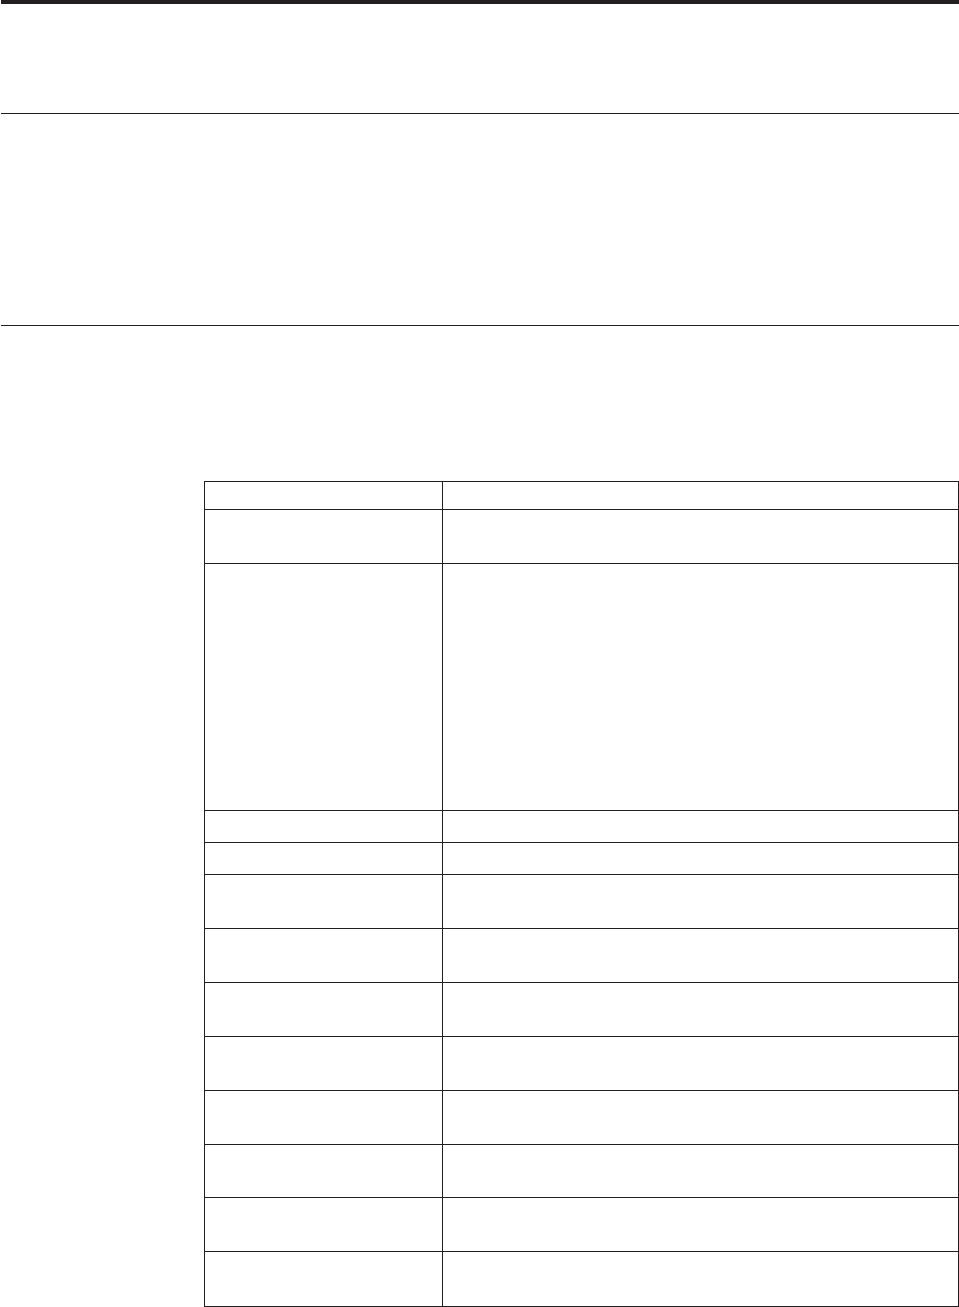
Chapter 12. Outbound Shipment Console Screens
Outbound Shipment Console Screens
The Outbound Shipment Console provides:
vExtensive search capabilities using granular level information such as plan #,
customer PO#.
vAbility to modify outbound shipment instruction.
vAbility to view discrepancies found in the outbound shipments.
Outbound Shipment Search By Status
You can search for shipments that fall under a particular status with the help of
this screen.
Table 205. Shipment Search By Status
Fields Description
Document Type Select the appropriate document type to search for, if
applicable.
Enterprise Choose the field and lookup option to find the specific
Enterprise you want to use.
Choose Across Enterprises to search across all Enterprises in
the system.
Note: If you belong to a team, the system only searches
across the Enterprises allowed by that group. For more
information about teams, see the section Defining Teams in
the chapter Configuring User Security of the Sterling Selling
and Fulfillment Foundation: Application Platform Configuration
Guide.
Shipment # Enter the shipment number to search for, if applicable.
Order # Enter the order number you are searching for, if applicable.
Customer PO # Enter the number of the customer's purchase order number
you are searching for, if applicable.
Plan # Enter the plan number the outbound shipment you are
searching for belongs to, if applicable.
Origin Node Enter the origin node you want to search for outbound
shipments under, if applicable.
Destination Node Enter the destination node you want to search for outbound
shipments under, if applicable.
Status Select the status range of the outbound shipments you want
to search for, if applicable.
Include Closed Shipments Select this if you want to search for outbound shipments that
have been closed, as well as those that are open, if applicable.
Pack And Hold Shipment Select this if you want to search for outbound shipments that
are packed and kept on hold, if applicable.
Held Shipments Check this box if you want to search for outbound shipments
that are held.
© Copyright IBM Corp. 1999, 2011 153

Table 205. Shipment Search By Status (continued)
Fields Description
Max Records Enter the maximum number of outbound shipments you
want returned from your search.
Do not use spaces before or after any text you enter in the search fields, as this
may result in inconsistent or inaccurate results.
The “Shipment List” on page 158 screen displays as a result of outbound shipment
search by status.
Outbound Shipment Search By Date
You can search for shipments that fall within a particular date range with the help
of this screen.
Table 206. Shipment Search By Date
Fields Description
Document Type Select the appropriate document type to search for, if
applicable.
Enterprise Choose the field and lookup option to find the specific
Enterprise you want to use.
Choose Across Enterprises to search across all Enterprises in
the system.
Note: If you belong to a team, the system only searches
across the Enterprises allowed by that group. For more
information about teams, see the section Defining Teams in
the chapter Configuring User Security of the Sterling Selling
and Fulfillment Foundation: Application Platform Configuration
Guide.
Carrier/Service Choose the Carrier/Service you want to search for outbound
shipments under, if applicable.
Status Choose the shipment status you are searching for, if
applicable.
Enter Shipment Dates Enter the requested ship date range, expected ship date
range, actual ship date range you want to search for
outbound shipments through, if applicable.
Enter Delivery Dates Enter the requested delivery date range, expected delivery
date range, actual delivery date range you want to search for
outbound shipments through, if applicable.
Max Records Enter the maximum number of outbound shipments you
want returned from your search.
Do not use spaces before or after any text you enter in the search fields, as this
may result in inconsistent or inaccurate results.
The “Shipment List” on page 158 screen displays as a result of outbound shipment
search by date.
154 Sterling Selling and Fulfillment Foundation: Distributed Order Management User Guide
Outbound Shipment Search By Carrier
You can search for shipments that belong to a particular carrier with the help of
this screen.
Table 207. Shipment Search By Carrier
Fields Description
Document Type Select the appropriate document type to search for, if
applicable.
Enterprise Choose the field and lookup option to find the specific
Enterprise you want to use.
Choose Across Enterprises to search across all Enterprises in
the system.
Note: If you belong to a team, the system only searches
across the Enterprises allowed by that group. For more
information about teams, see the section Defining Teams in
the chapter Configuring User Security of the Sterling Selling
and Fulfillment Foundation: Application Platform Configuration
Guide.
Shipment Mode Select the shipment mode, if applicable
Carrier/Service The Carrier/Service you want to search for outbound
shipments under, if applicable.
BOL # The bill of lading number of the outbound shipments you are
searching for, if applicable.
PRO # The PRO number of the outbound shipments you are
searching for, if applicable.
Trailer # The trailer number of the outbound shipments you are
looking for, if applicable.
Status Select the shipment status you are searching for, if applicable.
Requires Routing Choose this option if the shipment requires dynamic routing.
Max Records The maximum number of outbound shipments you want
returned from your search.
Do not use spaces before or after any text you enter in the search fields, as this
may result in inconsistent or inaccurate results.
The “Shipment List” on page 158 screen displays as a result of outbound shipment
search by carrier.
Outbound Shipment Search By Item
You can search for shipments based on the item information such as product class,
unit of measure, item ID and so on.
Table 208. Shipment Search By Item
Fields Description
Document Type Select the appropriate document type to search for, if
applicable.
Chapter 12. Outbound Shipment Console Screens 155
Table 208. Shipment Search By Item (continued)
Fields Description
Enterprise Choose the field and lookup option to find the specific
Enterprise you want to use.
Choose Across Enterprises to search across all Enterprises in
the system.
Note: If you belong to a team, the system only searches
across the Enterprises allowed by that group. For more
information about teams, see the section Defining Teams in
the chapter Configuring User Security of the Sterling Selling
and Fulfillment Foundation: Application Platform Configuration
Guide.
Item ID The item ID.
Product Class The item's product class.
Unit of Measure The item's unit of measure.
Buyer The identifier for the Buyer.
Seller The identifier for the Seller.
Status Select the shipment status you are searching for, if applicable.
Include Closed Shipments Select this if you want to search for outbound shipments that
have been closed, as well as those that are open, if applicable.
Has Hazardous Items Select this check box to search for outbound shipments that
contain hazardous items, if applicable.
Max Records The maximum number of outbound shipments you want
returned from your search.
Do not use spaces before or after any text you enter in the search fields, as this
may result in inconsistent or inaccurate results.
The “Shipment List” on page 158 screen displays as a result of outbound shipment
search by item.
Outbound Shipment Search By Wave
You can search for outbound shipment that fall within a particular wave in this
screen.
Table 209. Shipment Search By Wave
Fields Description
Document Type Select the document type to you want to search for, if
applicable.
Enterprise Select the enterprise for which you are searching.
Across Enterprise Select this option if you are searching across all enterprises.
Shipment # Enter the shipment number you are searching for, if
applicable.
Wave # Enter the wave number you are searching for, if applicable.
Load # Enter the load number you are searching for, if applicable.
Carrier/Service Select the carrier/service you are searching for, if applicable.
156 Sterling Selling and Fulfillment Foundation: Distributed Order Management User Guide
Table 209. Shipment Search By Wave (continued)
Fields Description
Buyer Enter the buyer associated with the shipment you want to
search for, if applicable.
Status Select the shipment status you are searching for, if applicable.
Shipment In Wave Choose this option if you are searching for the shipments in
wave.
Shipment Not In Wave Choose this option if you are searching for the shipments not
in wave.
Ignore Cancelled Shipment
Lines
Select this check box if you are considering only Shipment
Lines with quantity greater than zero. This check box displays
only when "Shipment Not In Wave" is selected.
All Choose this option if you are searching for all the shipments.
Has Shortage Choose this option
Enter Shipment Dates Choose to enter shipment date range you want to search for
outbound shipments, if applicable.
Enter Delivery Dates Choose to enter delivery date range you want to search for
outbound shipments, if applicable.
Max Record Enter the maximum number of records you want listed as a
result of your search.
Do not use spaces before or after any text you enter in the search fields, as this
may result in inconsistent or inaccurate results.
The “Shipment List” on page 158 screen displays as a result of outbound shipment
search by wave.
Outbound Shipment Search By Profiling
The warehouse supervisor can choose the pick strategy based on the profile
identifier density of the shipments. Usually, large shipments are picked
individually and small shipments are group together and picked together, and
sorted later.
You can search for shipments based on their profile identifiers.
Table 210. Shipment By Profile Search
Fields Description
Enterprise Select the enterprise.
Profile ID Select the profile ID from the drop down list.
You can also click the Lookup icon to select the Profile ID.
Consider Profiles Select this to view the shipment's state There are three
options:
Already In Wave - Select this to view the shipments that are
in wave.
Not In Wave - Select this to view the shipments that are not
in wave.
All - Select this to view all the shipments.
Chapter 12. Outbound Shipment Console Screens 157

Table 210. Shipment By Profile Search (continued)
Fields Description
Show Profiles Select to view the More number of Shipment First and Less
number of Shipment First. There are two options:
More number of Shipment First - Select this to view high-
density profile ID shipments first.
Less number of Shipment First - Select this to view
low-density profile ID shipments first.
Max Records Enter the number to display the maximum records.
You can view the shipment profile list based on the profile identifiers.
Table 211. Shipment Profile List
Actions Description
Create Wave This takes you to the Create Wave screen, where you can
create a wave for the selected shipment group.
Fields
ProfileId The identifier of a shipment.
No of shipments The number of shipments.
No of shipments in the
wave
The number of waved shipments.
No of shipments not in the
wave
The number of shipments that are not waved.
Shipment List
The Shipment List window displays the results of a shipment search. You can
perform actions on a single shipment or multiple shipments by selecting the check
boxes of the shipments you want to perform an action on and choosing the
applicable action from the action bar.
Table 212. Shipment List
Actions Description
View Details This action takes you to the Shipment Details screen where
you can view the shipment details.
Modify Shipment This action takes you to the Modify Shipment screen where
you can modify a shipment.
Print This action takes you to the Print screen where you can print
the shipment's documents or labels.
Cancel This action takes you to the Cancel Selected Shipments screen
where you can cancel an outbound shipment.
Create Wave This action takes you to the Create Wave screen where you
can create wave for the selected shipment group.
Add To Delivery Plan This action takes you to the Select Delivery Plan screen where
you can add shipment to a delivery plan.
Delete Shipment This action allows you to delete the selected shipments.
158 Sterling Selling and Fulfillment Foundation: Distributed Order Management User Guide
Table 212. Shipment List (continued)
Actions Description
Remove From Wave This action allows you to remove the selected shipments from
a wave.
View Holds This action takes you to the View Holds screen where you
can view the holds applied to the outbound shipment.
Fields
Shipment # The shipment number.
Status The shipment status.
Buyer The identifier for the buyer.
Carrier/Service The Carrier and Carrier service use to ship the outbound
shipments.
Expected Ship Date The date the shipment is estimated to ship on.
Origin The shipment's origin node.
Destination The shipment's destination node.
Total Weight The total weight of the outbound shipment.
Total Volume The total volume of the outbound shipment.
Tag/Serial Requested Indicates if tag or serial details exist for the outbound
shipment.
Note: The tag details for a tag-controlled item displays, if the
ship node is configured to capture tags in all operations
performed within the node, or if the buyer on a shipment
mandates it as a part of their inbound compliance. For more
information about capturing tag attributes, see the Sterling
Selling and Fulfillment Foundation: Application Platform
Configuration Guide.
Shipment Details
The Shipment Details screen provides shipment information for the selected
shipments. The actions that you can perform in the Shipment Details screen are
explained in the following tables.
Table 213. Shipment Details, Shipment
View Icons Description
Load This icon takes you to the Shipment Loads screen
where you can view any load carrying an outbound
shipment.
Containers This icon takes you to the Shipment Containers
screen where you can view all packed containers
included in the outbound shipment.
Instructions This icon takes you to the Shipment Instructions
screen where you can add, modify or delete the
instructions for a shipment.
Audit This icon takes you to the Shipment Audits screen
where you can view audit trail for shipment
modifications.
Chapter 12. Outbound Shipment Console Screens 159
Table 213. Shipment Details, Shipment (continued)
View Icons Description
Shipment Data Types This icon takes you to the Shipment Dates screen
where you can view and modify outbound shipment
dates and delivery dates.
Alert This icon takes you to the Alerts screen where you
can view the alerts for an outbound shipment.
Additional Attribute This icon takes you to the Additional Attributes
screen where you can view additional attributes for
the selected shipment.
Activity Demand This icon takes you to the Shipment Activity
Demand screen where you can view the shipment's
activity demand.
Actions
Confirm Shipment This action allows you to manually confirm an
outbound shipment, if the shipment is not
automatically confirmed.
Pack Containers This action takes you to the Pack Containers screen
where you can pack any unpacked items into
containers for shipping.
Print This action takes you to the Print screen where you
can print the shipping documents or labels.
Cancel This action takes you to the Cancel Selected
Shipments screen where you can cancel an outbound
shipment.
Create Pick List This action enables you to create a picklist for the
selected shipments, if applicable.
Split Shipment This action takes you to the Split Shipment screen
where you can split an outbound shipment.
Create Alert This action takes you to the Create Alerts screen
where you can create an alert for the shipment.
Release From ESP Hold This action allows you to release a shipment from the
ESP Hold.
Remove From Wave This action allows you to remove the shipment from
a wave.
View Holds This action takes you to the View Holds screen
where you can view the holds applied to the
outbound shipment.
Fields
Shipment # The outbound shipment number.
Shipper's Ref. # Enter the outbound shipment reference number.
Plan # The delivery plan number the outbound shipment is
associated with, if applicable.
Enterprise The Enterprise associated with the shipment.
Buyer Indicates the buyer associated with the shipment.
Click this link to go to the Organization Details to
view the buyer organization details.
Seller Indicates the seller associated with the shipment.
Click this link to go to the Organization Details to
view the seller organization details.
160 Sterling Selling and Fulfillment Foundation: Distributed Order Management User Guide
Table 213. Shipment Details, Shipment (continued)
View Icons Description
Ship Node The node from where the outbound shipment ships.
Click this link to go to the Ship Node Detail screen to
view the node details for the shipment.
Receiving Node Indicates the node that is receiving the outbound
shipment. Click this link to go to the Ship Node
Detail screen to view the shipment's receiving node
details.
Status The outbound shipment status. Click this link to go
to the Shipment Status Audits to view shipment
status audits. Click the Work Order Hold icon to go
to the View Holds screen where you can view holds
that are applied to the outbound shipment.
Has Hazardous Items Indicates if the outbound shipment contains
hazardous items.
Break Bulk Node This field displays only if the shipment belongs to a
break bulk load.
The break bulk node that is receiving the break bulk
load displays.
Table 214. Shipment Details, Execution Attributes
Actions Description
View Tasks This action takes you to the Task List screen where you can
view a list of tasks associated with the shipment.
Fields
Execution Status The status of wave corresponding to the shipment.
Pack And Hold Select the check box to pack and hold the outbound
shipment, if applicable.
Shipment Sort Lane The lane where containers are sorted by shipment, when 'Sort
by Shipment' option is chosen.
Carrier Sort Lane The lane where containers are sorted by carrier, when 'Sort by
Carrier' option is chosen.
Wave # The wave number to which the outbound shipment belongs
to.
Has Shortage Indicates if the outbound shipment has inventory shortage
when included in the wave.
Packed Quantity Indicates the total quantity packed.
Table 215. Shipment Details, Ship To
View Icon Icon Name Description
Address Details Choose this icon to view or modify the
Ship To addresses. For more information
about the screen, see Address Details.
The name and address of the person or organization where the shipment is shipped.
Chapter 12. Outbound Shipment Console Screens 161
Table 216. Shipment Details, Totals
Fields Description
Weight Enter the total weight associated to the shipment in the
appropriate UOM.
Volume Enter the total volume associated to the shipment in the
appropriate UOM.
No. of Containers Displays the total number of containers available in the
shipment.
Table 217. Shipment Details, Carrier Info
Actions Description
Manage Special Services This action takes you to the Special Services List screen where
you can select special services for the carrier.
Fields
Delivery Method The delivery method for the shipment.
Ship Mode Select the shipment mode for the shipment. Values include
'LTL', 'TL', 'PARCEL'
Carrier/Service Select the carrier service for the outbound shipment.
Trailer # Enter the outbound shipment's trailer number.
BOL # Enter the outbound shipment's bill of lading number.
Seal # Enter the outbound shipment's seal number.
Pro # Enter the PRO number assigned by the carrier to track the
shipment.
Routing Source Indicates if the routing was either pre-assigned, by the system
or through an external system.
Load # The outbound shipment's load number.
Routing Error Code The system automatically displays the routing error code, if
applicable.
Requested Carrier Service The requested carrier service for the outbound shipment.
Airway Bill # Indicates the airway bill number for tracking the shipment.
The airway bill is a document of carriage which is issued by
airlines to shippers of cargo. The airway bill number:
vIs an evidence of a contract of carriage.
vProves receipt of goods for shipment.
vIs a freight bill.
Is Revised Indicates whether the Ship To address has changed since the
creation of the outbound shipment.
Return Carrier Service Select the carrier service for the return shipment from the
drop-down list.
Note: If you do not select the carrier service for the return
shipment from the drop-down list, the carrier service used for
an outbound shipment is used for the return shipment.
162 Sterling Selling and Fulfillment Foundation: Distributed Order Management User Guide

Table 218. Shipment Details, Charges
View Icon
Charges and Taxes
Charges - This icon takes you to the Charges screen
where you can enter or modify additional charges
imposed to the shipment and/or container.
Fields
Carrier Account # Indicates the carrier account # for the shipment.
Freight Terms Indicates the freight terms used for the shipment.
Valid values include COLLECT, PREPAID,
TP-COLLECT and TP-PREPAID.
COD Pay Method Select the COD payment type for the carrier.
Estimated Shipment Charges The estimated charge for shipping the outbound
shipment.
Actual Shipment Charges The actual charge for shipping the outbound
shipment.
Freight Charge The charge applied by the carrier for shipping the
outbound shipment.
Table 219. Shipment Details, Shipment Lines
Actions Description
View Details This action takes you to the Shipment Line Details screen
where you can view the shipment line attributes for the
selected shipments.
Add Release This action takes you to the Add Release screen where you
can add an order release line to include in the shipment.
Remove Line This action allows you remove the selected shipment lines
from the shipment.
Fields
Shipment Line # Enter the outbound shipment line number.
Click this link to go to the Shipment Line Details screen to
view the shipment line attributes for the a shipment.
The Kit Components icon - This icon takes you to the Logical
Kits screen where you can view the item kit components for
the shipment line.
Order # Enter the order number being received on the shipment, if
applicable.
Line # Enter the order line number being received on the shipment,
if applicable.
Release # Enter the release number, if applicable
Item ID Enter the item ID for the SKU.
Description The item's description
PC Select the product class for the item.
UOM Select the unit of measure for the item.
Requested Serial # The serial number requested in the order.
Editable if the order is not available on the system.
Mark For The mark for address associated with the item.
Chapter 12. Outbound Shipment Console Screens 163
Table 219. Shipment Details, Shipment Lines (continued)
Actions Description
Quantity Number of requested units of the item included in the
shipment.
Over Ship Quantity Indicates quantity of an item over shipped.
Shortage Qty Indicates the shortage quantity on the order for the item.
Original Qty Indicates the original quantity on the order for the item.
Special Services List
You can select the applicable special services for a carrier.
Table 220. Special Services List
Fields Description
Special Services Check the applicable special services for the carrier and click
Save. Valid values are:
vDeclared Value Insurance
vShip Notification
vAdult Signature Required
vDelivery Confirmation
vSaturday Delivery
vSignature Required
vSaturday Pickup
vTagless COD
vReturn Shipping Label Required
Modify Shipment
You can modify a shipment in this screen.
Table 221. Modify Shipment
Fields Description
Carrier/Service Select the carrier and carrier service used to ship the
outbound shipment.
Expected Ship Date The date the shipment is estimated to ship on.
Shipment Sort Lane The lane where containers are sorted by shipment, when 'Sort
by Shipment' option is chosen.
Carrier Sort Lane The lane where containers are sorted by carrier, when 'Sort by
Carrier' option is chosen.
164 Sterling Selling and Fulfillment Foundation: Distributed Order Management User Guide
Address Details
You can modify an outbound shipment or container ship to address in this screen.
Table 222. Address Details
Fields Description
Address Line 1 The first address line.
Address Line 2 The second address line, if applicable.
Address Line 3 The third address line, if applicable.
Address Line 4 The fourth address line, if applicable.
Address Line 5 The fifth address line, if applicable.
Address Line 6 The sixth address line, if applicable.
City The city.
State The state.
Postal Code The postal code.
Country/Region The country or region.
First Name The first name.
Middle Name The middle name.
Last Name The surname.
Company The company.
Day Time Phone The day time phone number.
Evening Phone The evening phone number.
Mobile Phone The mobile phone number.
Fax The fax number.
E-Mail The e-mail address.
Charges
You can modify additional charges imposed to the shipment and/or container in
this screen.
Table 223. Charges, Shipment
Fields Description
Shipment # The outbound shipment number.
Shipper's Ref. # The outbound shipment reference number.
Plan # The delivery plan number the outbound shipment is
associated with, if applicable.
Enterprise The Enterprise associated with the shipment.
Buyer The identifier for the Buyer.
Seller The identifier for the Seller.
Ship Node The node from where the outbound shipment ships.
Receiving Node Indicates the node that is receiving the outbound shipment.
Click this link to go to the Ship Node Detail screen to view
the shipment's receiving node details.
Chapter 12. Outbound Shipment Console Screens 165

Table 223. Charges, Shipment (continued)
Fields Description
Status The outbound shipment status. Click this link to go to the
Shipment Status Audits to view shipment status audits.
Has Hazardous Items Indicates if the outbound shipment contains hazardous items.
Table 224. Charges, Shipment Charges
FieldsDescription Description
Charge Category/Charge
Name
The name of the additional outbound shipment charge.
Estimated Charge The estimated additional charge for the outbound shipment.
Actual Charge The actual additional outbound shipment charge.
Table 225. Charges, Container Charges
Fields Description
Container # The container number.
Actual Freight Charge The Carrier's freight charge for shipping the container.
Shipment Loads
You can view any load carrying an outbound shipment with the help of this
screen.
Table 226. Loads, Shipment
Fields Description
Shipment # The outbound shipment number.
Shipper's Ref. # The outbound shipment reference number.
Plan # The delivery plan number the outbound shipment is
associated with, if applicable.
Enterprise The Enterprise associated with the shipment.
Buyer The identifier for the Buyer.
Seller The identifier for the Seller.
Ship Node The node from where the outbound shipment ships.
Receiving Node The node that is receiving the outbound shipment.
Status The outbound shipment status.
Has Hazardous Items Indicates if the outbound shipment contains any hazardous
item.
Table 227. Loads, Loads
Actions Description
View Details The actions lets you view the load details.
Fields
Load # The load number the outbound shipment belongs to.
Load Type The load type as per your business practices.
166 Sterling Selling and Fulfillment Foundation: Distributed Order Management User Guide
Table 227. Loads, Loads (continued)
Actions Description
Carrier/Service The Carrier and Carrier service transporting the load.
Origin The load's origin location.
Destination The load's destination location.
Status The load status.
Shipment Containers
You can view the packed containers included in an outbound shipment in this
screen.
Table 228. Shipment Containers, Shipment
Fields Description
Shipment # The outbound shipment number.
Shipper's Ref. # The outbound shipment reference number.
Plan # The delivery plan number the outbound shipment is
associated with, if applicable.
Enterprise The Enterprise associated with the shipment.
Buyer The identifier for the Buyer.
Seller The identifier for the Seller.
Ship Node The node from where the outbound shipment ships.
Receiving Node The node that is receiving the outbound shipment.
Status The outbound shipment status.
Has Hazardous Items Indicates if the outbound shipment contains any hazardous
item.
Table 229. Shipment Containers, Containers
Actions Description
View Details This action takes you to the Container Details screen where
you can view the container details.
Delete Containers This action takes you to the Delete Selected Containers where
you can delete the selected containers from the shipment.
Modify Containerization This action takes you to the Modify Containerization screen.
Fields
Container # The container number.
Tracking # The container's tracking number used to track the status and
location of the container.
Container SCM The shipment container marking.
Net Weight The net weight.
Gross Weight The container's total weight (including packaging).
Freight Charge The charge applied by the Carrier for shipping the container.
Status The outbound shipment status. Click this link to go to the
Shipment Status Audits screen where you can view the
shipment's status audits.
Chapter 12. Outbound Shipment Console Screens 167
Table 229. Shipment Containers, Containers (continued)
Actions Description
Manifested Indicates whether the container is manifested.
Shipment Instructions
You can view special instructions pertaining to an outbound shipment, such as
handling instructions in this screen.
Table 230. Shipment Instructions, Shipment
Fields Description
Shipment # The outbound shipment number.
Shipper's Ref. # The outbound shipment reference number.
Plan # The delivery plan number the outbound shipment is
associated with, if applicable.
Enterprise The Enterprise associated with the shipment.
Buyer The identifier for the Buyer.
Seller The identifier for the Seller.
Ship Node The node from where the outbound shipment ships.
Receiving Node Indicates the node that is receiving the outbound shipment.
Click this link to go to the Ship Node Detail screen to view
the shipment's receiving node details.
Status The outbound shipment status. Click this link to go to the
Shipment Status Audits to view shipment status audits.
Has Hazardous Items Indicates if the outbound shipment contains hazardous items.
Table 231. Shipment Instructions, Instructions
Actions Description
Delete Instruction This actions lets you delete the selected shipment instructions.
Fields
Instruction Type The type of instruction, such as Gift, Pick, Pack, Ship, or
Other. This field can be modified.
Text The specific instructions to be performed on the order line.
This field can be modified.
Shipment Status Audits
You can view any status modifications performed against an outbound shipment
status in this screen.
Table 232. Shipment Status Audits, Shipment
Fields Description
Shipment # The outbound shipment number.
Shipper's Ref. # The outbound shipment reference number.
168 Sterling Selling and Fulfillment Foundation: Distributed Order Management User Guide
Table 232. Shipment Status Audits, Shipment (continued)
Fields Description
Plan # The delivery plan number the outbound shipment is
associated with, if applicable. Click this link to go to the
Select Delivery Plan screen where you can add an outbound
shipment to a delivery plan.
Enterprise The Enterprise associated with the shipment.
Buyer The identifier for the Buyer. Click this link to go to the
Organization Details screen where you can view the buyer
organization details.
Seller The identifier for the Seller. Click this link to go to the
Organization Details screen where you can view the seller
organization details.
Ship Node The node from where the outbound shipment ships. Click
this link to go to the Ship Node Detail screen where you can
view the node details for the shipment.
Destination The outbound shipment's destination.
Status The outbound shipment status. Click this link to go to the
Shipment Status Audits screen where you can view the
shipment's status audits.
Table 233. Shipment Status Audits, Shipment Status Audits
Fields Description
Modified By The user who performed the modification.
Old Status The outbound shipment status before the status modification.
Old Status Date The date the outbound shipment entered the old status.
New Status The outbound shipment status after the status modification.
New Status Date The date the status modification was made.
Reason Code The reason for the modification.
Reason Text Additional information as to why the modification was made.
Shipment Dates
You can change dates pertaining to the outbound shipment, such as shipment
dates and delivery dates in this screen.
Table 234. Shipment Dates, Shipment
Fields Description
Shipment # The outbound shipment number.
Shipper's Ref. # The outbound shipment reference number.
Plan # The delivery plan number the outbound shipment is
associated with, if applicable. Click this link to go to the
Select Delivery Plan screen where you can add an outbound
shipment to a delivery plan.
Enterprise The Enterprise associated with the shipment.
Buyer The identifier for the Buyer. Click this link to go to the
Organization Details screen where you can view the buyer
organization details.
Chapter 12. Outbound Shipment Console Screens 169
Table 234. Shipment Dates, Shipment (continued)
Fields Description
Seller The identifier for the Seller. Click this link to go to the
Organization Details screen where you can view the seller
organization details.
Ship Node The node from where the outbound shipment ships. Click
this link to go to the Ship Node Detail screen where you can
view the node details for the shipment.
Receiving Node The node that is receiving the outbound shipment.
Status The outbound shipment status. Click this link to go to the
Shipment Status Audits screen where you can view the
shipment's status audits.
Has Hazardous Items Indicates if the outbound shipment contains any hazardous
item.
Table 235. Shipment Dates, System Dates
Fields Description
Requested Shipment Date The requested shipment date.
Expected Shipment Date The expected shipment date.
Actual Shipment Date The actual shipment date.
Requested Delivery Date The requested delivery date.
Expected Delivery Date The expected delivery date.
Actual Delivery Date The actual delivery date.
Table 236. Shipment Dates, New Dates
Fields Description
Date Type The date type. For example, Shipment or Delivery.
Requested The Buyer requested date for the date type. This field can be
modified.
Expected The expected date for the date type. This field can be
modified.
Actual The actual date for the date type. This field can be modified.
Alerts
You can view shipment alerts in this screen.
Table 237. Shipment Alerts, Shipment
Fields Description
Shipment # The outbound shipment number.
Shipper's Ref. # The outbound shipment reference number.
Plan # The delivery plan number the outbound shipment is
associated with, if applicable. Click this link to go to the
Select Delivery Plan screen where you can add an outbound
shipment to a delivery plan.
Enterprise The Enterprise associated with the shipment.
170 Sterling Selling and Fulfillment Foundation: Distributed Order Management User Guide

Table 237. Shipment Alerts, Shipment (continued)
Fields Description
Buyer The identifier for the Buyer. Click this link to go to the
Organization Details screen where you can view the buyer
organization details.
Seller The identifier for the Seller. Click this link to go to the
Organization Details screen where you can view the seller
organization details.
Ship Node The node from where the outbound shipment ships. Click
this link to go to the Ship Node Detail screen where you can
view the node details for the shipment.
Receiving Node The node that is receiving the outbound shipment.
Status The outbound shipment status. Click this link to go to the
Shipment Status Audits screen where you can view the
shipment's status audits.
Has Hazardous Items Indicates if the outbound shipment contains any hazardous
item.
Table 238. Shipment Alerts, Alert List
Actions Description
View Details This action allows you to view alert details. For more
information about alerts, see the Sterling Selling and Fulfillment
Foundation: Application Platform User Guide.
Fields
Alert ID The alert ID.
Type The type of alert raised. For example, ON_FAILURE or
FAILED_AUTH. For more information about alerts, see the
Sterling Selling and Fulfillment Foundation: Application Platform
User Guide.
Description A brief description of the alert.
Queue The queue the alert has been assigned to.
Priority The alert priority.
Owner The user who is handling the alert.
Raised On The date the alert was raised.
Additional Attributes
You can view shipment additional attributes in this screen.
Table 239. Additional Attributes, Shipment
Fields Description
Shipment # The outbound shipment number.
Shipper's Ref. # The outbound shipment reference number.
Plan # The delivery plan number the outbound shipment is
associated with, if applicable. Click this link to go to the
Select Delivery Plan screen where you can add an outbound
shipment to a delivery plan.
Enterprise The Enterprise associated with the shipment.
Chapter 12. Outbound Shipment Console Screens 171
Table 239. Additional Attributes, Shipment (continued)
Fields Description
Buyer The identifier for the Buyer. Click this link to go to the
Organization Details screen where you can view the buyer
organization details.
Seller The identifier for the Seller. Click this link to go to the
Organization Details screen where you can view the seller
organization details.
Ship Node The node from where the outbound shipment ships. Click
this link to go to the Ship Node Detail screen where you can
view the node details for the shipment.
Receiving Node Indicates the node that is receiving the outbound shipment.
Status The outbound shipment status. Click this link to go to the
Shipment Status Audits screen where you can view the
shipment's status audits.
Has Hazardous Items Indicates if the outbound shipment contains hazardous items.
Table 240. Additional Attributes, Additional Attributes
Fields
Overage Allowed Indicates whether the overage is allowed.
For outbound shipments, overage means shipping more than
was initially intended in a shipment.
For inbound shipments, overage means receiving more than
the expected quantity in a shipment.
Manually Entered Indicates whether the shipment was manually entered, or
generated automatically.
Order Available On System Indicates whether the order that is associated with the
shipment is available in Sterling Selling and Fulfillment
Foundation, or if it only exists in an external system.
Case Content Verification
Not Required
Indicates whether the case content verification is required for
this shipment.
Pallet Content Verification
Not Required
Indicates whether the pallet content verification is required
for this shipment.
Shipment Entry Overridden Indicates whether the shipment entry is allowed.
Gift Indicates whether the shipment line is a gift.
Shipment Activity Demand
You can view activity demand for the selected outbound shipments in this screen.
Table 241. Shipment Activity Demand
Fields Description
Shipment # The outbound shipment number.
Shipper's Ref. # The outbound shipment reference number.
Plan # The delivery plan number the outbound shipment is
associated with, if applicable. Click this link to go to the
Select Delivery Plan screen where you can add an outbound
shipment to a delivery plan.
172 Sterling Selling and Fulfillment Foundation: Distributed Order Management User Guide
Table 241. Shipment Activity Demand (continued)
Fields Description
Enterprise The Enterprise associated with the shipment.
Buyer The identifier for the Buyer. Click this link to go to the
Organization Details screen where you can view the buyer
organization details.
Seller The identifier for the Seller. Click this link to go to the
Organization Details screen where you can view the seller
organization details.
Ship Node The node from where the outbound shipment ships. Click
this link to go to the Ship Node Detail screen where you can
view the node details for the shipment.
Receiving Node Indicates the node that is receiving the outbound shipment.
Status The outbound shipment status. Click this link to go to the
Shipment Status Audits screen where you can view the
shipment's status audits.
Has Hazardous Items Indicates if the outbound shipment contains hazardous items.
Table 242. Shipment Activity Demand, Activity Demand List
Actions Description
Delete This action allows you to delete the selected activity
demands.
Shipment Line # The outbound shipment line number.
Location ID The item location in the node.
Activity Code The activity to be performed on items belonging to the work
order.
Pallet Id The pallet LPN that belong to the work order.
Case Id The case LPN that belong to the work order.
Item ID The items that belong to the work order.
Priority Indicates the priority of the demand.
Demand Quantity Indicates whether the demand is satisfied or not.
Satisfied Quantity The extent to which the demand is satisfied.
Demand Satisfied Indicates whether the demand is satisfied or not.
Shipment Audits
You can view any modifications performed by the user through the Application
Console against an outbound shipment in this screen.
Table 243. Shipment Audits, Shipment
Fields Description
Shipment # The outbound shipment number.
Shipper's Ref. # The outbound shipment reference number.
Plan # The delivery plan number with which the outbound
shipment is associated, if applicable. Click this link to go to
the Select Delivery Plan screen where you can add an
outbound shipment to a delivery plan.
Chapter 12. Outbound Shipment Console Screens 173
Table 243. Shipment Audits, Shipment (continued)
Fields Description
Enterprise The Enterprise associated with the shipment.
Buyer The identifier for the Buyer. Click this link to go to the
Organization Details screen where you can view the buyer
organization details.
Seller The identifier for the Seller. Click this link to go to the
Organization Details screen where you can view the seller
organization details.
Ship Node The node from where the outbound shipment ships. Click
this link to go to the Ship Node Detail screen where you can
view the node details for the shipment.
Receiving Node The node that is receiving the outbound shipment.
Status The outbound shipment status. Click this link to go to the
Shipment Status Audits screen where you can view the
shipment's status audits.
Has Hazardous Item Indicates if the shipment has any hazardous item.
Table 244. Shipment Audits, Shipment Audits
Fields Description
Date The date and time on which the shipment was modified.
Modified By The user who performed the modification.
Context The modifications carried out against the shipment.
Modification The attribute that was modified for the shipment.
Old Value The attribute value before making the modifications.
New Value The attribute value after it was modified.
Reason Code The reason for the modification.
Reason Text Additional information as to why the modification was made.
Table 245. Shipment, Shipment Line Audits
Fields Description
Date The date and time on which the shipment line was modified.
Modified By The user who performed the modification.
Context The modifications carried out against the shipment line.
Line # The shipment line number that was modified.
Modification The attribute that was modified for the shipment line.
Old Value The attribute value before making the modifications.
New Value The attribute value after it was modified.
Reason Code The reason for the modification.
Reason Text Additional information as to why the modification was made.
174 Sterling Selling and Fulfillment Foundation: Distributed Order Management User Guide
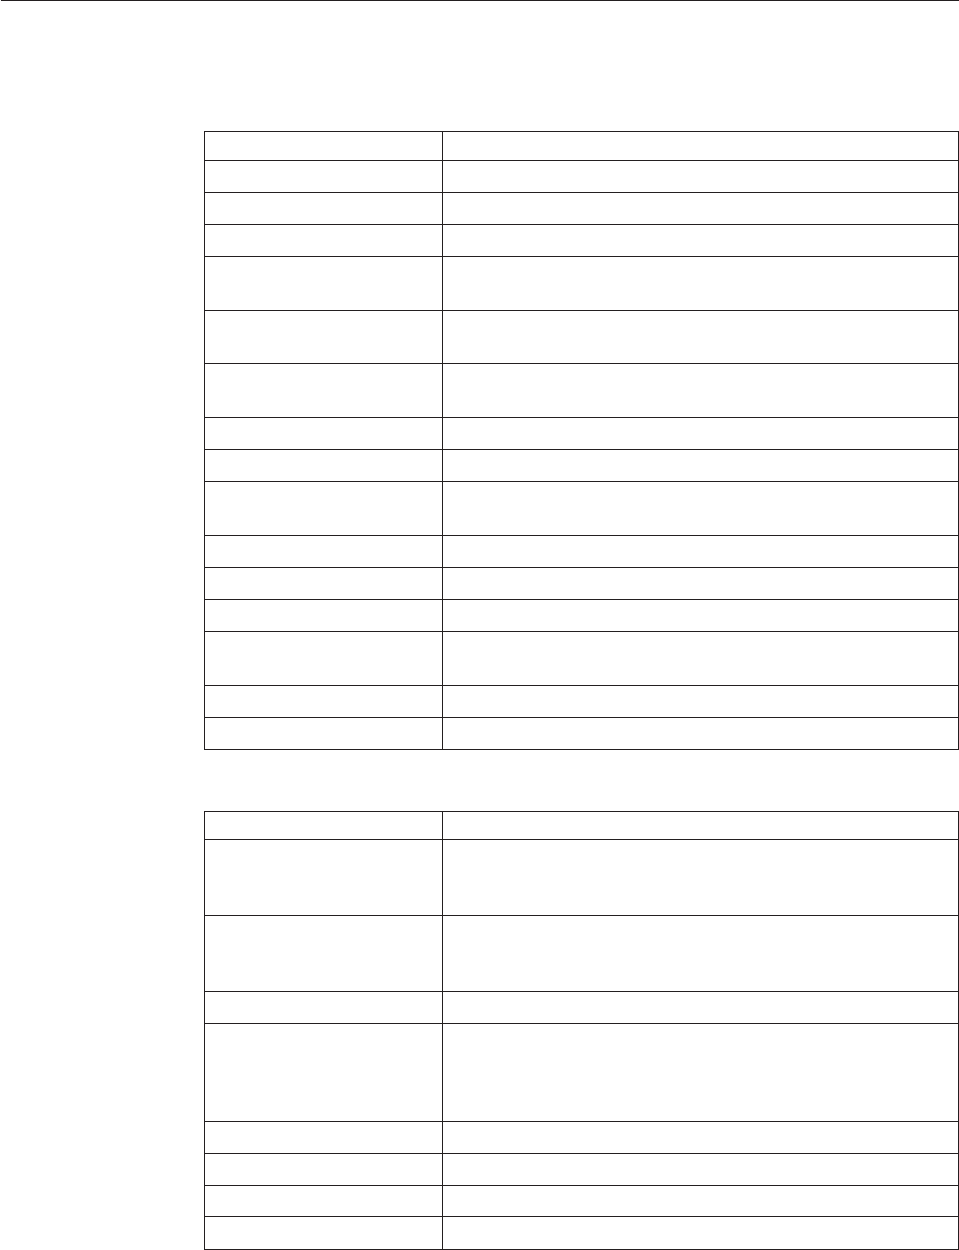
Logical Kits
You can view the kit components for a logical kit in this screen.
Table 246. Shipment Line Details, Shipment Line
Fields Description
Shipment Line # The shipment line number.
Shipment # The outbound shipment number.
Enterprise The Enterprise associated with the shipment.
Order # The order number to which the outbound shipment line
belongs.
Order Line # The order line number to which the outbound shipment line
belongs.
Release # The order release number to which the outbound shipment
line belongs.
Item ID The outbound shipment line item's item ID.
Description The item's description.
Is Hazardous Item Displays 'Y' if the item is a hazardous item, or 'N' if it is not a
hazardous item.
Product Class The outbound shipment line item's product class.
Unit of Measure The outbound shipment line item's unit of measure.
Requested Serial # The serial number requested in the order.
Quantity Number of requested units of the item included in the
shipment.
Over Ship Quantity Indicates quantity of an item over shipped.
Original Qty Indicates the original quantity on the order for the item.
Table 247. Shipment Line Details, Line Attributes
Fields Description
Segment Type Segment type of the item. A segment type indicates an
inventory category. Typical values are MTC - Made To
Customer or MTO - Made to Order.
Segment # Segment number of the item. A segment holds either the
specific buyer or specific order number that requires
dedication.
COO The country or region of origin.
FIFO # FIFO number is a date based inventory attribute that helps
understand the order in which stock arrived at the node. This
is used to send out items that arrived first than the ones that
arrived later.
Net Weight The net weight.
Net Weight UOM The net weight unit of measure.
Wave # The wave number.
Customer PO # The customer's purchase order number.
Chapter 12. Outbound Shipment Console Screens 175
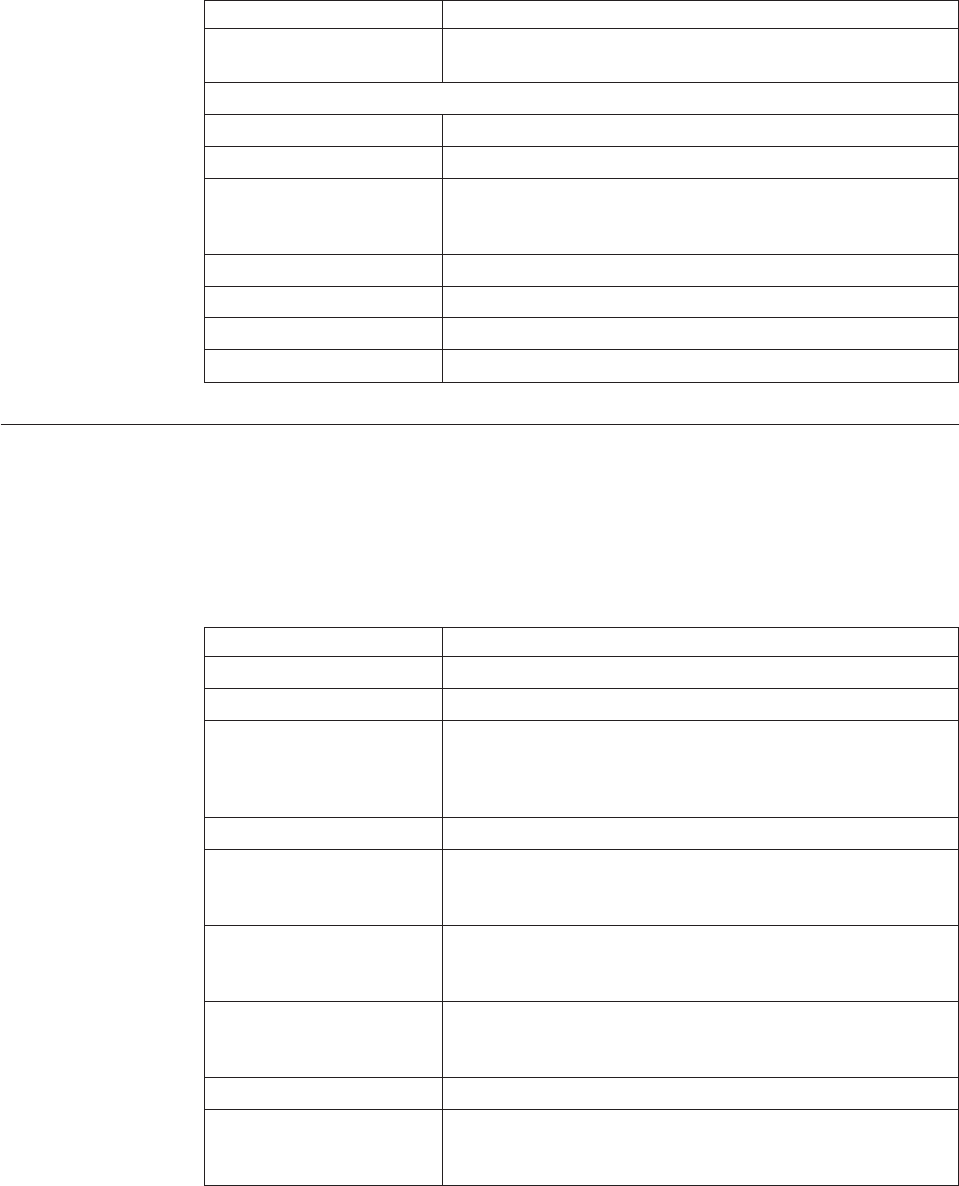
Table 248. Shipment Line Details, Kit Components
Actions Description
View Details This action takes you to the Shipment Line Details screen
where you can view the shipment line details.
Fields
Item ID The item ID for the SKU.
Description Description of the item.
PC Indicates the item's inventory categorization. Orders are
placed for an item and product class. Typical examples are
IRREGULAR, FD (Factory Defects).
UOM The item's unit of measure.
Qty Per Kit Number of units of the item included in the kit.
Wave # The wave number associated with the shipment line.
Quantity Number of units of the item included in the shipment.
Pack Containers
(Applicable only for IBM Sterling Distributed Order Management, IBM Sterling
Supply Collaboration, and IBM Sterling Reverse Logistics)
You can pack any unpacked items into containers for shipping in this screen.
Table 249. Pack Container, Shipment
Fields Description
Shipment # The outbound shipment number.
Shipper's Ref. # The outbound shipment reference number.
Plan # The delivery plan number the outbound shipment is
associated with, if applicable. Click this link to go to the
Select Delivery Plan screen where you can add an outbound
shipment to a delivery plan.
Enterprise The Enterprise associated with the shipment.
Buyer The identifier for the Buyer. Click this link to go to the
Organization Details screen where you can view the buyer
organization details.
Seller The identifier for the Seller. Click this link to go to the
Organization Details screen where you can view the seller
organization details.
Ship Node The node from where the outbound shipment ships. Click
this link to go to the Ship Node Detail screen where you can
view the node details for the shipment.
Destination The outbound shipment's destination.
Status The outbound shipment status. Click this link to go to the
Shipment Status Audits screen where you can view the
shipment's status audits.
176 Sterling Selling and Fulfillment Foundation: Distributed Order Management User Guide
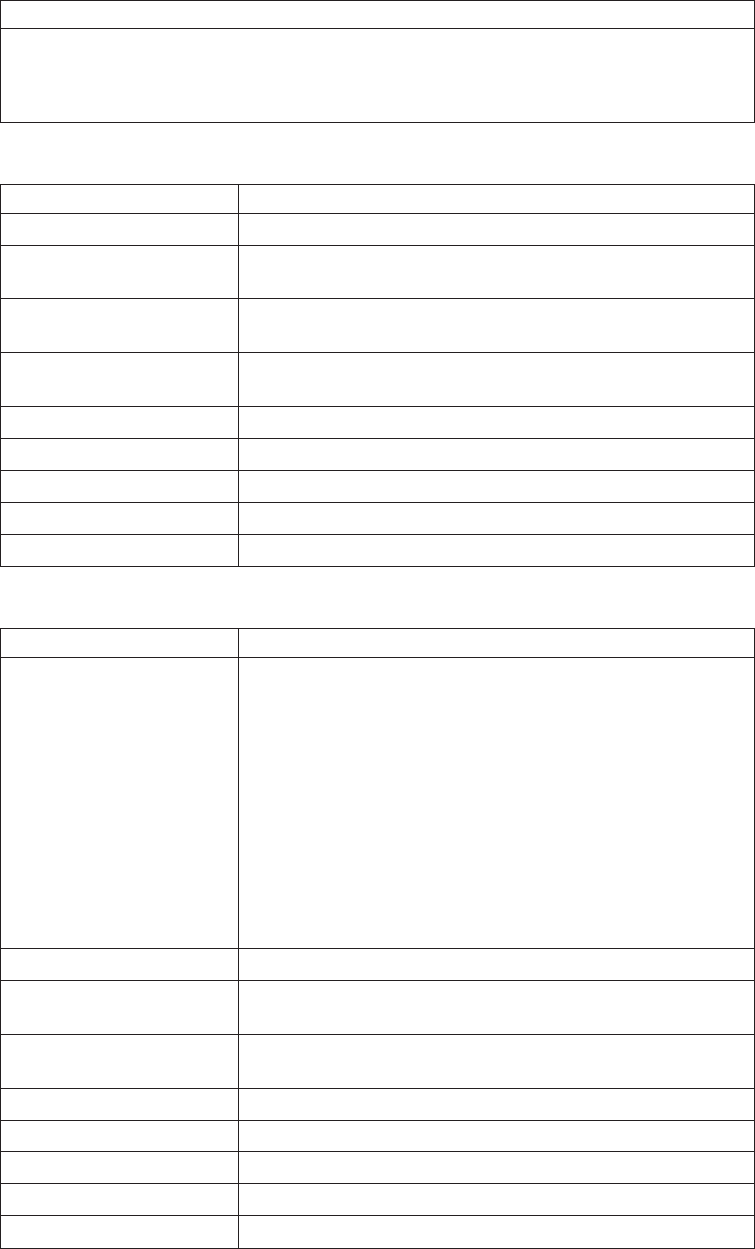
Table 250. Pack Container, Ship To
Description
The address the shipment is shipped to.
Click the Address Details icon to go to the Address Details screen where you can modify
the ship to address.
Table 251. Pack Container, Container Details
Fields Description
Container Type Select whether the container is a case or pallet.
Container SCM Enter the shipment container marking number of the case or
pallet.
Tracking # Enter the container's tracking number used to track the
container's status and location.
Declared Value Enter the declared value used to calculate customs charges.
This field is only applicable to international shipments.
Gross Weight Enter the weight of the container plus its contents.
Net Weight Enter the net weight of the container.
Height Enter the height of the container.
Width Enter the width of the container.
Length Enter the length of the container.
Table 252. Pack Container, Unpacked Items
Fields Description
Tag/Serial This column displays only if the item is tag-controlled or
serial tracked. The column label that displays is the name of
the unique identifier you have defined (for example, Lot #). If
you have defined more than one unique identifier, the label
that displays is Tag #. To view the details associated with the
container line, click the hypertext link.
The tag details for a tag-controlled item displays, if the ship
node is configured to capture tags in all operations performed
within the node, or if the buyer on a shipment mandates it as
a part of their inbound compliance. For more information
about capturing tag attributes, see the Sterling Selling and
Fulfillment Foundation: Application Platform Configuration Guide.
Order # The order number associated with the unpacked items.
Line # The order line number to which the line item packaged in the
container belongs to.
Release # The order release number to which the unpacked line item
belongs.
Item ID The item ID of the unpacked line item.
PC The product class of the unpacked line item.
UOM The unit of measure of the unpacked line item.
Quantity The quantity associated with the unpacked items.
Pack Quantity Enter the item quantity you can pack in the container.
Chapter 12. Outbound Shipment Console Screens 177

If the item is serial-controlled, an additional field is displayed to let you enter the
serial number.
Table 253. Pack Container, Serial Range
Field Description
Serial # Enter the serial number of the item.
Click the Add icon to add a new serial number.
Click the Toggle icon to go to the serial range panel, where
you can enter the serial range of the items.
From Serial # Enter the start serial number.
To Serial # Enter the end serial number.
Click the Add icon to add a new serial range.
While packing whenever there is requested serial defined in shipment lines of the
outbound shipment, the 'Enter serial range' button is not displayed in the screen.
For a serial tracked or serialized item, if secondary serials are defined and
secondary information is not provided, then in such scenario the 'Entry Serial
Range' button is not provided in the screen.
Packing a Container
You can pack any unpacked items into containers for shipping in this screen.
Print
You can print documents or labels and apply to an outbound shipment with the
help of this screen.
Table 254. Print
Fields Description
Print Service Name Choose the applicable document or label you want to print.
Printer Name Choose the printer to print the document or label from.
No. of Copies Enter the total number of copies of the document or label to
print.
Cancel Selected Shipments
This screen allows you to cancel the selected outbound shipments.
Table 255. Cancel Selected Shipments
Fields Description
Backorder cancelled
quantity
Select if the quantity that was cancelled from a shipment
must be backordered.
Cancellation Reason Code Select the applicable reason code for cancellation.
Reason Text Enter reason for cancellation of the outbound shipment.
178 Sterling Selling and Fulfillment Foundation: Distributed Order Management User Guide
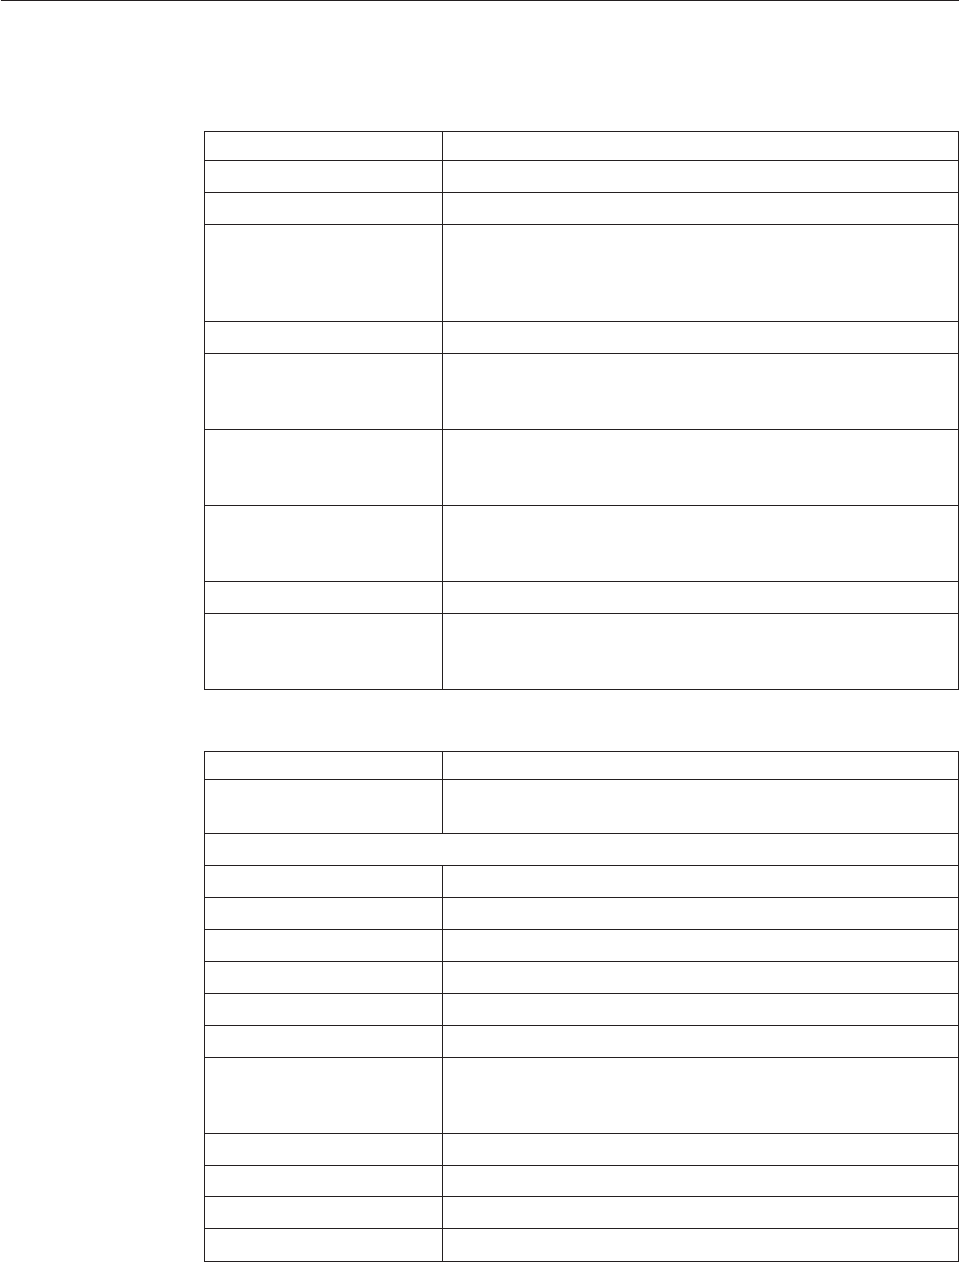
Split Shipment
Use this screen to split an outbound shipment.
Table 256. Split Shipment, Shipment
Fields Description
Shipment # The outbound shipment number.
Shipper's Ref. # The outbound shipment reference number.
Plan # The delivery plan number the outbound shipment is
associated with, if applicable. Click this link to go to the
Select Delivery Plan screen where you can add an outbound
shipment to a delivery plan.
Enterprise The Enterprise associated with the shipment.
Buyer The identifier for the Buyer. Click this link to go to the
Organization Details screen where you can view the buyer
organization details.
Seller The identifier for the Seller. Click this link to go to the
Organization Details screen where you can view the seller
organization details.
Ship Node The node from where the outbound shipment ships. Click
this link to go to the Ship Node Detail screen where you can
view the node details for the shipment.
Destination The outbound shipment's destination.
Status The outbound shipment status. Click this link to go to the
Shipment Status Audits screen where you can view the
shipment's status audits.
Table 257. Split Shipment, Shipment Lines
Actions Description
Split Lines This action takes you to the Split Shipment Lines where you
can split the selected shipment line or container lines.
Fields
Shipment Line # The line number on the shipment for the item.
Order # The order number to which the shipment line belongs
Line # The line number to which the shipment line belongs.
Release # The order release number to which the shipment line belongs.
Item ID The item ID for the SKU.
Description The item's description.
PC Indicates the item's inventory categorization. Orders are
placed for an item and product class. Typical examples are
IRREGULAR, FD (Factory Defects).
UOM The item's unit of measure.
Mark For The net weight of item expected
Quantity Number of units of the item included in the shipment.
Split Qty Enter the number of units of the item to be split.
Chapter 12. Outbound Shipment Console Screens 179
Table 258. Split Shipment, Shipment Containers
Actions Description
Split Containers This action takes you to the Split Shipment Lines where you
can split the selected shipment line or container lines.
Fields
Container # The container number.
Tracking # The tracking number used to track a container during the
shipment process.
Container SCM The shipment container marking.
Net Weight The container's net weight.
Gross Weight The container's total weight (including packaging).
Freight Charge The charge applied by the Carrier for shipping the container.
Split Shipment Lines
Use this screen to split a shipment or container lines in this screen.
Table 259. Split Shipment, Shipment
Fields Description
Shipment # The shipment number associated with the outbound
shipment is automatically generated and populated by the
system.
Enter the outbound shipment number, if applicable.
Create Alerts
You can create alerts for the selected outbound shipments in this screen. For field
value descriptions, see the Shipment Alerts, Shipment and Shipment Alerts, Alert
List tables.
Ship Node Detail
You can view the ship node details for an inbound shipment in this screen.
Table 260. Ship Node Details, Ship Node
Fields Description
Ship Node The node from where the outbound shipment ships.
Description A brief description of the ship node.
Interface The interface the node uses to communicate with the system.
Parent Organization The organization that owns the ship node.
Parent Organization Name The name of the parent organization.
Identified By Parent As The node ID as it is seen by the parent organization.
GLN The GLN number.
180 Sterling Selling and Fulfillment Foundation: Distributed Order Management User Guide
Table 261. Ship Node Detail, Ship Node Address
Description
The ship node's address.
Table 262. Ship Node Detail, Contact Address
Description
The contact address for the ship node.
Organization Details
You can view an organization's details in this screen.
Table 263. Organization Details
Field Description
Organization Information
Organization Code The code that identifies the organization.
Organization Name The name of the organization.
DUNS Number The unique nine-digit identification sequence which provides
unique identifiers of single business entities. Sterling Selling
and Fulfillment Foundation does not associate any logic with
the DUNS number.
Account Number With Hub If the organization is not the Hub, the account number that
the organization has with the Hub.
Primary Enterprise The primary enterprise of the organization.
Primary URL Enter the URL of the organization's Internet address, if
applicable.
Primary Contact Address
This inner panel displays the current primary contact address for this organization. Click
the Address Details icon to view the Primary Contact Address Details. For more
information about the Primary Contact Address Details window, see Address Details.
Corporate Address
This inner panel displays the current corporate address for this organization. Click the
Address Details icon to view the Corporate Address Details. For more information about
the Corporate Address Details window, see Address Details.
Select Delivery Plan
You can add an outbound shipment to a delivery plan in this screen.
Table 264. Select Delivery Plan
Fields Description
Plan # Enter the plan number of the delivery plan you want to add
the outbound shipment to.
Plan Name Enter the name of the delivery plan you want to add the
outbound shipment to.
Plan Date Enter the date range through which the delivery plan you are
adding the outbound shipment to is valid.
Chapter 12. Outbound Shipment Console Screens 181

Shipment Line Details
You can view an outbound shipment line details in this screen.
Table 265. Shipment Line Details, Shipment Line
Fields Description
Shipment Line # The shipment line number.
Shipment # The outbound shipment number.
Enterprise The Enterprise associated with the shipment.
Order # The order number to which the outbound shipment line
belongs.
Order Line # The order line number to which the outbound shipment line
belongs.
Release # The order release number to which the outbound shipment
line belongs.
Item ID The outbound shipment line item's item ID.
Description The item's description.
Is Hazardous Item Displays 'Y' if the item is a hazardous item, or 'N' if it is not a
hazardous item.
Product Class The outbound shipment line item's product class.
Unit of Measure The outbound shipment line item's unit of measure.
Requested Serial # The serial number requested in the order.
Quantity Number of requested units of the item included in the
shipment.
Over Ship Quantity Indicates quantity of an item over shipped.
Original Qty Indicates the original quantity on the order for the item.
Table 266. Shipment Line Details, Line Attributes
Fields Description
Segment Type The item's segment type. A segment type indicates an
inventory category. Typical values are MTC - Made To
Customer or MTO - Made to Order.
Segment The item's segment number. A segment holds either the
specific buyer or specific order number that requires
dedication.
COO The country or region of origin.
FIFO # The FIFO number is a date based inventory attribute that
helps understand the order in which stock arrived at the
node. This is used to send out items that arrived first than
the ones that arrived later.
Net Weight The net weight.
Net Weight UOM The net weight unit of measure.
Wave # The wave number.
Customer PO # The customer's purchase order number.
182 Sterling Selling and Fulfillment Foundation: Distributed Order Management User Guide
Table 267. Shipment Line Details, Requested Tag
Fields Description
Tag Identifiers The requested tag identifiers for this shipment line.
Tag Attributes The requested tag attributes for this shipment line.
Table 268. Shipment Line Details, Actual Tag
Actions Description
Delete This action deletes the specified tag quantity from the
shipment line.
Fields
The attributes shown here depend on the tag identifiers and attributes configured.
Quantity Indicates the quantity on the order with this tag criteria.
Add Release
You can add an order release line to be included in an outbound shipment in this
screen.
Create Wave
You can create wave for the selected shipment group in this screen.
Table 269. Create Wave
Fields Description
Node Node associated with the wave.
Create New Wave With
Shipment Group
Select the shipment group for the wave.
Add To Wave # Choose this option to add shipment to an existing wave
number.
You can also click the Lookup icon to select a wave number.
Consider Select one of the following options:
All Eligible Shipments - Choose this to select all the
shipments.
First Shipments based on Expected Ship Date - Choose this to
select the first shipments based on the expected ship date.
Containers
A container is the physical packaging of outbound shipment line items included in
a shipment. Cartons and pallets are examples of containers. You can use the
Outbound Shipment Console to search for individual containers and view details
such as container dimensions and line items packed in the container.
Chapter 12. Outbound Shipment Console Screens 183
Container Search By All Attributes
You can search for containers by all attributes with the help of this screen.
Table 270. Container Search By All Attributes
Fields Description
Document Type Select the appropriate document type to search for, if
applicable
Order # Enter the order number you are searching for, if applicable.
Shipment # Enter the outbound shipment number you are searching for,
if applicable.
Container # Enter the container number you are searching for, if
applicable.
Container Type Enter the type of containers you are searching for, if
applicable.
Tracking # Enter the tracking number you want to search for containers
under, if applicable.
Item ID Enter the item ID included in the containers you are
searching for, if applicable.
Container SCM Enter the container SCM number you are searching for, if
applicable.
Has Hazardous Items Select this check box to search for containers containing
hazardous items, if applicable.
Containers With Logical
Kits Only
Select this if you want to search for containers only with
logical kits, if applicable.
Max Records Enter the maximum number of outbound shipments you
want returned from your search.
Do not use spaces before or after any text you enter in the search fields, as this
may result in inconsistent or inaccurate results.
The Container List screen displays as a result of outbound container search by all
attributes.
Container Search By Status
You can search for containers that fall within a particular status with the help of
this screen.
Table 271. Container Search By Status
Fields Description
Document Type Select the appropriate document type to search for, if
applicable.
Node Select the node for which you want to search.
Shipment # Enter the outbound shipment number you are searching for,
if applicable.
Container # Enter the container number you are searching for, if
applicable.
184 Sterling Selling and Fulfillment Foundation: Distributed Order Management User Guide
Table 271. Container Search By Status (continued)
Fields Description
Container Type Enter the type of containers you are searching for, if
applicable.
Container Contains Select the container quantity you are searching for, if
applicable.
Status Select the status range of the container you want to search
for, if applicable.
Carrier/Service Select the carrier/service you are searching for, if applicable.
Container Group Select the container group you are searching for, if applicable.
Wave # Enter the wave number you are searching for, if applicable.
Outermost Containers Only Select check box to search for outermost containers only, if
applicable.
Unmanifested Containers
Only
Select check box to search for unmanifested containers only, if
applicable.
Max Records Enter the maximum number of outbound shipments you
want returned from your search.
Do not use spaces before or after any text you enter in the search fields, as this
may result in inconsistent or inaccurate results.
The Container List screen displays as a result of outbound container search by
status.
Container List
The Container List window displays the results of a container search. You can
perform actions on a single container or multiple containers by selecting the check
boxes of the containers you want to perform an action on and choosing the
applicable action from the action bar.
Table 272. Container List
Actions Description
View Details This action takes you to the Container Details screen where
you can view the container details.
Pack/Unpack This action takes you to the Pack or Unpack screen where
you can pack or unpack a container.
Print This action takes you to the Print screen where you can print
the container's documents or labels.
Delete This action lets you delete an inbound container.
Void Tracking# This action lets you void a container's tracking number.
Fields
Container # The container number.
Shipment # The shipment number of the shipment the container belongs
to.
Status The container status.
Manifested Indicates whether the container is manifested.
Container Type Indicates whether it is a Pallet or Carton.
Chapter 12. Outbound Shipment Console Screens 185
Table 272. Container List (continued)
Actions Description
Tracking # The tracking number used to track a container during the
shipment process.
Container SCM The shipment container marking.
Ship Date The date the container ships on.
Container Details
The Container Details screen provides container information associated with the
shipment. The actions that can be performed in the Container Details screen are
explained in the following tables.
Table 273. Container Details, Container
View Icon Description
Audit This icon takes you to the Container Status Audits
where you can view the container's status audits.
Activity Demand This icon takes you to the Container Activity List
where you can view activities performed against an
outbound container.
Actions
Pack/Unpack This action takes you to the Pack or Unpack screen
where you can pack or unpack a container.
Print This action takes you to the Print screen where you
can print the shipping documents or labels.
Void Tracking # This action takes lets you void a container's tracking
number.
View Return Tracking Numbers This action takes you to the Container Return
Tracking Numbers screen where you can view the
list of return tracking numbers associated to a
container.
Fields
Container # The container number.
Container Type The type of container used. For example, Carton or
Pallet.
Container Group The container group to which the container belongs
to. Valid values are: SHIPMENT, LOAD, or
INVENTORY.
Parent Container # The parent container #. This field displays only if
the container is a child container.
Parent Container Type # The type of parent container used. For example,
Carton or Pallet. This field displays only if the
container is a child container.
Parent Container Group # The container group to which the container belongs
to. Valid values are: SHIPMENT, LOAD, or
INVENTORY. This field displays only if the
container is a child container.
Container SCM The shipment container marking number of the case
or pallet.
186 Sterling Selling and Fulfillment Foundation: Distributed Order Management User Guide
Table 273. Container Details, Container (continued)
View Icon Description
Shipment # The outbound shipment number.
Load # The load number associated with the container. This
field displays only if the container belongs to a load.
Click this link to go to the Load Details screen to
view the load details associated with the container.
Table 274. Container Details, Execution Details
Fields Description
Container Location Indicates the location where the container is available.
Container Status Indicates the current status of the container.
Is Manifested Indicates whether the container is manifested.
Table 275. Container Details, Container Info
Fields Description
Carrier/Service The Carrier and Carrier service shipping the container.
Tracking # The container's tracking number used to track the container's
status and location.
Gross Weight The weight of the container plus its contents.
COD Pay Method The COD payment type.
Return Tracking # The return tracking number associated with the container.
Net Weight The container's content's weight.
COD Amount The COD amount.
Size The size of the container.
Actual Weight The actual weight of the container.
Actual Freight Charge The actual freight charges for the carrier or service
Length The length of the container.
Billed Weight The billed weight.
Special Services Surcharges The special services surcharges.
Width The width of the container.
Has Hazardous Items Indicates if the container contains hazardous items.
Declared Insurance Value The value used to calculate customs charges. This field is
only applicable to international shipments.
Height The height of the container.
Chapter 12. Outbound Shipment Console Screens 187
Table 276. Container Details, Container Line Details
Fields Description
Tag Details This column displays only if the item is tag-controlled or
serial tracked. The column label that displays is the name of
the unique identifier you have defined (for example, Lot #). If
you have defined more than one unique identifier, the label
that displays is Tag #.
The tag details for a tag-controlled item displays, if the ship
node is configured to capture tags in all operations performed
within the node, or if the buyer on a shipment mandates it as
a part of their inbound compliance. For more information
about capturing tag attributes, see the Sterling Selling and
Fulfillment Foundation: Application Platform Configuration Guide.
Click this link to go to the “Container Return Tracking
Numbers” on page 189 screen to the serial details for the
container line.
Order # The order number to which the line item packaged in the
container belongs.
Line # The order line number of the line item packaged in the
container.
Release # The order release number to which the line item packaged in
the container belongs.
Item ID The item ID of the line item packaged in the container.
PC The product class of the line item packaged in the container.
UOM The unit of measure of the line item packaged in the
container.
Description The item's description.
Quantity The quantity of the line item to be packaged into the
container.
Packed Quantity The actual quantity of the line item packaged into the
container.
Table 277. Container Details, Inner Pack Details
Fields
Tag Details Click the Plus icon to view and hide tag information of an
inner pack.
The tag details for a tag-controlled item displays, if the ship
node is configured to capture tags in all operations performed
within the node, or if the buyer on a shipment mandates it as
a part of their inbound compliance. For more information
about capturing tag attributes, see the Sterling Selling and
Fulfillment Foundation: Application Platform Configuration Guide.
Item ID The item's item ID.
PC The item's product class.
UOM The item's unit of measure.
Description A brief description of the item.
Inner Pack Quantity The item quantity contained in each inner pack.
No Of Inner Packs The total number of inner packs packaged into the container.
188 Sterling Selling and Fulfillment Foundation: Distributed Order Management User Guide
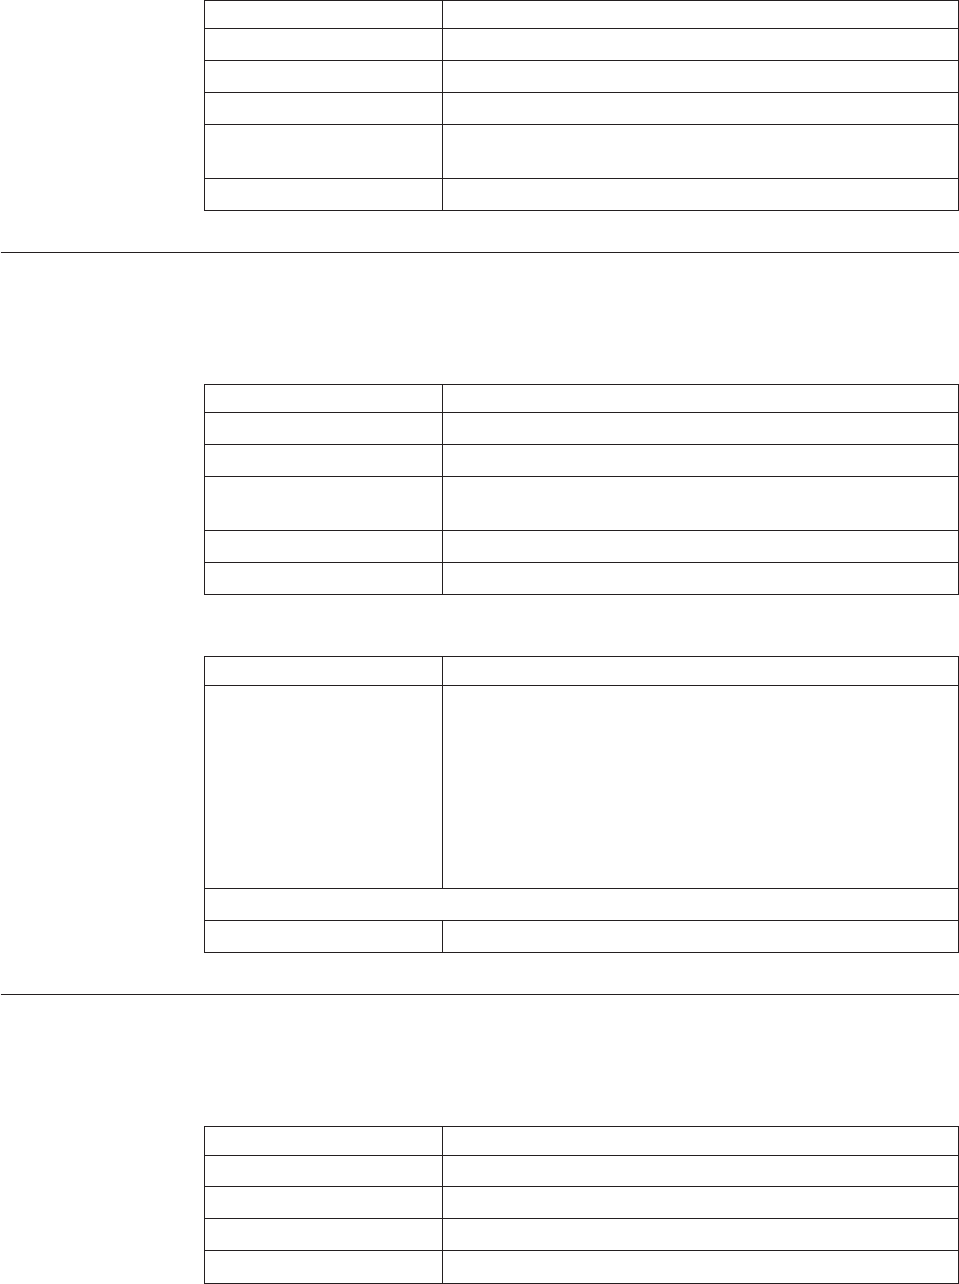
Table 278. Container Details, Child Containers
Fields Description
Container # The container number.
Status The container status.
Container Type The type of container used. For example, Carton or Pallet.
Tracking # The container's tracking number used to track the status and
location of the container.
Container SCM The shipment container marking.
Container Return Tracking Numbers
You can view the outbound container return tracking nu
Table 279. Container Return Tracking Numbers, Container
Fields Description
Container # The container number.
Container Type The type of container used. For example, Carton or Pallet.
Container Group The container group to which the container belongs to. Valid
values are: SHIPMENT, LOAD, or INVENTORY.
Container SCM The shipment container marking number of the case or pallet.
Shipment # The outbound shipment number.
Table 280. Container Return Tracking Numbers, Container Return Tracking Numbers
Actions Description
Print This action takes you to the Print screen where you can print
the return labels corresponding to the return tracking
numbers.
You must select the Return Tracking Number and click Print.
If you select the ReprintCarrierLabel service, the return label
will be reprinted.
Note: You must select the Return Tracking Numbers one at a
time.
Fields
Return Tracking Number Displays the outbound container return tracking numbers.
Serial Details
You can view an outbound container serial details in this screen.
Table 281. Serial Details, Serial Information
Fields Description
Node Node associated with the item.
Location Location associated with the item.
Case ID Case LPN associated with the container.
Pallet ID Pallet LPN associated with the container.
Chapter 12. Outbound Shipment Console Screens 189

Table 281. Serial Details, Serial Information (continued)
Fields Description
Serial # The serial number associated with the container items.
Table 282. Serial Details, Child Serials
Fields Description
Secondary Serial #1 Component serial number of the item.
Secondary Serial #2 Component serial number of the item.
Secondary Serial #3 Component serial number of the item.
Secondary Serial #4 Component serial number of the item.
Secondary Serial #5 Component serial number of the item.
Secondary Serial #6 Component serial number of the item.
Secondary Serial #7 Component serial number of the item.
Secondary Serial #8 Component serial number of the item.
Secondary Serial #9 Component serial number of the item.
Container Status Audits
You can view any status modifications performed against an outbound container
status in this screen.
Table 283. Container Status Audits, Container
Fields Description
Container # The outbound container number.
Container Type The outbound container type. Valid values are: Pallet or Case.
Container Group The container group to which the container belongs to. Valid
values are: SHIPMENT, LOAD, or INVENTORY.
Parent Container # The parent container number.
This field displays only if the container is a child container.
Parent Container Type The type of parent container used. For example, Case or
Pallet.
This field displays only if the container is a child container.
Parent Container Group The container group to which the container belongs. Valid
values are: SHIPMENT, LOAD, or INVENTORY.
This field displays only if the container is a child container.
Container SCM The shipment container marking number of the case or pallet.
Shipment # The outbound shipment number.
Click this link to go to the Shipment Details screen and view
the outbound shipment details.
Table 284. Container Status Audits, Container Status Audits
Fields Description
Modified By The user who performed the modification.
190 Sterling Selling and Fulfillment Foundation: Distributed Order Management User Guide

Table 284. Container Status Audits, Container Status Audits (continued)
Fields Description
Old Status The outbound shipment status before the status modification.
Old Status Date The date the outbound shipment entered the old status.
New Status The outbound shipment status after the status modification.
New Status Date The date the status modification was made.
Reason Code The reason for the modification.
Reason Text Additional information as to why the modification was made.
Container Activity List
You can view details about the outbound container activities in this screen.
Table 285. Container Activity List, Container
Fields Description
Container # The outbound container number.
Container Type The outbound container type. Valid values are: Pallet or Case.
Container Group The group to which the container belongs. Valid values are:
SHIPMENT, LOAD, or INVENTORY.
Parent Container # The parent container number.
This field displays only if the container is a child container.
Parent Container Type The type of parent container used. For example, Case or
Pallet.
This field displays only if the container is a child container.
Parent Container Group The group to which the parent container belongs. Valid
values are: SHIPMENT, LOAD, or INVENTORY.
This field displays only if the container is a child container.
Container SCM The shipment container marking number of the case or pallet.
Shipment # The outbound shipment number identifying the shipment to
which this container belongs.
Click this link to go to the Shipment Details screen and view
the details about this outbound shipment.
Table 286. Container Activity List, Container Activities
Fields Description
Date The date and time when the activity was performed for this
container.
Recorded By The user who performed the activity.
Activity Code Identifies the activity that was performed.
Location ID Indicates the location where the activity was performed in the
node.
Node Indicates the node where the activity was performed.
Address Indicates the address where the activity was performed.
Chapter 12. Outbound Shipment Console Screens 191
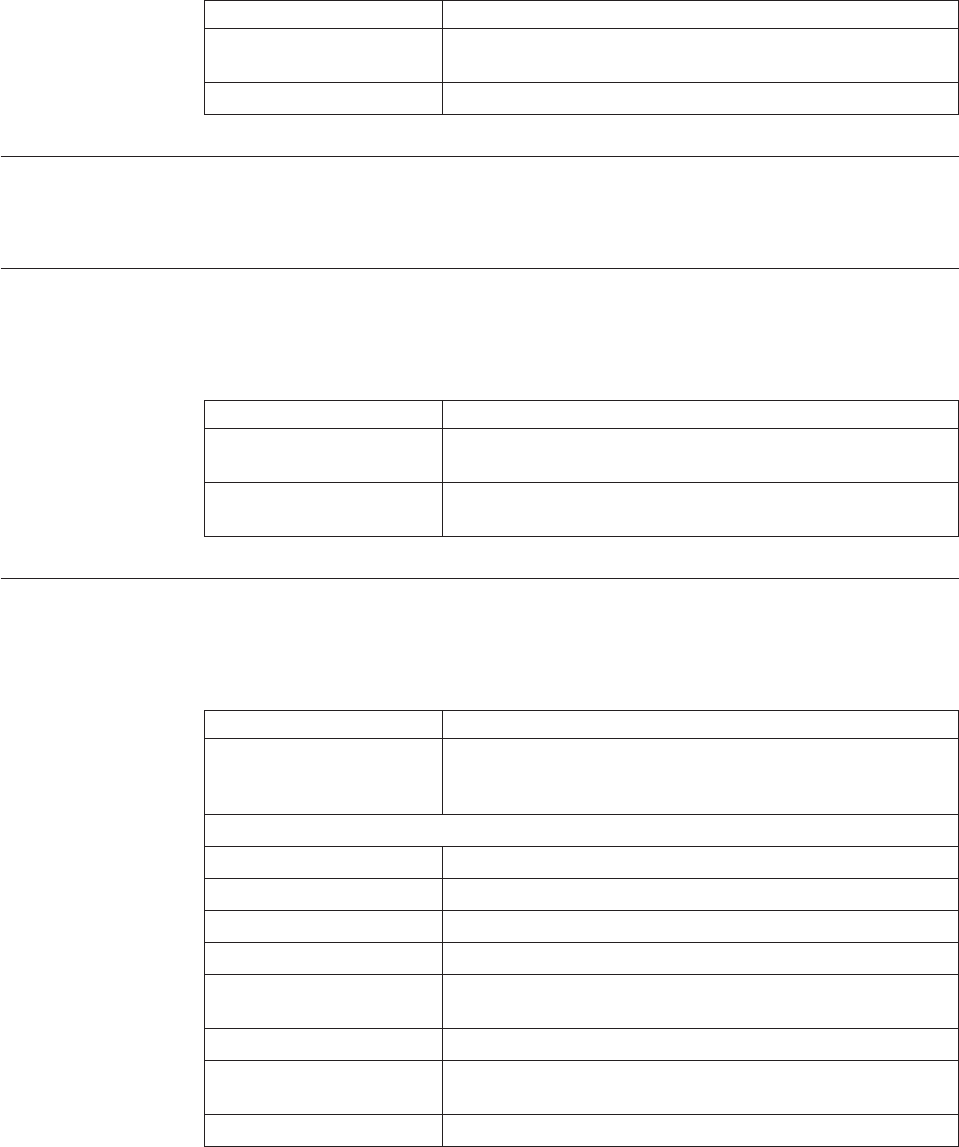
Table 286. Container Activity List, Container Activities (continued)
Fields Description
Is An Exception Indicates if the activity recorded is an exception to typically
performed activities.
Notes Any additional information about the activity execution.
Pack or Unpack
You can pack or unpack a container in this screen.
Delete Selected Containers
You can delete selected container from the shipment in this screen.
Table 287. Delete Selected Containers, Delete
Fields Description
Remove quantity from
shipment line
Select the check box to remove the quantity from shipment
line.
Backorder removed
quantity
Select the check box to remove backorder quantity.
Modify Containerization
You can modify the containerized quantity in this screen.
Table 288. Modify Containerization, Container
View Icon Description
Audit This icon takes you to the Container Status Audits screen
where you can view a list of status audits that you modified
for an outbound container.
Fields
Container # The container number.
Shipment # The outbound shipment the container belongs to.
Container Type The type of container used. For example, Carton or Pallet.
Ship Date The date by which the container must ship.
Container Group The container group to which the container belongs to. Valid
values are: SHIPMENT, LOAD, or INVENTORY.
Manifested Indicates whether the container is manifested.
Remove quantity from
shipment line
Select check box to remove quantity from the shipment line.
Ship To The address the container is shipped to.
192 Sterling Selling and Fulfillment Foundation: Distributed Order Management User Guide

Table 289. Modify Containerization, Ship To
Description
The address the shipment is shipped to.
Click the Address Details icon to go to the Address Details screen where you can modify
the ship to address.
Table 290. Modify Containerization, Container Info
Fields Description
Carrier/Service The Carrier and Carrier service used to ship the container.
Tracking # The container's tracking number used to track the container's
status and location.
Pallet/Carton SCM The shipment container marking number of the pallet or
carton.
Declared Value The value used to calculate customs charges. This field is
only applicable to international shipments as it is insured.
Gross Weight The gross weight of the container.
Actual Weight The actual weight of the container.
Size The size of the container.
Length The length of the container.
Width The width of the container.
Height The height of the container.
Net Weight The net weight of the container.
Table 291. Modify Containerization, Container Line Details
Fields Description
Tag Details This column displays only if the item is tag-controlled or
serial tracked. The column label that displays is the name of
the unique identifier you have defined (for example, Lot #). If
you have defined more than one unique identifier, the label
that displays is Tag #. To view the details associated with the
container line, click the hypertext link.
The tag details for a tag-controlled item displays, if the ship
node is configured to capture tags in all operations performed
within the node, or if the buyer on a shipment mandates it as
a part of their inbound compliance. For more information
about capturing tag attributes, see the Sterling Selling and
Fulfillment Foundation: Application Platform Configuration Guide.
Order # The order number to which the line item packaged in the
container belongs.
Line # The container line number and the order line number of the
line item packaged in the container.
Release # The order release number to which the line item packaged in
the container belongs.
Item ID The item ID of the line item packaged in the container.
PC The product class of the line item packaged in the container.
UOM The unit of measure of the line item packaged in the
container.
Chapter 12. Outbound Shipment Console Screens 193

Table 291. Modify Containerization, Container Line Details (continued)
Fields Description
Description Description of the item.
Ship By Date The date by which the container line must be shipped.
Containerized Quantity Enter or modify the containerized quantity. If containers are
short picked, you can resolve short pick by modifying the
containerized quantity. For more information, see the Resolve
Short Picked Containers screen.
Packed Quantity The quantity of the line item packaged in the container.
Table 292. Modify Containerization, Execution Details
Fields Description
Location The outbound container present in location.
Status The outbound container execution status.
Table 293. Modify Containerization, Child Containers
Fields Description
Container # The container number.
Status The container status.
Container Type The type of container used. For example, Carton or Pallet.
Tracking # The container's tracking number used to track the status and
location of the container.
Container SCM The shipment container marking.
The Modify Container action is only available when that container belongs to a
Sterling Warehouse Management System Node.
Resolve Short Picked Containers
About this task
Short picked containers can be resolved manually by requesting the system to pack
additional inventory into the containers or modifying the containerization quantity
on the container and backordering due to inadequate inventory.
Procedure
1. Click Short Picked link in the Container Details screen.
2. Modify the Containerized Quantity.
3. Click Save. The status changes to Short Pick Resolved.
Dock Appointment Search By All Attributes
Use this screen to search for appointment by all attributes.
Table 294. Dock Appointment Search By All Attributes
Fields Description
Node The node associated with the dock is displayed.
194 Sterling Selling and Fulfillment Foundation: Distributed Order Management User Guide
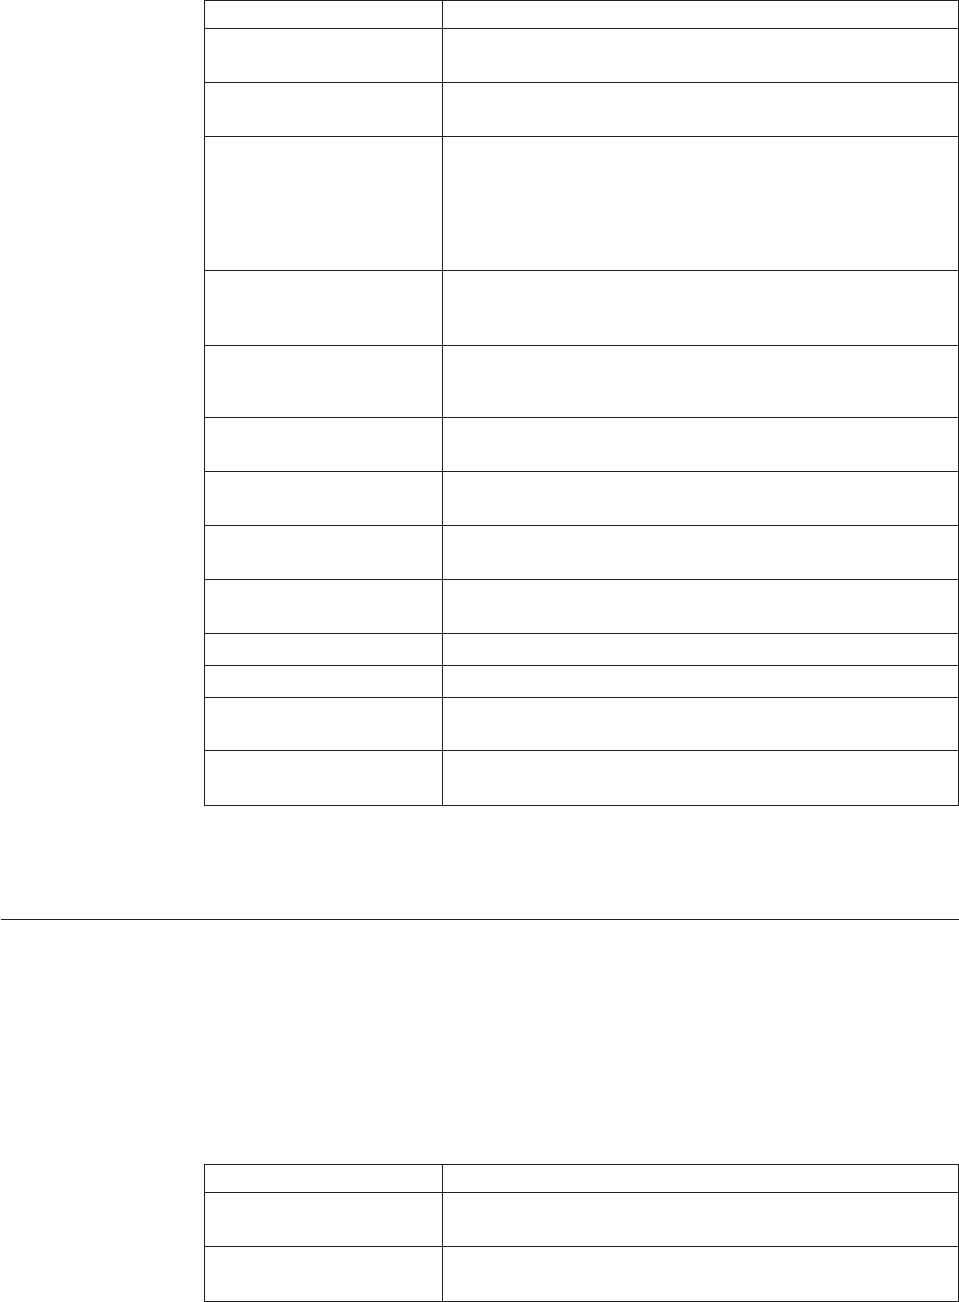
Table 294. Dock Appointment Search By All Attributes (continued)
Fields Description
Enterprise Select the enterprise for which you are searching for a dock
appointment, if applicable.
Across Enterprises Select this if you are searching for a dock appointment across
all enterprises, if applicable.
Start Date The start date is defaulted to the current date.
Enter the start date of the appointment you are searching for,
if applicable.
Choose the calendar lookup to change the date.
Number of Days To
Display
Enter the maximum number of days to be displayed on the
dock schedule calendar as a result of your search, if
applicable.
Location Enter the dock location, if applicable.
Choose the lookup option to search for dock locations.
Inbound Delivery Select this checkbox to search for an inbound dock, if
applicable.
Outbound Pickup Select this checkbox to search for an outbound dock, if
applicable.
Appointment # Enter the appointment number you are searching for, if
applicable.
Shipment # Enter the shipment number you are searching for, if
applicable.
Order # Enter the order number you are searching for, if applicable.
Load # Enter the load number you are searching for, if applicable.
Carrier/Service Select the carrier or service you want to search for shipments,
if applicable.
BOL # Enter the bill of lading number you are searching for, if
applicable.
The Dock Schedule Details screen is displayed as a result of dock appointment
search by all attributes.
Dock Schedule Details
This screen provides visibility to the dock appointment calendar, and displays
inbound, outbound, and both inbound and outbound docks with their:
vAvailable time slots for creating new appointments.
vUnavailable time slots due to calendar constraints.
vUnavailable time slots due to appointments already taken.
Table 295. Dock Schedule Details, Dock Availability
Actions Description
Manage Dock Group This action button takes you to the Dock Group Details
screen.
Zoom In Click this action button to view more definitive details of the
appointment calendar. Two levels of Zoom In are supported.
Chapter 12. Outbound Shipment Console Screens 195
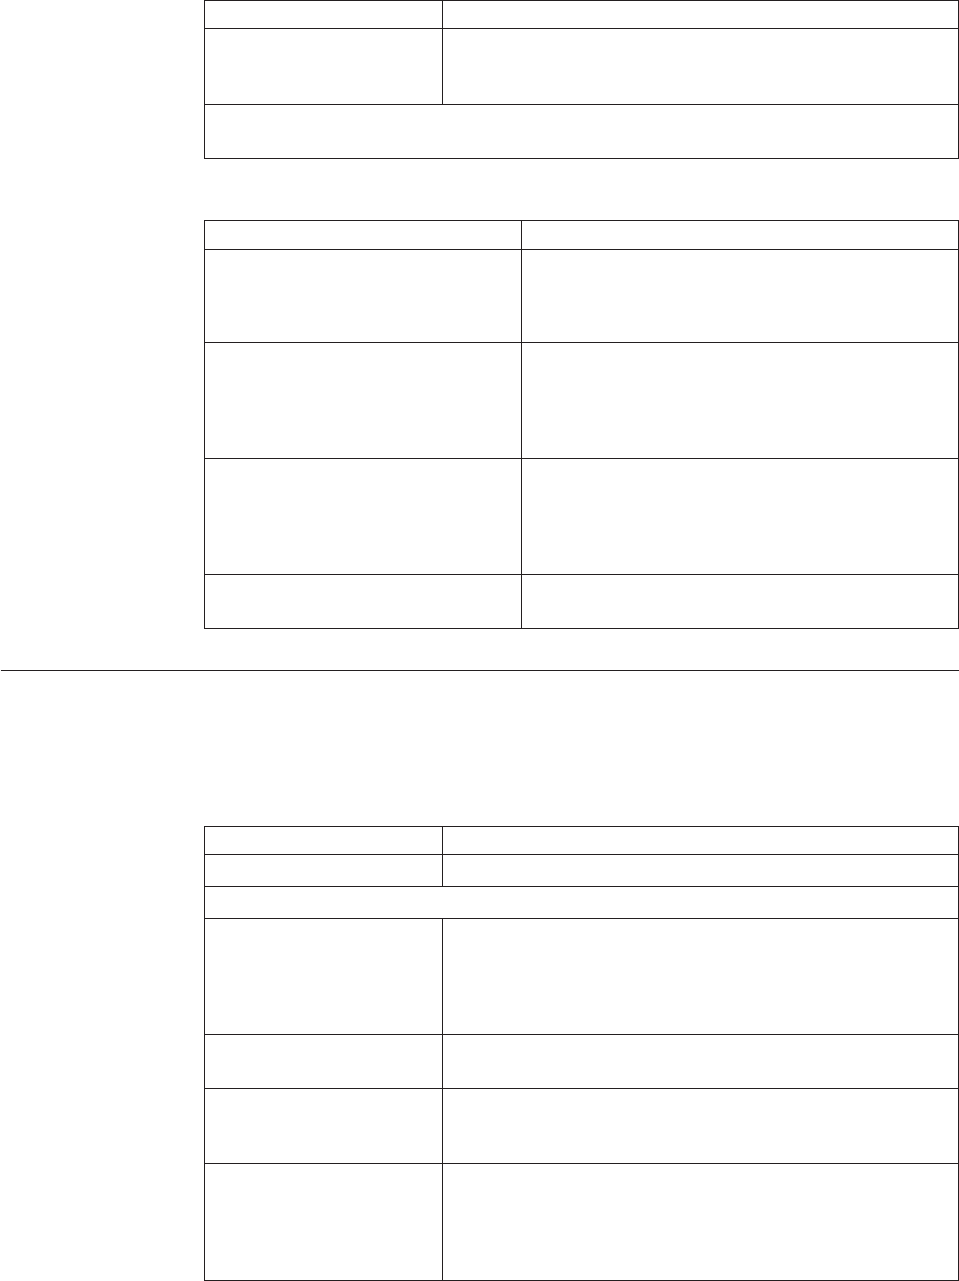
Table 295. Dock Schedule Details, Dock Availability (continued)
Actions Description
Zoom Out Click this action button to view a larger area of the
appointment calendar. Two levels of Zoom Out are
supported.
Displays the dock locations for nodes that are of the dock type INBOUND, OUTBOUND,
and BOTH.
Table 296. Dock Schedule Details, Legend
Color Description
Blue Indicates an appointment for the searched criteria.
Click a slot to modify an existing appointment. The
Dock Appointment screen displays.
Cyan Indicates appointments that do not match the
searched criteria.
Click a slot to modify an existing appointment. The
Dock Appointment screen displays.
Gray Indicates free slots for which new appointments can
be taken.
Click a slot to create a new dock appointment. The
Dock Appointment screen displays.
Black Indicates the unavailable slots due to the calendar
constraints.
Dock Appointment
You can create new appointments or modify existing appointments with the help
of this screen.
Table 297. Dock Appointment, Appointment Details
Actions Description
Cancel Click this action button to cancel an appointment.
Fields
Appointment # The appointment number associated with the dock displays,
if applicable.
The appointment number displays only for the existing
appointments.
Location The dock location for which you chose to take an
appointment displays here.
Appointment Type By default, the Outbound Pickup appointment type is
selected for outbound dock locations, and Inbound Delivery
for inbound and both inbound and outbound dock locations.
Start Date This start date is defaulted with the date of the selected slot.
Enter the start date on which you want to take an
appointment or choose the calendar lookup to change the
date.
196 Sterling Selling and Fulfillment Foundation: Distributed Order Management User Guide
Table 297. Dock Appointment, Appointment Details (continued)
Actions Description
Start Time This start time is defaulted with the time of the selected slot.
Enter the start time of the appointment or choose the time
lookup to change the time.
Shipment # Enter the shipment number you want to associate with the
dock appointment, if applicable.
Choose the Lookup icon to search for shipments. The
shipment's weight, volume, number of cases and number of
pallets automatically displays.
Load # Enter the load number you want to associate with the dock
appointment, if applicable.
Choose the Lookup icon to search for loads. The number of
cases and number of pallets associated with the load
automatically displays.
Order # Enter the order number you want to associate with the dock
appointment, if applicable.
BOL # Enter the bill of lading number you want to associate with
the dock appointment, if applicable.
PRO # Enter the PRO number you want to associate with the dock
appointment, if applicable.
Carrier Select the carrier for which you want to take an appointment,
if applicable.
Notes Enter any additional information associated with the dock
appointment, if applicable.
Weight Enter the weight of the shipment, if applicable.
Volume Enter the volume of the shipment, if applicable.
No Of Cases Enter the number of cases contained in the shipment or load,
if applicable.
No Of Pallets Enter the number of pallets contained in the shipment or
load, if applicable.
Estimate End Time Click this button to calculate and display the estimated end
time in the End Time field. The estimated end time is
calculated based on SAM definition for the productivity type,
LOADING/UNLOADING
End Time To specify a pre-determined end time, enter the end time.
Choose the time lookup to change the time.
Click Save to save the dock appointment.
Chapter 12. Outbound Shipment Console Screens 197

Dock Group Details
You can enter constraints on the maximum number of appointments that can be
taken for the group of docks associated with a node.
Table 298. Dock Group Details, Dock Group
Field Description
Node The node associated with the docks displays.
Table 299. Dock Group Details, Dock Group Max No. of Appointments
Action Description
Remove Click this action button to remove the selected appointment
constraints.
Fields
Start Time Indicates the start time of the time slot for which the
maximum number of appointment constraint needs to be
created.
Click the Add icon to create an appointment constraint.
End Time Indicates the end time of the time slot for which the
maximum number of appointment constraint needs to be
created.
Sunday Enter the maximum number of appointments you can take on
this day in the time window across dock locations.
Monday Enter the maximum number of appointments you can take on
this day in the time window across dock locations.
Tuesday Enter the maximum number of appointments you can take on
this day in the time window across dock locations.
Wednesday Enter the maximum number of appointments you can take on
this day in the time window across dock locations.
Thursday Enter the maximum number of appointments you can take on
this day in the time window across dock locations.
Friday Enter the maximum number of appointments you can take on
this day in the time window across dock locations.
Saturday Enter the maximum number of appointments you can take on
this day in the time window.
Click Save to save the maximum number of dock group appointment constraints.
View Holds
You can view holds that are applied to the selected outbound shipments in this
screen.
Table 300. View Holds, Shipment
Fields Description
Shipment # The outbound shipment number.
Shipper's Ref. # The outbound shipment reference number.
198 Sterling Selling and Fulfillment Foundation: Distributed Order Management User Guide
Table 300. View Holds, Shipment (continued)
Fields Description
Plan # The delivery plan number the outbound shipment is
associated with.
Enterprise The enterprise associated with the outbound shipment.
Buyer The identifier for the buyer.
Seller The identifier for the seller.
Ship Node The node from where the outbound shipment is shipped.
Receiving Node The node that is receiving the outbound shipment.
Status The outbound shipment status.
Release # The shipment release number to which the outbound
shipment line belongs.
Has Hazardous Items Indicates if the outbound shipment contains hazardous items.
Merge Node If you have shipment lines coming from multiple nodes and
want to consolidate them into one load, enter a node at
which you want all dependent shipment lines to be
consolidated with the parent shipment line.
Note: Merge Node is only relevant in a Deliver Together
dependency.
Table 301. View Holds, Shipment Holds
Actions Description
Add Holds This action takes you to the Add Holds screen where you can
add holds to the selected outbound shipment.
Fields
Hold Description A brief description of the hold.
Choose the View History icon to View History of the
shipments that are held.
Hold Status The current status of the hold.
Hold Comment Any additional comments for the hold.
Action Select the action that you want to apply to the hold from the
drop-down list.
Reason Enter the reason for the hold.
Table 302. View Holds, Resolved Holds
Fields Description
Hold Description A brief description of the hold.
Reason The reason for changing this hold to resolved status.
Chapter 12. Outbound Shipment Console Screens 199

Add Holds
You can add holds to the outbound shipment on this screen.
Table 303. Add Holds, Shipment Holds
Fields Description
Hold Type Select the hold type associated with the outbound shipment
from the drop-down list.
Reason Enter the reason for the hold.
View History
Whenever the status of a shipment hold changes, the information regarding the
status change is recorded in Sterling Selling and Fulfillment Foundation. In this
screen, you can view the history of a shipment hold.
Table 304. View History, Primary Information
Fields Description
Shipment# The outbound shipment number.
Shipper's Ref. # The outbound shipper's reference number.
Plan # The outbound shipment's plan number
Enterprise The Enterprise associated with the shipment
Buyer The Buyer's identifier.
Seller The Seller's identifier.
Ship Node The node from which the outbound shipment ships.
Receiving Node The node which receives the outbound shipment
Status The status of the outbound shipment.
Has Hazardous Items Indicates if the shipment contains any hazardous item.
Merge Node The node that has multiple shipment lines and is
consolidated into one shipment.
Table 305. View History, Shipment Holds
Fields
Hold Type The hold type that is associated with the outbound shipment.
vDate/Time - The date and time at which the status was
changed for the selected hold type.
vUser ID - The ID of the user who was responsible for
changing the status.
vStatus - The changed status for the selected hold type.
vComment - The comment added by the user who changed
the status for the selected hold type.
vHold Transaction - The transaction that changed the status
for the selected hold type.
200 Sterling Selling and Fulfillment Foundation: Distributed Order Management User Guide
Chapter 13. Service Work Order Console Screens
Service Work Order Console Screens
The Work Order Console provides details on service requests such as provided and
delivery services.
Work Order Search By All Attributes
You can search for work orders by all attributes in this screen.
Do not use spaces before or after any text you enter in the search fields, as this
may result in inconsistent or inaccurate results.
Table 306. Work Order Search By All Attributes
Fields Description
Node Select the node you want to search for, if applicable.
Across Nodes Select this option if you want to search for work orders across
all nodes.
Enterprise Choose the field and lookup option to find the specific
Enterprise you want use.
Across Enterprises Select this option if you want to search for work orders across
all enterprises.
Work Order # Enter the work order number associated with the work order
for which you want to search.
Order # Select the order number associated with the work order for
which you want to search.
Work Order Status Select the work order status range for which you want to
search.
Appointment Date Range Enter the appointment date range you want to search for, if
applicable.
Pre-call Status Select the pre-call status associated with the work order you
want to search for, if applicable.
Open Work Orders Only Select the check box if you want to search for open work
orders, if applicable.
Resource Pool Enter the resource pool of the work order you want to search
for, if applicable.
Service Complexity Level Select the service complexity level of the work order you
want to search for, if applicable.
Max Records Enter the maximum number of work orders you want
returned from your search.
The search results are displayed in the Work Order List screen.
© Copyright IBM Corp. 1999, 2011 201
Work Order List
The Work Order List window displays the results of a work order search. You can
perform actions on a single work order or multiple work orders by selecting the
check box(es) of the work order(s) you want to perform an action on and choosing
the applicable action from the action bar.
Table 307. Work Order List
Actions Description
View Details Select this action to view the work order details of the
selected work orders. For more information see Work Order
Details screen.
Plan Appointment Select the work order(s) for which you want to plan the
appointment. This action can be performed only on work
orders containing single appointments. For more information
see Plan Work Order Appointment screen.
Record Completion This action takes you to the Record Completion screen to
confirm an appointment for the selected work orders.
Record Service Failure This action takes you to the Record Service Failure screen to
enter the reasons for the appointment service failure for the
selected work orders.
Cancel This action pops up the Cancel Work Order screen to provide
the code and reason to cancel the work order.
Service Tools This action takes you to the Service Tools screen to add or
remove the service tools associated with the selected work
orders.
Work Order # The work order number associated with the work order. Click
this link to view work order details.
Node The node associated with the work order.
Enterprise The Enterprise associated with the work order.
Status The status of the work order namely, Created, Cancelled and
Completed.
Multiple Appointments A flag Yis specified if the work order has multiple
appointments, else the flag is set to N.
Appointment The current appointment schedule associated with the work
order.
Pre Call Status The current pre-call status associated with the work order.
Work Order Details
You can view the details of an work order in this screen. This screen lets you
perform certain actions and enables you to view some of the associated screens.
Table 308. Work Order Details Screen, Primary Information
View Icons Description
Alert This icon takes you to the Work Order Alerts screen to view
the alerts associated with the work order.
Audit This icon takes you to the Work Order Status Audits screen to
view the work order status audits.
202 Sterling Selling and Fulfillment Foundation: Distributed Order Management User Guide
Table 308. Work Order Details Screen, Primary Information (continued)
View Icons Description
Instructions This icon takes you to the Work Order Instructions screen to
add or modify the instructions created for the work order.
Notes This icon takes you to the Work Order Notes screen to add
notes or contact information associated with the work order.
If notes have been added, the Notes Check icon is displayed
instead.
Service Tools This icon takes you to the Service Tools screen to add or
remove the service tools associated with the work order.
Action
View Holds This action lets you view and manage order holds. For more
information refer to View Holds screen for field level
descriptions of the screen.
Cancel This action pops up the Cancel Work Order screen to provide
the code and reason to cancel the work order.
Fields
Work Order # The work order number associated with the work order.
Enterprise The Enterprise associated with the work order.
Node The node associated with the work order.
Order # The order number associated with the work order.
Click this link to view order details.
Provider Organization The provider organization associated with the order.
Service Item Group The service item group code associated with the order.
For example, Provided Service represents that the work
order performs a Provided Service
If the work order is designated as both a Provided Service
and a Delivery Service, the priority goes to the Provided
Service.
Status The current status of the work order. The valid statuses are
vWork Order Created
vWork Order Completed
vWork Order Cancelled
Service Complexity Level The service complexity level for this work order.
Supervisor ID The identifier of the service supervisor associated with this
work order.
The service location address can be specified in the Service Location panel of the
work order details screen. For more information refer to the Service Location
screen details.
Chapter 13. Service Work Order Console Screens 203
Table 309. Work Order Details Screen, Capacity Information
Fields Description
Preferred Resource Pool ID The preferred resource pool for the work order.
If the work order contains both a Provided Service and a
Delivery Service, only the Provided Service resource pool is
able to be selected as a Preferred Resource Pool ID.
Preferred Resource ID The resource ID associated with the preferred resource pool,
if applicable.
Override Requested
Capacity
This box is checked if the requested capacity is overridden.
Requested Capacity The requested capacity for the work order.
Allocated Capacity The allocated capacity for the work order. This also represents
the blocked capacity when planning appointments.
Total Weight The total capacity in terms of weight.
Total Volume The total capacity in terms of volume.
Table 310. Work Order Details Screen, Execution Details
Fields
Pre Call Status The pre-call status associated with the work order.
Planning Complete To indicate whether the work order planning is complete.
Multiple Appointments To indicate whether the work order has multiple
appointments.
Cancelled/Failed
Appointments
The number of appointments that are cancelled or have
failed.
Click this link if you want to view the appointment details of
cancelled or failed appointments. For more information see
Work Order Appointments.
The Open Appointments panel have different actions for single and multiple
appointments as described in the following table:
Table 311. Work Order Details Screen, Open Appointments
Actions Description
Plan Appointment This action takes you to the Plan Work Order Appointment
screen if you did NOT select the Multiple Appointments
checkbox when creating a work order.
Note: This action is available only for single appointments.
Add This action takes you to the Plan Work Order Appointment
screen if you have selected Multiple Appointments checkbox
when creating a work order.
Note: This action is available only for multiple appointments.
Change This action takes you to the Plan Work Order Appointment
screen to modify an existing appointment for a work order.
Note: This action is available only for multiple appointments.
Record Completion This action takes you to the Record Completion screen to
complete the appointment.
Record Failure This action takes you to the Record Service Failure screen to
enter the service failure reasons for the appointment.
204 Sterling Selling and Fulfillment Foundation: Distributed Order Management User Guide
Table 311. Work Order Details Screen, Open Appointments (continued)
Actions Description
Cancel This action pops up a Modify Work Order screen to cancel
the selected appointment.
View Execution Details This action lets you view the Execution Details screen for
completed appointments.
Fields
Sequence No. The sequence number of the appointments.
Appointment The current appointment date and time.
Appointment Overridden Specifies whether the appointment is overridden.
Allocated Capacity Specifies the allocated capacity for the appointment.
Resource Pool ID The associated resource pool ID of the appointment.
Resource ID The associated resource ID of the appointment.
Appointment Status The current status of the appointment. The valid statuses are:
vOpen
vFailed
vCancelled
vCompleted
You can add or remove service lines from a work order in the Service Lines
panel.
Table 312. Work Order Details Screen, Service Lines
Actions Description
Add Line This action takes you to the Add Service Lines screen to add
service lines to the work order.
Remove Line This action removes the selected service lines by popping up
the Modify Work Order screen. Enter the relevant information
and select OK. The selected service lines are removed.
Fields
Item Related Info The item name and the description is provided.
Click this link to view service request details.
Item Group Code The group code of the service item is specified. For example,
if the service is a Provided Service then the item group code
is Provided Service.
Required Quantity The quantity of the service items required.
You can add or remove the products that are to be delivered as part of the work
order.
Table 313. Work Order Details Screen, Products Being Delivered
Actions Description
Add Line This action takes you to the Add Products Being Delivered
screen if you want to add a product with a delivery service.
Remove Line This action removes the selected product lines by popping up
the Modify Work Order screen. Enter the relevant information
and select OK. The selected product lines are removed.
Chapter 13. Service Work Order Console Screens 205

Table 313. Work Order Details Screen, Products Being Delivered (continued)
Actions Description
Fields
Item Related Info The item name and description is provided.
Click this link to view service request details.
PC The item's product class.
UOM The item's unit of measure.
Required Quantity The requested quantity by the service.
Delivered Quantity The quantity to be delivered.
The work order is confirmed once the appointment and associated service lines are
completed.
Work Order Alerts
A list of alerts raised for a work order can be viewed in this screen. From the
Alerts table, find the alert you want to view and click on the Alert ID link. The
Alert Console appears. For more information about using the Alert Console, see
the Sterling Selling and Fulfillment Foundation: Application Platform Configuration
Guide.
Table 314. Primary Information
Fields Description
Work Order # The work order number associated with the work order.
Enterprise The Enterprise associated with the work order.
Node The node associated with the work order.
Order # The order number associated with the work order. Click this
link to view order details.
Provider Organization The provider organization associated with the order.
Service Item Group The service item group code associated with the order.
For example, Provided Service represents service group code
for Provided Service
Status The current status of the work order. The valid statuses are
vWork Order Created
vWork Order Completed
vWork Order Cancelled
Service Complexity Level The service complexity level for this work order.
Supervisor ID The identifier of the service supervisor associated with this
work order.
Table 315. Alerts
Actions Description
View Details This action takes you to the alert detail screen for the selected
alert ID. For more information about viewing the alert details,
see the Sterling Selling and Fulfillment Foundation: Application
Platform Configuration Guide.
206 Sterling Selling and Fulfillment Foundation: Distributed Order Management User Guide
Table 315. Alerts (continued)
Actions Description
Fields
Alert ID The alert ID. Click this link to view the alert details.
Type The type of alert raised. For example, ON_FAILURE or
FAILED_AUTH.
Description A brief description of the alert.
Queue The queue the alert has been assigned to.
Priority The alert priority.
Owner The user who is handling the alert.
Raised On The date the alert was raised.
Work Order Status Audits
You can view any status modifications performed against a work order in the
Work Order Details screen.
Table 316. Primary Information
Fields Description
Work Order # The work order number associated with the work order.
Enterprise The Enterprise associated with the work order.
Node The node associated with the work order.
Order # The order number associated with the work order. Click this
link to view order details.
Provider Organization The provider organization associated with the order.
Service Item Group The service item group code associated with the order.
For example, Provided Service represents service group code
for Provided Service
Status The current status of the work order. The valid statuses are
vWork Order Created
vWork Order Completed
vWork Order Cancelled
Service Complexity Level The service complexity level for this work order.
Supervisor ID The identifier of the service supervisor associated with this
work order.
Table 317. Work Order Status Audits Screen, Status Audits
Fields Description
Sequence # The sequence number associated with the work order.
Click on the Plus icon to view and hide sequence details. The
fields that can be viewed when expanded are explained
below:
vAttribute -he name of the modified field.
vOld Value - The old value of that field before modification.
vNew Value - The new value of that field after modification.
Chapter 13. Service Work Order Console Screens 207
Table 317. Work Order Status Audits Screen, Status Audits (continued)
Fields Description
Audit Time The time the work order was audited.
Action The action performed on the work order.
Modified By The user that performed the modification.
Reason The reason for the modification.
Comments Additional information as to why the modification was made.
Work Order Instructions
You can view or modify instructions for a work order in this screen.
Table 318. Instructions Window
Action Description
Delete Instruction This action enables you to delete the selected instructions.
Upon clicking this action, an alert window appears to confirm
the deletion of instructions.
Fields
Instruction Type The type of instruction, such as Gift, Pick, Pack, Ship, or
Other.
Text The specific instructions to be performed on the order.
Specify the instruction URL next to the Instructions URL
icon.
Work Order Notes
Miscellaneous information may need to be stored on a work order. For example,
the contact information of the individual to whom a product is being delivered, or
for whom a service is being provided, may need to be entered and stored. Various
execution details may also need to be entered while the work order is being
planned or completed, like notes.
Service Tools
You can add tools on a work order that can be used to perform the necessary
services, for instance a latter, or a tool kit.
Table 319. Service Tools Screen, Service Tools
Action Description
Remove This action removes the selected service tools from the list.
Fields
Service Tool ID The identifier of the service tool.
UOM The unit of measure for the service tool.
Short Description The short description of the service tool.
Required Quantity The quantity of the service tool that is required to perform
this work order.
208 Sterling Selling and Fulfillment Foundation: Distributed Order Management User Guide
Table 319. Service Tools Screen, Service Tools (continued)
Action Description
Comments Any additional comment.
View Holds
Work orders can be placed on hold, preventing them from being processed by
certain transactions, and preventing certain modification types from being applied.
Using the Applications Manager, you can configure which transactions and
modification types are disallowed for a work order on a particular hold type.
Additionally, hold types can be configured to be applied automatically, for instance
on work order creation, or upon resolution of another hold. For more information
about defining and configuring hold types, see the Sterling Selling and Fulfillment
Foundation: Distributed Order Management Configuration Guide.
Table 320. Work Order Holds Screen, Work Order Holds
View Icons Description
View History This icon takes you to the View History screen, where you
can view the hold's history.
Action
Add Holds This action takes you to the Add Holds screen, where you
can add holds to an order.
Fields
Hold Description The description of the hold.
Hold Status The status of the hold. Holds can either be in created,
resolved, or rejected status.
Hold Comment The reason for applying this hold to the order, or changing
the status of the hold.
Action Select from the drop-down list the status to which you want
to move this hold.
Reason Enter the reason for changing the status of this hold.
Table 321. Work Order Holds Screen, Resolved Holds
View Icons Description
View History This icon takes you to the View History screen, where you
can view the hold's history.
Fields
Hold Type The description of the hold.
Reason The reason for changing this hold to resolved status.
Click Save to update the changes made in the screen, and close it.
Chapter 13. Service Work Order Console Screens 209
Add Holds
You can add a hold to a work order, if that hold is not already being applied to the
work order in created or rejected status. If you add a hold that was previously
applied and now in resolved status, it removes that hold from the list of approved
holds, and reset its status to created. That hold maintains its previous history
records for that work order, and further status modifications is added on to that
history.
Table 322. Add Holds Screen, Work Order Holds
Fields Description
Hold Type Select the hold type you want to apply to the order from the
drop-down list.
Reason Select the reason for adding this hold to the order.
Click Save to close this screen and apply the selected hold to the work order.
View History
Every time the status of a work order hold changes, useful information regarding
the status change is recorded in Sterling Selling and Fulfillment Foundation. You
can view, in this screen, the history of a work order hold.
Table 323. Hold History Screen, Work Order Holds
Fields Description
Hold Type The hold type for which the history is being displayed.
Date/Time The date and time when the hold's status changed.
User ID The user who performed the change on the hold.
Status The status that the hold was moved to.
Comment The reason for the hold's creation or status change, if
applicable.
Hold Transaction The transaction responsible for the hold's status change.
Service Location
Table 324. Service Location Screen, Address
View Icons Description
Address Details Address Details- Choose this icon to modify or add a service
location address in the Service Location panel of the Work
Order Details screen.
Additional Questions Additional Address Questions - Choose this icon to view or
modify answers to address questions for this ship to address.
If any questions have already been answered, a Additional
Questions Check icon is displayed.
For more information about the screen that is displayed, see
the Questions screen.
210 Sterling Selling and Fulfillment Foundation: Distributed Order Management User Guide
Table 324. Service Location Screen, Address (continued)
View Icons Description
Permit Questions Permit Questions - Choose this icon to view or modify
answers to permit questions for this ship to address.
If any questions have already been answered, a Permit
Questions Check icon is displayed.
For more information about the screen that is displayed, see
the Questions screen.
This icon is only available at the order level.
Fields
Address Line 1 The ship to address line 1.
Address Line 2 The ship to address line 2.
Address Line 3 The ship to address line 3.
Address Line 4 The ship to address line 4.
Address Line 5 The ship to address line 5.
Address Line 6 The ship to address line 6.
City The city where the service has to be performed.
State The state to which the city belongs to.
Postal Code The postal code of the city.
Country/Region The country or region where the service has to be performed.
First Name The vendor's first name.
Middle Name The vendor's middle name.
Last Name The vendor's last name.
Company The company name of the vendor.
Day Time Phone The vendor's day time phone number.
Evening Phone The vendor's evening time phone number.
Mobile Phone The vendor's mobile number.
Fax The fax number.
E-mail The vendor's e-mail address.
Additional Address and /
or Permit Questions have
been answered for this
address.
This field is shown when additional address and/or permit
questions have been answered for this address.
Selecting the Retain Existing Answers radio button saves the
answers for this address. Selecting Clear Answers clears all
answers for this address.
Click Save to update any modifications in the screen.
Plan Work Order Appointment
You can take work order appointments in this screen. If you are planning a single
appointment work order select Plan Appointment in the Work Order Details screen.
Instead if the work order consists of multiple appointments you can choose Add in
the Open Appointments panel of the Work Order Details screen or Change to
modify an existing work order.
Chapter 13. Service Work Order Console Screens 211
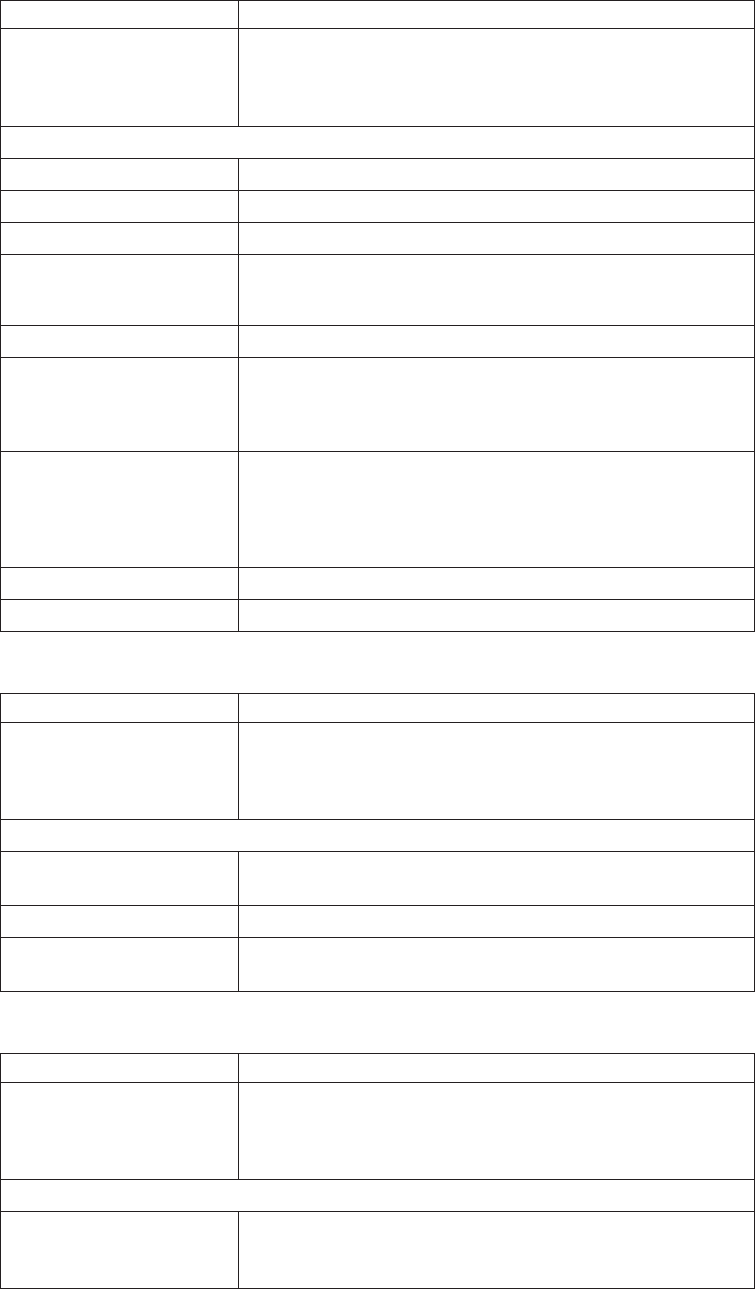
Table 325. Plan Work Order Appointment Screen, Work Order
Action Description
Save AppointmentS The work order appointment is saved with the help of this
action. Upon clicking Save Appointment the Modify Work
Order screen appears. Enter the relevant information and
click OK.
Fields
Work Order # The work order number associated with the work order.
Enterprise The Enterprise associated with the work order.
Node The node associated with the work order.
Order # The order number associated with the work order.
Click this link to view order details.
Provider Organization The provider organization associated with the order.
Service Item Group The service item group code associated with the order.
For example, Provided Service represents service group code
for Provided Service
Status The current status of the work order. The valid statuses are
vWork Order Created
vWork Order Completed
vWork Order Cancelled
Service Complexity Level The service complexity level for this work order
Supervisor ID The supervisor on this work order.
Table 326. Plan Work Order Appointment Screen, Constraints
Action Description
Product Availability The availability of the product can be found by selecting this
action. This action takes you to the Product Availability
screen where you can view the available products necessary
to fulfill the appointment.
Fields
Waiting for Sequence Line This flag is set to inform if there is any wait for sequence line
completion before scheduling the appointment.
All Product Lines Available This flag is set to Y if all products are available.
Constraints window Mentions if there are any constraints applicable for the work
order.
Table 327. Plan Work Order Appointment Screen, Override
Action Description
Resource Availability The resource pool details can be obtained by selecting this
action. This action takes you to the Resource Availability
screen where you can view the available resources necessary
to fulfill the appointment.
Fields
Consider Supplemental
Capacity
Check this option if you want to consider supplemental
capacity when looking for available resources for this
appointment.
212 Sterling Selling and Fulfillment Foundation: Distributed Order Management User Guide
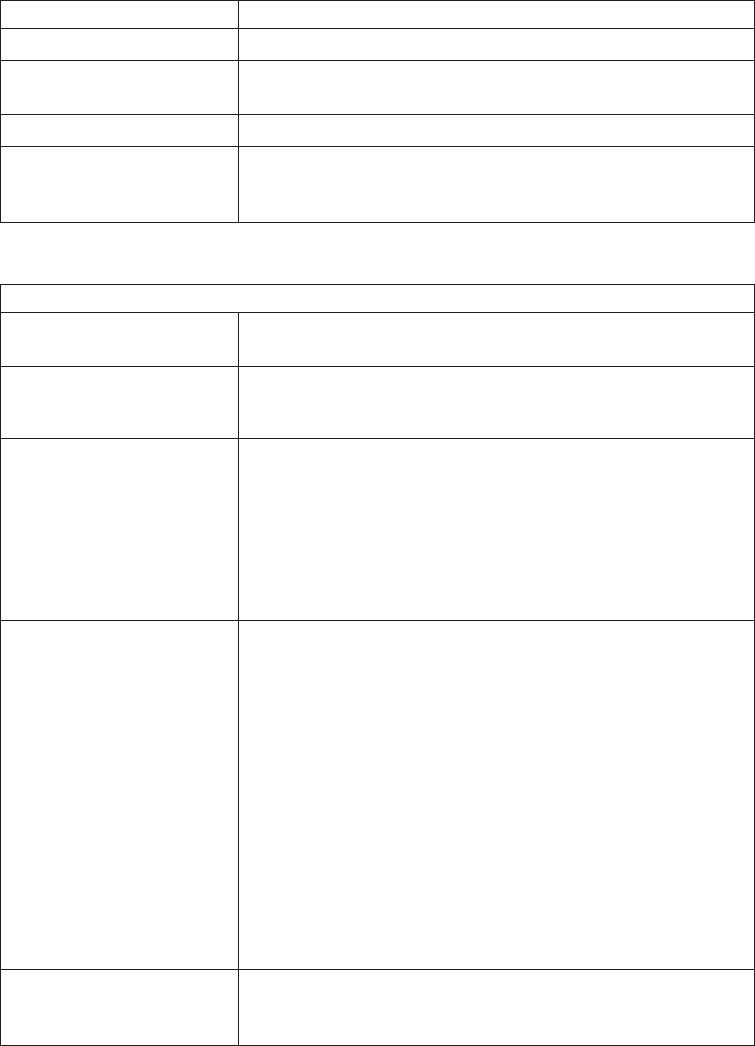
Table 327. Plan Work Order Appointment Screen, Override (continued)
Action Description
Resource Pool Select the resource pool applicable for overrides, if applicable.
Ignore Product Availability Check this option if you want to ignore product availability
during the capacity inquiry.
Resource ID Select the resource ID applicable for overrides, if applicable.
Ignore Node Notification
Time
Check this option if you want to ignore the node's requested
minimum notification time during appointment inquiry and
update.
Table 328. Plan Service Appointment Screen, Available Slots
Fields
Currently Chosen
Appointment Slot
By default, the first available date and time displays. If
overridden, it updates to reflect the values you choose.
Start Date The first day displayed in the available slots table.
Choose the Calendar lookup to change the date.
Number of Days to
Consider
Enter the number of days beyond the start date that display
in the available slot table. If the date for which you would
like to schedule the service appointment does not appear
within the available slots panels, you can increase this value
to see available slots past what is currently displayed.
To refresh the available slots table to new dates, enter a value
and choose Go.
Requested Capacity The capacity requested to plan the appointment duration.
This field cannot be modified for single appointment work
orders since the entire requested capacity is assumed.
For multiple appointment work orders, the entire requested
capacity minus the allocated capacity appears in this field.
This number can be adjusted based on your needs. The
chosen appointment is planned with this amount of capacity.
If you intend to change the requested capacity, the GO button
must be clicked before an appointment can be taken. This is
to make sure that there is sufficient capacity available in the
chosen slot to accommodate the new requested capacity
value.
The requested capacity can be zero but cannot be negative.
Slot (Start Time - End
Time)
The name of time slot and the range of time each time slot
spans. There is one row for each time slot. Time slots do not
overlap.
Chapter 13. Service Work Order Console Screens 213
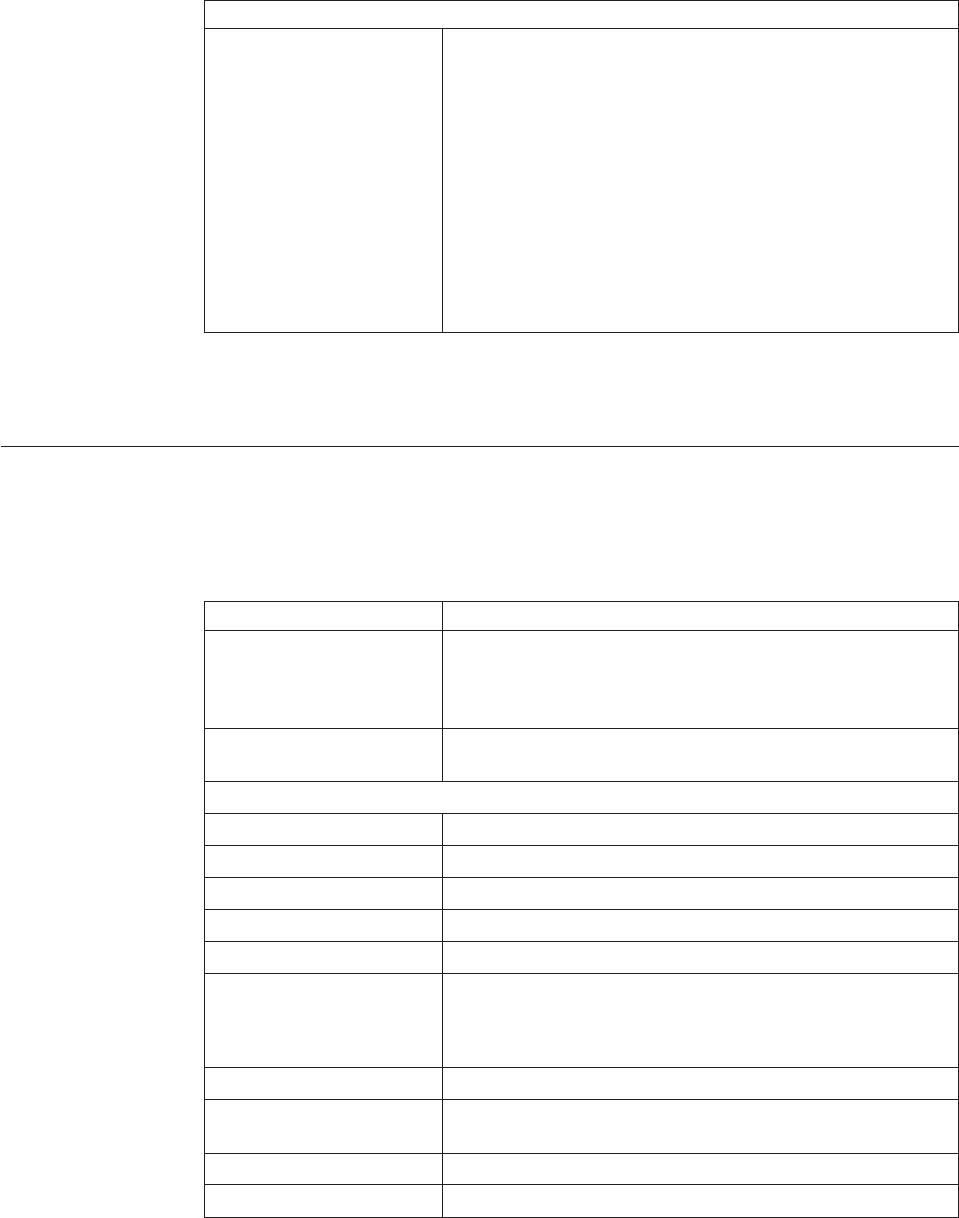
Table 328. Plan Service Appointment Screen, Available Slots (continued)
Fields
Available Slots Calendar The first available time slot is automatically highlighted.
Select this to choose the first time slot. Time slot availability
is indicated by:
vAdd icon - The time slot has sufficient capacity. Select to
make this the Currently Chosen Appointment Date.
vDelete icon on a white or blue background - The time slot
does not have sufficient capacity.
vAdd Preferred icon - The time slot is the preferred time
slot for this customer.
vDelete icon on a gray background - The region is not
serviced for the time slot.
vA gray background - The time slot is never serviced.
The Available Slots inner panel on this screen does not display the days graph or
the calendar when there is no available capacity for the resource pool.
Product Availability
The availability of the products can be viewed in this screen to make appointment
changes.
Table 329. Product Availability Screen, Product Availability
Actions Description
ATP Options The item or items availability to promise options can be
viewed by selecting this action. For more information about
ATP options, see the Sterling Selling and Fulfillment Foundation:
Global Inventory Visibility User Guide.
Changes Nodes This action takes you to the Change Nodes screen, when you
can change the Ship Node or Procurement Node for this item.
Fields
Item ID The product item ID.
PC Product class of the item.
UOM The unit of measure of the item.
Item Description The item description.
Ship Node The item's ship node.
Procure From Node The item's procurement node.
AWarning Indicator icon indicates that the item is awaiting
acceptance from a store or node.
Available Quantity The available quantity of the item's inventory.
Available Date The item's available date for shipping or performing the work
order.
Future Availability Date The future availability date as indicated by a user.
Comments Comments as indicated by a user.
Click Save to update any changes made to this screen.
214 Sterling Selling and Fulfillment Foundation: Distributed Order Management User Guide
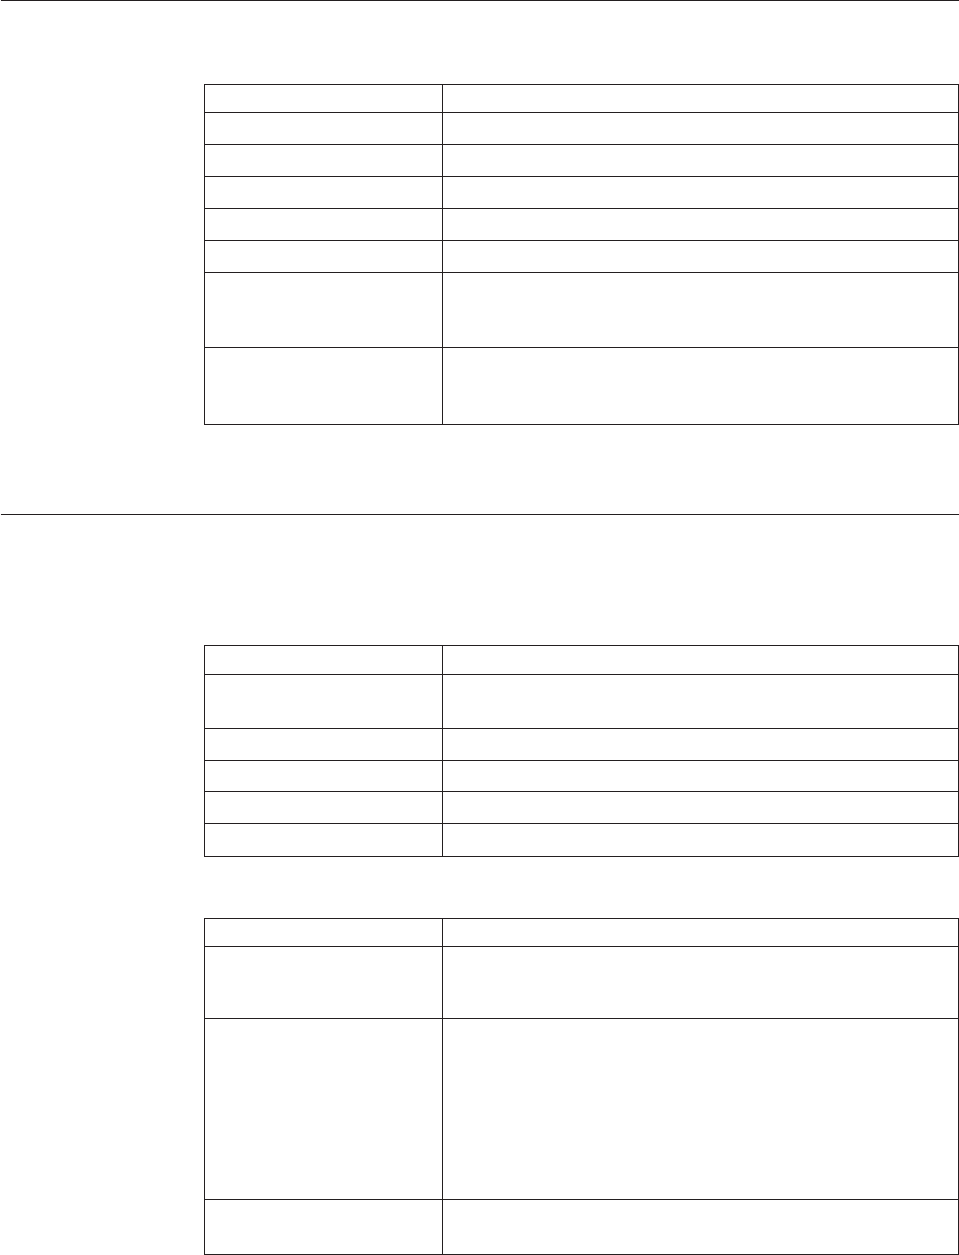
Change Nodes
Table 330. Change Nodes
Fields Description
Order # The order number.
Line # The line number.
Item ID The item identifier.
Unit of Measure The unit of measure for this item.
Product Class The product class for this item.
Ship Node The ship node for this item. To change the ship node, enter a
new ship node or select the Lookup icon which takes you to
the node lookup screen.
Procure From Node The procurement node for this item. To change the
procurement node, enter a new procurement node or select
the Lookup icon which takes you to the node lookup screen.
Click Save to save changes.
Resource Availability
The availability of the resources can be viewed in this screen.
Table 331. Resource Availability Screen, Resource Pool
Fields Description
Resource Pool The name of the resource pool associated with the work
order.
Resource Pool Description The description of the resource pool.
Node The ship node of the resource pool.
Capacity Organization The organization of the capacity node.
Supervisor ID
Table 332. Resource Availability Screen, Resource Availability
Fields Description
Start Date The first day displayed in the available slots table.
Choose the Calendar lookup to change the date.
Number of Days To
Display
Enter the number of days beyond the start date that display
in the available slot table. If the date for which you would
like to view the capacity details does not appear within the
available slots panels, you can increase this value to see
available slots past what is currently displayed.
To refresh the available slots table to new dates, enter a value
and choose Go.
Resource ID The identification of the resource associated with the
appointment.
Chapter 13. Service Work Order Console Screens 215
Record Completion
The appointment record can be completed by entering the information in the
Execution Information panel and by selecting the associated service and product
lines.
Table 333. Record Completion Screen, Team Members
Fields
User ID
The identifier of a team member associated with this
appointment.
User Name The name of a team member associated with this
appointment.
The list of team members gets automatically populated by Sterling Selling and
Fulfillment Foundation if a resource ID is selected on the appointment, and if team
members have been assigned to that resource in the Applications Manager. For
more information about assigning team members to a resource, refer to the IBM
Sterling Global Inventory Visibility: Configuration Guide.
Table 334. Record Completion Screen, Service Lines
Fields Description
Item Related Info The item name and the description is provided.
Item Group Code The group code of the service item is specified. For example,
if the service is a Provided Service then the item group code
is Provided Service.
Required Quantity The quantity of the service items required.
Table 335. Record Completion Screen, Products Being Delivered
Fields Description
Item Related Info The item name and description is provided.
PC The item's product class.
UOM The item's unit of measure.
Quantity To Be Delivered The requested quantity to be delivered by the service.
Actual Delivered Quantity The quantity that was actually delivered by the service.
Click the Complete button to record the service completion once the details are
entered in the fields.
Record Service Failure
You can record reasons for service failure from the Work Order Details screen or
from the Work Order List screen by selecting single appointments only. For
multiple appointments the failure reasons can be recorded only from the work
order details screen.
216 Sterling Selling and Fulfillment Foundation: Distributed Order Management User Guide
Table 336. Record Completion Screen, Team Members
Fields
User ID
The identifier of a team member associated with this
appointment.
User Name The name of a team member associated with this
appointment.
The list of team members gets automatically populated by Sterling Selling and
Fulfillment Foundation if a resource ID is selected on the appointment, and if team
members have been assigned to that resource in the Applications Manager. For
more information about assigning team members to a resource, see the IBM
Sterling Global Inventory Visibility: Configuration Guide.
Click Save after entering the relevant information for the service failure.
Work Order Appointments
You can view cancelled or failed appointments by selecting the link for
Cancelled/Failed Appointments in the Work Order Details screen Execution
Details panel.
Table 337. Work Order Appointments Screen, Closed Appointments
Actions Description
View Details This action takes you to the Execution Details screen where
you can view the details of failed appointments.
Note: You cannot view the details of the cancelled
appointment.
Fields
Sequence No. The line sequence number. Click this link to view the
Execution Details screen.
Appointment The confirmed or cancelled appointment date and time.
Appointment Overridden Specifies the value of appointment overridden flag.
Allocated Capacity The allocated capacity of the appointment line.
Resource Pool ID The identification of the resource pool associated with the
appointment.
Resource ID The identification of the resource associated with the
appointment.
Appointment Status Specifies the current status of the appointment. The valid
statuses are:
vOpen
vFailed
vCancelled
vCompleted
Chapter 13. Service Work Order Console Screens 217
Execution Details
You can view the execution details of an appointment by selecting the View
Execution Details action in the Work Order Details screen, Open Appointment
panel.
You cannot view the details for the cancelled appointments.
Table 338. Record Completion Screen, Team Members
Actions Description
Remove This action removes the selected team members from the list
of team members associated with this appointment.
Fields
User ID The identifier of a team member associated with this
appointment.
User Name The name of a team member associated with this
appointment.
The list of team members gets automatically populated by the Sterling Selling and
Fulfillment Foundation if a resource ID is selected on the appointment, and if team
members have been assigned to that resource in the Applications Manager. You can
add team members by clicking the Add icon. For more information about
assigning team members to a resource, see the IBM Sterling Global Inventory
Visibility: Configuration Guide.
Add Service Lines
You can add service lines to the work order details with the help of this screen.
Table 339. Add Service Lines Screen, Provided Services
Fields Description
Item ID The provided service item ID.
Description The provided service item description.
Ship Node The shipping node associated with the service
Line Qty The service item quantity.
Table 340. Add Service Lines Screen, Delivery Services
Fields Description
Item ID The delivery service item ID.
Description The delivery service item description.
Ship Node The shipping node associated with the delivery.
Line Qty The delivery item quantity.
Click Save after selecting the relevant provided services and delivery services.
218 Sterling Selling and Fulfillment Foundation: Distributed Order Management User Guide
Add Products Being Delivered
The products being delivered is added to the work order using this screen.
Table 341. Adding Products Being Delivered Screen, Products Being Delivered
Fields Description
Item ID The item ID to be delivered.
PC Product class of the item.
UOM The unit of measure of the item.
Description The item description.
Ship Node The item's ship node.
Delivery Date The requested delivery date of the product on the order line.
Required Qty The item's required quantity.
Click Save once the relevant products are added.
Modify Work Order
The modify work order window appears when you make modifications to the
work order details or work order appointment screens.
Table 342. Modifying a Work Order
Field Descriptions
Reason Code Select the reason code for work order modification.
Comments Additional information about why the work order was
modified.
Cancel Work Order
You can provide a cancellation code and reason for cancelling a work order.
Work order cancellation depends on the status of the service lines. If the work
order contains any service lines that are completed and any products that are
delivered, the work order status is marked as Completed and any remaining open
appointments are Cancelled and their allocated capacity is removed from the
associated resource pool.
Table 343. Cancel Work Order
Field Descriptions
Reason Code Select the reason code for work order cancellation.
Comments Additional information about why the work order was
cancelled.
Chapter 13. Service Work Order Console Screens 219

Questions
The address or permit questions and answer options displayed on this screen are
preconfigured. For more information about configuring questions and answer
options, refer to the Sterling Selling and Fulfillment Foundation: Distributed Order
Management Configuration Guide.
Once you have selected or entered your necessary answers, click Save.
220 Sterling Selling and Fulfillment Foundation: Distributed Order Management User Guide

Chapter 14. Accept/Reject Transfer Console Screens
Accept/Reject Procurement Requests
Table 344. Accept/Reject Procurement Requests
Fields Description
Procure From Node This field is defaulted to the node of the user that is logged
in.
Order # / Line # The order number and line number of the procurement
request that is awaiting acceptance.
Item The requested item on the order or line.
PC The product class of the item.
UOM The unit of measure.
Ship Node The ship node requesting the transfer of inventory.
Quantity The requested quantity.
Action Select whether to accept or reject this request.
Action Quantity Depending on your action, select the quantity you are
accepting or rejecting.
Click Save to confirm your acceptances or rejections.
© Copyright IBM Corp. 1999, 2011 221
222 Sterling Selling and Fulfillment Foundation: Distributed Order Management User Guide
Chapter 15. Serviced Area Search Screens
Serviced Area Search Screens
The serviced area search console allows you to check whether an enterprise
services a particular postal zip code through a seller organization for a given
service type. Sterling Selling and Fulfillment Foundation looks for available
resources and capacity across all the resource pools for the user's enterprise.
Serviced Area Search
This search screen determines whether or not the requested service type is serviced
for the a given enterprise, seller organization and postal code, and whether
capacity is currently available for each time slot of each day.
If no zip code is entered in the search screen, Sterling Selling and Fulfillment
Foundation behaves in one of the following ways:
vIf a region or set of regions is not defined by a set of zip codes, Sterling Selling
and Fulfillment Foundation returns the service availability for that region or set
of regions.
vIf all the regions are defined by postal zip codes, Sterling Selling and Fulfillment
Foundation returns no service availability.
Table 345. Serviced Area Search
Fields Description
Enterprise From the drop-down list, select the enterprise that is
responsible for the services.
Seller From the drop-down list, select the seller organization that
provides the services.
Country/Region This field is defaulted to the country or region of the user
that is logged in.
Service Type From the drop-down list, select the service type that you
want to search for. This field is mandatory.
Postal code Enter the postal code that you want to search for.
The Serviced Area List screen is displayed as a result of this search.
Serviced Area List
This list screen displays whether or not the service type for the requested postal
code is serviced for each time slot, and for each day.
Table 346. Serviced Area List Screen, Available Slots
Fields Description
Slot (Start Time- End Time) Indicates the time slots associated with this region.
© Copyright IBM Corp. 1999, 2011 223
Table 346. Serviced Area List Screen, Available Slots (continued)
Fields Description
Days of Week If the requested postal code is serviced for the day of the
week and capacity is available, a green checkmark appears.
If the requested postal code is serviced for the day the week
but capacity is not available, a red cross appears.
If the requested postal code is not ever serviced for the day of
the week, a grey background appears, with no icon on top of
it.
224 Sterling Selling and Fulfillment Foundation: Distributed Order Management User Guide
Chapter 16. Route Entry Screens
Route Entry Screens
The route entry console allows you to plan the route of a node’s resources
throughout the day. For example, a resource that has 4 appointments in a given
day may want to sequence them in the most efficient possible way by specifying
stop numbers, and expected start time for each appointment.
Work Order Appointments Search
This screen looks for open appointments in a time range for a given node. A
resource pool and a resource can be specified to narrow down the search.
Otherwise, all appointments within the specified time range for all the resource
pools and resources for a node is returned.
Table 347. Work Order Appointments Search
Fields Description
Node Enter the node from which the provided or delivery services
are being performed.
Delivery Service Check this if you want to look for delivery service
appointments.
Provided Service Check this if you want to search for provided service
appointments.
Resource Pool From the drop-down list, select the resource pool whose
appointments you want to search for.
Resource From the drop-down list, select the resource whose
appointments you want to search for.
Appointment Start Date Select the start date of the appointments you are searching
for.
The Route Entry screen is displayed as a result of this search.
Route Entry
This screen displays the list of appointments, grouped by resource pool.
Table 348. Route Entry Screen, Work Order Appointments
Actions Description
Override Team Members This action takes you to the Override Team Members screen,
where you can override the default team members for all the
selected appointments.
Fields
Work Order # / Appt # The appointment number, and work order number in which
that appointment is defined.
Promised Appointment The date and time of the appointment.
Resource From the drop-down list, select the resource responsible for
completing the appointment.
© Copyright IBM Corp. 1999, 2011 225
Table 348. Route Entry Screen, Work Order Appointments (continued)
Actions Description
Stop # Enter which stop number this appointment corresponds to in
your resource's route.
Expected Start Time Enter the expected start time of the appointment.
Expected End Time Enter the expected end time of the appointment.
Click Save to update the routing information for the modified appointments.
Override Team Members
This screen allows you to override the list of assigned team members to an
appointment. Overriding team members resets the list of team members for an
appointment, and replace it anew.
Table 349. Override Team Members Screen, Team Members
Fields Description
User ID The identifier of the team member to be associated with the
selected appointments.
User Name The name of the team member to be associated with the
selected appointments.
Use the Add icon to add new team members, and click Save once you are done.
226 Sterling Selling and Fulfillment Foundation: Distributed Order Management User Guide

Notices
This information was developed for products and services offered in the U.S.A.
IBM may not offer the products, services, or features discussed in this document in
other countries. Consult your local IBM representative for information on the
products and services currently available in your area. Any reference to an IBM
product, program, or service is not intended to state or imply that only that IBM
product, program, or service may be used. Any functionally equivalent product,
program, or service that does not infringe any IBM intellectual property right may
be used instead. However, it is the user's responsibility to evaluate and verify the
operation of any non-IBM product, program, or service.
IBM may have patents or pending patent applications covering subject matter
described in this document. The furnishing of this document does not grant you
any license to these patents. You can send license inquiries, in writing, to:
IBM Director of Licensing
IBM Corporation
North Castle Drive
Armonk, NY 10504-1785
U.S.A.
For license inquiries regarding double-byte character set (DBCS) information,
contact the IBM Intellectual Property Department in your country or send
inquiries, in writing, to:
Intellectual Property Licensing
Legal and Intellectual Property Law
IBM Japan Ltd.
1623-14, Shimotsuruma, Yamato-shi
Kanagawa 242-8502 Japan
The following paragraph does not apply to the United Kingdom or any other
country where such provisions are inconsistent with local law:
INTERNATIONAL BUSINESS MACHINES CORPORATION PROVIDES THIS
PUBLICATION "AS IS" WITHOUT WARRANTY OF ANY KIND, EITHER
EXPRESS OR IMPLIED, INCLUDING, BUT NOT LIMITED TO, THE IMPLIED
WARRANTIES OF NON-INFRINGEMENT, MERCHANTABILITY OR FITNESS
FOR A PARTICULAR PURPOSE. Some states do not allow disclaimer of express or
implied warranties in certain transactions, therefore, this statement may not apply
to you.
This information could include technical inaccuracies or typographical errors.
Changes are periodically made to the information herein; these changes will be
© Copyright IBM Corp. 1999, 2011 227
incorporated in new editions of the publication. IBM may make improvements
and/or changes in the product(s) and/or the program(s) described in this
publication at any time without notice.
Any references in this information to non-IBM Web sites are provided for
convenience only and do not in any manner serve as an endorsement of those Web
sites. The materials at those Web sites are not part of the materials for this IBM
product and use of those Web sites is at your own risk.
IBM may use or distribute any of the information you supply in any way it
believes appropriate without incurring any obligation to you.
Licensees of this program who wish to have information about it for the purpose
of enabling: (i) the exchange of information between independently created
programs and other programs (including this one) and (ii) the mutual use of the
information which has been exchanged, should contact:
IBM Corporation
J46A/G4
555 Bailey Avenue
San Jose, CA 95141-1003
U.S.A.
Such information may be available, subject to appropriate terms and conditions,
including in some cases, payment of a fee.
The licensed program described in this document and all licensed material
available for it are provided by IBM under terms of the IBM Customer Agreement,
IBM International Program License Agreement or any equivalent agreement
between us.
Any performance data contained herein was determined in a controlled
environment. Therefore, the results obtained in other operating environments may
vary significantly. Some measurements may have been made on development-level
systems and there is no guarantee that these measurements will be the same on
generally available systems. Furthermore, some measurements may have been
estimated through extrapolation. Actual results may vary. Users of this document
should verify the applicable data for their specific environment.
Information concerning non-IBM products was obtained from the suppliers of
those products, their published announcements or other publicly available sources.
IBM has not tested those products and cannot confirm the accuracy of
performance, compatibility or any other claims related to non-IBM products.
Questions on the capabilities of non-IBM products should be addressed to the
suppliers of those products.
All statements regarding IBM's future direction or intent are subject to change or
withdrawal without notice, and represent goals and objectives only.
All IBM prices shown are IBM's suggested retail prices, are current and are subject
to change without notice. Dealer prices may vary.
228 Sterling Selling and Fulfillment Foundation: Distributed Order Management User Guide
This information is for planning purposes only. The information herein is subject to
change before the products described become available.
This information contains examples of data and reports used in daily business
operations. To illustrate them as completely as possible, the examples include the
names of individuals, companies, brands, and products. All of these names are
fictitious and any similarity to the names and addresses used by an actual business
enterprise is entirely coincidental.
COPYRIGHT LICENSE:
This information contains sample application programs in source language, which
illustrate programming techniques on various operating platforms. You may copy,
modify, and distribute these sample programs in any form without payment to
IBM, for the purposes of developing, using, marketing or distributing application
programs conforming to the application programming interface for the operating
platform for which the sample programs are written. These examples have not
been thoroughly tested under all conditions. IBM, therefore, cannot guarantee or
imply reliability, serviceability, or function of these programs. The sample
programs are provided "AS IS", without warranty of any kind. IBM shall not be
liable for any damages arising out of your use of the sample programs.
Each copy or any portion of these sample programs or any derivative work, must
include a copyright notice as follows:
© IBM 2011. Portions of this code are derived from IBM Corp. Sample Programs. ©
Copyright IBM Corp. 2011.
If you are viewing this information softcopy, the photographs and color
illustrations may not appear.
Trademarks
IBM, the IBM logo, and ibm.com®are trademarks or registered trademarks of
International Business Machines Corp., registered in many jurisdictions worldwide.
Other product and service names might be trademarks of IBM or other companies.
A current list of IBM trademarks is available on the Web at “Copyright and
trademark information” at http://www.ibm.com/legal/copytrade.shtml.
Adobe, the Adobe logo, PostScript, and the PostScript logo are either registered
trademarks or trademarks of Adobe Systems Incorporated in the United States,
and/or other countries.
IT Infrastructure Library is a registered trademark of the Central Computer and
Telecommunications Agency which is now part of the Office of Government
Commerce.
Intel, Intel logo, Intel Inside, Intel Inside logo, Intel Centrino, Intel Centrino logo,
Celeron, Intel Xeon, Intel SpeedStep, Itanium, and Pentium are trademarks or
registered trademarks of Intel Corporation or its subsidiaries in the United States
and other countries.
Linux is a registered trademark of Linus Torvalds in the United States, other
countries, or both.
Notices 229
Microsoft, Windows, Windows NT, and the Windows logo are trademarks of
Microsoft Corporation in the United States, other countries, or both.
ITIL is a registered trademark, and a registered community trademark of the Office
of Government Commerce, and is registered in the U.S. Patent and Trademark
Office.
UNIX is a registered trademark of The Open Group in the United States and other
countries.
Java and all Java-based trademarks and logos are trademarks or registered
trademarks of Oracle and/or its affiliates.
Cell Broadband Engine is a trademark of Sony Computer Entertainment, Inc. in the
United States, other countries, or both and is used under license therefrom.
Linear Tape-Open, LTO, the LTO Logo, Ultrium and the Ultrium Logo are
trademarks of HP, IBM Corp. and Quantum in the U.S. and other countries.
Connect Control Center®, Connect:Direct®, Connect:Enterprise™, Gentran®,
Gentran®:Basic®, Gentran:Control®, Gentran:Director®, Gentran:Plus®,
Gentran:Realtime®, Gentran:Server®, Gentran:Viewpoint®, Sterling Commerce™,
Sterling Information Broker®, and Sterling Integrator®are trademarks or registered
trademarks of Sterling Commerce™, Inc., an IBM Company.
Other company, product, and service names may be trademarks or service marks
of others.
230 Sterling Selling and Fulfillment Foundation: Distributed Order Management User Guide

Index
Special characters
<$singlepage>service items
time slots
viewing available 9
<$singlepage>service requests
high priority 12
A
Accept action 19
Accept/Reject Procurement Request
screen. See procurement requests,
accepting 19, 20
Across Enterprises checkbox 25
Action Quantity field 19, 20
activity demand 172
Add Delivery Request action 33, 64
Add Holds action 61
Add Logical Kit action 37
Add Payment Type action 74
Add Products Being Delivered
action 219
Add Service Request action 33
Address Lookup action 28
address questions. See questions 22
addresses 165
billing 46
forward to 50
more 50
ship to
modifying 39
Alert ID field 41
alerts 40
creating 180
queues 41
service work orders 206
shipments 170
Allow Overage action 152
answer options 21, 22
Appointment Date field 67
Appointment field 38
Appointment Type field 196
appointments 5, 11, 12, 16, 17, 205, 217
completing 216
planning 211
recording service failure 216
searching 225
stop numbers
assigning 5
taking 11
team members
changing 15
managing 15
overriding 17
viewing 16
viewing 5, 17
viewing planned 11
Associate Delivery Request action 33, 63
Associate Service Requests action 37
ATP options 214
audits 57, 168
Authorization Expiration Date field 89
Authorize action 90
Authorized field 35
availability notes 40
Available To Return field 63
Awaiting Reservation Acceptance
status 19
B
Buyer Account Number field 25
C
calendars 214
Cancel action 30
capacity 9, 204, 223
See Also questions 22
supplemental 11
considering 12
Carrier Account # field 42
Carrier Sort Lane field 161
carriers 41, 63
modifying 68
Case Content Verification Not Required
field 172
chained orders. See related orders 56
Charge Actual Freight field 42
Charge Amount field 71
Charge Category field 71
Charge Name field 71
Charge Sequence field 78
charges 68, 71, 90, 165
Collected field 35
Collected Through AR? field 46
collection details 87
Comment field 200
Confirm action 30
Consider Supplemental Capacity
flag 12, 212
containers 48, 167
packing 176, 178
Copy Order action 30, 66
Counter Offer action 52
Create Credit Memo action 74, 86
Create Debit Memo action 74, 86
Create Dependency action 37, 110
Create Order action 23
create outbound shipments 151
Create Return action 30
Create Work Order action 33
Created For Return # field 41
credit cards 75
Currency field 42
customer accounts 77
Customer PO Number field 42
customers
preferred 12
schedule 11
CVV Authorization Code 89
D
Date/Time field 200
dates 58, 126, 169
Delivery Date field 37
delivery dates 154
delivery methods 99
delivery requests 37, 63
options 140
searching 137
dependencies 36
creating 109
viewing 110
derived orders. See related orders 56
discounts 68
discrepancies 59
reasons 59
types 59
distribution rules 98
Dock Appointment Scheduling
managing docks 198
searching for an appointment 194
taking a new appointment 196
viewing dock schedule details 195
Draft Order Created status 41
draft orders 29
E
Estimate End Time field 197
estimated time of shipment. See ETS
field 67
ETS field 67
Exchange Order With Type field 25
Exchange Type field 34, 41
exchange types 25, 41
execution details 204, 218
Execution Details screen. See team
members, managing 16
Execution Status field 161
Expected End Time field 5
Expected Start Time field 5
F
For Resp # field 52
Freight Terms field 42
fulfillment types 98, 133
Funds From Return field 75, 87
Future Availability Date field 40
G
gifts 36
© Copyright IBM Corp. 1999, 2011 231
H
Has Shortage field 161
history orders 30, 147
Hold Transaction field 200
Hold Type marker 200
hold types 61
holds 30
adding 210
viewing 209
Holds
viewing 198
I
Ignore Node Notification Time flag 12
Ignore Product Availability flag 213
Initiator field 50
instructions 36, 49, 131
adding 49
modifying 49
Intentional Backorder flag 98
inventory information 104
invoice types 46
invoices 45
charges 72
taxes 73
items
substituting 111
K
Kit Code field 101
kit components 36, 100, 101
adding 112
L
line availability 36, 108
Line Qty field 37
Line Quantity field 38
lines
searching 91
unscheduling 95
lists 17
creating 17
loads 166
logical kits 175
See Also kit components 175
M
made to customer. See MTC 44
made to order. See MTO 44
Manage Dock Group field 195
Minimum Fill Quantity field 98
minimum notification time 12
Modification Levels field 57
modification types 61
Modification Types field 57
MTC (Made To Customer) 44
MTO (Made To Order) 44
Multiple Appointments flag 65
N
negotiations 50
history 54
lines 55
statuses 50
node notification time
ignoring 12
nodes 12, 43, 98, 108, 180
changing 215
procuring 98
scheduling 59
notes 49
availability 40
Notification Reference field 43
Notification Type field 43
Number Of Days To Consider field 12
Number of Days To Display field 195
O
Offer action 52
options 131
Order Available On System field 172
order lines 35
orders
creating 23
searching 21, 25
organizations 181
details 147
Over Ship Quantity field 164
Overage Allowed field 172
Override Release Date field 60
Override Release Date flag 60
Override Team Members action 17
Override Team Members screen. See team
members 17
P
Pack And Hold flag 161
Pack Container action 176
Packed Quantity field 161
payment collection 45
payment information 74
adding 79
modifying 82
Payment Rule field 74
payment status 35
Payment Type Status field 76, 83, 84, 85,
86
payment types 75, 79, 80, 82, 84
permit questions. See questions 22
Plan Appointment action 11
Plan Work Order Appointment screen.
See appointments, viewing planned 11
plans
selecting 181
postal code 9
postal codes 28, 223
Pre-call Status field 44
Pre-settled Amount field 97
Pre-settled Quantity field 97
pre-settlements 97
Preferred Resource ID field 11
Preferred Resource Pool ID field 11
Price Program field 42
printing 178
Priority Code field 41
Procure From Node field 221
procurement requests 19
accepting 221
nodes 19
rejecting 20, 221
viewing 19
product availability 214
Products being Delivered field 44
products delivered 206
Q
questionnaire. See questions 21
questions
answering 22
capacity impact 22
viewing 21
Questions screen. See questions 21
queues 41
R
Raised On field 41
Recv Node field 37
Refund action 91
Reject action 20
related orders 56
Relationship field 56
Release action 30, 60
Release From ESP Hold action 160
Release Immediately flag 60
releases 43
adding 183
searching 120
Remove action 30
Remove Line action 37
Removing shipments from wave 159
Requested Cancel Date field 41
Requested Delivery Date field 41
Requested Ship Date field 42
resource availability 215
Resource Availability field 212
Resource field 5
resource pools 5, 9, 12, 17, 213, 223
Resp # field 52
Restore action 30
Return Against Order field 62
Return By Gift Recipient field 63
Return To Node field 62, 63
routes 225
stop numbers 5
Routing Error Code field 162
S
Sale Voided Orders checkbox 25
Save Appointment action 12, 212
Schedule action 30, 59
Scheduled status 30
scheduling 59
rules 59
Scheduling Rule field 42, 60
segment numbers 45
segment types 44, 104
232 Sterling Selling and Fulfillment Foundation: Distributed Order Management User Guide
service complexity levels 203
service item groups 44, 203
service lines 44, 205
adding 218
service locations 210
service requests 37
adding 106
associating 105
fulfillment types 133
options 131
searching 127
service resources 15
appointments
stop numbers 5
service tools 7, 208
viewing 7
service types 9, 223
service work orders 11, 43, 202
appointments 217
taking 11
team members 15, 17
viewing 5, 17
viewing planned 11
cancelling 219
creating 65
modifying 219
searching 7, 11, 15
service tools
viewing 7
Serviced Area List screen. See time slots,
viewing available 9
Serviced Area Search screen. See serviced
areas, searching 9
serviced areas
searching 9, 223
services 41
modifying 68
services. See service items 9
Ship Complete checkbox 42
Ship Line Complete action 123
ship modes 48
Ship Node field 37
ship nodes. See nodes 12
Ship Together flag 123
shipment audits 173
shipment dates 154
Shipment Sort Lane field 161
shipments 48, 108, 124, 159
cancelling 178
deleting 158
modifying 164
outbound 153
searching 153
splitting 179
splitting lines 180
Shipper's Ref. # field 48
shipping costs 42
Shipping Paid By field 42
special services 164
Start Date field 12
status breakup 66, 116, 127
Status field 200
statuses 25
Stop # field 5
stop numbers
assigning 5
stored value cards 77
Substitute Item action 37
substitutions 111
Supervisory Overrides action 151
supplemental capacity. See capacity 12
Suppress Procurement field 40
Suppress Sourcing field 40
T
tag attributes 105
tag identifiers 105
tag numbers 67
Tax Exempt checkbox 42
Tax Exemption Certificate field 42
Tax Jurisdiction field 42
Tax Percentage field 72
taxes 68
Taxpayer ID field 42
team 25
team members 216
changing 15
definition 15
lists
creating 17
managing 15
overriding 17, 226
viewing 16
team members. See Also team
members 15
Terms Code field 42
time slots 11, 213, 223
preferred 11, 12
selecting 12
viewing available 9
Tracking # field 47
transaction types 88
transportation costs 42
U
unit of measurement. See UOM 37
Unschedule Line action 37
UOM (Unit Of Measure) 37
User ID field 200
V
Vendor ID field 43
View Alerts action 29
View Audit action 30
View Execution Details action 16
View History action 62
View Holds action 30, 61
View Instructions action 30
View Invoices action 29
View Notes action 30
View Releases action 29
View Shipments action 30
W
Wave # field 161
waves 156
creating 183
work orders. See service work orders 43
Index 233
234 Sterling Selling and Fulfillment Foundation: Distributed Order Management User Guide
Printed in USA
