Based App Programming Guide For Mac Doc OSX
DocBasedAppProgrammingGuideForOSX
User Manual:
Open the PDF directly: View PDF ![]() .
.
Page Count: 73
- Document-Based App Programming Guide for Mac
- Contents
- Figures, Tables, and Listings
- Introduction
- Designing a Document-Based App
- The Classes That Support Document-Based Apps
- App Creation Process Overview
- Creating the Subclass of NSDocument
- Core App Behaviors
- Alternative Design Considerations
- Overriding the URL and File Package Reading Methods
- Overriding the URL and File Package Writing Methods
- Incremental Data Reading and Writing
- Multiple Document Types Use Multiple NSDocument Subclasses
- Additional Document Type Considerations
- Customizing the Save Dialog
- Customizing Document Window Titles
- Customizing Document Closing
- Message Flow in the Document Architecture
- Revision History

Document-Based App
Programming Guide for
Mac

Contents
About the Cocoa Document Architecture 7
At a Glance 7
The Model-View-Controller Pattern Is Basic to a Document-Based App 8
Xcode Supports Coding and Configuring Your App 8
You Must Subclass NSDocument 8
NSDocument Provides Core Behavior and Customization Opportunities 8
Prerequisites 9
See Also 9
Designing a Document-Based App 10
Documents in OS X 10
The Document Architecture Provides Many Capabilities for Free 11
Storing Documents in iCloud 12
The Document Architecture Supports App Sandbox 13
Considerations for Designing Your Document Data Model 13
Cocoa Uses the Model-View-Controller Design Pattern 13
A Data Model Corresponds to a Document Type 13
Data Model Storage 14
Handling a Shared Data Model in OS X and iOS 15
The Classes That Support Document-Based Apps 16
NSDocumentController Creates and Manages Documents 17
NSDocument Presents and Stores Document Data 18
NSWindowController Manages One Document Window 19
Subclassing Objects in the Document Architecture 21
You Must Subclass NSDocument 21
You Should Subclass NSWindowController 22
You Rarely Need to Subclass NSDocumentController 24
App Creation Process Overview 26
Xcode Provides a Document-Based App Template 26
Create the Project 27
Create Your Document Window User Interface 28
Review Your App Menu Bar Commands 28
2012-12-13 | Copyright © 2012 Apple Inc. All Rights Reserved.
2

Complete the Information Property List 29
Export Custom Document Type Information 32
Implement the NSDocument Subclass 33
Create Any Additional Custom Classes 33
Creating the Subclass of NSDocument 35
Reading Document Data 35
How to Override the Data-Based Reading Method 36
It’s Easy to Support Concurrent Document Opening 37
Don’t Rely on Document-Property Getters in Overrides of Reading Methods 37
Writing Document Data 37
Initializing a New Document 39
Moving Document Data to and from iCloud 40
Determining Whether iCloud Is Enabled 41
Searching for Documents in iCloud 42
Moving a Document into iCloud Storage 42
Removing a Document from iCloud Storage 43
NSDocument Handles Conflict Resolution Among Document Versions 44
Optional Method Overrides 44
Window Controller Creation 45
Window Nib File Loading 45
Printing and Page Layout 46
Modifying the Save Dialog Accessory View 46
Validating Menu Items 46
Core App Behaviors 47
Documents Are Automatically Saved 47
Autosaving in Place Differs From Autosaving Elsewhere 47
Consider Autosaving Performance 49
Safety Checking Prevents Unintentional Edits 49
Document Saving Can Be Asynchronous 49
Some Autosaves Can Be Cancelled 50
Users Can Browse Document Versions 50
Windows Are Restored Automatically 51
The Document Architecture Provides Undo Support for Free 52
Implementing Undo 53
Implementing Partial Undo 54
Managing the Change Count 54
Not Supporting Undo 55
The Document Architecture Supports Robust Error Handling 55
2012-12-13 | Copyright © 2012 Apple Inc. All Rights Reserved.
3
Contents

Alternative Design Considerations 57
Overriding the URL and File Package Reading Methods 57
Overriding the URL and File Package Writing Methods 60
Incremental Data Reading and Writing 62
Multiple Document Types Use Multiple NSDocument Subclasses 62
Additional Document Type Considerations 63
Customizing the Save Dialog 64
Customizing Document Window Titles 64
Customizing Document Closing 64
Message Flow in the Document Architecture 65
Creating a New Document 65
Opening a Document 66
Saving a Document 70
Document Revision History 72
2012-12-13 | Copyright © 2012 Apple Inc. All Rights Reserved.
4
Contents

Figures, Tables, and Listings
Designing a Document-Based App 10
Figure 1-1 Document file, object, and data model 10
Table 1-1 Primary classes in the document architecture 12
The Classes That Support Document-Based Apps 16
Figure 2-1 Relationships among NSDocumentController,NSDocument, and NSWindowController
objects 16
Figure 2-2 Key objects in a document-based app 17
Figure 2-3 Window outlet of window controller 20
Figure 2-4 Loading a nib file that is controller specific 24
Table 2-1 Document architecture objects and subclasses 21
App Creation Process Overview 26
Figure 3-1 New Project dialog 27
Figure 3-2 The information property list editor 30
Table 3-1 File Menu commands in the document-based app template 28
Table 3-2 Properties defining a document type (CFBundleDocumentTypes)31
Table 3-3 Properties defining an exported document type (UTExportedTypeDeclarations)33
Creating the Subclass of NSDocument 35
Figure 4-1 Sharing document data via iCloud 40
Listing 4-1 Data-based document-reading method implementation 36
Listing 4-2 Data-based document-writing method implementation 38
Listing 4-3 Determining whether iCloud is enabled 41
Listing 4-4 Moving a document to iCloud 43
Core App Behaviors 47
Figure 5-1 Autosaving in place 48
Figure 5-2 Window restoration 52
Figure 5-3 Undo and redo stacks 53
Alternative Design Considerations 57
Figure 6-1 File package containing an image 58
Figure 6-2 Creating a new document 65
2012-12-13 | Copyright © 2012 Apple Inc. All Rights Reserved.
5

Figure 6-3 Opening a document 67
Figure 6-4 Document initialization for document creation 68
Figure 6-5 Document initialization for document opening 69
Figure 6-6 Saving a document 70
Listing 6-1 URL-based document-reading method implementation 57
Listing 6-2 File wrapper example properties and constants 58
Listing 6-3 File wrapper document-reading method implementation 59
Listing 6-4 URL-based document-writing method implementation 60
Listing 6-5 File wrapper document-writing method override 61
2012-12-13 | Copyright © 2012 Apple Inc. All Rights Reserved.
6
Figures, Tables, and Listings
In OS X, a Cocoa subsystem called the document architecture provides support for apps that manage documents,
which are containers for user data that can be stored in files locally and in iCloud.
At a Glance
Document-based apps handle multiple documents, each in its own window, and often display more than one
document at a time. Although these apps embody many complex behaviors, the document architecture
provides many of their capabilities “for free,” requiring little additional effort in design and implementation.
2012-12-13 | Copyright © 2012 Apple Inc. All Rights Reserved.
7
About the Cocoa Document Architecture

The Model-View-Controller Pattern Is Basic to a Document-Based App
The Cocoa document architecture uses the Model-View-Controller (MVC) design pattern in which model objects
encapsulate the app’s data, view objects display the data, and controller objects act as intermediaries between
the view and model objects. A document, an instance of an NSDocument subclass, is a controller that manages
the app’s data model. Adhering to the MVC design pattern enables your app to fit seamlessly into the document
architecture.
Relevant Chapters: Designing a Document-Based App (page 10) and The Classes That Support
Document-Based Apps (page 16)
Xcode Supports Coding and Configuring Your App
Taking advantage of the support provided by Xcode, including a document-based application template and
interfaces for configuring app data, you can create a document-based app without having to write much code.
In Xcode you design your app’s user interface in a graphical editor, specify entitlements for resources such as
the App Sandbox and iCloud, and configure the app’s property list, which specifies global app keys and other
information, such as document types.
Relevant Chapter: App Creation Process Overview (page 26)
You Must Subclass NSDocument
Document-based apps in Cocoa are built around a subclass of NSDocument that you implement. In particular,
you must override one document reading method and one document writing method. You must design and
implement your app’s data model, whether it is simply a single text-storage object or a complex object graph
containing disparate data types. When your reading method receives a request, it takes data provided by the
framework and loads it appropriately into your object model. Conversely, your writing method takes your app’s
model data and provides it to the framework’s machinery for writing to a document file, whether it is located
only in your local file system or in iCloud.
Relevant Chapters: Creating the Subclass of NSDocument (page 35) and The Classes That Support
Document-Based Apps (page 16)
NSDocument Provides Core Behavior and Customization Opportunities
The Cocoa document architecture provides your app with many built-in features, such as autosaving,
asynchronous document reading and writing, file coordination, and multilevel undo support. In most cases, it
is trivial to opt-in to these behaviors. If your app has particular requirements beyond the defaults, the document
About the Cocoa Document Architecture
At a Glance
2012-12-13 | Copyright © 2012 Apple Inc. All Rights Reserved.
8

architecture provides many opportunities for extending and customizing your app’s capabilities through
mechanisms such as delegation, subclassing and overriding existing methods with custom implementations,
and integration of custom objects.
Relevant Chapters: Core App Behaviors (page 47) and Alternative Design Considerations (page
57)
Prerequisites
Before you read this document, you should be familiar with the information presented in Mac App Programming
Guide .
See Also
See Document-Based App Programming Guide for iOS for information about how to develop a document-based
app for iOS using the UIDocument class.
For information about iCloud, see iCloud Design Guide.
File Metadata Search Programming Guide describes how to conduct searches using the NSMetadataQuery
class and related classes. You use metadata queries to locate an app’s documents stored in iCloud.
For information about how to publish your app in the App Store, see App Distribution Guide .
About the Cocoa Document Architecture
Prerequisites
2012-12-13 | Copyright © 2012 Apple Inc. All Rights Reserved.
9
Documents are containers for user data that can be stored in files locally and in iCloud. In a document-based
design, the app enables users to create and manage documents containing their data. One app typically
handles multiple documents, each in its own window, and often displays more than one document at a time.
For example, a word processor provides commands to create new documents, it presents an editing environment
in which the user enters text and embeds graphics into the document, it saves the document data to disk or
iCloud, and it provides other document-related commands, such as printing and version management. In
Cocoa, the document-based app design is enabled by a subsystem called the document architecture, which
is part of of the AppKit framework.
Documents in OS X
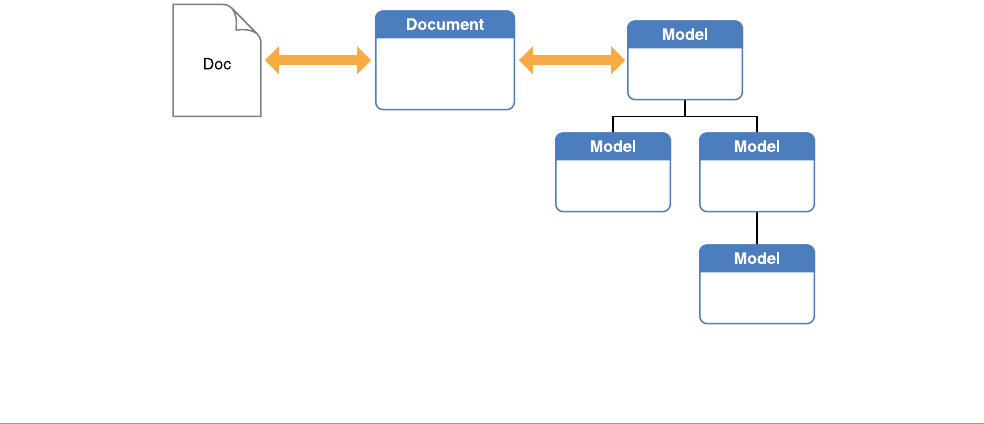
There are several ways to think of a document. Conceptually, a document is a container for a body of information
that can be named and stored in a file. In this sense, the document is an object in memory that owns and
manages the document data. To users, the document is their information—such as text and graphics formatted
on a page. In the context of Cocoa, a document is an instance of a custom NSDocument subclass that knows
how to represent internally persistent data that it can display in a window. This document object knows how
to read document data from a file and create an object graph in memory for the document data model. It also
knows how to modify that data model consistently and write the document data back out to disk. So, the
document object mediates between different representations of document data, as shown in Figure 1-1.
Figure 1-1 Document file, object, and data model
2012-12-13 | Copyright © 2012 Apple Inc. All Rights Reserved.
10
Designing a Document-Based App

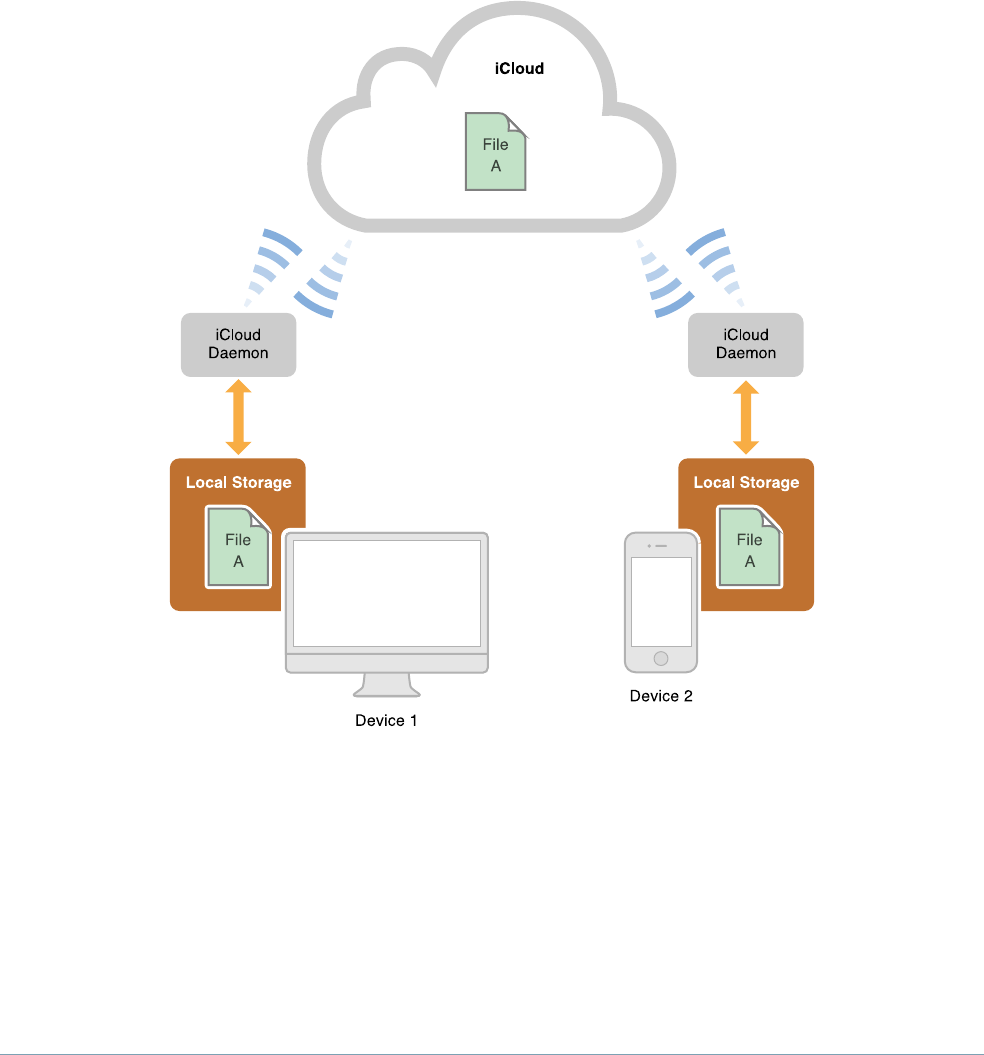
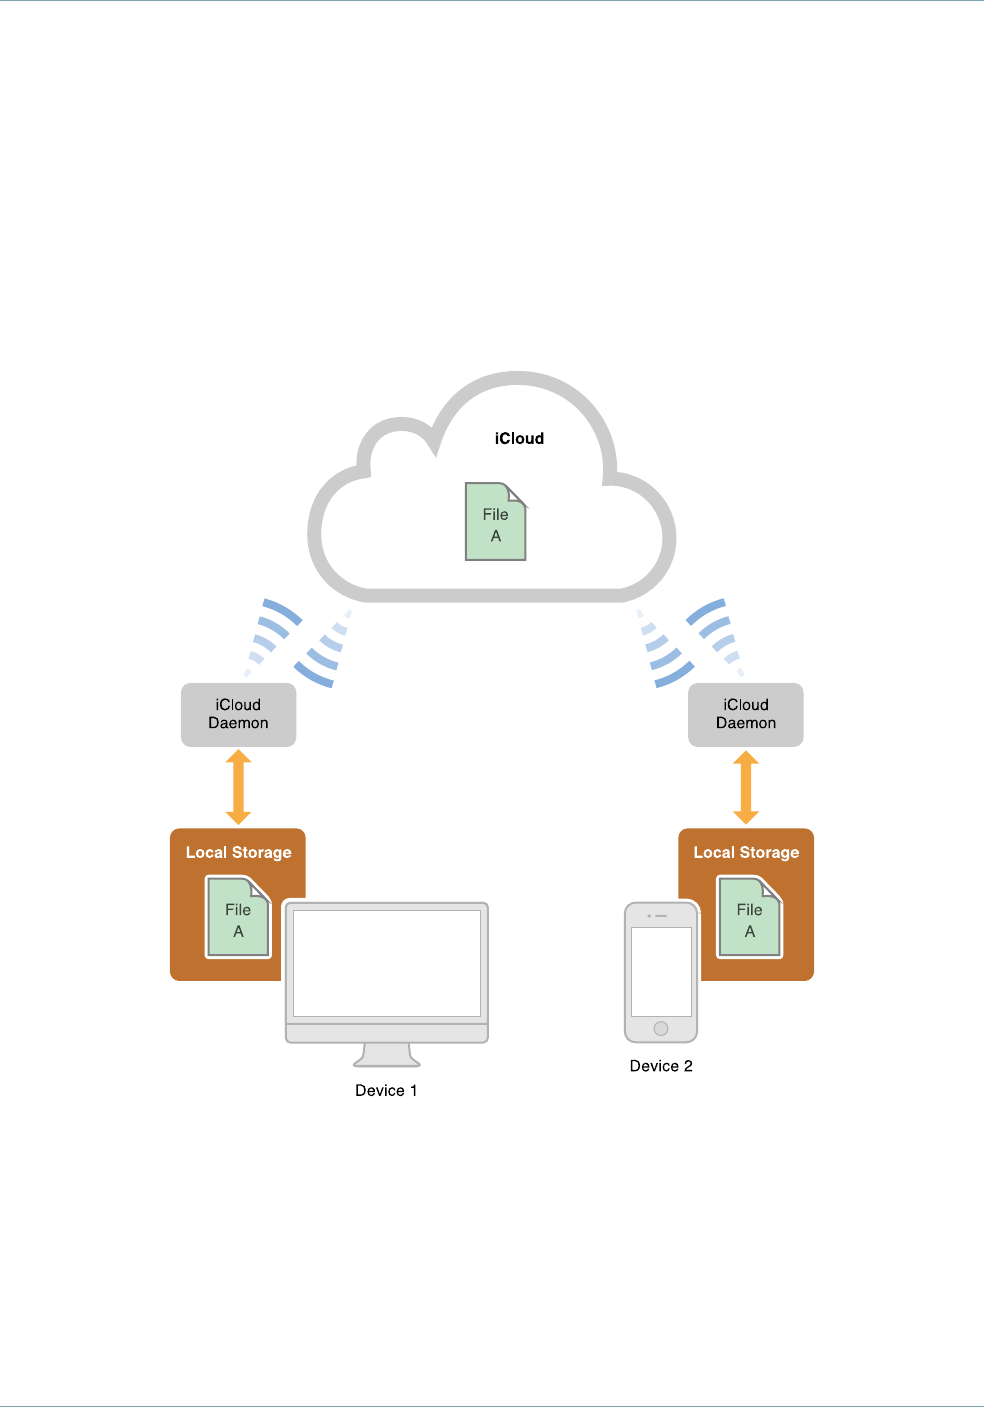
Using iCloud, documents can be shared automatically among a user’s computers and iOS devices. The system
synchronizes changes to the document data without user intervention. See Storing Documents in iCloud (page
12) for more information.
The Document Architecture Provides Many Capabilities for Free
The document-based style of app is one design choice among several that you should consider when you
design your app. Other choices include single-window utility apps, such as Calculator, and library-style “shoebox”
apps, such as iPhoto. It’s important to choose the basic app style early in the design process because
development takes quite different paths depending on that choice. If it makes sense for your users to create
multiple discrete sets of data, each of which they can edit in a graphical environment and store in files, then
you should plan to develop a document-based app.
The Cocoa document architecture provides a framework for document-based apps to do the following things:
●Create new documents. The first time the user chooses to save a new document, it presents a dialog in
which the user names and saves the document in a disk file in a user-chosen location.
●Open existing documents stored in files. A document-based app specifies the types of document files
it can read and write, as well as read-only and write-only types. It can represent the data of different
document types internally and display the data appropriately.
●Automatically save documents. Document-based apps can adopt autosaving in place, and its documents
are automatically saved at appropriate times so that the data the user sees on screen is effectively the
same as that saved on disk. Saving is done safely, so that an interrupted save operation does not leave
data inconsistent. To avoid automatic saving of inadvertent changes, old files are locked from editing until
explicitly unlocked by the user.
●Asynchronously read and write document data. Reading and writing are done asynchronously on a
background thread, so that lengthy operations do not make the app’s user interface unresponsive. In
addition, reads and writes are coordinated using the NSFilePresenter protocol and the
NSFileCoordinator class to reduce version conflicts.
●Manage multiple versions of documents. Autosave creates versions at regular intervals, and users can
manually save a version whenever they wish. Users can browse versions and revert the document’s contents
to a chosen version using a Time Machine–like interface. The version browser is also used to resolve version
conflicts from simultaneous iCloud updates.
●Print documents. Users can specify various page layouts in the print dialog and page setup dialog.
●Track changes and set the document’s edited status. The document manages its edited status and
implements multilevel undo and redo.
●Validate menu items. The document enables or disables menu items automatically, depending on its
edited status and the applicability of the associated action methods.
Designing a Document-Based App
The Document Architecture Provides Many Capabilities for Free
2012-12-13 | Copyright © 2012 Apple Inc. All Rights Reserved.
11

●Handle app and window delegation. Notifications are sent and delegate methods called at significant
life cycle events, such as when the app terminates.
Cocoa’s document architecture implements most of its capabilities in three classes. These classes interoperate
to provide an extensible app infrastructure that makes it easy for you to create document-based apps. Table
1-1 briefly describes these classes.
Table 1-1 Primary classes in the document architecture
PurposeClass
Creates, presents, and stores document dataNSDocument
Manages a window in which a document is displayedNSWindowController
Manages all of the document objects in the appNSDocumentController
See The Classes That Support Document-Based Apps (page 16) for more detailed information.
Storing Documents in iCloud
The iCloud storage technology enables you to share documents and other app data among multiple computers
that run your document-based app. If you have a corresponding iOS version of your app, you can share your
documents and app data with your iOS devices as well. Once your app sets up the proper connections, iCloud
automatically pushes documents and changes to all the devices running an instance of your app with no
explicit user intervention.
There are two kinds of storage in iCloud: document storage and key-value data storage. Document storage is
designed for storing large amounts of data such as that in a document file. Key-value storage is designed for
small amounts of app data such as configuration data. For example, you might store the text and illustrations
for a book in document storage, and you might store the reader’s page location in key-value storage. That
way, whenever the user opens the document on any device, the correct page is displayed.
Documents and key-value data designated for storage in iCloud are transferred to iCloud and to the user’s
other computers as soon as possible. On iOS devices, only file metadata is transferred from iCloud to devices
as soon as possible, while the file data itself is transferred on demand. Once data has been stored initially in
iCloud, only changes are transferred thereafter, to make synchronization most efficient.
NSDocument implements file coordination, version management, and conflict resolution among documents,
so it provides the easiest path to using iCloud. For details explaining how to handle document storage in
iCloud, see Moving Document Data to and from iCloud (page 40).
Designing a Document-Based App
Storing Documents in iCloud
2012-12-13 | Copyright © 2012 Apple Inc. All Rights Reserved.
12

The Document Architecture Supports App Sandbox
The document architecture helps document-based apps adopt App Sandbox, an access control technology
that provides a last line of defense against stolen, corrupted, or deleted user data if malicious code exploits
your app. The NSDocument class automatically works with Powerbox to make items available to your app
when the user opens and saves documents or uses drag and drop. NSDocument also provides support for
keeping documents within your sandbox if the user moves them using the Finder. For more information about
App Sandbox, see App Sandbox Design Guide.
Considerations for Designing Your Document Data Model
Your document data model is an object or graph of interconnected objects that contain the data displayed
and manipulated by your document objects.
Cocoa Uses the Model-View-Controller Design Pattern
The Cocoa document architecture and many other technologies throughout Cocoa utilize the
Model-View-Controller (MVC) design pattern. Model objects encapsulate the data specific to an app and
manipulate and process that data. View objects display data from the app’s model objects and enable the
editing of that data by users. Controller objects act as intermediaries between the app’s view objects and
model objects. By separating these behaviors into discrete objects, your app code tends to be more reusable,
the object interfaces are better defined, and your app is easier to maintain and extend. Perhaps most importantly,
MVC-compliant app objects fit seamlessly into the document architecture.
A Data Model Corresponds to a Document Type
A document object is a controller dedicated to managing the objects in the document’s data model. Each
document object is a custom subclass of NSDocument designed specifically to handle a particular type of data
model. Document-based apps are able to handle one or more types of documents, each with its own type of
data model and corresponding NSDocument subclass. Apps use an information property list file, which is
stored in the app’s bundle and named, by default, <appName>-Info.plist, to specify information that can
be used at runtime. Document-based apps use this property list to specify the document types the app can
edit or view. For example, when the NSDocumentController object creates a new document or opens an
existing document, it searches the property list for such items as the document class that handles a document
type, the uniform type identifier (UTI) for the type, and whether the app can edit or only view the type. For
more information about creating a property list for types of documents, see Complete the Information Property
List (page 29).
Designing a Document-Based App
The Document Architecture Supports App Sandbox
2012-12-13 | Copyright © 2012 Apple Inc. All Rights Reserved.
13

Data Model Storage
Any objects that are part of the persistent state of a document should be considered part of that document’s
model. For example, the Sketch sample app has a subclass of NSDocument named SKTDocument. Objects of
this class have an array of SKTGraphic objects containing the data that defines the shapes Sketch can draw,
so they form the data model of the document. Besides the actual SKTGraphic objects, however, the
SKTDocument object contains some additional data that should technically be considered part of the model,
such as the order of the graphics within the document’s array, which determines the front-to-back ordering
of the SKTGraphic objects.
Like any document-based app, Sketch is able to write the data from its data model to a file and vice versa. The
reading and writing are the responsibility of the SKTDocument object. Sketch implements the NSDocument
data-based writing method that flattens its data model objects into an NSData object before writing it to a
file. Conversely, it also implements the data-based NSDocument reading method to reconstitute its data model
in memory from an NSData object it reads from one of its document files.
There are three ways you can implement data reading and writing capabilities in your document-based app:
●Reading and writing native object types. NSDocument has methods that read and write NSData and
NSFileWrapper objects natively. You must override at least one writing method to convert data from
the document model’s internal data structures into an NSData object or NSFileWrapper object in
preparation for writing to a file. Conversely, you must also override at least one reading method to convert
data from an NSData or NSFileWrapper object into the document model’s internal data structures in
preparation for displaying the data in a document window. See Creating the Subclass of NSDocument (page
35) for more details about document reading and writing methods.
●Using Core Data. If you have a large data set or require a managed object model, you may want to use
NSPersistentDocument to create a document-based app that uses the Core Data framework. Core Data
is a technology for object graph management and persistence. One of the persistent stores provided by
Core Data is based on SQLite. Although Core Data is an advanced technology requiring an understanding
of Cocoa fundamental design patterns and programming paradigms, it brings many benefits to a
document-based app, such as:
●Incremental reading and writing of document data
●Data compatibility for apps with iOS and OS X versions
For more information, see Core Data Starting Point.
●Custom object formats. If you need to read and write objects without using NSData and NSFileWrapper,
you can override other NSDocument methods to do so, but your code needs to duplicate what NSDocument
does for you. Naturally, this means your code will have greater complexity and a greater possibility of
error.
Designing a Document-Based App
Considerations for Designing Your Document Data Model
2012-12-13 | Copyright © 2012 Apple Inc. All Rights Reserved.
14

Handling a Shared Data Model in OS X and iOS
Using iCloud, a document can be shared between document-based apps in OS X and iOS. However, there are
differences between the platforms that you must take into consideration. For an app to edit the same document
in iOS and OS X, the document-type information should be consistent. Other cross-platform considerations
for document-data compatibility are:
●Some technologies are available on one platform but not the other. For example, if you use rich text format
(RTF) as a document format in OS X, it won’t work in iOS because its text system doesn’t have built-in
support for rich text format (although you can implement that support in your iOS app).
●The default coordinate system for each platform is different, which can affect how content is drawn. See
“Default Coordinate Systems and Drawing in iOS” in Drawing and Printing Guide for iOS for a discussion
of this topic.
●If you archive a document’s model object graph, you may need to perform suitable conversions using
NSCoder methods when you encode and decode the model objects.
●Some corresponding classes are incompatible across the platforms. That is, there are significant differences
between the classes representing colors (UIColor and NSColor), images (UIImage and NSImage), and
Bezier paths (UIBezierPath and NSBezierPath). NSColor objects, for example, are defined in terms
of a color space (NSColorSpace), but there is no color space class in UIKit.
These cross-platform issues affect the way you store document data in the file that is shared between OS X
and iOS as an iCloud document. Both versions of your app must be able to reconstitute a usable in-memory
data model that is appropriate to its platform, using the available technologies and classes, without losing any
fidelity. And, of course, both versions must be able to convert their platform-specific data model structures
into the shared file format.
One strategy you can use is to drop down to a lower-level framework that is shared by both platforms. For
example, on the iOS side, UIColor defines a CIColor property holding a Core Image object representing the
color; on the OS X side, your app can create an NSColor object from the CIColor object using the
colorWithCIColor: class method.
Designing a Document-Based App
Considerations for Designing Your Document Data Model
2012-12-13 | Copyright © 2012 Apple Inc. All Rights Reserved.
15
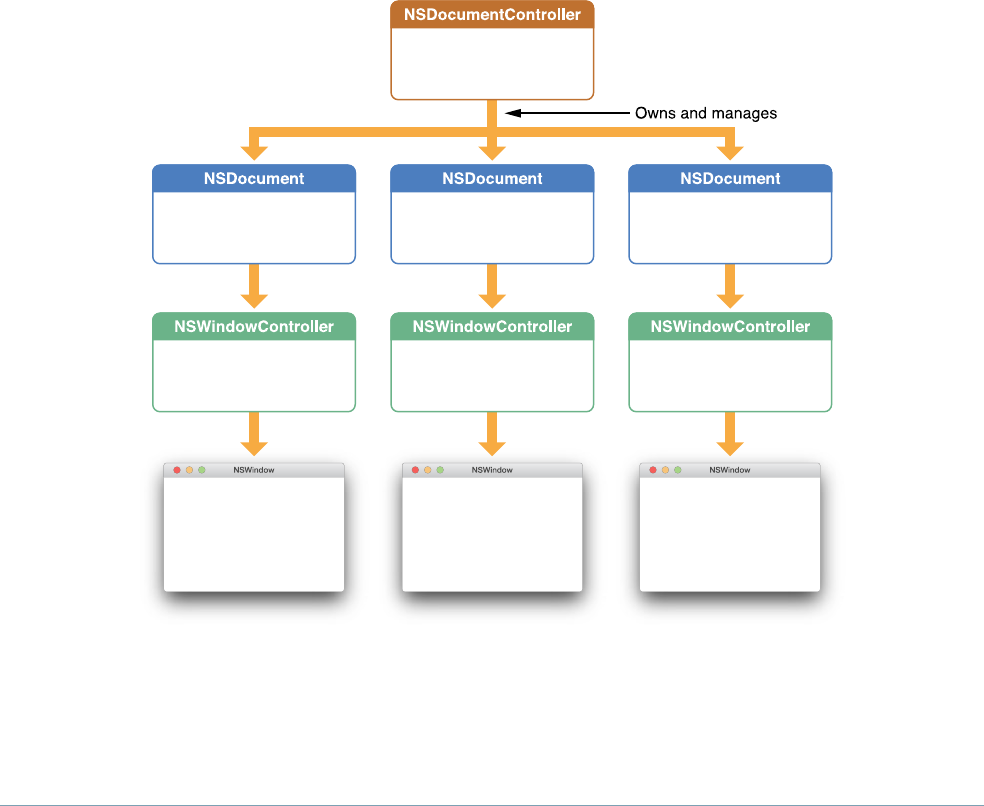
There are three major classes in the document architecture: NSDocumentController,NSDocument, and
NSWindowController. Objects of these classes divide and orchestrate the work of creating, saving, opening,
and managing the documents of an app. They are arranged in a tiered one-to-many relationship, as depicted
in Figure 2-1. An app can have only one NSDocumentController object, which creates and manages one
or more NSDocument objects (one for each New or Open operation). In turn, an NSDocument object creates
and manages one or more NSWindowController objects, one for each of the windows displayed for a
document. In addition, some of these objects have responsibilities analogous to NSApplication and NSWindow
delegates, such as approving major events like closing and quitting.
Figure 2-1 Relationships among NSDocumentController,NSDocument, and NSWindowController objects
2012-12-13 | Copyright © 2012 Apple Inc. All Rights Reserved.
16
The Classes That Support Document-Based Apps

A Cocoa app includes a number of key objects in addition to the three major types of objects of the document
architecture. Figure 2-2 shows how these objects fit into the overall Cocoa object infrastructure.
Figure 2-2 Key objects in a document-based app
NSDocumentController Creates and Manages Documents
An app’s NSDocumentController object manages the documents in an app. In the MVC design pattern, an
NSDocumentController object is a high-level controller. It has the following primary responsibilities:
●Creates empty documents in response to the New item in the File menu
●Creates documents initialized with data from a file in response to the Open item in the File menu
The Classes That Support Document-Based Apps
NSDocumentController Creates and Manages Documents
2012-12-13 | Copyright © 2012 Apple Inc. All Rights Reserved.
17

●Tracks and manages those documents
●Handles document-related menu items, such as Open Recent
When a user chooses New from the File menu, the NSDocumentController object gets the appropriate
NSDocument subclass from the app’s Information property list and allocates and initializes an instance of this
class. Likewise, when the user chooses Open, the NSDocumentController object displays the Open dialog,
gets the user’s selection, finds the NSDocument subclass for the file, allocates an instance of the class, and
initializes it with data from the file. In both cases, the NSDocumentController object adds a reference to
the document object to an internal list to help manage its documents.
Most of the time, you can use NSDocumentController as is to manage your app’s documents.
NSDocumentController is hard-wired to respond appropriately to certain app events, such as when the app
starts up, when it terminates, when the system is shutting down, and when documents are opened or printed.
Alternatively, you can create a custom delegate object and implement the delegate methods corresponding
to the same events (see NSApplicationDelegate Protocol Reference).
NSDocument Presents and Stores Document Data
NSDocument is the base class for document objects in the app architecture—you must create an NSDocument
subclass for each type of document your app handles. When your app is running, it has an NSDocument-based
object for each open document. In the MVC design pattern, NSDocument isamodel controller because it
manages the data model, that is, the persistent data associated with its document. An NSDocument object
has the following responsibilities:
●Manages the display and capture of the data in its windows (with the assistance of its window controllers)
●Loads and stores (that is, reads and writes) the persistent data associated with its document
●Responds to action messages to save, print, revert, and close documents
●Runs and manages the Save and Page Setup dialogs
A fully implemented NSDocument object also knows how to track its edited status, perform undo and redo
operations, print document data, and validate its menu items. Although these behaviors aren’t completely
provided by default, the NSDocument object does assist the developer in implementing each, in the following
ways:
●For tracking edited status, NSDocument provides a method for updating a change counter.
●For undo and redo operations, NSDocument lazily creates an NSUndoManager instance when one is
requested, responds appropriately to Undo and Redo menu commands, and updates the change counter
when undo and redo operations are performed.
The Classes That Support Document-Based Apps
NSDocument Presents and Stores Document Data
2012-12-13 | Copyright © 2012 Apple Inc. All Rights Reserved.
18

●For printing, NSDocument facilitates the display of the Page Setup dialog and the subsequent modification
of the NSPrintInfo object used in printing. To do this, subclasses of NSDocument must override
printOperationWithSettings:error:.
●To validate menu items, NSDocument implements validateUserInterfaceItem: to manage the
enabled state and titles of the menu items Revert Document and Save (which becomes Save a Version
after the document is first saved). If you want to validate other menu items, you can override this method,
but be sure to invoke the superclass implementation. For more information on menu item validation, see
NSUserInterfaceValidations Protocol Reference.
When designing your document objects, you should always maintain a clean separation between these
data-handling activities of the document object itself and the code for managing the visual presentation of
that data. The document object is responsible for the data, including the reading and writing of that data to
disk. The visual presentation of that data is the responsibility of the associated window controller object.
Keeping a clean separation between these two activities makes for a more modular design that can be updated
more easily in the future.
Nonetheless, managing the document’s data and its user interface are closely related, which is why the document
object owns and manages its window controllers. The document object also manages its menu, which is part
of the user interface, because the state of its user commands—what commands are available and whether
they are enabled—is determined by the state of the document data.
An NSDocument object should not contain or require the presence of any objects that are specific to the app’s
user interface. Although a document can own and manage NSWindowController objects—which present
the document visually and allow the user to edit it—it should not depend on these objects being there. For
example, it might be desirable to have a document open in your app without having it visually displayed.
For details about subclassing NSDocument, see Creating the Subclass of NSDocument (page 35).
If you have a large data set or require a managed object model, you may want to use NSPersistentDocument,
a subclass of NSDocument, to create a document-based app that uses Core Data. For more information, see
Core Data Starting Point .
NSWindowController Manages One Document Window
An NSWindowController object manages one window associated with a document. That window is typically
stored in a nib file. As such, in the MVC design pattern, it is a view controller. When an NSWindowController
object receives a request from its owning NSDocument object, it loads the nib file containing a window, displays
the window, and sets itself as the File’s Owner of the nib file. It also assumes responsibility for closing windows
properly.
The Classes That Support Document-Based Apps
NSWindowController Manages One Document Window
2012-12-13 | Copyright © 2012 Apple Inc. All Rights Reserved.
19
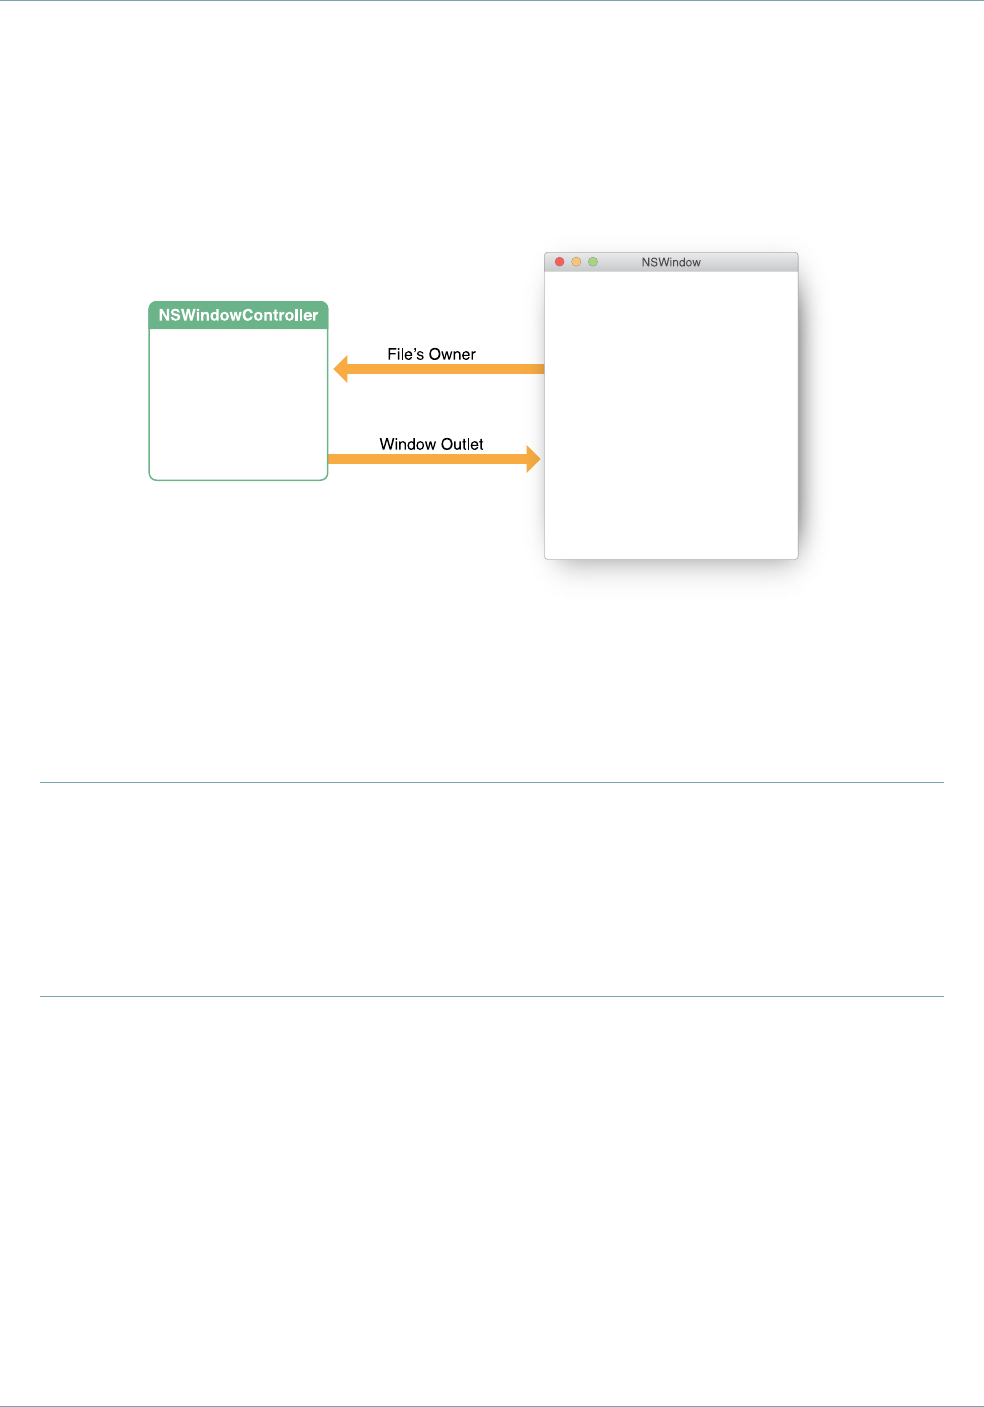
A window controller keeps track of its window using its window outlet. The window outlet should be connected
to the window for which your window controller is responsible, as shown in Figure 2-3.
Figure 2-3 Window outlet of window controller
Although not required, it’s often convenient to set up your window controller as the delegate of the window
it manages. In your nib file, connect the delegate outlet of the window your window controller is managing
to the object that represents your window controller—specifically, the File’s Owner object.
Note: NSWindowController does not depend on being the controlled window's delegate to do
its job, and it doesn't implement any NSWindow delegate methods. A subclass of
NSWindowController, however, is a fine place to put implementations of NSWindow delegate
methods, and if you do so you'll probably need to connect the delegate outlet of the window to the
File's Owner of the nib file as described. But you do not have to do so for NSWindowController
itself to work properly.
The Xcode document-based app template does not subclass NSWindowController, and you do not need
to do so if you are writing a simple app. However, if you are writing an app with more advanced requirements,
as is typical, you will almost certainly want to do so. In addition, subclassing NSWindowController promotes
better encapsulation of your view and model code. For more information, see You Should Subclass
NSWindowController (page 22).
The Classes That Support Document-Based Apps
NSWindowController Manages One Document Window
2012-12-13 | Copyright © 2012 Apple Inc. All Rights Reserved.
20

Subclassing Objects in the Document Architecture
You can create a document-based app without writing much code. You have only to create a document project,
compose the human interface, implement a subclass of NSDocument, and add any other custom classes or
behavior required by your app. However, most app requirements are more complex, so you can customize the
default object architecture through subclassing and delegation, as described in this section.
Table 2-1 summarizes the object architecture and subclass requirements of a document-based app.
Table 2-1 Document architecture objects and subclasses
SubclassingNumber of objectsClass
Required1 per documentNSDocument
Optional (but recommended)1 per windowNSWindowController
Optional (and unlikely)1 per appNSDocumentController
You Must Subclass NSDocument
Every app that uses the document architecture must create at least one subclass of NSDocument. To create a
document-based Cocoa app, you choose the Xcode template for a Cocoa application presented in the New
Project dialog and select the option Create Document-Based Application in the next pane. When you do this,
you get a new app project that already contains a subclass of NSDocument and nib files for your document
and app menu. Minimal or empty method implementations are provided for:
●Reading and writing document data. Comments explain what you need to fill in, how to handle an error
condition, and alternate reading and writing methods to override instead. The method bodies include
code that throws an “unimplemented method” exception if you don’t change anything.
●Initialization of the document object. The implementation contains the proper Cocoa initialization pattern,
which calls the superclass initializer and provides a place for subclass-specific initialization.
●Returning the document nib file name. This code overrides the windowNibName method to return the
nib file name used for documents of this type. Comments explain situations where you should do alternate
overrides.
●Post-nib-loading code. This override provides a place for code to be executed after the document window
nib file is loaded. For example, objects in the nib cannot be initialized until after the nib is loaded.
●Opting into autosaving. By leaving this override as written in the template to return YES, you ensure that
your document saves its data to disk automatically.
The Classes That Support Document-Based Apps
Subclassing Objects in the Document Architecture
2012-12-13 | Copyright © 2012 Apple Inc. All Rights Reserved.
21

See Creating the Subclass of NSDocument (page 35) for information about implementing the required methods
in your NSDocument subclass.
You Should Subclass NSWindowController
Even if your document has only one window, it may be complex enough that you’d like to split up some of
the logic in the controller layer to have a view controller as well as a model controller object. In this case, you
should subclass NSWindowController as well as NSDocument. In this way, you can add specific knowledge
of the app’s view layer that the window controller is responsible for managing. Any outlets and actions, and
any other behavior that is specific to the management of the user interface, goes into the NSWindowController
subclass. Especially for larger apps, splitting the controller duties between two classes makes a lot of sense.
This strategy allows you to have documents that are open, but not onscreen, to avoid having to allocate
memory and other resources of a front-end that may not be used in some circumstances.
Reasons to Subclass NSWindowController
If your document requires or allows multiple windows for a single document, that is a good reason to subclass
NSWindowController. For example, a CAD program could need to present front, top, and side views, as well
as a rendered 3D view of a document. When it does, you might want to have one or more subclasses of
NSWindowController to manage the different kinds of windows that your document needs, and so you
must create one of each in makeWindowControllers.
Some apps need only one window for a document but want to allow the user to create several copies of the
window for a single document (sometimes this is called a multiple-view document) so that the user can have
each window scrolled to a different position or displayed differently, such as at a different scale. In this case,
your makeWindowControllers override would create only one NSWindowController object, and there
would be a menu command or other control that allows the user to create others.
Another reason to subclass NSWindowController is to customize your document window titles. To customize
a document's window title properly, subclass NSWindowController and override
windowTitleForDocumentDisplayName:. If your app requires even deeper customization, override
synchronizeWindowTitleWithDocumentName.
How to Subclass NSWindowController
Once you've decided to subclass NSWindowController, you need to change the default document-based
app setup. First, add any Interface Builder outlets and actions for your document's user interface to the
NSWindowController subclass instead of to the NSDocument subclass. The NSWindowController subclass
instance should be the File’s Owner for the nib file because that creates better separation between the
The Classes That Support Document-Based Apps
Subclassing Objects in the Document Architecture
2012-12-13 | Copyright © 2012 Apple Inc. All Rights Reserved.
22

view-related logic and the model-related logic. Some menu actions can still be implemented in the NSDocument
subclass. For example, Save and Revert Document are implemented by NSDocument, and you might add other
menu actions of your own, such as an action for creating new views on a document.
Second, instead of overriding windowNibName in your NSDocument subclass, override
makeWindowControllers.InmakeWindowControllers, create at least one instance of your custom
NSWindowController subclass and use addWindowController: to add it to the document. If your document
always needs multiple controllers, create them all here. If a document can support multiple views but by default
has one, create the controller for the default view here and provide user actions for creating other views.
You should not force the windows to be visible in makeWindowControllers.NSDocument does that for you
if it’s appropriate.
An NSWindowController Subclass Manages Nib Files
An NSWindowController object expects to be told what nib file to load (through its initWithWindowNib...
methods) because it is a generic implementation of the default behavior for all window controllers. However,
when you write a subclass of NSWindowController, that subclass is almost always designed to control the
user interface contained in a particular nib file, and your subclass would not work with a different nib file. It is
therefore inconvenient and error-prone for the instantiator of the subclass to have to tell it which nib file to
load.
This problem is solved by overriding the init method to call the superclass’s initWithWindowNibName:
method with the correct nib name. Then instantiators just use init, and the controller has the correct nib file.
You can also override the initWithWindowNib... methods to log an error, as shown in Figure 2-4, because
no instantiator should ever try to tell your subclass which nib file to use. It is a good idea for any
The Classes That Support Document-Based Apps
Subclassing Objects in the Document Architecture
2012-12-13 | Copyright © 2012 Apple Inc. All Rights Reserved.
23
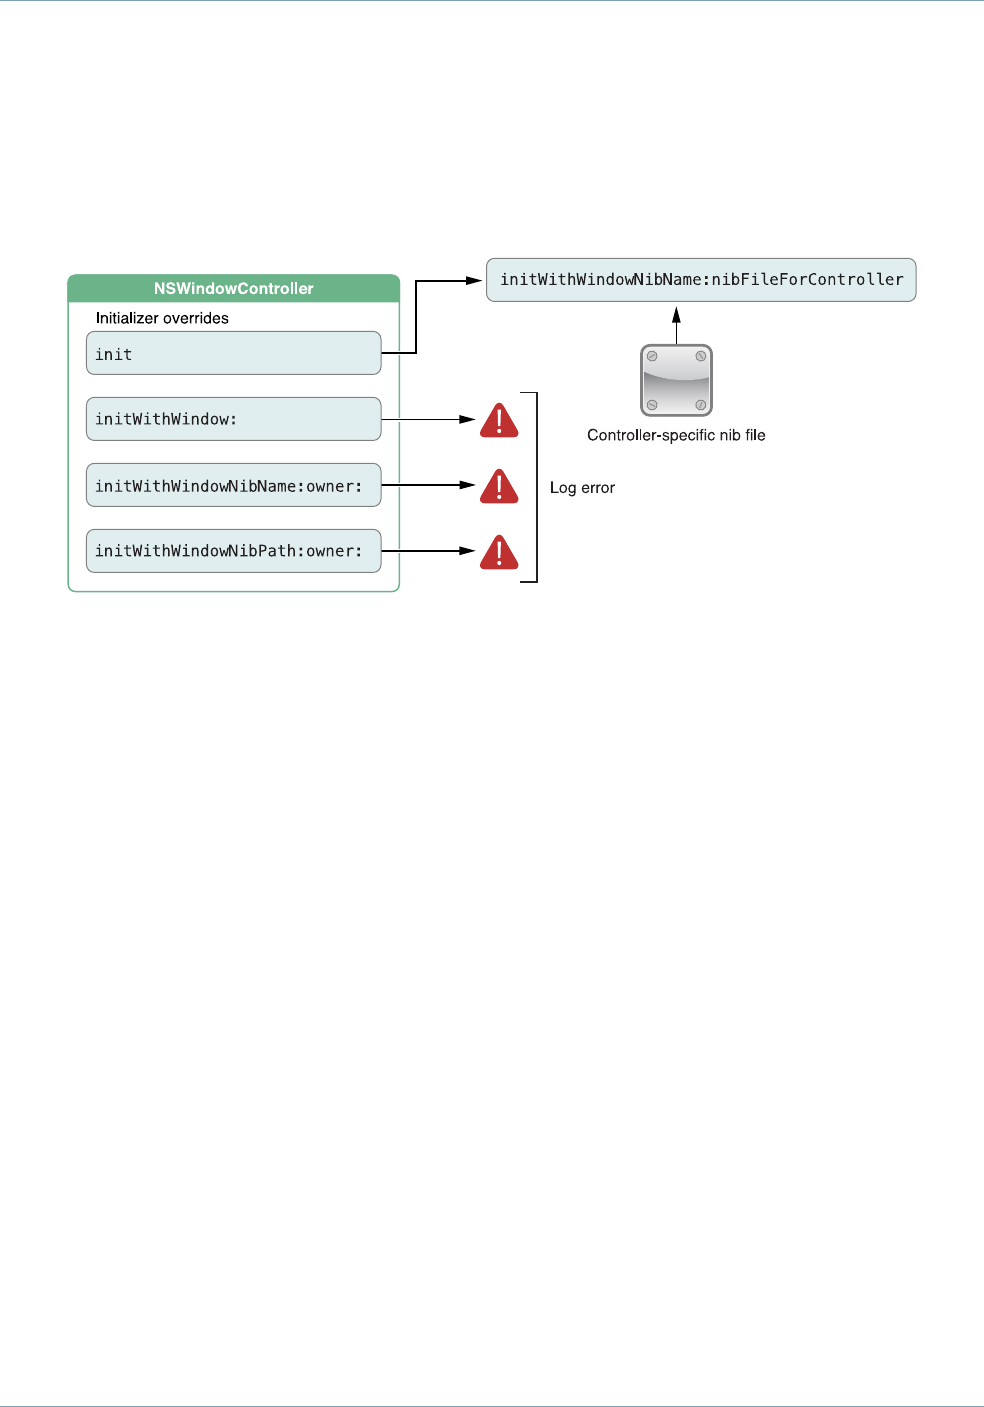
NSWindowController subclass designed to work with a specific nib file to use this technique. You should
do otherwise only if you are extending just the basic functionality of NSWindowController in your subclass
and have not tied that functionality to any particular nib file.
Figure 2-4 Loading a nib file that is controller specific
An NSWindowController object without an associated NSDocument object is useful by itself.
NSWindowController can be used as the base class for auxiliary panel controllers in order to gain the use
of its nib management abilities. One common standalone use of NSWindowController subclasses is as
controllers for shared panels such as find panels, inspectors, or preferences panels. For example, the Sketch
sample app uses NSWindowController subclasses for its various secondary panels. In this case, you can make
an NSWindowController subclass that implements a “shared-instance” method to create a singleton window
controller object. For example, you could create a PreferencesController subclass with a
sharedPreferenceController class method that creates a single instance the first time it is called and
returns that same instance on all subsequent calls.
Because your subclass derives from NSWindowController, you can just tell it the name of your preferences
nib file and it handles loading the nib file and managing the window automatically. You add your own outlets
and actions, as usual, to hook up the specific user interface for your panel and add methods to manage the
panel’s behavior.
You Rarely Need to Subclass NSDocumentController
Most apps do not need to subclass NSDocumentController. Almost anything that can be done by subclassing
can be done just as easily by the app’s delegate. However, it is possible to subclass NSDocumentController
if you need to.
The Classes That Support Document-Based Apps
Subclassing Objects in the Document Architecture
2012-12-13 | Copyright © 2012 Apple Inc. All Rights Reserved.
24

For example, if you need to customize the Open dialog, an NSDocumentController subclass is needed. You
can override the NSDocumentController method runModalOpenPanel:forTypes: to customize the
dialog or add an accessory view. The addDocument: and removeDocument: methods are provided for
subclasses that want to know when documents are opened or closed.
There are two ways to subclass NSDocumentController:
●You can make an instance of your subclass in your app’s main nib file. This instance becomes the shared
instance.
●You can create an instance of your subclass in your app delegate’s applicationWillFinishLaunching:
method.
The first NSDocumentController object to be created becomes the shared instance. The AppKit framework
creates the shared instance (using the NSDocumentController class) during the “finish launching” phase of
app startup. So if you need a subclass instance, you must create it before AppKit does.
The Classes That Support Document-Based Apps
Subclassing Objects in the Document Architecture
2012-12-13 | Copyright © 2012 Apple Inc. All Rights Reserved.
25

It is possible to put together a document-based app without having to write much code. You have only to
create a document project, compose the human interface, complete the information property list for your
document types, implement a subclass of NSDocument, and add any other custom classes or behavior required
by your app.
If you intend to sell your app through the Mac App Store or use iCloud storage, you also need to create an
explicit App ID, create provisioning profiles, and enable the correct entitlements for your app. These procedures
are explained in App Distribution Guide.
Xcode Provides a Document-Based App Template
To expedite the development of document-based apps, Xcode provides a Cocoa Application template, which
has the option to make the app document based. The template provides the following things:
●A skeletal NSDocument subclass implementation. The document subclass implementation (.m) file
includes commented blocks for important methods, including an init method that initializes and returns
self. This method provides a location for subclass-specific initialization. The template also includes a fully
implemented windowNibName method that returns the name of the document window nib file. An
override of windowControllerDidLoadNib: provides a place for code to be executed after the
document’s window nib has finished loading. In addition, the template includes skeletal implementations
of the dataOfType:error: and readFromData:ofType:error: basic writing and reading methods;
these methods throw an exception if you don’t supply a working implementation. Finally, the template
includes an override of the autosavesInPlace class method that returns YES to turn on automatic
saving of changes to your documents.
●A nib file for the app’s document. This nib file is named with your NSDocument subclass name with the
extension .xib. The subclass of NSDocument is made File’s Owner of the nib file. It has an outlet named
window connected to its window object, which in turn has a delegate outlet connected to the File’s Owner,
as shown in Figure 2-3 (page 20). The window has only one user interface object in it initially, a text field
with the words "Your document contents here".
●The app’s menu bar nib file. The menu bar nib file, named MainMenu.xib, contains an app menu (named
with the app’s name), a File menu (with all of its associated document commands), an Edit menu (with
text editing commands and Undo and Redo menu items), and Format, View, Window, and Help menus
2012-12-13 | Copyright © 2012 Apple Inc. All Rights Reserved.
26
App Creation Process Overview
(with their own menu items representing commands). These menu items are connected to the appropriate
first-responder action methods. For example, the About menu item is connected to the
orderFrontStandardAboutPanel: action method that displays a standard About window.
See Review Your App Menu Bar Commands (page 28) for more information about the menu bar nib file
provided by the Xcode app templates.
●The app's information property list. The <appName>-Info.plist file contains placeholder values for
global app keys, as well as for the CFBundleDocumentTypes key, whose associated value is a dictionary
containing key-value pairs specifying information about the document types the app works with, including
the NSDocument subclass for each document type.
The following sections describe the process of selecting and utilizing the document-based app template.
Create the Project
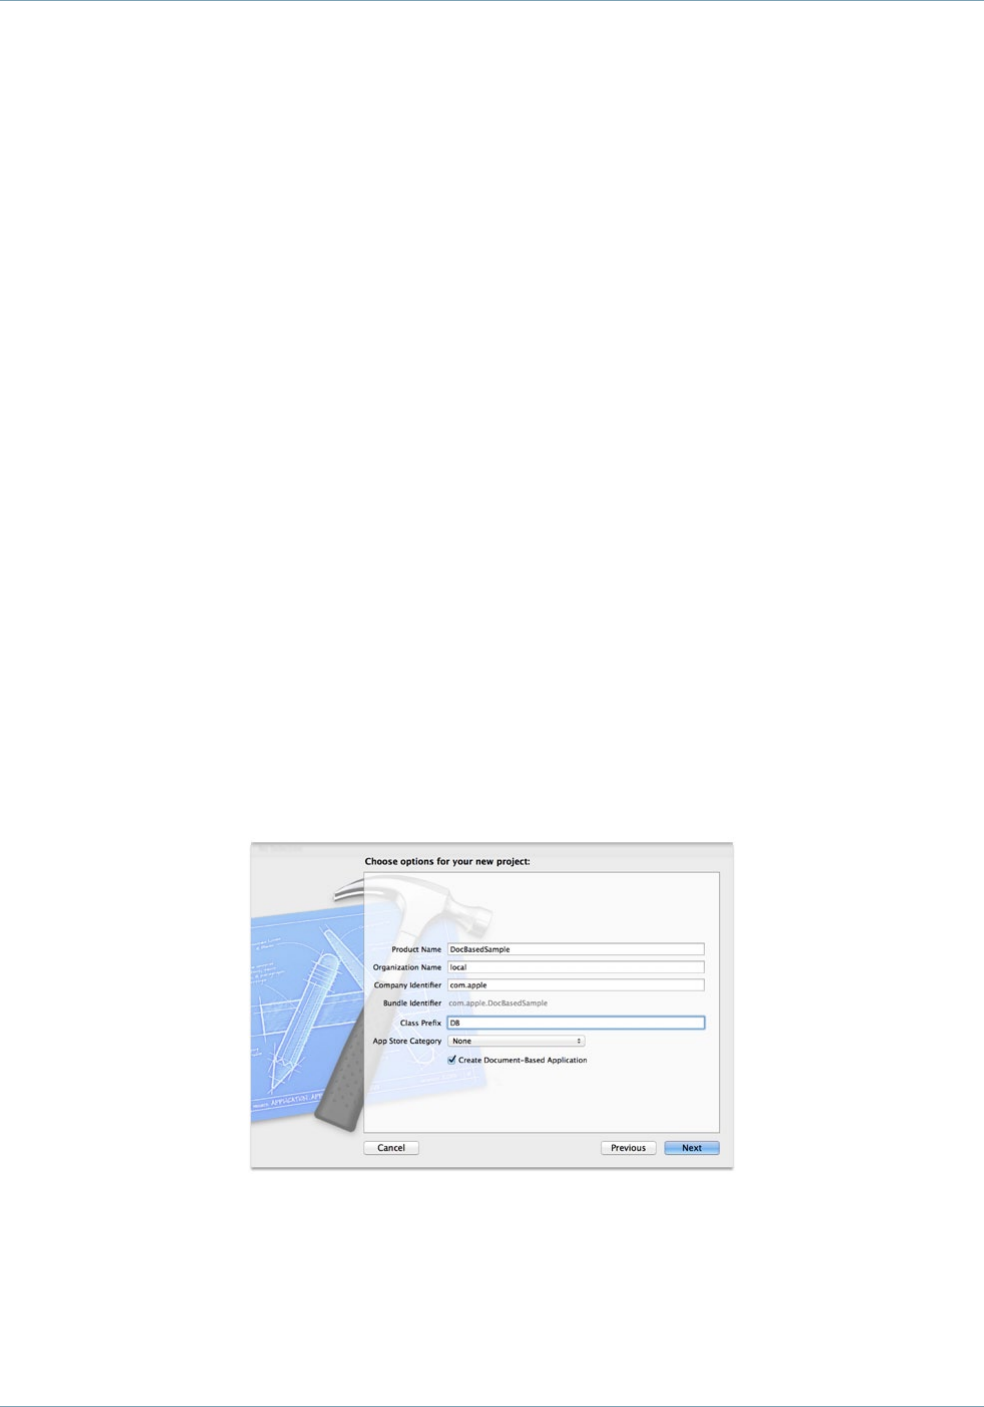
To create your project in Xcode, choose File > New > New Project. Select the Cocoa Application icon from the
OS X Application choices. In the next pane, select the Create Document-Based Application option, as shown
in Figure 3-1. In this pane you also name your app, give your NSDocument subclass a prefix, and specify your
documents’ filename extension, in addition to other options. If you intend to use Core Data for your data
model, select the Use Core Data option, which automatically inserts NSPersistentDocument as the immediate
superclass of your document subclass.
Figure 3-1 New Project dialog
The final pane of the New Project dialog enables you to place your project in the file system and create a source
control repository if you wish. For more details about the Xcode project creation process, see Start a Project
in Xcode Overview .
App Creation Process Overview
Create the Project
2012-12-13 | Copyright © 2012 Apple Inc. All Rights Reserved.
27

Without writing any additional code, you can compile and run the app. When you first launch the app, you
see an untitled document with an empty window. The File menu commands all do something reasonable,
such as bringing up a Save dialog or Open dialog. Because you have not yet defined any types or implemented
loading and saving, you can't open or save anything, and the default implementations throw an exception.
Create Your Document Window User Interface
To create the user interface for your document window, in the project navigator area, click the nib file named
with your NSDocument subclass name with the extension .xib. This opens the file in Interface Builder, an
Xcode editor that provides a graphical interface for the creation of user interface files. You can drag user
interface elements onto the document window representation from the Interface Builder Object library in the
utility area. If the objects in the document window require outlets and actions, add them to your NSDocument
subclass. Connect these actions and outlets via the File’s Owner icon in the list of placeholders in the Interface
Builder dock. If your document objects interact with other custom objects, such as model objects that perform
specialized computations, define those objects in Interface Builder and make any necessary connections to
them.
Step-by-step instructions for connecting menu items to action methods in your code are given in Edit User
Interfaces in Xcode Overview .
Review Your App Menu Bar Commands
Table 3-1 lists the File menu first-responder action connections that exist in the template.
Table 3-1 File Menu commands in the document-based app template
First-responder actionFile menu command
newDocument:New
openDocument:Open
clearRecentDocuments:Open Recent > Clear Menu
performClose:Close
saveDocument:Save/Save a Version
revertDocumentToSaved:Revert Document
runPageLayout:Page Setup
App Creation Process Overview
Create Your Document Window User Interface
2012-12-13 | Copyright © 2012 Apple Inc. All Rights Reserved.
28
First-responder actionFile menu command
printDocument:Print
After a document has been saved for the first time, the Save command changes to Save a Version. In applications
that have enabled autosaving in place, the Save As and Save All items in the File menu are hidden, and a
Duplicate menu item is added. The template has similar ready-made connections for the Edit, Format, View,
Window, and Help menus.
Warning: If your app does not support any of the supplied actions, such as printing, for example, you
must remove the associated menu items from the nib. Otherwise, when a user chooses the action,
your app could raise an exception or crash.
For your app’s custom menu items that are not already connected to action methods in objects or placeholder
objects in the nib file, there are two common techniques for handling menu commands in an OS X app:
●Connect the corresponding menu item to a first responder method.
●Connect the menu item to a method of your custom app object or your app delegate object.
Of these two techniques, the first is more common because many menu commands act on the current document
or its contents, which are part of the responder chain. The second technique is used primarily to handle
commands that are global to the app, such as displaying preferences or creating a new document. In addition
to implementing action methods to respond to your menu commands, you must also implement the methods
of the NSMenuValidation protocol to enable the menu items for those commands.
For more information about menu validation and other menu topics, see Application Menu and Pop-up List
Programming Topics .
Complete the Information Property List
You need to configure the project’s information property list so that the app knows what kinds of documents
it can handle. You specify this information in the Xcode information property list file, which is shown in Figure
3-2. The property list file is stored in the app’s bundle and named <appName>-Info.plist by default.
When the NSDocumentController object creates a new document or opens an existing document, it searches
the property list for such items as the document class that handles a document type, the uniform type identifier
(UTI) for the type, and whether the app can edit or only view the type. Similarly, Launch Services uses information
App Creation Process Overview
Complete the Information Property List
2012-12-13 | Copyright © 2012 Apple Inc. All Rights Reserved.
29
about the icon file for the type and to know which app to launch when the user double-clicks a document file.
Document type information is associated with the CFBundleDocumentTypes key as an array of dictionaries,
each of which contains the key-value pairs that define the document type.
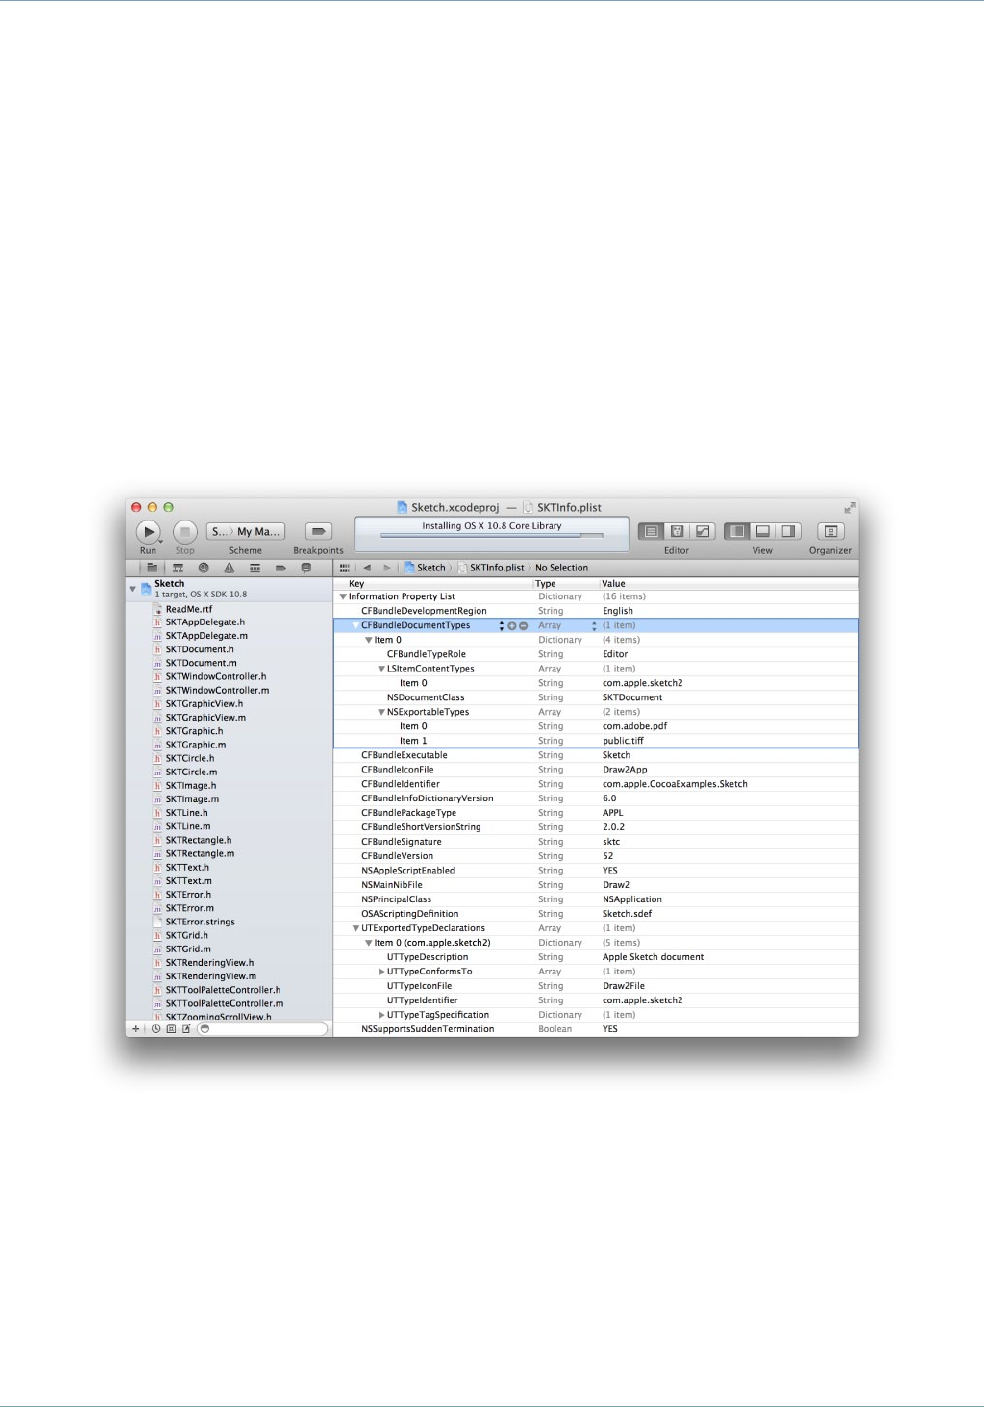
Xcode provides a property list file with every Mac app project. The property list editor appears when you select
the Info.plist file in the project navigator or select the target and choose the Info pane of the project editor.
In the Info pane, there’s a list of target properties. You can edit the property values and add new key-value
pairs. By default, Xcode displays a user-friendly version of each key name. To see the actual key names that
are in the Info.plist file, Control-click an item in the editor and choose Show Raw Keys/Values from the
contextual menu that appears.
Figure 3-2 The information property list editor
For a new document-based app, you should create a document type with a name and extension that make
sense for your app. You can add more types as well, one for each of the document types your app handles.
The app’s most important document type must be listed first in the list of types. This is the type that
NSDocumentController uses by default when the user asks for a new document.
App Creation Process Overview
Complete the Information Property List
2012-12-13 | Copyright © 2012 Apple Inc. All Rights Reserved.
30

The most important document type value is its Uniform Type Identifier (UTI), a string that uniquely identifies
the type of data contained in the document for all apps and services to rely upon. A document’s UTI corresponds
to the LSItemContentTypes key in the information property list. The UTI is used as the programmatic type
name by NSDocument and NSDocumentController. By using UTIs, apps avoid much of the complexity
previously required to handle disparate kinds of file-type information in the system, including filename
extensions, MIME types, and HFS type codes (OS types).
A document UTI can be defined by the system, as shown in System-Declared Uniform Type Identifiers in Uniform
Type Identifiers Reference , or a document-based app can declare its own proprietary UTI. Such custom UTIs
must also be exported to make the system aware of them, as described in Export Custom Document Type
Information (page 32).
To declare a document type in Xcode, perform the following steps:
1. Select the project in the project navigator.
2. Select the target and click the Info tab.
3. Click the Add (+) button at the bottom right of the editor area and choose Add Document Type from the
pop-up menu.
4. Click the triangle next to “Untitled” to disclose the property fields.
Alternatively, you can select the Info.plist file in the project navigator, click in the editor area, and choose
Editor > Add Item to add document type properties directly to the property list file, as shown in Figure 3-2 (page
30). Choose Editor > Show Raw Keys & Values to reveal the actual key names.
Add the properties shown in Table 3-2.
Table 3-2 Properties defining a document type (CFBundleDocumentTypes)
ValueXcode field
(Info.plist
identifier)
Key
An array of UTI strings. Typically, only one is
specified per document type. The UTI string must
be spelled out explicitly.
IdentifierLSItemContentTypes
A string specifying the NSDocument subclass
name corresponding to this document type.
Class (Cocoa
NSDocument
Class)
NSDocumentClass
A string specifying the role the app with respect
to this document type. Possible values are Editor,
Viewer, Shell, Quick Look Generator, or None.
RoleCFBundleTypeRole
App Creation Process Overview
Complete the Information Property List
2012-12-13 | Copyright © 2012 Apple Inc. All Rights Reserved.
31

ValueXcode field
(Info.plist
identifier)
Key
An array of strings specifying UTIs that define a
supported file type to which this document can
export its content.
(Exportable Type
UTIs)
NSExportableTypes
A Boolean value specifying whether the
document is distributed as a bundle. If NO, omit
this value.
Bundle
(Document is a
package or
bundle)
LSTypeIsPackage
A string specifying the name of the icon resource
file (extension .icns) to associate with this
document type. An icon resource file contains
multiple images at different resolutions.
Icon (Icon File
Name)
CFBundleTypeIconFile
A string specifying the abstract name of the
document type.
Name (Document
Type Name)
CFBundleTypeName
A string specifying how Launch Services ranks
this app among those that declare themselves
editors or viewers of documents of this type.
Possible values, in order of precedence, are
Owner,Alternate, and None.
Handler rankLSHandlerRank
For more information about these and other document type keys, see “CFBundleDocumentTypes” in Information
Property List Key Reference.
Export Custom Document Type Information
If you define a custom document type with its own UTI, you must export the UTI. To declare a document type
in Xcode, perform the following steps:
1. Select the project in the project navigator area.
2. Select the target and click the Info tab.
3. Click the Add (+) button at the bottom right of the editor area and choose Add Exported UTI from the
pop-up menu.
4. Click the triangle next to “Untitled” to disclose the property fields.
App Creation Process Overview
Export Custom Document Type Information
2012-12-13 | Copyright © 2012 Apple Inc. All Rights Reserved.
32

Add the properties shown in Table 3-3.
Table 3-3 Properties defining an exported document type (UTExportedTypeDeclarations)
ValueXcode field (Info.plist
identifier)
Key
A string describing this document type.DescriptionUTTypeDescription
The exported document type’s UTI.IdentifierUTTypeIdentifier
A string specifying the name of the document
type’s icon file.
Icon (Icon file name)UTTypeIconFile
An array of strings representing the UTIs to
which the document type conforms.
Conforms to (Conforms
to UTIs)
UTTypeConformsTo
An array of strings named
public.filename-extension containing
filename extensions corresponding to the
document type.
Extensions (Equivalent
Types)
UTTypeTag-
Specification
For more information about these and other exported type property keys, see Declaring New Uniform Type
Identifiers in Uniform Type Identifiers Overview .
For information about document types in alternate document-based app designs, see Multiple Document
Types Use Multiple NSDocument Subclasses (page 62) and Additional Document Type Considerations (page
63).
Implement the NSDocument Subclass
Every document-based app that uses the document architecture must create at least one subclass of
NSDocument. You must override some NSDocument methods (among several choices), and you should override
several others in certain situations. Details explaining how to implement your NSDocument subclass are in
Creating the Subclass of NSDocument (page 35).
Create Any Additional Custom Classes
The Cocoa document architecture, as embodied primarily in NSDocument,NSDocumentController, and
NSWindowController, provides an operating framework for apps, including sophisticated document handling
mechanisms. However, you must add the behaviors that differentiate your app and suit it to its particular
App Creation Process Overview
Implement the NSDocument Subclass
2012-12-13 | Copyright © 2012 Apple Inc. All Rights Reserved.
33

purpose. Much customized behavior can be implemented in your NSDocument subclass, in delegate methods,
custom classes added to your project, and subclasses of NSDocumentController and NSWindowController
if you need to extend the capabilities of either of those classes. Generally, you should use custom classes to
encapsulate the program logic of your data model and controllers, maintaining a healthy MVC separation.
For more information about app design, see Mac App Programming Guide.
App Creation Process Overview
Create Any Additional Custom Classes
2012-12-13 | Copyright © 2012 Apple Inc. All Rights Reserved.
34

The NSDocument subclass provides storage for the model and the ability to load and save document data. It
also has any outlets and actions required for the user interface. The NSDocument object automatically creates
an NSWindowController object to manage that nib file, but the NSDocument object serves as the File’s
Owner proxy object for the nib file.
When you subclass NSDocument, you must override certain key methods and implement others to do at least
the following things:
●Read data of existing documents from files
●Write document data to files
●Initialize new documents
●Put documents into iCloud and remove them
In particular, you must override one reading and one writing method. In the simplest case, you can override
the data-based reading and writing methods, readFromData:ofType:error: and dataOfType:error:.
Reading Document Data
Opening existing documents stored in files is one of the most common operations document-based apps
perform. Your override’s responsibility is to load the file data into your app’s data model.
If it works for your application, you should override the data-based reading method,
readFromData:ofType:error:. Overriding that method makes your work easier because it uses the default
document-reading infrastructure provided by NSDocument, which can handle multiple cases on your behalf.
2012-12-13 | Copyright © 2012 Apple Inc. All Rights Reserved.
35
Creating the Subclass of NSDocument

Note: You should disable undo registration during document reading.
How to Override the Data-Based Reading Method
You can override the readFromData:ofType:error: method to convert an NSData object containing
document data into the document’s internal data structures and display that data in a document window. The
document architecture calls readFromData:ofType:error:, passing in the NSData object, during its
document initialization process.
Listing 4-1 shows an example implementation of the readFromData:ofType:error: document-reading
method. This example assumes that the app has an NSTextView object configured with an NSTextStorage
object to hold the text view’s data. The NSDocument object has a setMString: accessor method for the
document’s NSAttributedString data model, declared as a property named mString.
Listing 4-1 Data-based document-reading method implementation
- (BOOL)readFromData:(NSData *)data ofType:(NSString *)typeName
error:(NSError **)outError {
BOOL readSuccess = NO;
NSAttributedString *fileContents = [[NSAttributedString alloc]
initWithData:data options:NULL documentAttributes:NULL
error:outError];
if (!fileContents && outError) {
*outError = [NSError errorWithDomain:NSCocoaErrorDomain
code:NSFileReadUnknownError userInfo:nil];
}
if (fileContents) {
readSuccess = YES;
[self setMString:fileContents];
}
return readSuccess;
}
If you need to deal with the location of the file, override the URL reading and writing methods instead. If your
app needs to manipulate document files that are file packages, override the file-wrapper reading and writing
methods instead. For information about overriding the URL-based and file-wrapper-based reading methods,
see Overriding the URL and File Package Reading Methods (page 57).
Creating the Subclass of NSDocument
Reading Document Data
2012-12-13 | Copyright © 2012 Apple Inc. All Rights Reserved.
36

The flow of messages during document data reading is shown in Figure 6-5 (page 69).
It’s Easy to Support Concurrent Document Opening
A class method of NSDocument,canConcurrentlyReadDocumentsOfType:, enables your NSDocument
subclass to load documents concurrently, using background threads. This override allows concurrent reading
of multiple documents and also allows the app to be responsive while reading a large document. You can
override canConcurrentlyReadDocumentsOfType: to return YES to enable this capability. When you do,
initWithContentsOfURL:ofType:error: executes on a background thread when opening files via the
Open dialog or from the Finder.
The default implementation of this method returns NO. A subclass override should return YES only for document
types whose reading code can be safely executed concurrently on non-main threads. If a document type relies
on shared state information, you should return NO for that type.
Don’t Rely on Document-Property Getters in Overrides of Reading Methods
Don’t invoke fileURL,fileType,orfileModificationDate from within your overrides. During reading,
which typically happens during object initialization, there is no guarantee that NSDocument properties like
the file’s location or type have been set yet. Your overridden method should be able to determine everything
it needs to do the reading from the passed-in parameters. During writing, your document may be asked to
write its contents to a different location or using a different file type.
If your override cannot determine all of the information it needs from the passed-in parameters, consider
overriding another method. For example, if you see the need to invoke fileURL from within an override of
readFromData:ofType:error:, you should instead override readFromURL:ofType:error: and use the
passed-in URL value.
Writing Document Data
In addition to implementing a document-reading method, you must implement a document-writing method
to save your document data to disk. In the simplest case, you can override the data-based writing method,
dataOfType:error:. If it works for your application, you should override dataOfType:error:. Overriding
that method makes your work easier because it uses the default document-reading infrastructure provided
by NSDocument. The responsibility of your override of the dataOfType:error: method is to create and
return document data of a supported type, packaged as an NSData object, in preparation for writing that data
to a file.
Creating the Subclass of NSDocument
Writing Document Data
2012-12-13 | Copyright © 2012 Apple Inc. All Rights Reserved.
37

Listing 4-2 shows an example implementation of dataOfType:error:. As with the corresponding example
implementation document-reading method, this example assumes that the app has an NSTextView object
configured with an NSTextStorage object to hold the document’s data. The document object has an outlet
property connected to the NSTextView object and named textView. The document object also has synthesized
mString and setMString: accessors for the document’s NSAttributedString data model, declared as a
property named mString.
Listing 4-2 Data-based document-writing method implementation
- (NSData *)dataOfType:(NSString *)typeName error:(NSError **)outError {
NSData *data;
[self setMString:[self.textView textStorage]]; // Synchronize data model with
the text storage
NSMutableDictionary *dict = [NSDictionary
dictionaryWithObject:NSRTFTextDocumentType
forKey:NSDocumentTypeDocumentAttribute];
[self.textView breakUndoCoalescing];
data = [self.mString dataFromRange:NSMakeRange(0, [self.mString length])
documentAttributes:dict error:outError];
if (!data && outError) {
*outError = [NSError errorWithDomain:NSCocoaErrorDomain
code:NSFileWriteUnknownError userInfo:nil];
}
return data;
}
The override sends the NSTextView object a breakUndoCoalescing message when saving the text view’s
contents to preserve proper tracking of unsaved changes and the document’s dirty state.
If your app needs access to document files, you can override writeToURL:ofType:error: instead. If your
document data is stored in file packages, you can override fileWrapperOfType:error: instead. For
information about overriding the other NSDocument writing methods, see Overriding the URL and File Package
Writing Methods (page 60).
The actual flow of messages during this sequence of events is shown in detail in Figure 6-6 (page 70).
Creating the Subclass of NSDocument
Writing Document Data
2012-12-13 | Copyright © 2012 Apple Inc. All Rights Reserved.
38

Initializing a New Document
The init method of NSDocument is the designated initializer, and it is invoked by the other initializers
initWithType:error: and initWithContentsOfURL:ofType:error:. If you perform initializations that
must be done when creating new documents but not when opening existing documents, override
initWithType:error:. If you have any initializations that apply only to documents that are opened, override
initWithContentsOfURL:ofType:error:. If you have general initializations, override init. In all three
cases, be sure to invoke the superclass implementation as the first action.
If you override init, make sure that your override never returns nil. Returning nil could cause a crash (in
some versions of AppKit) or present a less than useful error message. If, for example, you want to prevent the
creation or opening of documents under circumstances unique to your app, override a specific
NSDocumentController method instead. That is, you should control this behavior directly in your app-level
logic (to prevent document creation or opening in certain cases) rather than catching the situation after
document initialization has already begun.
Note: If you don’t want to open an untitled document when the app is launched or activated,
implement the app delegate method applicationShouldOpenUntitledFile: to return NO. If
you do want to open an untitled document when launched, but don't want to open an untitled
document when the app is already running and activated from the dock, you can instead implement
the delegate’s applicationShouldHandleReopen:hasVisibleWindows: method to return
NO.
Implement awakeFromNib to initialize objects unarchived from the document’s window nib files (but not the
document itself).
Creating the Subclass of NSDocument
Initializing a New Document
2012-12-13 | Copyright © 2012 Apple Inc. All Rights Reserved.
39
Moving Document Data to and from iCloud
The iCloud storage technology enables you to share documents and other app data among multiple computers
that run your document-based app. If you have an iOS version of your document-based app that shares the
same document data formats, documents can be shared among iOS devices as well, as shown in Figure 4-1.
Changes made to the file or directory on one device are stored locally and then pushed to iCloud using a local
daemon. The transfer of files to and from each device is transparent to your app.
Figure 4-1 Sharing document data via iCloud
Access to iCloud is controlled using entitlements, which your app configures through Xcode. If these entitlements
are not present, your app is prevented from accessing files and other data in iCloud. In particular, the container
identifiers for your app must be declared in the
com.apple.developer.ubiquity-container-identifiers entitlement. For information about how to
configure your app’s entitlements, see Developing for the App Store and Tools Workflow Guide for Mac.
Creating the Subclass of NSDocument
Moving Document Data to and from iCloud
2012-12-13 | Copyright © 2012 Apple Inc. All Rights Reserved.
40

All files and directories stored in iCloud must be managed by an object that adopts the NSFilePresenter
protocol, and all changes you make to those files and directories must occur through an NSFileCoordinator
object. The file presenter and file coordinator prevent external sources from modifying the file at the same
time and deliver relevant notifications to other file presenters. NSDocument implements the methods of the
NSFilePresenter protocol and handles all of the file-related management for you. All your app must do is
read and write the document data when told to do so. Be sure you override autosavesInPlace to return
YES to enable file coordination in your NSDocument object.
Determining Whether iCloud Is Enabled
Early in the execution of your app, before you try to use any other iCloud interfaces, you must call the
NSFileManager method URLForUbiquityContainerIdentifier: to determine whether iCloud storage
is enabled. This method returns a valid URL when iCloud is enabled (and the specified container directory is
available) or nil when iCloud is disabled. URLForUbiquityContainerIdentifier: also returns nil if you
specify a container ID that the app isn't allowed to access or that doesn't exist. In that case, the NSFileManager
object logs a message to the console to help diagnose the error.
Listing 4-3 illustrates how to determine whether iCloud is enabled for the document’s file URL, presenting an
error message to the user if not, and setting the value of the document’s destination URL to that of its iCloud
container otherwise (in preparation for moving the document to iCloud using the
setUbiquitous:itemAtURL:destinationURL:error: method).
Listing 4-3 Determining whether iCloud is enabled
NSURL *src = [self fileURL];
NSURL *dest = NULL;
NSURL *ubiquityContainerURL = [[[NSFileManager defaultManager]
URLForUbiquityContainerIdentifier:nil]
URLByAppendingPathComponent:@"Documents"];
if (ubiquityContainerURL == nil) {
NSDictionary *dict = [NSDictionary dictionaryWithObjectsAndKeys:
NSLocalizedString(@"iCloud does not appear to be configured.", @""),
NSLocalizedFailureReasonErrorKey, nil];
NSError *error = [NSError errorWithDomain:@"Application" code:404
userInfo:dict];
[self presentError:error modalForWindow:[self windowForSheet] delegate:nil
didPresentSelector:NULL contextInfo:NULL];
return;
}
Creating the Subclass of NSDocument
Moving Document Data to and from iCloud
2012-12-13 | Copyright © 2012 Apple Inc. All Rights Reserved.
41
dest = [ubiquityContainerURL URLByAppendingPathComponent:
[src lastPathComponent]];
Because the message specifies nil for the container identifier parameter,
URLForUbiquityContainerIdentifier: returns the first container listed in the
com.apple.developer.ubiquity-container-identifiers entitlement and creates the corresponding
directory if it does not yet exist. Alternatively, you could specify your app’s container identifier—a concatenation
of team ID and app bundle ID, separated by a period for the app’s primary container identifier, or a different
container directory. For example, you could declare a string constant for the container identifier, as in the
following example, and pass the constant name with the message.
static NSString *UbiquityContainerIdentifier = @"A1B2C3D4E5.com.domainname.appname";
The method also appends the document’s filename to the destination URL.
Searching for Documents in iCloud
Apps should use NSMetadataQuery objects to search for items in iCloud container directories. Metadata
queries return results only when iCloud storage is enabled and the corresponding container directories have
been created. For information about how to create and configure metadata search queries, see File Metadata
Search Programming Guide . For information about how to iterate directories using NSFileManager, see File
System Programming Guide.
Moving a Document into iCloud Storage
To save a new document to the iCloud container directory, first save it locally and then call the NSFileManager
method setUbiquitous:itemAtURL:destinationURL:error: to move the document file to iCloud.
Warning: Do not call setUbiquitous:itemAtURL:destinationURL:error: from your app’s
main thread. Doing so can trigger a deadlock with any file presenter monitoring the file, and it can
take an indeterminate amount of time to complete. Instead, call the method in a block running in a
dispatch queue other than the main-thread queue.
Listing 4-4 shows an example implementation of a method that moves a file to iCloud storage. It assumes the
source and destination URLs from Listing 4-3 (page 41).
Creating the Subclass of NSDocument
Moving Document Data to and from iCloud
2012-12-13 | Copyright © 2012 Apple Inc. All Rights Reserved.
42

Listing 4-4 Moving a document to iCloud
dispatch_queue_t globalQueue =
dispatch_get_global_queue(DISPATCH_QUEUE_PRIORITY_DEFAULT, 0);
dispatch_async(globalQueue, ^(void) {
NSFileManager *fileManager = [[NSFileManager alloc] init];
NSError *error = nil;
// Move the file.
BOOL success = [fileManager setUbiquitous:YES itemAtURL:src
destinationURL:dest error:&error];
dispatch_async(dispatch_get_main_queue(), ^(void) {
if (! success) {
[self presentError:error modalForWindow:[self windowForSheet]
delegate:nil didPresentSelector:NULL contextInfo:NULL];
}
});
});
[self setFileURL:dest];
[self setFileModificationDate:nil];
After a document file has been moved to iCloud, as shown in Listing 4-4, reading and writing are performed
by the normal NSDocument mechanisms, which automatically manage the file access coordination required
by iCloud.
Removing a Document from iCloud Storage
To move a document file from an iCloud container directory, follow the same procedure described in Moving
a Document into iCloud Storage (page 42), except switch the source URL (now the document file in the iCloud
container directory) and the destination URL (the location of the document file in the local file system). In
addition, the first parameter of the setUbiquitous:itemAtURL:destinationURL:error: method should
now be NO.
For clarity in this example, the URL of the file in iCloud storage is named cloudsrc and the local URL to which
the file is moved is named localdest.
dispatch_queue_t globalQueue =
dispatch_get_global_queue(DISPATCH_QUEUE_PRIORITY_DEFAULT, 0);
dispatch_async(globalQueue, ^(void) {
Creating the Subclass of NSDocument
Moving Document Data to and from iCloud
2012-12-13 | Copyright © 2012 Apple Inc. All Rights Reserved.
43

NSFileManager *fileManager = [[NSFileManager alloc] init];
NSError *error = nil;
// Move the file.
BOOL success = [fileManager setUbiquitous:NO itemAtURL:cloudsrc
destinationURL:localdest error:&error];
dispatch_async(dispatch_get_main_queue(), ^(void) {
if (! success) {
[self presentError:error modalForWindow:[self windowForSheet]
delegate:nil didPresentSelector:NULL contextInfo:NULL];
}
});
});
For more information about iCloud, see iCloud Design Guide.
NSDocument Handles Conflict Resolution Among Document Versions
NSDocument handles conflict resolution automatically, so you do not need to implement it yourself. If a conflict
comes in while the document is open, NSDocument presents a sheet asking the user to resolve the conflict
(or ignore, which marks it as resolved and accepts the automatic winner of the conflict, usually the one with
the most recent modification date). Clicking Resolve invokes the Versions user interface (see Users Can Browse
Document Versions (page 50)) with only the conflicting versions visible. The user can choose a particular
version and click Restore to make it the winner of the conflict, or just select Done to accept the automatic
winner.
Even after the conflict is resolved, NSDocument always keeps the conflicting versions, and they can be accessed
normally through Versions.
Optional Method Overrides
The areas described by items in the following sections require method overrides in some situations. And, of
course, you must implement any methods that are special to your NSDocument subclass. More options for
your NSDocument subclass are described in Alternative Design Considerations (page 57).
Creating the Subclass of NSDocument
Optional Method Overrides
2012-12-13 | Copyright © 2012 Apple Inc. All Rights Reserved.
44

Window Controller Creation
NSDocument subclasses must create their window controllers. They can do this indirectly or directly. If a
document has only one nib file with one window in it, the subclass can override windowNibName to return
the name of the window nib file. As a consequence, the document architecture creates a default
NSWindowController instance for the document, with the document as the nib file’s owner. If a document
has multiple windows, or if an instance of a custom NSWindowController subclass is used, the NSDocument
subclass must override makeWindowControllers to create these objects.
If your document has only one window, the project template provides a default implementation of the
NSDocument method windowNibName:
- (NSString *)windowNibName {
return @"MyDocument";
}
If your document has more than one window, or if you have a custom subclass of NSWindowController,
override makeWindowControllers instead. Make sure you add each created window controller to the list of
such objects managed by the document using addWindowController:.
Window Nib File Loading
You can implement windowControllerWillLoadNib: and windowControllerDidLoadNib: to perform
any necessary tasks related to the window before and after it is loaded from the nib file. For example, you may
need to perform setup operations on user interface objects, such as setting the content of a view, after the
app’s model data has been loaded. In this case, you must remember that the NSDocument data-reading
methods, such as readFromData:ofType:error:, are called before the document’s user interface objects
contained in its nib file are loaded. Of course, you cannot send messages to user interface objects until after
the nib file loads. So, you can do such operations in windowControllerDidLoadNib:.
Here is an example:
- (void)windowControllerDidLoadNib:(NSWindowController *)windowController {
[super windowControllerDidLoadNib:windowController];
[textView setAllowsUndo:YES];
if (fileContents != nil) {
[textView setString:fileContents];
fileContents = nil;
}
}
Creating the Subclass of NSDocument
Optional Method Overrides
2012-12-13 | Copyright © 2012 Apple Inc. All Rights Reserved.
45
Printing and Page Layout
A document-based app can change the information it uses to define how document data is printed. This
information is encapsulated in an NSPrintInfo object. If you want users to be able to print a document, you
must override printOperationWithSettings:error:, possibly providing a modified NSPrintInfo object.
Warning: If your app does not support printing, you must remove the printing-related menu items
from the menu bar nib file (MainMenu.nib) provided when you create a document-based application
using the Cocoa Application template in Xcode.
Modifying the Save Dialog Accessory View
By default, when NSDocument runs the Save dialog, and the document has multiple writable document types,
it inserts an accessory view near the bottom of the dialog. This view contains a pop-up menu of the writable
types. If you don’t want this pop-up menu, override shouldRunSavePanelWithAccessoryView to return
NO. You can also override prepareSavePanel: to do any further customization of the Save dialog.
Validating Menu Items
NSDocument implements validateUserInterfaceItem: to manage the enabled state of the Revert
Document and Save menu items. If you want to validate other menu items, you can override this method, but
be sure to invoke the superclass implementation. For more information on menu item validation, see Application
Menu and Pop-up List Programming Topics .
Creating the Subclass of NSDocument
Optional Method Overrides
2012-12-13 | Copyright © 2012 Apple Inc. All Rights Reserved.
46

The Cocoa document architecture, and NSDocument in particular, provide support for many core behaviors
of Mac apps.
Documents Are Automatically Saved
In OS X v10.7 and later, users don’t need to save documents explicitly or be concerned about losing unsaved
changes. Instead, the system automatically writes document data to disk as necessary. Your NSDocument
subclass opts into this behavior by overriding the autosavesInPlace class method to return YES. The ideal
baseline for save-less documents is this: The document data that users see in an app window is identical to
the document data on disk at all times. For practical reasons, the system does not attempt to save every change
immediately, but it saves documents often enough and at the correct times to ensure that the document in
memory and the one on disk are effectively the same.
Part of the implementation of save-less documents is file coordination, a mechanism that serializes access to
files among processes to prevent inconsistencies due to non-sequential reading and writing. Apps use file
coordination so that users don’t need to remember to save document changes before causing the document’s
file to be read by another app. Document-based Cocoa apps use file coordination automatically.
Autosaving in Place Differs From Autosaving Elsewhere
Automatic document saving is supported by the implementation of autosaving in place . Autosaving in place
and autosaving elsewhere both protect against the user losing work due to app crashes, kernel panics, and
power failures. However, autosaving in place differs from autosaving elsewhere in that it overwrites the actual
2012-12-13 | Copyright © 2012 Apple Inc. All Rights Reserved.
47
Core App Behaviors
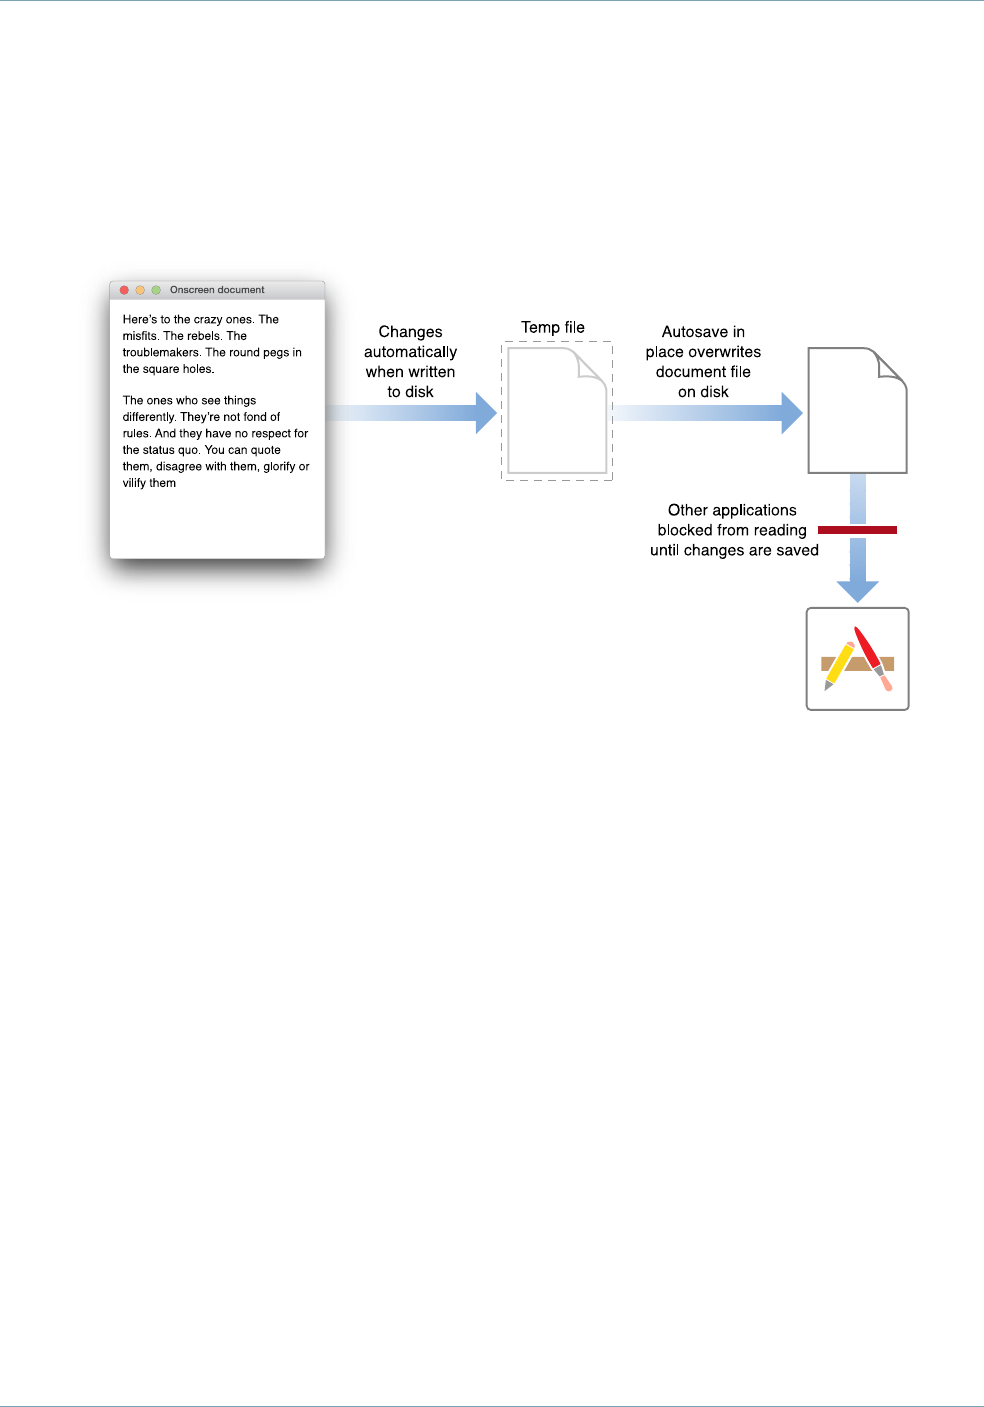
document file rather than writing a new file next to it containing the autosaved document contents. (Autosaving
in place performs a safe save by writing to a new file first, then moving it into the place of the document file
when done.) Autosaving in place is illustrated in Figure 5-1.
Figure 5-1 Autosaving in place
The document architecture still uses autosaving elsewhere to save untitled documents that have content but
have not been explicitly saved and named by the user. In this case, untitled documents are autosaved in
~/Library/Autosave Information. In addition, NSDocument saves earlier revisions of documents
elsewhere, giving the user access to previous versions.
The saveless-documents model automates crash protection but preserves the ability for users to save documents
explicitly. It also automates maintenance of multiple older versions. Users can save immediately in the traditional
way (by choosing File > Save a Version or pressing Command-S). For an untitled document, an explicit Save
command presents a dialog enabling the user to name the document and specify the location where it is to
be written to disk.
You should not invoke the autosavesInPlace method to find out whether autosaving is being done. Instead,
the document architecture passes one of two new autosaving-related enumerators as an
NSSaveOperationType parameter to your overrides of the NSDocument methods beginning with save...
and write..., and you can examine those values. The autosave enumerators are
NSAutosaveInPlaceOperation and NSAutosaveElsewhereOperation. The old NSAutosaveOperation
enumerator is equivalent to NSAutosaveElsewhereOperation and is deprecated in OS X v10.7.
Core App Behaviors
Documents Are Automatically Saved
2012-12-13 | Copyright © 2012 Apple Inc. All Rights Reserved.
48

Consider Autosaving Performance
Before you enable autosaving, consider the saving performance of your app. If your app saves quickly, there
is little reason not to enable it. But if your app saves slowly, enabling autosaving could cause periodic blocking
of your user interface while saving is happening. So, for example, if you have already implemented the autosaving
behavior introduced in OS X v10.4 (sending setAutosavingDelay: to the NSDocumentController object
with a nonzero value), then your app’s saving performance is probably acceptable, and opting into autosaving
in place is as simple as overriding autosavesInPlace to return YES. Otherwise, you may first need to address
any issues with your document model or saving logic that could hinder saving performance.
Safety Checking Prevents Unintentional Edits
When saving happens without user knowledge, it becomes easier for unintentional edits to get saved to disk,
resulting in potential data loss. To help prevent autosaving unintentional edits, NSDocument performs safety
checking to determine when a user has opened a document to read it, but not edit it. For example, if the
document has not been edited for some period of time, it is locked for editing and opened only for reading.
(The period after editing when the document is locked is an option in the Time Machine system preference.)
NSDocument also checks for documents that are in folders where the user typically does not edit documents,
such as the ~/Downloads folder.
When an edit is made to the document, NSDocument offers the user the choice of canceling the change,
creating a new document with the change, or allowing editing. A document that is preventing edits displays
Locked in the title bar. The user can explicitly enable editing of the document by clicking on the Locked label
and choosing Unlock in the pop-up menu. A document that has been changed since it was last opened and
is therefore being actively autosaved in place displays Edited in the titlebar instead of Locked.
An app can programmatically determine when a document is locked in read-only “viewing mode” by sending
it the isInViewingMode message. You can use this information to prevent certain kinds of user actions or
changes when the user is viewing an old document revision. Another useful feature for managing locked
documents is NSChangeDiscardable. You can use this constant to specify that a particular editing change
is non-critical and can be thrown away instead of prompting the user. For example, changing the slide in a
Keynote document would normally cause some data to be saved in the document, but Keynote declares that
change to be discardable, so the user viewing a locked document can change slides without being prompted
to unlock it.
Document Saving Can Be Asynchronous
In OS X v10.7 and later, NSDocument can save asynchronously, so that document data is written to a file on a
background thread. In this way, even if writing is slow, the app’s user interface remains responsive. You can
override the method canAsynchronouslyWriteToURL:ofType:forSaveOperation: to return YES to
Core App Behaviors
Document Saving Can Be Asynchronous
2012-12-13 | Copyright © 2012 Apple Inc. All Rights Reserved.
49

enable asynchronous saving. In this case, NSDocument creates a separate writing thread and invokes
writeSafelyToURL:ofType:forSaveOperation:error: on it. However, the main thread remains blocked
until an object on the writing thread invokes the unblockUserInteraction method.
When unblockUserInteraction is invoked, the app resumes dequeueing user interface events and the
user is able to continue editing the document, even if the writing of document data takes some time. The right
moment to invoke unblockUserInteraction is when an immutable snapshot of the document’s contents
has been taken, so that writing out the snapshot of the document’s contents can continue safely on the writing
thread while the user continues to edit the document on the main thread.
Some Autosaves Can Be Cancelled
For various reasons, an app may not be able to implement asynchronous autosaving, or it may be unable to
take a snapshot of the document’s contents quickly enough to avoid interrupting the user’s workflow with
autosaves. In that case, the app needs to use a different strategy to remain responsive. The document
architecture supports the concept of cancellable autosaves for this purpose, which the app can implement
instead of asynchronous saving. At various times during an autosave operation, the app can check to see if
the user is trying to edit the document, usually by checking the event queue. If an event is detected, and if the
actual write to file has not yet begun, the app can cancel the save operation and simply return an
NSUserCancelledError error.
Some types of autosaves can be safely cancelled to unblock user interaction, while some should be allowed
to continue, even though they cause a noticeable delay. You can determine whether a given autosave can be
safely cancelled by sending the document an autosavingIsImplicitlyCancellable message. This
method returns YES when periodic autosaving is being done for crash protection, for example, in which case
you can safely cancel the save operation. It returns NO when you should not cancel the save, as when the
document is being closed, for example.
Users Can Browse Document Versions
The document architecture implements the Versions feature of OS X v10.7 in the behavior of NSDocument.
An NSDocument subclass adopts autosaving in place by returning YES from autosavesInPlace, as described
in Documents Are Automatically Saved (page 47), and adopting autosaving in turn enables version browsing.
After a document has been named and saved, the Save menu item is replaced by the “Save a Version” menu
item. This command saves a version of the document identified by date and time. And NSDocument sometimes
creates a version automatically during autosaving. The user can choose File > Revert Document, or choose
Core App Behaviors
Some Autosaves Can Be Cancelled
2012-12-13 | Copyright © 2012 Apple Inc. All Rights Reserved.
50

Browse All Revisions from the pop-up menu at the right of the title bar, to display a dialog enabling the user
to choose between the last saved version or an older version. Choosing an older version displays a Time
Machine–like user interface that selects among all of the document’s versions.
If the user chooses to restore a previous version, the current document contents are preserved on disk, if
necessary, and the file's contents are replaced with those of the selected version. Holding down the Option
key while browsing versions gives the user the option to restore a copy of a previous version, which does not
affect the current document contents. The user can also select and copy contents from a version and paste
them into the current document.
Windows Are Restored Automatically
The document architecture implements the Resume feature of OS X v10.7, so that individual apps need to
encode only information that is peculiar to them and necessary to restore the state of their windows.
The document architecture implements the following steps in the window restoration process; the steps
correlate to the numbers shown in Figure 5-2 (page 52):
1. The NSWindowController method setDocument: sets the restoration class of document windows to
the class of the shared NSDocumentController object. The NSWindow object invalidates its restorable
state whenever its state changes by sending invalidateRestorableState to itself.
2. At the next appropriate time, Cocoa sends the window an encodeRestorableStateWithCoder:
message, and the window encodes identification and status information into the passed-in encoder.
3. When the system restarts, Cocoa relaunches the app and sends the
restoreWindowWithIdentifier:state:completionHandler: message to the NSApp object.
Apps can override this method to do any general work needed for window restoration, such as substituting
a new restoration class or loading it from a separate bundle.
NSApp decodes the restoration class for the window, sends the
restoreWindowWithIdentifier:state:completionHandler: message to the restoration class
object, and returns YES.
4. The restoration class reopens the document and locates its window. Then it invokes the passed-in
completion handler with the window as a parameter.
Core App Behaviors
Windows Are Restored Automatically
2012-12-13 | Copyright © 2012 Apple Inc. All Rights Reserved.
51
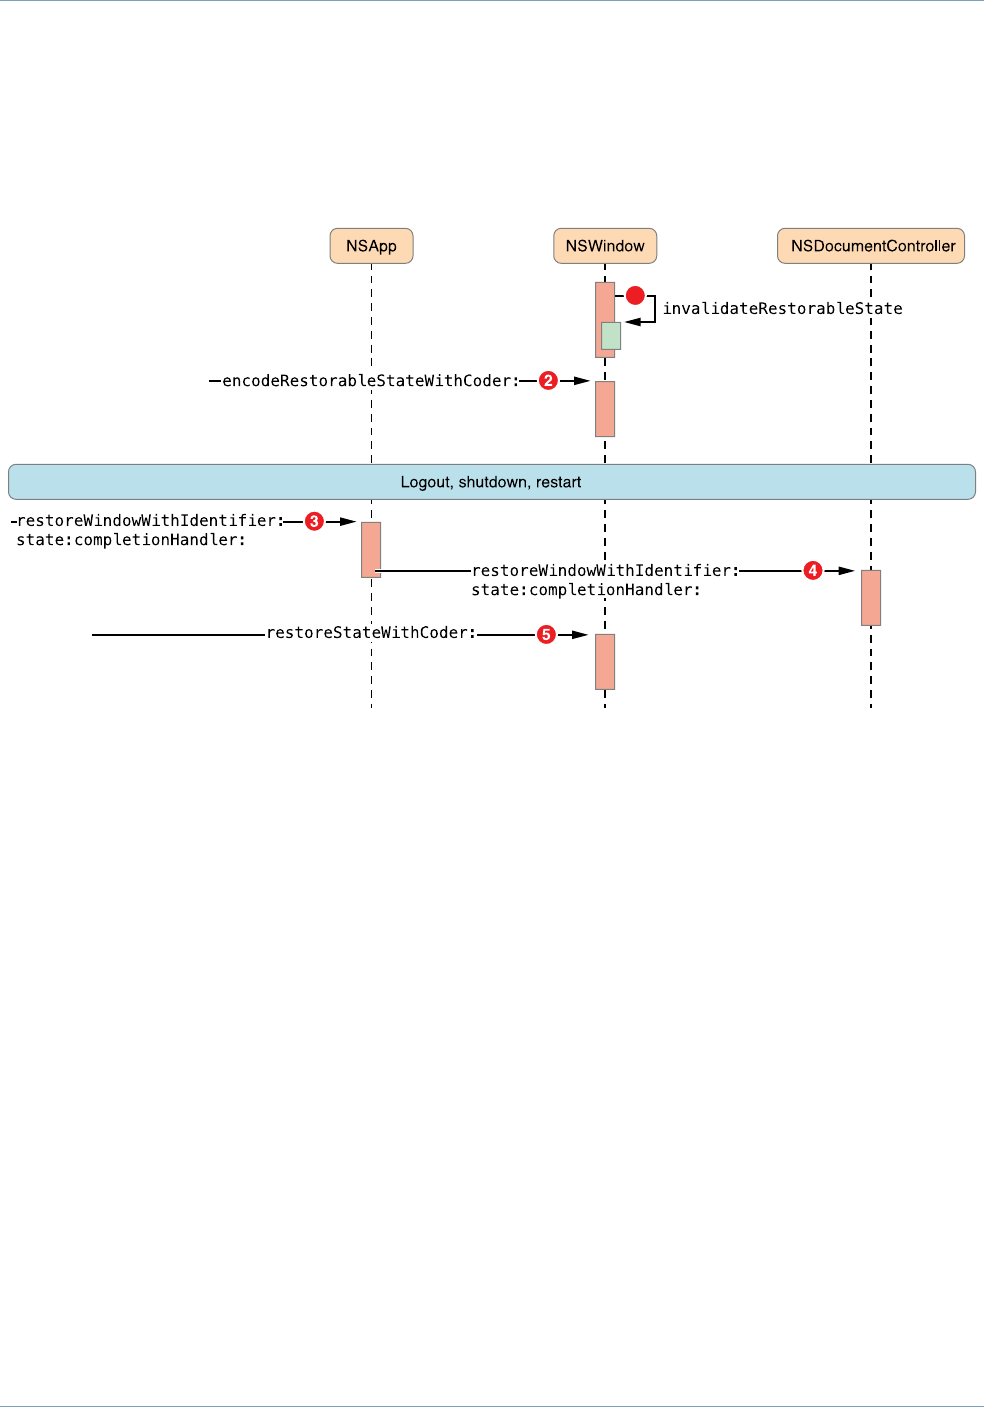
5. Cocoa sends the restoreStateWithCoder: message to the window, which decodes its restorable state
from the passed-in NSCoder object and restores the details of its content.
Figure 5-2 Window restoration
1
Although the preceding steps describe only window restoration, in fact every object inheriting from
NSResponder has its own restorable state. For example, an NSTextView object stores the selected range (or
ranges) of text in its restorable state. Likewise, an NSTabView object records its selected tab, an NSSearchField
object records the search term, an NSScrollView object records its scroll position, and an NSApplication
object records the z-order of its windows. An NSDocument object has state as well. Although NSDocument
does not inherit from NSResponder, it implements many NSResponder methods, including the restoration
methods shown in Figure 5-2.
When the app is relaunched, Cocoa sends the restoreStateWithCoder: message to the relevant objects
in turn: first to the NSApplication object, then to each NSWindow object, then to the NSWindowController
object, then to the NSDocument object, and then to each view that has saved state.
The Document Architecture Provides Undo Support for Free
Undo support in the document architecture is built-in and straightforward to implement. By default, an
NSDocument object has its own NSUndoManager object. The NSUndoManager class enables you to construct
invocations that do the opposite of a previous action.
Core App Behaviors
The Document Architecture Provides Undo Support for Free
2012-12-13 | Copyright © 2012 Apple Inc. All Rights Reserved.
52
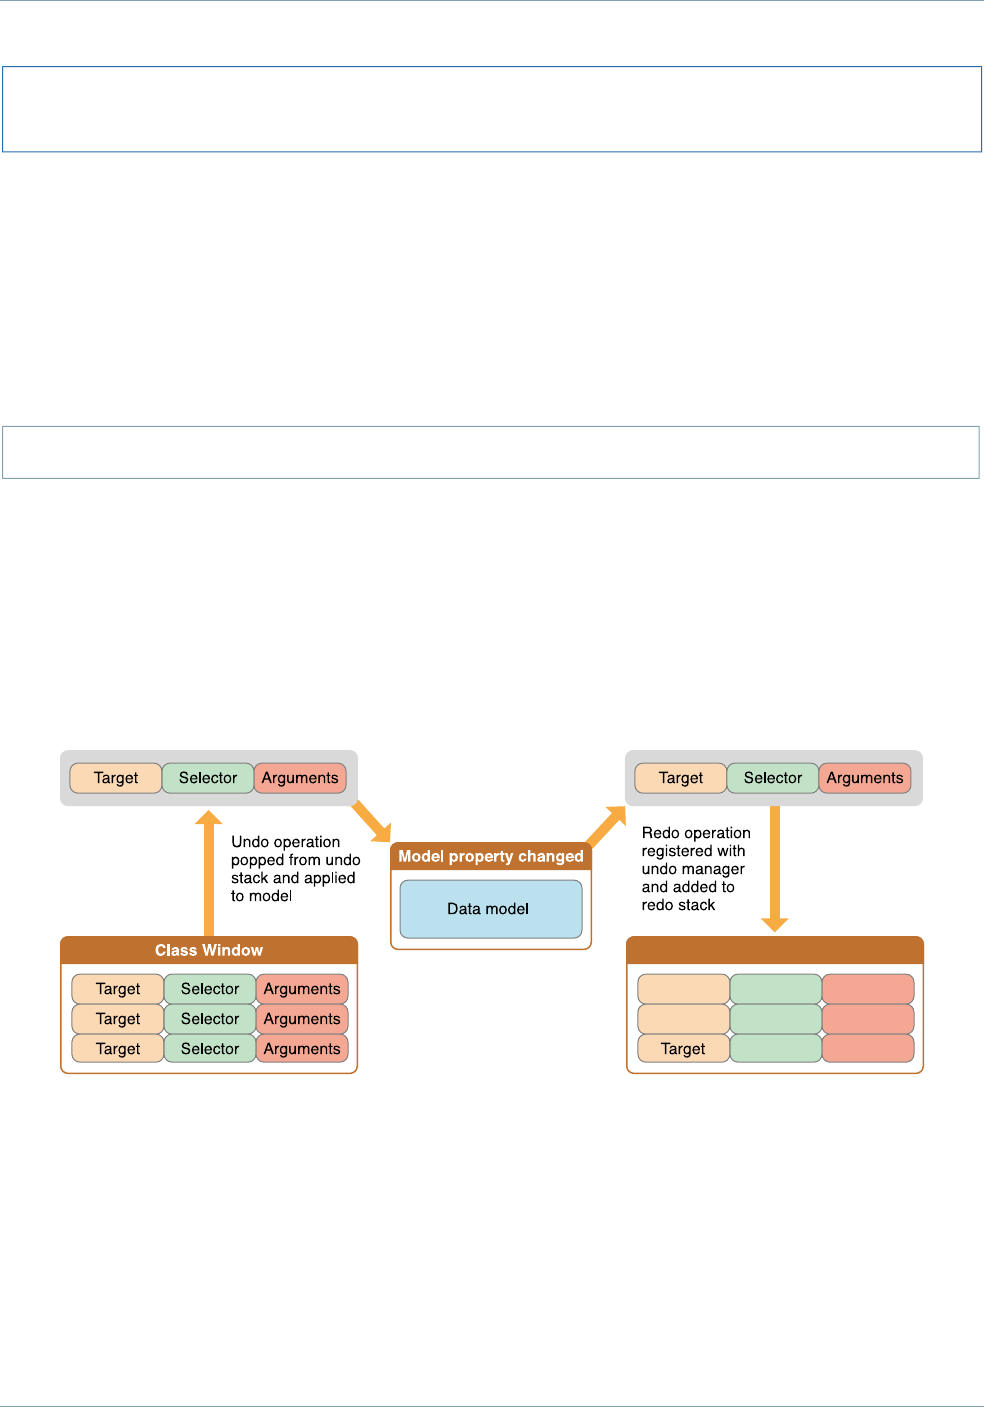
Important: Your document subclass should disable undo registration during document reading using the
[[self undoManager] disableUndoRegistration] message.
Implementing Undo
The key to implementing undo properly is to have well-defined primitives for changing your document. Each
model object, plus the NSDocument subclass itself, should define the set of primitive methods that can change
it. Each primitive method is then responsible for using the undo manager to enqueue invocations that undo
the action of the primitive method. For example, if you decide that setColor: is a primitive method for one
of your model objects, then inside of setColor: your object would do something like the following:
[[[myDocument undoManager] prepareWithInvocationTarget:self] setColor:oldColor]
This message causes the undo manager to construct and save an invocation. If the user later chooses Undo,
the saved invocation is invoked and your model object receives another setColor: message, this time with
the old color. You don’t have to keep track of whether commands are being undone to support redo. In fact,
the way redo works is by watching what invocations get registered as the undo is happening and recording
them on the redo stack.
Figure 5-3 Undo and redo stacks
Redo stack
Target
Target
Selector
Selector
Selector
Arguments
Arguments
Arguments
You can use the setUndoManager: method if you need to use a subclass or otherwise need to change the
undo manager used by the document.
Because many discrete changes might be involved in a user-level action, all the undo registrations that happen
during a single cycle of the event loop are usually grouped together and are undone all at once. NSUndoManager
has methods that allow you to control the grouping behavior further if you need to.
Core App Behaviors
The Document Architecture Provides Undo Support for Free
2012-12-13 | Copyright © 2012 Apple Inc. All Rights Reserved.
53

Another aspect of good undo implementation is to provide action names so that the Undo and Redo menu
items can have more descriptive titles. Undo action names are best set in action methods instead of the change
primitives in your model objects because many primitive changes might go into one user action, or different
user actions might result in the same primitives being called in different ways. The Sketch example app
implements undo in action methods.
Implementing Partial Undo
Because the undo manager does multiple-level undo, do not implement undo for only a subset of the possible
changes to your document. The undo manager relies on being able to reliably take the document back through
history with repeated undos. If some changes get skipped, the undo stack state is no longer synchronized with
the contents of the document. Depending on your architecture, that situation can cause problems that range
from merely annoying to fatal.
For example, imagine that you have a drawing program that is able to undo a resize, but not a delete operation.
If the user selects a graphic and resizes it, the undo manager gets an invocation that can undo that resize
operation. Now the user deletes that graphic (which is not recorded for undo). If the user now tries to undo,
nothing happens (at the very least), because the graphic that was resized is no longer there and undoing the
resize can’t have any visual effect. At worst, the app might crash trying to send a message to a freed object.
So when you implement undo, remember that everything that causes a change to the document should be
undoable.
If there are some changes that you cannot undo, there are two ways to handle the situation when a user makes
such a change. If you can be absolutely sure that the change has no relationship to any other changes that
can happen to the document (that is, something totally independent of all the rest of the contents of the
document has changed), then you do not register any undo action for that change. On the other hand, if the
change does have some relationship to the rest of the document contents, remove all actions from the undo
manager when such a change takes place. Such changes then mark points of no return in your user experience.
When designing your app and document format, you should strive to avoid the need for these “point of no
return” operations.
Managing the Change Count
Because of undo support, the document must keep more information than just whether the document is dirty
or clean. If a user opens a file, makes five changes, and then chooses Undo five times, the document should
once again be clean. But if the user chooses Undo only four times, the document is still dirty.
The NSDocument object keeps a change count to deal with this. The change count can be modified by sending
an updateChangeCount: message with one of the supported change types. The supported change types
are NSChangeDone,NSChangeUndone, and NSChangeCleared. The NSDocument object itself clears the
Core App Behaviors
The Document Architecture Provides Undo Support for Free
2012-12-13 | Copyright © 2012 Apple Inc. All Rights Reserved.
54

change count whenever the user saves or reverts the document. If the document has an undo manager, it
observes the undo manager and automatically updates the change count when changes are done, undone,
or redone.
Not Supporting Undo
If you don't want to support undo at all, first send the setHasUndoManager: message with a parameter value
of NO to your document. This message causes the document never to get an undo manager.
Without an undo manager (and without undo support from your model objects), the document cannot
automatically track its dirty state. So, if you aren't implementing undo, you need to send an
updateChangeCount: message explicitly whenever your document is edited.
The Document Architecture Supports Robust Error Handling
Many NSDocument and NSDocumentController methods include as their last parameter an indirect reference
to an NSError object. These are methods that create a document, write a file, access a resource, or perform
a similar operation.
An example of an NSDocumentController method that takes an error parameter is
openUntitledDocumentAndDisplay:error:, which creates a new untitled document. In case of failure,
this method directly returns nil and, in the last parameter, indirectly returns an NSError object that describes
the error. Before calling such a method, client code that is interested in a possible error declares an NSError
object variable and passes the address of the variable in the error parameter. If the clients are not interested
in the error, they pass NULL in the error parameter.
Using NSError objects gives Cocoa apps the capability to present much more useful error messages to the
user, including detailed reasons for the error condition, suggestions for recovery, and even a mechanism for
attempting programmatic recovery. In addition, AppKit handles presenting the error to the user.
Important: Cocoa methods that take error parameters in the Cocoa error domain are guaranteed to return
NSError objects. So, if you override such a method, you must adhere to the following rule: A method that
takes an error:(NSError **)outError parameter must set the value of *outError to point to an
NSError object whenever the method returns a value that signals failure (typically nil or NO) and outError
!= NULL.
If you override a method that takes an error parameter and you call the superclass implementation, you don’t
need to set outError yourself. Pass it the error argument that your override received when invoked.
Core App Behaviors
The Document Architecture Supports Robust Error Handling
2012-12-13 | Copyright © 2012 Apple Inc. All Rights Reserved.
55

If you override such a method to prevent some action but you don’t want an error alert to be presented to the
user, return an error object whose domain is NSCocoaErrorDomain and whose code is
NSUserCancelledError. The AppKit framework presents errors through the NSApplication implementations
of the presentError: and
presentError:modalForWindow:delegate:didPresentSelector:contextInfo: methods declared
by NSResponder. Those implementations silently ignore errors whose domain is NSCocoaErrorDomain and
whose code is NSUserCancelledError. So, for example, if your override wanted to avoid presenting an error
to the user, it could set an error object as shown in the following fragment:
if (outError) {
*outError = [NSError errorWithDomain:NSCocoaErrorDomain
code:NSUserCancelledError userInfo:nil];
}
For detailed information about NSError handling see Error Handling Programming Guide.
Core App Behaviors
The Document Architecture Supports Robust Error Handling
2012-12-13 | Copyright © 2012 Apple Inc. All Rights Reserved.
56

Most document-based apps can use the information presented in other chapters of this document. However,
some apps have particular requirements necessitating alternate techniques, some of which are discussed in
this chapter.
Overriding the URL and File Package Reading Methods
There are situations in which the simplest solution for document reading, overriding the data-based reading
method, readFromData:ofType:error:, as described in Reading Document Data (page 35), is not sufficient.
In such cases, you can override another NSDocument reading method instead, such as the URL-based and file
package reading methods.
If your app needs access to the URL of a document file, you should override the readFromURL:ofType:error:
method instead of readFromData:ofType:error:, as in the example implementation shown in Listing 6-1.
This example assumes that the app has an NSTextView object configured with an NSTextStorage object
to display the document’s data. The NSDocument object has text and setText: accessors for the document’s
NSAttributedString data model.
Listing 6-1 URL-based document-reading method implementation
- (BOOL)readFromURL:(NSURL *)inAbsoluteURL ofType:(NSString *)inTypeName
error:(NSError **)outError {
BOOL readSuccess = NO;
NSAttributedString *fileContents = [[NSAttributedString alloc]
initWithURL:inAbsoluteURL options:nil
documentAttributes:NULL error:outError];
if (fileContents) {
readSuccess = YES;
[self setText:fileContents];
}
return readSuccess;
}
2012-12-13 | Copyright © 2012 Apple Inc. All Rights Reserved.
57
Alternative Design Considerations
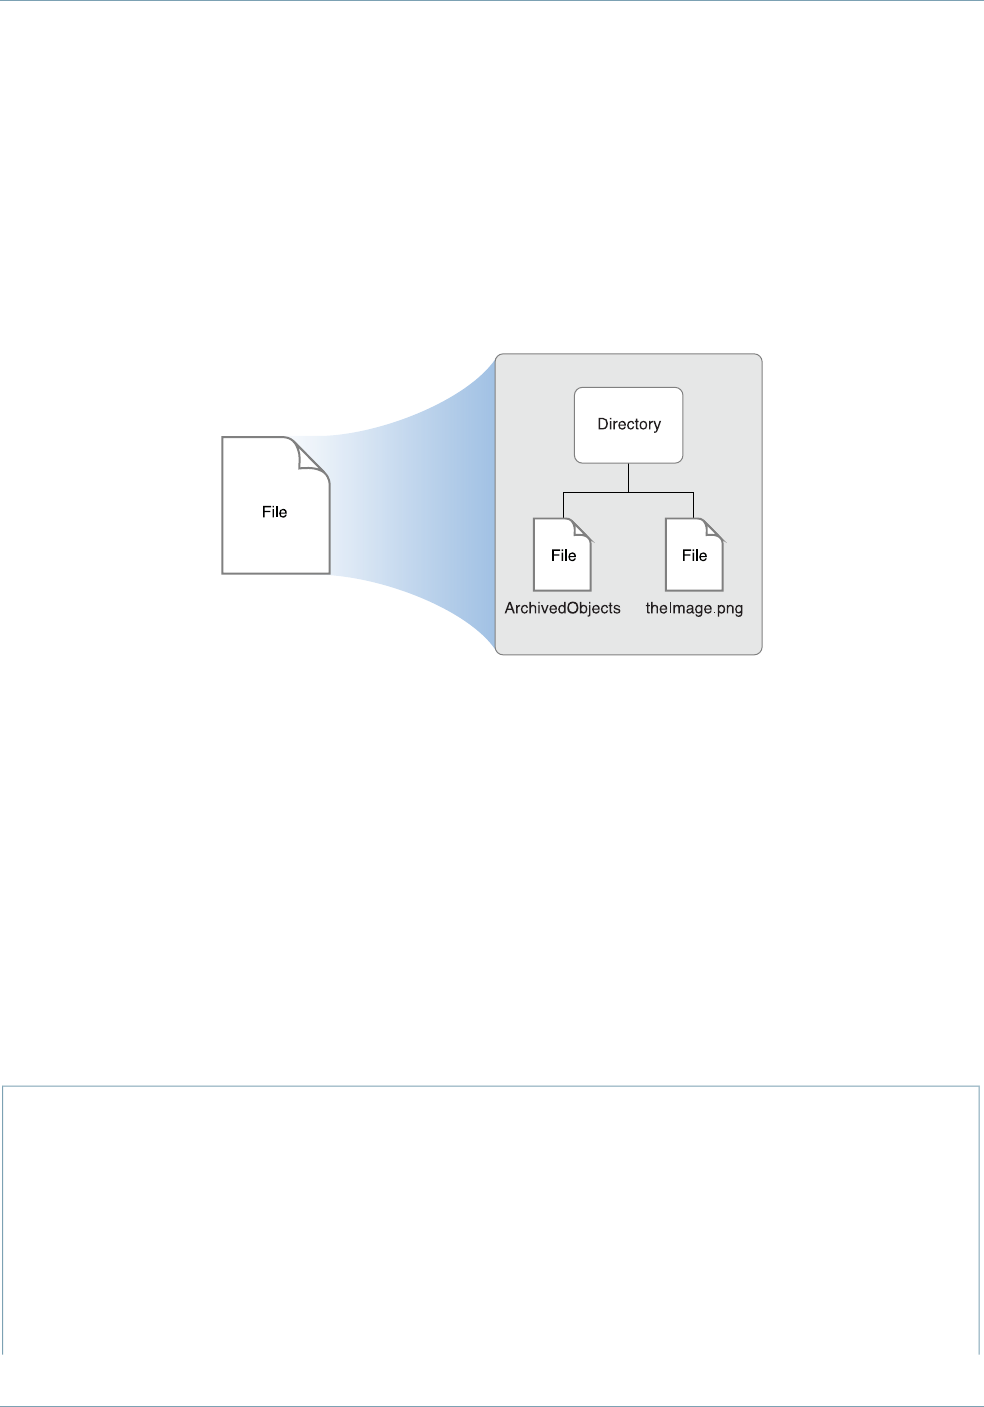
If your app needs to manipulate directly a document file that is a file package, you should override the
readFromFileWrapper:ofType:error: method instead of readFromData:ofType:error:. For example,
if your document contains an image file and a text file, you can store both in a file package. A major advantage
of this arrangement is that if only one of those objects changes during an editing session, you don’t need to
save both objects to disk but can save just the changed one. Figure 6-1 shows a file package containing an
image file and an object archive.
Figure 6-1 File package containing an image
When opening a document, the method looks for the image and text file wrappers. For each wrapper, the
method extracts the data from it and keeps the file wrapper itself. The file wrappers are kept so that, if the
corresponding data hasn't been changed, they can be reused during a save and thus the source file itself can
be reused rather than rewritten. Keeping the file wrapper avoids the overhead of syncing data unnecessarily.
Listing 6-3 shows an override of the NSDocument file wrapper reading method
readFromFileWrapper:ofType:error:.
The example code in Listing 6-3 (and its corresponding file wrapper writing override shown in Listing 6-5 (page
61)) assume the existence of some auto-synthesized properties and constants, such as those shown in Listing
6-2; of course, a complete NSDocument implementation also requires some additional program logic.
Listing 6-2 File wrapper example properties and constants
@property (assign) IBOutlet NSTextView *textView;
@property (nonatomic, strong) NSImage *image;
@property (strong) NSString *notes;
@property (strong) NSFileWrapper *documentFileWrapper;
NSString *ImageFileName = @"Image.png";
NSString *TextFileName = @"Text.txt";
Alternative Design Considerations
Overriding the URL and File Package Reading Methods
2012-12-13 | Copyright © 2012 Apple Inc. All Rights Reserved.
58

NSStringEncoding TextFileEncoding = NSUTF8StringEncoding;
Listing 6-3 File wrapper document-reading method implementation
- (BOOL)readFromFileWrapper:(NSFileWrapper *)fileWrapper
ofType:(NSString *)typeName
error:(NSError **)outError {
NSDictionary *fileWrappers = [fileWrapper fileWrappers];
NSFileWrapper *imageFileWrapper = [fileWrappers objectForKey:ImageFileName];
if (imageFileWrapper != nil) {
NSData *imageData = [imageFileWrapper regularFileContents];
NSImage *image = [[NSImage alloc] initWithData:imageData];
[self setImage:image];
}
NSFileWrapper *textFileWrapper = [fileWrappers objectForKey:TextFileName];
if (textFileWrapper != nil) {
NSData *textData = [textFileWrapper regularFileContents];
NSString *notes = [[NSString alloc] initWithData:textData
encoding:TextFileEncoding];
[self setNotes:notes];
}
[self setDocumentFileWrapper:fileWrapper];
return YES;
}
If the data related to a file wrapper changes (a new image is added or the text is edited), the corresponding
file wrapper object is disposed of and a new file wrapper created on save. See Listing 6-5 (page 61) which
shows an override of the corresponding file writing method, fileWrapperOfType:error:.
Alternative Design Considerations
Overriding the URL and File Package Reading Methods
2012-12-13 | Copyright © 2012 Apple Inc. All Rights Reserved.
59

Overriding the URL and File Package Writing Methods
As with document reading, there are situations in which the simplest solution for document writing, overriding
the data-based writing method, dataOfType:error:, as described in Writing Document Data (page 37), is
not sufficient. In such cases, you can override another NSDocument writing method instead, such as the
URL-based and file package writing methods.
If your app needs access to the URL of a document file, you should override the NSDocument URL-based writing
method, writeToURL:ofType:error:, as shown in Listing 6-4. This example has the same assumptions as
Listing 6-1 (page 57).
Listing 6-4 URL-based document-writing method implementation
- (BOOL)writeToURL:(NSURL *)inAbsoluteURL ofType:(NSString *)inTypeName
error:(NSError **)outError {
NSData *data = [[self text] RTFFromRange:NSMakeRange(0,
[[self text] length]) documentAttributes:nil];
BOOL writeSuccess = [data writeToURL:inAbsoluteURL
options:NSAtomicWrite error:outError];
return writeSuccess;
}
If your override cannot determine all of the information it needs from the passed-in parameters, consider
overriding another method. For example, if you see the need to invoke fileURL from within an override of
writeToURL:ofType:error:, you should instead override
writeToURL:ofType:forSaveOperation:originalContentsURL:error:. Override this method if your
document writing machinery needs access to the on-disk representation of the document revision that is about
to be overwritten. This method is responsible for doing document writing in a way that minimizes the danger
of leaving the disk to which writing is being done in an inconsistent state in the event of a software crash,
hardware failure, or power outage.
If your app needs to directly manipulate a document file that is a file package, you should override the
fileWrapperOfType:error: method instead of dataOfType:error:. An example file wrapper writing
method implementation is shown in Listing 6-5. In this implementation, if the document was not read from a
file or was not previously saved, it doesn't have a file wrapper, so the method creates one. Likewise, if the
document file wrapper doesn’t contain a file wrapper for an image and the image is not nil, the method
creates a file wrapper for the image and adds it to the document file wrapper. And if there isn’t a wrapper for
the text file, the method creates one.
Alternative Design Considerations
Overriding the URL and File Package Writing Methods
2012-12-13 | Copyright © 2012 Apple Inc. All Rights Reserved.
60

Listing 6-5 File wrapper document-writing method override
- (NSFileWrapper *)fileWrapperOfType:(NSString *)typeName
error:(NSError **)outError {
if ([self documentFileWrapper] == nil) {
NSFileWrapper * documentFileWrapper = [[NSFileWrapper alloc]
initDirectoryWithFileWrappers:nil];
[self setDocumentFileWrapper:documentFileWrapper];
}
NSDictionary *fileWrappers = [[self documentFileWrapper] fileWrappers];
if (([fileWrappers objectForKey:ImageFileName] == nil) &&
([self image] != nil)) {
NSArray *imageRepresentations = [self.image representations];
NSData *imageData = [NSBitmapImageRep
representationOfImageRepsInArray:imageRepresentations
usingType:NSPNGFileType
properties:nil];
if (imageData == nil) {
NSBitmapImageRep *imageRep = nil;
@autoreleasepool {
imageData = [self.image TIFFRepresentation];
imageRep = [[NSBitmapImageRep alloc] initWithData:imageData];
}
imageData = [imageRep representationUsingType:NSPNGFileType
properties:nil];
}
NSFileWrapper *imageFileWrapper = [[NSFileWrapper alloc]
initRegularFileWithContents:imageData];
[imageFileWrapper setPreferredFilename:ImageFileName];
[[self documentFileWrapper] addFileWrapper:imageFileWrapper];
Alternative Design Considerations
Overriding the URL and File Package Writing Methods
2012-12-13 | Copyright © 2012 Apple Inc. All Rights Reserved.
61

}
if ([fileWrappers objectForKey:TextFileName] == nil) {
NSData *textData = [[[self textView] string]
dataUsingEncoding:TextFileEncoding];
NSFileWrapper *textFileWrapper = [[NSFileWrapper alloc]
initRegularFileWithContents:textData];
[textFileWrapper setPreferredFilename:TextFileName];
[[self documentFileWrapper] addFileWrapper:textFileWrapper];
}
return [self documentFileWrapper];
}
Incremental Data Reading and Writing
If your app has a large data set, you may want to read and write increments of your files as needed to ensure
a good user experience. Consider the following strategies:
●Use file packages. If your app supports document files that are file packages, then you can override the
file-wrapper reading and writing methods. File wrapper (NSFileWrapper) objects that represent file
packages support incremental saving. For example, if you have a file package containing text objects and
graphic objects, and only one of them changes, you can write the changed object to disk but not the
unchanged ones.
●Use Core Data. You can subclass NSPersistentDocument, which uses Core Data to store your document
data in a managed object context. Core Data automatically supports incremental reading and writing of
only changed objects to disk.
For more information about reading and writing files, see File System Programming Guide.
Multiple Document Types Use Multiple NSDocument Subclasses
The document architecture provides support for apps that handle multiple types of documents, each type
using its own subclass of NSDocument. For example, you could have an app that enables users to create text
documents, spreadsheets, and other types of documents, all in a single app. Such different document types
each require a different user interface encapsulated in a unique NSDocument subclass.
Alternative Design Considerations
Incremental Data Reading and Writing
2012-12-13 | Copyright © 2012 Apple Inc. All Rights Reserved.
62

If your multiple-document-type app opens only existing documents, you can use the default
NSDocumentController instance, because the document type is determined from the file being opened.
However, if your app creates new documents, it needs to choose the correct type.
The NSDocumentController action method newDocument: creates a new document of the first type listed
in the app’s array of document types configured in the Info.plist file. But automatically creating the first
type does not work for apps that support several distinct types of document. If your app cannot determine
which type to create depending on circumstances, you must provide a user interface allowing the user to
choose which type of document to create.
You can create your own new actions, either in your app’s delegate or in an NSDocumentController subclass.
You could create several action methods and have several different New menu items, or you could have one
action that asks the user to pick a document type before creating a new document.
Once the user selects a type, your action method can use the NSDocumentController method
makeUntitledDocumentOfType:error: to create a document of the correct type. After creating the
document, your method should add it to the document controller’s list of documents, and it should send the
document makeWindowControllers and showWindows messages.
Alternatively, if you subclass NSDocumentController, you can override the defaultType method to
determine the document type and return it when the user chooses New from the File menu.
Additional Document Type Considerations
If your app has some document types that it can read but not write, you can declare this by setting the role
for those types to Viewer instead of Editor in Xcode. If your app has some types that it can write but not
read, you can declare this by using the NSExportableTypes key. You can include the NSExportableTypes
key in the type dictionary for another type that your document class supports, usually the type dictionary for
the most native type for your document class. Its value is an array of UTIs defining a supported file type to
which this document can export its content.
The Sketch sample app uses this key to allow it to export TIFF and PDF images even though it cannot read
those types. Write-only types can be chosen only when doing Save As operations. They are not allowed for
Save operations.
Sometimes an app might understand how to read a type, but not how to write it, and when it reads documents
of that type, it should automatically convert them to another type that you can write. An example would be
an app that can read documents from an older version or from a competing product. It might want to read in
the old documents and automatically convert them to the new native format. The first step is to add the old
type as a read-only type. By doing this, your app is able to open the old files, but they come up as untitled
files.
Alternative Design Considerations
Additional Document Type Considerations
2012-12-13 | Copyright © 2012 Apple Inc. All Rights Reserved.
63

If you want to automatically convert them to be saved as your new type, you can override the readFrom...
methods in your NSDocument subclass to call super and then reset the filename and type afterwards. You
should use setFileType: and setFileURL: to set an appropriate type and name for the new document.
When setting the filename, make sure to strip the filename extension of the old type from the original filename,
if it is there, and add the extension for the new type.
Customizing the Save Dialog
By default, when NSDocument runs the Save dialog and the document has multiple writable document types,
NSDocument inserts an accessory view near the bottom of the dialog. This view contains a pop-up menu of
the writable types. If you don’t want this pop-up menu, override shouldRunSavePanelWithAccessoryView
to return NO. You can also override prepareSavePanel: to customize the Save dialog.
Customizing Document Window Titles
Subclasses of NSDocument sometimes override displayName to customize the titles of windows associated
with the document. That is rarely the right thing to do because the document’s display name is used in places
other than the window title, and the custom value that an app might want to use as a window title is often
not appropriate. For example, the document display name is used in the following places:
●Error alerts that may be presented during reverting, saving, or printing of the document
●Alerts presented during document saving if the document has been moved, renamed, or move to the
Trash
●The alert presented when the user attempts to close the document with unsaved changes
●As the default value shown in the "Save As:" field of Save dialog
To customize a document’s window title properly, subclass NSWindowController and override
windowTitleForDocumentDisplayName:. If your app requires even deeper customization, override
synchronizeWindowTitleWithDocumentName.
Customizing Document Closing
If a document has multiple windows, each window has its own window controller. For example, a document
might have a main data-entry window and a window that lists records for selection; each window would have
its own NSWindowController object.
Alternative Design Considerations
Customizing the Save Dialog
2012-12-13 | Copyright © 2012 Apple Inc. All Rights Reserved.
64

If you have multiple window controllers for a single document, you may want to explicitly control document
closing. By default, a document closes when its last remaining window controller closes. However, if you want
the document to close when a particular window closes—the document’s “main” window, for example—then
you can send the main window controller a setShouldCloseDocument: message with a value of YES.
Message Flow in the Document Architecture
The objects that form the document architecture interact to perform the activities of document-based apps,
and those interactions proceed primarily through messages sent among the objects via public APIs. This
message flow provides many opportunities for you to customize the behavior of your app by overriding
methods in your NSDocument subclass or other subclasses.
This section describes default message flow among major objects of the document architecture, including
objects sending messages to themselves; it leaves out various objects and messages peripheral to the main
mechanisms. Also, these messages are sent by the default implementations of the methods in question, and
the behavior of subclasses may differ.
Creating a New Document
The document architecture creates a new document when the user chooses New from the File menu of a
document-based app. This action begins a sequence of messages among the NSDocumentController object,
the newly created NSDocument object, and the NSWindowController object, as shown in Figure 6-2.
Figure 6-2 Creating a new document
1
The sequence numbers in Figure 6-2 refer to the following steps in the document-creation process:
Alternative Design Considerations
Message Flow in the Document Architecture
2012-12-13 | Copyright © 2012 Apple Inc. All Rights Reserved.
65

1. The user chooses New from the File menu, causing the newDocument: message to be sent to the document
controller (or an Apple event, for example, sends an equivalent message).
2. The openUntitledDocumentAndDisplay:error: method determines the default document type
(stored in the app’s Info.plist file) and sends it with the
makeUntitledDocumentOfType:error:message.
3. The makeUntitledDocumentOfType:error: method determines the NSDocument subclass
corresponding to the document type, instantiates the document object, and sends it an initialization
message.
4. The document controller adds the new document to its document list and, if the first parameter passed
with openUntitledDocumentAndDisplay:error: is YES, sends the document a message to create a
window controller for its window, which is stored in its nib file. The NSDocument subclass can override
makeWindowControllers if it has more than one window.
5. The document adds the new window controller to its list of window controllers by sending itself an
addWindowController: message.
6. The document controller sends the document a message to show its windows. In response, the document
sends the window controller a showWindow: message, which makes the window main and key.
If the first parameter passed with openUntitledDocumentAndDisplay:error: is NO, the document
controller needs to explicitly send the document makeWindowControllers and showWindows messages to
display the document window.
Opening a Document
The document architecture opens a document, reading its contents from a file, when the user chooses Open
from the File menu. This action begins a sequence of messages among the NSDocumentController,
NSOpenPanel,NSDocument, and NSWindowController objects, as shown in Figure 6-3 (page 67).
There are many similarities between the mechanisms for opening a document and creating a new document.
In both cases the document controller needs to create and initialize an NSDocument object, using the proper
NSDocument subclass corresponding to the document type; the document controller needs to add the
document to its document list; and the document needs to create a window controller and tell it to show its
window.
Alternative Design Considerations
Message Flow in the Document Architecture
2012-12-13 | Copyright © 2012 Apple Inc. All Rights Reserved.
66
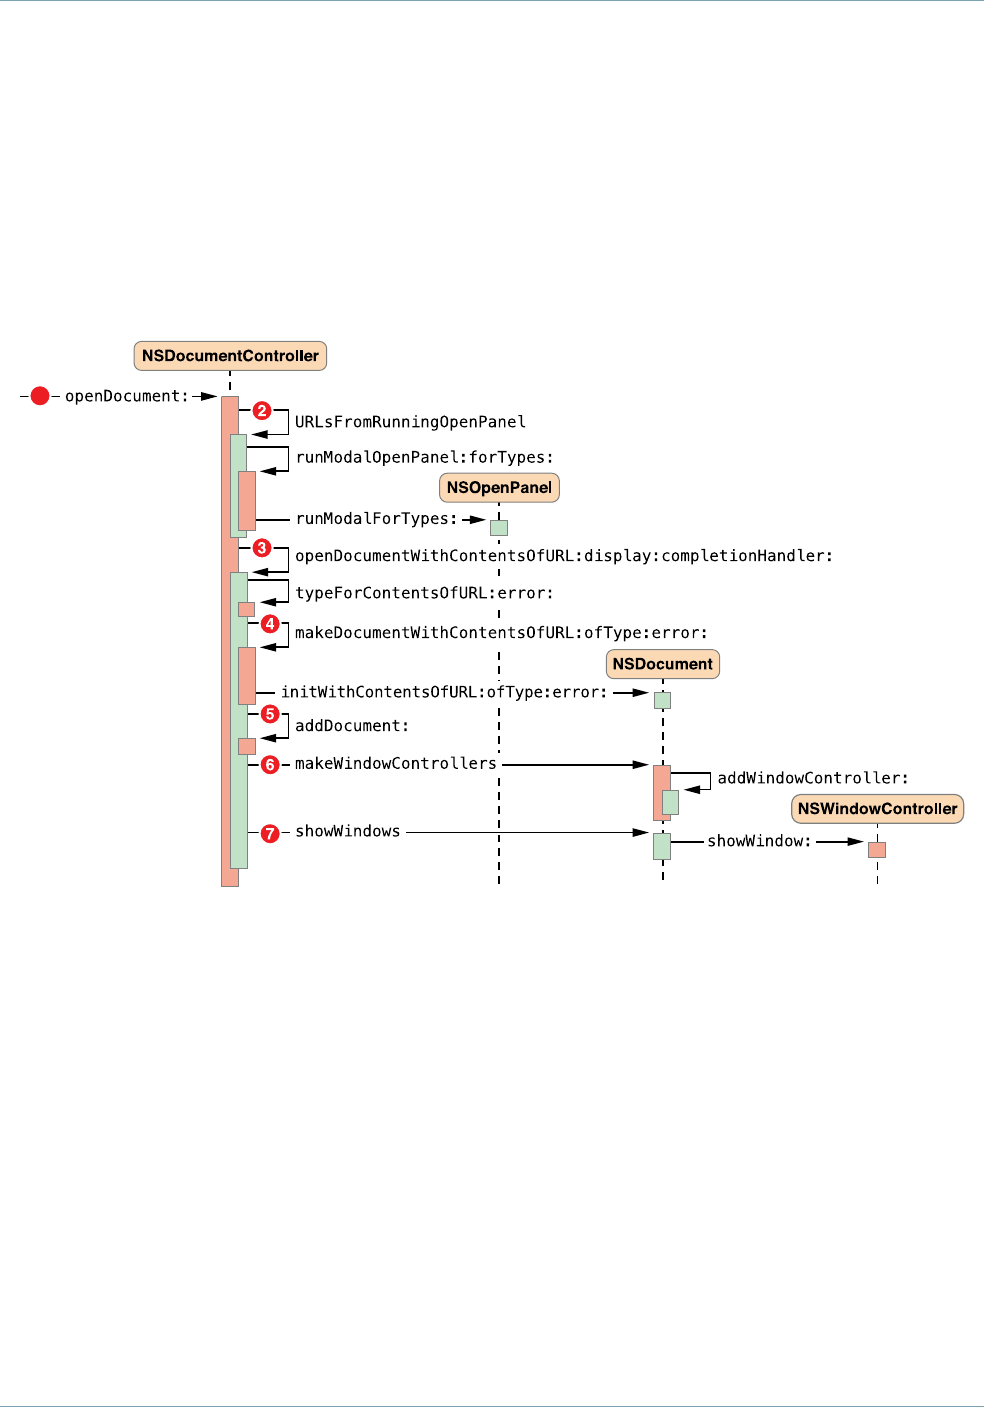
Document Opening Message Flow
Opening a document differs from creating a new document in several ways. If document opening was invoked
by the user choosing Open from the File menu, the document controller must run an Open dialog to allow
the user to select a file to provide the contents of the document. An Apple event can invoke a different message
sequence. In either case, the document must read its content data from a file and keep track of the file’s
meta-information, such as its URL, type, and modification date.
Figure 6-3 Opening a document
1
The sequence numbers in Figure 6-3 refer to the following steps in the document-opening process:
1. The user chooses Open from the File menu, causing the openDocument: message to be sent to the
document controller.
2. The URL locating the document file must be retrieved from the user, so the NSDocumentController
object sends itself the URLsFromRunningOpenPanel message. After this method creates the Open dialog
and sets it up appropriately, the document controller sends itself the runModalOpenPanel:forTypes:
message to present the Open dialog to the user. The NSDocumentController object sends the
runModalForTypes: message to the NSOpenPanel object.
3. With the resulting URL, the NSDocumentController object sends itself the
openDocumentWithContentsOfURL:display:completionHandler: message.
Alternative Design Considerations
Message Flow in the Document Architecture
2012-12-13 | Copyright © 2012 Apple Inc. All Rights Reserved.
67
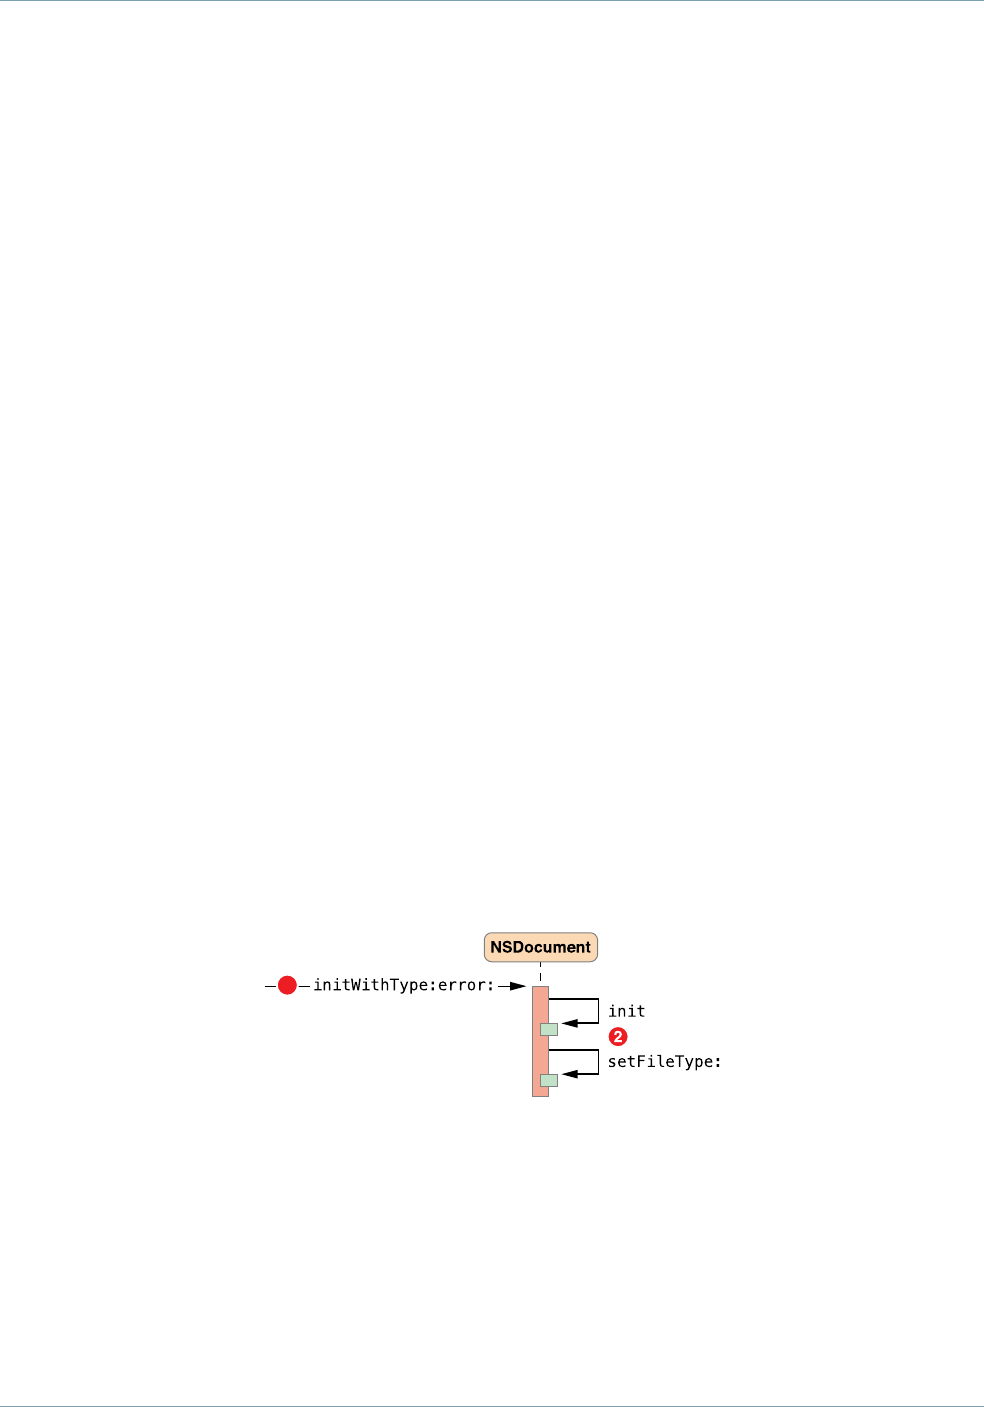
4. The NSDocumentController object sends itself the
makeDocumentWithContentsOfURL:ofType:error: message and sends the
initWithContentsOfURL:ofType:error: message to the newly created NSDocument object. This
method initializes the document and reads in its contents from the file located at the specified URL.
Document Initialization Message Flow (page 68) describes document initialization in this context.
5. When makeDocumentWithContentsOfURL:ofType:error: returns an initialized NSDocument object,
the NSDocumentController object adds the document to its document list by sending the
addDocument: message to itself.
6. To display the document’s user interface, the document controller sends the makeWindowControllers
message to the NSDocument object, which creates an NSWindowController instance and adds it to its
list using the addWindowController: message.
7. Finally, the document controller sends the showWindows message to the NSDocument object, which, in
turn, sends the showWindow: message to the NSWindowController object, making the window main
and key.
8. If the URLsFromRunningOpenPanel method returned an array with more than one URL, steps 3 through
7 repeat for each URL returned.
Document Initialization Message Flow
Steps in the document-initialization process for document creation are shown in Figure 6-4. Document
initialization in the context of document opening is noteworthy because it invokes the document's
location-based or data-based reading and writing methods, and you must override one of them. Steps in the
document-initialization process for document opening are shown in Figure 6-5 (page 69).
Figure 6-4 Document initialization for document creation
1
The sequence numbers in Figure 6-4 refer to the following steps in the document-initialization process:
1. The NSDocumentController object begins document initialization by sending the
initWithType:error: message to the newly created NSDocument object.
Alternative Design Considerations
Message Flow in the Document Architecture
2012-12-13 | Copyright © 2012 Apple Inc. All Rights Reserved.
68

2. The NSDocument object sends the init message to itself, invoking its designated initializer, then sets its
filetype by sending itself the message setFileType:.
Figure 6-5 Document initialization for document opening
1
The sequence numbers in Figure 6-5 refer to the following steps in the document-opening process:
1. The NSDocumentController object begins document initialization by sending the
initWithContentsOfURL:ofType:error: message to the newly created NSDocument object.
2. The NSDocument object sends the init message to itself, invoking its designated initializer, then sets its
metadata about the file it is about to open by sending itself the messages setFileURL:,setFileType:,
and setFileModificationDate:.
3. The NSDocument object reads the contents of the file by sending the readFromURL:ofType:error:
message to itself. That method gets a file wrapper from disk and reads it by sending the
readFromFileWrapper:ofType:error: message to itself. Finally, the NSDocument object puts the
file contents into an NSData object and sends the readFromData:ofType:error: message to itself.
Your NSDocument subclass must override one of the three document-reading methods
(readFromURL:ofType:error:,readFromData:ofType:error:, or
readFromFileWrapper:ofType:error:) or every method that may invoke
readFromURL:ofType:error:.
Alternative Design Considerations
Message Flow in the Document Architecture
2012-12-13 | Copyright © 2012 Apple Inc. All Rights Reserved.
69

Saving a Document
The document architecture saves a document—writes its contents to a file—when the user chooses one of
the Save commands or Export from the File menu. Saving is handled primarily by the document object itself.
Steps in the document-saving process are shown in Figure 6-6.
Figure 6-6 Saving a document
1
The sequence numbers in Figure 6-6 refer to the following steps in the document-saving process:
1. The user chooses Save As (document has never been saved) or Save a Version (document has been saved
before) from the File menu, causing the saveDocument: message to be sent to the NSDocument object.
2. The NSDocument object sends the saveDocumentWithDelegate:didSaveSelector:contextInfo:
message to itself.
Alternative Design Considerations
Message Flow in the Document Architecture
2012-12-13 | Copyright © 2012 Apple Inc. All Rights Reserved.
70

If the document has never been saved, or if the user has moved or renamed the document file, then the
NSDocument object runs a modal Save dialog to get the file location under which to save the document.
3. To run the Save dialog, the NSDocument object sends the
runModalSavePanelForSaveOperation:delegate:didSaveSelector:contextInfo: message
to itself. The document sends prepareSavePanel: to itself to give subclasses an opportunity to customize
the Save dialog, then sends runModal to the NSSavePanel object.
4. The NSDocument object sends the
saveToURL:ofType:forSaveOperation:delegate:didSaveSelector:contextInfo: and, in
turn, saveToURL:ofType:forSaveOperation:error: to itself.
5. The NSDocument object sends the writeSafelyToURL:ofType:forSaveOperation:error: message
to itself. The default implementation either creates a temporary directory in which the document writing
should be done, or renames the old on-disk revision of the document, depending on what sort of save
operation is being done, whether or not there’s already a copy of the document on disk, and the capabilities
of the file system to which writing is being done. Then it sends the
writeToURL:ofType:forSaveOperation:originalContentsURL:error: message to the document.
6. To write the document contents to the file, the NSDocument object sends itself the
writeToURL:ofType:error: message, which by default sends the document the
fileWrapperOfType:error: message. That method, in turn, sends the document the
dataOfType:error: message to create an NSData object containing the contents of the document.
(For backward compatibility, if the deprecated dataRepresentationOfType: is overridden, the document
sends itself that message instead.)
The NSDocument subclass must override one of its document-writing methods (dataOfType:error:,
writeToURL:ofType:error:,fileWrapperOfType:error:, or
writeToURL:ofType:forSaveOperation:originalContentsURL:error:).
7. The NSDocument object sends the
fileAttributesToWriteToURL:ofType:forSaveOperation:originalContentsURL:error:
message to itself to get the file attributes, if any, which it writes to the file. The method then moves the
just-written file to its final location, or deletes the old on-disk revision of the document, and deletes any
temporary directories.
8. The NSDocument object updates its location, file type, and modification date by sending itself the messages
setFileURL:,setFileType:, and setFileModificationDate: if appropriate.
Alternative Design Considerations
Message Flow in the Document Architecture
2012-12-13 | Copyright © 2012 Apple Inc. All Rights Reserved.
71

This table describes the changes to Document-Based App Programming Guide for Mac .
NotesDate
Added cross-references to iCloud Design Guide. Clarified example
implementations of fileWrapperOfType:error: and
readFromFileWrapper:ofType:error:.
2012-12-13
Rewrote the implementations of document-reading and writing methods.
Removed references to manual memory management in favor of ARC.
2012-07-23
New document that explains how to create document-based applications
using the Cocoa document architecture on OS X.
2012-01-09
2012-12-13 | Copyright © 2012 Apple Inc. All Rights Reserved.
72
Document Revision History

Apple Inc.
Copyright © 2012 Apple Inc.
All rights reserved.
No part of this publication may be reproduced,
stored in a retrieval system, or transmitted, in any
form or by any means, mechanical, electronic,
photocopying, recording, or otherwise, without
prior written permission of Apple Inc., with the
following exceptions: Any person is hereby
authorized to store documentation on a single
computer or device for personal use only and to
print copies of documentation for personal use
provided that the documentation contains
Apple’s copyright notice.
No licenses, express or implied, are granted with
respect to any of the technology described in this
document. Apple retains all intellectual property
rights associated with the technology described
in this document. This document is intended to
assist application developers to develop
applications only for Apple-branded products.
Apple Inc.
1 Infinite Loop
Cupertino, CA 95014
408-996-1010
Apple, the Apple logo, Cocoa, Finder, iPhoto,
Keynote, Mac, OS X, Sand, Time Machine, and
Xcode are trademarks of Apple Inc., registered in
the U.S. and other countries.
iCloud is a service mark of Apple Inc., registered
in the U.S. and other countries.
App Store and Mac App Store are service marks
of Apple Inc.
IOS is a trademark or registered trademark of
Cisco in the U.S. and other countries and is used
under license.
APPLE MAKES NO WARRANTY OR REPRESENTATION,
EITHER EXPRESS OR IMPLIED, WITH RESPECT TO THIS
DOCUMENT, ITS QUALITY, ACCURACY,
MERCHANTABILITY, OR FITNESS FOR A PARTICULAR
PURPOSE. AS A RESULT, THIS DOCUMENT IS PROVIDED
“AS IS,” AND YOU, THE READER, ARE ASSUMING THE
ENTIRE RISK AS TO ITS QUALITY AND ACCURACY.
IN NO EVENT WILL APPLE BE LIABLE FOR DIRECT,
INDIRECT, SPECIAL, INCIDENTAL, OR CONSEQUENTIAL
DAMAGES RESULTING FROM ANY DEFECT, ERROR OR
INACCURACY IN THIS DOCUMENT, even if advised of
the possibility of such damages.
Some jurisdictions do not allow the exclusion of
implied warranties or liability, so the above exclusion
may not apply to you.
