Docker Compose Installation & Setup Guide
User Manual:
Open the PDF directly: View PDF ![]() .
.
Page Count: 34

Docker Compose
Installation & Setup Guide.
NS1 Private DNS 1.0 • Revised August 8, 2018
2018 © NS1, Inc.

Private DNS 1.0
TABLE OF CONTENTS
1. Overview 3
2. Before You Begin 4
2.1. System Requirements 4
2.1.1. Hardware 4
2.1.2. Operating Systems 4
2.1.3. Docker 4
2.1.4. Software 5
2.1.5. Network 5
2.2. Securing System Access 5
2.3. Transport Layer Security 6
3. Installation 6
3.1. Accessing Files & Images 6
3.2. Configuring Compose Files 7
3.3. Installation Commands 7
4. Setup & Configuration 8
4.1. Setup with CLI 8
4.1.1. Common CLI Setup Options 8
4.1.2. Data CLI Setup 10
4.1.3. DNS CLI Setup 12
4.1.4. Web CLI Setup 13
4.1.5. Xfr CLI Setup 14
4.2. Setup with Web Interface 15
4.2.1. Data Setup 15
4.2.2. DNS Setup 16
4.2.3. Web Setup 16
4.2.4. Xfr Setup 17
5. Administrative Actions 18
5.1. Admin Actions with CLI 18
5.1.1. Data CLI Actions 18
5.1.2. DNS CLI Actions 19
5.1.3. Web CLI Actions 19
5.1.4. Xfr CLI Actions 20
5.2. Admin Actions with the Web Interface 21
5.2.1. Data Actions 21
2018 © NS1 Inc.
Page | 1

Private DNS 1.0
5.2.2. DNS Actions 21
5.2.3. Web Actions 22
5.2.4. Xfr Actions 22
6. Import New GeoIP Data 23
7. Upgrading 23
8. Uninstalling 24
9. Appendix A. Bootstrap an Operator 25
10. Appendix B: Managing Operators 26
10.1. View Operator(s) 26
10.2. Create an Operator 26
10.3. Update an Operator 26
10.4. Delete an Operator 26
11. Appendix C: Managing Organizations 28
11.1. View Organizations 28
11.2. View an Organization 28
11.3. Creating an Organization 28
11.4. Update an Organization 28
11.5. Delete an Organization 29
11.6. Reset a User’s Password 29
12. Appendix D: Managing API Keys, Users & Teams 30
12.1. Example: Adding a New User to an Organization as Operator 30
12.2. Example: Adding a Zone as Operator User 31
13. Appendix E: Unavailable API Endpoints in Private DNS 32
14. Appendix F: System Topologies 33
14.1. Architecting for Highly Available DNS 33
2018 © NS1 Inc.
Page | 2

Private DNS 1.0
1. Overview
NS1’s Private DNS is a solution that can be installed on customers’ networks. It is the
software version of NS1’s industry-leading SaaS platform, bringing DNS and traffic
management capabilities out of the cloud and into owned environments.
2018 © NS1 Inc.
Page | 3

Private DNS 1.0
2. Before You Begin
This guide assumes the reader has familiarity with the principles of DNS, networking, and
working knowledge of Docker and container-based systems.
2.1. System Requirements
The following sections contain both hard requirements and general guidance (e.g.
hardware) for the system. For questions or concerns about target environments, please
contact support@ns1.com for more information.
2.1.1. Hardware
The following is the minimum hardware recommended to run a single container image:
●2 CPUs
●2 GB RAM
●20 GB of free disk space
Important note: NS1 highly recommends monitoring disk usage on each host to prevent
service disruption.
2.1.2. Operating Systems
●Linux Ubuntu 18.04 (Docker CE 18.05 Edge and higher only) / 17.04 / 16.04 / 14.04 x64
●CentOS 7 x86
●Red Hat x86_64
Important note: If running multiple containers on the same host machine, a Linux kernel
must support the SO_REUSEPORT socket option to allow multiple sockets on the same host
to bind to the same port.
Important note: Running Private DNS on Mac OS or Windows 10 Pro / Enterprise 64-bit is
not supported by NS1.
2.1.3. Docker
To run multi-container applications with Docker Compose, Private DNS requires Docker
Version 17.03.x or 17.06.x (CE or EE) or higher. More information about Docker
requirements along with installation steps is found at the following locations:
●Docker: https://docs.docker.com/engine/installation/
●Docker Compose: https://docs.docker.com/compose/install/.
2018 © NS1 Inc.
Page | 4

Private DNS 1.0
2.1.4. Software
Web interface configuration was designed to work with current Evergreen browser
versions. Note that newer versions of each browser may be available since this release and
therefore may not be tested yet by NS1. The following browser versions were tested prior
to this release:
●Chrome 67.0.3396.87 (Official Build) (64-bit)
●Firefox 58.0
●Edge 41.16299.15
●EdgeHTML 16.16299
●Safari 11.0.2
2.1.5. Network
While configuring the system, IPv4 addresses are recommended. Access to the public
internet is required to pull the latest container images from my.nsone.net.
Important notes:
●For private networks without access to the public internet, NS1 recommends pulling
the container images on a separate machine first before transferring contents to a
hard disk or volume which is accessible by the private network.
●If available, it is highly recommended to add each image version to a private
container registry.
The following network protocols are used by the system: HTTP/HTTPS, UDP, TCP, TLS.
2.2. Securing System Access
Host Access. Access to host machines on which each container is running should be
secured to system administrators only. NS1 highly recommends that administrators and
operators should be required to access this machine via secure shell (SSH) connection.
Basic Auth. To further secure containers’ web configuration interface, operators must sign
in using “Basic Auth” credentials. By default, Private DNS initializes Username to ns1 and
Password to private.
Limiting Port Visibility. The web container should only be viewable on ports 80 and 443
from the localhost.
2018 © NS1 Inc.
Page | 5

Private DNS 1.0
2.3. Transport Layer Security
By default all network communication between the various Private DNS containers,
management portal and API endpoints, as well as the main portal and API endpoints is
encrypted using self signed certificates that are generated at initial runtime of each
container. It is expected behavior for a browser certificate trust warning to appear when
navigating to the web configuration interfaces of each container for the first time. Proceed
following the on screen browser instructions.
There are up to three different TLS configurations depending on the container:
TLS Configuration
Description
Availability
Transport TLS
This configuration manages how
communication between the various
containers is encrypted and verified.
●Data
●Web
●Xfr
●Dns
●Cache
Management TLS
This configuration manages how
communication between clients and the
management interface is encrypted and
verified.
●Data
●Web
●Xfr
●Dns
●Cache
Web TLS
This configuration manages how
communication between clients and the
main NS1 portal and API is encrypted and
verified.
●Web
The web container uses a self-signed certificate. As a result, a certificate trust warning may
appear when making API calls or visiting the NS1 portal in a web browser. It is safe to
ignore this validation warning. You can replace this certificate with a custom certificate at a
later time.
3. Installation
This section provides instructions on installation using docker-compose.
3.1. Accessing Files & Images
NS1 hosts the installation files and container images within the NS1 Portal. NS1’s Customer
Success team will send an email invitation to Private DNS customers directing them to
https://my.nsone.net/. Once a password is created, navigate to the Downloads page.
2018 © NS1 Inc.
Page | 6

Private DNS 1.0
Container images can now be downloaded locally, unzipped, and pushed to a private
container registry.
Alternatively, use your API key to run the following command or download and run the
command here:
sh <(curl -Ls
https://raw.githubusercontent.com/ns1/ns1-privatedns/master/get-privatedns.sh -o -) -k
APIKEY
Then download the compose file here:
wget https://raw.githubusercontent.com/ns1/ns1-privatedns/master/docker-compose.yml
Important note: It is a violation of the NS1 license agreement to push container images to
a repository which is not for exclusive use by the licensee. Pushing images to a public
registry is unlawful redistribution of the software.
3.2. Configuring Compose Files
The example docker-compose.yml provided in the installation directory will start a single
container of each service on one host machine. In-line comments provide more
information about specific parameters. Configuration management tools and other
infrastructure as code frameworks are highly recommended to orchestrate a
production-grade deployment.
3.3. Installation Commands
Execute docker-compose.yml to start containers and volumes for installation. Pass in the
image version at the command line using the TAG parameter as shown below.
TAG=1.0.2 docker-compose -p privatedns up -d
Important note: Upgrading the host machine’s version of Docker Compose is
recommended. See https://docs.docker.com/compose/install/#upgrading for more
information.
2018 © NS1 Inc.
Page | 7

Private DNS 1.0
4. Setup & Configuration
When first setting up the system, the data container should be configured first.
Configuration of other containers can be done in any order.
4.1. Setup with CLI
Using the command line, the system is set up using the supd application. For usage
information of supd, add the --help or -h option. For example, the xfr container’s supd
help is accessed with the following command:
docker exec privatedns_xfr_1 supd --help
4.1.1. Common CLI Setup Options
Certain fields are common and shared among all containers. To view the usage information
of the run command for the specific container. For example,
docker exec privatedns_data_1 supd run --help
The following table describes shared options for the run command.
Options
Description
--recovery
Used by the system to recover from a failed
configuration
--bootstrap
Used by the system when first standing up with no
configuration available
-f, --force
overwrite any existing config options with CLI
parameters
--pop_id [value]
This specifies the location (datacenter/pop) of the
server where the data container is running
--server_id [value]
This identifies a specific server in a location where
the data container is running
--enable_ops_metrics
[value]
If enabled this will export system metrics to the
specified metrics database(s)
--transport_enable_tls
[value]
Enable or disable transport TLS encryption, to use for
communicating with other cluster members. (defaults to
True)
--default_transport_tls_
settings [value]
Use the predefined TLS settings for transport networking
2018 © NS1 Inc.
Page | 8

Private DNS 1.0
--manual_transport_tls_s
ettings [value]
Define the TLS settings for transport networking, when
using manually mounted certificates
--manual_transport_tls_c
rl_file [value]
The CRL certificate to use for verifying client
certificates revocation status, when communicating
between cluster members
--manual_transport_tls_s
ni_zone [value]
The zone to use for TLS verification purposes, when
communicating between cluster members
--manual_transport_tls_c
lient_cert_verfiy
[value]
Whether or not to enforce strict certificate
verification, when communicating between cluster
members. NOTE: You must set 'TLS certificate zone' for
this to work with custom certificates
--manual_transport_tls_v
ersion [value]
The minimum TLS version to enforce, when communicating
between cluster members
--manual_transport_tls_c
iphers [value]
The set of TLS ciphers to use, when communicating
between cluster members
--management_enable_tls
[value]
Enable or disable management TLS encryption, to use for
communicating with other cluster members. (defaults to
True)
--default_management_tls
_settings [value]
Use the predefined TLS settings for management
networking
--manual_management_tls_
settings [value]
Define the TLS settings for management networking, when
using manually mounted certificates
--manual_management_tls_
cert_bundle [value]
The combined certificate/key PEM file to present, when
communicating between cluster members
--manual_management_tls_
crl_file [value]
The CRL certificate to use for verifying client
certificates revocation status, when communicating
between cluster members
--manual_management_tls_
client_cert_verfiy
[value]
Whether or not to enforce strict certificate
verification, when communicating between cluster members
--manual_management_tls_
version [value]
The minimum TLS version to enforce, when communicating
between cluster members
--manual_management_tls_
ciphers [value]
The set of TLS ciphers to use, when communicating
between cluster members
-h, --help
output usage information
2018 © NS1 Inc.
Page | 9

Private DNS 1.0
4.1.2. Data CLI Setup
To see the data container’s unique configuration options, view the usage information of the
run command.
docker exec privatedns_data_1 supd run --help
The following table describes options specific to the data container.
Options
Description
--number_of_stats_proces
sors [value]
The number of processors to run for query metrics
--query_metrics_ttl
[value]
Duration to keep query metrics.
--telegraf_output_ns1_da
ta [value]
None
--telegraf_output_ns1_da
ta_enabled [value]
Use the default metrics store
--telegraf_output_influx
db [value]
Enable InfluxDB output for operational metrics
--telegraf_output_influx
db_data_host [value]
Hostname of InfluxDB host
--telegraf_output_influx
db_database [value]
InfluxDB Database Name
--telegraf_output_influx
db_enable_auth [value]
Enable user/password authentication for InfluxDB
--telegraf_output_influx
db_username [value]
InfluxDB User
--telegraf_output_influx
db_password [value]
InfluxDB Password
--telegraf_output_influx
db_enable_tls [value]
Enable TLS for InfluxDB
--telegraf_output_influx
db_server_pem_key
[value]
The PEM key for the InfluxDB server
--telegraf_output_influx
db_ca_pem_key [value]
The CA key used for validation if provided
--telegraf_output_influx
db_crt [value]
The CRT for the InfluxDB server
--telegraf_output_elasti
csearch [value]
Enable Elasticsearch output for operational metrics
2018 © NS1 Inc.
Page | 10

Private DNS 1.0
--telegraf_output_elasti
csearch_data_host
[value]
Elasticsearch Host
--telegraf_output_elasti
csearch_sniff_cluster
[value]
Enable sniffing Elasticsearch for additional hosts in
cluster
--telegraf_output_elasti
csearch_timeout [value]
Timeout for Connecting to Elasticsearch
--telegraf_output_elasti
csearch_index [value]
Elasticsearch Index
--telegraf_output_elasti
csearch_enable_auth
[value]
Enable user/password authentication for Elasticsearch
--telegraf_output_elasti
csearch_username [value]
Elasticsearch Username
--telegraf_output_elasti
csearch_password [value]
Elasticsearch Password
--telegraf_output_elasti
csearch_enable_tls
[value]
Enable TLs for Elasticsearch
--telegraf_output_elasti
csearch_server_pem_key
[value]
The PEM key for the Elasticsearch server
--telegraf_output_elasti
csearch_ca_pem_key
[value]
The CA key used for validation of Elasticsearch
--telegraf_output_elasti
csearch_crt [value]
The CRT for the Elasticsearch server
--telegraf_output_elasti
csearch_enable_managed_t
emplate [value]
Whether to have the metrics process or Elasticsearch
manage the template
--telegraf_output_elasti
csearch_template_name
[value]
The name of the elasticsearch template
--telegraf_output_elasti
csearch_overwirte_templa
te [value]
Whether to be able to overwrite an existing template
--telegraf_output_opents
db [value]
Enable OpenTSB output for operational metrics
--telegraf_output_opents
db_host [value]
OpenTSDB Hostname
2018 © NS1 Inc.
Page | 11

Private DNS 1.0
--telegraf_output_opents
db_batch_size [value]
Batch Size of writes to OpenTSDB
--telegraf_output_graphi
te [value]
Enable graphite output for operational metrics
--telegraf_output_graphi
te_host [value]
Graphite server hostname
--telegraf_output_graphi
te_timeout [value]
Timeout for connecting to graphite
--telegraf_output_graphi
te_template [value]
Template format for metrics in graphite
--telegraf_output_graphi
te_enable_tls [value]
Enable TLS for graphite
--telegraf_output_graphi
te_server_pem_key
[value]
The PEM key for the graphite server
--telegraf_output_graphi
te_ca_pem_key [value]
The CA PEM key used for validation of graphite server
--telegraf_output_graphi
te_crt [value]
The CRT for the graphite server
4.1.3. DNS CLI Setup
To see the dns container’s unique configuration options, view the usage information of the
run command.
docker exec privatedns_dns_1 supd run --help
The following table describes options specific to the dns container.
Options
Description
--data_host [value]
Hostname or IP address of the data or cache container
--num_metrics_procs
[value]
The number of processors running to collect metrics for
DNS queries
--metrics_flush_interval
[value]
Interval for flushing metrics to the data container
--dns_recv_buffer
[value]
The size in bytes of the UDP receive buffers used by the
dns server. A setting of '0' uses the OS defined default
value.
--num_trex_procs [value]
Number of Authoritative DNS server processes to run
2018 © NS1 Inc.
Page | 12

Private DNS 1.0
--enable_ops_metrics
[value]
Whether to send operational metrics to the data
container
--operation_mode [value]
Controls whether the server will act as authoritative
server or recursive resolver
--external_resolver
[value]
IP address of resolver to handle ALIAS record resolution
and queries for non-authoritative zones if recursive
mode is enabled. Builtin resolver will be used if this
option is not specified
--forward_zones [value]
Additional zones and their authoritative servers to be
configured in the resolver as forwarded zones. This
allows the zones to be resolved if they are not
delegated from public DNS hierarchy
4.1.4. Web CLI Setup
To see the web container’s unique configuration options, view the usage information of the
run command.
docker exec privatedns_web_1 supd run --help
The following table describes options specific to the web container.
Options
Description
--data_host [value]
Hostname or IP address of data container
--api_hostname [value]
Hostname to use for API calls (bootstrap, organization
management require this to be set)
--portal_hostname
[value]
Hostname to use for portal access
--web_enable_tls [value]
Enable or disable web TLS encryption, to use for
communicating with the portal interface and api.
(defaults to True)
--default_web_tls_settin
gs [value]
Use the predefined TLS settings for web networking.
--manual_web_tls_setting
s [value]
Define the TLS settings for web networking, when using
manually mounted certificates.
--manual_web_tls_cert_bu
ndle [value]
The combined certificate/key PEM file to present, when
communicating between cluster members.
--manual_web_tls_crl_fil
e [value]
The CRL certificate to use for verifying client
certificates revocation status, when communicating
between cluster members.
--manual_web_tls_force_r
edir [value]
Enable or disable forcing redirect of http traffic to
https, for the web facing portal and api. (defaults to
2018 © NS1 Inc.
Page | 13

Private DNS 1.0
True)
--manual_web_tls_client_
cert_verfiy [value]
Whether or not to enforce strict certificate
verification, when communicating between cluster
members.
--manual_web_tls_version
[value]
The minimum TLS version to enforce, when communicating
between cluster members.
--manual_web_tls_ciphers
[value]
The set of TLS ciphers to use, when communicating
between cluster members.
--nameservers [value]
List of default name servers to set as NS records for
new zones. The first server in the list is also used as
primary name server in the SOA record. For example,
['ns1.example.net', 'ns2.example.net'].
--hostmaster_email
[value]
E-mail address to set as hostmaster in the SOA record
for new zones.
4.1.5. Xfr CLI Setup
To see the xfr container’s unique configuration options, view the usage information of the
run command.
docker exec privatedns_xfr_1 supd run --help
The following table describes options specific to the xfr container.
Options
Description
--data_host [value]
Hostname or IP address of data container
2018 © NS1 Inc.
Page | 14

Private DNS 1.0
4.2. Setup with Web Interface
Each container has a web interface for manual configuration.
4.2.1. Data Setup
To set up the data container via web interface:
1. Open a web browser to https://<data-hostname-ip>:3300
Note: The configuration port 3300 is set in the docker-compose file.
Optional configurations include:
2. Under the Identifiers grouping, enter a Location ID (datacenter/pop) of the server
where the container is run and Server ID to identify the specific host machine of the
container.
3. Under the Operational Details grouping, enter the Number of Metrics Processors
and the Query Metrics TTL to determine how long query metrics are retained.
4. Enable Metrics Export is configured to collect operational telemetry and
application metrics locally by default. Other export options allow metrics to also
feed into the following external data stores: InfluxDB, Elasticsearch, OpenTSDB, and
Graphite.
a. Each additional option besides of Default Internal Metrics requires additional
parameters to ensure successful connection to the external data store.
b. InfluxDB requires a Host, Database Name, Username, InfluxDB Password
and SSL/TLS key information to securely connect.
c. Elasticsearch cluster requires Hosts, Timeout, Index Name, Username,
Password, optional Template, and SSL/TLS information to securely connect.
d. OpenTSDB export requires a Host and Batch Size.
e. Graphite requires a Host, Timeout, Template, and SSL/TLS information to
securely connect.
5. Under the TLS Settings grouping, choosing to use Defaults for Transport TLS and
Management TLS will operate with the system’s self-signed certificates which were
generated on startup.
a. Manual Settings will require either bind mounting the certificates to Xyz or
uploading a certificate bundle by visiting the Certs and Files page.
Important note: If Enable Metrics Export is enabled on other containers, they will send
operational metrics back to data for aggregation and export to other data stores.
2018 © NS1 Inc.
Page | 15

Private DNS 1.0
4.2.2. DNS Setup
Before continuing with the dns container(s), the data container must be configured already.
For each dns container, to set up the dns container via web interface:
1. Open a web browser to https://<dns-hostname-ip>:3301
2. Under the Data Container Connection grouping, enter the Data Host.
3. To configure metrics settings under the Operational Details grouping, choose a
Number of Query Metrics Processors. NS1 recommends at least 2.
4. Enter a Metrics Flush Interval to determine at what interval metrics get sent back
to data. NS1 recommends 10s for this value.
5. Enter a DNS UDP Receive Buffer Length in bytes. A setting of '0' uses the OS
defined default value.
6. Enter the Number of Authoritative DNS Servers. NS1 recommends at least 2.
7. Under Resolving Configuration, toggle whether the container will operate as an
Authoritative Server or Recursive Resolver.
Optional configurations include:
8. Entering a Location ID (datacenter/pop) of the server where the container is run
9. Server ID to identify the specific host machine of the container
10. An External Resolver’s IP can be set to handle ALIAS record resolution and also
queries for non-authoritative zones in Recursive Resolver mode. By default, the
container’s built in resolver will be used if this value is not specified.
11. Forwarded Zones can be added individually with a Domain and one or more
forwarding IP Addresses and Port.
12. Under the TLS Settings grouping, choosing to use Defaults for Transport TLS and
Management TLS will operate with the system’s self-signed certificates which were
generated on startup.
a. Manual Settings will require either bind mounting the certificates to Xyz or
uploading a certificate bundle by visiting the Certs and Files page.
4.2.3. Web Setup
Before continuing with the web container, the data container must be configured already.
To set up the web container via web interface:
1. Open a web browser to https://<web-hostname-ip>:3302
2. Under the Data Container Connection grouping, enter the Data Host.
3. Enter an API Hostname which will be used for feed URLs.
4. Enter a Portal Hostname at which users can reach the NS1 Portal running in the
web container.
2018 © NS1 Inc.
Page | 16

Private DNS 1.0
Optional configurations include:
5. Entering a Location ID (datacenter/pop) of the server where the container is run
6. Server ID to identify the specific host machine of the container.
7. Under the Operational Details grouping, one more more Nameservers can be
added along with a Hostmaster E-mail address to be associated with new zones’
SOA records.
8. Under the TLS Settings grouping, choosing to use Defaults for Transport TLS,
Management TLS , and Web TLS will operate with the system’s self-signed
certificates which were generated on startup.
a. Manual Settings will require either bind mounting the certificates to Xyz or
uploading a certificate bundle by visiting the Certs and Files page.
4.2.4. Xfr Setup
Before continuing with the xfr container, the data container must be configured already. To
set up the xfr container via web interface:
1. Open a web browser to https://<xfr-hostname-ip>:3303
2. Under the Data Container Connection grouping, enter the Data Host.
Optional configurations include:
3. Entering a Location ID (datacenter/pop) of the server where the container is run
4. Server ID to identify the specific host machine of the container
5. Under the TLS Settings grouping, choosing to use Defaults for Transport TLS,
Management TLS , and Web TLS will operate with the system’s self-signed
certificates which were generated on startup.
a. Manual Settings will require either bind mounting the certificates to Xyz or
uploading a certificate bundle by visiting the Certs and Files page.
2018 © NS1 Inc.
Page | 17

Private DNS 1.0
5. Administrative Actions
Administrative actions are included with each container for operations such as restarting a
service or creating backups.
5.1. Admin Actions with CLI
Actions can be executed on the command line for each container.
5.1.1. Data CLI Actions
To see available actions of the dns container, view the usage information of supd.
docker exec privatedns_data_1 supd --help
The following table describes action commands.
Commands
Description
generate_runtime_logs
Generates an archive of runtime reports in
/ns1/data/log/health/
update_basic_auth
[options]
Sets and updates your basic authorization credentials to
the container’s configuration UI
backup_db
Dumps database to data/backup/<timestamp>.tgz
restart_maindb
This will cause an outage for API and XFR (zone
transfer) services.
restart_metricsdb
This will cause an outage for metrics.
restart_msg_svs
This will cause an outage for data container services.
restart_metrics_svs
This will cause an outage for operational metrics.
restart_in_mem_db
This will cause an outage for creation of portal
sessions
health [options]
run all health checks. returns a json-formatted
object in k:v format
version
print the standalone version number.
You can also use -V. versionfile is located at
/etc/version
run [options]
run ansible via flags or environment variables.
flags supercede environment vars.
Defaults to ignoring existing config.yml
viewconfig [options]
Lists all current config parameters; adding -a will
display all available parameters, even null values
2018 © NS1 Inc.
Page | 18

Private DNS 1.0
5.1.2. DNS CLI Actions
To see available actions of the dns container, view the usage information of supd.
docker exec privatedns_dns_1 supd --help
The following table describes action commands.
Commands
Description
generate_runtime_logs
Generates an archive of runtime reports in
/ns1/data/log/health/
update_basic_auth
[options]
Sets and updates your basic authorization credentials to
the container’s configuration UI
restart_dns
This will cause an outage for DNS.
restart_caching
This will cause DNS caching to be delayed.
restart_metrics
This will cause an outage for metrics reporting.
restart_resolver
This will cause an outage for DNS
health [options]
run all health checks. returns a json-formatted
object in k:v format
version
print the standalone version number.
You can also use -V. versionfile is located at
/etc/version
run [options]
run ansible via flags or environment variables.
flags supercede environment vars.
Defaults to ignoring existing config.yml
viewconfig [options]
Lists all current config parameters; adding -a will
display all available parameters, even null values
5.1.3. Web CLI Actions
To see available actions of the the web container, view the usage information of supd.
docker exec privatedns_web_1 supd --help
The following table describes action commands.
Commands
Description
generate_runtime_logs
Generates an archive of runtime reports in
/ns1/data/log/health/
update_basic_auth
Sets and updates your basic authorization credentials to
2018 © NS1 Inc.
Page | 19

Private DNS 1.0
[options]
the container’s configuration UI
restart_apid
Restarting the API Service will cause an outage for the
API.
health [options]
run all health checks. returns a json-formatted
object in k:v format
version
print the standalone version number.
You can also use -V. versionfile is located at
/etc/version
run [options]
run ansible via flags or environment variables.
flags supercede environment vars.
Defaults to ignoring existing config.yml
viewconfig [options]
Lists all current config parameters; adding -a will
display all available parameters, even null values
5.1.4. Xfr CLI Actions
To see available actions of the xfr container, view the usage information of supd.
docker exec privatedns_xfr_1 supd --help
The following table describes action commands.
Commands
Description
generate_runtime_logs
Generates an archive of runtime reports in
/ns1/data/log/health/
update_basic_auth
[options]
Sets and updates your basic authorization credentials to
the container’s configuration UI
restart_xfr_svs
This action restarts zone transfer services. Zone
transfers will be unavailable during the restart.
health [options]
run all health checks. returns a json-formatted
object in k:v format
version
print the standalone version number.
You can also use -V. versionfile is located at
/etc/version
run [options]
run ansible via flags or environment variables.
flags supercede environment vars.
Defaults to ignoring existing config.yml
viewconfig [options]
Lists all current config parameters; adding -a will
display all available parameters, even null values
2018 © NS1 Inc.
Page | 20

Private DNS 1.0
5.2. Admin Actions with the Web Interface
Actions are found on their own tab of each container configuration page.
5.2.1. Data Actions
The container’s actions can be executed from the Actions tab of the Configuration Manager
page.
Actions
Description
Generate Runtime Report
Generates an archive of runtime reports in
/ns1/data/log/health/
Set Basic Auth
Credentials
Sets and updates your basic authorization credentials to
the container’s configuration UI
Backup Database
Dumps database to data/backup/<timestamp>.tgz
Restart Main Database
This will cause an outage for API and XFR (zone
transfer) services.
Restart Metrics Database
This will cause an outage for metrics.
Restart Messaging
Service
This will cause an outage for data container services.
Restart Metrics Service
This will cause an outage for operational metrics.
Restart in Memory
Database
This will cause an outage for creation of portal
sessions
5.2.2. DNS Actions
The container’s actions can be executed from the Actions tab of the Configuration Manager
page.
Actions
Description
Generate Runtime Report
Generates an archive of runtime reports in
/ns1/data/log/health/
Set Basic Auth
Credentials
Sets and updates your basic authorization credentials to
the container’s configuration UI
Restart Authoritative
DNS Servers
This will cause an outage for DNS.
2018 © NS1 Inc.
Page | 21

Private DNS 1.0
Restart Caching Service
This will cause DNS caching to be delayed.
Restart Metrics Service
This will cause an outage for metrics reporting.
Restart Recursive DNS
Service
This will cause an outage for DNS
5.2.3. Web Actions
The container’s actions can be executed from the Actions tab of the Configuration Manager
page.
Actions
Description
Generate Runtime Report
Generates an archive of runtime reports in
/ns1/data/log/health/
Set Basic Auth
Credentials
Sets and updates your basic authorization credentials to
the container’s configuration UI
Restart API Service
Restarting the API Service will cause an outage for the
API.
5.2.4. Xfr Actions
The container’s actions can be executed from the Actions tab of the Configuration Manager
page.
Actions
Description
Generate Runtime Report
Generates an archive of runtime reports in
/ns1/data/log/health/
Set Basic Auth
Credentials
Sets and updates your basic authorization credentials to
the container’s configuration UI
Restart XFR Service
This action restarts zone transfer services. Zone
transfers will be unavailable during the restart.
2018 © NS1 Inc.
Page | 22

Private DNS 1.0
6. Import New GeoIP Data
The dns container images ships with a built-in GeoIP database to facilitate geographic
routing. This authoritative nameserver is populated from the free version of Maxmind
GeoIP2’s database files which NS1 has licensed for redistribution.
If available, a paid version of Maxmind’s GeoIP database files can be uploaded to each dns
container for more precise geo routing.
Important note: The dns container currently supports binary databases formatted
according to MaxMind DB File Format Specification v2.0.
1. Open a web browser to the dns container’s Certs and Files page.
2. Replace the default GeoIP-City.mmdb file by selecting Upload, browse to the file,
and select Open.
3. Replace the default GeoIP-ASN.mmdb file by selecting Upload, browse to the file,
and select Open.
4. Navigate to the Configuration Manager page, select the Actions tab, and select
Restart Authoritative DNS Service. When successfully restarted, the new GeoIP
data is loaded.
7. Upgrading
When a new version of a container is released, admins may choose to upgrade the docker
containers to apply the latest features and bug fixes to the system.
If a new version of one or more container images is available, admins should download the
images from https://my.nsone.net/. All containers can be updated at once with
docker-compose.
In the docker-compose.yml file, the ${TAG} parameter allows you to choose the image tag
at the command line. For example,
1. First, stop the system.
docker-compose -p privatedns stop
2. Remove the existing images and volumes.
docker-compose -p privatedns rm && docker volume prune
2018 © NS1 Inc.
Page | 23

Private DNS 1.0
3. And finally, bring the system up again passing in a different image tag at the
command line. In the docker-compose.yml file, the ${TAG} parameter allows you to
choose the image tag at the command line.
TAG=1.0.1 docker-compose -p privatedns up -d
Important note: Rollback to previous versions is also possible using the same process and
specifying the previous container image (e.g. 1.0.0).
8. Uninstalling
System uninstallation is simple. To remove the entire system, including volume data,
execute the following:
docker-compose -p privatedns down -v
Important note: This command is destructive and will remove volumes. Ensure data is
backed up appropriately.
2018 © NS1 Inc.
Page | 24

Private DNS 1.0
9. Appendix A. Bootstrap an Operator
When no operators exist in the main database, the bootstrap endpoint is enabled. Once
the system is ready for use, an initial operator must be boostrapped. Below is an example
cURL command.
curl -X POST \
https://{{web-host}}/v1/ops/bootstrap \
-H 'Content-Type: application/json' \
-d '{
"user": "root",
"name": "Root Operator",
"email": "ops@example.com",
"password": "rootpassword"
}'
Important Notes:
●Bootstrap can only be performed once.
●Save the API Key (key) and 2FA Secret (secret) of the first operator created during
bootstrap. If the API Key is lost and no other operators are created yet, the system is
rendered unmanageable and a new instance must be deployed.
●The options -k or --insecure are needed on a cURL command if a valid SSL/TLS
certificate has not been uploaded for use by the web container. See Transport Layer
Security for more information about adding custom certificates.
●Password length should be between 10 and 255 characters.
If the operator was successfully added, a JSON response will provide information such as
the 2FA Secret and API Key. For example,
{
"two_factor_auth": { "secret": "{{2fasecret}}", "type": "totp" },
"name": "Operator Name",
"id": "5b11a509d4f9fa0e5ec1373d",
"user": "operator",
"key": "{{operator_api_key}}",
"last_access": "2018-06-01T19:56:56.604228",
"password": "L0R3M1PSUm",
"email": "operator@example.com"
}
2018 © NS1 Inc.
Page | 25

Private DNS 1.0
10. Appendix B: Managing Operators
After bootstrap, other operator users can be added to the system. An operator user has full
access to every operation and all system data.
Important note: It is highly recommended to add additional operator users after
bootstrapping the first operator. If the bootstrapped operator’s API Key is lost and no other
operators are created yet, the system is rendered unmanageable and a new instance must
be deployed.
10.1. View Operator(s)
curl -X GET \
https://{{web-host}}/v1/ops/operators/{{id}} \
-H 'X-NSONE-Key: {{operator_api_key}}'
10.2. Create an Operator
curl -X PUT \
https://{{web-host}}/v1/ops/operators \
-H 'X-NSONE-Key: {{operator_api_key}}\
-d '{
"user": "operator",
"name": "Operator Name",
"email": "ops@email.com",
"password": "mypassword"
}'
10.3. Update an Operator
curl -X POST \
https://{{web-host}}/v1/ops/operators/{{id}} \
-H 'Content-Type: application/json' \
-H 'X-NSONE-Key: {{operator_api_key}}' \
-d '{
"name": "Changed Name",
"email": "changed@email.com"
}'
10.4. Delete an Operator
curl -X DELETE \
https://{{web-host}}/v1/ops/operators/{{id}} \
-H 'X-NSONE-Key: {{operator_api_key}}'
2018 © NS1 Inc.
Page | 26

Private DNS 1.0
Important note: Operators cannot delete their own accounts from the system. This
ensures bootstrapping system users is a one-time event.
2018 © NS1 Inc.
Page | 27

Private DNS 1.0
11. Appendix C: Managing Organizations
With the exception of operators, all users, zones, and records belong to an organization. To
continue with the initial setup of Private DNS, an operator must create the first
organization using the 'PUT' API call (Section 11.3) below.
11.1. View Organizations
curl -X GET \
'https://{{web-host}}/v1/ops/orgs' \
-H 'X-NSONE-Key: {{operator_api_key}}'
11.2. View an Organization
curl -X GET \
'https://{{web-host}}/v1/ops/orgs/{{org_id}}' \
-H 'X-NSONE-Key: {{operator_api_key}}'
11.3. Creating an Organization
curl -X PUT \
'https://{{web-host}}/v1/ops/orgs' \
-H 'X-NSONE-Key: {{operator_api_key}}' \
-d '{"name": "Organization Name"}'
In response, an org_id is created along with a unique object id. The first organization in
the Private DNS instance is set to 2000.
{
"org_id": 2000,
"name": "Organization Name",
"id": "5b16cb703ca56f"
}
11.4. Update an Organization
curl -X POST \
'https://{{web-host}}/v1/ops/orgs/{{org_id}}' \
-H 'X-NSONE-Key: {{operator_api_key}}' \
-d '{"name": "New Organization Name"}'
2018 © NS1 Inc.
Page | 28

Private DNS 1.0
11.5. Delete an Organization
Deleting an organization removes all data associated with the organization including: API
Keys, Users, Teams, Zone and Record data. For this reason, the DELETE operation can only
be performed using an operator user’s 2-factor authentication (2FA) token.
Important note: An operator’s 2FA secret was returned in response to operator creation.
A 2FA token can then be generated with any 6-digit TOTP generator that rotates at
30-second intervals.
curl -X DELETE \
'https://{{web-host}}/v1/ops/orgs/{{org_id}}?token={123456}' \
-H 'X-NSONE-Key: {{operator_api_key}}'
11.6. Reset a User’s Password
Operators can generate a new invite token for users if passwords are forgotten.
curl -X POST \
'https://{{web-host}}/v1/ops/account/{{org_id}}/user/{{user-name}}/password/reset' \
-H 'X-NSONE-Key: {{operator_api_key}}'
2018 © NS1 Inc.
Page | 29

Private DNS 1.0
12. Appendix D: Managing API Keys, Users &
Teams
API Keys, Users, and Teams are objects within an organization. Each can be managed by an
organization member with sufficient privileges; however, operators also have the ability to
act on behalf of an organization. This is necessary when setting up the first organization’s
users or API keys.
If an operator is acting on behalf of an organization, appending exclamation point (!) plus
the org_id (e.g. !2000) to an API key allows use of other endpoints described in NS1’s
Managed DNS API Documentation.
12.1. Example: Adding a New User to an Organization as
Operator
For example, an operator can add a user with the following cURL command:
curl -X PUT \
'https://{{web-host}}/v1/account/users/newuser' \
-H 'X-NSONE-Key: {{operator_api_key}}!{{org_id}}' \
-d '{"username":"newuser", "name":"New User","email":"newuser@exmple.com"}'
In response an invite token is generated for this user to set a password:
{
"username": "newuser",
"notify": {
"billing": false
},
"permissions": {},
"invite_token": "{{new_invite_token}}",
"ip_whitelist_strict": false,
"name": "New User",
"teams": [],
"ip_whitelist": [],
"last_access": null,
"2fa_enabled": false,
"email": "newuser@example.com"
}
An operator can then send an invitation URL to the portal user for setting an initial
password.
2018 © NS1 Inc.
Page | 30
Private DNS 1.0
https://{{web-host}}/#/invite/{{new_invite_token}}
12.2. Example: Adding a Zone as Operator User
And a zone can be added for an organization’s account using the following cURL command:
curl -X PUT \
'https://{{web-host}}/v1/zones/newzone.com' \
-H 'X-NSONE-Key: {{operator_api_key}}!{{org_id}}' \
-d '{"zone":"newzone.com", "nx_ttl":60}'
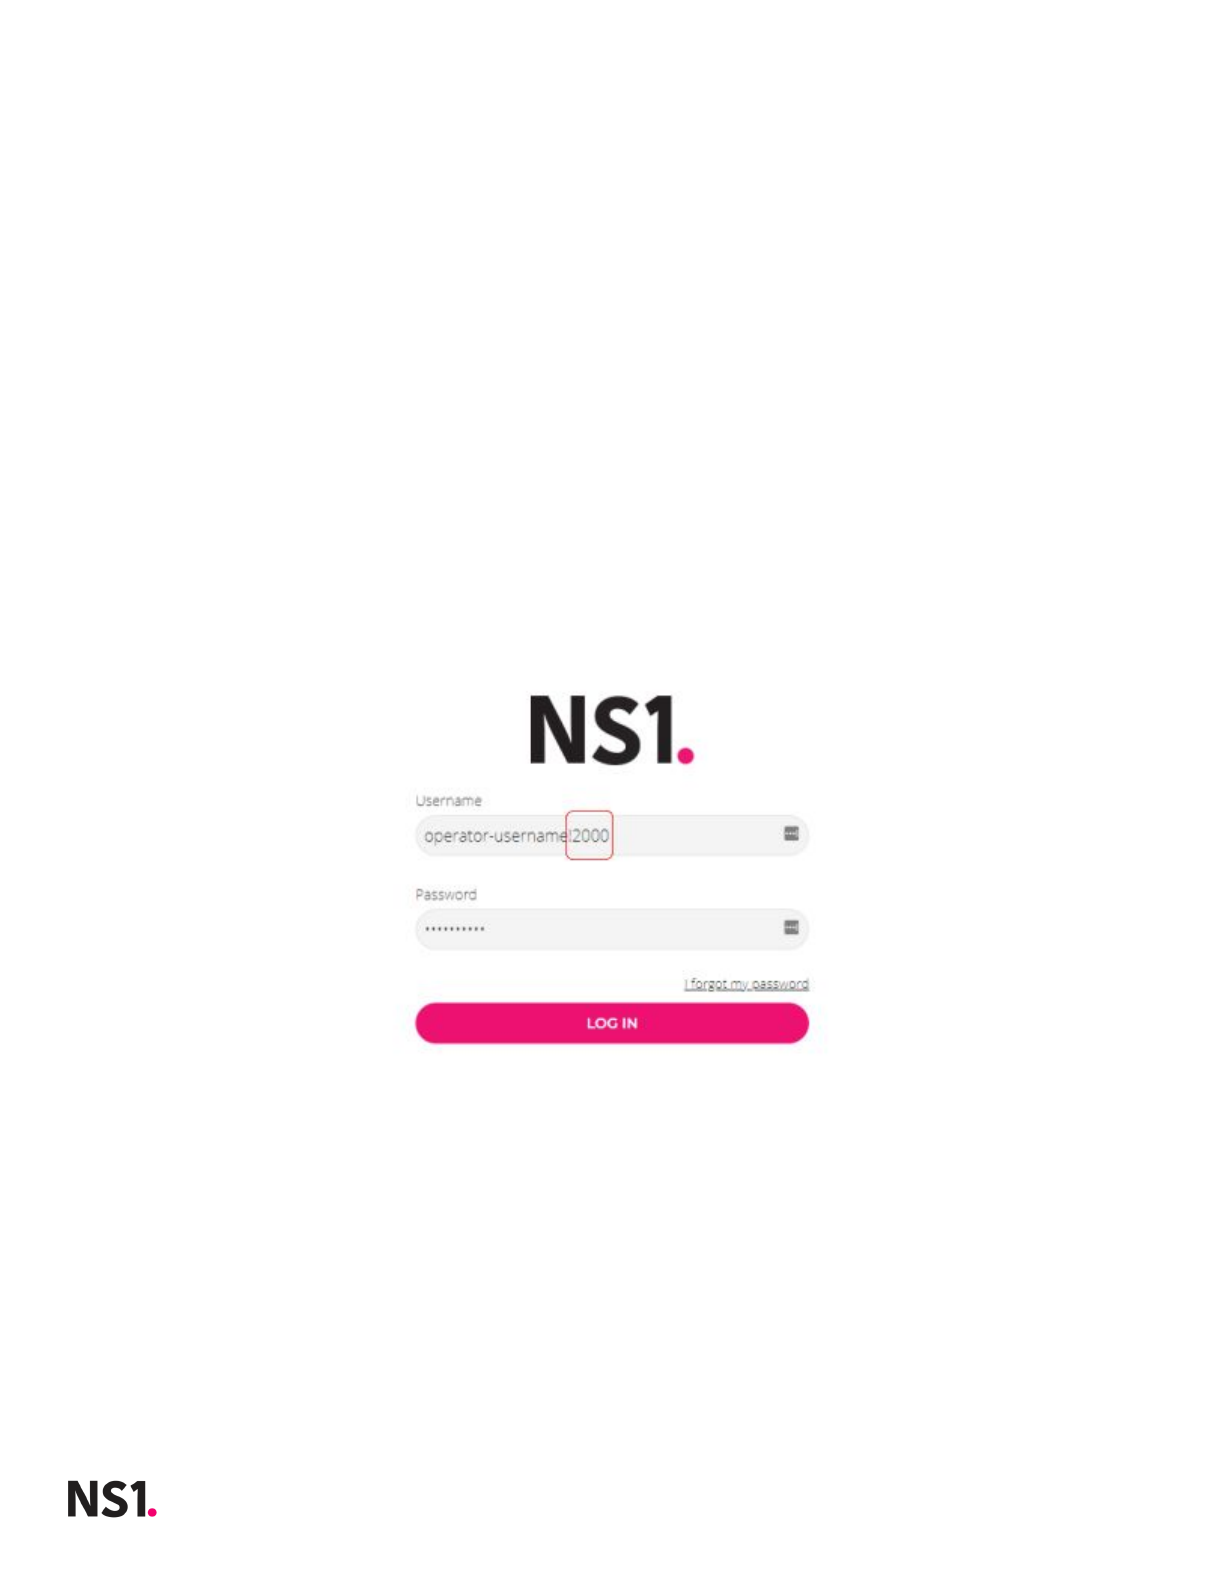
In the same way an operator can use the API on behalf of an organization, the operator can
also sign into the Private DNS portal by appending exclamation point (!) and org_id to the
operator username of the login page.
Important notes:
●An operator singing into the portal on behalf of an organization is required to
provide a 2-factor authentication (2FA) token.
●An operator’s 2FA secret was returned in response to operator creation. A 2FA token
can then be generated with any 6-digit TOTP generator that rotates at 30-second
intervals.
2018 © NS1 Inc.
Page | 31

Private DNS 1.0
13. Appendix E: Unavailable API Endpoints in
Private DNS
The NS1 Managed DNS API Documentation describe endpoints which are not applicable to
Private DNS including those pertaining to Account billing and overages. These endpoints
will return a 404: Not Found response. The following is a list of non-applicable endpoints:
●Monitoring & Notifications
○Monitoring Job endpoints
○Notification List endpoints
●Account Management
○Overage Alert endpoints
○Plan and Billing endpoints
○Payment method endpoints
●Pulsar
○All Pulsar endpoints
2018 © NS1 Inc.
Page | 32

Private DNS 1.0
14. Appendix F: System Topologies
In a typical Private DNS deployment, core services (web, xfr, and data containers) are run in
a control or “core” node. In an on-premise deployment, the system’s core node is typically
deployed to the enterprise’s primary data. There can be (and usually are) more than one
dns container running at the system’s edge in “edge nodes”. For local development or a
proof of concept deployment, it is possible to run all containers on one host machine;
however, it is recommended that at least dns be on its own host.
14.1. Architecting for Highly Available DNS
When initialized, each dns container caches authoritative zones and records; therefore, dns
containers can continue serving DNS responses even if the system core services are
unavailable. Depending on organization resources, prior experience, and preference,
network administrators typically choose one of two strategies to achieve high availability
(HA) of DNS services: anycasting with BGP or employing application- or appliance-based
load balancers.
Important note: No matter the chosen HA strategy, when setting up more than one DNS
service in multiple geographically distributed DNS nodes, filling in the Location ID and
Server ID should be used to properly identify the host machine.
2018 © NS1 Inc.
Page | 33
