Docmosis Guide
User Manual:
Open the PDF directly: View PDF ![]() .
.
Page Count: 71
- Preface
- 1 Introduction
- 2 Developing Docmosis Templates
- 2.1 Incorporating Docmosis elements
- 2.2 Using Plain Text Mark-Up
- 2.3 Using Document Fields As Mark-Up
- 2.4 Text Substitution
- 2.5 HTML Insertion
- 2.6 Images
- 2.7 Barcodes
- 2.8 Active Hyperlinks
- 2.9 Conditional sections
- 2.10 Repeating sections
- 2.11 Tables
- 2.12 Lists
- 2.13 Merging Templates Together
- 2.14 Page and Other Breaks
- 2.15 Comments in Templates
- 2.16 Creating Pre-Filled PDF Forms
- 3 Applying a Renderer

Docmosis Template Guide
Version 4.2
Create Documents and Reports Fast from Templates

Docmosis Template Guide
Copyrights
© 2017 Docmosis Pty Ltd
This document and all human-readable contents of the Docmosis distribution are the
copyright of Docmosis Pty Ltd. You may not reproduce or distribute any of this material
without the written permission of Docmosis.
http://www.docmosis.com
The placeholder image provided in the Docmosis distribution is intended for use in
document templates and is not restricted by the terms above. You may use the image
for the development of document templates and distribute it as required.
Trademarks
Microsoft Word and MS Windows are registered trademarks of the Microsoft
Corporation.
http://office.microsoft.com/en-us/default.aspx
http://www.microsoft.com/windows/
Adobe® PDF is a trademark of the Adobe Corporation.
http://www.adobe.com/products/acrobat/adobepdf.html
OpenOffice is a trademark of OpenOffice.org.
http://www.openoffice.org
LibreOffice is a trademark of LibreOffice contributors and/or their affiliates
http://www.libreoffice.org
Page ii Docmosis Template Guide
Version 4.2
Jul 2017

Contents
PREFACE............................................................................................................................5
1 INTRODUCTION.............................................................................................................7
1.1 Separating content from presentation.........................................................................................7
1.2 What are templates?..................................................................................................................7
1.3 Where are the templates stored?................................................................................................8
1.4 How does document generation work?.......................................................................................8
1.5 Template features.....................................................................................................................9
1.5.1 General features............................................................................................................9
1.5.2 Advanced features.........................................................................................................9
1.5.3 Docmosis elements.......................................................................................................10
2 DEVELOPING DOCMOSIS TEMPLATES.........................................................................23
2.1 Incorporating Docmosis elements.............................................................................................23
2.2 Using Plain Text Mark-Up.........................................................................................................24
2.3 Using Document Fields As Mark-Up...........................................................................................24
2.3.1 About MS Word versions...............................................................................................25
2.3.2 To Insert A Field Using MS Word...................................................................................26
2.3.3 To Insert A Field Using OpenOffice / LibreOffice Writer...................................................26
2.4 Text Substitution.....................................................................................................................27
2.4.1 Simple Data Lookup Fields............................................................................................27
2.4.2 Optional Paragraph Fields.............................................................................................28
2.4.3 Expression Fields..........................................................................................................29
2.5 HTML Insertion........................................................................................................................29
2.6 Images...................................................................................................................................29
2.7 Barcodes.................................................................................................................................32
2.7.1 Supported Barcode Formats..........................................................................................32
2.7.2 Typical Example...........................................................................................................33
2.7.3 Using a Template “Barcode” Field to Provide Defaults.....................................................33
2.7.4 Common Examples.......................................................................................................33
2.7.5 Barcode Tips................................................................................................................34
2.7.6 Barcode Controls in Detail.............................................................................................35
2.8 Active Hyperlinks.....................................................................................................................37
2.9 Conditional sections.................................................................................................................38
2.10 Repeating sections.................................................................................................................39
2.10.1 "Stepping Across" in Repeating Sections......................................................................40
2.10.2 "Stepping Down" in Repeating Sections.......................................................................42
2.11 Tables...................................................................................................................................43
2.11.1 Conditional rows.........................................................................................................43
Docmosis Template Guide Page 3
Version 4.2
Jul 2017

Docmosis Template Guide
2.11.2 Repeating rows..........................................................................................................44
2.11.3 Alternating Row Colours and Border Controls...............................................................45
2.11.4 Disabling Row Alternating...........................................................................................46
2.11.5 Conditional columns....................................................................................................46
2.11.6 Advanced table structures...........................................................................................48
2.12 Lists......................................................................................................................................49
2.13 Merging Templates Together..................................................................................................51
2.13.1 Direct Referencing......................................................................................................51
2.13.2 Indirect Referencing...................................................................................................51
2.13.3 Templates in Different Locations.................................................................................52
2.13.4 When A Template Cannot Be Found............................................................................53
2.13.5 Limitations.................................................................................................................53
2.14 Page and Other Breaks...........................................................................................................54
2.15 Comments in Templates.........................................................................................................55
2.16 Creating Pre-Filled PDF Forms................................................................................................56
3 APPLYING A RENDERER..............................................................................................60
3.1.1 Renderer Parameters....................................................................................................61
3.1.2 Built-In Date Renderer..................................................................................................61
3.1.3 Built-In Boolean Renderer.............................................................................................63
3.1.4 Built-In Number Renderer.............................................................................................66
Page 4 Docmosis Template Guide
Version 4.2
Jul 2017

Preface
Welcome to the
Docmosis Template Guide
. This manual is intended for document
template developers who will create richly formatted document layouts with the special
embedded features that enables Docmosis to produce documents and reports using data
supplied from other software applications.
The
Docmosis Template Guide
provides information on developing templates (in either MS
Word, OpenOffice Writer or LibreOffice Writer) that will be used to produce documents.
This guide assumes a level of competence in using one of those word processors and is
not a reference manual for either.
OpenOffice and LibreOffice are based on the same code and can be used interchangeably
by Docmosis. In this document it can be assumed that where OpenOffice is mentioned,
the same applies to LibreOffice unless otherwise stated.
Note
Don’t worry. If you are competent with only one of the two word processors, you don’t have to know
how to use the other. In general the activities to develop the templates are the same for both tools but
where there are differences between the two, this document highlights them and describes the
activities for each application.
Conventions used in this guide
This document uses typographical conventions that highlight significant parts of the text
to distinguish it from normal text.
Text that looks like this… Means this…
<<fieldname>> A field in the document template that will be replaced with data
docmosis.### A code instruction: either an individual line, or part of a complete
module.
A symbol to show that the line of code has wrapped due to the
space restrictions on the page. You should remove this symbol from
your code if you copy and paste code snippets from this document.
... An indicator to signify that the preceding sequence of code
instructions will execute incrementally until there is no more data in
the data provider.
template.doc A file name, a file extension or a Web site address.
Table 1: Typographical conventions
Additionally, some parts of the document are written specifically for one of the word
processors mentioned. When this is the case, the paragraph has the respective icon in the
left margin.
Docmosis Template Guide Page 5
Version 4.2
Jul 2017
Docmosis Template Guide
This icon… Means this…
The information applies to MS Word only.
The information applies to OpenOffice Writer and LibreOffice Writer.
Table 2: Graphical conventions
Special paragraphs
In addition to the text conventions, certain information is presented in a specific way to
emphasise their information.
Note
A note provides additional supporting information that will help you to understand a point that the
author is trying to make.
Tip
A tip provides anecdotal information to support the technical information about using the system and
might be useful in helping you understand the information being presented.
Important
Executed code on a computer rarely cause damage to hardware but may well corrupt data.
Information in this form is intended to alert you to the potential for data corruption.
General Terminology
Several terms are used in this document to identify elements of a document template.
The following table provides definitions for those terms. Note that the definitions are
general: for more details on these terms, you should refer to the online Help for the
particular word processor with which you are developing the templates.
This term... describes this document element...
field a placeholder that is used by Docmosis to substitute data or to control
document flow.
boilerplate graphical and textual content that is added to a template as reusable
content to avoid having the document developer recreate the content
for each document. Docmosis uses boilerplate components.
header and footer elements of a printed document that repeat on every page.
Information in these elements is usually administrative information
about the document.
Table 3: Document terminology
Page 6 Docmosis Template Guide
Version 4.2
Jul 2017

1 Introduction
Docmosis is an easy-to-use document generation engine which integrates with your software
application to provide the seamless production of documents and reports using data supplied
by your application.
The documents are produced in one or more of the following formats: MS Word; OpenOffice
Writer; LibreOffice Writer; Adobe PDF and HTML using your custom-made templates.
Docmosis delivers a great reporting engine by providing the following:
cross platform compatibility;
portability;
scalability.
In this chapter, we provide information about the main features of a Docmosis template.
Details for incorporating elements and Docmosis logic structures into a template are
provided in Chapter 2, Developing Docmosis Templates.
1.1 Separating content from presentation
Developing applications that contain presentation logic means that when an organisation’s
brand image changes (such as a new company logo, different corporate font or company
name), so must all the applications. Using Docmosis, all of your presentational features are
developed separately from your application in commonly used word processors. This has two
distinct benefits:
The initial development of the document templates can be assigned to those who are
experts in that field and they can be developed using one of the two most commonly
used word processors; and
Branding changes do not require software development support, which can be time
consuming and expensive.
In addition to these benefits, Docmosis is fast: the core document processor can produce
hundreds of documents in minutes in the most popular formats, which is a great
improvement on other document processors currently available.
1.2 What are templates?
As far as Docmosis is concerned, templates are typical MS Word or OpenOffice Writer
documents that may also contain fields. Docmosis uses fields to insert data, and mark the
start and end of content for exclusion or repetition. Fields are standard features of these
two document tools meaning Docmosis does not require any custom plugins. Docmosis
supports a wide range of versions (MS Word 97 onwards, OpenOffice Writer 2.2 onwards).
Docmosis Template Guide Page 7
Version 4.2
Jul 2017

Docmosis Template Guide
As well as using fields to drive Docmosis, templates in MS Word and
OpenOffice/LibreOffice Writer give ideal control over aspects such as:
page size, margins, and columns;
information in running headers and footers;
typographic characteristics that describe paragraph and character styles; and
boilerplate text, graphics and embedded field codes.
Documents created using a template inherit this pattern when they are created and no
programmatic effort at all is required to benefit from these features. Once the document
is rendered, it has no connection to the template from which it came other than that it is
based on its characteristics. Templates can be modified as required without any concern
to the documents that have been rendered in the past.
Tip
In addition, as the paragraph and character patterns for the output are described in simple
formatting terms, there is no real need to develop paragraph and character styles. However, if you
are comfortable using styles, it might be advantageous to implement them for future template
updates.
1.3 Where are the templates stored?
You can provide your templates to Docmosis in many different ways: from directories,
files or Jar files (or if you are a developer, from any InputStream). Docmosis manages a
“store” of its own templates, which acts as a cache for the templates. The cache enables
Docmosis to analyse the template and to optimise it for later rendering. For more
information about registering templates, refer to the
Docmosis Developer’s Reference
.
1.4 How does document generation work?
In the simplest terms, Docmosis merges the data provided by the software application
with the fields in the template to produce documents that may be:
stored electronically, printed, viewed or any combination of these; and
published in several document formats.
During document generation, Docmosis loads the template from the template store,
merges it with data and creates the resulting document in the desired format(s). Data
can be sourced from any combination of locations (databases, files, Java Objects etc),
templates can include/exclude any content, tables can grow and shrink and images can
be embedded. These features are discussed later in this guide.
If the template document includes an index or table of contents, Docmosis will
automatically update these tables in the resulting document.
Page 8 Docmosis Template Guide
Version 4.2
Jul 2017

1.5 Template features
Modern word processors enable the development of documents with support for high-
quality typesetting and layouts incorporating inline images. By inheriting these features
automatically, Docmosis provides the developer and template author with an extremely
powerful automatic document generation capability. Other aspects of the document that
are relevant to Docmosis are detailed in this section.
In this section:
General features. Information about the general document features that can be
used to create and exploit to deliver high-quality layouts;
Advanced features. Details on the Docmosis features that can be incorporated into
your template; and
Docmosis elements. Details of the Docmosis elements that interact with the
document generation process.
1.5.1 General features
Many of the integration aspects are achieved simply by using well known documentation
techniques. Docmosis understands elements such as lists and tables, so there is no need
to learn new techniques to develop templates for use with Docmosis.
The general aspects of a document template include the creation of branding features,
layout features and static text elements. In order to create a document template for use
with Docmosis, the template author can simply create a document and direct Docmosis
using the following features in your word processor:
Word Feature Writer Feature Controls
Plain text markup Plain text markup Data insertion and document flow
Mail merge fields Input fields Data insertion and document flow
Bookmarks Image properties Image insertion
1.5.2 Advanced features
To generate sophisticated documents of value to your application, fields are interpreted
by Docmosis. These fields can direct Docmosis providing:
Insertion of text or image data into the body, headers and footers and tables;
Inclusion or exclusion of static or dynamic content;
Hyperlink Insertion;
Repeating of content;
Table row repetition or exclusion;
Table column removal;
Docmosis Template Guide Page 9
Version 4.2
Jul 2017

Docmosis Template Guide
Numbered and bullet list expansion;
Template merging
1.5.3 Docmosis elements
All Docmosis “elements” are controlled by fields, except for image insertion which is
controlled by bookmarks or image properties. Each element is discussed in detail in this
guide. In general, elements may be singular (such as a text insertion) or may be paired
having a start and end marker.
1.5.3.1 Field Reference
The following table provides a quick reference to the elements and their syntax. The
names of the fields must match exactly for the document generation to succeed.
Element Description Closing Element
<<name>> Replace this field by the data referenced by “name”.
<<op:name>> Replace this field by the data referenced by “name”. If
name is blank, the entire paragraph is stripped (including
any other content). This makes the entire paragraph
optional.
<<{expr}>> Replace this field with the results of the given expression.
<<link:name>>
<<link_name>>
Insert a hyperlink at this location, using the URL from the
data referenced by "name". The data can optionally
specify display text by using the form: <text>|<url>
eg: "docmosis|https://www.docmosis.com"
<<$abc=name>>
<<$abc=10.2>>
<<$abc='Fred'>>
<<$abc=true>>
<<$abc=null>>
Lookup the data associated with “name” and assign it to
the variable “abc”.
Assign the number 10.2 to variable $abc
Assign the string "Fred" to variable $abc
Assign the boolean true to variable $abc
Assign the value null to variable $abc
<<$abc>> Lookup the variable “abc” and render its value
<<cs_name>>
<<cs_{expr}>>
<<cs_$abc>>
Content between the opening element and the closing
element is included or excluded depending on the value
associated with “name” or the expression “expr” or the
variable “abc”. The end tag must match exactly, or may
be anonymous: <<es_>>.
<<es_name>>
<<es_{expr}>>
<<es_$abc>>
<<es_>>
<<else_name>>
<<else_{expr}>>
<<else>>
This is the “else” tag related to a <<cs_>> tag to provide
the “else” and “else if” options to a condition.
Page 10 Docmosis Template Guide
Version 4.2
Jul 2017

Element Description Closing Element
<<rs_name>>
<<rs_$abc>>
<<rs_name:step2>>
<<rs_name:step2down>>
Content between the opening element and closing
element is repeated whilst there is data associated with
“name” or the variable “abc”.
“stepN” indicates that the data (“name”) should be
iterated in steps of N size. When stepping is used, the
variables $i1, $i2,...$iN are created automatically so you
can reference the items available in each step.
“stepNdown” indicates that the data (“name”) should be
iterated in steps of N size and data should be presented in
a “down”-ward manner. Variables $i1, $i2,... $iN are
created automatically.
<<es_name>>
<<es_$abc>>
<<es_name:step2>>
<<es_>>
<<cr_name>>
<<cr_{expr}>>
<<cr_$abc>>
Include the following table rows depending on the value
associated with “name” or expression “expr” or the
variable “abc”.
<<er_name>>
<<er_{expr}>>
<<er_$abc>>
<<er_>>
<<rr_name>>
<<rr_$abc>>
<<rr_name:step2>>
<<rr_name:step2down>>
The rows between the opening element row and the
closing element row are repeated whilst there is data
associated with “name” or the variable “abc”.
“stepN” indicates that the data (“name”) should be
iterated in steps of N size. When stepping is used, the
variables $i1, $i2,...$iN are created automatically so you
can reference the items available in each step.
“stepNdown” indicates that the data (“name”) should be
iterated in steps of N size and data should be presented in
a “down”-ward manner. Variables $i1, $i2,... $iN are
created automatically.
<<er_name>>
<<er_$abc>>
<<er_>>
<<noTableRowAlternate>> Disable automatic alternate-colouring of table rows. This
can appear in a table to disable for the table or appear in
the document body to disable for all following tables.
<<cc_name>>
<<cc_{expr}>>
<<cc_$abc>>
Include or exclude the table column containing this field
depending on the value associated with “name” or the
expression “expr” or the variable “abc”.
Image <<img_
MS Word: bookmarked
with label “img_name”
OpenOffice or
LibreOffice Writer:
image named “img_name”
(deprecated "bm_name")
Replace an image in the template with the image data
associated with “name” using the default scaling settings
(which is stretch).
The default setting can be changed by setting the
Docmosis property:
docmosis.analyzer.image.scaling.default to
fit or stretch.
See the Docmosis Developer's Reference for information
about setting properties.
Image <<imgstrech_
bookmarked with label
or named
“imgstretch_name”
Replace an image in the template with the image data
associated with “name” and stretch the new image to
match the template image placeholder.
Image <<imgfit_
bookmarked with label
or named “imgfit_name”
Replace an image in the template with the image data
associated with “name” and fit the new image into the
template image placeholder preserving the new image
aspect ratio.
<<ref:sub1.doc>> Insert the template named “sub1.doc” at this location.
<<refLookup:name>> Lookup “name” in the data to get the name of the
template to insert at this location.
<<html:name>> Lookup “name” in the data and inject the data as HTML
content into the document at this location
Docmosis Template Guide Page 11
Version 4.2
Jul 2017
Docmosis Template Guide
Element Description Closing Element
<<barcode:name:…>> Provide information for a barcode image in the template.
eg. <<barcode:barcode1:code128>> defines image
“barcode1” as a code 128 barcode.
<<## and ##>>
<</* and */>>
Template-comments are delimited by the matching open
and closing sequences. Content inside comments is not
processed and is removed when creating documents.
Table 4: Docmosis element quick reference
Note
Care must be taken with all fields when using MS Word documents as templates if you are using
MERGE FIELDS. You must avoid SPACES in a field name as a space will truncate the field and
sometimes Docmosis will not be able to detect this. The good news is that most of the time this will
turn up as an obvious error reported during document generation. If you are using plain-text fields
(rather than merge fields) this problem does not occur.
1.5.3.2 Expressions
Docmosis uses { and } to delimit an expression to be evaluated. Expressions are a
powerful way of retrieving and manipulating data and the syntax supports:
Data lookup (get data by name)
Literals (eg ‘abc’ or 123)
Operators (eg + to add numbers and strings, * to multiply numbers)
Functions (eg titleCase(name))
Expressions can be used for simple data insertion:
<<{‘Ms. ’ + lastName}>>
and in conditional sections:
<<cs_{itemCount < 10}>>
...
<<es_>>
and where template-variables are set:
<<$myVar={‘Ms. ’ + lastName}>>
The following table shows some examples of expressions in use. The sections to follow
detail the operators and functions available.
Element Description
<<{10 * 3.0}>> Calculate 10 multiplied by 3.0
<<{amount * qty}>> Lookup data elements “amount” and “qty” and multiply them together.
<<{round(item/10)}>> Lookup data element “item”, divide it by 10 then round the result.
<<cs_{a<10}>> Lookup data element “a” and see if it is less than 10 numerically. If “a” is
not numeric, a string comparison is performed automatically.
<<cs_{a='fred'}>> Lookup data element “a” and see if it is equal to the String literal “fred”.
Page 12 Docmosis Template Guide
Version 4.2
Jul 2017

Element Description
<<cs_{$a!=10}>> Lookup the variable “a” and see if it is not equal to the numeric value 10.
If variable “a” does not resolve to a numeric value, a String comparison is
performed.
<<cs_{a=null}>> Lookup the data element “a” and determine if it's value is null
<<cs_{$a}>> Determine if the value of the template variable $a is true
1.5.3.3 Expression Operators
The following operators are supported by the expression syntax:
Operator Description
( open parentheses
) close parentheses
+ addition (for numbers and strings)
- subtraction
* multiplication
/ division
% modulus
+ unary plus
- unary minus
= equal (for numbers and strings)
== equal (for numbers and strings)
!= not equal (for numbers and strings)
< less than (for numbers and strings)
<= less than or equal (for numbers and strings)
> greater than (for numbers and strings)
>= greater than or equal (for numbers and strings)
&& boolean and
|| boolean or
! boolean not
• ( open parentheses, ) close parentheses
• + unary plus, - unary minus, ! boolean not
• * multiplication, / division, % modulus
• + addition, - subtraction
• < less than, <= less than or equal, > greater than, >= greater than or equal
• = equal, != not equal
• && boolean and
• || boolean or
Docmosis Template Guide Page 13
Version 4.2
Jul 2017

Docmosis Template Guide
1.5.3.4 General Functions
The following General functions are supported by the expression syntax:
Function Synopsis
map A function to map one value to another.
map(key, test1, replace1 [,test2, replace2 ...] [,default])
where:
key = the data value
test1 = the first value to compare with the key
replace1 = the value to use if test1 matches the key
test2 = the second value to compare with the key
replace2 = the value to use if test2 matches the key
...
default = the value to use if no matches are made
For Example:
<<{map(gender, ‘M’, ’Male’, ‘F’, ‘Female’, ‘Other’)}>>
Will lookup “gender” in the data and if it equals “M” the value “Male” will be
used.
1.5.3.5 String Functions
The following String functions are supported by the expression syntax:
Functions Synopsis
charAt Returns the character at the requested position in the source string.
charAt (string, position)
where:
string = the string to lookup the character in
key = the position of the required character, starting from 0
for the first position.
For Example:
<<{charAt(‘abcdefg’,3)}>> returns the character “d”
<<{charAt(idNumber,6)}>> will lookup “idNumber” in the data. If
idNumber= “ID474-K234” then the character returned will be “K”.
Page 14 Docmosis Template Guide
Version 4.2
Jul 2017

Functions Synopsis
endsWith Checks to see if a string ends with a given string.
endsWith (mainString, subString)
where:
mainString = the string to check
subString = the string to look for at the end of mainString
For Example:
<<{endsWith(‘The first string’, ‘ing’)}>> returns the value “true”
Useful when creating a conditional section. For example, this conditional
section will only display the “serialNum” field if it ends with “ZZZ”.
<<cs_{endsWith(serialNum, ‘ZZZ’)}>> <<serialNum>> <<es_>>
equalsIgnoreCase Compares to strings, regardless of case.
equalsIgnoreCase (string1, string2)
where:
string1 = the first string
string2 = the second to compare to the first string
For Example:
<<{equalsIgnoreCase (‘Bob’, ‘bob’)}>> returns the value “true”
length Returns the length of a string.
length (string)
where:
string = the string to check the length of
For Example:
<<{length(‘Bob’)}>> returns the number “3.0”
Useful when creating a conditional section. For example, this conditional
section will only display the text if “refNo” is set.
<<cs_{length(refNo)>0}>> Ref Num : <<refNo>> <<es_>>
replace Replaces characters in the source string with new characters.
replace (string, oldChar, newChar)
where:
string = the string
oldChar = the character to find in the string
newChar = the character to use in place of the oldChar
For Example:
<<{replace(customerVIN,’o’,’0’)}>>
If the data contains customerVIN = “JHMAB5227EC8oo65o”
Then the replace function will turn all the letter “o” chars to the number “0” so
the result looks like this : “JHMAB5227EC800650”
Docmosis Template Guide Page 15
Version 4.2
Jul 2017

Docmosis Template Guide
Functions Synopsis
split Split a string into parts that can be displayed separately.
split (string, splitChar, index)
where:
string = the string
splitChar = the character to use as a delimiter
index = once split into parts, index identifies the part to be
used – counting from 0.
For Example:
<<{split(‘John|Mathews|47|Approved’ , ’|’ , 1)}>> returns “Mathews”
<<{split(cityStateZIPCountry , ’;’ , 1)}>> with
cityStateZIPCountry = "Charleston;West Virginia;29402;United States"
will return “West Virginia”
startsWith Checks to see if a string starts with a given string.
startsWith (mainString, subString)
where:
mainString = the string to check
subString = the string to look for at the start of mainString
For Example:
<<{startsWith(‘The first string’, ‘The’)}>> returns the value “true”
Useful when creating a conditional section. For example, this conditional
section will only display the “VIN” field if it starts with “1VW”.
<<cs_{startsWith(VIN, ‘1VW’)}>> <<VIN>> <<es_>>
substring Display a subsection of a string given starting and finishing indexes.
substring(string, start, finish)
where:
string = the string
start = the position in the string that will now become the
first character. Indexing starts at 0.
finish = the position in the string that marks where to cut
the string. The character before the cut makes it in to the
substring. The finish character doesn’t.
For Example:
<<{substring(‘0123456’ , 2 , 5)}>> returns “234”
<<{substring(LatLong , 0 , 6)}>> with
LatLong = “31.9088983S115.8049265E” will return “31.908”
Page 16 Docmosis Template Guide
Version 4.2
Jul 2017

Functions Synopsis
titleCase Changes the string so that the first character of each word is a capital letter.
titleCase (string)
where:
string = the string to convert
For Example:
<<{ titleCase (‘bob mathews’)}>> returns “Bob Mathews”
<<{titleCase (firstName+ ‘ ’ + lastName)}>>
with data of firstName = “bob” and lastName = “MATHEWS”
also returns “Bob Mathews”
toLowerCase Returns the string using all lower case characters.
toLowerCase (string)
where:
string = the string to convert
For Example:
<<{toLowerCase(‘Bob Mathews’)}>> returns “bob mathews”
toUpperCase Returns the string using all lower case characters.
toUpperCase (string)
where:
string = the string to convert
For Example:
<<{toUpperCase(‘Bob Mathews’)}>> returns “BOB MATHEWS”
trim Removes leading and trailing spaces from a string.
trim (string)
where:
string = the string to strip spaces from
For Example:
<<{trim(productID)}>>
Where productID = “ 12CVCV123-454 ”
returns “12CVCV123-454”
Docmosis Template Guide Page 17
Version 4.2
Jul 2017

Docmosis Template Guide
1.5.3.6 Numeric Functions
The following Numeric functions are supported by the expression syntax.
Any of the number literals (eg:“153.57”) in the examples below could be replaced with a
“name” that Docmosis will look for in the data.
Functions Synopsis
abs Returns the absolute value of the number.
abs (number)
For Example:
<<{abs(-153.57)}>> returns “153.57”
<<{abs(temp)}>>
If the data has temp = “-273.15” returns “273.15”
ceil Returns the next largest whole number.
ceil (number)
For Example:
<<{ceil(153.57)}>> returns “154.0”
floor Returns the next smallest whole number.
floor (number)
For Example:
<<{floor(153.57)}>> returns “153.0”
max Returns the larger of the two numbers.
max (number1, number2)
For Example:
<<{max(53.5,23.1)}>> returns “53.5”
min Returns the smaller of two numbers.
min (number1, number2)
For Example:
<<{min(53.5,23.1)}>> returns “23.1”
pow Returns the power of two numbers.
pow (number1, number2)
For Example:
<<{pow(7,2)}>> returns 7 to the power of 2, so “49.0”
Page 18 Docmosis Template Guide
Version 4.2
Jul 2017

Functions Synopsis
random Returns a random number between 0 and 1.
random()
For Example:
<<{round(random()*100)}>> returns a random number between 0 and 100.
round Rounds the number to the specified number of places.
round (number [, places])
where:
number = the number to round.
places = the number of decimal places required. If not
specified then round to zero decimal places.
For Example:
<<{round(153.75)}>> returns “154”
<<{round(153.73455,2)}>> returns “153.73”
sqrt Returns the square root of a number
sqrt (number)
For Example:
<<{sqrt(81.0)}>> returns “9.0”
1.5.3.7 Formatting Functions
The following Formatting functions are supported by the expression syntax:
Functions Synopsis
numFormat Format a number using the based on the format provided and the locale.
numFormat (value, format [, locale])
where:
value = the number to format
format = the format to apply. Eg: ‘#,###.00’
locale = optional locale to use. Country or language name or
code. Eg: ‘GERMAN’, ‘USA’.
See 3.1.4.1 for formatting syntax.
For Example:
<<{numFormat(totalPrice, ‘$#,###.00’ )}>>
where totalPrice = “1457.1”
will return the value “$1,457.10”
Docmosis Template Guide Page 19
Version 4.2
Jul 2017
Docmosis Template Guide
Functions Synopsis
dateFormat Format the value based on the output and input Formatting strings.
dateFormat (value [, outputFormat [, inputFormat] ])
where:
value = the data value to format
outputFormat = optional – the output format to apply
inputFormat = optional – the format used to decode the input
data value
See 3.1.2 for formatting syntax.
For Example:
<<{dateFormat(‘31-DEC-15’)}>> returns “31 Dec 2015” because it uses the
default output format (‘dd MMM yyyy’) and the value matches one of the
known standard input formats.
<<{dateFormat(‘2015-12-15’ , ‘EEEE, dd MMMM yyyy’ , ‘yyyy-MM-dd’)}>>
Returns “Tuesday, 15 December 2015”
1.5.3.8 Nesting
Elements can be “nested” with regards to the way they lookup data. For example,
<<hotel.floor>> typically would refer to the floor within a hotel object. The period “.”
character represents the delimiter between one level of data and the next. This is
described in detail later.
1.5.3.9 Range Specifiers
Data elements can also be referenced by ranges of values Docmosis should lookup. This
provides a fair amount of power within the template to select the values of interest. It
depends on the context of the element as to whether it is allowed to produce multiple
values (and Docmosis will flag errors where inappropriate use is made). For example, a
repeating section is expected to produce multiple values, but a simple lookup field is not.
The following table details the types of range specifier available.
Element Description
<<hotel[0]>> The first hotel (indexing starts at zero)
<<hotel[F]>> The first hotel (equivalent to index zero)
<<hotel[L]>> The last hotel
<<hotel[*]>> All hotels
<<hotel[F3]>> The first 3 hotels
<<hotel[L3]>> The Last 3 hotels
<<hotel[1,2,4]>> The hotels at indexes 1,2 and 4
<<hotel[1-3,L2]>> The hotels at indexes 1 to 3 inclusive and the last 2
<<hotel[0-L2]>> All but the last 2 hotels
<<hotel[3].floor[L].room[
0].name>>
The name of the first room of the last floor of the hotel at index 3
Page 20 Docmosis Template Guide
Version 4.2
Jul 2017
1.5.3.10 Built-In Variables
Docmosis provides some built-in variables to assist with common data lookup
requirements.
Variable Description
<<$top>>
or <<$root>>
The root of the data regardless of the current position or context
in the template
<<$this>>
or <<$current>>
The current source of data in the current position in the template.
This allows for anonymous data lookups from arrays or collections
such as <<$current[0]>>.
<<$parent>> The parent or container of data in the current context of the
template. Allows data lookup in the current “hotel” when the
current context is a “floor” for example.
<<$idx>> The current index when iterating through a data set. For example,
if we are repeating over all hotels, $idx would report the index of
the hotel we are up to. Note that <<$rowidx>> is the same
unless using a step size greater than 1.
<<$itemnum>> Similar to $idx but is the number of the item which we are
currently addressing. Item numbering starts at 1. Note that
<<$rownum>> is the same unless using a step size greater than
1 .
<<$size>> The size of the current repeating data set. For example if we are
repeating over all hotels, $size would be the number of hotels.
<<$i1>>,<<$i2>>,..<<$iN>> References to the Nth item when repeating data in "steps of N".
For example <<rs_people:step3>> steps through the people in
"steps of 3" and Docmosis automatically creates variables $i1, $i2
and $i3 to access each element in the step.
For more information about the use of "steps of N" see sections
2.10 Repeating sections (page 39) and 2.11.2 Repeating rows
(page 44).
<<$idx1>>,<<$idx2>>,..<<$
idxN>>
The absolute indexes of the items when repeating with "steps of
N" (as described above) starting at zero.
<<$itemnum1>>,<<$itemnum2
>>, ... <<$itemnumN>>
The absolute indexes of the items when repeating with "steps of
N" (as described above) starting at one.
<<$rownum>> The current row number (starting at 1) when repeating (either
repeating rows or repeating sections). This is most useful when
using the “stepping” directives and the $itemnum is not suitable.
<<$rowidx>> The current row number (starting at 0) when repeating (either
repeating rows or repeating sections). This is most useful when
using the “stepping” directives and the $idx is not suitable.
Note
Variables can also be referenced using var_ instead of $. This means <<$name>> is equivalent
to <<var_name>>. This is particularly useful for bookmarking images using variables in MS Word,
where you cannot use the $ symbol in the bookmark name.
Docmosis Template Guide Page 21
Version 4.2
Jul 2017

Docmosis Template Guide
1.5.3.11 Error Handling
Docmosis offers two ways to deal with errors encountered in templates during processing:
1. write the error INTO the resulting document - errors are highlighted and footnotes are
added to offer details and suggestions as appropriate
2. throw an exception and abort document production
This behaviour is property controlled since it is expected to be related to the type of
environment in which Docmosis is running. The default behaviour is write errors into the
document, but this is not always advisable. See the Docmosis Developer's Reference for
more information.
Page 22 Docmosis Template Guide
Version 4.2
Jul 2017
2 Developing Docmosis Templates
The basic steps for developing a template are:
1. create the layout, boilerplate content and typesetting characteristics of a document;
2. incorporate the Docmosis elements (fields).
The boilerplate content can include sophisticated structures using headings, lists, tables,
images, and headers and footers.
Tip
When creating a template, use the word processor of your choice from the two identified.
This chapter provides instructions for the inclusion of the supported fields; it is divided
into sections that discuss the basic aspects through to some advanced techniques. In
general, the information does not cover typesetting of documents but does provide
information where necessary. Most of the information in this chapter is relevant to both
word processors: where they differ, information is provided for each case.
Important
All the procedures in this chapter assume that you understand the techniques required for the
particular word processor and that you have a document open in the word processor on which you can
perform the procedure.
In addition, the procedures use menu-based instructions for consistency.
2.1 Incorporating Docmosis elements
You can add Docmosis "fields" at any location in a document template. Each field must
have an appropriate property name that identifies it and associates it with an element of
the data that will be supplied to Docmosis. During document generation, Docmosis
expects the application to provide values and logical data structures with the same names
and structure as the elements that exist in the template.
Docmosis supports fields using:
plain text mark-up
Merge Fields in MS Word
Input Fields in OpenOffice Writer or LibreOffice Writer
Plain text mark-up is the simplest to use since there are no dialogs to interact with and
what you see is what you get. With both Word and Writer, a field (Merge Field or Input
Field) can have a different value displayed to what it represents "behind the scenes".
Docmosis Template Guide Page 23
Version 4.2
Jul 2017
Docmosis Template Guide
2.2 Using Plain Text Mark-Up
Plain text mark-up is the easiest method of creating fields in Docmosis templates. By
default, the start of a field is annotated by << and the end of a field by >>. So to create
a field that looks up "personName", you would simply type <<personName>> into the
document.
So as to be as unobtrusive as possible to the text of a template, Docmosis is strict about
identifying plain text fields and will ignore invalid mark-up assuming it is plain text. For
example, <<personName> will be ignored and left as plain text because a closing ">"
character is missing. A single space between the << and the name or the name and >>
is allowed, but more spaces will also mean the field is not recognised. The following table
shows the typical types of error that will result in a field not being recognised.
Example Field Valid Problem
<<personName>> YES Correct field. Docmosis will identify and substitute.
<<personName> NO Missing trailing >
<personName>> NO Missing leading <
<< personName>> NO 2 spaces after leading <<
<<personName >> NO 2 spaces before trailing >>
< <personName>> NO Space after leading <
<<personName> > NO Space before trailing >
Plain text mark-up is controlled by the properties:
Property Default Description
docmosis.analyzer.field.plainText.prefix << Start of field delimiter
docmosis.analyzer.field.plainText.suffix >> End of field delimiter
The plain text mark-up settings can be changed or disabled on a case by case basis using features of
the DocumentProcessor class. For more information about setting Docmosis properties,
please see the Docmosis Developer's Reference.
2.3 Using Document Fields As Mark-Up
Docmosis also supports the use of the "document fields" supplied by the Word and Writer
word processors such as
merge
fields and
input
fields.
The advantages of using these document fields include:
1. you can display text that is different from the actual field codes for Docmosis. For
example the following field appears as:
«friends»
but may in fact represent:
«friends[0].lookupName»
so it appears smaller or more succinct in the document.
Page 24 Docmosis Template Guide
Version 4.2
Jul 2017
2. a logical separation of content and control/mark-up. It is clear to both users and the
Docmosis engine what is plain content and what is Docmosis mark-up.
The disadvantages of using document fields include:
3. a field can be confusing or misleading because it's true lookup value is hidden
4. more effort is required to work with these fields via popup dialogs or switching field
codes on and off
5. with Word merge fields the "display" value can be accidently lost (replaced with the
underlying lookup value) if the fields in the document are "updated"
6. the latest versions of Word make it difficult to simply insert a merge field, trying to
guide the user to link up to a data source. The options are to use plain text fields,
type the field codes manually, or copy a merge field from another document then edit
it to what you require.
The following sections describe how to insert document fields using the features of Word
and Writer.
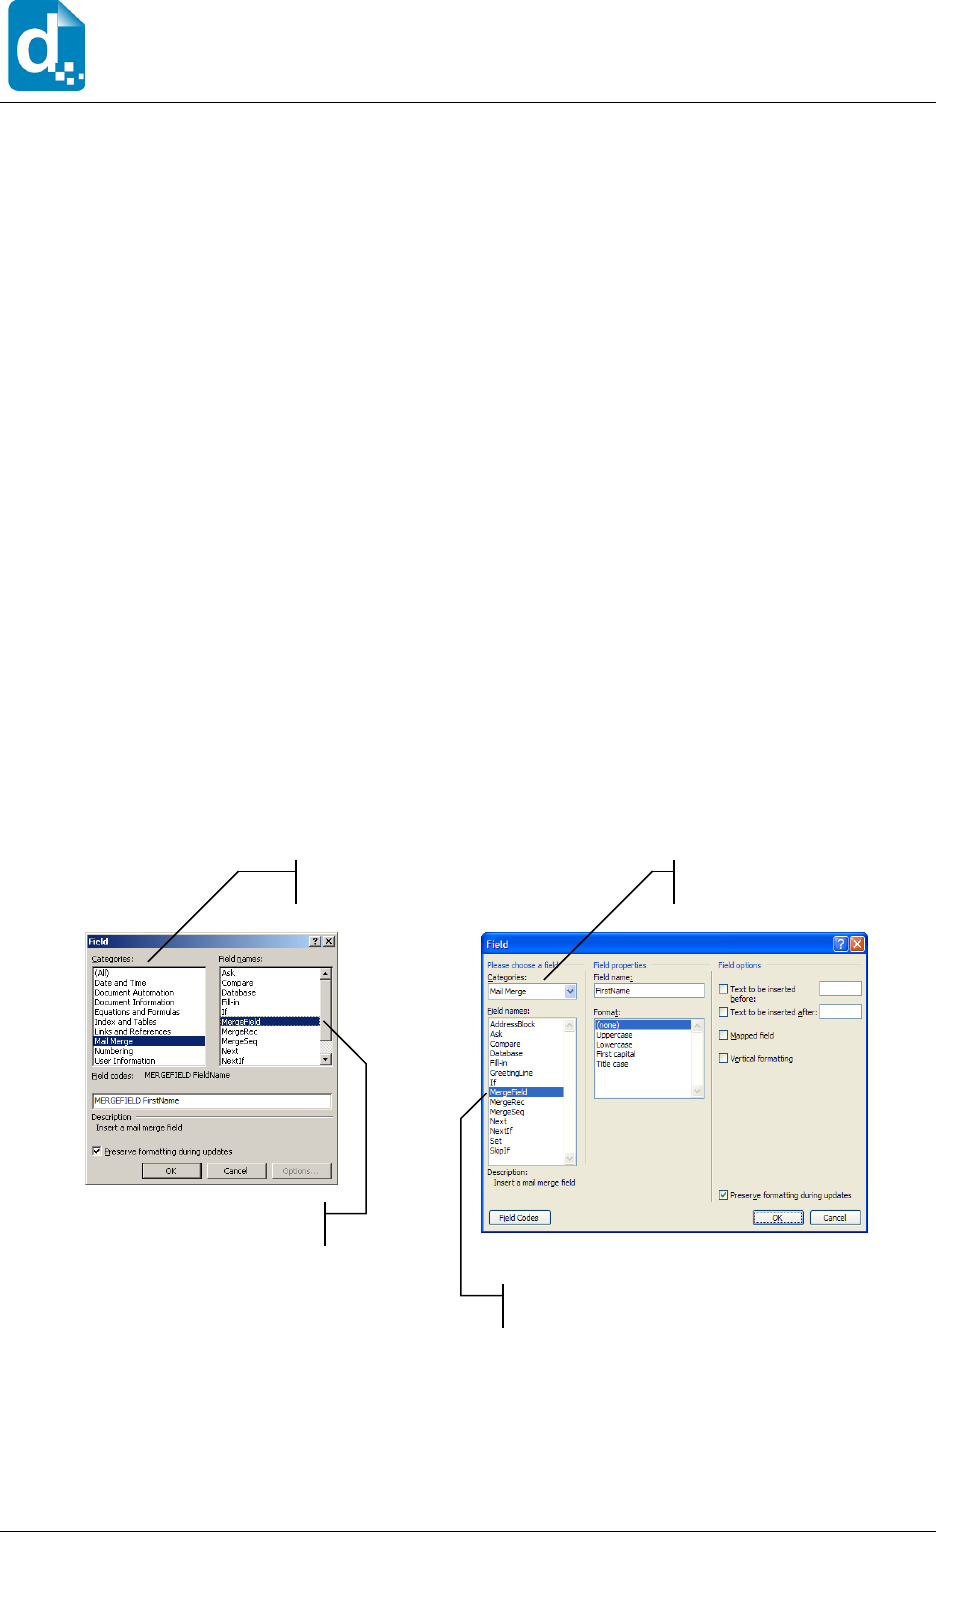
2.3.1 About MS Word versions
In general, the procedures to implement the Docmosis features into templates are
consistent in all versions of MS Word. However, the layout of the
Field
dialog box has
changed over the years. The following illustrations show the dialog box layouts for the
different versions and identifies the areas that are relevant to Docmosis templates.
The Field dialog box layouts in different versions of MS Word
Newer versions of Word (from 2007) make it difficult to insert a merge field manually.
Your options include:
1. use plain text mark-up instead of document fields
Docmosis Template Guide Page 25
Version 4.2
Jul 2017
The Categories list in
Word 97 and 2000.
The Categories list in
Word XP (2002) onwards.
The Field names list in
Word 97 and 2000.
The Field names list in
Word XP (2002) onwards.
Docmosis Template Guide
2. copy a merge-field from another document then edit it
3. turn field-codes on and manually construct a field. Please refer to Word's help for
details about manually entering field codes.
2.3.2 To Insert A Field Using MS Word
This section describes how to insert a document field. It is generally simpler to use plain
text mark-up as described in section 2.2 Using Plain Text Mark-Up.
To insert a field that will look up a value for "firstName":
For versions prior to Word 2007:
1. Position the insertion point at the location for the field.
2. Select Insert > Field.
3. In the
Field
dialog box, select Mail Merge from the Categories list.
4. Select MergeField from the Field names list.
5. Type firstName into the appropriate field (see About MS Word versions earlier).
6. Click OK.
Tip
By default, MS Word displays the same text in the merge field as the title you enter in the
Field
dialog box. You may change the text that is displayed without changing the title of the merge
field. Simply edit the text that appears between the angle brackets. Be warned though that this
is generally not a good idea because if anyone updates the field codes in the document, the
“display” name will be reverted back to the real contents.
Tip
In MS Word documents it is a good idea to frequently ensure the merge fields are displaying
what they actually are going to look up. This can be achieved by selecting the fields (or the
whole document) and pressing F9 (update field codes).
For versions from Word 2007:
1. Copy the field from another document and then edit
The reasons for the above limitation are described in 2.3.1 About MS Word versions.
2.3.3 To Insert A Field Using OpenOffice / LibreOffice Writer
This section describes how to insert a document field. It is generally simpler to use plain
text mark-up as described in section 2.2 Using Plain Text Mark-Up.
To insert a field that will look up a value for "firstName":
1. Position the insertion point at the location for the field.
Page 26 Docmosis Template Guide
Version 4.2
Jul 2017
2. Select Insert > Fields > Other.
3. In the
Fields
dialog box, select the Functions tab.
4. Select Input Field from the Type list.
5. Type firstName into the Reference field.
6. Click Insert.
7. When the
Input Fields
dialog box prompts you, in the field below the one that
contains the field reference, type the text that you want to be displayed in the
document to identify the field. Keeping this text consistent with the text in the
Reference is a good idea since it can avoid mix-ups.
Note
OpenOffice Writer presents the field information differently from MS Word: OpenOffice Writer does not
insert a pair of angled brackets («…») around the displayed field text. You can hover your mouse
cursor over the field to see the “real” value that will be used by Docmosis to lookup the data. Another
easy way to access the "real" value is to right click on the field and select "Fields".
8. Click OK.
9. To close the
Input Fields
dialog box, click Close.
Note
When inserting fields in OpenOffice Writer you may choose to leave the field dialog open whilst you
work and whenever you need to add a field, you simply go to the dialog and start adding it. Also, note
that ctrl-F2 is a shortcut to the Fields dialog.
2.4 Text Substitution
The simplest (and often most useful) fields in a Docmosis template are ones that look up
data and place it into the document. Docmosis supports simple text substitution and also
insertion based on more complex “expressions”. The following sections provide details
about these population fields.
2.4.1 Simple Data Lookup Fields
Docmosis supports the inclusion of elements that simply match an element of data that is
output by the application (essentially, this is a one-to-one match). Wherever an element
occurs, Docmosis will substitute the actual data value in the document. The inserted data
inherits all the typesetting characteristics that are applied to the field such as font and
paragraph style. The syntax for a text field is:
<<element-name>>
To populate the template element, the Docmosis engine would attempt to source data by
the name of the element. A field designed to look up data for "firstName" would appear
in different ways depending on how you create the field:
Docmosis Template Guide Page 27
Version 4.2
Jul 2017
Docmosis Template Guide
Field Appearance
Plain Text Field <<firstName>>
Word Merge Field «firstName»
Writer Input Field firstName
Docmosis will replace the field with all the text supplied as if you had selected and typed over the
field by hand. If the lookup data contains new-line characters, Docmosis will create new
paragraphs in the resulting document. If there is no lookup data for the name, the field is
removed.
2.4.2 Optional Paragraph Fields
Optional paragraph fields operate like the fields described earlier, except if there is no
data for the value the entire paragraph containing the field is removed. Optional
paragraphs are specified with the prefix “op:”, for example:
<<op:addressLine2>>
Optional paragraph fields are useful for condensing output (not leaving behind blank lines) when
populating data. Consider a typical address block:
<<name>>
<<addr1>>
<<addr2>>
<<city>>, <<country>>
If there is no value for “addr2”, the output using the above sequence would look like the following:
My Company
123 The Boulevarde
San Francisco, USA
The blank line in the middle of the output above is likely to be undesirable and so using an optional
field:
<<name>>
<<addr1>>
<<op:addr2>>
<<city>>, <<country>>
Will result in the required output:
My Company
123 The Boulevarde
San Francisco, USA
Optional fields are also useful for removing paragraphs from numbered or bullet lists. Consider:
1. I have one <<item1>>
2. I have one <<item2>>
3. I have one <<item3>>
With data “item2” = “orange” and “item3” = “banana”, this would result in:
1. I have one
2. I have one orange
3. I have one banana
Page 28 Docmosis Template Guide
Version 4.2
Jul 2017

Clearly point #1 above is incomplete because there is no item1 data. Changing to optional
paragraph fields resolves this:
1. I have one <<op:item1>>
2. I have one <<op:item2>>
3. I have one <<op:item3>>
With data “item2” = “orange” and “item3” = “banana”, this would result in:
1. I have one orange
2. I have one banana
Note
Optional Paragraphs always strip the entire paragraph. If you have other content, it will be removed.
2.4.3 Expression Fields
Docmosis templates allow you to evaluate an
expression
to be inserted into to template. The
expression syntax supports literals, data-lookups, operators and functions and return this as a
result, instead of simply the piece of data. This is enabled by using the <<{ and }>> delimiters.
So, we could display a person’s name for example using:
<<{firstname + ‘ ‘ +surname}>>
2.5 HTML Insertion
Docmosis supports the injection of HTML content. The following field:
<<html:myHtmlData>>
Will cause myHtmlData to be fetched from the data and injected as HTML. For example, if
myHtmlData contained:
<h1>My Heading</h1>
Then the text “My Heading” will appear as Heading 1 in the output document. Html can be
arbitrarily complex and not all HTML will be rendered into a document as well as a browser can do.
Typically using inline styles (rather than style declarations) will produce good results. The
intention is to allow simple HTML “snippets” to be inserted via data where this is advantageous to
the application using Docmosis.
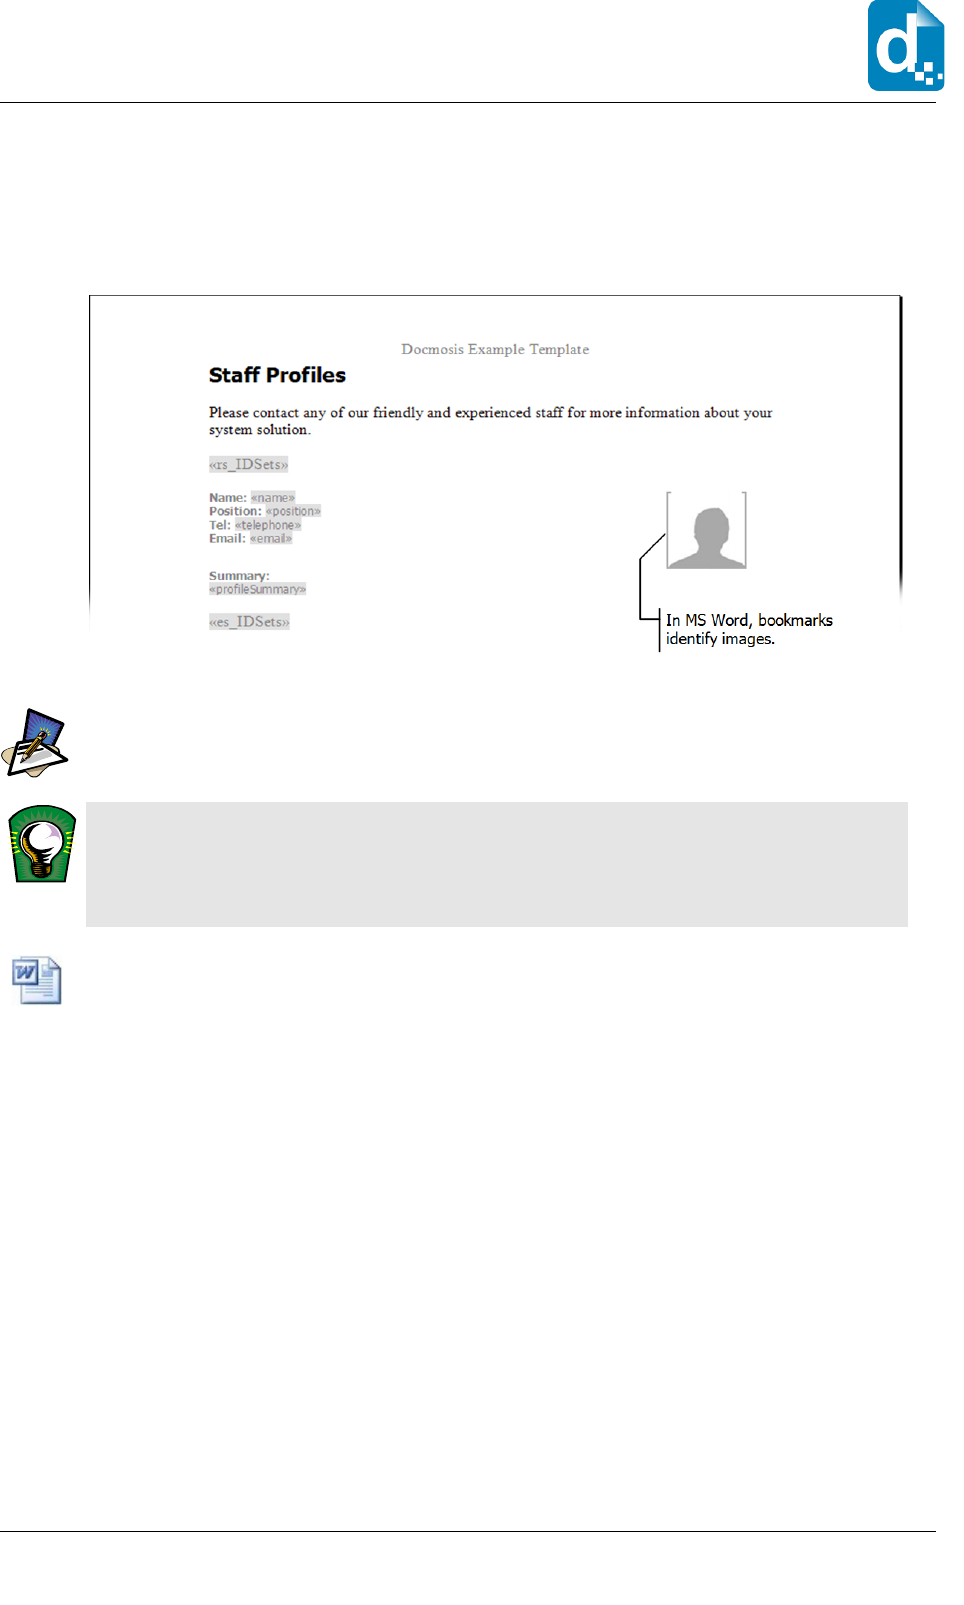
2.6 Images
Docmosis is able to insert images at arbitrary locations in documents. Instead of using
fields to identify the location for an image substitution, Docmosis uses the word
processor’s image handling features. By handling images this way, the template can
precisely define how the image will be placed and bordered within the resulting
document. As each word processor works slightly differently, there are specific methods
for setting up the Docmosis code element:
Docmosis Template Guide Page 29
Version 4.2
Jul 2017
Docmosis Template Guide
In MS Word Docmosis uses the bookmarks feature to identify a name for an image;
and
OpenOffice Writer supports the identification of images directly, using a
Name
property.
Images can be placed anywhere in a Docmosis template.
Note
In the preceding example, a borderless table is used for layout purposes.
Tip
This activity doesn’t discuss the actual images that you will publish, only the placeholder image. You
may create and use your own image but for your convenience, a placeholder image is provided as
part of the Docmosis distribution.
You are free to use it without restriction.
Use only inline images in MS Word
Docmosis cannot support floating images in MS Word because it uses the bookmarks
feature to assign a name an image placeholder. When you position an image using the
floating position settings, MS Word removes the bookmark. There are other limitations to
how Docmosis supports images, particularly in terms of overlapping with text and other
images. This generally will not cause issues for typical documents.
Image file size
When you insert a placeholder image, you will embed the image in the document. This
means there is a copy of the image at every location in which it is placed (not simply a
single, referenced copy). To limit the overall size of the template file and to improve the
performance of a document generation, you should use relatively simple and small
placeholder images to identify the locations without compromising on print-quality if the
document is to be printed.
Page 30 Docmosis Template Guide
Version 4.2
Jul 2017
Image placeholder naming convention
Image placeholder names are identified using special prefixes. These prefixes are a useful
way to distinguish those items that are specific to your Docmosis application and enable
you to use the bookmarking and naming features for other items that aren’t part of a
document generation.
The prefixes you can use are:
Prefix Example Effect
img_ img_image1
The image is substituted with the supplied
image1
and
default scaling is applied. The default scaling is "stretch"
and may be changed by Docmosis properties or by
parameters when rendering the document.
imgstretch_ imgstretch_image1
The image is substituted with the supplied
image1
and
stretch scaling is always applied. The image is stretched
to be the same size and shape as the place holder image
in the template.
imgfit_ imgfit_image1
The image is substituted with the supplied
image1
and
the image will be scaled to fit the template placeholder
whilst preserving image1's aspect ratio.
Note
Docmosis previously used "bm_" instead of "img_". The "bm_" prefix is still valid and is synonymous
with "img_" but it's use is deprecated and future versions of Docmosis may remove support for it.
In the following procedures, an image is inserted as a place holder in the template to be
substituted for image data identified by "image1".
To insert an image element (MS Word):
1. Position the insertion point at the location of the image.
2. Select Insert > Picture > From File.
3. In the
Insert Picture
dialog box, navigate to the location of the placeholder image and
select it in the list of files.
4. Click Insert.
5. When the image appears in the document, select it and use the reshaping handles to
adjust the dimensions of the image.
6. Make sure that the image is selected and click Insert > Bookmark.
7. In the
Bookmark
dialog box, type img_image1 into the Bookmark name field.
8. Click Add.
Tip
MS Word wraps the content of the bookmark in light-coloured square brackets. To see the bookmark
in place, set the Bookmarks option in the MS Word
Options
dialog box.
Docmosis Template Guide Page 31
Version 4.2
Jul 2017

Docmosis Template Guide
Tip
MS Word Bookmarks names can't contain "$" characters. To use a Docmosis variable in a bookmark
name use "var_" instead of "$", for example "var_myVar" instead of "$myVar".
Tip
MS Word Bookmarks names can't contain "." characters, so it cannot directly use "nested" lookups
(eg person[0].photo). You can use Docmosis variables to overcome this in conjunction with the tip
above about referencing variables in bookmarks.
eg <<$myImage=person[0].photo>> in your template body to set the variable
and "img_var_myImage" as the book mark name to link the image data to the template image.
To insert an image element (OpenOffice Writer):
1. Position the insertion point at the location of the image.
2. Select Insert > Picture > From File.
3. In the
Insert picture
dialog box, navigate to the location of the placeholder image and
select it in the list of files.
4. Click Open.
5. When the image appears in the document, select it and use the reshaping handles to
adjust the dimensions of the image.
6. Make sure that the image is selected and click Format > Picture.
7. In the
Picture
dialog box, select the Options tab.
8. Type img_image1 into the Name field.
9. Click OK.
Both bookmark names and image names must be unique in your template since both
Word and Writer force the name to be unique. If you wish to reference the same image
in your template multiple times, you will have to provide different names by which the
image can be referenced.
2.7 Barcodes
Docmosis can generate barcodes and insert them into your output document. Barcode
insertion is the same as image insertion except extra information is provided to specify
the type of barcode, resolution etc.
2.7.1 Supported Barcode Formats
The following barcode formats area supported:
• Code39
Page 32 Docmosis Template Guide
Version 4.2
Jul 2017
• Code128
• ITF14
2.7.2 Typical Example
As a typical example, you would put a placeholder image into your template and mark it
(with a name or bookmark as per section 2.6 above):
Image “marked” as “imgfit_barcode1”.
Your data can supply the barcode type and value (eg. in JSON format):
"barcode1":"1234567:code128"
Docmosis would then render a code 128 barcode with the value 1234567:
2.7.3 Using a Template “Barcode” Field to Provide Defaults
In the above example, the placeholder image determines the size, position and name for
the bookmark. The rest of the information is provided by the data at render-time.
It is also possible to provide barcode information with a “barcode” field in the template.
A barcode field starts with “barcode:”.
Continuing the above example, the template could provide barcode information like this:
<<barcode:barcode1:code128>>
This indicates that barcode1 will be a code 128 barcode. The data provided at render-time
could then simply provide the value (eg. in JSON format):
"barcode1":"1234567"
The barcode information field can appear anywhere in your template.
2.7.4 Common Examples
The following table shows common examples of use.
Docmosis Template Guide Page 33
Version 4.2
Jul 2017

Docmosis Template Guide
!
"!#
$
#
#$
%%!&&
"!#
$
'
$
#
#$
!())
"!#
*))
$
'
'*$
%%!())&&
"!#
*))
$
'
*$
'
#$
%% +&&
"+#
$
'
#,
*$
#
#$
2.7.5 Barcode Tips
When trying to work out the settings for the barcode, this is the recommended process:
1. Position the barcode placeholder image in the template using the size and orientation
that works for your template – the bigger the better for reliable scanning.
2. Use “imgfit” to mark the placeholder image (eg imgfit_barcode1) to preserve the
aspect ratio of the generated barcode. You can use the “imgstretch” to force the
barcode to match your placeholder precisely but this will likely reduce the accuracy of
the barcode and may make it harder to scan. By all means do, but test it well.
Page 34 Docmosis Template Guide
Version 4.2
Jul 2017

3. You can make the barcodes very small at a high resolution but realise this may impact
the ability to be scanned
4. Let Docmosis apply the default settings first and see if that produces a good result. If
not then start experimenting. The height, module width and wide factor are settings
that change the width of the resulting barcode.
5. The DPI setting typically should be 200 or higher. If you generate a barcode at below
100 dpi the quality is typically too low to scan. The default is 600.
2.7.6 Barcode Controls in Detail
Anything about a barcode can be specified in the template with a barcode field, including
the value:
<<barcode:barcode1:111222333:code128>>
and other configuration can be appended. For example:
<<barcode:barcode1:111222333:code128:dpi=1200:orientation=90>>
As mentioned previously, any template-settings can be overridden by the data supplied
on a per-render basis. For example, the DPI resolution can be changed dynamically by
the data (eg. in JSON format):
"barcode1":"1234567:dpi=800"
The data provided at render-time will override any value specified in a barcode field,
meaning the data has the final say.
The following settings are common to the supported barcodes.
!"!#
! $! % &
moduleWidth mw Barcode module width as a
double value. This
defines the width of the
narrow bars of the
barcode. Typical values
are in the range 1.0 –
3.0
mw=2.2 0.19
1.10 for
ITF14
doQuietZone dqz Whether or not the quiet
zone will be displayed
around the barcode
dqz=true False2
quietZoneWidth qzw The width of the quiet
zone in mm.
qzw=2.0 12.0 for
ITF14
quietZoneHeight qzh The height of the quiet
zone in mm.
qzh=2.0
height h The height of the barcode
in mm. Depending on the
type of barcode, the
barcode value, the module
width and other settings,
the height influences
also the width of the
resulting barcode.
h=30.0 10.0
40.0 for
ITF14
Docmosis Template Guide Page 35
Version 4.2
Jul 2017

Docmosis Template Guide
!"!#
! $! % &
orientation o The orientation of the
barcode in degrees, 0 is
horizontal. Values
allowed are 0, 90, -90,
180, -180, 270, -270.
o=90 0
fontSize fs The size of the font for
the displayed barcode
value. Zero will remove
the display of the value.
fs=0
dpi dpi The number of dots per
inch (resolution) of the
barcode. The higher the
resolution the bigger the
resulting document and
processing time.
Typically you would use
the minimum that suits
the use of the barcode
(eg taking into account
the printer quality).
dpi=1200 600
'()"!#
! $! % &
wideFactor wf Barcode wide factor as a
double value. This
defines the factor that
wide bars are wider than
narrow bars. Typical
values are in the range
1.0 – 3.0
wf=2.0 2.2
extendedCharset ec Whether or not to allow
an extended (ASCII-7
bit) character set to be
used.
ec=false true
displayChecksum dc Whether or not a
checksum should be
displayed in the human-
readable part of the
barcode.
dc=true false
checksumMode cm The code 39 checksum
mode: add, auto, check
or ignore
cm=add
displayStartStop dss Whether or not to
display the start and
stop characters in the
human-readable part of
the barcode.
dss=false
intercharGapWidth icgw The width between
encoded characters in
the barcode (mm).
icgw=0.2
*+)"!#
! $! % &
none
Page 36 Docmosis Template Guide
Version 4.2
Jul 2017

,-.)"!#
! $! % &
wideFactor wf Barcode wide factor as a
double value. This
defines the factor that
wide bars are wider than
narrow bars. Typical
values are in the range
1.0 – 3.0
wf=2.0 2.5
bearerBarWidth bbw The width of the bearer
bar in mm.
bbw=2.0 1.0
displayChecksum dc Whether or not a checksum
should be displayed in
the human-readable part
of the barcode.
dc=true false
checksumMode cm The code 39 checksum
mode: add, auto, check or
ignore
cm=add
2.8 Active Hyperlinks
Docmosis allows you to insert a hyperlink dynamically into your document. In your
template, a naming convention identifies fields you would like to work as hyperlinks.
To create a hyperlink, insert a field starting with "link:" (or "link_"). For example,
the following field:
<<link:myWebSpace>>
will act as a hyperlink looking up data for myWebSpace in your data. If your data has a
value http://www.docmosis.com for myWebSpace, then a hyperlink to
http://www.docmosis.com will appear in your rendered document.
You may also wish to make the displayed text for your hyperlink different from the actual
URL of the link. Using the above example, to display
DOCMOSIS
instead of
http://www.docmosis.com
for the link in the final document, the data can provide a value
DOCMOSIS|http://www.docmosis.com. The pipe (|) symbol separates the display
name from the actual link.
Note that in all cases, the template identifies the field:
<<link:myWebSpace>> or <<link_myWebSpace>>
and the data provides the address and optionally the display text. In JSON format, the
data would look like:
"myWebSpace":"http://www.docmosis.com"
or
"myWebSpace":"Docmosis|http://www.docmosis.com"
Docmosis Template Guide Page 37
Version 4.2
Jul 2017
Docmosis Template Guide
2.9 Conditional sections
Conditional content is content in that will be populated in the final document depending
upon the data that is generated by the application. If the specified condition is met, the
content within the matching conditional section is rendered in the document.
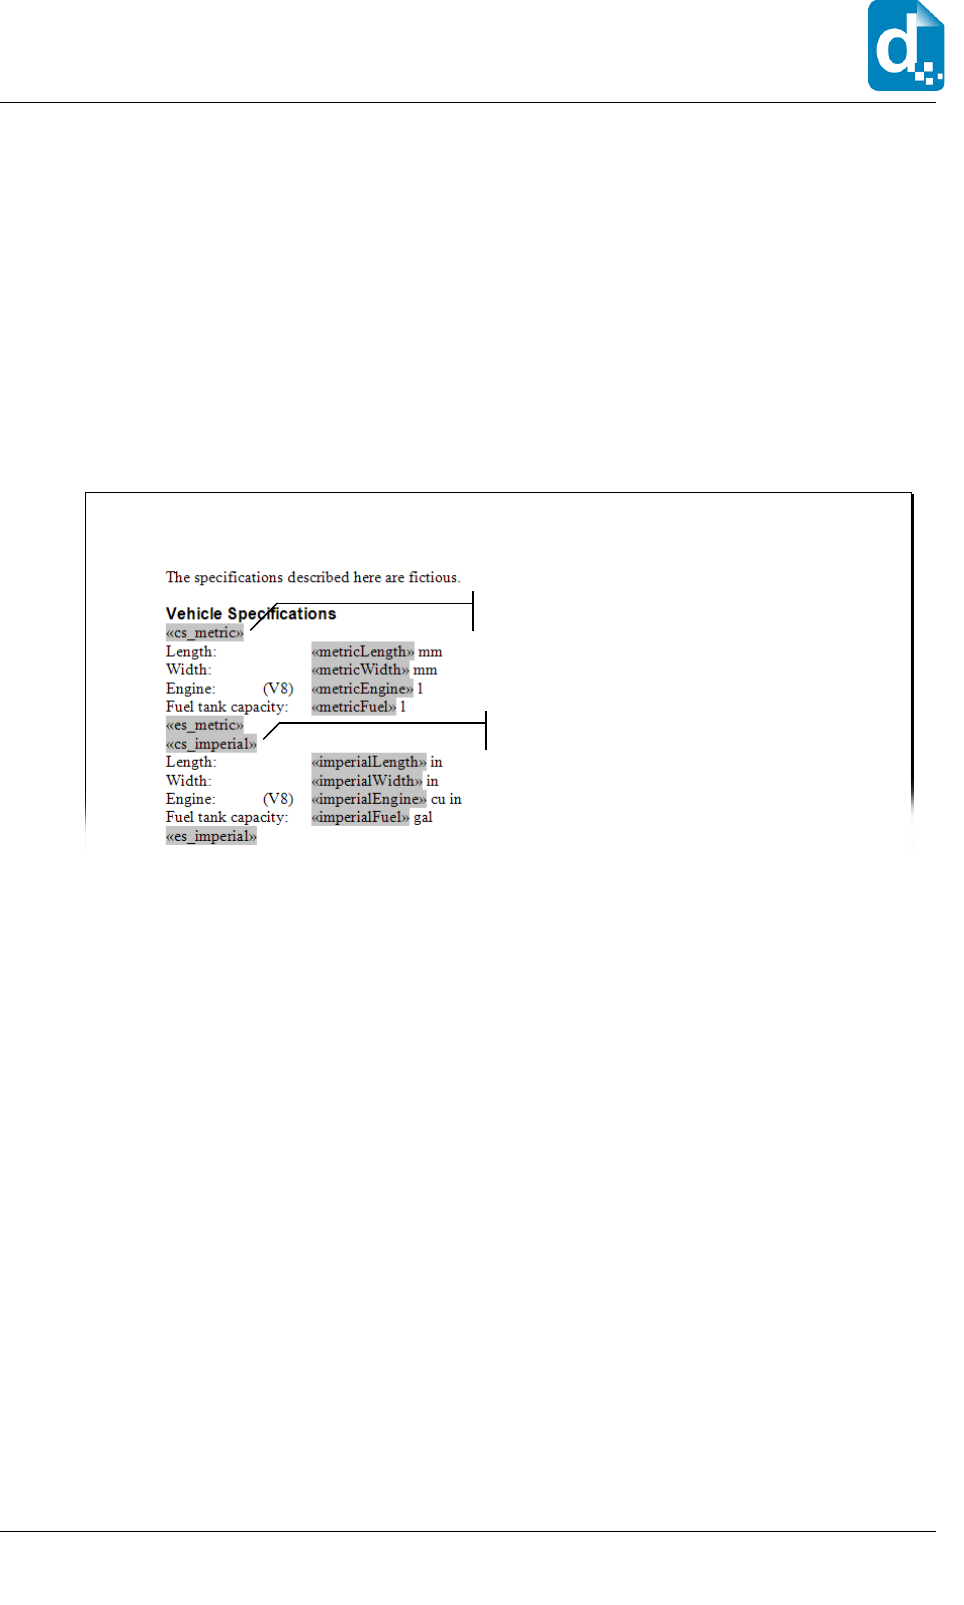
An example of the application of conditional content might be in a product description
such as that for a motor vehicle in the following illustration.
An example of conditional sections in a Docmosis template.
The conditional sections will render the data that is appropriate for each condition. That
is, each document will be generated with either metric or imperial specifications but not
both. Each conditional section is defined using a pair of fields: a start field and an end
field. The general syntax for a conditional section is:
<<cs_condition-name>>
The text and elements of the conditional section.
<<es_condition-name>> or simply <<es_ >>
Conditional sections can use expressions, variables and range specifiers. See the tables in
1.5.3 Docmosis elements for more information.
The conditional start and end tags are removed from the resulting document and if each
tag is on a line by itself, the entire line will be removed.
To create a conditional section:
1. Position the insertion point in an empty paragraph at the starting location of the
conditional section.
2. Insert the opening condition element into the empty paragraph.
Page 38 Docmosis Template Guide
Version 4.2
Jul 2017
This condition returns the
metric specifications.
This condition returns the
imperial specifications.
3. Add the boilerplate content and other Docmosis elements into the subsequent
paragraphs in the document.
4. Insert the closing condition element into an empty paragraph following the conditional
content.
5. Repeat steps 1 through 4 for as many conditions as there are in your application.
2.10 Repeating sections
In a document, a repeating section is a group of elements in succession whose content
changes but whose format is the same. Docmosis supports several forms of repeating
sections: block-level, tables and lists.
Note
Tables and lists are special forms of repeating sections. They are discussed after this section that deals
specifically with block-level repeating sections.
There might be occasions when you want to include repeating sections but do not want to
use tables and lists (bulleted or numbered) to present them. In this case you use the
Docmosis repeating section elements. Repeating sections can contain any content
desired, and it will be repeated whilst there is data to be displayed.
The example below shows a repeating section named IDSets, and it contains a table
with an image and textual data. This table will be repeated as many times as there is
data associated with IDSets.
Repeating sections also contain boilerplate content and other Docmosis elements.
The general syntax for a repeating section is:
<<rs_repeating-section-name>>
The text and elements of the repeating section.
<<es_repeating-section-name>> or simply <<es_ >>
Docmosis Template Guide Page 39
Version 4.2
Jul 2017
Repeating sections
have a pair of
containing elements.

Docmosis Template Guide
Repeating sections can be “nested” inside other repeating sections to any depth desired.
Repeating sections can use variables and range specifiers as appropriate. See the tables
in 1.5.3 Docmosis elements for more information.
The repeating start and end tags are removed from the resulting document and if each
tag is on a line by itself, the entire line will be removed.
To create a repeating section:
1. Position the insertion point in an empty paragraph at the starting location of the
repeating section.
2. Insert the opening repeating section element into the empty paragraph.
3. Add the boilerplate content and other Docmosis elements into the subsequent
paragraphs in the document.
4. Insert the closing element into an empty paragraph following the repeated content.
Repeating sections also provide access to some built-in variables such as $idx which is the
current count of the number of times the loop has been repeated starting from zero. For,
given 4 "people" in an array <<$idx>> can be used as a index as follows:
<<rs_people>>
<<$idx>>. <<$name>>
<<es_people>>
To produce output that might look like this:
0. James
1. Jenny
2. Julie
whereas using <<$itemnum>> instead would result in:
1. James
2. Jenny
3. Julie
2.10.1 "Stepping Across" in Repeating Sections
Docmosis supports the concept of repeating in "steps". Say for example you have a
simple array of people objects in your data, and you need to place this on the page in a
3-across layout:
Page 40 Docmosis Template Guide
Version 4.2
Jul 2017
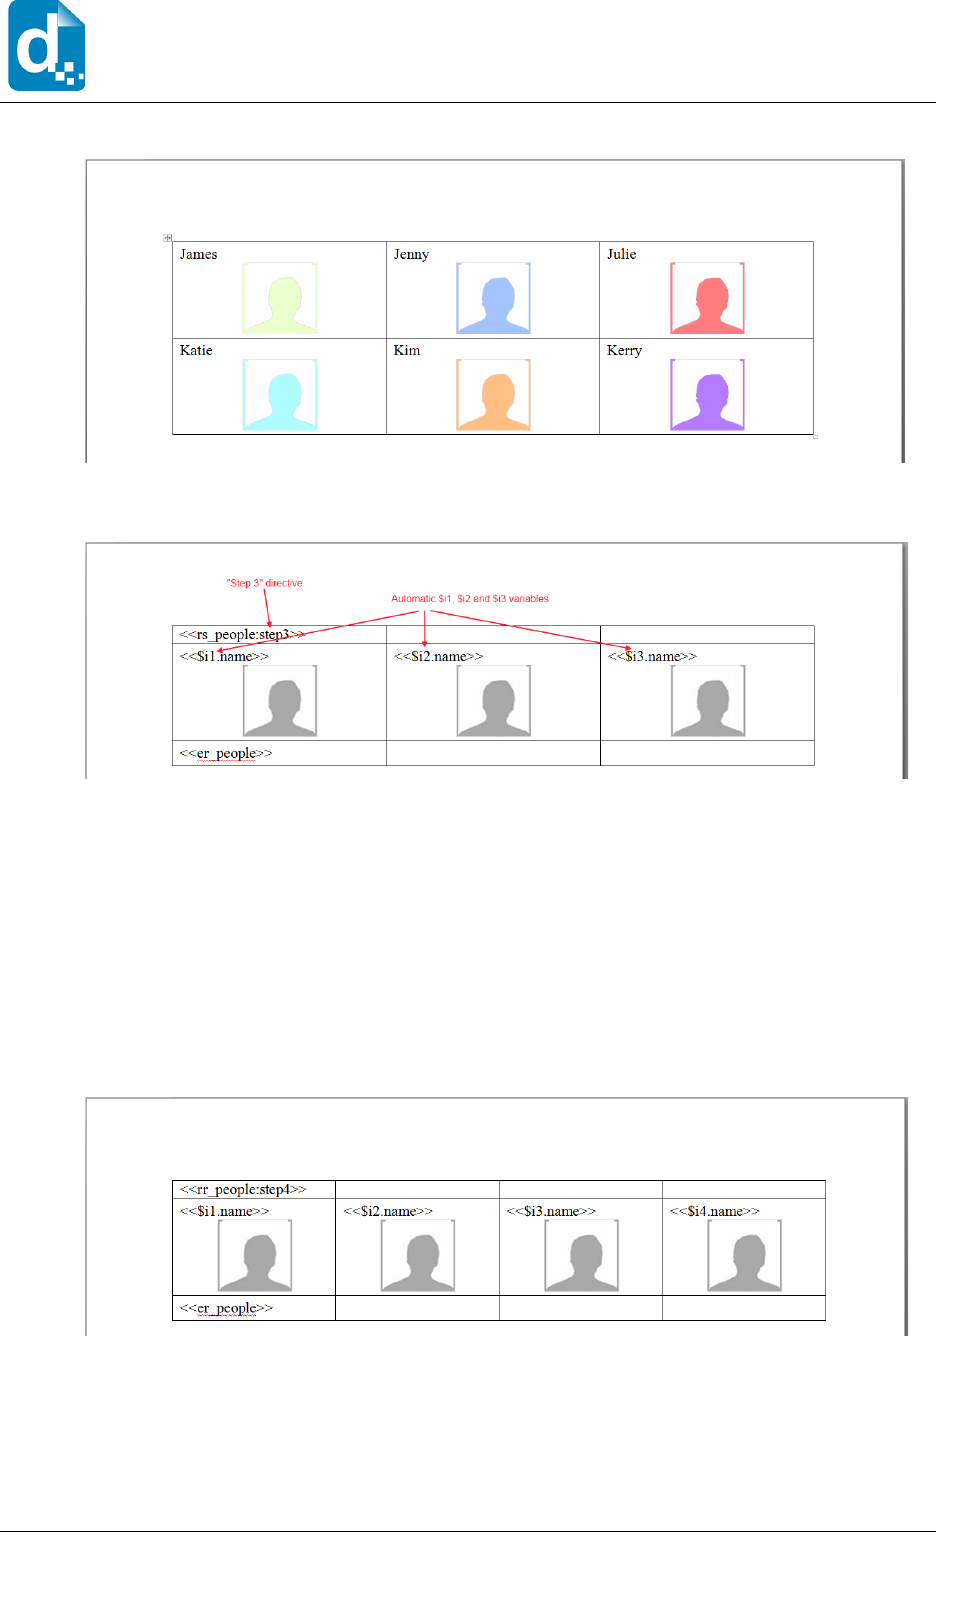
the "stepping" allows you to do this in the template as follows:
The ":step3" directive tells Docmosis that we want to move through the "people" data in
steps of 3. Docmosis automatically creates the $i1, $i2 and $i3 variables for you to use
corresponding to the first, second and third elements. For the second row, $i1, $i2 and
$i3 will correspond to the fourth, fifth and sixth elements and so on.
Docmosis will automatically create the variables required corresponding to the step being
used. In the case of "step10", variables $i1, $i2,... $i10 will exist.
If you need a 4-across layout instead, this is easily changed in the template by using
":step4" and adding the 4th column in your template to layout as you require:
and the resulting document (using the same data) would look as follows:
Docmosis Template Guide Page 41
Version 4.2
Jul 2017
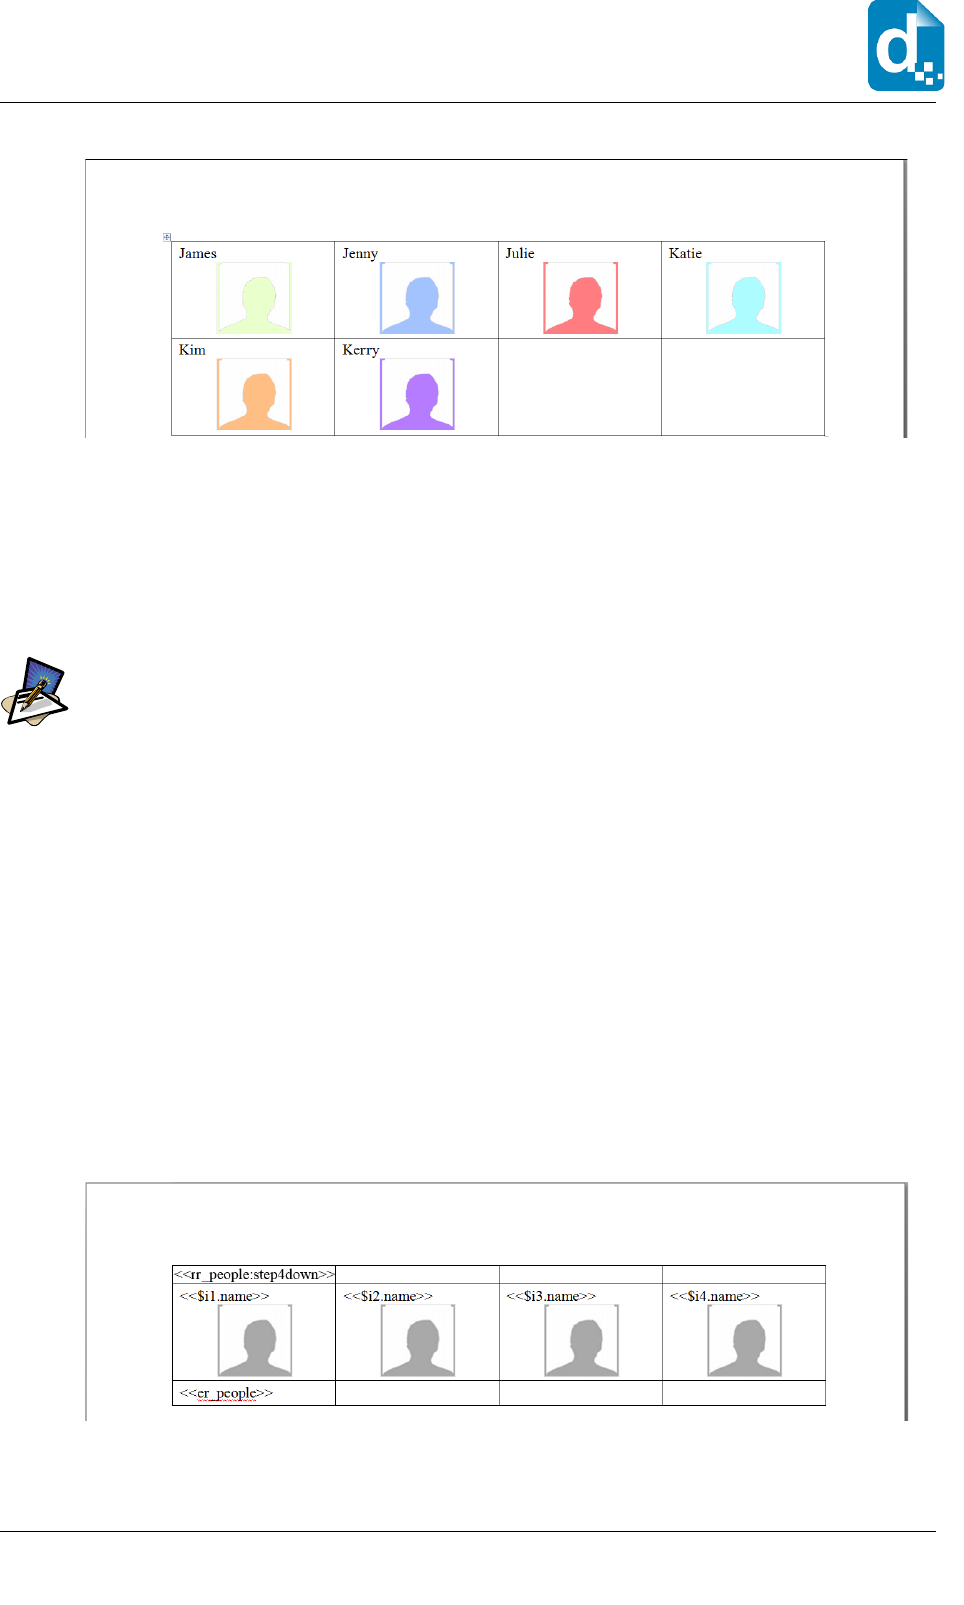
Docmosis Template Guide
The $i1, $i2 etc. automatic variables correspond to the elements in the data provided
under the "people" key. The example above assumes that each object in the "people"
data has at least a "name" attribute and an image to display. Though you can't see it
from the example, each of the images also has a template-setting to indicate where the
images come from. In Word templates, this would be a bookmark and in OpenOffice
Writer, this would be the image name (see section 2.6 Images for more information about
inserting images).
Note
The examples here use the repeating rows (<<rr_>>) directive, but the stepping directives also apply
to repeating sections (<<rs_>>).
Docmosis also creates $idx1, $idx2... and $itemnum1, $itemnum2... variables which relate
to the $i1, $i2... variables. The $idx1, $idx2.. variables provide the absolute index into
the data starting at zero (ie 0,1,2,3,4,5...). The $itemnum1, $itemnum2... variables
provide the absolute index starting at one (ie 1,2,3,4,5,6...).
2.10.2 "Stepping Down" in Repeating Sections
In the same way Docmosis can present your data in groups of 2, 3, 4 etc across a page, it
can also create groups of 2, 3, 4 etc but moving down the page instead. This means that
Docmosis will poplulate down column1, then down column 2, column3 and finally column
4. Docmosis will automatically balance the data into the right number of rows.
Given the above example where we have four columns, but we wish to show the data
down the columns rather than across the template and the result would look as follows.
Notice in the template the “step4down” directive:
And in the resulting document, notice that James is followed by Jenny underneath. The
next element (Julie) is displayed at the top of column 2 and so on:
Page 42 Docmosis Template Guide
Version 4.2
Jul 2017
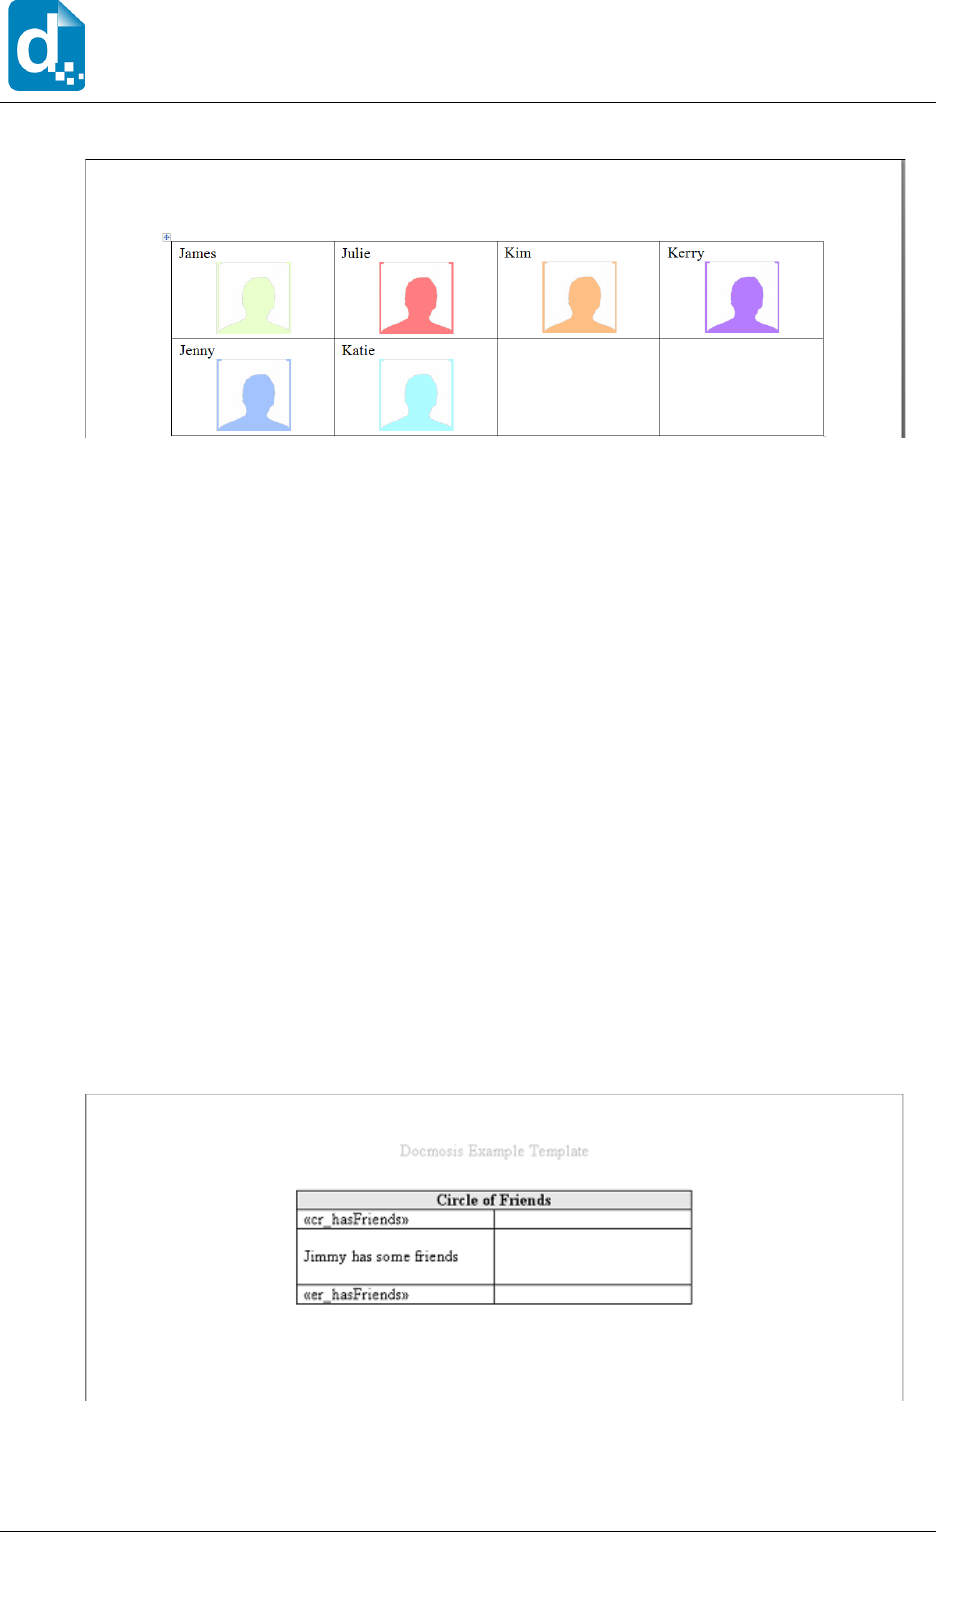
The “step” functions allow the template to control more of the presentation options given
the same set of data. Note that although the examples above are shown in tables since
that is often a good way to present the data, the same concepts applie to repeating
sections.
2.11 Tables
Using fairly simple table markup, you can create sophisticated table layouts in your output
documents. In addition to being able to insert text and images using the methods
already described, you can use the table-specific Docmosis elements to control:
including or excluding of groups of rows;
repeating groups of rows;
removing columns.
2.11.1 Conditional rows
A set of consecutive rows can be removed from a table using conditional row elements.
The following example uses the <<cr_hasFriends>> and <<er_hasFriends>> elements to
indicate a group of rows in a table that should be excluded if there are no friends.
Docmosis Template Guide Page 43
Version 4.2
Jul 2017
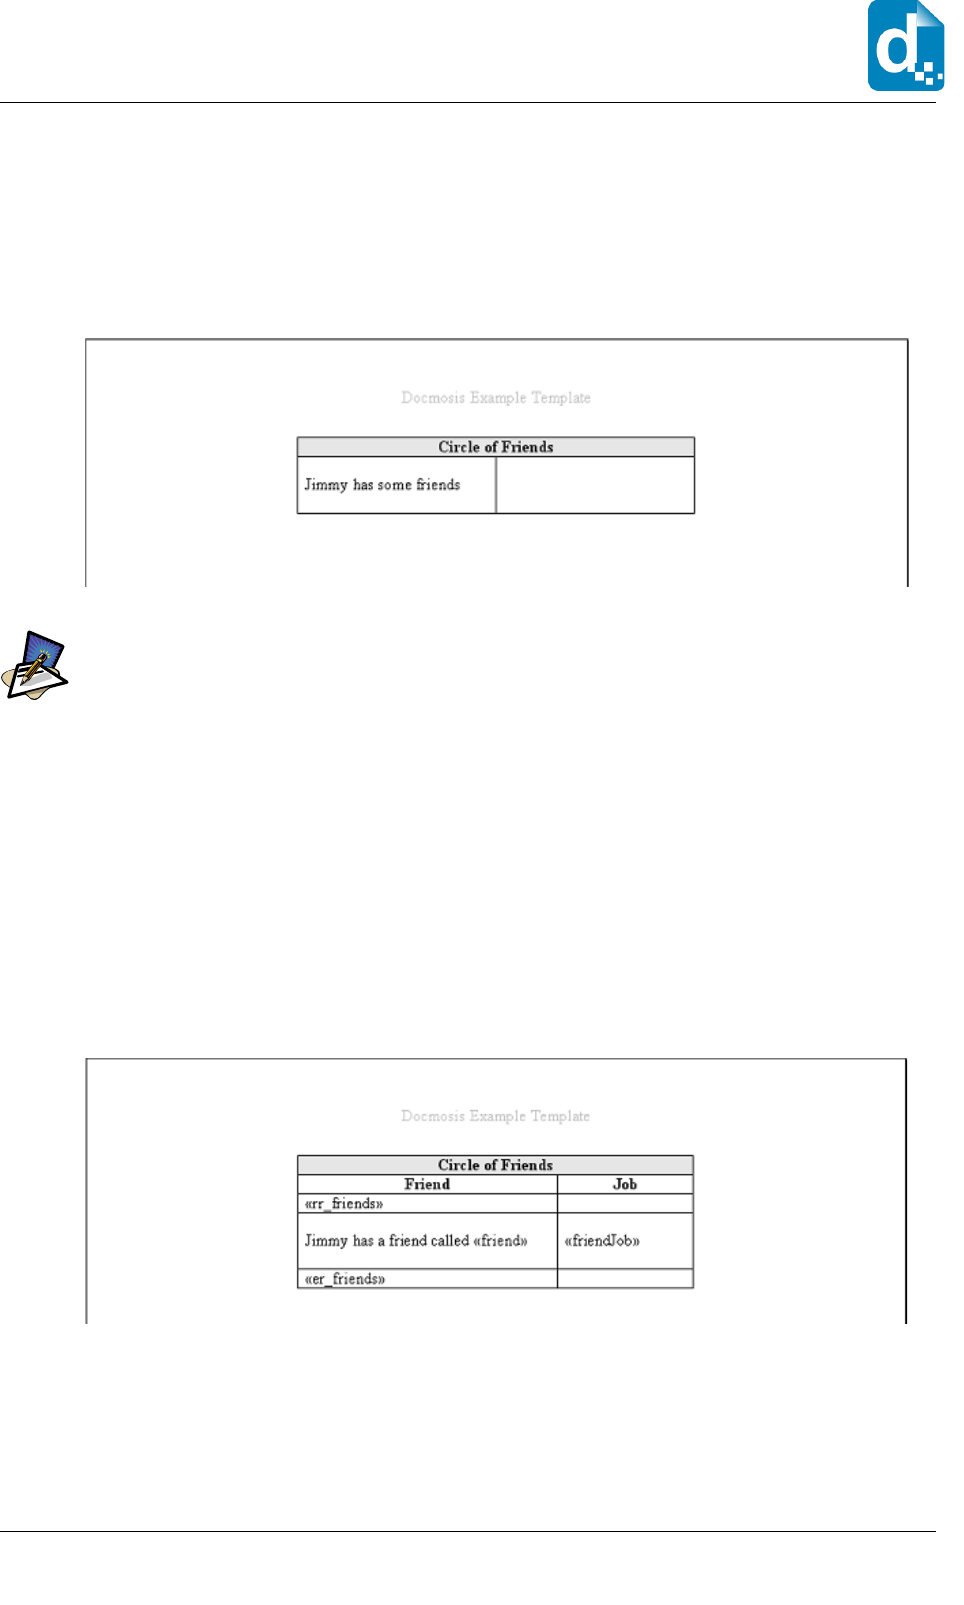
Docmosis Template Guide
In this case, if the data indicates that hasFriends is true then the row containing
“Jimmy has some friends” would be left in the resulting document, otherwise it would be
removed. In all cases, the rows containing the markers <<cr_hasFriends>> and
<<er_hasFriends>> will be removed:
Note
End markers for conditional rows can also be defined without the name. In the above example, the
field <<er_hasFriends>> could also be simplified to <<er_ >>.
2.11.2 Repeating rows
Rows of a table can be repeated whilst there is data to repeat. The following example
will list of all the friends of Jimmy using one row for each friend showing their name in
one column and job in another.
The following example uses the <<rr_friends>> and <<er_friends>> elements to
indicate a group of rows in a table that should be excluded if there are no friends.
In this case, while the data can supply information for friends the row containing the
lookup friend information will be rendered. In all cases, the rows containing the markers
<<rr_friends>> and <<er_friends>> will be removed.
Page 44 Docmosis Template Guide
Version 4.2
Jul 2017
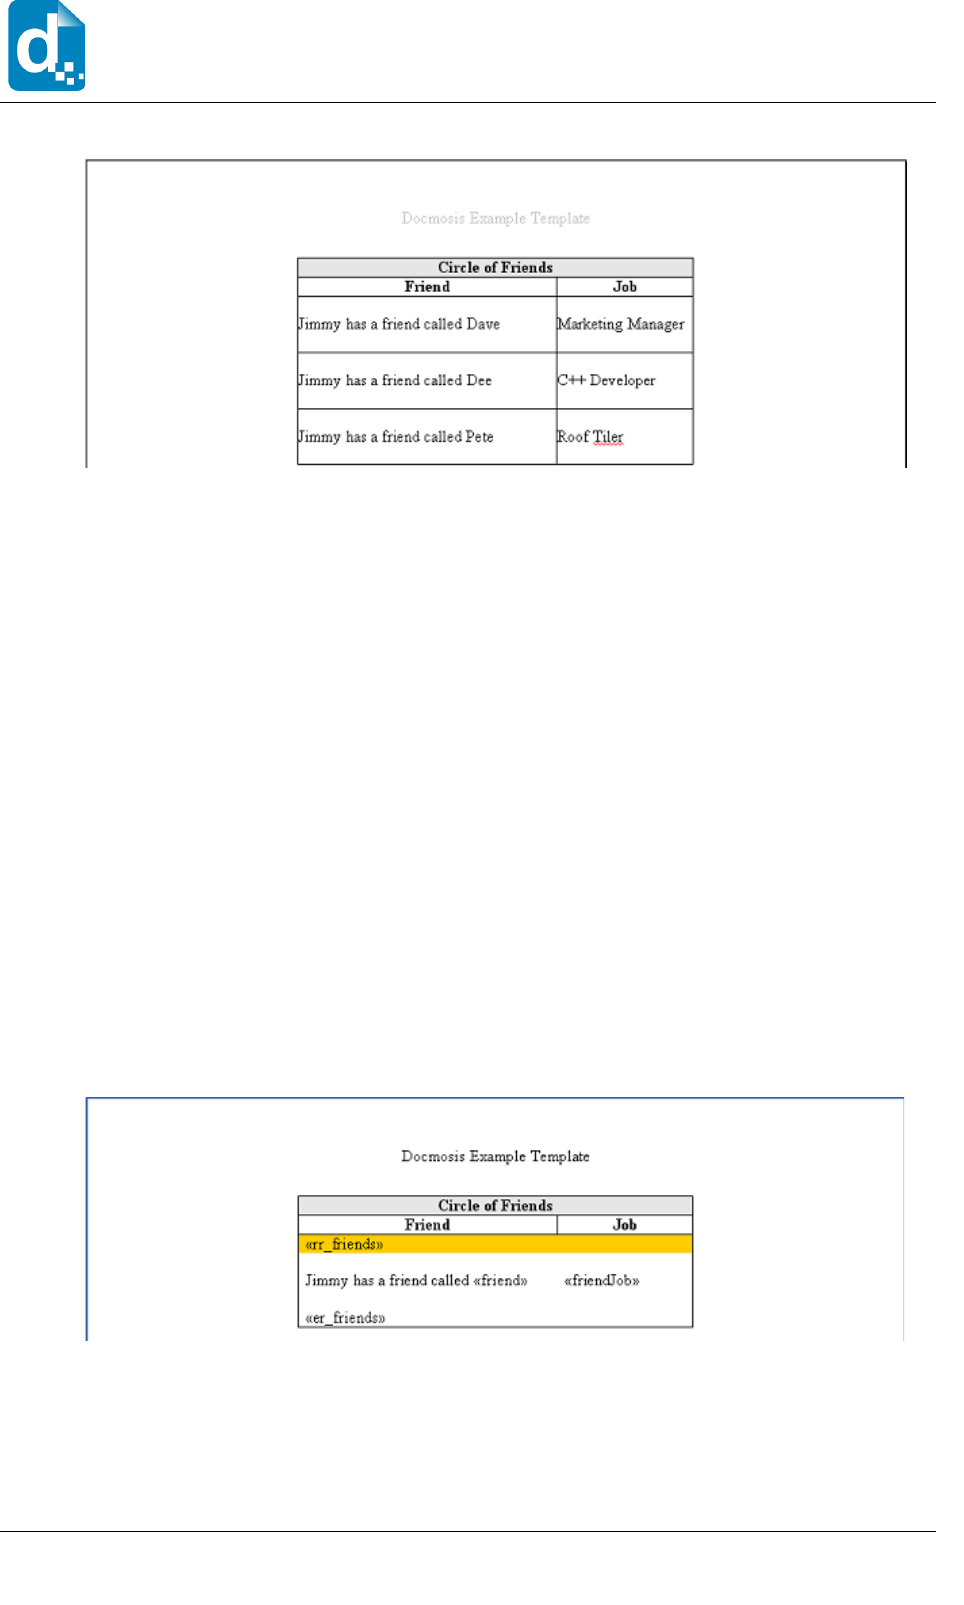
2.11.3 Alternating Row Colours and Border Controls
The template for repeating rows also provides some tricks for colouring and borders that
can produce impressive results. The rules are as follows:
1. if a cell of a row inside a set of repeating rows has a background colour different
to that of the corresponding cell of the starting row (the row with the
<<rr_xxx>> element), then the background colour for that cell will alternate
between that of the starter row and it’s own background colour. This allows
everything from plain tables, to alternating rows to crazy alternating patterns.
2. the starting row (the row with the <<rr_xxx>> element) determines the top
border of the first repeating row. The ending row (the row with the <<er_xxx>>
element) determines the bottom border of the last row to be rendered. This
applies on a cell-by-cell basis as for the background colouring. This allows for
highly configurable borders to be specified that work pretty much as one would
expect.
The following example creates a bounding border encapsulating all the repeating rows
(including the marker rows, and alternates the background colour.
Notice in the result below the alternating background colours and the border wraps all
cells collectively.
Docmosis Template Guide Page 45
Version 4.2
Jul 2017
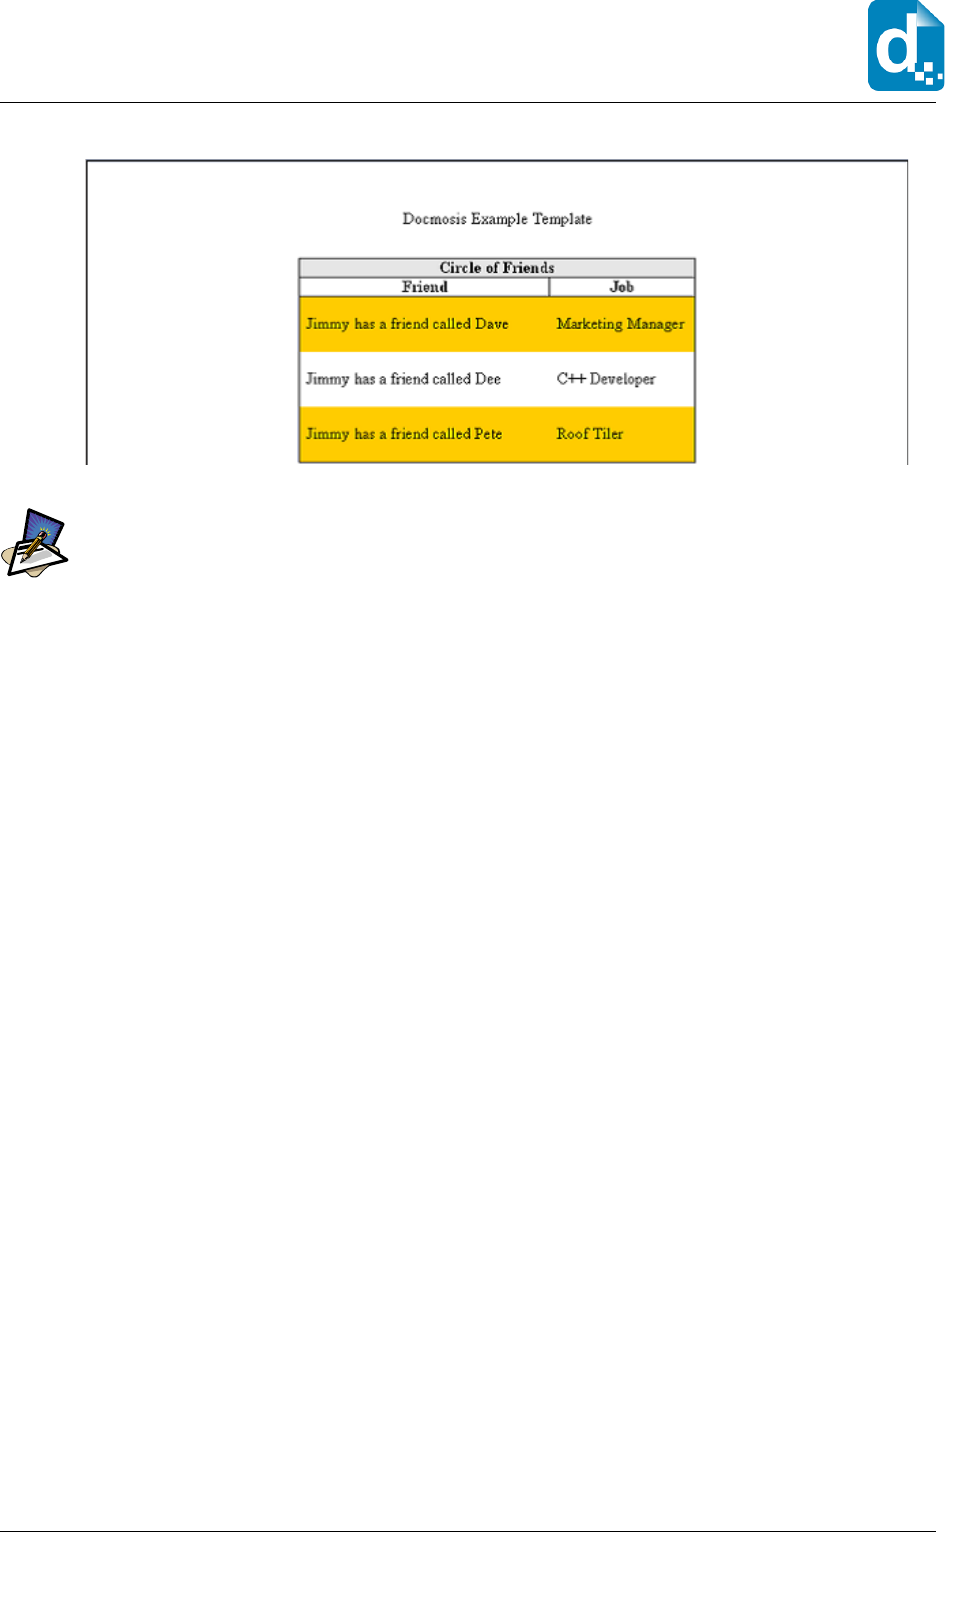
Docmosis Template Guide
Note
End markers for repeating rows can also be defined without the name. In the above example, the
field <<er_friends>> could also be simplified to <<er_ >>.
More advanced examples are given in section 2.11.6.
2.11.4 Disabling Row Alternating
Sometimes alternating row colouring is not desirable. In this case, Docmosis templates
can disable the row colouring by using the <<noTableRowAlternate>> directive. The
following rules apply the scope of effect of the directive:
1. if <<noTableRowAlternate>> appears anywhere in a table, the alternating
colouring is disabled for that table.
2. If <<noTableRowAlternate>> appears in the body text of the template
(outside of any table) all following tables will have no alternating colouring.
2.11.5 Conditional columns
A template may also indicate columns in a table that are to be conditionally removed.
The width of the table remains as fixed in the template and the space recovered by the
removal of the column is spread across the remaining columns. The following example
shows a Docmosis conditional column element (<<cc_showJobs>>) at the top of the
second column.
Page 46 Docmosis Template Guide
Version 4.2
Jul 2017

When rendered, this removes the column entirely where the data indicates that
showJobs is false.
The following example uses
expressions
to conditionally remove two columns from the
table. If you examine the Trial 2 and Trial 3 columns, you will see the conditional
column expressions in fields <<cc_{ntrials>1}>> and <<cc_{ntrials>2}>>.
If the underlying data says there is only one trial for example, that is, ntrials = 1 then the
conditions for the Trial 2 and Trial 3 columns will evaluate to false and the columns will be
excluded. This is shown in the following example output:
Docmosis Template Guide Page 47
Version 4.2
Jul 2017
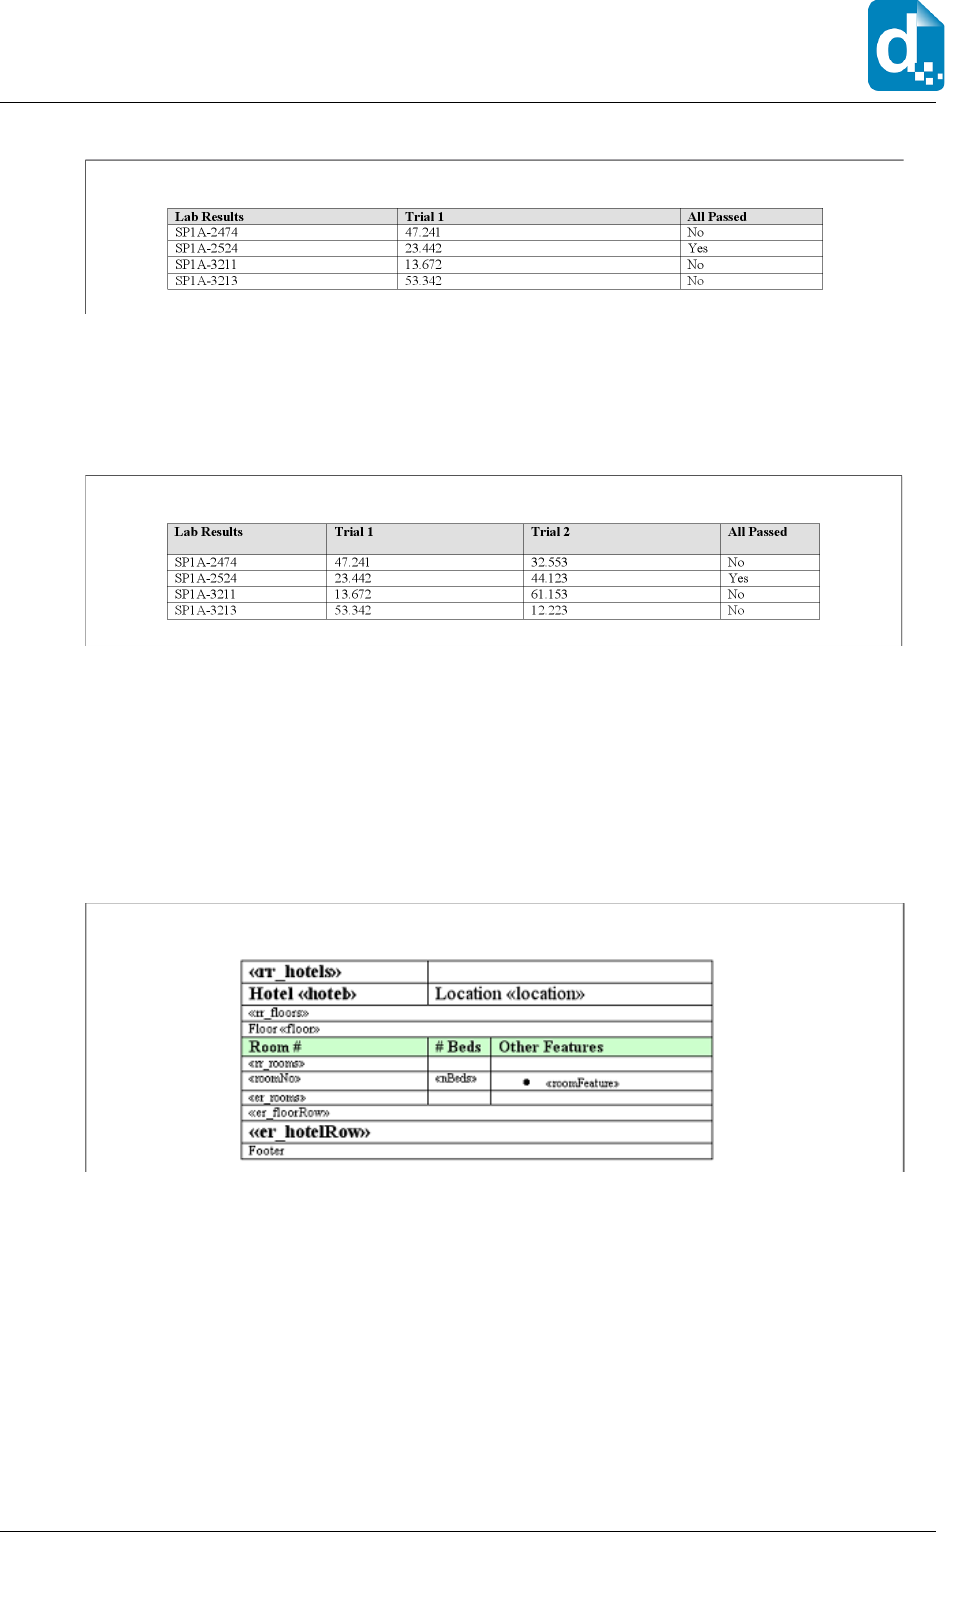
Docmosis Template Guide
If the underlying data says there are 2 trials, that is, ntrials = 2, then the Trial 2 column
will remain in the resulting document, but the Trial 3 column is still removed:
2.11.6 Advanced table structures
Docmosis supports the nesting of repeating and conditional content in table structures.
The following example template shows multiple levels of repeating to print out the room
details within each floor within each hotel.
The example above is fairly extreme and it would often be more natural to represent the
structure in a combination of repeating sections and tables with repeating rows. The
following template is equivalent but is not providing the entire structure within a single
table:
Page 48 Docmosis Template Guide
Version 4.2
Jul 2017

2.12 Lists
Docmosis infers repetition when there are one or more elements in paragraphs formatted
as a list using the ‘bullets and numbering’ features. As long as the data provider has data
to populate, the list will be rendered with items.
In the following example, a field is formatted as a numbered list and will be automatically
expanded.
An example of a list item.
Docmosis splits the element into two parts, a repeating component and a lookup
component. The repeating component can be limited by a using range specifier covering
multiple values. In this example, the range specifier [*] against the friends name means
for all friends and the trailing friend name is the lookup of the data to display.
Docmosis Template Guide Page 49
Version 4.2
Jul 2017
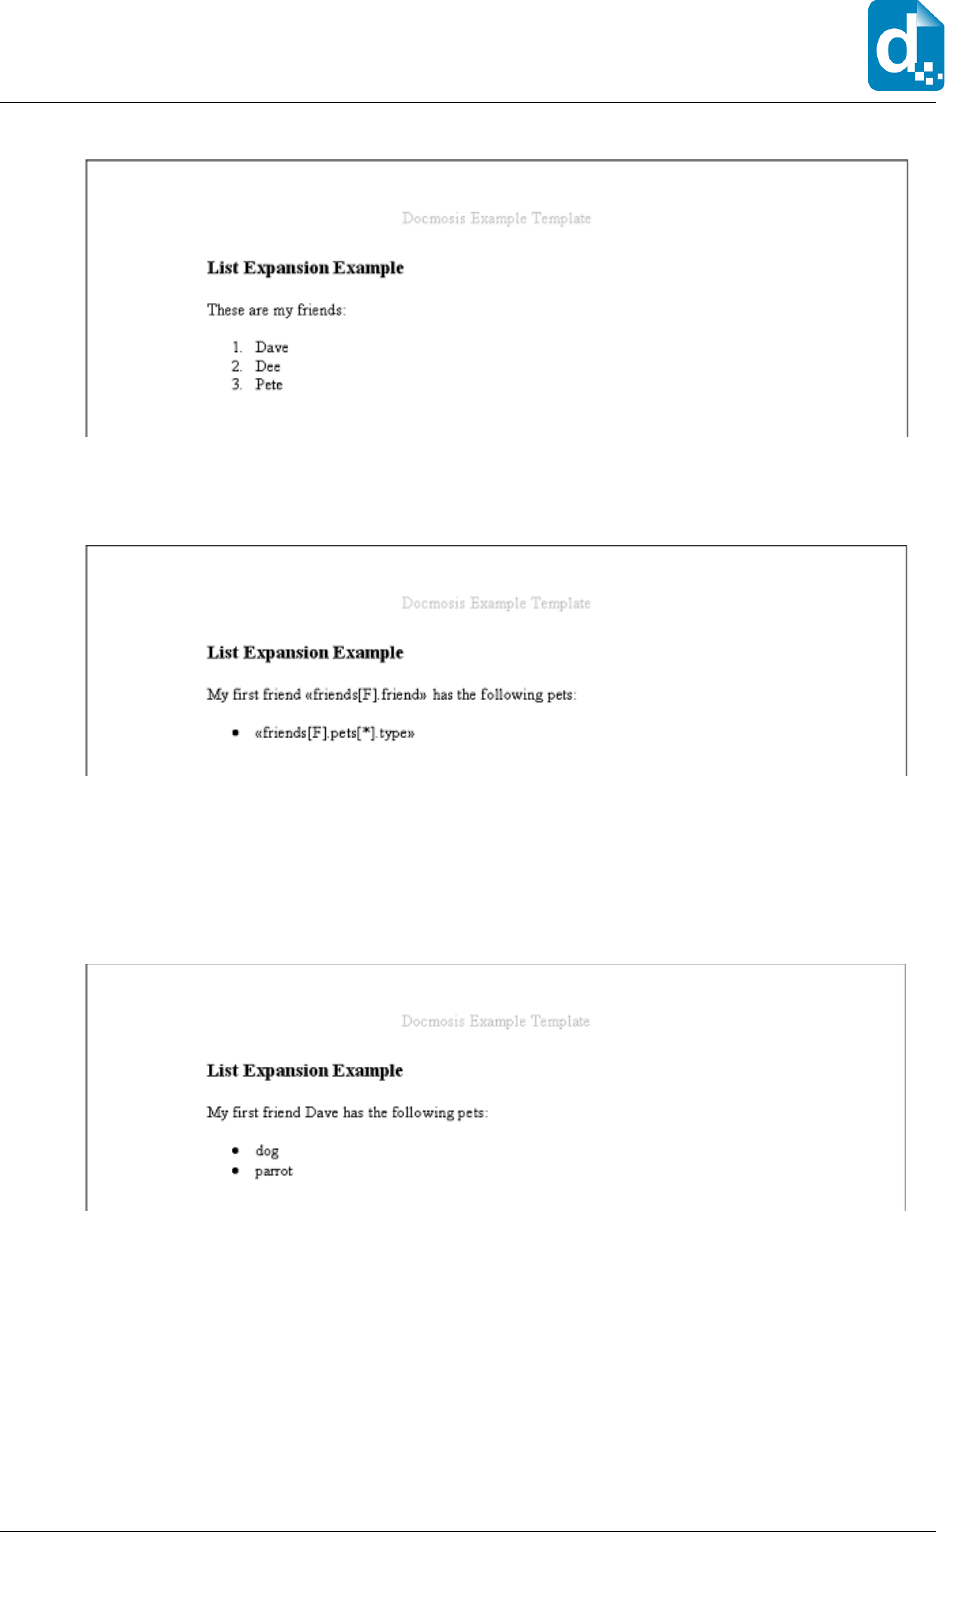
Docmosis Template Guide
As another example of how the field is split, consider the following template.
The element now is in a bullet list style rather than numbered. It has a repeating
component friends[F].pets[*] meaning all pets of the first friend and a lookup component
type. The resulting document is shown below where the friend has a dog and a parrot.
Docmosis only allows a single component of the element to be a multi-valued range. For
example, Docmosis would not allow an element friends[F2].pets[*] since this would repeat
at multiple stages and typically would be a mistake.
To create a list:
1. Position the insertion point at the location of the first list item.
2. Format the paragraph as a list item (bulleted or numbered).
3. Add the Docmosis element that will render the data into the list paragraph.
Page 50 Docmosis Template Guide
Version 4.2
Jul 2017

2.13 Merging Templates Together
Docmosis has the ability to combine multiple templates into the resulting document. This
gives developers and template authors the ability to separate common content out of
individual templates and into a "shared" or common template. The common information
then only needs to be maintained in one location and all referencing templates will
automatically use the new information. Examples of use include company information
including logos for the header, contractual clauses and signature blocks for the body, or
even the specific content of the bottom left of the footers.
Templates used for inclusion can include all typical content including styled text,
headings, tables, images etc. Docmosis will populate the templates as per normal using
the data that applies at the point of insertion, as if it were content in the main template
as opposed to separated out. Any number of templates can be included, and included
templates may include other templates.
The way to control this is to insert a
reference
in your template to another template. The
referenced template will be populated and inserted at the referenced location. For
example, given a starting template MainProcess.doc that references two other templates
process1.doc and process2.doc, Docmosis will insert process1.doc and process2.doc into
MainProcess.doc as it processes MainProcess.doc.
Docmosis supports two ways of referencing templates; directly and indirectly. Each of
these is explained in the following sections.
2.13.1 Direct Referencing
Direct referencing is very simple, the template to include is literally named in the
reference. The way to create a direct reference is to use a merge field prefixed with
“ref:”. For example <<ref:process1.doc>> will cause the template process1.doc to be
inserted. The following example shows how this would look in a template:
2.13.2 Indirect Referencing
The name of the template to include can be determined by the data, rather than by the
template directly. In this scenario, Docmosis will ask the DataProvider to provide the
template name.
Docmosis Template Guide Page 51
Version 4.2
Jul 2017
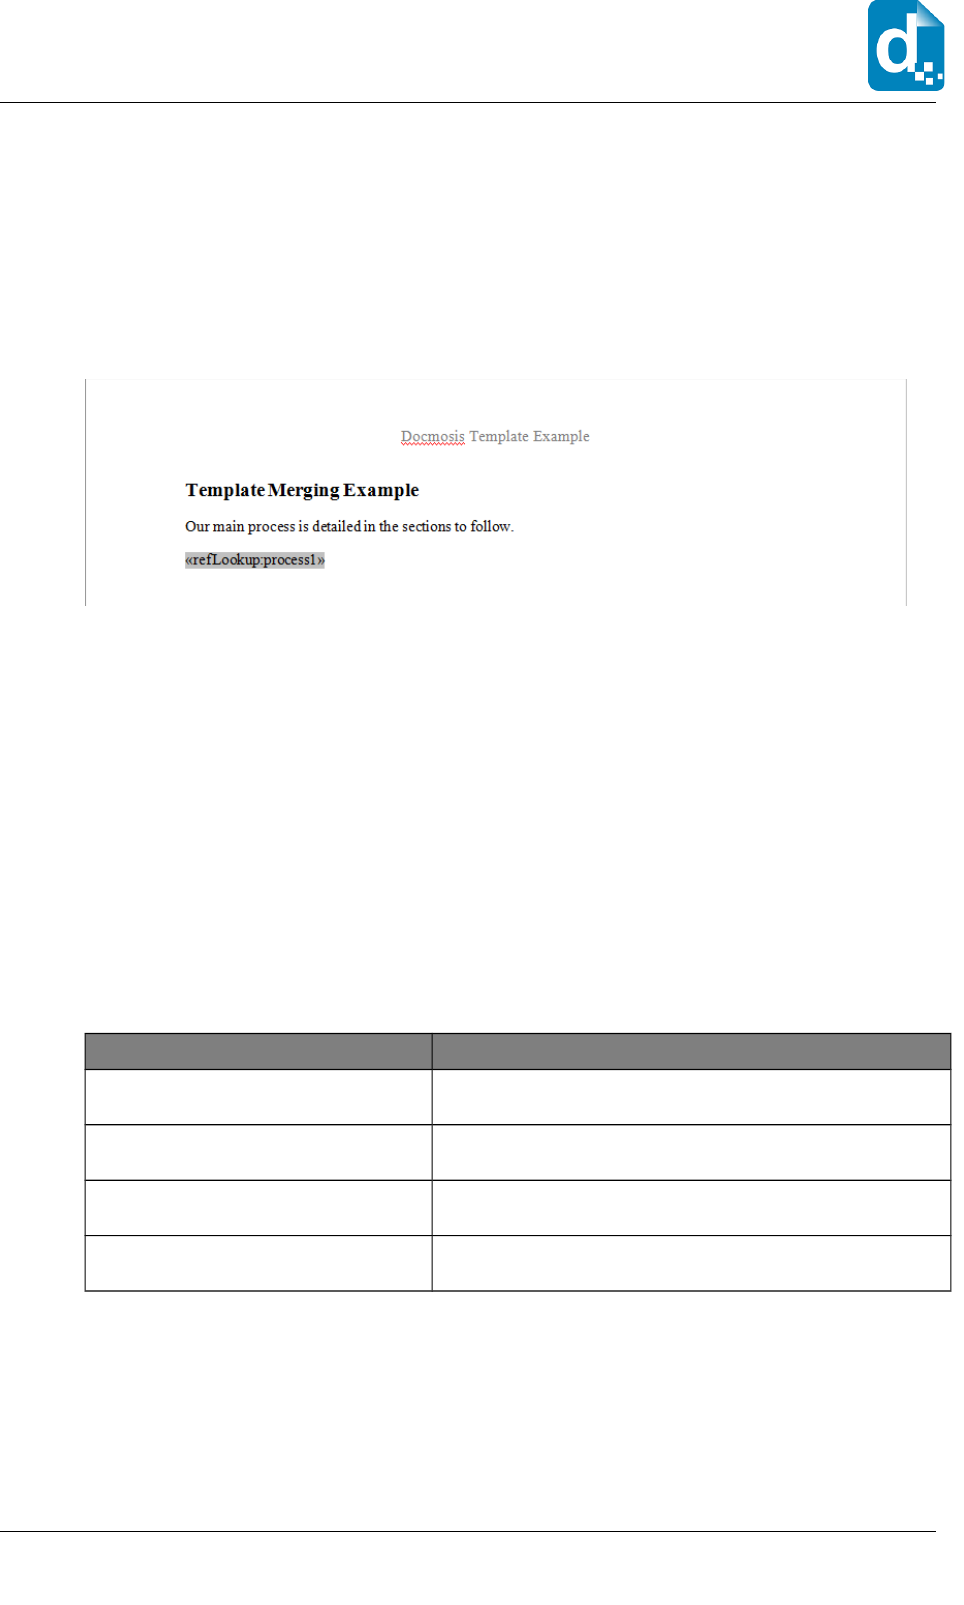
Docmosis Template Guide
To create an indirect reference, the field prefix “refLookup:” is used. For example, if we
created a field <<refLookup:process1>>, Docmosis will ask the DataProvider for the
name of the template under the key “process1”. The value the DataProvider returns will
be used as the name of the template to insert into the document. If the template in the
example above was changed to use an indirect reference as discussed, it would look like
this:
2.13.3 Templates in Different Locations
Docmosis assumes by default the templates referenced existing in the same location (that
is the same template context) as the referring template. In our scenario above,
process1.doc and process2.doc must exist in the same place as MainProcess.doc. This works
for small scale use, but would quickly become unmanageable if there were a large
number of templates in use.
For example, say the company banner information has been put into a separate template
for use in all documents, it would be unfortunate to have copies of this template
everywhere. Instead, there might be a single copy of the template in a common area for
all projects and templates to reference. Docmosis allows the templates to be referenced
in any context using the familiar path notation. Here are some example template
references and what they mean.
Field Description
<<ref:template1.doc>> template1.doc is expected to be in the same location as the
calling template.
<<ref:/template1.doc>> template1.doc is expected to be in "root" context . The root
context is the parent of all other contexts.
<<ref:/common/template1.doc>> template1.doc is expected to be in the "common" context one
down from the root context
<<ref:../template1.doc>> template1.doc is expected to be in the parent context of the
calling template.
For example, consider a project “projectAlpha” which has its own templates and is stored
in the template context “projects/projectAlpha”. We want to include a common heading in
some of our templates, and so we separate that content into a separate template called
corporateHeading.doc. We realise that corporateHeading.doc applies to lots of other projects
and should not really exist inside projectAlpha itself.
Page 52 Docmosis Template Guide
Version 4.2
Jul 2017
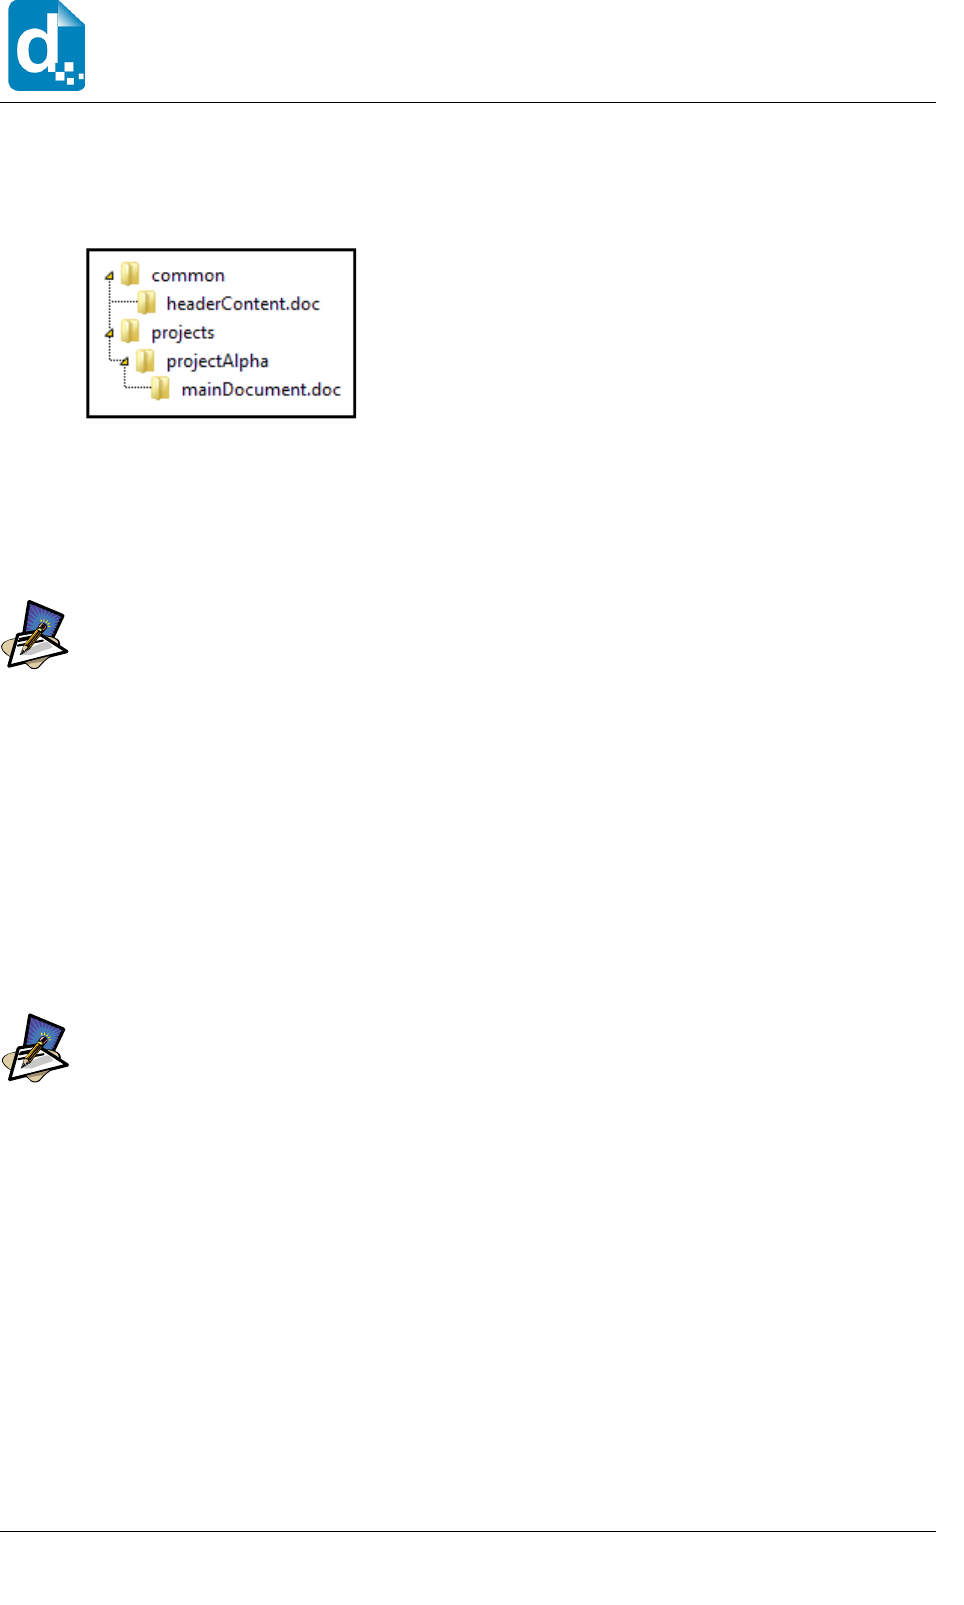
We decide to create a common area to store the templates that are common to lots of
projects inside the context “common”. When all our templates are loaded into Docmosis,
the template store will look like this:
Templates such as mainDocument.doc will be able to reference and include the template
headerContent.doc using the field <<ref:/common/headerContent.doc>> or the field
<<ref:../../common/headerContent.doc>>. The two fields just listed use a literal "ref:"
lookup of the template names; the same result can be achieved using the indirect
"refLookup:" lookup if the data provider supplies the appropriate value.
Note
If you are using Word for your templates, make sure the paths or folders you are using don't contain
spaces in the name. If so, the fields in the Word template will not work as desired (and Docmosis will
tell you so). If you really wish to have spaces in the names of paths and folders, then you will have to
use dynamic (refLookup:) fields rather than static (ref:) fields or use OpenOffice Writer for your
templates.
2.13.4 When A Template Cannot Be Found
Docmosis treats a missing template as an error. During the rendering of a document, if a
template reference is encountered and the template cannot be found then an error will be
raised. Depending on Docmosis configuration this will either write the error into the
resulting document, or produce no document at all and raise a Java Exception (see
section 1.5.3.11 Error Handling).
Note
Variables can also be referenced using var_ instead of $. This means <<$name>> is equivalent
to <<var_name>>. This is particularly useful for bookmarking images using variables in MS Word,
where you cannot use the $ symbol in the bookmark name.
A template
could
make reference to a template that doesn't exist and still be functional if
the processing of that template does not try to render the missing reference. This could
happen if the reference was in a conditional section that always gets skipped, for
example.
2.13.5 Limitations
There are some practical limitations to the ability to include templates. The following
sections cover the fundamental limitations.
Docmosis Template Guide Page 53
Version 4.2
Jul 2017
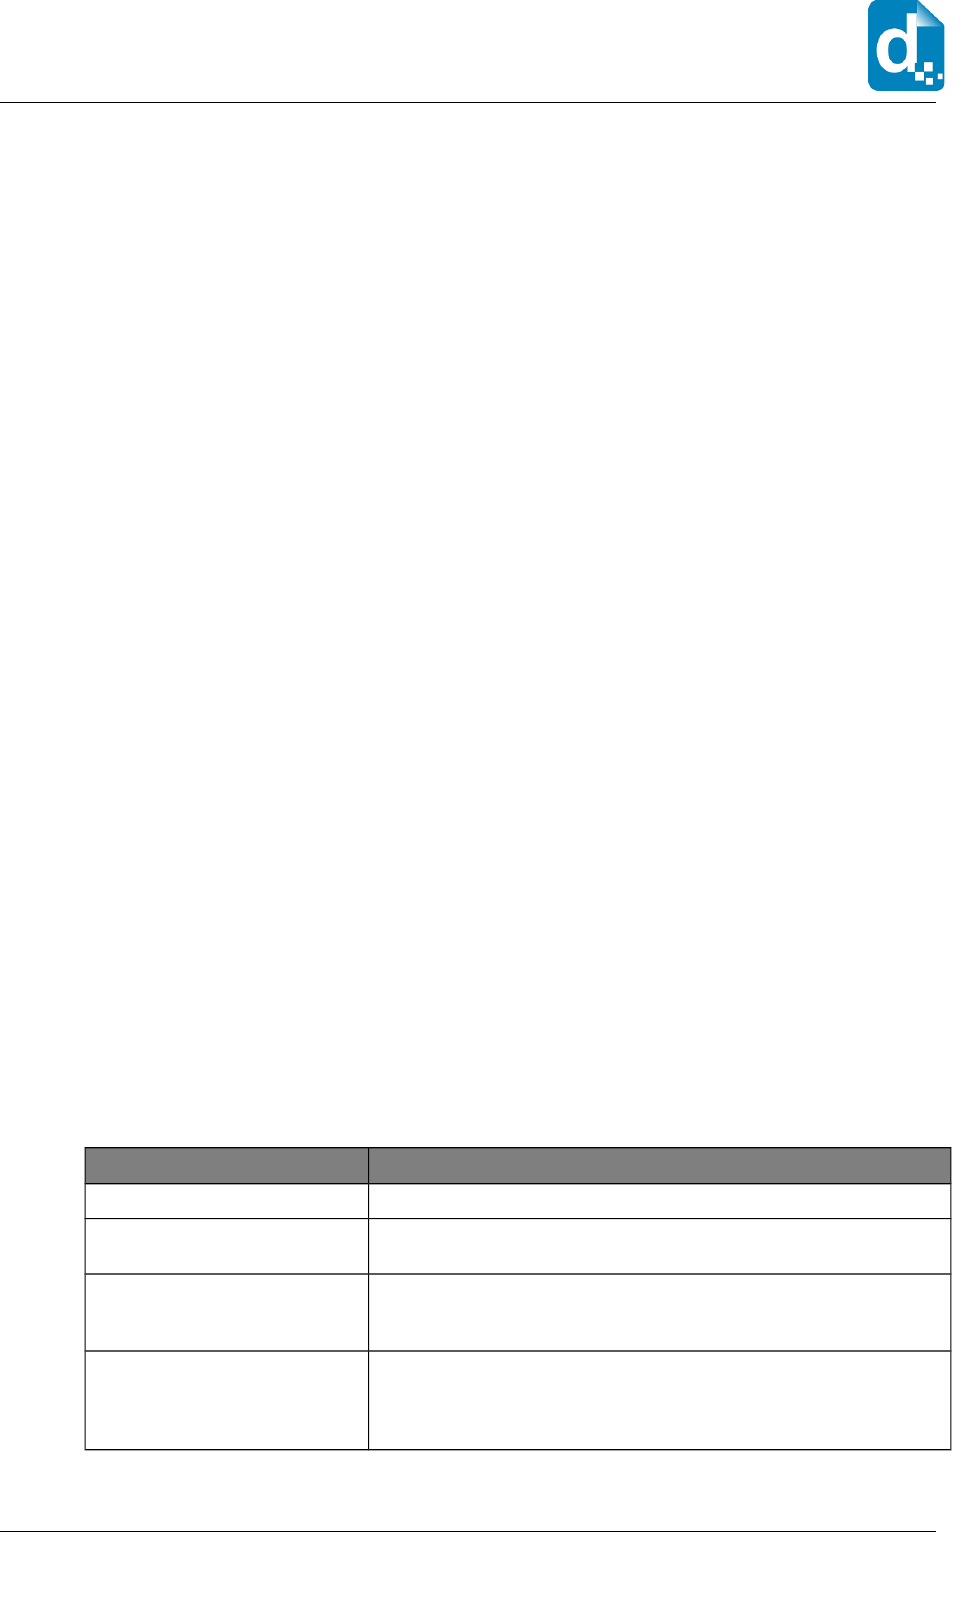
Docmosis Template Guide
2.13.5.1 Headers and Footers
The main (root) template defines the headers and footers that will be used throughout
the produced document. Any headers and footers in the included templates will be
ignored. This doesn't mean the
content
of headers and footers can't be determined by
included templates, but the presence and overall properties are controlled by the main
template.
2.13.5.2 Performance
The flexibility and maintainability provided by the Docmosis template merging feature has
a small processing overhead at runtime. Since significantly more work needs to be done
to produce the final combined document it is not surprising that there is a runtime cost.
The impact will vary upon the numbers and sizes of included documents but in practice
the difference in practice is not expected to be noticeable.
2.13.5.3 Styling Limitations
There are some tricks to learn about styling with regards to including templates. One
example is where the included template has a Heading style for the first line. Depending
on the versions of OpenOffice in use, the Heading style may get dropped unless there is a
leading blank line first. This is fairly minor in practice, but something to be aware of.
Most of the time the behaviour will be as expected and so experimentation will only
occasionally be called-for.
2.14 Page and Other Breaks
Docmosis templates may contain several types of break including page breaks, column
breaks and section breaks. If the break is in your template it will appear in your rendered
documents unless you condition it out with a conditional section. If the break is inside a
repeating section it will be repeated each time your repeating section is displayed.
To allow templates to be more expressive, Docmosis provides several fields that can be
used to render a break, but without having to place the break literally into the template:
Field Description
<<pageBreak>> Insert a page break at this location in the document.
<<columnBreak>> Insert a column break at this location in the document. This only
applies to templates that have a multi-column page layout.
<<pageBreakNotLast>> Insert a page break at this location in the document unless we have
finished repeating the current repeating section. This is only valid
within a repeating section.
<<columnBreakNotLast>> Insert a column break at this location in the document unless we have
finished repeating the current repeating section. This is only valid
within a repeating section and within a page layout that is multi-
column.
Page 54 Docmosis Template Guide
Version 4.2
Jul 2017

For example, a template section repeating person details and desiring to put each person
on a separate page could look like this:
2.15 Comments in Templates
Docmosis supports comments in templates. Comments are sections of the templates that
are ignored by document processing and never appear in the output document.
Comments are useful for:
1. Creating permanent notes in the template that are helpful to template authors and
maintainers
2. Disabling sections of templates temporarily to assist with development and
maintenance.
Due to the two distinct requirements for comments above, there are times where you
may need comment out a section of a template which itself contains other comments.
For example, you are temporarily disabling a section of the template which happens to
contain comments that are permanent. To support this, Docmosis provides multiple
distinct comment markup delimiters as shown by the following table. Different delimiters
may be used to nest comments inside other comments.
Start Delimiter End Delimiter
<<## ##>>
<</* */>>
Comments can span multiple lines and they are always done as plain text in the
document. Merge fields and Document fields cannot be used to create comments.
Docmosis Template Guide Page 55
Version 4.2
Jul 2017

Docmosis Template Guide
As an example, a template comment may look as follows:
<<# The following section displays the person
details if they exist #>
<<cs_displayPersonDetails>>
…
2.16 Creating Pre-Filled PDF Forms
Docmosis supports the creation of PDF forms, optionally pre-filled with data. PDF forms
can useful for allowing customers to fill out information.
Docmosis can inject text into PDF form text fields, text areas and checkbox labels.
Docmosis can also check or uncheck the checkboxes.
Note
Only ODT (Libre Office) templates are supported for PDF form creation
To Create a PDF form, start with an Libre Office Writer document for your template. You
need to make sure the Form Controls are visible: View -> Toolbars -> Form Controls. On
the Form Controls toolbar, you click the “Design Mode” button to be able to add form
fields to your template:
Once you are in design mode, all the controls are enabled and can be added to your
document.
To add text field, click the text box field:
Then drag the area in your document to create the field. The following example shows
creating a field to collect a name in a table:
Page 56 Docmosis Template Guide
Version 4.2
Jul 2017
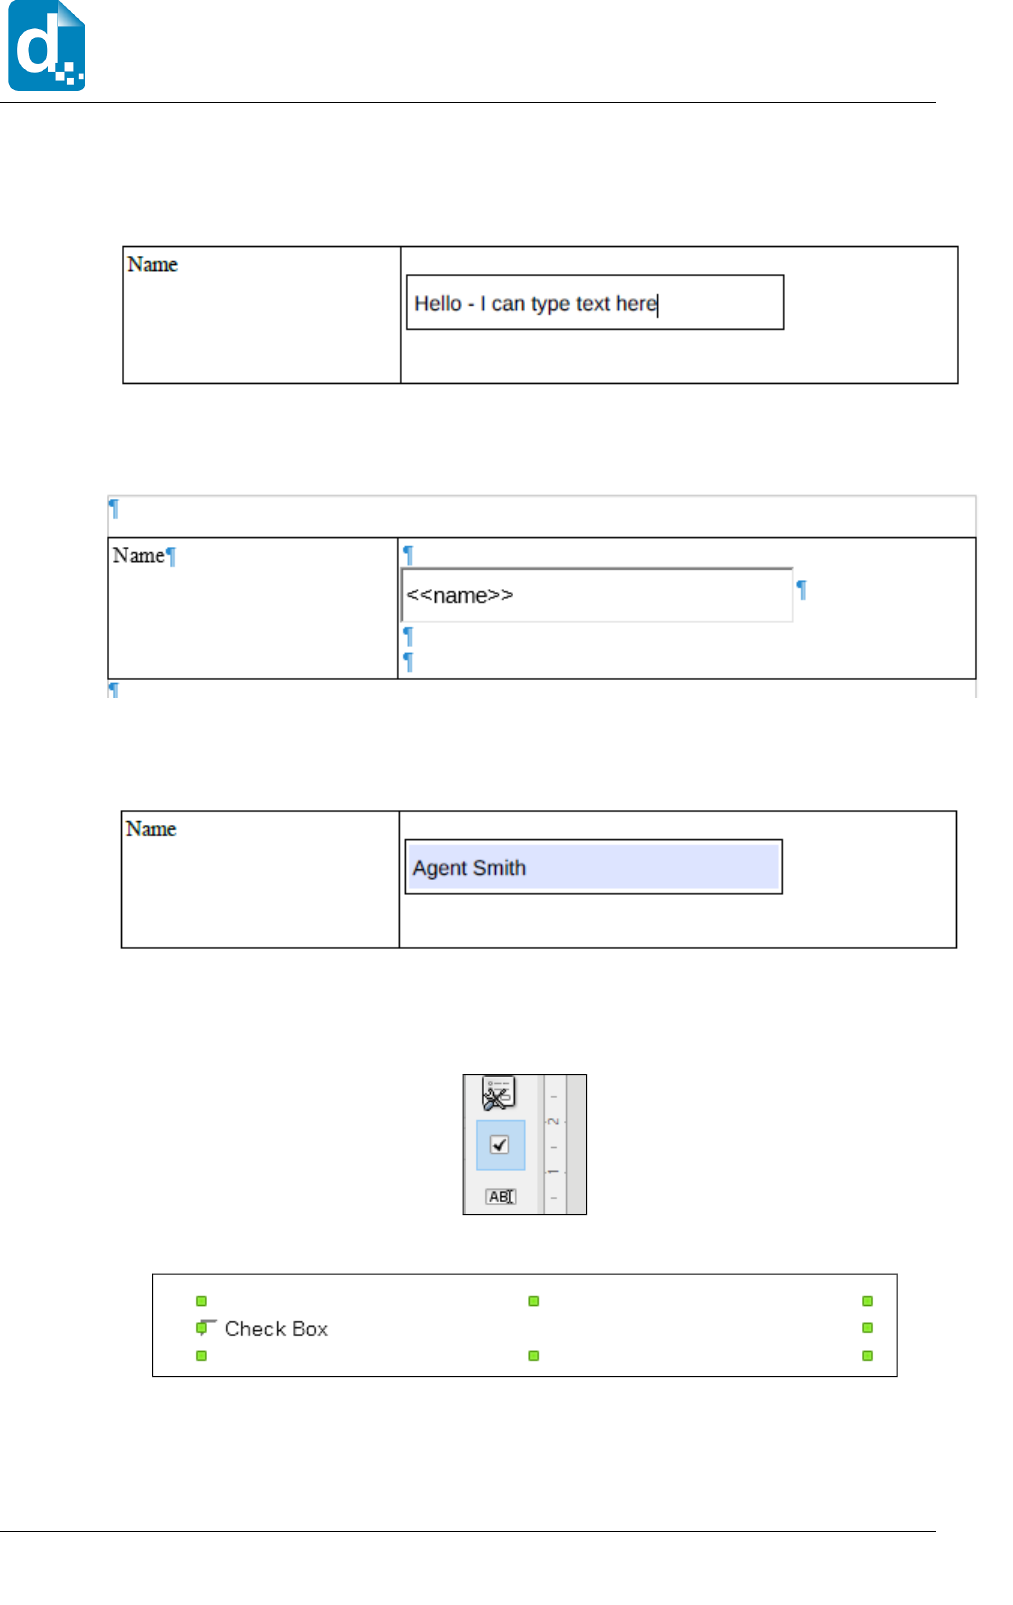
When the above template is rendered to PDF, there is a name field that can be typed into
by a user:
To get Docmosis to pre-fill the name, we simply add the <<name>> field into the new
text box in the template:
The next time we render this template, if we have name data, it will be pre-populated into
the form:
The PDF is now a pre-filled form, but can still be edited and adjusted as required.
When working with Checkboxes, the same process applies. Select the checkbox:
Then drag an area on your document to create the space for the checkbox and its label:
Double click on the field to access its properties. In the example below, we have set the
name to “fld_hasAddress” and the label to <<hasAddressLabel>>:
Docmosis Template Guide Page 57
Version 4.2
Jul 2017
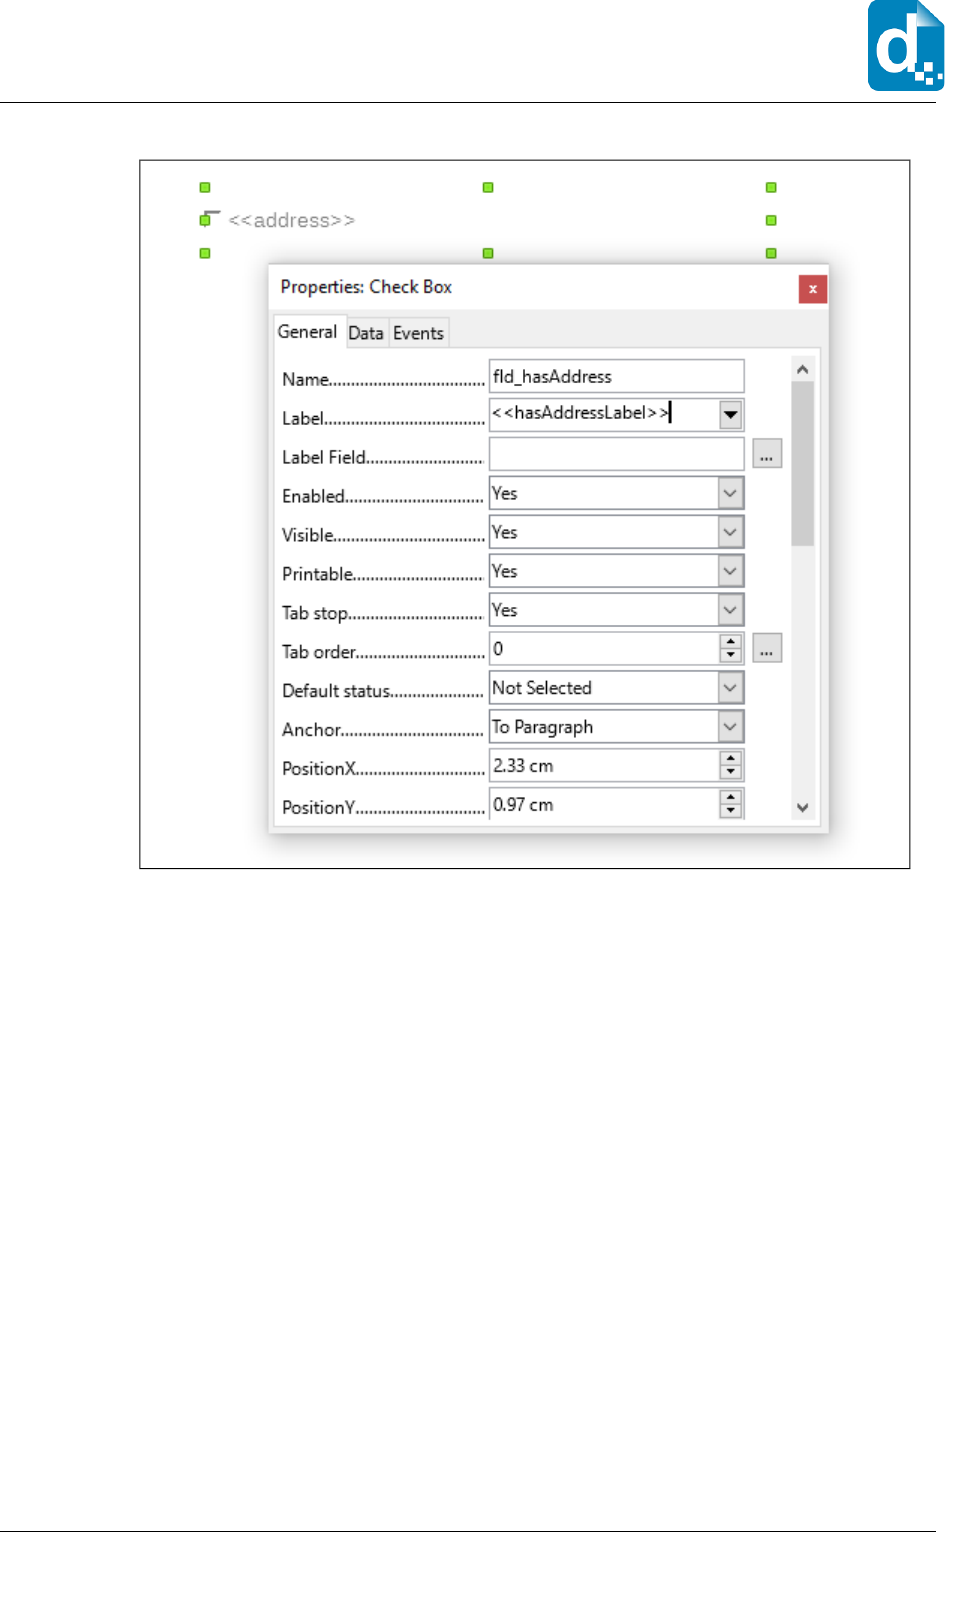
Docmosis Template Guide
The “fld_hasAddress” name will cause Docmosis to look up the data for the value of
“hasAddress” and use the value to tick or untick the box when the document is
generated. The “fld_” prefix is what tells Docmosis to look up the value dynamically.
The Label looks like a Docmosis field and indeed will be dynamically populated when the
document is rendered. If static text for the label is required, simply type the text and
omit the << and >> delimiters.
Page 58 Docmosis Template Guide
Version 4.2
Jul 2017
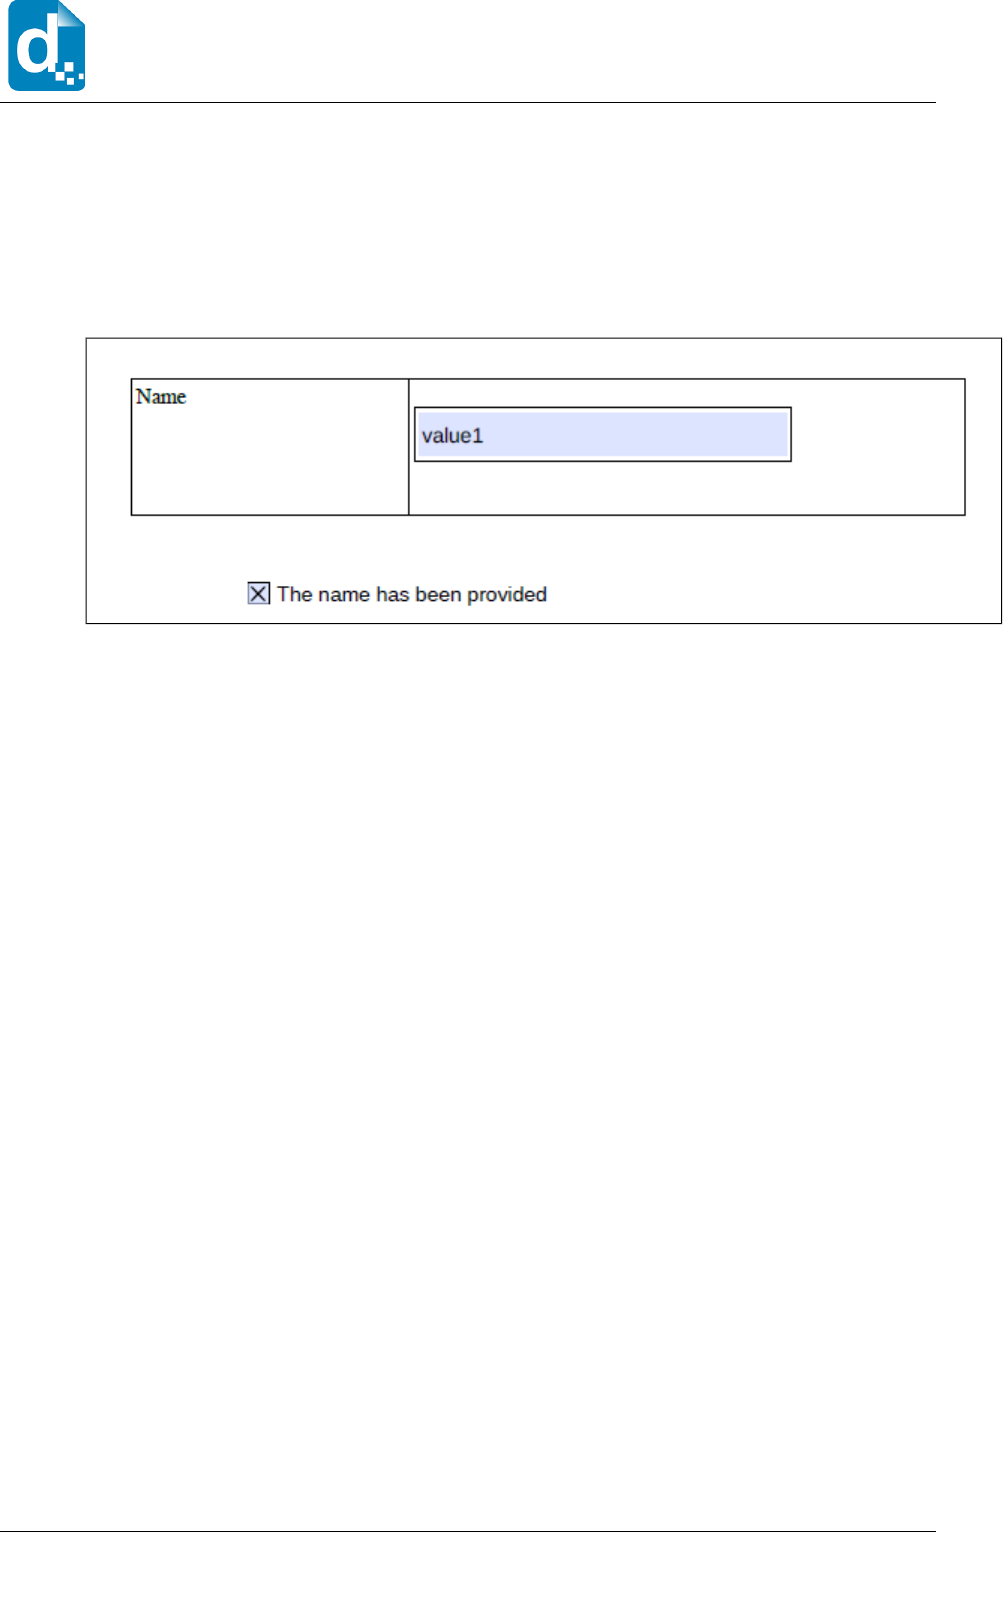
The above example, when rendered with data:
hasAddress=true, and
hasAddressLabel=”The name has been provided”
creates a pre-filled PDF form with the checkbox ticked and the label set to the data-
provided text:
Docmosis Template Guide Page 59
Version 4.2
Jul 2017
Docmosis Template Guide
3 Applying a Renderer
To enhance the presentation of your documents, you can apply a “renderer” to a field.
This allows changes to be made to the display of the data including changing the:
background colour (if in a table cell);
font style to bold, italics or underline.
characters/text to be displayed
Docmosis includes some Built-in Renderers for formatting: Booleans, Numbers and Dates.
With Docmosis-Java you can also define your own custom renderers.
Important
Later versions of Docmosis now provide a simplified method of formatting Numbers and Dates by using
functions (see 1.5.3.7 ).
It is recommended to use the new functions where appropriate.
To associate a renderer with a field, you use the renderer qualifier to specify the name
of the renderer that is to be used. The Java code supplying the data is also responsible
for supplying any custom renderers (which is described in the
Docmosis Developer’s
Reference)
. The only requirement in the template is to associate the renderer with the
applicable field.
For example a custom renderer called “myrenderer” applied to the “surname” field would
look something like this:
<<surname{renderer=myrenderer}>>
Note
Remember, you don’t need to use a renderer if you want a cell to be permanently shaded. Just
applying shading to the cell in the template. Renderers are used to allow changes based on
data/conditions that exist during document generation.
Tip
You can set the background colour of a cell with no data by using an element whose name has no
equivalent (and thus no data) in the application, or by using a field named dummy.
Important
Make sure there are no spaces in the field name or qualifier. Spaces may cause the qualifier to not be
recognised, particularly if using Word for the template source. If a space is required, use the
underscore character (_).
Page 60 Docmosis Template Guide
Version 4.2
Jul 2017
3.1.1 Renderer Parameters
Parameters may be passed to renderers so that the same renderer can produce different
results. For example, the following fields pass different parameters to the renderer
named myrenderer:
<<surname{renderer=myrenderer(‘strict’)}>>
<<surname{renderer=myrenderer(‘bold’,’relaxed’)}>>
The first sends a “strict” parameter to myrenderer, whilst the second sends “bold” and
“relaxed”. myrenderer is written in Java code and may respond to these parameters as
it sees fit.
3.1.2 Built-In Date Renderer
Docmosis has a built-in date renderer which is available to all templates without requiring
any Java code.
Important
Date Formatting can also be achieved by using the built-in function “dateFormat” (see 1.5.3.7 ). It is
recommended to use the new function where possible.
To use the date renderer simply reference a renderer named “date”.
The synopsis for the date renderer is:
date([<output format> [,<input format>]])
where:
output format = the desired output format
input format = the format used to decode the input date
Both the date renderer and the new dateFormat function accept input and output format
strings:
If no “output format” is specified then the output date will be formatted in the
default output format (‘dd MMM yyyy’).
If no “input format” is specified then input date will be compared to a set of
common input formats. If the input date cannot be decoded then an error will be
flagged.
Note
Docmosis errors and footnotes are only injected in to documents when Docmosis is running in DEV
mode.
Docmosis Template Guide Page 61
Version 4.2
Jul 2017

Docmosis Template Guide
The date formatter applies to date-typed data as comes from Java objects or database
queries. If the data comes from textual data (such as raw strings, XML or JSON data)
then Docmosis will automatically try to parse the data into a date. If you are passing an
unusual formatted date via text, then you can tell the date renderer how to parse it by
providing an “input format” parameter.
For example:
Birth Year=<<birthdate{renderer=date(‘yy’,’yyyy’)}>>
Would accept birthdate data supplied as a 4-digit date only (eg: “1970”) and produce a 2-
digit date (eg: “70”).
To allow for formats that include a space, the underscore character (_) is transcribed
automatically into a space. This is done since fields cannot contain spaces when using
Word as the template source. To include an underscore, the backslash character can be
used to indicate that the underscore should be left as an underscore (\_).
Examples - if the data for “myDate” was “27 May 2009”, the following table shows
what different formats would produce:
Example Field Result
<<myDate>> 27-MAY-2009
<<myDate{renderer=date}>> 27 May 2009
<<myDate{renderer=date(‘dd/MM/yyyy’)}>> 27/05/2009
<<myDate{renderer=date(‘MMM dd, yyyy’)}>> May 27, 2009
<<myDate{renderer=date(‘EE,_dd_MMM_yyyy’)}>> Wed, 27 May 2009
<<myDate{renderer=date(‘yyyy’)}>> 2009
The same results can be achieved by using the dateFormat function:
Example Field Result
<<myDate>> 27-MAY-2009
<<{dateFormat(myDate)}>> 27 May 2009
<<{dateFormat(myDate,‘dd/MM/yyyy’)}>> 27/05/2009
<<{dateFormat(myDate,‘MMM dd, yyyy’)}>> May 27, 2009
<<{dateFormat(myDate,‘EE, dd MMM yyyy’)}>> Wed, 27 May 2009
<<{dateFormat(myDate,‘yyyy’)}>> 2009
Page 62 Docmosis Template Guide
Version 4.2
Jul 2017

The input and output format strings can be created by using combinations of the following Letters:
Letter Date or Time Component Presentation Examples
G Era designator Text AD
y Year Year 1996; 96
M Month in year Month July; Jul; 07
w Week in year Number 27
W Week in month Number 2
D Day in year Number 189
d Day in month Number 10
F Day of week in month Number 2
E Day in week Text Tuesday; Tue
a Am/pm marker Text PM
H Hour in day (0-23) Number 0
k Hour in day (1-24) Number 24
K Hour in am/pm (0-11) Number 0
h Hour in am/pm (1-12) Number 12
m Minute in hour Number 30
s Second in minute Number 55
S Millisecond Number 978
z Time zone General time zone Pacific Standard Time;
PST; GMT-08:00
Z Time zone RFC 822 time zone -0800
The table above comes directly from Java’s SimpleDateFormat class documentation,
which is described in the Java API Specification. Some examples of suitable formats are
shown above, however the full documentation for SimpleDateFormat can be read on-line
at http://www.oracle.com/technetwork/java/api and navigating into the J2SE version of
your choice.
3.1.3 Built-In Boolean Renderer
Docmosis can format boolean (true/false) data into several presentational styles using the
built-in “boolean” renderer. This renderer exists since true/false can often be better
displayed in a document by Yes/No, Y/N, tick/cross etc.
The built-in Boolean render takes a single parameter indicating the way the true and false
values should be displayed. The following table lists the built in values that may be
passed as a parameter.
Parameter Effect
No parameter true is rendered as "true" and false as "false"
"yn" true is rendered as "Y" and false as "N"
"ynlc" true is rendered as "y" and false as "n" (lower case)
"yesnouc" true is rendered as "YES" and false as "NO" (upper case)
"yesnolc" true is rendered as "yes" and false as "no"
Docmosis Template Guide Page 63
Version 4.2
Jul 2017
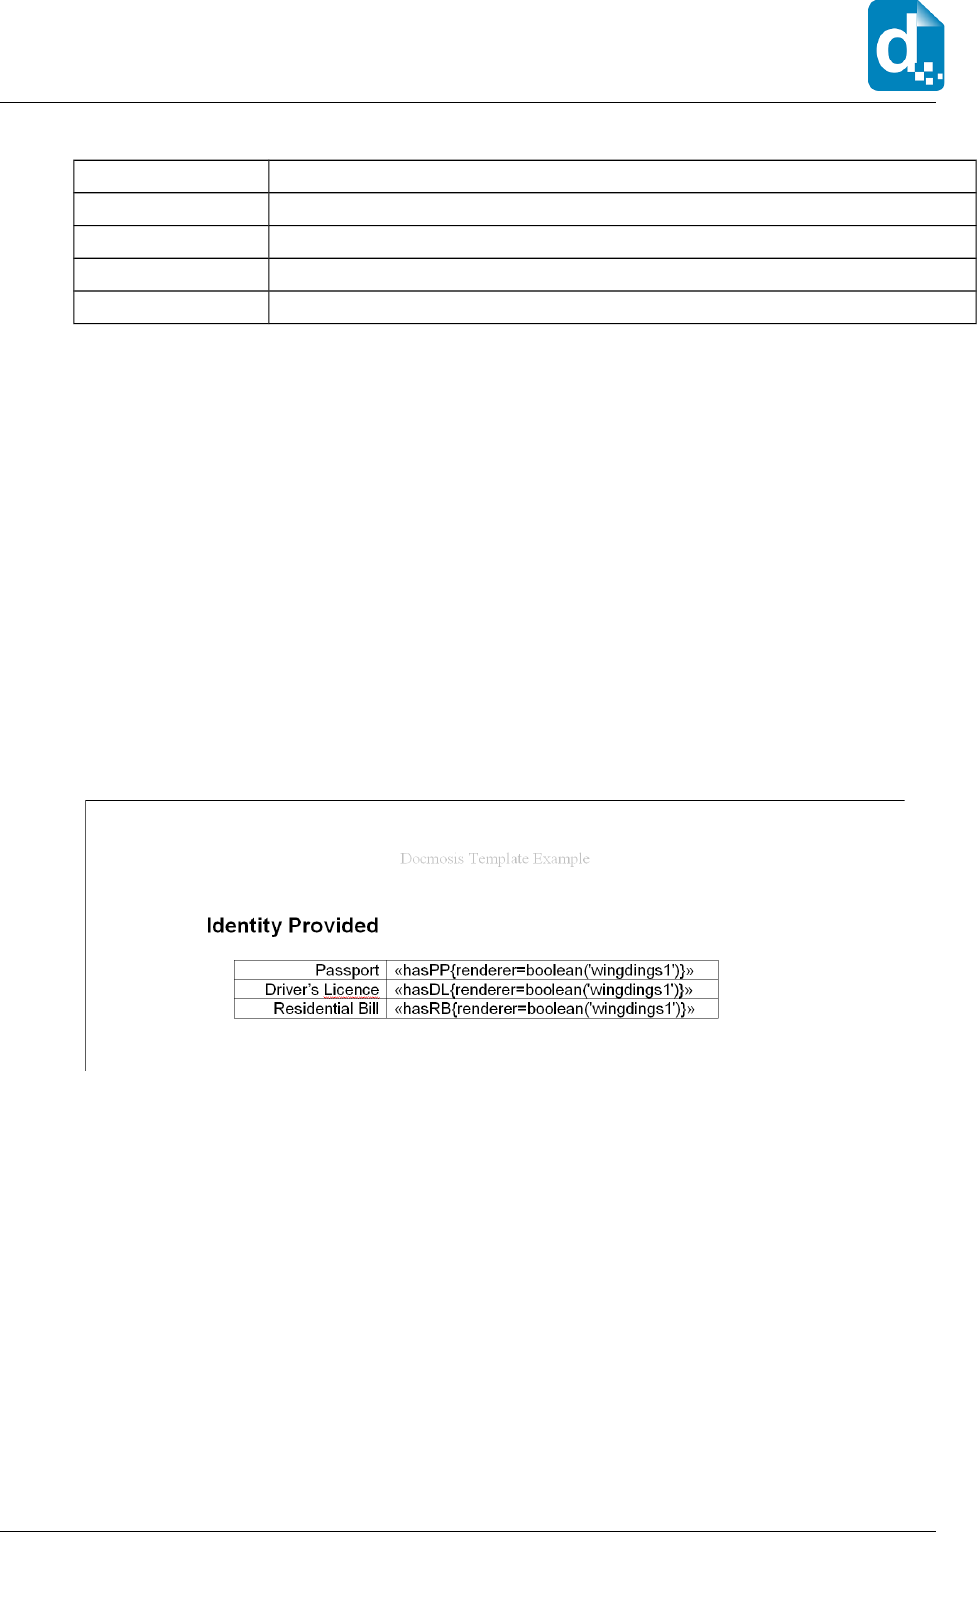
Docmosis Template Guide
"yesno" true is rendered as "Yes" and false as "No" (mixed case)
"wingdings1" true is rendered as a wingdings tick and false as a cross
"wingdings2" true is rendered as a wingdings checkbox ticked and false as unticked
"dingbats1" true is rendered as a dingbats light tick and false as a light cross
"dingbats2" true is rendered as a dingbats heavy tick and false as a heavy cross
For example, to use the yn Boolean renderer, a field may attach a renderer named
“boolean” and give it the ‘yn’ parameter:
<<isRetired{renderer=boolean(‘yn’)}>>
which will render true as Y and false as N.
The Boolean renderer will also try to parse textual data into a Boolean value to allow a
renderer to control the way it displays. For example, t, y, yes, and 1 are all considered
“true”.
3.1.3.1 Using the Wingdings Boolean Renderer
The wingdings renderers are unlike the other forms of renderers in that they rely on the
template field actually being in the wingdings font in the first place. This means you
would create the fields as required:
Then change the font of the fields that are using the wingdings renderer to the wingdings
font:
Page 64 Docmosis Template Guide
Version 4.2
Jul 2017
When this document is then rendered, the renderer will place the correct wingdings
characters into the document.
Important
Using specific fonts may cause issues if you then migrate your system to another platform. You should
always confirm the operation of your template in all its intended system environments.
To insert a formatted boolean value element:
1. Insert the element using the basic element procedure (see page 27).
2. When you are happy that the element is correct, select it and format its characters
using the font you require for the resulting symbol.
3. Work with the application developer to ensure that the Docmosis data formatter
returns the appropriate character values for the true and false conditions.
3.1.3.2 Using the Dingbats Boolean Renderer
The Boolean renderer also provides the ability to render dingbats character replacements.
Using dingbats does not require any changes to fonts in the templates as is required for
the wingdings formatter.
Docmosis Template Guide Page 65
Version 4.2
Jul 2017

Docmosis Template Guide
You may find that Word does not understand the dingbats characters, so if you choose
Word as the output document type, you typically would not use dingbats character
renderers. The dingbat Boolean renderer can be used with Word or Writer templates, the
effect is only an issue in the output document.
3.1.4 Built-In Number Renderer
Given numeric data (even from a text source like XML), you can instruct Docmosis to
format it in different ways by providing a formatting string. The formatting string
describes how you want the number to appear.
Important
Number Formatting can also be achieved by using the built-in function “numFormat” (see 1.5.3.7 ). It
is recommended to use the new function where possible.
The synopsis for the number renderer is:
number(<output format>[, <locale> ])
where:
output format = the desired output format
locale = an optional local to use for the formatting.
For Example - if the data for “myVal” was “1.23”, the following table shows what
different formats would produce:
Example Field Result
<<myVal>> 1.23
<<myVal{renderer=number(‘0.0’)}>> 1.2
<<myVal{renderer=number(‘$0.00’)}>> $1.23
<<myVal{renderer=number(‘0.0E0’)}>> 1.2E0
<<myVal{renderer=number(‘###.###’)}>> 1.23
<<myVal{renderer=number(‘000.000’)}>> 001.230
Page 66 Docmosis Template Guide
Version 4.2
Jul 2017

The same results can be achieved by using the numFormat function:
Example Field Result
<<myVal>> 1.23
<<{numFormat(myVal,‘0.0’)}>> 1.2
<<{numFormat(myVal,‘$0.00’)}>> $1.23
<<{numFormat(myVal,‘0.0E0’)}>> 1.2E0
<<{numFormat(myVal,‘###.###’)}>> 1.23
<<{numFormat(myVal,‘000.000’)}>> 001.230
The following sections provide details about creating the formatting string.
3.1.4.1 Number Formatting Specifications
The formatting string should be constructed using the specific characters shown in the
table below.
The placement and meaning of each character within the formatting string will determine
how the input number will be formatted for display.
This table comes directly from Oracle’s Java DecimalFormat class documentation:
Character Location Localized? Meaning
0 Number Yes Digit
# Number Yes Digit, zero shows as absent
. Number Yes Decimal separator or monetary decimal
separator
- Number Yes Minus sign
, Number Yes Grouping separator
E Number Yes Separates mantissa and exponent in
scientific notation. Need not be quoted
in prefix or suffix.
; Subpattern
boundary
Yes Separates positive and negative
subpatterns
% Prefix or suffix Yes Multiply by 100 and show as
percentage
\u2030 Prefix or suffix Yes Multiply by 1000 and show as per mille
value
¤
(\u00A4)
Prefix or suffix No Currency sign, replaced by currency
symbol. If doubled, replaced by
international currency symbol. If
present in a pattern, the monetary
decimal separator is used instead of
the decimal separator.
*Care must be taken when using the
currency symbol since this changes
over time with different versions of
Java (see below)
Docmosis Template Guide Page 67
Version 4.2
Jul 2017

Docmosis Template Guide
Character Location Localized? Meaning
' Prefix or suffix No Used to quote special characters in a
prefix or suffix, for example, "'#'#"
formats 123 to "#123". To create a
single quote itself, use two in a row:
"# o''clock".
Example 1. The formatting string: ‘#,##0.00’, will be interpreted as follows:
The ‘.’ point character is used to indicate the position of the decimal point.
The two ‘0’ characters to the right of the point indicate that a digit should always
be displayed in those positions. In the case where the number being formatted is
an integer or only has one decimal place, then the result will be padded with
trailing zeroes to the right.
The output number will have as many leading digits as is needed to encode the
number.
The single ‘0’ to the left of the point indicates that at a minimum of one digit
should always be displayed to the left of the point. In the case where the number
being formatted is less than one, then a leading zero will be used in the result.
(eg: An input of “.12” will display as “0.12”, however a formatting string of
‘#.00’ string would result in “.12” )
This string also uses “,” to indicate the position of the thousands separator. There
are three ‘#’ characters between the ‘,’ comma and the ‘.’ point – so the digits to
the left of the decimal point will be grouped in blocks of three.
Example 2. The formatting string: ‘0000’, will be interpreted as follows:
There is no ‘.’ point character so all numbers will be output as integers.
There will always be at least four digits as the ‘0’ character is used four times. If
the input number only has 1, 2 or 3 digits – then the output will be padded with
leading zeroes.
If the input contains more than four digits then it will expand so that the whole
number is displayed.
The table above also includes some locale-specific features such as the ‘¤’ character. If
you use the ‘¤’ character in your formatting string, Docmosis will replace this with the
currency sign for the locale being used. For example:
<<val{renderer=number(‘¤’, ‘UNITED STATES’)}>>
with val = 100 would render US$100 whereas:
<<val{renderer=number(‘¤’, ‘UNITED KINGDOM’)}>>
would render £100 (the UK currency symbol).
Page 68 Docmosis Template Guide
Version 4.2
Jul 2017
Important
Please note that the currency symbol behaviour has changed over time with different versions of Java
so care must be taken if using this character.
3.1.4.2 Locale Specific Formatting
The number formatter can also be given a locale to use when processing the values and
the format specification.
The locale used is by default the locale of the current environment. To override the
default, a second parameter can be provided:
renderer=number(<format>[, <locale> ]);
For example, to interpret a currency in a German format:
<<myVal{renderer=number(‘#.#,00’, ‘GERMAN’)}>>
Which would format “1500” as “1.500,00”.
Note that the input data value is also interpreted according to the locale where necessary
(for example the value is string data). So, for example, if using the GERMAN locale with
string data “1,500.00” would result in an error because this is NOT a valid representation
in the GERMAN locale.
The locale parameter, can be specified as a language or a country. The following table
lists all the values that may be used to specify the Locale by country, language or code.
Country Language
Code ISO CODE Name Code
ISO
Code Name
"- "-. " / / "
"0 "10 2"0 "
"1 "13 "* 4
"2 "24 " 0
" "2 " 3
.0 .0- . 5
.3 .31 . .
.6 .61 . "
.7 .-1 . .
. .- .# 4
.1 .1" .8 9
:" :"; : <
:6 :60 48 =
:- :6- : 4
:; :6; : 8 8 :
: :- : 4
Docmosis Template Guide Page 69
Version 4.2
Jul 2017

Docmosis Template Guide
Country Language
Code ISO CODE Name Code
ISO
Code Name
:1 :1= :1 4
:> :>0 :81 :8
50 502 3 3
5? 5;? 5@ 5
5 5A 51 4
5> 5>" " "
0: 0:2 0 4
03 037 0 "
04 049 4 :
04 049 4 4
00 04 0 0
<= <=; < ' ' <
<1 <1" < <
3. 3.1 2? 0
31 31: 3 3@
3 3A 3 4
6? 6?3 6? 8 8 :
6; 6;5 6 4
61 61B :* # :*
62 62; 6 6
=; =;5 = 0
=; =;5 = 6
=0 =1- = 0
=C =1C =/ "
=4 =4- = =
=- =41 = 6
= =" = =
D D1 D "
D9 D9; D E E D
?1 ?1 4? @ @ ?
?F ?F ? "
-. -.; - "
-7 -.7 - "
- -2 - -
-2 -2G -H 3
-2 -2G -H <
-B -B" -# # # -#-I
A" A"1 A "
AG A0G AH 4
A? A?5 A @ @ A
;= ;=: ; 4
Page 70 Docmosis Template Guide
Version 4.2
Jul 2017

Country Language
Code ISO CODE Name Code
ISO
Code Name
;- ;-5 ; 5
; ;1 ; ;
;> ;>- ;> 0
A A; "
9" 9"; 9 4
90 901 9 4
9- 9- 9 9
91 91= 91 4
9 91 9 9
97 917 9 4
C" C" C "
1 1A 1 1
12 124 1 1
4" 4"2 4" "
45 45; 4 "
4B 4-B 04# 4
4? 4B? 4#@ @ @ 4#@
4= 4B; 4# # 4#
40 4F0 4 # 4
47 471 4 "
6 6"
; 2; "
1 21 @ @
F F; 8 8 :
2" 2?1 2@ @ @ 2@
27 217 2 4
24 24" 24 0
B0 B0; B8 4
70 70A 7 "
72 723 7# 4J:*
72 723 7# 4
>" >"< 4" 0
From Oracle’s Java Locale class documentation for Java Version 7
Docmosis Template Guide Page 71
Version 4.2
Jul 2017
