Dome9 Workshop Guide 2018
User Manual:
Open the PDF directly: View PDF ![]() .
.
Page Count: 40
__________________________________________
AWS Security Operations
Lab Guide
Sponsored by
v1.0
1

Dome9 Lab Guide
Logistics
●Format: Overview presentation and lab setup, followed by paced exercises with
a section recap.
●Workshop Duration: 2 hours
●Target Audience: Technical security users (security engineers, architects,
DevOps) who have heard of Dome9 and know what Dome9 offers
● The organizing team is comprised of one speaker and 1-2 technical staff to help
out and answer questions
● Participants bring their own laptops and have an AWS account setup (preferably
beforehand) - Please do this early on since it takes a few hours for a new
AWS account to sync with a CFT template
● Participants need to download the Cloudformation (CFT) template to run this lab
- Please download CFT from the Github here
2

Dome9 Lab Guide
Table of Contents
1. Lab Overview and AWS Setup (10 -15 min)
a. Walkthrough of lab environment and exercises
b. Exercise 1.1: Setup AWS account
c. Exercise 1.2: Deploy sandbox environment in AWS
2. AWS Security Operations Lab (30 minutes)
a. Exercise 2.1: Identify zombie security group (no instance, but permissive
rule)
b. Exercise 2.2: Identify an exposed internal asset in the AWS environment -
Part 1
c. Exercise 2.3: Identify an exposed internal asset in the AWS environment -
Part 2
d. Section Wrap Up
3. Dome9 Overview and Onboarding (10 -15 min)
i. Overview of Dome9
ii. Exercise 3.1: Connect Dome9 to your new AWS account
4. AWS Security Operations Lab with Dome9 (30 min)
i. Exercise 4.1: Conduct inventory/asset review
ii. Exercise 4.2: Visualize security architecture
iii. Exercise 4.3: Identify zombie security group
iv. Exercise 4.4: Identify publicly accessible databases (2)
v. Section Wrap Up
5. Security Posture Management Lab (20 min)
i. Exercise 5.1: Enforce security policy
ii. Exercise 5.2: Active protection – Security group level
iii. Exercise 5.3: Active protection – Region level
iv. Section Wrap Up
3

Dome9 Lab Guide
6. S3 Security Lab (20 min)
i. Exercise 6.1: Identify publicly exposed S3 buckets (2) using Dome9
ii. Exercise 6.2: S3 Access Controls (ACL)
iii. Exercise 6.3: S3 Access Controls (Bucket policies)
iv. Section Wrap Up
7. Offboarding (5 min)
4
Dome9 Lab Guide
AWS Setup
Exercise 1.1: Setup lab environment (Login to your lab AWS account)
The instructor should provide you with an AWS Account for this workshop. Ensure you
have an AWS account setup before proceeding.
Exercise Complete!
Exercise 1.2: Deploy sandbox AWS environment
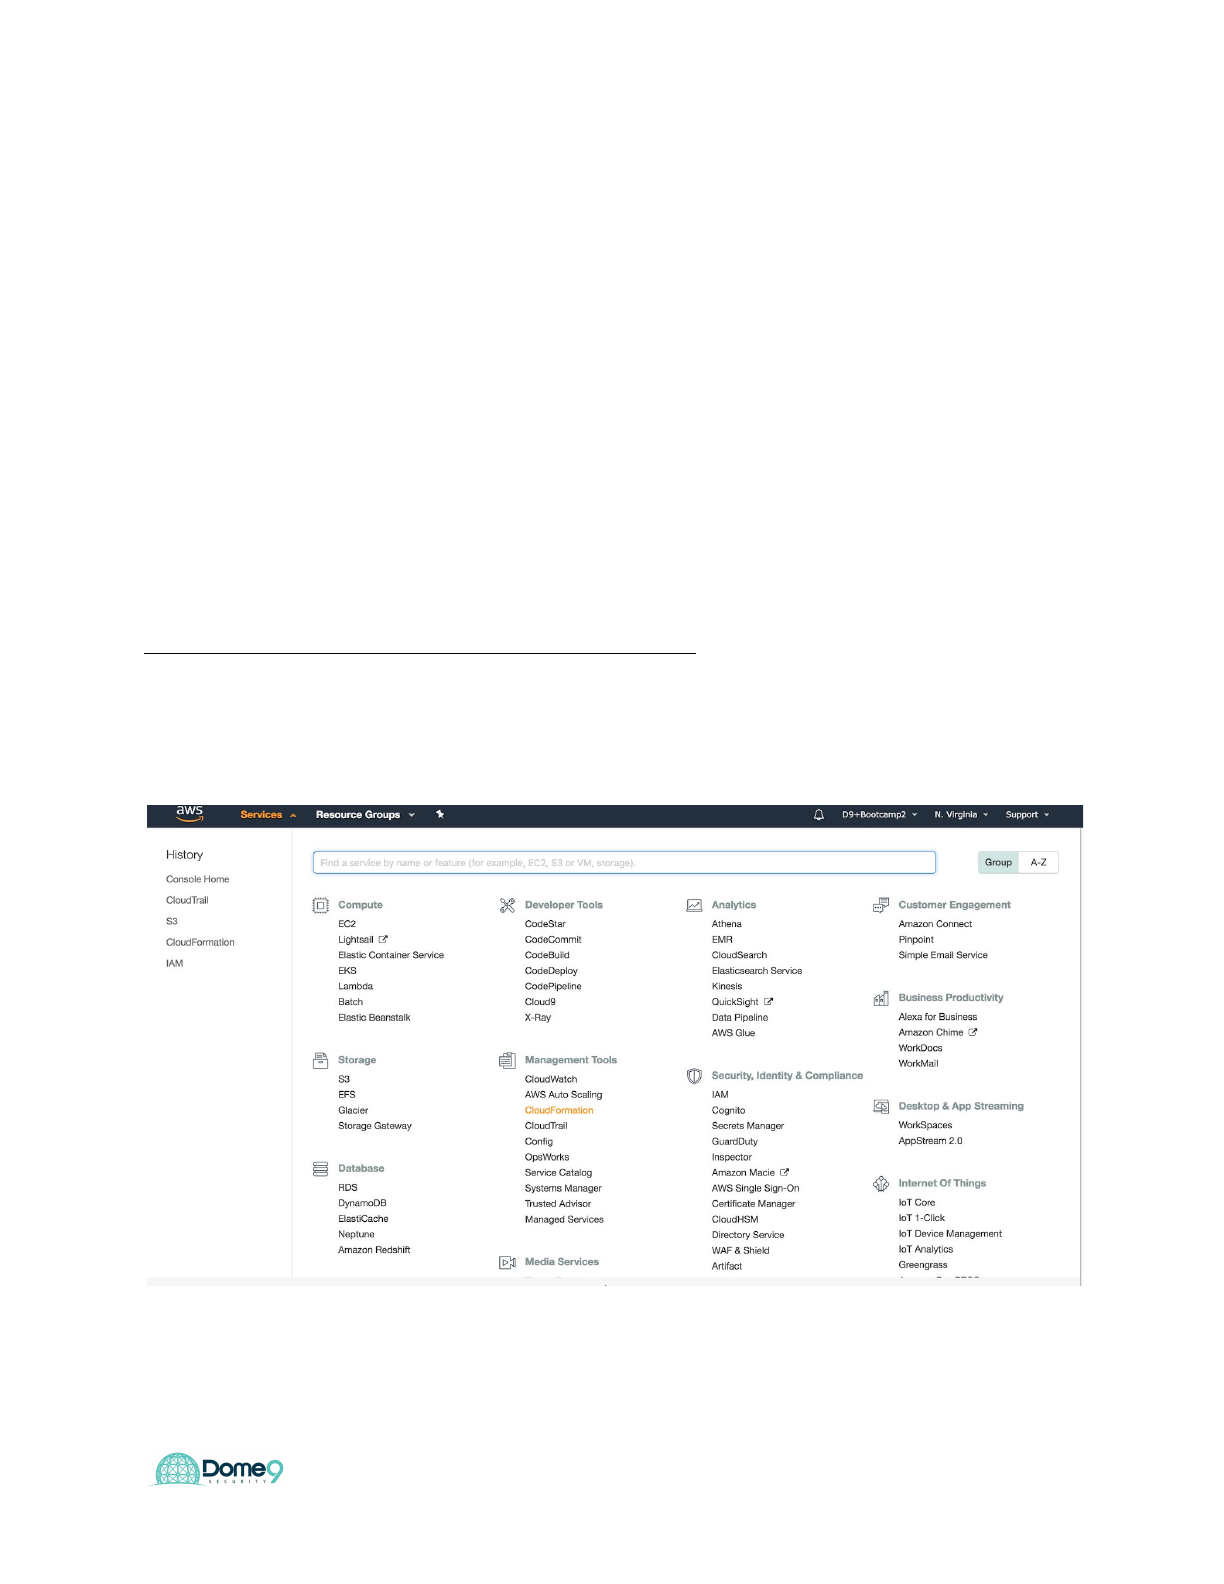
Navigate to AWS Cloudformation
5
Dome9 Lab Guide
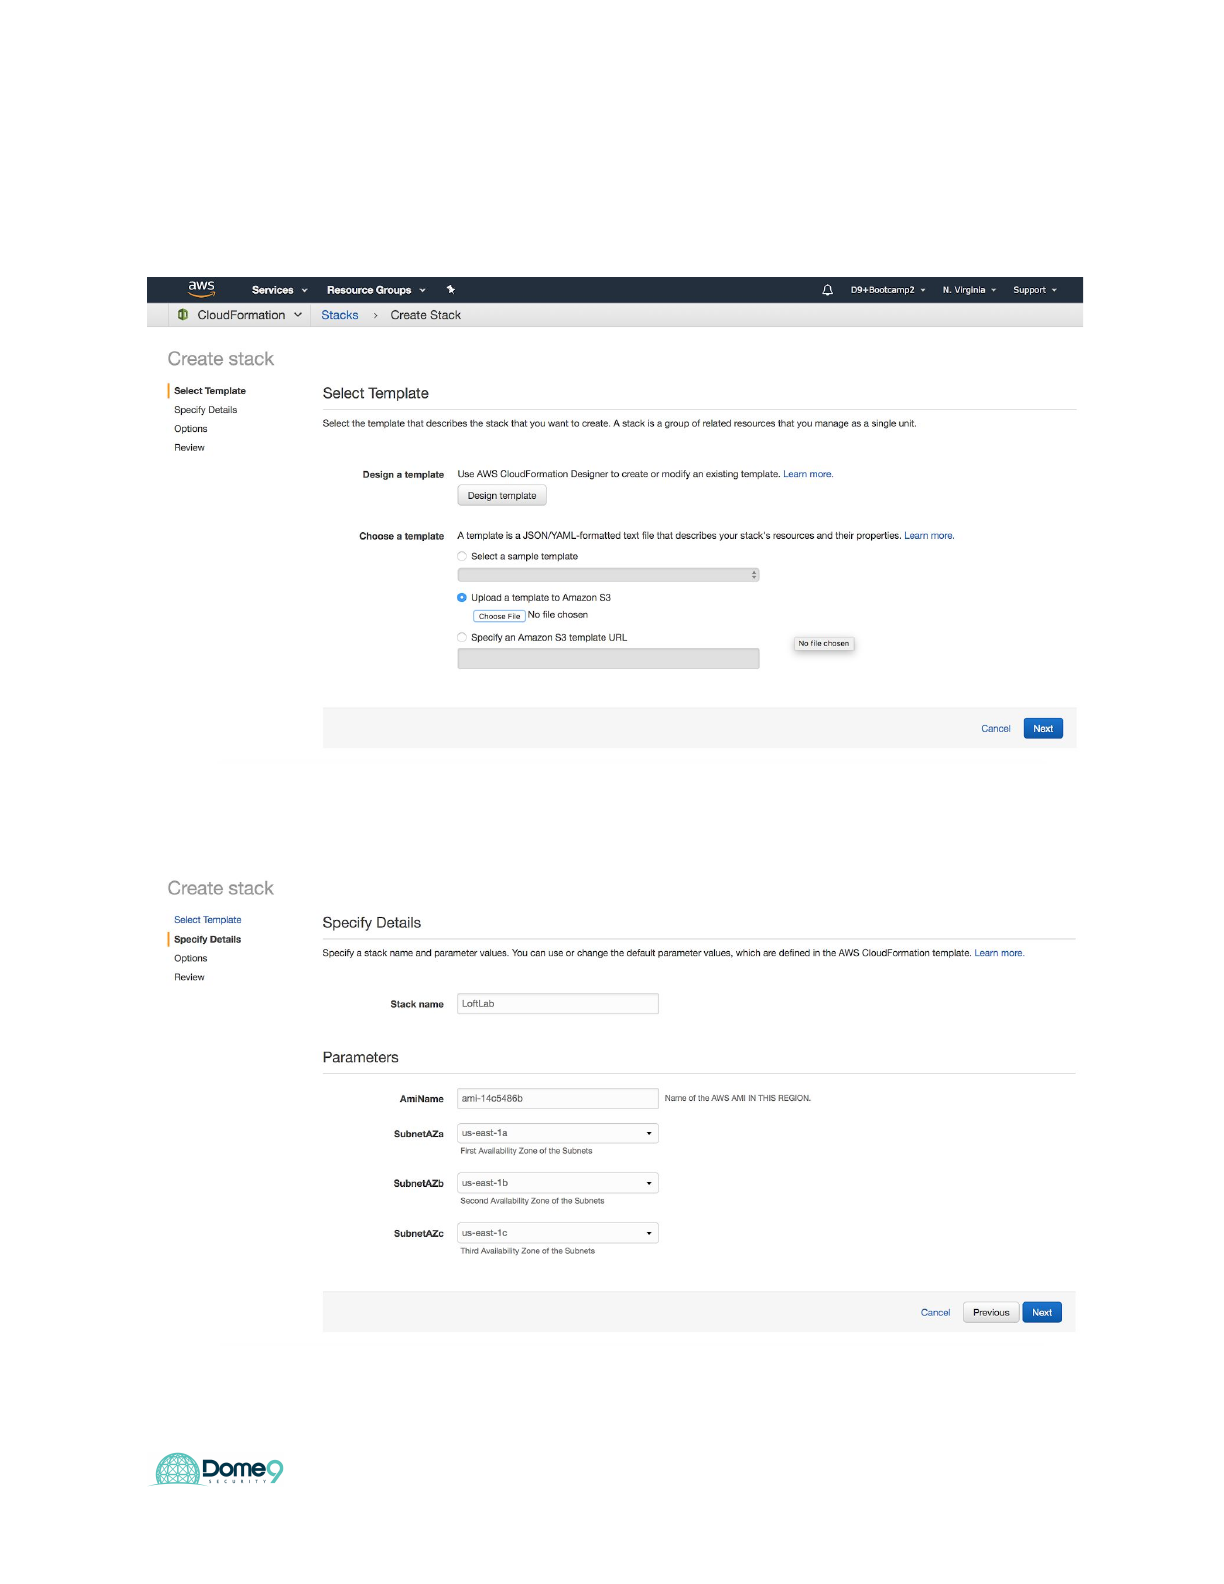
Click on create stack and select “upload a template to S3” and choose the CFT file that
you downloaded and click next
Create a stack name such as “<yourname>LoftLab” and select us-east1-a, 1-b, and
1-c for subnetAza, subnetAzb, subnetAzc and click next
6
Dome9 Lab Guide
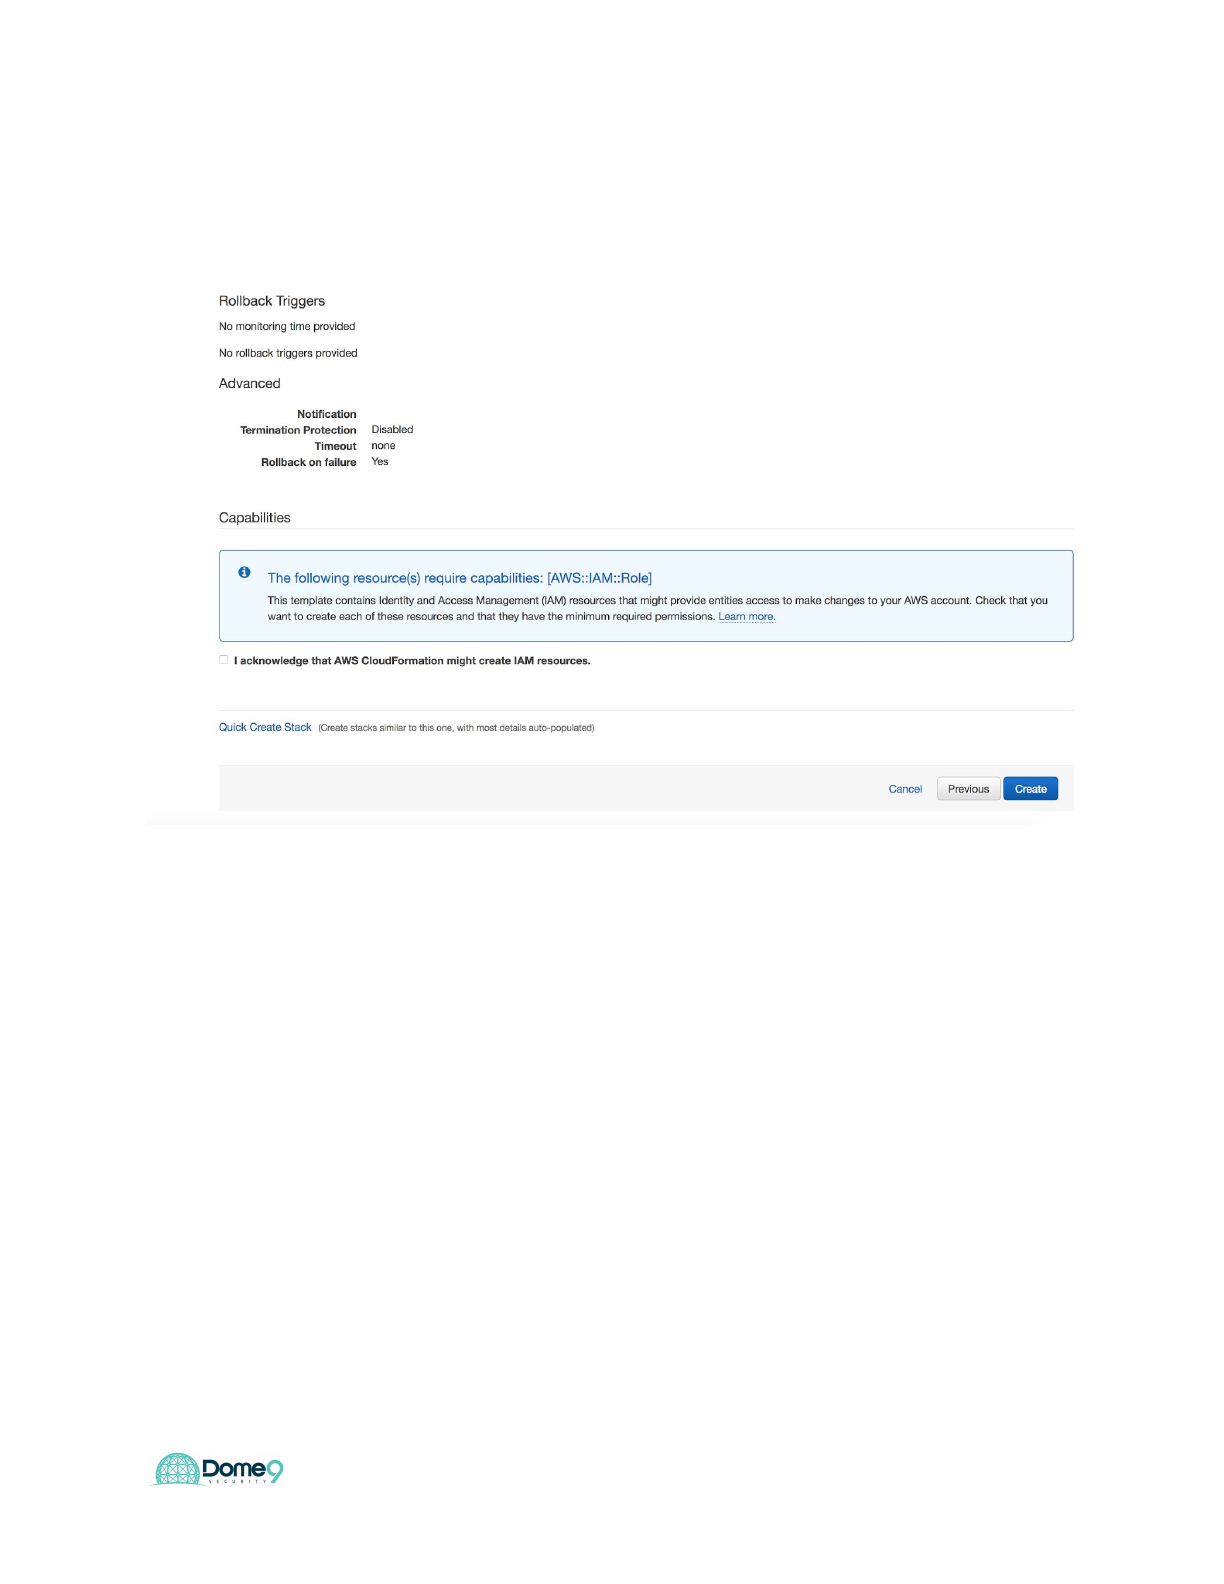
Click next twice and select “I acknowledge that AWS Cloudformation might create
resources” and click create.
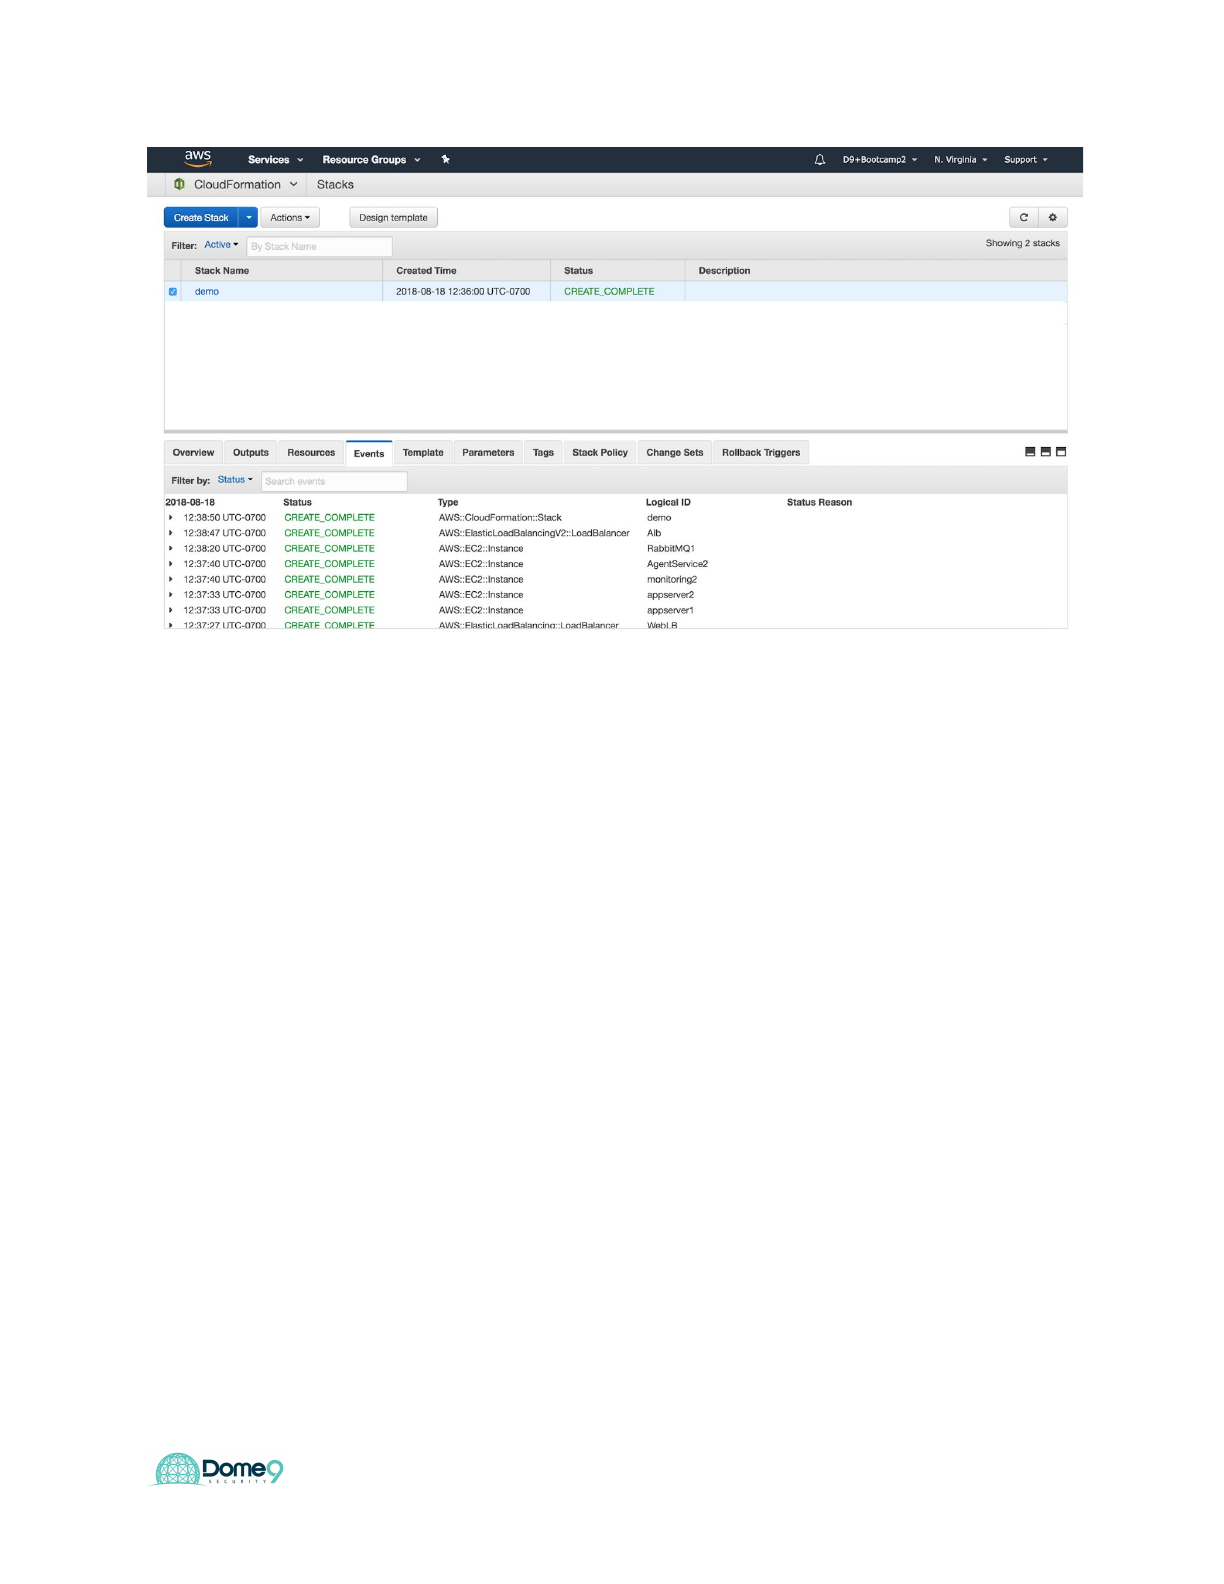
You will need to wait 5 minutes for the CFT to automatically deploy the environment in
your AWS account. At the end you should see the below screen:
7
Dome9 Lab Guide
Exercise Complete! You have now deployed the sandbox AWS environment in your
account.
AWS Security Policy Lab
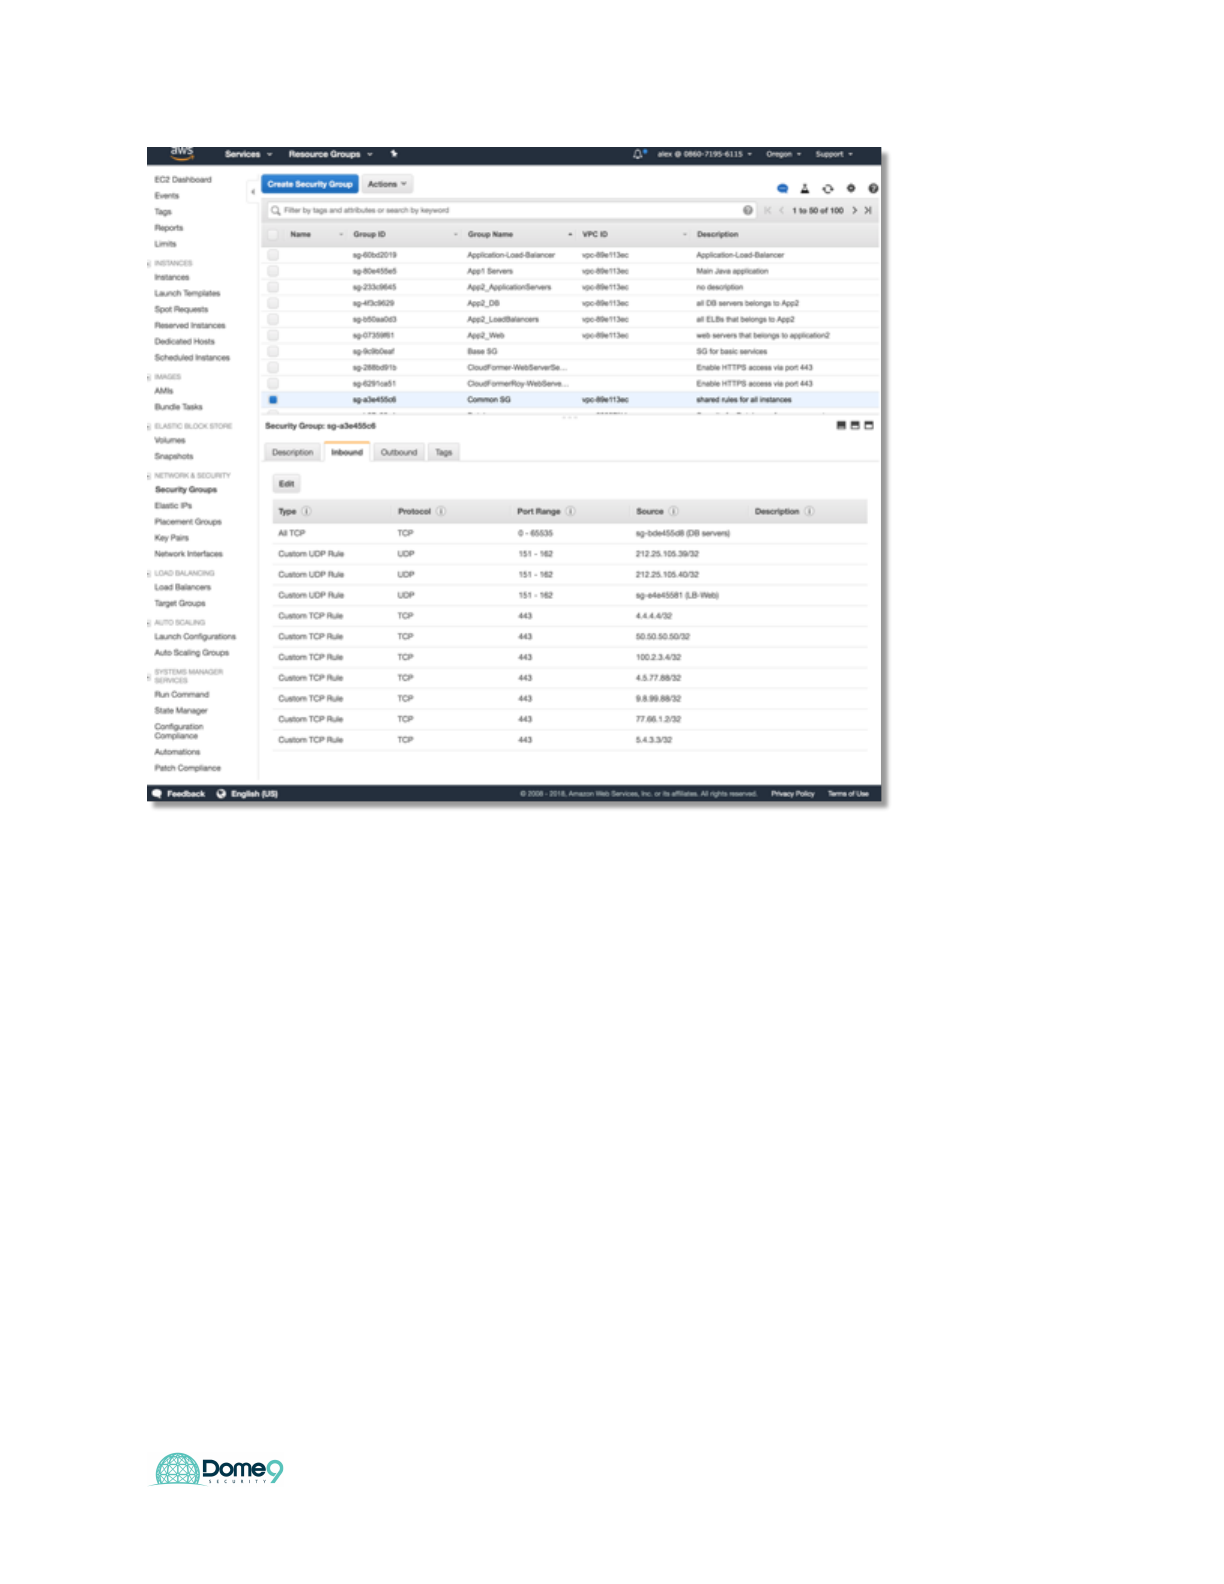
Exercise 2.1: Identify zombie security group
In your AWS account, navigate to N.Virginia region. Explore EC2 instances, Security
Groups, IAM and other services.
8
Dome9 Lab Guide
Hint: A zombie security group is a security group that has a permissive rule but has no
instances tied to it!
Exercise Complete! You have now found your zombie policy!
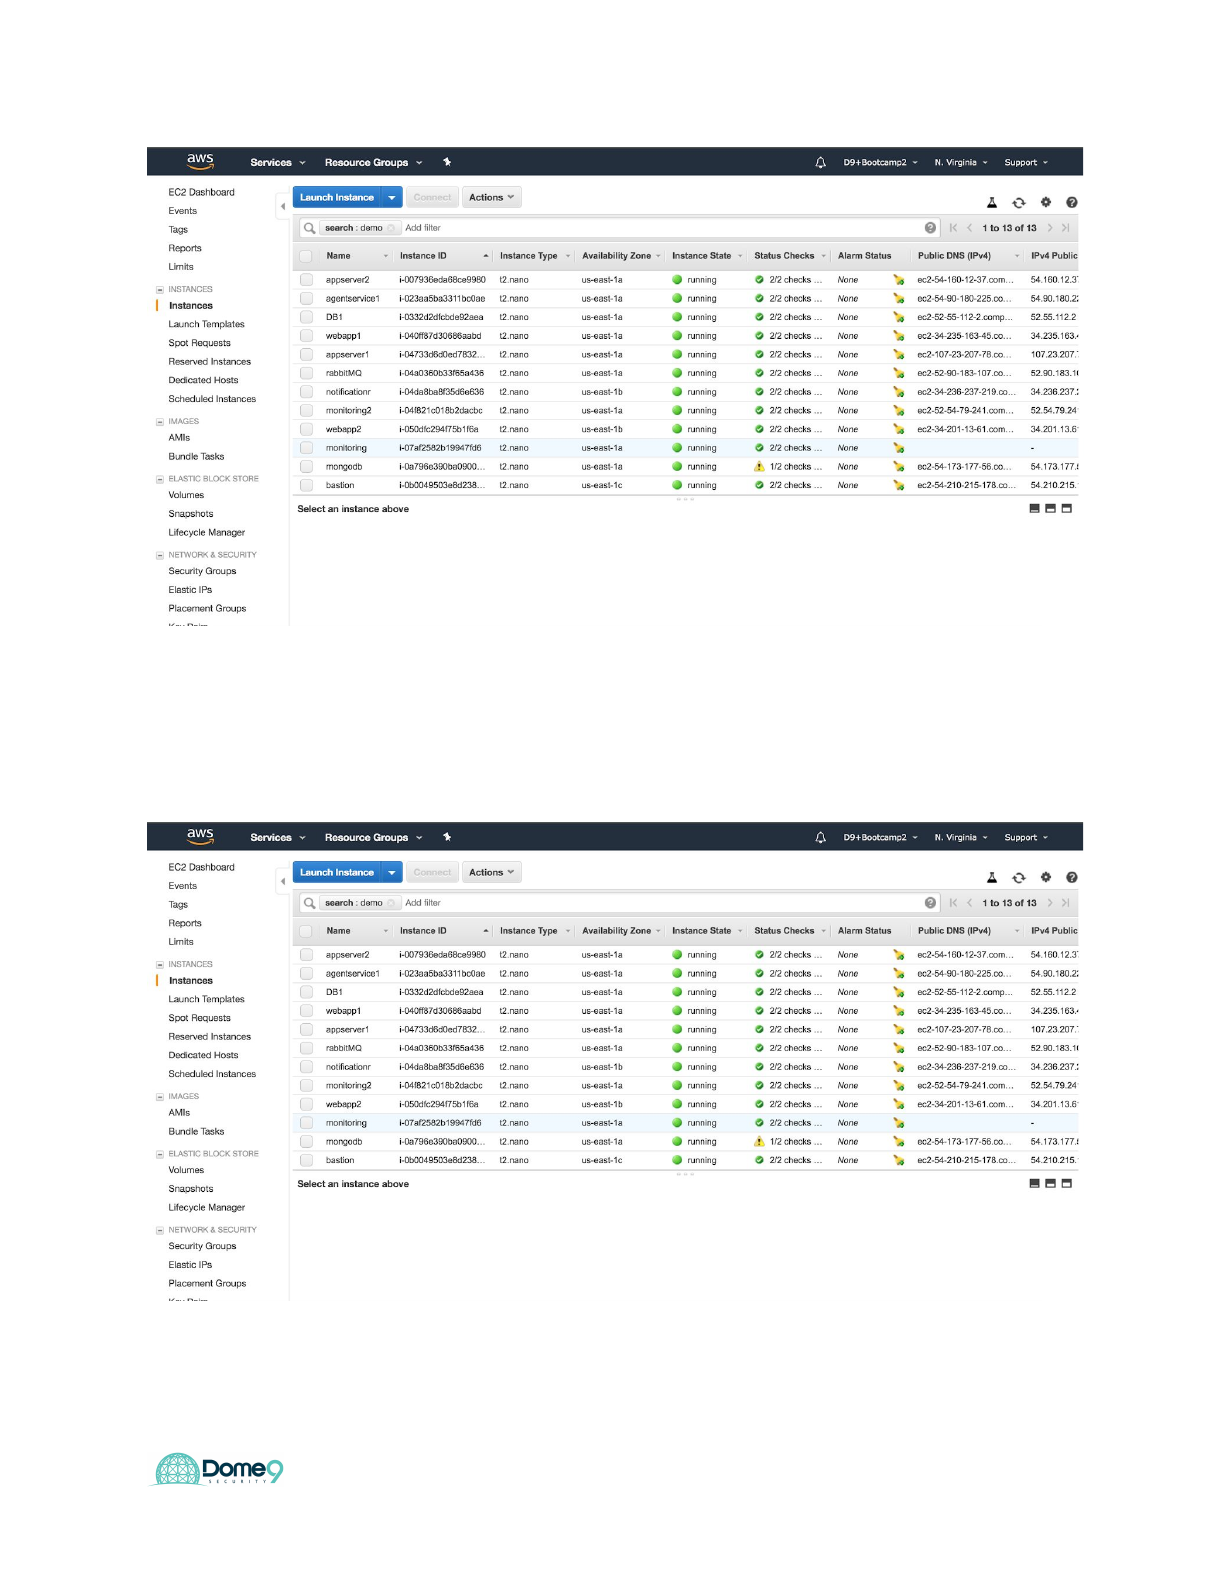
Exercise 2.2: Identify an exposed internal asset in the AWS environment - Part 1
9
Dome9 Lab Guide
There is an internal asset that is exposed to the public. Can you find it?
Exercise 2.3: Identify an exposed internal asset in the AWS environment - Part 2
10
Dome9 Lab Guide
There is another internal asset that is exposed to the public (this one is harder to find)
Good luck!
Exercise Complete! You have now found your exposed assets!
Dome9 Onboarding and Setup
Exercise 3.1: Connect Dome9 to your new AWS account
Onboard an AWS account
Onboarding an AWS account involves creating policies and attaching it to roles for
Dome9 to use. For simplicity, the policies and roles have already been created. Follow
these steps to onboard your AWS account to Dome9.
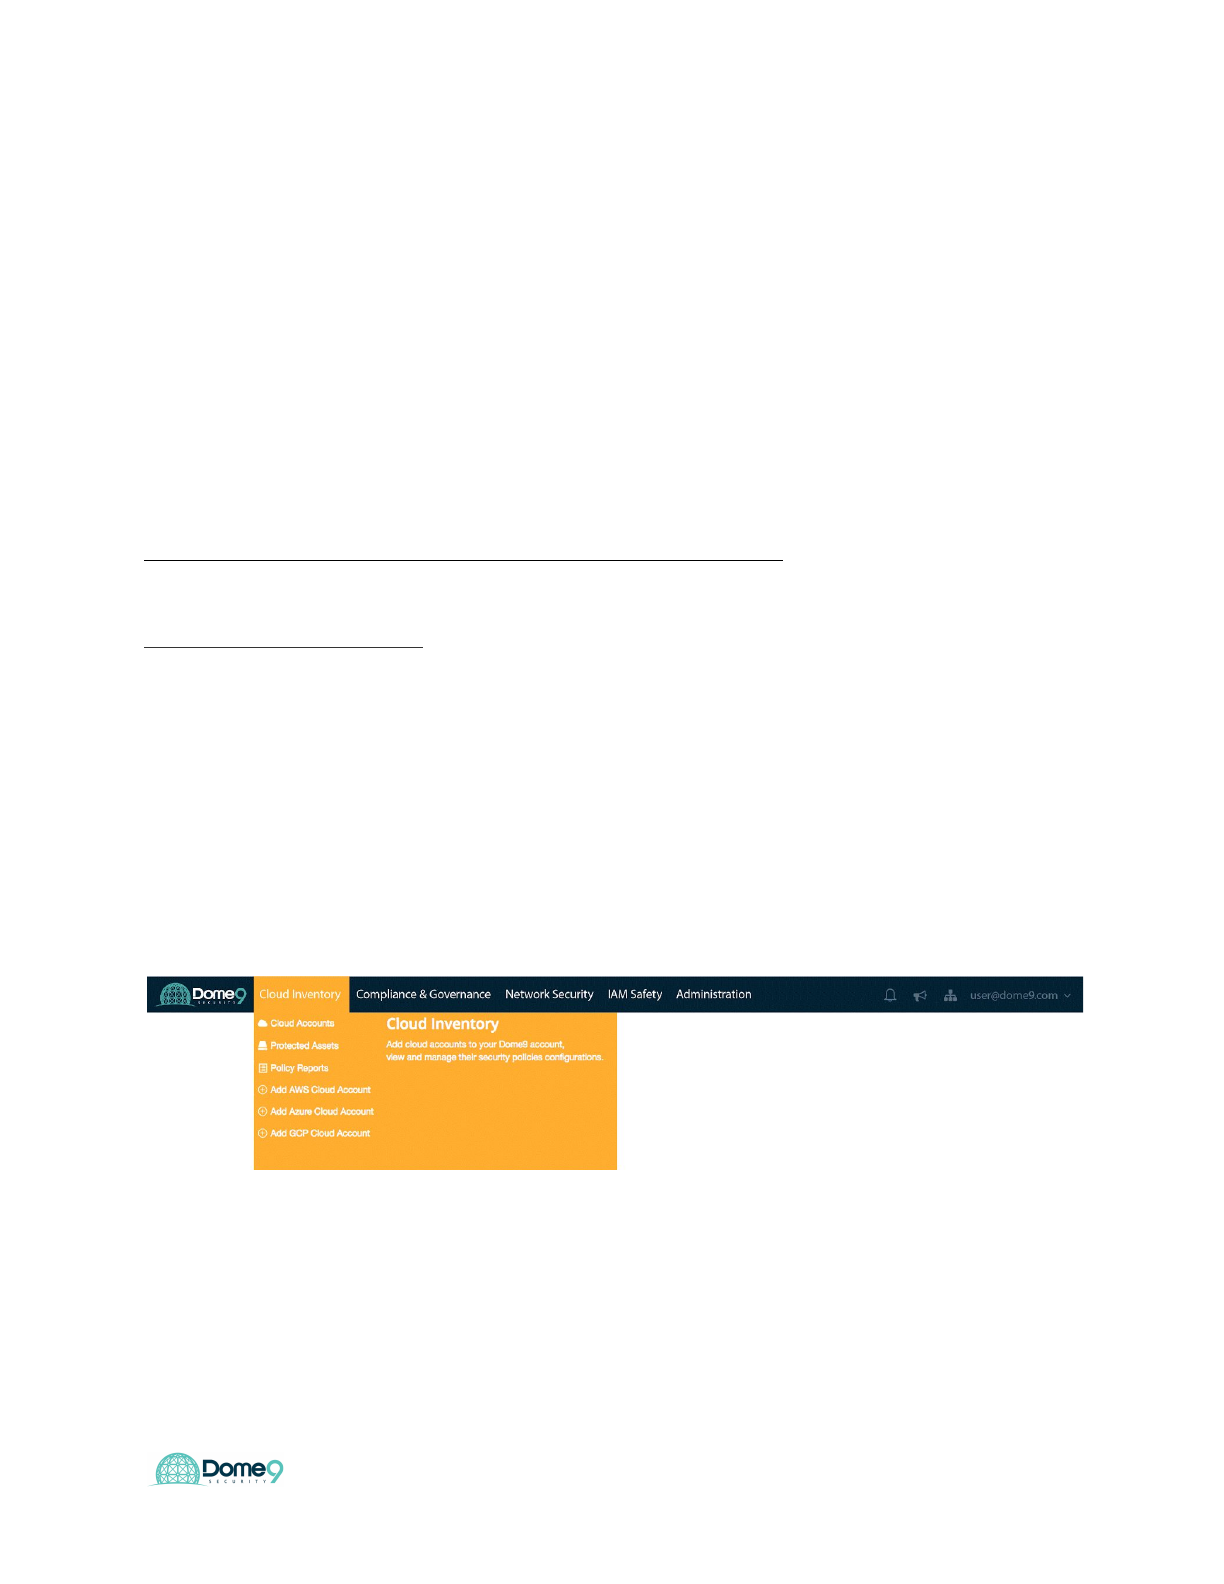
1. On the Dome9 console navigate to Cloud Inventory and select Add AWS
Account.
2. Select the Dome9 operation mode, Read/Write to be used for the account.
11
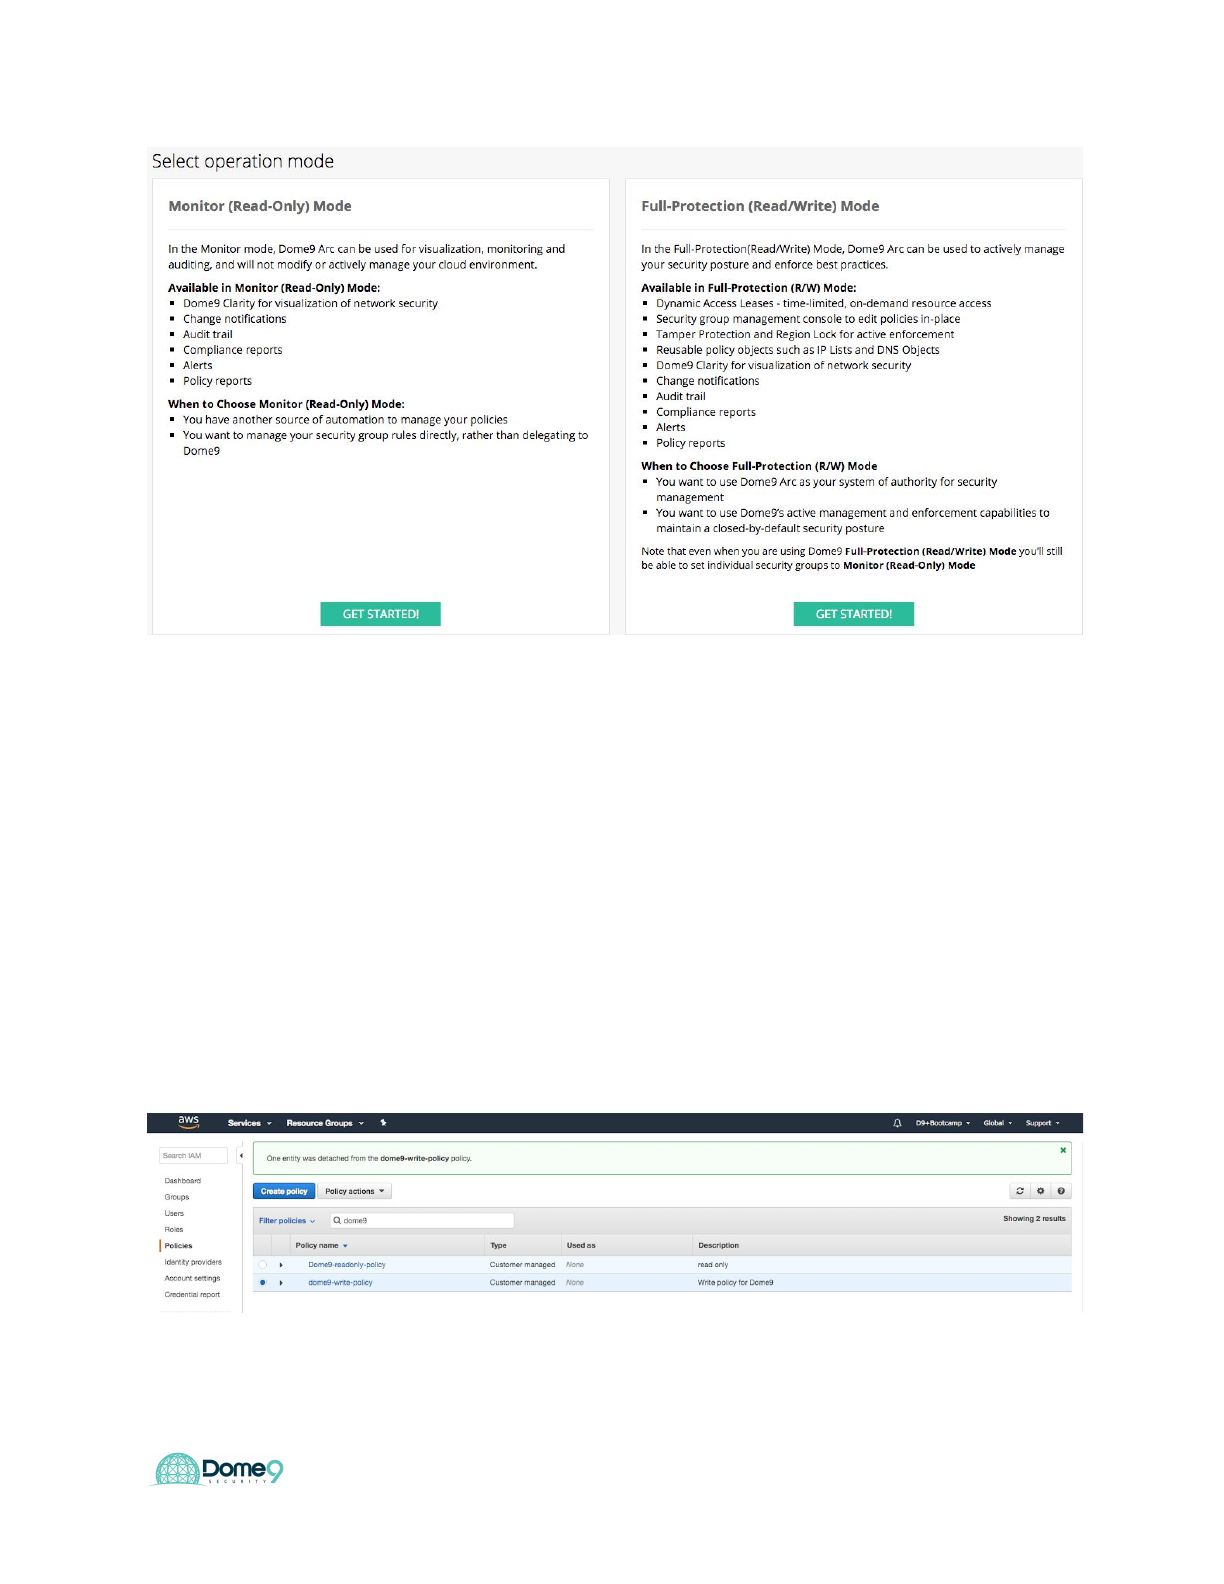
Dome9 Lab Guide
↑
3. Click next again
4. Sign to the AWS console (aws.amazon.com) in a new browser tab or window
(keep the Dome9 console open, as you will be switching between the two in the
following steps).
5. Click Services and select the IAM
6. Select Policies and search for Dome9 and you should see two policies created.
Click and review the policy for dome9-write
12
Dome9 Lab Guide
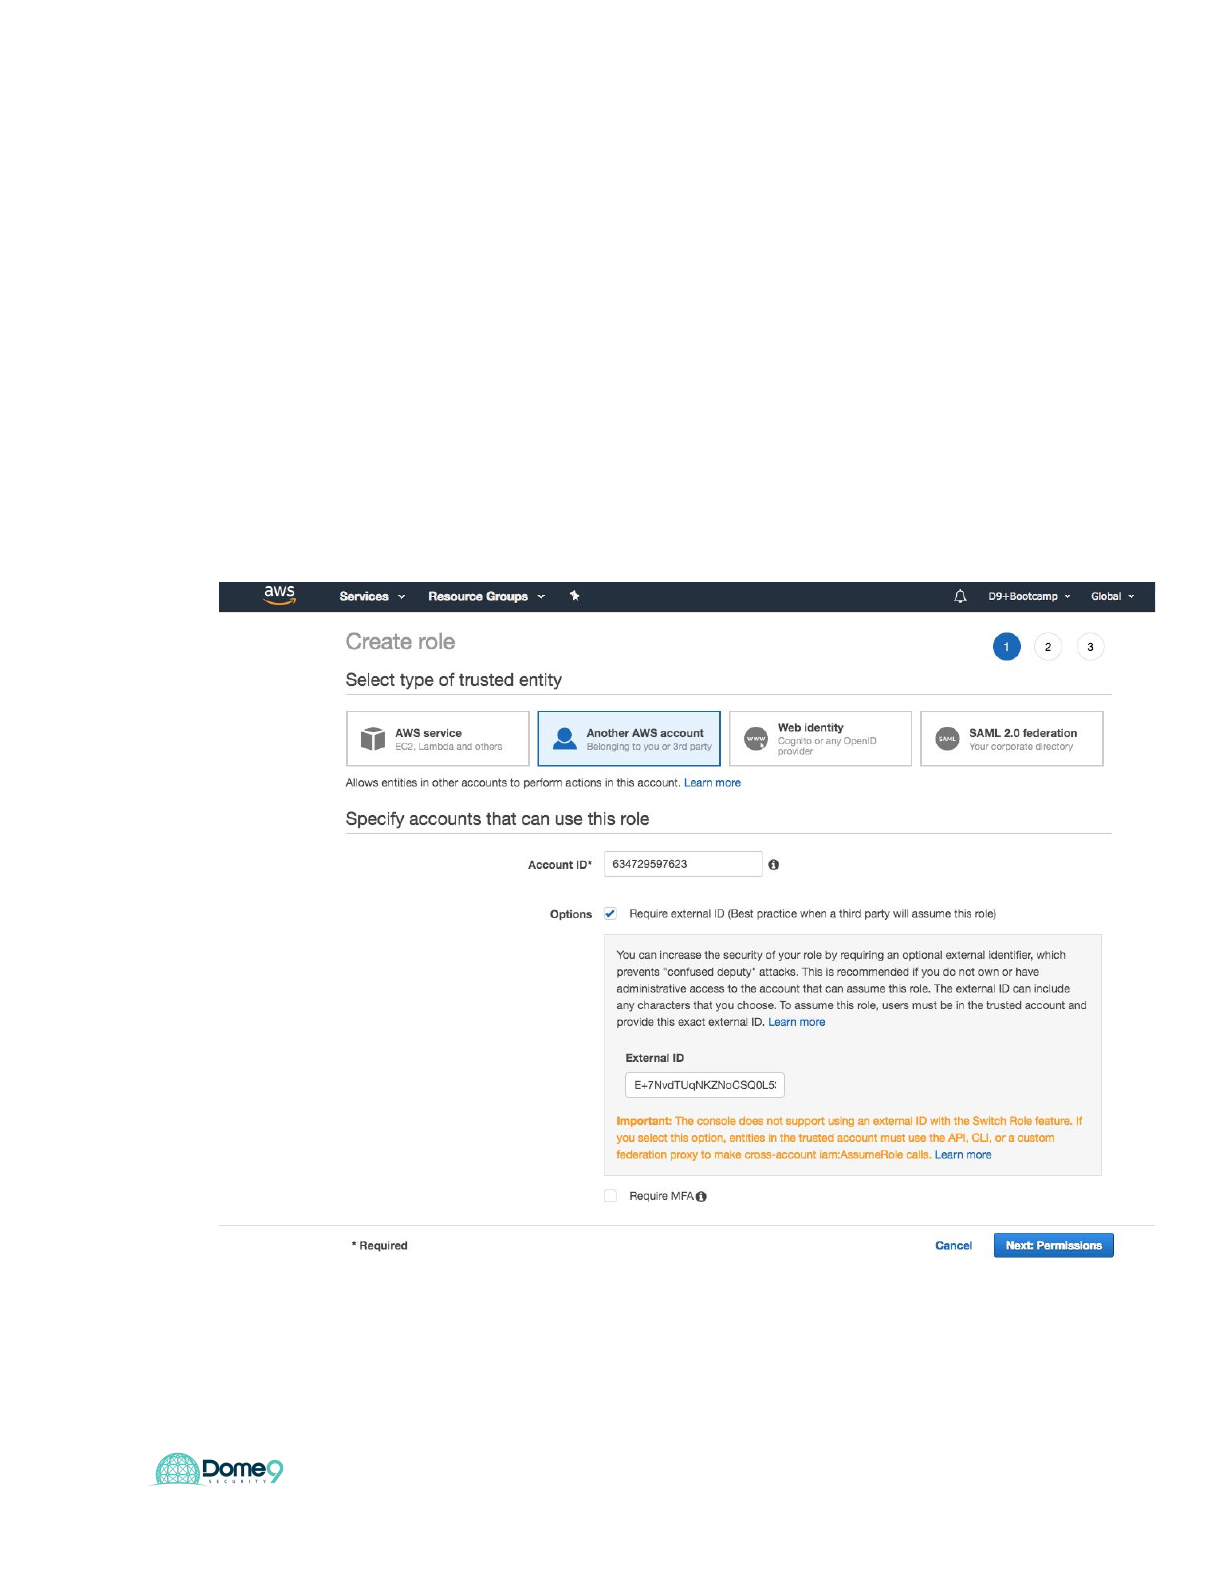
7. In the AWS console, click Roles and “Create new Role”
8. Select Role Type: ‘Another AWS Account‘, under options mark the ‘Required
External ID‘ option.
9. Enter the following:
● AccountId: 634729597623
● External ID: E+7NvdTUqNKZNoCSQ0L53@64
● Require MFA: NOT checked
10. READ-WRITE: Make sure the following policies are selected:
13
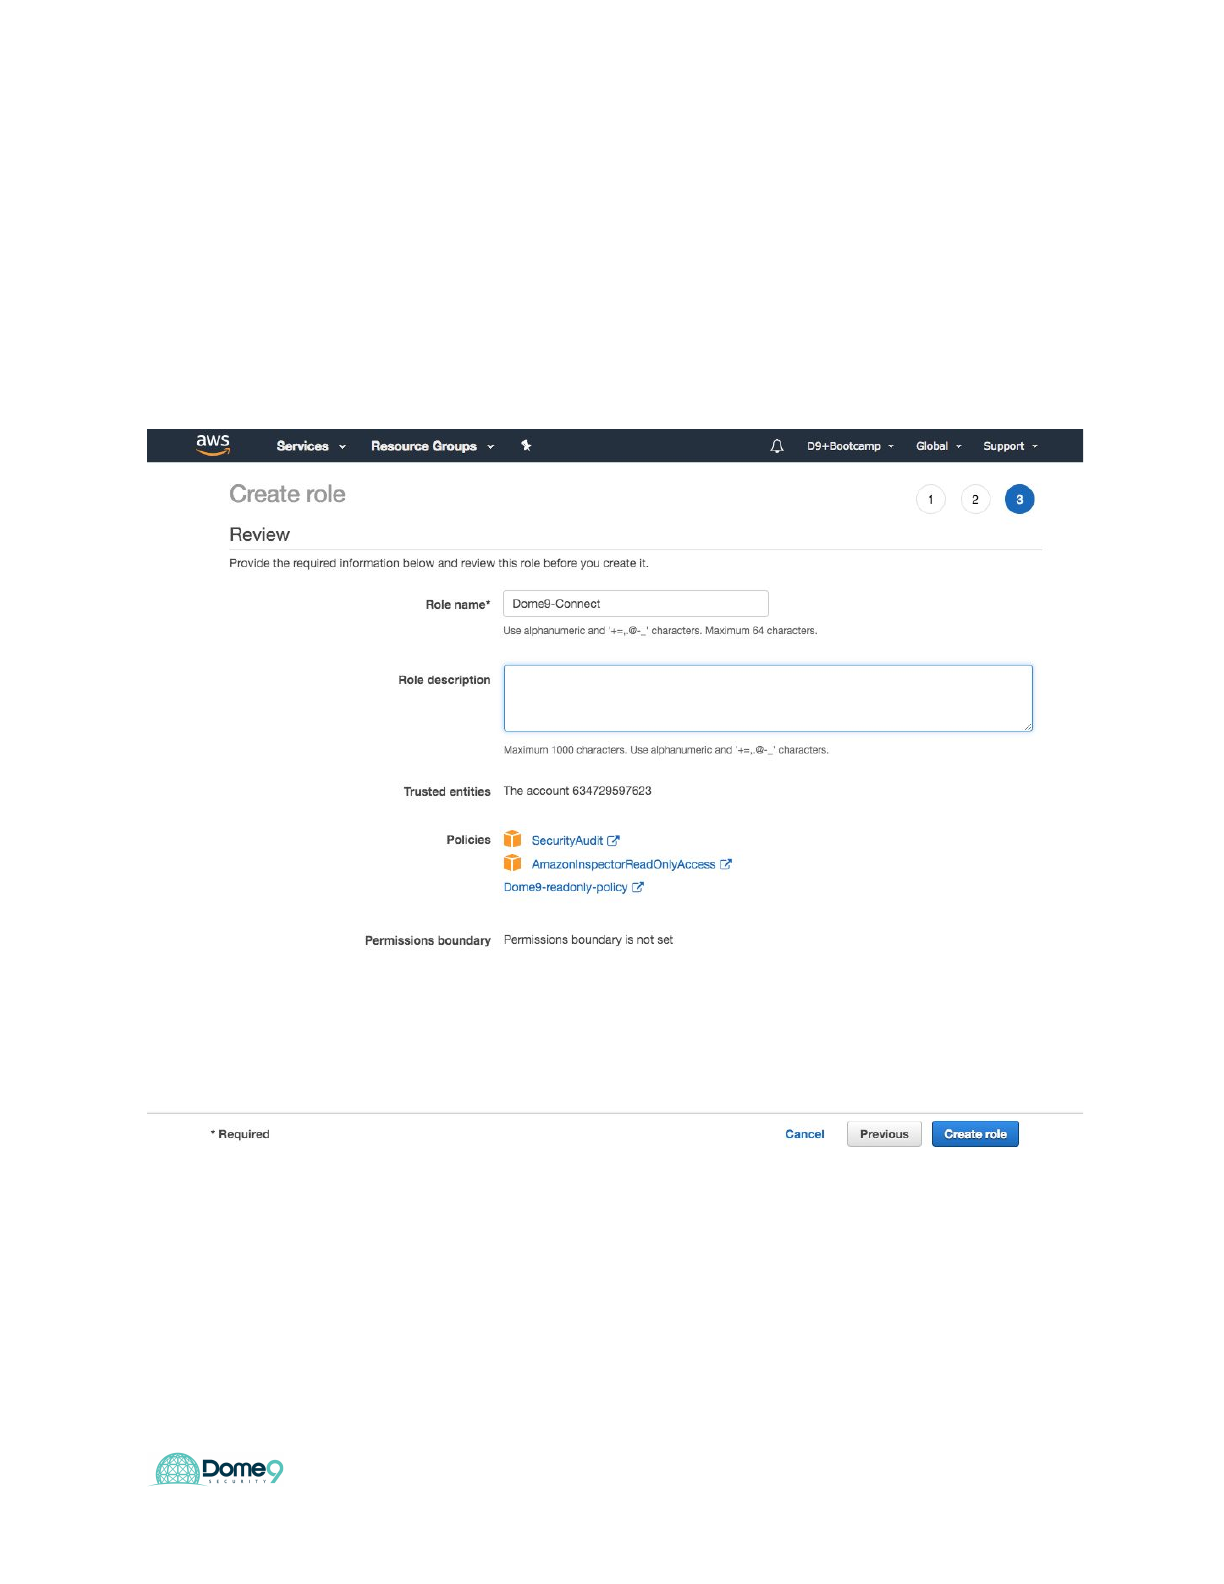
Dome9 Lab Guide
○SecurityAudit (AWS managed policy).
○AmazonInspectorReadOnlyAccess (AWS managed policy).
○dome9-write-policy, that you created before. You can search for
‘dome9’ in the filter
11. Set Role Name with your choice (‘Dome9-Connect’ makes sense) and click on
‘Create Role‘
12. Copy the Role ARN value, and enter it in the Role ARN field in the Dome9
console.
14
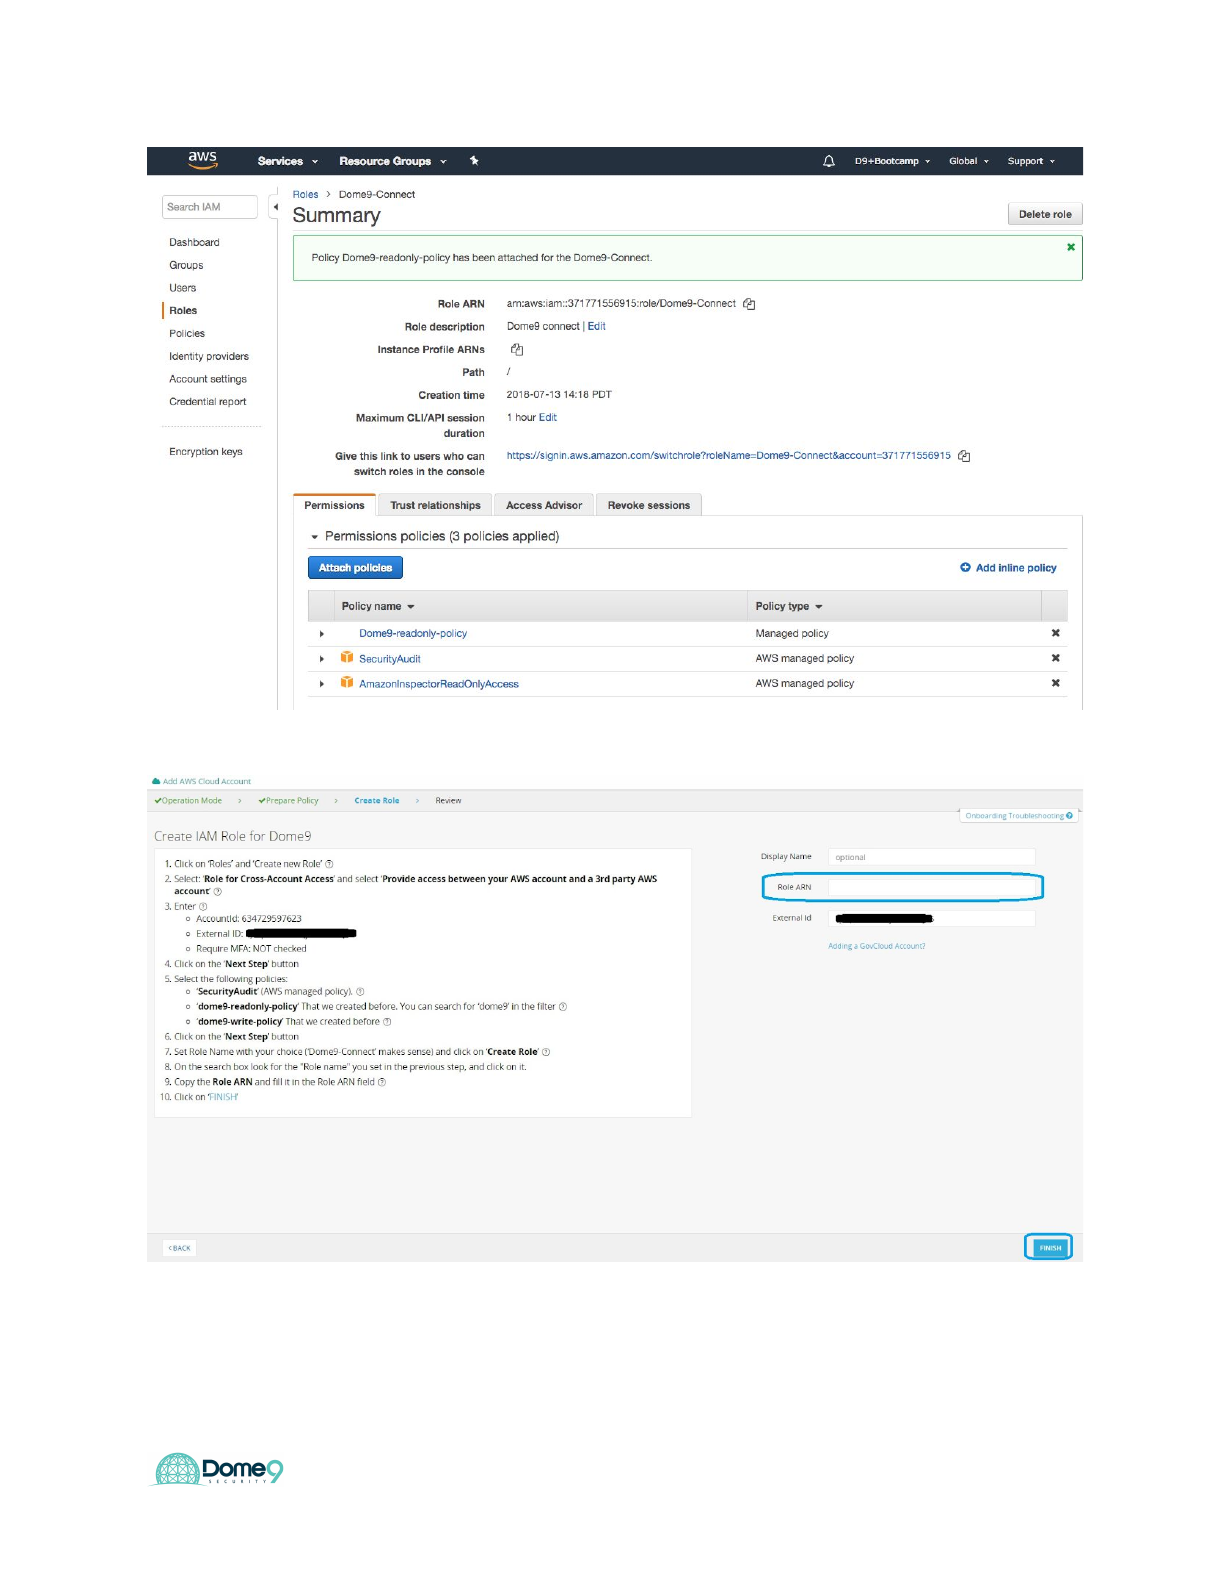
Dome9 Lab Guide
13. Click 'Finish'
15

Dome9 Lab Guide
14. Review the onboarded cloud account summary.
15. At the end of the onboarding process all the Security Groups will be in
Read-Write mode.
Exercise Complete! You have now connected your Dome9 to your AWS account
Security Architecture Review Lab
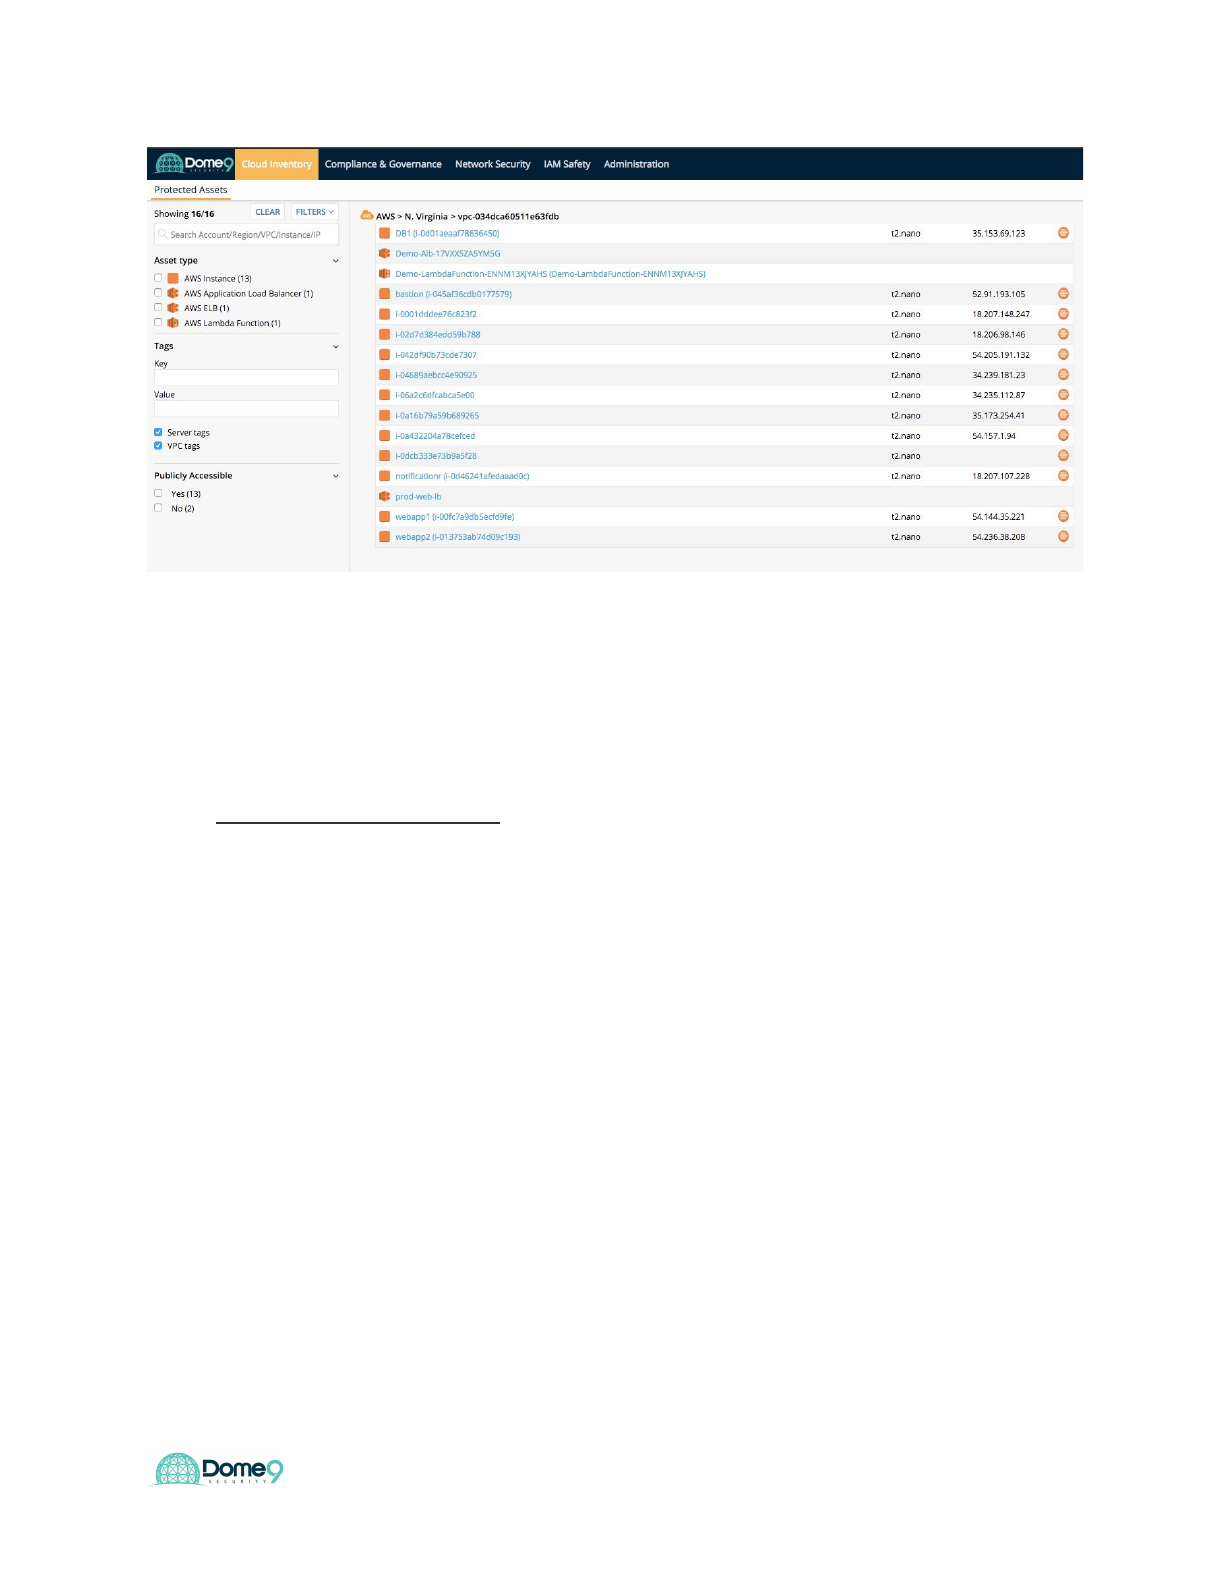
Exercise 4.1: Conduct inventory/asset review
Switch into your Dome9 console for the remaining part of this module
Dome9 presents a single console view of all your assets, on all platforms, from which
you can search or filter for specific assets of interest, and see details about their
security posture. In this section of the Dome9 console, you can see a summary of all the
assets in your VPCs that are protected by Dome9. These assets can include, for
example, instances (such as EC2s), RDSs, and load balancers. Dome9 fetches
information about these assets from the cloud platforms (AWS, Azure, Google) and
presents it in a console view.
1) View your Protected Assets
The main page shows a list of your assets that are protected by Dome9, organized by
region. Filter the list using the filters on the left, or search for assets by name in the
search bar.
16
Dome9 Lab Guide
For each asset in the list, the type, and its external IP address (if it has one) are shown.
Click on one of the assets in the list to see more details for it.
Please enter how many total EC2 instances are displayed in the google form.
2) View your Security Groups
The main page shows a list of all your managed security groups, in all your Dome9
managed accounts, on all cloud providers.
Filter the list using the search box or filter options on the left. You can filter by account,
VPC, cloud region, protection method (full, read-only), and the number of instances or
alerts.
17
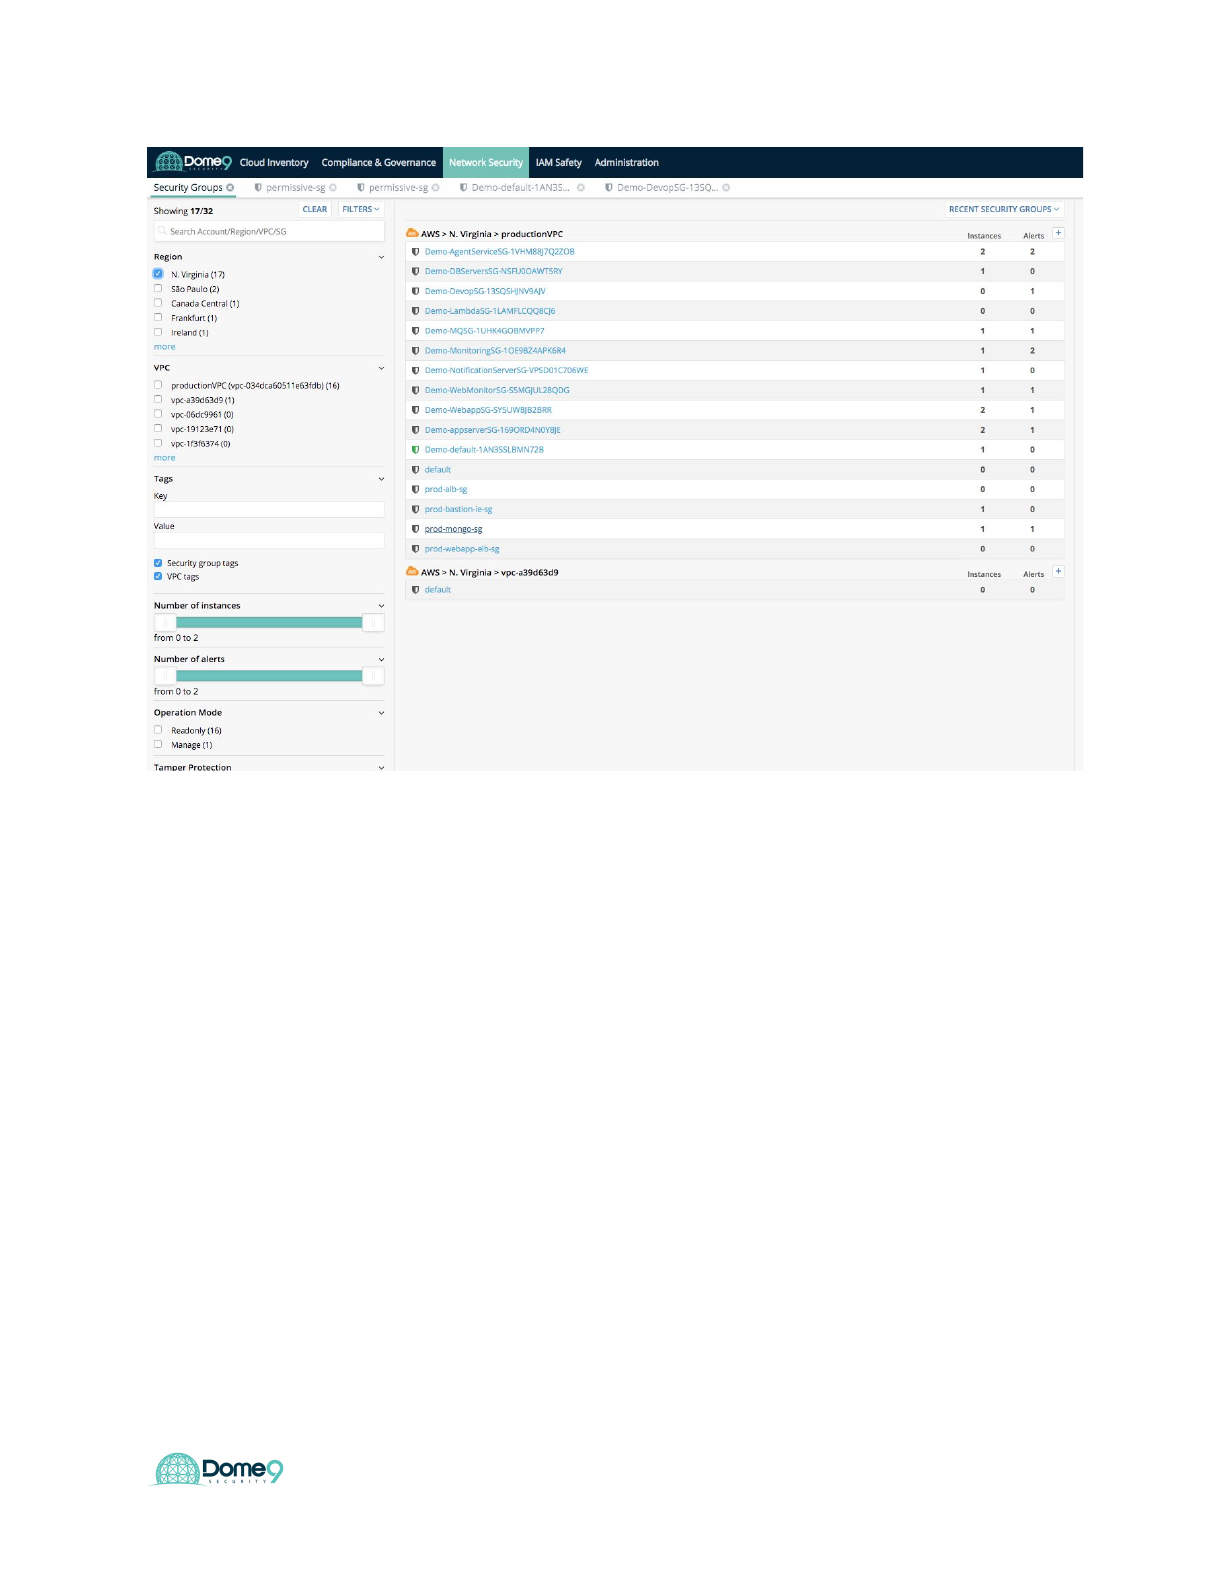
Dome9 Lab Guide
Please enter how many total SGs are displayed in the google form.
Exercise Complete! You have now explored your AWS instances and reviewed your
inventory within the protected asset view of Dome9.
Exercise 4.2: Visualize security architecture
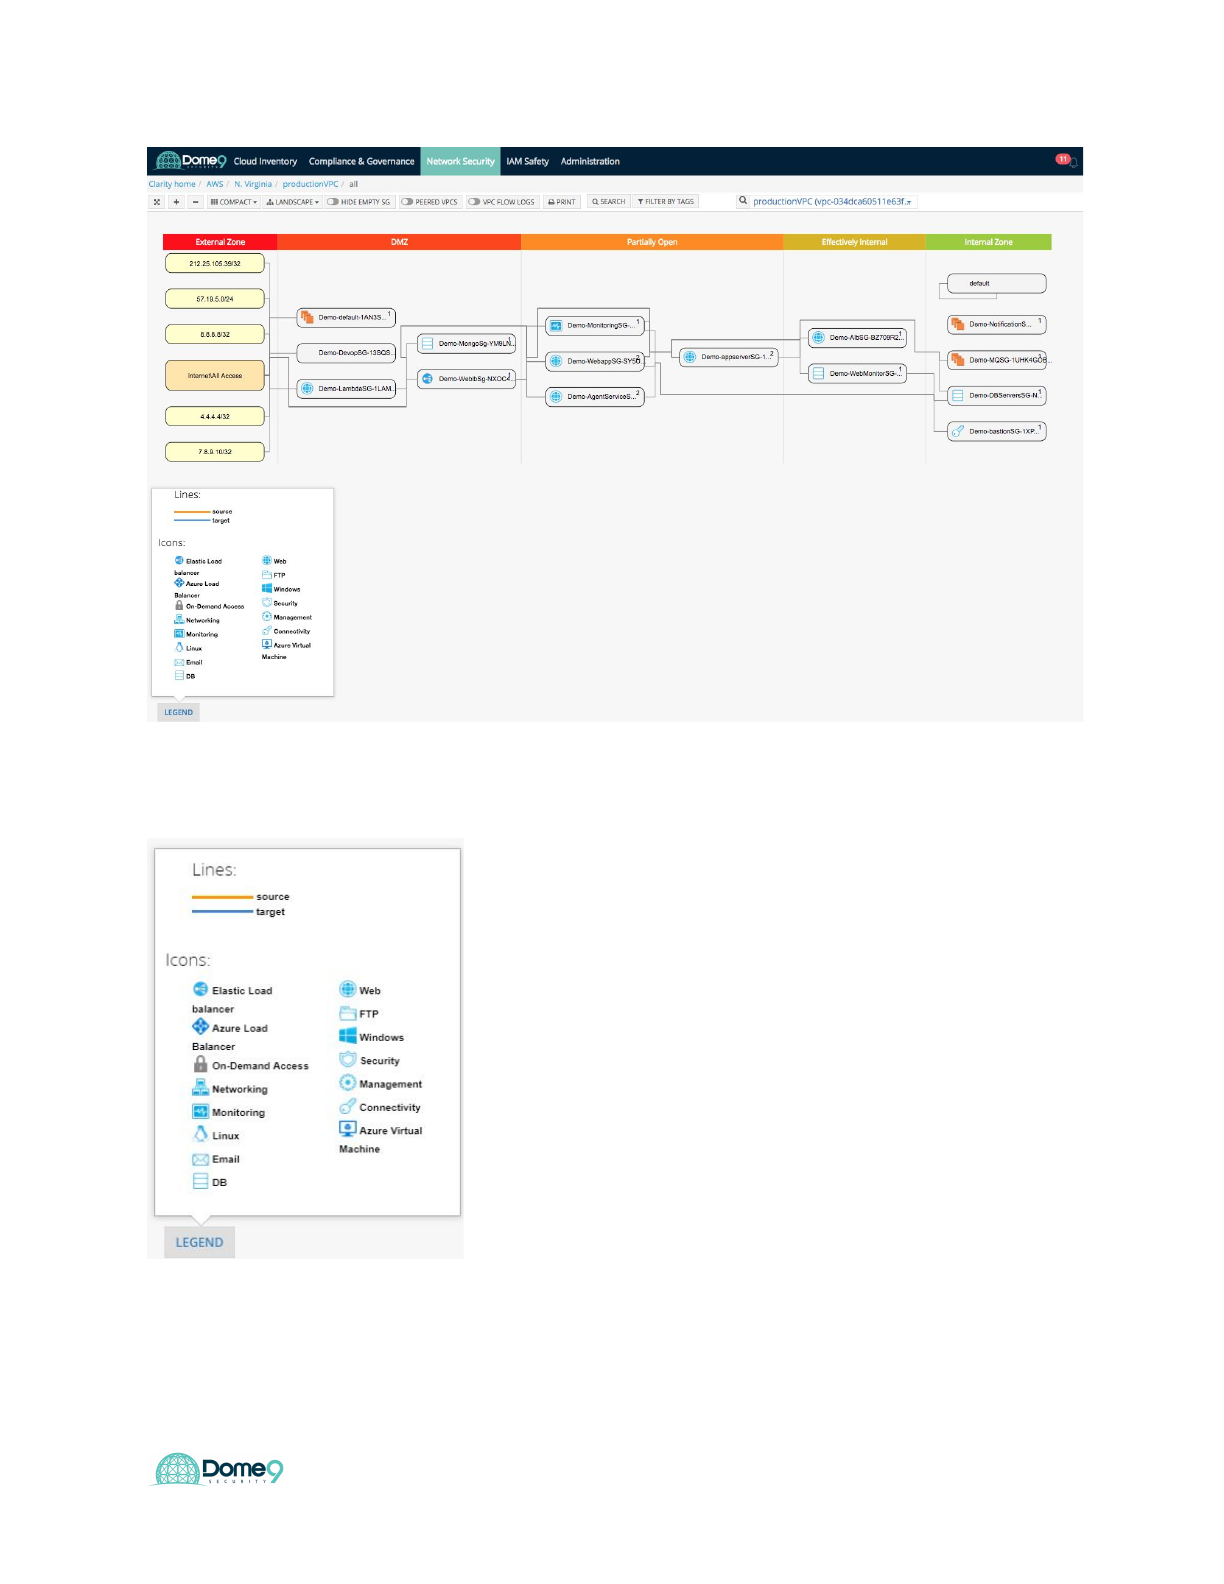
Dome9 Clarity gives a graphical visualization of the security groups in your cloud
environment, and their effects on the cloud assets in the environment. It shows the
security groups, traffic sources, and permitted traffic paths in the cloud network. The
view is organized logically, according to the level of exposure of the Security Group to
the external world. You can use Clarity to analyze your cloud network for security issues
such as access to sensitive components from the internet, or to troubleshoot it for
connectivity issues such as blocked paths to components.
18
Dome9 Lab Guide
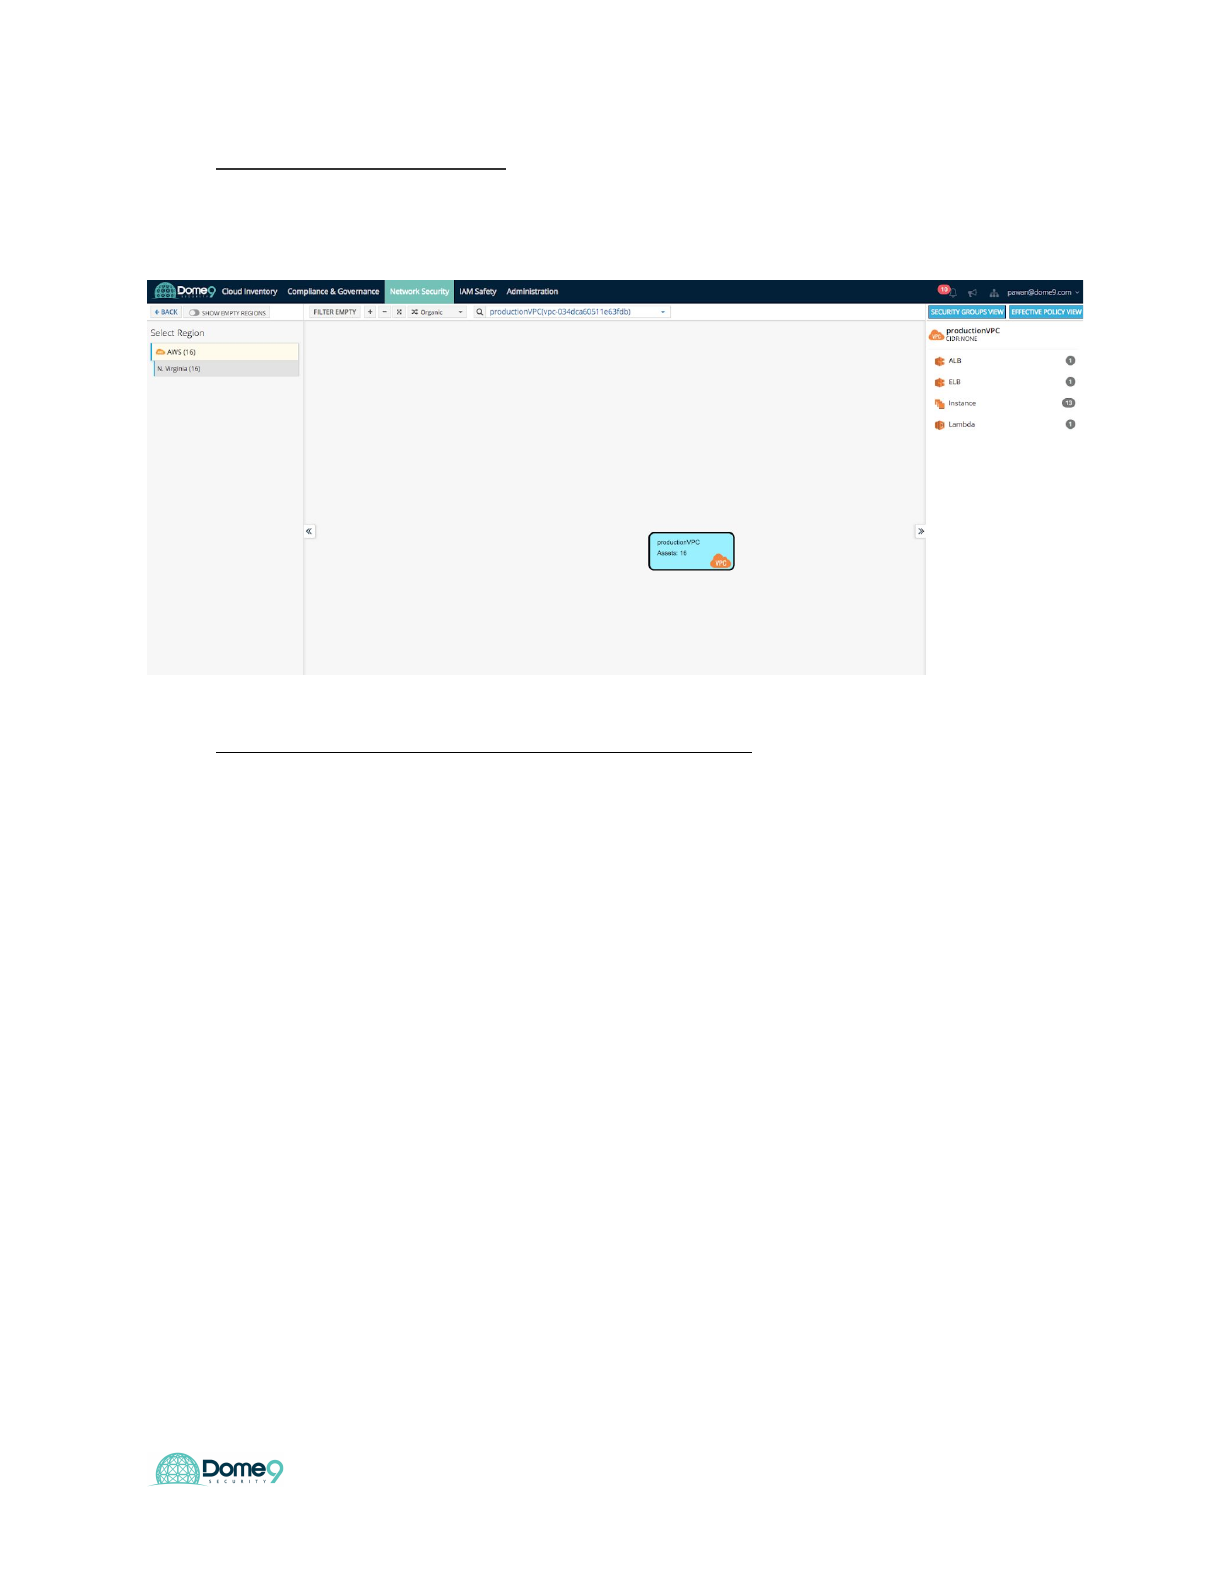
1) Select a cloud environment
Select Clarity from the main menu. A list of your cloud accounts is shown on the left.
2) View an environment with the Security Group view
In this step, an environment will be visualized with the Security Group view. This view
shows all the Security Groups.
a) In Clarity, select a cloud environment in one of your accounts (in the
previous section), and then select Security Groups from the list in the
menu bar on the upper right.
19
Dome9 Lab Guide
You can tell how the security groups (SG) interact with each other and can now
understand whether any internal assets are communicating with the public world based
on their inbound and outbound rules. The different swimlanes (which are auto classified
by Dome9, so customers don’t need to manually create them) represent security groups
with various levels of exposure to the public.
20
Dome9 Lab Guide
b) Click the Legend button to show what each icon represents.
c) Click on Internet/All Access block. The source block is highlighted in the
view, and the Security Groups that affect this source are highlighted.
21
Dome9 Lab Guide
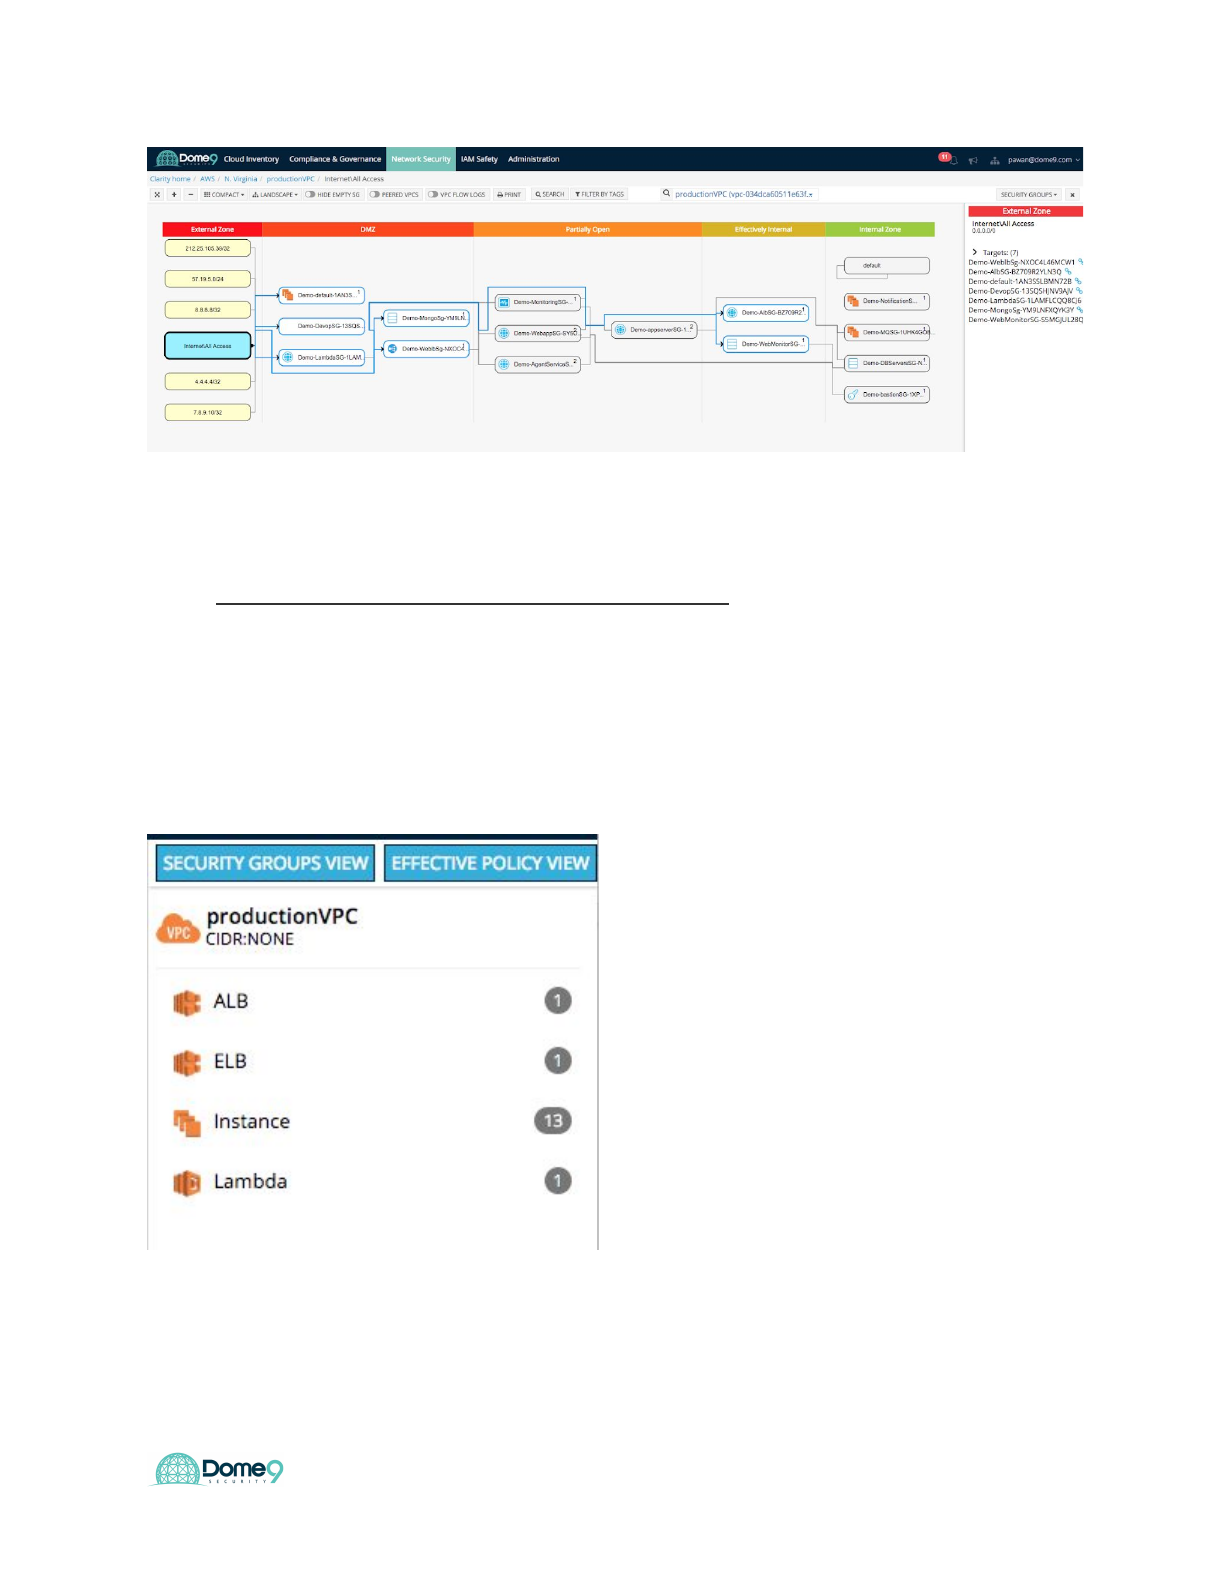
3) View an environment in the Effective Policy view
The Effective Policy view groups Security Groups that affect a common asset, and
hides those that do not affect any assets.
a) Select Effective Policy in the list in the menu bar at the upper right.
b) This shows the VPC in the Effective Policy view
22
Dome9 Lab Guide
c) This view also shows the Security Groups and Sources, organized by
zone. In this view, however, the Security Groups that affect the same
asset are grouped together. Security Groups that affect a number of
assets may appear several times in the view. Security Groups that do not
affect any assets are hidden.
Exercise Complete! You have visualized your AWS security configurations in the VPC
from a logical firewall view (SG view) and instance policy view (effective policy view)
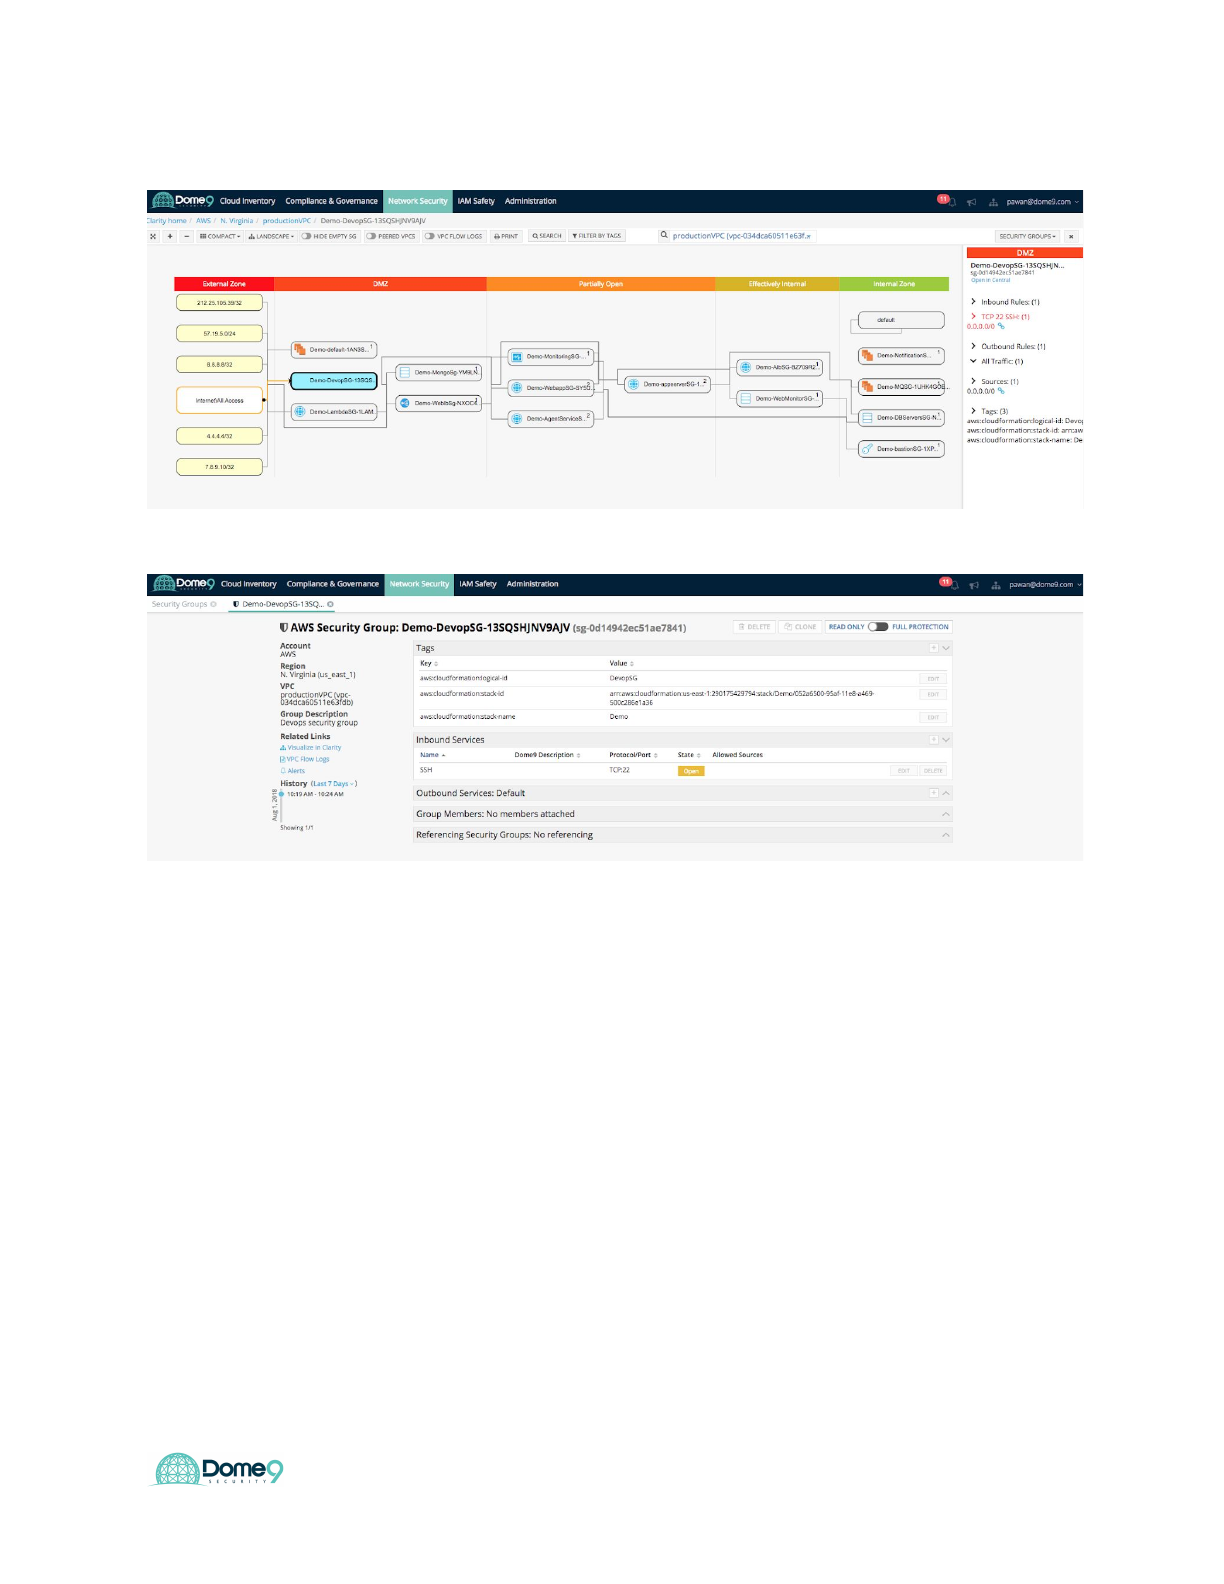
Exercise 4.3: Identify zombie security group
Let’s go back into Clarity’s security group view. See if you can identify a zombie security
group. This is a SG that has no instance attached to it but has an exposed policy (TCP
22 0.0.0.0/0) to the public.
Answer: Don’t peek just yet..
23
Dome9 Lab Guide
This is a low severity issue yet is important to be aware of as it is just one click away
from exposing your internal servers. With Clarity you can find such issues and take
appropriate actions to fix such misconfigurations.
Exercise Complete! You have now identified the zombie security group exposure
Exercise 4.4: Identify publicly accessible databases
In this section, we will investigate and find 2 different database exposures. Let’s jump
into Clarity.
24
Dome9 Lab Guide
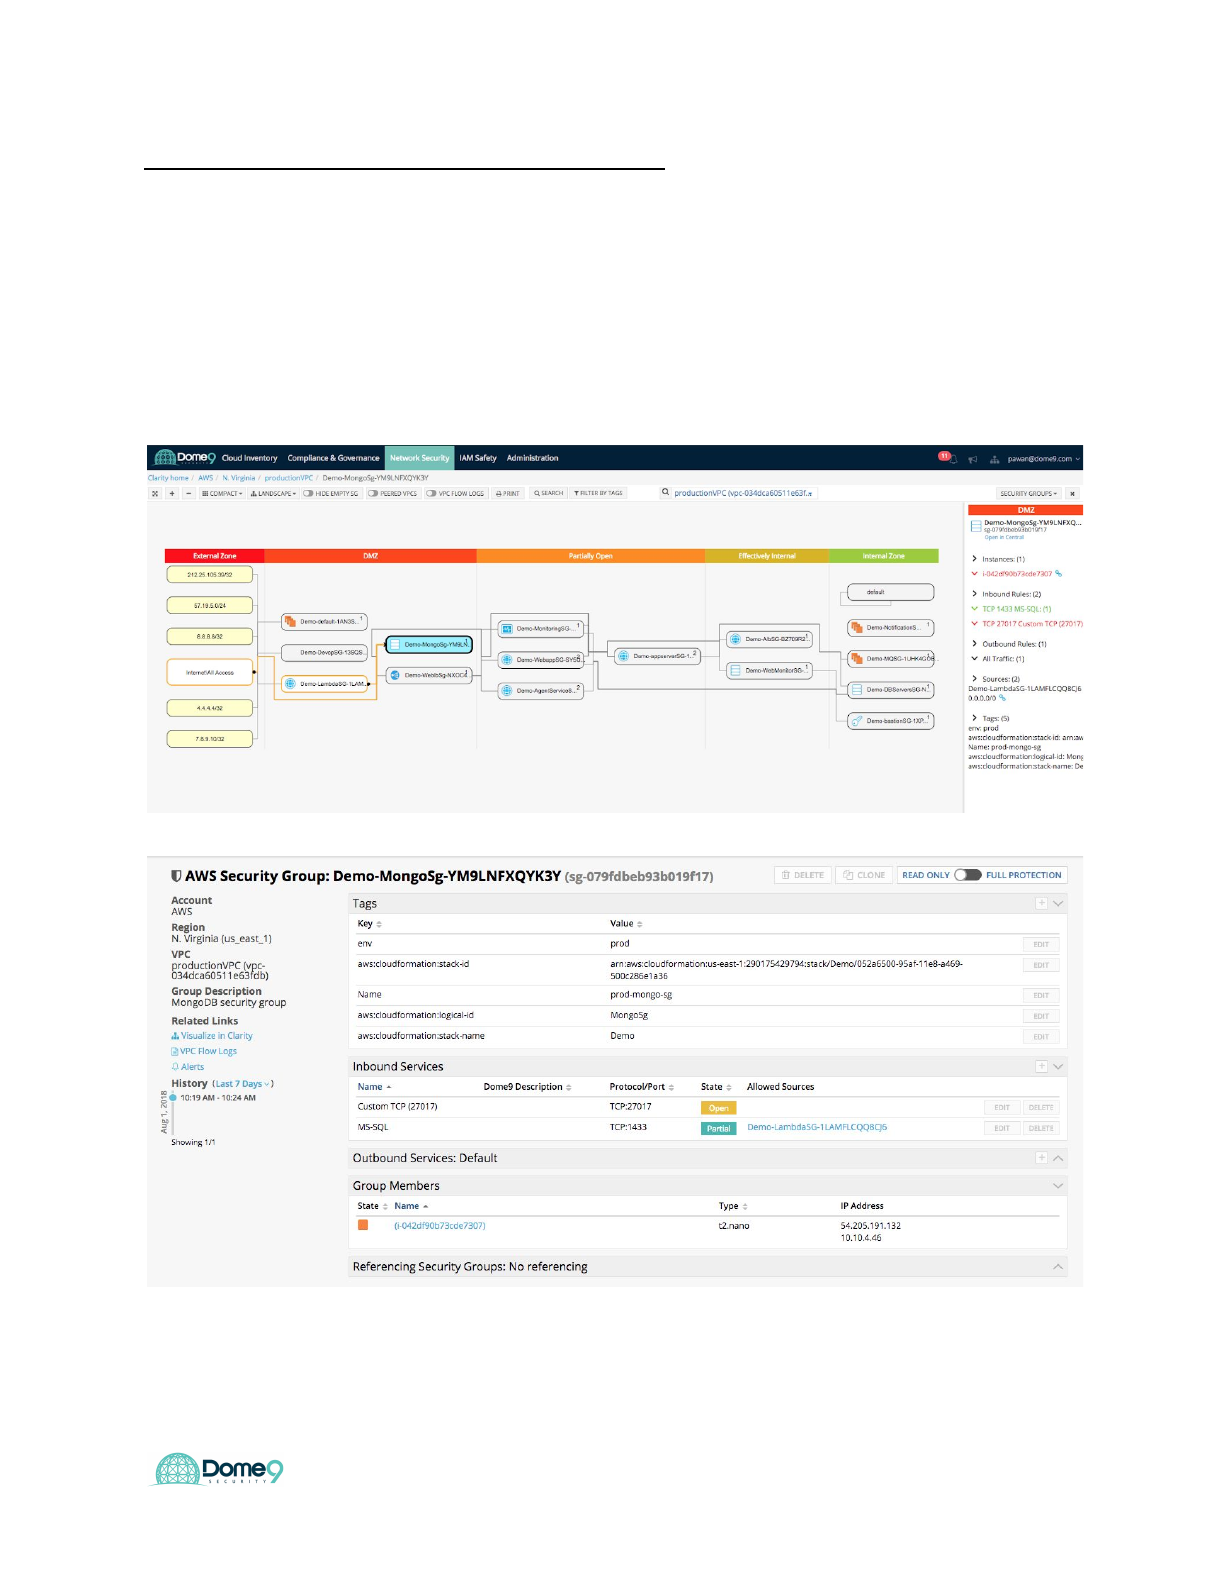
Challenge 1: Detect DB Exposure – part 1 (easy)
In Clarity, try to find an exposed DB:
Answer: Here you see that this SG has 0.0.0.0/0 on port 27017 associated with the
mongoDB instance. This is a high severity issue as one of your internal DB servers is
now wide open. Click on the SG for more details.
You can see the open port in this view. We will fix these issues in the next lab.
25
Dome9 Lab Guide
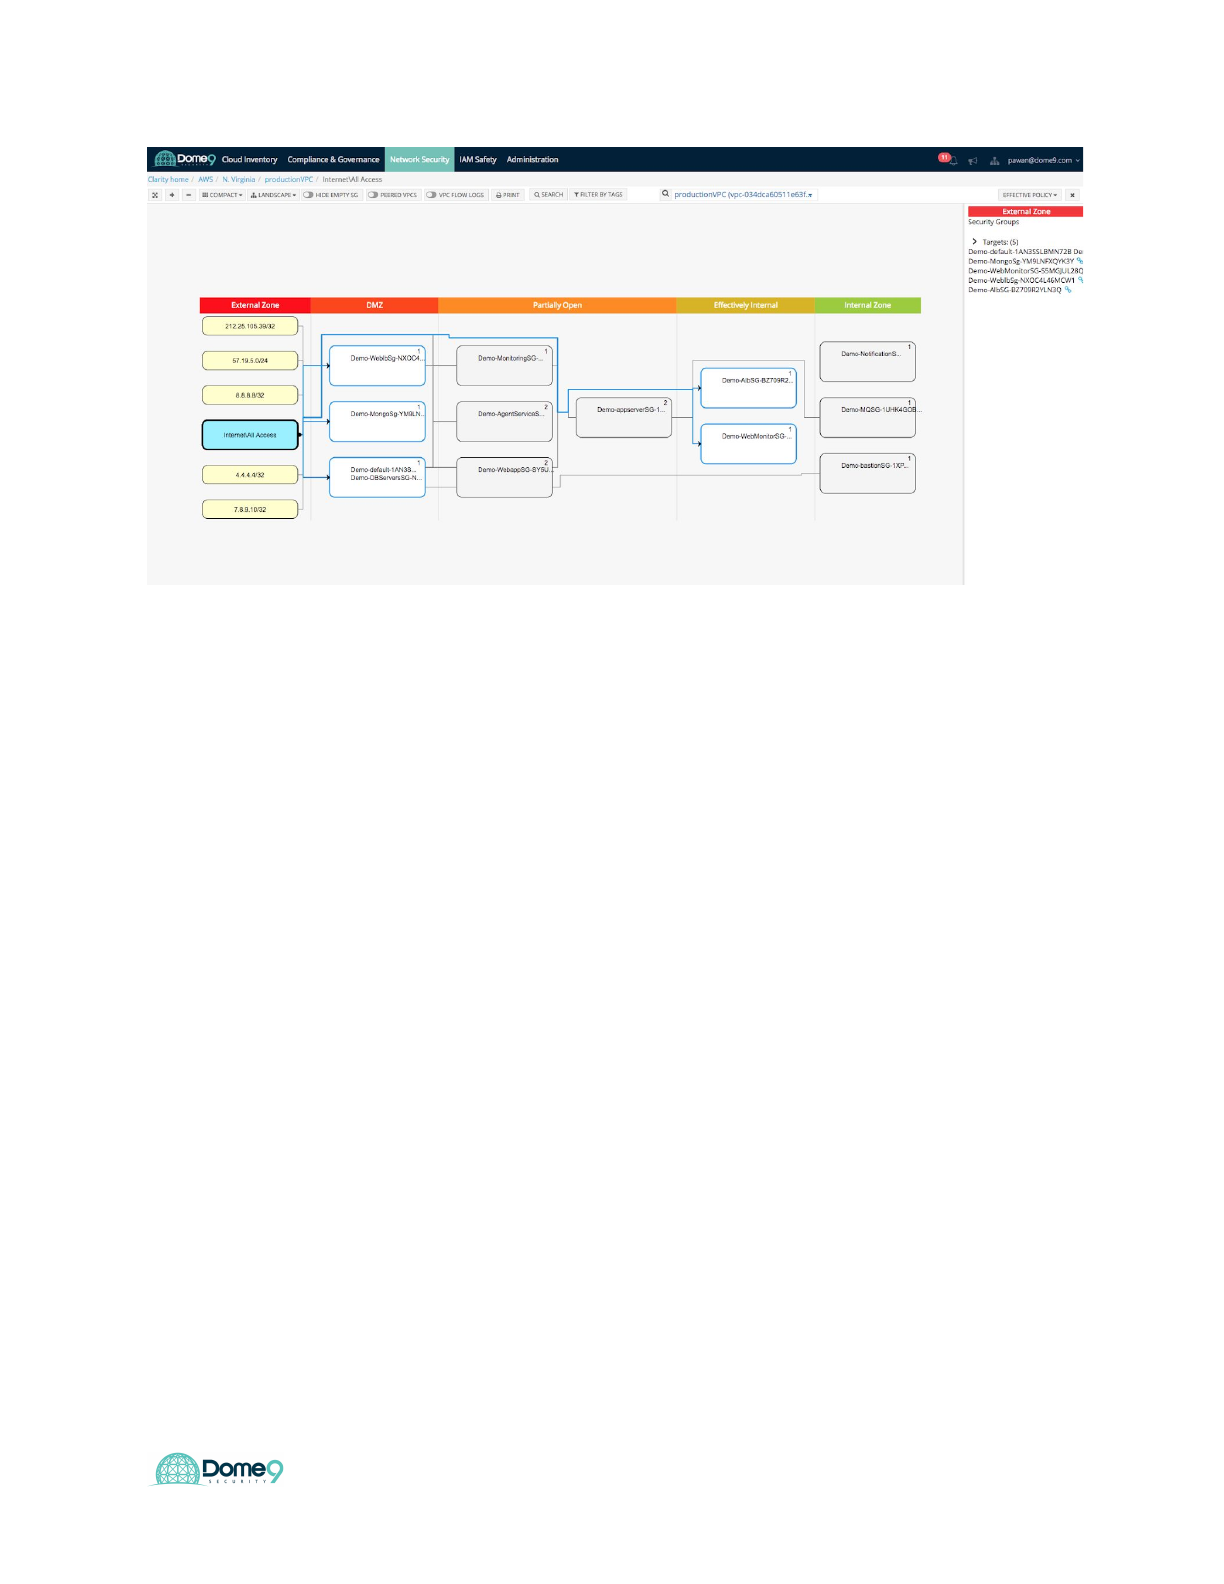
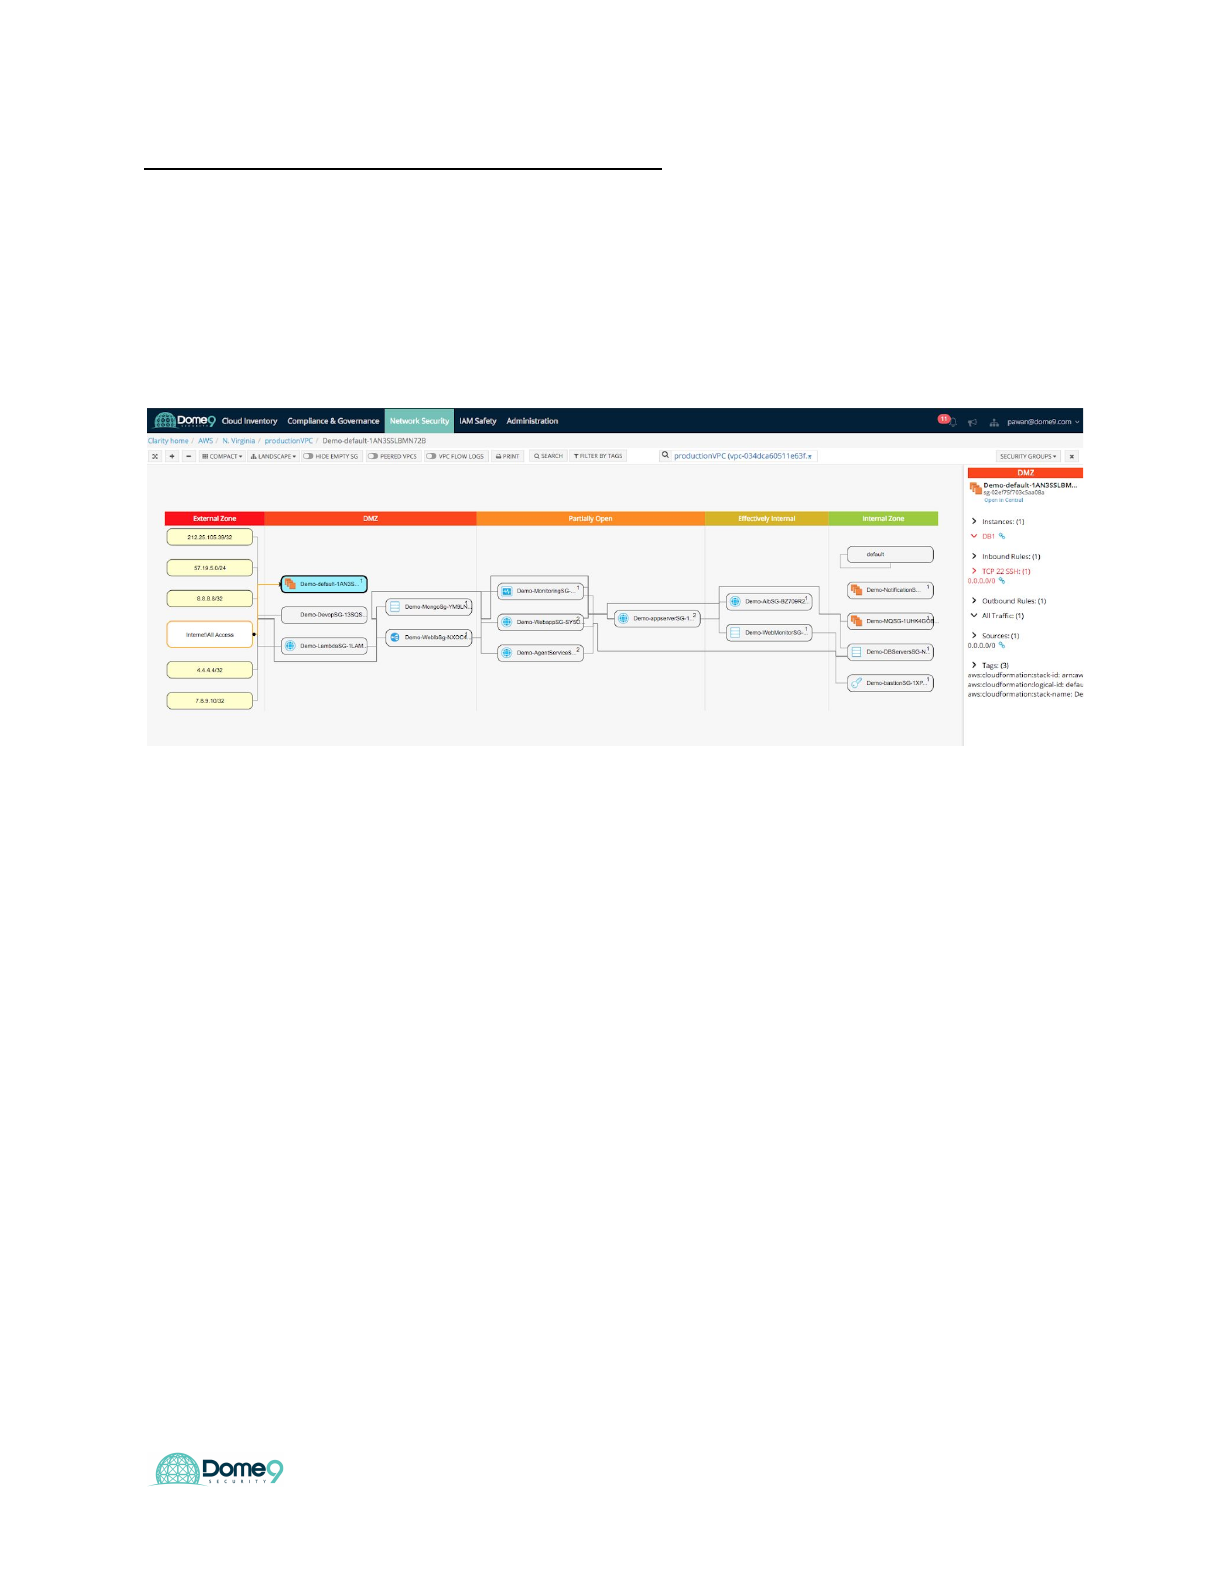
Challenge 2: Detect DB Exposure – part 2 (hard)
Find another exposed DB, this one is a bit tricky.
Answer: Click the default SG and hover over the right. Here you see default SG with
SSH wide open and that DB1 is associated with this default SG making the database
exposed to the public
In the effective policy view below – you can see default SG is in the DMZ zone and has
one instance assignment (DB1, which is also part of the DB servers group).
Digging deeper, we realize that even if the rules associated with the security group are
correct, an instance can still be assigned to the wrong security group. This is due to a
misconfiguration that occurred due to assignment of multiple security groups, and
specifically an incorrect default SG to DB1 instance.
The effective policy view brings this to light and tells you what security groups an
instance belongs to, and therefore what the effective security policy is. Now it is clear –
DB1 is exposed because it belongs to not only the internal DB Servers SG, but also to
the Default SG which is in the DMZ.
26
Dome9 Lab Guide
Exercise Complete! You have now investigated both database exposures in Clarity
Security Posture Management Lab
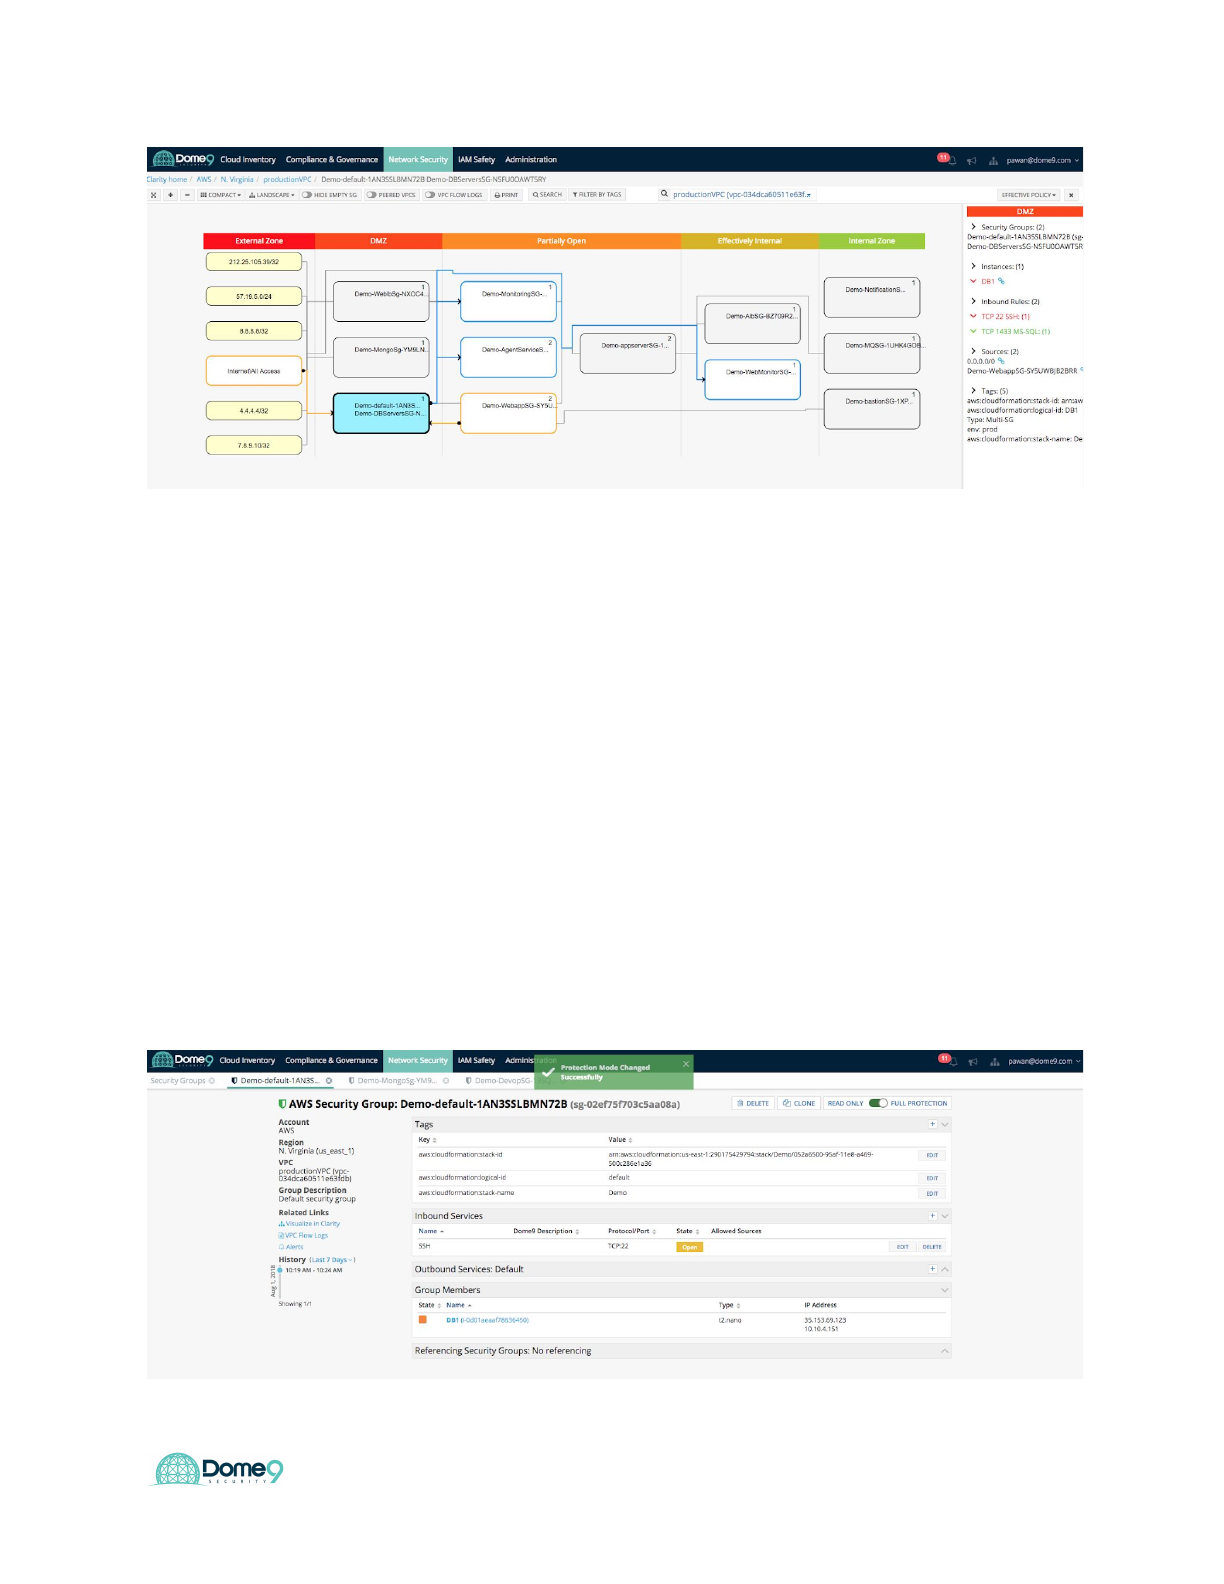
Exercise 5.1: Enforce security policy
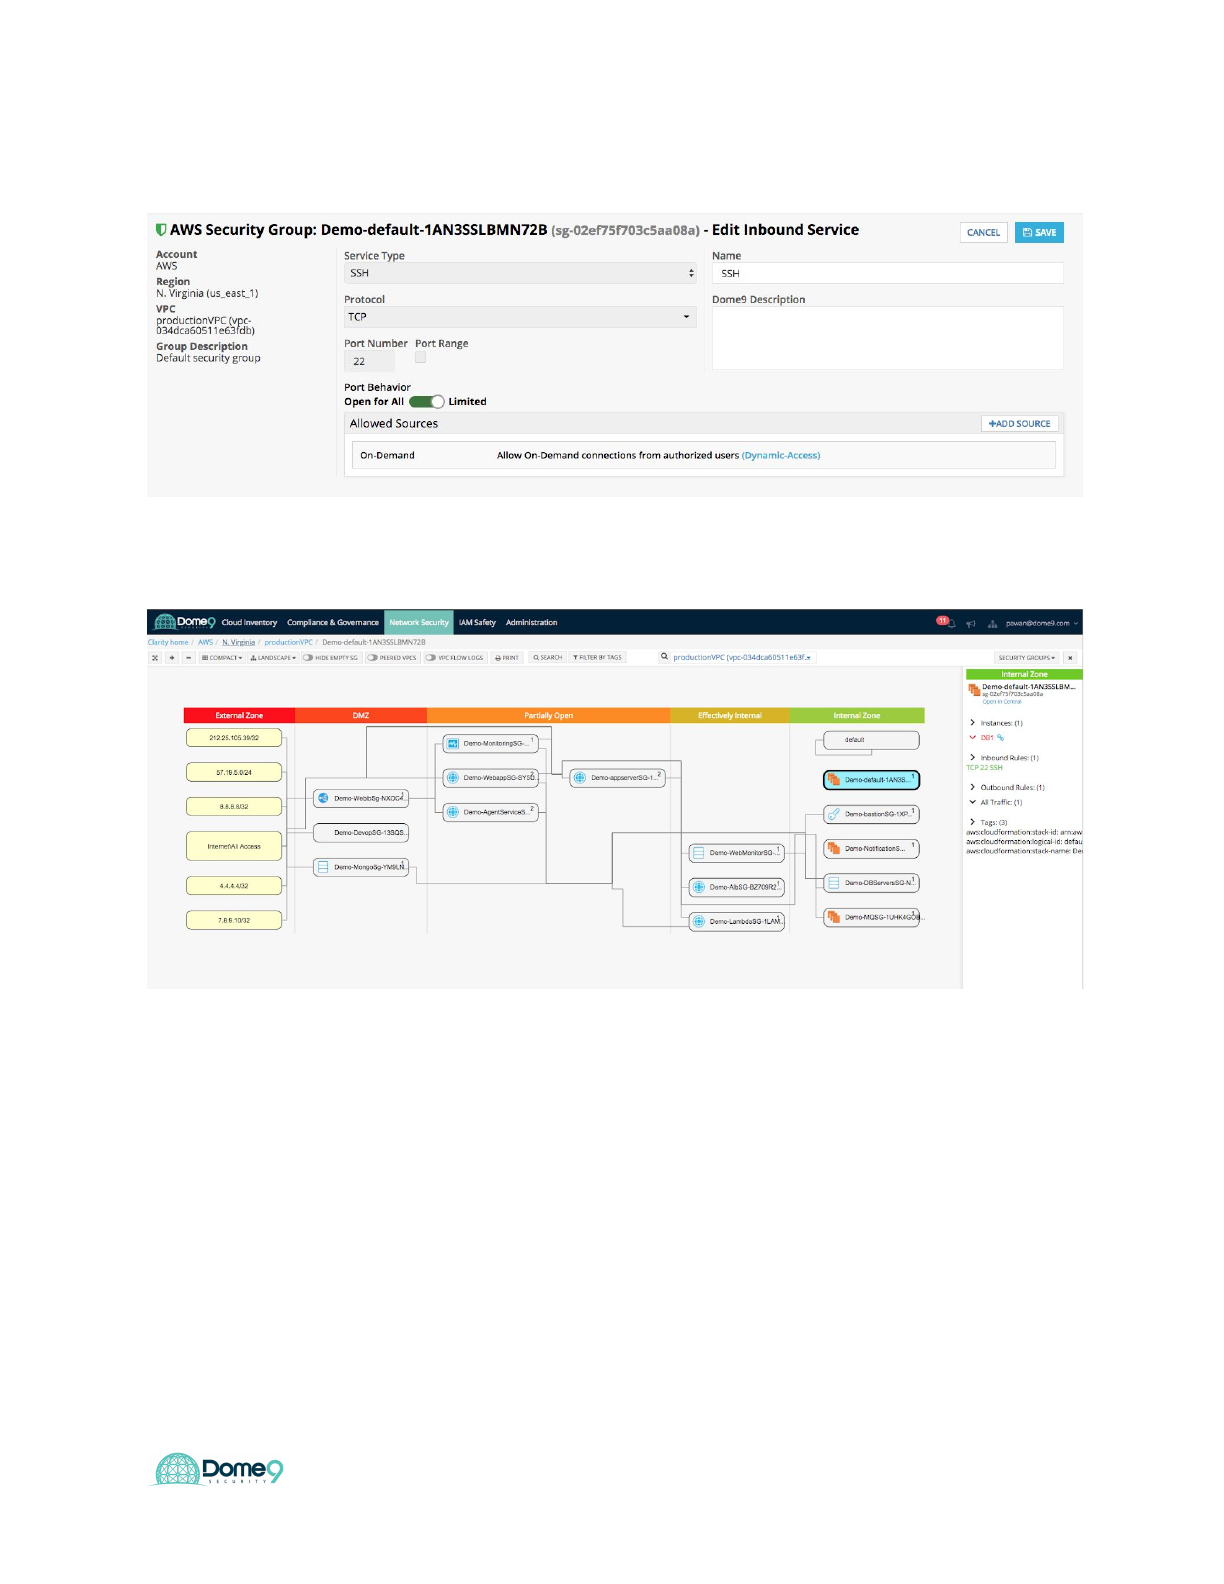
Fix misconfiguration in default security group by deleting the open SSH rule. For the
purpose of this lab, lets keep it completely closed.
Now back in Dome9 console - go to Clarity, click the default SG we saw as the culprit,
and turn on full protection mode at the top right in the entity explorer view:
27
Dome9 Lab Guide
Fix the issue by closing the SG for now
You can also check Clarity to see the correct topology below:
Exercise Complete! You have now fixed the misconfigured security group.
Exercise 5.2: Active protection – SG level
Let’s try to mess with this by making changes in the AWS console. Make SG change in
AWS by going to the default SG.
28
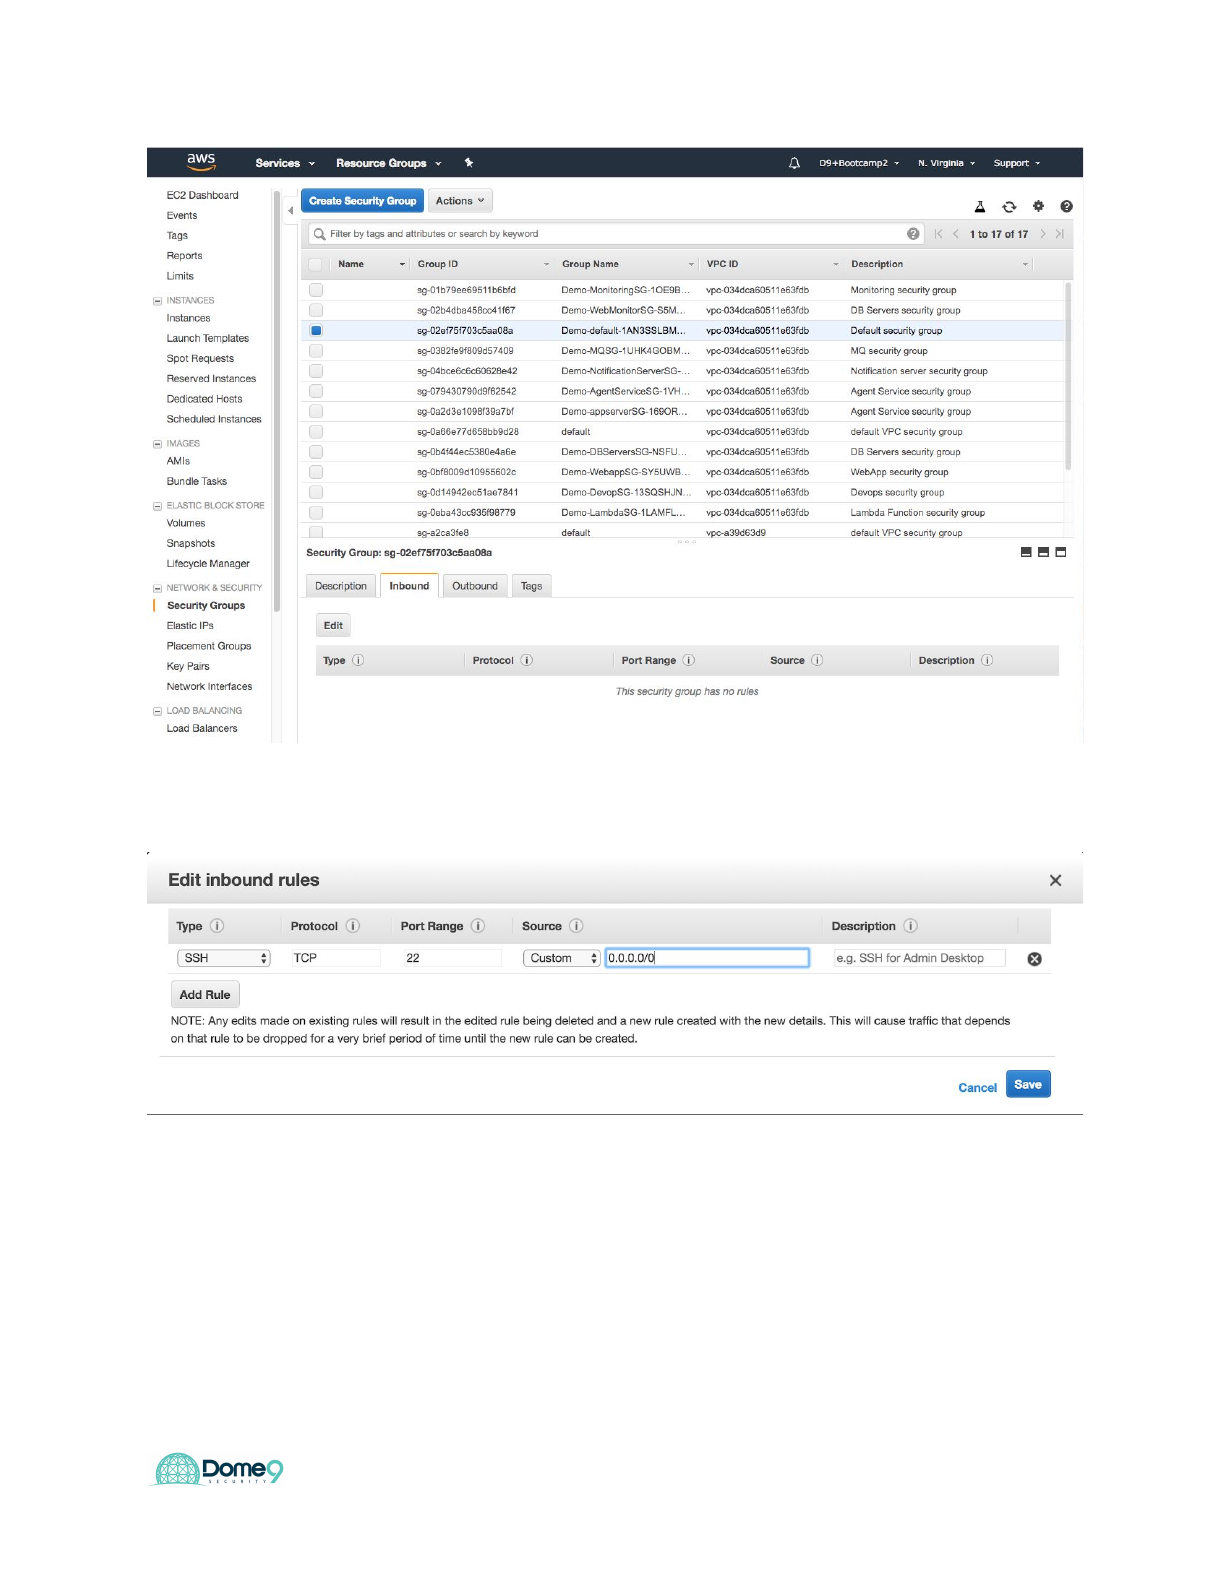
Dome9 Lab Guide
And now enable 0.0.0.0/0 SSH rule for default SG
You should now be able to see the change in Dome9 console. Dome9 also rolls
configuration back and adds the user event in the audit trail for further analysis.
You can see the activity trail in the audit log which is extracted context from CloudTrail
29
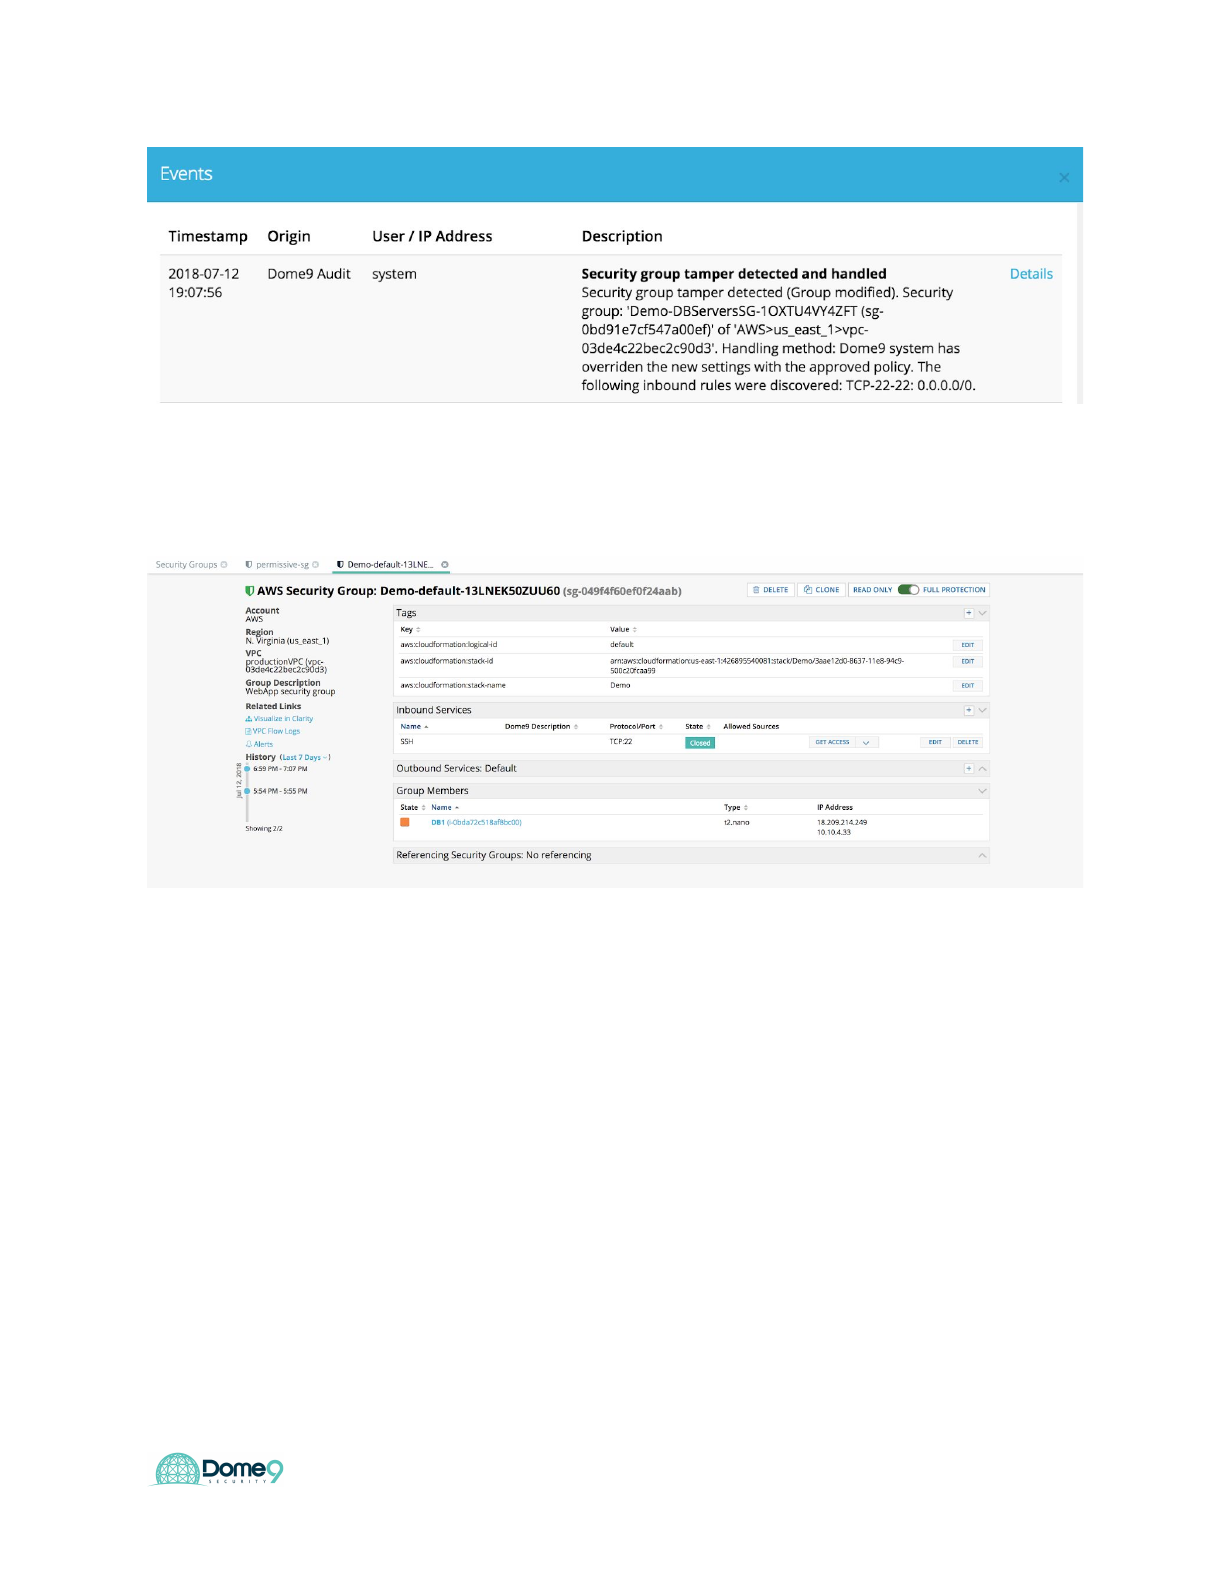
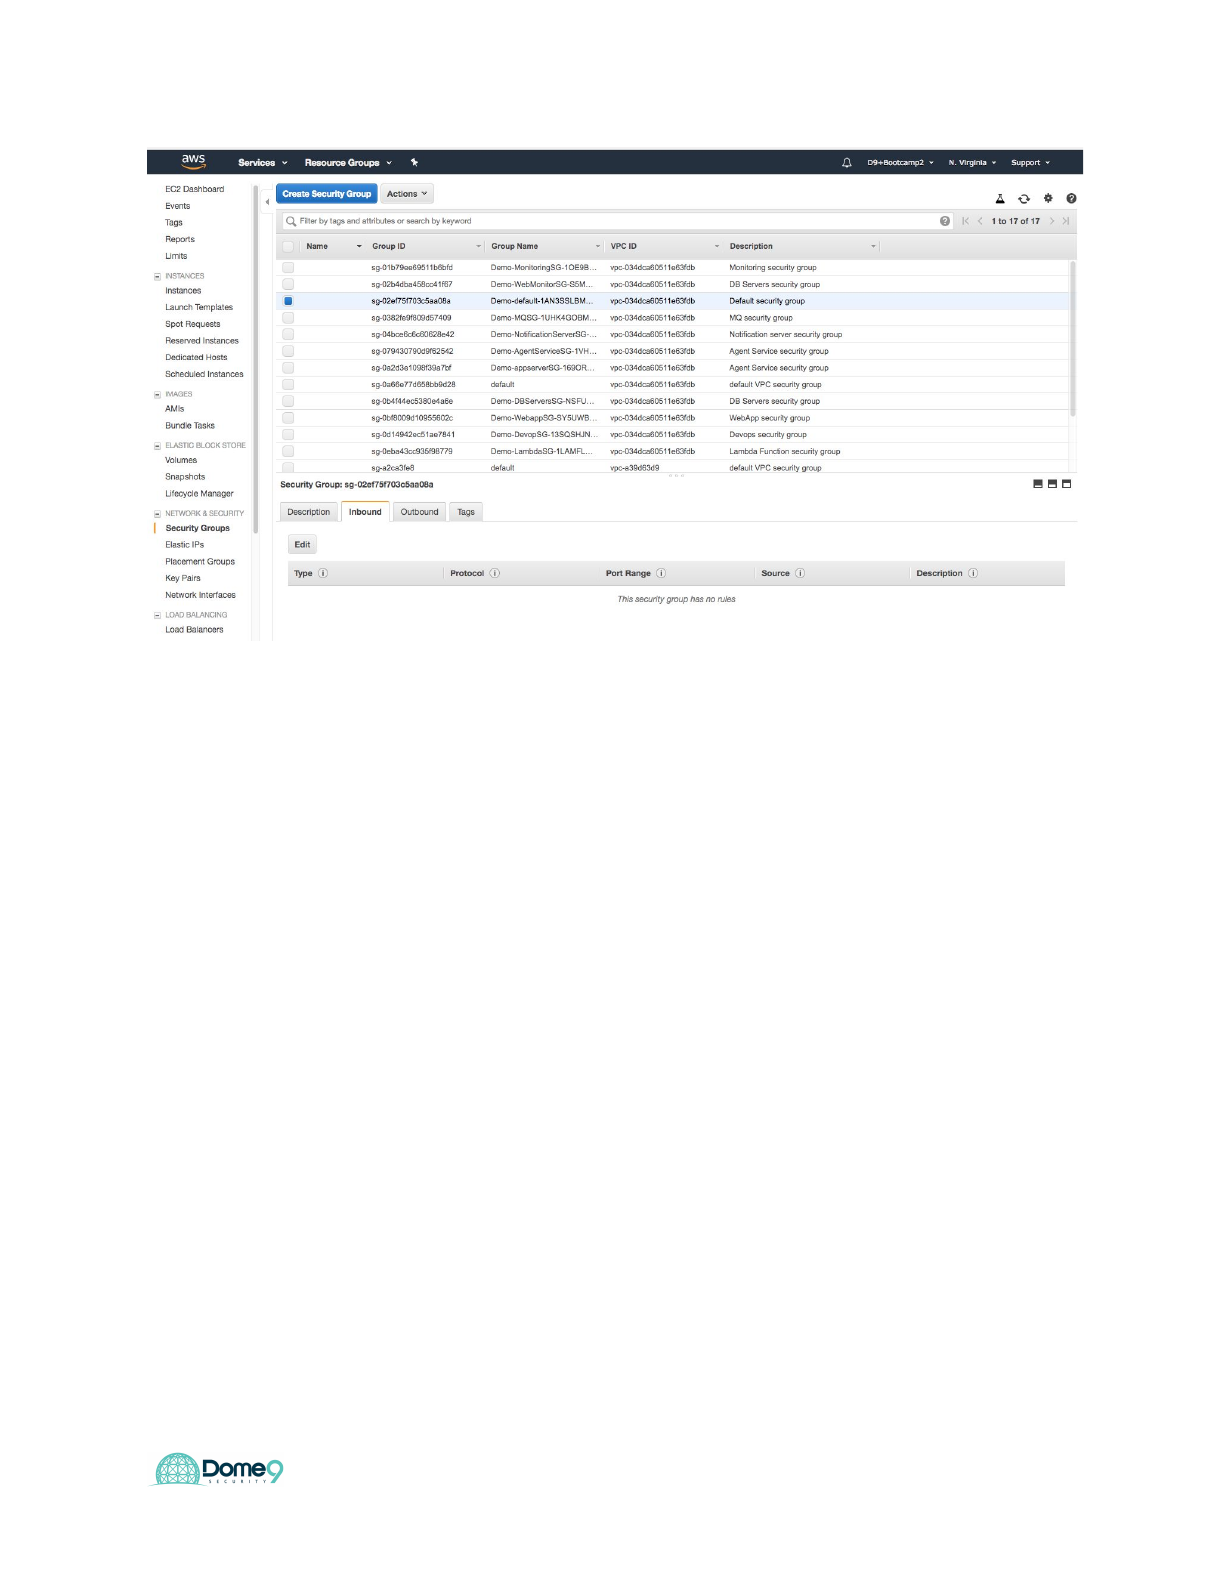
Dome9 Lab Guide
You should see the configuration reversed back to the gold standard configuration
You can also confirm it in the AWS console
30
Dome9 Lab Guide
Exercise Complete! You have now enabled enforcement of security policies and
eliminate configuration drift at a security group level in AWS
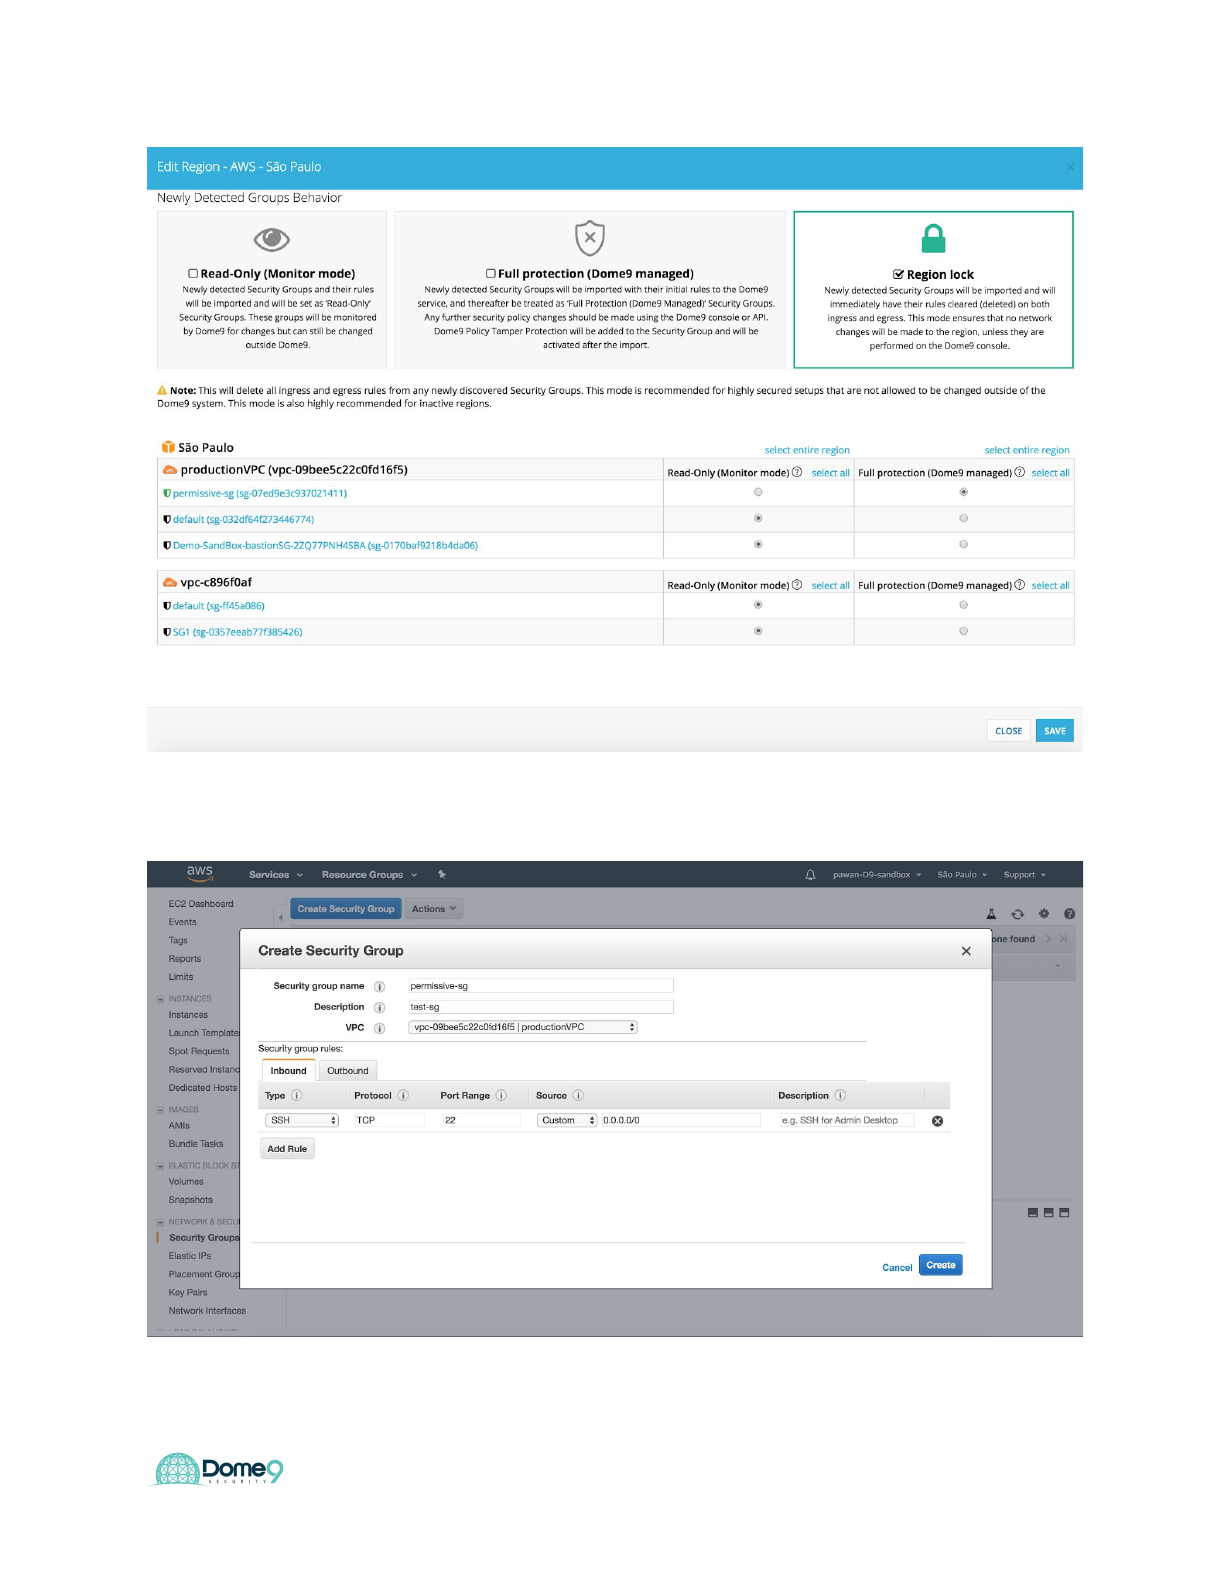
Exercise 5.3: Active protection – Region level
Let’s turn on Region Lock first in Dome9 (Lock down Sao Paolo region)
Go to the cloud inventory and select cloud accounts and navigate to Sao Paolo region.
31
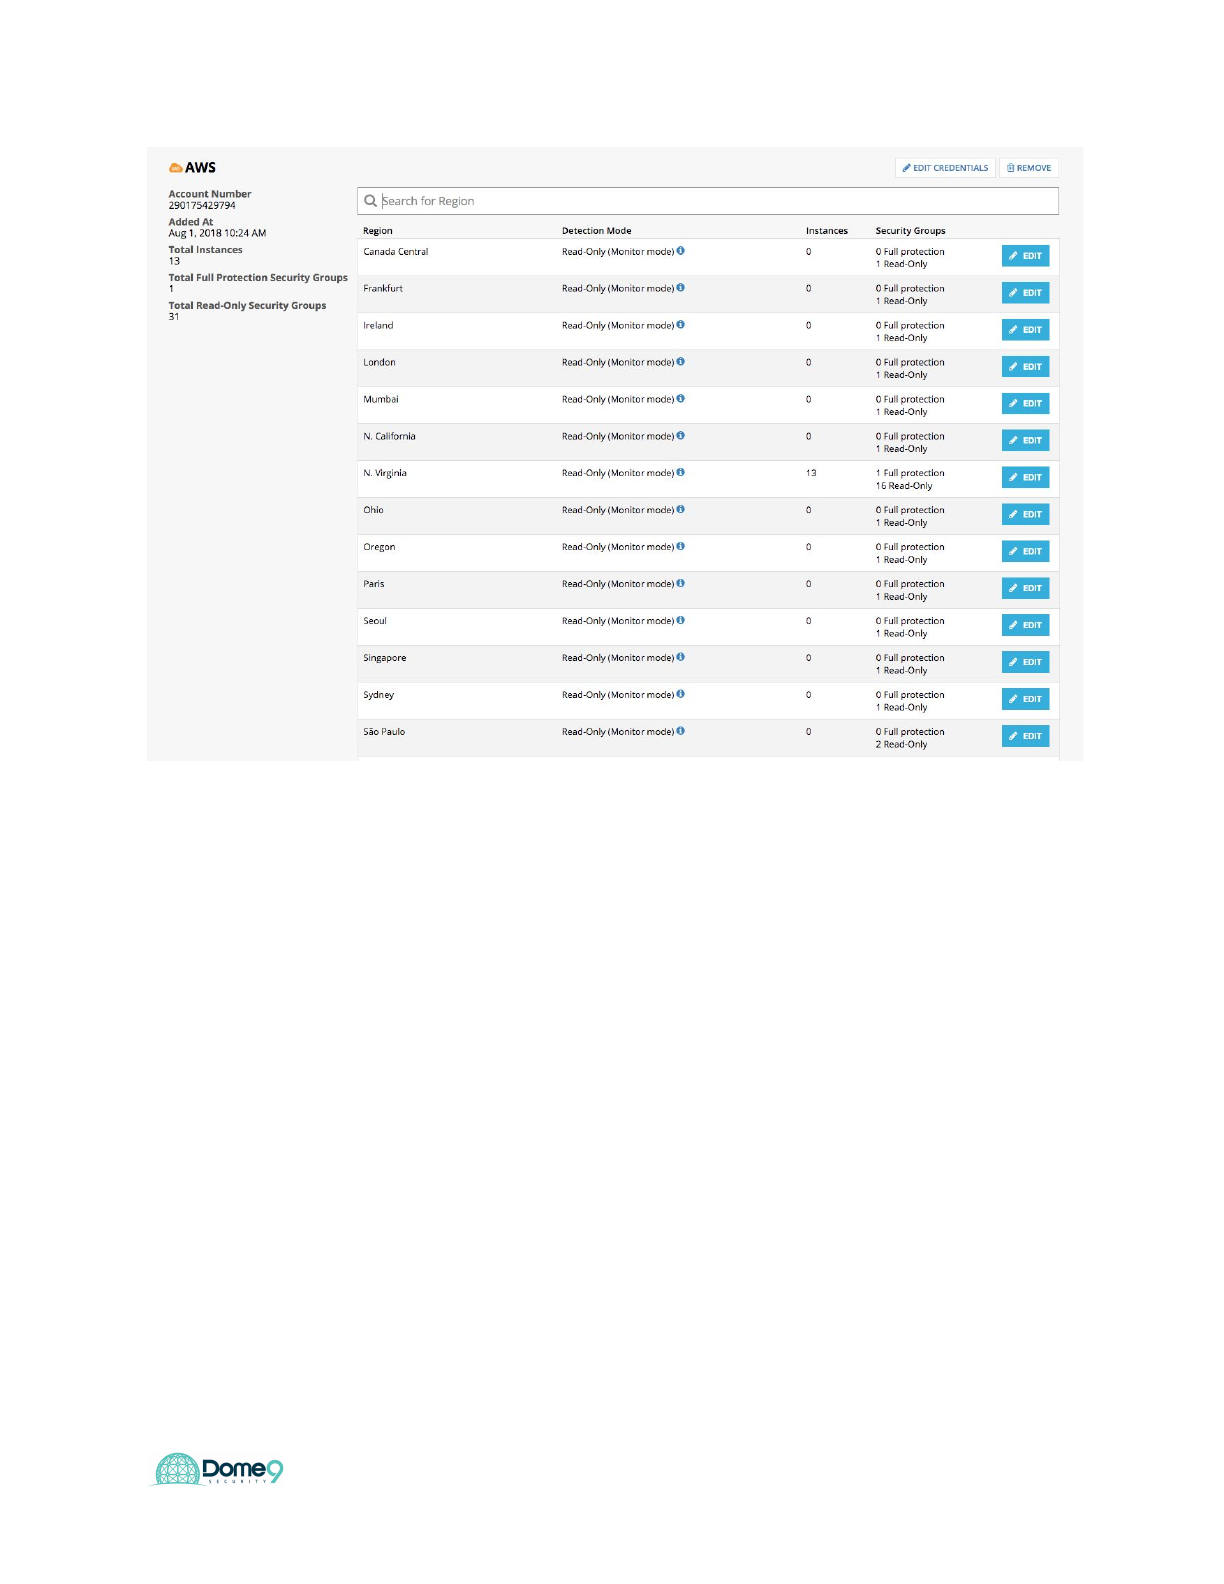
Dome9 Lab Guide
Let’s assume this would be an unused foreign region where you would not expect
activity happening. You can turn on Region Lock to ensure no changes are made to this
region unless its from within Dome9.
32
Dome9 Lab Guide
Go to the AWS console and create a new SG in Sao Paolo
33
Dome9 Lab Guide
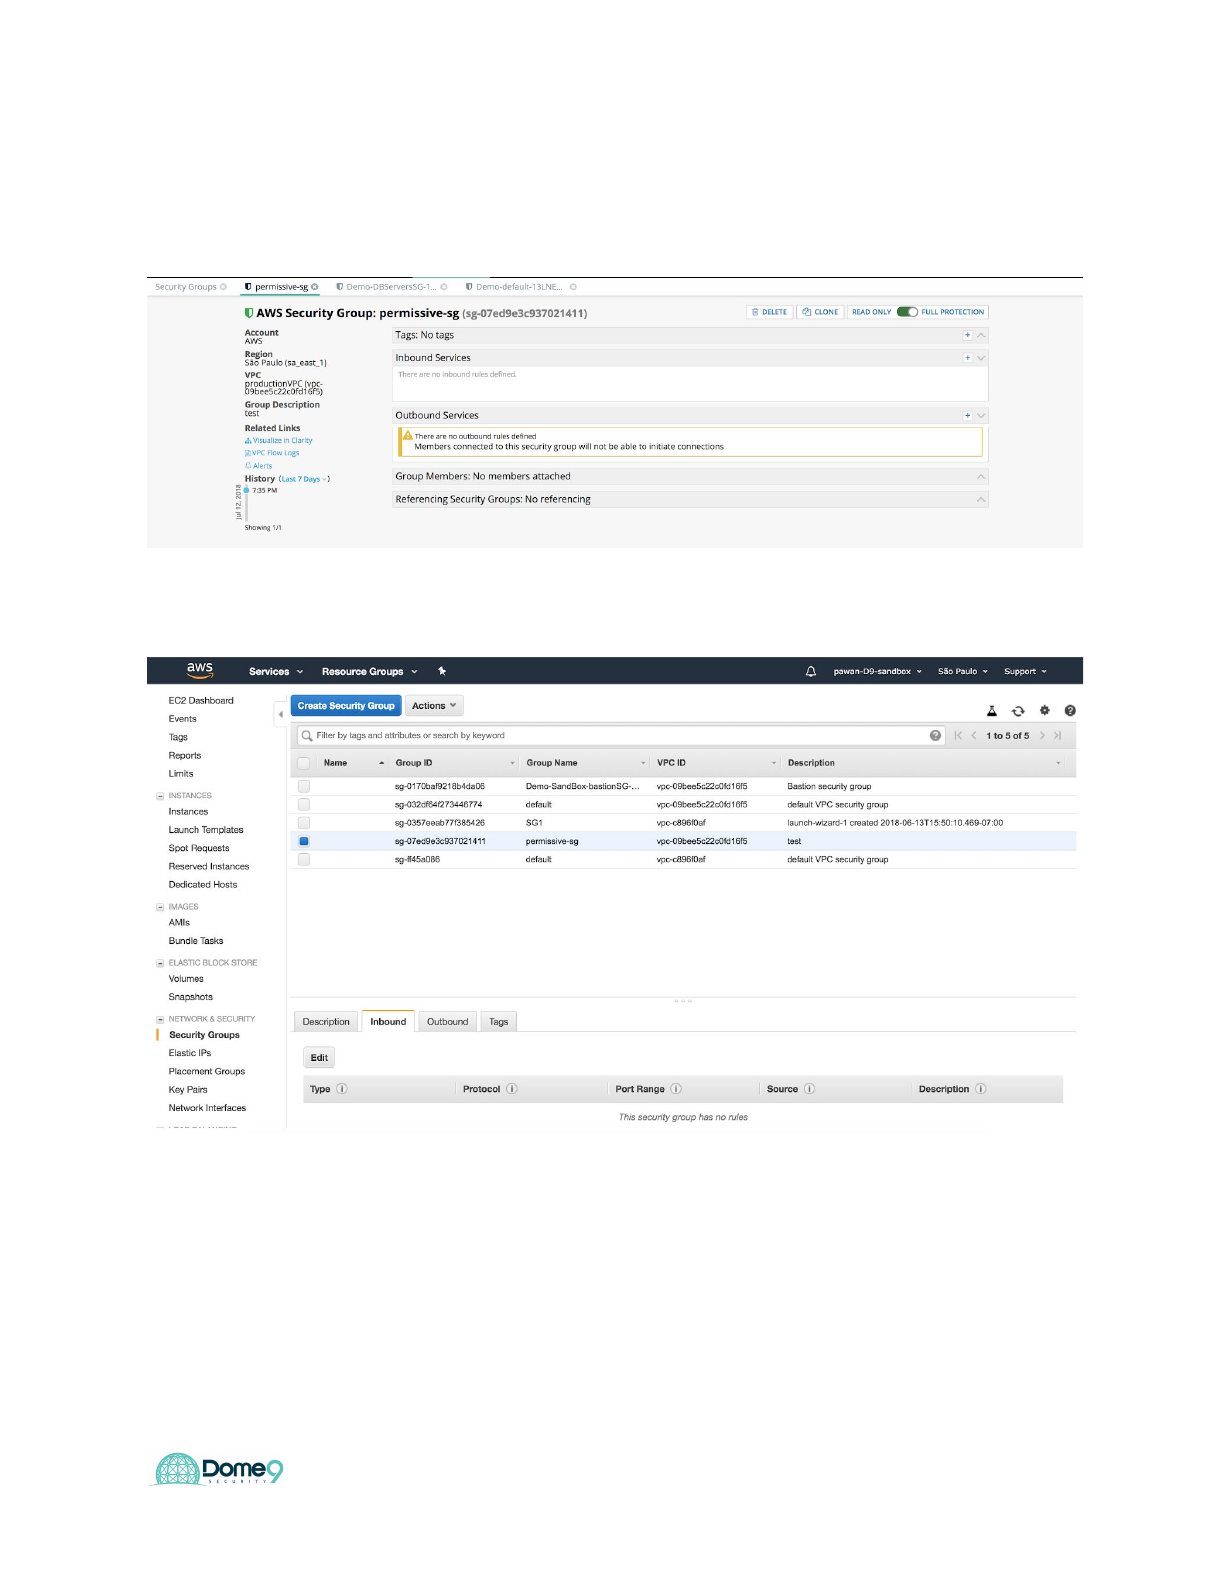
Go back to Dome9 console, you should see this new SG’s inbound/outbound rules
deleted.
You can also confirm it in the AWS console in Sao Paolo
Exercise Complete! You have now enabled enforcement of security policies and
eliminate configuration drift at a region level in AWS.
34
Dome9 Lab Guide
S3 Security Lab
The goal of this exercise is to help you understand how to control S3 bucket access. We
will focus on how to ensure specific role can interact with S3 and thereby not allowing
any anonymous/outside users have access to sensitive data in the bucket. We will also
look at least privilege concept, where you as an admin decide who has access
(whitelist) to the most sensitive S3 operations and deny everyone else.
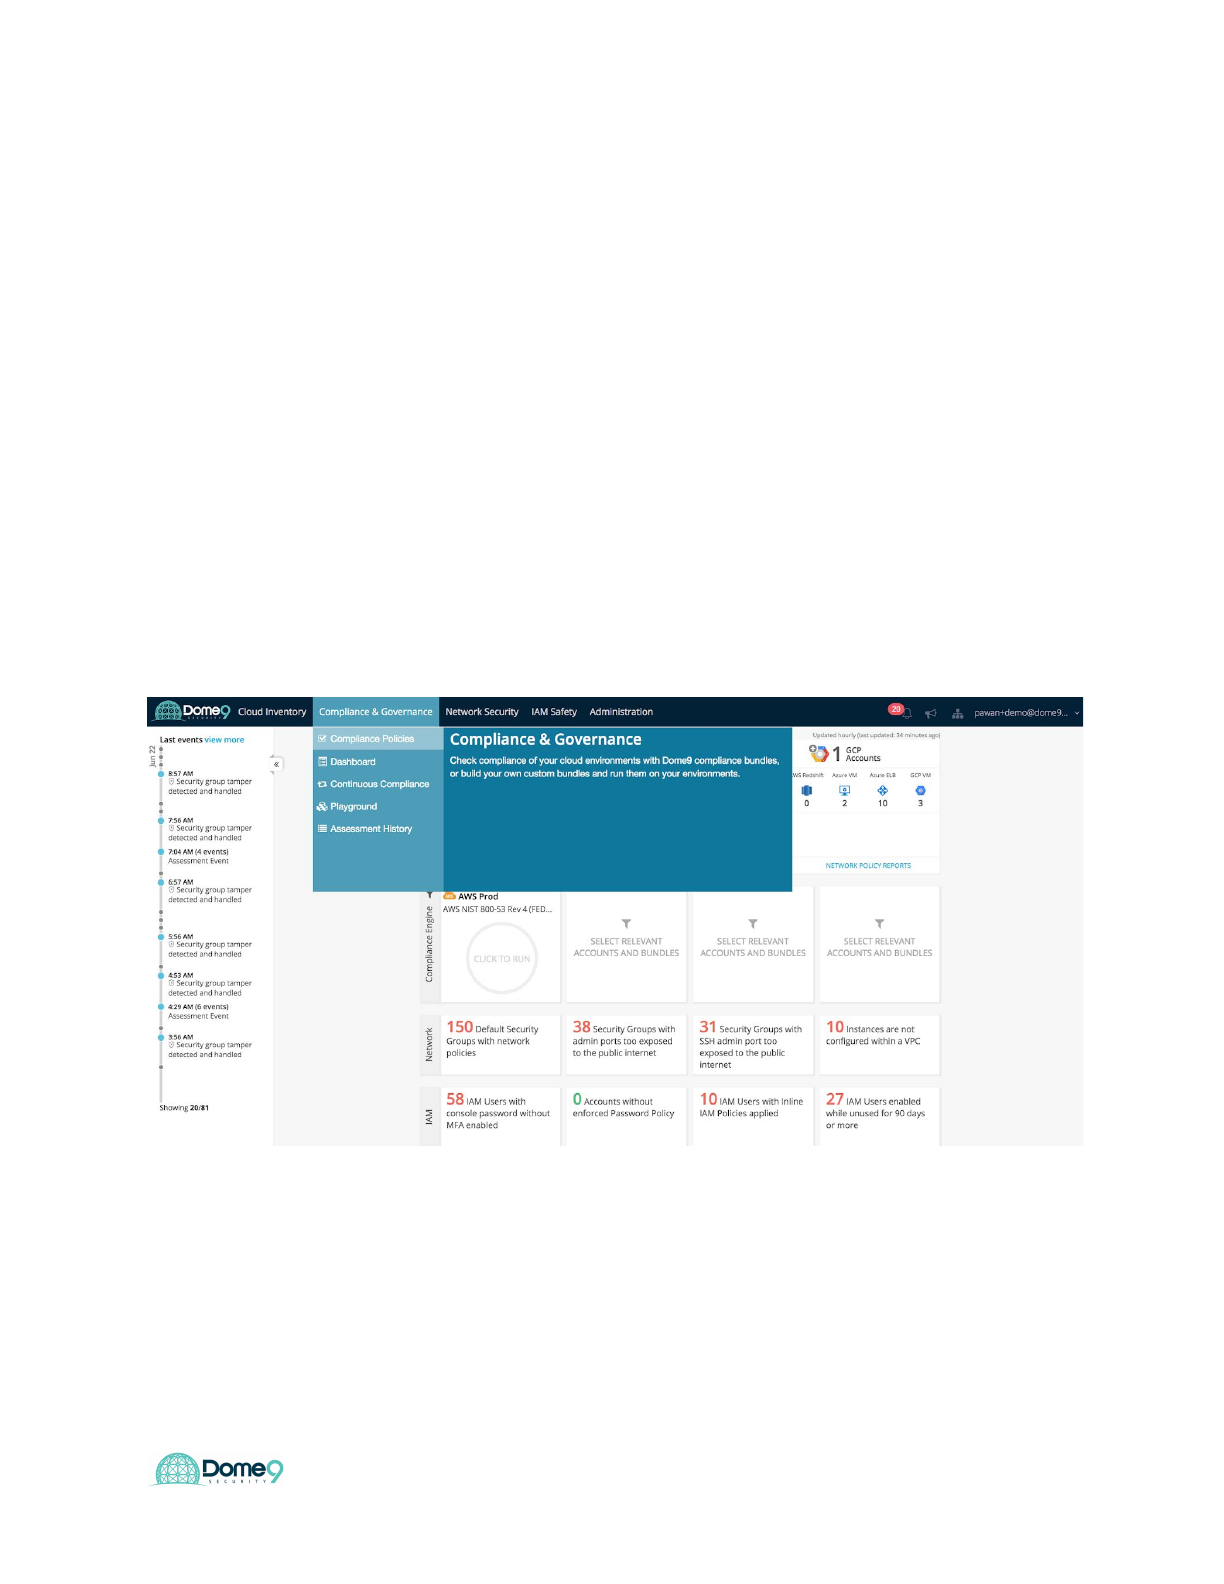
Exercise 6.1: Detecting Exposed Buckets
1. Navigate to Compliance Engine Tab
2. Explore Compliance Engine page
35
Dome9 Lab Guide
Dome9 Compliance Engine monitors and scans your AWS/Azure/GCP infrastructure to
ensure alignment with compliance standards such as PCI-DSS, NIST 800-53, GDPR,
CIS etc.
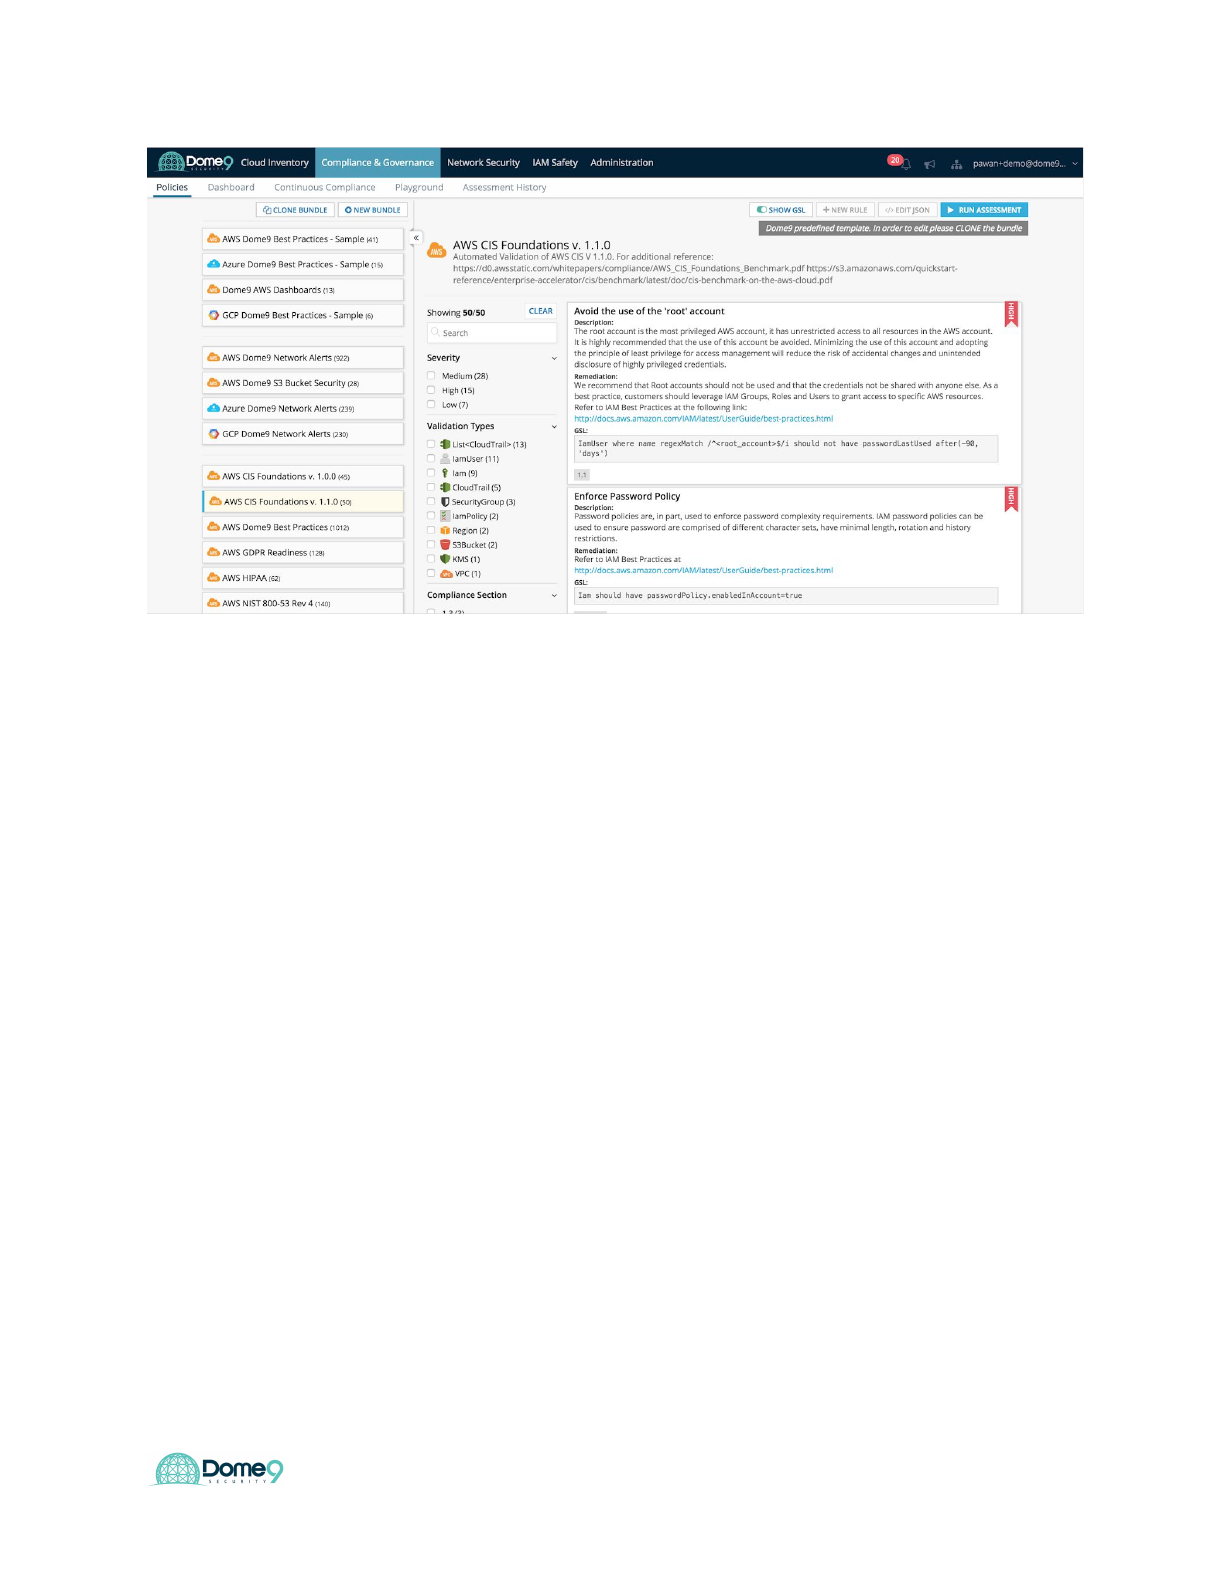
3. Select CIS Benchmarks and run bundle assessment
36
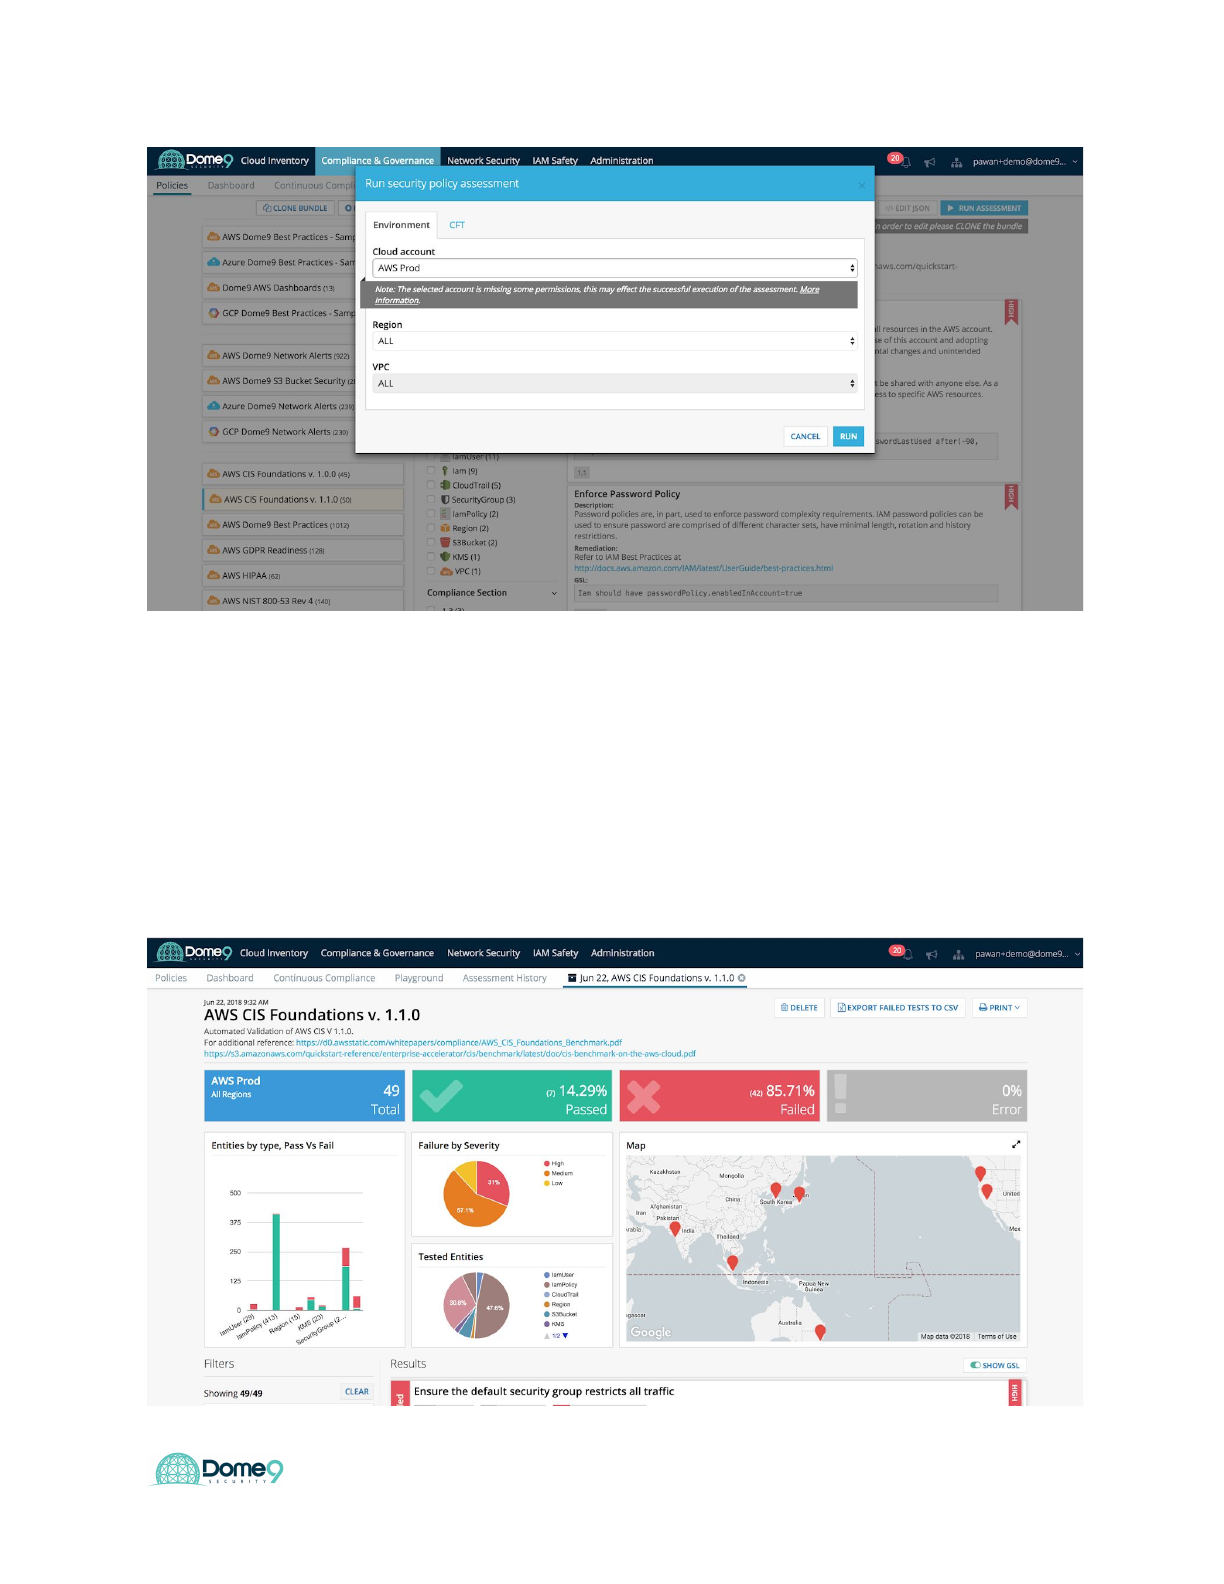
Dome9 Lab Guide
Select your AWS environment in the cloud account section. Dome9 also provides the
option to BYOC (Bring your own CFT) and scan your template before pushing to
production.
5. Analyze the report findings
37
Dome9 Lab Guide
Within a few seconds, the Compliance Engine runs an assessment and provides
detailed findings in an easy to use dashboard. You can see the number of test cases
passed vs failed, as well as test cases segmented geographically, across regions and
by test severities.
6. Filter Analyze key test results for S3 buckets
1. Ensure buckets are not publicly accessible
How many buckets are publicly accessible?
Exercise Complete! You have now detect publicly exposed buckets!
Exercise 6.2: S3 Access Controls (exposed ACLs)
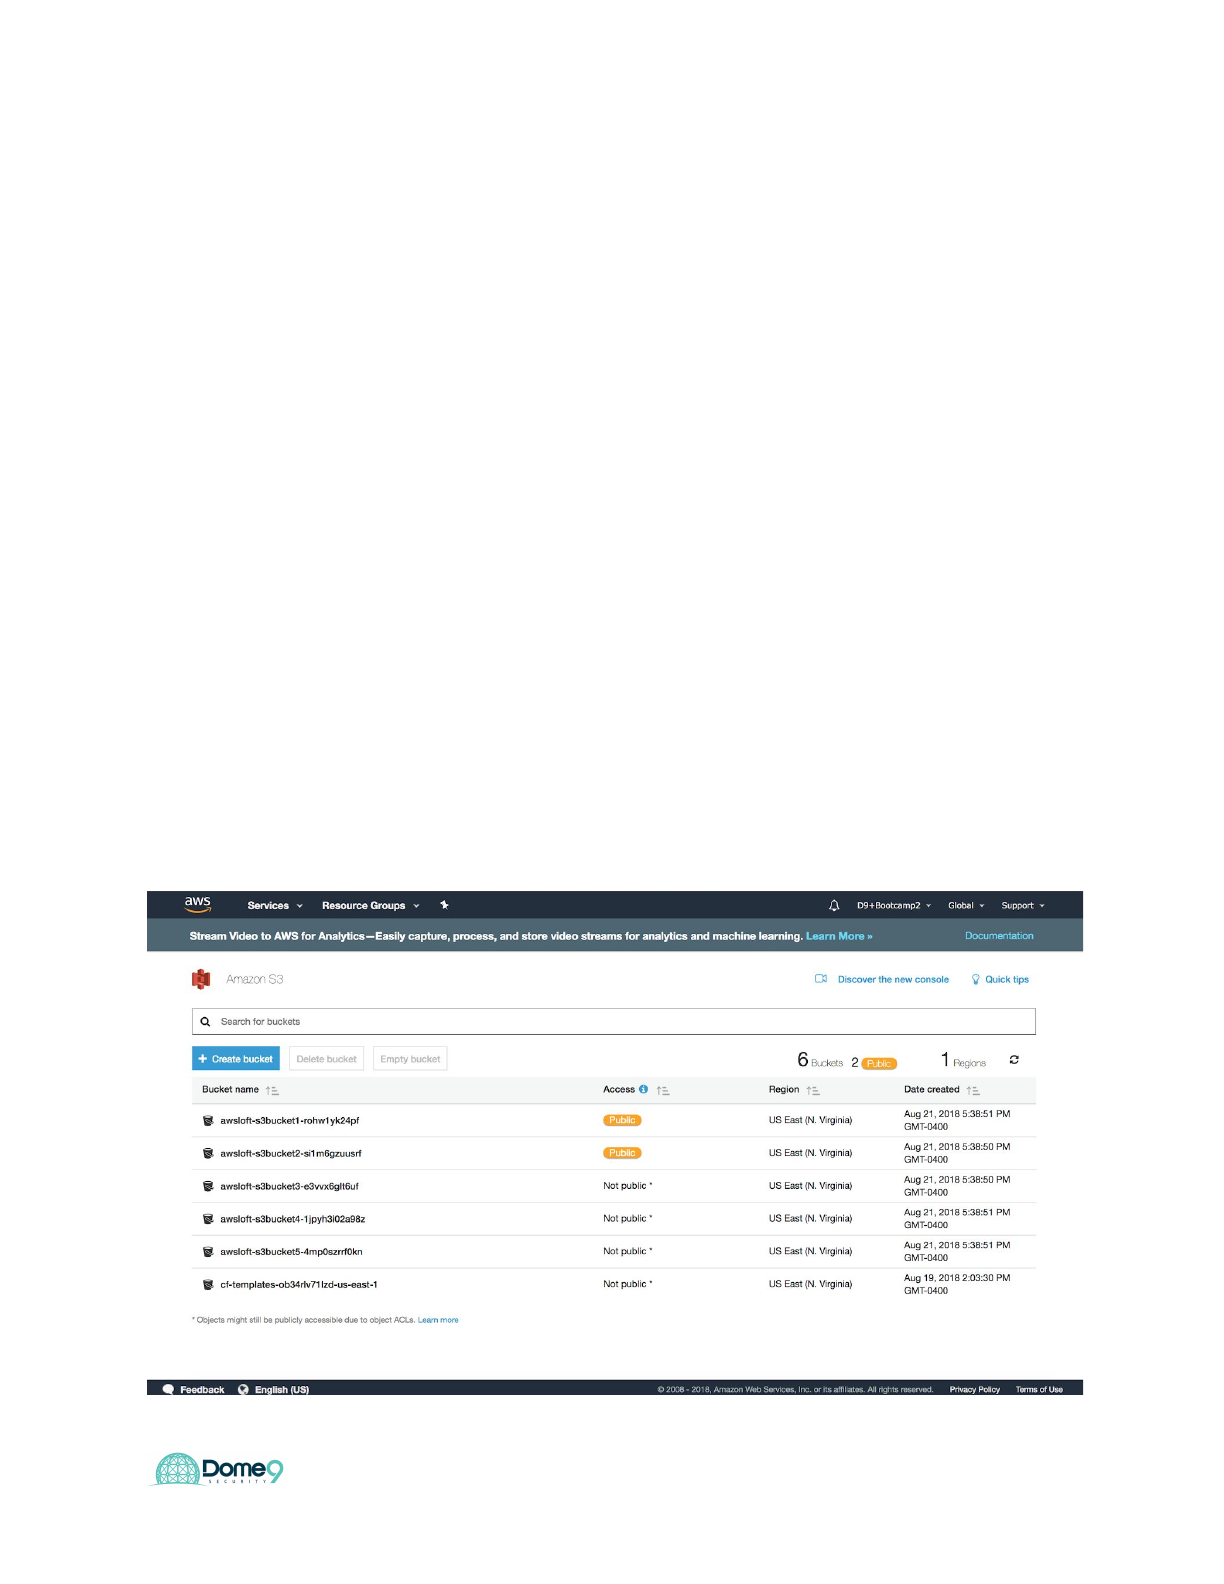
Navigate to the S3 console in AWS console. We will start with bucket 1
38
Dome9 Lab Guide
Fix <yourCFT>S3Bucket1
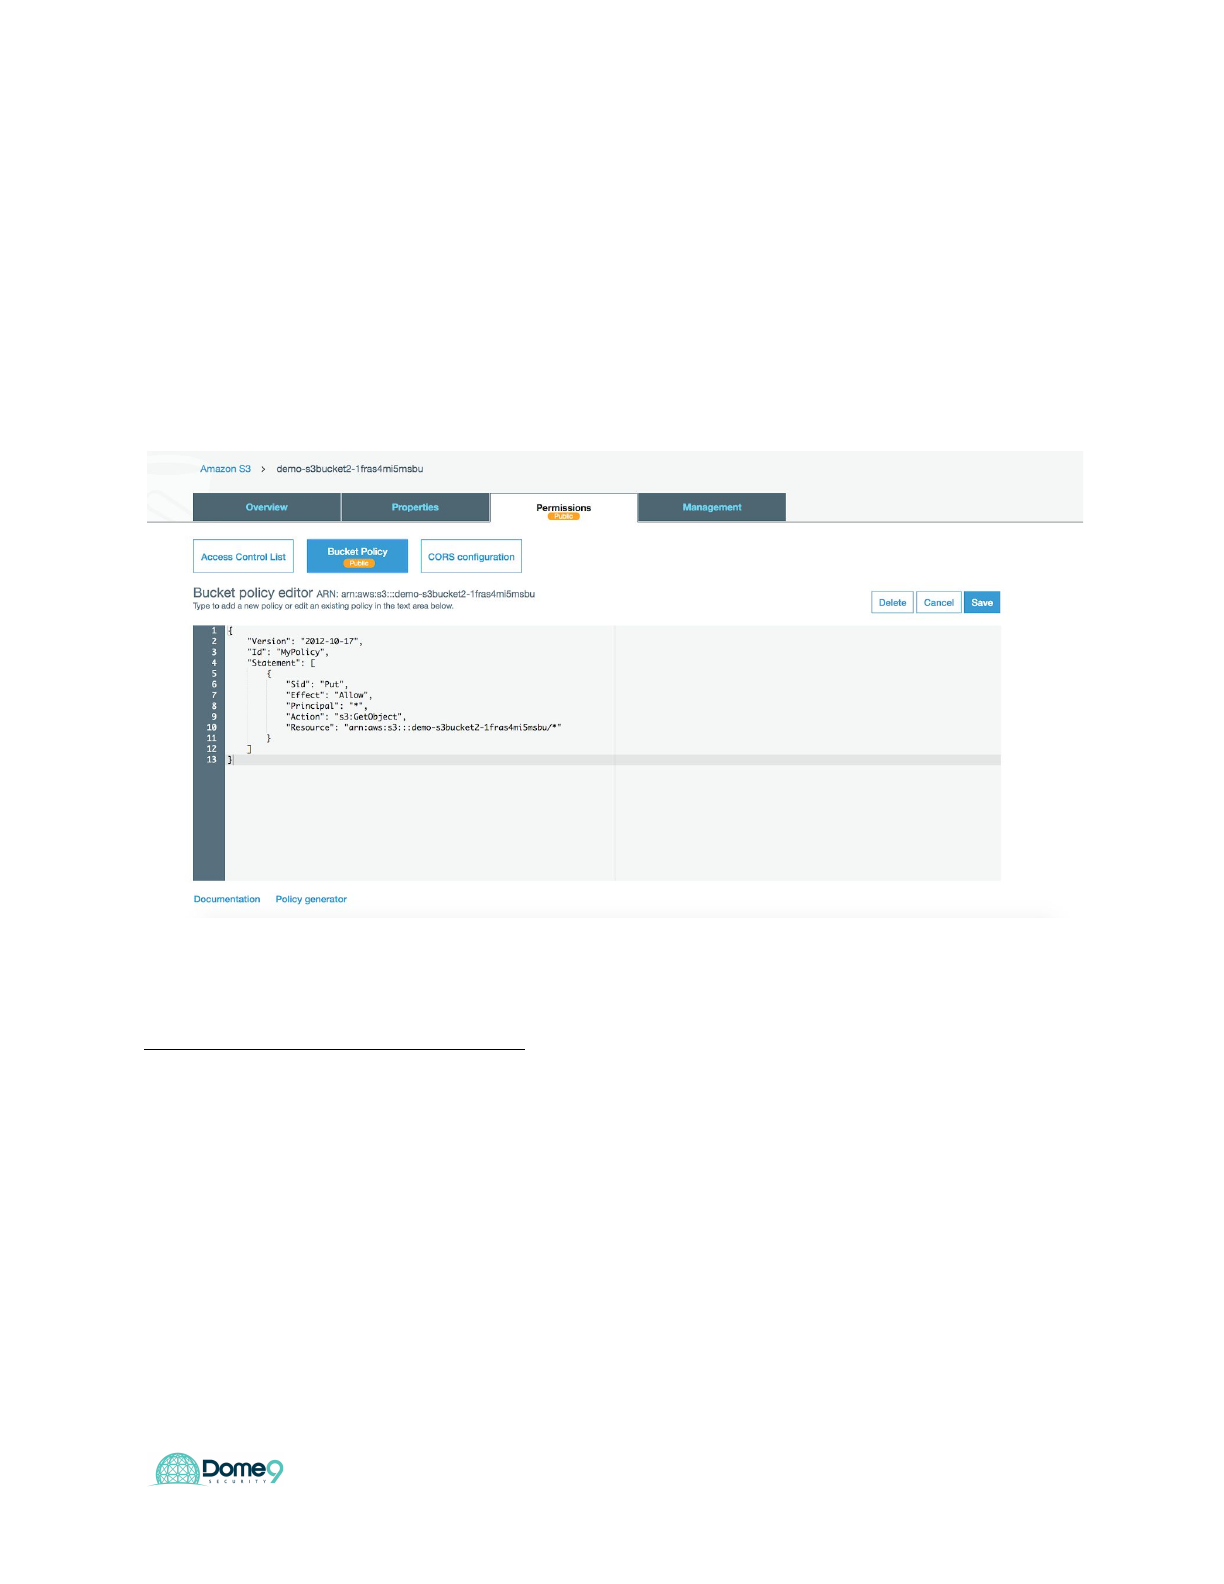
Exercise 6.3: S3 Access Controls (Bucket policies)
Now let’s move to <yourCFT>S3Bucket2. Write JSON policy (start from the existing
configuration seen below)
Bucket Policy: Access Management - Only Allow S3-Role to put and get objects in this
bucket.
Sample snippet for Principal parameter:
"Principal": {
"AWS": "arn:aws:iam::<ACCOUNT NUMBER>:role/<INSERT S3 ROLE NAME HERE>"
},
39

Dome9 Lab Guide
Hint: copy/paste the Principal parameter to include S3 role name. It can be found by
navigating to Services -> IAM -> Roles -> <your S3 Role Name>
Bucket Policy: Least Privilege enforcement - Ensure deletion of S3 bucket can only be
done based on your specific AWS account id (this is important for sensitive buckets that
may have other accounts accessing it, and you want to make sure the most critical
operations are whitelisted)
Sample JSON to add in your bucket policy (don’t forget to add , after previous
statement)
,
{
"Sid": "Stmt1526361042800",
"Effect": "Deny",
"Principal": "*",
"Action": "s3:DeleteBucket",
"Resource": "arn:aws:s3:::<copy your S3 bucket resource name in existing policy>",
"Condition": {
"StringNotLike": {
"aws:userid": "YOURAWSACCOUNTID"
}
}
}
Exercise Complete! You have now ensured no buckets are publicly exposed!
Offboarding
Please navigate to the Cloudformation and click the stack and delete stack. You are
now done!
40
