User’s Guide To Setting Up And Using Outernet Dreamcatcher V 2 3.03 SL 5.4 User Manual
User Manual:
Open the PDF directly: View PDF ![]() .
.
Page Count: 31
User’s Guide to Setting Up and Using Othernet Dreamcatcher v 3.03
With Skylark 5.4 (As of October 29, 2018 by Ken Barbi @kenbarbi)
This guide is designed for new users who ordered components from Othernet to set up their equipment
using a WiFi capable Windows, Linux or Apple computer. Section I - Purchase, Unpack, and
Assemble and Section II - Energize Dreamcatcher Setup can be done inside without looking at the
sky. Section III - Acquiring the Satellite is performed outside looking at the satellite. Section IV -
Connecting the Dreamcatcher to Your Local Router by WiFi as a Client, Section V - Additional
Storage, and Section VI - Printing and Othernet Satellite Radio can be performed anywhere. Please
note that Othernet is a revision of the old name Outernet. Older versions of Skylark prior to Version
5.2 will no longer work with the Dreamcatcher v 3.03.
Section I - Purchase, Unpack, and Assemble
Step 1. Purchase the necessary equipment from Othernet:
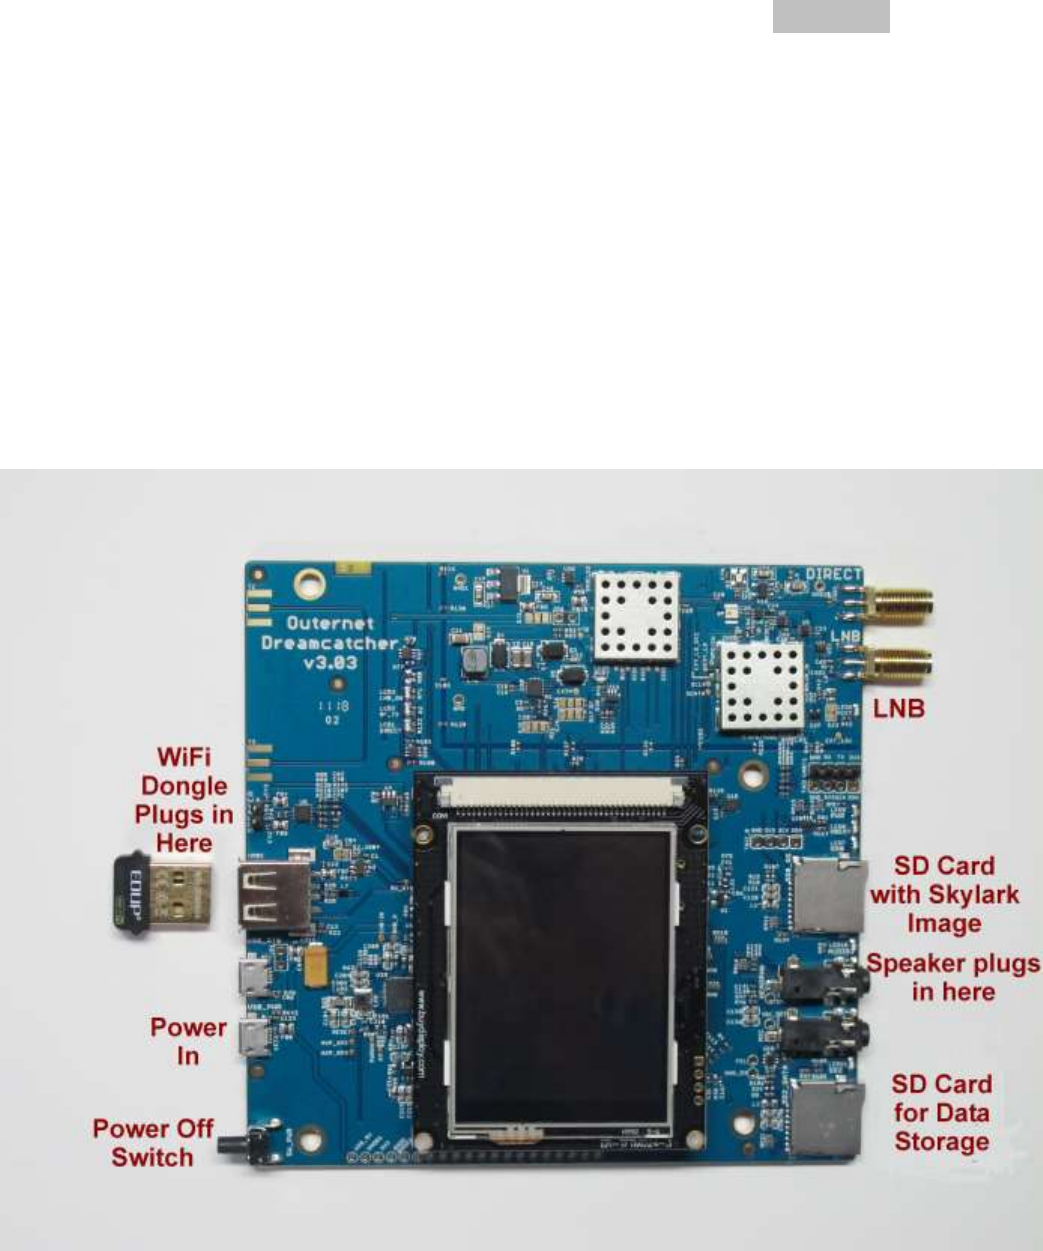
a. Dreamcatcher v 3.03 Board (Fig. 1) which comes with a WiFi dongle (Fig. 2).
Fig. 1 Dreamcatcher v 3.03 Board
1
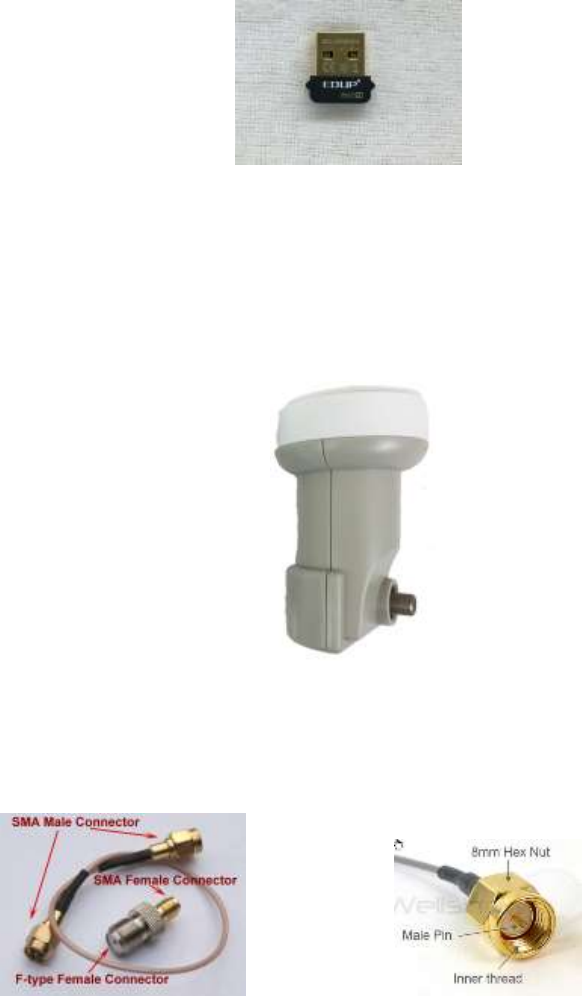
Fig. 2 EDUP WiFi Dongle
b. Maverick MK 1- PLL Phase Lock Loop Standard Linear KU LNB (Fig. 3) which comes with
the kit.
Fig. 3 Maverick MK 1-PLL
c. You don’t need anything else from Othernet. The kit comes with a 9 inch male SMA to male
SMA cable, and an F-type Female Connector to SMA Female Connector.
Kit comes with these items Male SMA Connector
Step 2. Purchase the following from an electronics store:
a. 2 Amp (or more) USB Power cube (the current rating is important)
b. Short USB to micro USB fast charging/sync cable
c. High quality fast micro SDHC card sized between 4 and 128 GB for the Skylark program - - a
micro SD larger than 16 GB is unnecessary and not required, but can be used.
d. 6 foot length of low-loss RG6 cable with male F-connectors at both ends. (The Dreamcatcher
v3.03 Boards being shipped by Othernet are tested with 50 feet of RG6 cable, and some users
have successfully sited their antennas up to 500 feet away from the Dreamcatcher.)
2

Male F-connector with RG6 Cable
Step 3. Assemble the equipment.
a. Connect the LNB to the LNB port (the second one down on the top right of the Fig. 1 picture)
on the Dreamcatcher Board using the short length of RG6 cable, and the Othernet provided F-
connector to the SMA adapter and the SMA cable to the female SMA jack on the
Dreamcatcher. You do not need a software defined radio (SDR) or amplifier as you did before
with CHIP or RaspberryPI configurations. You don’t need to be outside pointing to a satellite.
b. Mount the LNB on some sort of stand or tripod so it points toward the satellite when you take it
outside - - see Section III - Acquiring the Satellite for information on how to find the satellite.
c. Plug the WiFi Dongle into the standard USB plug on the left side of the Dreamcatcher Board.
d. Connect the micro USB charging cord to the USB_PWR Plug on the lower left side of the
Dreamcatcher Board.
Step 4. Download the latest version of the Skylark Program for Dreamcatcher which is located at:
https://archive.othernet.is/Dreamcatcher3 Skylark/ (Fig. 4)
Fig. 4 Index of /Dreamcatcher3 Skylark/
3
Unzip the .gz file with any standard ZIP File program such as 7-Zip to extract the .img file.
Step 5: Make sure you use a high quality fast micro SHDC card sized between 4 and 128GB for the
Skylark OS. Recommended size is 16GB since the Skylark OS automatically cleans old files, so never
fills up. Don’t skimp on quality here, as some users have discovered inexpensive micro SD cards don’t
last.
When you write the Skylark image on a micro SD card (either new, or previously used), the act of writing
the image itself takes care of the partitioning and formatting the card correctly for Skylark. There is no
need, ever, to try to partition or format the micro SD card manually, before or after writing the image. In
the specific case where the micro SD card already had an older version of Skylark on it, writing a new
image preserves the old configuration and old downloaded files.
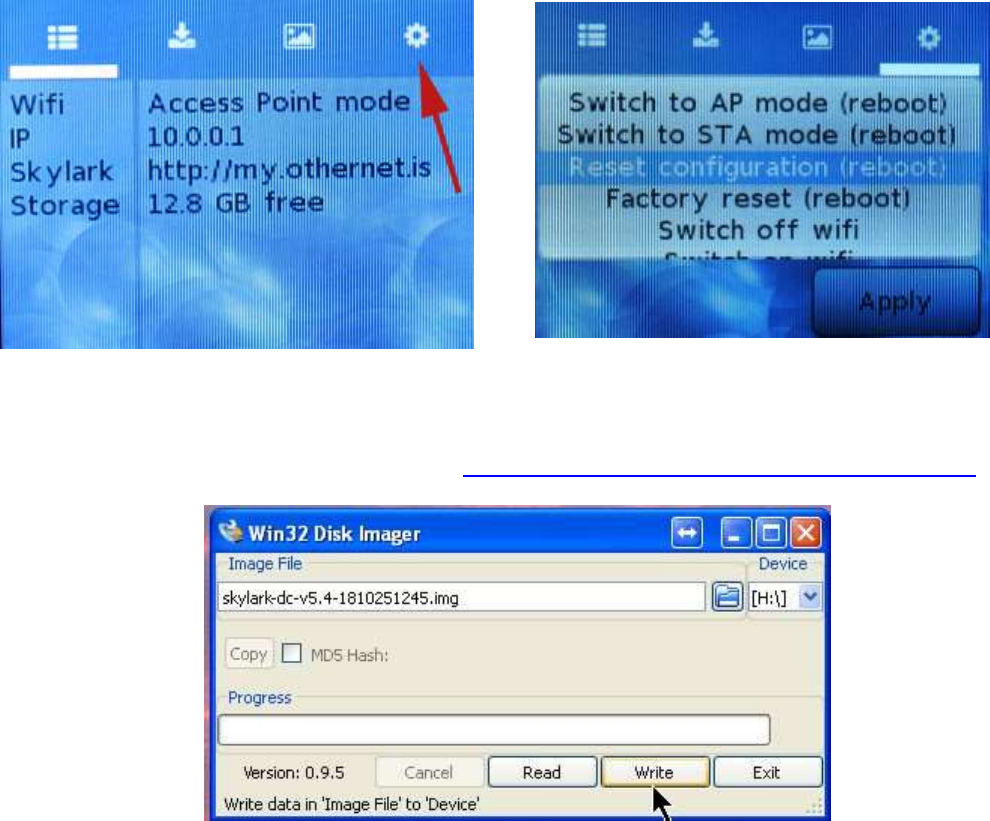
Every once in a while though, this carrying-over of old configuration files may cause problems, like when
upgrading from 5.3 to 5.4. In such cases, you must do a "Reset Configuration (reboot)" from the
Dreamcatcher Touch Screen (Figures 5 & 6). This will reset all configuration file and bring up the Access
Point mode, and you will need to reconfigure everything. It’s a good idea to try this as the first step if you
face problems connecting or logging-in to Skylark.
Fig. 5 Touch Screen Summary Page Fig. 6 Touch Screen to Reset configuration (reboot)
Step 6. Write the skylark-dc-v5.4-1810251245.img image file to a micro SD card sized with a program
such as Win32DiskImager (Fig. 7) available at: http://win32_disk_imager.en.lo4d.com/download
Fig. 7 Win32 Disk Imager
4

Step 7. Insert the micro SD card with the Dreamcatcher Skylark image into the Dreamcatcher Board’s
SD0_OS which is the micro SD card holder 1/3 of the way up on the right side of the board next to the
blinking LEDs.
Optional Step 8. Over the Air (OTA) Update
Skylark has a feature to allow older Skylark versions to be updated by a preliminary test for OTA. The
procedure is attached to this document as Annex A. Eventually, it should happen as an automatic
satellite download.
Section II - Energize Dreamcatcher Setup
Step 1. Energize the Dreamcatcher by plugging a 2 Amp (or more) USB power cube into an AC outlet.
Don’t forget, if you are using too small a power cube or a computer USB connection, the board’s lights
will blink and look correct, but there won’t be enough power to run the Dreamcatcher WiFi or its satellite
receiver correctly. Forum members’ experience varies with some USB power cubes, once the power
required by the Dreamcatcher exceeds1 amp dc, the voltage delivered to the Dreamcatcher Board by the
USB power cube decreases below 5 vdc to a level not sufficient to provide the 13 - 14 vdc Bias-T the
LNB requires.
The Dreamcatcher is an energy hungry device drawing 1.1 amps at 5 vdc, so don’t be surprised if your
gear doesn’t work. A sure (but expensive) solution is to use an external power pack such as an EasyAcc
20000 mAh unit to power the Dreamcatcher.
Fig. 8 EasyAcc 20000 mAh Fig. 9 IClever Charger
The EasyAcc 20000 mAh (Fig. 8) device has 2 micro plugs for charging on the upper surface in the
picture, and 4 standard size USB plugs for running devices. It can run a device while charging, and be
an uninterruptible power supply if the primary charging source goes away without causing the
Dreamcatcher to reboot. Use two 6 foot IHome heavy duty charging/sync cables to power the EasyAcc
from a 5 watt IClever dual 2.4 A charger (Fig. 9), and a single 6 inch heavy duty charging/sync cable to
connect to the Dreamcatcher to the EasyAcc 20000 mAh.
Some Forum members have found just a single charging port from the IClever dual 2.4 A charger and a
6 foot IHome heavy duty charging/sync cable work fine.
Step 2. Access the Skylark Program by using your computer operating through its WiFi to connect to
the Dreamcatcher’s Othernet WiFi Hotspot also called an Access Point. At this point you can
alternatively use a tablet or SMART Phone to continue the setup, but the procedure is illustrated with a
Windows computer.
Step 3. To be able to access the Dreamcatcher’s Othernet WiFi Hotspot, you need to be within 10 feet
of the device because the Dreamcatcher’s WiFi Hotspot is not very powerful. It is, however, much more
capable if connected through a local WiFi to your router (which is covered in Section IV – Connecting
Dreamcatcher to Your Local Router by WiFi as a Client).
Step 4. Find the Othernet WiFi Hotspot by going to your computer’s WiFi tab; selecting and connecting
to Othernet. For the rest of the Sections II & III of this procedure, you will be accessing the
Dreamcatcher thru this Othernet WiFi Hotspot (Fig. 10).
5
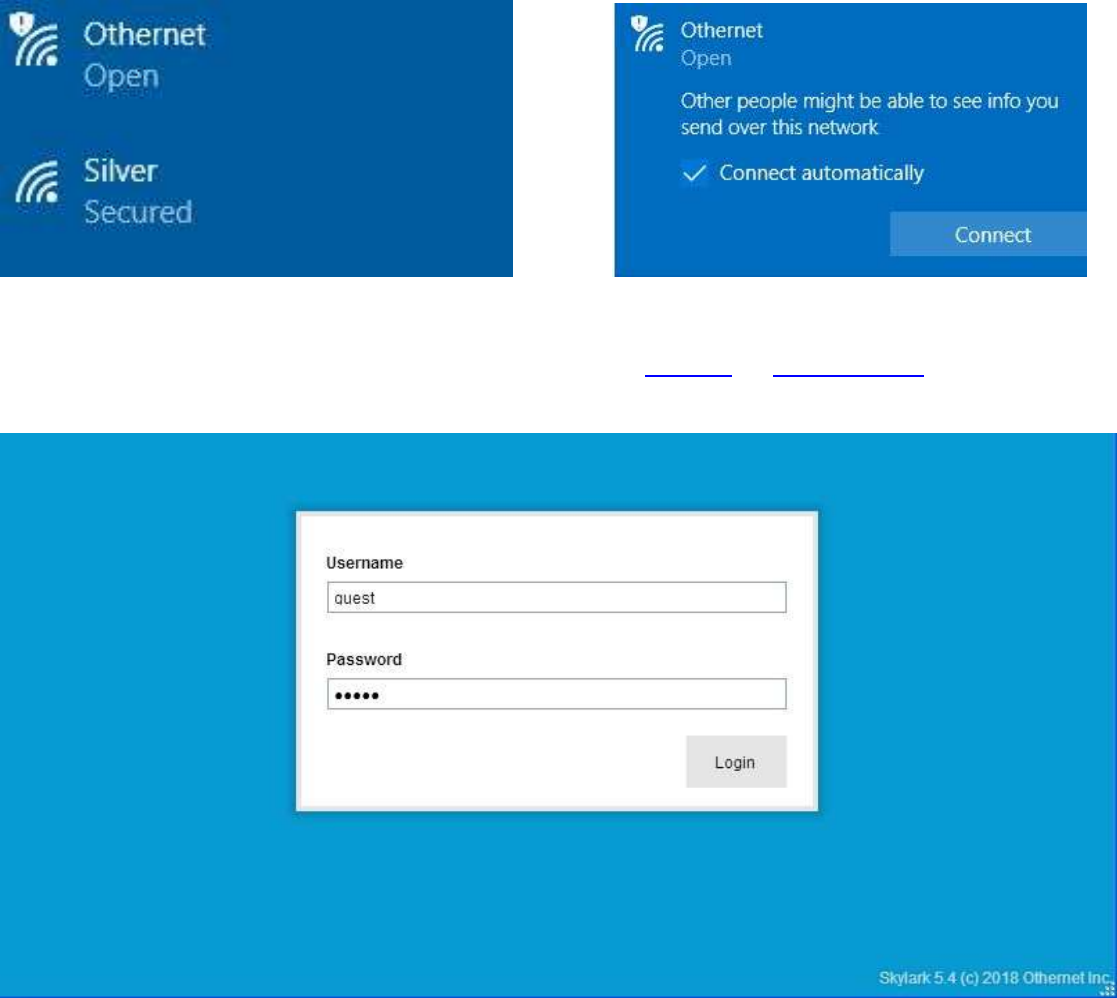
Fig. 10 Finding Othernet WiFi Hotspot on a Windows Computer
Step 5. Open your Web Browser and type (in the URL tab) 10.0.0.1 or my.othernet.is and you will see
the Skylark Guest Logon Screen (Fig. 11).
Fig. 11 Skylark Guest Logon Screen
6
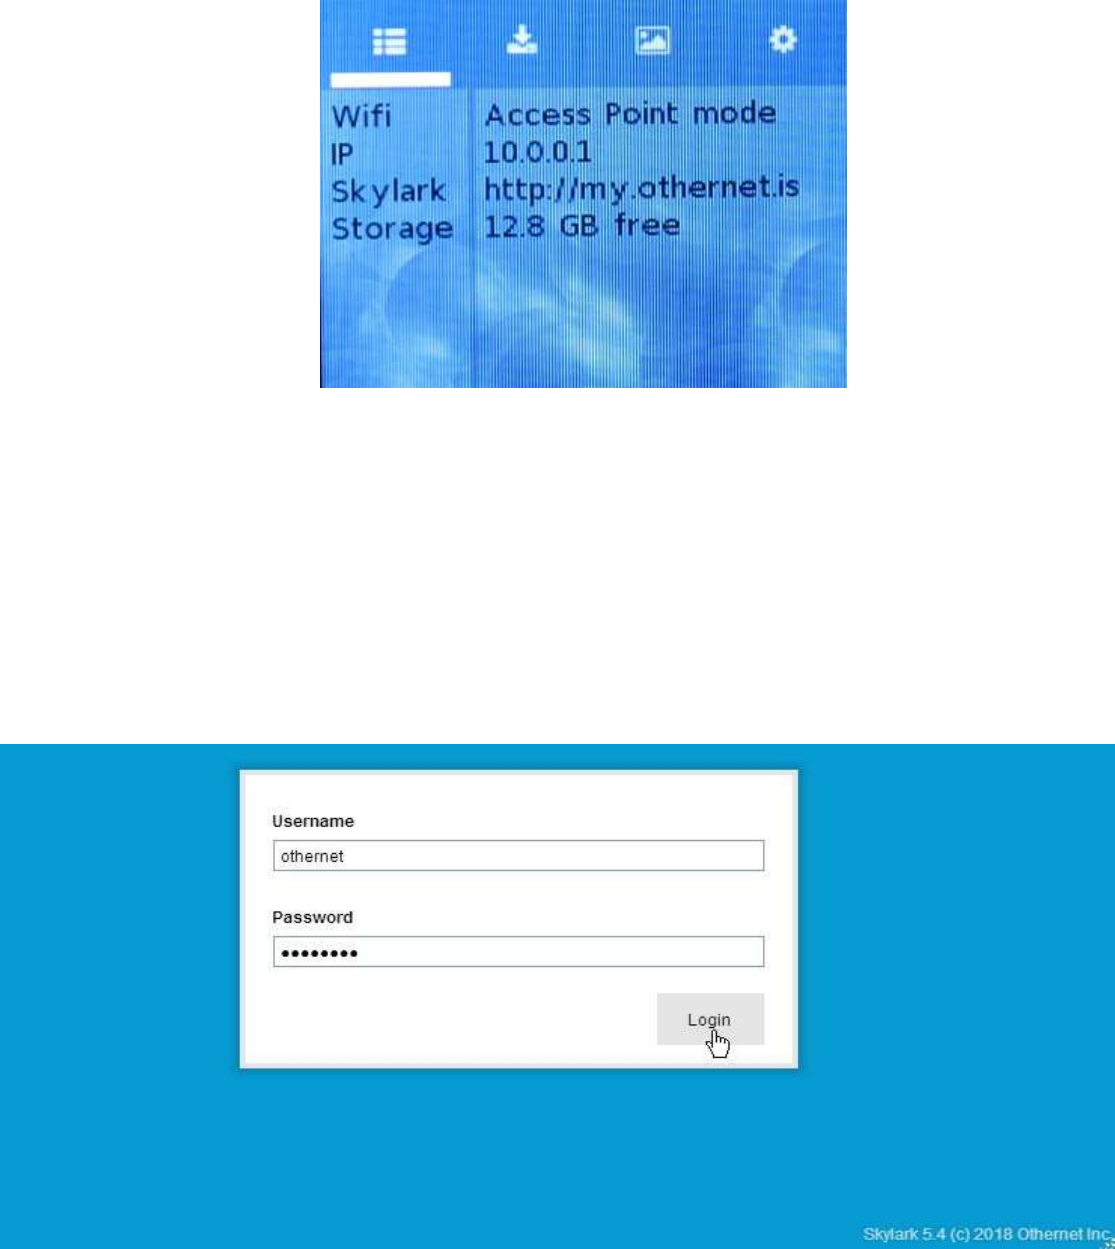
On the Dreamcatcher Touch Screen (Fig 11a), you will also see this Welcome Screen showing
operation in the Access Point mode with IP address 10.0.0.1 with 12.8 GB of free storage on the16 GB
micro SD card I am using for the Skylark OS. This is the same screen you started from before in Section
I Step 5 to reset the micro SD card.
Fig. 11a Touch Screen Welcome After Successful Boot
If you don’t see the Guest Logon screen (Fig. 11), something is wrong. Power the Dreamcatcher OFF
then ON with 1 minute of rest in between. If the problem persists, re write the Skylark image to the
micro SD card as in Section I Steps 5 - 7. The Dreamcatcher Board has a power button located on the
bottom left side which you press for 10 seconds to activate a shutdown. It is not necessary to use it, as
the Skylark image is read-only and can’t be corrupted by a sudden power shut down.
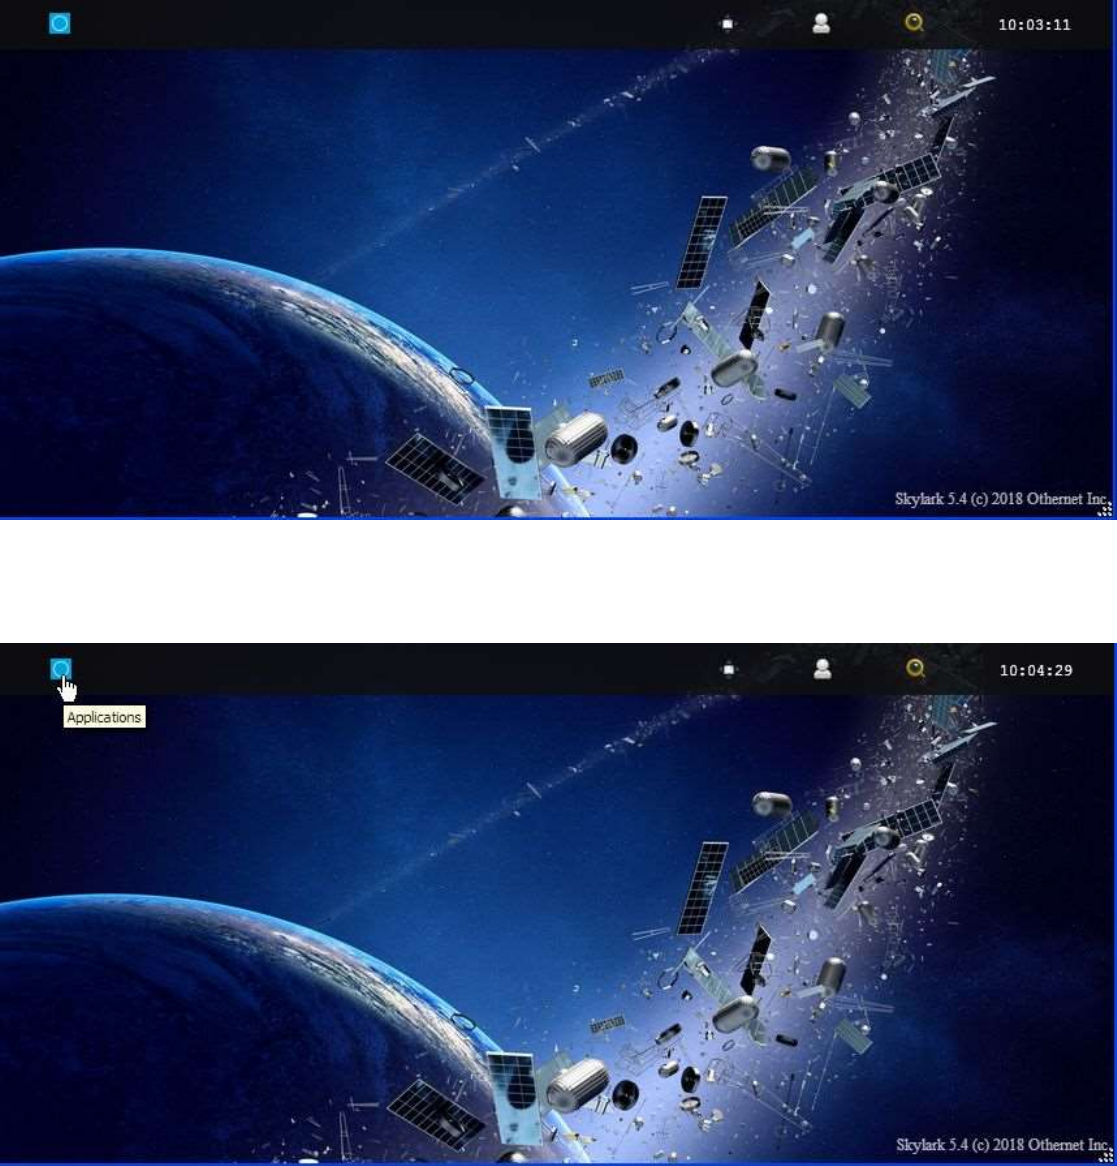
Step 6. To access all the full features of Skylark, you will need to logon with Username othernet and
Password othernet (Fig. 12) - - it is case sensitive. The Guest Logon will not allow you to access the
Network or Tuner Apps; or allow you to do an Over the Air (OTA) update (See Annex A).
Fig. 12 Skylark Logon Screen for full feature control
7
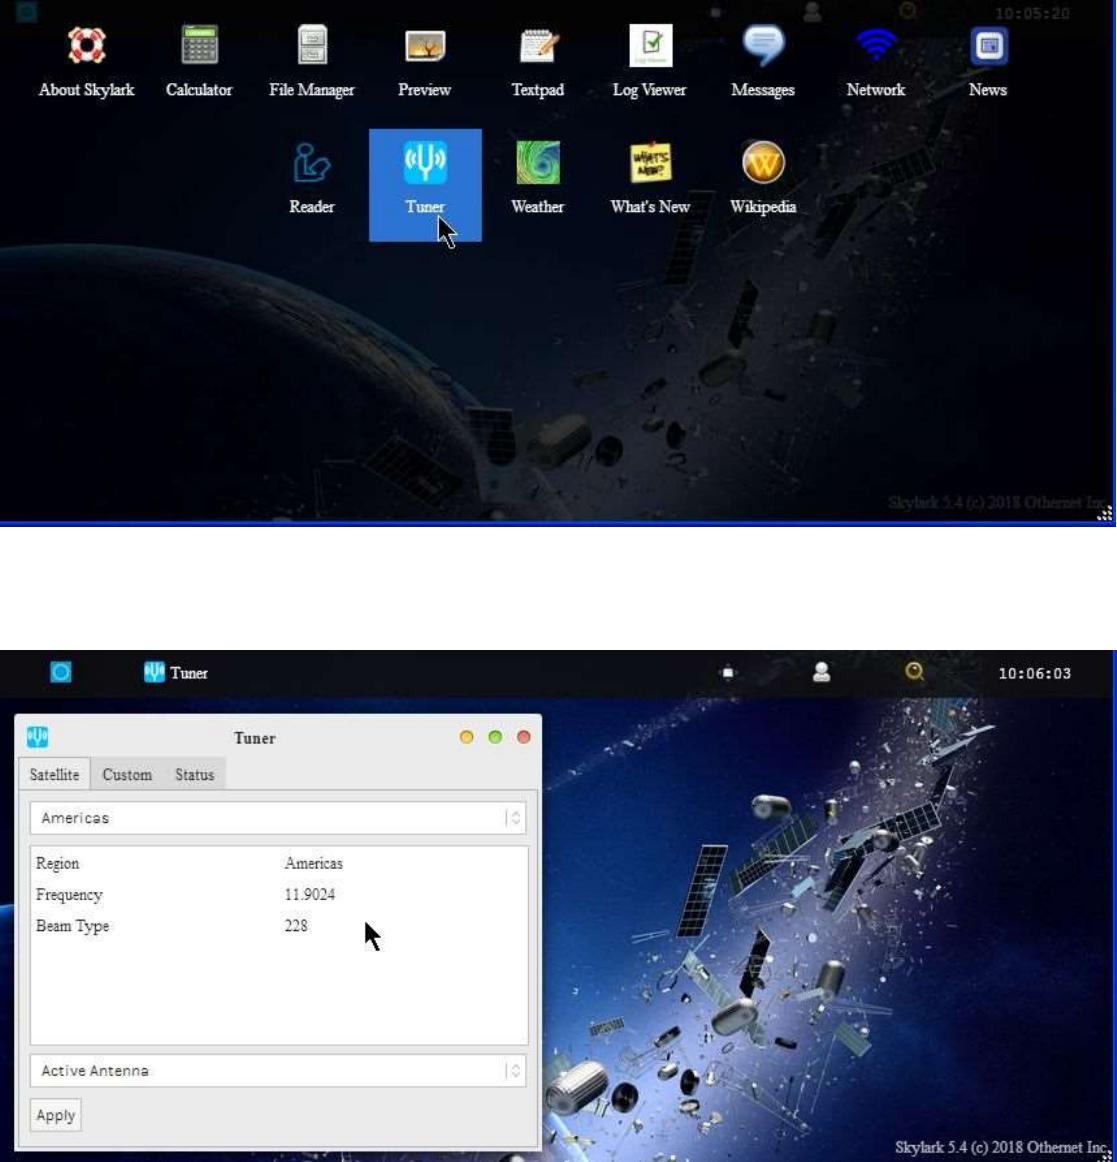
Step 7. You will now see the Skylark Welcome Screen (Fig. 13). When it pops up, you may also hear a
bell.
Fig. 13 Skylark Welcome Screen
Step 8. Open the Applications Icon (Fig. 14) on the top left to reveal Skylark Apps (Fig. 15).
Fig. 14 Click on the blue icon to bring up the Applications Icon
8
Open the Tuner Icon (Fig. 15) to run the Tuner App to begin the satellite setup process.
Fig. 15 Applications Icons showing Tuner App
The default tuner screen (Fig. 16) only has Americas (SES-2) (Coverage in Fig. 17) available at this time.
Fig. 16 Default Tuner Screen
9
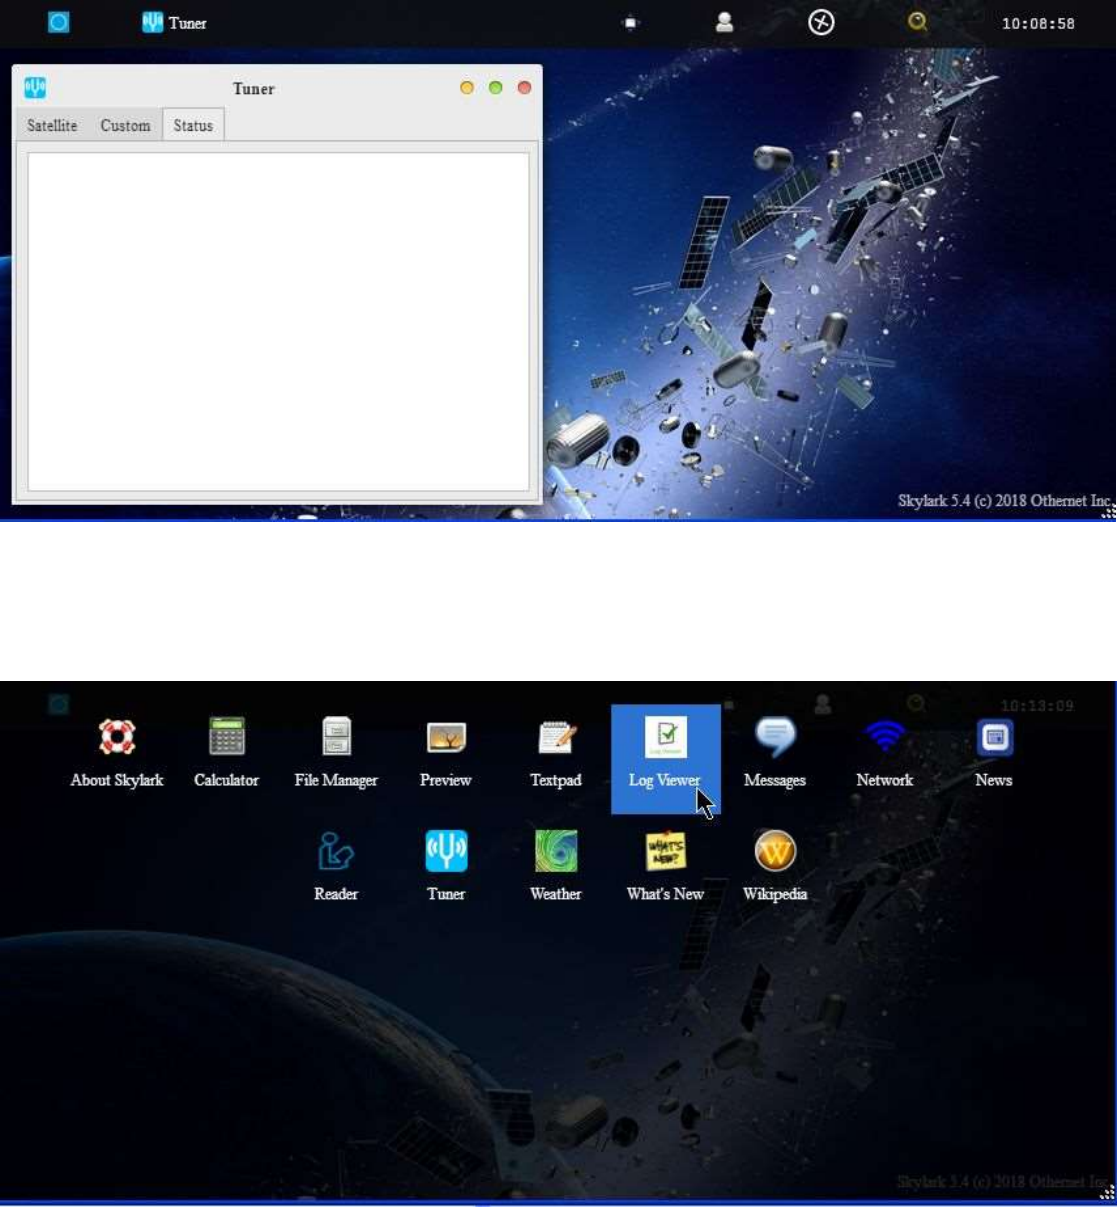
You do not need to click the Apply Button at this time as there is only 1 satellite in the data base and it is
already setup correctly. A blank Status Tab (Fig. 18) will appear when you go to the Status Tab because
the LNB has not been pointed toward the satellite to receive a signal.
Fig. 18 Tuner Status Tab – Blank with no Signal
In the Log Viewer App (Fig. 21a) there is a tab called LNB Status (Fig. 21b) which will confirm the
presence of your Bias-T voltage which powers the LNB.
Fig. 21a Applications Screen showing Log Viewer App
10
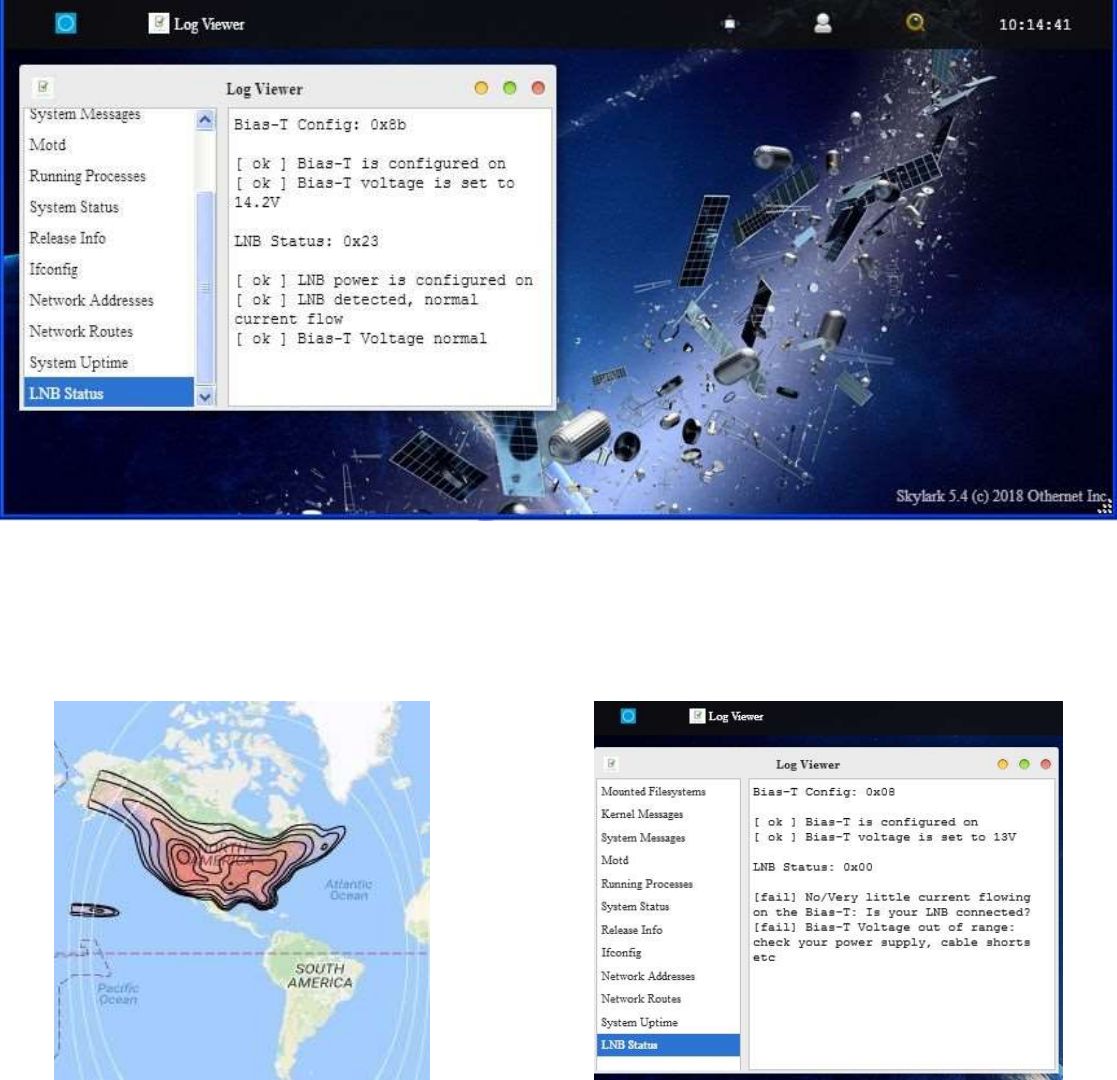
Fig. 21b LNB Status Showing Normal Bias-T Operation
If you see LNB Status: 0x00 {fail}, as in Fig. 21c, you have a power problem to address before going any
further. The LNB Status tab will show No/Very little current flow. Your most likely problem is too small a
USB power cube or too thin a USB to micro USB charging cable.
Fig. 17 Americas SES-2 Ku-band Coverage Fig 21c. No Bias-T voltage display
Using too small a USB Power Cube or too thin a cable
If everything looks good, shut down the Dreamcatcher by unplugging it. You are now ready to take your
device outside and point it toward the satellite.
11
Section III - Acquiring the Satellite
Step 1. Power up the Dreamcatcher/LNB outside, and point to the satellite. At this time, Othernet is only
broadcasting on SES-2 over North America which lives in orbit at 87 degrees West.
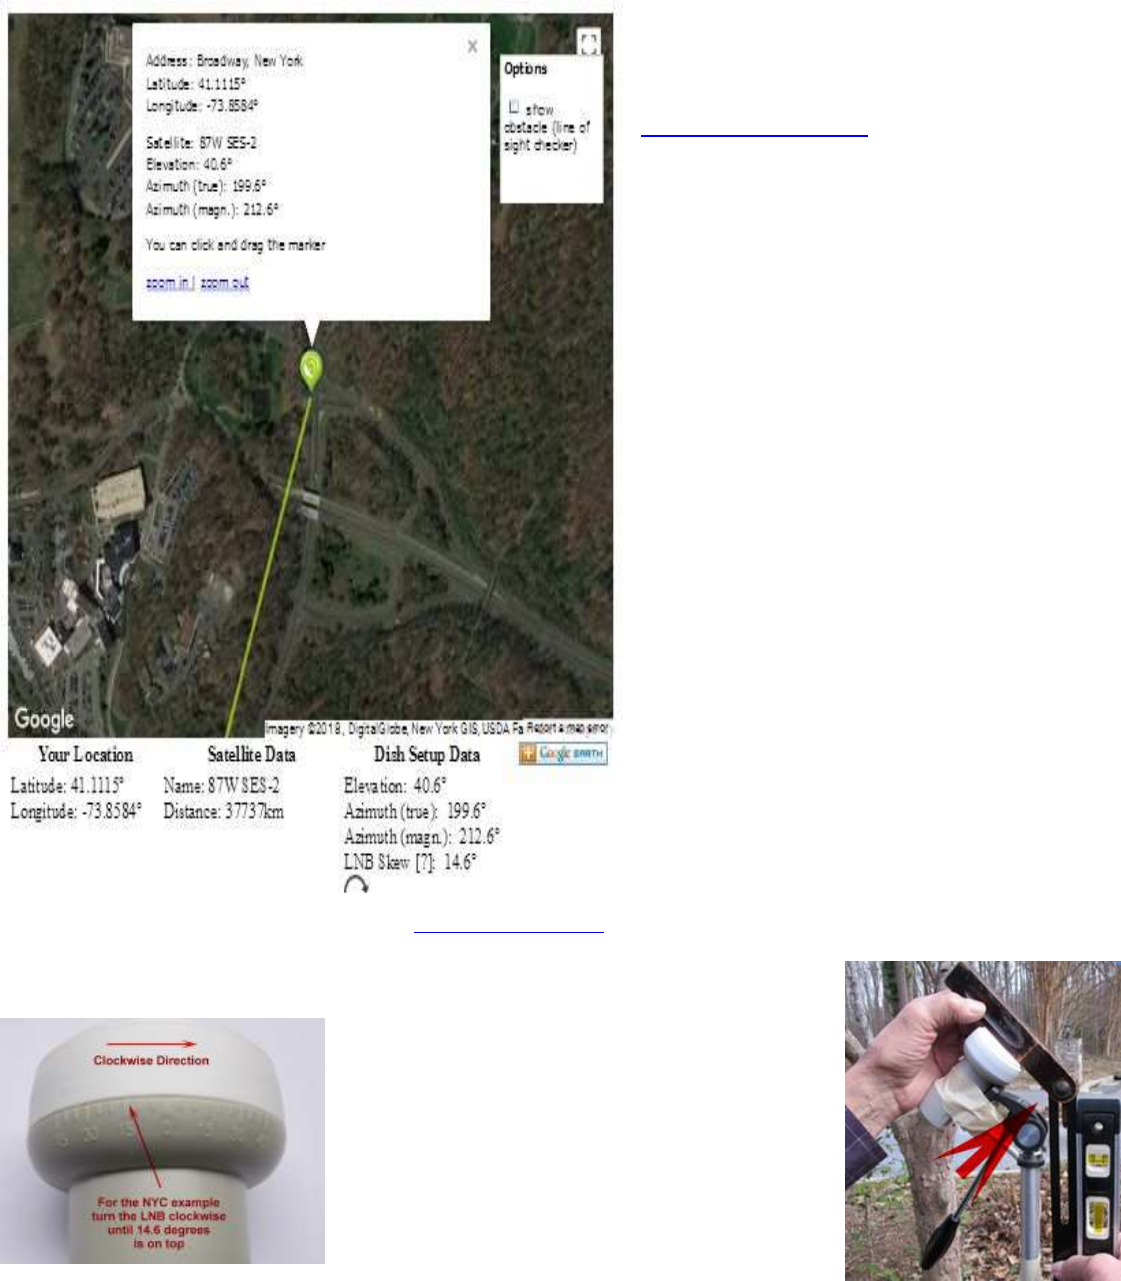
Step 2. Based on where you are, find your
elevation angle, skew, and magnetic
azimuth from a site such as
www.dishpointer.com (Fig. 19).
For your first satellite acquisition effort,
select a location with a clear unobstructed
view of the southern sky. (Later, once you
confirm your system is working, you can try
to find a better more permanent location.
Many people are able to operate thru
windows or off balconies with partially
obstructed views.)
Example: For NYC, mount the LNB on a
camera tripod with the appropriate skew
angle set to 14.6 degrees clockwise (more
on skew below). Using a magnetic compass
chose the Azimuth (magn.) to get a sight line
on close in objects which you can use to
point your LNB towards the satellite at 212.6
degrees magnetic. If you use a cellular
phone, you may have to use Azimuth (true)
to get the sight line. Use an Adjustable
Sliding Bevel and a carpenter’s level to get a
precise elevation angle (EA) of 40.6 deg for
NYC set on the LNB. In the picture below,
the obtuse angle inside the Adjustable
Sliding Bevel is EA + 90 degrees or 40.6 +
90 =130.6 degrees, and the vertical side of
the Adjustable Sliding Bevel is perfectly
perpendicular to the ground.
Fig. 19 Locating SES-2 from NYC using www.dishpointer.com
Skew allows you to match your LNB’s horizontal/vertical orientation with the
satellite antennas’ horizontal/vertical orientation to maximize signal strength.
When you set the skew, make sure you
rotate the LNB so that skew angle is pointed
directly overhead. Skew is given in degrees
either clockwise or counterclockwise. If the
reported LNB Skew direction for your location
is shown clockwise, you stand behind the
LNB looking at the satellite and rotate the
LNB clockwise until you arrive at that
number. For NYC, you set the skew to 14.6
degrees by turning the LNB in a clockwise direction. Viewing the same
satellite on the same longitude, but from South of the equator, result in an opposite rotation skew angle.
12

Step 3. Go back into your Tuner App from your computer’s WiFi which will be connected through the
Dreamcatcher’s Othernet WiFi Hotspot, and select the Status Tab. You should see information in the
Status Tab as in Fig. 20 if you are correctly pointed at the satellite and everything is working. If you are
not receiving packets or your Bias-T voltage is not present, the Status Tab will be empty as in Fig. 18.
Slowly move your LNB to maximize the SNR (dB) making it as large (less negative) as possible.
The Tuner Status screen in Fig. 20 or the Touch Screen shown below, will show the SNR (dB) line
fluctuating at a value above -14 dB (sometimes as high as 0 dB), the Lock line saying yes, and the Rssi
(dBm) line fluctuating at a value between -60 and -120 dBm. On the top of the Tuner Status Screen,
you will see what type file is being downloaded at that moment - - either audio or files. At the very
bottom of the screen you will see what file is being downloaded at any time. This picture represents a
successful connection at latitude 39 deg N longitude 76 deg W in mid morning with an accurately pointed
LNB. Additionally from page 14, LED 5 will be fast blinking green, and LED 6 will also be fast blinking
green if data packets are detected.
Fig. 20 Tuner Running Correctly on SES-2 at Latitude 39 degrees N
The Dreamcatcher Touch Screen has several other useful functions. When the Dreamcatcher is
operating correctly, the Status Screen shows key parameters that are visible in Fig. 20 in Skylark, and
does a long term Lock Status and SNR graph.
Status Screen Long Term Lock Status and SNR
13
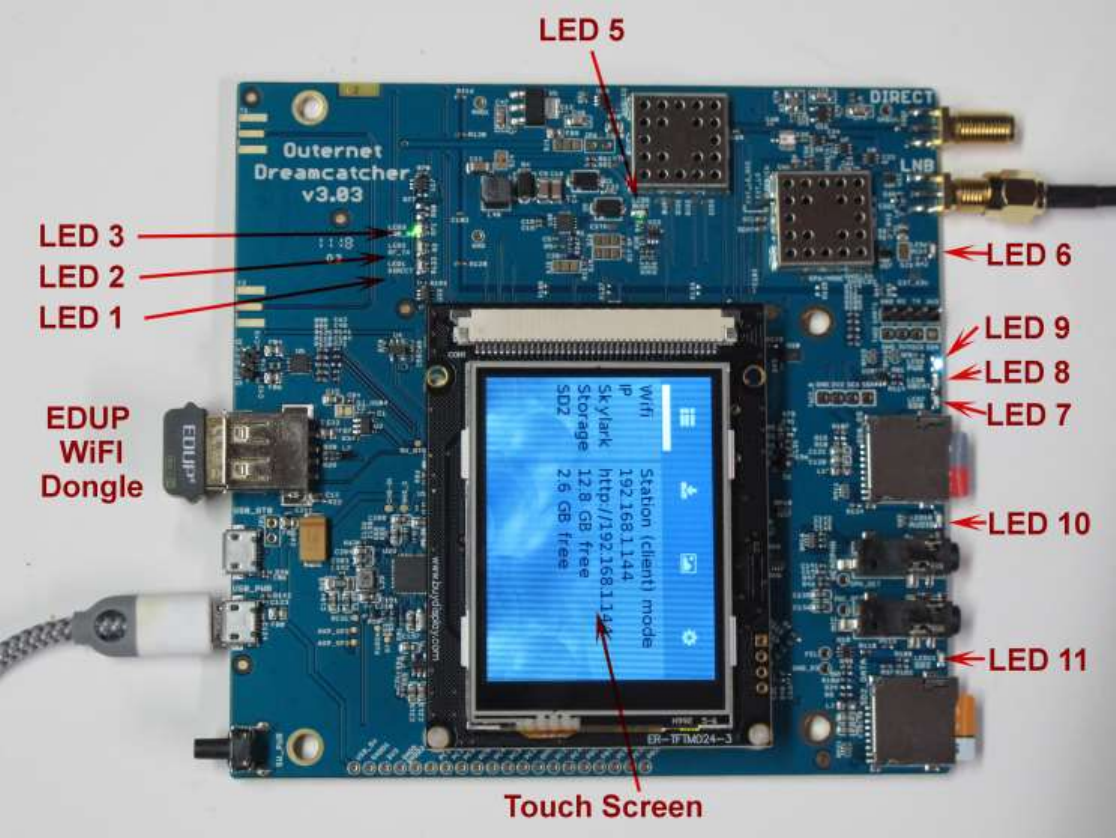
Properly connected and operating, the Dreamcatcher v3.03 with an external micro SD card installed, will
display the following LEDs:
Design Color Name Function Normal Booting
LED 1 Green Direct Shows rf signal to Direct SMA Off Off
LED 2 Green RF-TX Shows radio in rx mode Off On solid green
LED 3 Green LNB_ON Bias T applied On solid green Off
LED 5 Green Busy Shows Dreamcatcher in use On fast blinking green On solid green
LED 6 Green PCKT Receiving packets On fast blinking green Off
LED 7 Green SDO Ongoing read/write activity On blinking green On blinking green
(if SDO card is active)
LED 8 Green HBeat Reporting status On blinking green Off
LED 9 Blue Power OFF/ON indicator On solid blue On solid blue
LED 10 Green Audio Reports Presence of audio On blinking green (with audio) Off
LED 11 Green SD2 Note 1 Micro SD Card Storage On blinking green On blinking green
(if SD data card installed & active)
Touch Screen Blue screen tft 320x240 color Ready, then Menu Pls Wait
EDUP Green Blinking WiFi Flash for broadcast Slow blinking green Slow blinking reen
LED Table
Note 1 – LED 10 blinks green if audio is being broadcast on Othernet Satellite Radio. A connection to the speaker port is not required.
14
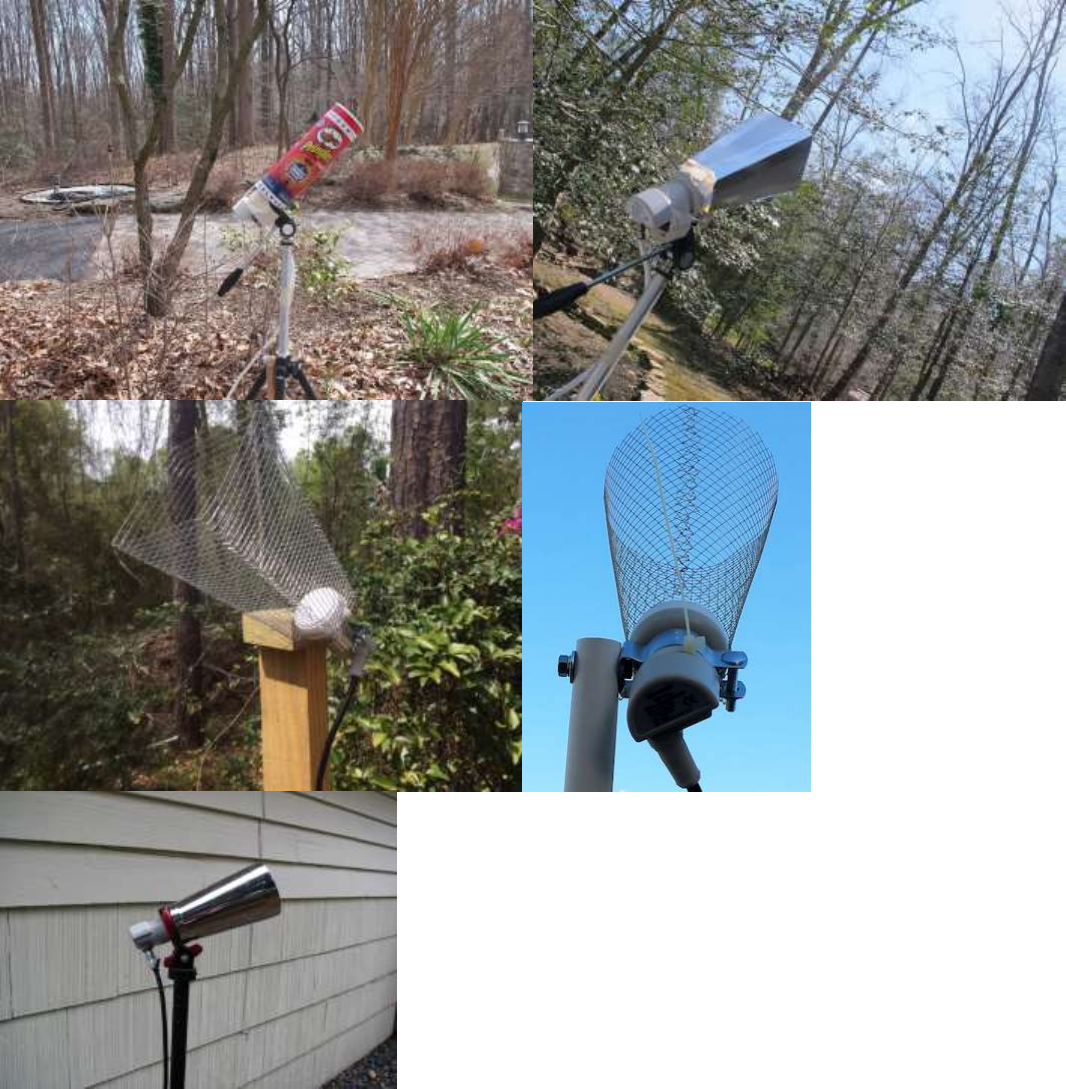
Optional Step 5. Several users living on the fringe of SES-2’s ERIP area have discovered using a cone
or horn around the Maverick LNB improves SNR by as much as 6 dB in some cases being the only way
to close the link. The cones and horns being used are 8 inches tall with an upper diameter of 4 inches
(either in diameter, or 4 inches by 4 inches square), and a lower diameter of 2 inches (either in diameter,
or 2 inches by 2 inches square). Both martini shakers, solid aluminum or garden mesh wires are being
effectively used. Pringles tubes (which are aluminum lined) offer free potato chips while you site your
LNB.
Optional Step 6. Connect your Dreamcatcher to an outside free-to-air (FTA) Ku-Band LNB/dish
antenna instead of using the Othernet Stock Maverick LNB. The Dreamcatcher Board is powerful
enough to operate over up to 500 feet of RG6 cable - maybe more! The only caveat is you cannot use a
motor drive or DiSEqC switch in series with your outside LNB/dish.
15
Section IV - Connecting the Dreamcatcher to Your Local Router by WiFi as a Client
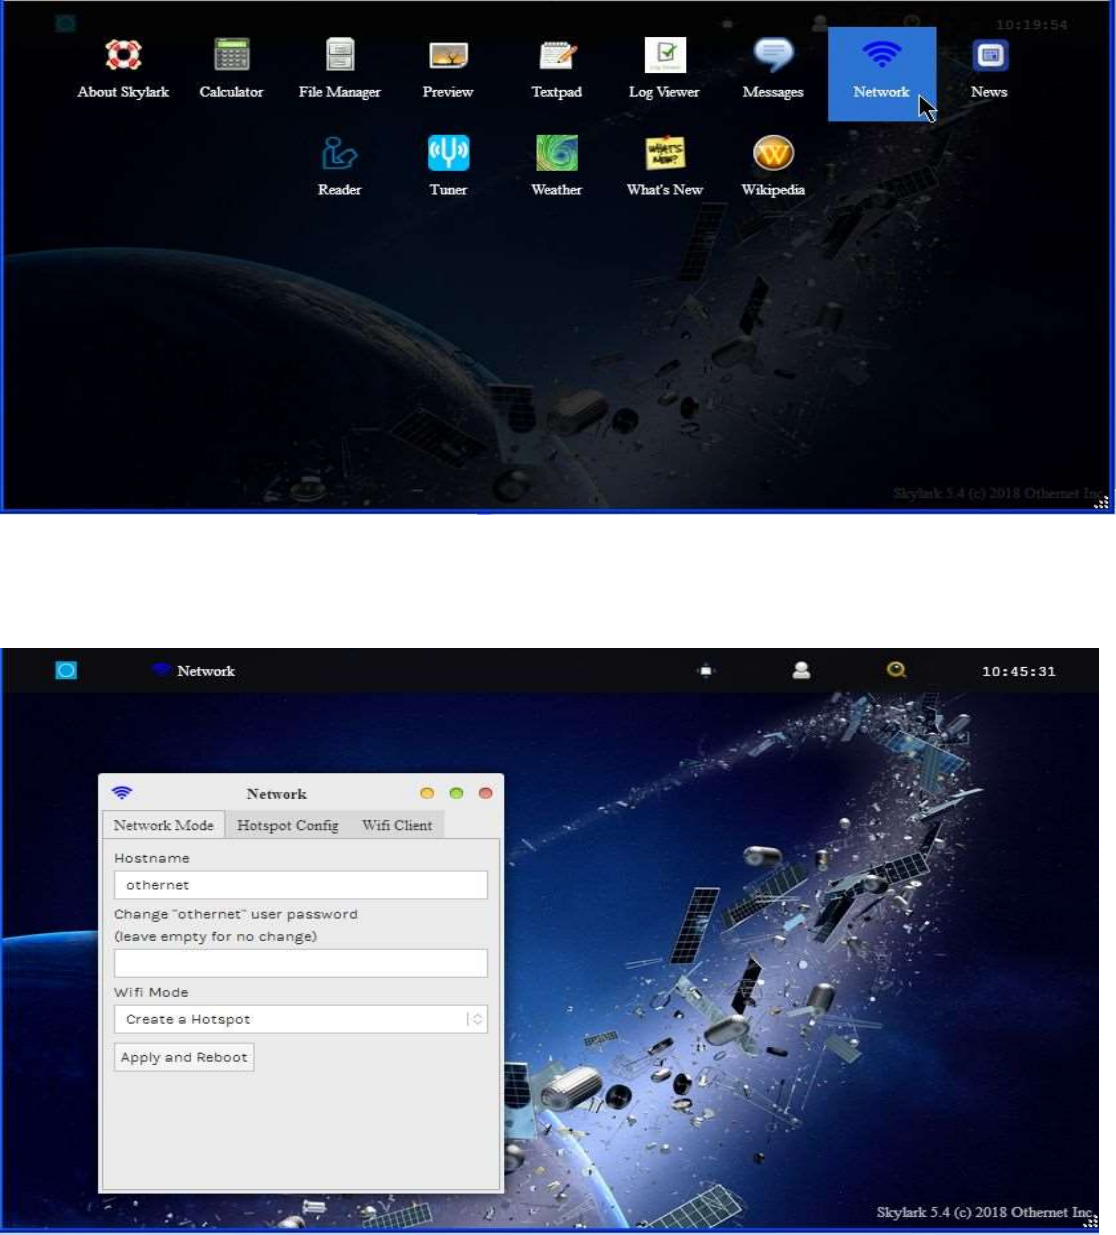
Step 1. On the Applications Screen (Fig. 22), open the Network Icon to run the Network App.
Fig. 22 Applications Icons showing Network App
Step 2. The default Network Screen (Fig. 23) is set to Create a Hotspot called othernet with no
password.
Fig. 23 Default Network Screen
16
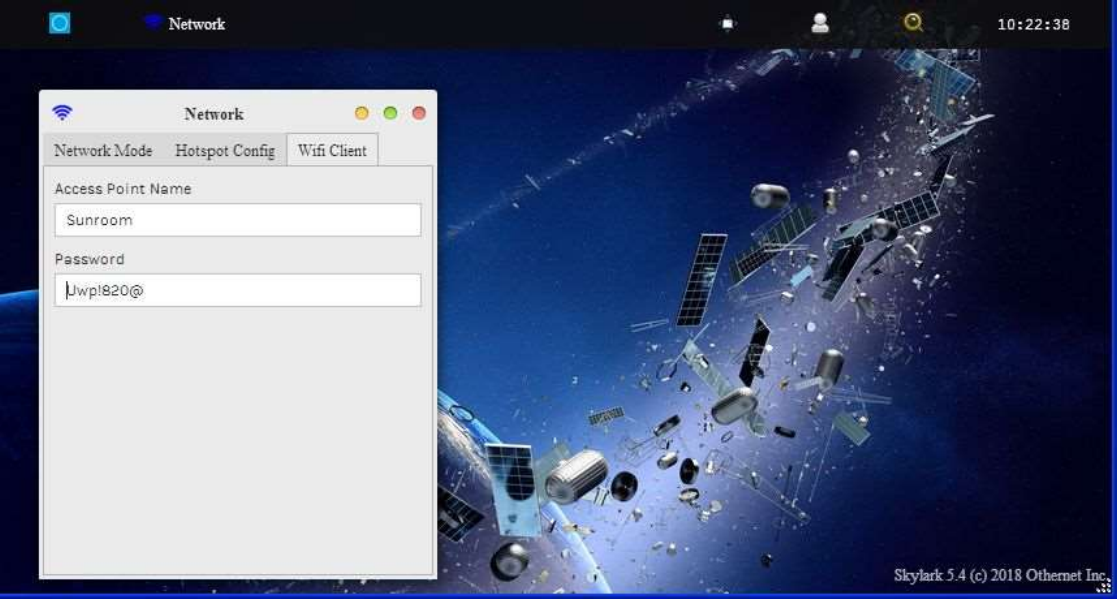
Step 3. Open the WiFi Client tab (Fig. 24), and fill in your Access Point Name and Password. Users
have reported not being able to connect to a WiFi Client Access Point network not broadcasting a SSID,
or to a WiFi Client Access Point network with a complex password comprised of letters, numbers, and
unusual characters. You cannot connect to a WiFi Client Access Point network that does not broadcast
a SSID, but you can connect to a WiFi Client Access Point network with a complex 8 or more element
passwords such as Uwp!820@
Fig. 24 WiFi Client Screen
After entering your Access Point Name and Password, go back to the Network Mode Tab (Fig. 25) and
select Connect to a WiFi router. Then Click Apply and Reboot. At this time you will lose the WiFi
connection between your computer and Othernet’s WiFi Hotspot as the Dreamcatcher connects to your
local WiFi as a client, and gets assigned an IP address by your router. Sometimes it could take up to 5
minutes for the changes to load, so be patient. If you mistype your Access Point Name or Password,
the Dreamcatcher will connect, but you won’t see it when you try to access it as in Step 4 below. To
regain access to the Dreamcatcher, proceed as in Step 5 below to go back to the Hotspot mode, then
redo this step.
17
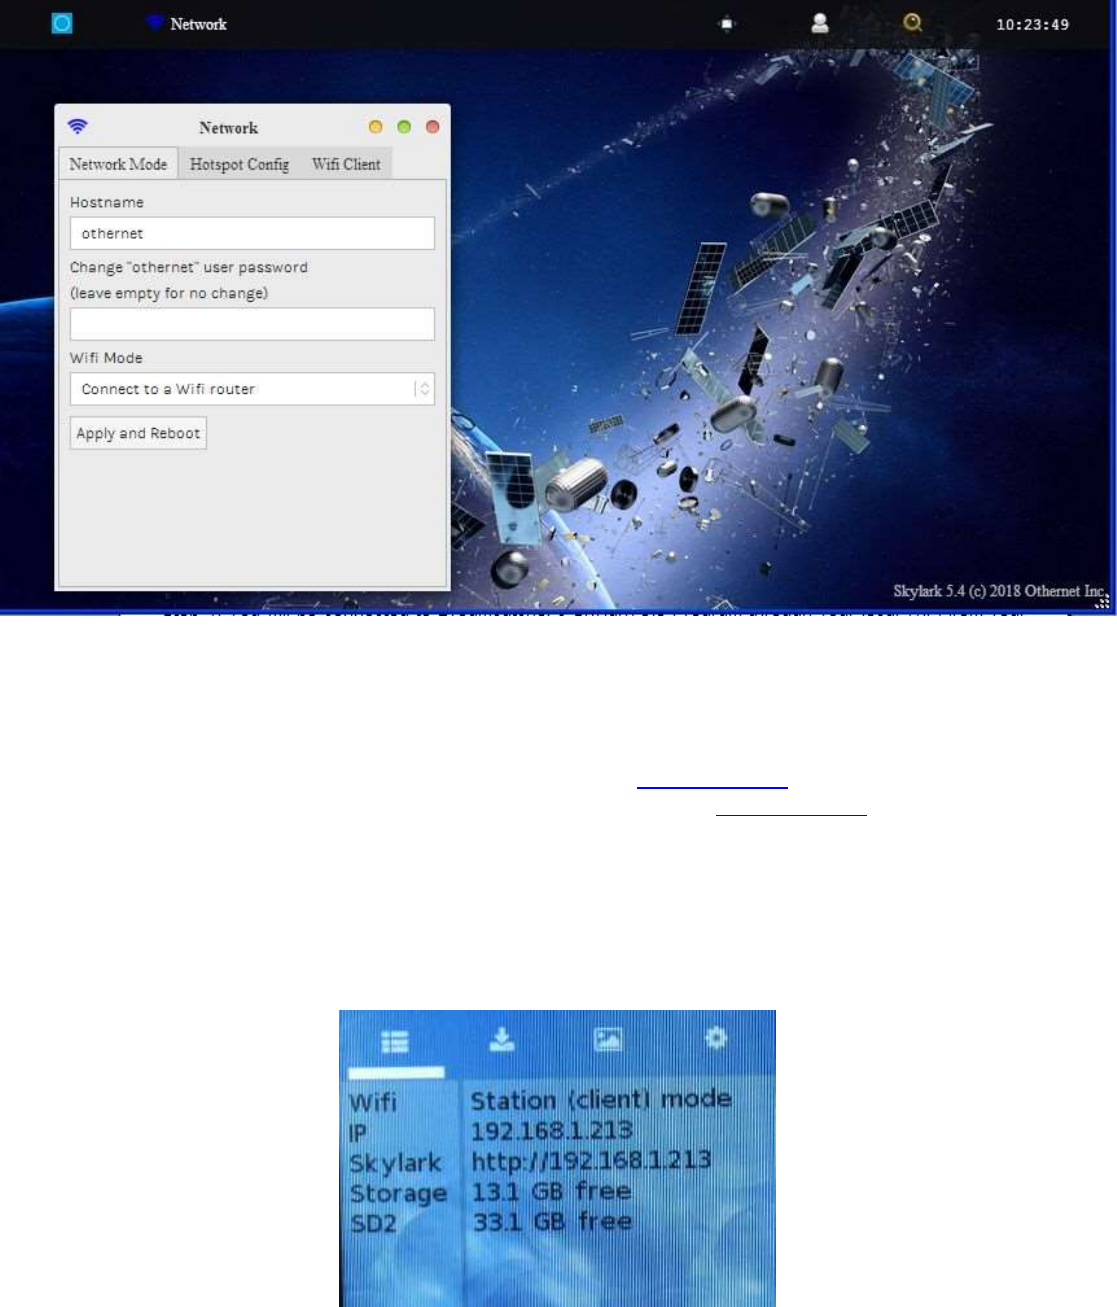
Fig. 25 Network Mode Tab ready to Connect to a WiFi router instead of Create a hotspot
Click Apply and Reboot
Step 4. You will be connected to Dreamcatcher’s Skylark Program through your local WiFi from your
router. You can go to any computer on your router’s network, and use any Web Browser to access
Skylark through its newly assigned IP address, or by typing my.othernet.is as before. If for some reason,
you can’t access Skylark through your router using the command my.othernet.is or its IP address, your
Dreamcatcher did not get connected to your router - - the application of the Connect to a WiFi router
command may have failed. You can look at the Touch Screen Summary Page (Fig. 25a) to see if you
are in the AP Hotspot or Station (client) mode. If you are connected to a router, you will see the
assigned IP address on the second and third lines. If the IP line is blank, reboot your Dreamcatcher and
try this step again. If you still show a connection to the Hotspot, start Section IV – Connecting the
Dreamcatcher to Your Local Router by WiFi as a Client over again.
Fig. 25a Touch Screen Summary Page Showing Connection Mode, [Station (client) mode],
Free Space on Skylark OS Micro SD Card, (13.1GB),
and Free Space on the Additional Data Storage Micro SD Card (33.1 GB)
18
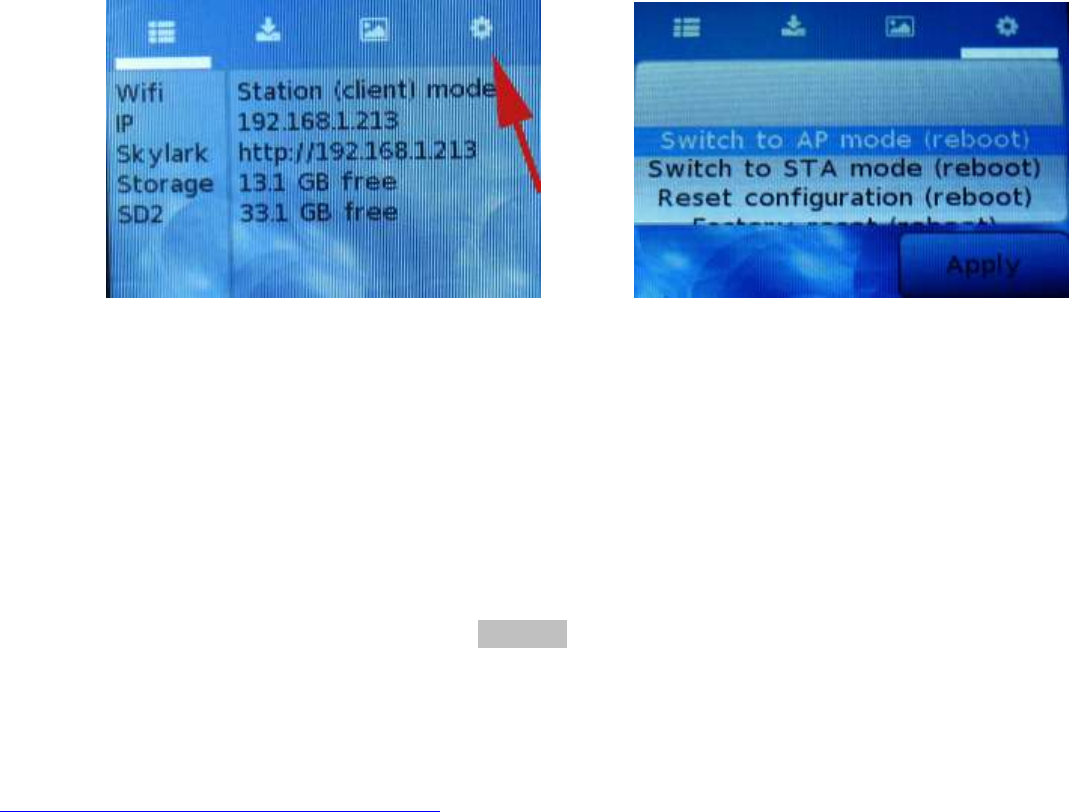
Step 5. Unlike the Skylark program for the Chip computer, Skylark will not automatically return to the
Othernet WiFi Hotspot mode if it detects a loss of its existing WiFi connection to a router. If you move
from one WiFi location to another (for example moving from one hotel to another where you
connected to an Access Point WiFi), you must reset the Dreamcatcher to the Othernet WiFi Hotspot
mode while you are connected as a client to a router using your browser then enter the new Access
Point Name and Password. Skylark has an option using the Touch Screen to return to the Hotspot
mode after you leave a network. Illustrated here on the Touch Screen Summary Page is the old WiFi
network information. If you click on the far right wheel icon, you will be able to go back to the Othernet
Hotspot mode by selecting Switch to AP mode (reboot). You will not be able to re enter a new WiFi
network name or password from the Touch Screen. To do that, you have to use the browser with
Skylark and repeat Step 3 above.
Touch Screen Summary Page Touch Screen Return to Hotspot
Step 6. In some installations, a WiFi repeater is desirable. Most Dreamcatcher installations can reliably
connect with your existing WiFi device to your router, however, low WiFi signal levels do cause
unexpected disconnects requiring you to manually reboot the Dreamcatcher. Many users install their
Othernet gear outside their residence in open area such as gazebos, decks, sheds, garages, etc. In
these situation a WiFi repeater assures reliability of Othernet reception. Install the repeater as far as
possible from your WiFi, and as close as possible to your Dreamcatcher.
Step 7. Alternate Connectivity Approach is to use a USB to Ethernet Network Adapter instead of going
through the Othernet WiFi Hotspot or Network Client approach. Be careful, NOT ALL USB to Ethernet
Network Adapters work both natively under Skylark and Armbian. Specifically a TP-Link TL-UE300 as
reported by Othernet Engineer, Zoltan Doczi @zoltan, works properly. Contact him for more details.
This Ethernet Dongle is natively supported, so works out of the box. Just replace the EDUP WiFi Dongle
(Fig. 2) with the Ethernet Dongle. The downside of this approach is you need to figure out the actual IP
address as the Ethernet IP will not shown in the Dreamcatcher LCD Touch Screen. Use your router to
look at all your client IP addresses, and find the one labeled “skylark”, or use a program such as FING at
https://www.fing.io/fingkit-sdk-downloads/
Section V - Additional Storage
Step 1. A micro SD data card of any size can act as additional storage. This did not work in the
Dreamcatcher v 2.03, but works now. Make sure to use a fast high quality micro SD card formatted
FAT32. Plug it into the Dreamcatcher Board’s SD1_DATA which is the SD card holder on the bottom
right of the board. You should not plug and unplug the micro SD card while the Dreamcatcher is
writing to the micro SD card as it may cause a writing error. You can tell if the micro SD card is working
by observing LED 11 on the Dreamcatcher Board (page 14) which will be blinking green if the card is
being written to. If you use a micro SD card larger than 32 GB, make sure it is FAT32 formatted - - 64
and 128 GB micro SD cards come exFAT formatted which will not work.
19
Step 2. It has been randomly observed that - - no boot occurs if a micro SD card is installed in the data
slot. Some boards work and others don’t. If this occurs in your setup, temporarily remove the second
micro SD card in the data slot while Skylark boots, then push it back in.
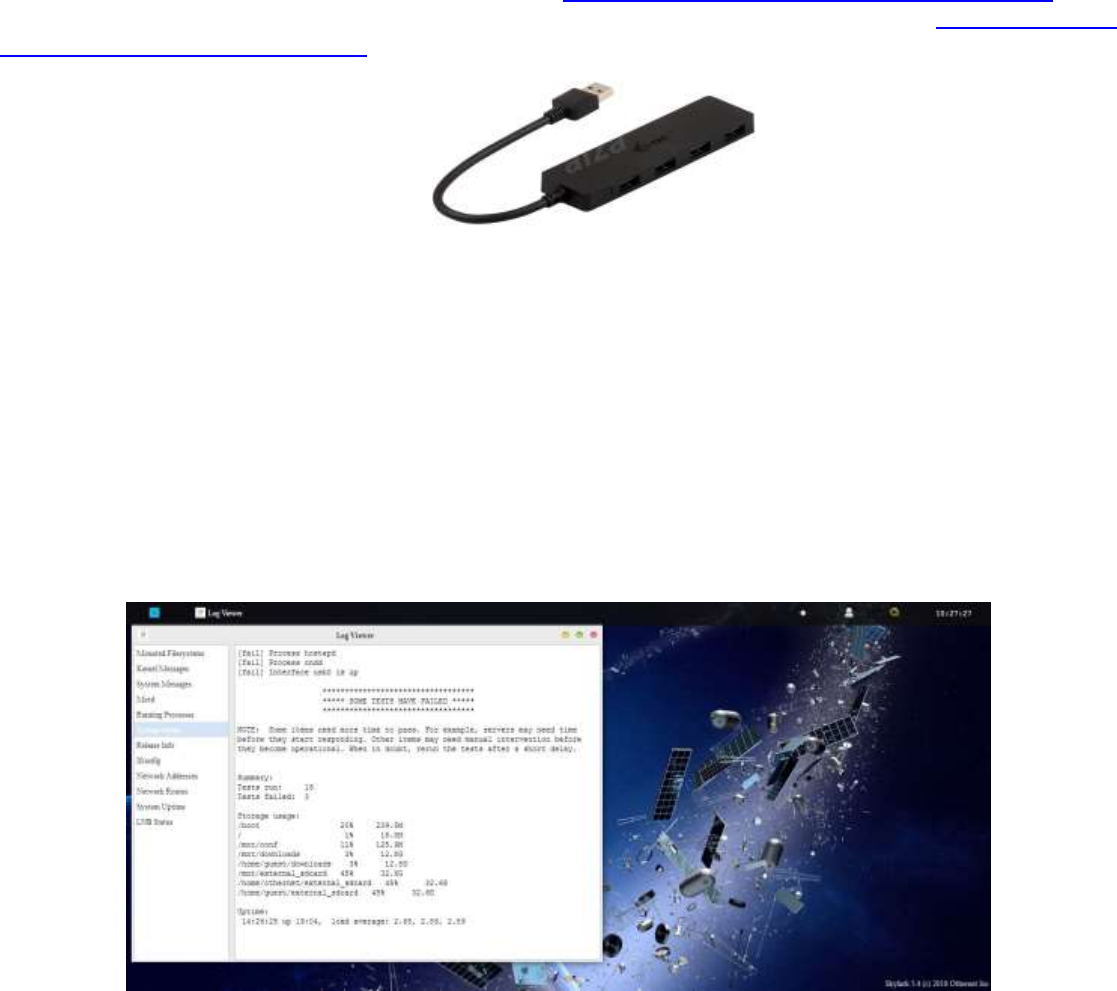
Step 3. Additional storage can also be provided by installing a FAT32 formatted USB Flash Drive or hard
drive plugged into a passive hub (Fig. 26) along with the EDUP WiFi Dongle (Fig. 2). Both a micro SD
card and an external storage device can be used simultaneously under Skylark. Again, make sure the
USB Flash Drive and hard drive are FAT32 formatted. I suggest you use Rufus 2.17 to FAT32 format
large micro SD cards and USB Flash Drives at https://rufus.akeo.ie/downloads/rufus-2.17.exe For
FAT32 formatting of hard drives, I suggest you use AOMEI Partition Assistant found at https://www.disk-
partition.com/download-home.html
Fig. 26 I-tec Passive Hub
By adding additional storage, the Dreamcatcher’s Skylark program will be able to periodically write
downloaded files to one of the storage devices so you won’t lose them when you re format the SD_OS
card, or update Skylark to a newer version. Keep in mind you will be storing approximately 2 GB of data
per month, so a large micro SD card or flash drive is desirable. (The micro SD card used with the Skylark
operating system automatically gets cleaned of old files hourly, so it never fills up. That is why I
recommend only a 16 GB micro SD card for the Skylark program.)
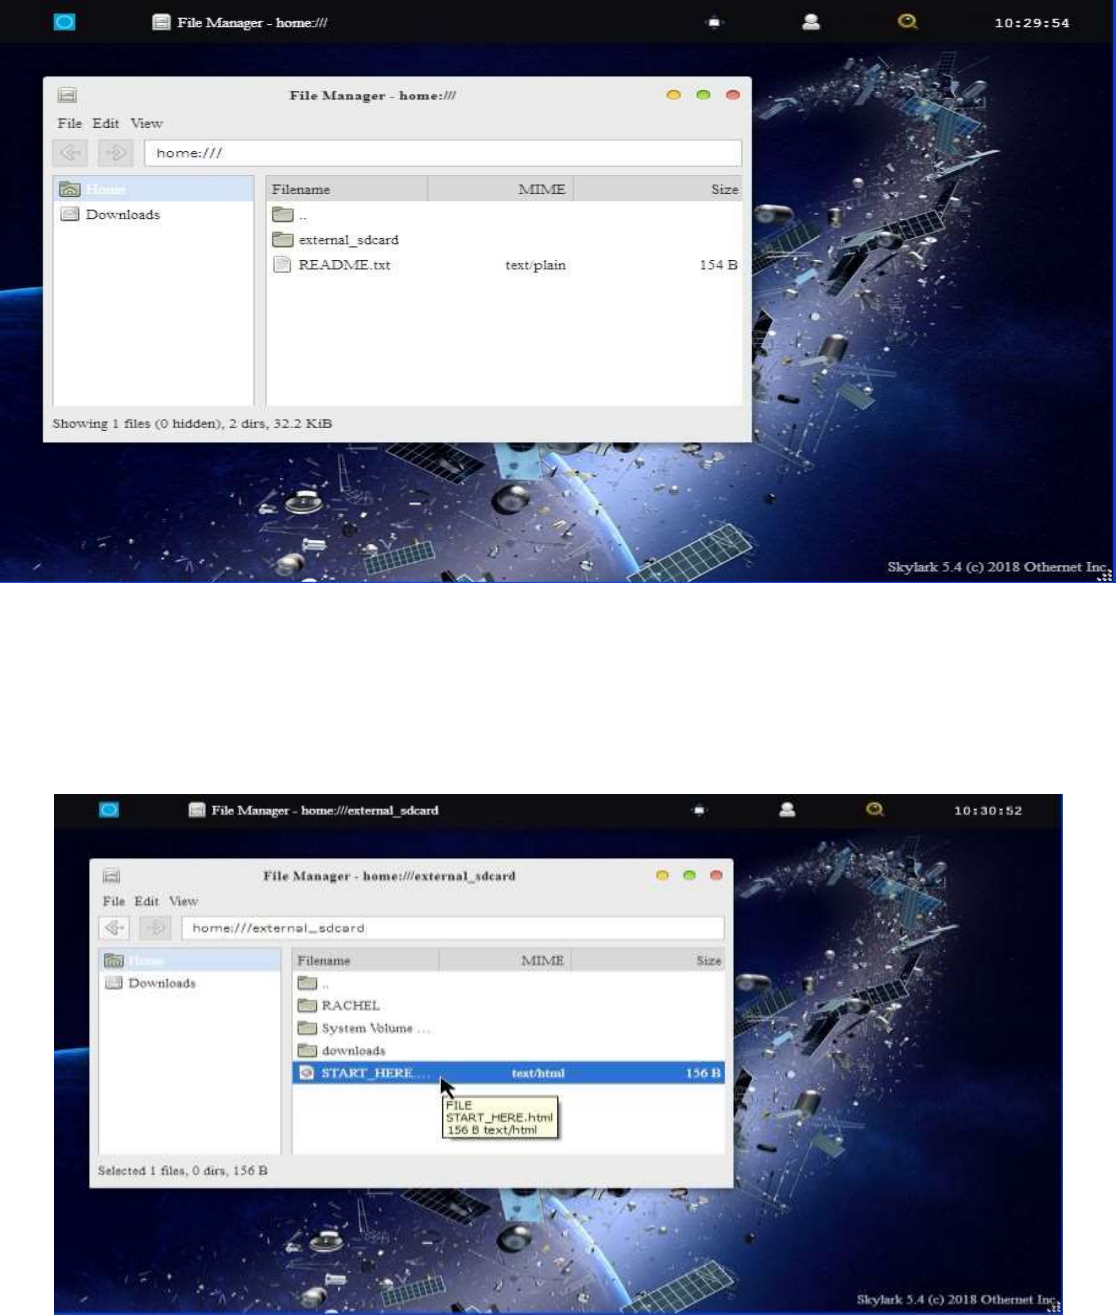
You can see how much storage is left on your micro SD card by going to the Log View App and looking
at the System Status Tab (Fig. 26a) which, for my 64 GB micro SD card, shows 44 % full with 33.1 GB
free space. The Touch Screen Summary Page (Fig. 25a) gives just free space for each micro SD card.
Fig. 26a Micro SD Card Statistics
20
Step 4. Access to files on additional storage devices is done by going to the File Manager App (Fig. 28)
on the Applications Screen.
Fig. 28 Accessing Files on Additional Storage
Access the External_usb folder (Fig. 29) and go to the file you want to run in Skylark. Several Forum
Members run the Rachel Data Base, videos, music, and pictures. When you select a file to access,
choose Skylark’s Reader program (Fig. 30) to view it very nicely as shown in Fig. 31. You can
alternately select the file, and Download it to your computer (Fig. 32) to view it.
Fig. 29 Select the file you want to run e.g. START_HERE.html
21
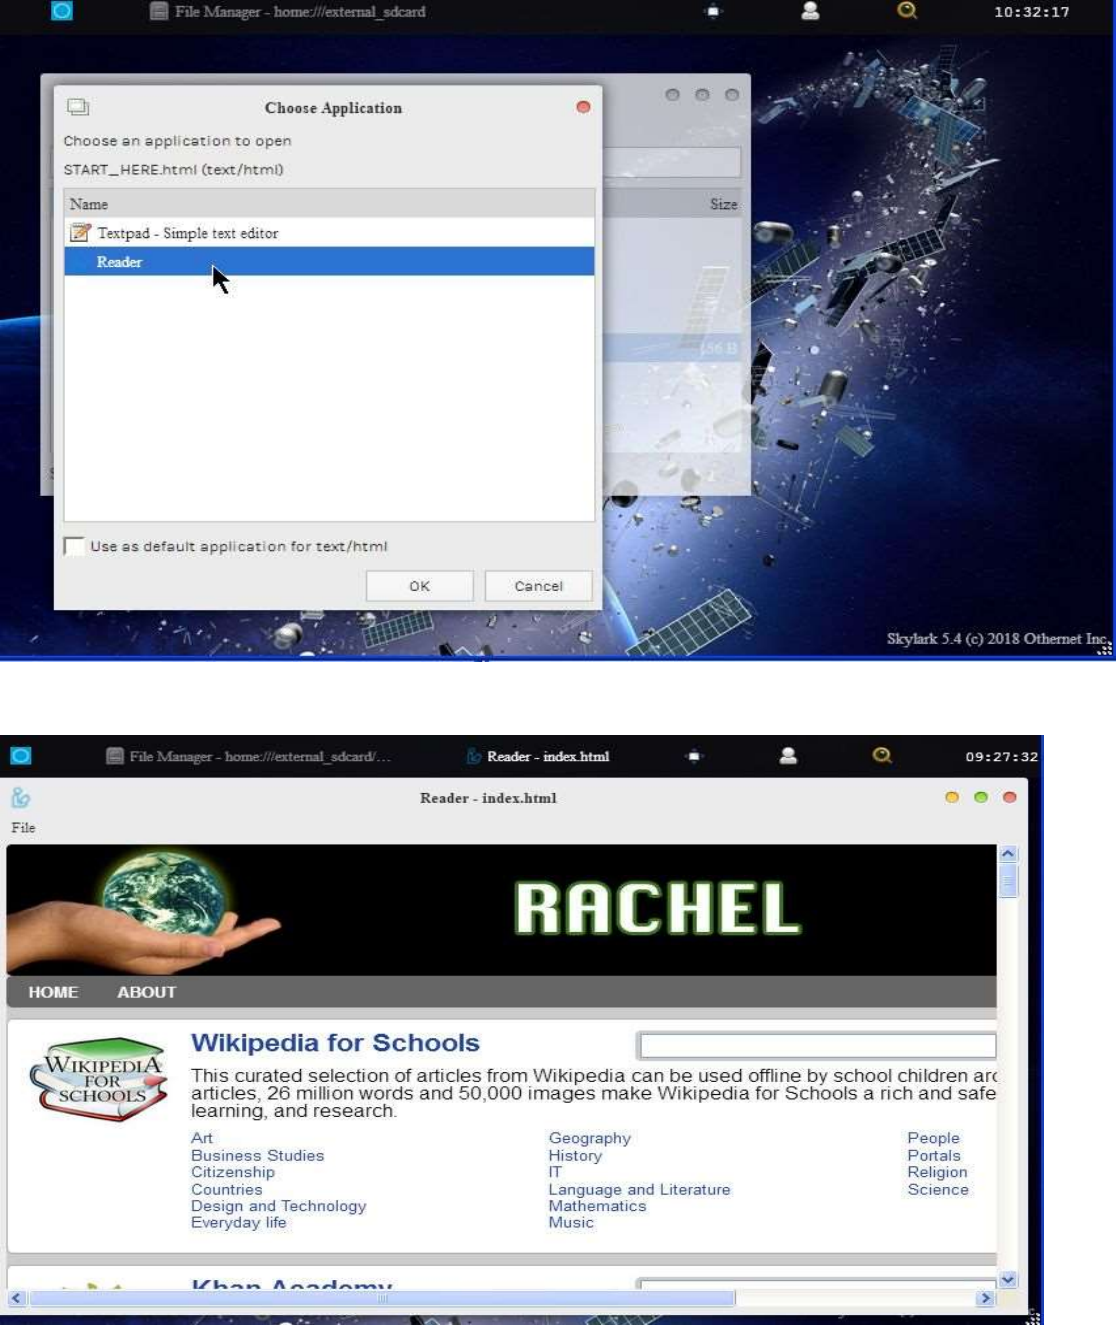
Fig. 30 Choose Skylark’s Reader Program
Fig. 31 Rachel’s START_HERE.html file viewed in Skylark’s Reader Program
22
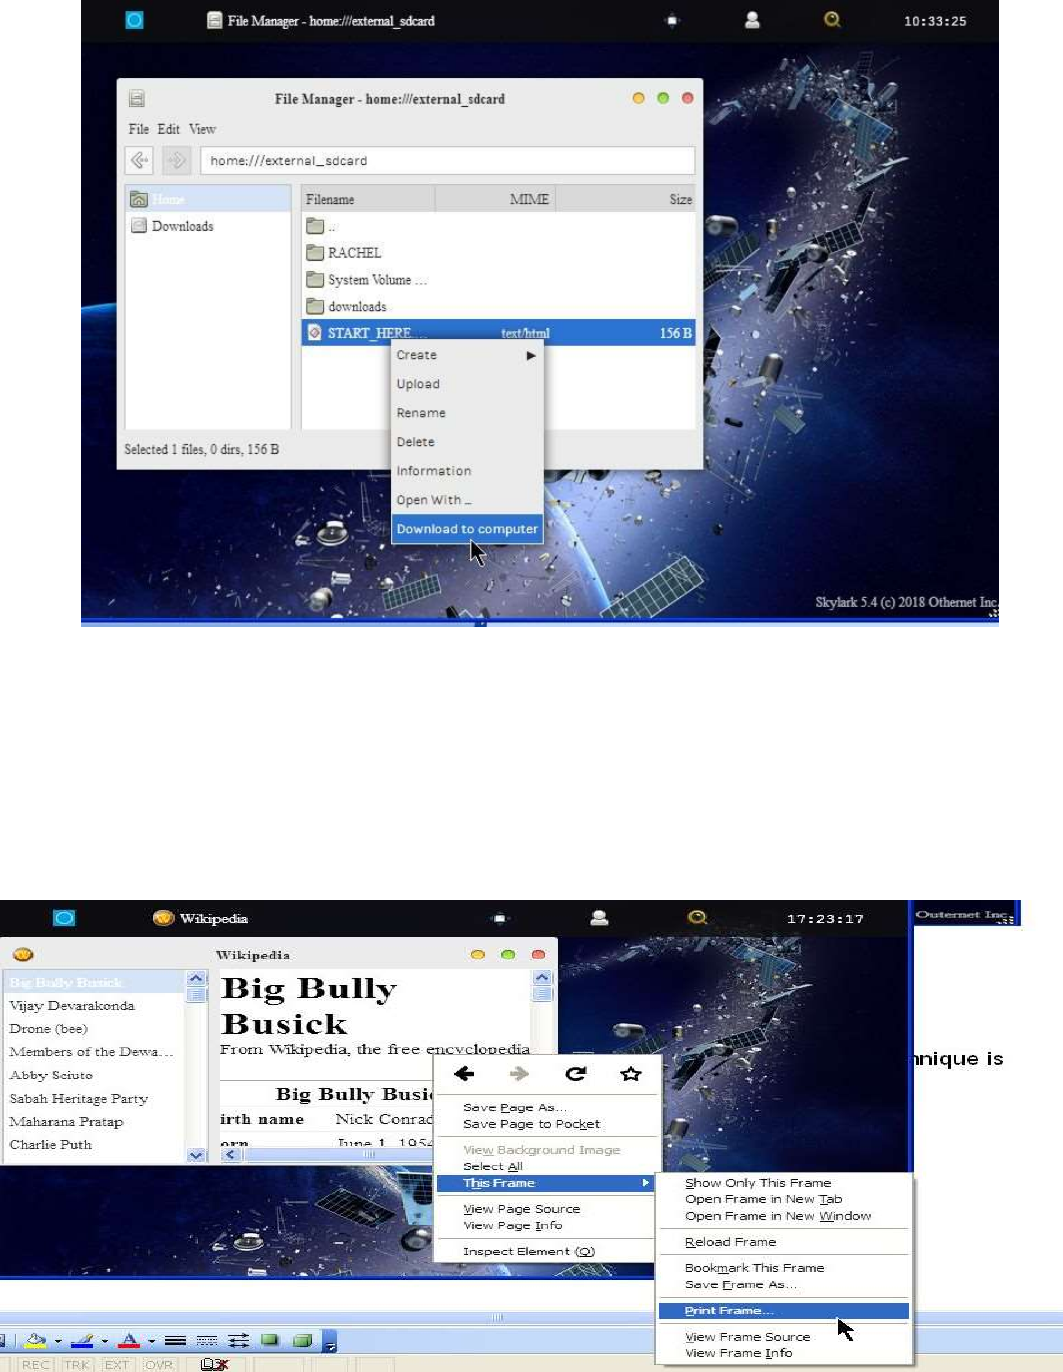
Fig. 32 Download to Computer
Section VI – Printing and Othernet Satellite Radio
Step 1. Printing frames from the Skylark data is possible if you use a Firefox Browser. MS Explorer,
Opera, and Chrome don’t work in the Windows world. The technique is very simple. Right click on the
frame you want to print, as in Fig. 33, select This Frame to pop up the Print Frame drop down, and then
select Print Frame. It will print fully in as many pages that are necessary.
Fig. 33 Printing Frames Using Firefox Browser
23
Step 2. Othernet Satellite Radio is available by either use of the native Skylark App, or plugging a
standard 3.5 mm stereo speaker into the speaker output plug on the Dreamcatcher Board. Audio is not
stored in Skylark - - it is a live event. Othernet Satellite Radio is broadcasting Old Time Radio
Podcasts and hourly Voice of America (VOA) News summaries.
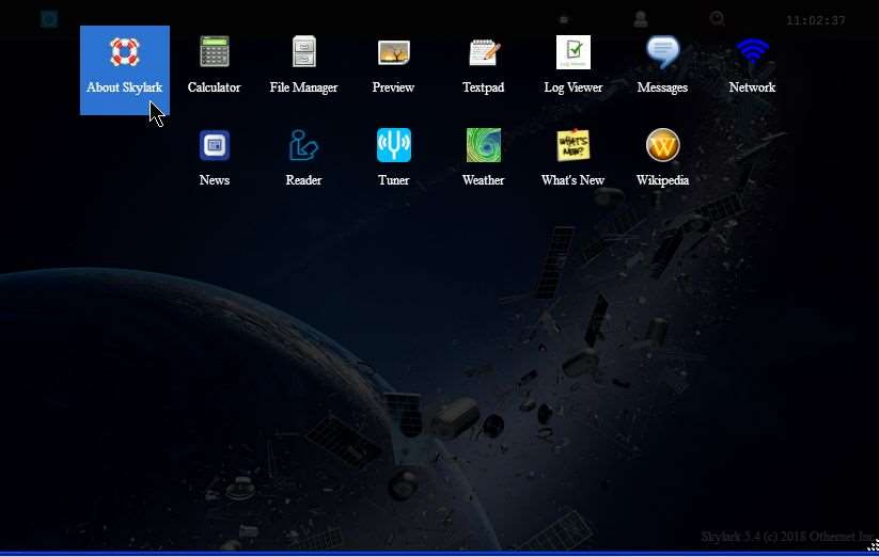
Method 1 - - Native audio/sound in found in the About Skylark App. Select this mode by going to
About Skylark on the Applications Icons Screen (Fig. 34)
Fig. 34 Applications Icons showing About Skylark
24
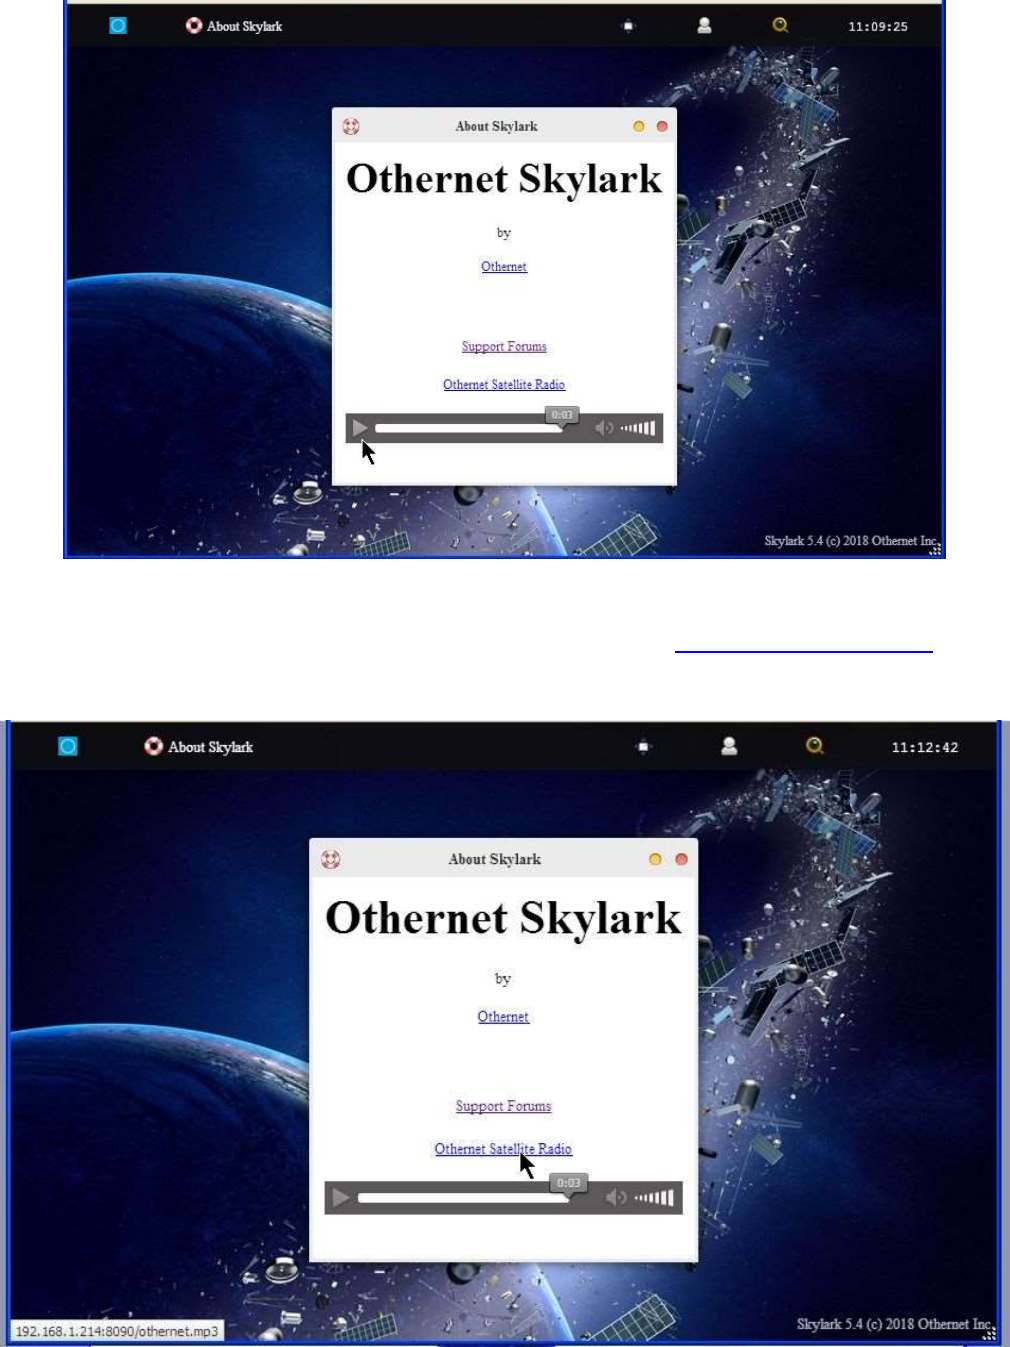
Fig. 35 About Skylark Screen with MP3 Player selected for listening to Othernet Satellite Radio
Play Othernet Satellite Radio directly here as in Fig. 35, or select Othernet Satellite Radio and open it
in a new browser window as in Fig 36. You can also run it in a RealPlayer or Windows Media Player if
you copy your network URL (Illustrated in Fig 36 as 192.168.1.214:8090/othernet.mp3) to the player.
Fig. 36 Selecting Othernet Satellite Radio Network URL
25
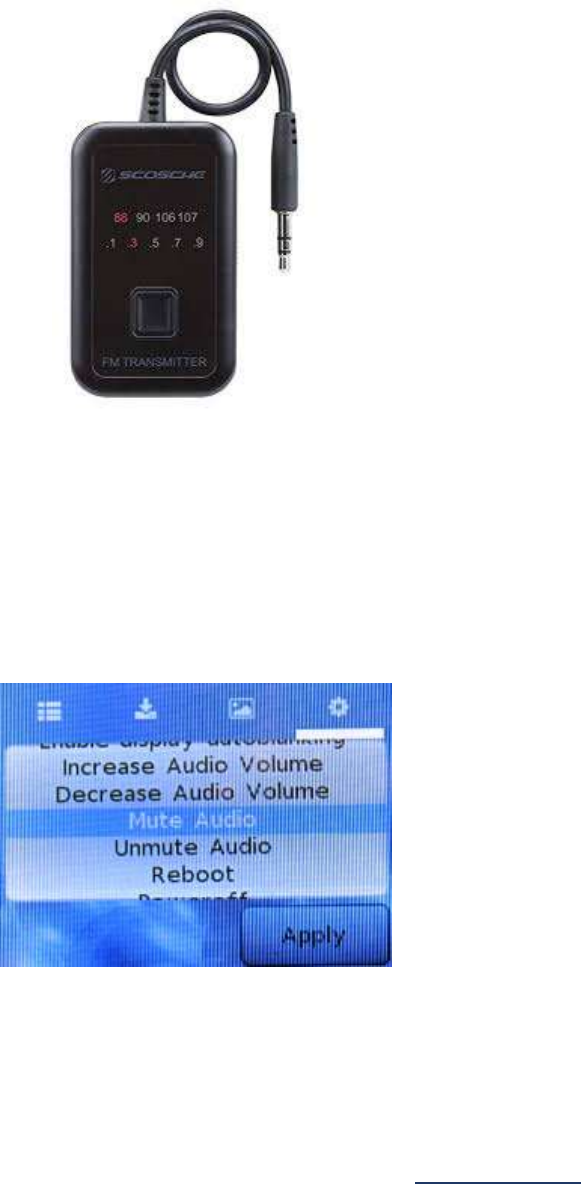
Method 2 - - Use of a speaker plugged into the standard 3.5 mm stereo output plug. Some users
connect the speaker output to an FM MP3 Player transmitter so they can tune to Othernet Satellite
Radio on a standard FM radio. If you use a device that requires external power from a USB cord, make
sure to power it from a separate power source. The Dreamcatcher power budget cannot support it.
In order to increase the volume of the audio/sound for the Dreamcatcher speaker plug, it is necessary to
make an “on the fly” software modification to Skylark that only remains in effect as long as you do not
reboot the Dreamcatcher. This change has no effect on the Native audio/sound mentioned in Method
1.
There are 2 ways make this adjustment. The first method is by using the Dreamcatcher Touch
Screen to increase/decrease the volume at the audio output plug (Fig. 37).
Fig. 37 Touch Screen for Adjusting Audio Levels
Since the Touch Screen is very sensitive to the touch, I have included a second method for making this
adjustment.
The second method is by using a program like PuTTY (available from https://putty.org) to gain access
to Skylark through its Secure Socket Shell (SSH) by entering your IP Client address into PuTTY. You
can do this from an Othernet WiFi Hotpot or as a Client (as I am doing) - -
26
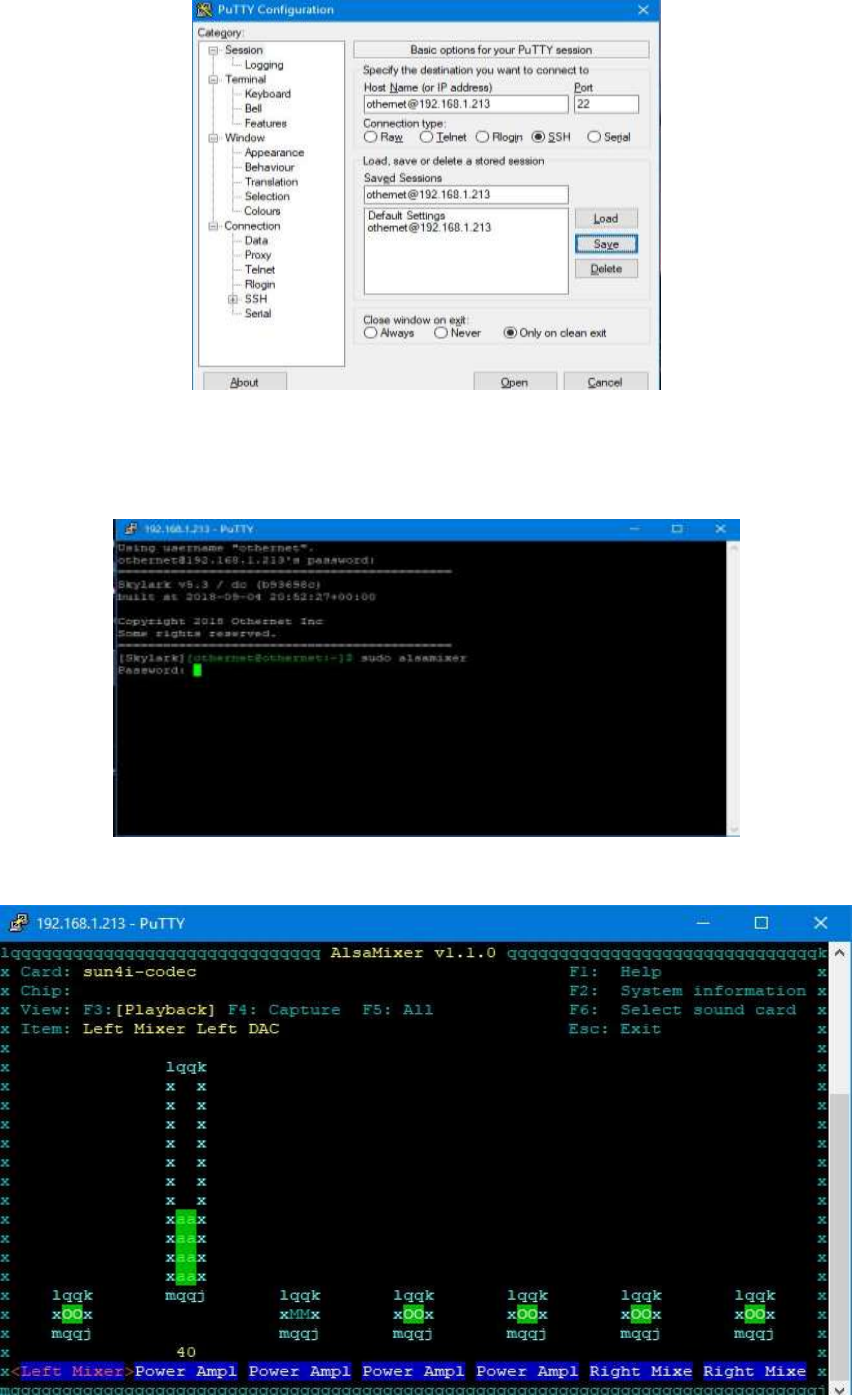
Login with Password: othernet
Then type sudo alsamixer
Then enter Password: othernet
The following control screen appears - - with “Left Mixer” selected as the default.
.
27
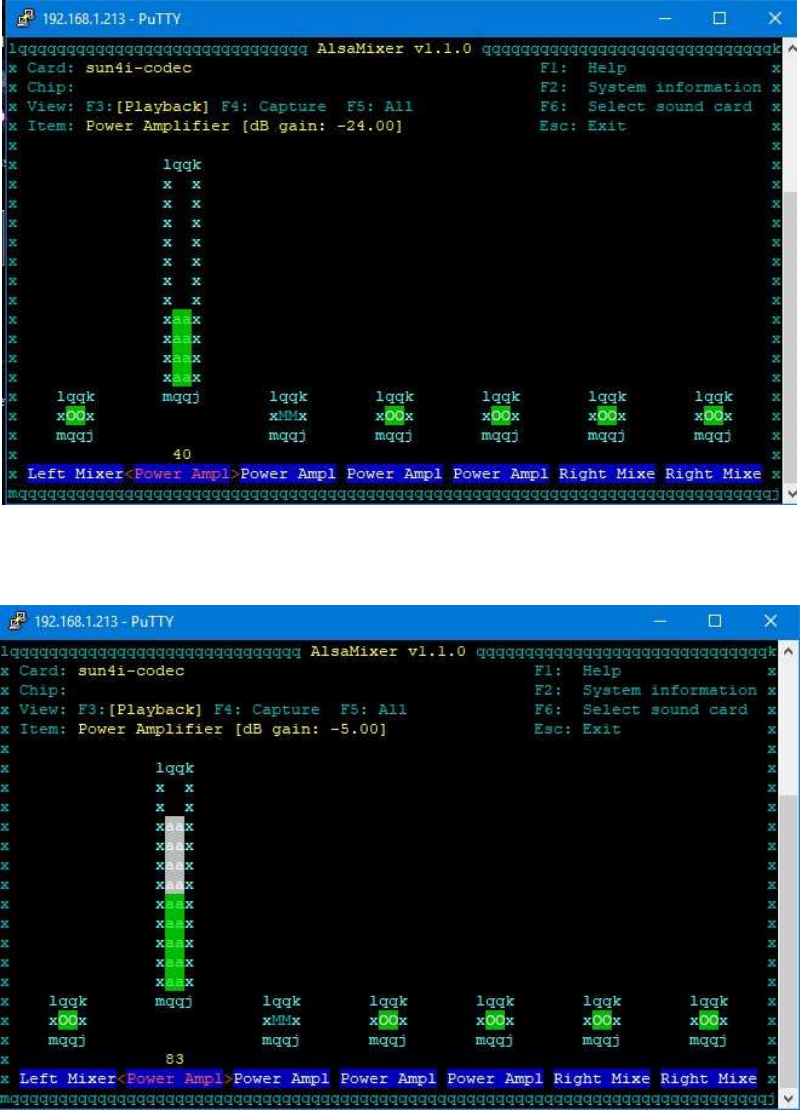
Using your computer keyboard’s right arrow key, cursor right one click until Power Amp1 turns red (you
don’t need to put your mouse pointer anywhere for this) - -
Now, using the UP arrow, move the green bar up to increase the volume from -24 dB (default) - - up to -5
dB or what you like. Then, you are done.
28
ANNEX A
Preliminary Test for OTA
You can use an Over the Air (OTA) file to update your Skylark 5.3 to Skylark 5.4 via the Web User
Interface (webUI) – here is no need to remove the micro SD card from the Dreamcatcher.
To use this method:
a. Download the update file skylark-dc-.1809042052.to.1810251245.psop.tbz2 shown on Fig. 4 to your
computer. DO NOT extract it or process it in any way.
b. Login to Skylark as the “othernet” user (logging-in as “guest” WILL NOT WORK).
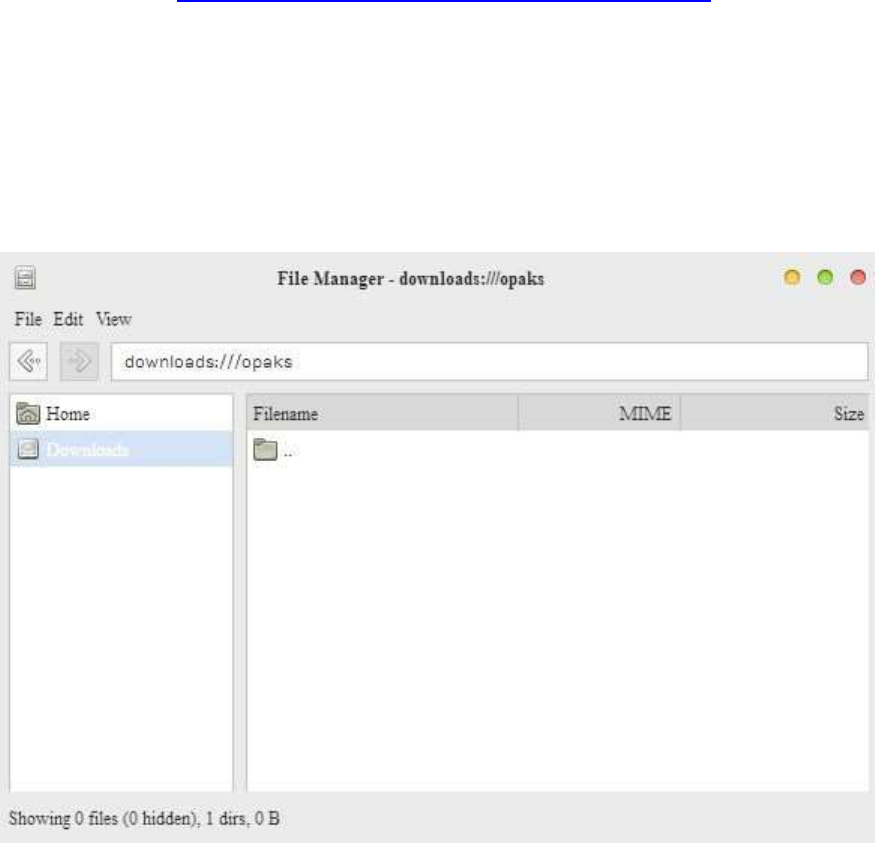
c. Open File Manager App.
d. In File Manager, in the left-most pane, select “Downloads” and then in the right-side pane, double-click
the “opaks” folder to enter it.
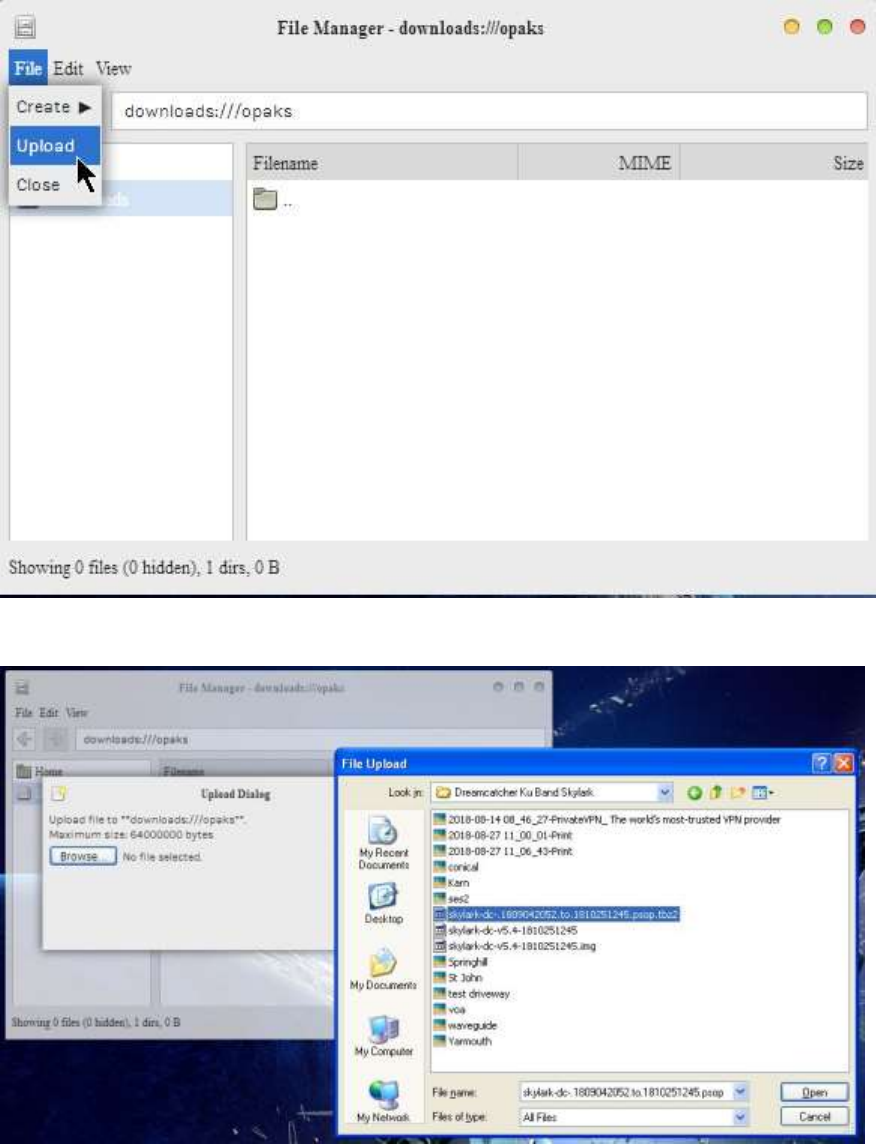
e. In the File Manager app menu bar, select “File” -> “Upload”. This will open up the file upload dialog,
and your normal OS file selection dialog; select the update file you downloaded to your computer in step
“a”. Click Ok/Open etc (as per your OS) to begin the upload.
Then select the .tbz2 file to upload, and just click Open - - nothing else needs to be clicked.
f. The update file will be uploaded to the “opaks” folder, and from there, Skylark OS will automatically
start processing the update.
g. Be patient. The update process will take 15 - 20 minutes to complete! Do NOT reboot your
Dreamcatcher during this process or change any other settings. During this process, it will appear as
though nothing is happening, but don’t despair - - it is working.
h. After the update process is complete, the Dreamcatcher will automatically reboot into the new version
of Skylark. You will need to refresh your WEB browser to see the new Skylark 5.4.
i. If the process fails, just use the normal micro SD card burning process Section I Step 4 as before to fix
things.
