Platinum Shipper LP2443 EPS Setup
User Manual: LP2443
Open the PDF directly: View PDF ![]() .
.
Page Count: 27

DYMO Endicia Platinum Shipper 1
DYMO Endicia
Platinum Shipper
Installation and Setup Guide
Version 11.2
5/6/2011
DYMO Endicia Platinum Shipper 2
Copyright © 2004-2011 DYMO Endicia, A Newell Rubbermaid Company
All rights reserved.
This document is the property of DYMO Endicia, A Newell Rubbermaid Company and may not be
reproduced, published, transmitted to other parties, in whole of in part, without written permission.
DAZzle and Endicia are registered trademarks of PSI Systems Inc. All other trademarks are property of
their respective owners.
DYMO and all DYMO trademarks (such as DYMO Stamps®) are trademarks of Sanford, L.P. Copyright
Sanford, L.P.
DYMO Endicia Platinum Shipper 3
Contents
Introduction .................................................................................................................................................. 5
Install and Set Up DAZzle .............................................................................................................................. 5
Install Printer Driver Software .................................................................................................................. 5
About Zebra Printer Drivers .................................................................................................................. 6
About Supported Zebra Printers ........................................................................................................... 6
Download and Install DAZzle .................................................................................................................... 6
Activate Your Account............................................................................................................................... 6
Buy Postage ............................................................................................................................................... 7
Set Up Label Layouts ................................................................................................................................. 7
Set Up Domestic Label Layouts ............................................................................................................. 7
Set Up APO, FPO, and DPO Label Layouts............................................................................................. 9
Using the APO FPO Mail Shipping Label Layout .................................................................................... 9
Set Up International Label Layouts ..................................................................................................... 10
Perform Test Prints ................................................................................................................................. 10
Optional: Customize Label Layouts ......................................................................................................... 11
Create a Custom Zebra 2-Part 4 × 6.75-inch Label Layout .................................................................. 11
Create a Custom Zebra 2-Part 4 × 8-inch Label Layout ....................................................................... 12
Install and Set Up Platinum Shipper ........................................................................................................... 13
Install Platinum Shipper .......................................................................................................................... 13
Assign Label Layouts to Mail Classes ...................................................................................................... 14
Buy Postage ............................................................................................................................................. 14
Specify Origin ZIP Code ........................................................................................................................... 15
Set Up Optional Features ............................................................................................................................ 15
Set Up Reference Fields .......................................................................................................................... 15
Link Database Fields to Platinum Shipper ............................................................................................... 16
Create the Lookup Database Map and Map the Fields .......................................................................... 16
Set Up Mail Class Code Automation ....................................................................................................... 17
Add a Rubber Stamp ............................................................................................................................... 17
About Post-Back Data ............................................................................................................................. 18
Create an ODBC Data Connection ....................................................................................................... 18
Create the Post-Back Database Map .................................................................................................. 19
DYMO Endicia Platinum Shipper 4
Create Ship From or Return Address .................................................................................................. 20
About New Features and Enhancements ................................................................................................... 21
Customize the List of Mail Classes .......................................................................................................... 21
About the Savings Log ............................................................................................................................. 22
About the Savings Log Report ............................................................................................................. 23
About SCAN Form Access ........................................................................................................................ 23
About the Feature Request Survey ......................................................................................................... 23
Mail Class, Printer, and Label Chart ............................................................................................................ 23
Index............................................................................................................................................................ 26
DYMO Endicia Platinum Shipper 5
Introduction
DYMO Endicia Platinum Shipper is a rate shopping tool that integrates with third-party shipping
products, such as UPS WorldShip or FedEx Ship Manager, to offer you less-costly shipping alternatives
that are available through the US Postal Service. Platinum Shipper provides seamless access to these
savings using:
Endicia address verification.
Residential and rural extended area surcharge prediction.
USPS postage-paid shipping label generation.
This guide is organized to help you:
Install and set up DAZzle
Install and set up Platinum Shipper
Set up optional features
Learn about new features and enhancements
Install and Set Up DAZzle
This section contains information for installation and setup of the Platinum Shipper system. If you
already have installed and set up DAZzle and your printer driver, you can skip to Install and Set Up
Platinum Shipper.
The following topics describe how to set up DAZzle:
Install Printer Driver Software
Download and Install DAZzle
Activate Your Account
Purchase Postage
Set Up Label Layouts
Perform Test Prints
Customize Label Layouts
Install Printer Driver Software
If you have not done so already, install the printer driver software that you are using to print labels,
which:
Might already be included with Windows.
Might be included on a CD or DVD that was included with your printer.
You can usually download from the printer manufacturer’s Web site.
DYMO Endicia Platinum Shipper 6
About Zebra Printer Drivers
If you have a Zebra printer and are using Microsoft® Windows® XP, use Zebra printer driver version
5.238 or higher. The latest Zebra printer drivers are available from Zebra Technologies Corporation at
http://www.zebra.com.
A secondary source for printer drivers is from Seagull Scientific, Inc. Their download address is:
http://www.seagullscientific.com/aspx/thermal_95.aspx. During installation, the Configuration Wizard
helps you configure your printer driver. During this process, use the following settings:
Cutter: None
Gap: Label
Label Size: 4×6
Measurement: inches
When prompted, click Yes to print a test page.
About Supported Zebra Printers
The following table shows supported current and non-current Zebra printers.
Current Zebra Printers
Non-Current Zebra Printers
LP2844
LP2443
TLP2844
LP2442
LP105se
LP2543
GX420d
2746e
Download and Install DAZzle
The following steps describe how to download and install DAZzle.
Steps
1. Download DAZzle through https://www.endicia.com/endicia-
usa/account/authenticatedownload.cfm.
Tip! When you save the installation file, remember to note where you have saved the
downloaded file. You can save downloaded files to your Desktop or any location where you can
easily locate the file. For example, you might have a directory (folder) called Downloads.
2. After downloading the file, locate and double-click the file to run the product installation or
update.
3. Follow the prompts to save, run, and install the product.
Activate Your Account
After you have installed DAZzle, you must activate your account.
The following steps describe how to activate your account.
DYMO Endicia Platinum Shipper 7
Steps
1. Start DAZzle.
2. When prompted:
a. Enter your account number and initial Pass Phrase.
b. Create a Pass Phrase with a minimum of 10 characters.
c. Click Next.
Buy Postage
You must purchase postage in order to activate the Test Print button. You can purchase postage in any
preset amount from $10 to $500.
You should make your first postage purchase from DAZzle because you must have postage in your
account in order to test your printer and label setup. Afterwards, you can buy postage through Platinum
Shipper.
The following steps describe how to buy postage through DAZzle.
Steps
1. From DAZzle, select Postage > Buy Postage.
2. In the Purchase amount field, select the desired amount.
3. Click the Buy Now button.
Set Up Label Layouts
In DAZzle, you set up all of your label layouts on the Design tab. DAZzle also includes other tabs, such as
the Quick Print tab and the Address Book tab, but you do not use those tabs with Platinum Shipper.
The following topics describe how to:
Set Up Domestic Label Layouts
Set Up APO, FPO, and DPO Label Layouts
Set Up International Label Layouts
Set Up Domestic Label Layouts
In most cases, you need only the following layouts for domestic mail:
For use with all mail classes except Express Mail
Express Mail
Set Up a Domestic Mail Layout—Other Than Express Mail
The following procedure assumes a typical 4 × 6 inch label for a Zebra 2844 printer.
The following steps describe how to create a domestic label layout template for any domestic mail class
other than Express Mail.
DYMO Endicia Platinum Shipper 8
Steps
1. From DAZzle, select File > Open Layout.
2. Select Zebra Label.lyt, and click Open.
3. Double-click the Return Address area and enter your company information.
4. Click OK.
5. Assign a printer to your label: Select File > Printer Setup.
6. In the Printer field of the Printer Setup dialog box, select your printer. For the purpose of this
example, you would select Zebra LP2844.
7. In the Printer Paper Size field, select 4.00” × 6.00”. If your printer driver does not include this
option, select User Defined and enter 4.00” × 6.00” in the provided field.
8. In the Label Orientation area, select Portrait, Face Up, Top First, and Center, and then click OK.
9. Examine the label on the Design tab for a red line running along at least two of the label edges.
This indicates that the label is properly set up. If the line cuts off any portion of the label, change
the Printer Settings, such as the offset or margins.
10. Select File > Save Layout As.
11. When prompted, enter a unique file name for your label that is easy for you to identify. For
example, using a number at the beginning of the file name can make identification and sorting
easier in Platinum Shipper, for example, 1 First Class Mail Label. It is suggested that you use the
number 1 for domestic and number 2 for international layouts.
12. Click OK.
Set Up a Domestic Express Mail Layout
The following procedure assumes a typical 4 × 6 inch label for a Zebra 2844 printer.
Express Mail requires a separate label layout due to the unique tracking number and postal
requirements.
The following steps describe how to set up a layout for domestic Express Mail.
Steps
1. From DAZzle, select File > Open Layout.
2. Select Zebra Express Mail Shipping Label.lyt.
3. Double-click the Return Address area and enter your company information.
4. Click OK.
5. Assign a printer to your label: Select File > Printer Setup.
6. In the Printer field of the Printer Setup dialog box, select your printer.
7. In the Printer Paper Size field, select 4.00” × 6.00”. If your printer driver does not include this
option, select User Defined and enter 4.00” × 6.00” in the provided field.
8. In the Label Orientation area, select Portrait, Face Up, Top First, and Center, and click OK.
9. Examine the label on the Design tab for a red line running along at least two of the label edges.
This indicates that the label is properly set up. If the line cuts off any portion of the label, change
the Printer Settings, such as the offset or margins.

DYMO Endicia Platinum Shipper 9
10. Select File > Save Layout As.
11. When prompted, enter a unique file name for your label that is easy for you to identify. For
example, using a number at the beginning of the file name can make identification and sorting
easier in Platinum Shipper, for example, 1 First Class Mail Label. It is suggested that you use the
number 1 for domestic and number 2 for international layouts.
12. Click OK.
Set Up APO, FPO, and DPO Label Layouts
Use the APO FPO Mail Shipping Label.lyt for APO, FPO, and DPO addresses. This label uses an integrated
customs form with a round stamp. The round stamp lets you mail packages without having to go to the
Post Office. Furthermore, if you are using Priority Mail with the Large Flat Rate Box on an APO / FPO
address, you qualify for a discounted rate. This label layout works with any mail class except for Express
Mail.
The following steps describe how to set up the APO FPO Mail Shipping Label Layout.
Steps
1. From DAZzle select the Design tab.
2. Select File > Open Layout.
3. Select APO FPO Mail Shipping Label.lyt.
4. Select File > Printer Setup.
5. On the Printer Setup dialog box, select:
Printer: Either an inkjet or laser printer.
Printer Paper Size: 8.5” × 11” letter paper.
6. Click OK.
7. From Platinum Shipper, select Setup > Domestic.
The Setup Domestic dialog box appears. In the Label Layouts area, you must assign your the APO
layout to that class of mail.
8. On the APO/FPO row, click the Browse button, select APO FPO Mail Shipping Label.lyt, and click
Open.
9. Click Save.
Using the APO FPO Mail Shipping Label Layout
The following Steps describe how to use the APO FPO Mail Shipping Label Layout.
Steps
1. In your carrier software, enter an address:
Enter all of the last line of the address into the City field.
Keep State and Zip Code fields blank.
Platinum Shipper actives the Customs button, which appears as a small planet Earth.
2. Click the Customs button.
3. In the Customs Information dialog box, complete the fields , including:

DYMO Endicia Platinum Shipper 10
The “I certify…” check box, which is in the lower area of the form. Selection of the “I
certify…” check box replaces the need for a hand-written signature.
Your name in the blank field below the “I certify…” check box.
The system prints four copies of the combined label and 2976-A customs form onto two sheets
of paper.
Set Up International Label Layouts
You create labels for use with international shipping using the same steps as the domestic layouts.
International layouts contain additional features. You should consider these features prior to creating
your international layouts.
Tip! The DAZzle Help offers detailed information about using international mail. For more
information, see http://www.endicia.com/DazzleHelp/90/default.cfm. In the DAZzle Help, click
Search Help Project, enter international in the Search field, and click Search.
The following layout files are commonly used with Zebra printers for creating international mail labels:
Zebra First Class International Shipping Label.lyt—only for First-Class International Mail.
Zebra Priority Mail International Shipping Label.lyt—for PMI flat-rate envelope and small flat-
rate PMI box.
The following layout files are commonly used with laser and inkjet printers for creating international
mail labels:
Large Priority Mail International Shipping Label.lyt
Large Express Mail International Shipping Label.lyt—Only for Express Mail International.
Note: Label names beginning with the word “Large” require either an inkjet or laser printer as their
sizes (8.5” × 11”) are too large for a Zebra printer.
For reference, see also the Printer and Label Chart.
Perform Test Prints
Before printing shipping labels with postage, you should perform a test print to verify that your label
prints correctly.
The following steps describe how to perform a test print using a label layout that you have already
opened and set up in DAZzle.
Note: You should have already:
Bought some postage for your account.
Loaded the paper, labels, or other media in your printer.
Set up and turned on your printer.
DYMO Endicia Platinum Shipper 11
Steps
1. From the Design tab, select File > Print.
2. Click the Test Print button.
Your printer should print a sample label. When you are satisfied with the results, you can print labels
with actual postage.
Optional: Customize Label Layouts
The following optional topics describe how to customize two popular label layouts for the Zebra printer.
Create a Custom Zebra 2-Part 4 × 6.75-inch Label Layout
Create a Custom Zebra 2-Part 4 × 8-inch Label Layout
Tip! You can optionally add one or more Rubber Stamps to your label layout. You can add as many
Rubber Stamps as you would like and can fit onto the smaller label. For more information, see Add a
Rubber Stamp.
Create a Custom Zebra 2-Part 4 × 6.75-inch Label Layout
The following steps describe how to create a custom Zebra 2-part 4 × 6.75-inch label, also known as a
Doc Tab label.
Steps
1. In DAZzle from the Design tab, select File > Open Layout.
2. Select Zebra Label.lyt and click Open.
3. Select Layout > Media.
4. In the Media dialog box, click the New button.
5. Use the following settings:
Columns section:
Number: 1
Width: 4"
Gap Between: 0"
Left Margin: 0"
Rows section:
Rows: 1
Height: 6.75"
Gap Between: 0"
Top Margin: 0"
Margins Section:
Left: 0"
Top: 0"
Right: 0"
Bottom: 0.75"

DYMO Endicia Platinum Shipper 12
Perforation Section:
Skip: 0"
Every: 0 row(s)
Split Labels Section:
Divided: Horizontally
from top: 6.1”
6. Click OK.
7. In the Media dialog box, click OK to return to the Design tab. The Design tab displays a 4 × 6 inch
label and a small blank 4 × .75 inch label below the larger label.
8. Select File > Printer Setup, and use the following settings:
Printer: Zebra
Paper Size: Custom or User-defined (Enter a width and height of 4” and 6.75”,
respectively.)
Offsets: from top: 0 from left: 0
Label Orientation: Portrait, Face Up, Top First, Center
9. Verify that the Print Upside Down check box is not selected.
10. Click OK.
11. Select Print > Test Print.
12. Select File > Save Layout As.
13. Enter a unique descriptive, easy-to-remember name, such as 1 zebra 2 part label.
14. Click Save.
Create a Custom Zebra 2-Part 4 × 8-inch Label Layout
The following steps describe how to create a custom Zebra 2-part 4 × 8-inch label layout, where the
total dimensions of both labels combined is 4 × 8 inches and the small label prints first.
Steps
1. In DAZzle from the Design tab, select File > Open Layout.
2. Select Zebra Label.lyt and click Open.
3. Select Layout > Media.
4. In the Media dialog box, click the New button.
5. Use the following settings:
Columns section:
Number: 1
Width: 4"
Gap Between: 0"
Left Margin: 0"
Rows section:
Rows: 1
Height: 8"
Gap Between: 0"

DYMO Endicia Platinum Shipper 13
Top Margin: 0"
Margins Section:
Left: 0"
Top: 0"
Right: 0"
Bottom: 2"
Perforation Section:
Skip: 0"
Every: 0 row(s)
Split Labels Section:
Divided: Horizontally
from top: 6.1”
6. Click OK.
7. In the Media dialog box, click OK to return to the Design tab. The Design tab displays a 4 × 6 inch
label and a small blank 4 × 2 inch label below the larger label.
8. Select File > Printer Setup, and use the following settings:
Printer: Zebra
Paper Size: Custom or User-defined (Enter a width and height of 4” and 8”,
respectively.)
Offsets: from top: 0 from left: 0
Label Orientation: Portrait, Face Up, Top First, Center
9. Verify that the Print Upside Down check box is not selected.
10. Click OK.
11. Select Print > Test Print.
12. Select File > Save Layout As.
13. Enter a unique descriptive, easy-to-remember name, such as 1 zebra 2 part label.
14. Click Save.
Install and Set Up Platinum Shipper
The following topics describe how to install and set up Platinum Shipper:
Install Platinum Shipper
Assign Label Layouts
Buy Postage
Specify Origin ZIP Code
Install Platinum Shipper
The Platinum Shipper installation program completes most of the configuration and setup for you.
The following steps describe how to download and install Platinum Shipper.

DYMO Endicia Platinum Shipper 14
Steps
1. Go to http://download.endicia.com/PlatinumShipperInstall.exe
2. Click Save. Save the file to a location where you can find the downloaded file. As of the time of
this writing, the filename is PlatinumShipperInstall.exe.
Tip! Some people save the file to their computer Desktop or the Downloads directory.
3. After completing the download, go to that file location and double-click
PlatinumShipperInstall.exe to run the installation.
4. Complete the on-screen prompts to install Platinum Shipper.
After installing Platinum Shipper, you should verify or set up your label layout assignment and the ZIP
Code.
Assign Label Layouts to Mail Classes
After installing Platinum Shipper, you should verify that your label layouts are linked to the correct mail
classes that you intend to use. You should verify the setup for both domestic and international mail class
assignments.
The following steps describe how to assign label layouts to mail classes.
Steps
1. In Platinum Shipper, select Setup > Domestic.
2. When the Setup dialog appears click the Browse button to the right of the desired mail class
located in the Label Layouts section.
3. Select the corresponding label layout and click the Open button.
4. For each class of postage that you use, select the layout that you created. You can use the same
layout for all classes of mail except Express Mail because Express Mail has unique layout
requirements.
Note: For Express Mail, use the Express Mail layout.
5. Repeat the process until all of the mail classes have been assigned a layout and click OK.
6. Assign international mail classes to your international label layouts: Select Setup > International
and repeat Steps 2–4. For information about assigning mail classes to international mail layouts,
see the Mail Class, Printer, and Label Chart.
7. Click OK.
Buy Postage
By default there is a limit of $500 on the amount of funds that you can have in your postage account at
any given time. Purchases are limited to amounts that do not bring the total balance to more than the
preset limit. For example, if an account has a balance of $500, you can make additional purchases up to,
but not exceeding $500. The system prevents any amount that would put the balance over your limit.
This policy only limits the maximum dollar amount contained in an account and does not limit either the
number of times you can purchase postage or the amount of postage printed.

DYMO Endicia Platinum Shipper 15
The following steps describe how to add funds to your postage account through Platinum Shipper.
Steps
1. In Platinum Shipper, click the Buy button.
2. In the Purchase Amount field, select an amount.
3. Click the Buy Now button.
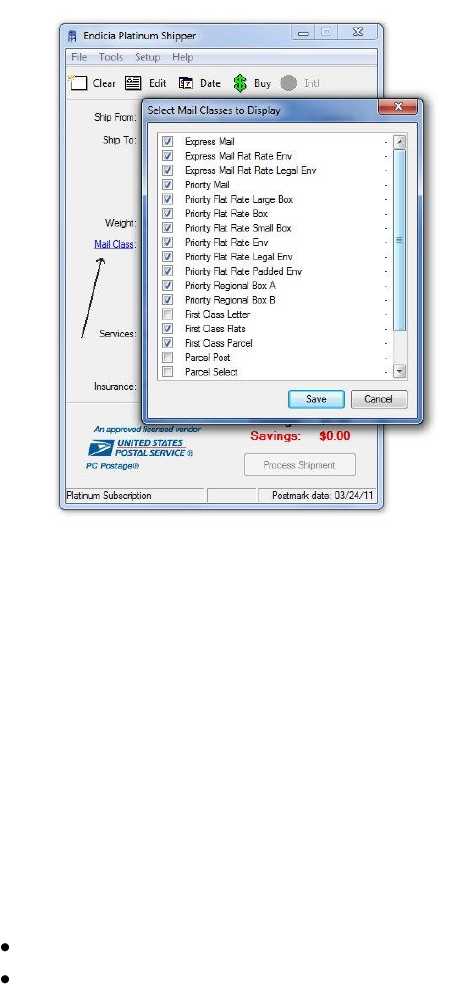
Specify Origin ZIP Code
It is important that you set the origin ZIP Code because shipping rates are calculated based on the ZIP
Code of the Post Office that collects your shipments. This insures that the rates that you pay are correct.
The following steps describe how to specify the origin ZIP Code.
Steps
1. In Platinum Shipper, select Setup > General.
2. In the Origin zip code field, enter on the ZIP Code of the Post Office that collects your
shipments.
3. Click the Save button.
Set Up Optional Features
The following topics describe how to:
Set Up Reference Fields
Link Database Fields to Platinum Shipper
Add a Rubber Stamp
About Post-Back Data
Create an ODBC Data Connection
Create the Post-Back Database Map
Create Ship From Address
Set Up Reference Fields
Platinum Shipper uses reference fields to integrate with third-party shipping products to capture and
transmit information to your label. Supported third-party products include United Parcel Service (UPS)
WorldShip™ and FedEx Ship Manager®. This topic uses United Parcel Service (UPS) WorldShip™ as an
example.
To integrate Platinum Shipper with United Parcel Service (UPS) WorldShip™, you must map WorldShip
Reference Number fields to Rubber Stamps in Platinum Shipper. Five WorldShip Reference Number
fields are available. When data is entered into WorldShip, Platinum Shipper places mapped reference
field data from WorldShip onto your label.
The following steps describe how to set up reference fields that integrate with UPS WorldShip.

DYMO Endicia Platinum Shipper 16
Steps
1. In Platinum Shipper, select Setup > Integration.
2. Select the UPS WorldShip check box, and click the Configure button.
3. In the Configure UPS dialog box, select any of the five reference fields in WorldShip to link the
corresponding Rubber Stamp field in DAZzle to populate with data.
4. Optional: Repeat the preceding Step to add more mapped, numbered Reference fields.
5. Click Save.
Link Database Fields to Platinum Shipper
This optional lookup feature allows you to directly access data from an ODBC data source and bypass
your carrier software. With this feature set up, when you enter a number in the Lookup field, Platinum
Shipper can display:
Data, such as name, address, weight, and mail class.
Rates and additional address information.
You can set up Platinum Shipper to look up order number, invoice number, packing slip, or customer
number, or some other unique value from your data source.
To set up this lookup feature you must:
1. Create a Lookup Database. For Windows XP, see Create a System DSN
http://support.microsoft.com/kb/305599.
2. Create an ODBC Data Connection. For Windows XP, see
http://support.microsoft.com/kb/305599.
3. Create the Lookup Database Map and Map the Fields. See the following topic.
Create the Lookup Database Map and Map the Fields
The following steps describe how to create the lookup database map.
Steps
1. From Platinum Shipper, select Setup > Integration.
2. Select the Database Lookup check box.
3. Click the Configure button.
4. Next to the ODBC Data Source field, click the Select button.
5. Select the data source name that you intend to use.
6. Click OK.
7. Next to the Table field, click the Select button.
8. Select the file that you intend to use.
Usually, this is a table of a database, such as MSSQL, My SQL, Oracle, Access, CSV, or Excel
spreadsheet.
9. Click OK.

DYMO Endicia Platinum Shipper 17
Each tab displays DYMO Endicia Platinum Shipper fields.
10. Select fields from your data source that correspond or map to the Platinum Shipper fields.
The Order Number field is the most important. Select a column header that you use everyday.
Common examples include order number, invoice number, packing slip, and customer number.
This is the data that you enter in the Lookup field to access your customers’ records.
11. On the Package Details tab, select the name of each field that you want to map.
12. When done, click Save.
Set Up Mail Class Code Automation
Optionally, you can convert data values from your data source into data that the system can use to
calculate postage, weights, mail classes, and so on.
For example, suppose your data source uses the code “MM” to indicate Media Mail. You can set up mail
class code automation to convert your code “MM” to the actual Media Mail class in Platinum Shipper.
You can create multiple mail class codes for the same mail class. For example, if you used two codes in
your data source for First-Class, such as “FC” and “USPS FC”, you can set up mail class code automation
to convert both “FC” and “USPS FC” to the First-Class Mail class in Platinum Shipper.
The following steps, which describe how to set the mail class automation codes, assume that you have
created and selected the lookup database map and have mapped the Mail Class field. For more
information, see Create the Lookup Database Map and Map the Fields.
Steps
1. From Platinum Shipper, select Setup > Integration.
2. Select the Database Lookup check box.
3. Click the Configure button.
The Setup Translation window appears.
4. On the Package Details tab, click the ----> button that is next to the Mail Class field.
5. In the If value equals field, enter the mail class code that you use in your data source.
6. In the translate to field, select a mail class.
7. Click Add.
8. Repeat Steps 5 through 7 for any additional mail class codes that you want to add.
9. When done, click Save.
Tip: Optionally, set up tracking service codes in the same way that you set up mail class codes. In
Platinum Shipper, tracking service codes are known as tracking types. Examples of tracking
services include Delivery Confirmation and Signature Confirmation.
Add a Rubber Stamp
Rubber Stamps let you add a text message or data, such as Delivery Confirmation, to your envelope,
label, or flyer. After selecting the Insert > Rubber Stamp command (or clicking the Add Rubber Stamp
button), you can enter the text for your message and select the font for the text.

DYMO Endicia Platinum Shipper 18
A Rubber Stamp is one line only; can be up to 300 characters—in any font or in any rotation; and include
a number of formatting options. For more information, see the DAZzle Help.
You can also link the text that appears in a Rubber Stamp to an address list field or some third-party
applications, such as United Parcel Service WorldShip™.
Tip! The DAZzle Help offers detailed information about using Rubber Stamps. For more
information, see http://www.endicia.com/DazzleHelp/90/default.cfm. In the DAZzle Help, click
Search Help Project, enter rubber stamp in the Search field, and click Search.
The following steps describe how to add a Rubber Stamp.
Steps
1. In DAZzle on the Design tab, display your label layout.
2. Select Insert > Rubber Stamp.
3. Select the Link to address list field check box, and select the field value.
4. Select a Rubber Stamp, such as Rubberstamp 1.
5. Click OK. The appearance of your cursor changes to a box.
6. Click the area where you want the Rubber Stamp data to appear.
7. Save your work by selecting File > Save Layout.
About Post-Back Data
The post-back feature lets you transfer updated shipment data into your database. The post-back
feature is optional.
By entering static field values—such as text—in posting back data, Platinum Shipper can write fixed
data—such as the postage amount—with each post-back action that Platinum Shipper performs.
Setup for posting back data requires you to:
1. Create an ODBC Data Connection, which prepares your database for post back.
2. Create the Post-Back Data Map, which links Platinum Shipper to the desired fields.
Create an ODBC Data Connection
Use the following steps as a general guideline:
Your system’s appearance might have been configured differently than what the following steps
describe.
Other versions of Microsoft Windows are similar, but may have different options.
You might be using some other data source.
For more information on setting up the ODBC data connection, refer to the Microsoft Windows Help.
The following steps describe how to create an ODBC Data Connection in Windows XP using a text-based
comma-separated-value (CSV) data source.
DYMO Endicia Platinum Shipper 19
Steps
1. From the Windows Desktop, click the Start button.
2. Select Control Panel.
3. Double-click Administrative Tools and double-click the Data Sources (ODBC) icon.
4. Select the System DSN tab.
5. Click the Add button.
6. Select Microsoft Text Driver (*.csv), and click the Finish button.
7. Enter a meaningful, easy-to-remember name for the data source, such as MyDataFile or
CompanyNameDataFile, and then enter a brief description.
8. Clear the Use Current Directory check mark.
9. Click the Select Directory button, and navigate to the location of your data file. The path for the
data file appears in the ODBC Microsoft Access Setup window.
10. Click OK to return to the System DSN tab.
11. Click OK to exit the ODBC Data Source Administrator window.
Create the Post-Back Database Map
The post-back feature updates your data source with shipment data, such as tracking and postage
amount data. The post-back map controls which fields Platinum Shipper writes back to the data file after
printing a shipping label.
The following steps describe how to create the post-back data source map.
Steps
1. From Platinum Shipper, select Setup > Integration.
2. Select the Database Post Back check mark, and click the Configure button on the same row.
3. Click the Select button next to the ODBC Data Source field.
4. In the ODBC Data Source field, select the type of data source that you are posting data back to.
5. If required, enter your User Name and Password to the data source.
6. Click OK.
7. Next to the Table field, click the Select button.
8. Select the data source file name that you intend to use.
9. Click OK.
10. From one or more of the following tabs—Package Details, Recipient Address, or Rubber
Stamps—for each field that you want to post back data, select a field from your data source.
This is also known as mapping fields between two different data sources.
11. After you have mapped the fields that you need to post back data to, click Save.
12. In the Setup Integration dialog box, click Save.
DYMO Endicia Platinum Shipper 20
Create Ship From or Return Address
This feature provides a convenient way to add and specify the default ship from or return address that
appears on each label.
The setup of return addresses requires you to:
1. Add one or more return addresses
2. Specify a default return address
Add a Return Address
The following steps describe how to add a return address.
Steps
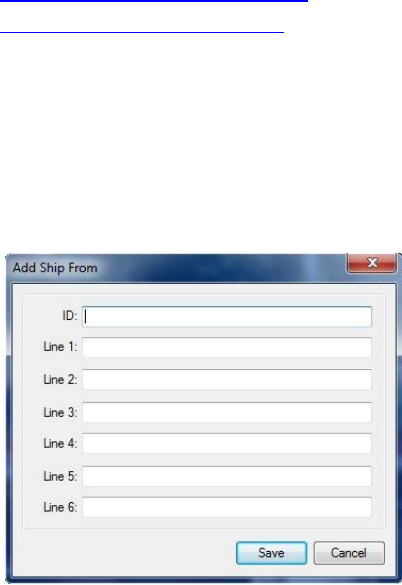
1. Select Setup > Ship From.
2. On the Setup Ship From window, click the Add button.
3. In the ID field, enter a name.
The ID field identifies the purpose of the address, such as Shipping Dept or Acme Products
Company, and so on.
4. In the Line 1 through Line 6 fields, enter the return address fields.
5. Click Save and then click Done.
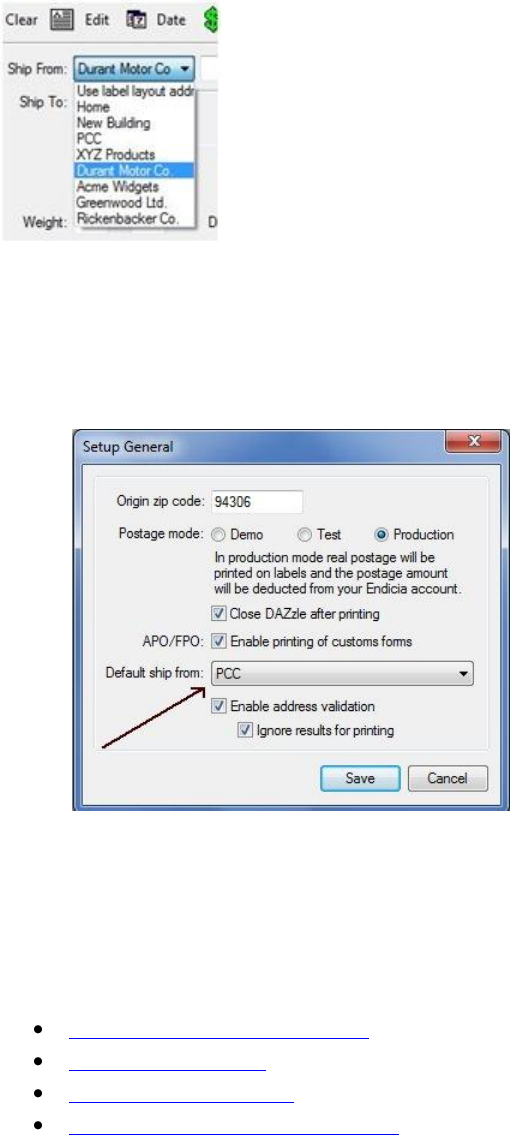
About the Selectable Return Address
The Ship From menu, which is located on the Platinum Shipper main window, lets you select and use a
return address for just one label. After you print that one label, the Ship From field reverts to the default
return address. This option allows you to continue using the default return address and to be able to
change the return address when needed.
DYMO Endicia Platinum Shipper 21
Specify Default Return Address
The following steps describe how specify the default return address.
Steps
1. Select Setup > General.
2. In the “Default ship from” field, select the default return address from the list.
3. Click Save.
About New Features and Enhancements
The following topics describe new features and enhancements:
Customize the List of Mail Classes
About the Savings Log
About SCAN Form Access
About the Feature Request Database
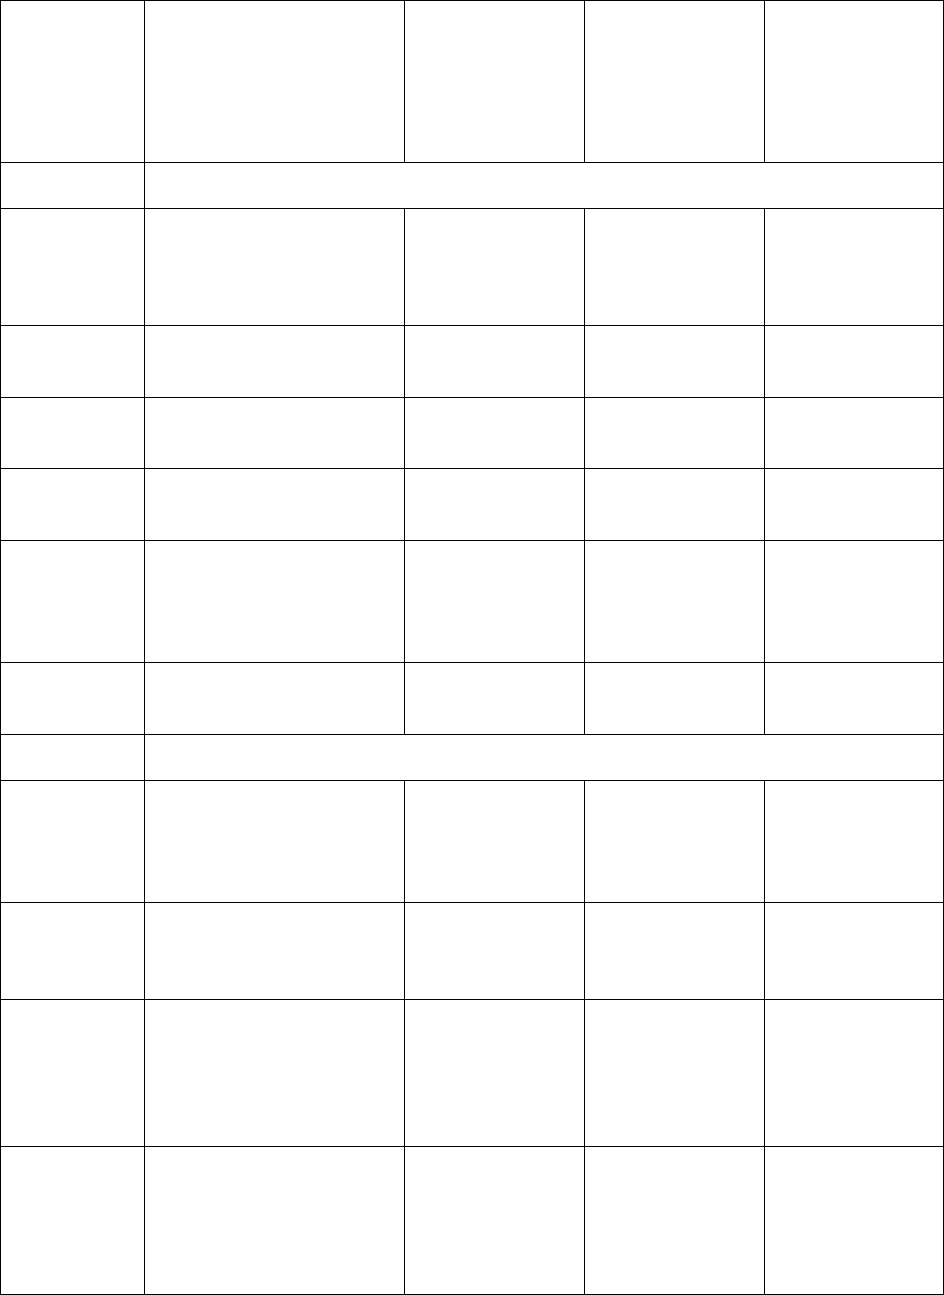
Customize the List of Mail Classes
The following steps describe how to customize the list of mail classes that appear on the main Platinum
Shipper window.
DYMO Endicia Platinum Shipper 22
Steps
1. Select the Mail Classes field name.
The Select Mail Classes to Display dialog box appears.
2. To make a mail class appear, select the check box next to the mail class.
3. To remove a mail class, clear the check box next to the mail class.
4. When done, click Save.
About the Savings Log
The Savings Log helps you discover ways of saving money in the future by analyzing your past shipments.
Platinum Shipper runs concurrently with your third-party shipping software to monitor shipping activity.
Platinum Shipper analyses and compares the third-party shipping charges with what the US Postal
Service offers. Platinum Shipper displays the results in the Savings Log by both potential savings and
actual savings.
The Savings Log displays:
Summary data by a specific month up to one year.
Potential and actual savings by:
o Shipping charge savings
o Residential mismatches
o Invalid addresses
o Rural addresses
To access the Savings Log, select Tools > Savings Log.

DYMO Endicia Platinum Shipper 23
About the Savings Log Report
The Saving Log report shows you Date, Time, Weight, Host Service, Host Residential, Invalid Address,
USPS Service, USPS Zone, USPS Charge, USPS Residential, USPS Rural, and Savings. The Savings Log
report also displays Length, Width, and Height when you use dimensional weight.
On the Savings Log dialog box, you can create Savings Log reports that are based on potential or actual
savings. After you select the month-year, you can:
Click the View button under the Potential or Actual columns to view the report in a spreadsheet
or other application that can display CSV (comma separated value) files.
Click the Save button under the Potential or Actual columns to save the report in CSV (comma
separated value) text file format.
Enter recipient e-mail addresses and click the Email Savings Report Now button to send the
Savings Log by e-mail. This action sends both the potential and actual Savings Log reports.
To have Platinum Shipper automatically send the Savings Log a monthly report, select the Send
email automatically at the end of each month check box.
About SCAN Form Access
By using the Bulk Acceptance Scan form, you can show your customers with proof that you shipped your
customers’ packages. The SCAN form links all your daily shipments to a single bar-coded form that the
USPS scans when the USPS picks up your packages. When this scan data are uploaded into the US postal
system that evening, all your packages are marked as accepted in the USPS tracking system.
When your customer verifies the status of their package through the automatic e-mail notification that
you had sent them, your customer can see "The USPS accepted this item at Date and Time" rather than
reading that the USPS was electronically notified of the item.
To create the SCAN form, select Tools > Create SCAN Form. You must then log in to your online account
and select Tools > Create a SCAN Form from the Accounts tab.
About the Feature Request Survey
The purpose of this feature is to provide a convenient way for you to offer your feature requests for
Platinum Shipper. You should explain the purpose and benefits that could be gained by adding your
feature request to a future version of Platinum Shipper.
If you have an idea of how your feature should work, then add that information as well.
To access the feature request survey, select Help > Feedback & Suggestions.
Mail Class, Printer, and Label Chart
The following table shows the label layout files that you should use by printer type for various classes of
domestic and international mail.
Table 1 Mail Class, Printer, and Label Chart
DYMO Endicia Platinum Shipper 24
Mail Class
Laser and Inkjet Printers
Full or 2 part 8.5 × 11 labels
Zebra Printers
4×6 labels
2 part 4×8 and
4×6.75 labels
DYMO 4XL
DYMO Turbo
Printers
Domestic with Delivery Confirmation
Priority Mail
Priority Mail Shipping Label.lyt
Zebra Label.lyt
Dymo4XL
Label.lyt
Dymo 30387
Label.lyt
Media Mail
Priority Mail Shipping Label.lyt
Zebra Label.lyt
Dymo4XL
Label.lyt
Dymo 30387
Label.lyt
Parcel Post
Priority Mail Shipping Label.lyt
Zebra Label.lyt
Dymo4XL
Label.lyt
Dymo 30387
Label.lyt
First-Class
Priority Mail Shipping Label.lyt
Zebra Label.lyt
Dymo4XL
Label.lyt
Dymo 30387
Label.lyt
Express Mail
with tracking
Express Mail Shipping Label.lyt
Express Mail
Shipping Label.lyt
Dymo4XL
Express Mail
Shipping
Label.lyt
NOT SUPPORTED
APO/FPO
APO FPO Priority Mail Shipping
Label.lyt
NOT SUPPORTED
NOT
SUPPORTED
NOT SUPPORTED
International with Customs Form
Express Mail
International
with tracking &
customs
Large Express Mail International
Shipping label.lyt
NOT SUPPORTED
NOT
SUPPORTED
NOT SUPPORTED
Priority Mail
International
with customs
Large Priority Mail International
Shipping label.lyt
NOT SUPPORTED
NOT
SUPPORTED
NOT SUPPORTED
Priority Mail
International
Flat Rate
Envelope with
customs
Large Priority Mail International
Shipping label.lyt
Zebra small Priority
Mail International
Shipping label.lyt
Dymo4XL Small
Priority Mail
International
Shipping
Label.lyt
Dymo 4XL small
Priority Mail
International
Shipping label.lyt
Priority Mail
International
Flat Rate Boxes
with customs
Large Priority Mail International
Shipping label.lyt
Zebra small Priority
Mail International
Shipping label.lyt
Dymo4XL Small
Priority Mail
International
Shipping
Label.lyt
Dymo 4XL small
Priority Mail
International
Shipping label.lyt

DYMO Endicia Platinum Shipper 25
Mail Class
Laser and Inkjet Printers
Full or 2 part 8.5 × 11 labels
Zebra Printers
4×6 labels
2 part 4×8 and
4×6.75 labels
DYMO 4XL
DYMO Turbo
Printers
First-Class
International
with customs
Small First Class Mail
International Shipping Label.lyt
Zebra small First
Class Mail
International
Shipping label.lyt
Dymo4XL Small
First Class Mail
International
Shipping
Label.lyt
Dymo 4XL small First
Class Mail
International
Shipping label.lyt
International
without
Customs Form
Click n Ship.lyt
Zebra Plain Label.lyt
NOT
SUPPORTED
Dymo 30387, 30383,
30384
DYMO Endicia Platinum Shipper 26
Index
Tip! If you are viewing the PDF file, most PDF viewers let you search for key words.
account balance
add to ........................................................... 15
accounts
activate ........................................................... 6
add funds to ................................................. 15
buy postage through DAZzle .......................... 7
activate
your account .................................................. 6
address
add return or ship from ............................... 21
create return ................................................ 21
create ship from ........................................... 21
select return or ship from ............................ 21
specify default return or ship from .............. 22
APO/FPO
layouts, set up ................................................ 9
using layouts for ........................................... 10
buy
postage through DAZzle ................................. 7
postage through Platinum Shipper .............. 15
classes
mail, select ................................................... 23
custom
label layouts, create ..................................... 11
customs forms
printer and labels for ................................... 25
data
about post-back ........................................... 19
data connection
ODBC, create ................................................ 19
data source
fields, link to Platinum Shipper .................... 17
database
create lookup map ....................................... 17
post-back, create mapping .......................... 20
source, link fields to Platinum Shipper ........ 17
DAZzle
download ................................................... 5, 6
install and set up ........................................ 5, 6
Delivery Confirmation
label and printer compatibility .................... 25
domestic
Express Mail layouts, set up ........................... 8
domestic labels
layouts, set up ................................................ 7
download
DAZzle ............................................................ 6
Platinum Shipper ......................................... 14
DPO
layouts, set up ................................................ 9
drivers
about Zebra printer ....................................... 6
printer software, install ................................. 5
DYMO printers
compatibility ................................................ 25
Express Mail
layouts, set up ................................................ 8
Feature Request Survey
about ............................................................ 24
fields
link database, to Platinum Shipper .............. 17
map from source to to Platinum Shipper .... 17
Rubber Stamps, map to ............................... 16
forms
SCAN, access ................................................ 24
inkjet printers
compatibility ................................................ 25
installation
Platinum Shipper ......................................... 14
integration
set up reference fields ................................. 16
international
customs forms for ........................................ 25
introduction ....................................................... 5
label layouts. See labels or layouts. ................. 14
labels
compatibility with printers .......................... 25
layouts, assign to mail classes ..................... 14
layouts, customize ....................................... 11
layouts, domestic, set up ............................... 7
layouts, Express Mail, set up ......................... 8
layouts, international, set up ....................... 10
layouts, set up ................................................ 7
layouts, set up APO FPO DPO ........................ 9
layouts, using APO FPO Shipping ................. 10
test prints, perform ..................................... 11
Zebra 2-Part 4 × 6.75-inch Zebra 2-Part 4 ×
6.75-inch .................................................. 11
DYMO Endicia Platinum Shipper 27
Zebra 2-Part 4 × 8-inch, create .................... 13
laser printers
compatibility ................................................ 25
layouts
domestic labels, set up .................................. 7
Express Mail, set up ....................................... 8
international labels, set up .......................... 10
labels, customize .......................................... 11
labels, set up .................................................. 7
set up APO FPO DPO label ............................. 9
using APO FPO Shipping ............................... 10
Zebra 2-Part 4 × 6.75-inch, create ............... 11
Zebra 2-Part 4 × 8-inch, create .................... 13
lookup database map
create ........................................................... 17
mail class code
set up automation of ................................... 18
mail classes
label layouts, assign to ................................. 14
layouts needed for ................................... 7, 25
select ............................................................ 23
map
lookup fields ................................................. 17
mapping
fields between data sources ........................ 20
fields to Rubber Stamps ............................... 16
post-back data, create ................................. 20
ODBC data connection
create an ...................................................... 19
optional features
set up ........................................................... 16
Platinum Shipper
download ..................................................... 14
install, set up ................................................ 14
postage
buy, through DAZzle ....................................... 7
buy, through Platinum Shipper .................... 15
post-back
database map, create .................................. 20
post-back data
about ............................................................ 19
Printer and Label Chart .................................... 25
printer drivers
install .............................................................. 5
printers
compatibility with labels .............................. 25
software drivers, install ................................. 5
supported Zebra, about ................................. 6
Zebra, install software ................................... 6
printing
test, perform ................................................ 11
purchase
postage ........................................................ 15
reference fields
set up ........................................................... 16
reports
Savlings Log, about ...................................... 24
return address
add ............................................................... 21
create ........................................................... 21
select ............................................................ 21
specify default ............................................. 22
Rubber Stamps
add ............................................................... 18
fields, map to ............................................... 16
Savings Log
about ............................................................ 23
access ........................................................... 23
Savings Log report
about ............................................................ 24
SCAN form
access ........................................................... 24
ship from address
add ............................................................... 21
create ........................................................... 21
select ............................................................ 21
specify default ............................................. 22
surveys
Feature Request, about ............................... 24
test prints
perform ........................................................ 11
Zebra printers
2-Part 4 × 8-inch label layout, create........... 13
about software drivers .................................. 6
about supported ............................................ 6
compatibility ................................................ 25
create 2-Part 4 × 6.75-inch layout ............... 11
ZIP Code
originating, specify ....................................... 15
