ESMA Paperless User Manual V1.1.0
ESMA_Paperless_User_Manual_v1.1.0
User Manual:
Open the PDF directly: View PDF ![]() .
.
Page Count: 73

Ver.
DATE
AUTHOR
DESCRIPTION
V1.1.0
21/12/2017
Laura Vazquez
Updated version with the CRs: CR30, CR31,
CR32, CR33, C37, CR38, CR39
Customer
ESMA
Document
Paperless 1.1.0 - User Manual
About
This document represents the user manual for Paper-
less Routing Slip 1.1.0 over Microsoft SharePoint
Server 2013 server farm
Edificio Miribilla Santiago Compostela, 12, 4ª A
48003 Bilbao – Spain
Tel: +34 944 276 308 Fax: +34 944 271 547
Bilbao | Madrid | Pamplona

ESMA - Purchase Order - 170018511EB1
ESMA - Paperless 1.1.0 User Manual
Page 2 of 73 BILBOMATICA
21/12/2017 v1.1.0
Table of Contents
1 Introduction ................................................................................................................ 5
1.1 Purpose...................................................................................................................... 5
1.2 Definitions, acronyms and abbreviations .................................................................. 5
2 Paperless main menu................................................................................................... 6
3 How to create a new workflow .................................................................................... 7
3.1 How the workflow information is organised in screen ........................................... 10
4 My Workflows ........................................................................................................... 12
4.1 What is the “Workflows to be signed" list .............................................................. 12
4.2 What is the “Status of initiated workflows” list ...................................................... 14
5 How can a step of the workflow be completed ........................................................... 15
6 How can a step of a workflow be re-assigned ............................................................. 17
7 How to work with the attachments ............................................................................ 17
7.1 How a document can be added to a workflow ....................................................... 17
7.1.1 How to upload a document ................................................................................. 18
7.1.2 How to upload multiple documents.................................................................... 20
7.2 How to know who modified a document ................................................................ 22
7.3 How to move an attached document ..................................................................... 23
7.4 How to remove an attached document .................................................................. 24
8 Possible status of a workflow ..................................................................................... 27
9 Which actions are available on workflows .................................................................. 28
9.1 Saving a workflow when its status is “Draft” .......................................................... 28
9.2 Launching a workflow ............................................................................................. 29
9.3 Deleting a workflow ................................................................................................ 29
9.4 Put On Hold a workflow .......................................................................................... 30
9.5 E-mail a workflow .................................................................................................... 31
9.6 Link workflow(s) ...................................................................................................... 31
9.7 Cancelling the creation of a workflow .................................................................... 33

ESMA - Purchase Order - 170018511EB1
ESMA - Paperless 1.1.0 User Manual
Page 3 of 73 BILBOMATICA
21/12/2017 v1.1.0
9.8 Signing a workflow step .......................................................................................... 34
9.9 Rejecting a workflow step ....................................................................................... 36
9.10 Cancelling a workflow step ..................................................................................... 37
9.11 Re-assignment of steps in a non-restricted workflow ............................................ 37
9.12 Re-assignment of steps in a restricted workflow .................................................... 38
10 Which permission rules are applied on workflows ...................................................... 38
10.1 General rules ........................................................................................................... 38
10.2 Specific rules for non-restricted workflows ............................................................ 40
10.3 Specific rules for restricted workflows .................................................................... 41
11 Searching for workflows ............................................................................................ 42
11.1 Advanced Search ..................................................................................................... 42
11.2 All workflows ........................................................................................................... 45
11.3 Signed Workflows .................................................................................................... 46
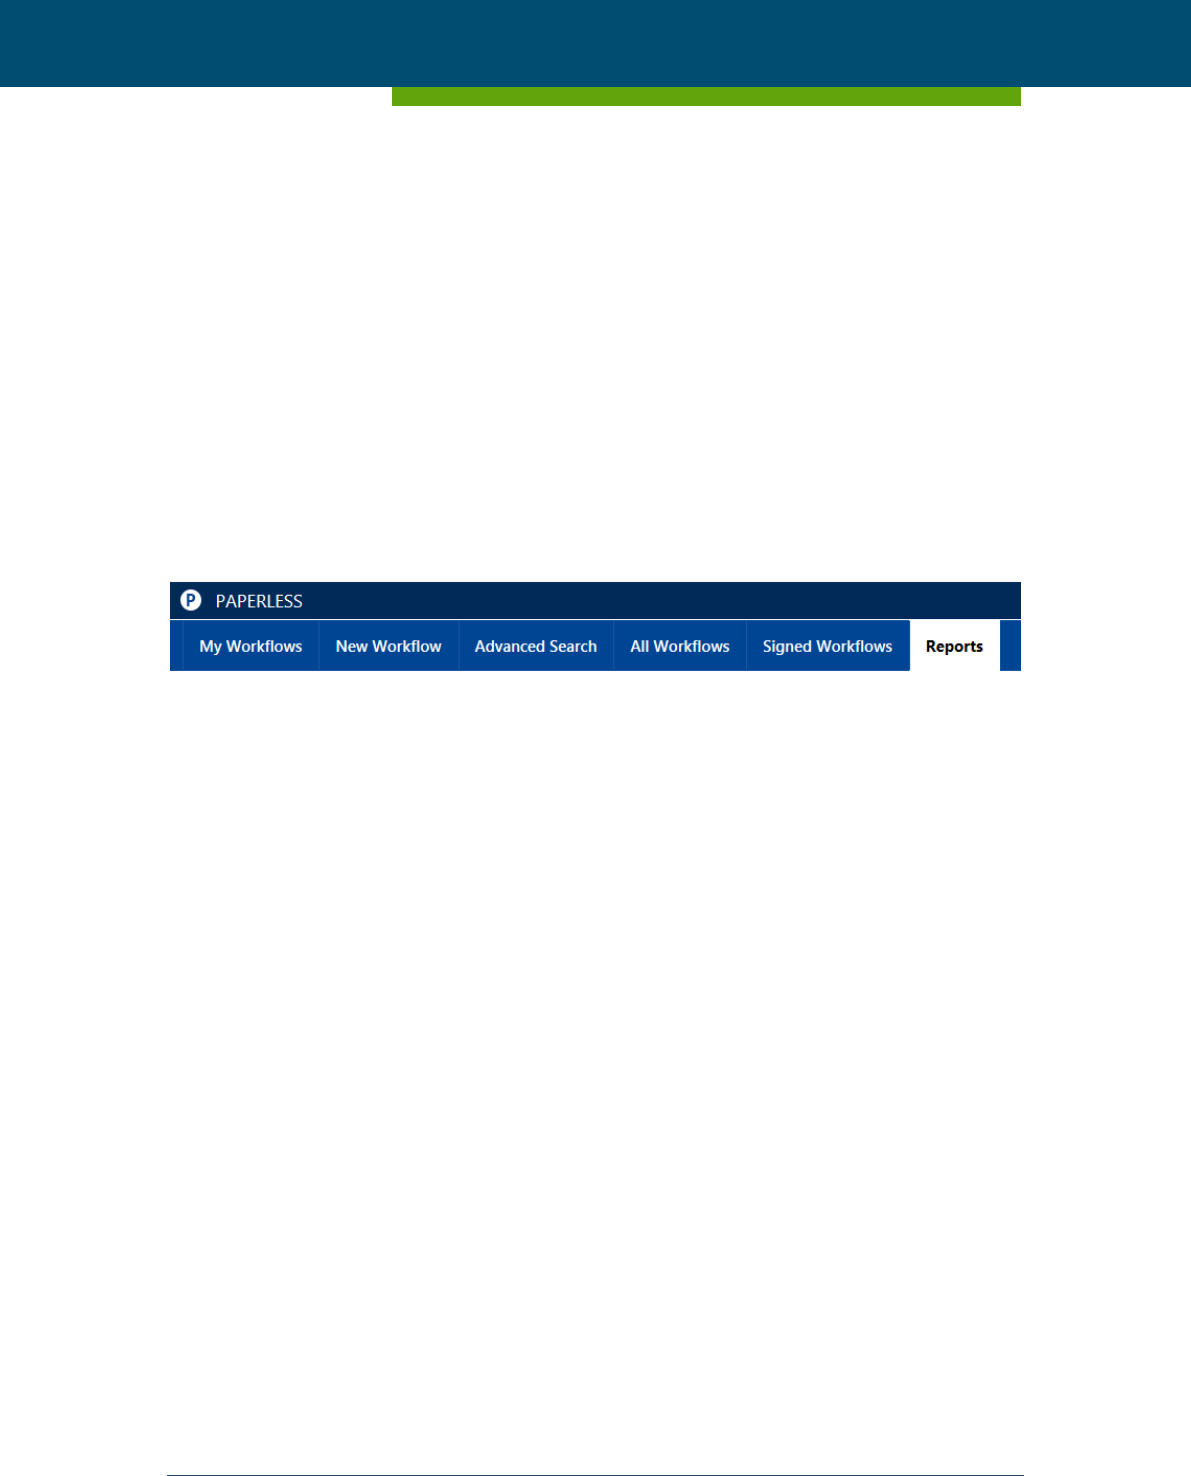
12 Reports ..................................................................................................................... 48
12.1 Reports home page ................................................................................................. 49
12.2 Create a new report ................................................................................................ 50
12.3 Report outcome (results) ........................................................................................ 51
12.3.1 How to customize a report outcome .................................................................. 54
12.3.2 How to save a report outcome ........................................................................... 56
12.4 Report Templates .................................................................................................... 57
12.4.1 How to create a report template ........................................................................ 57
12.4.2 How to generate a report from a template ........................................................ 58
12.4.3 How to edit a report template ............................................................................ 60
12.4.4 How to delete a report template ........................................................................ 61
12.4.5 How to share a report template .......................................................................... 63
12.4.6 How to receive reports by e-mail on a regular basis .......................................... 65
12.5 How to save a report outcome ............................................................................... 67
12.5.1 How to download a report in Excel format ......................................................... 68
12.5.2 How to view a report in HTML format ................................................................ 69
13 Notifications Service .................................................................................................. 70

ESMA - Purchase Order - 170018511EB1
ESMA - Paperless 1.1.0 User Manual
Page 5 of 73 BILBOMATICA
21/12/2017 v1.1.0
1 Introduction
This document represents the User Manual of Paperless Routing Slip 1.1.0 for a Microsoft
SharePoint Server 2013 environment.
1.1 Purpose
The purpose of this document is to guide users in the use of the Paperless system.
1.2 Definitions, acronyms and abbreviations
This section provides the reader of the user manual with an overview of terms used through-
out this document.
Actor
An actor is the user who completes a step of the paperless workflow. Among
other actions, actors can initiate and launch a workflow or either sign or reject
a step in the workflow.
Closed
“Closed” is one of the possible statuses that a workflow may have in the sys-
tem. This status is assigned when all the steps in it have been signed and all
the workflow information is moved to the archive.
Deleted
“Deleted” is one of the possible statuses that a workflow may have in the
system. This status is assigned when the initiator clicks the option “Delete”
meaning that the workflow is no longer valid or that it should not have been
initiated in the first place.
Draft
“Draft” is one of the possible statuses that a workflow may have in the sys-
tem. This status is assigned when the initiator has created a workflow but has
not launched it yet.
In progress
“In progress” is one of the possible statuses that a workflow may have in the
system. This status is assigned when the workflow initiator launches the
workflow and while there is at least one step left to complete in the workflow.
On hold
“On hold” is one of the possible statuses that a workflow may have in the
system. This status saves all changes made in the workflow without the need
to sign it.
ESMA - Purchase Order - 170018511EB1
ESMA - Paperless 1.1.0 User Manual
Page 6 of 73 BILBOMATICA
21/12/2017 v1.1.0
2
Paperless main menu
The information that concerns paperless workflows can be divided into six sets of information:
Figure 1 – Main menu
My Workflows: This tab provides access to the list of “Workflows assigned to me” (more
details in section 4) and the list “Workflows initiated by me” (more details in section
4.2).
New workflow: This tab provides a list
1
of links to initiate different types of workflows
(see section 3 for details on how to create a new workflow).
Advanced Search: This tab allows the user search workflows by different criteria.
1
You will have access to initiate only those workflow types associated to your role/profile
Rejected
“Rejected” is one of the possible statuses that a workflow may have in the
system. This status is assigned when the actor of the current step rejects an-
other step previously signed by another actor. In this case, the workflow is
returned to the rejected step.
Initiator
The initiator of a workflow is the actor who launches it.
Responsible
Assigned Person in the workflow.
Backup Group
Members of this group can perform any action as if they were the “Assigned
Person” (responsible).
Launch
This action is performed by the initiator of the workflow and it means to start
its execution. It implies the assignation of the next step in the workflow to
the corresponding actor and a change of the current workflow status to “In
progress”.
ESMA - Purchase Order - 170018511EB1
ESMA - Paperless 1.1.0 User Manual
Page 7 of 73 BILBOMATICA
21/12/2017 v1.1.0
All workflows: This tab provides access to all the workflows executed in the system by
any user.
Signed workflows: This tab displays the workflows in which the user has at least signed
one of the steps. The signed workflows view will contain a column to indicate the date
in which the workflow was last signed by the current user.
Reports: This tab provides the possibility to generate and save reports, as well as creat-
ing report templates.
3 How to create a new workflow
Workflows can be created from a set of links available under the tab “New workflow”:
Figure 2 – New workflow tab
When clicking in this tab a list of links will be displayed grouped by categories/types:
ESMA - Purchase Order - 170018511EB1
ESMA - Paperless 1.1.0 User Manual
Page 8 of 73 BILBOMATICA
21/12/2017 v1.1.0
Figure 3 – List of links to initiate workflows
Each link will redirect user to the workflow creation form, where the name of the workflow will
be already set depending on the link clicked.
The availability of this links depends on the group of users the actor belongs to. For instance,
the type “Approval of internal documents” can only be initiated by ADs; therefore, if the user
does not belong to this group he will not be able to start this type of workflow.
The system will automatically populate the following information in the form:
Workflow type (Name of the workflow): This field corresponds to the name of the
workflow type being executed. For instance “RECOVERY ORDER REQUEST”, “GENERAL

ESMA - Purchase Order - 170018511EB1
ESMA - Paperless 1.1.0 User Manual
Page 9 of 73 BILBOMATICA
21/12/2017 v1.1.0
WORKFLOW” or “REQUEST FOR REGULAR TELEWORKING”. This name is provided by the
system depending on the link clicked in the “New workflows” tab.
Workflow ID (WFID): This number is automatically provided by the system and uniquely
identifies a workflow in the system.
Workflow status: Provides information of the current situation of the workflow: draft,
in progress, rejected, deleted or closed. See section 7.4 for details of the status
workflow.
The user will complete the following required
2
information:
General Fields: These fields will be completed by workflow actors. The list of available
general fields to complete will depend on the type of workflow being executed. One of
the most important general fields is the “Restricted” field. This field can contain 3 pos-
sible values:
Non-restricted: This is the default value. It indicates that the workflow is non-
restricted and therefore any user would be able to find it through the search
functionality and access to it.
Restricted. Indicates that the workflow is restricted and only allowed users will
be able to open it. It can only be modified to non-restricted by the initiator of
the workflow or members of a backup group, regardless of the status of the
workflow (it is possible to modify it even if the workflow is in “In progress”, “On
Hold”, “Rejected” or “Closed” status).
Actors/Steps: Provides the list of steps a workflow is divided into and that need to be
completed in order to consider a workflow as “Closed”. The number of steps of each
workflow type is defined by administrators. Each step contains a group of users
3
that
are allowed to sign each step. All actors involved in the workflow can change the actors
assigned for the upcoming steps, regardless of whether the workflow is restricted or
non-restricted.
Documents: The user can attach, download, preview or remove
4
different types of doc-
uments to a workflow. Each type of document should be loaded in the corresponding
section. The documents section is divided into four sections (tabs):
Main documents.
2
No fields are mandatory in order to save or launch the workflow.
3
The group of users that are allowed to sign each step of a workflow are defined by administrators.
4
It is required to provide a reason for deleting a document.

ESMA - Purchase Order - 170018511EB1
ESMA - Paperless 1.1.0 User Manual
Page 10 of 73 BILBOMATICA
21/12/2017 v1.1.0
Documents ABAC.
Supporting documents.
Documents to be signed on paper
Paper signed documents.
My comment: This field allows the actor assigned to the step add comments. These
comments will be saved and displayed in the “Previous comments” field.
Previous comments: This field is not editable. It provides the history of comments in-
troduced by previous actors in “My comments” field.
3.1 How the workflow information is organised in screen
After the user selects the workflow type to be initiated from the “New workflows” tab, the
form in Figure 4 is displayed. All types of workflows have the same structure.
Sections of a workflow:
Figure 4 – Workflow sections
1. Workflow basic information: “Workflow type”, “Workflow ID” and “Workflow status”
are automatically populated when a new workflow is created.

ESMA - Purchase Order - 170018511EB1
ESMA - Paperless 1.1.0 User Manual
Page 11 of 73 BILBOMATICA
21/12/2017 v1.1.0
2. Action buttons
5
: Allow the user to save, launch, delete, cancel, sign, put on hold or reject
a workflow or a workflow step. The same sets of buttons appear at the top and bottom
of the page.
3. Workflow general fields
6
: General Fields need to be completed by workflow actors and
provide relevant information of the workflow. For instance, “Urgent”, “Workflow Sub-
ject” and “Link to Workflow(s)” fields are part of the general fields.
4. Workflow steps/actors: Provide information regarding the list of users (and their corre-
sponding role) executing each step of the workflow. These fields will also be used to
modify the assigned actor of a step. See section 5 for more details.
5. Step description: This section provides a description of the current workflow step that
is to be signed. It is an informative section to guide the user on how to proceed in order
to sign the step. This section is collapsed by default. Users can expand this section using
“+” button (to expand) “-“button (to collapse) located on the top right hand side of the
section.
6. Workflow documents: This section provides the possibility to add/download/preview
attached documents. See section 7 for more details.
7. Workflow comments: Allows the current actor of a step add new comments and review
previous comments introduced by other actors. To add a comment the user can directly
write it in “My comment” box. The history of comments for the workflow will be dis-
played in “Previous comments” field.
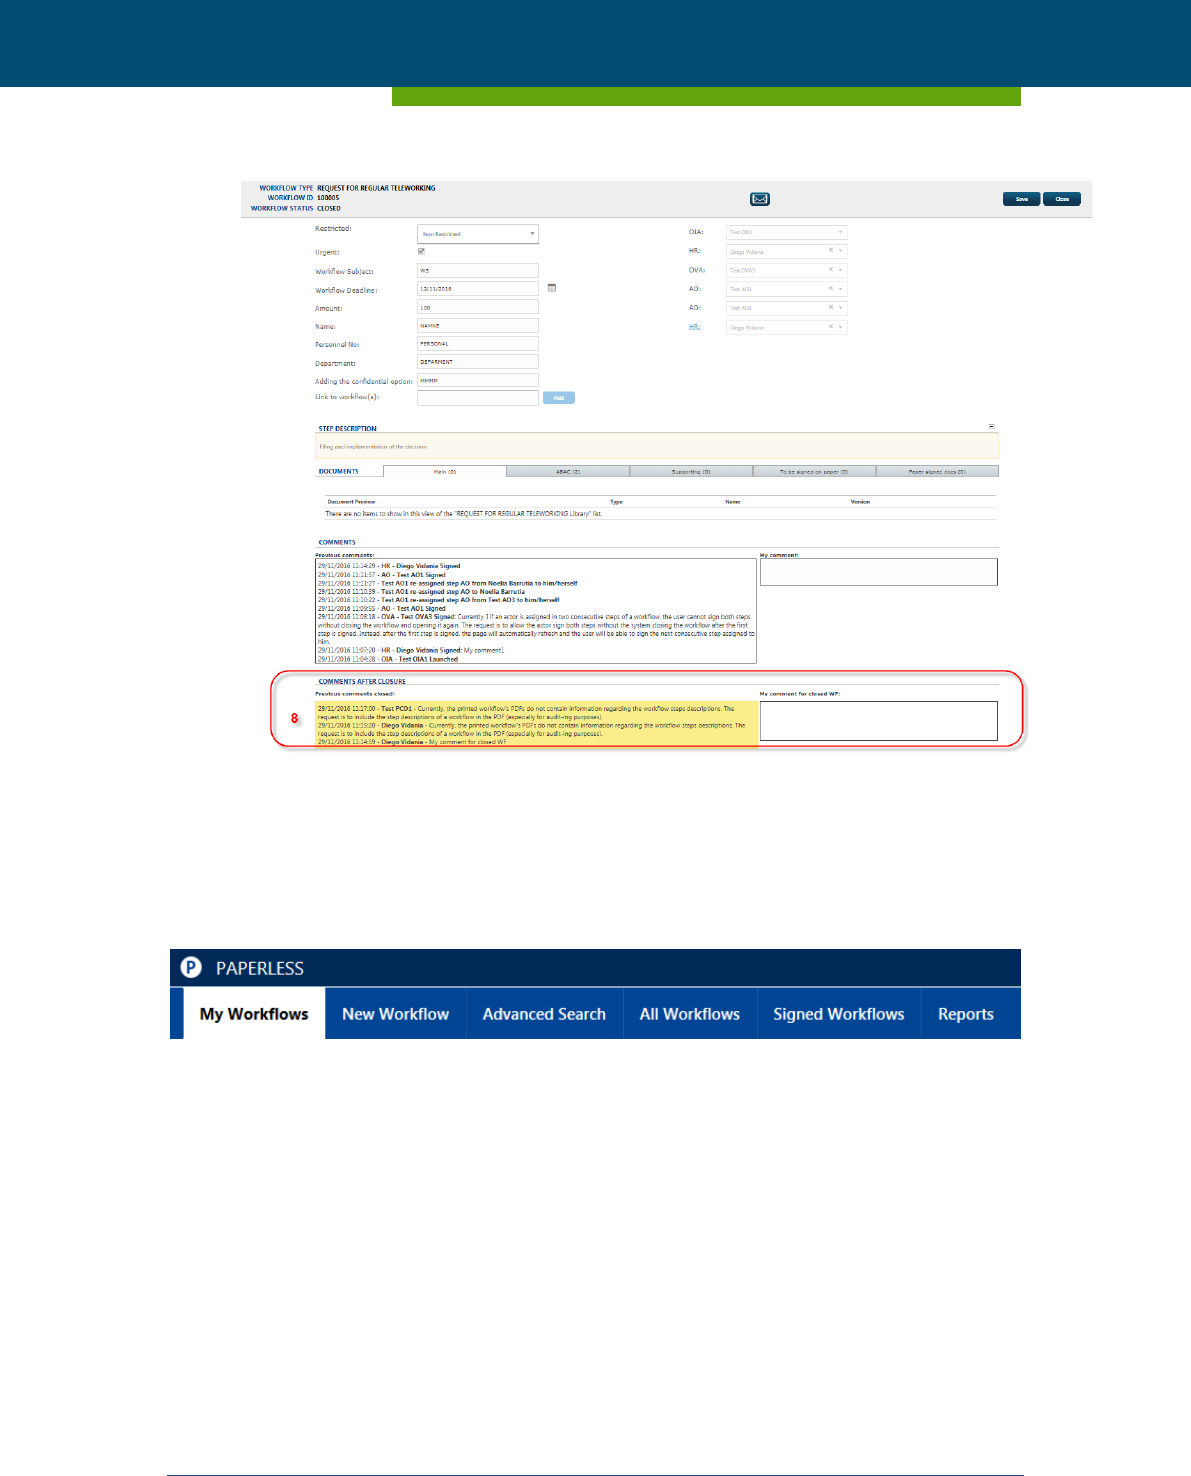
8. Comments for closed WFs: Allows any user add and review previous comments intro-
duced by different actors only for WFs in “Close” status. To add a comment the user can
directly write in “My comment” box. The history of comments for the workflow will be
displayed in “Previous comments” field.
5
The available action buttons will depend on the current status of the workflow (e.g. “Reject” button
will not be available if the workflow has not been launched). See section 9 for more details on WF ac-
tions.
6
The general fields depend on the workflow type selected. Some fields will only be available for specific
workflow types.
ESMA - Purchase Order - 170018511EB1
ESMA - Paperless 1.1.0 User Manual
Page 12 of 73 BILBOMATICA
21/12/2017 v1.1.0
Figure 5 – Workflow comments section for closed workflows
4 My Workflows
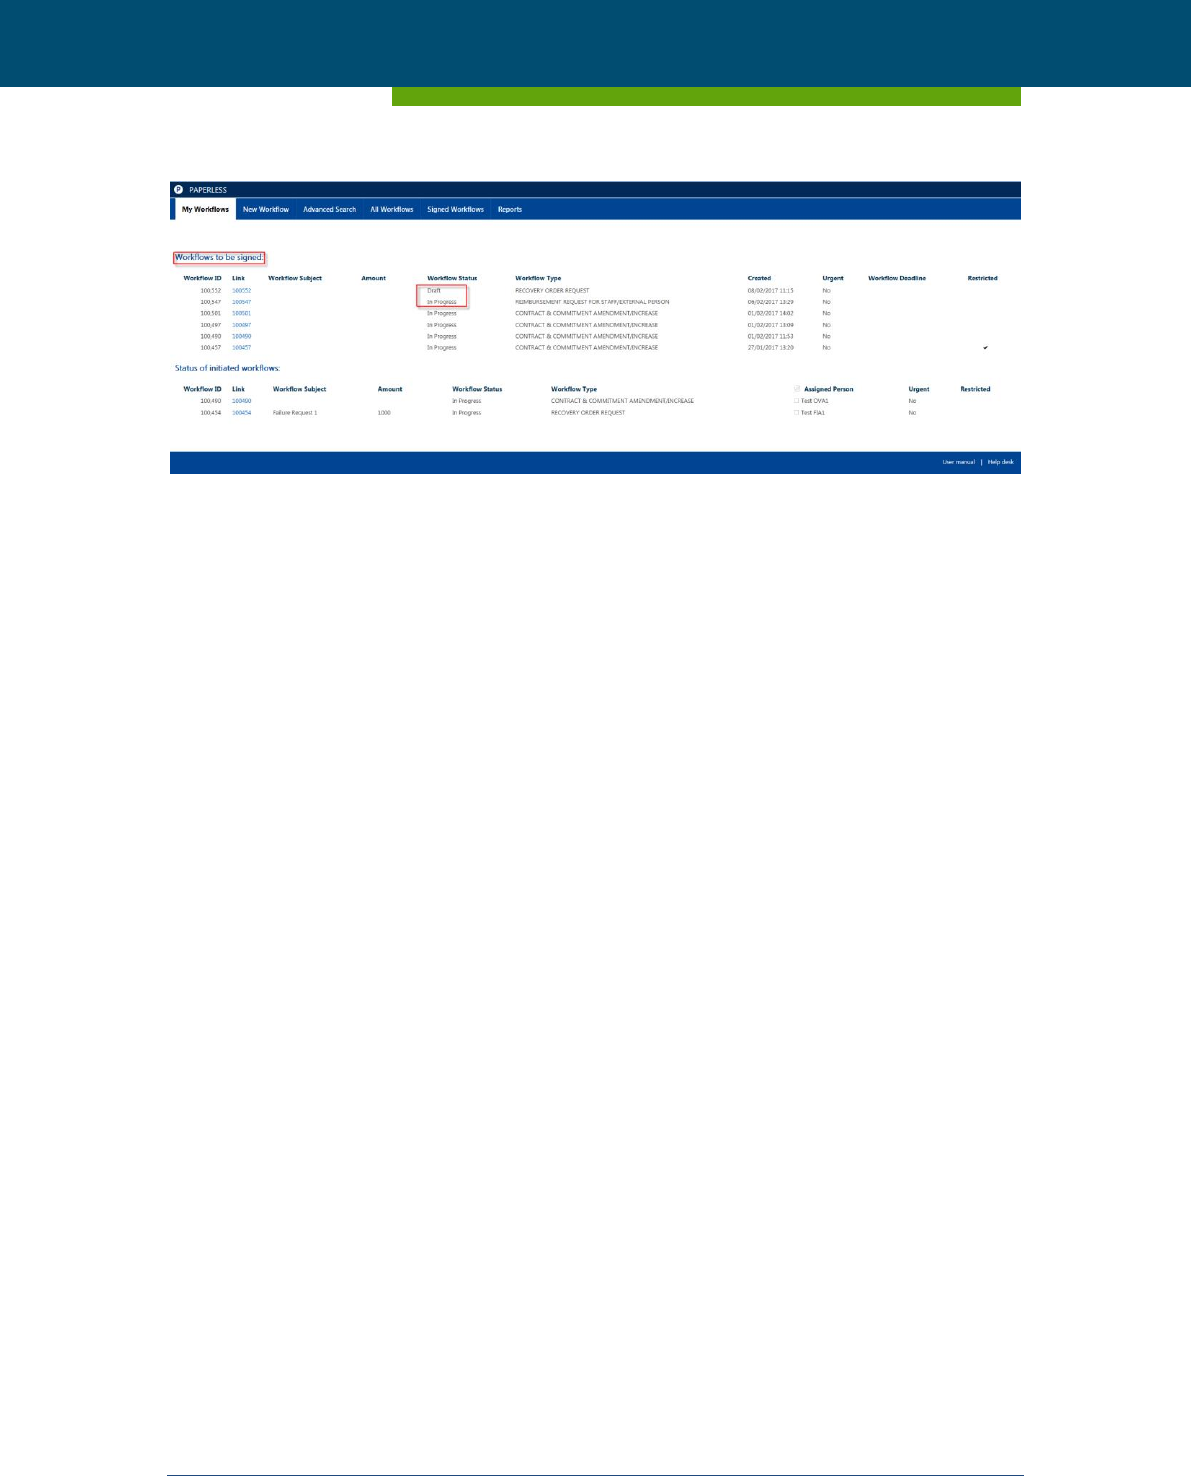
Workflows assigned to an actor are listed in “My workflows” tab:
Figure 6 – My workflows tab
4.1 What is the “Workflows to be signed" list
The top of the page, under “Workflows to be signed” displays a list of workflows (restricted
and non-restricted) for which the user has a step assigned pending to be signed.
ESMA - Purchase Order - 170018511EB1
ESMA - Paperless 1.1.0 User Manual
Page 13 of 73 BILBOMATICA
21/12/2017 v1.1.0
Figure 7 – Workflows to be signed list
The purpose of this list is to offer, from a single point, a direct access to:
Workflows created by the user that are still in “Draft” status.
Workflow steps assigned to the user pending to be signed (“In Progress”).
Workflow steps re-assigned back to the user because they have been set to “Rejected”
status by another actor of the workflow. After the user signs the step, the status will
automatically change to “In progress” status.
Workflows paused by the user (“On Hold”).
This section can be described as a to-do list. Columns displayed already offer certain infor-
mation about workflows that will help the user prioritize the work (for instance, the “urgent”
or “deadline” columns). Columns displayed in the “Workflows assigned to me” section:
Workflow ID: Number that uniquely identifies the workflow.
Link: Allows the user open the corresponding workflow. The user will proceed to create
the workflow (if it is in “Draft” status) or to sign/reject a step (if it is “in progress” status).
Workflow subject: The value of the “Subject” field of each workflow. If the workflow
type does not define a “Subject” field it will appear empty.
Amount: The value of the “amount” field of each workflow. If this value was not set or
if the workflow type does not define a field “amount” the value will appear empty.

ESMA - Purchase Order - 170018511EB1
ESMA - Paperless 1.1.0 User Manual
Page 14 of 73 BILBOMATICA
21/12/2017 v1.1.0
Workflow status
7
: The possible status in this section: “Draft”, “In progress”, “On hold”
or “Rejected”. In case of “Rejected” status, the workflow will appear highlighted with a
red icon.
Figure 8 – Rejected workflows are highlighted by a red icon
Workflow type: Type of each workflow.
Created: The date in which the workflow was created.
Urgent: This value can either be “Yes” or “No”.
Workflow Deadline: The value of the “deadline” field of each workflow. If this value
was not set or if the workflow type does not define a field “deadline” the value will ap-
pear empty.
Restricted: This column displays a “tick” when the corresponding workflow is classified
as restricted.
4.2 What is the “Status of initiated workflows” list
As an initiator of a workflow this list will help the user review the status of all the workflows
(restricted or not) initiated by him/her. This list is available in the Paperless homepage, under
the tab “My workflows” tab:
Figure 9 – My workflows tab
Below the “Workflows to be signed” list.
7
Workflows in “Closed” status are displayed in “All workflows” tab. Workflows in “Deleted” status are
not displayed anywhere; they are removed from the system.

ESMA - Purchase Order - 170018511EB1
ESMA - Paperless 1.1.0 User Manual
Page 15 of 73 BILBOMATICA
21/12/2017 v1.1.0
Figure 10 – Status of initiated workflows list
The columns of the list offer information about:
Workflow ID: Number that uniquely identifies the workflow.
Link: The workflow ID displayed as a link will redirect the user to the form of the work-
flow.
Workflow subject: The value of the “Subject” field of each workflow. If the workflow
type does not define a “Subject” field it will appear empty.
Amount: The value of the “amount” field of each workflow. If this value was not set or
if the workflow type does not define a field “amount” the value will appear empty.
Workflow status
8
: The possible status values in this section: “Draft”, “In progress”, “On
hold” or “Rejected”. In case of “Rejected” status, the workflow will appear highlighted
with a red icon.
Workflow type: Type of each workflow (i.e. “Payment of grants”).
Assigned person: Name of the user responsible of the current step of the workflow.
Urgent: This value can either be “Yes” or “No”.
Restricted: This column displays a “tick” when the corresponding workflow is classified
as restricted.
5 How can a step of the workflow be completed
Those workflows in which the user has a pending step to be signed will be displayed in the “My
Workflows” list (see section 5).
8
Workflows in status “Closed” are displayed in “All workflows” tab. Workflows in status “Deleted” are
not displayed anywhere; they are removed from the system

ESMA - Purchase Order - 170018511EB1
ESMA - Paperless 1.1.0 User Manual
Page 16 of 73 BILBOMATICA
21/12/2017 v1.1.0
The workflow form is used by workflow initiators to create a workflow and by other actors of
the workflow to complete a step of the workflow. This form contains all the information rele-
vant to the execution of a workflow (specific fields, actors, documents, comments...).
By clicking on the workflow Link number, the system will open the workflow to sign or reject
the step assigned to him/her. The user will be able to review and modify the following infor-
mation:
Urgent: It is possible to modify the value of this checkbox before signing/putting on
hold/rejecting the step.
General information: The value of these fields could have been completed by any other
previous actor of the workflow, but the current user is also able to modify any of them
(except the " Restricted”
9
field) before clicking “Sign”, “On Hold” or “Reject” if needed.
Workflow actors: The workflow is divided into a certain number of steps each of one
executed by a group of users. Any actor involved in the workflow or member of backup
groups will be able to change the actors assigned for the upcoming steps.
My comment: This field provides the possibility of introducing a comment before sign-
ing or rejecting a step. Please note that just one comment can be added per step. The
comment will be saved when clicking “Sign”, “On Hold” or “Reject” buttons.
Previous comments: This is an informative field which contains a list of actions taken by
all previous actors of the workflow and any comment added by them. The comment the
user may have introduced in “My comment” field will be displayed in this field.
Documents: An actor can add/delete documents when the workflow is assigned to
him/her regardless of the step number, except (for deleting), if additional versions of
that document have been generated by other users. The initiator of the workflow is al-
ways able to delete documents, even documents not uploaded by him/her.
After modifying and/or reviewing the workflow information the user can either sign, put on
hold or reject a step.
9
The “Restricted” field is only editable by the workflow initiator.
ESMA - Purchase Order - 170018511EB1
ESMA - Paperless 1.1.0 User Manual
Page 17 of 73 BILBOMATICA
21/12/2017 v1.1.0
6 How can a step of a workflow be re-assigned
Actors on a workflow are subject to be replaced by any other actor on the workflow for in-
stance to avoid situations in which a workflow is on hold because the actor of the current step
is on holidays.
The initiator, members of the backup group of the step or any actor involved in the workflow
can modify the actors assigned to current and subsequent steps. Previous steps already signed
cannot be modified.
Once the actor of the current step has been replaced, the new actor will have the new pending
step accessible from the list “Workflows to be signed” and will have all the necessary controls
available to sign/reject the step of the workflow. If, for instance, the new actor assigned is the
logged user, once the actor has been changed and the page refreshed, the user will see all the
controls active again so that he/she can add comments, upload documents etc.
It is also possible to select a “blank” actor in a workflow step. This means that the correspond-
ing step shall not be executed and therefore it will be skipped.
7 How to work with the attachments
7.1 How a document can be added to a workflow
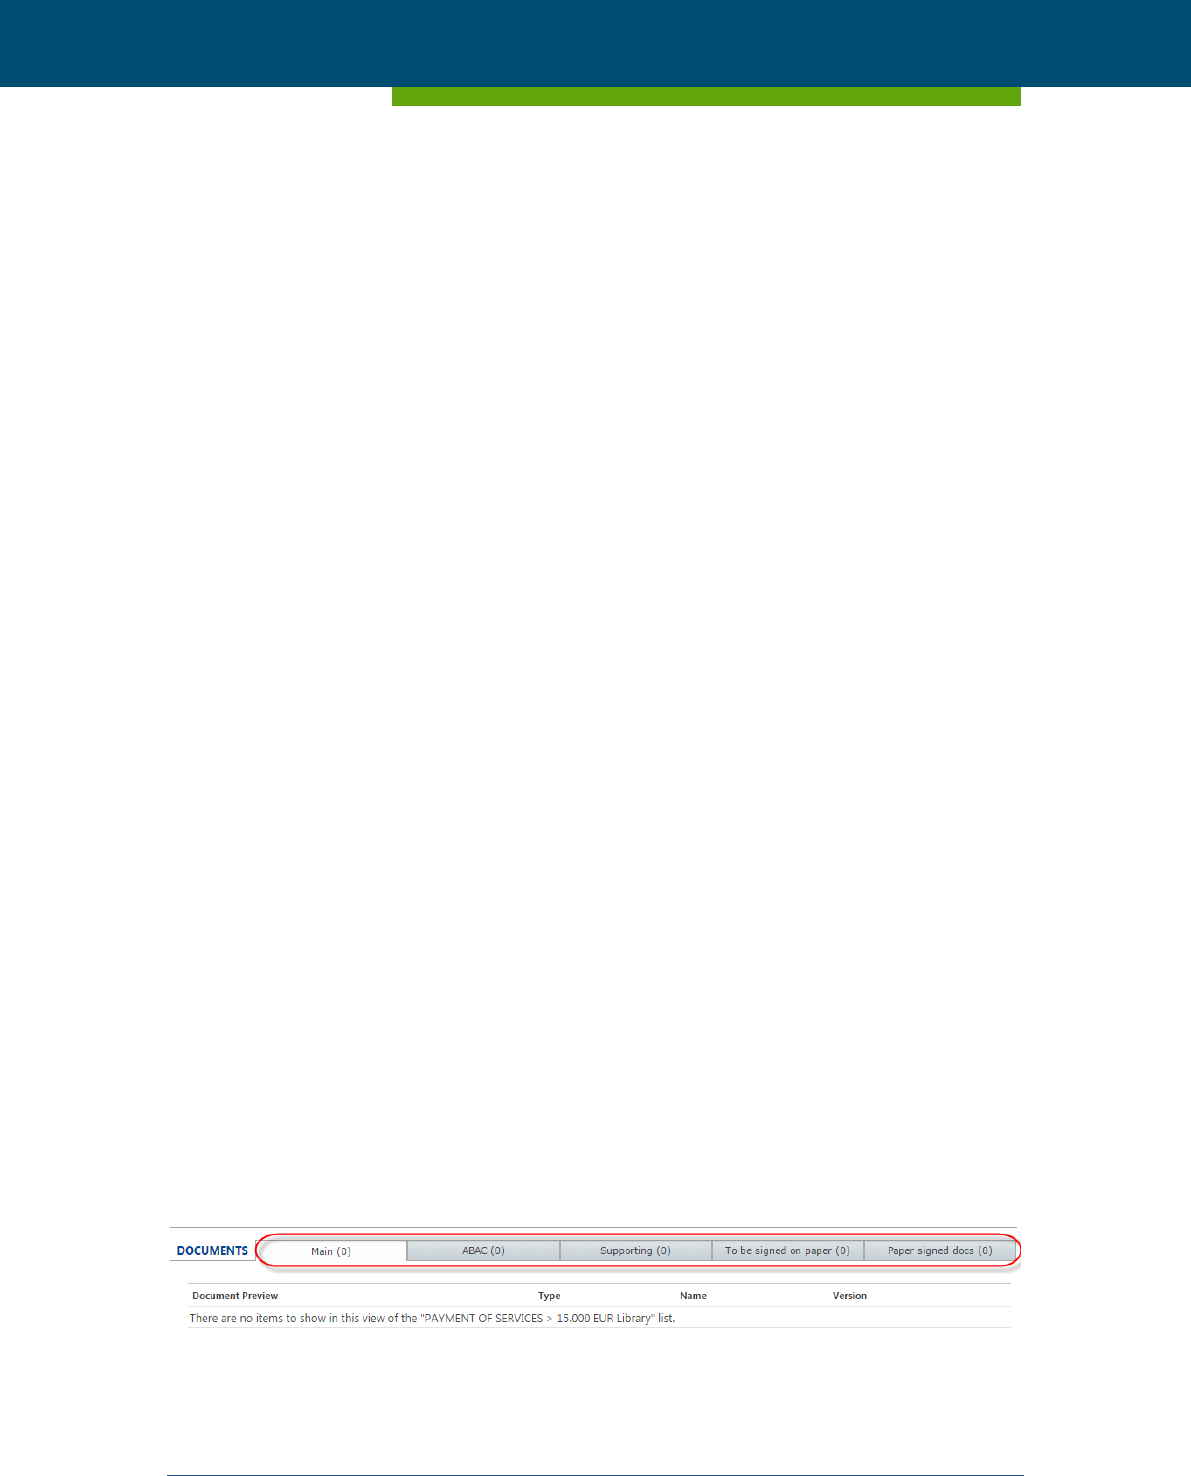
Documents in a workflow are organized in five categories separated by tabs:
Main.
ABAC.
Supporting.
To be signed on Paper.
Paper signed docs.
Figure 11 – Types of documents
ESMA - Purchase Order - 170018511EB1
ESMA - Paperless 1.1.0 User Manual
Page 18 of 73 BILBOMATICA
21/12/2017 v1.1.0
Please note that, together with the type of document, there is a number between brackets.
This number indicates the number of documents uploaded per type.
Workflow initiators or other actors will be able to:
Upload new documents.
Upload new versions of an attached document.
Download any attached document.
Move any attached document.
Preview any attached document.
Remove documents uploaded by them only when the workflow is assigned to him/her
regardless of the step number, except for the case when additional versions of that doc-
ument have been generated by other users.
View the version history of any attached document
Documents added will appear in a table where each row will contain the name of the docu-
ment attached and the document version number.
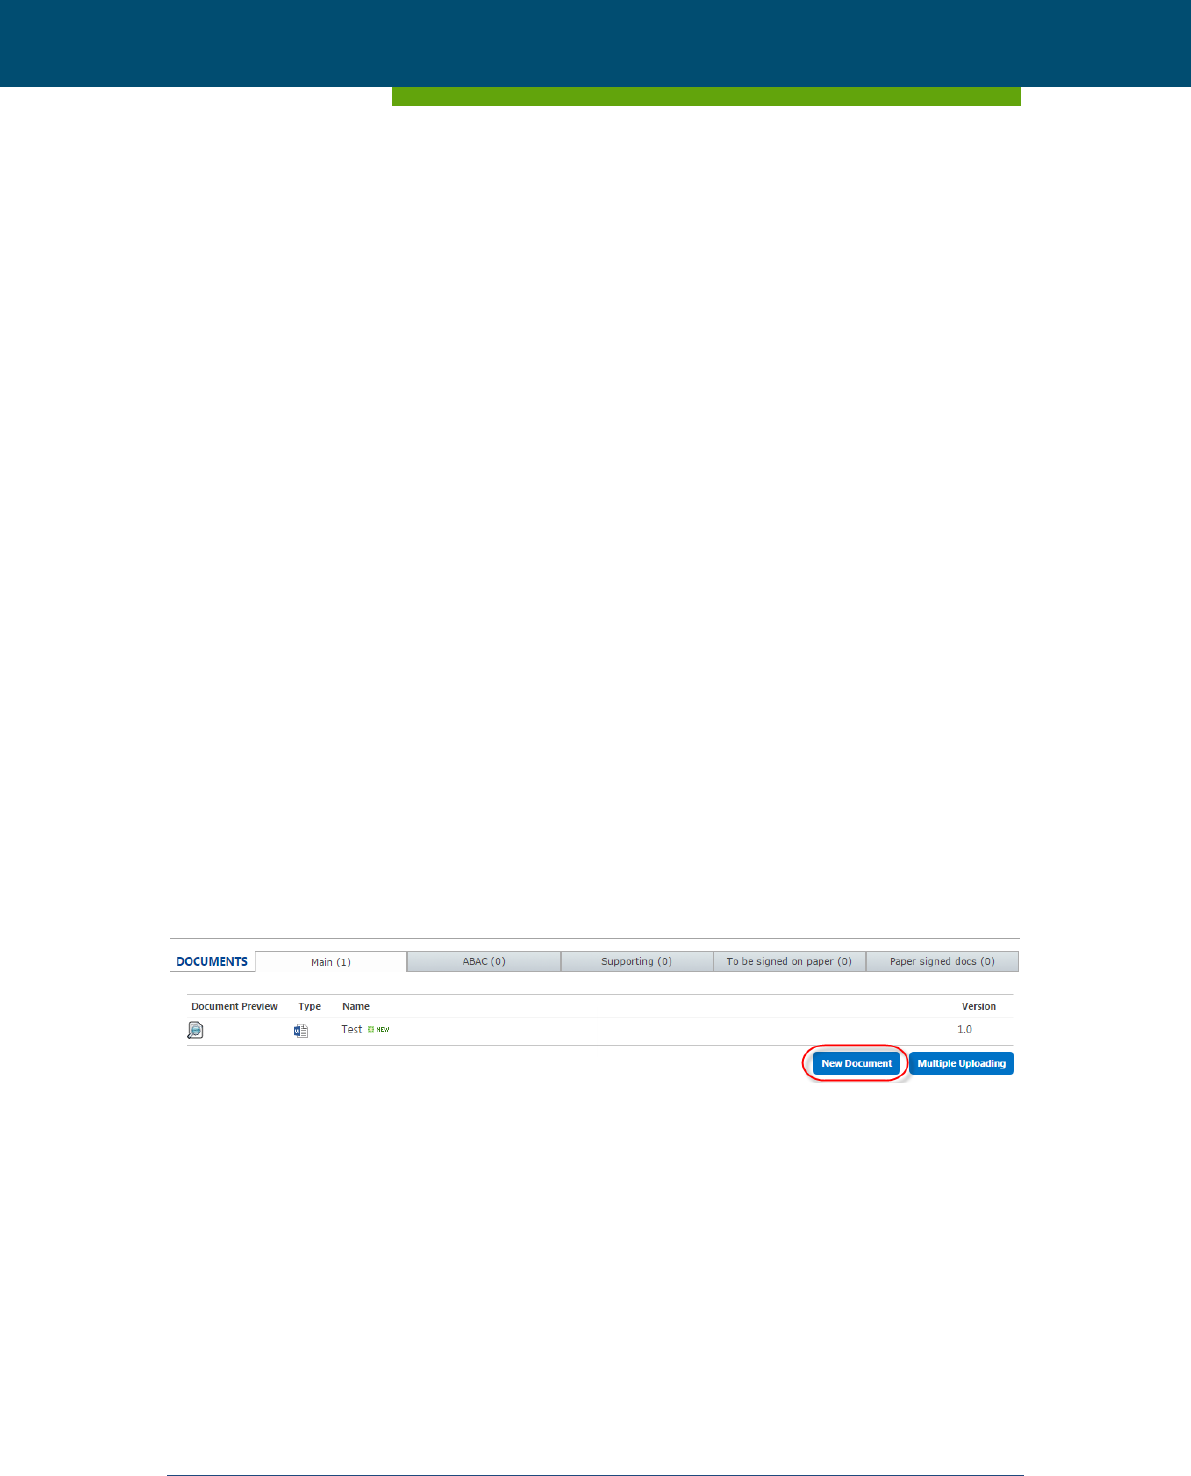
7.1.1 How to upload a document
To upload a new document, first click on the tab corresponding to the category where the doc-
ument will be uploaded. Click on the “New Document” button:
Figure 12 – “New Document” button to upload a document to a workflow
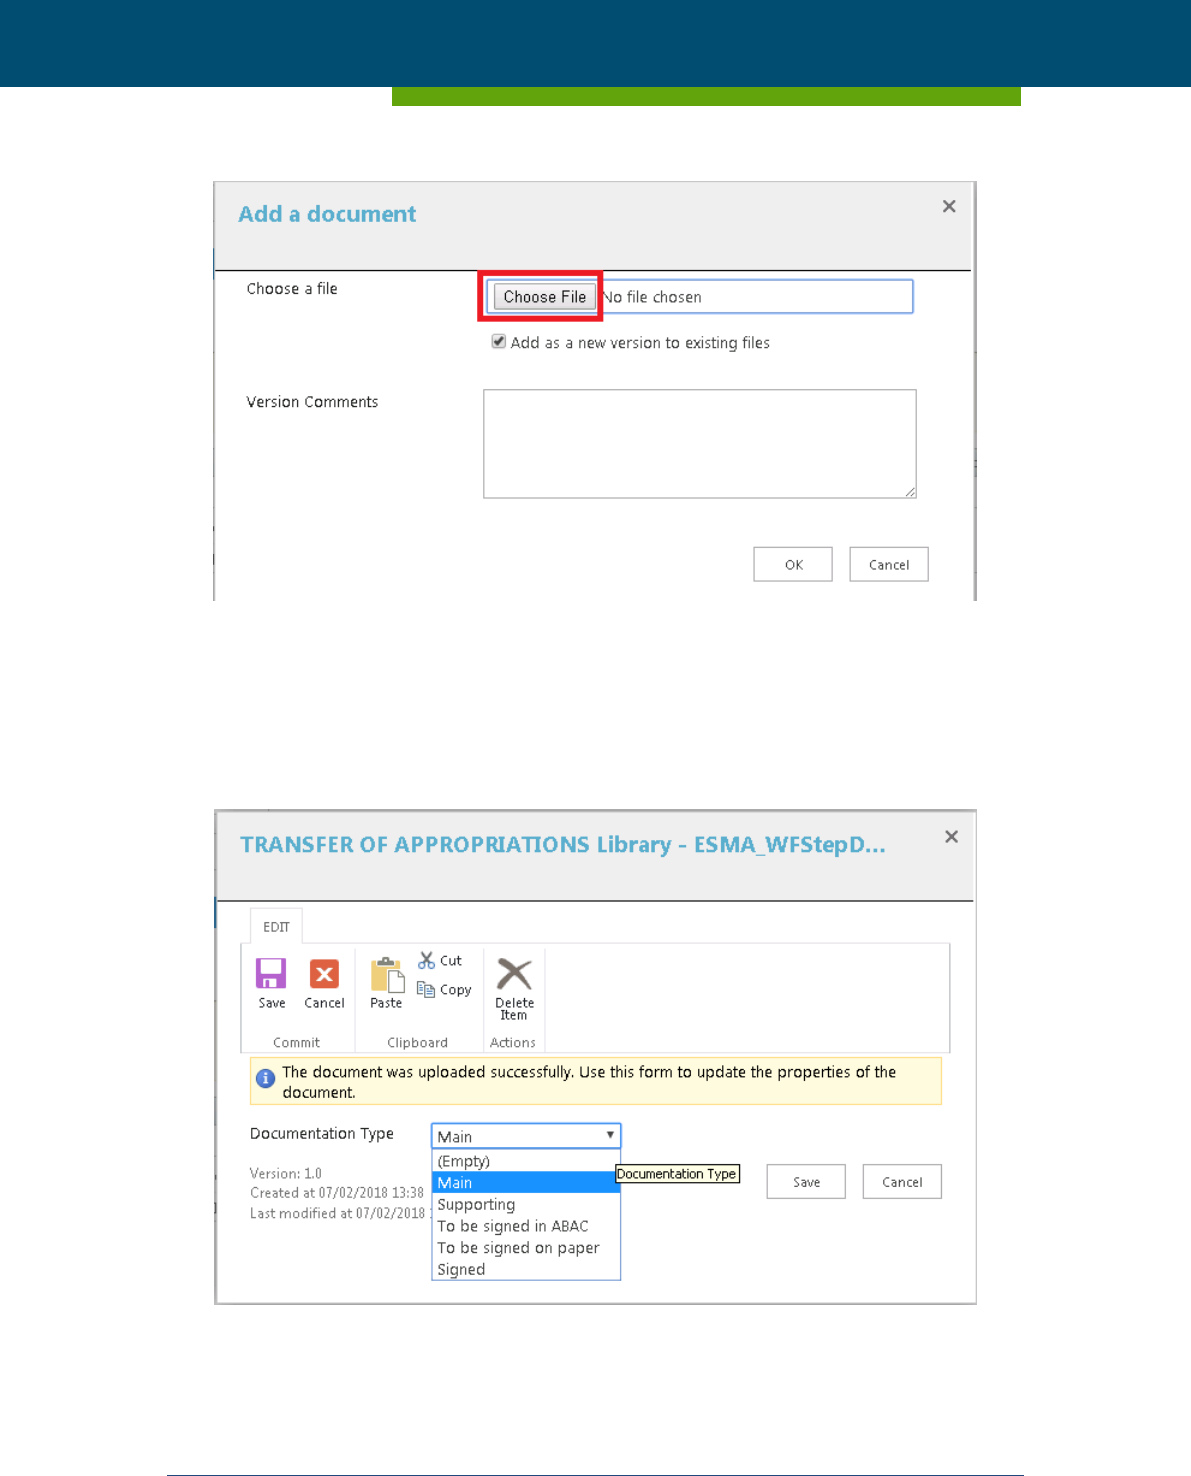
In the popup window displayed, click on “Choose File” button to select a file from the com-
puter:
ESMA - Purchase Order - 170018511EB1
ESMA - Paperless 1.1.0 User Manual
Page 19 of 73 BILBOMATICA
21/12/2017 v1.1.0
Figure 13 – Select a file to upload
Although the user has selected a tab for uploading a document, it will be possible to indicate a
different tab during the upload process. They could select the tab with the option “Documen-
tation type”, as displayed in the image below:
Figure 14 – Select the tab where the document will be uploaded
ESMA - Purchase Order - 170018511EB1
ESMA - Paperless 1.1.0 User Manual
Page 20 of 73 BILBOMATICA
21/12/2017 v1.1.0
If the user selects the option “(Empty)”, the system will not do anything, maintaining the docu-
ment in its current location.
Complete the rest of fields, if desired, and click OK. The document will be uploaded to the
workflow.
The first time a document is uploaded to a workflow, it is saved as version 1.0. If a document
with the same name is uploaded to the workflow and to the same category, the number of the
version is automatically incremented. The “Modified By” column will show who updated the
document.
Figure 15 – Who the document modified
7.1.2 How to upload multiple documents
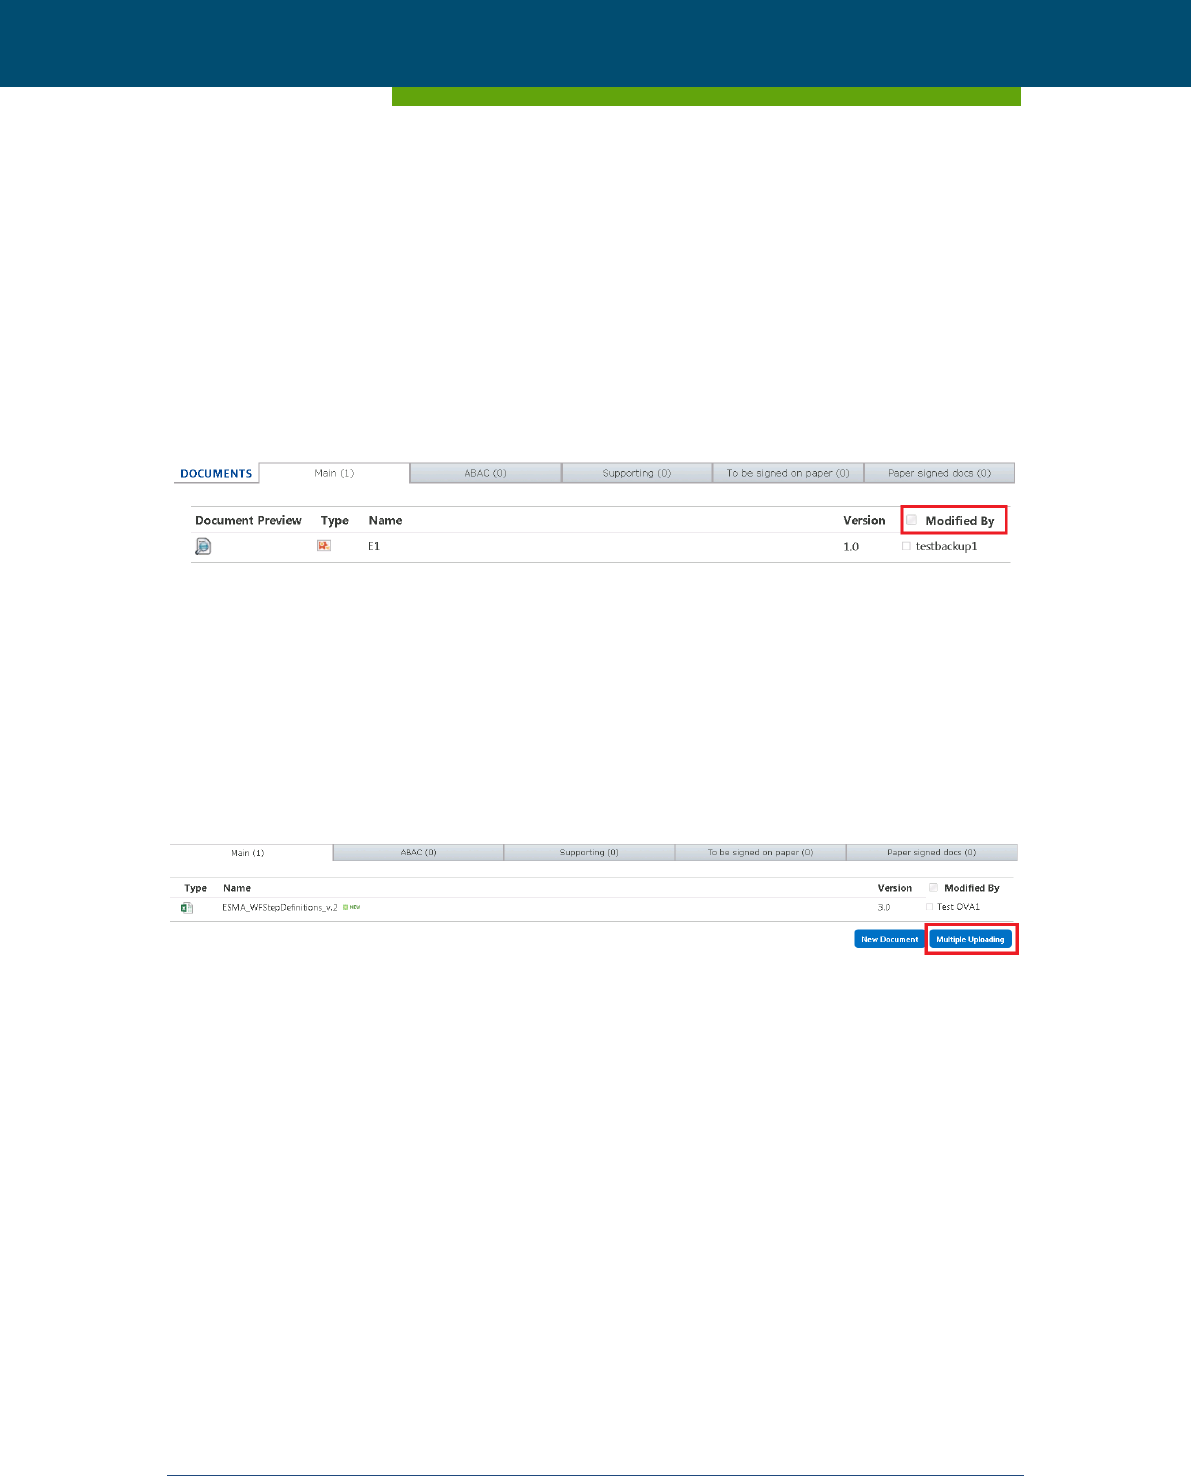
To upload new documents, first click on the tab corresponding to the category where the doc-
uments will be uploaded. Click on the “Multiple Uploading” button.
Figure 16 – Multiple Uploading button
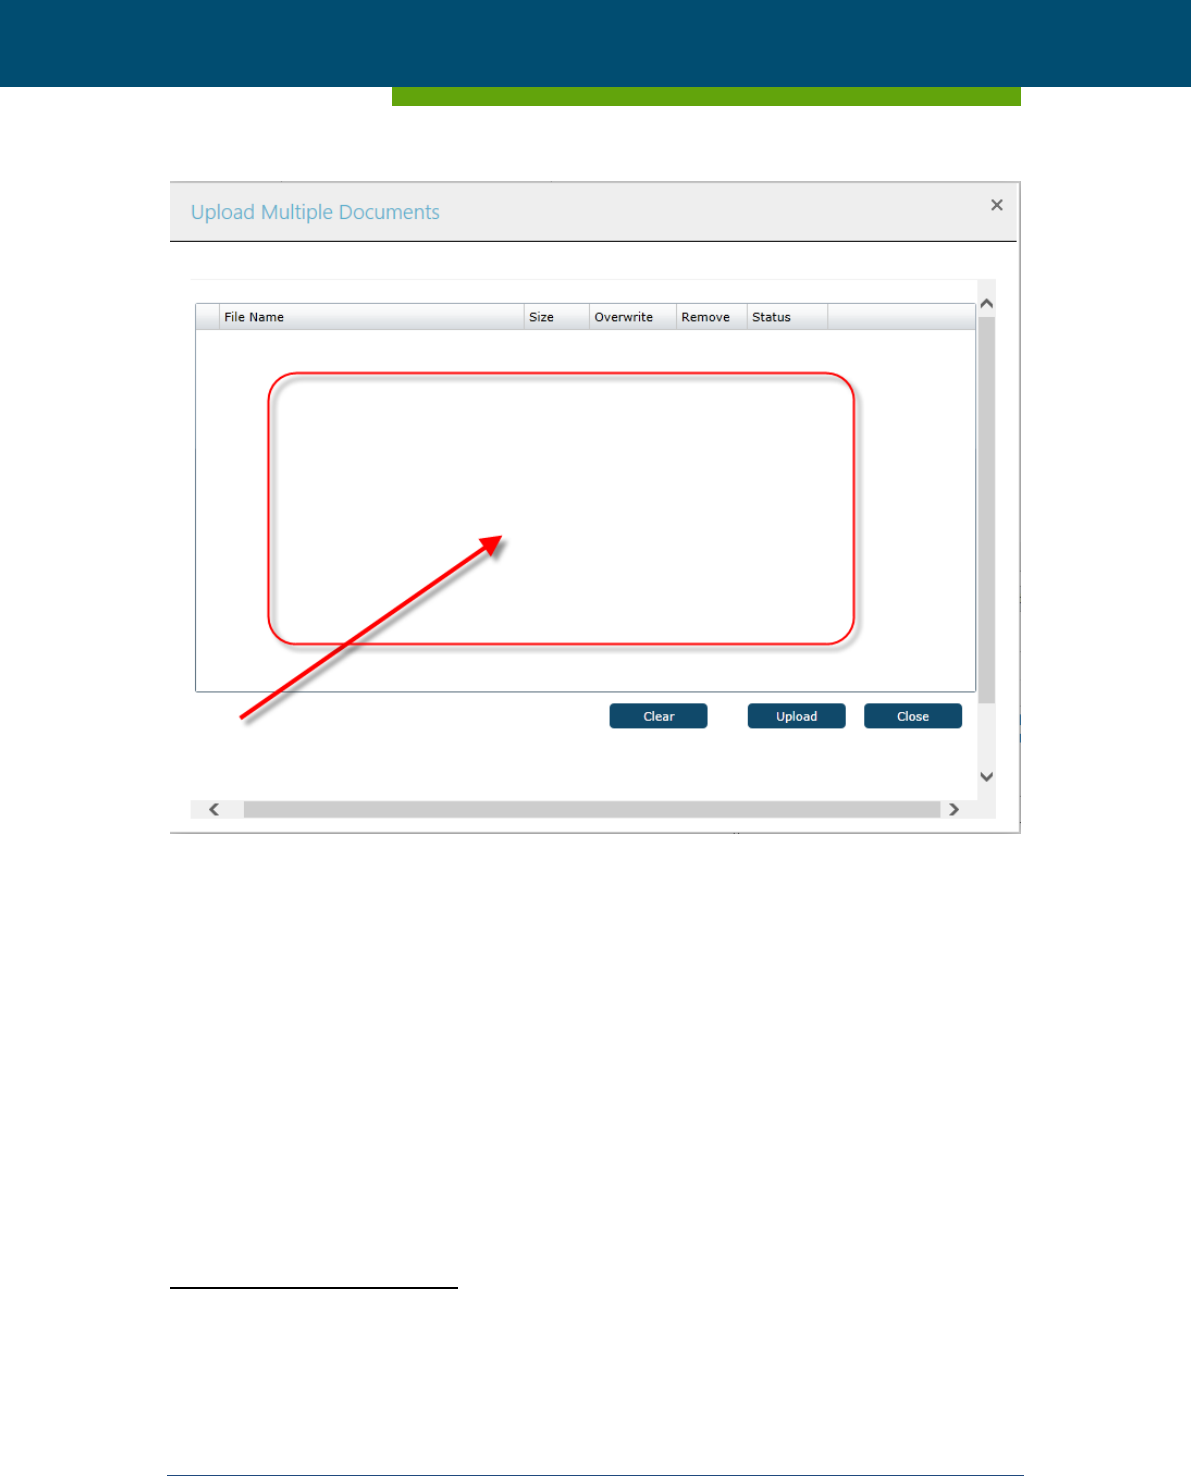
A popup window will appear where it is possible to drag and drop files from the computer to
the area indicated with an arrow:
ESMA - Purchase Order - 170018511EB1
ESMA - Paperless 1.1.0 User Manual
Page 21 of 73 BILBOMATICA
21/12/2017 v1.1.0
Figure 17 – Area to drag and drop files to be uploaded
Once the files have been dropped click “Upload” button to add them to the list of documents
attached to the workflow.
The first time a document is uploaded to a workflow, it is saved as version 1.0. If a document
with the same name is uploaded to the workflow and to the same category, the version is au-
tomatically incremented.
This functionality (multiple upload) can also be used to attach files contained in other Share-
Point libraries.
Limitations
10
to upload multiple files:
Documents should not exceed {1.5 GB}.
10
The limitations specified herein are configurable by Paperless administrators, so the following values
are approximate.

ESMA - Purchase Order - 170018511EB1
ESMA - Paperless 1.1.0 User Manual
Page 22 of 73 BILBOMATICA
21/12/2017 v1.1.0
The maximum amount of documents to be uploaded at the same time cannot be
larger than {10}.
Internet Explorer browser should be used.
7.2 How to know who modified a document
Paperless allows users to know who updated any version of the document.
Figure 18 – Version History
Right click on the space between the document name and version number, and then click Ver-
sion History from the menu to open the history dialog box.
The version history dialog box will be opened with all changes made in the document:
Who updated the document
In which step uploaded the document
When uploaded the document
ESMA - Purchase Order - 170018511EB1
ESMA - Paperless 1.1.0 User Manual
Page 23 of 73 BILBOMATICA
21/12/2017 v1.1.0
Figure 19 – Version History Panel
7.3 How to move an attached document
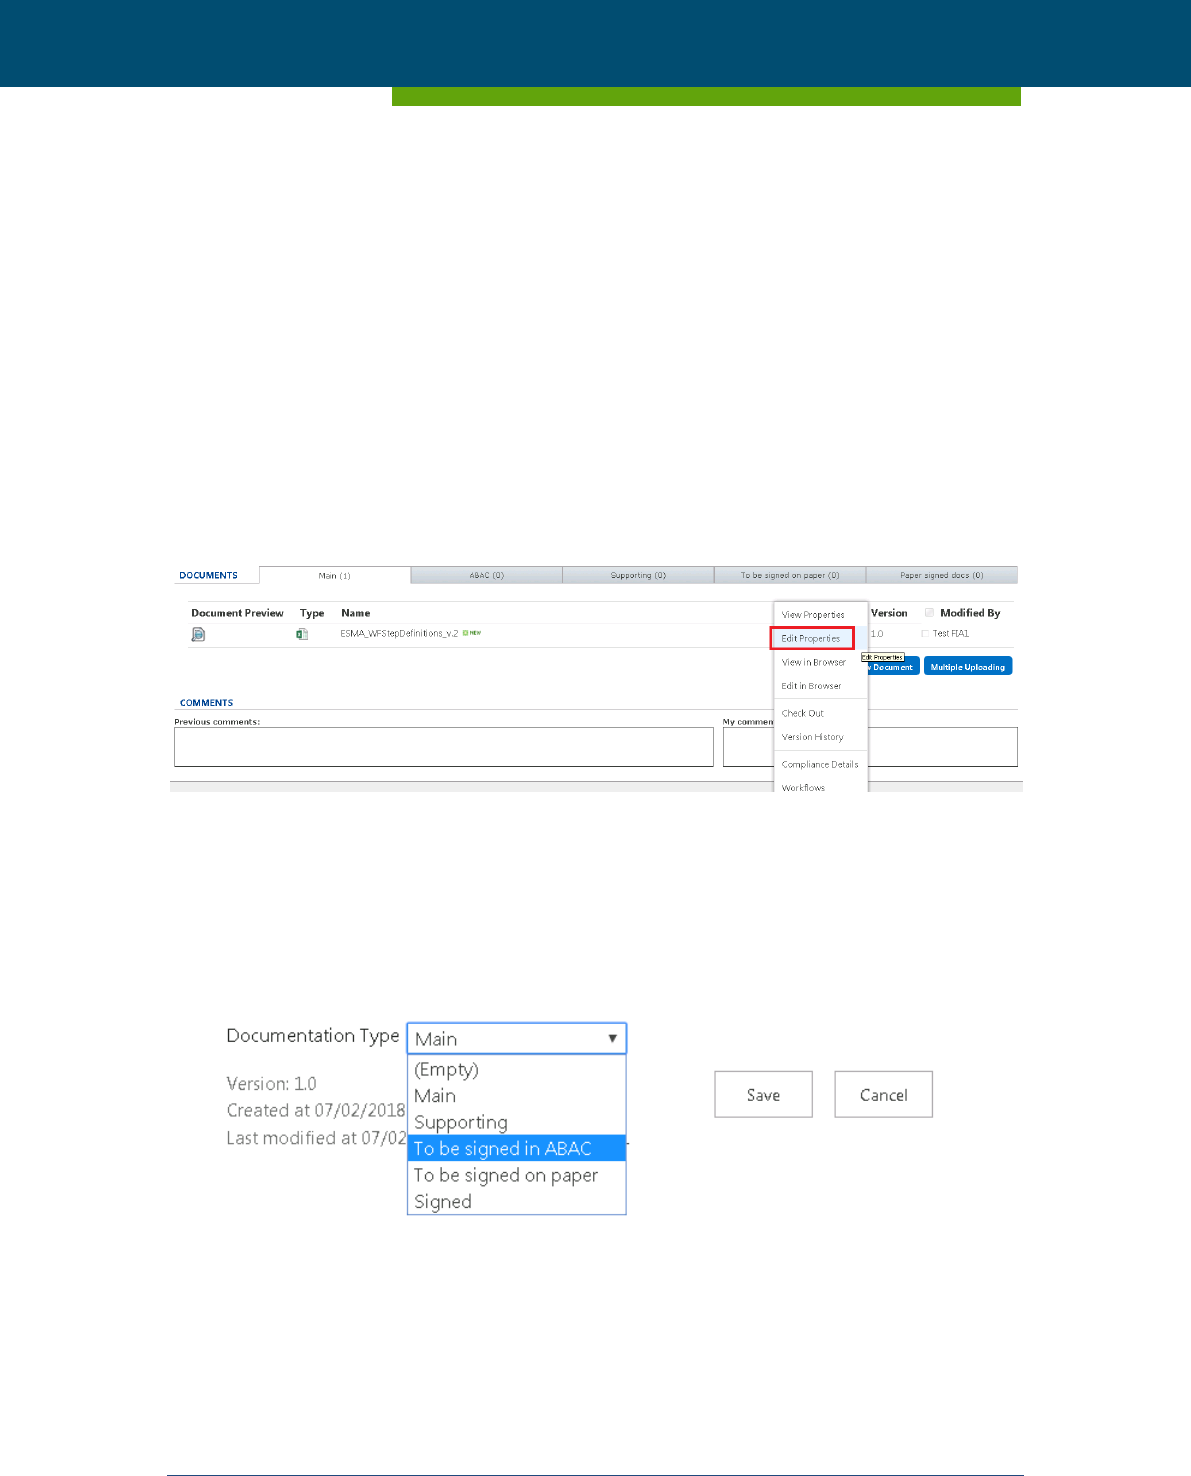
Paperless users can move documents through tabs. Only the initiator and the assigned person
will be able to change the location of a document when the workflow is not “Closed”.
If a user wants to move a document to other tab, he will have to click on the menu item and
select the option “Edit Properties”.
Figure 20 – Edit Properties
After clicking in Edit Properties option, a new screen will be shown where the user will select
the tab where the document will be moved.
Figure 21 – Tabs Option
ESMA - Purchase Order - 170018511EB1
ESMA - Paperless 1.1.0 User Manual
Page 24 of 73 BILBOMATICA
21/12/2017 v1.1.0
The document will be uploaded to the workflow in the indicated tab.
Figure 22 – Document moved to ABAC tab
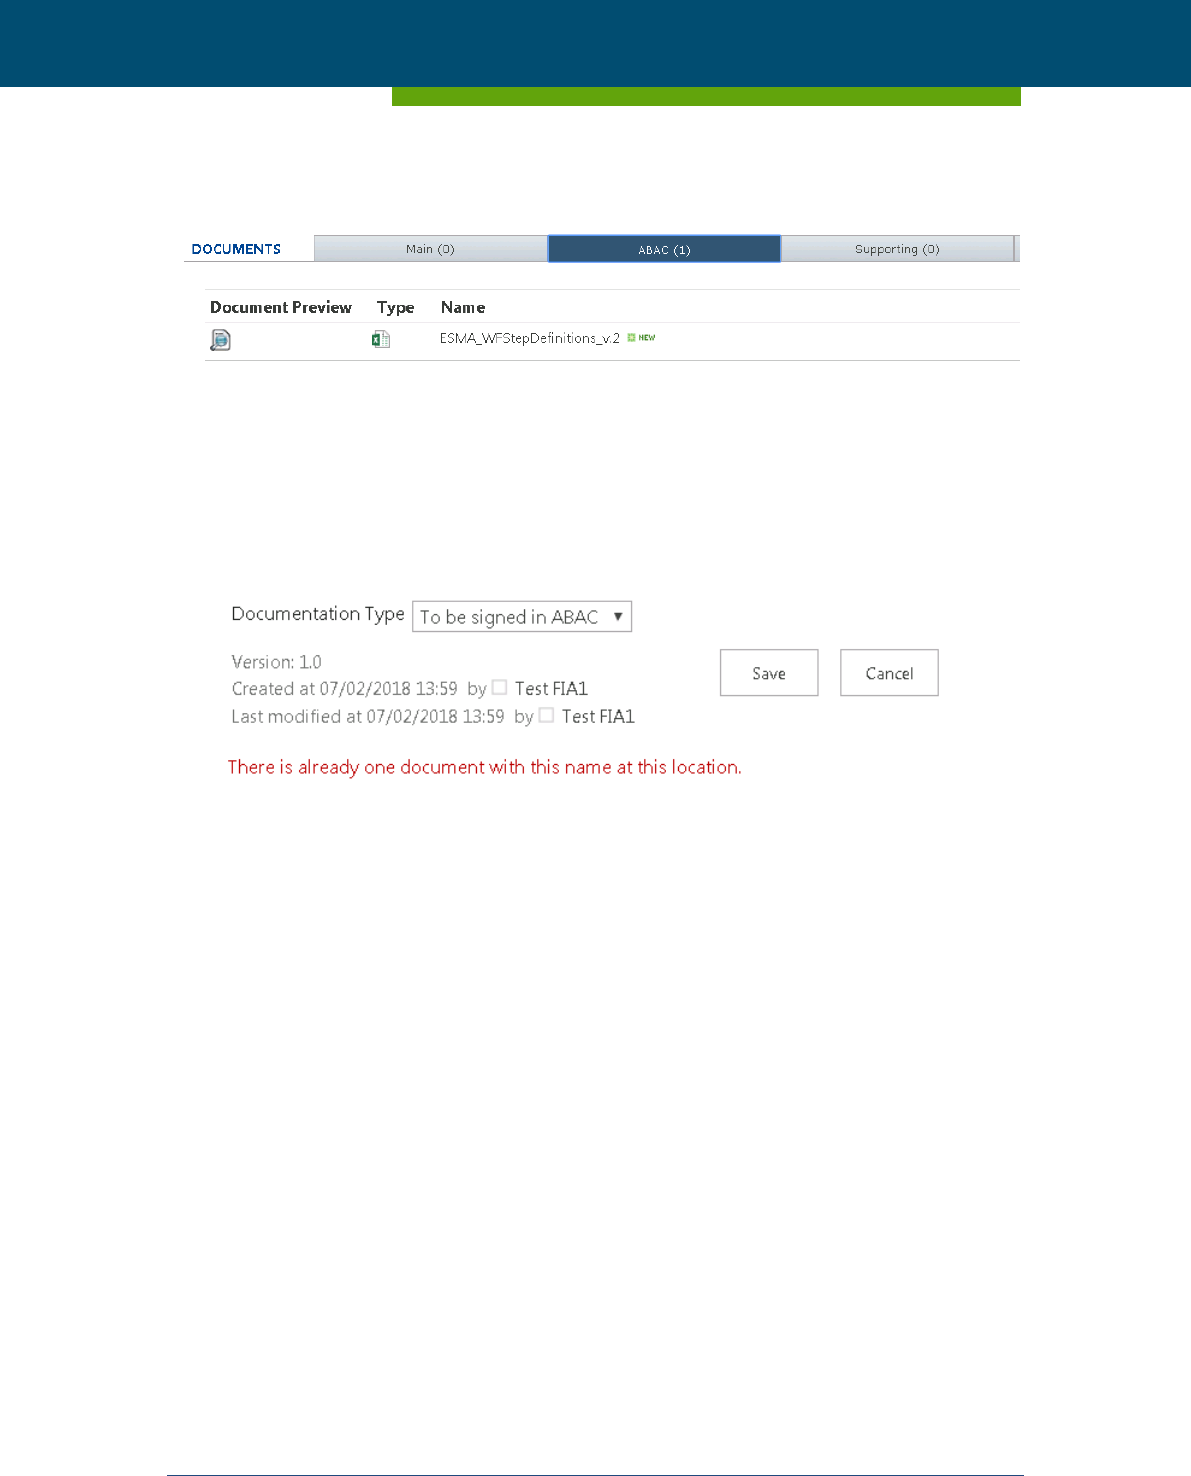
If the document that is going to be moved, already exists in the destination, Paperless will dis-
play an information message and will not allow to perform this action.
Figure 23 – Information message
7.4 How to remove an attached document
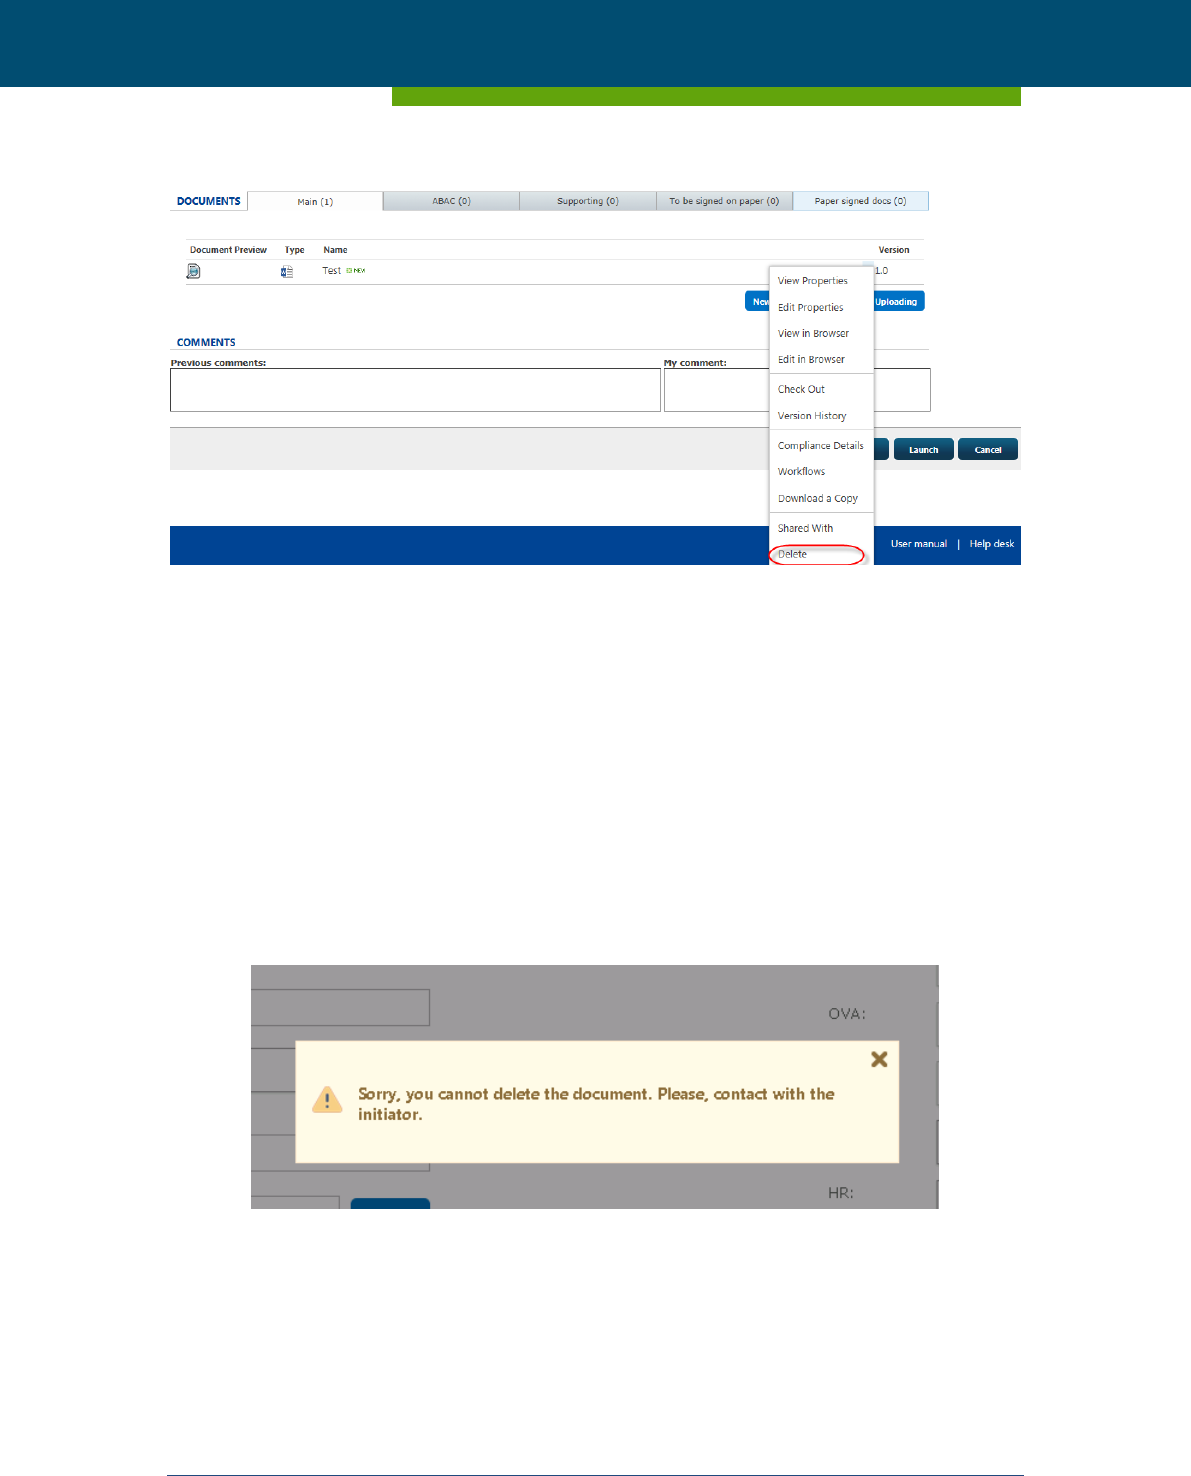
To remove a document, open the drop down list corresponding to the document, and select
“Delete”.
ESMA - Purchase Order - 170018511EB1
ESMA - Paperless 1.1.0 User Manual
Page 25 of 73 BILBOMATICA
21/12/2017 v1.1.0
Figure 24 – Delete a document
Please note that this option can only be performed as long as any of the following points are
met:
If the status of the workflow is “Draft”.
If the user is the initiator.
All versions of the document have been uploaded by the same user.
If it is not the case, an informative message is displayed, explaining the user that he or she has
not permissions for the deletion of that document.
Figure 25 – Informative message
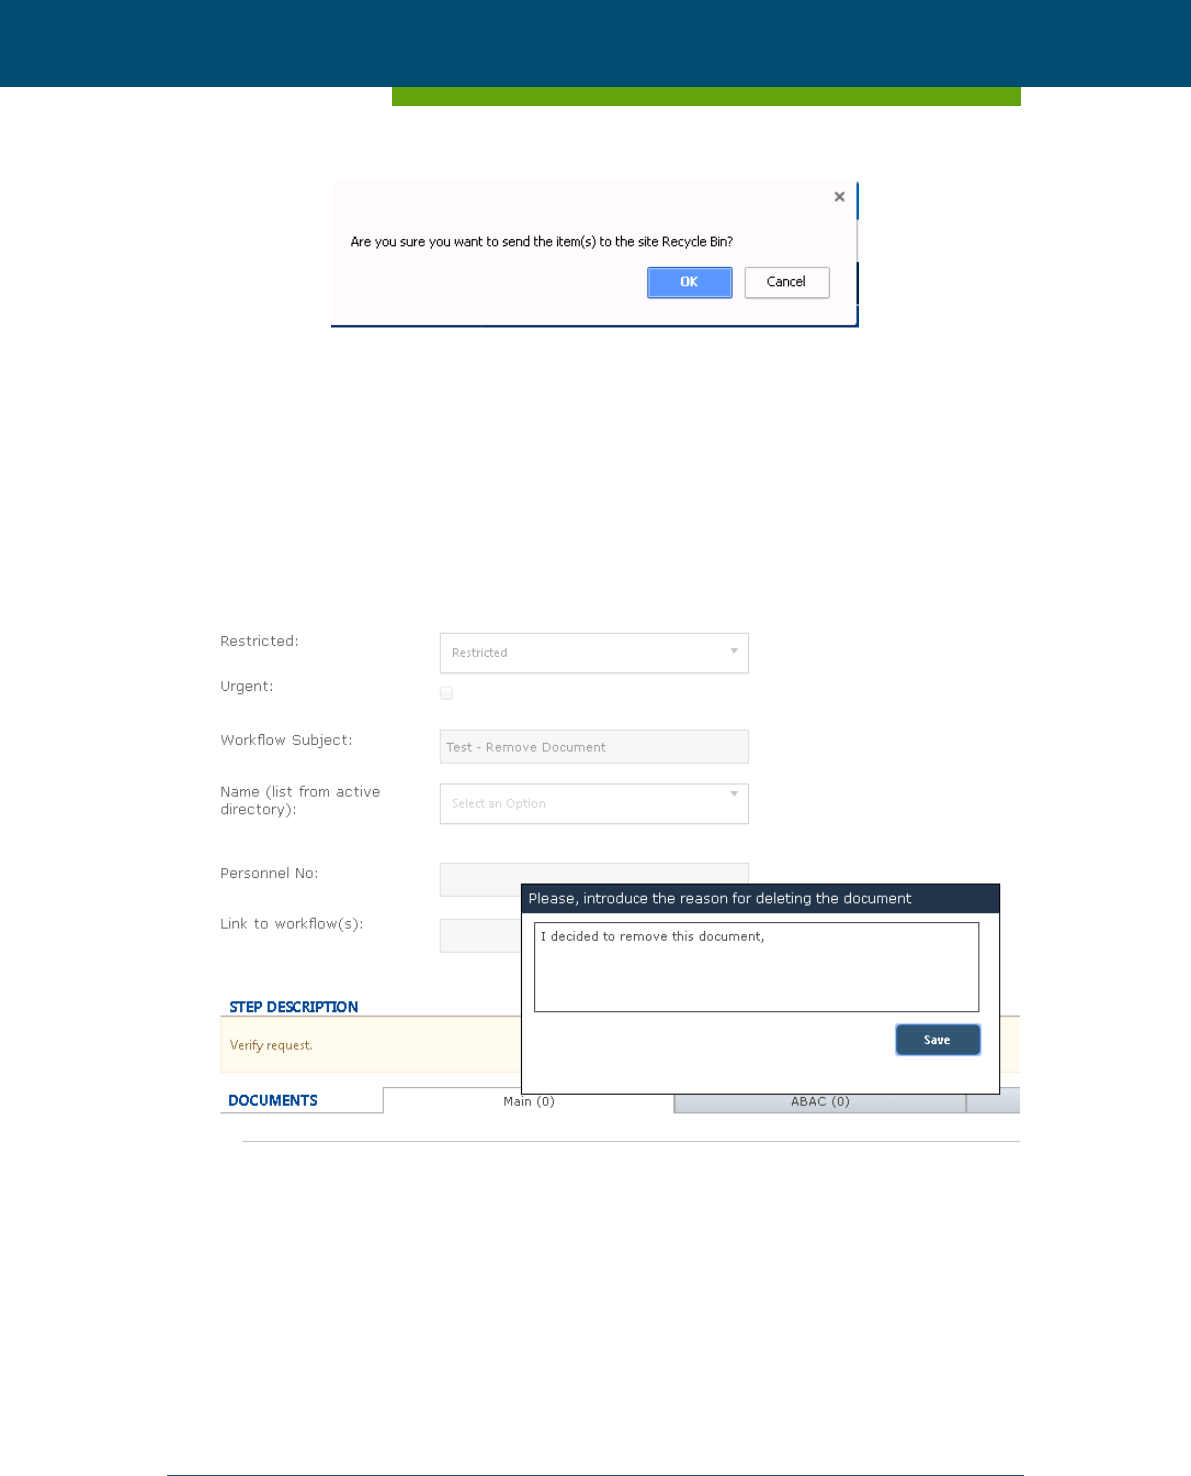
After the permissions validation, if the abovementioned requirements are met, it is requested
to the user if he or she wants to delete the document (SharePoint window).
ESMA - Purchase Order - 170018511EB1
ESMA - Paperless 1.1.0 User Manual
Page 26 of 73 BILBOMATICA
21/12/2017 v1.1.0
Figure 26 – Confirmation message
If the user does want to delete the document, Paperless displays a pane requesting the user the
introduction of a comment. The introduction of this comment is mandatory. This panel overlaps
in a layer superior to the form, so that it leaves disabled any button of the Paperless interface
(Cancel, Sign, Save,…). No action will be possible related to the WF as long as the user does not
introduce a comment. Besides, there is no option to save the comment in blank since this field
is mandatory.
Figure 27 – Panel for adding a comment
If a user accesses the WF at that very moment, he or she will see in the “My Previous Comments”
window the trace of the document’s deletion.

ESMA - Purchase Order - 170018511EB1
ESMA - Paperless 1.1.0 User Manual
Page 27 of 73 BILBOMATICA
21/12/2017 v1.1.0
Figure 28 – Comment added
8 Possible status of a workflow
The status of a workflow describes a point in the execution of a workflow. The status a workflow
is assigned by the system:
Draft: This status is assigned when the initiator has created a workflow but has not
launched it yet.
In progress: This status is assigned when the workflow initiator launches the workflow
and while there is at least one step left to complete in the workflow.
On hold: This status is assigned when the actor of the current step clicks the option “On
hold” meaning that the workflow is in a paused state.
Deleted: This status is assigned when the initiator clicks the option “Delete” meaning
that the workflow is no longer valid.
Rejected: This status is assigned when the actor of the current step rejects a previously
signed step.
Closed: This status is assigned when all the steps within a workflow have been com-
pleted.
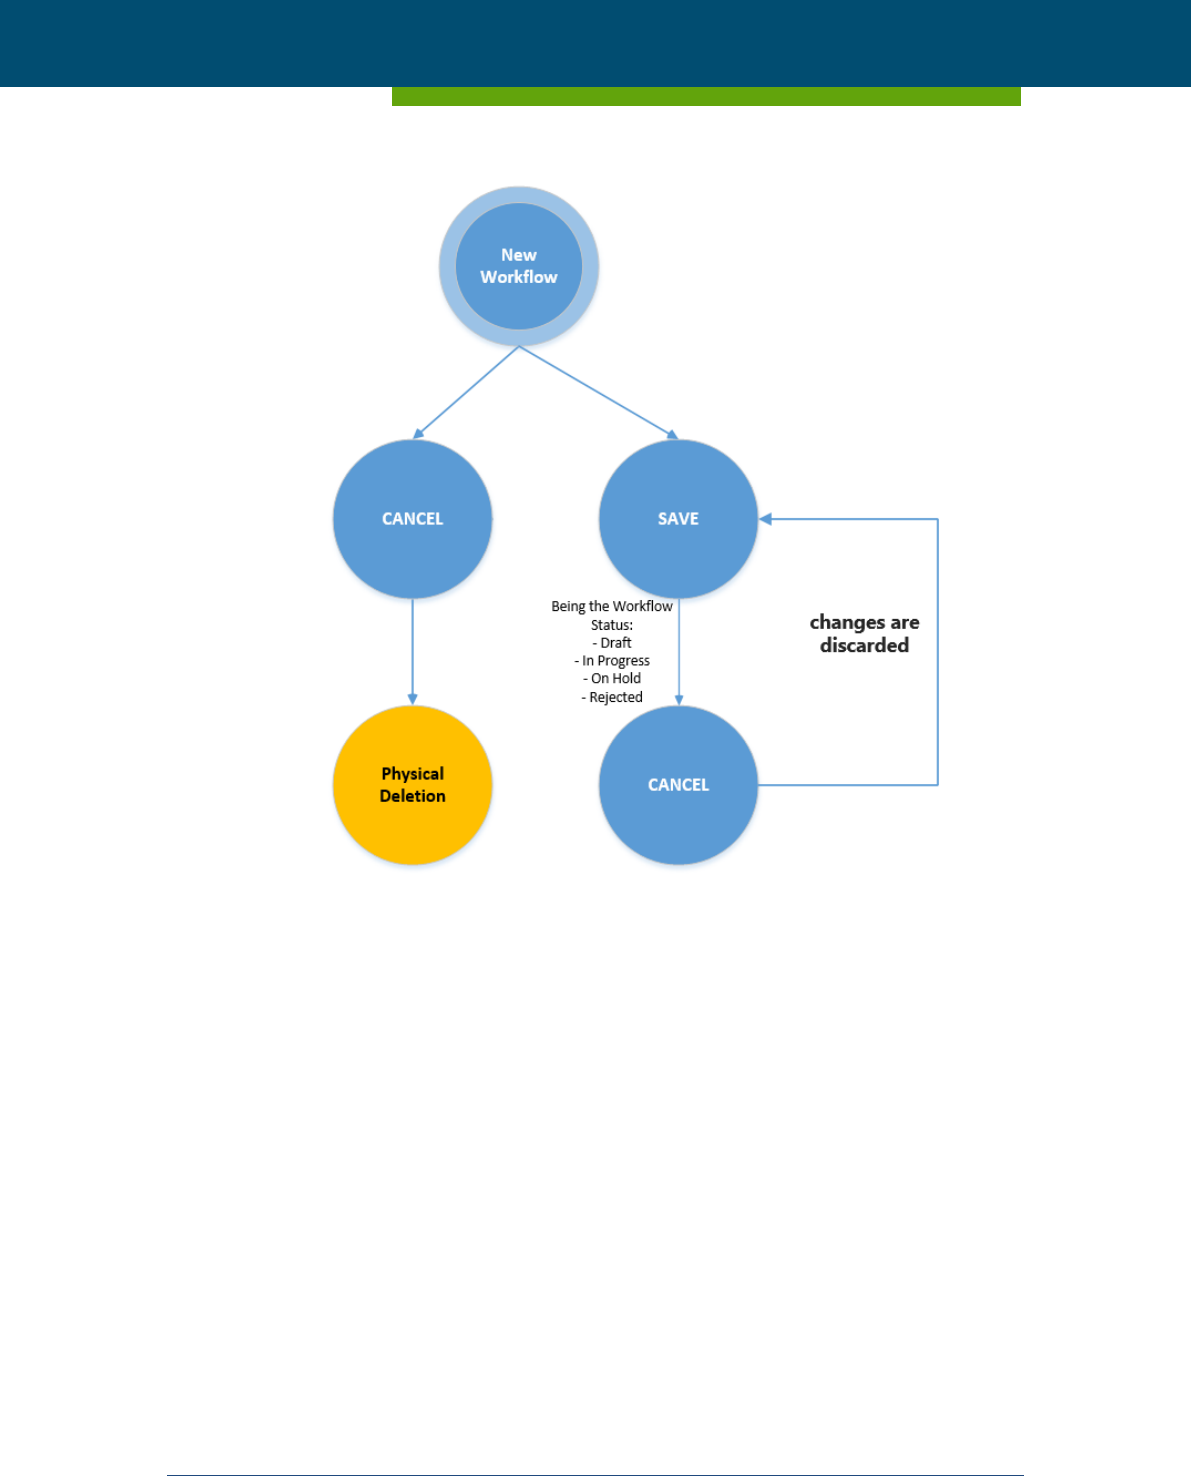
Figure 29 illustrates how the status of the workflow can change in the system depending on the
action performed by the user.

ESMA - Purchase Order - 170018511EB1
ESMA - Paperless 1.1.0 User Manual
Page 28 of 73 BILBOMATICA
21/12/2017 v1.1.0
Figure 29 – Changes on the Paperless workflow status
9 Which actions are available on workflows
This section depicts which are the actions available from the workflows.
9.1 Saving a workflow when its status is “Draft”
Saving a workflow allows initiators, or in case there was defined a backup group, all members
of this group, to save their work on a workflow without launching it. The button “Save” is only
available to these users in the top right side of the workflow creation form.
By clicking this option the system will:
Save any changes made to the general fields of the workflow
Save any comment added

ESMA - Purchase Order - 170018511EB1
ESMA - Paperless 1.1.0 User Manual
Page 29 of 73 BILBOMATICA
21/12/2017 v1.1.0
Save any change made on workflow documents
Save any change made on workflow actors
Set the status of the workflow to “Draft”
Add the workflow to the “Workflows to be signed” list
After clicking the button, the system will redirect the user to the Routing Slip homepage.
9.2 Launching a workflow
The button “Launch” is only available for workflow initiators and those users who are mem-
bers of the backup group from the top right side of the workflow creation form.
By clicking this button the system will:
Save any changes made to the general fields of the workflow
Save any comment added
Save any change made on workflow documents
Save any change made on workflow actors
Set the status of the workflow to “In progress”
Remove the workflow from the “Workflows to be signed” list
Add the workflow to the “Status of initiated workflows” list
If the workflow is “Urgent”, Paperless will send an email to the next actor of the work-
flow.
This means that the workflow will be assigned to the next actor of the workflow so he/she can
sign the corresponding step.
After clicking the button, the system will redirect the user to the Routing Slip homepage.
9.3 Deleting a workflow
Deleting a workflow modifies its status to “Deleted” which means that it will no longer appear
available to be signed or rejected by any user of the system. Use this option whenever a work-
flow should have not been initiated in the first place.

ESMA - Purchase Order - 170018511EB1
ESMA - Paperless 1.1.0 User Manual
Page 30 of 73 BILBOMATICA
21/12/2017 v1.1.0
Please note that this button only appears available for workflow initiators and initiators and
those users who are members of backup group so if you are any other workflow actor and you
think the workflow should be deleted, add a comment explaining the situation and reject the
current step re-assigning the workflow back to the initiator.
In case you are the initiator of a workflow, to delete a workflow click on the button “Delete”
that appears on the top right side of the screen. This action will:
Save any changes made to the general fields of the workflow
Save any comment added
Save any changes made on workflow documents
Set the status of the workflow to “Deleted”
Remove the workflow from the “Workflows to be signed” and from the “Status of initi-
ated workflows” lists
After clicking the button, the system will redirect the user to the Paperless Routing Slip homep-
age.
9.4 Put On Hold a workflow
Putting On Hold a workflow allows initiators to save their work on a workflow without having
to sign it. The button “On hold” is only available to initiators, user responsible of the step and
those users who are members of a backup group.
By clicking this option the system will:
Save any changes made to the general fields of the workflow
Save any comment added
Save any change made on workflow documents
Save any change made on workflow actors
Even if the workflow is “Urgent”, Paperless will not send an email to the next actor of
the workflow.
Set the status of the workflow to “On Hold”
The action will be recorded and it will be shown in the section of “My previous com-
ment”

ESMA - Purchase Order - 170018511EB1
ESMA - Paperless 1.1.0 User Manual
Page 31 of 73 BILBOMATICA
21/12/2017 v1.1.0
Add the workflow to the “Workflows to be signed” list, continuing the workflow as-
signed to user who made this action.
After clicking the button, the system will redirect the user to the Routing Slip homepage.
9.5 E-mail a workflow
The envelope icon displayed in the middle of the workflow form will allow sharing the work-
flow with specific users my e-mail. The icon will be available for all workflow types in any sta-
tus.
Figure 30 – Forward to recipient icon
When the user clicks on the icon, a new e-mail will be opened in Microsoft Outlook with some
information already populated (Subject and e-mail text). The e-mail text will contain a link to
the workflow ID being shared.
9.6 Link workflow(s)
All workflow types provide the possibility of linking a workflow to already existing workflow(s)
through the “Link to workflow(s)” field located in the general fields (see Figure 31).
ESMA - Purchase Order - 170018511EB1
ESMA - Paperless 1.1.0 User Manual
Page 32 of 73 BILBOMATICA
21/12/2017 v1.1.0
Figure 31 – Forward to recipient icon
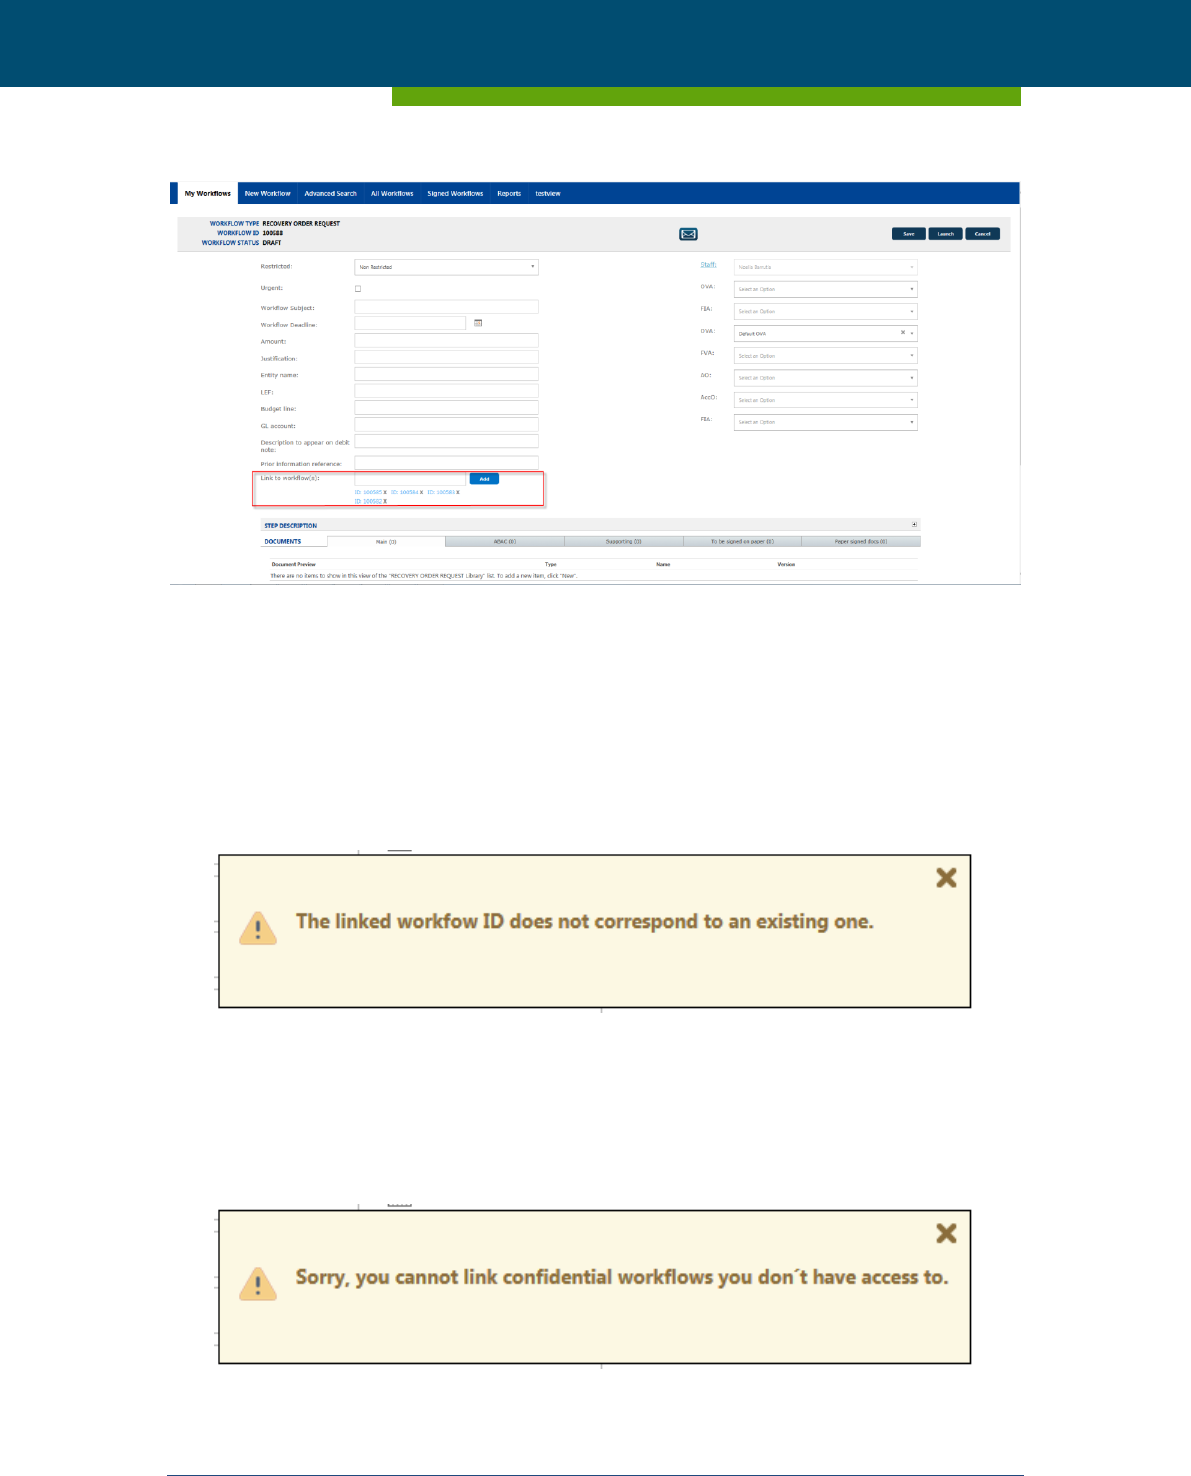
When the user introduces the ID number of a WF in the current “Link to workflow” field, it will
become a hyperlink to the related WF when the user clicks on the “Add” button.
It will be possible to introduce multiple related workflow IDs. After clicking on the “Add” but-
ton the system will validate if the ID number introduced corresponds to an existing workflow
ID. If the ID is correct, it will be displayed below as a hyperlink. If the ID is not correct (does not
correspond to an existing one), a message will be displayed to inform the user.
Figure 32 – The ID is not correct
The system will also display an informative message when the actor introduces a restricted WF
ID and does not have access to it at the time of clicking on the “Add” button. Users with no ac-
cess to the linked restricted workflow will not be able to open the WF ID even if they have ac-
cess to the parent workflow.
Figure 33 – The ID doesn’t have access to

ESMA - Purchase Order - 170018511EB1
ESMA - Paperless 1.1.0 User Manual
Page 33 of 73 BILBOMATICA
21/12/2017 v1.1.0
If a workflow is not restricted it will always be possible to open the linked workflows by clicking
on the corresponding workflow ID. It will be possible to delete created ID hyperlinks by clicking
on the grey cross located on the right of each link (see Figure 31).
The actor assigned to the current step will be able to add and delete linked workflow IDs. An
actor that is not assigned one to the current step cannot add or delete linked workflow IDs.
9.7 Cancelling the creation of a workflow
The button “Cancel” that appears on the top right side of the workflow creation form will have
different consequences on the system depending on previous actions.
If the user has never saved the workflow before (by clicking the button “Save”) the cancel but-
ton will cancel the creation of the workflow. This means that all the information added or any
document uploaded to it will be lost. Also, the workflow will not appear on the list of “Work-
flows to be signed”.
However, if the workflow has previously been saved, the “Cancel” button will cancel the crea-
tion of the workflow but it will not disappear from your “Workflows to be signed” list as it is in
“Draft” status. In this case, the “Cancel” button will discard any changes made on the general
fields section, any comment added/modified, any change made to the workflow actors and
any document uploaded.
ESMA - Purchase Order - 170018511EB1
ESMA - Paperless 1.1.0 User Manual
Page 34 of 73 BILBOMATICA
21/12/2017 v1.1.0
Figure 34 – Cancellation flow
After clicking the button, the system will redirect the user to the Paperless Routing Slip homep-
age.
9.8 Signing a workflow step
By clicking on an item from the list “Workflows to be signed” the user will access the workflow
form of the corresponding workflow ID where he/she will be able to review all its information,
documents, comments and actors that have participated on it.
To sign a workflow step the user needs to be the actor of the current step of the workflow or
member of a backup group of the current step. Then, the user needs to click the button “Sign”
that appears on the top right side of the screen.
By clicking this button the system will:
ESMA - Purchase Order - 170018511EB1
ESMA - Paperless 1.1.0 User Manual
Page 35 of 73 BILBOMATICA
21/12/2017 v1.1.0
Save all the changes made to the general fields of the workflow
Save any comment added
Save any change made on documents
Save any change on workflow actors
If the workflow is “Urgent”, Paperless will send an email to the next actor of the work-
flow.
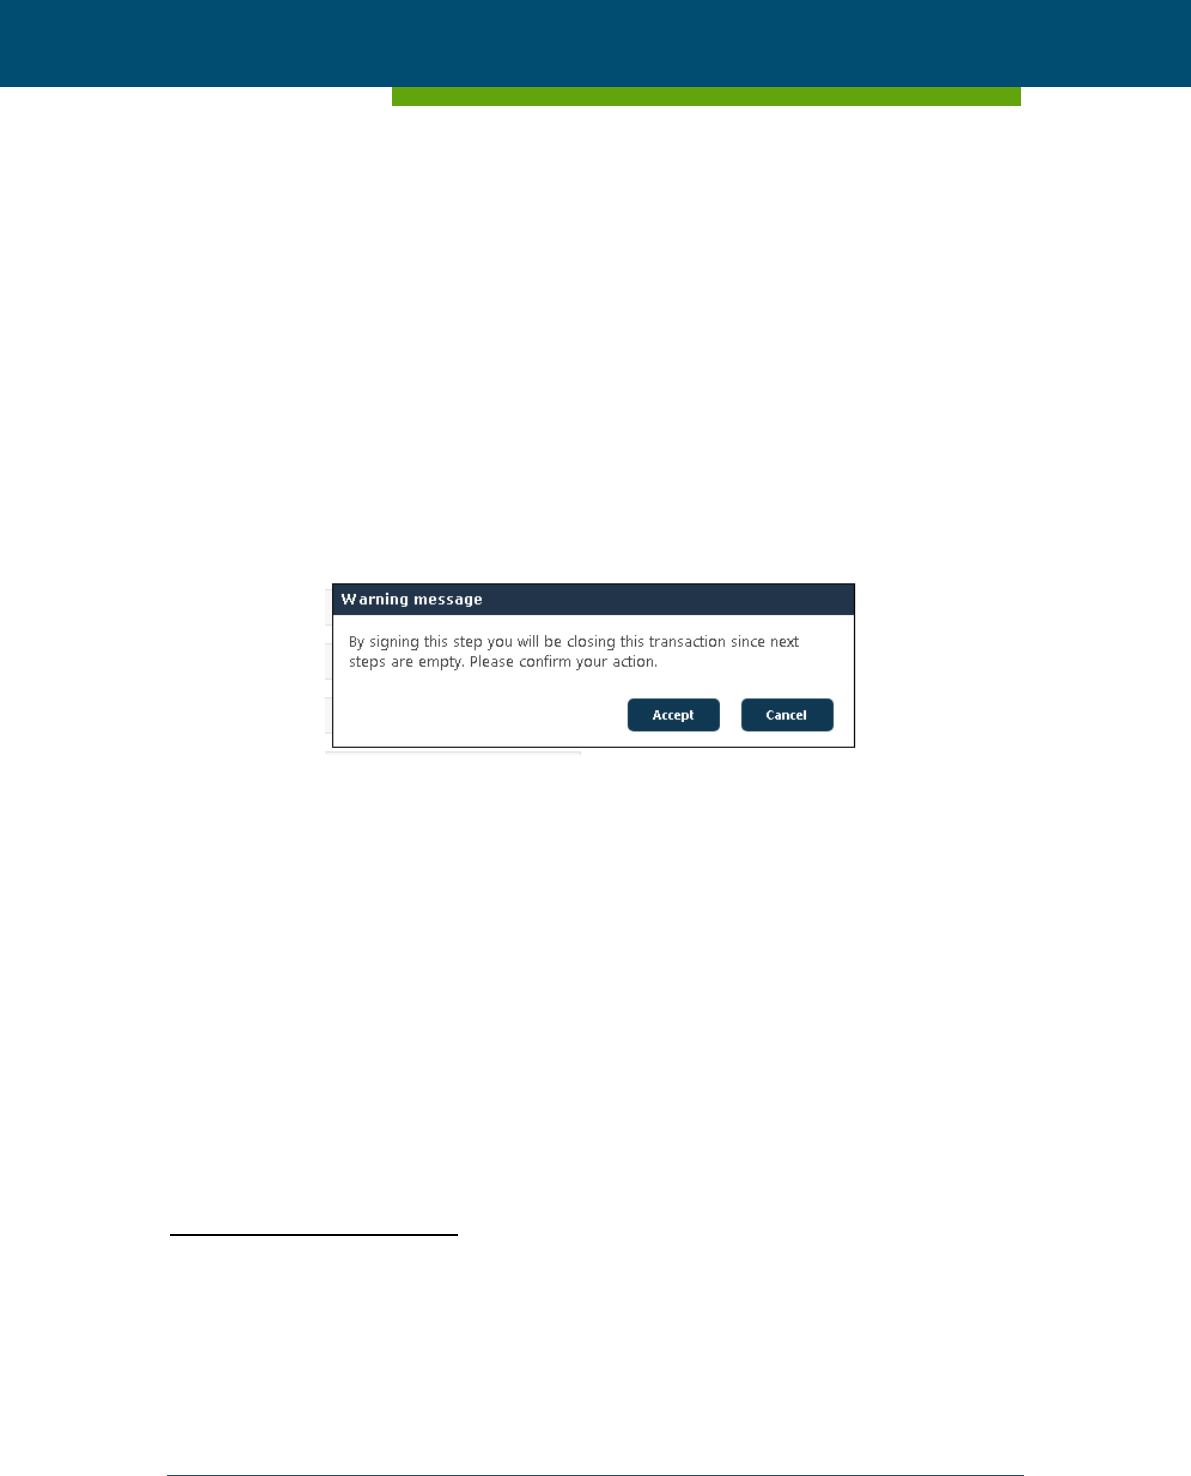
In case the workflow has the next steps to sign empty, Paperless will show a warning message.
This message will warn the actor about that this action will close the workflow.
Figure 35 – Warning Pop-up Message
After clicking “Sign” or “Accept” (in case of the pop-up message) the user will be redirected
11
to the Paperless Routing Slip homepage where he/she can review that the step just signed has
disappeared from the list “Workflows assigned to me”.
In case of clicking “Cancel”, no action will be done over the workflow, closing the pop-up mes-
sage and keeping the actor in the workflow interface.
11
In case you are the actor assigned to two (or more) consecutive steps, you will be able to sign both
steps without the system closing the workflow and redirecting you to the Homepage after the first step
is signed. When the first step is signed, the page will automatically refresh and you will be able to sign
the next consecutive step assigned to you.

ESMA - Purchase Order - 170018511EB1
ESMA - Paperless 1.1.0 User Manual
Page 36 of 73 BILBOMATICA
21/12/2017 v1.1.0
9.9 Rejecting a workflow step
If the user selects a workflow from the “Workflows to be signed” list he/she will access the
workflow form, where he/she will be able to review all its information, documents, comments
and actors that have participated on it.
To reject a workflow it is required to be the actor of the current step of the workflow. This is
applicable to restricted and non-restricted workflows. The workflow is rejected by clicking on
the “Reject” button displayed at the top right side of the screen.
By doing so, the workflow actor´s section will be replaced by the list of the previous actors of
the workflow. To reject the step a previous actor needs to be selected (only one). To be able to
assign a rejected WF to a previous actor it is mandatory that the user introduces a comment in
“My comment” box justifying the reason for the step rejection. Once the user has provided
this information, he can proceed on assigning the workflow by clicking on the “Assign” button.
By clicking this button the system will:
Save any data added or modified from the general fields section
Save any comment added to the workflow
Save any change made on workflow documents
Save any change made on workflow actors
Paperless will send an email to the assigned person.
After the button “Assign” is clicked, the system will re-assign the workflow to the selected ac-
tor which implies the removal of the pending step from the user´s list of “Workflows assigned
to me”. The status of the workflow will change to “Rejected” and it will be highlighted with a
red mark.
A particular case of rejection occurs when the user who signed the rejected step has been re-
moved from the system:
For non-restricted workflows, the rejected step will be automatically assigned to the
default user of the group.
For restricted workflows the rejected steps will be automatically assigned to username
(deleted) where username corresponds to the deleted user. In this case, if you are the
initiator of the workflow, it will be your responsibility to manually assign the step to
another user.
When the user who signed the rejected step was removed from a group but added to another
one (therefore, not deleted from the system):

ESMA - Purchase Order - 170018511EB1
ESMA - Paperless 1.1.0 User Manual
Page 37 of 73 BILBOMATICA
21/12/2017 v1.1.0
For non-restricted workflows the step will be automatically assigned to the default
user of the group the user belonged to.
For restricted workflows the step will be assigned to the initiator.
9.10 Cancelling a workflow step
By clicking on the button “Cancel” in a workflow step, users will be redirected to the home
page of the Routing Slip and the following actions will be executed:
Any change on the general fields of the workflow will be lost.
Any comment added will be lost.
Any change made on workflow actors will be lost.
Any change on documents will be lost.
The action will be recorded.
The step, however, will remain in the list of “Workflows assigned to me” as it has neither been
signed nor rejected.
9.11 Re-assignment of steps in a non-restricted workflow
In general, any assigned actors of a non-restricted workflow will be able to change the actor of
the current step and/or any actors of the subsequent steps of the workflow. Actors of previous
steps appear in disabled drop-down lists avoiding modifications on past actions.
Besides, there are a couple of special situations where actors of a workflow can also be re-as-
signed:
(1) A member of the group of the current step will be able to re-assign the actor of the
current step. Imagine that the current step is performed by the OIA group to which
the users A, B and C belong to. Even if the step is assigned to actor “A”, either user
“B” or “C” can access the workflow and change the actor of the current step.
(2) A member of FIA or OIA group (these groups are configurable and they will depend
on the configuration done by Paperless administrators) and the initiator of the work-
flow have the same rights to re-assign actors as a member of the groups of the cur-
rent step (see previous point).
Please note that a user in this situation will only be allowed to change the current step of the
workflow. The system avoids:

ESMA - Purchase Order - 170018511EB1
ESMA - Paperless 1.1.0 User Manual
Page 38 of 73 BILBOMATICA
21/12/2017 v1.1.0
Any changes on the general information section.
Any changes on the document section.
Any comments to be added.
The signing/rejecting of the step.
Any changes on the actors assign to a step different than the current one.
9.12 Re-assignment of steps in a restricted workflow
In general, any assigned actors of a restricted workflow will be able to change the actor of the
current step and/or any actors of the subsequent steps of the workflow. Actors of previous
steps appear in disabled drop-down lists avoiding modifications on past actions.
Unlike the non-restricted workflows, this type of workflows does not have special situations.
10 Which permission rules are applied on workflows
10.1 General rules
Paperless Routing Slip workflows offer a set of embedded rules in order to avoid any non-au-
thorized access to workflow controls. That is, it is at any moment guaranteed that only actors
of the workflow can sign or reject a step or that only the designated users can initiate certain
types of workflows. These rights are controlled taking into consideration five aspects:
Who the logged user is
Which group(s) the logged user belongs to
Who the initiator of the workflow is
Who the actors of the workflow are
Who the actor of the current step of the workflow is
Based on this information, the system applies the following rules to verify which actions are
available for each user. Specifically the rules applied are:
Users with rights to initiate workflows:

ESMA - Purchase Order - 170018511EB1
ESMA - Paperless 1.1.0 User Manual
Page 39 of 73 BILBOMATICA
21/12/2017 v1.1.0
Have access to the links to initiate workflows
Before launching a workflow:
o Edit workflow general information (general fields, link to workflow, confidenti-
ality)
o Add a comment
o Add/update/remove/move/download/preview documents and view versions
o Delete documents
o Change any actor of the workflow steps
o Save/launch/delete/cancel the workflow
Once the workflow has been started (“In progress/Rejected/On hold”):
o Have access to the workflow details once it has been launched
o Save/cancel the workflow
o Delete the workflow if it has been re-assigned to the initiator (independently to
the step number)
o Delete documents
o Change any actor of the workflow steps that have not been signed yet
o Update the confidentiality of the workflow
o Add Link To workflows
o Add a comment
Once the workflow was closed:
o Add comments in the virtual post-it of a closed WF.
The user who has the current step of the workflow assigned or is member of a backup
group
12
(workflow responsible):
Once the workflow has been started (“In progress/Rejected/On hold”):
12
Paperless Admins will be able to select a backup group at step level. This means that all members of
this backup group will be able to perform any action as if they were the assigned person.

ESMA - Purchase Order - 170018511EB1
ESMA - Paperless 1.1.0 User Manual
Page 40 of 73 BILBOMATICA
21/12/2017 v1.1.0
o Access the details of the workflow through the “Workflows to be signed” list
o Edit workflow general information
o Add/review comments
o Add/update/remove/move/download/preview documents and view versions
o Delete documents before the step is signed and provided that the user is the
editor of all versions of the document.
o Change any actor of the workflow steps that have not been signed yet
o Sign/reject/put on hold/cancel the step
o Cannot update the confidentiality of the workflow
o Reassign the current step
Once the workflow was closed:
o Add comments in the virtual post-it of a closed WF.
Any assigned actor of the workflow:
o Can re-assign the current or subsequent steps of a workflow. This is in order to
prevent a workflow from being stopped even if the actor of the current step
and/or the initiator of the workflow are on leave.
10.2 Specific rules for non-restricted workflows
The following rules are applicable to non-restricted workflows
Users belonging to the same group of users as the actor of the current step, members
of groups FIA and OIA
13
or the initiator will access workflow details in read-only mode:
General information will not be available to be changed
All buttons will be disabled except a “Close” button
13
These groups are configurable by Paperless administrator

ESMA - Purchase Order - 170018511EB1
ESMA - Paperless 1.1.0 User Manual
Page 41 of 73 BILBOMATICA
21/12/2017 v1.1.0
Controls to change actors in the workflow will be disabled except for the list to re-
assign the actor of the current step
Add comments in the virtual post-it of a closed WF.
Any other user of the system will be able to access the workflow details in read-only
mode:
General information will not be available to be changed
All buttons will be disabled except a “Close” button
Controls to change actors in the workflow will be disabled
Add comments in the virtual post-it of a closed WF.
10.3 Specific rules for restricted workflows
Only the following users will have access to restricted workflows, regardless the workflow sta-
tus:
The initiator of the restricted workflow
Any actor of the workflow steps: Actors involved in a restricted workflow will have ac-
cess to workflow information at any moment during the life of the workflow
Members of the “paperless-restricted-admin” group will be able to access the work-
flow details in read-only mode.
Members of FIA, OIA or of the group owning the current step of the workflow will not have
rights to see or access the workflow unless they are the initiator of the workflow, one of its ac-
tors or they belong to the specific group with permission for restricted workflows.
Documents attached to steps in restricted workflows will only be displayed by the initiator, the
user responsible for the corresponding step and users included in the specific group with per-
mission to see restricted workflows.
Specific rules for restricted workflows are also applicable to:
Lists (All workflows, workflows pending to be signed and status of initiated workflows).
Search results.
Report results.
Link workflow(s).
ESMA - Purchase Order - 170018511EB1
ESMA - Paperless 1.1.0 User Manual
Page 42 of 73 BILBOMATICA
21/12/2017 v1.1.0
This means that the system will not list or offer as search results any workflow they are not al-
lowed to see.
11 Searching for workflows
There are three functionalities that can be used to search for workflows and that can be found
through following tabs of the Paperless Routing Slip homepage: “Advanced Search”, “All Work-
flows” and “Signed Workflows”
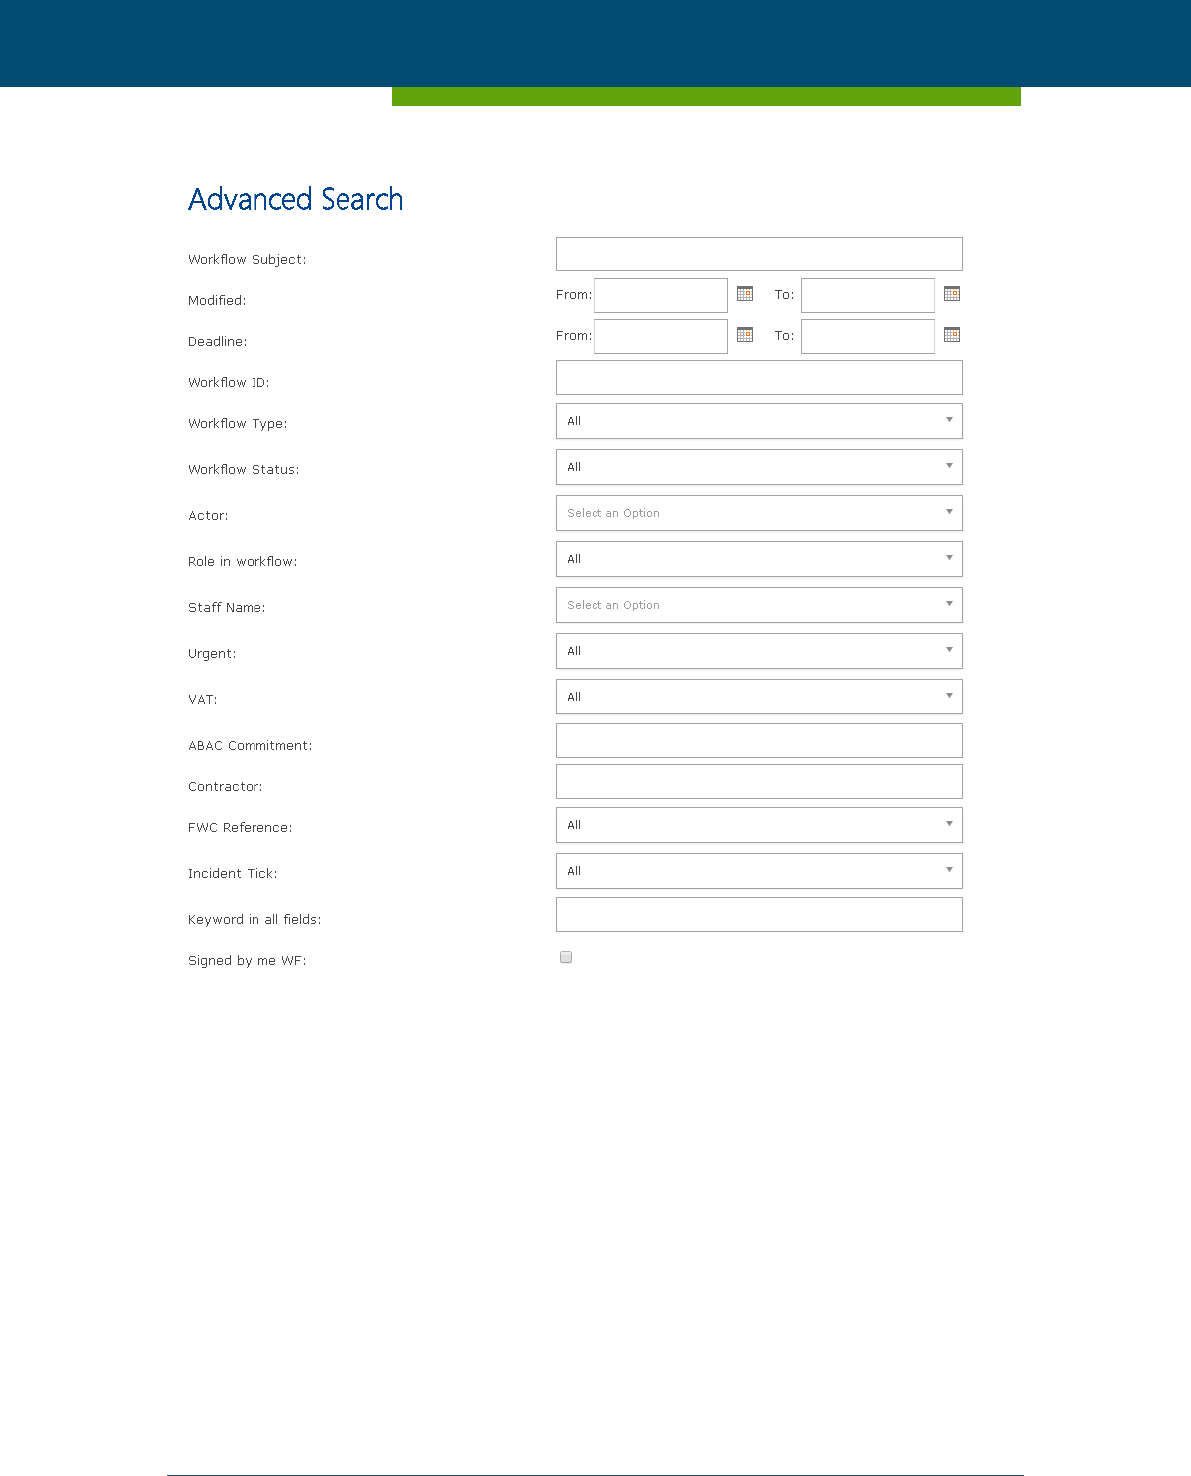
11.1 Advanced Search
To search specific workflows in the system there is advanced search functionality available
through the tab “Advanced search”.
Figure 21 – Advanced Search tab
This page offers a set of fields that can be used to find specific text in a workflow and specific
values in the general fields of a workflow:
ESMA - Purchase Order - 170018511EB1
ESMA - Paperless 1.1.0 User Manual
Page 43 of 73 BILBOMATICA
21/12/2017 v1.1.0
Figure 36 - Advanced Search form
Specifically, it is possible to search workflows based on:
Workflow Subject
The date range when the workflow was modified
The data range by Deadline
Workflow ID
Workflow Type
Workflow Status
Actor
ESMA - Purchase Order - 170018511EB1
ESMA - Paperless 1.1.0 User Manual
Page 44 of 73 BILBOMATICA
21/12/2017 v1.1.0
The Role in workflow that the selected actor had in the workflow
Staff Name
Urgent
VAT
ABAC Commitment
Contractor
FWC Reference
Incident Ticket
Keyword in all fields
Signed by me WF
Please note that all the system will look for workflows in the system that match with all the
requested values. That is, all the fields are concatenated using an “And”. For instance when
specifying a workflow type “CARRY FORWARD REQUEST” and status “In progress”, the sys-
tem will look for all the workflows of the type “CARRY FORWARD REQUEST” that are “In
progress”.
When the query is ready, click the “Search” button to search.
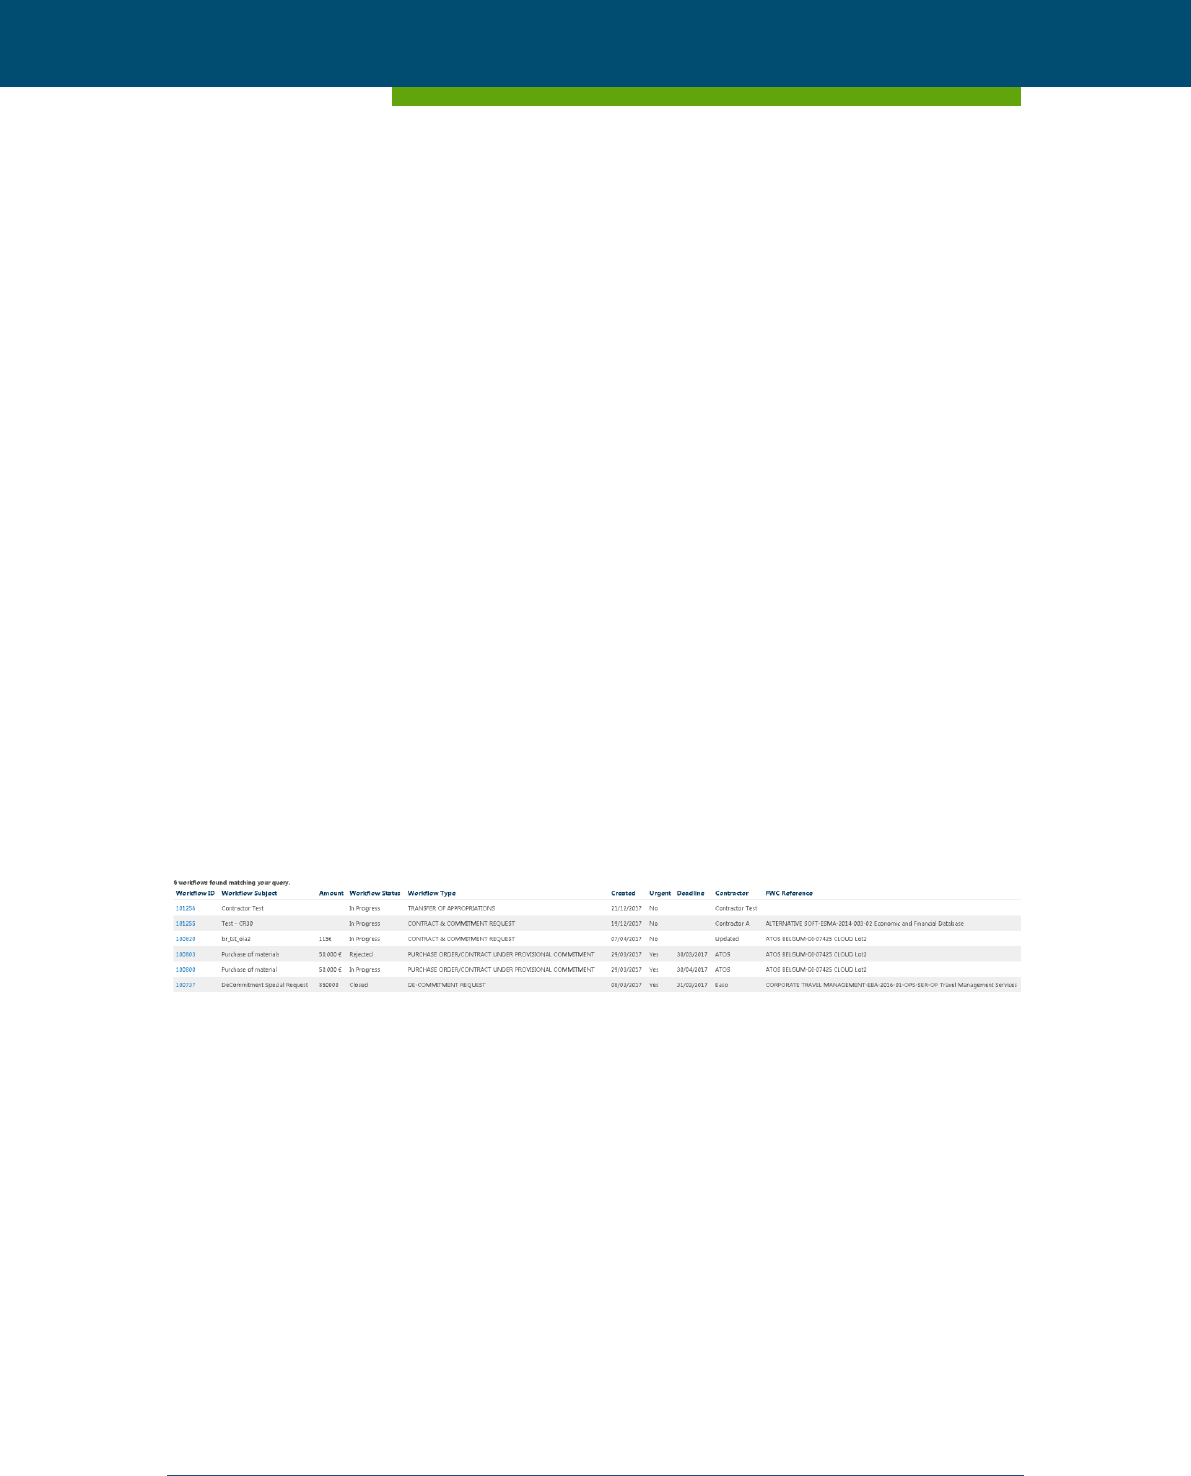
The results of the search will appear on a list as follows:
Figure 37 – Advanced Search results
The following columns are displayed:
Workflow ID: Link to the workflow details.
Workflow Subject: The text added to the “subject” field of the workflow. If the work-
flow type does not have this field, it will appear empty.
Amount: The text added to the “Amount” field of the workflow. If the workflow type
does not have this field or if it does not contain a value, it will appear empty.
Workflow Status: “Draft”, “In progress”, “Closed” or “Deleted”.
Workflow Type: Type of the workflow (i.e. “Approval of Internal Documents”)
ESMA - Purchase Order - 170018511EB1
ESMA - Paperless 1.1.0 User Manual
Page 45 of 73 BILBOMATICA
21/12/2017 v1.1.0
Created: Date when the workflow was created.
Urgent: This field will have the values “Yes” or “No”.
Deadline: The date added to the “Deadline” field of the workflow. If the workflow type
does not have this field or if it does not contain a value, it will appear empty.
Contractor: The text added to the “Contractor” field of the workflow. If the workflow
type does not have this field or if it does not contain a value, it will appear empty.
FWC Reference: The text added to the “FWC Reference” field of the workflow. If the
workflow type does not have this field or if it does not contain a value, it will appear
empty.
Results can also be sorted in the table by clicking on the name of each column.
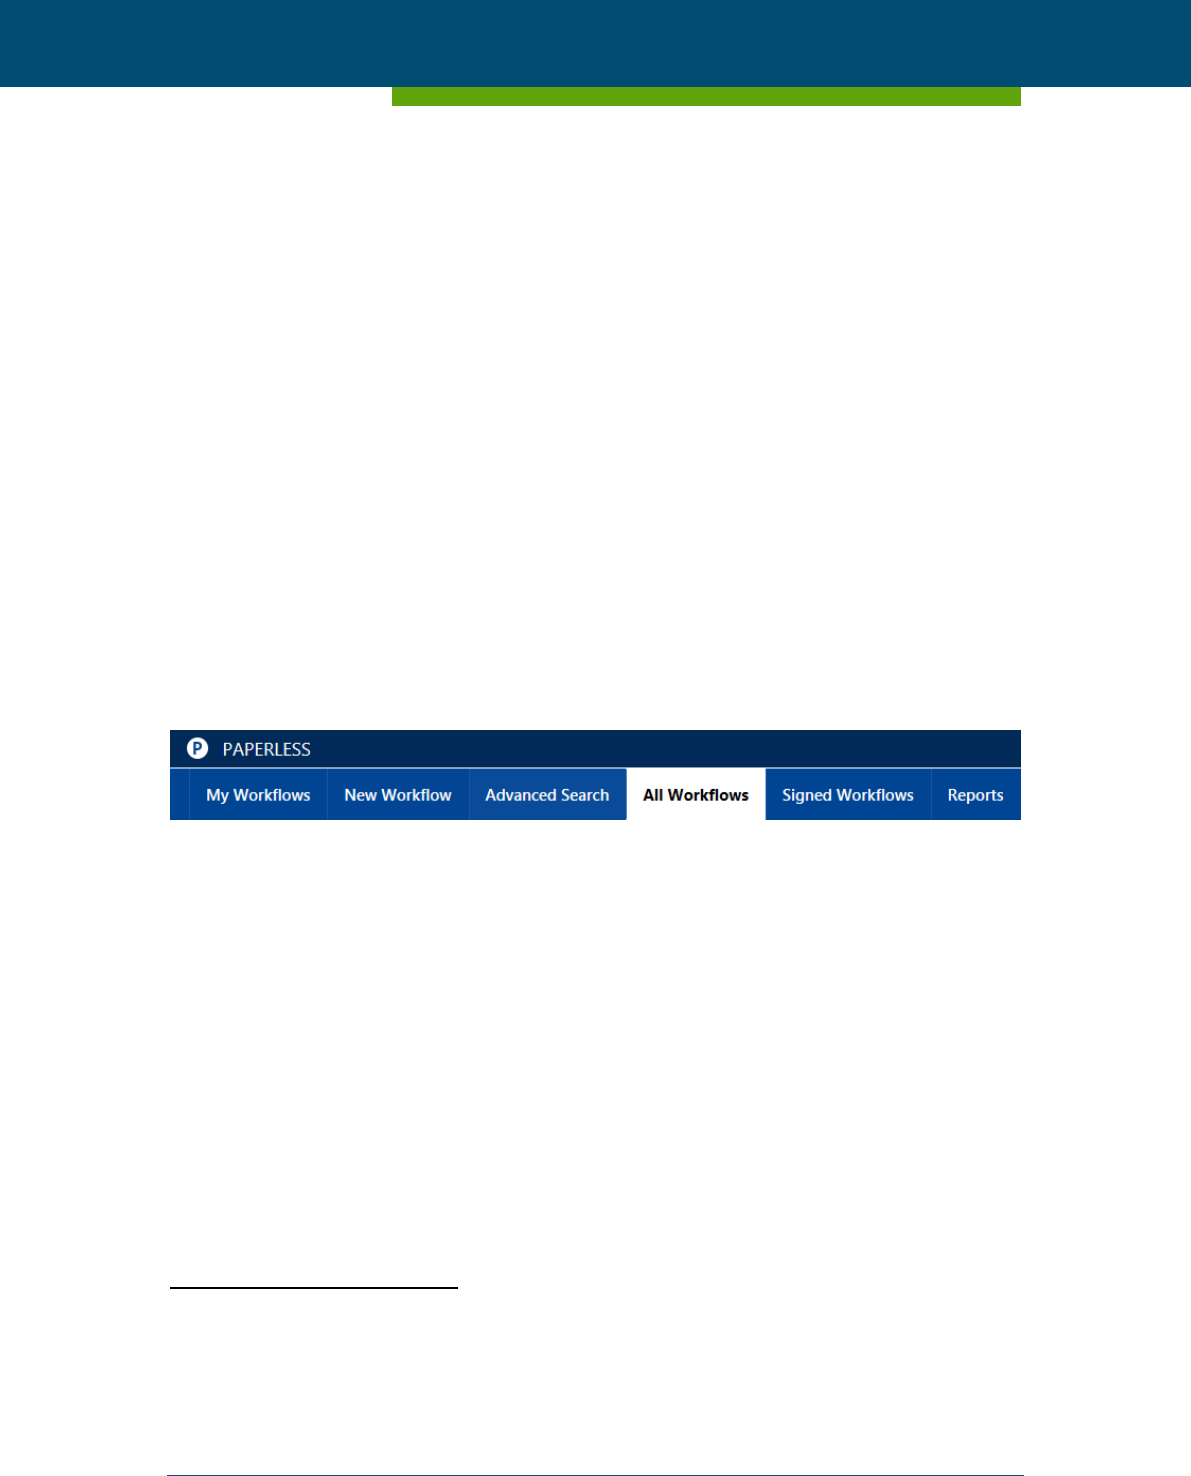
11.2 All workflows
The tab to access this functionality can be found on the top of the page:
Figure 38 – All workflows tab
This tab shows
14
all non-restricted workflows that are in the system and those restricted work-
flows where the user is the initiator, an actor, regardless its status. Users included in the group
with access to all Paperless Workflows will display all workflows (restricted or not). Specifically
the information that will be shown in the list is:
Workflow ID: Number that uniquely identifies the workflow.
Link: Link to the workflow details.
Workflow subject: The text added to the “subject” field of the workflow. If the workflow
type does not have this field, it will appear empty.
Amount: The text added to the “Amount” field of the workflow. If the workflow type
does not have this field or if it does not contain a value, it will appear empty.
14
Users with Staff-Ext role assigned will be able to see “All Workflows” tab content but they will not be
able to access a specific workflow they have not been part of
ESMA - Purchase Order - 170018511EB1
ESMA - Paperless 1.1.0 User Manual
Page 46 of 73 BILBOMATICA
21/12/2017 v1.1.0
Workflow status: “Draft”, “In progress”, “On Hold”, “Closed” or “Deleted”.
Workflow type: Type of the workflow (i.e. “Payment of grants”)
Assigned person: The person responsible of the current step of each workflow. It will
appear empty for those workflows “Closed” or “Deleted”.
Urgent: This field will have the values “Yes” or “No”.
Created: Date when the workflow was created.
Created by: Name of the person who launched the workflow.
Signed by: Displays the name of the logged user only in those workflows in which he has
signed at least one of the steps.
Restricted: This field will indicate if the workflow is restricted or not. For non-restricted
workflows it will be empty and for the restricted a “tick” will be shown.
To narrow the search it is possible to use the filter and sorting capabilities available in the
name of its column.
Figure 39 – All workflows
11.3 Signed Workflows
The tab to access this functionality can be found on the top of the page:
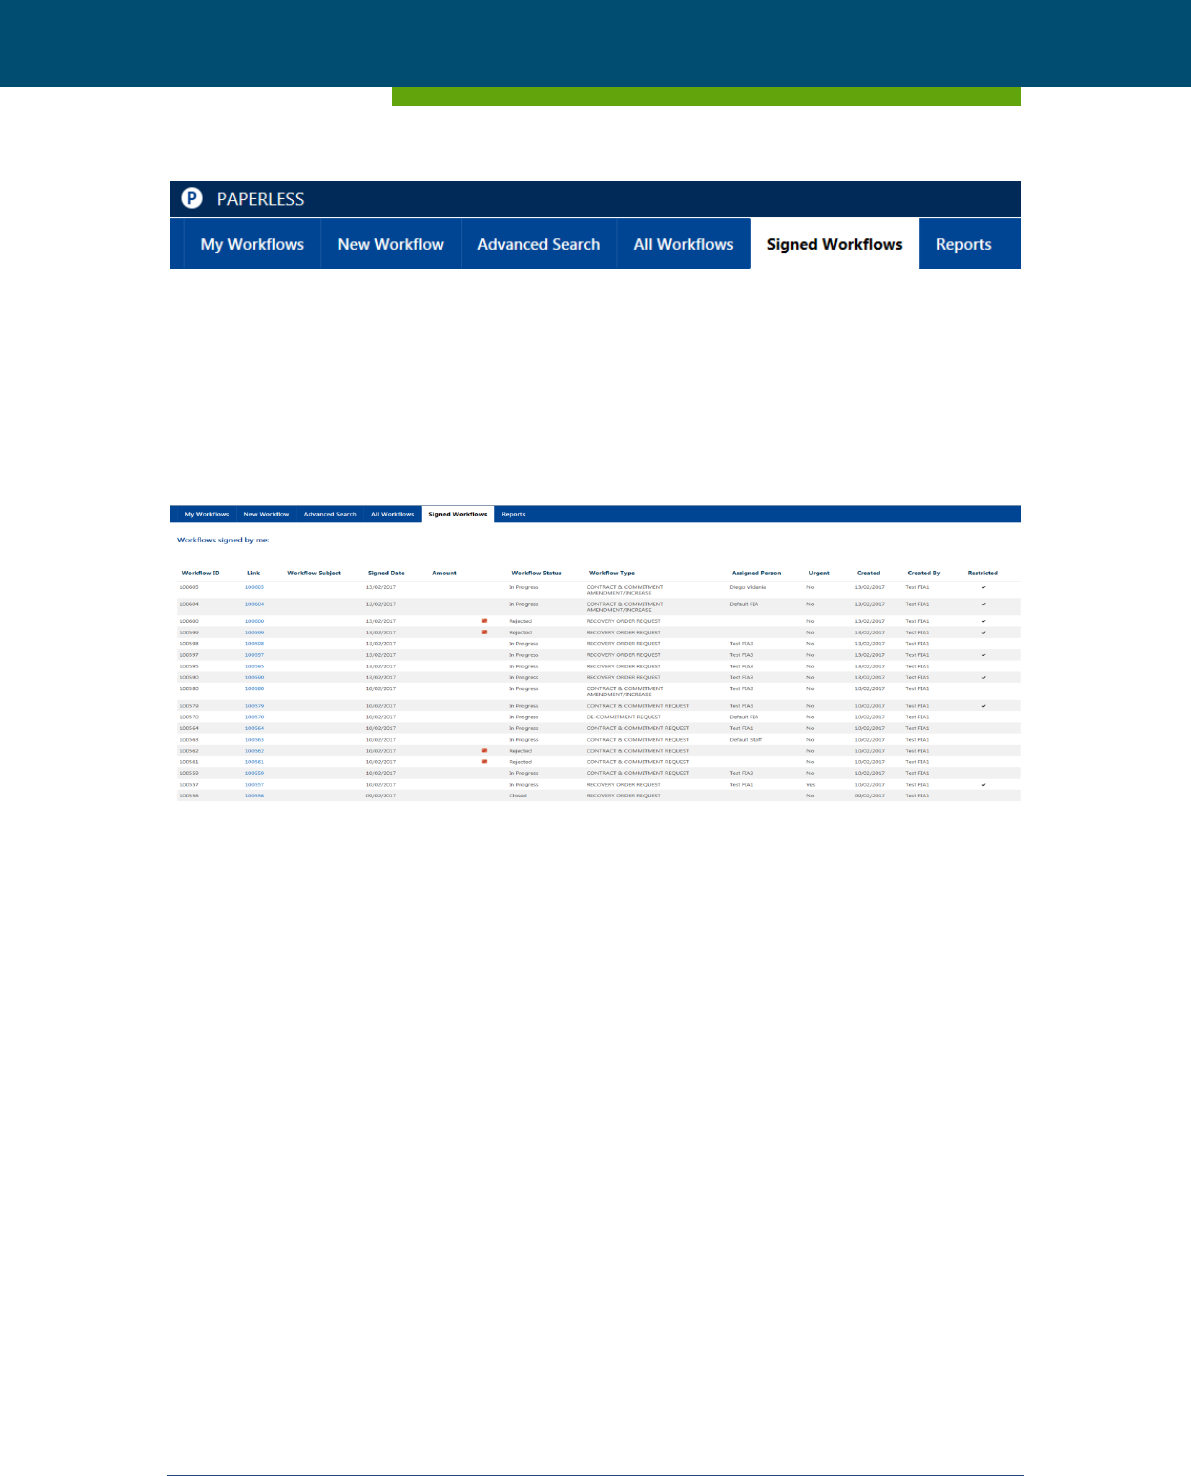
ESMA - Purchase Order - 170018511EB1
ESMA - Paperless 1.1.0 User Manual
Page 47 of 73 BILBOMATICA
21/12/2017 v1.1.0
Figure 40 – Signed Workflows tab
This tab displays the workflows in which the user has at least signed one of the step.
By default the screen displays 50 records sorted by the date of the signature of the logged
user. If there are more than 50 records the user has to move to the next page by clicking on
the arrows. There is no limit in the number of pages, it is possible to search any signed work-
flow.
Figure 41 – Signed Workflows results
Specifically the information that will be shown in the list is:
Workflow ID: Number that uniquely identifies the workflow.
Link: Link to the workflow details.
Workflow Subject: The text added to the “subject” field of the workflow. If the work-
flow type does not have this field, it will appear empty.
Signed Date: The date in which the workflow was last signed by the current user.
Amount: The text added to the “Amount” field of the workflow. If the workflow type
does not have this field or if it does not contain a value, it will appear empty.
Workflow Status: “Draft”, “In progress”, “Closed”, “Rejected” or “Deleted”.
Workflow Type: Type of the workflow.
Assigned Person: The person responsible of the current step of each workflow. It will
appear empty for those workflows “Closed” or “Deleted”.
Urgent: This field will have the values “Yes” or “No”.
ESMA - Purchase Order - 170018511EB1
ESMA - Paperless 1.1.0 User Manual
Page 48 of 73 BILBOMATICA
21/12/2017 v1.1.0
Created: Date when the workflow was created.
Created By: Name of the person who launched the workflow.
Restricted: This field will indicate if the workflow is restricted or not. For non-re-
stricted workflows it will be empty and for the restricted a “tick” will be shown.
To narrow the search it is possible to use the filter and sorting capabilities available in the
name of its column.
12 Reports
The tab to access this functionality can be found on the top of the page:
Figure 42 – Reports tab
ESMA - Purchase Order - 170018511EB1
ESMA - Paperless 1.1.0 User Manual
Page 49 of 73 BILBOMATICA
21/12/2017 v1.1.0
12.1 Reports home page
Figure 43 - Reports home page
This page is divided into the following main areas:
1. A “report quick access” menu that provides quick access to the functionalities to cre-
ate new reports, access saved report templates and “My reports”.
2. The main area where the page selected in the “report quick access” menu is displayed.
ESMA - Purchase Order - 170018511EB1
ESMA - Paperless 1.1.0 User Manual
Page 50 of 73 BILBOMATICA
21/12/2017 v1.1.0
12.2 Create a new report
By clicking on the “New report” option under the “report quick access menu” displayed on the
left hand side of the page, the system will load the page shown in Figure 30. This page allows
users to define the parameters to generate a report.
Please note that it is mandatory to specify the “Created” time range and that the input dates
should not exceed one year.
After providing all the needed parameters in the page, please click the button “Create Report”
located at the bottom of the page to obtain results from the application.
Figure 44 - Report input parameters
ESMA - Purchase Order - 170018511EB1
ESMA - Paperless 1.1.0 User Manual
Page 51 of 73 BILBOMATICA
21/12/2017 v1.1.0
NOTE: When a report outcome exceeds 200 records and in order to avoid performance issues,
the report will not be displayed on screen and will be automatically saved under the “My re-
ports” section when the user clicks ‘Show steps’. System will display the following message:
Due to the large amount of data being processed, the report will automatically be saved in the
"My Reports" section when it has finished executing.
You can also use the “Clear” button to automatically clear all fields from this page.
Figure 45 - Clear fields
12.3 Report outcome (results)
Results obtained when using the reports functionality are listed as displayed in the following
image:
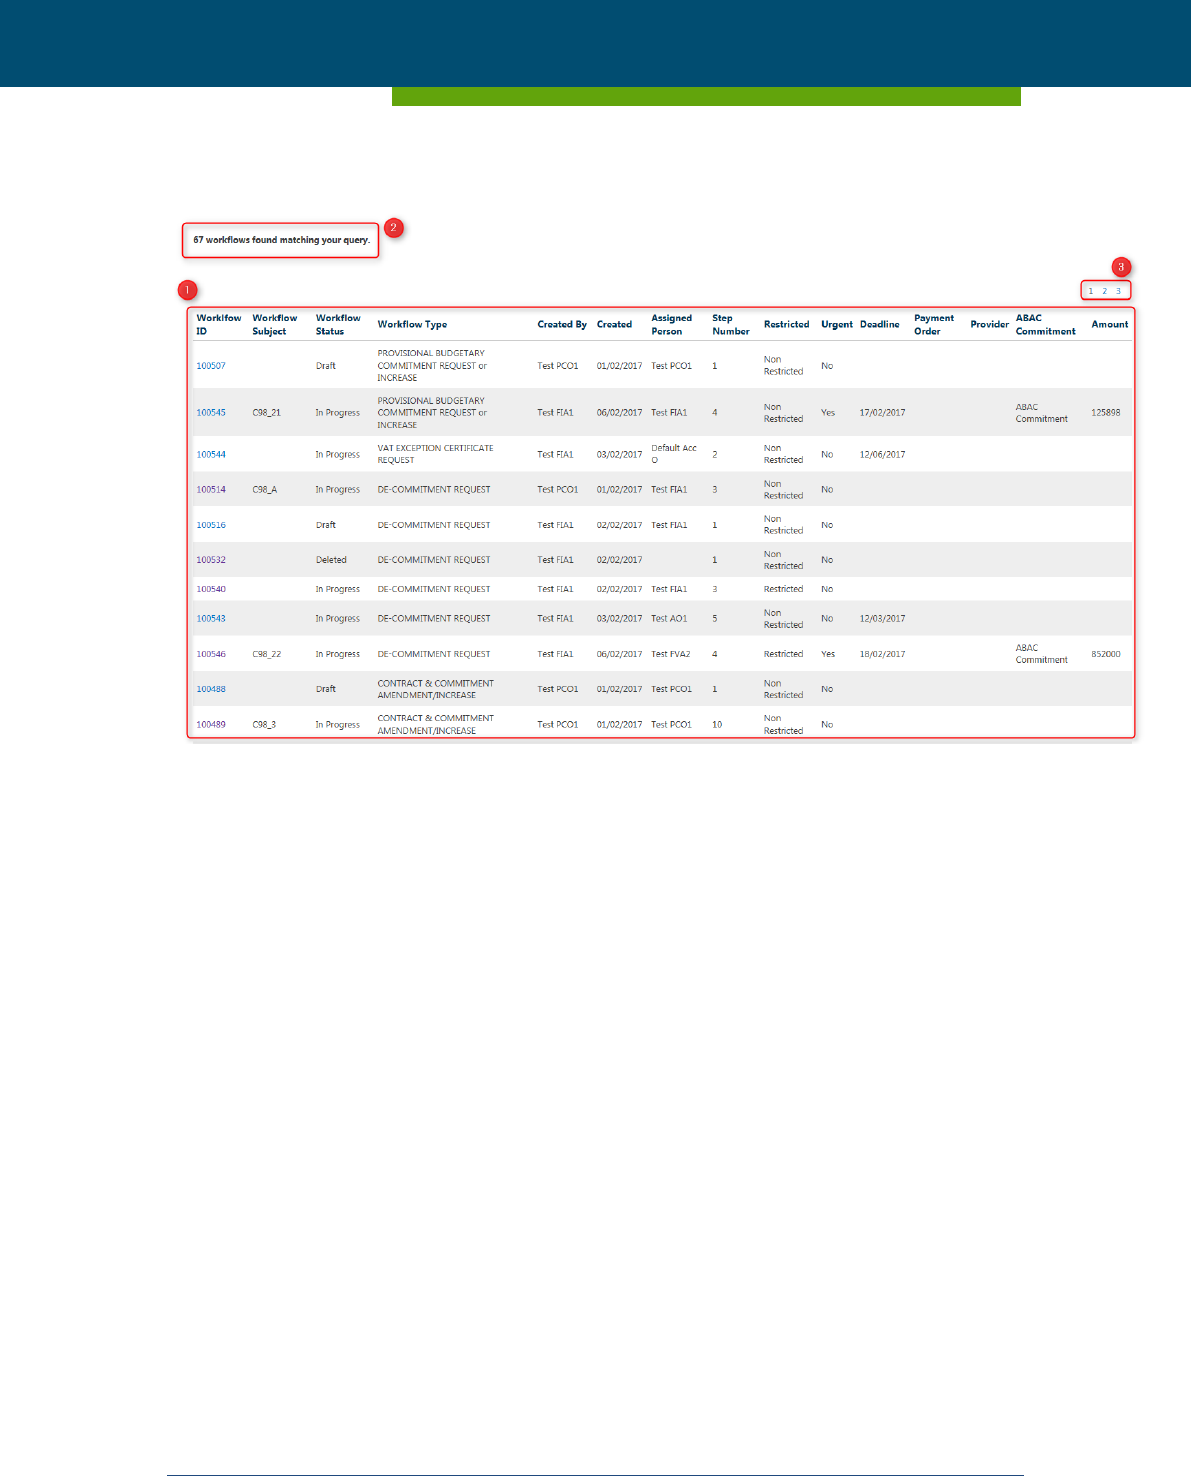
ESMA - Purchase Order - 170018511EB1
ESMA - Paperless 1.1.0 User Manual
Page 52 of 73 BILBOMATICA
21/12/2017 v1.1.0
Figure 46 - Report outcome
By default the report outcome displays the following information for each workflow
found:
a. Workflow ID
b. Workflow Subject
c. Workflow Status
d. Workflow Type
e. Created By
f. Created
g. Assigned Person
h. Step Number
i. Restricted
j. Urgent
k. Deadline

ESMA - Purchase Order - 170018511EB1
ESMA - Paperless 1.1.0 User Manual
Page 53 of 73 BILBOMATICA
21/12/2017 v1.1.0
l. Payment Order
m. Provider
n. ABAC Commitment
o. Amount
Number of Workflows found matching user query.
Pagination if result number is greater than 50.
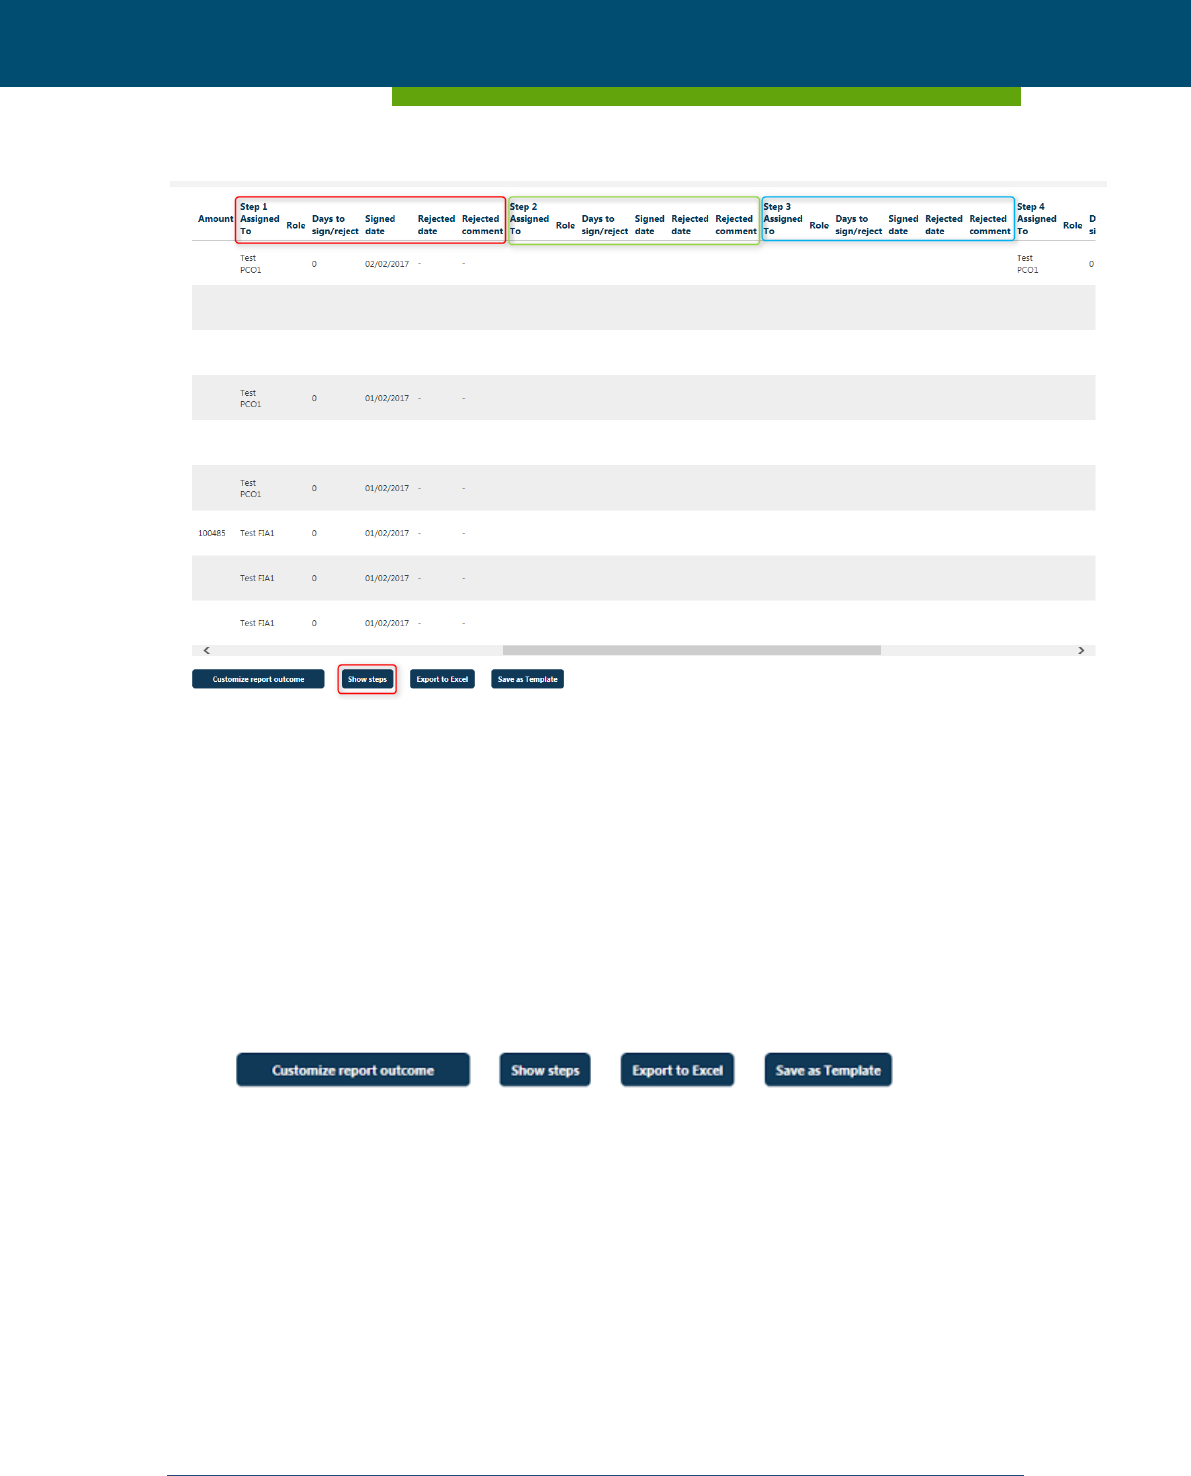
You can enhance the report outcome including details of all the steps in each workflow. This
functionality is accessible by clicking on “Show steps” button (see Figure 47 - Show steps). This
action will modify the report outcome so that it includes columns with details on who is the
assigned actor and corresponding role of each step of the workflow in question, the days taken
to sign or reject each workflow step, the date in which the step was signed or rejected and the
comment introduced when a workflow step is rejected.
Step 1 Assigned To (repeated)
Role (repeated)
Days to sign/reject (repeated)
Signed date (repeated)
Rejected date (repeated)
Rejected comment (repeated)
ESMA - Purchase Order - 170018511EB1
ESMA - Paperless 1.1.0 User Manual
Page 54 of 73 BILBOMATICA
21/12/2017 v1.1.0
Figure 47 - Show steps
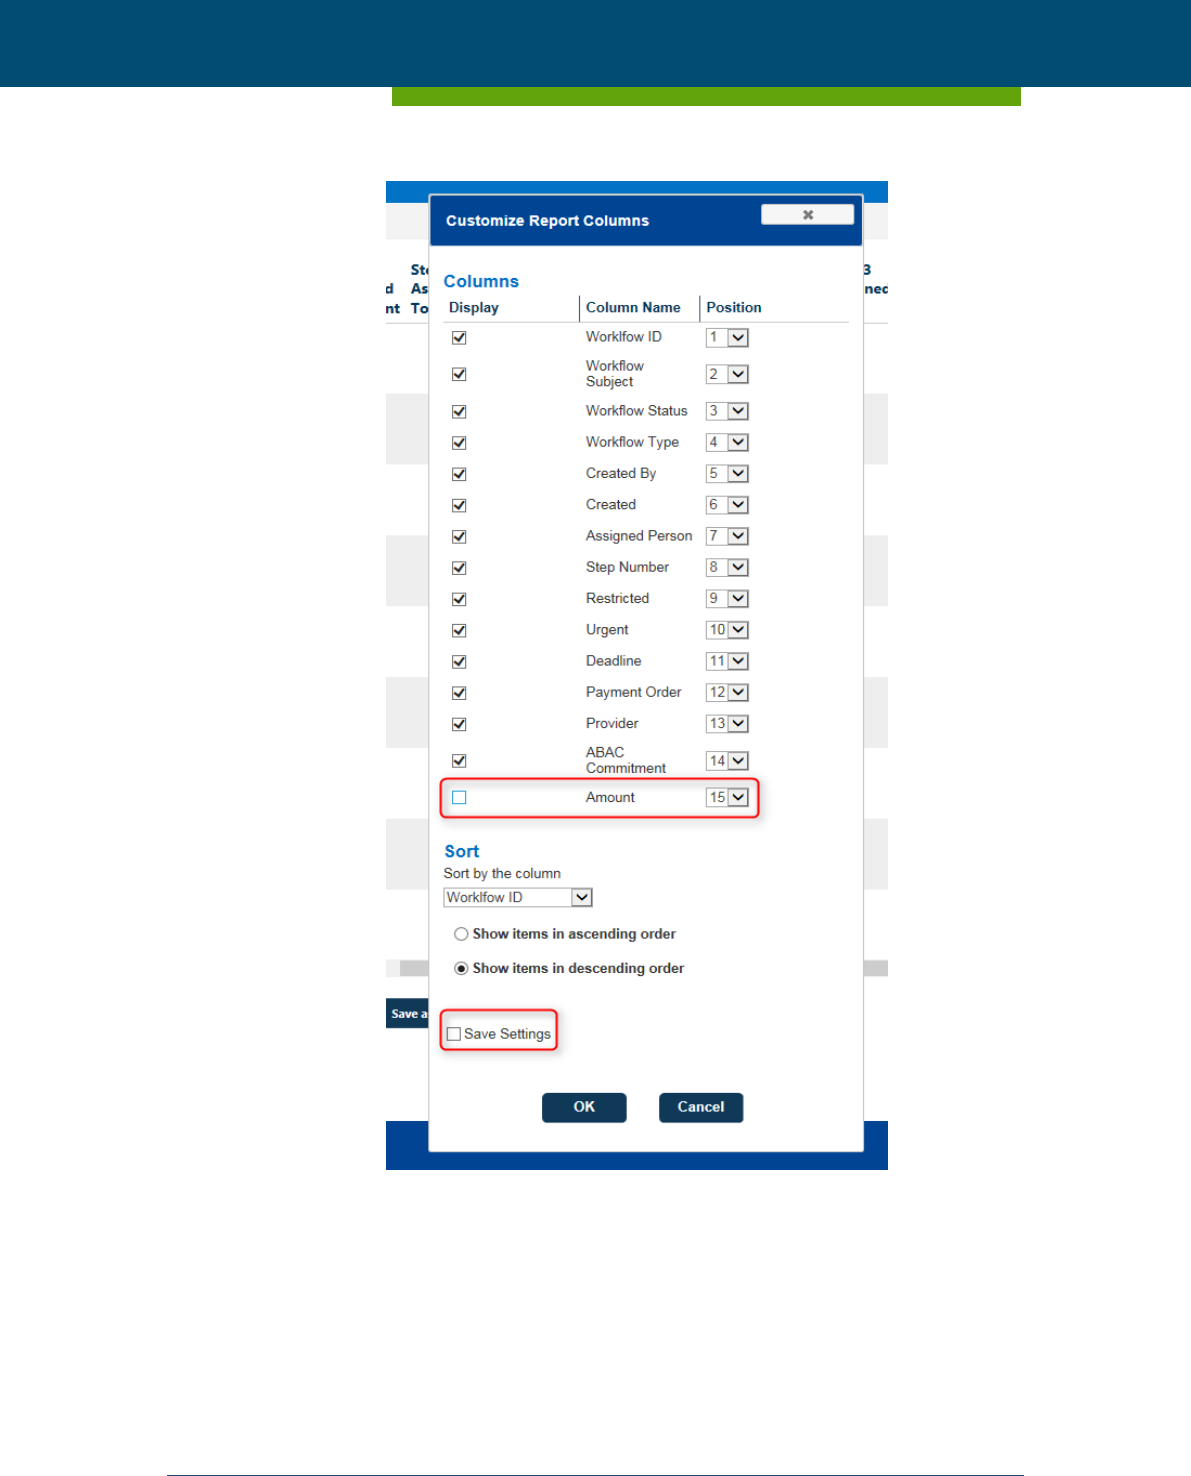
12.3.1 How to customize a report outcome
Once you obtained a report outcome, it is possible to decide which columns should be dis-
played by default in the report outcome, the columns displayed order and how data should be
sorted (e.g. ascending or descending order). This functionality is available through the “Cus-
tomize report outcome” displayed below the report outcome.
For example, in Figure 48, the ”Amount” column is not checked, therefore, it will not be dis-
played in the reports outcome.
This customization can be applied one single time, clicking on the “OK” button, or it can be ap-
plied to all reports executed henceforth by clicking on “Save Settings”. This is, by saving these
settings, the next time you log into the application the system will remember the preferences
on the report outcome parameters, position and sorting defined.
ESMA - Purchase Order - 170018511EB1
ESMA - Paperless 1.1.0 User Manual
Page 55 of 73 BILBOMATICA
21/12/2017 v1.1.0
Figure 48 - Customize report outcome

ESMA - Purchase Order - 170018511EB1
ESMA - Paperless 1.1.0 User Manual
Page 56 of 73 BILBOMATICA
21/12/2017 v1.1.0
12.3.2 How to save a report outcome
It is possible to save the report outcome by clicking on the “Export to Excel” button displayed
below the report outcome.
Figure 49 - Export to excel
The report will be saved and stored under the “My reports” section in two formats:
HTML format
Excel file format
Figure 50 - My reports
By default, the name of the report is saved with the date and time when the report was gener-
ated.
Figure 51 - Report name
ESMA - Purchase Order - 170018511EB1
ESMA - Paperless 1.1.0 User Manual
Page 57 of 73 BILBOMATICA
21/12/2017 v1.1.0
12.4 Report Templates
Report templates can be used as a starting point for new reports by using a previously defined
query. It is also possible to share these templates with other users. Moreover, users can spec-
ify the frequency to automatically receive a specific report defined in a template.
12.4.1 How to create a report template
Once a report is generated it is possible to save it as a template by clicking on the “Save as
template” button (see Figure 38). These templates will contain the values provided in the fields
to generate the report.
Figure 52 - Save report as Template
After clicking on “Save as template” button the system will display “Report Template” section.
Please provide a “Template Name” and click on “Save Template” button.

ESMA - Purchase Order - 170018511EB1
ESMA - Paperless 1.1.0 User Manual
Page 58 of 73 BILBOMATICA
21/12/2017 v1.1.0
Figure 53 - Report Template
Once the template has been saved, it will be displayed in “Report Template” table (see Figure
40).
Figure 54 - Report template list
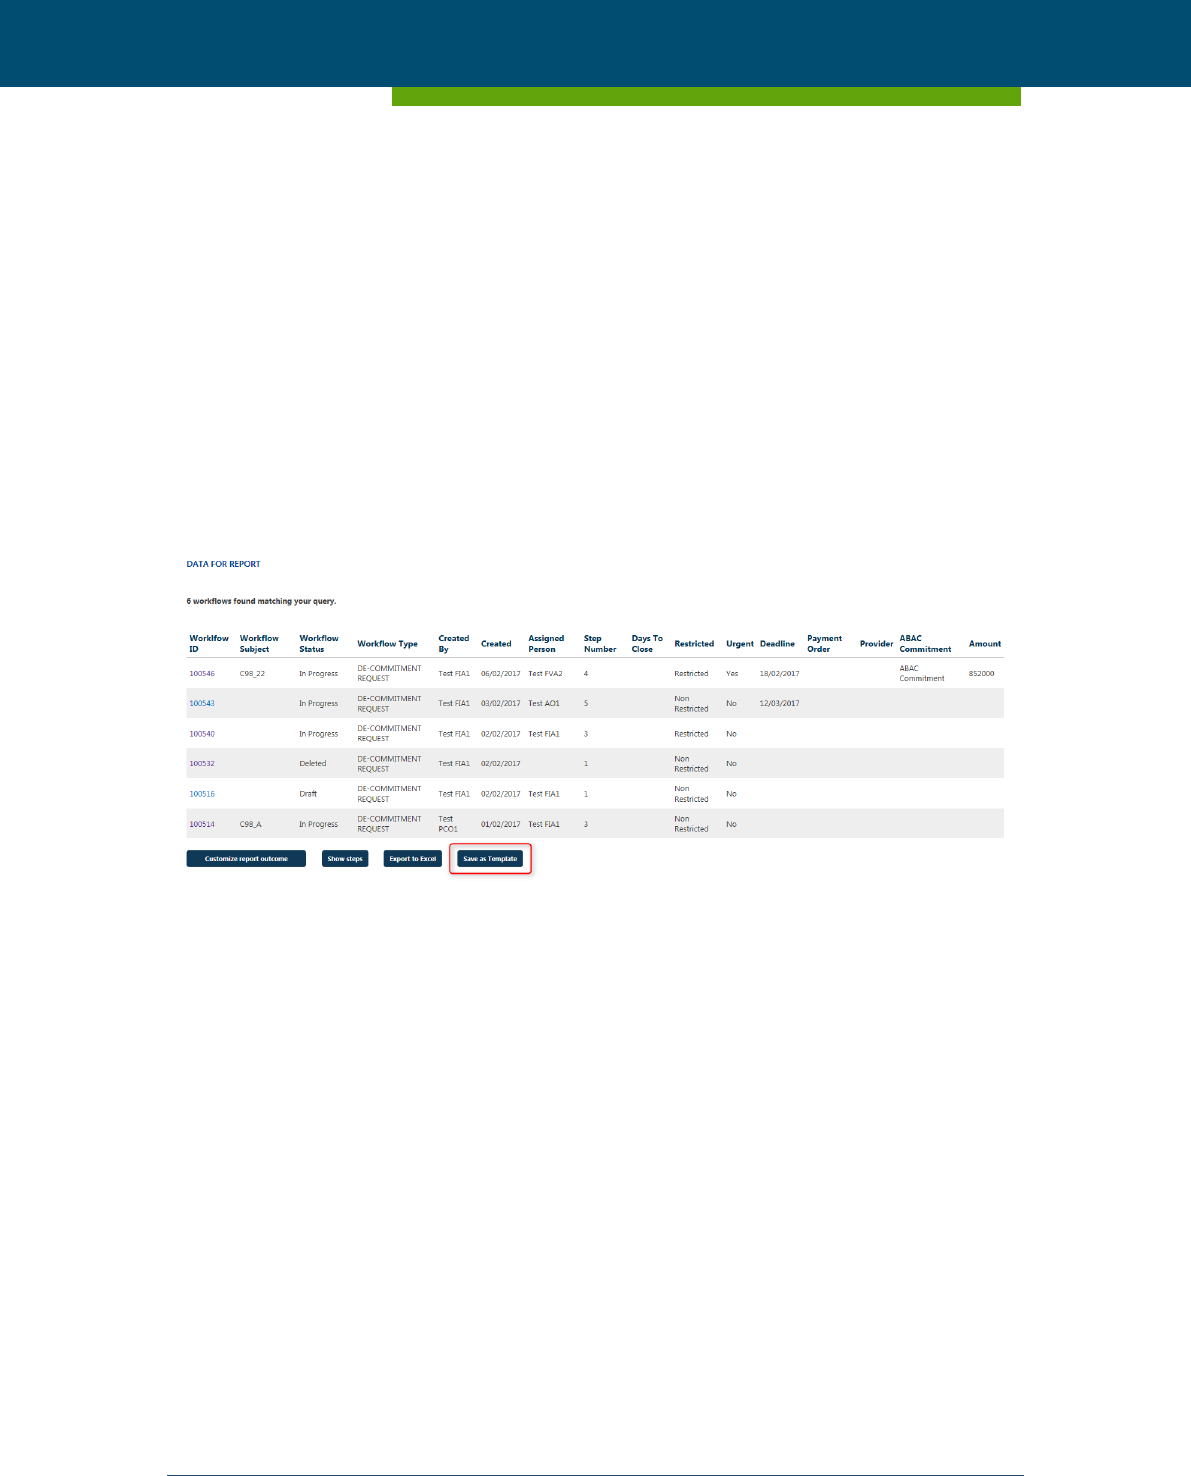
12.4.2 How to generate a report from a template
From the “Report Templates” section it is possible to generate a report using a criteria already
saved on a report template. In order to do so, click on the name of a report template. Its de-
tails will be loaded on the right side of the page. You can use the button “Generate report” in
order for the system to generate a report outcome based on the selected template.
ESMA - Purchase Order - 170018511EB1
ESMA - Paperless 1.1.0 User Manual
Page 59 of 73 BILBOMATICA
21/12/2017 v1.1.0
Figure 55 - Report Templates detail
Reports generated will also offer buttons to “Customize report outcome” (see section 12.3.1),
“Show steps” and “Export to Excel”. (See Figure 42).
Figure 56 - Data for Report Template
ESMA - Purchase Order - 170018511EB1
ESMA - Paperless 1.1.0 User Manual
Page 60 of 73 BILBOMATICA
21/12/2017 v1.1.0
12.4.3 How to edit a report template
The details of a report template (e.g. name) can be modified at any moment but not the crite-
ria introduced to generate the reports (e.g. “Actor” or “Role in a workflow” fields).
In order to modify a template details click on “Edit Template” button.
Figure 57 - Edit Template
You can modify the “Template Name”, “Share template” and “Send by e-mail regularly” (see
Figure 44) fields.
Figure 58 - Edit template
After updating all the relevant information, click on the “Save template” button in order to
save changes.
ESMA - Purchase Order - 170018511EB1
ESMA - Paperless 1.1.0 User Manual
Page 61 of 73 BILBOMATICA
21/12/2017 v1.1.0
12.4.4 How to delete a report template
Templates can be deleted by using the button “Delete template” displayed after selecting the
corresponding template, as shown in the following image.
Figure 59 - Delete Template
A message is displayed to confirm the deletion (see Figure 45)
ESMA - Purchase Order - 170018511EB1
ESMA - Paperless 1.1.0 User Manual
Page 62 of 73 BILBOMATICA
21/12/2017 v1.1.0
Figure 60 - Confirm delete template
After clicking “OK” the application will delete the template and you will see a confirmation
message (see Figure 46). The template will no longer be displayed in the template list. Please
use the button “Cancel” in the confirmation question in order to cancel the deletion of the
template.
Figure 61 - Template deleted successfully
ESMA - Purchase Order - 170018511EB1
ESMA - Paperless 1.1.0 User Manual
Page 63 of 73 BILBOMATICA
21/12/2017 v1.1.0
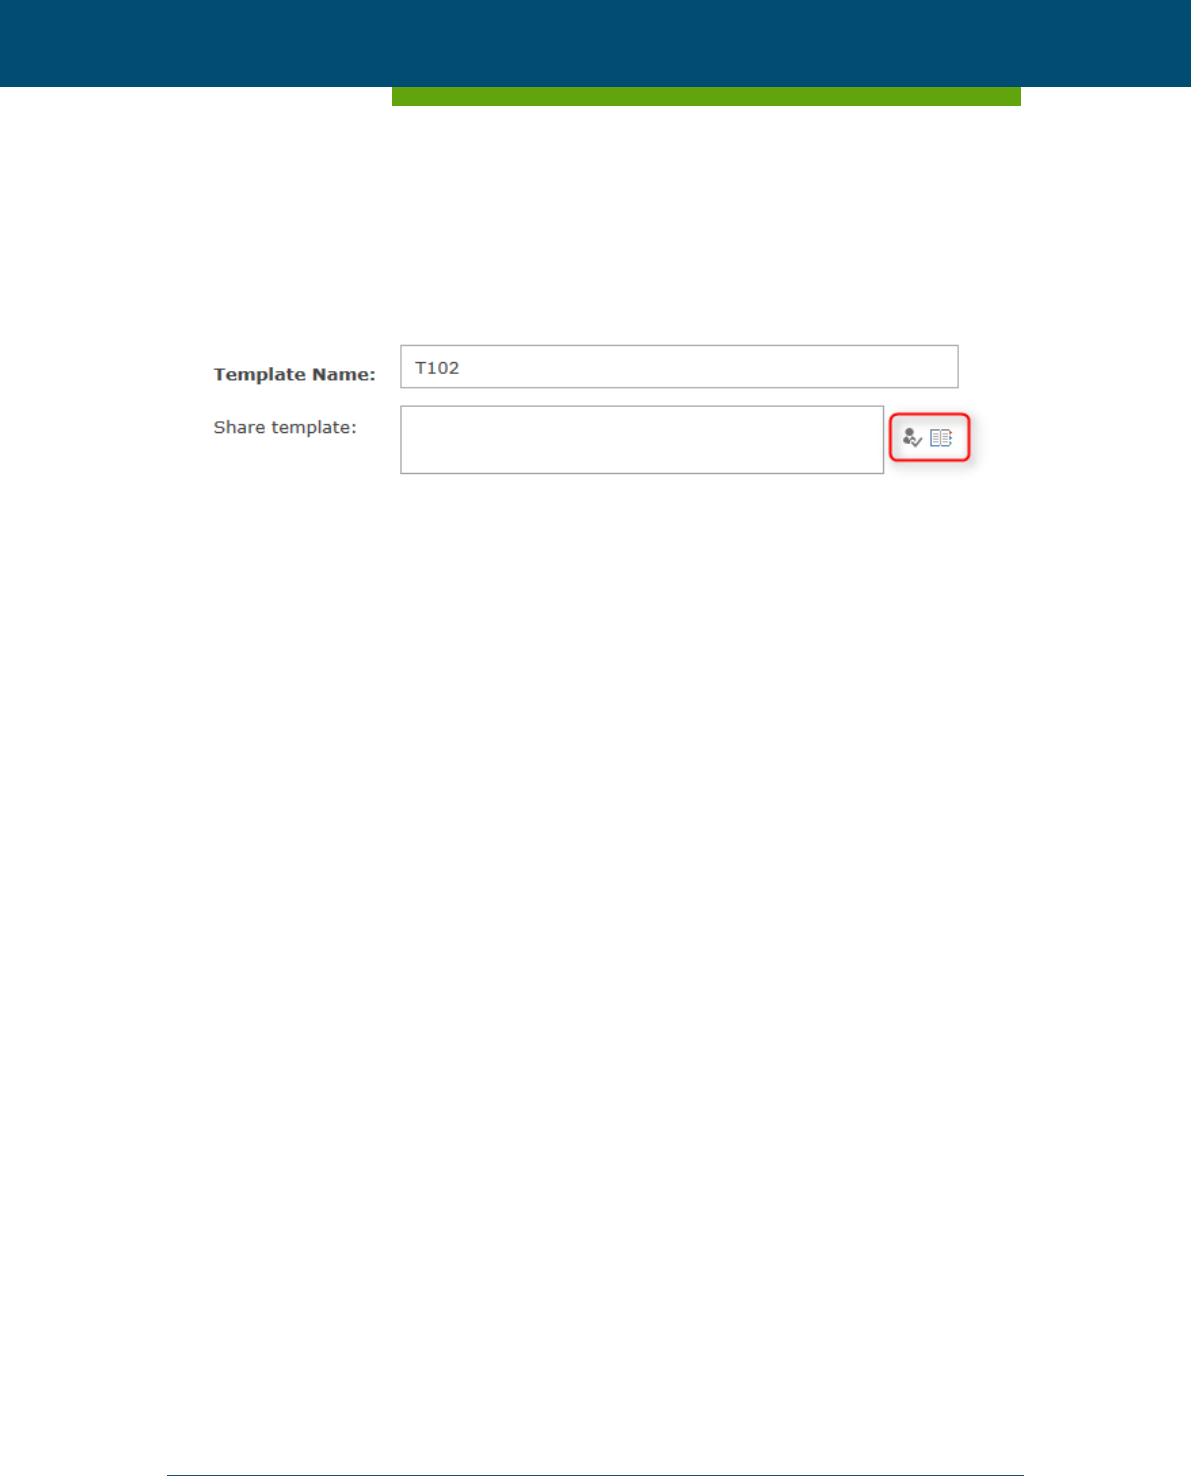
12.4.5 How to share a report template
Templates can be shared with other users. The icon displayed at the right of the “Share tem-
plate” field allows you to choose the users to share the template with (see Figure 48)
Figure 62 - Share template
By clicking on this icon you will be able to select users to share the template as explained in
Figure 49.
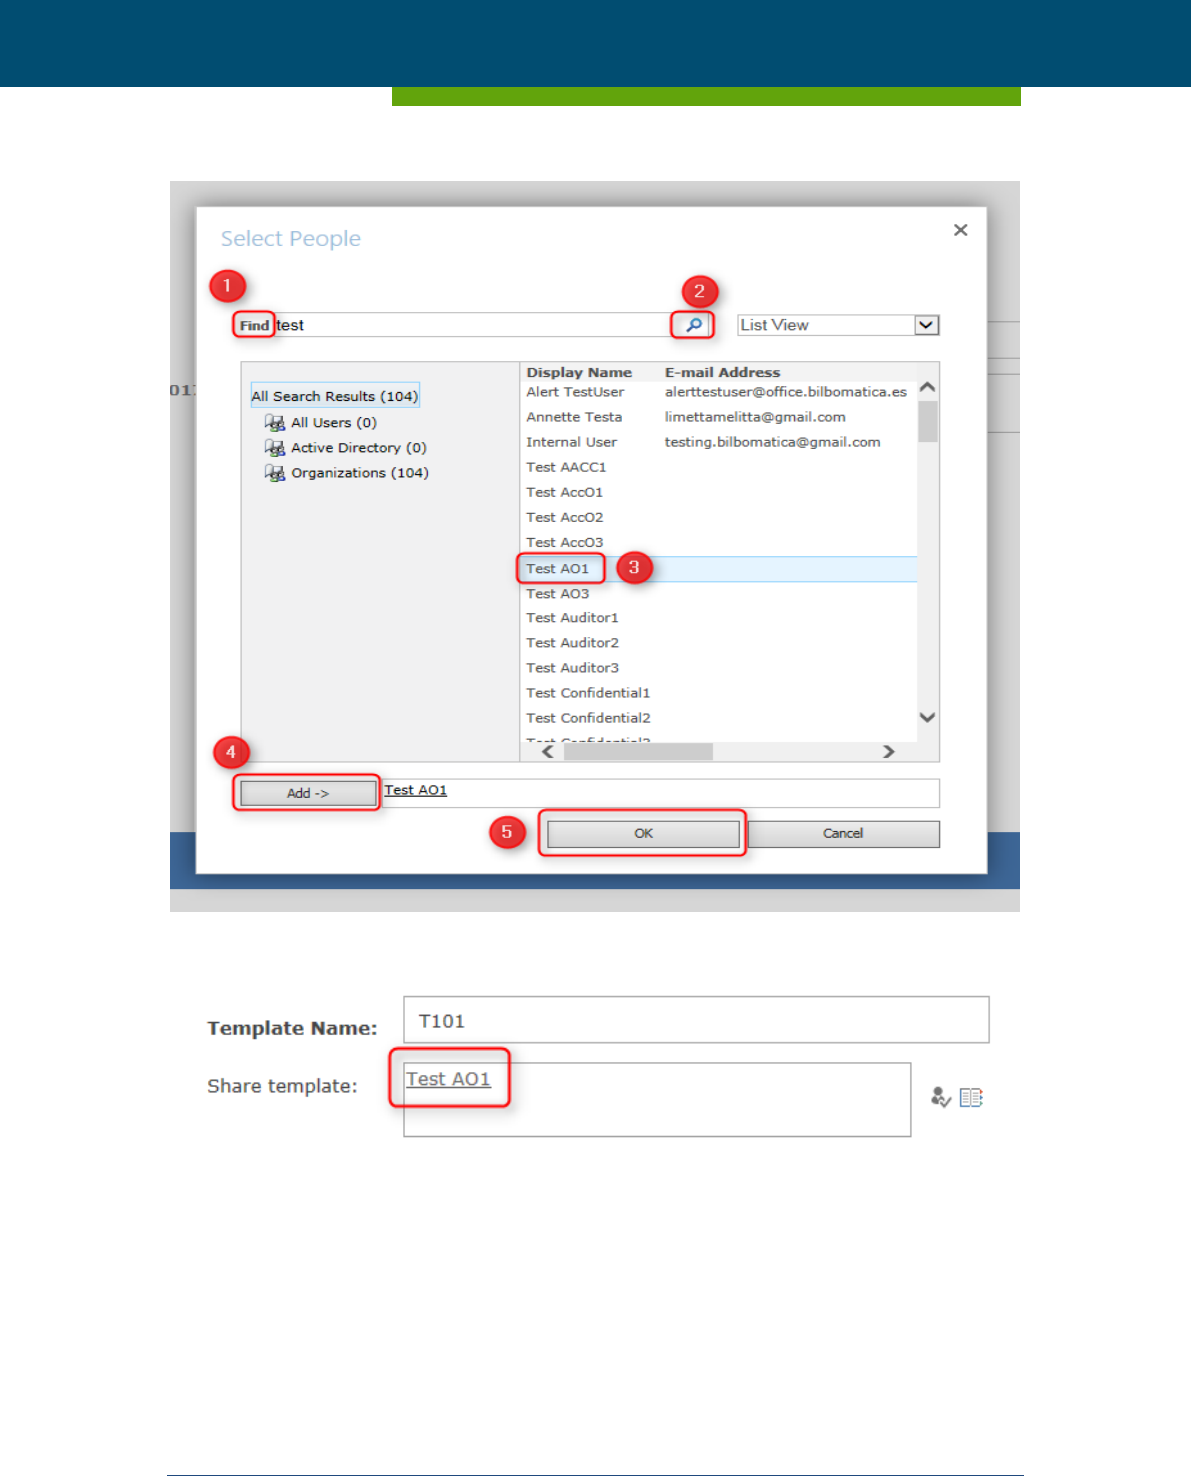
ESMA - Purchase Order - 170018511EB1
ESMA - Paperless 1.1.0 User Manual
Page 64 of 73 BILBOMATICA
21/12/2017 v1.1.0
Figure 63 - Select users to share the template with
Figure 64 - Select users to share the template with
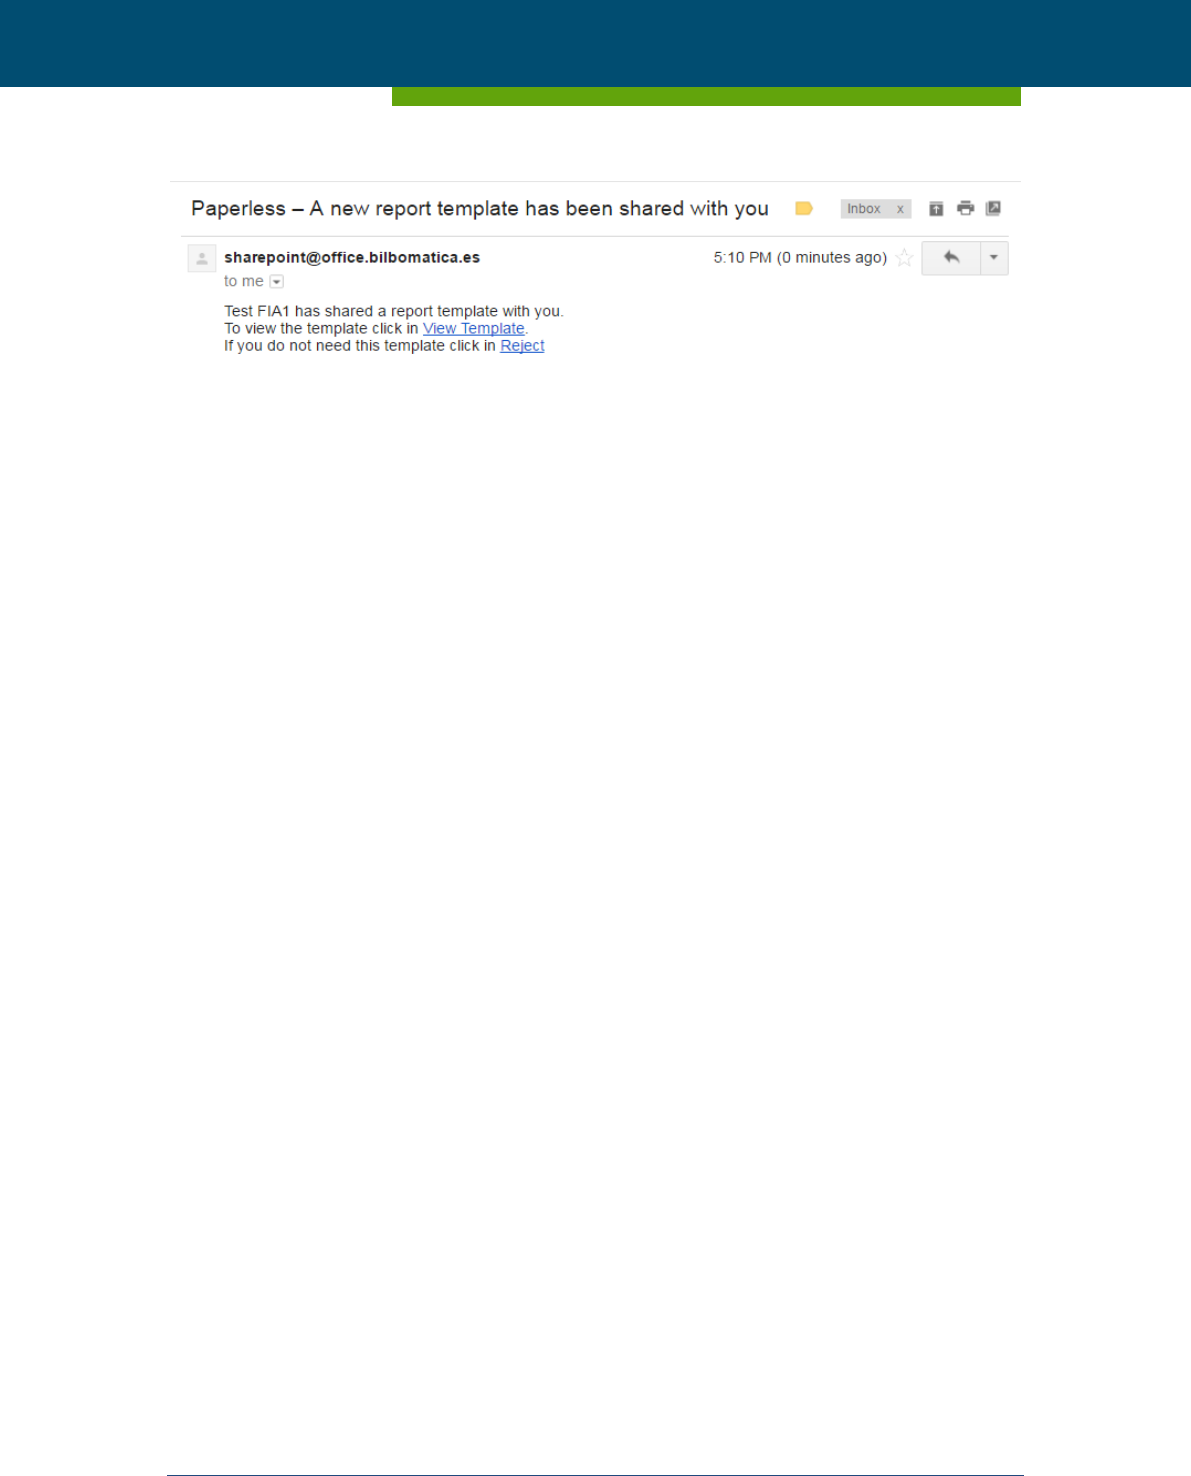
Users with access to a template will automatically receive an e-mail to view or reject the tem-
plate. If the email recipient rejects to have access to the shared template, the template will au-
tomatically be deleted from his/her list of templates.
ESMA - Purchase Order - 170018511EB1
ESMA - Paperless 1.1.0 User Manual
Page 65 of 73 BILBOMATICA
21/12/2017 v1.1.0
Figure 65 - E-mail content received when a template has been shared
12.4.6 How to receive reports by e-mail on a regular basis
Users can use the application to receive report by e-mail on a regular basis. This can be done
by ticking the “Send by e-mail regularly” checkbox (see Figure 66). It opens a new section
which allows configuring the frequency and the starting and ending date of the automatic
emails and the report recipients. By default in the “Report recipients” list the application will
add the template owner.
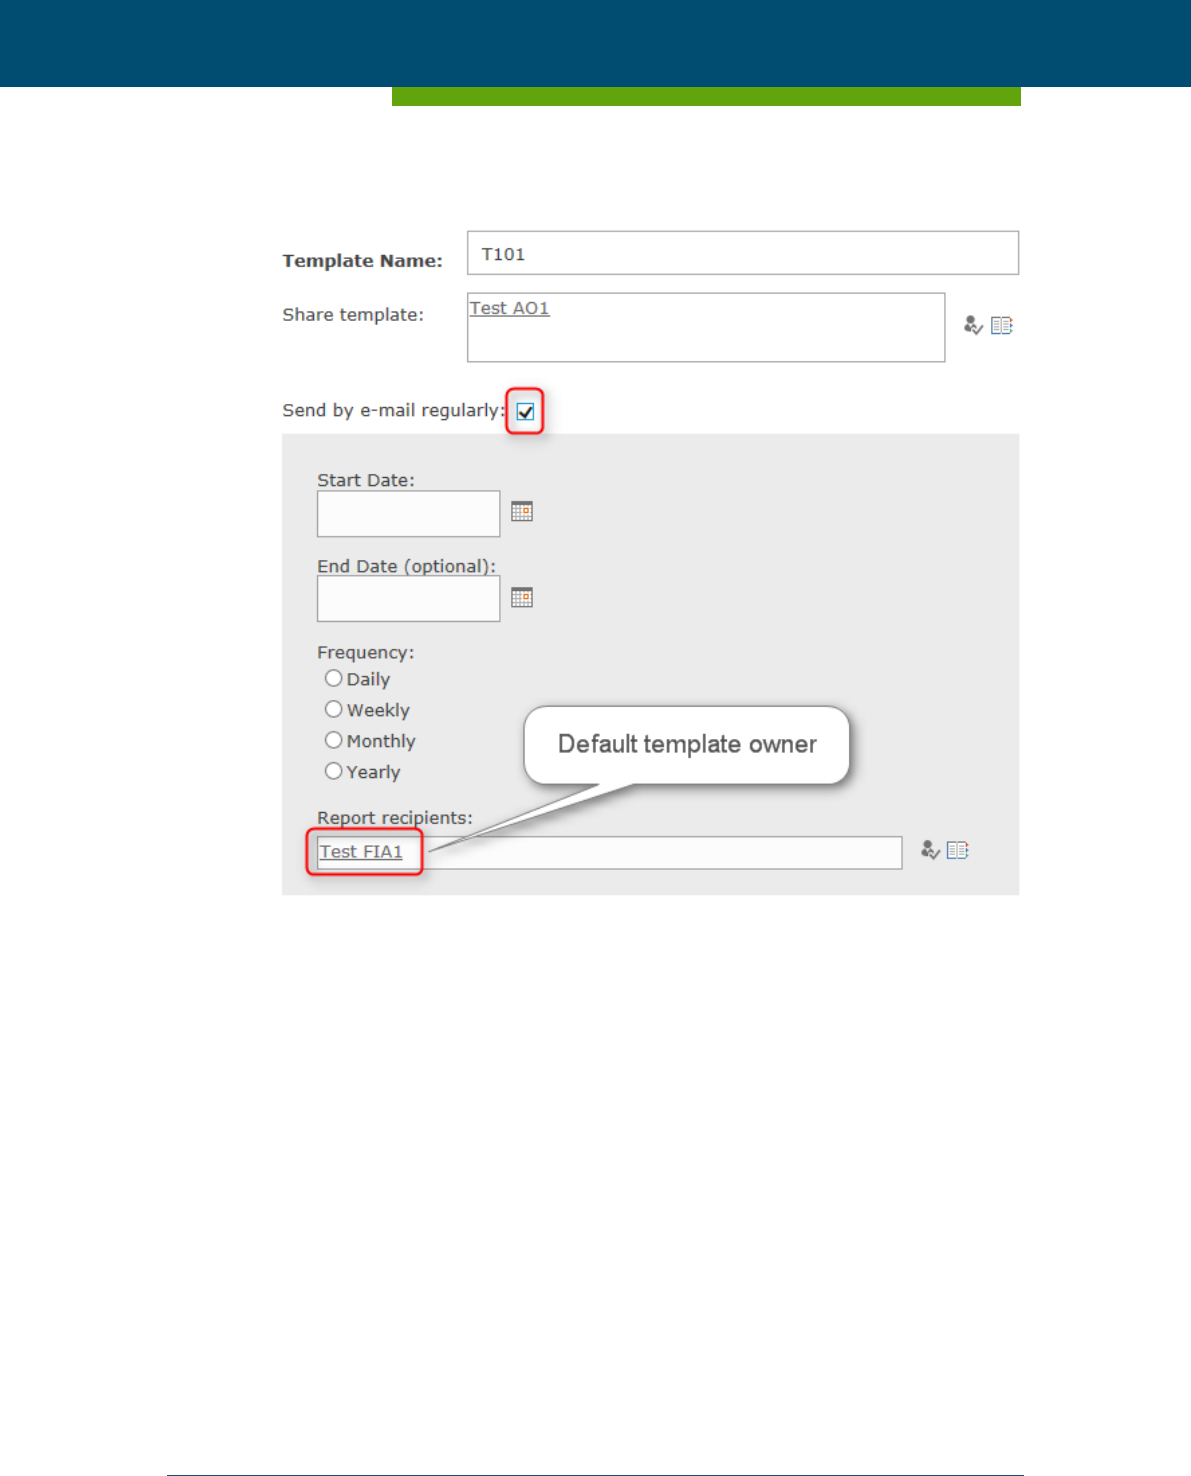
ESMA - Purchase Order - 170018511EB1
ESMA - Paperless 1.1.0 User Manual
Page 66 of 73 BILBOMATICA
21/12/2017 v1.1.0
Figure 66 - Automatic report sending configuration
Automatic reports sent by e-mail will contain an excel file format with the report information
defined in the corresponding template.
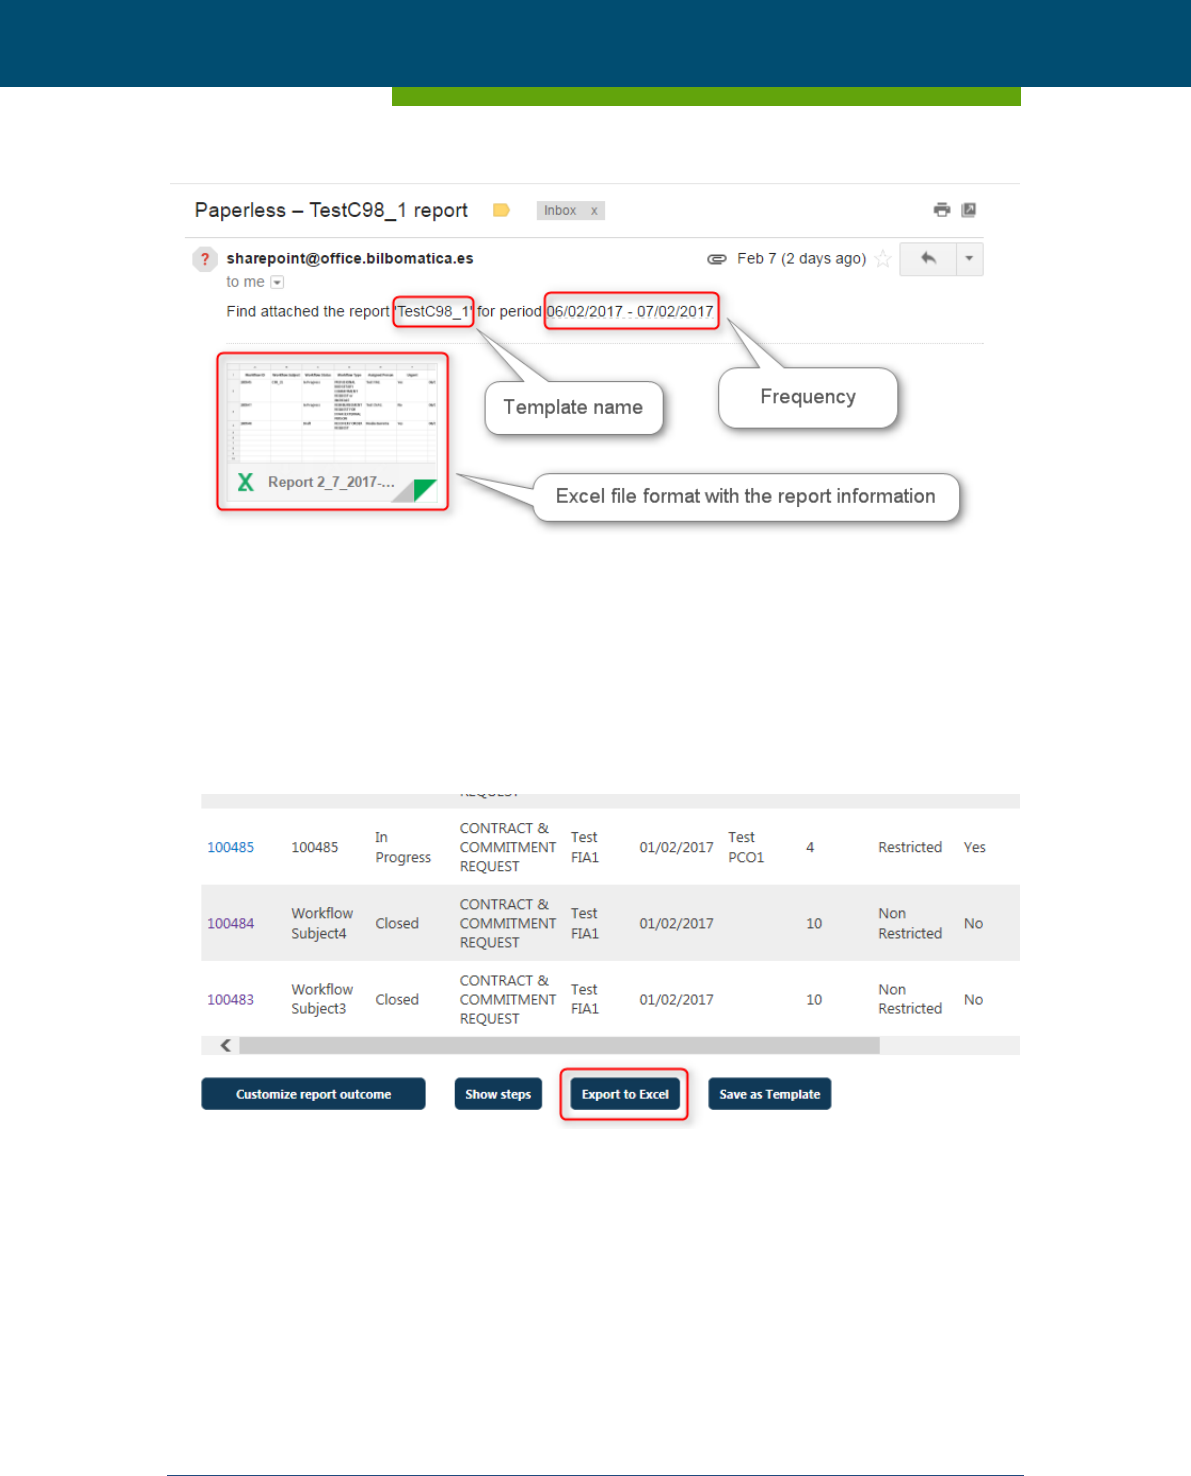
ESMA - Purchase Order - 170018511EB1
ESMA - Paperless 1.1.0 User Manual
Page 67 of 73 BILBOMATICA
21/12/2017 v1.1.0
Figure 67 - Report received by e-mail
12.5 How to save a report outcome
It is possible to save the report outcome by clicking on the “Export to Excel” button.
Figure 68 - Report saved in "My reports"
The report will be saved and stored under the “My reports” section in two formats:
HTML format
Excel file format
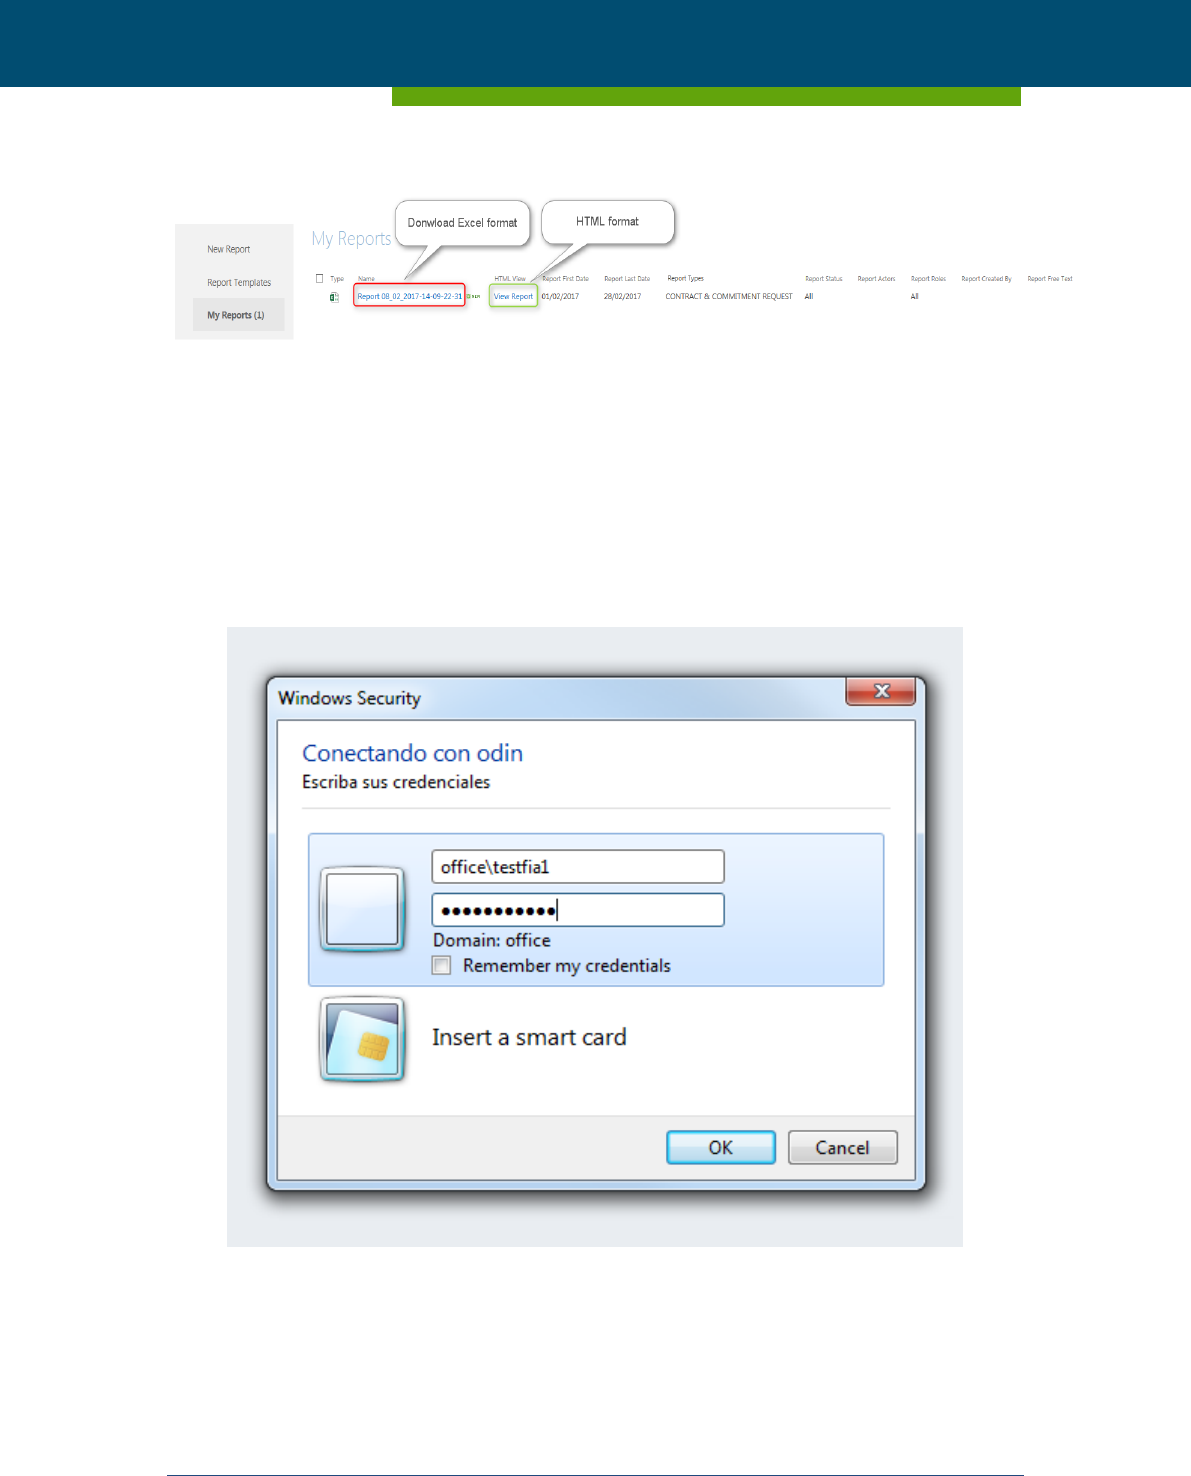
ESMA - Purchase Order - 170018511EB1
ESMA - Paperless 1.1.0 User Manual
Page 68 of 73 BILBOMATICA
21/12/2017 v1.1.0
Figure 69 – My Reports view
12.5.1 How to download a report in Excel format
In order to download a report in Excel format, click on the report name and provide a valid
username and password.
Figure 70 - Enter username and password to view excel report
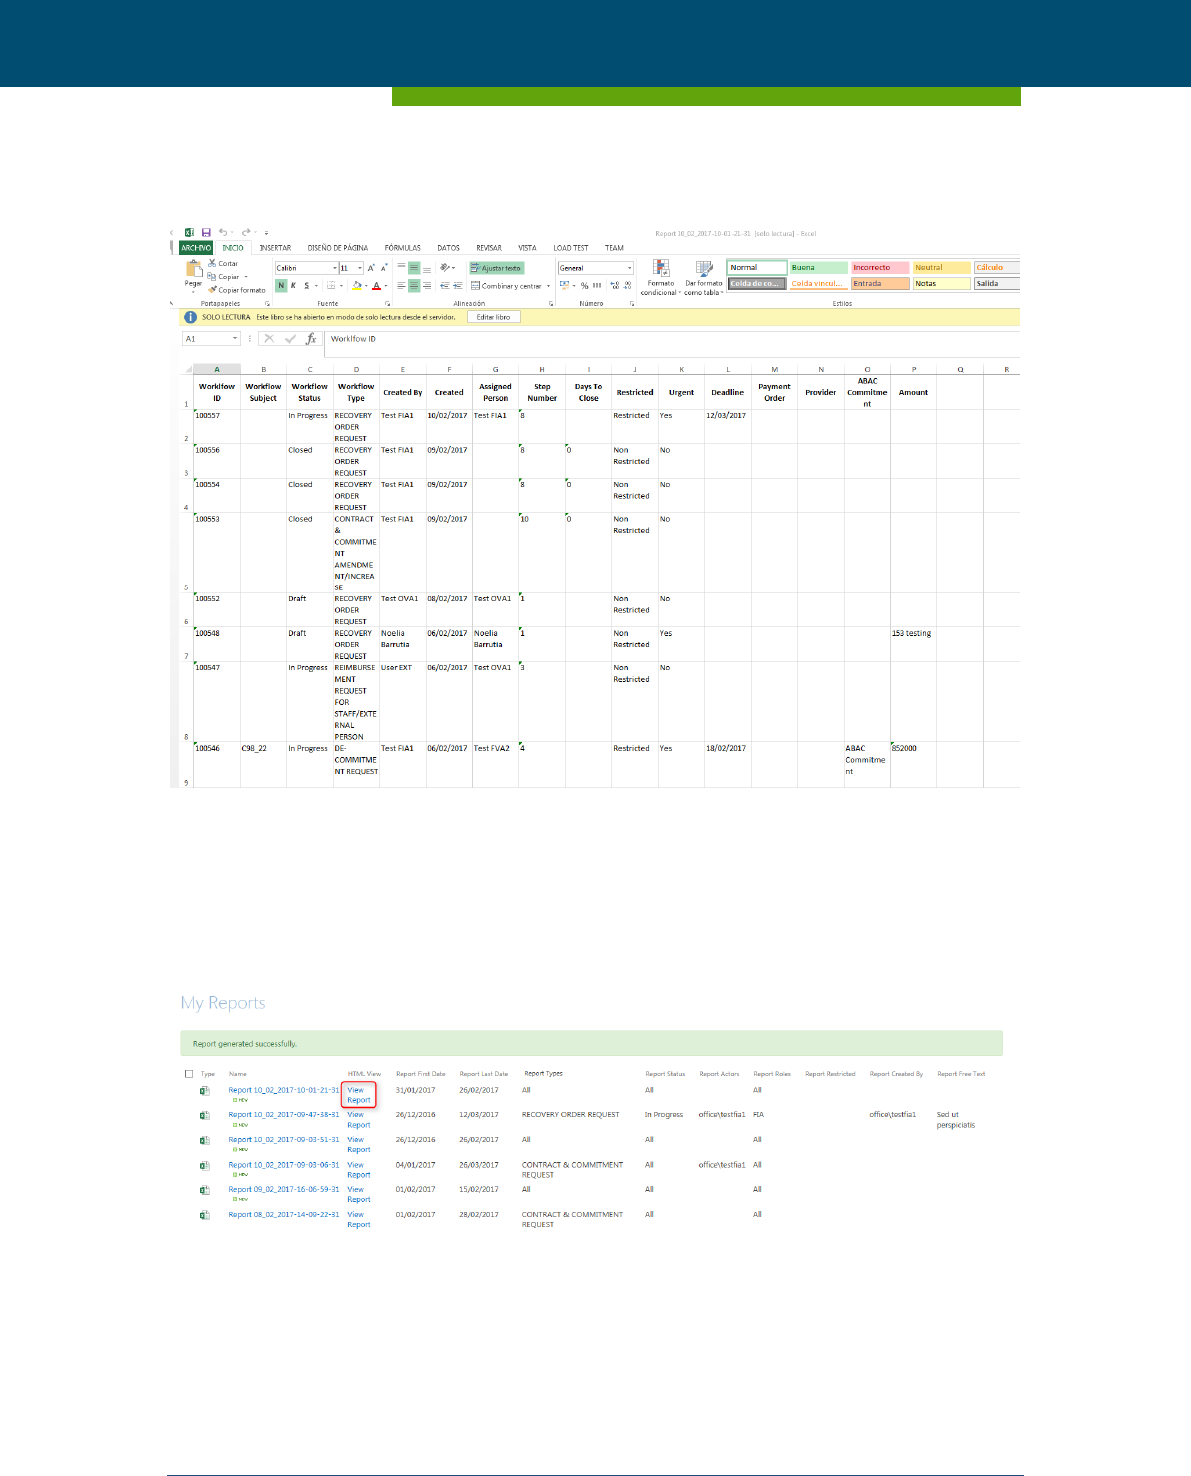
ESMA - Purchase Order - 170018511EB1
ESMA - Paperless 1.1.0 User Manual
Page 69 of 73 BILBOMATICA
21/12/2017 v1.1.0
Figure 71 - Report excel format
12.5.2 How to view a report in HTML format
In order to see a report in html format go to “My Reports” and click on “View Report”
Figure 72 - View Report in My Report
The report will be opened in another tab.
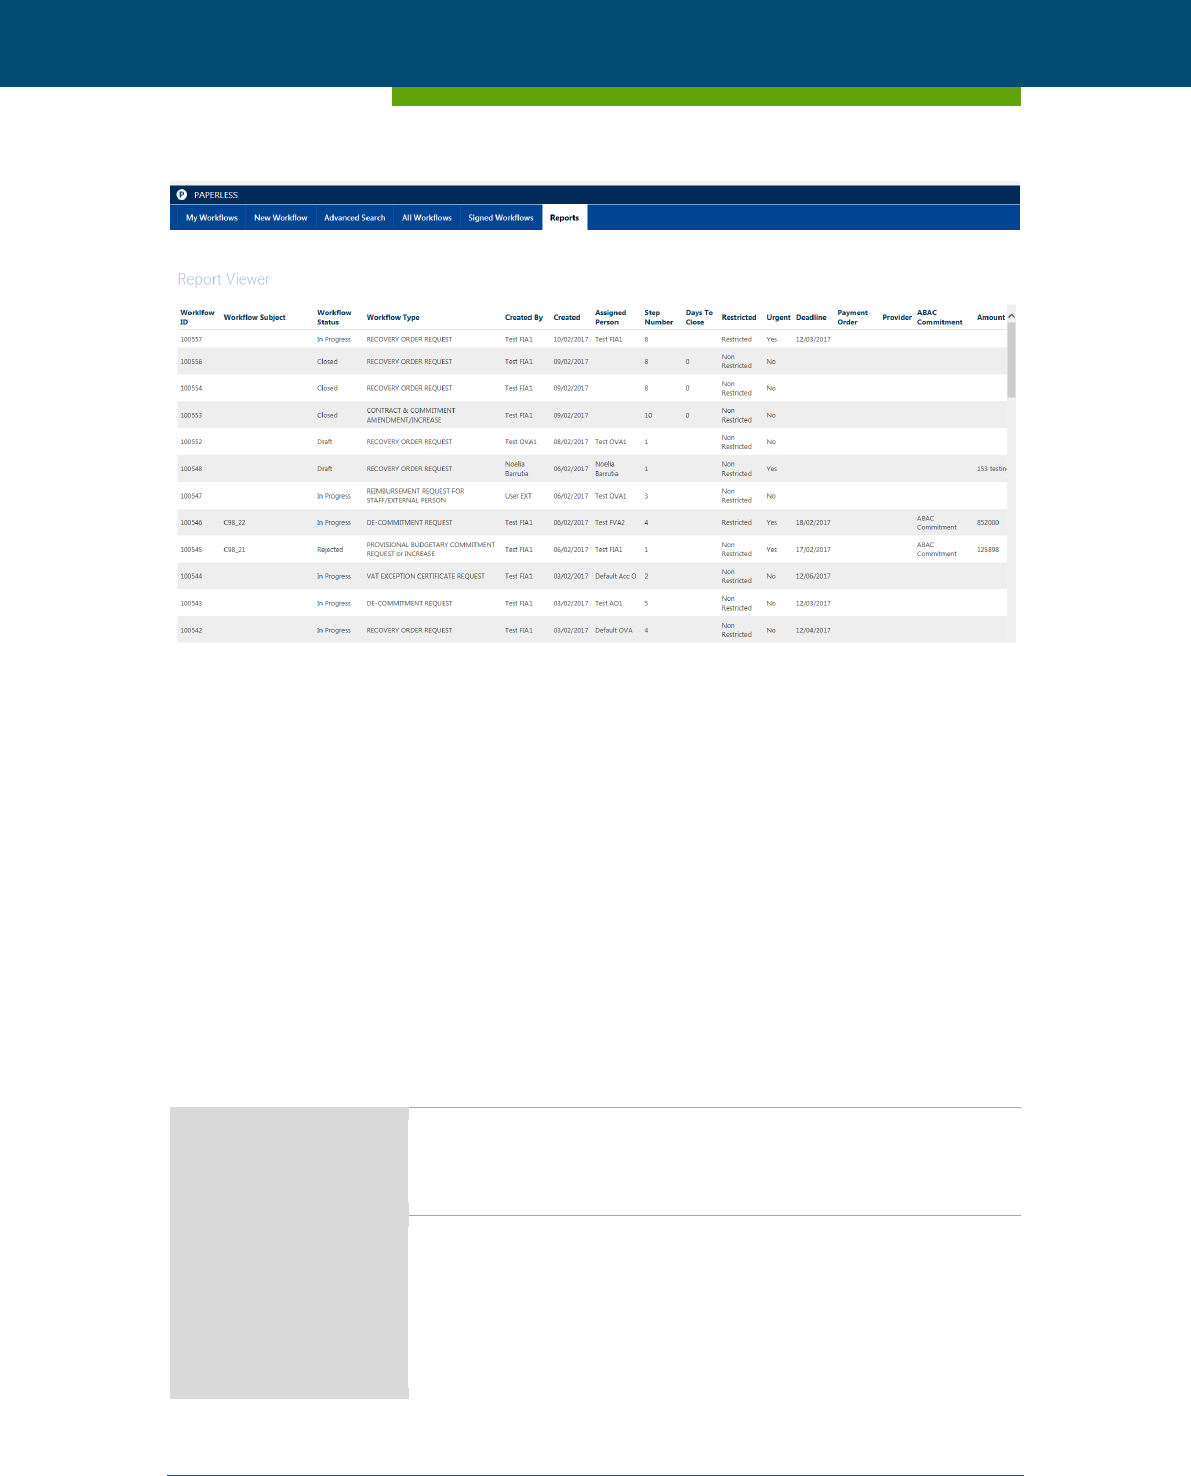
ESMA - Purchase Order - 170018511EB1
ESMA - Paperless 1.1.0 User Manual
Page 70 of 73 BILBOMATICA
21/12/2017 v1.1.0
Figure 73 - Report Viewer
13 Notifications Service
A reminder e-mail with a summary of all workflows that they have pending of signing, is sent to
users. The frequency of e-mails delivery is defined by administrators, being initially set to 24hrs.
The e-mail will contain a list of workflows pending of being signed grouped by “URGENT/NON-
URGENT”. It will show in first place the most urgent workflows.
As a general rule, the workflow in “On hold” status will be excluded from the list. The Paperless
administrator can decide whether the “On hold” workflows are included or not in notifications.
The content of the aforementioned notifications is as follows:
Subject
Paperless file for your action
Body
Dear [User Name],
URGENT WORKFLOWS
The file [WF Subject] [WF Status] is pending your action.
Please click on this link: [WF Link]
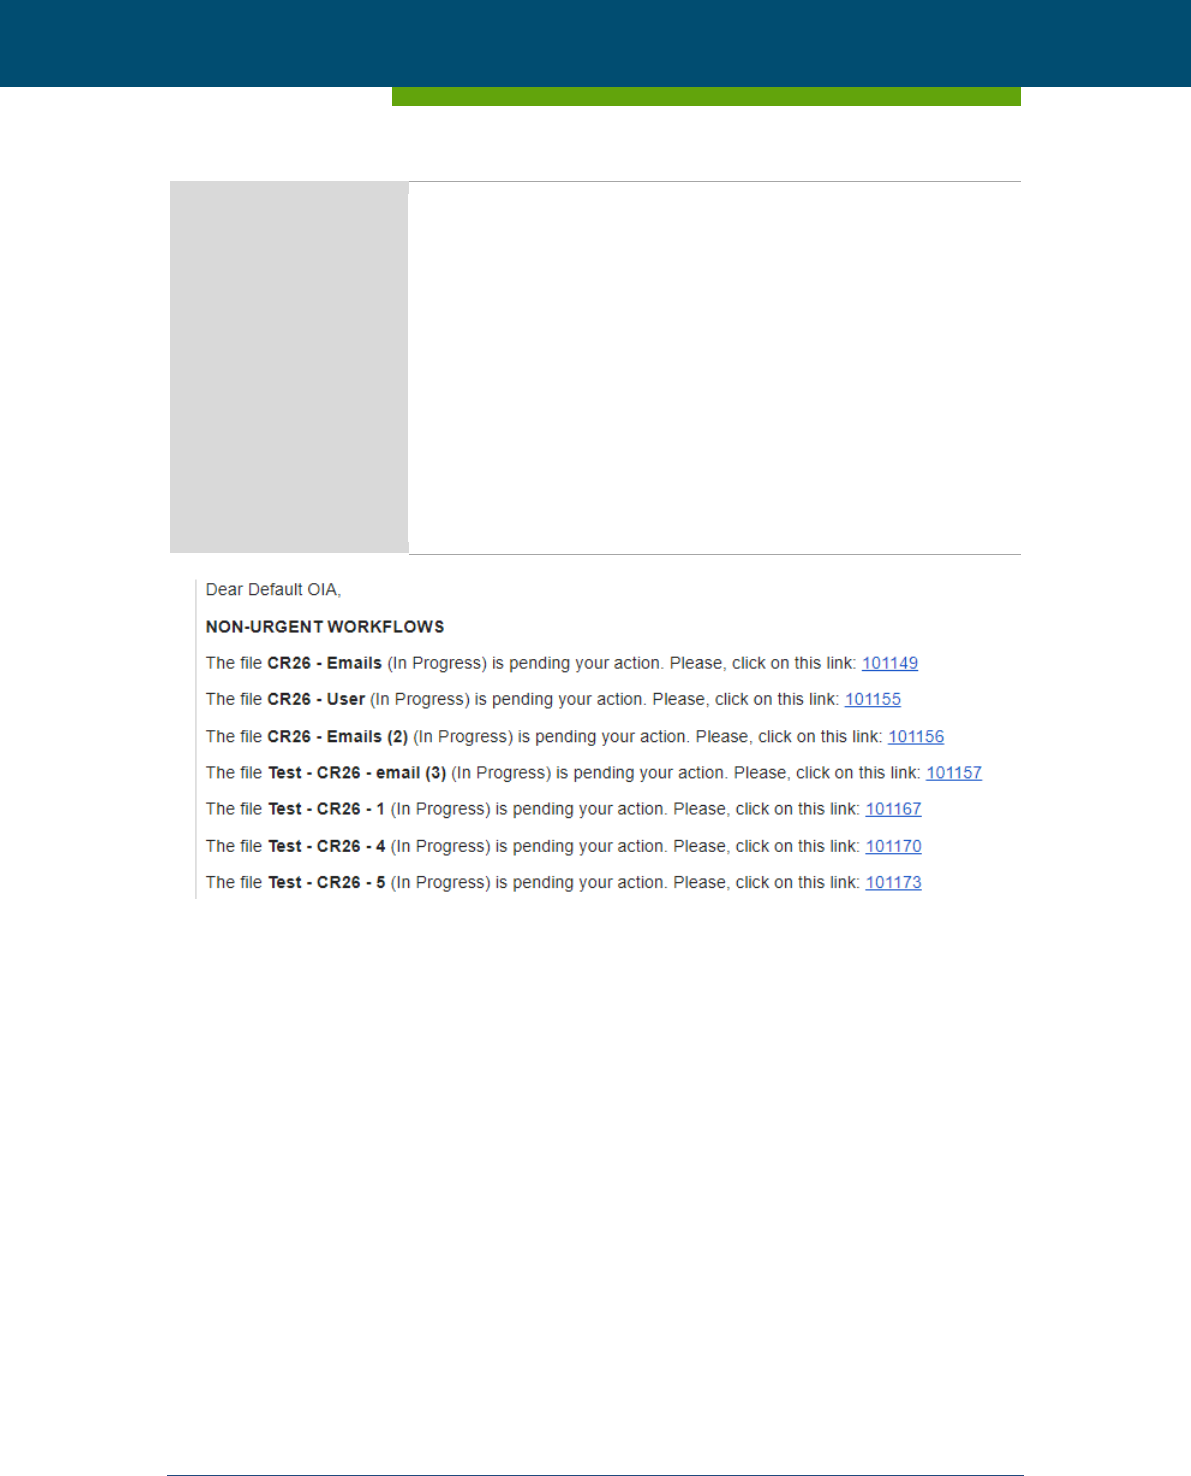
ESMA - Purchase Order - 170018511EB1
ESMA - Paperless 1.1.0 User Manual
Page 71 of 73 BILBOMATICA
21/12/2017 v1.1.0
NON-URGENT WORKFLOWS
The file [WF Subject] [WF Status] is pending your action.
Please click on this link: [WF Link]
This is an automated message, please do not reply.
Where:
(3) [WF Subject] is the subject of the workflow
(4) [WF Status] is the status of the workflow
(5) [WF Link] is the link to the workflow
(6) [User Name] is the Display Name of the assigned user.
Figure 74 – Notification Email
14 Printing Service
Paperless generates PDF files with the information of each Closed and Deleted workflow.
This PDF file is available from the workflow interface as shown in the following image.
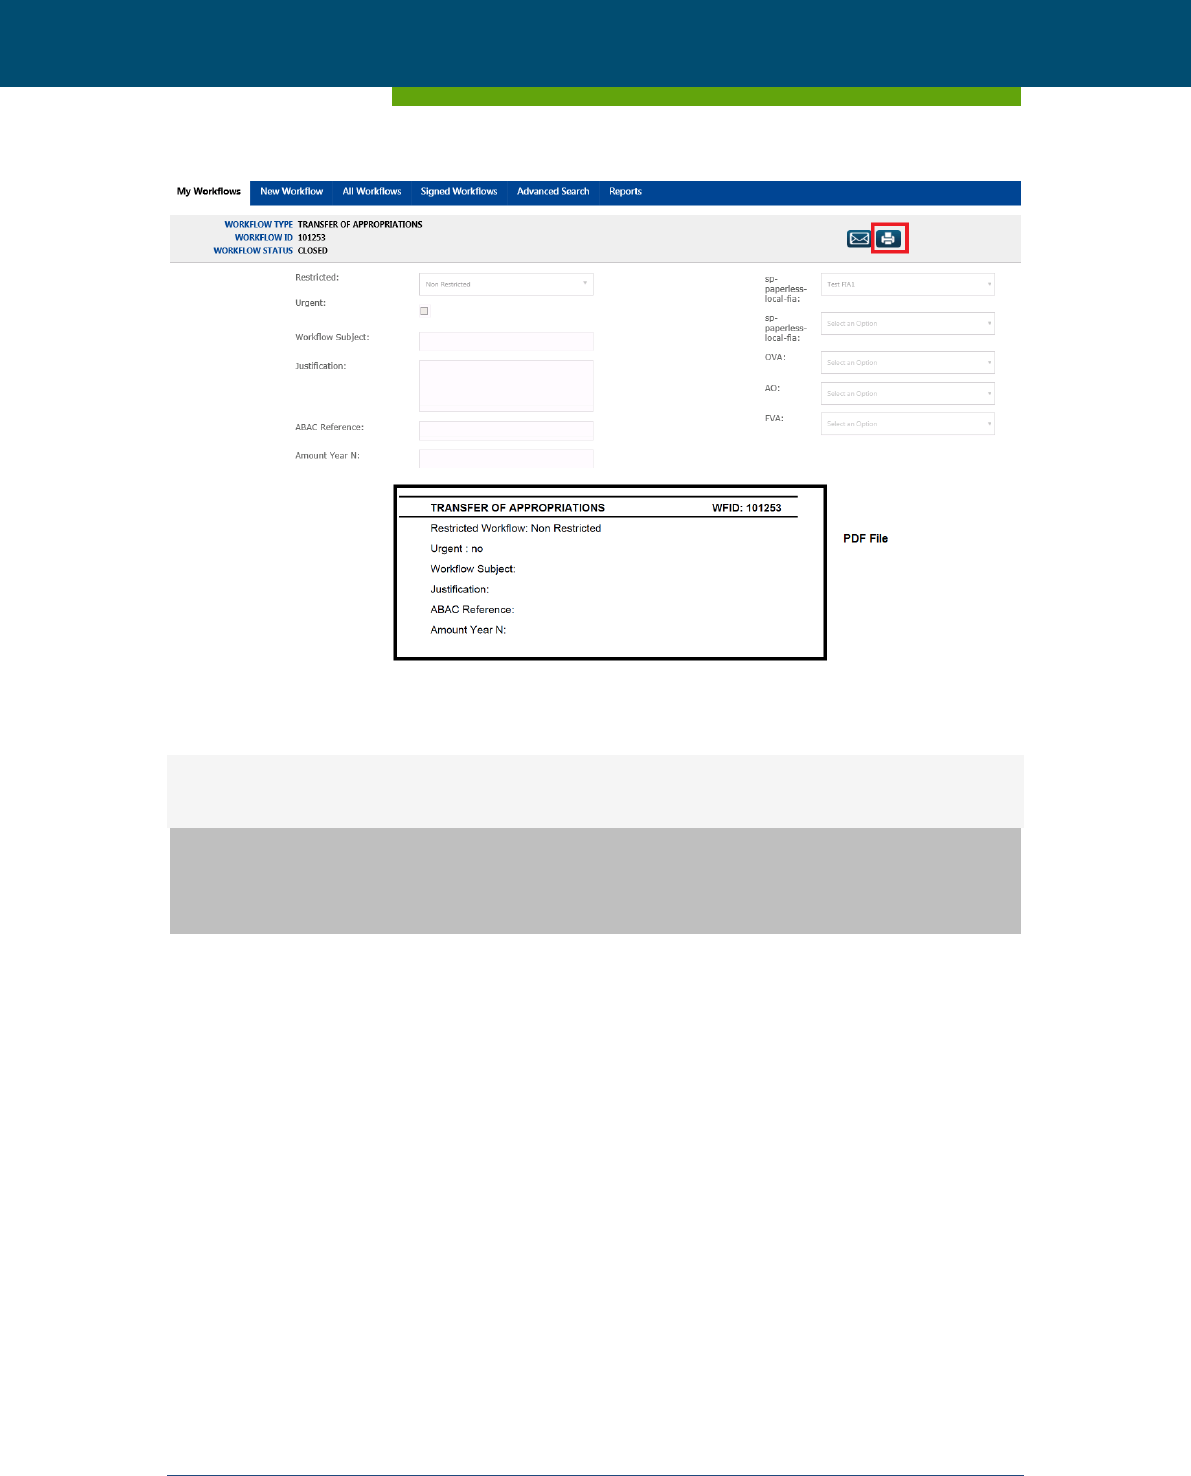
ESMA - Purchase Order - 170018511EB1
ESMA - Paperless 1.1.0 User Manual
Page 72 of 73 BILBOMATICA
21/12/2017 v1.1.0
Figure 75 – Link to printable document
The content of the printable document is as follows:
PDF File (only in Closed/Deleted workflows)
Workflow Information
A header with the Workflow Title and Workflow ID
General Fields
Actors assigned and the description of each step
Comments
Index
An index with the attached documents in the workflow and their print
order.
NOTE: Please note that only the following formats are allowed:
Word Documents: .doc, .docx
Excel Documents: .xls (*), .xlsx
PDF Documents: .pdf
Images: .png, .gif, .jpg, .bmp, .jpeg
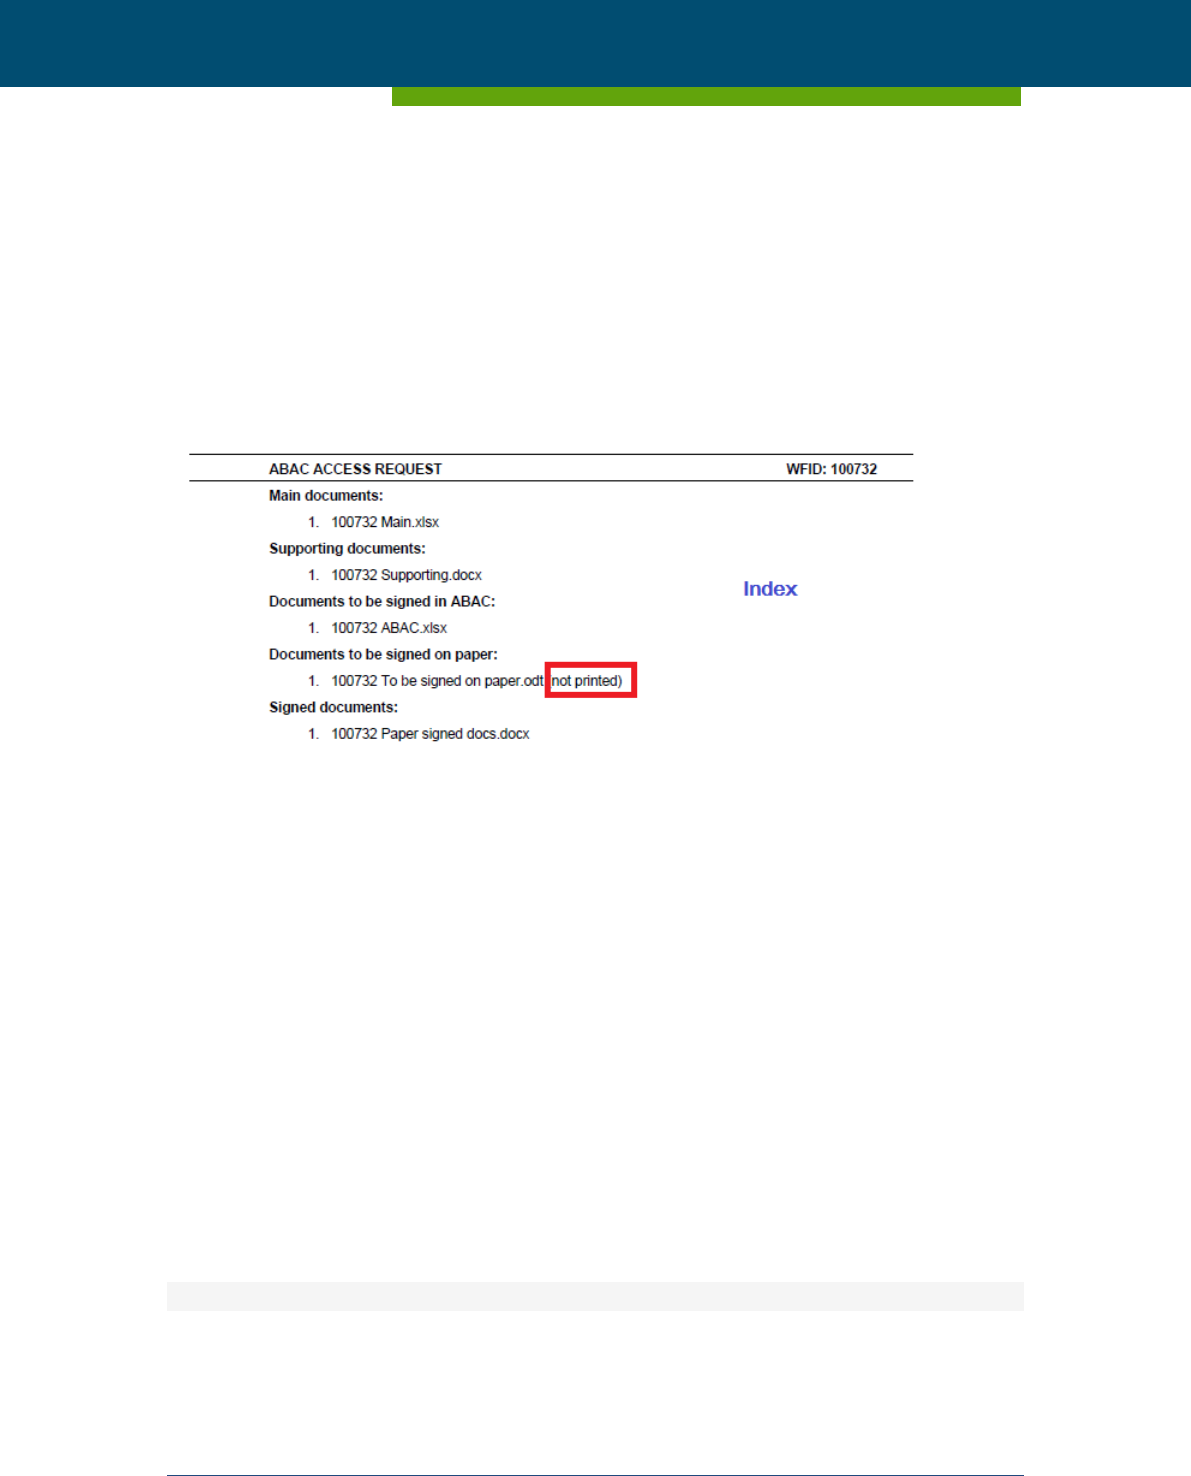
ESMA - Purchase Order - 170018511EB1
ESMA - Paperless 1.1.0 User Manual
Page 73 of 73 BILBOMATICA
21/12/2017 v1.1.0
Those documents with a different extension, they will be shown as
“(not printed)”.
(*) Warning: Even though .xls files are allowed, as the previsualization
in OWA is not supported, we do not recommend to add files with this
format.
Figure 76 – Index
Attached Files
Attached files will be separated by sections and only the documents
with an allowed extension will be included in the printed file.
Logs
It will be included a table with all actions done in the workflow. This
table will have the following columns:
Creation Date
Step Number
Workflow Status
Action Taken
Assigned Person
Computer Name
Action Details
Workflow Comment
