Administrator's Guide X548dte EWS HSP Security Admin Lexmark En
User Manual: X548dte
Open the PDF directly: View PDF ![]() .
.
Page Count: 79
- Contents
- Devices covered in this guide
- Managing authentication and authorization methods
- Understanding the basics
- Simple-security device access controls
- Limiting access using basic security setup
- Advanced-security building blocks
- Configuring advanced building blocks from the control panel
- Creating a password building block for advanced security setup
- Creating a PIN building block for advanced security setup
- Setting up internal accounts
- Connecting your printer to an Active Directory domain
- Using LDAP
- Using LDAP+GSSAPI
- Configuring Kerberos 5 for use with LDAP+GSSAPI
- Using a security template to control function access
- Managing certificates and other settings
- Managing devices remotely
- Managing other access functions
- Securing network connections
- Securing data
- Security solutions
- Security scenarios
- Troubleshooting
- Login troubleshooting
- USB device is not supported
- Printer home screen fails to return to a locked state when not in use
- Login screen does not appear when a smart card is inserted
- KDC and MFP clocks are out of sync
- Kerberos configuration file is not uploaded
- Cannot authenticate users
- Domain controller certificate is not installed
- KDC does not respond within the required time
- Cannot find user realm in the Kerberos configuration file
- Cannot find realm on card in the Kerberos configuration file
- Client is unknown
- Login does not respond at “Getting User Info”
- User is logged out automatically
- LDAP troubleshooting
- LDAP lookups take a long time and then fail
- LDAP lookups fail almost immediately
- Make sure that the Address Book Setup contains the host name for the LDAP server
- Make sure that the Address Book Setup settings are correct
- Narrow the LDAP search base to the lowest possible scope that includes all necessary users
- Make sure that the LDAP attributes for the user e-mail address and home directory are correct
- Held Jobs/Print Release Lite troubleshooting
- Login troubleshooting
- Appendix
- Glossary of Security Terms
- Index


Contents
Devices covered in this guide.......................................................................4
Simple‑security devices.............................................................................................................................4
Advanced‑security devices........................................................................................................................4
Managing authentication and authorization methods..................................5
Understanding the basics..........................................................................................................................5
Simple-security device access controls.....................................................................................................8
Limiting access using basic security setup...............................................................................................10
Advanced-security building blocks..........................................................................................................10
Using a security template to control function access.............................................................................20
Managing certificates and other settings....................................................24
Installing a Certificate Authority certificate on the device......................................................................24
Configuring the device for certificate information..................................................................................24
Managing devices remotely........................................................................28
Using HTTPS for device management.....................................................................................................28
Setting a backup password......................................................................................................................28
Setting up SNMP......................................................................................................................................29
Configuring security audit log settings....................................................................................................30
Updating firmware..................................................................................................................................31
Managing other access functions...............................................................33
Configuring confidential printing............................................................................................................33
Setting login restrictions..........................................................................................................................34
Enabling and disabling USB host ports....................................................................................................34
Enabling the security reset jumper.........................................................................................................35
Enabling holding faxes.............................................................................................................................36
Enabling Operator Panel Lock.................................................................................................................36
Securing network connections....................................................................38
Configuring 802.1X authentication.........................................................................................................38
Configuring IP security settings...............................................................................................................39
Configuring the TCP/IP port access setting.............................................................................................41
Setting the restricted server list..............................................................................................................41
Contents 2

Securing data.............................................................................................42
Physical lock............................................................................................................................................42
Disk encryption........................................................................................................................................43
Checking disk encryption status..............................................................................................................44
Erasing settings (non‑volatile memory)..................................................................................................44
Disk file wiping........................................................................................................................................46
Erasing hard disk data.............................................................................................................................48
Out‑of‑service wiping..............................................................................................................................49
Statement of volatility.............................................................................................................................50
Security solutions.......................................................................................52
Print Release............................................................................................................................................52
Secure Held Print Jobs.............................................................................................................................52
Card Authentication................................................................................................................................52
Smart Card authentication......................................................................................................................52
Security scenarios......................................................................................54
Scenario: Printer in a public place...........................................................................................................54
Scenario: Standalone or small office.......................................................................................................55
Scenario: Network running Active Directory...........................................................................................56
Scenario: More security‑aware environment (802.1X) and SNMPv3......................................................57
Scenario: Network‑based usage restrictions using access card..............................................................57
Troubleshooting.........................................................................................59
Login troubleshooting.............................................................................................................................59
LDAP troubleshooting.............................................................................................................................62
Held Jobs/Print Release Lite troubleshooting.........................................................................................63
Appendix....................................................................................................66
Glossary of Security Terms.........................................................................76
Index..........................................................................................................77
Contents 3

Devices covered in this guide
There are two levels of security supported based on the product definition. For a complete list of available functionality,
see “Authentication and authorization” on page 5.
Simple‑security devices
C540, C543, C544, C546, C746, E260d, E260dn, E360d, E360dn, X264dn, X363dn, X364dn, X364dw, X543, X544, X546dtn
Advanced‑security devices
C73x, C748, C792, C925, C950, E460dn, E460dw, E462dtn, T650, T652, T654, T656, W850, X464de, X466, X548de,
X548dte, X65x, X73x, X74x, X792, X796, X86x, X925, X950, X952, X954
Devices covered in this guide 4
Managing authentication and authorization
methods
Understanding the basics
Securing a printer through the Embedded Web Server involves combining one or more components to define who is
allowed to use the printer, and which functions those users are allowed to access. Available components include
Authentication, Authorization, and Groups.
Create a plan that identifies who the users will be and what they will need to do before configuring printer security.
Items to consider might include:
•The location of the printer and whether authorized persons have access to that area
•Sensitive documents that will be sent to or stored on the printer
•Information security policies of your organization
Authentication and authorization
Authentication is the method by which a system securely identifies a user.
Authorization specifies which functions are available to a user who has been authenticated by the system. This set of
authorized functions is also referred to as “permissions.”
There are two levels of security that are supported based on the product definition. Simple security only supports
internal device authentication and authorization methods. More advanced security permits internal and external
authentication and authorization as well as additional restriction capability for management, function, and solution
access. Advanced security is supported for those devices that permit the installation of additional solutions to the
device.
Simple security uses Panel PIN Protect to restrict user access to the printer control panel and Web Page Password
Protect to restrict administrator access to the device. For more information, see “Creating a PIN and applying access
control restriction” on page 9 and “Creating a Web page password and applying access control restrictions” on
page 8.
Advanced‑security devices support the following:
•PIN and password restrictions in addition to the other authentication and authorization specified
•Multiple local authentication functions that support PIN, password, and user name‑password combinations
•Standard network authentication through LDAP, LDAP+GSSAPI, Kerberos, and Active Directory
Authorization can be specified individually or by groups (either local or network). Devices that support advanced-level
security are capable of running installed solutions, which permits usage of card readers to provide advanced two-factor
authentication.
Managing authentication and authorization methods 5

Function Simple‑security devices Advanced‑security devices
Panel PIN Protect X
PIN Protection X
Web Page Password Protect X
Password Protection X
Internal Accounts (Username and Username/Password) X
Groups (internal) X
LDAP X
LDAP+GSSAPI X
Kerberos 5 X
Active Directory*X
Limited access controls X
Access controls (complete) X
Security Templates X
Basic Security Setup X
= Supported
X = Not supported
* Available only in some printer models
The device handles authentication and authorization using one or more of the following, also referred to as building
blocks:
•PIN or Panel PIN Protect
•Password or Web Page Password Protect
•Internal Accounts
•LDAP
•LDAP+GSSAPI
•Kerberos 5 (used only with LDAP+GSSAPI and the Smart Card Authentication application)
•Active Directory (available only in some printer models)
To provide simple security, use either PIN and Password, or Panel PIN Protect and Web Page Password Protect. This
type of security might be appropriate if a printer is located in a lobby or other public area of a business, so that only
employees who know the password and PIN are able to use the printer. Passwords and PINs are considered less secure
than other building blocks because they do not require a user to be identified or authorized.
Note: The device default settings do not contain any authentication or authorization building blocks, so everyone
has unrestricted access to the device.
Managing authentication and authorization methods 6
Groups
Administrators can designate up to 32 groups to be used in association with either the Internal accounts or LDAP/LDAP
+GSSAPI building blocks. To ensure device security, groups are used to identify sets of users needing access to similar
functions. For example, in Company A, employees in the warehouse do not need to print in color, but employees in
sales and marketing use color every day. In this scenario, you can create a “Warehouse” group and a “Sales and
Marketing” group.
Access Controls
By default, all device menus, settings, and functions come with no security enabled. Access controls (also referred to
in some devices as “Function Access Controls”) are used to manage access to specific menus and functions or to disable
them entirely. Access controls can be set using a password, PIN, or security template. The number of functions that
can be controlled varies depending on the type of device, but in some multifunction printers, over 40 individual menus
and functions can be protected.
Note: For a list of individual access controls and what they do, see “Appendix C: Access controls” on page 66.
Security Templates
Some scenarios call for only limited security, such as PIN‑protected access to common device functions, while others
require tighter security and role‑based restrictions. Individually, building blocks, groups, and access controls may not
meet the needs of a complex security environment. In order to accommodate users in different groups needing access
to a common set of functions such as printing, copying, and faxing, administrators must be able to combine these
components in ways that give all users the functions they need, while restricting other functions to only authorized
users.
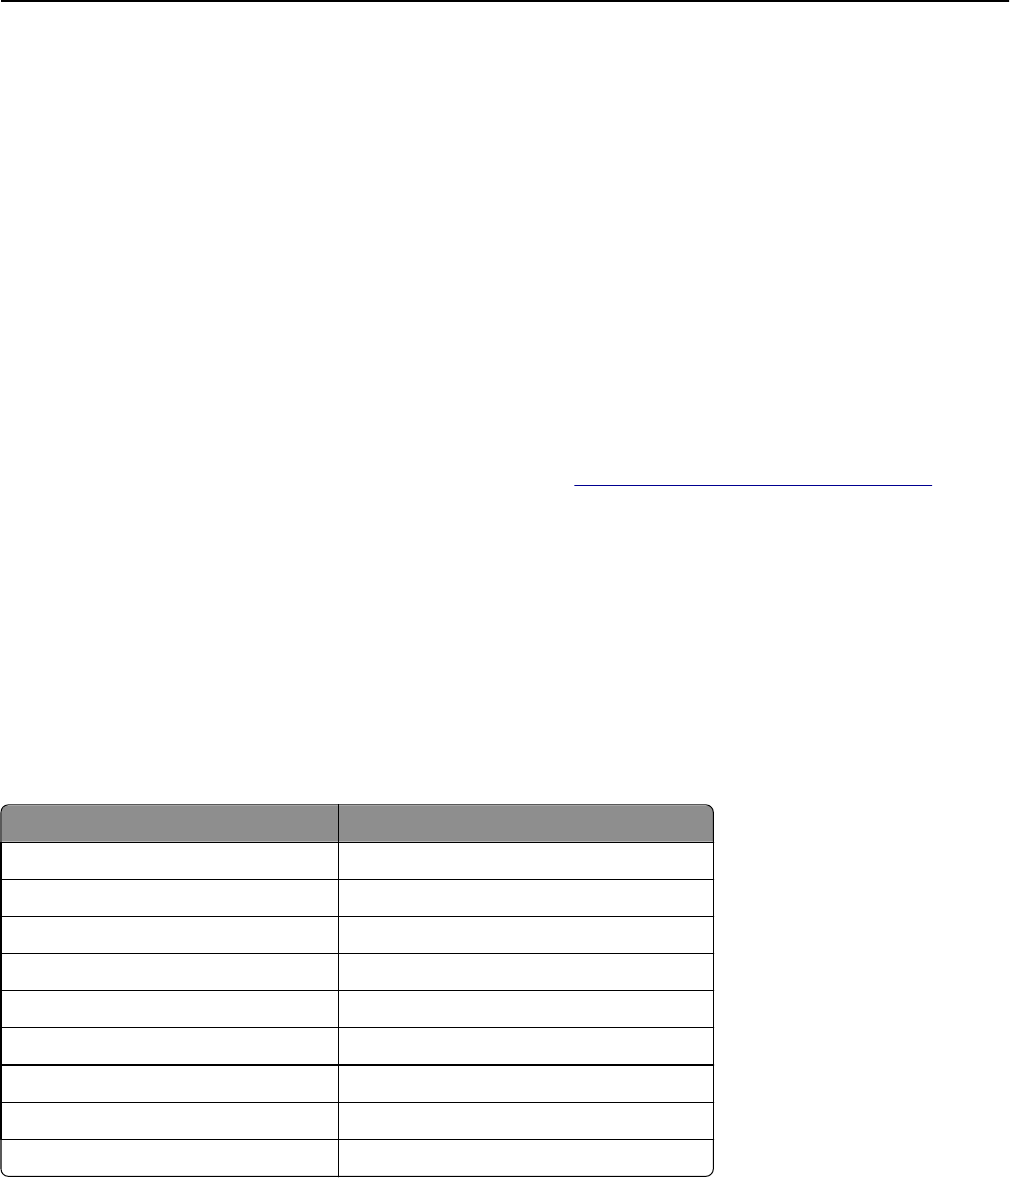
A security template is a profile constructed using a building block, or certain building blocks paired with one or more
groups. How they are combined determines the type of security created:
Building block Type of security
Internal Accounts Authentication only
Internal Accounts with Groups Authentication and authorization
Kerberos 5 Authentication only
LDAP Authentication only
LDAP with Groups Authentication and authorization
LDAP+GSSAPI Authentication only
LDAP+GSSAPI with Groups Authentication and authorization
Password Authorization only
PIN Authorization only
Each device can support up to 140 security templates, allowing administrators to create very specific profiles for each
access control.
Accessing the Embedded Web Server
Open a Web browser, and then type the printer IP address.
Managing authentication and authorization methods 7

To obtain the printer IP address, print a network setup page, and then locate the TCP/IP section. For more information
on printing a network setup page, see the printer User’s Guide.
We recommend using HTTPS when connecting to the Embedded Web Server to prevent network viewing of the data
being entered. For example, type HTTPS://ip_address.
Note: When you access the Embedded Web Server, a warning message may appear. Proceed by continuing to
connect to the device IP address.
Simple-security device access controls
Creating a Web page password and applying access control restrictions
For simple‑security devices, Web page access control is limited to creating a password and applying access restrictions
through Web Page Password Protect on the device EWS.
Note: This feature is available only in simple‑security devices.
1From the Embedded Web Server, click Settings > Security > Web Page Password Protect.
2Create a user password.
Depending on your printer, do either of the following:
•Under “Basic Security Setup: Create User Password,” type a password in the appropriate field, retype the
password to confirm it, and then click Modify.
•Select Create User Password, type a password in the appropriate field, retype the password to confirm it, and
then click Submit.
3Create an administrator password.
Depending on your printer, do either of the following:
•Under “Basic Security Setup: Create Admin Password,” type a password in the appropriate field, retype the
password to confirm it, and then click Modify.
•Select Create Advanced Password, type a password in the appropriate field, retype the password to confirm it,
and then click Submit.
Notes:
•Functions or settings protected by a user‑level password can be accessed using any administrator‑level
password.
•To delete a password, click Delete Entry.
4From the function drop‑down menu, select one of the following security template settings:
•Admin Password Protected
•Admin and User Password Protected
•No Security
•Disable
Note: This setting is available only in some functions.
5Click Submit.
Managing authentication and authorization methods 8

Creating a PIN and applying access control restriction
For simple‑security devices, control panel access control is limited to creating a PIN and applying access restrictions
through the Panel PIN Protect security control.
Typically, personal identification numbers (PINs) are used to control access to a device or specific device menus. PINs
can also be required when retrieving a held print, copy, or fax job.
Note: This feature is available only in simple‑security devices.
1From the Embedded Web Server, click Settings > Security > Panel PIN Protect.
2Depending on your printer, do either of the following:
Creating a user and administrator PIN and applying restrictions
aUnder “Basic Security Setup: Create User PIN,” enter a PIN in the appropriate field, and then reenter the PIN to
confirm it.
bUnder “Basic Security Setup: Create Admin PIN,” enter a PIN in the appropriate field, and then reenter the PIN
to confirm it.
Note: Functions or settings protected by a user PIN can be accessed using any administrator PIN.
cClick Modify, and then select one of the following security template settings for each function:
•Admin Password Protected
•Admin and User Password Protected
•No Security
•Disable
Note: This setting is available only in some functions.
Creating a PIN and applying restrictions
aUnder Create PIN, enter a PIN in the appropriate field, and then reenter the PIN to confirm it.
bUnder Panel PIN Protect, select the functions that you want to protect.
3Click Submit.
Managing authentication and authorization methods 9

Limiting access using basic security setup
Use Basic Security Setup to limit access to the Embedded Web Server settings and the configuration menus on the
printer control panel. This selection allows the definition of simple internal device security authentication methods.
Notes:
•This feature is available only in advanced‑security printer models as a simple‑security access restriction method.
•The device default settings do not contain any authentication or authorization building blocks, so everyone has
unrestricted access to the Embedded Web Server.
Applying basic security setup
1From the Embedded Web Server, click Settings > Security > Security Setup.
2Under Basic Security Setup, from the Authentication Type menu, select one of the following:
•PIN—Enter a PIN number. Each PIN must be 4–16 digits in length.
•Password—Type the password. Each password must have a unique name containing up to 128 UTF‑8 characters.
•User ID and Password—Type a unique user ID, and then type the password. Each password must have a unique
name containing up to 128 UTF‑8 characters.
3Click Apply Basic Security Setup.
Note: Applying this setup may overwrite a previous configuration.
The new settings are submitted. The next time you access Security Setup, you will be required to enter your
authentication credentials.
Modifying or removing basic security setup
1From the Embedded Web Server, click Settings > Security > Security Setup.
2Enter your authentication credentials to access Security Setup.
3Under Modify or Remove Basic Security Setup, enter your new authentication credentials.
4Click Modify Basic Security Setup to enter your new authentication credentials to access Security Setup, or click
Remove Basic Security Setup to remove all authentication requirements.
Advanced-security building blocks
To define the authentication required when accessing device functions and menus, create and configure a login method
(building blocks) first.
Advanced‑security building blocks used in security templates are found under “Configure a Building Block.”
Configuring advanced building blocks from the control panel
We recommend configuring security setup using the device Embedded Web Server. These steps in configuring security
setup are the same for all advanced‑security devices.
Managing authentication and authorization methods 10

When configuring from the control panel, the steps may vary depending on your printer model. For example, for devices
with a large touch screen, you can access the security setup by doing the following:
1Navigate to the menu screen.
2Touch Security > Edit Security Setups.
Creating a password building block for advanced security setup
Note: This feature is available only in advanced‑security devices.
1From the Embedded Web Server, click Settings > Security > Security Setup.
2Under Advanced Security Setup, click Password.
3Under Manage Passwords, select Add a Password.
4In the Setup Name field, type a name for the password.
Note: Each password must have a unique name containing up to 128 UTF‑8 characters. For example, “Copy
Lockout Password.”
5Type a password in the appropriate field, and then retype the password to confirm it.
6If the password is used as the administrator password, then select Admin Password.
Note: Functions or settings protected by a user‑level password can be accessed using any administrator‑level
password.
7Click Submit.
Notes:
•To edit a password, select a password from the list, and then modify the settings.
•To delete a password, select a password from the list, and then click Delete Entry.
•To delete all passwords in the list, click Delete List.
Creating a PIN building block for advanced security setup
Note: This feature is available only in advanced‑security devices.
Personal identification numbers (PINs) are used to control access to specific device menus or to a device itself. PINs can
also be required when retrieving a held print, copy, or fax job.
1From the Embedded Web Server, click Settings > Security > Security Setup.
2Under Advanced Security Setup, click PIN > Add a PIN.
3In the Setup Name field, type the name of the PIN configuration.
Note: Each PIN must have a unique name containing up to 128 UTF‑8 characters. For example, “Copy Lockout
PIN.”
4Type a PIN in the appropriate field, and then retype the PIN to confirm it.
5If the PIN is used as the Administrator PIN, then click Admin PIN.
6Click Submit.
Managing authentication and authorization methods 11

Changing the PIN length
1Click Settings > Security > Miscellaneous Security Settings.
2Enter a number in the Minimum PIN Length field.
3Click Submit.
Setting up internal accounts
Note: This feature is available only in advanced‑security devices.
Administrators can configure one internal account building block per supported device. Each internal account building
block can include a maximum of 750 user accounts and 32 user groups.
You can use this building block by itself in a security template to provide authentication‑level security, or with other
groups to provide both authentication and authorization.
Defining user groups
Before you begin, do the following:
•Create a list of all the users in the group.
•Identify the device functions needed for all users and for specific users.
Note: When a security template is assigned to a group, a role is created. Users can be assigned to more than one
group or role.
Using the Embedded Web Server
1From the Embedded Web Server, click Settings > Security > Security Setup.
2Under Advanced Security Setup, click Internal Accounts > Setup groups for use with internal accounts.
3Type the group name.
Note: Group names can contain up to 128 UTF‑8 characters.
4Click Add.
Using the control panel
Note: These instructions apply only in printer models with a touch‑screen display.
1Navigate to the menu screen.
2Touch Security > Edit Security Setups > Edit Building Blocks > Internal Accounts > General Settings > Groups for
Internal Accounts > Add Entry.
3In the Name field, type a group name.
4Touch Done.
Creating user accounts
Note: We recommend creating groups before creating a user account.
Managing authentication and authorization methods 12

Using the Embedded Web Server
1Click Settings > Security > Security Setup.
2Under Advanced Security Setup, click Internal Accounts > Add an Internal Account.
3Provide the information needed for each account:
•Account Name—Type the account name of the user. For example, “Jack Smith.” You can use up to 164 UTF‑8
characters.
•User ID—Type an ID for the account. For example, “jsmith.” You can use up to 128 UTF‑8 characters.
•Password—Type a password of between 8 and 128 characters.
•Re‑enter Password—Type the password entered in the preceding field.
•E‑mail—Type the e-mail address of the user. For eample, “jsmith@company.com.”
•Groups—Select the groups to which the account belongs. Hold down the Ctrl key to select multiple groups for
the account.
4Click Submit.
Using the control panel
Note: These instructions apply only in printer models with a touch‑screen display.
1Navigate to the menu screen.
2Touch Security > Edit Security Setups > Edit Building Blocks > Internal Accounts > General Settings.
3Set Required User Credentials to User ID and password, and then touch Submit.
4Select Manage Internal Accounts > Add Entry.
5Type the user account name, and then touch Done.
6Type a user ID for the account, and then touch Done.
7Type a password for the account, and then touch Done.
8Retype the password, and then touch Done.
9Type the user e-mail address, and then touch Done.
10 From the Set Groups screen, select the groups to which the account belongs.
11 Touch Done.
Specifying settings for internal accounts
Internal account settings determine the information an administrator submits when creating a new internal account
and the information a user submits when authenticating.
•Custom Building Block Name—Type a unique name for this building block.
•Require E‑mail Address—Select this box to make the e-mail address a required field when creating new internal
accounts.
•Required User Credentials—Select either User ID or User ID and password to specify the information a user must
submit when authenticating.
Managing authentication and authorization methods 13

Connecting your printer to an Active Directory domain
Using Active Directory simplifies network authentication and authorization setup, automatically creating and
configuring LDAP+GSSAPI and Kerberos authentication building blocks.
Notes:
•This feature is available only in some printer models.
•Use HTTPS to protect the credentials that are used to join the printer to the domain.
1From the Embedded Web Server, click Settings > Security > Security Setup > Active Directory > Join an Active
Directory Domain.
2Provide the information needed for each account:
•Realm—Type the name of the realm that you are using.
•Domain Controllers—Type the domain controllers that you are using. Separate each domain controller with a
comma.
•User ID—Type the user name of the network administrator or any individual who has rights to add computers
to a network.
•Password—Type the password of the network administrator or the individual who has rights to add computers
to a network.
Note: Passwords are case‑sensitive and are not cached by the device.
•Organizational Unit—If necessary, type the name of your organizational unit.
3Click Submit.
Note: If the configuration is unsuccessful, a big red X mark appears. A message appears if the configuration is
not successful.
4Click Manage Security Templates to use the Active Directory information to complete your security setup.
If you want to review or make some small modifications to the LDAP+GSSAPI building block, then click Return to
Security Setup and do the following:
aUnder Advanced Security Setup, click Kerberos 5.
bClick View File to open the Kerberos Config file that was created using the Active Directory setup.
cReview the file, and then click the back button of the browser.
dClick Return to Security Setup, and then click LDAP+GSSAPI.
eUnder LDAP+GSSAPI Setups, click the building block that was created by the Active Directory Setup process.
Note: By default, the building block name is the realm name, and the server address field is the domain
controller name.
fIf necessary, change some of the building block settings depending on your environment, including the following:
•Server Port—The standard port for LDAP is 389. Another common port is 3268, but this port is used only
for Global Catalog servers in Active Directory. If applicable, change the port to 3268 to speed up the querying
process.
•Search Base—This setting indicates the location in the directory tree where the device starts searching. At
the most basic we recommend specifying the root of the directory (such as “dc=company,dc=com”).
Managing authentication and authorization methods 14

•Use Kerberos Service Ticket—This advanced setup, otherwise known as SPNEGO, is the session ticket that
a user uses to log in to a computer. We recommend leaving this setting unchanged.
•Use Active Directory Device Credentials—This option lets you use the service account that is created in
Active Directory. If you want to use an existing service account or user credential (advanced setup), then
clear this check box.
gIf necessary, adjust the following settings:
•Group Search Base—This setting indicates the location in the directory tree where the device starts searching
for a particular group. If the environment requires user‑ or group‑based authorization, then leave this field
blank.
•Short name for group—This setting is a name that a user can use to associate to a group identifier.
•Group Identifier—This setting is a container or organizational unit that a device searches to validate whether
an authenticated user is a member of an authorized group.
hClick Modify.
Using LDAP
Note: This feature is available only in advanced‑security devices.
Lightweight Directory Access Protocol (LDAP) is a standards‑based, cross‑platform, extensible protocol that runs directly
on top of the TCP/IP layer. It is used to access information stored in a specially organized information directory. It can
interact with many different kinds of databases without special integration, making it more flexible than other
authentication methods.
Notes:
•Supported devices can store a maximum of five unique LDAP configurations. Each configuration must have a
unique name.
•Administrators can create up to 32 user‑defined groups that apply to each unique LDAP configuration.
•LDAP relies on an external server for authentication. If an outage prevents the printer from communicating with
the server, users will not be able to access protected device functions.
•To help prevent unauthorized access, log out from the printer after each session.
Adding an LDAP setup
1From the Embedded Web Server, click Settings > Security > Security Setup.
2Under Advanced Security Setup, click LDAP.
3Click Add an LDAP Setup.
The LDAP Server Setup dialog is divided into four parts:
General Information
•Setup Name—This name is used to identify each particular LDAP Server Setup when creating security templates.
•Server Address—Type the IP address or the host name of the LDAP server where the authentication is
performed.
•Server Port—The Embedded Web Server communicates with the LDAP server using this port. The default LDAP
port is 389.
•Use SSL/TLS—From the drop‑down menu, select None, SSL/TLS (Secure Sockets Layer/Transport Layer
Security), or TLS.
Managing authentication and authorization methods 15

•Userid Attribute—Type either cn (common name), uid, userid, or user‑defined.
•Mail Attribute—Type a maximum of 48 characters to identify e‑mail addresses. The default value is “mail.”
•Full Name Attribute—Type a maximum of 48 characters. The default value is “cn.”
•Search Base—The node in the LDAP server where user accounts reside. You can enter multiple search bases,
separated by commas.
Note: A search base consists of multiple attributes separated by commas, such as cn (common name), ou
(organizational unit), o (organization), c (country), and dc (domain).
•Search Timeout—Enter a value from 5 to 30 seconds or 5 to 300 seconds, depending on your printer model.
•Required User Input—Select either User ID and password or User ID to specify which credentials a user must
provide when attempting to access a function protected by the LDAP building block. User ID and password is
the default setting.
Device Credentials
•Use Active Directory Device Credentials—Allow user credentials and group designations to be pulled from the
existing network comparable to other network services.
•Anonymous LDAP Bind—Bind the Embedded Web Server with the LDAP server anonymously, and make the
Distinguished Name and MFP Password fields unavailable.
•Distinguished Name—Type the distinguished name of the print server or servers.
•MFP’s Password—Type the password for the print servers.
Search specific object classes
•Person—Allow the “person” object class to be searched.
•Custom Object Class—Allow the custom search object class to be searched. You can define up to three custom
search object classes.
LDAP Group Names
•Administrators can associate as many as 32 named groups stored on the LDAP server by entering identifiers for
those groups under the Group Search Base list. Both the Short name for group and Group Identifier must be
provided.
•When creating security templates, you can pick groups from this setup for controlling access to device functions.
4Click Submit to save the changes, or Cancel to return to previous values.
Editing an LDAP setup
1From the Embedded Web Server, click Settings > Security > Security Setup.
2Under Advanced Security Setup, click LDAP.
3Click a setup from the list.
4Make any needed changes in the LDAP Configuration dialog.
5Click Modify to save the changes, or click Cancel to return to previous values.
Deleting an LDAP setup
1From the Embedded Web Server, click Settings > Security > Security Setup.
2Under Advanced Security Setup, click LDAP.
Managing authentication and authorization methods 16

3Select a setup from the list.
4Click Delete Entry to remove the profile, or Cancel to return to previous values.
Notes:
•Click Delete List to delete all LDAP setups in the list.
•An LDAP building block cannot be deleted if it is being used as part of a security template.
Validating an LDAP setup
1From the Embedded Web Server, click Settings > Security > Security Setup.
2Under Advanced Security Setup, click LDAP.
3Click Test LDAP Authentication Setup next to the setup you want to test.
Using LDAP+GSSAPI
Note: This feature is available only in advanced‑security devices.
Some administrators prefer authenticating to an LDAP server using the more secure Generic Security Services
Application Programming Interface (GSSAPI) instead of simple LDAP authentication. Instead of authenticating directly
with the LDAP server, the user first authenticates with a Kerberos server to obtain a Kerberos “ticket.” This ticket is
presented to the LDAP server using the GSSAPI protocol for access. LDAP+GSSAPI is typically used for networks running
Active Directory.
Notes:
•LDAP+GSSAPI requires Kerberos 5 to be configured.
•Supported devices can store a maximum of five unique LDAP+GSSAPI configurations. Each configuration must
have a unique name.
•LDAP relies on an external server for authentication. If an outage prevents the printer from communicating with
the server, users will not be able to access protected device functions.
•To help prevent unauthorized access, log out from the printer after each session.
Adding an LDAP+GSSAPI setup
1From the Embedded Web Server, click Settings > Security > Security Setup.
2Under Advanced Security Setup, click LDAP+GSSAPI.
3Click Add an LDAP+GSSAPI Setup. The setup dialog is divided into four parts:
General Information
•Setup Name—This name is used to identify each particular LDAP+GSSAPI Server Setup when creating security
templates.
•Server Address—Type the IP address or the host name of the LDAP server where the authentication is
performed.
•Server Port—The port used by the Embedded Web Server to communicate with the LDAP server. The default
LDAP port is 389.
•Use SSL/TLS—From the drop‑down menu, select None, SSL/TLS (Secure Sockets Layer/Transport Layer
Security), or TLS.
Managing authentication and authorization methods 17

•Userid Attribute—Type either cn (common name), uid, userid, or user‑defined.
•Mail Attribute—Type a maximum of 48 characters to identify e‑mail addresses. The default value is “mail.”
•Full Name Attribute—Type a maximum of 48 characters.
•Search Base—The node in the LDAP server where user accounts reside. You can enter multiple search bases,
separated by commas.
Note: A Search Base consists of multiple attributes separated by commas, such as cn (common name), ou
(organizational unit), o (organization), c (country), and dc (domain).
•Search Timeout—Enter a value from 5 to 30 seconds.
•Use Kerberos Service Ticket—If this is selected, then a Kerberos ticket is presented to the LDAP server using
the GSSAPI protocol to obtain access.
Device Credentials
•Use Active Directory Device Credentials—Allow user credentials and group designations to be pulled from the
existing network comparable to other network services.
•MFP Kerberos Username—Type the distinguished name of the print server or servers.
•MFP’s Password—Type the Kerberos password for the print servers.
Search specific object classes
•Person—Allow the “person” object class to be searched.
•Custom Object Class—Allow the custom search object class to be searched. You can define up to three custom
search object classes.
LDAP Group Names
•Configure Groups—You can associate up to 32 named groups stored on the LDAP server by entering identifiers
for those groups under the Group Search Base list. Both the Short name for group and Group Identifier must
be provided.
•When creating security templates, you can pick groups from this setup for controlling access to device functions.
4Click Submit to save the changes, or Cancel to return to previous values.
Editing an LDAP+GSSAPI setup
1From the Embedded Web Server, click Settings > Security > Security Setup.
2Under Advanced Security Setup, click LDAP+GSSAPI.
3Select a setup from the list.
4Make any needed changes in the LDAP Configuration dialog.
5Click Modify to save the changes, or Cancel to return to previous values.
Deleting an LDAP+GSSAPI setup
1From the Embedded Web Server, click Settings > Security > Security Setup.
2Under Advanced Security Setup, click LDAP+GSSAPI.
3Select a setup from the list.
4Click Delete Entry to remove the profile, or Cancel to return to previous values.
Managing authentication and authorization methods 18

Notes:
•Click Delete List to delete all LDAP+GSSAPI setups in the list.
•An LDAP+GSSAPI building block cannot be deleted if it is being used as part of a security template.
Configuring Kerberos 5 for use with LDAP+GSSAPI
Note: This feature is available only in advanced‑security devices.
Kerberos 5 can be used by itself for user authentication, but it is most often used with the LDAP+GSSAPI building block.
While only one Kerberos configuration file (krb5.conf) can be stored on a supported device, that file can apply to multiple
realms and Kerberos Domain Controllers (KDCs). An administrator must anticipate the different types of authentication
requests that the Kerberos server might receive, and configure the krb5.conf file to handle these requests.
Notes:
•Because only one krb5.conf file is used, uploading or resubmitting a simple Kerberos file will overwrite the
configuration file.
•The krb5.conf file can specify a default realm. But if a realm is not specified in the configuration file, then the
first realm specified is used as the default realm for authentication.
•Some types of authentication relies on an external server. If an outage prevents the printer from communicating
with the server, users will not be able to access protected device functions.
•To help prevent unauthorized access, log out from the printer after each session.
Creating a simple Kerberos configuration file
1From the Embedded Web Server, click Settings > Security > Security Setup.
2Under Advanced Security Setup, click Kerberos 5.
3Type the KDC (Key Distribution Center) address or host name in the KDC Address field.
4Enter the number of the port (between 1 and 65535) used by the Kerberos server in the KDC Port field. The default
port number is 88.
5Type the realm (or domain) used by the Kerberos server in the Realm field.
6Click Submit to save the information as a krb5.conf file on the selected device, or Reset Form to reset the fields
and start again.
Uploading a Kerberos configuration file
1From the Embedded Web Server, click Settings > Security > Security Setup.
2Under Advanced Security Setup, click Kerberos 5.
3Click Browse, and then select the krb5.conf file.
4Click Submit to upload the krb5.conf file to the selected device.
The Embedded Web Server automatically tests the krb5.conf file to verify that it is functional.
Notes:
•To reset the field and search for a new configuration file, click Reset Form.
•To remove the Kerberos configuration file from the selected device, click Delete File.
•To view the Kerberos configuration file for the selected device, click View File.
Managing authentication and authorization methods 19

•To verify that the Kerberos configuration file for the selected device is functional, click Test Setup.
Setting date and time
Kerberos servers require key requests to have a recent time stamp (usually within 300 seconds). Therefore, the printer
clock must be in sync or closely aligned with the KDC system clock. You can update the printer clock settings manually.
You can also set it to use Network Time Protocol (NTP) to sync automatically with a clock that is also used by the Kerberos
server.
Note: We recommend using an NTP server.
1Access the date and time settings.
Do either of the following:
•From the Embedded Web Server, click Settings > Security > Set Date and Time.
•From the home screen, navigate to the menu screen, and then click Security > Set Date and Time.
Note: When accessing the menu screen, log in as an administrator.
2To manage the settings manually, enter the correct date and time in YYYY-MM-DD HH:MM format, and then select
a time zone from the drop‑down menu.
Notes:
•Entering manual settings automatically disables the use of NTP.
•If you select (UTC+user) Custom from the Time Zone list, then you need to configure more settings under
Custom Time Zone Setup.
3If daylight saving time (DST) is observed in your area, then select Automatically Observe DST.
4If you are located in a nonstandard time zone or an area that observes an alternate DST calendar, then adjust the
Custom Time Zone Setup settings.
5If you want to sync to an NTP server rather than update the clock settings manually, then select Enable NTP. Then
type the IP address or host name of the NTP server.
6If the NTP server requires authentication, then select the preferred method from the Authentication menu. Then
click Install MD5 key or Install Autokey IFF params to browse to the file containing the matching NTP authentication.
7Click Submit to save the changes, or click Reset Form to restore the default settings.
Using a security template to control function access
Note: This feature is available only in advanced‑security devices.
Each access control can be set to require no security (default) or to use any of the building blocks in the drop‑down
menu for that function. Only one method of security can be assigned to each access control.
Managing authentication and authorization methods 20

Step 1: Create a building block
A building block is required to specify authentication and authorization for device menus and functions. Use the building
blocks to define security templates, and then select a template for each access control.
1From the Embedded Web Server, click Settings > Security > Security Setup.
2Under Advanced Security Setup, click the appropriate building block, and then configure it.
Note: For more information on configuring a specific type of building block, see “Advanced-security building
blocks” on page 10.
Step 2: Create a security template
Using the Embedded Web Server
One or two building blocks can be combined with a unique name of up to 128 characters to create a security template.
Each device can support up to 140 security templates. Though the names of security templates must be different from
one another, building blocks and security templates can share a name.
1Click Settings > Security > Security Setup.
2Under Advanced Security Setup, click Security Template.
3Under Manage Security Templates, click Add a Security Template.
4In the Security Template Name field, type a unique name containing up to 128 characters. It can be helpful to use
a descriptive name, such as ”Administrator_Only” or “Common_Functions_Template.”
5From the Authentication Setup list, select a building block method for authenticating users.
Note: The Authentication Setup list is populated with the authentication building blocks that have been
configured on the device. Certain building blocks such as passwords and PINs, do not support separate
authorization.
6To use authorization, click Add authorization, and then from the Authorization Setup menu, select a building block.
Note: The Authorization Setup list is populated with the authorization building blocks available on the device.
7To use group authorization, click Modify Groups, and then select one or more groups to include in the security
template.
Note: Hold down the Ctrl key to select multiple groups.
8Click Save Template.
Note: For simple authorization‑level security, which uses no individual authentication, administrators can control
access to functions by assigning only a password or PIN to a security template. Users are required to enter the
correct code to access any function controlled by the password or PIN.
Using the control panel
Note: These instructions apply only in printer models with a touch‑screen display.
1Navigate to the menu screen.
2Touch Security > Edit Security Setups > Edit Security Templates > Add Entry.
3Type a unique name to identify the template. Use a descriptive name, such as ”Administrator_Only” or
“Authenticated_Users,” and then touch Done.
Managing authentication and authorization methods 21

4On the Authentication Setup screen, select the appropriate building block, and then touch Done.
5On the Authorization Setup screen, select the appropriate building block, and then touch Done.
6Select one or more groups to be included in the template, and then touch Done.
Step 3: Assign security templates to access controls
After assigning a security template, users are required to provide the appropriate credentials to access any functions
assigned with a security template.
Using the Embedded Web Server
1Click Settings > Security > Security Setup > Access Controls.
Note: If necessary, click Expand All to view all access controls, or select a folder to view specific access controls
for the selected access control group.
2For each function you want to protect, select a security template from the drop‑down menu next to the name of
that function.
3Click Submit to save the changes, or Reset Form to cancel all changes.
Notes:
•To help prevent unauthorized access, log out from the printer after each session.
•For a list of individual access controls, see “Appendix C: Access controls” on page 66.
Using the control panel
Note: These instructions apply only in printer models with a touch‑screen display.
1Navigate to the menu screen.
2Touch Security > Edit Security Setups > Edit Access Controls.
3For each function you want to protect or update, select a security template for that function.
Note: Scroll down to see all available access controls.
4Touch Submit.
Editing or deleting a security template from the Embedded Web Server
1Click Settings > Security > Security Setup.
2Under Advanced Security Setup, click Security Template.
3Select a security template from the list.
4Edit the fields if necessary.
5Click Modify to save the changes.
Notes:
•To retain previously configured values, click Cancel.
•To delete the selected security template, click Delete Entry.
•To delete all security templates on the device, from Manage Security Templates screen, click Delete List.
Managing authentication and authorization methods 22

•You can delete a security template only if it is not in use, but you can edit a security template that is in use.
Editing or deleting a security template from the control panel
Note: These instructions apply only in printer models with a touch‑screen display.
1Navigate to the menu screen.
2Touch Security > Edit Security Setups > Edit Security Templates.
3Do one of the following:
•To remove all security templates, touch Delete List.
•To remove an individual security template, select it from the list, and then touch Delete Entry.
•To modify an individual security template, select it from the list, and then touch Open Entry.
Managing authentication and authorization methods 23
Managing certificates and other settings
Note: This feature is available only in some printer models.
The Certificate Management menu is used for configuring printers to utilize certificates for establishing SSL, IPSec, and
802.1x connections. Additionally, devices utilize certificates for LDAP over SSL authentication and address book look-
ups.
Certificates are used by network devices to securely identify other devices. Certificate Authorities (CA) are trusted
locations established on the network that are required in secure environments. Otherwise, the default device certificate
is used to identify devices on the network.
The process for creating a CA-signed certificate on a device consists of the following activities:
1Loading of the CA certificate for a certificate authority into the device
2Creating a Certificate Signing Request (CSR) to obtain a CA-signed device certificate
3Generating a CA-signed certificate using the CSR by the CA administrator
4Loading of the CA-signed certificate into the device
Installing a Certificate Authority certificate on the device
Note: This feature is available only in network printers or in printers connected to print servers.
The Certificate Authority (CA) certificate is needed so that the printer can trust and validate the credentials of another
system on the network. Without a CA certificate, the printer cannot determine whether to trust the certificate that is
presented by the system trying to create the secure connection.
Start with the certificate file (.pem format) for the CA that you want to utilize. An example of how to create this file is
provided in “Appendix A: CA file creation” on page 66.
1Open a Web browser, and then type the IP address or host name of the printer.
2From the Embedded Web Server, click Settings > Security > Certificate Management > Certificate Authority
Management.
Notes:
•This window lets the device administrator load a new CA certificate, delete all CA certificates, and view
previously installed CA certificates. To view more details of an installed CA certificate or delete a certificate,
click common name link under Certificate Authority Common Name.
•There are no installed CA certificates to view on this page in new devices.
3Click New to display the Certificate Authority Installation screen.
4Click Browse to select the .pem format certificate authority file.
5Click Submit.
Configuring the device for certificate information
Note: This setting is available only in some printer models.
Managing certificates and other settings 24

The printer has a self‑generated certificate. For some operations (such as 802.1X and IPsec), the printer certificate
needs to be upgraded to a certificate that has been signed by a certificate authority.
The printer includes a process of generating a certificate signing request that can be viewed or downloaded, which
facilitates the process of obtaining the signed certificate for the printer.
1From the Embedded Web Server, click Settings > Security > Certificate Management > Set Certificate Defaults.
2Update the information on the device to fit your organization, and then click Submit. For more information, see
“Setting certificate defaults” on page 27.
3From the Certificate Management page, click Device Certificate Management.
Notes:
•This window lets the device administrator load a new device certificate, delete all device certificates, and
view previously installed device certificates. To view more details of an installed device certificate or delete a
device certificate, click on the certificate common name link under Friendly Name.
•If you are configuring a new device, then a default self‑signed certificate can be viewed on this page.
4Select the link for the preferred device certificate to obtain the certificate signing request information.
Notes:
•You may use the link to the default certificate created in step 2 or another named certificate. The certificate
information is displayed.
•To create other certificates, select New to open a Certificate Generation Parameters page. For more
information, see “Creating a new device certificate” on page 26.
5Click Download Signing Request, and then save and open the .csr file with a text editor.
Note: The file data is displayed in a standard format that includes the base‑64 representation in the application
window. Copy and save that information for later use.
Sample certificate request data
-----BEGIN CERTIFICATE REQUEST-----
MIIC+TCCAeECAQAwaDEQMA4GA1UEChMHTGV4bWFyazEOMAwGA1UECxQFUFMmU0Qx
EjAQBgNVBAcTCUxleGluZ3RvbjELMAkGA1UECBMCS1kxCzAJBgNVBAYTAlVTMRYw
FAYDVQQDEw1MZXhtYXJrIE1YODEyMIIBIjANBgkqhkiG9w0BAQEFAAOCAQ8AMIIB
CgKCAQEAtqZYnFpgp9CfvK9cp4WY+jcerPHZkqTdCmyo8TcVArItFXPZk0XwzirZ
UvdA6lgnEc2lA9QG4M9ldm2Kg48qnUvTq8qGbs09FtoS3ayYfY6HxF5NXiQdkJTh
8coS3E3k8ZdM5kP4UFBL3dTf1POTbn1FEQf5YwVCmjxFjDv48xXobzSfu/cqC42e
KZsH4EK6thVOy0KoScPbO5DfI5m0xm6ZRlPjaA6NXu/4pZQYtcuur2hhI/7mrkTb
flX6P9aa2rYL+WDypaNyKJxfygfk090bI+L1rRWHKEKu+GOGfO1+NjFvlm6Kr82C
nOIpV/x8fU6WRFbG7z2gVHisTW1tCwIDAQABoEwwSgYJKoZIhvcNAQkOMT0wOzAP
BgNVHREECDAGhwT/////MAkGA1UdEwQCMAAwHQYDVR0OBBYEFLOZMlQBnxiCfLx3
6VDLpC88HgSzMA0GCSqGSIb3DQEBBQUAA4IBAQBwTHx62ROkOh8IbUv5tTWyYeUc
ayiPW+8ekGyHXajFybXTzKxu2KMUCeQen6CIeGq6MJWiQ1BvpVrIlPsCH8H2mbxD
1dWutSMtDJR6W9Cgk/TLXzKbdhVwd7yY8XhGkigj6c4k2C6dxRNaxvNWU06JCrVp
nfFQvyQq88M7tZuhHbvD8+AkCOsub1hceGSQPhtdo8Ctlu1uDKe99u5uCFabiHs0
sbQJFUkEkA9AJBGLEUjRWl8B+bauYn2eSCgF8+tppgMSKFRays5M3Kt7UPiT5WiE
afQqHR4K/E0mzx+++1S+4yriryt7gNw6ofoJwV4i7YVBOJWHDN5S9e/TIxdX
-----END CERTIFICATE REQUEST-----
6Open another Web browser, and go to the CA Web site.
Managing certificates and other settings 25

7Follow the CA certificate request process as defined for the CA. A sample request is shown in “Appendix B: CA‑Signed
Device Certificate creation” on page 66.
Note: The result is a CA‑signed device certificate file (in .pem format). Save this file on your computer for use in
the next steps.
8From the Embedded Web Server, return to the “default” Device Certificate Management page, and then click Install
Signed Certificate.
9Click Browse, and then select the CA‑signed device certificate file that was created in step 8.
10 Click Submit.
Note: This completes the process of creating and installing a signed printer certificate. The printer can now
present a valid CA‑signed certificate to systems to which it attempts to negotiate an SSL or IPsec connection.
Creating a new device certificate
1From the Embedded Web Server, click Settings > Security > Certificate Management.
2Click Device Certificate Management > New.
3Enter values in the appropriate fields:
•Friendly Name—Type a name for the certificate (64‑character maximum).
•Common Name—Type a name for the device (128‑character maximum).
Note: Leave this field blank if you want to use the host name for the device.
•Organization Name—Type the name of the company or organization issuing the certificate (128‑character
maximum).
•Unit Name—Type the name of the unit within the company or organization issuing the certificate (128‑character
maximum).
•Country/Region—Type the country or region where the company or organization issuing the certificate is
located (2‑character maximum).
•Province Name—Type the name of the province or state where the company or organization issuing the
certificate is located (128‑character maximum).
•City Name—Type the name of the city where the company or organization issuing the certificate is located
(128‑character maximum).
•Subject Alternate Name—Type the alternate name and prefix that conforms to RFC 2459. For example, type
an IP address using the format IP:1.2.3.4, or a DNS address using the format
DNS:ldap.company.com. Leave this field blank if you want to use the IPv4 address (128‑character
maximum).
4Click Generate New Certificate.
Viewing, downloading, and deleting a certificate
1From the Embedded Web Server, click Settings > Security > Certificate Management > Device Certificate
Management.
2Select a certificate from the list.
The details of the certificate appear in the Device Certificate Management window.
Managing certificates and other settings 26

3Click any of the following:
•Delete—Remove a previously stored certificate.
•Download To File—Download or save the certificate as a .pem file.
•Download Signing Request—Download or save the signing request as a .csr file.
•Install Signed Certificate—Upload a previously signed certificate.
Setting certificate defaults
Administrators can set default values for certificates generated for a supported device. The values entered here will
be present in all new certificates generated in the Certificate Management task, even though those fields will remain
blank on the screen.
1From the Embedded Web Server, click Settings > Security > Certificate Management > Set Certificate Defaults.
2Enter values in the appropriate fields:
•Common Name—Type a name for the device (128‑character maximum).
Note: Leave this field blank to use the domain name for the device.
•Organization Name—Type the name of the company or organization issuing the certificate.
•Unit Name—Type the name of the unit within the company or organization issuing the certificate.
•Country/Region—Type the country or region where the company or organization issuing the certificate is
located (2‑character maximum).
•Province Name—Type the name of the province or state where the company or organization issuing the
certificate is located.
•City Name—Type the name of the city where the company or organization issuing the certificate is located.
•Subject Alternate Name—Type the alternate name and prefix that conforms to RFC 2459. For example, type
an IP address using the format IP:1.2.3.4, or a DNS address using the format
DNS:ldap.company.com. Leave this field blank to use the IPv4 address.
Note: All fields accept a maximum of 128 characters, except where noted.
3Click Submit.
Managing certificates and other settings 27

Managing devices remotely
Using HTTPS for device management
Turn off the HTTP port, leaving the HTTPS port (443) active, to restrict the access of the device Embedded Web Server
to HTTPS only. This action ensures that all communication with the device using Embedded Web Server is encrypted.
1From the Embedded Web Server, click Settings > Security > TCP/IP Port Access.
2Clear TCP 8000 (HTTP) and TCP 80 (HTTP).
3Click Submit.
Setting a backup password
Note: This setting is available only in advanced‑security devices.
A backup password lets the Embedded Web Server administrator access security menus regardless of the type of
security assigned. It can also be helpful if other security measures become unavailable, such as when there is a network
communication problem or an authentication server fails.
Notes:
•In some organizations, security policies prohibit the use of a backup password. Consult your organization's
policies before deploying any security method that might compromise those policies.
•The backup password is not associated with any accounts in the corporate directory. It is a password stored only
on the device. Share only with users who are authorized to modify the device security settings.
•Make sure that the backup password contains a minimum of eight alphanumeric characters and that it is not a
dictionary word or a variation of the user ID.
Using the Embedded Web Server
1Click Settings > Security > Security Setup.
2Under Additional Security Setup, click Backup Password.
3Select Use Backup Password, and then type and retype the password to confirm it.
4Click Submit.
Using the control panel
1Navigate to the menu screen.
2Touch Security > Edit Security Setups > Edit Backup Password > Password.
3Type and then retype the password to confirm it.
4From the Edit Backup Password screen, set User Backup Password to On.
5Apply the changes.
Managing devices remotely 28

Setting up SNMP
Simple Network Management Protocol (SNMP) is used in network management systems to monitor network-connected
devices for conditions that warrant administrative attention. The Embedded Web Server allows administrators to
configure settings for SNMP versions 1 through 3.
Note: We recommend selecting only SNMPv3, setting Minimum Authentication Level to Authentication, Privacy,
and setting the strongest privacy algorithm.
SNMP Version 1,2c
1From the Embedded Web Server, click Settings > Security > SNMP.
2Under SNMP Version 1,2c, select Enabled.
3To allow administrators to set SNMP variables, select Allow SNMP Set.
4Type a name to be used for the SNMP Community identifier. The default community name is “public.”
5To facilitate the automatic installation of device drivers and other printing applications, select Enable PPM Mib
(Printer Port Monitor MIB).
6Click Submit to save the changes, or click Reset Form to restore the default values.
SNMP Version 3
1From the Embedded Web Server, click Settings > Security > SNMP.
2Under SNMP Version 3, select Enabled.
Note: Under SNMP Version 1,2c, clear Enabled.
3To allow remote installation and configuration changes, and device monitoring, type login information in the
SNMPv3 Read/Write User and SNMPv3 Read/Write Password fields.
4To allow device monitoring only, type login information in the SNMPv3 Read Only User and SNMPv3 Read Only
Password fields.
5From the SNMPv3 Minimum Authentication Level list, select Authentication, Privacy.
6From the SNMPv3 Authentication Hash list, select MD5 or SHA1.
7From the SNMPv3 Privacy Algorithm list, select the strongest setting supported by your network environment.
8Click Submit to save the changes, or click Reset Form to restore the default values.
Setting SNMP Traps
After configuring SNMP Version 1,2c or SNMP Version 3, you can further customize which alerts are sent to the network
management system by designating SNMP “traps,” or events that trigger an alert message.
1From the Embedded Web Server, click Settings > Security > SNMP.
2Click Set SNMP Traps.
3From the IP Address list, click one of the blank IP address entries (shown as 0.0.0.0).
4Under Trap Destination, enter the IP address of the network management server or monitoring station, and then
select the conditions for which you want to generate an alert.
5Click Submit to save the changes, or click Reset Form to clear all fields.
Managing devices remotely 29

Configuring security audit log settings
Note: This setting is available only in advanced‑security devices and in simple‑security devices with color LCD control
panels.
The security audit log lets administrators monitor security‑related events on a device, including failed user
authorization, successful administrator authentication, and Kerberos file uploads to a device. By default, security logs
are stored on the device, but may also be transmitted to a network syslog server for further processing or storage.
We recommend enabling audit in secure environments.
1From the Embedded Web Server, click Settings > Security > Security Audit Log.
2Select Enable Audit to activate security audit logging.
3To use both remote syslog server and internal logging, type the IP address or host name of the Remote Syslog Server.
Then select Enable Remote Syslog to transmit log events to a network syslog server.
Note: Enable Remote Syslog is available only after an IP address or host name is entered.
4Enter the Remote Syslog Port number used on the destination server. The default value is 514.
5From the Remote Syslog Method menu, select one of the following:
•Normal UDP—Send log messages and events using a lower‑priority transmission protocol.
•Stunnel—If implemented on the destination server.
6From the Remote Syslog Facility menu, select a facility code for events to be logged to on the destination server.
All events sent from the device are tagged with the same facility code to aid in sorting and filtering by network
monitoring or intrusion detection software.
Note: step 3 on page 30 through step 6 and step 8 are valid only if Remote Syslog is enabled.
7From the “Severity of events to log” menu, select the priority level cutoff (0–7) for logging messages and events.
Note: The highest severity is 0, and the lowest is 7. The selected severity level and anything higher is logged. For
example, if you select 4 ‑ Warning, then severity levels 0–4 are logged.
8Select Remote Syslog non‑logged events to send all events regardless of severity to the remote server.
9In the “Admin's e‑mail address” field, type one or more e-mail addresses (separated by commas) to automatically
notify administrators of certain log events. Then select from the following options:
•E‑mail log cleared alert—Indicates when the Delete Log button is clicked.
•E‑mail log wrapped alert—Indicates when the log becomes full and begins to overwrite the oldest entries.
•Log full behavior—Provides a drop‑down list with two options:
–Wrap over oldest entries
–E‑mail log then delete all entries
•E‑mail % full alert—Indicates when log storage space reaches a certain percentage of capacity.
•% full alert level (1–99%)—Sets how full the log must be before an alert is triggered.
•E‑mail log exported alert—Indicates when the log file is exported.
•E‑mail log settings changed alert—Indicates when the log settings are changed.
•Log line endings—Sets how the log file terminates the end of each line. Select a line ending option from the
drop‑down menu.
•Digitally sign exports—Adds a digital signature to each exported log file.
Managing devices remotely 30

Note: To use e-mail alerts, click Submit to save the changes, and then click Setup E-mail Server to configure
SMTP settings.
10 Click Submit to save the changes, or Reset Form to restore the default settings.
E-mail server setup
To use the e‑mail notification of logged events, set up the e‑mail server.
1From the Security Audit Log main screen, click Setup E-mail Server.
2Under SMTP Setup, type the IP address or host name of the Primary SMTP Gateway the device will use for sending
e-mail.
3Enter the Primary SMTP Gateway Port number of the destination server. The default value is 25.
4If you are using a secondary or backup SMTP server, then type the IP address/host name and SMTP port for that
server.
5For SMTP Timeout, enter the number of seconds (5–30) the device will wait for a response from the SMTP server
before timing out. The default value is 30 seconds.
6To receive responses to messages sent from the printer (in case of failed or bounced messages), type the reply
address.
7From the Use SSL/TLS list, select Disabled, Negotiate, or Required to specify whether e-mail will be sent using an
encrypted link.
8If your SMTP server requires user credentials, then select an authentication method from the SMTP Server
Authentication list. The default setting is “No authentication required.”
9From the Device‑Initiated E‑mail list, select None for no authentication, or Use Device SMTP Credentials if
authentication is required.
10 From the User‑Initiated E‑mail list, select None for no authentication, or Use Device SMTP Credentials if
authentication is required.
11 If the device must provide credentials in order to send e-mail, then enter the information appropriate for your
network under Device Credentials.
12 Click Submit to save the changes, or Reset Form to restore the default settings.
Managing the security audit log
•To view or save a text file of the current syslog, click Export Log.
•To delete the current syslog, click Delete Log.
Updating firmware
Automated firmware updates can be done simultaneously over a network of devices. For security, the ability to perform
this update can be restricted to authorized administrators by using access control.
Managing devices remotely 31

Devices inspect all downloaded firmware packages for a number of required attributes before adopting and executing
the packages. The firmware must be packaged in a proprietary format and encrypted with a symmetric encryption
algorithm through an embedded key that is known only to Lexmark. However, the strongest security measure comes
from requiring all firmware packages to include multiple digital 2048-bit RSA signatures from Lexmark. If these
signatures are not valid, or if the message logs indicate a change in firmware after the signatures were applied, then
the firmware is discarded.
1From the Embedded Web Server, click Settings > Update Firmware.
2Browse to the flash file.
3Click Submit.
Managing devices remotely 32
Managing other access functions
Configuring confidential printing
Note: This feature is available only in printer models that allow PIN selection from the control panel.
Users printing confidential or sensitive information may use the confidential print option. This option allows print jobs
to e remain in the print queue until the user enters a PIN on the printer control panel.
1From the Embedded Web Server, click Settings > Security > Confidential Print Setup.
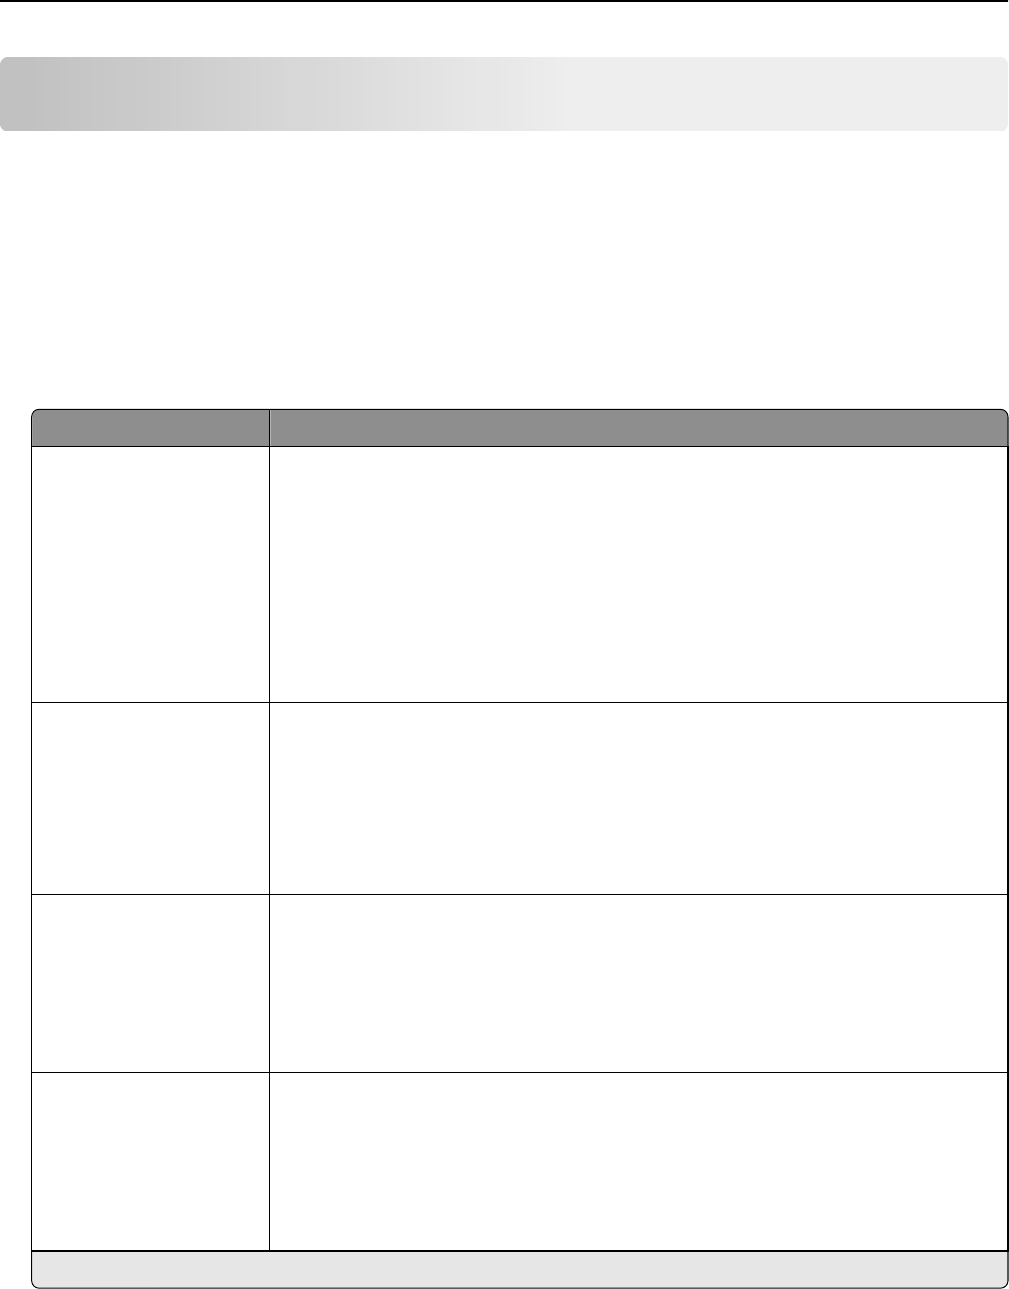
2Enter an option for the following:
Use To
Max Invalid PIN
Off
2–10
Set a limit on the number of times an invalid PIN can be entered.
Notes:
•This menu item appears only when a formatted, working printer hard disk is
installed.
•Enter 0 to allow users to enter an incorrect PIN as many times as they choose.
•Enter a value between 2 and 10 to specify the number of times users can enter an
incorrect PIN before being locked out.
•When the limit is reached, the print jobs for that user name and PIN is deleted.
Confidential Job Expiration
Off
1 hour
4 hours
24 hours
1 week
Set a limit on how long the printer stores confidential print jobs.
Notes:
•Changes in this setting do not affect the expiration time for confidential print jobs
that are already in the printer memory or hard disk.
•If the printer is turned off, then all confidential jobs held in the printer memory are
deleted.
Repeat Job Expiration
Off
1 hour
4 hours
24 hours
1 week
Set a limit on how long the printer stores print jobs.
Note: This setting is available only in some printer models.
Verify Job Expiration
Off
1 hour
4 hours
24 hours
1 week
Set a limit on how long the printer stores print jobs needing verification.
Note: This setting is available only in some printer models.
Note: Off is the factory default setting.
Managing other access functions 33

Use To
Reserve Job Expiration
Off
1 hour
4 hours
24 hours
1 week
Set a limit on how long the printer stores print jobs for printing at a later time.
Note: This setting is available only in some printer models.
Note: Off is the factory default setting.
3Click Submit.
Setting login restrictions
Note: This setting is available only in advanced‑security devices.
To prevent malicious access to a device, restrict the number of invalid login attempts and require a lockout time before
letting users retry logging in.
Many organizations establish login restrictions for information assets such as workstations and servers. Make sure that
device login restrictions also comply with organizational security policies.
1From the Embedded Web Server, click Settings > Security > Miscellaneous Security Settings > Login Restrictions.
2Enter the appropriate login restrictions:
•Login failures—Specify the number of times a user can attempt login before being locked out.
•Failure time frame—Specify how long before lockout takes place.
•Lockout time—Specify how long the lockout lasts.
•Panel Login Timeout—Specify how long a user may be logged in before being automatically logged out.
•Remote Login Timeout—Specify how long a user may be logged in remotely before being automatically logged
out.
3Click Submit.
Enabling and disabling USB host ports
Note: This setting is available only in some printer models.
USB host ports on devices do the following:
•Detect and display the files that are stored in the inserted USB mass storage devices, such as a flash drive.
•Print a supported file from the flash drive or initiate a firmware update.
•Scan data directly into the flash drive.
•Access can be restricted or permitted depending on the schedule.
In secure environments, devices can be configured to limit these operations, or to not allow them at all.
Device administrators can disable the front USB port during setup using access control restrictions. Devices have a rear
USB host port designed for card readers and HID devices, such as a keyboard.
To restrict access to the front USB port, apply a security template to the appropriate access control. For more
information, see “Using a security template to control function access” on page 20.
Managing other access functions 34
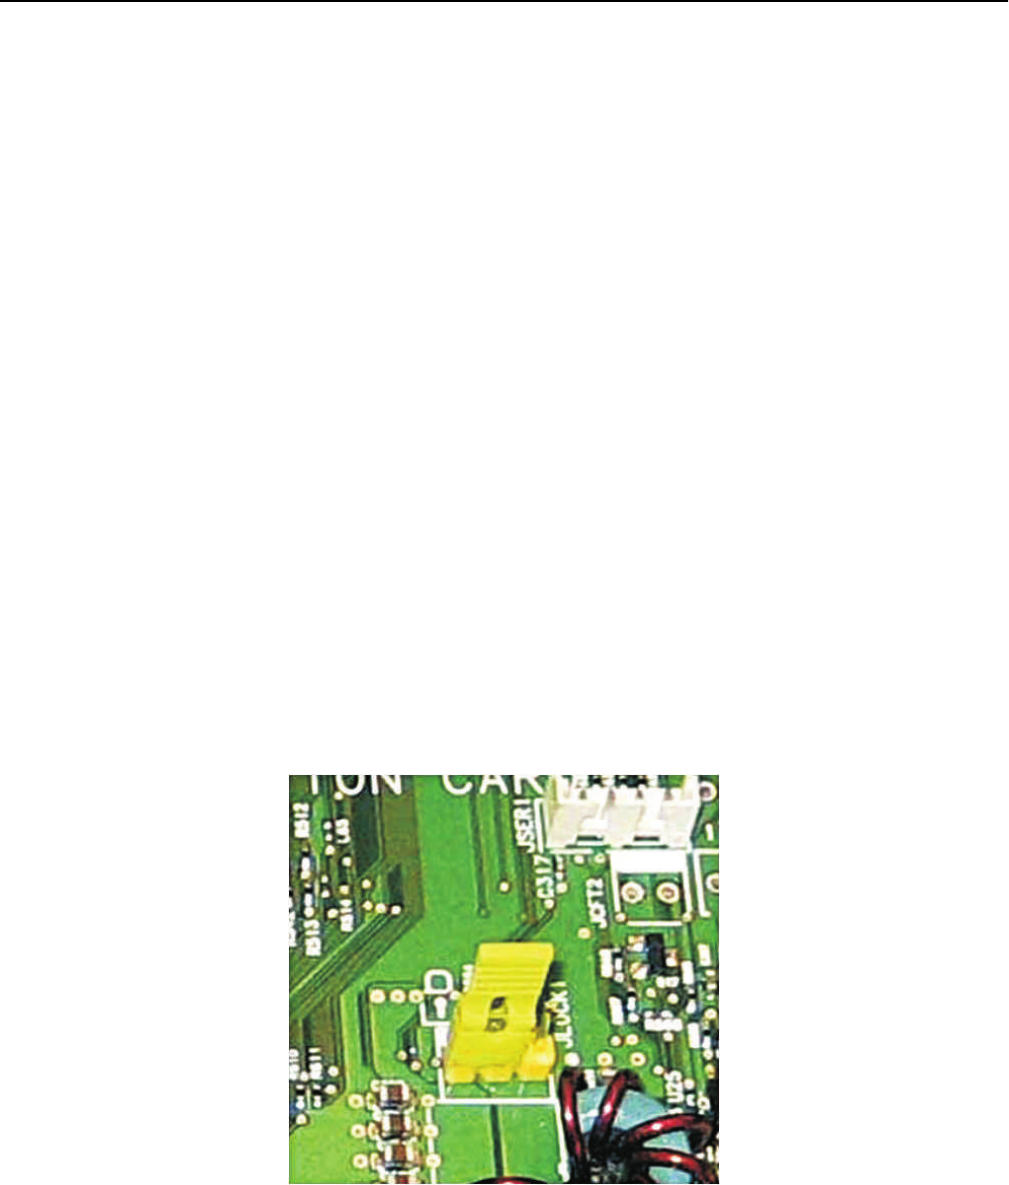
To set the schedule that restricts access at a specified time, do the following:
1From the Embedded Web Server, click Settings > Security > Schedule USB Devices.
2From the Disable Devices menu, select to disable printing from any USB device or from flash drives only.
Note: All scheduled Disable actions are affected by this setting.
3Click Submit.
4Enable or disable the use of USB devices on certain days or during certain hours. To create a schedule:
aSelect a device action, and then set the time and day for the device to perform the action.
bAdd the entry.
Notes:
•Use of USB devices is enabled by default.
•For each Disable schedule entry, create an Enable schedule entry to reactivate use of the USB devices.
Enabling the security reset jumper
Note: This feature is available only in some printer models.
If the device is locked down due to a forgotten administrator password or lost network connectivity, then you can
recover the device by resetting it. Access the controller board and move the reset jumper to cover the middle and
unexposed prongs.
Using a cable lock to secure access to the controller board ensures that the device is not maliciously reset.
Warning—Potential Damage: Resetting the device deletes all customer data.
Managing other access functions 35

The secure reset feature requires specifying in the Embedded Web Server the effect of using the security reset
jumper, which is located on the controller board.
1From the Embedded Web Server, click Settings > Security > Miscellaneous Security Settings.
2From the Security Reset Jumper list, select one of the following:
•No Effect—Remove access to all security menus. This option should be used with caution.
•Access controls = “No security”—Remove security only from the function access controls.
•Reset factory security defaults—Restore all security settings to the default values.
3Click Submit to save the changes, or Reset Form to restore the default settings.
Warning—Potential Damage: If you selected No Effect and the device is locked down, then you cannot access the
security menus. To replace the device controller board and regain access to the security menus, a service call is
required.
Enabling holding faxes
Use the Incoming Fax Holding feature to configure MFPs to receive faxes and temporarily store them in the printer
hard disk. The held faxes are secured in the hard disk until the designated release time or when valid user credentials
are provided.
1From the Embedded Web Server, click Settings > Fax Settings > Analog Fax Setup > Holding Faxes.
2Select the appropriate help fax mode.
•Always On—Always holds the fax jobs.
•Manual—Lets users select if they want to continue storing the fax jobs or not.
•Scheduled—Prints faxes depending on the set fax holding schedule.
3Click Submit.
Setting the fax holding schedule
1From the Embedded Web Server, click Settings > Fax Settings > Analog Fax Setup > Holding Faxes > Fax Holding
Schedule.
2Select a device action, and then set the time and day for the device to perform the action.
3Add the entry.
Notes:
•Fax printing is enabled by default.
•For each Disable schedule entry, create an Enable schedule entry to reactive fax printing.
Enabling Operator Panel Lock
Use the Operator Panel Lock feature to lock a device so that the control panel cannot be used for any user operations
or configurations. If the device has a hard disk, incoming print and fax jobs are temporarily stored instead of being
printed. The device can be unlocked by entering a valid user credential.
Configure this feature by creating an authentication building block, then applying it against the control panel lock
function access control using the Embedded Web Server. To access the device control panel, provide your credentials.
Managing other access functions 36

Notes:
•This feature requires a hard disk.
•When the device is locked, incoming print and fax jobs are stored in the printer hard disk. If the hard disk is
encrypted, then the jobs stored are encrypted.
•When the device is unlocked, jobs received during the locked period are printed. Confidential print jobs received
during the lock state are not printed, but are available through the confidential print job menu on the control
panel.
1From the Embedded Web Server, click Settings > Security > Security Setup.
2Under Advanced Security Setup, click Access Controls.
3Select a template for control panel lock .
4Click Submit.
Managing other access functions 37

Securing network connections
Configuring 802.1X authentication
Note: This feature is available only in advanced‑security devices.
Though normally associated with wireless devices and connectivity, 802.1X authentication supports both wired and
wireless environments.
The following network authentication mechanisms can be included in the 802.1X protocol negotiation:
•EAP‑MD5
•EAP‑TLS
•EAP‑TTLS with the following methods:
–CHAP
–MSCHAP
–MSCHAPv2
–PAP
•EAP_MSCHAPV2
•PEAP
•LEAP
Use To
EAP‑MD5 Require a device login name and password.
EAP‑TLS Require a device login name and password, CA certificate, and signed device
certificate.
EAP‑TTLS Require a device login name and password, and CA certificate.
PEAP (PEAP‑MSCHAPV2) Require a device login name and password, and CA certificate.
PEAP (TLS) Require a device login name and password, CA certificate, and signed device
certificate.
LEAP Require a device login name and password.
Note: Make sure that all of the devices participating in the 802.1X process support the same EAP authentication
type.
1From the Embedded Web Server, click Settings > Security > 802.1x.
2Under 802.1x Authentication, do the following:
aSelect Active to enable 802.1X authentication.
bType the login name and password the printer uses to log in to the authentication server.
cSelect the Validate Server Certificate check box to require verification of the security certificate on the
authenticating server.
Securing network connections 38

Notes:
•If using digital certificates to establish a secure connection to the authentication server, configure the
certificates on the printer before changing 802.1X authentication settings. For more information, see
“Managing certificates and other settings” on page 24.
•Server certificate validation is integral to TLS (Transport Layer Security), PEAP (Protected Extensible
Authentication Protocol), and TTLS (Tunneled Transport Security Layer).
dSelect Enable Event Logging to log activities related to 802.1X authentication activity.
Warning—Potential Damage: To reduce flash part wear, use this feature only when necessary.
eFrom the 802.1x Device Certificate list, select the digital certificate that you want to use. If only one certificate
is installed, then default is the only choice that appears.
3Under Allowable Authentication Mechanisms, select the authentication protocols that the printer will recognize by
clicking the check box next to each applicable protocol.
4From the TTLS Authentication Method list, select the authentication method to accept through the secure tunnel
created between the authentication server and the printer.
5Apply the changes.
Note: The print server resets when changes are made to settings marked with an asterisk (*) on the Embedded Web
Server.
Configuring IP security settings
Note: This setting is available only in some printer models.
Apply IPsec between the device and the workstation or server to secure traffic between the systems with a strong
encryption. The devices support IPsec with preshared keys and certificates. Both modes can be used simultaneously.
In preshared key mode, devices are configured to establish a secure IPsec connection with up to five other systems.
Devices and the systems are configured with a pass phrase that is used to authenticate the systems and to encrypt the
data.
In certificate mode, devices are configured to establish a secure IPsec connection with up to five systems or subnets.
Devices exchange data securely with a large number of systems, and the process is integrated with a PKI or CA
infrastructure. Certificates provide a robust and scalable solution, without configuring or managing keys and pass
phrases.
1From the Embedded Web Server, click Settings > Network/Ports > IPSec.
2Configure the following settings:
Setting Description
IPSec Enable
On*
Off
Enables or disables the IP security settings of the printer.
* This is the factory default setting.
Securing network connections 39

Setting Description
Connections
Pre‑Shared Key Authenticated Connections
Host 1–5
Certificate Authenticated Connections
Host 1–5
Configures the authenticated connections of the printer.
•The following pre‑shared key settings can be configured:
–Address—You can type a maximum of 45 bytes of characters.
–Key—You can type a maximum of 256 bytes of characters.
•The following certificate setting can be configured:
–Address[/subnet]—You can type a maximum of 59 bytes of
characters.
Settings
DH Group
DH (Diffie‑Hellman) Group Proposal
modp768 (1)
modp1024 (2)*
modp1536 (5)
modp2048 (14)
Encryption
Proposed Encryption Method
DES
3DES*
AES
Authentication
Proposed Authentication Method
MD5
SHA 1
Certificate Validation
Validate Peer Certificate
On*
Off
Select Device Certificate
IPSec Device Certificate
default*
Specifies the encryption and authentication methods of the printer.
* This is the factory default setting.
3Click Submit.
Securing network connections 40

Configuring the TCP/IP port access setting
Note: This setting is available only in some printer models.
You can control your network device activities by configuring your device to filter out traffic on specific network ports.
Protocols (such as FTP, HTTP, and Telnet) can be disabled.
Port filtering on devices disables network ports individually. When a port is closed, a device does not respond to traffic
on the specified port whether or not the corresponding network application is enabled. We recommend closing any
ports that you do not plan to use under standard operation by clearing them.
This feature lets you set access settings on the different TCP/IP ports of the device.
1From the Embedded Web Server, click Settings > Security > TCP/IP Port Access.
Note: A list of TCP/IP ports appears. All ports, except TCP 10000 (Telnet), are enabled by default.
2Click the check box of the TCP/IP port to change its access setting.
3Click Submit.
Setting the restricted server list
Note: This setting is available only in advanced-security devices.
Devices can be configured to allow connection only from a list of specified TCP/IP addresses. This action blocks all TCP
connections from other addresses, protecting the device against unauthorized printing and configuring.
1From the Embedded Web Server, click Settings > Network/Ports > TCP/IP.
2In the Restricted Server List field, type up to 50 IP addresses, separated by commas, that are allowed to make TCP
connections.
3From the Restricted Server List Options menu, set the blocking option.
4Click Submit.
Securing network connections 41
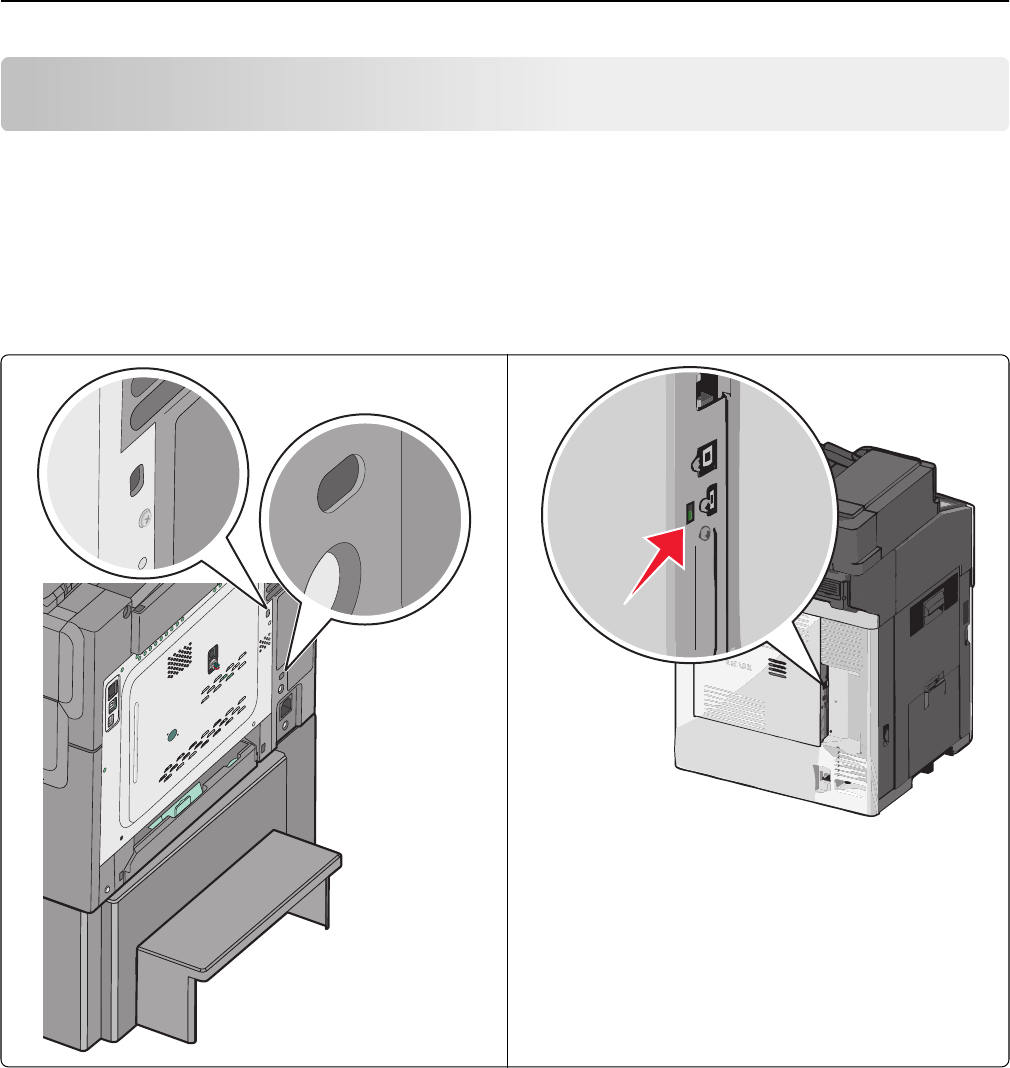
Securing data
Physical lock
Most Lexmark printers support cabled computer locks used to secure the critical and sensitive components of the
device, such as the controller board and hard disk. These locks let you identify whether the physical components
containing sensitive data on the devices have been tampered with.
The following shows the most common security slot locations:
Securing data 42

Disk encryption
Enable hard disk encryption to prevent loss of sensitive data if the printer or its hard disk is stolen. When hard disk
encryption is activated, the encryption key to be used (256-bit AES symmetric encryption) is pseudo-randomly
generated. This encryption key is stored in a proprietary way in the NV memory of the device. The hard disk is then
reformatted with the encryption key. Any data on the disk is lost. The key, which is unique to the device, is not stored
on the hard disk itself. So if the hard disk is removed from the device, then the contents of the hard disk are
indecipherable.
When an encrypted hard disk is moved to another supported device, the hard disk attempts to verify its encryption
key with the device encryption key. Because the encryption key on the hard disk is different than the device encryption
key, the verification fails. The device prompts to reformat the hard disk with a new encryption key, replacing the existing
encrypted data on the hard disk.
Note: Some printer models may not have a printer hard disk installed.
Using the Embedded Web Server
1Click Settings > Security > Disk Encryption.
Note: Disk Encryption appears in the Security menu only when a formatted, working hard disk is installed.
2From the Disk Encryption menu, select either of the following:
•Disable—Disable disk encryption.
•Enable—Enable disk encryption.
Notes:
–Disable is the factory default setting.
–Changing this setting causes the printer to undergo a power‑on reset.
Warning—Potential Damage: Changing the setting for disk encryption will erase the contents of the hard
disk.
3Click Submit to proceed with disk encryption.
Note: Encryption takes approximately two minutes. A status bar appears on the control panel indicating the
progress of the disk encryption task.
Warning—Potential Damage: Do not turn off the printer during the encryption process.
4From the Web browser, refresh the page to return to the Embedded Web Server.
Using the control panel
1Turn off the printer.
2While turning the printer on, press and hold down 2 and 6 simultaneously on the keypad until a progress bar appears.
Note: Some printer models require you to press and hold down the check mark and the right arrow buttons.
The printer performs a power-on reset, and then the Configuration menu appears. When the printer is fully turned
on, a list of functions appears on the printer display.
3Touch Disk Encryption > Enable > Yes.
Securing data 43

Notes:
•Encryption takes approximately two minutes. A status bar appears on the control panel indicating the
progress of the disk encryption task.
•After the disk has been encrypted, the printer returns to the Enable/Disable screen.
Warning—Potential Damage: Do not turn off the printer during the encryption process. Doing so may result in
loss of data.
4Touch Exit Config Menu or Exit Config.
The printer performs a power‑on reset, and then returns to normal operating mode.
Checking disk encryption status
1From the Embedded Web Server, click Select Reports > Select Device Settings.
2In the Other Settings section, check the value for Disk Encryption.
Note: You can also check the disk encryption status using Markvision Enterprise. Markvision provides an advanced
search feature to view the disk encryption status on a fleet of devices.
Erasing settings (non‑volatile memory)
Most devices use two forms of non‑volatile memory—EEPROM and NAND. These components store the device
operating system, device settings, network information, embedded solution applications, various scanner settings, and
bookmark settings. No user-related print, copy, or scan data is stored in non‑volatile memory.
The user may erase selected groups of data or all data. There is one “restore defaults” setting defined in the standard
administrator menu to restore the basic operator settings. This setting is easily accessible but only restores basic
settings. From the configuration menu or the device Embedded Web Server, you can add more options for erasing
groups of settings (printer, network, or application settings).
The Wipe All Settings option (also called Erase Printer Memory on some devices) erases all contents stored on
non‑volatile memory. Using Wipe All Settings completely clears all device settings, including network and security
settings. Installed applications and their settings are removed.
Restoring default settings from the control panel
1Navigate to the menu screen, and then touch Settings > General Settings > Factory Defaults.
2Select Restore Now > Submit.
Note: This feature does not remove the following settings:
•Network settings or connections
•Paper source settings
•Country selections
•Display language
•Applications settings
•CA certificate data
•Security settings
Securing data 44

Clearing selected settings
Using the Embedded Web Server
1Click Settings > Security > Restore Factory Defaults > Restore Settings.
Note: Some settings are available only in the latest printer firmware versions.
2Select one of the following settings:
•Printer Settings—Restore all non‑critical base device settings to the factory default. It does not affect network
settings or connections, and display language.
•Network Settings—Reset all network and port settings.
•Apps—Restore the factory default configuration of applications. All non‑factory installed applications are
removed, all application settings are reset, and SE logs are cleared.
3Click Restore.
Using the control panel
1Turn off the printer.
2While the printer is turning on, press and hold 2 and 6 on the keypad simultaneously until a progress bar appears.
Note: Some printer models require you to press and hold the check mark and the right arrow buttons.
The printer performs a power‑on sequence, and then the Configuration menu appears.
3Depending on your printer, do one of the following:
•From the list, select Restore Factory Defaults > Restore Settings.
•From the list, select Factory Reset or Restore Factory Settings.
4Depending on your printer, select one of the following settings:
•Restore Printer Settings or Restore Base—Restore all non‑critical base device settings to the factory default. It
does not affect network settings or connections, and display language.
•Restore Network Settings or Restore STD NET—Reset all network and port settings.
•Restore Solutions or Restore LES—Restore the factory default configuration of applications. All non‑factory
installed applications are removed, all application settings are reset, and SE logs are cleared.
Clearing all settings
Note: After all settings are cleared or reset, network connectivity cannot be retained because the device is in the
out-of-box shipping state. You are prompted to restart the device for transport. There is no network connectivity
until the device is restarted to ensure that the original ship configuration is maintained.
Using the Embedded Web Server
1Click Settings > Security > Restore Factory Defaults > Erase Printer Memory.
Note: Some settings are available only in the latest printer firmware versions.
2Select the check box to confirm, and then click Erase.
Securing data 45

Using the control panel
1Turn off the printer.
2While the printer is turning on, press and hold 2 and 6 on the keypad simultaneously until a progress bar appears.
Note: Some printer models require you to press and hold the check mark and the right arrow buttons.
The printer performs a power‑on sequence, and then the Configuration menu appears.
3Depending on your printer, do one of the following:
•From the list, select Restore Factory Defaults > Erase Printer Memory.
•From the list, select Wipe All Settings or Erase Printer Memory.
This feature erases all device settings stored in NVRAM, including network, security, and application settings, and all
pending jobs. Installed applications and settings are also removed.
If there is no hard disk installed, then pending fax data is also removed.
Disk file wiping
File-based disk wiping sanitizes the portion of the hard disk where data is stored after a job is processed, to remove
any residual data.
Some devices temporarily buffer scan, fax, print, and copy data that exceed the amount of RAM installed on the device.
Buffered data can be deleted from the hard disk immediately after the job is completed. Temporary data is also stored
on the hard disk when using the Confidential Print and Print and Hold features or sending and receiving held fax jobs.
This data remains on the hard disk until you print or delete the job, or until the document expires through the job
expiration feature.
When a data file is deleted from a hard disk, the data that is associated with that file is not actually deleted. This data
remains on the hard disk and can be recovered with substantial effort. All printer models with a hard disk support an
additional mechanism for protecting residual data, which is hard disk file wiping.
Hard disk file wiping actively overwrites any job data files that are deleted. You can overwrite data using a single or
multiple passes to remove all data residue from the deleted file.
All permanent data on the hard disk is preserved, such as downloaded fonts, macros, and held jobs. The multiple‑pass
wiping process adheres to NIST and DOD (DOD 5220.22-M) guidelines for overwriting confidential data.
The settings available for hard disk file wiping are Automatic, Scheduled, and Manual. Disk wiping for these three
methods can be either single or multiple pass. Single-pass and multiple-pass settings determine the number of overwrite
passes that are used during the wiping process. Highly confidential information should be wiped only with the
multiple‑pass method. Multiple-pass wiping takes longer than the single-pass version.
Note: Automatic, Scheduled, and Manual wiping selections are available only if a formatted, working hard disk is
installed.
Securing data 46

•Automatic—Immediately overwrite areas of the disk that were used for job processing. Automatic wiping marks
all disk space used by a previous job and prevents the file system from reusing this space until it is sanitized.
Automatic wiping is the only wiping process that operates without having to take the device offline during the
wiping process.
Note: Automatic wiping is the preferred method of wiping because the time that job files are resident on the
disk is minimized.
•Scheduled—Select when the disk wiping of previous job files is executed. When the disk space that is used for a
job is no longer required, it is marked for wiping later. At the first available non-busy period after the next scheduled-
time setting, the device goes offline and begins wiping the marked disk space. No user warning or confirmation
message is displayed. The Scheduled and Manual settings enable the file system to reuse marked disk space without
wiping it.
•Manual—Immediately start wiping all disk space that is marked as previously used for job data. The device is offline
during the wiping process. Do Not Start Now is the default setting. In devices that support a hard disk, you can
access the disk wiping menu from the device Embedded Web Server. In most devices, the menu can also be accessed
from the control panel. If the disk wiping access control is enabled, then make sure that you are authorized before
starting disk wiping.
Setting up disk wiping from the Embedded Web Server
1Click Settings > Security.
2Click Disk Wiping or Erase Temporary Data.
3Select one of the following:
•Off—Disable disk wiping.
•Auto—Automatically wipe data following each use (can increase the time between jobs).
•Manual—Set up a schedule for disk wiping.
4Click Submit.
Notes:
•The Schedule Disk Wiping option appears only after you have selected and submitted the Manual Wiping
mode.
•To make further configuration changes, select Disk Wiping or Erase Temporary Data.
Setting up disk wiping from the control panel
Note: These instructions apply only in printer models with a touch‑screen display.
1Navigate to the menu screen.
Note: Make sure that you are log in as an administrator.
2Touch Security > Disk Wiping or Erase Temporary Data Files.
3Select one of the following:
•Off—Disable disk wiping.
•Auto—Automatically wipe data following each use (can increase the time between jobs).
•Manual—Set up a schedule for disk wiping.
4Touch Submit.
Securing data 47

Modifying scheduled disk wiping from the Embedded Web Server
1If you have enabled the Manual Wiping mode to set a schedule for disk wiping, then click Scheduled Disk Wiping
and do the following:
aUse the Time and Day(s) lists to schedule the disk wiping, and then click Add.
bIf necessary, repeat the step to schedule additional times for disk wiping.
2Set the Disk Wiping method (Automatic, Manual, or Scheduled) that matches the selected Wiping Mode:
•Single Pass—Overwrite the hard disk in a single pass with a repeating bit pattern.
•Multi‑pass—Overwrite the hard disk with random bit patterns several times, followed by a verification pass. A
secure overwrite is compliant with the DoD 5220.22‑M standard for securely erasing data from a hard disk. Use
this method to wipe highly confidential information.
3Click Submit.
Erasing hard disk data
Completely erase the hard disk data to wipe it clean when doing any of the following:
•Decommissioning the device
•Replacing the hard disk
•Moving the device to a different department or location
•Preparing the device to be serviced by someone outside the organization
•Removing the device from the premises of service
Warning—Potential Damage: This action deletes all the contents of a hard disk, including font data, forms data,
macros, and any buffered fax, Confidential Print, or Print and Hold data.
Access the Complete Wipe Disk or the Erase Hard Disk option from the Configuration menu or from the Embedded
Web Server.
Using the Embedded Web Server
1Click Settings > Security > Restore Factory Defaults > Erase Hard Disk.
Note: Some settings are available only in the latest device firmware versions.
2Select the check box to confirm.
3Select either of the following:
•Single Pass Erase—Overwrite the hard disk in a single pass.
•Multiple Pass Erase—Overwrite the hard disk with random bit patterns several times, followed by a verification
pass. A secure overwrite is compliant with the DoD 5220.22‑M standard for securely erasing data from a hard
disk. Use this method when wiping highly confidential information.
4Click Submit.
Securing data 48

Using the control panel
1Turn off the printer.
2While turning on the printer, press and hold 2 and 6 on the keypad simultaneously until a progress bar appears. It
takes approximately a minute before the Configuration menu appears.
Note: Some printer models require you to press and hold the check mark and the right arrow buttons.
3Depending on your printer, do either of the following:
•From the list, select Reset Factory Defaults > Erase Hard Disk.
•From the list, select Wipe Disk or Erase Hard Disk.
4Select Single Pass Erase or Multiple Pass Erase.
Note: Do not turn off the printer while erasing hard disk data. The printer display shows the progress of the erasure.
Out‑of‑service wiping
This menu lets you clear all settings, applications, and pending job or fax data stored in the device, erase all contents
on the hard disk, or both. Doing both restores the device to the original factory default settings, which includes network
settings.
Out‑of‑service wiping allows users to erase the printer memory and completely wipe the hard disk in one process.
When removing a device from a secure environment, we recommend performing this to make sure that no customer
data remains.
Using the Embedded Web Server
1Click Settings > Security.
Note: Depending on your printer model, click Restore Factory Defaults.
2Depending on your printer firmware version, click Out of Service Erase or Out of Service Wiping, and then select
one or more of the following:
•Erase Printer Memory—Erase all settings, applications, and job data.
•Erase Hard Disk—Erase all the contents of the hard disk.
•Perform Disk Wipe—Clear all job data.
•Clear Settings and Solutions—Clear all settings and applications.
Note: In some printer models, the Out of Service Wiping setting is visible only if security is enabled. Make sure
that the access control for the security menus are set to use any security template other than No Security.
3If you selected either Erase Hard Disk or Perform Disk Wipe, select either of the following:
•Single Pass Erase—Erase the content on the printer hard disk in a single pass with a repeating bit pattern.
•Multiple Pass Erase—Erase the content on the printer hard disk with random bit patterns several times, followed
by a verification pass. A secure erase is compliant with the DoD 5220.22‑M standard for securely erasing data
from a hard disk. Highly confidential information should be erased using this method.
4Confirm your selection.
5Apply the changes.
Warning—Potential Damage: Do not turn off the printer while erasing data. This process may take several hours to
complete.
Securing data 49

Using the control panel
This menu is available only in some firmware versions.
1Turn off the printer.
2While turning on the printer, press and hold 2 and 6 on the keypad simultaneously until a progress bar appears.
Note: Some printer models require you to press and hold the check mark and the right arrow buttons.
The printer performs a power-on reset, and then the Configuration menu appears.
3From the list, select Reset Factory Defaults > Out of Service Erase.
4Select one of the following:
•Erase Memory—Erase all settings, applications, and job data.
•Erase Memory and Hard Disk (Single Pass)—Erase all settings, applications, and job data (including all the
contents of the hard disk) in a single pass with a repeating bit pattern.
•Erase Memory and Hard Disk (Multiple Pass)—Erase all settings, applications, and job data (including all
contents of the hard disk) with random bit patterns several times, followed by a verification pass. A secure erase
is compliant with the DoD 5220.22‑M standard for securely erasing data from a hard disk. Highly confidential
information should be erased using this method.
5Follow the instructions on the printer display.
Warning—Potential Damage: Do not turn off the printer while erasing data. This process may take several hours to
complete.
Statement of volatility
Your printer contains various types of memory that are capable of storing device and network settings, information
from embedded solutions, and user data. The types of memory—along with the types of data stored by each—are
described as follows:
•Volatile memory—Your device utilizes standard random access memory (RAM) to temporarily buffer user data
during simple print and copy jobs.
•Non‑volatile memory—Your device may utilize two forms of non-volatile memory: EEPROM and NAND (flash
memory). Both types are used to store the operating system, device settings, network information, scanner and
bookmark settings, and embedded solutions.
•Hard disk memory—Some devices have a hard disk drive installed. The printer hard disk is designed for
device‑specific functionality and cannot be used for long term storage for data that is not print‑related. The hard
disk does not provide the capability for users to extract information, create folders, create disk or network file
shares, or FTP information directly from a client device. The hard disk can retain buffered user data from complex
scan, print, copy, and fax jobs, as well as form data, and font data.
You may want to erase the contents of the memory devices installed in your printer when:
•The printer is being decommissioned.
•The printer hard drive is being replaced.
•The printer is being moved to a different department or location.
•The printer is being serviced by someone from outside your organization.
•The printer is being removed from your premises for service.
Securing data 50

Disposing of a hard disk
Note: Some printer models may not have a hard disk installed.
High‑security environments may require additional steps to ensure that confidential data on the printer or hard disk
cannot be accessed when either is removed from premises.
•Degaussing—Flushes the hard drive with a magnetic field that erases stored data
•Crushing—Physically compresses the hard disk to break component parts and render them unreadable
•Milling—Physically shreds the hard disk into small metal bits
Note: Most data can be erased electronically, but to guarantee that all data is completely erased, physically destroy
each hard disk where data is stored.
Erasing volatile memory
The volatile memory (RAM) installed on your printer requires a power source to retain information. To erase the
buffered data, simply turn off the device.
Erasing non‑volatile memory
There are several methods for erasing data stored in non‑volatile memory, depending on the type of memory device
installed and the type of data stored.
•Individual settings—Erase individual printer settings using the control panel or the Embedded Web Server. For
more information, see the printer User’s Guide.
•Device and network settings—Erase device and network settings, and restore factory defaults by resetting the
NVRAM from the configuration menu. You can also use the Restore Factory Defaults setting from the Embedded
Web Server.
•Security settings—Restore factory defaults or erase security settings by selecting an action for the Security Reset
Jumper setting in the Embedded Web Server. Then move the hardware jumper on the controller board.
•Fax data—If no hard disk is installed, or fax storage uses NAND, then erase fax settings and data by resetting the
NVRAM from the configuration menu. You can also use the Restore Factory Defaults setting from the Embedded
Web Server.
Note: If your printer has a hard disk that has been partitioned for fax storage, then reformat that partition to
erase fax data and settings.
•Embedded solutions—Erase information and settings associated with embedded solutions by uninstalling the
solution, or by restoring factory defaults from the configuration menu. You can also use the Restore Factory Defaults
setting from the Embedded Web Server.
Securing data 51

Security solutions
Lexmark products support installable solutions that are developed to utilize the embedded Solutions Framework (eSF)
and cloud Solutions Framework (cSF) platforms in the device. These solutions extend the basic capabilities of the device,
often enhancing the security of the device or the customer environment. Some device models come with selected
solutions pre-installed such as Common Criteria configured models.
Print Release
This solution consists of an externally hosted document management application and a device‑resident application
providing the local user interface for selecting and releasing print jobs. All documents are held in a print queue until
their owners release them. The queue can be hosted on-premise or in the cloud, which offers more features and
benefits. To release your documents, enter your credentials at the device, and then select the documents you want to
print.
For more information on how to configure and use the application, see the documentation that came with the Lexmark
Print Management application.
Secure Held Print Jobs
This application prevents accidental exposure of sensitive or confidential business information by holding jobs at the
printer until an authorized user releases the job for printing. On devices containing a hard disk, you can send and store
jobs on the printer and release them using a badge or a four-digit PIN.
To clear all DRAM memory used to store job data after a job is completed, enable Clear Print Data under Advanced
Settings.
For more information on how to configure and use the application, see Secure Held Print Jobs Administrator’s Guide.
Card Authentication
Lexmark devices support a number of different contactless card solutions (applications) for basic badge authentication
where your identity is linked to your ID badge. The application verifies the badge ID and retrieves your user information
so that it can be used for accessing held print jobs. It can also be used for identifying the source of scanned documents
or identifying you for other identification purposes.
The application is designed to work with a card reader driver application. The card reader driver provides card ID data
to other solutions that manage workflows, or access to device functions. The background and idle screen control
application is also included to restrict control of the operator panel primary menus.
For more information on how to configure and use the application, see Card Authentication Administrator’s Guide.
Smart Card authentication
The Common Access Card (CAC) and Personal Identity Verification (PIV) authentication solution extends the card
authentication applications to provide safe workflow processes throughout federal government operations. The
solution provides more control over the security of networked Lexmark MFPs. The same solution also supports SIPR
token cards (using a different card interface application) to provide access over the Secret Internet Protocol Router
Network.
Security solutions 52

For more information on how to configure and use this application, see Smart Card Authentication Administrator’s
Guide.
Security solutions 53

Security scenarios
Scenario: Printer in a public place
To provide simple protection for a printer located in a public space, such as a lobby, use a password and PIN.
Administrators can assign a single password or PIN for all authorized users of the device, or separate codes to protect
individual functions. Anyone who knows a password or PIN can access any functions protected by that code.
Setting up simple‑security devices
1From the Embedded Web Server, click Settings > Security > Panel PIN Protect.
2Enter a user PIN, and then reenter the PIN to confirm it.
3Enter an administrator PIN, and then reenter the PIN to confirm it.
4Click Modify.
5Select the appropriate security template setting for each function you want to protect.
6Click Submit.
Notes:
•When an access control is set to user PIN, any administrator PIN set for your printer is valid for that access
control. For more information, see “Simple-security device access controls” on page 8.
•You can also create a Web Page password for the administrator to restrict access to the security settings. For
more information, see “Creating a Web page password and applying access control restrictions” on page 8.
Setting up advanced‑security devices
1Create a building block password or PIN.
aFrom the Embedded Web Server, click Settings > Security > Security Setup.
bUnder Advanced Security Setup, click either PIN or Password, and then configure it.
cClick Submit.
Note: For more information, see “Creating a password building block for advanced security setup” on page 11 and
“Creating a PIN building block for advanced security setup” on page 11.
2Create a security template.
aFrom the Embedded Web Server, click Settings > Security > Security Setup > Security Template > Add a Security
Template.
bType a security template name containing up to 128 characters. It can be helpful to use a descriptive name,
such as ”Administrator_Only” or “Common_Functions_Template.”
cFrom the Authentication Setup menu list, select the PIN or password created in step 1.
dSave the template.
3Assign security templates to access controls.
aFrom the Embedded Web Server, click Settings > Security > Security Setup > Access Controls.
bIf necessary, expand or click a specific folder to view a list of available functions.
Security scenarios 54

cFrom the drop‑down menu next to the name of each function you want to protect, select the security template
created in step 2.
dClick Submit.
Note: To gain access to any function controlled by this security template, users are required to enter the appropriate
PIN or password.
Scenario: Standalone or small office
Note: This feature is available only in advanced‑security devices.
Create and store internal accounts within the Embedded Web Server for authentication or authorization in the following
conditions
•Your printer is not connected to a network.
•You do not use an authentication server to grant users access to devices.
For small office usage, an internal account building block should be defined. Each user is added as an entry in the internal
account. You can set up multiple groups (for example, admin, managers, function1, function2) with each user associated
with one or more groups. You can define one or more templates. Within a template definition, specify the authorization
as the internal account building block name and then the groups that have that authorization. Then specify the access
controls for each template.
Step 1: Set up individual user accounts
1From the Embedded Web Server, click Settings > Security > Security Setup.
2Under Advanced Security Setup, click Internal Accounts, and then configure it.
For more information on configuring individual user accounts, see “Setting up internal accounts” on page 12.
Step 2: Create a security template
1From the Embedded Web Server, click Settings > Security > Security Setup > Security Template > Add a Security
Template.
2Type a security template name containing up to 128 characters. It can be helpful to use a descriptive name, such
as ”Administrator_Only” or “Common_Functions_Template.”
3From the Authentication Setup menu, select a building block method for authenticating users. This list is populated
with the authentication building blocks that have been configured on the device.
Note: Certain building blocks (such as PINs and passwords) do not support separate authorization.
4To use authorization, click Add authorization, and then select a building block from the Authorization Setup menu.
This list is populated with the authorization building blocks available on the device.
Note: Certain building blocks (such as PINs and passwords) do not support separate authorization.
5To use authorization groups, click Modify Groups, and then select one or more groups to include in the security
template.
6Save the template.
Security scenarios 55

Step 3: Assign security templates to access controls
1From the Embedded Web Server, click Settings > Security > Security Setup > Access Controls.
2If necessary, click Expand All or click a specific folder to view a list of available functions.
3Select a security template for each function you want to protect.
4Click Submit.
Note: Users are now required to enter the appropriate credentials to access any function controlled by a security
template.
Scenario: Network running Active Directory
Note: This feature is available only in advanced‑security devices.
On networks running Active Directory, administrators can use the LDAP+GSSAPI capabilities of the device to use the
authentication and authorization services deployed on the network. User credentials and group designations can be
pulled from the existing network, making access to the printer as seamless as other network services. The device
automatically downloads the domain controller CA certificate chain.
Before configuring the Embedded Web Server to integrate with Active Directory, check the following:
•Domain name
•User ID (for the domain)
•Password (for the User ID)
For more information, see “Connecting your printer to an Active Directory domain” on page 14.
Create a security template
1From the Embedded Web Server, click Settings > Security > Security Setup > Security Template > Add a Security
Template.
2Type a security template name containing up to 128 characters. It can be helpful to use a descriptive name, such
as ”Administrator_Only” or “Common_Functions_Template.”
3From the Authentication Setup list, select the name given to your authentication client application or building block
setup.
4Click Add authorization, and then select the name given to your authentication client application or building block
setup.
5To use groups, click Modify Groups, and then select one or more of the groups listed in your Active Directory Group
Names list.
6Save the template.
Assign security templates to access controls
1From the Embedded Web Server, click Settings > Security > Security Setup > Access Controls.
2Select the newly created security template for each function you want to protect.
3Click Submit.
Note: Users are required to enter the appropriate credentials in order to gain access to any function controlled by
the security template.
Security scenarios 56

Scenario: More security‑aware environment (802.1X) and
SNMPv3
In this scenario, the network uses 802.1X communication to restrict network access, and secure LDAP to enforce
authentication and authorization for access of device functions. Also, device access is logged and the device is remotely
managed using SNMPv3.
1Load a CA certificate for the authority you want into the device. For more information, see “Installing a Certificate
Authority certificate on the device” on page 24.
2Create the CA‑signed device certificate and load it into the device. For more information, see “Configuring the device
for certificate information” on page 24.
3Set up a secure a connection using the 802.1X authentication. Make sure that the usage of 802.1X is specified in
the CA‑signed certificate. For more information, see “Configuring 802.1X authentication” on page 38.
4To allow remote management of SNMPv3, enable SNMPv3, and then disable SNMPv1,2. For more information, see
“Setting up SNMP” on page 29.
Note: Specify the user credentials for Read/Write and optionally Read/Only users. We recommend setting the
authentication level to Authentication, Privacy.
5Configure audit logging. For more information, see “Configuring security audit log settings” on page 30. Remote
system log for events can be specified by identifying the syslog server and selecting the appropriate settings. We
recommend specifying an e‑mail address for the administrator and selectingn the events to be e‑mailed.
6Set up secure LDAP authentication and authorization. For more information, see “Using LDAP” on page 15.
Note: Specify the LDAP setup name, server address, port, and other appropriate settings. To enhance security,
use a TLS or SSL/TLS connection.
7Create one or more security templates using the LDAP building block, and then assign them to the appropriate
access controls. For more information, see “Using a security template to control function access” on page 20.
Scenario: Network‑based usage restrictions using access card
Note: Before your begin, make sure that Smart Card Authentication bundle is installed.
In this scenario, the network uses an Active Directory environment. A SIPR access card and a password is used for device
authentication and authorization. Device access is audited and the device is remotely managed using SNMPv3. All ports
except the HTTPS (443) port and the SNMPv3 port are blocked.
1Configure the Active Directory domain. For more information, see “Connecting your printer to an Active Directory
domain” on page 20.
Make sure to specify the following:
•Domain name
•User ID
•Password
2Configure the Smart Card Authentication bundle. For more information, see Smart Card Authentication
Administrator’s Guide.
Note: To secure access to all applications and printer functions on the home screen, configure Background and
Idle Screen. For more information, see Background and Idle Screen Administrator’s Guide.
Security scenarios 57

3To secure a network, restrict all network ports that are not used. For more information, see “Configuring the TCP/
IP port access setting” on page 41.
4To allow remote management of SNMPv3, enable SNMPv3, and then disable SNMPv1,2. For more information, see
“Setting up SNMP” on page 29.
Note: Specify the user credentials for Read/Write and optionally Read/Only users. It is recommended that
authentication level is set to Authentication, Privacy.
5If necessary, configure the audit logging. For more information, see “Configuring security audit log settings” on
page 30. If necessary, remote system log for events can be specified by identifying the syslog server and selecting
the appropriate settings. Specification of an e‑mail address for the administrator is encouraged with selection of
the events to be e‑mailed.
6Create one or more security templates using the LDAP building block, and then assign them to the appropriate
access controls. For more information, see “Using a security template to control function access” on page 20.
Security scenarios 58

Troubleshooting
Login troubleshooting
USB device is not supported
MAKE SURE THAT A SUPPORTED SMART CARD READER IS ATTACHED
Remove the unsupported reader and attach a valid reader. For information on the supported readers, contact your
Lexmark representative.
Printer home screen fails to return to a locked state when not in use
Try one or more of the following:
MAKE SURE THAT THE AUTHENTICATION TOKEN IS INSTALLED AND RUNNING
1From the Embedded Web Server, click Settings > Device Solutions > Solutions (eSF).
2Make sure that the authentication token appears in the list of installed solutions and that it is in a “Running”
state.
•If the authentication token is installed but is not running, then select the application name, and then click
Start.
•If the authentication token does not appear in the list of installed solutions, then contact the Solutions Help
Desk for assistance.
MAKE SURE THAT PKI AUTHENTICATION IS INSTALLED AND RUNNING
1From the Embedded Web Server, click Settings > Device Solutions > Solutions (eSF).
2Make sure that PKI Authentication solution appears in the list of installed solutions and that it is in a “Running”
state.
•If PKI Authentication is installed but is not running, then select the application name, and then click Start.
•If PKI Authentication does not appear in the list of installed solutions, then contact the Solutions Help Desk.
Login screen does not appear when a smart card is inserted
MAKE SURE THAT THE SMART CARD IS RECOGNIZED BY THE READER
Contact the Solutions Help Desk for assistance.
Troubleshooting 59

KDC and MFP clocks are out of sync
This error indicates that the printer clock is more than five minutes out of sync with the domain controller clock.
MAKE SURE THAT THE DATE AND TIME SETTINGS ON THE PRINTER ARE CORRECT
1From the Embedded Web Server, click Settings > Security > Set Date and Time.
2If you have manually configured date and time settings, then adjust the settings if necessary. Make sure that the
time zone and daylight saving time settings are correct.
Note: If your network uses DHCP, then make sure that NTP settings are not automatically provided by the DHCP
server before manually configuring NTP settings.
3If the printer uses an NTP server, then make sure that those settings are correct and that the NTP server is
functioning correctly.
4Apply the changes.
Kerberos configuration file is not uploaded
This error occurs when PKI Authentication is configured to use the Device Kerberos Setup, but no Kerberos file has been
uploaded.
MAKE SURE THAT THE KERBEROS FILE HAS BEEN UPLOADED
1From the Embedded Web Server, click Settings > Device Solutions > Solutions (eSF) > PKI Authentication >
Configure.
2If you are using Simple Kerberos Setup, then clear Use Device Kerberos Setup, and then apply the changes.
3If you are using a Kerberos configuration file, then do the following:
aFrom the Embedded Web Server, click Settings > Security > Security Setup > Kerberos 5.
bFrom the Import Kerberos File section, browse to the krb5.conf file, and then click Submit.
Cannot authenticate users
MAKE SURE THAT THE REALM SPECIFIED IN THE KERBEROS SETTINGS IS IN UPPERCASE
1From the Embedded Web Server, click Settings > Device Solutions > Solutions (eSF) > PKI Authentication >
Configure.
2For Simple Kerberos Setup, make sure that the realm is correct and typed in uppercase.
3If you are using a krb5.conf file, then make sure that the Realm entries in the configuration file are in uppercase.
Domain controller certificate is not installed
MAKE SURE THAT THE CORRECT CERTIFICATE IS INSTALLED ON THE PRINTER
For information on installing, viewing, or modifying certificates, see “Installing a Certificate Authority certificate on
the device” on page 24.
Troubleshooting 60

KDC does not respond within the required time
Try one or more of the following:
MAKE SURE THAT THE IP ADDRESS OR HOST NAME OF THE KDC IS CORRECT
1From the Embedded Web Server, click Settings > Device Solutions > Solutions (eSF) > PKI Authentication >
Configure.
2For Simple Kerberos Setup, make sure that the IP address or host name specified for the Domain Controller is
correct.
3Apply the changes.
MAKE SURE THAT THE KDC IS AVAILABLE
You can specify multiple KDCs in the PKI Authentication settings or in the krb5.conf file.
MAKE SURE THAT PORT 88 IS NOT BLOCKED BY A FIREWALL
Port 88 must be opened between the printer and the KDC for authentication to work.
Cannot find user realm in the Kerberos configuration file
MAKE SURE THAT THE WINDOWS DOMAIN IS SPECIFIED IN THE KERBEROS SETTINGS
1From the Embedded Web Server, click Settings > Device Solutions > Solutions (eSF) > PKI Authentication >
Configure.
2From the Simple Kerberos Setup, add the Windows Domain in lowercase to the Domain setting.
For example, if the Domain setting is mil,.mil and the Windows Domain is x.y.z, then change the Domain
setting to mil,.mil,x.y.z.
3If you are using a krb5.conf file, then add an entry to the domain_realm section. Map the lowercase Windows
domain to the uppercase realm (similar to the existing mapping for the “mil” domain).
Cannot find realm on card in the Kerberos configuration file
This error occurs during smart card login.
UPLOAD A KERBEROS CONFIGURATION FILE AND MAKE SURE THAT THE REALM HAS BEEN ADDED TO THE FILE
The PKI Authentication settings do not support multiple Kerberos Realm entries. If multiple realms are needed, then
create and upload a krbf5.conf file containing the needed realms. If you are already using a Kerberos configuration
file, then make sure that the missing realm is correctly added to the file.
Troubleshooting 61

Client is unknown
This error indicates that the KDC being used to authenticate the user does not recognize the User Principal Name
specified in the error message.
MAKE SURE THAT THE DOMAIN CONTROLLER INFORMATION IS CORRECT
1From the Embedded Web Server, click Settings > Device Solutions > Solutions (eSF) > PKI Authentication >
Configure.
2For Simple Kerberos Setup, make sure that the IP address or host name of the domain controller is correct.
3If you are using a Kerberos configuration file, then make sure that the domain controller entry is correct.
Login does not respond at “Getting User Info”
For information on LDAP‑related issues, see“LDAP troubleshooting” on page 62.
User is logged out automatically
INCREASE THE PANEL LOGIN TIMEOUT INTERVAL
1From the Embedded Web Server, click Settings > Security > Miscellaneous Security Settings > Login Restrictions.
2Increase the time (in seconds) of the Panel Login Timeout setting.
3Apply the changes.
LDAP troubleshooting
LDAP lookups take a long time and then fail
This issue can occur during login (at “Getting User Info”) or during address book searches. Try one or more of the
following:
MAKE SURE THAT PORT 389 (NON‑SSL) AND PORT 636 (SSL) ARE NOT BLOCKED BY A FIREWALL
The printer uses these ports to communicate with the LDAP server. The ports must be open for LDAP lookups to
work.
MAKE SURE THAT THE LDAP SEARCH BASE IS NOT TOO BROAD IN SCOPE
Narrow the LDAP search base to the lowest possible scope that will include all necessary users.
Troubleshooting 62

LDAP lookups fail almost immediately
Try one or more of the following:
MAKE SURE THAT THE ADDRESS BOOK SETUP CONTAINS THE HOST NAME FOR THE LDAP SERVER
1From the Embedded Web Server, click Settings > Network/Ports > Address Book Setup.
2Make sure that the host name (not the IP address) of the LDAP server specified in the Server Address field is
correct.
3Apply the changes.
MAKE SURE THAT THE ADDRESS BOOK SETUP SETTINGS ARE CORRECT
1From the Embedded Web Server, click Settings > Network/Ports > Address Book Setup.
2If necessary, modify the following settings:
•Server Port—Set this port to 636.
•Use SSL/TLS—Select SSL/TLS.
•LDAP Certificate Verification—Select Never.
3Apply the changes.
NARROW THE LDAP SEARCH BASE TO THE LOWEST POSSIBLE SCOPE THAT INCLUDES ALL NECESSARY USERS
MAKE SURE THAT THE LDAP ATTRIBUTES FOR THE USER E‑MAIL ADDRESS AND HOME DIRECTORY ARE
CORRECT
Held Jobs/Print Release Lite troubleshooting
Cannot use the Held Jobs feature
ADD THE USER TO THE APPROPRIATE ACTIVE DIRECTORY GROUP
If user authorization is enabled for Held Jobs, then add the user to an Active Directory group that is included in the
authorization list for the Held Jobs function.
Troubleshooting 63

Cannot determine Windows user ID
MAKE SURE THAT PKI AUTHENTICATION SETS THE USER ID FOR THE SESSION
1From the Embedded Web Server, click Settings > Device Solutions > Solutions (eSF) > PKI Authentication >
Configure.
2From the User Session and Access Control section, in the Session Userid setting, specify how to obtain the
Windows user ID when logging in:
•None—The user ID is not set. Select this option if the user ID is not needed by other applications.
•User Principal Name—The smart card principal name or the credential provided by manual login is used to
set the user ID (userid@domain).
•EDI‑PI—The user ID portion of the smart card principal name or the credential provided by manual login is
used to set the user ID.
•LDAP Lookup—The user ID is retrieved from Active Directory.
3Apply the changes.
No jobs are available for the user
Try one or more of the following:
MAKE SURE THAT PKI AUTHENTICATION IS SET TO THE CORRECT USER ID
1From the Embedded Web Server, click Settings > Device Solutions > Solutions (eSF) > PKI Authentication >
Configure.
2From the User Session and Access Control section, select LDAP Lookup for the Session UserID setting.
3Apply the changes.
MAKE SURE THAT THE JOBS WERE SENT TO THE CORRECT PRINTER AND WERE PRINTED
The jobs may have been sent to a different printer or automatically deleted because they were not printed quickly
enough.
Jobs are printing immediately
Try one or more of the following:
MAKE SURE THAT PKI HELD JOBS IS INSTALLED AND RUNNING
1From the Embedded Web Server, click Settings > Device Solutions > Solutions (eSF).
2Make sure that the PKI Held Jobs solution appears in the list of installed solutions and that it is in a “Running”
state.
•If PKI Held Jobs is installed but not running, then select the check box next to the application name, and then
click Start.
•If PKI Held Jobs does not appear in the list of installed solutions, then contact the Solutions Help Desk for
assistance.
Troubleshooting 64

MAKE SURE THAT ALL JOBS ARE REQUIRED TO BE HELD
1From the Embedded Web Server, click Settings > Device Solutions > Solutions (eSF) > PKI Held Jobs >
Configure.
2From the Advanced Settings section, enable Require All Jobs to be Held and Clear Print Data .
3Apply the changes.
Troubleshooting 65

Appendix
Appendix A: CA file creation
Note: This example of generation of a CA file for the Certificate Authority assumes usage of a Windows Certificate
Authority server.
1Point the browser window to the CA. Make sure to use the URL, http//<CA’s address>/CertSrv, where CA’s
address is the IP address or host name of the CA server.
Note: Before the CA Web page opens, a Windows login window may pop up and request user credentials to
verify that you have access to the CA Web page.
2Click Download a CA certificate, certificate chain, or CRL.
3Click Base 64 encoded, and then click Download CA Certificate.
Note: DER encoding is not supported.
4Save the certificate that is offered in a file. The file name is arbitrary, but the extension should be “.pem”.
Appendix B: CA‑Signed Device Certificate creation
Note: This example of generation of a CA file for the Certificate Authority assumes usage of a Windows Certificate
Authority server.
1Point the browser window to the CA. Make sure to use the URL, http//<CA’s address>/CertSrv, where CA’s
address is the IP address or host name of the CA server.
2Click Request a certificate.
3Click advanced certificate request.
4Click Submit a certificate request by using a base‑64‑encoded.
5Paste the (.csr prompted) information copied from the device into the Saved Request field, and then select a Web
Server‑type certificate template.
6Click Submit.
Note: The server takes a moment or two to process the request, and then presents a dialog window.
7Select Base 64 encoded, and then click Download Certificate.
Note: DER encoding is not supported.
8Save the certificate that is offered in a file. The file name is arbitrary, but the extension should be “.pem”.
Appendix C: Access controls
Depending on the device type and installed options, some access controls (referred to on some devices as Function
Access Controls) may not be available for your printer.
Appendix 66

Function access control What it does
Configuration Menu This protects access to the Configuration Menu.
Manage Shortcuts at the Device This protects access to the Manage Shortcuts section of the Settings menu from the
printer control panel.
Manage Shortcuts Remotely This protects access to the Manage Shortcuts section of the Settings menu from the
Embedded Web Server.
Network/Ports Menu at the Device This protects access to the Network/Ports section of the Settings menu from the
printer control panel.
Network/Ports Menu Remotely This protects access to the Network/Ports section of the Settings menu from the
Embedded Web Server.
NPA Network Adapter Setting
Changes
When disabled, all network adapter NPA settings change commands are ignored.
Option Card Configuration at the
Device
This controls access to the Option Card Configuration section of the Settings menu
from the printer control panel. This applies only when an Option Card with
configuration options is installed on the device.
Option Card Configuration Remotely This controls access to the Option Card Configuration section of the Settings menu
from the Embedded Web Server. This applies only when an Option Card with
configuration options is installed on the device.
Paper Menu at the Device This protects access to the Paper menu from the printer control panel.
Paper Menu Remotely This protects access to the Paper menu from the Embedded Web Server.
Remote Certificate Management When disabled, it is no longer possible to manage certificates using remote
management tools. Certificate Management is limited to the operations available
from the printer control panel and Embedded Web Server.
Reports Menu at the Device This protects access to the Reports menu from the printer control panel.
Reports Menu Remotely This protects access to the Reports menu from the Embedded Web Server.
Security Menu at the Device This protects access to the Security menu from the printer control panel.
Security Menu Remotely This protects access to the Security menu from the Embedded Web Server.
Service Engineer Menus at the Device This protects access to the Service Engineer menu from the printer control panel.
Service Engineer Menus Remotely This protects access to the Service Engineer menu from the Embedded Web Server.
Settings Menu at the Device This protects access to the General and Print Settings sections of the Settings menu
from the printer control panel.
Settings Menu Remotely This protects access to the General and Print Settings sections of the Settings menu
from the Embedded Web Server.
Supplies Menu at the Device This protects access to the Supplies menu from the printer control panel.
Supplies Menu Remotely This protects access to the Supplies menu from the Embedded Web Server.
Appendix 67

Function access control What it does
Firmware Updates This controls the ability to update firmware from any source other than a flash drive.
Firmware files that are received through FTP, the Embedded Web Server, etc., will
be ignored (flushed) when this function is protected.
Operator Panel Lock This protects access to the locking function of the printer control panel. If this is
enabled, then users with appropriate credentials can lock and unlock the printer
touch screen. In a locked state, the touch screen displays only the "Unlock Device"
icon, and no further operations can be performed at the device until appropriate
credentials are entered. Once unlocked, the touch screen will remain in an unlocked
state even if the user logs out of the device. To enable the control panel lock, the
user must select the "Lock Device" icon, and then enter the appropriate credentials.
PJL Device Setting Changes When disabled, all device settings changes requested by incoming print jobs are
ignored.
Remote Management This controls access to printer settings and functions by remote management tools
such as MarkVisionTM. When protected, no printer configuration settings can be
altered except through a secured communication channel (such as that provided by
a properly configured installation of MarkVision).
Solutions Configuration or eSF
Configuration
This controls access to the configuration of any installed solutions.
Web Import/Export Settings This controls the ability to import and export printer settings files (UCF files) from
the Embedded Web Server.
Function access control What it does
Address Book This controls the ability to perform address book searches in the Scan to Fax and Scan
to E‑mail functions.
Cancel Jobs at the Device This controls the ability to cancel jobs from the printer control panel.
Change Language from Home Screen This controls access to the Change Language feature from the printer control panel.
Color Dropout This controls the ability to use the Color Dropout feature for scan and copy functions.
Copy Color Printing This controls the ability to perform color copy functions. Users who are denied will
have their copy jobs printed in black and white.
Copy Function This controls the ability to use the Copy function.
Create Bookmarks at the Device This controls the ability to create new bookmarks from the printer control panel.
Create Bookmarks Remotely This controls the ability to create new bookmarks from the Bookmark Setup section
of the Settings menu on the Embedded Web Server.
Create Profiles This controls the ability to create new profiles.
E‑mail Function This controls access to the Scan to E‑mail function.
Fax Function This controls access to the Scan to Fax function.
Flash Drive Color Printing This controls the ability to print color from a flash drive. Users who are denied will
have their print jobs printed in black and white.
Flash Drive Firmware Updates This controls the ability to update firmware from a flash drive.
Flash Drive Print This controls the ability to print from a flash drive.
Flash Drive Scan This controls the ability to scan documents to a flash drive.
Appendix 68
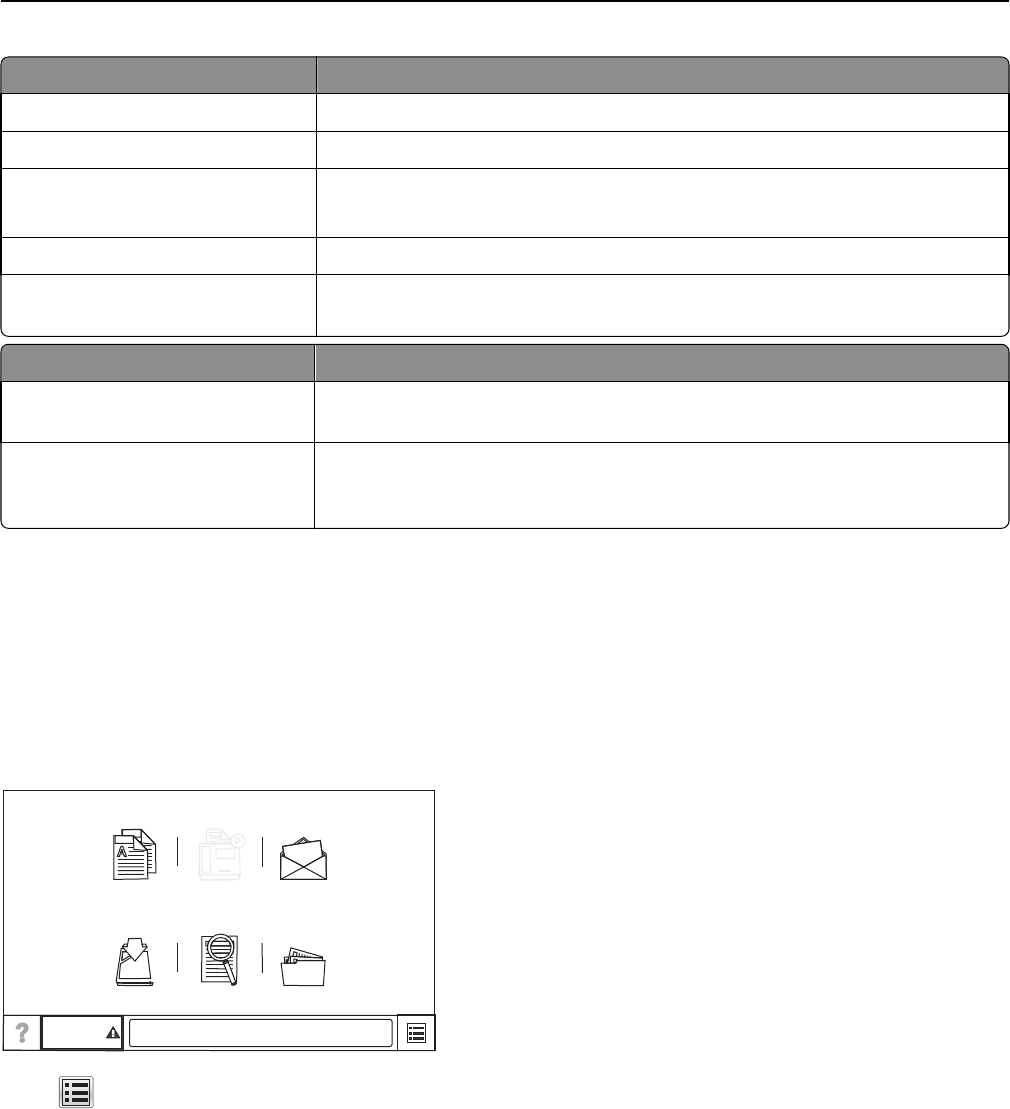
Function access control What it does
FTP Function This controls access to the Scan to FTP function.
Held Jobs Access This protects access to the Held Jobs function.
PictBridge Printing This controls the ability to print from an attached PictBridge‑enabled digital camera.
Note: Selected devices only.
Release Held Faxes This controls the ability to release (print) held faxes.
Use Profiles This controls access to profiles, such as scanning shortcuts, workflows, and eSF
applications.
Function access control What it does
New Solutions This controls the initial security profile of each solution‑specific access control
installed on the printer.
Solution 1–10 The Solution 1 through Solution 10 access controls can be assigned to installed eSF
applications and profiles created by LDSS. The access control for each solution is
assigned in the creation or configuration of the application or profile.
Note: Depending on the solutions you have installed, additional solution‑specific access controls may be listed below
solutions 1–10. Use these additional access controls if they are available for your installed solutions. If no additional
solution‑specific access controls are available, then assign one of the ten numbered access controls to each solution
you want to protect.
Understanding the home screen
The screen located on the front of the printer is touch‑sensitive and can be used to access device functions and navigate
settings and configuration menus. The home screen looks similar to this (yours may contain additional icons):
@
Status/
Supplies
Ready.
Copy Release Held
Faxes E-mail
FTP Search
Held Jobs Held jobs
Touch on the lower right to access settings and configuration menus for the device.
Note: Access to device menus may be restricted to administrators only.
Appendix 69
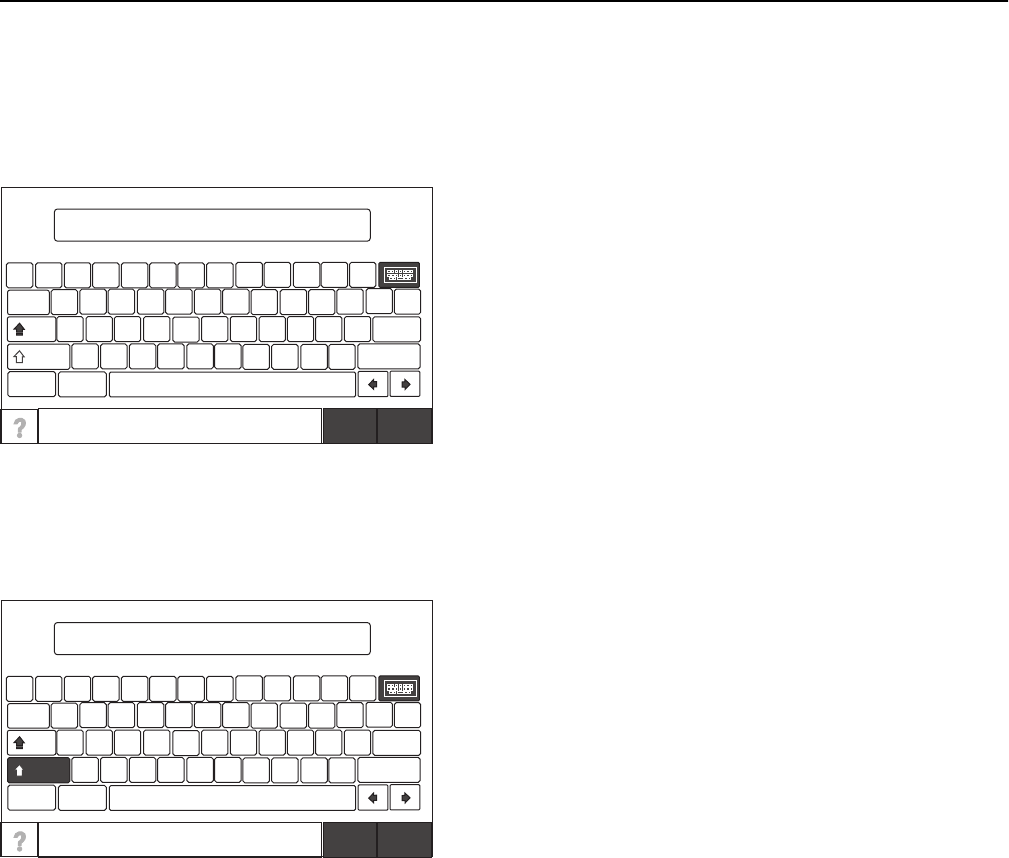
Using the on‑screen keyboard
Some device settings require one or more alphanumeric entries, such as server addresses, user names, and passwords.
When an alphanumeric entry is needed, a keyboard appears:
Password
~1234567890-=
QWE RT YUIOP[]\
ASDFGHJKL ;Clear
Backspace
ZXCVBNM,./
.com .org Space
@
Caps
Shift
Cancel Done
!@#$
%^&*()_+
{}|
:“
<> ?
As you touch the letters and numbers, your selections appear in a corresponding field at the top of the screen. The
keyboard display may also contain other icons, such as Next, Submit, Cancel, and the home icon.
To type a single uppercase or shift character, touch Shift, and then touch the letter or number you need to uppercase.
To turn on Caps Lock, touch Caps, and then continue typing. Caps Lock will remain engaged until you touch Caps again.
Password
~1234567890-=
QWE RT YUIOP[]\
ASDFGHJKL ;Clear
Backspace
ZXCVBNM,./
.com .org Space
@
Caps
Shift
Cancel Done
!@#$
%^&*()_+
{}|
:“
<> ?
Touch Backspace to delete a single character or Clear to delete everything you have typed.
Appendix 70

Notices
Edition notice
September 2014
The following paragraph does not apply to any country where such provisions are inconsistent with local law:
LEXMARK INTERNATIONAL, INC., PROVIDES THIS PUBLICATION “AS IS” WITHOUT WARRANTY OF ANY KIND, EITHER
EXPRESS OR IMPLIED, INCLUDING, BUT NOT LIMITED TO, THE IMPLIED WARRANTIES OF MERCHANTABILITY OR FITNESS
FOR A PARTICULAR PURPOSE. Some states do not allow disclaimer of express or implied warranties in certain
transactions; therefore, this statement may not apply to you.
This publication could include technical inaccuracies or typographical errors. Changes are periodically made to the
information herein; these changes will be incorporated in later editions. Improvements or changes in the products or
the programs described may be made at any time.
References in this publication to products, programs, or services do not imply that the manufacturer intends to make
these available in all countries in which it operates. Any reference to a product, program, or service is not intended to
state or imply that only that product, program, or service may be used. Any functionally equivalent product, program,
or service that does not infringe any existing intellectual property right may be used instead. Evaluation and verification
of operation in conjunction with other products, programs, or services, except those expressly designated by the
manufacturer, are the user’s responsibility.
For Lexmark technical support, visit http://support.lexmark.com.
For information on supplies and downloads, visit www.lexmark.com.
If you don't have access to the Internet, you can contact Lexmark by mail:
Lexmark International, Inc.
Bldg 004-2/CSC
740 New Circle Road NW
Lexington, KY 40550
USA
© 2014 Lexmark International, Inc.
All rights reserved.
Trademarks
Lexmark and Lexmark with diamond design are trademarks of Lexmark International, Inc., registered in the United
States and/or other countries.
Mac and the Mac logo are trademarks of Apple Inc., registered in the U.S. and other countries.
All other trademarks are the property of their respective owners.
GOVERNMENT END USERS
The Software Program and any related documentation are "Commercial Items," as that term is defined in 48 C.F.R.
2.101, "Computer Software" and "Commercial Computer Software Documentation," as such terms are used in 48 C.F.R.
12.212 or 48 C.F.R. 227.7202, as applicable. Consistent with 48 C.F.R. 12.212 or 48 C.F.R. 227.7202-1 through 227.7207-4,
Notices 71

as applicable, the Commercial Computer Software and Commercial Software Documentation are licensed to the U.S.
Government end users (a) only as Commercial Items and (b) with only those rights as are granted to all other end users
pursuant to the terms and conditions herein.
GifEncoder
GifEncoder - writes out an image as a GIF. Transparency handling and variable bit size courtesy of Jack Palevich. Copyright
(C) 1996 by Jef Poskanzer * <jef@acme.com>. All rights reserved. Redistribution and use in source and binary forms,
with or without modification, are permitted provided that the following conditions are met: 1. Redistributions of source
code must retain the above copyright notice, this list of conditions and the following disclaimer. 2. Redistributions in
binary form must reproduce the above copyright notice, this list of conditions and the following disclaimer in the
documentation and/or other materials provided with the distribution. THIS SOFTWARE IS PROVIDED BY THE AUTHOR
AND CONTRIBUTORS ``AS IS'' AND ANY EXPRESS OR IMPLIED WARRANTIES, INCLUDING, BUT NOT LIMITED TO, THE
IMPLIED WARRANTIES OF MERCHANTABILITY AND FITNESS FOR A PARTICULAR PURPOSE ARE DISCLAIMED. IN NO
EVENT SHALL THE AUTHOR OR CONTRIBUTORS BE LIABLE FOR ANY DIRECT, INDIRECT, INCIDENTAL, SPECIAL,
EXEMPLARY, OR CONSEQUENTIAL DAMAGES (INCLUDING, BUT NOT LIMITED TO, PROCUREMENT OF SUBSTITUTE
GOODS OR SERVICES; LOSS OF USE, DATA, OR PROFITS; OR BUSINESS INTERRUPTION) HOWEVER CAUSED AND ON ANY
THEORY OF LIABILITY, WHETHER IN CONTRACT, STRICT LIABILITY, OR TORT (INCLUDING NEGLIGENCE OR OTHERWISE)
ARISING IN ANY WAY OUT OF THE USE OF THIS SOFTWARE, EVEN IF ADVISED OF THE POSSIBILITY OF SUCH DAMAGE.
Visit the ACME Labs Java page for up-to-date versions of this and other fine Java utilities:
http://www.acme.com/java/
ZXing 1.7
This project consists of contributions from several people, recognized here for convenience, in alphabetical order.
Agustín Delgado (Servinform S.A.), Aitor Almeida (University of Deusto), Alasdair Mackintosh (Google), Alexander
Martin (Haase & Martin GmbH), Andreas Pillath, Andrew Walbran (Google), Andrey Sitnik, Androida.hu /
http://www.androida.hu/, Antonio Manuel Benjumea (Servinform S.A.), Brian Brown (Google), Chang Hyun Park,
Christian Brunschen (Google), crowdin.net, Daniel Switkin (Google), Dave MacLachlan (Google), David Phillip Oster
(Google), David Albert (Bug Labs), David Olivier, Diego Pierotto, drejc83, Eduardo Castillejo (University of Deusto),
Emanuele Aina, Eric Kobrin (Velocitude), Erik Barbara, Fred Lin (Anobiit), gcstang, Hannes Erven, hypest (Barcorama
project), Isaac Potoczny-Jones, Jeff Breidenbach (Google), John Connolly (Bug Labs), Jonas Petersson (Prisjakt), Joseph
Wain (Google), Juho Mikkonen, jwicks, Kevin O'Sullivan (SITA), Kevin Xue (NetDragon Websoft Inc., China), Lachezar
Dobrev, Luiz Silva, Luka Finžgar, Marcelo, Mateusz Jędrasik, Matrix44, Matthew Schulkind (Google), Matt York
(LifeMarks), Mohamad Fairol, Morgan Courbet, Nikolaos Ftylitakis, Pablo Orduña (University of Deusto), Paul
Hackenberger, Ralf Kistner, Randy Shen (Acer), Rasmus Schrøder Sørensen, Richard Hřivňák, Romain Pechayre, Roman
Nurik (Google), Ryan Alford, Sanford Squires, Sean Owen (Google), Shiyuan Guo / 郭世元, Simon Flannery (Ericsson),
Steven Parkes, Suraj Supekar, Sven Klinkhamer, Thomas Gerbet, Vince Francis (LifeMarks), Wolfgang Jung, Yakov
Okshtein (Google)
Apache License Version 2.0, January 2004
http://www.apache.org/licenses/
TERMS AND CONDITIONS FOR USE, REPRODUCTION, AND DISTRIBUTION
1Definitions.
"License" shall mean the terms and conditions for use, reproduction, and distribution as defined by Sections 1
through 9 of this document.
Notices 72

"Licensor" shall mean the copyright owner or entity authorized by the copyright owner that is granting the License.
"Legal Entity" shall mean the union of the acting entity and all other entities that control, are controlled by, or are
under common control with that entity. For the purposes of this definition, "control" means (i) the power, direct
or indirect, to cause the direction or management of such entity, whether by contract or otherwise, or (ii) ownership
of fifty percent (50%) or more of the outstanding shares, or (iii) beneficial ownership of such entity.
"You" (or "Your") shall mean an individual or Legal Entity exercising permissions granted by this License.
"Source" form shall mean the preferred form for making modifications, including but not limited to software source
code, documentation source, and configuration files.
"Object" form shall mean any form resulting from mechanical transformation or translation of a Source form,
including but not limited to compiled object code, generated documentation, and conversions to other media types.
"Work" shall mean the work of authorship, whether in Source or Object form, made available under the License,
as indicated by a copyright notice that is included in or attached to the work (an example is provided in the Appendix
below).
"Derivative Works" shall mean any work, whether in Source or Object form, that is based on (or derived from) the
Work and for which the editorial revisions, annotations, elaborations, or other modifications represent, as a whole,
an original work of authorship. For the purposes of this License, Derivative Works shall not include works that remain
separable from, or merely link (or bind by name) to the interfaces of, the Work and Derivative Works thereof.
"Contribution" shall mean any work of authorship, including the original version of the Work and any modifications
or additions to that Work or Derivative Works thereof, that is intentionally submitted to Licensor for inclusion in
the Work by the copyright owner or by an individual or Legal Entity authorized to submit on behalf of the copyright
owner. For the purposes of this definition, "submitted" means any form of electronic, verbal, or written
communication sent to the Licensor or its representatives, including but not limited to communication on electronic
mailing lists, source code control systems, and issue tracking systems that are managed by, or on behalf of, the
Licensor for the purpose of discussing and improving the Work, but excluding communication that is conspicuously
marked or otherwise designated in writing by the copyright owner as "Not a Contribution."
"Contributor" shall mean Licensor and any individual or Legal Entity on behalf of whom a Contribution has been
received by Licensor and subsequently incorporated within the Work.
2Grant of Copyright License. Subject to the terms and conditions of this License, each Contributor hereby grants to
You a perpetual, worldwide, non-exclusive, no-charge, royalty-free, irrevocable copyright license to reproduce,
prepare Derivative Works of, publicly display, publicly perform, sublicense, and distribute the Work and such
Derivative Works in Source or Object form.
3Grant of Patent License. Subject to the terms and conditions of this License, each Contributor hereby grants to You
a perpetual, worldwide, non-exclusive, no-charge, royalty-free, irrevocable (except as stated in this section) patent
license to make, have made, use, offer to sell, sell, import, and otherwise transfer the Work, where such license
applies only to those patent claims licensable by such Contributor that are necessarily infringed by their
Contribution(s) alone or by combination of their Contribution(s) with the Work to which such Contribution(s) was
submitted. If You institute patent litigation against any entity (including a cross-claim or counterclaim in a lawsuit)
alleging that the Work or a Contribution incorporated within the Work constitutes direct or contributory patent
infringement, then any patent licenses granted to You under this License for that Work shall terminate as of the
date such litigation is filed.
4Redistribution. You may reproduce and distribute copies of the Work or Derivative Works thereof in any medium,
with or without modifications, and in Source or Object form, provided that You meet the following conditions:
a(a) You must give any other recipients of the Work or Derivative Works a copy of this License; and
b(b) You must cause any modified files to carry prominent notices stating that You changed the files; and
Notices 73

c(c) You must retain, in the Source form of any Derivative Works that You distribute, all copyright, patent,
trademark, and attribution notices from the Source form of the Work, excluding those notices that do not pertain
to any part of the Derivative Works; and
d(d) If the Work includes a "NOTICE" text file as part of its distribution, then any Derivative Works that You
distribute must include a readable copy of the attribution notices contained within such NOTICE file, excluding
those notices that do not pertain to any part of the Derivative Works, in at least one of the following places:
within a NOTICE text file distributed as part of the Derivative Works; within the Source form or documentation,
if provided along with the Derivative Works; or, within a display generated by the Derivative Works, if and
wherever such third-party notices normally appear. The contents of the NOTICE file are for informational
purposes only and do not modify the License. You may add Your own attribution notices within Derivative Works
that You distribute, alongside or as an addendum to the NOTICE text from the Work, provided that such
additional attribution notices cannot be construed as modifying the License.
You may add Your own copyright statement to Your modifications and may provide additional or different license
terms and conditions for use, reproduction, or distribution of Your modifications, or for any such Derivative Works
as a whole, provided Your use, reproduction, and distribution of the Work otherwise complies with the conditions
stated in this License.
5Submission of Contributions. Unless You explicitly state otherwise, any Contribution intentionally submitted for
inclusion in the Work by You to the Licensor shall be under the terms and conditions of this License, without any
additional terms or conditions. Notwithstanding the above, nothing herein shall supersede or modify the terms of
any separate license agreement you may have executed with Licensor regarding such Contributions.
6Trademarks. This License does not grant permission to use the trade names, trademarks, service marks, or product
names of the Licensor, except as required for reasonable and customary use in describing the origin of the Work
and reproducing the content of the NOTICE file.
7Disclaimer of Warranty. Unless required by applicable law or agreed to in writing, Licensor provides the Work (and
each Contributor provides its Contributions) on an "AS IS" BASIS, WITHOUT WARRANTIES OR CONDITIONS OF ANY
KIND, either express or implied, including, without limitation, any warranties or conditions of TITLE, NON-
INFRINGEMENT, MERCHANTABILITY, or FITNESS FOR A PARTICULAR PURPOSE. You are solely responsible for
determining the appropriateness of using or redistributing the Work and assume any risks associated with Your
exercise of permissions under this License.
8Limitation of Liability. In no event and under no legal theory, whether in tort (including negligence), contract, or
otherwise, unless required by applicable law (such as deliberate and grossly negligent acts) or agreed to in writing,
shall any Contributor be liable to You for damages, including any direct, indirect, special, incidental, or consequential
damages of any character arising as a result of this License or out of the use or inability to use the Work (including
but not limited to damages for loss of goodwill, work stoppage, computer failure or malfunction, or any and all
other commercial damages or losses), even if such Contributor has been advised of the possibility of such damages.
9Accepting Warranty or Additional Liability. While redistributing the Work or Derivative Works thereof, You may
choose to offer, and charge a fee for, acceptance of support, warranty, indemnity, or other liability obligations
and/or rights consistent with this License. However, in accepting such obligations, You may act only on Your own
behalf and on Your sole responsibility, not on behalf of any other Contributor, and only if You agree to indemnify,
defend, and hold each Contributor harmless for any liability incurred by, or claims asserted against, such Contributor
by reason of your accepting any such warranty or additional liability.
END OF TERMS AND CONDITIONS
APPENDIX: How to apply the Apache License to your work.
To apply the Apache License to your work, attach the following boilerplate notice, with the fields enclosed by brackets
"[]" replaced with your own identifying information. (Don't include the brackets!) The text should be enclosed in the
appropriate comment syntax for the file format. We also recommend that a file or class name and description of purpose
be included on the same "printed page" as the copyright notice for easier identification within third-party archives.
Notices 74

Copyright [yyyy] [name of copyright owner]
Licensed under the Apache License, Version 2.0 (the "License"); you may not use this file except in compliance with the
License. You may obtain a copy of the License at
http://www.apache.org/licenses/LICENSE-2.0
Unless required by applicable law or agreed to in writing, software distributed under the License is distributed on an
"AS IS" BASIS, WITHOUT WARRANTIES OR CONDITIONS OF ANY KIND, either express or implied. See the License for the
specific language governing permissions and limitations under the License.
Notices 75

Glossary of Security Terms
Access Controls Settings that control whether individual device menus, functions, and settings
are available, and to whom. Also referred to as Function Access Controls on some
devices.
Authentication A method for securely ientifying a user.
Authorization A method for specifying which functions are available to a user, i.e. what the user
is allowed to do.
Building Block Authentication and Authorization tools used in the Embedded Web Server. They
include: password, PIN, Internal accounts, LDAP, LDAP+GSSAPI, Kerberos 5, and
NTLM.
Group A collection of users sharing common characteristics.
Security Template A profile created and stored in the Embedded Web Server, used in conjunction
with Access Controls to manage device functions.
Glossary of Security Terms 76

Index
Numerics
802.1X authentication 38, 57
A
access controls
list of 66
managing with PIN or
password 20
managing with security
templates 20
understanding 7
accessing the Embedded Web
Server 7
Active Directory
connecting a printer to 14
advanced building blocks
configuring 10
advanced security setup
password 11
advanced‑security devices 4
Appendix A
CA file creation 66
Appendix A: CA file creation 66
Appendix B
CA‑Signed Device Certificate
creation 66
Appendix B: CA‑Signed Device
Certificate creation 66
applying access control restriction
Panel PIN Protect 9
applying access control restrictions
Web Page Password Protect 8
authenticating
using Kerberos 19
using LDAP 15
using LDAP+GSSAPI 17
authentication
understanding 5
authentication failure 60
authorization
understanding 5
B
backup password
creating 28
using 28
basic security
applying basic security setup 10
authentication type 10
limiting access 10
modifying or removing access 10
building blocks
adding to security templates 20
internal accounts 12
Kerberos 5 19
LDAP 15
LDAP+GSSAPI 17
C
CA file creation
Appendix A 66
cannot authenticate users 60
cannot determine Windows user
ID 64
cannot find realm on card 61
cannot find user realm 61
cannot use Held Jobs 63
Card Authentication 52
card authentication 52
CA‑Signed Device Certificate
creation
Appendix B 66
certificate
creating 26
deleting 26
downloading 26
viewing 26
Certificate Authority certificate
installing 24
certificate defaults
setting 27
certificate error 60
certificate information
device, configuring 24
certificates
setting defaults 27
checking disk encryption status 44
Common Access Card 52
complete hard disk erasure 48
confidential printing
configuring 33
configuring
IP security settings 39
TCP/IP port access setting 41
configuring advanced building
blocks
control panel 10
configuring device
certificate information 24
Configuring Out of Service Erase 49
configuring out‑of‑service
wiping 49
control panel
locking 36
control panel lock
enabling 36
creating
certificate 26
creating internal accounts 12
creating password
security 8
Web Page Password Protect 8
D
deleting
certificate 26
device certificate
creating 26
device management
using HTTPS 28
device, configuring
certificate information 24
devices
advanced‑security 4
simple security 4
disk encryption status
checking 44
disk wiping
modifying 46
out of service 49
scheduling 46
disposing of printer hard disk 51
domain certificate error 60
domain controller certificate not
installed 60
downloading
certificate 26
E
Embedded Web Server
accessing 7
encrypting the printer hard disk 43
Index 77

erasing hard disk 48
erasing non‑volatile memory 44, 51
erasing volatile memory 51
F
firmware
updating 31
Function Access Controls 7
function access controls
list of 66
G
groups
understanding 7
H
hard disk
disposing of 51
wiping 46
hard disk erasure 48
holding faxes
enabling 36
home screen 69
home screen does not lock 59
HTTPS
device management 28
I
installing
Certificate Authority certificate 24
Installing a Certificate Authority
certificate on the device 24
internal accounts
creating 12
using 12
IP security settings
configuring 39
IPsec 39
J
jobs print immediately 64
K
KDC and MFP clocks out of sync 60
KDC does not respond within the
required time 61
Kerberos
configuring 19
LDAP+GSSAPI and 19
setting date and time for 19
Kerberos file not uploaded 60
keyboard
using the 69
L
LDAP
using 15
LDAP lookup failure 63
LDAP+GSSAPI
Kerberos and 19
using 17
limiting access 10
location of a lock 42
lock
location 42
lockout 34
login
failure 34
restrictions 34
M
MFP clock out of sync 60
missing Kerberos realm 61
multiple Kerberos realms 61
N
no jobs are available for the
user 64
non‑volatile memory
erasing 51
non‑volatile memory erasure 44
not authorized to use Held Jobs 63
notices 71
O
Operator Panel Lock
enabling 36
out‑of‑service wiping
configuring 49
P
Panel PIN Protect 9
password
advanced security setup 11
backup 28
creating or editing 11
personal identification number
(PIN) 9, 11
physical lock 42
PIN
advanced security setup 11
creating or editing 9, 11
Panel PIN Protect 9
Print Release 52
printer
connecting to Active Directory 14
printer clock out of sync 60
printer hard disk
disposing of 51
encrypting 43
wiping 46
printer hard disk encryption 43
printer hard disk erasure 48
R
realm on card not found 61
reset jumper 35
restricted server list
setting 41
restricting access card 57
S
scenario
Active Directory networks 56
assigning security templates 55
creating passwords and PINs 54
creating security templates 54
printer in a public place 54
standalone or small office 55
Secret Internet Protocol Router 52
Secure Held Print Jobs 52
securing network connections 57
security
802.1X authentication 38
Active Directory domain 14
advanced 4
authentication 5
authorization 5
backup password 28
confidential printing 33
disk wiping 46
groups 7
internal accounts 12
Kerberos authentication 19
LDAP authentication 15
LDAP+GSSAPI authentication 17
login restrictions 34
password 11
PIN 9, 11
Index 78

reset jumper on controller
board 35
security audit log 30
security templates 20
simple 4
SNMP 29
USB host ports 34
security audit log
configuring 30
security reset jumper
enabling 35
security templates
understanding 7
using to control function
access 20
servers
restricting 41
setting
restricted server list 41
settings (non‑volatile memory)
erasing 44
simple‑security devices
simple 4
Smart Card Authentication 52
SNMP 29
SNMPv3 authentication 57
T
TCP/IP Port Access
configuring 41
touch screen
using the 69
troubleshooting
authentication failure 60
cannot authenticate users 60
cannot determine Windows user
ID 64
cannot find realm on card 61
cannot find user realm 61
cannot use Held Jobs 63
certificate error 60
client unknown 62
domain certificate error 60
domain controller certificate not
installed 60
home screen does not lock 59
jobs not being held at printer 64
jobs print immediately 64
KDC and MFP clocks out of
sync 60
KDC does not respond within the
required time 61
Kerberos file not uploaded 60
LDAP lookup failure 62, 63
LDAP lookups take too long 62
login does not respond while
getting user info 62
login screen does not appear
when card is inserted 59
MFP clock out of sync 60
missing Kerberos realm 61
multiple Kerberos realms 61
no jobs are available for the
user 64
not authorized to use Held
Jobs 63
printer clock out of sync 60
problem getting user info 62
realm on card not found 61
unable to authenticate users 60
unable to determine Windows
user ID 64
unexpected logout 62
unknown client 62
unsupported USB device 59
USB device not supported 59
user is logged out
automatically 62
user realm not found 61
U
unable to authenticate users 60
unable to determine Windows user
ID 64
unexpected logout 62
unsupported USB device 59
updating firmware 31
USB device not supported 59
USB host ports
disabling 34
enabling 34
user is logged out automatically 62
user realm not found 61
V
viewing
certificate 26
volatile memory
erasing 51
W
Web Page Password Protect 8
Index 79
