EclipsePOS User Guide Eclipse POS V1.1
User Manual:
Open the PDF directly: View PDF ![]() .
.
Page Count: 40
EclipsePOS User Guide
Simplifying Point of Sales for Retail and Restaurants
[Type the author name]

1
Chapter 1
Introduction
About EclipsePOS
EclipsePOS is a simple configurable point of sales application that can be used in retail and restaurants.
EclipsePOS application is distributed free. You can download it from our website
http://www.eclipsesoftware.com.sg/download.htm
EclipsePOS is a PC based computer application.
Software Requirements
You need at least windows XP SP2 or higher 32 bit Microsoft Windows Operation system.
EclipsePOS clickonce installer will install following Microsoft software components automatically.
Microsoft .Net Framework 3.5 SP2
SQL Server Express 2005 SP2
In addition to above, you will also need to install Microsoft POS for .Net 1.12 API
Hardware Requirements
Following are the minimum hardware requirement for your PC.
RAM - Minimum 1GB
Hard disk space - Minimum 4GB free space
Processor - Pentium 4, Minimum 1GHz
VGA Monitor with minimum resolution 0f 1024 * 768
(Connection to Internet - at least at the time of installation of EclipsePOS software application)
System Organization

[Type the author name]
2
EclipsePOS point of sales system consists of two separate executables, EclipsePOS Workbench and
EclipsePOS System Manager. You need both executables to run and configure EclipsePOS system.
EclipsePOS workbench is where transactions are entered.
EclipsePOS system manager is where configuration settings such as item creation, menu configuration,
price setup and user authorities are maintained.
EclipsePOS setup program can be deployed on a web server (Clickonce deployable).
Conventions used in this guide
Following conventions are used in this guide
EclipsePOS System Manger -> POS Setup -> System Manager Users.
Indicated that you need to start the EclipsePOS system manger if not yet started, click on the 'POS setup'
module navigation button and then 'System Manager User' task button.
3
Chapter 2
Getting Started
Installing EclipsePOS
You can download the EclipsePOS from our web site
http://www.eclipsesoftware.com.sg/download.htm
While installing EclipsePOS system manager you will see security warning dialogs, you can ignore those
warnings and continue to install the software. Installer will automatically install Microsoft .Net 3.5 SP1
and SQL Server Express 2005 if not present. You may also need to re-boot the PC while installing the
software.
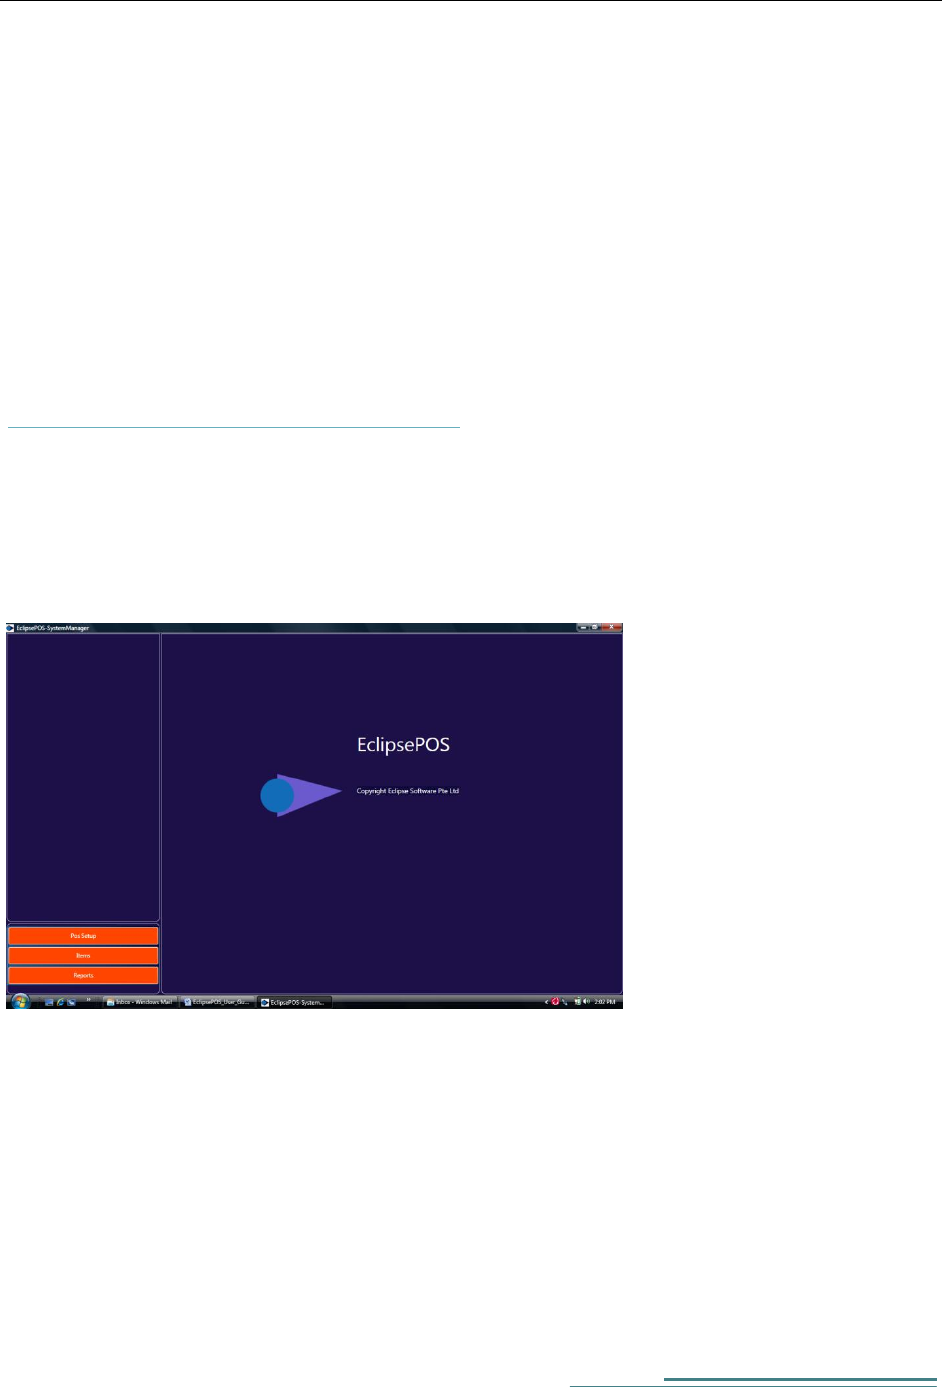
Once the installation is complete you will see the EclipsePOS system manager start screen on your PC.
Figure 1 - EclipsePOS system manager
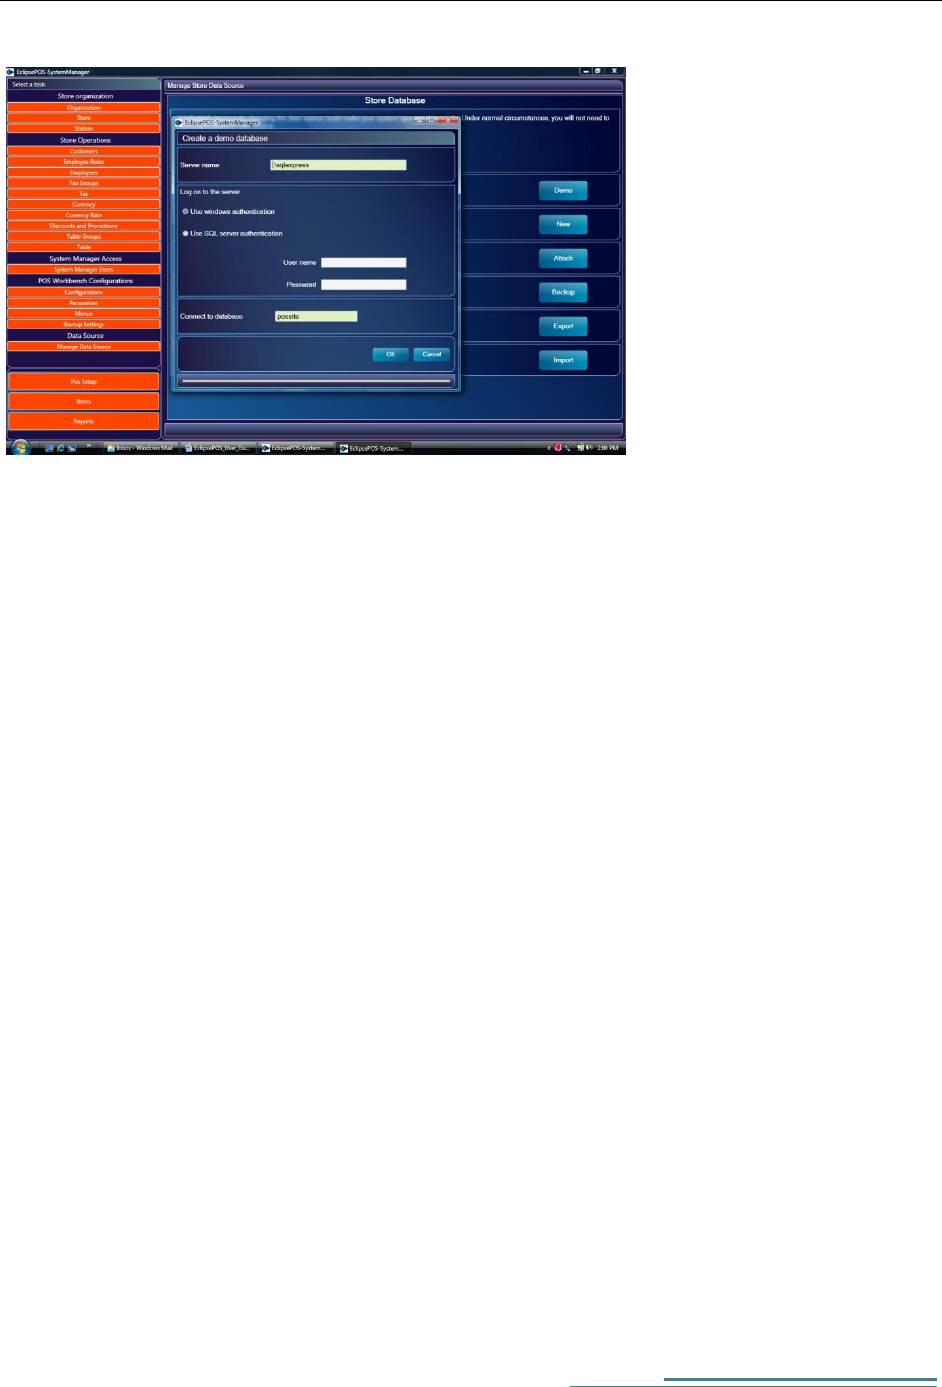
Your first task in the system manager is to setup the data source.
Choose POS setup and then manage data source option.
Select 'create a database with demo data' option.
[Type the author name]
4
Figure 2 - Create a demo store database
From 'Create a demo database' dialog box, accept defaults and select OK.
Navigate to Startup setting from pos setup.
EclipsePOS system manager-> Pos setup-> Startup Settings
You will be prompted to login.
Login with default user name 'admin' and password 'admin'.
If you want to configure the EclipsePOS for a Retail operation, please set following parameters and save it.
Organization: - 1-Eclipse Holding
Store: - 2-WOS Plaza
Station: - 105-Corner store
Configuration: - 1- Retail
Receipt Print Immediate True
If you want to configure the system for a Restaurant operation, then select following:
Organization: - 12 - ACME Restaurant Pte Ltd
Store: - 20-ACME Restaurant - Air Port Terminal 1

5
Station: - 125-Coounter 1
Configuration: - 1- Retail
Receipt Print Immediate False
Remember to save the settings.
This completes the System manager setting to use demo data.
Installing POS for .Net 1.12
EclipsePOS uses Microsoft POS for .Net API 1.12 to communicate with POS peripherals. Most of the
leading pos peripheral manufacture's make available device rivers for pos for .Net. You need to install POS
for .Net 1.12, before installing EclipsePOS workbench.
You can download and install Microsoft POS for .Net 1.12 from following web site:-
http://www.microsoft.com/downloads/en/details.aspx?FamilyID=EAAE202A-0FCC-406A-8FDE-
35713D7841CA&displaylang=en
[Type the author name]
6
Installing EclipsePOS Workbench
You can download and Install EclipsePOS Workbench from our web site
http://www.eclipsesoftware.com.sg/download.htm
Installation is easy and you can ignore security warning dialogs that are displayed during the installation.
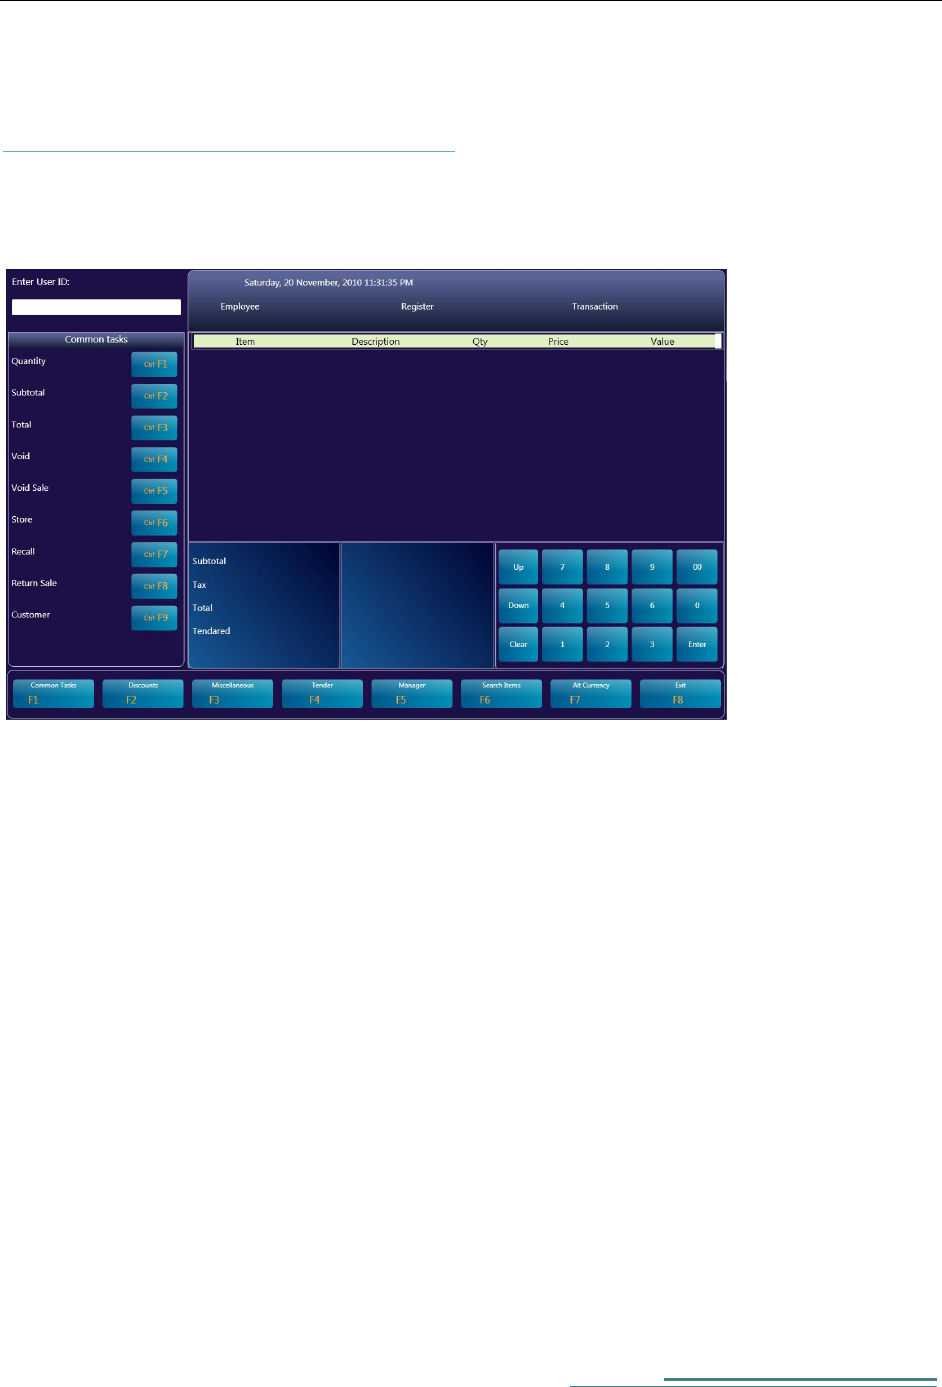
Once installation is complete you will see EclipsePOS workbench displayed on your PC.
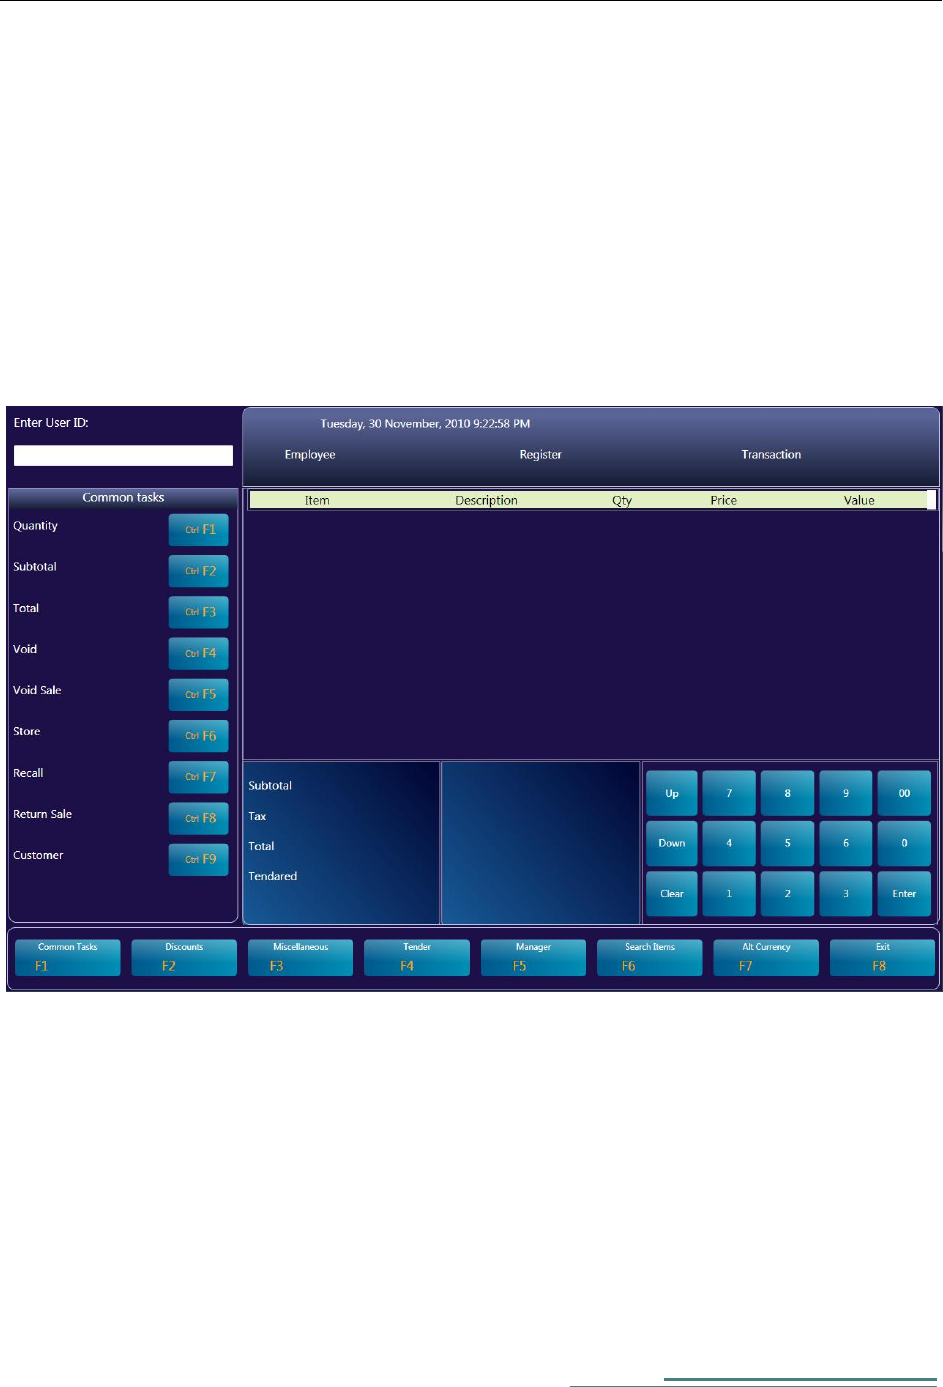
Figure 3 - EclipsePOS Workbench
If you have configured the system for retail operation then logon with user id 100 and password 100.
If you have configured the system for restaurant operation then logon with user id 200 and password 200.
You can use the touchpad keys displayed on the screen or the PC Keyboard to input the data to the system.
(Before installing EclipsePOS workbench you need to install EclipsePOS system manager and configure
the database)
Access Control
Default user id and password to access pos system manager is 'admin' and 'admin' respectively.
To change the system manager access password or add in a new system manager user navigate as follows:
EclipsePOS System Manager -> POS Setup -> System Manager Users.

7
To add in a new Employee to log in to EclipsePOS Workbench
EclipsePOS System Manager -> POS Setup -> Employee
Stopping the system
Press the Exit Button. POS workbench will show the Exit Menu. You can press the Shutdown POS Key to
exit from EclipsePOS.
EclipsePOS Workbench-> Exit -> Shutdown
[Type the author name]
8
Chapter 3
EclipsePOS System Manager
.
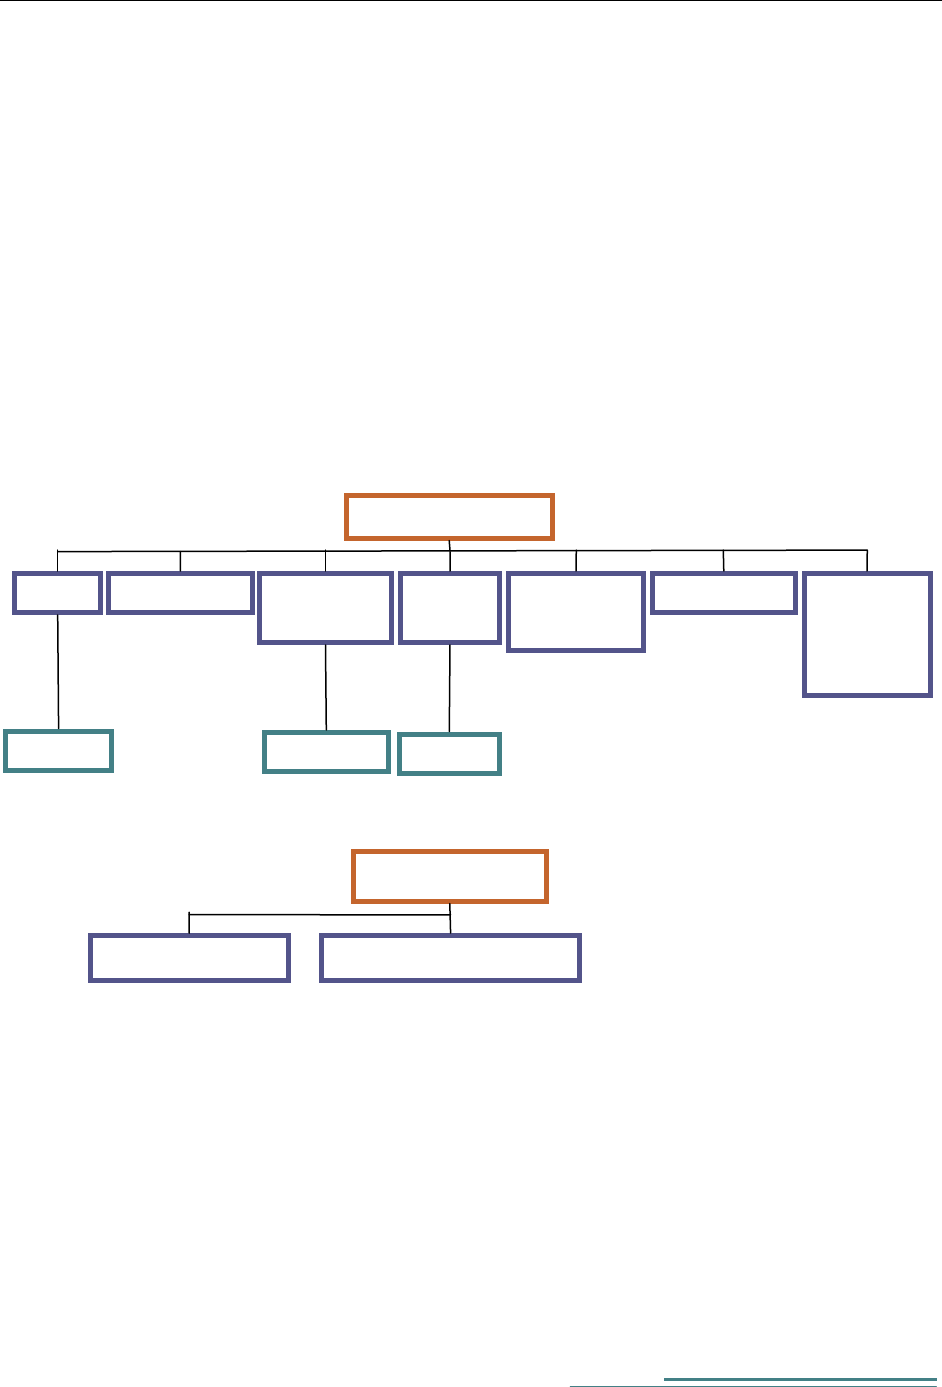
Architecture of EclipsePOS
Every EclipsePOS workbench needs to know it's organization number, store number, station number and
configuration number as it's startup parameters. These parameters are configured within EclipsePOS
System Manager.
Organization
Store
Station
Customers
Employee
Rolls
Employee
s
Tax
Groups
Tax
Currency
Rate
Promotions
Product
groups
and
Products
Configurations
POS Parameters
Menus and Pos Keys
9
Navigating though the menus
Module navigator keys are located in bottom left of screen. Use the module navigation buttons to
navigate Pos setup module, Item module or Reports module.
Task navigation buttons are located on top right corner of the screen.
Following buttons are available on each task:
|< Select the begging record of the list view
< Select the next record of list view
> Select the previous record of list view
>| Select the last record of list view
Delete Delete the selected item from list view
Add Add a new item to list view
Revert Revert changes done to list to the list of records
Save Save change done to the list View

[Type the author name]
10
Setting up the store database
You can setup a store database one of following ways:
1. Use the demo database
Create your organization
EclipsePOS System Manager -> POS Setup -> Organization->Add
Click the Add button so that it creates a new organization record.
Fill in the required input fields and save changes.
Set the newly created organization as your default organization.
EclipsePOS System Manager -> POS Setup -> Startup Settings
Create store and Station data.
EclipsePOS System Manager -> POS Setup -> Store
EclipsePOS System Manager -> POS Setup -> Station
Save the store and station as your startup parameters
EclipsePOS System Manager -> POS Setup -> Startup Settings
Now you can create the rest of parameters such as employee, tax, items etc.
You can also create a new POS configuration if necessary.
2. Setup a new database
If you require the store data base without any demo data, you can create a new database.
EclipsePOS System Manager -> POS Setup -> Manage Data Source->Create an empty new
database
After creating the new database, you can either setup your Organization data as described in section 1
above or import data from a another store as described in section 3 below.

11
3. Import data setting
When creating a second store or when there is requirement to start with a new database, you can export
the settings from old database and import into the new database.
Export data from old database
EclipsePOS System Manage -> POS Setup -> Data source setup -> Export data
Create a new database as described in section 2 above.
Import data to new database.
EclipsePOS System Manage -> POS Setup -> Data source setup -> Import data
Remember to set your startup parameters
EclipsePOS System Manager -> POS Setup -> Startup Settings
[Type the author name]
12
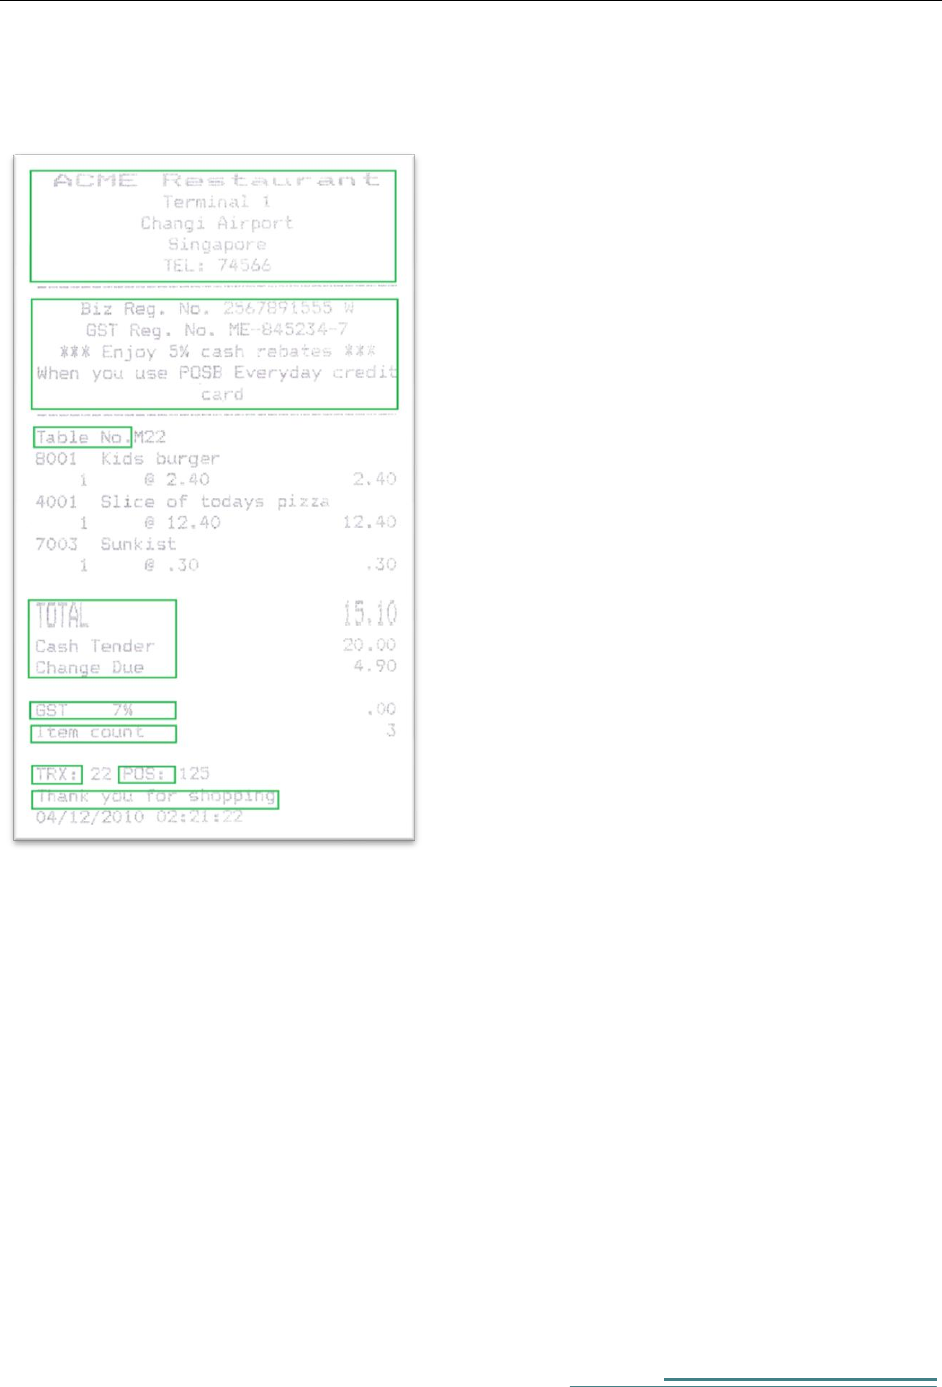
Configuring the receipt print
1. Receipt Heading
Receipt header text is taken from Store data setup
You can change the store name and address from EclipsePOS System Manager
Navigate to:-
EclipsePOS System Manager -> POS Setup -> Store
2. Receipt Header Message
Promotional or any other text can be printed on this space.
13
You can change these texts from parameter setup
EclipsePOS System Manager -> POS Setup -> Parameters->Receipt Print
Change following pos parameter values:
ReceiptTopMOD1
ReceiptTopMOD2
ReceiptTopMOD3
ReciptTopMOD4
If these values are blanks then nothing is printed.
3. Tax Line
You can change the text for tax line from pos parameters
Navigate to
EclipsePOS System Manager -> POS Setup -> Parameters->Receipt Print

[Type the author name]
14
Change the 'TaxIncludedText' parameter.
4. Item Count Text
Navigate to:-
EclipsePOS System Manager -> POS Setup -> Parameters->Receipt Print
Change the 'TotalItemCountText' parameter value.
5. Transaction number and Station number text
Navigate to:-
EclipsePOS System Manager -> POS Setup -> Parameters->Receipt Print
Change the 'TrxNo' and 'PosNo' parameter values.
6. Receipt trailer message
Navigate to:-
EclipsePOS System Manager -> POS Setup -> Parameters->Receipt Print
Change the 'ReceiptBottomMOD' parameter values.

15
Promotion and Discounts
Following promotional structures are supported.
Item discount (Example:- 10% discount for item A)
Whole order Discount (Example:- 10% discount for all the items)
Fixed Amount discount (Example:- $ 0.20 discount for item A )
Group discount NForX (Example:- $ 10.00 for 3 items)
Promotion can be bound to an item or POS Key .
If the promotion is bound to an item then discount is given automatically when item is entered.
Normally you will use this method for Group discount NForX.
If the promotion is bound to a POS key then you need to press the bound pos key (discount button) in pos
workbench to effect a discount. Normally you will bound the promotion to pos key for item discount or a
whole order discount.
[Type the author name]
16
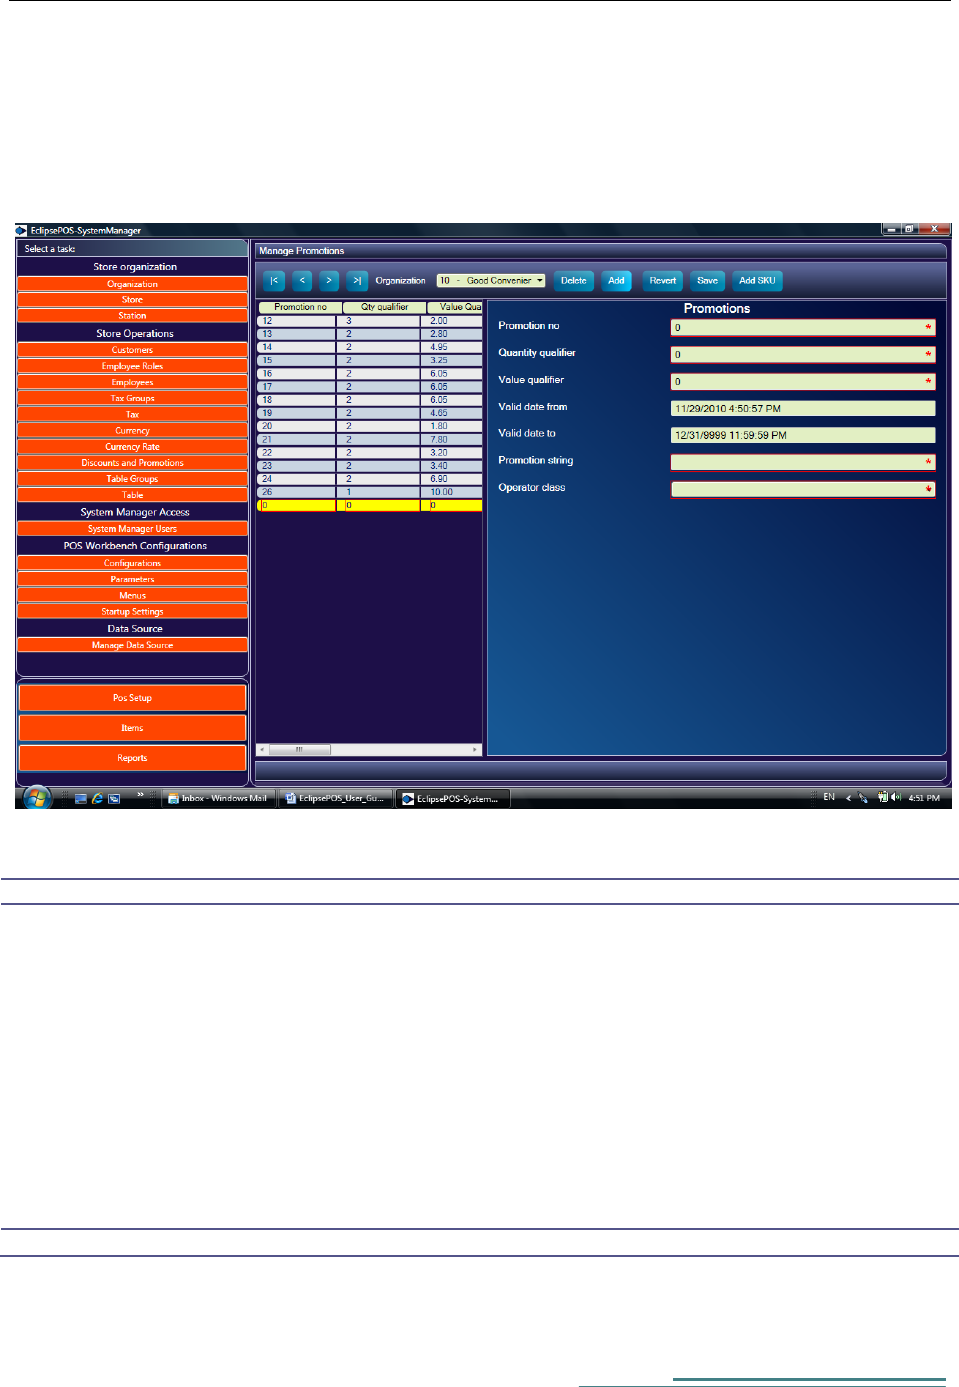
Crating a Promotion
Navigate to:
EclipsePOS System Manager -> POS Setup ->Discount and Promotions->Add
Set the quantity qualifier and value qualifiers based on Promotion class according the following table
Class Name
Quantity Qualifier
Value Qualifier
Comments
ItemDiscount
1(not used)
Enter the percentage
For example 10.00
10% line discount
GroupDiscount
1(not used)
Enter the percentage
For example 10.00
10% whole order
discount
FixedAmountDiscount
1(not used)
Enter the amount
For example 0.20
$0.20 discount
NForX
Enter the Quantity
For example 3
Enter the Value
For example 10.00
Three for $ 10.00
17
Set the Promotion number, Promotion string and Valid date from/to according to your business needs.
Binding the Promotion to an Item
Save the promotion created in above step and Click on Add SKU button
EclipsePOS System Manager -> POS Setup ->Discount and Promotions->Add SKU
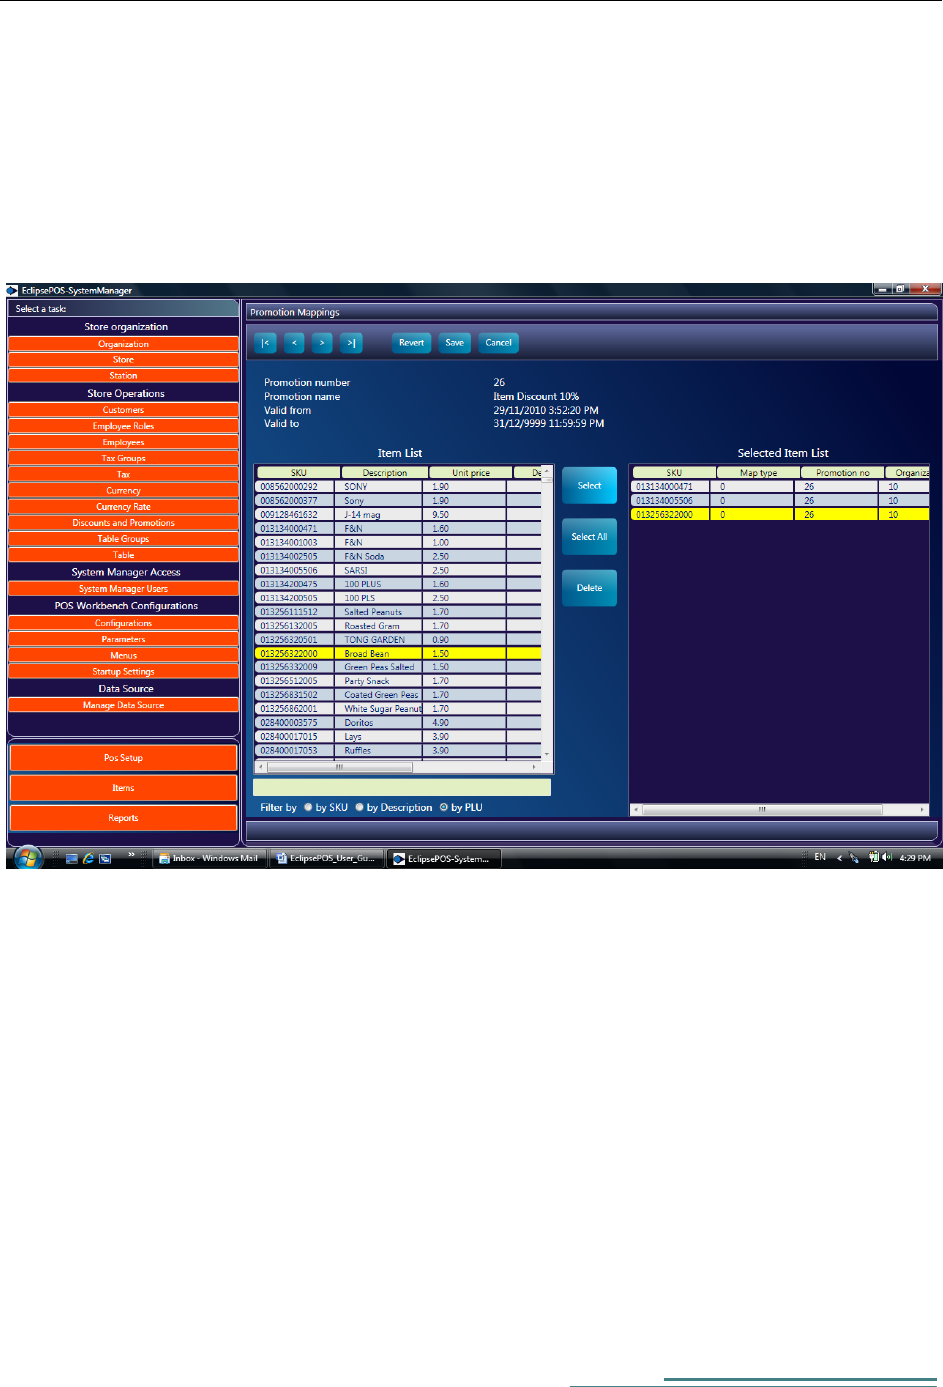
From Promotion Mapping Screen you can select and add item to effect promotion.
Following function are available in this screen
|< Position to First record of items list
< Position to Previous record of items list
> Position to Next record of items list
>| Position to Last record of items list
Revert Abandon changes

[Type the author name]
18
Save Save change
Cancel Go back to Promotion Screen
Filter Enter the Filter text and press enter. Remember to select the filter filed before
entering the filter text
Select Add the item to promotion list
Select All Add all items to promotion list
Delete Delete the selected item from promotion list
19
Binding a Promotion to a POS Key
You can bind a promotion no to a pos key, so that you can effect a discount by pressing a pos key in POS
workbench.
Navigate to Menu task from POS Setup. Select the pos panel where you want to add the discount key
(Usually the Discount panel) and press the add POS Key button
EclipsePOS System Manager -> POS Setup ->Menus->Select A Pos Panel->Add Pos Key
Enter the Promotion no in the Key parameter value
Choose the Key Class as 'Discount(Key)'
Fill in other input field as described in creating menus and Pos Key section in this menu.
Save the menu setting.
Once this step is complete and when you re-start the pos workbench the new discount key should appear
in POS Workbench.

[Type the author name]
20
Restaurant specific setups
Enable/Disable Table select prompting
If you don't need to select a table no at the start of receipt entry then you can disable this feature.
Navigate to parameters from pos setup and change 'PromptForTableNo' parameter to TRUE or FALSE.
EclipsePOS System Manager -> POS Setup ->Parametes->From Miscellanious group,
select 'PromptForTableNO'
Select Print receipt Immediate or at end of tender
You can set when to print the receipt from Startup parameter.
EclipsePOS System Manager -> POS Setup ->Startup Settings->Print receipt immediate
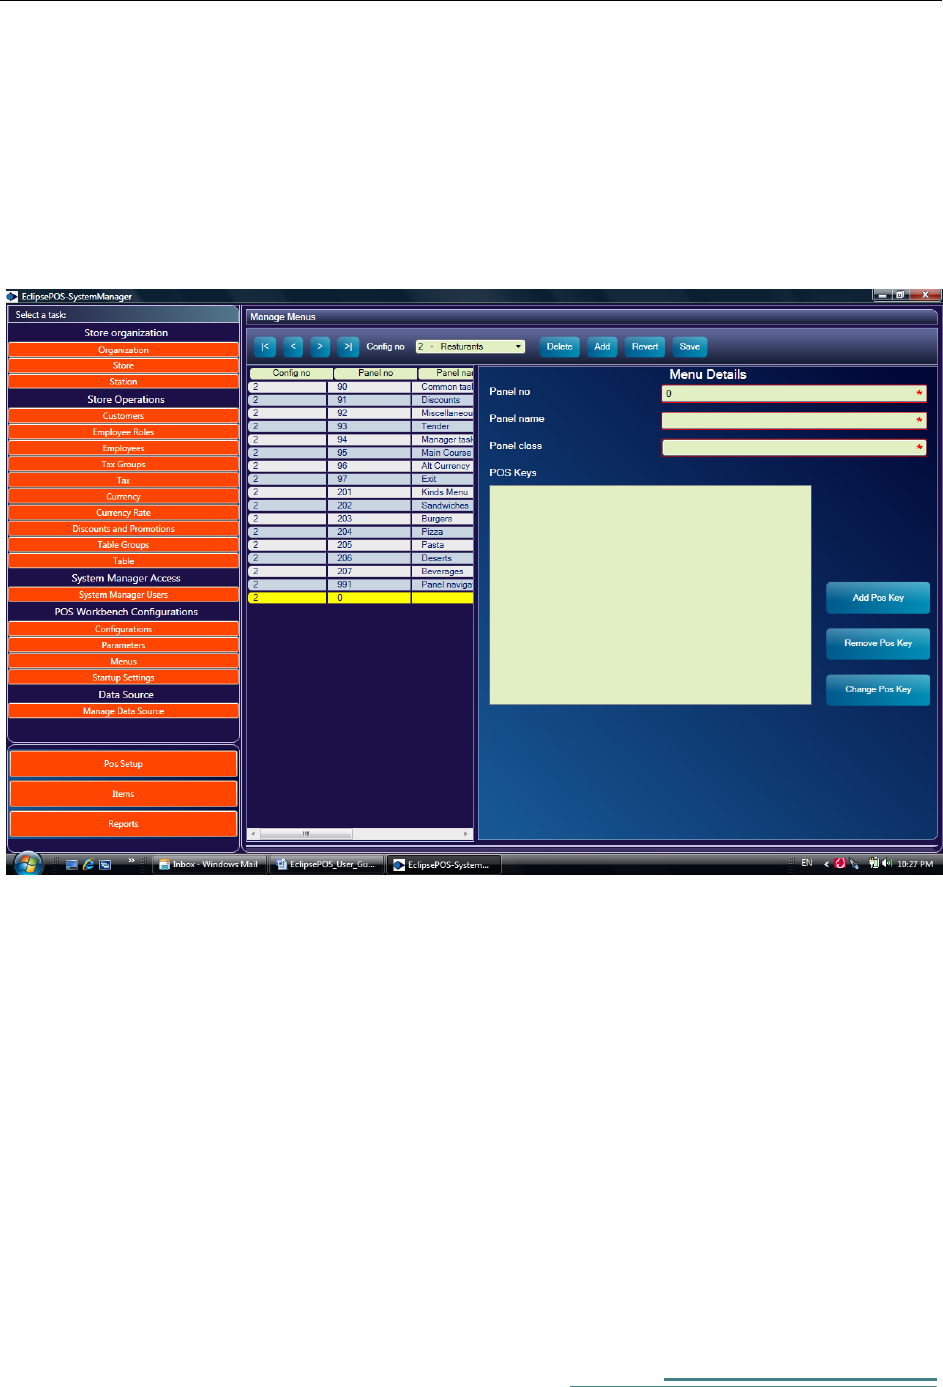
Creating menus and sub menus
Often you may need to create menus and sub menus in a restaurant specific setup.
Navigate to Menu setup:-
EclipsePOS System Manager -> POS Setup ->Menus->Add
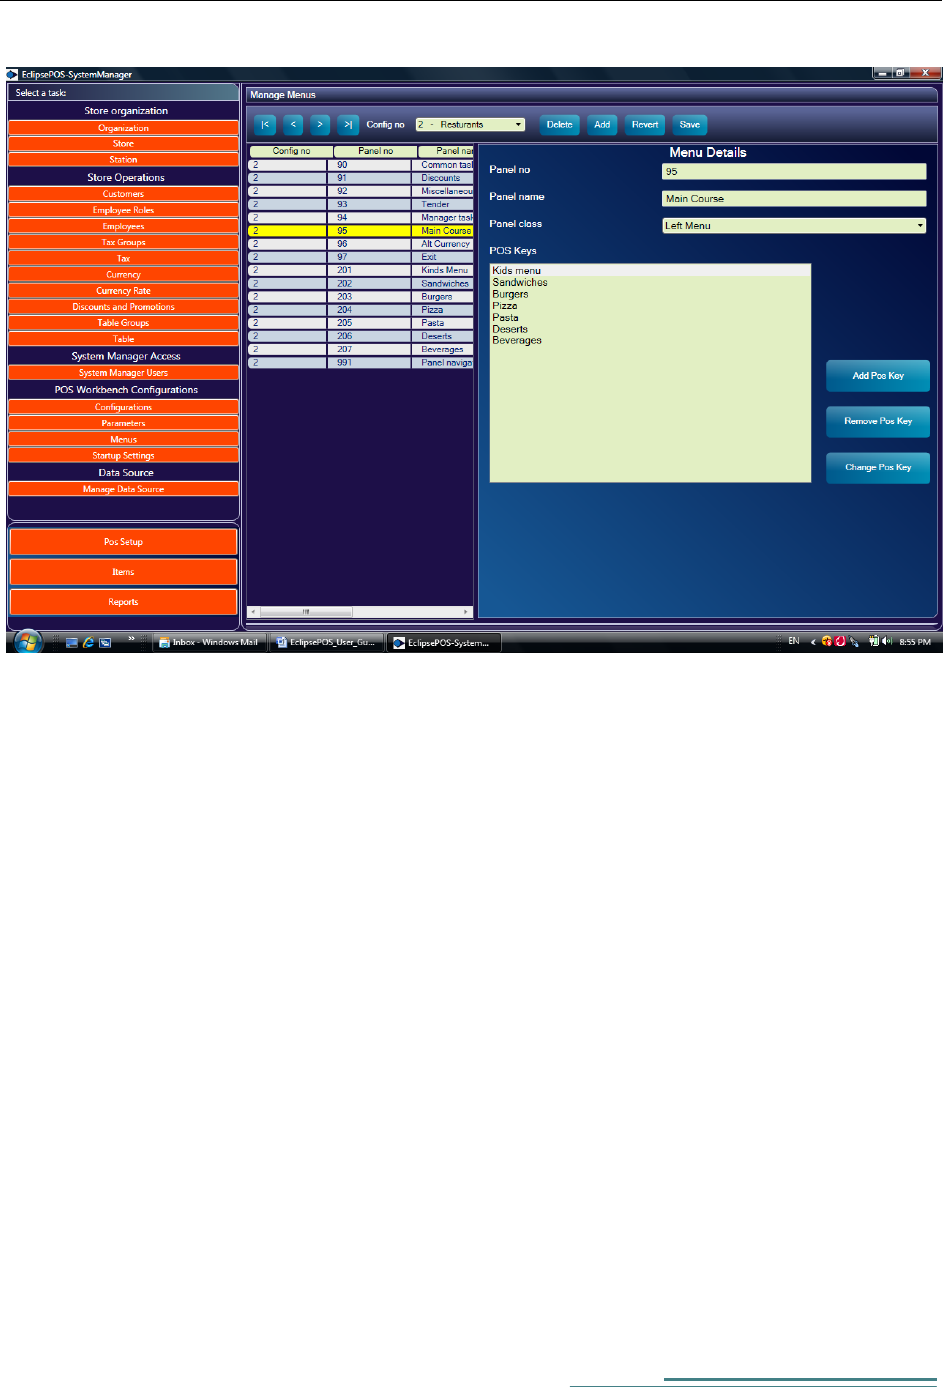
21
Assign a panel number, Panel name (Menu Name) and choose the panel class 'Left Menu'.
Save the data by clicking the Save button.
Now you can add POS key to this panel by clicking the Add POS key button.
[Type the author name]
22
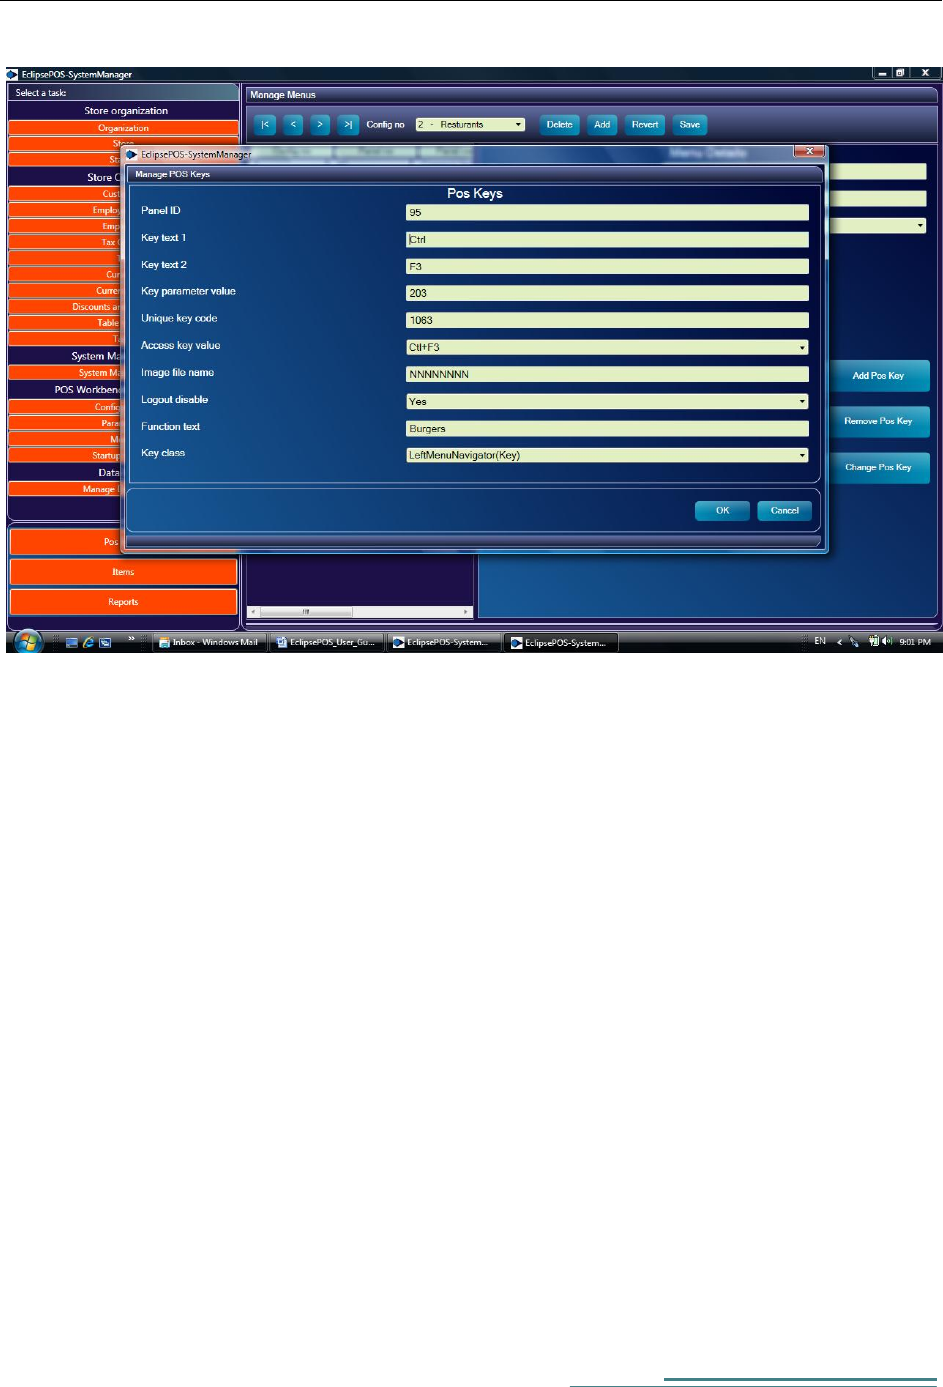
In the POS keys panel, If the POS key should bind to another menu then choose key class
'LeftMenuNaviagator' and key parameter value panel no. you want to navigate to.
If the pos key should bind to an item then choose the key class 'plu' and key parameter value plu
number.

23
Setting up Table Groups and Table Layout for restaurants
Before creating the table layout of your restaurant you need to create Table Group Names.
Navigate to
EclipsePOS System Manager -> POS Setup ->Table Groups->Add
Assign a group number and a group name. Save the data.
Now you can create table layouts for your restaurant.
Navigatate to
EclipsePOS System Manager -> POS Setup ->Table -> Add
Assign a table name and a picture.
Drag and Drop the table button to desired box.
Save the data. Now this table layout is available in pos workbench.
[Type the author name]
24
Menus and POS Keys
You can easily configure the Left and bottom panels of pos workbench from Menus setup.
EclipsePOS System Manager -> POS Setup ->Menus
Press Add key to add in a new record.
Assign a panel no. and Panel name. Panel class can be 'Left Menu' or the 'Bottom Menu'. It's best to use
the bottom menu as the navigation panel and the left panel for pos operations.
Save the panels and press the add pos key button to create pos keys.
25
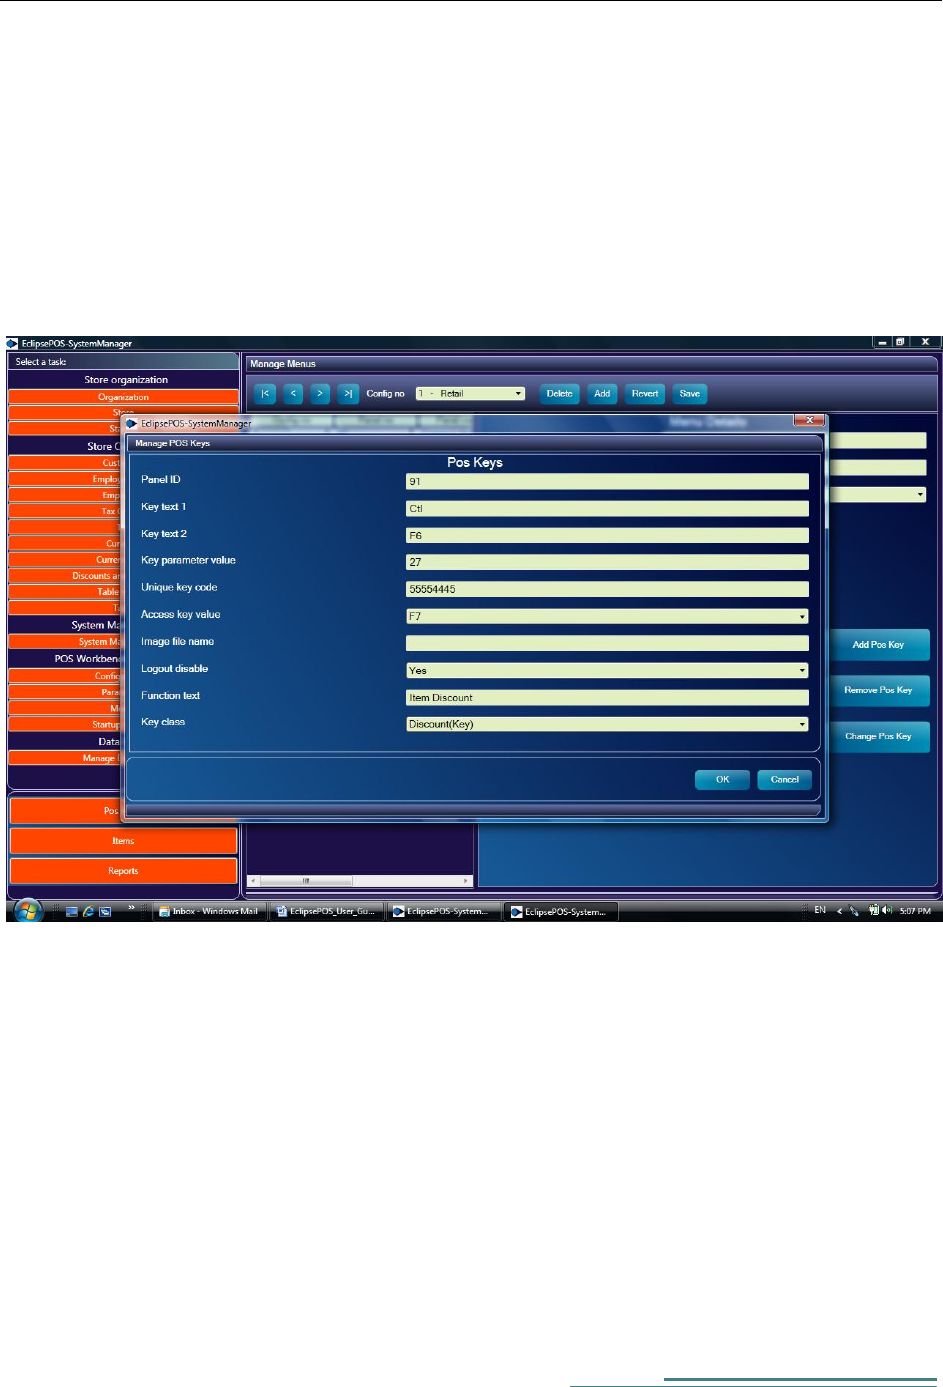
Key Text 1 This text is displayed inside the POS button. Usually it is set as 'Ctl'
Key Text 2 This text is displayed inside the POS button. Usually it is the Function Key
Key parameter value Set the value according to the table given below
Access Key value Keyboard Navigation key
Image File Name Not used at the present. Leave it blank
Logout Disable Yes/No
Function text This text is displayed outside the button along the same line
Key Class Set according to the table given below

[Type the author name]
26
Key class (Pos Event)
Key Parameter Value
Event description
AlphaKey
AscII value
Alpha key event
AltCurrTender
Currency code no
Alt currency tender
CashTender
1
Cash tendering dialog
CheckTender
1
Check tendering dialog
ClearKey
1
Clears current pos event
Customer
1
Customer select
CloseCashDrawer
1
Used in dialogs
CreditTender
1
Credit tender
Discount
Promotion no
Discount Key
DebitTender
1
Debit Tender Key(Customer)
DebitCardTender
1
Debit Card Tender Key
EnterKey
1
Enter Key event
Exit
1
Shutdown event
ExecScript
1,2
1=Calculator, 2=Note Pad
ItemMarkdown
1
Item discount(Do not use this
directly)
ItemVoid
1
Void an item line
LeftMenuNavigator
Panel no
Navigate to desired panel
Lock
1
Lock the pos workbench
Logoff
1
Logoff the pos workbench
LogOn
1
Logon the pos workbench
LookupItem
1
Item Search
PageDown
1
Scroll one line down (Invoice
display)
PageUp
1
Scroll one line up (Invoice
display)
PaidIn
Paid in dialog
PaidOut
1
Paid out dialog
Plu
Plu number
Similar to entering the PLU
PriceOverride
1
Change Price
Quatity
1
Change Qty Dialog
RecallEj
1
Recall a saved receipt
ReturnSale
1
Return Sale
SaveEj
1
Save a receipt
Subtotal
1
Display subtotal
Total
1
Display total
TerminalReport
1,2
1=X-Report, 2=Z-report
TrainingMode
1
Training Mode (No update to
database)
Unlock
1
Unlock the pos workbench
VoidSale
1
Void Receipt

27
[Type the author name]
28
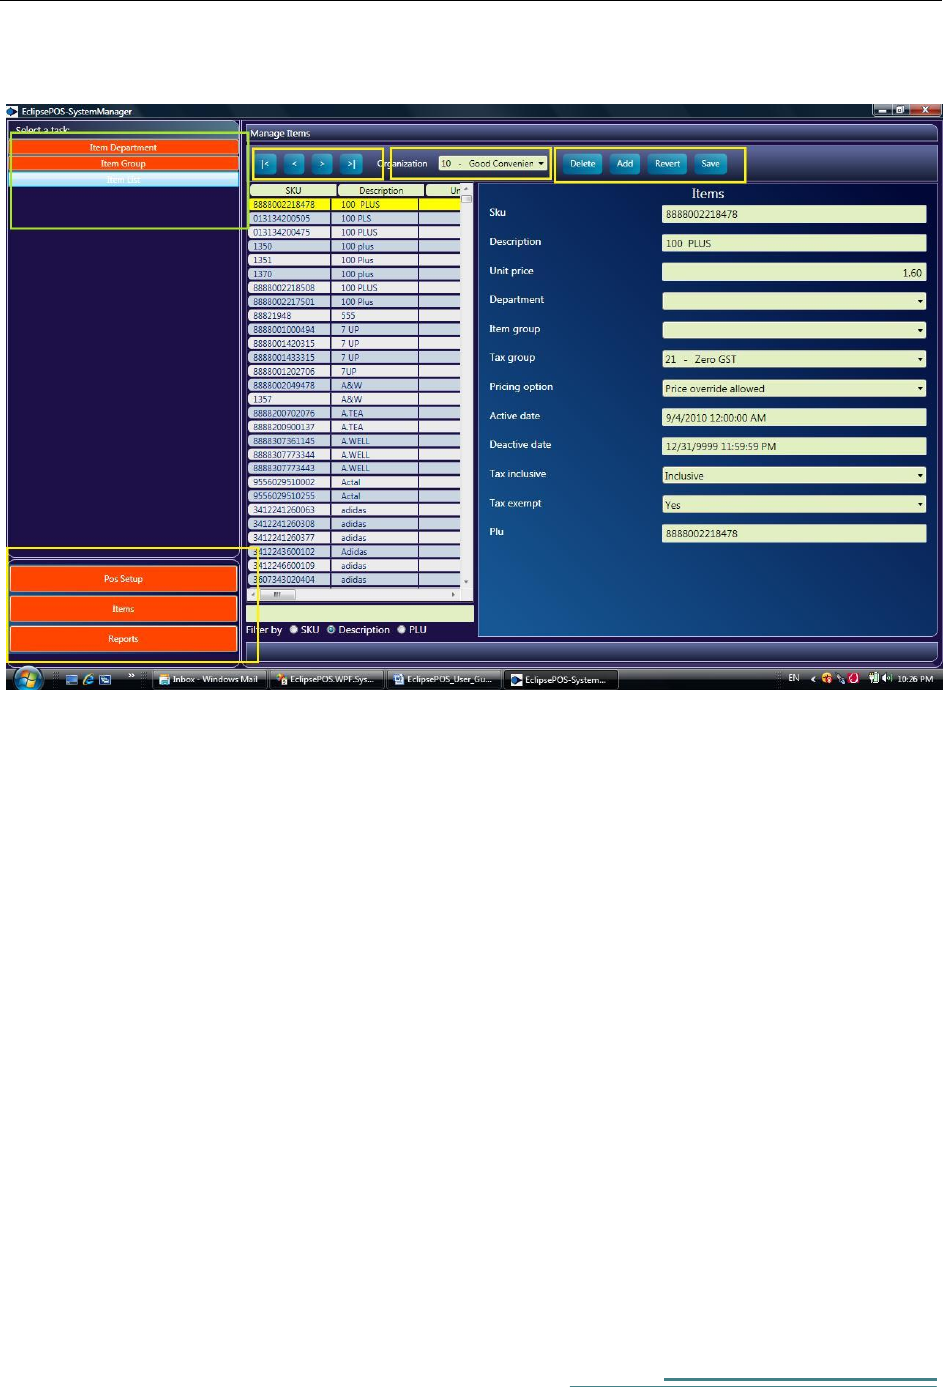
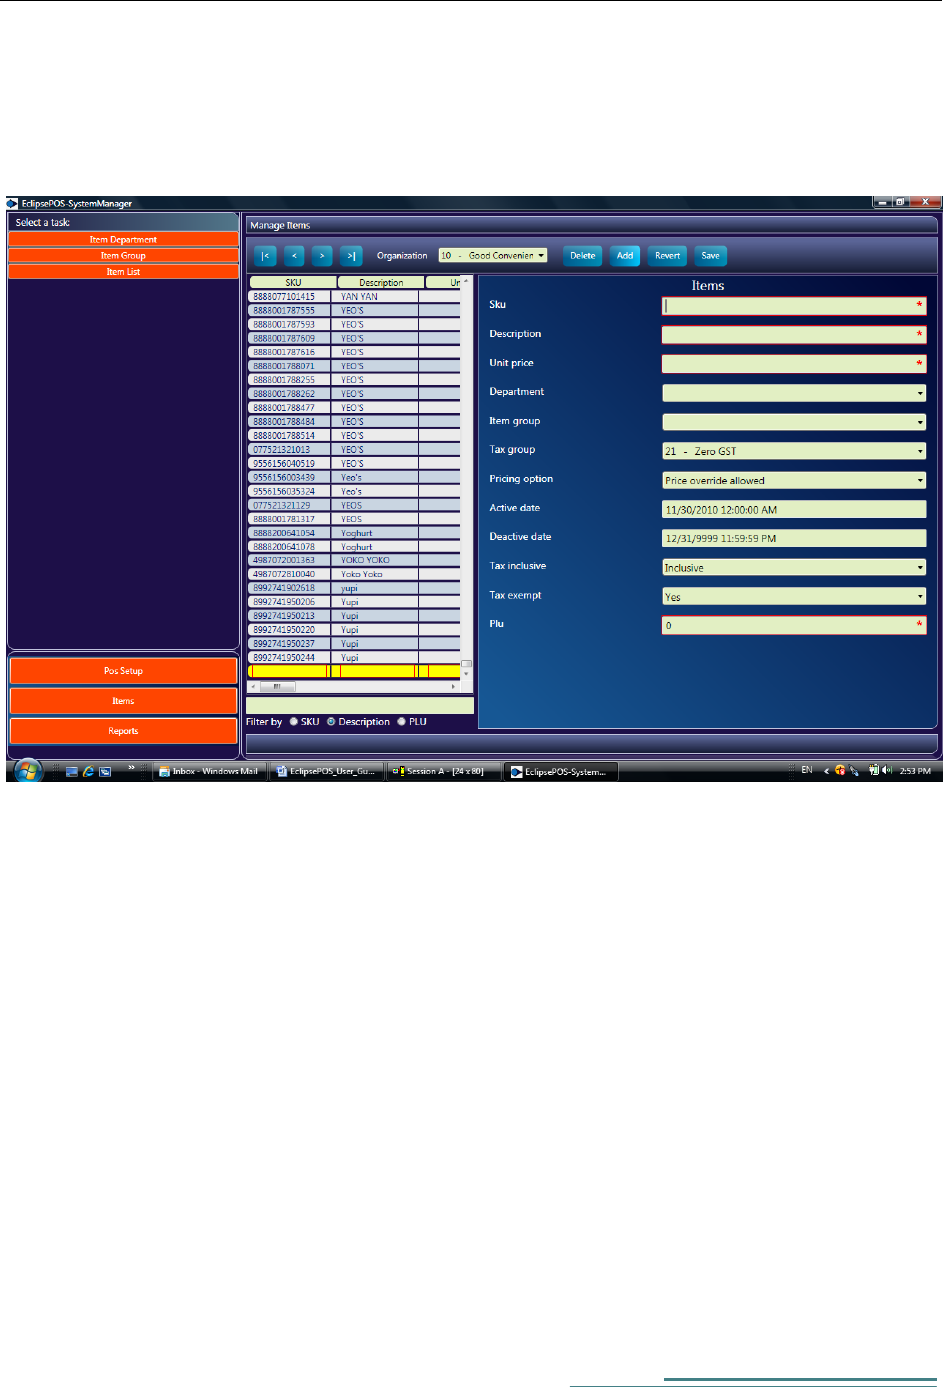
Item Master Setup
To setup the store item master, navigate to:-
EclipsePOS System Manager ->Items ->Items List ->Add
Fill all the required fields.
Active date and Inactive date columns are not used at present.
You can also filter existing items list by Description, SKU or PLU
Select the Filter column and enter the search argument and press enter key.
To amend an item select the row you want to change and change values.
Following function keys are available in this screen
|< Position to First record of items list
< Position to Previous record of items list
> Position to Next record of items list
>| Position to Last record of items list

29
Delete Deletes a selected Row
Add Add a new Row
Revert Abandon changes
Save Save change
[Type the author name]
30
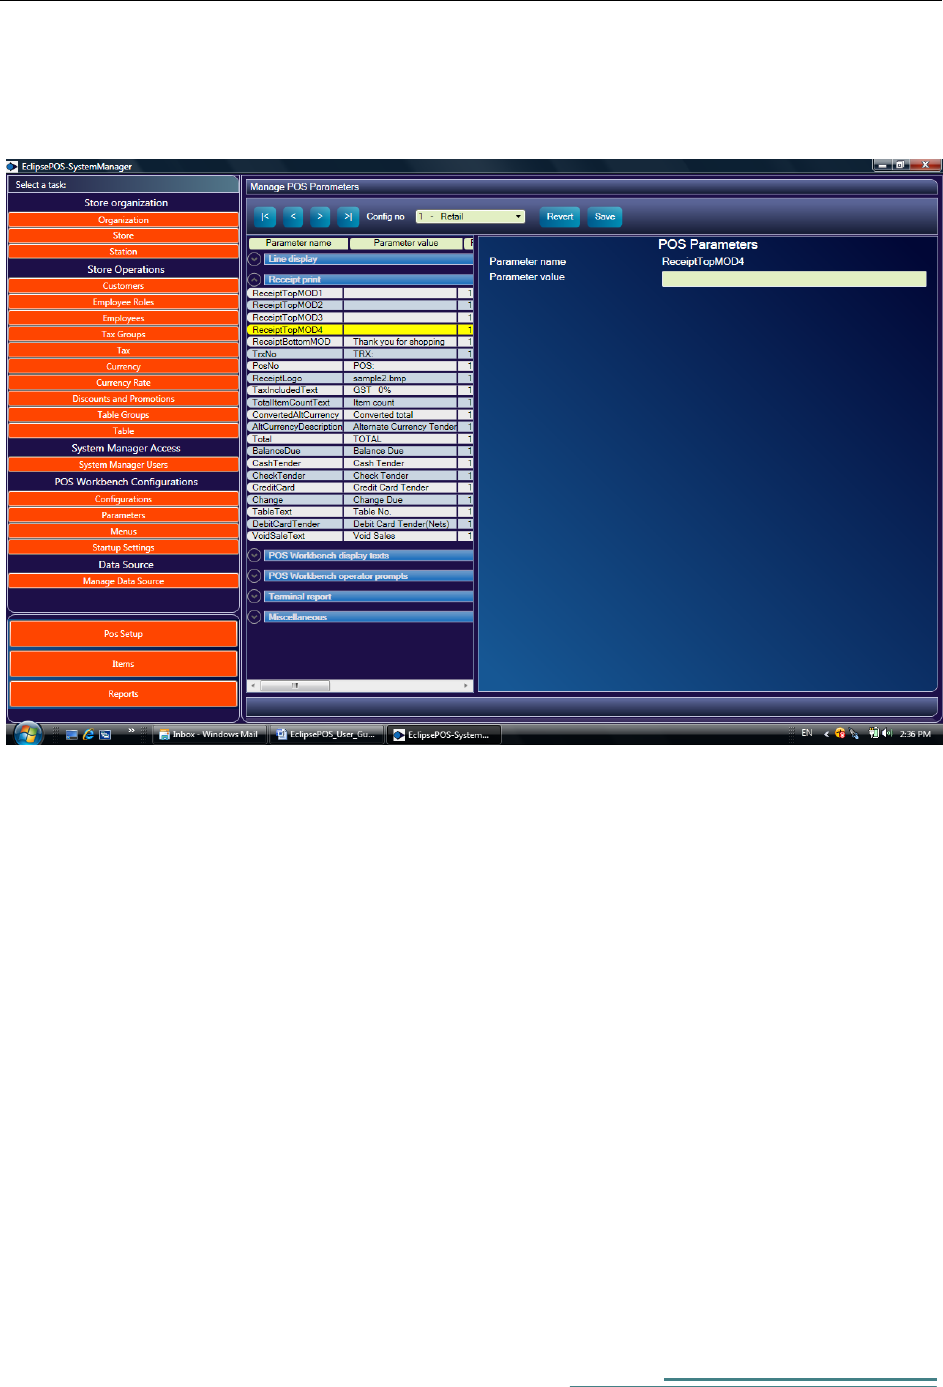
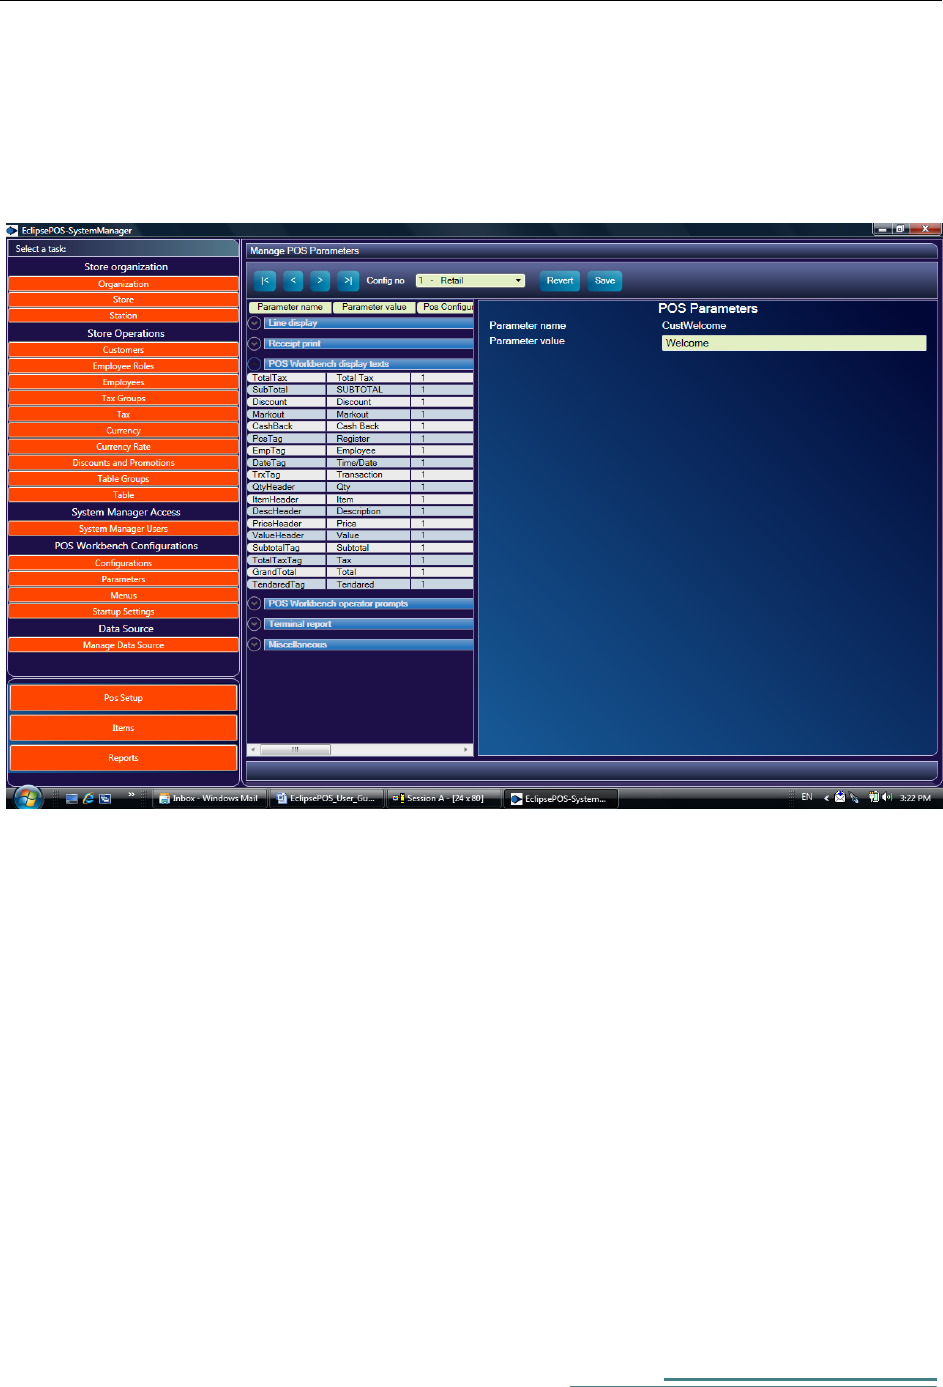
Parameter Setup
POS Parameter setup allows you configure all text literals that are displayed in POS Hardware and
EclipsePOS Workbench.
EclipsePOS System Manager ->Pos Setup ->Parameters
Pos parameters are grouped as follows:-
1. Line Display (Customer display)
2. Receipt Print
3. POS Workbench
4. POS Workbench operator prompt(Error messages)
5. Terminal report ( X-Report and Z-Report)
6. Miscellaneous
You can change all these parameters to suit your business needs

31
Securing the store database
[Type the author name]
32
Chapter 4
EclipsePOS Workbench
Navigation through Menus and POS Keys
1. Only numeric user id and password are allowed. You can create a new employee user id from
theEclipsePOS system manager.
2. If there is an error message on the screen, you can clear it by clicking Clear key or pressing the Del
button on the keyboard.
3. Pos key buttons on left and bottom are enabled only after successful login.
4. All pos key buttons on the screen have corresponding keys on your PC keyboard. You can also use the
PC Keyboard keys to invoke it.

33
5. If you have a touch screen then you simply touch the button to invoke it.
6. To enter multiple item quantity, first enter the Quantity number then press the 'Quantity' button.
System will prompt you to enter the item.
7. You can use item's PLU code or SKU code.
8. After printing X-Report or Z-Report, you can press clear key to clear the screen.
Tending
Following are the steps to accept a cash tender.
Press the cash tender key.
System will show the total amount due.
Enter the amount customer has tendered.
System will show the change due and open the cash drawer.
You can close the drawer and press enter key to complete the transaction.

[Type the author name]
34
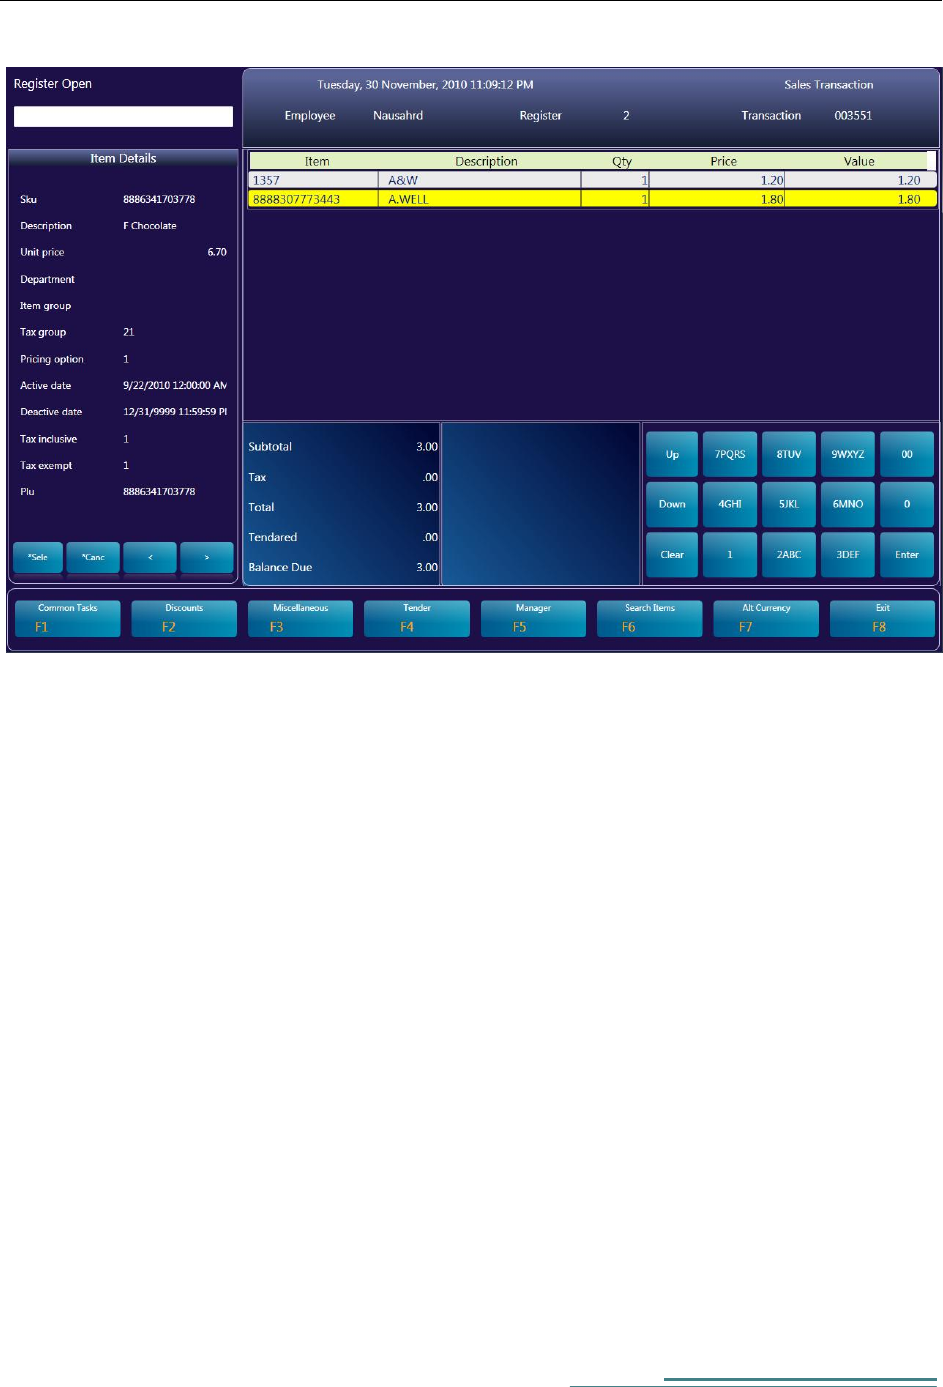
Item Search Facility
Items can be searched by description, SKU, department or item group
Key in Search argument and press the Find Key (or Ctl + F )
Select the item from search list by pressing the Select Key ( or Ctl+S )
Press Clear (Del) key to go to common task menu.
To display more details of the item press Details Key (or Ctl+D)
35
[Type the author name]
36
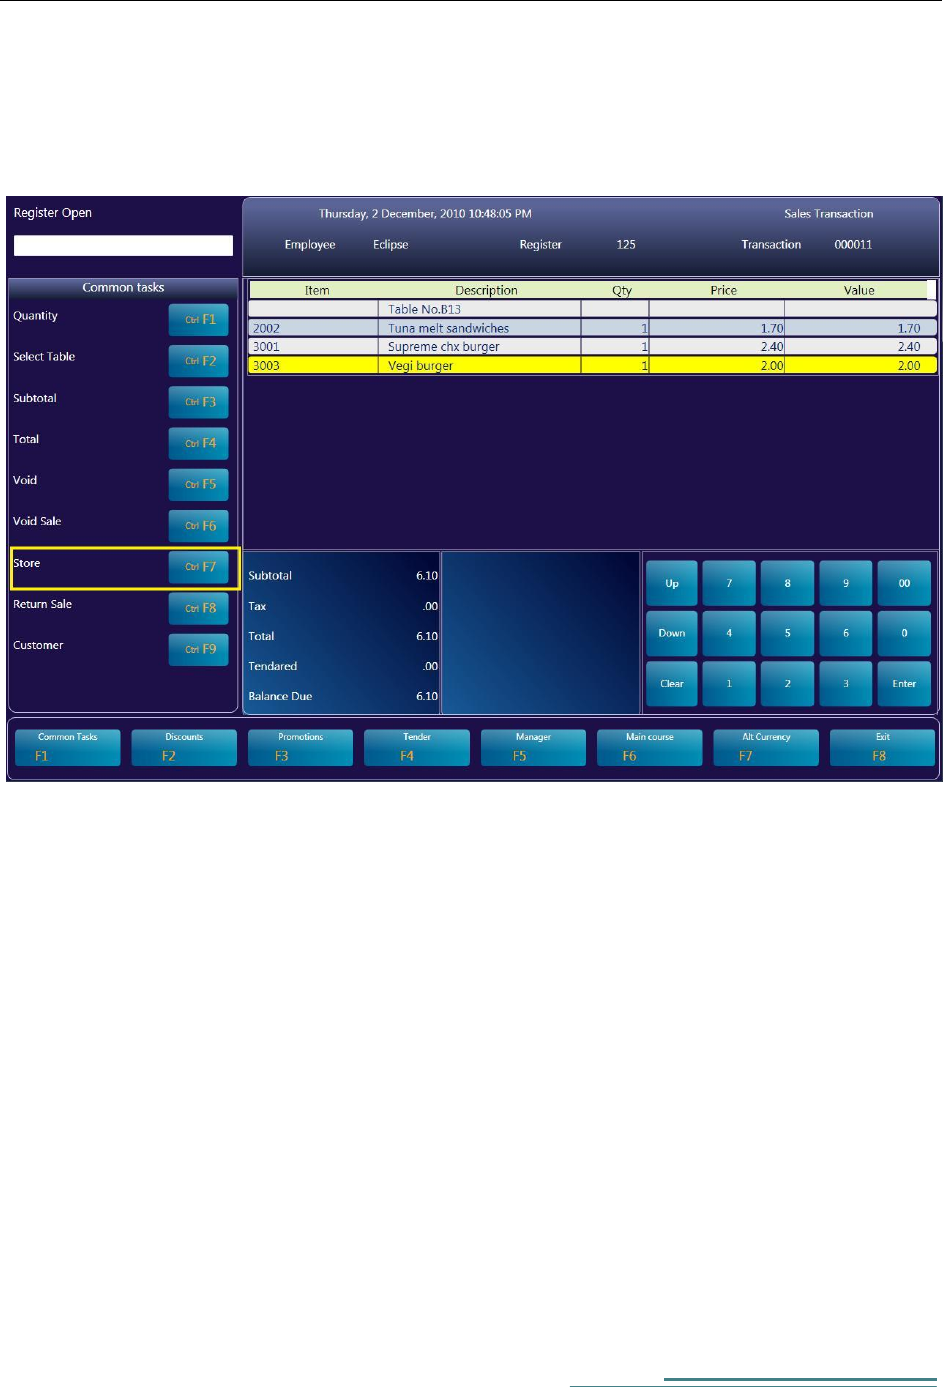
Saving the receipt in Restaurant Setups
In a table serviced restaurant setup, receipt can be saved and recalled by table number.
To save the receipt press the 'Store' pos key from common functions menu.
37
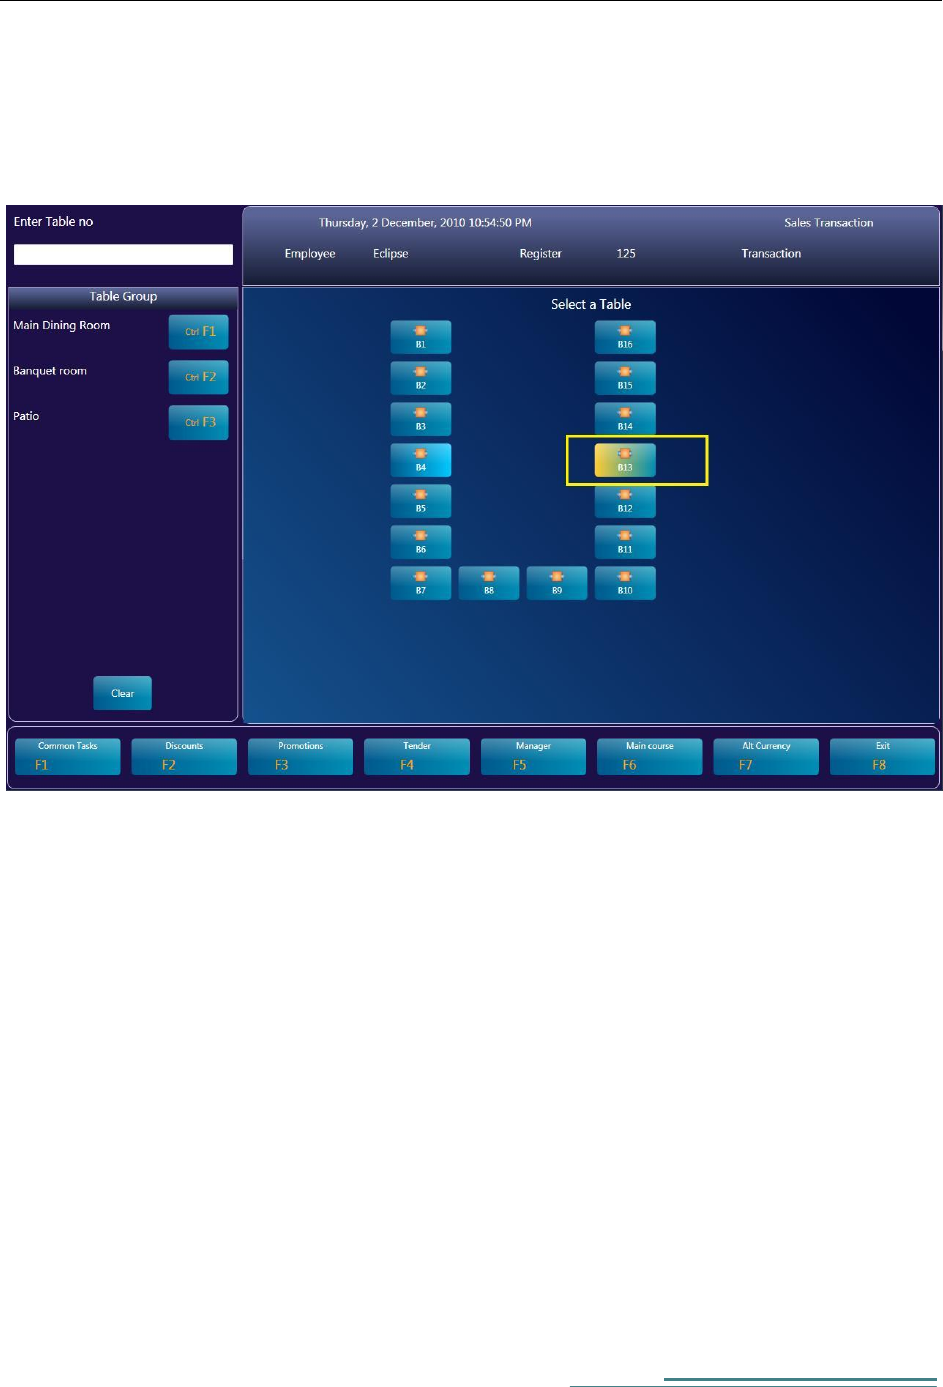
To retrieve the receipt, press the Table pos key from Common task menu.
Select the table group and Click the table button or just enter the table number using the keyboard.

[Type the author name]
38
Changing error Messages and text literals
You can customize all text literals that are displayed on pos workbench from EclipsePOS System manager.
You can find all these text literals in pos parameter setup.
For text literals that are displayed inside and next to a POS button, you can find those in POS key setup.

39
Chapter 5
POS Hardware Configuration
Installing POS for .Net Driver
Check Health Utility
Assigning a Logical device name
