Presentation Ecohome Lease User Guide
User Manual:
Open the PDF directly: View PDF ![]() .
.
Page Count: 47
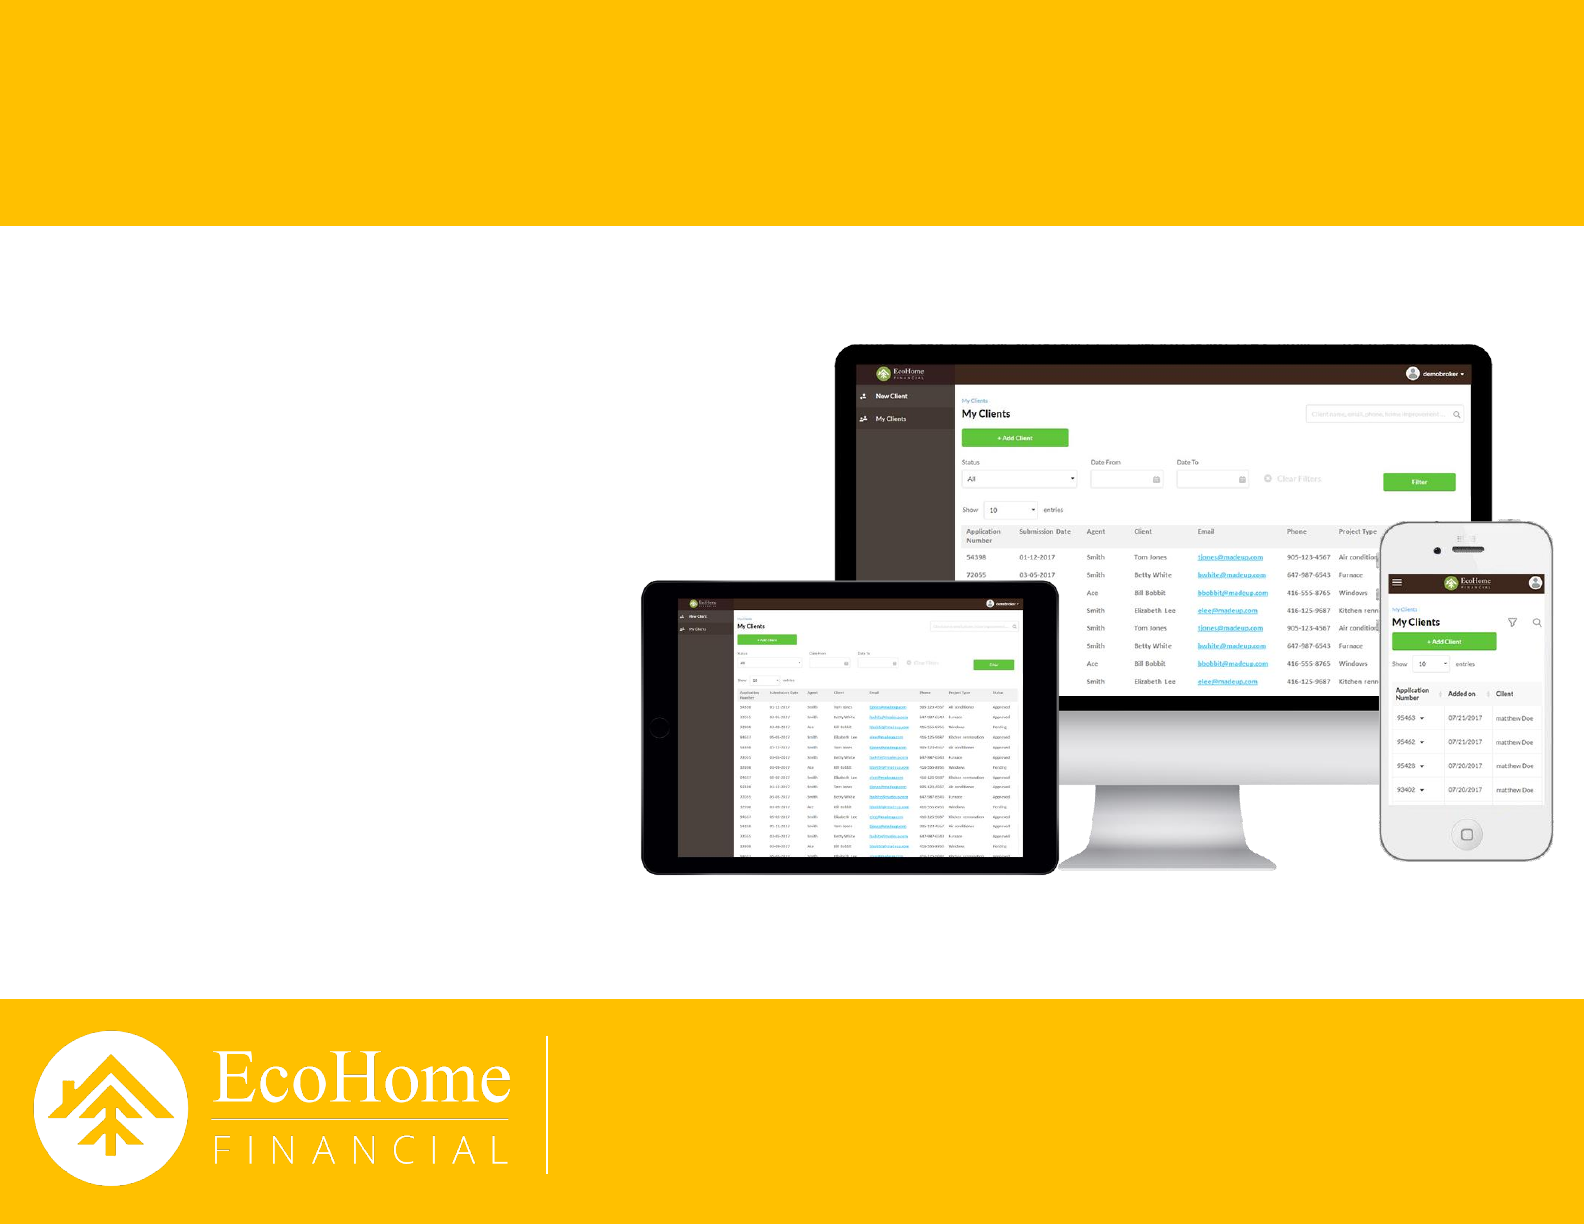
Dealer Portal
Lease User guide
May 2018 version
Engagement-Powered Consumer Financing

TABLE OF CONTENTS
©EcoHome Financial 2018. Proprietary and Confidential 2
CREATING AN APPLICATION (entering a deal)
4
SENDING AND SIGNING CONTRACT FOR
E
-SIGNATURE
15
DOWNLOADING SIGNED E
-SIGNATURE
CONTRACT
20
E
-SIGNATURE CONTRACT STATUS
21
PRINTING THE CONTRACT
22
UPLOADING THE DOCUMENTS
24
REQUEST TO FUND (getting paid for the work)
28
EDITING A DEAL
29
VIEWING YOUR DASHBOARD
31
MY DEALS
32
CALCULATOR
34
CUSTOMER LINK
35
CUSTOMER LINK
–CUSTOMER PROCESS
37
LEADS
40

TABLE OF CONTENTS
©EcoHome Financial 2018. Proprietary and Confidential 3
MY PROFILE
44
ABOUT US
46
RESOURCES
47

CREATING AN APPLICATION (entering a deal)
Your login credentials would have been provided to you by your Sales Account
Manager. If at any time you forget your password or have locked your account you can
contact Dealer Support at 1-866-382-7468 ext.3 to have it reset
STEP 1:
Visit the following URL: https://beta.ecohomefinancial.com/ecohome
STEP 2:
Enter your username and password on the Log In page
EcoHome Financial 2018. Proprietary and Confidential 4
CREATING AN APPLICATION (entering a deal)
STEP 3:
You will be directed to your Dashboard upon successful login
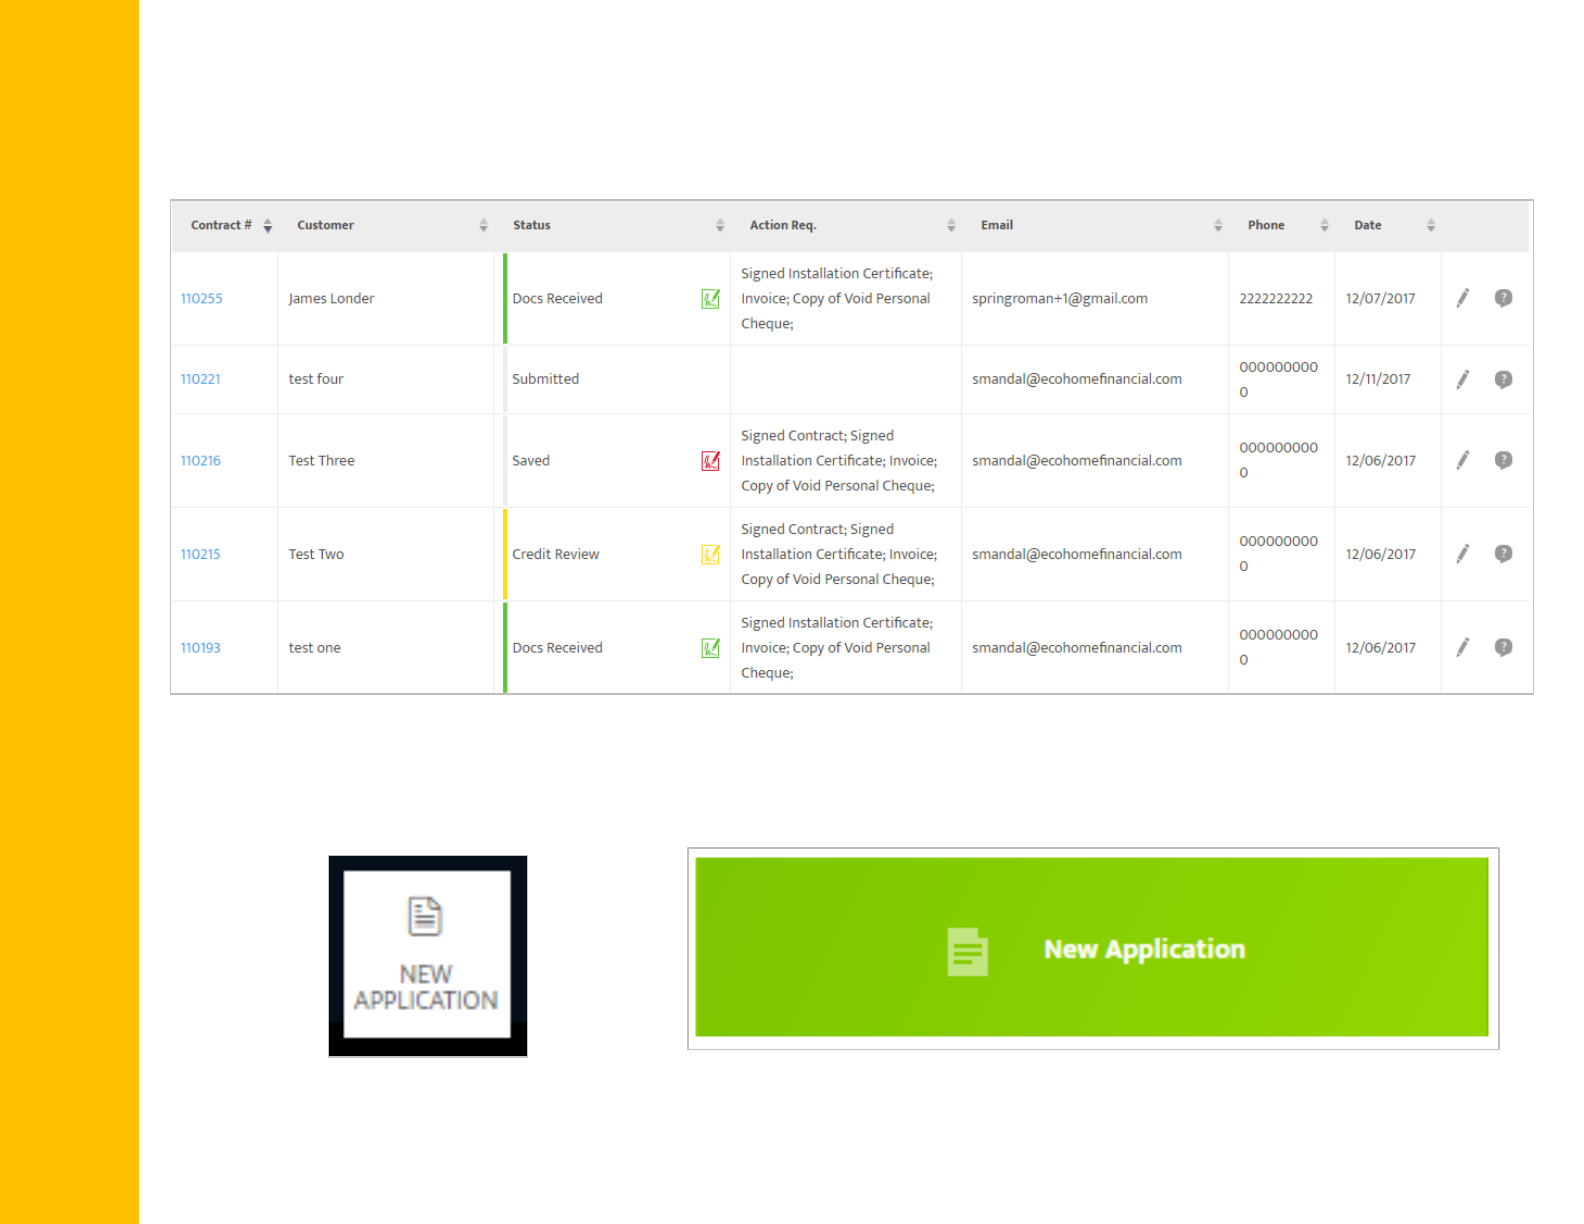
STEP 4:
Click on ‘New Application’ in the Menu on the left side of the screen OR click on the ‘New Application’ icon at the
top of the screen
EcoHome Financial 2018. Proprietary and Confidential 5
CREATING AN APPLICATION (entering a deal)
STEP 5:
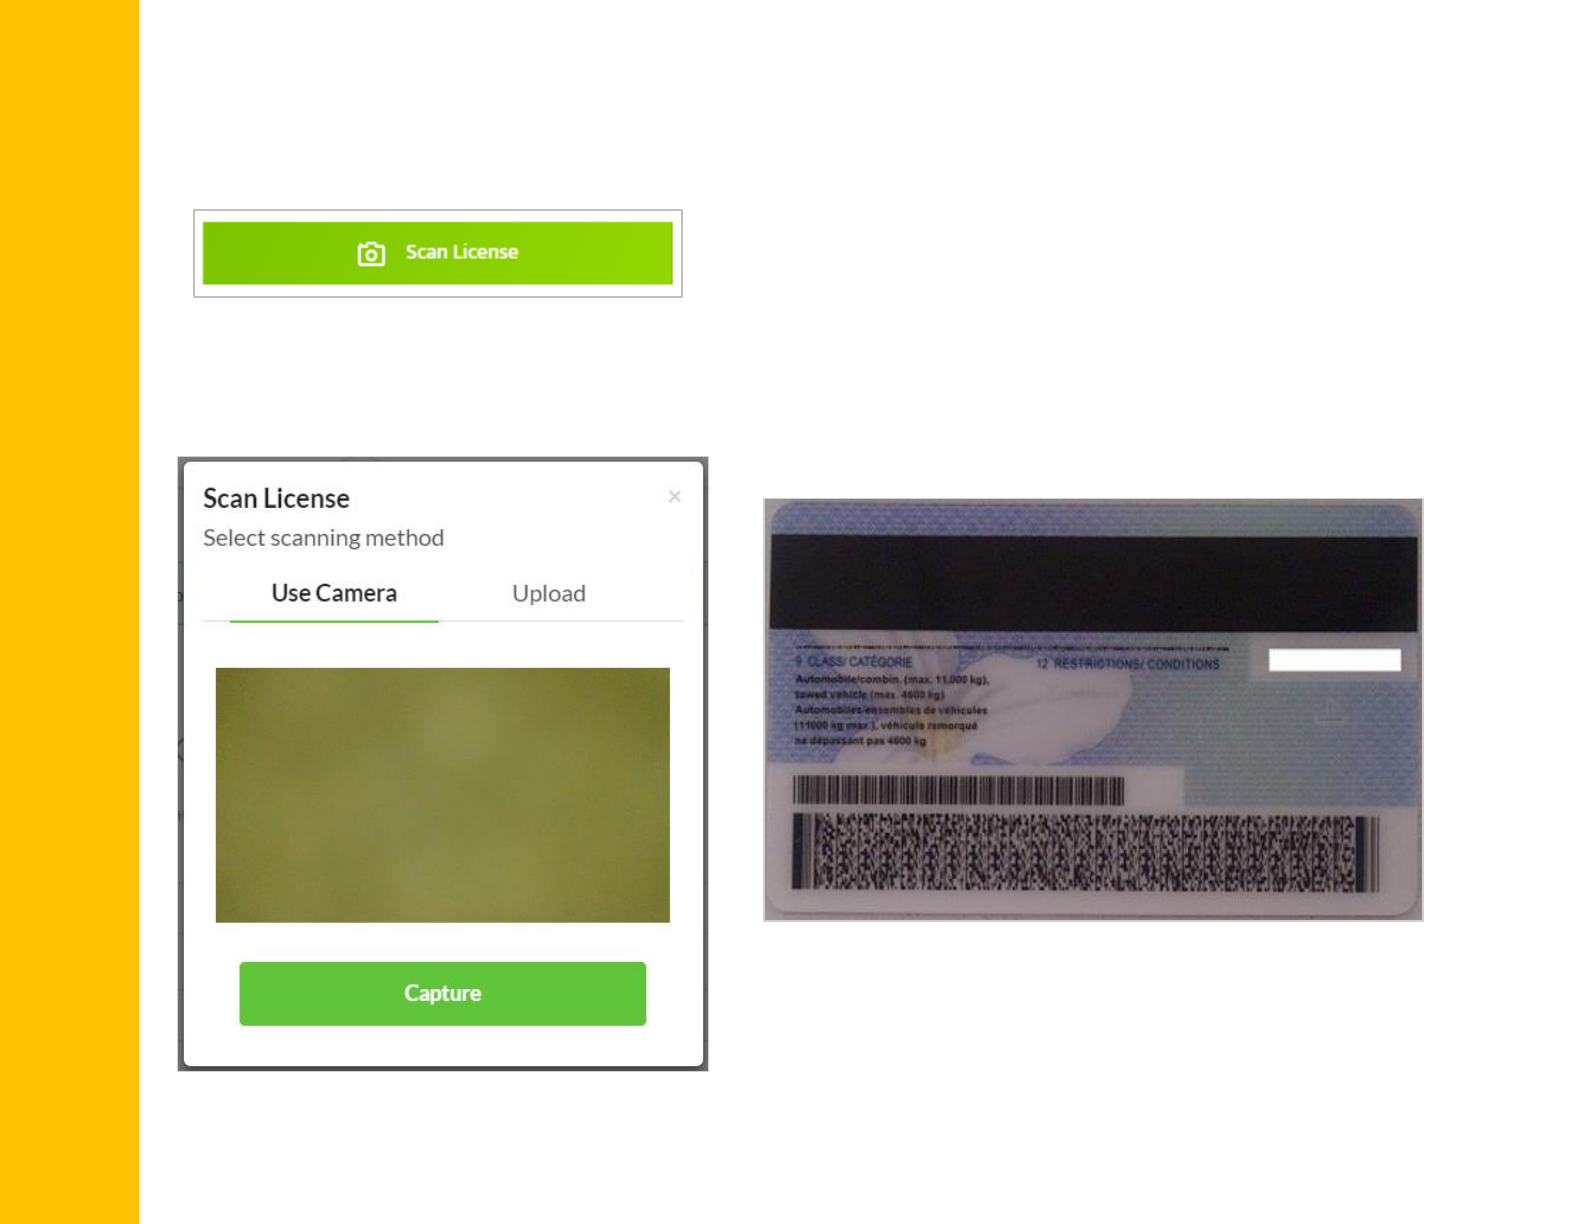
Complete the Borrower Information section. Click the ‘Scan License’ button
EcoHome Financial 2018. Proprietary and Confidential 6
To scan the driver’s license, turn the license over to
scan the barcode on the back of the license. Avoid
any glare and turn off your flash
Mobile users click ‘Capture’
Desktop users click ‘Upload’
Sample image of back of Driver’s License:
The following will appear to allow you to
capture the driver’s license barcode

CREATING AN APPLICATION (entering a deal)
STEP 6:
If drivers license is not available to be scanned enter the following information in the Borrower Information
section:
a) First Name
b) Last Name
c) Date of Birth
d) Customer`s Verification ID
e) Dealers Initials
EcoHome Financial 2018. Proprietary and Confidential 7
STEP 7:
Complete the Installation Address Information section. If you are at the Customers home click the ‘Get My
Location’ button. The Installation Address Information section will automatically populate
STEP 8:
If you are not at the Customers home enter the following information in the Installation Address Information
section:
a) Address
b) Unit #
c) City
d) Province
e) Postal Code
1.
At least one of the applicants must be the home owner
2.
Postal code is a minimum of 5 characters and maximum of 6 characters
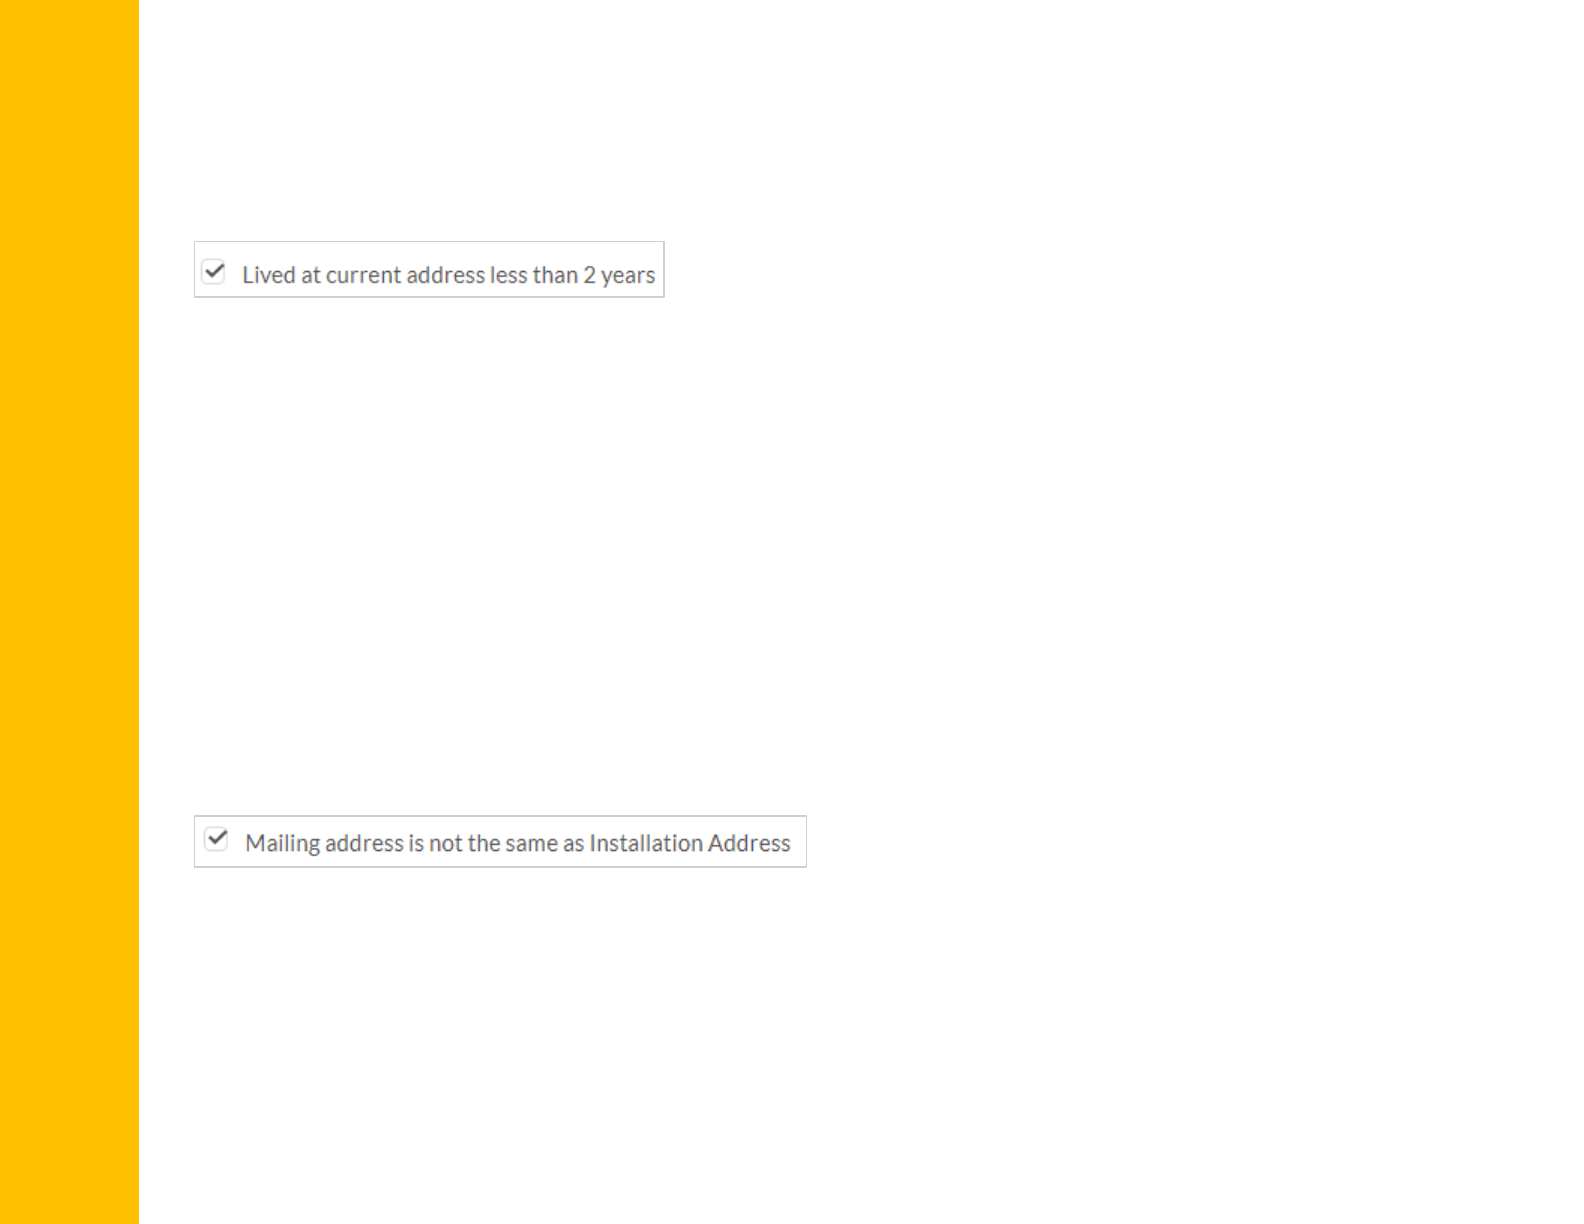
If the mailing address is different than the installation address, click the box as per below in the form to
complete the Customers mailing address
Enter the following information in the Mailing Address section:
a) Street
b) Unit #
c) City
d) Province
e) Postal Code
CREATING AN APPLICATION (entering a deal)
STEP 9:
If the Customers has lived at their current address for less than 2 years, click the check box as per below in the
form to complete the Customers previous address
Enter the following information in the Previous Address Information section:
a) Street
b) Unit #
c) City
d) Province
e) Postal Code
EcoHome Financial 2018. Proprietary and Confidential 8
STEP 10:
CREATING AN APPLICATION (entering a deal)
STEP 11:
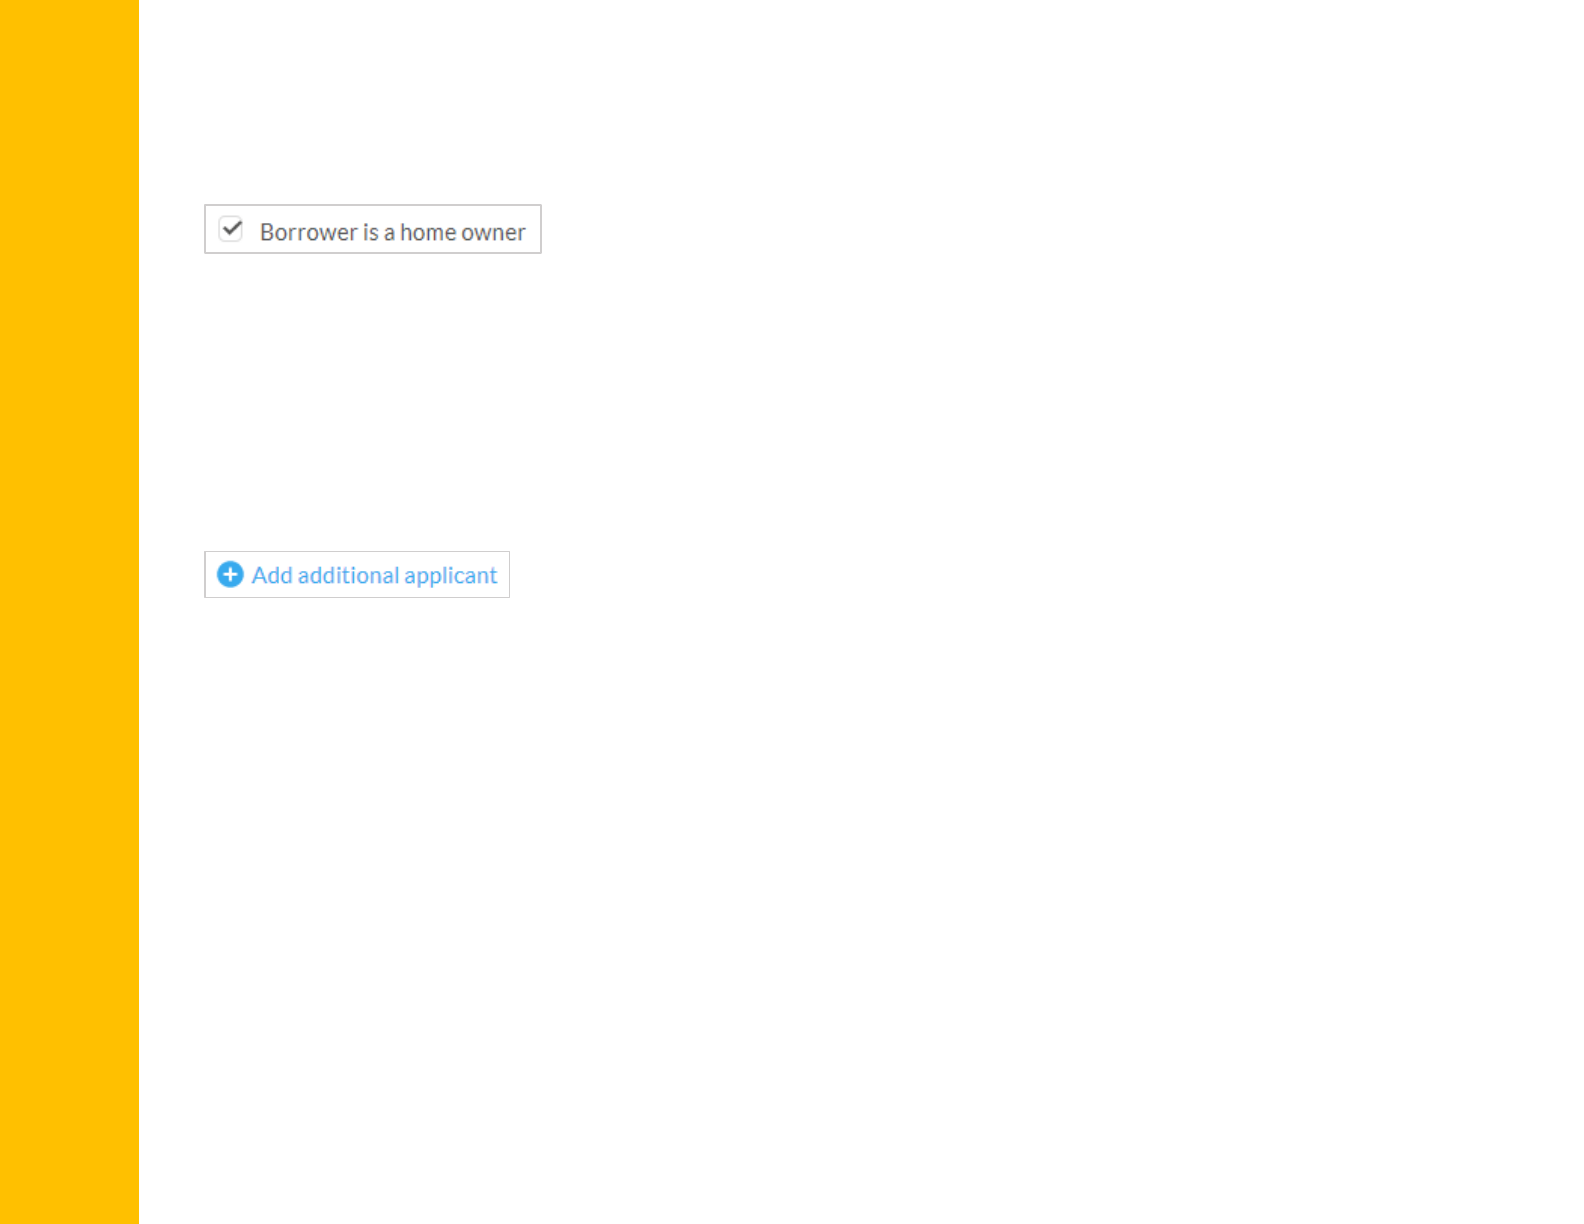
Confirm that the Customer is the Home Owner by clicking on the box as per the below in the form
If the first Customer is not the home owner you will have this option with the additional applicant
EcoHome Financial 2018. Proprietary and Confidential 9
STEP 12:
If there is an additional applicant, click on the ‘Add Additional applicant’ icon as shown below in the form to
complete the additional applicants information
Enter/complete the following information in the Additional Applicant Information section:
Scan driver’s license OR enter
a) First Name
b) Last Name
c) Date of Birth
d) Customer`s Verification ID
e) Dealer`s Initial
f) Relationship to Main Borrower
CREATING AN APPLICATION (entering a deal)
STEP 13:
Before you proceed with the credit check review the Customer’s information for accuracy.
EcoHome Financial 2018. Proprietary and Confidential 10
STEP 14:
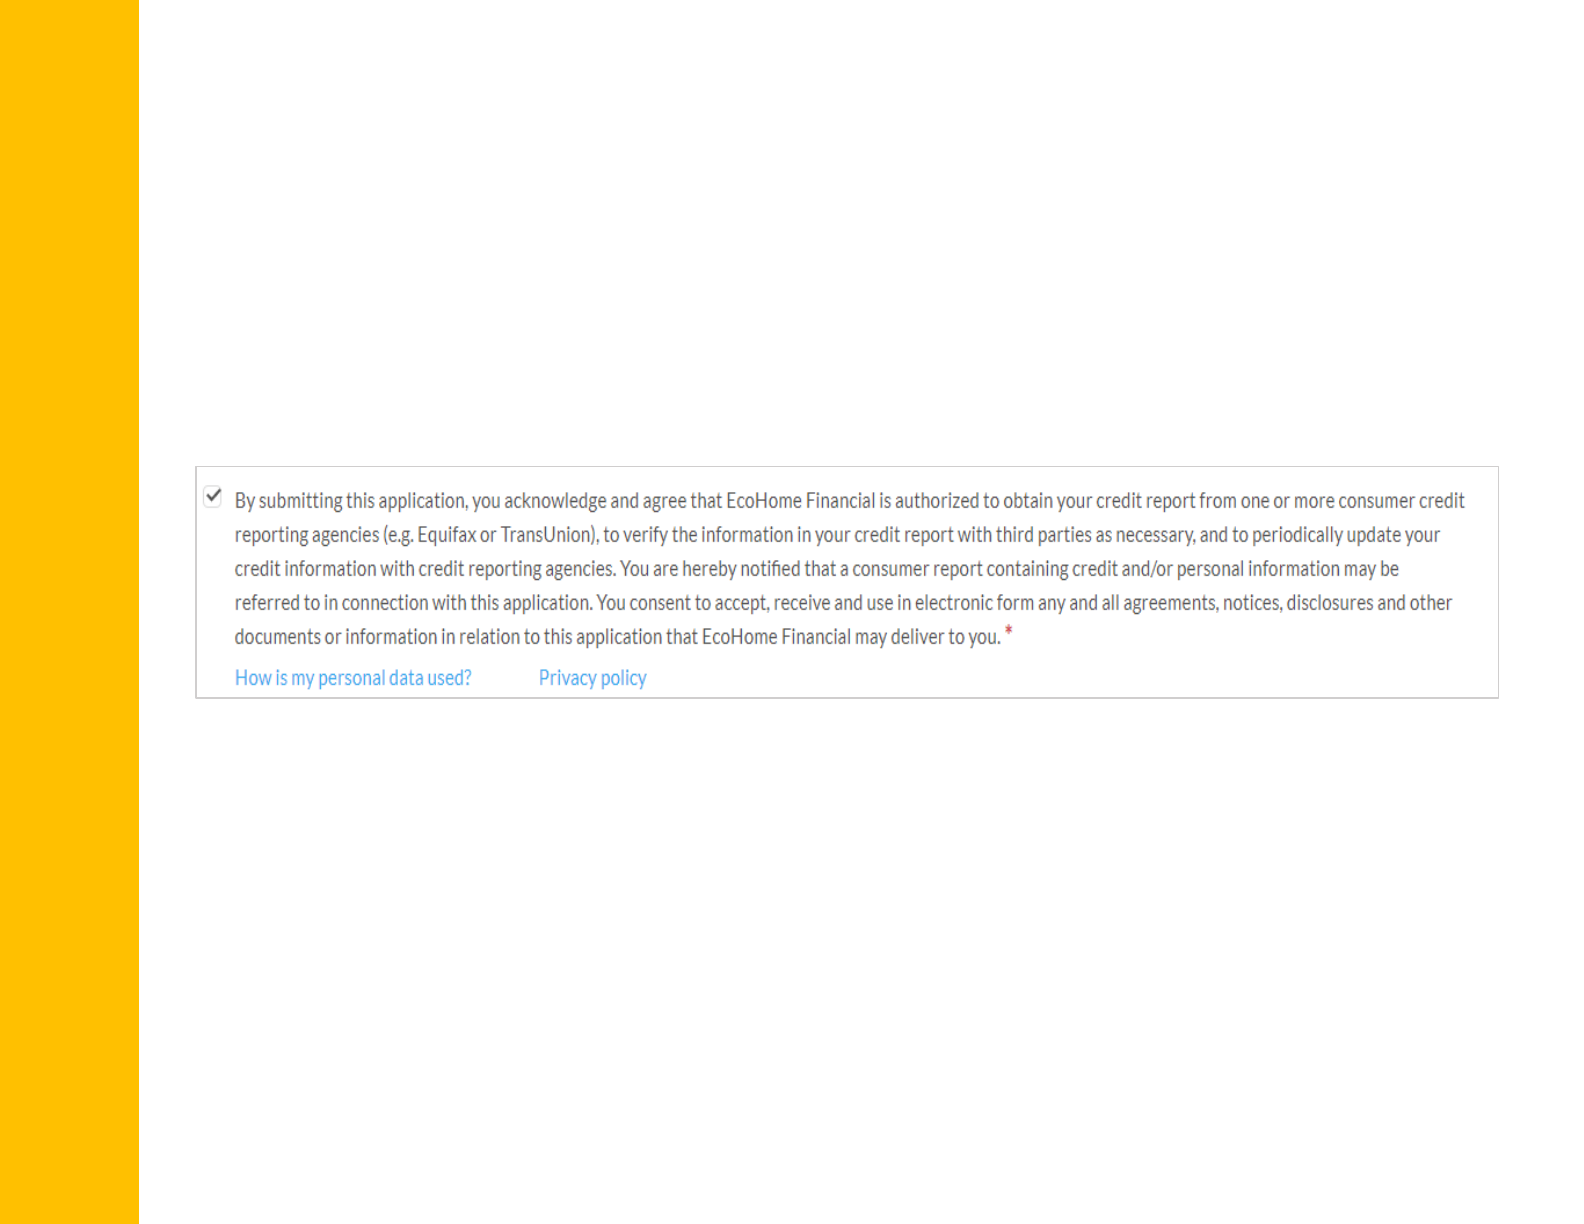
The Customer must read and authorize their credit report to be pulled. This must be completed for each
customer
The Customer has the ability to view `How is my personal data used?’ and ‘Privacy Policy’
STEP 15:
Click on the ‘Save and Proceed’ button at the bottom of the page to move to the next step – the Customers
information is now created
CREATING AN APPLICATION (entering a deal)
STEP 16:
At this point at the top of the page you will see a response from the credit check. You will receive one of the
below response messages:
•Credit Check Processed Successfully –Pre-approved amount will display
•No Message –this application will proceed for credit review
•We were not able to match the Customer’s credit details. Please ensure that the Customer information
provided matches their Government issued ID (e.g. driver’s license). Continue with the application for credit
adjudication upon submission.
•Declined
EcoHome Financial 2018. Proprietary and Confidential 11
STEP 17:
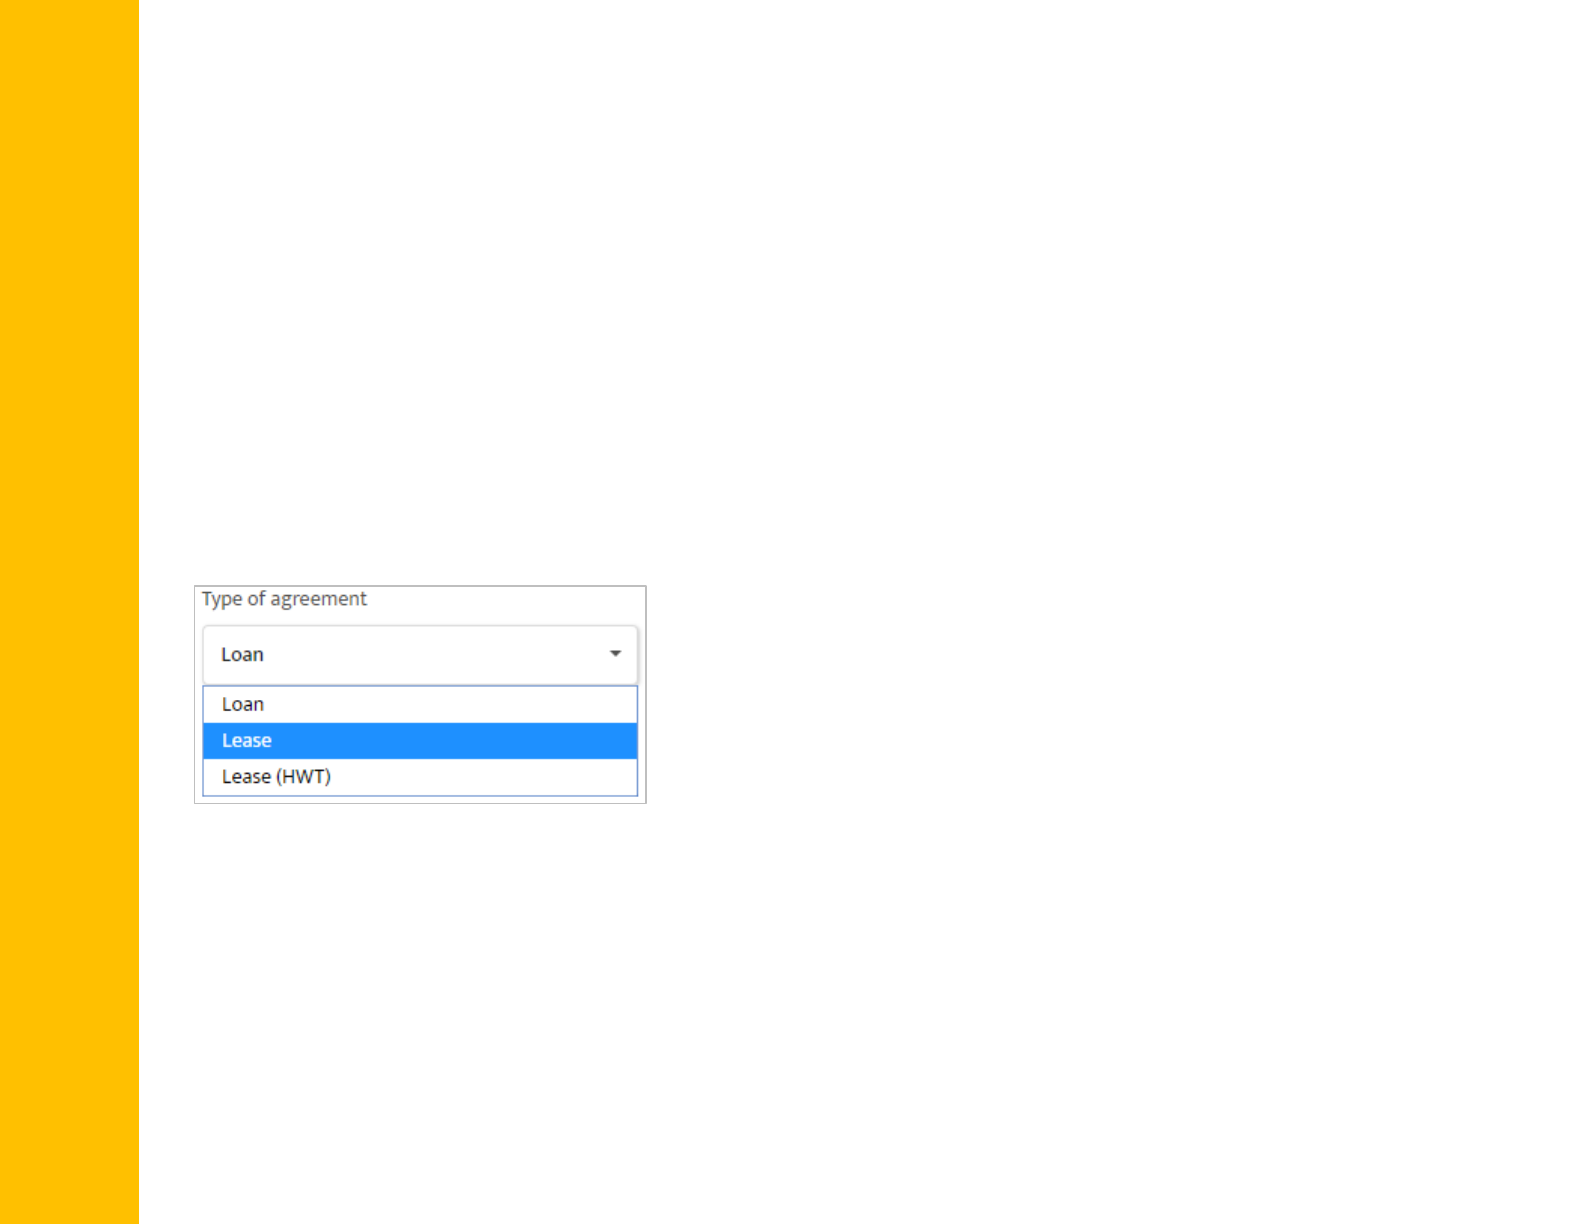
Select the ‘Type of Agreement’ from the drop-down menu
STEP 18:
Enter/complete the following information in the New Equipment Information section:
a)
Program Type –select the program from the drop
down
b)
Type –select equipment/service from drop down
menu
c)
Description –complete this free form field
e)
Monthly Cost –enter the monthly cost for the
lease
f)
Estimated Retail Cost –enter the retail cost
g)
Add additional equipment –if required

STEP 23:
Enter/complete the Contact Information section for the Borrower:
a) Enter Home phone number
b) Enter Cell phone number
c) Enter Business phone number
d) Enter email address
CREATING AN APPLICATION (entering a deal)
STEP 19:
Enter/complete the following information :
a) Sales Rep –enter Sales Representative name
b) Role of the Sales Rep –select all that apply
c) Does the Customer have any agreements with EcoHome Financial? –select one that applies
d) Select Preferred Install Date
e) Select Preferred Install Time
e) Enter house size (in sq. feet)
EcoHome Financial 2018. Proprietary and Confidential 12
STEP 21:
Complete the Contract Notes section if needed
STEP 20:
Complete the Existing Equipment Information section if required
STEP 22:
Click on the ‘Save and Proceed’ button at the bottom of the page to move to the next step – the Equipment
information has now been added to the application

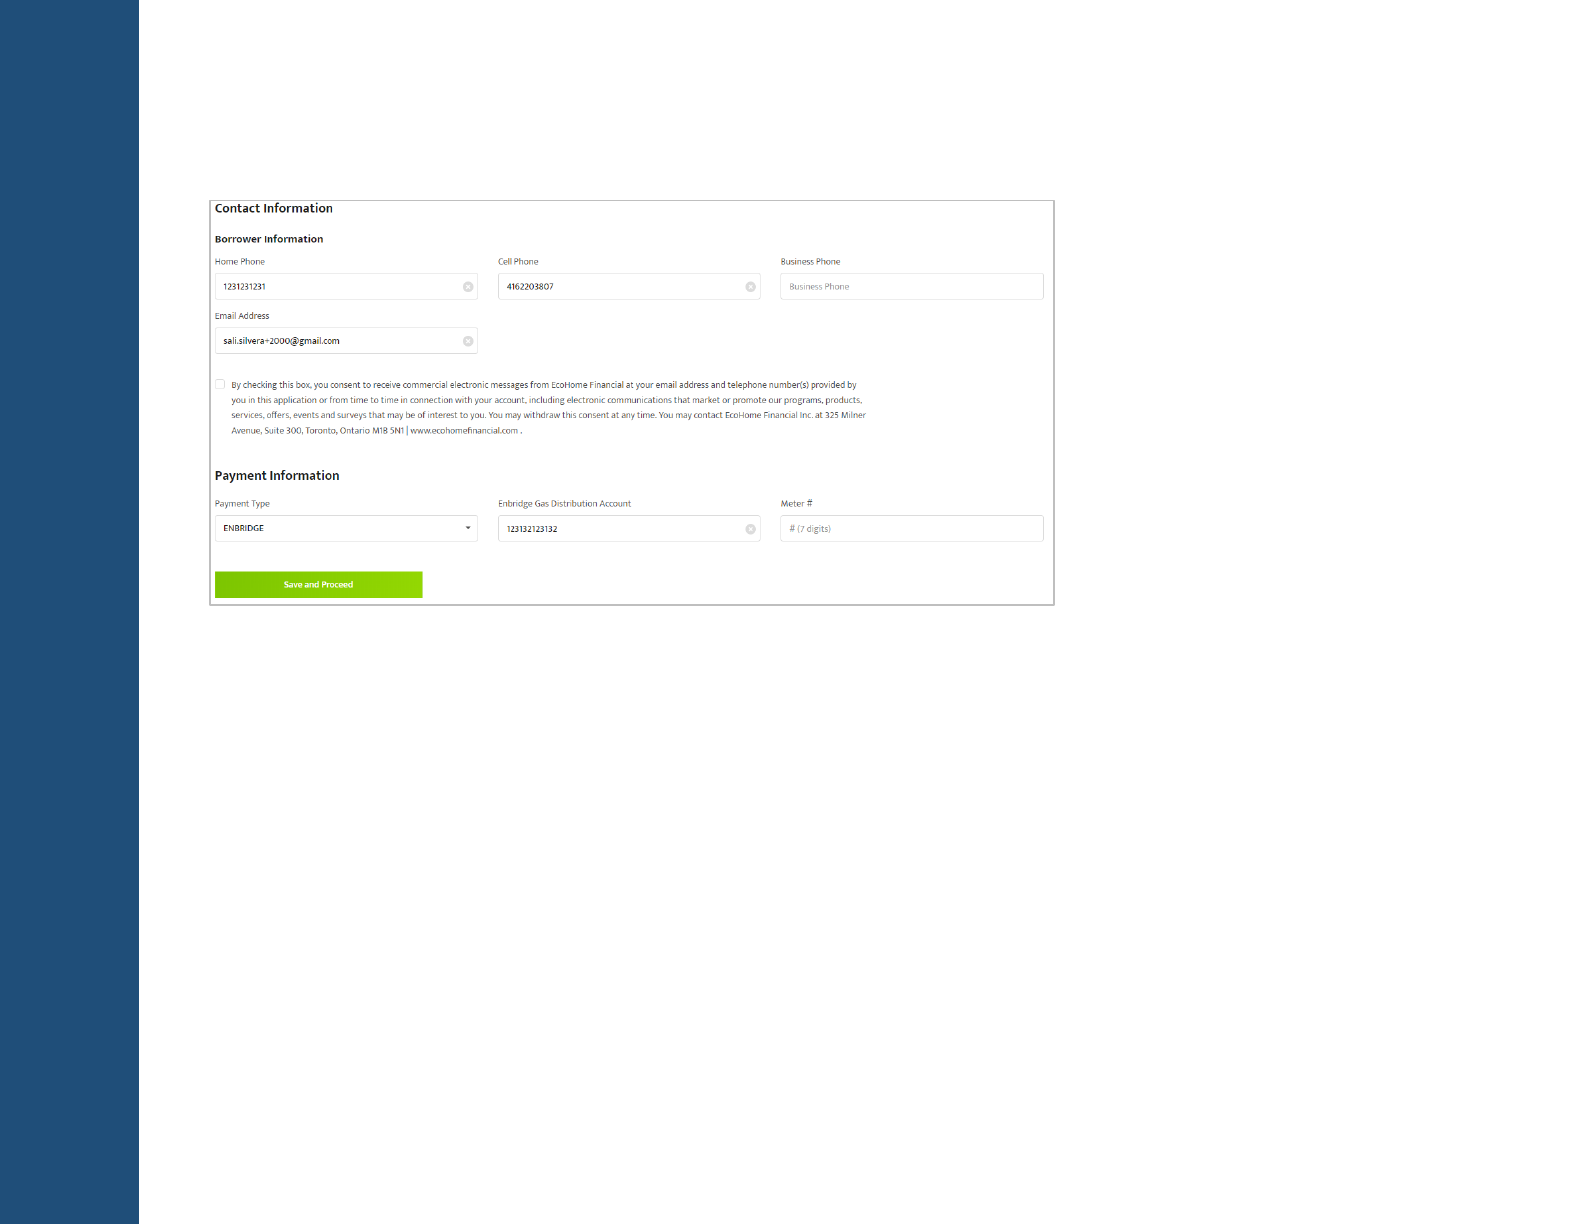
Complete the following information in
the Payment Information section:
a) Payment Type –select from the drop
down menu
i. If Enbridge is selected enter
Enbridge Gas Distribution
Account number or Meter #
ii. If PAD is selected enter
Preferred Withdrawal Date,
Bank Number, Transit
Number and Account
Number
CREATING AN APPLICATION (entering a deal)
STEP 24:
If the Customer would like to receive electronic messages from EcoHome Financial, check the box next to the
consent
EcoHome Financial 2018. Proprietary and Confidential 13
STEP 25:
STEP 26:
If there is an additional applicant on the application, complete the Additional Applicant Information section:
a)
Enter Home phone number
b)
Enter Cell phone number
e)
Enter Business phone number
f)
Enter email address
If the Additional Applicant would like to receive electronic messages from EcoHome Financial, check the box
next to the consent

You can’t proceed from Step 1 to Step 2 until all applicants agree to send their personal data
to credit check
CREATING AN APPLICATION (entering a deal)
STEP 27:
Click on the ‘Save and Proceed’ button to move to the next step
EcoHome Financial 2018. Proprietary and Confidential 14
STEP 29:
Once all information is complete and accurate, click on the ‘Submit Deal’ button
STEP 28:
You are now at the ‘Summary and Confirmation’. You can review all information for accuracy and click on the
‘Edit’ icon in any section in order to return to that page to make any corrections
STEP 30:
This process is complete. You can now send the contract for E-Signature or print the contract
SENDING AND SIGNING CONTRACT FOR E-SIGNATURE
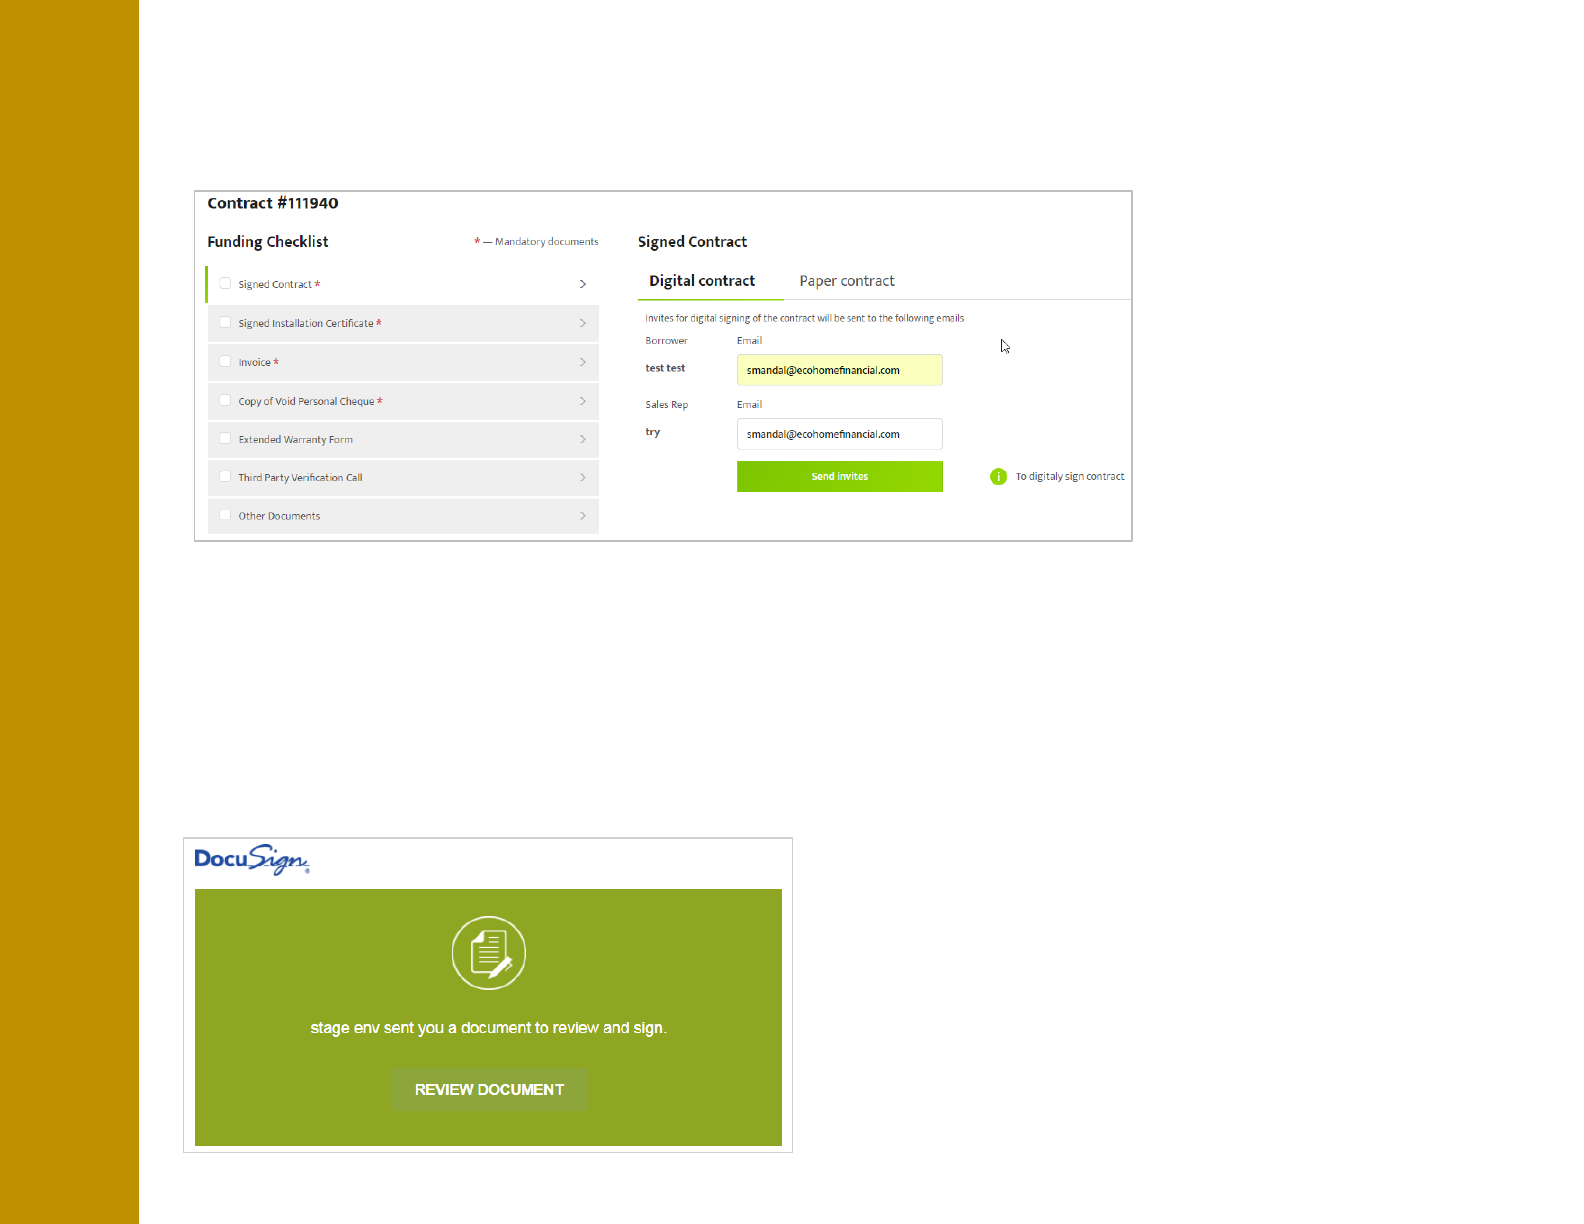
STEP 1:
Review Borrower(s) and Sales Rep email addresses are correct and Click on the ‘Send Emails’ button
EcoHome Financial 2018. Proprietary and Confidential 15
STEP 2:
Email will be sent to Borrower, Co-Borrower (if one is present) and Dealer in that order
STEP 3:
Borrower one opens the email and review the message from EcoHome Financial and clicks REVIEW DOCUMENT
to begin the signing process
SENDING AND SIGNING CONTRACT FOR E-SIGNATURE
EcoHome Financial 2018. Proprietary and Confidential 16
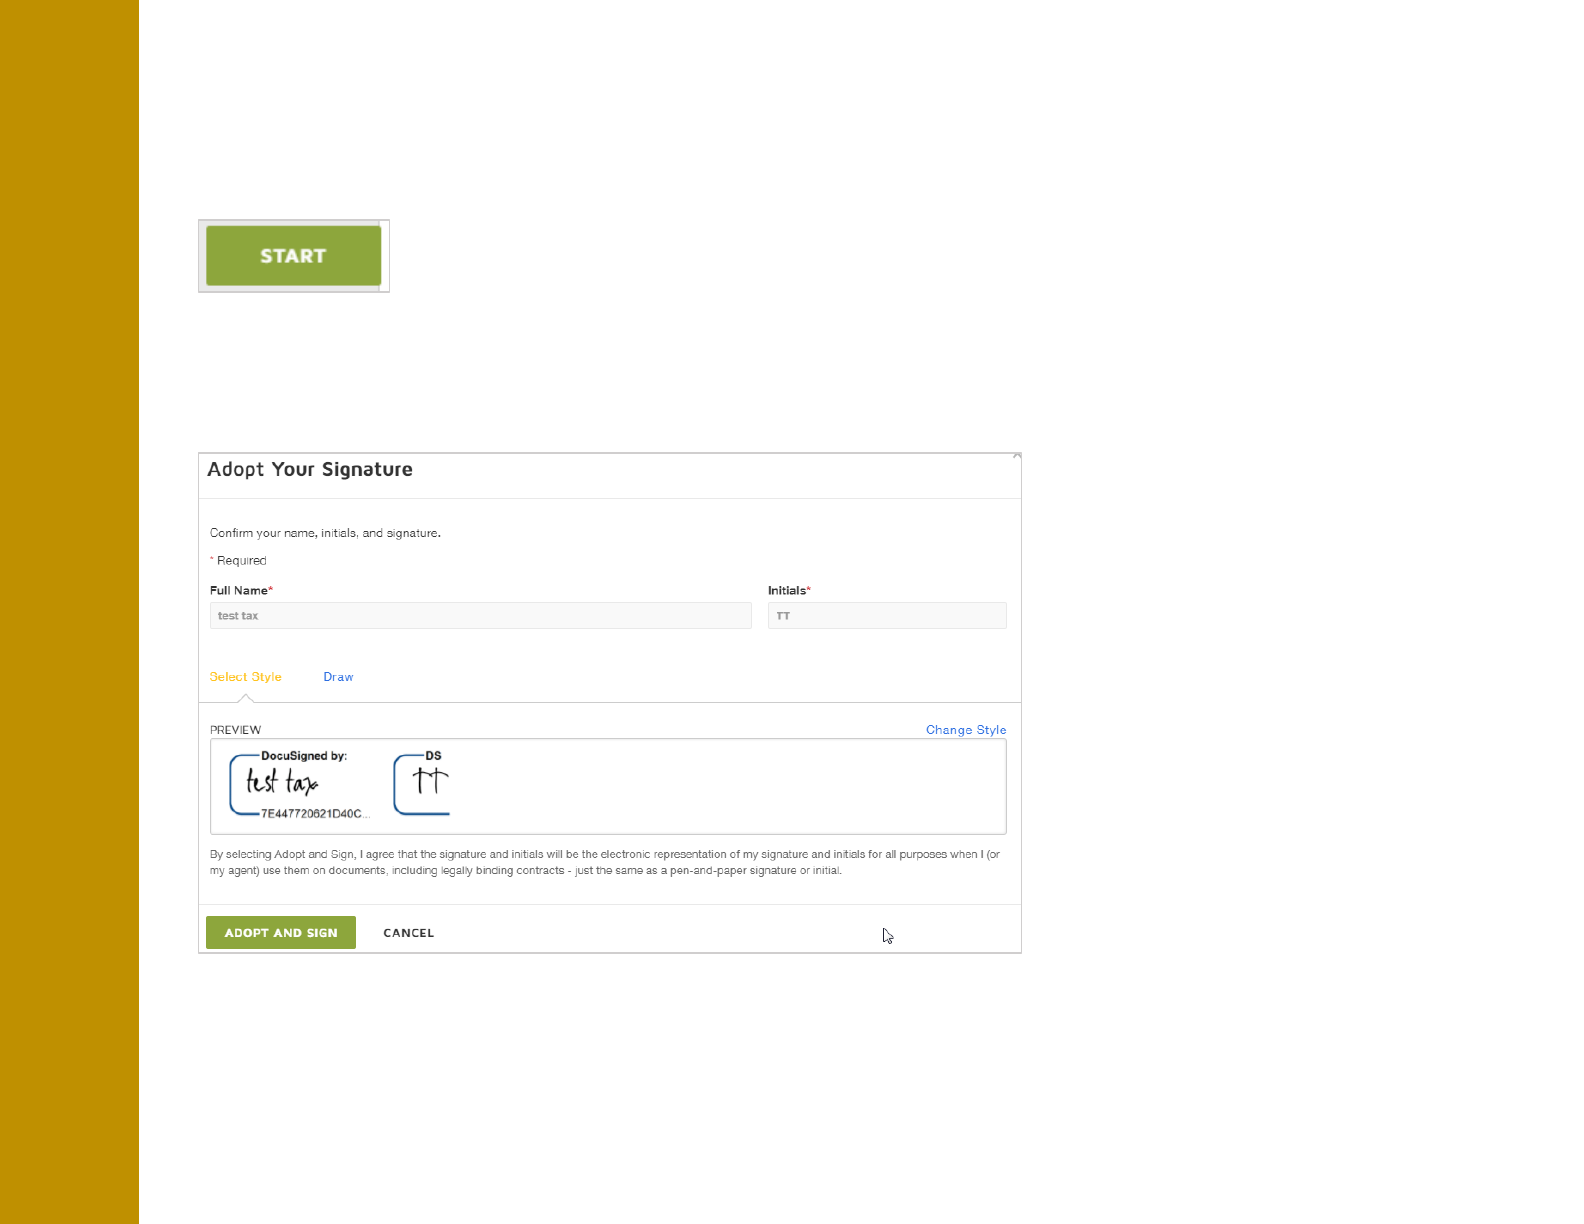
STEP 4:
Borrower one clicks the START tag on the left to begin the signing process. They are taken to the first field
requiring action. Click the SIGN tag. You are asked to Adopt and Sign. You also have the ability to DRAW signature
STEP 5:
Borrower verifies their name and initials are correct when using Adopt and Sign. If not, change them as needed
SENDING AND SIGNING CONTRACT FOR E-SIGNATURE
EcoHome Financial 2018. Proprietary and Confidential 17
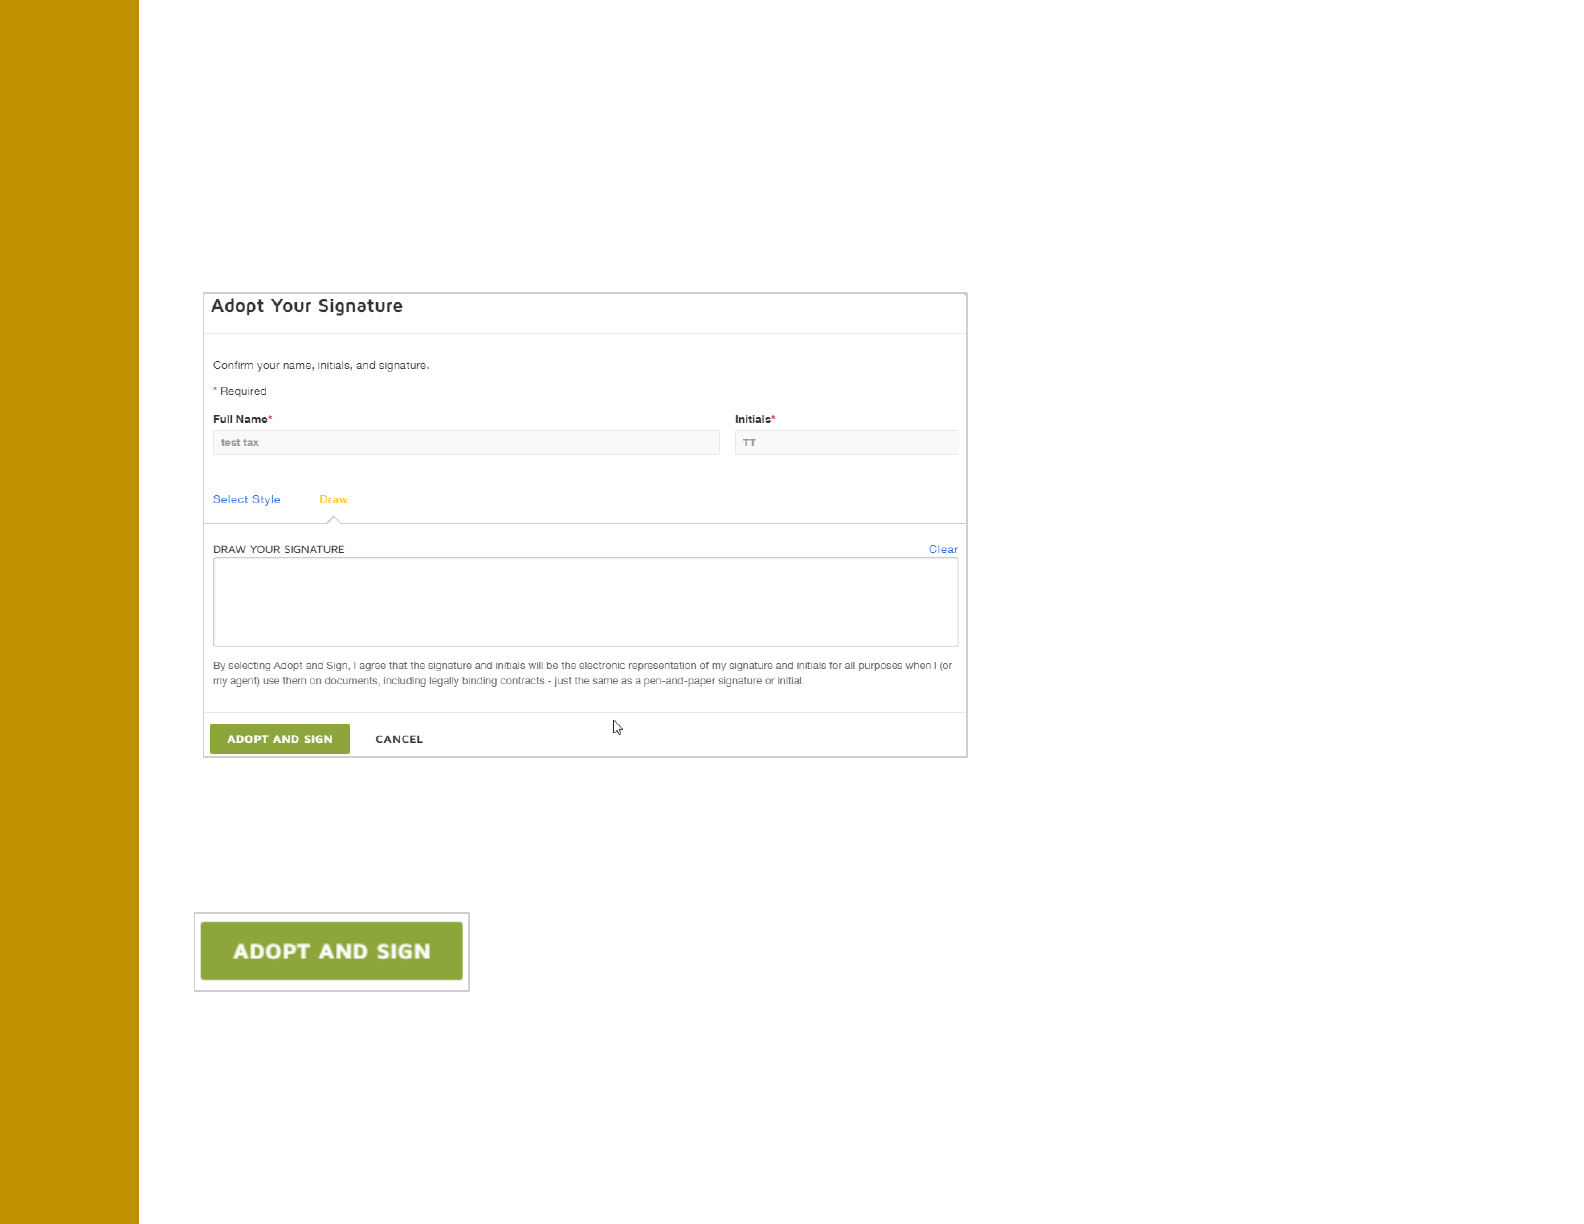
STEP 6:
Borrower does one of the following:
> Accept the default signature and initial style
> Click Draw. Draw your signature using a mouse,
your finger or a stylus
STEP 7:
Borrower clicks ADOPT AND SIGN to adopt and save their signature information and return to your document

SENDING AND SIGNING CONTRACT FOR E-SIGNATURE
EcoHome Financial 2018. Proprietary and Confidential 18
STEP 8:
When the borrower is finished clicking all signature tags in the document, confirm signing by clicking FINISH
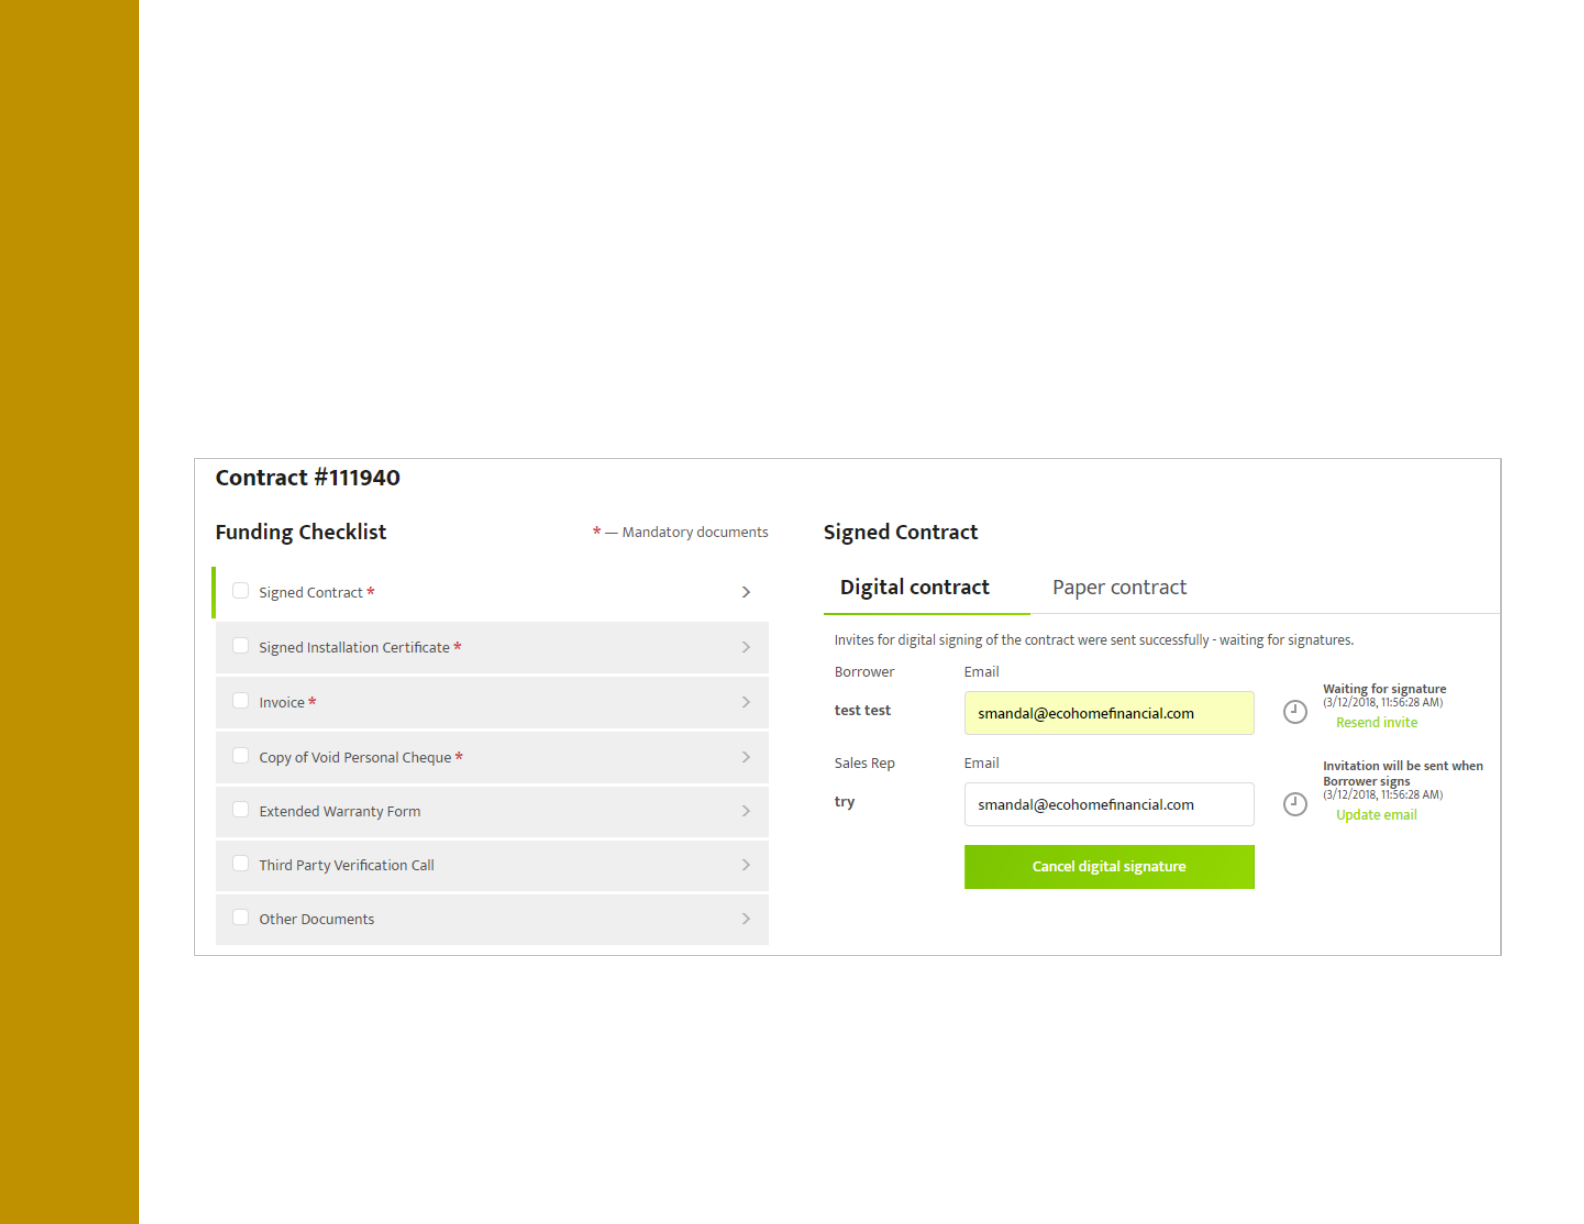
STEP 9:
Once the Borrower has completed signing, the Co-borrower (if present) is notified by email and completes step
3-8.
STEP 10:
Once all Borrowers have completed signing, the Dealer is notified by email and completes step 3-8.
STEP 11:
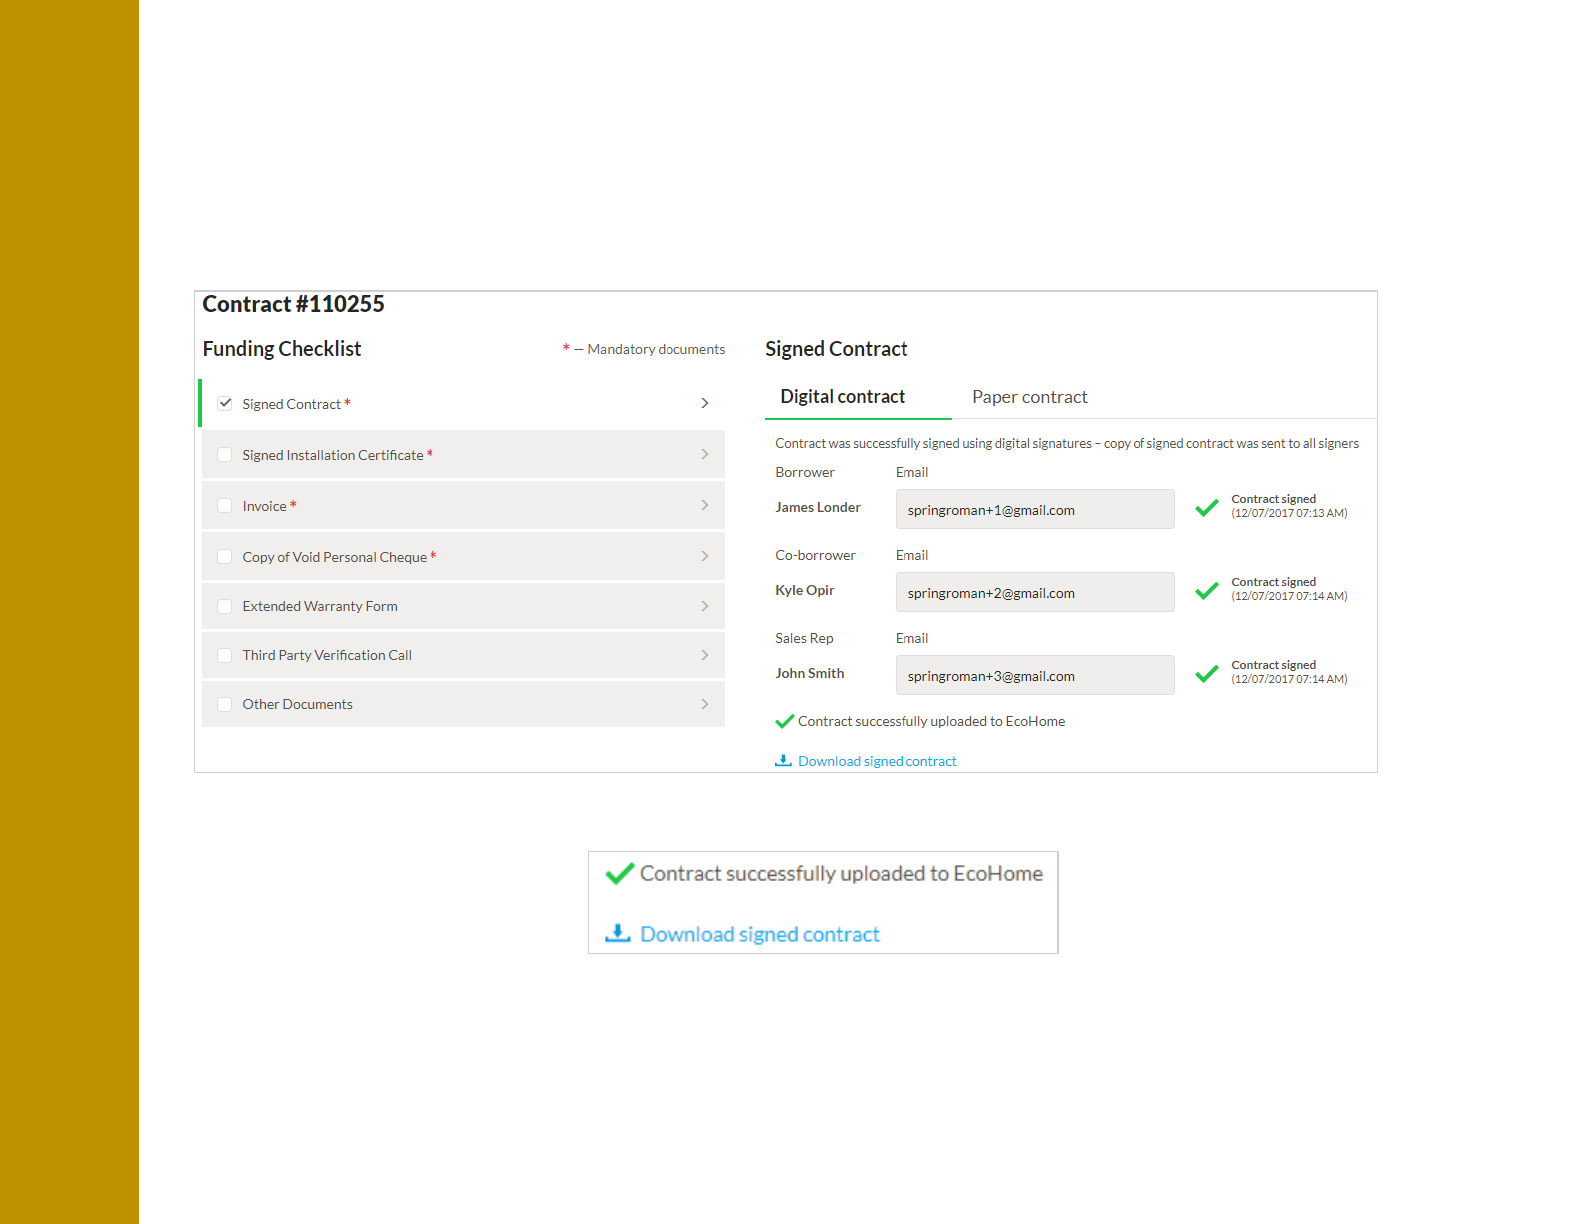
All parties will receive a copy of the completed contract
STEP 12:
Contracts will be automatically uploaded to the Dealer Portal’s Funding Checklist under Signed Contract
SENDING AND SIGNING CONTRACT FOR E-SIGNATURE
EcoHome Financial 2018. Proprietary and Confidential 19
STEP 13:
This process in now complete. You can proceed to uploading documents to the Funding Checklist
STEP 14:
If contracts need to be resent for signing, this can be done from the Funding Checklist.
If contracts sent for digital signature need to be cancelled, this can be done from the Funding Checklist.
DOWNLOADING SIGNED E-SIGNATURE CONTRACT
EcoHome Financial 2018. Proprietary and Confidential 20
STEP 1:
Once a contract has been successfully signed by all parties, you can download a copy of the contract from the
Funding Checklist.
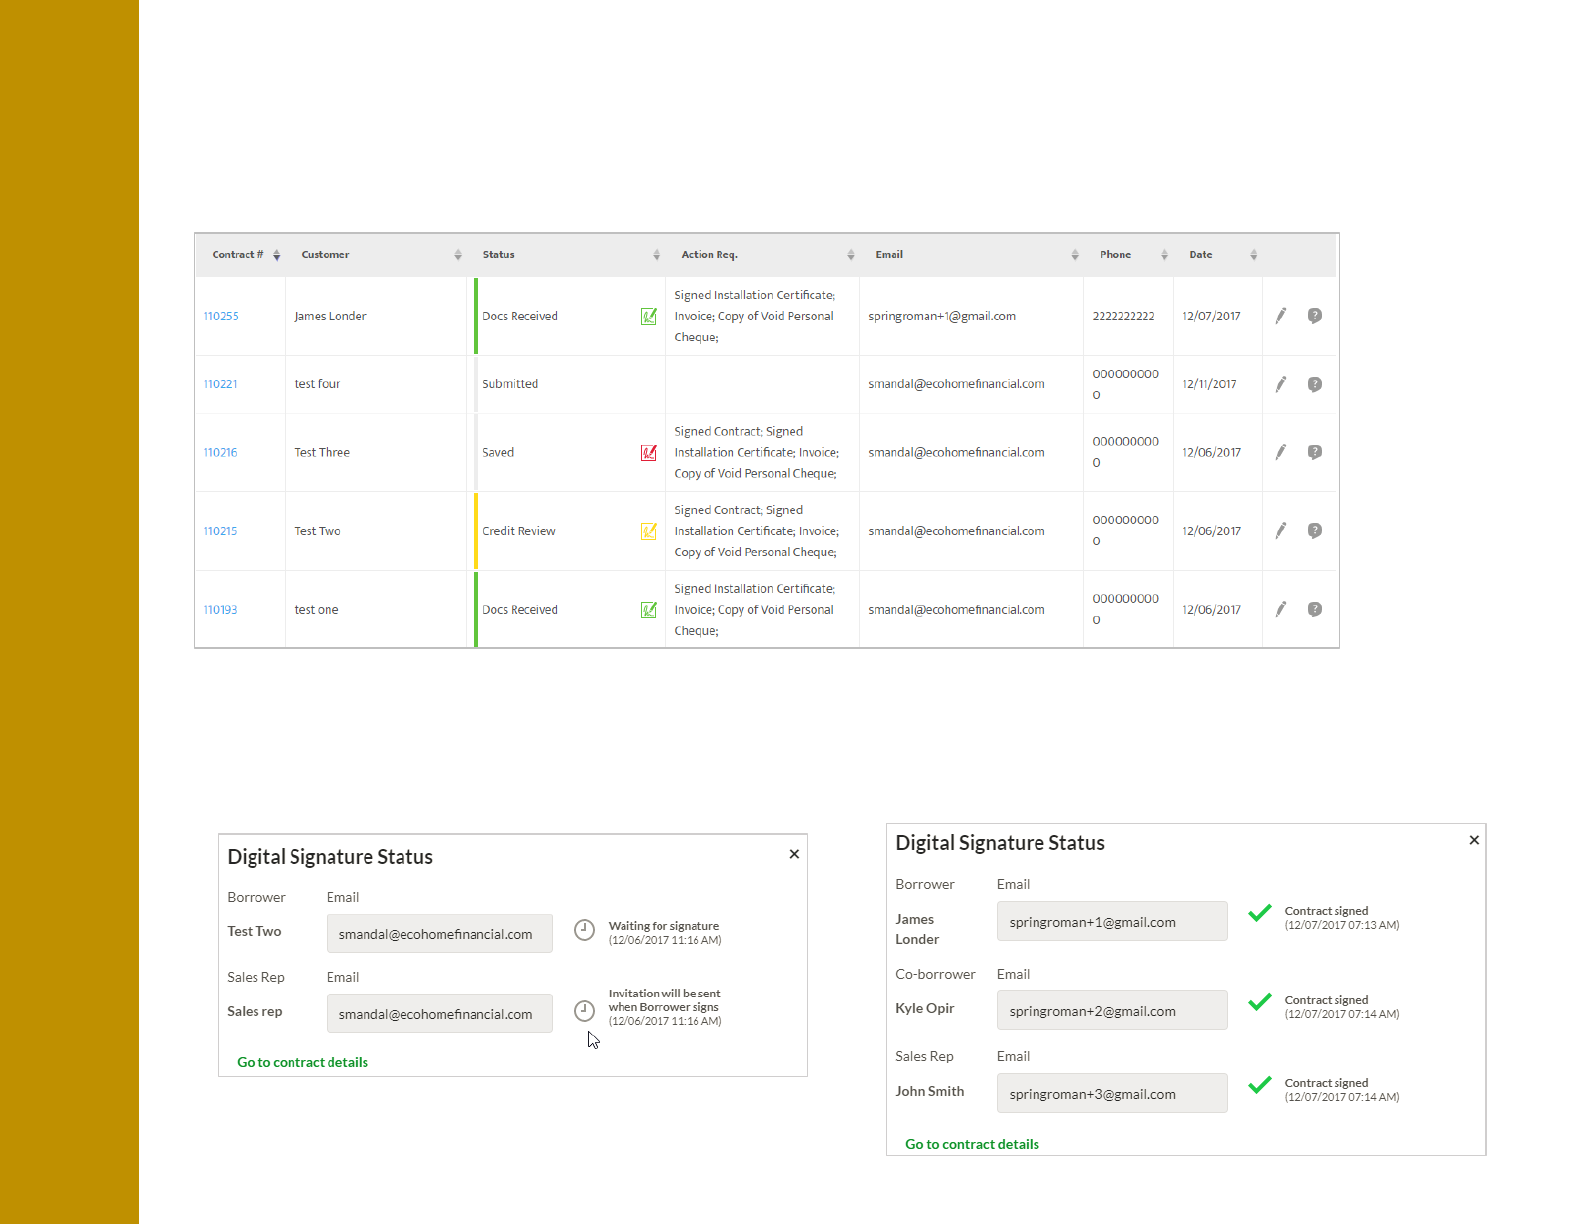
E-SIGNATURE CONTRACT STATUS
EcoHome Financial 2018. Proprietary and Confidential 21
STEP 1:
You can review the status of contract sent for E-Signature from the Home Page or My Deals Page. A digital
signature icon can be found next to each deal status for any deal that has a contract sent for E-Signature.
STEP 2:
To view the contract status, click on the E-Signature icon and review the details presented in the pop-up box.
Sample 1: Sample 2:

PRINTING THE CONTRACT
STEP 1:
Click on the ‘Print the contract’ icon
EcoHome Financial 2018. Proprietary and Confidential 22
STEP 2:
The contract will be auto-populated with all of the application details from the portal
STEP 4:
This process is now complete. You can proceed to uploading documents to the portal
(See next page for sample of an auto-populated contract)
STEP 3:
Have the applicant(s) review and sign the contract
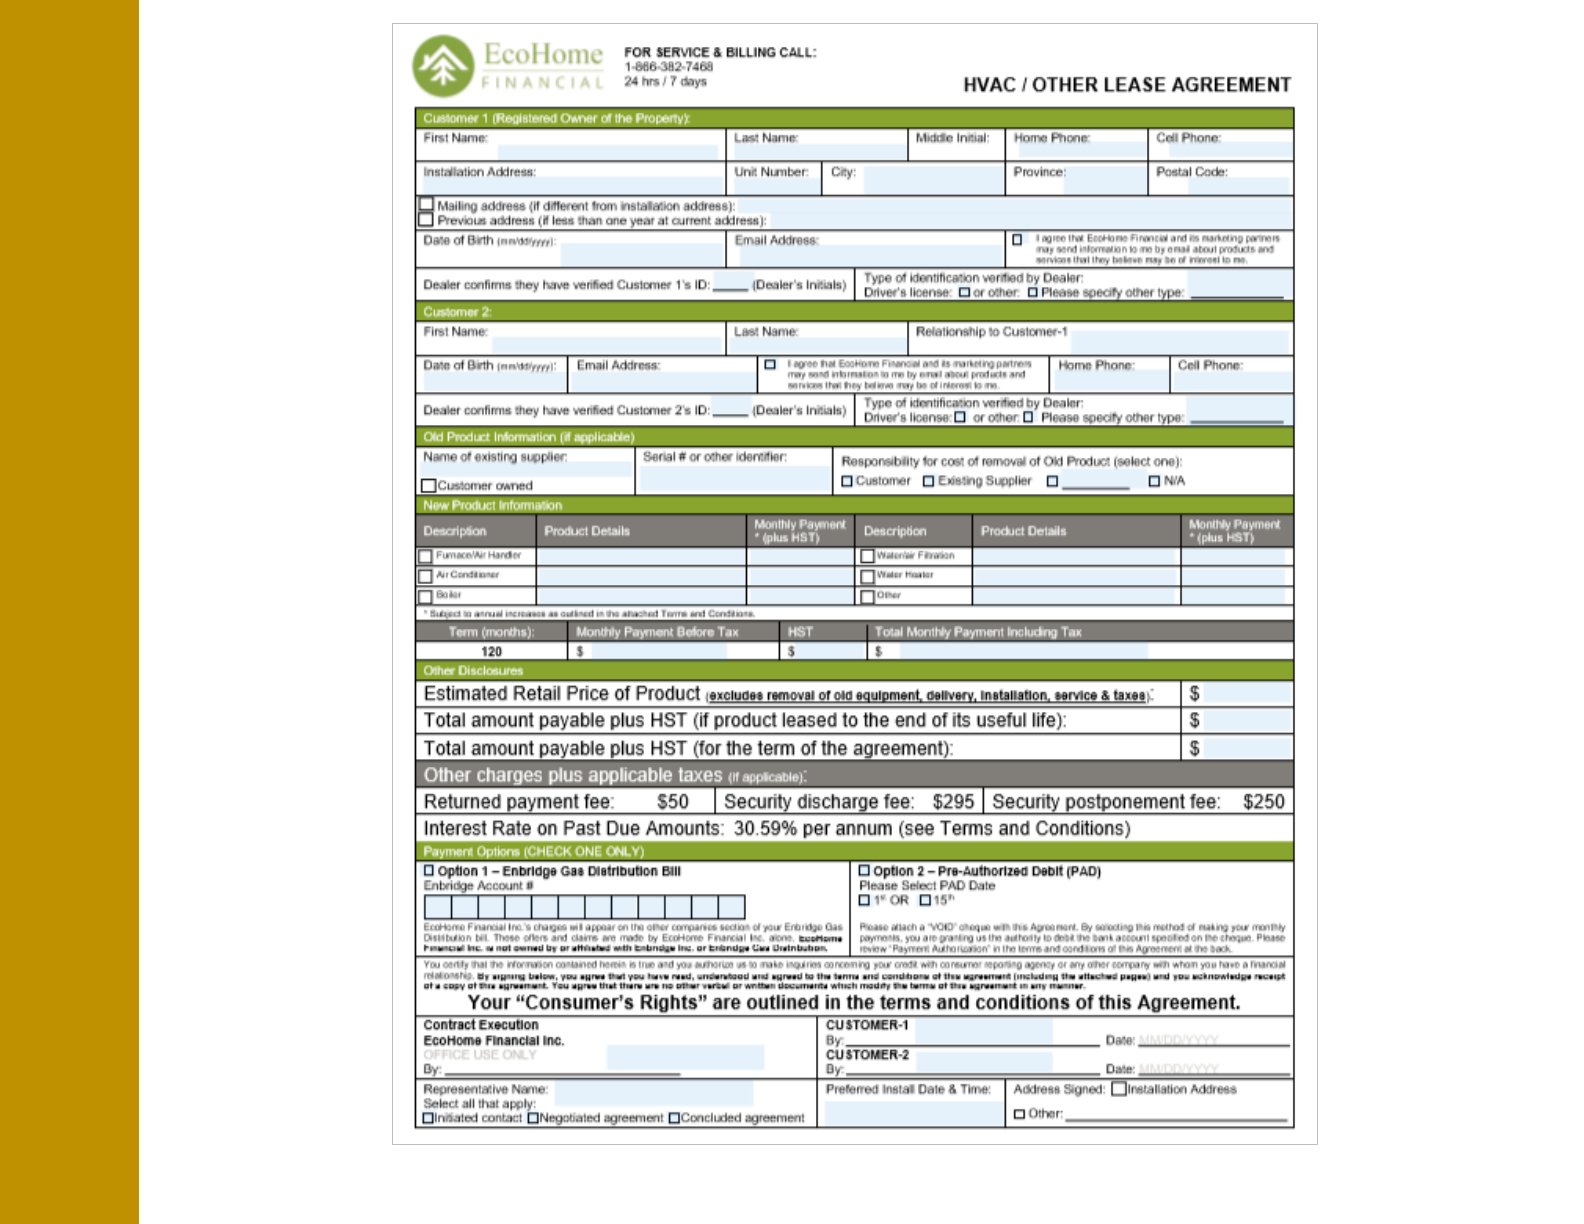
PRINTING THE CONTRACT
EcoHome Financial 2018. Proprietary and Confidential 23
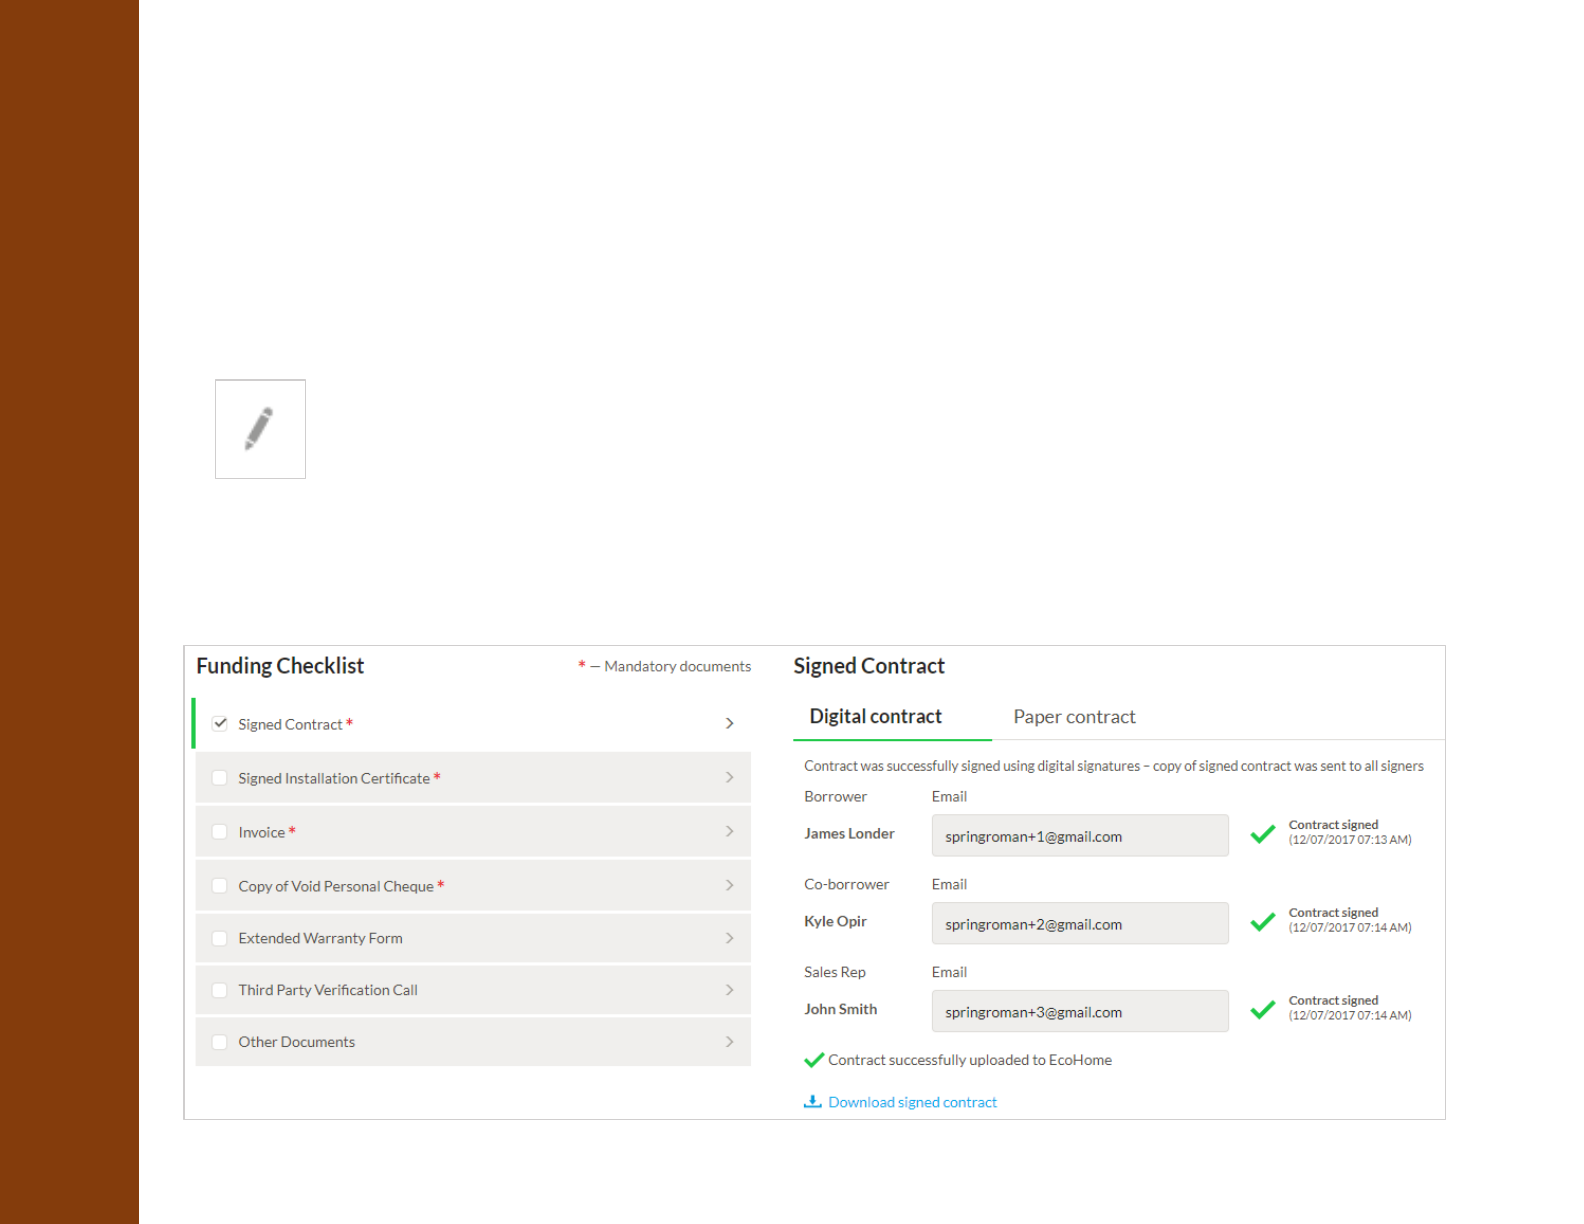
UPLOADING DOCUMENTS
STEP 1:
Return to your Dashboard or My Deals Page
EcoHome Financial 2018. Proprietary and Confidential 24
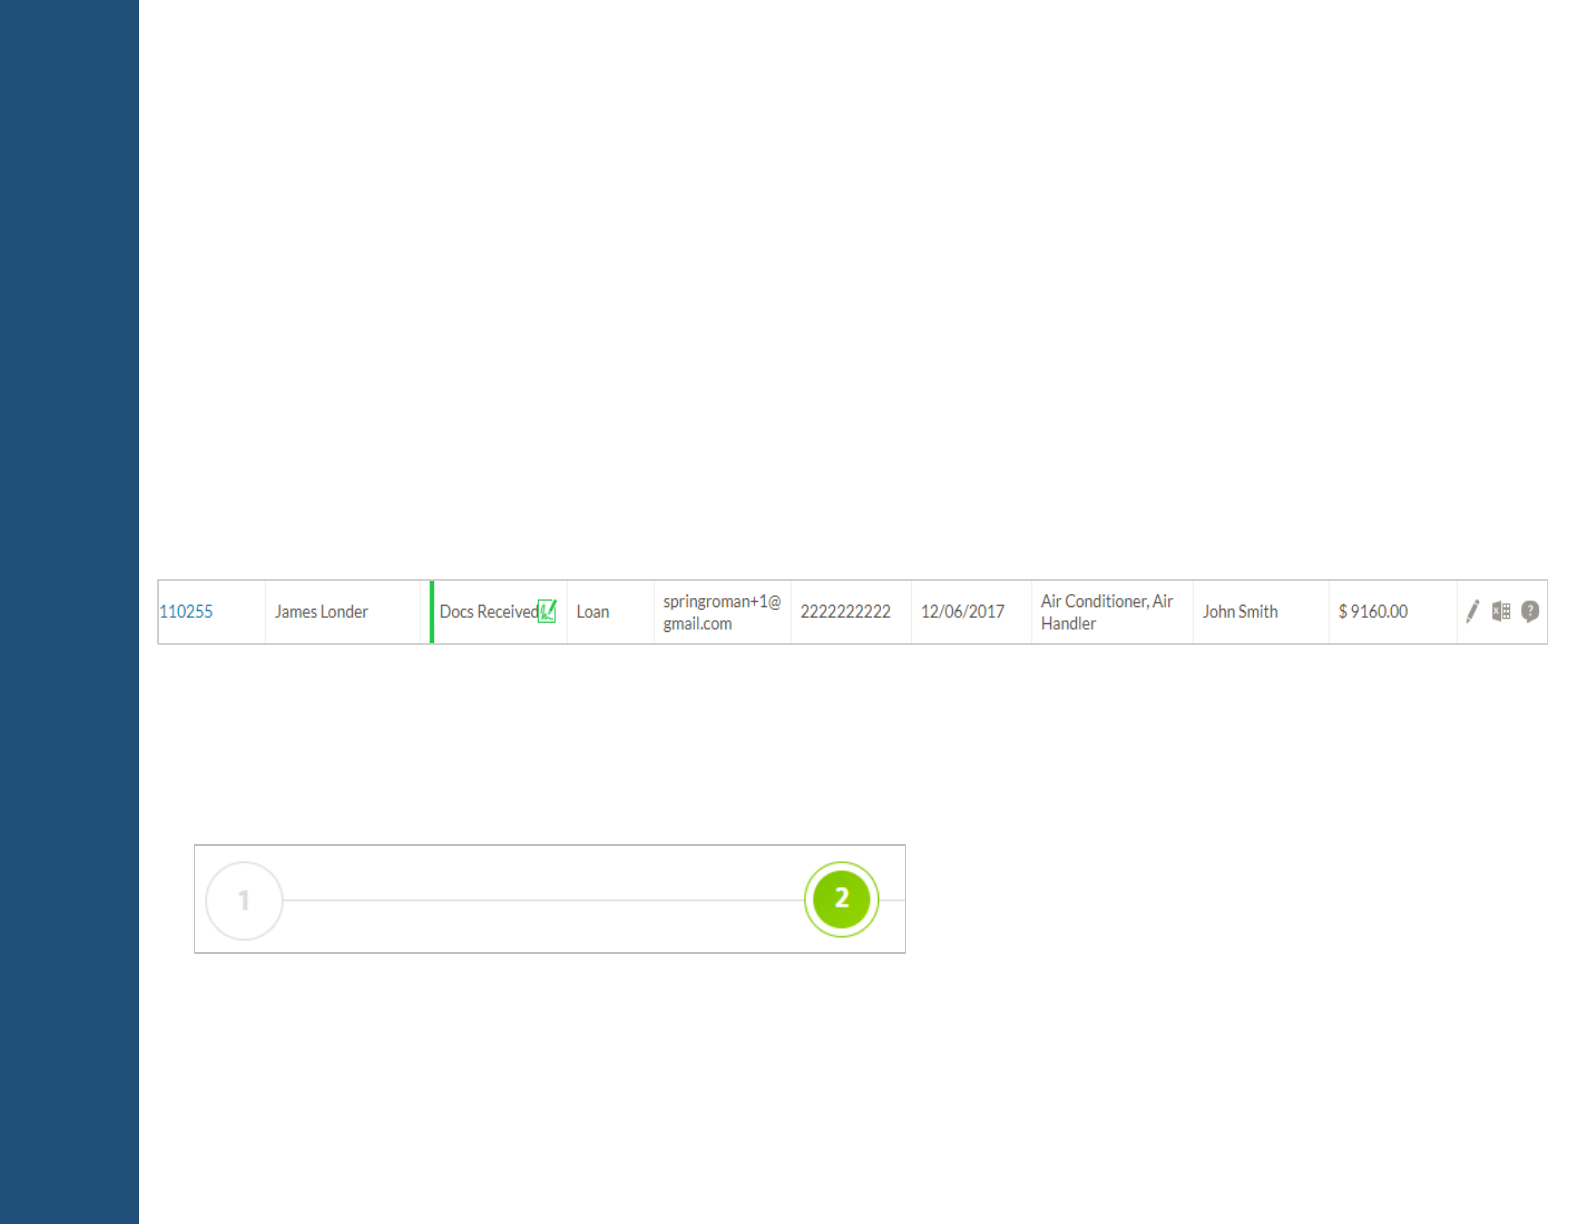
STEP 2:
To upload documents to your deal, click on the ‘Edit’ icon at the end of the row of the deal
STEP 3:
You will be directed to the ‘Funding Checklist’ page
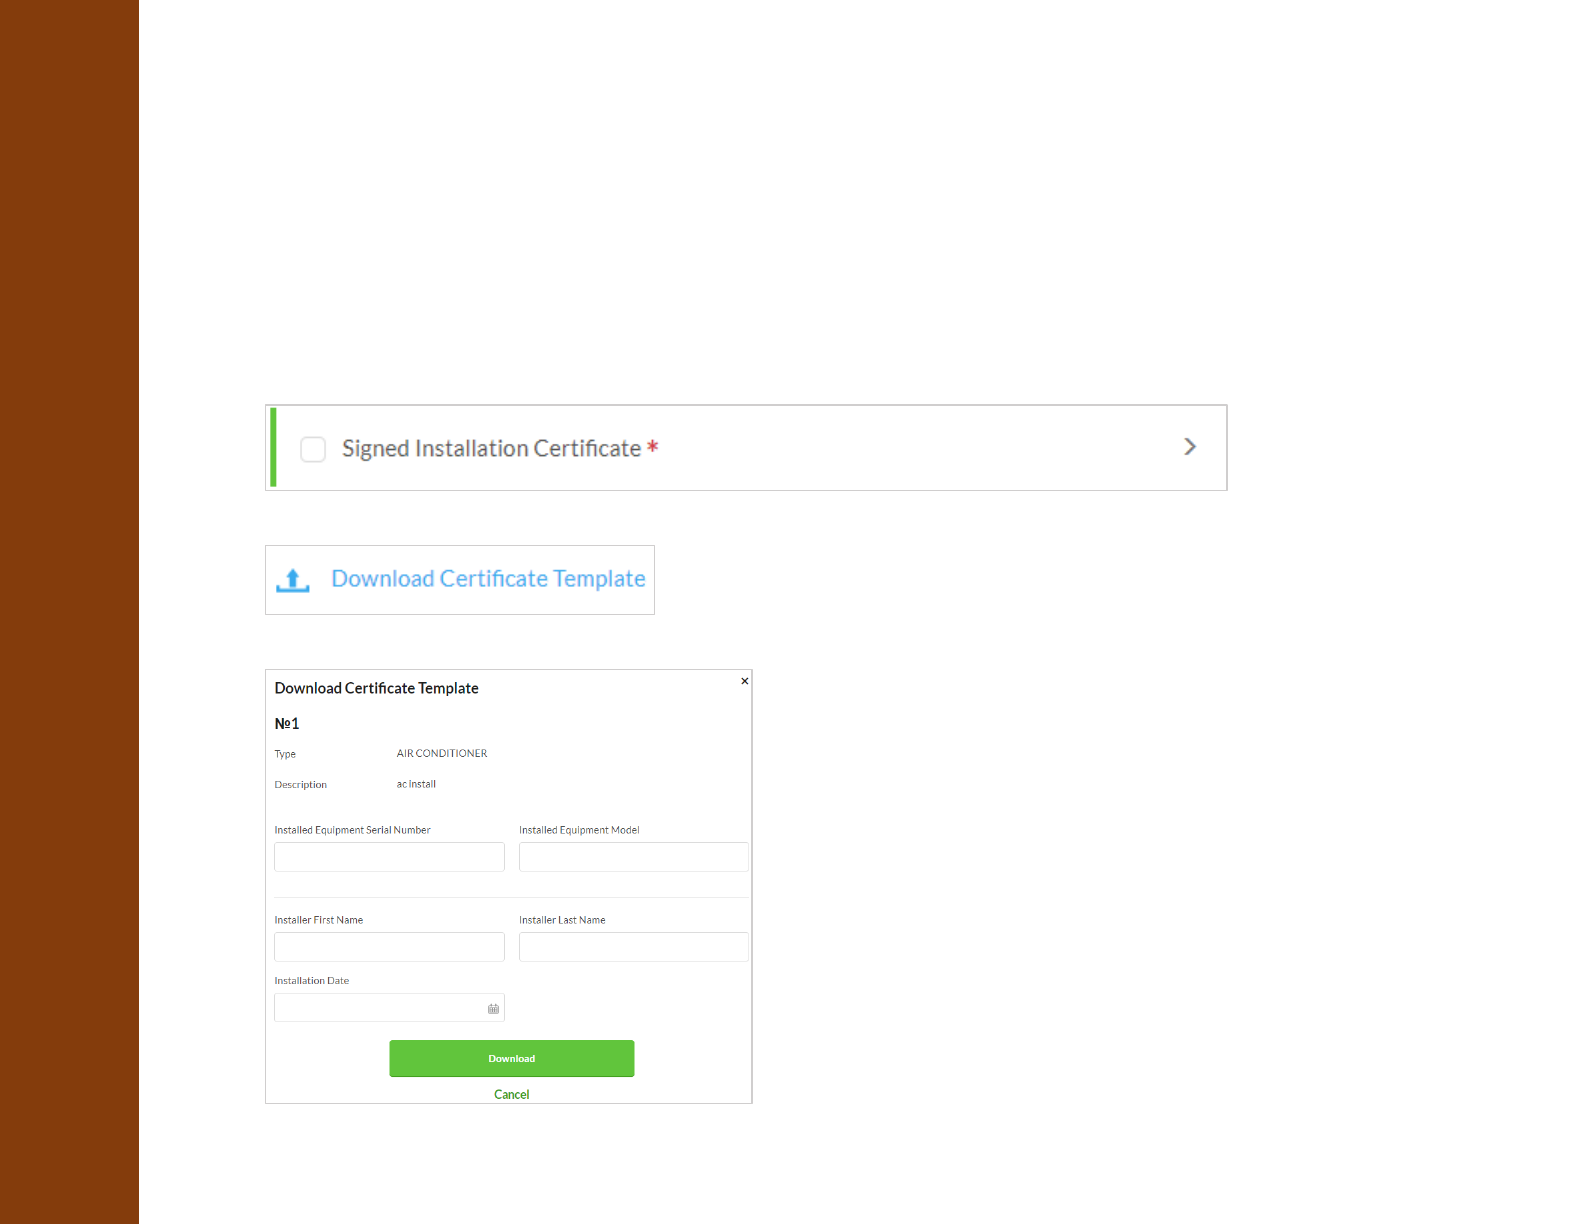
STEP 5:
You can download a pre-filled copy of the Installation Certificate to be used at the time of installation
a) Click on the ‘Signed Installation Certificate’ bar in the Funding Checklist
b) Click on ‘Download Certificate Template’
c) Enter as much information into the fields that is available to you
d) Click ‘Download’
UPLOADING DOCUMENTS
STEP 4:
Save all of your documents that are required to be uploaded to your computer. The preferred file types are .PDF
and .JPEG
EcoHome Financial 2018. Proprietary and Confidential 25
UPLOADING DOCUMENTS
STEP 5 cont’d:
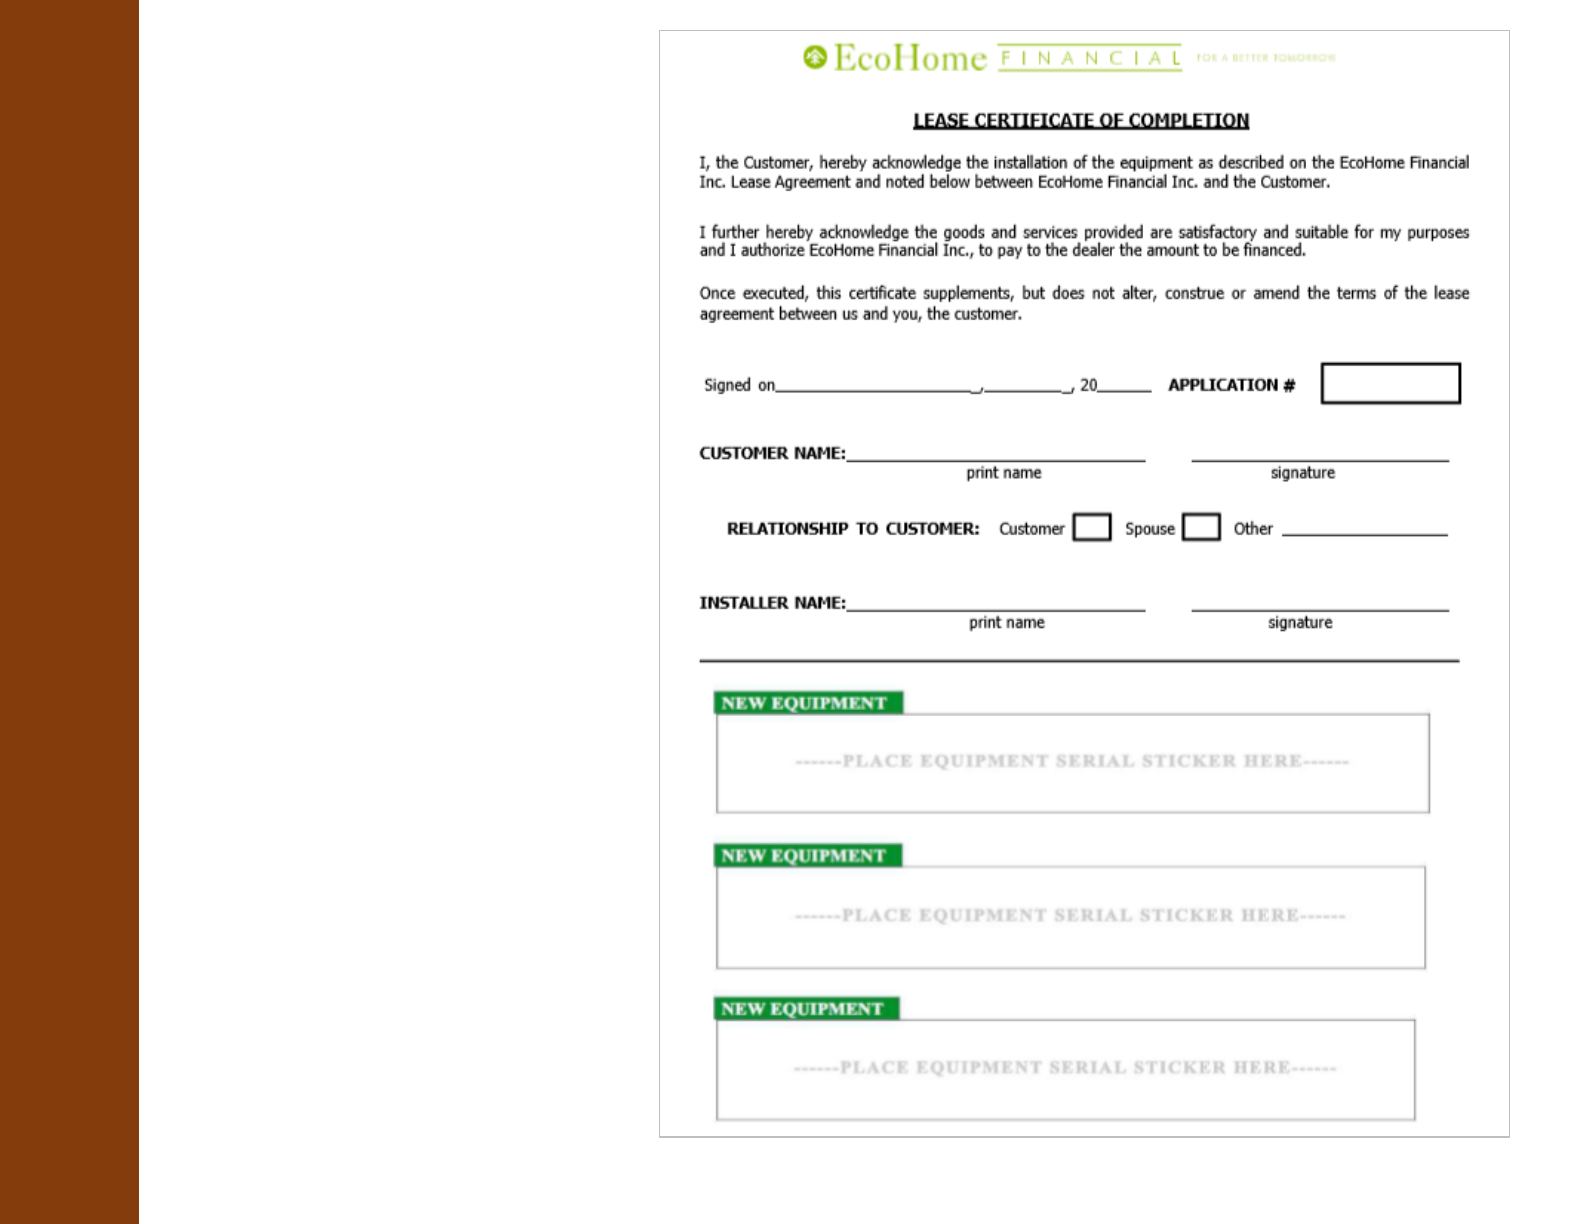
e) The Certificate of Completion
is presented to be printed
(Sample of auto-populated
certificate of completion)
EcoHome Financial 2018. Proprietary and Confidential 26

UPLOADING DOCUMENTS
STEP 6:
To upload documents to your deal, click on any bar that you wish to upload the document to
EcoHome Financial 2018. Proprietary and Confidential 27
STEP 7:
Click ‘Upload’
STEP 8:
Select the document you wish to upload, click open to select the file
STEP 10:
This process is now complete
STEP 9:
Continue steps 7 and 8 until you have uploaded all of the documents
REQUEST TO FUND (getting paid for the work)
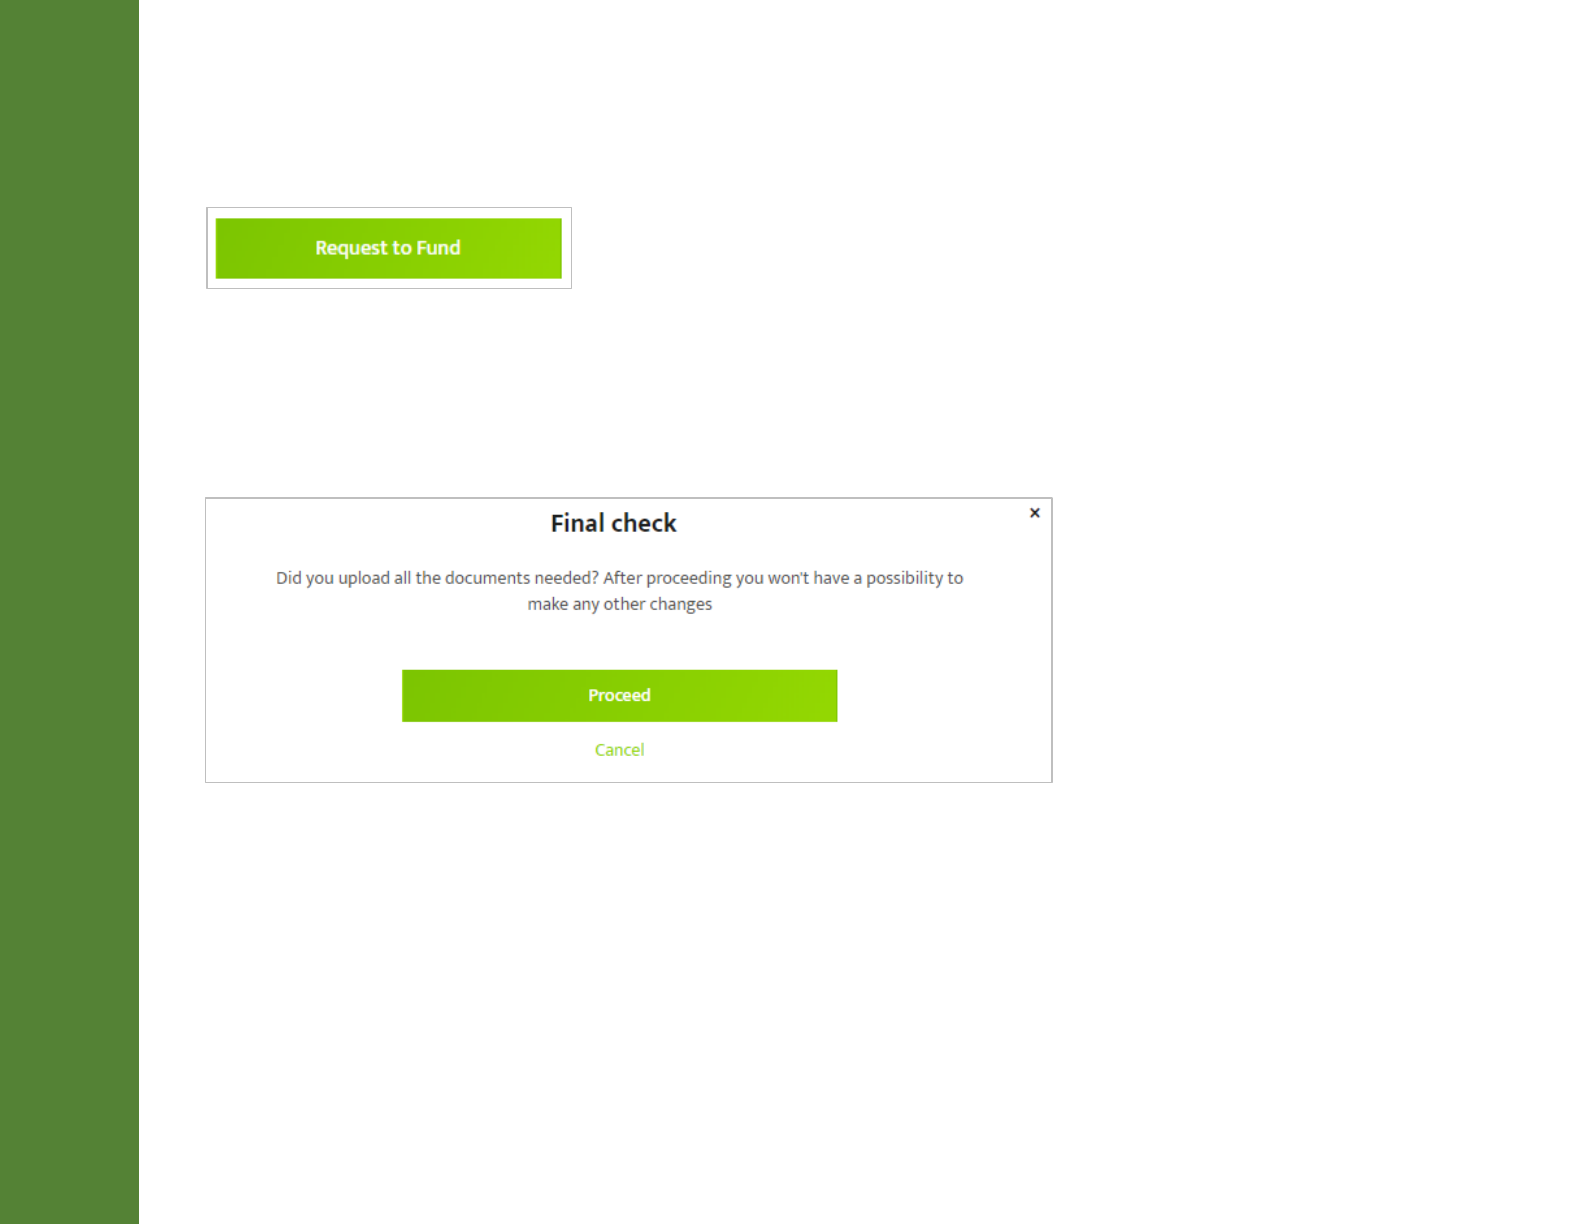
STEP 1:
Once all documents have been uploaded, click on the ‘Request to Fund’ button
This button only becomes active once all of the mandatory documents have been uploaded
EcoHome Financial 2018. Proprietary and Confidential 28
STEP 2:
You will be presented with a final check pop-up message to confirm that you wish to submit the deal for funding
STEP 3:
Click ‘Proceed’ to submit the deal for funding or ‘Cancel’ to go back to the Funding Checklist
STEP 4:
This process is now complete
EDITING A DEAL
STEP 1:
You can make modifications to already submitted contracts as long as they are not in the following Status:
•Booked
•Ready for Audit
•Cancelled
•Expired
EcoHome Financial 2018. Proprietary and Confidential 29
STEP 2:
You are able to make more modifications to already submitted contracts:
The Edit button on the contract edit page will allow you to navigate to the appropriate step. You can also click on
the Contract # to edit the deal
STEP 3:
Editing the Equipment information and Existing Equipment Information will redirect you to step 2
EDITING A DEAL
STEP 4:
Editing the Contact information and Payment information section will return you to step 4 to make edits
EcoHome Financial 2018. Proprietary and Confidential 30
STEP 5:
After you make changes to the deal, the deal will be re-calculated and re-submitted to Aspire. You will now be able
to resend the contract for e-signature or print the updated contract
STEP 6:
Dealers will have the ability to edit and/or re-submit deals submitted by Sales Reps associated with their account
STEP 7:
The process is now complete
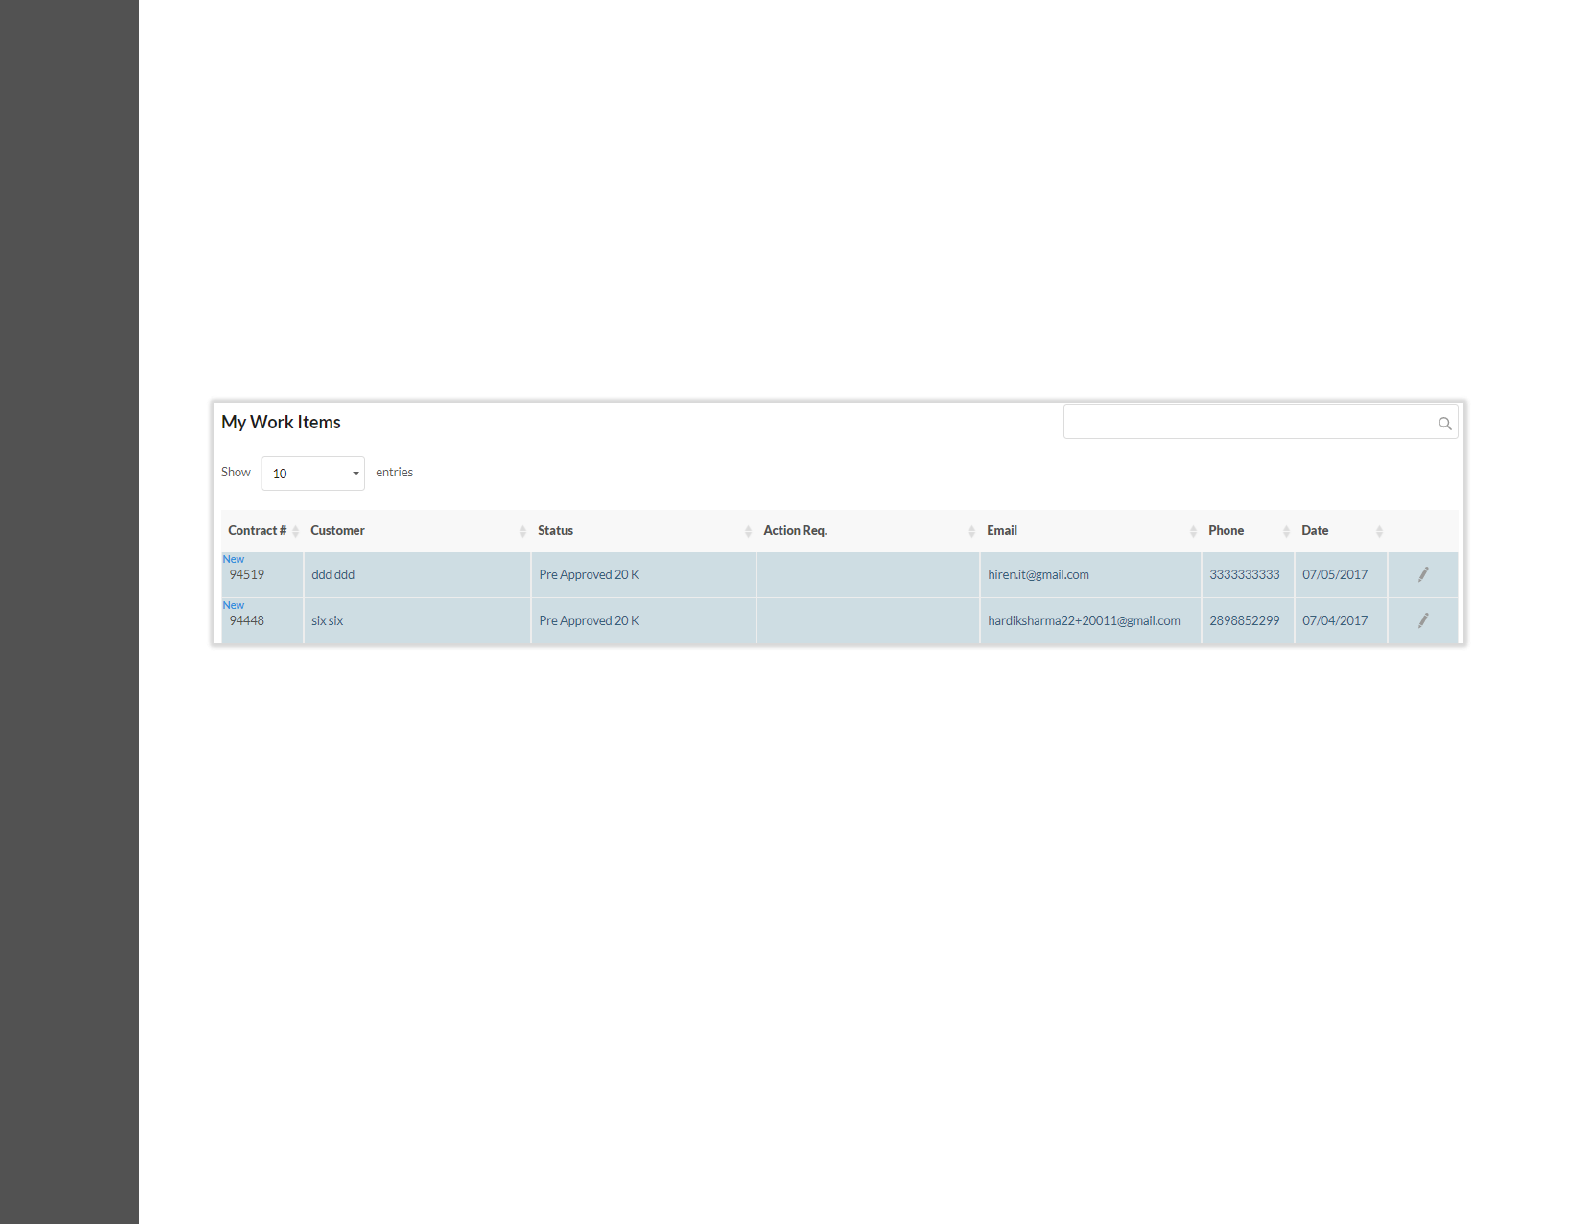
VIEWING YOUR DASHBOARD (my work items)
STEP 1:
Upon logging into the portal, you will be directed to your “My Work Items’ view or Dashboard
EcoHome Financial 2018. Proprietary and Confidential 31
STEP 4:
From the Dashboard you can click the ‘Edit’ button or Contract # on any deal in order to view/edit or upload
documents to the deal
STEP 3:
STEP 2:
This page is filtered to show any ‘New’ deals from Customer Link and accepted ‘Leads’ to the top of all the deals,
highlighted gray with a ‘New’ icon next to the Contract #
The My Work Items view displays the following information and can be filtered from any column:
•
Contract #
•
Customer (name)
•
Status (of deal)
•
Action Req. (of deal)
•
Email (of customer)
•
Phone (of customer)
•
Date (deal created)
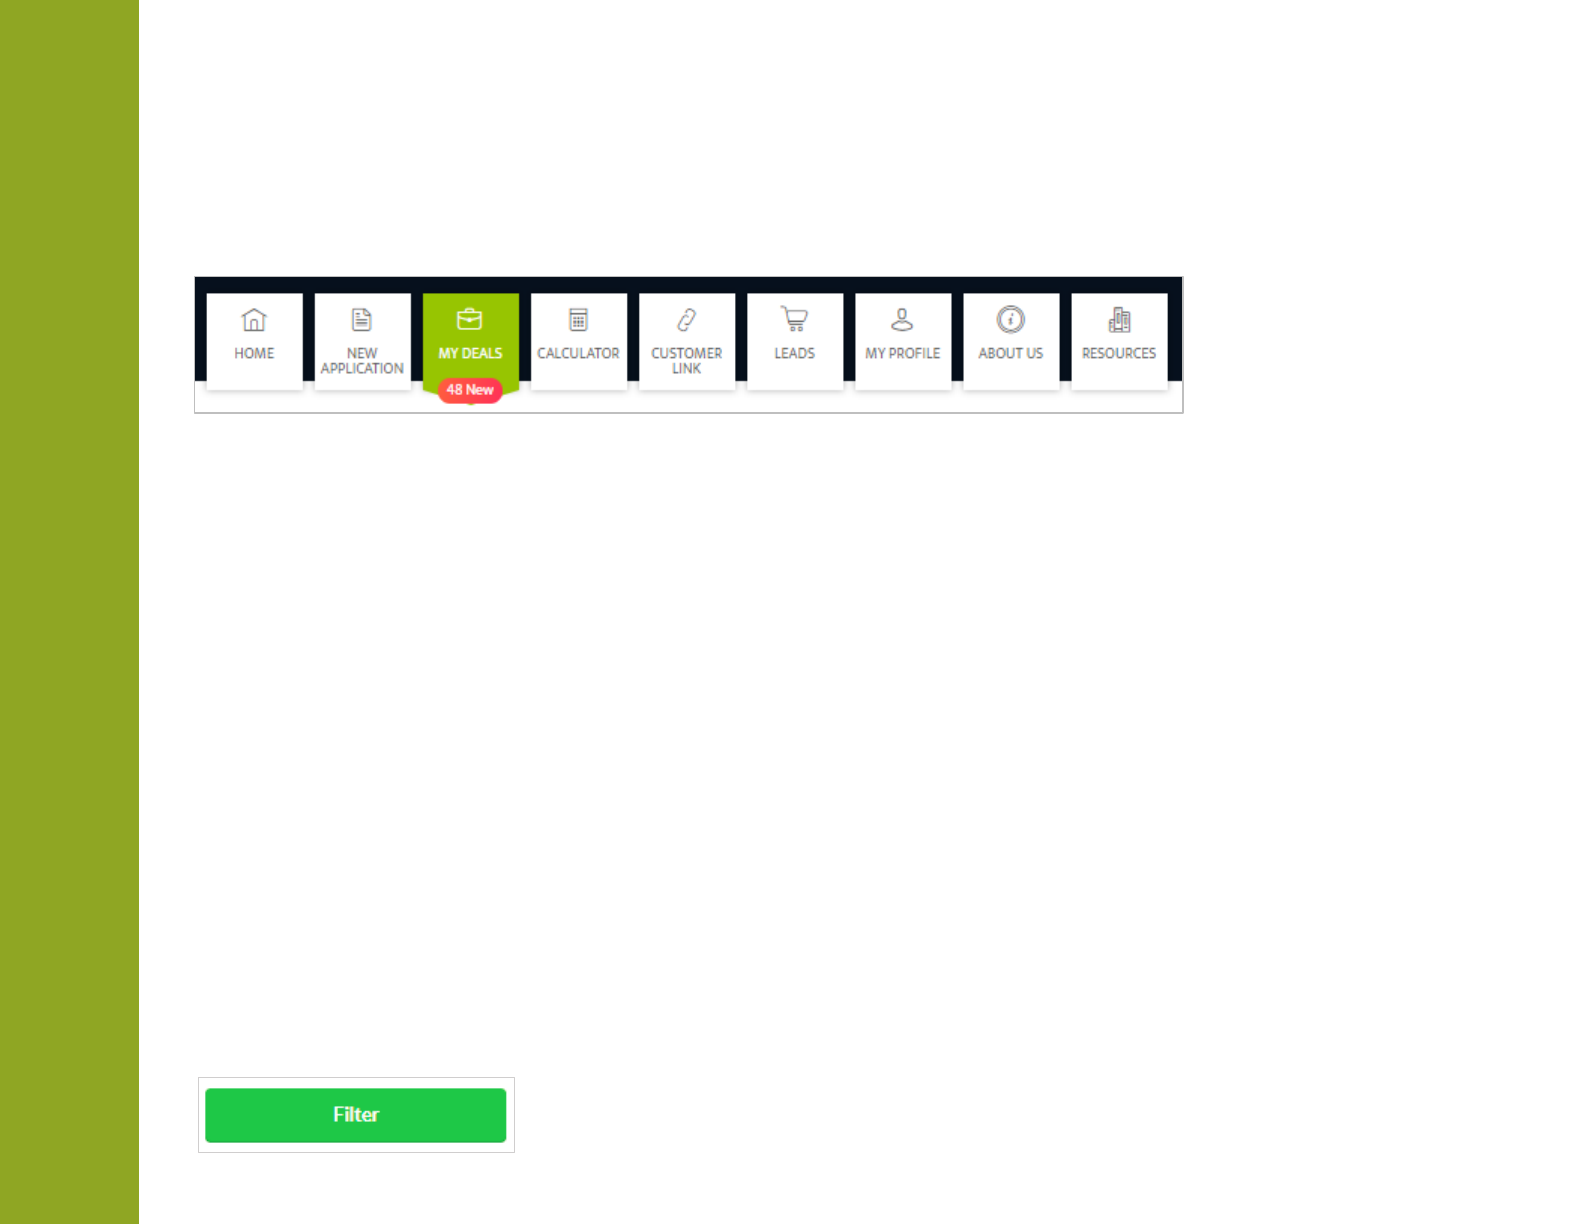
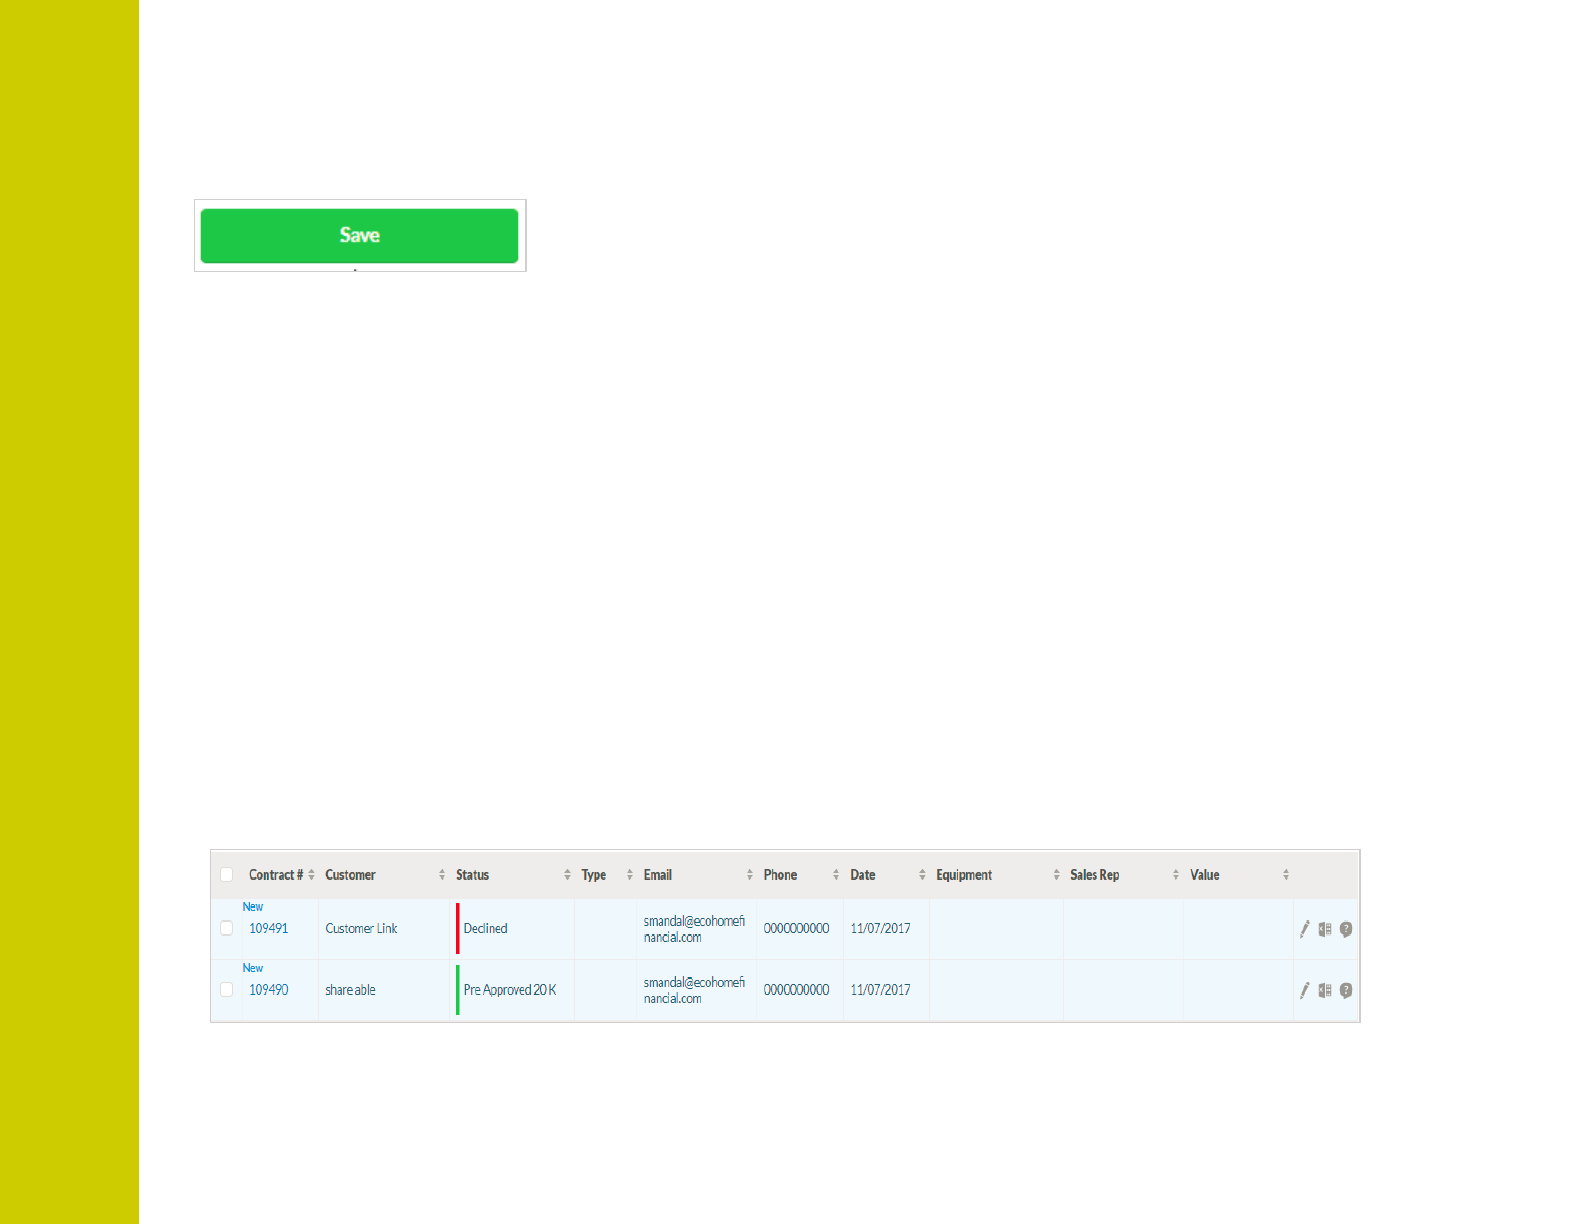
MY DEALS
STEP 1:
To access My Deals, you can
select it from the Main Menu
EcoHome Financial 2018. Proprietary and Confidential 32
STEP 2:
In the My Deals section, you can view all your deals. You can view by the following information:
•
Contract #
•
Customer
•
Status
•
Type
•
Email
•
Phone
•
Date
•
Equipment
•
Sales Rep
•
Value
STEP 3:
You can view by Deal Info or Detailed Info. You can filter your view by:
•
Deal Type
•
Date From
•
Date To
•
Deal Status
Once you have selected your criteria click the green Filter button to view your results

MY DEALS
STEP 4:
EcoHome Financial 2018. Proprietary and Confidential 33
You can export all information or your filtered criteria to export, click on the green Export All to Excel button
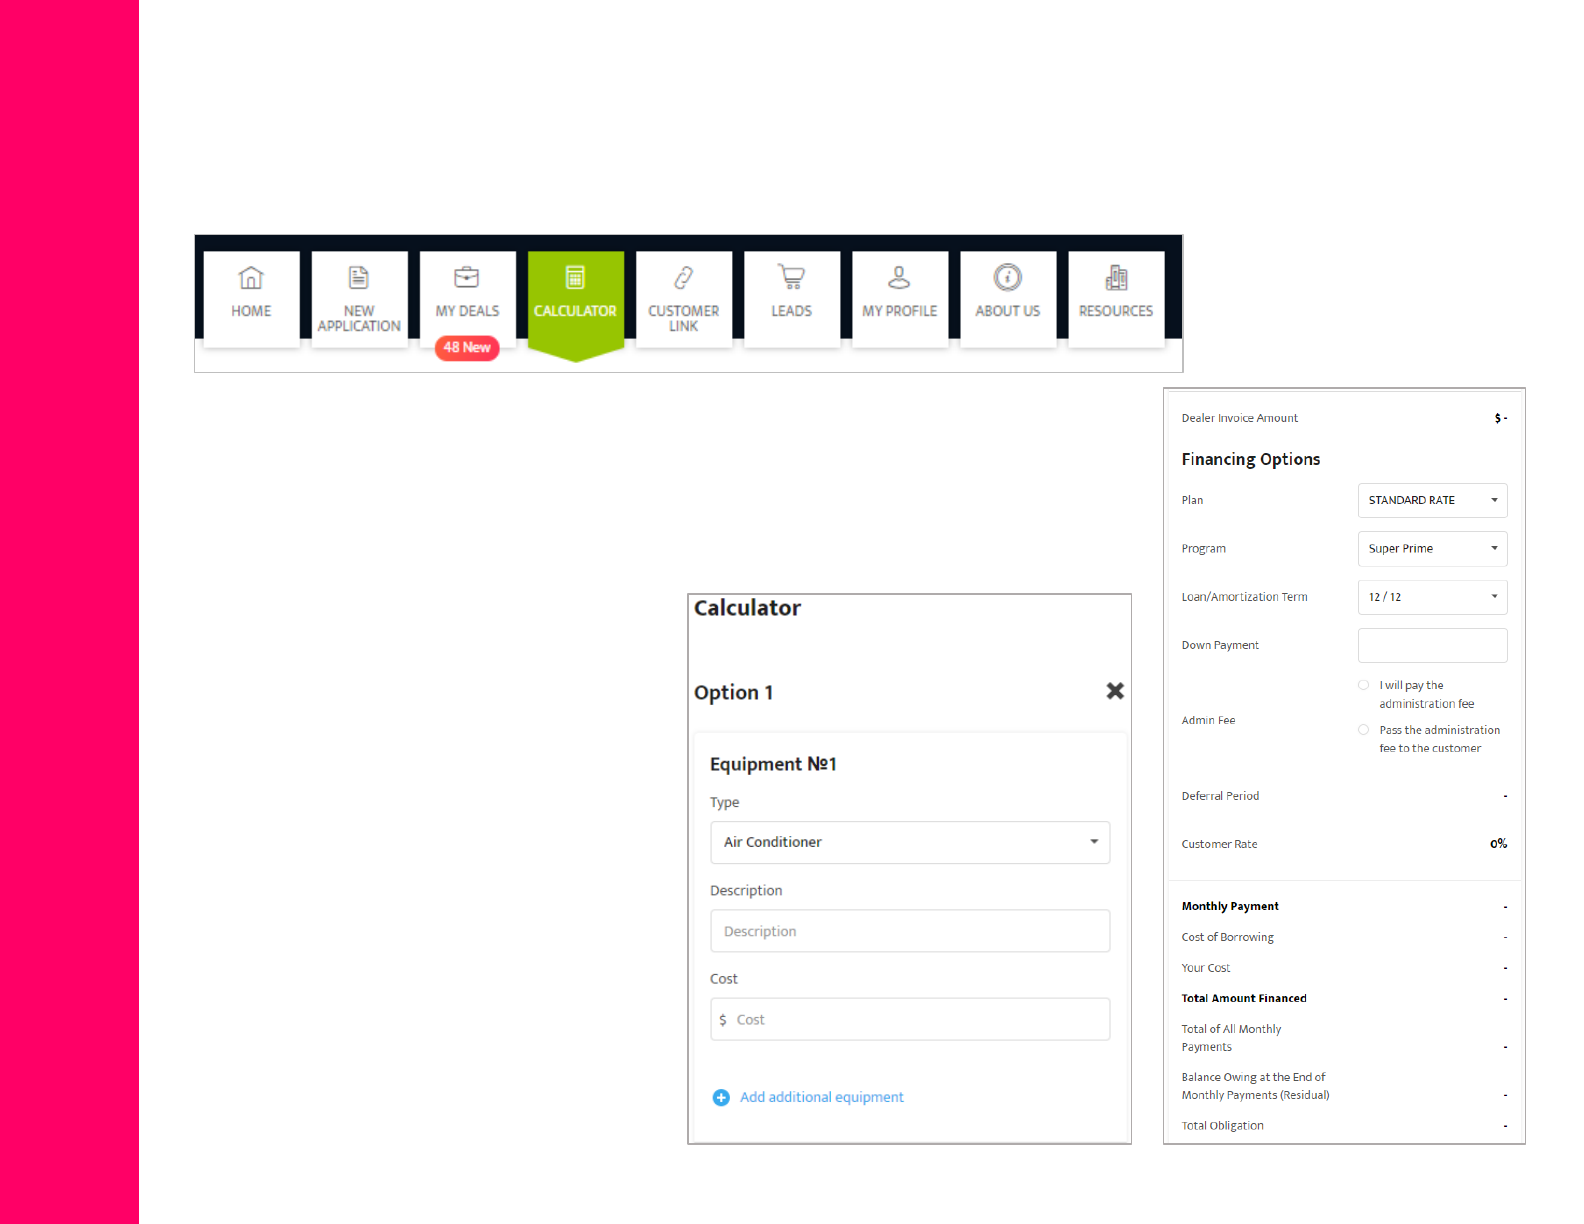
CALCULATOR
STEP 1:
The Calculator can be selected
from the Main Menu
EcoHome Financial 2018. Proprietary and Confidential 34
STEP 2:
The Calculator is similar to step
2 of creating a new deal in that
you can select/enter the
Province, Equipment Type,
Cost, Plan, Down Payment,
Loan Term, Amortization Fee
and Deferral Type. You will be
able to create up to 3
comparisons and view them
side by side
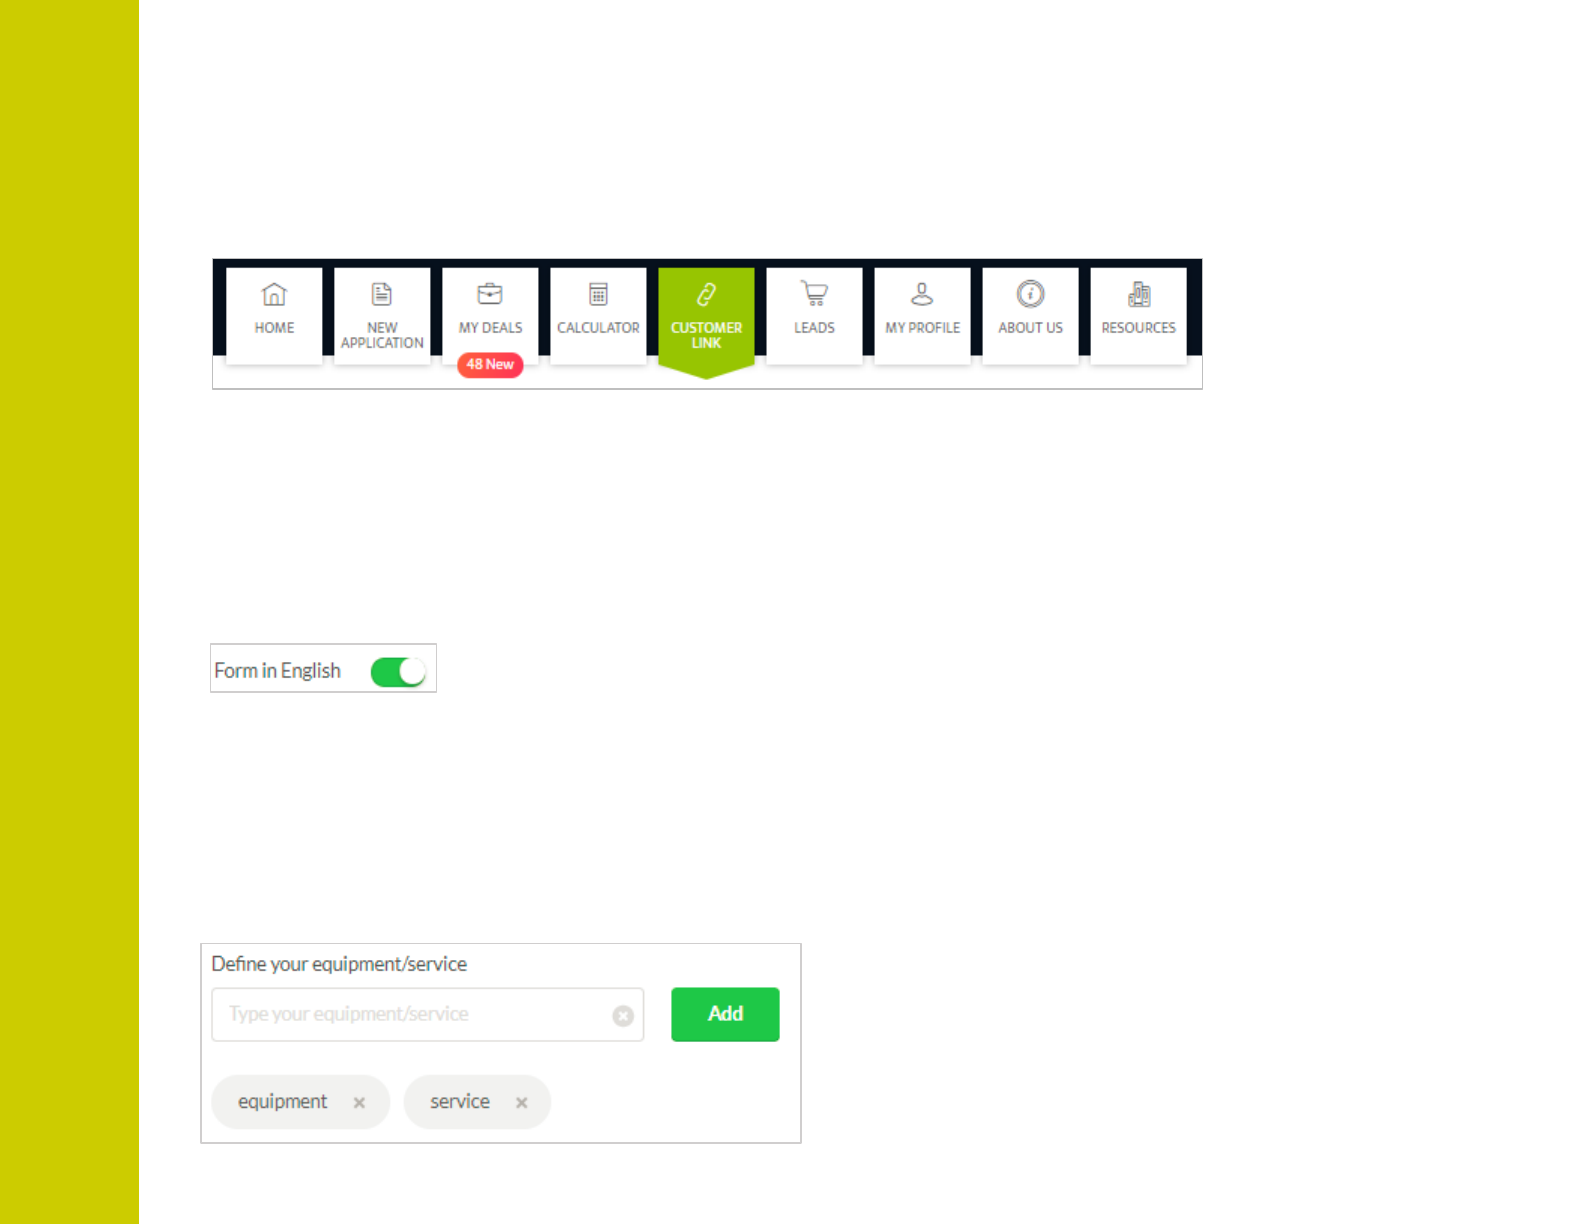
CUSTOMER LINK
STEP 1:
The Customer Link can be
selected from the Main Menu
EcoHome Financial 2018. Proprietary and Confidential 35
STEP 2:
Toggle the Customer Link ‘On’ next to Form in English
STEP 3:
You have the ability to provide your Equipment and/or Service on the form that the Customer will complete. You
can do this by keying in the Equipment and/or Service you offer and clicking on the Add button. You can add
more than one selection by continually adding Equipment and/or Service and clicking Add OR you can skip this
step and leave this information blank
CUSTOMER LINK
STEP 4:
Click Save
EcoHome Financial 2018. Proprietary and Confidential 36
STEP 5:
The Customers will be able to click on the link and be directed to a one-page form in order to submit their
application to the Dealer. The steps to complete the form are presented in the Customer Link - Customer
Process section
STEP 7:
The deal will appear in the portal on the My Deals page. The Deal will be highlighted in gray and have a ‘New’
identifier beside it
STEP 6:
Once the Customer submits their information, Dealers will receive an email notification containing the
following information:
a)
Contract ID
b)
Customer Name
c)
Pre-
Approved Amount
d)
Comments
e) Installation Address
f)
Phone Numbers
g)
Email Address
h)
Link to deal in the portal
STEP 8:
The Dealer can click on the edit icon or Contract # in order to complete the deal as they do today
CUSTOMER LINK –CUSTOMER PROCESS
STEP 1:
Customers will click on the link/button from the Dealers website or email
EcoHome Financial 2018. Proprietary and Confidential 37
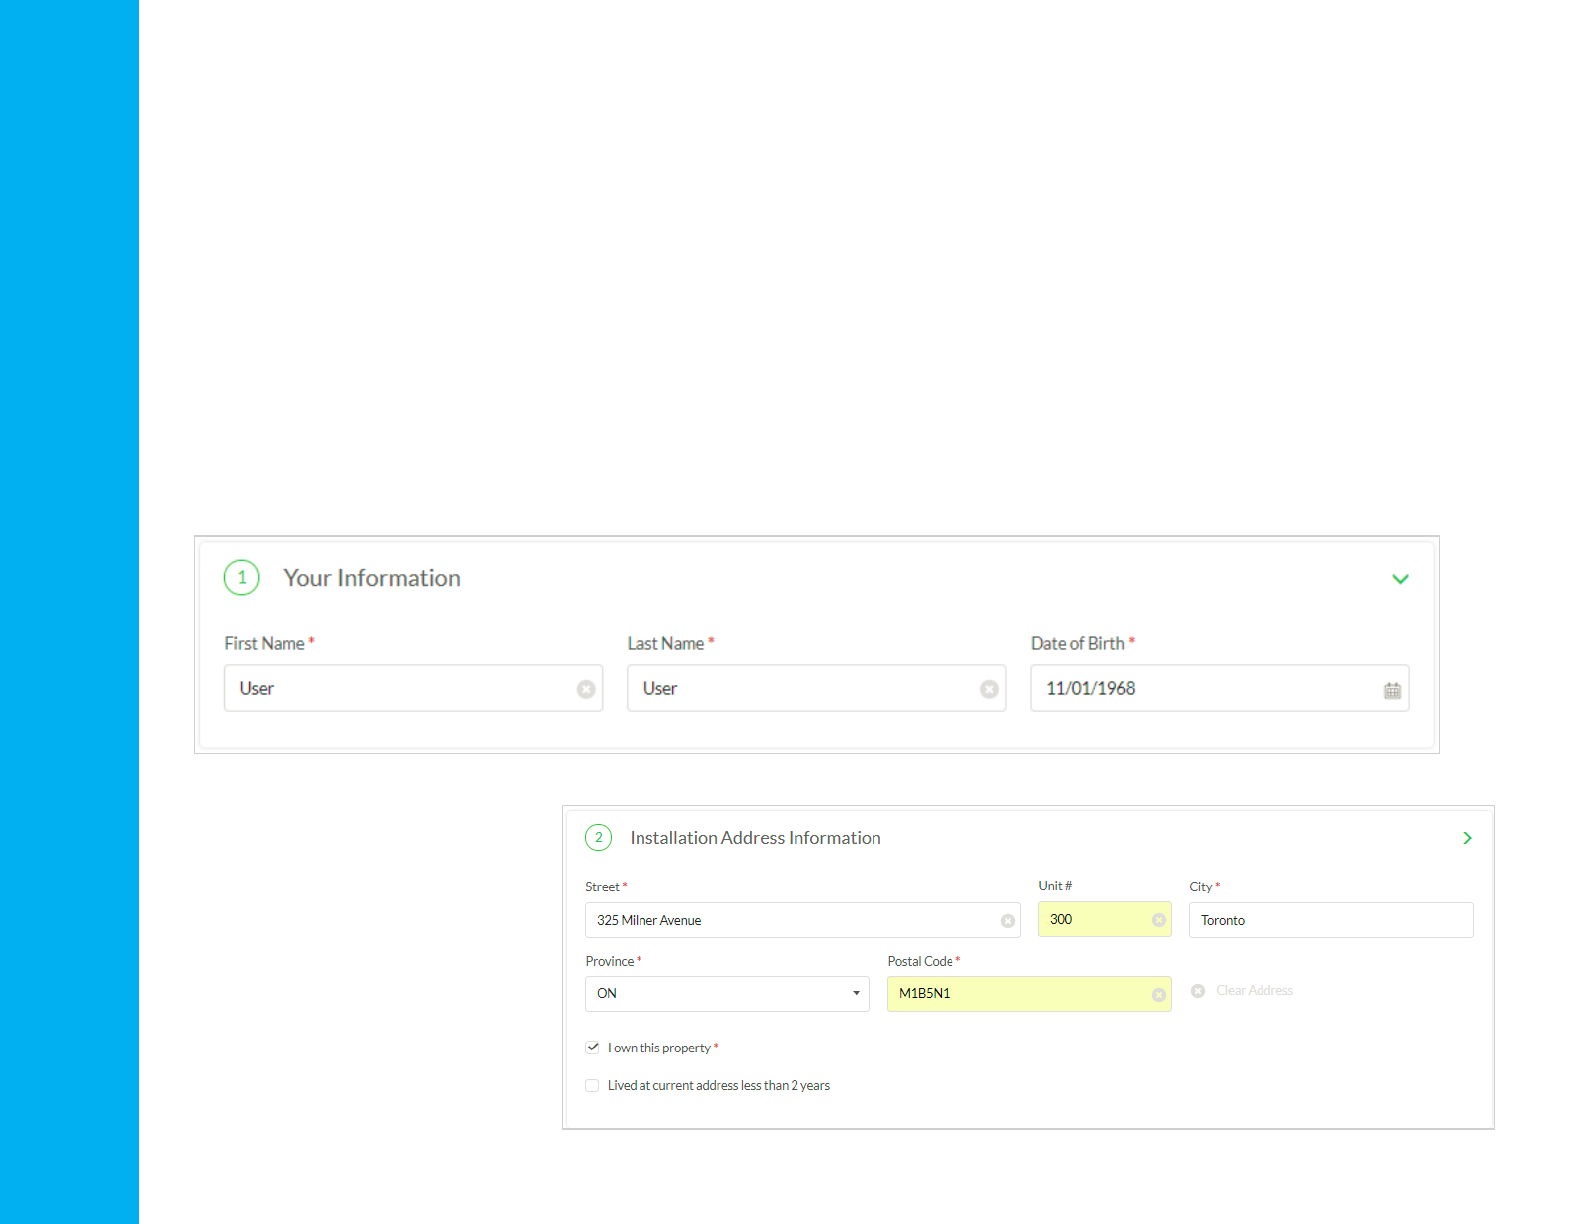
STEP 2:
Customers will be directed to a one-page form, this form is broken down into 3 sections: Your Information,
Installation Address Information and Contact Information
STEP 3:
Customers will enter their First Name, Last Name and Date of Birth in the Your Information section
STEP 4:
Customers will enter full
installation civic address,
advise if they are the
property owner and can
advise if they have lived at
the current address for less
than 2 years
CUSTOMER LINK –CUSTOMER PROCESS
STEP 5:
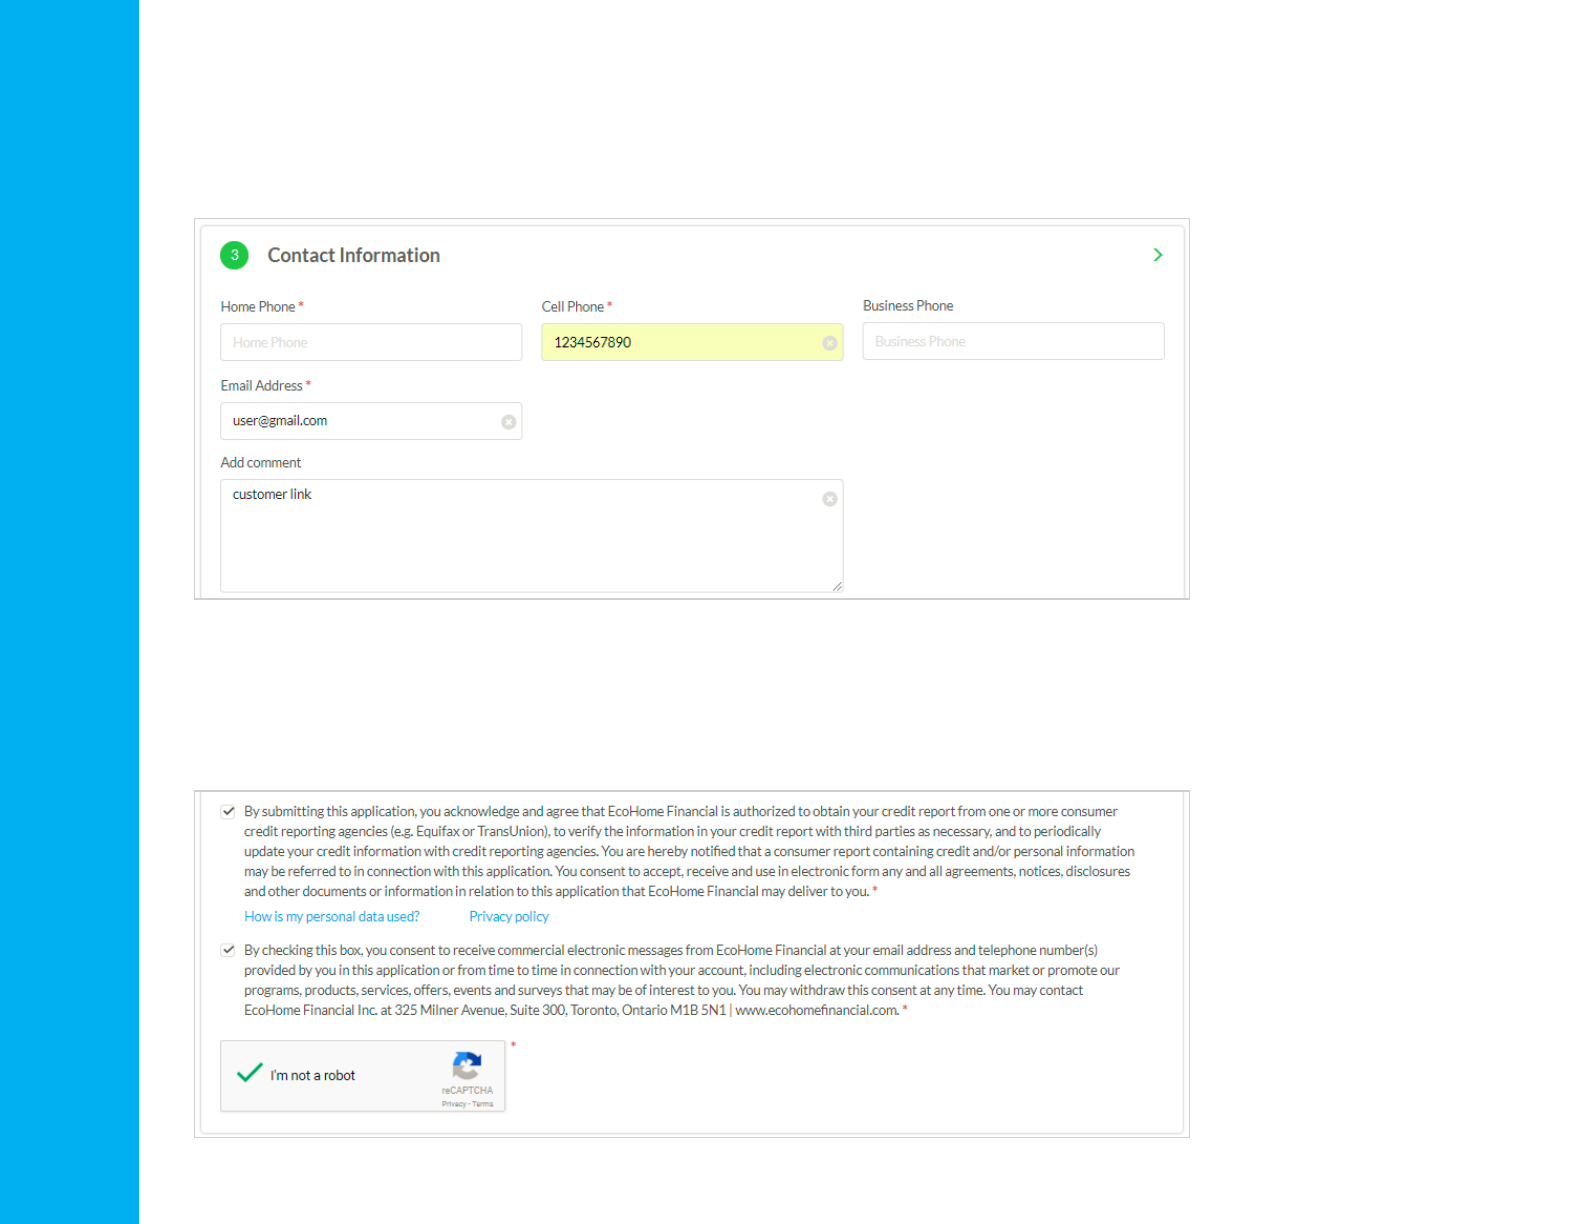
Customers will enter one of the mandatory contact phone numbers, their email address and can enter notes
that will be provided to the Dealer
EcoHome Financial 2018. Proprietary and Confidential 38
STEP 6:
Lastly, the Customer will review and authorize their credit report to be obtained and consent to receiving
communication from EcoHome Financial. The Customer will confirm they are a person by checking the
reCaptcha box
CUSTOMER LINK –CUSTOMER PROCESS
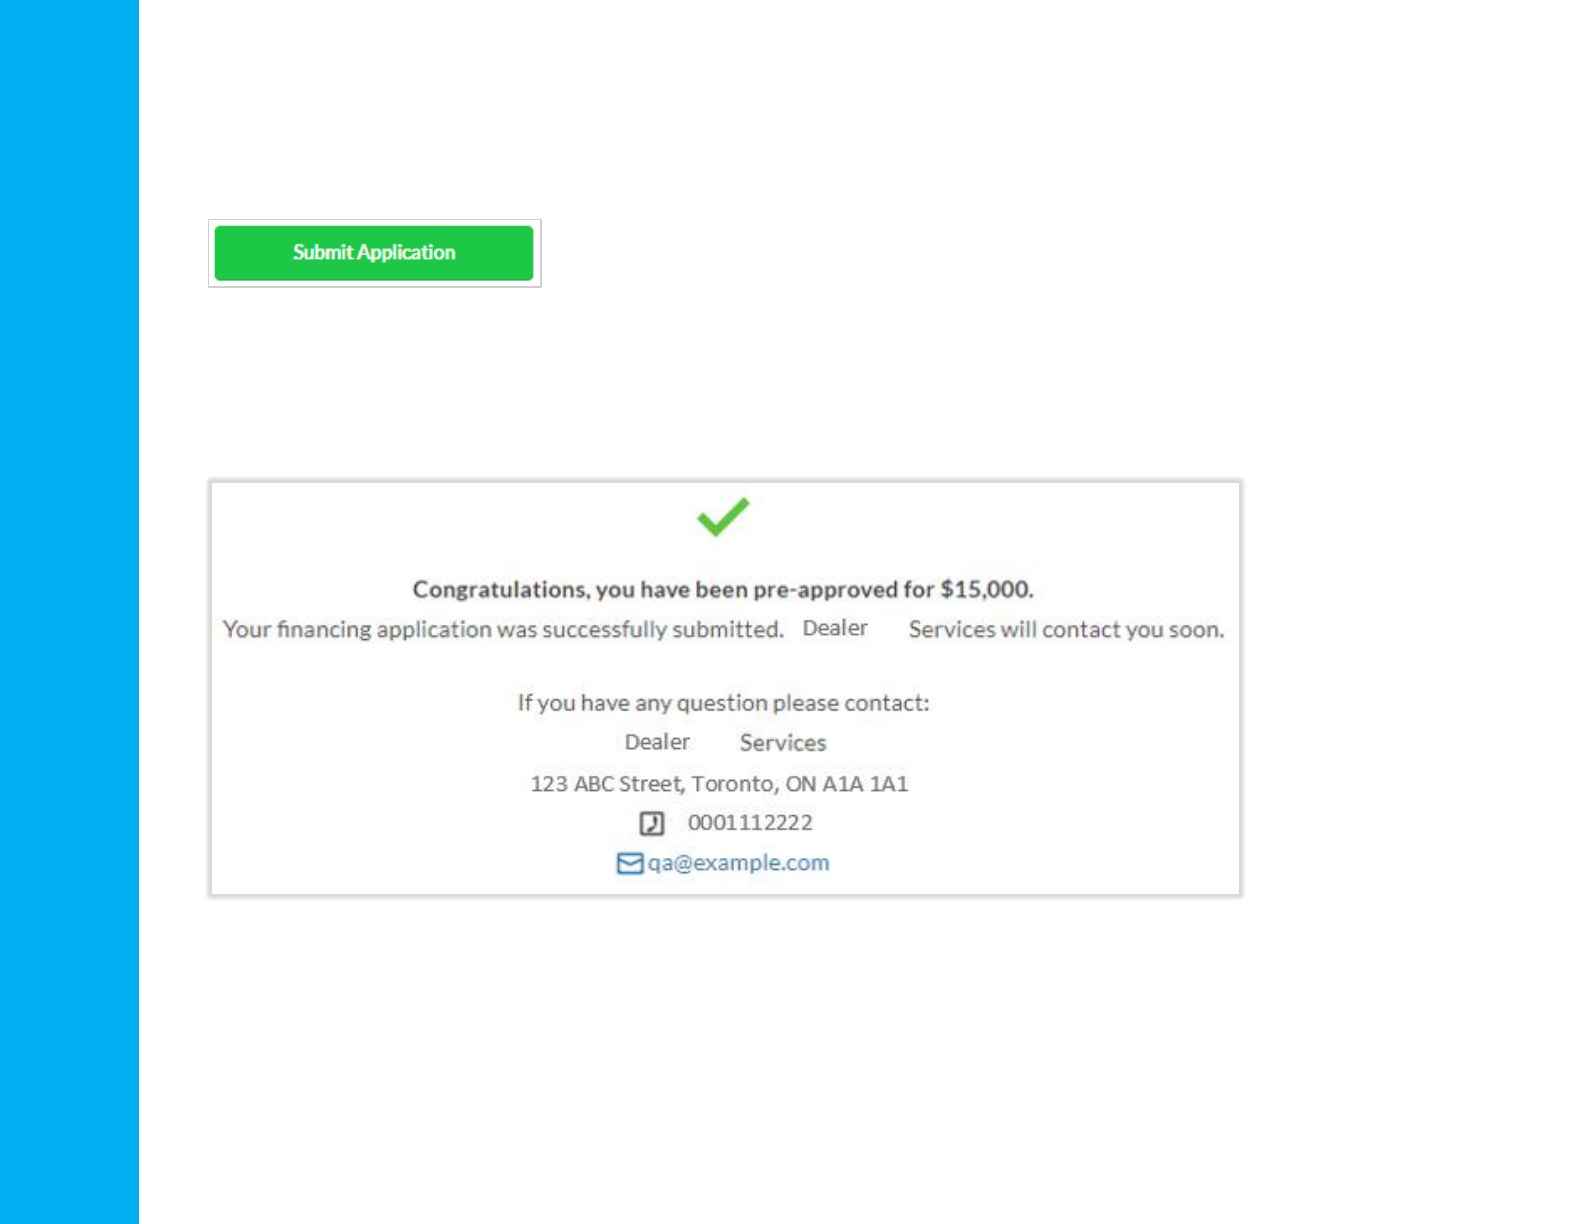
STEP 7:
Customer clicks Submit Application
EcoHome Financial 2018. Proprietary and Confidential 39
STEP 8:
Customer is presented with a successful message upon submission
LEADS
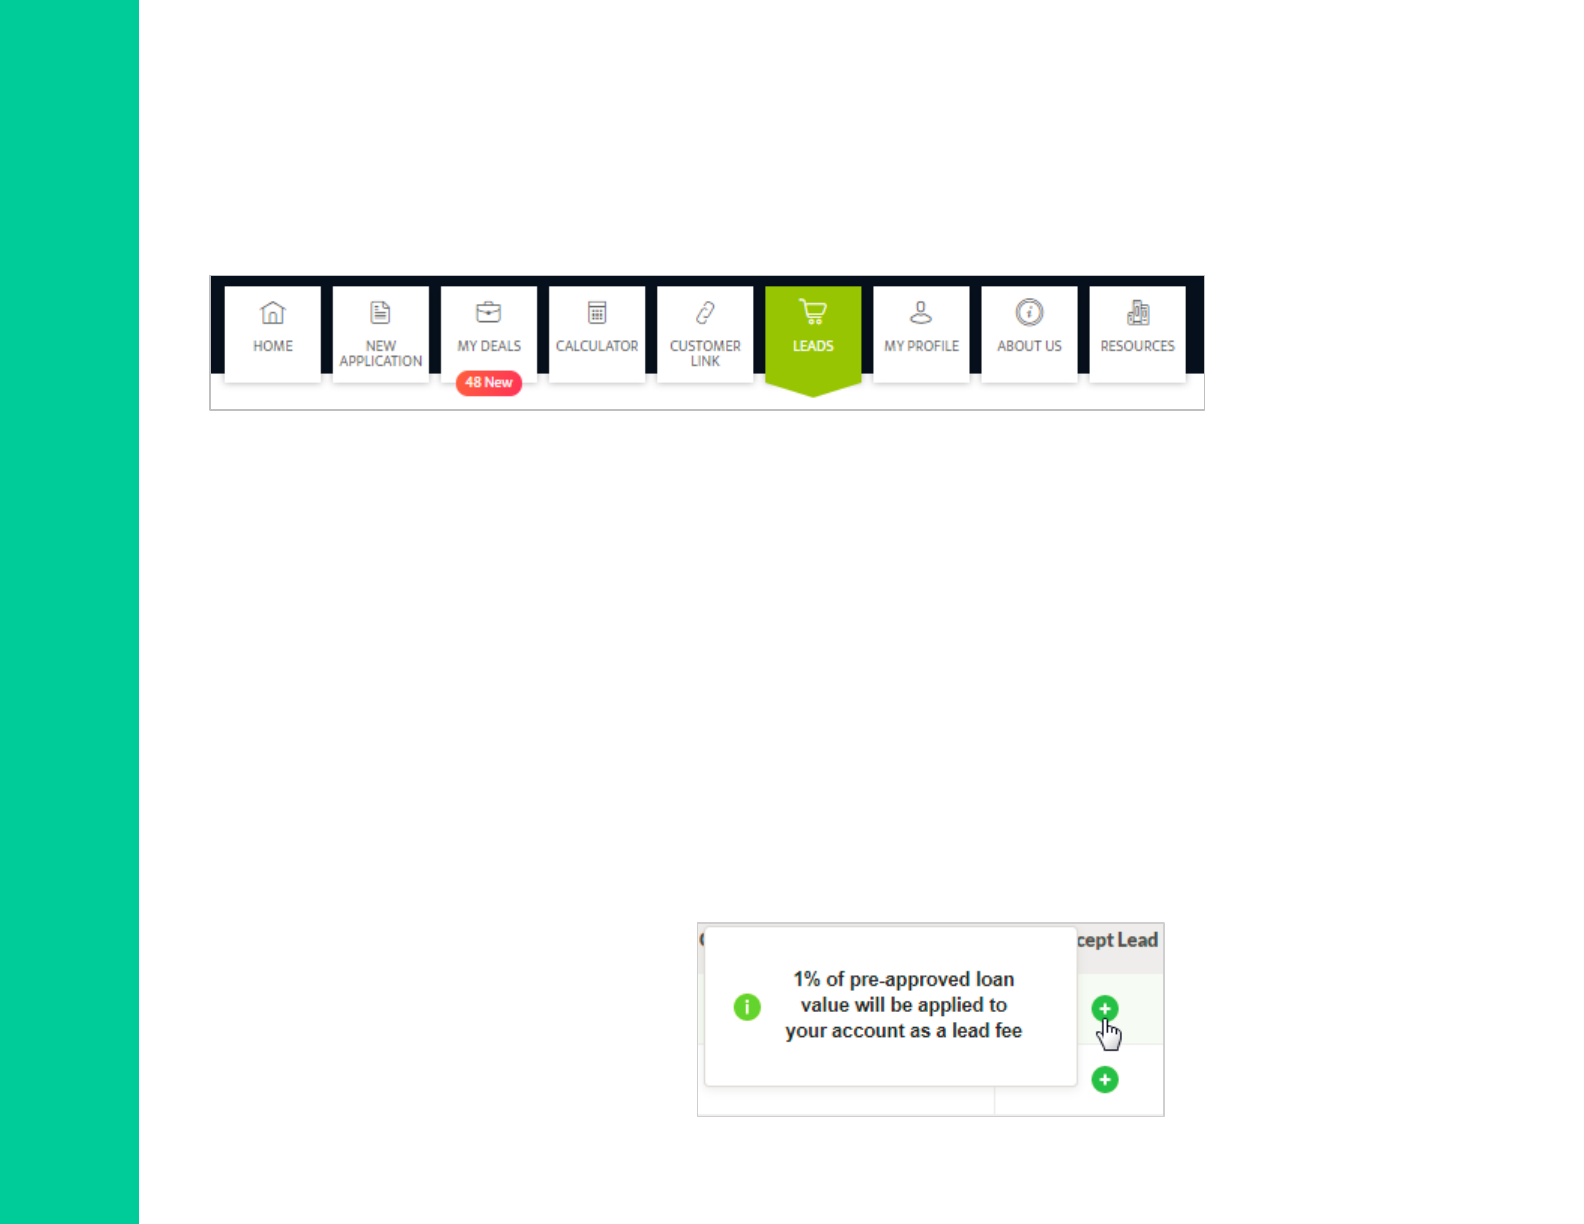
STEP 1:
The Leads section can be selected
from the Main Menu
EcoHome Financial 2018. Proprietary and Confidential 40
STEP 2:
The Leads are displayed with the following information:
•
Date –lead was submitted by Broker/Agent
•
Postal Code –partial FSA of the location of the
customer
•
Pre-Approved for -
amount that the customer has
been pre-approved for
•
Project Type –the equipment/service the
customer is interested in
•
Customer Comment –if any is provided at the
time the Lead is submitted
•
Accept Lead –button to accept the Lead
STEP 3:
Hovering over the Accept Lead
button will display a message in
regards to the fee of the Lead that
will be charged to you
LEADS
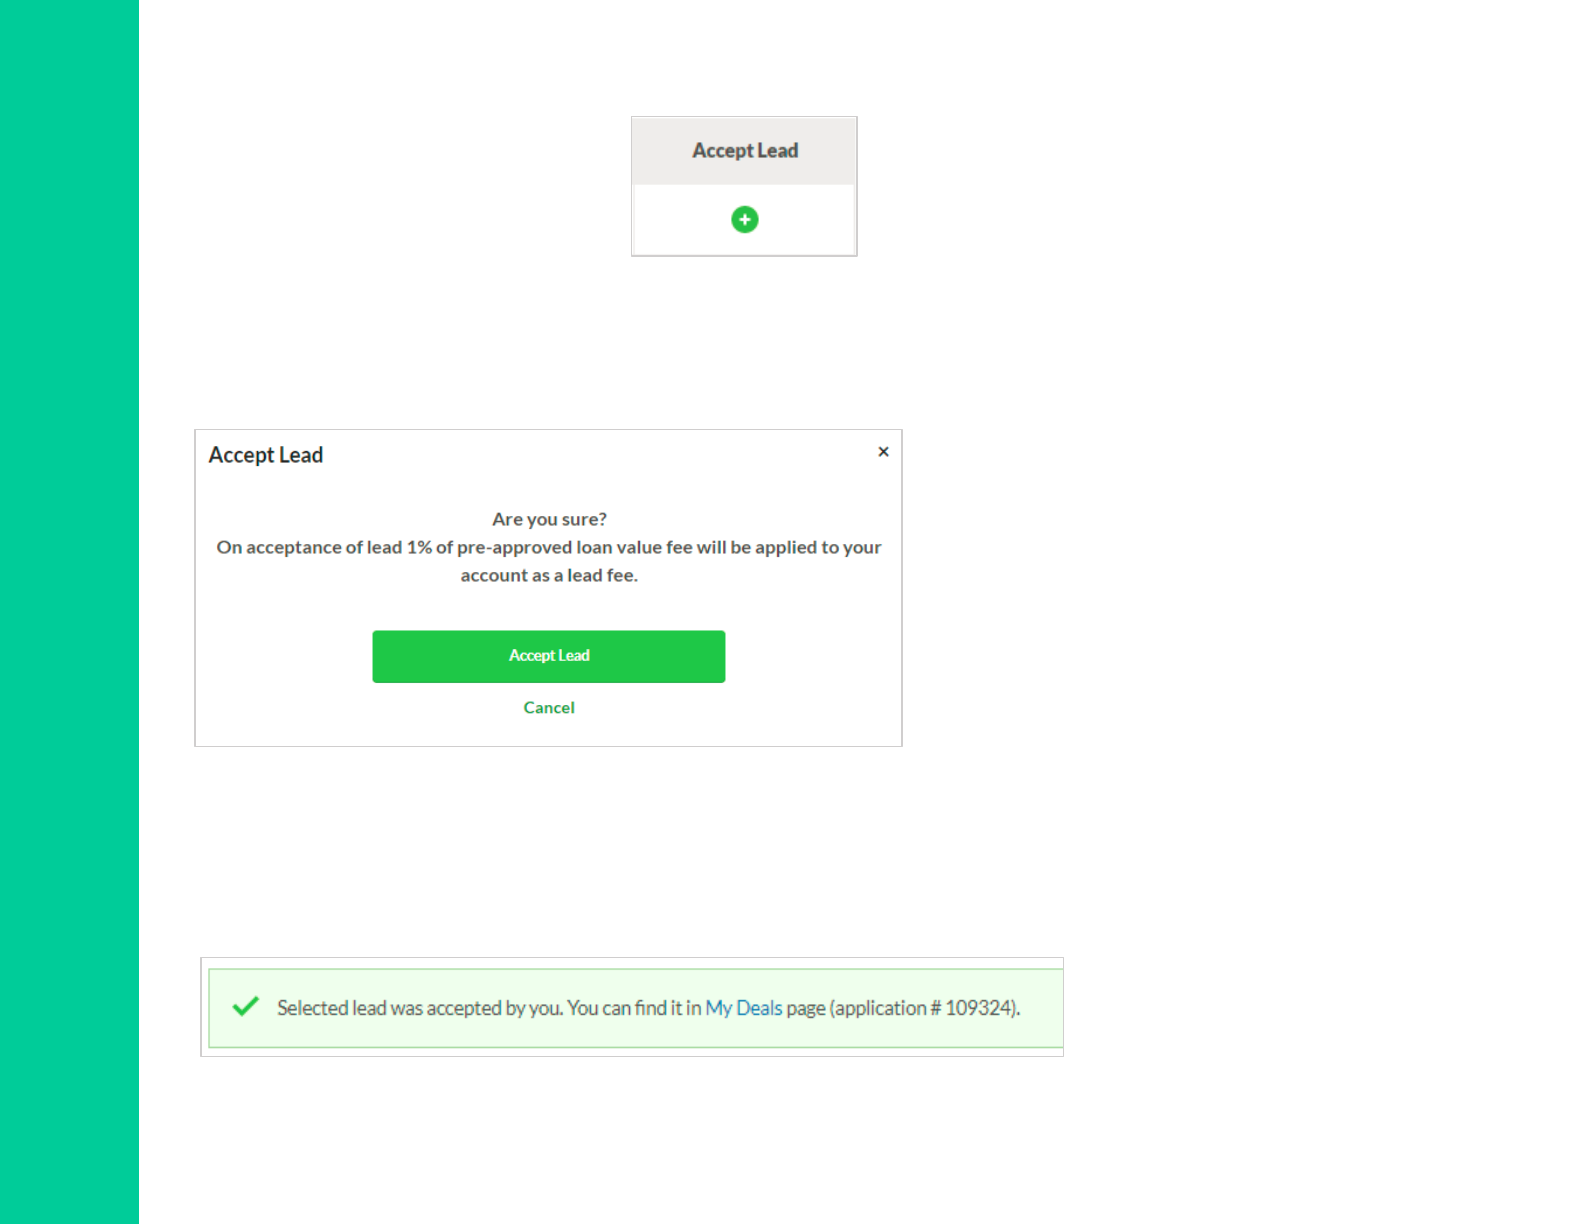
STEP 4:
To accept the Lead, click on
the button in the Accept
Lead column
EcoHome Financial 2018. Proprietary and Confidential 41
STEP 5:
STEP 6:
A confirmation pop up message is displayed to accept the Lead, or cancel and return to the Leads page
Once the Lead is accepted a confirmation message is displayed on the Lead page to advise where to locate the
Lead and it’s corresponding application #

LEADS
STEP 7:
The Lead will be displayed on your My Deals page. It will have a ‘New” indicator next to it in the Contract # box,
be highlighted light blue and appear to the top of the My Deals Page
EcoHome Financial 2018. Proprietary and Confidential 42
STEP 8:
You will now see the following fields displayed to you:
Customer (name)
•Email (address of customer)
•Phone (number of customer)
STEP 9:
To edit the deal you click the Edit icon or the Contract #
STEP 10:
Once you have edited or opened the deal it is no longer considered new, nor is it highlighted

LEADS
STEP 11:
Leads can be filtered by:
•Postal Code
•Pre-Approved for
•Date From –Date To
Click on the filter button once you have selected an option
EcoHome Financial 2018. Proprietary and Confidential 43

MY PROFILE
STEP 1:
The My Profile section can be
selected from the Main Menu
EcoHome Financial 2018. Proprietary and Confidential 44
STEP 2:
From the Offered Service drop down select the
service that you provide. You can select one or
many services from the list. As you select, the
service will appear on the screen. To delete a
service selected, click on the ‘X’ next to the
service and it will be removed from your profile

MY PROFILE
STEP 3:
To set your Area of my service click on Add Postal Code
EcoHome Financial 2018. Proprietary and Confidential 45
STEP 4:
Enter postal code of your service area in
any of these formats, M1B 5N1, L1T or K.
To delete any postal code format, click on
the ‘X’ next to the postal code
STEP 5:
Click Save
STEP 6:
Your My Profile is set and can be updated at anytime
ABOUT US
STEP 1:
The About Us section can be selected
from the Main Menu
EcoHome Financial 2018. Proprietary and Confidential 46
STEP 2:
About Us displays an overview about EcoHome Financial, Contact information and Location
RESOURCES
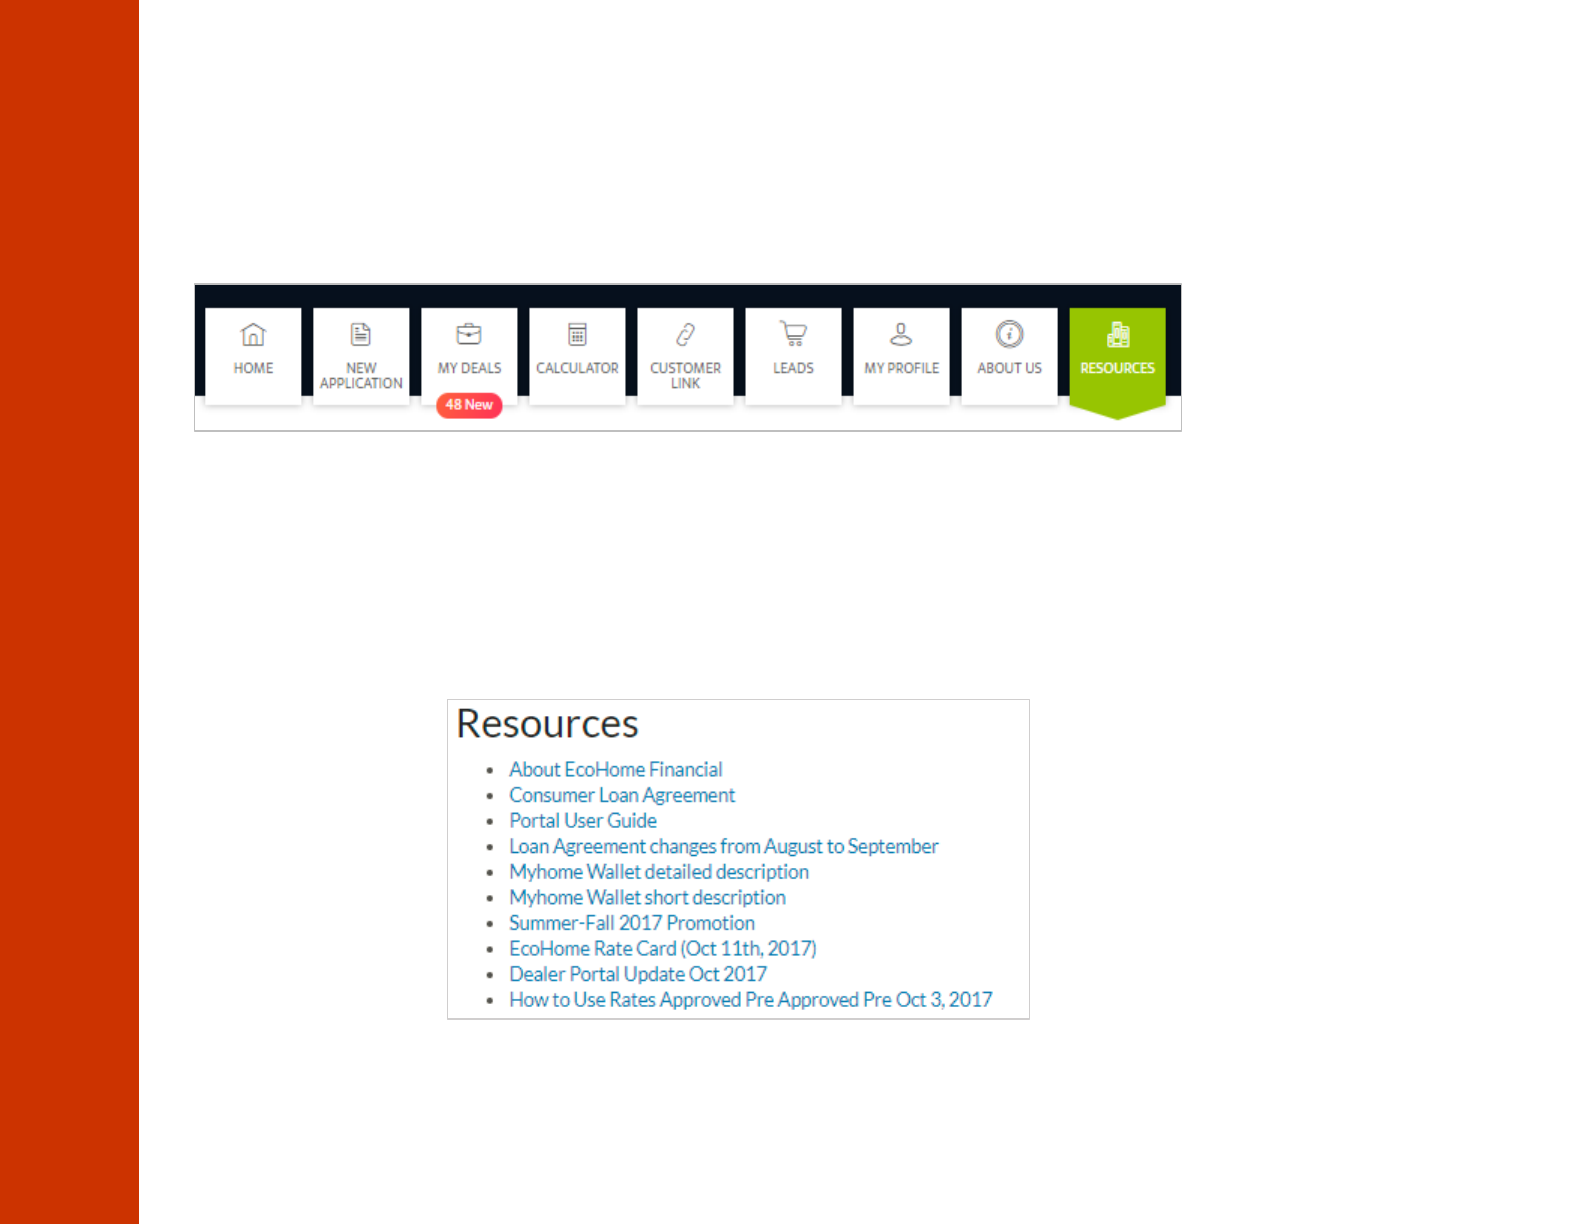
STEP 1:
The Resources section can be
selected from the Main Menu
EcoHome Financial 2018. Proprietary and Confidential 47
STEP 2:
Resources will allow Dealers to access update material at any time and will be presented on the screen to view,
download or print
