Amazon Elastic File System User Guide Service
User Manual:
Open the PDF directly: View PDF ![]() .
.
Page Count: 222 [warning: Documents this large are best viewed by clicking the View PDF Link!]
- Amazon Elastic File System
- Table of Contents
- What Is Amazon Elastic File System?
- Amazon EFS: How It Works
- Setting Up
- Getting Started with Amazon Elastic File System
- Assumptions
- Related Topics
- Step 1: Create Your EC2 Resources and Launch Your EC2 Instance
- Step 2: Create Your Amazon EFS File System
- Step 3: Connect to Your Amazon EC2 Instance and Mount the Amazon EFS File System
- Step 4: Sync Files from Existing File Systems to Amazon EFS Using EFS File Sync
- Step 5: Clean Up Resources and Protect Your AWS Account
- Creating Resources for Amazon EFS
- Using File Systems
- Managing Amazon EFS File Systems
- Managing File System Network Accessibility
- Managing File System Tags
- Metering – How Amazon EFS Reports File System and Object Sizes
- Managing Amazon EFS File Sync
- Deleting an Amazon EFS File System
- Managing Access to Encrypted File Systems
- Mounting File Systems
- Monitoring Amazon EFS
- Amazon EFS Performance
- Security
- Amazon EFS Limits
- Troubleshooting Amazon EFS
- Troubleshooting Amazon EFS: General Issues
- Mount Command Fails with "wrong fs type" Error Message
- Mount Command Fails with "incorrect mount option" Error Message
- File System Mount Fails Immediately After File System Creation
- File System Mount Hangs and Then Fails with Timeout Error
- File System Mount Using DNS Name Fails
- Amazon EC2 Instance Hangs
- Mount Target Lifecycle State Is Stuck
- File System Mount on Windows Instance Fails
- Application Writing Large Amounts of Data Hangs
- Mount Does Not Respond
- Open and Close Operations Are Serialized
- Operations on Newly Mounted File System Return "bad file handle" Error
- Custom NFS Settings Causing Write Delays
- Creating Backups with Oracle Recovery Manager Is Slow
- File Operation Errors
- Troubleshooting AMI and Kernel Issues
- Troubleshooting Encrypted File Systems
- Troubleshooting Amazon EFS: General Issues
- Troubleshooting EFS File Sync
- Your On-Premises Source File System Is Stuck in Mounting Status
- Your Amazon EC2 Source File System Is Stuck in Mounting Status
- Your Sync Task Is Stuck in Starting Status
- Enabling AWS Support To Help Troubleshoot Your EFS File Sync Running On-Premise
- Enabling AWS Support To Help Troubleshoot Your EFS File Sync Running on Amazon EC2
- Amazon Elastic File System Walkthroughs
- Walkthrough 1: Create Amazon EFS File System and Mount It on an EC2 Instance Using the AWS CLI
- Walkthrough 2: Set Up an Apache Web Server and Serve Amazon EFS Files
- Walkthrough 3: Create Writable Per-User Subdirectories and Configure Automatic Remounting on Reboot
- Walkthrough 4: Backup Solutions for Amazon EFS File Systems
- Backing Up Amazon EFS File Systems by Using AWS Data Pipeline
- Walkthrough 5: Create and Mount a File System On-Premises with AWS Direct Connect
- Walkthrough 6: Enforcing Encryption on an Amazon EFS File System at Rest
- Walkthrough 7: Sync Files from an On-Premises File System to Amazon EFS by Using EFS File Sync
- Walkthrough 8: Sync a File System from Amazon EC2 to Amazon EFS Using EFS File Sync
- Authentication and Access Control for Amazon EFS
- Amazon EFS API
- Document History

Amazon Elastic File System
User Guide

Amazon Elastic File System User Guide
Amazon Elastic File System: User Guide
Copyright © 2017 Amazon Web Services, Inc. and/or its affiliates. All rights reserved.
Amazon's trademarks and trade dress may not be used in connection with any product or service that is not Amazon's, in any manner
that is likely to cause confusion among customers, or in any manner that disparages or discredits Amazon. All other trademarks not
owned by Amazon are the property of their respective owners, who may or may not be affiliated with, connected to, or sponsored by
Amazon.

Amazon Elastic File System User Guide
Table of Contents
What Is Amazon Elastic File System? .................................................................................................... 1
Are you a first-time user of Amazon EFS? ..................................................................................... 1
How it Works .................................................................................................................................... 3
Overview ................................................................................................................................... 3
How Amazon EFS Works with Amazon EC2 ................................................................................... 4
How Amazon EFS Works with AWS Direct Connect ......................................................................... 4
Implementation Summary ........................................................................................................... 5
Authentication and Access Control ............................................................................................... 6
Data Consistency in Amazon EFS ................................................................................................. 7
Setting Up ........................................................................................................................................ 8
Sign up for AWS ........................................................................................................................ 8
Create an IAM User .................................................................................................................... 8
Getting Started ................................................................................................................................ 10
Assumptions ............................................................................................................................ 10
Related Topics ......................................................................................................................... 11
Step 1: Create Your EC2 Resources and Launch Your EC2 Instance ................................................... 11
Step 2: Create Your Amazon EFS File System ............................................................................... 15
Step 3: Connect to Your Amazon EC2 Instance and Mount the Amazon EFS File System ...................... 16
Step 4: Sync Files from Existing File Systems to Amazon EFS Using EFS File Sync .............................. 17
Step 5: Clean Up Resources and Protect Your AWS Account ........................................................... 18
Creating Resources for Amazon EFS .................................................................................................... 19
Creating File Systems ................................................................................................................ 20
Requirements ................................................................................................................... 20
Permissions Required ........................................................................................................ 20
Creating a File System ...................................................................................................... 21
Creating Mount Targets ............................................................................................................. 23
Creating a Mount Target Using the Amazon EFS console ....................................................... 24
Creating a Mount Target using the AWS CLI ......................................................................... 27
Creating Security Groups ........................................................................................................... 27
Creating Security Groups Using the AWS Management Console .............................................. 28
Creating Security Groups Using the AWS CLI ........................................................................ 29
Using File Systems ........................................................................................................................... 30
Related Topics ......................................................................................................................... 30
NFS-Level Users, Groups, and Permissions ................................................................................... 30
Example Amazon EFS File System Use Cases and Permissions ................................................ 31
User and group ID permissions on files and directories within a file system .............................. 32
No Root Squashing ........................................................................................................... 32
Permissions Caching ......................................................................................................... 33
Changing File System Object Ownership ............................................................................. 33
Amazon EFS File Sync ............................................................................................................... 33
Requirements for EFS File Sync .......................................................................................... 33
EFS File Sync Architecture ................................................................................................. 36
Managing File Systems ...................................................................................................................... 38
Managing Network Accessibility ................................................................................................. 38
Creating or Deleting Mount Targets in a VPC ....................................................................... 40
Creating Mount Targets in Another VPC .............................................................................. 42
Updating the Mount Target Configuration ........................................................................... 43
Managing Tags ......................................................................................................................... 45
Using the Console ............................................................................................................ 45
Using the AWS CLI ........................................................................................................... 45
Metering File System and Object Sizes ........................................................................................ 45
Metering Amazon EFS File System Objects .......................................................................... 45
Metering an Amazon EFS File System ................................................................................. 46
Managing EFS File Sync ............................................................................................................ 47
iii

Amazon Elastic File System User Guide
Deleting a Sync Agent ...................................................................................................... 47
Deleting a Sync Task ........................................................................................................ 47
Understanding Sync Agent Status ...................................................................................... 47
Understanding Sync Task Status ......................................................................................... 48
Performing Tasks on the EFS File Sync VM Local Console ...................................................... 48
Performing Maintenance Tasks on the file sync on Amazon EC2 Local Console .......................... 55
Deleting a File System .............................................................................................................. 58
Using the Console ............................................................................................................ 59
Using the CLI ................................................................................................................... 59
Related Topics ................................................................................................................. 59
Managing Access to Encrypted File Systems ................................................................................. 59
Performing Administrative Actions on Amazon EFS Customer Master Keys ............................... 60
Related Topics ................................................................................................................. 61
Mounting File Systems ...................................................................................................................... 62
NFS Support ............................................................................................................................ 62
Troubleshooting AMI/Kernel Versions .................................................................................. 62
Installing the NFS Client ........................................................................................................... 62
Mounting on Amazon EC2 with a DNS Name ............................................................................... 63
Mounting on On-Premises Servers with a DNS Name ............................................................ 64
Mounting with an IP Address ..................................................................................................... 64
Mounting Automatically ............................................................................................................ 65
Updating an Existing EC2 Instance to Mount Automatically .................................................... 66
Configuring an EFS File System to Mount Automatically at EC2 Instance Launch ....................... 67
Additional Mounting Considerations ........................................................................................... 68
Unmounting File Systems .................................................................................................. 69
Monitoring File Systems .................................................................................................................... 70
Monitoring Tools ...................................................................................................................... 70
Automated Tools .............................................................................................................. 70
Manual Monitoring Tools ................................................................................................... 71
Monitoring CloudWatch ............................................................................................................. 71
Amazon CloudWatch Metrics for Amazon EFS ...................................................................... 71
Bytes Reported in CloudWatch ........................................................................................... 74
Amazon EFS Dimensions ................................................................................................... 74
How Do I Use Amazon EFS Metrics? .................................................................................... 74
Monitoring EFS File Sync ................................................................................................... 75
Access CloudWatch Metrics ................................................................................................ 75
Creating Alarms ............................................................................................................... 76
Logging Amazon EFS API Calls with AWS CloudTrail ..................................................................... 77
Amazon EFS Information in CloudTrail ................................................................................ 77
Understanding Amazon EFS Log File Entries ........................................................................ 78
Amazon EFS Log File Entries for Encrypted File Systems ........................................................ 79
Performance .................................................................................................................................... 81
Performance Overview .............................................................................................................. 81
Amazon EFS Use Cases ............................................................................................................. 82
Big Data and Analytics ...................................................................................................... 82
Media Processing Workflows .............................................................................................. 82
Content Management and Web Serving .............................................................................. 82
Home Directories .............................................................................................................. 82
File System Syncing to Amazon EFS ................................................................................... 82
Performance Modes .................................................................................................................. 82
General Purpose Performance Mode ................................................................................... 83
Max I/O Performance Mode ............................................................................................... 83
Using the Right Performance Mode .................................................................................... 83
Bursting .................................................................................................................................. 83
Managing Burst Credits ..................................................................................................... 85
On-Premises Performance Considerations .................................................................................... 85
Architecting for High Availability ........................................................................................ 85
iv

Amazon Elastic File System User Guide
Amazon EFS Performance Tips ................................................................................................... 86
Related Topics ......................................................................................................................... 87
Security ........................................................................................................................................... 88
AWS Identity and Access Management (IAM) Permissions for API Calls ............................................. 88
Security Groups for Amazon EC2 Instances and Mount Targets ....................................................... 88
Security Considerations for Mounting an Amazon EFS File System .......................................... 89
Read, Write, and Execute Permissions for EFS Files and Directories .................................................. 90
Encrypting Data and Metadata at Rest in EFS .............................................................................. 90
When to Use Encryption ................................................................................................... 91
Encrypting a File System Using the Console ......................................................................... 91
How Encryption Works with Amazon EFS ............................................................................ 91
Related Topics ................................................................................................................. 92
Limits ............................................................................................................................................. 93
Amazon EFS Limits That Can Be Increased ................................................................................... 93
Resource Limits ........................................................................................................................ 93
Limits for Client EC2 Instances ................................................................................................... 94
Limits for Amazon EFS File Systems ........................................................................................... 94
Limits for EFS File Sync ............................................................................................................. 94
Unsupported NFSv4 Features ..................................................................................................... 95
Additional Considerations .......................................................................................................... 96
Troubleshooting Amazon EFS ............................................................................................................. 97
Troubleshooting General Issues .................................................................................................. 97
Mount Command Fails with "wrong fs type" Error Message .................................................... 97
Mount Command Fails with "incorrect mount option" Error Message ....................................... 98
File System Mount Fails Immediately After File System Creation ............................................. 98
File System Mount Hangs and Then Fails with Timeout Error .................................................. 98
File System Mount Using DNS Name Fails ........................................................................... 99
Amazon EC2 Instance Hangs .............................................................................................. 99
Mount Target Lifecycle State Is Stuck ................................................................................. 99
File System Mount on Windows Instance Fails ...................................................................... 99
Application Writing Large Amounts of Data Hangs .............................................................. 100
Mount Does Not Respond ................................................................................................ 100
Open and Close Operations Are Serialized ......................................................................... 100
Operations on Newly Mounted File System Return "bad file handle" Error .............................. 101
Custom NFS Settings Causing Write Delays ........................................................................ 101
Creating Backups with Oracle Recovery Manager Is Slow ..................................................... 102
File Operation Errors ............................................................................................................... 102
Command Fails with “Disk quota exceeded” Error ............................................................... 102
Command Fails with "I/O error" ....................................................................................... 102
Command Fails with "File name is too long" Error ............................................................... 102
Command Fails with "Too many links" Error ....................................................................... 103
Command Fails with "File too large" Error .......................................................................... 103
Command Fails with "Try again" Error ............................................................................... 103
Troubleshooting AMI and Kernel Issues ..................................................................................... 103
Unable to chown ............................................................................................................ 103
File System Keeps Performing Operations Repeatedly Due to Client Bug ................................ 104
Deadlocked Client ........................................................................................................... 104
Listing Files in a Large Directory Takes a Long Time ............................................................ 104
Troubleshooting Encrypted File Systems .................................................................................... 105
Encrypted File System Can't Be Created ............................................................................ 105
Unusable Encrypted File System ....................................................................................... 105
Troubleshooting EFS File Sync .......................................................................................................... 106
Your On-Premises Source File System Is Stuck in Mounting Status ................................................ 106
Your Amazon EC2 Source File System Is Stuck in Mounting Status ................................................. 106
Your Sync Task Is Stuck in Starting Status ................................................................................. 107
Enabling AWS Support To Help Troubleshoot Your EFS file sync ................................................... 107
Enabling AWS Support To Help Troubleshoot Your EC2 EFS File Sync ............................................ 108
v

Amazon Elastic File System User Guide
Walkthroughs ................................................................................................................................. 110
Walkthrough 1: Create and Mount a File System Using the AWS CLI .............................................. 110
Before You Begin ............................................................................................................ 111
Setting Up Tools ............................................................................................................ 111
Step 1: Create Amazon EC2 Resources ............................................................................... 112
Step 2: Create Amazon EFS Resources ............................................................................... 116
Step 3: Mount and Test the File System ............................................................................ 118
Step 4: Clean Up ............................................................................................................ 121
Walkthrough 2: Set Up an Apache Web Server and Serve Files ..................................................... 122
Single EC2 Instance Serving Files ...................................................................................... 122
Multiple EC2 Instances Serving Files ................................................................................. 124
Walkthrough 3: Create Writable Per-User Subdirectories .............................................................. 127
Automatic Remounting on Reboot .................................................................................... 128
Walkthrough 4: Backup Solutions for Amazon EFS File Systems .................................................... 128
Backing Up Amazon EFS File Systems by Using AWS Data Pipeline ........................................ 128
Walkthrough 5: Create and Mount a File System On-Premises with AWS Direct Connect ................... 140
Before You Begin ............................................................................................................ 141
Step 1: Create Your Amazon Elastic File System Resources ................................................... 141
Step 2: Mount the Amazon EFS File System on Your On-Premises Server ................................ 142
Step 3: Clean Up Resources and Protect Your AWS Account .................................................. 143
Walkthrough 6: Enforcing Encryption on an Amazon EFS File System at Rest .................................. 144
Enforcing Encryption at Rest ............................................................................................ 144
Walkthrough 7: Sync Files from On-Premises by Using EFS File Sync ............................................. 146
Before You Begin ............................................................................................................ 146
Step 1: Create a Sync Agent ............................................................................................ 146
Step 2: Create a Sync Task .............................................................................................. 147
Step 3: Sync Your Source File System to Amazon EFS .......................................................... 149
Step 4: Access Your Files ................................................................................................. 150
Step 5: Clean Up ............................................................................................................ 150
Walkthrough 8: Sync a File System from Amazon EC2 to Amazon EFS Using EFS File Sync ................ 151
Before You Begin ............................................................................................................ 151
Step 1: Create a Sync Agent ............................................................................................ 151
Step 2: Create a Sync Task .............................................................................................. 153
Step 3: Sync Your Source File System to Amazon EFS .......................................................... 155
Step 4: Access Your Files ................................................................................................. 156
Step 4: Clean Up ............................................................................................................ 156
Authentication and Access Control .................................................................................................... 157
Authentication ....................................................................................................................... 157
Access Control ........................................................................................................................ 158
Overview of Managing Access .................................................................................................. 158
Amazon Elastic File System Resources and Operations ......................................................... 159
Understanding Resource Ownership .................................................................................. 159
Managing Access to Resources ......................................................................................... 159
Specifying Policy Elements: Actions, Effects, and Principals .................................................. 161
Specifying Conditions in a Policy ...................................................................................... 161
Using Identity-Based Policies (IAM Policies) ................................................................................ 162
Permissions Required to Use the Amazon EFS Console ........................................................ 163
AWS Managed (Predefined) Policies for Amazon EFS ........................................................... 164
Customer Managed Policy Examples ................................................................................. 164
Amazon EFS API Permissions Reference ..................................................................................... 165
Amazon EFS API ............................................................................................................................. 168
API Endpoint .......................................................................................................................... 168
API Version ............................................................................................................................ 168
Related Topics ........................................................................................................................ 169
Actions .................................................................................................................................. 169
CreateFileSystem ............................................................................................................ 170
CreateMountTarget ......................................................................................................... 176
vi

Amazon Elastic File System User Guide
CreateTags ..................................................................................................................... 183
DeleteFileSystem ............................................................................................................ 186
DeleteMountTarget ......................................................................................................... 188
DeleteTags ..................................................................................................................... 191
DescribeFileSystems ........................................................................................................ 193
DescribeMountTargets ..................................................................................................... 197
DescribeMountTargetSecurityGroups ................................................................................. 200
DescribeTags .................................................................................................................. 203
ModifyMountTargetSecurityGroups ................................................................................... 206
Data Types ............................................................................................................................ 208
FileSystemDescription ..................................................................................................... 209
FileSystemSize ................................................................................................................ 211
MountTargetDescription .................................................................................................. 212
Tag ............................................................................................................................... 214
Document History .......................................................................................................................... 215
vii

Amazon Elastic File System User Guide
Are you a first-time user of Amazon EFS?
What Is Amazon Elastic File System?
Amazon Elastic File System (Amazon EFS) provides simple, scalable file storage for use with Amazon
EC2. With Amazon EFS, storage capacity is elastic, growing and shrinking automatically as you add and
remove files, so your applications have the storage they need, when they need it.
Amazon EFS has a simple web services interface that allows you to create and configure file systems
quickly and easily. The service manages all the file storage infrastructure for you, avoiding the
complexity of deploying, patching, and maintaining complex file system deployments.
Amazon EFS supports the Network File System versions 4.0 and 4.1 (NFSv4) protocol, so the applications
and tools that you use today work seamlessly with Amazon EFS. Multiple Amazon EC2 instances can
access an Amazon EFS file system at the same time, providing a common data source for workloads and
applications running on more than one instance or server.
With Amazon EFS, you pay only for the storage used by your file system. You don't need to provision
storage in advance and there is no minimum fee or setup cost. For more information, see Amazon EFS
Pricing.
The service is designed to be highly scalable, highly available, and highly durable. Amazon EFS file
systems store data and metadata across multiple Availability Zones in a region and can grow to petabyte
scale, drive high levels of throughput, and allow massively parallel access from Amazon EC2 instances to
your data.
Amazon EFS provides file system access semantics, such as strong data consistency and file locking. For
more information, see Data Consistency in Amazon EFS (p. 7).
Amazon EFS also allows you to control access to your file systems through Portable Operating System
Interface (POSIX) permissions. For more information, see Security (p. 88).
You can enable encryption when creating an Amazon EFS file system. If you do, all your data
and metadata is encrypted. For more information, see Encrypting Data and Metadata at Rest in
EFS (p. 90).
Amazon EFS is designed to provide the throughput, IOPS, and low latency needed for a broad range of
workloads. With Amazon EFS, throughput and IOPS scale as a file system grows, and file operations are
delivered with consistent, low latencies. For more information, see Amazon EFS Performance (p. 81).
Note
Using Amazon EFS with Microsoft Windows Amazon EC2 instances is not supported.
Are you a first-time user of Amazon EFS?
If you are a first-time user of Amazon EFS, we recommend you read the following sections in order:
1. For an Amazon EFS product and pricing overview, see Amazon EFS.
2. For an Amazon EFS technical overview, see Amazon EFS: How It Works (p. 3).
3. Try the introductory exercises:
•Getting Started (p. 10)
•Walkthroughs (p. 110)
If you would like to learn more about Amazon EFS, the following topics discuss the service in greater
detail:
1


Amazon Elastic File System User Guide
Overview
Amazon EFS: How It Works
Following, you can find a description about how Amazon EFS works, its implementation details, and
security considerations.
Topics
•Overview (p. 3)
•How Amazon EFS Works with Amazon EC2 (p. 4)
•How Amazon EFS Works with AWS Direct Connect (p. 4)
•Implementation Summary (p. 5)
•Authentication and Access Control (p. 6)
•Data Consistency in Amazon EFS (p. 7)
Overview
Amazon EFS provides file storage in the AWS Cloud. With Amazon EFS, you can create a file system,
mount the file system on an Amazon EC2 instance, and then read and write data from to and from your
file system. You can mount an Amazon EFS file system in your VPC, through the Network File System
versions 4.0 and 4.1 (NFSv4) protocol.
For a list of Amazon EC2 Linux Amazon Machine Images (AMIs) that support this protocol, see NFS
Support (p. 62). We recommend using a current generation Linux NFSv4.1 client, such as those found
in Amazon Linux and Ubuntu AMIs. For some AMIs, you'll need to install an NFS client to mount your file
system on your Amazon EC2 instance. For instructions, see Installing the NFS Client (p. 62).
You can access your Amazon EFS file system concurrently from Amazon EC2 instances in your Amazon
VPC, so applications that scale beyond a single connection can access a file system. Amazon EC2
instances running in multiple Availability Zones within the same region can access the file system, so that
many users can access and share a common data source.
Note the following restrictions:
• You can mount an Amazon EFS file system on instances in only one VPC at a time.
• Both the file system and VPC must be in the same AWS Region.
For a list of AWS regions where you can create an Amazon EFS file system, see the Amazon Web Services
General Reference.
To access your Amazon EFS file system in a VPC, you create one or more mount targets in the VPC. A
mount target provides an IP address for an NFSv4 endpoint at which you can mount an Amazon EFS file
system. You mount your file system using its DNS name, which will resolve to the IP address of the EFS
mount target in the same Availability Zone as your EC2 instance. You can create one mount target in
each Availability Zone in a region. If there are multiple subnets in an Availability Zone in your VPC, you
create a mount target in one of the subnets, and all EC2 instances in that Availability Zone share that
mount target.
Mount targets themselves are designed to be highly available. When designing your application for high
availability and the ability to failover to other Availability Zones, keep in mind that the IP addresses and
DNS for your mount targets in each Availability Zone are static.
3
Amazon Elastic File System User Guide
How Amazon EFS Works with Amazon EC2
After mounting the file system via the mount target, you use it like any other POSIX-compliant file
system. For information about NFS-level permissions and related considerations, see Network File
System (NFS)–Level Users, Groups, and Permissions (p. 30).
You can mount your Amazon EFS file systems on your on-premises datacenter servers when connected
to your Amazon VPC with AWS Direct Connect. You can mount your EFS file systems on on-premises
servers to migrate data sets to EFS, enable cloud bursting scenarios, or backup your on-premises data to
EFS.
Amazon EFS file systems can be mounted on Amazon EC2 instances, or on-premises through an AWS
Direct Connect connection.
How Amazon EFS Works with Amazon EC2
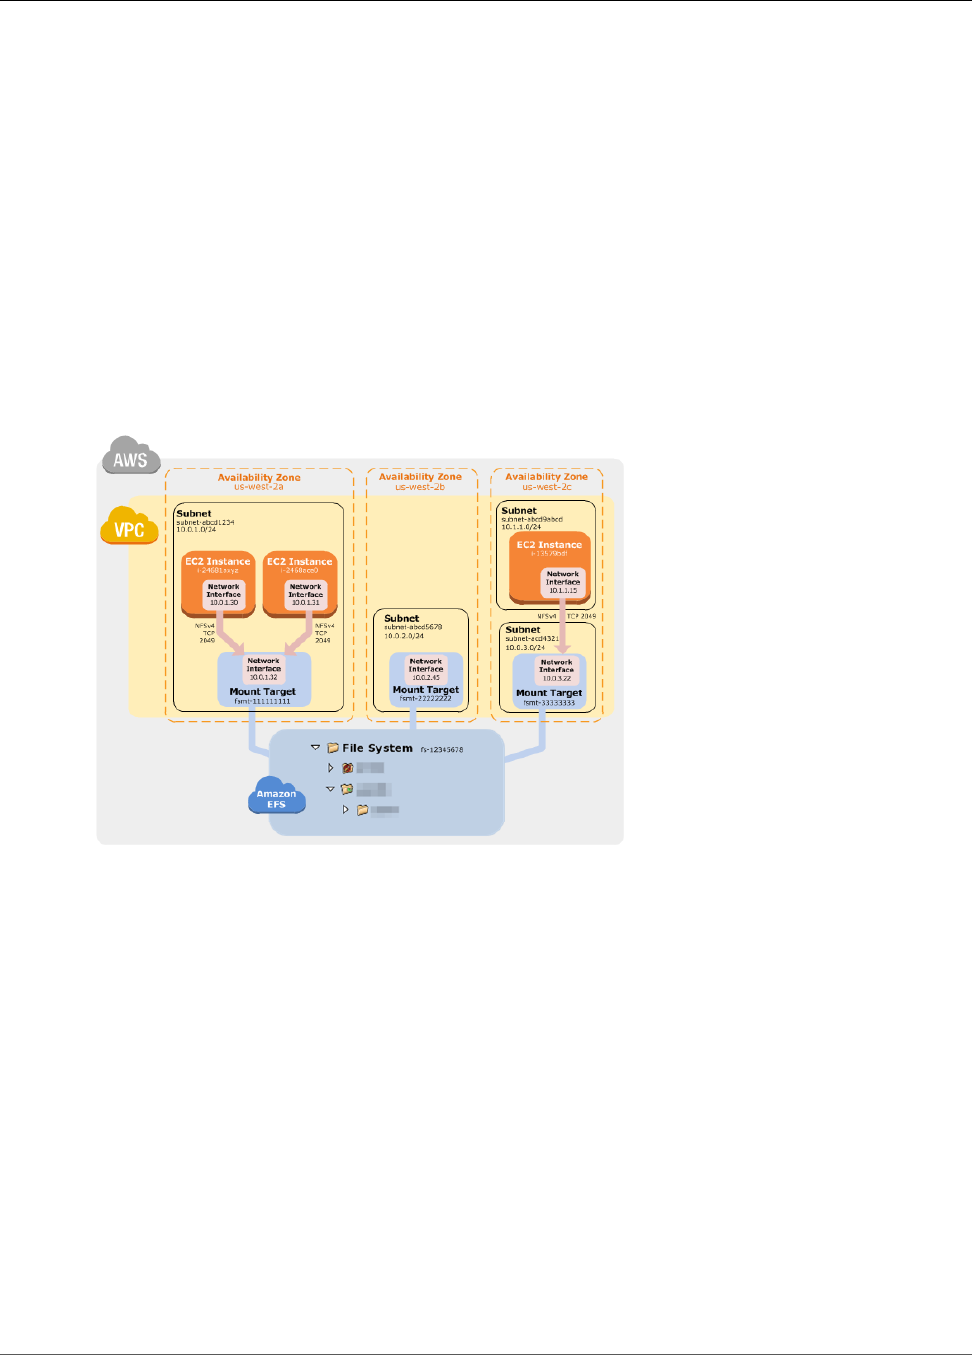
The following illustration shows an example VPC accessing an Amazon EFS file system. Here, EC2
instances in the VPC have file systems mounted.
In this illustration, the VPC has three Availability Zones, and each has one mount target created in it. We
recommend that you access the file system from a mount target within the same Availability Zone. Note
that one of the Availability Zones has two subnets. However, a mount target is created in only one of the
subnets. Creating this setup works as follows:
1. Create your Amazon EC2 resources and launch your Amazon EC2 instance. For more information on
Amazon EC2, see Amazon EC2 - Virtual Server Hosting.
2. Create your Amazon EFS file system.
3. Connect to your Amazon EC2 instance, and mount the Amazon EFS file system.
For detailed steps, see Getting Started with Amazon Elastic File System (p. 10).
How Amazon EFS Works with AWS Direct Connect
By using an Amazon EFS file system mounted on an on-premises server, you can migrate on-premises
data into the AWS Cloud hosted in an Amazon EFS file system. You can also take advantage of bursting,
meaning that you can move data from your on-premises servers into Amazon EFS, analyze it on a fleet of
4
Amazon Elastic File System User Guide
Implementation Summary
Amazon EC2 instances in your Amazon VPC, and then store the results permanently in your file system or
move the results back to your on-premises server.
Keep the following considerations in mind when using Amazon EFS with AWS Direct Connect:
• Your on-premises server must have a Linux based operating system. We recommend Linux kernel
version 4.0 or later.
• For the sake of simplicity, we recommend mounting an Amazon EFS file system on an on-premises
server using a mount target IP address instead of a DNS name.
• AWS VPN is not supported for accessing an Amazon EFS file system from an on-premises server.
There is no additional cost for on-premises access to your Amazon EFS file systems. Note that you'll be
charged for the AWS Direct Connect connection to your Amazon VPC. For more information, see AWS
Direct Connect Pricing.
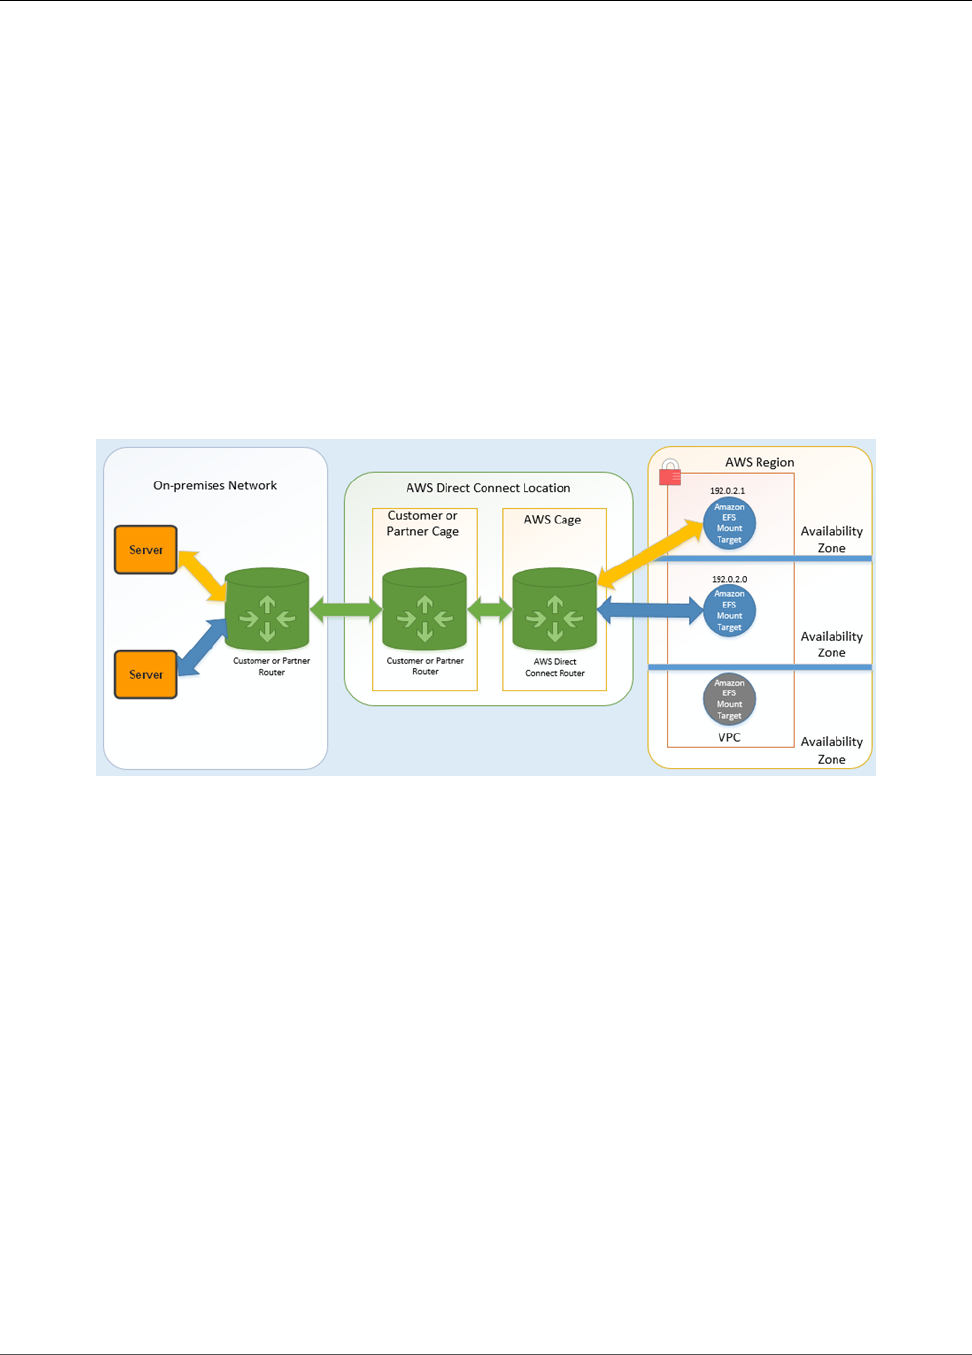
The following illustration shows an example of how to access an Amazon EFS file system from on-
premises (the on-premises servers have the file systems mounted).
You can use any one of the mount targets in your VPC as long as the subnet of the mount target is
reachable by using the AWS Direct Connect connection between your on-premises server and your
Amazon VPC. To access Amazon EFS from a on-premises server, you need to add a rule to your mount
target security group to allow inbound traffic to the NFS port (2049) from your on-premises server.
To create a setup like this, you do the following:
1. Establish an AWS Direct Connect connection between your on-premises data center and your Amazon
VPC. For more information on AWS Direct Connect, see AWS Direct Connect.
2. Create your Amazon EFS file system.
3. Mount the Amazon EFS file system on your on-premises server.
For detailed steps, see Walkthrough 5: Create and Mount a File System On-Premises with AWS Direct
Connect (p. 140).
Implementation Summary
In Amazon EFS, a file system is the primary resource. Each file system has properties such as ID, creation
token, creation time, file system size in bytes, number of mount targets created for the file system, and
the file system state. For more information, see CreateFileSystem (p. 170).
5
Amazon Elastic File System User Guide
Authentication and Access Control
Amazon EFS also supports other resources to configure the primary resource. These include mount
targets and tags:
•Mount target – To access your file system, you must create mount targets in your VPC. Each mount
target has the following properties: the mount target ID, the subnet ID in which it is created, the file
system ID for which it is created, an IP address at which the file system may be mounted, and the
mount target state. You can use the IP address or the DNS name in your mount command. Each file
system has a DNS name of the following form.
file-system-id.efs.aws-region.amazonaws.com
You can specify this DNS name in your mount command to mount the Amazon EFS file system.
Suppose you create an efs-mount-point subdirectory off of your home directory on your EC2
instance or on-premises server. Then, you can use the mount command to mount the file system. For
example, on an Amazon Linux AMI, you can use following mount command.
$ sudo mount -t nfs -o
nfsvers=4.1,rsize=1048576,wsize=1048576,hard,timeo=600,retrans=2 file-system-DNS-name:/
~/efs-mount-point
For more information, see Creating Mount Targets (p. 23). First, you need to install the NFS client on
your EC2 instance. The Getting Started (p. 10) exercise provides step-by-step instructions.
•Tags – To help organize your file systems, you can assign your own metadata to each of the file
systems you create. Each tag is a key-value pair.
You can think of mount targets and tags as subresources that don't exist without being associated with a
file system.
Amazon EFS provides API operations for you to create and manage these resources. In addition to the
create and delete operations for each resource, Amazon EFS also supports a describe operation that
enables you to retrieve resource information. You have the following options for creating and managing
these resources:
• Use the Amazon EFS console – For an example, see Getting Started (p. 10).
• Use the Amazon EFS command line interface (CLI) – For an example, see Walkthrough 1: Create
Amazon EFS File System and Mount It on an EC2 Instance Using the AWS CLI (p. 110).
• You can also manage these resources programmatically as follows:
• Use the AWS SDKs – The AWS SDKs simplify your programming tasks by wrapping the underlying
Amazon EFS API. The SDK clients also authenticate your requests by using access keys that you
provide. For more information, see Sample Code and Libraries.
• Call the Amazon EFS API directly from your application – If you cannot use the SDKs for some
reason, you can make the Amazon EFS API calls directly from your application. However, you need to
write the necessary code to authenticate your requests if you use this option. For more information
about the Amazon EFS API, see Amazon EFS API (p. 168).
Authentication and Access Control
You must have valid credentials to make Amazon EFS API requests, such as create a file system. In
addition, you must also have permissions to create or access resources. By default, when you use the root
account credentials of your AWS account you can create and access resources owned by that account.
However, we do not recommend using root account credentials. In addition, any AWS Identity and Access
Management (IAM) users and roles you create in your account must be granted permissions to create or
6

Amazon Elastic File System User Guide
Data Consistency in Amazon EFS
access resources. For more information about permissions, see Authentication and Access Control for
Amazon EFS (p. 157).
Data Consistency in Amazon EFS
Amazon EFS provides the open-after-close consistency semantics that applications expect from NFS.
In Amazon EFS, write operations will be durably stored across Availability Zones when:
• An application performs a synchronous write operation (for example, using the open Linux command
with the O_DIRECT flag, or the fsync Linux command).
• An application closes a file.
Amazon EFS provides stronger consistency guarantees than open-after-close semantics depending on
the access pattern. Applications that perform synchronous data access and perform non-appending
writes will have read-after-write consistency for data access.
7

Amazon Elastic File System User Guide
Sign up for AWS
Setting Up
Before you use Amazon EFS for the first time, complete the following tasks:
1. Sign up for AWS (p. 8)
2. Create an IAM User (p. 8)
Sign up for AWS
When you sign up for Amazon Web Services (AWS), your AWS account is automatically signed up for all
services in AWS, including Amazon EFS. You are charged only for the services that you use.
With Amazon EFS, you pay only for the storage you use. For more information about Amazon EFS usage
rates, see the Amazon Elastic File System Pricing. If you are a new AWS customer, you can get started
with Amazon EFS for free. For more information, see AWS Free Usage Tier.
If you have an AWS account already, skip to the next task. If you don't have an AWS account, use the
following procedure to create one.
To create an AWS account
1. Open https://aws.amazon.com/, and then choose Create an AWS Account.
Note
This might be unavailable in your browser if you previously signed into the AWS
Management Console. In that case, choose Sign in to a different account, and then choose
Create a new AWS account.
2. Follow the online instructions.
Part of the sign-up procedure involves receiving a phone call and entering a PIN using the phone
keypad.
Note your AWS account number, because you'll need it for the next task.
Create an IAM User
Services in AWS, such as Amazon EFS, require that you provide credentials when you access them, so
that the service can determine whether you have permissions to access its resources. AWS recommends
that you do not use the root credentials of your AWS account to make requests. Instead, create an IAM
user, and grant that user full access. We refer to these users as administrator users. You can use the
administrator user credentials, instead of root credentials of your account, to interact with AWS and
perform tasks, such as create a bucket, create users, and grant them permissions. For more information,
see Root Account Credentials vs. IAM User Credentials in the AWS General Reference and IAM Best
Practices in the IAM User Guide.
If you signed up for AWS but have not created an IAM user for yourself, you can create one using the IAM
console.
To create an IAM user for yourself and add the user to an Administrators group
1. Use your AWS account email address and password to sign in to the AWS Management Console as
the AWS account root user.
8
Amazon Elastic File System User Guide
Create an IAM User
2. In the navigation pane of the console, choose Users, and then choose Add user.
3. For User name, type Administrator.
4. Select the check box next to AWS Management Console access, select Custom password, and then
type the new user's password in the text box. You can optionally select Require password reset to
force the user to select a new password the next time the user signs in.
5. Choose Next: Permissions.
6. On the Set permissions for user page, choose Add user to group.
7. Choose Create group.
8. In the Create group dialog box, type Administrators.
9. For Filter, choose Job function.
10. In the policy list, select the check box for AdministratorAccess. Then choose Create group.
11. Back in the list of groups, select the check box for your new group. Choose Refresh if necessary to
see the group in the list.
12. Choose Next: Review to see the list of group memberships to be added to the new user. When you
are ready to proceed, choose Create user.
You can use this same process to create more groups and users, and to give your users access to your
AWS account resources. To learn about using policies to restrict users' permissions to specific AWS
resources, go to Access Management and Example Policies.
To sign in as this new IAM user, sign out of the AWS Management Console, and then use the following
URL, where your_aws_account_id is your AWS account number without the hyphens (for example, if your
AWS account number is 1234-5678-9012, your AWS account ID is 123456789012):
https://your_aws_account_id.signin.aws.amazon.com/console/
Enter the IAM user name and password that you just created. When you're signed in, the navigation bar
displays your_user_name@your_aws_account_id.
If you don't want the URL for your sign-in page to contain your AWS account ID, you can create an
account alias. From the IAM dashboard, click Create Account Alias and enter an alias, such as your
company name. To sign in after you create an account alias, use the following URL:
https://your_account_alias.signin.aws.amazon.com/console/
To verify the sign-in link for IAM users for your account, open the IAM console and check under AWS
Account Alias on the dashboard.
9

Amazon Elastic File System User Guide
Assumptions
Getting Started with Amazon Elastic
File System
Topics
•Assumptions (p. 10)
•Related Topics (p. 11)
•Step 1: Create Your EC2 Resources and Launch Your EC2 Instance (p. 11)
•Step 2: Create Your Amazon EFS File System (p. 15)
•Step 3: Connect to Your Amazon EC2 Instance and Mount the Amazon EFS File System (p. 16)
•Step 4: Sync Files from Existing File Systems to Amazon EFS Using EFS File Sync (p. 17)
•Step 5: Clean Up Resources and Protect Your AWS Account (p. 18)
This Getting Started exercise shows you how to quickly create an Amazon Elastic File System (Amazon
EFS) file system, mount it on an Amazon Elastic Compute Cloud (Amazon EC2) instance in your VPC, and
test the end-to-end setup.
There are four steps you need to perform to create and use your first Amazon EFS file system:
• Create your Amazon EC2 resources and launch your instance.
• Create your Amazon EFS file system.
• Connect to your Amazon EC2 instance and mount the Amazon EFS file system.
• Clean up your resources and protect your AWS account.
Assumptions
For this exercise, we assume the following:
• You're already familiar with using the Amazon EC2 console to launch instances.
• Your Amazon VPC, Amazon EC2, and Amazon EFS resources are all in the same region. This guide uses
the US West (Oregon) Region (us-west-2).
• You have a default VPC in the region that you're using for this Getting Started exercise. If you don't
have a default VPC, or if you want to mount your file system from a new VPC with new or existing
security groups, you can still use this Getting Started exercise as long as you configure Security Groups
for Amazon EC2 Instances and Mount Targets (p. 88).
• You have not changed the default inbound access rule for the default security group.
You can use the root credentials of your AWS account to sign in to the console and try the Getting
Started exercise. However, AWS Identity and Access Management (IAM) recommends that you do not use
the root credentials of your AWS account. Instead, create an administrator user in your account and use
those credentials to manage resources in your account. For more information, see Setting Up (p. 8).
10

Amazon Elastic File System User Guide
Related Topics
Related Topics
This guide also provides a walkthrough to perform a similar Getting Started exercise using AWS
Command Line Interface (AWS CLI) commands to make the Amazon EFS API calls. For more information,
see Walkthrough 1: Create Amazon EFS File System and Mount It on an EC2 Instance Using the AWS
CLI (p. 110).
Step 1: Create Your EC2 Resources and Launch
Your EC2 Instance
Before you can launch and connect to an Amazon EC2 instance, you need to create a key pair, unless you
already have one. You can create a key pair using the Amazon EC2 console and then you can launch your
EC2 instance.
Note
Using Amazon EFS with Microsoft Windows Amazon EC2 instances is not supported.
To create a key pair
• Follow the steps in Setting Up with Amazon EC2 in the Amazon EC2 User Guide for Linux Instances to
create a key pair. If you already have a key pair, you do not need to create a new one and you can use
your existing key pair for this exercise.
To launch the EC2 instance
1. Open the Amazon EC2 console at https://console.aws.amazon.com/ec2/.
2. Choose Launch Instance.
3. In Step 1: Choose an Amazon Machine Image (AMI), find the Amazon Linux AMI at the top of the
list and choose Select.
Note
If you choose either the AmazonLinuxAMI2016.03.0 or AmazonLinuxAMI2016.09.0
AMI when launching your Amazon EC2 instance, you don't need to install nfs-utils
because it's already included in the AMI by default.
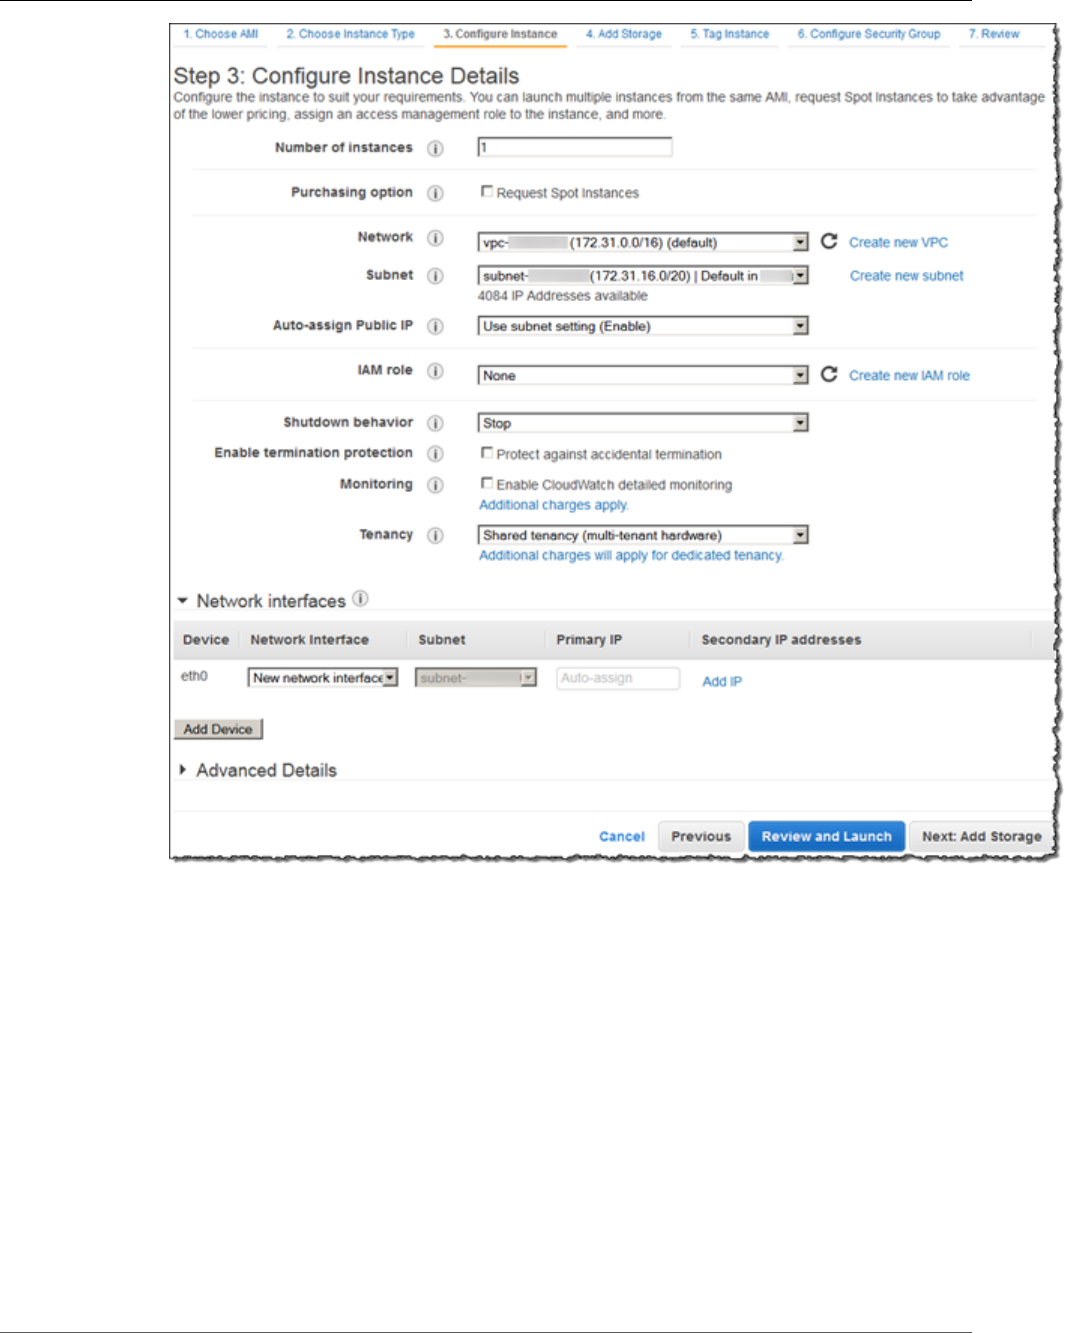
4. In Step 2: Choose an Instance Type, choose Next: Configure Instance Details.
5. In Step 3: Configure Instance Details, choose Network, and then choose the entry for your default
VPC. It should look something like vpc-xxxxxxx (172.31.0.0/16) (default).
a. Choose Subnet, and then choose a subnet in any Availability Zone.
11
Amazon Elastic File System User Guide
Step 1: Create Your EC2 Resources
and Launch Your EC2 Instance
b. Choose Next: Add Storage.
6. Choose Next: Tag Instance.
7. Name your instance and choose Next: Configure Security Group.
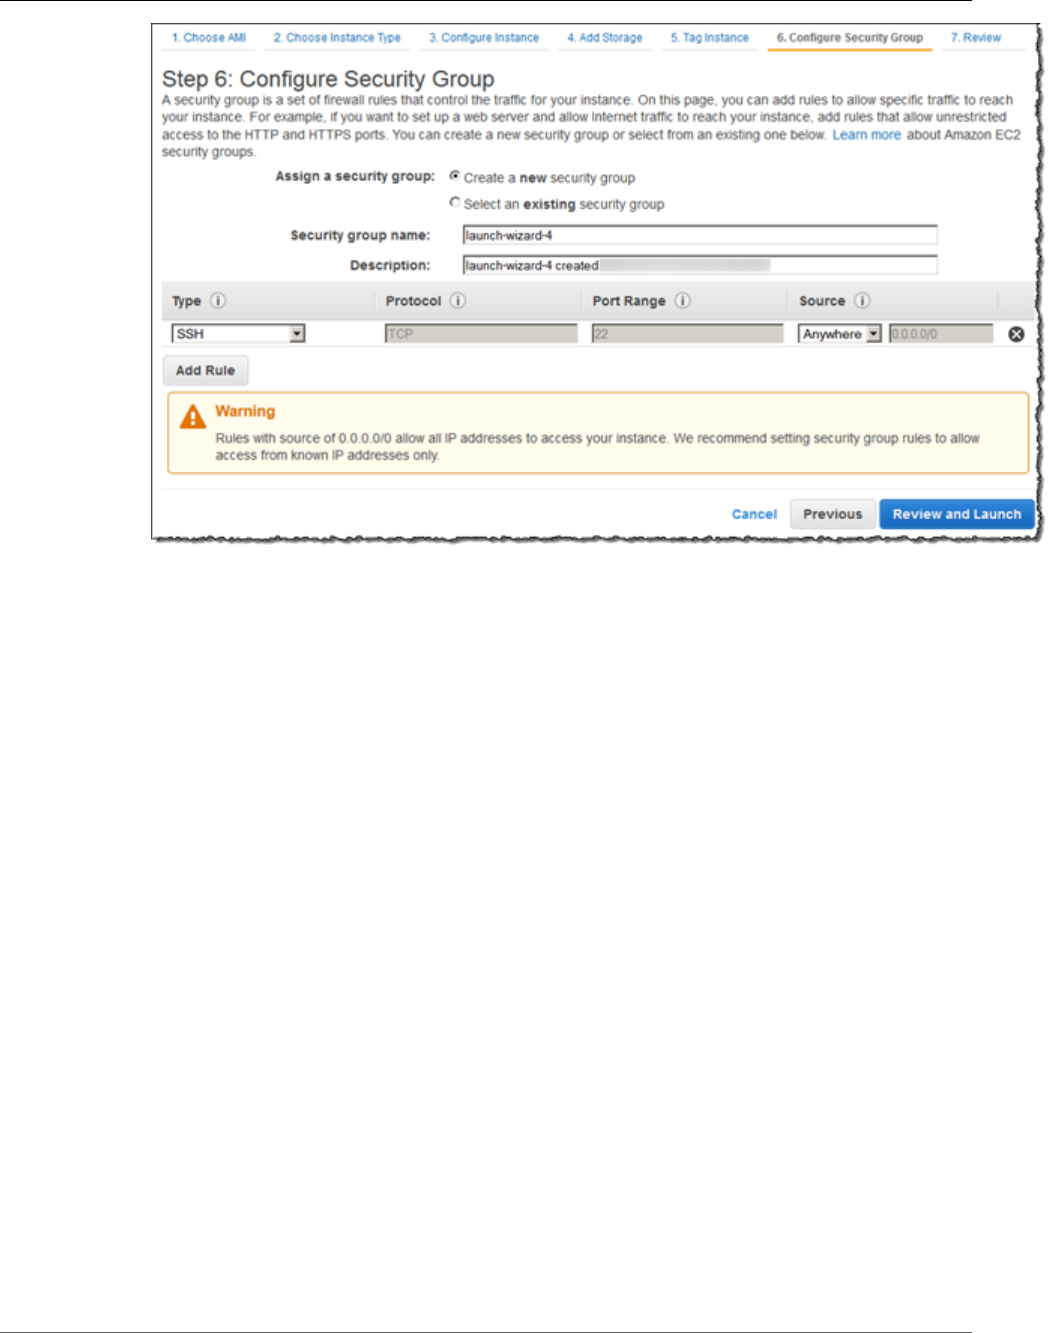
8. In Step 6: Configure Security Group, review the contents of this page, ensure that Assign a security
group is set to Create a new security group, and verify that the inbound rule being created has the
following default values.
•Type: SSH
•Protocol: TCP
•Port Range: 22
•Source: Anywhere 0.0.0.0/0
12
Amazon Elastic File System User Guide
Step 1: Create Your EC2 Resources
and Launch Your EC2 Instance
Note
You can configure the EFS file system to mount on your EC2 instance automatically. For
more information, see Configuring an EFS File System to Mount Automatically at EC2
Instance Launch (p. 67).
9. Choose Review and Launch.
10. Choose Launch.
11. Select the check box for the key pair that you created, and then choose Launch Instances.
12. Choose View Instances.
13. Choose the name of the instance you just created from the list, and then choose Actions.
a. From the menu that opens, choose Networking and then choose Change Security Groups.
13

Amazon Elastic File System User Guide
Step 1: Create Your EC2 Resources
and Launch Your EC2 Instance
b. Select the check box next to the security group with the description default VPC security
group.
c. Choose Assign Security Groups.
Note
In this step, you assign your VPC's default security group to the Amazon EC2 instance. Doing
this ensures that the instance is a member of the security group that the Amazon EFS file
system mount target authorizes for connection in Step 2: Create Your Amazon EFS File
System (p. 15).
14
Amazon Elastic File System User Guide
Step 2: Create Your Amazon EFS File System
By using your VPC's default security group, with its default inbound and outbound rules,
you are potentially opening up this instance and this file system to potential threats from
within your VPC. Make sure that you follow Step 5: Clean Up Resources and Protect Your
AWS Account (p. 18) at the end of this Getting Started exercise to remove resources
exposed to your VPC's default security group for this example. For more information, see
Security Groups for Amazon EC2 Instances and Mount Targets (p. 88).
14. Choose your instance from the list.
15. On the Description tab, make sure that you have two entries listed next to security groups—one for
the default VPC security group and one for the security group that you created when you launched
the instance.
16. Make a note of the values listed next to VPC ID and Public DNS. You'll need those values later in this
exercise.
Step 2: Create Your Amazon EFS File System
In this step, you create your Amazon EFS file system.
To create your Amazon EFS file system
1. Open the Amazon EFS console at https://console.aws.amazon.com/efs/.
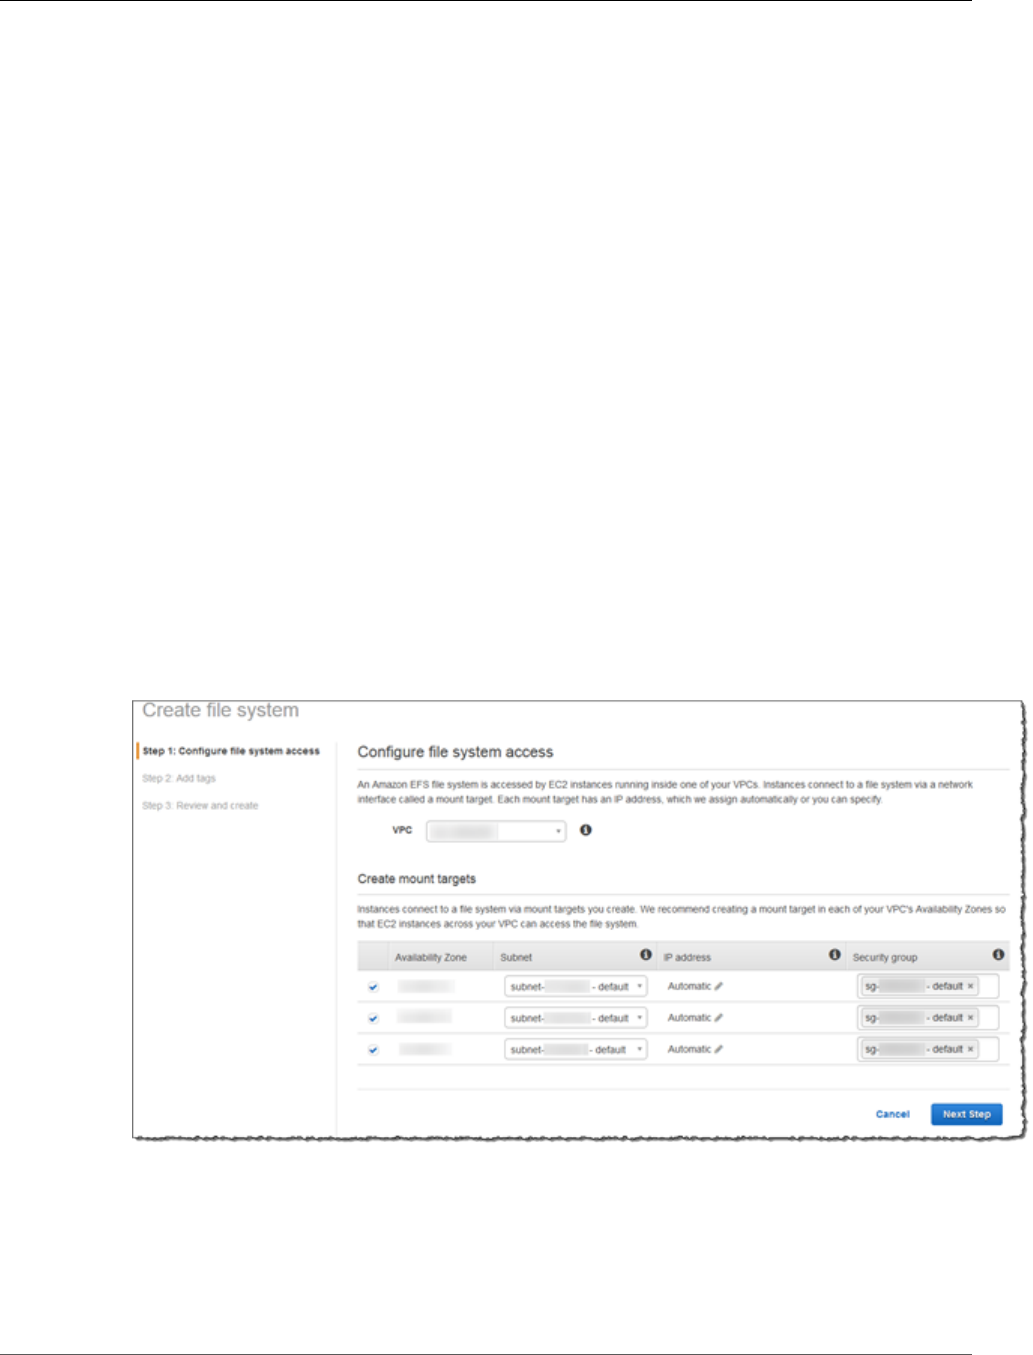
2. Choose Create File System.
3. Choose your default VPC from the VPC list. It has the same VPC ID that you noted at the end of Step
1: Create Your EC2 Resources and Launch Your EC2 Instance (p. 11).
4. Select the check boxes for all of the Availability Zones. Make sure that they all have the default
subnets, automatic IP addresses, and the default security groups chosen. These are your mount
targets. For more information, see Creating Mount Targets (p. 23).
5. Choose Next Step.
6. Name your file system, keep general purpose selected as your default performance mode, and
choose Next Step.
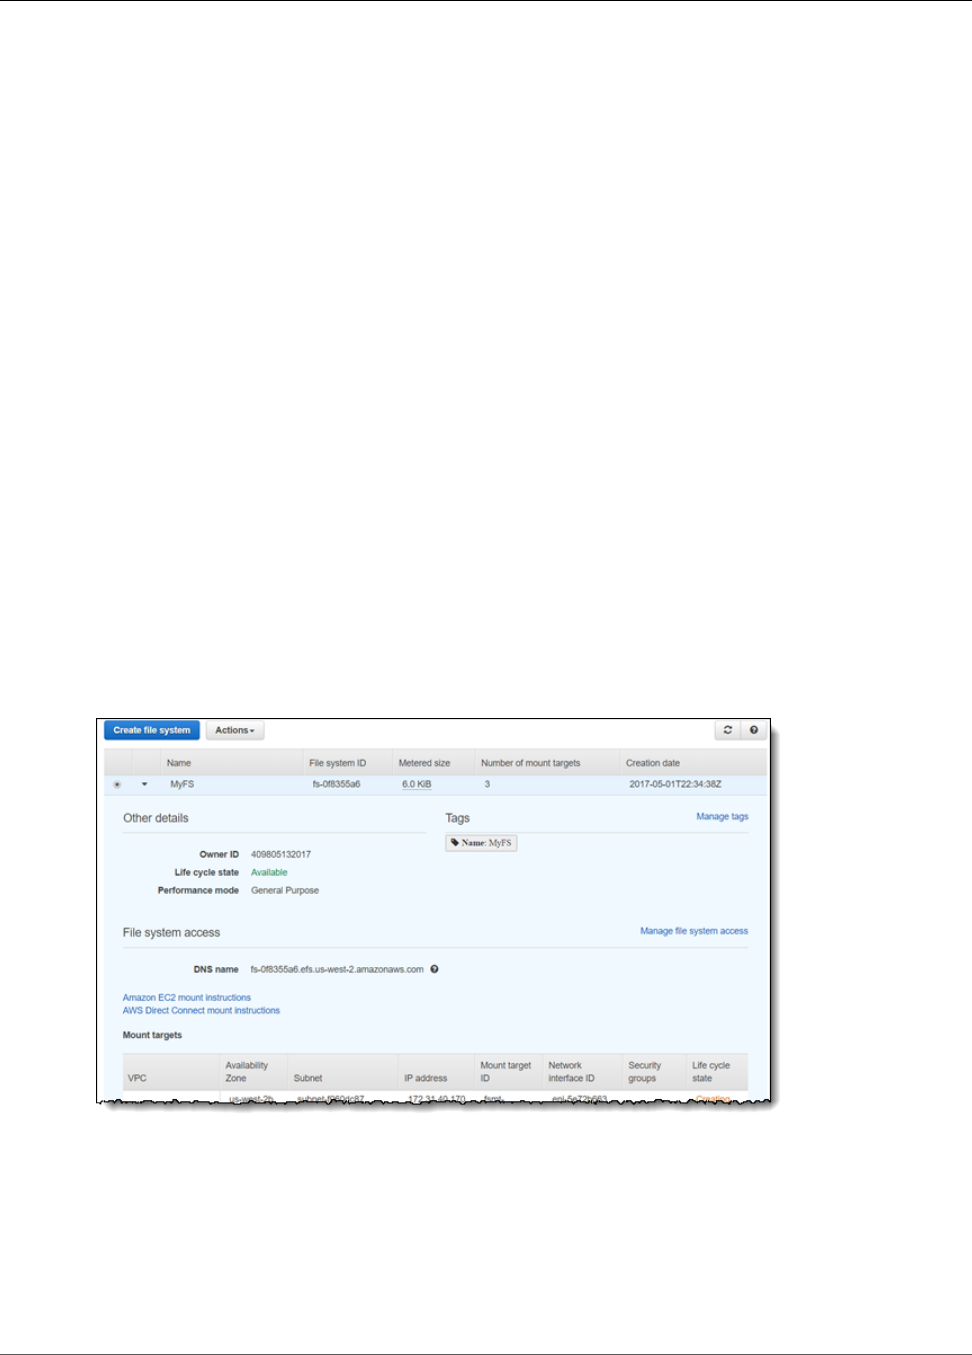
7. Choose Create File System.
8. Choose your file system from the list and make a note of the File system ID value. You'll need this
value for the next step.
15

Amazon Elastic File System User Guide
Step 3: Connect to Your Amazon EC2 Instance
and Mount the Amazon EFS File System
Step 3: Connect to Your Amazon EC2 Instance and
Mount the Amazon EFS File System
You can connect to your Amazon EC2 instance from a computer running Windows or Linux. To connect to
your Amazon EC2 instance and mount the Amazon EFS file system, you need the following information:
• The Public DNS name of the Amazon EC2 instance. You made a note of this value at the end of Step 1:
Create Your EC2 Resources and Launch Your EC2 Instance (p. 11).
• The File system ID value for the mount target for your Amazon EFS file system. You made a note of
this value at the end of Step 2: Create Your Amazon EFS File System (p. 15).
To connect to your Amazon EC2 instance and mount the Amazon EFS file system
1. Connect to your Amazon EC2 instance. For more information, see Connecting to Your Linux Instance
from Windows Using PuTTY or Connecting to Your Linux Instance Using SSH in the Amazon EC2 User
Guide for Linux Instances.
2. After you've connected, install the Network File System (NFS) client.
If you're using an Amazon Linux AMI or RedHat Linux AMI, install the NFS client with the following
command.
$ sudo yum -y install nfs-utils
If you're using an Ubuntu AMI, install the NFS client with the following command.
$ sudo apt-get -y install nfs-common
3. Make a directory for the mount point with the following command.
$ sudo mkdir efs
4. Mount the Amazon EFS file system to the directory that you created. Use the following command
and replace the file-system-id and aws-region placeholders with your File System ID value
and AWS Region, respectively.
$ sudo mount -t nfs -o
nfsvers=4.1,rsize=1048576,wsize=1048576,hard,timeo=600,retrans=2 file-system-
id.efs.aws-region.amazonaws.com:/ efs
Note
We recommend that you wait 90 seconds after creating a mount target before you mount
the file system, as the DNS records propagate fully in the region.
5. Change directories to the new directory that you created with the following command.
$ cd efs
6. Make a subdirectory and change the ownership of that subdirectory to your EC2 instance user. Then,
navigate to that new directory with the following commands.
$ sudo mkdir getting-started
$ sudo chown ec2-user getting-started
$ cd getting-started
16

Amazon Elastic File System User Guide
Step 4: Sync Files from Existing File
Systems to Amazon EFS Using EFS File Sync
7. Create a text file with the following command.
$ touch test-file.txt
8. List the directory contents with the following command.
$ ls -al
As a result, the following file is created.
-rw-rw-r-- 1 ec2-user ec2-user 0 Aug 15 15:32 test-file.txt
Step 4: Sync Files from Existing File Systems to
Amazon EFS Using EFS File Sync
Now that you have created a functioning Amazon EFS file system, you can use EFS File Sync to sync
files from an existing file system to Amazon EFS. EFS File Sync can sync your file data, and file system
metadata such as ownership, time stamps, and access permissions.
In this step, we assume that you have the following:
• A source NFS file system that you can sync from. This source system needs to be accessible over NFS
version 3 or version 4. The source file system can be on-premises or on Amazon EC2.
• A destination Amazon EFS file system to sync to. If you don't have an Amazon EFS file system, create
one. For more information, see Getting Started with Amazon Elastic File System (p. 10).
To get started with EFS File Sync, do the following:
1. On the Amazon EFS Management Console, download and deploy a sync agent. For on-premises
deployment the sync agent is provided as virtual machine (VM) image for VMware ESXi. For in the
cloud deployment, you can create an Amazon EC2 instance from the community AMI.
2. Create a sync task and configure your source and destination file systems.
3. Start your sync task to begin syncing files from the source file system to the Amazon EFS file system.
4. Monitor your sync task on the Amazon EFS console or from Amazon CloudWatch. For more
information, see Monitoring EFS File Sync with Amazon CloudWatch (p. 75).
For more details on the EFS File Sync process, see the following:
• For information about how to sync files from an on-premises file system to Amazon EFS, see
Walkthrough 7: Sync Files from an On-Premises File System to Amazon EFS by Using EFS File
Sync (p. 146).
• For information about how to sync files from Amazon EC2 to Amazon EFS, see Walkthrough 8: Sync a
File System from Amazon EC2 to Amazon EFS Using EFS File Sync (p. 151).
17

Amazon Elastic File System User Guide
Step 5: Clean Up Resources and Protect Your AWS Account
Step 5: Clean Up Resources and Protect Your AWS
Account
This guide includes walkthroughs that you can use to further explore Amazon EFS. Before you perform
this clean-up step, you can use the resources you've created and connected to in this Getting Started
exercise in those walkthroughs. For more information, see Walkthroughs (p. 110). After you have
finished the walkthroughs or if you don't want to explore the walkthroughs, you should follow these
steps to clean up your resources and protect your AWS account.
To clean up resources and protect your AWS account
1. Connect to your Amazon EC2 instance.
2. Unmount the Amazon EFS file system with the following command.
$ sudo umount efs
3. Open the Amazon EFS console at https://console.aws.amazon.com/efs/.
4. Choose the Amazon EFS file system that you want to delete from the list of file systems.
5. For Actions, choose Delete file system.
6. In the Permanently delete file system dialog box, type the file system ID for the Amazon EFS file
system that you want to delete, and then choose Delete File System.
7. Open the Amazon EC2 console at https://console.aws.amazon.com/ec2/.
8. Choose the Amazon EC2 instance that you want to terminate from the list of instances.
9. For Actions, choose Instance State and then choose Terminate.
10. In Terminate Instances, choose Yes, Terminate to terminate the instance that you created for this
Getting Started exercise.
11. In the navigation pane, choose Security Groups.
12. Select the name of the security group that you created for this Getting Started exercise in Step 1:
Create Your EC2 Resources and Launch Your EC2 Instance (p. 11) as a part of the Amazon EC2
instance launch wizard.
Warning
Don't delete the default security group for your VPC.
13. For Actions, choose Delete Security Group.
14. In Delete Security Group, choose Yes, Delete to delete the security group you created for this
Getting Started exercise.
18

Amazon Elastic File System User Guide
Creating Resources for Amazon EFS
Amazon EFS provides elastic, shared file storage that is POSIX-compliant. The file system you create
supports concurrent read and write access from multiple Amazon EC2 instances and is accessible from all
of the Availability Zones in the AWS Region where it is created.
You can mount an Amazon EFS file system on EC2 instances in your Amazon Virtual Private Cloud
(Amazon VPC) using the Network File System versions 4.0 and 4.1 protocol (NFSv4). For more
information, see Amazon EFS: How It Works (p. 3).
Topics
•Creating an Amazon Elastic File System (p. 20)
•Creating Mount Targets (p. 23)
•Creating Security Groups (p. 27)
As an example, suppose you have one or more EC2 instances launched in your VPC. Now you want to
create and use a file system on these instances. Following are the typical steps you need to perform to
use Amazon EFS file systems in the VPC:
•Create an Amazon EFS file system – When creating a file system, we recommend that you consider
using the Name tag because the Name tag value appears in the console and makes it easier to identify.
You can also add other optional tags to the file system.
•Create mount targets for the file system – To access the file system in your VPC and mount the file
system to your Amazon EC2 instance, you must create mount targets in the VPC subnets.
•Create security groups – Both an Amazon EC2 instance and a mount target need to have associated
security groups. These security groups act as a virtual firewall that controls the traffic between them.
You can use the security group you associated with the mount target to control inbound traffic to your
file system by adding an inbound rule to the mount target security group that allows access from a
specific EC2 instance. Then, you can mount the file system only on that EC2 instance.
If you are new to Amazon EFS, we recommend that you try the following exercises that provide a first-
hand, end-to-end experience of using an Amazon EFS file system:
•Getting Started (p. 10) – The Getting Started exercise provides a console-based end-to-end setup in
which you create a file system, mount it on an EC2 instance, and test the setup. The console takes care
of many things for you and helps you set up the end-to-end experience quickly.
•Walkthrough 1: Create Amazon EFS File System and Mount It on an EC2 Instance Using the AWS
CLI (p. 110) – The walkthrough is similar to the Getting Started exercise, but it uses the AWS
Command Line Interface (AWS CLI) to perform most of the tasks. Because the AWS CLI commands
closely map to the Amazon EFS API, the walkthrough can help you familiarize yourself with the
Amazon EFS API operations.
For more information about creating and accessing a file system, see the following topics.
Topics
•Creating an Amazon Elastic File System (p. 20)
•Creating Mount Targets (p. 23)
19

Amazon Elastic File System User Guide
Creating File Systems
•Creating Security Groups (p. 27)
Creating an Amazon Elastic File System
Following, you can find an explanation about how to create an Amazon EFS file system and optional tags
for the file system. This section explains how to create these resources using both the console and the
AWS Command Line Interface (AWS CLI).
Note
If you are new to Amazon EFS, we recommend you go through the Getting Started exercise,
which provides console-based end-to-end instructions to create and access a file system in your
VPC. For more information, see Getting Started (p. 10).
Topics
•Requirements (p. 20)
•Permissions Required (p. 20)
•Creating a File System (p. 21)
Requirements
To create a file system, the only requirement is that you create a token to ensure idempotent
operation. If you use the console, it generates the token for you. For more information, see
CreateFileSystem (p. 170). After you create a file system, Amazon EFS returns the file system
description as JSON. Following is an example.
{
"SizeInBytes": {
"Value": 6144
},
"CreationToken": "console-d7f56c5f-e433-41ca-8307-9d9c0example",
"CreationTime": 1422823614.0,
"FileSystemId": "fs-c7a0456e",
"PerformanceMode" : "generalPurpose",
"NumberOfMountTargets": 0,
"LifeCycleState": "available",
"OwnerId": "231243201240"
}
If you use the console, the console displays this information in the user interface.
After creating a file system, you can create optional tags for the file system. Initially, the file system
has no name. You can create a Name tag to assign a file system name. Amazon EFS provides the
CreateTags (p. 183) operation for creating tags. Each tag is simply a key-value pair.
Permissions Required
For all operations, such as creating a file system and creating tags, a user must have AWS Identity and
Access Management permissions for the corresponding API action and resource.
You can perform any Amazon EFS operations using the root credentials of your AWS account, but using
root credentials is not recommended. If you create IAM users in your account, you can grant them
permissions for Amazon EFS actions with user policies. You can also use roles to grant cross-account
permissions. For more information about managing permissions for the API actions, see Authentication
and Access Control for Amazon EFS (p. 157).
20
Amazon Elastic File System User Guide
Creating a File System
Creating a File System
You can create a file system using the Amazon EFS console or using the AWS Command Line Interface.
You can also create file systems programmatically using AWS SDKs.
Creating a File System Using the Amazon EFS Console
The Amazon EFS console provides an integrated experience. In the console, you can specify VPC subnets
to create mount targets and optional file system tags when you create a file system.
To create the file system mount targets in your VPC, you must specify VPC subnets. The console
prepopulates the list of VPCs in your account that are in the selected AWS Region. First, you select your
VPC, and then the console lists the Availability Zones in the VPC. For each Availability Zone, you can
select a subnet from the list. After you select a subnet, you can either specify an available IP address in
the subnet or let Amazon EFS choose an address.
When creating a file system, you also choose a performance mode. There are two performance modes to
choose from—General Purpose and Max I/O. For the majority of use cases, we recommend that you use
the general purpose performance mode for your file system. For more information about the different
performance modes, see Performance Modes (p. 82).
You can enable encryption when creating a file system. If you enable encryption for your file system,
all data and metadata stored on it is encrypted. For more information about EFS encryption, see
Security (p. 88).
When you choose Create File System, the console sends a series of API requests to create the file system.
The console then sends API requests to create tags and mount targets for the file system. The following
example console shows the MyFS file system. It has the Name tag and three mount targets that are
being created. The mount target lifecycle state must be Available before you can use it to mount the file
system on an EC2 instance.
For instructions on how to create an Amazon EFS file system using the console, see Step 1: Create Your
EC2 Resources and Launch Your EC2 Instance (p. 11).
Creating a File System Using the AWS CLI
When using the AWS CLI, you create these resources in order. First, you create a file system. Then, you
can create mount targets and optional tags for the file system using corresponding AWS CLI commands.
21

Amazon Elastic File System User Guide
Creating a File System
The following examples use the adminuser as the profile parameter value. You need to use an
appropriate user profile to provide your credentials. For information about the AWS CLI, see Getting Set
Up with the AWS Command Line Interface in the AWS Command Line Interface User Guide.
• To create a file system, use the Amazon EFS create-file-system CLI command (corresponding
operation is CreateFileSystem (p. 170)), as shown following.
$ aws efs create-file-system \
--creation-token creation-token \
--region aws-region \
--profile adminuser
For example, the following create-file-system command creates a file system in the us-west-2
region. The command specifies MyFirstFS as the creation token. For a list of AWS regions where you
can create an Amazon EFS file system, see the Amazon Web Services General Reference.
$ aws efs create-file-system \
--creation-token MyFirstFS \
--region us-west-2 \
--profile adminuser
After successfully creating the file system, Amazon EFS returns the file system description as JSON, as
shown in the following example.
{
"SizeInBytes": {
"Value": 6144
},
"CreationToken": "MyFirstFS",
"CreationTime": 1422823614.0,
"FileSystemId": "fs-c7a0456e",
"PerformanceMode" : "generalPurpose",
"NumberOfMountTargets": 0,
"LifeCycleState": "available",
"OwnerId": "231243201240"
}
Amazon EFS also provides the describe-file-systems CLI command (corresponding operation
is DescribeFileSystems (p. 193)) that you can use to retrieve a list of file systems in your account, as
shown following:
$ aws efs describe-file-systems \
--region aws-region \
--profile adminuser
Amazon EFS returns a list of the file systems in your AWS account created in the specified region.
• To create tags, use the Amazon EFS create-tags CLI command (the corresponding API operation is
CreateTags (p. 183)). The following example command adds the Name tag to the file system.
aws efs create-tags \
--file-system-id File-System-ID \
--tags Key=Name,Value=SomeExampleNameValue \
--region aws-region \
--profile adminuser
You can retrieve a list of tags created for a file system using the describe-tags CLI command
(corresponding operation is DescribeTags (p. 203)), as shown following.
22

Amazon Elastic File System User Guide
Creating Mount Targets
aws efs describe-tags \
--file-system-id File-System-ID \
--region aws-region \
--profile adminuser
Amazon EFS returns these descriptions as JSON. The following is an example of tags returned by the
DescribeTags operation. It shows a file system as having only the Name tag.
{
"Tags": [
{
"Value": "MyFS",
"Key": "Name"
}
]
}
Creating Mount Targets
After you create a file system, you can create mount targets and then you can mount the file system on
EC2 instances in your VPC, as shown in the following illustration.
For more information about creating a file system, see Creating an Amazon Elastic File System (p. 20).
The mount target security group acts as a virtual firewall that controls the traffic. For example, it
determines which Amazon EC2 instances can access the file system. This section explains the following:
• Mount target security groups and how to enable traffic.
• How to mount the file system on your Amazon EC2 instance.
23
Amazon Elastic File System User Guide
Creating a Mount Target Using the Amazon EFS console
• NFS-level permissions considerations.
Initially, only the root user on the Amazon EC2 instance has read-write-execute permissions on the file
system. This topic discusses NFS-level permissions and provides examples that show you how to grant
permissions in common scenarios. For more information, see Network File System (NFS)–Level Users,
Groups, and Permissions (p. 30).
You can create mount targets for a file system using the console, using AWS Command Line Interface, or
programmatically using the AWS SDKs. When using the console, you can create mount targets when you
first create a file system or after the file system is created.
Creating a Mount Target Using the Amazon EFS
console
Perform the steps in the following procedure to create a mount target using the console. As you follow
the console steps, you can also create one or more mount targets. You can create one mount target for
each Availability Zone in your VPC.
To create an Amazon EFS file system (console)
1. Sign in to the AWS Management Console and open the Amazon EFS console at https://
console.aws.amazon.com/efs/.
2. Choose Create File System.
Note
The console shows the preceding page only if you don't already have any Amazon EFS file
systems. If you have created file systems, the console shows a list of your file systems. On
the list page, choose Create File System.
3. On the Step 1: Configure File System Access page, select the VPC and the Availability Zone in the
VPC where you want the console to create one or more mount targets for the file system that you
are creating. This VPC should be the same Amazon VPC in which you created your Amazon EC2
instance in the preceding section.
a. Select a Amazon VPC from the VPC list.
24
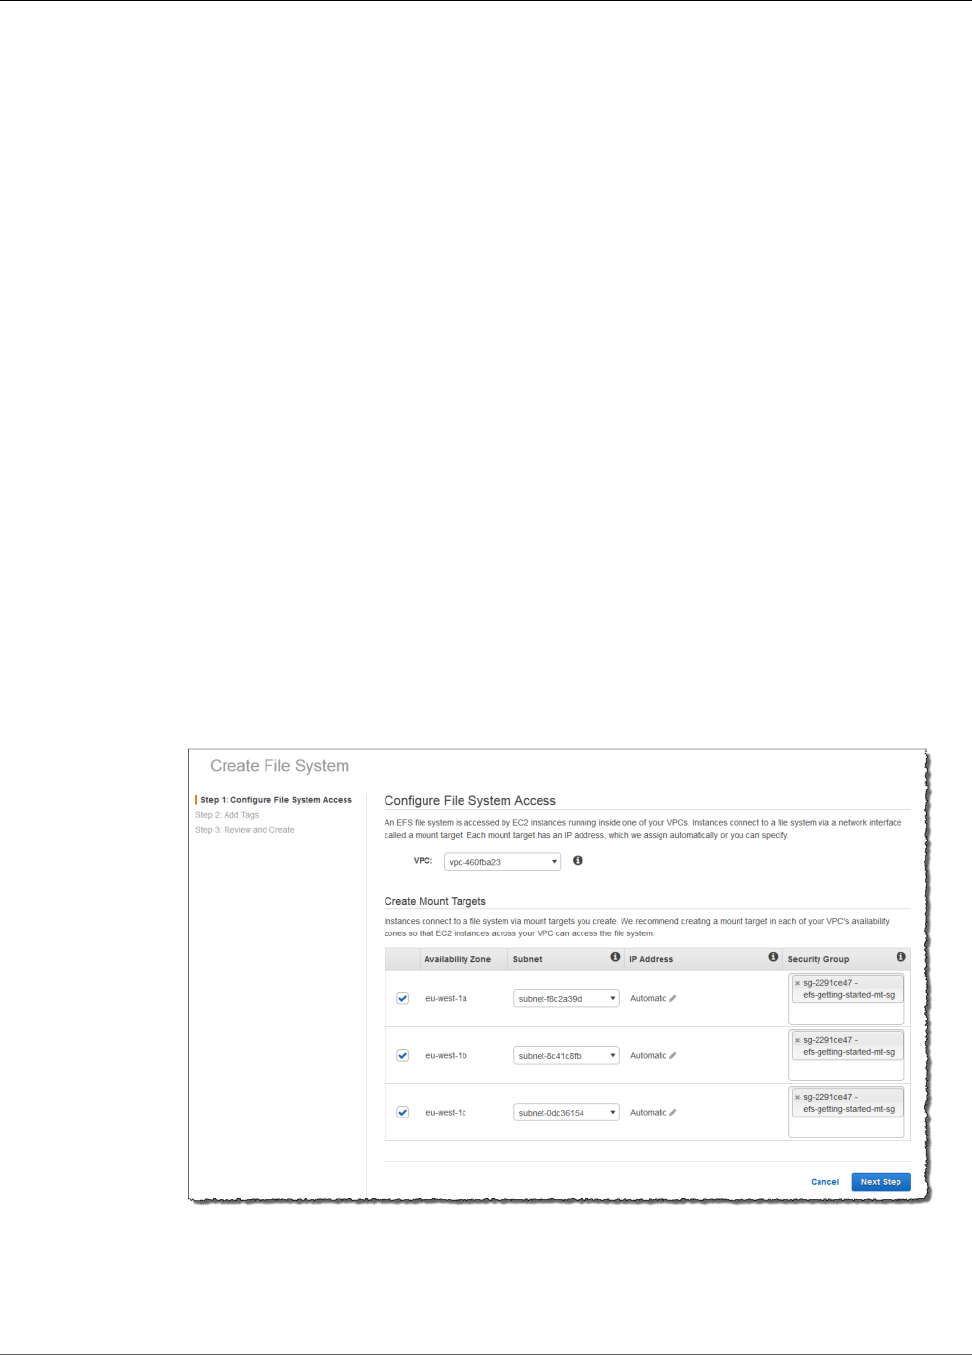
Amazon Elastic File System User Guide
Creating a Mount Target Using the Amazon EFS console
Warning
If the Amazon VPC you want is not listed, verify the region in the global navigation in
the Amazon EFS console.
b. In the Create Mount Targets section, select all of the Availability Zones listed.
We recommend that you create mount targets in all Availability Zones. You can then mount
your file system on Amazon EC2 instances created in any of the Amazon VPC subnets.
Note
You can access a file system on an Amazon EC2 instance in one Availability Zone
by using a mount target created in another Availability Zone, but there are costs
associated with cross–Availability Zone access.
For each Availability Zone, do the following:
• Choose a Subnet from the list where you want to create the mount target.
You can create one mount target in each Availability Zone. If you have multiple subnets in an
Availability Zone where you launched your Amazon EC2 instance, you don't have to create
mount target in the same subnet, it can be any subnet in the Availability Zone.
• Leave IP Address select to Automatic. Amazon EFS will select one of the available IP
addresses for the mount target.
• Specify the Security Group you created specifically for the mount target, or the default
security group for the default VPC. Both security groups will have the necessary inbound rule
that allows inbound access from the EC2 instance security group.
Click in the Security Group box and the console will show you the available security groups.
Here you can select a specific security group and remove the Default security group, or leave
the default in place, depending on how you configured your Amazon EC2 instance.
4. On the Step 2: Configure optional settings page, specify a value for the Name tag
(MyExampleFileSystem) and choose your performance mode.
The console prepopulates the Name tag because Amazon EFS uses its value as the file system
display name.
25

Amazon Elastic File System User Guide
Creating a Mount Target Using the Amazon EFS console
5. On the Step 3: Review and Create page, choose Create File System.
6. The console shows the newly created file system on the File Systems page. Verify that all mount
targets show the Life Cycle State as Available. It might take a few moments before the mount
26

Amazon Elastic File System User Guide
Creating a Mount Target using the AWS CLI
targets become available (you can expand/collapse the file system in the EFS console to force it to
refresh).
7. Under File system access, you'll see the file system's DNS name. Make a note of this DNS name.
In the next section, you use the DNS name to mount the file system on the Amazon EC2 instance
through the mount target. The Amazon EC2 instance on which you mount the file system can
resolve the file system's DNS name to the mount target's IP address.
Now you are ready to mount the Amazon EFS file system on an Amazon EC2 instance.
Creating a Mount Target using the AWS CLI
To create a mount target using AWS CLI, use the create-mount-target CLI command (corresponding
operation is CreateMountTarget (p. 176)), as shown following.
$ aws efs create-mount-target \
--file-system-id file-system-id \
--subnet-id subnet-id \
--security-group ID-of-the-security-group-created-for-mount-target \
--region aws-region \
--profile adminuser
After successfully creating the mount target, Amazon EFS returns the mount target description as JSON
as shown in the following example.
{
"MountTargetId": "fsmt-f9a14450",
"NetworkInterfaceId": "eni-3851ec4e",
"FileSystemId": "fs-b6a0451f",
"LifeCycleState": "available",
"SubnetId": "subnet-b3983dc4",
"OwnerId": "23124example",
"IpAddress": "10.0.1.24"
}
You can also retrieve a list of mount targets created for a file system using the describe-mount-
targets CLI command (corresponding operation is DescribeMountTargets (p. 197)), as shown
following.
$ aws efs describe-mount-targets \
--file-system-id file-system-id \
--region aws-region \
--profile adminuser
For an example, see Walkthrough 1: Create Amazon EFS File System and Mount It on an EC2 Instance
Using the AWS CLI (p. 110).
Creating Security Groups
Note
The following section is specific to Amazon EC2 and discusses how to create security groups
so you can use Secure Shell (SSH) to connect to any instances that have mounted Amazon EFS
file systems. If you're not using SSH to connect to your Amazon EC2 instances, you can skip this
section.
27
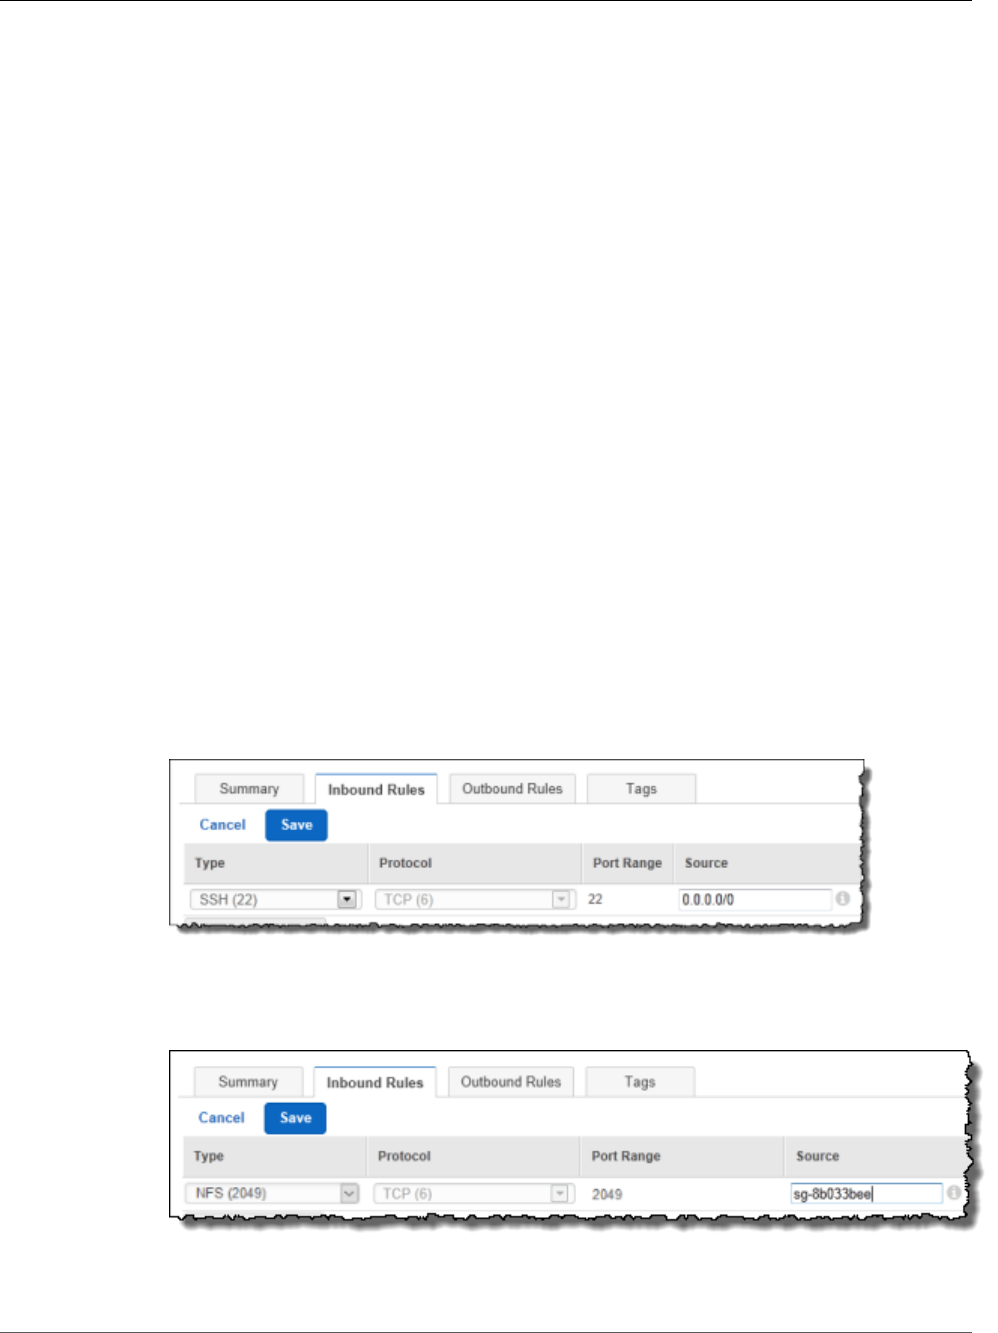
Amazon Elastic File System User Guide
Creating Security Groups Using
the AWS Management Console
Both an Amazon EC2 instance and a mount target have associated security groups. These security groups
act as a virtual firewall that controls the traffic between them. If you don't provide a security group when
creating a mount target, Amazon EFS associates the default security group of the VPC with it.
Regardless, to enable traffic between an EC2 instance and a mount target (and thus the file system), you
must configure the following rules in these security groups:
• The security groups you associate with a mount target must allow inbound access for the TCP protocol
on the NFS port from all EC2 instances on which you want to mount the file system.
• Each EC2 instance that mounts the file system must have a security group that allows outbound access
to the mount target on the NFS port.
For more information about security groups, see Amazon EC2 Security Groups in the Amazon EC2 User
Guide for Linux Instances.
Creating Security Groups Using the AWS
Management Console
You can use the AWS Management Console to create security groups in your VPC. To connect your
Amazon EFS file system to your Amazon EC2 instance, you'll need to create two security groups: one for
your Amazon EC2 instance and another for your Amazon EFS mount target.
1. Create two security groups in your VPC. For instructions, see Creating a Security Group in the
Amazon VPC User Guide.
2. In the VPC console, verify the default rules for these security groups. Both security groups should
have only an outbound rule that allows traffic to leave.
3. You need to authorize additional access to the security groups as follows:
a. Add a rule to the EC2 security group to allow inbound access, as shown following. Optionally,
you can restrict the Source address.
For instructions, see Adding and Removing Rules in the Amazon VPC User Guide.
b. Add a rule to the mount target security group to allow inbound access from the EC2 security
group, as shown following (where the EC2 security group is identified as the source):
28

Amazon Elastic File System User Guide
Creating Security Groups Using the AWS CLI
Note
You don't need to add an outbound rule because the default outbound rule allows all traffic
to leave (otherwise, you will need to add an outbound rule to open TCP connection on the
NFS port, identifying the mount target security group as the destination).
4. Verify that both security groups now authorize inbound and outbound access as described in this
section.
Creating Security Groups Using the AWS CLI
For an example that shows how to create security groups using the AWS CLI, see Step 1: Create Amazon
EC2 Resources (p. 112).
29

Amazon Elastic File System User Guide
Related Topics
Using File Systems
Amazon Elastic File System presents a standard file system interface that support full file system access
semantics. Using NFSv4.1, you can mount your Amazon EFS file system on any Amazon Elastic Compute
Cloud (Amazon EC2) Linux-based instance. Once mounted, you can work with the files and directories
just like you would with a local file system. For more information on mounting, see Mounting File
Systems (p. 62).
You can also use EFS File Sync to copy file from any file system to Amazon EFS. For more information on
mounting, see Amazon EFS File Sync (p. 33).
After you create a file system and mount it on your EC2 instance, there are a few things you need to
know in order to use it effectively:
•Users, groups, and related NFS-Level permissions management – When you first create the file
system, there is only one root directory at /. By default, only the root user (UID 0) has read-write-
execute permissions. In order for other users to modify the file system, the root user must explicitly
grant them access. For more information, see Network File System (NFS)–Level Users, Groups, and
Permissions (p. 30).
Related Topics
Amazon EFS: How It Works (p. 3)
Getting Started (p. 10)
Walkthroughs (p. 110)
Network File System (NFS)–Level Users, Groups,
and Permissions
Topics
•Example Amazon EFS File System Use Cases and Permissions (p. 31)
•User and group ID permissions on files and directories within a file system (p. 32)
•No Root Squashing (p. 32)
•Permissions Caching (p. 33)
•Changing File System Object Ownership (p. 33)
After creating a file system, by default, only the root user (UID 0) has read-write-execute permissions. In
order for other users to modify the file system, the root user must explicitly grant them access.
Amazon EFS file system objects have a Unix-style mode associated with them. This value defines the
permissions for performing actions on that object, and users familiar with Unix-style systems can easily
understand how Amazon EFS behaves with respect to these permissions.
30
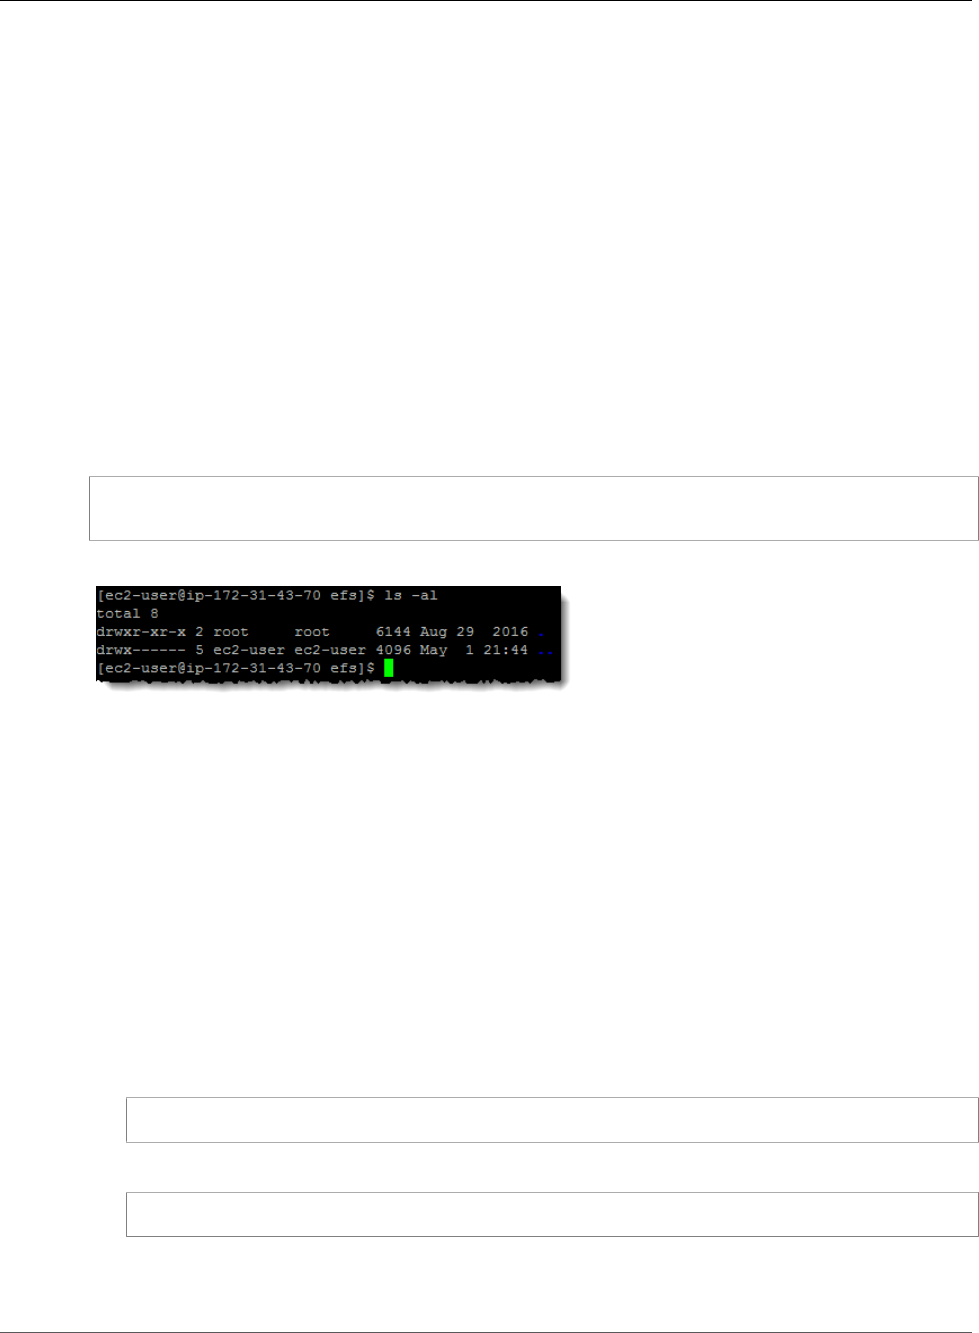
Amazon Elastic File System User Guide
Example Amazon EFS File System
Use Cases and Permissions
Additionally, on Unix-style systems, users and groups are mapped to numeric identifiers, which Amazon
EFS uses to represent file ownership. File system objects (that is, files, directories, etc.) on Amazon
EFS are owned by a single owner and a single group. Amazon EFS uses these numeric IDs to check
permissions when a user attempts to access a file system object.
This section provides examples of permissions and discusses Amazon EFS–specific NFS permissions
considerations.
Example Amazon EFS File System Use Cases and
Permissions
After you create an Amazon EFS file system and mount targets for the file system in your VPC, you can
mount the remote file system locally on your Amazon EC2 instance. The mount command can mount
any directory in the file system. However, when you first create the file system, there is only one root
directory at /.
The following mount command mounts the root directory of an Amazon EFS file system, identified by
the file system DNS name, on the /efs-mount-point local directory.
sudo mount -t nfs -o nfsvers=4.1,rsize=1048576,wsize=1048576,hard,timeo=600,retrans=2 file-
system-id.efs.aws-region.amazonaws.com:/ efs-mount-point
Note that the root user and root group own the mounted directory.
The initial permissions mode allows:
•read-write-execute permissions to the owner root
•read-execute permissions to the group root
•read-execute permissions to others
Note that only the root user can modify this directory. The root user can also grant other users
permissions to write to this directory. For example:
• Create writable per-user subdirectories. For step-by-step instructions, see Walkthrough 3: Create
Writable Per-User Subdirectories and Configure Automatic Remounting on Reboot (p. 127).
• Allow users to write to the Amazon EFS file system root. A user with root privileges can grant other
users access to the file system.
• To change the Amazon EFS file system ownership to a non-root user and group, use the following:
$ sudo chown user:group /EFSroot
• To change permissions of the file system to something more permissive, use the following:
$ sudo chmod 777 /EFSroot
This command grants read-write-execute privileges to all users on all EC2 instances that have the
file system mounted.
31
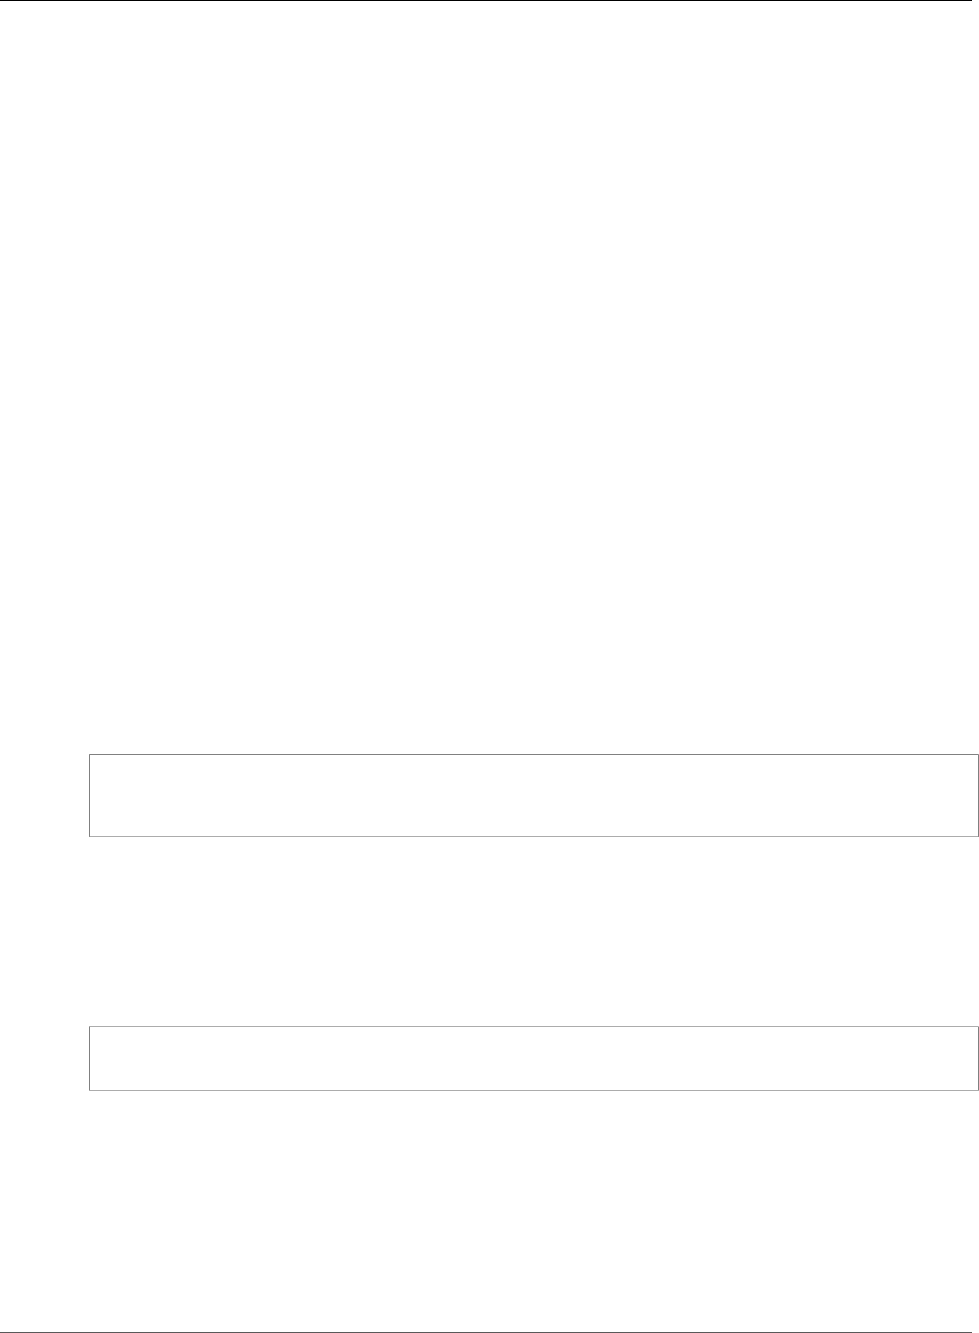
Amazon Elastic File System User Guide
User and group ID permissions on files
and directories within a file system
User and group ID permissions on files and
directories within a file system
Files and directories in an Amazon EFS file system support standard Unix-style read/write/execute
permissions based on the user ID and group ID asserted by the mounting NFSv4.1 client. When a user
attempts to access files and directories, Amazon EFS checks their user ID and group IDs to verify the user
has permission to access the objects. Amazon EFS also uses these IDs as the owner and group owner for
new files and directories the user creates. Amazon EFS does not examine user or group names—it only
uses the numeric identifiers.
Note
When you create a user on an EC2 instance, you can assign any numeric UID and GID to the user.
The numeric user IDs are set in the /etc/passwd file on Linux systems. The numeric group IDs
are in the /etc/group file. These files define the mappings between names and IDs. Outside of
the EC2 instance, Amazon EFS does not perform any authentication of these IDs, including the
root ID of 0.
If a user accesses an Amazon EFS file system from two different EC2 instances, depending on whether
the UID for the user is the same or different on those instances, you see different behavior as follows:
• If the user IDs are the same on both EC2 instances, Amazon EFS considers them to be the same user,
regardless of the EC2 instance they use. The user experience when accessing the file system is the
same from both EC2 instances.
• If the user IDs are not the same on both EC2 instances, Amazon EFS considers them to be different
users, and the user experience will not be the same when accessing the Amazon EFS file system from
the two different EC2 instances.
• If two different users on different EC2 instances share an ID, Amazon EFS considers them the same
user.
You might consider managing user ID mappings across EC2 instances consistently. Users can check their
numeric ID using the id command, as shown following:
$ id
uid=502(joe) gid=502(joe) groups=502(joe)
Turn Off the ID Mapper
The NFS utilities in the operating system include a daemon called an ID Mapper that manages mapping
between user names and IDs. In Amazon Linux, the daemon is called rpc.idmapd and on Ubuntu is
called idmapd. It translates user and group IDs into names, and vice versa. However, Amazon EFS deals
only with numeric IDs. We recommend you turn this process off on your EC2 instances (on Amazon Linux
the mapper is usually disabled, in which case don't enable the ID mapper), as shown following:
$ service rpcidmapd status
$ sudo service rpcidmapd stop
No Root Squashing
When root squashing is enabled, the root user is converted to a user with limited permissions on the NFS
server.
Amazon EFS behaves like a Linux NFS server with no_root_squash. If a user or group ID is 0, Amazon
EFS treats that user as the root user, and bypasses permissions checks (allowing access and modification
to all file system objects).
32

Amazon Elastic File System User Guide
Permissions Caching
Permissions Caching
Amazon EFS caches file permissions for a small time period. As a result, there may be a brief window
where a user who had access to a file system object but the access was revoked recently can still access
that object.
Changing File System Object Ownership
Amazon EFS enforces the POSIX chown_restricted attribute. This means only the root user can
change the owner of a file system object. While the root or the owner user can change the owner group
of a file system object, unless the user is root, the group can only be changed to one that the owner user
is a member of.
Amazon EFS File Sync
Using Amazon EFS File Sync, you can easily and efficiently sync files from an existing source file system
into a destination Amazon EFS file system. The source file system can be on-premises or in the cloud.
With EFS File Sync, you can migrate file-based applications to Amazon EC2 and sync existing datasets
into Amazon EFS. EFS File Sync copies your file data, and file system metadata such as ownership,
timestamps, and access permissions.
Topics
•Requirements for EFS File Sync (p. 33)
•EFS File Sync Architecture (p. 36)
Requirements for EFS File Sync
Unless otherwise noted, the following are required for creating Amazon EFS File Sync.
Hardware Requirements
When deploying Amazon EFS File Sync on-premises, you must make sure that the underlying hardware
on which you are deploying the file sync VM is able to dedicate the following minimum resources:
• Four virtual processors assigned to the VM.
• 16 GB of RAM assigned to the VM
• 80 GB of disk space for installation of VM image and system data
When deploying Amazon EFS File Sync on Amazon EC2, the instance size must be at least xlarge for
your Amazon EFS File Sync to function. We recommend using one of the Memory optimized r4.xlarge
instance types.
Supported Hypervisors and Host Requirements
You can choose to run EFS File Sync either on-premises as a virtual machine (VM), or in AWS as an
Amazon Elastic Compute Cloud (Amazon EC2) instance.
EFS File Sync supports the following hypervisor versions and hosts:
• VMware ESXi Hypervisor (version 4.1, 5.0, 5.1, 5.5, 6.0 or 6.5)—A free version of VMware is available on
the VMware website. You will also need a VMware vSphere client to connect to the host.
33
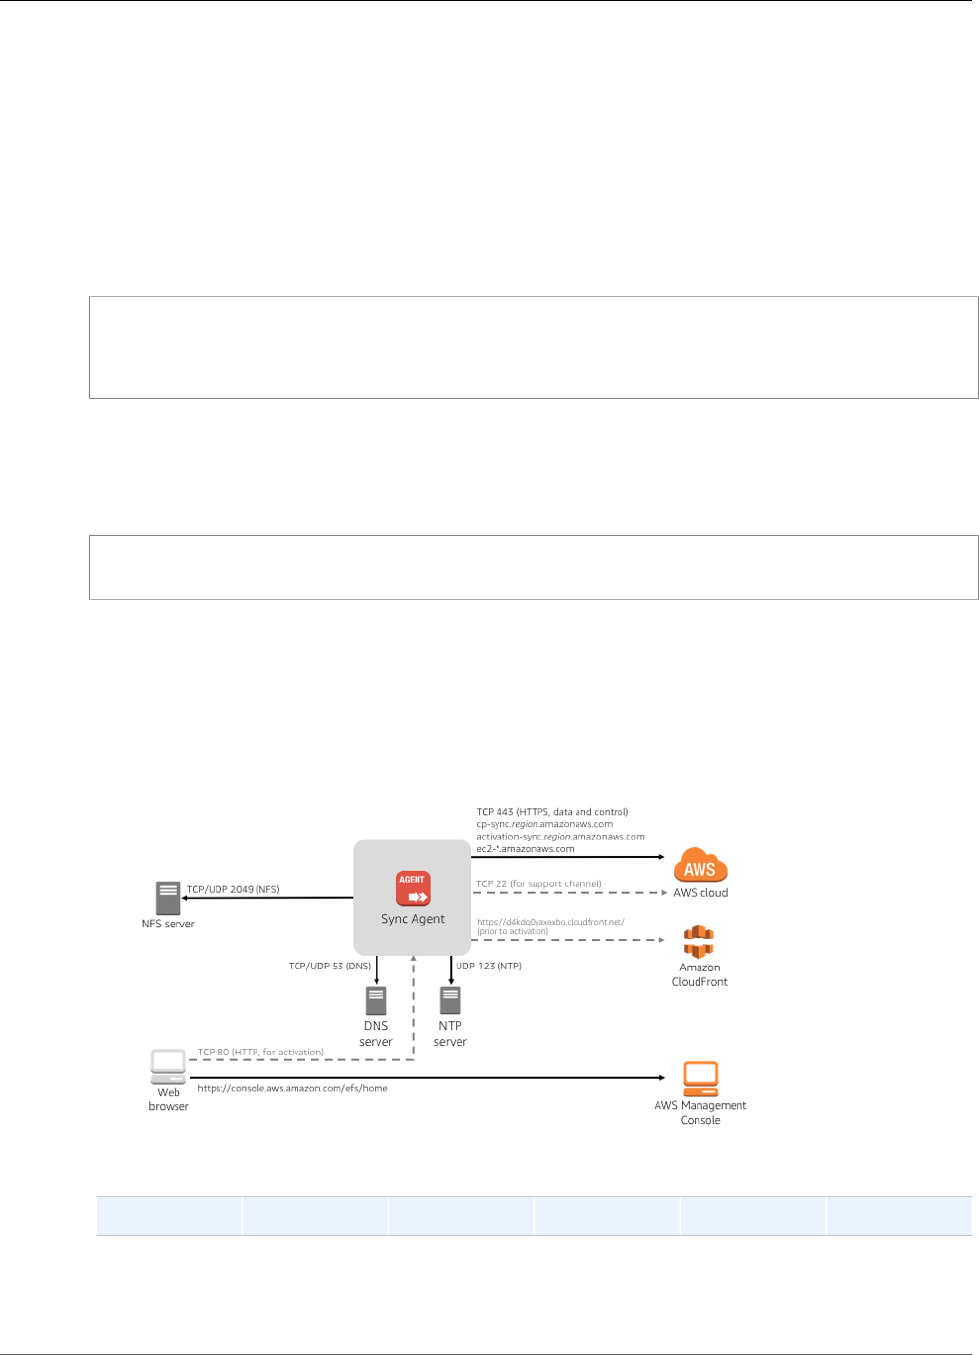
Amazon Elastic File System User Guide
Requirements for EFS File Sync
• EC2 instance—EFS File Sync provides an Amazon Machine Image (AMI) that contains the EFS File Sync
VM image. We recommend using the Memory optimized r4.xlarge instance types.
Allowing EFS File Sync Access through Firewalls and Routers
EFS File Sync requires access to the following endpoints to communicate with AWS. If you use a firewall
or router to filter or limit network traffic, you must configure your firewall and router to allow these
service endpoints for outbound communication to AWS.
The following endpoints are required by EFS File Sync.
cp-sync.$region.amazonaws.com
activation-sync.$region.amazonaws.com
ec2-*.amazonaws.com
For information about supported AWS Regions, see Amazon Elastic File System in the AWS General
Reference.
The CloudFront endpoint is required prior to activation for the sync agent to get the list of available AWS
Regions.
https://d4kdq0yaxexbo.cloudfront.net/
Network and Port Requirements
EFS File Sync requires the following ports for its operation. This section shows an illustration of the
required ports and lists the ports required by EFS File Sync.
The following illustration shows the ports to open for EFS File Sync deployed on premise.
Ports required by EFS File Sync
From To Protocol Port How Used
EFS File Sync
VM
AWS TCP 443 (HTTPS) For
communication
from EFS File
34

Amazon Elastic File System User Guide
Requirements for EFS File Sync
From To Protocol Port How Used
Sync VM to the
AWS service
endpoint. For
information
about service
endpoints,
see Allowing
EFS File Sync
Access through
Firewalls and
Routers (p. 34).
Your Web
browser
EFS File Sync
VM
TCP 80 (HTTP) By local
systems to
obtain the
sync agent
activation key.
Port 80 is only
used during
activation of
the EFS File
Sync agent.
EFS File Sync
VM does not
require port 80
to be publicly
accessible.
The required
level of access
to port 80
depends on
your network
configuration.
If you activate
your sync
agent from the
Amazon EFS
Management
Console, the
host from
which you
connect to the
console must
have access
port 80.
EFS File Sync
VM
Domain Name
Service (DNS)
server
UDP/UDP 53 (DNS) For
communication
between EFS
File Sync VM
and the DNS
server.
35
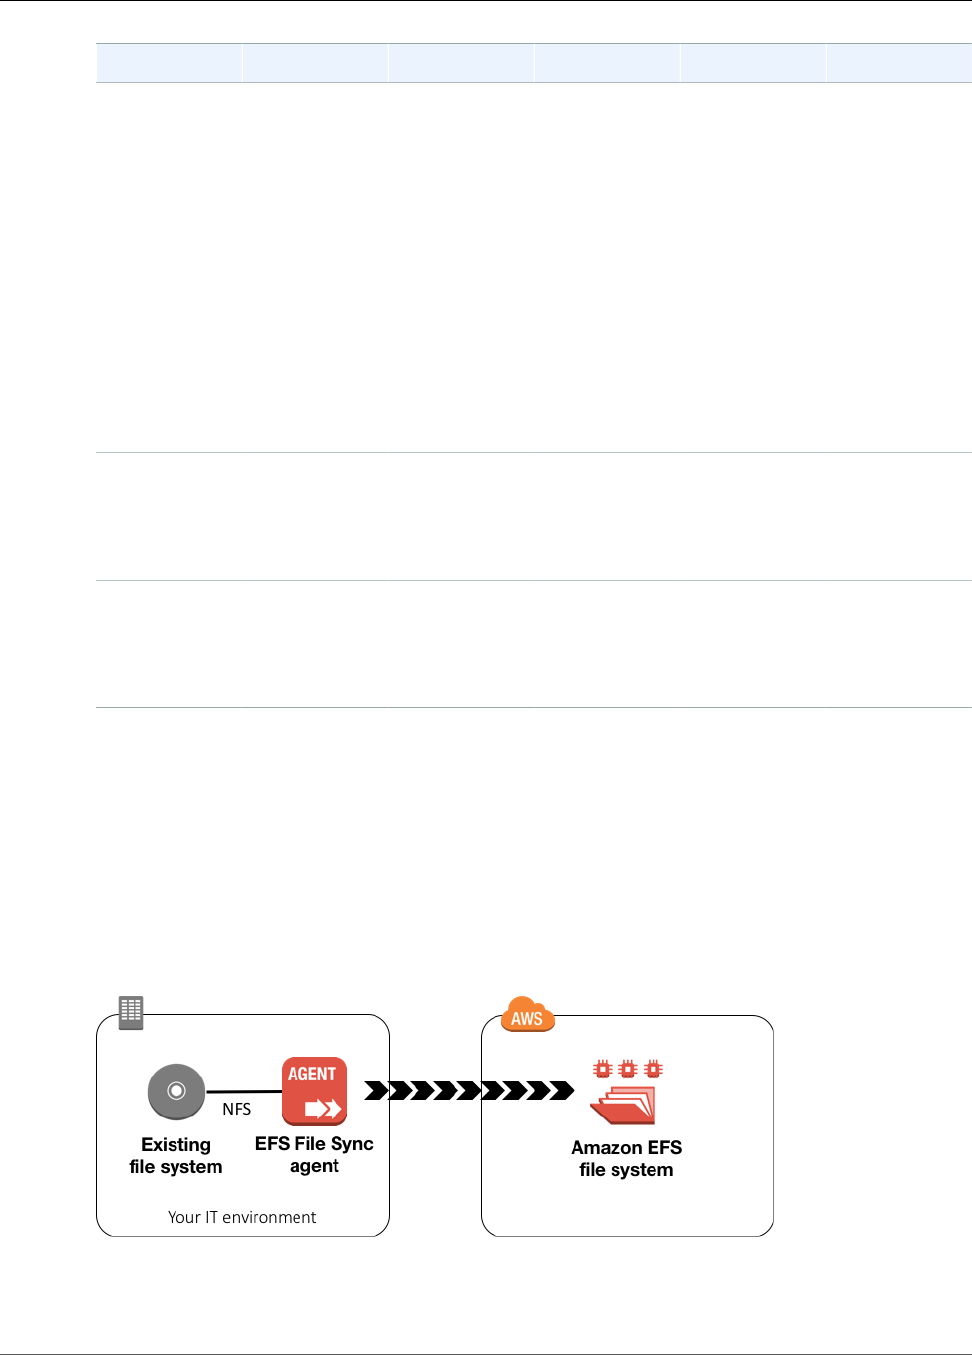
Amazon Elastic File System User Guide
EFS File Sync Architecture
From To Protocol Port How Used
EFS File Sync
VM
AWS TCP 22 (Support
channel)
Allows AWS
Support to
access your
EFS File
Sync to help
you with
troubleshooting
EFS File Sync
issues. You
don't need this
port open for
the normal
operation,
but it is
required for
troubleshooting.
EFS File Sync
VM
NTP server UDP 123 (NTP) Used by local
systems to
synchronize
VM time to the
host time.
NFS client EFS File Sync
VM
TCP/UDP 2049 (NFS) For local
systems to
connect to NFS
shares EFS File
Sync exposes.
EFS File Sync Architecture
EFS File Sync provides the following benefits:
• Efficient high-performance parallel data transfer that tolerates unreliable and high-latency networks.
• Encryption of data transferred from your IT environment to AWS.
• Data transfer rate up to five times faster than standard Linux copy tools.
The following diagram shows the EFS File Sync architecture.
To sync your existing file system to Amazon EFS with EFS File Sync, you do the following:
36

Amazon Elastic File System User Guide
EFS File Sync Architecture
1. Deploy a sync agent that can mount your source file system. The sync agent is available on the
Amazon EFS console as a downloadable virtual machine (VM) image for VMware ESXi or an Amazon
Machine Image (AMI) for Amazon EC2.
2. Create a sync task and configure the source and destination file systems. EFS File Sync accesses your
source file system through the agent by using the Network File System version 4.1 (NFSv4.1) protocol.
3. Start your sync task to begin syncing files from the source file system to the destination Amazon EFS
file system.
4. Monitor the progress of your sync task on the Amazon EFS Management Console or from Amazon
CloudWatch.
37

Amazon Elastic File System User Guide
Managing Network Accessibility
Managing Amazon EFS File Systems
File system management tasks refer to creating and deleting file systems, managing tags, and managing
network accessibility of an existing file system. Managing network accessibility is about creating and
managing mount targets.
You can perform these file system management tasks using the Amazon EFS console, AWS Command
Line Interface (AWS CLI), or programmatically, as discussed in the following sections.
Topics
•Managing File System Network Accessibility (p. 38)
•Managing File System Tags (p. 45)
•Metering – How Amazon EFS Reports File System and Object Sizes (p. 45)
•Managing Amazon EFS File Sync (p. 47)
•Deleting an Amazon EFS File System (p. 58)
•Managing Access to Encrypted File Systems (p. 59)
If you are new to Amazon EFS, we recommend that you try the following exercises that provide you with
first-hand end-to-end experience using an Amazon EFS file system:
•Getting Started (p. 10) – This exercise provides a console-based, end-to-end setup in which you create
a file system, mount it on an EC2 instance, and test the setup. The console takes care of many things
for you and thus helps you quickly set up the end-to-end experience.
•Walkthrough 1: Create Amazon EFS File System and Mount It on an EC2 Instance Using the AWS
CLI (p. 110) – This walkthrough is similar to the Getting Started exercise, but it uses the AWS CLI
to perform most of the tasks. Because the CLI commands closely map to the Amazon EFS API, the
walkthrough can help you familiarize yourself with the Amazon EFS API.
Managing File System Network Accessibility
You mount your file system on an EC2 instance in your VPC using a mount target that you create for the
file system. Managing file system network accessibility refers to managing the mount targets.
The following illustration shows how EC2 instances in a VPC access an Amazon EFS file system using a
mount target.
38
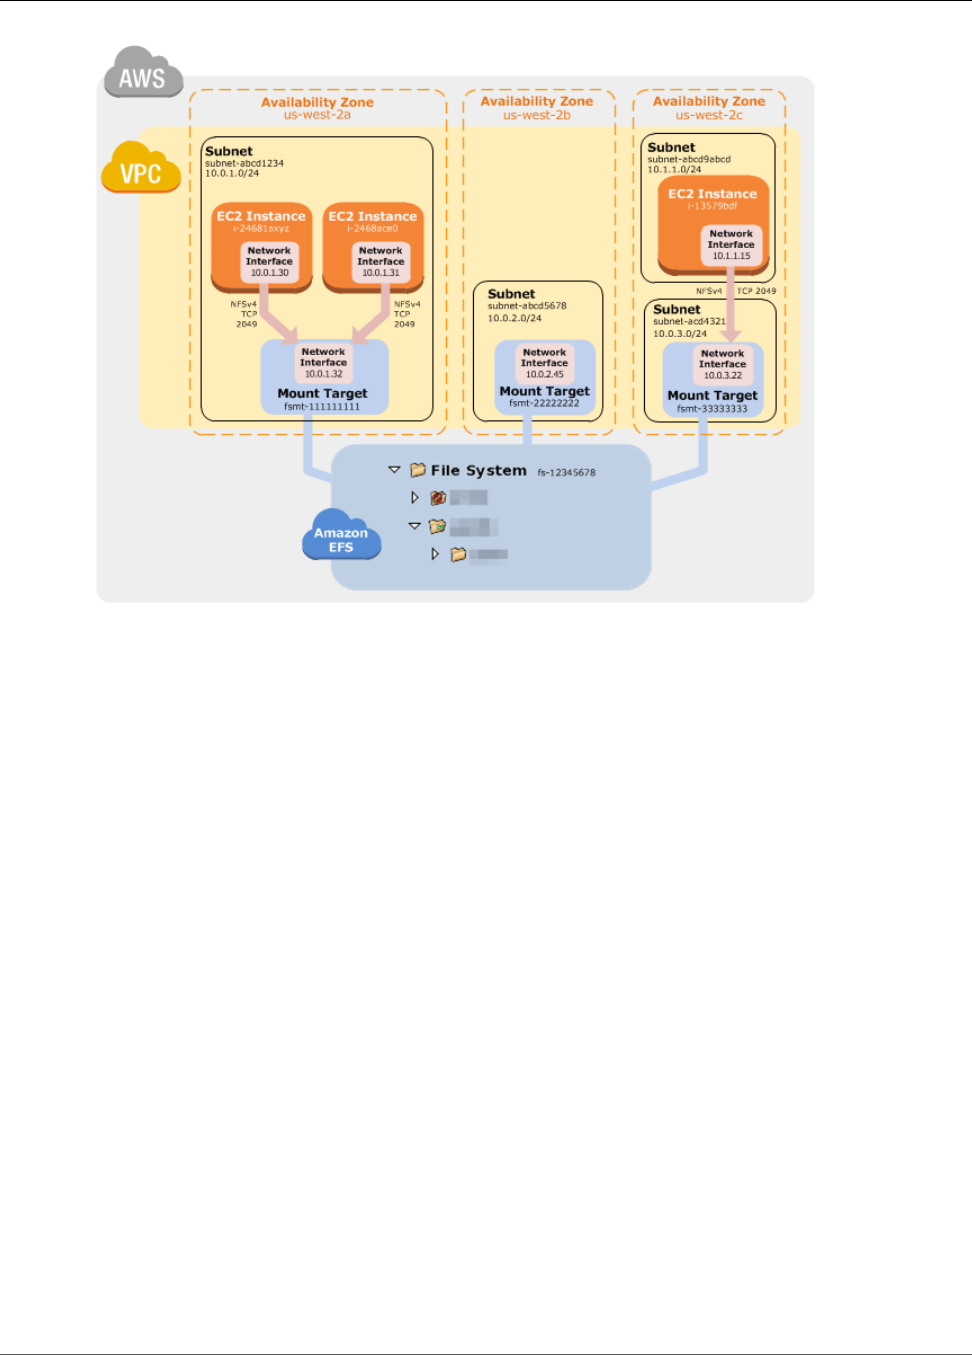
Amazon Elastic File System User Guide
Managing Network Accessibility
The illustration shows three EC2 instances launched in different VPC subnets accessing an Amazon EFS
file system. The illustration also shows one mount target in each of the Availability Zones (regardless of
number of subnets in each Availability Zone).
You can create only one mount target per Availability Zone. If an Availability Zone has multiple subnets,
as shown in one of the zones in the illustration, you create a mount target in only one of the subnets.
As long as you have one mount target in an Availability Zone, the EC2 instances launched in any of its
subnets can share the same mount target.
Managing mount targets refers to these activities:
•Creating and deleting mount targets in a VPC – At a minimum, you should create a mount target in
each Availability Zone from which you want to access the file system.
Note
We recommend you create mount targets in all the Availability Zones so you can easily mount
the file system on EC2 instances that you might launch in any of the Availability Zones.
If you delete a mount target, the operation forcibly breaks any mounts of the file system via the
mount target being deleted, which might disrupt instances or applications using those mounts. To
avoid application disruption, stop applications and unmount the file system before deleting the mount
target.
You can use a file system only in one VPC at a time. That is, you can create mount targets for the file
system in one VPC at a time. If you want to access the file system from another VPC, you must delete
the mount targets from the current VPC and then create new mount targets in another VPC.
•Updating the mount target configuration – When you create a mount target, you associate security
groups with the mount target. A security group acts as a virtual firewall that controls the traffic to and
from the mount target. You can add inbound rules to control access to the mount target, and thus the
file system. After creating a mount target, you might want to modify the security groups assigned to
them.
39

Amazon Elastic File System User Guide
Creating or Deleting Mount Targets in a VPC
Each mount target also has an IP address. When you create a mount target, you can choose an IP
address from the subnet where you are placing the mount target. If you omit a value, Amazon EFS
selects an unused IP address from that subnet.
There is no Amazon EFS operation to change the IP address after creating a mount target, so you
cannot change the IP address programmatically or by using the AWS CLI. But the console enables you
to change the IP address. Behind the scenes, the console deletes the mount target and creates the
mount target again.
Warning
If you change the IP address of a mount target, you will break any existing file system mounts
and you will need to remount the file system.
None of the configuration changes to file system network accessibility affect the file system itself. Your
file system and data remain.
The following sections provide information about managing network accessibility of your file system.
Topics
•Creating or Deleting Mount Targets in a VPC (p. 40)
•Creating Mount Targets in Another VPC (p. 42)
•Updating the Mount Target Configuration (p. 43)
Creating or Deleting Mount Targets in a VPC
To access an Amazon EFS file system in a VPC you need mount targets. For an Amazon EFS file system:
• You can create one mount target in each Availability Zone.
• If the VPC has multiple subnets in an Availability Zone, you can create a mount target in only one of
those subnets. All EC2 instances in the Availability Zone can share the single mount target.
Note
We recommend that you create a mount target in each of the Availability Zones. There are cost
considerations for mounting a file system on an EC2 instance in an Availability Zone through a
mount target created in another Availability Zone. For more information, see Amazon EFS. In
addition, by always using a mount target local to the instance's Availability Zone, you eliminate
a partial failure scenario. If the mount target's zone goes down, you won't be able to access your
file system through that mount target.
For more information about the operation, see CreateMountTarget (p. 176).
You can delete mount targets. Note that a mount target deletion forcibly breaks any mounts of the file
system via that mount target, which might disrupt instances or applications using those mounts. For
more information, see DeleteMountTarget (p. 188).
Using the Console
Use the following procedure to create new mount targets, delete, or update existing mount targets using
the AWS Management Console.
1. In the Amazon EFS console, select the file system, choose Actions, and then choose Manage File
System Access.
40
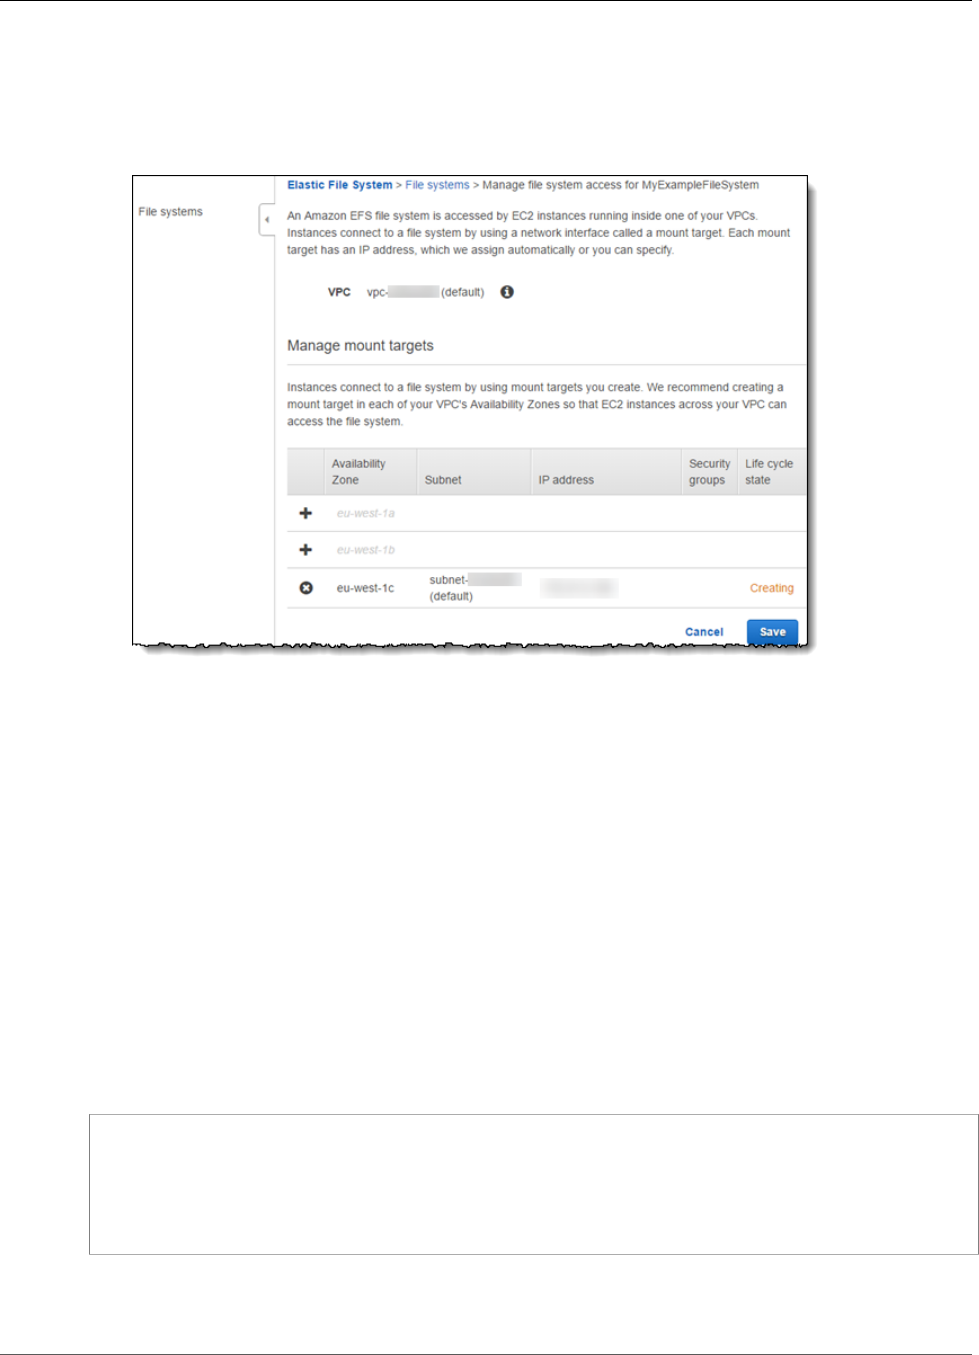
Amazon Elastic File System User Guide
Creating or Deleting Mount Targets in a VPC
The console displays the Manage File System Access page with a list of file system mount targets
you have created in the selected VPC. The console shows a list of Availability Zones and mount
target information, if there is a mount target in that Availability Zone.
The console shows that the file system has one mount target in the eu-west-2c Availability Zone, as
shown following:
2. To create new mount targets
a. Click on the left side in the specific Availability Zone row.
b. If the Availability Zone has multiple subnets, select a subnet from the Subnet list.
c. Amazon EFS automatically selects an available IP address, or you can provide another IP address
explicitly.
d. Choose a Security Group from the list.
For more information about security groups, see Amazon EC2 Security Groups in the Amazon
EC2 User Guide for Linux Instances.
3. To delete a mount target, choose the X next to the Availability Zone from which you want to remove
a mount target.
Using the AWS CLI
To create a mount target, use the create-mount-target AWS CLI command (corresponding operation
is CreateMountTarget (p. 176)), as shown following:
$ aws efs create-mount-target \
--file-system-id file-system-ID (for which to create the mount target) \
--subnet-id vpc-subnet-ID (in which to create mount target) \
--security-group security-group IDs (to associate with the mount target) \
--region aws-region (for example, us-west-2) \
--profile adminuser
Note that the AWS region (the region parameter) must be the VPC region.
41

Amazon Elastic File System User Guide
Creating Mount Targets in Another VPC
You can get a list of mount targets created for a file system using the describe-mount-target AWS
CLI command (corresponding operation is DescribeMountTargets (p. 197)), as shown following:
$ aws efs describe-mount-targets \
--file-system-id file-system-ID \
--region aws-region-where-file-system-exists \
--profile adminuser
Here's a sample response:
{
"MountTargets": [
{
"MountTargetId": "fsmt-52a643fb",
"NetworkInterfaceId": "eni-f11e8395",
"FileSystemId": "fs-6fa144c6",
"LifeCycleState": "available",
"SubnetId": "subnet-15d45170",
"OwnerId": "23124example",
"IpAddress": "10.0.2.99"
},
{
"MountTargetId": "fsmt-55a643fc",
"NetworkInterfaceId": "eni-14a6ae4d",
"FileSystemId": "fs-6fa144c6",
"LifeCycleState": "available",
"SubnetId": "subnet-0b05fc52",
"OwnerId": "23124example",
"IpAddress": "10.0.19.174"
}
]
}
To delete an existing mount target, use the delete-mount-target AWS CLI command (corresponding
operation is DeleteMountTarget (p. 188)), as shown following:
$ aws efs delete-mount-target \
--mount-target-id mount-target-ID-to-delete \
--region aws-region-where-mount-target-exists \
--profile adminuser
Creating Mount Targets in Another VPC
You can use an Amazon EFS file system in one VPC at a time. That is, you create mount targets in a VPC
for your file system, and use those mount targets to provide access to the file system from EC2 instances
in that VPC. To access the file system from EC2 instances in another VPC, you must first delete the mount
targets from the current VPC and then create new mount targets in another VPC.
Using the Console
1. In the Amazon EFS console, first select the file system, choose Actions, and then choose Manage
File System Access.
The console displays the Manage File System Access page with a list of mount targets you created
for the file system in a VPC. The following illustration shows a file system that has three mount
targets, one in each Availability Zones.
42
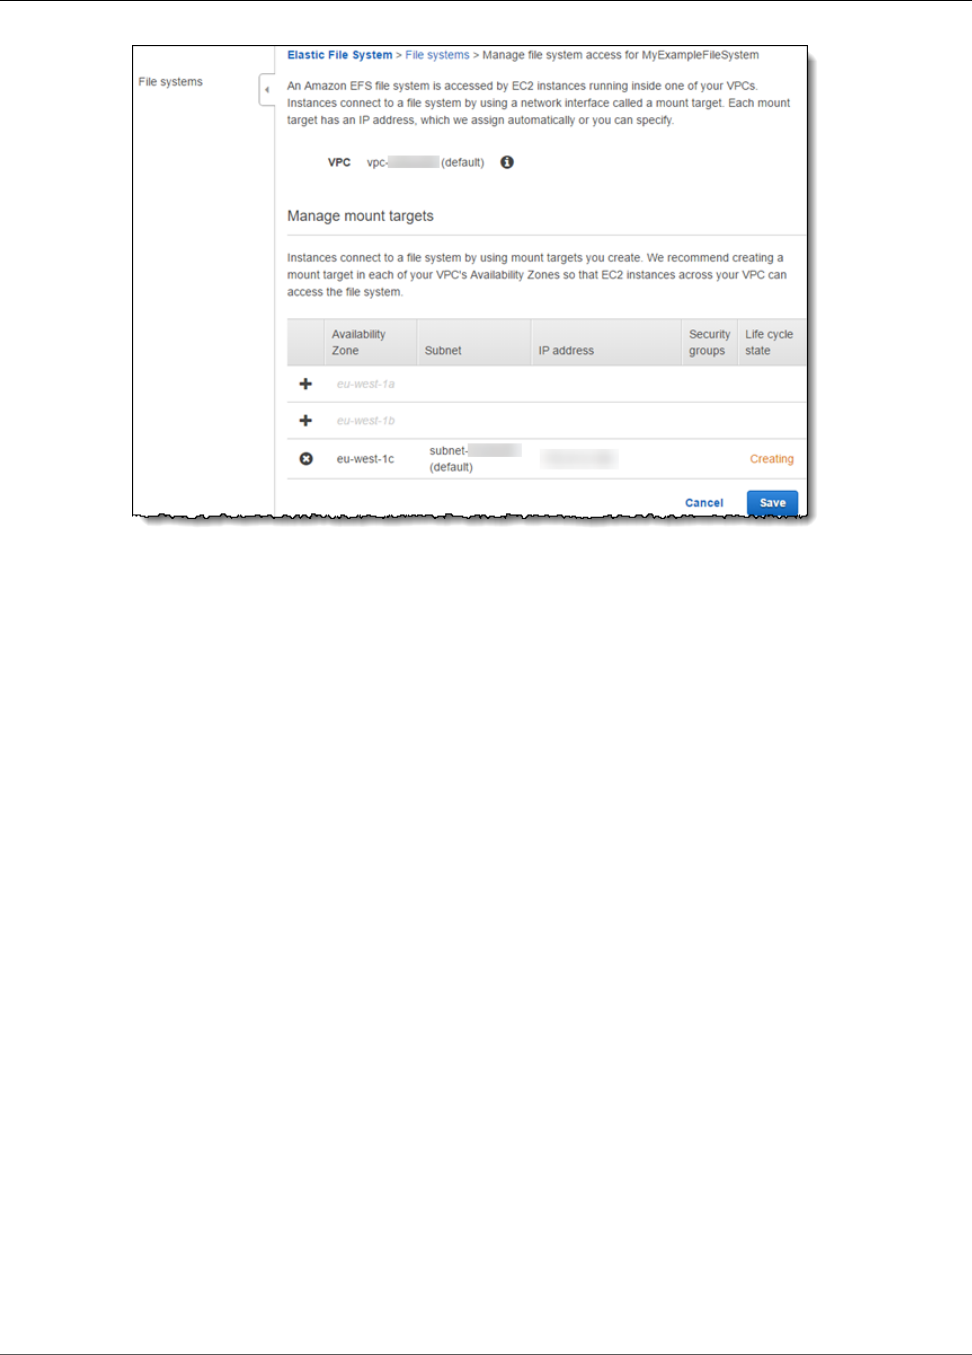
Amazon Elastic File System User Guide
Updating the Mount Target Configuration
2. To change the VPC, select another VPC from the VPC list.
The console clears all of the mount target information and lists only the Availability Zone.
3. Create mount targets in one or more Availability Zones as follows:
a. If the Availability Zone has multiple subnets, select a subnet from the Subnet list.
b. Amazon EFS automatically selects an available IP address, or you can provide another IP address
explicitly.
c. Choose the security groups that you want to associate.
For information about security groups, see Amazon EC2 Security Groups in the Amazon EC2 User
Guide for Linux Instances.
4. Choose Save.
The console first deletes the mount targets from the previous VPC and then creates new mount
targets in the new VPC that you selected.
Using the CLI
To use a file system in another VPC, you must first delete any mount targets you previously created in a
VPC and then create new mount targets in another VPC. For example AWS CLI commands, see Creating
or Deleting Mount Targets in a VPC.
Updating the Mount Target Configuration
After you create a mount target for your file system, you may want to update security groups that are
in effect. You cannot change the IP address of an existing mount target. To change IP address you must
delete the mount target and create a new one with the new address. Note that deleting a mount target
will break any existing file system mounts.
43
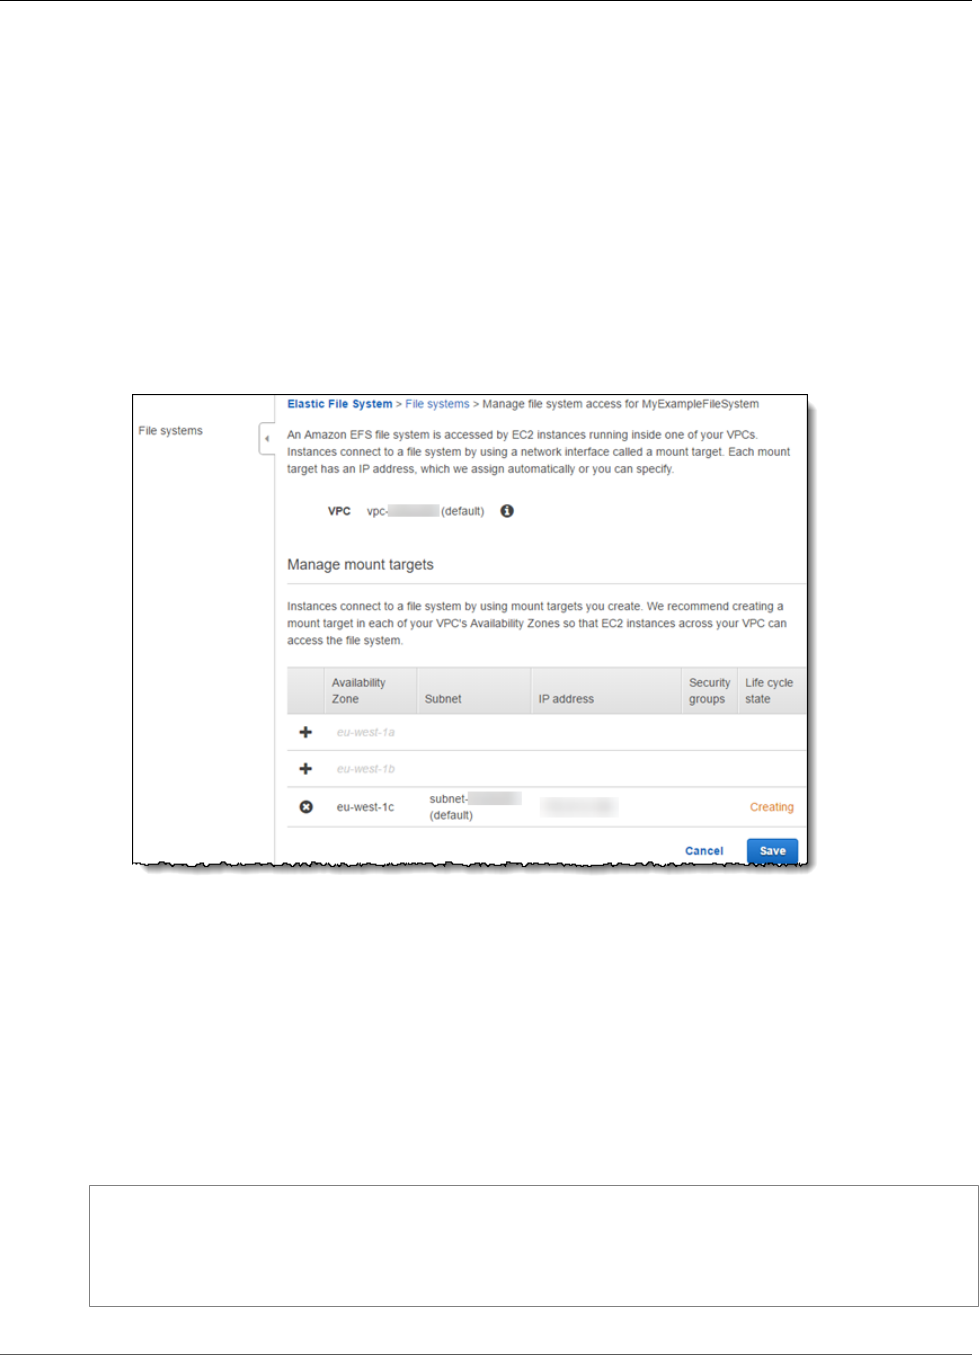
Amazon Elastic File System User Guide
Updating the Mount Target Configuration
Modifying the Security Group
Security groups define inbound/outbound access. When you change security groups associated with
a mount target, make sure that you authorize necessary inbound/outbound access so that your EC2
instance can communicate with the file system.
For more information about security groups, see Amazon EC2 Security Groups in the Amazon EC2 User
Guide for Linux Instances.
Using the Console
1. In the Amazon EFS console, select the file system, choose Actions, and then choose Manage File
System Access.
The console displays the Manage File System Access page with a list of Availability Zones and
mount target information, if there is a mount target in the Availability Zone.
2. In the Security Group column, you can add or remove security groups. Choose X to remove an
existing security group. Choose the Security Group box to select from other available security
groups.
If you remove all security groups, Amazon EFS assigns the VPC's default security group.
Using the CLI
To modify security groups that are in effect for a mount target, use the modify-
mount-target-security-group AWS CLI command (corresponding operation is
ModifyMountTargetSecurityGroups (p. 206)) to replace any existing security groups, as shown
following:
$ aws efs modify-mount-target-security-groups \
--mount-target-id mount-target-ID-whose-configuration-to-update \
--security-groups security-group-ids-separated-by-space \
--region aws-region-where-mount-target-exists \
--profile adminuser
44
Amazon Elastic File System User Guide
Managing Tags
Managing File System Tags
You can create new tags, update values of existing tags, or delete tags associated with a file system.
Using the Console
The console lists existing tags associated with a file system. You can add new tags, change values of
existing tags, or delete existing tags.
1. Open the Amazon Elastic File System console at https://console.aws.amazon.com/efs/.
2. Choose the file system.
3. Choose Action and then choose Manage Tags.
4. On the Manage Tags page, add or delete tags. For each new tag, provide a Key and its Value.
5. Choose Save.
Using the AWS CLI
You can use the create-tags CLI command to add new tags, delete-tags to delete existing tags,
or use the describe-tags command to retrieve tags associated with a file system. Each CLI command
corresponds to the CreateTags (p. 183), DeleteTags (p. 191), and DescribeTags (p. 203) Amazon EFS
operations.
For an example walkthrough of the AWS CLI commands that you can use to add and list tags, see Step
2.1: Create Amazon EFS File System (p. 116).
The following delete-tags command removes the tag keys test1 and test2 from the tag list of the
specified file system.
$ aws efs \
delete-tags \
--file-system-id fs-c5a1446c \
--tag-keys "test1" "test2" \
--region us-west-2 \
--profile adminuser
Metering – How Amazon EFS Reports File System
and Object Sizes
This section explains how Amazon EFS reports file system sizes and sizes of objects within a file system.
Metering Amazon EFS File System Objects
Customer-visible objects in an Amazon EFS system can be regular files, directories, symbolic links, and
special files (FIFOs and sockets). Each of these objects is metered for 2 KiB (kibibytes) of metadata (for its
inode) and one or more increments of 4 KiB of data. The following list explains the metered data size for
different types of file system objects.
•Regular files – The metered data size of a regular file is the logical size of the file rounded to the next
4 KiB increment, except that it may be less for sparse files.
45
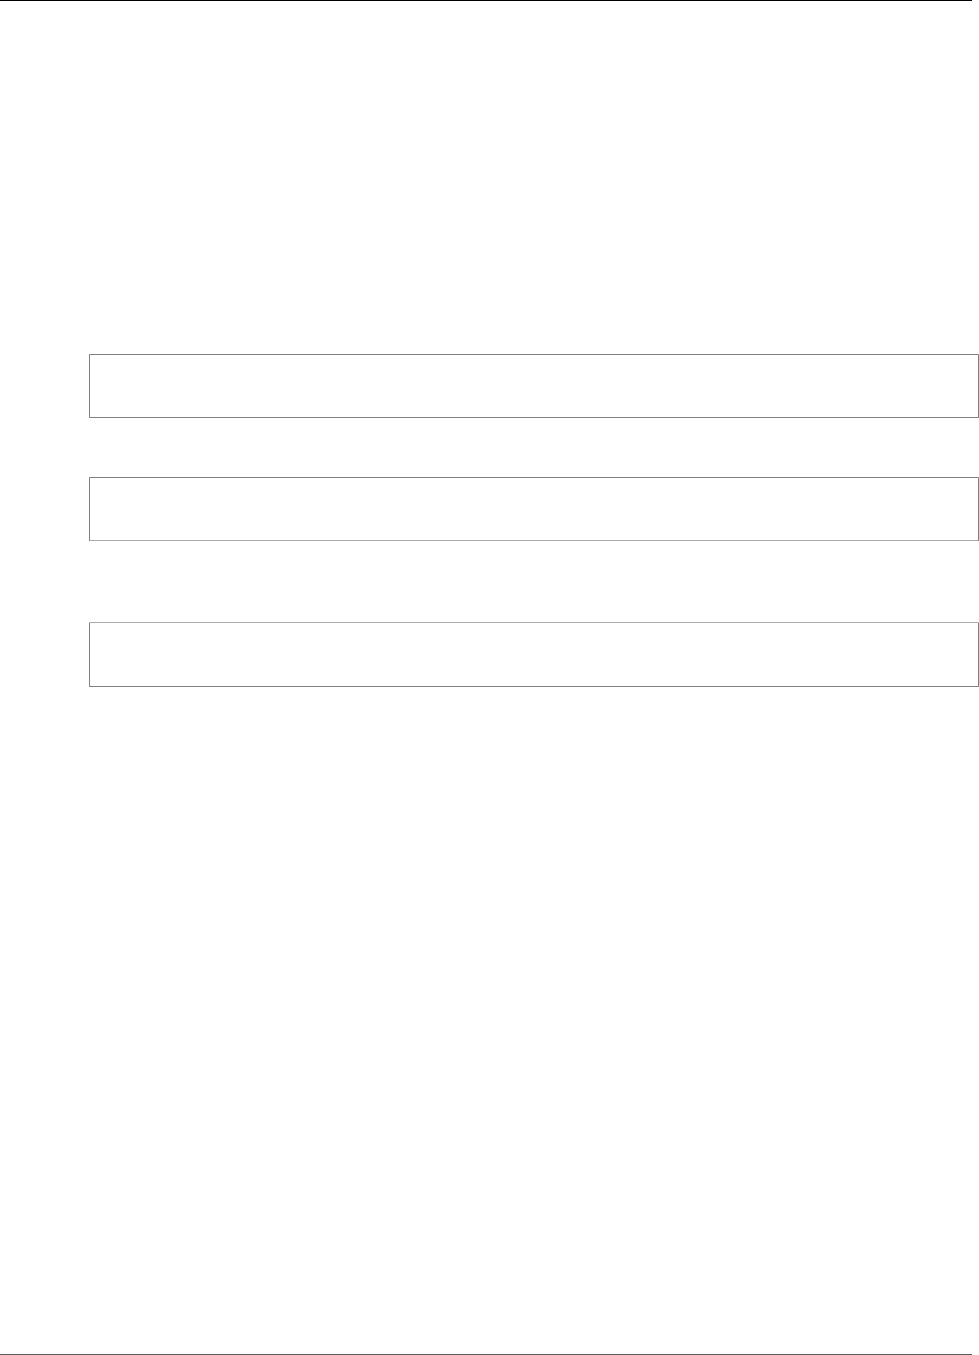
Amazon Elastic File System User Guide
Metering an Amazon EFS File System
A sparse file is a file to which data is not written to all positions of the file before its logical size is
reached. For a sparse file, if the actual storage used is less than the logical size rounded to the next 4
KiB increment, Amazon EFS reports actual storage used as the metered data size.
•Directories – The metered data size of a directory is the actual storage used for the directory entries
and the data structure that holds them, rounded to the next 4 KiB increment (it does not include the
actual storage used by the file data).
•Symbolic links and special files – The metered data size for these objects is always 4 KiB.
When Amazon EFS reports the space used for an object, through the NFSv4.1 space_used attribute, it
includes the object's current metered data size, but not its metadata size. There are two utilities available
for measuring the disk usage of a file, the du and stat utilities. Here's an example of how to use the du
utility, on an empty file, with the -k option to return the output in kilobytes:
$ du -k file
4 file
Here's an example of how to use the stat utility on an empty file to return the file's disk usage:
$ /usr/bin/stat --format="%b*%B" file | bc
4096
To measure the size of a directory, use the stat utility, find the Blocks value, and then multiply that
value by the block size. Here's an example of how to use the stat utility on an empty directory:
$ /usr/bin/stat --format="%b*%B" . | bc
4096
Metering an Amazon EFS File System
The metered size of an entire Amazon EFS file system is the sum of the sizes (including metadata) of all
of its current objects. The size of each object is calculated from a representative sampling that represents
the size of the object during the metered hour, for example the hour from 8:00 am to 9:00 am.
For example, an empty file contributes 6 KiB (2 KiB metadata + 4 KiB data) to the metered size of its file
system. Upon creation, a file system has a single empty root directory and therefore has a metered size
of 6 KiB.
The metered sizes of a particular file system define the usage for which the owner account is billed for
that file system for that hour.
Note
The computed metered size does not represent a consistent snapshot of the file system at any
particular time during that hour. Rather, it represents the sizes of the objects that existed in the
file system at varying times within each hour or possibly the hour before it, which are summed
to determine the file system's metered size for the hour. The metered size of a file systems is
thus eventually consistent with the metered sizes of the objects stored when there are no writes
to the file system.
This metered size for an Amazon EFS file system can be seen in the following ways:
•DescribeFileSystems API – Used in SDKs, HTTP, and the AWS CLI.
•File Systems table – For each file system listed in the AWS Management Console.
•DF command – In Linux, the df command can be run at the terminal prompt of an EC2 instance.
46

Amazon Elastic File System User Guide
Managing EFS File Sync
Note
The metered size is also used to determine your I/O throughput baseline and burst rates. For
more information, see Throughput Scaling in Amazon EFS (p. 83).
Managing Amazon EFS File Sync
In this section, you can find information about how to manage your Amazon EFS File Sync.
Topics
•Deleting a Sync Agent (p. 47)
•Deleting a Sync Task (p. 47)
•Understanding Sync Agent Status (p. 47)
•Understanding Sync Task Status (p. 48)
•Performing Tasks on the EFS File Sync VM Local Console (p. 48)
•Performing Tasks on Amazon EC2 EFS File Sync Local Console (p. 55)
Deleting a Sync Agent
If you no longer need a sync agent, you can delete it from the Amazon EFS Management Console.
To delete a sync agent
1. Choose File syncs, choose Agents, and then choose the sync agent that you want to delete.
2. For Actions, choose Delete.
3. In the Confirm deletion of sync agent dialog box, choose Check box confirm deletion, and then
choose OK.
Deleting a Sync Task
If you no longer need a sync task, you can delete it from the Amazon EFS Management Console.
To delete a sync task
1. Choose File syncs, choose Tasks, and then choose the sync task that you want to delete.
2. For Actions, choose Delete.
3. In the Confirm deletion of sync task dialog box, choose Check box confirm deletion, and then
choose OK.
Understanding Sync Agent Status
The following table describes each sync agent status, and if and when you should take action based on
the status. When a sync agent is in use, it has Running status all or most of the time.
Sync Agent Status Meaning
Running The sync agent is configured properly
and is available to use. The Running
47

Amazon Elastic File System User Guide
Understanding Sync Task Status
Sync Agent Status Meaning
status is the normal running status for
a sync agent.
Offline The sync agent's VM or EC instance
is turned off or the agent is in an
unhealthy state. When the issue that
caused the unhealthy state is resolved,
the agent returns to Running status.
Understanding Sync Task Status
The following table described each sync task status, and if and when you should take action based on the
status.
Sync Task Status Meaning
Available The sync task is configured properly
and is available to be started.
Completed The task creating process has
completed.
Creating EFS File Sync is creating the sync task.
Error
Starting The task creating process has started.
Preparing The sync task is examining the source
and destination file systems to
determine which files to sync.
Syncing EFS File Sync is syncing file from the
source file system to the destination
Amazon EFS file system.
Verifying EFS File Sync is verifying consistency
between the source and destination file
systems.
Performing Tasks on the EFS File Sync VM Local
Console
For a EFS File Sync deployed on-premises, you can perform the following maintenance tasks using the
VM host's local console.
Topics
•Logging in to the Local Console Using Default Credentials (p. 49)
•Configuring Your EFS File Sync Network (p. 50)
•Testing Your EFS File Sync Connection to the Internet (p. 52)
•Viewing Your EFS File Sync System Resource Status (p. 53)
48
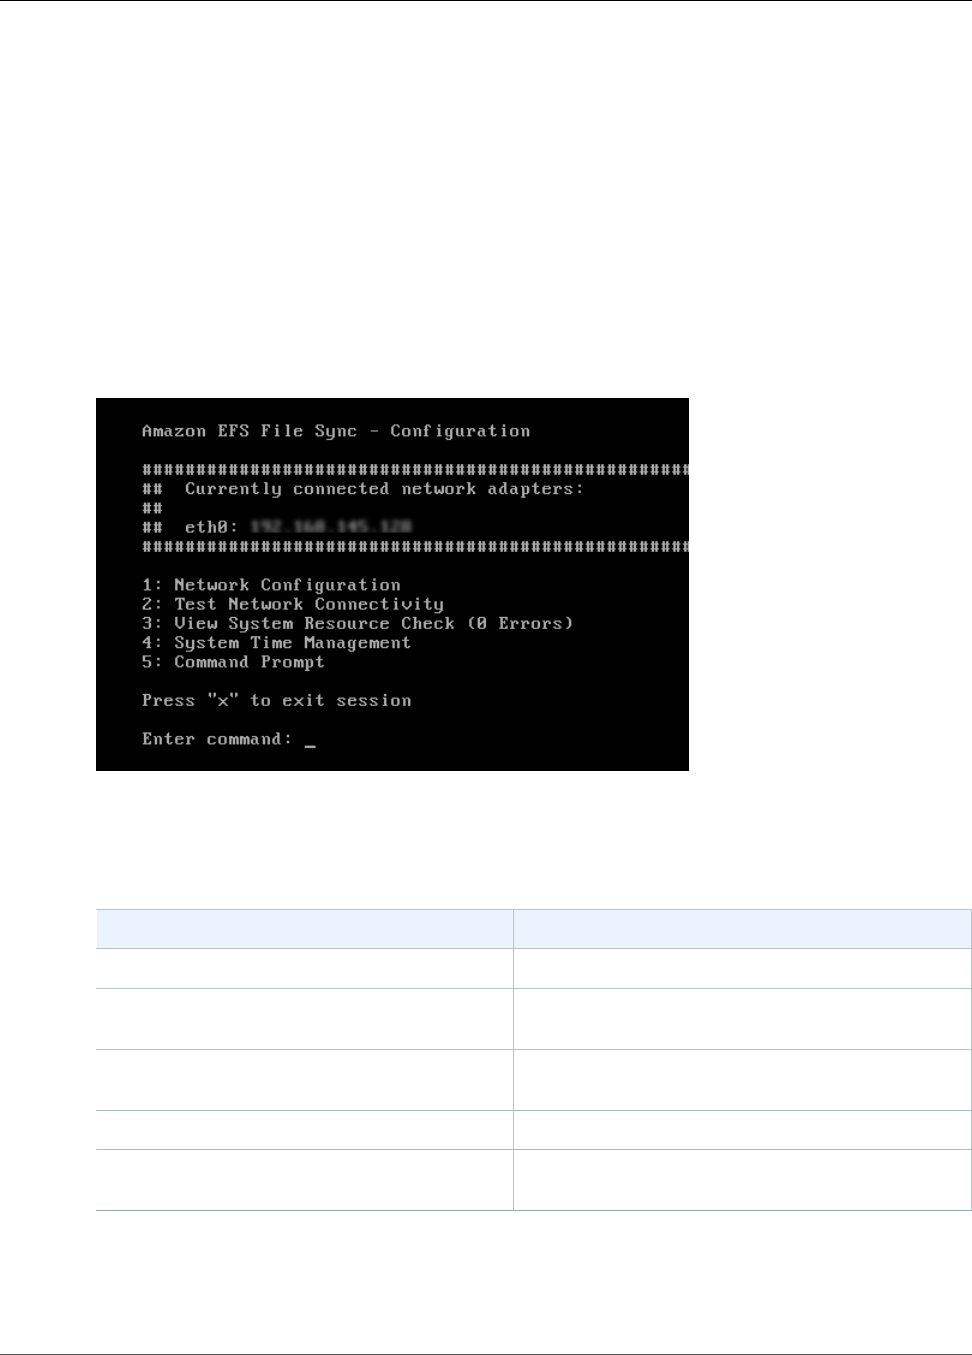
Amazon Elastic File System User Guide
Performing Tasks on the EFS File Sync VM Local Console
•Synchronizing Your EFS File Sync VM Time (p. 54)
•Running EFS File Sync Commands on the Local Console (p. 54)
Logging in to the Local Console Using Default Credentials
When the VM is ready for you to log in, the login screen is displayed.
To log in to the EFS File Sync's local console
• If this is your first time logging in to the local console, log in to the VM with the user name sguser
and password sgpassword. Otherwise, use your credentials to log in.
After you log in, you see the Amazon EFS File Sync Configuration main menu, as shown in the following
screenshot.
Note
We recommend changing the default password. You do this by running the passwd command
from the EFS File Sync Command Prompt (item 5 on the main menu). For information about
how to run the command, see Running EFS File Sync Commands on the Local Console (p. 54).
To See
Configure your network Configuring Your EFS File Sync Network (p. 50).
Test network connectivity Testing Your EFS File Sync Connection to the
Internet (p. 52).
View system resource check Viewing Your EFS File Sync System Resource
Status (p. 53).
Manage VM time Synchronizing Your EFS File Sync VM Time (p. 54).
Run Local console commands Running EFS File Sync Commands on the Local
Console (p. 54).
To shut down EFS File Sync, type 0.
To exit the configuration session, type x to exit the menu.
49
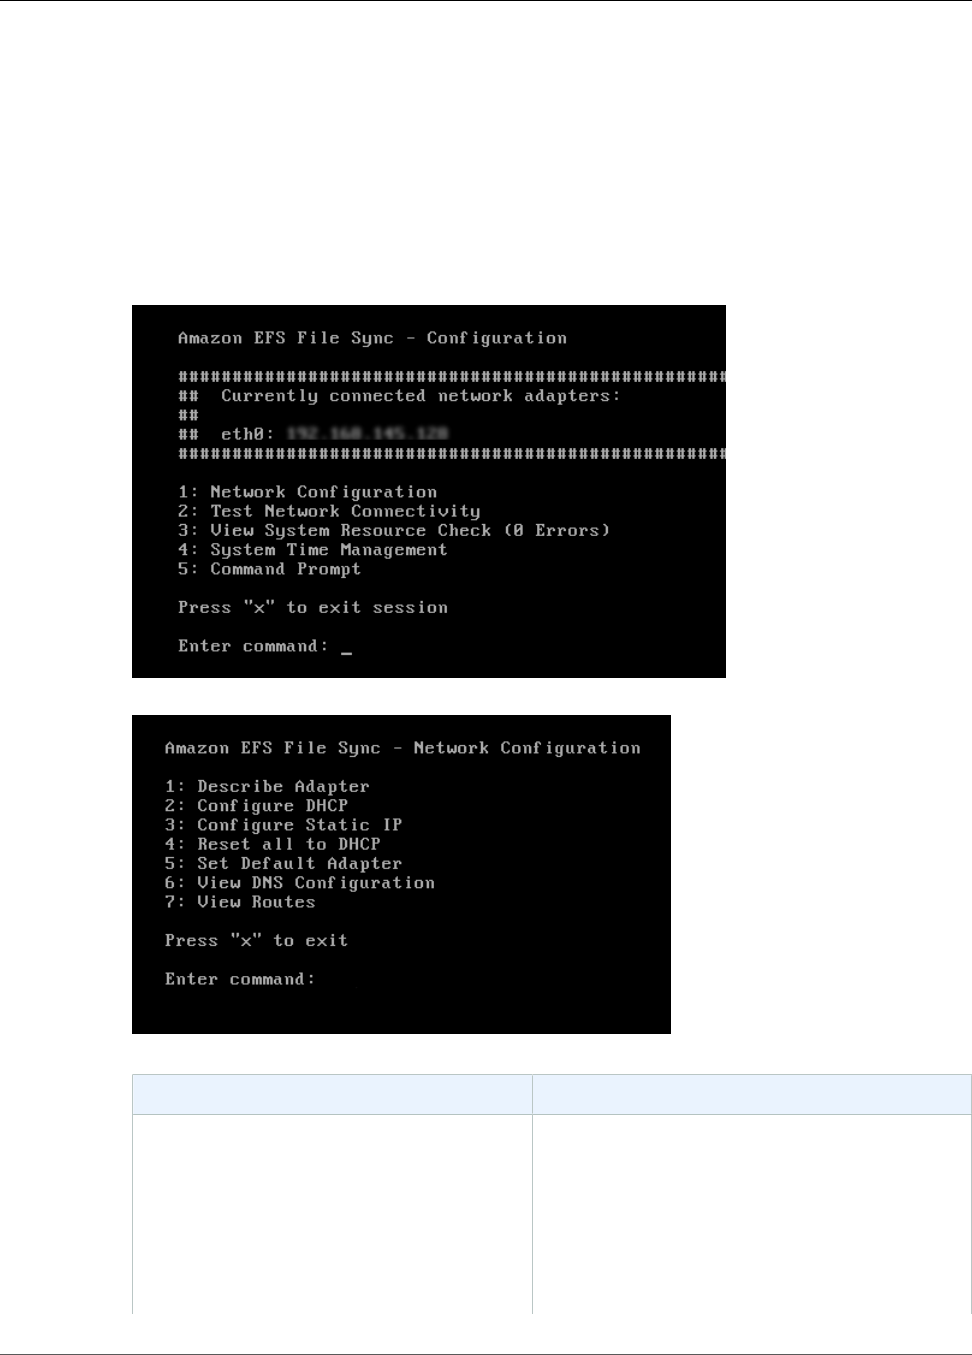
Amazon Elastic File System User Guide
Performing Tasks on the EFS File Sync VM Local Console
Configuring Your EFS File Sync Network
The default network configuration for the EFS File Sync is Dynamic Host Configuration Protocol (DHCP).
With DHCP, your EFS File Sync is automatically assigned an IP address. In some cases, you might need to
manually assign your EFS File Sync's IP as a static IP address, as described following.
To configure your EFS File Sync to use static IP addresses
1. Log in to your EFS File Sync's local console.
2. On the Amazon EFS File Sync Configuration main menu, type option 1 to begin configuring a static
IP address.
3. Choose one of the following options on the Amazon EFS File Sync Configuration menu:
To Do This
Describe network adapter Type option 1.
A list of adapter names appears, and you are
prompted to type an adapter name—for example,
eth0. If the adapter you specify is in use, the
following information about the adapter is
displayed:
• Media access control (MAC) address
50

Amazon Elastic File System User Guide
Performing Tasks on the EFS File Sync VM Local Console
To Do This
• IP address
• Netmask
• EFS File Sync IP address
• DHCP enabled status
You use the same adapter name when you
configure a static IP address (option 3) as when
you set your EFS File Sync's default route adapter
(option 5).
Configure DHCP Type option 2.
You are prompted to configure network interface
to use DHCP.
Configure a static IP address for your EFS File
Sync
Type option 3.
You are prompted to type the following
information to configure a static IP:
• Network adapter name
• IP address
• Netmask
• Default EFS File Sync address
• Primary Domain Name Service (DNS) address
• Secondary DNS address
Important
If your EFS File Sync has already been
activated, you must shut it down and
restart it from the EFS File Sync console
for the settings to take effect.
If your EFS File Sync uses more than one network
interface, you must set all enabled interfaces to
use DHCP or static IP addresses.
For example, suppose your EFS File Sync VM uses
two interfaces configured as DHCP. If you later set
one interface to a static IP, the other interface is
disabled. To enable the interface in this case, you
must set it to a static IP.
If both interfaces are initially set to use static IP
addresses and you then set the EFS File Sync to
use DHCP, both interfaces will use DHCP.
51
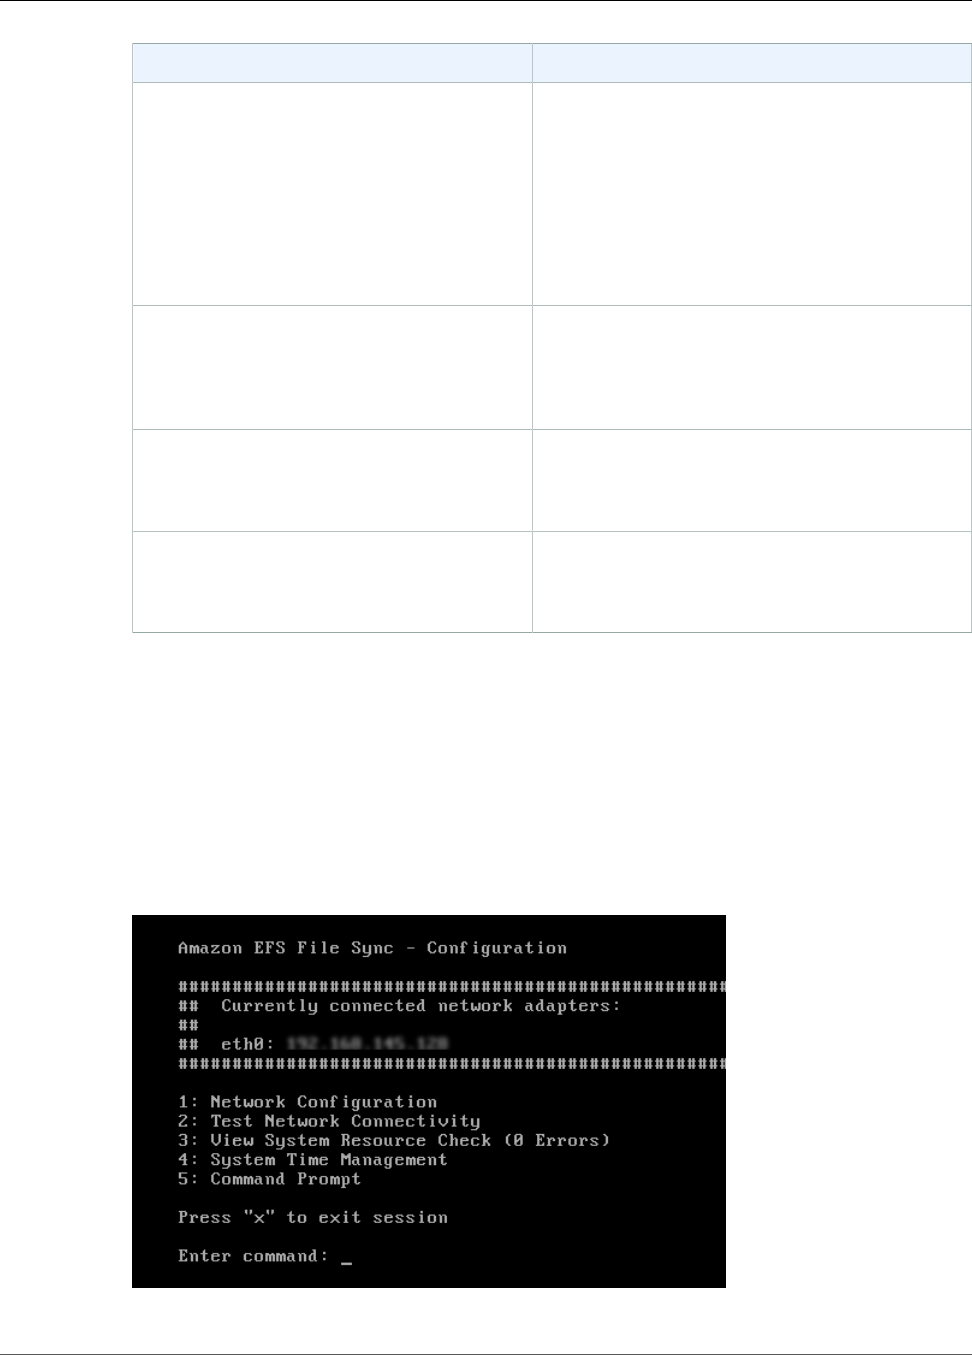
Amazon Elastic File System User Guide
Performing Tasks on the EFS File Sync VM Local Console
To Do This
Reset all your EFS File Sync's network
configuration to DHCP
Type option 4.
All network interfaces are set to use DHCP.
Important
If your EFS File Sync has already been
activated, you must shut down and
restart your EFS File Sync from the EFS
File Sync console for the settings to take
effect.
Set your EFS File Sync's default route adapter Type option 5.
The available adapters for your EFS File Sync are
shown, and you are prompted to select one of the
adapters—for example, eth0.
View your EFS File Sync's DNS configuration Type option 6.
The IP addresses of the primary and secondary
DNS name servers are displayed.
View routing tables Type option 7.
The default route of your EFS File Sync is
displayed.
Testing Your EFS File Sync Connection to the Internet
You can use your EFS File Sync's local console to test your Internet connection. This test can be useful
when you are troubleshooting network issues with your EFS File Sync.
To test your EFS File Sync's connection to the Internet
1. Log in to your EFS File Sync's local console.
2. On the EFS File Sync Configuration main menu, type option 2 to begin testing network
connectivity.
52
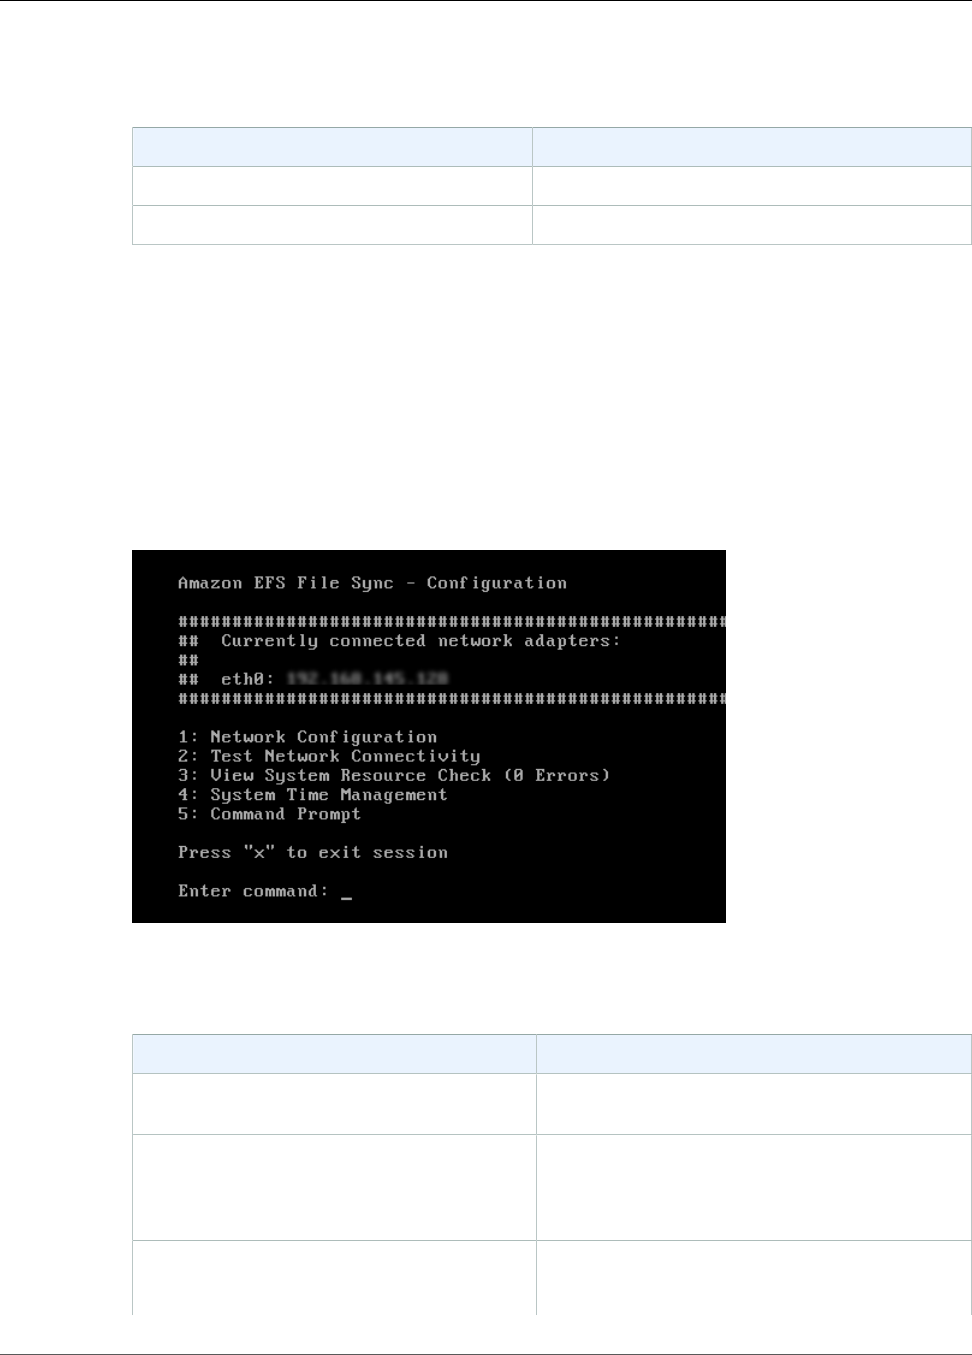
Amazon Elastic File System User Guide
Performing Tasks on the EFS File Sync VM Local Console
3. The endpoint in the selected region displays either a PASSED or FAILED message, as shown
following.
Message Description
[ PASSED ] EFS File Sync has Internet connectivity.
[ FAILED ] EFS File Sync does not have Internet connectivity.
Viewing Your EFS File Sync System Resource Status
When your gateway starts, it checks its virtual CPU cores, root volume size, and RAM and determines
whether these system resources are sufficient for your EFS File Sync to function properly. You can view
the results of this check on the EFS File Sync's local console.
To view the status of a system resource check
1. Log in to your EFS File Sync's local console.
2. In the EFS File Sync Configuration main menu, type 3 to view the results of a system resource
check.
The console displays an [OK], [WARNING], or [FAIL] message for each resource as described in the
table following.
Message Description
[OK] The resource has passed the system resource
check.
[WARNING] The resource does not meet the recommended
requirements, but your EFS File Sync will continue
to function. EFS File Sync displays a message that
describes the results of the resource check.
[FAIL] The resource does not meet the minimum
requirements. Your EFS File Sync might not
function properly. EFS File Sync displays a
53
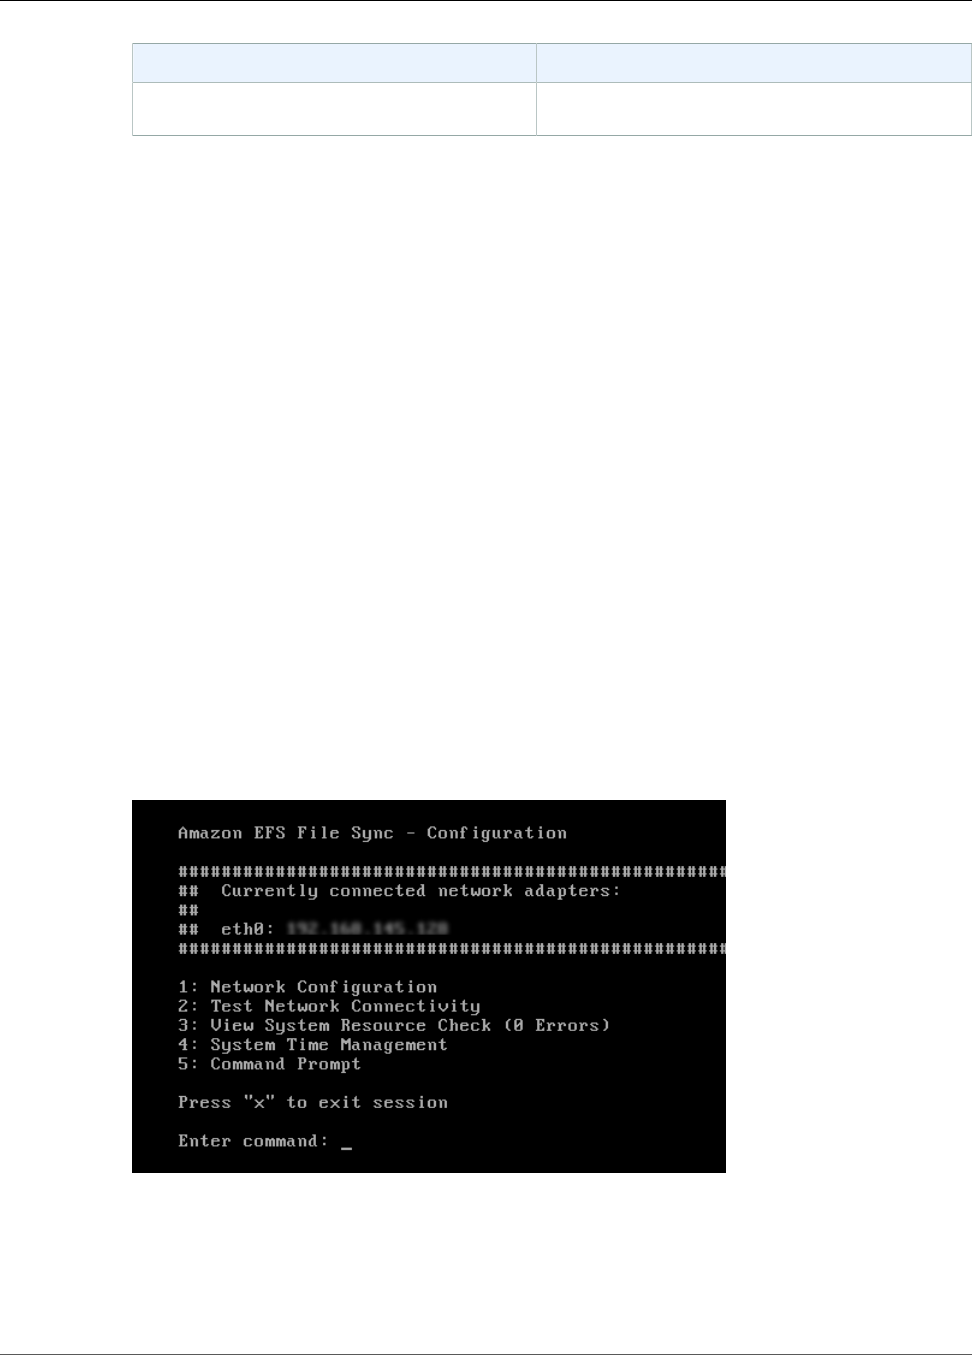
Amazon Elastic File System User Guide
Performing Tasks on the EFS File Sync VM Local Console
Message Description
message that describes the results of the resource
check.
The console also displays the number of errors and warnings next to the resource check menu
option.
The following screenshot shows a [FAIL] message and the accompanying error message.
Synchronizing Your EFS File Sync VM Time
After your EFS File Sync is deployed and running, in some scenarios the EFS File Sync VM's time can drift.
For example, if there is a prolonged network outage and your hypervisor host and EFS File Sync do not
get time updates, then the EFS File Sync VM's time will be different from the true time. When there is a
time drift, a discrepancy occurs between the stated times when operations such as snapshots occur and
the actual times that the operations occur.
For a EFS File Sync deployed on VMware ESXi, setting the hypervisor host time and synchronizing the VM
time to the host is sufficient to avoid time drift.
Running EFS File Sync Commands on the Local Console
The EFS File Sync console helps provide a secure environment for configuring and diagnosing issues with
your EFS File Sync. Using the console commands, you can perform maintenance tasks such as saving
routing tables or connecting to AWS Support.
To run a configuration or diagnostic command
1. Log in to your EFS File Sync's local console.
2. On the EFS File Sync Configuration main menu, type option 5 for Command Prompt.
3. On the EFS File Sync console, type h, and then press the Return key.
The console displays the Available Commands menu with the available commands and after the
menu a Command Prompt, as shown in the following screenshot.
54
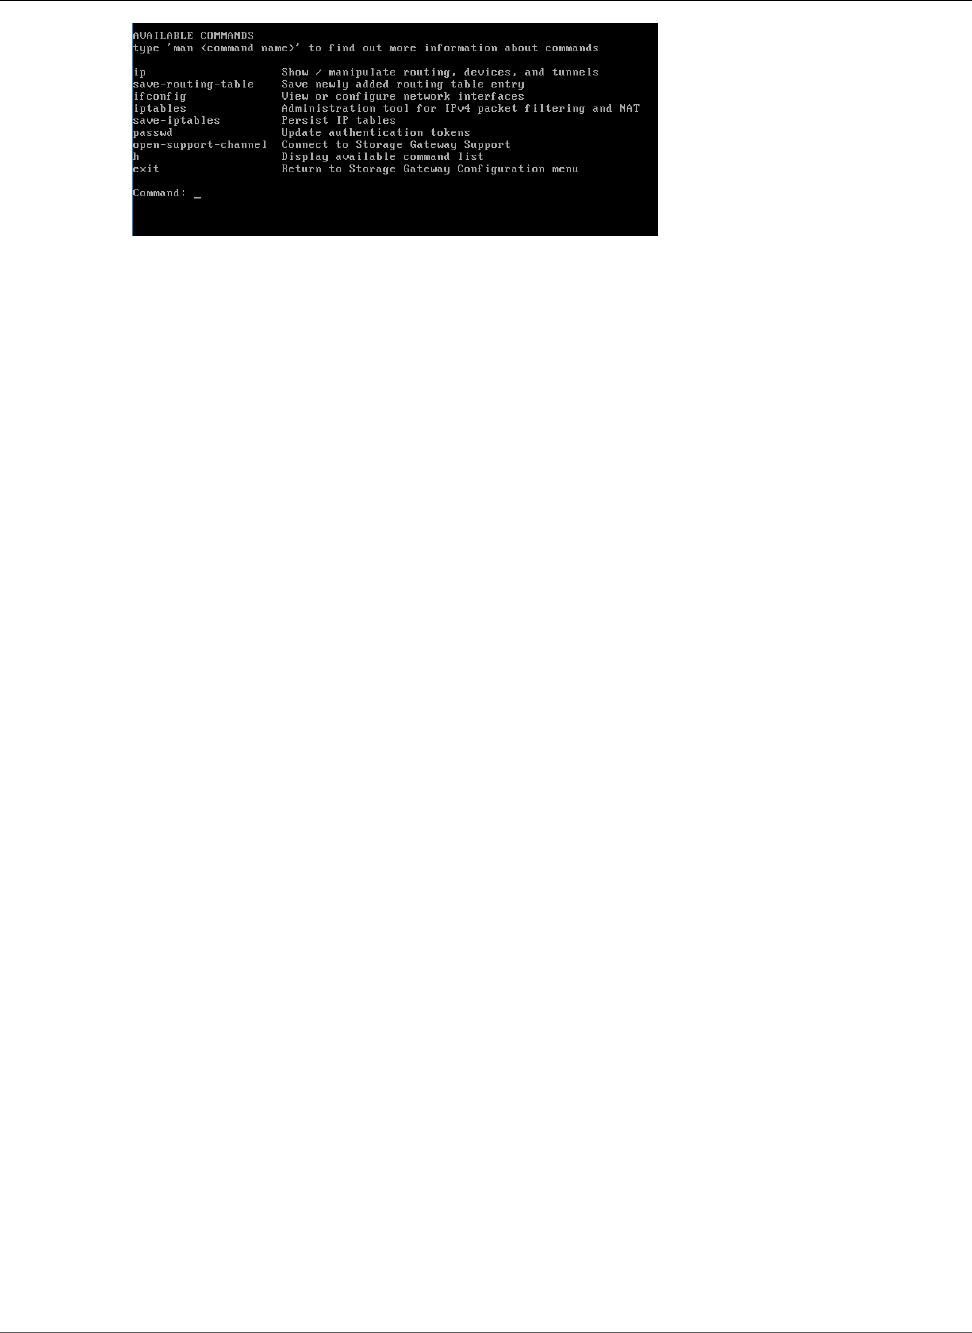
Amazon Elastic File System User Guide
Performing Maintenance Tasks on the
file sync on Amazon EC2 Local Console
4. To learn about a command, type man + command name at the EFS File Sync Console prompt.
Performing Tasks on Amazon EC2 EFS File Sync Local
Console
Some maintenance tasks require that you log in to the local console when running a EFS File Sync
deployed on an Amazon EC2 instance. In this section, you can find information about how to log in to the
local console and perform maintenance tasks.
Topics
•Logging In to Amazon EC2 EFS File Sync Local Console (p. 55)
•Testing EFS File Sync Connectivity to the Internet (p. 56)
•Viewing EFS File Sync System Resource Status (p. 57)
•Running EFS File Sync Commands on the Local Console (p. 58)
Logging In to Amazon EC2 EFS File Sync Local Console
You can connect to your Amazon EC2 instance by using a Secure Shell (SSH) client. For detailed
information, see Connect to Your Instance in the Amazon EC2 User Guide. To connect this way, you will
need the SSH key pair you specified when you launched the instance. For information about Amazon EC2
key pairs, see Amazon EC2 Key Pairs in the Amazon EC2 User Guide.
To log in to the EFS File Sync local console
1. Log in to your local console. If you are connecting to your EC2 instance from a Windows computer,
log in as sguser.
2. After you log in, you see the Amazon EFS File Sync Configuration main menu, as shown in the
following screenshot.
55
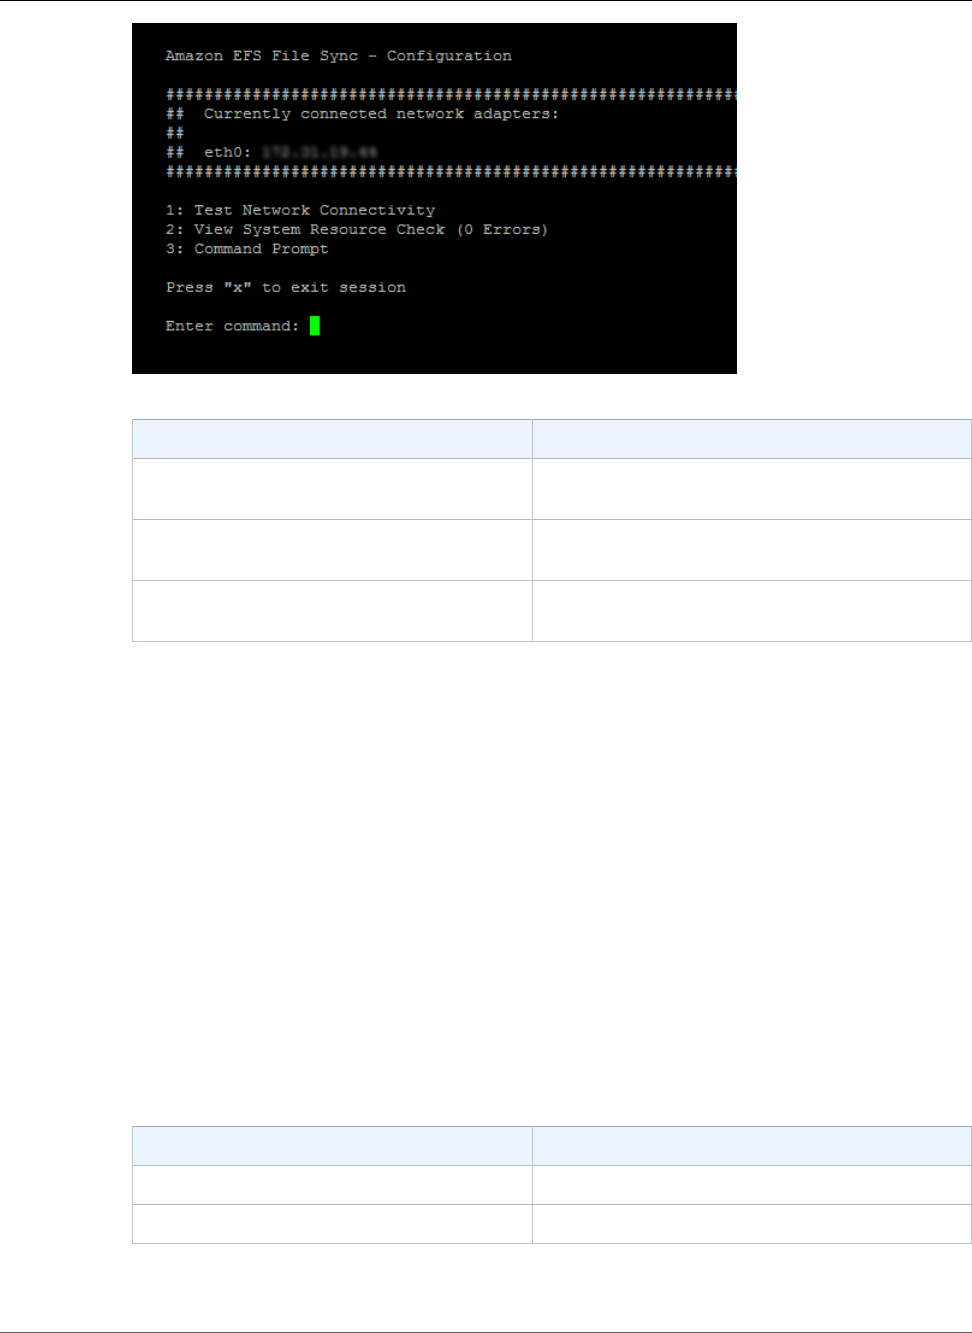
Amazon Elastic File System User Guide
Performing Maintenance Tasks on the
file sync on Amazon EC2 Local Console
To See
Test network connectivity Testing EFS File Sync Connectivity to the
Internet (p. 56)
View a system resource check Viewing EFS File Sync System Resource
Status (p. 57).
Run EFS File Sync console commands Running EFS File Sync Commands on the Local
Console (p. 58)
To shut down the EFS File Sync, type 0.
To exit the configuration session, type x to exit the menu.
Testing EFS File Sync Connectivity to the Internet
You can use your EFS File Sync's local console to test your Internet connection. This test can be useful
when you are troubleshooting network issues.
To test EFS File Sync's connection to the Internet
1. Log in to your EFS File Sync's local console. For instructions, see Logging In to Amazon EC2 EFS File
Sync Local Console (p. 55).
2. In the Amazon EFS File Sync Configuration main menu, type 1 to begin testing network
connectivity.
3. The endpoint in the region you select displays either a [PASSED] or [FAILED] message, as shown
following.
Message Description
[PASSED] EFS File Sync has Internet connectivity.
[FAILED] EFS File Sync does not have Internet connectivity.
56
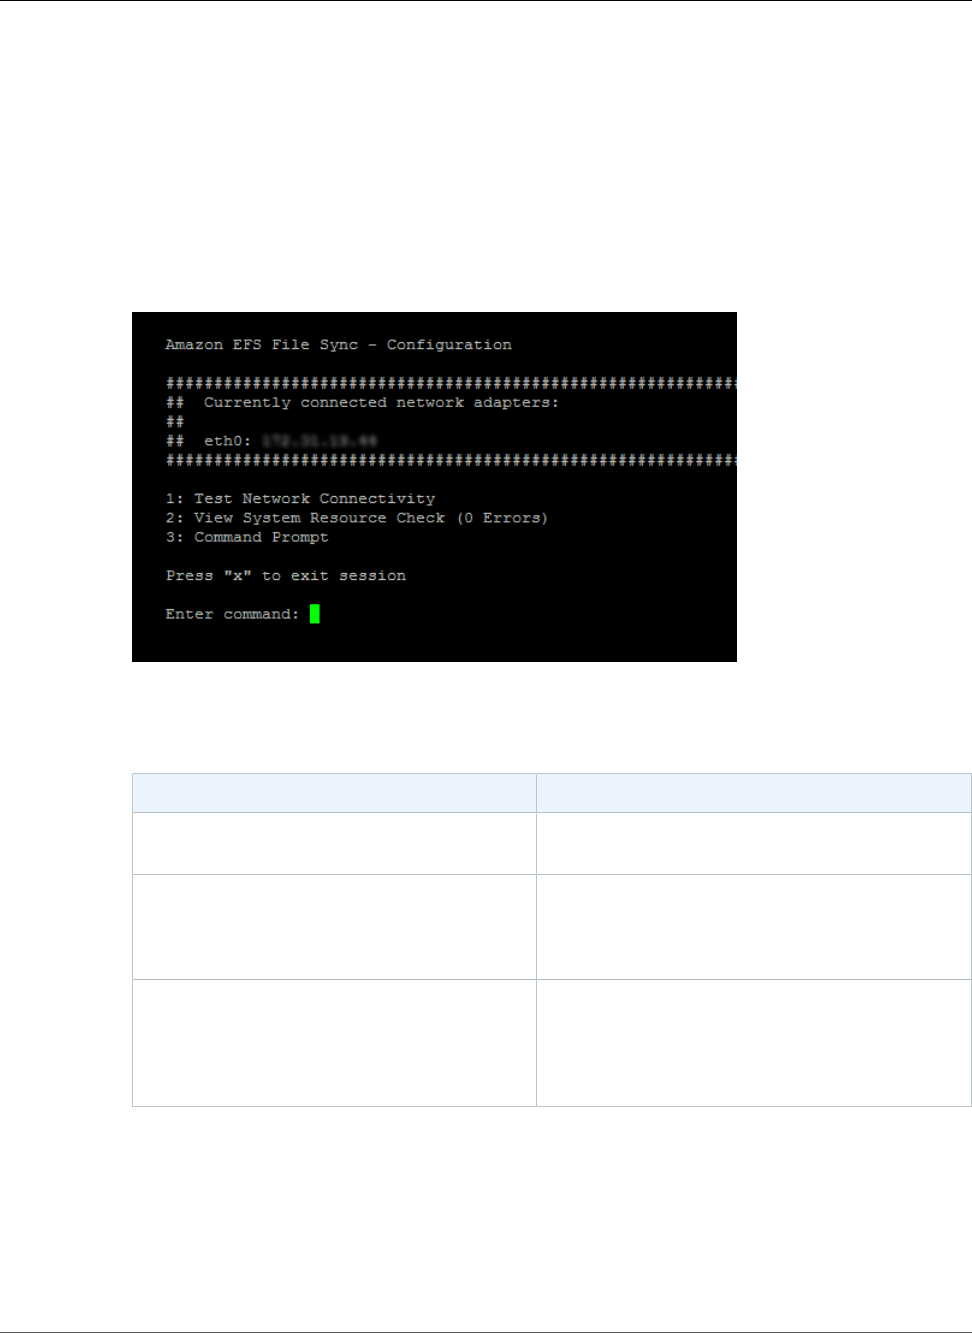
Amazon Elastic File System User Guide
Performing Maintenance Tasks on the
file sync on Amazon EC2 Local Console
Viewing EFS File Sync System Resource Status
When your EFS File Sync starts, it checks its virtual CPU cores, root volume size, and RAM and determines
whether these system resources are sufficient for your EFS File Sync to function properly. You can view
the results of this check on the EFS File Sync's local console.
To view the status of a system resource check
1. Log in to your EFS File Sync's local console. For instructions, see Logging In to Amazon EC2 EFS File
Sync Local Console (p. 55).
2. In the Amazon EFS File Sync Configuration main menu, type 2 to view the results of a system
resource check.
The console displays an [OK], [WARNING], or [FAIL] message for each resource as described in the
table following.
Message Description
[OK] The resource has passed the system resource
check.
[WARNING] The resource does not meet the recommended
requirements, but your EFS File Sync will continue
to function. EFS File Sync displays a message that
describes the results of the resource check.
[FAIL] The resource does not meet the minimum
requirements. Your EFS File Sync might not
function properly. EFS File Sync displays a
message that describes the results of the resource
check.
The console also displays the number of errors and warnings next to the resource check menu
option.
The following screenshot shows a [FAIL] message and the accompanying error message.
57
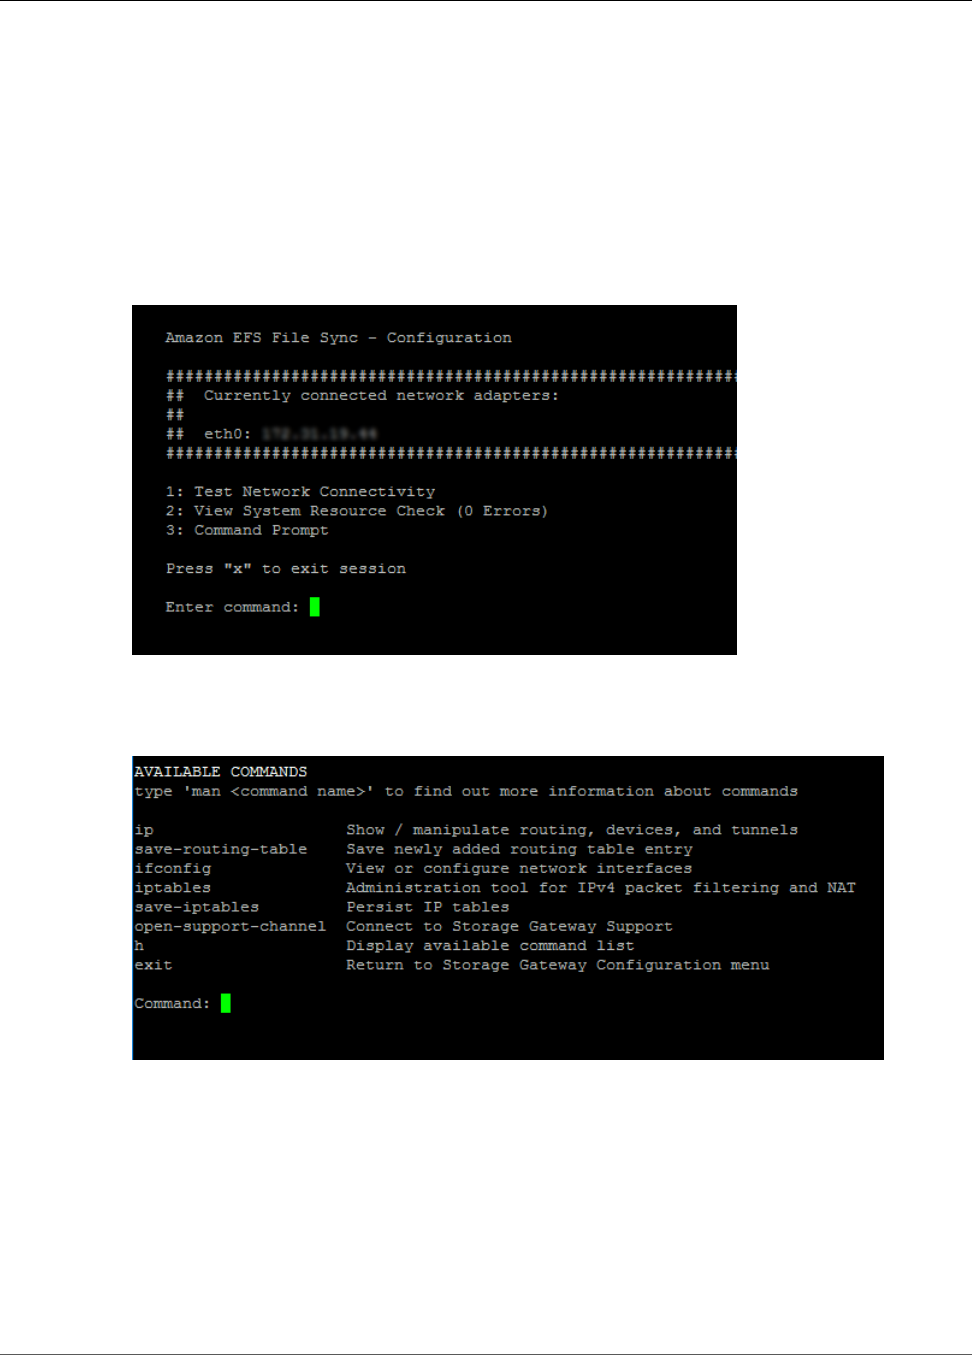
Amazon Elastic File System User Guide
Deleting a File System
Running EFS File Sync Commands on the Local Console
The EFS File Sync local console helps provide a secure environment for configuring and diagnosing issues
with your EFS File Sync. Using the local console commands, you can perform maintenance tasks such as
saving routing tables or connecting to AWS Support.
To run a configuration or diagnostic command
1. Log in to your EFS File Sync's local console. For instructions, see Logging In to Amazon EC2 EFS File
Sync Local Console (p. 55).
2. In the Amazon EFS File Sync Configuration main menu, type 3 for EFS File Sync Console.
3. In the EFS File Sync console, type h, and then press the Return key.
The console displays the Available Commands menu with the available commands. After the menu,
a EFS File Sync Console prompt appears, as shown in the following screenshot.
4. To learn about a command, type man + command name at the EFS File Sync Console prompt.
Deleting an Amazon EFS File System
File system deletion is a destructive action that cannot be undone. You will lose the file system and any
data you have in it.
Important
You should always unmount a file system before you delete it.
58

Amazon Elastic File System User Guide
Using the Console
Using the Console
1. Open the Amazon Elastic File System console at https://console.aws.amazon.com/efs/.
2. Select the file system that you want to delete.
3. Choose Action and then choose Delete File System.
4. In Permanently Delete File System confirmation box, type the file system ID and then choose
Delete File System.
The console simplifies the file deletion for you. First it deletes the associated mount targets, and
then it deletes the file system.
Using the CLI
Before you can use the AWS CLI command to delete a file system, you must delete all of the mount
targets created for the file system.
For example AWS CLI commands, see Step 4: Clean Up (p. 121).
Related Topics
Managing Amazon EFS File Systems (p. 38)
Managing Access to Encrypted File Systems
Using Amazon EFS, you can create encrypted file systems. If you create an encrypted file system, data
and metadata is encrypted at rest. Amazon EFS uses AWS Key Management Service (AWS KMS) for key
management. When you create an encrypted file system, you specify a customer master key (CMK). The
CMK can be aws/elasticfilesystem (the AWS-managed CMK for Amazon EFS) or it can be a CMK
that you manage.
File data (that is, the contents of your files) is encrypted using the CMK you specified when you created
the file system. Metadata (that is, file names, directory names, and directory contents) is encrypted by a
key that Amazon EFS manages.
The AWS-managed CMK for your file system is used as the master key for the metadata in your file
system, for example file names, directory names, and directory contents. You own the CMK used to
encrypt file data (that is, the contents of your files).
You manage who has access to your CMKs and the contents of your encrypted file systems. This access
is controlled by both AWS Identity and Access Management (IAM) policies and AWS KMS. IAM policies
control a user's access to Amazon EFS API actions. AWS KMS key policies control a user's access to the
CMK you specified when the file system was created. For more information, see the following:
•IAM Users in the IAM User Guide.
•Using Key Policies in AWS KMS in the AWS Key Management Service Developer Guide.
•Using Grants in the AWS Key Management Service Developer Guide.
As a key administrator, you can import external keys and you can modify keys by enabling, disabling, or
deleting them. The state of the CMK that you specified when you encrypted the file system affects access
to its contents. The CMK must be in the enabled state for users to have access to the contents of an
encrypted file system.
59

Amazon Elastic File System User Guide
Performing Administrative Actions on
Amazon EFS Customer Master Keys
Performing Administrative Actions on Amazon EFS
Customer Master Keys
Following, you can find how to enable, disable, or delete the CMKs associated with your Amazon EFS file
system. You can also learn about the behavior to expect from your file system when you perform these
actions.
Disabling, Deleting, or Revoking Access to the CMK for a File
System
You can disable or delete your custom CMKs, or you can revoke Amazon EFS's access to your CMKs.
Disabling and revoking access for Amazon EFS to your keys are reversible actions. Significant caution
should be exercised when deleting CMKs. Deleting a CMK is an irreversible action.
If you disable or delete the CMK used for your mounted file system, the following is true:
• That CMK can't be used as the master key for new encrypted file systems.
• Existing encrypted file systems that use that CMK will stop working after a period of time.
If you revoke Amazon EFS's access to a grant for any existing mounted file system, the behavior is
the same as if you disabled or deleted the associated CMK. In other words, the encrypted file system
continues to function, but will stop working after a period of time.
To prevent access to a mounted encrypted file system that has a CMK that you've disabled, deleted, or
revoked Amazon EFS's access to, unmount the file system and delete your Amazon EFS mount targets.
You can't immediately delete an AWS KMS key, but you can instead schedule a key to be deleted. The
earliest a CMK can be deleted is seven days after the key has been scheduled for deletion. When a key is
scheduled for deletion, it behaves as if it is disabled. You can also cancel a key's scheduled deletion. For
more information on deleting a master key in AWS KMS, see Deleting Customer Master Keys in the AWS
Key Management Service Developer Guide.
The following procedure outlines how to disable a CMK.
To disable a CMK
1. Open the Encryption Keys section of the IAM console at https://console.aws.amazon.com/iam/
home#encryptionKeys.
2. For Region, choose the appropriate AWS Region. Don't use the region selector in the navigation bar
(top right corner).
3. Select the check box or boxes next to the alias of the CMK or CMKs that you want to disable.
Note
You can't disable AWS-managed CMKs, which are denoted by the orange AWS icon.
4. To disable a CMK, choose Key actions, Disable.
The following procedure outlines how to enable a CMK.
To enable a CMK
1. Open the Encryption Keys section of the IAM console at https://console.aws.amazon.com/iam/
home#encryptionKeys.
2. For Region, choose the appropriate AWS Region. Don't use the region selector in the navigation bar
(top right corner).
60

Amazon Elastic File System User Guide
Related Topics
3. Select the check box or boxes next to the alias of the CMK or CMKs that you want to enable.
Note
You can't enable AWS-managed CMKs, which are denoted by the orange AWS icon.
4. To enable a CMK, choose Key actions, Enable.
Related Topics
• For more information on encrypted data and metadata at rest in Amazon EFS, see Encrypting Data and
Metadata at Rest in EFS (p. 90).
• For example key policies, see Amazon EFS Key Policies for AWS KMS (p. 92).
• For a list of AWS CloudTrail log entries associated with an encrypted file system, see Amazon EFS Log
File Entries for Encrypted File Systems (p. 79).
• For more information on determining what accounts and services have access to your CMKs, see
Determining Access to an AWS KMS Customer Master Key in the AWS Key Management Service
Developer Guide.
61

Amazon Elastic File System User Guide
NFS Support
Mounting File Systems
In the following section, you can learn how to install the Network File System (NFS) client and how to
mount your Amazon EFS file system on an Amazon EC2 instance. You also can find an explanation of
the mount command and the available options for specifying your file system's Domain Name System
(DNS) name in the mount command. In addition, you can find how to use the file fstab to automatically
remount your file system after any system restarts.
Note
Before you can mount a file system, you must create, configure, and launch your related AWS
resources. For detailed instructions, see Getting Started with Amazon Elastic File System (p. 10).
Topics
•NFS Support (p. 62)
•Installing the NFS Client (p. 62)
•Mounting on Amazon EC2 with a DNS Name (p. 63)
•Mounting with an IP Address (p. 64)
•Mounting Automatically (p. 65)
•Additional Mounting Considerations (p. 68)
NFS Support
Amazon EFS supports the Network File System versions 4.0 and 4.1 (NFSv4) and NFSv4.0 protocols when
mounting your file systems on Amazon EC2 instances. While NFSv4.0 is supported, we recommend that
you use NFSv4.1. Mounting your Amazon EFS file system on your Amazon EC2 instance also requires an
NFS client that supports your chosen NFSv4 protocol.
To get the best performance out of your file system, use an Amazon EC2 Amazon Machine
Image (AMI) that includes a Linux kernel that is version 4.0 or newer. We recommend using
AmazonLinuxAMI2016.03.0 or AmazonLinuxAMI2016.09.0 as the AMI for the Amazon EC2 instance
to mount your file system to.
Note
Using Amazon EFS with Microsoft Windows Amazon EC2 instances is not supported.
Troubleshooting AMI/Kernel Versions
To troubleshoot issues related to certain AMI or kernel versions when using Amazon EFS from an EC2
instance, see Troubleshooting AMI and Kernel Issues (p. 103).
Installing the NFS Client
To mount your Amazon EFS file system on your Amazon EC2 instance, first you need to install an NFS
client. To connect to your EC2 instance and install an NFS client, you need the public DNS name of the
EC2 instance and a user name to log in. That user name is ec2-user when connecting from computers
running Linux or Windows.
62
Amazon Elastic File System User Guide
Mounting on Amazon EC2 with a DNS Name
To connect your EC2 instance and install the NFS client
1. Connect to your EC2 instance. Note the following about connecting to the instance:
• To connect to your instance from a computer running Mac OS or Linux, specify the .pem file to
your SSH client with the -i option and the path to your private key.
• To connect to your instance from a computer running Windows, you can use either MindTerm or
PuTTY. If you plan to use PuTTY, you need to install it and use the following procedure to convert
the .pem file to a .ppk file.
For more information, see the following topics in the Amazon EC2 User Guide for Linux Instances:
•Connecting to Your Linux Instance from Windows Using PuTTY
•Connecting to Your Linux Instance Using SSH
The key file cannot be publicly viewable for SSH. You can use the chmod 400 filename.pem
command to set these permissions. For more information, see Create a Key Pair.
2. (Optional) Get updates and reboot.
$ sudo yum -y update
$ sudo reboot
3. After the reboot, reconnect to your EC2 instance.
4. Install the NFS client.
If you're using an Amazon Linux AMI or Red Hat Linux AMI, install the NFS client with the following
command.
$ sudo yum -y install nfs-utils
If you're using an Ubuntu Amazon EC2 AMI, install the NFS client with the following command.
$ sudo apt-get -y install nfs-common
If you use a custom kernel (build a custom AMI), you need to include at a minimum the NFSv4.1 client
kernel module and the right NFS4 userspace mount helper.
Note
If you choose the AmazonLinuxAMI2016.03.0 or AmazonLinuxAMI2016.09.0 Amazon Linux
AMI when launching your Amazon EC2 instance, you won't need to install nfs-utils because
it's already included in the AMI by default.
Next: Mount Your File System
Use one of the following procedures to mount your file system.
•Mounting on Amazon EC2 with a DNS Name (p. 63)
•Mounting with an IP Address (p. 64)
•Mounting Automatically (p. 65)
Mounting on Amazon EC2 with a DNS Name
You can mount an Amazon EFS file system on an Amazon EC2 instance using DNS names. You can do this
with a DNS name for the file system, or a DNS name for a mount target.
63
Amazon Elastic File System User Guide
Mounting on On-Premises Servers with a DNS Name
•File system DNS name – Using the file system's DNS name is your simplest mounting option. The file
system DNS name will automatically resolve to the mount target’s IP address in the Availability Zone
of the connecting Amazon EC2 instance. You can get this DNS name from the console, or if you have
the file system ID, you can construct it using the following convention:
file-system-id.efs.aws-region.amazonaws.com
Using the file system DNS name, you can mount a file system on your Amazon EC2 instance with the
following command:
sudo mount -t nfs -o
nfsvers=4.1,rsize=1048576,wsize=1048576,hard,timeo=600,retrans=2 file-system-id.efs.aws-
region.amazonaws.com:/ efs-mount-point
•Mount target DNS name – In December 2016, we introduced file system DNS names. We continue to
provide a DNS name for each Availability Zone mount target for backward compatibility. If you delete
a mount target and then create a new one in the same Availability Zone, the DNS name for that new
mount target in that Availability Zone remains the same as the DNS name for the old mount target.
The generic form of a mount target DNS name is as follows:
availability-zone.file-system-id.efs.aws-region.amazonaws.com
For a list of regions that support Amazon EFS, see Amazon Elastic File System in the AWS General
Reference.
To be able to use a DNS name in the mount command, the following must be true:
• The connecting EC2 instance must be inside a VPC and must be configured to use the DNS server
provided by Amazon. For information about Amazon DNS server, see DHCP Options Sets in the
Amazon VPC User Guide.
• The VPC of the connecting EC2 instance must have DNS host names enabled. For more information,
see Viewing DNS Hostnames for Your EC2 Instance in the Amazon VPC User Guide.
Note
We recommend that you wait 90 seconds after creating a mount target before you mount the
file system, as the DNS records propagate fully in the region.
Mounting on On-Premises Servers with a DNS Name
Although you can mount your file system on your on-premises server through AWS Direct Connect with
a DNS name, we recommend using IP addresses for simplicity. To use DNS names, you need to integrate
your DNS services in your Amazon VPC with your on-premises DNS domains. Specifically, you need to
update your on-premises DNS server to forward the DNS requests for Amazon EFS mount targets to a
DNS server in the Amazon VPC over the AWS Direct Connect connection. For more information, see How
to Set Up DNS Resolution Between On-Premises Networks and AWS Using AWS Directory Service and
Amazon Route 53, in the AWS Security Blog.
Mounting with an IP Address
As an alternative to mounting your Amazon EFS file system with the DNS name, Amazon EC2 instances
can mount a file system using a mount target’s IP address. Mounting by IP address will work in
environments where DNS is disabled, such as VPCs with DNS hostnames disabled, and EC2-Classic
64
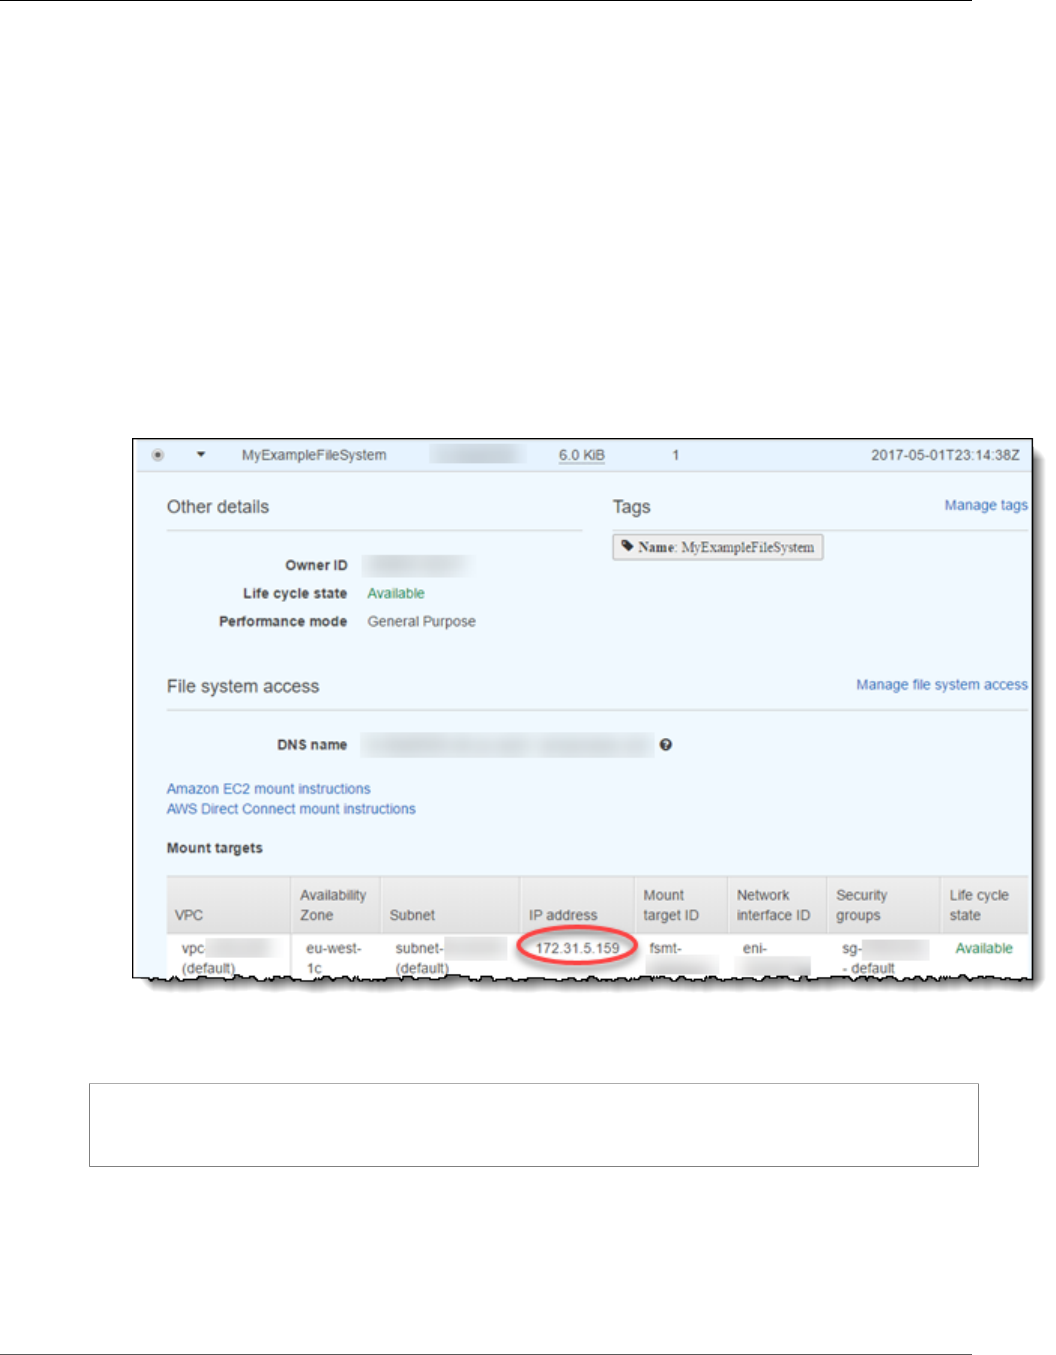
Amazon Elastic File System User Guide
Mounting Automatically
instances mounting using ClassicLink. For more information on ClassicLink, see ClassicLink in the Amazon
EC2 User Guide for Linux Instances.
Mounting a file system using the mount target IP address can also be configured as a fallback option for
applications configured to mount the file system using its DNS name by default. When connecting to
a mount target IP address, EC2 instances should mount using the mount target IP address in the same
Availability Zone as the connecting instance.
You can get the mount target IP address for your EFS file system through the console using the following
procedure.
To obtain the mount target IP address for your EFS file system
1. Open the Amazon Elastic File System console at https://console.aws.amazon.com/efs/.
2. Choose the Name of your EFS file system from the File systems list.
3. In the Mount targets table, identify the Availability Zone that you want to use to mount your EFS
file system to your EC2 instance.
4. Make a note of the IP address associated with your chosen Availability Zone.
You can specify the IP address of a mount target in the mount command, as shown following:
$ sudo mount -t nfs -o
nfsvers=4.1,rsize=1048576,wsize=1048576,hard,timeo=600,retrans=2 mount-target-IP:/ ~/
efs-mount-point
Mounting Automatically
You can use the file fstab to automatically mount your Amazon EFS file system whenever the Amazon
EC2 instance it is mounted on reboots. There are two ways to set up automatic mounting. You can
65

Amazon Elastic File System User Guide
Updating an Existing EC2 Instance to Mount Automatically
update the /etc/fstab file in your EC2 instance after you connect to the instance for the first time, or
you can configure automatic mounting of your EFS file system when you create your EC2 instance.
Updating an Existing EC2 Instance to Mount
Automatically
To automatically remount your Amazon EFS file system directory when the Amazon EC2 instance
reboots, you can use the file fstab. The file fstab contains information about file systems, and the
command mount -a, which runs during instance startup, mounts the file systems listed in the fstab
file.
Note
Before you can update the /etc/fstab file of your EC2 instance, make sure that you've already
created your Amazon EFS file system and that you're connected to your Amazon EC2 instance.
For more information, see Step 2: Create Your Amazon EFS File System (p. 15) in the Amazon
EFS Getting Started exercise.
To update the /etc/fstab file in your EC2 instance
1. Connect to your EC2 instance, and open the /etc/fstab file in an editor.
2. Add the following line to the /etc/fstab file.
mount-target-DNS:/ efs-mount-point nfs4
nfsvers=4.1,rsize=1048576,wsize=1048576,hard,timeo=600,retrans=2,_netdev 0 0
If you want to copy the contents of your /etc/fstab file between EC2 instances in different
Availability Zones (AZ), we recommend that you use the file system DNS name. You shouldn't copy
the /etc/fstab file between AZs if you're using the mount target DNS name, because then each
file system will have a unique DNS name for each Availability Zone with a mount target. For more
information about DNS names, see Mounting on Amazon EC2 with a DNS Name (p. 63).
3. Save the changes to the file.
Your EC2 instance is now configured to mount the EFS file system whenever it restarts.
Note
If your Amazon EC2 instance needs to start regardless of the status of your mounted Amazon
EFS file system, you'll want to add the nofail option to your file system's entry in your etc/
fstab file.
The line of code you added to the /etc/fstab file does the following.
Field Description
mount-target-DNS:/ The Domain Name Server (DNS) name for the file system that you want
to mount. This is the same value used in mount commands to mount the
subdirectory of your EFS file system.
efs-mount-point The mount point for the EFS file system on your EC2 instance.
nfs4 The type of file system. For EFS, this type is always nfs4.
mount options Mount options for the file system. This is a comma-separated list of the
following options:
•nfsvers – Identifies the version of NFS that will be used. We
recommend 4.1 as the value for this option.
66

Amazon Elastic File System User Guide
Configuring an EFS File System to Mount
Automatically at EC2 Instance Launch
Field Description
•rsize – Defines the size of the chunks for reading data between your
client and the file system in the cloud. We recommend 1048576 as the
value for this option.
•wsize – Defines the size of the chunks for writing data between your
client and the file system in the cloud. We recommend 1048576 as the
value for this option.
•hard – Specifies that the local applications using a file on the file
system should stop and wait for the file system to come back online if
Amazon EFS is temporarily unavailable.
•timeo – Specifies the amount of time, in tenths of a second, that the
NFS client waits for a response before it retries a request to the file
system in the cloud. We recommend 600 deciseconds as the value for
this option.
•retrans – Specifies the number of times the NFS client should retry a
request. We recommend 2 as the value for this option.
•_netdev – This is used to prevent the Amazon EC2 instance’s kernel
from mounting the file system before the instance has network
connectivity.
For more information, see Additional Mounting Considerations (p. 68).
0A nonzero value indicates the file system should be backed up by dump.
For EFS, this value should be 0.
0The order in which fsck checks file systems at boot. For EFS file systems,
this value should be 0 to indicate that fsck should not run at startup.
Configuring an EFS File System to Mount
Automatically at EC2 Instance Launch
You can configure an Amazon EC2 instance to mount your Amazon EFS file system automatically when
it is first launched with a script that works with cloud-init. You add the script during the Launch
Instance wizard of the EC2 management console. For an example of how to launch an EC2 instance from
the console, see Getting Started (p. 10).
The script installs the NFS client and writes an entry in the /etc/fstab file that will identify the mount
target DNS name as well as the subdirectory in your EC2 instance on which to mount the EFS file system.
The script ensures the file gets mounted when the EC2 instance is launched and after each system
reboot.
For more information about the customized version of cloud-init used by Amazon Linux, see cloud-
init in the Amazon EC2 User Guide for Linux Instances.
To configure your EC2 instance to mount an EFS file system automatically at launch
1. Open the Amazon EC2 console in your web browser, and begin the Launch Instance wizard.
2. When you reach Step 3: Configure Instance Details, configure your instance details, expand the
Advanced section, and then do the following:
• Paste the following script into User data. You must update the script by providing the
appropriate values for file-system-id, aws-region, and efs-mount-point:
67

Amazon Elastic File System User Guide
Additional Mounting Considerations
#cloud-config
package_upgrade: true
packages:
- nfs-utils
runcmd:
- mkdir -p /var/www/html/efs-mount-point/
- chown ec2-user:ec2-user /var/www/html/efs-mount-point/
- echo "file-system-id.efs.aws-region.amazonaws.com:/ /var/www/html/efs-mount-point
nfs4 nfsvers=4.1,rsize=1048576,wsize=1048576,hard,timeo=600,retrans=2 0 0" >> /
etc/fstab
- mount -a -t nfs4
If you are specifying a custom path to your mount point, as in the example, you may want to
use mkdir -p, because the -p option creates intermediate parent directories as needed. The -
chown line of the preceding example changes the ownership of the directory at the mount point
from the root user to the default Linux system user account for Amazon Linux, ec2-user. You
can specify any user with this command, or leave it out of the script to keep ownership of that
directory with the root user.
For more information about user data scripts, see Adding User Data in the Amazon EC2 User
Guide for Linux Instances.
3. Complete the Launch Instance wizard.
Note
To verify that your EC2 instance is working correctly, you can integrate these steps into the
Getting Started exercise. For more information, see Getting Started (p. 10).
Your EC2 instance is now configured to mount the EFS file system at launch.
Additional Mounting Considerations
When mounting your Amazon EFS file system on an Amazon EC2 instance, note the following additional
considerations:
• We recommend the following default Linux mount option values:
rsize=1048576
wsize=1048576
hard
timeo=600
retrans=2
• If you must change the IO size parameters (rsize and wsize), we recommend that you use the
largest size possible (up to 1048576) to avoid diminished performance.
• If you must change the timeout parameter (timeo), we recommend that you use a value of at least
150, which is equivalent to 15 seconds. The timeo parameter is in deciseconds, so 15 seconds is equal
to 150 deciseconds.
• We recommend that you use the hard mount option. However, if you use a soft mount, you need to set
the timeo parameter to at least 150 deciseconds.
• Avoid setting any other mount options that are different from the defaults. For example, changing
read or write buffer sizes, or disabling attribute caching can result in reduced performance.
• Amazon EFS ignores source ports. If you change Amazon EFS source ports, it doesn't have any effect.
68
Amazon Elastic File System User Guide
Unmounting File Systems
• Amazon EFS does not support any of the Kerberos security variants. For example, the following will
cause a mount to fail:
$ mount -t nfs4 -o krb5p <DNS_NAME>:/ /efs/
• We recommend that you mount your file system using its DNS name, which will resolve to the IP
address of the Amazon EFS mount target in the same Availability Zone as your Amazon EC2 instance. If
you use a mount target in a different Availability Zone as your Amazon EC2 instance, you will incur the
standard Amazon EC2 data transfer charges for data sent across Availability Zones, and you may see
increased latencies for file system operations.
• For more mount options, and detailed explanations of the defaults, refer to the man fstab and man
nfs pages.
Unmounting File Systems
Before you delete a file system, we recommend that you unmount it from every Amazon EC2 instance
that it's connected to. You can unmount a file system on your Amazon EC2 instance by running the
umount command on the instance itself. You can't unmount an Amazon EFS file system through the AWS
CLI, the AWS Management Console, or through any of the AWS SDKs. To unmount an Amazon EFS file
system connected to an Amazon EC2 instance running Linux, use the umount command as follows:
umount ~/efs-mount-point
We recommend that you do not specify any other umount options. Avoid setting any other umount
options that are different from the defaults.
You can verify that your Amazon EFS file system has been unmounted by running the df command to
display the disk usage statistics for the file systems currently mounted on your Linux-based Amazon
EC2 instance. If the Amazon EFS file system that you want to unmounts isn’t listed in the df command
output, this means that the file system is unmounted.
Example – Identify the Mount Status of an Amazon EFS File System and Unmount It
$ df -T
Filesystem Type 1K-blocks Used Available Use% Mounted on
/dev/sda1 ext4 8123812 1138920 6884644 15% /
availability-zone.file-system-id.efs.aws-region.amazonaws.com :/ nfs4 9007199254740992 0
9007199254740992 0% /home/ec2-user/efs
$ umount ~/efs
$ df -T
Filesystem Type 1K-blocks Used Available Use% Mounted on
/dev/sda1 ext4 8123812 1138920 6884644 15% /
69

Amazon Elastic File System User Guide
Monitoring Tools
Monitoring Amazon EFS
Monitoring is an important part of maintaining the reliability, availability, and performance of Amazon
EFS and your AWS solutions. You should collect monitoring data from all of the parts of your AWS
solution so that you can more easily debug a multi-point failure if one occurs. Before you start
monitoring Amazon EFS, however, you should create a monitoring plan that includes answers to the
following questions:
• What are your monitoring goals?
• What resources will you monitor?
• How often will you monitor these resources?
• What monitoring tools will you use?
• Who will perform the monitoring tasks?
• Who should be notified when something goes wrong?
The next step is to establish a baseline for normal Amazon EFS performance in your environment, by
measuring performance at various times and under different load conditions. As you monitor Amazon
EFS, you should consider storing historical monitoring data. This stored data will give you a baseline to
compare against with current performance data, identify normal performance patterns and performance
anomalies, and devise methods to address issues.
For example, with Amazon EFS, you can monitor network throughput, I/O for read, write, and/
or metadata operations, client connections, and burst credit balances for your file systems. When
performance falls outside your established baseline, you might need change the size of your file system
or the number of connected clients to optimize the file system for your workload.
To establish a baseline you should, at a minimum, monitor the following items:
• Your file system's network throughput.
• The number of client connections to a file system.
• The number of bytes for each file system operation, including data read, data write, and metadata
operations.
Monitoring Tools
AWS provides various tools that you can use to monitor Amazon EFS. You can configure some of these
tools to do the monitoring for you, while some of the tools require manual intervention. We recommend
that you automate monitoring tasks as much as possible.
Automated Monitoring Tools
You can use the following automated monitoring tools to watch Amazon EFS and report when
something is wrong:
•Amazon CloudWatch Alarms – Watch a single metric over a time period that you specify, and perform
one or more actions based on the value of the metric relative to a given threshold over a number of
70

Amazon Elastic File System User Guide
Manual Monitoring Tools
time periods. The action is a notification sent to an Amazon Simple Notification Service (Amazon SNS)
topic or Auto Scaling policy. CloudWatch alarms do not invoke actions simply because they are in a
particular state; the state must have changed and been maintained for a specified number of periods.
For more information, see Monitoring with Amazon CloudWatch (p. 71).
•Amazon CloudWatch Logs – Monitor, store, and access your log files from AWS CloudTrail or other
sources. For more information, see Monitoring Log Files in the Amazon CloudWatch User Guide.
•Amazon CloudWatch Events – Match events and route them to one or more target functions or
streams to make changes, capture state information, and take corrective action. For more information,
see What is Amazon CloudWatch Events in the Amazon CloudWatch User Guide.
•AWS CloudTrail Log Monitoring – Share log files between accounts, monitor CloudTrail log files in real
time by sending them to CloudWatch Logs, write log processing applications in Java, and validate that
your log files have not changed after delivery by CloudTrail. For more information, see Working with
CloudTrail Log Files in the AWS CloudTrail User Guide.
Manual Monitoring Tools
Another important part of monitoring Amazon EFS involves manually monitoring those items that
the Amazon CloudWatch alarms don't cover. The Amazon EFS, CloudWatch, and other AWS console
dashboards provide an at-a-glance view of the state of your AWS environment. We recommend that you
also check the log files on file system.
• From the Amazon EFS console, you can find the following items for your file systems:
• The current metered size
• The number of mount targets
• The life cycle state
• CloudWatch home page shows:
• Current alarms and status
• Graphs of alarms and resources
• Service health status
In addition, you can use CloudWatch to do the following:
• Create customized dashboards to monitor the services you use
• Graph metric data to troubleshoot issues and discover trends
• Search and browse all your AWS resource metrics
• Create and edit alarms to be notified of problems
Monitoring with Amazon CloudWatch
You can monitor file systems using Amazon CloudWatch, which collects and processes raw data from
Amazon EFS into readable, near real-time metrics. These statistics are recorded for a period of 15
months, so that you can access historical information and gain a better perspective on how your web
application or service is performing. By default, Amazon EFS metric data is automatically sent to
CloudWatch at 1-minute periods. For more information about CloudWatch, see What Are Amazon
CloudWatch, Amazon CloudWatch Events, and Amazon CloudWatch Logs? in the Amazon CloudWatch
User Guide.
Amazon CloudWatch Metrics for Amazon EFS
The AWS/EFS namespace includes the following metrics.
71

Amazon Elastic File System User Guide
Amazon CloudWatch Metrics for Amazon EFS
Metric Description
BurstCreditBalance The number of burst credits that a file system has.
Burst credits allow a file system to burst to throughput levels above a
file system’s baseline level for periods of time. For more information, see
Throughput scaling in Amazon EFS.
The Minimum statistic is the smallest burst credit balance for any minute
during the period. The Maximum statistic is the largest burst credit balance
for any minute during the period. The Average statistic is the average burst
credit balance during the period.
Units: Bytes
Valid statistics: Minimum, Maximum, Average
ClientConnections The number of client connections to a file system. When using a standard
client, there is one connection per mounted Amazon EC2 instance.
Note
To calculate the average ClientConnections for periods greater
than one minute, divide the Sum statistic by the number of minutes
in the period.
Units: Count of client connections
Valid statistics: Sum
DataReadIOBytes The number of bytes for each file system read operation.
The Sum statistic is the total number of bytes associated with read
operations. The Minimum statistic is the size of the smallest read operation
during the period. The Maximum statistic is the size of the largest read
operation during the period. The Average statistic is the average size of
read operations during the period. The SampleCount statistic provides a
count of read operations.
Units:
• Bytes for Minimum, Maximum, Average, and Sum.
• Count for SampleCount.
Valid statistics: Minimum, Maximum, Average, Sum, SampleCount
DataWriteIOBytes The number of bytes for each file write operation.
The Sum statistic is the total number of bytes associated with write
operations. The Minimum statistic is the size of the smallest write operation
during the period. The Maximum statistic is the size of the largest write
operation during the period. The Average statistic is the average size of
write operations during the period. The SampleCount statistic provides a
count of write operations.
Units:
• Bytes are the units for the Minimum, Maximum, Average, and Sum
statistics.
72

Amazon Elastic File System User Guide
Amazon CloudWatch Metrics for Amazon EFS
Metric Description
• Count for SampleCount.
Valid statistics: Minimum, Maximum, Average, Sum, SampleCount
MetadataIOBytes The number of bytes for each metadata operation.
The Sum statistic is the total number of bytes associated with metadata
operations. The Minimum statistic is the size of the smallest metadata
operation during the period. The Maximum statistic is the size of the largest
metadata operation during the period. The Average statistic is the size
of the average metadata operation during the period. The SampleCount
statistic provides a count of metadata operations.
Units:
• Bytes are the units for the Minimum, Maximum, Average, and Sum
statistics.
• Count for SampleCount.
Valid statistics: Minimum, Maximum, Average, Sum, SampleCount
PercentIOLimit Shows how close a file system is to reaching the I/O limit of the General
Purpose performance mode. If this metric is at 100% more often than
not, consider moving your application to a file system using the Max I/O
performance mode.
Note
This metric is only submitted for file systems using the General
Purpose performance mode.
Units:
• Percent
PermittedThroughput The maximum amount of throughput a file system is allowed, given the file
system size and BurstCreditBalance. For more information, see Amazon
EFS Performance.
The Minimum statistic is the smallest throughput permitted for any
minute during the period. The Maximum statistic is the highest throughput
permitted for any minute during the period. The Average statistic is the
average throughput permitted during the period.
Units: Bytes per second
Valid statistics: Minimum, Maximum, Average
73

Amazon Elastic File System User Guide
Bytes Reported in CloudWatch
Metric Description
TotalIOBytes The number of bytes for each file system operation, including data read,
data write, and metadata operations.
The Sum statistic is the total number of bytes associated with all file system
operations. The Minimum statistic is the size of the smallest operation
during the period. The Maximum statistic is the size of the largest operation
during the period. The Average statistic is the average size of an operation
during the period. The SampleCount statistic provides a count of all
operations.
Note
To calculate the average operations per second for a period, divide
the SampleCount statistic by the number of seconds in the period.
To calculate the average throughput (Bytes per second) for a
period, divide the Sum statistic by the number of seconds in the
period.
Units:
• Bytes for Minimum, Maximum, Average, and Sum statistics.
• Count for SampleCount.
Valid statistics: Minimum, Maximum, Average, Sum, SampleCount
Bytes Reported in CloudWatch
As with Amazon S3 and Amazon EBS, Amazon EFS CloudWatch metrics are reported as raw Bytes.
Bytes are not rounded to either a decimal or binary multiple of the unit. Keep this in mind when
calculating your burst rate using the data you get from the metrics. For more information on bursting,
see Throughput Scaling in Amazon EFS (p. 83).
Amazon EFS Dimensions
Amazon EFS metrics use the EFS namespace and provides metrics for a single dimension,
FileSystemId. A file system's ID can be found in the Amazon EFS management console, and it takes
the form of fs-XXXXXXXX.
How Do I Use Amazon EFS Metrics?
The metrics reported by Amazon EFS provide information that you can analyze in different ways. The
list below shows some common uses for the metrics. These are suggestions to get you started, not a
comprehensive list.
How do I? Relevant Metrics
How can I determine my
throughput?
You can monitor the daily Sum statistic of the TotalIOBytes metric to see
your throughput.
How can I track the
number of Amazon
EC2 instances that are
You can monitor the Sum statistic of the ClientConnections metric. To
calculate the average ClientConnections for periods greater than one
minute, divide the sum by the number of minutes in the period.
74

Amazon Elastic File System User Guide
Monitoring EFS File Sync
How do I? Relevant Metrics
connected to a file
system?
How can I see my burst
credit balance?
You can see your balance by monitoring the BurstCreditBalance metric
for your file system. For more information on bursting and burst credits, see
Throughput Scaling in Amazon EFS (p. 83).
Monitoring EFS File Sync with Amazon CloudWatch
You can monitor EFS File Sync using Amazon CloudWatch, which collects and processes raw data from
Amazon EFS into readable, near real-time metrics. These statistics are recorded for a period of 15
months, so that you can access historical information and gain a better perspective on how EFS File Sync.
By default, EFS File Sync metric data is automatically sent to CloudWatch at 5-minute periods. For more
information about CloudWatch, see What Are Amazon CloudWatch, Amazon CloudWatch Events, and
Amazon CloudWatch Logs? in the Amazon CloudWatch User Guide.
The AWS/FileSync namespace includes the following metrics.
Metric Description
FilesTransferred The number of files and directories transferred from source file system
to the Amazon EFS file system. A file or directory is considered to be
transferred if any aspect of the or directory required syncing. and
increments this metric. In this case, this metric is incremented. However, if
only metadata is changed then no actual data will be transferred.
units: Count
PhysicalBytesTransferredThe total number of bytes transferred over the network when the sync
agent reads from the source file system to the Amazon EFS file system.
Unit: Bytes
LogicalBytesTransferredThe total size of the files transferred to the Amazon EFS file system.
Directories and metadata are not included in this metric.
Units: Bytes
Amazon EFS File Sync Dimensions
EFS File Sync metrics use the AWS/FileSync namespace and provide metrics for the following
dimensions.
• HostId—the unique ID of your host server.
• HostName—the name or domain of your host server.
• SyncSetId—the ID of the sync set. It takes the form set-12345678912345678
Access CloudWatch Metrics
There are many ways to see the Amazon EFS metrics for CloudWatch. You can view them through the
CloudWatch console, or you can access them using the CloudWatch CLI or the CloudWatch API. The
following procedures show you how to access the metrics using these various tools.
75

Amazon Elastic File System User Guide
Creating Alarms
To view metrics using the CloudWatch console
1. Open the CloudWatch console at https://console.aws.amazon.com/cloudwatch/.
2. In the navigation pane, choose Metrics.
3. Select the EFS namespace.
4. (Optional) To view a metric, type its name in the search field.
5. (Optional) To filter by dimension, select FileSystemId.
To access metrics from the AWS CLI
• Use the list-metrics command with the --namespace "AWS/EFS" namespace. For more
information, see the AWS Command Line Interface Reference.
To access metrics from the CloudWatch API
• Call GetMetricStatistics. For more information, see Amazon CloudWatch API Reference.
Creating CloudWatch Alarms to Monitor Amazon EFS
You can create a CloudWatch alarm that sends an Amazon SNS message when the alarm changes state.
An alarm watches a single metric over a time period you specify, and performs one or more actions
based on the value of the metric relative to a given threshold over a number of time periods. The action
is a notification sent to an Amazon SNS topic or Auto Scaling policy.
Alarms invoke actions for sustained state changes only. CloudWatch alarms don't invoke actions simply
because they are in a particular state; the state must have changed and been maintained for a specified
number of periods.
Note
One important use of CloudWatch alarms for Amazon EFS is with file system encryption.
You can enable encryption for an Amazon EFS file system when it's created. To enforce data
encryption policies for Amazon EFS file systems, you can use Amazon CloudWatch and AWS
CloudTrail to detect the creation of a file system and verify that encryption is enabled. For
more information, see Walkthrough 6: Enforcing Encryption on an Amazon EFS File System at
Rest (p. 144).
The following procedures outline how to create alarms for Amazon EFS.
To set alarms using the CloudWatch console
1. Sign in to the AWS Management Console and open the CloudWatch console at https://
console.aws.amazon.com/cloudwatch/.
2. Choose Create Alarm. This launches the Create Alarm Wizard.
3. Choose EFS Metrics and scroll through the Amazon EFS metrics to locate the metric you want to
place an alarm on. To display just the Amazon EFS metrics in this dialog box, search on the file
system id of your file system. Select the metric to create an alarm on and choose Next.
4. Fill in the Name, Description, Whenever values for the metric.
5. If you want CloudWatch to send you an email when the alarm state is reached, in the Whenever this
alarm: field, choose State is ALARM. In the Send notification to: field, choose an existing SNS topic.
If you select Create topic, you can set the name and email addresses for a new email subscription
list. This list is saved and appears in the field for future alarms.
Note
If you use Create topic to create a new Amazon SNS topic, the email addresses must be
verified before they receive notifications. Emails are only sent when the alarm enters an
76

Amazon Elastic File System User Guide
Logging Amazon EFS API Calls with AWS CloudTrail
alarm state. If this alarm state change happens before the email addresses are verified, they
do not receive a notification.
6. At this point, the Alarm Preview area gives you a chance to preview the alarm you’re about to
create. Choose Create Alarm.
To set an alarm using the AWS CLI
• Call put-metric-alarm. For more information, see AWS Command Line Interface Reference.
To set an alarm using the CloudWatch API
• Call PutMetricAlarm. For more information, see Amazon CloudWatch API Reference
Logging Amazon EFS API Calls with AWS
CloudTrail
Amazon EFS is integrated with AWS CloudTrail, a service that captures AWS API calls and delivers the
log files to an Amazon S3 bucket that you specify. CloudTrail captures API calls from the Amazon EFS
console, the AWS CLI, or one of the AWS SDKs to the Amazon EFS API operations. Using the information
collected by CloudTrail, you can determine the request that was made to Amazon EFS, the source IP
address from which the request was made, who made the request, when it was made, and more.
Once you've created a trail, it starts logging events automatically for that region. It can take about 15
minutes for the logs to appear in the bucket. To learn more about CloudTrail, including how to configure
and enable it, see the AWS CloudTrail User Guide.
Amazon EFS Information in CloudTrail
When CloudTrail logging is enabled in your AWS account, API calls made to Amazon EFS are tracked in
CloudTrail log files, where they are written with other AWS service records. CloudTrail determines when
to create and write to a new log file based on a time period and file size.
All Amazon EFS API calls (p. 168) are logged by CloudTrail. For example, calls to the
CreateFileSystem, CreateMountTarget and CreateTags actions generate entries in the CloudTrail
log files.
Each log file contains at least one API call. Some Amazon EFS API calls will trigger other API calls
for other services. For example, the Amazon EFS CreateMountTarget API call will trigger a
CreateNetworkInterface Amazon EC2 API call. For more information on which Amazon EFS API
actions will trigger API calls in other services, see the Required Permissions (API Actions) column of the
table in Amazon EFS API Permissions: Actions, Resources, and Conditions Reference (p. 165).
Every log entry contains information about who generated the request. The user identity information in
the log entry helps you determine the following:
• Whether the request was made with root or IAM user credentials
• Whether the request was made with temporary security credentials for a role or federated user
• Whether the request was made by another AWS service
For more information, see the CloudTrail userIdentity Element.
77

Amazon Elastic File System User Guide
Understanding Amazon EFS Log File Entries
You can store your log files in your Amazon S3 bucket for as long as you want, but you can also define
Amazon S3 lifecycle rules to archive or delete log files automatically. By default, your log files are
encrypted with Amazon S3 server-side encryption (SSE).
If you want to be notified upon log file delivery, you can configure CloudTrail to publish Amazon SNS
notifications when new log files are delivered. For more information, see Configuring Amazon SNS
Notifications for CloudTrail.
You can also aggregate Amazon EFS log files from multiple AWS regions and multiple AWS accounts into
a single Amazon S3 bucket.
For more information, see Receiving CloudTrail Log Files from Multiple Regions and Receiving CloudTrail
Log Files from Multiple Accounts.
Understanding Amazon EFS Log File Entries
CloudTrail log files can contain one or more log entries. Each entry lists multiple JSON-formatted events.
A log entry represents a single request from any source and includes information about the requested
action, the date and time of the action, request parameters, and more. For information on what events
are recorded, see the CloudTrail Record Contents in the AWS CloudTrail User Guide. Log entries are not
an ordered stack trace of the public API calls, so they do not appear in any specific order.
The following example shows a CloudTrail log entry that demonstrates the CreateTags action when a
tag for a file system is created from the console.
{
"eventVersion": "1.04",
"userIdentity": {
"type": "Root",
"principalId": "111122223333",
"arn": "arn:aws:iam::111122223333:root",
"accountId": "111122223333",
"accessKeyId": "AKIAIOSFODNN7EXAMPLE",
"sessionContext": {
"attributes": {
"mfaAuthenticated": "false",
"creationDate": "2017-03-01T18:02:37Z"
}
}
},
"eventTime": "2017-03-01T19:25:47Z",
"eventSource": "elasticfilesystem.amazonaws.com",
"eventName": "CreateTags",
"awsRegion": "us-west-2",
"sourceIPAddress": "192.0.2.0",
"userAgent": "console.amazonaws.com",
"requestParameters": {
"fileSystemId": "fs-00112233",
"tags": [{
"key": "TagName",
"value": "AnotherNewTag"
}
]
},
"responseElements": null,
"requestID": "dEXAMPLE-feb4-11e6-85f0-736EXAMPLE75",
"eventID": "eEXAMPLE-2d32-4619-bd00-657EXAMPLEe4",
"eventType": "AwsApiCall",
"apiVersion": "2015-02-01",
"recipientAccountId": "111122223333"
}
78

Amazon Elastic File System User Guide
Amazon EFS Log File Entries for Encrypted File Systems
The following example shows a CloudTrail log entry that demonstrates the DeleteTags action when a
tag for a file system is deleted from the console.
{
"eventVersion": "1.04",
"userIdentity": {
"type": "Root",
"principalId": "111122223333",
"arn": "arn:aws:iam::111122223333:root",
"accountId": "111122223333",
"accessKeyId": "AKIAIOSFODNN7EXAMPLE",
"sessionContext": {
"attributes": {
"mfaAuthenticated": "false",
"creationDate": "2017-03-01T18:02:37Z"
}
}
},
"eventTime": "2017-03-01T19:25:47Z",
"eventSource": "elasticfilesystem.amazonaws.com",
"eventName": "DeleteTags",
"awsRegion": "us-west-2",
"sourceIPAddress": "192.0.2.0",
"userAgent": "console.amazonaws.com",
"requestParameters": {
"fileSystemId": "fs-00112233",
"tagKeys": []
},
"responseElements": null,
"requestID": "dEXAMPLE-feb4-11e6-85f0-736EXAMPLE75",
"eventID": "eEXAMPLE-2d32-4619-bd00-657EXAMPLEe4",
"eventType": "AwsApiCall",
"apiVersion": "2015-02-01",
"recipientAccountId": "111122223333"
}
Amazon EFS Log File Entries for Encrypted File
Systems
Amazon EFS gives you the option of creating encrypted file systems. For more information, see
Encrypting Data and Metadata at Rest in EFS (p. 90).
If you're using an encrypted file system, the calls that Amazon EFS makes on your behalf appear in your
AWS CloudTrail logs as coming from an AWS-owned account. If you see one of the following account IDs
in your CloudTrail logs, depending on the AWS Region that your file system is created in, this ID is one
owned by the Amazon EFS service.
AWS Region Account ID
US East (Ohio) 771736226457
US East (N. Virginia) 055650462987
US West (Oregon) 736298361104
EU (Frankfurt) 992038834663
EU (Ireland) 805538244694
79

Amazon Elastic File System User Guide
Amazon EFS Log File Entries for Encrypted File Systems
AWS Region Account ID
Asia Pacific (Sydney) 288718191711
Amazon EFS Encryption Context
Amazon EFS sends encryption context when making AWS KMS API requests to generate data keys
and decrypt. Amazon EFS using the file system ID as the encryption context for all file systems. In
the requestParameters field of a CloudTrail log entry, the encryption context looks similar to the
following.
"EncryptionContextEquals": {}
"aws:elasticfilesystem:filesystem:id" : "fs-4EXAMPLE"
80

Amazon Elastic File System User Guide
Performance Overview
Amazon EFS Performance
This topic provides an overview of Amazon EFS performance, discusses the two performance modes
(General Purpose and Max I/O) available in Amazon EFS, reviews the Amazon EFS bursting model, and
outlines some useful performance tips.
Performance Overview
Amazon EFS file systems are distributed across an unconstrained number of storage servers, enabling file
systems to grow elastically to petabyte scale and allowing massively parallel access from Amazon EC2
instances to your data. Amazon EFS's distributed design avoids the bottlenecks and constraints inherent
to traditional file servers.
This distributed data storage design means that multithreaded applications and applications that
concurrently access data from multiple Amazon EC2 instances can drive substantial levels of aggregate
throughput and IOPS. Big data and analytics workloads, media processing workflows, content
management, and web serving are examples of these applications.
In addition, Amazon EFS data is distributed across multiple Availability Zones (AZs), providing a high
level of durability and availability. The following tables compare high-level performance and storage
characteristics for Amazon’s file and block cloud storage services.
Performance Comparison – Amazon EFS and Amazon EBS
Amazon EFS Amazon EBS Provisioned IOPS
Per-operation
latency
Low, consistent latency. Lowest, consistent latency.
Throughput scale 10+ GB per second. Up to 2 GB per second.
Storage Characteristics Comparison – Amazon EFS and Amazon EBS
Amazon EFS Amazon EBS Provisioned IOPS
Availability and
durability
Data is stored redundantly across
multiple AZs.
Data is stored redundantly in a single
AZ.
Access Up to thousands of Amazon EC2
instances, from multiple AZs, can
connect concurrently to a file system.
A single Amazon EC2 instance in a
single AZ can connect to a file system.
Use cases Big data and analytics, media
processing workflows, content
management, web serving, and home
directories.
Boot volumes, transactional and
NoSQL databases, data warehousing,
and ETL.
The distributed nature of Amazon EFS enables high levels of availability, durability, and scalability.
This distributed architecture results in a small latency overhead for each file operation. Due to this per-
81

Amazon Elastic File System User Guide
Amazon EFS Use Cases
operation latency, overall throughput generally increases as the average I/O size increases, because the
overhead is amortized over a larger amount of data. Amazon EFS supports highly parallelized workloads
(for example, using concurrent operations from multiple threads and multiple Amazon EC2 instances),
which enables high levels of aggregate throughput and operations per second.
Amazon EFS Use Cases
Amazon EFS is designed to meet the performance needs of the following use cases.
Big Data and Analytics
Amazon EFS provides the scale and performance required for big data applications that require high
throughput to compute nodes coupled with read-after-write consistency and low-latency file operations.
Media Processing Workflows
Media workflows like video editing, studio production, broadcast processing, sound design, and
rendering often depend on shared storage to manipulate large files. A strong data consistency model
with high throughput and shared file access can cut the time it takes to perform these jobs and
consolidate multiple local file repositories into a single location for all users.
Content Management and Web Serving
Amazon EFS provides a durable, high throughput file system for content management systems that store
and serve information for a range of applications like websites, online publications, and archives.
Home Directories
Amazon EFS can provide storage for organizations that have many users that need to access and share
common data sets. An administrator can use Amazon EFS to create a file system accessible to people
across an organization and establish permissions for users and groups at the file or directory level.
File System Syncing to Amazon EFS
Amazon EFS File Sync provides efficient high-performance parallel data sync that is tolerant to
unreliable and high latency networks and enables you to easily and efficiently sync files from an existing
file system into Amazon EFS. for more information, see Amazon EFS File Sync (p. 33).
Performance Modes
To support a wide variety of cloud storage workloads, Amazon EFS offers two performance modes. You
select a file system's performance mode when you create it.
The two performance modes have no additional costs, so your Amazon EFS file system is billed and
metered the same, regardless of your performance mode. For information about file system limits, see
Limits for Amazon EFS File Systems (p. 94).
Note
An Amazon EFS file system's performance mode can't be changed after the file system has been
created.
82

Amazon Elastic File System User Guide
General Purpose Performance Mode
General Purpose Performance Mode
We recommend the General Purpose performance mode for the majority of your Amazon EFS file
systems. General Purpose is ideal for latency-sensitive use cases, like web serving environments, content
management systems, home directories, and general file serving. If you don't choose a performance
mode when you create your file system, Amazon EFS selects the General Purpose mode for you by
default.
Max I/O Performance Mode
File systems in the Max I/O mode can scale to higher levels of aggregate throughput and operations per
second with a tradeoff of slightly higher latencies for file operations. Highly parallelized applications
and workloads, such as big data analysis, media processing, and genomics analysis, can benefit from this
mode.
Using the Right Performance Mode
Our recommendation for determining which performance mode to use is as follows:
1. Create a new file system (p. 15) using the default General Purpose performance mode.
2. Run your application (or a use case similar to your application) for a period of time to test its
performance.
3. Monitor the PercentIOLimit (p. 71) Amazon CloudWatch metric for Amazon EFS during the
performance test. For more information about accessing this and other metrics, see Amazon
CloudWatch Metrics (p. 70).
If the PercentIOLimit percentage returned was at or near 100 percent for a significant amount of
time during the test, your application should use the Max I/O performance mode. Otherwise, it should
use the default General Purpose mode.
Throughput Scaling in Amazon EFS
Throughput on Amazon EFS scales as a file system grows. Because file-based workloads are typically
spiky—driving high levels of throughput for short periods of time, and low levels of throughput the rest
of the time—Amazon EFS is designed to burst to high throughput levels for periods of time.
All file systems, regardless of size, can burst to 100 MiB/s of throughput, and those over 1 TiB large can
burst to 100 MiB/s per TiB of data stored in the file system. For example, a 10 TiB file system can burst
to 1,000 MiB/s of throughput (10 TiB x 100 MiB/s/TiB). The portion of time a file system can burst
is determined by its size, and the bursting model is designed so that typical file system workloads will be
able to burst virtually any time they need to.
Amazon EFS uses a credit system to determine when file systems can burst. Each file system earns credits
over time at a baseline rate that is determined by the size of the file system, and uses credits whenever
it reads or writes data. The baseline rate is 50 MiB/s per TiB of storage (equivalently, 50 KiB/s per GiB of
storage).
Accumulated burst credits give the file system permission to drive throughput above its baseline rate. A
file system can drive throughput continuously at its baseline rate, and whenever it's inactive or driving
throughput below its baseline rate, the file system accumulates burst credits.
For example, a 100 GiB file system can burst (at 100 MiB/s) for 5 percent of the time if it's inactive for
the remaining 95 percent. Over a 24-hour period, the file system earns 432,000 MiBs worth of credit,
which can be used to burst at 100 MiB/s for 72 minutes.
83
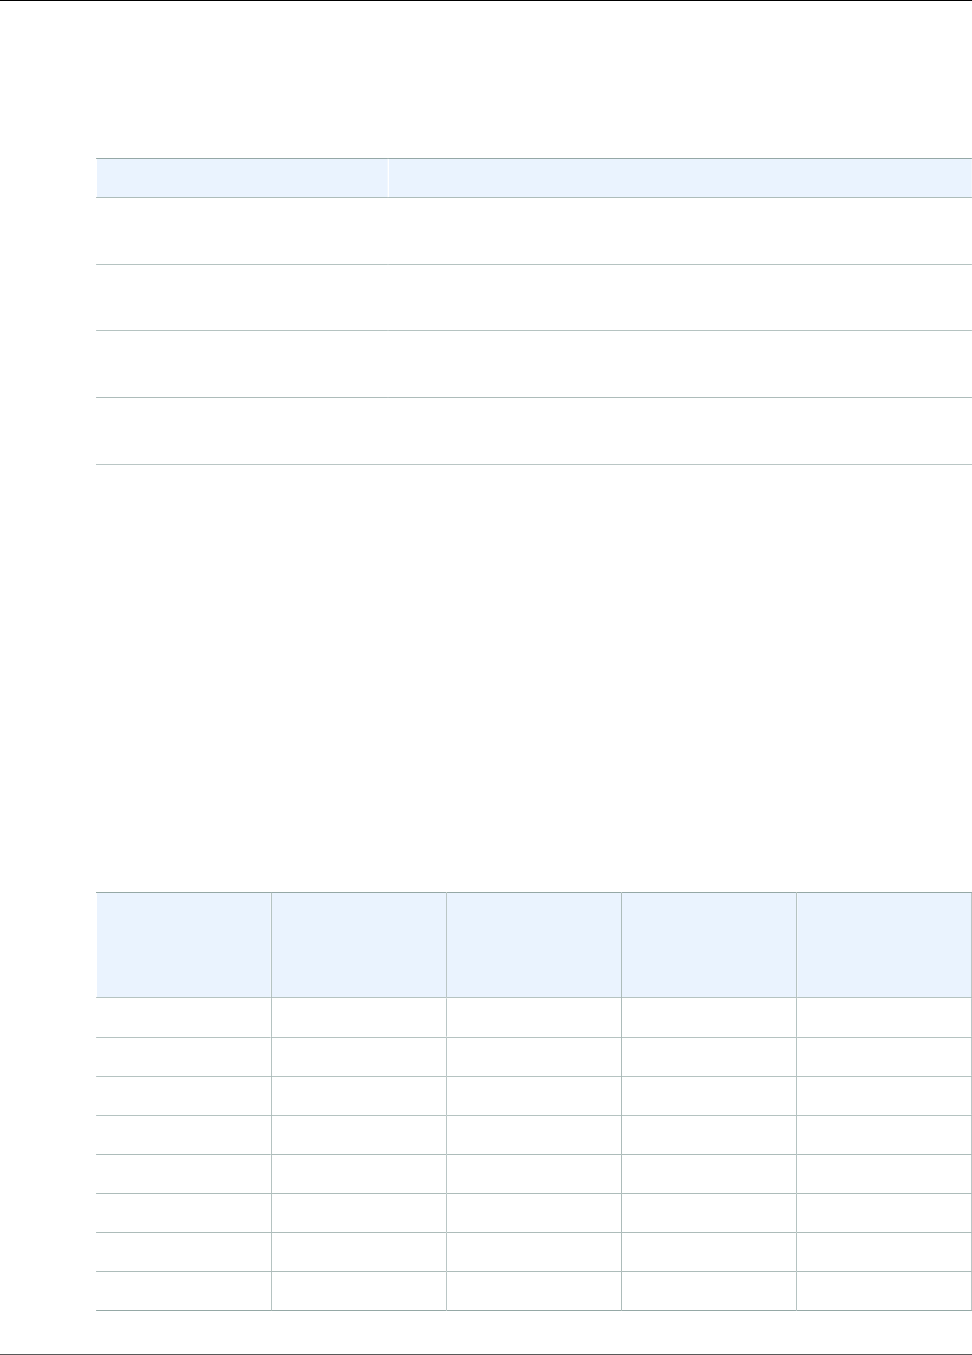
Amazon Elastic File System User Guide
Bursting
File systems larger than 1 TiB can always burst for up to 50 percent of the time if they are inactive for
the remaining 50 percent.
The following table provides examples of bursting behavior.
File System Size Aggregate Read/Write Throughput
A 100 GiB file system can... • Burst to 100 MiB/s for up to 72 minutes each day, or
• Drive up to 5 MiB/s continuously
A 1 TiB file system can... • Burst to 100 MiB/s for 12 hours each day, or
• Drive 50 MiB/s continuously
A 10 TiB file system can... • Burst to 1 GiB/s for 12 hours each day, or
• Drive 500 MiB/s continuously
Generally, a larger file system
can...
• Burst to 100MiB/s per TiB of storage for 12 hours each day, or
• Drive 50 MiB/s per TiB of storage continuously
Note
• The minimum file system size used when calculating the baseline rate is 1 GiB, so all file
systems have a baseline rate of at least 50 KiB/s.
• The file system size used when determining the baseline rate and burst rate is the same as the
metered size available through the DescribeFileSystems operation.
• File systems can earn credits up to a maximum credit balance of 2.1 TiB for file systems
smaller than 1 TiB, or 2.1 TiB per TiB stored for file systems larger than 1 TiB. This implies that
file systems can accumulate enough credits to burst for up to 12 hours continuously.
• Newly created file systems begin with an initial credit balance of 2.1 TiB, which enables
them to add data at the 100 MiB/s burst rate until they are large enough to run at 100 MiB/s
continuously (that is, 2 TiB).
The following table provides more detailed examples of bursting behavior for file systems of different
sizes.
File System Size
(GiB)
Baseline
Aggregate
Throughput (MiB/
s)
Burst Aggregate
Throughput (MiB/
s)
Maximum Burst
Duration (Min/
Day)
% of Time File
System Can Burst
(Per Day)
10 0.5 100 7.2 0.5%
256 12.5 100 180 12.5%
512 25.0 100 360 25.0%
1024 50.0 100 720 50.0%
1536 75.0 150 720 50.0%
2048 100.0 200 720 50.0%
3072 150.0 300 720 50.0%
4096 200.0 400 720 50.0%
84

Amazon Elastic File System User Guide
Managing Burst Credits
Note
As previously mentioned, new file systems have an initial burst credit balance of 2.1 TB. With
this starting balance, you can burst at 100 MB/s for 6.12 hours (which is calculated by 2.1 x
1024 x (1024/100/3600) to get 6.116 hours, rounded up to 6.12) without spending any
credits that you’re earning from your storage.
Managing Burst Credits
When a file system has a positive burst credit balance, it can burst. You can see the burst credit balance
for a file system by viewing the BurstCreditBalance Amazon CloudWatch metric for Amazon EFS. For
more information about accessing this and other metrics, see Monitoring Amazon EFS (p. 70).
The bursting capability (both in terms of length of time and burst rate) of a file system is directly related
to its size. Larger file systems can burst at larger rates for longer periods of time. Therefore, if your
application needs to burst more (that is, if you find that your file system is running out of burst credits),
you should increase the size of your file system.
Note
There’s no provisioning with Amazon EFS, so to make your file system larger you need to add
more data to it.
Use your historical throughput patterns to calculate the file system size you need to sustain your desired
level of activity. The following steps outline how to do this:
1. Identify your throughput needs by looking at your historical usage. From the Amazon CloudWatch
console, check the sum statistic of the TotalIOBytes metric with daily aggregation, for the past 14
days. Identify the day with the largest value for TotalIOBytes.
2. Divide this number by 24 hours, 60 minutes, 60 seconds, and 1024 bytes to get the average KiB/
second your application required for that day.
3. Calculate the file system size (in GB) required to sustain this average throughput by dividing the
average throughput number (in KB/s) by the baseline throughput number (50 KB/s/GiB) that EFS
provides.
On-Premises Performance Considerations
The throughput bursting model for Amazon EFS file systems remains the same whether accessed from
your on-premises servers or your Amazon EC2 instances. However, when accessing Amazon EFS file data
from your on-premises servers, the maximum throughput is also constrained by the bandwidth of the
AWS Direct Connect connection.
Because of the propagation delay tied to data traveling over long distances, the network latency of
an AWS Direct Connect connection between your on-premises data center and your Amazon VPC can
be tens of milliseconds. If your file operations are serialized, the latency of the AWS Direct Connect
connection directly impacts your read and write throughput. In essence, the volume of data you can
read or write during a period of time is bounded by the amount of time it takes for each read and write
operation to complete. To maximize your throughput, parallelize your file operations so that multiple
reads and writes are processed by Amazon EFS concurrently. Standard tools like GNU parallel enable you
to parallelize the copying of file data.
Architecting for High Availability
To ensure continuous availability between your on-premises data center and your Amazon VPC, we
recommend configuring two AWS Direct Connect connections. For more information, see Step 4:
Configure Redundant Connections with AWS Direct Connect in the AWS Direct Connect User Guide.
85

Amazon Elastic File System User Guide
Amazon EFS Performance Tips
To ensure continuous availability between your application and Amazon EFS, we recommend that your
application be designed to recover from potential connection interruptions. In general, there are two
scenarios for on-premises applications connected to an Amazon EFS file system; highly available and not
highly available.
If your application is Highly Available (HA) and uses multiple on-premises servers in its HA cluster, ensure
that each on-premises server in the HA cluster connects to a mount target in a different Availability Zone
(AZ) in your Amazon VPC. If your on-premises server can’t access the mount target because the AZ in
which the mount target exists becomes unavailable, your application should failover to a server with an
available mount target.
If your application is not highly available, and your on-premises server can’t access the mount target
because the AZ in which the mount target exists becomes unavailable, your application should
implement restart logic and connect to a mount target in a different AZ.
Amazon EFS Performance Tips
When using Amazon EFS, keep the following performance tips in mind:
•Average I/O Size – Amazon EFS's distributed nature enables high levels of availability, durability, and
scalability. This distributed architecture results in a small latency overhead for each file operation. Due
to this per-operation latency, overall throughput generally increases as the average I/O size increases,
because the overhead is amortized over a larger amount of data.
•Simultaneous Connections – Amazon EFS file systems can be mounted on up to thousands of Amazon
EC2 instances concurrently. If you can parallelize your application across more instances, you can drive
higher throughput levels on your file system in aggregate across instances.
•Request Model – By enabling asynchronous writes to your file system, pending write operations
are buffered on the Amazon EC2 instance before they are written to Amazon EFS asynchronously.
Asynchronous writes typically have lower latencies. When performing asynchronous writes, the kernel
uses additional memory for caching. A file system that has enabled synchronous writes, or one that
opens files using an option that bypasses the cache (for example, O_DIRECT), will issue synchronous
requests to Amazon EFS and every operation will go through a round trip between the client and
Amazon EFS.
Note
Your chosen request model will have tradeoffs in consistency (if you're using multiple Amazon
EC2 instances) and speed.
•NFS Client Mount Settings – Verify that you’re using the recommended mount options as outlined in
Mounting File Systems (p. 62) and in Additional Mounting Considerations (p. 68). Amazon EFS supports
the Network File System versions 4.0 and 4.1 (NFSv4) and NFSv4.0 protocols when mounting your file
systems on Amazon EC2 instances. NFSv4.1 provides better performance.
Note
You might want to increase the size of the read and write buffers for your NFS client to 1 MB
when you mount your file system.
•Amazon EC2 Instances – Applications that perform a large number of read and write operations likely
need more memory or computing capacity than applications that don't. When launching your Amazon
EC2 instances, choose instance types that have the amount of these resources that your application
needs. Note that the performance characteristics of Amazon EFS file systems are not dependent on
the use of EBS-optimized instances.
•Encryption – Choosing to enable encryption for your file system has a minimal effect on I/O latency
and throughput.
For information about the Amazon EFS limits for total file system throughput, per-instance throughput,
and operations per second in General Purpose performance mode, see Amazon EFS Limits (p. 93).
86


Amazon Elastic File System User Guide
AWS Identity and Access Management
(IAM) Permissions for API Calls
Security
Following, you can find a description of security considerations for working with Amazon EFS. There are
four levels of access control to consider for Amazon EFS file systems, with different mechanisms used for
each.
Topics
•AWS Identity and Access Management (IAM) Permissions for API Calls (p. 88)
•Security Groups for Amazon EC2 Instances and Mount Targets (p. 88)
•Read, Write, and Execute Permissions for EFS Files and Directories (p. 90)
•Encrypting Data and Metadata at Rest in EFS (p. 90)
AWS Identity and Access Management (IAM)
Permissions for API Calls
You create, manage, and delete file systems with calls to the Amazon EFS API. If the caller is using
credentials for an AWS Identity and Access Management (IAM) user or assumed role, each API call
requires that the caller have permissions for the action being called in its IAM policy. Some API actions
support policy permissions specific to the file system that is the object of the call (that is, resource-level
permissions). API calls made with an account's root credentials have permissions for all API actions on file
systems owned by the account.
As an example of IAM permissions, IAM user Alice might have permissions to retrieve descriptions of all
file systems in her parent AWS account. However, she might be allowed to manage the security groups
for only one of them, file system ID fs-12345678.
For more information about IAM permissions with the Amazon EFS API, see Authentication and Access
Control for Amazon EFS (p. 157).
Security Groups for Amazon EC2 Instances and
Mount Targets
When using Amazon EFS, you specify Amazon EC2 security groups for your EC2 instances and security
groups for the EFS mount targets associated with the file system. Security groups act as a firewall, and
the rules you add define the traffic flow. In the Getting Started exercise, you created one security group
when you launched the EC2 instance. You then associated another with the EFS mount target (that is,
the default security group for your default VPC). That approach works for the Getting Started exercise.
However, for a production system, you should set up security groups with minimal permissions for use
with EFS.
You can authorize inbound and outbound access to your EFS file system. To do so, you add rules that
allow your EC2 instance to connect to your Amazon EFS file system through the mount target using the
Network File System (NFS) port. Take the following steps to create and update your security groups.
To create security groups for EC2 instances and mount targets
1. Create two security groups in your VPC.
88
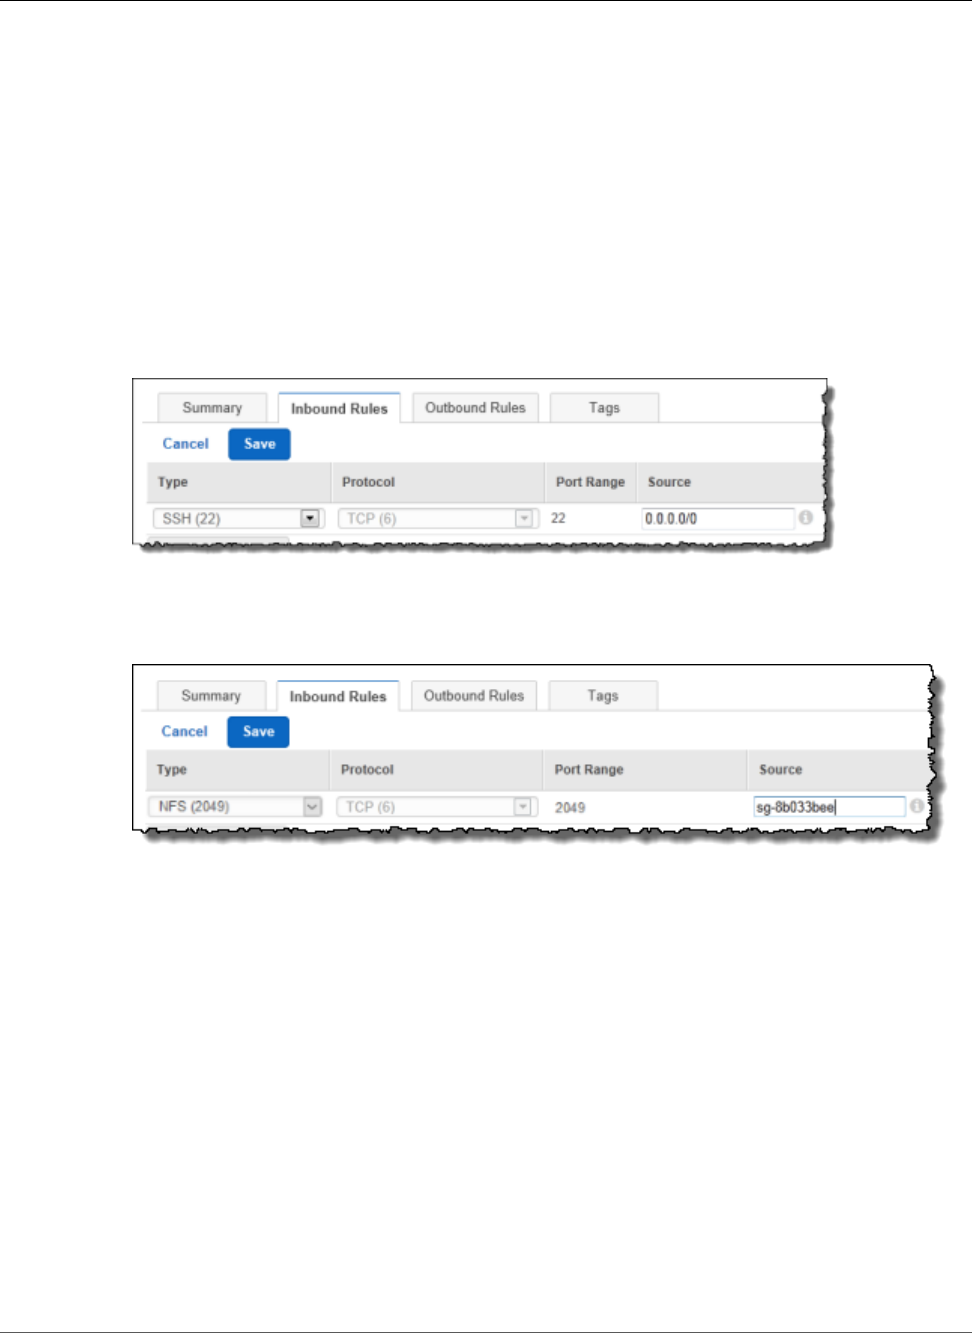
Amazon Elastic File System User Guide
Security Considerations for Mounting
an Amazon EFS File System
For instructions, see the procedure "To create a security group" in Creating a Security Group in the
Amazon VPC User Guide.
2. Open the Amazon VPC Management Console at https://console.aws.amazon.com/vpc/, and verify
the default rules for these security groups. Both security groups should have only an outbound rule
that allows traffic to leave.
To update the necessary access for your security groups
1. Open the Amazon VPC console at https://console.aws.amazon.com/vpc/.
2. Add a rule for your EC2 security group to allow inbound access using Secure Shell (SSH) from any
host. Optionally, restrict the Source address.
You don't need to add an outbound rule, because the default outbound rule allows all traffic to
leave. If this were not the case, you'd need to add an outbound rule to open the TCP connection on
the NFS port, identifying the mount target security group as the destination.
For instructions, see Adding and Removing Rules in the Amazon VPC User Guide.
3. Add a rule for the mount target security group to allow inbound access from the EC2 security group
as shown following. The EC2 security group is identified as the source.
4. Verify that both security groups now authorize inbound and outbound access.
For more information about security groups, see Security Groups for EC2-VPC in the Amazon EC2 User
Guide for Linux Instances.
Security Considerations for Mounting an Amazon EFS
File System
An NFSv4.1 client can only mount a file system if it can make a network connection to the NFS port of
one of the file system's mount targets. Similarly, an NFSv4.1 client can only assert a user and group ID
when accessing a file system if it can make this network connection.
The ability to make this network connection is governed by a combination of the following:
•Network isolation provided by the mount targets' VPC – File system mount targets can't have public
IP addresses associated with them. Only Amazon EC2 instances in the Amazon VPC or on-premises
89

Amazon Elastic File System User Guide
Read, Write, and Execute Permissions
for EFS Files and Directories
servers connected to the Amazon VPC by using AWS Direct Connect can mount Amazon EFS file
systems.
You can't currently use other mechanisms for connecting to a VPC's private IP addresses from outside
the VPC to mount Amazon EFS file systems. For example, you can't use VPN connections or VPC
peering to do so. Don't rely on such other methods for file system access control.
•Network access control lists (ACLs) for the VPC subnets of the client and mount targets, for access
from outside the mount target's subnets – To mount a file system, the client must be able to make a
TCP connection to the NFS port of a mount target and receive return traffic.
•Rules of the client's and mount targets' VPC security groups, for all access – For an EC2 instance to
mount a file system, the following security group rules must be in effect:
• The file system must have a mount target whose network interface has a security group with a
rule that enables inbound connections on the NFS port from the instance. You can enable inbound
connections either by IP address (CIDR range) or security group. The source of the security group
rules for the inbound NFS port on mount target network interfaces is a key element of file system
access control. Inbound rules other than the one for the NFS port, and any outbound rules, aren't
used by network interfaces for file system mount targets.
• The mounting instance must have a network interface with a security group rule that enables
outbound connections to the NFS port on one of the file system's mount targets. You can enable
outbound connections either by IP address (CIDR range) or security group.
For more information, see Creating Mount Targets (p. 23).
Read, Write, and Execute Permissions for EFS Files
and Directories
Files and directories in an EFS file system support standard Unix-style read, write, and execute
permissions based on the user and group ID asserted by the mounting NFSv4.1 client. For more
information, see Network File System (NFS)–Level Users, Groups, and Permissions (p. 30).
Note
This layer of access control depends on trusting the NFSv4.1 client in its assertion of the user
and group ID. There is no authentication of the identity of the NFSv4.1 client when establishing
a mount connection. Thus, any NFSv4.1 client that can make a network connection to the NFS
port of a file system's mount target IP address can read and write the file system as the root
user ID.
As an example of read, write, and execute permissions for files and directories, Alice might have
permissions to read and write to any files that she wants to in her personal directory on a file system,/
alice. However, in this example Alice is not allowed to read or write to any files in Mark's personal
directory on the same file system,/mark. Both Alice and Mark are allowed to read but not write files in
the shared directory/share.
Encrypting Data and Metadata at Rest in EFS
If you create an encrypted file system, data and metadata are encrypted at rest. You choose whether to
enable encryption for a file system when creating it.
As with unencrypted file systems, you can create encrypted file systems through the AWS Management
Console, the AWS CLI, or programmatically through the Amazon EFS API or one of the AWS SDKs. Your
organization might require the encryption of all data that meets a specific classification or is associated
with a particular application, workload, or environment.
90

Amazon Elastic File System User Guide
When to Use Encryption
You can enforce data encryption policies for Amazon EFS file systems by using Amazon CloudWatch and
AWS CloudTrail to detect the creation of a file system and verify that encryption is enabled. For more
information, see Walkthrough 6: Enforcing Encryption on an Amazon EFS File System at Rest (p. 144).
Note
The AWS key management infrastructure uses Federal Information Processing Standards
(FIPS) 140-2 approved cryptographic algorithms. The infrastructure is consistent with National
Institute of Standards and Technology (NIST) 800-57 recommendations.
When to Use Encryption
If your organization is subject to corporate or regulatory policies that require encryption of data and
metadata at rest, we recommend creating an encrypted file system.
Encrypting a File System Using the Console
You can choose to enable encryption for a file system when you create it. The following procedure
describes how to enable encryption for a new file system when you create it from the console.
To encrypt a new file system on the console
1. Open the Amazon Elastic File System console at https://console.aws.amazon.com/efs/.
2. Choose Create file system to open the file system creation wizard.
3. For Step 1: Configure file system access, choose your VPC, create your mount targets, and then
choose Next Step.
4. For Step 2: Configure optional settings, add any tags, choose your performance mode, check the
box to encrypt your file system, and then choose Next Step.
5. For Step 3: Review and create, review your settings, and choose Create File System.
You now have a new encrypted file system.
How Encryption Works with Amazon EFS
In an encrypted file system, data and metadata are automatically encrypted before being written to
the file system. Similarly, as data and metadata are read, they are automatically decrypted before being
presented to the application. These processes are handled transparently by Amazon EFS, so you don’t
have to modify your applications.
Amazon EFS uses an industry-standard AES-256 encryption algorithm to encrypt EFS data and
metadata. For more information, see Cryptography Basics in the AWS Key Management Service Developer
Guide.
How Amazon EFS Uses AWS KMS
Amazon EFS integrates with AWS Key Management Service (AWS KMS) for key management. Amazon
EFS uses customer master keys (CMKs) to encrypt your file system in the following way:
•Encrypting metadata – An EFS-managed key is used to encrypt and decrypt file system metadata
(that is, file names, directory names, and directory contents).
•Encrypting file data – You choose the CMK used to encrypt and decrypt file data (that is, the contents
of your files). You can enable, disable, or revoke grants on this CMK. This CMK can be one of the two
following types:
•AWS-managed CMK – This is the default CMK, and it's free to use.
91

Amazon Elastic File System User Guide
Related Topics
•Customer-managed CMK – This is the most flexible master key to use, because you can configure
its key policies and grants for multiple users or services. For more information on creating CMKs, see
Creating Keys in the AWS Key Management Service Developer Guide.
If you use a customer-managed CMK as your master key for file data encryption and decryption,
you can enable key rotation. When you enable key rotation, AWS KMS automatically rotates your
key once per year. Additionally, with a customer-managed CMK, you can choose when to disable,
re-enable, delete, or revoke access to your CMK at any time. For more information, see Disabling,
Deleting, or Revoking Access to the CMK for a File System (p. 60).
Data encryption and decryption are handled transparently. However, AWS account IDs specific to
Amazon EFS will appear in your AWS CloudTrail logs related to AWS KMS actions. For more information,
see Amazon EFS Log File Entries for Encrypted File Systems (p. 79).
Amazon EFS Key Policies for AWS KMS
Key policies are the primary way to control access to CMKs. For more information on key policies, see
Using Key Policies in AWS KMS in the AWS Key Management Service Developer Guide. The following list
describes all the AWS KMS-related permissions supported by Amazon EFS for encrypted file systems:
•kms:Encrypt – (Optional) Encrypts plaintext into ciphertext. This permission is included in the default
key policy.
•kms:Decrypt – (Required) Decrypts ciphertext. Ciphertext is plaintext that has been previously
encrypted. This permission is included in the default key policy.
•kms:ReEncrypt – (Optional) Encrypts data on the server side with a new customer master key (CMK),
without exposing the plaintext of the data on the client side. The data is first decrypted and then re-
encrypted. This permission is included in the default key policy.
•kms:GenerateDataKeyWithoutPlaintext – (Required) Returns a data encryption key encrypted under a
CMK. This permission is included in the default key policy under kms:GenerateDataKey*.
•kms:CreateGrant – (Required) Adds a grant to a key to specify who can use the key and under what
conditions. Grants are alternate permission mechanisms to key policies. For more information on
grants, see Using Grants in the AWS Key Management Service Developer Guide. This permission is
included in the default key policy.
•kms:DescribeKey – (Required) Provides detailed information about the specified customer master key.
This permission is included in the default key policy.
•kms:ListAliases – (Optional) Lists all of the key aliases in the account. When you use the console
to create an encrypted file system, this permission populates the Select KMS master key list. We
recommend using this permission to provide the best user experience. This permission is included in
the default key policy.
Related Topics
For more information on encryption with Amazon EFS, see these related topics:
•Creating Resources for Amazon EFS (p. 19)
•Managing Access to Encrypted File Systems (p. 59)
•Amazon EFS Performance Tips (p. 86)
•Amazon EFS API Permissions: Actions, Resources, and Conditions Reference (p. 165)
•Amazon EFS Log File Entries for Encrypted File Systems (p. 79)
•Troubleshooting Encrypted File Systems (p. 105)
92
Amazon Elastic File System User Guide
Amazon EFS Limits That Can Be Increased
Amazon EFS Limits
This section describes limitations when working with Amazon EFS.
Topics
•Amazon EFS Limits That Can Be Increased (p. 93)
•Resource Limits (p. 93)
•Limits for Client EC2 Instances (p. 94)
•Limits for Amazon EFS File Systems (p. 94)
•Limits for EFS File Sync (p. 94)
•Unsupported NFSv4 Features (p. 95)
•Additional Considerations (p. 96)
Amazon EFS Limits That Can Be Increased
Following are the limits for Amazon EFS that can be increased by contacting AWS Support.
Resource Default Limit
Number of file systems per customer account per
AWS region
10
Total throughput per file system for all connected
clients
US East (Ohio) Region – 3 GB/s
US East (N. Virginia) Region – 3 GB/s
US West (Oregon) Region – 3 GB/s
EU (Frankfurt) Region – 1 GB/s
EU (Ireland) Region – 3 GB/s
Asia Pacific (Sydney) Region – 3 GB/s
You can take the following steps to request an increase for these limits. These increases are not granted
immediately, so it might take a couple of days for your increase to become effective.
To request a limit increase
1. Open the AWS Support Center page, sign in, if necessary, and then choose Create Case.
2. Under Regarding, choose Service Limit Increase.
3. Under Limit Type, choose the type of limit to increase, fill in the necessary fields in the form, and
then choose your preferred method of contact.
Resource Limits
Following are the limits on Amazon EFS resources per customer account in an AWS Region.
93
Amazon Elastic File System User Guide
Limits for Client EC2 Instances
Resource Limit
Default limit on the number of file systems 10
Number of mount targets per file system per Availability
Zone
1
Number of security groups per mount target 5
Number of tags per file system 50
Number of VPCs per file system 1
Limits for Client EC2 Instances
The following limits for client EC2 instances apply, assuming a Linux NFSv4.1 client.
• The maximum throughput you can drive per Amazon EC2 instance is 250 MB/s.
• Up to 128 active user accounts per instance may have files open at the same time. Each user account
represents one local user logged in to the instance.
• Up to 32,768 files open at the same time on the instance.
• Each unique mount on the instance can acquire up to a total of8,192locks across a maximum of 256
unique file/process pairs. For example, a single process can acquire one or more locks on 256 separate
files, or 8 processes can each acquire one or more locks on 32 files.
• Using Amazon EFS with Microsoft Windows Amazon EC2 instances is not supported.
Limits for Amazon EFS File Systems
The following are limits specific to the Amazon EFS file systems:
• Maximum name length: 255 bytes.
• Maximum symbolic link (symlink) length: 4080 bytes.
• Maximum number of hard links to a file 175.
• Maximum size of a single file: 52,673,613,135,872 bytes (47.9 TiB).
• Maximum directory depth: 1000 levels deep.
• Any one particular file can have up to 87 locks across all users of the file system. You may mount a file
system on one or more Amazon EC2 instances, but the maximum 87-lock limit for a file applies.
• In General Purpose mode, there is a limit of 7000 file system operations per second. This operations
limit is calculated for all clients connected to a single file system.
Limits for EFS File Sync
Following are the limits on EFS File Sync resources for each customer account in an AWS Region.
Resource Limit
Maximum number of sync tasks 10
94

Amazon Elastic File System User Guide
Unsupported NFSv4 Features
Resource Limit
Maximum number of files for each sync task 35,000,000
Maximum file ingest rate for each sync task 500 files per second
Maximum data throughput 1 Gbps
Unsupported NFSv4 Features
Although Amazon Elastic File System does not support NFSv2, or NFSv3, Amazon EFS supports both
NFSv4.1 and NFSv4.0, except for the following features:
• pNFS
• Client delegation or callbacks of any type
• Operation OPEN always returns OPEN_DELEGATE_NONE as the delegation type.
• The operation OPEN returns NFSERR_NOTSUPP for the CLAIM_DELEGATE_CUR and
CLAIM_DELEGATE_PREV claim types.
• Mandatory locking
All locks in Amazon EFS are advisory, which means that READ and WRITE operations do not check for
conflicting locks before the operation is executed.
• Deny share
NFS supports the concept of a share deny, primarily used by Windows clients for users to deny
others access to a particular file that has been opened. Amazon EFS does not support this, and
returns the NFS error NFS4ERR_NOTSUPP for any OPEN commands specifying a share deny
value other than OPEN4_SHARE_DENY_NONE. Linux NFS clients do not use anything other than
OPEN4_SHARE_DENY_NONE.
• Access control lists (ACL)
• Amazon EFS does not update the time_access attribute on file reads. Amazon EFS updates
time_access in the following events:
• When a file is created (an inode is created).
• When an NFS client makes an explicit setattr call.
• On a write to the inode caused by, for example, file size changes or file metadata changes.
• Any inode attribute is updated.
• Namespaces
• Persistent reply cache
• Kerberos based security
• NFSv4.1 data retention
• SetUID on directories
• Unsupported file types when using the CREATE operation: Block devices (NF4BLK), character devices
(NF4CHR), attribute directory (NF4ATTRDIR), and named attribute (NF4NAMEDATTR).
• Unsupported attributes: FATTR4_ARCHIVE, FATTR4_FILES_AVAIL, FATTR4_FILES_FREE,
FATTR4_FILES_TOTAL, FATTR4_FS_LOCATIONS, FATTR4_MIMETYPE, FATTR4_QUOTA_AVAIL_HARD,
FATTR4_QUOTA_AVAIL_SOFT, FATTR4_QUOTA_USED, FATTR4_TIME_BACKUP, and FATTR4_ACL.
An attempt to set these attributes will result in an NFS4ERR_ATTRNOTSUPP error that is sent back to
the client.
95

Amazon Elastic File System User Guide
Additional Considerations
Additional Considerations
In addition, note the following:
• For a list of AWS Regions where you can create Amazon EFS file systems, see the AWS General
Reference.
• Some AWS accounts created before 2012 might have access to Availability Zones in us-east-1 that
do not support creating mount targets. If you are unable to create a mount target in the region, try
a different Availability Zone in that region. However, there are cost considerations for mounting a
file system on an EC2 instance in an Availability Zone through a mount target created in another
Availability Zone.
• You mount your file system from EC2 instances in your VPC via the mount targets you create in the
VPC. You can also mount your file system on your EC2-Classic instances (which are not in the VPC), but
you must first link them to your VPC via the ClassicLink. For more information about using ClassicLink,
see ClassicLink in the Amazon EC2 User Guide for Linux Instances.
• An Amazon EFS file system can be mounted from on-premises data center servers using AWS Direct
Connect. However, other VPC private connectivity mechanisms such as a VPN connection and VPC
peering are not supported.
96

Amazon Elastic File System User Guide
Troubleshooting General Issues
Troubleshooting Amazon EFS
Following, you can find information on how to troubleshoot issues for Amazon Elastic File System
(Amazon EFS). For optimal performance and to avoid a variety of known NFS client bugs, we recommend
a Linux kernel that is version 4.0 or newer.
Topics
•Troubleshooting Amazon EFS: General Issues (p. 97)
•File Operation Errors (p. 102)
•Troubleshooting AMI and Kernel Issues (p. 103)
•Troubleshooting Encrypted File Systems (p. 105)
Troubleshooting Amazon EFS: General Issues
Following, you can find information about general troubleshooting issues related to Amazon EFS. For
information on performance, see Amazon EFS Performance (p. 81).
Topics
•Mount Command Fails with "wrong fs type" Error Message (p. 97)
•Mount Command Fails with "incorrect mount option" Error Message (p. 98)
•File System Mount Fails Immediately After File System Creation (p. 98)
•File System Mount Hangs and Then Fails with Timeout Error (p. 98)
•File System Mount Using DNS Name Fails (p. 99)
•Amazon EC2 Instance Hangs (p. 99)
•Mount Target Lifecycle State Is Stuck (p. 99)
•File System Mount on Windows Instance Fails (p. 99)
•Application Writing Large Amounts of Data Hangs (p. 100)
•Mount Does Not Respond (p. 100)
•Open and Close Operations Are Serialized (p. 100)
•Operations on Newly Mounted File System Return "bad file handle" Error (p. 101)
•Custom NFS Settings Causing Write Delays (p. 101)
•Creating Backups with Oracle Recovery Manager Is Slow (p. 102)
Mount Command Fails with "wrong fs type" Error
Message
The mount command fails with the following error message.
mount: wrong fs type, bad option, bad superblock on 10.1.25.30:/,
missing codepage or helper program, or other error (for several filesystems
(e.g. nfs, cifs) you might need a /sbin/mount.<type> helper program)
In some cases useful info is found in syslog - try dmesg | tail or so.
97
Amazon Elastic File System User Guide
Mount Command Fails with "incorrect
mount option" Error Message
Action to Take
Install the nfs-utils (or nfs-common on Ubuntu) package. For more information, see Installing the
NFS Client (p. 62).
Mount Command Fails with "incorrect mount option"
Error Message
The mount command fails with the following error message.
mount.nfs: an incorrect mount option was specified
Action to Take
This error message most likely means that your Linux distribution doesn't support Network File System
versions 4.0 and 4.1 (NFSv4). To confirm this is the case, you can run the following command:
$ grep CONFIG_NFS_V4_1 /boot/config*
If the preceding command returns # CONFIG_NFS_V4_1 is not set, NFSv4.1 is not supported on
your Linux distribution. For a list of the Amazon Machine Images (AMIs) for Amazon Elastic Compute
Cloud (Amazon EC2) that support NFSv4.1, see NFS Support (p. 62).
File System Mount Fails Immediately After File
System Creation
It can take up to 90 seconds after creating a mount target for the Domain Name Service (DNS) records to
propagate fully in a region.
Action to Take
If you're programmatically creating and mounting file systems, for example with an AWS
CloudFormation template, we recommend that you implement a wait condition.
File System Mount Hangs and Then Fails with
Timeout Error
The file system mount command hangs for a minute or two, and then fails with a timeout error. The
following code shows an example.
$ sudo mount -t nfs -o
nfsvers=4.1,rsize=1048576,wsize=1048576,hard,timeo=600,retrans=2 mount-target-ip:/ mnt
[2+ minute wait here]
mount.nfs: Connection timed out
$Â
Action to Take
• This error can occur because either the Amazon EC2 instance or the mount target security groups are
not configured properly. For more information, see Creating Security Groups (p. 27).
98

Amazon Elastic File System User Guide
File System Mount Using DNS Name Fails
• Verify that the mount target IP address that you specified is valid. If you specify the wrong IP address
and there is nothing else at that IP address to reject the mount, you can experience this issue.
File System Mount Using DNS Name Fails
A file system mount that is using a DNS name fails. The following code shows an example.
$ sudo mount -t nfs -o
nfsvers=4.1,rsize=1048576,wsize=1048576,hard,timeo=600,retrans=2 file-system-id.efs.aws-
region.amazonaws.com:/ mnt
mount.nfs: Failed to resolve server file-system-id.efs.aws-region.amazonaws.com:
Name or service not known.
$
Action to Take
Check your VPC configuration. If you are using a custom VPC, make sure that DNS settings are enabled.
For more information, see Using DNS with Your VPC in the Amazon VPC User Guide.
To specify a DNS name in the mount command, you must do the following:
• Ensure that there's an Amazon EFS mount target in the same Availability Zone as the Amazon EC2
instance.
• Connect your Amazon EC2 instance inside an Amazon VPC configured to use the DNS server provided
by Amazon. For more information, see DHCP Options Sets in the Amazon VPC User Guide.
• Ensure that the Amazon VPC of the connecting Amazon EC2 instance has DNS host names enabled.
For more information, see Updating DNS Support for Your VPC in the Amazon VPC User Guide.
Amazon EC2 Instance Hangs
An Amazon EC2 instance can hang because you deleted a file system mount target without first
unmounting the file system.
Action to Take
Before you delete a file system mount target, unmount the file system. For more information about
unmounting your Amazon EFS file system, see Unmounting File Systems (p. 69).
Mount Target Lifecycle State Is Stuck
The mount target lifecycle state is stuck in the creating or deleting state.
Action to Take
Retry the CreateMountTarget or DeleteMountTarget call.
File System Mount on Windows Instance Fails
A file system mount on an Amazon EC2 instance on Microsoft Windows fails.
Action to Take
Don't use Amazon EFS with Windows EC2 instances, which isn't supported.
99
Amazon Elastic File System User Guide
Application Writing Large Amounts of Data Hangs
Application Writing Large Amounts of Data Hangs
An application that writes a large amount of data to Amazon EFS hangs and causes the instance to
reboot.
Action to Take
If an application takes too long to write all of its data to Amazon EFS, Linux might reboot because it
appears that the process has become unresponsive. Two kernel configuration parameters define this
behavior, kernel.hung_task_panic and kernel.hung_task_timeout_secs.
In the example following, the state of the hung process is reported by the ps command with D before
the instance reboot, indicating that the process is waiting on I/O.
$ ps aux | grep large_io.py
root 33253 0.5 0.0 126652 5020 pts/3 D+ 18:22 0:00 python large_io.py
/efs/large_file
To prevent a reboot, increase the timeout period or disable kernel panics when a hung task is detected.
The following command disables hung task kernel panics on most Linux systems.
$ sudo sysctl -w kernel.hung_task_panic=0
Mount Does Not Respond
An Amazon EFS mount appears unresponsive. For example, commands like ls hang.
Action to Take
This error can occur if another application is writing large amounts of data to the file system. Access
to the files that are being written might be blocked until the operation is complete. In general, any
commands or applications that attempt to access files that are being written to might appear to hang.
For example, the ls command might hang when it gets to the file that is being written. This is because
some Linux distributions alias the ls command so that it retrieves file attributes in addition to listing the
directory contents.
To resolve this issue, verify that another application is writing files to the Amazon EFS mount, and that it
is in the Uninterruptible sleep (D) state, as in the following example:
$ ps aux | grep large_io.py
root 33253 0.5 0.0 126652 5020 pts/3 D+ 18:22 0:00 python large_io.py /efs/large_file
After you've verified that this is the case, you can address the issue by waiting for the other write
operation to complete, or by implementing a workaround. In the example of ls, you can use the /bin/
ls command directly, instead of an alias, which will allow the command to proceed without hanging on
the file being written. In general, if the application writing the data can force a data flush periodically,
perhaps by using fsync(2), this might help improve the responsiveness of your file system for other
applications. However, this improvement might be at the expense of performance when the application
writes data.
Open and Close Operations Are Serialized
Open and close operations that are performed on a file system by a user on a single Amazon EC2
instance are serialized.
Action to Take
100

Amazon Elastic File System User Guide
Operations on Newly Mounted File
System Return "bad file handle" Error
This issue can be resolved by using NFS protocol version 4.1, and an Amazon EC2 Amazon Machine
Image (AMI) that includes a Linux kernel version 4.0 or newer. By using NFSv4.1 when mounting your file
systems, you enable parallelized open and close operations on files. We recommend using Amazon Linux
AMI 2016.03.0 as the AMI for the Amazon EC2 instance that you mount your file system to.
If you can't use NFSv4.1, note that the Linux NFSv4.0 client serializes open and close requests by user ID
and group IDs. This serialization happens even if multiple processes or multiple threads issue requests at
the same time. The client only sends one open or close operation to an NFS server at a time, when all of
the IDs match.
In addition, you can perform any of the following actions to resolve this issue:
• You can run each process from a different user ID on the same Amazon EC2 instance.
• You can leave the user IDs the same across all open requests, and modify the set of group IDs instead.
• You can run each process from a separate Amazon EC2 instance.
Operations on Newly Mounted File System Return
"bad file handle" Error
Operations performed on a newly mounted file system return a bad file handle error.
This error can happen if an Amazon EC2 instance was connected to one file system and one mount target
with a specified IP address, and then that file system and mount target were deleted. If you create a new
file system and mount target to connect to that Amazon EC2 instance with the same mount target IP
address, this issue can occur.
Action to Take
You can resolve this error by unmounting the file system, and then remounting the file system on the
Amazon EC2 instance. For more information about unmounting your Amazon EFS file system, see
Unmounting File Systems (p. 69).
Custom NFS Settings Causing Write Delays
You have custom NFS client settings, and it takes up to three seconds for an Amazon EC2 instance to see
a write operation performed on a file system from another Amazon EC2 instance.
Action to Take
If you encounter this issue, you can resolve it in one of the following ways:
• If the NFS client on the Amazon EC2 instance that's reading data has attribute caching activated,
unmount your file system. Then remount it with the noac option to disable attribute caching.
Attribute caching in NFSv4.1 is enabled by default.
Note
Disabling client-side caching can potentially reduce your application's performance.
• You can also clear your attribute cache on demand by using a programming language compatible with
the NFS procedures. To do this, you can send an ACCESS procedure request immediately before a read
request.
For example, using the Python programming language, you can construct the following call.
# Does an NFS ACCESS procedure request to clear the attribute cache, given a path to the
file
import os
101

Amazon Elastic File System User Guide
Creating Backups with Oracle Recovery Manager Is Slow
os.access(path, os.W_OK)
Creating Backups with Oracle Recovery Manager Is
Slow
In this issue, Oracle Recovery Manager pauses for 120 seconds before starting a backup job.
Action to Take
If you encounter this issue, disable Oracle Direct NFS, as described in Enabling and Disabling Direct NFS
Client Control of NFS in the Oracle Help Center.
Note
Amazon EFS doesn't support Oracle Direct NFS.
File Operation Errors
When you access Amazon EFS file systems, certain limits on the files in the file system apply. Exceeding
these limits causes file operation errors. For more information on client and file-based limits in Amazon
EFS, see Limits for Client EC2 Instances (p. 94). Following, you can find some common file operation
errors and the limits associated with each error.
Command Fails with “Disk quota exceeded” Error
Amazon EFS doesn't currently support user disk quotas. This error can occur if any of the following limits
have been exceeded:
• Up to 128 active user accounts can have files open at once for an instance.
• Up to 32,768 files can be open at once for an instance.
• Each unique mount on the instance can acquire up to a total of8,192locks across 256 unique file-
process pairs. For example, a single process can acquire one or more locks on 256 separate files, or
eight processes can each acquire one or more locks on 32 files.
Action to Take
If you encounter this issue, you can resolve it by identifying which of the preceding limits you are
exceeding, and then making changes to meet that limit.
Command Fails with "I/O error"
This error occurs when more than 128 active user accounts for each instance have files open at once.
Action to Take
If you encounter this issue, you can resolve it by meeting the supported limit of open files on your
instances. To do so, reduce the number of active users that have files from your Amazon EFS file system
open simultaneously on your instances.
Command Fails with "File name is too long" Error
This error occurs when the size of a file name or its symbolic link (symlink) is too long. File names have
the following limits:
102

Amazon Elastic File System User Guide
Command Fails with "Too many links" Error
• A name can be up to 255 bytes long.
• A symlink can be up to 4080 bytes in size.
Action to Take
If you encounter this issue, you can resolve it by reducing the size of your file name or symlink length to
meet the supported limits.
Command Fails with "Too many links" Error
This error occurs when there are too many hard links to a file. You can have up to 175 hard links in a file.
Action to Take
If you encounter this issue, you can resolve it by reducing the number of hard links to a file to meet the
supported limit.
Command Fails with "File too large" Error
This error occurs when a file is too large. A single file can be up to 52,673,613,135,872 bytes (47.9 TiB) in
size.
Action to Take
If you encounter this issue, you can resolve it by reducing the size of a file to meet the supported limit.
Command Fails with "Try again" Error
This error occurs when too many users or applications try to access a single file. When an application or
user accesses a file, a lock is placed on the file. Any one particular file can have up to 87 locks among
all users and applications of the file system. You can mount a file system on one or more Amazon EC2
instances, but the 87-lock limit for a file still applies.
Action to Take
If you encounter this issue, you can resolve it by reducing the number of applications or users accessing
the file until that number meets the number of allowed locks or lower.
Troubleshooting AMI and Kernel Issues
Following, you can find information about troubleshooting issues related to certain Amazon Machine
Image (AMI) or kernel versions when using Amazon EFS from an Amazon EC2 instance.
Topics
•Unable to chown (p. 103)
•File System Keeps Performing Operations Repeatedly Due to Client Bug (p. 104)
•Deadlocked Client (p. 104)
•Listing Files in a Large Directory Takes a Long Time (p. 104)
Unable to chown
You're unable to change the ownership of a file/directory using the Linux chown command.
103

Amazon Elastic File System User Guide
File System Keeps Performing
Operations Repeatedly Due to Client Bug
Kernel Versions with This Bug
2.6.32
Action to Take
You can resolve this error by doing the following:
• If you're performing chown for the one-time setup step necessary to change ownership of the EFS root
directory, you can run the chown command from an instance running a newer kernel. For example, use
the newest version of Amazon Linux.
• If chown is part of your production workflow, you must update the kernel version to use chown.
File System Keeps Performing Operations Repeatedly
Due to Client Bug
A file system gets stuck performing repeated operations due to a client bug.
Action to Take
Update the client software to the latest version (currently, Linux kernel version 4.1).
Deadlocked Client
A client becomes deadlocked.
Kernel Versions with This Bug
• CentOS-7 with kernel Linux 3.10.0-229.20.1.el7.x86_64
• Ubuntu 15.10 with kernel Linux 4.2.0-18-generic
Action to Take
Do one of the following:
• Upgrade to a newer kernel version. For CentOS-7, kernel version Linux 3.10.0-327 or later contains the
fix.
• Downgrade to an older kernel version.
Listing Files in a Large Directory Takes a Long Time
This can happen if the directory is changing while your NFS client iterates through the directory to finish
the list operation. Whenever the NFS client notices that the contents of the directory changed during
this iteration, the NFS client restarts iterating from the beginning. As a result, the ls command can take a
long time to complete for a large directory with frequently changing files.
Kernel Versions with This Bug
CentOS kernel versions lower than 2.6.32-696.1.1.el6
Action to Take
To resolve this issue, upgrade to a newer kernel version.
104

Amazon Elastic File System User Guide
Troubleshooting Encrypted File Systems
Troubleshooting Encrypted File Systems
Encrypted File System Can't Be Created
You've tried to create a new encrypted file system. However, you get an error message saying that AWS
KMS is unavailable.
Action to Take
This error can occur in the rare case that AWS KMS becomes temporarily unavailable in your region. If
this happens, wait until AWS KMS returns to full availability, and then try again to create the file system.
Unusable Encrypted File System
An encrypted file system consistently returns NFS server errors. These errors can occur when EFS can't
retrieve your master key from KMS for one of the following reasons:
• The key was disabled.
• The key was deleted.
• Permission for Amazon EFS to use the key was revoked.
• AWS KMS is temporarily unavailable.
Action to Take
First, confirm that the AWS KMS key is enabled. You can do so by viewing the keys in the console. For
more information, see Viewing Keys in the AWS Key Management Service Developer Guide.
If the key is not enabled, enable it. For more information, see Enabling and Disabling Keys in the AWS Key
Management Service Developer Guide.
If the key is pending deletion, then this will disable the key. You can cancel the deletion, and re-enable
the key. For more information, see Scheduling and Canceling Key Deletion in the AWS Key Management
Service Developer Guide.
If the key is enabled, and you're still experiencing an issue, or if you encounter an issue re-enabling your
key, contact AWS Support.
105

Amazon Elastic File System User Guide
Your On-Premises Source File
System Is Stuck in Mounting Status
Troubleshooting EFS File Sync
Following, you can find information on how to troubleshoot issues with EFS File Sync.
Topics
•Your On-Premises Source File System Is Stuck in Mounting Status (p. 106)
•Your Amazon EC2 Source File System Is Stuck in Mounting Status (p. 106)
•Your Sync Task Is Stuck in Starting Status (p. 107)
•Enabling AWS Support To Help Troubleshoot Your EFS File Sync Running On-Premise (p. 107)
•Enabling AWS Support To Help Troubleshoot Your EFS File Sync Running on Amazon EC2 (p. 108)
Your On-Premises Source File System Is Stuck in
Mounting Status
Your on-premises source file system can become stuck in Mounting status when the sync agent that you
chose can't mount the location that you specified during configuration.
Action to Take
First, make sure that the NFS server and export that you specified are both valid. If they aren't, delete the
sync set, create a new one using the correct NFS server, and then export.
If the NFS server and export are both valid, it generally indicates one of two things. Either a firewall is
preventing the sync agent from mounting the NFS server, or the NFS server is not configured to allow
the sync agent to mount it.
Make sure that there is no firewall between the sync agent and the NFS server. Then make sure that the
NFS server is configured to allow the sync agent to mount the export specified in the sync set.
If you perform these actions and the sync agent still can't mount the NFS server and export, open
a support channel and engage AWS customer support. For information about how to open a
support channel, see Enabling AWS Support To Help Troubleshoot Your EFS File Sync Running On-
Premise (p. 107) or Enabling AWS Support To Help Troubleshoot Your EFS File Sync Running on
Amazon EC2 (p. 108).
Your Amazon EC2 Source File System Is Stuck in
Mounting Status
Your Amazon EC2 source file system can become stuck in Mounting status when the sync agent that you
chose can't mount the location that you specified during configuration.
Action to Take
106

Amazon Elastic File System User Guide
Your Sync Task Is Stuck in Starting Status
First, make sure that the NFS server and export that you specified are both valid. If they aren't, delete the
sync set, create a new one using the correct NFS server, and then export.
If the NFS server and export are both valid, it generally indicates one of two things. Either a firewall is
preventing the sync agent from mounting the NFS server, or the NFS server is not configured to allow
the sync agent to mount it.
Make sure that the VPC in which your NFS server resides has a security group inbound rule that allows
all traffic to the sync agent that you created for your source file system. Then make sure that the VPC in
which your sync agent is running in has a security group outbound rule that allows all traffic from the
sync agent.
If you perform these actions and the sync agent still can't mount the NFS server and export, open
a support channel and engage AWS customer support. For information about how to open a
support channel, see Enabling AWS Support To Help Troubleshoot Your EFS File Sync Running On-
Premise (p. 107) or Enabling AWS Support To Help Troubleshoot Your EFS File Sync Running on
Amazon EC2 (p. 108).
Your Sync Task Is Stuck in Starting Status
Your sync task can become stuck in Starting status when EFS File Sync can't instruct the specified source
sync agent to begin a sync task. This issue usually occurs because the sync agent either is powered off or
has lost network connectivity.
Action to Take
Make sure that the source sync agent is connected and the status is Running. If the status is Offline, then
the agent is not connected.
Next, make sure that your sync agent is powered on. If it isn't, power it on.
If the sync agent is powered on and the sync task is still stuck in Starting status, then a network
connectivity problem between the sync agent and EFS File Sync is the most likely issue. Check your
network and firewall settings to make sure that the sync agent can connect to EFS File Sync.
If you perform these actions and the issue isn't resolved, open a support channel and engage AWS
customer support. For information about how to open a support channel, see Enabling AWS Support To
Help Troubleshoot Your EFS File Sync Running On-Premise (p. 107) or Enabling AWS Support To Help
Troubleshoot Your EFS File Sync Running on Amazon EC2 (p. 108).
Enabling AWS Support To Help Troubleshoot Your
EFS File Sync Running On-Premise
EFS File Sync provides a local console you can use to perform several maintenance tasks, including
enabling AWS Support to access your EFS File Sync to assist you with troubleshooting EFS File Sync
issues. By default, AWS Support access to your EFS File Sync is disabled. You enable this access through
the host's local console. To give AWS Support access to your EFS File Sync, you first log in to the local
console for the host then connect to the support server.
To enable AWS Support access to EFS File Sync
1. Log in to your host's local console. use user name: sguser and password: sgpassword
The local console looks like the following.
107

Amazon Elastic File System User Guide
Enabling AWS Support To Help
Troubleshoot Your EC2 EFS File Sync
2. At the prompt, type 5 to open the help menu.
3. Type h to open the AVAILABLE COMMANDS window.
4. In the AVAILABLE COMMANDS window, type open-support-channel to connect to customer
support. You must allow TCP port 22 to initiate a support channel to AWS. When you connect to
customer support, EFS File Sync assigns you a support number. Make a note of your support number.
Note
The channel number is not a Transmission Control Protocol/User Datagram Protocol (TCP/
UDP) port number. Instead, it makes a Secure Shell (SSH) (TCP 22) connection to servers
and provides the support channel for the connection.
5. Once the support channel is established, provide your support service number to AWS Support so
AWS Support can provide troubleshooting assistance.
6. When the support session is completed, type q to end it.
7. Type exit to log out of the EFS File Sync local console.
8. Follow the prompts to exit the local console.
Enabling AWS Support To Help Troubleshoot Your
EFS File Sync Running on Amazon EC2
EFS File Sync provides a local console you can use to perform several maintenance tasks, including
enabling AWS Support to access your EFS File Sync to assist you with troubleshooting EFS File Sync
issues. By default, AWS Support access to your EFS File Sync is disabled. You enable this access through
the Amazon EC2 local console. You log in to the Amazon EC2 local console through a Secure Shell (SSH).
To successfully log in through SSH, your instance's security group must have a rule that opens TCP port
22.
Note
If you add a new rule to an existing security group, the new rule applies to all instances that
use that security group. For more information about security groups and how to add a security
group rule, see Amazon EC2 Security Groups in the Amazon EC2 User Guide.
To let AWS Support connect to your EFS File Sync, you first log in to the local console for the Amazon
EC2 instance, navigate to the EFS File Sync's console, and then provide the access.
108
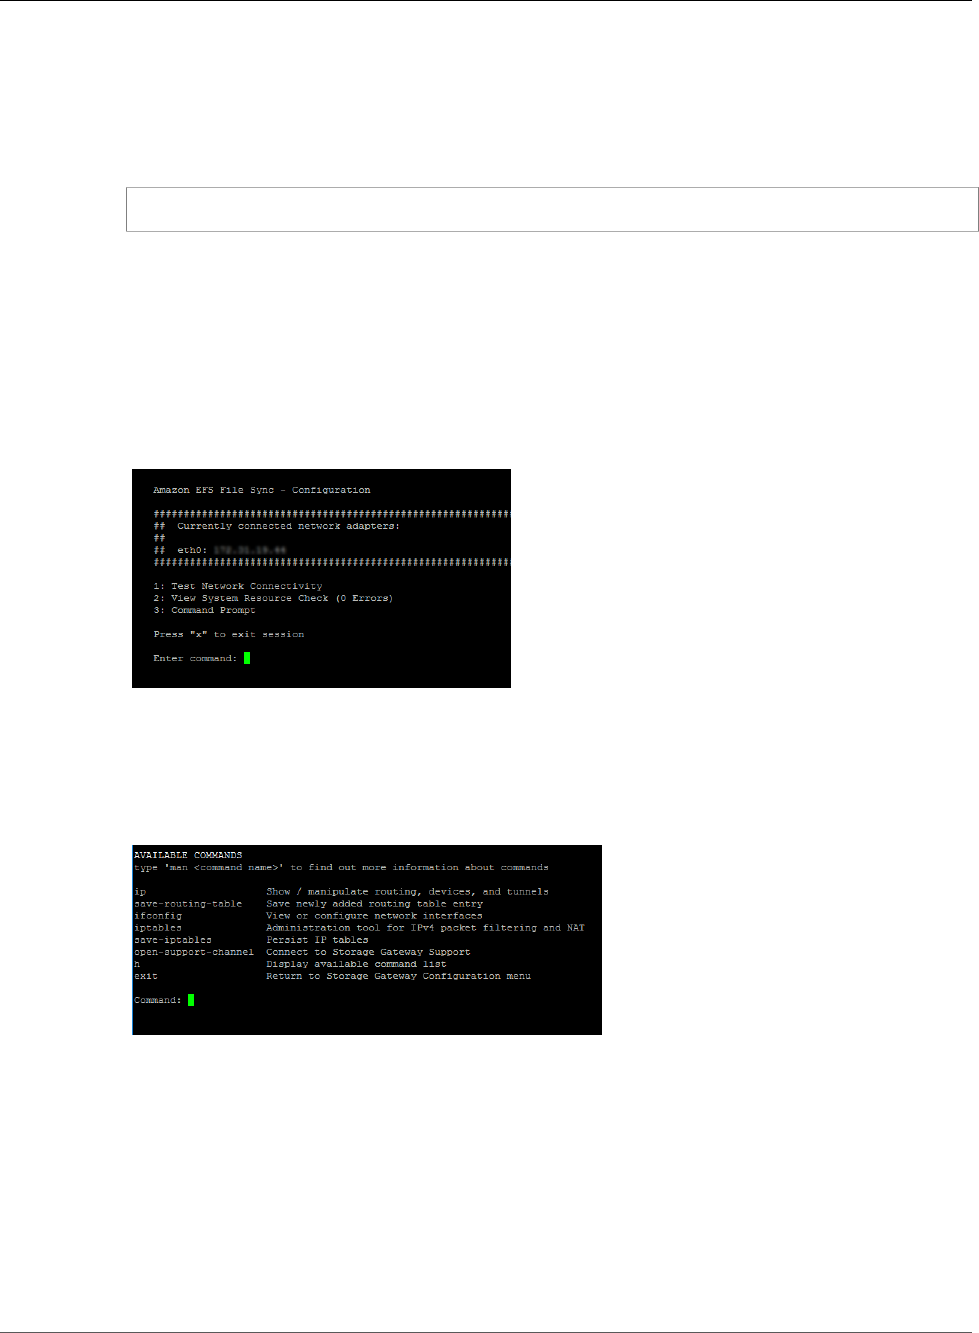
Amazon Elastic File System User Guide
Enabling AWS Support To Help
Troubleshoot Your EC2 EFS File Sync
To enable AWS support access to a EFS File Sync deployed on an Amazon EC2 instance
1. Log in to the local console for your Amazon EC2 instance. For instructions, go to Connect to Your
Instance in the Amazon EC2 User Guide.
You can use the following command to log in to the EC2 instance's local console. the user name is
sguser.
ssh –i PRIVATE-KEY sguser@INSTANCE-PUBLIC-DNS-NAME
Note
The PRIVATE-KEY is the .pem file containing the private certificate of the EC2 key pair
that you used to launch the Amazon EC2 instance. For more information, see Retrieving the
Public Key for Your Key Pair in the Amazon EC2 User Guide.
The INSTANCE-PUBLIC-DNS-NAME is the public Domain Name System (DNS) name of
your Amazon EC2 instance that your EFS File Sync is running on. You obtain this public DNS
name by selecting the Amazon EC2 instance in the EC2 console and clicking the Description
tab.
The local console looks like the following.
2. At the prompt, type 3 to open the help menu.
3. Type h to open the AVAILABLE COMMANDS window.
4. In the AVAILABLE COMMANDS window, type open-support-channel to connect to customer
support for EFS File Sync. You must allow TCP port 22 to initiate a support channel to AWS. When
you connect to customer support, EFS File Sync assigns you a support number. Make a note of your
support number.
Note
The channel number is not a Transmission Control Protocol/User Datagram Protocol
(TCP/UDP) port number. Instead, the EFS File Sync makes a Secure Shell (SSH) (TCP 22)
connection to EFS File Sync servers and provides the support channel for the connection.
5. Once the support channel is established, provide your support service number to AWS Support so
AWS Support can provide troubleshooting assistance.
6. When the support session is completed, type q to end it.
7. Type exit to exit the EFS File Sync console.
8. Follow the console menus to log out of the EFS File Sync instance.
109

Amazon Elastic File System User Guide
Walkthrough 1: Create and Mount
a File System Using the AWS CLI
Amazon Elastic File System
Walkthroughs
This section provides walkthroughs that you can use to explore Amazon EFS and test the end-to-end
setup.
Topics
•Walkthrough 1: Create Amazon EFS File System and Mount It on an EC2 Instance Using the AWS
CLI (p. 110)
•Walkthrough 2: Set Up an Apache Web Server and Serve Amazon EFS Files (p. 122)
•Walkthrough 3: Create Writable Per-User Subdirectories and Configure Automatic Remounting on
Reboot (p. 127)
•Walkthrough 4: Backup Solutions for Amazon EFS File Systems (p. 128)
•Walkthrough 5: Create and Mount a File System On-Premises with AWS Direct Connect (p. 140)
•Walkthrough 6: Enforcing Encryption on an Amazon EFS File System at Rest (p. 144)
•Walkthrough 7: Sync Files from an On-Premises File System to Amazon EFS by Using EFS File
Sync (p. 146)
•Walkthrough 8: Sync a File System from Amazon EC2 to Amazon EFS Using EFS File Sync (p. 151)
Walkthrough 1: Create Amazon EFS File System
and Mount It on an EC2 Instance Using the AWS
CLI
This walkthrough uses the AWS CLI to explore the Amazon EFS API. In this walkthrough, you create an
Amazon EFS file system, mount it on an EC2 instance in your VPC, and test the setup.
Note
This walkthrough is similar to the Getting Started exercise. In the Getting Started (p. 10)
exercise, you use the console to create EC2 and Amazon EFS resources. In this walkthrough, you
use the AWS CLI to do the same—primarily to familiarize yourself with the Amazon EFS API.
In this walkthrough, you create the following AWS resources in your account:
• Amazon EC2 resources:
• Two security groups (for your EC2 instance and Amazon EFS file system).
You add rules to these security groups to authorize appropriate inbound/outbound access to allow
your EC2 instance to connect to the file system via the mount target using a standard NFSv4.1 TCP
port.
• An Amazon EC2 instance in your VPC.
• Amazon EFS resources:
• A file system.
• A mount target for your file system.
To mount your file system on an EC2 instance you need to create a mount target in your VPC. You
can create one mount target in each of the Availability Zones in your VPC. For more information, see
Amazon EFS: How It Works (p. 3).
110

Amazon Elastic File System User Guide
Before You Begin
Then, you test the file system on your EC2 instance. The cleanup step at the end of the walkthrough
provides information for you to remove these resources.
The walkthrough creates all these resources in the US West (Oregon) Region (us-west-2). Whichever
AWS Region you use, be sure to use it consistently. All of your resources—your VPC, EC2 resources, and
Amazon EFS resources—must be in the same AWS Region.
Before You Begin
• You can use the root credentials of your AWS account to sign in to the console and try the Getting
Started exercise. However, AWS Identity and Access Management (IAM) recommends that you do not
use the root credentials of your AWS account. Instead, create an administrator user in your account
and use those credentials to manage resources in your account. For more information, see Setting
Up (p. 8).
• You can use a default VPC or a custom VPC that you have created in your account. For this
walkthrough, the default VPC configuration works. However, if you use a custom VPC, verify the
following:
• DNS hostnames are enabled. For more information, see Updating DNS Support for Your VPC in the
Amazon VPC User Guide.
• The Internet gateway is attached to your VPC. For more information, see Internet Gateways in the
Amazon VPC User Guide.
• The VPC subnets are configured to request public IP addresses for instances launched in the VPC
subnets. For more information, see IP Addressing in Your VPC in the Amazon VPC User Guide.
• The VPC route table includes a rule to send all Internet-bound traffic to the Internet gateway.
• You need to set up the AWS CLI and add the adminuser profile.
Setting Up AWS CLI
Use the following instructions to set up the AWS CLI and user profile.
To set up the AWS CLI
1. Download and configure the AWS CLI. For instructions, see the following topics in the AWS
Command Line Interface User Guide.
Getting Set Up with the AWS Command Line Interface
Installing the AWS Command Line Interface
Configuring the AWS Command Line Interface
2. Set profiles.
You store user credentials in the AWS CLI config file. The example CLI commands in this
walkthrough specify the adminuser profile. Create the adminuser profile in the config file. You can
also set the administrator user profile as the default in the config file as shown.
[profile adminuser]
aws_access_key_id = admin user access key ID
aws_secret_access_key = admin user secret access key
region = us-west-2
[default]
aws_access_key_id = admin user access key ID
aws_secret_access_key = admin user secret access key
region = us-west-2
111
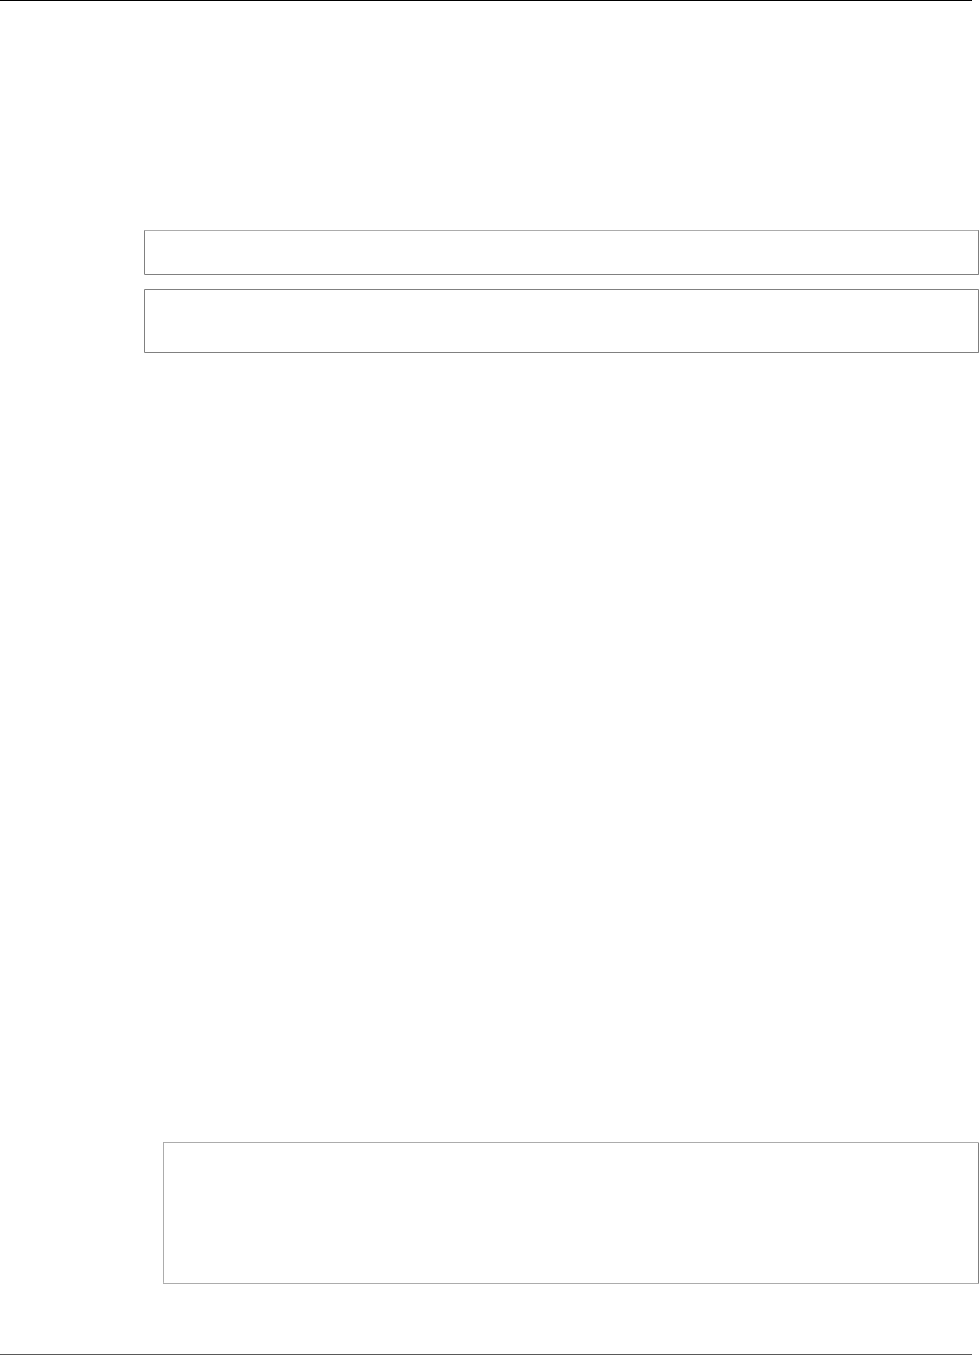
Amazon Elastic File System User Guide
Step 1: Create Amazon EC2 Resources
The preceding profile also sets the default AWS Region. If you don't specify a region in the CLI
command, the us-west-2 region is assumed.
3. Verify the setup by entering the following command at the command prompt. Both of these
commands don't provide credentials explicitly, so the credentials of the default profile are used.
• Try the help command
You can also specify the user profile explicitly by adding the --profile parameter.
aws help
aws help \
--profile adminuser
Next Step
Step 1: Create Amazon EC2 Resources (p. 112)
Step 1: Create Amazon EC2 Resources
In this step, you do the following:
• Create two security groups.
• Add rules to the security groups to authorize additional access.
• Launch an EC2 instance. You create and mount an Amazon EFS file system on this instance in the next
step.
Topics
•Step 1.1: Create Two Security Groups (p. 112)
•Step 1.2: Add Rules to the Security Groups to Authorize Inbound/Outbound Access (p. 113)
•Step 1.3: Launch an EC2 instance (p. 114)
Step 1.1: Create Two Security Groups
In this section, you create security groups in your VPC for your EC2 instance and Amazon EFS mount
target. Later in the walkthrough, you assign these security groups to an EC2 instance and an Amazon EFS
mount target. For information about security groups, see Security Groups for EC2-VPC in the Amazon
EC2 User Guide for Linux Instances.
To create security groups
1. Create two security groups using the create-security-group CLI command.
a. Create a security group (efs-walkthrough1-ec2-sg) for your EC2 instance. You will need to
provide your VPC ID.
$ aws ec2 create-security-group \
--region us-west-2 \
--group-name efs-walkthrough1-ec2-sg \
--description "Amazon EFS walkthrough 1, SG for EC2 instance" \
--vpc-id vpc-id-in-us-west-2 \
--profile adminuser
112
Amazon Elastic File System User Guide
Step 1: Create Amazon EC2 Resources
Write down the security group ID. The following is an example response:
{
"GroupId": "sg-aexample"
}
You can find the VPC ID using the following command:
$ aws ec2 describe-vpcs
b. Create a security group (efs-walkthrough1-mt-sg) for your Amazon EFS mount target. You
need to provide your VPC ID.
$ aws ec2 create-security-group \
--region us-west-2 \
--group-name efs-walkthrough1-mt-sg \
--description "Amazon EFS walkthrough 1, SG for mount target" \
--vpc-id vpc-id-in-us-west-2 \
--profile adminuser
Write down the security group ID. The following is an example response:
{
"GroupId": "sg-aexample"
}
2. Verify the security groups.
aws ec2 describe-security-groups \
--group-ids list of security group IDs separated by space \
--profile adminuser \
--region us-west-2
Both should have only one outbound rule that allows all traffic to leave.
In the next section, you authorize additional access that enable the following:
• Enable you to connect to your EC2 instance.
• Enable traffic between an EC2 instance and an Amazon EFS mount target (to which you will
associate these security groups later in this walkthrough).
Step 1.2: Add Rules to the Security Groups to Authorize
Inbound/Outbound Access
In this step, you add rules to the security groups to authorize inbound/outbound access.
To add rules
1. Authorize incoming SSH connections to the security group for your EC2 instance (efs-
walkthrough1-ec2-sg) so you can connect to your EC2 instance using SSH from any host.
$ aws ec2 authorize-security-group-ingress \
--group-id id of the security group created for EC2 instance \
--protocol tcp \
--port 22 \
113
Amazon Elastic File System User Guide
Step 1: Create Amazon EC2 Resources
--cidr 0.0.0.0/0 \
--profile adminuser \
--region us-west-2
Verify that the security group has the inbound and outbound rule you added.
aws ec2 describe-security-groups \
--region us-west-2 \
--profile adminuser \
--group-id security-group-id
2. Authorize inbound access to the security group for the Amazon EFS mount target (efs-
walkthrough1-mt-sg).
At the command prompt, run the following AWS CLI authorize-security-group-ingress
command using the adminuser profile to add the inbound rule.
$ aws ec2 authorize-security-group-ingress \
--group-id ID of the security group created for Amazon EFS mount target \
--protocol tcp \
--port 2049 \
--source-group ID of the security group created for EC2 instance \
--profile adminuser \
--region us-west-2
3. Verify that both security groups now authorize inbound access.
aws ec2 describe-security-groups \
--group-names efs-walkthrough1-ec2-sg efs-walkthrough1-mt-sg \
--profile adminuser \
--region us-west-2
Step 1.3: Launch an EC2 instance
In this step, you launch an EC2 instance.
To launch an EC2 instance
1. Gather the following information that you need to provide when launching an EC2 instance:
a. Key pair name.
• For introductory information, see Setting Up with Amazon EC2 in the Amazon EC2 User Guide
for Linux Instances.
• For instructions to create a .pem file, see Create a Key Pair in the Amazon EC2 User Guide for
Linux Instances.
b. The AMI ID you want to launch.
The AWS CLI command you will use to launch an EC2 instance requires an AMI ID (that you want
to deploy) as a parameter. The exercise uses the Amazon Linux HVM AMI.
Note
You can use most general purpose Linux-based AMIs. If you use another Linux API, keep
in mind that you will use yum to install NFS client on the instance and you might need
to add software packages as you need them.
For the Amazon Linux HVM AMI, you can find the latest IDs at Amazon Linux AMI. You choose
the ID value from the Amazon Linux AMI IDs table as follows:
114

Amazon Elastic File System User Guide
Step 1: Create Amazon EC2 Resources
• Choose the US West Oregon region. This walkthrough assumes you are creating all resources
in the US West (Oregon) Region (us-west-2).
• Choose the EBS-backed HVM 64-bit type (because in the CLI command you specify the
t2.micro instance type, which does not support instance store).
c. ID of the security group you created for an EC2 instance.
d. AWS Region. This walkthrough uses the us-west-2 region.
e. Your VPC subnet ID where you want to launch the instance. You can get list of subnets using the
describe-subnets command.
$ aws ec2 describe-subnets \
--region us-west-2 \
--filters "Name=vpc-id,Values=vpc-id" \
--profile adminuser
After you choose subnet ID, write down the following values from the describe-subnets
result:
•subnet ID – You need this value when you create a mount target. In this exercise, you create a
mount target in the same subnet where you launch an EC2 instance.
•Availability Zone of the subnet – You need this to construct your mount target DNS name,
which you use to mount a file system on the EC2 instance.
2. Run the following AWS CLI run-instances command to launch an EC2 instance.
$ aws ec2 run-instances \
--image-id AMI ID \
--count 1 \
--instance-type t2.micro \
--associate-public-ip-address \
--key-name key-pair-name \
--security-group-ids ID of the security group created for EC2 instance \
--subnet-id VPC subnet ID \
--region us-west-2 \
--profile adminuser
3. Write down the instance ID returned by the run-instances command.
4. The EC2 instance you created must have a public DNS name that you use to connect to the EC2
instance and mount the file system on it. The public DNS name is of the form:
ec2-xx-xx-xx-xxx.compute-1.amazonaws.com
Run the following CLI command and write down the public DNS name.
aws ec2 describe-instances \
--instance-ids EC2 instance ID \
--region us-west-2 \
--profile adminuser
If you don't find the public DNS name, check the configuration of the VPC in which you launched the
EC2 instance. For more information, see Before You Begin (p. 111).
5. You can assign a name to the EC2 instance you created by adding a tag with the key Name and
value set to the name you want to assign to the instance. Run the following AWS CLI create-tags
command.
$ aws ec2 create-tags \
115

Amazon Elastic File System User Guide
Step 2: Create Amazon EFS Resources
--resources EC2-instance-ID \
--tags Key=Name,Value=Provide-instance-name \
--region us-west-2 \
--profile adminuser
Next Step
Step 2: Create Amazon EFS Resources (p. 116)
Step 2: Create Amazon EFS Resources
In this step, you do the following:
• Create an Amazon EFS file system.
• Create a mount target in the Availability Zone where you have your EC2 instance launched.
Topics
•Step 2.1: Create Amazon EFS File System (p. 116)
•Step 2.2: Create a Mount Target (p. 117)
Step 2.1: Create Amazon EFS File System
In this step, you create an Amazon EFS file system. Write down the FileSystemId to use later when you
create mount targets for the file system in the next step.
To create a file system
1. Create a file system and add the optional Name tag.
a. At the command prompt, run the following AWS CLI create-file-system command.
$ aws efs create-file-system \
--creation-token FileSystemForWalkthrough1 \
--region us-west-2 \
--profile adminuser
b. Verify the file system creation by calling the describe-file-systems CLI command.
$ aws efs describe-file-systems \
--region us-west-2 \
--profile adminuser
Here's an example response:
{
"FileSystems": [
{
"SizeInBytes": {
"Timestamp": 1418062014.0,
"Value": 1024
},
"CreationToken": "FileSystemForWalkthrough1",
"CreationTime": 1418062014.0,
"FileSystemId": "fs-cda54064",
"PerformanceMode" : "generalPurpose",
116

Amazon Elastic File System User Guide
Step 2: Create Amazon EFS Resources
"NumberOfMountTargets": 0,
"LifeCycleState": "available",
"OwnerId": "account-id"
}
]
}
c. Note the FileSystemId value. You need this value when you create a mount target for this file
system in the next step.
2. (Optional) Add a tag to the file system you created using the create-tag CLI command.
You don't need to create a tag for your file system to complete this walkthrough. But you are
exploring the Amazon EFS API, so let's test the Amazon EFS API for creating and managing tags. For
more information, see CreateTags (p. 183).
a. Add a tag.
$ aws efs create-tags \
--file-system-id File-System-ID \
--tags Key=Name,Value=SomeExampleNameValue \
--region us-west-2 \
--profile adminuser
b. Retrieve a list of tags added to the file system by using the describe-tags CLI command.
$ aws efs describe-tags \
--file-system-id File-System-ID \
--region us-west-2 \
--profile adminuser
Amazon EFS returns tags list in the response body.
{
"Tags": [
{
"Value": "SomeExampleNameValue",
"Key": "Name"
}
]
}
Step 2.2: Create a Mount Target
In this step, you create a mount target for your file system in the Availability Zone where you have your
EC2 instance launched.
1. Make sure you have the following information:
• ID of the file system (for example, fs-example) for which you are creating the mount target.
• VPC subnet ID where you launched the EC2 instance in Step 1.
For this walkthrough, you create the mount target in the same subnet in which you launched the
EC2 instance, so you need the subnet ID (for example, subnet-example).
• ID of the security group you created for the mount target in the preceding step.
2. At the command prompt, run the following AWS CLI create-mount-target command.
$ aws efs create-mount-target \
117

Amazon Elastic File System User Guide
Step 3: Mount and Test the File System
--file-system-id file-system-id \
--subnet-id subnet-id \
--security-group ID-of-the security-group-created-for-mount-target \
--region us-west-2 \
--profile adminuser
You get this response:
{
"MountTargetId": "fsmt-example",
"NetworkInterfaceId": "eni-example",
"FileSystemId": "fs-example",
"PerformanceMode" : "generalPurpose",
"LifeCycleState": "available",
"SubnetId": "fs-subnet-example",
"OwnerId": "account-id",
"IpAddress": "xxx.xx.xx.xxx"
}
3. You can also use the describe-mount-targets command to get descriptions of mount targets
you created on a file system.
$ aws efs describe-mount-targets \
--file-system-id file-system-id \
--region us-west-2 \
--profile adminuser
Next Step
Step 3: Mount the Amazon EFS File System on the EC2 Instance and Test (p. 118)
Step 3: Mount the Amazon EFS File System on the
EC2 Instance and Test
In this step, you do the following:
Topics
•Step 3.1: Gather Information (p. 118)
•Step 3.2: Install the NFS Client on Your EC2 Instance (p. 119)
•Step 3.3: Mount File System on Your EC2 Instance and Test (p. 119)
•Next Step (p. 121)
• Install an NFS client on your EC2 instance.
• Mount the file system on your EC2 instance and test the setup.
Step 3.1: Gather Information
Make sure you have the following information as you follow the steps in this section:
• Public DNS name of your EC2 instance in the following format:
ec2-xx-xxx-xxx-xx.aws-region.compute.amazonaws.com
118
Amazon Elastic File System User Guide
Step 3: Mount and Test the File System
• DNS name of your file system. You can construct this DNS name using the following generic form:
file-system-id.efs.aws-region.amazonaws.com
The EC2 instance on which you mount the file system by using the mount target can resolve the file
system's DNS name to the mount target's IP address.
Note
Amazon EFS doesn't require that your Amazon EC2 instance have either a public IP address or
public DNS name. The requirements listed preceding are just for this walkthrough example to
ensure that you'll be able to connect by using SSH into the instance from outside the VPC.
Step 3.2: Install the NFS Client on Your EC2 Instance
You can connect to your EC2 instance from Windows or from a computer running Linux, or Mac OS X, or
any other Unix variant.
To install an NFS client
1. Connect to your EC2 instance:
• To connect to your instance from a computer running Mac OS or Linux, you specify the .pem file to
your ssh command with the -i option and the path to your private key.
• To connect to your instance from a computer running Windows, you can use either MindTerm or
PuTTY. If you plan to use PuTTY, you need to install it and use the following procedure to convert
the .pem file to a .ppk file.
For more information, see the following topics in the Amazon EC2 User Guide for Linux Instances:
•Connecting to Your Linux Instance from Windows Using PuTTY
•Connecting to Your Linux Instance Using SSH
2. Execute the following commands on the EC2 instance by using the SSH session:
a. (Optional) Get updates and reboot.
$ sudo yum -y update
$ sudo reboot
After the reboot, reconnect to your EC2 instance.
b. Install the NFS client.
$ sudo yum -y install nfs-utils
Note
If you choose the Amazon Linux AMI 2016.03.0 Amazon Linux AMI when launching
your Amazon EC2 instance, you won't need to install nfs-utils because it is already
included in the AMI by default.
Step 3.3: Mount File System on Your EC2 Instance and Test
Now you mount the file system on your EC2 instance.
1. Make a directory ("efs-mount-point").
119

Amazon Elastic File System User Guide
Step 3: Mount and Test the File System
$ mkdir ~/efs-mount-point
2. Mount the Amazon EFS file system.
$ sudo mount -t nfs -o
nfsvers=4.1,rsize=1048576,wsize=1048576,hard,timeo=600,retrans=2 mount-target-DNS:/
~/efs-mount-point
The EC2 instance can resolve the mount target DNS name to the IP address. You can optionally
specify the IP address of the mount target directly.
$ sudo mount -t nfs -o
nfsvers=4.1,rsize=1048576,wsize=1048576,hard,timeo=600,retrans=2 mount-target-ip:/~/
efs-mount-point
3. Now that you have the Amazon EFS file system mounted on your EC2 instance, you can create files.
a. Change the directory.
$ cd ~/efs-mount-point
b. List the directory contents.
$ ls -al
It should be empty.
drwxr-xr-x 2 root root 4096 Dec 29 22:33 .
drwx------ 4 ec2-user ec2-user 4096 Dec 29 22:54 ..
c. The root directory of a file system, upon creation, is owned by and is writable by the root user,
so you need to change permissions to add files.
$ sudo chmod go+rw .
Now, if you try the ls -al command you see that the permissions have changed.
drwxrwxrwx 2 root root 4096 Dec 29 22:33 .
drwx------ 4 ec2-user ec2-user 4096 Dec 29 22:54 ..
d. Create a text file.
$ touch test-file.txt
e. List directory content.
$ ls -l
You now have successfully created and mounted an Amazon EFS file system on your EC2 instance in your
VPC.
The file system you mounted will not persist across reboots. To automatically remount the directory
you can use the fstab file. For more information, see Automatic Remounting on Reboot (p. 128).
If you are using an Auto Scaling group to launch EC2 instances, you can also set scripts in a launch
120

Amazon Elastic File System User Guide
Step 4: Clean Up
configuration. For an example, see Walkthrough 2: Set Up an Apache Web Server and Serve Amazon EFS
Files (p. 122).
Next Step
Step 4: Clean Up (p. 121)
Step 4: Clean Up
If you no longer need the resources you created, you should remove them. You can do this with the CLI.
• Remove EC2 resources (the EC2 instance and the two security groups). Amazon EFS deletes the
network interface when you delete the mount target.
• Remove Amazon EFS resources (file system, mount target).
To delete AWS resources created in this walkthrough
1. Terminate the EC2 instance you created for this walkthrough.
$ aws ec2 terminate-instances \
--instance-ids instance-id \
--profile adminuser
You can also delete EC2 resources using the console. For instructions, see Terminating an Instance in
the Amazon EC2 User Guide for Linux Instances.
2. Delete the mount target.
You must delete the mount targets created for the file system before deleting the file system. You
can get a list of mount targets by using the describe-mount-targets CLI command.
$ aws efs describe-mount-targets \
--file-system-id file-system-ID \
--profile adminuser \
--region aws-region
Then delete the mount target by using the delete-mount-target CLI command.
$ aws efs delete-mount-target \
--mount-target-id ID-of-mount-target-to-delete \
--profile adminuser \
--region aws-region
3. (Optional) Delete the two security groups you created. You don't pay for creating security groups.
You must delete the mount target's security group first, before deleting the EC2 instance's security
group. The mount target's security group has a rule that references the EC2 security group.
Therefore, you cannot first delete the EC2 instance's security group.
For instructions, see Deleting a Security Group in the Amazon EC2 User Guide for Linux Instances.
4. Delete the file system by using the delete-file-system CLI command. You can get a list of your
file systems by using the describe-file-systems CLI command. You can get the file system ID
from the response.
aws efs describe-file-systems \
--profile adminuser \
121

Amazon Elastic File System User Guide
Walkthrough 2: Set Up an Apache
Web Server and Serve Files
--region aws-region
Delete the file system by providing the file system ID.
$ aws efs delete-file-system \
--file-system-id ID-of-file-system-to-delete \
--region aws-region \
--profile adminuser
Walkthrough 2: Set Up an Apache Web Server and
Serve Amazon EFS Files
You can have EC2 instances running the Apache web server serving files stored on your Amazon EFS file
system. It can be one EC2 instance, or if your application needs, you can have multiple EC2 instances
serving files from your Amazon EFS file system. The following procedures are described.
•Set up an Apache web server on an EC2 instance (p. 122).
•Set up an Apache web server on multiple EC2 instances by creating an Auto Scaling group (p. 124).
You can create multiple EC2 instances using Auto Scaling, an AWS service that allows you to increase
or decrease the number of EC2 instances in a group according to your application needs. When you
have multiple web servers, you also need a load balancer to distribute request traffic among them.
Note
For both procedures, you create all resources in the US West (Oregon) Region (us-west-2).
Single EC2 Instance Serving Files
Follow the steps to set up an Apache web server on one EC2 instance to serve files you create in your
Amazon EFS file system.
1. Follow the steps in the Getting Started exercise so that you have a working configuration consisting
of the following:
• Amazon EFS file system
• EC2 instance
• File system mounted on the EC2 instance
For instructions, see Getting Started with Amazon Elastic File System (p. 10). As you follow the steps,
write down the following:
• Public DNS name of the EC2 instance.
• Public DNS name of the mount target created in the same Availability Zone where you launched
the EC2 instance.
2. (Optional) You may choose to unmount the file system from the mount point you created in the
Getting Started exercise.
$ sudo umount ~/efs-mount-point
In this walkthrough, you create another mount point for the file system.
3. On your EC2 instance, install the Apache web server and configure it as follows:
122
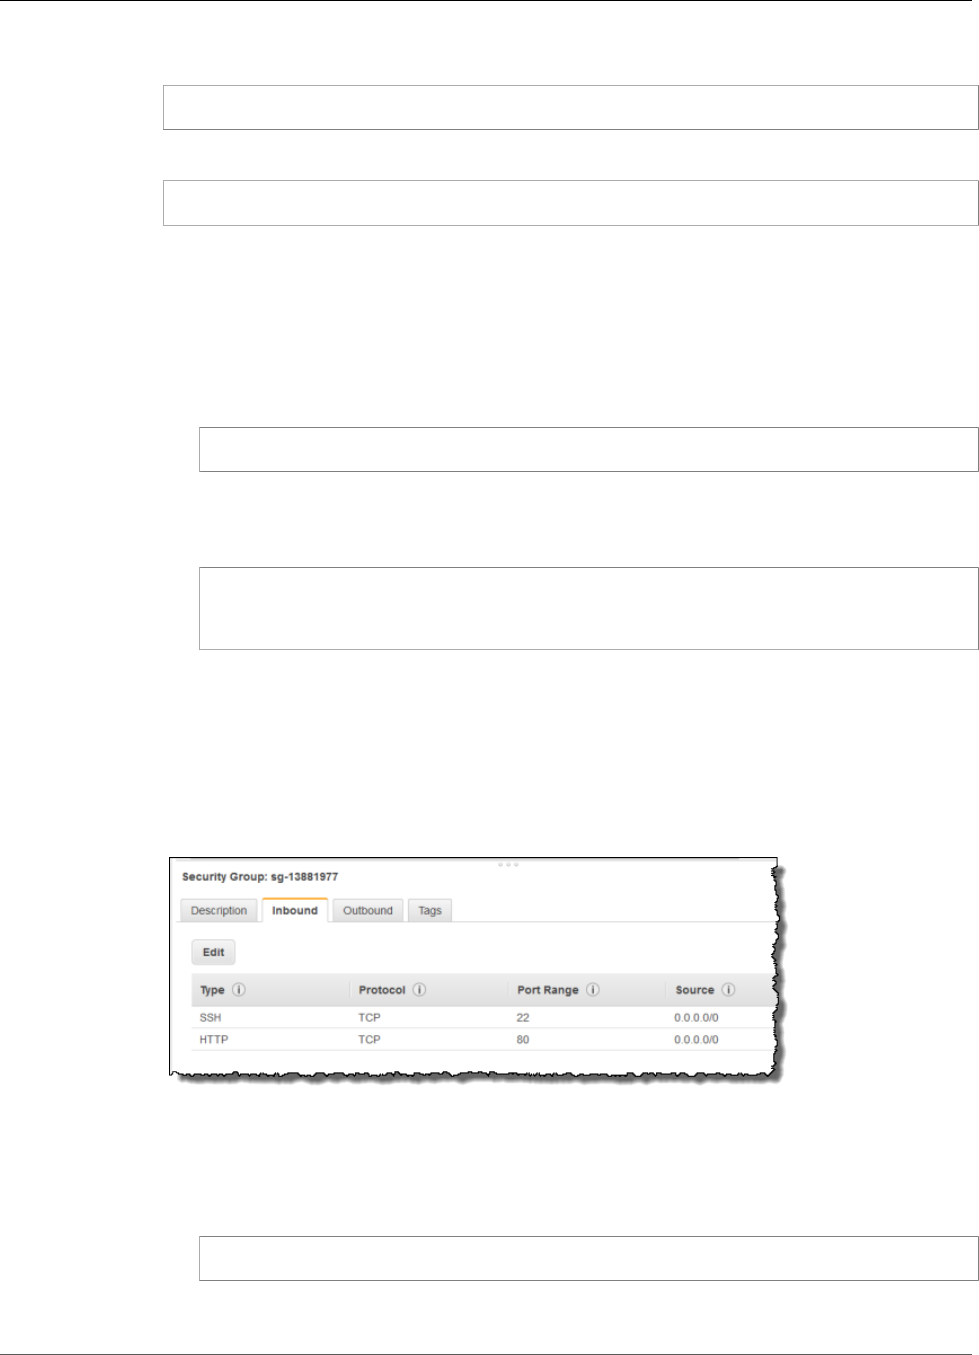
Amazon Elastic File System User Guide
Single EC2 Instance Serving Files
a. Connect to your EC2 instance and install the Apache web server.
$ sudo yum -y install httpd
b. Start the service.
$ sudo service httpd start
c. Create a mount point.
First note that the DocumentRoot in the /etc/httpd/conf/httpd.conf file points to /
var/www/html (DocumentRoot "/var/www/html").
You will mount your Amazon EFS file system on a subdirectory under the document root.
i. Create a subdirectory efs-mount-point under /var/www/html.
$ sudo mkdir /var/www/html/efs-mount-point
ii. Mount your Amazon EFS file system. You need to update the following command by
providing your file system ID and AWS region (if you followed the Getting Started exercise
to create a file system, the getting started assumes us-west-2 AWS Region).
$ sudo mount -t nfs -o
nfsvers=4.1,rsize=1048576,wsize=1048576,hard,timeo=600,retrans=2 file-system-
id.efs.aws-region.amazonaws.com://var/www/html/efs-mount-point
Here you dynamically construct DNS name of the mount target from the EC2 instance you
are on. For more information, see Mounting on Amazon EC2 with a DNS Name (p. 63).
4. Test the setup.
a. Add a rule in the EC2 instance security group, which you created in the Getting Started exercise,
to allow HTTP traffic on TCP port 80 from anywhere.
After you add the rule, the EC2 instance security group will have the following inbound rules.
For instructions, see Creating Security Groups Using the AWS Management Console (p. 28).
b. Create a sample html file.
i. Change directory.
$ cd /var/www/html/efs-mount-point
ii. Make a subdirectory for sampledir and change the ownership. And change directory so
you can create files in the sampledir subdirectory.
123

Amazon Elastic File System User Guide
Multiple EC2 Instances Serving Files
$ sudo mkdir sampledir
$ sudo chown ec2-user sampledir
$ sudo chmod -R o+r sampledir
$ cd sampledir
iii. Create a sample hello.html file.
$ echo "<html><h1>Hello from Amazon EFS</h1></html>" > hello.html
c. Open a browser window and enter the URL to access the file (it is the public DNS name of the
EC2 instance followed by the file name). For example:
http://EC2-instance-public-DNS/efs-mount-point/sampledir/hello.html
Now you are serving web pages stored on an Amazon EFS file system.
Note
This setup does not configure the EC2 instance to automatically start httpd (web server) on
boot, and also does not mount the file system on boot. In the next walkthrough, you create a
launch configuration to set this up.
Multiple EC2 Instances Serving Files
Follow the steps to serve the same content in your Amazon EFS file system from multiple EC2 instances
for improved scalability or availability.
1. Follow the steps in the Getting Started (p. 10) exercise so that you have an Amazon EFS file system
created and tested.
Important
For this walkthrough, you don't use the EC2 instance that you created in the Getting Started
exercise. Instead, you launch new EC2 instances.
2. Create a load balancer in your VPC using the following steps.
1. Define a load balancer
In the Basic Configuration section, select your VPC where you also create the EC2 instances on
which you mount the file system.
In the Select Subnets section, you can select all of the available subnets or select . For details,
see the cloud-config script in the next section.
2. Assign security groups
Create a new security group for the load balancer to allow HTTP access from port 80 from
anywhere, as shown following:
• Type: HTTP
• Protocol: TCP
• Port Range: 80
• Source: Anywhere (0.0.0.0/0)
124

Amazon Elastic File System User Guide
Multiple EC2 Instances Serving Files
Note
When everything works, you can also update the EC2 instance security group inbound
rule access to allow HTTP traffic only from the load balancer.
3. Configure a health check
Set the Ping Path value to /efs-mount-point/test.html. The efs-mount-point is the
subdirectory where you have the file system mounted. You add test.html page in it later in
this procedure.
Note
Don't add any EC2 instances. Later, you create an Auto Scaling Group in which you launch
EC2 instance and specify this load balancer.
For instructions to create a load balancer, see Getting Started with Elastic Load Balancing in the
Elastic Load Balancing User Guide.
3. Create an Auto Scaling group with two EC2 instances. First, you create a launch configuration
describing the instances. Then, you create an Auto Scaling group by specifying the launch
configuration. The following steps provide configuration information that you specify to create an
Auto Scaling group from the Amazon EC2 console.
a. Choose Launch Configurations under AUTO SCALING from the left hand navigation.
b. Choose Create Auto Scaling group to launch the wizard.
c. Choose Create launch configuration.
d. From Quick Start, select the latest version of the Amazon Linux (HVM) AMI. This is same AMI
you used in Step 1: Create Your EC2 Resources and Launch Your EC2 Instance (p. 11) of the
Getting Started exercise.
e. In the Advanced section, do the following:
• For IP Address Type, choose Assign a public IP address to every instance.
• Copy/paste the following script in the User data box.
You must update the script by providing values for the file-system-id and aws-region
(if you followed the Getting Started exercise, you created the file system in the us-west-2
region).
In the script, note the following:
• The script installs the NFS client and the Apache web server.
• The echo command writes the following entry in the /etc/fstab file identifying the
file system's DNS name and subdirectory on which to mount it. This entry ensures that
the file gets mounted after each system reboot. Note that the file system's DNS name is
dynamically constructed. For more information, see Mounting on Amazon EC2 with a DNS
Name (p. 63).
file-system-ID.efs.aws-region.amazonaws.com:/ /var/www/html/efs-mount-point
nfs4 defaults
• Creates efs-mount-point subdirectory and mounts the file system on it.
• Creates a test.html page so ELB health check can find the file (when creating a load
balancer you specified this file as the ping point).
For more information about user data scripts, see Adding User Data in the Amazon EC2 User
Guide for Linux Instances.
125

Amazon Elastic File System User Guide
Multiple EC2 Instances Serving Files
#cloud-config
package_upgrade: true
packages:
- nfs-utils
- httpd
runcmd:
- echo "$(curl -s http://169.254.169.254/latest/meta-data/placement/availability-
zone).file-system-id.efs.aws-region.amazonaws.com:/ /var/www/html/efs-mount-
point nfs4 defaults" >> /etc/fstab
- mkdir /var/www/html/efs-mount-point
- mount -a
- touch /var/www/html/efs-mount-point/test.html
- service httpd start
- chkconfig httpd on
f. For Assign a security group, choose Select an existing security group, and then choose the
security group you created for the EC2 instance.
When configuring the Auto Scaling group details, use the following information:
1. For Group size, choose Start with 2 instances. You will create two EC2 instances.
2. Select your VPC from the Network list.
3. Select a subnet in the same Availability Zone that you used when specifying the mount target ID
in the User Data script when creating the launch configuration in the preceding step.
4. In the Advanced Details section
a. For Load Balancing, choose Receive traffic from Elastic Load Balancer(s), and then select
the load balancer you created for this exercise.
b. For Health Check Type, choose ELB.
Follow the instructions to create an Auto Scaling group at Set Up a Scaled and Load-Balanced
Application in the Auto Scaling User Guide. Use the information in the preceding tables where
applicable.
4. Upon successful creation of the Auto Scaling group, you have two EC2 instances with nfs-utils
and the Apache web server installed. On each instance, verify that you have the /var/www/html/
efs-mount-point subdirectory with your Amazon EFS file system mounted on it. For instructions
to connect to an EC2 instance, see Step 3: Connect to Your Amazon EC2 Instance and Mount the
Amazon EFS File System (p. 16).
Note
If you choose the Amazon Linux AMI 2016.03.0 Amazon Linux AMI when launching your
Amazon EC2 instance, you won't need to install nfs-utils because it is already included in
the AMI by default.
5. Create a sample page (index.html).
a. Change directory.
$ cd /var/www/html/efs-mount-point
b. Make a subdirectory for sampledir and change the ownership. And change directory so
you can create files in the sampledir subdirectory. If you followed the preceding Single EC2
Instance Serving Files (p. 122), you already created the sampledir subdirectory, so you can
skip this step.
$ sudo mkdir sampledir
$ sudo chown ec2-user sampledir
126
Amazon Elastic File System User Guide
Walkthrough 3: Create Writable Per-User Subdirectories
$ sudo chmod -R o+r sampledir
$ cd sampledir
c. Create a sample index.html file.
$ echo "<html><h1>Hello from Amazon EFS</h1></html>" > index.html
6. Now you can test the setup. Using the load balancer's public DNS name, access the index.html page.
http://load balancer public DNS Name/efs-mount-point/sampledir/index.html
The load balancer sends a request to one of the EC2 instances running the Apache web server. Then,
the web server serves the file that is stored in your Amazon EFS file system.
Walkthrough 3: Create Writable Per-User
Subdirectories and Configure Automatic
Remounting on Reboot
After you create an Amazon EFS file system and mount it locally on your EC2 instance, it exposes
an empty directory called the file system root. One common use case is to create a "writable"
subdirectory under this file system root for each user you create on the EC2 instance, and mount it on
the user's home directory. All files and subdirectories the user creates in their home directory are then
created on the Amazon EFS file system.
In this walkthrough, you first create a user "mike" on your EC2 instance. You then mount an Amazon EFS
subdirectory onto user mike's home directory. The walkthrough also explains how to configure automatic
remounting of subdirectories if the system reboots.
Suppose you have an Amazon EFS file system created and mounted on a local directory on your EC2
instance. Let's call it EFSroot.
Note
You can follow the Getting Started (p. 10) exercise to create and mount an Amazon EFS file
system on your EC2 instance.
In the following steps, you create a user (mike), create a subdirectory for the user (EFSroot/mike),
make user mike the owner of the subdirectory, granting him full permissions, and finally mount the
Amazon EFS subdirectory on the user's home directory (/home/mike).
1. Create user mike:
• Log in to your EC2 instance. Using root privileges (in this case, using the sudo command), create
user mike and assign a password.
$ sudo useradd -c "Mike Smith" mike
$ sudo passwd mike
This also creates a home directory, /home/mike, for the user.
2. Create a subdirectory under EFSroot for user mike:
a. Create subdirectory mike under EFSroot.
$ sudo mkdir /EFSroot/mike
127
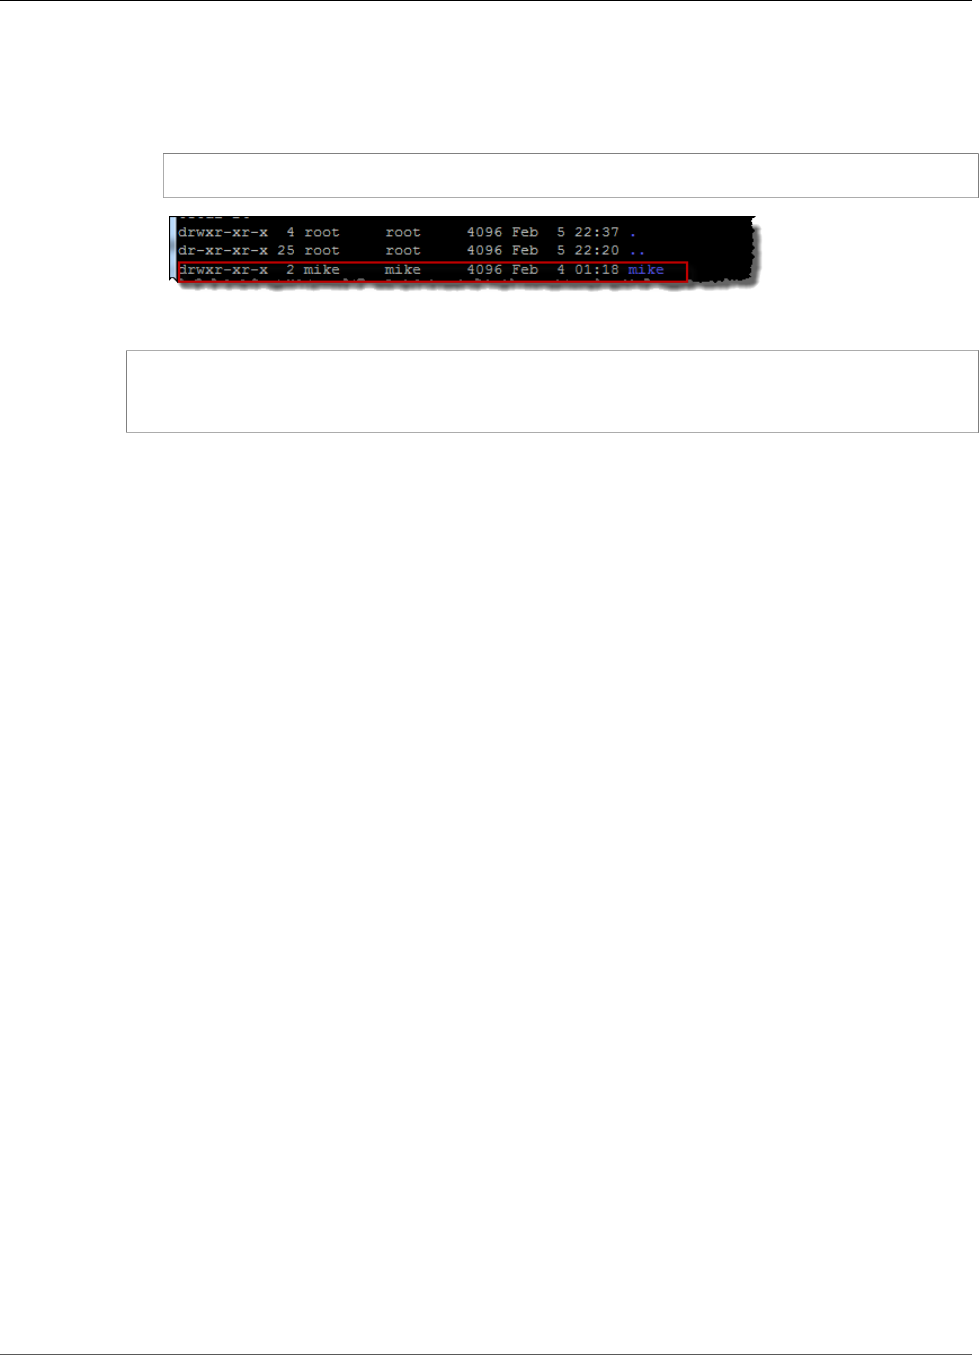
Amazon Elastic File System User Guide
Automatic Remounting on Reboot
You will need to replace EFSroot with your local directory name.
b. The root user and root group are the owners of the /mike subdirectory (you can verify this by
using the ls -l command). To enable full permissions for user mike on this subdirectory, grant
mike ownership of the directory.
$ sudo chown mike:mike /EFSroot/mike
3. Use the mount command to mount the EFSroot/mike subdirectory onto mike's home directory.
$ sudo mount -t nfs -o
nfsvers=4.1,rsize=1048576,wsize=1048576,hard,timeo=600,retrans=2 mount-target-DNS:/
mike/home/mike
The mount-target-DNS address identifies the remote Amazon EFS file system root.
Now user mike's home directory is a subdirectory, writable by mike, in the Amazon EFS file system. If you
unmount this mount target, the user can't access their EFS directory without remounting, which requires
root permissions.
Automatic Remounting on Reboot
You can use the file fstab to automatically remount your file system after any system reboots. For more
information, see Mounting Automatically (p. 65).
Walkthrough 4: Backup Solutions for Amazon EFS
File Systems
If you need to be able to recover from unintended changes or deletions in your Amazon EFS file systems,
we recommend that you implement a backup solution. Following are two possible backup solutions that
you can use, depending on regional support of the related AWS services:
•EFS-to-EFS Backup Solution – This backup solution in AWS Answers is suitable for all Amazon EFS file
systems in all AWS Regions. It includes an AWS CloudFormation template that launches, configures,
and runs the AWS services required to deploy this solution. This solution follows AWS best practices for
security and availability.
•Backing Up Amazon EFS File Systems by Using AWS Data Pipeline (p. 128) – This backup solution
is suitable only for Amazon EFS systems in AWS Regions that have AWS Data Pipeline support. In this
solution, you create an AWS Data Pipeline to copy data from one Amazon EFS file system to another.
Backing Up Amazon EFS File Systems by Using AWS
Data Pipeline
In this backup solution, you create a data pipeline by using the AWS Data Pipeline service to copy data
from your Amazon EFS file system (called the production file system) to another Amazon EFS file system
128

Amazon Elastic File System User Guide
Backing Up Amazon EFS File
Systems by Using AWS Data Pipeline
(called the backup file system). This solution consists of AWS Data Pipeline templates that implement the
following:
• Automated EFS backups based on a schedule that you define (for example, hourly, daily, weekly, or
monthly).
• Automated rotation of the backups, where the oldest backup is replaced with the newest backup
based on the number of backups that you want to retain.
• Quicker backups using rsync, which only back up the changes made between one backup to the next.
• Efficient storage of backups using hard links. A hard link is a directory entry that associates a name
with a file in a file system. By setting up a hard link, you can perform a full restoration of data from
any backup while only storing what changed from backup to backup.
After you set up the backup solution, this walkthrough shows you how to access your backups to restore
your data. This backup solution depends on running scripts that are hosted on GitHub, and is therefore
subject to GitHub availability. If you'd prefer to eliminate this reliance and host the scripts in an Amazon
S3 bucket instead, see Hosting the rsync Scripts in an Amazon S3 Bucket (p. 139).
Important
This solution requires using AWS Data Pipeline in the same AWS Region as your file system.
Because AWS Data Pipeline is not supported in US East (Ohio), this solution doesn't work in that
AWS Region. We recommend that if you want to back up your file system using this solution,
you use your file system in one of the other supported AWS Regions.
Topics
•Performance for Amazon EFS Backups Using AWS Data Pipeline (p. 129)
•Considerations for Amazon EFS Backup by Using AWS Data Pipeline (p. 130)
•Assumptions for Amazon EFS Backup with AWS Data Pipeline (p. 130)
•Backing Up an Amazon EFS File System with AWS Data Pipeline (p. 131)
•Additional Resources (p. 136)
Performance for Amazon EFS Backups Using AWS Data Pipeline
When performing data backups and restorations, your file system performance is subject to Amazon EFS
Performance (p. 81), including baseline and burst throughput capacity. Be aware that the throughput
used by your backup solution counts toward your total file system throughput. The following table
provides some recommendations for the Amazon EFS file system and Amazon EC2 instance sizes that
work for this solution, assuming that your backup window is 15 minutes long.
EFS Size (30
MB Average
File Size)
Daily Change Volume Remaining Burst Hours Minimum Number of
Backup Agents
256 GB Less than 25 GB 6.75 1 - m3.medium
512 GB Less than 50 GB 7.75 1 - m3.large
1.0 TB Less than 75 GB 11.75 2 - m3.large*
1.5 TB Less than 125 GB 11.75 2 - m3.xlarge*
2.0 TB Less than 175 GB 11.75 3 - m3.large*
3.0 TB Less than 250 GB 11.75 4 - m3.xlarge*
129

Amazon Elastic File System User Guide
Backing Up Amazon EFS File
Systems by Using AWS Data Pipeline
* These estimates are based on the assumption that data stored in an EFS file system that is 1 TB or
larger is organized so that the backup can be spread across multiple backup nodes. The multiple-node
example scripts divide the backup load across nodes based on the contents of the first-level directory of
your EFS file system.
For example, if there are two backup nodes, one node backs up all of the even files and directories
located in the first-level directory, and the odd node does the same for the odd files and directories. In
another example, with six directories in the Amazon EFS file system and four backup nodes, the first
node backs up the first and the fifth directories. The second node backs up the second and the sixth
directories, and the third and fourth nodes back up the third and the fourth directories respectively.
Considerations for Amazon EFS Backup by Using AWS Data
Pipeline
Consider the following when you're deciding whether to implement an Amazon EFS backup solution
using AWS Data Pipeline:
• This approach to EFS backup involves a number of AWS resources. For this solution, you need to create
the following:
• One production file system and one backup file system that contains a full copy of the production
file system. The system also will contain any incremental changes to your data over the backup
rotation period.
• Amazon EC2 instances, whose lifecycles are managed by AWS Data Pipeline, that perform
restorations and scheduled backups.
• One regularly scheduled AWS Data Pipeline for backing up data.
• An ad hoc AWS Data Pipeline for restoring backups.
When this solution is implemented, it results in billing to your account for these services. For more
information, see the pricing pages for Amazon EFS, Amazon EC2, and AWS Data Pipeline.
• This solution isn't an offline backup solution. To ensure a fully consistent and complete backup, pause
any file writes to the file system or unmount the file system while the backup occurs. We recommend
that you perform all backups during scheduled downtime or off hours.
Assumptions for Amazon EFS Backup with AWS Data Pipeline
This walkthrough makes several assumptions and declares example values as follows:
• Before you get started, this walkthrough assumes that you already completed Getting Started (p. 10).
• After you've completed the Getting Started exercise, you have two security groups, a VPC subnet,
and a file system mount target for the file system that you want to back up. For the rest of this
walkthrough, you use the following example values:
• The ID of the file system that you back up in this walkthrough is fs-12345678.
• The security group for the file system that is associated with the mount target is called efs-mt-sg
(sg-1111111a).
• The security group that grants Amazon EC2 instances the ability to connect to the production EFS
mount point is called efs-ec2-sg (sg-1111111b).
• The VPC subnet has the ID value of subnet-abcd1234.
• The source file system mount target IP address for the file system that you want to back up is
10.0.1.32:/.
• The example assumes that the production file system is a content management system serving
media files with an average size of 30 MB.
The preceding assumptions and examples are reflected in the following initial setup diagram.
130
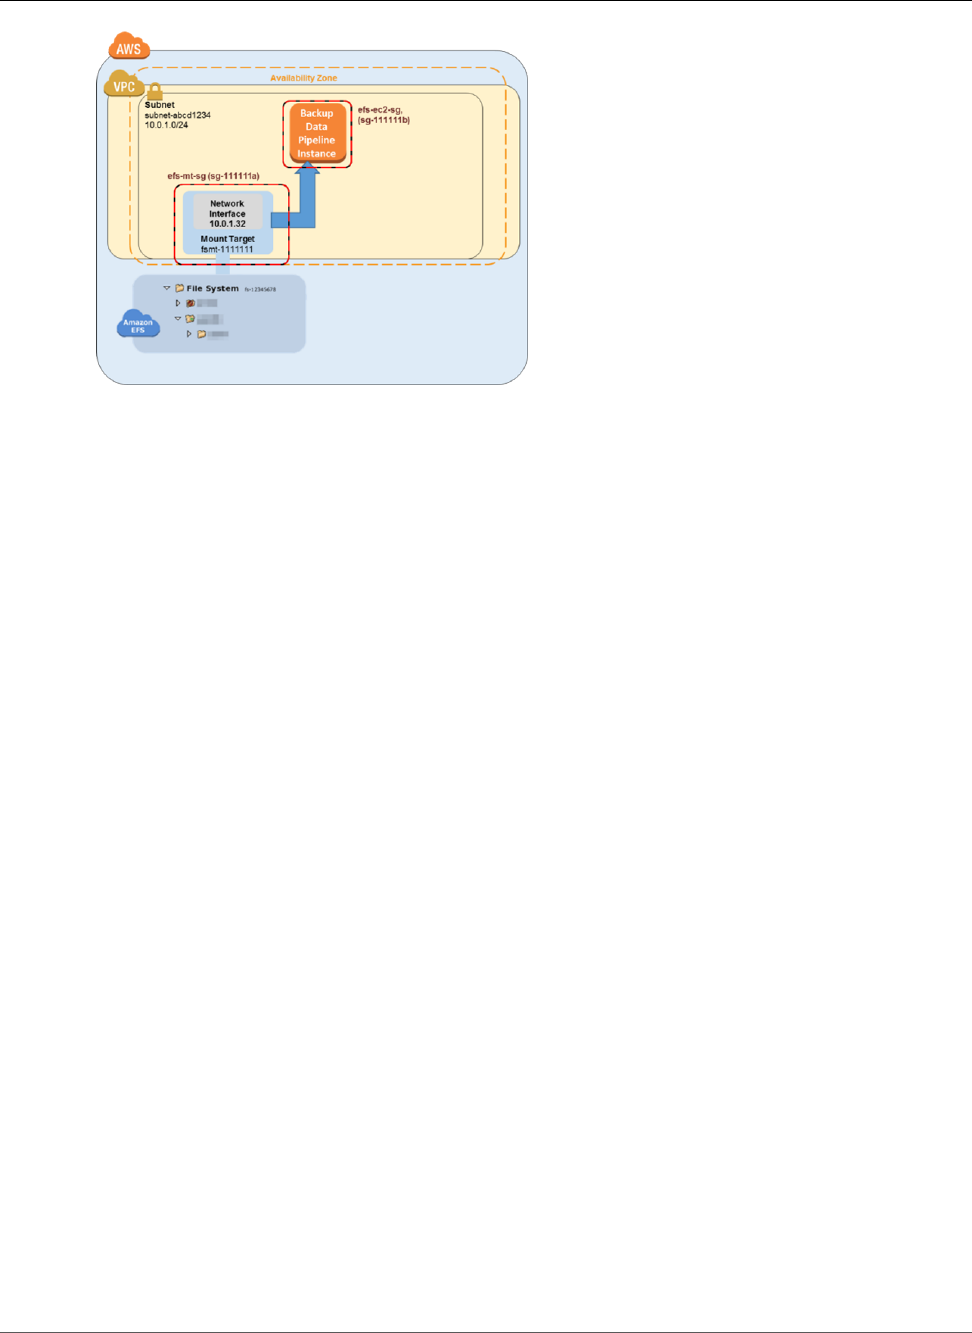
Amazon Elastic File System User Guide
Backing Up Amazon EFS File
Systems by Using AWS Data Pipeline
Backing Up an Amazon EFS File System with AWS Data Pipeline
Follow the steps in this section to back up or restore your Amazon EFS file system with AWS Data
Pipeline.
Topics
•Step 1: Create Your Backup Amazon EFS File System (p. 131)
•Step 2: Download the AWS Data Pipeline Template for Backups (p. 132)
•Step 3: Create a Data Pipeline for Backup (p. 132)
•Step 4: Access Your Amazon EFS Backups (p. 133)
Step 1: Create Your Backup Amazon EFS File System
In this walkthrough, you create separate security groups, file systems, and mount points to separate your
backups from your data source. In this first step, you create those resources:
1. First, create two new security groups. The example security group for the backup mount target is
efs-backup-mt-sg (sg-9999999a). The example security group for the EC2 instance to access
the mount target is efs-backup-ec2-sg (sg-9999999b). Remember to create these security
groups in the same VPC as the EFS volume that you want to back up. In this example, the VPC
associated with the subnet-abcd1234 subnet. For more information about creating security groups,
see Creating Security Groups (p. 27).
2. Next, create a backup Amazon EFS file system. In this example, the file system ID is fs-abcdefaa. For
more information about creating file systems, see Creating an Amazon Elastic File System (p. 20).
3. Finally, create a mount point for the EFS backup file system and assume that it has the value
of 10.0.1.75:/. For more information about creating mount targets, see Creating Mount
Targets (p. 23).
After you've completed this first step, your setup should look similar to the following example diagram.
131
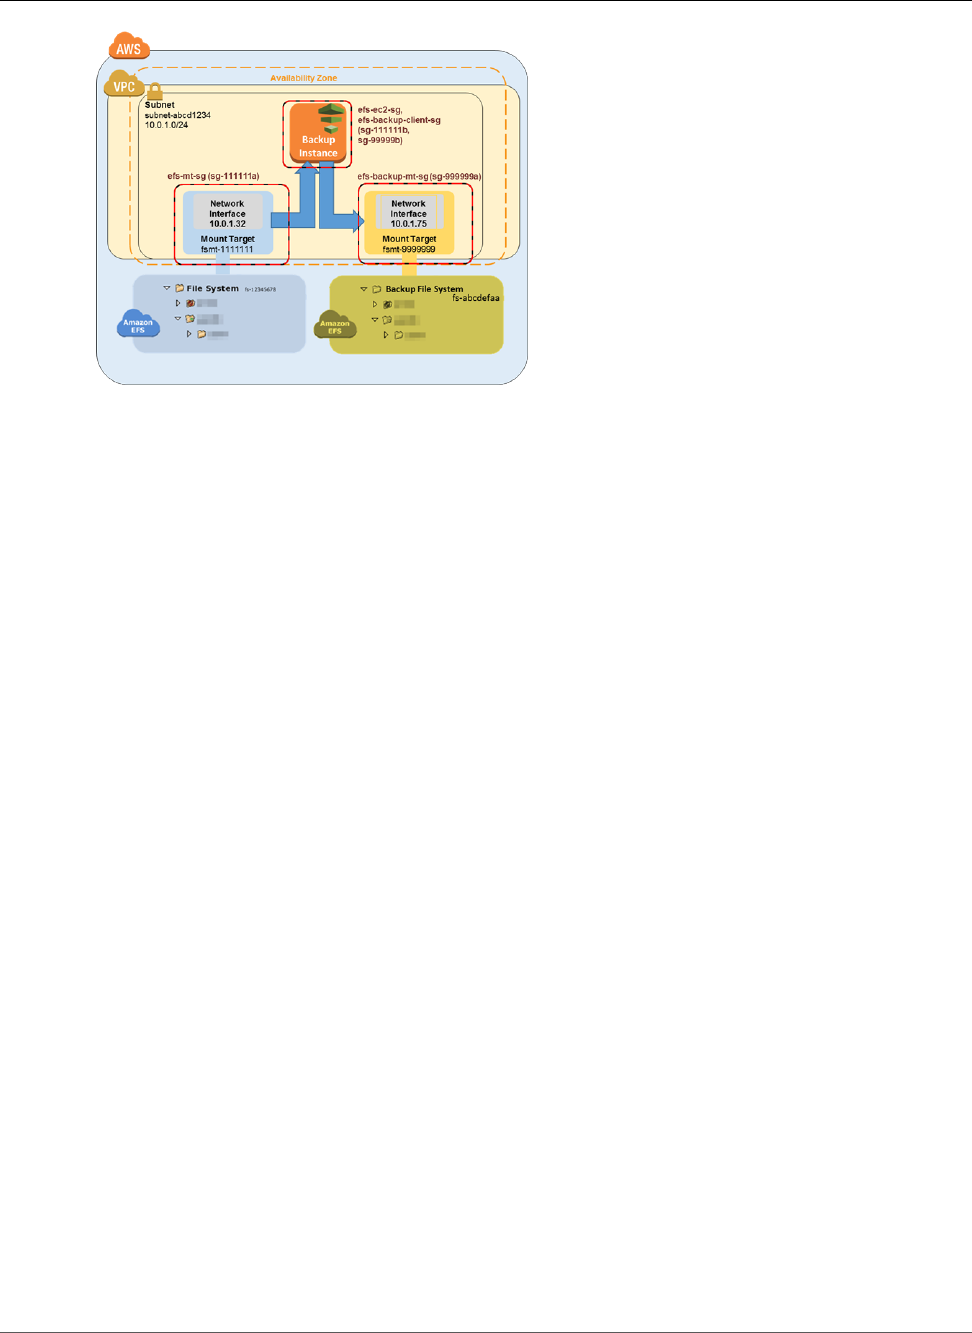
Amazon Elastic File System User Guide
Backing Up Amazon EFS File
Systems by Using AWS Data Pipeline
Step 2: Download the AWS Data Pipeline Template for Backups
AWS Data Pipeline helps you reliably process and move data between different AWS compute and
storage services at specified intervals. By using the AWS Data Pipeline console, you can create
preconfigured pipeline definitions, known as templates. You can use these templates to get started with
AWS Data Pipeline quickly. For this walkthrough, a template is provided to make the process of setting
up your backup pipeline easier.
When implemented, this template creates a data pipeline that launches a single Amazon EC2 instance
on the schedule that you specify to back up data from the production file system to the backup file
system. This template has a number of placeholder values. You provide the matching values for those
placeholders in the Parameters section of the AWS Data Pipeline console. Download the AWS Data
Pipeline template for backups at 1-Node-EFSBackupDataPipeline.json from GitHub.
Note
This template also references and runs a script to perform the backup commands. You can
download the script before creating the pipeline to review what it does. To review the script,
download efs-backup.sh from GitHub. This backup solution depends on running scripts that are
hosted on GitHub and is subject to GitHub availability. If you'd prefer to eliminate this reliance
and host the scripts in an Amazon S3 bucket instead, see Hosting the rsync Scripts in an Amazon
S3 Bucket (p. 139).
Step 3: Create a Data Pipeline for Backup
Use the following procedure to create your data pipeline.
To create a data pipeline for Amazon EFS backups
1. Open the AWS Data Pipeline console at https://console.aws.amazon.com/datapipeline/.
Important
Make sure that you're working in the same AWS Region as your Amazon EFS file systems.
2. Choose Create new pipeline.
3. Add values for Name and optionally for Description.
4. For Source, choose Import a definition, and then choose Load local file.
5. In the file explorer, navigate to the template that you saved in Step 2: Download the AWS Data
Pipeline Template for Backups (p. 132), and then choose Open.
6. In Parameters, provide the details for both your backup and production EFS file systems.
132
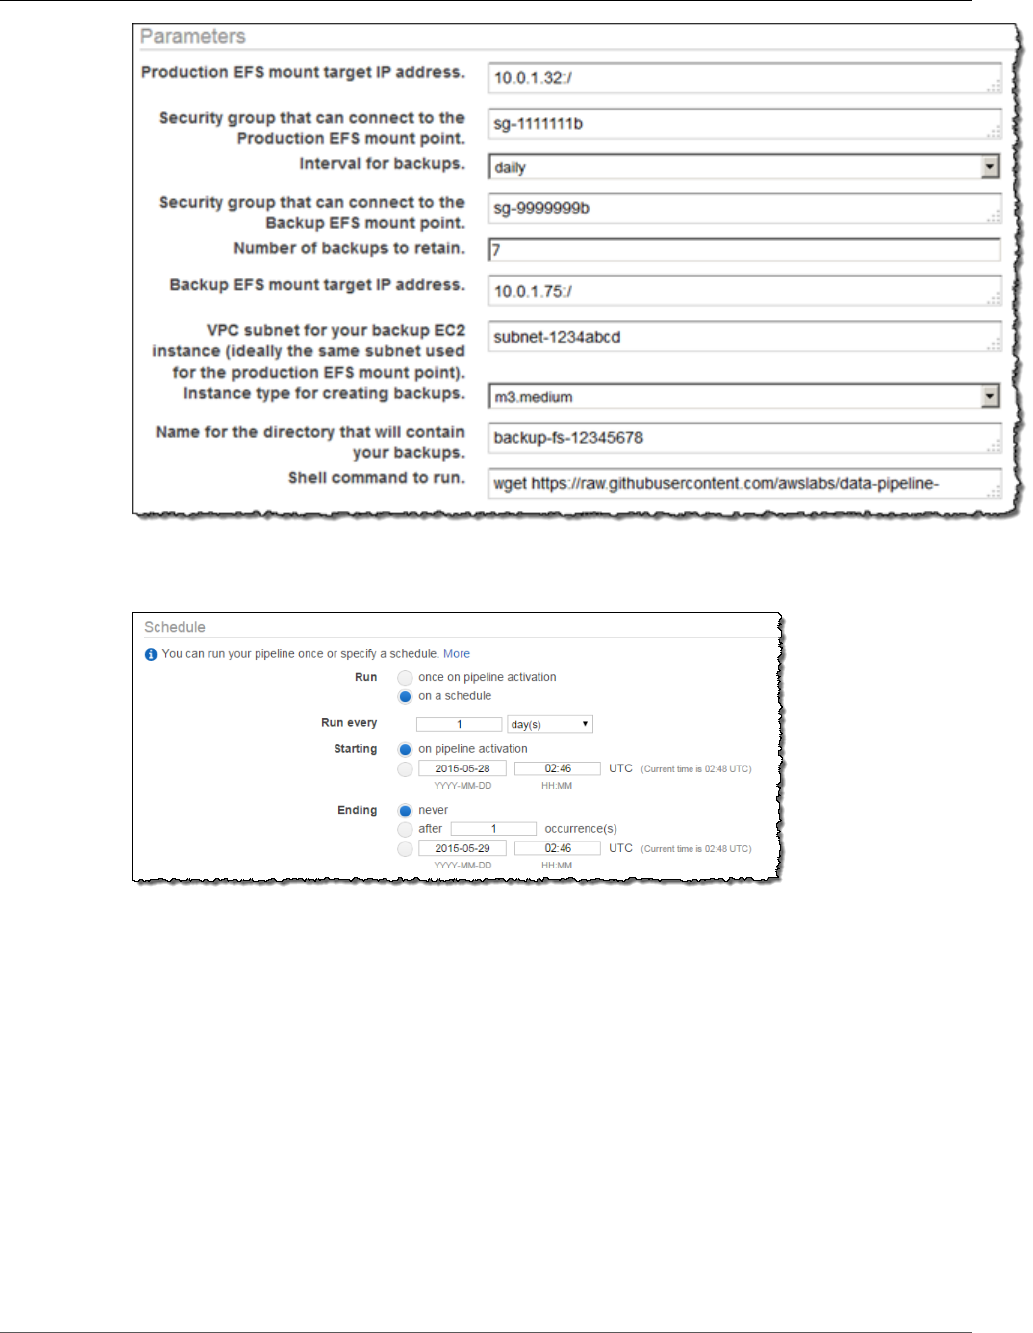
Amazon Elastic File System User Guide
Backing Up Amazon EFS File
Systems by Using AWS Data Pipeline
7. Configure the options in Schedule to define your Amazon EFS backup schedule. The backup in the
example runs once every day, and the backups are kept for a week. When a backup is seven days old,
it is replaced with next oldest backup.
Note
We recommend that you specify a run time that occurs during your off-peak hours.
8. (Optional) Specify an Amazon S3 location for storing pipeline logs, configure a custom IAM role, or
add tags to describe your pipeline.
9. When your pipeline is configured, choose Activate.
You’ve now configured and activated your Amazon EFS backup data pipeline. For more information
about AWS Data Pipeline, see the AWS Data Pipeline Developer Guide. At this stage, you can perform the
backup now as a test, or you can wait until the backup is performed at the scheduled time.
Step 4: Access Your Amazon EFS Backups
Your Amazon EFS backup has now been created, activated, and is running on the schedule you defined.
This step outlines how you can access your EFS backups. Your backups are stored in the EFS backup file
system that you created in the following format.
133

Amazon Elastic File System User Guide
Backing Up Amazon EFS File
Systems by Using AWS Data Pipeline
backup-efs-mount-target:/efs-backup-id/[backup interval].[0-backup retention]-->
Using the values from the example scenario, the backup of the file system is located in 10.1.0.75:/
fs-12345678/daily.[0-6], where daily.0 is the most recent backup and daily.6 is the oldest of
the seven rotating backups.
Accessing your backups gives you the ability to restore data to your production file system. You can
choose to restore an entire file system, or you can choose to restore individual files.
Step 4.1: Restore an Entire Amazon EFS Backup
Restoring a backup copy of an Amazon EFS file system requires another AWS Data Pipeline, similar to
the one you configured in Step 3: Create a Data Pipeline for Backup (p. 132). However, this restoration
pipeline works in the reverse of the backup pipeline. Typically, these restorations aren't scheduled to
begin automatically.
As with backups, restores can be done in parallel to meet your recovery time objective. Keep in mind
that when you create a data pipeline, you need to schedule when you want it run. If you choose to run
on activation, you start the restoration process immediately. We recommend that you only create a
restoration pipeline when you need to do a restoration, or when you already have a specific window of
time in mind.
Burst capacity is consumed by both the backup EFS and restoration EFS. For more information about
performance, see Amazon EFS Performance (p. 81). The following procedure shows you how to create
and implement your restoration pipeline.
To create a data pipeline for EFS data restoration
1. Download the data pipeline template for restoring data from your backup EFS file system. This
template launches a single Amazon EC2 instance based on the specified size. It launches only
when you specify it to launch. Download the AWS Data Pipeline template for backups at 1-Node-
EFSRestoreDataPipeline.json from GitHub.
Note
This template also references and runs a script to perform the restoration commands. You
can download the script before creating the pipeline to review what it does. To review the
script, download efs-restore.sh from GitHub.
2. Open the AWS Data Pipeline console at https://console.aws.amazon.com/datapipeline/.
Important
Make sure that you're working in the same AWS Region as your Amazon EFS file systems
and Amazon EC2.
3. Choose Create new pipeline.
4. Add values for Name and optionally for Description.
5. For Source, choose Import a definition, and then choose Load local file.
6. In the file explorer, navigate to the template that you saved in Step 1: Create Your Backup Amazon
EFS File System (p. 131), and then choose Open.
7. In Parameters, provide the details for both your backup and production EFS file systems.
134
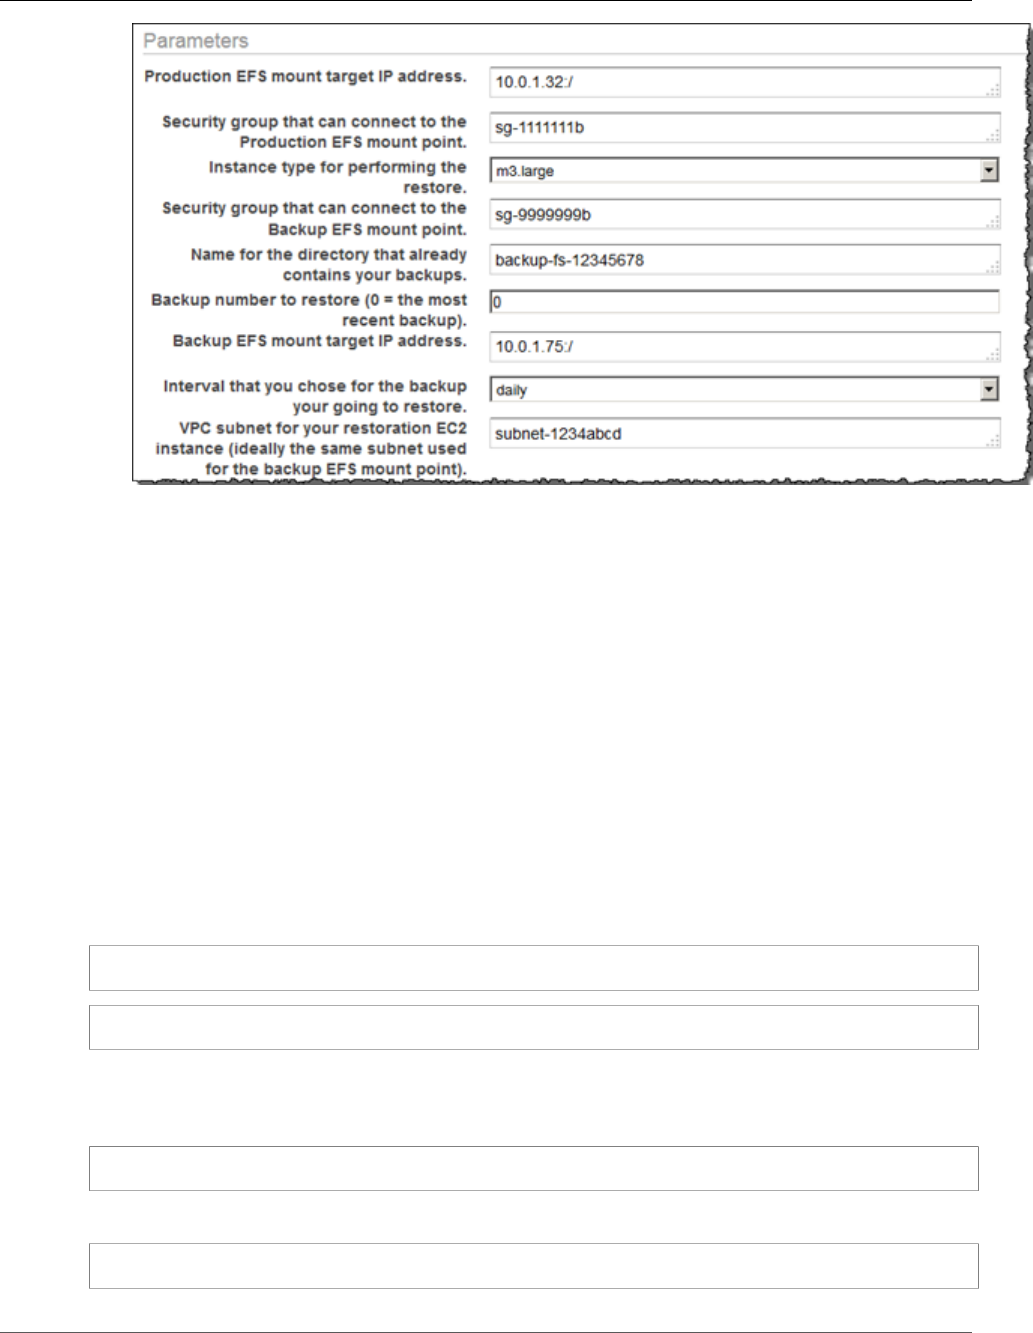
Amazon Elastic File System User Guide
Backing Up Amazon EFS File
Systems by Using AWS Data Pipeline
8. Because you typically perform restorations only when you need them, you can schedule the
restoration to run once on pipeline activation. Or schedule a one-time restoration at a future time
of your choosing, like during an off-peak window of time.
9. (Optional) Specify an Amazon S3 location for storing pipeline logs, configure a custom IAM role, or
add tags to describe your pipeline.
10. When your pipeline is configured, choose Activate.
You’ve now configured and activated your Amazon EFS restoration data pipeline. Now when you need
to restore a backup to your production EFS file system, you just activate it from the AWS Data Pipeline
console. For more information, see the AWS Data Pipeline Developer Guide.
Step 4.2: Restore Individual Files from Your Amazon EFS Backups
You can restore files from your Amazon EFS file system backups by launching an Amazon EC2 instance
to temporarily mount both the production and backup EFS file systems. The EC2 instance must be a
member of both of the EFS client security groups (in this example, efs-ec2-sg and efs-backup-clients-
sg). Both EFS mount targets can be mounted by this restoration instance. For example, a recovery EC2
instance can create the following mount points. Here, the -o ro option is used to mount the Backup EFS
as read-only to prevent accidentally modifying the backup when attempting to restore from a backup.
mount -t nfs source-efs-mount-target:/ /mnt/data
mount -t nfs -o ro backup-efs-mount-target:/fs-12345678/daily.0 /mnt/backup>
After you've mounted the targets, you can copy files from /mnt/backup to the appropriate location in
/mnt/data in the terminal using the cp -p command. For example, an entire home directory (with its
file system permissions) can be recursively copied with the following command.
sudo cp -rp /mnt/backup/users/my_home /mnt/data/users/my_home
You can restore a single file by running the following command.
sudo cp -p /mnt/backup/user/my_home/.profile /mnt/data/users/my_home/.profile
135

Amazon Elastic File System User Guide
Backing Up Amazon EFS File
Systems by Using AWS Data Pipeline
Warning
When you are manually restoring individual data files, be careful that you don't accidentally
modify the backup itself. Otherwise, you might corrupt it.
Additional Resources
The backup solution presented in this walkthrough uses templates for AWS Data Pipeline. The templates
used in Step 2: Download the AWS Data Pipeline Template for Backups (p. 132) and Step 4.1: Restore
an Entire Amazon EFS Backup (p. 134) both use a single Amazon EC2 instance to perform their work.
However, there's no real limit to the number of parallel instances that you can run for backing up or
restoring your data in Amazon EFS file systems. In this topic, you can find links to other AWS Data
Pipeline templates configured for multiple EC2 instances that you can download and use for your backup
solution. You can also find instructions for how to modify the templates to include additional instances.
Topics
•Using Additional Templates (p. 136)
•Adding Additional Backup Instances (p. 136)
•Adding Additional Restoration Instances (p. 138)
•Hosting the rsync Scripts in an Amazon S3 Bucket (p. 139)
Using Additional Templates
You can download the following additional templates from GitHub:
•2-Node-EFSBackupPipeline.json – This template starts two parallel Amazon EC2 instances to backup
your production Amazon EFS file system.
•2-Node-EFSRestorePipeline.json – This template starts two parallel Amazon EC2 instances to restore a
backup of your production Amazon EFS file system.
Adding Additional Backup Instances
You can add additional nodes to the backup templates used in this walkthrough. To add a node, modify
the following sections of the 2-Node-EFSBackupDataPipeline.json template.
Important
If you're using additional nodes, you can't use spaces in file names and directories stored in the
top-level directory. If you do, those files and directories won't be backed up or restored. All files
and subdirectories that are at least one level below the top level are backed up and restored as
expected.
• Create an additional EC2Resource for each additional node you would like to create (in this example, a
fourth EC2 instance).
{
"id": "EC2Resource4",
"terminateAfter": "70 Minutes",
"instanceType": "#{myInstanceType}",
"name": "EC2Resource4",
"type": "Ec2Resource",
"securityGroupIds" : [ "#{mySrcSecGroupID}","#{myBackupSecGroupID}" ],
"subnetId": "#{mySubnetID}",
"associatePublicIpAddress": "true"
},
• Create an additional data pipeline activity for each additional node (in this case, activity
BackupPart4), make sure to configure the following sections:
136

Amazon Elastic File System User Guide
Backing Up Amazon EFS File
Systems by Using AWS Data Pipeline
• Update the runsOn reference to point to the EC2Resource created previously (EC2Resource4 in the
following example).
• Increment the last two scriptArgument values to equal the backup part each node will be
responsible for and the total number of nodes ("3" and "4" in the example below—the backup part
is "3" for the fourth node in this example because our modulus logic needs to count starting with
0).
{
"id": "BackupPart4",
"name": "BackupPart4",
"runsOn": {
"ref": "EC2Resource4"
},
"command": "wget https://raw.githubusercontent.com/awslabs/data-pipeline-samples/master/
samples/EFSBackup/efs-backup-rsync.sh\nchmod a+x efs-backup-rsync.sh\n./efs-backup-
rsync.sh $1 $2 $3 $4 $5 $6 $7",
"scriptArgument": ["#{myEfsSource}","#{myEfsBackup}", "#{myInterval}",
"#{myRetainedBackups}","#{myEfsID}", "3", "4"],
"type": "ShellCommandActivity",
"dependsOn": {
"ref": "InitBackup"
},
"stage": "true"
},
• Increment the last value in all existing scriptArgument values to the number of nodes (in this
example, "4").
{
"id": "BackupPart1",
...
"scriptArgument": ["#{myEfsSource}","#{myEfsBackup}", "#{myInterval}",
"#{myRetainedBackups}","#{myEfsID}", "1", "4"],
...
},
{
"id": "BackupPart2",
...
"scriptArgument": ["#{myEfsSource}","#{myEfsBackup}", "#{myInterval}",
"#{myRetainedBackups}","#{myEfsID}", "2", "4"],
...
},
{
"id": "BackupPart3",
...
"scriptArgument": ["#{myEfsSource}","#{myEfsBackup}", "#{myInterval}",
"#{myRetainedBackups}","#{myEfsID}", "0", "4"],
...
},
• Update FinalizeBackup activity and add the new backup activity to the dependsOn list
(BackupPart4 in this case).
{
"id": "FinalizeBackup", "name": "FinalizeBackup", "runsOn": { "ref":
"EC2Resource1" }, "command": "wget
https://raw.githubusercontent.com/awslabs/data-pipeline-samples/master/samples/EFSBackup/
efs-backup-end.sh\nchmod a+x
efs-backup-end.sh\n./efs-backup-end.sh $1 $2", "scriptArgument": ["#{myInterval}",
"#{myEfsID}"], "type": "ShellCommandActivity", "dependsOn": [ { "ref": "BackupPart1" },
{ "ref": "BackupPart2" }, { "ref": "BackupPart3" }, { "ref": "BackupPart4" } ], "stage":
137

Amazon Elastic File System User Guide
Backing Up Amazon EFS File
Systems by Using AWS Data Pipeline
"true"
Adding Additional Restoration Instances
You can add nodes to the restoration templates used in this walkthrough. To add a node, modify the
following sections of the 2-Node-EFSRestorePipeline.json template.
• Create an additional EC2Resource for each additional node you want to create (in this case, a third EC2
instance called EC2Resource3).
{
"id": "EC2Resource3",
"terminateAfter": "70 Minutes",
"instanceType": "#{myInstanceType}",
"name": "EC2Resource3",
"type": "Ec2Resource",
"securityGroupIds" : [ "#{mySrcSecGroupID}","#{myBackupSecGroupID}" ],
"subnetId": "#{mySubnetID}",
"associatePublicIpAddress": "true"
},
• Create an additional data pipeline activity for each additional node (in this case, Activity
RestorePart3). Make sure to configure the following sections:
• Update the runsOn reference to point to the EC2Resource created previously (in this example,
EC2Resource3)
• Increment the last two scriptArgument values to equal the backup part each node is be
responsible for and the total number of nodes (in this example, "2" and "3" in the example
following—the backup part is "3" for the fourth node in this example because our modulus logic
needs to count starting with 0).
{
"id": "RestorePart3",
"name": "RestorePart3",
"runsOn": {
"ref": "EC2Resource3"
},
"command": "wget https://raw.githubusercontent.com/awslabs/data-pipeline-samples/master/
samples/EFSBackup/efs-restore-rsync.sh\nchmod a+x efs-restore-rsync.sh\n./efs-backup-
rsync.sh $1 $2 $3 $4 $5 $6 $7",
"scriptArgument": ["#{myEfsSource}","#{myEfsBackup}", "#{myInterval}",
"#{myBackup}","#{myEfsID}", "2", "3"],
"type": "ShellCommandActivity",
"dependsOn": {
"ref": "InitBackup"
},
"stage": "true"
},
• Increment the last value in all existing scriptArgument values to the number of nodes (in this
example, "3").
{
"id": "RestorePart1",
...
"scriptArgument": ["#{myEfsSource}","#{myEfsBackup}", "#{myInterval}",
"#{myBackup}","#{myEfsID}", "1", "3"],
...
},
{
"id": "RestorePart2",
138

Amazon Elastic File System User Guide
Backing Up Amazon EFS File
Systems by Using AWS Data Pipeline
...
"scriptArgument": ["#{myEfsSource}","#{myEfsBackup}", "#{myInterval}",
"#{myBackup}","#{myEfsID}", "0", "3"],
...
},
Hosting the rsync Scripts in an Amazon S3 Bucket
This backup solution is dependent on running rsync scripts that are hosted in a GitHub repository on
the internet. Therefore, this backup solution is subject to the GitHub repository being available. This
requirement means that if the GitHub repository removes these scripts, or if the GitHub website goes
offline for some reason, the backup solution as implemented preceding won't function.
If you'd prefer to eliminate this GitHub dependency, you can choose to host the scripts in an Amazon S3
bucket that you own instead. Following, you can find the steps necessary to host the scripts yourself.
To host the rsync scripts in your own Amazon S3 bucket
1. Sign Up for AWS – If you already have an AWS account, go ahead and skip to the next step.
Otherwise, see Sign up for AWS (p. 8).
2. Create an AWS Identity and Access Management User – If you already have an IAM user, go ahead
and skip to the next step. Otherwise, see Create an IAM User (p. 8).
3. Create an Amazon S3 bucket – If you already have a bucket that you want to host the rsync scripts
in, go ahead and skip to the next step. Otherwise, see Create a Bucket in the Amazon Simple Storage
Service Getting Started Guide.
4. Download the rsync scripts and templates – Download all of the rsync scripts and templates
in the EFSBackup folder from GitHub. Make a note of the location on your computer where you
downloaded these files.
5. Upload the rsync scripts to your S3 bucket – For instructions on how to upload objects into your S3
bucket, see Add an Object to a Bucket in the Amazon Simple Storage Service Getting Started Guide.
6. Change the permissions on the uploaded rsync scripts to allow Everyone to Open/Download them.
For instructions on how to change the permissions on an object in your S3 bucket, see Editing Object
Permissions in the Amazon Simple Storage Service Console User Guide.
139
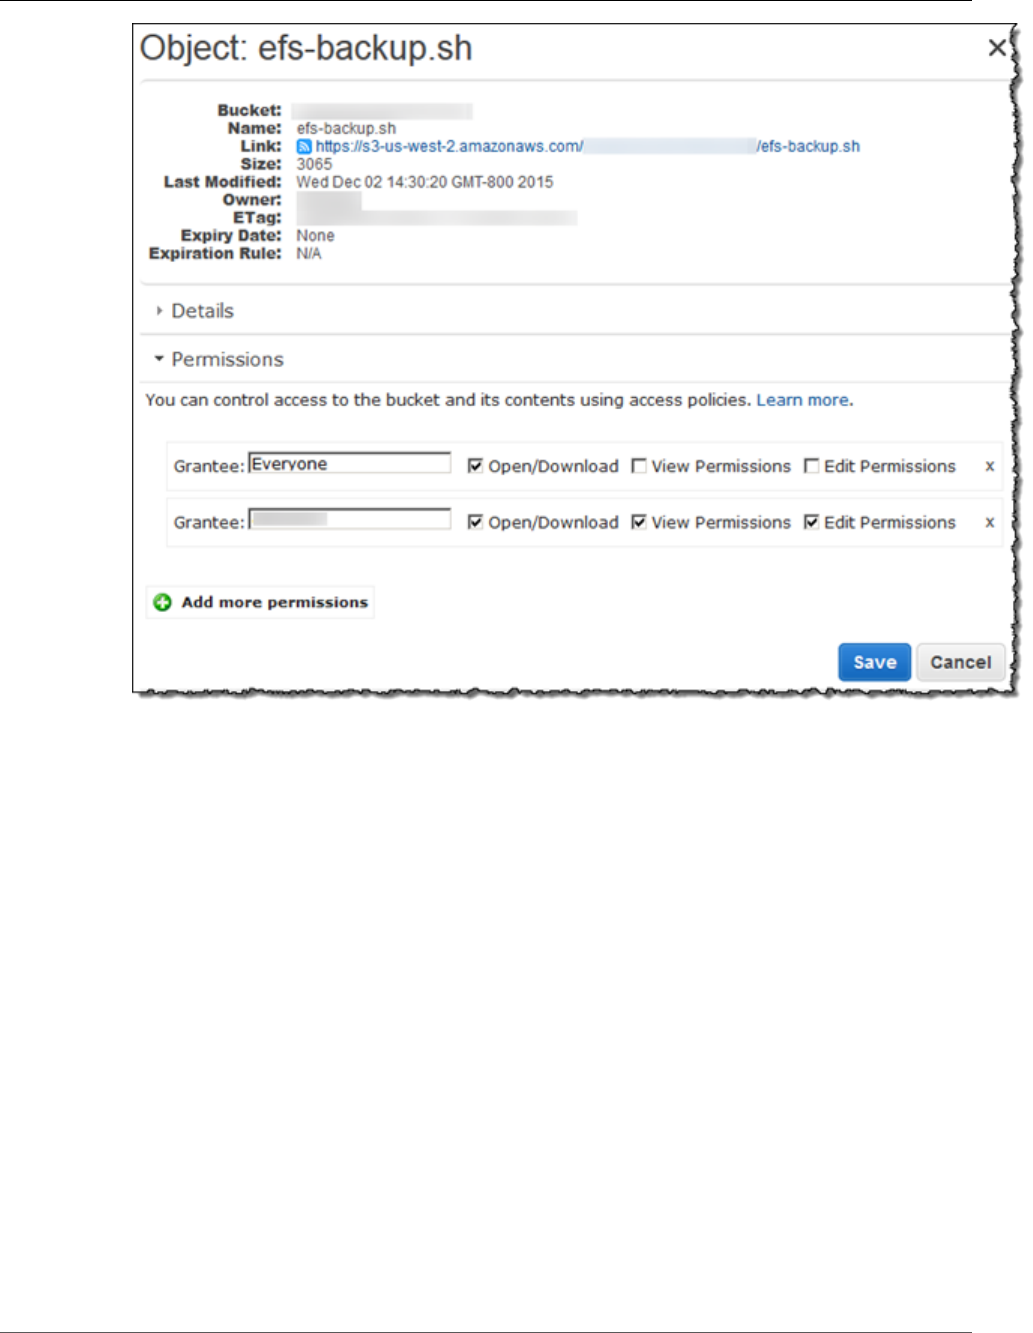
Amazon Elastic File System User Guide
Walkthrough 5: Create and Mount a File
System On-Premises with AWS Direct Connect
7. Update your templates – Modify the wget statement in the shellCmd parameter to point
to the Amazon S3 bucket where you put the startup script. Save the updated template, and
use that template when you're following the procedure in Step 3: Create a Data Pipeline for
Backup (p. 132).
Note
We recommend that you limit access to your Amazon S3 bucket to include the IAM account
that activates the AWS Data Pipeline for this backup solution. For more information, see
Editing Bucket Permissions in the Amazon Simple Storage Service Console User Guide.
You are now hosting the rsync scripts for this backup solution, and your backups are no longer
dependent on GitHub availability.
Walkthrough 5: Create and Mount a File System
On-Premises with AWS Direct Connect
This walkthrough uses the console to create and mount a file system on an on-premises server using a
AWS Direct Connect connection.
In this walkthrough, it's assumed that you already have an AWS Direct Connect connection. If you don't
have one, you can begin the process now and come back to this walkthrough when your connection is
established. For more information, see AWS Direct Connect Product Details.
140

Amazon Elastic File System User Guide
Before You Begin
When you have an AWS Direct Connect connection, you'll create the following AWS resources in your
account:
• Amazon EFS resources:
• A file system.
• A mount target for your file system.
To mount your file system on your on-premises servers, you need to create a mount target in your
VPC. You can create one mount target in each of the Availability Zones in your VPC. For more
information, see Amazon EFS: How It Works (p. 3).
Then, you'll test the file system from your on-premises server. The clean-up step at the end of the
walkthrough provides information for you to remove these resources.
The walkthrough creates all these resources in the US West (Oregon) Region (us-west-2). Whichever
AWS Region you use, be sure to use it consistently. All of your resources—your VPC, your mount target,
and your Amazon EFS file system—must be in the same AWS Region.
Note
If your local application needs to know if the EFS file system is available, then your application
should be able to point to a different mount point IP address if the first mount point becomes
temporarily unavailable. In this scenario, we recommend that you have two on-premises servers
connected to your file system through different Availability Zones (AZs) for higher availability.
Before You Begin
You can use the root credentials of your AWS account to sign in to the console and try this exercise.
However, AWS Identity and Access Management (IAM) Best practices recommend that you do not use
the root credentials of your AWS account. Instead, create an administrator user in your account and use
those credentials to manage resources in your account. For more information, see Setting Up (p. 8).
You can use a default VPC or a custom VPC that you have created in your account. For this walkthrough,
the default VPC configuration works. However, if you use a custom VPC, verify the following:
• The Internet gateway is attached to your VPC. For more information, see Internet Gateways in the
Amazon VPC User Guide.
• The VPC route table includes a rule to send all Internet-bound traffic to the Internet gateway.
Step 1: Create Your Amazon Elastic File System
Resources
In this step, you create your Amazon EFS file system and mount targets.
To create your Amazon EFS file system
1. Open the Amazon EFS console at https://console.aws.amazon.com/efs/.
2. Choose Create File System.
3. Choose your default VPC from the VPC list.
4. Select the check boxes for all of the Availability Zones. Make sure that they all have the default
subnets, automatic IP addresses, and the default security groups chosen. These are your mount
targets. For more information, see Creating Mount Targets (p. 23).
5. Choose Next Step.
141

Amazon Elastic File System User Guide
Step 2: Mount the Amazon EFS File
System on Your On-Premises Server
6. Name your file system, keep general purpose selected as your default performance mode, and
choose Next Step.
7. Choose Create File System.
8. Choose your file system from the list and make a note of the Security group value. You'll need this
value for the next step.
The file system you just created has mount targets, created in step 1.4. Each mount target has an
associated security group. The security group acts as a virtual firewall that controls network traffic. If
you didn't provide a security group when creating a mount target, Amazon EFS associates the default
security group of the VPC with it. If you followed the above steps exactly, then your mount targets are
using the default security group.
Next, you'll add a rule to the mount target's security group to allow inbound traffic to the NFS port
(2049). You can use the AWS Management Console to add the rule to your mount target's security
groups in your VPC.
To allow inbound traffic to the NFS port
1. Sign in to the AWS Management Console and open the Amazon EC2 console at https://
console.aws.amazon.com/ec2/.
2. Under NETWORK & SECURITY, choose Security Groups.
3. Choose the security group associated with your file system. You made a note of this at the end of
Step 1: Create Your Amazon Elastic File System Resources (p. 141).
4. In the tabbed pane that appears below the list of security groups, choose the Inbound tab.
5. Choose Edit.
6. Choose Add Rule, and choose a rule of the following type:
•Type – NFS
•Source – Anywhere
We recommend that you only use the Anywhere source for testing. You can choose to create a
custom source set to the IP address of the on-premises server, or use the console from the server
itself, and choose My IP.
Note
You don't need to add an outbound rule because the default outbound rule allows all traffic
to leave (otherwise, you will need to add an outbound rule to open TCP connection on the
NFS port, identifying the mount target security group as the destination).
Step 2: Mount the Amazon EFS File System on Your
On-Premises Server
Open a terminal on your on-premises Linux server. To mount the Amazon EFS file system, you need the
mount target IP Address for your Amazon EFS file system. If you created multiple mount targets for your
file system, then you can choose any one of these. Once you have that and your terminal open, you can
run the following command to mount your Amazon EFS file system.
$ sudo mount -t nfs -o
nfsvers=4.1,rsize=1048576,wsize=1048576,hard,timeo=600,retrans=2 MOUNT_TARGET_IP_ADDRESS:/
efs
Change directories to the new directory that you created with the following command.
142
Amazon Elastic File System User Guide
Step 3: Clean Up Resources and Protect Your AWS Account
$ cd efs
Make a subdirectory and change the ownership of that subdirectory to your EC2 instance user. Then,
navigate to that new directory with the following commands.
$ sudo mkdir getting-started
$ sudo chown ec2-user getting-started
$ cd getting-started
Create a text file with the following command.
$ touch test-file.txt
List the directory contents with the following command.
$ ls -al
As a result, the following file is created.
-rw-rw-r-- 1 username username 0 Nov 15 15:32 test-file.txt
Step 3: Clean Up Resources and Protect Your AWS
Account
After you have finished this walkthrough, or if you don't want to explore the walkthroughs, you should
follow these steps to clean up your resources and protect your AWS account.
To clean up resources and protect your AWS account
1. Unmount the Amazon EFS file system with the following command.
$ sudo umount efs
2. Open the Amazon EFS console at https://console.aws.amazon.com/efs/.
3. Choose the Amazon EFS file system that you want to delete from the list of file systems.
4. For Actions, choose Delete file system.
5. In the Permanently delete file system dialog box, type the file system ID for the Amazon EFS file
system that you want to delete, and then choose Delete File System.
6. Open the Amazon EC2 console at https://console.aws.amazon.com/ec2/.
7. In the navigation pane, choose Security Groups.
8. Select the name of the security group that you added the rule to for this walkthrough.
Warning
Don't delete the default security group for your VPC.
9. For Actions, choose Edit inbound rules.
10. Choose the X at the end of the inbound rule you added, and choose Save.
143

Amazon Elastic File System User Guide
Walkthrough 6: Enforcing Encryption
on an Amazon EFS File System at Rest
Walkthrough 6: Enforcing Encryption on an
Amazon EFS File System at Rest
Following, you can find details about how to enforce encryption at rest using Amazon CloudWatch and
AWS CloudTrail. This walkthrough is based upon the AWS whitepaper Encrypt Data at Rest with Amazon
EFS Encrypted File Systems.
Enforcing Encryption at Rest
Your organization might require the encryption of all data that meets a specific classification or is
associated with a particular application, workload, or environment. You can enforce data encryption
policies for Amazon EFS file systems by using detective controls that detect the creation of a file system
and verify that encryption is enabled. If an unencrypted file system is detected, you can respond in a
number of ways, ranging from deleting the file system and mount targets to notifying an administrator.
If you want to delete an unencrypted file system but want to retain the data, you should first create a
new encrypted file system. Next, you should copy the data over to the new encrypted file system. After
the data is copied over, you can delete the unencrypted file system.
Detecting Unencrypted File Systems
You can create an CloudWatch alarm to monitor CloudTrail logs for the CreateFileSystem event.
You can then trigger the alarm to notify an administrator if the file system that was created was
unencrypted.
Create a Metric Filter
To create a CloudWatch alarm that is triggered when an unencrypted Amazon EFS file system is created,
use the following procedure.
Before you begin, you must have an existing trail created that is sending CloudTrail logs to a CloudWatch
Logs log group. For more information, see Sending Events to CloudWatch Logs in the AWS CloudTrail
User Guide.
To create a metric filter
1. Open the CloudWatch console at https://console.aws.amazon.com/cloudwatch/.
2. In the navigation pane, choose Logs.
3. In the list of log groups, choose the log group that you created for CloudTrail log events.
4. Choose Create Metric Filter.
5. On the Define Logs Metric Filter page, choose Filter Pattern and then type the following:
{ ($.eventName = CreateFileSystem) && ($.responseElements.encrypted IS FALSE) }
6. Choose Assign Metric.
7. For Filter Name, type UnencryptedFileSystemCreated.
8. For Metric Namespace, type CloudTrailMetrics.
9. For Metric Name, type UnencryptedFileSystemCreatedEventCount.
10. Choose Show advanced metric settings.
11. For Metric Value, type 1.
12. Choose Create Filter.
144

Amazon Elastic File System User Guide
Enforcing Encryption at Rest
Create an Alarm
After you create the metric filter, use the following procedure to create an alarm.
To create an alarm
1. On the Filters for the Log_Group_Name page, next to the UnencryptedFileSystemCreated filter
name, choose Create Alarm.
2. On the Create Alarm page, set the following parameters:
• For Name, type Unencrypted File System Created
• For Whenever, do the following:
• Set is to > = 1
• Set for: to 1 consecutive period(s).
• For Treat missing data as, choose good (not breaching threshold).
• For Actions, do the following:
• For Whenever this alarm, choose State is ALARM.
• For Send notification to, choose NotifyMe, choose New list, and then type a unique topic name
for this list.
• For Email list, type in the email address where you want notifications sent. You should receive
an email at this address to confirm that you created this alarm.
• For Alarm Preview, do the following:
• For Period, choose 1 Minute.
• For Statistic, choose Standard and Sum.
3. Choose Create Alarm.
Test the Alarm for the Creation of Unencrypted File Systems
You can test the alarm by creating an unencrypted file system, as follows.
To test the alarm by creating an unencrypted file system
1. Open the Amazon EFS console at https://console.aws.amazon.com/efs.
2. Choose Create File System.
3. From the VPC list, choose your default VPC.
4. Choose all the Availability Zones. Ensure that the default subnets, automatic IP addresses, and the
default security groups are chosen. These are your mount targets.
5. Choose Next Step.
6. Name your file system and keep Enable encryption unchecked to create an unencrypted file system.
7. Choose Next Step.
8. Choose Create File System.
Your trail logs the CreateFileSystem operation and delivers the event to your CloudWatch Logs log
group. The event triggers your metric alarm and CloudWatch Logs sends you a notification about the
change.
145
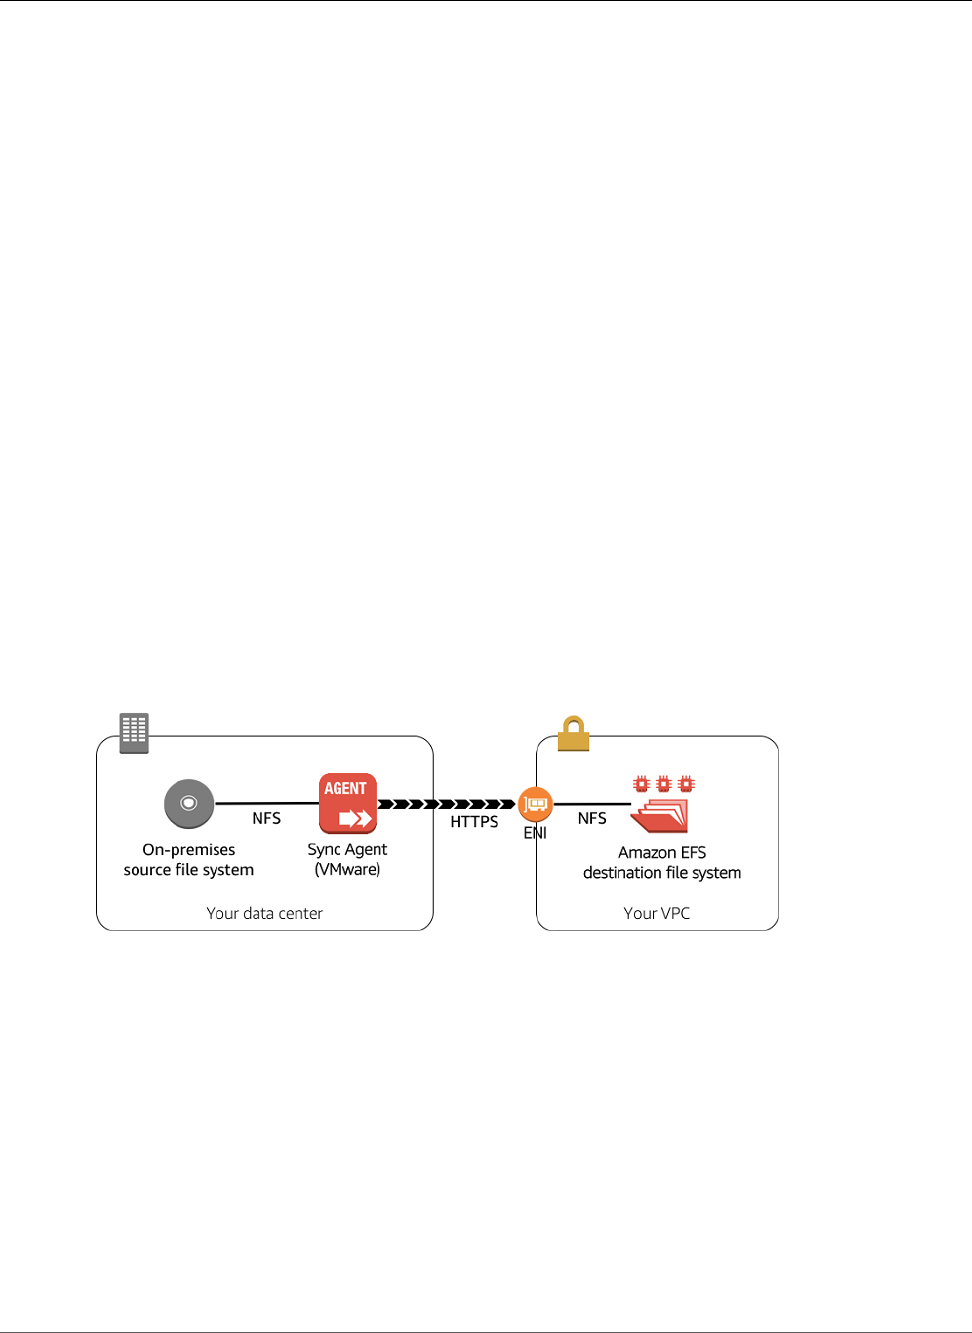
Amazon Elastic File System User Guide
Walkthrough 7: Sync Files from On-
Premises by Using EFS File Sync
Walkthrough 7: Sync Files from an On-Premises
File System to Amazon EFS by Using EFS File Sync
This walkthrough shows the steps how to sync files from an on-premises file system to Amazon EFS
using EFS File Sync.
Topics
•Before You Begin (p. 146)
•Step 1: Create a Sync Agent (p. 146)
•Step 2: Create a Sync Task (p. 147)
•Step 3: Sync Your Source File System to Amazon EFS (p. 149)
•Step 4: Access Your Files (p. 150)
•Step 5: Clean Up (p. 150)
Before You Begin
In this walkthrough, we assume the following:
• You have a Network File System (NFS) file server in your on-premises data center.
• You have a VMware ESXi Hypervisor host in your on-premises data center.
• You have created an Amazon EFS file system. If you don't have an Amazon EFS file system, create
one now and come back to this walkthrough when you are done. For more information about how to
create an Amazon EFS file system, see Getting Started with Amazon Elastic File System (p. 10).
Step 1: Create a Sync Agent
To create a sync agent, you download a virtual machine (VM) image and deploy it into your on-premises
environment so that it can mount your source file system. Once deployed, you activate the agent to
securely associate it with your AWS account.
To create a sync agent for on-premises data
1. Open the Amazon EFS Management Console at https://console.aws.amazon.com/efs/.
2. Choose File syncs. If you haven't yet used EFS File Sync in this AWS Region, you see an introductory
page. Choose Get started to open the Select a host platform page.
If you have previously used EFS File Sync in this AWS Region, choose Agents from the left
navigation, and then choose Create sync agent to open the Select a host platform page.
146
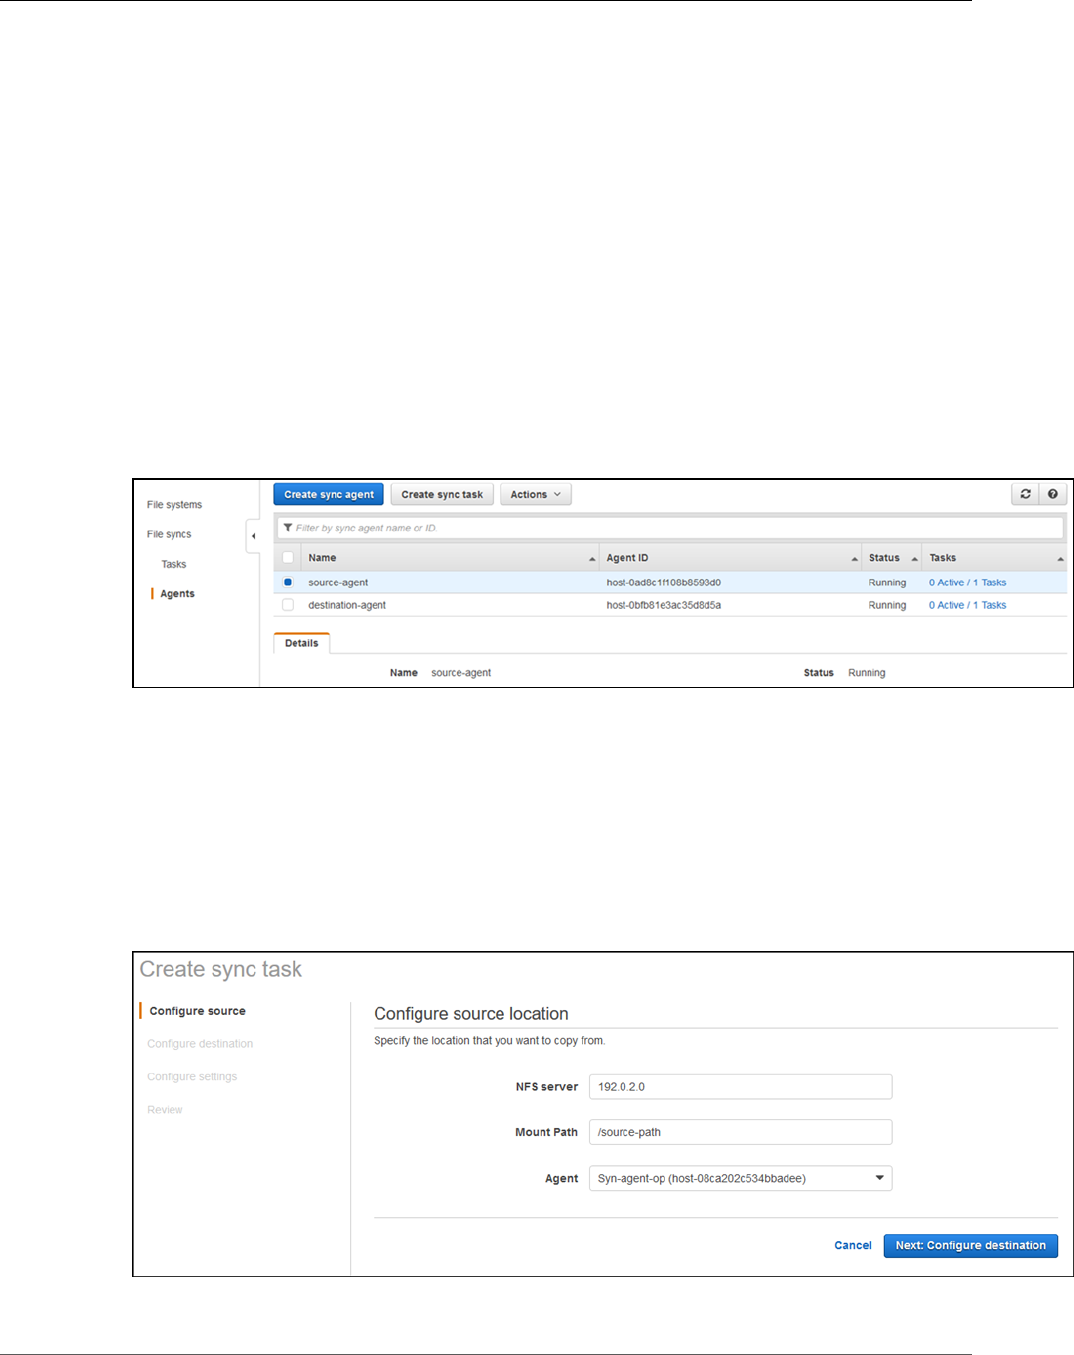
Amazon Elastic File System User Guide
Step 2: Create a Sync Task
3. From the Select host platform page, choose VMware ESXi, and then choose Download image. The
virtual machine (VM) image will begin downloading.
4. When the download completes, deploy the VM to your VMware ESXi hypervisor and, use the VMware
client to configure the VM. We recommend a VM with 4 vCPUs, 32 GB of memory, 10 Gigabit
networking, and an 80 GB root volume.
5. Start the VM, and then take note of the VM IP address. This VM must be able to mount your source
file system using NFS.
Note
Although it's not required, we recommend that you use paravirtualized network controllers
for your VMware ESXi VM.
You don't need to add additional disks to the VM. EFS File Sync uses only the root disk.
6. On the Amazon EFS Console, choose Next: Connect to agent
7. For IP address, type the VM's IP address, and then choose Next: Activate agent. Your browser will
connect to this IP address to get a unique activation key from your sync agent. This key securely
associates your sync agent with your AWS account. This IP address doesn't need to be accessible
from outside your network, but must be accessible from your browser.
8. On the Activate agent page, type a name for your sync agent, and then choose Activate agent.
At this point, you should see your activated sync agent on the Amazon EFS console.
Step 2: Create a Sync Task
Create a sync task and configure the source and destination file systems.
To create a sync task
1. Choose Create sync task. The Configure source location page appears.
2. Provide the following information for the source file system:
147
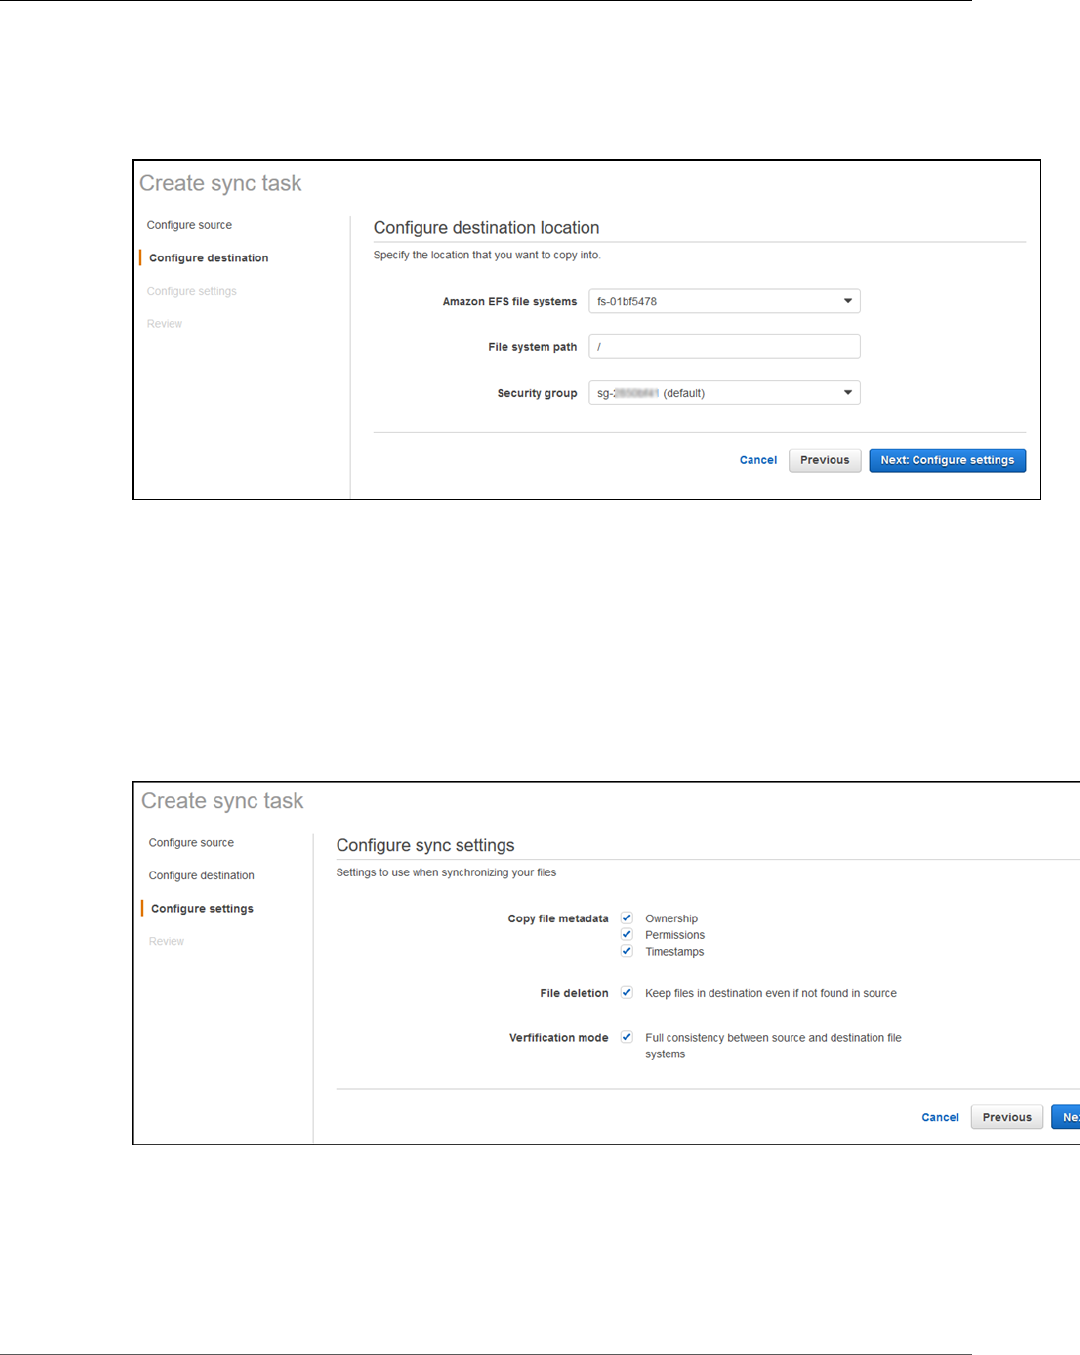
Amazon Elastic File System User Guide
Step 2: Create a Sync Task
• For NFS server, type the domain name or IP address of the source NFS server.
• For Mount Path, type the mount path for your source file system.
• For Agent, choose the sync agent that you created earlier.
3. Choose Next: Configure destination. The Configure destination location page appears.
4. Provide the following information for the destination file system:
• For Amazon EFS file system, choose the EFS file system you want to sync to. If you don't have
an Amazon EFS file system, create one now and restart this walkthrough when you are done.
For more information about how to create an Amazon EFS file system, see Getting Started with
Amazon Elastic File System (p. 10).
• For File system path, type the path of the file system that you want to write data to. This path
must exist in the destination file system.
• For Security group, choose a security group that allows access to the destination Amazon EFS file
system you selected.
5. Choose Next: Configure settings. The Configure sync settings page appears.
6. Configure the default settings that you want this sync task to use for synchronizing your files:
Note
You can override these settings later when you start a sync task.
• Choose Ownership (User/Group ID) to copy the user and group IDs from the source files.
• Choose Permissions to copy the source files permissions.
148
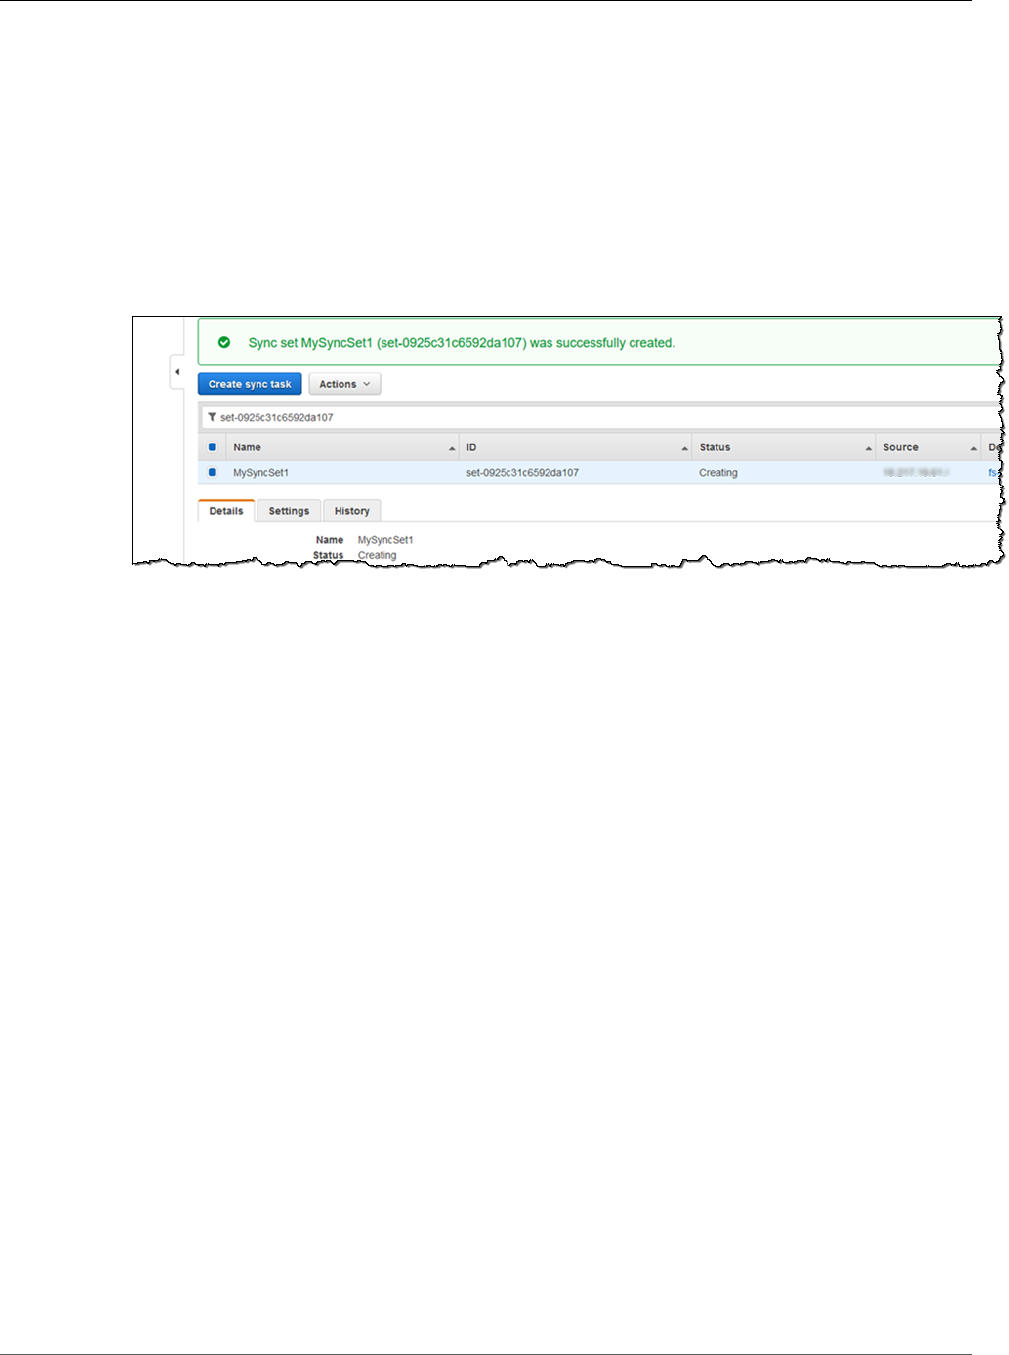
Amazon Elastic File System User Guide
Step 3: Sync Your Source File System to Amazon EFS
• Choose Timestamps to copy time stamps from the source files.
• Choose File deletion to keep all files in the destination that are not found in the source file
system. If this box is cleared, all files in the destination that are not found in the source file system
will be deleted.
• Choose Verification mode to check that the destination file system is an exact copy of the source
file system after the sync task completes. If you do not choose this option, only the data that is
transferred is verified. Changes made to files while they are being actively transferred and changes
made to files that are not actively being transferred, will not be discovered. We recommend
choosing full verification.
7. Choose Next: Review and Create, and then review your sync task settings. When you are ready,
choose Create sync task.
Your sync task is created. The status of the task show as Available when the source and destination file
systems have been mounted.
The Details tab shows the status and settings for your source and destination file systems.
Step 3: Sync Your Source File System to Amazon EFS
Now that you have a sync task, you can start your sync task to begin syncing files from the source file
system to the destination Amazon EFS file system.
To sync the source file system
1. On the Tasks page, choose the sync task you just created. The Details tab shows the status of your
sync task.
2. In the Actions menu, choose Start.
3. In the Start sync task dialog box, you can modify the settings for your sync task and choose Start.
149
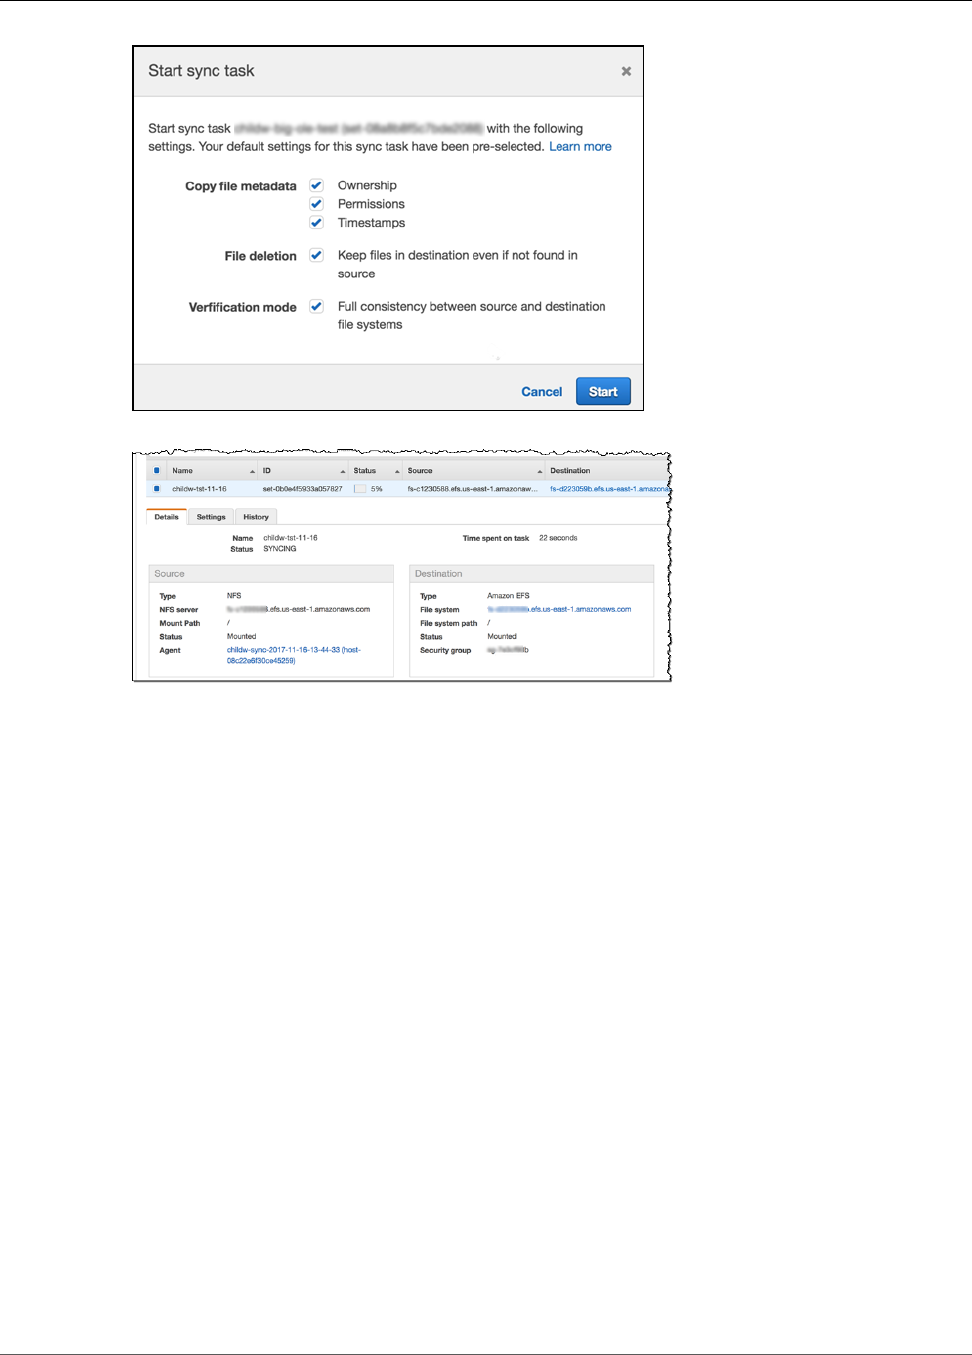
Amazon Elastic File System User Guide
Step 4: Access Your Files
4. Choose Start to start syncing files.
5. When the sync task starts, the Status column shows the progress of the sync task. As the sync task
begins preparation, the status changes from Starting to Preparing. When the task starts to sync
files, the status changes from Preparing to Syncing. When file consistency verification starts, the
status changes to Verifying. When the sync task is done, the status changes to Success.
Step 4: Access Your Files
To access your files, you connect to the Amazon EFS file system from an Amazon EC2 instance or use
AWS Direct Connect.
For information about how to connect using Amazon EC2, see Connect to Your Amazon EC2 Instance and
Mount the Amazon EFS File System.
For information about how to connect using AWS Direct Connect, see Walkthrough 5: Create and Mount
a File System On-Premises with AWS Direct Connect (p. 140).
Step 5: Clean Up
If you no longer need the resources you created, you should remove them:
• Delete the task you created. For more information, see Deleting a Sync Task (p. 47).
• Delete the sync agent you created. This will not delete the VM you deployed to your on-premises
hypervisor.
• Clean up the Amazon EFS resources you created. For more information, see Step 5: Clean Up Resources
and Protect Your AWS Account (p. 18).
150

Amazon Elastic File System User Guide
Walkthrough 8: Sync a File System from
Amazon EC2 to Amazon EFS Using EFS File Sync
Walkthrough 8: Sync a File System from Amazon
EC2 to Amazon EFS Using EFS File Sync
This walkthrough shows the steps how to sync files from a file system that is in AWS to Amazon EFS
using EFS File Sync.
Topics
•Before You Begin (p. 151)
•Step 1: Create a Sync Agent (p. 151)
•Step 2: Create a Sync Task (p. 153)
•Step 3: Sync Your Source File System to Amazon EFS (p. 155)
•Step 4: Access Your Files (p. 156)
•Step 4: Clean Up (p. 156)
Before You Begin
In this walkthrough, we assume the following:
• You have a Network File System (NFS) file server on an Amazon EC2 instance.
• You have created an Amazon EFS file system. If you don't have an Amazon EFS file system, create
one now and come back to this walkthrough when you are done. For more information about how to
create an Amazon EFS file system, see Getting Started with Amazon Elastic File System (p. 10).
Step 1: Create a Sync Agent
To create a sync agent in Amazon EC2, you will use the AMI provided to create an Amazon EC2 instance
that can mount the source file system in your AWS environment. This Amazon EC2 instance will run in
the same AWS Region as your source file system. Once deployed, you will activate the agent to securely
associate it with your AWS account.
To create a sync agent for data in AWS
1. Open the Amazon EFS Management Console at https://console.aws.amazon.com/efs/ and choose
the AWS Region where you created your destination file system.
2. Choose File syncs. If you haven't used EFS File Sync in this AWS Region, you see an introductory
page. Choose Get started to open the Select a host platform page.
If you have previously used EFS File Sync in this AWS Region, choose Agents from the left
navigation, and then choose Create sync agent to open the Select a host platform page.
151
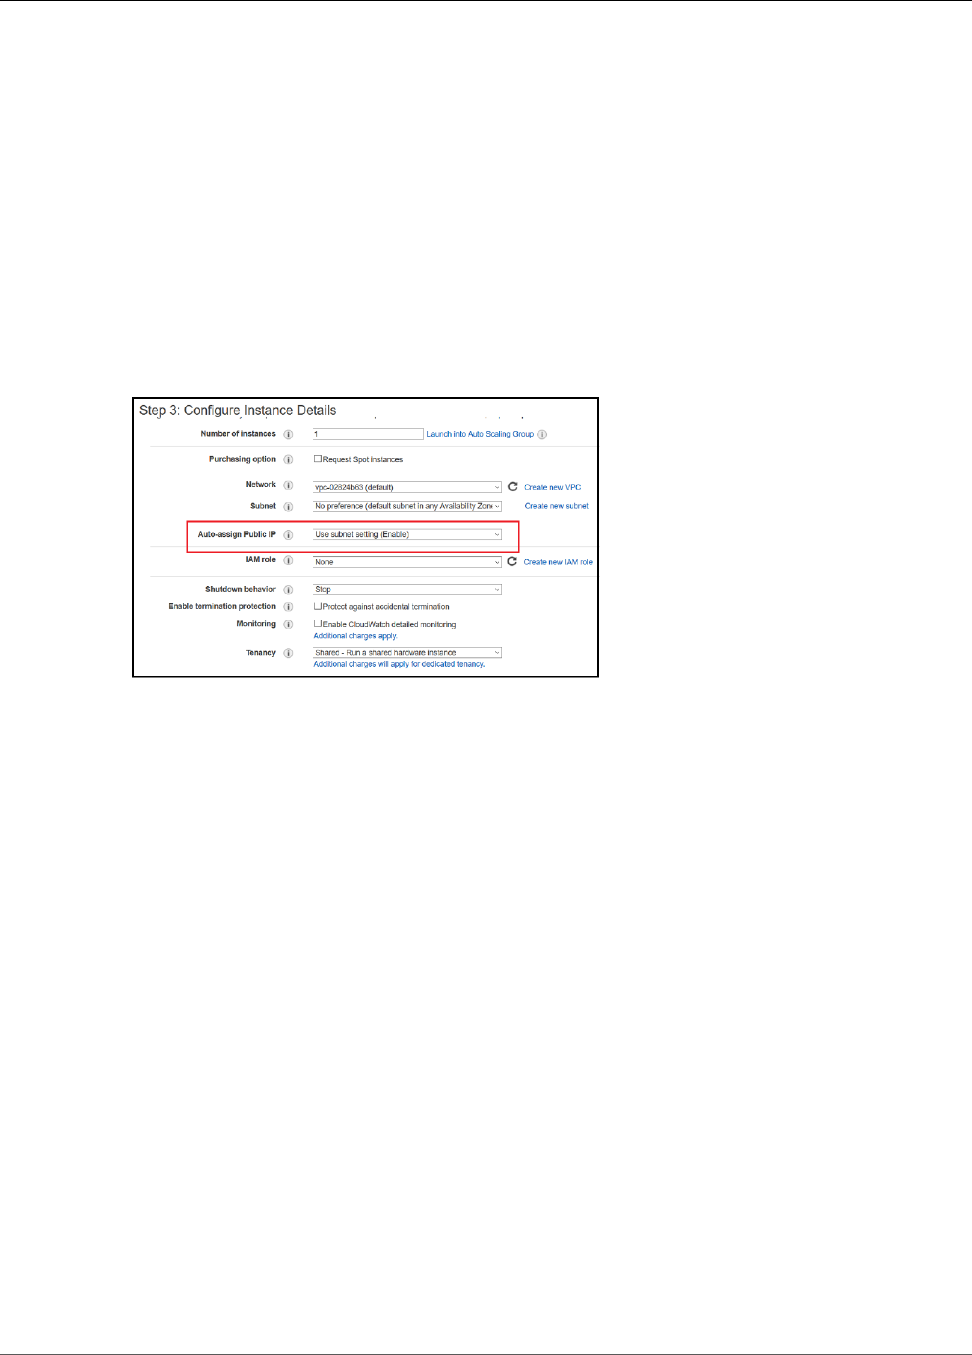
Amazon Elastic File System User Guide
Step 1: Create a Sync Agent
3. From Select a host platform page, choose Amazon EC2, choose the AWS Region where your source
file system is located and then choose Launch instance. You will be redirected to the Choose an
Instance Type page in the Amazon EC2 Management Console in that AWS Region, where you can
choose an instance type.
Note
A sync agent syncs files to EFS file systems in the AWS region where the sync agent is
activated. Standard Amazon EC2 rates apply to the instance.
4. On the Choose an Instance Type page, choose the hardware configuration of your instance. When
deploying your sync agent on Amazon EC2,we recommend choosing one of the Memory optimized
r4.xlarge instance types for your sync agent. The instance size you choose must be at least xlarge.
5. Choose Next: Configure Instance Details.
6. On the Configure Instance Details page, choose a value for Auto-assign Public IP. If you want your
instance to be accessible from the public internet, set Auto-assign Public IP to Enable. Otherwise,
set Auto-assign Public IP to Disable.
7. Choose Next: Add Storage and choose Next: Add tags. The EFS File Sync agent uses the root volume
and doesn't require additional storage.
8. On the Add Tags page, you can optionally add tags to your instance. Then choose Next: Configure
Security Group.
9. On the Configure Security Group page, add firewall rules for specific traffic to reach your instance.
You can create a new security group or choose an existing security group.
Important
At a minimum, your security group must allow inbound access to HTTP port 80 from your
web browser to activate your sync agent.
10. Choose Review and Launch to review your configuration, then choose Launch to launch your
instance. We recommend selecting an existing key pair or creating a new key pair for your instance.
This key pair is not needed for normal operation of EFS File Sync, but it may be needed if you
contact AWS to get support.
A confirmation page appears to say that your instance is launching.
11. Choose View Instances to close the confirmation page and return to the console. On the Instances
screen, you can view the status of your instance. It takes a short time for an instance to launch.
When you launch an instance, its initial state is pending. After the instance starts, its state changes
to running, and it's assigned a public DNS name and IP address.
12. Choose your instance and take note of the public IP address in the Description tab. You use this IP
address to connect to your sync agent.
Note
The IP address doesn’t need to be accessible from outside your network.
152
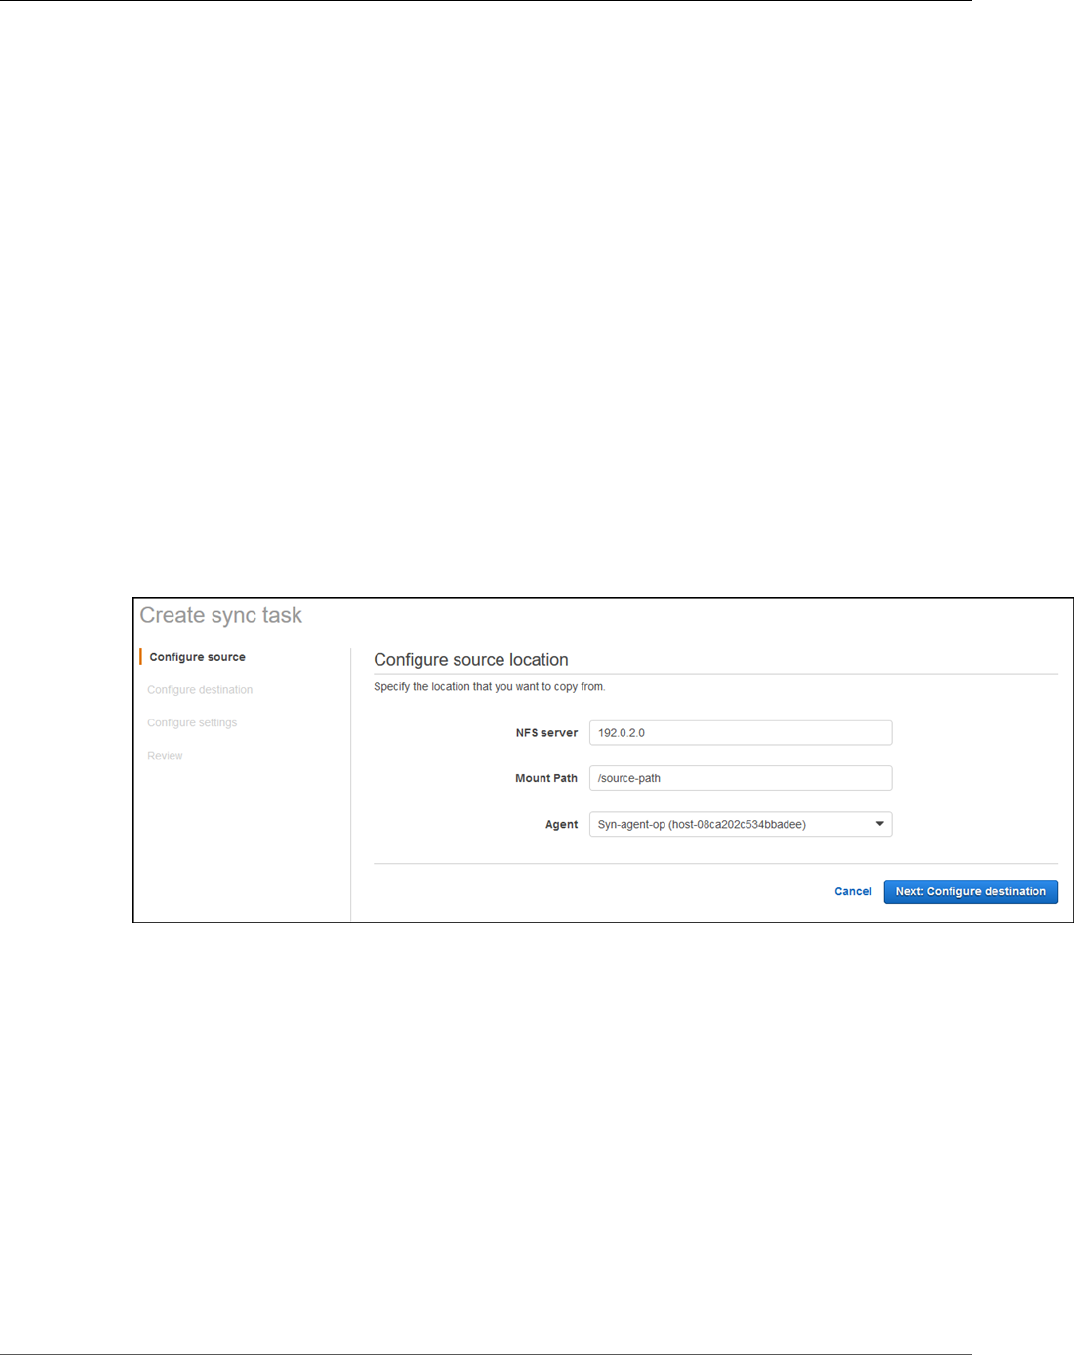
Amazon Elastic File System User Guide
Step 2: Create a Sync Task
Important
If your source file system and destination Amazon EFS file system are in different AWS
Regions, you open the Amazon EFS Console in the AWS Region where your destination
Amazon EFS file system is located to connect.
Your source and destination file system must be in different virtual private clouds (VPCs).
13. Choose File syncs, choose Create sync agent, and then choose Next: Connect to agent on the
Select host platform page.
14. For IP address, type the Amazon EC2 instance IP address, and then choose Next: Activate agent.
Your browser will connect to this IP address to get a unique activation key from your sync agent. This
key securely associates your sync agent with your AWS account. This IP address doesn't need to be
accessible from outside your network, but must be accessible from your browser.
15. On the Activate agent page, type a name for your sync agent and choose Activate agent.
At this point, you should see your activated sync agent on the Amazon EFS console.
Step 2: Create a Sync Task
Create a sync task and configure the source and destination file systems.
To create a sync task
1. Choose Create sync task. The Configure source location page appears.
2. Provide the following information for the source file system:
• For NFS server, type the domain name or IP address of the source NFS server.
• For Mount Path, type the mount path for your source file system.
• For Agent, choose the sync agent that you created earlier.
3. Choose Next: Configure destination. The Configure destination location page appears.
153
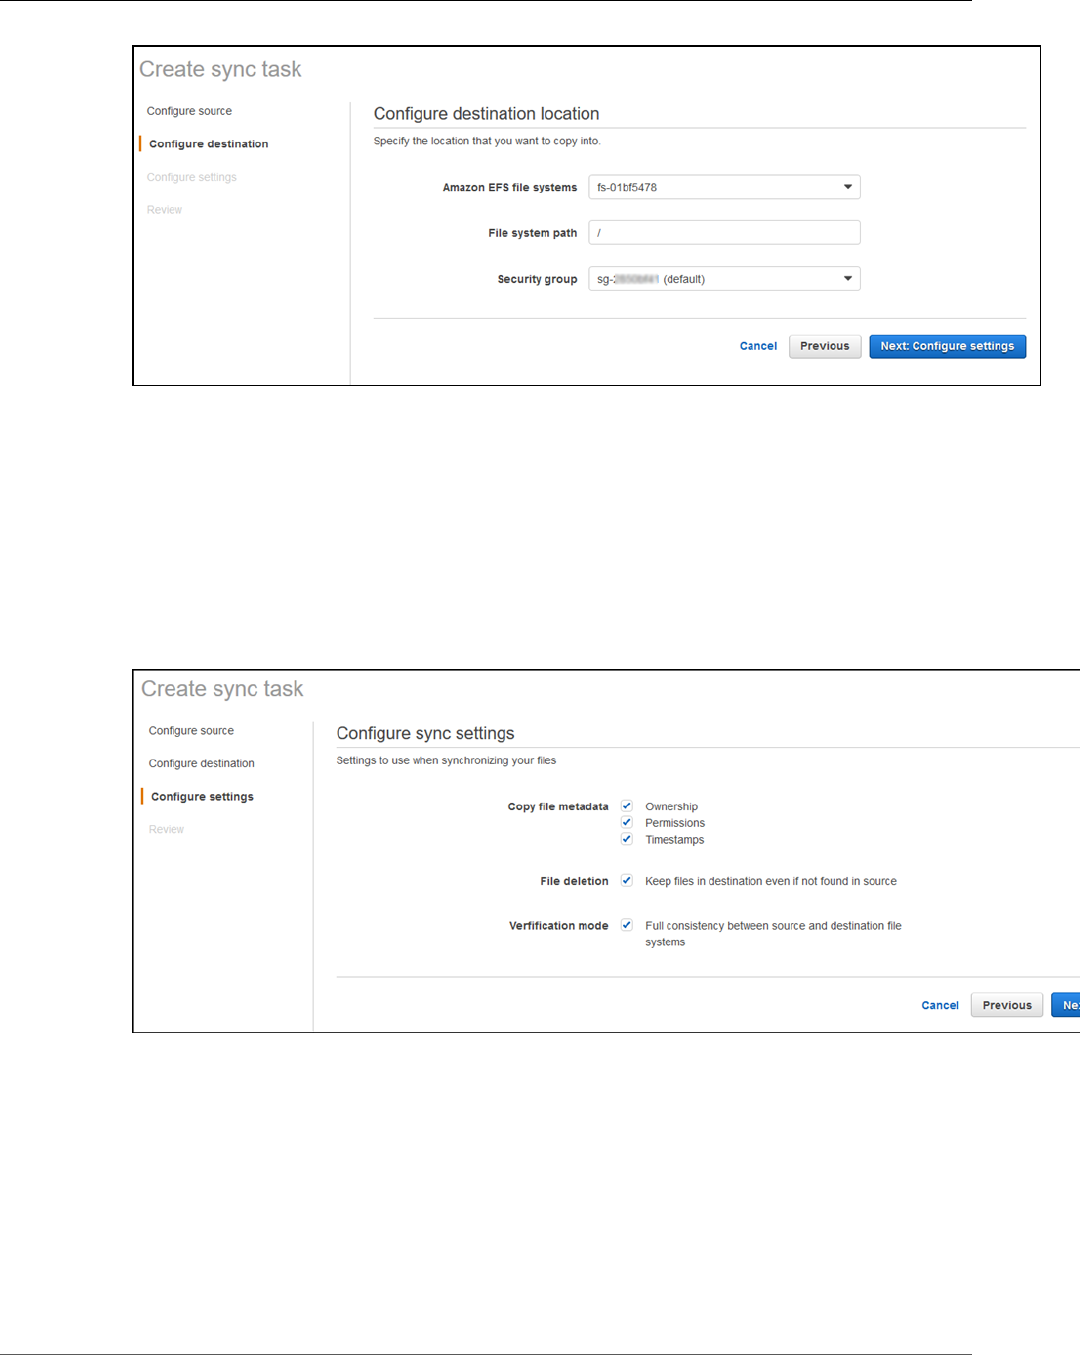
Amazon Elastic File System User Guide
Step 2: Create a Sync Task
4. Provide the following information for the destination file system:
• For Amazon EFS file system, choose the EFS file system you want to sync to. If you don't have
an Amazon EFS file system, create one now and restart this walkthrough when you are done.
For more information about how to create an Amazon EFS file system, see Getting Started with
Amazon Elastic File System (p. 10).
• For File system path, type the path of the file system that you want to write data to. This path
must exist in the destination file system.
• For Security group, choose a security group that allows access to the destination Amazon EFS file
system you selected.
5. Choose Next: Configure settings. The Configure sync settings page appears.
6. Configure the default settings that you want this sync task to use for synchronizing your files:
Note
You can override these settings later when you start a sync task.
• Choose Ownership (User/Group ID) to copy the user and group IDs from the source files.
• Choose Permissions to copy the source files permissions.
• Choose Timestamps to copy time stamps from the source files.
• Choose File deletion to keep all files in the destination that are not found in the source file
system. If this box is cleared, all files in the destination that are not found in the source file system
will be deleted.
154
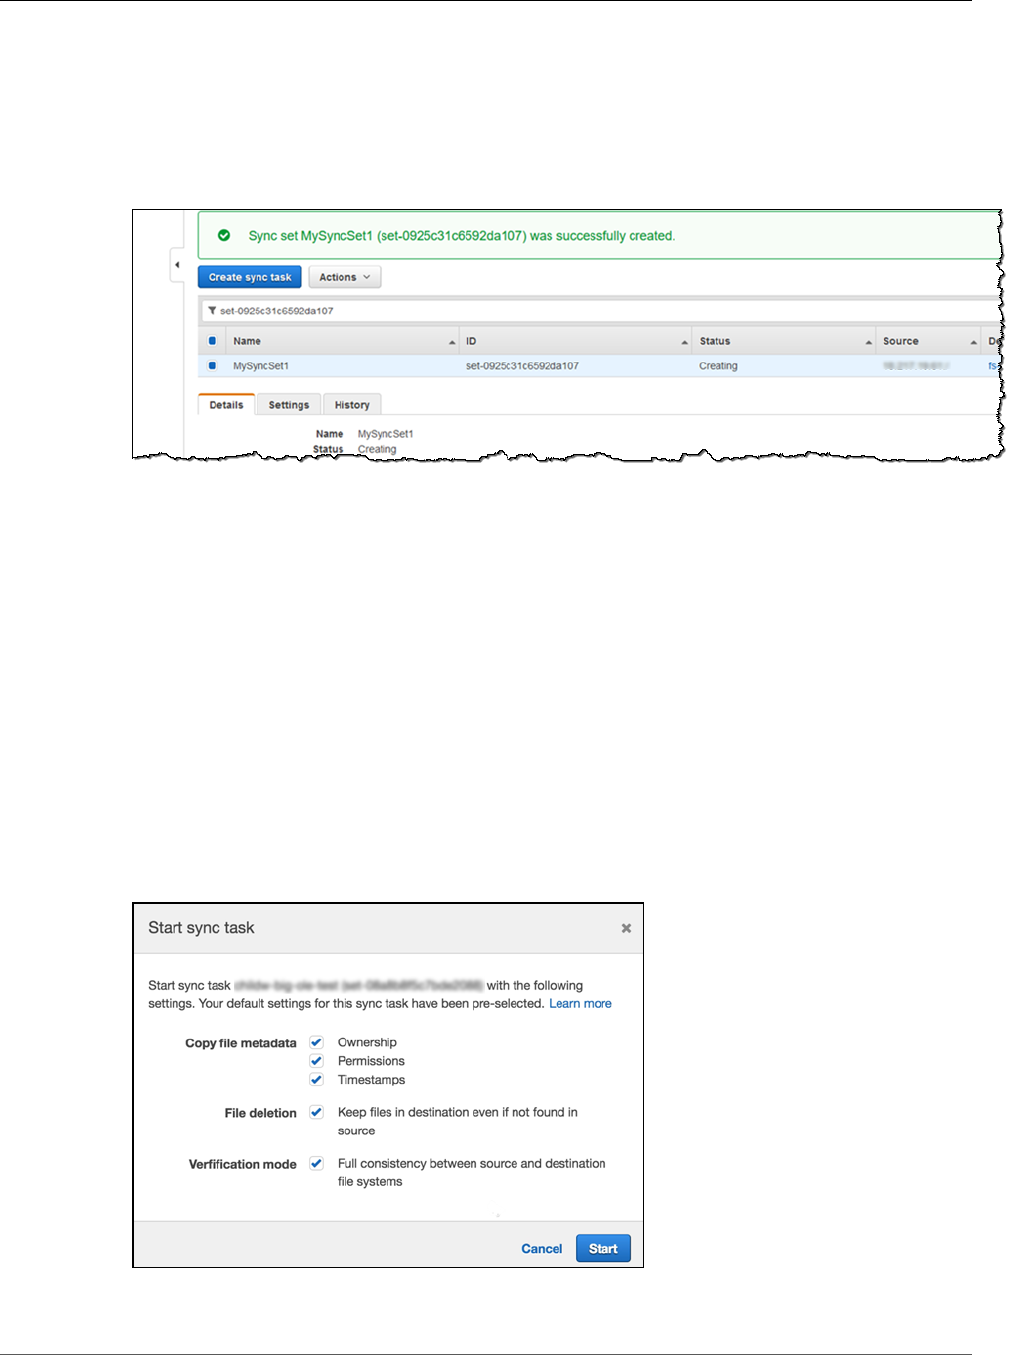
Amazon Elastic File System User Guide
Step 3: Sync Your Source File System to Amazon EFS
• Choose Verification mode to check that the destination file system is an exact copy of the source
file system after the sync task completes. If you do not choose this option, only the data that is
transferred is verified. Changes made to files while they are being actively transferred and changes
made to files that are not actively being transferred, will not be discovered. We recommend
choosing full verification.
7. Choose Next: Review and Create, and then review your sync task settings. When you are ready,
choose Create sync task.
Your sync task is created. The status of the task will show as Available when the source and destination
file systems have been mounted.
The Details tab shows the status and settings for your source and destination file systems.
Step 3: Sync Your Source File System to Amazon EFS
Now that you have a sync task, you can start your sync task to begin syncing files from the source file
system to the destination EFS File Sync file system.
To sync the source file system
1. On the Tasks page, choose the sync task you just created. The Details tab shows the status of your
sync task.
2. In the Actions menu, choose Start.
3. In the Start sync task dialog box, you can modify the settings for your sync task and choose Start.
4. Choose Start to start syncing files.
155

Amazon Elastic File System User Guide
Step 4: Access Your Files
5. When the sync task starts, the Status column shows the progress of the sync task. As the sync task
begins preparation, the status changes from Starting to Preparing. When the task starts to sync
files, the status changes from Preparing to Syncing. When file consistency verification starts, the
status changes to Verifying. When the sync task is done, the status changes to Success.
Step 4: Access Your Files
To access your files, connect to the Amazon EFS file system from an Amazon EC2 instance or use AWS
Direct Connect.
For information about how to connect using Amazon EC2, see Connect to Your Amazon EC2 Instance and
Mount the Amazon EFS File System.
For information about how to connect using AWS Direct Connect, see Walkthrough 5: Create and Mount
a File System On-Premises with AWS Direct Connect (p. 140).
Step 4: Clean Up
If you no longer need the resources you created, you should remove them to protect your account:
If you no longer need the resources you created, you should remove them:
• Delete the task you created. For more information, see Deleting a Sync Task (p. 47).
• Delete the sync agent you created. This will not delete the Amazon EC2 instance you launched. .
• Clean up the Amazon EFS resources you created. For more information, see Step 5: Clean Up Resources
and Protect Your AWS Account (p. 18).
• Clean up your instance if you created your EFS File Sync on Amazon EC2. For more information, see
Step 3: Clean Up Your Instance in the Amazon EC2 User Guide for Linux Instances.
156

Amazon Elastic File System User Guide
Authentication
Authentication and Access Control
for Amazon EFS
Access to Amazon EFS requires credentials that AWS can use to authenticate your requests. Those
credentials must have permissions to access AWS resources, such an Amazon EFS file system or an
Amazon Elastic Compute Cloud (Amazon EC2) instance. The following sections provide details on how
you can use AWS Identity and Access Management (IAM) and Amazon EFS to help secure your resources
by controlling who can access them.
•Authentication (p. 157)
•Access Control (p. 158)
Authentication
You can access AWS as any of the following types of identities:
•AWS account root user – When you sign up for AWS, you provide an email address and password
that is associated with your AWS account. This is your AWS account root user. Its credentials provide
complete access to all of your AWS resources.
Important
For security reasons, we recommend that you use the root user only to create an
administrator, which is an IAM user with full permissions to your AWS account. You can then
use this administrator user to create other IAM users and roles with limited permissions. For
more information, see IAM Best Practices and Creating an Admin User and Group in the IAM
User Guide.
•IAM user – An IAM user is simply an identity within your AWS account that has specific custom
permissions (for example, permissions to create a file system in Amazon EFS). You can use an IAM
user name and password to sign in to secure AWS webpages like the AWS Management Console, AWS
Discussion Forums, or the AWS Support Center.
In addition to a user name and password, you can also generate access keys for each user. You can
use these keys when you access AWS services programmatically, either through one of the several
SDKs or by using the AWS Command Line Interface (CLI). The SDK and CLI tools use the access keys to
cryptographically sign your request. If you don’t use the AWS tools, you must sign the request yourself.
Amazon EFS supports Signature Version 4, a protocol for authenticating inbound API requests. For
more information about authenticating requests, see Signature Version 4 Signing Process in the AWS
General Reference.
•IAM role – An IAM role is another IAM identity that you can create in your account that has specific
permissions. It is similar to an IAM user, but it is not associated with a specific person. An IAM role
enables you to obtain temporary access keys that can be used to access AWS services and resources.
IAM roles with temporary credentials are useful in the following situations:
•Federated user access – Instead of creating an IAM user, you can use preexisting user identities from
AWS Directory Service, your enterprise user directory, or a web identity provider. These are known as
157

Amazon Elastic File System User Guide
Access Control
federated users. AWS assigns a role to a federated user when access is requested through an identity
provider. For more information about federated users, see Federated Users and Roles in the IAM User
Guide.
•Cross-account administration – You can use an IAM role in your account to grant another AWS
account permissions to administer your account’s Amazon EFS resources. For an example, see
Tutorial: Delegate Access Across AWS Accounts Using IAM Roles in the IAM User Guide. Note that
you can't mount Amazon EFS file systems from across VPCs or accounts. For more information, see
Managing File System Network Accessibility (p. 38)
•AWS service access – You can use an IAM role in your account to grant an AWS service permissions
to access your account’s resources. For example, you can create a role that allows Amazon Redshift
to access an Amazon S3 bucket on your behalf and then load data from that bucket into an Amazon
Redshift cluster. For more information, see Creating a Role to Delegate Permissions to an AWS
Service in the IAM User Guide.
•Applications running on Amazon EC2 – You can use an IAM role to manage temporary credentials
for applications running on an EC2 instance and making AWS API requests. This is preferable to
storing access keys within the EC2 instance. To assign an AWS role to an EC2 instance and make it
available to all of its applications, you create an instance profile that is attached to the instance.
An instance profile contains the role and enables programs running on the EC2 instance to get
temporary credentials. For more information, see Using Roles for Applications on Amazon EC2 in the
IAM User Guide.
Access Control
You can have valid credentials to authenticate your requests, but unless you have permissions you cannot
create or access Amazon Elastic File System resources. For example, you must have permissions to create
an Amazon EFS file system.
The following sections describe how to manage permissions for Amazon Elastic File System. We
recommend that you read the overview first.
•Overview of Managing Access Permissions to Your Amazon EFS Resources (p. 158)
•Using Identity-Based Policies (IAM Policies) for Amazon Elastic File System (p. 162)
Overview of Managing Access Permissions to Your
Amazon EFS Resources
Every AWS resource is owned by an AWS account, and permissions to create or access a resource are
governed by permissions policies. An account administrator can attach permissions policies to IAM
identities (that is, users, groups, and roles), and some services (such as AWS Lambda) also support
attaching permissions policies to resources.
Note
An account administrator (or administrator user) is a user with administrator privileges. For more
information, see IAM Best Practices in the IAM User Guide.
When granting permissions, you decide who is getting the permissions, the resources they get
permissions for, and the specific actions that you want to allow on those resources.
158

Amazon Elastic File System User Guide
Amazon Elastic File System Resources and Operations
Topics
•Amazon Elastic File System Resources and Operations (p. 159)
•Understanding Resource Ownership (p. 159)
•Managing Access to Resources (p. 159)
•Specifying Policy Elements: Actions, Effects, and Principals (p. 161)
•Specifying Conditions in a Policy (p. 161)
Amazon Elastic File System Resources and Operations
In Amazon Elastic File System, the primary resource is a file system. Amazon Elastic File System also
supports additional resource types, the mount target and tags. However, for Amazon EFS, you can create
mount targets and tags only in the context of an existing file system. Mount targets and tags are referred
to as subresource.
These resources and subresources have unique Amazon Resource Names (ARNs) associated with them as
shown in the following table.
Amazon EFS provides a set of operations to work with Amazon EFS resources. For a list of available
operations, see Amazon Elastic File System Actions (p. 169).
Understanding Resource Ownership
The AWS account owns the resources that are created in the account, regardless of who created the
resources. Specifically, the resource owner is the AWS account of the principal entity (that is, the root
account, an IAM user, or an IAM role) that authenticates the resource creation request. The following
examples illustrate how this works:
• If you use the root account credentials of your AWS account to create a file system, your AWS account
is the owner of the resource (in Amazon EFS, the resource is the file system).
• If you create an IAM user in your AWS account and grant permissions to create a file system to that
user, the user can create a file system. However, your AWS account, to which the user belongs, owns
the file system resource.
• If you create an IAM role in your AWS account with permissions to create a file system, anyone who can
assume the role can create a file system. Your AWS account, to which the role belongs, owns the file
system resource.
Managing Access to Resources
A permissions policy describes who has access to what. The following section explains the available
options for creating permissions policies.
Note
This section discusses using IAM in the context of Amazon Elastic File System. It doesn't provide
detailed information about the IAM service. For complete IAM documentation, see What Is IAM?
in the IAM User Guide. For information about IAM policy syntax and descriptions, see AWS IAM
Policy Reference in the IAM User Guide.
Policies attached to an IAM identity are referred to as identity-based policies (IAM polices) and policies
attached to a resource are referred to as resource-based policies. Amazon Elastic File System supports
only identity-based policies (IAM policies).
Topics
159

Amazon Elastic File System User Guide
Managing Access to Resources
•Identity-Based Policies (IAM Policies) (p. 160)
•Resource-Based Policies (p. 161)
Identity-Based Policies (IAM Policies)
You can attach policies to IAM identities. For example, you can do the following:
•Attach a permissions policy to a user or a group in your account – To grant a user permissions to
create an Amazon EFS resource, such as a file system, you can attach a permissions policy to a user or
group that the user belongs to.
•Attach a permissions policy to a role (grant cross-account permissions) – You can attach an
identity-based permissions policy to an IAM role to grant cross-account permissions. For example,
the administrator in Account A can create a role to grant cross-account permissions to another AWS
account (for example, Account B) or an AWS service as follows:
1. Account A administrator creates an IAM role and attaches a permissions policy to the role that
grants permissions on resources in Account A.
2. Account A administrator attaches a trust policy to the role identifying Account B as the principal
who can assume the role.
3. Account B administrator can then delegate permissions to assume the role to any users in Account
B. Doing this allows users in Account B to create or access resources in Account A. The principal
in the trust policy can also be an AWS service principal if you want to grant an AWS service
permissions to assume the role.
For more information about using IAM to delegate permissions, see Access Management in the IAM
User Guide.
The following is an example policy that allows a user to perform the CreateFileSystem action for
your AWS account.
{
"Version": "2012-10-17",
"Statement": [
{
"Sid" : "Stmt1EFSpermissions",
"Effect": "Allow",
"Action": [
"elasticfilesystem:CreateFileSystem",
"elasticfilesystem:CreateMountTarget"
],
"Resource": "arn:aws:elasticfilesystem:us-west-2:account-id:file-system/*"
},
{
"Sid" : "Stmt2EC2permissions",
"Effect": "Allow",
"Action": [
"ec2:DescribeSubnets",
"ec2:CreateNetworkInterface",
"ec2:DescribeNetworkInterfaces"
],
"Resource": "*"
}
]
For more information about using identity-based policies with Amazon EFS, see Using Identity-Based
Policies (IAM Policies) for Amazon Elastic File System (p. 162). For more information about users,
groups, roles, and permissions, see Identities (Users, Groups, and Roles) in the IAM User Guide.
160

Amazon Elastic File System User Guide
Specifying Policy Elements: Actions, Effects, and Principals
Resource-Based Policies
Other services, such as Amazon S3, also support resource-based permissions policies. For example, you
can attach a policy to an S3 bucket to manage access permissions to that bucket. Amazon Elastic File
System doesn't support resource-based policies.
Specifying Policy Elements: Actions, Effects, and
Principals
For each Amazon Elastic File System resource (see Amazon Elastic File System Resources and
Operations (p. 159)), the service defines a set of API operations (see Actions (p. 169)). To grant
permissions for these API operations, Amazon EFS defines a set of actions that you can specify in
a policy. For example, for the Amazon EFS file system resource, the following actions are defined:
CreateFileSystem, DeleteFileSystem, and DescribeFileSystems. Note that, performing an API
operation can require permissions for more than one action.
The following are the most basic policy elements:
•Resource – In a policy, you use an Amazon Resource Name (ARN) to identify the resource to
which the policy applies. For more information, see Amazon Elastic File System Resources and
Operations (p. 159).
•Action – You use action keywords to identify resource operations that you want to allow or deny. For
example, depending on the specified Effect, elasticfilesystem:CreateFileSystem either
allows or denies the user permissions to perform the Amazon Elastic File System CreateFileSystem
operation.
•Effect – You specify the effect when the user requests the specific action—this can be either allow or
deny. If you don't explicitly grant access to (allow) a resource, access is implicitly denied. You can also
explicitly deny access to a resource, which you might do to make sure that a user cannot access it, even
if a different policy grants access.
•Principal – In identity-based policies (IAM policies), the user that the policy is attached to is the
implicit principal. For resource-based policies, you specify the user, account, service, or other entity
that you want to receive permissions (applies to resource-based policies only). Amazon EFS doesn't
support resource-based policies.
To learn more about IAM policy syntax and descriptions, see AWS IAM Policy Reference in the IAM User
Guide.
For a table showing all of the Amazon Elastic File System API actions, see Amazon EFS API Permissions:
Actions, Resources, and Conditions Reference (p. 165).
Specifying Conditions in a Policy
When you grant permissions, you can use the IAM policy language to specify the conditions when a
policy should take effect. For example, you might want a policy to be applied only after a specific date.
For more information about specifying conditions in a policy language, see Condition in the IAM User
Guide.
To express conditions, you use predefined condition keys. There are no condition keys specific to Amazon
Elastic File System. However, there are AWS-wide condition keys that you can use as appropriate. For a
complete list of AWS-wide keys, see Available Keys for Conditions in the IAM User Guide.
Note
Do not use the aws:SourceIp AWS-wide condition for the CreateMountTarget,
DeleteMountTarget, or ModifyMountTargetSecurityGroup actions. Amazon EFS
161

Amazon Elastic File System User Guide
Using Identity-Based Policies (IAM Policies)
provisions mount targets by using its own IP address, not the IP address of the originating
request.
Using Identity-Based Policies (IAM Policies) for
Amazon Elastic File System
This topic provides examples of identity-based policies that demonstrate how an account administrator
can attach permissions policies to IAM identities (that is, users, groups, and roles) and thereby grant
permissions to perform operations on Amazon EFS resources.
Important
We recommend that you first review the introductory topics that explain the basic concepts
and options available for you to manage access to your Amazon Elastic File System resources.
For more information, see Overview of Managing Access Permissions to Your Amazon EFS
Resources (p. 158).
The sections in this topic cover the following:
•Permissions Required to Use the Amazon EFS Console (p. 163)
•AWS Managed (Predefined) Policies for Amazon EFS (p. 164)
•Customer Managed Policy Examples (p. 164)
The following shows an example of a permissions policy.
{
"Version": "2012-10-17",
"Statement": [
{
"Sid" : "AllowFileSystemPermissions",
"Effect": "Allow",
"Action": [
"elasticfilesystem:CreateFileSystem",
"elasticfilesystem:CreateMountTarget"
],
"Resource": "arn:aws:elasticfilesystem:us-west-2:account-id:file-system/*"
},
{
"Sid" : "AllowEC2Permissions",
"Effect": "Allow",
"Action": [
"ec2:DescribeSubnets",
"ec2:CreateNetworkInterface",
"ec2:DescribeNetworkInterfaces"
],
"Resource": "*"
}
]
}
The policy has two statements:
• The first statement grants permissions for two Amazon EFS actions
(elasticfilesystem:CreateFileSystem and elasticfilesystem:CreateMountTarget) on
a resource using the Amazon Resource Name (ARN) for the file system. The ARN specifies a wildcard
character (*) because you don't know the file system ID until after you create a file system.
162

Amazon Elastic File System User Guide
Permissions Required to Use the Amazon EFS Console
• The second statement grants permissions for some of the Amazon EC2 actions because the
elasticfilesystem:CreateMountTarget action in the first statement requires permissions
for specific Amazon EC2 actions. Because these Amazon EC2 actions don't support resource-level
permissions, the policy specifies the wildcard character (*) as the Resource value instead of specifying
a file system ARN.
The policy doesn't specify the Principal element because in an identity-based policy you don't specify
the principal who gets the permission. When you attach policy to a user, the user is the implicit principal.
When you attach a permissions policy to an IAM role, the principal identified in the role's trust policy gets
the permissions.
For a table showing all of the Amazon Elastic File System API actions and the resources that they apply
to, see Amazon EFS API Permissions: Actions, Resources, and Conditions Reference (p. 165).
Permissions Required to Use the Amazon EFS Console
The permissions reference table lists the Amazon EFS API operations and shows the required permissions
for each operation. For more information about Amazon EFS API operations, see Amazon EFS API
Permissions: Actions, Resources, and Conditions Reference (p. 165).
To use the Amazon EFS console, you need to grant permissions for additional actions as shown in the
following permissions policy:
{
"Version": "2012-10-17",
"Statement": [
{
"Sid" : "Stmt1AddtionalEC2PermissionsForConsole",
"Effect": "Allow",
"Action": [
"ec2:DescribeAvailabilityZones",
"ec2:DescribeSecurityGroups",
"ec2:DescribeVpcs",
"ec2:DescribeVpcAttribute"
],
"Resource": "*"
}
{
"Sid" : "Stmt2AdditionalKMSPermissionsForConsole",
"Effect": "Allow",
"Action": [
"kms:ListAliases",
"kms:DescribeKey"
],
"Resource": "*"
}
]
}
The Amazon EFS console needs these additional permissions for the following reasons:
• Permissions for the Amazon EFS actions enable the console to display Amazon EFS resources in the
account.
• The console needs permissions for the ec2 actions to query Amazon EC2 so it can display Availability
Zones, VPCs, security groups, and account attributes.
• The console needs permissions for the kms actions to create an encrypted file system. For more
information on encrypted file systems, see Encrypting Data and Metadata at Rest in EFS (p. 90).
163

Amazon Elastic File System User Guide
AWS Managed (Predefined) Policies for Amazon EFS
AWS Managed (Predefined) Policies for Amazon EFS
AWS addresses many common use cases by providing standalone IAM policies that are created and
administered by AWS. Managed policies grant necessary permissions for common use cases so you can
avoid having to investigate what permissions are needed. For more information, see AWS Managed
Policies in the IAM User Guide.
The following AWS managed policies, which you can attach to users in your account, are specific to
Amazon EFS:
•AmazonElasticFileSystemReadOnlyAccess – Grants read-only access to Amazon EFS resources.
•AmazonElasticFileSystemFullAccess – Grants full access to Amazon EFS resources.
Note
You can review these permissions policies by signing in to the IAM console and searching for
specific policies there.
You can also create your own custom IAM policies to allow permissions for Amazon EFS API actions. You
can attach these custom policies to the IAM users or groups that require those permissions.
Customer Managed Policy Examples
In this section, you can find example user policies that grant permissions for various Amazon EFS actions.
These policies work when you are using AWS SDKs or the AWS CLI. When you are using the console, you
need to grant additional permissions specific to the console, which is discussed in Permissions Required
to Use the Amazon EFS Console (p. 163).
Note
All examples use the us-west-2 region and contain fictitious account IDs.
Examples
•Example 1: Allow a User to Create a Mount Target and Tags on an Existing File System (p. 164)
•Example 2: Allow a User to Perform All Amazon EFS Actions (p. 165)
Example 1: Allow a User to Create a Mount Target and Tags on
an Existing File System
The following permissions policy grants the user permissions to create mount targets and tags on
a particular file system in the us-west-2 region. To create mount targets, permissions for specific
Amazon EC2 actions are also required and are included in the permissions policy.
{
"Version": "2012-10-17",
"Statement": [
{
"Sid" : "Stmt1CreateMountTargetAndTag",
"Effect": "Allow",
"Action": [
"elasticfilesystem:CreateMountTarget",
"elasticfilesystem:DescribeMountTargets",
"elasticfilesystem:CreateTags",
"elasticfilesystem:DescribeTags"
],
"Resource": "arn:aws:elasticfilesystem:us-west-2:123456789012:file-system/file-
system-ID"
164

Amazon Elastic File System User Guide
Amazon EFS API Permissions Reference
},
{
"Sid" : "Stmt2AdditionalEC2PermissionsToCreateMountTarget",
"Effect": "Allow",
"Action": [
"ec2:DescribeSubnets",
"ec2:CreateNetworkInterface",
"ec2:DescribeNetworkInterfaces"
],
"Resource": "*"
}
]
}
Example 2: Allow a User to Perform All Amazon EFS Actions
The following permissions policy uses a wildcard character ("elasticfilesystem:*") to allow all
Amazon EFS actions in the us-west-2 region. Because some of the Amazon EFS actions also require
permissions for Amazon EC2 actions, the policy also grants permissions for all those actions.
{
"Version": "2012-10-17",
"Statement": [
{
"Sid" : "Stmt1PermissionForAllEFSActions",
"Effect": "Allow",
"Action": "elasticfilesystem:*",
"Resource": "arn:aws:elasticfilesystem:us-west-2:123456789012:file-system/*"
},
{
"Sid" : "Stmt2RequiredEC2PermissionsForAllEFSActions",
"Effect": "Allow",
"Action": [
"ec2:DescribeSubnets",
"ec2:CreateNetworkInterface",
"ec2:DescribeNetworkInterfaces",
"ec2:DeleteNetworkInterface",
"ec2:ModifyNetworkInterfaceAttribute",
"ec2:DescribeNetworkInterfaceAttribute"
],
"Resource": "*"
}
]
}
Amazon EFS API Permissions: Actions, Resources,
and Conditions Reference
When you are setting up Access Control (p. 158) and writing a permissions policy that you can attach
to an IAM identity (identity-based policies), you can use the following list as a reference. The list includes
each Amazon EFS API operation, the corresponding actions for which you can grant permissions to
perform the action, and the AWS resource for which you can grant the permissions. You specify the
actions in the policy's Action field, and you specify the resource value in the policy's Resource field.
You can use AWS-wide condition keys in your Amazon EFS policies to express conditions. For a complete
list of AWS-wide keys, see Available Keys in the IAM User Guide.
165

Amazon Elastic File System User Guide
Amazon EFS API Permissions Reference
Note
To specify an action, use the elasticfilesystem: prefix followed by the API operation name
(for example, elasticfilesystem:CreateFileSystem).
Amazon EFS API and Required Permissions for Actions
CreateFileSystem (p. 170)
Action(s): elasticfilesystem:CreateFileSystem
Resource: arn:aws:elasticfilesystem:region:account-id:file-system/*
CreateMountTarget (p. 176)
Action(s): elasticfilesystem:CreateMountTarget, ec2:DescribeSubnets,
ec2:DescribeNetworkInterfaces, ec2:CreatenetworkInterface
Resource: arn:aws:elasticfilesystem:region:account-id:file-system/file-system-
id
CreateTags (p. 183)
Action(s): elasticfilesystem:CreateTags
Resource: arn:aws:elasticfilesystem:region:account-id:file-system/filesystem-
id
DeleteFileSystem (p. 186)
Action(s): elasticfilesystem:DeleteFileSystem
Resource: arn:aws:elasticfilesystem:region:account-id:file-system/filesystem-
id
DeleteMountTarget (p. 188)
Action(s): elasticfilesystem:DeleteMountTarget, ec2:DeleteNetworkInterface
Resource: arn:aws:elasticfilesystem:region:account-id:file-system/filesystem-
id
DeleteTags (p. 191)
Action(s): elasticfilesystem:DeleteTags
Resource: arn:aws:elasticfilesystem:region:account-id:file-system/filesystem-
id
DescribeFileSystems (p. 193)
Action(s): elasticfilesystem:DescribeFileSystems
Resource: arn:aws:elasticfilesystem:region:account-id:file-system/filesystem-
id, arn:aws:elasticfilesystem:region:account-id:file-system/*
DescribeMountTargetSecurityGroups (p. 200)
Action(s): elasticfilesystem:DescribeMountTargetSecurityGroups,
ec2:DescribeNetworkInterfaceAttribute
Resource: arn:aws:elasticfilesystem:region:account-id:file-system/filesystem-
id
DescribeMountTargets (p. 197)
Action(s): elasticfilesystem:DescribeMountTargets
166

Amazon Elastic File System User Guide
Amazon EFS API Permissions Reference
Resource: arn:aws:elasticfilesystem:region:account-id:file-system/filesystem-
id
DescribeTags (p. 203)
Action(s): elasticfilesystem:DescribeTags
Resource: arn:aws:elasticfilesystem:region:account-id:file-system/filesystem-
id
ModifyMountTargetSecurityGroups (p. 206)
Action(s): elasticfilesystem:ModifyMountTargetSecurityGroups,
ec2:ModifyNetworkInterfaceAttribute
Resource: arn:aws:elasticfilesystem:region:account-id:file-system/filesystem-
id
167

Amazon Elastic File System User Guide
API Endpoint
Amazon EFS API
The Amazon EFS API is a network protocol based on HTTP (RFC 2616). For each API call, you make an
HTTP request to the region-specific Amazon EFS API endpoint for the AWS Region where you want to
manage file systems. The API uses JSON (RFC 4627) documents for HTTP request/response bodies.
The Amazon EFS API is an RPC model, in which there is a fixed set of operations and the syntax for each
operation is known to clients without any prior interaction. This section describes each API operation
using an abstract RPC notation, with an operation name that does not appear on the wire. For each
operation, the topic specifies the mapping to HTTP request elements.
The specific Amazon EFS operation to which a given request maps is determined by a combination of
the request's method (GET, PUT, POST, or DELETE) and which of the various patterns its Request-URI
matches. If the operation is PUT or POST, Amazon EFS extracts call arguments from the Request-URI
path segment, query parameters, and the JSON object in the request body.
Note
Although the operation name, such as CreateFileSystem, does not appear on the wire
these names are meaningful in IAM policies. For more information, see Authentication and
Access Control for Amazon EFS (p. 157). The operation name is also used to name commands in
command-line tools and elements of the AWS SDK APIs. For example, there is a CLI command
create-file-system that maps to the CreateFileSystem operation. It also appears in
CloudTrail logs for Amazon EFS API calls.
API Endpoint
The API endpoint is the DNS name used as a host in the HTTP URI for the API calls. These API endpoints
are region-specific and take the following form:
elasticfilesystem.aws-region.amazonaws.com
For example, the Amazon EFS API endpoint for the US West (Oregon) Region is:
elasticfilesystem.us-west-2.amazonaws.com
For a list of AWS Regions that Amazon EFS supports (where you can create and manage file systems), see
Amazon Elastic File System in the AWS General Reference.
The region-specific API endpoint defines the scope of the Amazon EFS resources that are accessible
when you make an API call. For example, when you call the DescribeFileSystems operation using the
preceding endpoint, you get a list of file systems in the US West (Oregon) Region that have been created
in your account.
API Version
The version of the API being used for a call is identified by the first path segment of the request URI, and
its form is a ISO 8601 date. For example, see CreateFileSystem (p. 170).
The documentation describes API version 2015-02-01.
168

Amazon Elastic File System User Guide
Related Topics
Related Topics
The following sections provide descriptions of the API operations, how to create a signature for request
authentication, and how to grant permissions for these API operations using the IAM policies.
•Authentication and Access Control for Amazon EFS (p. 157)
•Actions (p. 169)
•Data Types (p. 208)
Actions
The following actions are supported:
•CreateFileSystem (p. 170)
•CreateMountTarget (p. 176)
•CreateTags (p. 183)
•DeleteFileSystem (p. 186)
•DeleteMountTarget (p. 188)
•DeleteTags (p. 191)
•DescribeFileSystems (p. 193)
•DescribeMountTargets (p. 197)
•DescribeMountTargetSecurityGroups (p. 200)
•DescribeTags (p. 203)
•ModifyMountTargetSecurityGroups (p. 206)
169

Amazon Elastic File System User Guide
CreateFileSystem
CreateFileSystem
Creates a new, empty file system. The operation requires a creation token in the request that Amazon
EFS uses to ensure idempotent creation (calling the operation with same creation token has no effect).
If a file system does not currently exist that is owned by the caller's AWS account with the specified
creation token, this operation does the following:
• Creates a new, empty file system. The file system will have an Amazon EFS assigned ID, and an initial
lifecycle state creating.
• Returns with the description of the created file system.
Otherwise, this operation returns a FileSystemAlreadyExists error with the ID of the existing file
system.
Note
For basic use cases, you can use a randomly generated UUID for the creation token.
The idempotent operation allows you to retry a CreateFileSystem call without risk of creating an
extra file system. This can happen when an initial call fails in a way that leaves it uncertain whether or
not a file system was actually created. An example might be that a transport level timeout occurred or
your connection was reset. As long as you use the same creation token, if the initial call had succeeded in
creating a file system, the client can learn of its existence from the FileSystemAlreadyExists error.
Note
The CreateFileSystem call returns while the file system's lifecycle state is still creating. You
can check the file system creation status by calling the DescribeFileSystems (p. 193) operation,
which among other things returns the file system state.
This operation also takes an optional PerformanceMode parameter that you choose for your file
system. We recommend generalPurpose performance mode for most file systems. File systems using
the maxIO performance mode can scale to higher levels of aggregate throughput and operations per
second with a tradeoff of slightly higher latencies for most file operations. The performance mode can't
be changed after the file system has been created. For more information, see Amazon EFS: Performance
Modes.
After the file system is fully created, Amazon EFS sets its lifecycle state to available, at which point
you can create one or more mount targets for the file system in your VPC. For more information, see
CreateMountTarget (p. 176). You mount your Amazon EFS file system on an EC2 instances in your VPC
via the mount target. For more information, see Amazon EFS: How it Works.
This operation requires permissions for the elasticfilesystem:CreateFileSystem action.
Request Syntax
POST /2015-02-01/file-systems HTTP/1.1
Content-type: application/json
{
"CreationToken": "string",
"Encrypted": boolean,
"KmsKeyId": "string",
"PerformanceMode": "string"
}
URI Request Parameters
The request does not use any URI parameters.
170

Amazon Elastic File System User Guide
CreateFileSystem
Request Body
The request accepts the following data in JSON format.
CreationToken (p. 170)
String of up to 64 ASCII characters. Amazon EFS uses this to ensure idempotent creation.
Type: String
Length Constraints: Minimum length of 1. Maximum length of 64.
Required: Yes
Encrypted (p. 170)
A Boolean value that, if true, creates an encrypted file system. When creating an encrypted file
system, you have the option of specifying a CreateFileSystem:KmsKeyId (p. 171) for an existing
AWS Key Management Service (AWS KMS) customer master key (CMK). If you don't specify a
CMK, then the default CMK for Amazon EFS, /aws/elasticfilesystem, is used to protect the
encrypted file system.
Type: Boolean
Required: No
KmsKeyId (p. 170)
The ID of the AWS KMS CMK to be used to protect the encrypted file system. This parameter is only
required if you want to use a non-default CMK. If this parameter is not specified, the default CMK for
Amazon EFS is used. This ID can be in one of the following formats:
• Key ID - A unique identifier of the key, for example,
1234abcd-12ab-34cd-56ef-1234567890ab.
• ARN - An Amazon Resource Name (ARN) for the key, for example, arn:aws:kms:us-
west-2:111122223333:key/1234abcd-12ab-34cd-56ef-1234567890ab.
• Key alias - A previously created display name for a key. For example, alias/projectKey1.
• Key alias ARN - An ARN for a key alias, for example, arn:aws:kms:us-
west-2:444455556666:alias/projectKey1.
If KmsKeyId is specified, the CreateFileSystem:Encrypted (p. 171) parameter must be set to true.
Type: String
Length Constraints: Minimum length of 1. Maximum length of 2048.
Required: No
PerformanceMode (p. 170)
The PerformanceMode of the file system. We recommend generalPurpose performance mode
for most file systems. File systems using the maxIO performance mode can scale to higher levels
of aggregate throughput and operations per second with a tradeoff of slightly higher latencies for
most file operations. This can't be changed after the file system has been created.
Type: String
Valid Values: generalPurpose | maxIO
Required: No
171

Amazon Elastic File System User Guide
CreateFileSystem
Response Syntax
HTTP/1.1 201
Content-type: application/json
{
"CreationTime": number,
"CreationToken": "string",
"Encrypted": boolean,
"FileSystemId": "string",
"KmsKeyId": "string",
"LifeCycleState": "string",
"Name": "string",
"NumberOfMountTargets": number,
"OwnerId": "string",
"PerformanceMode": "string",
"SizeInBytes": {
"Timestamp": number,
"Value": number
}
}
Response Elements
If the action is successful, the service sends back an HTTP 201 response.
The following data is returned in JSON format by the service.
CreationTime (p. 172)
Time that the file system was created, in seconds (since 1970-01-01T00:00:00Z).
Type: Timestamp
CreationToken (p. 172)
Opaque string specified in the request.
Type: String
Length Constraints: Minimum length of 1. Maximum length of 64.
Encrypted (p. 172)
A Boolean value that, if true, indicates that the file system is encrypted.
Type: Boolean
FileSystemId (p. 172)
ID of the file system, assigned by Amazon EFS.
Type: String
KmsKeyId (p. 172)
The ID of an AWS Key Management Service (AWS KMS) customer master key (CMK) that was used to
protect the encrypted file system.
Type: String
Length Constraints: Minimum length of 1. Maximum length of 2048.
172

Amazon Elastic File System User Guide
CreateFileSystem
LifeCycleState (p. 172)
Lifecycle phase of the file system.
Type: String
Valid Values: creating | available | deleting | deleted
Name (p. 172)
You can add tags to a file system, including a Name tag. For more information, see
CreateTags (p. 183). If the file system has a Name tag, Amazon EFS returns the value in this field.
Type: String
Length Constraints: Maximum length of 256.
NumberOfMountTargets (p. 172)
Current number of mount targets that the file system has. For more information, see
CreateMountTarget (p. 176).
Type: Integer
Valid Range: Minimum value of 0.
OwnerId (p. 172)
AWS account that created the file system. If the file system was created by an IAM user, the parent
account to which the user belongs is the owner.
Type: String
PerformanceMode (p. 172)
The PerformanceMode of the file system.
Type: String
Valid Values: generalPurpose | maxIO
SizeInBytes (p. 172)
Latest known metered size (in bytes) of data stored in the file system, in bytes, in its Value field,
and the time at which that size was determined in its Timestamp field. The Timestamp value is the
integer number of seconds since 1970-01-01T00:00:00Z. Note that the value does not represent
the size of a consistent snapshot of the file system, but it is eventually consistent when there are
no writes to the file system. That is, the value will represent actual size only if the file system is not
modified for a period longer than a couple of hours. Otherwise, the value is not the exact size the
file system was at any instant in time.
Type: FileSystemSize (p. 211) object
Errors
BadRequest
Returned if the request is malformed or contains an error such as an invalid parameter value or a
missing required parameter.
HTTP Status Code: 400
173

Amazon Elastic File System User Guide
CreateFileSystem
FileSystemAlreadyExists
Returned if the file system you are trying to create already exists, with the creation token you
provided.
HTTP Status Code: 409
FileSystemLimitExceeded
Returned if the AWS account has already created maximum number of file systems allowed per
account.
HTTP Status Code: 403
InternalServerError
Returned if an error occurred on the server side.
HTTP Status Code: 500
Example
Create a file system
The following example sends a POST request to create a file system in the us-west-2 region. The
request specifies myFileSystem1 as the creation token.
Sample Request
POST /2015-02-01/file-systems HTTP/1.1
Host: elasticfilesystem.us-west-2.amazonaws.com
x-amz-date: 20140620T215117Z
Authorization: <...>
Content-Type: application/json
Content-Length: 42
{
"CreationToken" : "myFileSystem1",
"PerformanceMode" : "generalPurpose"
}
Sample Response
HTTP/1.1 201 Created
x-amzn-RequestId: 7560489e-8bc7-4a56-a09a-757ce6f4832a
Content-Type: application/json
Content-Length: 319
{
"ownerId":"251839141158",
"creationToken":"myFileSystem1",
"PerformanceMode" : "generalPurpose",
"fileSystemId":"fs-47a2c22e",
"CreationTime":"1403301078",
"LifeCycleState":"creating",
"numberOfMountTargets":0,
"sizeInBytes":{
"value":1024,
"timestamp":"1403301078"
}
}
174

Amazon Elastic File System User Guide
CreateFileSystem
See Also
For more information about using this API in one of the language-specific AWS SDKs, see the following:
•AWS Command Line Interface
•AWS SDK for .NET
•AWS SDK for C++
•AWS SDK for Go
•AWS SDK for Java
•AWS SDK for JavaScript
•AWS SDK for PHP V3
•AWS SDK for Python
•AWS SDK for Ruby V2
175

Amazon Elastic File System User Guide
CreateMountTarget
CreateMountTarget
Creates a mount target for a file system. You can then mount the file system on EC2 instances via the
mount target.
You can create one mount target in each Availability Zone in your VPC. All EC2 instances in a VPC within
a given Availability Zone share a single mount target for a given file system. If you have multiple subnets
in an Availability Zone, you create a mount target in one of the subnets. EC2 instances do not need to
be in the same subnet as the mount target in order to access their file system. For more information, see
Amazon EFS: How it Works.
In the request, you also specify a file system ID for which you are creating the mount target and the file
system's lifecycle state must be available. For more information, see DescribeFileSystems (p. 193).
In the request, you also provide a subnet ID, which determines the following:
• VPC in which Amazon EFS creates the mount target
• Availability Zone in which Amazon EFS creates the mount target
• IP address range from which Amazon EFS selects the IP address of the mount target (if you don't
specify an IP address in the request)
After creating the mount target, Amazon EFS returns a response that includes, a MountTargetId and
an IpAddress. You use this IP address when mounting the file system in an EC2 instance. You can also
use the mount target's DNS name when mounting the file system. The EC2 instance on which you mount
the file system via the mount target can resolve the mount target's DNS name to its IP address. For more
information, see How it Works: Implementation Overview.
Note that you can create mount targets for a file system in only one VPC, and there can be only one
mount target per Availability Zone. That is, if the file system already has one or more mount targets
created for it, the subnet specified in the request to add another mount target must meet the following
requirements:
• Must belong to the same VPC as the subnets of the existing mount targets
• Must not be in the same Availability Zone as any of the subnets of the existing mount targets
If the request satisfies the requirements, Amazon EFS does the following:
• Creates a new mount target in the specified subnet.
• Also creates a new network interface in the subnet as follows:
• If the request provides an IpAddress, Amazon EFS assigns that IP address to the network interface.
Otherwise, Amazon EFS assigns a free address in the subnet (in the same way that the Amazon
EC2 CreateNetworkInterface call does when a request does not specify a primary private IP
address).
• If the request provides SecurityGroups, this network interface is associated with those security
groups. Otherwise, it belongs to the default security group for the subnet's VPC.
• Assigns the description Mount target fsmt-id for file system fs-id where fsmt-id
is the mount target ID, and fs-id is the FileSystemId.
• Sets the requesterManaged property of the network interface to true, and the requesterId
value to EFS.
Each Amazon EFS mount target has one corresponding requester-managed EC2 network interface.
After the network interface is created, Amazon EFS sets the NetworkInterfaceId field in the mount
target's description to the network interface ID, and the IpAddress field to its address. If network
interface creation fails, the entire CreateMountTarget operation fails.
176

Amazon Elastic File System User Guide
CreateMountTarget
Note
The CreateMountTarget call returns only after creating the network interface, but while the
mount target state is still creating, you can check the mount target creation status by calling
the DescribeMountTargets (p. 197) operation, which among other things returns the mount
target state.
We recommend you create a mount target in each of the Availability Zones. There are cost considerations
for using a file system in an Availability Zone through a mount target created in another Availability
Zone. For more information, see Amazon EFS. In addition, by always using a mount target local to the
instance's Availability Zone, you eliminate a partial failure scenario. If the Availability Zone in which
your mount target is created goes down, then you won't be able to access your file system through that
mount target.
This operation requires permissions for the following action on the file system:
•elasticfilesystem:CreateMountTarget
This operation also requires permissions for the following Amazon EC2 actions:
•ec2:DescribeSubnets
•ec2:DescribeNetworkInterfaces
•ec2:CreateNetworkInterface
Request Syntax
POST /2015-02-01/mount-targets HTTP/1.1
Content-type: application/json
{
"FileSystemId": "string",
"IpAddress": "string",
"SecurityGroups": [ "string" ],
"SubnetId": "string"
}
URI Request Parameters
The request does not use any URI parameters.
Request Body
The request accepts the following data in JSON format.
FileSystemId (p. 177)
ID of the file system for which to create the mount target.
Type: String
Required: Yes
IpAddress (p. 177)
Valid IPv4 address within the address range of the specified subnet.
Type: String
Required: No
177

Amazon Elastic File System User Guide
CreateMountTarget
SecurityGroups (p. 177)
Up to five VPC security group IDs, of the form sg-xxxxxxxx. These must be for the same VPC as
subnet specified.
Type: Array of strings
Array Members: Maximum number of 5 items.
Required: No
SubnetId (p. 177)
ID of the subnet to add the mount target in.
Type: String
Required: Yes
Response Syntax
HTTP/1.1 200
Content-type: application/json
{
"FileSystemId": "string",
"IpAddress": "string",
"LifeCycleState": "string",
"MountTargetId": "string",
"NetworkInterfaceId": "string",
"OwnerId": "string",
"SubnetId": "string"
}
Response Elements
If the action is successful, the service sends back an HTTP 200 response.
The following data is returned in JSON format by the service.
FileSystemId (p. 178)
ID of the file system for which the mount target is intended.
Type: String
IpAddress (p. 178)
Address at which the file system may be mounted via the mount target.
Type: String
LifeCycleState (p. 178)
Lifecycle state of the mount target.
Type: String
Valid Values: creating | available | deleting | deleted
MountTargetId (p. 178)
System-assigned mount target ID.
178

Amazon Elastic File System User Guide
CreateMountTarget
Type: String
NetworkInterfaceId (p. 178)
ID of the network interface that Amazon EFS created when it created the mount target.
Type: String
OwnerId (p. 178)
AWS account ID that owns the resource.
Type: String
SubnetId (p. 178)
ID of the mount target's subnet.
Type: String
Errors
BadRequest
Returned if the request is malformed or contains an error such as an invalid parameter value or a
missing required parameter.
HTTP Status Code: 400
FileSystemNotFound
Returned if the specified FileSystemId does not exist in the requester's AWS account.
HTTP Status Code: 404
IncorrectFileSystemLifeCycleState
Returned if the file system's life cycle state is not "created".
HTTP Status Code: 409
InternalServerError
Returned if an error occurred on the server side.
HTTP Status Code: 500
IpAddressInUse
Returned if the request specified an IpAddress that is already in use in the subnet.
HTTP Status Code: 409
MountTargetConflict
Returned if the mount target would violate one of the specified restrictions based on the file
system's existing mount targets.
HTTP Status Code: 409
NetworkInterfaceLimitExceeded
The calling account has reached the ENI limit for the specific AWS region. Client should try to delete
some ENIs or get its account limit raised. For more information, see Amazon VPC Limits in the
Amazon Virtual Private Cloud User Guide (see the Network interfaces per VPC entry in the table).
179

Amazon Elastic File System User Guide
CreateMountTarget
HTTP Status Code: 409
NoFreeAddressesInSubnet
Returned if IpAddress was not specified in the request and there are no free IP addresses in the
subnet.
HTTP Status Code: 409
SecurityGroupLimitExceeded
Returned if the size of SecurityGroups specified in the request is greater than five.
HTTP Status Code: 400
SecurityGroupNotFound
Returned if one of the specified security groups does not exist in the subnet's VPC.
HTTP Status Code: 400
SubnetNotFound
Returned if there is no subnet with ID SubnetId provided in the request.
HTTP Status Code: 400
UnsupportedAvailabilityZone
HTTP Status Code: 400
Examples
Example 1: Add a mount target to a file system
The following request creates a mount target for a file system. The request specifies values for only
the required FileSystemId and SubnetId parameters. The request does not provide the optional
IpAddress and SecurityGroups parameters. For IpAddress, the operation uses one of the available
IP addresses in the specified subnet. And, the operation uses the default security group associated with
the VPC for the SecurityGroups.
Sample Request
POST /2015-02-01/mount-targets HTTP/1.1
Host: elasticfilesystem.us-west-2.amazonaws.com
x-amz-date: 20140620T221118Z
Authorization: <...>
Content-Type: application/json
Content-Length: 160
{"SubnetId": "subnet-748c5d03", "FileSystemId": "fs-e2a6438b"}
Sample Response
HTTP/1.1 200 OK
x-amzn-RequestId: c3616af3-33fa-40ad-ae0d-d3895a2c3a1f
Content-Type: application/json
Content-Length: 252
{
"MountTargetId": "fsmt-55a4413c",
180

Amazon Elastic File System User Guide
CreateMountTarget
"NetworkInterfaceId": "eni-d95852af",
"FileSystemId": "fs-e2a6438b",
"LifeCycleState": "available",
"SubnetId": "subnet-748c5d03",
"OwnerId": "231243201240",
"IpAddress": "172.31.22.183"
}
Example 2: Add a mount target to a file system
The following request specifies all the request parameters to create a mount target.
Sample Request
POST /2015-02-01/mount-targets HTTP/1.1
Host: elasticfilesystem.us-west-2.amazonaws.com
x-amz-date: 20140620T221118Z
Authorization: <...>
Content-Type: application/json
Content-Length: 160
{
"FileSystemId":"fs-47a2c22e",
"SubnetId":"subnet-fd04ff94",
"IpAddress":"10.0.2.42",
"SecurityGroups":[
"sg-1a2b3c4d"
]
}
Sample Response
HTTP/1.1 200 OK
x-amzn-RequestId: c3616af3-33fa-40ad-ae0d-d3895a2c3a1f
Content-Type: application/json
Content-Length: 252
{
"OwnerId":"251839141158",
"MountTargetId":"fsmt-9a13661e",
"FileSystemId":"fs-47a2c22e",
"SubnetId":"subnet-fd04ff94",
"LifeCycleState":"available",
"IpAddress":"10.0.2.42",
"NetworkInterfaceId":"eni-1bcb7772"
}
See Also
For more information about using this API in one of the language-specific AWS SDKs, see the following:
•AWS Command Line Interface
•AWS SDK for .NET
•AWS SDK for C++
•AWS SDK for Go
•AWS SDK for Java
•AWS SDK for JavaScript
•AWS SDK for PHP V3
181


Amazon Elastic File System User Guide
CreateTags
CreateTags
Creates or overwrites tags associated with a file system. Each tag is a key-value pair. If a tag key specified
in the request already exists on the file system, this operation overwrites its value with the value
provided in the request. If you add the Name tag to your file system, Amazon EFS returns it in the
response to the DescribeFileSystems (p. 193) operation.
This operation requires permission for the elasticfilesystem:CreateTags action.
Request Syntax
POST /2015-02-01/create-tags/FileSystemId HTTP/1.1
Content-type: application/json
{
"Tags": [
{
"Key": "string",
"Value": "string"
}
]
}
URI Request Parameters
The request requires the following URI parameters.
FileSystemId (p. 183)
ID of the file system whose tags you want to modify (String). This operation modifies the tags only,
not the file system.
Request Body
The request accepts the following data in JSON format.
Tags (p. 183)
Array of Tag objects to add. Each Tag object is a key-value pair.
Type: Array of Tag (p. 214) objects
Required: Yes
Response Syntax
HTTP/1.1 204
Response Elements
If the action is successful, the service sends back an HTTP 204 response with an empty HTTP body.
183

Amazon Elastic File System User Guide
CreateTags
Errors
BadRequest
Returned if the request is malformed or contains an error such as an invalid parameter value or a
missing required parameter.
HTTP Status Code: 400
FileSystemNotFound
Returned if the specified FileSystemId does not exist in the requester's AWS account.
HTTP Status Code: 404
InternalServerError
Returned if an error occurred on the server side.
HTTP Status Code: 500
Example
Create tags on a file system
The following request creates three tags ("key1", "key2", and "key3") on the specified file system.
Sample Request
POST /2015-02-01/create-tags/fs-e2a6438b HTTP/1.1
Host: elasticfilesystem.us-west-2.amazonaws.com
x-amz-date: 20140620T221118Z
Authorization: <...>
Content-Type: application/json
Content-Length: 160
{
"Tags": [
{
"Value": "value1",
"Key": "key1"
},
{
"Value": "value2",
"Key": "key2"
},
{
"Value": "value3",
"Key": "key3"
}
]
}
Sample Response
HTTP/1.1 204 no content
x-amzn-RequestId: c3616af3-33fa-40ad-ae0d-d3895a2c3a1f
See Also
For more information about using this API in one of the language-specific AWS SDKs, see the following:
184


Amazon Elastic File System User Guide
DeleteFileSystem
DeleteFileSystem
Deletes a file system, permanently severing access to its contents. Upon return, the file system no longer
exists and you can't access any contents of the deleted file system.
You can't delete a file system that is in use. That is, if the file system has any mount targets,
you must first delete them. For more information, see DescribeMountTargets (p. 197) and
DeleteMountTarget (p. 188).
Note
The DeleteFileSystem call returns while the file system state is still deleting. You
can check the file system deletion status by calling the DescribeFileSystems (p. 193)
operation, which returns a list of file systems in your account. If you pass file system ID or
creation token for the deleted file system, the DescribeFileSystems (p. 193) returns a 404
FileSystemNotFound error.
This operation requires permissions for the elasticfilesystem:DeleteFileSystem action.
Request Syntax
DELETE /2015-02-01/file-systems/FileSystemId HTTP/1.1
URI Request Parameters
The request requires the following URI parameters.
FileSystemId (p. 186)
ID of the file system you want to delete.
Request Body
The request does not have a request body.
Response Syntax
HTTP/1.1 204
Response Elements
If the action is successful, the service sends back an HTTP 204 response with an empty HTTP body.
Errors
BadRequest
Returned if the request is malformed or contains an error such as an invalid parameter value or a
missing required parameter.
HTTP Status Code: 400
FileSystemInUse
Returned if a file system has mount targets.
186
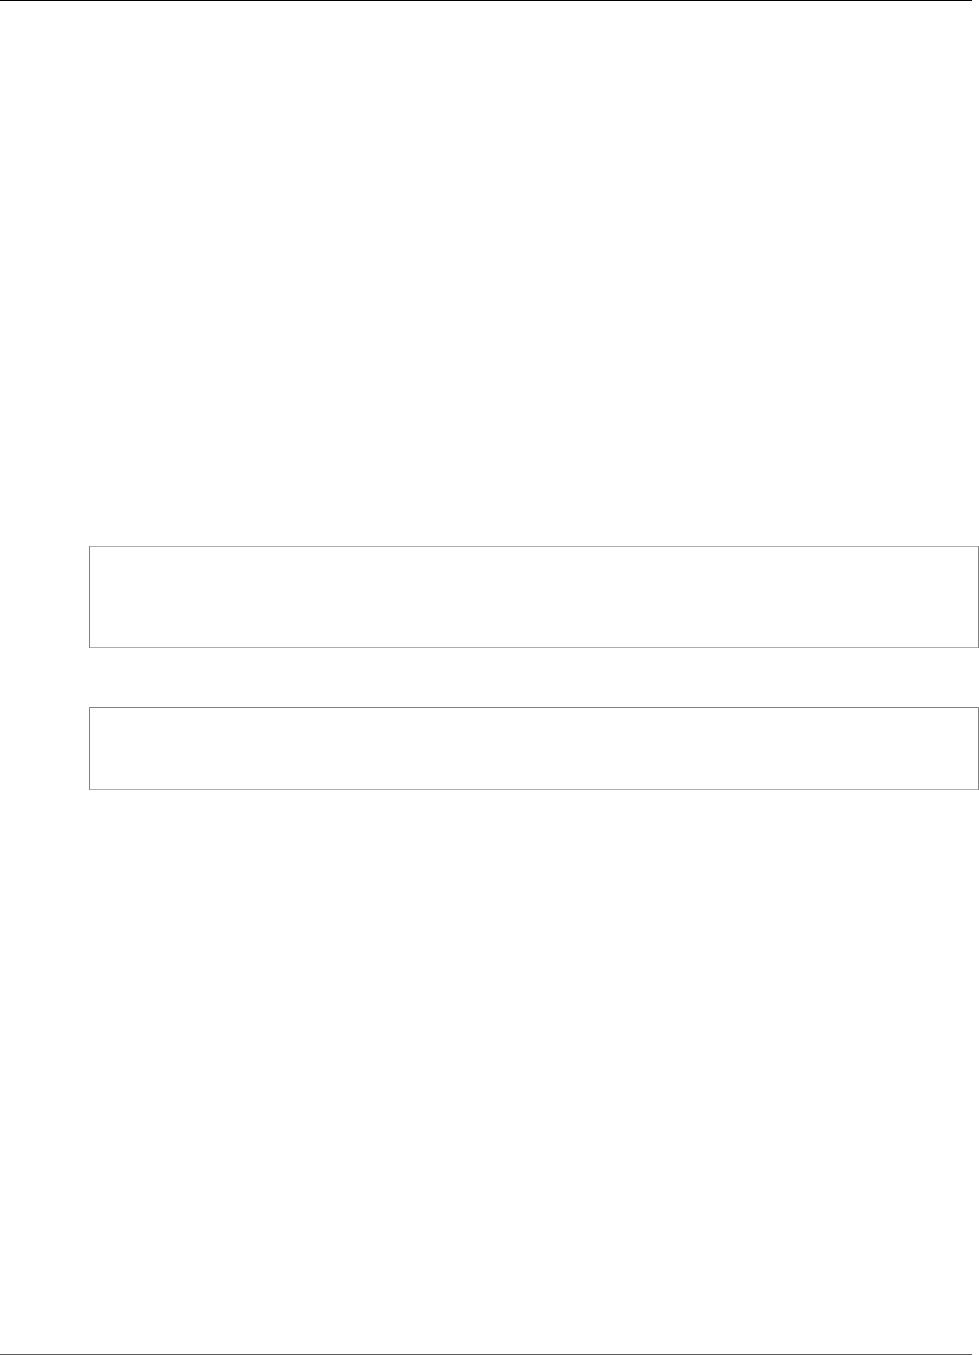
Amazon Elastic File System User Guide
DeleteFileSystem
HTTP Status Code: 409
FileSystemNotFound
Returned if the specified FileSystemId does not exist in the requester's AWS account.
HTTP Status Code: 404
InternalServerError
Returned if an error occurred on the server side.
HTTP Status Code: 500
Example
Delete a file system
The following example sends a DELETE request to the file-systems endpoint
(elasticfilesystem.us-west-2.amazonaws.com/2015-02-01/file-systems/fs-47a2c22e)
to delete a file system whose ID is fs-47a2c22e.
Sample Request
DELETE /2015-02-01/file-systems/fs-47a2c22e HTTP/1.1
Host: elasticfilesystem.us-west-2.amazonaws.com
x-amz-date: 20140622T233021Z
Authorization: <...>
Sample Response
HTTP/1.1 204 No Content
x-amzn-RequestId: a2d125b3-7ebd-4d6a-ab3d-5548630bff33
Content-Length: 0
See Also
For more information about using this API in one of the language-specific AWS SDKs, see the following:
•AWS Command Line Interface
•AWS SDK for .NET
•AWS SDK for C++
•AWS SDK for Go
•AWS SDK for Java
•AWS SDK for JavaScript
•AWS SDK for PHP V3
•AWS SDK for Python
•AWS SDK for Ruby V2
187

Amazon Elastic File System User Guide
DeleteMountTarget
DeleteMountTarget
Deletes the specified mount target.
This operation forcibly breaks any mounts of the file system via the mount target that is being deleted,
which might disrupt instances or applications using those mounts. To avoid applications getting cut off
abruptly, you might consider unmounting any mounts of the mount target, if feasible. The operation also
deletes the associated network interface. Uncommitted writes may be lost, but breaking a mount target
using this operation does not corrupt the file system itself. The file system you created remains. You can
mount an EC2 instance in your VPC via another mount target.
This operation requires permissions for the following action on the file system:
•elasticfilesystem:DeleteMountTarget
Note
The DeleteMountTarget call returns while the mount target state is still deleting. You
can check the mount target deletion by calling the DescribeMountTargets (p. 197) operation,
which returns a list of mount target descriptions for the given file system.
The operation also requires permissions for the following Amazon EC2 action on the mount target's
network interface:
•ec2:DeleteNetworkInterface
Request Syntax
DELETE /2015-02-01/mount-targets/MountTargetId HTTP/1.1
URI Request Parameters
The request requires the following URI parameters.
MountTargetId (p. 188)
ID of the mount target to delete (String).
Request Body
The request does not have a request body.
Response Syntax
HTTP/1.1 204
Response Elements
If the action is successful, the service sends back an HTTP 204 response with an empty HTTP body.
188
Amazon Elastic File System User Guide
DeleteMountTarget
Errors
BadRequest
Returned if the request is malformed or contains an error such as an invalid parameter value or a
missing required parameter.
HTTP Status Code: 400
DependencyTimeout
The service timed out trying to fulfill the request, and the client should try the call again.
HTTP Status Code: 504
InternalServerError
Returned if an error occurred on the server side.
HTTP Status Code: 500
MountTargetNotFound
Returned if there is no mount target with the specified ID found in the caller's account.
HTTP Status Code: 404
Example
Remove a file system's mount target
The following example sends a DELETE request to delete a specific mount target.
Sample Request
DELETE /2015-02-01/mount-targets/fsmt-9a13661e HTTP/1.1
Host: elasticfilesystem.us-west-2.amazonaws.com
x-amz-date: 20140622T232908Z
Authorization: <...>
Sample Response
HTTP/1.1 204 No Content
x-amzn-RequestId: 76787670-2797-48ee-a34f-fce2ce122fef
See Also
For more information about using this API in one of the language-specific AWS SDKs, see the following:
•AWS Command Line Interface
•AWS SDK for .NET
•AWS SDK for C++
•AWS SDK for Go
•AWS SDK for Java
•AWS SDK for JavaScript
•AWS SDK for PHP V3
189

Amazon Elastic File System User Guide
DeleteTags
DeleteTags
Deletes the specified tags from a file system. If the DeleteTags request includes a tag key that does
not exist, Amazon EFS ignores it and doesn't cause an error. For more information about tags and related
restrictions, see Tag Restrictions in the AWS Billing and Cost Management User Guide.
This operation requires permissions for the elasticfilesystem:DeleteTags action.
Request Syntax
POST /2015-02-01/delete-tags/FileSystemId HTTP/1.1
Content-type: application/json
{
"TagKeys": [ "string" ]
}
URI Request Parameters
The request requires the following URI parameters.
FileSystemId (p. 191)
ID of the file system whose tags you want to delete (String).
Request Body
The request accepts the following data in JSON format.
TagKeys (p. 191)
List of tag keys to delete.
Type: Array of strings
Length Constraints: Minimum length of 1. Maximum length of 128.
Required: Yes
Response Syntax
HTTP/1.1 204
Response Elements
If the action is successful, the service sends back an HTTP 204 response with an empty HTTP body.
Errors
BadRequest
Returned if the request is malformed or contains an error such as an invalid parameter value or a
missing required parameter.
191
Amazon Elastic File System User Guide
DeleteTags
HTTP Status Code: 400
FileSystemNotFound
Returned if the specified FileSystemId does not exist in the requester's AWS account.
HTTP Status Code: 404
InternalServerError
Returned if an error occurred on the server side.
HTTP Status Code: 500
Example
Delete tags from a file system
The following request deletes the tag key2 from the tag set associated with the file system.
Sample Request
POST /2015-02-01/delete-tags/fs-e2a6438b HTTP/1.1
Host: elasticfilesystem.us-west-2.amazonaws.com
x-amz-date: 20140620T215123Z
Authorization: <...>
Content-Type: application/json
Content-Length: 223
{
"TagKeys":[
"key2"
]
}
Sample Response
HTTP/1.1 204 No Content
x-amzn-RequestId: ec08ae47-3409-49f3-9e90-64a5f981bb2b
See Also
For more information about using this API in one of the language-specific AWS SDKs, see the following:
•AWS Command Line Interface
•AWS SDK for .NET
•AWS SDK for C++
•AWS SDK for Go
•AWS SDK for Java
•AWS SDK for JavaScript
•AWS SDK for PHP V3
•AWS SDK for Python
•AWS SDK for Ruby V2
192
Amazon Elastic File System User Guide
DescribeFileSystems
DescribeFileSystems
Returns the description of a specific Amazon EFS file system if either the file system CreationToken
or the FileSystemId is provided. Otherwise, it returns descriptions of all file systems owned by the
caller's AWS account in the AWS Region of the endpoint that you're calling.
When retrieving all file system descriptions, you can optionally specify the MaxItems parameter to limit
the number of descriptions in a response. If more file system descriptions remain, Amazon EFS returns a
NextMarker, an opaque token, in the response. In this case, you should send a subsequent request with
the Marker request parameter set to the value of NextMarker.
To retrieve a list of your file system descriptions, this operation is used in an iterative process, where
DescribeFileSystems is called first without the Marker and then the operation continues to call it
with the Marker parameter set to the value of the NextMarker from the previous response until the
response has no NextMarker.
The implementation may return fewer than MaxItems file system descriptions while still including a
NextMarker value.
The order of file systems returned in the response of one DescribeFileSystems call and the order of
file systems returned across the responses of a multi-call iteration is unspecified.
This operation requires permissions for the elasticfilesystem:DescribeFileSystems action.
Request Syntax
GET /2015-02-01/file-systems?
CreationToken=CreationToken&FileSystemId=FileSystemId&Marker=Marker&MaxItems=MaxItems
HTTP/1.1
URI Request Parameters
The request requires the following URI parameters.
CreationToken (p. 193)
(Optional) Restricts the list to the file system with this creation token (String). You specify a creation
token when you create an Amazon EFS file system.
Length Constraints: Minimum length of 1. Maximum length of 64.
FileSystemId (p. 193)
(Optional) ID of the file system whose description you want to retrieve (String).
Marker (p. 193)
(Optional) Opaque pagination token returned from a previous DescribeFileSystems operation
(String). If present, specifies to continue the list from where the returning call had left off.
MaxItems (p. 193)
(Optional) Specifies the maximum number of file systems to return in the response (integer). This
parameter value must be greater than 0. The number of items that Amazon EFS returns is the
minimum of the MaxItems parameter specified in the request and the service's internal maximum
number of items per page.
Valid Range: Minimum value of 1.
193

Amazon Elastic File System User Guide
DescribeFileSystems
Request Body
The request does not have a request body.
Response Syntax
HTTP/1.1 200
Content-type: application/json
{
"FileSystems": [
{
"CreationTime": number,
"CreationToken": "string",
"Encrypted": boolean,
"FileSystemId": "string",
"KmsKeyId": "string",
"LifeCycleState": "string",
"Name": "string",
"NumberOfMountTargets": number,
"OwnerId": "string",
"PerformanceMode": "string",
"SizeInBytes": {
"Timestamp": number,
"Value": number
}
}
],
"Marker": "string",
"NextMarker": "string"
}
Response Elements
If the action is successful, the service sends back an HTTP 200 response.
The following data is returned in JSON format by the service.
FileSystems (p. 194)
Array of file system descriptions.
Type: Array of FileSystemDescription (p. 209) objects
Marker (p. 194)
Present if provided by caller in the request (String).
Type: String
NextMarker (p. 194)
Present if there are more file systems than returned in the response (String). You can use the
NextMarker in the subsequent request to fetch the descriptions.
Type: String
194

Amazon Elastic File System User Guide
DescribeFileSystems
Errors
BadRequest
Returned if the request is malformed or contains an error such as an invalid parameter value or a
missing required parameter.
HTTP Status Code: 400
FileSystemNotFound
Returned if the specified FileSystemId does not exist in the requester's AWS account.
HTTP Status Code: 404
InternalServerError
Returned if an error occurred on the server side.
HTTP Status Code: 500
Example
Retrieve list of ten file systems
The following example sends a GET request to the file-systems endpoint
(elasticfilesystem.us-west-2.amazonaws.com/2015-02-01/file-systems). The request
specifies a MaxItems query parameter to limit the number of file system descriptions to 10.
Sample Request
GET /2015-02-01/file-systems?MaxItems=10 HTTP/1.1
Host: elasticfilesystem.us-west-2.amazonaws.com
x-amz-date: 20140622T191208Z
Authorization: <...>
Sample Response
HTTP/1.1 200 OK
x-amzn-RequestId: ab5f2427-3ab3-4002-868e-30a77a88f739
Content-Type: application/json
Content-Length: 499
{
"FileSystems":[
{
"OwnerId":"251839141158",
"CreationToken":"MyFileSystem1",
"FileSystemId":"fs-47a2c22e",
"PerformanceMode" : "generalPurpose",
"CreationTime":"1403301078",
"LifeCycleState":"created",
"Name":"my first file system",
"NumberOfMountTargets":1,
"SizeInBytes":{
"Value":29313417216,
"Timestamp":"1403301078"
}
}
]
}
195

Amazon Elastic File System User Guide
DescribeFileSystems
See Also
For more information about using this API in one of the language-specific AWS SDKs, see the following:
•AWS Command Line Interface
•AWS SDK for .NET
•AWS SDK for C++
•AWS SDK for Go
•AWS SDK for Java
•AWS SDK for JavaScript
•AWS SDK for PHP V3
•AWS SDK for Python
•AWS SDK for Ruby V2
196

Amazon Elastic File System User Guide
DescribeMountTargets
DescribeMountTargets
Returns the descriptions of all the current mount targets, or a specific mount target, for a file system.
When requesting all of the current mount targets, the order of mount targets returned in the response is
unspecified.
This operation requires permissions for the elasticfilesystem:DescribeMountTargets action, on
either the file system ID that you specify in FileSystemId, or on the file system of the mount target
that you specify in MountTargetId.
Request Syntax
GET /2015-02-01/mount-targets?
FileSystemId=FileSystemId&Marker=Marker&MaxItems=MaxItems&MountTargetId=MountTargetId
HTTP/1.1
URI Request Parameters
The request requires the following URI parameters.
FileSystemId (p. 197)
(Optional) ID of the file system whose mount targets you want to list (String). It must be included in
your request if MountTargetId is not included.
Marker (p. 197)
(Optional) Opaque pagination token returned from a previous DescribeMountTargets operation
(String). If present, it specifies to continue the list from where the previous returning call left off.
MaxItems (p. 197)
(Optional) Maximum number of mount targets to return in the response. It must be an integer with a
value greater than zero.
Valid Range: Minimum value of 1.
MountTargetId (p. 197)
(Optional) ID of the mount target that you want to have described (String). It must be included in
your request if FileSystemId is not included.
Request Body
The request does not have a request body.
Response Syntax
HTTP/1.1 200
Content-type: application/json
{
"Marker": "string",
"MountTargets": [
{
"FileSystemId": "string",
"IpAddress": "string",
197

Amazon Elastic File System User Guide
DescribeMountTargets
"LifeCycleState": "string",
"MountTargetId": "string",
"NetworkInterfaceId": "string",
"OwnerId": "string",
"SubnetId": "string"
}
],
"NextMarker": "string"
}
Response Elements
If the action is successful, the service sends back an HTTP 200 response.
The following data is returned in JSON format by the service.
Marker (p. 197)
If the request included the Marker, the response returns that value in this field.
Type: String
MountTargets (p. 197)
Returns the file system's mount targets as an array of MountTargetDescription objects.
Type: Array of MountTargetDescription (p. 212) objects
NextMarker (p. 197)
If a value is present, there are more mount targets to return. In a subsequent request, you can
provide Marker in your request with this value to retrieve the next set of mount targets.
Type: String
Errors
BadRequest
Returned if the request is malformed or contains an error such as an invalid parameter value or a
missing required parameter.
HTTP Status Code: 400
FileSystemNotFound
Returned if the specified FileSystemId does not exist in the requester's AWS account.
HTTP Status Code: 404
InternalServerError
Returned if an error occurred on the server side.
HTTP Status Code: 500
MountTargetNotFound
Returned if there is no mount target with the specified ID found in the caller's account.
HTTP Status Code: 404
198

Amazon Elastic File System User Guide
DescribeMountTargets
Example
Retrieve descriptions mount targets created for a file system
The following request retrieves descriptions of mount targets created for the specified file system.
Sample Request
GET /2015-02-01/mount-targets?FileSystemId=fs-47a2c22e HTTP/1.1
Host: elasticfilesystem.us-west-2.amazonaws.com
x-amz-date: 20140622T191252Z
Authorization: <...>
Sample Response
HTTP/1.1 200 OK
x-amzn-RequestId: ab5f2427-3ab3-4002-868e-30a77a88f739
Content-Type: application/json
Content-Length: 357
{
"MountTargets":[
{
"OwnerId":"251839141158",
"MountTargetId":"fsmt-9a13661e",
"FileSystemId":"fs-47a2c22e",
"SubnetId":"subnet-fd04ff94",
"LifeCycleState":"added",
"IpAddress":"10.0.2.42",
"NetworkInterfaceId":"eni-1bcb7772"
}
]
}
See Also
For more information about using this API in one of the language-specific AWS SDKs, see the following:
•AWS Command Line Interface
•AWS SDK for .NET
•AWS SDK for C++
•AWS SDK for Go
•AWS SDK for Java
•AWS SDK for JavaScript
•AWS SDK for PHP V3
•AWS SDK for Python
•AWS SDK for Ruby V2
199

Amazon Elastic File System User Guide
DescribeMountTargetSecurityGroups
DescribeMountTargetSecurityGroups
Returns the security groups currently in effect for a mount target. This operation requires that the
network interface of the mount target has been created and the lifecycle state of the mount target is not
deleted.
This operation requires permissions for the following actions:
•elasticfilesystem:DescribeMountTargetSecurityGroups action on the mount target's file
system.
•ec2:DescribeNetworkInterfaceAttribute action on the mount target's network interface.
Request Syntax
GET /2015-02-01/mount-targets/MountTargetId/security-groups HTTP/1.1
URI Request Parameters
The request requires the following URI parameters.
MountTargetId (p. 200)
ID of the mount target whose security groups you want to retrieve.
Request Body
The request does not have a request body.
Response Syntax
HTTP/1.1 200
Content-type: application/json
{
"SecurityGroups": [ "string" ]
}
Response Elements
If the action is successful, the service sends back an HTTP 200 response.
The following data is returned in JSON format by the service.
SecurityGroups (p. 200)
Array of security groups.
Type: Array of strings
Array Members: Maximum number of 5 items.
200
Amazon Elastic File System User Guide
DescribeMountTargetSecurityGroups
Errors
BadRequest
Returned if the request is malformed or contains an error such as an invalid parameter value or a
missing required parameter.
HTTP Status Code: 400
IncorrectMountTargetState
Returned if the mount target is not in the correct state for the operation.
HTTP Status Code: 409
InternalServerError
Returned if an error occurred on the server side.
HTTP Status Code: 500
MountTargetNotFound
Returned if there is no mount target with the specified ID found in the caller's account.
HTTP Status Code: 404
Example
Retrieve security groups in effect for a file system
The following example retrieves the security groups that are in effect for the network interface
associated with a mount target.
Sample Request
GET /2015-02-01/mount-targets/fsmt-9a13661e/security-groups HTTP/1.1
Host: elasticfilesystem.us-west-2.amazonaws.com
x-amz-date: 20140620T223513Z
Authorization: <...>
Sample Response
HTTP/1.1 200 OK
x-amzn-RequestId: 088fb0b4-0c1d-4af7-9de1-933207fbdb46
Content-Length: 57
{
"SecurityGroups" : [
"sg-188d9f74"
]
}
See Also
For more information about using this API in one of the language-specific AWS SDKs, see the following:
•AWS Command Line Interface
•AWS SDK for .NET
201


Amazon Elastic File System User Guide
DescribeTags
DescribeTags
Returns the tags associated with a file system. The order of tags returned in the response of one
DescribeTags call and the order of tags returned across the responses of a multi-call iteration (when
using pagination) is unspecified.
This operation requires permissions for the elasticfilesystem:DescribeTags action.
Request Syntax
GET /2015-02-01/tags/FileSystemId/?Marker=Marker&MaxItems=MaxItems HTTP/1.1
URI Request Parameters
The request requires the following URI parameters.
FileSystemId (p. 203)
ID of the file system whose tag set you want to retrieve.
Marker (p. 203)
(Optional) Opaque pagination token returned from a previous DescribeTags operation (String). If
present, it specifies to continue the list from where the previous call left off.
MaxItems (p. 203)
(Optional) Maximum number of file system tags to return in the response. It must be an integer with
a value greater than zero.
Valid Range: Minimum value of 1.
Request Body
The request does not have a request body.
Response Syntax
HTTP/1.1 200
Content-type: application/json
{
"Marker": "string",
"NextMarker": "string",
"Tags": [
{
"Key": "string",
"Value": "string"
}
]
}
Response Elements
If the action is successful, the service sends back an HTTP 200 response.
The following data is returned in JSON format by the service.
203

Amazon Elastic File System User Guide
DescribeTags
Marker (p. 203)
If the request included a Marker, the response returns that value in this field.
Type: String
NextMarker (p. 203)
If a value is present, there are more tags to return. In a subsequent request, you can provide the
value of NextMarker as the value of the Marker parameter in your next request to retrieve the
next set of tags.
Type: String
Tags (p. 203)
Returns tags associated with the file system as an array of Tag objects.
Type: Array of Tag (p. 214) objects
Errors
BadRequest
Returned if the request is malformed or contains an error such as an invalid parameter value or a
missing required parameter.
HTTP Status Code: 400
FileSystemNotFound
Returned if the specified FileSystemId does not exist in the requester's AWS account.
HTTP Status Code: 404
InternalServerError
Returned if an error occurred on the server side.
HTTP Status Code: 500
Example
Retrieve tags associated with a file system
The following request retrieves tags (key-value pairs) associated with the specified file system.
Sample Request
GET /2015-02-01/tags/fs-e2a6438b/ HTTP/1.1
Host: elasticfilesystem.us-west-2.amazonaws.com
x-amz-date: 20140620T215404Z
Authorization: <...>
Sample Response
HTTP/1.1 200 OK
x-amzn-RequestId: f264e454-7859-4f15-8169-1c0d5b0b04f5
Content-Type: application/json
Content-Length: 288
204

Amazon Elastic File System User Guide
DescribeTags
{
"Tags":[
{
"Key":"Name",
"Value":"my first file system"
},
{
"Key":"Fleet",
"Value":"Development"
},
{
"Key":"Developer",
"Value":"Alice"
}
]
}
See Also
For more information about using this API in one of the language-specific AWS SDKs, see the following:
•AWS Command Line Interface
•AWS SDK for .NET
•AWS SDK for C++
•AWS SDK for Go
•AWS SDK for Java
•AWS SDK for JavaScript
•AWS SDK for PHP V3
•AWS SDK for Python
•AWS SDK for Ruby V2
205

Amazon Elastic File System User Guide
ModifyMountTargetSecurityGroups
ModifyMountTargetSecurityGroups
Modifies the set of security groups in effect for a mount target.
When you create a mount target, Amazon EFS also creates a new network interface. For more
information, see CreateMountTarget (p. 176). This operation replaces the security groups in effect for the
network interface associated with a mount target, with the SecurityGroups provided in the request.
This operation requires that the network interface of the mount target has been created and the lifecycle
state of the mount target is not deleted.
The operation requires permissions for the following actions:
•elasticfilesystem:ModifyMountTargetSecurityGroups action on the mount target's file
system.
•ec2:ModifyNetworkInterfaceAttribute action on the mount target's network interface.
Request Syntax
PUT /2015-02-01/mount-targets/MountTargetId/security-groups HTTP/1.1
Content-type: application/json
{
"SecurityGroups": [ "string" ]
}
URI Request Parameters
The request requires the following URI parameters.
MountTargetId (p. 206)
ID of the mount target whose security groups you want to modify.
Request Body
The request accepts the following data in JSON format.
SecurityGroups (p. 206)
Array of up to five VPC security group IDs.
Type: Array of strings
Array Members: Maximum number of 5 items.
Required: No
Response Syntax
HTTP/1.1 204
Response Elements
If the action is successful, the service sends back an HTTP 204 response with an empty HTTP body.
206

Amazon Elastic File System User Guide
ModifyMountTargetSecurityGroups
Errors
BadRequest
Returned if the request is malformed or contains an error such as an invalid parameter value or a
missing required parameter.
HTTP Status Code: 400
IncorrectMountTargetState
Returned if the mount target is not in the correct state for the operation.
HTTP Status Code: 409
InternalServerError
Returned if an error occurred on the server side.
HTTP Status Code: 500
MountTargetNotFound
Returned if there is no mount target with the specified ID found in the caller's account.
HTTP Status Code: 404
SecurityGroupLimitExceeded
Returned if the size of SecurityGroups specified in the request is greater than five.
HTTP Status Code: 400
SecurityGroupNotFound
Returned if one of the specified security groups does not exist in the subnet's VPC.
HTTP Status Code: 400
Example
Replace a mount target's security groups
The following example replaces security groups in effect for the network interface associated with a
mount target.
Sample Request
PUT /2015-02-01/mount-targets/fsmt-9a13661e/security-groups HTTP/1.1
Host: elasticfilesystem.us-west-2.amazonaws.com
x-amz-date: 20140620T223446Z
Authorization: <...>
Content-Type: application/json
Content-Length: 57
{
"SecurityGroups" : [
"sg-188d9f74"
]
}
207

Amazon Elastic File System User Guide
Data Types
Sample Response
HTTP/1.1 204 No Content
x-amzn-RequestId: 088fb0b4-0c1d-4af7-9de1-933207fbdb46
See Also
For more information about using this API in one of the language-specific AWS SDKs, see the following:
•AWS Command Line Interface
•AWS SDK for .NET
•AWS SDK for C++
•AWS SDK for Go
•AWS SDK for Java
•AWS SDK for JavaScript
•AWS SDK for PHP V3
•AWS SDK for Python
•AWS SDK for Ruby V2
Data Types
The following data types are supported:
•FileSystemDescription (p. 209)
•FileSystemSize (p. 211)
•MountTargetDescription (p. 212)
•Tag (p. 214)
208

Amazon Elastic File System User Guide
FileSystemDescription
FileSystemDescription
Description of the file system.
Contents
CreationTime
Time that the file system was created, in seconds (since 1970-01-01T00:00:00Z).
Type: Timestamp
Required: Yes
CreationToken
Opaque string specified in the request.
Type: String
Length Constraints: Minimum length of 1. Maximum length of 64.
Required: Yes
Encrypted
A Boolean value that, if true, indicates that the file system is encrypted.
Type: Boolean
Required: No
FileSystemId
ID of the file system, assigned by Amazon EFS.
Type: String
Required: Yes
KmsKeyId
The ID of an AWS Key Management Service (AWS KMS) customer master key (CMK) that was used to
protect the encrypted file system.
Type: String
Length Constraints: Minimum length of 1. Maximum length of 2048.
Required: No
LifeCycleState
Lifecycle phase of the file system.
Type: String
Valid Values: creating | available | deleting | deleted
Required: Yes
Name
You can add tags to a file system, including a Name tag. For more information, see
CreateTags (p. 183). If the file system has a Name tag, Amazon EFS returns the value in this field.
209

Amazon Elastic File System User Guide
FileSystemDescription
Type: String
Length Constraints: Maximum length of 256.
Required: No
NumberOfMountTargets
Current number of mount targets that the file system has. For more information, see
CreateMountTarget (p. 176).
Type: Integer
Valid Range: Minimum value of 0.
Required: Yes
OwnerId
AWS account that created the file system. If the file system was created by an IAM user, the parent
account to which the user belongs is the owner.
Type: String
Required: Yes
PerformanceMode
The PerformanceMode of the file system.
Type: String
Valid Values: generalPurpose | maxIO
Required: Yes
SizeInBytes
Latest known metered size (in bytes) of data stored in the file system, in bytes, in its Value field,
and the time at which that size was determined in its Timestamp field. The Timestamp value is the
integer number of seconds since 1970-01-01T00:00:00Z. Note that the value does not represent
the size of a consistent snapshot of the file system, but it is eventually consistent when there are
no writes to the file system. That is, the value will represent actual size only if the file system is not
modified for a period longer than a couple of hours. Otherwise, the value is not the exact size the
file system was at any instant in time.
Type: FileSystemSize (p. 211) object
Required: Yes
See Also
For more information about using this API in one of the language-specific AWS SDKs, see the following:
•AWS SDK for C++
•AWS SDK for Go
•AWS SDK for Java
•AWS SDK for Ruby V2
210

Amazon Elastic File System User Guide
FileSystemSize
FileSystemSize
Latest known metered size (in bytes) of data stored in the file system, in its Value field, and the time at
which that size was determined in its Timestamp field. Note that the value does not represent the size
of a consistent snapshot of the file system, but it is eventually consistent when there are no writes to the
file system. That is, the value will represent the actual size only if the file system is not modified for a
period longer than a couple of hours. Otherwise, the value is not necessarily the exact size the file system
was at any instant in time.
Contents
Timestamp
Time at which the size of data, returned in the Value field, was determined. The value is the integer
number of seconds since 1970-01-01T00:00:00Z.
Type: Timestamp
Required: No
Value
Latest known metered size (in bytes) of data stored in the file system.
Type: Long
Valid Range: Minimum value of 0.
Required: Yes
See Also
For more information about using this API in one of the language-specific AWS SDKs, see the following:
•AWS SDK for C++
•AWS SDK for Go
•AWS SDK for Java
•AWS SDK for Ruby V2
211

Amazon Elastic File System User Guide
MountTargetDescription
MountTargetDescription
Provides a description of a mount target.
Contents
FileSystemId
ID of the file system for which the mount target is intended.
Type: String
Required: Yes
IpAddress
Address at which the file system may be mounted via the mount target.
Type: String
Required: No
LifeCycleState
Lifecycle state of the mount target.
Type: String
Valid Values: creating | available | deleting | deleted
Required: Yes
MountTargetId
System-assigned mount target ID.
Type: String
Required: Yes
NetworkInterfaceId
ID of the network interface that Amazon EFS created when it created the mount target.
Type: String
Required: No
OwnerId
AWS account ID that owns the resource.
Type: String
Required: No
SubnetId
ID of the mount target's subnet.
Type: String
Required: Yes
212


Amazon Elastic File System User Guide
Tag
Tag
A tag is a key-value pair. Allowed characters: letters, whitespace, and numbers, representable in UTF-8,
and the following characters: + - = . _ : /
Contents
Key
Tag key (String). The key can't start with aws:.
Type: String
Length Constraints: Minimum length of 1. Maximum length of 128.
Required: Yes
Value
Value of the tag key.
Type: String
Length Constraints: Maximum length of 256.
Required: Yes
See Also
For more information about using this API in one of the language-specific AWS SDKs, see the following:
•AWS SDK for C++
•AWS SDK for Go
•AWS SDK for Java
•AWS SDK for Ruby V2
214

Amazon Elastic File System User Guide
Document History
The following table describes important changes to the Amazon Elastic File System User Guide.
•API version: 2015-02-01
•Latest documentation update: November 22, 2017
Change Description Date Changed
Amazon EFS File
Sync (EFS File Sync)
Amazon EFS now supports copying files from your on-
premises data center or from the cloud to Amazon EFS
by using EFS File Sync. EFS File Sync copies file systems
accessed using Network File System (NFS) version 3 or
NFS version 4 to Amazon EFS file systems. To get started,
see Amazon EFS File Sync (p. 33).
In this release
Data encryption at
rest
Amazon EFS now supports data encryption at rest. For
more information, see Encrypting Data and Metadata at
Rest in EFS (p. 90).
August 14, 2017
Additional region
support added
Amazon EFS is now available to all users in the EU
(Frankfurt) region.
July 20, 2017
File system names
using Domain Name
System (DNS)
Amazon EFS now supports DNS names for file systems.
A file system's DNS name automatically resolves to a
mount target’s IP address in the Availability Zone for the
connecting Amazon EC2 instance. For more information,
see Mounting on Amazon EC2 with a DNS Name (p. 63).
December 20, 2016
Increased tag
support for file
systems
Amazon EFS now supports 50 tags per file system. For
more information on tags in Amazon EFS, see Managing
File System Tags (p. 45).
August 29, 2016
General availability Amazon EFS is now generally available to all users in the
US East (N. Virginia), US West (Oregon), and EU (Ireland)
regions.
June 28, 2016
File system limit
increase
The number of Amazon EFS file systems that can be
created per account per region increased from 5 to 10.
August 21, 2015
Updated Getting
Started exercise
The Getting Started exercise has been updated to
simplify the getting started process.
August 17, 2015
New guide This is the first release of the Amazon Elastic File System
User Guide.
May 26, 2015
215
