0060 Creative Sound Blaster Live! 5.1 User Guide English
Creative A520 English
User Manual: Creative Sound Blaster Live! 5.1 User Guide Creative | Problem Troubleshooting Manuals - Part 3
Open the PDF directly: View PDF ![]() .
.
Page Count: 66
- User’s Guide
- Creative Sound Blaster Live! Digital Entertainment 5.1 Creative Audio Software
- Contents
- Introduction
- Installing Sound Blaster Live! Player 5.1
- Installing Software
- Using Sound Blaster Live! Player 5.1
- To Do This ... Use These Applications
- General Specifications
- SB Emulation in MS-DOS/ Windows 95/98/ME
- Troubleshooting

User’s Guide
Creative Sound Blaster Live! Digital Entertainment 5.1
Creative Audio Software
Information in this document is subject to change without notice and does not represent a commitment on the part of Creative Technology Ltd. No part of this
manual may be reproduced or transmitted in any form or by any means, electronic or mechanical, including photocopying and recording, for any purpose without
the written permission of Creative Technology Ltd. The software described in this document is furnished under a license agreement and may be used or copied
only in accordance with the terms of the license agreement. It is against the law to copy the software on any other medium except as specifically allowed in the
license agreement. The licensee may make one copy of the software for backup purposes.
Copyright © 1998-2000 by Creative Technology Ltd. All rights reserved.
Version 1.0
October 2000
Sound Blaster and Blaster are registered trademarks, and the Sound Blaster Live! logo, the Sound Blaster PCI logo, EMU10K1, Environmental Audio, Creative
Multi Speaker Surround, and LAVA! are trademarks of Creative Technology Ltd. in the United States and/or other countries. E-Mu and SoundFont are registered
trademarks of E-mu Systems, Inc.. SoundWorks is a registered trademark, and MicroWorks, PCWorks and FourPointSurround are trademarks of Cambridge
SoundWorks, Inc.. Microsoft, MS-DOS, and Windows are registered trademarks of Microsoft Corporation. Manufactured under license from Dolby Laboratories.
Dolby, AC-3, Pro Logic and the double-D symbol are trademarks of Dolby Laboratories. © 2000 Dolby Laboratories. All rights reserved. All other products are
trademarks or registered trademarks of their respective owners.
This product is covered by one or more of the following U.S. patents:
4,506,579; 4,699,038; 4,987,600; 5,013,105; 5,072,645; 5,111,727; 5,144,676; 5,170,369; 5,248,845; 5,298,671; 5,303,309; 5,317,104; 5,342,990; 5,430,244;
5,524,074; 5,698,803; 5,698,807; 5,748,747; 5,763,800; 5,790,837.

Creative End-User Software License Agreement
Version 2.4, June 2000
PLEASE READ THIS DOCUMENT CAREFULLY BEFORE INSTALLING THE SOFTWARE. BY INSTALLING AND USING THE SOFTWARE, YOU
AGREE TO BE BOUND BY THE TERMS OF THIS AGREEMENT. IF YOU DO NOT AGREE TO THE TERMS OF THIS AGREEMENT, DO NOT
INSTALL OR USE THE SOFTWARE. PROMPTLY RETURN, WITHIN 15 DAYS, THE SOFTWARE, ALL RELATED DOCUMENTATION AND
ACCOMPANYING ITEMS TO THE PLACE OF ACQUISITION FOR A FULL REFUND.
This is a legal agreement between you and Creative
Technology Ltd. and its subsidiaries (“Creative”).
This Agreement states the terms and conditions
upon which Creative offers to license the software
sealed in the disk package together with all related
documentation and accompanying items including,
but not limited to, the executable programs, drivers,
libraries and data files associated with such
programs (collectively, the “Software”).
LICENSE
1.Grant of License
The Software is licensed, not sold, to you for use
only under the terms of this Agreement. You own
the disk or other media on which the Software is
originally or subsequently recorded or fixed; but,
as between you and Creative (and, to the extent
applicable, its licensors), Creative retains all title
to and ownership of the Software and reserves all
rights not expressly granted to you.
2.For Use on a Single Computer
The Software may be used only on a single
computer by a single user at any time. You may
transfer the machine-readable portion of the
Software from one computer to another computer,
provided that (a) the Software (including any
portion or copy thereof) is erased from the first
computer and (b) there is no possibility that the
Software will be used on more than one computer
at a time.
3.Stand-Alone Basis
You may use the Software only on a stand-alone
basis, such that the Software and the functions it
provides are accessible only to persons who are
physically present at the location of the computer
on which the Software is loaded. You may not
allow the Software or its functions to be accessed
remotely, or transmit all or any portion of the
Software through any network or communication
line.
4.Copyright
The Software is owned by Creative and/or its
licensees and is protected by United States
copyright laws and international treaty provisions.
You may not remove the copyright notice from
any copy of the Software or any copy of the
written materials, if any, accompanying the
Software.
5.One Archival Copy
You may make one (1) archival copy of the
machine-readable portion of the Software for
backup purposes only in support of your use of the
Software on a single computer, provided that you
reproduce on the copy all copyright and other
proprietary rights notices included on the
originals of the Software.
6.No Merger or Integration
You may not merge any portion of the Software
into, or integrate any portion of the Software with,
any other program, except to the extent expressly
permitted by the laws of the jurisdiction where
you are located. Any portion of the Software
merged into or integrated with another program, if
any, will continue to be subject to the terms and
conditions of this Agreement, and you must
reproduce on the merged or integrated portion all
copyright and other proprietary rights notices
included in the originals of the Software.
7. Network Version
If you have purchased a “network” version of the
Software, this Agreement applies to the
installation of the Software on a single “file
server”. It may not be copied onto multiple
systems. Each “node” connected to the “file
server” must also have its own license of a “node
copy” of the Software, which becomes a license
only for that specific “node”.
8. Transfer of License
You may transfer your license of the Software,
provided that (a) you transfer all portions of the
Software or copies thereof, (b) you do not retain
any portion of the Software or any copy thereof,
and (c) the transferee reads and agrees to be bound
by the terms and conditions of this Agreement.
9. Limitations on Using, Copying, and Modifying
the Software
Except to the extent expressly permitted by this
Agreement or by the laws of the jurisdiction
where you acquired the Software, you may not
use, copy or modify the Software. Nor may you
sub-license any of your rights under this
Agreement. You may use the software for your
personal use only, and not for public performance
or for the creation of publicly displayed
videotapes.
10.Decompiling, Disassembling, or Reverse
Engineering
You acknowledge that the Software contains trade

secrets and other proprietary information of
Creative and its licensors. Except to the extent
expressly permitted by this Agreement or by the
laws of the jurisdiction where you are located, you
may not decompile, disassemble or otherwise
reverse engineer the Software, or engage in any
other activities to obtain underlying information
that is not visible to the user in connection with
normal use of the Software.
In particular, you agree not for any purpose to
transmit the Software or display the Software's
object code on any computer screen or to make
any hardcopy memory dumps of the Software's
object code. If you believe you require
information related to the interoperability of the
Software with other programs, you shall not
decompile or disassemble the Software to obtain
such information, and you agree to request such
information from Creative at the address listed
below. Upon receiving such a request, Creative
shall determine whether you require such
information for a legitimate purpose and, if so,
Creative will provide such information to you
within a reasonable time and on reasonable
conditions.
In any event, you will notify Creative of any
information derived from reverse engineering or
such other activities, and the results thereof will
constitute the confidential information of Creative
that may be used only in connection with the
Software.
11.For Software With CDDB Features.
This package includes applications which may
contain software from CDDB, Inc.of Berkeley
California ("CDDB"). The software from CDDB
(the "CDDB Client") enables the application to do
online disc identification and obtain music-related
information, including name, artist, track and title
information ("CDDB Data") from online servers
("CDDB Servers") and to perform other
functions.
You agree that you will use CDDB Data, the
CDDB Client and CDDB Servers for your own
personal non-commercial use only. You agree not
to assign, copy, transfer or transmit the CDDB
Client or any CDDB Data to any third party. YOU
AGREE NOT TO USE OR EXPLOIT CDDB
DATA, THE CDDB CLIENT,OR CDDB
SERVERS,EXCEPT AS EXPRESSLY
PERMITTED HEREIN.
You agree that your non-exclusive license to use
the CDDB Data, the CDDB Client and CDDB
Servers will terminate if you violate these
restrictions. If your license terminates, you agree
to cease any and all use of the CDDB Data, the
CDDB Client and CDDB Servers. CDDB
reserves all rights in CDDB Data, the CDDB
Client and the CDDB Servers, including all
ownership rights.
You agree that CDDB, Inc. may enforce its rights
under this Agreement against you directly in its
own name.
The CDDB Client and each item of CDDB Data
are licensed to you "AS IS." CDDB makes no
representations or warranties, express or implied,
regarding the accuracy of any CDDB Data from in
the CDDB Servers. CDDB reserves the right to
delete data from the CDDB Servers or to change
data categories for any cause that CDDB deems
sufficient. No warranty is made that the CDDB
Client or CDDB Servers are error-free or that
functioning of CDDB Client or CDDB Servers
will be uninterrupted. CDDB is not obligated to
provide you with any new enhanced or additional
data types or categories that CDDB may chose to
provide in the future.
CDDB DISCLAIMS ALL WARRANTIES
EXPRESS OR IMPLIED, INCLUDING, BUT
NOT LIMITED TO, IMPLIED WARRANTIES
OF MERCHANTABILITY, FITNESS FOR A
PARTICULAR PURPOSE, TITLE AND NON-
INFRINGEMENT. CDDB does not warrant the
results that will be obtained by your use of the
CDDB Client or any CDDB Server. IN NO CASE
WILL CDDB BE LIABLE FOR ANY
CONSEQUENTIAL OR INCIDENTIAL
DAMAGES OR FOR ANY LOST PROFITS, OR
LOST REVENUES.
TERMINATION
The license granted to you is effective until
terminated. You may terminate it at any time by
returning the Software (including any portions or
copies thereof) to Creative. The license will also
terminate automatically without any notice from
Creative if you fail to comply with any term or
condition of this Agreement. You agree upon such
termination to return the Software (including any
portions or copies thereof) to Creative. Upon
termination, Creative may also enforce any rights
provided by law. The provisions of this Agreement
that protect the proprietary rights of Creative will
continue in force after termination.
LIMITED WARRANTY
Creative warrants, as the sole warranty, that the
disks on which the Software is furnished will be free
of defects, as set forth in the Warranty Card or
printed manual included with the Software. No
distributor, dealer or any other entity or person is
authorised to expand or alter this warranty or any
other provisions of this Agreement. Any
representation, other than the warranties set forth in
this Agreement, will not bind Creative.
Creative does not warrant that the functions
contained in the Software will meet your
requirements or that the operation of the Software
will be uninterrupted, error-free or free from
malicious code. For purposes of this paragraph,
“malicious code” means any program code designed

to contaminate other computer programs or
computer data, consume computer resources,
modify, destroy, record, or transmit data, or in some
other fashion usurp the normal operation of the
computer, computer system, or computer network,
including viruses, Trojan horses, droppers, worms,
logic bombs, and the like. EXCEPT AS STATED
ABOVE IN THIS AGREEMENT, THE
SOFTWARE IS PROVIDED AS-IS WITHOUT
WARRANTY OF ANY KIND, EITHER
EXPRESS OR IMPLIED, INCLUDING, BUT
NOT LIMITED TO, ANY IMPLIED
WARRANTIES OF MERCHANTABILITY
AND FITNESS FOR A PARTICULAR
PURPOSE. CREATIVE IS NOT OBLIGATED
TO PROVIDE ANY UPDATES, UPGRADES
OR TECHNICAL SUPPORT FOR THE
SOFTWARE.
Further, Creative shall not be liable for the accuracy
of any information provided by Creative or third
party technical support personnel, or any damages
caused, either directly or indirectly, by acts taken or
omissions made by you as a result of such technical
support.
You assume full responsibility for the selection of
the Software to achieve your intended results, and
for the installation, use and results obtained from the
Software. You also assume the entire risk as it
applies to the quality and performance of the
Software. Should the Software prove defective, you
(and not Creative, or its distributors or dealers)
assume the entire cost of all necessary servicing,
repair or correction.
This warranty gives you specific legal rights, and
you may also have other rights which vary from
country/state to country/state. Some countries/states
do not allow the exclusion of implied warranties, so
the above exclusion may not apply to you. Creative
disclaims all warranties of any kind if the Software
was customised, repackaged or altered in any way
by any third party other than Creative.
LIMITATION OF REMEDIES AND
DAMAGES
THE ONLY REMEDY FOR BREACH OF
WARRANTY WILL BE THAT SET FORTH IN
THE WARRANTY CARD OR PRINTED
MANUAL INCLUDED WITH THE
SOFTWARE. IN NO EVENT WILL
CREATIVE OR ITS LICENSORS BE LIABLE
FOR ANY INDIRECT, INCIDENTAL,
SPECIAL OR CONSEQUENTIAL DAMAGES
OR FOR ANY LOST PROFITS, LOST
SAVINGS, LOST REVENUES OR LOST
DATA ARISING FROM OR RELATING TO
THE SOFTWARE OR THIS AGREEMENT,
EVEN IF CREATIVE OR ITS LICENSORS
HAVE BEEN ADVISED OF THE
POSSIBILITY OF SUCH DAMAGES. IN NO
EVENT WILL CREATIVE’S LIABILITY OR
DAMAGES TO YOU OR ANY OTHER
PERSON EVER EXCEED THE AMOUNT
PAID BY YOU TO USE THE SOFTWARE,
REGARDLESS OF THE FORM OF THE
CLAIM.
Some countries/states do not allow the limitation or
exclusion of liability for incidental or consequential
damages, so the above limitation or exclusion may
not apply to you.
PRODUCT RETURNS
If you must ship the software to Creative or an
authorised Creative distributor or dealer, you must
prepay shipping and either insure the software or
assume all risk of loss or damage in transit.
U.S. GOVERNMENT RESTRICTED RIGHTS
All Software and related documentation are
provided with restricted rights. Use, duplication or
disclosure by the U.S. Government is subject to
restrictions as set forth in subdivision (b)(3)(ii) of
the Rights in Technical Data and Computer
Software Clause at 252.227-7013. If you are sub-
licensing or using the Software outside of the United
States, you will comply with the applicable local
laws of your country, U.S. export control law, and
the English version of this Agreement.
CONTRACTOR/MANUFACTURER
The Contractor/Manufacturer for the Software is:
Creative Technology Ltd
31, International Business Park
Creative Resource
Singapore 609921
GENERAL
This Agreement is binding on you as well as your
employees, employers, contractors and agents, and
on any successors and assignees. Neither the
Software nor any information derived therefrom
may be exported except in accordance with the laws
of the U.S. or other applicable provisions. This
Agreement is governed by the laws of the State of
California (except to the extent federal law governs
copyrights and federally registered trademarks).
This Agreement is the entire agreement between us
and supersedes any other understandings or
agreements, including, but not limited to,
advertising, with respect to the Software. If any
provision of this Agreement is deemed invalid or
unenforceable by any country or government agency
having jurisdiction, that particular provision will be
deemed modified to the extent necessary to make
the provision valid and enforceable, and the
remaining provisions will remain in full force and
effect.
For questions concerning this Agreement, please
contact Creative at the address stated above. For
questions on product or technical matters, contact
the Creative technical support centre nearest you.

ADDENDUM TO THE MICROSOFT
SOFTWARE LICENSE AGREEMENT
(WINDOWS 95)
IMPORTANT: By using the Microsoft software
files (the “Microsoft Software”) provided with this
Addendum, you are agreeing to be bound by the
following terms. If you do not agree to be bound by
these terms, you may not use the Microsoft
Software.
The Microsoft Software is provided for the sole
purpose of replacing the corresponding files
provided with a previously licensed copy of the
Microsoft software product identified above
(“ORIGINAL PRODUCT”). Upon installation, the
Microsoft Software files become part of the
ORIGINAL PRODUCT and are subject to the same
warranty and license terms and conditions as the
ORIGINAL PRODUCT. If you do not have a valid
license to use the ORIGINAL PRODUCT, you may
not use the Microsoft Software. Any other use of the
Microsoft Software is prohibited.
SPECIAL PROVISIONS APPLICABLE TO
THE EUROPEAN UNION
IF YOU ACQUIRED THE SOFTWARE IN THE
EUROPEAN UNION (EU), THE FOLLOWING
PROVISIONS ALSO APPLY TO YOU. IF THERE
IS ANY INCONSISTENCY BETWEEN THE
TERMS OF THE SOFTWARE LICENSE
AGREEMENT SET OUT EARLIER AND IN THE
FOLLOWING PROVISIONS, THE FOLLOWING
PROVISIONS SHALL TAKE PRECEDENCE.
DECOMPILATION
You agree not for any purpose to transmit the
Software or display the Software’s object code on
any computer screen or to make any hard copy
memory dumps of the Software’s object code. If you
believe you require information related to the
interoperability of the Software with other
programs, you shall not decompile or disassemble
the Software to obtain such information, and you
agree to request such information from Creative at
the address listed earlier. Upon receiving such a
request, Creative shall determine whether you
require such information for a legitimate purpose
and, if so, Creative will provide such information to
you within a reasonable time and on reasonable
conditions.
LIMITED WARRANTY
EXCEPT AS STATED EARLIER IN THIS
AGREEMENT, AND AS PROVIDED UNDER
THE HEADING “STATUTORY RIGHTS”,
THE SOFTWARE IS PROVIDED AS-IS
WITHOUT WARRANTY OF ANY KIND,
EITHER EXPRESS OR IMPLIED,
INCLUDING, BUT NOT LIMITED TO, ANY
IMPLIED WARRANTIES OR CONDITIONS
OF MERCHANTABILITY, QUALITY AND
FITNESS FOR A PARTICULAR PURPOSE.
LIMITATION OF REMEDY AND DAMAGES
THE LIMITATIONS OF REMEDIES AND
DAMAGES IN THE SOFTWARE LICENSE
AGREEMENT SHALL NOT APPLY TO
PERSONAL INJURY (INCLUDING DEATH)
TO ANY PERSON CAUSED BY CREATIVE’S
NEGLIGENCE AND ARE SUBJECT TO THE
PROVISION SET OUT UNDER THE
HEADING “STATUTORY RIGHTS”.
STATUTORY RIGHTS
Irish law provides that certain conditions and
warranties may be implied in contracts for the sale
of goods and in contracts for the supply of services.
Such conditions and warranties are hereby
excluded, to the extent such exclusion, in the context
of this transaction, is lawful under Irish law.
Conversely, such conditions and warranties, insofar
as they may not be lawfully excluded, shall apply.
Accordingly nothing in this Agreement shall
prejudice any rights that you may enjoy by virtue of
Sections 12, 13, 14 or 15 of the Irish Sale of Goods
Act 1893 (as amended).
GENERAL
This Agreement is governed by the laws of the
Republic of Ireland. The local language version of
this agreement shall apply to Software acquired in
the EU. This Agreement is the entire agreement
between us, and you agree that Creative will not
have any liability for any untrue statement or
representation made by it, its agents or anyone else
(whether innocently or negligently) upon which you
relied upon entering this Agreement, unless such
untrue statement or representation was made
fraudulently.
Safety Information
The following sections contain notices for
various countries:
CAUTION: This device is intended to be installed
by the user in a CSA/TUV/UL certified/listed IBM
AT or compatible personal computers in the
manufacturer’s defined operator access area. Check
the equipment operating/installation manual and/or
with the equipment manufacturer to verify/confirm
if your equipment is suitable for user-installed
application cards.
Modifications
Any changes or modifications not expressly
approved by the grantee of this device could void the
user’s authority to operate the device.
Compliance
This product conforms to the following Council
Directive:
❑Directive 89/336/EEC, 92/31/EEC (EMC)

Contents
Introduction
The All-Round Audio Solution for Internet and Digital Home Entertainment........xi
System Requirements.................................................................................................xii
Live!Ware Benefits.....................................................................................................xii
Getting More Information........................................................................................ xiii
Where To Go From Here ......................................................................................... xiii
Other Recommendations.......................................................................................... xiii
Document Conventions............................................................................................ xiii
1 Installing Sound Blaster Live! Player 5.1
Your Audio Card................................................................................................................... 1-2
Installing the Card................................................................................................................. 1-3
Connecting Related Peripherals ........................................................................................... 1-4
Enhancing Your Sound Blaster Live! Experience.............................................................. 1-5
Playing Games and Music, and Watching Movies ................................................. 1-5
Watching DVD Movies or Playing DVD Games................................................... 1-5
Recording and Content Authoring........................................................................... 1-9
Positioning Your Speakers.................................................................................................... 1-9
2 Installing Software
Installing Audio Drivers and Applications.......................................................................... 2-1
Using Sound Blaster Live! ................................................................................................... 2-2
Uninstalling the Applications............................................................................................... 2-3
Reinstalling the Audio Drivers............................................................................................. 2-4
Playing Legacy Games ......................................................................................................... 2-4

3 Using Sound Blaster Live!
Creative Sound Blaster Live! Tour......................................................................................3-2
Creative Diagnostics ............................................................................................................. 3-2
Creative Launcher.................................................................................................................3-2
Surround Mixer .....................................................................................................................3-3
Switching between analog and digital output modes..............................................3-4
Enabling Bass Redirection .......................................................................................3-5
Enabling Dolby Digital (AC-3) Decoding...............................................................3-5
AudioHQ ............................................................................................................................... 3-6
SoundFont Control....................................................................................................3-7
Device Controls.........................................................................................................3-9
Creative Keyboard ..................................................................................................3-10
EAX Control ...........................................................................................................3-11
AutoEAX ................................................................................................................3-12
Wave Studio......................................................................................................................... 3-12
Creative PlayCenter 2 .........................................................................................................3-13
Creative Recorder................................................................................................................3-13
Creative LAVA!...................................................................................................................3-14
Creative MediaRing Talk....................................................................................................3-14
Creative Keytar....................................................................................................................3-15
Creative Rhythmania...........................................................................................................3-15
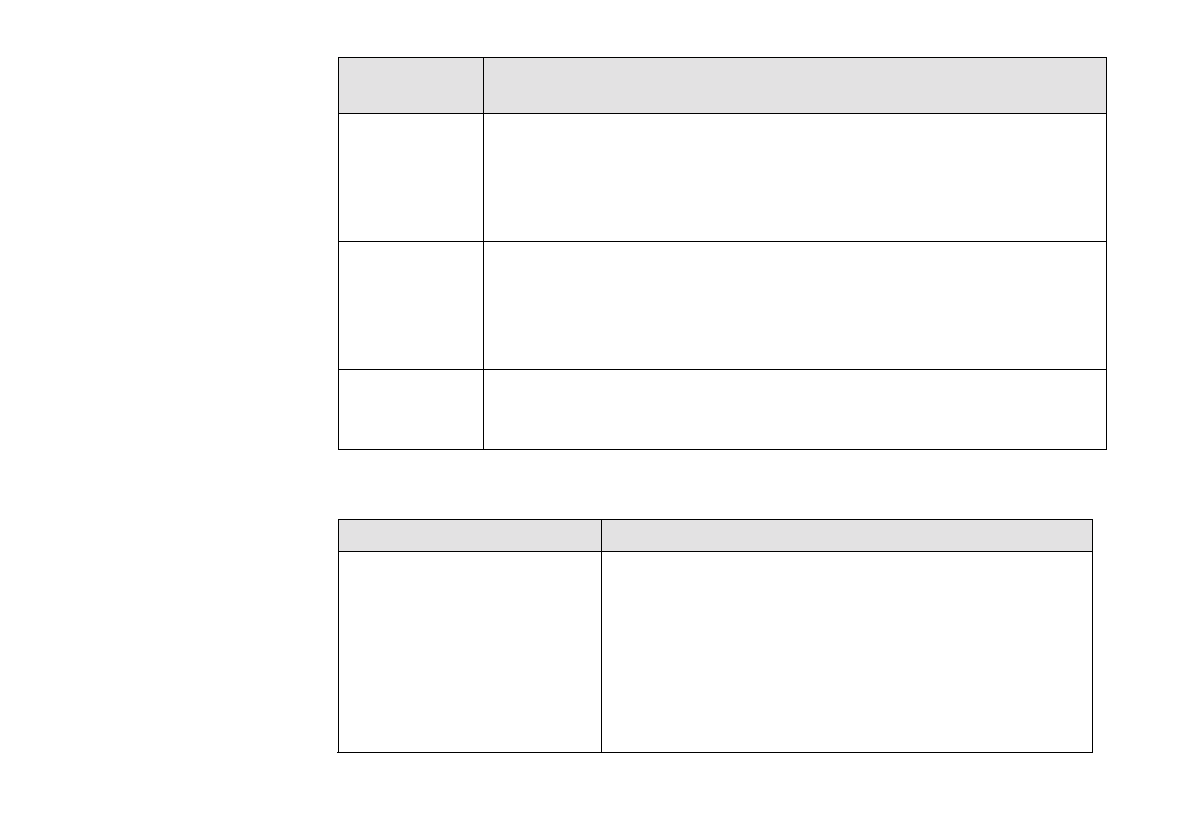
4 To Do This ... Use These Applications
Multimedia Playback............................................................................................................4-1
Digital Entertainment............................................................................................................ 4-2
Internet Entertainment........................................................................................................... 4-3
Gaming Reference................................................................................................................. 4-5
AGeneral Specifications
Features................................................................................................................................. A-1

Connectivity ......................................................................................................................... A-3
Sound Blaster Live! card......................................................................................... A-3
BSB Emulation in MS-DOS/ Windows 95/98/ME
Background ...........................................................................................................................B-1
Understanding the Installation Program ..............................................................................B-2
The AUTOEXEC.BAT File Settings.......................................................................B-2
The CONFIG.SYS File Settings..............................................................................B-3
System Resource Settings.....................................................................................................B-3
Input/Output (I/O) Addresses...................................................................................B-3
Interrupt Request (IRQ) Line...................................................................................B-4
Direct Memory Access (DMA) Channel................................................................B-4
Environment Variables..........................................................................................................B-5
CTSYN Environment Variable................................................................................B-5
BLASTER Environment Variable ...........................................................................B-5
Determining Resources.........................................................................................................B-6
Selecting the Best Audio Options in a Game......................................................................B-7
Music Options...........................................................................................................B-7
Digital Audio Options ..............................................................................................B-7
MS-DOS Mode Utilities.......................................................................................................B-8
SBECFG.EXE ..........................................................................................................B-8
SBEMIXER.EXE.....................................................................................................B-8
SBESET.EXE ...........................................................................................................B-9
SBEGO.EXE ......................................................................................................... B-10
CTroubleshooting
Problems Installing Software ...............................................................................................C-1
Problems With Sound...........................................................................................................C-2
Problem with Surround Mixer..............................................................................................C-4
Insufficient SoundFont Cache ..............................................................................................C-5

Problems With Joystick ....................................................................................................... C-5
Resolving I/O Conflicts ....................................................................................................... C-7
Problems in Windows NT 4.0 ............................................................................................. C-7
Problems with Encore DVD Player .................................................................................... C-8

xi
Introduction
The All-Round Audio
Solution for Internet and
Digital Home
Entertainment
Sound Blaster Live! Player 5.1 is the top audio solution for your games, movies, CDs, MP3 songs
and other Internet entertainment. With its support for today’s leading audio standard—EAX—
Sound Blaster Live! Player 5.1 creates real-life, multi-dimensional sound and multi-textured
acoustical environments for the most realistic 3D audio experience. Its powerful EMU10K1 audio
processor delivers audio at optimum CPU performance with the highest fidelity and absolute
clarity. Combine it with a four- or five-speaker setup and you’ll experience realistic 3D audio,
EAX in supported games, and enjoy your movies with true surround sound. The Live!Ware
upgrade program will keep your Sound Blaster Live! card up to date with continual upgrades
supporting future technologies, functionality, and features.
If you wish to create your own music or audio content in the future, your Sound Blaster Live! card
also offers you many upgrade options which will allow you to connect multiple digital and analog
devices simultaneously, including keyboards and other music gear, as well as optical connection
to MiniDisc and DAT recorders.

xii
System Requirements For Creative software, your card requires at least:
❑Genuine Intel® Pentium® class processor:
166 MHz for Windows 95/98 or Windows Millennium Edition,
200 MHz for Windows NT 4.0 or Windows 2000
❑Intel or 100% compatible motherboard chipset
❑Windows 95, 98 or Millennium Edition, Windows NT 4.0 or Windows 2000
❑16 MB RAM for Windows 95/98 or Millennium Edition (32 MB RAM recommended),
32 MB RAM for Windows NT 4.0,
64 MB RAM for Windows 2000
❑160 MB of free hard disk space
❑Open half-length PCI 2.1 compliant slot
❑Headphones or amplified speakers (available separately)
❑CD-ROM drive required for software installation
Sound Blaster Live! Player 5.1 gives you an estimate of the hard disk space required when you
select it on the installation screen. Included applications may need higher system requirements or
microphone for basic functionalities. Refer to the documentation for individual applications for
details.
Live!Ware Benefits Your Investment Is Protected as you have less of a likelihood of finding your audio card
obsolete shortly after purchasing it. Through Live!Ware, new features and applications are always
made available for you to experience the latest technology and to extend the life of your card.
The Value and Experience Increases Over Time as Live!Ware continues to deliver new
capabilities and enhancements. Each upgrade will “rejuvenate” your audio card, allowing you to
experience new functionality. It is as if your audio card is “reborn”.
Your Hardware Is Up To Date because the latest Live!Ware upgrades are only a download away.
When new standards and capabilities emerge, your hardware is ready for it—just download the
functions and your hardware becomes up-to-date!
xiii
Getting More Information See the online User’s Guide for MIDI specifications and connector pin assignments, as well as
instructions on using the various applications in your audio package.
Where To Go From
Here ...
❑For hardware and software installation instructions, refer to Chapters 1 and 2.
❑To learn about the bundled applications, refer to Chapters 3 and 4.
Other Recommendations ❑View the contents of the Demo CD for additional demonstrations, libraries and other software.
❑Visit the www.soundblaster.com site for more information, content and Live!Ware updates.
Document Conventions The following typographical conventions are used throughout this document:
bold Text that must be entered exactly as it appears.
italic Title of a book or a placeholder, which represents the information you must
provide.
UPPERCASE Directory name, file name, or acronym.
The notepad icon indicates information that is of particular importance and
should be considered before continuing.
The alarm clock designates a caution or warning that can help you avoid
situations involving risk.

1-2 Installing Sound Blaster Live! Player 5.1
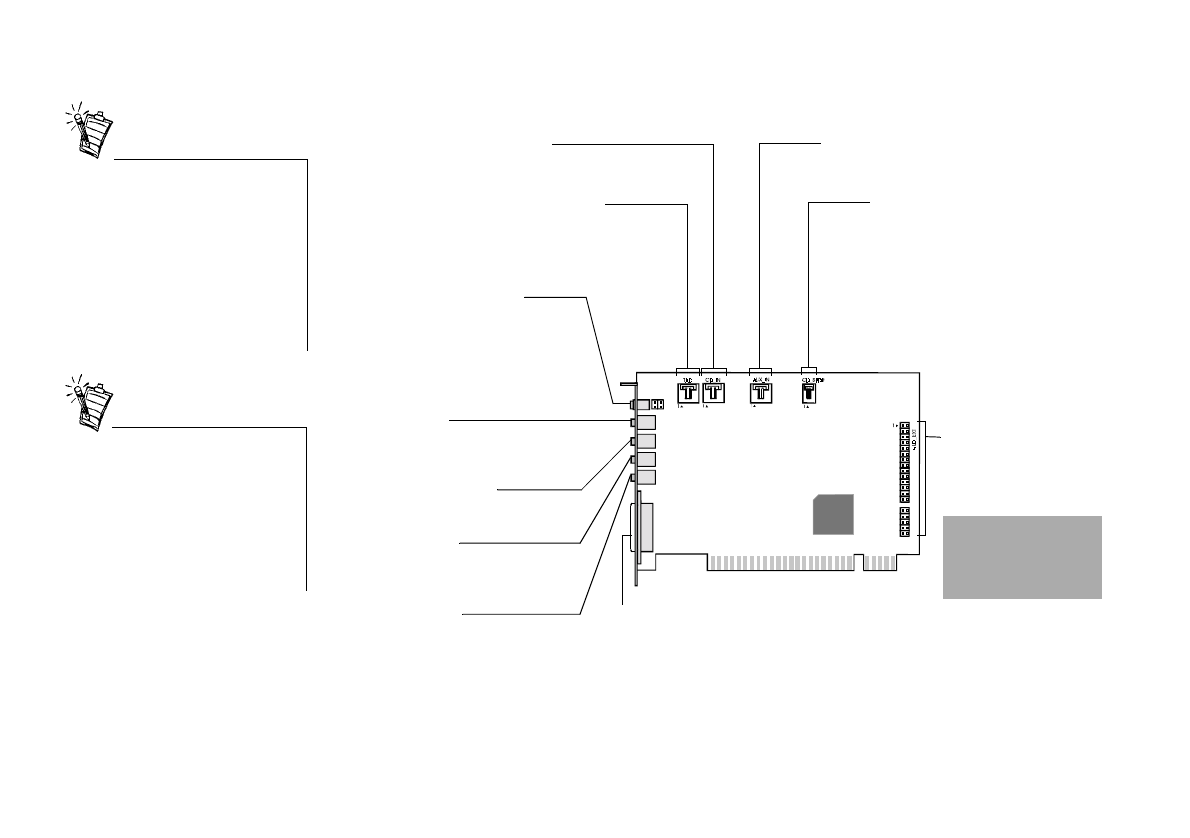
Your Audio Card Your audio card has these jacks and connectors which allow you to attach other devices:
A jack is a one-hole connecting
interface whereas a connector
consists of many pins. Some
connectors here may not be
available on your card. Refer to
the online User’s Guide,
“Hardware Information”, for
details on connector pin
assignments.
Line Out and Rear Out jacks can
be used simultaneously to power
4.1 channel speaker systems. In
addition, the Analog/Digital Out
j
ack can be used to power the
Centre and Subwoofer (LFE) for
5.1 channel speaker systems.
CD Audio connector
Connects to the Analog Audio output on a CD-ROM
or DVD-ROM drive using a CD audio cable.
Joystick/MIDI connector
Connects to a joystick or a MIDI device. You can
buy an optional MIDI kit that allows you to plug in
the joystick and MIDI device simultaneously.
Line In jack
C
onnects to an external device
(
such as a cassette, DAT, or MiniDisc
p
layer).
Microphone In jack
Connects to an external microphone
f
or voice input.
Figure 1-1: Jacks and connectors on the Sound Blaster Live! card.
Rear Out jack
Connects to powered speakers or an
external amplifier for audio output.
Line Out jack
Connects to powered speakers or an
external amplifier for audio output.
Also supports headphones.
Telephone Answering Device
connector
Provides a mono connection from a
standard voice modem, and transmits
microphone signals to the modem.
AUX connector
Connects to internal audio sources such as
TV Tuner, MPEG, or other similar cards.
Audio Extension
(Digital I/O) connector
Connects to the Digital I/O
card or Live! Drive.
Warning: This is not
an IDE interface. Do
not connect to your
IDE devices.
CD SPDIF connector
Connects to the SPDIF (Digital
Audio) output (where available) on
a CD-ROM or DVD-ROM drive.
A
nalog/Digital Out jack
6-channel or compressed AC-3 SPDIF
o
utput for connection to external digital
d
evices or digital speaker systems.
A
lso supports Centre and Subwoofer
a
nalog channels for connection to 5.1
a
nalog speaker systems.
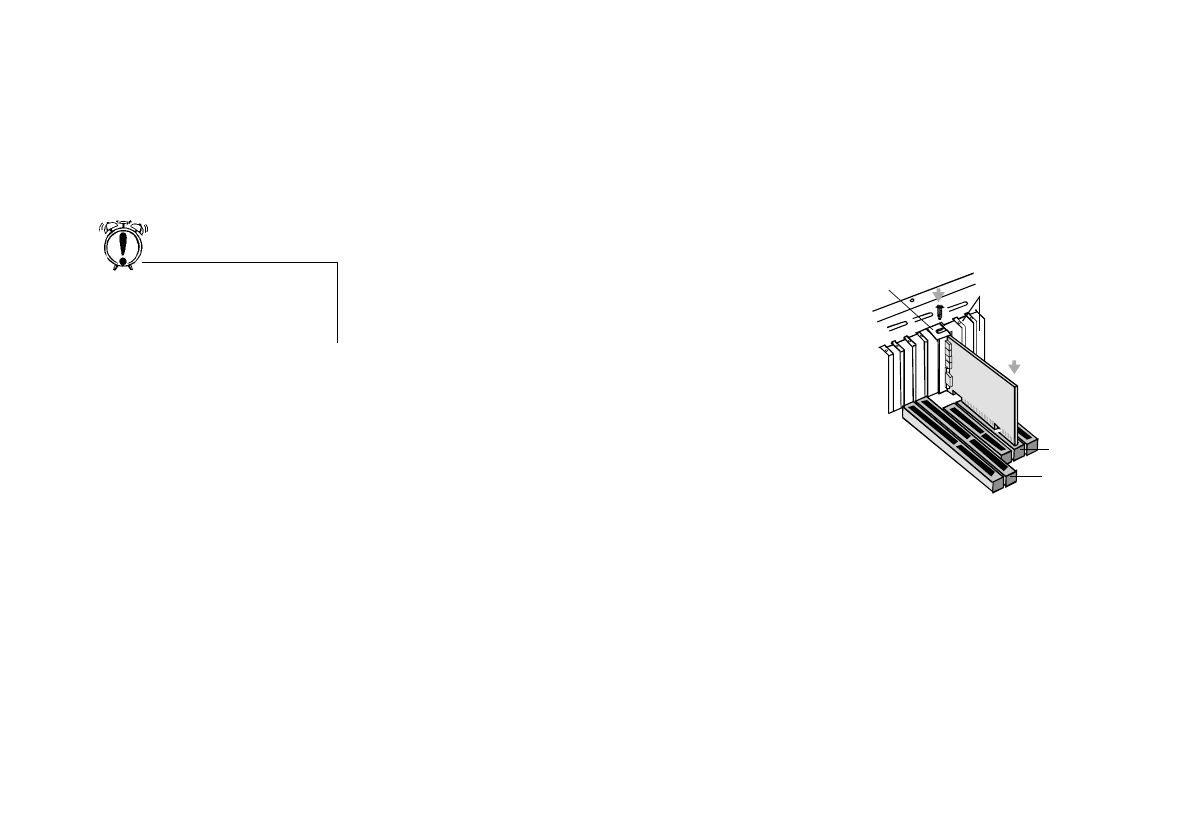
Installing Sound Blaster Live! Player 5.1 1-3
Installing the Card 1. Switch off your system and all peripheral devices.
2. Touch a metal plate on your system to ground yourself and to discharge any static
electricity, and then unplug the power cord from the wall outlet.
3. Remove the cover from your system.
4. Remove the metal plate from one unused PCI expansion slot in your system and put the
screw aside, to be used later.
5. Align the Sound Blaster Live! card with the
vacant PCI expansion slot. Press the card gently
and evenly into the slot as shown in Figure 1-2.
Ensure that the card is seated firmly inside the
PCI expansion slot.
6. Secure the card to the expansion slot with a
screw.
7. Replace the cover onto your system.
8. Plug the power cord back into the wall outlet, and
switch on the system.
Do not force the audio card into
the slot. If it does not fit properly,
gently remove it and try again.
Figure 1-2: Securing the audio card to the
PCI expansion slot.
Unused brackets
ii. Fasten the card
to the slot with a
screw.
i. Gently press the
audio card into
the slot.
PCI slot
ISA slot
1-4 Installing Sound Blaster Live! Player 5.1
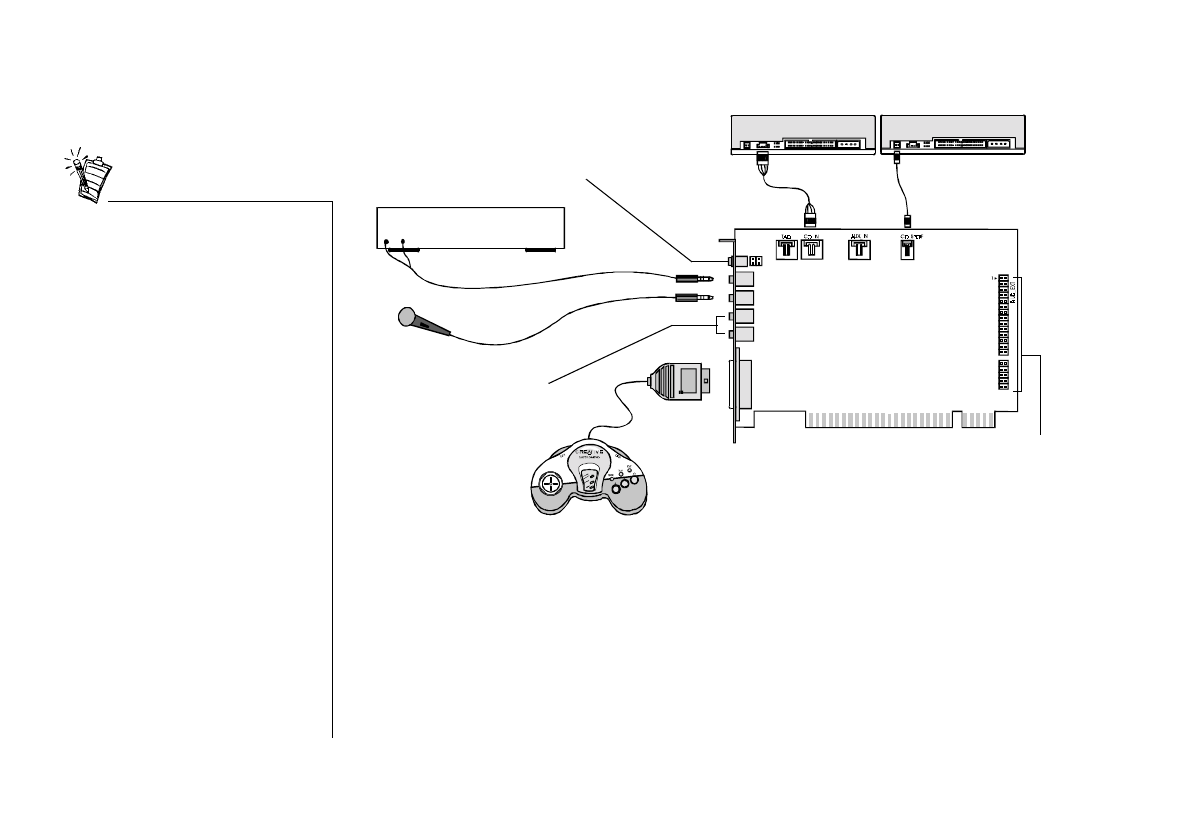
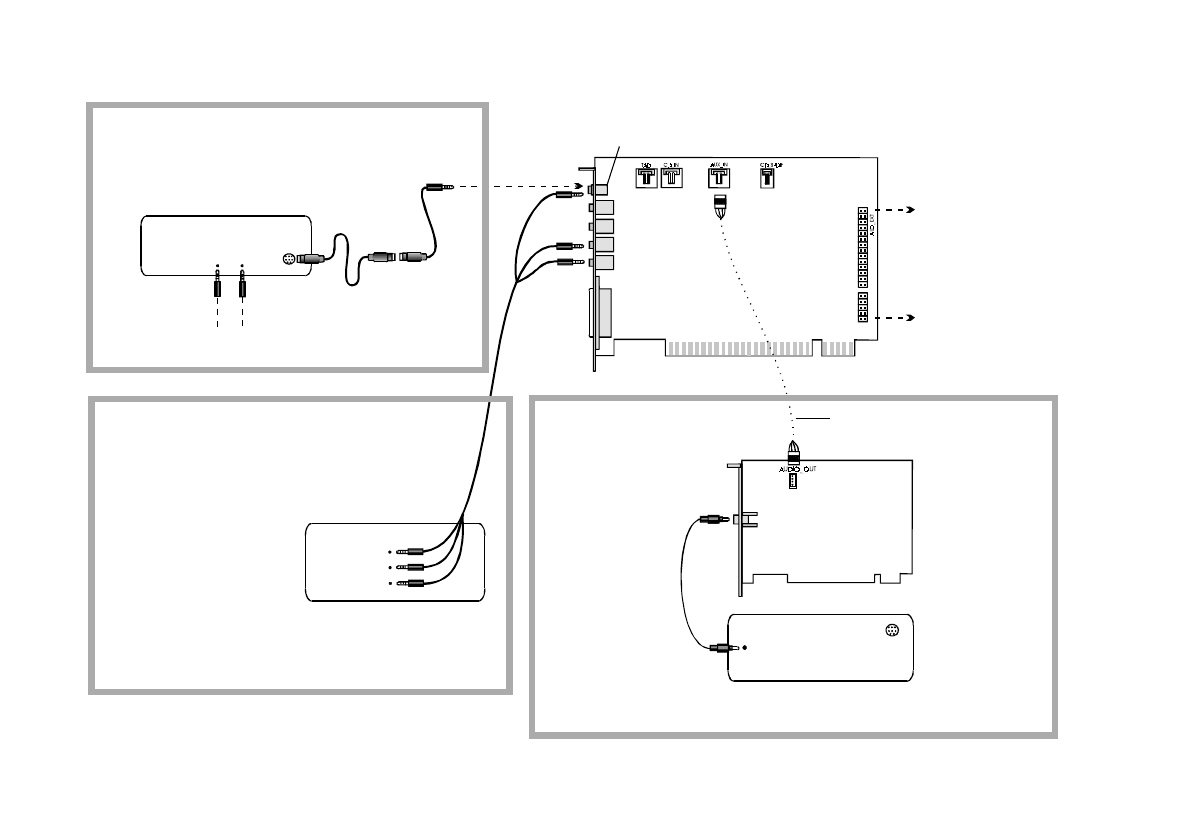
Connecting Related
Peripherals
❑If you are playing games in
Windows 95/98 MS-DOS
mode (pure DOS mode), you
must:
•Make sure the CD In
connector and the Analog
Audio connector of the
CD-ROM or PC-DVD
drive are connected.
•In addition, if you get
distorted audio, do not
connect the CD SPDIF
connector to the Digital
Audio connector of the
CD-ROM or PC-DVD
drive.
❑If you connect to the Digital
Audio and Analog Audio
connectors of the same CD-
ROM or PC-DVD drive, do not
unmute CD Audio and CD
Digital at the same time in
Surround Mixer.
Figure 1-3: Connecting other devices.
CD-ROM drive
Rear Out
Joystick/MIDI
GamePad
Line-out
Microphone
MPC-to-
MPC (4-pin)
audio cable
Line Out
Sound Blaster Live! card
Connects to analog front
and rear inputs of
FourPointSurround
speakers
MPC-to-MPC (2-pin)
audio cable
PC-DVD drive
Line In
Cassette and CD player,
Synthesiser, etc.
Mic In
Connects to Live! Drive IR.
See “Enhancing Your
Sound Blaster Live!
Experience” for more
details.
Analog Mode (default): Connects to Centre and
Subwoofer channels.
Digital Mode: Connects to digital speakers*,
MiniDisc or DAT via minijack-to-DIN cable.
For instructions on how to switch between digital
and analog modes, see “Switching between
analog and digital output modes” on page 3-4.
* e.g., Playworks
DTT3500 Digital
speakers

Installing Sound Blaster Live! Player 5.1 1-5
Enhancing Your
Sound Blaster Live!
Experience
The Sound Blaster Live! card alone will most undoubtedly give you endless hours of listening
pleasure. To further enhance your SB Live! experience, there are several upgrade options
(available separately). The following information and diagrams on the next few pages show how
you can connect these options to your SB Live! card.
Playing Games and Music,
and Watching Movies
❑With FourPointSurround Digital speakers from Cambridge SoundWorks, you can experience
crystal clear gaming sequences or music from the Digital DIN connection. If you want an even
more immersive surround experience while watching movies, get the Playworks DTT3500
5.1 Digital speakers. A minijack-to-DIN cable is bundled with the speaker set for this
connection.
❑Alternatively, you can also connect an analog 5.1 channel speaker system (such as the
DeskTop Theater 5.1 DTT2200 speakers from Cambridge SoundWorks) or even your 6-
channel home theatre speaker system. Besides the Front and Rear outputs, the SB Live! card
has an Analog/Digital Out jack which allows you to connect to your Centre & Subwoofer
channels.
For instructions on how to switch between the analog and digital modes of the Digital/Analog
jack, see “Switching between analog and digital output modes” on page 3-4
Watching DVD Movies or
Playing DVD Games
❑To watch DVD movies on your PC, why not get Creative’s PC-DVD kit which comes with a
PC-DVD drive and Encore MPEG2 decoder card? You can connect your Encore Dxr2, Dxr3
or MPEG2 decoder card to an external Dolby Digital (AC-3) decoder such as the DeskTop
Theater speaker systems. In this case, disconnect the audio card’s Aux In connector from the
decoder card’s Audio Out connector. However, if an external Dolby Digital (AC-3) decoder
speaker system is not available, this connection is necessary.
* Information continues on page 1-9.
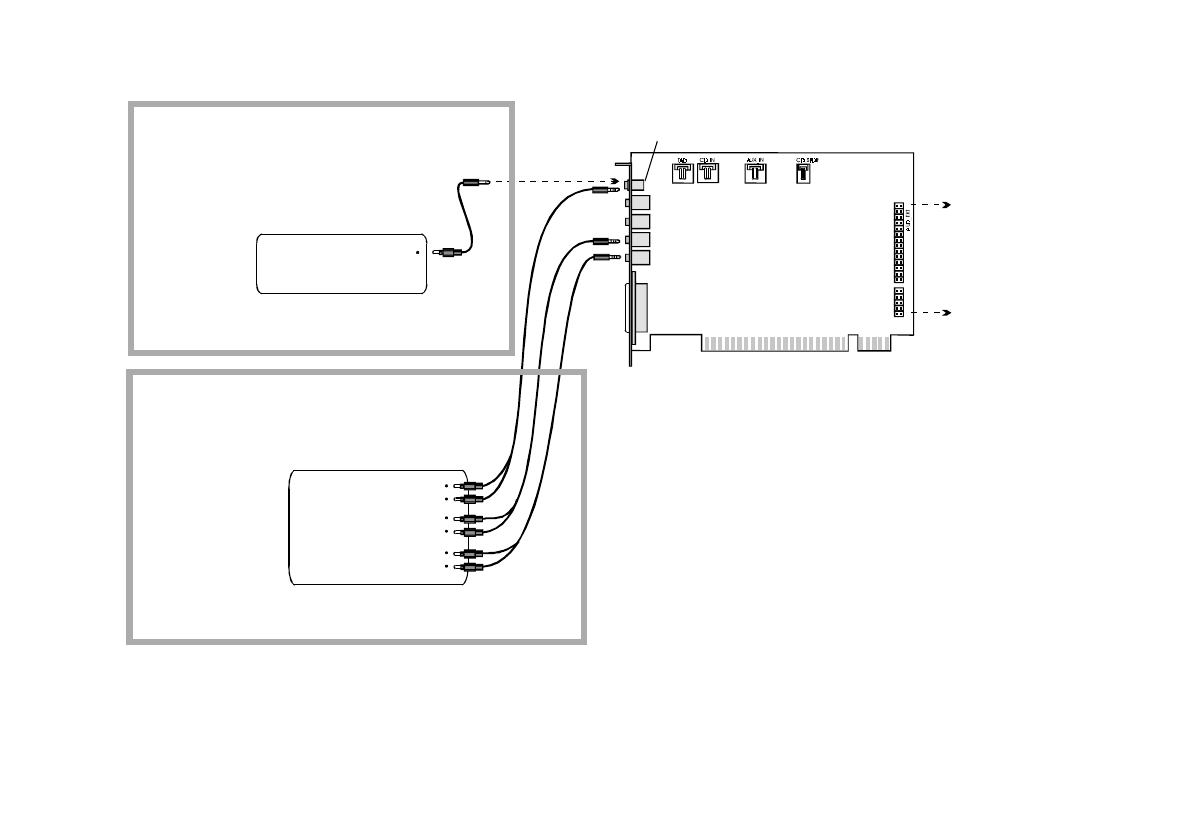
1-6 Installing Sound Blaster Live! Player 5.1
Playing Games and Music,
and Watching Movies
with 4.1 or 5.1 Digital Speaker
Systems
Sound Blaster
Live! card
Connect for downmix audio only when
a Dolby Digital (AC-3) decoder
speaker system is not available.
Digital
DIN
MPEG2 decoder card
Dolby Digital
(AC-3)
SPDIF In
Dolby Digital (AC-3)
SPDIF Out jack
Analog Line and Rear Inputs
Digital
DIN
FourPointSurround
or DeskTop Theater
Digital Speakers
Watching DVD Movies
or Playing DVD Games
with Creative PC-DVD
and DeskTop Theater 5.1
Digital Speaker System
Connects to the
Optical Digital I/O card
or Live! Drive
(see next page).
Minijack-to-DIN
cable
DeskTop Theater 5.1 Digital
Speaker System
Analog/Digital
Out jack
Figure 1-4: Connecting peripherals to the Sound Blaster Live! card.
Playing Games and Watching Movies
with an Analog 5.1 channel speaker
system*
Analog
Front, Rear
and Centre/
Sub Inputs
5.1 Channel
Analog Speaker
System*
* e.g., DTT2200 Speaker
System from Cambridge
SoundWorks
Triple stereo
audio cable
RCA cable
Installing Sound Blaster Live! Player 5.1 1-7
Connecting to External
Consumer Elecronic Devices:
Dolby Digital Decoder/Amplifier
Sound Blaster
Live! Player 5.1
card
Dolby Digital Decoder/Amplifier
Connects to the
Optical Digital I/O card
or Live! Drive
(see page 1-8).
3.5mm(mono)-
to-RCA cable
Analog/Digital
Out jack
Analog
Front, Rear
and Centre/
Sub Inputs
Discrete
6-channel
Amplifier
3 sets of 3.5mm
(stereo)-to-RCA
cable
Dolby Digital
(AC-3)
SPDIF In
Connecting to External
Consumer Electronic Devices:
Discrete 6-channel Amplifier
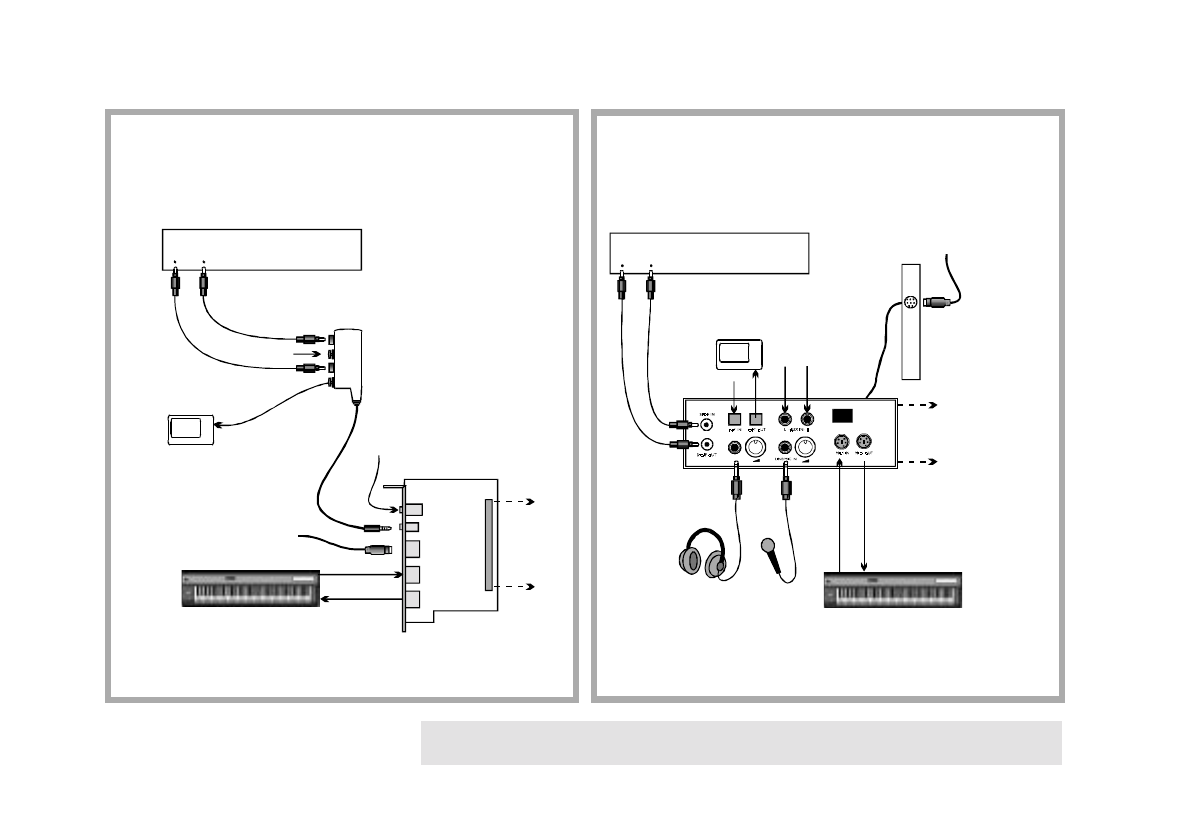
1-8 Installing Sound Blaster Live! Player 5.1
Digital I/O
Module
Optical
Digital I/O
card
Live! Drive IR
MIDI devices
(e.g., MIDI keyboard)
MIDI devices
(e.g., MIDI keyboard)
2nd analog Line In for an
additional recording device
Line In 2
Digital In/Out
Digital DIN
MIDI In
MIDI Out
Digital device
( e.g., DAT)
MiniDisc
Recorder
SPDIF (RCA)
In Out
Recording to or from an
external digital device
supporting RCA SPDIF
input/output
Recording and Content Authoring
with Optical Digital I/O card and
Digital I/O Module
Connects
to SB Live!
card
SPDIF In (RCA)
Optical
Input
Optical
Output
Digital
DIN
MiniDisc
Recording and Content Authoring
with Live! Drive IR
Digital device
( e.g., DAT)
SPDIF (RCA)
In Out
Metal
bracket
Headphones Microphone /
Line In
To Digital Speaker
System**
Connects
to SB Live!
card
To Digital Speaker
System**
**e.g., FourPointSurround
or DeskTop Theater 5.1 Digital
Speaker Systems*
AUX input from
an analog source
(e.g., CD player,
tape deck)
Note: FourPointSurround and Desktop Theater 5.1 speaker systems, Digital I/O
Module, Digital I/O card, Live! Drive IR and cables are available separately.
Optical Input
via MiniDIN-to-
standard DIN
adapter (provided)

Installing Sound Blaster Live! Player 5.1 1-9
Recording and Content
Authoring
❑If you are a musician with semi-professional requirements, you may want to upgrade your
Sound Blaster Live! card with either the Optical Digital I/O card (plus Digital I/O Module),
or the Live! Drive IR.
❑For either options, you will be given:
•A set of SPDIF (RCA) and Optical input/output jacks for recording to and from external
digital devices;
•MIDI input/output connectors for connection to MIDI devices;
•A Digital DIN connector for connection to digital speakers such as the
FourPointSurround or DeskTop Theater 5.1 Digital Speaker Systems;
•A second analog Line In allows you to connect to an additional input device (e.g. a CD
player) for recording.
❑The Live! Drive IR fits into the standard 5¼” drive bay of your computer and thus allows you
easy access to these connectors from its front panel. The Headphones and Microphone inputs
utilise ¼” jacks for high-quality connectivity.
Positioning Your
Speakers
If you are using four speakers, place them so that they
form the corners of a square with you exactly in the
centre (as in Figure 1-5) and that they are angled
toward you. Make sure the computer monitor is not
blocking the path of your front speakers. If you have a
centre speaker, place it on top of your monitor, also
angled toward you. You may want to adjust the relative
positions of the speakers until you get the audio
experience you like best. If you have a subwoofer,
place the unit in a corner of the room for the best bass
experience.
Figure 1-5: Recommended speaker positions
for the 4-speaker configuration.
Computer
monitor
Front left
speaker
Front right
speaker
Rear left
speaker Rear right
speaker
Yo u
Sub-
woofer

Installing Software 2-1
2
Installing Software
This chapter shows you how to install the audio software in the various Windows operating
systems. It consists of the following sections:
❑Installing Audio Drivers and Applications
❑Using Sound Blaster Live! Player 5.1
❑Uninstalling the Applications
❑Reinstalling the Audio Drivers
❑Playing Legacy Games
Installing Audio
Drivers and
Applications
You need device drivers to control the components on your audio card. To install these drivers as
well as the bundled applications, use the following instructions. The instructions are applicable
to all Windows operating systems.
After you have installed the card and switched on your system, Windows automatically detects
the card.
1. If you are prompted for the drivers, click the Cancel button. Otherwise proceed to step 2.
2. Insert the installation disc into your CD-ROM drive.
The disc supports Windows AutoPlay mode and starts running automatically. If not, see
“Problems Installing Software” on page C-1.
3. Follow the instructions on the screen to complete the installation.

2-2 Installing Software
Setting Up Joystick Drivers in
Windows NT 4.0
1. Log on to your computer as Administrator.
2. Click Start -> Settings -> Control Panel.
3. Double-click the Multimedia icon, click the Devices tab, and then click the Add button.
4. In the List of Drivers box of the Add dialog box, select Unlisted Or Updated Driver, and
then click the OK button.
5. Insert the Windows NT 4.0 CD-ROM into the CD-ROM drive.
6. In the Install Driver dialog box, type
E:\DRVLIB\MULTIMED\JOYSTICK\X86
if E:\ is the CD-ROM drive letter, and then click the OK button.
7. In the Add Unlisted Or Updated Driver dialog box, click Analog Joystick Driver, and
then click the OK button.
8. In the Microsoft Joystick Configuration dialog box, click the OK button.
9. Restart your computer when prompted.
Using Sound Blaster
Live! Player 5.1
Congratulations! You have successfully installed Sound Blaster Live! Player 5.1. For more
information on how you can get the most out of your audio card, refer to the other chapters in
this manual.
In Windows 2000, the joystick
drivers are automatically set up.

Installing Software 2-3
Uninstalling the
Applications
Use the following steps to cleanly remove applications before you reinstall them to correct
problems, change configurations, or make version upgrades. These instructions are applicable to
all Windows operating systems.
1. Close the audio card’s applications if they are open. This includes Creative Launcher and
the SB Live! icon on the taskbar. Applications that are still running during the
uninstallation will not be removed.
2. Click Start -> Settings -> Control Panel.
3. Double-click the Add/Remove Programs icon.
4. In the Add/Remove Programs Properties dialog box, select Sound Blaster Live! Player
5.1, and then click the Add/Remove button.
5. In the Creative Uninstaller dialog box, select the check boxes of the items you want to
delete and then click the Next button.
The selected applications will be uninstalled.
6. Click the OK button to close the Add/Remove Programs Properties dialog box.
7. Restart the computer if prompted.

2-4 Installing Software
Reinstalling the
Audio Drivers
You may want to reinstall only the audio drivers if you think they have been corrupted.
1. Insert the installation disc into your CD-ROM drive.
The disc supports Windows AutoPlay mode and starts running automatically. If not, see
“Problems Installing Software” on page C-1.
2. Follow the instructions on the screen until the Setup Options dialog box appears.
3. Click the Drivers only button.
4. Follow the instructions on the screen to complete the installation of the audio drivers.
Playing Legacy
Games
For more information, see Appendix B, “SB Emulation in MS-DOS/ Windows 95/98/ME”.

Using Sound Blaster Live! Player 5.1 3-1
3
Using Sound Blaster Live! Player 5.1
Sound Blaster Live! Player 5.1 is supported by a full range of applications to help you get the
absolute most from the audio card. The software most important to the operation of your audio
card is the Sound Blaster Live! group:
❑Creative Sound Blaster Live! Tour
❑Creative Diagnostics
❑Creative Launcher
❑Surround Mixer
❑AudioHQ
❑Wave Studio
❑Creative PlayCenter 2
❑Creative Recorder
❑Creative LAVA!
❑Creative MediaRing Talk
❑Creative Keytar
❑Creative Rhythmania
To locate and run these programs, click Start -> Programs -> Creative -> Sound Blaster Live!
For more information and usage details for these applications, refer to their respective online
help.
3-2 Using Sound Blaster Live! Player 5.1
Creative Sound
Blaster Live! Tour
This is a good place to start to learn more about the features of Sound Blaster Live! and to
experience its awesome capabilities. The tour uses PixAround’s technology to immerse you in a
panaromic “walk-through” experience which encompasses a number of closely-related
interactive and informative demos, each featuring a different aspect of Sound Blaster Live!.
Creative Diagnostics Use Creative Diagnostics to quickly test your audio card’s Wave, MIDI or CD Audio playback,
recording function and speaker output.
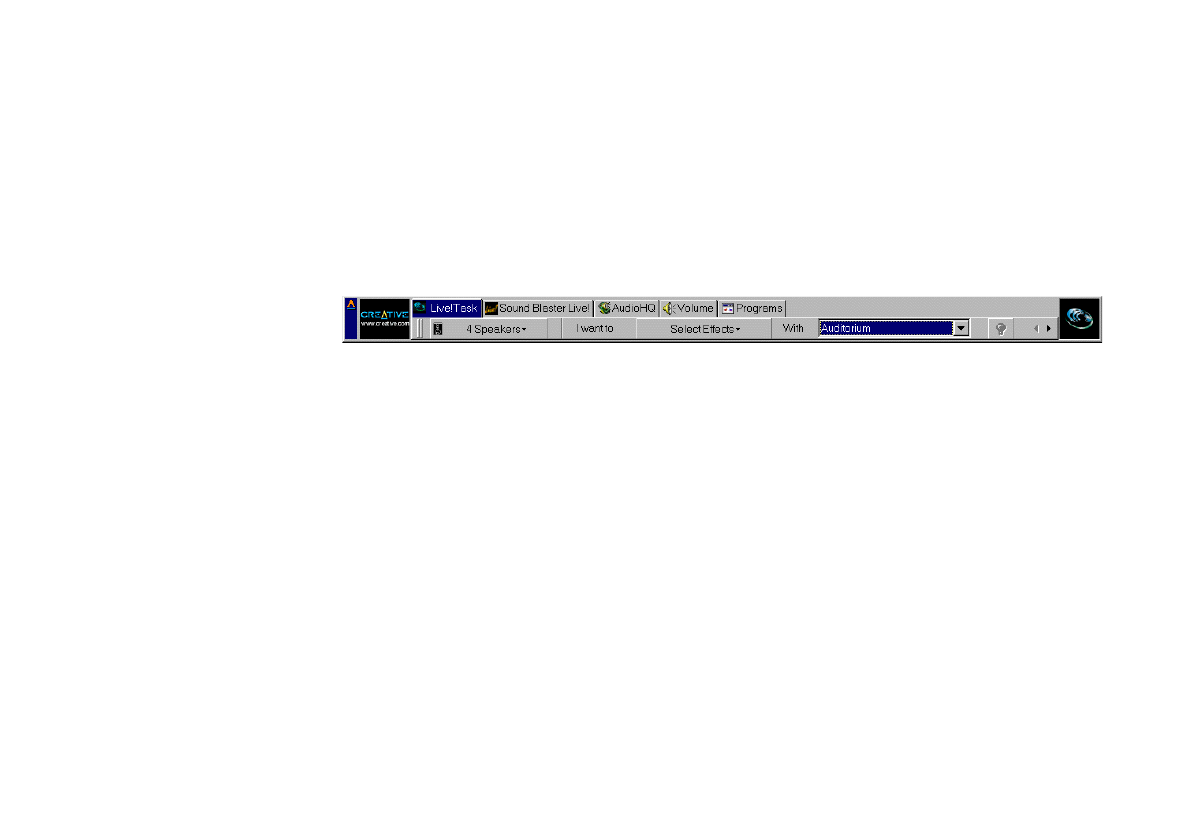
Creative Launcher Creative Launcher allows you to organise your desktop and open Creative applications quickly.
Creative Launcher resides at the top of your screen. The software installation creates a number
of group tabs in Launcher that may contain shortcuts to Creative applications such as PlayCenter
2 and Surround Mixer. It may also contain shortcuts to other applications for your hardware
settings, volume control, help files, or demonstration programs by Creative.
The Live!Task tab in the Launcher offers a "one-touch" setting which you can use to perform a
task easily. An application can also be launched automatically with its associated audio preset.

Using Sound Blaster Live! Player 5.1 3-3
Surround Mixer Creative Surround Mixer is the nerve centre for setting and controlling the various aspects of
your audio card. It consists of two "detachable" decks: the Main deck and the Mixer deck.
Main deck The top area of the Main deck allows you to:
•Select tasks or save, delete, import and export audio presets. You can save endless
combinations of these settings as audio presets for the selected speaker output. An audio
preset, when selected, is your passport to a one-step automatic configuration of speakers,
mixer and effects for whatever you want to do: play a particular game, record to a
particular medium, record or play in a particular style—each style having its unique set of
positions of audio input sources. These presets can then be configured for use in Creative
Launcher's Live!Task.
Mixer
deck
Main
deck
Speaker view
Spectrum view
Set audio presets here
To restore Surround Mixer to its
original settings, click Start ->
Program-> Creative -> Sound
Blaster Live! -> Creative
Restore Defaults.

3-4 Using Sound Blaster Live! Player 5.1
The three buttons at the left side of the Main deck allows you to switch between three different
views:
•In the EAX view, you can select and create your audio presets and position audio sources
within the speaker configuration space.
•In the Speaker view, you can select your speaker setup and perform a speaker output test.
•In the Spectrum view, you can select and display the spectrum analyzer during playback
or recording.
Mixer deck The Mixer deck allows you to:
•Mix sounds from various audio input sources when playing or recording;
•Adjust the volume level for the audio input sources;
•Adjust the treble and bass level, front/rear or left/right balance.
Tip
❑If you are not sure what the icons on the Surround Mixer represent, place the pointer over any
icon or area to display the tooltip.
Switching between analog
and digital output modes
By default, the Analog/Digital Out jack of the audio card outputs analog centre and subwoofer
channels. To allow it to give digital 6-channel or compressed AC-3 SPDIF output (digital output
mode), do the following:
1. In the Main deck of the Surround Mixer, click the Speaker button.
2. In the Speaker view, click the Digital Output only check box to select it.
(This is available for all speaker modes except for the Headphones mode).
Alternatively, you can do the following:
1. In the Mixer deck of Surround Mixer, click the red plus sign above the VOL control.
2. In the dialog box that appears, click the Digital Output only check box to select it.
To switch back to analog output mode, clear this check box.
Changes made will be reflected in the Speaker view.
Using Sound Blaster Live! Player 5.1 3-5
Enabling Bass Redirection Dolby Digital delivers five full range channels and one bass-only effects channel. However most
multimedia speaker systems have satellite speakers that usually do not reproduce low frequency
content. Enabling bass redirection allows low frequency source content from the front, rear and
centre channels to be redirected and added to the low frequency source effects (LFE) channel to
produce deeper subwoofer output. This feature is useful for producing bass in games or
applications that have only front and rear channel content. To enable bass redirection:
1. In the Main deck of the Surround Mixer, click the
Speaker button.
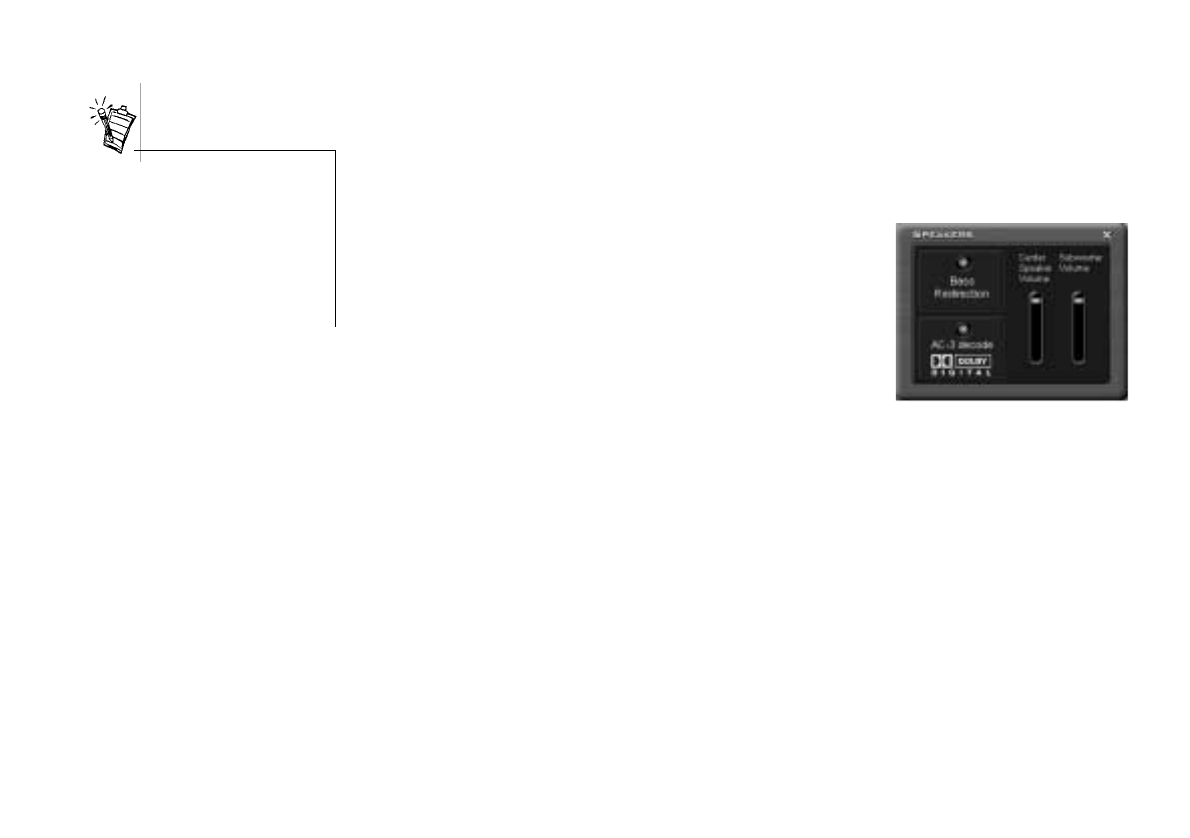
2. In the Speaker view, click the Speaker Selection button
to select the 5.1 speaker mode if it is not selected.
3. Click the Advanced button.
4. In the dialog box that appears, click the Bass Redirection
button. When enabled, the button is orange.
Enabling Dolby Digital
(AC-3) Decoding
By enabling Dolby Digital decoding, the SB Live! card will decode Dolby Digital stream to six
discrete analog channels. The Cambridge SoundWorks DeskTop Theater DTT2200 speaker
system is an ideal match for this usage. Thus, an external Dolby Digital decoder is not required
for you to enjoy multi-speaker surround sound. To enable Dolby Digital (AC-3) decoding:
1. In the Speaker view, clear the Digital Output only check box.
2. Follow the steps 1 to 3 described in the previous section and then click the AC-3 Decode
button if it is not yet enabled.
However, if you wish to use an external Dolby Digital decoder, do not enable this feature. This
setting will pass through compressed Dolby Digital (AC-3) PCM SPDIF output from the
Analog/Digital Out jack. Remember to set the SB Live! card to the Digital Output mode. In
addition, you will need a separate 3.5mm-to-RCA jack cable to connect to your decoder.
Some subwoofers may not be able
to reproduce excessive bass. We
recommend that you set the
subwoofer volume slider to a low
level before you enable bass
redirection. Thereafter, increase
the volume level to a comfortable
level.
3-6 Using Sound Blaster Live! Player 5.1
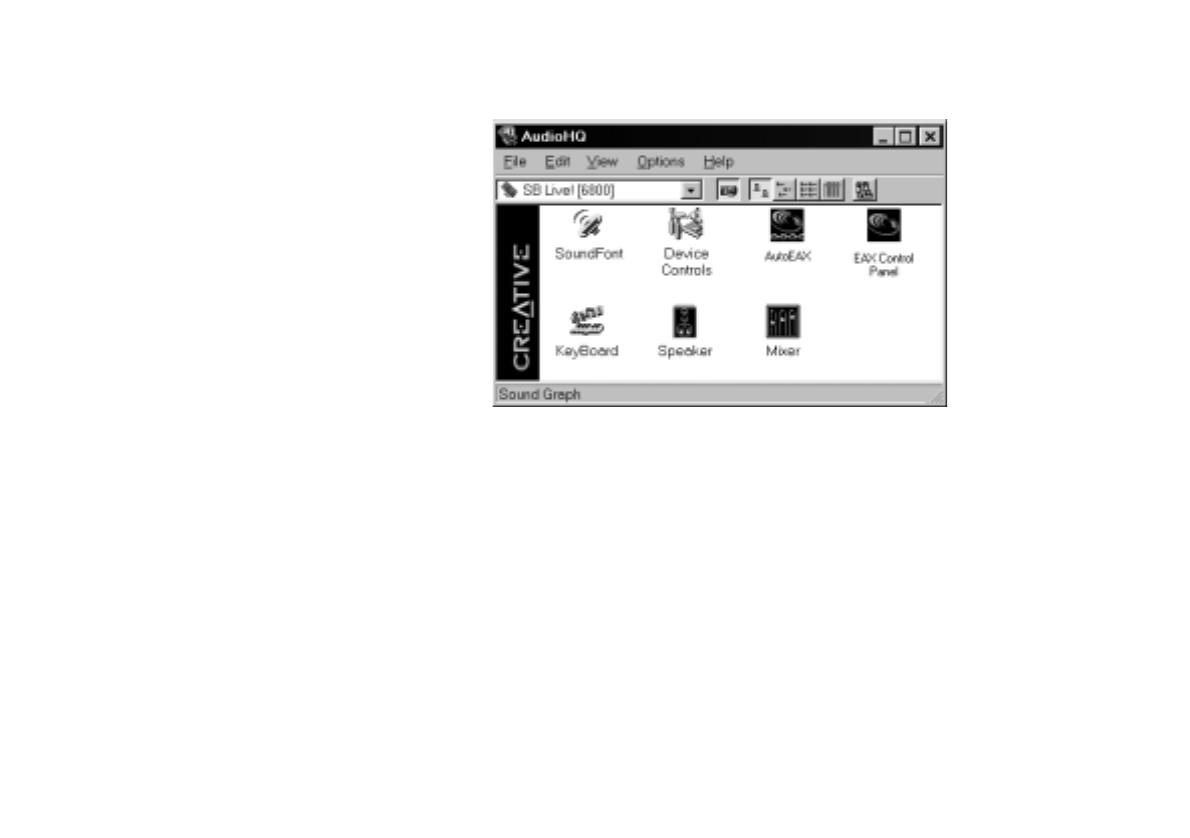
AudioHQ AudioHQ contains several control utilities that allow you to view, audition, or set up the audio
properties of one or more audio devices on your computer.
AudioHQ can be accessed using any of the following methods:
•Click Start -> Programs -> Creative -> Sound Blaster Live! -> AudioHQ;
•Click or double-click the AudioHQ icon located at the bottom right corner of your
Windows desktop.
Using Sound Blaster Live! Player 5.1 3-7
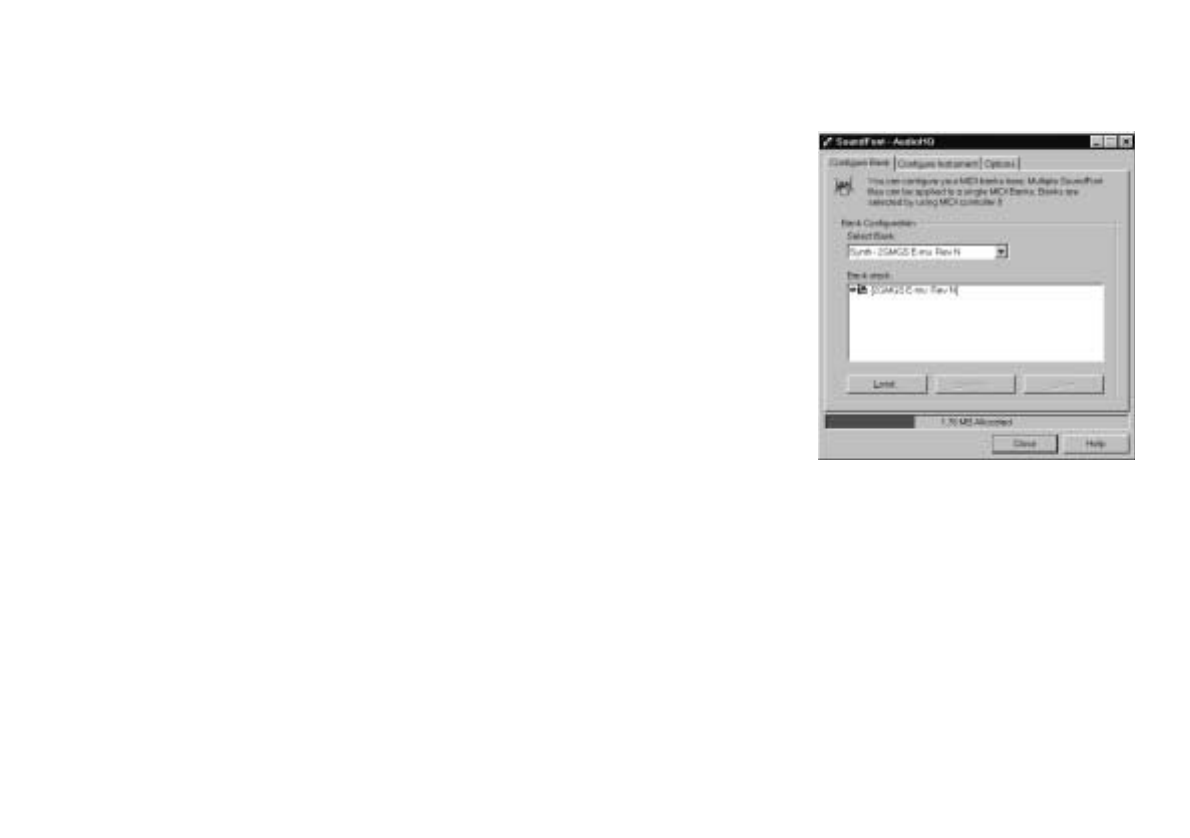
SoundFont Control Creative SoundFont Control allows you to configure MIDI banks with SoundFont files and
instruments, as well as set the caching algorithm and space.
Configure a MIDI Bank To configure a MIDI bank:
1. In SoundFont dialog box, click the Configure
Bank tab.
2. In the Select Bank list, select the MIDI bank to
configure.
3. Click the Load button and load the SoundFont
file you want to the MIDI bank.
The latest file loaded always appears at the top
of the Bank Stack box.
The top of the stack is indicated by an arrow.
4. To replace a SoundFont file, click the file and
then click the Replace button.
5. To clear a bank from the stack, select the bank
and then click the Clear button.
A variation bank can only be cleared by clearing its main bank.
6. Repeat Steps 3, 4 or 5 as required.
By stacking a SoundFont file instead of replacing one with the other, you may return to the
original sounds or use the new selection.
You can “spot” hide particular instruments by loading one or more SoundFont files on top of the
original.
When you clear a SoundFont file, you remove the latest configuration of the main bank and any
variation banks, including the latest configuration of instruments on the Configure Instrument
tabbed page.

3-8 Using Sound Blaster Live! Player 5.1
Configure an Instrument To configure an instrument:
1. In the SoundFont dialog box, click the
Configure Instrument tab.
2. In the Select Bank list, select the bank whose
instruments you want to configure. You can
select any bank.
3. In the Select Instrument list, select the
instrument to configure.
In the Instrument Stack, you may see an
instrument entry although you did not load an
instrument on this page. The instrument can be
found in a bank loaded on the Configure Bank
tabbed page.
4. Click the Load button and load a SoundFont or
single-instrument (for example, .WAV) file.
The last file loaded always appears at the top of the Instrument Stack with an arrow
pointing to it.
5. To clear an instrument from the stack, select the instrument and then click the Clear
button.
6. For faster processing of SoundFont files, the files are loaded into memory. You need to set
the maximum amount of cache memory your SoundFont files can occupy, so that your
system performance does not suffer from insufficient memory. You can also set the caching
algorithm for a balanced system performance.
Setting the maximum amount of
cache memory for SoundFont files
does not mean setting aside or
reserving the space. The space can
still be used by your computer or
other files, if needed.
Using Sound Blaster Live! Player 5.1 3-9
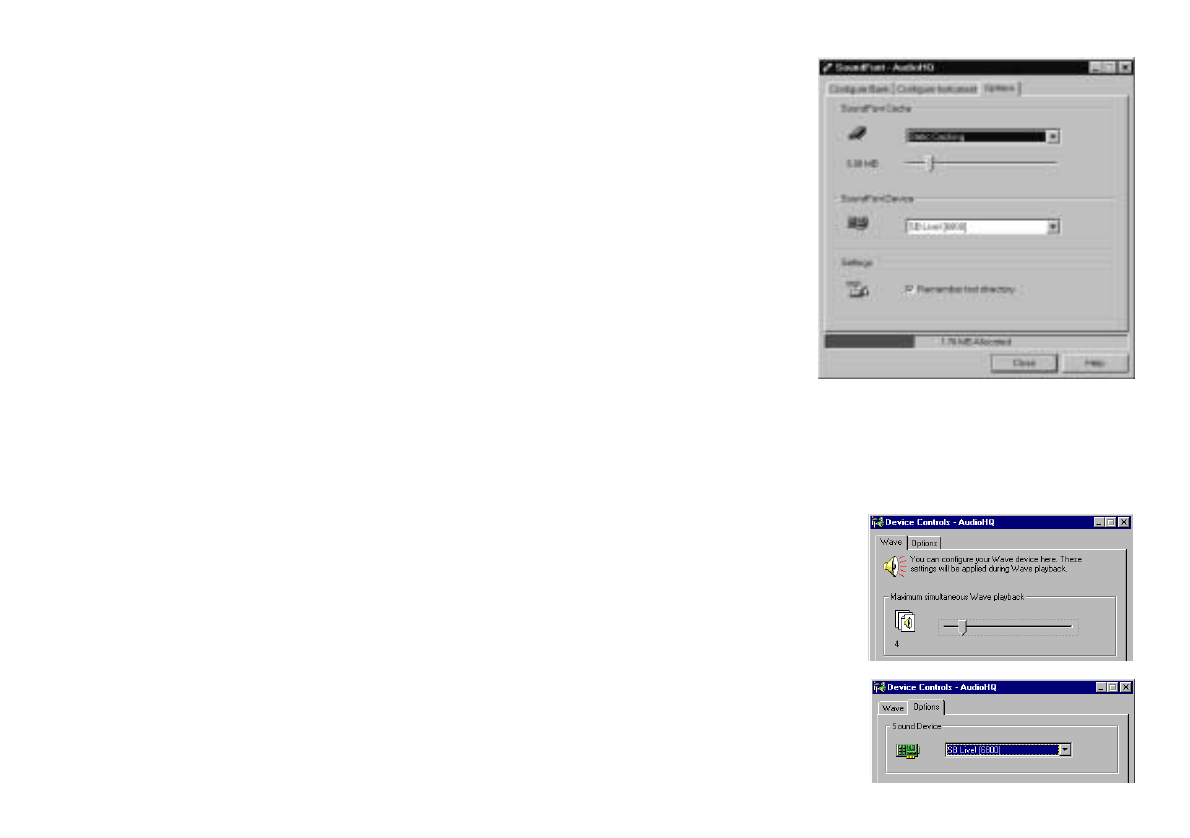
SoundFont Options You change the following options on the Options
tabbed page of the SoundFont Control dialog box:
To specify the caching algorithm:
•Select an algorithm from the SoundFont Cache
list.
To set the amount of cache for SoundFont files:
•Drag the SoundFont Cache slider to set the
amount of cache.
To change the SoundFont device
•Select the new device from the SoundFont
Device list.
Device Controls Device Controls allows you to configure for audio playback the audio devices that allow multiple
simultaneous Wave playback sessions. For example, you can play five Wave tracks at the same
time and enjoy the sounds from them all. This feature is currently not supported under Windows
2000.
Playback Sessions To set maximum simultaneous Wave playback sessions:
•On the Wave tabbed page, drag the Maximum
Simultaneous Wave Playback slider to the right to set a
higher number of Wave playback sessions, or to the left
to set a lower number of simultaneous playback sessions.
Sound Device To select the sound device to configure:
•On the Options tabbed page, click the device you want to
configure from the Sound Device list.
The device is immediately selected.
3-10 Using Sound Blaster Live! Player 5.1
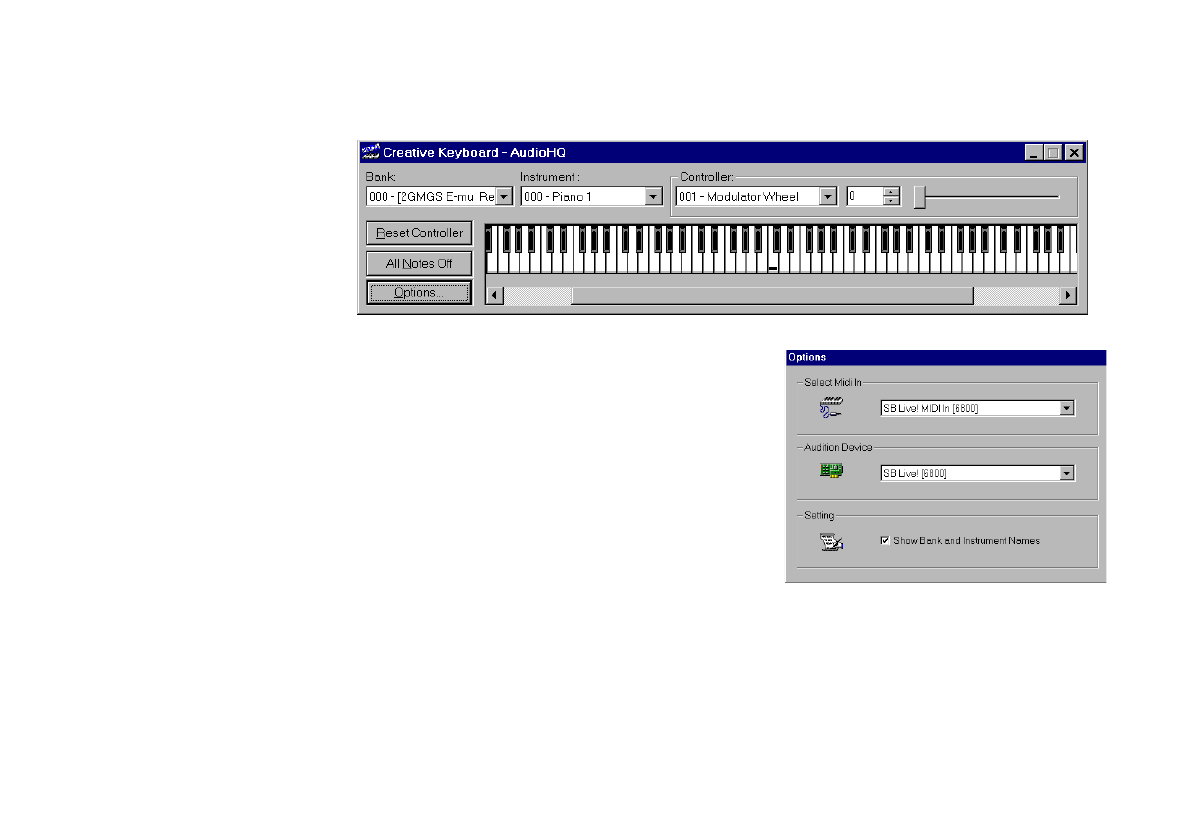
Creative Keyboard Creative Keyboard is a virtual keyboard which allows you to audition or play musical notes
produced through MIDI devices. To edit the sound, use Vienna SoundFont Studio or another
sound editor.
MIDI Input To select a MIDI input device:
1. In the Select MIDI In box in the Options
dialog box, click the correct MIDI port.
2. Click the OK button.
You can use external MIDI input devices to audition
your MIDI banks and instruments. First, connect a
MIDI input device to your audio card and then select
that device in Creative Keyboard.
Test an Instrument To test an instrument:
1. In Creative Keyboard, click the bank and the instrument you want.
2. Click the keys on the keyboard to test the sound. If you have an external MIDI input device,
you will probably find it easier to use it instead.
Using Sound Blaster Live! Player 5.1 3-11
Tips
❑To select multiple notes to play simultaneously, use your right mouse button to click the keys,
which will be marked by black dots.
❑To release the keys, right-click them one by one, or click the All Notes Off button for
simultaneous release.
❑To slide across the keyboard, drag the mouse.
❑If the playback’s sustain is too long, click the All Notes Off button.
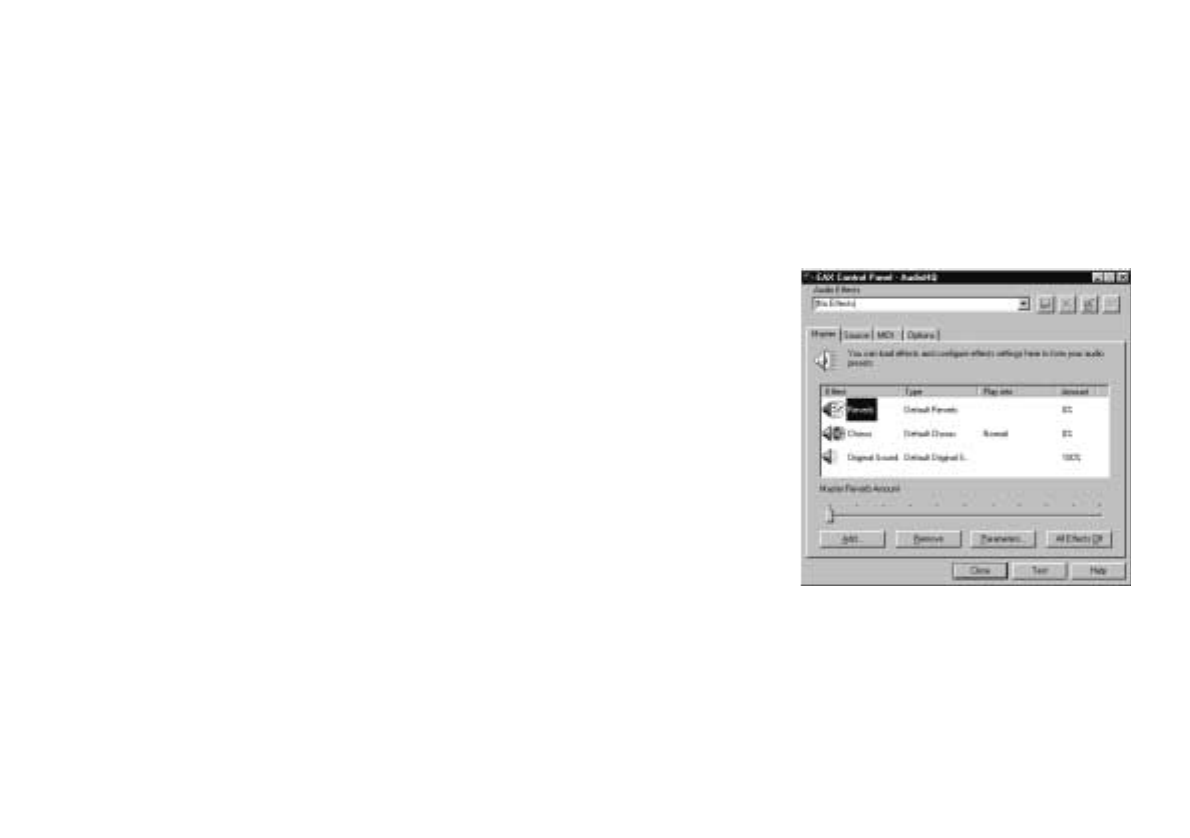
EAX Control EAX Control allows you to configure the
EMU10K1 effects engine. It allows you to specify
the components that make up the audio elements
that in turn make up an audio effect. An audio effect
is the modeling of a real-world experience. We have
provided some entertainment, gaming and various
audio effects to get you started with. EAX Control
can be also be accessed from Creative Surround
Mixer.
Learn from the online help how to:
❑Configure master effects
•Add or remove effects
•Specify the effect type
•Specify the degree or amount of the effect
•Edit an effect all the way down to its parameters or building blocks
❑Configure source effects, that is, set the amount of the effects to apply on an audio source.
❑Configure MIDI playback effects
❑Export an audio effect to a file
❑Import an audio effect

3-12 Using Sound Blaster Live! Player 5.1
AutoEAX AutoEAX allows you to specify for any audio application which audio preset to automatically
associate with the currently active speaker output. For the automatic audio presets to work,
AutoEAX must be active or at least minimised.
Associating
an Audio Preset
For each audio application on your computer, you can specify the audio preset that will be
automatically associated with it, for each speaker output configuration. For example, when
playing an audio CD using Creative PlayCenter 2, you may want to associate different audio
presets for the speaker outputs "Live!Surround" and "4 Speakers".
1. In the Application list, select the audio application with which to associate an audio preset
for a particular speaker output. If the application is not in the list, click the Browse button
to browse for and open the application.
2. In the Speaker Output box, click the speaker output to configure.
3. In the Linked Audio Preset box, click the audio preset you want to associate with this
application/speaker-output combination.
This combination trio are automatically set.
4. If you want AutoEAX to monitor this application's activity, clear the Do not monitor this
application check box. If you check it, AutoEAX will not configure the audio preset for
that application even when the application is started.
For other functions, refer to its online help.
Wave Studio Wave Studio allows you to perform the following sound editing functions easily:
❑Play, edit, and record 8-bit (tape quality) and 16-bit (CD quality) Wave data. Enhance your
Wave data or create unique sounds with various special effects and editing operations such as
rap, reverse, echo, mute, pan, cut, copy, and paste.
❑Open and edit several Wave files at the same time.
❑Import and export raw (.RAW) data files.
Using Sound Blaster Live! Player 5.1 3-13
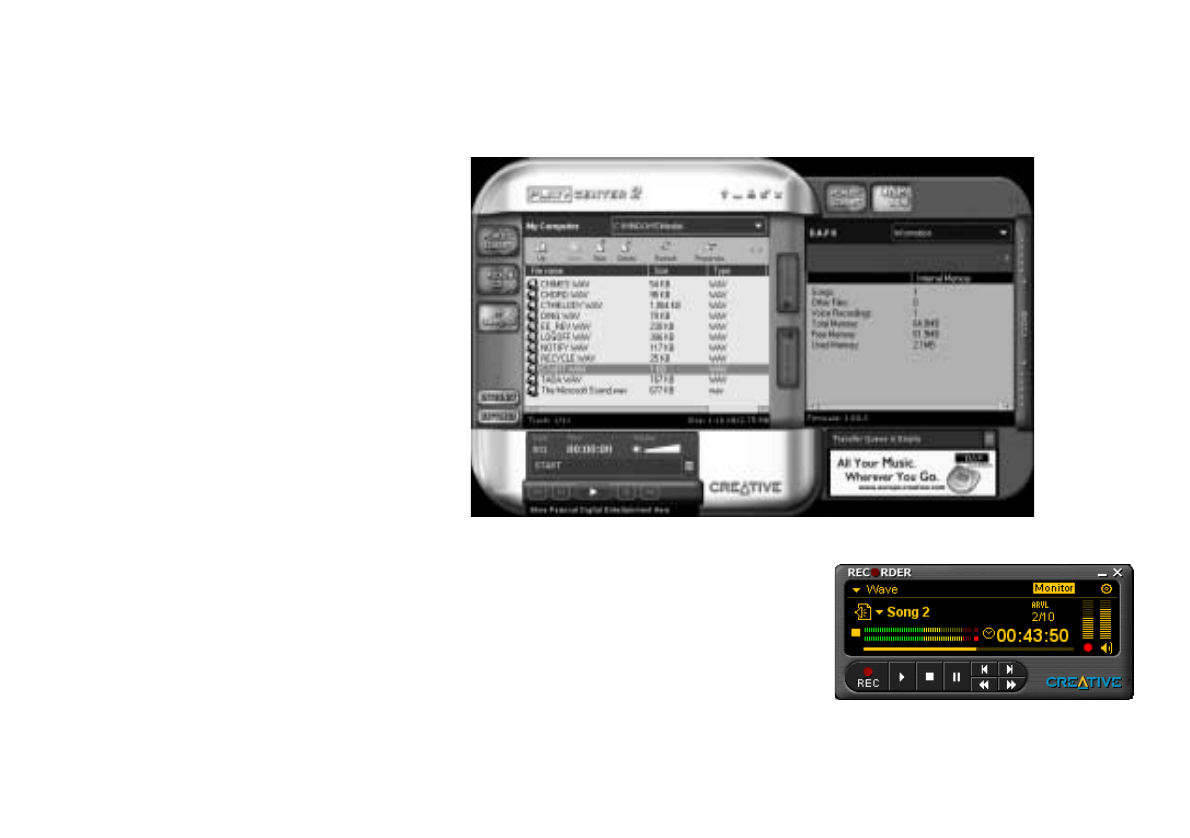
Creative
PlayCenter 2
Creative PlayCenter 2 is a revolutionary audio CD and digital audio (such as MP3 or WMA)
player. Besides managing your favourite digital audio files on your computer, it is also an
integrated MP3/WMA encoder for ripping audio CD tracks into compressed digital audio files.
It can encode tracks at speeds of up to 8x faster than normal play speed and up to 320 kbps.
Creative Recorder Recorder allows you to record sounds or music from
various input sources like the microphone or Audio CD,
and save them as Wave (.wav) files.
3-14 Using Sound Blaster Live! Player 5.1
Creative LAVA! Creative LAVA! (Live! Audio-Visual Animation) gives your music visual expression that
enhances the emotional depth of your music experience.
Through LAVA!, 3D graphical objects interact with the music and intelligently dance to the
sound cues from sources such as CD and MIDI.
Explore the various animation scenarios provided by LAVA! or create your own environments
and scenarios for your animation.
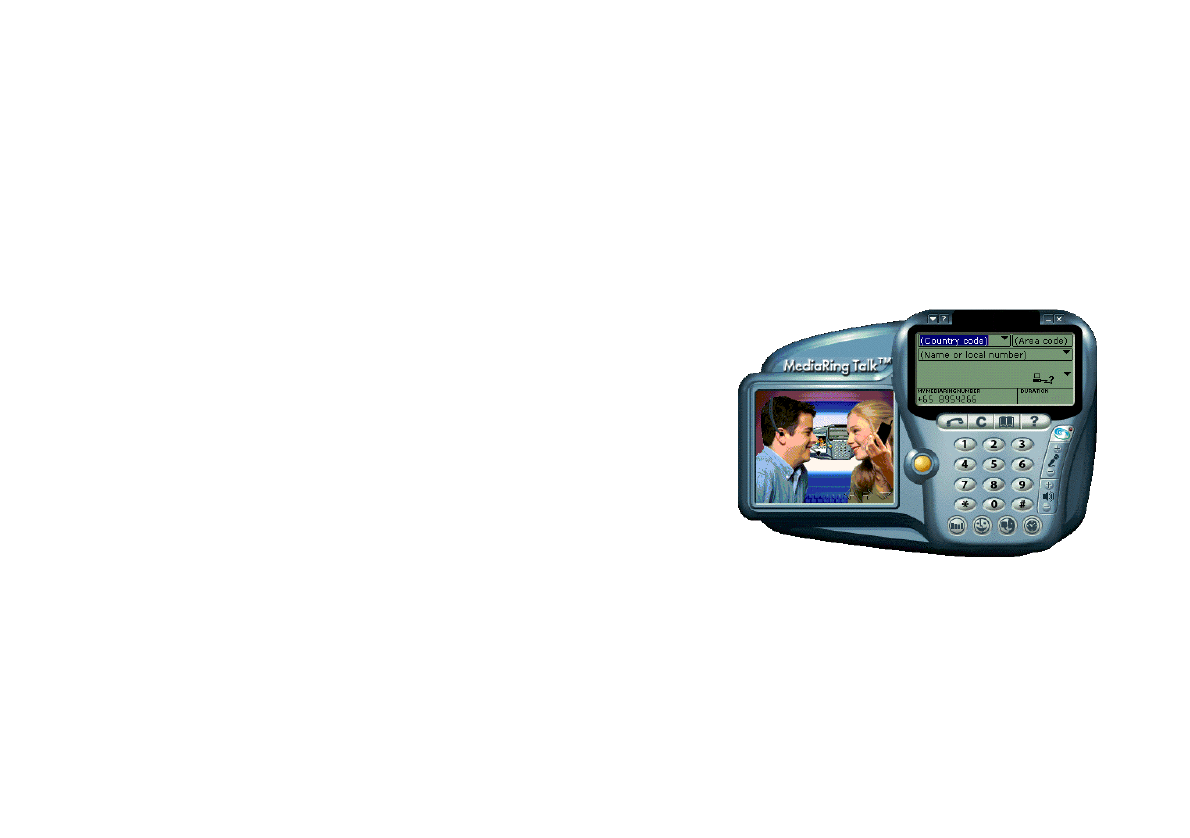
Creative
MediaRing Talk
Creative MediaRing Talk is an award-winning
Internet voice communication software. It
allows you to make long distance and
international calls over the Internet, from your
PC to another PC with Internet access and
MediaRing Talk installed. It also allows you to
make calls to a regular telephone if you
subscribe to MediaRing’s ValueFone service.
All you need to do is start MediaRing Talk;
dial the number; and let MediaRing Talk
establish a connection for you.
Furthermore, with Sound Blaster Live! Player 5.1’s EAX, your voice can be modified as you
take on different “personas” (for example, a male or female person, chipmunk etc.) when you
talk to the other party. Disguise you voice and your friend on the other end may think he’s
talking to another person! To make use of these voice effects, just click the Voice Effects button
(also known as the EAX button) and select the desired persona from the list.

Using Sound Blaster Live! Player 5.1 3-15
Creative Keytar With Creative Keytar, an easy-to-use and highly interactive edutainment software for beginners,
you can turn your multimedia computer into a virtual rhythm guitar system immediately. Click a
picture at the top of the screen to choose your favorite guitar. Press a function key (F1, ..., F12)
to activate a chord, and you can start strumming or plucking your favorite tunes.
Just hold the chord with one hand until it is time to change the chord and use the other hand to
strum or pluck the strings according to a tune's rhythmic variation. You don’t need to worry
about notes, all you need is a sense of rhythm and to remember your chord keys.
Creative Rhythmania Creative Rhythmania lets you create a MIDI file, choosing from a professional set of backup
rhythms and instruments.
Creative Rhythmania allows you to:
❑Perform with auto-accompaniment in Rhythm mode:
•Four-part Rhythm section
•Preset backing styles
•Interactive backing arrangement
•Chord Palette system
•SoundFont support
❑Choose between two Keyboard types: PC (QWERTY) keyboard or MIDI keyboard connected
to your PC.
Rhythmania is essentially a pattern-based software:
❑You play a Pattern to provide auto-accompaniment for your melody playing.
❑You create or modify a Pattern by building or changing it Section by Section in Rhythm mode.
❑Then, you combine a Pattern and a melody to create a Sequence in Sequencer mode.

To Do This ... Use These Applications 4-1
4
To Do This ... Use These Applications
Sound Blaster Live! Player 5.1 offers you digital and internet entertainment, multimedia
playback, and gaming. The following reference tables point you to the bundled applications that
will help you achieve your goals.
Multimedia Playback
Multimedia
Playback Applications
DVD Movies To play back DVD movies on your Sound Blaster Live! Player 5.1, you
must first have a DVD-compatible drive. Next, you must have a software
DVD solution that is available from Creative. For the full DVD experience,
you may want to purchase Cambridge SoundWorks’ DeskTop Theater 5.1
or a Dolby Digital (AC-3) decoder.
MP3/WMA Creative PlayCenter 2 supports/plays MP3 and WMA files.
Wave/CD
Audio
Use Creative PlayCenter 2 to play back files in both Wave and CD Audio
formats. WAV is the format for digital audio files on the Windows
operating platform. CD Audio is played back from an audio compact disc
on your CD-ROM drive.
4-2 To Do This ... Use These Applications
Digital
Entertainment
MIDI MIDI (*.MID) is a music format used by musicians that is played back
from the internal synthesiser on the Sound Blaster Live! Player 5.1 card.
Use Creative PlayCenter 2 to play back MIDI files or use the MIDI
sequencer bundled with your card. To achieve the best quality, load the
8MB GM bank in the SoundFont applet found in the AudioHQ group.
SoundFont
MIDI
Many musicians have created music files that use exotic or non-regular
instrument (non General MIDI compliant). These instruments are stored in
SoundFont banks. Such MIDI files can be played back from Creative
PlayCenter 2. The bundled CD contains many examples of MIDI demos
that use high quality SoundFont banks.
Dolby Digital
(AC-3) audio
Sound Blaster Live! Player 5.1 offers Dolby Digital (AC-3) decoding so
there’s no need for an external Dolby Digital decoder. Just configure your
speaker setup to 5.1 Speaker systems in Surround Mixer.
Multimedia
Playback Applications
Digital Entertainment Applications
Watch Surround Movies If you want to enjoy high quality movie entertainment,
ensure you have good speakers. If you have 4 or 5
speakers connected to your Sound Blaster Live! Player 5.1
card, configure your respective speaker setup in Surround
Mixer. For DVD movies, it is recommended that you
purchase Creative PC-DVD Encore’s solution as well as
the Cambridge SoundWorks’ DeskTop Theater 5.1
Speaker systems.
To Do This ... Use These Applications 4-3
Internet
Entertainment
Play Customised Albums You can compile your own albums containing your
favorite music using the bundled Creative PlayCenter 2;
whether they are in CD Audio, WAV or MIDI format.
Play Guitar Sound Blaster Live! Player 5.1 lets you play the guitar on
your PC. With Creative Keytar, you can literally transform
your computer keyboard into a guitar. And strum, using
your mouse!
Play Keyboard Music with
Auto-Accompaniment/One-
Man Band
You need not invest in a musical keyboard to be a one-
man-band. Creative Rhythmania lets you play music on
your computer keyboard.
Digital Entertainment Applications
Internet Entertainment Applications
Experience Music with
Visual Animation
With LAVA!, your MP3 songs can now be associated and
distributed over the Internet with a customised “music
video” (called MV3) containing high quality 3D animation
that gives dynamic visual expression to your songs. Watch
the animation dance to the beat of your music!
To enjoy the LAVA! experience, you will also need any 3D
accelerated graphics card.
Encode CD Songs to MP3 /
Download and Play MP3
Songs
With PlayCenter 2, you can encode and record all your
favorite CD songs into your PC hard drive, creating a
database for playing customised song lists.
You can also add songs to your database by downloading
them from various sites in the Internet.

4-4 To Do This ... Use These Applications
Play MP3 Songs with EAX Use Creative PlayCenter 2 to create your own MP3
renditions with multi-dimensional and multi-textured
realism by adding environments such as concert hall or
bathroom! You can share these enhanced MP3 songs even
with someone who does not own an SB Live! card.
Chat over the Internet using
another Voice
Take on another personality or life-form while talking over
the Internet! You can do this with Creative MediaRing Talk
and its Voice Personas feature, which uses Sound Blaster
Live! Player 5.1’s EAX to modify your voice in real-time
as you chat.
Create 360° Interactive
PixAround Web Pages with
Audio Hotspots
Use PixMaker to create immersive and interactive 360°
web pages or postcards easily. You can even add audio
hotspots in your panaromic pictures that will play audio
files when clicked.
Internet Entertainment Applications

To Do This ... Use These Applications 4-5
Gaming Reference
Games Applications
EAX Support Enjoy the many EAX titles by top game developers that
immerse you in realistic environments. Go to
www.sblive.com for a full list of compatible titles.
DirectSound3D Support DirectSound3D (DS3D) games are supported on your
Sound Blaster Live! Player 5.1 card. You can hear sounds
positioned in 3D space that enhance your game experience.
A3D 1.0 Support Your card translates A3D calls into DirectSound3D,
meaning that you can enjoy A3D games.
Sound Blaster Compatibility Your card provides you with exceptional Sound Blaster
compatibility so that you can continue to play the
thousands of popular DOS games already in the market.
Audio Presets For Legacy/
Existing Games
You can still enjoy audio effects even if your game does
not have EAX support. You card bundles over 50 presets
for use with existing games. These can be accessed from
Creative Launcher. You can also associate effects
individually with your favorite games. Launch the
AutoEAX applet.
Customised environments
for non-3D audio games
You can create customised environments for your non
EAX games using the EAX Control panel, which can be
accessed from Creative Surround Mixer.

General Specifications A-1
A
General Specifications
This section lists the specifications of your card.
Features
PCI Bus Mastering ❑PCI Specification Version 2.1 compliant
❑Bus mastering reduces latency and speeds up system performance
EMU10K1 ❑Advanced hardware accelerated digital effects processing
❑32-bit digital processing while maintaining a 192 dB dynamic range
❑Patented 8-point interpolation that achieves the highest quality of audio reproduction
❑64-voice hardware wavetable synthesizer
❑Professional-quality digital mixing and equalization
❑Up to 32 MB of sound RAM mapped to host memory
Stereo Digitized Voice Channel ❑True 16-bit Full Duplex operation
❑16-bit and 8-bit digitizing in stereo and mono modes
❑Playback of 64 audio channels, each at an arbitrary sample rate
❑ADC recording sampling rates: 8, 11.025, 16, 22.05, 24, 32, 44.1 and 48 kHz
❑Dithering for 8-bit and 16-bit recording

A-2 General Specifications
AC 97 Codec Mixer ❑Mixes EMU10K1 audio sources and analog sources such as CD Audio, Line In, Microphone,
Auxiliary and TAD
❑Selectable input source or mixing of various audio sources for recording
❑16-bit Analog-to-Digital conversion of analog inputs at 48 kHz sample rate
Volume Control ❑Software record and playback control of Master, Digitized Voice, and inputs from MIDI
device, CD Audio, Line, Microphone, Auxiliary, TAD, SPDIF, Wave/DirectSound device, CD
Digital (CD SPDIF)
❑Separate bass and treble control
❑Front and Rear Balance control
❑Muting and balance control for individual playback sources
Dolby Digital (AC-3) Decoding ❑Decodes Dolby Digital (AC-3) to 5.1 channels or pass-through compressed Dolby Digital
(AC-3) PCM SPDIF stream to external decoder
❑Bass Redirection: Enhances bass output to subwoofer for small satellite speaker systems
Creative Multi Speaker
SurroundTM (CMSSTM)
❑Multi-speaker technology
❑Professional-quality panning and mixing algorithm
❑Upmixes mono or stereo sources to 5.1 channels

General Specifications A-3
Connectivity
Sound Blaster Live! Player
5.1 card
Audio Inputs ❑One line-level analog Line input via stereo jack on rear bracket
❑One mono Microphone analog input via stereo jack on rear bracket
❑CD_IN line-level analog input via 4-pin Molex connector on card
❑AUX_IN line-level analog input via 4-pin Molex connector on card
❑TAD line-level analog input via 4-pin Molex connector on card
❑CD_SPDIF digital input via 2-pin Molex connector on card, accepting sampling rates of 32,
44.1 and 48 kHz
Audio Outputs ❑ANALOG/DIGITAL OUT via 4-pole 3.5mm minijack on rear bracket
•ANALOG OUT: Center and Subwoofer channels
•DIGITAL OUT: Front, Rear, Center and Subwoofer SPDIF digital outputs
❑Three line-level analog outputs via stereo jacks on rear bracket, Line-Outs 1, 2 and 3
❑Stereo headphone (32-ohm load) support on Front Line-Out
Interfaces ❑D-Sub MIDI interface for connection to external MIDI devices. Doubles as Joystick port
❑AUD_EXT 2x20 pin header for connection to Live! Drive

SB Emulation in MS-DOS/ Windows 95/98/ME B-1
B
SB Emulation in MS-DOS/ Windows 95/98/ME
Background Legacy games in the market have been designed for only MS-DOS. SB Live! supports MS-DOS
games. There are two ways to play MS-DOS games:
❑From the MS-DOS box in Windows 95/98/ME (recommended)
To open the box:
•Click Start -> Programs -> MS-DOS Prompt.
❑In the Windows 95/98 MS-DOS mode
There may be times when you do not want to or cannot run a game from the MS-DOS box.
The game may be incompatible with Windows 95/98, or there are insufficient system
resources to play the game with Windows 95/98 loaded. In such cases, use the MS-DOS
mode, in which only the real-mode portions of Windows 95/98 are loaded.
To restart the system in MS-DOS mode when you are already in Windows 95/98:
1. Click Start -> Shut Down.
2. Click the Restart the computer in MS-DOS mode option button, and then click the OK
button.
To start the system in MS-DOS mode at system startup:
1. At startup as Windows 95/98 is loading, hold the F8 key.
2. At the startup menu, choose the Command Prompt Only option, and then press <Enter>.

B-2 SB Emulation in MS-DOS/ Windows 95/98/ME
Understanding the
Installation Program
The installation program modifies your AUTOEXEC.BAT and CONFIG.SYS files.
The AUTOEXEC.BAT
File Settings
The installation program adds the following statements to the AUTOEXEC.BAT file:
SET CTSYN=C:\WINDOWS
SET BLASTER=A220 I5 D1 H5 P330 T6
C:\PROGRA~1\CREATIVE\SBLIVE\DOSDRV\SBEINIT.COM
The first two statements set up the environment variables for your audio card. For an explanation
of the variables, see “Environment Variables” on page B-5.
The third statement runs SBEINIT.COM which is the SB Live! MS-DOS driver. It is required
for the SB Live! card to function properly under MS-DOS mode.
SBEINIT.COM requires the HIMEM.SYS and EMM386.EXE files to be loaded. If needed, the
installation program adds the necessary HIMEM.SYS and EMM386.EXE lines to your
CONFIG.SYS file, creating the file if it is not present.
On the rare occasion a program does not work with expanded memory, simply add the NOEMS
parameter to your memory manager. For example:
DEVICE=C:\WINDOWS\EMM386.EXE NOEMS
You may load this driver into high memory in the AUTOEXEC.BAT file, even though the
default is not. For example:
LOADHIGH=C:\PROGRA~1\CREATIVE\SBLIVE\DOSDRV\SBEINIT.COM
Do not remove the memory manager altogether. Do not attempt to load SBEINIT.COM into
high memory when using the NOEMS option if SBEINIT.COM fails to run SBELOAD.EXE or
SBECFG.EXE. In the rare case that an MS-DOS game will not work with a memory manager,
you will not be able to use the SB Live! card with the game.
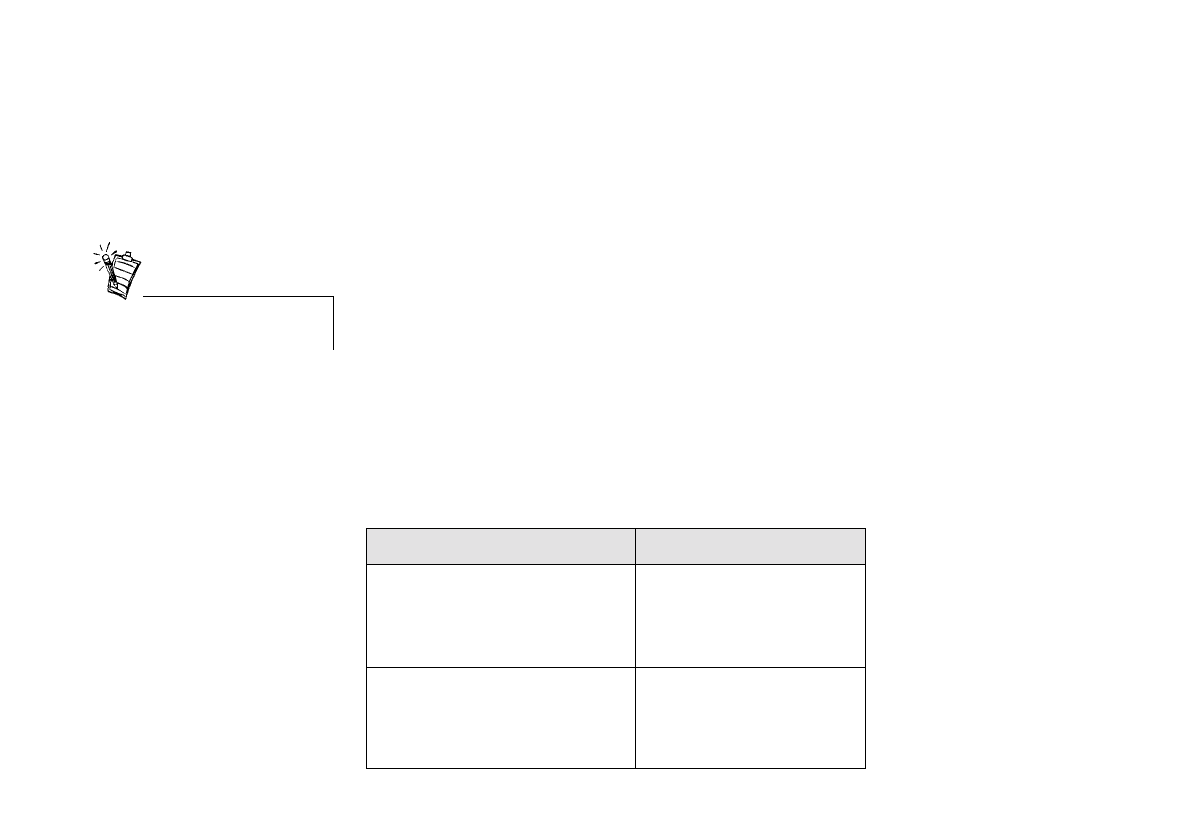
SB Emulation in MS-DOS/ Windows 95/98/ME B-3
The CONFIG.SYS File
Settings
The installation program adds the following statements to the CONFIG.SYS file:
DEVICE=C:\WINDOWS\HIMEM.SYS
DEVICE=C:\WINDOWS\EMM386.EXE
System Resource
Settings
This section explains the following software SB emulation resources—not hardware resources—
of your card:
❑Input/Output (I/O) Addresses
❑Interrupt Request (IRQ) Line
❑Direct Memory Access (DMA) Channel
If your card encounters a conflict with a peripheral device, you may need to change its resource
settings. For details, see “Resolving I/O Conflicts” on page C-7.
When any resource setting is changed, make sure that the environment variables (see
“Environment Variables” on page B-5) reflect the changes as well. You can view your system
environment by typing SET at the DOS prompt.
Input/Output (I/O)
Addresses
I/O addresses are communication areas used by your computer’s central processor to distinguish
among various peripheral devices connected to your system when sending or receiving data.
In the following tables, the
preferred values are in bold.
Table B-1: Possible default input/output (I/O) addresses.
Device Default I/O Address Range
SB interface 220H to 22FH
240H to 24FH
260H to 26FH
280H to 28FH
MPU-401 UART MIDI interface 300H to 301H
310H to 311H
320H to 321H
330H to 331H
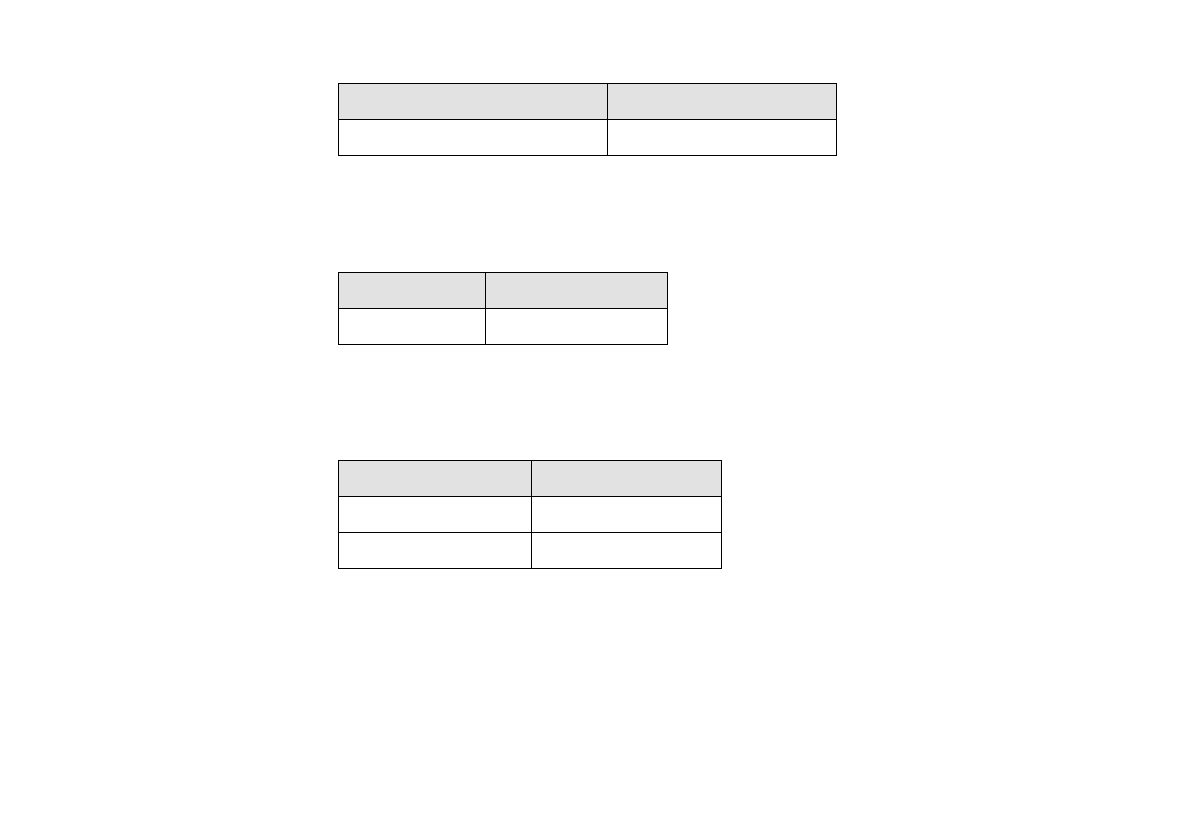
B-4 SB Emulation in MS-DOS/ Windows 95/98/ME
Interrupt Request (IRQ)
Line
An IRQ line is a signal line that a device uses to notify your computer’s central processor that it
wants to send or receive data for processing.
Direct Memory Access
(DMA) Channel
A DMA channel is a data channel that a device uses to transfer data directly to and from the
system memory.
Stereo music synthesiser 388H to 38BH
Table B-1: Possible default input/output (I/O) addresses.
Device Default I/O Address Range
Table B-2: Possible default interrupt request (IRQ) line assignment.
Device Default IRQ Line
SB interface 5, 7, 9, 10
Table B-3: Possible default direct memory access (DMA) channel assignment.
Usage Default DMA Channel
First DMA channel 0, 1, 3
Second DMA channel 5, 6, 7

SB Emulation in MS-DOS/ Windows 95/98/ME B-5
Environment
Variables
Environment variables are used to pass hardware configuration information to the software in
your system. For MS-DOS, your audio card includes the following:
❑CTSYN Environment Variable
❑BLASTER Environment Variable
CTSYN Environment
Variable
The CTSYN environment variable points to the location of the CTSYN.INI file, which usually
resides in the Windows directory. The syntax for this variable is as follows:
CTSYN=path
where path is the location of the CTSYN.INI file.
BLASTER Environment
Variable
The BLASTER environment variable specifies the base I/O address, IRQ line, and DMA
channels of the SB interface. Its syntax is:
BLASTER=A220 I5 D1 H5 P330 T6
The parameters in the command are as follows.
This
Parameter Specifies
Axxx SB interface’s base I/O address.
IxIRQ line used by the audio interface.
DxFirst DMA channel used by the audio interface.
HxSecond DMA channel used by the audio interface.
Pxxx MPU-401 UART interface’s base I/O address.
TxCard type. x must be 6.

B-6 SB Emulation in MS-DOS/ Windows 95/98/ME
Determining
Resources
To find the current SB Live! SB16 Emulation resources in Windows 95/98:
1. Click Start -> Settings -> Control Panel.
2. In the Control Panel window, double-click the System icon.
3. In the System Properties dialog box, click the Device Manager tab.
4. Double-click Creative Miscellaneous Devices, and then double-click Creative SB Live!
SB16 Emulation.
5. Click the Resources tab.
You can use the information in the resource list to help you configure MS-DOS games for use
with the SB Live! card.
The resource list may show three entries of “Input/Output Range” and two entries of “Direct
Memory Access”. They correspond to the sequence of entries in Table B-1 and Table B-3. If the
number of entries do not match, a good estimate of the identity of the device is its I/O address or
DMA channel.
To find the current SB Live! SB16 Emulation resources in MS-DOS mode:
1. Switch to your SB Live! DOS driver directory, that is:
C:\PROGRA~1\CREATIVE\SBLIVE\DOSDRV
2. Type SBECFG and then press <Enter>.
Some older games may have difficulty detecting the SB Live! card at certain resource settings.
Typically, these games expect the card to be at a fixed set of resources and would fail to load if
those resources are not detected. If you have older MS-DOS games that do not work properly,
try changing the SB Live! SB16 Emulation configuration. Use the following as a guide:
Problem: Sound Blaster emulation is not recognised.
Solution: Try switching the SB Emulation IRQ between 5 and 7, use DMA channel 1, use SB
interface port 220.
Problem: The MPU-401emulation is not recognised.
Solution: Try using Port address 330.
The MS-DOS driver
SBEINIT.COM must be running
for SBECFG.EXE to work
properly.

SB Emulation in MS-DOS/ Windows 95/98/ME B-7
Selecting the Best
Audio Options in a
Game
Most MS-DOS–based games that provide sound have some procedure for audio setup. These
procedures generally allow you to choose from a list of popular audio cards or audio devices.
Games may present audio options differently. Some may present a single choice that corresponds
to a particular audio device; for example, Sound Blaster 16, Roland Sound Canvas, etc. Others
provide an option for music and digital audio separately; for example, General MIDI music with
Sound Blaster digital audio. In such a case, there are often two separate menus to configure.
Some games allow you to set the MIDI port address and IRQ for music and sound. Make sure that
these settings correspond to the values displayed by SBECFG.EXE or the Resources tabbed page
of the Creative SB Live! SB16 Emulation Properties dialog box.
There are games that offer MPU-401/Roland (General MIDI or MT-32/LAPC-1) as an option.
Often these games allow you to set the MIDI port address. Make sure that they match the MIDI
address in the Resources list on Resources tabbed page of the Creative SB Live! SB16 Emulation
Properties dialog box. The same values can be found under “MPU-401 (General MIDI, Roland
MT-32/LAPC-1) Emulation”, displayed by SBECFG.EXE in MS-DOS mode. Remember to
enable the MT-32 MIDI patch with the SBEMIXER program if you select Roland MT-32 or
LAPC-1 for music.
Music Options Most MS-DOS games offer a menu choice for sound when they start up. If you have a choice
between General MIDI and MT-32, always choose General MIDI, since it will provide you with
the best sound quality. If you need to use MT-32, you must first switch from the General MIDI
instrument set (the default) to the MT-32 instrument set using SBEMIXER. Be sure to switch
back to the General MIDI set when you are finished using the MT-32 instrument set.
Digital Audio Options SB Live! supports Sound Blaster, Sound Blaster Pro, Sound Blaster 16, and Adlib digital audio
emulation. If an application provides all these as options, specify the choices in this order:
1. Sound Blaster 16
2. Sound Blaster Pro
3. Sound Blaster
4. Adlib

B-8 SB Emulation in MS-DOS/ Windows 95/98/ME
MS-DOS Mode
Utilities
The SB Live! card includes a few MS-DOS utilities. These utilities require the SB Live! DOS
driver SBEINIT.COM to be loaded.
SBECFG.EXE Use the SBECFG.EXE utility to obtain the hardware settings and the status of the SB Live!
card.Typing SBECFG.EXE at the command prompt displays the following hardware settings:
❑PCI Hardware Settings: Port, IRQ
❑Sound Blaster Emulation: Port, IRQ, DMA
❑MPU-401 Emulation (GM, Roland MT-32/LAPC-1) Emulation: Port
❑Adlib Emulation: Port
The emulation settings appear only if they are enabled.
SBEMIXER.EXE Use SBEMIXER.EXE to change the volume levels of the MPU-401 instrument set used on the
SB Live! card. You can use SBEMIXER.EXE from the command line—useful for advanced
users who want to set up batch files with particular volume levels—or within the SBEMIXER
screen. The settings for SBEMIXER.EXE are independent of the Creative Mixer settings in
Windows 95/98.
To set SBEMIXER values in the command line:
At the DOS prompt, type the SBEMIXER command in a single line. Its syntax is:
SBEMIXER [/S:
x
] [/W:
x
] [/C:
x
] [/M:
x
] [/?]
where square brackets [ ] denote optional parameters, and:
This
Parameter Specifies
/S:xSynth volume. x can be a value from the range 0 to 127.
/W:xWave volume. x can be a value from the range 0 to 127.
/C:xCD audio volume. x can be a value from the range 0 to 127.
/M:xSynth MT-32/LAPC-1 mode. For x, 0 is Off, 1 is On.
/? View a short description of the parameters.

SB Emulation in MS-DOS/ Windows 95/98/ME B-9
An example of an SBEMIXER command is
SBEMIXER /S:64 /W:120 /C:50 /M:0
which corresponds to “set the synth volume to 64, the Wave volume to 120, the CD audio volume
to 50, and turn off the Synth MT-32/LAPC-1 mode”.
To set SBEMIXER values within the Mixer screen:
At the DOS prompt, type
SBEMIXER
The interactive editor mode allows you to change the mixer settings with the mouse, <Tab>,
<PgUp>, <PgDn>, or arrow keys.
Use the Save button to save the settings for the next session.
SBESET.EXE Use SBESET.EXE to manually configure SB resources or disable SB Emulation. By default, SB
Emulation in DOS follows the Windows settings. For example, if you disable SB Emulation in
Windows, in the next boot to DOS, SB Emulation in DOS disabled. Under rare circumstances
you may need to manually reconfigure DOS SB Emulation, for example, if there is conflict in
DOS before it can boot to Windows. SBESET.EXE is run from the command line.
To set SBESET values in the command line:
At the DOS prompt, type the SBESET command in a single line. Its syntax is:
SBESET [-A
xxx
] [-I
x
] [-D
x
] [-H
x
] [-P
xxx
] [-d
x
] [-w
x
]
where square brackets [ ] denote optional parameters, and:
This
Parameter Specifies
-Axxx SB interface’s base I/O address.
-IxIRQ line used by the audio interface.
-DxFirst DMA channel used by the audio interface.
-HxSecond DMA channel used by the audio interface.
See “System Resource
Settings” on page B-3 for a list
of the possible values.

B-10 SB Emulation in MS-DOS/ Windows 95/98/ME
-Pxxx MPU-401 UART interface’s base I/O address.
-dxSB Emulation mode. For x, 1 is Off, 0 is On.
-wxSet x to 1 to use the Windows-assigned resource configuration.
Set x to 0 to use (your) user-assigned resource configuration.
An example of an SBESET command is
SBESET -A240 -I5 -D3 -w0
which corresponds to “set the SB interface’s base I/O address to 240, the IRQ line used by the
audio interface to 5, the First DMA channel used by the audio interface to 3, and use the
Windows-assigned resource configuration”.
SBEGO.EXE Use this to confirm whether SB16 Emulation is properly installed and working.

Troubleshooting C-1
C
Troubleshooting
This appendix provides tips for solving problems you may encounter during installation or
normal use.
Problems Installing
Software
In Windows, the installation does not start automatically after the CD-ROM is inserted.
The AutoPlay feature in your Windows system may not be enabled.
To start the installation program through the My Computer shortcut menu:
1. Double-click the My Computer icon on your Windows desktop.
2. In the My Computer window, right-click the CD-ROM drive icon.
3. On the shortcut menu, click AutoPlay and follow the instructions on the screen.
To enable AutoPlay through Auto Insert Notification:
1. Click Start -> Settings -> Control Panel.
2. In the Control Panel window, double-click the System icon.
3. In the System Properties dialog box, click the Device Manager tab and select your CD-
ROM drive.
4. Click the Properties button.
5. In the Properties dialog box, click the Settings tab and select Auto Insert Notification.
6. Click the OK button to exit from the dialog box.

C-2 Troubleshooting
Problems With
Sound
There is unexpected excessive environmental sound or effects when an audio file is played.
The last selected preset is an inappropriate environment for the current audio file.
To switch to an appropriate environment:
1. Open the Environmental Audio control applet in AudioHQ.
2. In the Environment list, select “No effects” or an appropriate environment.
No sound from the headphones.
Check the following:
❑The headphones are connected to the Headphones jack.
❑Under the Speaker view in the Main deck of Surround Mixer, make sure that the Speaker
selected is “Headphones”.
❑In the Mixer deck of Surround Mixer, the recording source selected is “What U Hear”.
In a 4-speaker configuration, there is no sound from the rear speakers.
Check the following:
❑The rear speakers are connected to the audio card’s Rear Out jack.
❑If you are playing sound from one of these sources:
•CD Audio
•Line In
•TAD
•Auxiliary (AUX)
•Microphone
To solve the problem:
1. In Surround Mixer’s Mixer deck, make sure the source being played is selected, that is,
enabled.
2. Select the same source as the record source.
If your record source is “What U
Hear”, then at any one time, you
can only select one of the five
sources and mute the others.
Therefore, you can get sound
from the rear speakers only from
the selected source.

Troubleshooting C-3
For example, if you are playing DVD games or movies, make sure that you select the Auxiliary
device and select the Auxiliary device as your record source in Surround Mixer.
❑If you have changed environments, make sure that your active sources are selected in
Surround Mixer.
No sound from the speakers.
Check the following:
❑You have connected your speakers to your card's output.
❑You have selected the correct source in the Mixer deck.
❑If both the above conditions have been met and you still do not get any sound, click the red
plus sign above the VOL control and check whether the Digital Output Only check box is
selected. If it is, you are in the Digital Output Only mode and so must connect to digital
speakers to hear the sound from your audio card. See the section on Digital Output Only in
Surround Mixer’s online help for more information.
No audio output when playing digital files such as .WAV, MIDI files or AVI clips.
Check the following:
❑The speakers’ volume control knob, if any, is set at mid-range. Use Creative Mixer to adjust
the volume, if necessary.
❑The powered speakers or external amplifier are connected to the card’s Line Out or Rear Out
jack.
❑There is no hardware conflict between the card and a peripheral device. See “Resolving I/O
Conflicts” on page C-7.
❑The Speaker selection in the Main deck of Surround Mixer corresponds to your speaker or
headphone configuration.
❑The Original Sound sliders in either or both the Master and Source tabbed pages of the
Environmental Audio applet are set to 100%.

C-4 Troubleshooting
No audio output when playing CD-Audio or DOS games that require a CD-ROM.
To solve this problem:
•Make sure the Analog Audio connector on the CD-ROM drive and the CD In connector on
the audio card are connected.
Panning a source sometimes turns off its sound.
This occurs when you are in the Digital Output Only mode and the source’s left-right balance in
a software mixer application other than Surround Mixer (for example, the Windows Volume
Control application) is at the opposite end compared to the position to which you have panned the
source in the Main deck of Surround Mixer. For example, the CD Audio balance in Windows
Volume Control is on the left but in Surround Mixer you have panned the CD Audio to the right.
To solve this problem:
•Open that other mixer, and center the balances for all the audio input sources.
This ensures that your analog sources will not turn silent when you pan them in Surround
Mixer.
Problem with
Surround Mixer
The mixer settings change unexpectedly every time the audio preset is changed.
To solve this problem:
•Dissociate the mixer settings.
1. Click the Audio Preset Options icon in the upper right corner of Surround Mixer.
2. To dissociate mixer settings, make sure that Dissociate Mixer Settings is checked on the
menu that appears.

Troubleshooting C-5
Insufficient
SoundFont Cache
There is insufficient memory to load SoundFonts.
This may occur when a SoundFont-compatible MIDI file is loaded or played while insufficient
memory has been allocated to SoundFonts.
To allocate more SoundFont cache:
•On the Options tabbed page of the SoundFont Control applet, move the SoundFont Cache
slider to the right.
The amount of SoundFont cache you can allocate depends on the system RAM available.
If there is still insufficient system RAM available:
•On the Configure Banks tabbed page of the SoundFont Control applet, select a smaller
SoundFont bank from the Select Bank box.
The smallest SoundFont bank available is 2 MB (2GMGSMT.SF2).
Problems With
Joystick
The joystick port is not working.
The audio card’s joystick port may be conflicting with the system’s joystick port.
To solve this problem:
•Disable the audio card’s joystick port and use the system port instead. Do the following:
1. Click Start -> Settings -> Control Panel.
2. In the Control Panel window, double-click the System icon.
3. In the System Properties dialog box, click the Device Manager tab.
4. Double-click Sound, Video And Game Controllers, and then select Creative Gameport
Joystick.
5. Click the Properties button.
The trade-off of a smaller
SoundFont file is its lower
sound quality.

C-6 Troubleshooting
6. In the Properties dialog box:
If you have an Original Configuration (Current) check box:
•Clear the check box to disable it.
If you have a Disable In This Hardware Profile check box:
•Make sure that the check box is selected to disable it.
7. Click OK to restart Windows and for the change to take effect.
When the Gameport Joystick interface is disabled, the entry in Device Manager has a red cross.
The joystick is not working properly in some programs.
The program may use the system processor timing to calculate the joystick position. When the
processor is fast, the program may determine the position of the joystick incorrectly, assuming
that the position is out of range.
To solve this problem:
•Increase your system’s 8 bit I/O recovery time of the BIOS setting, usually under the Chipset
Feature Settings section. Or, if available, you may adjust the AT Bus speed to a slower clock.
If the problem persists, try a different joystick.
Do not attempt to make changes to
the BIOS unless you have
experience with system software.

Troubleshooting C-7
Resolving I/O
Conflicts
Conflicts between your audio card and another peripheral device may occur if your card and the
other device are set to use the same I/O address.
To resolve I/O conflicts, change the resource settings of your audio card or the conflicting
peripheral device in your system using Device Manager in Windows 95/98.
If you still do not know which card is causing the conflict, remove all cards except the audio card
and other essential cards (for example, disk controller and graphics cards). Add each card back
until Device Manager indicates that a conflict has occurred.
To resolve hardware conflicts in Windows 95/98:
1. Click Start -> Settings -> Control Panel.
2. In the Control Panel window, double-click the System icon.
3. In the System Properties dialog box, click the Device Manager tab.
4. Under the Sound, Video And Game Controllers entry, select the conflicting audio card
driver—indicated by an exclamation mark (!)—and click the Properties button.
5. In the Properties dialog box, click the Resources tab.
6. Make sure that the Use automatic settings check box is selected, and click the OK button.
7. Restart your system to allow Windows 95/98 to reassign resources to your audio card and/
or the conflicting device.
Problems in
Windows NT 4.0
A Service Control Manager error message appears with one or more other error messages
at system restart.
This occurs after you remove an audio card from your computer after you have successfully
installed the Sound Blaster Live! Player 5.1 card. Windows is trying to match the drivers to the
removed audio card.
To solve this problem:
1. Log on to your computer as Administrator.
You can also refer to the
Troubleshooting section in the
Help file of Windows 95/98.

C-8 Troubleshooting
2. Click Start -> Settings -> Control Panel.
3. Double-click the Multimedia icon, and then click the Devices tab.
4. In the list, remove from under these entries
• Audio Devices
• MIDI Devices And Instruments
the items other than
• Audio for Creative SB Live!
• MIDI for Creative SB Live!
• MIDI for Creative S/W Synth
5. Click the OK button to close the dialog box.
The drivers are removed.
Problems with
Encore DVD Player
The Encore DVD Player is not launched when a DVD disc is inserted into the drive.
To solve this problem:
1. In the Windows system tray, right-click the Disc Detector icon, and then click Properties.
2. On the General tabbed page of the Creative Disc Detector dialog box, make sure that
Enable Disc Detector check box is selected.
3. Click the Players tab.
4. Select the DVD Disc entry and then click the Select Player button.
5. In the Players Properties dialog box, click the Browse button.
6. Browse to C:\Program Files\Creative\PC- DVD Encore
and double-click the entry ctdvdply
The Name box now displays the entry ctdvdply.
7. Click the OK button twice.
Now when you double-click the Disc Detector icon, the Encore DVD Player is launched.
