Explorer_8300HD_Users_Guide Explorer 8300HD Users Guide
User Manual: Explorer_8300HD_Users_Guide
Open the PDF directly: View PDF ![]() .
.
Page Count: 32

1
Explorer® 8300™ and 8300HD™ DVR
Digital Video Recorder/DVR with HDTV
User’s Gude
Record your favorite programs when you’re busy
Record one program and watch another
Record two live programs while watching a third program you recorded earlier
Record and store up to 50 hours of standard-definition programs on the 8300
DVR, or up to 20 hours of high-definition programs on the 8300HD DVR
Pause live TV for up to 1 hour without missing a minute
Use instant replay any time you want
Watch two programs at the same time with the Picture-in-Picture feature on
any TV you have
3
Welcome!
With the Explorer® 8300™
Digital Video Recorder (DVR),
you can easily record your
favorite programs and then
play them back anytime. The
DVR and Picture-In-Picture
(PIP) features give you com-
plete control, convenience,
and choice when watching TV.
Use your DVR to control the
following features...
Control live TV
The telephone is ringing and you do not want to miss any scenes of your
favorite live TV program. DVR lets you PAUSE the live program, or REWIND
and PLAY a portion of it again, or FAST-FORWARD it to catch up to live TV.
Sports fans can enjoy complete control by using INSTANT REPLAY, SLOW
MOTION, and FRAME ADVANCE AND REWIND to watch their favorite play
again.
Record TV programs without a VCR
RECORD and save your favorite TV programs to the DVR to watch later.
When two of your favorite TV programs are scheduled at the same time,
RECORD one program to the built-in recorder while watching the other!
Never miss your favorite programs that are scheduled at the same time.
Simply RECORD both programs at the same time. While recording both
programs, you can play back a third program you have already recorded.
RECORD a single episode or all episodes of your favorite TV programs.
RECORD one of your favorite TV programs and at the same time, access any
advanced application, such as video-on-demand (VOD).
Not sure if you have room to RECORD new programs? You can check your
available recording space any time.
Watch two TV programs at the same time
PIP is built into the Explorer 8300 DVR, so you can watch two live programs
at the same time on any make or model TV that is connected to your DVR.
When something exciting occurs in the PIP program, you can easily swap the
PIP into the Main screen. Once that program is in the Main screen, you can
pause, rewind, or record it.
When the PIP screen position is covering a “must see” moment on the Main
screen, simply MOVE the PIP screen to a different corner of your TV screen.
Let’s Get Started!
"Design On A Dime"
Save: Until erased
Title
Options/Play Scheduled Recordings Preferences
Date Time
Recorded List
Length
World Soccer
Extreme Homes
Design On A Dime
Home Matters
Thirteen Days
Wed 11/10
Wed 11/10
Mon 11/15
Sun 11/14
Mon 11/8
4:10am
8:10pm
12:00pm
12:30pm
8:00pm
30min
50min
30min
30min
1hr 30min
5
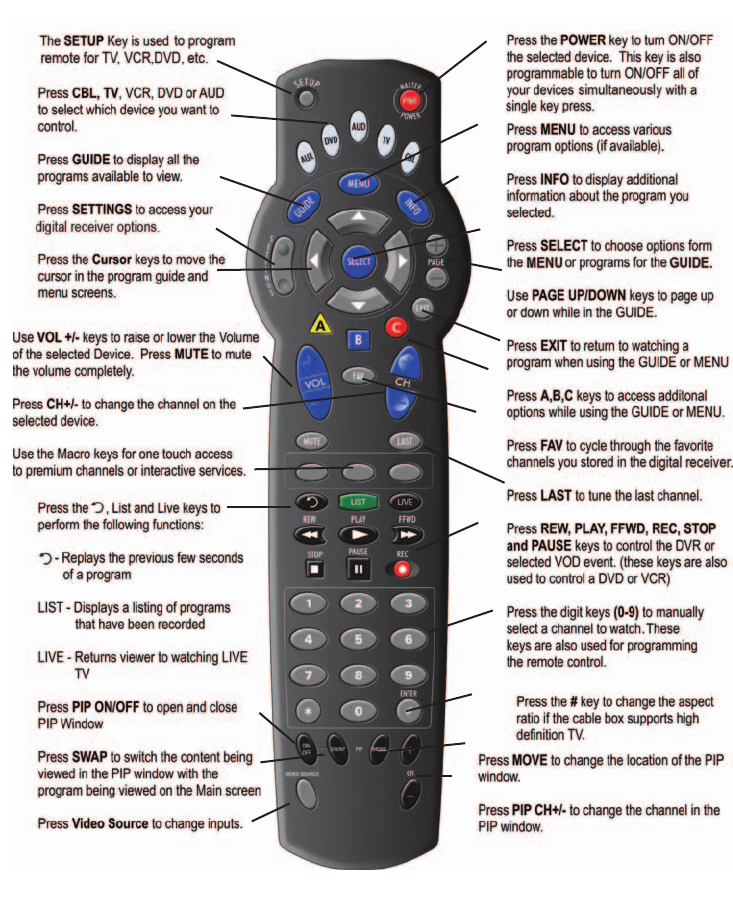
Using Your Remote Control
*Remote Controls May Vary.
6
Preparing the Explorer 8300HD DVR to Work
With Your High-Definition TV
First make sure that your DVR is properly connected to your HDTV television
and other electronic devices. Use the component (PrPbY) or HDMI™ ports to
connect the DVR to your HDTV.
For more information, refer to the connectivity guide for your DVR model:
• Connecting the Explorer® 8300™ Digital Video Recorder - page 19
• Connecting the Explorer® 8300HD™ Digital Video Recorder - page 23
Note: The composite ports (red, yellow, white) and the component ports
(PrPbY) on the back of the 8300HD are both active simultaneously.
Selecting HDTV Picture Formats With the HDTV Setup Wizard
The following section provides instructions for using the HDTV Setup Wizard to
select HDTV picture formats using the Easy and Advanced Setup modes.
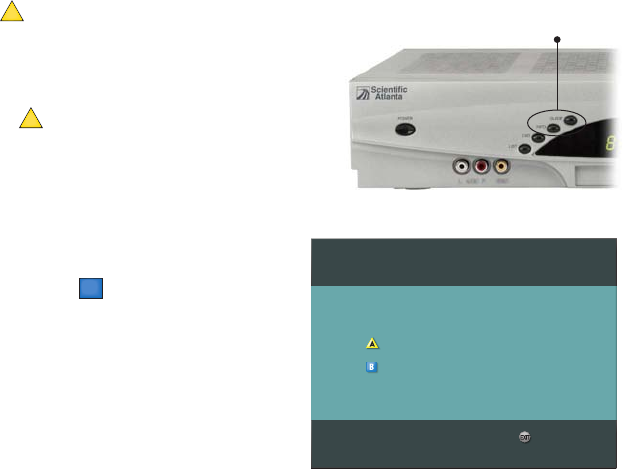
Start the HDTV Setup Wizard
To start the HDTV Setup Wizard, follow these steps.
1. Make sure that the DVR is powered OFF, but still plugged into an active
power outlet, and connected to the HDTV using the proper connectors
(HDMI or Component for an HDTV; Composite, RF, or S-Video for a SDTV).
2. Turn the TV ON.
3. With the DVR powered OFF, press Guide
and Info at the same time. The HDTV Setup
Wizard screen appears.
4. Press to start the set up.
5. Choose one of the following options:
• To choose the Easy Setup option
press
A
; then, go to the Easy
Setup Instructions on page 5.
Note: Choosing the Easy Setup
mode limits your HDTV picture
formats to 480i and 1080i, depending
on the TV type you select.
• To choose the Advanced Setup
option press
B
; then, go to the
Advanced Setup Instructions on
page 5.
Note: Choosing the Advanced Setup
mode allows you to save all the
HDTV picture formats, so that you
can toggle between them easily while
watching TV.
Setup Options
Press for Easy Setup: Used by most TV viewers
Press for Advanced Setup: Used by advanced TV viewers
Complete setup
Press the Guide and Info
keys at the same time
A
7
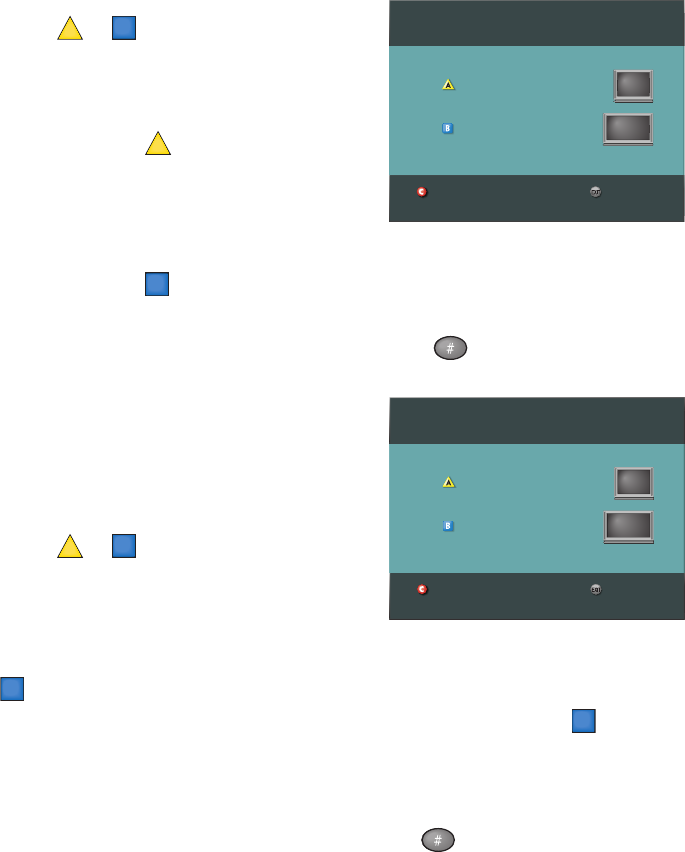
Easy Setup Instructions
1. Press
A
or
B
to select the type of TV
screen you have. The setup is complete.
2. Press Power to begin watching TV.
Notes:
• If you pressed
A
for the standard
screen (4:3) TV setting, the TV is set to
receive programming in 480i format on
non-HD channels and 1080i format on
HD channels.
• If you pressed
B
for the widescreen (16:9) TV setting, the TV is set to only
receive programming in 1080i format (even on non-HD channels).
Tip: After you complete the setup, you can use to stretch or zoom the
picture.
Advanced Setup Instructions
1. Press
A
or
B
to select the type of TV
screen you have.
2. Follow the on-screen instructions to select
your picture formats.
3. Press SELECT to toggle between the Save and Remove options, or press
B
to see how the next format looks on your TV screen.
Note: If you see a black screen do not press SELECT. Press
B
again
to view the next screen format.
4. After saving the picture formats, press EXIT. The setup is complete.
5. Press POWER to begin watching TV.
Tip: After you complete the setup, you can use to stretch or zoom the
picture.
Restart setup
Standard or Widescreen
Press if your TV has a standard screen (4:3)
Press if your TV has a widescreen (16:9)
Complete setup
Restart setup
Standard or Widescreen
Press if your TV has a standard screen (4:3)
Press if your TV has a widescreen (16:9)
Complete setup
8
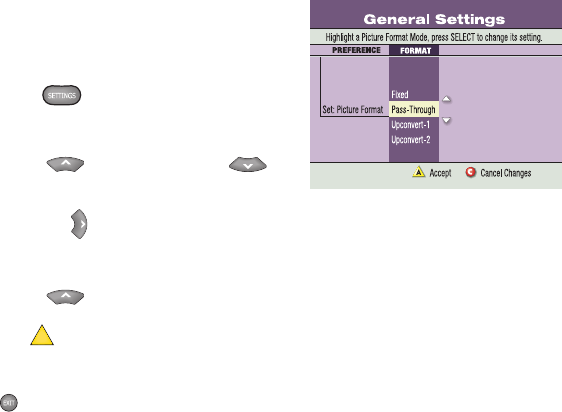
Select Picture Mode for Normal Viewing
After you use the HDTV Setup Wizard to select all the HDTV picture formats
you want to use, you need to choose a General Settings picture mode for
normal viewing. If you do not have your HDTV connected to the HDMI
connector on the back of the 8300HD DVR, then Pass-Through mode is
recommended for normal viewing. Pass-Through mode allows non-HD
channels to be displayed using their native picture formats, which can
improve picture quality on non-HD channels.
To select Pass-Through mode for normal
viewing, follow these steps.
1. Press Settings twice. The General
Settings menu appears.
2. Press Move Up or Move Down to
highlight Set: Picture Format.
3. Press Move Right to highlight the picture
format setting.
4. Press Move Up to select Pass-Through.
5. Press Accept
A
to use this option for the 8300HD. The DVR front panel
displays AUTO, plus the scan rate you are viewing (for example, 1080i).
6. Press Exit to return to normal viewing.
Note: When the HDMI connector is connected to the HDTV, the General
Settings - Set: Picture Format screen displays the AutoDVI/HDMI option
instead of the Pass-Through option.
Important: Do not connect the HDMI (DVI) output to a HDTV that does not
support High-Definition Copy Protection (HDCP). If you connect the HDMI
(DVI) output cable to a HDTV that does not support HDCP, you will not be able
to see any video output. A message will be displayed instructing you to
disconnect the HDMI connection and watch video output through the PrPbY
component connectors.
9
Important Note Regarding the HDMI Interface
The High-Definition Multimedia Interface (HDMI) is an all-digital audio and
video interface. HDMI provides a digital interface between any audio and
video source. HDMI supports standard, enhanced, or high-definition video,
plus digital audio.
Some HDTVs do not contain circuitry to decode Dolby® Digital formatted
content. If you connect your DVR to an HDTV that cannot support Dolby
Digital audio, the HDMI interface instructs the DVR to switch its audio outputs
to 2-channel PCM audio (to be compatible with the HDTV). In this case, all
digital audio outputs on the DVR are formatted as 2-channel PCM. As a result,
you will not be able to receive Dolby Digital or DTS audio on your home theater
system when connected to either the optical or coax (RCA Connector) S/PDIF
ports. You can avoid this by overriding the automatic configuration through the
General Settings menu and switching the audio output to Dolby Digital.
Important: If your HDTV cannot decode Dolby Digital formatted content
and you have configured the DVR to output in the Dolby Digital format, you
will not be able to listen to audio through the TV. Instead, you must use your
home theater or your Dolby Digital decoding device in order to hear audio.
Alternatively, you can reconfigure the DVR to output 2-channel PCM any
time you want to use the TV to produce the audio portion of the content by
selecting HDMI in the General Settings - Audio Output screen. Depending
upon your equipment capabilities to select alternate audio sources for input,
other configurations may be possible. Refer to your equipment user’s guides
for more information.
10
Controlling Live TV
Control a Live Program You Are Watching
Use the following remote control keys to control
the live program in the Main screen:
The Pause, Rewind, Fast-Forward, Play,
Instant Replay, and Live keys on the remote
control are used to control the live program in
the Main screen.
For example, when you are watching your
favorite live TV program and the telephone
rings, press Pause to pause the program for up
to 1 hour. From Pause mode, press Pause or
Play to resume the normal play mode.
While in normal play mode, press Rewind or Fast-Forward to cycle through
three different speeds of rewind or fast-forward.
To reverse or advance one frame at a time, press Pause and then repeatedly
press Rewind or Fast-Forward. For example, to advance three frames, press
Pause and then press Fast-Forward three times.
To see the action in slow motion, press Play from normal play mode. Press
Play again to resume normal play mode.
To replay the last 8 seconds of a live or recorded program, press Instant
Replay.
If you have rewound or paused a live program, press Live at anytime to catch
up to the live TV program.
Note: You can use these same dedicated DVR keys to control the reduced
screen (also known as the quarter screen) in the Program Guide and in all
DVR screens.
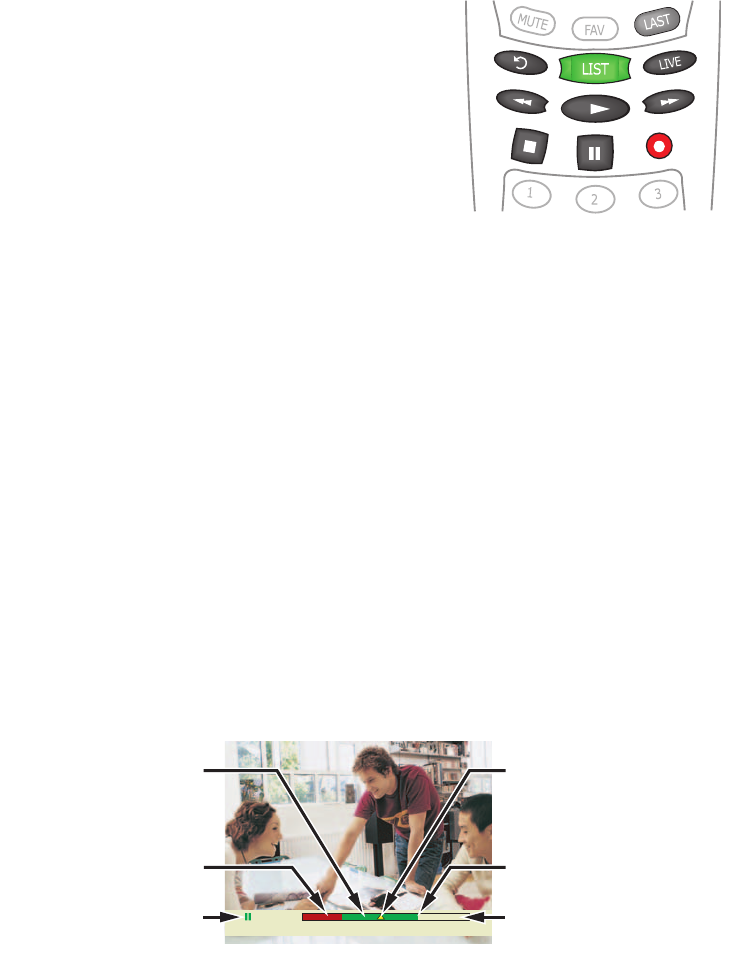
Pause a Live Program
The paused status bar appears when you press Pause.
Note: All of the features for controlling live TV (such as Pause, Fast-Forward,
Rewind) are also available when playing back recorded programs.
T11170
Pause Design On A Dime 12:00 - 12:30pm
"Paused" Status Bar
Red Area of Bar Indicates
Missed Programming
Green Area of Bar
Indicates Stored or
Recorded Programming
Clear Area of Bar Indicates
Programming Not Aired Yet
Live Point of Programming
Triangle Indicates Your
Current Position in Program
T10964
11
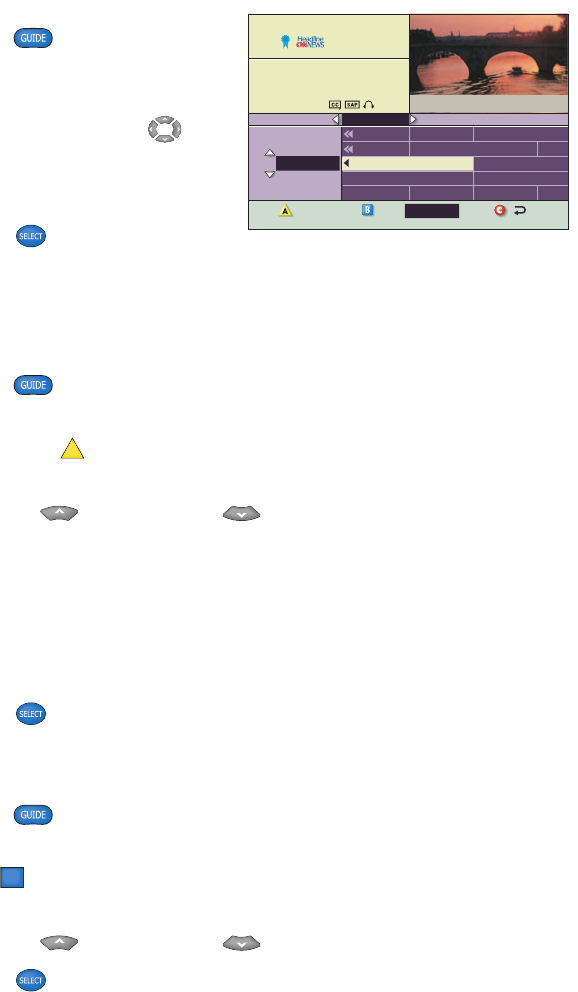
Using the Program Guide
Find a Program to Watch
1. Press Guide . The Program
Guide appears and lists the next 7
days of programs.
2. Press the directional keys ( ) to
move through the program listings
and highlight the program you want
to watch.
3. Press Select . If the program is
currently on, the Program Guide closes and the program you selected
appears in full-screen TV. If the program is on in the future, a future
program option screen appears.
Search for a Program by Channel, Title, or Theme
1. Press Guide . The Program Guide appears and lists the next
7 days of programs.
2. Press Browse By
A
. The Browse By area of the Program Guide displays
the options Title, Channel, and Theme.
3. Press Move Up or Move Down to highlight one of the following
options:
• Channel, which lists programs numerically by channel number
• Title, which lists programs alphabetically by program title
• Theme, which lists programs by theme, such as adventure, comedy,
sports, or news
4. Press Select . The Browse By area of the Program Guide displays the
programs according to the option you selected.
Search for a Program by Date
1. Press Guide . The Program Guide appears and lists the next
7 days of programs.
2. Press Date
B
. The Browse By area of the Program Guide displays the
next 7 dates.
3. Press Move Up or Move Down to highlight a date.
4. Press Select . The Program Guide displays the programs that will be
broadcast on that date.
Headline News
4:00-5:00pm
Up-to-the-minute coverage of the
latest events.
HDLN
36
DSC 34
CNN 35
HDLN 36
ESPN 37
TOON 38
Great Chefs
Inside Politics
' Headline News
Bikes, Blades & Boards
Yu-Gi-Oh!
Hollywo
Pokemo
Travelers
Headline News
NFL's Greatest
Pokemon
Great Chefs
Early Prime
Yu-Gi-Oh!
4:00pm 4:30pm
36
Wed 6/18 4:02pm
5:00pm 5:3CHANNEL
WED 6/18
Date
Browse By
12
TUE 1/15
Channel 2 Action News
Tue 5:00-6:00pm
(60 min)
WSB
02
DateBrowse By
PBY_B 1915
DVR 1
WSB 2
WATL 3
WGNX 4
World View News
Recorded Programs List
Channel 2 Action News
Ricki Lake
Frasier
Simpso
Channel 2 Action News
Steve Harvey
Judge JudyFrasier
5:00pm 5:30pm 6:00pm 6:3CHANNEL
Choose highlighted item
All Episode Recording Options
Cancel changes
Options
All episodes on this channel at any time
New first-run episodes on this channel
All episodes on this channel in this time slot
"Design On A Dime"
HGTV (Ch 238)
Thu: 11/13
START
Accept recording Cancel changes
RECORD
Confirm Recording
SAVE TIME
12:00pm
STOP
12:30pm One episode
All episodes
14 days
"Design On A Dime"
Tue: 11/13
Save: 14 days
START
Accept recording Cancel changes
RECORD
Confirm Recording
SAVE TIME
12:00pm
STOP
12:30pm All episodes
One episode
14 days
"Design On A Dime"
Tue: 11/13
Save: 14 days
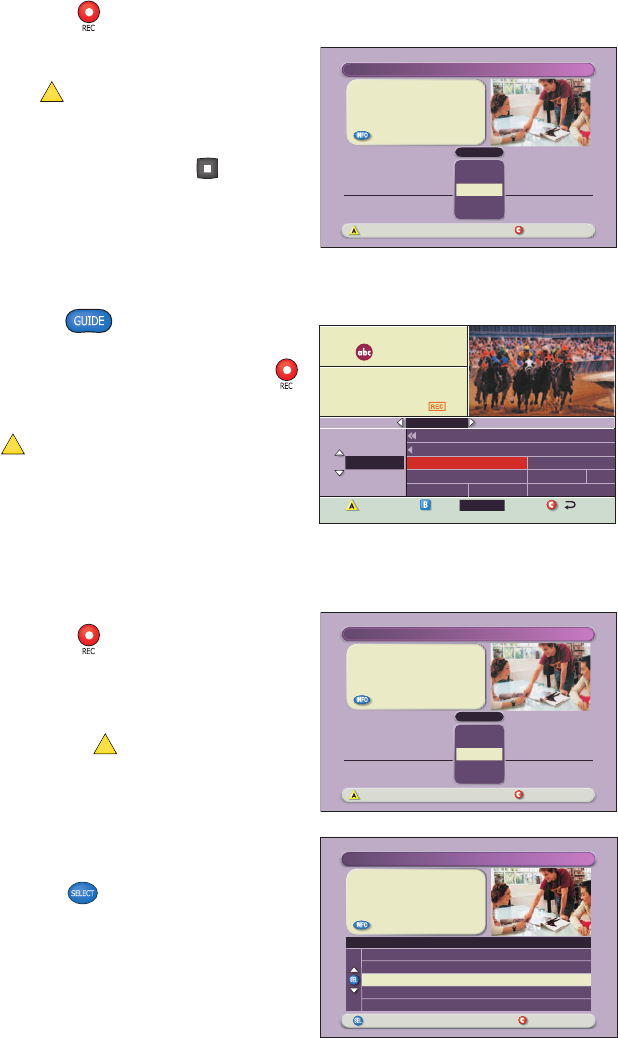
Recording TV Programs
Record a TV Program You Are Watching
1. Press Record .
2. While in the Confirm Recording
screen, choose your recording options
and press
A
. The Record Indicator is
lit on the front panel of the DVR.
3. To manually stop recording before the
scheduled time, press Stop and
then follow the on-screen choices.
Record a TV Program From the
Program Guide
1. Press Guide .
2. Press the arrow keys to highlight a
TV program, and then press Record .
3. In the Confirm Recording screen,
choose your recording options and
press
A
. The recording program is
highlighted in red in the Program Guide.
Record Multiple Episodes of a TV Program
If you want to record all the episodes of a program you are watching, follow
these steps:
1. Press Record .
2. Choose One Episode or All Episodes.
Notice the information in the fourth
column changes, based on your
selection. Press
A
. If you selected All
Episodes from the third column, the All
Episode Recording Options screen
appears.
3. Choose one of the options on the
screen.
4. Press Select to save your settings.
Note: The “New first-run episodes on
this channel” option is subject to
availability in your area.

13
Managing Recording Space
How Much Recording Space Do I
Have?
1. Press List .
2. Press
B
to display the Preferences
screen, which displays the percentage
of space used.
Automatically Erasing Oldest
Recordings If Space Is Needed
Turning Auto Erase on will automatically
erase your oldest recordings one by one
until there is enough space to record your
new programs.
Note: Any recordings that have a Save
Time of “Until I Erase” will not be
automatically erased.
1. Press List .
2. Press
B
to display the Preferences
screen.
3. Choose Turn ON Auto Erase.
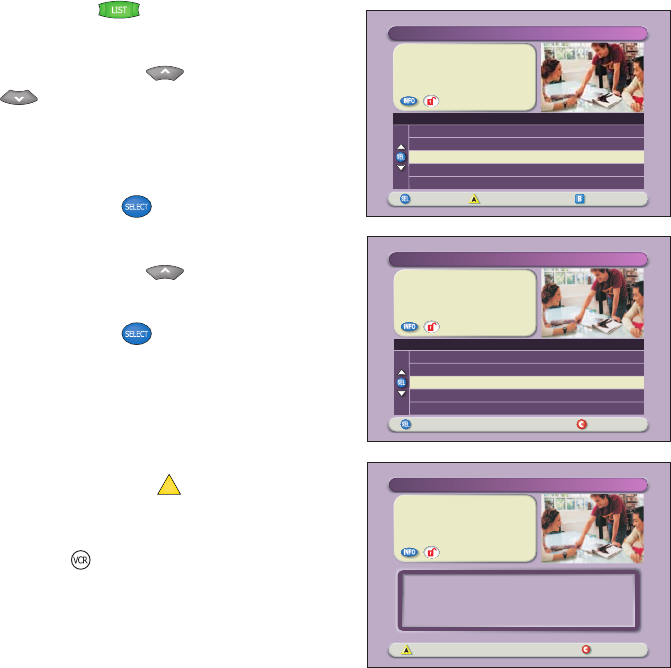
Watching Your Recordings
Access and Play Back Your
Recorded Programs Anytime
1. Press List .
2. Use the arrow keys to choose the
program you want to play back.
3. Press Select to display your
options.
"Design On A Dime"
Save: Until erased
Title
Options/Play Scheduled Recordings Preferences
Date Time
Recorded List
Length
World Soccer
Extreme Homes
Design On A Dime
Home Matters
Thirteen Days
Wed 11/10
Wed 11/10
Mon 11/15
Sun 11/14
Mon 11/8
4:10am
8:10pm
12:00pm
12:30pm
8:00pm
30min
50min
30min
30min
1hr 30min
TUE 1/15
Recorded Programs List
Tue 3:00-9:00pm
Programs you have recorded
for later viewing.
DVR
01
DateBrowse By
PBY_A 1914
PBY_B 1915
DVR 1
WSB 2
WATL 3
World Business News
World View News
Recorded Programs List
Channel 2 Action News
Ricki Lake Simpso
Channel 2 Action News
Steve Harvey
5:00pm 5:30pm 6:00pm 6:3CHANNEL
Access and Play Back Your Recorded Programs
From the Program Guide
1. Press Guide .
2. Use the arrow keys to choose the
DVR channel and press Select .
Note: The DVR channel is a dedicated
channel that allows you to play back
your recorded programs.
3. Use the arrow keys to choose the
program you want to play back.
4. Press Select to play back the program.
Auto Erase is OFF.
Press if you want your oldest
recordings automatically erased to
make space for new ones.
Options
Scheduled Recordings
Preferences
Schedule a new Manual Recording
Sort Recorded List by time recorded
Turn ON Auto Erase
Recording space used
Change Save Time for future recordings
Recorded List
Recording Space Used:
Options
Scheduled Recordings
Preferences
Sort Recorded List by time recorded
Turn ON Auto Erase
Recording space used
Change Save Time for future recordings
Schedule a new Manual Recording
Recorded List
You currently have 10 recordings.
19%
14
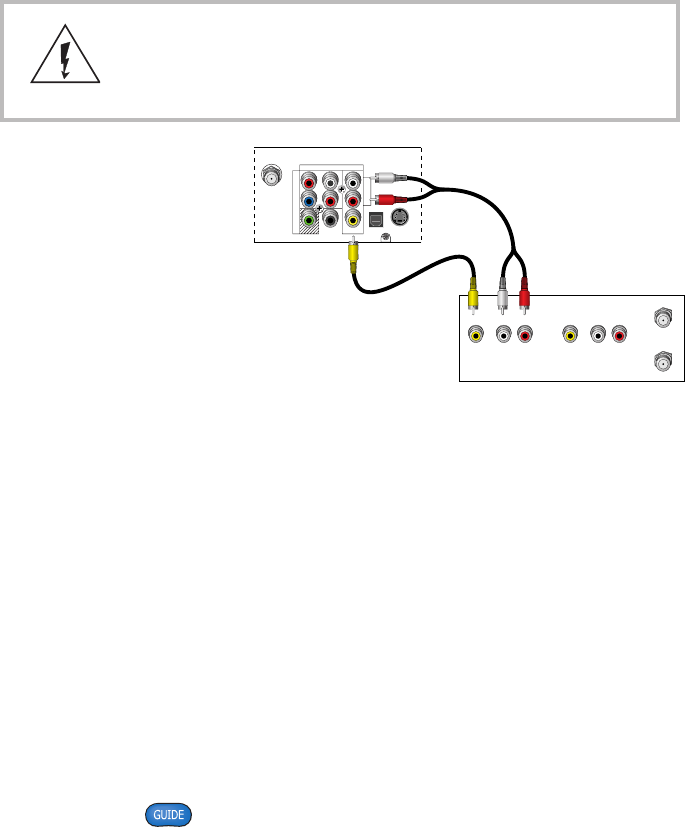
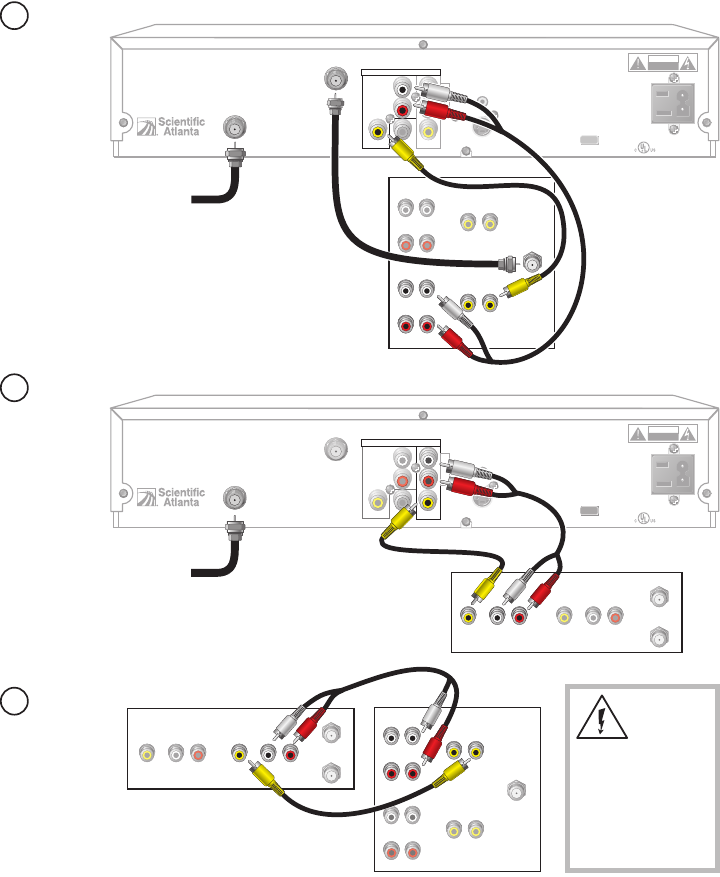
Copy Recordings From Your DVR to a VCR Tape
The Copy to VCR feature lets you copy recordings from your DVR to a VCR tape.
Warning: Avoid electric shock. Unplug all electronic
devices before connecting or disconnecting any
device cables to the DVR.
Verify that the OUT 2
outputs are connected to
your VCR inputs.
Note: This graphic shows
the 8300HD DVR back
panel layout. The 8300
DVR back panel is slightly
different.
The program that you are copying appears in the PIP window. Connecting to
your VCR using the OUT 2 outputs allows you to watch or record another
program or even change channels in the Main screen, without affecting the
copy in progress.
Notes:
• You can turn the PIP feature off and on without affecting the copy in
progress. A “Copying to VCR” banner will be displayed for 3 seconds when
you turn the PIP feature on.
• You can still record live TV directly to a VCR tape (instead of your DVR) by
connecting the DVR OUT 2 outputs directly to the VCR inputs and not using
the Copy a Recording to a VCR Tape instructions on page 13. Recording
live TV directly to your VCR causes the VCR to record all remote control
activities, including information banners and on-screen displays such as
when Guide is pressed.
CABLE
OUT
S - VIDEO
OUT
AUDIO OUT
OPTICAL
VIDEO
OUT 1 OUT 2
A
U
D
I
O
DIGITAL
AUDIO OUT
L
R
Y/V
Pr
Pb
T11304 VCR
RF IN
RL
AUDIO
IN
VIDEO
IN
RF OUT
RL
AUDIO
OUT
VIDEO
OUT
15
"Design On A Dime"
Recorded: Mon 11/15
12:00pm 30min
Save: Until Erased
Options
Choose highlighted item Recorded List
Recorded Program Options
Erase
Change save time
Copy to VCR
Play "Design On A Dime"
Block "Design On A Dime"
"Design On A Dime"
Recorded: Mon 11/15
12:00pm 30min
Save: Until Erased
Start copy Cancel copy
Copy to VCR
Connect VCR inputs to cable box outputs "OUT 2 (VCR)."
Place a blank tape in your VCR.
Set your VCR input to record from the cable box.
Press RECORD on your VCR.
"Design On A Dime"
Save: Until Erased
Recorded Programs
Options/Play Scheduled Recordings Preferences
Date Time
Recorded List
Length
Friends
ER
Design On A Dime
Divine Design
NYPD Blues
Wed� 11/10
Thur� 11/11
Mon� 11/15
Tue� 11/16
Wed� 11/17
8:30pm
9:00pm
12:00pm
9:00pm
10:00pm
30min
1hr 0min
30min
30min
1hr 0min
Copy a Recording to a VCR Tape
1. Connect the VCR to the OUT 2 connection on the back of the Explorer DVR.
See page 12 for more information.
2. Make sure that a tape is in your VCR and that the VCR is set to record.
3. Press List . The Recorded List
screen appears.
4. Press Move Up or Move Down
to highlight the recording you
want to copy to the VCR. Make sure to
select a program that is not currently
being recorded.
5. Press Select . The Recorded
Program Options screen appears.
6. Press Move Up to highlight “Copy
to VCR.”
7. Press Select . The Copy to VCR
screen appears.
8. Make sure your VCR is properly
connected to your DVR outputs,
and press Record on your VCR.
9. Press Start copy
A
. The recording
begins copying to VCR tape. The
Recorded List displays the VCR
symbol for the recording that is
copying to VCR.
Note: You can watch the copying in
progress through the PIP.
16
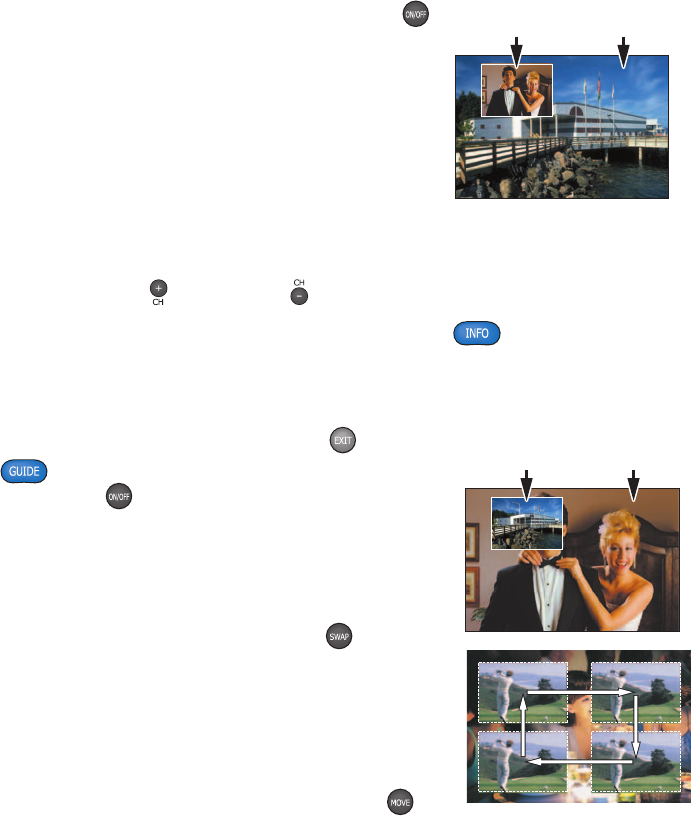
Using Picture-In-Picture
Activate PIP on Your TV
While watching a program, press PIP On/Off
to activate the PIP screen.
Notes:
• To pause or record the video in the PIP
screen, you must first swap it to the
Main screen.
• You can only use the dedicated DVR keys
(Pause, Rewind, Fast-Forward) to control
the program shown in the Main screen.
• To change the channel in the PIP screen,
use PIP CH+ and PIP CH- .
Tip: While the PIP screen is activated, press INFO to display a channel
banner for both the Main screen and the PIP screen.
Activate PIP From the Program Guide
From the Program Guide, press Exit or Guide
to close the Program Guide, and then press
PIP On/Off to activate PIP. You can only
activate PIP from full-screen video.
Swap the Main and PIP Screens
To swap the TV program that is in the PIP screen
to the Main screen, press PIP Swap .
Note: You will only hear the audio for
the program shown in the Main screen.
Move the PIP Screen
To move the PIP screen clockwise to a different
corner of the Main screen, press PIP Move .
You can move the PIP screen to any of the four
corners of the Main screen.
PIP
Screen
Main
Screen
PIP
Screen
Main
Screen

17
Use Power-Save Mode
To maximize the life of your DVR, you should power-down the DVR when it is
not in use. Simply press CBL and then Power on your remote control, or press
Power on the front panel of the DVR. The Power light turns off; but, because
the DVR is still plugged in, your scheduled recordings still occur.
Between 1:00 a.m. and 6:00 a.m. daily, your DVR
will automatically enter Power-Save mode unless
you press a key on the remote control or a key on
the DVR front panel at least once every 2 hours. In
Power-Save mode, the set-top is powered-down,
but all scheduled recordings still occur. When the
DVR enters Power-Save mode, your TV displays
a black screen. Note: Your cable service provider
controls whether or not the automatic Power-Save mode is activated on your
set-top.
At 1:10 a.m., the DVR displays the above 5-minute warning banner, indicating
that the DVR is about to enter power-save mode. When this banner appears,
do one of the following:
• To allow the DVR to enter Power-Save mode, do nothing when the
warning banner appears. The DVR will automatically power-down. After
your DVR powers down, you must press CBL and then Power on your
remote control, or press Power on the front panel of your DVR to start
watching TV again.
• To prevent the DVR from entering Power-Save mode, simply press any key
on your remote or any key on the front panel of the DVR when the warning
banner appears. The DVR will not attempt to enter power-save mode again
until another 2 hours of inactivity has passed.
Attention
Your DVR will automatically enter power-save mode in 5 minutes.
Press any remote key to continue watching TV.
18
Frequently Asked Questions
How far back can I rewind live TV? The length of time you can rewind live TV depends on how
long you have been tuned to a single channel. Each time you change channels, a new copy is
automatically stored to the built-in recorder. This copy saves up to the last 1 hour of programming.
For example, if you have been watching the same channel for 15 minutes, you can rewind that 15
minutes of the program.
Can I record the quarter screen in the Program Guide or the DVR Recorded List? Yes, you can
record the quarter screen on all DVR screens by pressing Record. You can also record the quarter
screen in the Program Guide. Press Exit to display the video in full screen, and then press Record.
Note: Pressing Record while in the Program Guide will record the highlighted program in the grid.
Can I record or pause the video in the PIP screen? Yes, but you must swap it to the Main screen
first. After pressing Record and confirming the recording, you can swap it back to the PIP screen and
it will continue recording. You can also press PIP On/Off, and the video will continue to record.
Can I use PIP while copying a program to my VCR? When copying a program to a VCR, the PIP
can be used only to monitor the progress of the copy status. You cannot use PIP to watch another
program while copying a program to a VCR.
If I’ve been tuned to a program since it started, do I have to rewind to the beginning to record
the entire program? No, if you have been tuned to the program since its beginning, just press
Record from any point in the program to record the entire program. Recording will automatically stop
when the program ends.
How will I know the DVR is almost out of recording space? When you try to schedule the next
recording, a warning appears on the Confirm Recording screen. Also, you can see what percentage
of recording space you have used. Press List and then press B for preferences.
What happens if my DVR loses power temporarily? Everything you have recorded is saved, based
on the save time you selected in the Confirm Recording screen. Your scheduled recordings during the
time the DVR lost power are the only recordings you may miss.
Do my Parental Controls in the Program Guide carry over to DVR recordings? Yes. If you block
programs by channel or rating in General Settings menu, those settings are carried over to DVR
recordings. For example, if you decide to block all R-rated programs in the General Settings menu,
the R-rated programs will still be recorded, but you cannot play them back until you enter the correct
PIN.
How do I block or erase individual recordings in my recorded list or change the save time for
the recording? Highlight the recording on the Recorded List screen, and press Select on the remote
control. An Options screen appears for the program you selected.
Why are all my programs displayed in 1080i format? You may have selected the Easy Setup
mode and the Widescreen (16:9) TV setting in the HDTV Setup Wizard. Choosing these two settings
together limits your programming to 1080i format, even on non-HD channels. To see your non-HD
programs in 480i on a widescreen (16:9) HDTV, use the Advanced Setup in the HDTV Setup Wizard.
Make sure that you select 480i as one of your saved formats, and then select Pass-Through in
General Settings: Picture Format for your default picture format.
19
Where Are the Connection Diagrams?
The diagrams on the following pages show examples of common ways to connect the 8300 to
your TV, VCR, and home theater receiver.
However, these diagrams do not show every possible combination of devices. Please consult
the user’s guides that came with your other electronic devices for further information.
What Cables Do I Need?
Some of the cables shown in the diagrams may not be included with the 8300. The required
cables are shown in the connection diagrams on the following pages.
How Do I Connect the 8300 to My TV and Other Entertainment Devices?
When you are ready to connect the 8300, follow these instructions.
1. Power off all electrical devices before connecting to avoid electrical shock.
2. Connect the 8300 to your TV, VCR, and other entertainment devices as shown in the diagrams
on the following pages. (The diagrams in this guide do not cover every possible combination.)
3. Connect the 8300 to the coaxial cable coming from the wall.
4. Plug the 8300 and the TV into an AC power source.
5. Do not turn on the set-top or TV yet.
6. Wait until you see one of the following displays on the front of the set-top:
• Current time
• Four dashes (- - - -)
Important: It may take several minutes for the set-top to receive the latest software, program-
ming, and service information. When the front panel displays the time or four dashes, the
update is complete.
7. After the update is complete, turn on the TV.
How Do I Set Up Stereo Sound?
To set up stereo sound, choose one of the following options:
• Connect an RCA cable from the DIGITAL AUDIO OUT on the 8300 to the DIGITAL AUDIO IN
on your TV (if equipped) or stereo receiver.
• Connect stereo audio cables from the AUDIO OUT LEFT and RIGHT connectors on the 8300
to the AUDIO IN LEFT and RIGHT connectors on your TV.
Connecting the 8300 Digital Video Recorder
to Entertainment Devices
20
Explorer 8300
THIS DEVICE IS INTENDED TO BE ATTACHED
TO A RECEIVER THAT IS NOT USED TO
RECEIVE OVER-THE-AIR BROADCAST
SIGNALS. CONNECTION OF THIS DEVICE
IN ANY OTHER FASHION MAY CAUSE
HARMFUL INTERFERENCE TO RADIO
COMMUNICATIONS AND IS IN VIOLATION
OF THE FCC RULES, PART 15.
CABLE
IN
SATA
VIDEOVIDEO
TV
OUT 1
A
U
D
I
O
DIGITAL
AUDIO OUT
L
R
CATV CONVERTER
MADE IN MEXICO
IR
S - VIDEO
OUT
120 VAC
60HZ 5A
LISTED 14H1
CABLE EQUIP
.
120 VAC
60HZ 80W
CAUTION
RISK OF ELECTRIC SHOCK
DO NOT OPEN
AVIS: RISQUE DE CHOC
ELECTRIQUE NE PAS OUVRIR
OUT 2
Cable
Input
CABLE
OUT
Explorer 8300
THIS DEVICE IS INTENDED TO BE ATTACHED
TO A RECEIVER THAT IS NOT USED TO
RECEIVE OVER-THE-AIR BROADCAST
SIGNALS. CONNECTION OF THIS DEVICE
IN ANY OTHER FASHION MAY CAUSE
HARMFUL INTERFERENCE TO RADIO
COMMUNICATIONS AND IS IN VIOLATION
OF THE FCC RULES, PART 15.
CABLE
IN
SATA
VIDEO VIDEO
TV
OUT 1
A
U
D
I
O
DIGITAL
AUDIO OUT
L
R
CATV CONVERTER
MADE IN MEXICO
IR
S - VIDEO
OUT
120 VAC
60HZ 5A
LISTED 14H1
CABLE EQUIP.
120 VAC
60HZ 80W
CAUTION
RISK OF ELECTRIC SHOCK
DO NOT OPEN
AVIS: RISQUE DE CHOC
ELECTRIQUE NE PAS OUVRIR
OUT 2
CABLE
OUT
VCR
IN FROM ANT. OUT TO TV
Standard
TV
RIGHT
INOUT
LEFT
AUDIO
INOUT CABLE/
ANTENNA
VIDEO
INOUT
VCR
IN FROM ANT. OUT TO TV
Standard
TV
RIGHT
INOUT
LEFT
AUDIO
INOUT CABLE/
ANTENNA
VIDEO
INOUT
T11327
Cable
Input
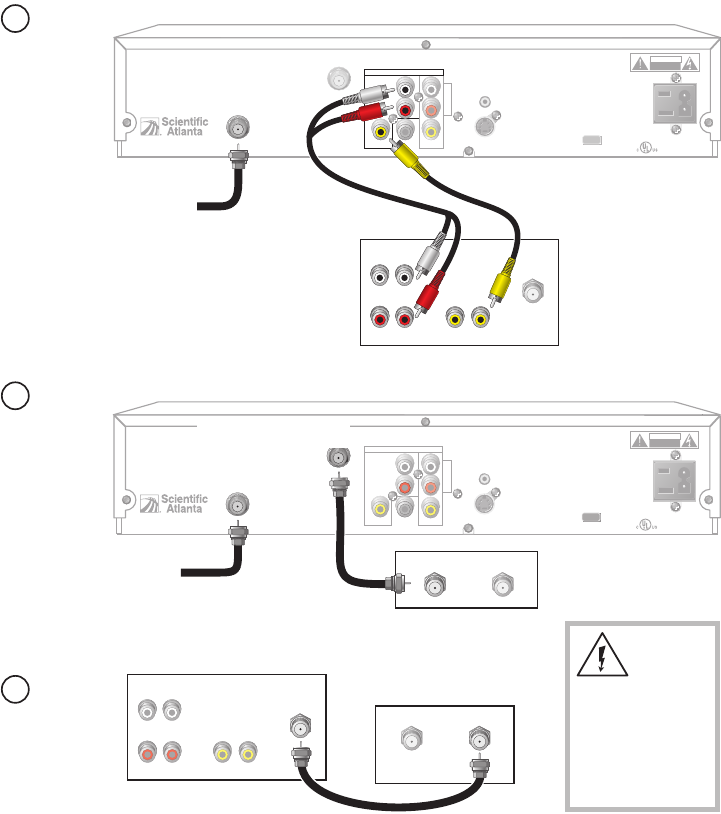
1
Connect
the 8300
to the TV.
2
Connect
the 8300
to the VCR.
3
Connect
the TV to
the VCR.
WARNING:
Electric shock
hazard! Unplug all
electronic devices
before connecting
or disconnecting
any device cables
to the 8300.
Connecting the 8300 to Your TV and VCR
21
Explorer 8300
THIS DEVICE IS INTENDED TO BE ATTACHED
TO A RECEIVER THAT IS NOT USED TO
RECEIVE OVER-THE-AIR BROADCAST
SIGNALS. CONNECTION OF THIS DEVICE
IN ANY OTHER FASHION MAY CAUSE
HARMFUL INTERFERENCE TO RADIO
COMMUNICATIONS AND IS IN VIOLATION
OF THE FCC RULES, PART 15.
CABLE
IN
SATA
VIDEOVIDEO
TV
OUT 1
A
U
D
I
O
DIGITAL
AUDIO OUT
L
R
CATV CONVERTER
MADE IN MEXICO
IR
S - VIDEO
OUT
120 VAC
60HZ 5A
LISTED 14H1
CABLE EQUIP.
120 VAC
60HZ 80W
CAUTION
RISK OF ELECTRIC SHOCK
DO NOT OPEN
AVIS:
RISQUE DE CHOC
ELECTRIQUE NE PAS OUVRIR
OUT 2
CABLE
OUT
Explorer 8300
THIS DEVICE IS INTENDED TO BE ATTACHED
TO A RECEIVER THAT IS NOT USED TO
RECEIVE OVER-THE-AIR BROADCAST
SIGNALS. CONNECTION OF THIS DEVICE
IN ANY OTHER FASHION MAY CAUSE
HARMFUL INTERFERENCE TO RADIO
COMMUNICATIONS AND IS IN VIOLATION
OF THE FCC RULES, PART 15.
CABLE
IN
SATA
VIDEO
VIDEO
TV
OUT 1
A
U
D
I
O
DIGITAL
AUDIO OUT
L
R
CATV CONVERTER
MADE IN MEXICO
IR
S - VIDEO
OUT
120 VAC
60HZ 5A
LISTED 14H1
CABLE EQUIP.
120 VAC
60HZ 80W
CAUTION
RISK OF ELECTRIC SHOCK
DO NOT OPEN
AVIS:
RISQUE DE CHOC
ELECTRIQUE NE PAS OUVRIR
OUT 2
CABLE
OUT
RF OUT
RF IN
RIGHT
INOUT
LEFT
AUDIO 1
INOUT
CABLE/
ANTENNA
VIDEO 1
INOUT
Stereo
TV
RIGHT
INOUT
LEFT
AUDIO 2
INOUT VIDEO 2
INOUT
Cable
Input
Stereo
VCR
RF OUT
RF IN
RL
AUDIO
IN
VIDEO
IN
RL
AUDIO
OUT
VIDEO
OUT
RIGHT
INOUT
LEFT
AUDIO 1
INOUT
CABLE/
ANTENNA
VIDEO 1
INOUT
Stereo
TV
RIGHT
INOUT
LEFT
AUDIO 2
INOUT VIDEO 2
INOUT
Stereo VCR
RL
AUDIO
IN
VIDEO
IN
RL
AUDIO
OUT
VIDEO
OUT
T11328
Cable
Input
1
Connect
the 8300
to the
stereo TV
.
2
Connect
the 8300
to the
stereo VCR.
3
Connect the
stereo TV
to the
stereo VCR.
WARNING:
Electric shock
hazard! Unplug all
electronic devices
before connecting
or disconnecting
any device cables
to the 8300.
Connecting the 8300 to Your Stereo TV and Stereo VCR
22
Explorer 8300
THIS DEVICE IS INTENDED TO BE ATTACHED
TO A RECEIVER THAT IS NOT USED TO
RECEIVE OVER-THE-AIR BROADCAST
SIGNALS. CONNECTION OF THIS DEVICE
IN ANY OTHER FASHION MAY CAUSE
HARMFUL INTERFERENCE TO RADIO
COMMUNICATIONS AND IS IN VIOLATION
OF THE FCC RULES, PART 15.
CABLE
IN
SATA
VIDEOVIDEO
TV
OUT 1
A
U
D
I
O
DIGITAL
AUDIO OUT
L
R
CATV CONVERTER
MADE IN MEXICO
IR
S - VIDEO
OUT
120 VAC
60HZ 5A
LISTED 14H1
CABLE EQUIP.
120 VAC
60HZ 80W
CAUTION
RISK OF ELECTRIC SHOCK
DO NOT OPEN
AVIS:
RISQUE DE CHOC
ELECTRIQUE NE PAS OUVRIR
OUT 2
CABLE
OUT
Home
Theater
Receiver
VIDEO
COMPONENT VIDEO
1
Y
P
B
P
R
2
Y
P
B
P
R
Y
P
B
P
R
L
R
AUDIO
S-VIDEO
DIGITAL
AUDIO TV/CABLE
1
2
3
4
VIDEO
L
R
AUDIO
S-VIDEO
DVD
S-VIDEO
VIDEO 1
S-VIDEO
OUT
VIDEO OUT
MONITOR
VIDEO
L
R
AUDIO
S-VIDEO
OUTIN
OUT
VIDEO
L
R
AUDIO
IN
Home
Theater
Receiver
VIDEO
COMPONENT VIDEO
1
Y
P
B
P
R
2
Y
P
B
P
R
Y
P
B
P
R
L
R
AUDIO
S-VIDEO
DIGITAL
AUDIO TV/CABLE
1
2
3
4
VIDEO
L
R
AUDIO
S-VIDEO
DVD
S-VIDEO
VIDEO 1
S-VIDEO
OUT
VIDEO OUT
MONITOR
VIDEO
L
R
AUDIO
S-VIDEO
OUTIN
OUT
VIDEO
L
R
AUDIO
IN
SATA
External SATA
Hard Disk Drive
RIGHT
INOUT
LEFT
AUDIO 1
INOUT
CABLE/
ANTENNA
VIDEO 1
INOUT
Stereo
TV
RIGHT
INOUT
LEFT
AUDIO 2
INOUT VIDEO 2
INOUT
T11329
1
Connect
the 8300
to the
Home
Theater
Receiver.
2
Connect
the 8300
to the
SATA hard
disk drive.
3
Connect the
Home Theater
Receiver
to the
stereo TV.
WARNING:
Electric shock hazard!
Unplug all electronic
devices before connecting
or disconnecting any
device cables to the 8300.
Notes:
Consult with your cable
service provider for a list of
approved external SATA hard
disk drives that work with the 8300.
External SATA hard disk drives
allow for greater program storage
capacity and are not meant to
be used for archiving.
Connecting the 8300 to Your HomeTheater, Stereo TV,
and External SATA Hard Disk Drive
23
Connecting the 8300 to Your HomeTheater, Stereo TV,
and External SATA Hard Disk Drive
Connecting the 8300HD to Entertainment Devices
Required Connections for an HDTV
When using the 8300HD with an HDTV, you must make one of the following
connections to view the HD content. In addition, you can make connections to a VCR or other
external recording device. You also have the option to make an SD
connection from the 8300HD to an SDTV. See the tables and cabling diagrams in this section
for more detailed information.
Note: You can stretch and zoom the displayed picture using the built-in capability of the 8300HD by
pressing the # key on the remote control. Refer to your DVR user’s guide for more information on
this feature.
For VCRs that have a Video, Left, and Right connector, you can use
the Out 2 connectors (Video, Left, and Right) on the 8300HD.
8300HD
Connector
VCR
Connector
L
VIDEO
IN
AUDIO
IN
R
VIDEO
OUT 2
L
A
U
D
I
O
R
Optional Connections for a VCR
There are several brands and models of VCRs in the marketplace. The features
and connectors are not the same on all brands and models. The following table
describes the connectors commonly found on stereo VCRs and specifies the
corresponding connector on the 8300HD that should be used.
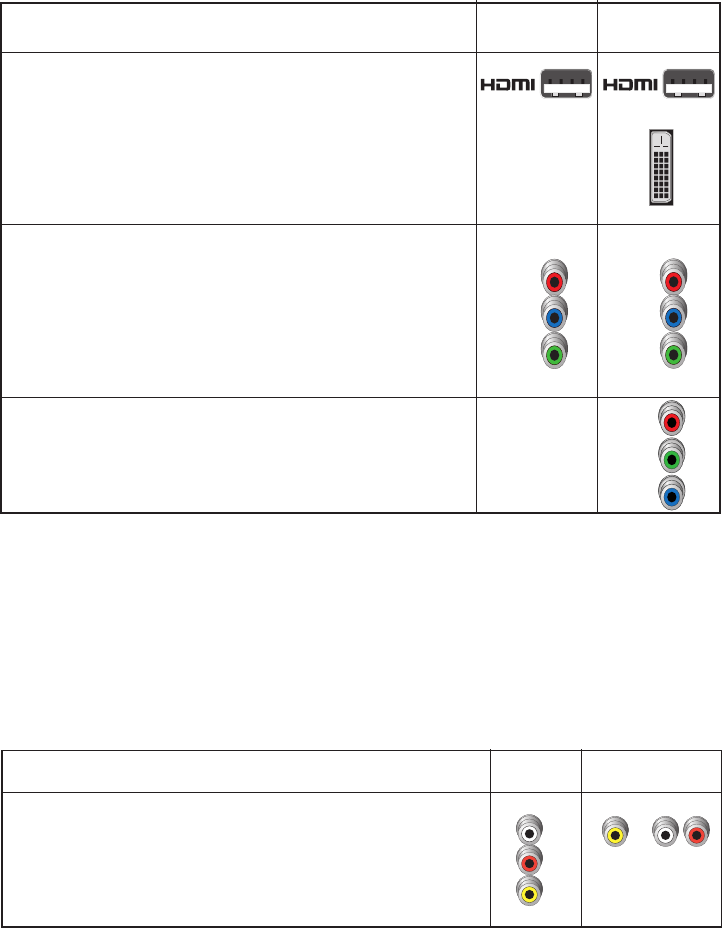
Some HDTVs have an HDMI or DVI connector. The HDMI connector pro-
vides both a digital video and audio connection. The DVI
connector provides a digital video connection. The HDMI connector provides
the optimal connection to an HDTV with either an HDMI input or a DVI input.
If your HDTV has a DVI connector, you will need an HDMI-to-DVI adaptor,
and you will need to connect a separate audio connection.
DVI
Some HDTVs have only RGB connectors. If you have one of these HDTVs,
you need an RGB adaptor. Check with your cable service provider for infor-
mation about acquiring an RGB adaptor, or you can purchase the adaptor at
your local electronics supplier.
B
R
G
8300HD
Connector
HDTV
Connector
or
Y
/V
Pr
Pb
Y
Pr
Pb
Adaptor
Needed
Most HDTVs have PrPbY connectors for component video inputs. When you
set up the 8300HD in HD mode, the Y/V connector
supplies the “Y” component of the component video. See the
diagram on page 10 for an example.
Refer to your DVR and HDTV user’s guides to choose the proper scan rates
(480i, 480p, 720p, 1080i) for your setup. See the Picture Formats section in
this guide for more information on scan rate.
24
Connecting the 8300HD to Entertainment Devices, continued
Setting Up Your Explorer 8300HD With an SDTV
If you have an SDTV, you must first connect the 8300HD to your SDTV following the guidelines
in the section Required Connections for a Standard-Definition TV on this page. You may
also reference the diagram on page 13.
Follow these steps to set up the 8300HD to work with an SDTV:
1. Make sure that the 8300HD is Off and the TV is On.
2. On the 8300HD, press Guide and Info at the same time.
3. Follow the on-screen instructions to choose the SD mode.
4. Press POWER to begin watching television.
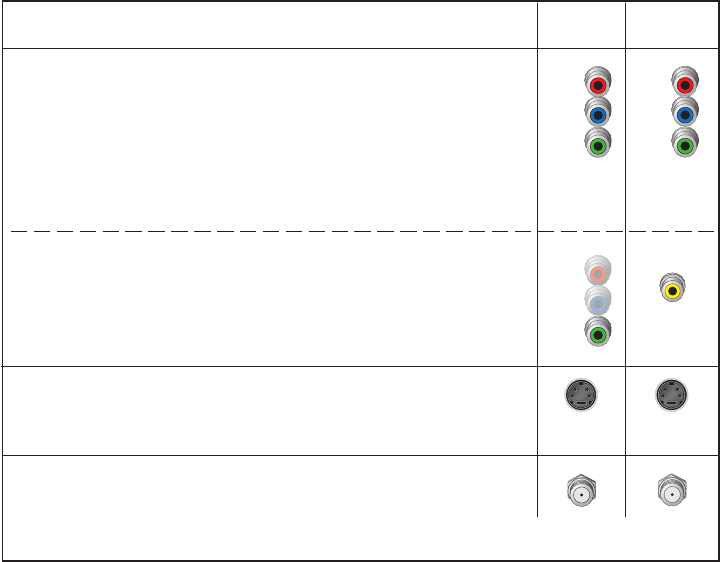
Required Connections for a Standard-Definition TV
When using the 8300HD with an SDTV, you must make one of the following
connections to view content. There are several brands and models of SDTVs in
the marketplace. The features and connectors are not the same on all brands and models. The
following table describes the connectors commonly found on SDTVs and specifies the corre-
sponding connector on the 8300HD that should be used.
Y
/V
Pr
Pb
Y
/V
Pr
Pb
Some SDTVs have PrPbY connectors for component video inputs. The connectors
on the 8300HD function as follows depending on the mode of the 8300HD:
• When you set up the 8300HD in HD mode on an SDTV with a PrPbY input, the Y/V
connector on the 8300HD supplies the Y portion for the PrPbY input on the SDTV.
See the diagram on page 13 for an example. Refer to your TV’s user’s guide for
more information on the scan rate that is supported. Refer to your DVR user’s
guide for more information on configuring the 8300HD for this setup.
• When you set up the 8300HD in SD mode, the Y/V connector on the 8300HD is
configured as a composite video out connector (V). See the diagram on page 13
for an example.
The S-Video Out connection provides an optimal video connection to standard-defi-
nition TVs. This connector remains active regardless of whether the 8300HD is in
SD or HD mode.
8300HD
Connector
SDTV
Connector
Y
Pr
Pb
VIDEO
IN
CABLE
OUT
CABLE IN
/
ANT IN
The Cable Out connector provides a video and audio connection to a VCR or
SDTV. This connector remains active regardless of whether the 8300HD is in SD
or HD mode.
S-VIDEO
IN
S-VIDEO
OUT
25
Connecting the 8300HD to Entertainment Devices, continued Connecting the 8300HD to Entertainment Devices, continued
Where Are the Connection Diagrams?
The diagrams on the following pages show examples of common ways to connect the 8300HD
to your HDTV, DVD, and home theater receiver. However, these diagrams do not show every
possible combination of devices. Refer to the user’s guides that came with your other electronic
devices for further information.
What Cables Do I Need?
Some of the cables and adaptors shown in the diagrams may not be included with the 8300HD.
The required cables are shown in the connection diagrams on the
following pages.
How Do I Connect the 8300HD to My TV and Other Entertainment Devices?
When you are ready to connect the 8300HD and to choose the screen type for your TV, follow
these instructions.
1. Make sure that all electrical devices are powered off before connecting the 8300HD to avoid
electrical shock.
2. Connect the 8300HD to your HDTV, DVD, and other entertainment devices as shown in the
diagrams on the following pages. (The diagrams in this guide do not cover every possible
combination.)
3. Connect the 8300HD to the coaxial cable coming from the wall.
4. Plug the 8300HD and the TV into an AC power source.
5. Do not turn on the 8300HD or HDTV yet.
6. It may take several minutes for the 8300HD to receive the latest software, programming, and
service information. When the front panel displays the time or four dashes, the update is com-
plete.
Wait until you see one of the following displays on the front of the 8300HD:
• Current time
• Four dashes (- - - -)
Note: If four dashes are displayed, you must call your cable service provider to get the 8300HD
authorized.
7. After the update is complete, turn on the TV and the 8300HD.
How Do I Set Up Stereo Sound?
To set up stereo sound, choose one of the following options:
• Connect an RCA cable from the DIGITAL AUDIO OUT on the 8300HD to the DIGITAL AUDIO
IN on your HDTV or stereo receiver.
• Connect an optical digital audio cable from the OPTICAL AUDIO OUT on the 8300HD to the
OPTICAL AUDIO IN on your HDTV (if equipped) or stereo receiver.
• Connect stereo audio cables from the AUDIO OUT LEFT and RIGHT connectors on the
8300HD to the AUDIO IN LEFT and RIGHT connectors on your HDTV.
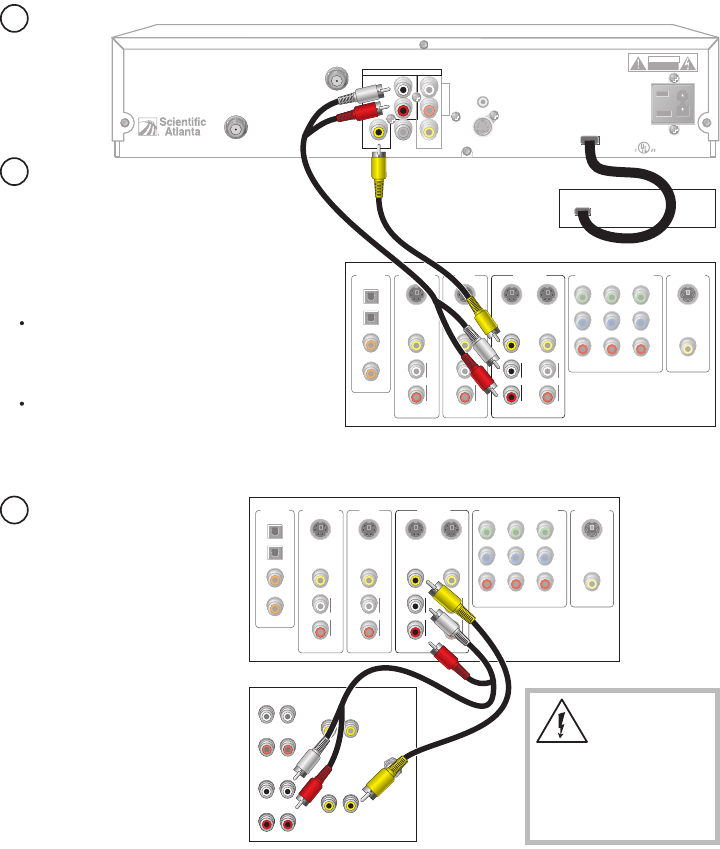
26
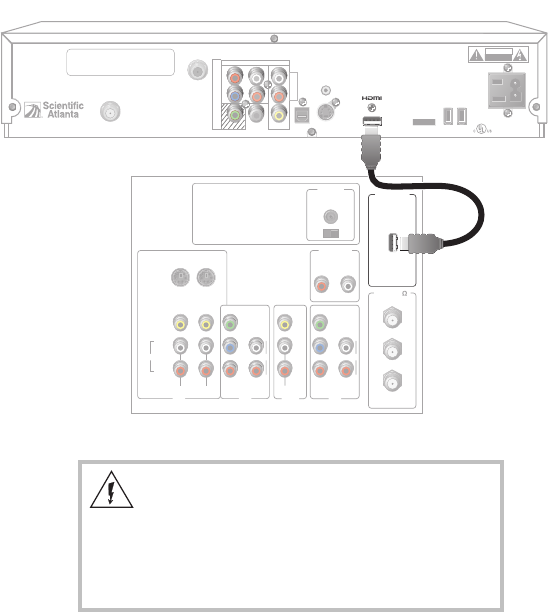
WARNING:
Electric shock hazard! Unplug all electronic devices
before connecting or disconnecting any device
cables to the 8300HD.
Connecting the 8300HD to an HDTV With an HDMI Connector
Explorer 8300HD DVR
IR
CABLE
OUT
THIS DEVICE IS INTENDED TO BE ATTACHED
TO A RECEIVER THAT IS NOT USED TO
RECEIVE OVER-THE-AIR BROADCAST
SIGNALS. CONNECTION OF THIS DEVICE
IN ANY OTHER FASHION MAY CAUSE
HARMFUL INTERFERENCE TO RADIO
COMMUNICATIONS AND IS IN VIOLATION
OF THE FCC RULES, PART 15.
120 VAC
60HZ 5A
LISTED 14H1
CABLE EQUIP.
120 VAC
60HZ 80W
CAUTION
RISK OF ELECTRIC SHOCK
DO NOT OPEN
CABLE
IN
S - VIDEO
OUT
AUDIO OUT
CATV CONVERTER
MADE IN MEXICO
VIDEO
OUT 1 OUT 2
OPTICAL
A
U
D
I
O
DIGITAL
AUDIO OUT
L
R
AVIS: RISQUE DE CHOC
ELECTRIQUE NE PAS OUVRIR
T11211
1394
SATA
1394
Y/V
Pr
Pb
Back of HDTV
DVI/HDCP
IN
AUDIO
CENTER
CHANNEL IN
AUDIO IN
DVI/HDCP
ANT (75 )
IN
OUT
LR
ANT-1
HD 2
Y
OUT
ANT-2
P
B
P
R
L
R
VIDEO
L/
MONO
R
L/
MONO
R
AUDIO
IN
ON OFF
IN
HD 1
S-VIDEO
VIDEO Y
P
B
P
R
L
R
AUDIO
AUDIO
27
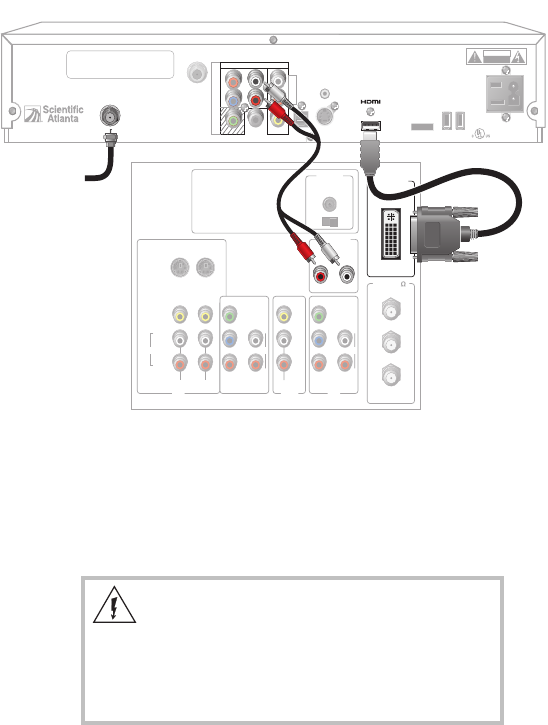
WARNING:
Electric shock hazard! Unplug all electronic devices
before connecting or disconnecting any device
cables to the 8300HD.
Connecting the 8300HD to an HDTV With an HDMI Connector
Explorer 8300HD DVR
IR
CABLE
OUT
THIS DEVICE IS INTENDED TO BE ATTACHED
TO A RECEIVER THAT IS NOT USED TO
RECEIVE OVER-THE-AIR BROADCAST
SIGNALS. CONNECTION OF THIS DEVICE
IN ANY OTHER FASHION MAY CAUSE
HARMFUL INTERFERENCE TO RADIO
COMMUNICATIONS AND IS IN VIOLATION
OF THE FCC RULES, PART 15.
120 VAC
60HZ 5A
LISTED 14H1
CABLE EQUIP.
120 VAC
60HZ 80W
CAUTION
RISK OF ELECTRIC SHOCK
DO NOT OPEN
CABLE
IN
S - VIDEO
OUT
AUDIO OUT
CATV CONVERTER
MADE IN MEXICO
VIDEO
OUT 2
OPTICAL
A
U
D
I
O
DIGITAL
AUDIO OUT
L
R
AVIS:
RISQUE DE CHOC
ELECTRIQUE NE PAS OUVRIR
T11308
1394
SATA
1394
Y/V
Pr
Pb
OUT 1
Back of
HDTV
DVI/HDCP
IN
AUDIO
CENTER
CHANNEL IN
AUDIO IN
DVI/HDCP
ANT (75 )
IN
OUT
LR
ANT-1
HD 2
Y
OUT
ANT-2
PB
PR
L
R
VIDEO
L/
MONO
R
L/
MONO
R
AUDIO
IN
ON OFF
S-VIDEO
VIDEO
AUDIO
HD 2
Y
PB
PR
L
R
AUDIO
Cable Input
Connecting the 8300HD to an HDTV With a DVI Connector
Note: When connecting the HDMI connector to the HDTV’s DVI connec-
tor, you need an HDMI-to-DVI adaptor, and you need a separate audio
connection.

28
WARNING:
Electric shock hazard! Unplug all electronic devices
before connecting or disconnecting any device
cables to the 8300HD.
Explorer 8300HD DVR
IR
CABLE
OUT
THIS DEVICE IS INTENDED TO BE ATTACHED
TO A RECEIVER THAT IS NOT USED TO
RECEIVE OVER-THE-AIR BROADCAST
SIGNALS. CONNECTION OF THIS DEVICE
IN ANY OTHER FASHION MAY CAUSE
HARMFUL INTERFERENCE TO RADIO
COMMUNICATIONS AND IS IN VIOLATION
OF THE FCC RULES, PART 15.
120 VAC
60HZ 5A
LISTED 14H1
CABLE EQUIP.
120 VAC
60HZ 80W
CAUTION
RISK OF ELECTRIC SHOCK
DO NOT OPEN
CABLE
IN
S - VIDEO
OUT
AUDIO OUT
CATV CONVERTER
MADE IN MEXICO
OPTICAL
AVIS:
RISQUE DE CHOC
ELECTRIQUE NE PAS OUVRIR
T11140
1394
SATA
1394
VIDEO
OUT 1 OUT 2
A
U
D
I
O
DIGITAL
AUDIO OUT
L
R
Y/V
Pr
Pb
Back of
HDTV
DVI/HDCP
IN
AUDIO
CENTER
CHANNEL IN
AUDIO IN
DVI/HDCP
ANT (75 )
IN
OUT
LR
ANT-1
HD 2
Y
OUT
ANT-2
P
B
P
R
L
R
VIDEO
L/
MONO
R
L/
MONO
R
AUDIO
IN
ON OFF
IN
HD 1
S-VIDEO
VIDEO Y
P
B
P
R
L
R
AUDIO
AUDIO
Cable Input
Connecting the 8300HD to an HDTV With
Component Input (PrPbY)
29
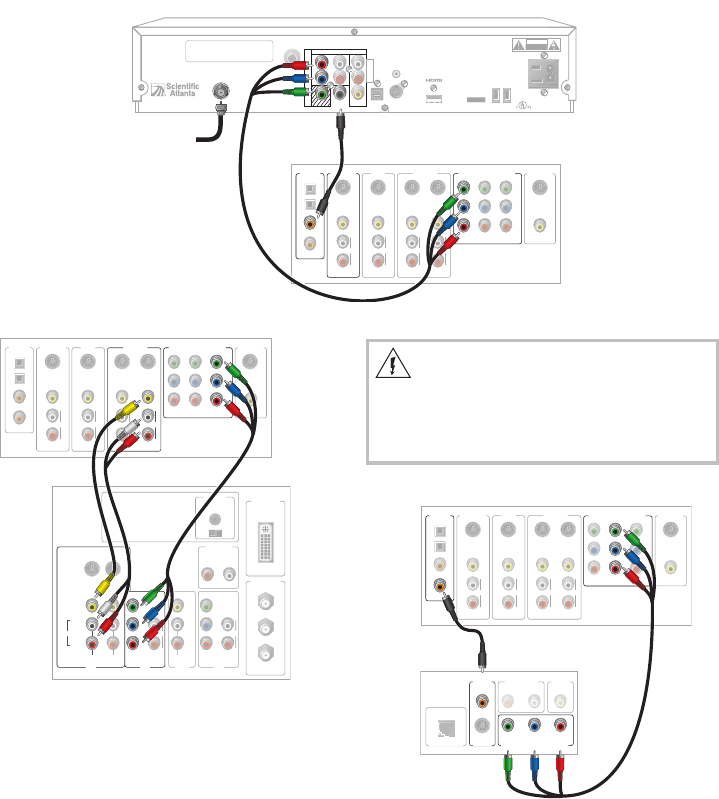
WARNING:
Electric shock hazard! Unplug all electronic devices
before connecting or disconnecting any device
cables to the 8300HD.
Connecting the 8300HD to an HDTV With
Component Input (PrPbY)
Connecting the 8300HD to a Home Theater System With
Component Input (PrPbY)
Note: This connection
assumes that audio is
provided by the home
theater speakers.
Explorer 8300HD DVR
IR
CABLE
OUT
THIS DEVICE IS INTENDED TO BE ATTACHED
TO A RECEIVER THAT IS NOT USED TO
RECEIVE OVER-THE-AIR BROADCAST
SIGNALS. CONNECTION OF THIS DEVICE
IN ANY OTHER FASHION MAY CAUSE
HARMFUL INTERFERENCE TO RADIO
COMMUNICATIONS AND IS IN VIOLATION
OF THE FCC RULES, PART 15.
120 VAC
60HZ 5A
LISTED 14H1
CABLE EQUIP.
120 VAC
60HZ 80W
CAUTION
RISK OF ELECTRIC SHOCK
DO NOT OPEN
CABLE
IN
S - VIDEO
OUT
AUDIO OUT
CATV CONVERTER
MADE IN MEXICO
VIDEO
OUT 1 OUT 2
OPTICAL
A
U
D
I
O
DIGITAL
AUDIO OUT
L
R
AVIS:
RISQUE DE CHOC
ELECTRIQUE NE PAS OUVRIR
1394
SATA
1394
Y/V
Pr
Pb
Back of Home
Theater Receiver
COMPONENT VIDEO
1
Y
P
B
P
R
2
Y
PB
P
R
Y
PB
P
R
S-VIDEO
DIGITAL
AUDIO
TV/CABLE
1
2
3
4
VIDEO
L
R
AUDIO
S-VIDEO
DVD
VIDEO
L
R
AUDIO
VIDEO
L
R
AUDIO
S-VIDEO
VIDEO 1
S-VIDEO
OUT
VIDEO OUT
MONITOR
VIDEO
L
R
AUDIO
S-VIDEO
OUTIN
OUT
IN
Cable Input
T11139
Back of
DVD Player
AUDIO OUT
LR
VIDEO
OUT
DIGITAL
OUT
COAXIAL
S-VIDEO
OUT
OPTICAL
DIGITAL OUT
COMPONENT VIDEO OUT/
PROGRESSIVE SCAN
P
B
P
B
Y
Back of Home Theater Receiver
VIDEO
COMPONENT VIDEO
1
Y
P
B
P
R
2
Y
P
B
P
R
Y
P
B
P
R
L
R
AUDIO
S-VIDEO
DIGITAL
AUDIO TV/CABLE
1
2
3
4
VIDEO
L
R
AUDIO
S-VIDEO
DVD
VIDEO
L
R
AUDIO
S-VIDEO
VIDEO 1
S-VIDEO
OUT
VIDEO OUT
MONITOR
VIDEO
L
R
AUDIO
S-VIDEO
OUTIN
OUT
IN
T11135
Back of
HDTV DVI/HDCP
IN
AUDIO
CENTER
CHANNEL IN
AUDIO IN
DVI/HDCP
ANT (75½)
IN
OUT
LR
ANT-1
HD 2
Y
OUT
ANT-2
PB
PR
L
R
AUDIO
VIDEO
L/
MONO
R
L/
MONO
R
VIDEO-1 VIDEO-2
AUDIO
IN
ON OFF
IN
HD 1
S-VIDEO
VIDEO Y
P
B
P
R
L
R
AUDIO
AUDIO
Back of Home Theater Receiver
VIDEO
COMPONENT VIDEO
1
Y
PB
PR
2
Y
PB
PR
Y
PB
PR
L
R
AUDIO
S-VIDEO
DIGITAL
AUDIO TV/CABLE
1
2
3
4
VIDEO
L
R
AUDIO
S-VIDEO
DVD
VIDEO
L
R
AUDIO
S-VIDEO
VIDEO 1
S-VIDEO
OUT
VIDEO OUT
MONITOR
VIDEO
L
R
AUDIO
S-VIDEO
OUTIN
OUT
IN
T11136

30
Explorer 8300HD DVR
IR
CABLE
OUT
THIS DEVICE IS INTENDED TO BE ATTACHED
TO A RECEIVER THAT IS NOT USED TO
RECEIVE OVER-THE-AIR BROADCAST
SIGNALS. CONNECTION OF THIS DEVICE
IN ANY OTHER FASHION MAY CAUSE
HARMFUL INTERFERENCE TO RADIO
COMMUNICATIONS AND IS IN VIOLATION
OF THE FCC RULES, PART 15.
120 VAC
60HZ 5A
LISTED 14H1
CABLE EQUIP.
120 VAC
60HZ 80W
CAUTION
RISK OF ELECTRIC SHOCK
DO NOT OPEN
CABLE
IN
S - VIDEO
OUT
AUDIO OUT
CATV CONVERTER
MADE IN MEXICO
VIDEO
OUT 1 OUT 2
OPTICAL
A
U
D
I
O
DIGITAL
AUDIO OUT
L
R
AVIS:
RISQUE DE CHOC
ELECTRIQUE NE PAS OUVRIR
1394
SATA
1394
Y/V
Pr
Pb
T11332
Back of
Stereo VCR
RF OUT
RF IN
RL
AUDIO
IN
VIDEO
IN
RL
AUDIO
OUT
VIDEO
OUT
Back of
HDTV DVI/HDCP
IN
AUDIO
CENTER
CHANNEL IN
AUDIO IN
DVI/HDCP
ANT (75½)
IN
OUT
LR
ANT-1
HD 2
Y
OUT
ANT-2
P
B
PR
L
R
AUDIO
VIDEO
L/
MONO
R
L/
MONO
R
VIDEO-1
VIDEO-2
AUDIO
IN
ON OFF
IN
HD 1
S-VIDEO
VIDEO Y
PB
P
R
L
R
AUDIO
AUDIO
Explorer 8300HD DVR
IR
CABLE
OUT
THIS DEVICE IS INTENDED TO BE ATTACHED
TO A RECEIVER THAT IS NOT USED TO
RECEIVE OVER-THE-AIR BROADCAST
SIGNALS. CONNECTION OF THIS DEVICE
IN ANY OTHER FASHION MAY CAUSE
HARMFUL INTERFERENCE TO RADIO
COMMUNICATIONS AND IS IN VIOLATION
OF THE FCC RULES, PART 15.
120 VAC
60HZ 5A
LISTED 14H1
CABLE EQUIP.
120 VAC
60HZ 80W
CAUTION
RISK OF ELECTRIC SHOCK
DO NOT OPEN
CABLE
IN
S - VIDEO
OUT
AUDIO OUT
CATV CONVERTER
MADE IN MEXICO
VIDEO
OUT 1 OUT 2
OPTICAL
A
U
D
I
O
DIGITAL
AUDIO OUT
L
R
AVIS:
RISQUE DE CHOC
ELECTRIQUE NE PAS OUVRIR
1394
1394
Y/V
Pr
Pb
T11209
External SATA
Hard Disk Drive
SATA
SATA
Notes:
- Consult with your cable service provider for a list of
approved external SATA hard disk drives that work
with the 8300HD.
- External SATA hard disk drives allow for greater pro-
gram storage capacity and are not meant to be used
for archiving.
Connecting the 8300HD to an External SATA Hard Disk Drive (optional)
Connecting the 8300HD to a Stereo VCR and HDTV (optional)
Note: This connection allows for
archiving to the VCR and for watching
VCR tapes on your HDTV. To watch HD
content, one of the other connections
required for HD content is needed. See
the previous diagrams.
WARNING:
Electric shock hazard!
Unplug all electronic
devices before connecting or
disconnecting any device cables
to the 8300HD.
31
Connecting the 8300HD to an External SATA Hard Disk Drive (optional)
Connecting the 8300HD to a Stereo VCR and HDTV (optional)
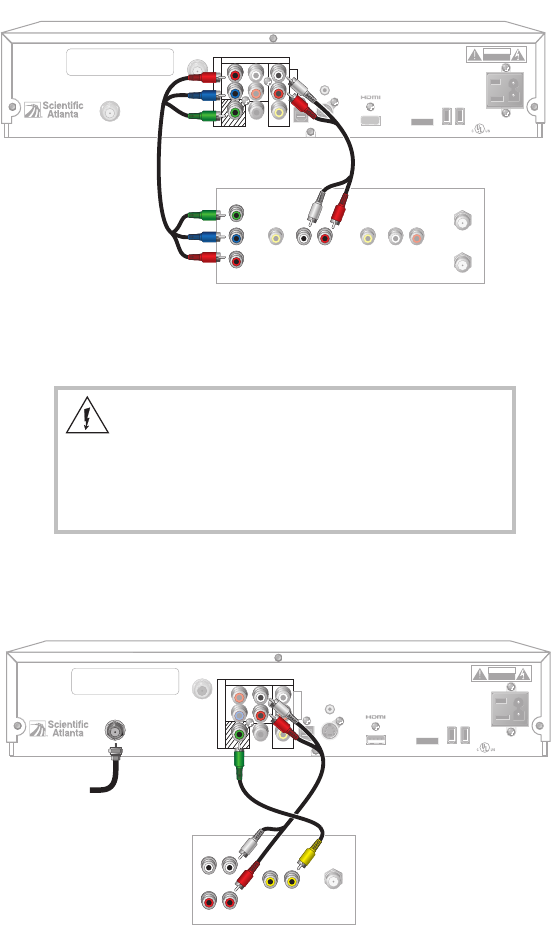
Connecting the 8300HD in SD Mode to an SDTV
Explorer 8300HD DVR Set to SD Mode
IR
CABLE
OUT
THIS DEVICE IS INTENDED TO BE ATTACHED
TO A RECEIVER THAT IS NOT USED TO
RECEIVE OVER-THE-AIR BROADCAST
SIGNALS. CONNECTION OF THIS DEVICE
IN ANY OTHER FASHION MAY CAUSE
HARMFUL INTERFERENCE TO RADIO
COMMUNICATIONS AND IS IN VIOLATION
OF THE FCC RULES, PART 15.
120 VAC
60HZ 5A
LISTED 14H1
CABLE EQUIP.
120 VAC
60HZ 80W
CAUTION
RISK OF ELECTRIC SHOCK
DO NOT OPEN
CABLE
IN
S - VIDEO
OUT
AUDIO OUT
CATV CONVERTER
MADE IN MEXICO
OPTICAL
AVIS: RISQUE DE CHOC
ELECTRIQUE NE PAS OUVRIR
T11331
1394
SATA
1394
VIDEO
OUT 1 OUT 2
A
U
D
I
O
DIGITAL
AUDIO OUT
L
R
Y/V
Pr
Pb
Back of
SDTV
RIGHT
INOUT
LEFT
AUDIO
INOUT CABLE/
ANTENNA
VIDEO
INOUT
Cable Input
Note: Refer to Required Connections for a Standard-Definition TV on page
6 regarding setting the 8300HD to SD mode.
Connecting the 8300HD in HD Mode to an SDTV With Component
Input (PrPbY)
Explorer 8300HD DVR Set to HD Mode
IR
CABLE
OUT
THIS DEVICE IS INTENDED TO BE ATTACHED
TO A RECEIVER THAT IS NOT USED TO
RECEIVE OVER-THE-AIR BROADCAST
SIGNALS. CONNECTION OF THIS DEVICE
IN ANY OTHER FASHION MAY CAUSE
HARMFUL INTERFERENCE TO RADIO
COMMUNICATIONS AND IS IN VIOLATION
OF THE FCC RULES, PART 15.
120 VAC
60HZ 5A
LISTED 14H1
CABLE EQUIP.
120 VAC
60HZ 80W
CAUTION
RISK OF ELECTRIC SHOCK
DO NOT OPEN
CABLE
IN
S - VIDEO
OUT
CATV CONVERTER
MADE IN MEXICO
OPTICAL
AVIS:
RISQUE DE CHOC
ELECTRIQUE NE PAS OUVRIR
1394
SATA
1394
VIDEO
OUT 1 OUT 2
A
U
D
I
O
DIGITAL
AUDIO OUT
L
R
Y/V
Pr
Pb
AUDIO OUT
T11230
Back of SDTV
RF OUT
RF IN
RL
AUDIO
IN
VIDEO
IN
RL
AUDIO
OUT
VIDEO
OUT
Y
PB
PR
Note: The 8300HD must be set to the proper output mode, typically 480i.
WARNING:
Electric shock hazard!
Unplug all electronic devices before connecting or discon-
necting any device cables to the 8300HD.
4004007 Rev A
