Favicon Info
Favicon Info favicon info favicon info Product Images_WORKING _gsmith.backup gsmith
Favicon Info favicon info favicon info photos _gsmith.backup gsmith
Favicon Info favicon info favicon info photos gsmith
2017-12-15
: Favicon Info favicon info ATPK-EM06-9T___thru___XH-TT-4T _gsmith.backup
Open the PDF directly: View PDF ![]() .
.
Page Count: 20
Bonus Chapter 7
Exploring Advanced Topics
In This Chapter
▶ Using promotional coupons
▶ Downloading items
▶ Using PayPal and Google Checkout
▶ Setting up a Knowledge Base
▶ Answering employee questions
NetSuite is chock full of features to enhance your Web site and assist
both customers and employees. This chapter tells you how to make
your site and the products you sell there more appealing — offer coupons,
downloads, and a running shopping cart total on each checkout page. This
chapter also describes resources you can provide to help your customers
and your employees help themselves.
Keep your eyes on the Release Notes with every release and sign up for the
NetSuite User Community site. New enhancements are always arriving, and
other NetSuite users come up with great ideas!
Checking Things Out
Checkout includes lots of elements: promotions, coupons, and checkout
options. Read all about it in the following sections.
Getting promotional URLs
Promotional URLs are a way to make short URLs for pages when you’re
running sales or promotions. Promotional URLs differ from descriptive URLs in
that they’re used only for linking and don’t help with search engine optimization.
After the link is followed, the URL snaps back to the original.
191071-BC07.indd BC77191071-BC07.indd BC77 10/11/10 8:45 AM10/11/10 8:45 AM
BC78 NetSuite For Dummies
You can also use promotional URLs for the following:
✓ Entirely new domains that you may buy for special events. If you get a
new domain, set it up first on the Domains page and select Promotional
URL in the Hosted As column. For example, you can make
http://shopping.netsuite.com/app/site/site.nl/site.
ACCT00000/mode.items/sc.5/.f.
look like this:
http://shopping.netsuite.com/fallsale
✓ Passing discounts through a link. If you set up a promotion code with a
discount, you can add the promotion code parameter to the promotional
URL. For more information about promotion codes, see Chapter 8.
To set up a promotional URL:
1. From the Setup tab menu, choose Marketing➪Promotional URLs➪New.
The Promotional URL page appears.
2. In the Composite URL field, enter the base domain for this promo URL.
The base domain must be set up on the Domains page at Setup➪Web
Site➪Domains.
3. In the Name field, enter the part of the URL to show just after the base
domain.
This appears automatically in the Composite URL field.
For example, if the name is clearance, the Composite URL field would
read http://www.example.com/clearance.
4. In the Page Type field, choose the type of page or form you’re linking to.
• File Cabinet Item: Link to a file stored in the File Cabinet. Make
sure the file is marked as Available Without Login in order to share
it via a URL.
• Hosted Web Page: Link to a file stored in your Live Hosting Files
folder of the File Cabinet.
• Knowledge Base Topic: Link to a topic page if you use the
Knowledge Base feature.
• Online Case Form: Link to an online case form that has the Enable
Online check box selected.
• Online Customer Form: Link to an online customer form that has
the Enable Online check box selected.
• Web Site Category: Link to one of the categories set up for this
Web site.
• Web Site Information Item: Link to an information item that has
the Display in Web Site check box selected.
191071-BC07.indd BC78191071-BC07.indd BC78 10/11/10 8:45 AM10/11/10 8:45 AM

BC79
Bonus Chapter 7: Exploring Advanced Topics
• Web Site Item: Link to an item that has the Display in Web Site
check box selected.
• Web Site Tab: Link to one of the tabs set up for this Web site.
This choice determines your choices in the Page field.
5. In the Page field, choose the page or form you are linking to.
6. (Optional) In the Additional Parameters field, add tags.
These tags pass default information through a form or pass discounts
(using a promotion code parameter) to your store checkout. String
parameters together with the & sign to add multiple parameters to a
URL. For example, you can enter category=wholesale&partner=ABC
Company when linking to an online customer form. When the customer
record is created, the category is automatically saved as wholesale with
partner ABC Company. Here are some of the available parameters for
use with promotional URLs:
• Contact First Name: firstname
• Currency: currency
• Promotion Code: promocode
• Unsubscribe to E-mail Campaigns: unsubscribe
• Web Address: url
7. Click the Save button.
You can now test your promotional URL, market the URL, or link to it from
your other Web site pages.
Offering promotional coupons
You can offer promotion codes as coupons for orders and for individual
items to help draw sales or to promote or reduce inventory for a certain
item. Most of the time, you’ll offer discounts or free shipping with promotion
codes, but you can also create promotion codes without discounts to
associate with online forms, campaigns, or partners for tracking purposes.
Here are a few ways to use promotion codes:
✓ Offer customers a percentage or flat amount discount on a phone or
Web site order
✓ Offer customers associated with or brought in by a certain partner a
percentage or flat amount discount on an order
✓ Offer customers a code for a percentage or flat amount discount on a
certain item or items
✓ Attach a code for free shipping on orders over a certain amount
191071-BC07.indd BC79191071-BC07.indd BC79 10/11/10 8:45 AM10/11/10 8:45 AM
BC80 NetSuite For Dummies
Attach a promotion code with no discount to a URL linked in a campaign
e-mail or an online form to track the success of the e-mail in driving traffic to
the site.
If you want to offer a discount with a promotion code to make it a coupon
code, an Accountant or someone with similar permissions must create a
discount item in NetSuite. (A discount item is not really an item per se; it’s a
line item on the sales order that calculates a discount.) Discount items set
the discount rate in a percentage or flat rate.
Creating discount items
Creating a discount item is necessary only to discount an item; you don’t have
to set up free shipping coupons.
Administrators can create discount items this way:
1. From the Accounting tab menu choose Lists➪Accounting➪Items➪New.
2. Click the Discount link on the Item Type page.
The Discount screen appears.
3. Enter a name for the discount in the Item Name/Number field.
This should be descriptive of the discount rate, such as 25% Off.
4. Select an account from the Account drop-down list.
5. Enter a percentage or flat discount amount in the Rate field.
Setting up promotion codes
Before you can create a promotion code, the Promotion Codes feature must
be enabled by your Administrator. From the Setup tab menu she would
choose Company➪Enable Features. Select the Promotion Codes check box on
the Transactions tab to enable promotion codes.
To set up a promotion code:
1. From the Campaigns tab menu choose Marketing➪Promotion
Codes➪New.
The Promotion Code page appears.
2. In the Promotion Code field, enter the code that customers can enter.
For example, this code can look similar to SPRNGSALE20. You don’t
want people to be able to guess it easily, or you’ll be giving many more
discounts than you planned!
3. To offer a discount with this promotion code, select the discount item
you created in the Discount drop-down list field.
The rate associated with the discount item shows in the Rate field, but
you can edit this rate if needed.
191071-BC07.indd BC80191071-BC07.indd BC80 10/11/10 8:45 AM10/11/10 8:45 AM

BC81
Bonus Chapter 7: Exploring Advanced Topics
4. Choose one option from the Apply Discount To drop-down list:
• First sale only
• All sales
5. To offer free shipping with this code, select the shipping method that
should become free when this code is applied at checkout.
Note that you can set a minimum order amount (in Step 8) for offers like
“Free UPS Ground Shipping on orders over $50.”
6. In the Start Date and End Date fields, enter the date range when this
code can be used.
Be sure to tell your customers the expiration date if you set an end date.
7. Select the Available to All Customers check box if every customer can
use this code.
Clear this check box to limit the code to only those customers associated
with the partners you select on the Partners tab. Customers are associated
with partners when the partner is selected on the customer record.
8. Choose the Minimum Order Amount tab.
9. In the Minimum Order Amount field, enter the minimum pre-tax
amount required for an order before the promotion code will work.
If you use the Multiple Currencies feature, you can enter an amount
for each currency on the Minimum Order Amount tab in the Minimum
Order Amount column.
10. On the Items tab, you can select the items that this promotion code
applies to.
If you select no items, the code applies to all items you offer. If you
check the Exclude Items box, the code applies to all items except those
you select and add on the Items tab.
11. On the Partners tab, choose partners that should be credited for the
sale when this code is used.
12. Click the Save button.
This promotion code is now available for use on transactions. If you added
a discount item to the promotion code and the transaction meets the criteria of
the code, such as the correct items or partner, the discount is automatically
applied to the order. Promotion codes can be entered internally, in the
customer center, or by using the Coupon Code field during checkout in a
NetSuite-generated Web site.
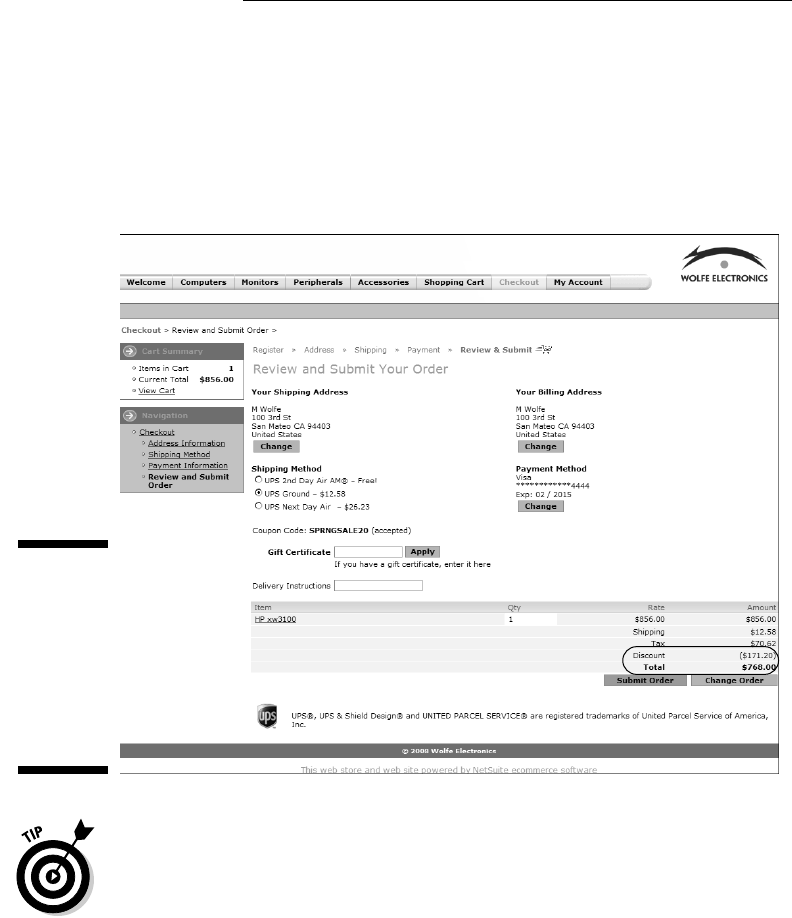
You can add promotion codes to URLs to give customers a discount when
they click a link to your NetSuite Web site. This is especially useful when
offering discounts through e-mail marketing campaigns. When customers
click the link in the e-mail, the promotion code is applied; the discount, if any,
is taken off the total, as shown in Figure BC-1.
191071-BC07.indd BC81191071-BC07.indd BC81 10/11/10 8:45 AM10/11/10 8:45 AM
BC82 NetSuite For Dummies
Passing promotion code discounts in this way requires having an
administrator set a preference. Your Administrator should follow these steps:
1. From the Setup tab menu choose Web Site➪Set Up Web Site.
2. Select the Pass URL Promotion Code to Checkout check box on the
Shopping tab.
Figure BC-1:
The coupon
code is
automati-
cally applied
when cus-
tomers click
a link to get
a discount.
You can add specify a promotion code in a link using the following format:
http://www.yourstore.com/item&promocode=YourPromotionCode. Using
SPRNGSALE20 as an example, the URL would look like this: http://www.
yourstore.com/item&promocode=SPRINGSALE20.
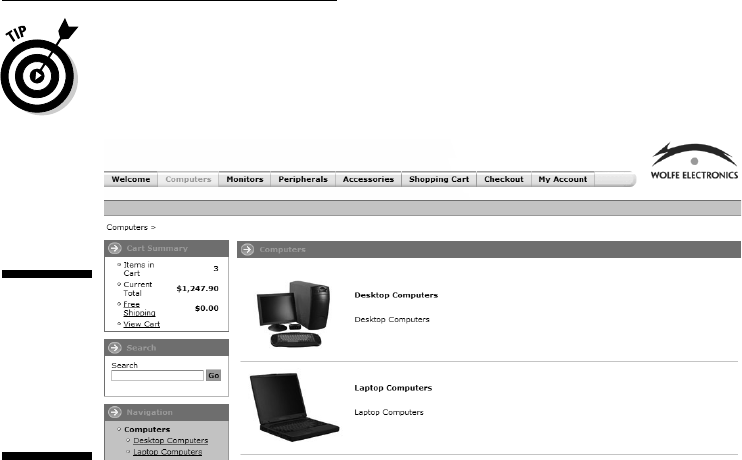
Cart preview and shipping estimator
The cart summary is a small box on the side of your site (the exact position
depends on your theme) that shows the number of items in the cart with a
running total of the order. See Figure BC-2.
191071-BC07.indd BC82191071-BC07.indd BC82 10/11/10 8:45 AM10/11/10 8:45 AM
BC83
Bonus Chapter 7: Exploring Advanced Topics
Showing the shopping cart summary on all pages of your Web site is a good
way to avoid shopping cart abandonment.
Figure BC-2:
The shop-
ping cart
summary
with
shipping
estimator.
Additionally, you can show a shipping cost estimate in your shopping cart
and shopping cart summary. This helps customers see the order total and
prevents any surprises during checkout. The shipping estimator automatically
calculates the shipping cost for the order based on the least expensive
shipping method.
To show the shopping cart summary and the shipping estimator:
1. From the Setup tab menu, choose Web Site➪Set Up Web Site.
The Web Site Setup page appears.
2. Click the Appearance tab.
3. In the Shopping Cart section, select the Show Cart Summary check box.
4. Check the Show Shipping Estimator in Cart box.
This reveals a shipping total in both the cart summary and the shopping
cart page.
5. Click the Save button.
Getting Downloadable Items
You can offer downloadable files in your site either for purchase or for free.
You may want to offer mp3 files, product user manuals, or software trials.
191071-BC07.indd BC83191071-BC07.indd BC83 10/11/10 8:45 AM10/11/10 8:45 AM

BC84 NetSuite For Dummies
Offering items for download
Offering downloadable items requires the Electronic File Download add-on.
To offer downloadable items in your site ask an administrator to take these
steps:
1. Choose Setup➪Company➪Enable Features.
This turns on the Sell Downloadable Files feature, which is available only
if you bought the Electronic File Download add-on.
2. On the Enable Features page, click the Items & Inventory tab.
3. In the Items section, select the Sell Downloadable Items check box.
4. Click the Save button.
Adding a downloadable item
To add a downloadable item, follow these steps:
1. From the Lists tab menu choose Web Site➪Items➪New.
2. On the New Item page, click the Download Item link.
The Download Item record appears.
3. Type in the Item Name/Number field.
4. Type a description in the Display Name/Code field.
Select or enter any other information as needed.
5. Select the Display in Web Site check box.
6. On the Basic tab, click the Download Item field double arrow.
7. Click List.
A pop-up window appears.
8. Select the file to be downloaded.
9. Click the Add button.
You can choose files stored in the File Cabinet (available from the Home
tab menu) here. To upload a file in a pop-up, click the double arrow and
select New.
191071-BC07.indd BC84191071-BC07.indd BC84 10/11/10 8:45 AM10/11/10 8:45 AM

BC85
Bonus Chapter 7: Exploring Advanced Topics
Downloadable items are charged by item record. To charge for each file,
you must create a download item record for each file. To charge a set
rate for a group of files, as you might for an album of songs, create a
download item record for the group and add each file.
10. Enter a number in the Number of Allowed Downloads field.
11. Enter a number in the Days Before Expiration field.
12. Select the Immediate Download check box.
If you deselect this check box, the item is available in the Customer
Center or My Account page after payment is cleared.
13. (Optional) To charge for the download, click the Pricing tab and type
the charge in the Online Price field.
14. On the Store tab, select images for this item.
15. From the Site Category drop-down list, select the category where the
item should display online.
16. Click Save.
Your item is now available for download in your site. When site visitors buy
or fill out a form for a download, the download becomes available on the
customer’s My Account page in your site. Customers must be registered and
logged in to access the download on the My Account page.
Requiring registration
We recommend requiring registration when selling downloadable items.
Otherwise, customers purchasing downloads can only access them just
after purchasing them or via the link in the confirmation e-mail. Requiring
registration simply means that customers must register their information with
a login and password to buy something on your site.
To require registration, follow along:
1. From the Setup tab menu choose Web Site➪Set Up Web Site.
2. Click the Shopping tab.
191071-BC07.indd BC85191071-BC07.indd BC85 10/11/10 8:45 AM10/11/10 8:45 AM

BC86 NetSuite For Dummies
3. From the Customer Registration drop-down list, choose Required.
The list is in the Registration Page area. With registration, customers
can access download files at any time from the Customer Center or from
the My Account tab of your Web site.
4. Click the Save button.
Creating an online customer form
You can also offer free downloads to collect lead information. For example,
you may let site visitors download a software trial when they submit contact
information. The information is used to create a lead record.
To do this, create an online customer form:
1. From the Setup tab menu choose Other Setup➪Marketing➪Online
Customer Forms➪New.
2. Click the Default Form Template link.
For more information on creating online forms, see Bonus Chapter 2.
3. From the Lists tab menu choose Web Site➪Publish Forms➪New.
4. Click the File Download with Online Form link.
5. Type a name for the form in the Name field.
6. To attach the file to download, click the plus sign and browse to it.
7. Enter descriptions in the Brief Form Description, Detailed Form
Description, and Featured Description fields.
8. Click Save.
Befriending PayPal and Google Checkout
PayPal and Google Checkout make paying for your products even easier for
customers.
PayPal Integration
Accepting PayPal as payment and adding PayPal Express Checkout to your
site allows customers to quickly pay for orders with their PayPal accounts.
PayPal Express Checkout can save customers from re-entering their address
and credit card information.
191071-BC07.indd BC86191071-BC07.indd BC86 10/11/10 8:45 AM10/11/10 8:45 AM
BC87
Bonus Chapter 7: Exploring Advanced Topics
To offer PayPal as a payment method, you need to do the following:
✓ Enable the PayPal Integration feature.
✓ Set up an account with PayPal.
✓ Complete the PayPal Processing page.
Enable the PayPal Integration feature
To enable the PayPal Integration feature, administrators must set up an
account with PayPal (at www.paypal.com), enable the feature, and complete
the PayPal Processing page as described in the following section.
1. Choose Setup➪Company➪Enable Features.
The Enable Features page appears.
2. On the Transactions tab, select the PayPal Integration check box.
3. Click Save.
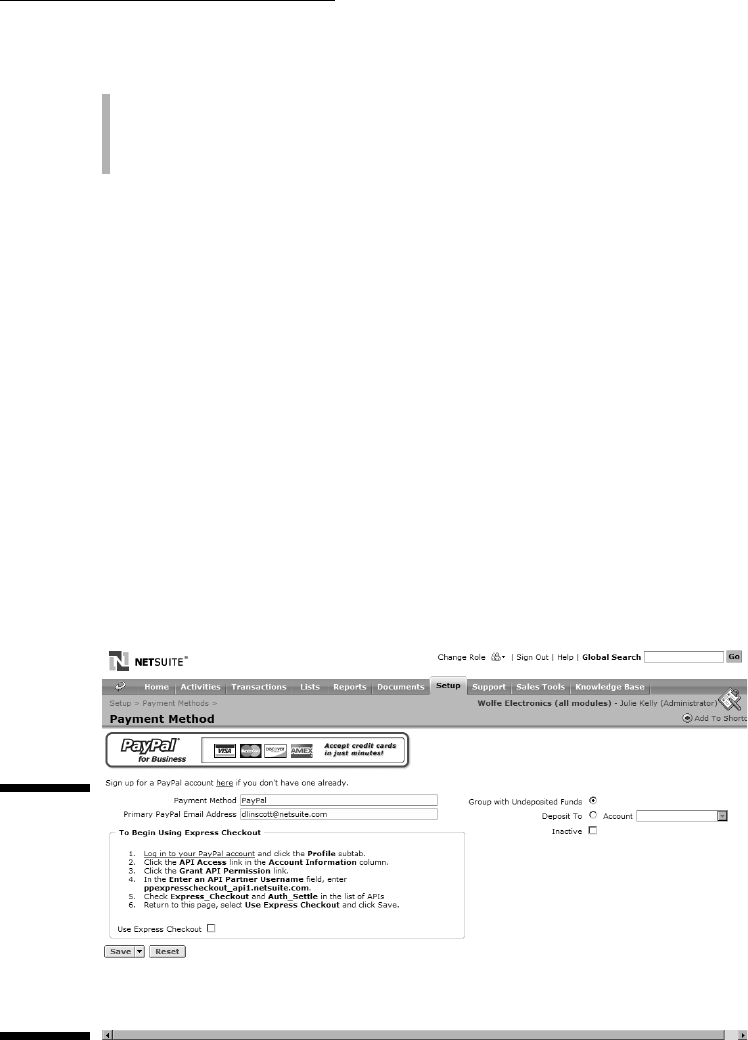
Set up PayPal as payment
To set up PayPal as a payment method, administrators should do this:
1. From the Setup tab menu, choose Accounting➪PayPal Processing.
The Payment Method page for PayPal appears, as shown in Figure BC-3.
Figure BC-3:
This
Payment
Method
page is
designed
specifically
for setting
up PayPal
integration.
191071-BC07.indd BC87191071-BC07.indd BC87 10/11/10 8:45 AM10/11/10 8:45 AM

BC88 NetSuite For Dummies
2. In the Email Address field, enter the main address associated with
your PayPal account.
This is the e-mail address you log in to PayPal with and the account
where you payments. If you use PayPal Express Checkout, this account
works like a merchant account with a credit card processor.
3. Choose depending on how this income should be accounted for:
• Group with Undeposited Funds
• Deposit To (and then select the account)
4. If you’re not offering PayPal Express Checkout, click Save. Otherwise,
keep following along.
To offer PayPal Express Checkout, follow the instructions onscreen to
set up your PayPal account.
These instructions contain information specific to your account that
allows you to link your NetSuite and PayPal accounts. The link is verified
when you save this page. If you’re following the steps in a separate page,
you may need to refresh this page before saving.
5. Select the Use PayPal Express Checkout check box.
6. Now click Save.
Buttons now appear on your checkout’s Login/Register and Address pages.
When customers click the PayPal button, they’re sent to PayPal’s site for
payment and address verification; then they’re brought back to your Review
and Submit page, where they can enter gift certificate or coupon codes. The
final amount is processed when the order is submitted.
Google Checkout
If you have a Google merchant account from http://checkout.google.com, you
can integrate your NetSuite Web site with Google checkout. When you set up
Google checkout integration in your NetSuite account, customers can click a
Google Checkout button in the shopping cart to check out using their Google
account profile, which usually has their saved credit card and address
information.
Using Google checkout is beneficial because it
✓ Offers a payment guarantee to merchants
✓ Offers fraud protection to merchants
✓ Can result in higher sales when your advertisements feature the Google
checkout badge
191071-BC07.indd BC88191071-BC07.indd BC88 10/11/10 8:45 AM10/11/10 8:45 AM

BC89
Bonus Chapter 7: Exploring Advanced Topics
Enable Google checkout
To use Google checkout, you must enable the feature.
1. From the Setup tab menu, choose Company➪Enable Features➪Web
Presence.
2. Choose the Google Checkout check box.
3. Click the Save button.
Register your Google Checkout
Once the feature is enabled, you must register your Google Checkout account
with NetSuite.
1. From the Setup tab menu, choose Web Site➪Google Checkout
Accounts➪New.
The Google Checkout Account page appears.
2. Enter the name of the account in the Account Name field.
3. Enter the Google Merchant ID and Google Merchant Key in the
respective fields.
Google assigns the merchant ID and merchant key.
4. Click Submit.
Activate Google Checkout
To activate a Google checkout account that you’ve registered with NetSuite,
follow along:
1. From the Setup tab menu, choose Web Site➪Set Up Web Site.
2. Choose the Setup tab.
3. Select the account name from the Google Checkout Account
drop-down list.
4. Click Save.
Set up default shipping method for Google
Google Checkout integrates with your NetSuite shipping methods, including
UPS, FedEx, and USPS real-time rate methods. However, if Google can’t
establish a real-time rate for a customer, you need to give it a default shipping
method to use instead that doesn’t require Google to come up with a real-time
rate.
191071-BC07.indd BC89191071-BC07.indd BC89 10/11/10 8:45 AM10/11/10 8:45 AM

BC90 NetSuite For Dummies
1. From the Lists tab menu, choose Accounting➪Shipping Items.
Shipping Item is NetSuite parlance for shipping method.
2. Click Edit next to each shipping method that has a real-time rate
associated with it.
The Shipping Item page appears.
3. Click the Shipping Rate tab.
4. Select a shipping method that doesn’t use a real-time rate from the
Default Shipping Method drop-down list.
Do so for each shipping item that’s integrated or uses a real-time rate.
The option is on the Shipping Rate tab.
5. Click Save.
6. Repeat Steps 2–6 for each shipping item that uses a real-time rate.
Make items compliant with Google Checkout
The final step in setting up Google Checkout with NetSuite is to make your
store items compliant with Google Checkout. Luckily, you can do a mass
update.
Follow along to set all items showing in your store to be Google Checkout
compliant:
1. From the Lists tab menu, choose Mass Update➪Mass Updates.
2. Click General Updates to expand this section.
3. Under Items, click Inventory Item.
If you also sell other types of items, you will need to repeat these steps
for each item type.
4. On the Criteria tab, select Display in Web in the Filters column.
A pop-up window asks if this should display in the Web site (with radio
buttons for Either, No, and Yes).
5. Select the Yes radio button.
6. Choose the Mass Update Fields tab.
7. Select the check box in the Apply column to the left of Google
Compliant.
191071-BC07.indd BC90191071-BC07.indd BC90 10/11/10 8:45 AM10/11/10 8:45 AM
BC91
Bonus Chapter 7: Exploring Advanced Topics
8. Select the check box in the Value column to the right of Google
Compliant.
9. Click the Preview button.
10. Review the items that will be updated, and click the Perform Update
button.
When customers check out from your site using Google Checkout, a sales
order is created in your account using the order form you set at Setup➪Web
Site➪Google Checkout Accounts. On this order’s Payment tab, special Google
Checkout fields reveal the order status. Once the Google Order Financial
State field shows CHARGEABLE, the order is ready for processing and is
available under Transactions➪Sales➪Fulfill Orders.
When you fulfill an order, you can click the Bill button on the fulfillment to
charge for the order with a cash sale.
Favicons
Favicons are small logos that appear with page
titles in browser windows. In Firefox, Internet
Explorer, and Chrome, these icons show on the
tabs for each page and show when you book-
mark a page or add it as a favorite.
A couple things to know before you charge
ahead:
✓ Favicons must have the file extension .ico.
You will need to create and save your logo
as favicon.ico. Numerous online tools can
help you do this quickly.
✓ Enable both the Advanced Site
Customization and Host HTML Files
features to use favicons.
To use a favicon with a NetSuite site:
1. From the Setup tab menu, choose Web
Site➪Web Site➪Web Site Hosting Files.
This opens the Web Site Hosting Files of
your File Cabinet, which is also available
from the Documents tab.
2. Click Live Hosting Files to open the folder.
Keep going to subfolders until you reach
the root directory for your site.
3. Click the Add File button.
4. Choose the .ico file from your hard drive.
5. From the Setup tab menu, choose Web
Site➪Themes.
6. Click the Edit or Customize link next to the
theme you use for your site.
7. Type the following in the Addition to <head>
field:
<link href=”/favicon.ico” rel=”shortcut
icon” type=”image/x-icon”>
191071-BC07.indd BC91191071-BC07.indd BC91 10/11/10 8:45 AM10/11/10 8:45 AM

BC92 NetSuite For Dummies
Anticipating Customer and
Employee Questions
Both customers and employees need a little more help at different times. You
can offer a knowledge base to your customers and provide a help desk to your
employees so that they can find answers to their questions on their own.
Scoring with a knowledge base
A thoughtfully set up and complete knowledge base can come in handy and
makes good business sense. When it’s after hours or there are long hold
times, customers can search your knowledge base to see whether someone
else has already asked the same question and take action — without ever
having to contact support.
Your knowledge base is basically a collection of solutions to common problems
or questions. These solutions are organized under topics. If you operate a
Web site through NetSuite, the topics act like categories, and the solutions are
like items.
You can create more than one knowledge base in NetSuite, but most likely,
you’ll want to create just one. You can also make your knowledge base
accessible only to support reps or publish it to your Web site for anyone to
access. You can also publish your knowledge base as a tab in the Customer
Center so that only registered customers (not regular Web site visitors) can
see it.
Before you can do anything, however, you must first enable the Knowledge
Base feature:
1. From the Setup tab menu, choose Company➪Enable Features.
2. On the CRM tab, select the Knowledge Base check box.
3. Click the Save button.
Choosing your topics
First, you build the outline of the knowledge base by deciding on topics. For
example, the support manager of a furniture store may have such topics as
Delivery, Assembly, Patterns, Returns, Repair, and Basic Care. You can also
have subtopics. For example, under Assembly, there may be subtopics of
Chairs, Sofas, and Recliners.
Administrators add topic records, though, so you may need to do some
baking if you want a lot of topics created.
191071-BC07.indd BC92191071-BC07.indd BC92 10/11/10 8:45 AM10/11/10 8:45 AM
BC93
Bonus Chapter 7: Exploring Advanced Topics
To create a topic record:
1. From the Lists tab menu choose Support➪Topics➪New.
The New Topic page appears.
2. In the Title field, type the name of the topic.
3. If this topic should be nested under another topic, select the parent
topic in the Subtopic Of drop-down list.
When your knowledge base is published, subtopics appear indented
under parent topics.
First make a topic named Knowledge Base or something very generic
to serve as your top-level topic. All other topics you create should be
placed under this topic. This will allow you to publish your entire
knowledge base at once. Alternatively, you can make all topics subtopics
of the default Unassigned topic. You can then rename the Unassigned
topic before publishing the knowledge base.
4. In the Brief Description field, enter a sentence-long summary of this
topic.
This brief description shows with the topic when viewing a list of topics,
as shown in Figure BC-4.
5. In the Detailed Description field, enter a longer description of what
this topic includes.
This detailed description shows when you click the topic name above
the included solutions. You can enter CRMSDK tags in this field, and if
you click the HTML Source Code link, you can also enter JavaScript.
6. (Optional) In the Memo field, add user notes about this topic.
Those notes may include why it was created.
7. Click the Save button.
Figure BC-4:
Topics
in a list
with brief
descrip-
tions.
191071-BC07.indd BC93191071-BC07.indd BC93 10/11/10 8:45 AM10/11/10 8:45 AM

BC94 NetSuite For Dummies
After saving the topic, you can open the topic from the list (choose
Lists➪Support➪Topics, and click the name of a topic) and see new tabs on
the record:
✓ Subtopics: Add or change the order of any subtopics in a separate
window by clicking the New button.
✓ Solutions: See which solutions are sorted under this topic, re-order
them, or create new ones to show under this topic in a separate window
by clicking the New button.
✓ Notes: View and add notes on the User Notes tab and click the System
Notes tab to see past changes to this record.
✓ Publish: See where this topic and its associated solutions have been
published.
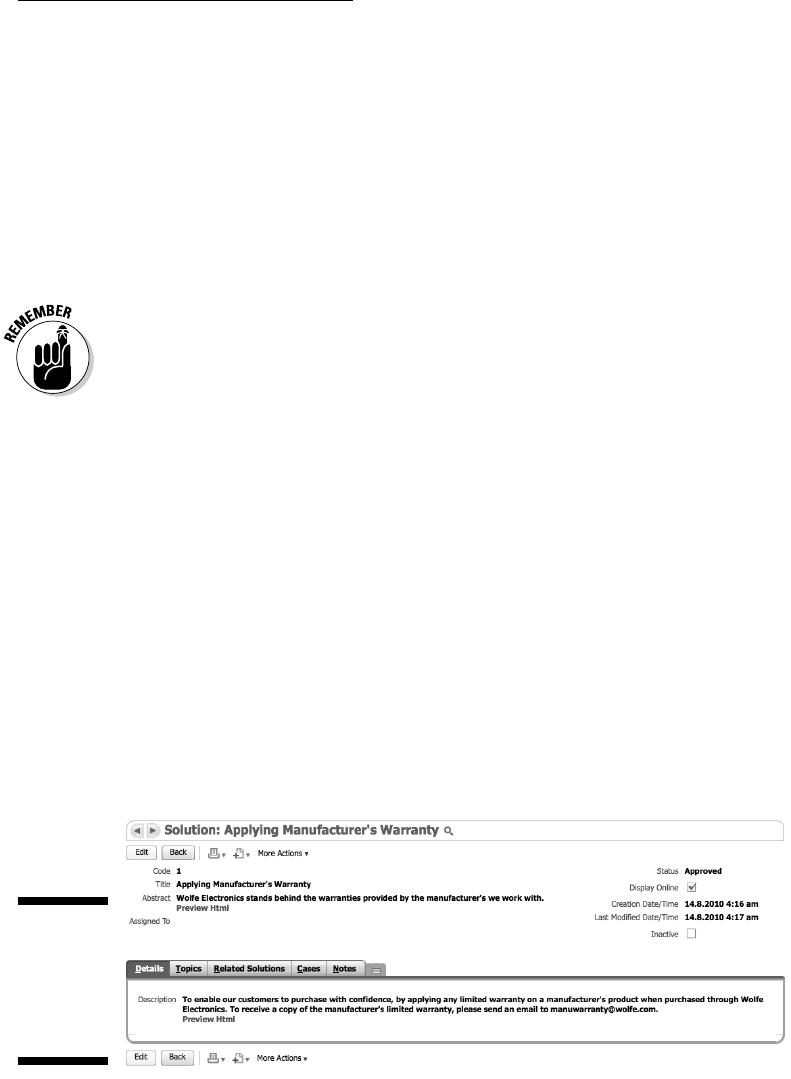
If you’re not part of the solution . . .
Solutions are similar to Help topics for your customers. They can include
standard responses to frequently asked questions, steps for assembling or
repairing something, or quick tips on using your products or services.
To create a solution:
1. From the Cases tab menu choose Customer Service➪Solutions➪New.
The New Solution page appears.
As discussed in the previous section, you can also create new solutions
from the Solutions tab of topic records.
2. (Optional) In the Code field, enter a special code for this solution.
If you use Auto-Generated Numbering for solutions, this code is
generated after you save the solution to prevent duplication.
3. In the Title field, type a descriptive name for the solution.
You can enter 256 characters in this field. It’s important to make this as
descriptive as possible because titles can be searched in the knowledge
base, and titles are what you use when attaching solutions to topics or
cases.
4. In the Abstract field, enter a brief description of what this solution is
about.
This description shows with for the solution in Solutions lists, and helps
the reader know whether this is the main solution for their problem or
question.
5. In the Assigned To drop-down list, you can select a person that is
responsible for keeping this content up to date or responsible for
approving the solution for publishing.
191071-BC07.indd BC94191071-BC07.indd BC94 10/11/10 8:45 AM10/11/10 8:45 AM

BC95
Bonus Chapter 7: Exploring Advanced Topics
Being assigned to a solution simply means that you can filter the
Solutions list to view only solutions that you need to manage.
6. Choose from the Status drop-down list:
• Approved
• Unapproved
Solutions must be approved to be published online or attached to
support cases, even if the Display Online check box is selected.
Typically, one other person, such as a support manager, should review
the solution and select Approved from the Status drop-down list after
the solution is created. You can assign the solution to this person to let
her know it needs to be approved.
7. Select the Display Online check box if this solution should be
published.
The solution still must be approved and attached to a published topic
before it’s visible in the knowledge base. You can deselect this check
box to keep the solution internal.
8. On the Details tab, enter the text for the solution in the Description
field.
If you use the HTML source code view of this field, you can enter HTML
and JavaScript. You can use CRMSDK tags in both the source code and
the rich text formatting views. You can enter a million characters in this
field, so don’t worry about getting text cut off!
9. (Optional) Add the solution to the appropriate topics on the Topics tab
by selecting from the Topics drop-down list.
10. (Optional) Select the Related Solutions tab to link this solution with
similar solutions. You enter the code or title of the related solutions in
the Code/Title field.
11. Click the Save button.
Publish your knowledge base when the basic topics and solutions are set up
(you can add to the knowledge base anytime). If you haven’t done so, you
should create the tab or category where your knowledge base will be. For
more information on creating tabs and categories, see Chapter 15.
To publish your knowledge base, Administrators can follow these steps:
1. From the Lists tab menu, choose Support➪Knowledge Base➪New.
2. From the Topic drop-down list, select the top-level topic to publish.
All subtopics and attached solutions that are approved and set to
display online are included.
191071-BC07.indd BC95191071-BC07.indd BC95 10/11/10 8:45 AM10/11/10 8:45 AM

BC96 NetSuite For Dummies
3. Choose an option from the Publish To drop-down list (either a Web
site tab name or Knowledge Base).
4. Select the Display in Web Site check box if you’re publishing to your
Web site.
5. (Optional) On the Audience tab, specify who can see the knowledge
base by selecting roles, names, and groups of people.
6. Click the Save button.
Helping employees who
help desk themselves
Employees need extra help at times, too. Even in the most technologically
advanced companies, sometimes the best and brightest gather in a conference
room and can’t figure out how to use the phone for their conference call.
Thankfully, that’s why they have an IT team or Help desk.
Like the support team, the internal help desk team needs a helpful way to
manage cases and track progress. NetSuite’s Help Desk feature turns regular
support cases into internal cases and gives employees a way to submit cases
online through the Employee Center.
Enable the Help Desk feature on the CRM tab: From the Setup tab menu,
choose Company➪Enable Features.
A Help Desk check box is added to case records when you enable the feature.
If a help desk employee gets a call or an e-mail from another employee, the
employee can enter a case record and select the Help Desk check box to
mark the case as internal.
All cases entered through the Employee Center automatically have the Help
Desk check box selected. This keeps it out of the regular support case queue.
Even better, you can set up case rules and territories to automatically route
help desk cases from employees to the correct IT person. For example, by
setting up a case rule based on the Help Desk check box, you set up additional
more detailed rules based on the subject or employee submitting the case
to route them to the person best able to answer the case. In this case, you’d
want the case to match both rules so that it’s both an internal case (for
the help desk) and a case about a particular subject (so you can route it
automatically to the person who knows most about that topic).
191071-BC07.indd BC96191071-BC07.indd BC96 10/11/10 8:45 AM10/11/10 8:45 AM
