Financial Management Data Quality Service V2 User Guide
User Manual:
Open the PDF directly: View PDF ![]() .
.
Page Count: 21

1
Financial Management
Data Quality Service
Version 2.0 User Guide
2
This page was intentionally left blank.
3
Table of Contents
Introduction .................................................................................................................................................. 5
FMDQS Description………………………………………………………………………………………………………………………………….5
Main Menu .................................................................................................................................................... 5
Searching Elements ....................................................................................................................................... 6
Search Bar ................................................................................................................................................. 6
Multiple Data Element Selection in the Search Bar ............................................................................... 7
Output Type .............................................................................................................................................. 7
Web Output .......................................................................................................................................... 8
Web Output Sorting .......................................................................................................................... 8
Keyword Search ................................................................................................................................. 8
Web Output Excel Option ................................................................................................................. 9
Excel/XML Output ............................................................................................................................... 10
Filtered Search ........................................................................................................................................ 11
Wild Cards ........................................................................................................................................... 12
Date Filters .......................................................................................................................................... 13
Element Changes RSS Feed ......................................................................................................................... 14
What is an RSS Feed? .................................................................................................................................... 14
Setting up a RSS Feed .............................................................................................................................. 14
Checking for Updates in Internet Explorer .......................................................................................... 17
Internet Explorer Feed Tools ............................................................................................................... 18
Internet Explorer Feed Properties ....................................................................................................... 19
4
Figure 1. FMDQS Home page ............................................................................................................................. 5
Figure 2. Menu toggled ................................................................................................................................ 5
Figure 3. Search bar selected ....................................................................................................................... 6
Figure 4 RCCC Search Example ...................................................................................................................... 7
Figure 5. Multiple options selected example................................................................................................ 7
Figure 6 Output Types ................................................................................................................................... 8
Figure 7 Web Output Column Sorting ........................................................................................................... 8
Figure 8 Web Output Keyword Search .......................................................................................................... 8
Figure 9. Web output "Chicago" search example ......................................................................................... 9
Figure 10 Web Output ................................................................................................................................. 10
Figure 11 Web Output Excel Button ............................................................................................................ 10
Figure 12. Excel output file download prompt example................................................................................. 11
Figure 13 Excel Output Zip File Example ..................................................................................................... 11
Figure 14. Filtered Search Bar Button ......................................................................................................... 11
Figure 15. Additional Filtered Search Tabs ................................................................................................. 12
Figure 16 Filtered Search element example ................................................................................................ 12
Figure 17 Filtered Search '%' Wildcard ........................................................................................................ 13
Figure 18 Filtered Search '_' Wildcard ......................................................................................................... 13
Figure 19. Filtered search date example .................................................................................................... 14
Figure 20 Data Table Updates (RSS) ............................................................................................................ 15
Figure 21 RSS Element Selection ................................................................................................................. 16
Figure 22. RSS feed example ...................................................................................................................... 17
Figure 23. Subscribe to feed prompt example ........................................................................................... 17
Figure 24 Internet Explorer Feeds Tab ........................................................................................................ 18
Figure 25. Internet Explorer feed tools example ........................................................................................ 19
Figure 26. Internet Explorer feed properties example ............................................................................... 20
5
Introduction
Welcome to the Financial Management Data Quality Service (FMDQS) version 2.0 user guide. This tool is
designed to help users validate financial data elements and their associated values.
FMDQS Description
The Financial Management Data Quality Service (FMDQS) is an innovative web-based tool instrumental in
carrying out the Assistant Secretary of the Air Force for Financial Management and Comptroller (SAF/FM)
Chief Information Officer’s (CIO) objective of developing, managing, and executing the FM data strategy and
process for the Air Force. Located within FMDQS, the FM Data Dictionary (FMDD) is the Air Force’s
authoritative source for FM data element validation, an essential part of ensuring the proper use and
transfer of data in FM systems and business processes. Upon accessing the FMDD via FMDQS’ intuitive, web-
based design, users have the ability to query multiple FM data elements and retrieve information regarding
their status, title, and description.
Main Menu
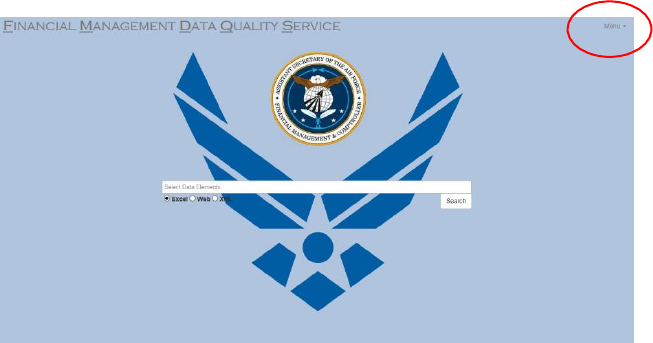
The main menu is located on the top right corner of the home page (Figure 1). It provides several
functions in its drop-down list – from setting up a Rich Site Summary (RSS) feed to contacting the
FMDQS helpdesk. To open the “Menu”, simply click on the word “Menu.” To close the “Menu”, click
again (or elsewhere on the page).
Figure 1. FMDQS Home page
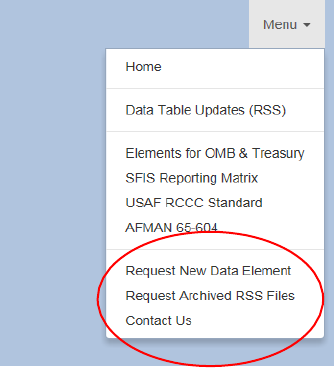
Each option in the menu redirects the user to the appropriate location, whether inside the FMDQS tool
or outside to an external government link. The last three options (Figure 2), open email prompts which
contact the SAF/FMFS Data Management Team in order to request actions such as requesting new data
elements or asking for previously archived files.
6
Figure 2. Menu toggled
7
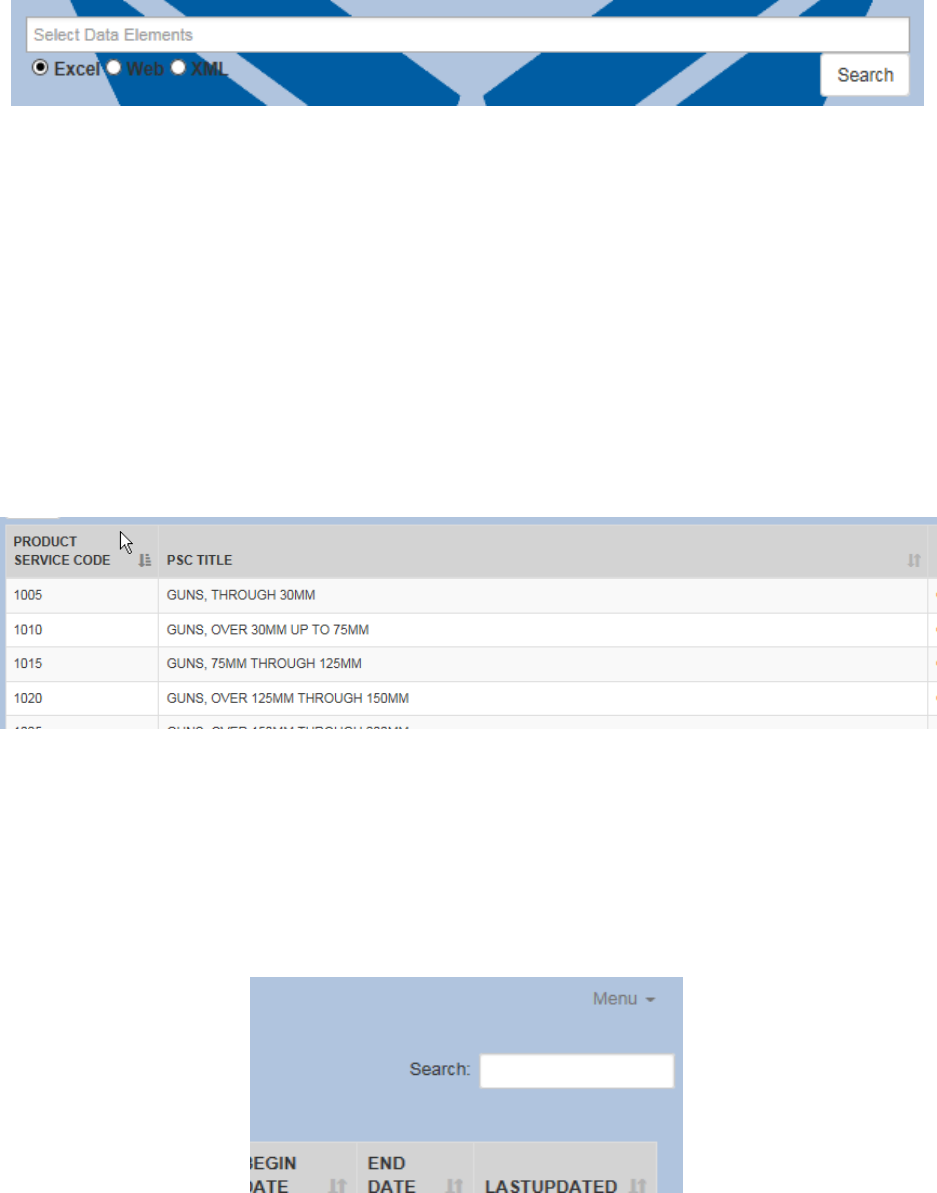
Searching Elements
FMDQS Version 2.0 employs a new interactive “google-type” search bar that promotes a user-friendly
experience.
Search Bar
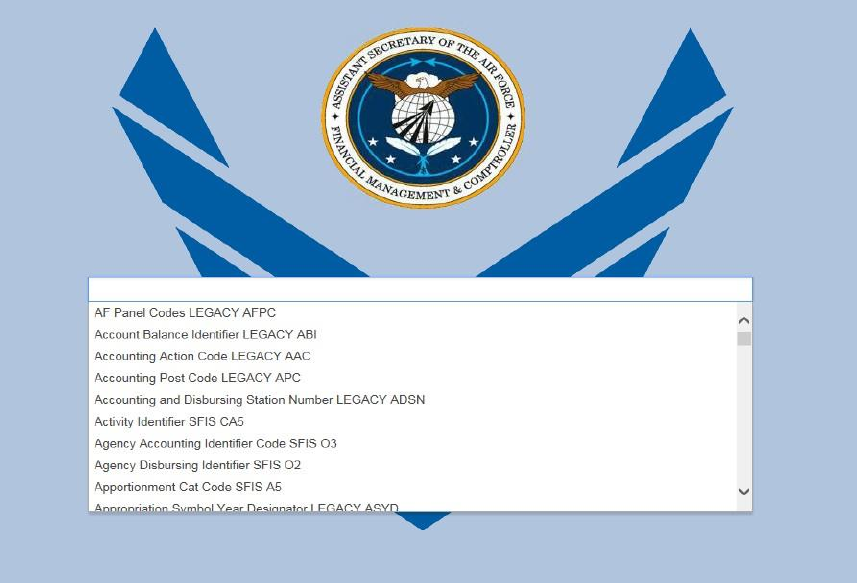
When users select the search bar in the center of the FMDQS home page (Figure 1), a drop-down list
appears which displays all the available data element options (Figure 3). Simply scroll through and select
a data element from the available drop-down list OR begin typing the name of the data element title.
Typing the name of the desired data element begins to limit the number of data element options which
appear in the search bar’s drop-down list. In addition to typing the full name of the desired data
element title, the user can also type the data element type (i.e., SFIS or Legacy), the data element’s SFIS
code (i.e., B4, B13, TP5, etc.), or the data element’s legacy acronym (i.e., OAC, OBAN, EEIC, etc.). Any of
these entries will filter the available selection from the search bar’s drop-down list.
Figure 3. Search bar selected
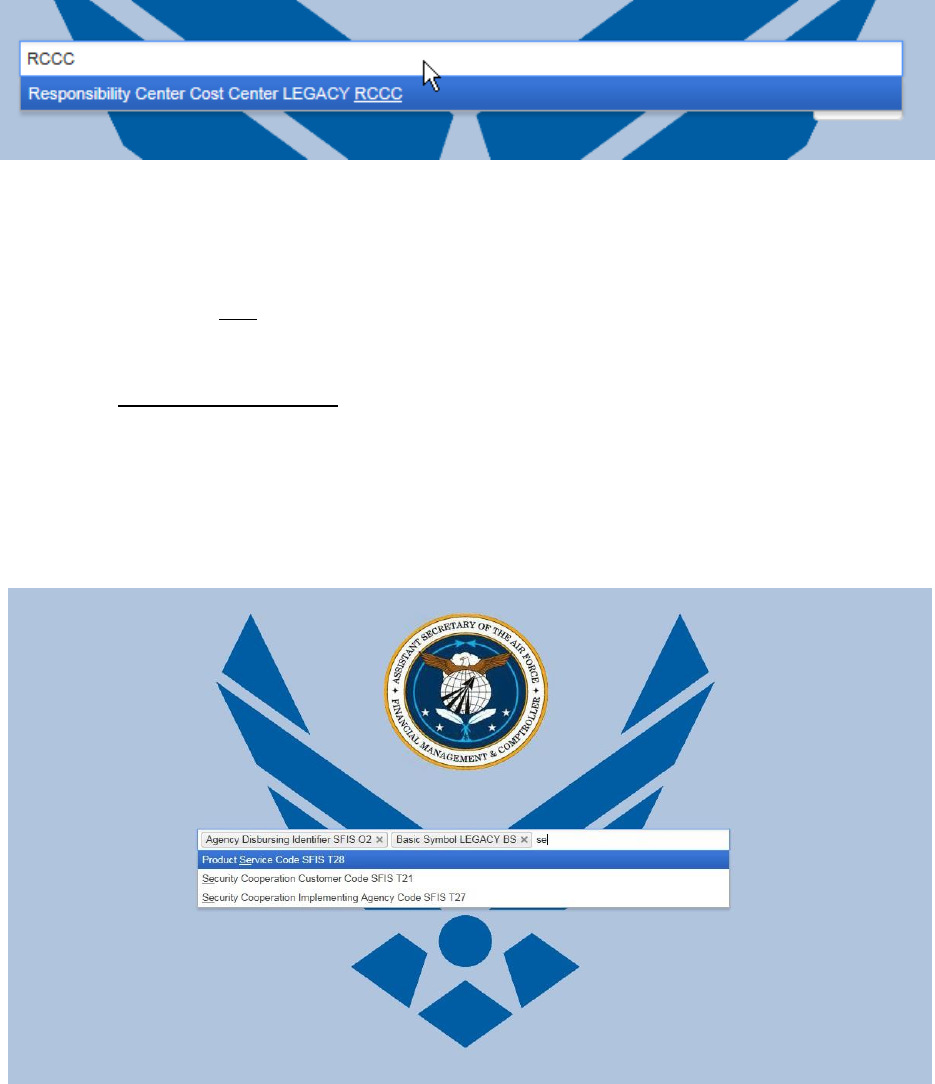
For example, entering “T28” into the search bar limits the drop-down list options to only display the SFIS
data element “Product Service Code.” Similarly, typing “RCCC” in the search bar limits the drop-down list
to display the legacy data element, “Responsibility Center Cost Center” (Figure 4).
Once a data element selection is made, the user need only select their desired output type (i.e., Excel,
Web, or XML) and click the “Search” button (located just below the search bar) to obtain the results.
8
Figure 4 RCCC Search Example
Multiple Data Element Selection in the Search Bar
A user may search up to five data elements at a time using the search bar. After a user types their
desired data element title (or code or acronym) into the search bar and selects the desired data element
from the drop-down list, their selection is added to the search bar (Figure 5). The user can repeat this
process until five total data elements have been added to the search bar. Once happy with the data
element selections, the user need only select a desired output option (i.e., Excel, Web, or XML) and
press the “Search” button (located just below the search bar) to obtain results.
Should a need arise to delete a selected data element from the search bar, simply click the “x” next to
the data element title, or place the cursor in front of the data element that needs to be deleted and
press the backspace key on the keyboard.
Output Type
Figure 5. Multiple options selected example
When delivering search results, the FMDQS provides users with three different output format options.
They are: (1) an Excel file, (2) an interactive table displayed via a web page (i.e., web output), or (3) an
XML file (Figure 6). The FMDQS default output format is “Excel”.
9
Figure 6 Output Types
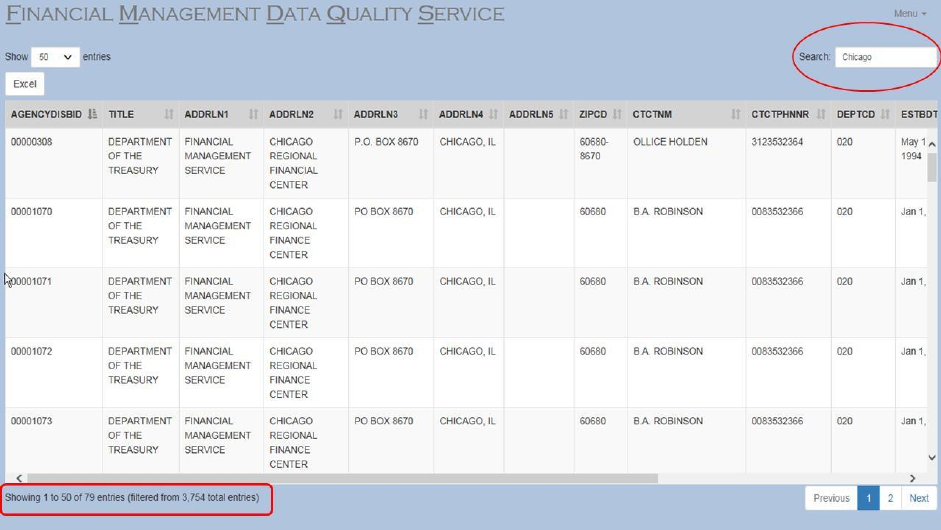
Web Output
When performing a search in the FMDQS, the “Web” output option generates a new window (i.e., Tab)
for each data element selected in the search bar. Each window (i.e., Tab) contains a new interactive
table which allows users to sort columns, perform keyword searches (to minimize results), and export
displayed results as a MS Excel file by selecting the “Excel” output button (Figure 11) in the upper left
corner of the web page (Figure 10).
Web Output Sorting
In order to sort the table data within the web output screen, simply click on the column header. This
sorts the table data alphabetically/numerically based on the information in that column. The icon next
to each column name is highlighted depending on which column is selected. Clicking column names that
have already been sorted toggles between ascending and descending order (Figure 7).
Figure 7 Web Output Column Sorting
Keyword Search
The search at the top right corner of the web output page (Figure 8) filters the entire table. It only
displays lines based on the search parameters. As each character is entered into the search bar, the data
begins filtering and narrowing-down the elements displayed. This filter function is applied to all columns
in the table. In order to apply the filter on only certain columns, select the “filtered search” option on
the home page when initially searching for the desired data element (Figure 14).
Figure 8 Web Output Keyword Search
10
For example, entering “Chicago” into the “Agency Disbursing Identifier” web output table narrows-down
the displayed entries to include data that only contains the word “Chicago” (Figure 9).
Continuing with the “Chicago” example, a user can then sort the filtered results (Figure 9). As indicated
earlier, simply click on the desired column “Title.” This will sort the 79 displayed results containing the
searched word, “Chicago” (instead of all 3,754 records).
Figure 9. Web output "Chicago" search example
Web Output Excel Option
Selecting the “Excel” button (Figure 11) located on the top left corner of the web output page
downloads a copy of the table results as an Excel (.xlsx) document. The downloaded copy contains the
results exactly as they appeared on the web output page (to include any filtering or sorting performed).
11
Figure 10 Web Output
In the “Chicago” example (Figure 9), pressing the “Excel” button (Figure 11) downloads only the 79
filtered entries that include the word “Chicago”. Removing the search keyword “Chicago” and then
pressing the “Excel” button would download a file containing all 3,754 records.
Figure 11 Web Output Excel Button
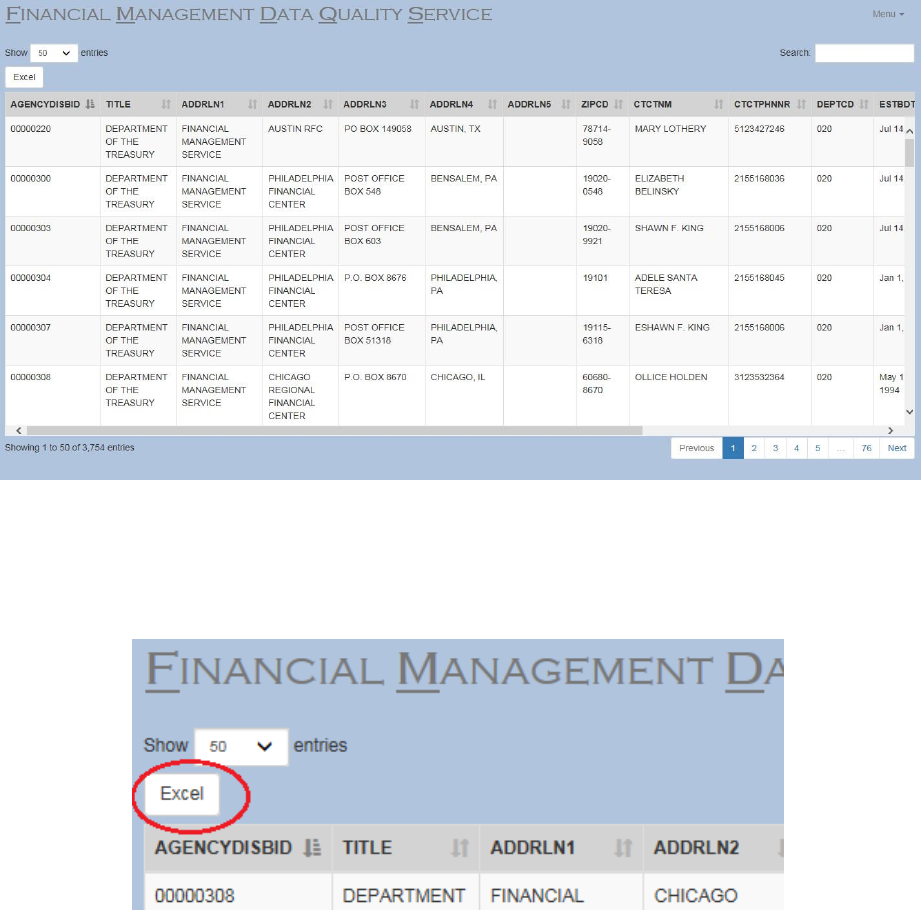
Excel/XML Output
For both of these output options, a zip file will attempt to download. Users may choose to save or open
the zip file. The zip file will contain an Excel (.xlsx) or XML (.xml) file for each data element(s) that was
selected.
For example, selecting “Excel” or “XML” (Figure 6) as the desired output option, would generate a zip
file for all the selected data elements entered on the search bar (i.e., “Agency Disbursing Identifier” and
“Basic Symbol” in Figure 5). When the user clicks “Search”, a message prompts the user to either
download or open the zip file. The zip file will be named in the following format: “Data Elements
TODAYS-DATE.zip” (Figure 12) – where “TODAYS-DATE” represents the current date, formatted as, “mm-
dd-yyyy”.
12
Figure 12. Excel output file download prompt example
The zip file contains the data elements selected. In the example above (Figure 12), the zip file contains
files “Agency Disbursing Identifier.xlsx” and “Basic Symbol.xlsx”. If the “XML” radio button was selected
instead of “Excel” (for the desired output), the files inside the zip file would end in “.xml” instead of
“.xlsx” (Figure 13).
Filtered Search
Figure 13 Excel Output Zip File Example
The “Filtered Search” option is only available for the web output format. It allows column specific
filtering of displayed elements based on user-defined search parameters. Selecting the “Filtered Search”
button opens a new tab for each element in the Search bar (Figure 5). For example, in Figure 14, two
tabs corresponding to each data element (i.e., “Agency Disbursing Identifier” and “Basic Symbol”)
appear when the user selects the “Filtered Search” button. The tabs allow the user to further define the
data elements expected results.
Figure 14. Filtered Search
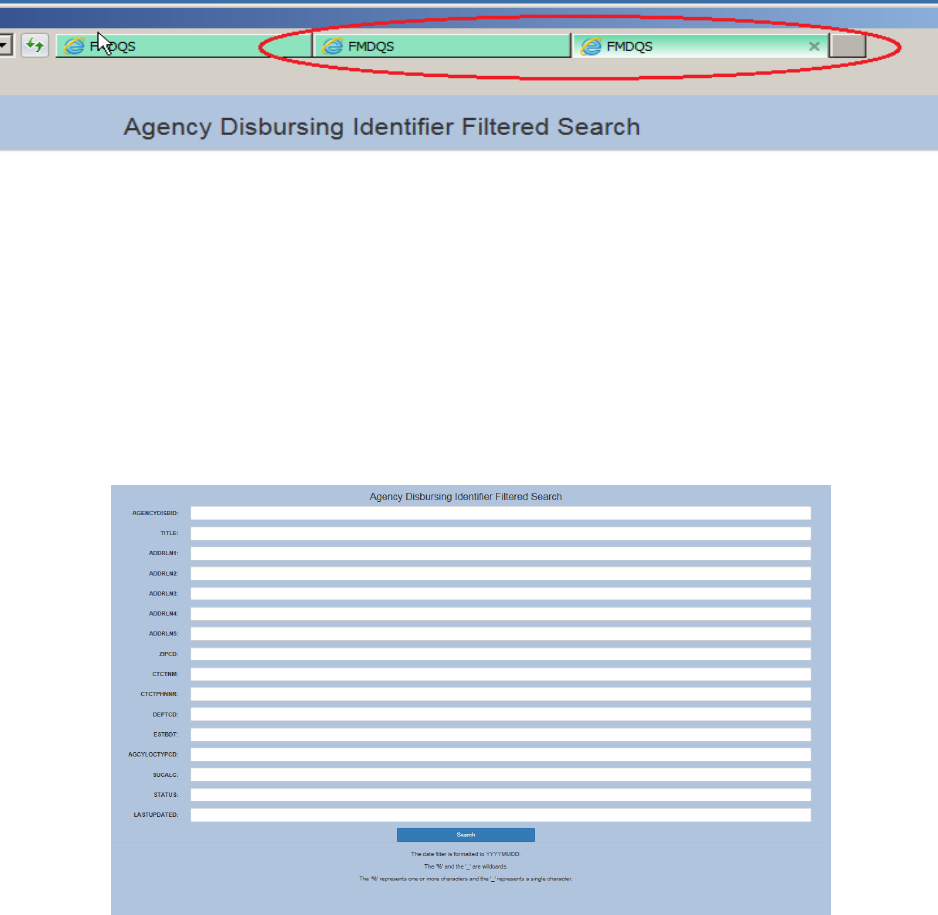
13
Figure 15. Additional Filtered Search Tabs
For example, Figure 14 shows the user attempting to query on two separate data elements (i.e.,
“Agency Disbursing Identifier” and “Basic Symbol”). Once the user clicks the “Filtered Search” button,
two tabs will appear (Figure 16). One of the tabs will look like the illustration shown in Figure 16 (i.e.,
the “Agency Disbursing Identifier” tab). Within this tab, the user can further define the desired results
by entering criteria specific to the data element’s attributes. Notice an empty input box is provided next
to each data element attribute. The user has the option of entering information into any one of these
fields to narrow the desired results. If the user leaves all of the attribute fields blank, the results will
include every value for the respective data element when the user clicks “Search.”.
Figure 16 Filtered Search element example
Wild Cards
Continuing with the “Filtered Search” option, there are two wildcards users can employ to help refine
their desired results. They are the “%” and the “_”. The “%” represents a wildcard that permits multiple
characters, while the “_” represents only one character.
For example, if a user wanted to perform a “Filtered Search” on the data element “Agency Disbursing
Identifier” such that their desired results included only those records which had the word “CHICAGO” in
the “ADDRLN2” attribute field, the user would enter “%CHICAGO%” into the “ADDRLN2” field (Figure
17). The”%” on either side of the word “CHICAGO” would return records for ALL CHARACTERS before
AND after the word “CHICAGO” in the “ADDRLN2” field. If the user desired results where the word
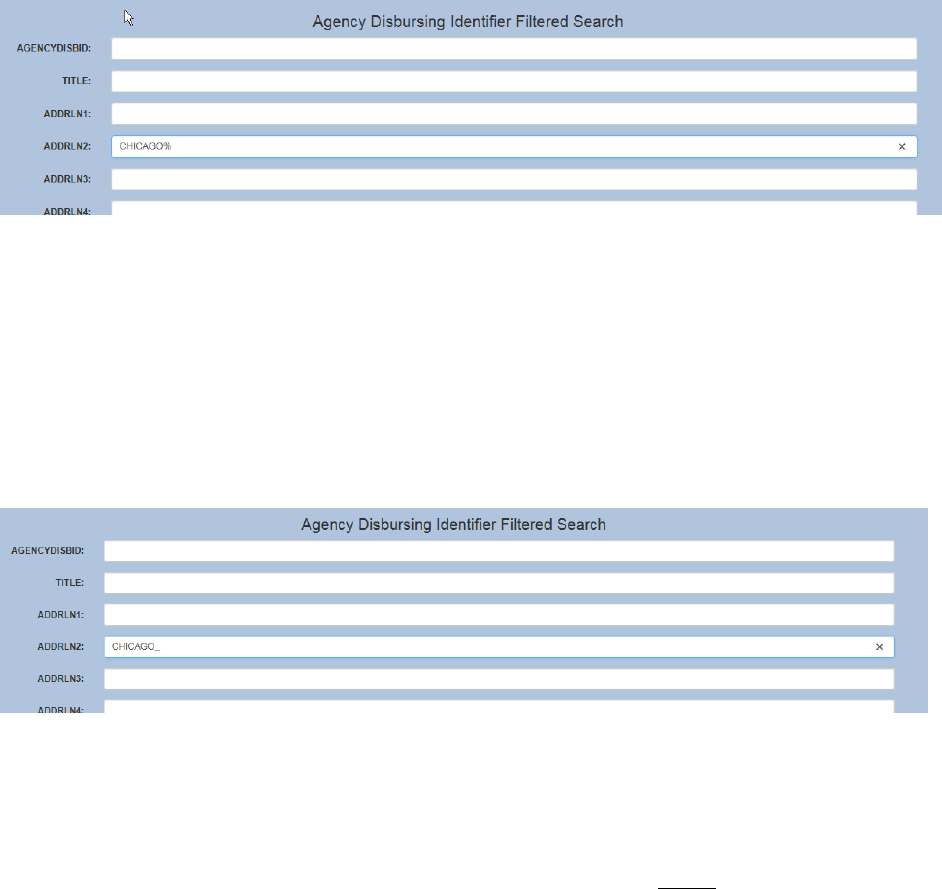
14
“CHICAGO” was only at the beginning or end of the “ADDRLN2” attribute field, then the user would
input “CHICAGO%” or “%CHICAGO” respectively.
Figure 17 Filtered Search '%' Wildcard
Similarly, the “_” wildcard works in the same fashion as the “%” wildcard except the “_” only allows ONE
additional character. For example, entering “CHICAGO_” in the “ADDRLN2” attribute field would return
records like “CHICAGO1”, “CHICAGO2”, “CHICAGO3”, (or any other single character after the word
“CHICAGO”), etc. in the “ADDRLN2” attribute field (Figure 18). Please note, however, that no wildcards
were used before the word “CHICAGO”, so all the resulting records in the “ADDRLN2” attribute field will
start with the defined word “CHICAGO.”
Figure 18 Filtered Search '_' Wildcard
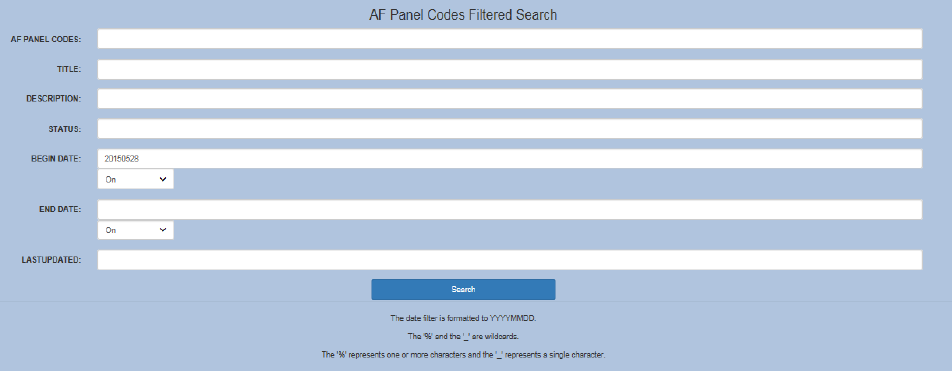
Date Filters
Continuing with the “Filtered Search” option, a drop-down box appears for any attribute field that
contains a date. The input values within the drop-down box are “On”, “Before”, and “After”. The default
selection is “On.” Although the date selection is self-explanatory, the field MUST be entered in the
following format: YYYYMMDD. For example, if a user wanted only values with a begin date of May 28,
2015, they would enter “20150528” into the text box next to “Begin Date” (Figure 19). A reminder of the
required date format is located at the bottom on every “Filtered Search” element page.
15
Figure 19. Filtered search date example
Element Changes RSS Feed
The FMDQS web application includes the option for users to subscribe to a Rich Site Summary (RSS)/
Really Simple Syndication (RSS) feed for either specific or multiple data elements.
What is an RSS Feed?
Simply defined, a RSS feed is an easy and automatic way to notify users of changes to information.
RSS feeds provides users the option to remain current on the most recent changes to data elements
within the FMDQS data tables. The data element changes reflected in FMDQS includes the following
categories: ADD, EDIT, HISTORICAL, and DELETE (Figure 25).
ADD – Indicates a new data element value has been added to the data element table.
EDIT – Indicates an existing data element value has been updated/modified in the data element table.
HISTORICAL – Indicates an existing data element value has been marked such that it will no longer
appear in the data mart for use in accounting system transactions for the current fiscal year.
DELETE – Indicates an existing data element value has been removed from the data element table.
The RSS feed function works with a “feed aggregator”. For most FMDQS users, the aggregator is the
commonly known web-browser, Internet Explorer. By default, Internet Explorer sets a saved RSS feed to
automatically look for updates every 24 hours, storing only the most recent 200 items at a time. To find
updates, the internet browser downloads a copy of the RSS file from the FMDQS server and compares it
to the currently saved RSS version. The differences are considered new items. These settings may be
changed with more details (19) of this document, however, the default settings are encouraged for
performance.
Setting up a RSS Feed
Setting up a RSS Feed can be done in three simple steps:
16
Figure 20 Data Table Updates (RSS)
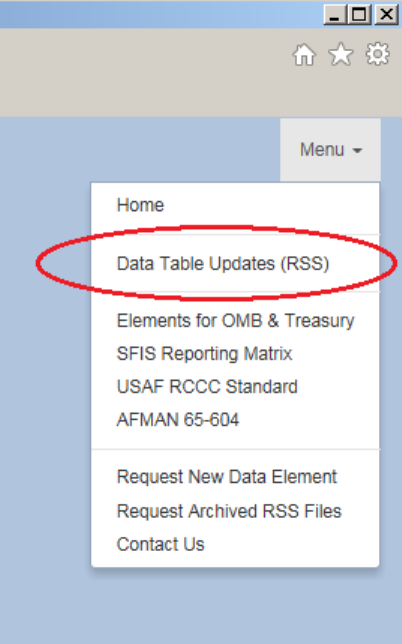
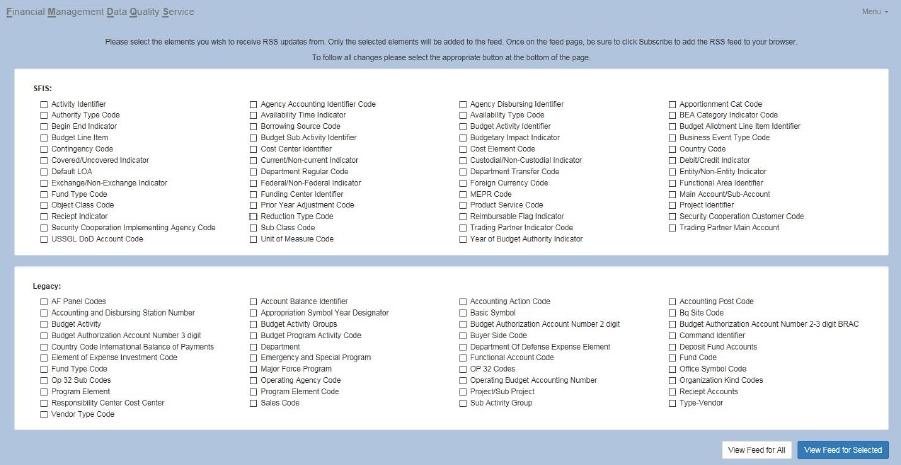
Example: To be notified of changes to the “Agency Disbursing Identifier”, simply select the “Data Table
Updates (RSS)” option from the main menu (Figure 20). Then, activate the checkbox next to “Agency
Disbursing Identifier” and press the “View feed for Selected” button at the bottom right of the page
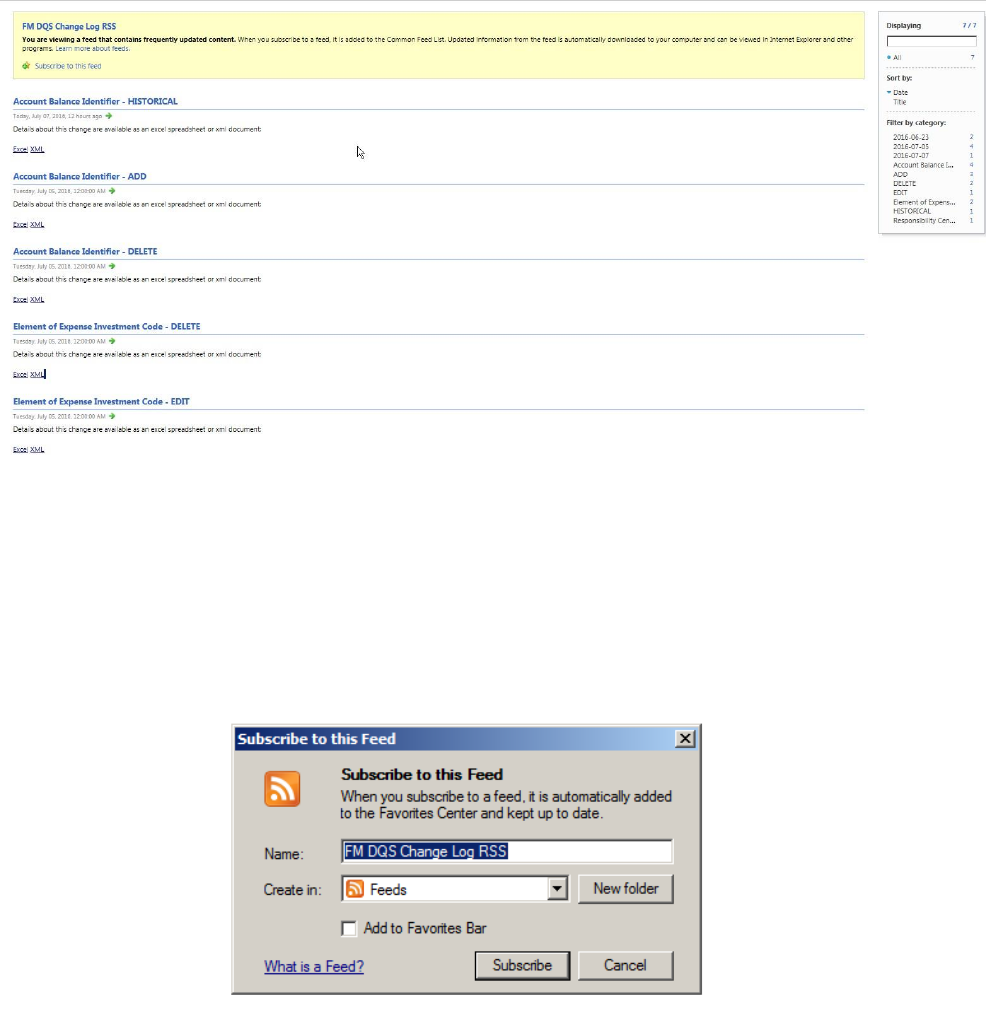
(Figure 21). This will bring up the RSS feed for the given element. Finally, to save the feed to the user’s
internet browser, click the subscribe button (Figure 22). As a result, the internet browser will indicate if
new changes have occurred on a regular basis.
17
Figure 21 RSS Element Selection
1. Access the RSS command: Click the main “Menu” command on the upper right-side of the home page
(Figure 2) and select “Data Table Updates (RSS).” The resulting screen (Figure 21) displays all the data
elements available in the FMDQS. Notice the screen is partitioned into two distinct areas: the top
portion displays all the SFIS data elements available in the FMDQS, while the bottom portion displays all
the legacy data elements.
2. Select the desired data element(s): In order to review recent updates and be notified of future ADD,
EDIT, DELETE, or HISTORICAL changes for select data elements, the user must select the desired data
element(s) and click the “View Feed for Selected” button (NOTE: There is no limit to the number of data
elements that can be selected.)
In order to view the changes for ALL the data elements, simply scroll to the bottom right-corner of the
page and click the “View Feed for All” button.
3. Subscribe to the desired RSS feed: Click the “Subscribe to this feed” link (Figure 22) to save the RSS
feed to the web-browser. This link is only available if you are not already subscribed to that particular
feed.
The feed displays an entry for the different type of changes for the selected elements. The feed also
includes built-in sorting and filtering tools specific to each feed visible on the right-hand side of the feed
page (Figure 22).
18
Figure 22. RSS feed example
In order to name the feed, simply click the “Subscribe to this feed” link located in the yellow box located
near the top of the page (Figure 22).
This prompts (Figure 23) the user to choose a name for the new feed. The default name is “FM DQS
Change Log RSS”.
Figure 23. Subscribe to feed prompt example
Checking for Updates in Internet Explorer
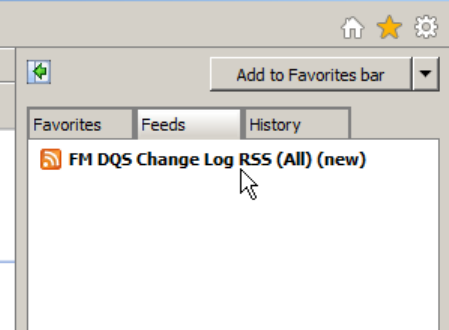
To view updates, click on the favorites (Star) button on the top right of Internet Explorer (Figure 24). This
will open the “Favorites” side bar, then click the “Feeds” tab. All subscribed feeds will appear.
19
Figure 24 Internet Explorer Feeds Tab
Hovering over the feed name displays how many new items have been added to the feed since it was
last viewed. Any updates to the feed are indicated with a “(new)” next to it. In order to force the feed to
check for updates, simply right-click the feed and select “refresh”.
By selecting “Add to Favorites bar”, the feed is added to the favorites bar (Figure 24) and works in the
same manner. It displays “(new)” when a change is detected.
Internet Explorer Feed Tools
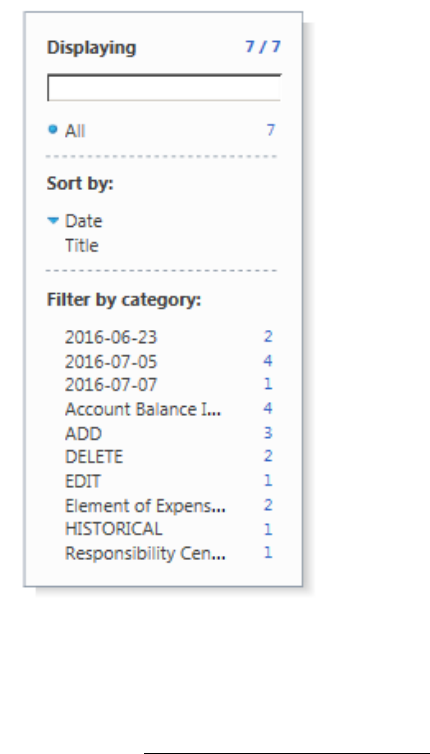
The built–in Internet Explorer Feed Tools (Figure 25) has the ability to sort on the subscription title or
the publication date in both ascending and descending order. The tools also include a filter by category.
This filter narrows the displayed results to only the category selected.
The filter categories available for each feed are:
Entry publication dates in format (YYYY-MM-DD)
The type of change (e.g. ADD, EDIT, DELETE, HISTORICAL)
The names of each element with an entry in the field*
*Note: This is a good indicator of which elements are included within the current feed.
20
Figure 25. Internet Explorer feed tools example
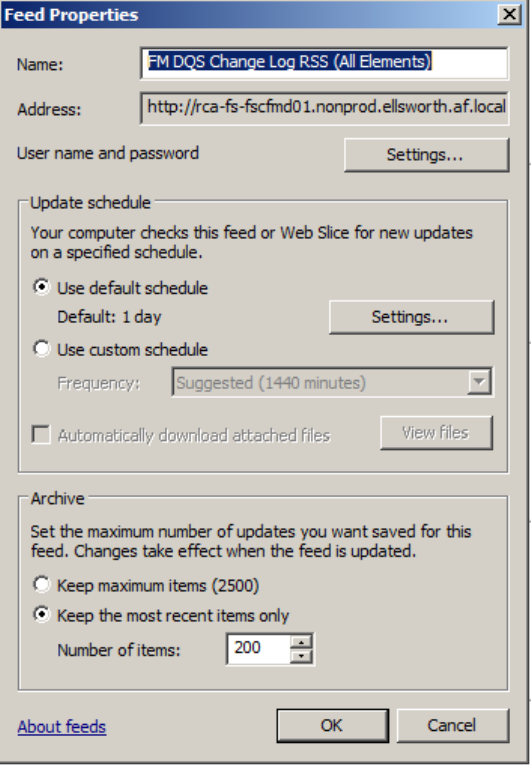
Internet Explorer Feed Properties
For Internet Explorer, the “View feed properties” link below the feed tools (Figure 25) allows users to
make changes to their feed settings; however, the default settings are encouraged. Here (Figure 26)
users may adjust the frequency in which feeds are compared for new entries, the name of the feed, and
the amount of entries saved at a given time. The default is to save the 200 most recent items, increasing
the amount of items increases the amount of space needed.
All aggregators have a way to adjust feed settings and tool usage; however, this tutorial only includes
Internet Explorer examples.
21
Figure 26. Internet Explorer feed properties example
