PPCH™ Hydraulic Pressure Controller/Calibrator Fluke PPCH Automated Controller Calibrator Data Sheet Brochure
Fluke-PPCH-Automated-Pressure-Controller-Calibrator-Data-sheet-Brochure-1 Fluke-PPCH-Automated-Pressure-Controller-Calibrator-Data-sheet-Brochure-1
User Manual: Fluke-PPCH-Automated-Pressure-Controller-Calibrator-Data-sheet-Brochure
Open the PDF directly: View PDF ![]() .
.
Page Count: 4

Technical Data
PPCH
™
Hydraulic Pressure
Controller/Calibrator
Features
• Pressure “ready/not ready”
indicator with user adjust-
able criteria
• Intelligent AutoZero™
function
• 16 SI and US pressure units
• Automatic fluid pressure
head correction
• On-board, programmable
calibration sequences with
UUT tolerance testing
• Remote [ENTER] footswitch
for hands free test execution
• Valve drivers option for
system design
• Automated leak testing
routines
• RS-232 and IEEE-488
communications
• FLASH memory for simple
and free embedded soft-
ware upgrades from
www.flukecal.com
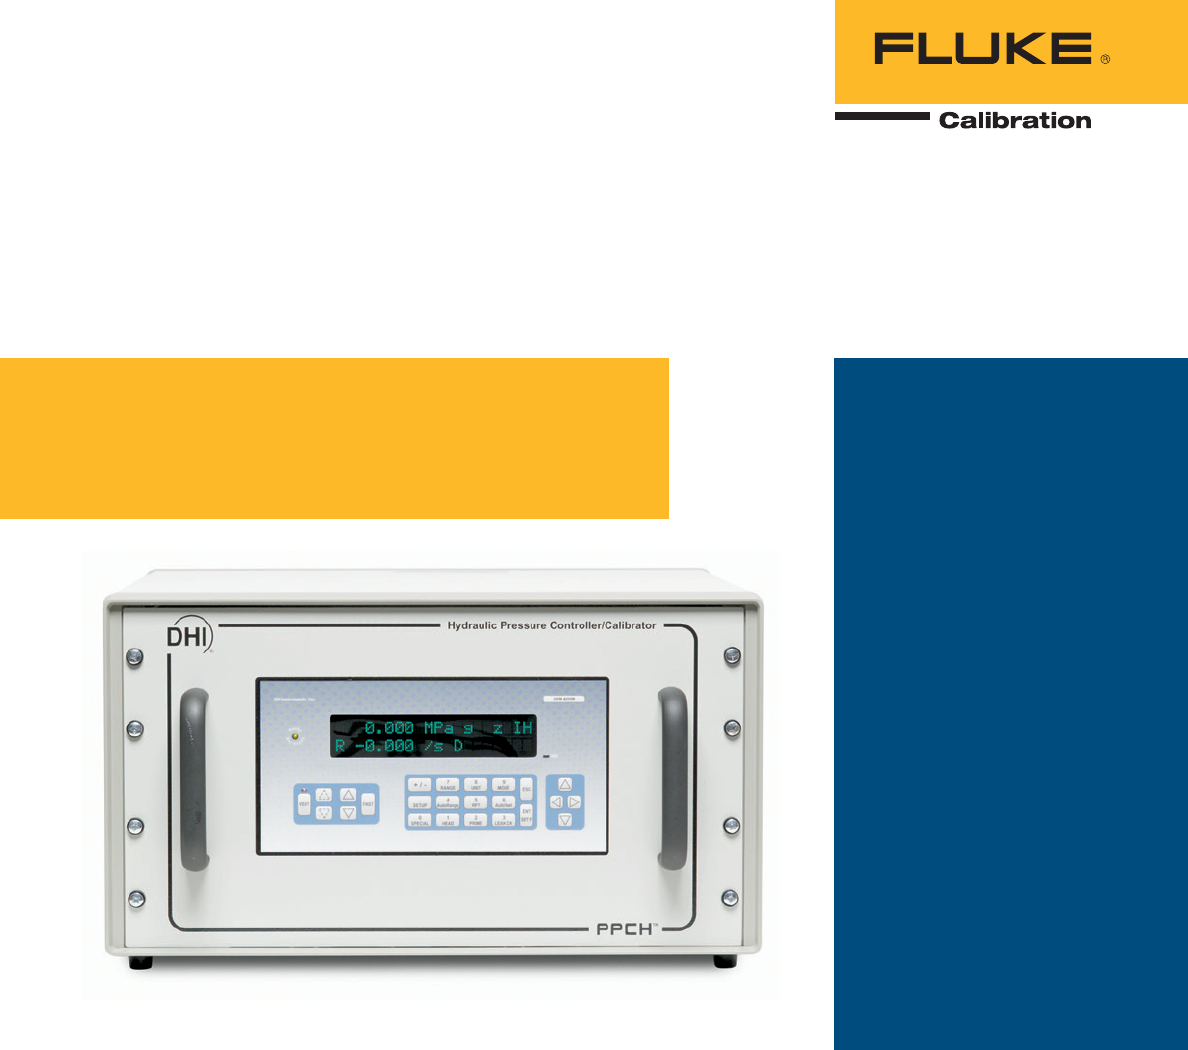
PPCH™, is a pressure generator/controller/
calibrator for liquid pressure operation from
1 to 200 MPa (150 to 30 000 psi). As with the
rest of the Fluke Calibration PPC family of pres-
sure controllers, the emphasis is on high end
performance, minimizing measurement uncer-
tainty and maintaining precise control over a
very wide pressure range—in a compact and
rugged instrument.
New, individually characterized, quartz
reference pressure transducer (Q-RPT) modules
increase precision and reduce measurement
uncertainty. The AutoRange™ feature supports
infinite ranging, automatically optimizing all
aspects of operation for the exact range to be
explored and taking pressure controller range-
ability to a new level.
A unique pressure generation and control
system provides unlimited, on-demand pressure,
very high control resolution and 10:1 pressure
control turndown. Four different control modes
are included for maximum versatility.
Open architecture allows reference pres-
sure measurement to be internal to or remote
from the controller. If desired, the reference can
be located at the test measurement point and
independently removed for recalibration.
With all of this, PPCH opens new doors in
automated high pressure hydraulic calibration
and test applications.
High performance pressure
generation and control to
200 MPa (30 000 psi)

2 Fluke Calibration PPCH™ Hydraulic Pressure Controller/Calibrator
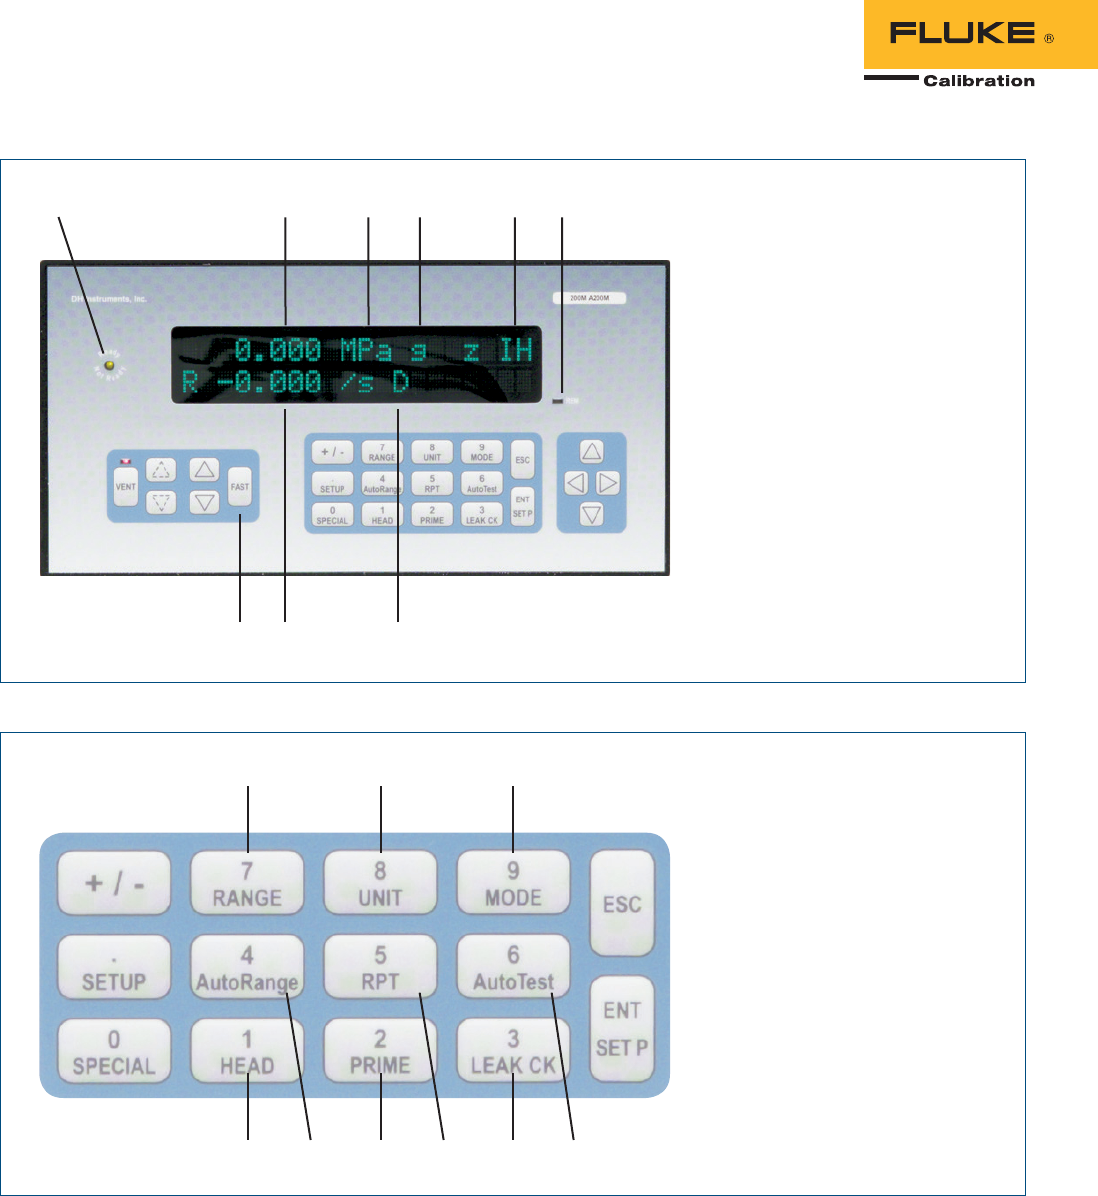
1. Indication of pressure “Ready” (green)
“Not Ready” (red) condition
2. Current target pressure
3. Unit of measure
4. Measurement mode (absolute, gauge)
5. Active Q-RPT module (up to four
possible)
6. Remote activity indicator
7. Direct pressure control keys for
slewing, jogging and venting pressure.
8. Current deviation from target control
value
9. Control mode and status
1 2
8 97
3 4 5 6
1. Make automatic fluid head corrections
for differences in height between PPCH
and UUT.
2. Run automated test system prime and
purge functions.
3. Run leak test function.
4. Automatically optimize measurement,
control and safety features for the exact
pressure range and mode of operation.
5. View and select active Q-RPT (from up
to four in PPC/RPM system).
6. Set up and run calibration sequences
automatically, with tolerance testing,
based on UUT tolerance, range and
measurement mode.
7. Select between saved, user defined
range configurations.
8. Select pressure unit of measure.
9. Select measurement mode (absolute,
gauge).
7 8 9
1 4 2 5 3 6

3 Fluke Calibration PPCH™ Hydraulic Pressure Controller/Calibrator
Q-RPTs available for PPCH
Q-RPT
designation
SI version
Maximum range
Absolute/gauge (MPa)
US version
Maximum range
Absolute/gauge (psi)
A200M1200 30 000
A140M1140 20 000
A100M1100 15 000
A70M 70 10 000
A40M 40 6 000
A20M 20 3 000
1 Hi Q-RPT only, not available in Lo Q-RPT position.
Quartz reference pressure
transducer (Q-RPT) modules
PPCH’s outstanding pressure measurement
specifications are made possible by the Fluke
Calibration exclusive quartz reference pressure
transducer (Q-RPT) modules.
Q-RPTs measure pressure by measuring the
change in the natural oscillating frequency of
a quartz crystal with pressure induced stress.
To be qualified for use in a Q-RPT module, each
transducer is individually evaluated and char-
acterized using automated primary pressure
standards. Only transducers exhibiting required
levels of linearity, repeatability and stability are
selected. A proprietary compensation model,
derived from more than 15 years experience
with thousands of quartz pressure transducers,
is applied to optimize the metrological charac-
teristics needed in a transfer standard.
PPCH can be delivered with a low cost utility
sensor for applications in which the high preci-
sion and stability of a Q-RPT are not required.
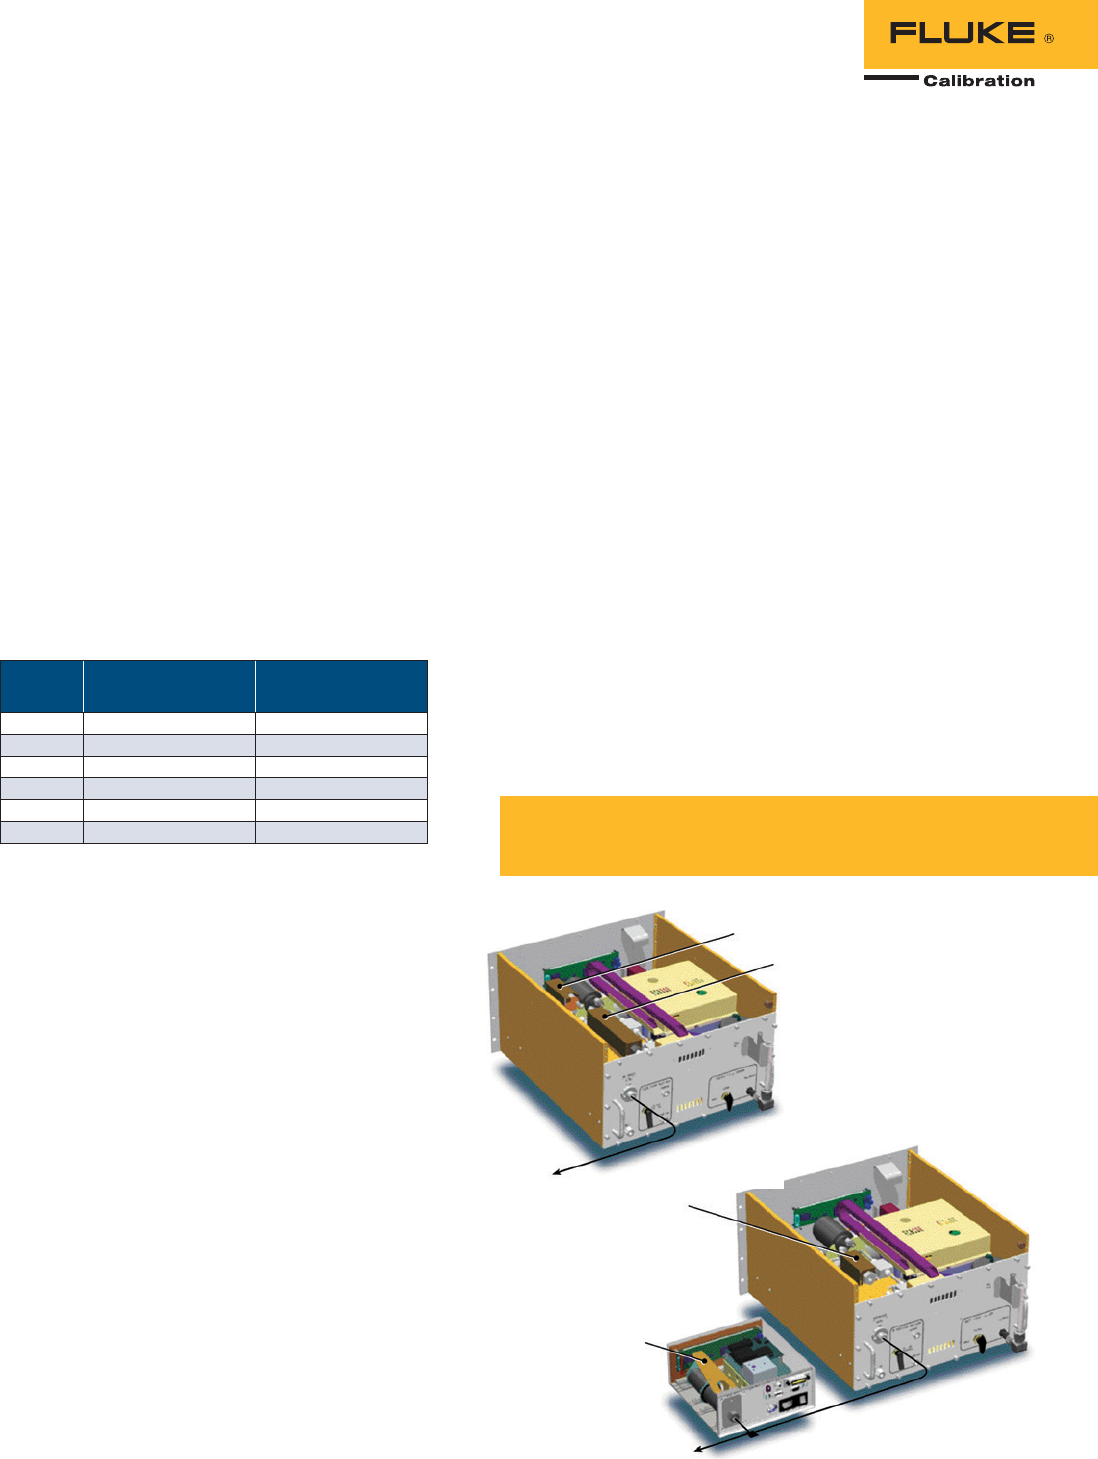
Q-RPT
To UUT
Utility
sensor
To UUT
Lo Q-RPT
Hi Q-RPT
Open architecture PPCH system
conguration examples
Infinite ranging™ and autoRange™
There’s a lot more to covering a wide range of
test devices with a single pressure controller
than “% of reading” measurement uncertainty.
In addition to the necessary measurement
uncertainty, PPCH offers the full pressure control
and feature adaptability that are needed for true
rangeability in test and calibration applications.
Infinite Ranging gives PPCH unprecedented
versatility in adapting to a wide variety of
devices to be tested. With the easy to use
AutoRange function, a few simple key strokes
or a single remote command string at the start
of a test adapts every feature of the controller to
optimize it for a specific range.
Open architecture
A PPCH controller can be configured with up to
four Q-RPT modules. These can be internal or
external to the PPCH controller. External Q-RPTs
are in Fluke Calibration RPM4™ Reference Pres-
sure Monitors. The RPM4’s Q-RPTs then become
part of the PPCH system and are managed by
PPCH. External Q-RPTs must be disconnected or
protected by valves when PPCH is used at pres-
sure greater than the external Q-RPT range.
Examples of possible PPCH system configura-
tions include:
• A PPCH with one or two built-in Q-RPTs to
act as a stand alone, “one box” controller/
calibrator package
• A PPCH with no internal Q-RPTs and an
external Q-RPT to configure a system whose
reference pressure measurement is remote
from the controller. This configuration is ideal
when it is advantageous for the reference to
be removed from the system (e.g. for recali-
bration) while leaving the controller installed
or to locate the reference measurement in
closer proximity to the device or system under
test
• A PPCH with no built-in Q-RPTs to act as
a low cost automated pressure setting and
controlling device (for example to automate
pressure control in a PG7000™ piston gauge
system)

Specications
General specifications
Power requirements 85 V to 264 V ac, 50/60 Hz, 75 W max
Normal operating temperature 15 °C to 35 °C (59 °F to 95 °F)
Vibration Meets MIL-T-28800D
Weight (typical) 50 kg approx (110 lb)
Dimensions (H x W x D) 30 cm x 52 cm x 50 cm (12 in x 20.5 in x 20 in)
with enclosure 6U H rack mount version
Communications ports RS-232 (COM1, COM2), IEEE-488.2
Operating modes Absolute, gauge
Pressure ranges Atmosphere to 200 MPa (30 000 psi)
Operating media Sebacate oil standard. Others optional (consult Fluke
Calibration)
Internal reservoir volume 250 cc (external unlimited)
Drive air supply 70 M, 140 M: 500 kPa (75 psi),
300 l/m (10 cfm), 450 l/m (15 cfm)
100 M, 200 M: 700 kPa (100 psi),
300 l/m (10 cfm), 450 l/m (15 cfm)
Pressure connections Drive air supply: 1/8 in. NPT F
Test gas supply: DH500 (equivalent to AE F250C, HIP HF4)
Utility sensor precision/resolution ± 0.10 % span/0.001 % span
Drivers (8) 12 V, 1 A max total output
CE conformance Available, must be specified
Measured and delivered pressure (Q-RPT)
Warm up time 30 minute temperature stabilization recommended from cold
power up
Resolution To 1 ppm, user adjustable
Calibration A2LA accredited calibration report included
Q-RPTs Less than A200M A200M
Precision1± 0.012 % of reading5± 0.015 % of reading5
Predicted one year stability2± 0.005 % of reading ± 0.005 % of reading
Measurement uncertainty3± 0.013 % of reading5± 0.018 % of reading5
Delivered pressure uncertainty
(dynamic control mode)4
± 0.016 % of reading5± 0.020 % of reading5
1 Combined linearity, hysteresis and repeatability.
2 Predicted one year stability limit (k=2) assuming regular use of AutoZero function. AutoZero occurs
automatically when vented in gauge mode, by comparison with a barometric reference in absolute
mode. Absolute mode predicted one year stability without use of AutoZ is ± (0.005 % Q-RPT span
+ 0.005 % of reading).
3 Maximum deviation of the Q-RPT indication from the true value of applied pressure including
precision, predicted one year stability, temperature effect and calibration uncertainty, combined
and expanded (k=2) following the ISO “Guide to the Expression of Uncertainty in Measurement.”
4 Maximum deviation of the PPCH controlled pressure from the true value including measurement
uncertainty and dynamic control hold limt.
5 % of reading applies to 30 % to 100 % of Q-RPT span. Under 30 % of Q-RPT span, uncertainty is a
constant value obtained by multiplying the % of reading value by 30 % of Q-RPT span.
Ordering information
Model
PPCH 04-02 SI units version
PPCH 05-01 CE mark
PPCH 06-01 Enclosure (for bench applications)
PPCH 07 Special calibration
PPCH 08-SP Special fluid
Accessories
RPM4 Reference pressure monitor for external Q-RPTs (see
RPM4 brochure)
Footswitch Remote [ENTER] footswitch
RS-232 Cable 9 pin, 2 m for PPC3 COM1 or PPC3 to RPM4
connection
Reservoir, 4l External fluid reservoir
Pressure control
Modes Dynamic Sets target pressure within hold limit and continu-
ously adjusts pressure to remain at target value
Static Sets target pressure within hold limit and shuts off
control, allowing pressure to stabilize naturally
Monotonic Sets pressure to target, then maintains very slow
ramp in same direction as pressure increment
Ramp Sets and maintains user specified rate of change
of pressure
Piston gauge
control
PPCH is controlled by PG7302™ to automate piston
gauge pressure control
Precision To ± 0.003 % of Q-RPT span
Volume 0 cc to 100 cc (0 in3 to 6 in3), 50 cc (3 in3) optimum,
(operates in larger volumes but pressure stabilizing
time increases)
Dynamic mode typical
time to Ready
180 seconds into a 50 cc volume and 20 % FS
excursions with default hold limits
Lowest controllable
pressure
1 MPa (150 psi) (lower in optimum conditions and
with PG7302)
Configuring a PPCH model number
1. Determine maximum controlled pressure required. Select:
PPCH-200M for 200 MPa (30 000 psi)
PPCH-140M for 140 MPa (20 000 psi)
PPCH-100M for 100 MPa (15 000 psi)
PPCH-70M for 70 MPa (10 000 psi)
2. Decide whether Q-RPTs will be internal (built-in to PPCH) and/or external (in remote RPM4).
3. If Q-RPTs are to be built-in to the PPCH, select one or two Q-RPTs from the Q-RPTs table on
page 3. Lo Q-RPT must be A70M or lower.
4. If Q-RPT(s) are to be external to the PPCH, configure an appropriate RPM4 using the RPM4
brochure. Note that the maximum pressure of the PPCH defines the maximum pressure of the
PPCH system.
For a PPCH with no internal Q-RPT (utility sensor only)
PPCH-nnnM
Where: nnnM Indicates the PPCH controller's designation
(200M, 140M, 100M or 70M).
For a PPCH with one or two internal Q-RPTs
PPCH-nnnM AnnnMc1/AnnnMc2
Where: nnnM Indicates the PPCH controller’s designation.
AnnnMc1 Indicates the Hi RPT designation. c indicates class
(s for Standard, u for utility sensor if there is no Hi Q-RPT).
AnnnMc2 Indicates the Lo Q-RPT designation. c indicates class
(always s for Standard). Leave blank if there is no Lo Q-RPT.
Fluke Calibration
PO Box 9090, Everett, WA 98206 U.S.A.
Fluke Europe B.V.
PO Box 1186, 5602 BD
Eindhoven, The Netherlands
Web access: http://www.flukecal.eu
For more information call:
In the U.S.A. (877) 355-3225 or
Fax (425) 446-5716
In Europe/M-East/Africa +31 (0) 40 2675 200 or
Fax +31 (0) 40 2675 222
In Canada (800)-36-FLUKE or
Fax (905) 890-6866
From other countries +1 (425) 446-6110 or
Fax +1 (425) 446-5716
Web access: http://www.flukecal.com
©2014 Fluke Calibration.
Specifications subject to change without notice.
Printed in U.S.A. 12/2015 3031128c-en
Pub-ID 12115-eng
Modification of this document is not permitted
without written permission from Fluke Calibration.
Fluke Calibration.
Precision, performance, confidence.™