Flux Quick Start Guide V3
User Manual:
Open the PDF directly: View PDF ![]() .
.
Page Count: 68
Flux
Quickstart
Guide

This page is intentionally blank.

Introduction!2
Create the Project!3
Open the page for editing!5
The Page Designer!6
Adding Assets to your Project!8
The Site Manager!10
Configuring the body element!11
The Inspector!14
Adding an object to the page!17
Creating the external style!21
Editing the #mycontent style!22
Preview your page!23
Locking objects!24
Creating another new object!25
Entering text into an element!28
Text styling!29
Padding!31
Creating a heading!33
Setting up the H1 style!41
Create a subheading!45
Adding an image to the page!50
Adding a text box!53
Add a button!55
Adding an action!59
Create another new page and link to it!61
The End!64

Introduction
This guide will take you through the process of creating, designing, and editing a web site step-by-
step using Flux. The goal is to create a page like the one pictured below.
You will notice that some of the pages have a shaded bar at the top, these pages are not part of
the guide, and are simply for further information.
You can also see the same site be created in a screencast here, although the process is slightly
different.
http://www.theescapers.com/screencast
Flux is a very advanced and powerful application, and if you’ve never used it before , or even if you
have, The Escapers recommends you follow this guide to get the best out of Flux.
Thanks for trying Flux!
The Escapers Team
Flux QuickStart Guide
2
Create the Project
Step 1
Before we can create a web page in Flux, we must first create a Project.
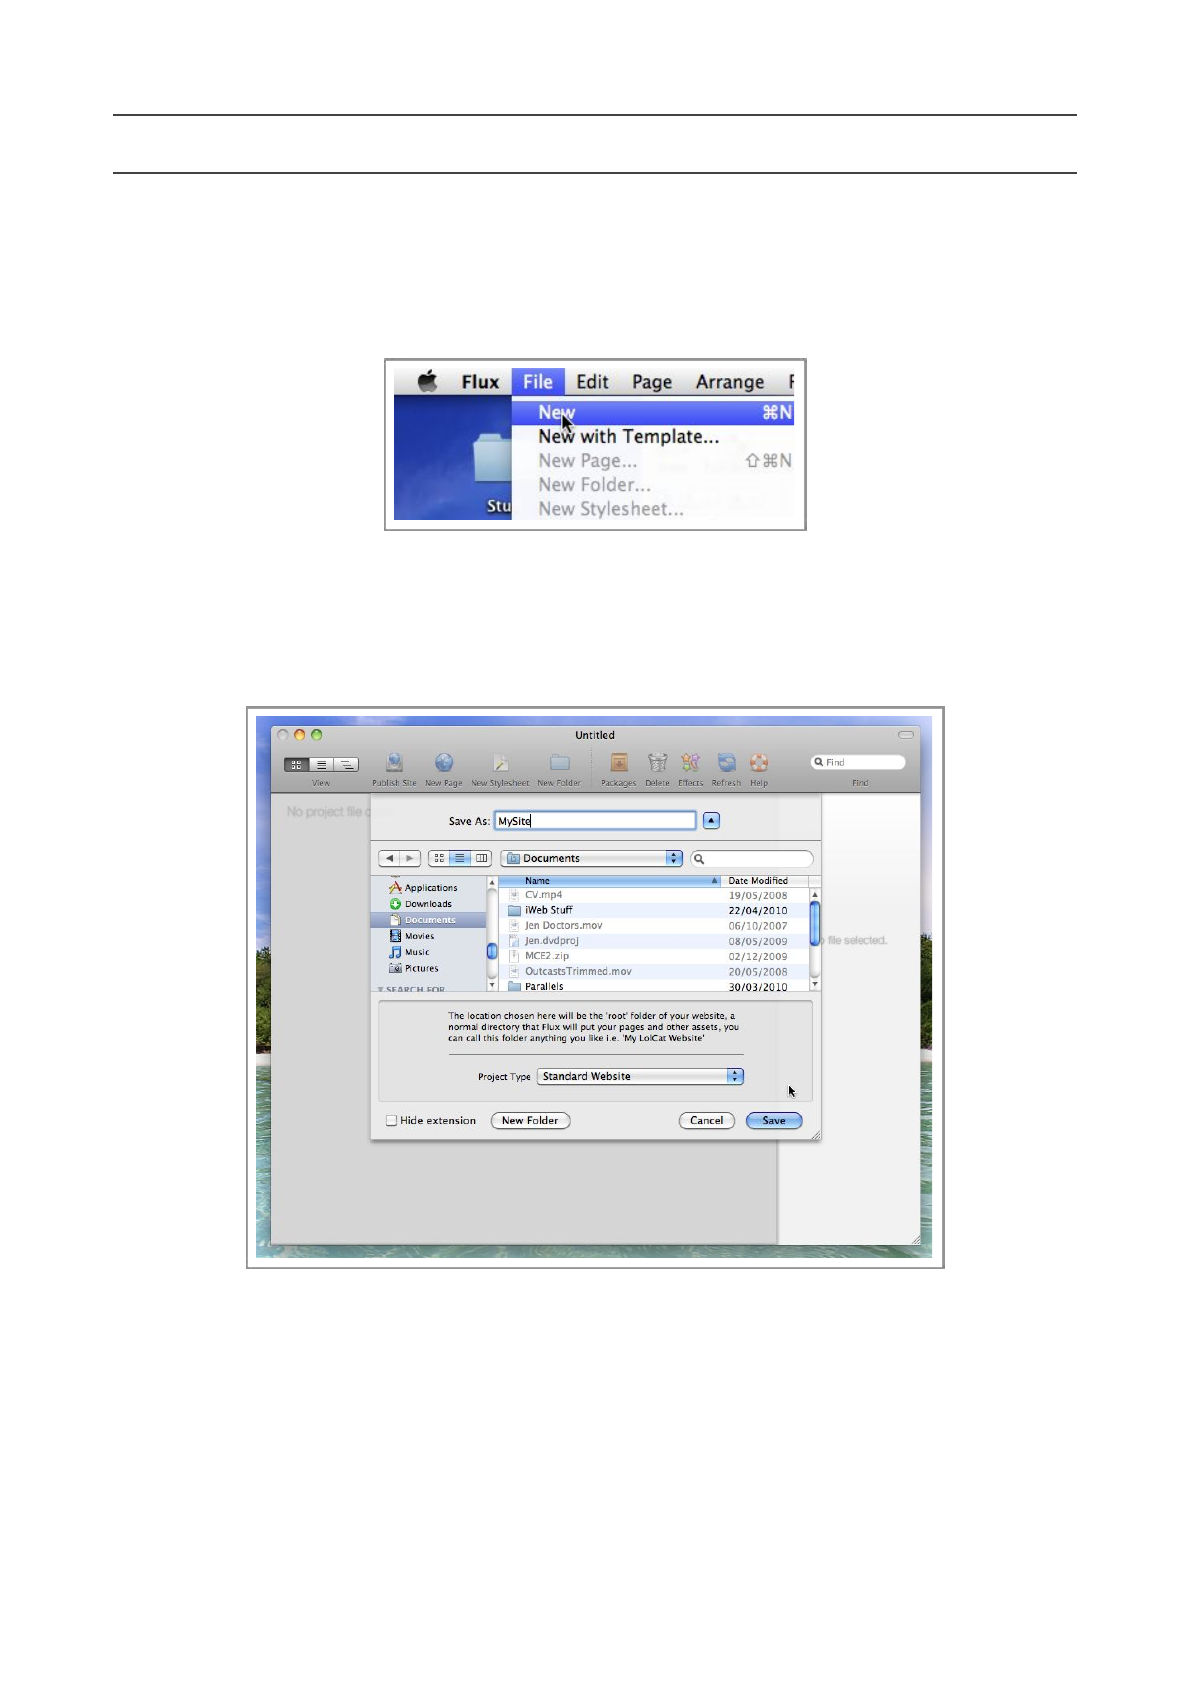
To create a Project from scratch, choose New from the File menu.
Step 2
You will be presented with a Save sheet.
Choose a location for your new project, and type in a name for it, and press Save
Step 3
Flux will offer to create a new page and a new CSS file to help get you started. If you are just
starting out in web design, and do not fully understand the relationship between CSS and HTML
files, press Yes
Flux QuickStart Guide
3

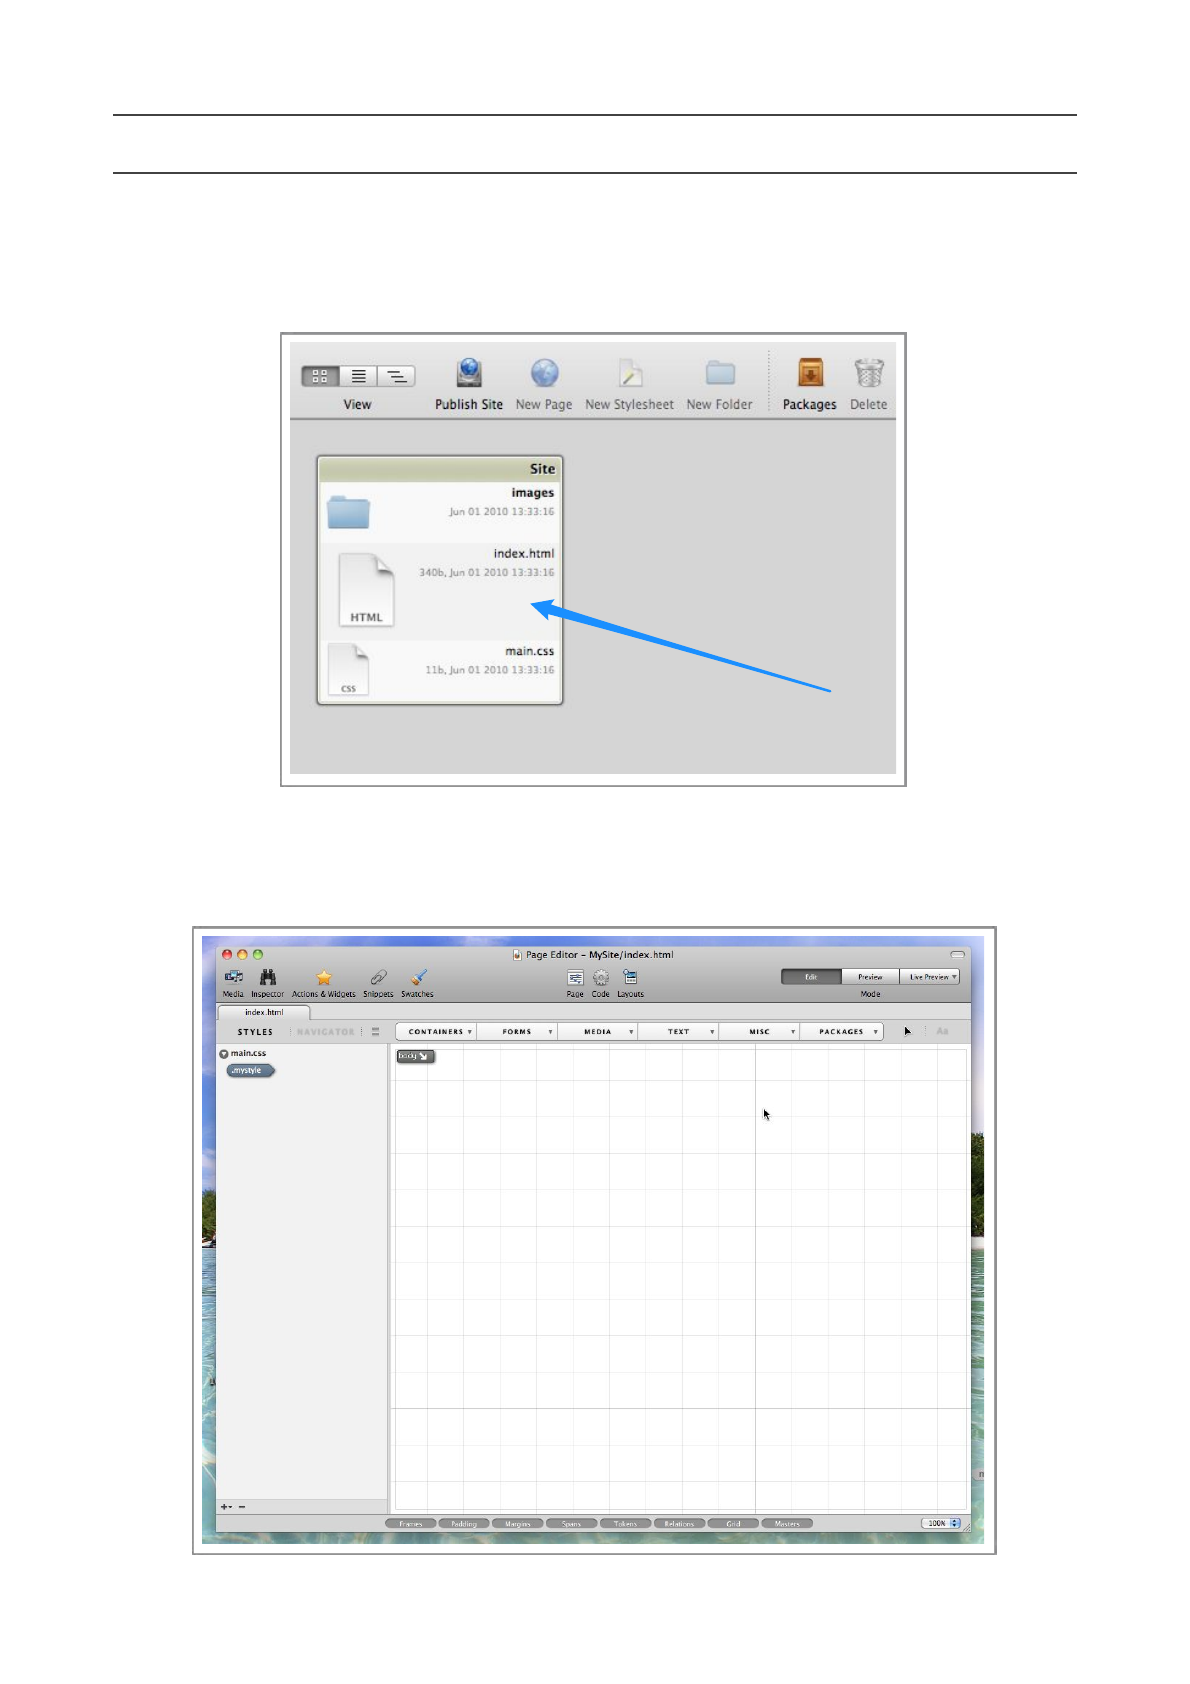
A brand new site has been created, ready to use.
Remember, Flux projects are simply folders, so you can use any existing website folder, it doesn’t
need to have been created by Flux.
Flux QuickStart Guide
4
Open the page for editing
Step 1
Double-click the index.html file, this will open the file in Flux’s Page Designer
Step 2
The Page Designer will open, displaying an empty page, and the CSS styles list has a single entry.
Flux QuickStart Guide
5
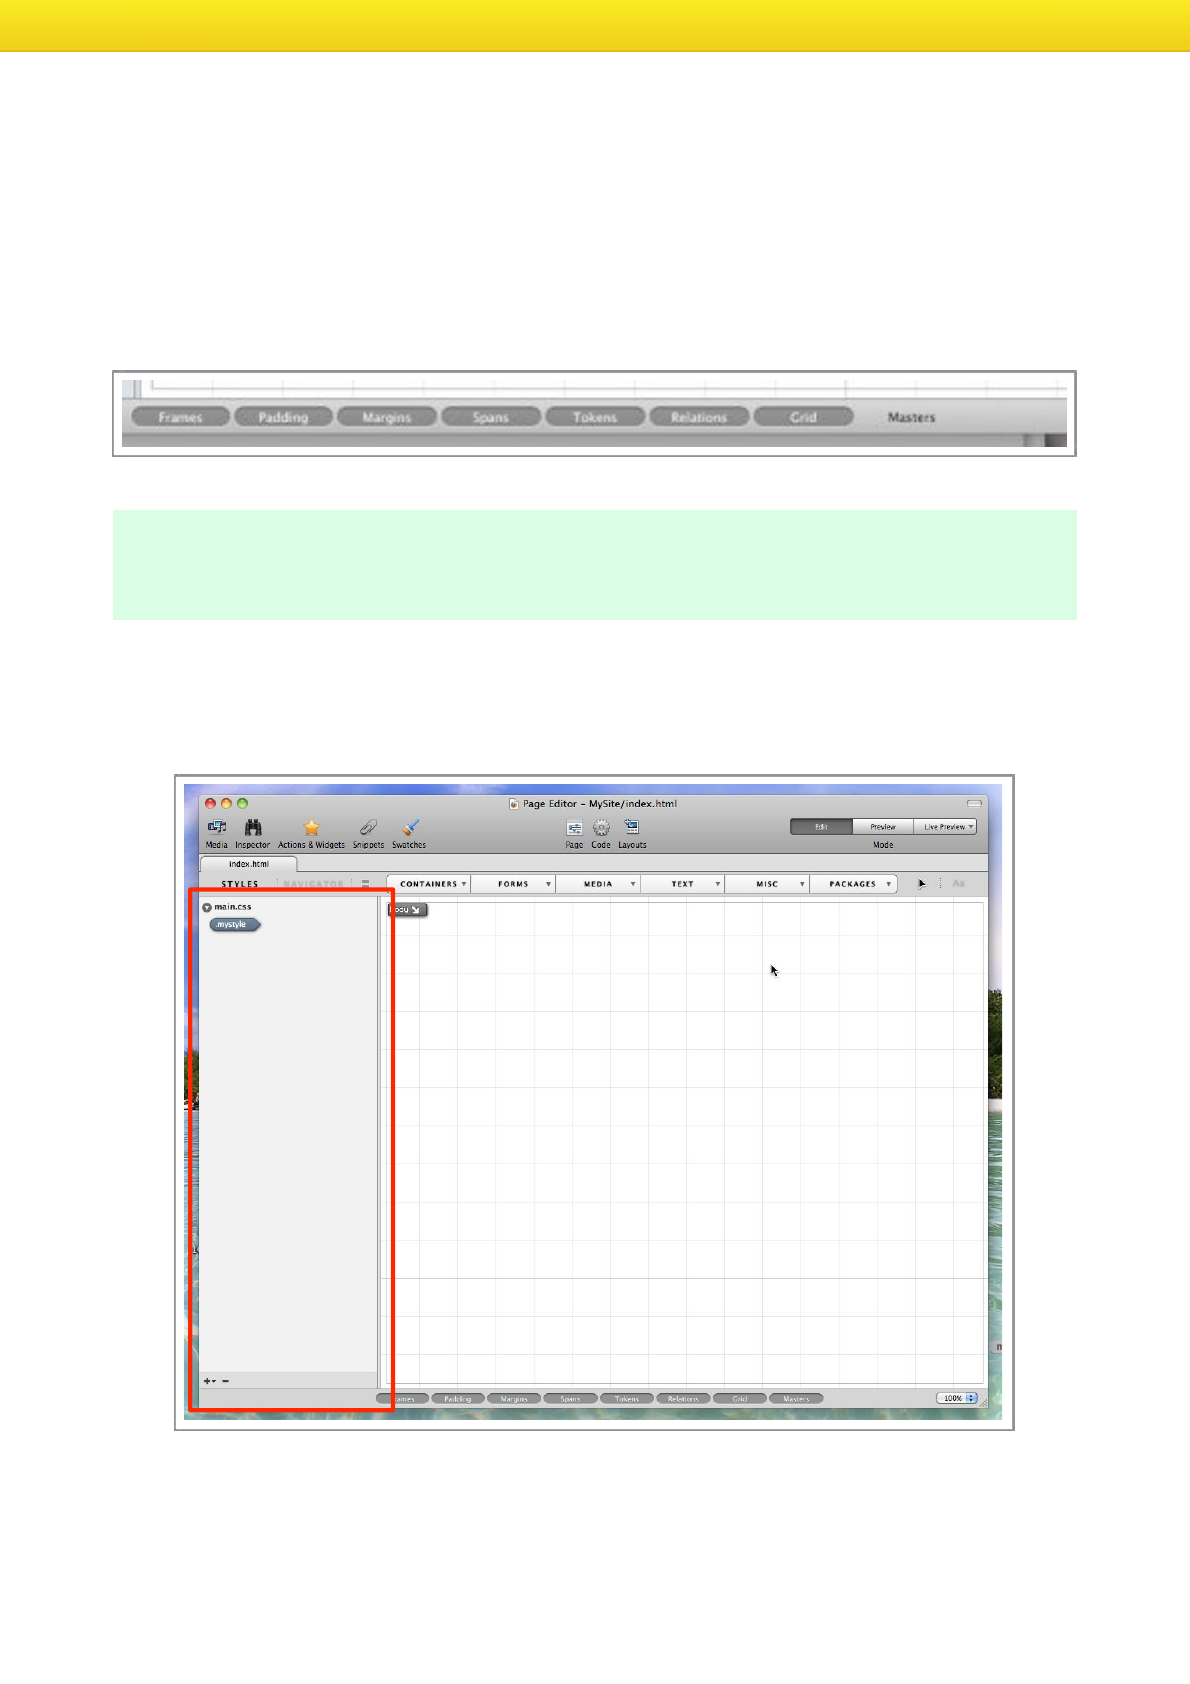
The Page Designer
All page editing and designing takes place in the Page Designer, which has a few distinct sections
you need to be aware of.
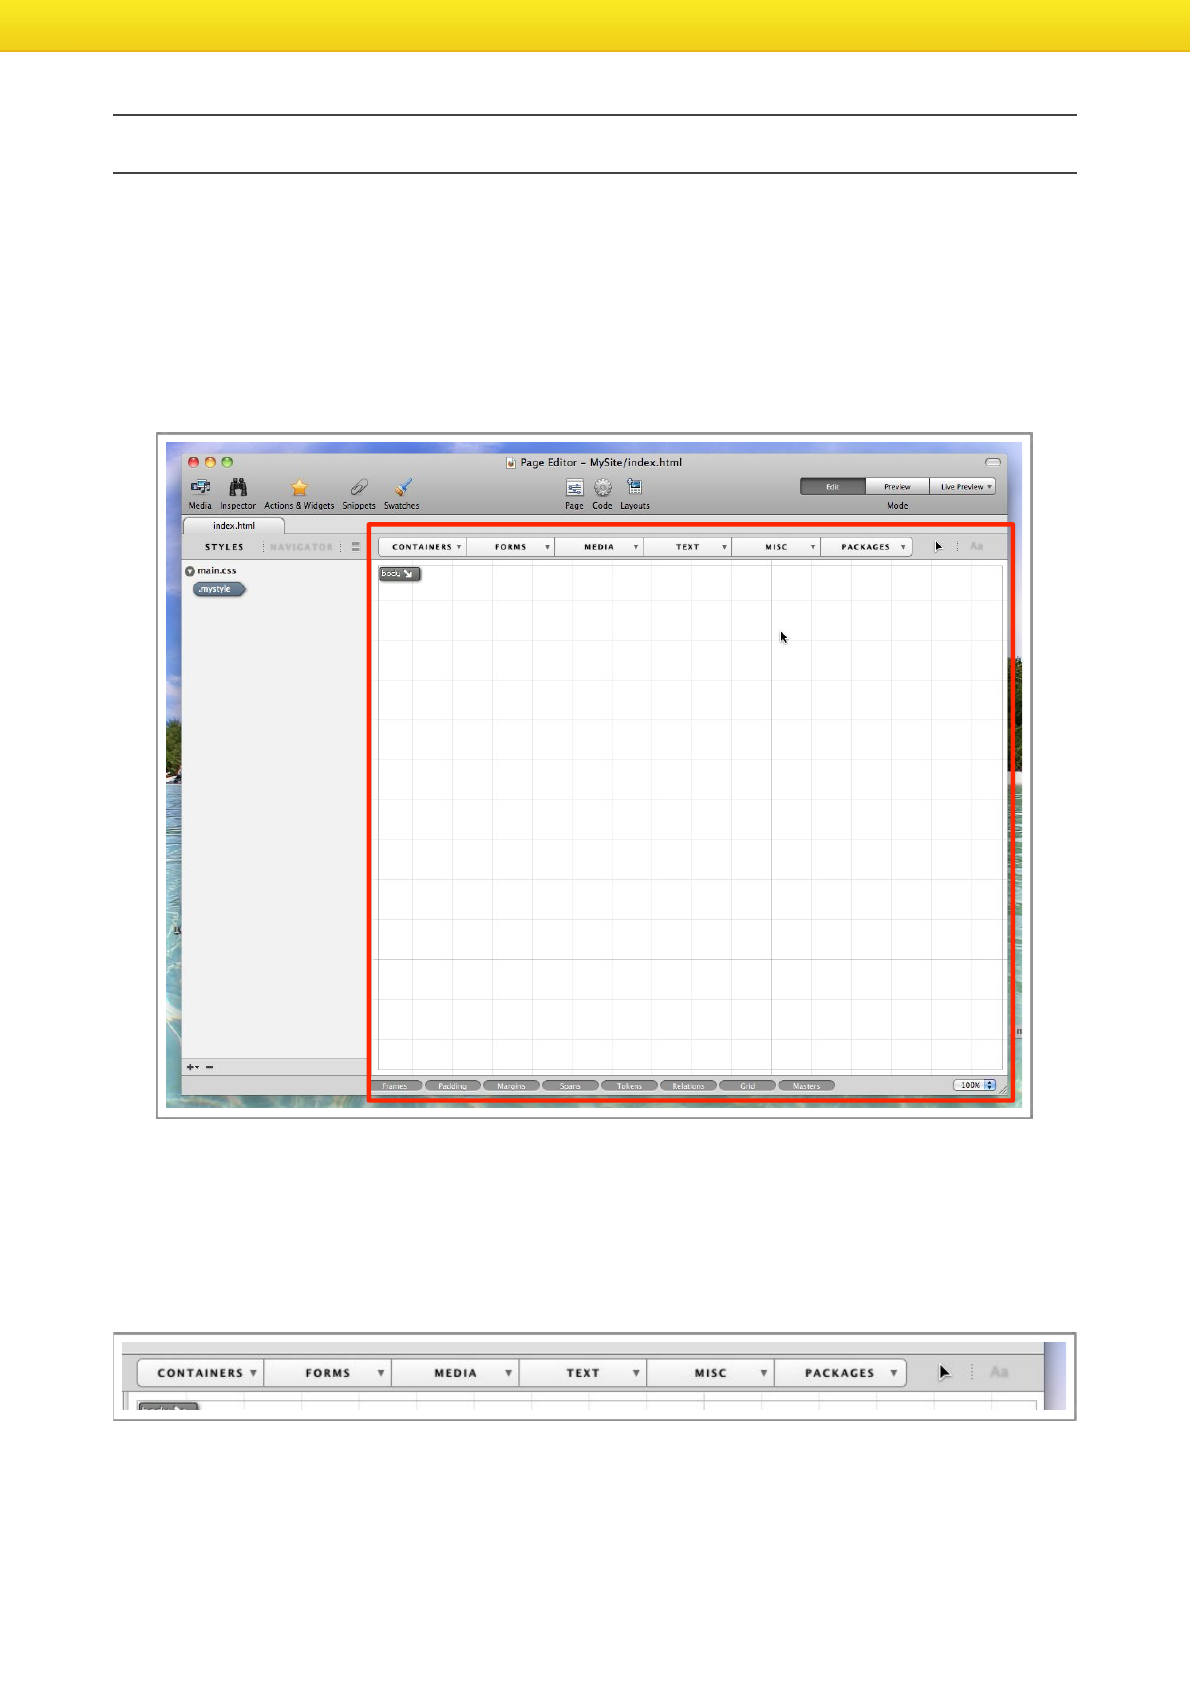
Design Area
The area highlighted in red in the image below is the Design area, t h i s i s p r o b a b l y t h e a r e a yo u w i l l
spend most of your time in Flux.
The Design area has two toolbars, one at the top, and one at the bottom.
The top toolbar has two purposes, the buttons on the left of the toolbar are to create new
elements on the page, and the buttons on the right of the toolbar toggle between Movement mode
and Text mode, to move objects around on the page, or adjust their size, you should use Movement
mode, and to edit text, switch to Text mode .
Flux QuickStart Guide
6
The toolbar at the bottom of the design area is used to toggle various display options, these
options have no effect on the structure of your page, but they may make your life a little easier.
For example, if you want to visually adjust the Padding of an object, you’ll want to make sure you
have the Padding option selected, as you will then be able to see , and change the padding of an
object by dragging the handles on the element. When the Padding option is turned off, you will
not be able to see the padding of the object, or change it. The more options you turn off, the less
cluttered your page will appear.
It’s important to remember that these options will never affect the actual page you are working on,
just how it appears in Flux’s Page Designer.
CSS Area
The CSS Area is on the left side of the Page Designer, it’s a list of the CSS files that are linked to
your page, and the CSS Rules within them.
Flux QuickStart Guide
7
Adding Assets to your Project
Most of the assets in your project will be images, but the following instructions will also work for
MP3s, Quicktime movies, fonts, and any other type of file you want to include in your project.
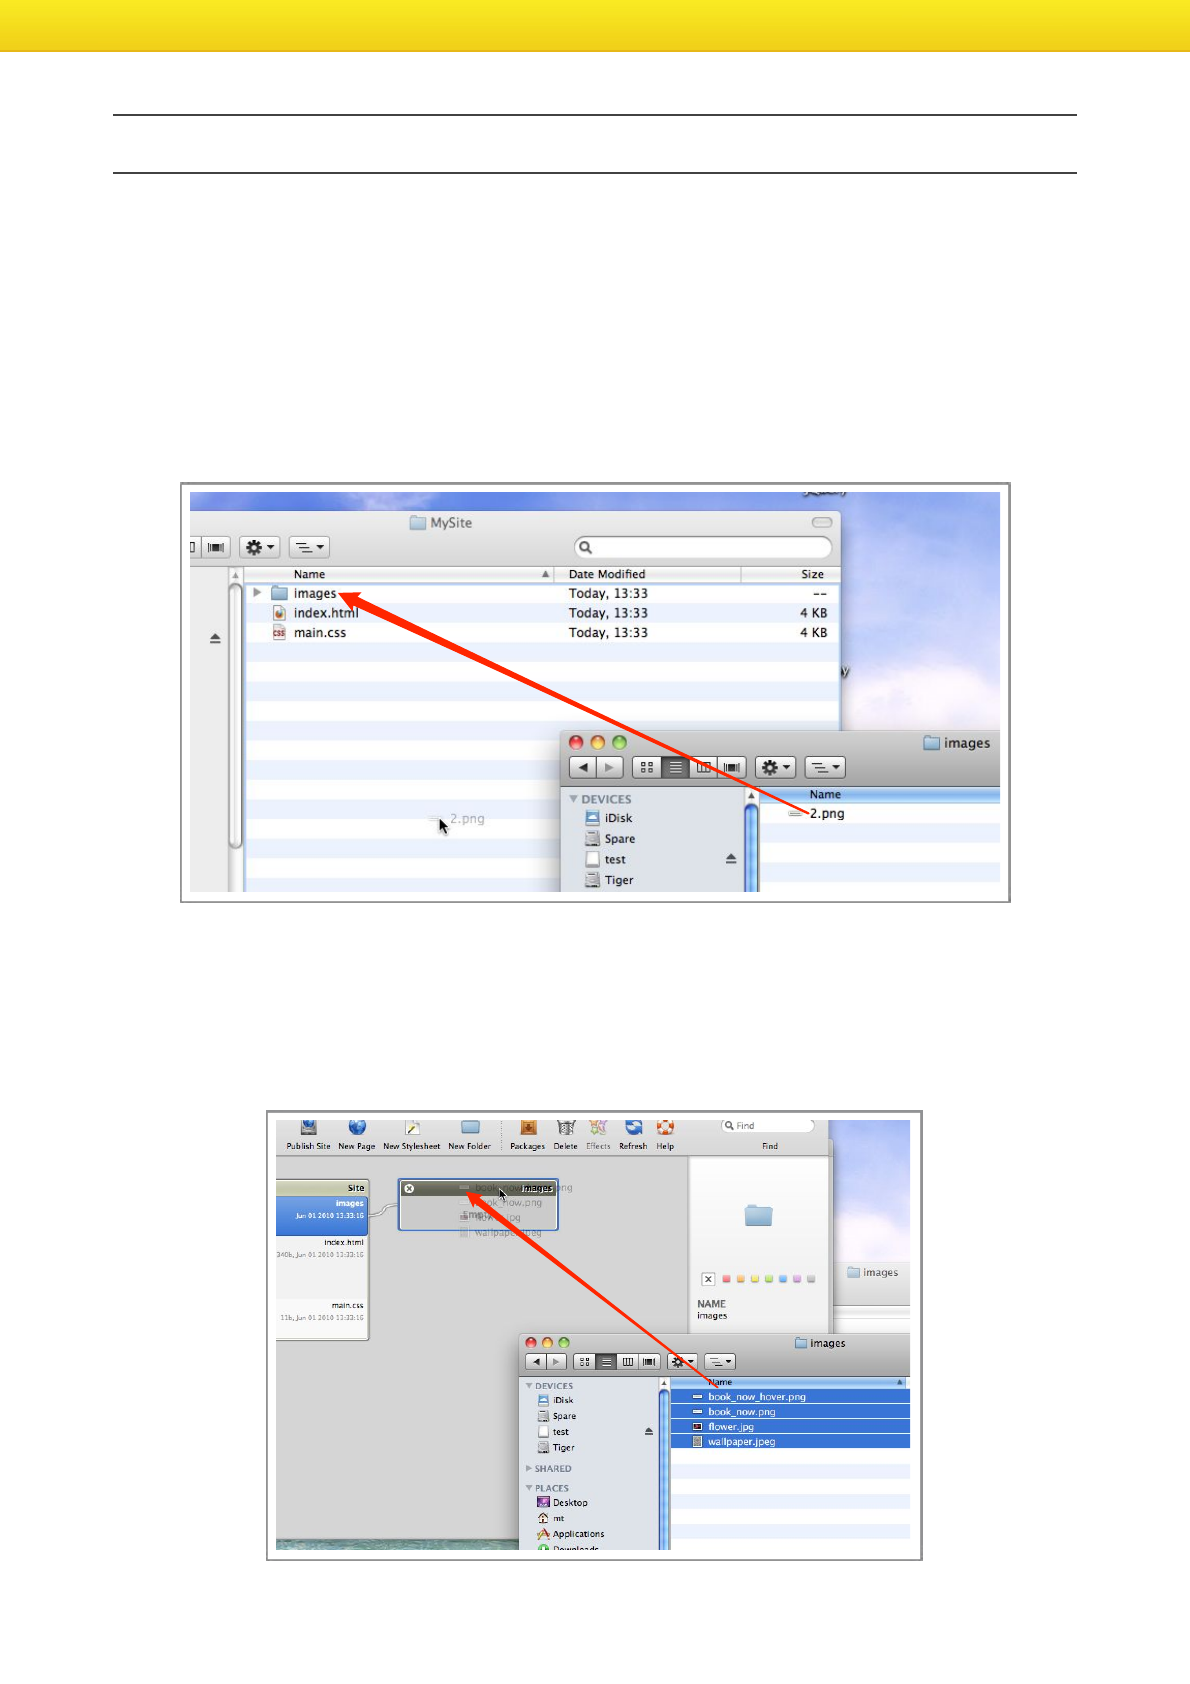
Method 1
You can easily add files to your project using the Finder, simply drag assets from anywhere on your
Mac, to your project folder (blue arrow).
The Flux site manager will update automatically.
Method 2
You can simply drag files from the Finder to Flux’s Site Manager, note that it’s important to
drag the files to the title of the folder you want to put the files in, as shown by the red arrow in
the image below.
Flux QuickStart Guide
8
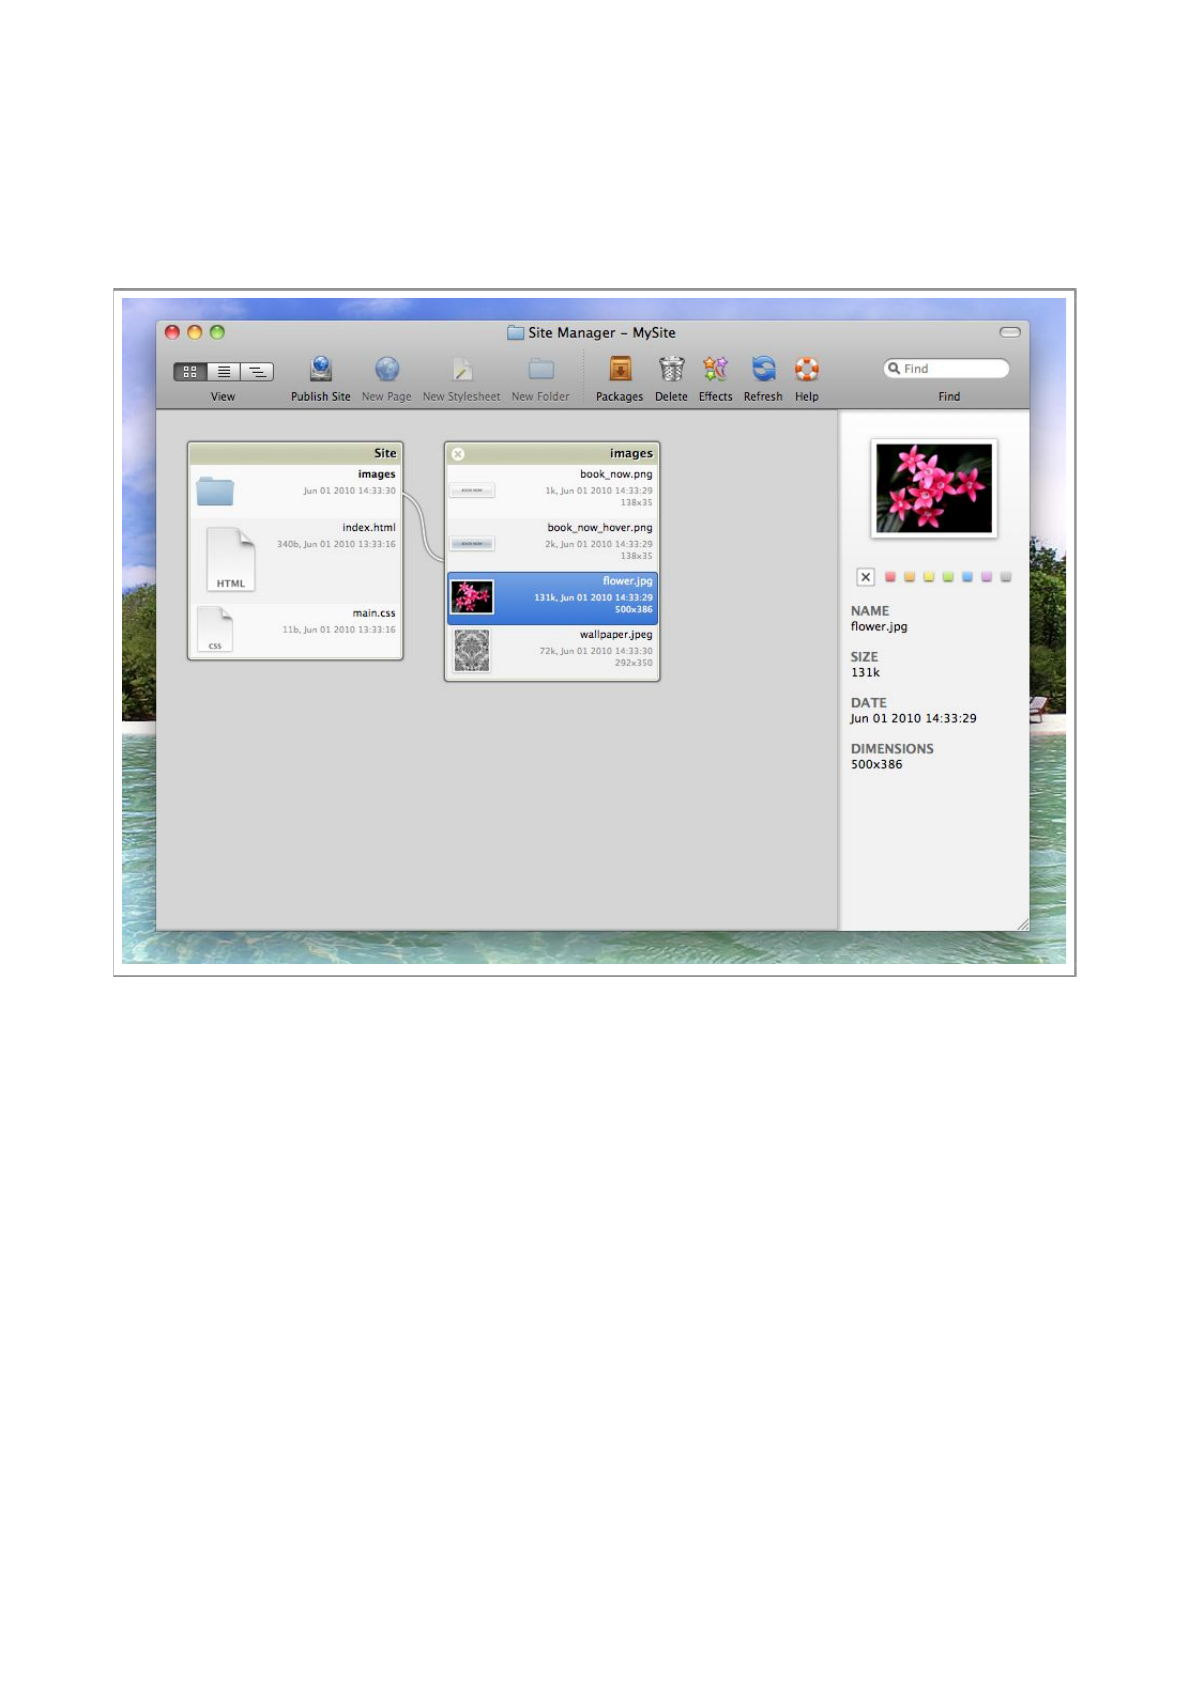
Summary
Both of the above methods will have the same result, the images will now be in your project, this
means that Flux can ‘see’ them, and they can be used in your pages.
Flux QuickStart Guide
9
The Site Manager
The Site Manager is where you can view the structure of your site, open pages for editing,
import assets, and publish your site.
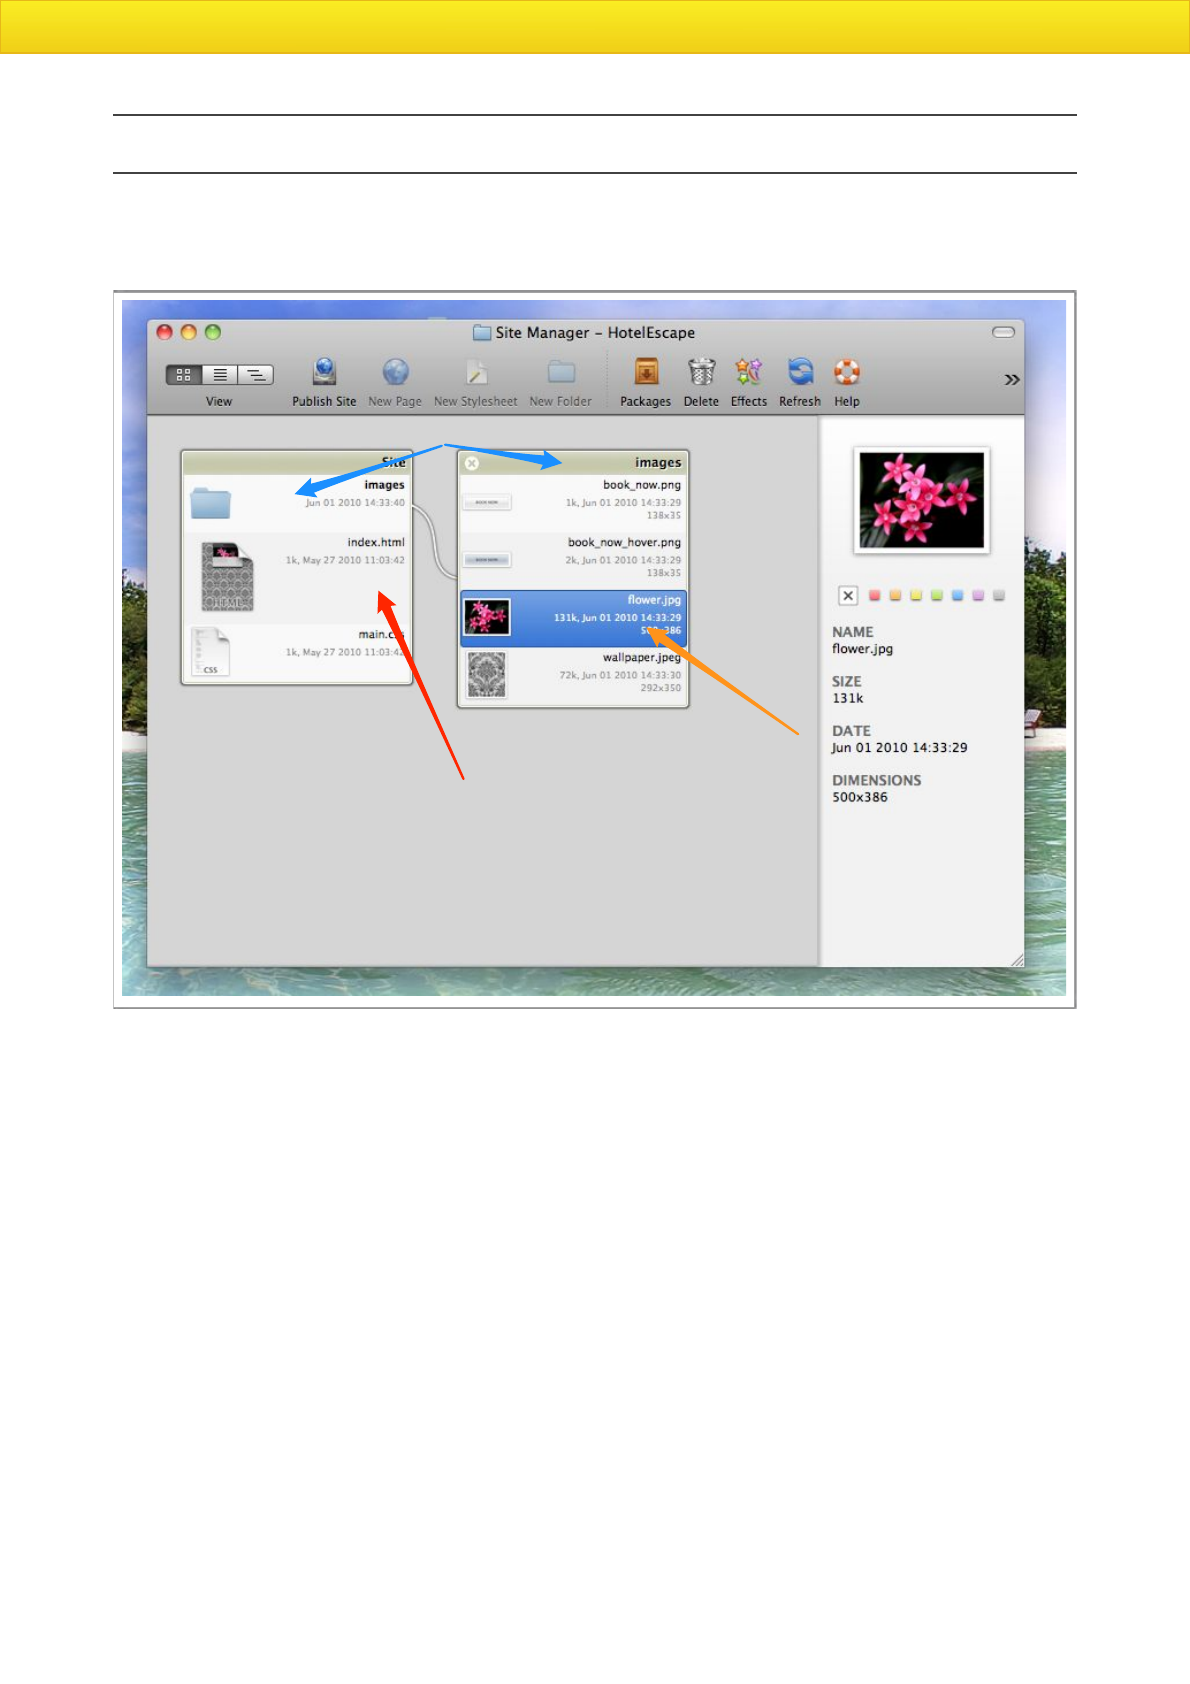
In the image above, the red arrow points out a web page, it has a thumbnail to aid quick
identification, to edit the page, simply double-click it.
The blue arrows point out a folder, the left most blue arrow is the folder, and the right blue arrow
is the contents of the folder.
The orange arrow points to an image file, you can double-click images to open them in the default
application.
To copy a file from the Finder, simply drag it to the title of the folder in the Site Manager.
Flux QuickStart Guide
10
Configuring the body element
The body element controls the background of your page, we want our new web page to have a nice
image as background, so we need to setup the body to do this.
It’s possible to configure the body using an external style, or inline , it’s generally considered to be
good practice to use an external style, so that’s what we will do now.
Step 1
The first thing we need to do, is to create the body style.
At the moment, our page has the main.css file linked to it,
it’s in this file we will create our body style.
Since we only have one CSS file linked, you don’t need to
select it specifically, but if you had more than one CSS
file, you would need to select the file you wanted to
create the style in.
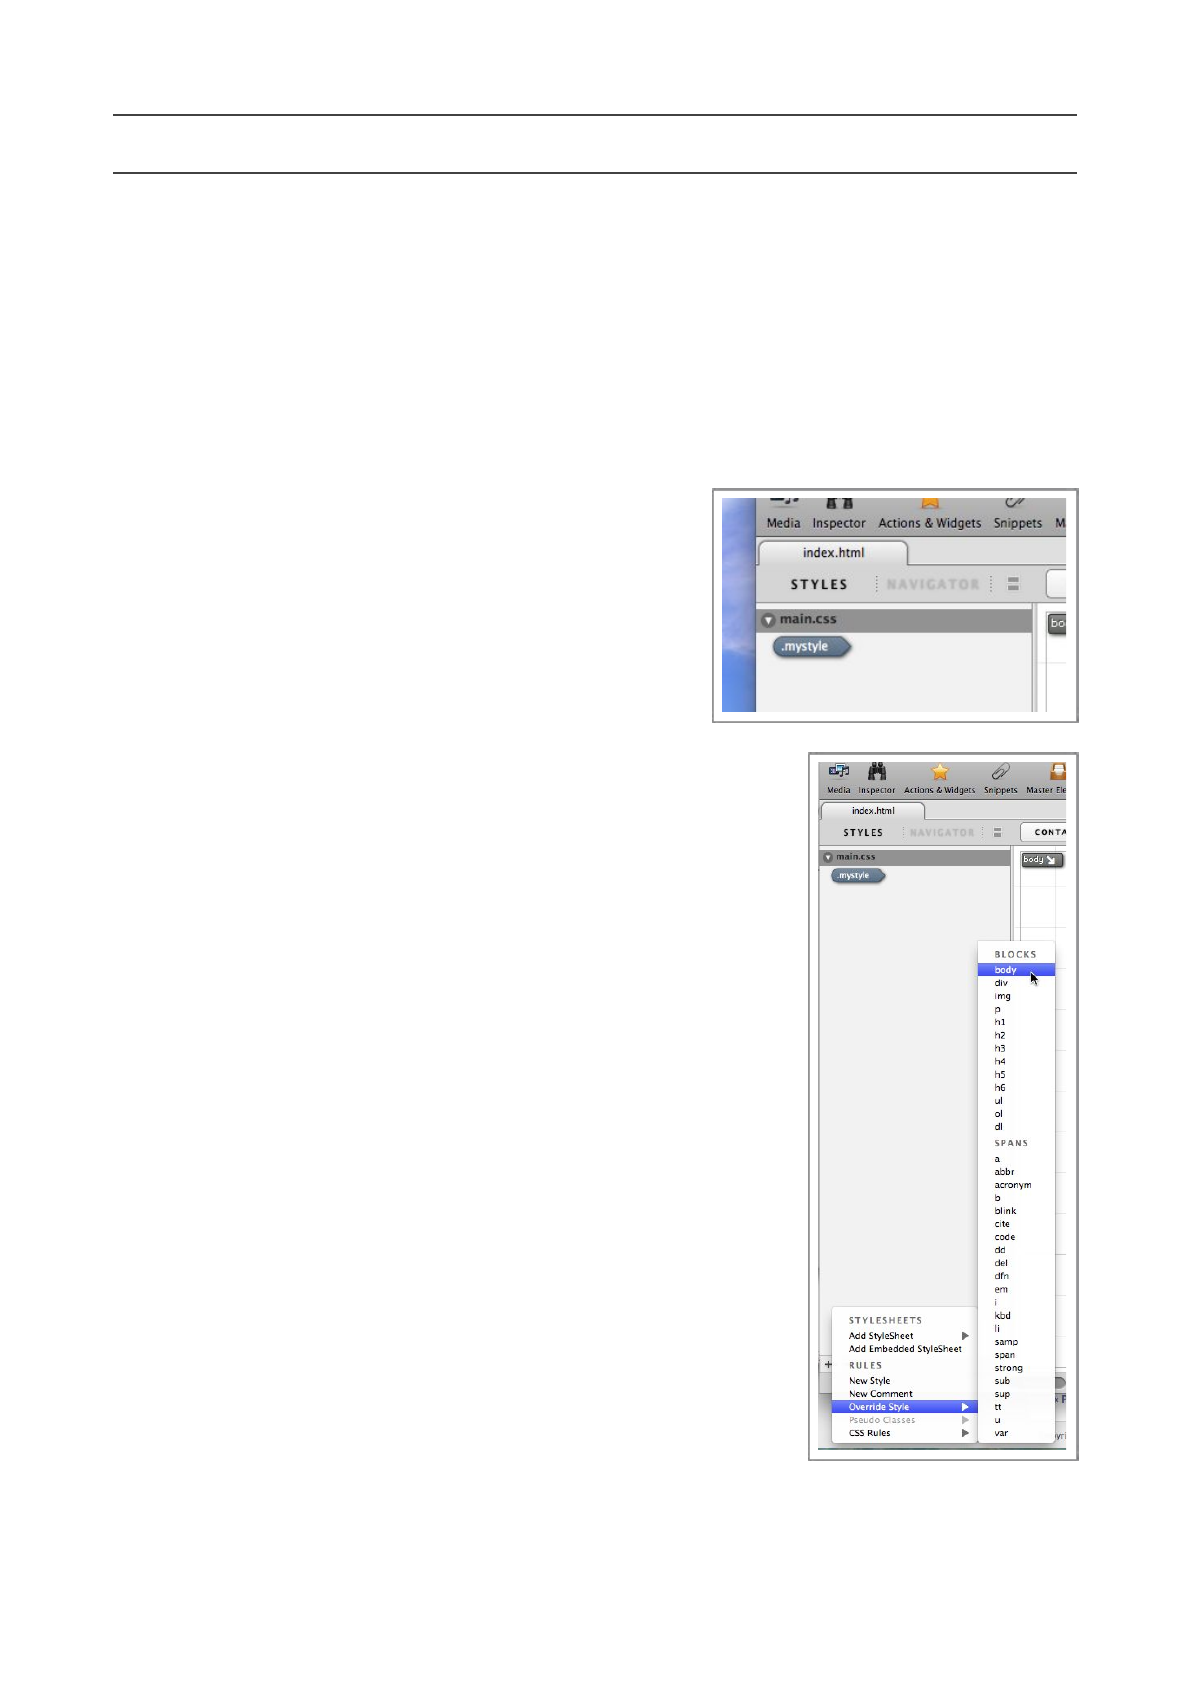
Step 2
Press the small ‘+’ button at the bottom of the styles list to reveal a
pop-up menu, in the Override Style submenu, choose body.
This will create a brand new CSS style (or rule) called ‘body’
The name of the style is ver y important, it must be called ‘body’, or
it will not work.
There are other ways to link a style to a particular element on the
page, but for now, we will use this method, often called the override
method.
Step 3
Now we have created the new CSS rule, we need to set it up to
display a background image. So make sure the style we just created
is selected.
You may also have noticed that a little dot has appeared to the right
of the CSS filename, this means the CSS file has been modified, but
is unsaved, so now is a good time to save.
Press Command-S to save, this will save modified CSS files in
addition to the page itself.
Flux QuickStart Guide
11
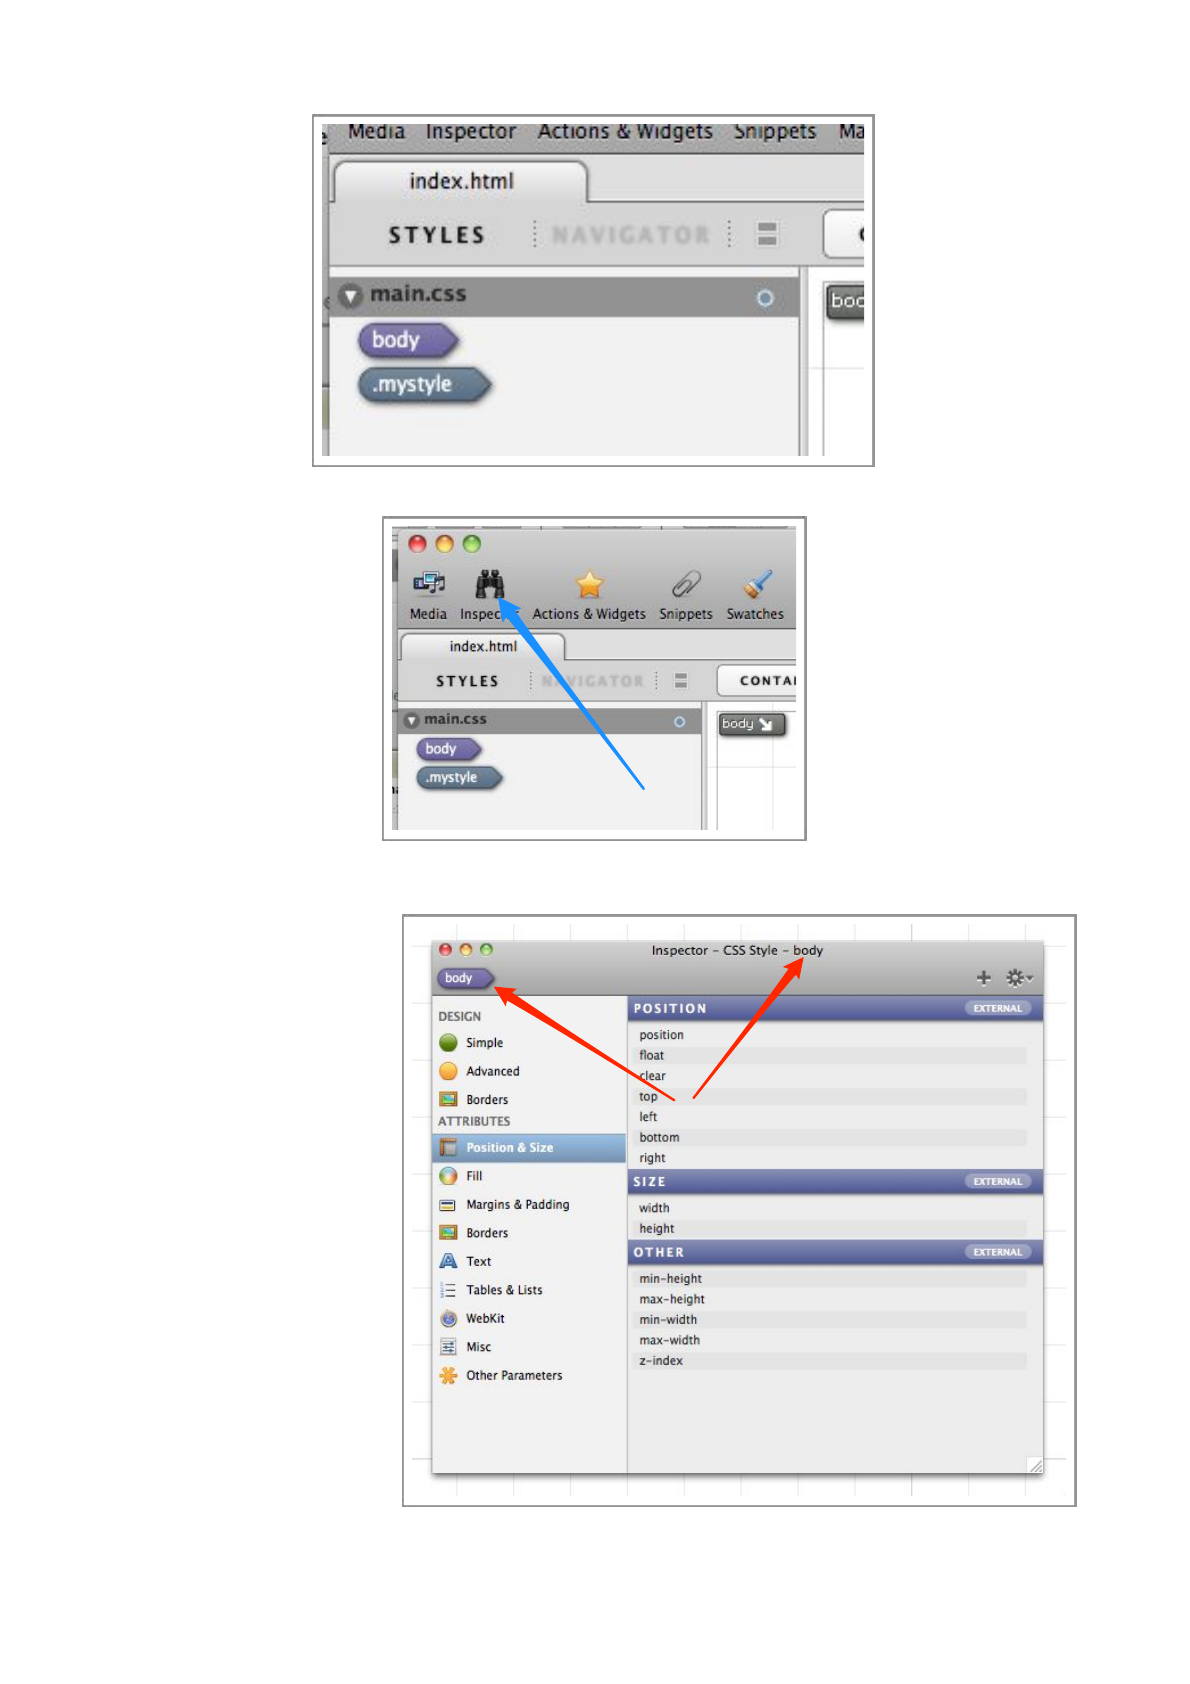
Open the Inspector by pressing Command-6 or the Inspector toolbar button.
We can now use the Inspector to edit the body style . The Inspector will edit whatever object we
happen to have selected,
but we can make sure we
ar e ed i ti n g th e c o rre ct
element by checking what
the Inspector states in the
title bar.
Select the ‘Fill’ area of the
Inspector to display all the
‘Fill’ related attributes.
Step 4
We want setup a
background image, so click
the ‘background-image’
item.
When it’s clicked, it will
expand. If an item is
expanded, it means that it
Flux QuickStart Guide
12
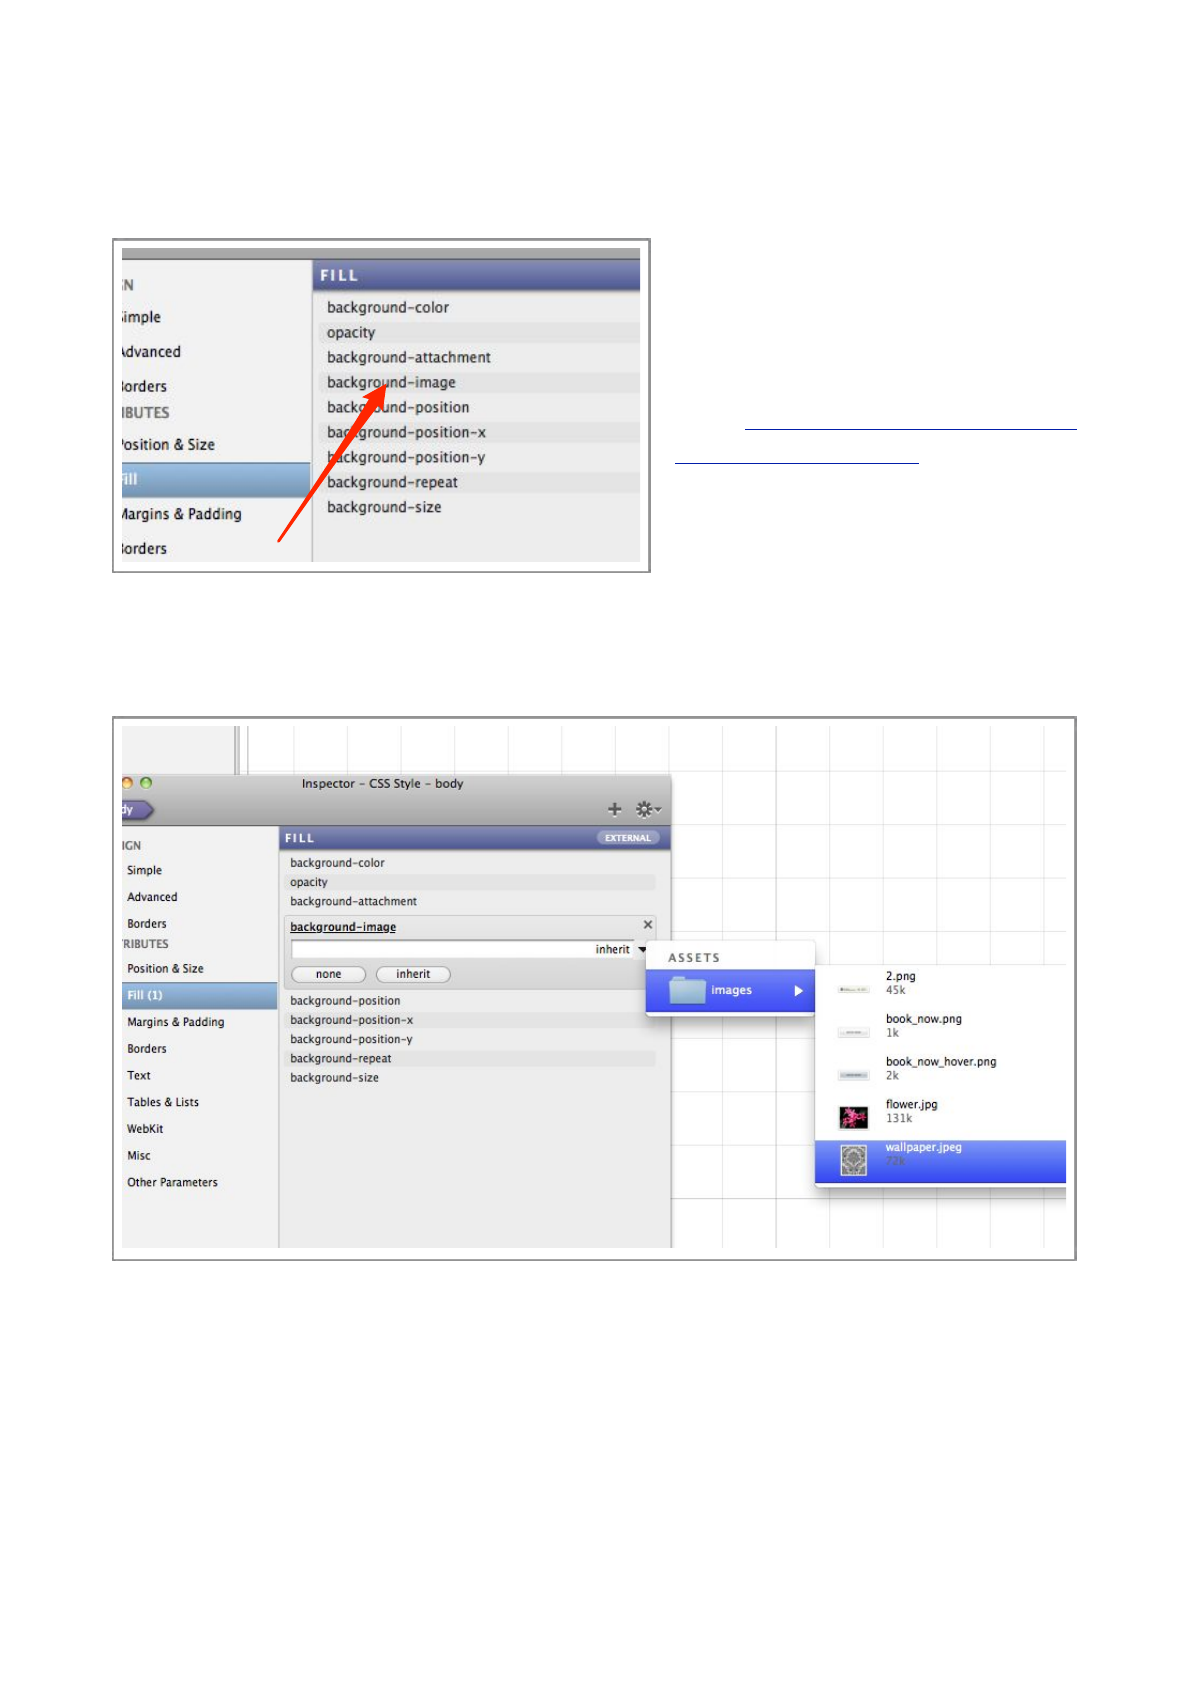
is enabled, although it doesn’t have a value assigned to it.
The easiest way to assign a value, i.e. the name of the image, is to click the little downward
pointed arrow, and choose an image from your project.
At the moment, there are no images in
you project, so see the ‘Adding Assets to
your Project’ section of this guide.
If you want to use the same images as we
use in this guide, you can download them
from http://www.theescapers.com/
tutorial_images.zip To p r e v e n t
duplication of effort, we recommend you
copy all the images in this archive to
your project, as the others will be used
later in this guide.
Step 4
Choose the appropriate image from the pop-up menu, in this case ‘wallpaper.jpeg’.
The image should immediately appear as the background of the page.
Flux QuickStart Guide
13
The Inspector
Almost all parameters are changed via the Inspector, for both CSS rules and elements on the
page.
The Inspector, amongst other things, controls the
properties of CSS Styles, both external and inline.
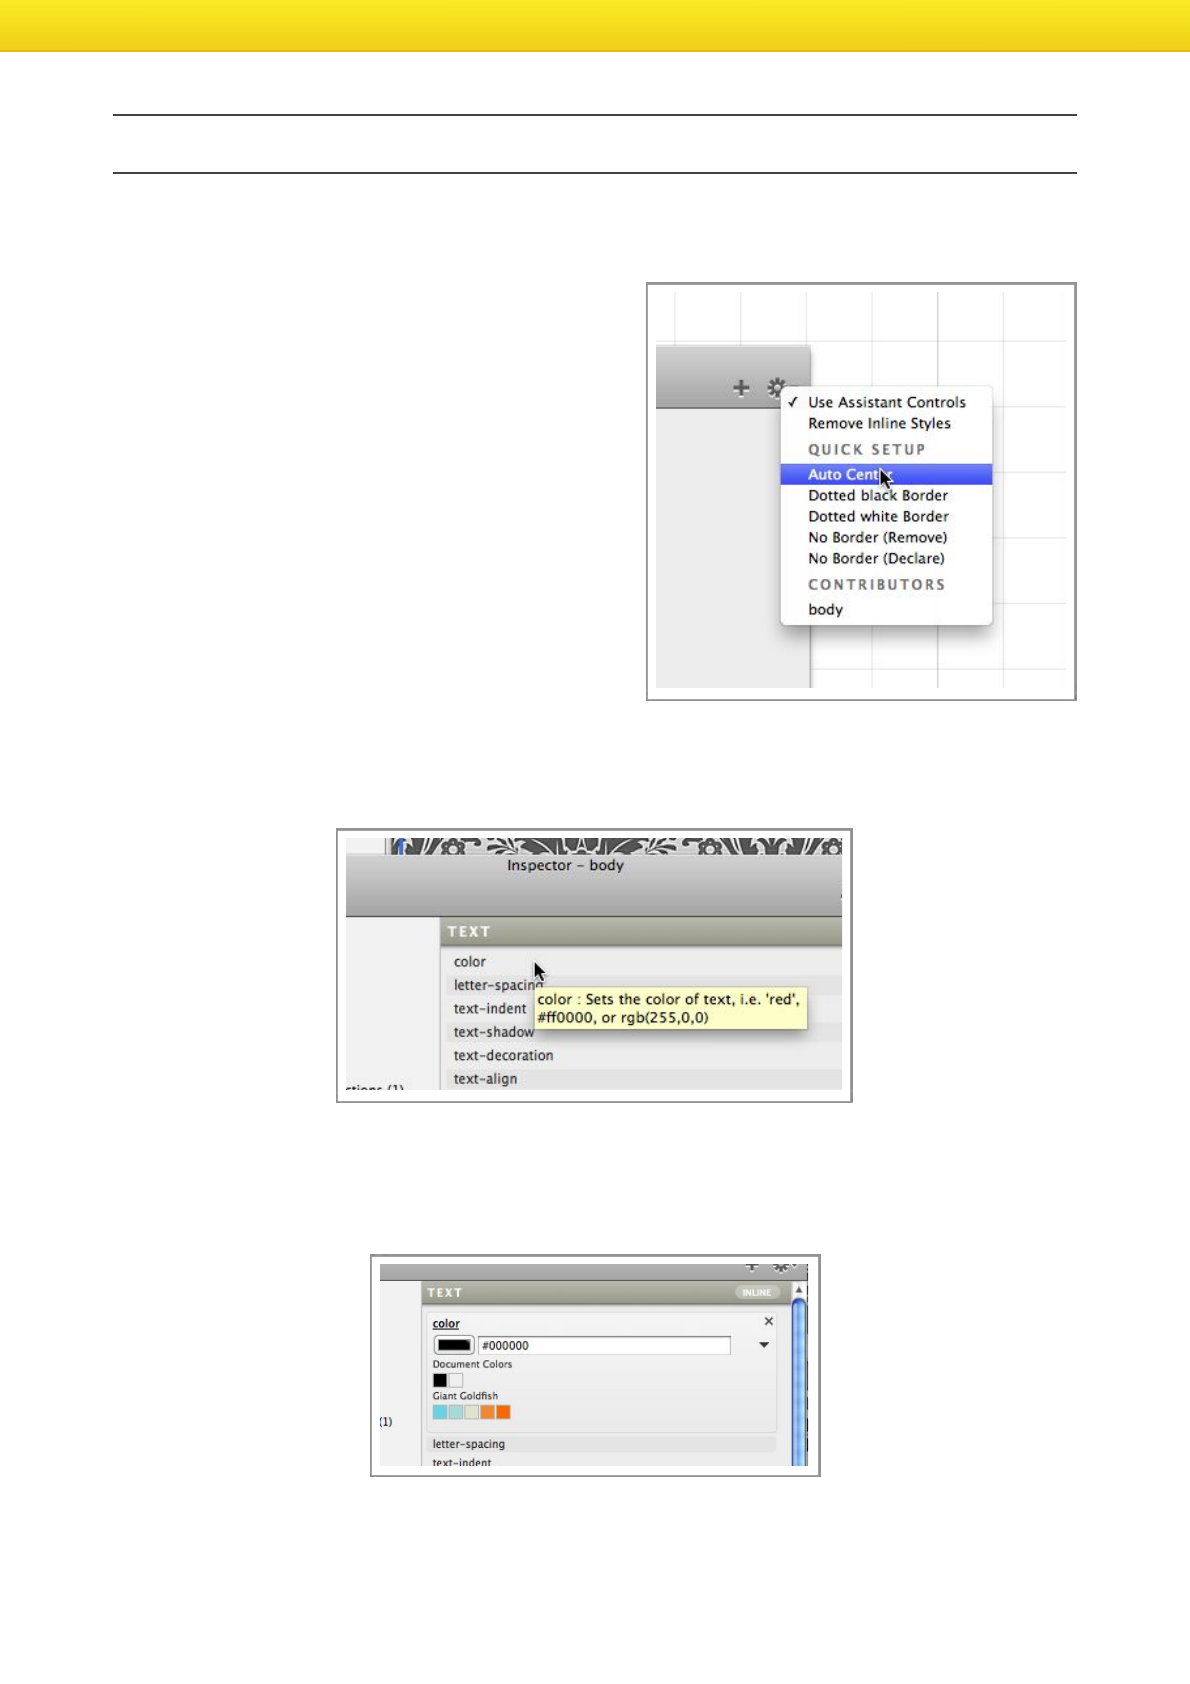
Quick changes
M a n y c o m m o n c o n f i g u r a t i o n o p t i o n s c a n b e
a c c o m p l i s h e d v i a t h e ‘ G e a r ’ m e n u o n t h e
Inspector. These ‘Quick Setup’ entries, can save a
lot of time by populating many property values at
once.
Enabling properties
Before you can setup, say, the color property of a
style, you need to first enable it. This is done by
simply clicking on the disabled property.
After being clicked, the proper ty will expand to reveal options concerning it’s value, in this case
there is a color well for picking a color via the standard Mac OS X color picker. There is also a
text field where a color can be manually typed in i.e. rgb(255,0,0) or #ff0000
Flux QuickStart Guide
14
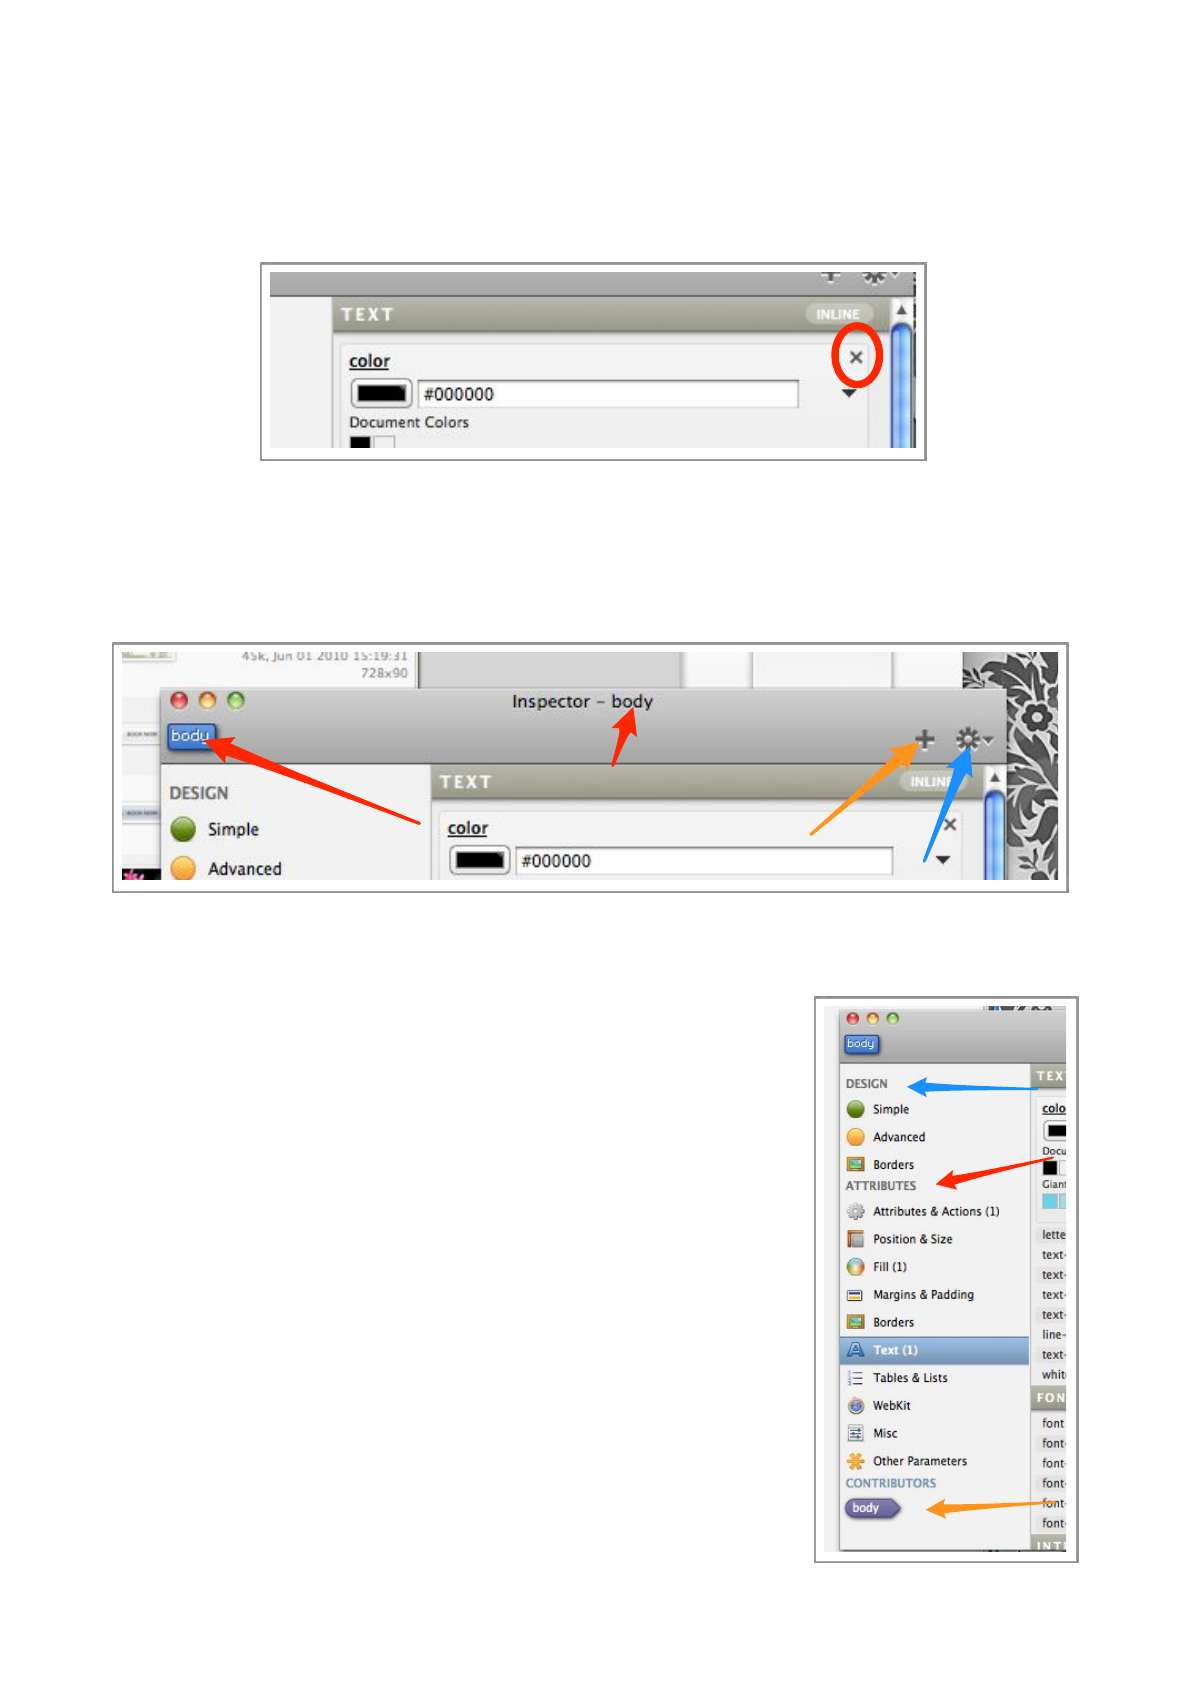
Disabling properties
When you want to remove a property, press the little ‘x’ button, this will remove the property and
it’s value from the selected style or element.
Toolbar
The most important area of the Inspector toolbar is pinpointed by the red arrows, these items
indicate what the Inspector is editing at that time , it’s ver y important you don’t accidentally edit
the wrong style or element, so always keep an eye on these items.
The blue arrow points out the ‘Gear’ menu, where useful options are held.
The orange arrow points out the ‘+’ button, this button allows you to enter a property manually.
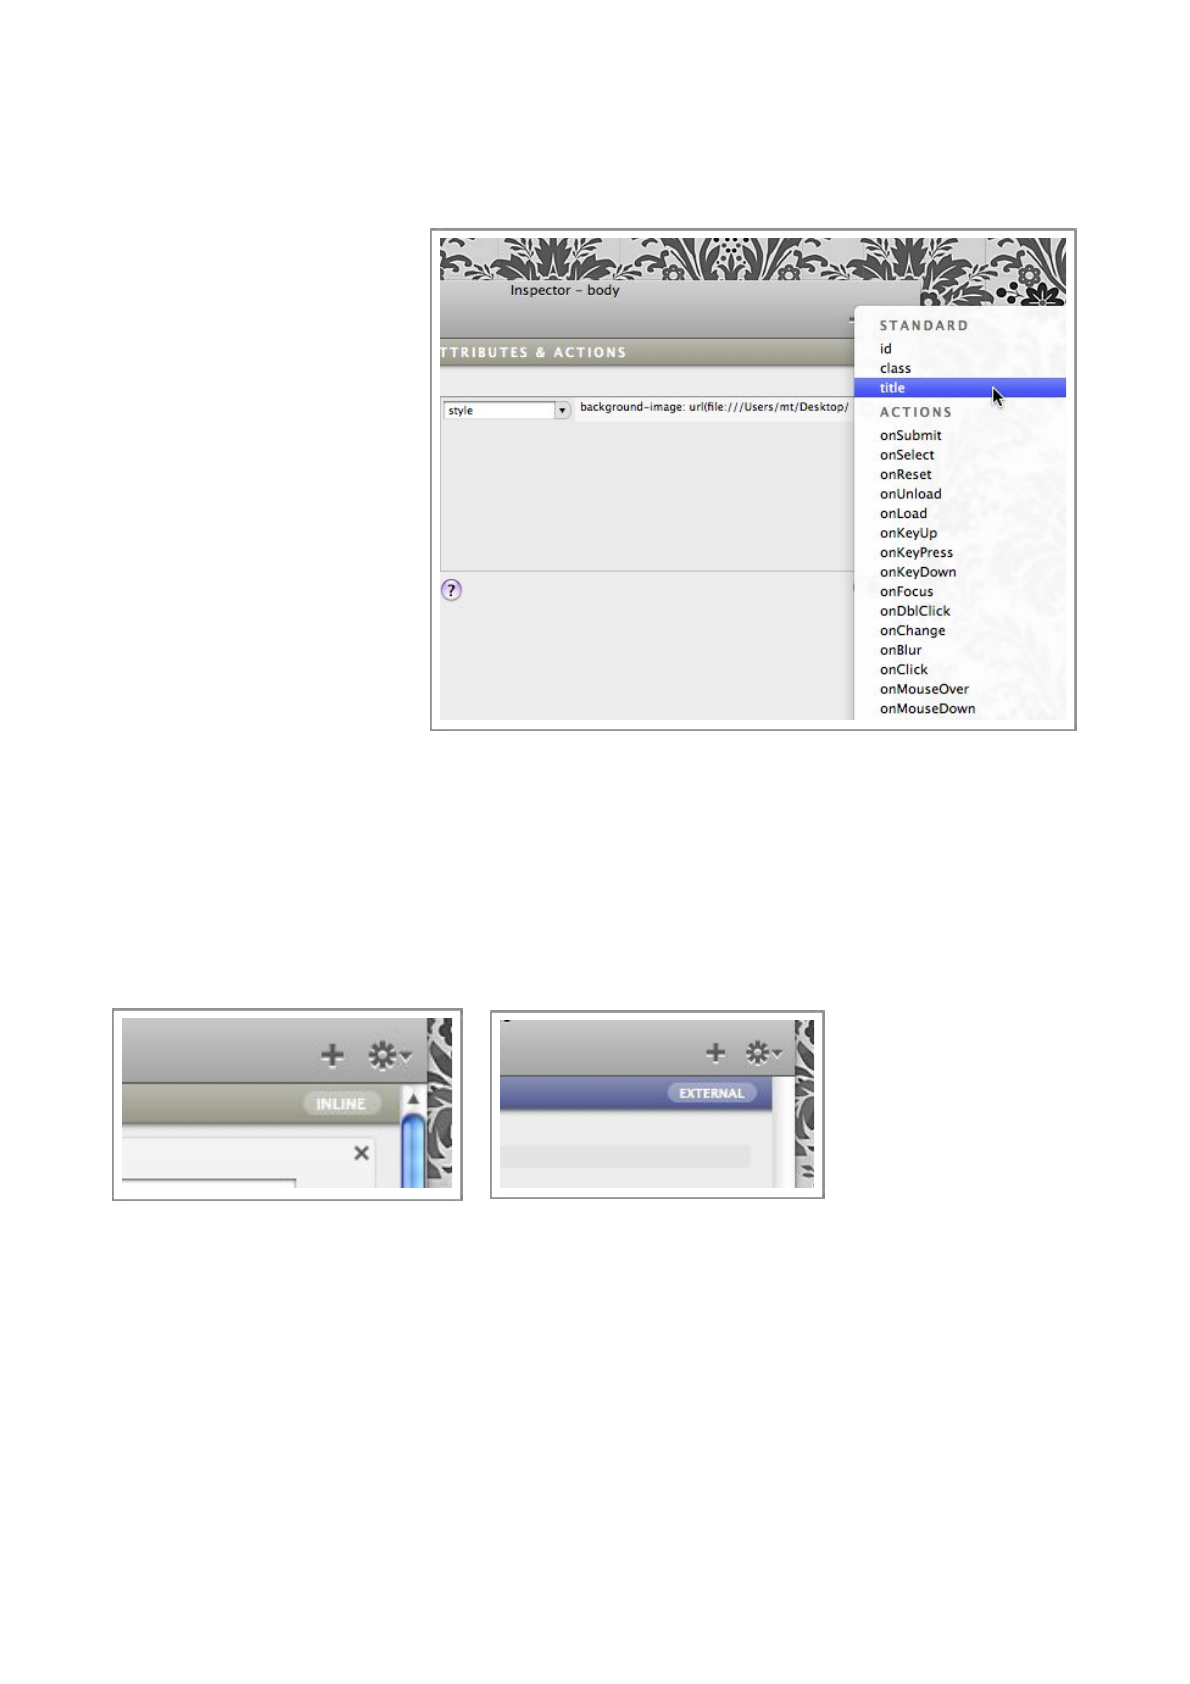
Side Bar
Styles and elements, have hundreds of possible options, so they have
been split into sections to allow them to be easily found. These
sections are split into two groups, the first, pinpointed with the blue
arrow in the image to the right, is the ‘Design’ group, these sections
are easy to use configurations, where you can visually alter styles.
The second group, pointed out by the red arrow, contains all the
options, and they can be modified individually and accurately.
The third group, pointed out by the orange arrow is quite different
from the other two, as it only appears when you are editing elements
and not styles.
The Contributors section lists the styles that an element is linked
to, i.e. styles that contribute to how an element looks and behaves.
You can click on these contributor styles to make them editable in
the Inspector.
Flux QuickStart Guide
15
Attributes & Actions
Like the Contributors sections, the Attributes & Actions section only applies to elements, not
styles.
In this section, you can view,
edit, and create new
attributes in an element.
An attribute is, for example,
t h e
href=”www.apple.com”
in a <a> t a g , o r t h e
class=”mystyle” in a div.
You can easily add attributes
using the small ‘Gear’ button
under the attributes table,
t h e r e a r e m a n y p r e s e t
o p t i o n s , i n c l u d i n g Z o p e
specific attributes.
To r e m o v e a n a t t r i b u t e ,
simply press the small ‘x’
buttons next to the attribute.
You can press the small ‘i’ button to view or edit the attribute in a much larger editor, which is
useful for attributes with long values.
Inline and External styles
It’s very important to understand that the Inspector can edit both inline styles and external ones,
and the Inspector has indicators to tell them apart.
The colors of these indicators are configurable in the Preferences.
Flux QuickStart Guide
16
Adding an object to the page
Before you add any object to the page, you need to first select the parent object that you want to
insert the object into. The first object you create will have the body object as it’s parent, the body
object can be considered to be the root object.
Step 1
Select the parent, in this case, it’s the body element, so
you can click almost anywhere on the page to select it.
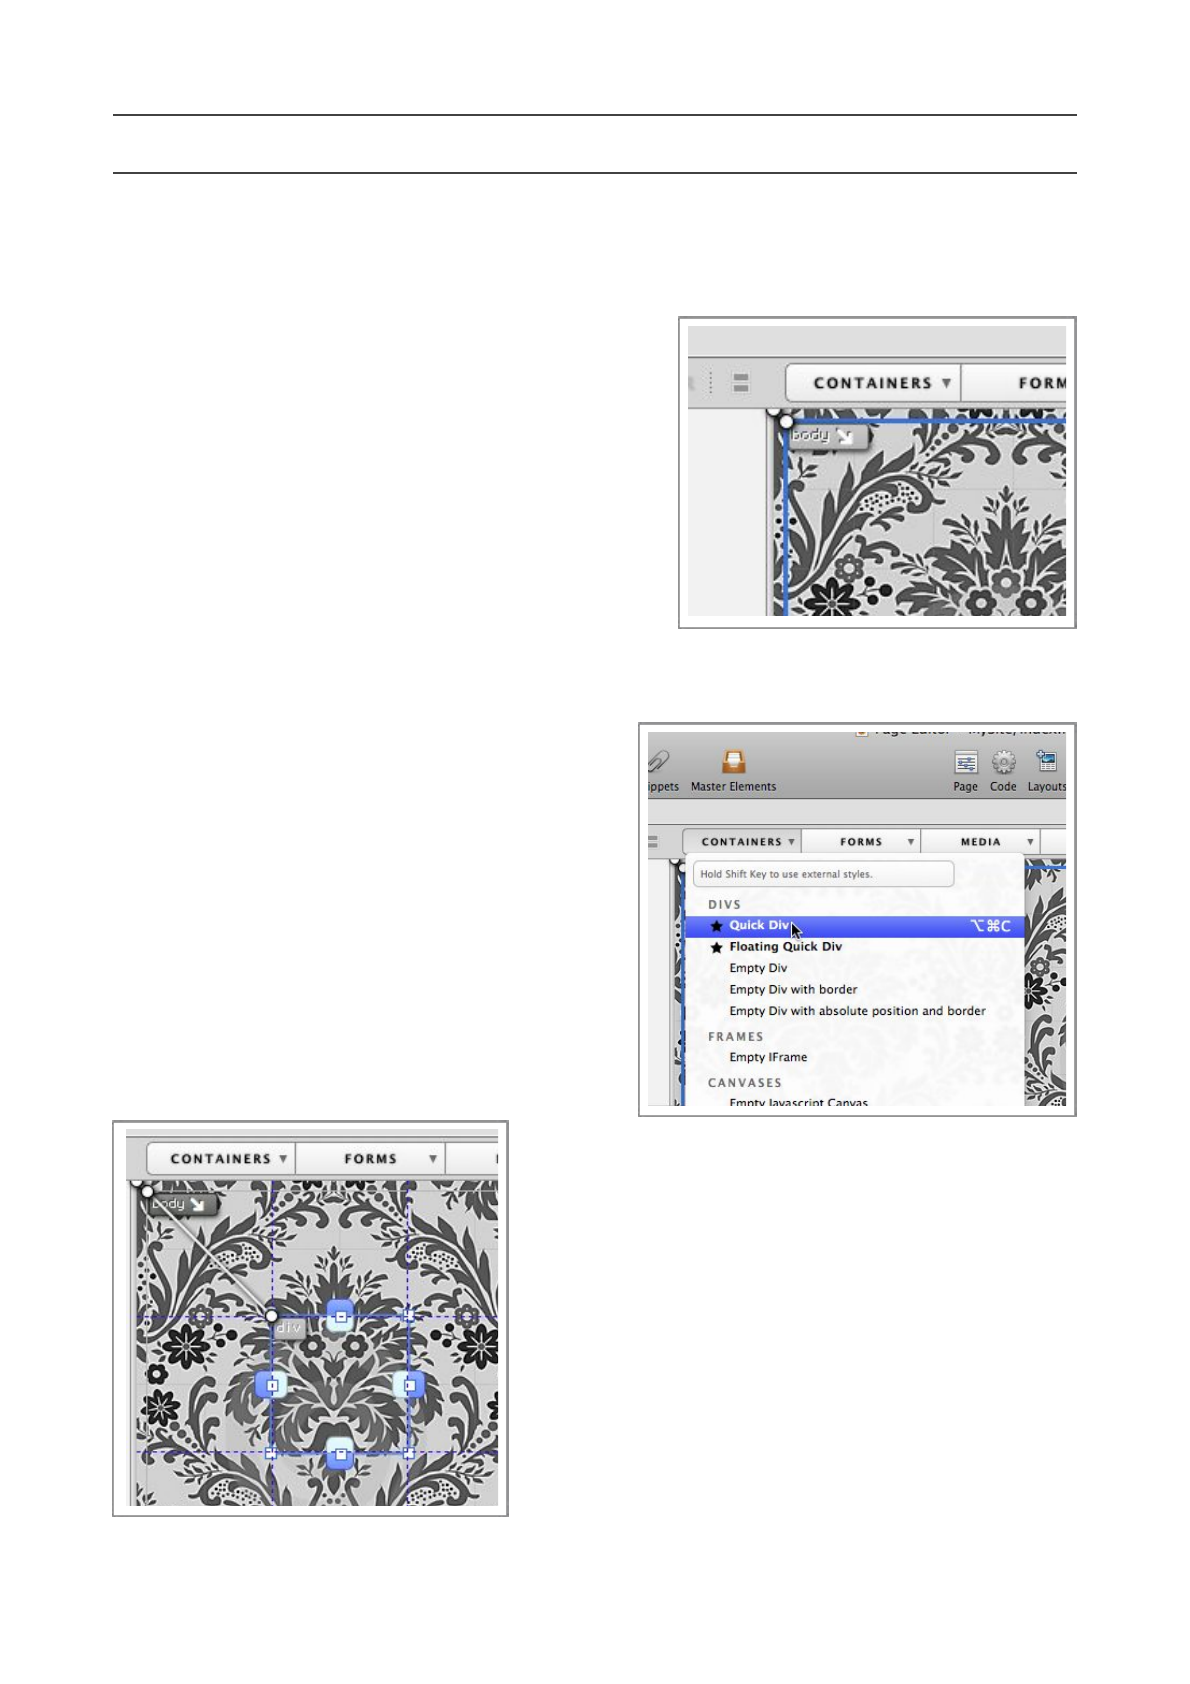
Step 2
Once the element is selected, we need to add a new
div, a div can be considered to simply be a container
for objects, than can be decorated as you see fit. Use
the Quick Div option, as this type of div comes pre-configured with certain values that make
them easier to work with.
The Containers menu has a lot of different type
of objects to choose from, the differences are
explained in the Flux Reference Manual, which is
available from the Help menu.
Step 3
Once you have created the new div, select it by
clicking on it, and we can start configuring it.
The image below shows the new div is selected on
the page.
Flux QuickStart Guide
17
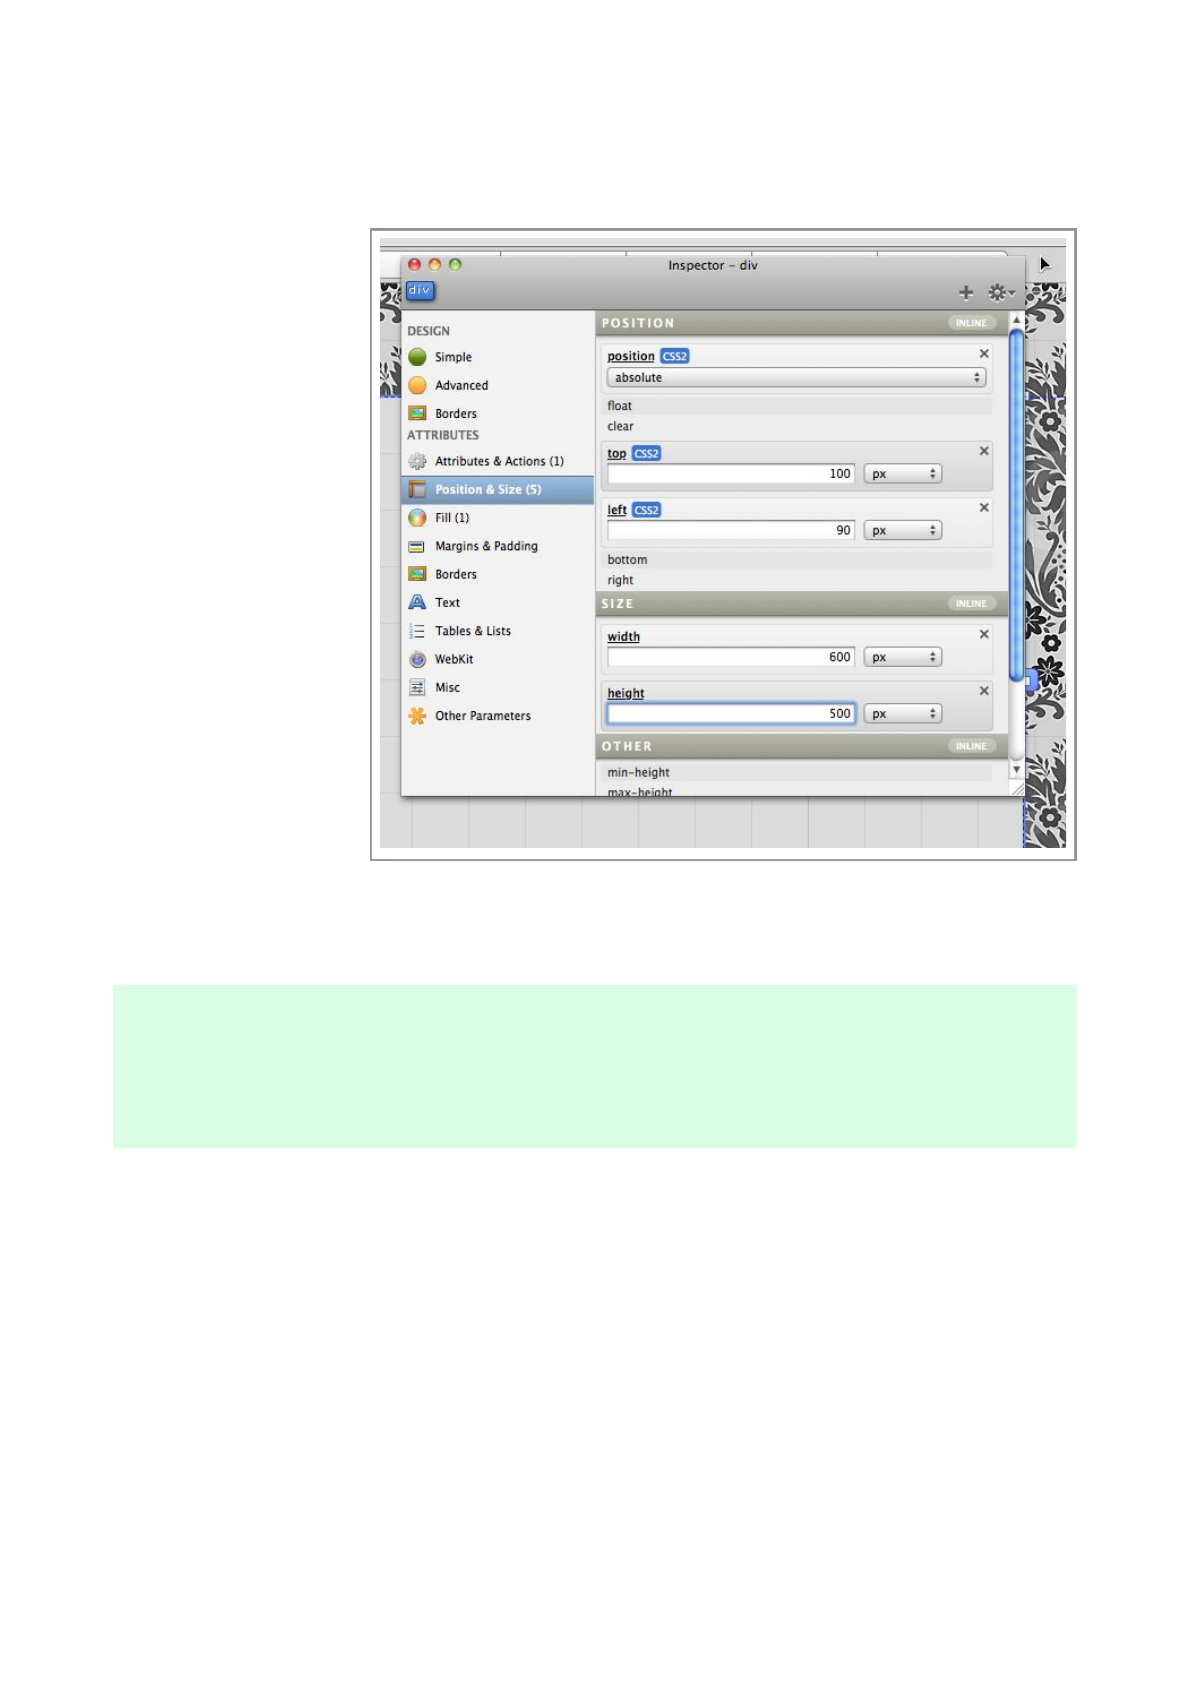
Step 4
We want this object to become the main container on the page, and for it to float in the center.
We will first set the
size of the object, we
want it to be 600 px
(pixels) width, and
500px tall.
Make sure the object is
still selected, and
choose the Position
& Si ze section of the
Inspector.
S e e h o w t h e r e a r e
already values
populated, this is
because we created a
Quick Div w h i c h
creates a div with some
v a l u e s a l r e a d y
configured.
Change the width value
to 600 and the height value to 500. You will see the selected object on the page change
immediately.
Note : At the top of the Inspector sections, you will see the word Inline, this means the values are
being made directly to the element on the page, and NOT via an external style, don’t worry about
this, we will make it into an external style later.
Step 5
Now, we will change the color of the element, so we need to switch to the Fill area of the
Inspector, and enable the background-color attribute.
Flux QuickStart Guide
18
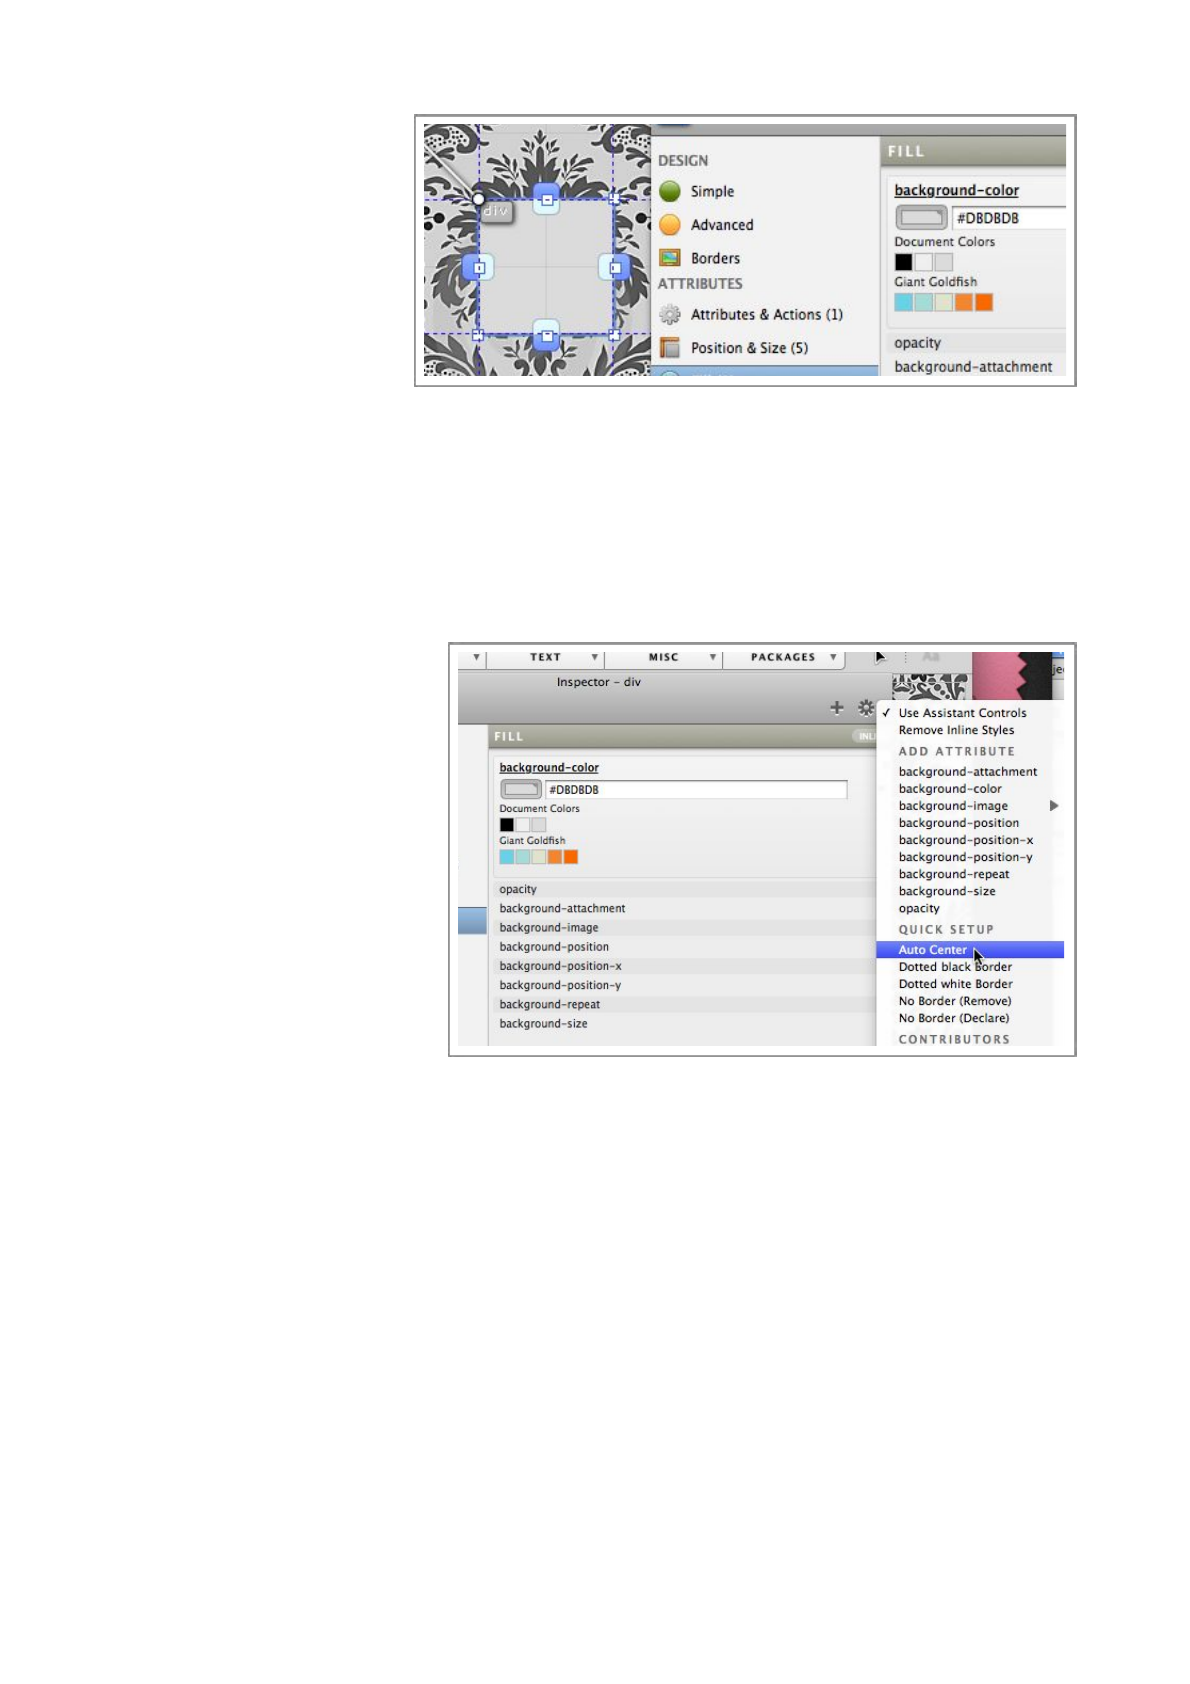
Once, the bac kground-color
attribute is enabled, click
the color well and choose
t he c o l o r yo u w a nt t h e
container to be.
You can choose any color
you like, but for this
design, we recommend a
light grey. Again, you will
s e e t h e c h a n g e h a p p e n
immediately, and the element will be much easier to see on the page.
Step 6
The last step of this section is to put the container in the right place. At the moment, it’s on the
page, in a fixed location, we want to make it centered.
Flux makes cent er ing o bj ec t
very easy, with the element still
selected on the page, choose
Auto Center from the Gear
menu at the top right of the
Inspector.
Yo u w i l l s e e th e o b j e c t m o v e t o
a d if fe re nt p os i ti on str aig ht
away, although it may not be
centered, this is because the
element may still have left
value assigned, if it does,
remove it by switching to the
Position & Size section of
the Inspector and clicking the
little ‘x’ next to the left value.
You can also set the top value to a different value, around 100 would probably be about right.
Flux QuickStart Guide
19
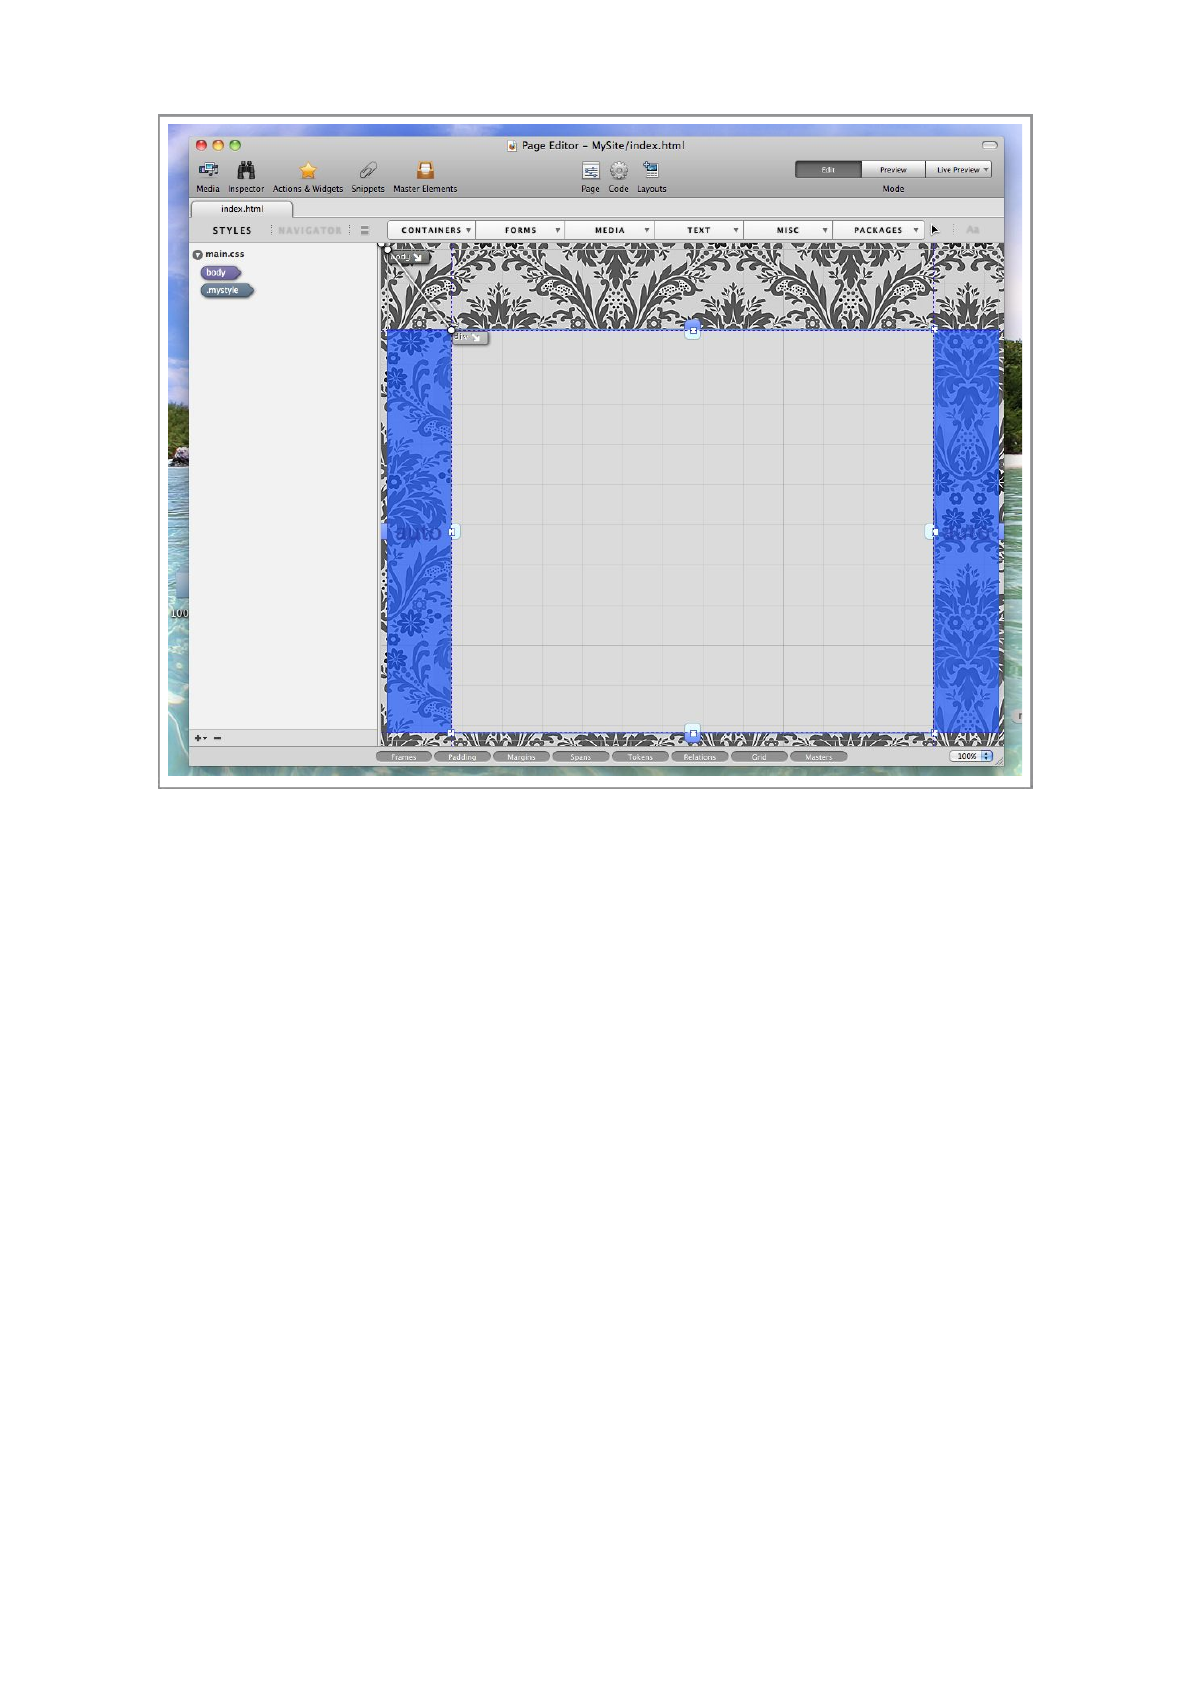
Your page should now look like the image display above. If you cannot see the blue margin areas,
check that the “Margins” button at the bottom of the window is clicked on.
Flux QuickStart Guide
20
Creating the external style
The element we have just created has the CSS styling embedded inline, this is generally considered
undesirable, and it’s better that styles are external.
In this section of the guide we are to convert inline styles into external styles.
Step 1
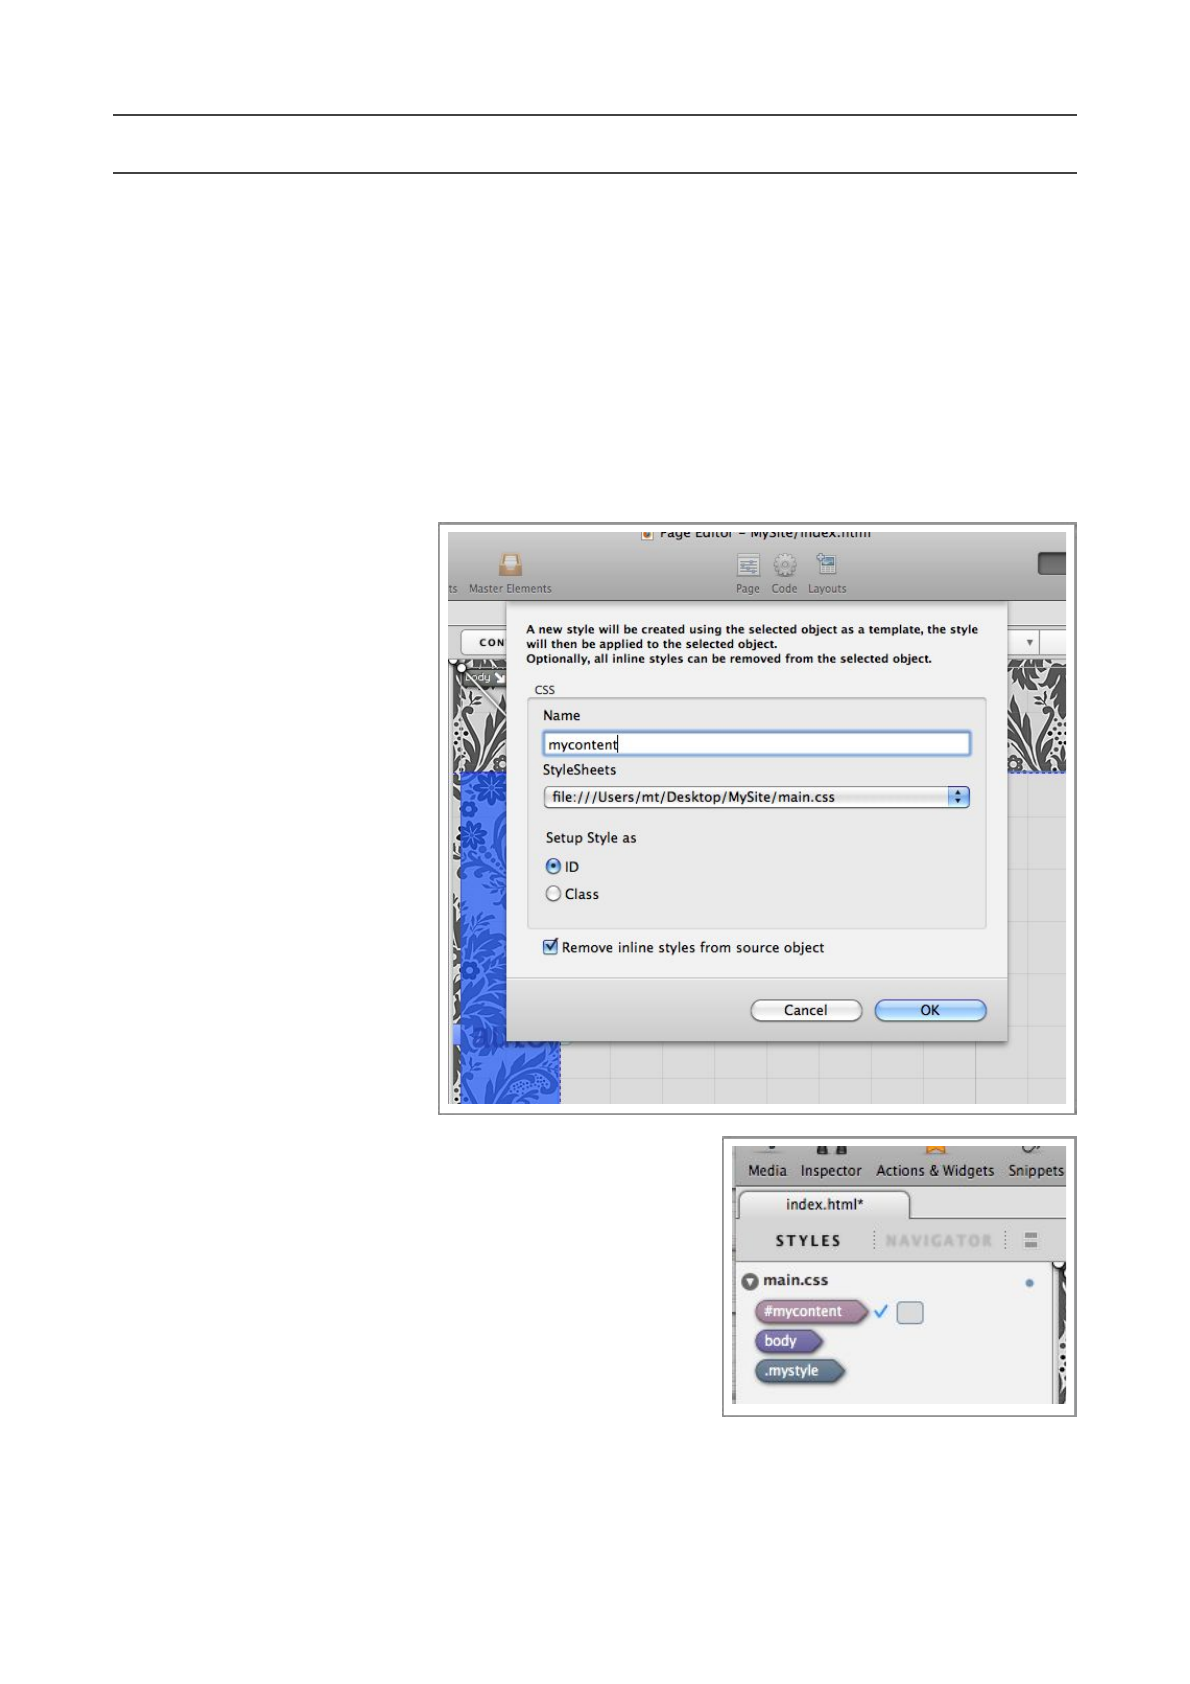
Make sure the element we have just created is still selected, and choose Create Style with...
from the Edit menu.
Enter a name for your new external style, in this case, we will call it ‘mycontent’.
Choose the stylesheet to save
the style in, in our example,
there is only one StyleSheet
attached to our page , so we
don’t need to choose.
We also need to choose if we
want to create the external
style as an ID style or a Class
style. In this case, choose ID.
Lastly, we need to decide if we
want Flux to remove the inline
styles in the selected object,
in this case, we do, so make
sure this option is checked.
Step 2
After performing this
operation, the page shouldn’t
change at all, but a new style
will be visible in the Style List,
called ‘#mycontent’, the ‘#’ sign means it is an ID style.
Flux has also ‘linked’ the external style to the page element
by setting the ID attribute in the page element.
Flux QuickStart Guide
21
Editing the #mycontent style
Now we have created the external style, we can make a few changes to it.
Step 1
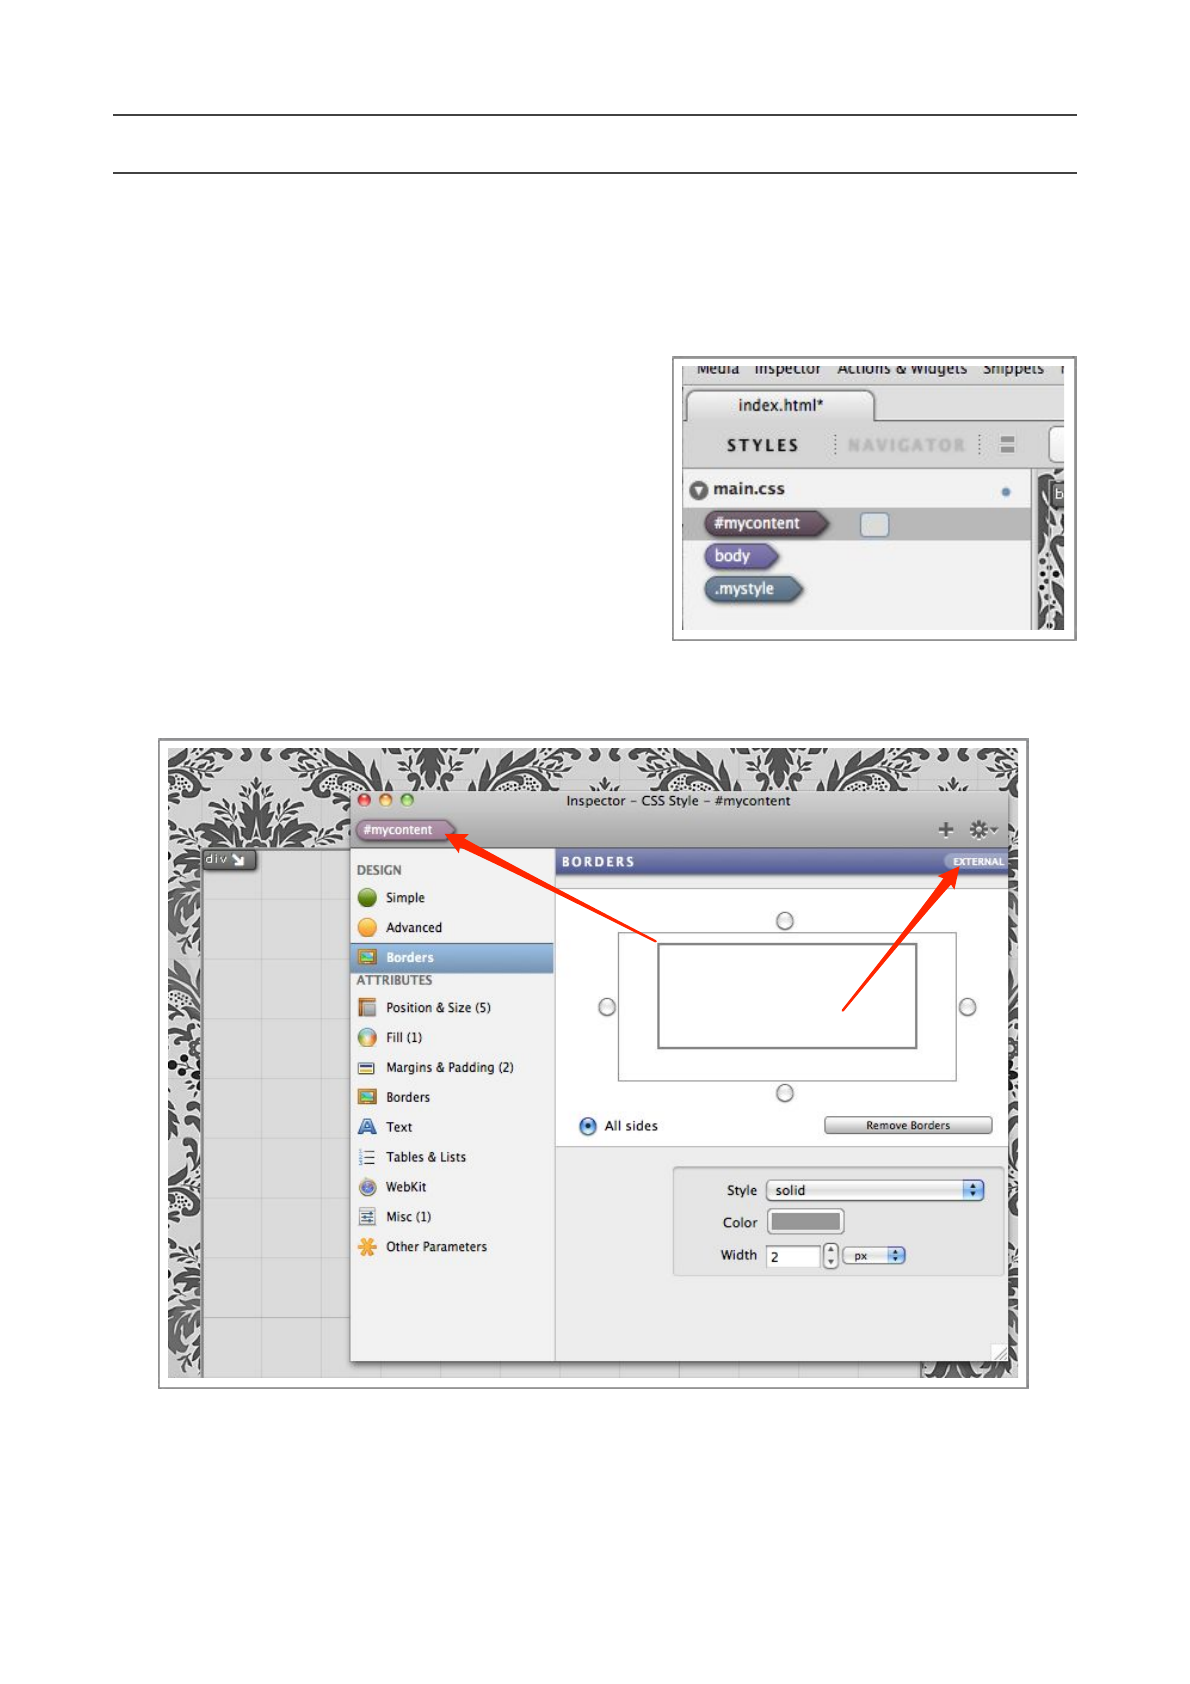
Select the #mycontent style in the styles list and open
the Inspector.
Let’s alter the border of this style, by choosing
Borders under the Design s e c t i o n o f t h e
Inspector.
Step 2
Make sure you are editing the external style by
checking the Inspector at the two locations
pinpointed by the red arrows in the image below.
Select the ‘All sides’ option, as we want the change the border on all the sides of the element.
Change the style to ‘solid’, pick an appropriate color, and set the width to 2px.
Changes will happen immediately.
Flux QuickStart Guide
22
Preview your page
We’ve make quite a few changes, so now would be a good time to preview your page, Flux can
preview your page in two different ways.
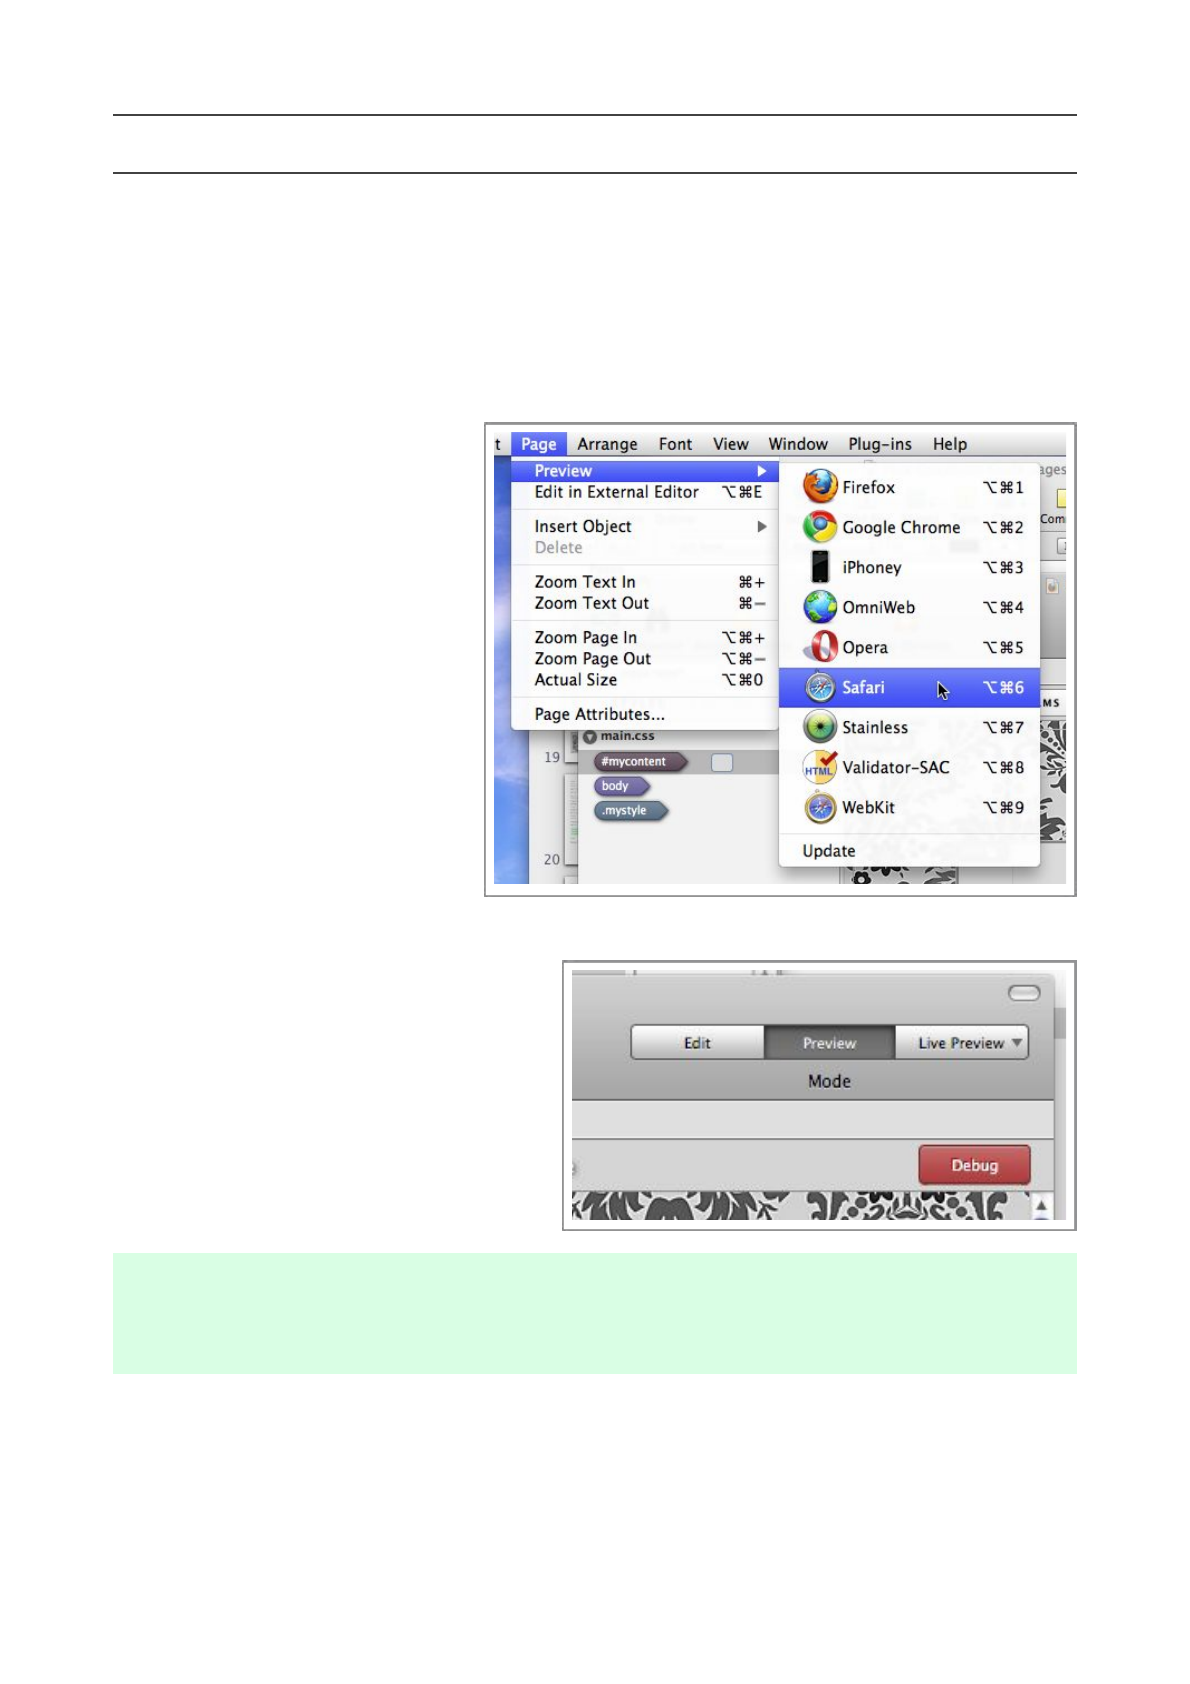
Method 1
Choose a web browser installed on your system from the Preview submenu, which is found in
the Page menu. You may need to
use Update option before any
browsers appear in this list.
Once you choose the browser,
your page will be opened in that
browser.
Your page and stylesheets will be
a ut o m at i c a ll y s av ed b e fo re t h e
preview.
Method 2
Another method of previewing, is
to use Flux’s built-in web browser,
to do this, simply press the middle
section of the button bank at the
top right of the Page Designer window.
Yo u r p a g e a n d s t y l e s h e e t s w i l l b e
automatically saved before the preview.
Flux’s built-in Preview function is ver y
similar to the Apple Safari web browser
supplied with your Mac.
Once you have finished previewing, press
the ‘Edit’ section of the button back to
return to editing your page.
It’s recommended that you preview your page in a few different browsers, particularly Firefox, as
many web users use this browser.
Flux QuickStart Guide
23
Locking objects
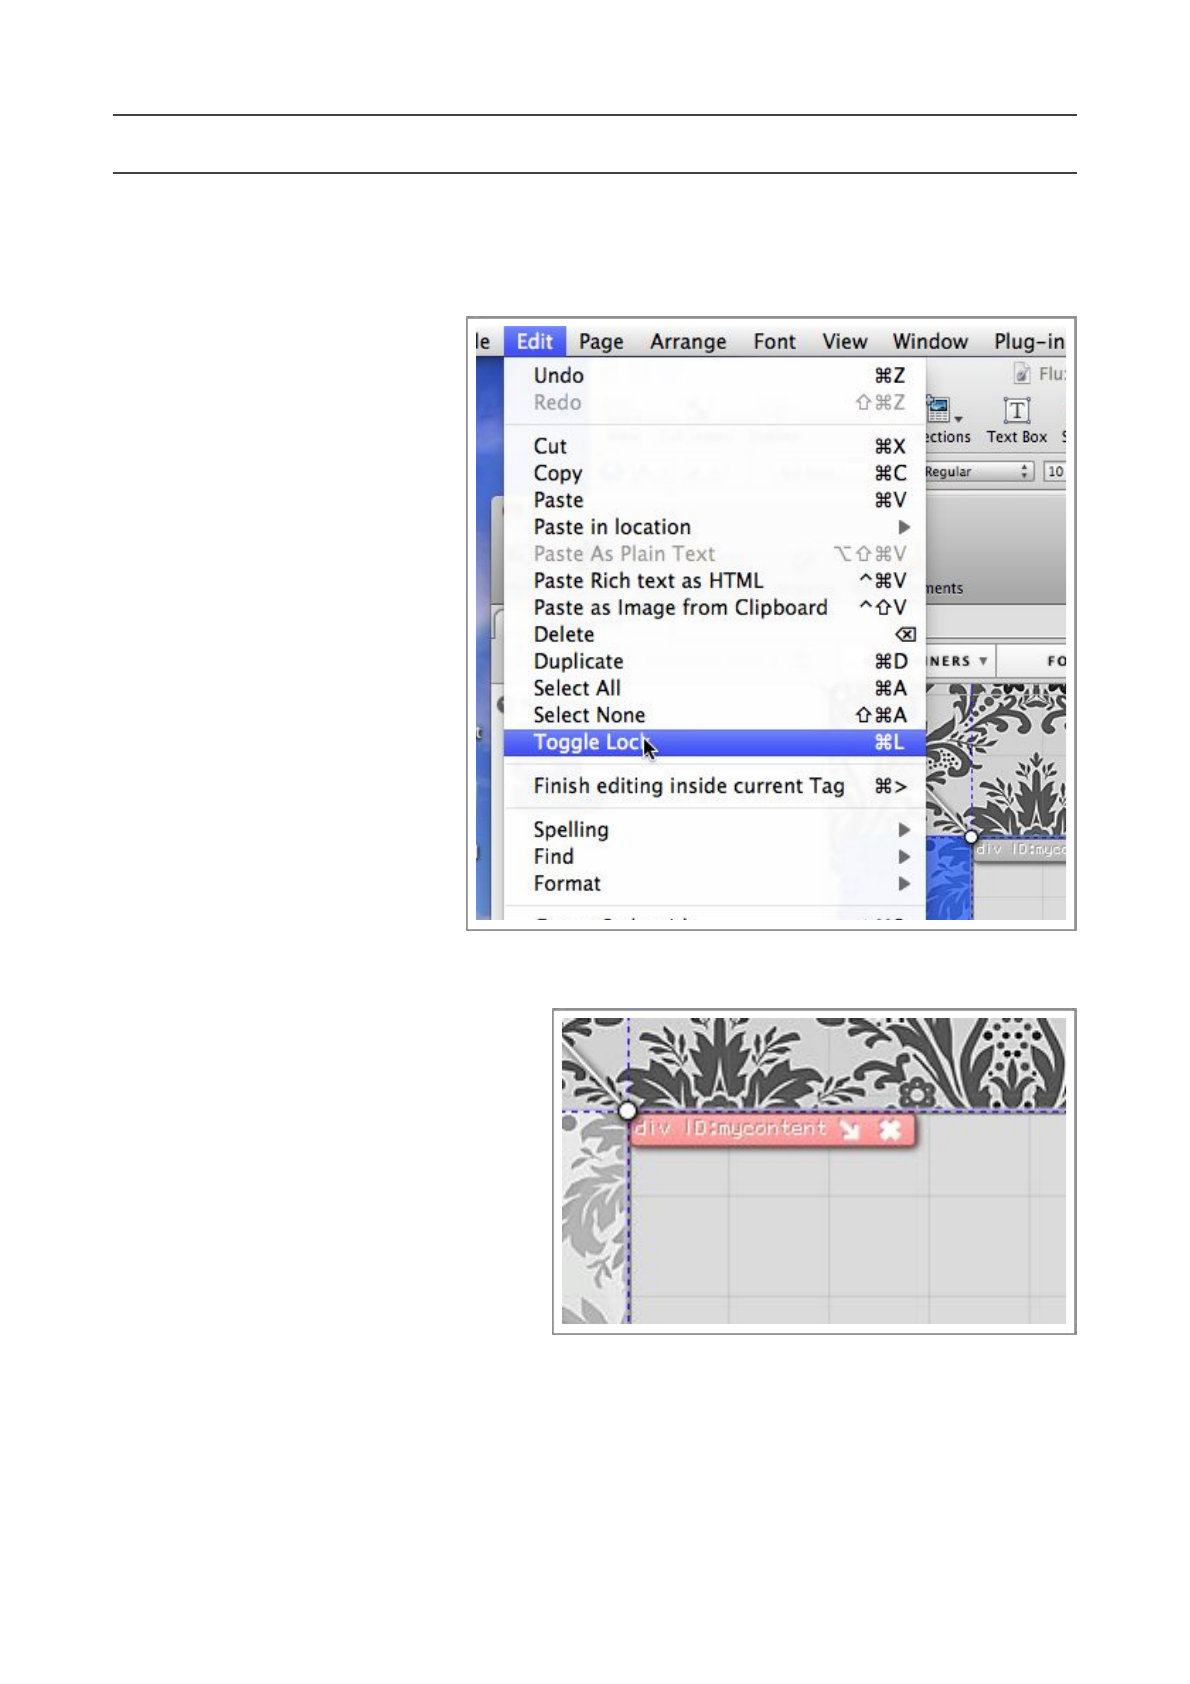
We’re finished editing our new object now, so to prevent accidental editing, we can lock the object.
To lock the object, make sure the
object is selected, and choose
Toggle Lock from the Edit
m e n u , o r u s e t h e s h o r t c u t
Command-L.
Yo u w o n ’t b e a b l e t o e d i t t h i s
object visually until you unlock it
using the same method, although
you can still edit the object using
the Inspector and the Code
Editor.
L o c k e d o b j e c t s a r e v i s u a l l y
recognizable as their tags turn
red, and the drag handles for
resizing are disabled and grey.
Flux QuickStart Guide
24
Creating another new object
In this part of the guide, we are going to create the bottom bar par t of the website, where we can
write copyright information.
Step 1
Before we create our ne xt
object, make sure you have
selected the object that is
intended to be it’s parent, i.e.
t h e o b j e c t w e h a v e j u s t
c r e a t e d . T h i s i s v e r y
impor tant, if we select t h e
wrong parent, the structure of
our page will be incorrect.
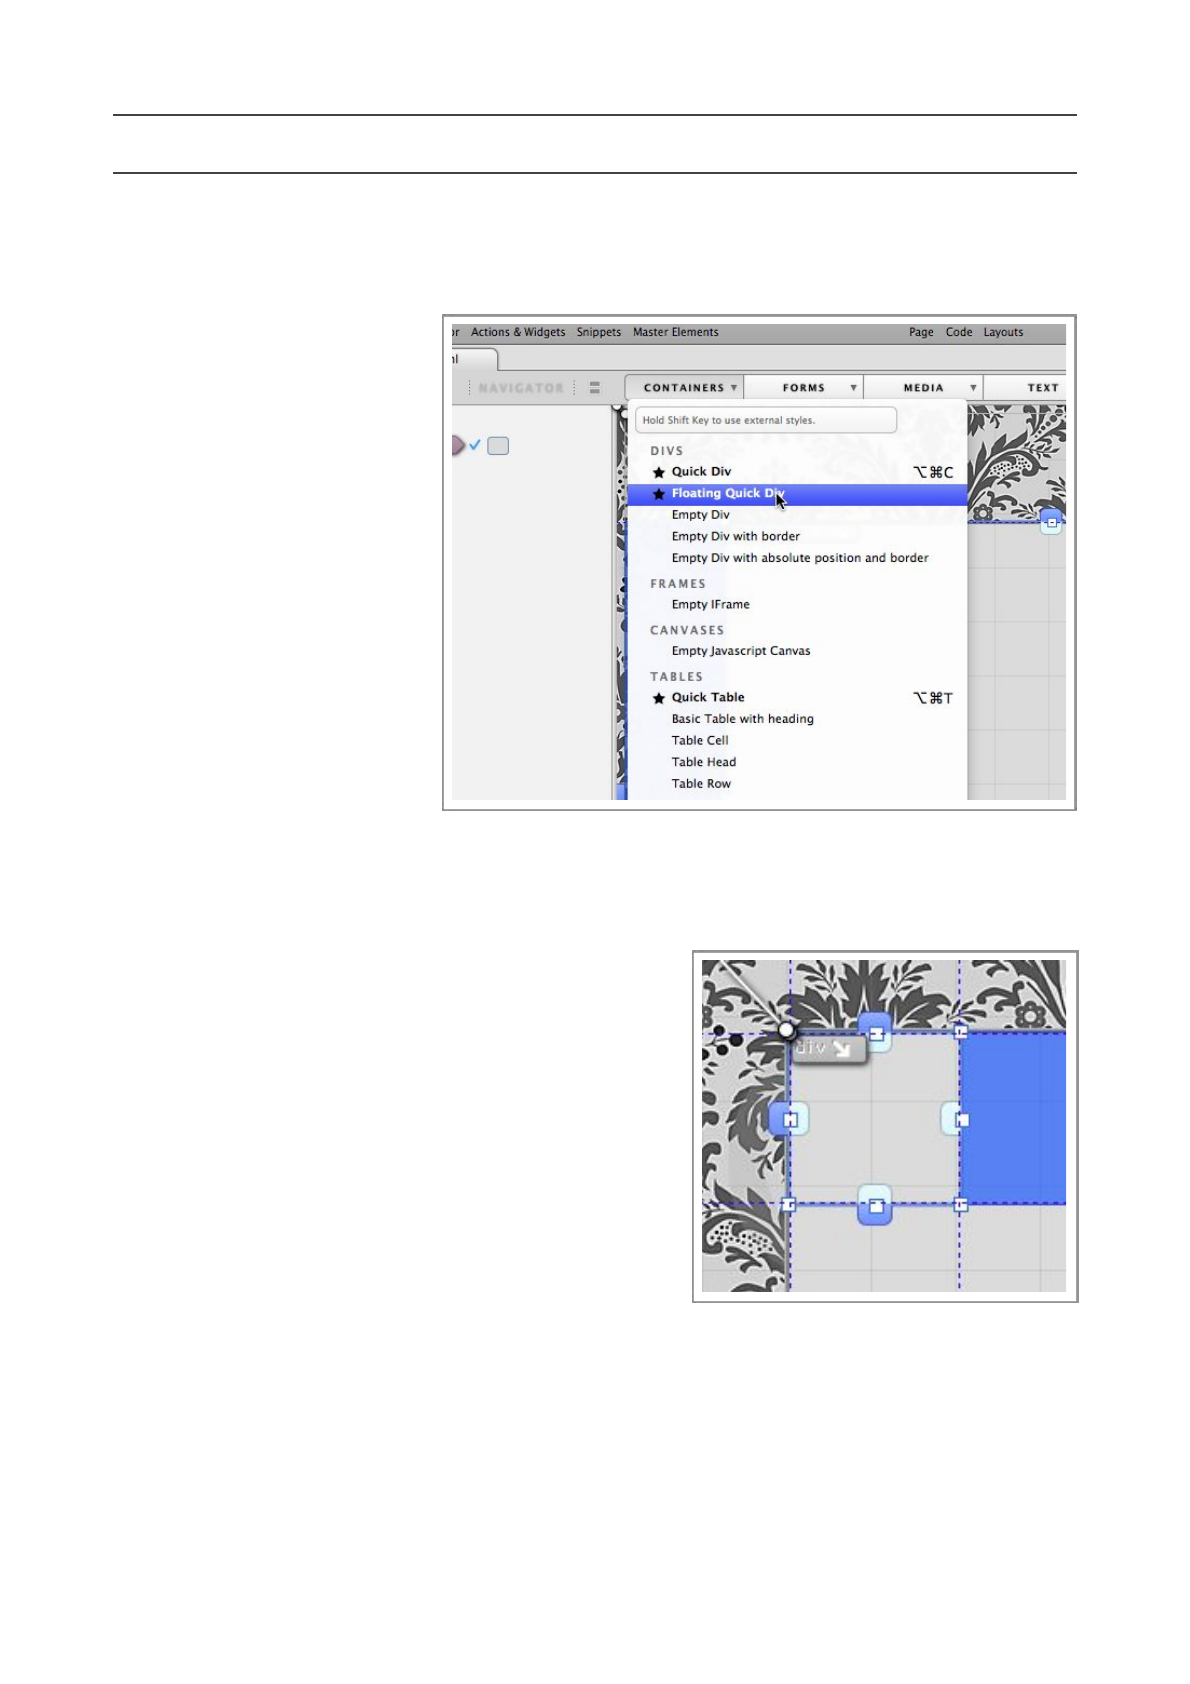
Our next object is going to be
a f l o a t i n g d i v, s o c h o o s e
Floating Quick Div from
the Containers menu.
You will see the object appear
at the top left of the large grey
element we created in the previous section. If it appears in the top left of the body element
instead, then delete it, and try again, making sure you have the correct parent object selected.
Step 2
Click and hold the mouse button on the bottom right
drag handle of the object, and drag the object to roughly
the desired size, it’s width should equal that of the
parent element, and it’s height should be about the
width of a ballpoint pen. We can adjust it more
accurately in the Inspector later, this is just an
exercise to get used to using drag handles to resize an
object.
Step 3
Once you have dragged the object to roughly the correct size, use the Inspector to set the color
to a dark grey color.
Flux QuickStart Guide
25
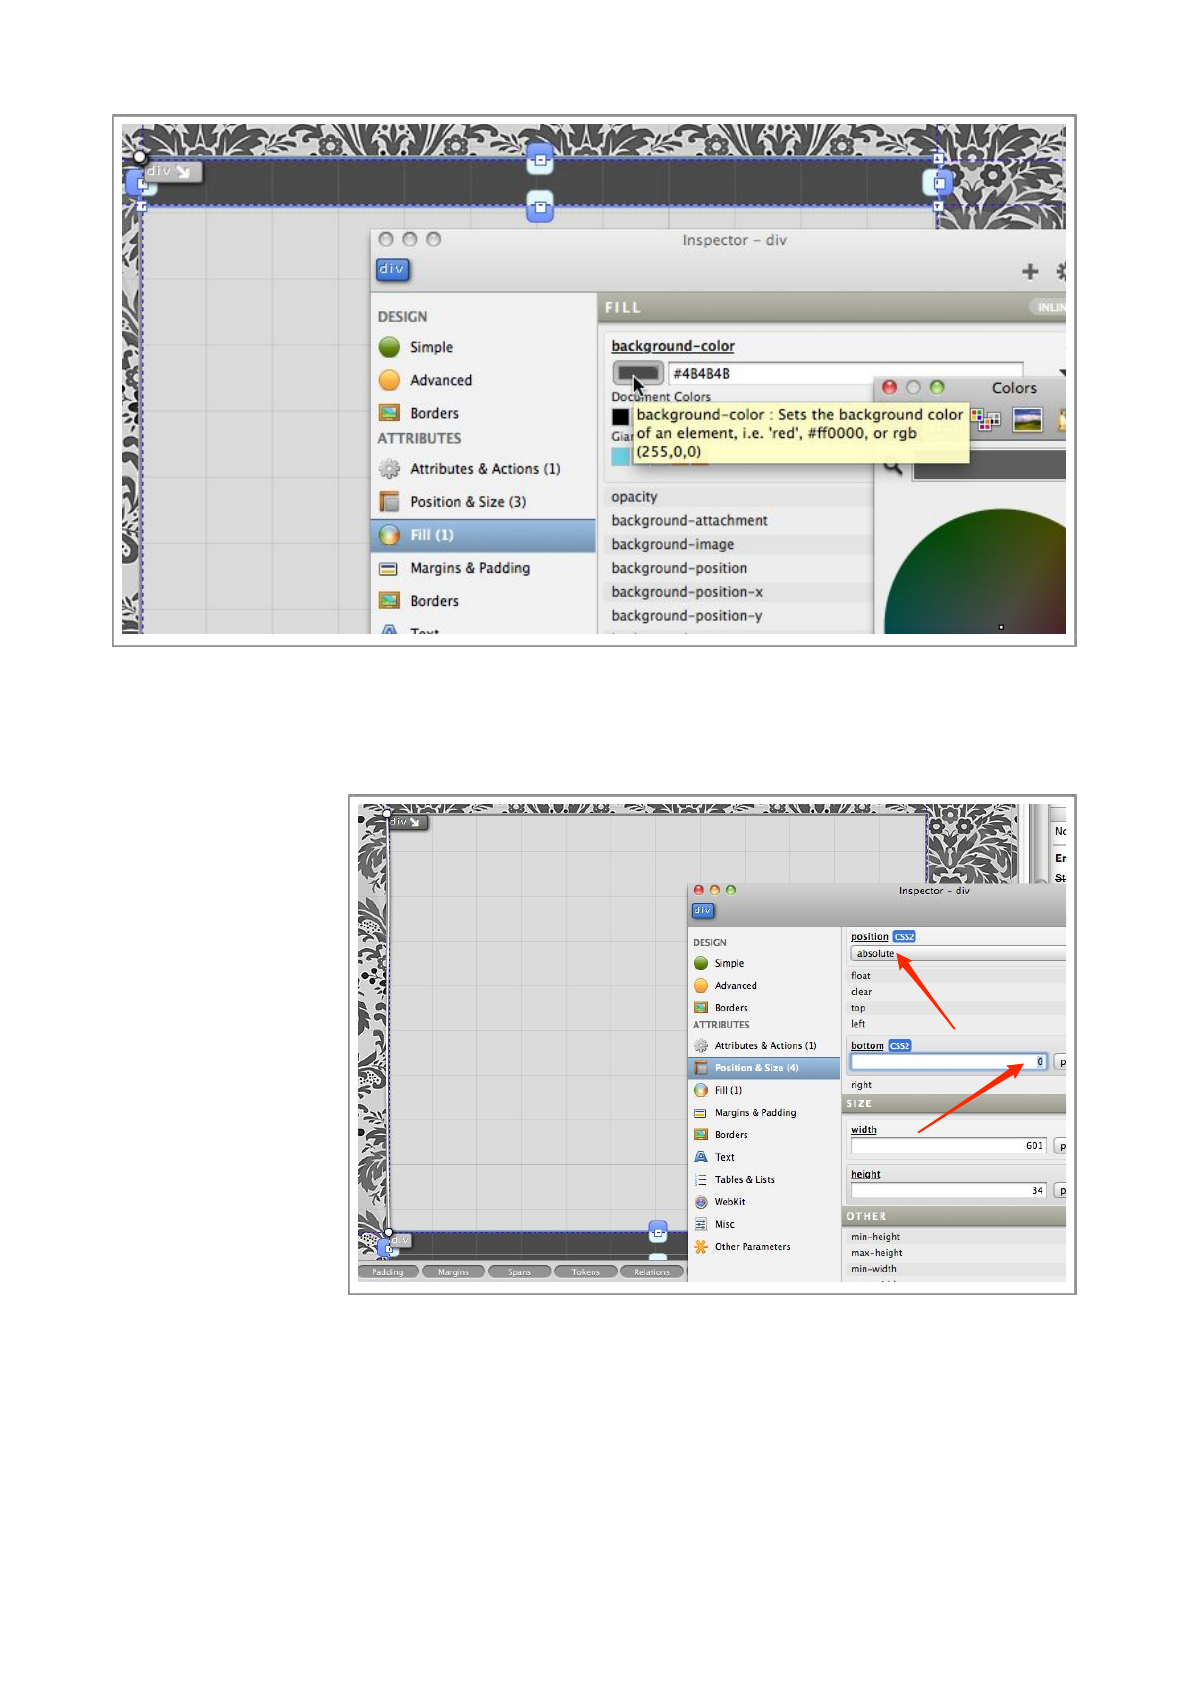
Step 4
Next, we need to make the object hug the bottom of it’s parent element.
To d o t h i s , s w i t c h t o
the Position &
Size section of the
Inspector, c h an g e
the Position t o
absolute, enabled the
bottom and set it to
0px.
Step 5
Since we just used
the drag handles to
g e t it r ou g h l y t h e
correct size, we can
get exactly corre c t
n o w u s i n g t h e
Inspector.
Set the width to 100 and set the width unit to ‘%’, this will make the object 100% of the size of it’s
parent, i.e. exactly the same width.
Step 6
Like before, we have been making these changes inline, and now we want to make them external.
So, just like we’ve done before, make sure the element we have just created is still selected, and
choose Create Style with... from the Edit menu.
Flux QuickStart Guide
26

This time, we will call the style ‘bottombar’, and again, it will be an ID style.
It’s important you carry out this last step, or the rest of the tutorial will not work correctly.
Flux QuickStart Guide
27
Entering text into an element
The element we just created is intended to display copyright information, so lets enter some now.
Step 1
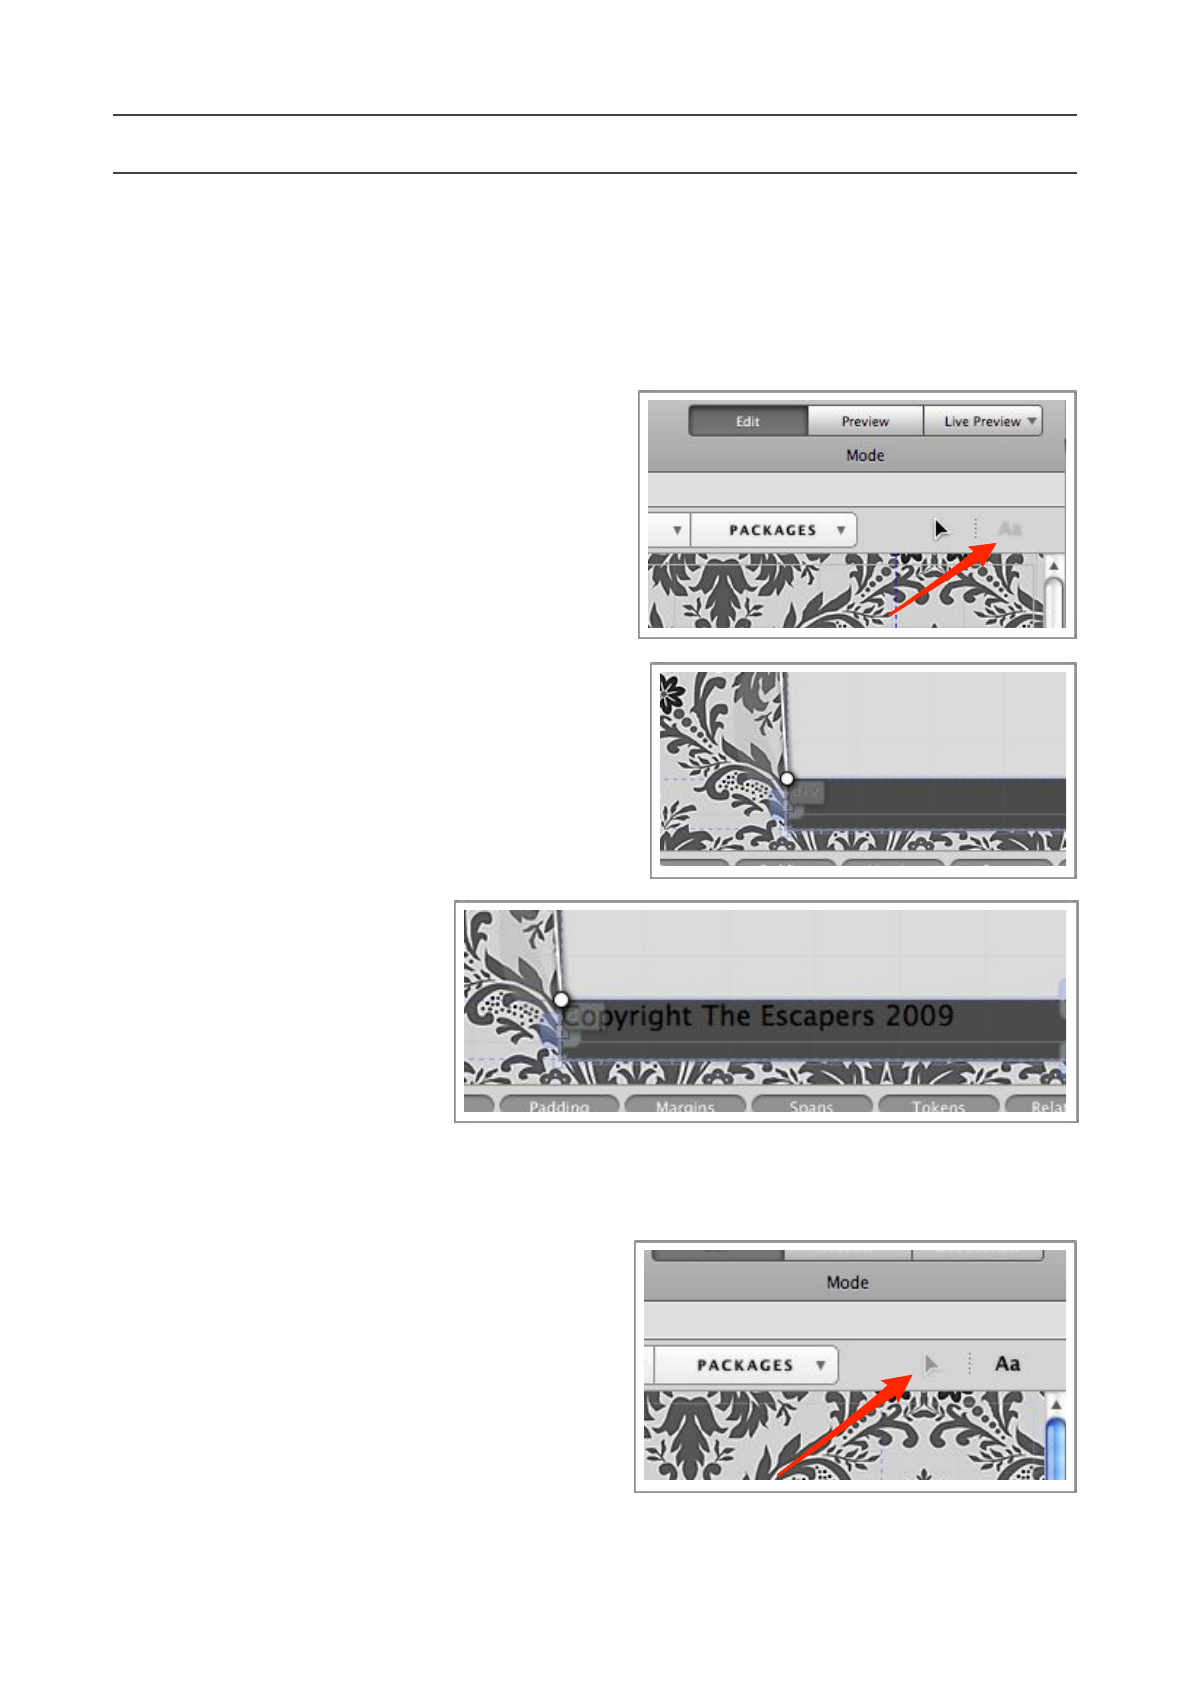
Switch to Text mode by pressing the button pictured below.
Step 2
Click inside the bottom bar we have just created.
It may be difficult to see, but a flashing cursor
should appear where you can start typing.
Step 3
Enter your text, for this example , we will enter
‘Copyright The Escapers 2009’
Step 4
Switch back to Edit mode to complete the text
changes. Save the document by
pressed Command-S.
Flux QuickStart Guide
28
Text styling
The text we’ve just entered doesn’t look very pretty, the alignment is wrong, the color is wrong
and it needs to be moved down inside the object.
First, lets tackle the color.
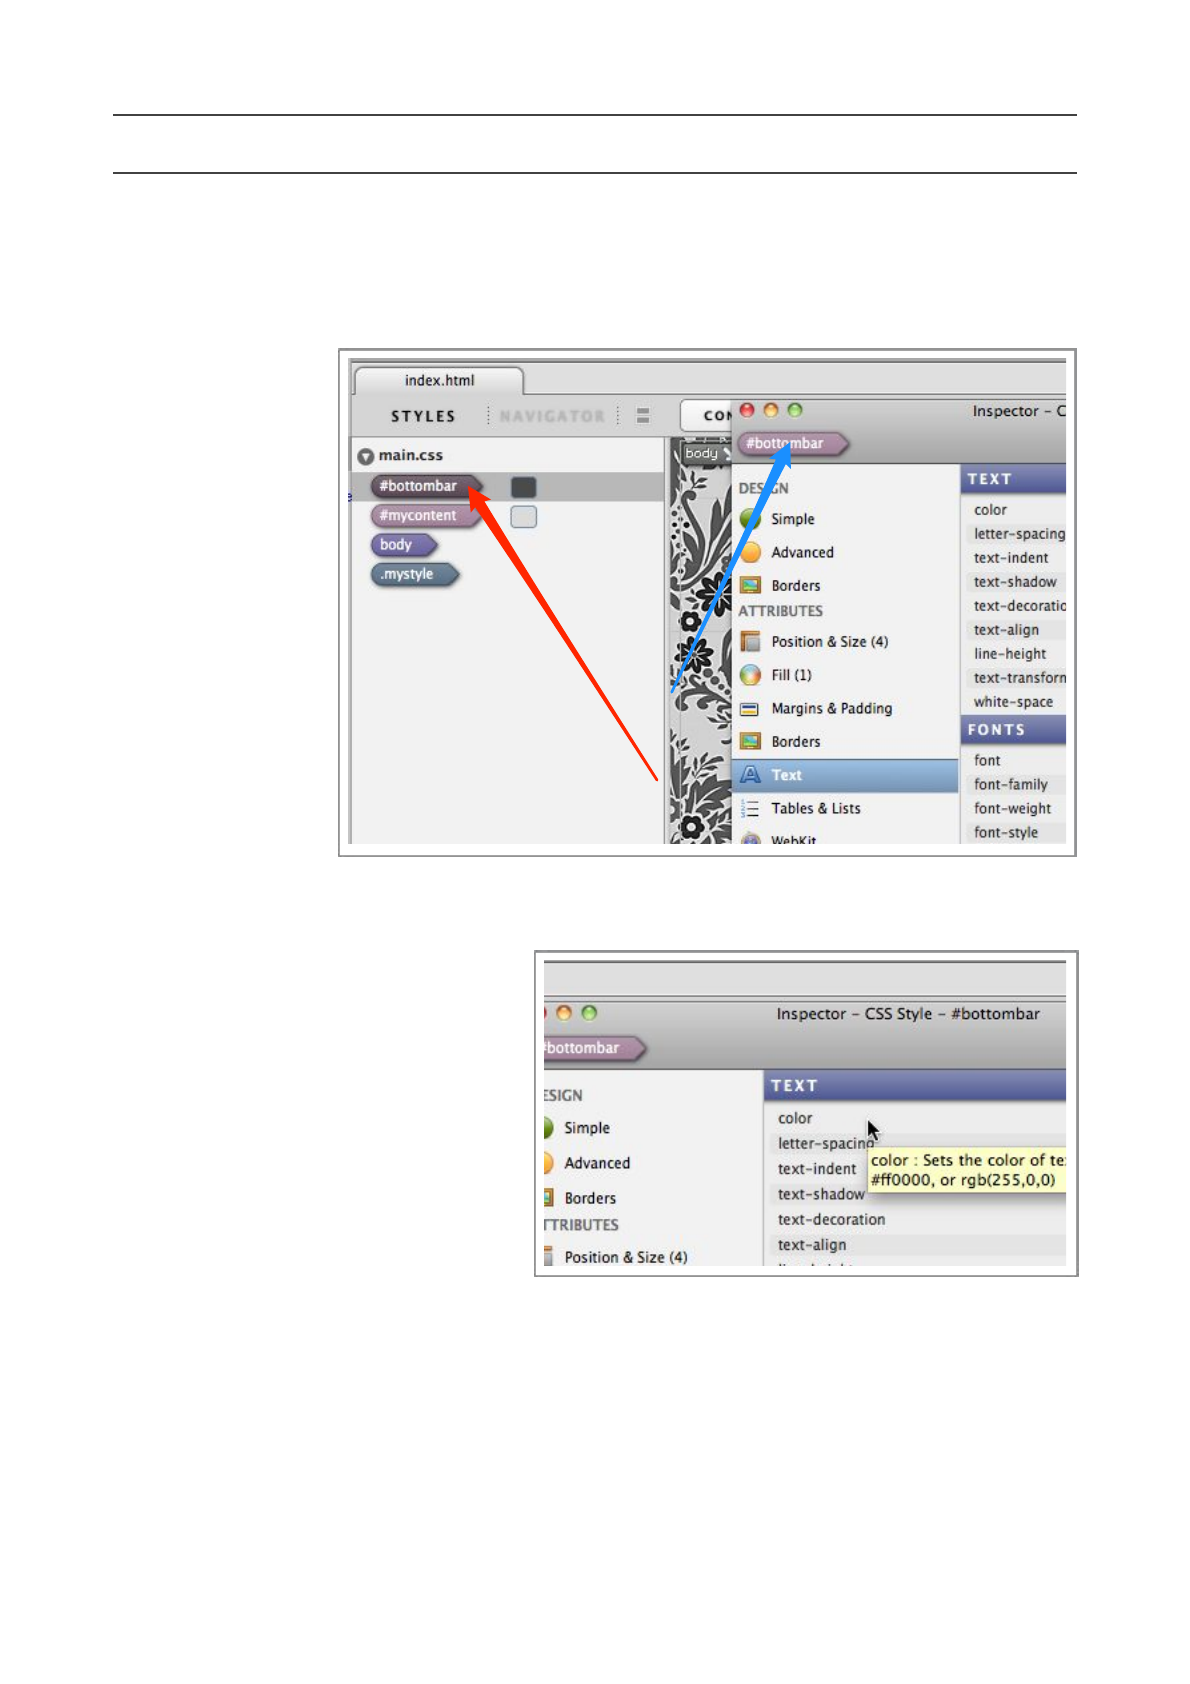
Step 1
T o c o r r e c t t h e
color, we need to
edit the #bottombar
s t y l e t h a t w e
created earlier.
Select the style in
the Styles list and
o p e n t h e
Inspector to the
Tex t section.
Making sure you are
editing the correct
style by checking
t h e t o p o f t h e
Inspector (c he ck
the correct style is being edited, it’s pinpointed by the blue arrow in the picture to the right)
Step 2
Enable the color attribute by clicking on
it, and use the colorwell to select an
appropriate color, maybe white, or a
light grey.
As with the other attribute changes, you
Flux QuickStart Guide
29
will see this take
effect right away.
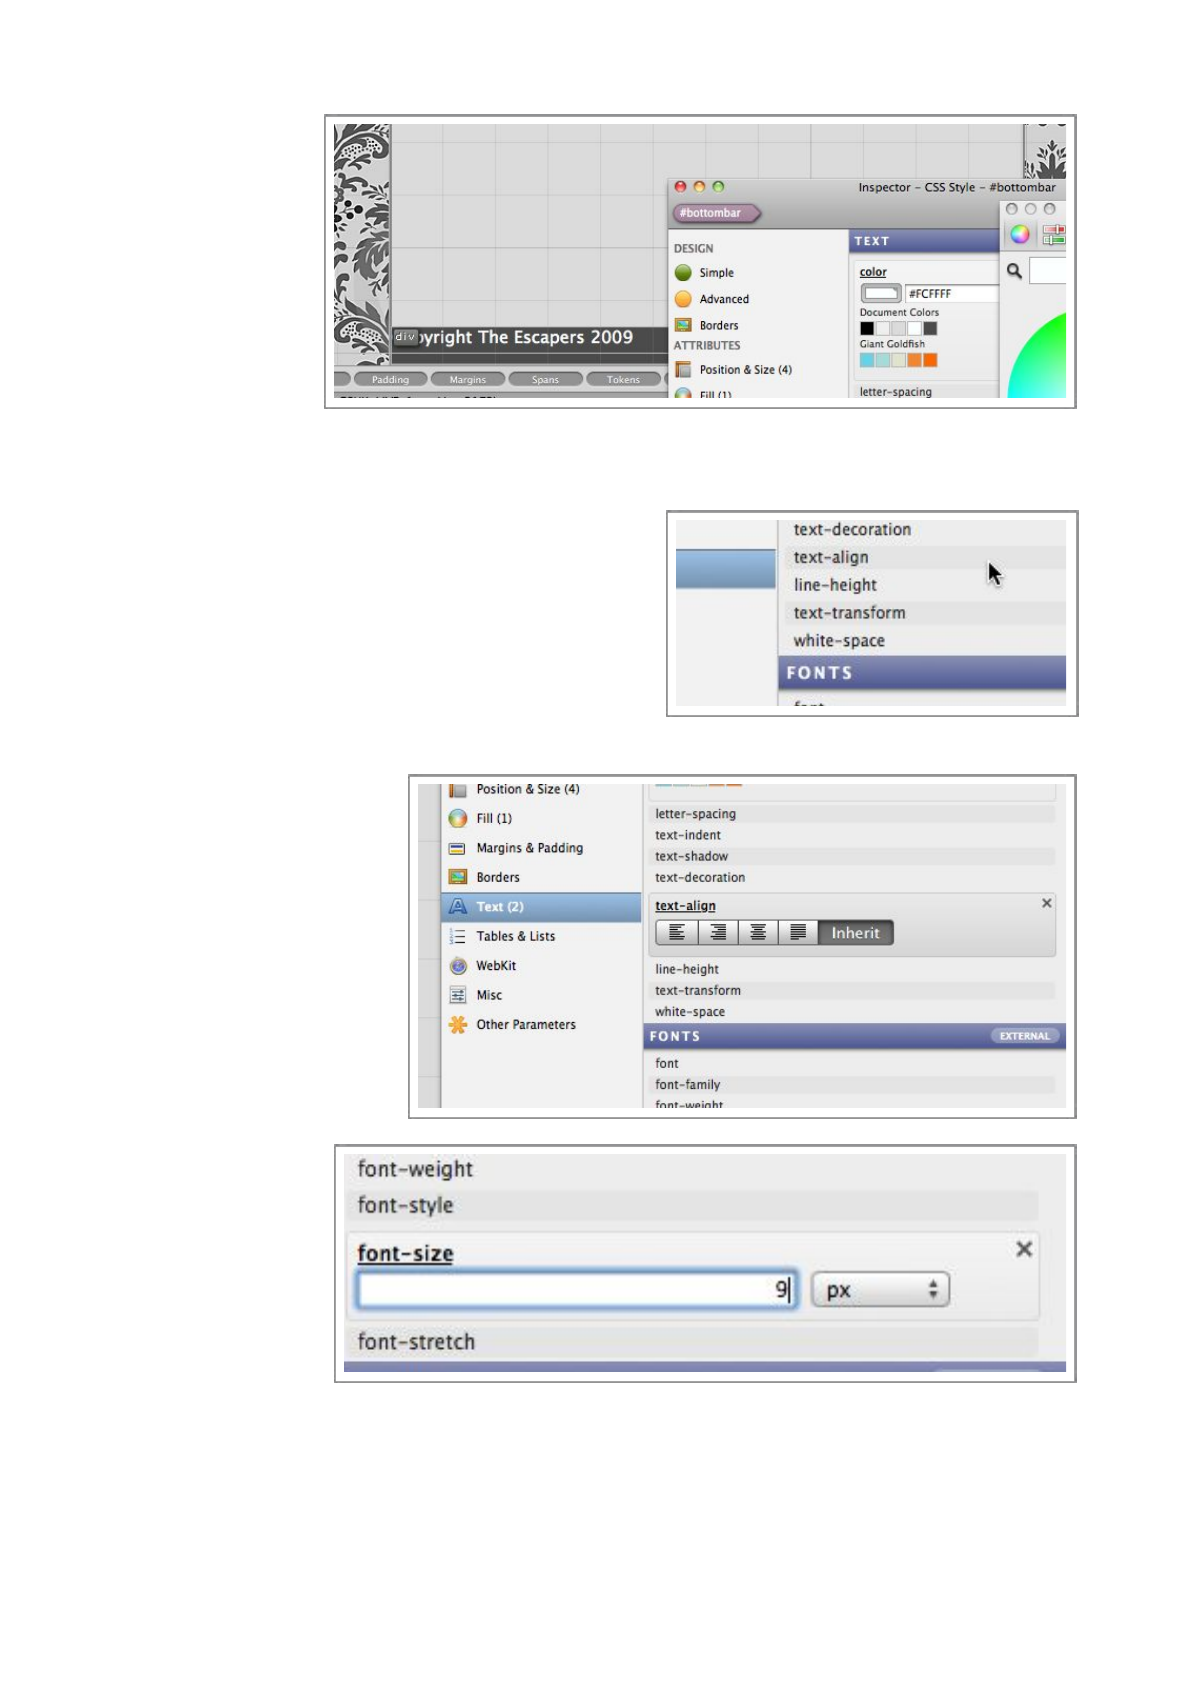
Step 3
We’ve corrected
the color, so now
let’s take care of
the alignment.
Alignment is done
in the same place
in the Inspector.
This time, enable the text-align property, and set it to
‘center’.
Your text should now look similar to the picture
below, both the color and the alignment are now
correct.
It’s important to realize that these changes are being
made to the CSS style, and not the element, the
element is linked to the style.
Step 4
Next, we need to change
the font size, so enable the
font-size property, and
change to 9px.
Flux QuickStart Guide
30
Padding
At the moment, the text of our bottom bar is at the top of the element, it would probably look a
lot nicer if it was pushed down a little more towards the centre of it’s container.
A good way to achieve this, would be to use padding. Padding is like the inner margin of an
element, for example, if you had a container div with a paragraph of text within it, and you set a
1cm top padding, the text would start flowing 1cm from the top of the div.
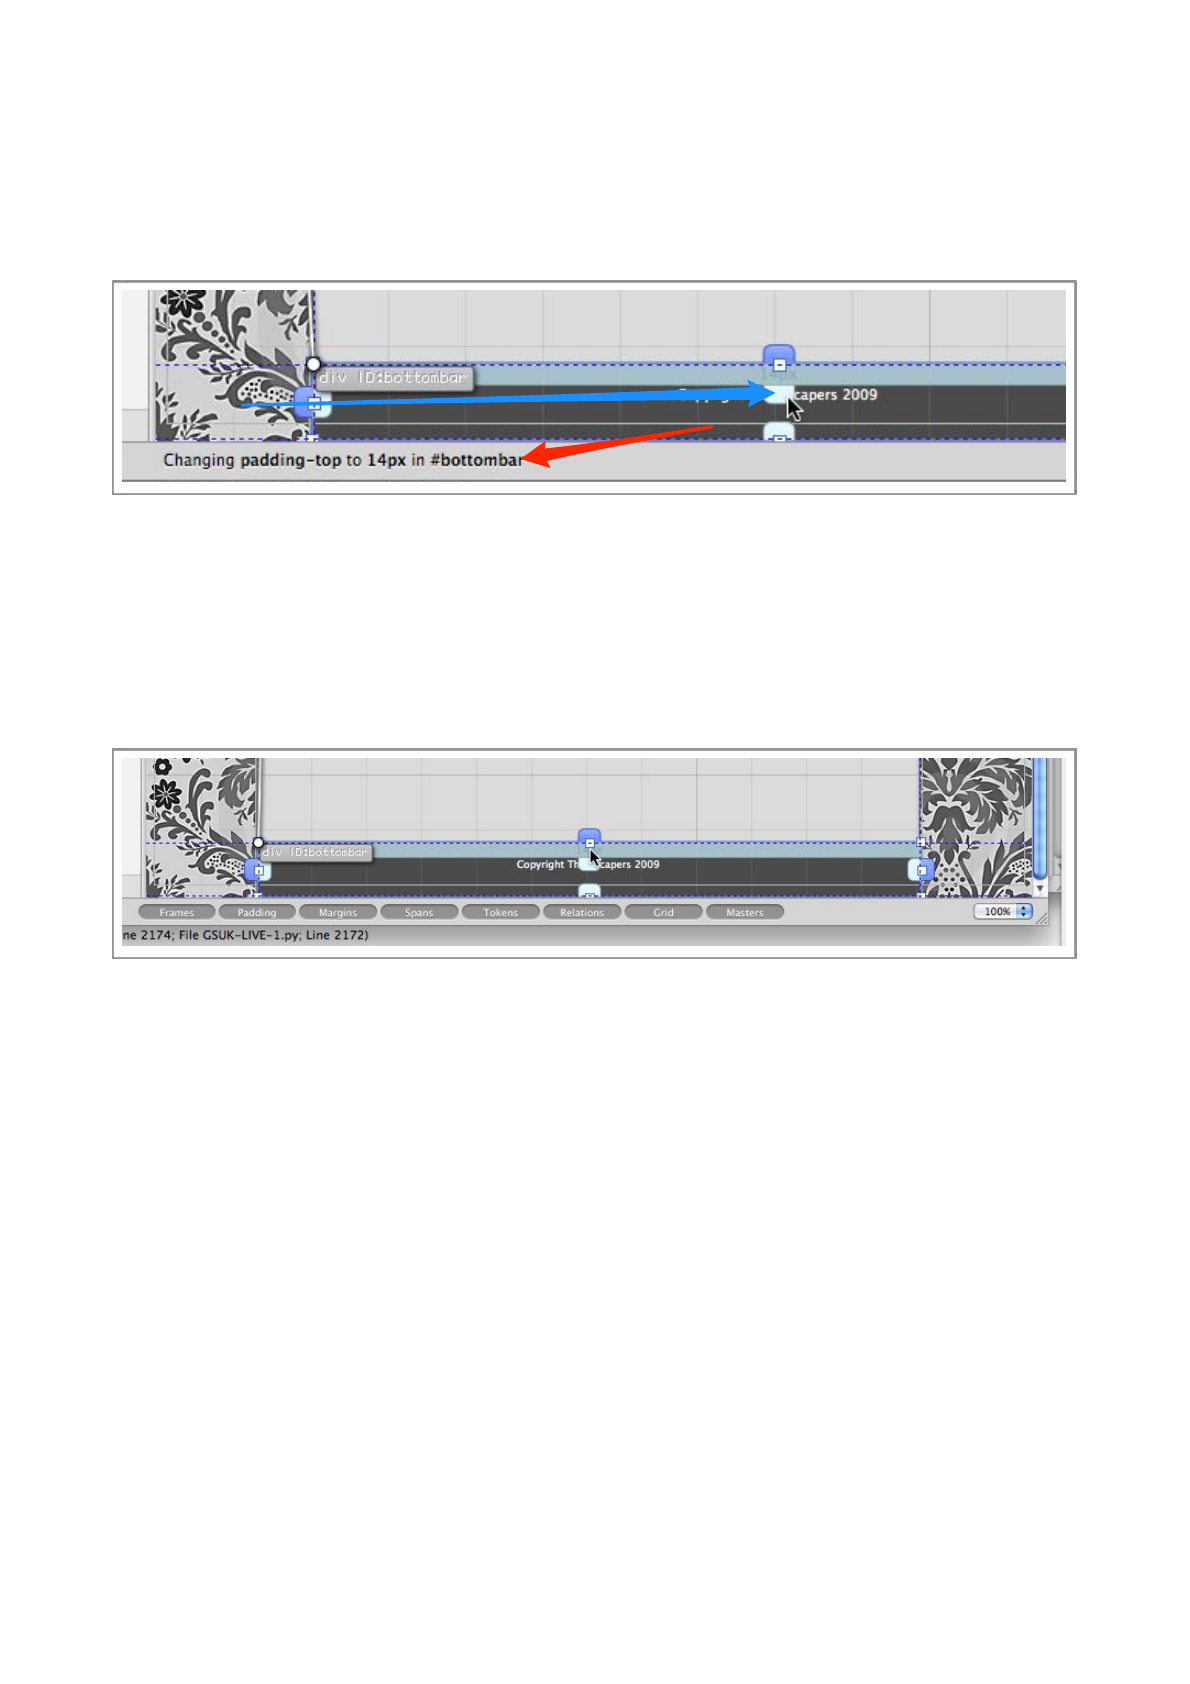
The purple handles in the image above are the padding handles, they may be a different color on
your Mac, but they are always the inner handles.
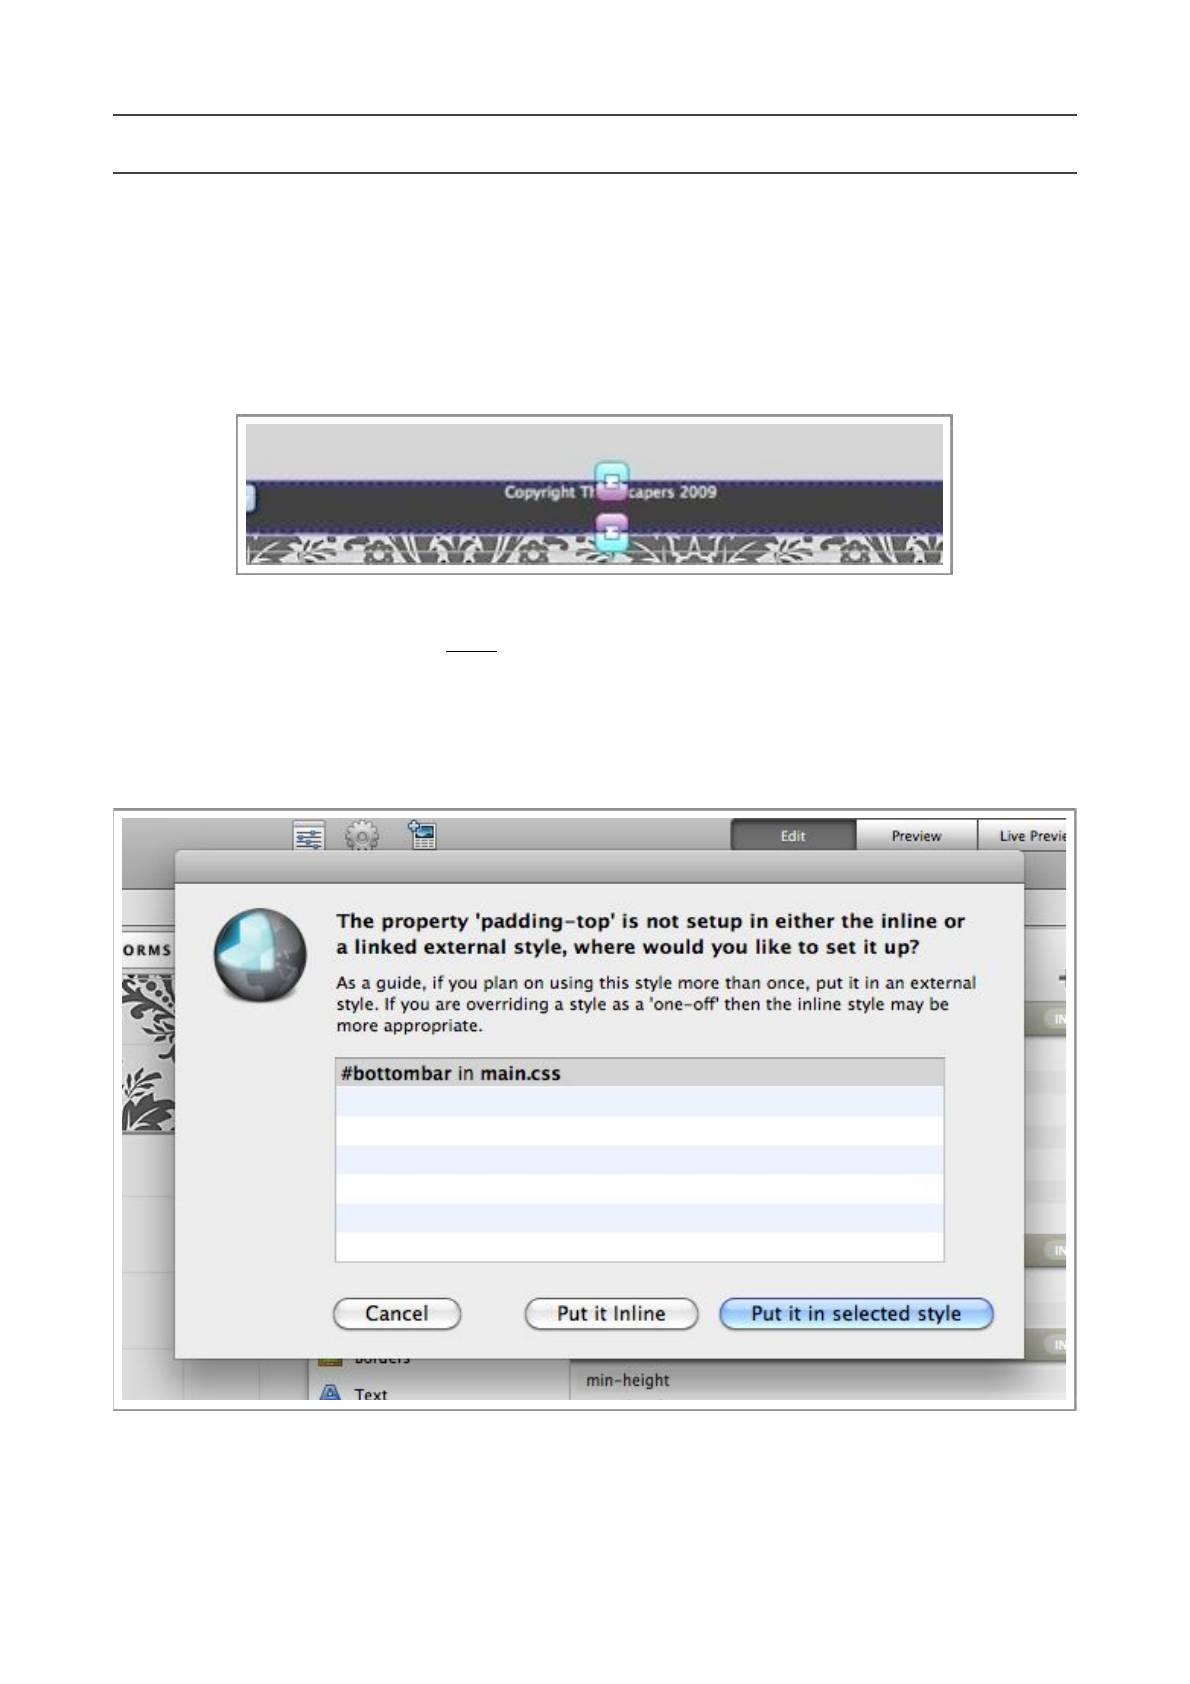
Step 1
Click and hold the mouse button on the top padding handle, you can visually adjust it, but first you
will be asked if you want to make the padding inline or external.
Make sure the #bottombar style is selected, and press the ‘Put it in selected style’ button.
Now you have chosen where to store the padding changes, you can use this handle to tweak the
padding. There are a few important points to be aware of.
Flux QuickStart Guide
31
a) The padding changes will affect all elements that are linked to #bottombar, unless overridden.
b) The overall size of the element will increase, this may seem a little odd, but this is how padding
is defined to work by the W3C.
c) The change you are making visually is explained at the bottom of the Flux window (See red
arrow).
We recommend you set the padding to around 10px.
Step 2
As we explained in note ‘b’, the overall size has increased, so we need to adjust the height of the
element to account for this.
Adjust the size by tweaking the bottom square handle to adjust the height, since this box is still
anchored to the bottom, only the height will change.
Again, the change you are making is explained at the bottom of the window.
We recommend changing the height to around 20px.
Once you have made these changes, use Command-L to lock the element.
Flux QuickStart Guide
32
Creating a heading
Step 1
Create another ‘Floating Quick Div’ making sure to use the element selected in the image below as
the parent.
It’s always very important to get the structure of your site correct, if you don’t, it’ll be difficult to rectify when
the page gets more complex.
Once you have created the new floating div, it should appear on your
page in the same location as the image to the right. If it does not,
delete the div and try, again, making sure you have selected the
correct element as the parent.
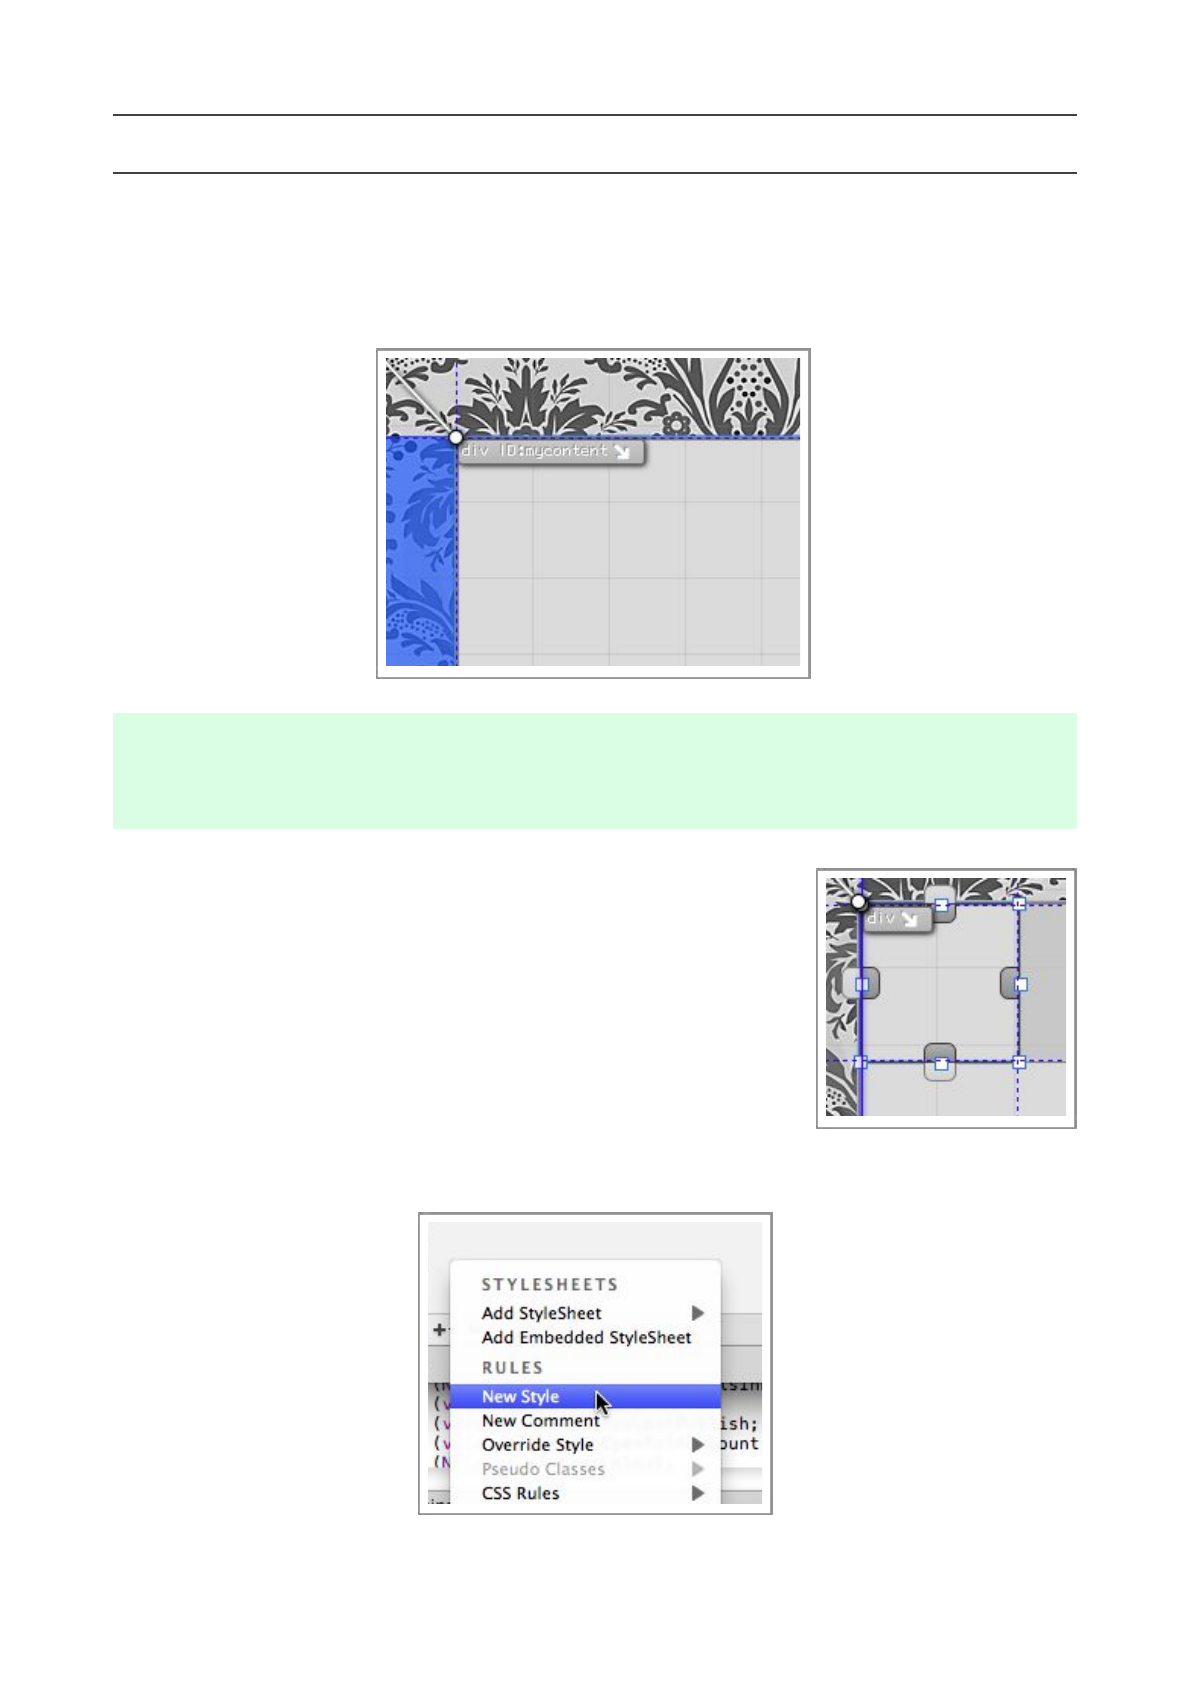
Step 2
For this element, we are going to make a style from scratch, so
create a new style by pressing the small ‘+’ button at the bottom of
the Style Lists, and choose New Style.
Flux QuickStart Guide
33
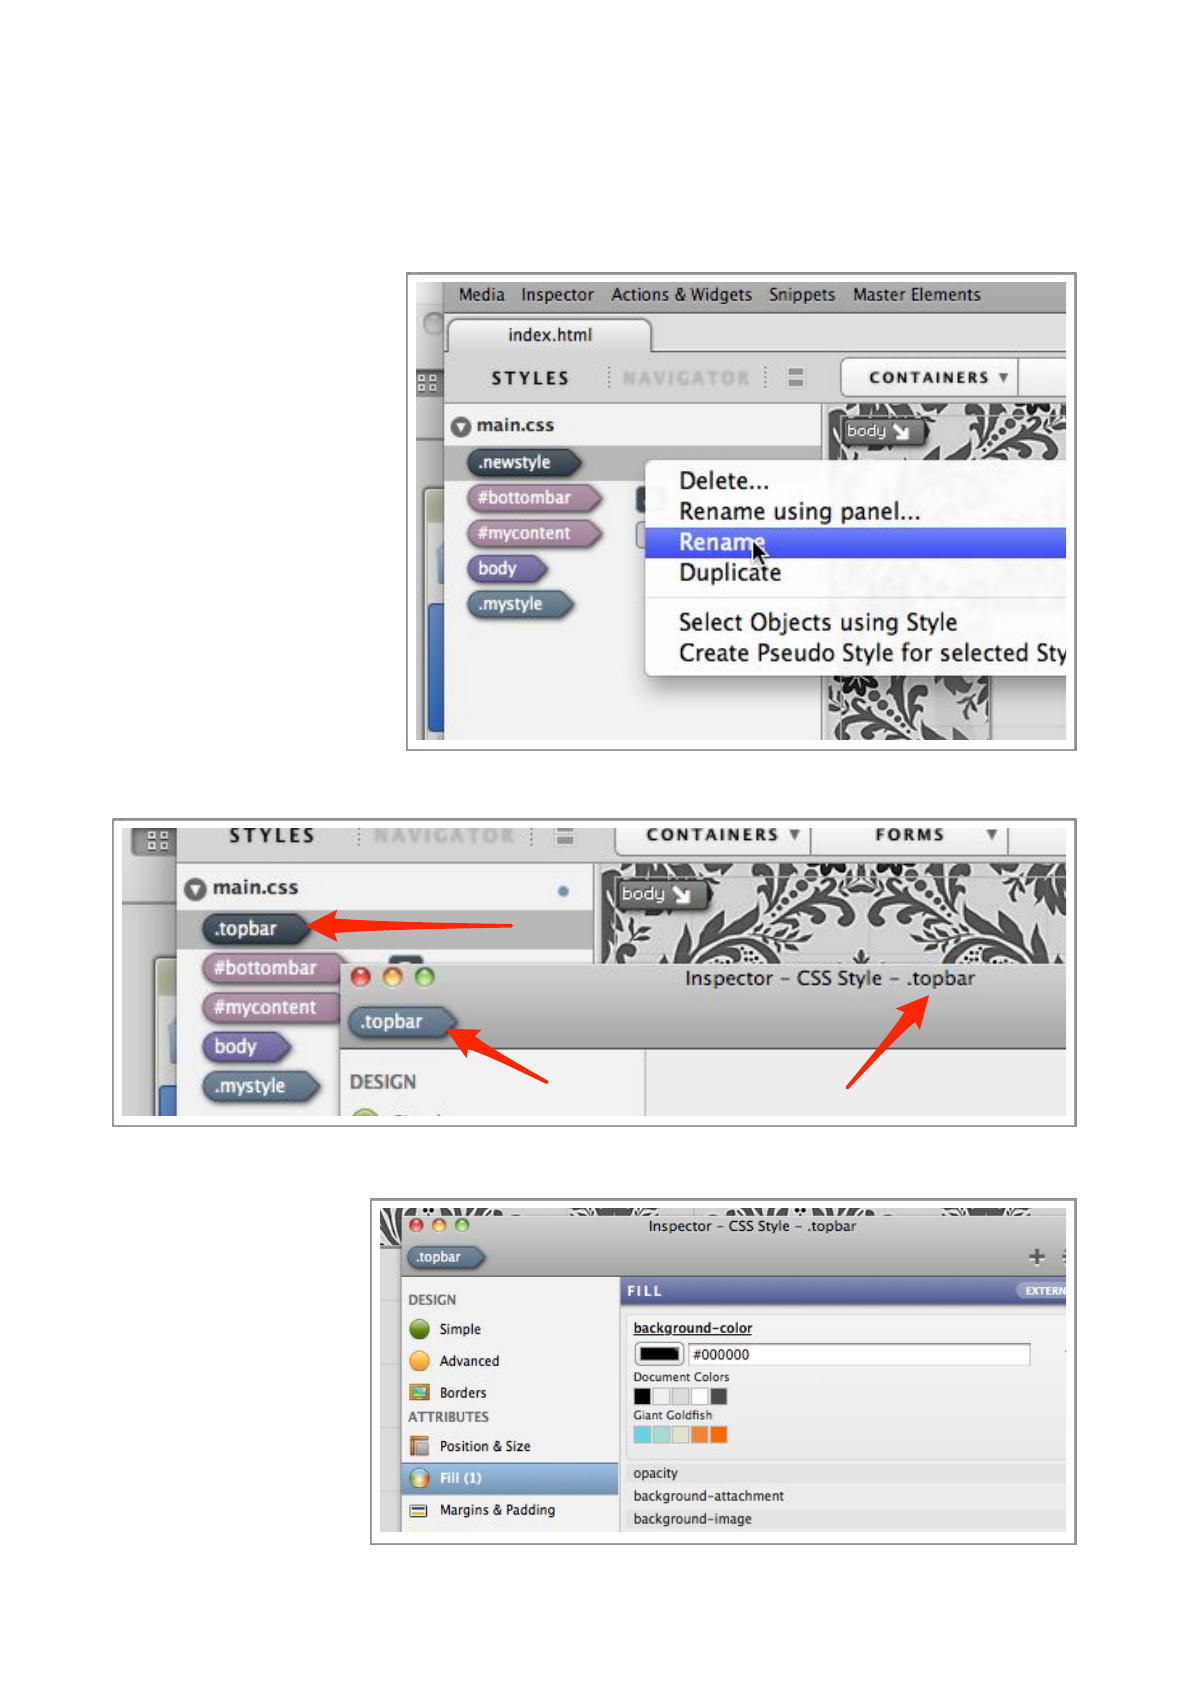
A new style will be be created called ‘.newStyle’, we will rename this to something more
descriptive. Select the style in the list, and either right-click your mouse, or control-click, to
reveal the contextual menu.
Choose ‘Rename’ from the menu, and type in the new name.
In this case, we will call the
new style ‘.topBar’
The preceding ‘.’ in the
name, means it’s a class
style, not an ID style like
we have been using so far.
Step 3
Make sure the ‘.topBar’ is
selected in the Styles list
and open the Inspector,
as usual check to ma ke
sure you are editing the
c o r r e c t o b j e c t i n t h e
Inspector by checking
the values pinpointed by the red arrows.
Select the Fill section of the Inspector and enable the background-color property.
Set the color to the
s a m e c o l o r a s t h e
#bottombar style, the
easiest way to do this
i s t o u s e t h e c o l o r
picker feature of the
Mac OS X color palette
(pictured below.)
An alternative solution
would be to setup a
‘Swatch’ to keep track
Flux QuickStart Guide
34
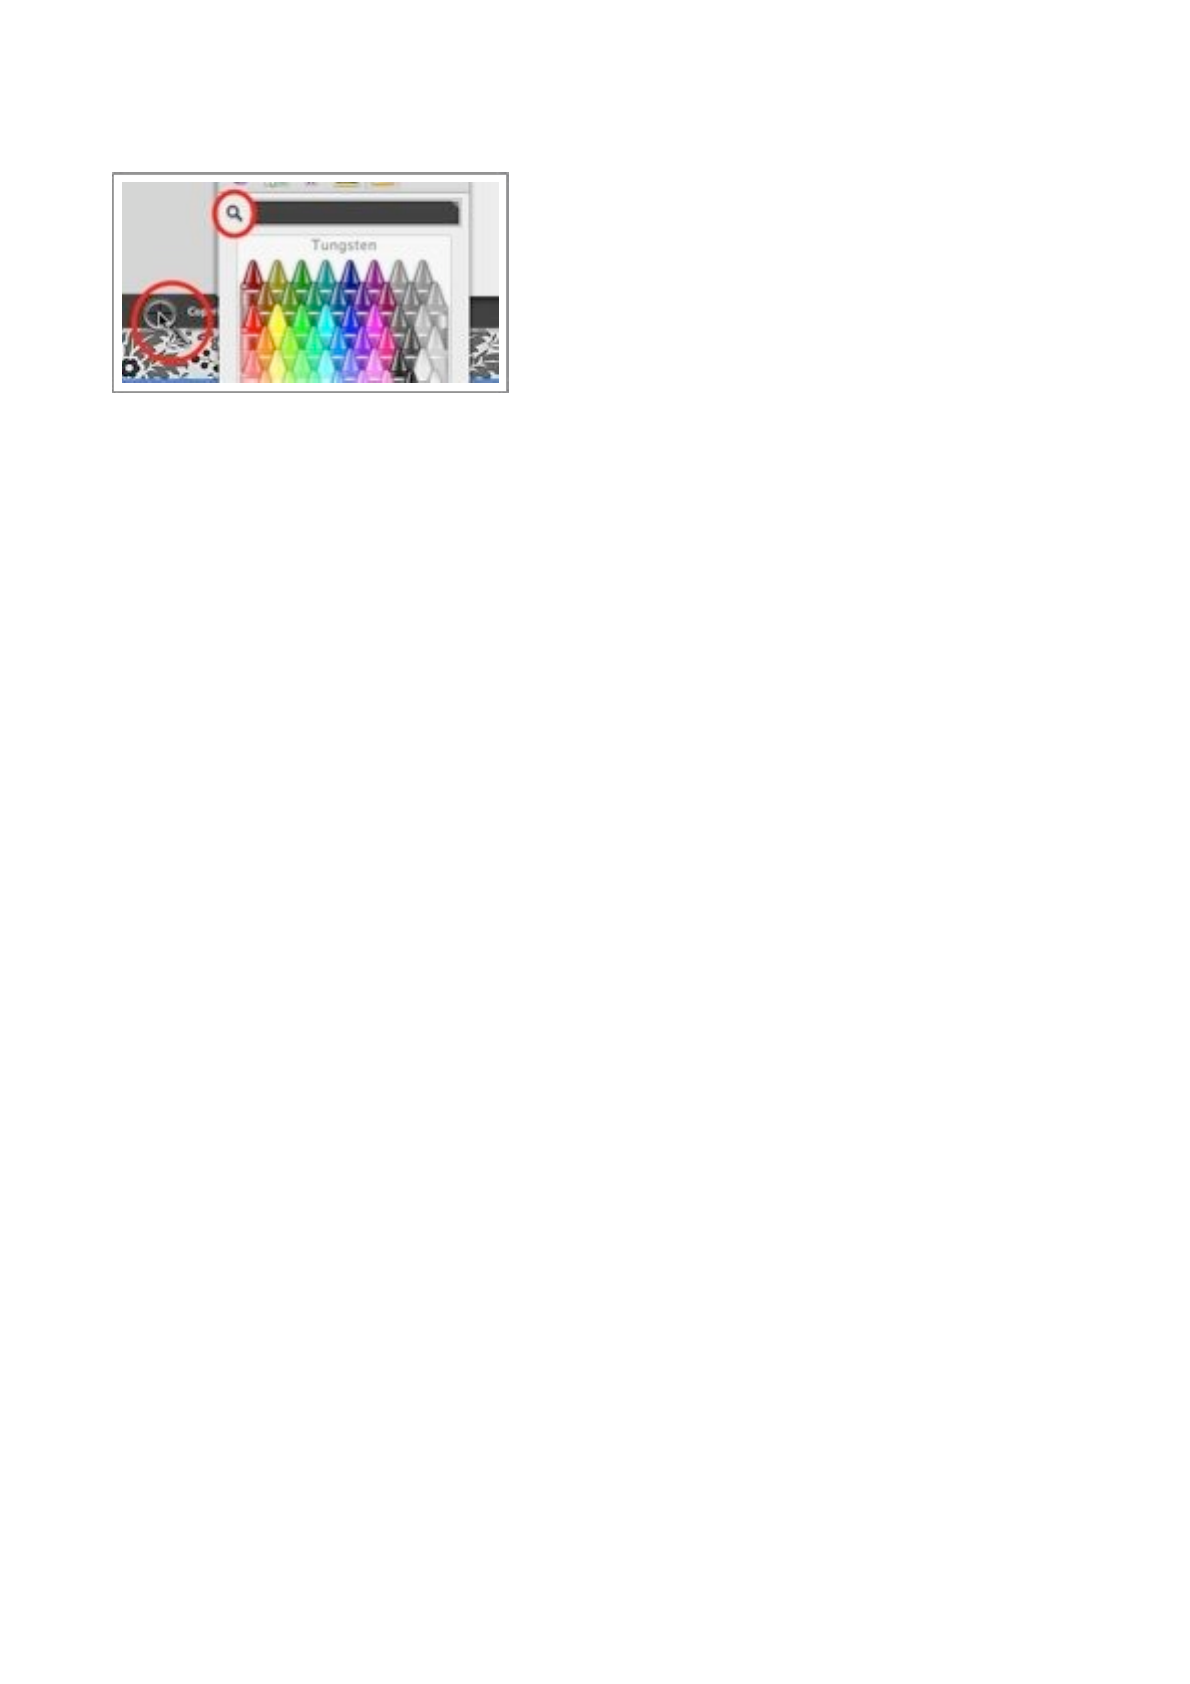
of all your colours, in the screengrab, the ‘Giant Goldfish’ swatch is active.
Flux QuickStart Guide
35
Step 4
You may have noticed that the changes you are making to this style are having no impact on the
look of the page, this is normal, and it’s simply because, although you have created the element,
and the style, we have not linked the two yet, so let’s do that now.
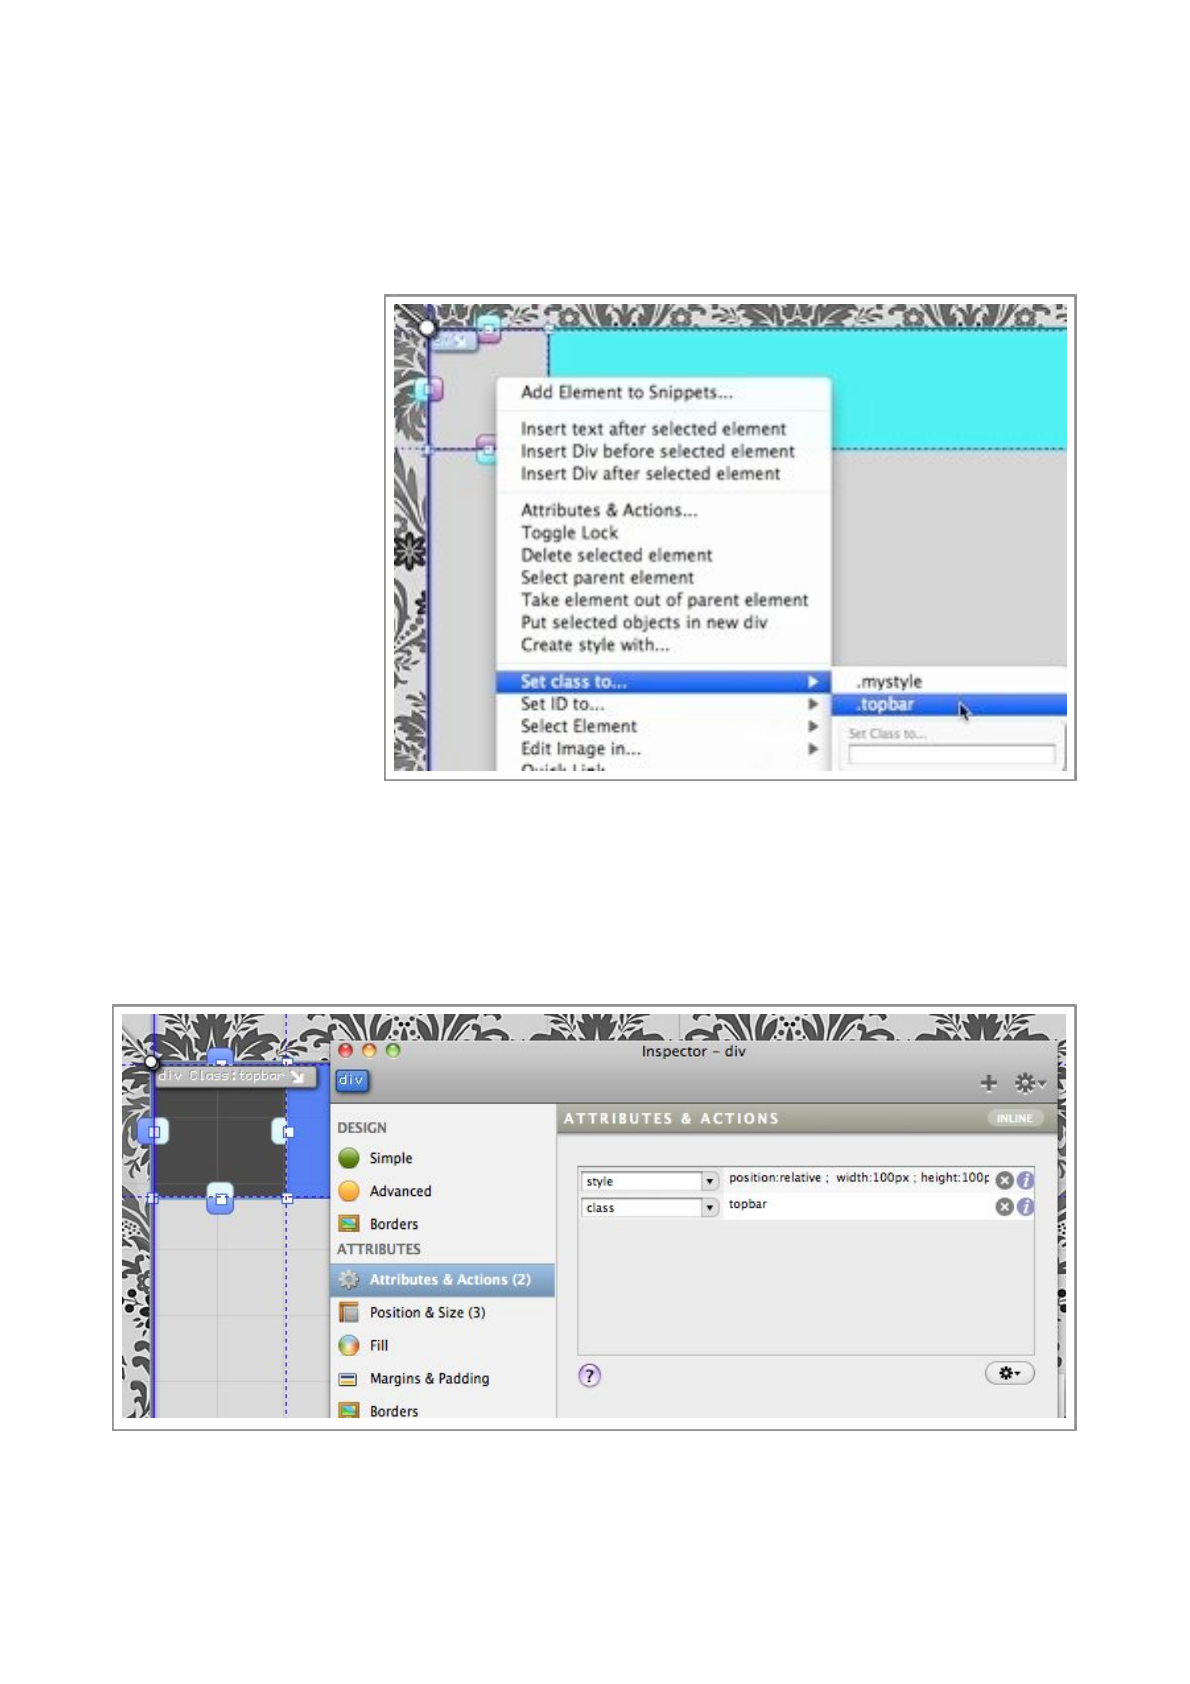
Make sure the floating
div you created earlier is
selected on the page.
Right-click (or control-
click) to pop open the
contextual menu.
Choose the ‘.topbar’
style from the Set class
to... sub-menu.
Yo u h av e n o w l i n ke d
the .topBar style to your
floating div, this means
the floating div will
a d o p t i t ’s s t y l e f r o m
th e . to pBa r sty le . You
will see the floating div
change color immediately to the background-color you setup earlier.
Step 5 - Optional
To understand how the element is linked to the style, select the floating div, and select the
Attributes & Actions section of the Inspector.
You will see all the attributes of the element listed, the ‘style’ attribute is the inline styles, this
value is generated by Flux based on the options you have selected in the Inspector. The other
attribute is ‘class’ which is the value that is linking this element to the ‘.topBar’ style.
Flux QuickStart Guide
36
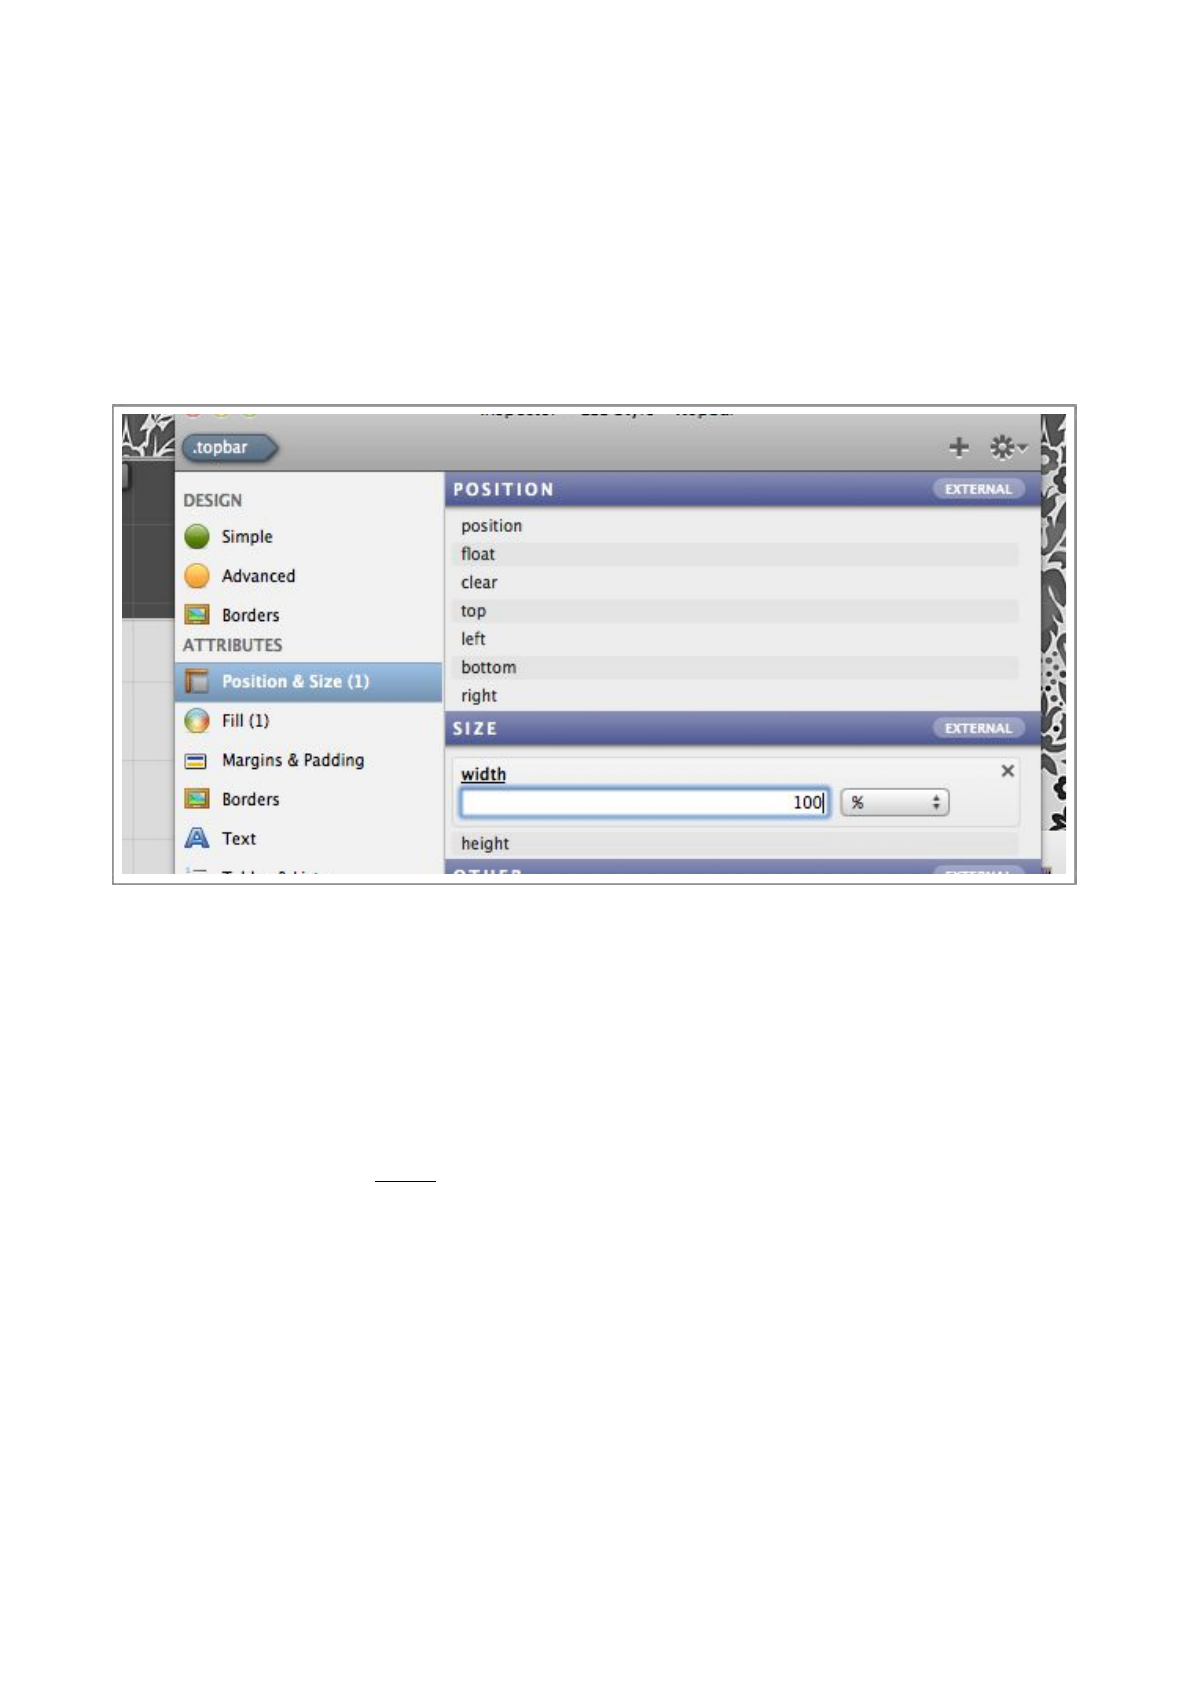
Step 6
Now that the style is linked to the element, any changes we make to the style will be immediately
reflected on the element.
We will now set the width and height property of the style.
Select the .topBar style in the Styles List for editing in the Inspector, and select the Position
& Size section of the Inspector.
As always, make sure the Inspector is editing the correct object, in this case, the .topBar style.
Enable the width property,and set it to 100% as shown in the image to the right.
Enable the height property,and set it to 60px.
You will probably notice that the size of the element hasn’t changed, even though the style is
linked to it. Why? Because the element still has inline styles that are overriding the values in the
external style. Inline values always override external ones.
Flux QuickStart Guide
37
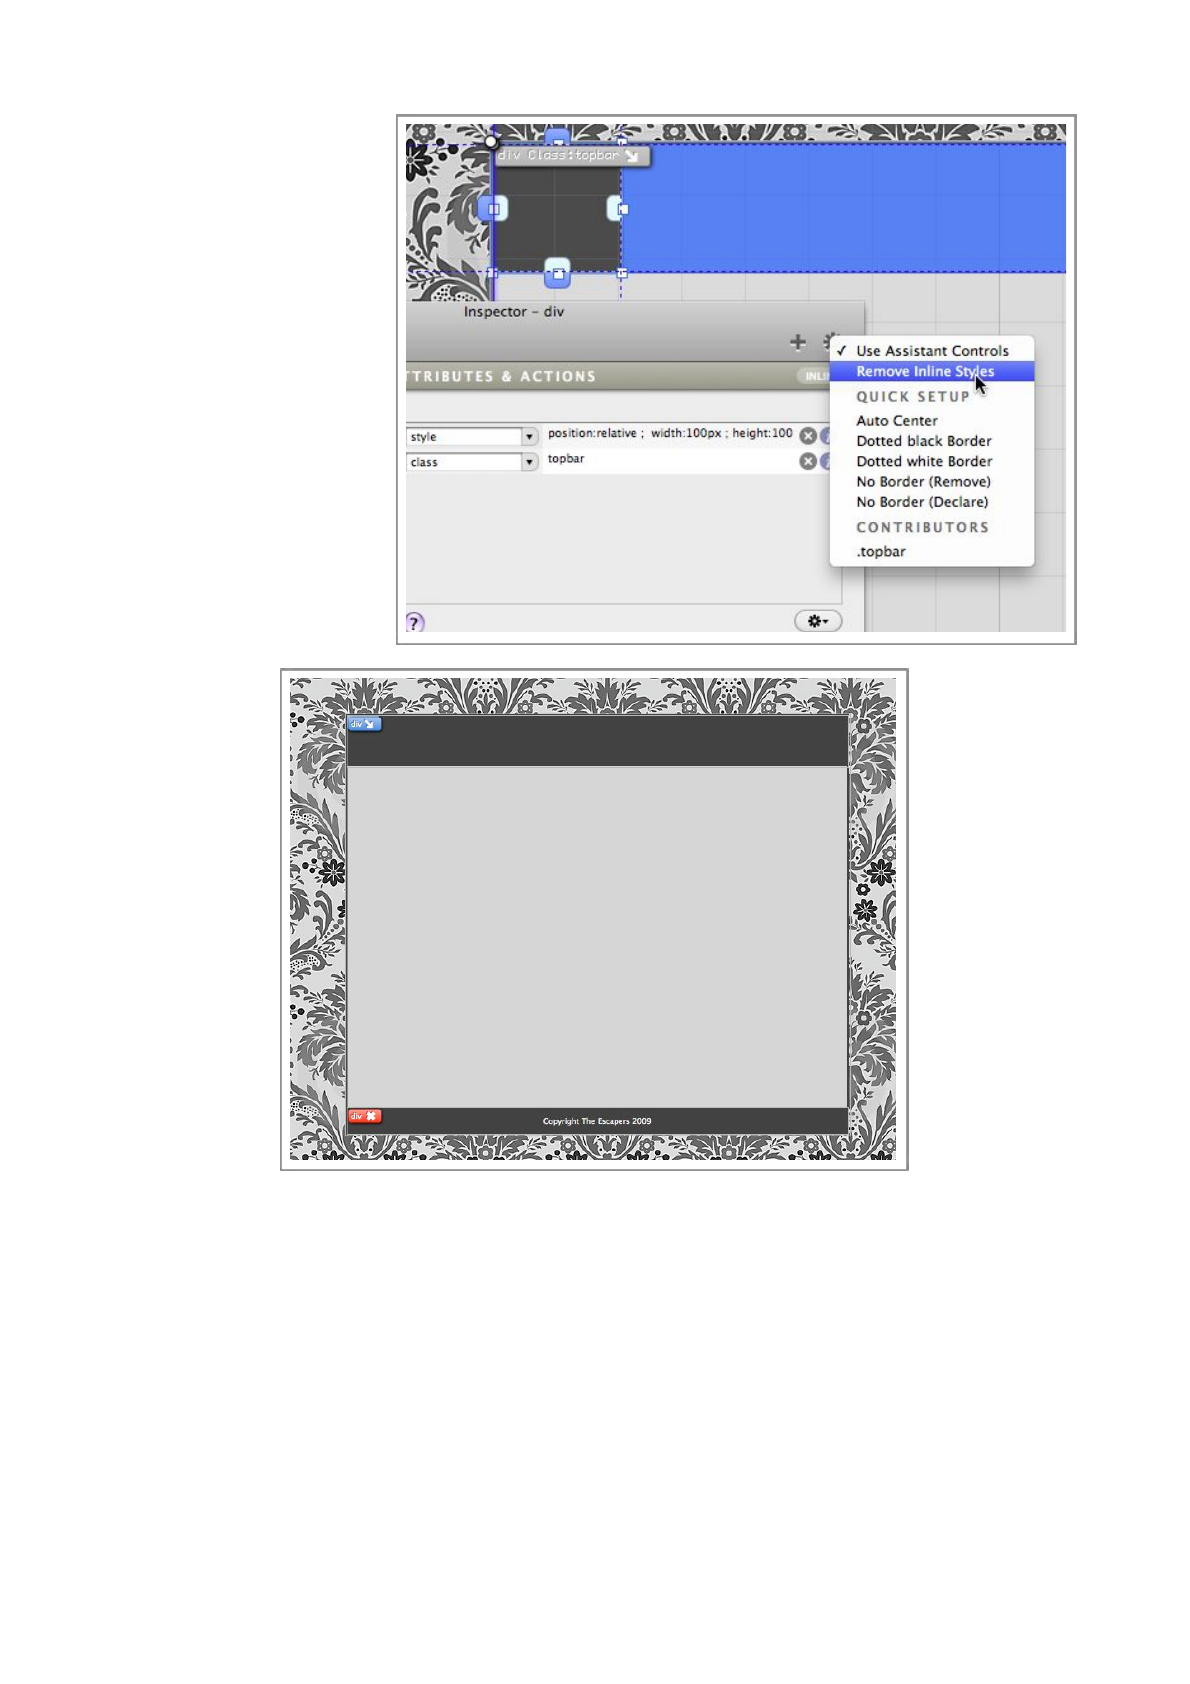
We need to remove the
inline s t y l e s f r o m t h e
element on the page, so
select the element on the
p a g e , o p e n t h e
Inspector and use the
‘Gear’ me nu to choos e
the Remove Inline
Styles function.
When you have done this,
you will see the width and
height changes appear on
the page, as there are no
overriding styles now.
Your page should now
look like the image below.
Now that the style is setup correctly, you can use the drag handles to make the div bigger or
smaller, and the .topBar style will be modified automatically.
Step 7
Flux QuickStart Guide
38

Now, let’s enter some text into the heading
element.
Switch Flux into Text mode, by pressing the button
pointed out in the image on right.
You can now click inside the heading element, due
to the dark background, it may be difficult to see
the text caret, so look carefully.
Yo u c a n n o w t y p e i n a h e a d i n g , we ’ v e e n t e re d
‘Hotel Escape’, but of course, you can enter any text you want.
Once you have entered the text, we want to make it much bigger, so we will apply the H1 style.
Flux QuickStart Guide
39
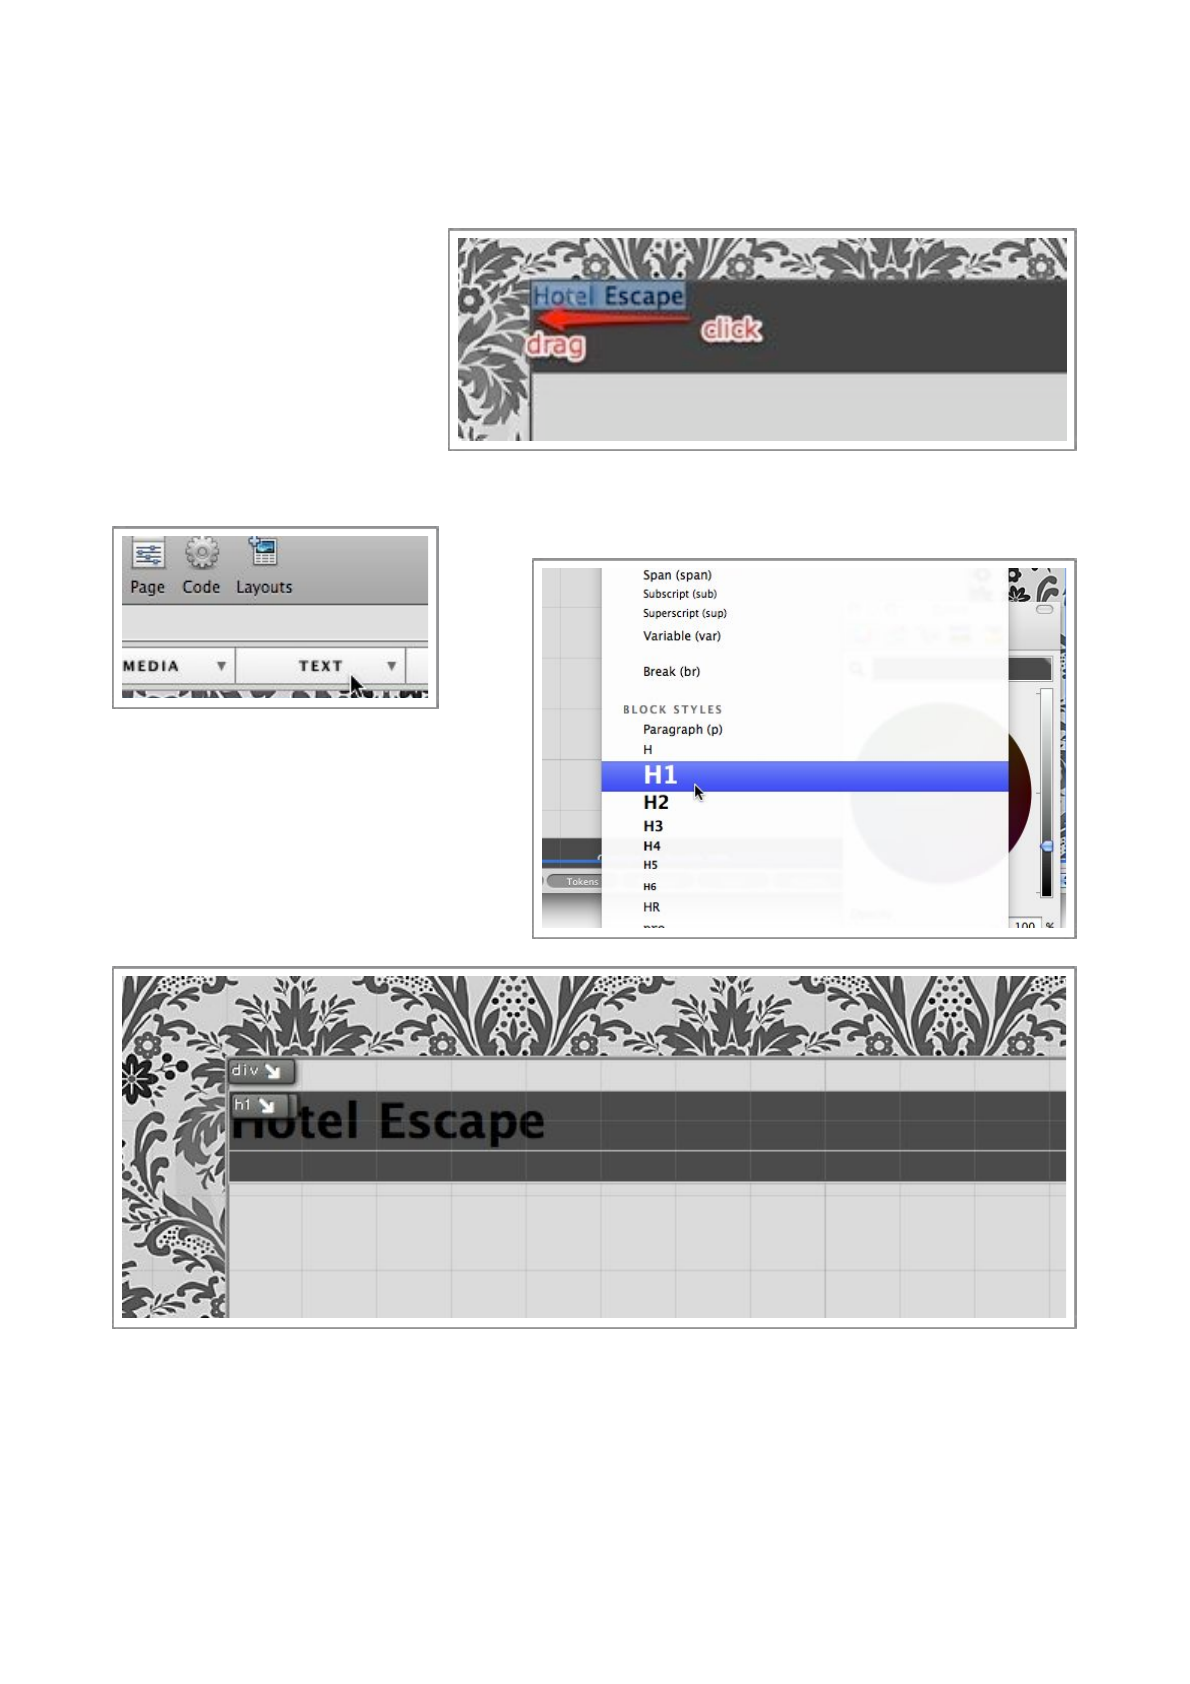
Step 8
Select the text you have just entered (you need to stay in Text mode for this), by clicking and
dragging across the text, just
like you would in a word
processor or an email message.
When you have selected the
text like in the image to the
right, we will apply the H1 tag
to the text.
C l i c k in t h e ‘ Tex t ’ t o o l b a r
button, and choose H1.
Y o u
will
s e e
t h e
text
immediately increase in size , as the
default proper ties of the H1 tag include
a large font size.
Yo u w i l l a l s o h av e n o t i c e d t h a t y o u r g r e y h e a d i n g b o x h a s m o ve d d o w n t h e p a g e a l i t t l e b i t , t h i s i s
due to other (unwanted) default properties of the H1 tag, we will learn how to correct this in the
next chapter.
Flux QuickStart Guide
40
Setting up the H1 style
So far, we’ve setup class styles and id styles, now we are going to setup a different type of style,
often called an override style. It’s often called this because they override existing styles, like ‘H1’ or
‘b’.
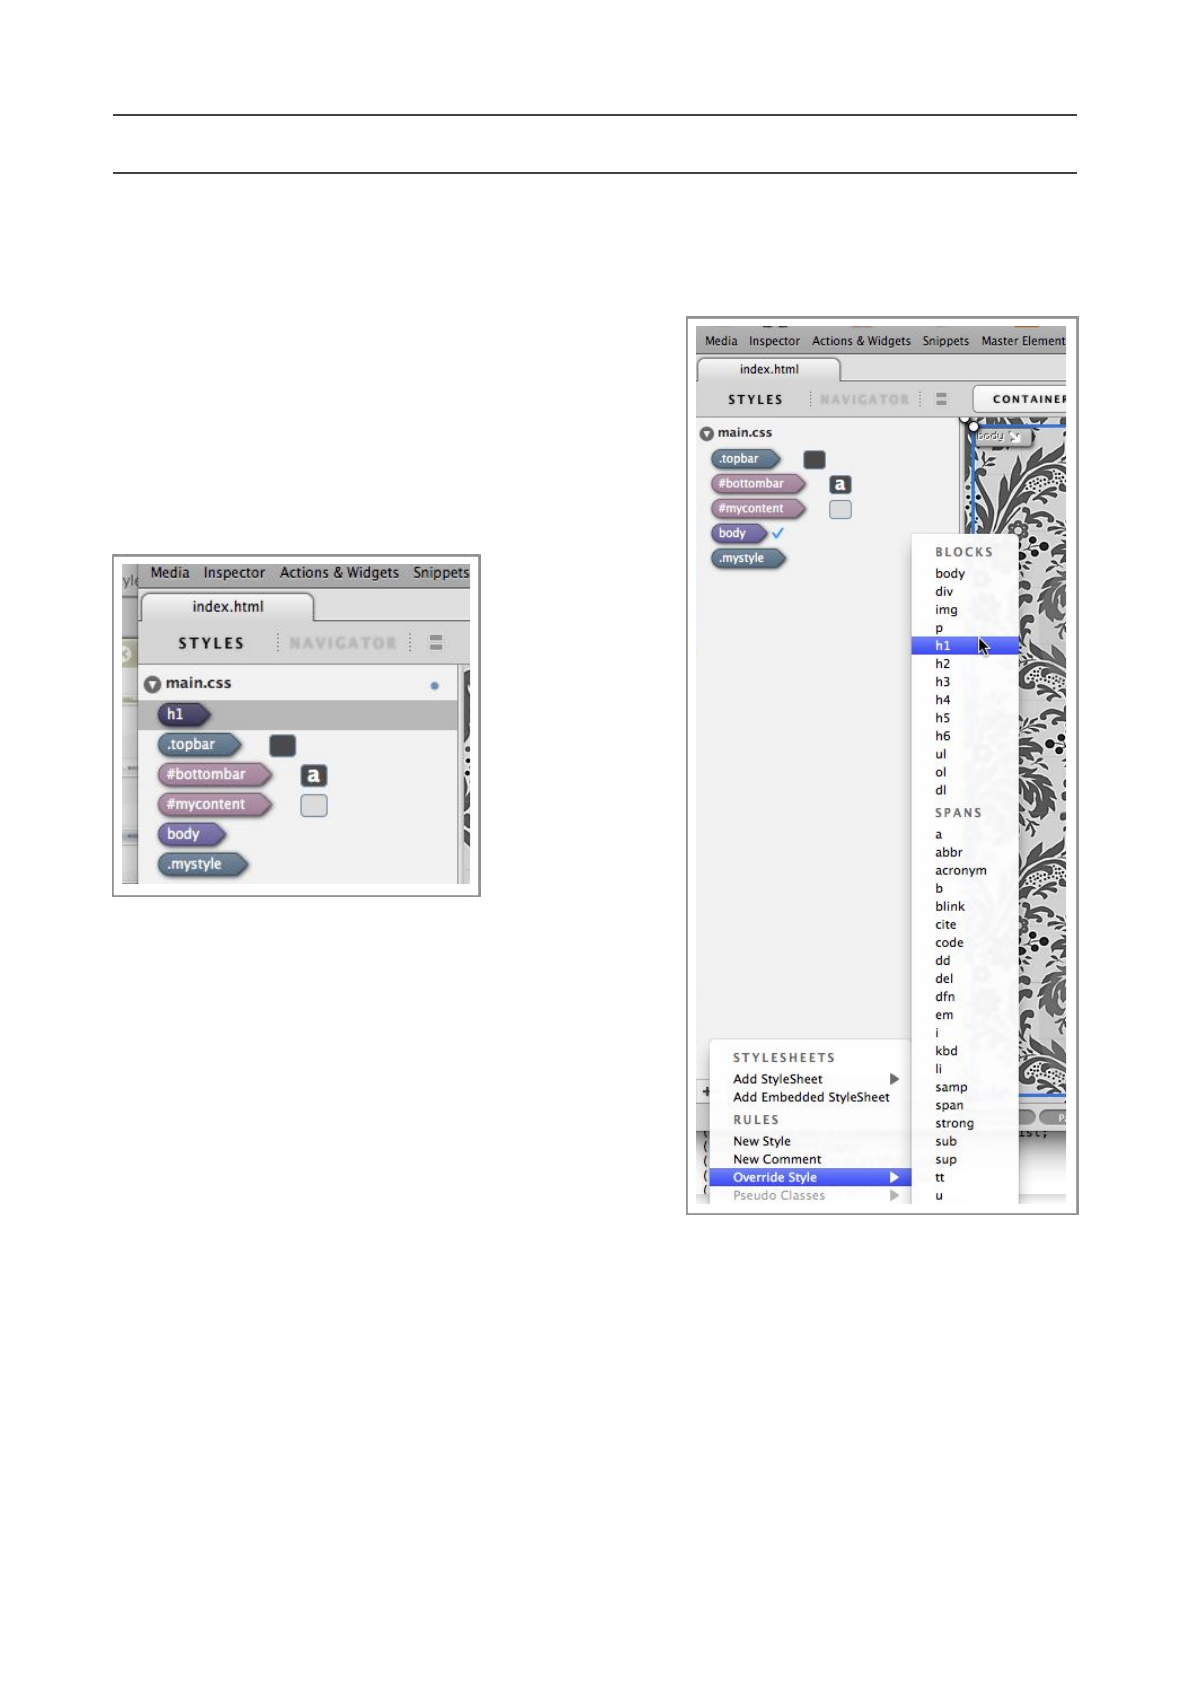
Step 1
Our first job is to create the style, Flux makes this
easy by listing almost all of the styles we can override,
so we simply need to choose it from a pop-up menu
(pictured right).
Once the new
h1 s t y l e h a s
been created,
we need to
change a few
p r o p e r t i e s i n
the Inspector
to make it look
t h e w a y w e
want.
Make sure the
h1 style is selected (pictured left), and open the
Inspector.
As usual, double-check the Inspector is editing the
correct element by checking the toolbar.
Step 2
The first properties we will define in the h1 style will
be the margin-top and margin-bottom properties. It’s
these properties that are causing the empty gap at the
top of the main container.
Flux QuickStart Guide
41
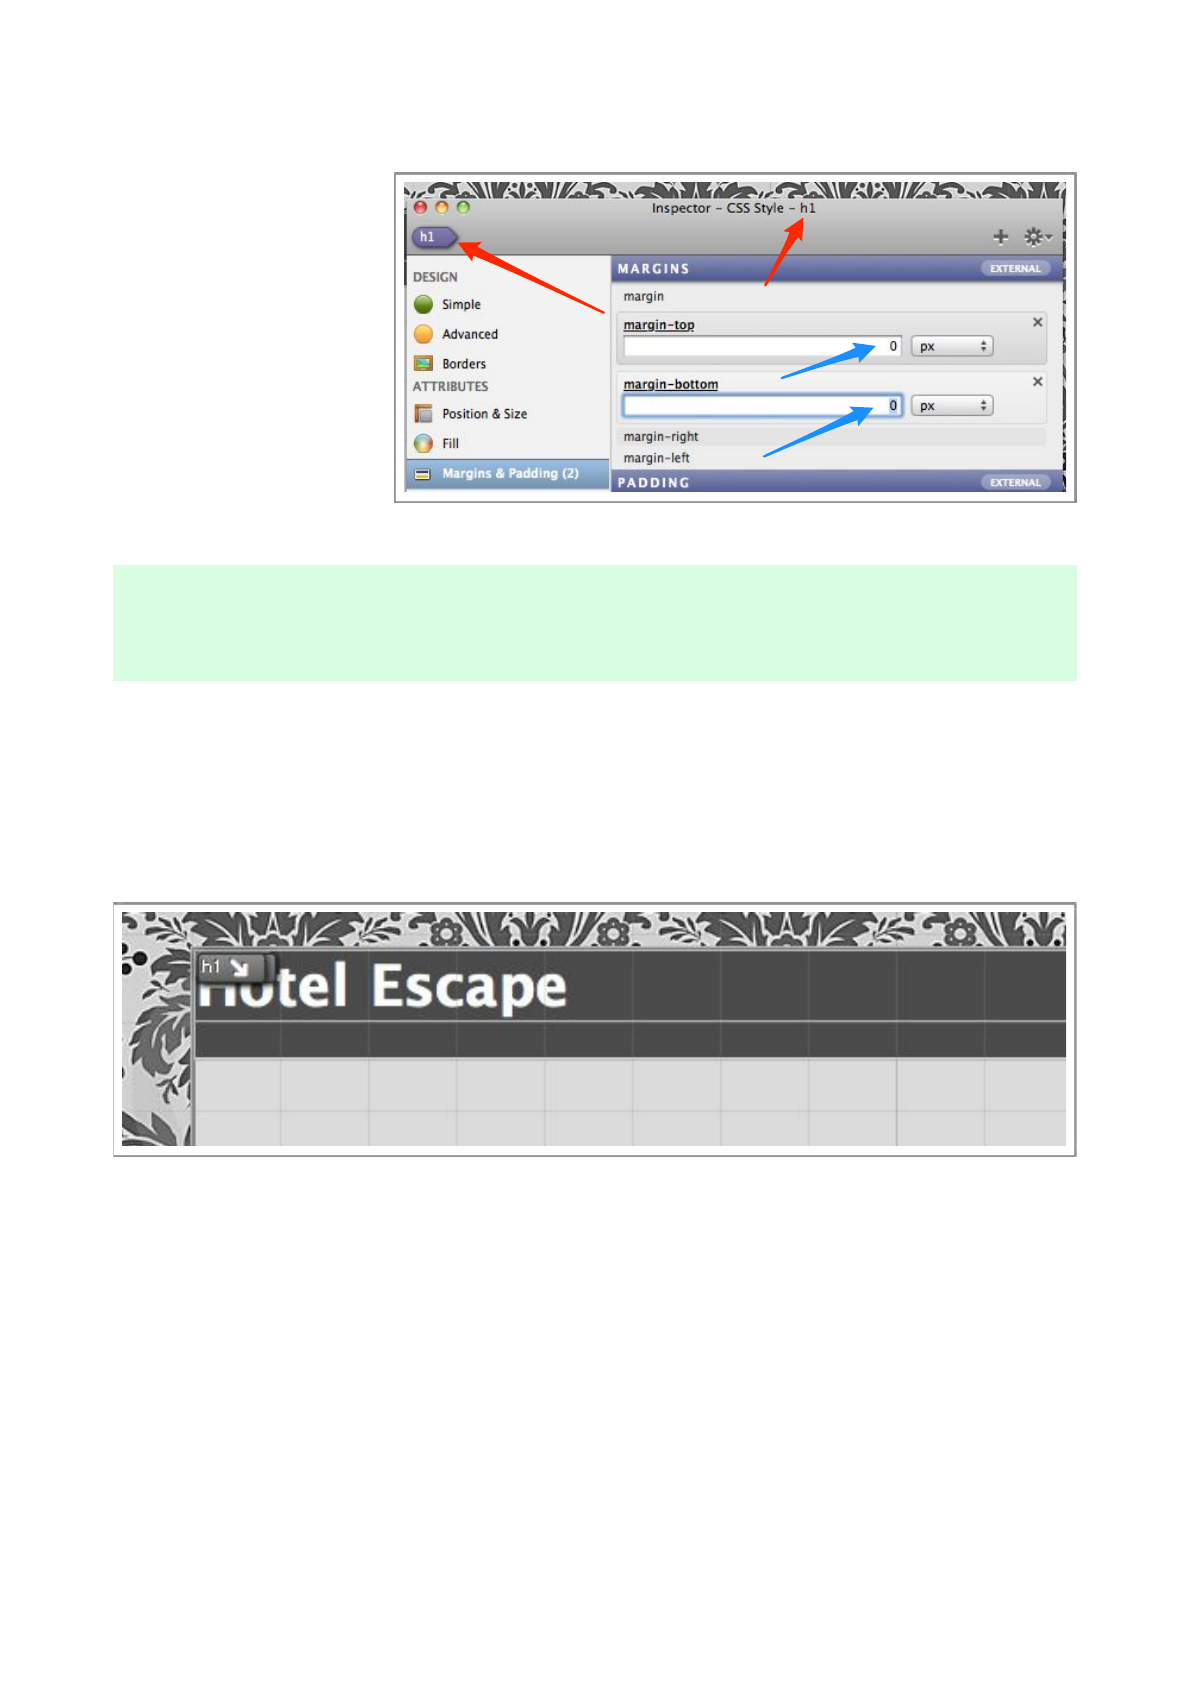
To define these properties, select the Margins & Padding section of the Inspector, a n d
e n a b l e , a n d s e t b o t h
properties to 0px.
You will immediately see
t h e u n w a n t e d g a p
disappear, this is because
the H1 style (and almost
all others) have default
values. To make matters
more complicated,
different web browsers
have different defaults!
The are CSS packages that ‘reset’ these default values such as BluePrint, these packages are fully compatible
with Flux, and are worth investigating for more complex sites.
Step 3
Now, lets set the color. Making sure the Inspector is still editing the H1 style, switch to the
Tex t section, and enable the color property.
As we have done before, use the color well to set the color to white.
Your heading should now look like the image above.
Step 4
We also need to move the text downwards, and to the right to make it look a little better.
We could make these changes in the Inspector, but for a learning exercise, we will use the on
page controls.
Flux QuickStart Guide
42
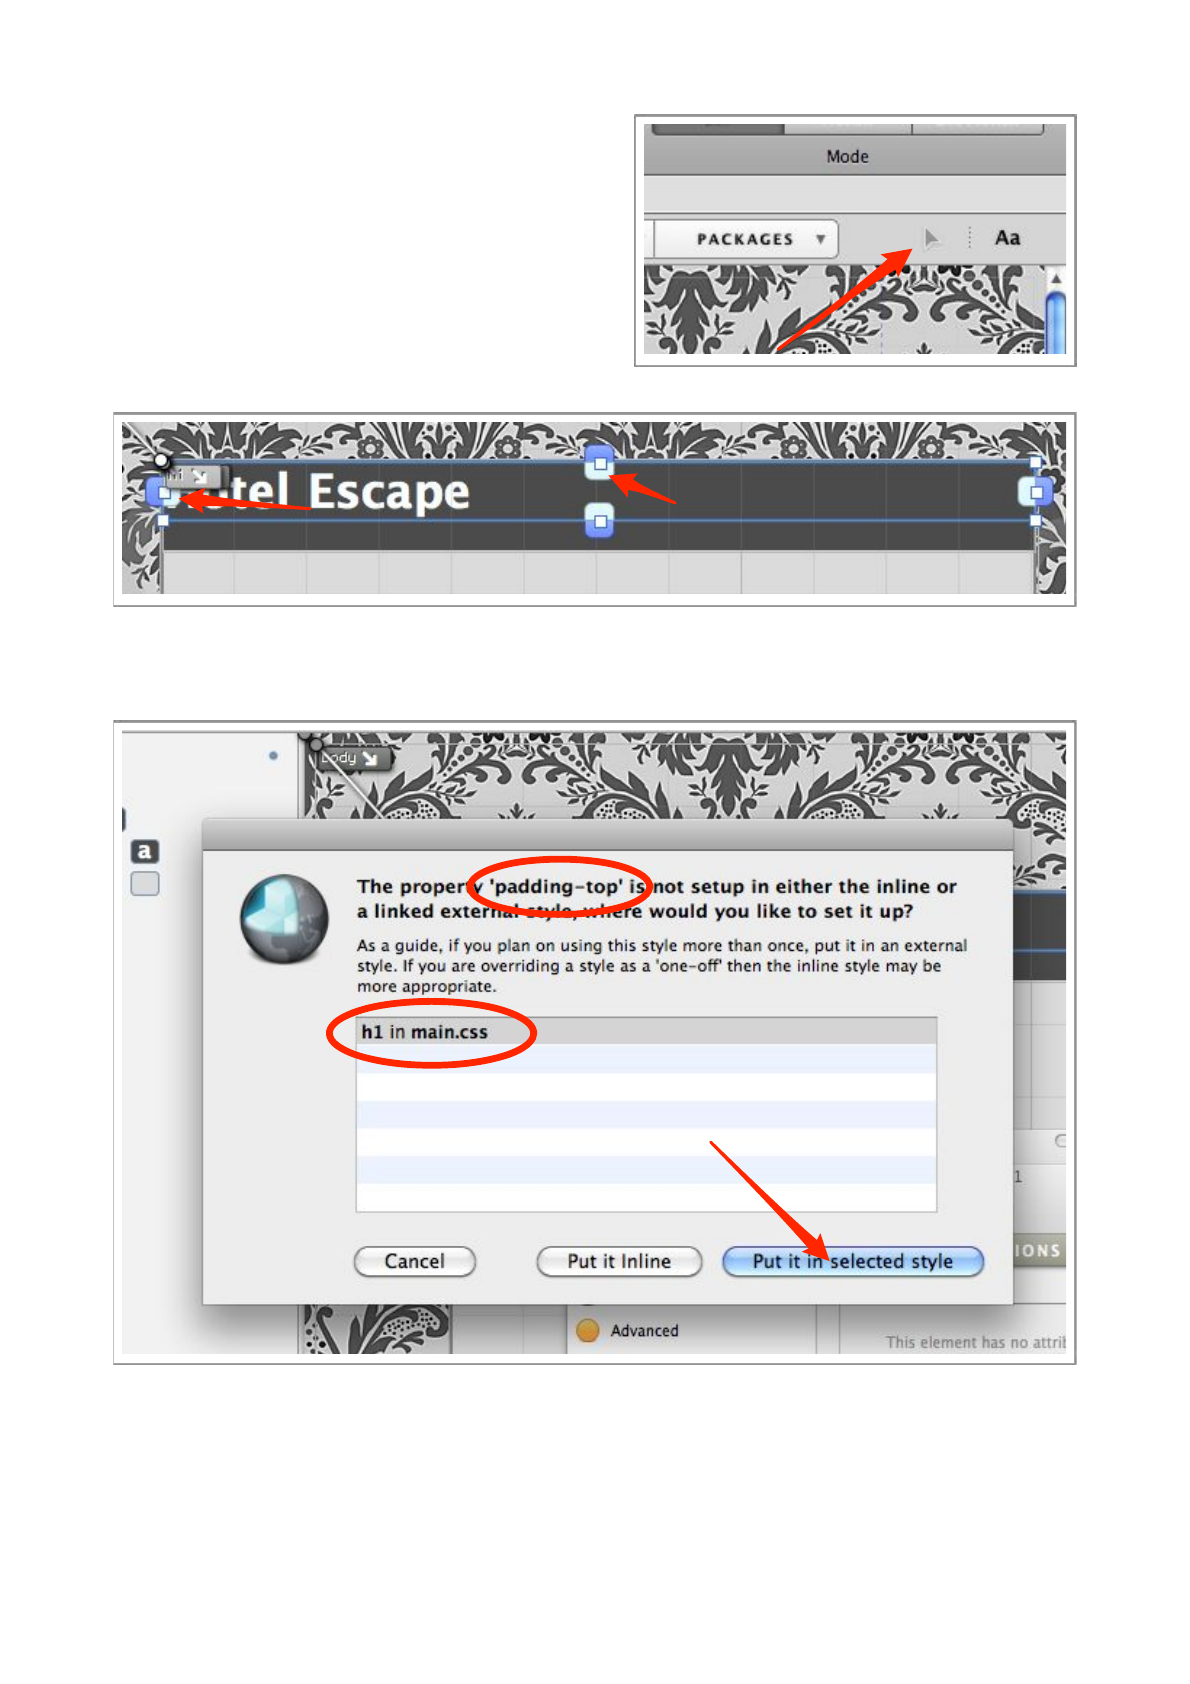
Switch to Edit mode, by pressing the button
pictured to the right.
Make the ‘H1’ element selected by clicking on it.
You can tell which is the selected element as it’s
handles will be available for use.
To alter the padding, drag the handles pointed to
by the red arrows, note, your handles may be a
different color. Let’s start with the top handle.
As you have not set these properties before , a dialog will appear to ask you where you want to save
them.
In the list, you will see your H1 style, choose this location, and press ‘Put it in selected style’.
Repeat the process for the left handle, set both to around 10px. The indicator pictured below will
assist you in setting the correct value.
Flux QuickStart Guide
43
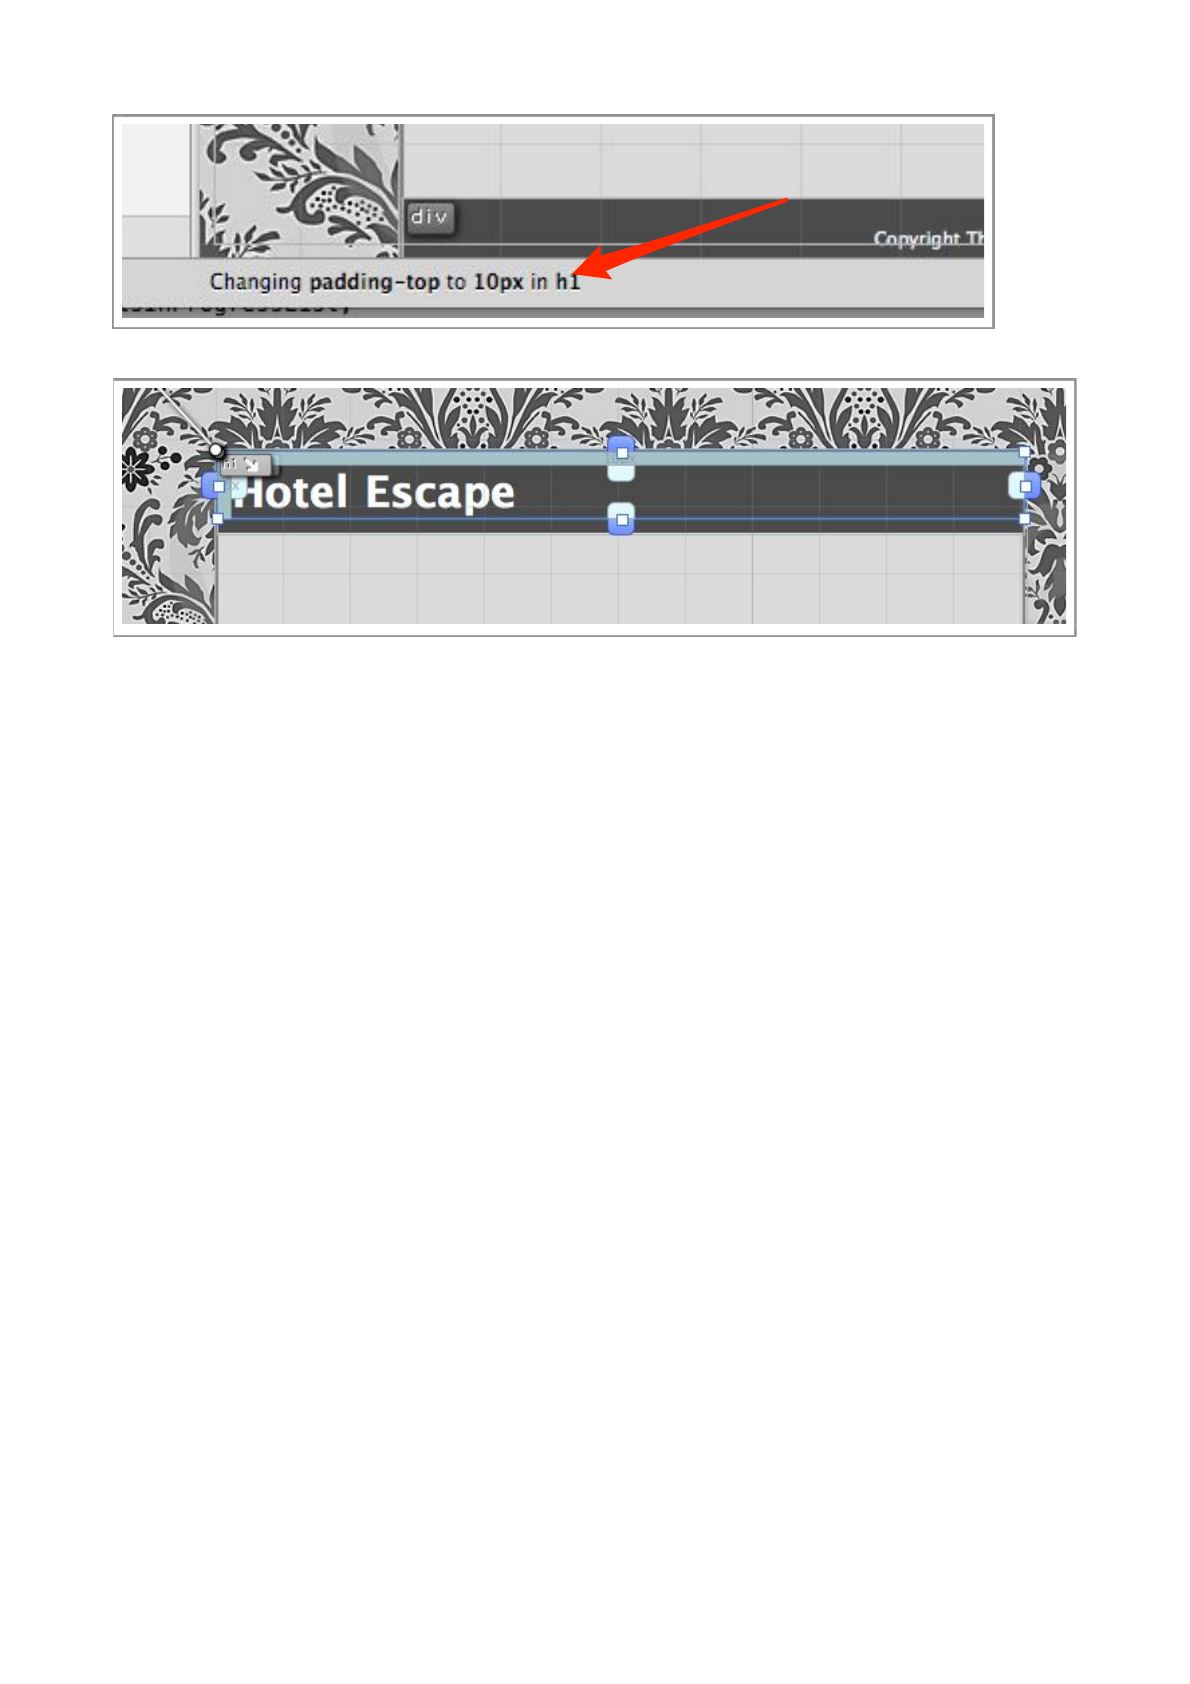
Your heading should now look something like the image below.
Flux QuickStart Guide
44
Create a subheading
We will now make a subheading, under the main heading, you could use an almost identical
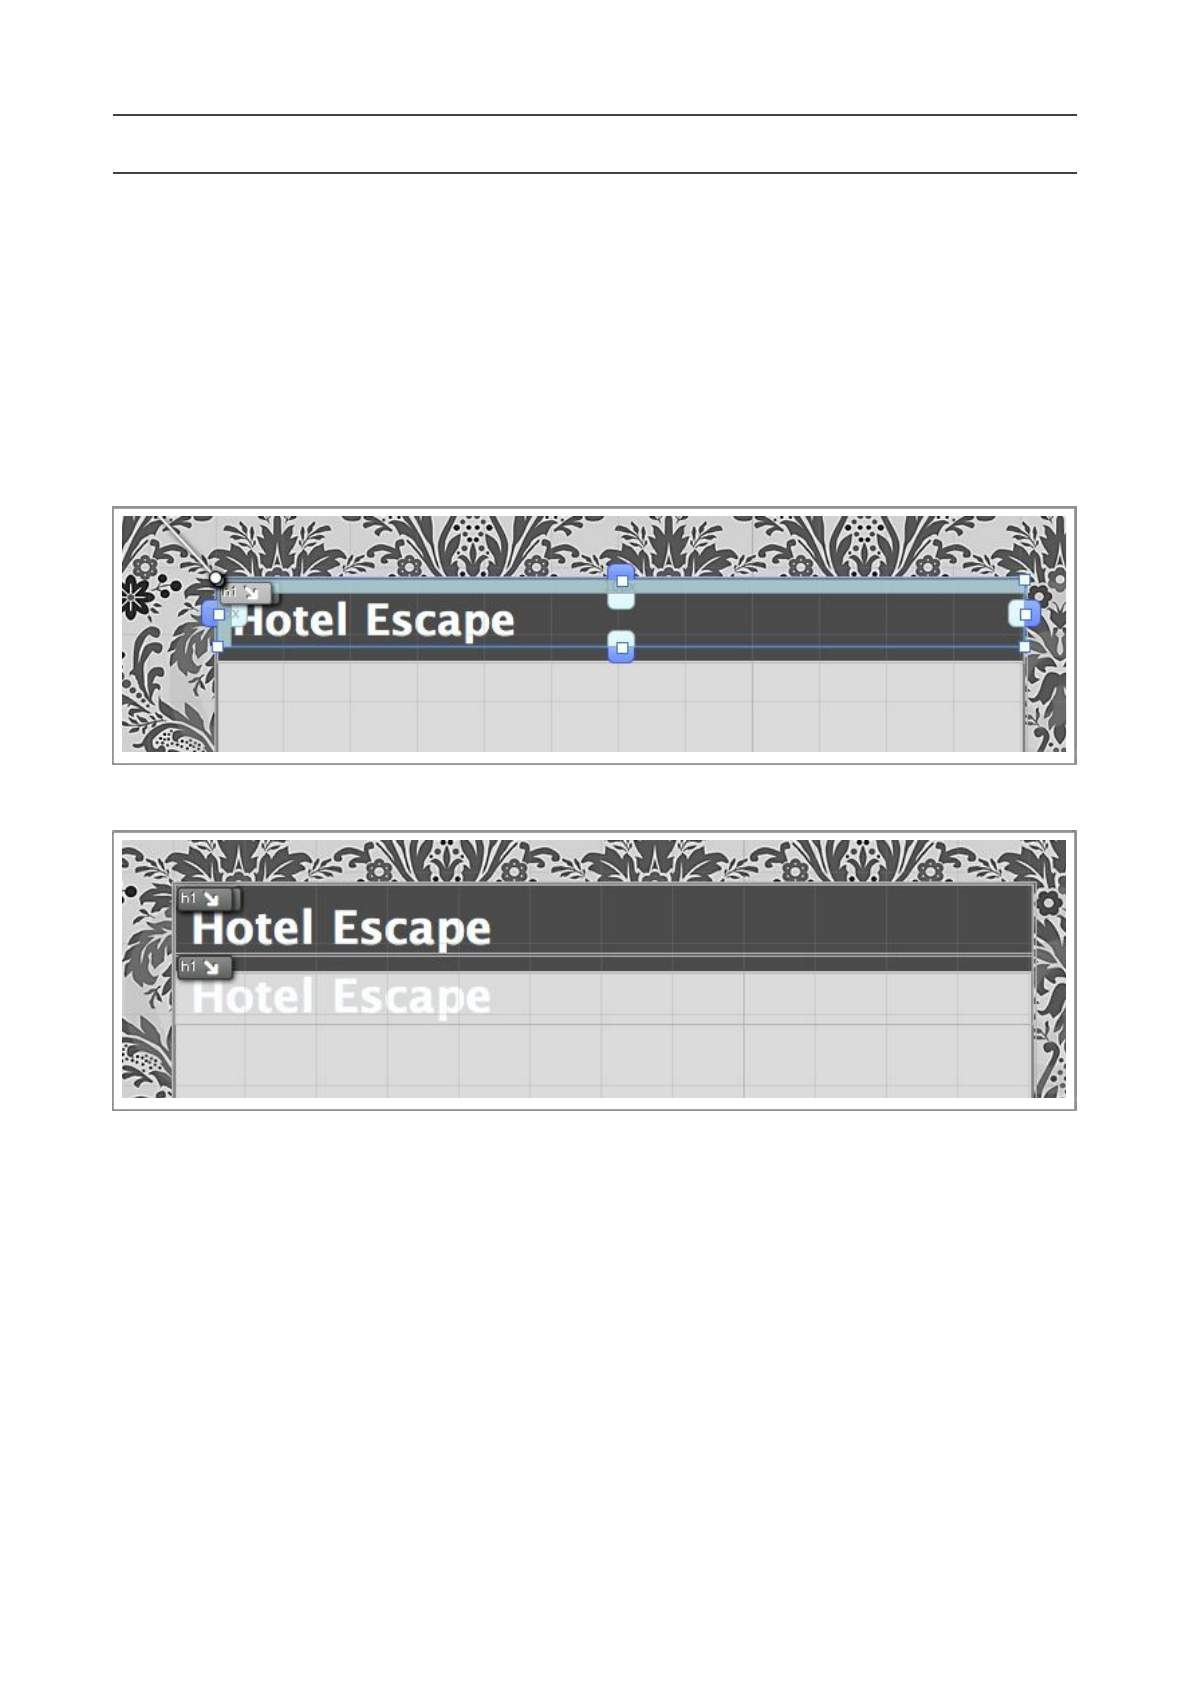
technique to the main heading, but as a learning exercise, we will do a little differently.
Step 1
Select the H1 element and press Command-C to copy it to the clipboard.
Step 2
Select the containing element (the dark gray box, pictured below)
Press Command-V to paste, and you should end up with something like the image below.
Step 3
We need to now change the element we have just pasted. We will make the changes in the Code
Editor, press Command-3 to open it.
Flux QuickStart Guide
45
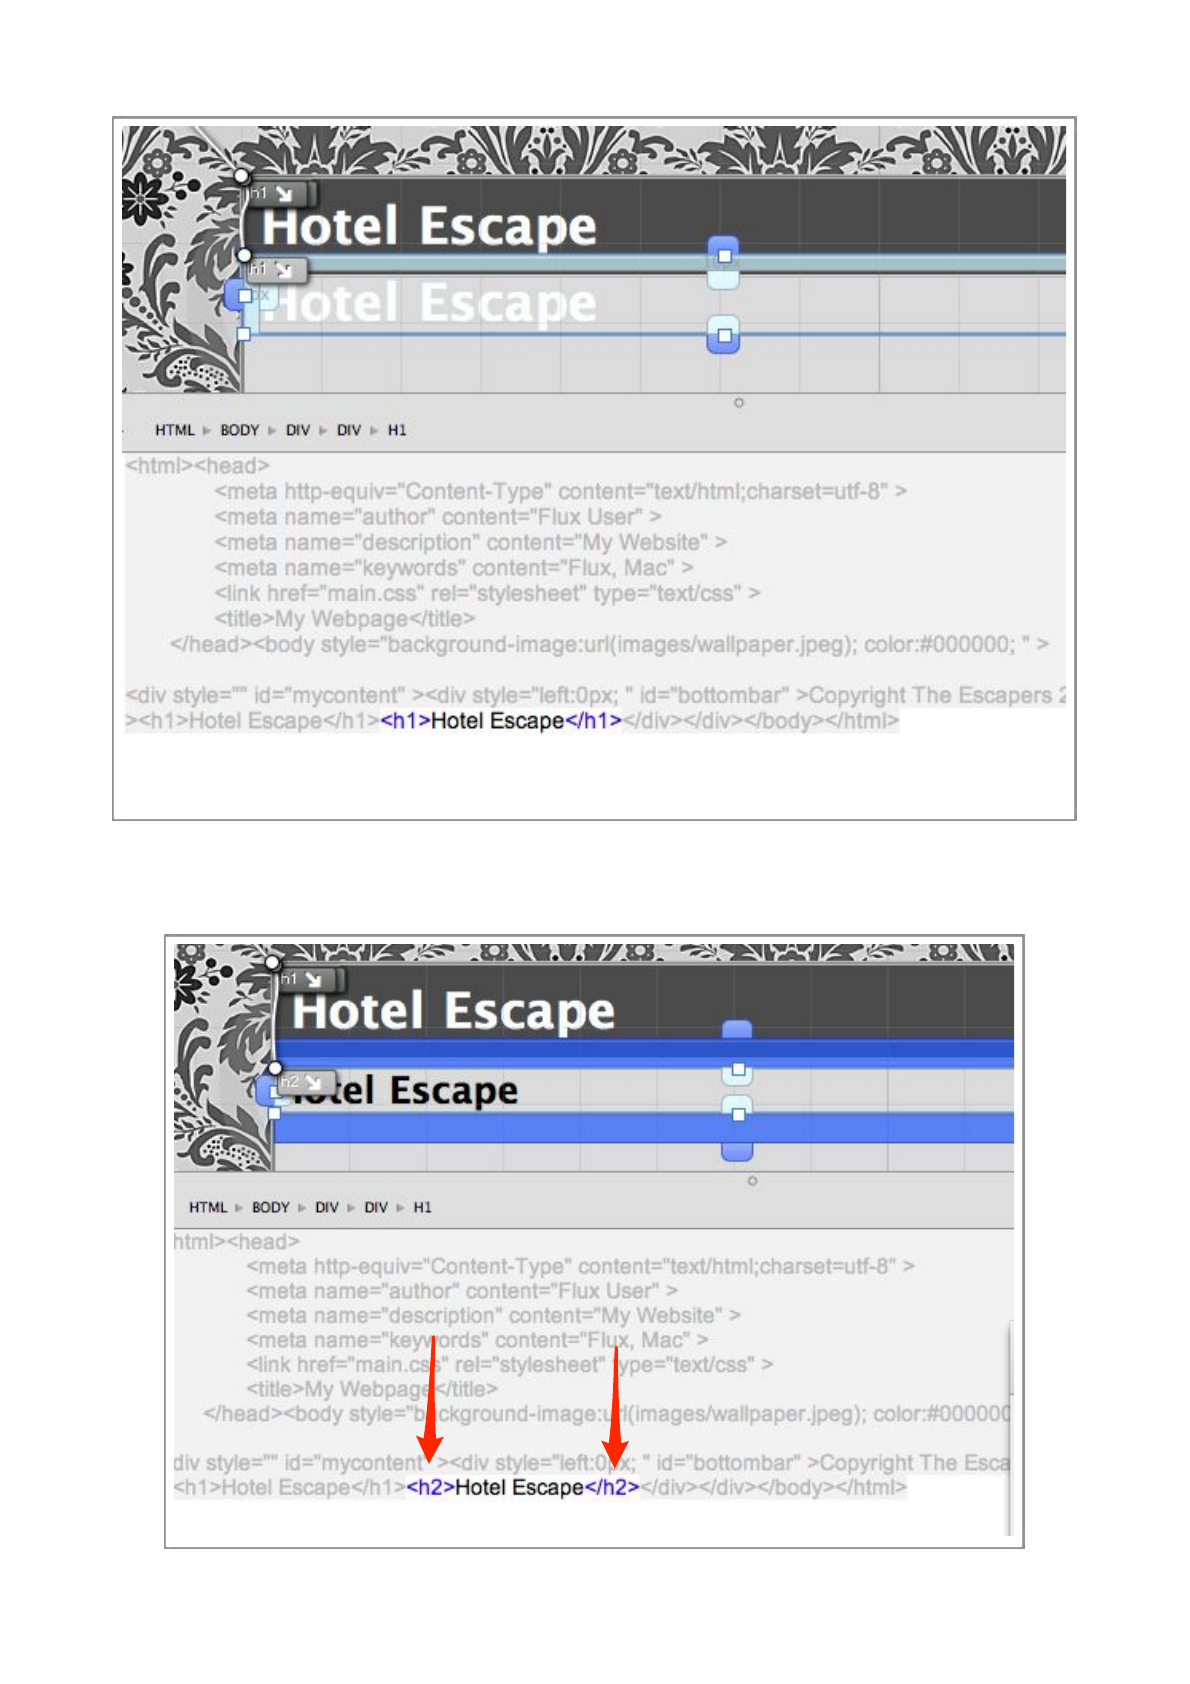
The Code Editor will display the underlying HTML code of any object you select on the page.
To try it out, select the second of the two ‘Hotel Escape’ elements, and change the tags so it looks
like the image below.
Flux QuickStart Guide
46
As you change the H1 tags to become H2 tags, you will see the page change, the text will look
different,as our H1 style is no longer taking effect. We need to create a H2 style.
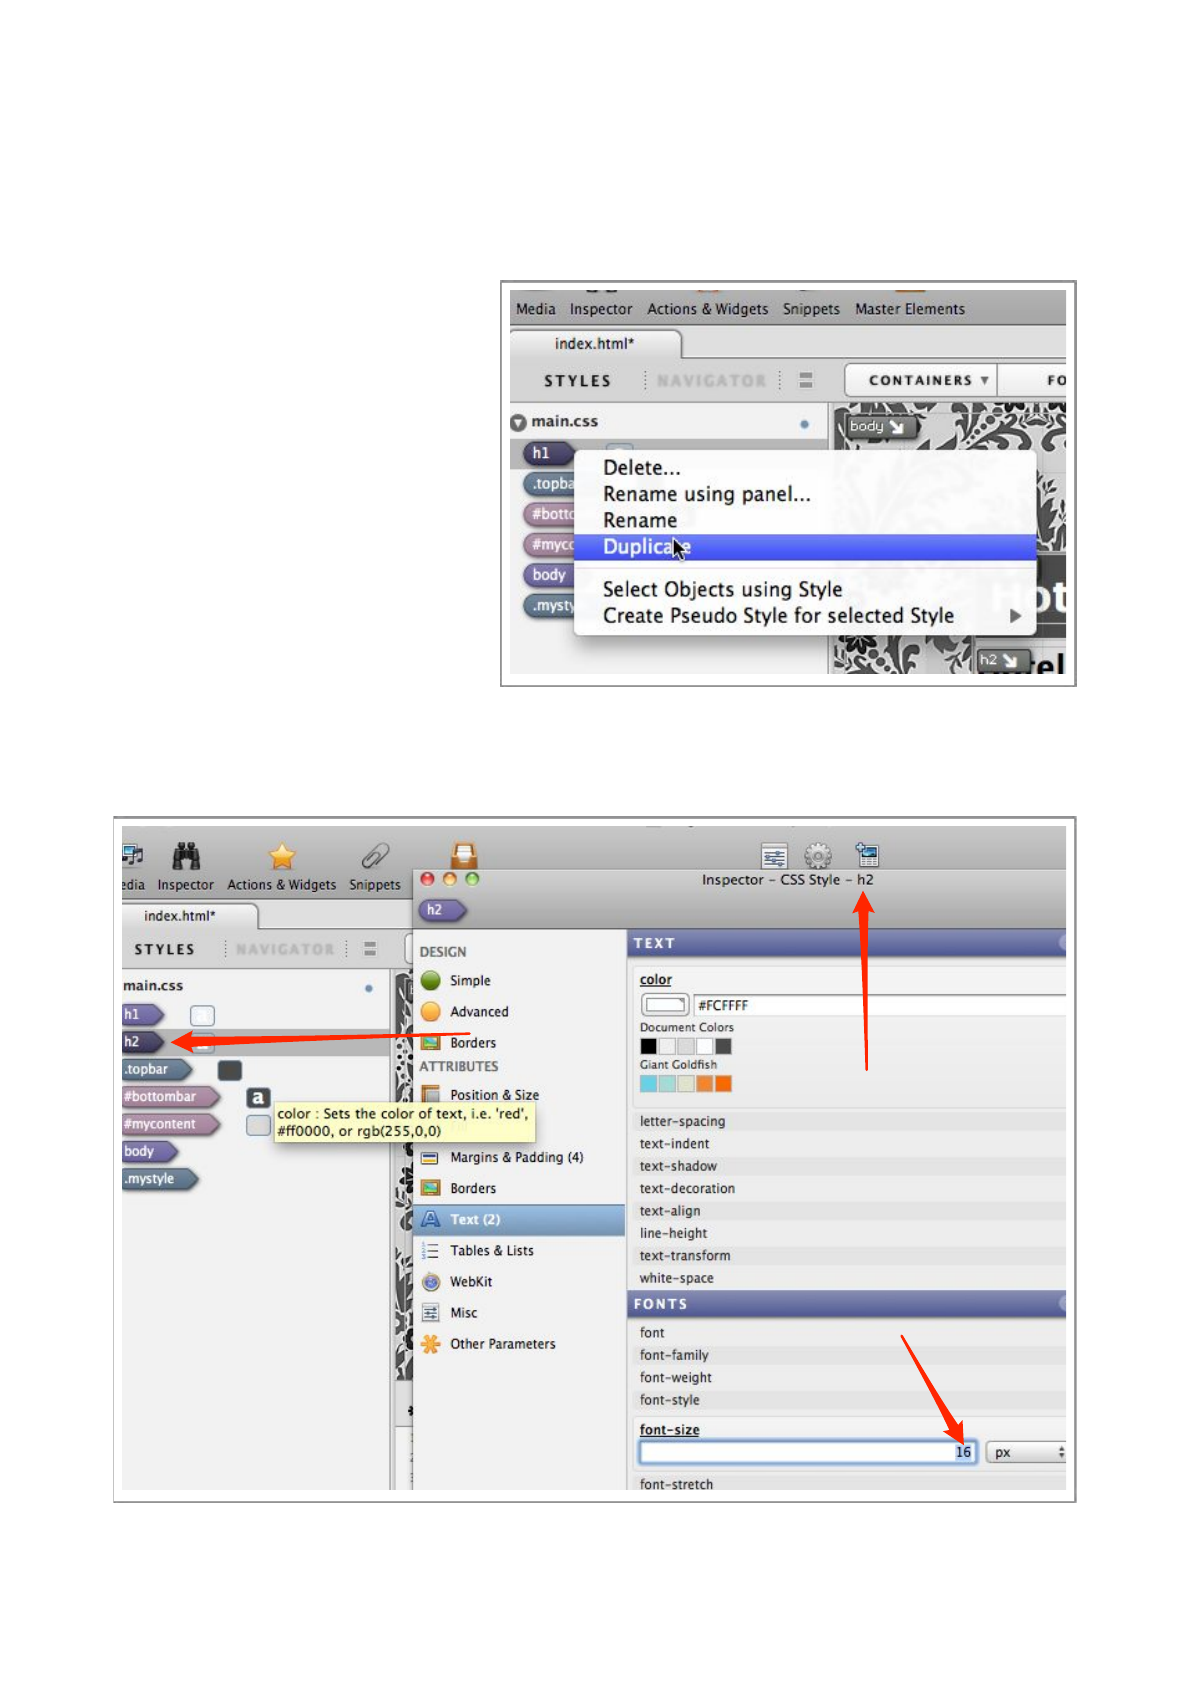
Step 4
To c r e a t e t h e H2 style, we will
duplicate the H1 style. To d o t h i s ,
simply select the H1 style in the
Styles List and choose Duplicate
from the contextual menu.
Then, simply rename the style as we
have done before, change the name
from h1 to h2.
You will see the second ‘Hotel
Escape’ element on the page change
size and turn white.
It has become white, as it’s now
adopting it’s style from our newly
created h2 style.
It has shrunk in size because the default style of a H2 element is smaller than the default size of a
H1 element.
Flux QuickStart Guide
47
Using the Inspector, change the font-size property of the h2 style to an appropriate side,
somewhere between 12px and 16px (see image above).
The heading should now look like the image below, so all we need to do now, is to change the
text, again, we will use the Code Editor.
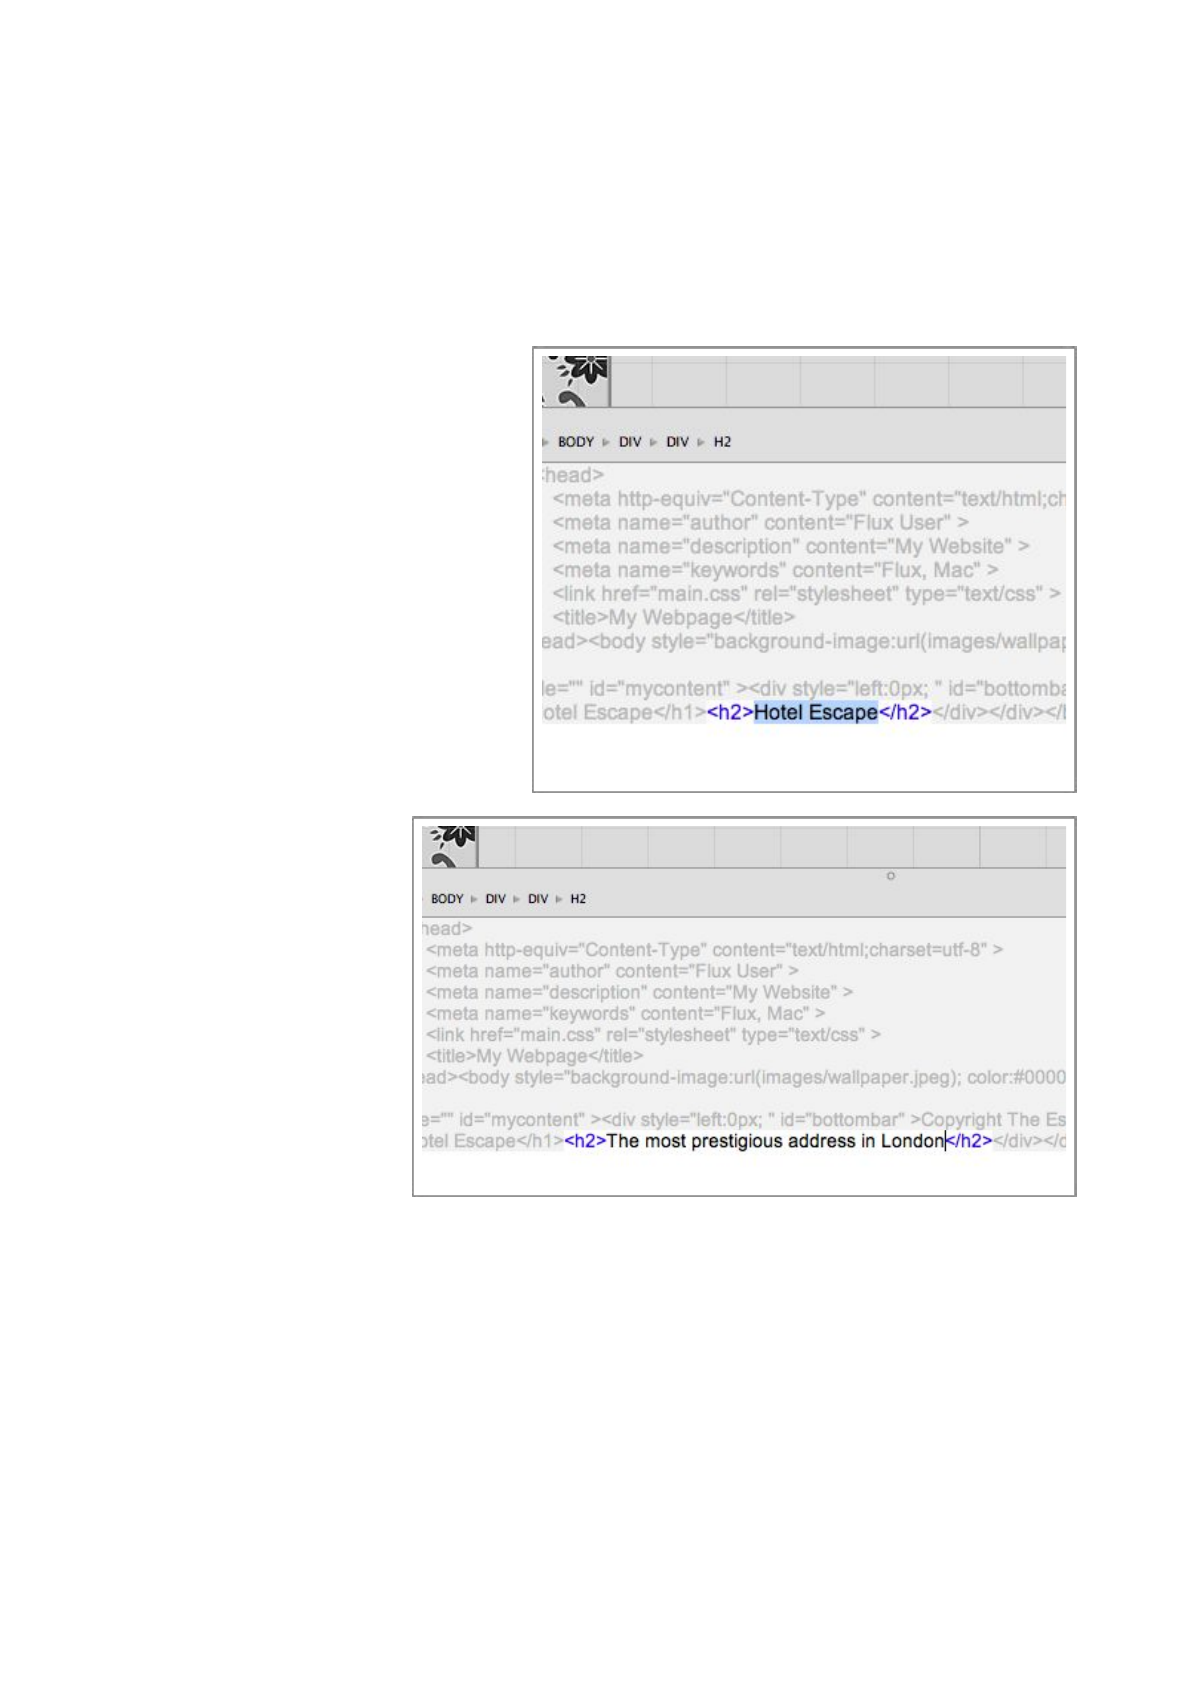
Step 5
Select the bottom ‘Hotel Escape’
element, and open the Code Editor
(Command-3) if it is not already open.
Select the ‘Hotel Escape’ text and
replace it with ‘The most prestigious
address in London’, the change will be
applied to the page a few seconds after
you finish typing.
You might find, that the bottom line of
text doesn’t quite fit on the dark gray
box.
If this is the case, select the gray box,
and use the bottom drag handle to
resize it.
You might find it difficult to
select this element, as it’s
covered by the elements on
top of it. To select it, select
one the covering elements,
which are children of the
g r e y b o x , a n d u s e t h e
Select Parent Element
function in the contextual
Flux QuickStart Guide
48

menu.
In complex websites, objects can
often overlap or obscure other
ones, so take care to select the
correct object. You can also use
the Navigator to help you select
the right object.
Yo u s h o u l d n o w h a v e a h e a d i n g
that looks something like the image below.
Flux QuickStart Guide
49
Adding an image to the page
Much earlier in this guide, we added some images to the project, and used one of them for the
‘wallpaper’ of our page. Now, we’re going to use another one of these images.
Step 1
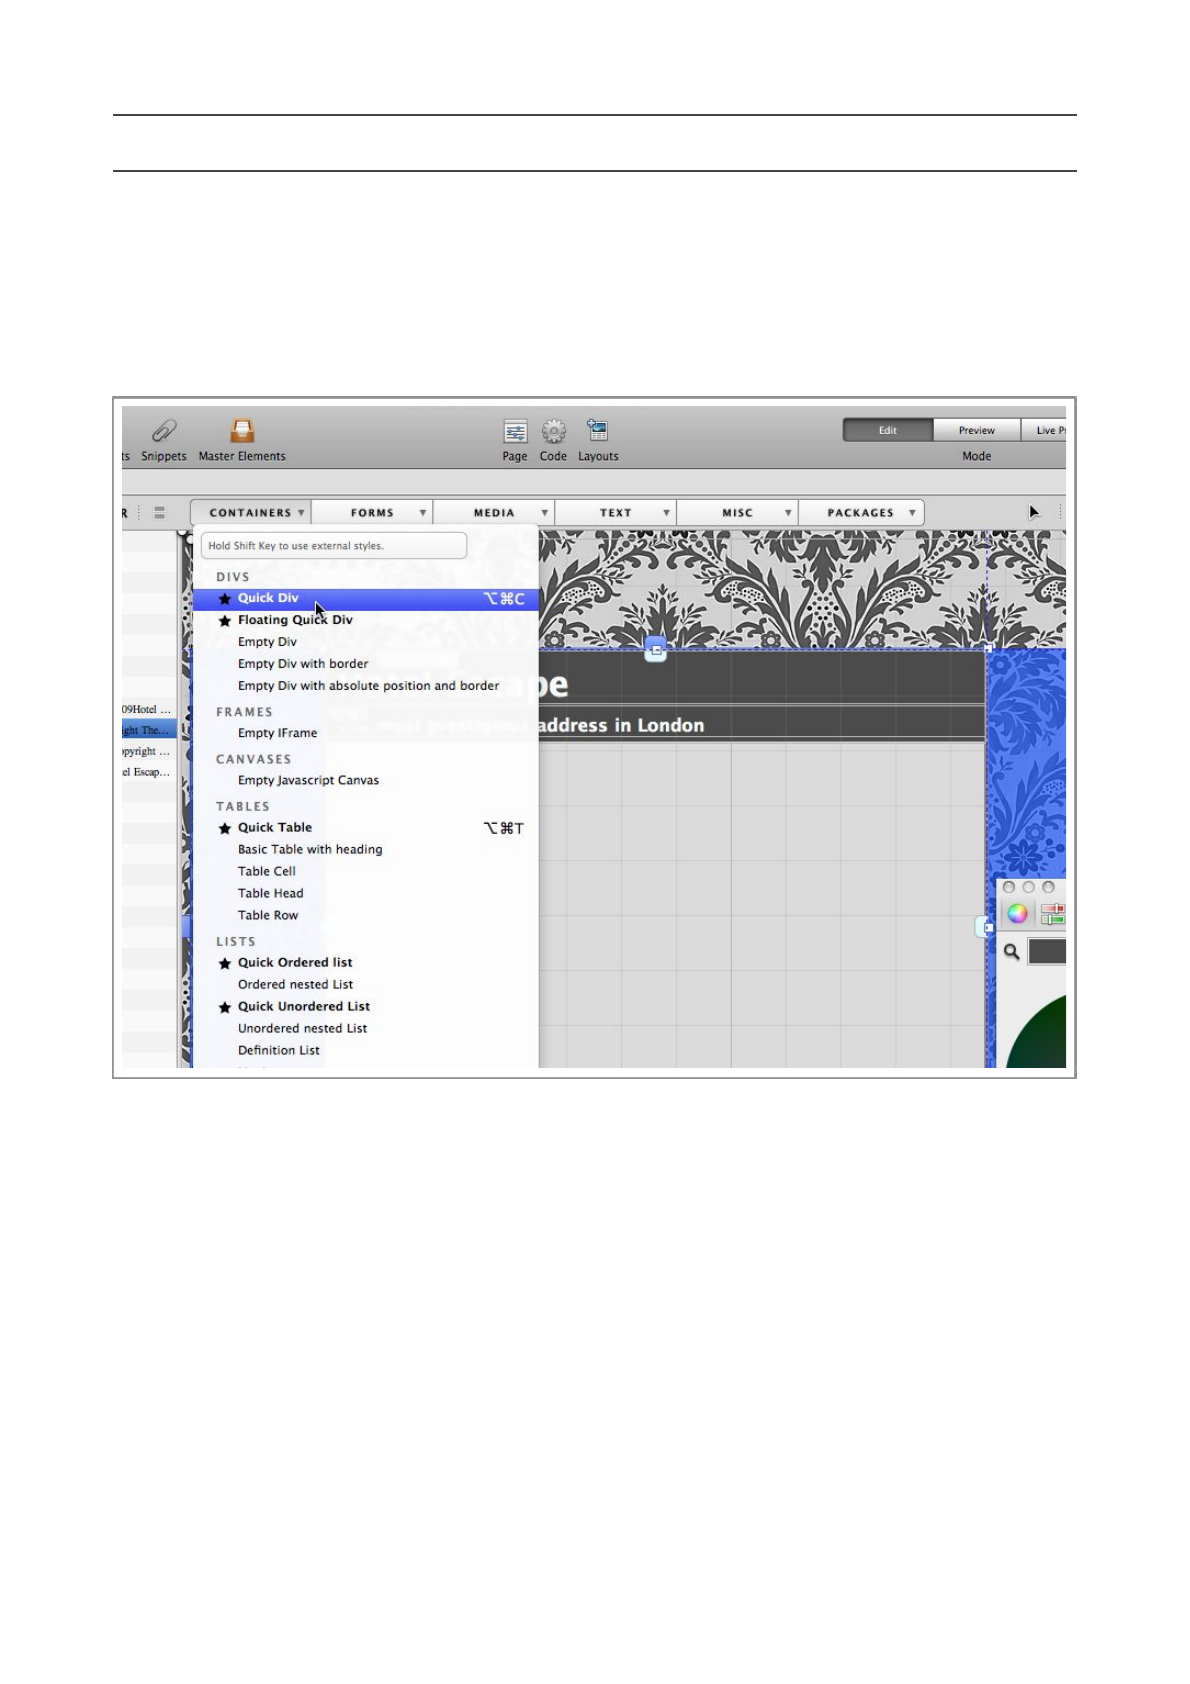
Select the main container on the page (large, centered, light gray box), and add a Quick Div.
This kind of div has some properties which have been preset to allow you to move it around an
resize it on the page. Resize it to make it a little bigger.
Step 2
Making sure the new div is selected, open the Inspector, sw it ch to th e Fill section, enable the
background-image property, and select the ‘flower.jpg’ image from the pop-up menu.
Flux QuickStart Guide
50
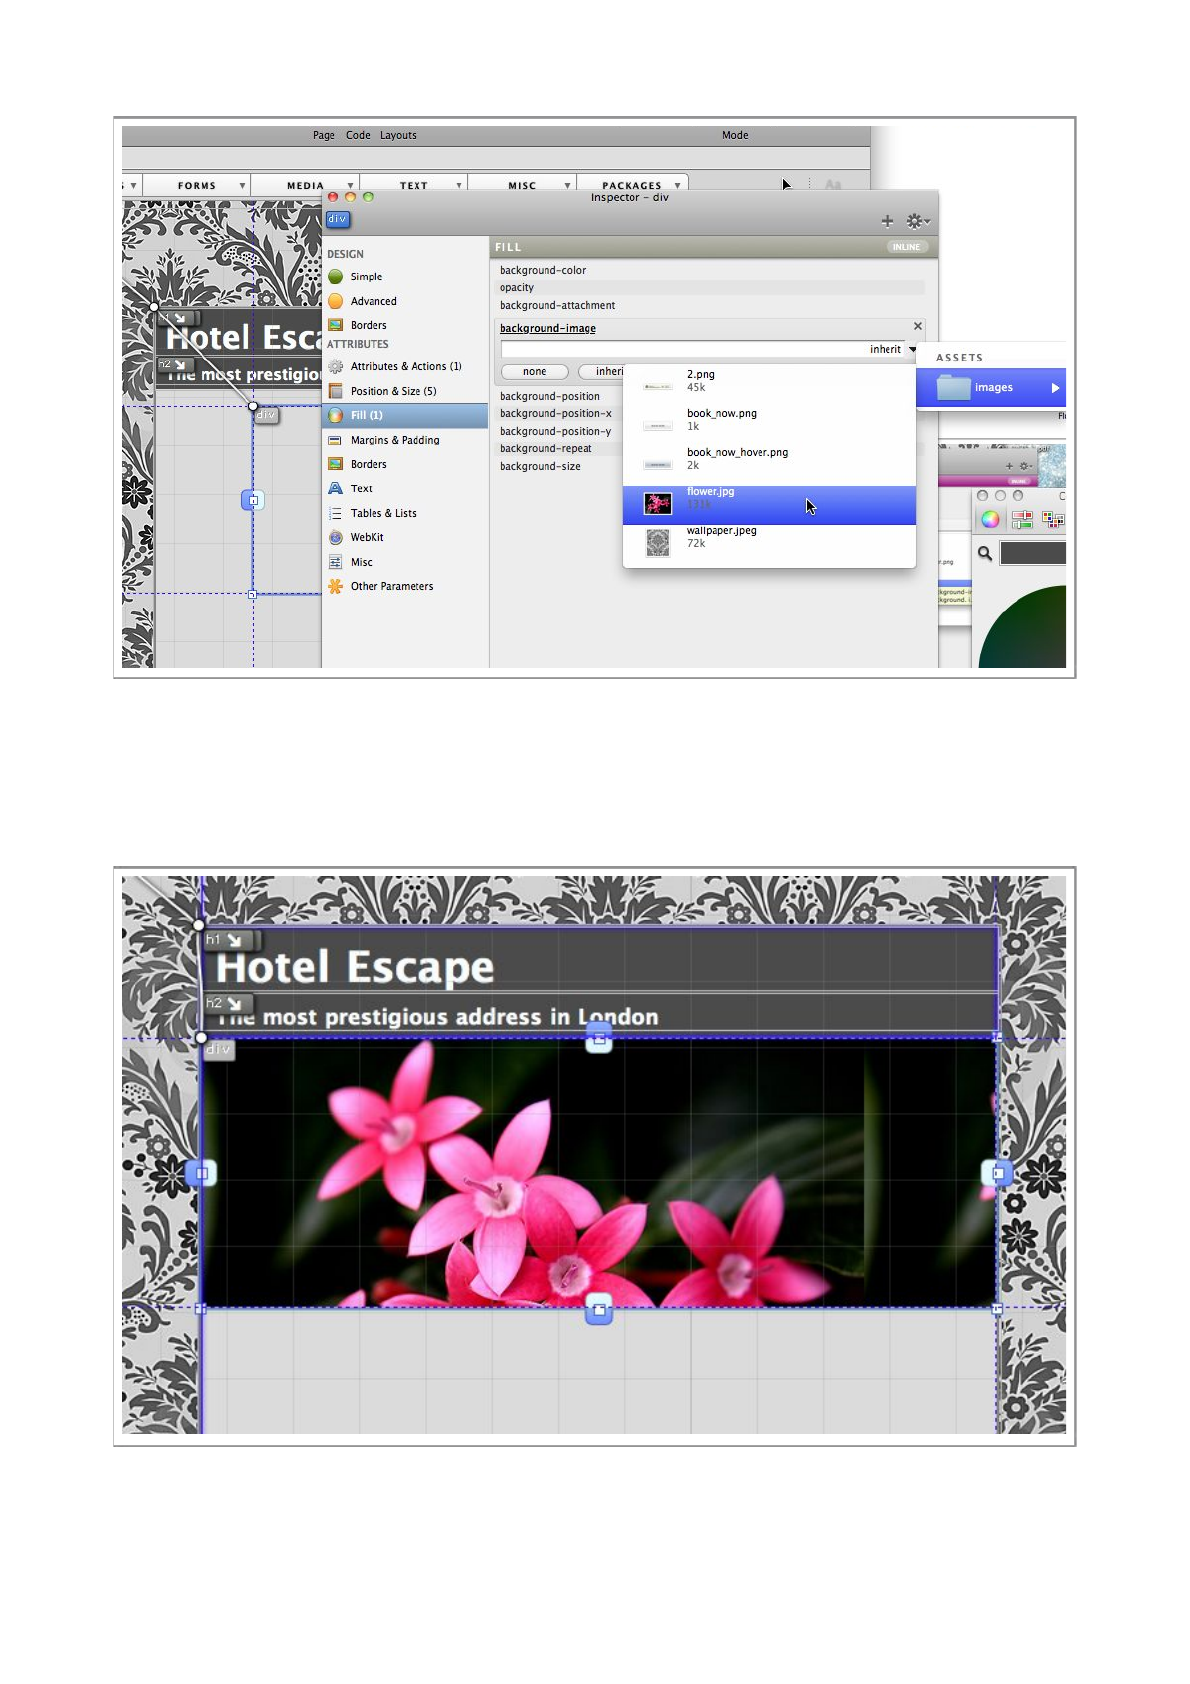
The selected image will become the background of the div.
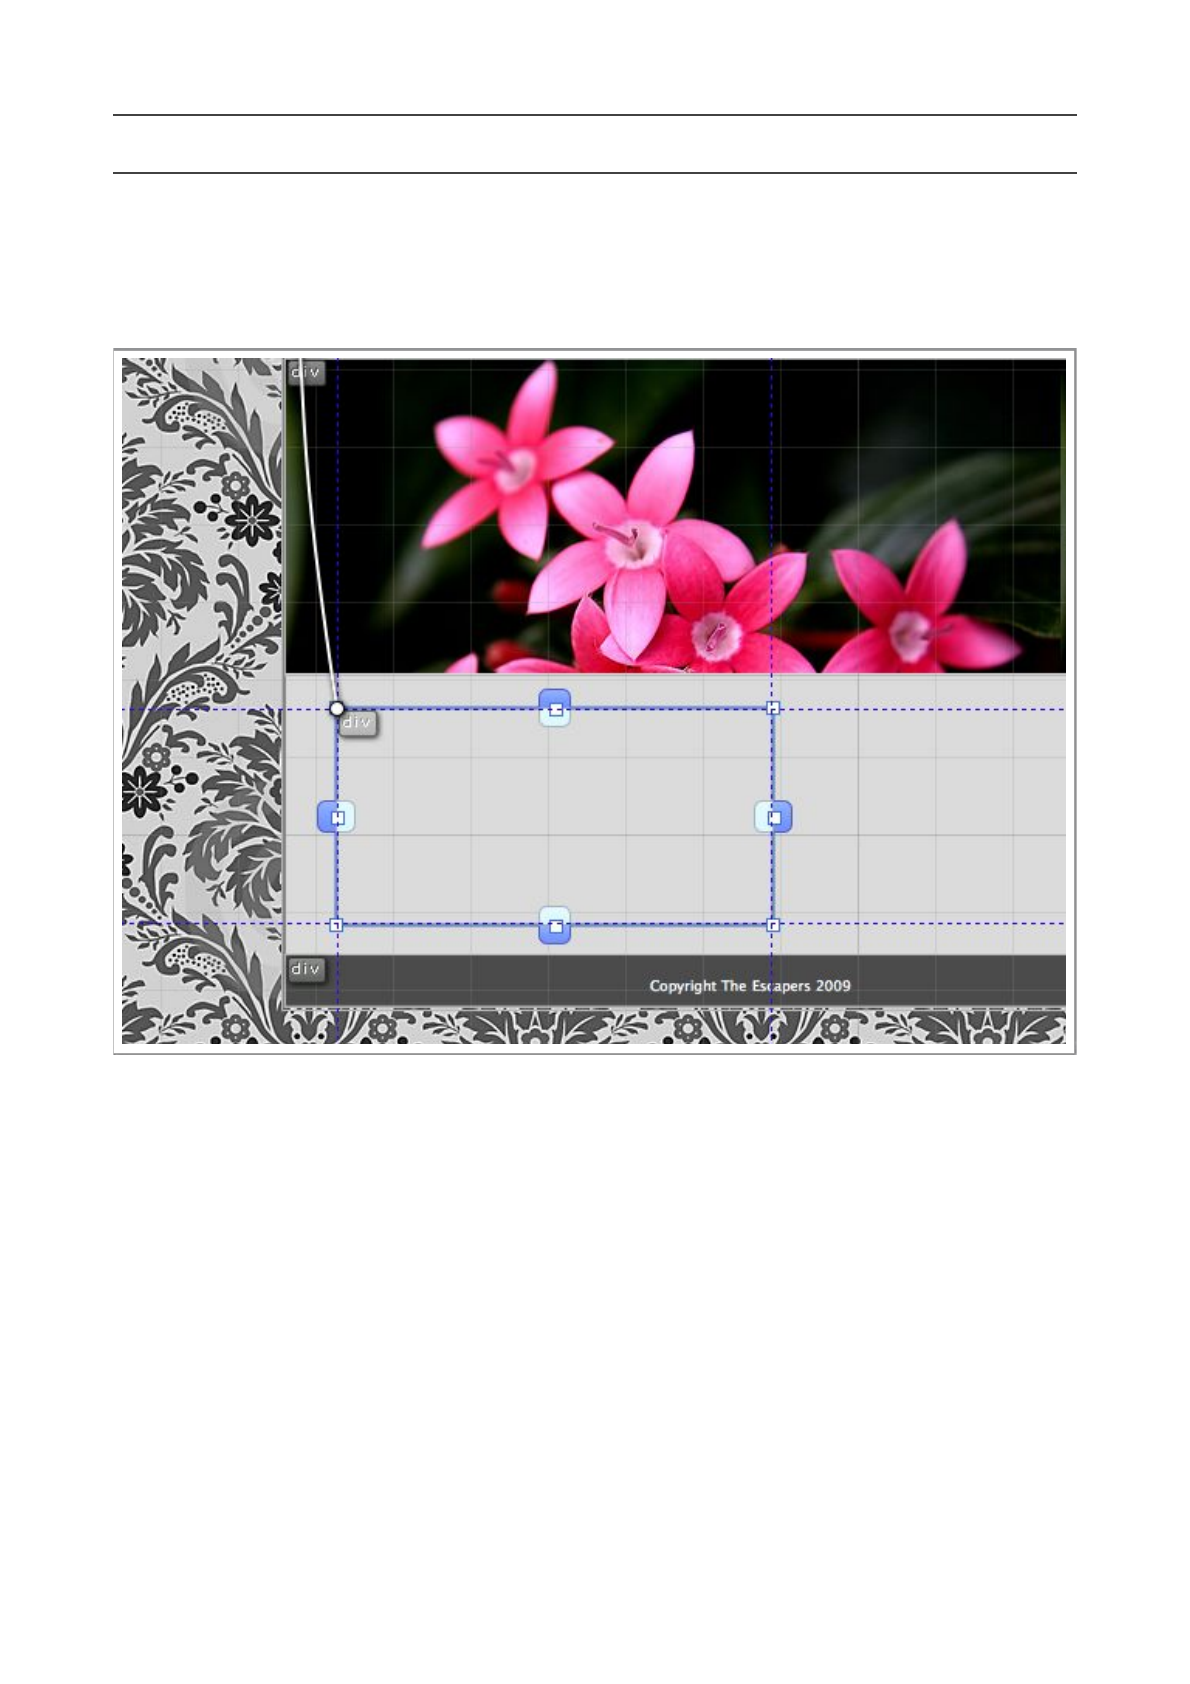
Step 3
You can now resize the image to whatever size you like, and position it wherever you want.
To position the div more precisely, you can use the arrow keys on your keyboard to move elements
1 pixel at a time, of course, you could also enter the co-ordinates manually using the Inspector.
Flux QuickStart Guide
51

All the changes made in this chapter have been done inline, you could use the Create Style
with... function in the Edit menu to make it an external style if you want.
Flux QuickStart Guide
52
Adding a text box
Step 1
Select the main container on the page (large, centered, light gray box), and add a Quick Div.
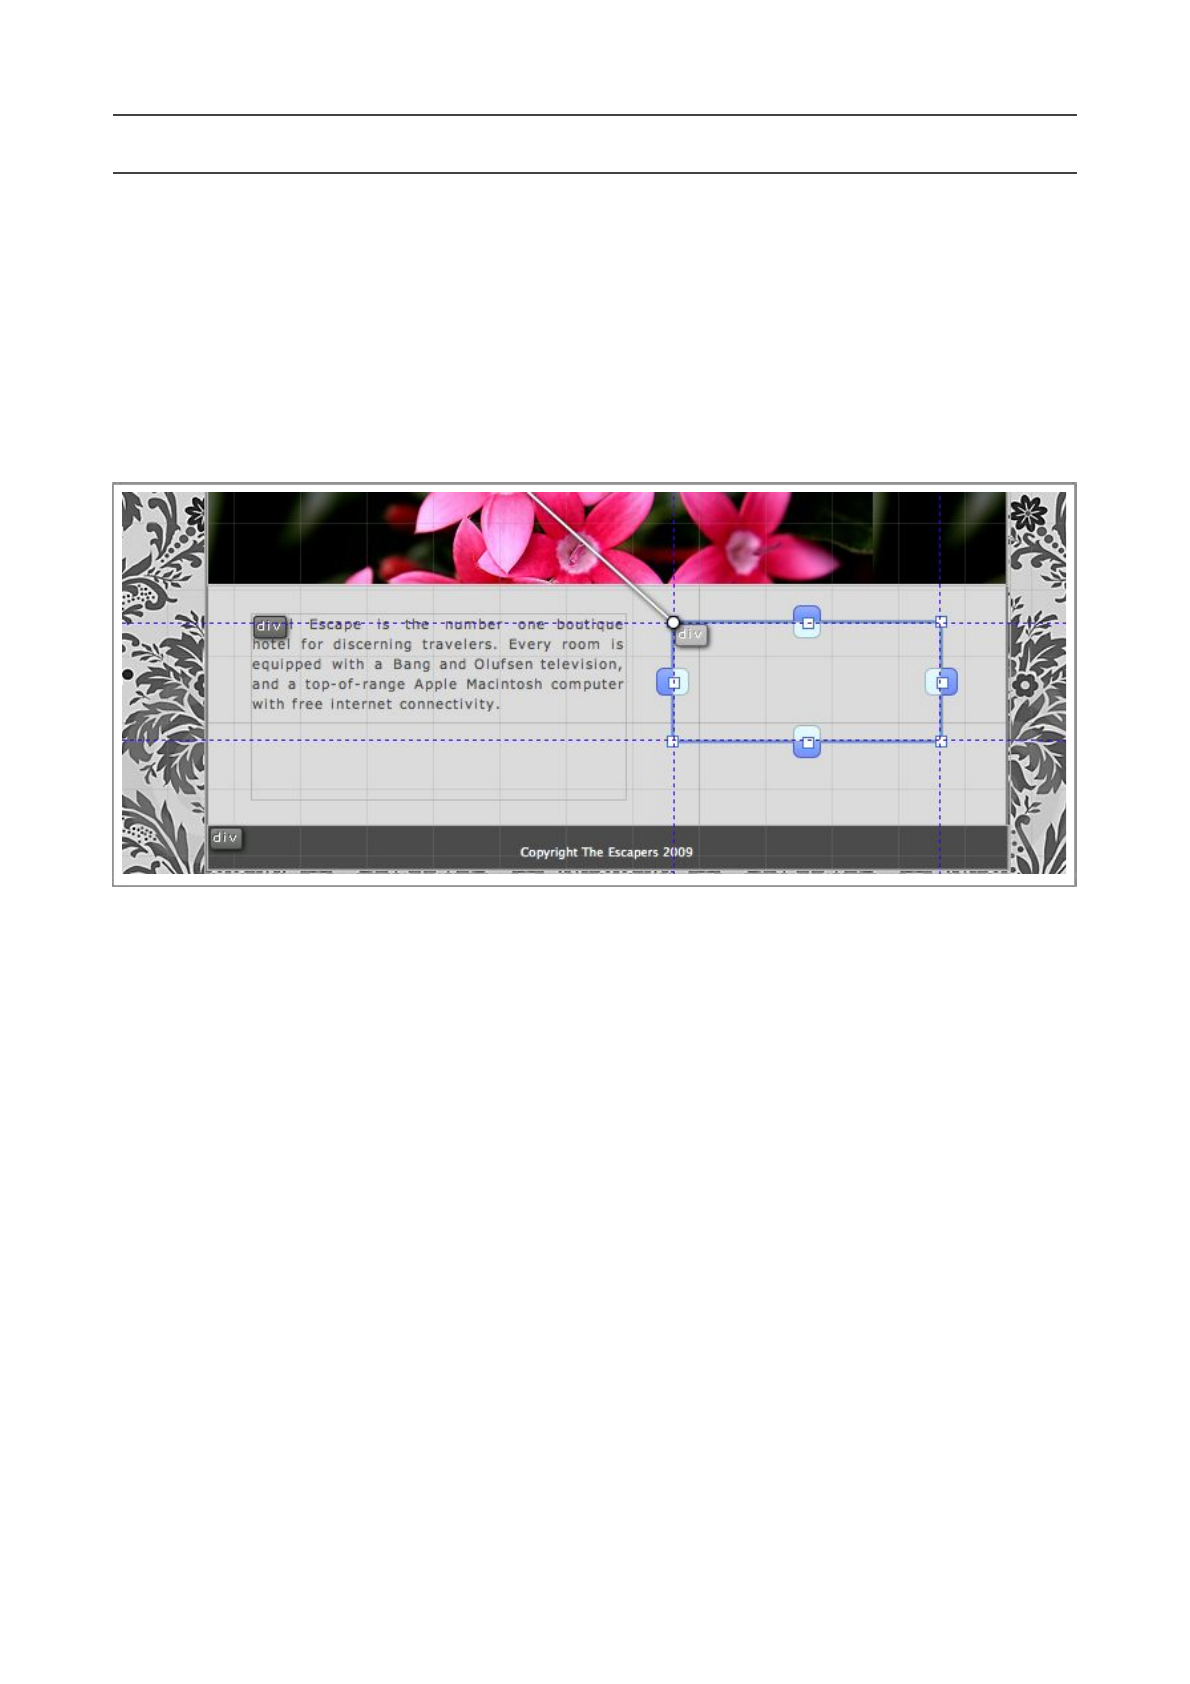
Move the new div to the desired location on the page, and resize it. See image below.
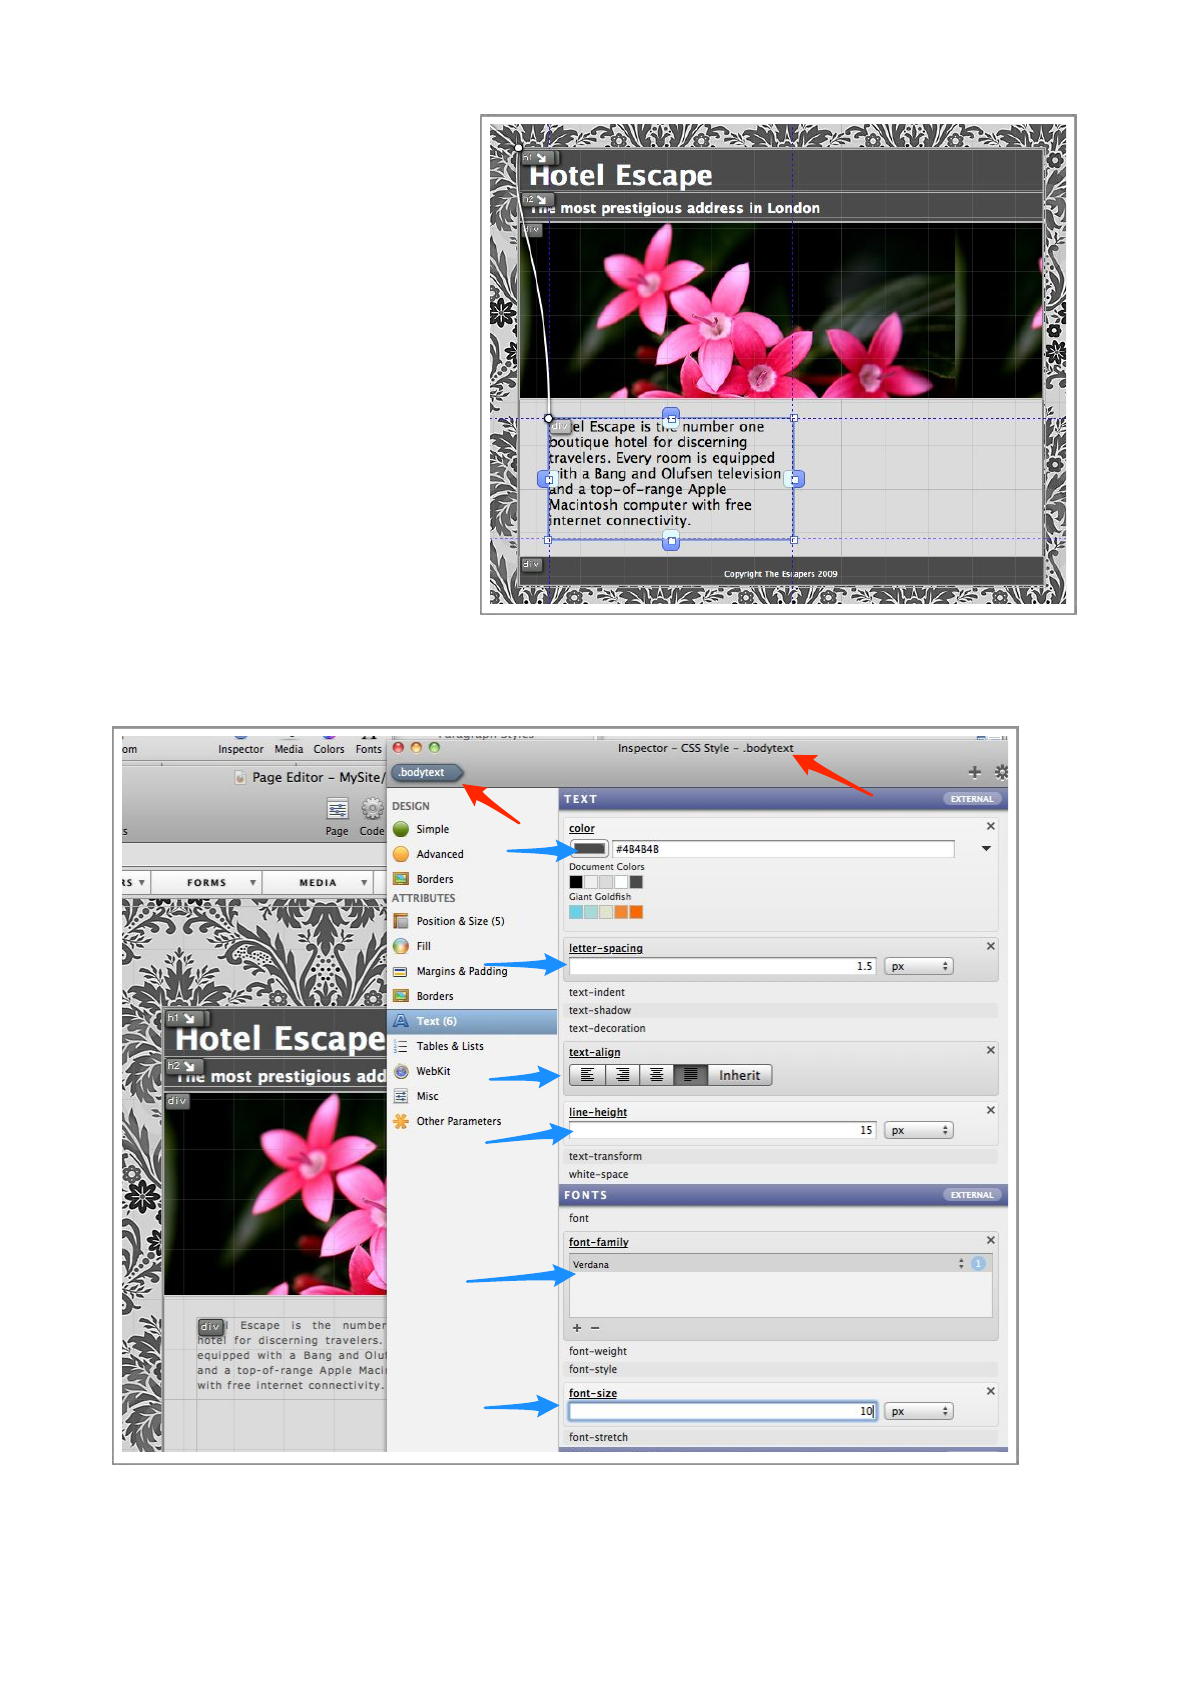
Step 2
Switch to Text Mode, a nd c li ck i ns id e th e div. Enter the following text (or any other text you
like)
“Hotel Escape is the number one boutique hotel for discerning
travelers. Every room is equipped with a Bang and Olufsen television,
and a top-of-range Apple Macintosh computer with free internet
connectivity.”
Flux QuickStart Guide
53
Once the text has been entered,
your page should look like the
image on the right.
Step 3
Making sure the text box div is
selected, use the Create Style
with... function in the Edit menu
to make it an external style.
Call the style ‘bodytext’ and make
it a class style.
To ma ke t h i s te xt l oo k a bi t
p r e t t i e r, w e w i l l m a k e s o m e
changes to the .bodytext style we
have just created.
Step 4
Making sure .bodytext is selected in the Styles List and is being edited in the Inspector, setup
all the parameters in image above.
Try changing the values to see how they affect the display of the text.
Flux QuickStart Guide
54
Add a button
Our page is nearly complete, we just need to add a link to a new page, we will do this using
JavaScript and a couple of images to make a more interesting link than just some blue,underlined
text.
Step 1
Select the main container on the page (large, centered, light gray box), and add a Quick Div.
Move and resize the div so it looks like the image below, you don’t need to be exact.
Step 2
Use the Create Style With function to create a style for the div, call it ‘booknowbutton’ and
make it a class style.
Flux QuickStart Guide
55
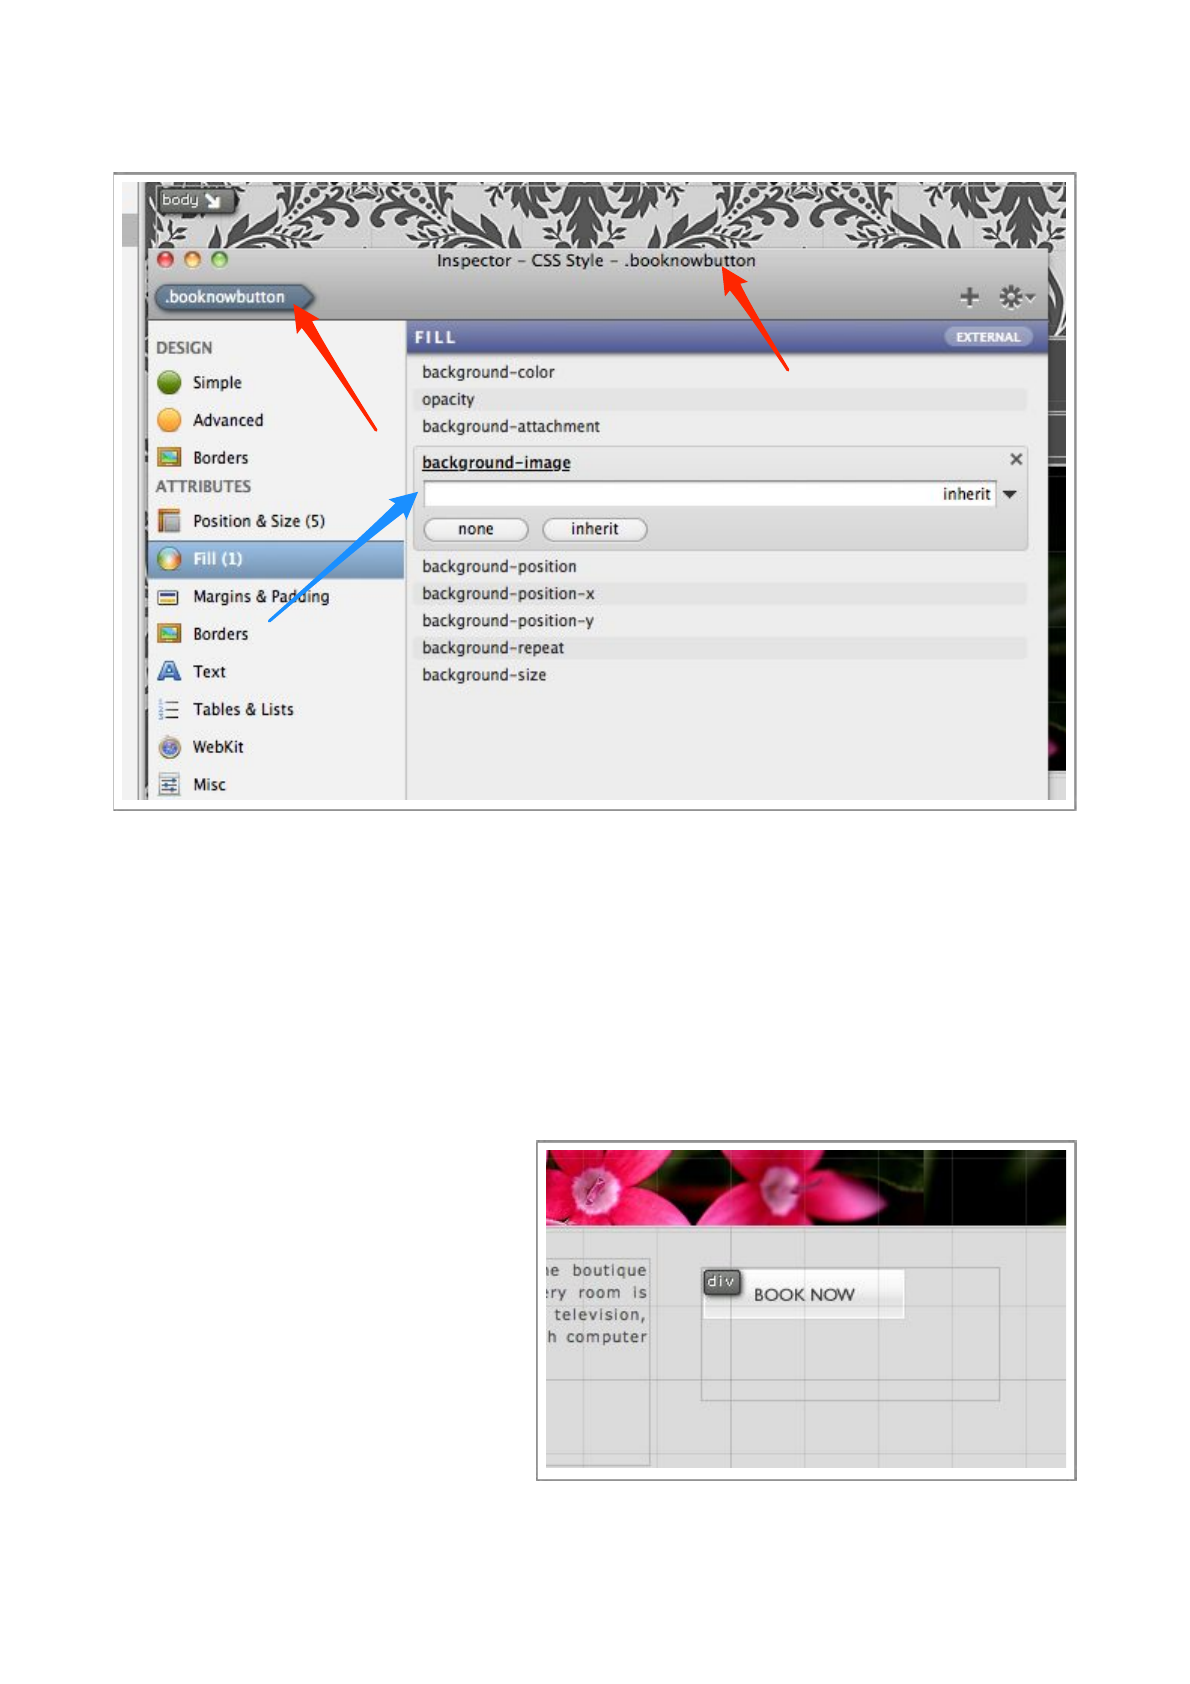
Step 3
Select the .booknowbutton in the Style List and open the Inspector, as usual, check you are
editing the correct object.
Enable the background-image property, which is in the Fill section.
Choose the ‘book_now.png’ file from the pop-up menu.
You will see the image tiled across your div, to prevent the tiling, enable the background-repeat
property and set it to ‘no-repeat’.
Step 4
Yo u r div should now look like the image
to the right, we c a n se e t h at t h e d i v is a
little too big for the image, so use the
resize handles to resize it to around the
same size as the image.
Remember, if you want to put the button
somewhere else, simply pick it up and
move it.
Step 5
To make this button a little more interesting, we are going to setup a pseudo-class.
Flux QuickStart Guide
56
Pseudo Classes allow you to apply CSS styles when certain conditions are met, for example, you can
apply a pseudo class to make links that have been visited appear in a different color.
We are going to setup a hover pseudo style, which will apply a style when the mouse pointer is
‘hovering’ over our element.
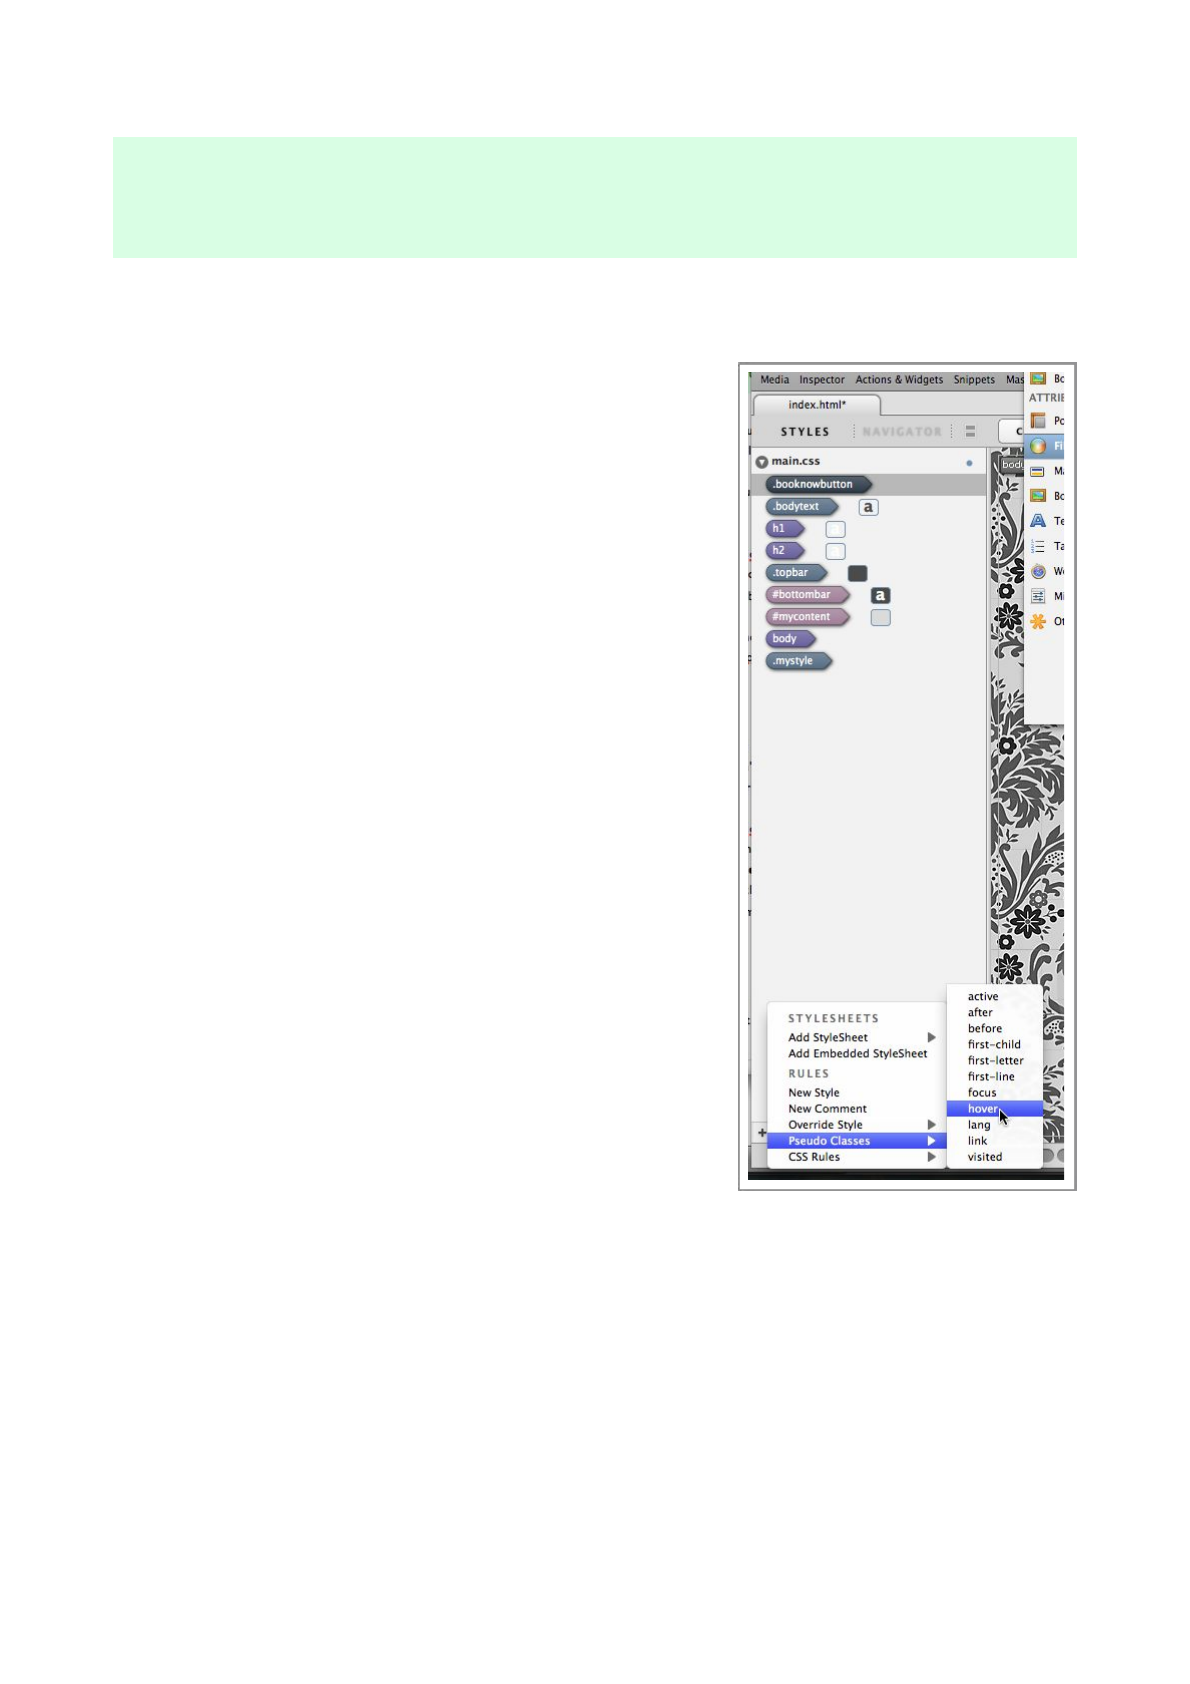
Press the little ‘+’ button at the bottom of the Styles List.
Select the ‘.booknowbutton’ style in the Styles List, a n d
choose ‘hover’ from the Pseudo Classes submenu.
You will see that a new style has been created called
‘.booknowbutton:hover’
Step 6
At the moment, our new pseudo class has no properties, so it
won’t do anything, so let’s add a background-image property.
Select the ‘.booknowbutton:hover’ in the Styles List, and
enable it’s background-image property in the Inspector.
This time, select the ‘book_now_hover.png’ image in the pop
up menu.
Step 7
Switch to Preview Mode to examine your page, if you
move the mouse pointer over the the ‘Book Now’ button, the
pseudo class will be applied and the image will change to a
slightly darker variation.
Flux QuickStart Guide
57

Some older web browser do
not support all pseudo
classes, but any modern one
will support the hover.
It’s impor tant to realize that
pseudo classes will ‘overlay’
their style onto th e main
class they are based on, so all
the ot her para m eter s li ke
size, position, will still be
taken from the original
‘booknowbutton’ style.
Flux QuickStart Guide
58
Adding an action
We’ve created a button, so now we need to add an action to it to make it actually do something.
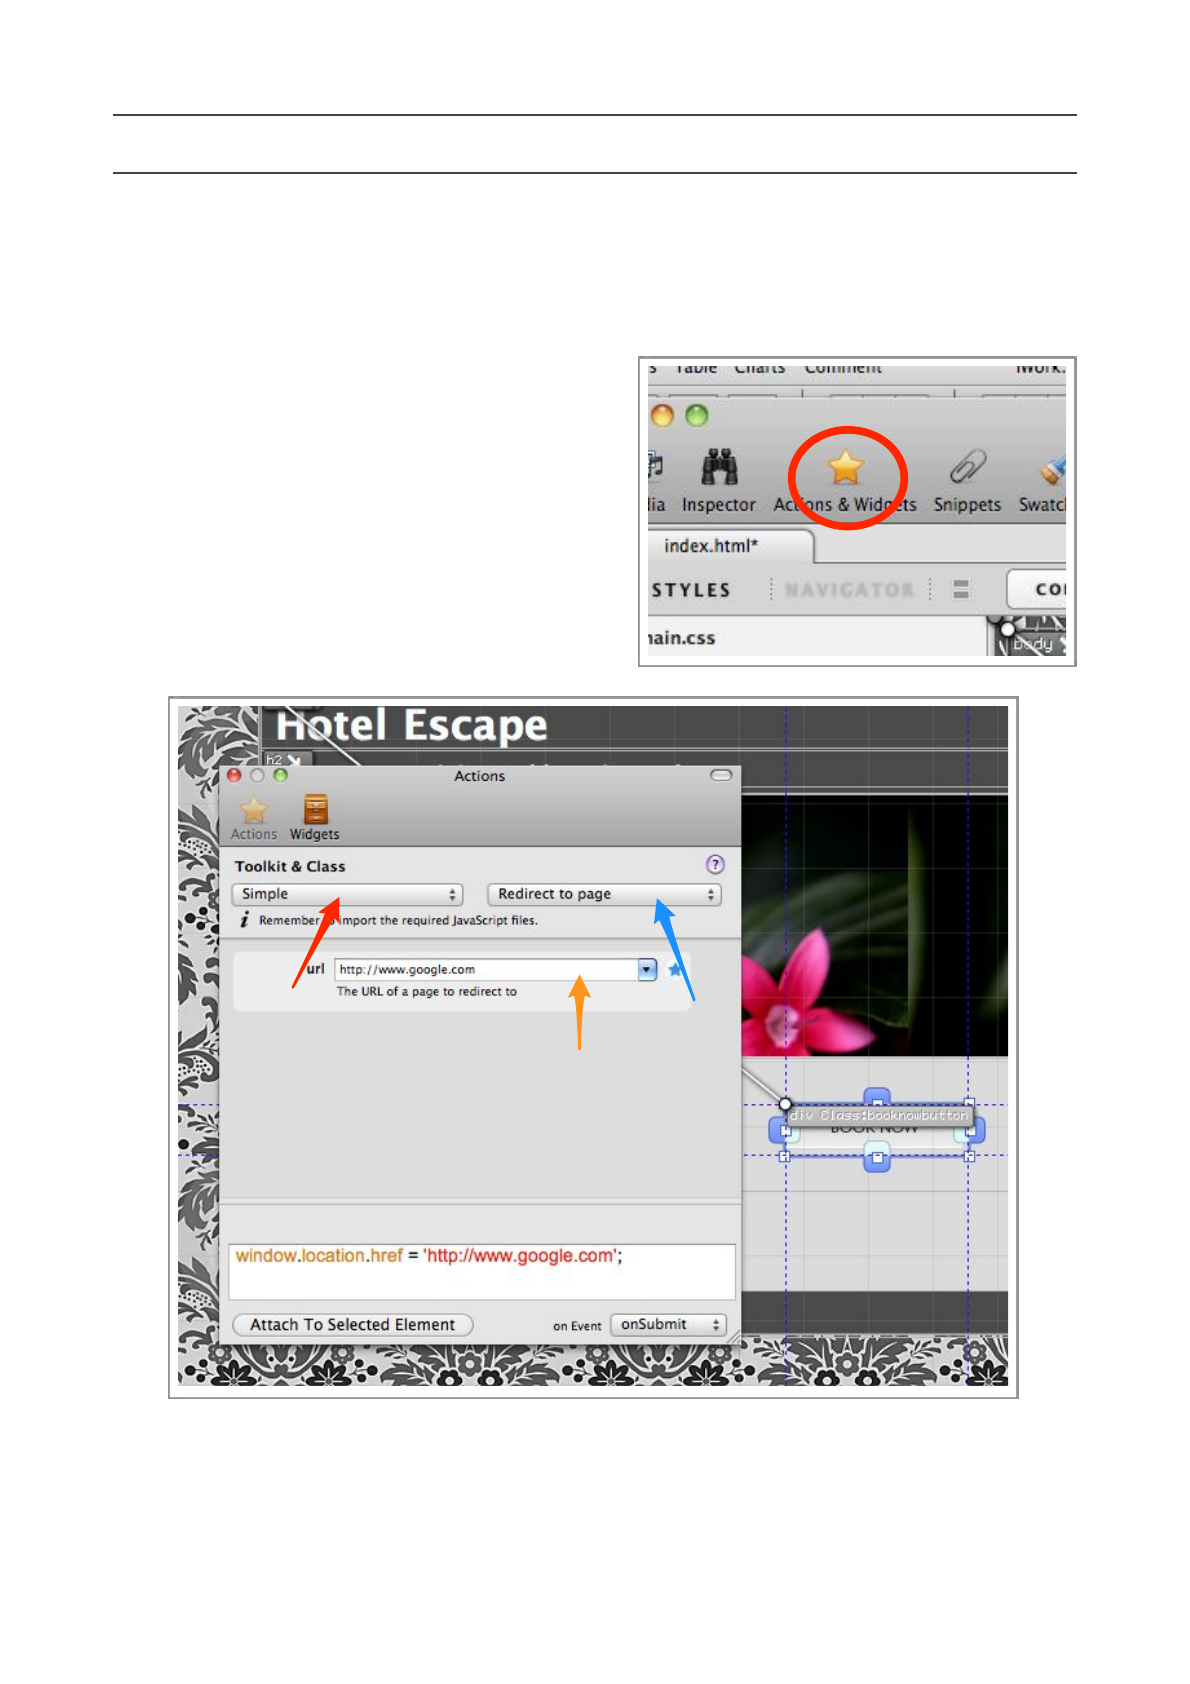
Step 1
Open the Actions p al e tt e b y p r es s i n g t he
‘Actions’ button on the main Toolbar.
Step 2
The Actions palette is used to attach Javascript
actions to elements on the page. We are going to
add one of the simplest actions.
Choose ‘Simple’ from the pop-up menu pinpointed
by the red arrow.
Choose ‘Redirect to page’ from the pop-up menu pinpointed by the blue arrow.
The middle (main) area of the palette will change, this is where parameters for the actions are
set. This action only takes one parameter.
Flux QuickStart Guide
59
In the ‘url’ parameter field, type an URL to redirect to, we only have one page in our site, so for
the sake of example, type another existing URL, i.e.
http://www.apple.com
or
http://www.google.com
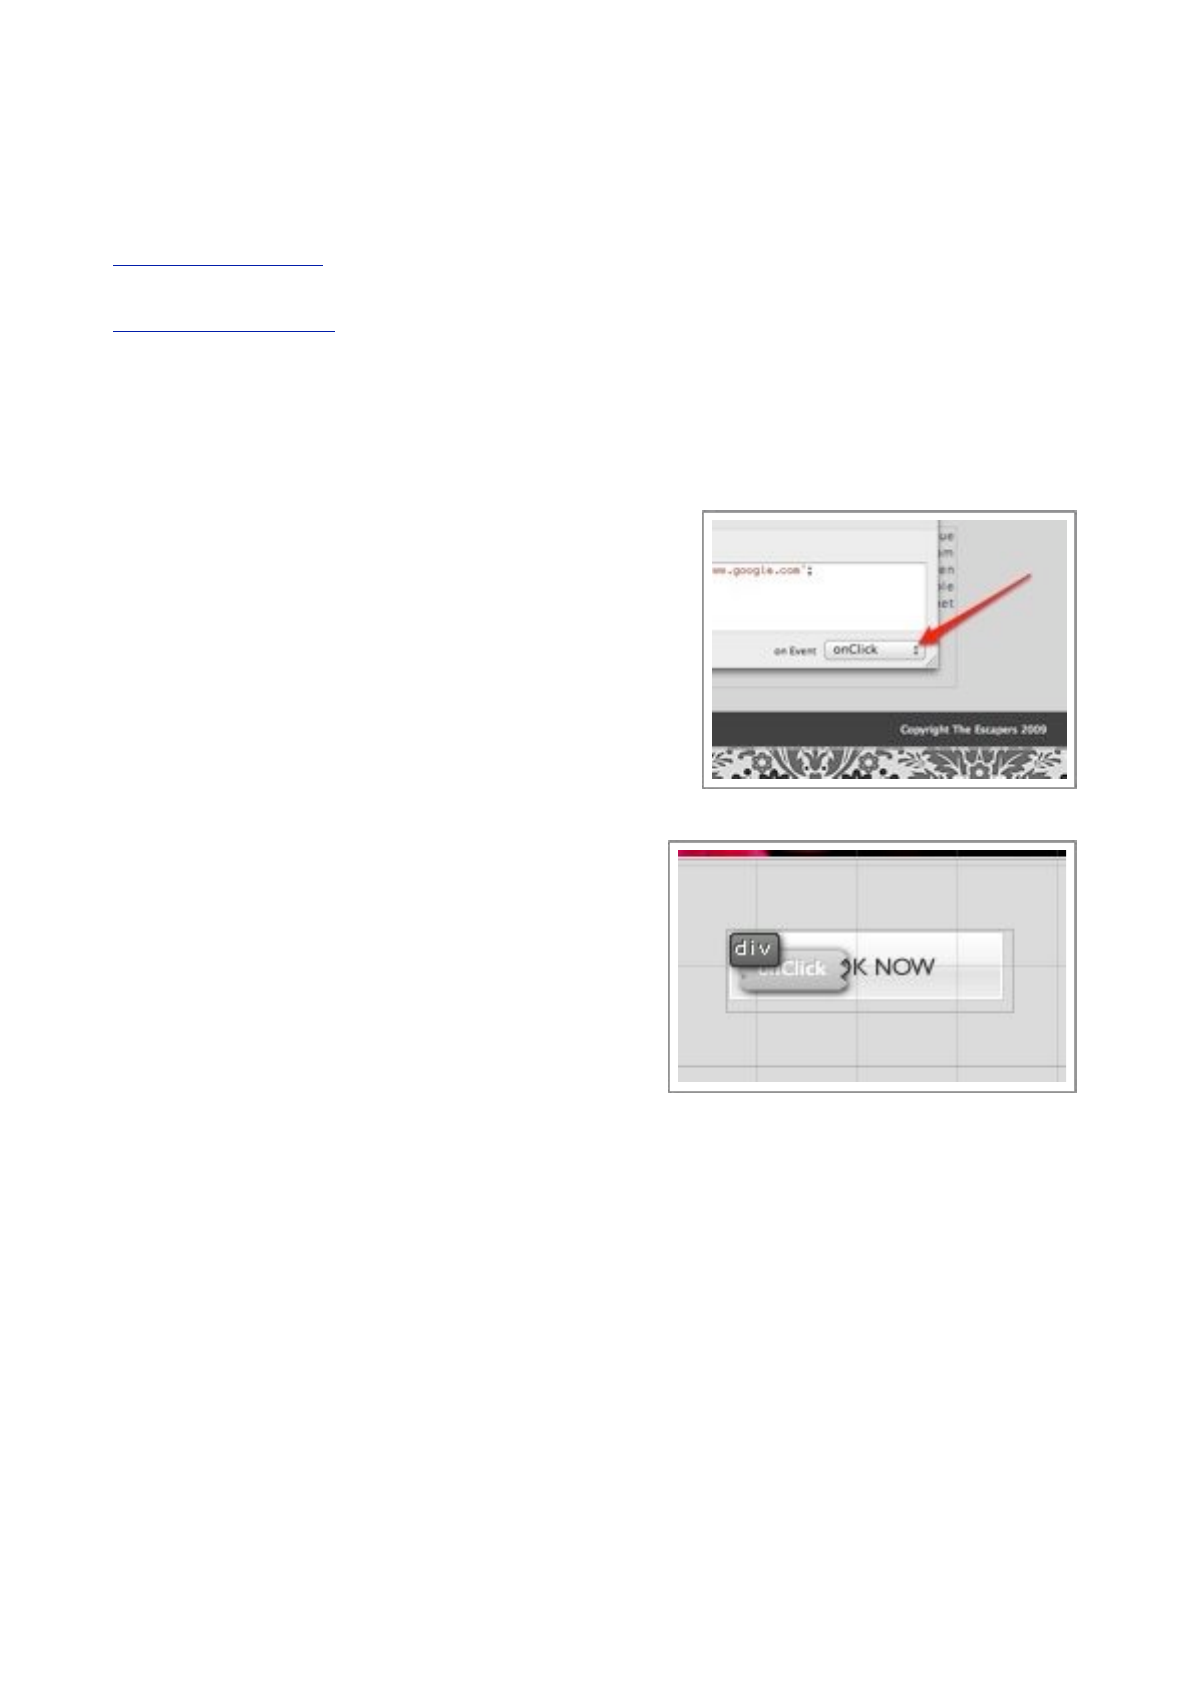
Step 3
Select ‘onClick’ from the pop-up menu at the bottom
right of the Actions palette (see image, right).
Once you have checked all the parameters are correct,
make sure the button on the page is selected, and press
the ‘Attach to selected element’ button.
This will attach the generated JavaScript code to the
‘onClick’ handler of the selected element.
Page Elements with actions attached will have markers
on them for easy identification.
Step 4
Switch to Preview Mode, click the mouse button on
the ‘Book Now’ button, and the new page will load.
This make take a few seconds, like any other website.
Well done! You have just created a website using Flux!
Flux QuickStart Guide
60
Create another new page and link to it
We’ve created a brand new page with images, CSS, and JavaScript. As one last task, we will create
another new, much simpler page and link to it.
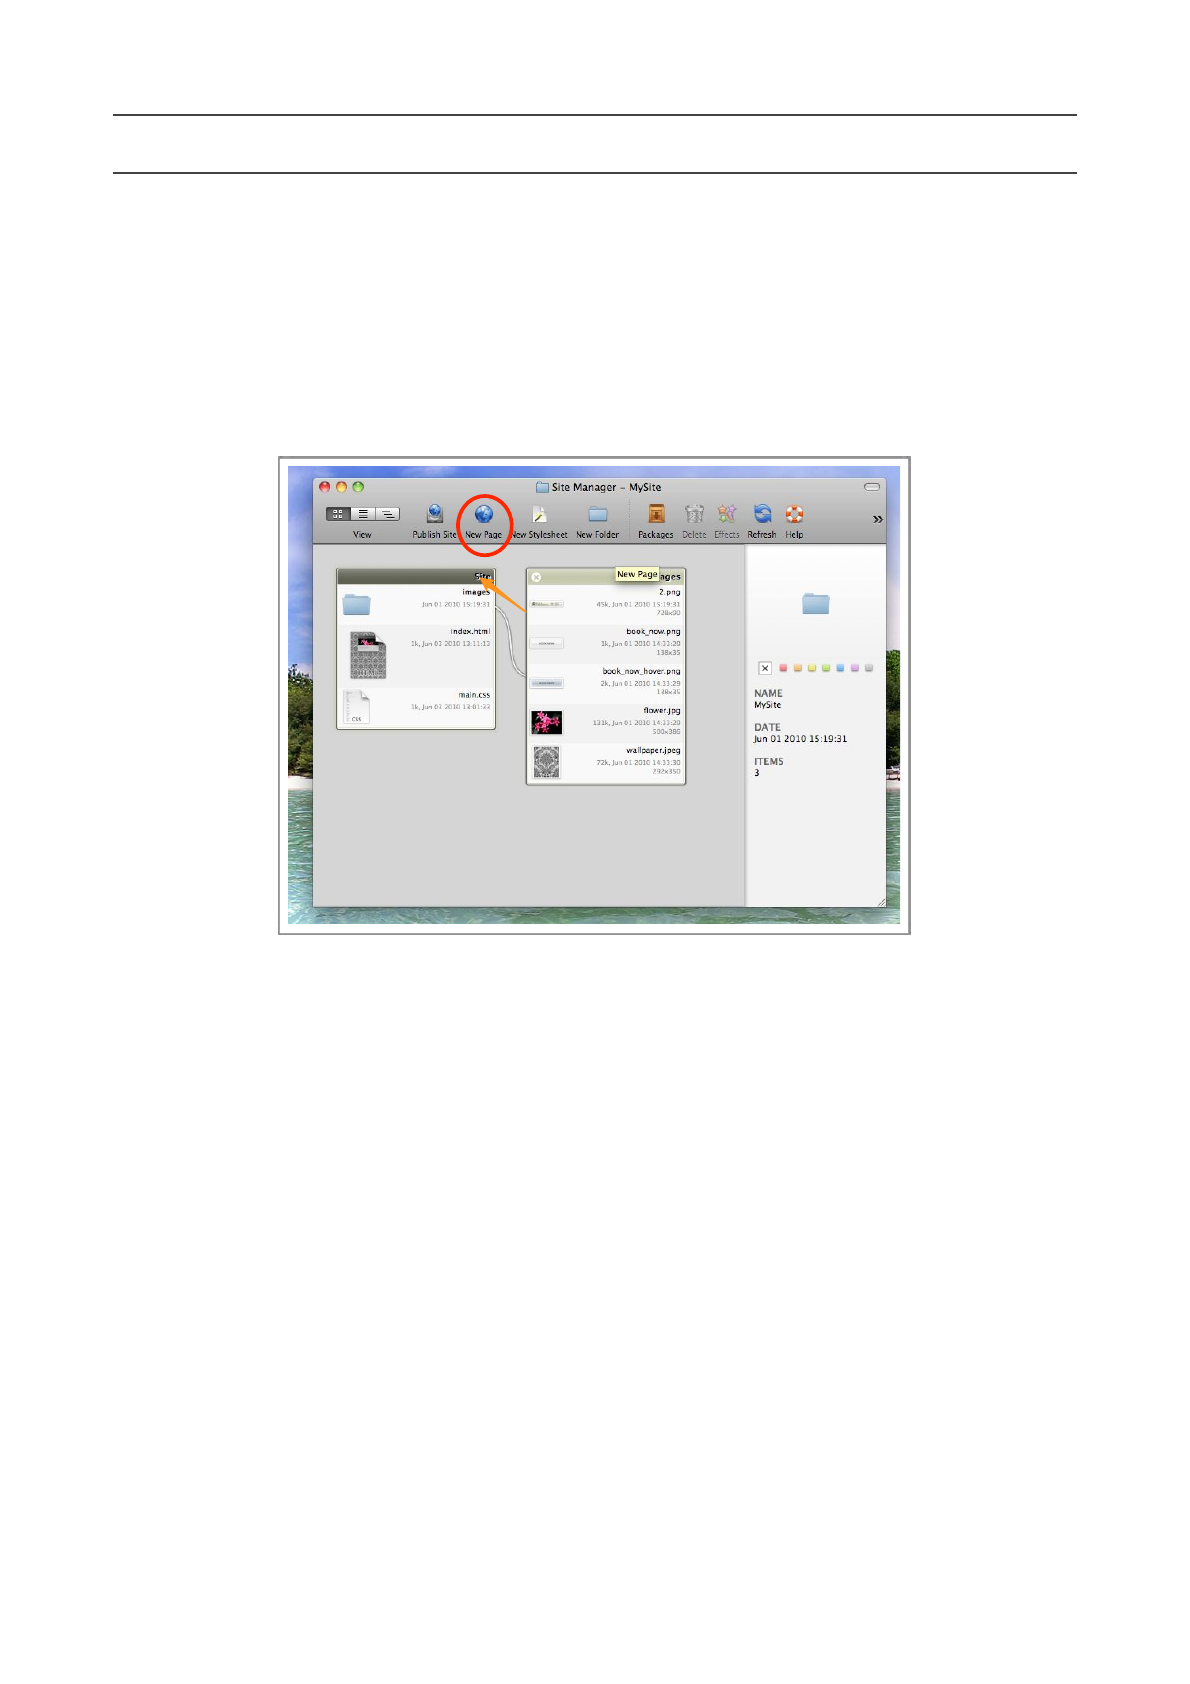
Step 1
In the Site Manager, sel ect the ‘Si te’ fold e r by cl icki n g o n it’s ti tle , and press th e New Page
toolbar button.
Flux QuickStart Guide
61
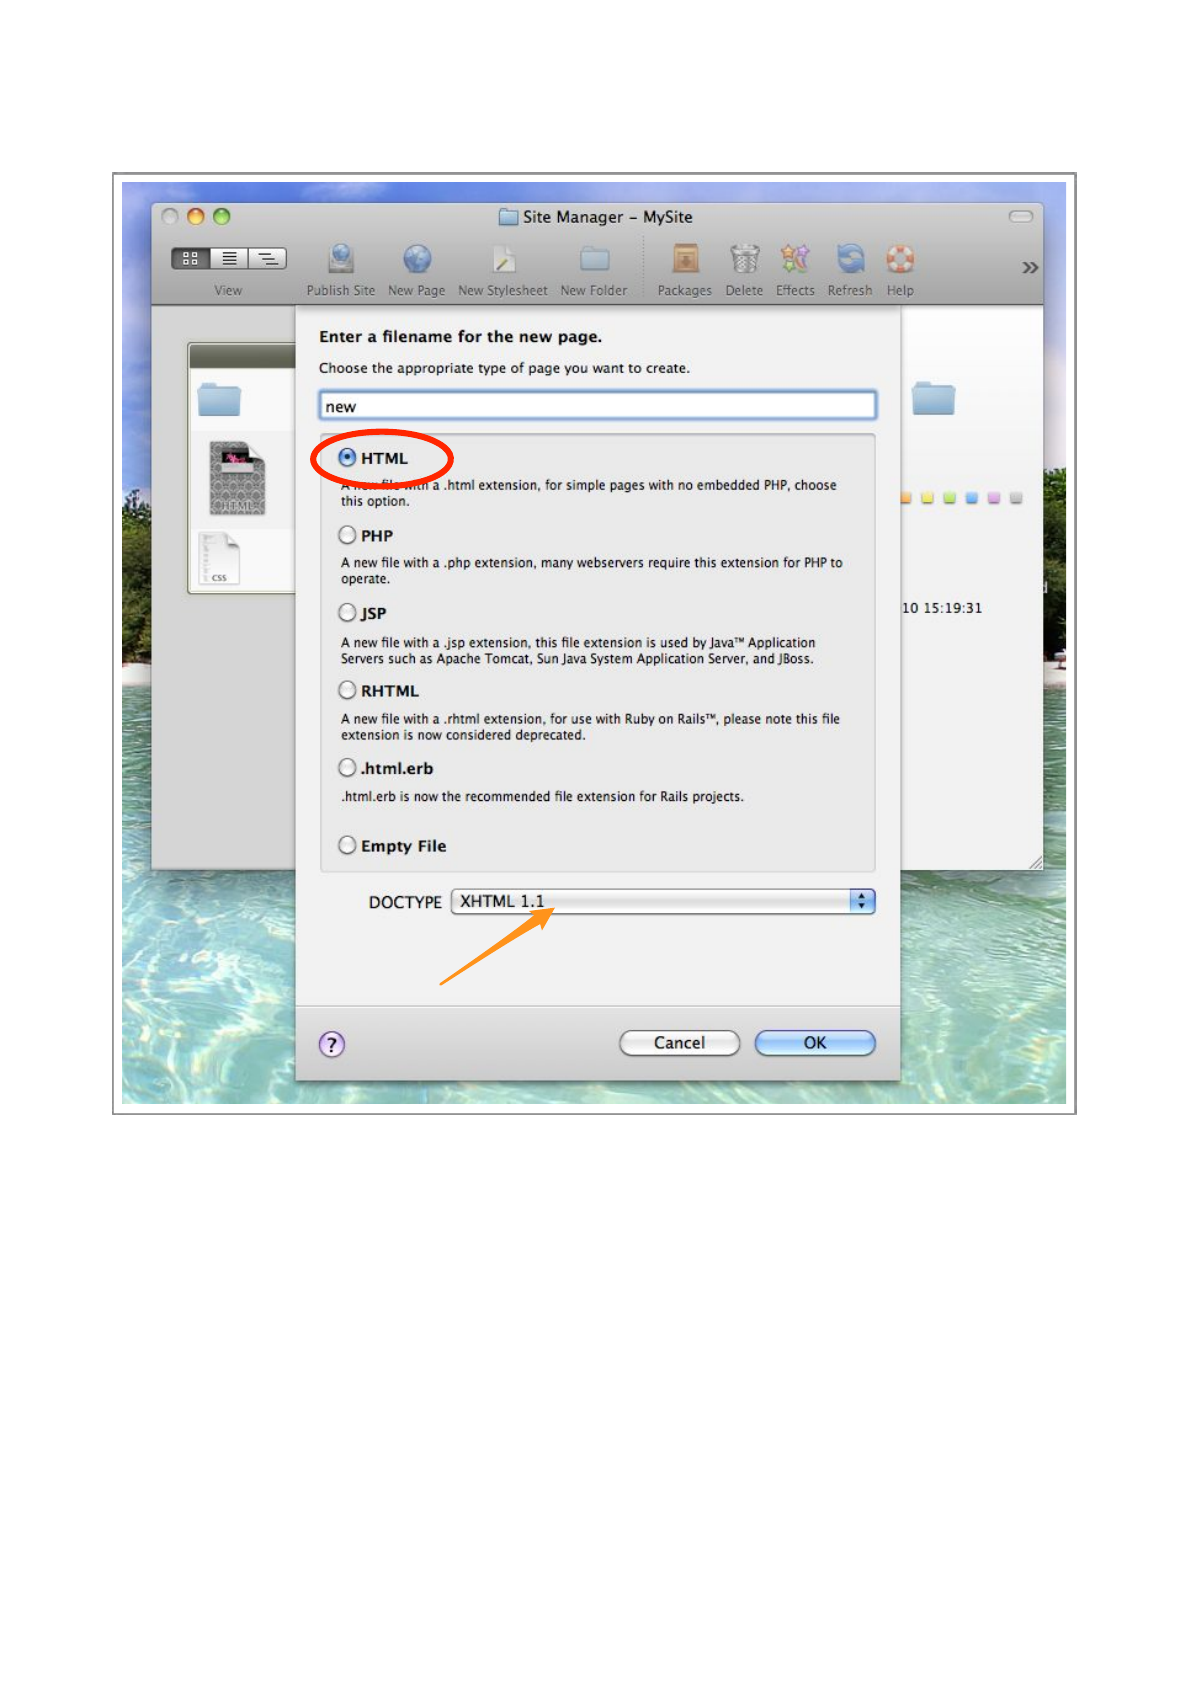
Step 2
In the sheet that appears, type a name for the new page, we will call it ‘new’.
There are a few options allowing you to choose what kind of page to create, choose the top one
to create a simple HTML file.
The last option is to choose what type of DOCTYPE to give your page. This can be changed later,
but it’s best to decide now.
In the image, we have chosen XHTML 1.1, but ‘HTML 4.01 Transitional’ is probably the most
versatile, so if you are unsure, choose that one. Press OK.
Flux QuickStart Guide
62

Step 3
Double-click the ‘new.html’ file to open it in the Page
Designer.
Using the skills you have learned in this guide, add some
objects to the page, it doesn’t matter what, as we are just
using this page as an example to link to.
When you have added some elements, save and close the
page.
You will see the thumbnail in the Site Manager update
to show your changes.
Step 4
Now, open the ‘index.html’ page, and switch into Te xt
Mode.
Select some text to make into a link, in this case, we have
selected the ‘room’ text.
Use the right mouse button (or Control-Click) to
open the contextual menu.
Choose Quick Link...
A sheet will appear allowing to either choose a
page to link to, or type one in.
In this case, we will choose a page from the pop-
up menu, the page ‘new.html’ that we just created.
Press OK and the link will have been
created, you can switch to Preview
mode to try it out.
Flux QuickStart Guide
63


Flux QuickStart Guide
65

Flux QuickStart Guide
66
