FlyWithLua Quick Reference Manual Fly With Lua En
User Manual:
Open the PDF directly: View PDF ![]() .
.
Page Count: 101 [warning: Documents this large are best viewed by clicking the View PDF Link!]
- Using the Plugin
- Reference
- Predefined variables
- LONGITUDE
- LATITUDE
- PLANE_ICAO
- PLANE_TAILNUMBER
- SCREEN_WIDTH
- SCREEN_HIGHT
- MOUSE_X
- MOUSE_Y
- XSB_METAR
- LUA_RUN
- XPLANE_VERSION
- XPLANE_HOSTID
- SDK_VERSION
- SYSTEM
- SYSTEM_ARCHITECTURE
- XPLANE_LANGUAGE
- DIRECTORY_SEPARATOR
- SCRIPT_DIRECTORY
- AIRCRAFT_PATH
- AIRCRAFT_FILENAME
- DO_EVERY_FRAME_TIME_SEC
- DO_EVERY_DRAW_TIME_SEC
- DO_SOMETIMES_TIME_SEC
- DO_OFTEN_TIME_SEC
- SCRIPTS_LOADING_TIME_SEC
- CLOCKS_PER_SEC
- LUA_MEMORY_USAGE_KB
- Lua functions
- DataRef( "variable name", "DataRef name" )
- DataRef( "variable name", "DataRef name", "readonly" )
- DataRef( "variable name", "DataRef name", "readonly", index )
- table = dataref_table( "DataRef name")
- define_shared_DataRef("DataRef name", "DataRef type")
- table = create_dataref_table( "DataRef name", "DataRef type")
- DataRef name, Index, readonly, DataRef type, DataRef ID = get_DataRef_binding( "variable name" )
- button( button number )
- last_button( button number )
- create_switch( button number, DataRef name, index, off value, on value )
- create_positive_edge_flip( button number, DataRef name, index, first value, second value )
- create_negative_edge_flip( button number, DataRef name, index, first value, second value )
- create_positive_edge_trigger( button number, DataRef name, index, value )
- create_negative_edge_trigger( button number, DataRef name, index, value )
- create_positive_edge_increment( button number, DataRef name, index, stepping, limit, rounding )
- create_negative_edge_increment( button number, DataRef name, index, stepping, limit, rounding )
- create_positive_edge_decrement( button number, DataRef name, index, stepping, limit, rounding )
- create_negative_edge_decrement( button number, DataRef name, index, stepping, limit, rounding )
- create_axis_median( axis number, variable name )
- get( "DataRef name" )
- get( "DataRef name", index )
- set( "DataRef name", value )
- set_array( "DataRef name", index, value )
- set_button_assignment( button number, "simulator function")
- set_axis_assignment( axis number, "axis function", "reverse")
- clear_all_axis_assignments()
- clear_all_button_assignments()
- set_pilots_head( x, y, z, heading, pitch )
- x, y, z, heading, pitch = get_pilots_head( )
- command_begin( "simulator function" )
- command_once( "simulator function" )
- command_end( "simulator function" )
- logMsg( "string" )
- XSBSpeakString( "string" )
- XPLMSpeakString( "string" )
- print( "string" )
- do_sometimes( "Lua code string" )
- do_often( "Lua code string" )
- do_every_frame( "Lua code string" )
- do_every_draw( "Lua code string" )
- do_on_keystroke( "Lua code string" )
- do_on_mouse_wheel( "Lua code string" )
- do_on_mouse_click( "Lua code string" )
- do_on_new_metar( "Lua code string" )
- do_on_new_XSB_text( "Lua code string" )
- do_on_exit( "Lua code string" )
- draw_string( x, y, "string" )
- draw_string( x, y, "string", "color" )
- draw_string( x, y, "string", red, green, blue )
- draw_string_Helvetica_10( x, y, "string" )
- draw_string_Helvetica_12( x, y, "string" )
- draw_string_Helvetica_18( x, y, "string" )
- draw_string_Times_Roman_10( x, y, "string" )
- draw_string_Times_Roman_24( x, y, "string" )
- measure_string( "string" )
- measure_string( "string", "font name" )
- hight, width = bubble( x, y, "title", … )
- hight, width = big_bubble( x, y, "title", … )
- hight, width = huge_bubble( x, y, "title", … )
- add_macro( "macro name", "Lua code string" )
- add_ATC_macro( "macro name", "Lua code string" )
- add_macro( "macro name", "activation code string", "deactivation code string", "default state" )
- create_command( "command name", "command description", "begin code string", "continue code string", "end code string" )
- table = directory_to_table( "path" )
- place_aircraft_at( "ICAO" )
- load_aircraft( "path and full filename" )
- load_situation( "path and full filename" )
- save_situation( "path and full filename" )
- reload_scenery()
- crash_the_sim()
- Predefined variables
- Modules
- OpenAL sound
- OpenGL graphics
- Functions of OpenGL
- glBegin_POINTS()
- glBegin_LINES()
- glBegin_LINE_STRIP()
- glBegin_LINE_LOOP()
- glBegin_POLYGON()
- glBegin_TRIANGLES()
- glBegin_TRIANGLE_STRIP()
- glBegin_TRIANGLE_FAN()
- glBegin_QUADS()
- glBegin_QUAD_STRIP()
- glEnd()
- glVertex2f(x, y)
- glVertex3f(x, y, z)
- glLineWidth(width)
- glColor3f(red, green, blue)
- glColor4f(red, green, blue, alpha)
- glRectf(x1, y1, x2, y2)
- XPLMSetGraphicsState(EnableFog, NumberTexUnits, EnableLighting, EnableAlphaTesting, EnableAlphaBlending, EnableDepthTesting, EnableDepthWriting)
- Functions of OpenGL
- The graphics module
- Functions of graphics module
- x_result, y_result = graphics.move_angle( x, y, angle, length )
- graphics.draw_line( x1, y1, x2, y2 )
- graphics.draw_rectangle( x1, y1, x2, y2 )
- graphics.draw_triangle( x1, y1, x2, y2, x3, y3 )
- graphics.set_color( red, green, blue, alpha )
- graphics.set_width( width )
- graphics.draw_angle_line( x, y, angle, length )
- graphics.draw_angle_arrow( x, y, angle, length, arrowhead's length, line width )
- graphics.draw_circle( x, y, radius, line width )
- graphics.draw_filled_circle( x, y, radius )
- graphics.draw_arc( x, y, start angle, end angle, radius, line width )
- graphics.draw_filled_arc( x, y, start angle, end angle, radius )
- graphics.draw_tick_mark( x, y, angle, radius, length, width )
- graphics.draw_outer_tracer( x, y, angle, radius, size )
- graphics.draw_inner_tracer( x, y, angle, radius, size )
- Functions of graphics module
- HUD module
- An Interactive HUD
- An Example
- Functions from HUD module
- HUD.begin_HUD( x, y, width, hight, "name", "always" )
- HUD.end_HUD( )
- HUD.create_element( "name", x, y, width, hight, red, green, blue, alpha )
- HUD.draw_string( x, y, fontsize, "string", red, green, blue, alpha )
- HUD.draw_fstring( x, y, fontsize, "format", "expression", red, green, blue, alpha )
- HUD.create_backlight_indicator( x, y, width, hight, "condition", red, green, blue, alpha )
- HUD.create_click_action( x, y, width, hight, "action" )
- HUD.create_click_switch( x, y, width, hight, "variable", value, alternative value )
- HUD.create_wheel_action( x, y, width, hight, "action" )
- XPLMNavigation
- Functions from XPLMNavigation
- nav_reference = XPLMGetFirstNavAid()
- next_nav_reference = XPLMGetNextNavAid( inNavAidRef )
- first_nav_reference = XPLMFindFirstNavAidOfType( inType )
- last_nav_reference = XPLMFindLastNavAidOfType( inType )
- nav_reference = XPLMFindNavAid( inNameFragment, inIDFragment, inLat, inLon, inFrequency, inType)
- outType, outLatitude, outLongitude, outHeight, outFrequency, outHeading, outID, outName = XPLMGetNavAidInfo( inRef )
- index_count = XPLMCountFMSEntries()
- index = XPLMGetDisplayedFMSEntry()
- index = XPLMGetDestinationFMSEntry()
- XPLMSetDisplayedFMSEntry( inIndex )
- XPLMSetDestinationFMSEntry( inIndex )
- outType, outID, outRef, outAltitude, outLat, outLon = XPLMGetFMSEntryInfo( inIndex )
- XPLMSetFMSEntryInfo( inIndex, inRef, inAltitude)
- XPLMSetFMSEntryLatLon( inIndex, inLat, inLon, inAltitude)
- XPLMClearFMSEntry( inIndex )
- Functions from XPLMNavigation
- Access HID devices
- Pre-defined variables
- HID related functions
- table, number = create_HID_table()
- device = hid_open( vendor_ID, product_ID )
- device = hid_open_path( path )
- hid_close( device )
- hid_write( device, report ID, value, ... )
- nov, variable, ... = hid_read_timeout( device, nov wanted, milliseconds )
- nov, variable, ... = hid_read_timeout( device, nov wanted )
- success = hid_set_nonblocking( device, nonblock )
- nobw = hid_send_feature_report( device, report ID, value, ... )
- nobw = hid_send_filled_feature_report( device, report ID, nobts, value, ... )
- nobr, report ID, variable, ... = hid_get_feature_report( device, novw )
- The Arcaze USB module
- device = arcaze.open_first_device()
- A1, A2, A3, ..., B19, B20 = arcaze.read_pins( device )
- ADC1, ADC2, ADC3, ADC4, ADC5, ADC6 = arcaze.read_ADCs( device )
- E1, E2, E3, ..., E19, E20 = arcaze.read_encoders( device )
- arcaze.set_all_pins_for_input( device )
- arcaze.set_pin_direction( device, pin, direction )
- arcaze.set_pin( device, pin, value )
- arcaze.init_display( device, address, intensity, scan_limit )
- arcaze.init_display( device, address )
- arcaze.show( device, address, mask, value_string )
- Classic and modern mode
- The Lua way to access DataRefs
- Manage your joysticks
- Understanding PLCs
- Basic knowledge about DataRefs
- Take Lua into consideration
- Debugging
- Integrate foreign libraries
- The new 64-bit architecture
- Q&A
- Credits
- License

FlyWithLua V2.6 Core Reference Manual
Carsten Lynker
October 28, 2018

Contents Contents
Contents
1 Using the Plugin 10
1.1 What’s needed ................................... 10
1.2 Difference between Core, Complete and Source Edition ............. 10
1.3 Installation .................................... 11
1.4 How to interact with Lua ............................. 11
1.5 Lua variables and DataRefs ............................ 12
1.6 Writing a first config file ............................. 12
1.7 Pre-defined variables ............................... 13
1.8 Loop Callbacks .................................. 13
1.9 Menu entries ................................... 13
1.10 Menu switches .................................. 14
2 Reference 15
2.1 Predefined variables ................................ 15
2.1.1 LONGITUDE .............................. 15
2.1.2 LATITUDE ................................ 15
2.1.3 PLANE_ICAO .............................. 15
2.1.4 PLANE_TAILNUMBER ......................... 15
2.1.5 SCREEN_WIDTH ............................ 15
2.1.6 SCREEN_HIGHT ............................ 15
2.1.7 MOUSE_X ................................ 16
2.1.8 MOUSE_Y ................................ 16
2.1.9 XSB_METAR .............................. 16
2.1.10 LUA_RUN ................................ 16
2.1.11 XPLANE_VERSION .......................... 16
2.1.12 XPLANE_HOSTID ........................... 16
2.1.13 SDK_VERSION ............................. 16
2.1.14 SYSTEM ................................. 17
2.1.15 SYSTEM_ARCHITECTURE ...................... 17
2.1.16 XPLANE_LANGUAGE ......................... 17
2.1.17 DIRECTORY_SEPARATOR ...................... 18
2.1.18 SCRIPT_DIRECTORY ......................... 18
2.1.19 AIRCRAFT_PATH ............................ 18
2.1.20 AIRCRAFT_FILENAME ........................ 18
2.1.21 DO_EVERY_FRAME_TIME_SEC ................... 18
2.1.22 DO_EVERY_DRAW_TIME_SEC .................... 19
2.1.23 DO_SOMETIMES_TIME_SEC ..................... 19
2.1.24 DO_OFTEN_TIME_SEC ........................ 19
Seite 2 von 101

Contents Contents
2.1.25 SCRIPTS_LOADING_TIME_SEC ................... 19
2.1.26 CLOCKS_PER_SEC ........................... 19
2.1.27 LUA_MEMORY_USAGE_KB ..................... 19
2.2 Lua functions ................................... 20
2.2.1 DataRef( "variable name", "DataRef name" ) .............. 20
2.2.2 DataRef( "variable name", "DataRef name", "readonly" ) ........ 20
2.2.3 DataRef( "variable name", "DataRef name", "readonly", index ). . . . 20
2.2.4 table = dataref_table( "DataRef name") ................. 21
2.2.5 define_shared_DataRef("DataRef name", "DataRef type") ....... 21
2.2.6 table = create_dataref_table( "DataRef name", "DataRef type") ..... 21
2.2.7 DataRef name,Index,readonly,DataRef type,DataRef ID = get_DataRef_binding(
"variable name" ) ............................. 22
2.2.8 button( button number )......................... 22
2.2.9 last_button( button number )....................... 22
2.2.10 create_switch( button number,DataRef name,index,off value,on value )23
2.2.11 create_positive_edge_flip( button number,DataRef name,index,first
value,second value )........................... 23
2.2.12 create_negative_edge_flip( button number,DataRef name,index,first
value,second value )........................... 24
2.2.13 create_positive_edge_trigger( button number,DataRef name,index,value
)...................................... 24
2.2.14 create_negative_edge_trigger( button number,DataRef name,index,value
)...................................... 25
2.2.15 create_positive_edge_increment( button number,DataRef name,index,
stepping,limit,rounding )........................ 25
2.2.16 create_negative_edge_increment( button number,DataRef name,index,
stepping,limit,rounding )........................ 25
2.2.17 create_positive_edge_decrement( button number,DataRef name,index,
stepping,limit,rounding )........................ 26
2.2.18 create_negative_edge_decrement( button number,DataRef name,index,
stepping,limit,rounding )........................ 26
2.2.19 create_axis_median( axis number,variable name )........... 26
2.2.20 get( "DataRef name" ) .......................... 26
2.2.21 get( "DataRef name", index )....................... 27
2.2.22 set( "DataRef name", value )....................... 28
2.2.23 set_array( "DataRef name", index,value )................ 28
2.2.24 set_button_assignment( button number, "simulator function") ..... 28
2.2.25 set_axis_assignment( axis number, "axis function", "reverse") ..... 29
2.2.26 clear_all_axis_assignments() ....................... 29
2.2.27 clear_all_button_assignments() ..................... 29
2.2.28 set_pilots_head( x,y,z,heading,pitch )................. 29
2.2.29 x,y,z,heading,pitch = get_pilots_head( ) ................ 30
2.2.30 command_begin( "simulator function" ) ................. 30
2.2.31 command_once( "simulator function" ) ................. 30
Seite 3 von 101

Contents Contents
2.2.32 command_end( "simulator function" ) .................. 30
2.2.33 logMsg( "string" ) ............................ 31
2.2.34 XSBSpeakString( "string" ) ....................... 31
2.2.35 XPLMSpeakString( "string" ) ...................... 31
2.2.36 print( "string" ) .............................. 32
2.2.37 do_sometimes( "Lua code string" ) ................... 32
2.2.38 do_often( "Lua code string" ) ...................... 32
2.2.39 do_every_frame( "Lua code string" ) .................. 32
2.2.40 do_every_draw( "Lua code string" ) ................... 32
2.2.41 do_on_keystroke( "Lua code string" ) .................. 33
2.2.42 do_on_mouse_wheel( "Lua code string" ) ................ 33
2.2.43 do_on_mouse_click( "Lua code string" ) ................ 34
2.2.44 do_on_new_metar( "Lua code string" ) ................. 34
2.2.45 do_on_new_XSB_text( "Lua code string" ) ............... 34
2.2.46 do_on_exit( "Lua code string" ) ..................... 35
2.2.47 draw_string( x,y, "string" ) ........................ 35
2.2.48 draw_string( x,y, "string", "color" ) ................... 35
2.2.49 draw_string( x,y, "string", red,green,blue )............... 36
2.2.50 draw_string_Helvetica_10( x,y, "string" ) ................ 36
2.2.51 draw_string_Helvetica_12( x,y, "string" ) ................ 36
2.2.52 draw_string_Helvetica_18( x,y, "string" ) ................ 36
2.2.53 draw_string_Times_Roman_10( x,y, "string" ) ............. 36
2.2.54 draw_string_Times_Roman_24( x,y, "string" ) ............. 37
2.2.55 measure_string( "string" ) ........................ 37
2.2.56 measure_string( "string", "font name" ) ................. 37
2.2.57 hight,width = bubble( x,y, "title", . . . )................. 37
2.2.58 hight,width = big_bubble( x,y, "title", . . . )............... 37
2.2.59 hight,width = huge_bubble( x,y, "title", . . . ).............. 38
2.2.60 add_macro( "macro name", "Lua code string" ) ............. 38
2.2.61 add_ATC_macro( "macro name", "Lua code string" ) .......... 38
2.2.62 add_macro( "macro name", "activation code string", "deactivation code
string", "default state" ) ......................... 38
2.2.63 create_command( "command name", "command description", "begin code
string", "continue code string", "end code string" ) ........... 39
2.2.64 table = directory_to_table( "path" ) ................... 39
2.2.65 place_aircraft_at( "ICAO" ) ........................ 40
2.2.66 load_aircraft( "path and full filename" ) ................. 40
2.2.67 load_situation( "path and full filename" ) ................ 40
2.2.68 save_situation( "path and full filename" ) ................ 40
2.2.69 reload_scenery() ............................. 41
2.2.70 crash_the_sim() .............................. 41
3 Modules 42
3.1 The Radio Module ................................ 42
Seite 4 von 101

Contents Contents
3.2 The XSquawkBox Module ............................ 43
3.2.1 XSBConnect() .............................. 43
3.2.2 XSBUserLogin() ............................. 43
3.2.3 XSBDisconnect() ............................. 43
3.2.4 XSBShowFlightplan() .......................... 44
3.2.5 XSBSendFlightplan() ........................... 44
3.2.6 frequency = XSBLookupATC( "name string" ) ............. 44
3.3 The Bit Module .................................. 44
4 OpenAL sound 45
4.1 Buffers, Sounds and Listeners .......................... 45
4.2 Loading and defining sounds ........................... 45
4.2.1 table position = load_WAV_file( filename )............... 45
4.2.2 let_sound_loop( table position,boolean value )............. 46
4.2.3 set_sound_pitch( table position,float value ).............. 46
4.2.4 set_sound_gain( table position,float value )............... 46
4.2.5 unload_all_sounds( ) ........................... 46
4.2.6 replace_WAV_file(table position,filename )............... 47
4.3 Using the sounds from the sound table ...................... 48
4.3.1 play_sound( table position )....................... 48
4.3.2 stop_sound( table position )....................... 48
4.3.3 pause_sound( table position )...................... 48
4.3.4 rewind_sound( table position )...................... 48
5 OpenGL graphics 49
5.1 Functions of OpenGL ............................... 49
5.1.1 glBegin_POINTS() ............................ 49
5.1.2 glBegin_LINES() ............................. 49
5.1.3 glBegin_LINE_STRIP() ......................... 49
5.1.4 glBegin_LINE_LOOP() ......................... 49
5.1.5 glBegin_POLYGON() .......................... 49
5.1.6 glBegin_TRIANGLES() ......................... 49
5.1.7 glBegin_TRIANGLE_STRIP() ..................... 49
5.1.8 glBegin_TRIANGLE_FAN() ....................... 49
5.1.9 glBegin_QUADS() ............................ 49
5.1.10 glBegin_QUAD_STRIP() ........................ 49
5.1.11 glEnd() .................................. 49
5.1.12 glVertex2f(x, y) .............................. 49
5.1.13 glVertex3f(x, y, z) ............................ 49
5.1.14 glLineWidth(width) ........................... 50
5.1.15 glColor3f(red, green, blue) ........................ 50
5.1.16 glColor4f(red, green, blue, alpha) .................... 50
5.1.17 glRectf(x1, y1, x2, y2) .......................... 50
Seite 5 von 101

Contents Contents
5.1.18 XPLMSetGraphicsState(EnableFog, NumberTexUnits, EnableLighting,
EnableAlphaTesting, EnableAlphaBlending, EnableDepthTesting, En-
ableDepthWriting) ............................ 50
6 The graphics module 51
6.1 Functions of graphics module ........................... 51
6.1.1 x_result,y_result = graphics.move_angle( x,y,angle,length )..... 51
6.1.2 graphics.draw_line( x1,y1,x2,y2 )................... 51
6.1.3 graphics.draw_rectangle( x1,y1,x2,y2 )................. 51
6.1.4 graphics.draw_triangle( x1,y1,x2,y2,x3,y3 )............. 51
6.1.5 graphics.set_color( red,green,blue,alpha )............... 52
6.1.6 graphics.set_width( width )........................ 52
6.1.7 graphics.draw_angle_line( x,y,angle,length )............. 52
6.1.8 graphics.draw_angle_arrow( x,y,angle,length,arrowhead’s length,line
width ).................................. 52
6.1.9 graphics.draw_circle( x,y,radius,line width ).............. 53
6.1.10 graphics.draw_filled_circle( x,y,radius )................ 53
6.1.11 graphics.draw_arc( x,y,start angle,end angle,radius,line width ). . . 53
6.1.12 graphics.draw_filled_arc( x,y,start angle,end angle,radius )..... 53
6.1.13 graphics.draw_tick_mark( x,y,angle,radius,length,width )...... 53
6.1.14 graphics.draw_outer_tracer( x,y,angle,radius,size ).......... 53
6.1.15 graphics.draw_inner_tracer( x,y,angle,radius,size ).......... 54
7 HUD module 55
7.1 An Interactive HUD ................................ 55
7.2 An Example .................................... 55
7.3 Functions from HUD module ........................... 58
7.3.1 HUD.begin_HUD( x,y,width,hight,"name","always" )........ 58
7.3.2 HUD.end_HUD( ) ............................ 58
7.3.3 HUD.create_element( "name",x,y,width,hight,red,green,blue,alpha )58
7.3.4 HUD.draw_string( x,y,fontsize,"string",red,green,blue,alpha ). . . 59
7.3.5 HUD.draw_fstring( x,y,fontsize,"format","expression",red,green,
blue,alpha )............................... 59
7.3.6 HUD.create_backlight_indicator( x,y,width,hight,"condition",red,
green,blue,alpha )............................ 59
7.3.7 HUD.create_click_action( x,y,width,hight,"action" )......... 60
7.3.8 HUD.create_click_switch( x,y,width,hight,"variable",value,alterna-
tive value )................................ 60
7.3.9 HUD.create_wheel_action( x,y,width,hight,"action" )........ 61
8 XPLMNavigation 62
8.1 Functions from XPLMNavigation ........................ 62
8.1.1 nav_reference = XPLMGetFirstNavAid() ................ 62
8.1.2 next_nav_reference = XPLMGetNextNavAid( inNavAidRef ) ..... 62
Seite 6 von 101

Contents Contents
8.1.3 first_nav_reference = XPLMFindFirstNavAidOfType( inType ) . . . . 62
8.1.4 last_nav_reference = XPLMFindLastNavAidOfType( inType ) . . . . . 62
8.1.5 nav_reference = XPLMFindNavAid( inNameFragment, inIDFragment,
inLat, inLon, inFrequency, inType) ................... 62
8.1.6 outType, outLatitude, outLongitude, outHeight, outFrequency, outHead-
ing, outID, outName = XPLMGetNavAidInfo( inRef ) ......... 62
8.1.7 index_count = XPLMCountFMSEntries() ................ 62
8.1.8 index = XPLMGetDisplayedFMSEntry() ................ 62
8.1.9 index = XPLMGetDestinationFMSEntry() ................ 62
8.1.10 XPLMSetDisplayedFMSEntry( inIndex ) ................ 62
8.1.11 XPLMSetDestinationFMSEntry( inIndex ) ............... 62
8.1.12 outType, outID, outRef, outAltitude, outLat, outLon = XPLMGetFM-
SEntryInfo( inIndex ) ........................... 62
8.1.13 XPLMSetFMSEntryInfo( inIndex, inRef, inAltitude) .......... 63
8.1.14 XPLMSetFMSEntryLatLon( inIndex, inLat, inLon, inAltitude) . . . . . 63
8.1.15 XPLMClearFMSEntry( inIndex ) .................... 63
9 Access HID devices 64
9.1 Pre-defined variables ............................... 64
9.1.1 NUMBER_OF_HID_DEVICES ..................... 64
9.1.2 ALL_HID_DEVICES .......................... 64
9.2 HID related functions ............................... 64
9.2.1 table, number = create_HID_table() ................... 64
9.2.2 device = hid_open( vendor_ID, product_ID ) .............. 65
9.2.3 device = hid_open_path( path ) ...................... 65
9.2.4 hid_close( device ) ............................ 65
9.2.5 hid_write( device, report ID, value, ... ) ................. 66
9.2.6 nov, variable, ... = hid_read_timeout( device, nov wanted, milliseconds ) 66
9.2.7 nov, variable, ... = hid_read_timeout( device, nov wanted ) ....... 66
9.2.8 success = hid_set_nonblocking( device, nonblock ) ........... 66
9.2.9 nobw = hid_send_feature_report( device, report ID, value, ... ) ..... 67
9.2.10 nobw = hid_send_filled_feature_report( device, report ID, nobts, value,
... ) .................................... 67
9.2.11 nobr, report ID, variable, ... = hid_get_feature_report( device, novw ) . 68
9.3 The Arcaze USB module ............................. 68
9.3.1 device = arcaze.open_first_device() ................... 69
9.3.2 A1, A2, A3, ..., B19, B20 = arcaze.read_pins( device ) ......... 69
9.3.3 ADC1, ADC2, ADC3, ADC4, ADC5, ADC6 = arcaze.read_ADCs( de-
vice ) ................................... 70
9.3.4 E1, E2, E3, ..., E19, E20 = arcaze.read_encoders( device ) ....... 70
9.3.5 arcaze.set_all_pins_for_input( device ) ................. 70
9.3.6 arcaze.set_pin_direction( device, pin, direction ) ............ 71
9.3.7 arcaze.set_pin( device, pin, value ) .................... 71
9.3.8 arcaze.init_display( device, address, intensity, scan_limit ) ....... 71
Seite 7 von 101

Contents Contents
9.3.9 arcaze.init_display( device, address ) .................. 72
9.3.10 arcaze.show( device, address, mask, value_string ) ........... 72
10 Classic and modern mode 73
10.1 Reading classic functions ............................. 73
10.1.1 variable = XPLMGetDatai( DataRef ).................. 73
10.1.2 variable = XPLMGetDataf( DataRef ).................. 74
10.1.3 variable = XPLMGetDatad( DataRef )................. 74
10.1.4 table = XPLMGetDatavi( DataRef,inIndex,inMax ).......... 74
10.1.5 table = XPLMGetDatavf( DataRef )................... 74
10.1.6 userdata variable = XPLMFindDataRef( DataRef Name )....... 75
10.1.7 datatype variable = XPLMGetDataRefTypes( DataRef reference ). . . 75
10.2 Writing classic functions ............................. 77
10.2.1 XPLMSetDatai( DataRef,variable or value).............. 77
10.2.2 XPLMSetDataf( DataRef,variable or value).............. 77
10.2.3 XPLMSetDatad( DataRef,variable or value).............. 77
10.2.4 XPLMSetDatavi( DataRef,table,inIndex,inMax )........... 77
10.2.5 XPLMSetDatavf( DataRef,table,inIndex,inMax )........... 78
11 The Lua way to access DataRefs 78
11.1 A magic metatable ................................ 78
11.1.1 table = dataref_table( DataRef )..................... 79
12 Manage your joysticks 80
12.1 Get a basic configuration ............................. 80
12.2 Define your sticks ................................. 81
12.3 Define type specific assignments ......................... 81
12.4 Lua for cockpit builders .............................. 82
13 Understanding PLCs 84
14 Basic knowledge about DataRefs 86
14.1 What are DataRefs? ................................ 86
14.2 Find the right DataRefs .............................. 86
14.3 Accessing DataRefs ................................ 87
14.4 Observe the DataRef ............................... 88
15 Take Lua into consideration 90
15.1 Strings inside of strings .............................. 90
15.2 Multiple line strings ................................ 91
15.3 Global or local variables? ............................. 91
15.4 Tables are tables .................................. 92
16 Debugging 93
Seite 8 von 101

Contents Contents
17 Integrate foreign libraries 94
18 The new 64-bit architecture 95
18.1 Architecture exclusive script loading ....................... 95
18.2 Checking architecture inside a script ....................... 95
18.3 64-bit DLLs .................................... 95
19 Q&A 96
19.1 My script doesn’t work. What can I do? ..................... 96
19.1.1 Check the debug info file and Log.txt .................. 96
19.1.2 Check for conflicts to other scripts .................... 96
19.1.3 I really can’t solve it! ........................... 96
19.2 How to ask the developer of FlyWithLua for help? ................ 97
19.3 Is the debug file privacy safe? ........................... 97
19.4 Where are the Splines? .............................. 97
19.5 Feature requests .................................. 98
19.6 Can I store Lua files inside the aircraft’s folder? ................. 98
19.7 I want full access to X-Plane’s plugin SDK! ................... 99
19.8 Using Lua For Windows ............................. 100
20 Credits 101
21 License 101
Seite 9 von 101

1 USING THE PLUGIN
1 Using the Plugin
1.1 What’s needed
To use FlyWithLua, you will need following:
a) The plugin itself.
b) A nice text editor (VIM,GNU Emacs,Notepad++, ...).
c) The plugin »XSquawkBox« (optional, but usefull).
d) The plugin »DataRef Editor« (optional, but extremely high recommended).
e) Some skills in programming Lua (FlyWithLua uses LuaJIT, compatible to Lua 5.1).
f) Knowledge about DataRefs.
1.2 Difference between Core, Complete and Source Edition
FlyWithLua is originally published in three different flavors.
The first version is the Core Edition. This is the right version to start your first steps in using Lua
to customize your X-Plane installation. The Core Edition is fully supported by the FlyWithLua
developer team and acts as the heart of the FlyWithLua economy. If you got an error with
this version, check if you have the latest version installed and report your issue together with a
Log.txt and FlyWithLua_debug.txt file at the official FlyWithLua support forum.
Please ask for support here: HelpMe Forum of FlyWithLua
The second edition was made for the user who know what they are doing. We call it the Com-
plete Edition. The Complete Edition is a ready to use binary version of FlyWithLua with
additional libraries and no restrictions (access to private art control DataRefs is possible
with this version). Remember, Pandora keeps her box widely opened for you in the Complete
Edition, but this has not only positive effects. The more possibilities you get to manipulate X-
Plane, the more possible frustration may be the result, when Laminar Research updates X-Plane.
If you do not know what the last sentence is about, you should not use the Complete Edition!
This version of FlyWithLua has a lower level of support. Please ask in the same HelpMe Forum
to get some assistance.
For the real hackers we have the whole source code of FlyWithLua Core Edition published on
GitHub. Just grab the code and compile it for your own, to have the full control.
You want all menu entries blink in pink? If you are a C/C++ crack, just edit the source and com-
pile your own flavor. FlyWithLua is published with the MIT license, so you can do everything
you want to the source code without getting into trouble with us.
Years of hard work is our free gift to you. Use it with respect and honor.
Seite 10 von 101

1.3 Installation 1 USING THE PLUGIN
1.3 Installation
To use the plugin, just copy the complete folder FlyWithLua into X-Plane’s main plugin folder.
The main plugin folder looks like this:
«place where you store the sim»/X-Plane 10/Resources/plugins/1
When the plugin starts up, there must be a folder named
«place where you store the sim»/X-Plane 10/Resources/plugins/FlyWithLua/Scripts/2
with at least one file in it (no matter if it is a Lua script or not). When you copy the complete
folder, you will start with two subfolders, Scripts and Scripts (disabled). All scripts inside
the Scripts folder will be run automatically by the plugin.
When the plugin starts, it will run all files inside the Scripts folder, who end as:
.fwl,.FWL,.lua,.Lua or .LUA
If a file is hidden (it’s name begins with a single dot), the file will be ignored by the plugin.
This means, you have three ways to disable a script.
a) Change the endian.
b) Hide it (let the name start with ».«).
c) Move it to another folder.
I prefer the last way, so you find the folder Scripts (disabled) filled with examples. All
these examples may produce an enormous frustration, if you just copy them into the »active«
folder. They may redefine your joystick setting for example. So be very carefully and modify
them before usage. Lua scripts are a powerful weapon!
1.4 How to interact with Lua
If you have XSquawkBox3installed, there is an easy way to talk to Lua. If you type in a line
into XSquawkBox starting with a >(a greater than sign), the line is send directly to Lua, instead
of talking to your VATSIM channel (on COM1). Try the following code:
>print(2+3)
1If you use X-Plane 9 instead of X-Plane 10, search for the README_XP9.txt file and follow the instruction inside.
2If you rename the plugin, it will stop working. So never change it’s folder name.
3If not, you can click on the menu entry »Enter a line of code« in FlyWithLua’s plugin menu. There is no need to
have XSquawkBox installed to use FlyWithLua. On the other hand, flying online on VATSIM is really cool.
Seite 11 von 101

1.5 Lua variables and DataRefs 1 USING THE PLUGIN
If everything is fine, Lua will print a 5into the XSquawkBox’s main text display4. The output
produced by Lua is not forwarded to the VATSIM COM1 channel. So don’t be afraid of disturb-
ing the controller. You can check this behavior as XSquawkBox prints all internal information
in dark red color.
So FlyWithLua is a little pocket calculator? Hmm, why not. But this is not the intension of the
plugin. FlyWithLua was made to interact with DataRefs.
1.5 Lua variables and DataRefs
Lua can handle variables. You can try it out:
>LuaIsNice = true
>print(LuaIsNice)
Not very spectacular, but wait, let’s tell Lua to bind a variable to a DataRef:
>DataRef("battery", "sim/cockpit/electrical/battery_on", "writable")
>print(battery)
Wow! Lua prints out a 1if the battery is on, or a 0when the battery is off. That’s magic! But it
goes even better. Turn on your plane and type this:
>battery = 0
Plopp – your plane is down. If a variable is connected to a DataRef, and you define the connec-
tion as not readonly (the third parameter of the function call was "writable"), all changes on
the variable will be pushed to the DataRef instandly.
1.6 Writing a first config file
With the knowledge now, we can write a little config script like this:
1DataRef ( " p i t c h _ n u l l z o n e " , " sim / j o y s t i c k / j o y s t i c k _ p i t c h _ n u l l z o n e " , " w r i t a b l e " )
2pitch_nullzone = 0.0
3DataRef ( " r o l l _ n u l l z o n e " , " sim / j o y s t i c k / j o y s t i c k _ r o l l _ n u l l z o n e " , " w r i t a b l e " )
4roll_nullzone = 0.0
5DataRef ( " h ea d i ng _ nu l lz o n e " , " sim / j o y s t i c k / j o y s t i c k _ h e a d i n g _ n u l l z o n e " , " w r i t a b l e " )
6h e a d i n g _ n u l l z o n e = 0 . 0
This works very well, but it is not really user friendly. So I decided to give FlyWithLua some
extra functions, who make the code more cheerful. The config file can be alternatively written
as:
1s e t ( " sim / j o y s t i c k / j o y s t i c k _ p i t c h _ n u l l z o n e " , 0. 0 )
2s e t ( " sim / j o y s t i c k / j o y s t i c k _ r o l l _ n u l l z o n e " , 0. 0 )
3s e t ( " sim / j o y s t i c k / j o y s t i c k _ h e a d i n g _ n u l l z o n e " , 0 .0 )
4Use the developer console to see the output, if you don’t have XSquawkBox installed.
Seite 12 von 101

1.7 Pre-defined variables 1 USING THE PLUGIN
Much easier to read, isn’t it?
1.7 Pre-defined variables
But what to code if you want a nullzone of 0.1 in your piston, but 0.0 in your helicopter? You
can use the pre-defined variable PLANE_ICAO.
1−− n u l l z o n e o f my l i t t l e Ces sna
2i f ( PLANE_ICAO == " C172 " ) th e n
3s e t ( " sim / j o y s t i c k / j o y s t i c k _ p i t c h _ n u l l z o n e " , 0. 1 )
4s e t ( " sim / j o y s t i c k / j o y s t i c k _ r o l l _ n u l l z o n e " , 0 . 1 )
5s e t ( " sim / j o y s t i c k / j o y s t i c k _ h e a d i n g _ n u l l z o n e " , 0 .1 )
6end
7−− n u l l z o n e o f my l i t t l e c o f f e e m i l l
8i f (PLANE_ICAO == " R22 " ) t h e n
9s e t ( " sim / j o y s t i c k / j o y s t i c k _ p i t c h _ n u l l z o n e " , 0. 0 )
10 s e t ( " sim / j o y s t i c k / j o y s t i c k _ r o l l _ n u l l z o n e " , 0 . 0 )
11 s e t ( " sim / j o y s t i c k / j o y s t i c k _ h e a d i n g _ n u l l z o n e " , 0 .0 )
12 end
1.8 Loop Callbacks
All your code will be calculated automatically during startup, if you change the plane or position,
or when you click on Reload all Lua script files in the plugin’s main menu.
If this is not enough to you, you can generate code, that will be calculated continuously in a loop
callback.
These two commands given to Lua (using XSquawkBox’s input line) will produce an ugly be-
havior:
>DataRef("poslight", "sim/cockpit/electrical/nav_lights_on", "writable")
>do_sometimes("poslight = 0")
Now, from time to time, Lua will turn off your navigation lights. Try it out to see how it works.
You will not bewitch the simulator for the rest of your life. A simple click on the menu entry
Reload all Lua script files will reset your magic spell.
1.9 Menu entries
Every time you get your little bird back to Paderborn/Lippstadt (EDLP), you want to talk to the
tower controller (on frequency 133.375) to initialize your VFR approach, and want your needle
pointing to PAD (on frequency 354). Maybe you want to tune in the ILS signal.
You can define an ATC menu entry to script it. This will help a lot, because the code will only be
calculated if you click on the menu entry. Nobody always want to fly around Paderborn, right?
Write a little file like this and name it »EDLP_VFR_Approach.lua«.
Seite 13 von 101

1.10 Menu switches 1 USING THE PLUGIN
1DataRef ( "COM1" , " sim / c o c k p i t / r a d i o s / com1_freq_hz " , " w r i t a b l e " )
2DataRef ( "NAV1" , " sim / c o c k p i t / r a d i o s / n av 1_ f re q_ h z " , " w r i t a b l e " )
3DataRef ( "ADF1" , " si m / c o c k p i t / r a d i o s / a d f 1 _ f r e q _ h z " , " w r i t a b l e " )
4
5add_ATC_macro ( " coming home " , [ [−− f l y home t o EDLP
6COM1 = 13337
7NAV1 = 10855
8ADF1 = 3 5 4 ] ] )
As the code of your macro needs more than one line, you use the double brackets [[ and ]] to
write down a multi line string as the second argument of the function add_ATC_macro. So don’t
forget the closing normal bracket, as shown in the last line above.
1.10 Menu switches
If you want to toggle a special behavior of your simulator, defined in a script, but you do not
want to rename or move the file and reload all scripts to use it or not, you can use menu entry
switches.
It’s just as easy as giving Lua’s add_macro function two additional string parameters. Write a
file like this and name it »transponder_helper.lua«.
If you don’t want to copy&paste the code, just take a look into the Scripts (disabled)
folder.
1−− The g r o u n d s p e e d i s i n m / s ( m e t e r p e r s e c o n d ) , n o t k n ( k n o t s ) , an d a l w a y s r e a d o n l y
2DataRef ( " g ro und spe ed " , " sim / f l i g h t m o d e l / p o s i t i o n / gr ou nd sp eed " )
3−− The t r a n s p o n d e r c od e i s a 4−d i g i t i n t e g e r
4DataRef ( " t r a n s p o n d e r _ c o d e " , " sim / c o c k p i t / r a d i o s / t r a n s p o n d e r _ c o d e " , " w r i t a b l e " )
5−− T r a n s p o n d e r mode ( o f f = 0 , s t d b y =1 , o n =2 , t e s t =3)
6DataRef ( " t ra ns po nd er _m od e " , " sim / c o c k p i t / r a d i o s / t ra ns pon de r_ mo de " , " w r i t a b l e " )
7
8−− we s t a r t i n Eu rop e mo s t o f t h e t i m e
9t r a n s p o n d e r _ c o d e = 7000
10
11 −− t u r n on yo u r t r a n s p o n d e r when f l y i n g f a s t e r t h a n 20 m/ s ( a b o u t 40 kn )
12 function check_transponder ()
13 i f ( transponder_help == t r u e )th e n
14 i f ( ( gr ou nd s pe ed > 20) and ( transponder_mode ~= 2) ) the n
15 transponder_mode = 2
16 XPLMSpeakString ( " T ran sp ond er s e t t o a c t i v e " )
17 end
18 i f ( ( gr ou nd s pe ed < 20) and ( transponder_mode > 1) ) t hen
19 transponder_mode = 1
20 XPLM Spe akS tri ng ( " T r a n sp o n d e r s e t t o s t a n d b y " )
21 end
22 end
23 end
24
25 −− c h ec k i t e v e r y 10 s e c
26 do_sometimes ( " c h e c k _ t r a n s p o n d e r ( ) " )
27
28 −− make a s w i t c h a b l e menu e n t ry , d e f a u l t i s on
29 add_ ma cr o ( " A u t om a t i c al l y s e t T ra ns po n de r " , " t r a n s p o n d e r _ h e l p = t r u e " , " t r a n s p o n d e r _ h e l p
= f a l s e " , " a c t i v a t e " )
Seite 14 von 101

2 REFERENCE
2 Reference
2.1 Predefined variables
All predefined variables are readonly. If you change them, X-Plane will not recognize it.
2.1.1 LONGITUDE
Gives the actual longitude value in decimal as a double float value (remember Lua didn’t know
float but only number). As X-Plane uses the data type double, but the numbers in Lua are only
float, you will get an approximation.
The value is readonly, like all predefined variables. So it isn’t possible to replace the plane in
it’s position by changing the value.
Positive values in LONGITUDE are east, negative values are west.
2.1.2 LATITUDE
This gives the latitude value of the plane’s position as a decimal value. So for example seven
degree thirty minutes north is represented as 7.5 (a positive value, negative values are south).
2.1.3 PLANE_ICAO
A string holding the plane’s ICAO code in it.
2.1.4 PLANE_TAILNUMBER
The Tailnumber of the plane as a string.
2.1.5 SCREEN_WIDTH
The screen width in pixel.
2.1.6 SCREEN_HIGHT
The screen hight in pixel.
Seite 15 von 101

2.1 Predefined variables 2 REFERENCE
2.1.7 MOUSE_X
Horizontally position of the mouse pointer. Coordinates start on the left side with 0 (zero).
2.1.8 MOUSE_Y
Vertically position of the mouse pointer. Coordinates start on the bottom side with 0 (zero).
2.1.9 XSB_METAR
A string containing the last metar received by XSquawkBox. If you are not connected to VAT-
SIM, the variable will be useless. It is readonly.
Readonly means, you can’t modify the online weather by changing the XSB_METAR variable!
2.1.10 LUA_RUN
An integer value showing how often Lua was (re)started. During the very first run of Lua, it’s
value is 1. You can use it to do things only once after X-Plane was started, and do not repeat
when a new plane was loaded or the airport was changed. (Both will force a Lua restart.)
2.1.11 XPLANE_VERSION
An integer value showing the version number of X-Plane. FlyWithLua is designed to run on
X-Plane version 10.x, but it may run on X-Plane 9. To check if you are really on X-Plane 10 (or
newer), you can say: if XPLANE_VERSION > 1000 then ... end.
Example given: the version X-Plane 10.10rc3 shows: XPLANE_VERSION = 10101
2.1.12 XPLANE_HOSTID
An integer value showing the HostID of X-Plane, an OS-specific value (totally unnecessary).
2.1.13 SDK_VERSION
An integer value showing the version number of the SDK, FlyWithLua is running on. The SDK
version should be 210 or above for X-Plane 10. If not, download a version for X-Plane 10 of
FlyWithLua.
Seite 16 von 101

2.1 Predefined variables 2 REFERENCE
2.1.14 SYSTEM
A string telling you on witch computer system FlyWithLua (the simulator) is running. It’s
value is "IBM" on Windows systems, "APL" on Apple Macintosh systems and "LIN" on Linux
systems.
2.1.15 SYSTEM_ARCHITECTURE
A number either 32 or 64, depending on the architecture. 64 means X-Plane is running in 64-bit,
32 means the simulator and all plugins are running in 32-bit.
2.1.16 XPLANE_LANGUAGE
A string value showing the language of X-Plane’s menus. The value can be "English","French",
"German","Italian","Spanish","Korean","Russian","Greek","Japanese","Chinese"
or "Unknown".
Seite 17 von 101

2.1 Predefined variables 2 REFERENCE
Since FlyWithLua version 2.0 all menu entries are no longer forced to English. To create a
multiple language support for your plugin, write code like this5:
1d a t a r e f ( "COM1" , " sim / c o c k p i t / r a d i o s / co m1 _freq_hz " , " w r i t a b l e " )
2
3i f XPLANE_LANGUAGE == " German " then
4add_macro ( " S t e l l e das FunkgerÃd’t a u f UNICOM" , "COM1 = 12280 " )
5
6elseif XPLANE_LANGUAGE == " F renc h " th e n
7add_ macro ( " FrÃl’quence r a d i o p o i n t s u r l ’UNICOM" , "COM1 = 12280 " )
8
9elseif XPLANE_LANGUAGE == " S p a n is h " the n
10 add_macro ( " P unto de f r e c u e n c i a de r a d i o en l a UNICOM" , "COM1 = 12280 " )
11
12 elseif XPLANE_LANGUAGE == " I t a l i a n " t hen
13 ad d_mac ro ( " P un to d i f r e q u e n z a r a d i o s u l l a UNICOM" , "COM1 = 12280 " )
14
15 else
16 add_macro ( " Se t r a d i o t o UNICOM" , "COM1 = 12280 " )
17 end
2.1.17 DIRECTORY_SEPARATOR
A string containing the directory separator of the current OS.
2.1.18 SCRIPT_DIRECTORY
The complete OS-specific path to the scripts including a directory separator as it’s last character.
If you want to write a file named my_info.txt into the scripts directory (instead of X-Plane’s
main directory), use code like this:
infofile = os.open(SCRIPT_DIRECTORY .. "my_info.txt", "w")
2.1.19 AIRCRAFT_PATH
The full path to your aircraft file, ending with a directory separator.
2.1.20 AIRCRAFT_FILENAME
The name of the ACF aircraft file, including the endian ".acf".
2.1.21 DO_EVERY_FRAME_TIME_SEC
The duration time in seconds of the every frame loop.
5All text other than English or German was translated using Google Translator.
Seite 18 von 101

2.1 Predefined variables 2 REFERENCE
2.1.22 DO_EVERY_DRAW_TIME_SEC
The duration time in seconds of the drawing loop.
2.1.23 DO_SOMETIMES_TIME_SEC
The duration time in seconds of the loop to be executed sometimes.
2.1.24 DO_OFTEN_TIME_SEC
The duration time in seconds of the often executed loop.
2.1.25 SCRIPTS_LOADING_TIME_SEC
The time it takes to load all scripts.
2.1.26 CLOCKS_PER_SEC
The number of clock ticks in one second, a C value depending on your system.
1
CLOCKS_PER_SEC is the ninimal time that can be maesured.
2.1.27 LUA_MEMORY_USAGE_KB
The memory usage of the Lua environment in kB. This is not the complete memory consumption
of your scripts, as some objects like wave files are not stored into Lua, but are allocated in C by
the plugin FlyWithLua.
Seite 19 von 101

2.2 Lua functions 2 REFERENCE
2.2 Lua functions
The following functions are written in core C++ and are a part of the plugin. Most of them are
multi-defined to handle different count of arguments.
2.2.1 DataRef( "variable name", "DataRef name" )
a) variable name = Name of the Lua variable representing the DataRef.
b) DataRef name = Name of the DataRef. Look at the listing of all DataRefs.
Binds a Lua variable to a DataRef6. The connection will be forced to readonly. Not possible to
array DataRefs.
2.2.2 DataRef( "variable name", "DataRef name", "readonly" )
a) variable name = Name of the Lua variable representing the DataRef.
b) DataRef name = Name of the DataRef. Look at the listing of all DataRefs.
c) readonly = Should the variable be pushed to X-Plane when it is changed? Say "readonly"
to have it readonly or "writable" to make it writable.
Binds a Lua variable to a DataRef. The connection will be writealbe if you say "writable" as
the third argument and if the DataRef is writable. Not possible to array DataRefs.
2.2.3 DataRef( "variable name", "DataRef name", "readonly", index )
a) variable name = Name of the Lua variable representing the DataRef.
b) DataRef name = Name of the DataRef. Look at the listing of all DataRefs.
c) readonly = Should the variable be pushed to X-Plane when it is changed? Say "readonly"
to have it readonly or "writable" to make it writable.
d) index = The index of an array DataRef.
Binds a Lua variable to a DataRef. The connection will be writalbe if you say "writable" as
the third argument and if the DataRef is writable. For array DataRefs use a fourth argument, the
index starting at 0 (Zero). It will bind the element at the given index. It will not bind an array as
a Lua table.
6You can spell it dataref() instead of DataRef(), if you don’t like uppercase letters.
Seite 20 von 101

2.2 Lua functions 2 REFERENCE
2.2.4 table = dataref_table( "DataRef name")
a) table = Name of the Lua variable representing the DataRef. The variable will be a Lua
table, access it like an anrray with index starting at 0 (Zero).
b) DataRef name = Name of the DataRef. Look at the listing of all DataRefs.
This function will create a table variable to access a DataRef. You can use it for any type of
DataRef, no matter if the DataRef is an array or not. Here are some examples:
1−− t h e b a t t e r y D a t a R e f i s an a r ra y o f up t o 8 b a t t e r y s w i t c h e s
2b a t t e r y = d a t a r e f _ t a b l e ( " sim / c oc k p it 2 / e l e c t r i c a l / b at t e r y _ on " )
3
4−− now we t u r n on t h e f i r s t b a t t e r y o f t h e p la n e
5b a t t e r y [ 0 ] = 1
6
7−− b u t i t w i l l work on non−a r r a y D a t a R e f s t o o
8COM1FREQ = d a t a r e f _ t a b l e ( " sim / c o ck p it / r a d i os / com1_freq_hz " )
9
10 −− s w i t c h i t t o UNICOM
11 COM1FREQ[ 0 ] = 12280
2.2.5 define_shared_DataRef("DataRef name", "DataRef type")
a) DataRef name = Name of the DataRef. Look at the listing of all DataRefs.
b) DataRef type = Type of the DataRef. This type is a string argument and can be
"Int","Float","IntArray","FloatArray","Double" or "Data".
With this function you will create a DataRef of the given type if it does not exist. If it exist
and the type is different, you will get an error message. If it still exists with the same type, this
command will do nothing. Shared DataRefs should help you interacting with other plugins.
2.2.6 table = create_dataref_table( "DataRef name", "DataRef type")
a) table = Name of the Lua variable representing the DataRef. The variable will be a Lua
table, access it like an anrray with index starting at 0 (Zero).
b) DataRef name = Name of the DataRef. Look at the listing of all DataRefs.
c) DataRef type = Type of the DataRef. This type is a string argument and can be
"Int","Float","IntArray","FloatArray","Double" or "Data".
Here you have the best way to create a new DataRef and connect it to a table variable inside
Lua.
This is an example:
Seite 21 von 101

2.2 Lua functions 2 REFERENCE
1−− A s t r i n g m ust be c r e a t e d as a " Data " t y p e
2my_w el co me _s tri ng = c r e a t e _ d a t a r e f _ t a b l e ( " Fl yWi thL ua / u s e l e s s _ s a m p l e s / welcome " , " Dat a " )
3
4−− no m a t t e r i f i t l o o k s l i k e a t a b l e , j u s t i n d e x t h e f i r s t e l e me n t t o f i l l i t
5my_we lco me_s tri ng [ 0 ] = " H el lo World ! "
6
7−− a n o t h e r ex amp le , now we c r e a t e an i n t e g e r v a l u e
8th e_ an swe r = c r e a t e _ d a t a r e f _ t a b l e ( " FlyWithLua / u s e le s s _ sa m p le s / t he _an s we r " , " I n t " )
9t he _ an sw er [ 0 ] = 42
10
11 −− i n t i m e s o f a l t e r n a t i v e f a c t s , we can ha v e m u l t i p l e a n s w e r s
12 a ll _ a ns w er s = c r e a t e _ d a t a r e f _ t a b l e ( " FlyWithLua / u s e le s s _ sa m p le s / a n sw er s " , " I nt A r r a y " )
13 a l l _ a n s w e r s [ 0 ] = 42
14 a l l _ a n s w e r s [ 1 ] = 2017
2.2.7 DataRef name,Index,readonly,DataRef type,DataRef ID = get_DataRef_binding(
"variable name" )
a) variable name = Name of the Lua variable representing the DataRef.
b) DataRef name = Name of the DataRef. Look at the listing of all DataRefs.
c) Index = The Index of the DataRef. This is always 0 (zero) if the DataRef isn’t an array.
d) readonly = This results to true is the DataRef is readonly and false if it’s writable.
e) DataRef type = Type of the DataRef. 1 = integer, 2 = float, 4 = double, 8 = float array,
16 = integer array and 32 = data (strings).
f) DataRef ID = The ID of the DataRef. A pointer to the memory, the DataRef is stored.
2.2.8 button( button number )
a) button number = Number of the button, starting at 0 (zero).
Returns the value of the actual state of a joystick button. button(i) will result in true if the
button is pressed, else it gives back false. The argument imust be an integer, ranging from 0
to 1599. Check out the number in X-Plane’s advanced buttons menu.
2.2.9 last_button( button number )
a) button number = Number of the button, starting at 0 (zero).
Seite 22 von 101

2.2 Lua functions 2 REFERENCE
Returns the value of the state of a joystick button, as it was during the last frame. last_button(i)
will result in true if the button was pressed, else it gives back false. The argument imust be an
integer, ranging from 0 to 1599. Check out the number in X-Plane’s advanced buttons menu.
Advice:
Always use button() and last_button() to grab joystick values, instead of using
DataRef("MyButton", "sim/joystick/joystick_button_values", "readonly", 123),
if you like super fast code execution. The functions button() and last_button() deliver
values much efficient than user defined DataRefs.
2.2.10 create_switch( button number,DataRef name,index,off value,on value )
a) button number = Number of the button, starting at 0 (zero).
b) DataRef name = Name of the DataRef. Look at the listing of all DataRefs.
c) index = The index of an array DataRef, else 0.
d) off value = Value to be set when button is not pressed (off).
e) on value = Value to be set when button is pressed (on).
This will turn a joystick buton into a switch controlling a DataRef. If the button is not pressed,
the DataRef will be set to the off value, else to the on value. The index is 0 (zero) for non-array
DataRefs.
The last three arguments are optional. If you leave them away, Lua will guess 0 for the index and
the off value and 1 for the on value. So this will be fine to let button no. 15 control the battery
as a real hardware switch:
>create_switch(15, "sim/cockpit/electrical/battery_on")
2.2.11 create_positive_edge_flip( button number,DataRef name,index,first value,
second value )
a) button number = Number of the button, starting at 0 (zero).
b) DataRef name = Name of the DataRef. Look at the listing of all DataRefs.
c) index = The index of an array DataRef, else 0.
d) first value = Value to be set when button is just pressed (positive edge detecttion).
e) second value = Value to be set when button is just pressed but the DataRef’s value is equal
to the first value.
Seite 23 von 101

2.2 Lua functions 2 REFERENCE
This is similar to the create_switch() function, but it will flip between the two values, given
as the last two arguments, every time a positive edge was detected (when the button is pressed
just in that moment).
The last three arguments are optional. If you leave them away, Lua will guess 0 for the index
and the first value and 1 for the second value. So this will be fine to let button no. 15 control the
battery and flip it every time it is pressed:
>create_positive_edge_flip(15, "sim/cockpit/electrical/battery_on")
Lua will automatically handle it like this:
>create_positive_edge_flip(15, "sim/cockpit/electrical/battery_on", 0, 0, 1)
2.2.12 create_negative_edge_flip( button number,DataRef name,index,first value,
second value )
a) button number = Number of the button, starting at 0 (zero).
b) DataRef name = Name of the DataRef. Look at the listing of all DataRefs.
c) index = The index of an array DataRef, else 0.
d) first value = Value to be set when button is just released (positive edge detecttion).
e) second value = Value to be set when button is just released but the DataRef’s value is
equal to the first value.
Nearly the same as the function create_positive_edge_flip(), but it will react when the
button is released. For an engeneer, this is the negative edge of the button’s signal.
2.2.13 create_positive_edge_trigger( button number,DataRef name,index,value )
a) button number = Number of the button, starting at 0 (zero).
b) DataRef name = Name of the DataRef. Look at the listing of all DataRefs.
c) index = The index of an array DataRef, else 0.
d) value = Value to be set in the moment when button is pressed down (positive signal edge).
This will set the DataRef to the given value in the moment, when the button is pressed down,
not during hold. In engineer’s words it’s a positive edge detection.
Seite 24 von 101

2.2 Lua functions 2 REFERENCE
2.2.14 create_negative_edge_trigger( button number,DataRef name,index,value )
a) button number = Number of the button, starting at 0 (zero).
b) DataRef name = Name of the DataRef. Look at the listing of all DataRefs.
c) index = The index of an array DataRef, else 0.
d) value = Value to be set in the moment when button is released (negative signal edge).
This will set the DataRef to the given value in the moment, when the button is released. In
engineer’s words it’s a negative edge detection.
2.2.15 create_positive_edge_increment( button number,DataRef name,index,stepping,
limit,rounding )
a) button number = Number of the button, starting at 0 (zero).
b) DataRef name = Name of the DataRef. Look at the listing of all DataRefs.
c) index = The index of an array DataRef, else 0.
d) stepping = Value to be added to the DataRef when the button is pressed down (positive
signal edge).
e) limit = Value that should not be trespass.
f) rounding = Value must be a power of ten, the DataRef should be rounded to.
This will increase the DataRef by the given step when the button is pressed down.
The parameter rounding is optional. If you give this value to Lua, the DataRef will be rounded.
Here is an example:
>create_positive_edge_increment(13, "sim/flightmodel/engine/ENGN_cowl", 2, 0.1, 1.0, 0.1)
This will increase the cowl flap of engine no. 3 (X-Plane starts numbering at 0) by 0.1 up to the
limit of 1.0 – and the result will be rounded to one decimal place. Rounding is only possible to
float DataRefs.
2.2.16 create_negative_edge_increment( button number,DataRef name,index,stepping,
limit,rounding )
The same as before, but with negative edge detection (works when the button is released).
Seite 25 von 101

2.2 Lua functions 2 REFERENCE
2.2.17 create_positive_edge_decrement( button number,DataRef name,index,stepping,
limit,rounding )
Same as before, but decreases the DataRef.
An other example (the radio frequency is an integer DataRef):
>create_positive_edge_increment(15, "sim/cockpit/radios/com1_freq_hz", 0, 100, 13797)
>create_positive_edge_decrement(14, "sim/cockpit/radios/com1_freq_hz", 0, 100, 11800)
2.2.18 create_negative_edge_decrement( button number,DataRef name,index,stepping,
limit,rounding )
What the hell could this does? ;)
2.2.19 create_axis_median( axis number,variable name )
a) axis number = Number of the axis, starting at 0 (zero).
b) variable name = Name of the variable to be filled with the median value of the axis.
Calculates a median value of the last five values from an axis and puts it into a Lua variable. This
is an example how to store the median value of axis no. 3 (the fourth axis shown in X-Plane, as
we start counting with zero) into the variable median_throttle:
>create_axis_median(3, "median_throttle")
2.2.20 get( "DataRef name" )
a) DataRef name = Name of the DataRef. Look at the listing of all DataRefs.
Pulling a DataRef to Lua. This function returns one value pulled from the DataRef. Slower than
the automatic pull, but does not need a variable. Good for initial scripts or macros. Highly not
recommended in callbacks. This is the version used for non array DataRefs. If you try to pull an
array DataRef with this function, you will get the first element of the array.
An easy way of reading out a DataRef with the XSquawkBox’s input line. Check DataRefs like
this:
>print(get("sim/aircraft/weight/acf_m_fuel_tot"))
Seite 26 von 101

2.2 Lua functions 2 REFERENCE
2.2.21 get( "DataRef name", index )
a) DataRef name = Name of the DataRef. Look at the listing of all DataRefs.
b) index = The index of an array DataRef.
Pulling a DataRef to Lua. This function returns one value pulled from the DataRef. Slower than
the automatic pull, but does not need a variable. Good for initial scripts or macros. Highly not
recommended in callbacks. This is the version used for array DataRefs.
Seite 27 von 101

2.2 Lua functions 2 REFERENCE
2.2.22 set( "DataRef name", value )
a) DataRef name = Name of the DataRef. Look at the listing of all DataRefs.
b) value = The value you want to push to the DataRef.
Pushing a given value to a DataRef. Not possible for array or string DataRefs. The set function
is slower than the automatic pushing of variables to DataRefs. But on the other hand it will not
create a global variable. This can provide getting in confict between multiple scripts using the
same variable for different DataRefs, a situation normally crashing the system.
Use the set function to fill DataRefs during startup (typically config files) or in macros, when
you only need to push the values (and do not need to pull them into Lua variables).
2.2.23 set_array( "DataRef name", index,value )
a) DataRef name = Name of the DataRef. Look at the listing of all DataRefs.
b) index = The index of an array DataRef.
c) value = The value you want to push to the DataRef.
Does the same as the set() function, but to be used for array DataRefs.
2.2.24 set_button_assignment( button number, "simulator function")
a) button number = Number of the button (starting with 0).
b) simulator function = Name of the function you want to assign. You can copy&paste the
name from X-Plane’s advanced button setting menu. Must be a string, don’t forget the
brackets.
Assigning a function given by X-Plane to a joystick button. The same as clicking it inside
the advanced button settings menu. Usefull to make different configs for different planes or
situations.
Seite 28 von 101

2.2 Lua functions 2 REFERENCE
2.2.25 set_axis_assignment( axis number, "axis function", "reverse")
a) axis number = Number of the axis (starting with 0). Since X-Plane 10.10 Austin forces
you to guess the numbers or to view inside the config files. Counting them inside the menu
is no longer possible. Please ask him why he did it, not me.
b) axis function = Name of the function you want to assign. You can copy&paste the name
from X-Plane’s advanced button setting menu. Must be a string, don’t forget the brackets.
c) reverse = a string telling X-Plane to reverse the axis if the value is "reverse" or to set a
normal axis if the value is "normal".
Assigning axis functions. Possible values for the function names are: "none","pitch","roll",
"yaw","throttle","collective","left toe brake", , "right toe brake","prop",
"mixture","carb heat","flaps","thrust vector","wing sweep","speedbrakes","displacement",
"reverse","elev trim","ailn trim","rudd trim","throttle 1","throttle 2","throttle 3",
"throttle 4","prop 1","prop 2","prop 3","prop 4","mixture 1","mixture 2",
"mixture 3","mixture 4","reverse 1","reverse 2","reverse 3","reverse 4","landing gear",
"nosewheel tiller","backup throttle","cowl flaps","view left/right","view up/down",
"view zoom","camera left/right","camera up/down","camera zoom","gun/bomb left/right",
"gun/bomb up/down","VR Touchpad X","VR Touchpad Y" and "VR Trigger".
2.2.26 clear_all_axis_assignments()
Sets all assignments to "none".
2.2.27 clear_all_button_assignments()
Sets all assignments to "sim/none/none".
2.2.28 set_pilots_head( x,y,z,heading,pitch )
a) x,y,z= Position of pilot’s head relative to the plane.
b) heading = The heading of pilot’s head.
c) pitch = The pitch of pilot’s head.
This will set the pilot’s head in position and angle. If we are not in 3D view, 3D view will be
set.
Seite 29 von 101

2.2 Lua functions 2 REFERENCE
2.2.29 x,y,z,heading,pitch = get_pilots_head( )
a) x,y,z= Position of pilot’s head relative to the plane.
b) heading = The heading of pilot’s head.
c) pitch = The pitch of pilot’s head.
This will get the pilot’s head position and angle.
2.2.30 command_begin( "simulator function" )
a) simulator function = Name of the function you want to assign. You can copy&paste the
name from X-Plane’s advanced button setting menu.
Execute a simulator given command only one time.
This will execute the "begin" part of a command. X-Plane’s commands have three phases. What
really will happen when you execute one of this parts depends on the original programming
made by Laminar Research (or other). In some cases you will have to experiment the right
command call (the right phase).
2.2.31 command_once( "simulator function" )
a) simulator function = Name of the function you want to assign. You can copy&paste the
name from X-Plane’s advanced button setting menu.
Execute a simulator given command only one time.
This will execute the "main" part of a command. X-Plane’s commands have three phases. What
really will happen when you execute one of this parts depends on the original programming
made by Laminar Research (or other). In some cases you will have to experiment the right
command call (the right phase).
In nearly 100% this is the phase you want to call.
2.2.32 command_end( "simulator function" )
a) simulator function = Name of the function you want to assign. You can copy&paste the
name from X-Plane’s advanced button setting menu.
Seite 30 von 101

2.2 Lua functions 2 REFERENCE
Execute a simulator given command only one time.
This will execute the "end" part of a command. X-Plane’s commands have three phases. What
really will happen when you execute one of this parts depends on the original programming
made by Laminar Research (or other). In some cases you will have to experiment the right
command call (the right phase).
2.2.33 logMsg( "string" )
a) string = What you want to say.
Write a string into the Log.txt file in X-Plane’s main directory. You can take a look into the log
file by assigning a button to the simulator function "sim/operation/dev_console". Or you
choose the viewing toggle from the specials menu.
2.2.34 XSBSpeakString( "string" )
a) string = What you want to say.
Write a string into the XSquawkBox. The string will not be send to other pilots or controllers
when connected to VATSIM. Only to give you an easy way to print notes on the screen.
2.2.35 XPLMSpeakString( "string" )
a) string = What you want to say.
Write a string onto the screen for a few seconds and speaks the string if text-to-speak is enabled.
This function will return immediately, the string will be spoken asynchronously. If you fire up
multiple strings at once, you will get a confusing mix. So take care of timing.
Seite 31 von 101

2.2 Lua functions 2 REFERENCE
2.2.36 print( "string" )
a) string = What you want to say.
Similar to XSBSpeakString(), but uses it’s own box to display. All text will be displayed for 5
seconds, then the box fades away. To display the box again, you can move the mouse pointer to
the top of the screen. To scroll through the lines, just move the mouse pointer left or right.
2.2.37 do_sometimes( "Lua code string" )
a) Lua code string = A string containing Lua code you want to be calculated every 10 sec.
Calculates a string of Lua code from time to time.
2.2.38 do_often( "Lua code string" )
a) Lua code string = A string containing Lua code you want to be calculated every sec.
Calculates a string of Lua code very often.
2.2.39 do_every_frame( "Lua code string" )
a) Lua code string = A string containing Lua code you want to be calculated every single
frame.
Calculates a string of Lua code every single frame. Can slow down the simulator at a glance.
Use this function carefully!
2.2.40 do_every_draw( "Lua code string" )
a) Lua code string = A string containing Lua code you want to be calculated every single
draw.
Calculates a string of Lua code every single draw. Seems to be the same as do_every_frame(),
but it is different. Only in this drawing callback you are able to draw things like colored text. To
save CPU time, the automatic DataRefs to variables transfer is disabled during a draw callback.
So do not read or write DataRefs, use it only to draw your messages.
Can slow down the simulator at a glance. Use this function carefully!
Seite 32 von 101

2.2 Lua functions 2 REFERENCE
2.2.41 do_on_keystroke( "Lua code string" )
a) Lua code string = A string containing Lua code you want to be calculated every time when
the user presses or releases a key.
When the user (pilot) presses or releases a key, a keystroke event starts your Lua code given by
this function. Lua provides these special variables, the last one is writable:
a) VKEY = An integer value representing the key you pressed. Play around with this value a
little bit, it is not the ASCII value.
b) CKEY = The key as a char (string with a single letter).
c) SHIFT_KEY = A boolean value, representing the state of the shift key. If a shift key is
pressed, the value is true, else false.
d) OPTION_KEY = A boolean value, representing the state of the option or alt key. If an
option or alt key is pressed, the value is true, else false.
e) CONTROL_KEY = A boolean value, representing the state of the control key. If a control
key is pressed, the value is true, else false.
f) KEY_ACTION = A string either resulting in "pressed" or "released", depending on
the user action.
g) RESUME_KEY = A boolean value. If it is set to true your script will resume the keystroke
and X-Plane will not recognize it. Default value is false, to not disturb X-Plane or other
plugins.
2.2.42 do_on_mouse_wheel( "Lua code string" )
a) Lua code string = A string containing Lua code you want to be calculated every time when
the user presses, holds down or releases the primary mouse button.
When the user (pilot) moves a mouse wheel, an event handler starts your Lua code given by this
function. Lua provides these special variables, the last one is writable:
a) MOUSE_WHEEL_NUMBER = An positive integer value starting with 0 (zero), indicating
what wheel causes the event. Some operating systems allow more than one mouse wheel.
If not, it will be always 0.
b) MOUSE_WHEEL_CLICKS = An integer value indicating the number of steps the user
moved the wheel. Can be positive or negative depending on the moving direction.
c) RESUME_MOUSE_WHEEL = A boolean value. If it is set to true your script will resume
the mouse wheel movement and X-Plane will not recognize it. Default value is false, to
not disturb X-Plane or other plugins.
Seite 33 von 101

2.2 Lua functions 2 REFERENCE
2.2.43 do_on_mouse_click( "Lua code string" )
a) Lua code string = A string containing Lua code you want to be calculated every time when
the user presses, holds down or releases the primary mouse button.
When the user (pilot) presses, holds or releases the primary mouse button, an event handler
starts your Lua code given by this function. Lua provides these special variables, the last one is
writable:
a) MOUSE_STATUS = A string either "down","drag" or "up"."down" says, the user
just starts pressing the button, "drag" means, he holds down the mouse button and if he
releases the button, you get "up".
b) RESUME_MOUSE_CLICK = A boolean value. If it is set to true your script will resume
the mouse click and X-Plane will not recognize it. Default value is false, to not disturb
X-Plane or other plugins.
2.2.44 do_on_new_metar( "Lua code string" )
a) Lua code string = A string containing Lua code you want to be calculated every time when
the plugin receives a new METAR from XSquawkBox.
This is called by a XSquawkBox event. You can read out the predefined variable XSB_METAR, or
do whatever you like when XSquawkBox sends a new METAR (changes the weather).
2.2.45 do_on_new_XSB_text( "Lua code string" )
a) Lua code string = A string containing Lua code you want to be calculated every time when
the plugin receives a new text message from XSquawkBox.
This is called by a XSquawkBox event. You can read out the predefined variable XSB_TEXT_MESSAGE,
XSB_TEXT_FROM,XSB_TEXT_FREQ,XSB_TEXT_USE, or do whatever you like when XSquawkBox
receives a new text message.
The variable XSB_TEXT_USE can be 0 or 1. If XSB_TEXT_USE is 0 (zero), XSquawkBox will not
display or evaluate the message. Only this variable is pushed back to the XSquawkBox. The
other three variables are read only (pulled from the XSquawkBox before executing the Lua code
string, but not pushed back when finished).
Please keep in mind that the code is executed during the event call (inter plugin communi-
cation). So you can not write into a variable defined by the DataRef() function. But the
dataref_table() function works (you can use the variables created this way to write to X-
Plane).
There is an example script delivered with FlyWithLua. As you can see, the XSB_TEXT_FREQ
contains an integer value representing the frequency in 10 Hz multiplied by the value.
Seite 34 von 101

2.2 Lua functions 2 REFERENCE
2.2.46 do_on_exit( "Lua code string" )
a) Lua code string = A string containing Lua code you want to be executed when Lua stops.
The will be executed only on normal stops, like changing the airport or aircraft or shutting
down X-Plane. The code can/will not be execuded on errors.
Use this function to collect code that is executed when Lua stops working because of a script
reload. This is not for error handling, but can be usefull if you want to store values to disk for
the next time you start Lua.
2.2.47 draw_string( x,y, "string" )
a) x= Horizontally position where you want to draw. Starts on the left side from 0 (Zero).
b) y= Vertically position where you want to draw. Starts from the bottom with value 0 (Zero).
c) string = The string you want to see on top of the screen.
Prints a string onto the screen. Will only work during draw callbacks. The color is set to white.
The drawing system is for advanced users only!
2.2.48 draw_string( x,y, "string", "color " )
a) x= Horizontally position where you want to draw. Starts on the left side from 0 (Zero).
b) y= Vertically position where you want to draw. Starts from the bottom with value 0 (Zero).
c) string = The string you want to see on top of the screen.
d) color = A string describing the color you want to choose.
Prints a string onto the screen. Will only work during draw callbacks. The color can be "white",
"black","grey","red","green","blue","yellow","magenta" or "cyan".
The drawing system is for advanced users only!
Seite 35 von 101

2.2 Lua functions 2 REFERENCE
2.2.49 draw_string( x,y, "string", red,green,blue )
a) x= Horizontally position where you want to draw. Starts on the left side from 0 (Zero).
b) y= Vertically position where you want to draw. Starts from the bottom with value 0 (Zero).
c) string = The string you want to see on top of the screen.
d) red = A float value from 0.0 to 1.0 choosing the red part of a RGB color.
e) green = A float value from 0.0 to 1.0 choosing the green part of a RGB color.
f) blue = A float value from 0.0 to 1.0 choosing the blue part of a RGB color.
If the predefined color don’t fit your needs, choose a custom RGB value.
The drawing system is for advanced users only!
2.2.50 draw_string_Helvetica_10( x,y, "string" )
a) x= Horizontally position where you want to draw. Starts on the left side from 0 (Zero).
b) y= Vertically position where you want to draw. Starts from the bottom with value 0 (Zero).
c) string = The string you want to see on top of the screen.
Prints a string onto the screen. Will only work during draw callbacks.
This will print the text to screen using the GLUT library instead of the X-Plane SDK. So you
will have to set the color first by glColor4f(red, green, blue, alpha). It will print the
text using the bitmap font GLUT_BITMAP_HELVETICA_10.
2.2.51 draw_string_Helvetica_12( x,y, "string" )
The same as above, but using the bitmap font GLUT_BITMAP_HELVETICA_12.
2.2.52 draw_string_Helvetica_18( x,y, "string" )
The same as above, but using the bitmap font GLUT_BITMAP_HELVETICA_18.
2.2.53 draw_string_Times_Roman_10( x,y, "string" )
The same as above, but using the bitmap font GLUT_BITMAP_TIMES_ROMAN_10.
Seite 36 von 101

2.2 Lua functions 2 REFERENCE
2.2.54 draw_string_Times_Roman_24( x,y, "string" )
The same as above, but using the bitmap font GLUT_BITMAP_TIMES_ROMAN_24.
2.2.55 measure_string( "string" )
a) string = The string you want to measure.
Returns the length of a given string in screen pixel as a float number. Calculation is based on the
standard proportional font used by draw_string().
2.2.56 measure_string( "string", "font name" )
a) string = The string you want to measure.
b) font name = The name of the font for use with GLUT.
Returns the length of a given string in screen pixel as an integer number. Calculation is based on
the font given by the second argument. It can be Helvetica_10,Helvetica_12,Helvetica_18,
Times_Roman_10 or Times_Roman_24.
2.2.57 hight,width = bubble( x,y, "title", . . . )
a) x= Horizontally position where you want to draw the bubble. Starts on the left side from
0 (Zero).
b) y= Vertically position where you want to draw the bubble. Starts from the bottom with
value 0 (Zero).
c) title = The string you want to see on top of the bubble in a slightly bigger font size.
d) . . . = An optional set of strings for the text lines. Each line must be a single string
argument without an CR/LF in it.
The function bubble() is only allowed inside the drawing loop callback. So only use it with
do_every_draw() – or you will see no result. The two returned arguments will give you the
maximum x and y screen coordinate the bubble will use.
The scripts QNH_helper.lua and bubble copilot.lua will show you some examples how to
use bubbles.
2.2.58 hight,width = big_bubble( x,y, "title", . . . )
The same as bubble(), but with a bigger font size.
Seite 37 von 101

2.2 Lua functions 2 REFERENCE
2.2.59 hight,width = huge_bubble( x,y, "title", . . . )
The same as bubble(), but with a much bigger font size.
2.2.60 add_macro( "macro name", "Lua code string" )
a) macro name = Name of the macro. This string is used for the menu entry.
b) Lua code string = A string containing Lua code you want to be calculated when the user
clicks on the menu entry.
Make a menu entry to calculate a little piece of Lua code on demand.
2.2.61 add_ATC_macro( "macro name", "Lua code string" )
a) macro name = Name of the macro. This string is used for the menu entry.
b) Lua code string = A string containing Lua code you want to be calculated when the user
clicks on the menu entry.
Make a menu entry to calculate a little piece of Lua code on demand. Menu entry will be
created inside the ATC menu, instead of the macro menu. Nice to collect some radio settings for
recurrent situations like flying home to your base airport. Can save a lot of clicks.
2.2.62 add_macro( "macro name", "activation code string", "deactivation code string",
"default state" )
a) macro name = Name of the macro. This string is used for the menu entry.
b) activation code string = A string containing Lua code you want to be calculated when the
user turns on the menu item.
c) deactivation code string = A string containing Lua code you want to be calculated when
the user turns off the menu item.
d) default state = A string either "activate" or "deactivate" to define the default state of
the menu entry.
Creating a menu entry with a switch. Only possible for macro menu, not for the ATC menu. See
the tutorial above for an example (auto setting the transponder).
Seite 38 von 101

2.2 Lua functions 2 REFERENCE
2.2.63 create_command( "command name", "command description", "begin code
string", "continue code string", "end code string" )
a) command name = Name of the command, as X-Plane wants it to be (slash separated).
b) command description = A string describing your command. Can be found in X-Plane’s
keyboard and joystick menu.
c) begin code string = A string containing Lua code you want to be calculated when the
command begins.
d) continue code string = A string containing Lua code you want to be calculated when the
command continues (one per frame).
e) end code string = A string containing Lua code you want to be calculated when the com-
mand ends.
Creates a classic custom command. As you can check button states and call Lua functions direct
in every frame loops, custom commands are pretty useless.
If you want to script a classic command to provide a nice new feature to the X-Plane universe,
keep in mind that all of your little script have to contain classic code. Do not use modern
code (variables connected to DataRefs). You will never know if the user, who downloaded your
custom command script file, will use the same writable DataRef with a different variable name.
If so, FlyWithLua will stop working and presents an error message.
Attention: Never use a custom command name like "sim/...", or Austin will kill you.
There is a demo script »test command.lua«, showing how to use this powerful feature. And
the QNH tool »automatic set qnh.lua« will also provide a custom command.
2.2.64 table = directory_to_table( "path" )
a) table = A variable you want to be filled with a Lua table containing all filenames inside
the given directory.
b) path = A string with the path of the directory. The path can be written in Unix stile,
independent from the OS FlyWithLua is running on.
Will return a simple table containing all filenames in alphabetical order. Only the filenames are
returned, without the path.
Seite 39 von 101

2.2 Lua functions 2 REFERENCE
2.2.65 place_aircraft_at( "ICAO" )
a) ICAO = A string with the ICAO code of the airport you want to place the user to.
Lua will be stopped for a moment and the plane will be replaced. This can take some time, so
please be patient. Please remember that all Lua scripts will be reloaded after this action!
2.2.66 load_aircraft( "path and full filename" )
a) path and full filename = A string with the path of your file. The path can be written in
Unix stile, independent from the OS FlyWithLua is running on. You will need the full
filename including the ending.
Lua will be stopped for a moment and the plane will be changed. This can take some time, so
please be patient. Please remember that all Lua scripts will be reloaded after this action!
This is an example:
1l o a d _ a i r c r a f t ( " A i r c r a f t / G en e ra l A v i a t io n / C e ssna 172SP / Cessna_172SP . a cf " )
2.2.67 load_situation( "path and full filename" )
a) path and full filename = A string with the path of your file. The path can be written in
Unix stile, independent from the OS FlyWithLua is running on. You will need the full
filename including the ending.
Lua will be stopped for a moment and the situation file will be loaded. This can take some time,
so please be patient. Please remember that all Lua scripts will be reloaded after this action!
This does the same as the menu item "File" -> "Load Situation".
2.2.68 save_situation( "path and full filename" )
a) path and full filename = A string with the path of your file. The path can be written in
Unix stile, independent from the OS FlyWithLua is running on. You will need the full
filename including the ending.
The current situation is written into a file. You will have to use the ending ".sit" for situation
files, to make sure that you can load them with X-Plane’s menu.
This does the same as the menu item "File" -> "Save Situation".
Seite 40 von 101

2.2 Lua functions 2 REFERENCE
2.2.69 reload_scenery()
This will reload the scenery silently. But keep in mind that reloading the scenery will freeze the
simulation for a couple of time, depending on the complexity of your scenery and the power of
your CPU.
Reloading the scenery with this function call will not reload the scripts.
2.2.70 crash_the_sim()
Believe me, you will never ever want to know what this function does to your simulator.
Seite 41 von 101

3 MODULES
3 Modules
You can write a module file to create new functions, predefined DataRefs, global variables or
whatever you need for more than one script file. The file must be named name you want.lua
and must be copied into this folder:
«place where you store the sim»/X-Plane 10/Resources/plugins/FlyWithLua/Modules/
For the more advanced Lua coders, the Lua engine will look for modules inside the folder named
above with the search pattern:
"?.lua;?/init.lua"
If you do not understand it, don’t matter. This will be a quick and ugly info:
Create a file with an ending .lua and start with a first line exactly as shown:
1module ( . . . , pack a ge . s e e a l l ) ;
2
3−− h e r e c ome s y o u r own c o de
4function say_hello ()
5XSBSpeakString ( " H el l o World ! " )
6end
When the first line is spelled 100% correct, you can get access to the module from every script
inside the Scripts folder. Just start with the name of the module followed by "." (a dot)
followed by what you want to access. If you named the file shown above "nonsense.lua", then
you can write a script like this.
1require ("nonsense")
2
3−− l e t ’ s s ay h e l l o
4n on se ns e . s a y _ h e l l o ( )
In all files you want access to your module, you have to start the script with a Lua command
require(), to tell Lua which module you want to use. If you want access to more than one
module, use multiple require() commands.
3.1 The Radio Module
If you start your script with a line like this:
require("radio")
you will get all major DataRefs writable to access to the radios. They are:
COM1, COM2, COM1_STDBY, COM2_STDBY, NAV1, NAV2, NAV1_STDBY, NAV2_STDBY,
ADF1, ADF2, ADF1_STDBY, ADF2_STDBY, DME, DME_STDBY, OBS1, OBS2,
SQUAWK (0000 to 7777), TRANSPONDER\_MODE (0=off, 1=standby, 2=on, 3=test) and HDG.
Seite 42 von 101

3.2 The XSquawkBox Module 3 MODULES
3.2 The XSquawkBox Module
To access all common DataRefs provided by XSquawkBox, you should start your script with:
require("XSquawkBox")
The DataRefs are:
XSB_VERS_NUMBER,XSB_VERS_STRING,XSB_CON_CALLSIGN,XSB_CON_SERVER,
XSB_CON_PORT,XSB_CON_PILOT_ID,XSB_CON_PASSWORD,XSB_CON_REALNAME,
XSB_CON_MODEL,XSB_CON_STATUS,XSB_FP_FLIGHT_TYPE,XSB_FP_TCAS_TYPE,
XSB_FP_NAV_TYPE,XSB_FP_SPEED,XSB_FP_DEPARTURE_AIRPORT,
XSB_FP_DEPARTURE_TIME,XSB_FP_DEPARTURE_TIME_ACTUAL,XSB_FP_CRUISE_ALTITUDE,
XSB_FP_ARRIVAL_AIRPORT,XSB_FP_ENROUTE_HRS,XSB_FP_ENROUTE_MINS,
XSB_FP_FUEL_HRS,XSB_FP_FUEL_MINS,XSB_FP_ALTERNATE_AIRPORT,XSB_FP_REMARKS,
XSB_FP_ROUTE,XSB_MIC_OPEN and XSB_MIC_ENABLED.
The DataRefs XSB_VERS_NUMBER,XSB_VERS_STRING,XSB_CON_STATUS and XSB_MIC_OPEN
are readonly, all other DataRefs are writable. Look into the module file XSquawkBox.lua and
study the XSquawkBox documentation, to find out how they work.
Independent from the module, you get these functions to command the XSquawkBox plugin:
3.2.1 XSBConnect()
Connects the plugin to VATSIM, using the login data from the DataRefs. No login dialog will
be shown.
3.2.2 XSBUserLogin()
Nearly the same as XSBConnect(), but it will show the login dialog and stop. The user can take
a look at the data and click on »connect« or »cancel«. If you are unsure what function is the best
to connect to VATSIM by a lua script, choose this. (You will not surprise the user.)
3.2.3 XSBDisconnect()
Disconnects from the VATSIM network instantly, without any dialog.
Seite 43 von 101

3.3 The Bit Module 3 MODULES
3.2.4 XSBShowFlightplan()
Shows the flightplan dialog of XSquawkBox. The flightplan uses the DataRefs defined by the
module, so you can preload them with data before calling XSquawkBox to show the flightplan
dialog. The user can click on »send« or »cancel«.
If he cancels the dialog, all changes are not put into the DataRefs. If he sends the plan to the
VATSIM server, changes to the values are put into the DataRefs (the next time a per-frame call
starts, section »Understanding PLCs« explains why).
3.2.5 XSBSendFlightplan()
This function fires the flightplan filled by the DataRefs directly to VATSIM, without any dialog.
This behavior can surprise a user, so use it with care!
3.2.6 frequency = XSBLookupATC( "name string" )
This function wants a string as it’s argument and returns an integer value showing the frequency
of the ATC you ask for, or 0 (zero) if a controller with the given name is not online. This allows
a script like this:
1local informed_the_user = false
2
3function check_Wooge_service ()
4i f XSBLookupATC ( "EDWG_I_TWR" ) == 12240 and informed_the_user == f a l s e th e n
5print ( " Hurra ! Hurra ! Wooge i s t b e s e t z t ! " )
6informed_the_user = t r u e
7end
8end
9
10 do_sometimes ( " c he ck_ wo og e_s er vi ce ( ) " )
The unit of the return value is 10 kHz, to get it compatible to X-Plane’s DataRefs (see module
radio). The original value returned by XSquawkBox uses the unit 1 kHz, FlyWithLua makes
the translation for you.
3.3 The Bit Module
The Bit module is included as a part of the LuaJIT system. A documentation to bitwise opera-
tions provided by these module can be found here:
http://bitop.luajit.org/
To use the Bit module, simply start your script with:
require("bit")
Seite 44 von 101

4 OPENAL SOUND
4 OpenAL sound
Since version 2.3 FlyWithLua supports OpenAL sound. The OpenAL sound system is part of
X-Plane, so no additional library or module is needed. But before you play a sound, you must
understand how the sound system works.
4.1 Buffers, Sounds and Listeners
If you are familiar with OpenAL, you know that the sound system uses tree parts, buffers, sounds
and listeners. FlyWithLua combines these different parts into one table, where all the sound
stuff is stored. So forget everything you know about OpenAL and think about sound as system
represented by only one big table. If you force FlyWithLua to write a debug file, you will see
the sound system table (if it contains sounds).
4.2 Loading and defining sounds
To use the sound system, you first have to load a sound file into memory. At the moment, only
WAV files are allowed, no MP3 or OGG files.
You fill the sound system table by loading a WAV file and remembering the position inside
the table. The first sound you load gets number 0 (zero), as this is typical for C++ plugins
(FlyWithLua is written in C/C++).
4.2.1 table position = load_WAV_file( filename )
a) table position = The index value, where your file is stored into the sound system table.
Index values starts from 0 (Zero).
b) filename = The name of the WAV file to load.
This function loads a WAV file into the sound system table and gives back the index value. This
is an example:
1r o t a t e _ s o u n d = load_WAV_file ( SCRIPT_DIRECTORY . . " s ou nd s / r o t a t e . wav " )
After you have loaded a sound file, you can define some parameters to the sound, like the loop,
pitch and gain value. By default, a sound is only played once (loop = false), with normal pitch
(pitch = 1.0) and full gain (gain = 1.0). If you want other than the default values, modify them
with these functions:
Seite 45 von 101

4.2 Loading and defining sounds 4 OPENAL SOUND
4.2.2 let_sound_loop( table position,boolean value )
a) table position = The index value, where your file is stored into the sound system table.
Index values starts from 0 (Zero).
b) boolean value = This has to be true, if the sound should loop, else false.
4.2.3 set_sound_pitch( table position,float value )
a) table position = The index value, where your file is stored into the sound system table.
Index values starts from 0 (Zero).
b) float value = The value for the pitch. The default value is 1.0 for an unmodified, normal
pitch.
4.2.4 set_sound_gain( table position,float value )
a) table position = The index value, where your file is stored into the sound system table.
Index values starts from 0 (Zero).
b) float value = The value for the gain. The default value is 1.0 for full gain.
Here is an example:
1−− l o ad so un d " c ab i n crew , p r e p ar e f o r l a n d i n g "
2c c _ p r e p a r e _ l a n d i n g _ s o u n d = loa d_W AV_ fil e ( SCRIPT_DIRECTORY . . " s o un ds / c c p r e p l a n d . wav " )
3−− f a s t s p e ak in g , h e li u m b r e a t h i n g p i l o t w h i s p e r i n g
4s e t _ s o u n d _ p i t c h ( c c _ p r e p a r e _ l a n d i n g _ s o u n d , 1 . 8 )
5s e t _ s o u n d _ g a i n ( c c _ p r e p a r e _ l a n d i n g _ s o u n d , 0 . 2 5 )
4.2.5 unload_all_sounds( )
This will unload all sounds from memory. After this the sound system table is enpty and all your
stored index values are useless.
FlyWithLua uses this function to clean up the memory before reloading all scripts. You should
avoid to directly access this cleanup, if you want to share your script, or other scripts of the users
can be crashed by killing there sounds.
Seite 46 von 101

4.2 Loading and defining sounds 4 OPENAL SOUND
4.2.6 replace_WAV_file(table position,filename )
a) table position = The index value, where your file is stored into the sound system table.
Index values starts from 0 (Zero).
b) filename = The name of the WAV file to load.
This function loads a WAV file into a given position of the sound system table. The position
must contain a sound file, as this function only replaces the WAV buffer in memory. You can’t
create a new element in the sound system table.
You can use this to adjust the content of sounds. This is an example:
1. . .
2
3−− l o a d s o un d " Good m or n in g S i r "
4welcome_sound = load_WAV_file ( SCRIPT_DIRECTORY . . " s oun d s / goodmorning . wav" )
5
6. . .
7
8function teach_copilot_Frisian ()
9repl ace_ WAV_ file ( welcome_sound , SCRIPT_DIRECTORY . . " soun ds / moinmoin . wav " )
10 end
Seite 47 von 101

4.3 Using the sounds from the sound table 4 OPENAL SOUND
4.3 Using the sounds from the sound table
After you filled the sound system table with WAV files and all parameters are defined, you can
use the sounds by using these functions:
4.3.1 play_sound( table position )
a) table position = The index value, where your sound is stored into the sound system table.
Index values starts from 0 (Zero).
This functions starts playing the sound at the given index. If the loop parameter is set to false
(the dafault value), playing will stop automatically, else it will restart from the beginning until
you stop the sound.
4.3.2 stop_sound( table position )
a) table position = The index value, where your sound is stored into the sound system table.
Index values starts from 0 (Zero).
This functions stops the sound at the given index. This is especially useful, if the sound is forced
to loop. FlyWithLua will not remember the position (duration) where you stop the sound.
4.3.3 pause_sound( table position )
a) table position = The index value, where your sound is stored into the sound system table.
Index values starts from 0 (Zero).
This functions pause the sound at the given index. This is especially useful, if the sound is forced
to loop. FlyWithLua will remember the position (duration) where you pause the sound. When
you call the play_sound() function the next time, it will continue at this position (duration).
4.3.4 rewind_sound( table position )
a) table position = The index value, where your sound is stored into the sound system table.
Index values starts from 0 (Zero).
This functions rewinds the sound at the given index. In other words, the sound will continue at
the beginning position, if you restart playing.
Seite 48 von 101

5 OPENGL GRAPHICS
5 OpenGL graphics
If you want to draw more than text, you can get directly access to a few OpenGL functions.
All OpenGL functions provided by FlyWithLua will not check the arguments!
This is a performance issue. OpenGL is for advanced coders only. If you make a mistake and
send a nil argument direct into your graphic card, it’s your blame seeing the hellfire of a black
hole eating up your computer hardware. ;)
5.1 Functions of OpenGL
FlyWithLua provides these OpenGL stuff:
5.1.1 glBegin_POINTS()
5.1.2 glBegin_LINES()
5.1.3 glBegin_LINE_STRIP()
5.1.4 glBegin_LINE_LOOP()
5.1.5 glBegin_POLYGON()
5.1.6 glBegin_TRIANGLES()
5.1.7 glBegin_TRIANGLE_STRIP()
5.1.8 glBegin_TRIANGLE_FAN()
5.1.9 glBegin_QUADS()
5.1.10 glBegin_QUAD_STRIP()
5.1.11 glEnd()
5.1.12 glVertex2f(x, y)
5.1.13 glVertex3f(x, y, z)
Seite 49 von 101

5.1 Functions of OpenGL 5 OPENGL GRAPHICS
5.1.14 glLineWidth(width)
5.1.15 glColor3f(red, green, blue)
5.1.16 glColor4f(red, green, blue, alpha)
5.1.17 glRectf(x1, y1, x2, y2)
All arguments are float numbers, but as Lua don’t know the difference between int, float and
double, you can fire into your graphic card any type of number, as long as it’s not a string or
table.
Important: FlyWithLua draws when X-Plane is in "window draw state". Everything you can
do is drawing 2D with screen pixel coordinates starting from left bottom. The xargument is
"pixels to the right", the yarguments is "pixels up". The zcoordinate must be 0 (zero), or you
will not see what you want to draw.
So glVertex3f() is pretty useless at the moment. It is included for further versions of FlyWith-
Lua. The same for glColor4f, as the window draw state ignores the alpha values.7
If you want more graphic features, than you might better use other tools like SASL.
You should not change OpenGL states directly. Use the XPLMSetGraphicsState() function in-
stead. This function can be accessed directly through FlyWithLua (without any error check-
ing!).
5.1.18 XPLMSetGraphicsState(EnableFog, NumberTexUnits, EnableLighting,
EnableAlphaTesting, EnableAlphaBlending, EnableDepthTesting,
EnableDepthWriting)
Sets the OpenGL graphics state. All arguments are integers, 1 is on, 0 is off.
FlyWithLua starts every drawing with
XPLMSetGraphicsState(0,0,0,1,1,0,0) -- set alpha testing and blending on
The line above is executed before everything from do_every_draw() is done. But commands
from other scripts may change the state, so you should always reset the state before you draw
any 2D stuff.
7This is no longer true in FlyWithLua 2.0, but you have to use XPLMSetGraphicsState() when a draw_string()
function is used.
Seite 50 von 101

6 THE GRAPHICS MODULE
6 The graphics module
If you start a script with a line like require("graphics"), you will be able to use all functions
delivered by the graphics module.
6.1 Functions of graphics module
The functions are:
6.1.1 x_result,y_result = graphics.move_angle( x,y,angle,length )
a) x= Horizontal position where your calculation starts (left begins with 0).
b) y= Vertical position where your calculation starts (bottom begins with 0).
c) angle = Angle to the point you are interested in. A value of 0 will point upwards, values
go clockwise (90 is to the right, 180 is downwards, 270 is to the left).
d) length = The length of your (virtual) line in pixel.
e) x_result = The horizontal coordinate in screen pixel of the end point of your (virtual) line.
f) y_result = The vertical coordinate in screen pixel of the end point of your (virtual) line.
A helper function used by other graphics functions to do the calculations. You may not need this
function directly.
6.1.2 graphics.draw_line( x1,y1,x2,y2 )
x1, y1 and x2, y2 are the screen coordinates of the start and end point of the line, you want to
draw.
6.1.3 graphics.draw_rectangle( x1,y1,x2,y2 )
x1, y1 and x2, y2 are the screen coordinates of two opposite corner points of the rectangle, you
want to draw.
6.1.4 graphics.draw_triangle( x1,y1,x2,y2,x3,y3 )
x1, y1 and x2, y2 and x3, y3 are the screen coordinates of the points of a triangle, you want to
draw.
Seite 51 von 101

6.1 Functions of graphics module 6 THE GRAPHICS MODULE
6.1.5 graphics.set_color( red,green,blue,alpha )
a) red = A float value from 0.0 to 1.0 choosing the red part of a RGB color.
b) green = A float value from 0.0 to 1.0 choosing the green part of a RGB color.
c) blue = A float value from 0.0 to 1.0 choosing the blue part of a RGB color.
d) alpha = The alpha value (transparency) of the color. An alpha value of 1.0 will draw only
your stuff, a value of 0.0 makes it invisible. If the alpha arguments is missing, it will be
set to 1.0.
6.1.6 graphics.set_width( width )
a) width = The line width you want to use from now on.
6.1.7 graphics.draw_angle_line( x,y,angle,length )
a) x= Horizontal position where your line starts (left begins with 0).
b) y= Vertical position where your line starts (bottom begins with 0).
c) angle = Angle where to draw the line. A value of 0 will point upwards, values go clock-
wise (90 is to the right, 180 is downwards, 270 is to the left).
d) length = The length of your line in pixel.
Draws a line from a given point with a given angle and length. Very useful for drawing round
instruments.
6.1.8 graphics.draw_angle_arrow( x,y,angle,length,arrowhead’s length,line width )
a) x= Horizontal position where your arrow starts (left begins with 0).
b) y= Vertical position where your arrow starts (bottom begins with 0).
c) angle = Angle where to draw the arrow. A value of 0 will point upwards, values go
clockwise (90 is to the right, 180 is downwards, 270 is to the left).
d) length = The length of your arrow in pixel.
e) arrowhead’s length = The length of the arrowhead in pixel. When the value is missing,
7.5 will be used.
f) line width = The width of the line (default is 1).
Seite 52 von 101

6.1 Functions of graphics module 6 THE GRAPHICS MODULE
Draws an arrow from a given point with a given angle and length. Very useful for drawing
round instruments. You can modify the design by choosing the width and the length of the
arrowhead.
6.1.9 graphics.draw_circle( x,y,radius,line width )
If you leave the line width argument away, a line width of 1.0 will be used.
6.1.10 graphics.draw_filled_circle( x,y,radius )
Draws a circle filled with the actual color.
6.1.11 graphics.draw_arc( x,y,start angle,end angle,radius,line width )
Draws an arc defined by a start and an end angle. If you leave the line width argument away, a
line width of 1.0 will be used.
6.1.12 graphics.draw_filled_arc( x,y,start angle,end angle,radius )
Draws an arc defined by a start and an end angle. The arc is filled with the actual color.
6.1.13 graphics.draw_tick_mark( x,y,angle,radius,length,width )
Draws a tick mark to the inner side of a given circle (by x, y, radius). The position of the tick
mark has to be set as an angle.
You can change the design of the inner tick mark line by setting it’s length and width. If you
leave the parameters away, the default length is 10.0 and the default width is 1.0.
This will only draw the tick mark, not the circle. So you can use it for circles and arcs.
6.1.14 graphics.draw_outer_tracer( x,y,angle,radius,size )
Draws an outer tracer (a little triangle) to a given circle (by x, y, radius). The position of the
tracer has to be set as an angle.
You can change the design of the tracer by setting it’s size. If you leave the size parameter away,
the default size of 7.5 will be used.
This will only draw the tracer, not the circle. So you can use it for circles and arcs.
Seite 53 von 101


7 HUD MODULE
7 HUD module
7.1 An Interactive HUD
Normally X-Plane has a forward view with HUD but all HUD elements are unchangeable given
by X-Plane, and they are not interactive. Since FlyWithLua 2.2 you can react on mouse clicks
and mouse wheel movement. So we made a little demo how to use it by creating the HUD
module.
The module allows to define multiples »HUDs«. A HUD, as defined by the module, is a rectan-
gle area of the screen containing elements, who are rectangle areas as well.
7.2 An Example
Let’s start with an example.
1require "HUD"
2
3HUD. begin_HUD (1 0 0 , 200 , 80 , 45 , "MyExample " )
4
5HUD. c r e a t e _ e l e m e n t ( " c a p t i o n " , 0 , 3 0 , 80 , 1 5)
6HUD. d r a w _ s t r i n g ( 1 2 , 3 , 10 , " H e ll o World ! " )
7
8HUD. end_HUD ( )
Create a Lua script file with these code and execute it. Now change the view to forward with
HUD and you will see your result.
Seeing »Hello World!« isn’t really cool for pilots, so we modify the script a little bit.
1require "HUD"
2
3d a t a r e f ( " QNH_Pilot " , " sim / c o ck p it 2 / g au ges / a c t u a t o r s / b a r o m e t e r _ s e t t i n g _ i n _ h g _ p i l o t " , "
w r i t a b l e " )
4
5HUD. begin_HUD (1 0 0 , 200 , 80 , 45 , "MyExample " )
6
7HUD. c r e a t e _ e l e m e n t ( " c a p t i o n " , 0 , 3 0 , 80 , 1 5)
8HUD. d r a w _ s t r i n g ( 1 2 , 3 , 10 , " H e ll o World ! " )
9
10 HUD. c r e a t e _ e l e m e n t ( " ba ro " , 0 , 0 , 8 0 , 3 0)
11 HUD. d r a w _ s t r i n g ( 1 2 , 20 , 10 , "BARO" )
12 HUD. d r a w _ f s t r i n g ( 1 2 , 3 , 18 , " %2.2 f " , " QNH_Pilot " )
13
14 HUD. end_HUD ( )
Okay, this is a little more useful to pilots. We can see the barometer setting of the pilot’s altime-
ter.
The first lines of code are loading the module »HUD« and define a DataRef variable QNH_Pilot.
Then line no. 5 starts creating a HUD container. The parameters are x, y, width, hight and an
Seite 55 von 101

7.2 An Example 7 HUD MODULE
unique name of the HUD container (useful to debug the code). The screen coordinates x and
y are from the bottom left corner of the screen. If you want them relative to the right or upper
border of the screen use negative values.
The parameters of the next function are relative to the HUD container. So 0, 30, 80, 15
meens a screen area from 100/230 to 180/245, as this is 0/30 to 80/45 inside the HUD con-
tainer.
We always define elements by there lower left corner. If we have to define an area instead
of only a point, we add width and hight, not an upper right corner!
The same in line 8, the parameters 12, 20 points to 112/233 on the screen, as all sub-elements
are relative to there »mother« element or container.
This is a big advantage, as you can move the whole container or element, just by changing one
pair of parameters. All lower elements will follow there parents.
The function draw_fstring() allows us to format the output. The fourth parameter must be
a string, not an expression! If you forget the brackets around QNH_Pilot, your code won’t
work.
To make it even more useful, we will now add some interaction.
1require "HUD"
2
3d a t a r e f ( " QNH_Pilot " , " sim / c o ck p it 2 / g au ges / a c t u a t o r s / b a r o m e t e r _ s e t t i n g _ i n _ h g _ p i l o t " , "
w r i t a b l e " )
4
5HUD. begin_HUD ( −81 , −200, 80 , 45 , " MyExample " )
6
7HUD. c r e a t e _ e l e m e n t ( " c a p t i o n " , 0 , 3 0 , 80 , 1 5)
8HUD. d r a w _ s t r i n g ( 1 2 , 3 , 10 , " s e t t o STD" )
9HUD. c r e a t e _ c l i c k _ a c t i o n ( 0 , 0 , 80 , 1 5 , " QNH_Pilot = 2 9 .9 2 " )
10
11 HUD. c r e a t e _ e l e m e n t ( " ba ro " , 0 , 0 , 8 0 , 30 , 0 , 0 , 0 , 0 )
12 HUD. d r a w _ s t r i n g ( 1 2 , 20 , 10 , "BARO" )
13 HUD. d r a w _ f s t r i n g ( 1 2 , 3 , 18 , " %2.2 f " , " QNH_Pilot " )
14
15 HUD. end_HUD ( )
The first change is that we are now positioned from the upper right of the screen (see line
no. 5).
An element is made with a border around it. You can give the color values red, green, blue and
alpha. By making alpha 0 (zero), the border will be invisible (see line no. 11).
The most important change is in line no. 9. We define an action, when the user (pilot) clicks
inside the element. The action itself must be given as a string, not as an expression.
But we are not limited to mouse clicks. We can also react on mouse wheel movements. Let’s
modify the code once again.
Seite 56 von 101

7.2 An Example 7 HUD MODULE
1require "HUD"
2
3d a t a r e f ( " QNH_Pilot " , " sim / c o ck p it 2 / g au ges / a c t u a t o r s / b a r o m e t e r _ s e t t i n g _ i n _ h g _ p i l o t " , "
w r i t a b l e " )
4
5HUD. begin_HUD ( −81 , −200, 80 , 45 , " MyExample " )
6
7HUD. c r e a t e _ e l e m e n t ( " c a p t i o n " , 0 , 3 0 , 80 , 1 5)
8HUD. d r a w _ s t r i n g ( 1 2 , 3 , 10 , " s e t t o STD" )
9HUD. c r e a t e _ c l i c k _ a c t i o n ( 0 , 0 , 80 , 1 5 , " QNH_Pilot = 2 9 .9 2 " )
10
11 HUD. c r e a t e _ e l e m e n t ( " ba ro " , 0 , 0 , 8 0 , 30 , 0 , 0 , 0 , 0 )
12 HUD. d r a w _ s t r i n g ( 1 2 , 20 , 10 , "BARO" )
13 HUD. d r a w _ f s t r i n g ( 1 2 , 3 , 18 , " %2.2 f " , " QNH_Pilot " )
14 HUD. c r e a t e _ w h e e l _ a c t i o n ( 0 , 0 , 80 , 3 0 , " QNH_Pilot = QNH_Pilot + MOUSE_WHEEL_CLICKS / 100
" )
15
16 HUD. end_HUD ( )
One more line of code adds a lot of additional fun. In line no. 14 we create a reaction on mouse
wheel movement. The variable MOUSE_WHEEL_CLICKS is a read-only FlyWithLua predefined
variable. It’s value is positive or negative depending on the direction of the movement.
Now we make the last modification of the example.
1require "HUD"
2
3d a t a r e f ( " QNH_Pilot " , " sim / c o ck p it 2 / g au ges / a c t u a t o r s / b a r o m e t e r _ s e t t i n g _ i n _ h g _ p i l o t " , "
w r i t a b l e " )
4d a t a r e f ( "GPU" , " sim / c o c k p i t / e l e c t r i c a l / gpu_on " , " w r i t a b l e " )
5
6HUD. begin_HUD ( −81 , −200, 80 , 45 , " MyExample " )
7
8HUD. c r e a t e _ e l e m e n t ( " c a p t i o n " , 0 , 3 0 , 80 , 1 5)
9HUD. d r a w _ s t r i n g ( 1 2 , 3 , 10 , " s e t t o STD" )
10 HUD. c r e a t e _ c l i c k _ a c t i o n ( 0 , 0 , 80 , 1 5 , " QNH_Pilot = 2 9 .9 2 " )
11
12 HUD. c r e a t e _ e l e m e n t ( " ba ro " , 0 , 0 , 8 0 , 30 , 0 , 0 , 0 , 0 )
13 HUD. d r a w _ s t r i n g ( 1 2 , 20 , 10 , "BARO" )
14 HUD. d r a w _ f s t r i n g ( 1 2 , 3 , 18 , " %2.2 f " , " QNH_Pilot " )
15 HUD. c r e a t e _ w h e e l _ a c t i o n ( 0 , 0 , 80 , 3 0 , " QNH_Pilot = QNH_Pilot + MOUSE_WHEEL_CLICKS / 100
" )
16
17 HUD. end_HUD ( )
18
19 HUD. begin_HUD (1 0 0 , 1 , 30 , 12 , "GPU" , " alw ays " )
20 HUD. c r e a t e _ e l e m e n t ( "GPU" , 0 , 0 , 3 0 , 1 2)
21 HUD. d r a w _ s t r i n g ( 4 , 2 , 1 0 , "GPU" )
22 HUD. c r e a t e _ b a c k l i g h t _ i n d i c a t o r ( 0 , 0 , 30 , 12 , "GPU == 1 " , 0 , 1 , 0 , 0 . 5 )
23 HUD. c r e a t e _ c l i c k _ s w i t c h ( 0 , 0 , 30 , 12 , "GPU" , 0 , 1)
24 HUD. end_HUD ( )
Lines 19 to 24 define another HUD container. The additional container is defined as "always",
so it will appear if the mouse hovers over it, no matter of the view mode.
You find the example file as HUD module example.lua and an even more complex script
HUD module test.lua in the Scripts (disabled) folder.
Seite 57 von 101

7.3 Functions from HUD module 7 HUD MODULE
7.3 Functions from HUD module
7.3.1 HUD.begin_HUD( x,y,width,hight,"name","always" )
a) x= Horizontal position of the HUD container’s lower left corner. Use negative value to
get relative to the right screen border.
b) y= Vertical position of the HUD container’s lower left corner. Use negative value to get
relative to the upper screen border.
c) width = The width in pixel.
d) hight = The hight in pixel.
e) name = The name of the container. A string for debugging only.
f) "always" = If this optional string is given as the last parameter, the container will always
be visible if the mouse hovers over it. Otherwise it will be visible in forward with HUD
view mode only.
This starts the description of a container. A must use function, or you will never see something
on your screen.
7.3.2 HUD.end_HUD( )
This ends the description of a container, generates a Lua script file and executes this file. This
can be followed by the next container, as long as the container names are different.
7.3.3 HUD.create_element( "name",x,y,width,hight,red,green,blue,alpha )
a) name = The name of the element. A string for debugging only.
b) x= Horizontal position of the element relative to it’s container. Negative values are not
allowed.
c) y= Vertical position of the element relative to it’s container. Negative values are not
allowed.
d) width = The width in pixel.
e) hight = The hight in pixel.
f) red, green, blue, alpha = OpenGL color code of the border around the element. All values
are floating point numbers from 0.0 (zero) to 1.0 (one).
Creates an element. Elements can contain strings, colored indicators and actions. There is no
HUD.end_element() function. Just start the next element or close the HUD description.
Seite 58 von 101

7.3 Functions from HUD module 7 HUD MODULE
7.3.4 HUD.draw_string( x,y,fontsize,"string",red,green,blue,alpha )
a) x= Horizontal position of the string relative to it’s element.
b) y= Vertical position of the string relative to it’s element.
c) fontsize = The size of the font. Value can be 8, 10, 12 or 18.
d) "string" = The string to be printed.
e) red, green, blue, alpha = OpenGL color code of the border around the element. All values
are floating point numbers from 0.0 (zero) to 1.0 (one).
This will draw a string inside the element. Keep in mind that all coordinates are relative to the
parent. The string will be printed directly onto the screen without any evaluation.
7.3.5 HUD.draw_fstring( x,y,fontsize,"format","expression",red,green,blue,alpha )
a) x= Horizontal position of the string relative to it’s element.
b) y= Vertical position of the string relative to it’s element.
c) fontsize = The size of the font. Value can be 8, 10, 12 or 18.
d) "format" = The format string, as used by Lua’s string.format() function.
e) "expression" = A string to be evaluated to get the values for the format string.
f) red, green, blue, alpha = OpenGL color code of the border around the element. All values
are floating point numbers from 0.0 (zero) to 1.0 (one).
If you want to print variable values, use the HUD.draw_fstring() function. The output can be
well formatted, as known from the string.format() function in pure Lua.
7.3.6 HUD.create_backlight_indicator( x,y,width,hight,"condition",red,green,blue,
alpha )
a) x= Horizontal position of the area relative to the element.
b) y= Vertical position of the area relative to the element.
c) width = The width in pixel.
d) hight = The hight in pixel.
e) "condition" = A string containing a Lua expression that can be evaluated as true or false.
f) red, green, blue, alpha = OpenGL color code of the background. All values are floating
point numbers from 0.0 (zero) to 1.0 (one).
Seite 59 von 101

7.3 Functions from HUD module 7 HUD MODULE
If the expression results into true, the area will be filled with the given color.
7.3.7 HUD.create_click_action( x,y,width,hight,"action" )
a) x= Horizontal position of the click-sensitive area relative to the element.
b) y= Vertical position of the click-sensitive area relative to the element.
c) width = The width in pixel.
d) hight = The hight in pixel.
e) "action" = A string containing the Lua code to be executed when the user clicks into the
sensitive area.
If the user clicks into the sensitive area, the action will be done. This will always resume the
click.
7.3.8 HUD.create_click_switch( x,y,width,hight,"variable",value,alternative value )
a) x= Horizontal position of the click-sensitive area relative to the element.
b) y= Vertical position of the click-sensitive area relative to the element.
c) width = The width in pixel.
d) hight = The hight in pixel.
e) "variable" = The Lua variable to be set.
f) value = The value to be set.
g) alternative value = The alternative value.
If the user clicks into the sensitive area, the variable will be set to the value. But if it contains
the value, it will be set to the alternative value.
Seite 60 von 101

7.3 Functions from HUD module 7 HUD MODULE
7.3.9 HUD.create_wheel_action( x,y,width,hight,"action" )
a) x= Horizontal position of the sensitive area relative to the element.
b) y= Vertical position of the sensitive area relative to the element.
c) width = The width in pixel.
d) hight = The hight in pixel.
e) "action" = A string containing the Lua code to be executed when the user moves the mouse
wheel inside the sensitive area.
If the user moves the mouse wheel while the mouse pointer is inside the sensitive area, the action
will be done. This will always resume the wheel movement.
You can use the predefined variable MOUSE_WHEEL_CLICKS to define the action. The variable is
positive or negative depending on the direction of the wheel movement. It’s value depends on
the operation system, on Windows you will get little integer steps.
Seite 61 von 101

8 XPLMNAVIGATION
8 XPLMNavigation
You can use all functions from the XPLMNavigation SDK Part delivered by Sandy Barbour. Get
more info on it here:
http://www.xsquawkbox.net/xpsdk/mediawiki/XPLMNavigation
When you use the functions in Lua, you will have to use a different spelling, as Lua does not
need pointers to return more than one value. The correct spelling is shown in the following
function description.
8.1 Functions from XPLMNavigation
8.1.1 nav_reference = XPLMGetFirstNavAid()
8.1.2 next_nav_reference = XPLMGetNextNavAid( inNavAidRef )
8.1.3 first_nav_reference = XPLMFindFirstNavAidOfType( inType )
8.1.4 last_nav_reference = XPLMFindLastNavAidOfType( inType )
8.1.5 nav_reference = XPLMFindNavAid( inNameFragment, inIDFragment, inLat, inLon,
inFrequency, inType)
8.1.6 outType, outLatitude, outLongitude, outHeight, outFrequency, outHeading, outID,
outName = XPLMGetNavAidInfo( inRef )
8.1.7 index_count = XPLMCountFMSEntries()
8.1.8 index = XPLMGetDisplayedFMSEntry()
8.1.9 index = XPLMGetDestinationFMSEntry()
8.1.10 XPLMSetDisplayedFMSEntry( inIndex )
8.1.11 XPLMSetDestinationFMSEntry( inIndex )
8.1.12 outType, outID, outRef, outAltitude, outLat, outLon = XPLMGetFMSEntryInfo(
inIndex )
Seite 62 von 101

8.1 Functions from XPLMNavigation 8 XPLMNAVIGATION
8.1.13 XPLMSetFMSEntryInfo( inIndex, inRef, inAltitude)
8.1.14 XPLMSetFMSEntryLatLon( inIndex, inLat, inLon, inAltitude)
8.1.15 XPLMClearFMSEntry( inIndex )
If you have to use inType or outType, you will have to manage integer values, not strings. You
can use the variables (Lua does not know constants) XPLM_NAV_NOT_FOUND,xplm_Nav_Unknown,
xplm_Nav_Airport,xplm_Nav_NDB,xplm_Nav_VOR,xplm_Nav_ILS,xplm_Nav_Localizer,
xplm_Nav_GlideSlope,xplm_Nav_OuterMarker,xplm_Nav_MiddleMarker,xplm_Nav_InnerMarker,
xplm_Nav_Fix,xplm_Nav_DME and xplm_Nav_LatLon.
The value outReg from XPLMGetNavAidInfo( inIndex ) will not be returned by Lua, because
it’s useless for your script. If you want a ninth value, you will always get a nil value.
Seite 63 von 101

9 ACCESS HID DEVICES
9 Access HID devices
Since version 2.1 of FlyWithLua, you can access HID devices at low level. This is really cool
for cockpit builders. Normal users can skip this section.
9.1 Pre-defined variables
9.1.1 NUMBER_OF_HID_DEVICES
Integer value showing the number of HID devices, you can access from FlyWithLua.
9.1.2 ALL_HID_DEVICES
All HID devices found are stored in a table ALL_HID_DEVICES. The table has elements indexed
from 1 to NUMBER_OF_HID_DEVICES. Each elements has sub-elements. You can see all sub-
elements when you write a debug file. Here is an example of the first HID device on my Win-
dows 7 development system:
630 ALL_HID_DEVICES [ 1 ] . ve n d o r_ i d = 1103 (0 x44f )
631 ALL_HID_DEVICES [ 1 ] . p r o d u c t _ i d = 45322 (0 xb10a )
632 ALL_HID_DEVICES [ 1 ] . r e l e a s e _ n u m b e r = 1 280 ( 0 x500 )
633 ALL_HID_DEVICES [ 1 ] . i n t e r f a c e _ n u m b e r = −1 ( 0 x f f f f f f f f )
634 ALL_HID_DEVICES [ 1 ] . u sag e_ p ag e = 1 ( 0 x1 )
635 ALL_HID_DEVICES [ 1 ] . u sag e = 4 ( 0 x4 )
636 ALL_HID_DEVICES [ 1 ] . p a t h = \ \ ? \ h i d # vi d_ 0 4 4 f&p id_ b10 a #7&5a04db4 &0&0000#{4
d1e55b2−f16 f −11cf −88cb −001111000030}
637 ALL_HID_DEVICES [ 1 ] . s e r i a l _ n u m b e r = ?
638 ALL_HID_DEVICES [ 1 ] . m a n u f a c t u r e r _ s t r i n g = T h r u s t m a s t e r
639 ALL_HID_DEVICES [ 1 ] . p r o d u c t _ s t r i n g = T. 16 00 0M
9.2 HID related functions
To access to HID devices, FlyWithLua uses a C-library HIDAPI from Alan Ott, Signal 11 Soft-
ware. As Lua isn’t C, the function calls are different.
9.2.1 table, number = create_HID_table()
a) table = A table to be filled with the complete info about all HID devices found.
b) number = An integer representing the number of elements in the table.
Every time Lua restarts, it will generate a table and a number as a global variable set like shown
above. The code line to do this is:
ALL_HID_DEVICES, NUMBER_OF_HID_DEVICES = create_HID_table()
Seite 64 von 101

9.2 HID related functions 9 ACCESS HID DEVICES
If you plug a device in or out, the global variables won’t change. As most of the pre-defined vari-
ables, they are filled when Lua (re)starts. There are dynamic pre-defined variables like MOUSE_X,
MOUSE_Y,SCREEN_WIDTH or SCREEN_HIGHT, but a dynamic filled variable consumes more CPU
time. As pluggin in and out devices is not a typical behavior of simulator pilots during flight,
the decision was not to listen to HID plugging events.
The function create_HID_table() will replace all the enumeration stuff from the original
HIDAPI library. Just examine the table ALL_HID_DEVICES if you need info generated by the
following functions not implemented into FlyWithLua:
hid_enumerate() and hid_free_enumerate()
9.2.2 device = hid_open( vendor_ID, product_ID )
a) device = A C-pointer to the object generated by the HIDAPI function to handle the HID
device (a userdata variable).
b) vendor_ID = The vendor ID of the device you want to open, an integer number.
c) product_ID = The product ID of the device you want to open, an integer number.
This will open the first device matching to your given IDs. Unlike the original library HIDAPI
you can’t search for a serial number. This is a limitation to Lua, that can’t handle wchar strings.
Use the next function, if you need to access a discrete device from a set of unique devices:
9.2.3 device = hid_open_path( path )
a) device = A C-pointer to the object generated by the HIDAPI function to handle the HID
device (a userdata variable).
b) path = The path representing the device you want to open. This string can be taken from
the global variable like: ALL_HID_DEVICES[n].path.
9.2.4 hid_close( device )
a) device = The pointer to the devices, given by the opening function.
This function closes a connection to a HID device. When Lua restarts, it automatically closes
all open connections to HID devices. It’s not a good way to create code, but if you like you can
forget to close the connections and let Lua do the work.
Seite 65 von 101

9.2 HID related functions 9 ACCESS HID DEVICES
9.2.5 hid_write( device, report ID, value, ... )
a) device = The pointer to the devices, given by the opening function.
b) report ID = The report ID you want to write. For devices which only support a single
report, this must be set to 0 (zero).
c) value, ... = A set of integer values (range 0 to 255) to be written.
FlyWithLua will automatically count the number of values you give to the function hid_write,
unlike the original HIDAPI library, you can’t give a string plus number of elements.
9.2.6 nov, variable, ... = hid_read_timeout( device, nov wanted, milliseconds )
a) nov = A variable to store the number of values returned by the function. If the number
is lower than the number of variables you want to be filled, the variables without a return
value are filled with nil (typical to Lua).
b) variable, ... = A list of variables to store the values in.
c) device = The pointer to the devices, given by the opening function.
d) nov wanted = The number of values you want to receive.
e) milliseconds = The timeout in milliseconds the functions waits until receive process is
canceled.
You must provide a set of variables to store every byte of the returned message, not a single
string variable. If you are familiar to the original HIDAPI library, this may be unusual to you.
9.2.7 nov, variable, ... = hid_read_timeout( device, nov wanted )
The same as above, but without a timeout. If the device declines to answer, the simulator will
freeze. As this is normally not wanted, set the device connection to non-blocking:
9.2.8 success = hid_set_nonblocking( device, nonblock )
a) success = A variable to check if the execution was successfully. If the function does it’s
job right, the return value will be 0 (zero), otherwise it returns -1.
b) device = The pointer to the devices, given by the opening function.
c) nonblock = Defines if the connection should be non-blocking (set this value to 1) or block-
ing (set this value to 0).
Seite 66 von 101

9.2 HID related functions 9 ACCESS HID DEVICES
9.2.9 nobw = hid_send_feature_report( device, report ID, value, ... )
a) nobw = The number of bytes written by the function. Use it to control, if the function
completes it’s job as expected. The number of bytes should be equal to the number of
values plus one for the report ID. In case of an error, it will return -1.
b) device = The pointer to the devices, given by the opening function.
c) report ID = The report ID you want to write. For devices which only support a single
report, this must be set to 0 (zero).
d) value, ... = A set of integer values (range 0 to 255) to be written.
This function sends a feature report to the HID device.
Time for an example? Let’s set the brightness of a Saitek BIP panel to 80%.
1−− d e f i n e t h e b r i g h t n e s s we wan t t o s e t ( r a n g e 0 t o 1 0 0)
2BIP_brightness = 80
3
4−− v e nd o r ID and p r o d u c t ID f o r a BIP = 0 x6 a3 and 0 x b4e
5my _ f i rs t _ B I P = hi d_o pen ( 0 x6a3 , 0 xb4e )
6
7−− c h ec k i f t h e d e v i c e was o p ene d and s e t b r i g h t n e s s
8i f my_first_BIP == n i l t h en
9print ( " Oh , no ! We can ’ t f i n d o u r BIP p a n e l ! " )
10 else
11 −− 0 xb2 = r e p o r t ID f o r b r i g h t n e s s
12 h i d _ s e n d _ f e a t u r e _ r e p o r t ( m y_ fir st _BI P , 0xb2 , B I P _b r ig h tn e ss )
13 end
14
15 −− c l o s e t h e c o n n e c t i o n t o t h e d e v i c e
16 h i d _ c l o s e ( m y _f ir st _ BI P )
As you can see, we ignored the return value ot the function hid_sent_feature_report().
This is allowed, and we control the function by observing the panel brightness with our eyes.
9.2.10 nobw = hid_send_filled_feature_report( device, report ID, nobts, value, ... )
a) nobw = The number of bytes written by the function. Use it to control, if the function
completes it’s job as expected. The number of bytes should be equal to the number of
values plus one for the report ID. In case of an error, it will return -1.
b) device = The pointer to the devices, given by the opening function.
c) report ID = The report ID you want to write. For devices which only support a single
report, this must be set to 0 (zero).
d) nobts = The number of bytes to send. If you give too less values, it will be filled up with
zeros.
e) value, ... = A set of integer values (range 0 to 255) to be written.
Seite 67 von 101

9.3 The Arcaze USB module 9 ACCESS HID DEVICES
This function sends a feature report to the HID device like the one above. The only difference
is, that it can fill up the data to send with zeros to a given lenght of data.
9.2.11 nobr, report ID, variable, ... = hid_get_feature_report( device, novw )
a) nobr = Number of bytes received (including the report ID).
b) report ID = The report ID the device sends.
c) variable, ... = A list of variables to store the values in.
d) device = The pointer to the devices, given by the opening function.
e) novw = Number of values we want to receive. This will not include the report ID!
Never confuse the number of bytes with the number of values. If you want to receive a feature
report containing four bytes of data, use this line of code:
novr, report_id, one, two, three, four = hid_get_feature_report(my_device, 4)
9.3 The Arcaze USB module
If you want to build your own home cockpit, but you don’t like the prebuild systems, why not
building your own design. With a little USB board you are able to communicate with FlyWith-
Lua using USB HID feature reports. I will demonstrate this with an example using the Arcaze
USB board and his additional display driver board. Both are relative cheap hardware and you
can order it here:
http://simple-solutions.de
Of course this will work with every other hardware too, so why should you use the Arcaze USB
device? Because it’s very well documented:
http://wiki.simple-solutions.de/en/products/Arcaze/Arcaze-USB/Arcaze-USB_SDK/
Feature_Report_Protocol
In FlyWithLua there is a module to access the Arcaze device via USB HID feature reports.
Even if you have absolutely no idea of feature reports, it’s very easy to use the Arcase with the
included module. The first thing to do is loading the module, if you want to get access to it.
require "arcaze"
Start your script with this line, to load the module.
Then you will have to connect to the device. Let’s say you have only one Arcaze connected, so
we can do this:
my_arcaze = arcaze.open_first_device()
Seite 68 von 101

9.3 The Arcaze USB module 9 ACCESS HID DEVICES
Please remember to start all commands from a module with the name of the module and a dot
between the name and the command.
After that, the variable my_arcase will contain a handle to the device. If you have more than
one device, this is the way you identify them.
If the pins A1 and A2 are connected to a rotary encoder, we can read it’s relative position
value.
encoder_value = arcaze.read_encoders( my_arcaze )
Now we want to show the value of the encoder on the seven-segment-display. We connect a
six element display to the display driver 32 board at channel »2A«. First we init the display
driver:
arcaze.init_display( my_arcaze, "2A", 15, 6)
This little line of code shows the value:
arcaze.show(my_first_arcaze, "2A", 0xff, encoder_value)
Repeat the reading and writing every frame to play around with the little Arcaze board.
Here are all functions the arcaze module provides:
9.3.1 device = arcaze.open_first_device()
a) device = The pointer to the devices, or -1 if it fails to open the Arcaze USB.
This will open the first Arcaze USB board FlyWithLua will find. If there is no Arcaze to open,
the function will return -1 instead of the device handler.
9.3.2 A1, A2, A3, ..., B19, B20 = arcaze.read_pins( device )
a) A1, A2, A3, ..., B19, B20 = The variables to be filled with the pins values (0 or 1).
b) device = The pointer to the devices, given by the opening function.
This will fill up to 40 variables with the value 0 (zero) or 1 (one), depending on the input pins
on the Arcaze Board. The first variable will be filled depending on the two pins labled A1, the
second depending on A2 and so on. If the pin pair is connected (closed), than a value of 1 is
returned, else the value is 0 (and the pin pair isn’t connected or open).
Use the underscore to skip a value. If the pin pairs A3 and A4 are connected to a rotary encoder,
and A1,A2 and A5 should control battery, avoinics and generator switch, than you can write a
little script like this:
Seite 69 von 101

9.3 The Arcaze USB module 9 ACCESS HID DEVICES
1require " a r c a z e "
2
3−− op en t h e d e v i c e
4my_ arcaz e = ar c az e . o p e n _ f i r s t _ d e v i c e ( )
5
6−− u s e D a t a R e f s t o c o n t r o l t h e s i m
7DataRef ( " b a t t e r y " , " sim / c o c k p i t / e l e c t r i c a l / b a t t e r y _ o n " , " w r i t a b l e " )
8DataRef ( " a v o i n i c s " , " sim / c o c k p i t / e l e c t r i c a l / a v i o n i c s _ o n " , " w r i t a b l e " )
9DataRef ( " g e n e r a t o r " , " sim / c o c k p i t / e l e c t r i c a l / g e n e r a t o r _ o n " , " w r i t a b l e " , 0)
10
11 −− s e t t h e D a t a R e f s by r e a d i n g p i n p a i r s A1 , A2 and A5
12 d o_ ev er y _f ra me ( " b a t t e r y , a v o i n i c s , _ , _ , g e n e r a t o r = a r c a z e . r e a d _ p i n s ( m y_arcaz e ) " )
9.3.3 ADC1, ADC2, ADC3, ADC4, ADC5, ADC6 = arcaze.read_ADCs( device )
a) ADC1, ADC2, ADC3, ADC4, ADC5, ADC6 = The variables to be filled with the six ADC
values (range 0 to 4095).
b) device = The pointer to the devices, given by the opening function.
Read out the six analog values as 12-bit integer values. This is used to connect potis to X-
Plane.
9.3.4 E1, E2, E3, ..., E19, E20 = arcaze.read_encoders( device )
a) E1, E2, E3, ..., E19, E20 = The variables to be filled with the encoder values (range 0 to
65535).
b) device = The pointer to the devices, given by the opening function.
Encoders must be connected to pairs of pin pairs. The first encoder E1 must be connected to the
pin pairs A1 and A2, the last encoder E20 must be connected to the pin pairs B19 and B20.
The rotary encoder logic of the Arcaze USB board will produce a relative value between 0x0000
and 0xffff. It will count all positive and negative edges of both channels, so normally it makes 4
steps for each turn. The values can start whereever they want, so don’t expect 0x0000 when the
device is pluged into the USB port. See the example script little arcaze radio.lua to see
the usage of rotary encoders in detail.
9.3.5 arcaze.set_all_pins_for_input( device )
a) device = The pointer to the devices, given by the opening function.
All 40 pin pairs can be used as inputs or outputs. This function will set all pin pairs to input
mode. Use it before defining the output pins, to make tabula rasa.
Seite 70 von 101

9.3 The Arcaze USB module 9 ACCESS HID DEVICES
9.3.6 arcaze.set_pin_direction( device, pin, direction )
a) device = The pointer to the devices, given by the opening function.
b) pin = The number of the pin pair to be set. Pin pair A1 is 0, B20 is 39.
c) direction = The direction to be set. Can be "input" or 0 for input direction, else use
"output" or 1 for output direction.
This will set the direction of a pin pair. Please remember that the number starts with 0, similar
to X-Plane’s joystick button numbers, as this is the standard counting of pure C code. You are
operating really low level here!
9.3.7 arcaze.set_pin( device, pin, value )
a) device = The pointer to the devices, given by the opening function.
b) pin = The number of the pin pair to be set. Pin pair A1 is 0, B20 is 39.
c) value = The value to be set. Can be "off" or 0 to open the output, else use "on" or 1 to
close the output pins.
This will set a pin pair. Please remember that the number starts with 0, similar to X-Plane’s
joystick button numbers, as this is the standard counting of pure C code. You should never set a
pin that is defined as an input pin!
9.3.8 arcaze.init_display( device, address, intensity, scan_limit )
a) device = The pointer to the devices, given by the opening function.
b) address = The address where the display unit is connected to, for example "1a" (range
"1a" to "4b", a string value). The address is printed onto the display driver board.
c) intensity = The value for the LED intensity (range 0 to 15).
d) scan_limit = The number of digits to be filled (range 4 to 8).
Use this once to initialize the display driver.
Seite 71 von 101

9.3 The Arcaze USB module 9 ACCESS HID DEVICES
9.3.9 arcaze.init_display( device, address )
a) device = The pointer to the devices, given by the opening function.
b) address = The address where the display unit is connected to, for example "1a" (range
"1a" to "4b", a string value). The address is printed onto the display driver board.
If you let the intensity and scan limit away, FlyWithLua will guess an intensity of 15 (full) and
8 digits.
The display will show some nonsense data until you use this function:
9.3.10 arcaze.show( device, address, mask, value_string )
a) device = The pointer to the devices, given by the opening function.
b) address = The address where the display unit is connected to, for example "1a" (range
"1a" to "4b", a string value). The address is printed onto the display driver board.
c) mask = A bit mask of the digits to be set (range 0x00 to 0xff). If unsure, use 0xff.
d) value_string = The string to be displayed.
The mask will define the digits to be manipulated as a bit mask. If you say 0xff as the mask, all
eight digits will be set.
The value string is a string containing a numeric value. A decimal point "." can be used and the
negative sign "-". A space will left the digit blank.
All ports "1a", "2a", "3a" and "4a" are filled from right to left, so you can do this:
arcaze.show( my_arcaze, "1a", 0xff, "-4")
But on the left-filled ports, you should write a code like this:
arcaze.show( my_arcaze, "1b", 0xff, " -4")
This code has six spaces in front of the substring "-4", to be shown on the right side of the
display.
See the example script little arcaze radio.lua to see the usage of seven segment dis-
plays.
Seite 72 von 101

10 CLASSIC AND MODERN MODE
10 Classic and modern mode
Definition:
All scripts are »modern type« scripts, until you use one of the functions XPLMSetDatai(),
XPLMSetDataf(),XPLMSetDatad(),XPLMSetDatavi() or XPLMSetDatavf(). If a script uses
one of these functions, in FlyWithLua version 2.1 the use of dataref(),get(),set() and
set_array() is prohibited. Since version 2.2.1 you can mix them without any error.
The command XPLMSetDatab() is not possible in FlyWithLua, use a modern script file, if
you need access to string DataRefs. If performance is not an issue, you can try get() and
set(). Remember that the most important strings are in the predefined variables PLANE_ICAO,
PLANE_TAILNUMBER and XSB_METAR.
All modern script files work like a big PLC. You define the DataRefs you want as input and/or
output, and FlyWithLua handles all the value transfer from/to the simulator. No worry about
different types, clean code with perfect readability. But all the comfort you get will cost a little
bit of performance. If you are a performance fetishist wanting to squeeze out your CPU, but
you only have poor skills in C/C++, then you will probably want to write »classic mode« script
files.
Or in shorter words, classic mode leaves away the comfort and gives DataRef handling to your
responsibility. A big chance to get a super fast, ugly to read script code.
10.1 Reading classic functions
To pull a value out of the simulator, you must use one of the following functions, depending on
the type of the DataRef.
10.1.1 variable = XPLMGetDatai( DataRef )
a) variable = The lua variable, you want the value to be pushed in.
b) DataRef = The reference(!) of the DataRef you want to read out.
Reading out an integer DataRef. If the DataRef is not readable as an integer, the simulator may
blow up without a warning!
Seite 73 von 101

10.1 Reading classic functions 10 CLASSIC AND MODERN MODE
10.1.2 variable = XPLMGetDataf( DataRef )
a) variable = The lua variable, you want the value to be pushed in.
b) DataRef = The reference(!) of the DataRef you want to read out.
Reading out a float DataRef. If the DataRef is not readable as a float, the simulator may blow up
without a warning!
10.1.3 variable = XPLMGetDatad( DataRef )
a) variable = The lua variable, you want the value to be pushed in.
b) DataRef = The reference(!) of the DataRef you want to read out.
Reading out a double DataRef. If the DataRef is not readable as a double, the simulator may
blow up without a warning!
10.1.4 table = XPLMGetDatavi( DataRef,inIndex,inMax )
a) table = The lua table, you want the value to be pushed in.
b) DataRef = The reference(!) of the DataRef you want to read out.
c) inIndex = The index where you want to start.
d) inMax = The number of values you want to access.
Reading out an integer DataRef array. If the DataRef is not readable as an integer array, or are
you using index values outside the range of the DataRef, the simulator may blow up without
a warning! The lua table will store the values with correct index seen from the world of X-
Plane. The first value can be indexed 0 (zero), if you start from the first entry of an array
DataRef. This is cool for C/C++ code, but uncool for Lua. So avoid ipairs() on tables made by
XPLMGetDatavi() commands.
10.1.5 table = XPLMGetDatavf( DataRef )
a) table = The lua table, you want the value to be pushed in.
b) DataRef = The reference(!) of the DataRef you want to read out.
c) inIndex = The index where you want to start.
d) inMax = The number of values you want to access.
Seite 74 von 101

10.1 Reading classic functions 10 CLASSIC AND MODERN MODE
The same as above, but for float array DataRefs.
10.1.6 userdata variable = XPLMFindDataRef( DataRef Name )
a) userdata variable = The lua variable, you want the reference to be pushed in.
b) DataRef name = The name of the DataRef you want to know as a string.
The Lua variable will be filled with a »userdata«. This means, that you can’t do anything with
it’s value. It’s only needed for the XPLM functions.
10.1.7 datatype variable = XPLMGetDataRefTypes( DataRef reference )
a) datatype variable = The lua variable, you want the DataRef type to be pushed in.
b) DataRef reference = The reference of the DataRef you want to know it’s type.
The Lua variable will be filled with an integer, showing the type of the DataRef. The DataRefs
must be given by it’s reference, not by it’s name.
Seite 75 von 101
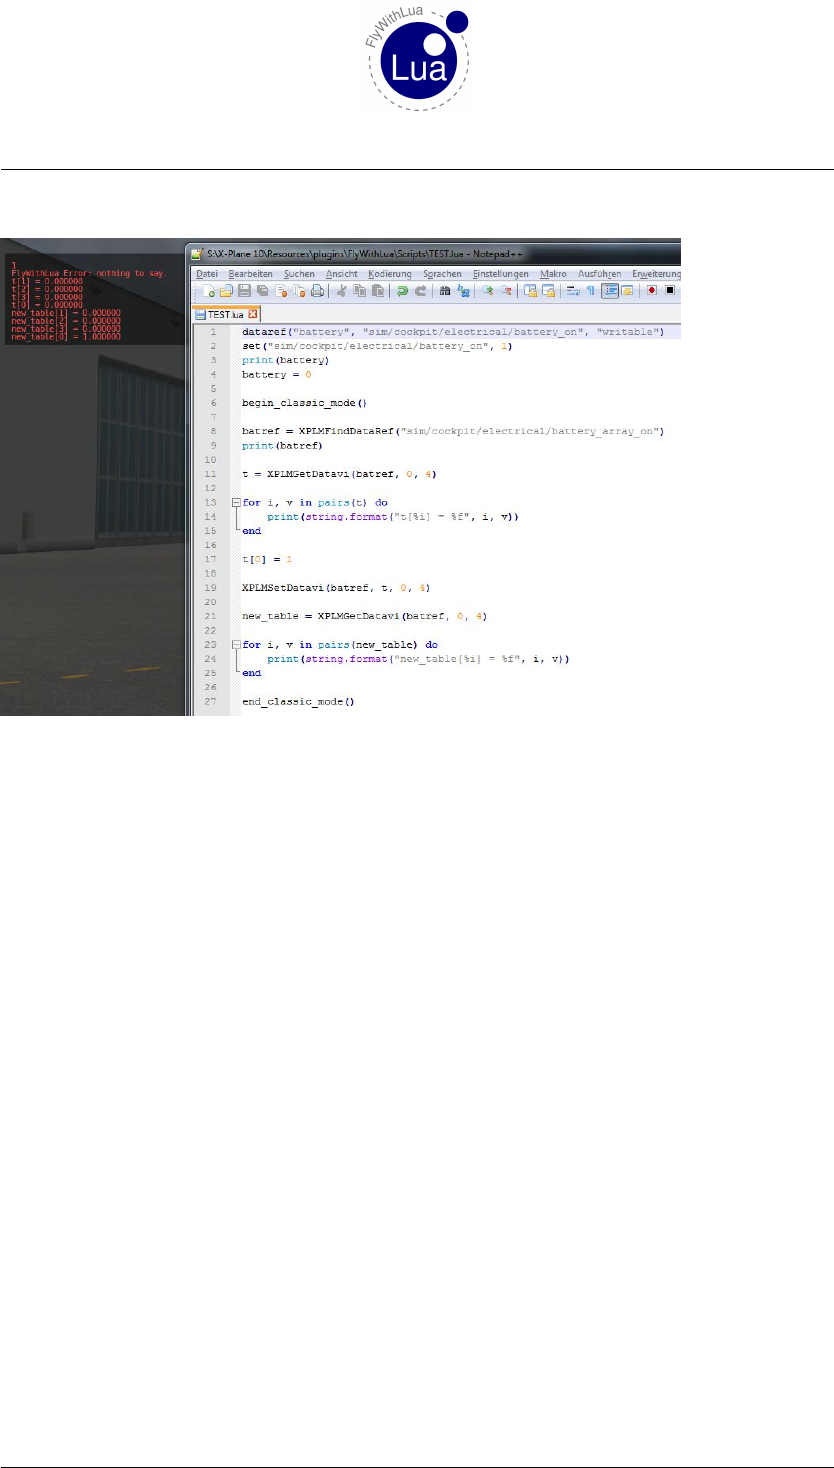
10.1 Reading classic functions 10 CLASSIC AND MODERN MODE
This is a little example:
Forget the rest of the code and look at lines 8 to 25. They show how to handle an array DataRef
by reading and manipulation the battery. (In the more modern versions of X-Plane there is in
fact more than one battery! But most planes only interact with the first battery.)
As you can see in line 8, the following functions will read references instead of strings. It is not
possible to write:
t = XPLMGetDatavi("sim/cockpit/electrical/battery_array_on", 0, 4)
You will crash the simulator if you try it. To find the right argument, you first have to use
XPLMFindDataRef() - a very slow function. If you like performance, use it only as often as
needed.
In line no. 9 you force Lua to print batref, the variable holding the reference to the battery
DataRef. Lua says »FlyWithLua Error: nothing to say.« because a reference is strored
as a userdata, and can not be converted into a string, so the automatic converter results in nil
and the print() function can’t print it.
Seite 76 von 101

10.2 Writing classic functions 10 CLASSIC AND MODERN MODE
10.2 Writing classic functions
To give values back to X-Plane, use one of these functions:
10.2.1 XPLMSetDatai( DataRef,variable or value)
a) DataRef = The reference(!) of the DataRef you want to write into.
b) variable or value = The lua variable, carrying the value you want to write, or a value
directly.
Use this for integer DataRefs.
10.2.2 XPLMSetDataf( DataRef,variable or value)
a) DataRef = The reference(!) of the DataRef you want to write into.
b) variable or value = The lua variable, carrying the value you want to write, or a value
directly.
Use this for float DataRefs.
10.2.3 XPLMSetDatad( DataRef,variable or value)
a) DataRef = The reference(!) of the DataRef you want to write into.
b) variable or value = The lua variable, carrying the value you want to write, or a value
directly.
Use this for double DataRefs.
10.2.4 XPLMSetDatavi( DataRef,table,inIndex,inMax )
a) DataRef = The reference(!) of the DataRef you want to write into.
b) table = The lua table, carrying the values you want to write, with correct indexes!
c) inIndex = The index where you want to start.
d) inMax = The number of values you want to access.
Use this for integer array DataRefs.
Seite 77 von 101

11 THE LUA WAY TO ACCESS DATAREFS
10.2.5 XPLMSetDatavf( DataRef,table,inIndex,inMax )
a) DataRef = The reference(!) of the DataRef you want to write into.
b) table = The lua table, carrying the values you want to write, with correct indexes!
c) inIndex = The index where you want to start.
d) inMax = The number of values you want to access.
Use this for float array DataRefs.
11 The Lua way to access DataRefs
Classic code can be fine and super fast, but it is hard to read (and write). And all the methods to
access DataRefs we know until now aren’t good Lua code. The classic approach comes from the
SDK’s C code, so it fakes C-style to Lua. The modern style fakes a PLC and transfers DataRefs
to Lua variables. A clever code, but a little bit confusing when we want to access array DataRefs.
And it consumes more CPU power.
11.1 A magic metatable
The Lua way of life is to use a metatable. Metatables are one of the primary features making
Lua unique to other programming languages. FlyWithLua respects this of course, and provides
a magic metatable DATAREF_META_TABLE.
The magic metatable is defined in the file FlyWithLua.ini:
42 −− c r e a t e a ma gi c m e t a t a b l e
43 DATAREF_META_TABLE = {}
44 DATAREF_META_TABLE . __ in dex = function ( t , key ) r e t u r n peek ( t . r e f e r e n c e , t . r e f t y p e , key )
end
45 DATAREF_META_TABLE . __newindex = function ( t , key , v a lu e ) pok e ( t . r e f e r e n c e , t . r e f t y p e ,
key , v a l u e ) end
There are two undocumented functions in this metatable, peek() and poke(). Don’t care about
them. You do not need these functions, if you want to write a Lua-style script.
More important is, how the metatable works. It expects two values, reference and reftype as
elements of the table it is attached to.
Let’s create an empty table, add the elements needed by the metatable and attach the metatable
to the table. In this example, we will access the well known battery DataRef.
1b a t t e r y = {}
2b a t t e r y . r e f e r e n c e = XPLMFindDataRef ( " sim / c o c k p i t / e l e c t r i c a l / b a t t e r y _ a r r a y _ o n " )
3b a t t e r y . r e f t y p e = XPLMGetDataRefTypes ( b a t t e r y . r e f e r e n c e )
4s e t m e t a t a b l e ( b a t t e r y , DATAREF_META_TABLE )
Seite 78 von 101

11.1 A magic metatable 11 THE LUA WAY TO ACCESS DATAREFS
Now we test the code (write through XSquawkBox’s input line).
>print( battery[0] )
Lua takes a look inside the table battery, searching for an element indexed with 0. The table
itself does not provide an element with this index.
Lua knows, that a metatable is attached to the table battery, so it looks into the metatable for
an element with the given index.
As there is no element DATAREF_META_TABLE[0], Lua looks for an element __index inside the
metatable. An element __index can be found as a function, and Lua now calls it this way:
DATAREF_META_TABLE.__index( battery, 0 )
And the function finally returns:
peek( battery.reference, battery.reftype, 0 )
This is resolved to 0, if the first battery is off, or to 1 if it is on.
Because of peek() and poke() ignoring the index, if the DataRef points to a single value instead
of an array, you can do the same magic access with all DataRefs X-Plane provides. The only
circumstance is to give a dummy index of 0 (zero) to all non-array DataRefs.
And if you give an index to a string DataRef, it will begin with the character at the index position
(starting at position 0, not 1).
As peek() and poke() are C-style functions, all indexes will start at 0 (zero), not 1 (like Lua
starts array indexes). This behavior was implemented, because of X-Plane’s DataRefs will al-
ways use 0 for the first index.
To shorten the code, FlyWithLua provides a function to declare a magic table in one single line
of code:
11.1.1 table = dataref_table( DataRef )
a) table = The lua table, you want to contain your magic.
b) DataRef = The name of the DataRef as a string.
Creating a new magic table to access the given DataRef, auto detecting the type of the DataRef.
The function dataref_table() initializes a direct access to the DataRef. This causes a conflict
to the PLC8behavior of FlyWithLua. As a consequence dataref_table() always forces the
script to be classic code.
Never use dataref() and dataref_table() together in the same script file!
8See section »Understanding PLCs« for more info.
Seite 79 von 101

12 MANAGE YOUR JOYSTICKS
12 Manage your joysticks
FlyWithLua was made to replace the plugin Button2DataRef, a very popular plugin to manage
your button and axis assignments. You can completely replace it with FlyWithLua 2.0.
This section of the quick manual will show a step-by-step creating process of a joystick config
script.
12.1 Get a basic configuration
The first step is to load your most used plane into the simulator, click into the joystick configu-
ration menu of X-Plane, and setup everything as you want it to be.
Then restart X-Plane (with the same plane). Every time X-Plane is shut down, it saves your last
settings in a preference file:
«place where you store the sim»/X-Plane 10/Output/preferences/X-Plane.prf
This file keeps all joystick settings for the next run in a non Lua friendly way:
1680 . . .
1681 _joy_AXIS_use97 0
1682 _joy_AXIS_use98 0
1683 _joy_AXIS_use99 0
1684 _joy_BUTN_use0 sim / a u t o p i l o t / f d i r _ o n
1685 _joy_BUTN_use1 sim / none / none
1686 _joy_BUTN_use2 sim / view / c h as e
1687 _joy_BUTN_use3 sim / view / c h as e
1688 _joy_BUTN_use4 sim / g e n e r a l / z oo m_ i n_ fa st
1689 _joy_BUTN_use5 sim / g e n e r a l / z oo m_ ou t_ fa st
1690 _joy_BUTN_use6 sim / none / none
1691 . . .
You could copy&paste the values out of this code, but there is an easier way. FlyWithLua
translates X-Plane’s preferences saved inside the X-Plane.prf file into a Lua readable script
code. The code is written to a file named:
«sim storage»/X-Plane 10/Resources/plugins/FlyWithLua/initial_assingments.txt
And yes, it’s a »txt« file, not a script file, because it is made for copy&paste only.
You will find the lines above translated into:
12 . . .
13 clear_all_button_assignments ()
14 set_button_assignment( (0∗40 ) + 0 , " sim / a u t o p i l o t / f d i r _ o n " )
15 set_button_assignment( (0∗40 ) + 2 , " sim / view / ch a s e " )
16 set_button_assignment( (0∗40 ) + 3 , " sim / view / ch a s e " )
17 set_button_assignment( (0∗40 ) + 4 , " sim / g e n e r a l / z oo m_ i n_ fa st " )
18 set_button_assignment( (0∗40 ) + 5 , " sim / g e n e r a l / z oo m_ ou t_ fa st " )
19 . . .
Seite 80 von 101

12.2 Define your sticks 12 MANAGE YOUR JOYSTICKS
FlyWithLua ignores all lines defining axis or buttons to nothing. This is done by the two function
calls clear_all_axis_assignments() (in line 5) and clear_all_button_assignments().
This prevents you from coding 1600 button assignments and 100 axis assignments.
Write a new script file into the Scripts folder and fill it with a copy of the automatic generated
configuration code.
12.2 Define your sticks
As you can see, FlyWithLua has made all button numbers to mathematic exercises. Why that?
You can easily see that all your joysticks start with it’s first button numbered by a multiple of
40. FlyWithLua prepared the code to use a nice standard function of text editors: »replace«.
Go to the beginning of your configuration script and type in a line like this:
LeftHandSteeringStick = 0
Then use your editor to replace all »(0*40)« with »LeftHandSteeringStick«.
The result will look similar to this code:
12 . . .
13 LeftHandSteeringStick = 0
14
15 clear_all_button_assignments ()
16 s e t _ b u t t o n _ a s s i g n m e n t ( L e f t H a n d S t e e r i n g S t ic k + 0 , " sim / a u t o p i l o t / f d i r _ o n " )
17 s e t _ b u t t o n _ a s s i g n m e n t ( L e f t H a n d S t e e r i n g S t ic k + 2 , " sim / view / c ha se " )
18 s e t _ b u t t o n _ a s s i g n m e n t ( L e f t H a n d S t e e r i n g S t ic k + 3 , " sim / view / c ha se " )
19 s e t _ b u t t o n _ a s s i g n m e n t ( L e f t H a n d S t e e r i n g S t ic k + 4 , " sim / g e n e r a l / z o om _i n_ fa s t " )
20 s e t _ b u t t o n _ a s s i g n m e n t ( L e f t H a n d S t e e r i n g S t ic k + 5 , " sim / g e n e r a l / z oo m_ ou t_ fa st " )
21 . . .
Now you are prepared to buy a new USB device. If your stick in your left hand starts at button
number 160 after you plug in an other joystick device, you will only have to change one line in
your code (line 13 in the example above). This is very cool if you are tired of still reconfiguring
your setup, while all the other members of the LAN party starts flying.
12.3 Define type specific assignments
Next step is to define settings, where plane types other than your favorite one need to be recon-
figured. If your most used plane is a C172, and you want to fly the MD902 Explorer and a Bell
206 too, define a »helicopter class«.
The helicopter needs all »little helpers« like nullzone, sensitivity or augment at value 0.0 - to
give maximum control into your hand.
And of course the throttle has to be replaced by a collective.
Seite 81 von 101

12.4 Lua for cockpit builders 12 MANAGE YOUR JOYSTICKS
134 −− a l l h e l i c o p t e r w i l l g e t a u ni qu e s e t t i n g as d e f a u l t
135 function set_helicopter_assignments ()
136 s e t _ a x i s _ a s s i g n m e n t ( 12 , " c o l l e c t i v e " , " n ormal " )
137 s e t ( " sim / j o y s t i c k / j o y s t i c k _ p i t c h _ n u l l z o n e " , 0. 0 )
138 s e t ( " sim / j o y s t i c k / j o y s t i c k _ r o l l _ n u l l z o n e " , 0. 0 )
139 s e t ( " sim / j o y s t i c k / j o y s t i c k _ h e a d i n g _ n u l l z o n e " , 0 .0 )
140 s e t ( " sim / j o y s t i c k / j o y s t i c k _ p i t c h _ a u g m e n t " , 0 .0 )
141 s e t ( " sim / j o y s t i c k / j o y s t i c k _ r o l l _ a u g m e n t " , 0 .0 )
142 s e t ( " sim / j o y s t i c k / j o y s t i c k _ h e a d i n g _ a u g m e n t " , 0 . 0 )
143 s e t ( " sim / j o y s t i c k / j o y s t i c k _ p i t c h _ s e n s i t i v i t y " , 0 . 0 )
144 s e t ( " sim / j o y s t i c k / j o y s t i c k _ r o l l _ s e n s i t i v i t y " , 0. 0 )
145 s e t ( " sim / j o y s t i c k / j o y s t i c k _ h e a d i n g _ s e n s i t i v i t y " , 0. 0 )
146 end
After these lines of code, you can bind individual Helicopters (or Planes) to your aircraft types:
156 −− MD902 E x p l o r e r ( EXPL )
157 i f PLANE_ICAO == "EXPL" th e n
158 set_helicopter_assignments ()
159 end
160
161 −− B e l l 206 D r e a m f o i l
162 i f PLANE_ICAO == " B06" t hen
163 set_helicopter_assignments ()
164 end
If a plane has no ICAO code, go into the Planemaker and correct it. Or you can use the predefined
variable PLANE_TAILNUMBER instead of PLANE_ICAO, if it is unique to this individual aircraft.
The work has to be done manually, there is no automatic way to define classes and bind aircrafts
to them. But it is easy to copy some lines and change the values. If you redefine a button
command, use the »button advanced« menu of X-Plane. You can copy&paste the command
string.
Finish!
From now on you will always start with the right setting in all aircrafts you cover by your
script.
12.4 Lua for cockpit builders
If you build a home cockpit like with Button2DataRef, you may want to bind buttons to DataRefs.
This is different to handle, if you are used to write B2D code, but not too complex.
FlyWithLua offers two functions, button() and last_button(). The function button()
needs the number of the button as its argument and delivers true if the button is pressed, else
you get false returned. The function last_buuton() gives the state one frame ago.
Let’s compare some code. First you get the old Button2DataRef code, followed by the Lua code,
doing exactly the same.
Seite 82 von 101

12.4 Lua for cockpit builders 12 MANAGE YOUR JOYSTICKS
This is a typical configuration of a switch firing into a joystick button. If it is pressed (on), the
battery should be on, else it should be set to off:
#IF BUTTON 13 SWITCHES FROM 1 TO 1 SET sim/cockpit/electrical/battery_on TO 1
#IF BUTTON 13 SWITCHES FROM 0 TO 0 SET sim/cockpit/electrical/battery_on TO 0
1i f b u t t o n ( 1 3 ) th e n
2s e t ( " sim / c o c k p i t / e l e c t r i c a l / b a t t e r y _ o n " , 1 )
3else
4s e t ( " sim / c o c k p i t / e l e c t r i c a l / b a t t e r y _ o n " , 0 )
5end
Next we want to release the parking brake if button 166 is released:
#IF BUTTON 166 SWITCHES FROM 1 TO 0 SET sim/flightmodel/controls/parkbrake TO 0
1i f n o t b u t t o n ( 1 6 6 ) and l a s t _ b u t t o n ( 16 6 ) t h en
2s e t ( " sim / f l i g h t m o d e l / c o n t r o l s / p a rk b ra ke " , 0 )
3end
Remember to put all your »button code« into a function called every frame. This can be done in
this way:
1function parkbrake_button ()
2i f n o t b u t t o n ( 1 6 6 ) and l a s t _ b u t t o n ( 16 6 ) t h en
3s e t ( " sim / f l i g h t m o d e l / c o n t r o l s / p a rk b ra ke " , 0 )
4end
5end
6
7d o_ e ve ry _f r am e ( " p a r k b r a k e _ b u t t o n ( ) " )
Or shorter by using the »[[« and »]]« string delimiters:
1do_every_frame( [[
2i f n o t b u t t o n ( 1 6 6 ) and l a s t _ b u t t o n ( 16 6 ) t h en
3s e t ( " sim / f l i g h t m o d e l / c o n t r o l s / p a rk b ra ke " , 0 )
4end ] ] )
It will produce an useless empty line of code inside the do_every_frame() routine, but this is
not a performance issue, as Lua will interpret a byte-code. The byte-code is compiled on the fly
and does not contain empty lines or comments slowing down the interpreter.
The next bad thing different to Button2DataRef is, that the function set() is much slower than
SET in B2D code. If you want the speed of Button2DataRef, define a DataRef first. A fast code
looks like this:
1d a t a r e f ( " x p _p ar kb ra ke " , " sim / f l i g h t m o d e l / c o n t r o l s / p a rk b ra ke " , " w r i t a b l e " )
2do_every_frame( [[
3i f n o t b u t t o n ( 1 6 6 ) and l a s t _ b u t t o n ( 16 6 ) t h en
4xp_parkbrake = 0
5end ] ] )
Developers first law: Good code can prevent your simulator becoming a flip-book.
As a consequence never use set(),set_array() or get() in code looping every frame.
Seite 83 von 101

13 UNDERSTANDING PLCS
13 Understanding PLCs
Aprogrammable logic controller will do his work in endless cycling steps. These steps will
loop:
a) Read input values.
b) Do the calculations.
c) Write the output values.
The »modern part« of FlyWithLua works like a PLC. Let’s have a look into an example file:
1d a t a r e f ( " x p _ b a t t e r y " , " sim / c o c k p i t / e l e c t r i c a l / b a t t e r y _ o n " , " w r i t a b l e " )
2d a t a r e f ( " r o _ b a t t e r y " , " sim / c o c k p i t / e l e c t r i c a l / b a t t e r y _ o n " )
3x p _ b a t t e r y = 1
4print ( x p _ b a t t e r y )
5print (ro_battery )
You will get a warning in Log.txt, but the script will run. Turn off the battery and reload the
script. You will get:
1
0
The first printed result is what we expect. The battery was turned on, so after this we get a value
of 1when querying the actual value of the battery. But is it really the actual value of the battery?
No, it is the actual value of the variable connected to the battery.
Remember the PLC steps. We are in the calculating step, and as a fact of this, the value isn’t
transfered from the variable xp_battery to the DataRef "sim/cockpit/electrical/battery_on"
yet. If all calculations are finished, FlyWithLua (who is acting like a PLC) goes to the writing
step, pushing all writable variable-DataRef bindings towards X-Plane. (After that it copies all
DataRefs to there variables, independent of the writable or readonly state, and comes to the next
calculation.)
So the second output is 0and not 1, as the variable ro_battery was filled with 0one PLC step
before (you turned off the battery before reloading the script).
If you do not »think as a PLC does«, you might get unexpected results from your own code.
There are three possible solution. The first is to learn to think like a PLC.
Seite 84 von 101

13 UNDERSTANDING PLCS
But if you don’t like PLCs logic, you can use the functions get(),set() and set_array().
This is the second solution. Look at the screen shot some pages before. The program starts:
1d a t a r e f ( " b a t t e r y " , " sim / c o c k p i t / e l e c t r i c a l / b a t t e r y _ o n " , " w r i t a b l e " )
2s e t ( " sim / c o c k p i t / e l e c t r i c a l / b a t t e r y _ o n " , 1)
3print (battery )
The result of this code is (reloading again with batteries off):
1
Hey! Is this real? Didn’t we say battery was filled with the value of 0during the pulling step
before calculation?
Sure, we can try it out by adding a line of code:
1d a t a r e f ( " b a t t e r y " , " sim / c o c k p i t / e l e c t r i c a l / b a t t e r y _ o n " , " w r i t a b l e " )
2print (battery )
3s e t ( " sim / c o c k p i t / e l e c t r i c a l / b a t t e r y _ o n " , 1)
4print (battery )
The output is now:
0
1
Strange! The reason to this behavior is, that set() will freeze the calculation, force a push step,
does its own manipulation, forces a pull step and gets back to the calculation point, where it
freezes the code. This doesn’t even sounds complicated, it is enormous time consuming. So if
you are a friend of performance, use set() only in time-uncritical situations.
The same behavior is shown by get() and set_array().
Coming to the third solution to escape from PLC logic. You can write classic mode script files.
If you do all the XPLM voodoo on your own, everything goes directly from or to the simulator.
But you will have to handle references and types. And you will get no error handling from
FlyWithLua.
To be able to handle all three coding styles in a wildly mix of multiple script files, FlyWithLua
needs two functions to switch his mode, begin_classic_mode() and end_classic_mode().
Please do not care about these two functions in your scripts. Just write script files who use only
one mode, a style mix of dataref() and get()/set() (modern mode), or clean XPLM based
code (classic mode). FlyWithLua will automatically insert the functions to change the mode if
needed. You may check this by writing a debug file to disk.
As switching between modes will consume CPU, sort your scripts. You can start all modern style
scripts with an uppercase letter and all classic style scripts with a lowercase letter. This will force
only one switch, the minimum if you use both styles. Or name scripts written in one style like a
lock and key service in a telephone directory (»AAAAAA_my_lttle_script.lua«).
Seite 85 von 101

14 BASIC KNOWLEDGE ABOUT DATAREFS
14 Basic knowledge about DataRefs
If you are unfamiliar to DataRefs, you should read this section, if you already know everything
about DataRefs, you can skip it.
DataRefs are the main connection to X-Plane’s bowels. Most of them are writable, giving you
an enormous feature to tweak the simulator. But you need to know how they work and how to
access them.
14.1 What are DataRefs?
As your Lua scripts uses global variables, X-Plane itself has it’s own »variables«. But plugins
can’t see them, as they are not published to the plugins in a direct way. The plugin SDK/API
offers C/C++ code to access the »inner heart« of X-Plane by DataRefs.
Definition: A DataRef is a reference to a place in memory, where X-Plane stores a special
value. Each DataRef consists of a »folder/file-type« string giving the DataRef it’s name and the
reference itself.
14.2 Find the right DataRefs
If you want to find a DataRef to be used by your script, first take a look onto this site:
http://www.xsquawkbox.net/xpsdk/docs/DataRefs.html
This is the official website representing all DataRefs X-Plane offers. Always check this site and
use the search function of your web browser to look out for a good DataRef to use.
If you found an useful DataRef, do not stop your search. Sometimes there are more than one
DataRefs pointing to the same (logical) value. For example there is a DataRef »sim/cockpit/
electrical/battery_on«. This DataRefs allows you to turn on/off the battery. But there is
another DataRef »sim/cockpit/electrical/battery_array_on«.
The first DataRef only points to the first battery of the aircraft, but the second DataRef points to
an array of up to eight batteries. Most aircrafts will only simulate one battery, so it’s enough to
control it by the first DataRef. If an aircraft uses more than one battery, your script may result in
mysterious behavior.
Take a look onto the columns of the official DataRef website. The third column shown in what
version of X-Plane the DataRef is present. If you look onto the example above, you can see that
all planes since X-Plane 6.60 will provide access to only one main battery, but since version 8.20
there are up to eight batteries.
Seite 86 von 101

14.3 Accessing DataRefs 14 BASIC KNOWLEDGE ABOUT DATAREFS
If you read out the value behind »sim/cockpit/misc/has_radar« using X-Plane 9.70, and
you send it to a friend using X-Plane 10.10r3, he might be surprised by the beauty of your
code.
14.3 Accessing DataRefs
A very important issue is, that the value in memory the DataRef points to, has a special byte
structure. The DataRef itself only points to the first byte, no matter what structure (or length)
the value has. It is your part to access the value the right way.
You can see the byte structure in the second column of the official DataRef list. If you find only
int,float or double, it is a single value behind the DataRef. If there are brackets behind the
type, it is an array of this type.
Only look into the second column to examine the type, not in the name of the DataRef. For exam-
ple »sim/cockpit/electrical/battery_array_on« is an array of eight integer values, but
»sim/weather/cloud_type[2]« is only one single integer value, not an array of 2 values.
If you want access to a DataRef, you will first have to find out the reference. Use the function
XPLMFindDataRef() to get the reference. For example:
battery_ref = XPLMFindDataRef("sim/cockpit/electrical/battery_array_on")
Now you have the reference address stored in a variable named battery_ref. If you want to
turn on the third battery, you must access the value stored behind the DataRef like this:
1−− f i n d o ut t h e r e f e r e n c e
2b a t t e r y _ r e f = XPLMFindDataRef ( " sim / c o c k p it / e l e c t r i c a l / b a t t e r y _ a r r a y _ o n " )
3
4−− f i l l a t a b l e w i t h t h e v a l u e s fro m t h e D at a R e f
5b a t t e r y _ a r r a y = XPLMGetDatavi ( b a t t e r y _ r e f , 0 , 8)
6
7−− c ha n g e t h e v a l u e r e p r e s e n t i n g t h e t h i r d b a t t e r y
8b a t t e r y _ a r r a y [ 2 ] = 1
9
10 −− w r i t e t h e v a l u e s b ack t o X−Plane
11 XPLMSetDatavi ( b a t t e r y _ r e f , b a t t e r y _ a r r a y , 0 , 8 )
In this code, you change battery_array[2] to turn on the third battery. All of X-Plane’s arrays
start at level 0 (like C/C++ does), not level 1 (like Lua does). The last value is battery_array[7].
In the functions XPLMGetDatavi() and XPLMSetDatavi() your arguments are »0, 8«, you start
at position 0 and get/set 8 values.
You can get all batteries into one table, do your changes to them, and at the last step write them
all back to X-Plane. Between getting and setting the values can be as much of code as you like.
But you do not need to get/set them all. If you only want to access to the third value, write a
code like this instead:
Seite 87 von 101

14.4 Observe the DataRef 14 BASIC KNOWLEDGE ABOUT DATAREFS
1−− f i n d o ut t h e r e f e r e n c e
2b a t t e r y _ r e f = XPLMFindDataRef ( " sim / c o c k p it / e l e c t r i c a l / b a t t e r y _ a r r a y _ o n " )
3
4−− f i l l a t a b l e w i t h t h e v a l u e s fro m t h e D at a R e f
5b a t t e r y _ a r r a y = XPLMGetDatavi ( b a t t e r y _ r e f , 2 , 1)
6
7−− c ha n g e t h e v a l u e r e p r e s e n t i n g t h e t h i r d b a t t e r y
8b a t t e r y _ a r r a y [ 2 ] = 1
9
10 −− w r i t e t h e v a l u e s b ack t o X−Plane
11 XPLMSetDatavi ( b a t t e r y _ r e f , b a t t e r y _ a r r a y , 2 , 1 )
Keep in mind that you still use a table, even if you want to access a single value. If the DataRef
points to an array, you must use the »array-function«.
If you use the modern code to access, FlyWithLua will always translate into single values. The
same code written in modern style will look like this:
1−− d e f i n e t h e c o n n e c t i o n t o t h e t h i r d b a t t e r y
2d a t a r e f ( " t h i r d _ b a t t e r y _ o n " , " sim / c o c k p it / e l e c t r i c a l / b a t t e r y _ a r r a y _ o n " , " w r i t a b l e " , 2)
3
4−− c ha n g e t h e v a l u e o f t h e t h i r d b a t t e r y
5t h i r d _ b a t t e r y _ o n = 1
The modern code style is shorter, but it is impossible to get/set complete arrays at once to/from
a Lua table.
14.4 Observe the DataRef
You should observe the behavior of a DataRef with the tool DataRef Editor. Sometimes a
DataRef (to be exact: the value behind it) will not behave as you aspect it.
Let’s have an example. You want to turn on the carb heat if there is ice in the engine. Your code
is this:
1d a t a r e f ( " c a rb _ he a t " , " sim / c o ck p i t 2 / e ng in e / a c t u a t o r s / c a r b _ h e a t _ r a t i o " , " w r i t a b l e " , 0)
2d a t a r e f ( " i c i n g " , " sim / f l i g h t m o d e l / e ng in e / ENGN_crbice " , " r e ad o nl y " )
3
4function a u t o m a t i c _ c a r b _ h e a t ( )
5−− i f ca r b i s i c i n g t h e n s w i t c h h e a t on
6i f ( i c i n g == 1) t h e n
7carb_heat = 1
8else
9carb_heat = 0
10 end
11 end
Everything seems to be fine, FlyWithLua didn’t produce an error message and all other stuff
works well. Only your function automatic_carb_heat() will not react to ice inside the en-
gine. Let’s observe the value of sim/flightmodel/engine/ENGN_crbice with the DataRef
Editor.
Seite 88 von 101

14.4 Observe the DataRef 14 BASIC KNOWLEDGE ABOUT DATAREFS
Your code expects an integer value (yes = 1, no = 0), like the third_battery_on in the example
above. But sim/flightmodel/engine/ENGN_crbice is an array of float values, representing
a ratio of icing. The values start at zero, but they will grow up slowly. Before they reach a value
of 1.0, your plane usually crashed into ground.
If you absolutely dislike ice in your engine, change the code to:
1d a t a r e f ( " c a rb _ he a t " , " sim / c o ck p i t 2 / e ng in e / a c t u a t o r s / c a r b _ h e a t _ r a t i o " , " w r i t a b l e " , 0)
2d a t a r e f ( " i c i n g " , " sim / f l i g h t m o d e l / e ng in e / ENGN_crbice " , " r e ad o nl y " )
3
4function a u t o m a t i c _ c a r b _ h e a t ( )
5−− i f ca r b i s i c i n g t h e n s w i t c h h e a t on
6i f ( i c i n g > 0) th e n
7carb_heat = 1
8else
9carb_heat = 0
10 end
11 end
As the value for the carb heat is a ratio too, but you are firing all or nothing, you may be too power
consuming. In times fuel gets more and more expansive, it might be better to give more power
to the carb heat, if there is more ice in the engine. Let your fantasy create a nice mathematic
model for the relationship level of ice —> level of carb heat.
1d a t a r e f ( " c a rb _ he a t " , " sim / c o ck p i t 2 / e ng in e / a c t u a t o r s / c a r b _ h e a t _ r a t i o " , " w r i t a b l e " , 0)
2d a t a r e f ( " i c i n g " , " sim / f l i g h t m o d e l / e ng in e / ENGN_crbice " , " r e ad o nl y " )
3
4function a u t o m a t i c _ c a r b _ h e a t ( )
5−− i f ca r b i s i c i n g t h e n s w i t c h h e a t on
6i f ( i c i n g > 0) th e n
7c a r b _ h e a t = 0 . 25 + i c i n g ∗3 / 4
8else
9carb_heat = 0
10 end
11 end
Now you are using all benefits of float ratio values. The world is more than black/white, there
are nearly9unlimited shades of gray.
9As a C/C++ float value is stored into a limited number of bytes, it represents a collection of discrete values.
Seite 89 von 101

15 TAKE LUA INTO CONSIDERATION
15 Take Lua into consideration
There are some specials Lua offer, a script developer needs to know. In this section, we will show
some common mistakes/problems in scripting. If you are familiar with Lua, skip this section.
We will write an example file, not included in the FlyWithLua package. To follow this text, turn
on X-Plane and start a text editor. Then copy&paste the examples and see how X-Plane reacts.
15.1 Strings inside of strings
Let’s start with a typical script. You make a script printing out the solution of the universe.
1xyz = 42
2do_ eve ry _d ra w ( " d r a w _ s t r i n g ( 5 0 , 5 00 , s t r i n g . f o rm at ( " The s o l u t i o n i s %i " , xyz ) ) " )
The script seems to be ok, but FlyWithLua reacts like this (lines copied from Log.txt):
1136 FlyWithLua I n f o : Lua eng i n e ( r e ) s t a r t e d . LUA_RUN = 2 , SDK_VERSION = 21 0 , XPLANE_VERSION
= 10101 , XPLANE_LANGUAGE = German and XPLANE_HOSTID = 1
1137 FlyWithLua : Load i n i f i l e .
1138 Fl yW ith Lu a : S e a r c h i n g for Lua s c r i p t f i l e s
1139 Fl yWi thLua : S o r t i n g Lua s c r i p t f i l e s
1140 Fl yWit hLu a : S t a r t l o a d i n g s c r i p t f i l e R e so ur ce s / p l u g i n s / Fly With Lua / S c r i p t s /ALPHA . l u a
1141 FlyWithLua I nf o : No c l a s s i c commands found i n s i d e t he f i l e .
1142 Fl yWi thLua : Lua ha s c ra she d , c an ’ t e x ec u te s c r i p t f i l e : R es ou r ce s / p l u g i n s / FlyWit hLu a /
S c r i p t s /ALPHA . l ua
1143 Fl yWit hLu a : E r r o r l o a d i n g s c r i p t f i l e R e so ur ce s / p l u g i n s / Fly With Lua / S c r i p t s /ALPHA . l u a
1144 Fl yWit hLu a Debug I n f o : The Lua s t a c k c o n t a i n s t h e f o l l o w i n g e l e me n t s :
1145 R es o ur c es / p l u g i n s / F lyW ith Lua / S c r i p t s / ALPHA . l u a : 2 : ’ ) ’ e x p ec te d n e ar ’ The ’
1146 FlyWithLua Debug I nf o : Debug f i l e w r i t t e n t o "<<x−p l a n e d i r > >/ Fl yW ithL ua_Debug . t x t " .
Lua crashes! The reason is, that you put a string into a string the wrong way. The reason is not,
that you forgot a closing bracket. Always think twice when reading an error message!
A string can be set between the char »"« (double quotation), but you can also use »’« (single
quotation). This can set an inner string into an outer string.
The correct script looks like this:
1xyz = 42
2do_ eve ry _d ra w ( ’ d r a w _ s t r i n g ( 5 0 , 5 00 , s t r i n g . f o rm at ( " The s o l u t i o n i s %i " , xyz ) ) ’ )
Or you can write it this way:
1xyz = 42
2do_ eve ry _d ra w ( " d r a w _ s t r i n g ( 5 0 , 5 00 , s t r i n g . f o rm at ( ’ The s o l u t i o n i s %i ’ , xyz ) ) " )
Seite 90 von 101

15.2 Multiple line strings 15 TAKE LUA INTO CONSIDERATION
15.2 Multiple line strings
If you want to declare a string over more than one line, you must use the delimiters »[[« (at the
beginning) and »]]« (at the end). This can look like:
1xyz = 42
2do_ eve ry _d ra w ( [ [ d r a w _ s t r i n g ( 5 0 , 5 20 , " T hi s i s a l l you need t o know : " )
3d r a w _ s t r i n g ( 5 0 , 500 , s t r i n g . f or m at ( " The s o l u t i o n i s %i " , xyz ) ) ] ] )
There are a lot of more tricks handling strings. Please take a look into the official Lua 5.2
manual.
15.3 Global or local variables?
We will now name the script from above to ALPHA.lua and write a second script named BETA.lua:
1xyz = 17
2
3function beta_print_xyz ()
4d r a w _ s t r i n g ( 5 0 , 450 , s t r i n g . f or m at ( "BETA: xyz = %i " , xyz ) )
5end
6
7do_eve ry_d raw ( " b e t a _ p r i n t _ x y z ( ) " )
This will produce no error message, all scripts run as they should, but the solution is now 17.
Why? It is because the first line of BETA.lua will overwrite variable xyz first initialized in line
1 of script ALPHA.lua (all scripts are compiled in alphabetical order). All variables used in Lua
are global variables, and every code can see and manipulate the variable!
But you can make a variable local. Make it local means, it can’t be seen from code outside of
the block it is declared in. To declare a local variable, just write »local« in front of the first use
of the variable. Change BETA.lua to:
1local xyz = 17
2
3function beta_print_xyz ()
4d r a w _ s t r i n g ( 5 0 , 450 , s t r i n g . f or m at ( "BETA: xyz = %i " , xyz ) )
5end
6
7do_eve ry_d raw ( " b e t a _ p r i n t _ x y z ( ) " )
Now the solution switches back to 42. What happened here? The first line of BETA.lua declares
a local variable xyz. The global variable xyz from script ALPHA.lua still exists, but a local
variable will hide a global variable with an identical name. All code inside the active block will
now use the local variable instead of the global.
A function defined in the same block will now see the local variable xyz of the code block made
by the script file (a file is a block of code).
Seite 91 von 101

15.4 Tables are tables 15 TAKE LUA INTO CONSIDERATION
Now we know how clever a script can be written, we will change the code of ALPHA.lua too.
This will avoid conflicts with scripts using a global variable named xyz, even if we do not have
a script like this at the moment. But we could get one from a friend or download one from the
Internet.
1local xyz = 42
2do_ eve ry _d ra w ( [ [ d r a w _ s t r i n g ( 5 0 , 5 20 , " T hi s i s a l l you need t o know : " )
3d r a w _ s t r i n g ( 5 0 , 500 , s t r i n g . f or m at ( " The s o l u t i o n i s %i " , xyz ) ) ] ] )
Crash!
Was it not clever to declare every variable as local? What happened now?
The reason is, that the command do_every_draw() always creates a totally new block of
code, containing all strings from all scripts in it. This block is completely independent to all
other code you give to Lua. If you write a debug file, you can see this block inside the file
FlyWithLua_debug.txt in X-Plane’s main directory.
The functions do_sometimes(),do_often() and do-every_frame() behave the same way.
add_macro() creates two independent blocks of code and create_command() creates three
independent blocks of code, while add_ATC_macro() creates only one.
The trick in BETA.lua is, that we call a function beta_print_xyz() from the do_every_draw()
command block. Lua jumps into the function beta_print_xyz(). This is a jump into the block
automatically created by the file BETA.lua.
Important info: A jump from one block into another block (as made by a function call) changes
the view onto the variables (if local variables are declared)!
Conclusion: If you want to write code that does not make unwanted side-effects to other scripts,
keep all variables local and mask everything you want to be done continuously in a function.
Next conclusion: As the function DataRef() always creates a global variable, you must write
classic code, if you plan to share a script online. You will never know if the user, who down-
loaded your script, uses the same DataRef() binding as your script does. As long as you are the
only user of your script, you can do whatever you want. Just like in real life.
15.4 Tables are tables
If you use tables in Lua, you can’t use the name of the table as a variable. This code will fail
without a warning (it simply redefines the variable to hold a number instead of a table):
1local b a t t e r y = d a t a r e f _ t a b l e ( " sim / c o c k p i t / e l e c t r i c a l / b a t t e r y _ o n " )
2battery = 1
If you want to turn on the battery, use this code:
1local b a t t e r y = d a t a r e f _ t a b l e ( " sim / c o c k p i t / e l e c t r i c a l / b a t t e r y _ o n " )
2b a t t e r y [ 0 ] = 1
Seite 92 von 101

16 DEBUGGING
16 Debugging
To domesticate the beast is a hard job sometimes. If you are searching an error inside your code,
FlyWithLua gives you a nice little weapon. Just click the menu entry Write Debug file. It
writes a file FlyWithLua_debug.txt into X-Plane’s main directory. You may observe the file
with a text editor able to recognize changes.
Inside the file you will find the content of Lua’s stack, the list of DataRefs handled by the plugin
and the content of the internal tables used by the plugin.
The debug info will show all global variables too. They are shown as name plus value. The
debug info ends with a list of all global tables and functions. A lot of information to dive deep
into FlyWithLua’s bowels.
If this is still not enough, and you need to look into a local variable or need a continuous obser-
vation of a variable, write a debug code like this (debugging the example one section before):
1d a t a r e f ( " c a rb _ he a t " , " sim / c o ck p i t 2 / e ng in e / a c t u a t o r s / c a r b _ h e a t _ r a t i o " , " w r i t a b l e " , 0)
2d a t a r e f ( " i c i n g " , " sim / f l i g h t m o d e l / e ng in e / ENGN_crbice " , " r e ad o nl y " )
3
4function a u t o m a t i c _ c a r b _ h e a t ( )
5−− de bug t h e v a r i a b l e
6m y_ d eb u g_ s tr i ng = s t r i n g . f o rm a t ( " b e f o r e : i c i n g = %f , c a r b _ h e a t = %f " , i c i n g ,
carb_heat)
7
8−− i f ca r b i s i c i n g t h e n s w i t c h h e a t on
9i f ( i c i n g == 1) t h e n
10 carb_heat = 1
11 else
12 carb_heat = 0
13 end
14 my _d eb ug _s tr in g = m y_ de bu g_ st ri ng . . s t r i n g . f o rm at ( " ==> a f t e r : i c i n g = %f ,
c a r b _ h e a t = %f " , i c i n g , c a r b _ h e a t )
15 end
16
17 d o _o f te n ( " a u t o m a t i c _ c a r b _ h e a t ( ) " )
18
19 do_ eve ry _d ra w ( " i f m y_ de bu g _s tr in g t h e n d r a w _ s t r i n g ( 2 0 , 2 0 , m y_ de b ug _ st r in g ) end " )
This example is pretty overobserved, but it shows how to observe more than one variable more
than one time.
Please recognize the code in line 19. If you do not use the if statement, FlyWithLua will crash,
when the first drawing frame has nothing to draw. If you don’t like the if statement in the last
line, start the script with:
my_debug_string = "No values at the moment."
After you solved the problem, simply remove the debug code.
Seite 93 von 101

17 INTEGRATE FOREIGN LIBRARIES
17 Integrate foreign libraries
FlyWithLua provides a lot of features and functions, but there may be some function missing,
and you want to integrate a foreign library filling the hole.
Some libraries are easy to integrate. All you have to do is, to place the related files into the
Modules folder. If you choose a binary file, it must be compiled with MinGW on Windows
or GnuCC on Linux or Macintosh. Windows binaries end with .dll, Linux and Macintosh
binaries end with .so (it is important on Linux, that you copy the files into the Modules folder,
FlyWithLua will not search in your Linux library path).
We will look at two libraries made by Gerald Franz, LuaXML and proteaAudio, to show the
integration on an example.
For the LuaXML library, we only need to download it and copy the files LuaXML.lua and
LuaXML_lib.dll (or LuaXML_lib.dll) from the downloaded ZIP archive into the Modules
folder.
To integrate the proteaAudio library, we do the same for the binary file (proAudioRt.dll or
proAudioRt.so), but we have to do something more.
Using the library in a script file will force you not only to load the module (with a code line
containing require("proAudioRt")). You will also have to initialize and close the sound
device. This can be done in a script for sure, but if multiple scripts use the same sound module
and each script opens and closes the sound device independent from the other scripts, your set
of scripts will fail.
To avoid a fail like this, FlyWithLua gives you two files in it’s main folder you can edit,
user.ini and user.exit.
During startup, the script user.ini will be executed. So fill this script with code like this:
1−− l o ad t h e sou n d l i b r a r y and i n i t i t
2require ("proAudioRt" )
3i f proAudio . c r e a t e ( ) t h en
4logMsg ( " F lyW ithL ua I n f o : Sound e n g i ne i s r u n n i ng . " )
5else
6logMsg ( " FlyWithLua E rr or : Can ’ t i n i t t he sound l i b r a r y ! " )
7end
And shut down the sound device inside the file user.exit:
1−− s h o t down s ou nd e n g i n e
2proA udio . d e s t r o y ( )
3logMsg ( " F lyW ithL ua I n f o : Sound e n g i ne i s down . " )
Now every script behaves like the sound library was »battery included« in FlyWithLua.
The LuaXML library is included into FlyWithLua. If you want to use proteaAudio, you will have
to integrate it as described. Two example files for proteaAudio are included into FlyWithLua, to
help you making the first steps with this library.
Seite 94 von 101

18 THE NEW 64-BIT ARCHITECTURE
18 The new 64-bit architecture
Since X-Plane 10.20 the simulator can run in 64-bit. As the simulator integrates the plugins as
dynamic libraries, the plugins will also have to use 64-bit code. FlyWithLua can run under both
conditions, 32 and 64 bit. But you will sometimes have to write different code for 32 and 64
bit.
18.1 Architecture exclusive script loading
If you rename a script, and change it’s ending from .lua to .lua64, FlyWithLua will only load
this file, if it is running in 64-bit mode. If you rename it’s ending to .lua32, the script file will
only be loaded when running in 32-bit. Else the file will be ignored.
You can also use .Lua64,.LUA64,Lua32 or LUA32.
If you use the ending .lua,.Lua or .LUA, it will be loaded in 32-bit and 64-bit architecture. As
a script is usually architecture independent, the ending without the number should be the normal
case.
18.2 Checking architecture inside a script
You can read out the global variable SYSTEM_ARCHITECTURE. It contains a number, either 64 or
32. If you need different code, use this system variable together with an if statement.
18.3 64-bit DLLs
If you want to use a dynamic library, you can call the library with the require command. The
DLL’s name must end as »_64.dll« on Windows, »_64.so« on Mac or Linux, if it has to be
loaded in 64-bit.
If your script starts with a line like this:
1require ( " LuaXML_lib " )
there must be two DLLs to make it running under 32-bit and 64-bit, »LuaXML_lib.dll« and
»LuaXML_lib_64.dll«. This is for Windows system, for Mac and Linux, you will have to
provide »LuaXML_lib.so« and »LuaXML_lib_64.so«.
Seite 95 von 101

19 Q&A
19 Q&A
At the end of this little manual, I will answer to some popular questions.
19.1 My script doesn’t work. What can I do?
19.1.1 Check the debug info file and Log.txt
Take a look into the file Log.txt provided by X-Plane. The easy way is clicking on X-Plane’s
menu item »special—>show dev console«, the more complex way is to use a text editor or a
command line tool like tail. Search the end of the file Log.txt for error reports generated by
FlyWithLua.
If FlyWithLua provides error or warning messages while loading or executing your script, pass
the messages through your brain, take your conclusions and edit your script file to eliminate the
problem.
If Lua stops working, it will automatically write a debug file in X-Plane’s main directory called
FlyWithLua_debug.txt. This file will also help to understand what’s going wrong. If it wasn’t
generated automatically, force a generation by clicking on »Plugins—>FlyWithLua—>Write
Debug file«.
19.1.2 Check for conflicts to other scripts
If the analysis made above didn’t solve your problem, move all other scripts to the disabled
folder and restart Lua. If the problem disappears, you might have a conflict to other scripts.
Move the other scripts back to the active scripts folder one by one and restart Lua after each file
movement.
By this way, you will find out the scripts, who causes the conflict. Compare the code of all
scripts causing the error. In most cases you will use a variable with a global scope in more than
one script. Rename the variable in one of the scripts or make them local.
Do this only for »normal« variables, not for variables connected to DataRefs. If a DataRef is
connected to more than one variable, rename all variables of this DataRef to be unique. Fly-
WithLua prints a warning message into the Log.txt file, if a DataRef is connected to multiple
variables.
19.1.3 I really can’t solve it!
Then ask for assistance. Most X-Plane related forums in the Internet will provide a developer
corner.
Seite 96 von 101

19.2 How to ask the developer of FlyWithLua for help? 19 Q&A
19.2 How to ask the developer of FlyWithLua for help?
If nobody can solve your problem, you may ask me for some help. Write a mail to:
carsten.lynker@gmail.com
Your mail should use the word »FlyWithLua« in it’s subject line and must have a meaningful
subject, otherwise it will be deleted without reading.
The body of your mail must describe your problem in detail. As I have no time for an end-
less Q&A ping-pong, a mail without a detailed report of your problem will move directly into
dev/null.
Attached to the mail, you must send the FlyWithLua_debug.txt file and all lines of your
Log.txt file starting with »FlyWithLua« (make a tail | grep on Mac or Linux or use mTail on
Windows). And of course attach your script.
If you are using foreign binary libraries — forget it. I will not execute foreign binaries on my
development system. If you use plain Lua modules in your script, not included to FlyWithLua,
attach them as well.
A reaction to a mail can take several days (or weeks if I am busy). Keep in mind that this is my
hobby, not my job.
19.3 Is the debug file privacy safe?
By default, yes. It will hide your VATSIM ID, your real name and (most important) your VAT-
SIM password – as long as you only use the pre-defined variables to access XSquawkBox. If you
are using DataRef access to online plugins (an IVAO client or something alike), delete private
info manually before sending the file to friend, a forum or to me.
19.4 Where are the Splines?
Splines are a nice feature of Button2DataRef, but FlyWithLua does not provide spline functions.
Button2DataRef isn’t able to calculate math expressions. So you must use splines. In most cases
splines are slower than direct formulas.
If you want to script a relationship defined by data points, take a look on this website:
http://arachnoid.com/polysolve/index.html#The_Program
It will help you to find a low-order polynomial expression to calculate your relationship.
If you want to make a mixture spline, where half way of your input device divides the mixture
by 1/4 to 3/4, enter these data points into the website:
Seite 97 von 101

19.5 Feature requests 19 Q&A
0 0
0.5 0.75
1 1
Click on the »Output Form« button to get a result like this:
1Mode : normal x , y a n a l y s i s
2P ol y n om i al d e gr e e 2 , 3 x , y d a t a pairs .
3C o r r e l a t i o n c o e f f i c i e n t ( r ^ 2 ) = 1.0000000000000004
4Standard error = 4.742874840267547e−16
5C o e f f i c i e n t o ut p ut form : m at hem at ic al function :
6
7f ( x ) = −1.6653345369377348e−016 ∗x ^0
8+ 2.0000000000000027e+000 ∗x ^1
9+−1.0000000000000027e+000 ∗x ^2
10
11 Co p y r i g h t ( c ) 2012 , P . Lut us −− h t t p : / / a r a c h n o i d . com . A l l R i g h t s R e s e r v e d .
The value -1.6653345369377348e-016 represents nearly nothing, so your script can use a cal-
culation like this:
y = 0*x^0 + 2*x^1 + (-1)*x^2
y = 2*x - x^2
19.5 Feature requests
If you need a feature FlyWithLua doesn’t provide, you can start your own trunk of development,
as this is allowed by the license we use10. But please first try to ask, if we implement your
wish into the official FlyWithLua project. This can help to protect users getting confused by
thousands of different flavors of Lua Scripting plugins.
19.6 Can I store Lua files inside the aircraft’s folder?
Not by default. You should leave an aircraft as it is, to avoid surprising behavior when you (or
X-Plane) update the plane. But if you want to store all your joystick configuration inside the
aircraft’s folder, write a »loader« script into the script folder and fill it like this:
1dofile (AIRCRAFT_PATH . . " m y _ j o y s t i c k _ c o n f i g u r a t i o n . l u a " )
Then this script will load the other script, but make sure that every plane you load has a file that
can be read. It can be empty, if you have no Lua code for that plane.
10See section »License« for detailed info.
Seite 98 von 101

19.7 I want full access to X-Plane’s plugin SDK! 19 Q&A
19.7 I want full access to X-Plane’s plugin SDK!
The plugin SDK is a complete interface to X-Plane from Delphi, C or C++, but not from Lua.
FlyWithLua offers the most important functions of the plugin SDK for little scripts. But you
may want more.
The nice side effect choosing LuaJIT as the Lua engine of FlyWithLua is, that you can take
advantage of the FFI library. It allows to access every C-function from Lua. And you can
declare C-types to be used in Lua code. For a documentation of FFI see:
http://luajit.org/ext_ffi.html
Let’s make an example. Reloading the scenery is possible, even if there is no XPLMReload-
Scenery() function provided by FlyWithLua. We will create a macro doing the reload:
12 −− l o ad t h e XPLM l i b r a r y
13 local f f i = require ( " f f i " )
14 local XPLM = f f i . l o a d ( "XPLM" )
15
16 −− d e f i n e t h e XPL MRelo ad Scene ry ( ) C−f u n c t i o n t o be u s e d f r om Lua
17 f f i . c de f ( " vo id XPLMReloadScenery ( voi d ) " )
18
19 −− d e f i n e a g l o b a l f u n c t i o n ( m ac ros can o n l y a c c e s s g l o b a l f u n c t i o n s )
20 function r e l o a d _ s c e n e r y ( )
21 XPLMSpeakString ( " P l e a s e w ai t , X−P la ne i s r e l o a d i n g t he s c en e ry . Don ’ t p a ni c ! The
s i m u l a t o r w i l l f r e e z e f o r a moment . " )
22 XPLM. XPLMReloadScenery ()
23 end
24
25 −− c r e a t e t h e macro
26 add_ ma cr o ( " R el oad t h e s c e n er y " , " r e l o a d _ s c e n e r y ( ) " )
Other example files can be found in the Scripts (disabled) folder.
If you want to use the FFI access to the plugin SDK in more than one script, you can collect all
definitions of the C-functions in a Lua module and start your script with:
require "name of your module"
Seite 99 von 101

19.8 Using Lua For Windows 19 Q&A
19.8 Using Lua For Windows
If you don’t like the extreme fast LuaJIT engine, and you are using Lua For Windows on a
Windows system, then you can replace the Lua engine of FlyWithLua. When you change the
engine, you will loose the libraries included by LuaJIT (FFI and Bit).
Doing the following steps changes the Lua engine of FlyWithLua. Every change on basic
binary files is not supported by the FlyWithLua developer team! If you get problems after
an engine change, solve it on your own or come back to the official FlyWithLua.
This has to be done:
a) Download Lua For Windows and run the Installer.
b) Delete the file FlyWithLua\lua51.dll in X-Plane’s plugin folder.
c) Go into the subfolder Lua\5.1\, of your just installed Lua For Windows.
d) Copy the files lua51.dll and lua5.1.dll into FlyWithLua, replacing the old lua51.dll.
e) Copy all files you find inside the Lua For Windows folder Lua\5.1\clibs into the Fly-
WithLua subfolder Modules.
That’s all. Now you are using the Lua interpreter provided by Lua For Windows, not the Just-In-
Time compiler LuaJIT. If you don’t have thousands of lines with Lua code, you will not »feel«
the difference in execution speed. But you now access an enormous pool of usable libraries like
Lua Socket.
Seite 100 von 101

21 LICENSE
20 Credits
This plugin was made by Carsten Lynker (main developer, Windows code), Snagar (early Mac-
intosh and Linux code), William B. Good (Macintosh and Linux code) and Ingo Alm (lector and
bughunter).
FlyWithLua uses source code
from HIDAPI, created by Alan Ott, Signal 11 Software,
from The LuaJIT Project, created by Mike Pall
and code snippets from Kein-Hong Man’s luahidapi.
FlyWithLua uses two library packages made by Gerald Franz, LuaXML and proteaAudio.
Graphic design of the logo by Alexandre Nakonechnyj, Copyright Âl’ 1998 Lua.org11.
If you find a bug produced by the plugin, please email:
carsten.lynker@gmail.com
Happy landings!
21 License
Copyright (c) 2012 Carsten Lynker
Permission is hereby granted, free of charge, to any person obtaining a copy of this software and
associated documentation files (the "Software"), to deal in the Software without restriction, in-
cluding without limitation the rights to use, copy, modify, merge, publish, distribute, sublicense,
and/or sell copies of the Software, and to permit persons to whom the Software is furnished to
do so, subject to the following conditions:
The above copyright notice and this permission notice shall be included in all copies or substan-
tial portions of the Software.
THE SOFTWARE IS PROVIDED "AS IS", WITHOUT WARRANTY OF ANY KIND, EX-
PRESS OR IMPLIED, INCLUDING BUT NOT LIMITED TO THE WARRANTIES OF MER-
CHANTABILITY, FITNESS FOR A PARTICULAR PURPOSE AND NONINFRINGEMENT.
IN NO EVENT SHALL THE AUTHORS OR COPYRIGHT HOLDERS BE LIABLE FOR
ANY CLAIM, DAMAGES OR OTHER LIABILITY, WHETHER IN AN ACTION OF CON-
TRACT, TORT OR OTHERWISE, ARISING FROM, OUT OF OR IN CONNECTION WITH
THE SOFTWARE OR THE USE OR OTHER DEALINGS IN THE SOFTWARE.
11For more information about license and design of Lua see www.lua.org.
Seite 101 von 101
