Fund Manager User Guide 90010
User Manual:
Open the PDF directly: View PDF ![]() .
.
Page Count: 122 [warning: Documents this large are best viewed by clicking the View PDF Link!]
- How to access Fund Manager
- Configuring your browser for Fund Manager
- Dashboard
- Administration
- Transactions
- Reports
- Bank & Cash
- Register
- SIMs Software Integrations
- Fund Manager Action Buttons
- Glossary
- Index

Fund Manager
User Guide

Copyright
© SF Software Limited t/a PEBBLE 2017. All Rights Reserved.
The software described in this document is furnished under a license agreement or
nondisclosure agreement. The software may be used or copied only in accordance with the
terms of those agreements. No part of this publication may be reproduced, stored in a retrieval
system, or transmitted in any form or any means electronic or mechanical, including
photocopying and recording for any purpose other than the purchaser's personal use without
the written permission of Pebble.
Pebble, Media Exchange 3, Coquet Street, Newcastle, Tyne and Wear, NE1-2QB
Tel: 0845 310 1788.
Publication Number: 90308
Date of Issue: 13/09/18

How to access Fund Manager 1
Logging in 1
Getting help on the screens 1
Configuring your browser for Fund Manager 3
Dashboard 5
Administration 7
Manage Names 9
Batch Actions 10
Group Actions 10
Create New Names/Organisations 11
Consolidating pupil names 12
Manage Accounts 14
To view and edit accounts 14
To edit account details 15
Batch Actions 17
Contents

Group Actions 18
To create a new account 18
Manage Bank Accounts 20
Period End options 24
View Opening Balances 24
Period End Closedown 25
Joinos options 26
Create Joinos Codes 26
Transactions 27
Recording transactions 29
Receipts 30
Payments 34
Splitting receipts and payments 37
Making transfers 39
Between accounts 39
Between names 39
Cancelling and amending transactions 41
Importing transactions 41
Reports 43
Accounts Summary 43
Search Transactions 44
Fund Manager User Guide

Search Account Balances 45
Lists 46
List Receipts by Receipt Number 46
List Payments By Cheque/Voucher Number 46
List All Transfers 46
Cancellations 47
List of Cancellations 47
Special Reports 47
Who’s Not Paid 47
Journal Reports 48
Gift Aid 48
New Claim for Donations 49
Claim History 50
Bank & Cash 53
Reports 53
Bank & Cash Summary 53
Bank History 54
Cash History 54
List Reconciled Bank Accounts 54
Banking Actions 54
Pay Receipts to Bank 54

Draw Cheque for Cash 55
Reconcile a Bank Statement 56
Transfers 57
Transfer between Bank Accounts 57
Cancellations 57
Cancel/Amend Bank Transaction 57
Unreconcile a Bank Statement 58
List Cancelled Bank Transactions 58
VAT 58
Generate VAT 100 59
Previous VAT 100 Submissions 59
Register 61
Prerequisites 62
Record Taken Items 62
Reports 63
Taken Items 64
Name Summary 64
Statement 65
Special 66
Universal Infant Free School Meals 66
Account Summary 68
Fund Manager User Guide

Upload Register File 68
SIMs Software Integrations 69
Joinos 70
Create Offer v2 70
Create Offer 71
Active Offers 72
Pending Offers 73
Expired Offers 73
Documents 73
How to transfer Joinos payments so you can reconcile your bank statements 74
Messaging 76
ParentPay 77
Map Names 78
Accounts 78
Reports 80
Other 80
How to transfer money so you can reconcile your bank statements 80
sQuid 81
View Offers 82
Post New Offer 82
Map Offers to Accounts 83


How to access Fund Manager
Logging in
1. Go to apps.mypebble.co.uk.
2. Enter the email and password from your welcome email.
If you don’t have a password:
lClick on the Forgotten Your Login Details link underneath the login button.
lYou’ll then be prompted for your email address; enter the email address
you use to log onto Fund Manager and click Reset my Password.
lYou should then receive an email with a link to choose a new password.
Note: When you set your password, please remember that it must have at
least eight characters, including at least one letter, one number and one
special character e.g. $, &
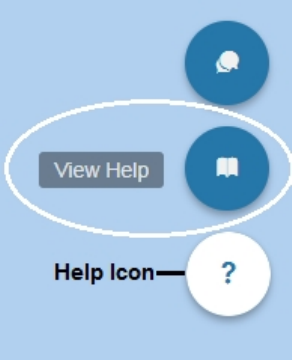
Getting help on the screens
You can use the screen help within Fund Manager to learn more about the
screen and the fields on the screen.
1
Chapter 1
Fund Manager User Guide
To access this, click on the Help icon at the bottom right hand of the screen and
then select View Help.
This opens a panel of help on the screen which helps you with the activity you
are doing on the screen.
2
Configuring your browser for Fund
Manager
We recommend you use Google Chrome whilst using Fund Manager as this is
the highest supported browser. You can, however, use latest versions of Internet
Explorer or Mozilla Firefox.
For configuration, please follow the steps below for the browser you are using.
See Configuring Browsers - found on the Support site
3
Chapter 2
Fund Manager User Guide
4
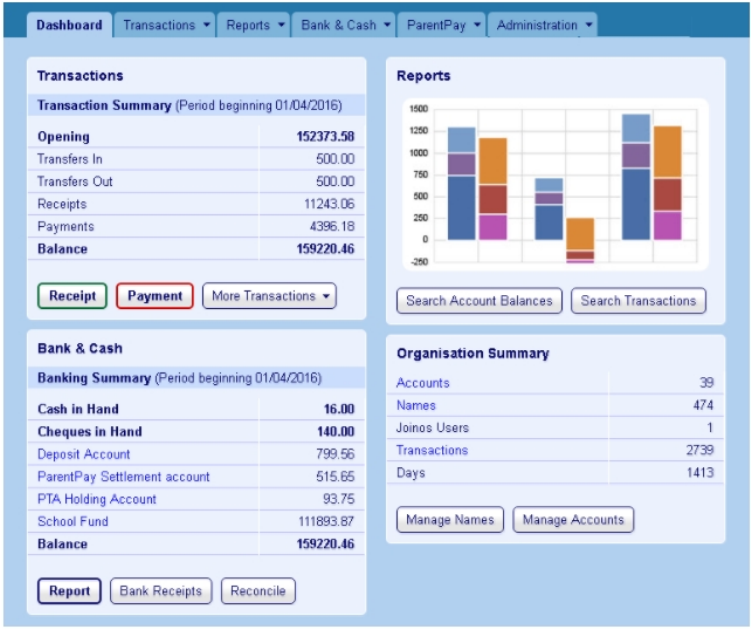
Dashboard
The Dashboard has been designed with a report function, showing a quick
overview of your accounts and as a shortcut to the most frequently used menu
options. You can navigate through the application by using the tabs at the top of
the screen or by clicking on the quick link buttons.
5
Chapter 3
Fund Manager User Guide
Each section has a specific purpose.
lThe Transactions area identifies your Opening Balance as well as
Transfers in and out, Receipts, Payments and the Balance of your
Accounts.
lThe Bank and Cash area identifies your Cash and Cheques in Hand, your
Bank Accounts and their Balances. It also identifies the Financial Period
start date.
lThe Reports area offers you short cuts to Search Account Balances and
Search Transactions.
lThe Organisation Summary displays the number of Accounts, Names,
Transactions and Days in the Financial Period.
lThe Tabs at the top of the screen are the way in which you navigate to the
different areas of the application. Each Tab reveals a list of menu items.
6
Administration
The Administration menu is where you complete setup, started before or during
training. So although it is the last menu on Fund Manager, we will consider what
is on it first.
There are a number of records set up here:
lNames
lAccounts
lBank Accounts
lLedger Codes
In addition this is where you have period end options:
lView Opening Balances
lPerform year end close-down
If you use Joinos, you will also see the following options on the Administration
menu:
lCreate Joinos Codes
lManage Connections
7
Chapter 4


Chapter 4 Administration
Manage Names
You can import pupil Names from your school administration database. The
*MISAPP SIMS only feature is the automatic way to add an up-to-date file of
pupil names with their year and registration group details and import them
quickly into Fund Manager. If you have an integration with Fund Manager e.g.
ParentPay or sQuid then we can import your names within the integration. More
help and information on this can be found by contacting the Support Team.
Note: Pebble Support generally does this for you as part of your initial setup.
Each Pupil has their own entry within Fund Manager so you can register
individual transactions against them. More options are available such as Staff,
Contact details and Groups. Other names, including organisations etc., can be
added as required using the Manage Names/Organisation option.
You will need to refresh your pupil and staff information e.g. at the start of a new
year or term or when pupils move from class to class or year to year. If you use
MISapp or have an integration, pupils will automatically move from class to
class, year to year once you refresh the data. New names for pupils or staff will
appear ready for you to import into Fund Manager - don’t forget to archive old
pupils and staff when they leave school via Administration > Manage Names >
Batch Actions. If you are not using MISapp or a third party integration, you will
need to update names manually, with an imported CSV file.
Note: It is your responsibility to handle personal data in accordance with
GDPR law.
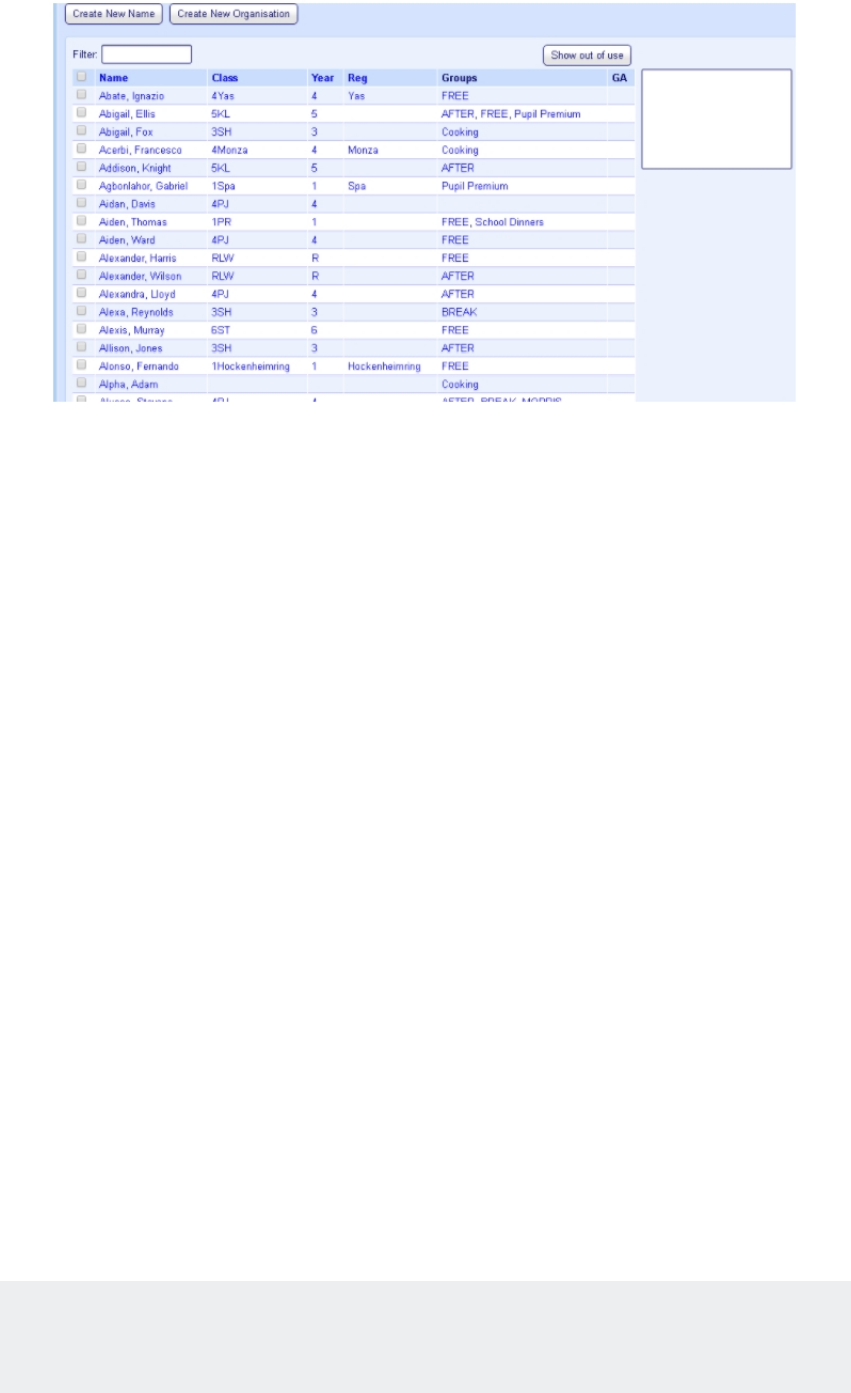
In Administration > Manage Names, use the Filter box at the top of the Manage
Names screen to find quickly the Name/Group/Year/Class etc. you are looking
for.
9
Fund Manager User Guide
Batch Actions
The options in these sections can be applied to more than one name at a time.
Once a name is no longer required you can mark it Out of Use. Select the box
next to the name and then select Out of Use.
You can return a name to ‘in use’ by clicking Show out of use. You will now see
‘out of use’ names; they will appear in grey. Select the name(s) and then select
In Use in Batch Actions. Refresh the page by clicking Administration > Manage
Names for the Name(s) to be returned to ‘In Use’.
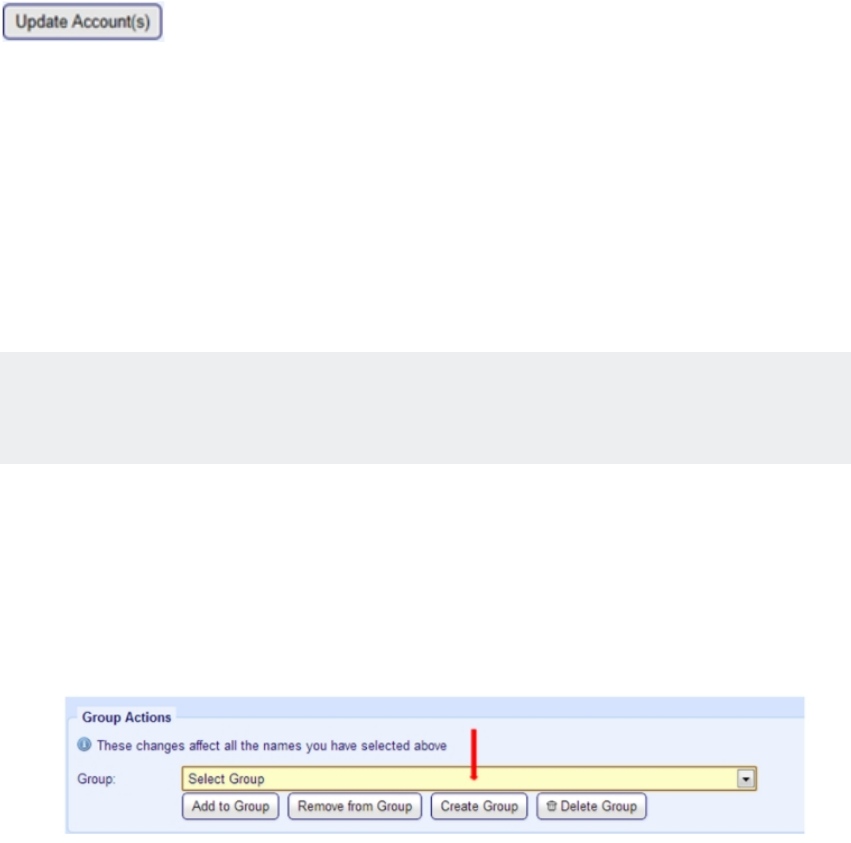
Group Actions
Pupils are already usually imported by Class, Year or Registration group or
create your own pupil group (User Defined) for your Fund Manager names, e.g.
trips, off site, overseas, sixth form, etc. You can also set up groups for different
groups of pupils e.g. universal infant free school meals, pupil premium, etc.
Together with the filter options throughout Fund Manager, groups assist you in
selecting names quickly when you want to assign transactions to the names in
the group or include the names in the group within reports, such as the Who’s
Not Paid report.
Note: Names can be assigned to more than one group, so you can design the
groups to make your workday easier.
10

Chapter 4 Administration
Once you have created the groups you want to use, you assign names to the
groups. This includes the names in the group and you can then apply various
actions to the groups.
lOpen Administration > Manage Names.
Create New Names/Organisations
We would always suggest that you Import your pupil names from your
administration database; this should avoid duplication. The *MISAPP feature is
the automatic way to add an up to date file of pupil names with their year and
registration group details and import them quickly into Fund Manager more help
and information on this can be found by contacting the Support Team.
Names can be added on an ad-hoc basis for pupils, staff and parents. Choose
the entry (Create New Pupil) and enter the correct Title/Name and complete the
fields below with any additional information you require.
lIn Use means that the record is on roll and actively in use.
lGift Aid means that the parent or other adult is a tax payer.
Selecting this flag will mark the pupil for gift aid donation on the Names list
and help you search on Gift Aid donors. However, in order to claim gift aid
and complete the tax refund form for Registered Charities, you must fill in
the gift aid donor details on the pupil details. Once you have created the
pupil record, update the pupil details and select the Gift Aid tab for the
pupil. There, enter the gift aid donor details (Title, First name, Last name,
Address line and Postcode).
11

Fund Manager User Guide
Note: You can copy in the gift aid donor information from the parent /
guardian contact details you have on record. You may need to amend
the copied details if they are incomplete.
Tip: If you update Gift Aid Donor details for a transaction that falls in a
closed period it is automatically included in the next submission.
Note: Don’t forget to archive old pupils and staff when they leave school via
Administration > Manage Names > Batch Actions.
New organisations can be created and only need creating once, using Create
New Organisation. Input the organisation’s name, you do not have to enter any
other details unless you want to. Once you have filled in all the information you
require click Save.
Consolidating pupil names
If you have duplicate pupil names you can consolidate these into one and merge
the associated contact details, transactions and taken items.
1. On the Manage Names screen, click the pupil Name you want to use as
the Primary Record. This opens the pupil Details screen.
2. On the Details screen, select the Consolidate Pupil tab.
3. Select the pupil in the list of names as the Secondary Record which you
want to merge in with the Primary Record.
4. Click Preview Consolidation.
lCheck the details of the consolidation.
These include Receipts, Payments, Transfers, Taken Items, Phone
Numbers, Addresses, Email Addresses, Joinos Codes and sQuid
Cards depending on what information is associated to each contact.
5. If you are sure you are merging the correct records, click Confirm.
12
Chapter 4 Administration
6. Because you can’t retrieve the two separate records once you complete
this process, you must click Consolidate Names at the prompt to confirm
that this is really what you want to do.
After clicking Consolidate Names, receipts, payments, transfers and taken
items transferred from the Secondary Records will now be reported as
belonging to the consolidated Primary Record and the Secondary Record
will be marked Out of Use.
13

Fund Manager User Guide
Manage Accounts
An Account (sometimes known as a cost centre) is equivalent to an individual
column header in a manual ledger. Accounts can be created at any time. There
is no effective limit to the number of Accounts you may have, but each one must
have its own unique Code.
The Account Code is a combination of between 1 and 6 letters and/or numbers.
Once saved, a code and an account name can be edited but can never be
deleted; instead Accounts are taken Out of Use when you have no further need
of them. This prevents them from appearing on the transaction screens. They
may continue to appear on the report screens if they have a balance which is
relevant to the open financial period. The accounts in the group will be reported
individually and with a subtotal.
Note: When accounts are listed in Fund Manager, they are presented in
Account Code order; numbers first and then alphabetically.
To view and edit accounts
1. Open Dashboard (Organisation Summary) > Manage Accounts
OR
Open Administration> Manage Accounts.
2. By clicking on any of the Account names you can then edit the account
14
Chapter 4 Administration
details.
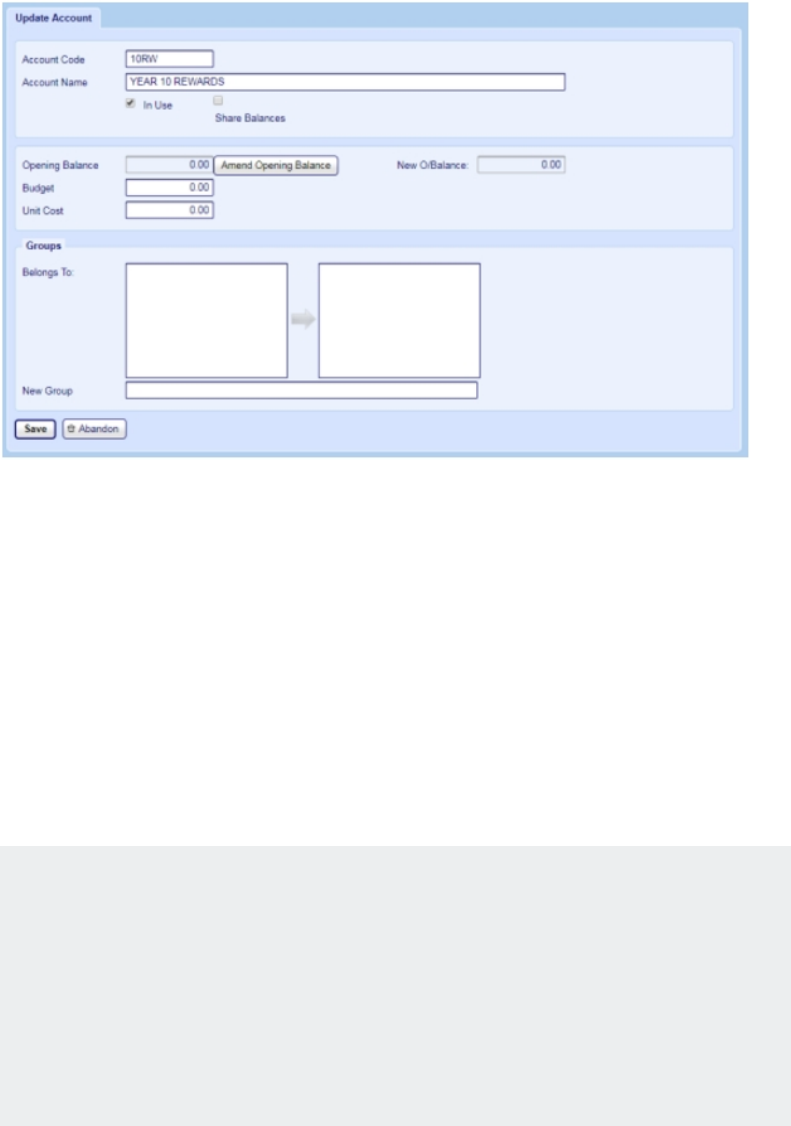
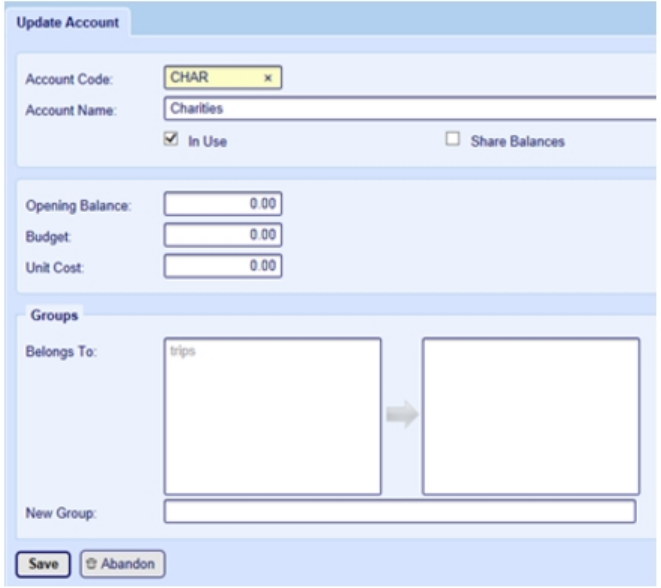
To edit account details
1. The unique Account Code.
2. Enter the Account Name.
3. In Use is selected by default and this means that you can select the
account on the system.
4. Joinos for Parents only: If you want to share the balance through Joinos so
parents can see what’s left to pay on an offer, select Share Balances.
Note: You will need to create the offer as usual within Joinos, using
Joinos > Create Offer, then select the Unspecified check box and enter
the minimum amount you would like parents to pay, complete the offer
with the relevant attachments, add names to the offer and then post to
make it visible to parents. Once a parent has paid the deposit, they will
be able to see what they have left to pay, via the Balances tab in Joinos.
5. Register only: If you want to register pupil attendance and take-up of
meals, using the Register tab within Fund Manager, then select Register
Account.
15

Fund Manager User Guide
1. Select an Exclusion Group for the account.
Note: You must select an Exclusion Group even if you don’t have
any pupils assigned to it.
2. If you have an Android Tablet you have purchased direct from
Pebble, and you want to view and record attendance on this, select
Display on Device.
Note: If you have any other Tablet, you must check with Pebble
Support for its compatibility.
6. If required, you can amend the account Opening Balance (the amount of
money the account owned or owed on the date the account was created)
although we do not recommend this.
For example, if you have discovered that your user accounts and bank
accounts don’t balance, and have identified the reason why you can
increase or decrease the user account opening balance so that the user
accounts and bank accounts balance correctly.
Note: Don’t use this option as a short-cut to entering a transaction on
the system to get your accounts to balance. Entering a transaction -
either anew if you had not entered it before, or as a contra-entry to
cancel a mistaken entry - is the best way to get your accounts to
balance as this provides traceability when you come to audit your
accounts.
Warning! If you amend the user account opening balance so that your
user accounts and bank accounts don’t balance you will not be able to
complete your period end close-down.
If you need to amend the opening balance, click Amend Opening Balance.
To increase or decrease the opening balance:
16

Chapter 4 Administration
1. Select Increase or Decrease.
2. Enter the value by which you want to increase or decrease the
opening balance. For example, to increase by £10, enter 10.00 in the
balance by box; to decrease by £25.30, enter 25.30 in the balance by
box.
3. Click Set Opening Balance Change.
7. Enter a Budget value for the account, if required.
A negative value indicates an expected level of expenditure or loss. A
positive value indicates an expected level of income or profit. This might
be useful for budget holders to know their budget position by simply
looking in Fund Manager for the funds that remain available.
8. If you want to use the report, Who’s not paid, enter a Unit Cost (cost per
pupil head).
Note: If you don’t use a unit cost then the Who’s Not Paid report won’t
generate any details for you to view.
9. If required, select which Groups the account Belongs to by clicking the
group name in the left-hand window. Or if you need to create a new group,
enter the name in the New Group field.
10. Click Save.
Batch Actions
The options in these sections can be applied to more than one account at a time.
Once an account is no longer required for daily use you can mark it Out of Use.
Select the box next to the Account then select Out of Use. If you need to report
on an archived account simply click Show Out of Use.
You will now see archived Accounts – they will appear in grey. To mark an
account in use again, select the box next to the Account then select In Use in the
Batch Actions section, Click the Update Account(s) button for the Account.
17
Fund Manager User Guide
Then click the Hide out of use button again to return.
Group Actions
You can create your own account groups for your Fund Manager accounts, e.g.
trips, off site, overseas, sixth form, etc. Together with the filter options throughout
Fund Manager, groups assist you in selecting accounts quickly within reports.
Note: Accounts can be assigned to more than one group, so you can design
the groups to make your workday easier.
Once you have created the groups you want to use, you assign accounts to the
groups. This includes the accounts in the group and you can then apply various
actions to the groups.
lOpen Administration > Manage Accounts.
To create a new account
To create a new account to pay receipts to and make payments from:
18
Chapter 4 Administration
lClick Administration > Manage Accounts > Create New Account.
19
Fund Manager User Guide
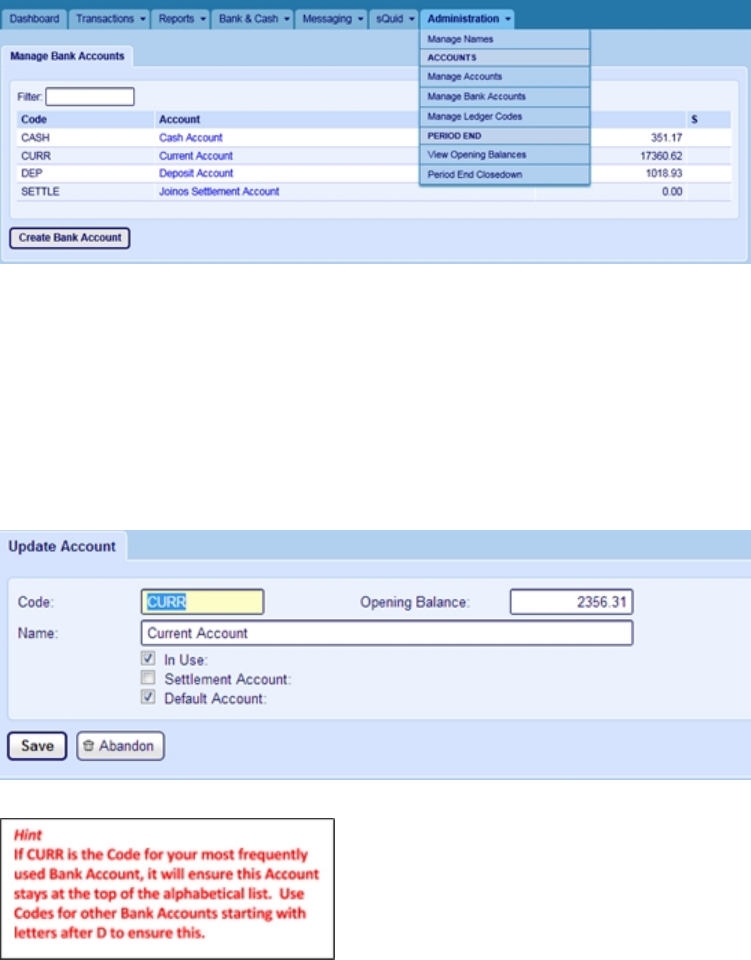
Manage Bank Accounts
A Bank Account can be any account held with a bank that is used for the
purposes of managing your Fund, eg current account, Savings accounts etc.
Many schools operate with a single Bank Account for their School Fund. The
system comes with one such Account already defined. This is called 'Current
Account' but you may edit this Bank Name if you wish. Click the Current Account
Name and then overtype the Name 'Current Account' with whatever you want
your Bank Account to be called.
If you have more than one Bank Account you may create additional accounts by
clicking Create Bank Account. You will need to add a unique Code and Name.
However the name of the Default Account cannot be changed from code CURR
(nor can it be archived). The Name normally includes the name of the bank itself
and the type of account. This information can be edited when necessary.
20
Chapter 4 Administration
You can set an Opening Balance for a Bank Account. This is the value of the
Reconciled Bank Balance at the date on which you are creating the account.
In Use
Bank Accounts can be taken Out of Use when you have no further need of them,
by ticking the box 'Out of Use’ and then saving.
Settlement Account
This is a very particular type of Bank Account that is used for electronic
transactions. If your parents are paying for items by logging into a payment portal
and using Debit and Credit cards, these electronic transactions are handled
using a settlement Bank Account.
Default Account
You can also mark an Account as your Default Account in this screen, i.e. the
Account you use most frequently eg the CURR – Current Account.
21

Fund Manager User Guide
Ledger Codes
The Ledger Codes option is available for providing exports into other finance
packages to allow you to continue providing unified reports (eg VAT reporting),
whilst gaining the benefits of Fund Manager's superior transaction entry. Set up
your ledger codes in Fund Manager to match the Ledger codes in your external
finance package. Then you can assign debit and credit entries to the correct
ledgers to make accounting easier (e.g. grouping all trip transactions etc).
There are two types of Ledger Code:
Ledger Code
This is used to group transactions for a particular purpose.
Bank Ledger Code
This is used to match the bank in Fund Manager to the bank code in an external
financial system.
The codes can be Alphanumeric, up to 20 characters. If you integrate with an
external accounting package for reporting purposes, set up the codes in Fund
Manager that match the same codes in the external system you are integrating
with. This ensures that the transaction appears in the external ledger that you
want it to, making it easy for you to identify and track the transactions or if a bank
ledger code that the transactions are posted to the expected banks in both
systems.
To create a Ledger code
1. Open Administration > Manage Ledger Codes.
2. Click New Ledger Code.
3. Enter the Code and the Name.
22
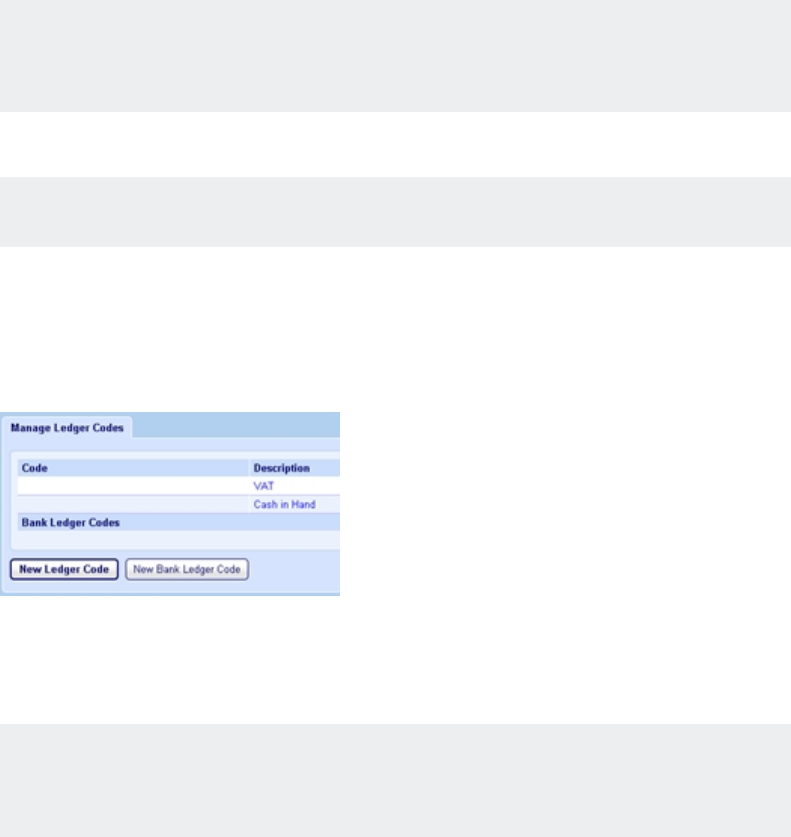
Chapter 4 Administration
Note: The VAT and Cash in Hand ledger codes are set up in Fund
Manager by default and you can’t amend the name of these codes.
4. Select In use if you want to be able to select the code for transactions.
Note: It doesn’t apply to the VAT or Cash in Hand codes.
5. Click Save.
To create a bank ledger code
1. Open Administration > Manage Ledger Codes.
2. Click New Bank Ledger Code.
3. Enter the Code and select the Bank account.
Note: You can only select a bank account that has already been
created using Administration > Manage Bank Accounts.
4. Click Save.
23
Fund Manager User Guide
Period End options
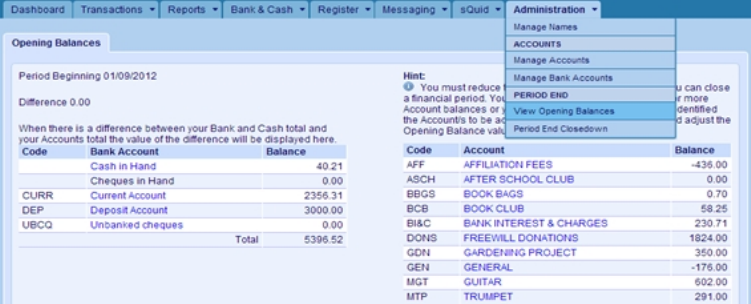
View Opening Balances
The Opening Balances of your accounts and bank accounts are usually entered
by Pebble Support when you first begin using Fund Manager. If you create
additional accounts or bank accounts, you can set up their opening balances
using Administration > Manage Accounts and Administration > Manage Bank
Accounts.
You can see all of your accounts and their balances using Administration > View
Opening Balances. Bank Account opening balances are shown in the left
column while Account opening balances are shown in the right column. The
totals of the two columns should always match. The Difference should always
be 0.00.
These will also be the Opening Balances for the new financial year following a
Period End Close-down. Once the end date for your financial period has passed
you can perform a Period End Closedown in Fund Manager that will draw a line
under your transactions and allow you to produce the necessary reports to
submit to your auditor once you have reconciled all your bank accounts. During
the Period End Closedown, Fund Manager will automatically carry forward your
account closing balances and present them as the opening balances in the next
period.
24

Chapter 4 Administration
Period End Closedown
Note: You do not have to stop entering transactions in your new financial
year. You can close down any time after your year end date.
You will need to close down Fund Manager after period end. When you confirm
all transactions for the period, these become locked and Fund Manager will
automatically carry forward your account closing balances and present them as
the opening balance in the next period.
Closedown is something that many people find difficult. Because of this we have
created a guide to take you through this step-by-step. For more information, see
Period End Closedown Your Financial Year End Guide
25

Fund Manager User Guide
Joinos options
Joinos is Pebble’s platform for helping you and the parents of your pupils
communicate, pay for trips, school activities and meals.
Although there are two options in the Administration menu, both of these options
open the four tabs which enable you to manage the creation and issue of Joinos
codes and letters and the contacts for pupils. These tabs are:
lCreate Joinos Codes.
lJoinos Codes.
lManage Connections.
lJoinos Letters.
There are also Joinos options on the Joinos menu. For more information, see
the section on Joinos in SIMs Software Integrations on page 69.
Create Joinos Codes
You use this screen to select students and staff who are waiting to be registered
on Joinos and create Joinos codes for them.
Joinos codes are used by parents to access Joinos and pay for trips and
activitites for their child.
1. Open Administration > Create Joinos Codes.
2. Select the pupils to generate Joinos codes for.
3. Click Create Joinos Codes.
The codes are displaed on the Joinos Codes tab.
Note: Joinos codes expire if they aren’t used within three months by the
parents/carers to register the child on Joinos. In that case you will need to
issue a new Joinos code. To do this, use the procedure above, but before
selecting pupils to recreate codes for, click Show Registered.
26

Transactions
Transactions represent the flow of money through Fund Manager. These are
either Receipts (money is received) or Payments (money is paid out).
Transactions are processed as follows within Fund Manager.
Activity Where in Fund Manager
Recording transactions Transactions > Enter a Receipt
Transactions > Record a Payment
Recording money received
as paid into the bank Bank & Cash > Pay Receipts to Bank
Reconciling transactions Bank & Cash > Reconcile a Bank Statement
Closing the financial year Administration > Period End Closedown
Some of the processing activities cross into the other menus and those will be
covered in the relevant chapters. This chapter focuses on the options on the
Transactions menu:
lRecording transactions (receipts in and payments out).
lMaking transfers (between accounts or names).
27
Chapter 5

Chapter 5 Transactions
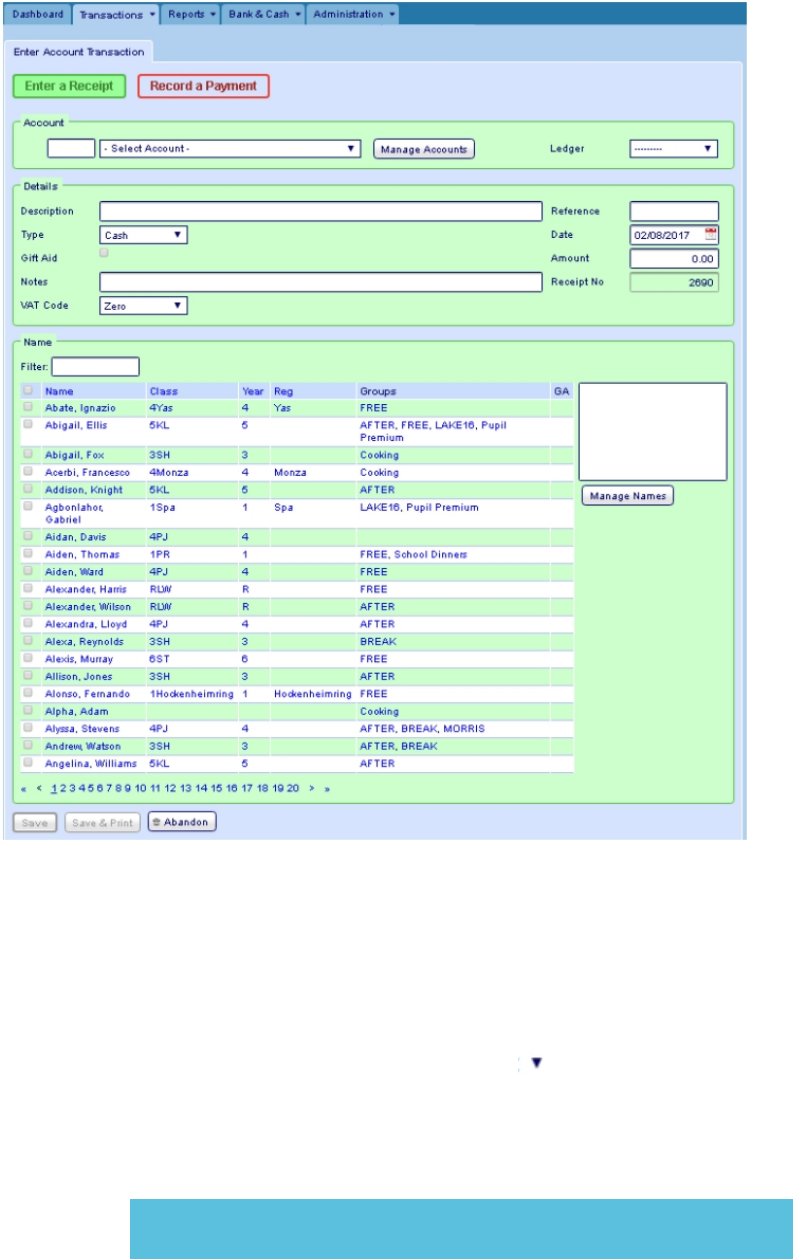
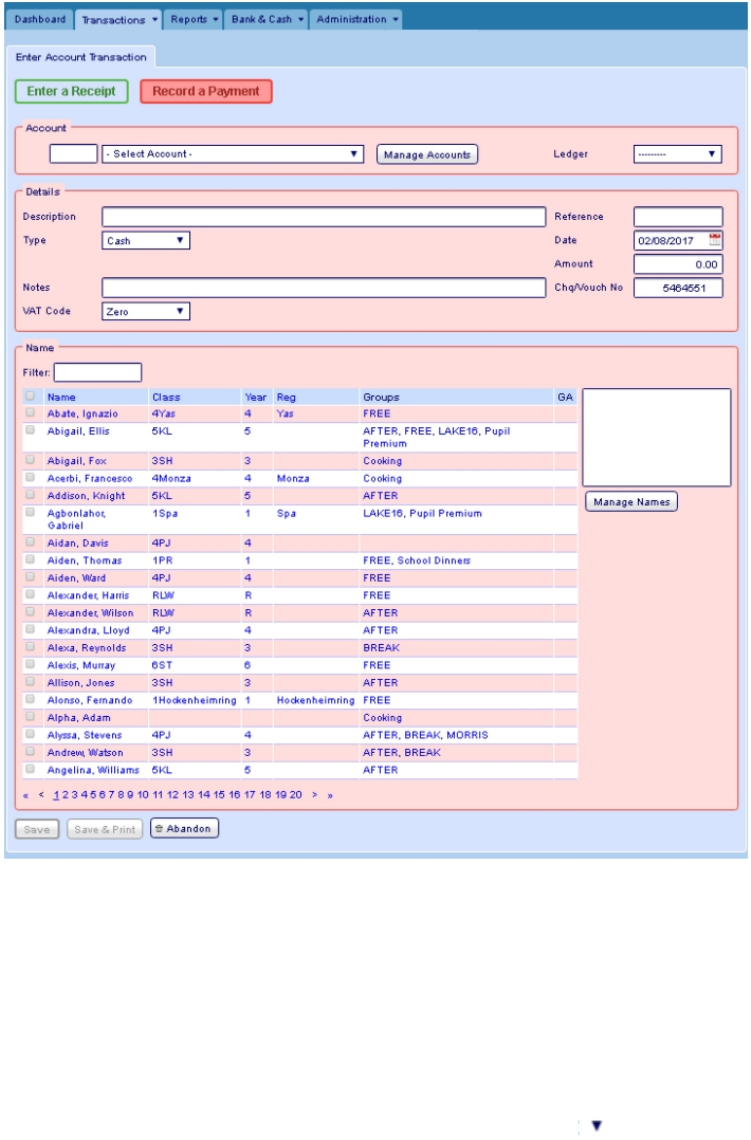
Recording transactions
By default receipts are displayed on a green background and payments on a red
background.
Note: To be able to save receipts and payments you must select an Account,
enter a Description and Amount and select a Name.
29
Fund Manager User Guide
Receipts
Use the field descriptions to help you complete the transaction entry.
Receipt Field Description
Account The account the cash/cheque or credit is being paid into. Click
the arrow on the Select Account box to select the account
from the drop-down list or enter the Account Code to the left of
this.
Tip: When you select an account, the View Transactions
30

Chapter 5 Transactions
Receipt Field Description
tab appears for the account and you can click that to view
all the transactions that have been posted for the account to
date.
Ledger The Ledger code (if required) you want to assign the
transaction to. You can select the code from the drop-down list
of available codes. Ledger codes are set up within
Administration. These codes allow you to continue providing
unified reports (e.g. VAT reporting) when you integrate with
external financial systems. Setting up and assigning the ledger
code which matches the ledger code in your external system
ensures that your transactions will fall in the correct ledger for
reporting.
Manage
Accounts
A short-cut to the Administration > Manage Accounts screen.
Description A description (up to 81 characters) for the receipt. This should
be something which makes it easy to identify, for example
Trip
to Isle of Man
,
Donation from Alumni Joe Bloggs
,
Unreconciled transaction receipt from previous system
, etc.
Tip: If required, enter more information about the receipt in
the Notes box.
Type The type of receipt you are entering. This can be Cash,
Cheque, Direct Credit or ePayment (receipt).
Bank and
Balance
If Type is Direct Credit or ePayment, select the Bank to which
the receipt has been given from the Bank drop-down list. The
balance of the bank account is displayed automatically in the
Balance field once you select the bank account.
31

Fund Manager User Guide
Receipt Field Description
Gift Aid Indicates whether the receipt is eligible for gift aid. Selected
means that it is eligible. Clear indicates it is not.
Note: To be eligible, your organisation must be a charity, or
have charitable status and the person making the payment
must be a UK taxpayer. For more information, see HMRC
requirements for claiming gift aid.
Tip: If you update Gift Aid Donor details for a transaction
that falls in a closed period it is automatically included in
the next submission.
Notes Notes (up to 81 characters)about the receipt. This is an
optional field and can be used in addition to the Description if
more information needs to be recorded.
VAT Code The VAT rate for the transaction. You can select from a
number of pre-defined VAT rates as follows: Zero(0%),
Standard (20%), Reduced (5%), Exempt (0%), Outside scope
(0%), or Custom (which you define yourself).
For guidance on VAT rates, see the HMRC guidance - VAT
rates on different goods and services.
VAT Rate Only applicable if you select Custom for the VAT Code. Enter
the % VAT rate to apply.
Reference A reference you enter which helps you to identify or trace the
receipt.
The reference is optional as you will always be given an
automatically generated Receipt No when you save the
transaction.
32

Chapter 5 Transactions
Receipt Field Description
Tip: This is a useful place to record an invoice number.
Date The date the transaction takes place for VAT purposes.
The transaction date defaults to today’s date but you can
amend this, if required. For example, you can enter the date of
receipt as the date on a cheque, or the date of the direct credit.
Amount The gross amount of the transaction or the individual Amount
to bulk input.
Receipt No The number which is automatically generated within Fund
Manager for the receipt you are entering. You can’t change
this number when you create the receipt, although you can
change it later if you amend the receipt.
Names Pupil and other names i.e. suppliers and/or staff, are displayed
for you to record your receipt against.
Name Filter Enter a character or characters in the name/class/year/group
you want to find and the list of displayed names adjusts
accordingly to show a shorter list to choose the name from.
Note: The filter works by displaying all names which
contain the character or characters you have entered.
Manage
Names
A short-cut to the Administration > Manage Names screen.
33
Fund Manager User Guide
Payments
Use the field descriptions to help you complete the transaction entry.
Payment
Field Description
Account The account the cash/cheque or debit is being paid out of.
Click the arrow on the Select Account box to select the
account from the drop-down list or enter the Account Code to
the left of this.
34

Chapter 5 Transactions
Payment
Field Description
Tip: When you select an account, the View Transactions
tab appears for the account and you can click that to view
all the transactions that have been posted for the account to
date.
Ledger The Ledger code (if required) you want to assign the
transaction to. You can select the code from the drop-down list
of available codes. Ledger codes are set up within
Administration. These codes allow you to continue providing
unified reports (e.g. VAT reporting) when you integrate with
external financial systems. Setting up and assigning the ledger
code which matches the ledger code in your external system
ensures that your transactions will fall in the correct ledger for
reporting.
Manage
Accounts
A short-cut to the Administration > Manage Accounts screen.
Description A description (up to 81 characters) for the receipt. This should
be something which makes it easy to identify, for example
Trip
to Isle of Man
,
Unreconciled transaction receipt from previous
system
, etc.
Tip: If required, enter more information about the receipt in
the Notes box.
Type The type of payment you are recording. This can be Cash,
Cheque, Direct Debit or ePayment (payment).
Bank and
Balance
If Type is Cheque, Direct Debit or ePayment, select the Bank
from which payment has been made from the Bank drop-down
35

Fund Manager User Guide
Payment
Field Description
list. The balance of the bank account is displayed
automatically in the Balance field once you select the bank
account.
Notes Notes (up to 81 characters)about the payment. This is an
optional field and can be used in addition to the Description if
more information needs to be recorded.
VAT Code The VAT rate for the transaction. You can select from a
number of pre-defined VAT rates as follows: Zero(0%),
Standard (20%), Reduced (5%), Exempt (0%), Outside scope
(0%), or Custom (which you define yourself).
For guidance on VAT rates, see the HMRC guidance - VAT
rates on different goods and services.
VAT Rate Only applicable if you select Custom for the VAT Code. Enter
the % VAT rate to apply.
Reference A reference you enter which helps you to identify or trace the
payment.
The reference is optional as you will always be given an
automatically generated Chq/Vouch No when you save the
transaction.
Tip: This is a useful place to record an invoice number.
Date The date the transaction takes place for VAT purposes.
The transaction date defaults to today’s date but you can
amend this, if required. For example, you can enter the date of
payment as the date on a cheque, or the date of the direct
36

Chapter 5 Transactions
Payment
Field Description
debit.
Amount The gross amount of the transaction or the individual Amount
to bulk input.
Chq/Vouch
No
The number which is automatically generated within Fund
Manager for the payment you are entering against a particular
Bank Account or Cash Transaction. You can change this
number when you create the payment and you can change it
later if you amend the payment.
Names Pupil and other names i.e. suppliers and/or staff, are displayed
for you to record your payment against.
Name Filter Enter a character or characters in the name/class/year/group
you want to find and the list of displayed names adjusts
accordingly to show a shorter list to choose the name from.
Note: The filter works by displaying all names which
contain the character or characters you have entered.
Manage
Names
A short-cut to the Administration > Manage Names screen.
Splitting receipts and payments
You can split a receipt or payment across any number of accounts and a receipt
across any number of names. This is useful, for example, if you have received
money from a parent for two children at the same school who are going on
different trips.
When you click Save on the transaction, if the transaction Type is Cheque or
Direct Credit for Receipts or Cheque or Direct Debit for Payments, then a yellow
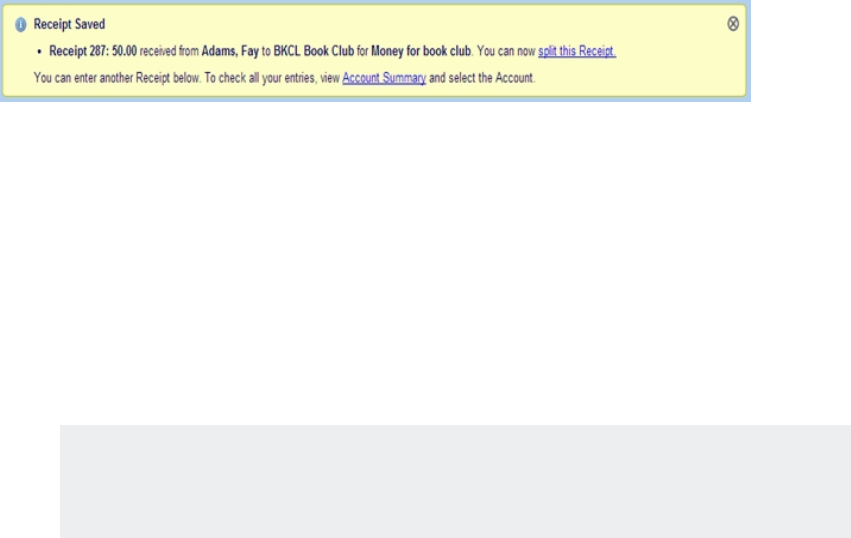
bar appears at the top of the window. For example:
37
Fund Manager User Guide
1. Click split this Receipt or split this Payment.
2. Select the Account over which the Amount is being split.
3. If a Receipt, select the Name the Amount is to be recorded against.
4. Enter the Amount you want to split from the original Receipt or Payment.
5. Click Split Receipt or Split Payment - to split further if required.
6. Continue splitting until the Balance is shown as Zero.
Note: You must always Split Receipt or Split Payment before you click
Finished.
7. Click Finished to complete the split.
38
Chapter 5 Transactions
Making transfers
You can transfer amounts between accounts or between names.
Between accounts
The most common transfer is between accounts without reference to names. For
example, if you have a general or miscellaneous account, you might want to
transfer underspend from a visit or trip to this account.
1. Open Transactions > Transfer Between User Accounts.
2. Select the Transfer From account.
3. Select the Transfer To account.
4. Enter the Amount that you want to transfer.
5. Enter the Date of the transfer.
6. Enter the reason for the transfer in the Notes field.
7. Click Transfer.
Transferring a negative balance
You can only transfer positive balances, so if you want to transfer the negative
amount in one account to another, do it the other way around, as follows:.
1. Select the account you want to transfer the negative balance to in the
Transfer From field.
2. Select the account you want to transfer the negative amount from, in the
Transfer To field.
3. Enter the amount you want to transfer as a positive amount.
Between names
Transfer between accounts and/or two different names.
1. Open Transactions > Transfer Between Names.
2. Select the Account From.
3. Select the Name From.
4. Select the Account To.
39
Fund Manager User Guide
5. Select the Name To.
6. Enter the Amount that you want to transfer.
7. Enter the Date of the transfer.
8. Enter the reason for the transfer in the Notes field.
9. Click Transfer.
40

Chapter 5 Transactions
Cancelling and amending transactions
You can’t amend transactions using Transactions > Amend Receipt or Payment
Transaction or cancel transactions using Transactions > Cancel Receipt or
Payment Transaction if the transactions have been:
lIncluded in a VAT 100 Report
lIncluded in a reconciled or part-reconciled statement
lLeft unreconciled from a previous closed period
If you need to cancel a transaction that falls in one of these categories, you can
do this by entering a contra-entry transaction which has the effect of cancelling
the original transaction. You can then net these transactions off your next
reconciliation.
Note: If you are cancelling, do not cancel the original cheque receipt or alter
the original paying-in slip.
1. Select the relevant Receipts or Payments.
2. Click Continue.
3. Type in a Reason for Cancellation.
4. Click Cancel Transactions.
Importing transactions
You can import transactions from CSV files using Transactions > Import
Transactions.
This is a manual way of bringing in transactions and particularly useful if you
use Fund Manager alongside SchoolComms, SchoolMoney or ParentMail.
Create the CSV file from within those programs and then import it into Fund
Manager, using Transactions > Import Transactions.
Note: It is your responsibility to handle personal data in accordance with
GDPR law.
41


Reports
Reports provide a useful way of tracking what is happening in your accounts
throughout the year. They are also essential at Year End when you need to
submit the accounts for the year to your auditors. All of reports you need to
produce for the auditors are described in the Fund Manager Year End Guide.
Below is a summary of the reports accessible from the Reports menu.
Note: There are also some reports available from the Bank & Cash menu.
Tip: Remember you can get more help on anything you read in this chapter
by checking the help on the Fund Manager screens. For more information,
see How to access Fund Manager.
Accounts Summary
This lists the current balance of all your accounts. You can click any of the
account Codes to view transactions associated with that individual account. You
can also Include Transfers and Include Out of Use accounts in the report.
There is also a quick link to the Search Account Balances report at the bottom
as well as the option to Print or Export CSV so you can open the report in Excel.
43
Chapter 6

Fund Manager User Guide
Note: The account balance amount you see in Accounts Summary may be
different from that in Search Transactions. In the Accounts Summary report,
transfer values are excluded by default although you can choose to include
these when you run the report. If you include them, the values are added to
the receipts and payments totals.
Search Transactions
This is the screen on which you can see all the details you added when entering
your transactions, including Description, Notes and Reference. The total of all
the displayed transactions in the summary bar is labelled Total. However this is
the total of the transactions in the filtered list and is not a balance. There are no
balances on the Search Transactions report because it is a list of transactions
within an Account. You can find the Account details in either Account Summary
or Search Account Balances.
If you want to see all transactions in your system, make no changes to the fields
that are presented and click on the Search button.
If you want to see a filtered list, use the filter fields to select a single account or a
group of accounts. If you select a single account, the Search Transactions report
will display the same values and balances as the Accounts Summary report,
however here the transfer values are included by default. On the Search
Transactions report transfer values are specifically identified as transfers and
are not added to the receipts and payments totals.
The Search Transactions report is particularly useful for finding and viewing
different types of transactions, for example, transactions which have VAT
included or those which you have imported using Transactions > Import
Transactions.
To filter by Aggregated Name, just filter for ‘By Name’ in the Aggregate Box.
There is the option to Print or Export CSV at the bottom of the screen. If you
choose Export CSV you can open the report in Excel.
44

Chapter 6 Reports
Note: It is your responsibility to handle personal data in accordance with
GDPR law.
The account balance amount you see in Search Transactions may be different
from the Accounts Summary report as this report only displays the receipts in,
payments out and balances of such from your current financial year. In the
Accounts Summary report , transfer values are excluded by default although you
can choose to include these when you run the report. If you include them, the
values are added to the receipts and payments totals. In the Search
Transactions report, transfer values are included by default but are not added to
the receipts and payments totals as they are specifically identified as transfers.
Search Account Balances
This report is comprehensive and allows you the greatest flexibility in searching
your accounts. It is often used to determine which accounts are to be closed and
which are to be retained with their balance into the next financial period.
Note: When you come to do your year end, if you have outstanding balances
in out-of-use accounts, you may transfer these balances to an account which
is in use, preferably a year end closing account, so it will be easier for you to
identify this pot of money. If you don’t want to do this then you must select
Include Out of Use on the report so that your overall year end figures will
show your true balance for the year. If you are unsure what to do with
balances at year end then we would recommend that you seek audit advice
from whomever audits your accounts. You should also select Include
Transfers to show internal movement of funds.
There is the option to Print or Export CSV at the bottom of the screen. If you
choose Export CSV you can open the report in Excel.
45

Fund Manager User Guide
Lists
List Receipts by Receipt Number
Use this report on the Reports menu to list all receipt transactions within the
current financial period and to reprint receipts that have already been entered if
required.
You can use the filter fields to include or exclude transaction types, or shorten
the list of receipts by changing the From and To receipt number range.
There is the option to Print or Reprint Receipts at the bottom of the screen. Fund
Manager will print these receipts on A4 paper or on a receipt printer if you have
one.
List Payments By Cheque/Voucher Number
Use this report on the Reports menu to list payment transactions within the
current financial period and to reprint payments that have already been entered.
You can use the filter fields to include or exclude cheque or cash transactions or
shorten the list of payments by changing the From and To cheque or cash
number range.
There is the option to Print at the bottom of the screen.
Note: If more than one payment is shown then this option will print the results
as a table which does not have individual signature boxes. If you want
signature boxes for payments then you will need to print each payment
individually.
List All Transfers
Use this report to view transfer transactions that have been made either between
accounts (List Account Transfers) or between names (List Transfers Between
Names).
46

Chapter 6 Reports
You can define the start and end dates for the report in order to shorten the list of
transactions.
There is the option to Print or Export CSV at the bottom of the screen. If you
choose Export CSV you can open the report in Excel.
Note: It is your responsibility to handle personal data in accordance with
GDPR law.
Cancellations
List of Cancellations
Use this to see a list of cancelled transactions between two dates. You can filter
the list for names or groups.
There is the option to Print or Export CSV at the bottom of the screen. If you
choose Export CSV you can open the report in Excel.
Note: It is your responsibility to handle personal data in accordance with
GDPR law.
Special Reports
Who’s Not Paid
Use this report to see a list of who’s not paid in a year, class or group between
two dates.
If you want to show who has paid along with who has not then select Show Paid
Balances.
There is the option to Print or Export CSV at the bottom of the screen. If you
choose Export CSV you can open the report in Excel.
Note: It is your responsibility to handle personal data in accordance with
GDPR law.
47

Fund Manager User Guide
Tip: The report will not generate any results unless you have defined a Unit
Cost for the account so if the account you require is not in the list, go to
Administration > Manage Accounts to enter a Unit Cost for the account.
Journal Reports
Use this report to produce a list of journals between the start and end date for the
report, in the ledger and bank or cash account.
Note: You must have defined ledger and bank ledger codes in order to run
this report.
Gift Aid
You can create reports for Gift Aid transactions that meet the specifications for
HMRC’s online submissions.
Note: HMRC limits submissions to 1000 transactions. If your period under
submission has more than 1000 transactions, then prepare two or more
reports for submission to HMRC.
In order for a transaction to be included in your Gift Aid claim, you must:
1. Set the Gift Aid
flag
lTransactions > Enter a Receipt.
2. Add Gift Aid
donor details
1. Administration > Manage Names > Update Pupil
Details.
lOptionally, select Gift Aid Donor flag if you
want to see the pupil is assigned a G in the
GA column on the Manage Names List.
Note: You don't have to select this flag for
gift aid to work but it will make it visible on
48

Chapter 6 Reports
the Names list that the pupil has been
marked for gift aid donation.
2. Select the Gift Aid tab and enter the gift aid donor
Title, First name, Last name, Address line and
Postcode.
3.
Note: You can copy in the gift aid donor
information from the parent / guardian contact
details you have on record. You may need to
amend the copied details if they are incomplete.
Click Save.
New Claim for Donations
Use this to generate a new Gift Aid claim report.
Enter the date you want to claim Gift Aid donations up to and click Preview
Donations. This lets you view all transactions from eligible Gift Aid donors within
the donation period.
Only transactions from pupils with a designated Gift Aid donor will appear in this
report.
Note: If Gift Aid donors exist with incomplete information, you won't be able to
claim gift aid for them. You can see which donors are missing information as
these are greyed out in the report.
To manage Gift Aid status and donors, click the Manage Names link. Click the
pupil’s name to bring up the Update Pupil screen and then select the Gift Aid tab
to enter the gift aid donor information.
There is the option to Print, Export CSV or Close Donation Period at the bottom
of the screen.
49

Fund Manager User Guide
lIf you choose Export CSV you can open the report in Excel.
Tip: First open Excel and then go to File > Open and select the
downloaded file. An issue with HMRC's file format prevents opening by
double-clicking on the downloaded file.
lIf you Close Donation Period, this finalises your submission and archives it
to your Claim History.
Note: It is your responsibility to handle personal data in accordance with
GDPR law.
Claim History
Use this to view previously submitted Gift Aid claims.
Click on the End Date link to view an archived report for the claim period in
question.
There is the option to Print or Export CSV at the bottom of the screen.
lIf you choose Export CSV you can open the report in Excel.
Tip: First open Excel and then go to File > Open and select the
downloaded file. An issue with HMRC's file format prevents opening by
double-clicking on the downloaded file.
Note: It is your responsibility to handle personal data in accordance with
GDPR law.
Backdated Gift Aid Claims
You can backdate eligible transactions that haven’t been included within a
donation period that is now closed.
If you update the Gift Aid Donor details for a transaction that falls within a closed
period it will be automatically included within your next submission.
50

Chapter 6 Reports
51
Fund Manager User Guide
52

Bank & Cash
The Bank & Cash menu contains options that are specific to your bank accounts
and cash handling.
The first options on this menu are reports, including the Bank & Cash Summary
report that opens and displays when you click the Bank & Cash tab.
Tip: Remember you can get more help on anything you read in this chapter
by checking the help on the Fund Manager screens. For more information,
see How to access Fund Manager.
Reports
Bank & Cash Summary
This shows your balance position for all your bank accounts, cash and cheques
in hand.
You have the option to Print or Export CSV at the bottom of the screen. If you
choose Export CSV you can open the report in Excel.
53
Chapter 7
Fund Manager User Guide
Bank History
Use this report on the Bank & Cash menu to see the debits and credits
associated with the bank account displayed. This report is used during
preparation for period end close-down in viewing unreconciled transactions. It’s
also useful if you need to reprint paying-in slips.
You can choose to filter the list by date, transaction type or
reconciled/unreconciled.
You have the option to Print or Export CSV at the bottom of the screen. If you
choose Export CSV you can open the report in Excel.
Cash History
This report shows the debits and credits associated with the cash in hand
account.
Leave the dates blank to look at the current financial year, or narrow your
selection by entering the dates to view.
You have the option to Print or Export CSV at the bottom of the screen. If you
choose Export CSV you can open the report in Excel.
List Reconciled Bank Accounts
Use this to view bank statements that have been reconciled.
Find the statement you want to view and click on the End Date to open the
statement and reveal the details.
Banking Actions
Pay Receipts to Bank
When you enter receipt transactions on Fund Manager you also need to record
the money (cash and cheques) which you are paying in to the bank. This will
allow you to reconcile your bank statement correctly when it arrives from the
bank.
54

Chapter 7 Bank & Cash
You can pay in all the cheques by selecting the box next to the Date column or
to pay in specific cheques, select the check box for those cheques.
When you select a cheque, its details are added to the items selected box on the
right of the screen. This is useful especially if you are selecting items on multiple
pages as you can see the list of all the items selected in one place. If you are
importing cash and cheque transactions from a payment platform then these
transactions will appear on this page just as if you had entered them in
Transactions r> Enter a Receipt.
Note: If you are drawing a cheque for cash, this isn’t included in the list of
cheques in hand. Use Draw Cheque for Cash for this.
Enter the Amount to Pay in and select the Bank Account to pay the money into.
The Paying-in Slip Number and Date are displayed automatically but you can
amend this if required.
Note: If Fund Manager won’t accept your paying-in slip number, it might be
because you are using a duplicate paying-in slip number. For information on
resolving this, see the support article How do I deal with a duplicated
cheque?
Click Pay In Receipts to Bank to complete the process.
Draw Cheque for Cash
Use this when you want to record cheques that you want to cash. This enables
you to retain cash as petty cash.
Enter all the relevant details:
1. Bank account the cheque is to be raised from.
2. The full value of the cheque.
3. The Cheque Number (this should match the actual cheque number you
are taking to be cashed).
55

Fund Manager User Guide
4. The relevant date.
5. Click Draw Cheque.
Note: You can’t cancel drawing a cheque for cash. If you make an error, pay
the cash into the bank, using Pay Receipts to Bank. Enter the amount of cash
and the relevant paying-in slip details and click Pay Receipts to Bank.
Reconcile a Bank Statement
This option on the Bank & Cash menu opens the Reconcile Bank Account
screen but you can also select the Reconcile Settlement Account tab if you want
to reconcile the settlement bank account.
Reconciliation is the means by which you and the bank agree that the
transactions recorded on each bank account are matched in Fund Manager. You
can’t reconcile transactions until you receive the bank statement.
Note: Some Fund Manager transactions may not appear on your bank
statement for some time.
1. To reconcile a bank statement, on the Reconcile Bank Account screen,
choose the bank account you want to reconcile.
2. Enter the first and last page, the end date and closing balance on the
statement you are reconciling.
Note: The Opening Balance on the List Unreconciled Bank Entries
Report should always match the figure on the last bank statement you
reconciled.
3. Select the transactions form the list of entries to reconcile that match the
entries on your bank statement.
Note: You can only reconcile transactions that lie inside your start and
end dates.
4. Click Reconcile.
56

Chapter 7 Bank & Cash
When reconciliation is complete, you can print the report from the bottom of the
screen.
Tip: You can leave a reconciliation part-way through but until you complete it
or abandon it you won’t be able to reconcile another account.
Transfers
Transfer between Bank Accounts
Use this option to let Fund Manager know that you have transferred money from
one bank account to another bank account without issuing a cheque or using
cash, and so on.
Cancellations
Cancel/Amend Bank Transaction
Use this option to cancel or amend bank transactions (cashed cheques, paying-
in slips and bank transfers) that have not been reconciled.
Taking the paying-in slip as an example:
lTo amend a paying-in slip:
1. Look for the relevant slip number in the Reference fields.
2. Click the slip number to open the slip
3. Make the necessary amendments .
4. Click Amend Paying in Slip.
Note: Please ensure that the paying-in slip number is re-entered
as Fund Manager will automatically choose the next one.
lTo cancel a paying-in slip:
1. Look for the relevant slip number in the Reference fields.
2. Click the radio button in the first column for the relevant Slip Number.
57

Fund Manager User Guide
3. Click the Cancel button at the bottom.
4. Confirm that this is the correct slip and click Cancel Transaction.
Note: Reconciled items and items that are part of an incomplete bank
reconciliation and have been selected in that are not included in the list for
you to cancel or amend.
Unreconcile a Bank Statement
If you need to cancel a bank transaction that was included in a statement that
has been reconciled, then you must unreconcile the bank statement first from the
Bank & Cash menu.
Unreconcile a Bank Statement returns all the items that have been previously
reconciled back to the list of items to be reconciled.
1. Select the statement you would like to unreconcile.
2. Click Unreconcile.
Note: Unreconciling a statement will cause all subsequent reconciliations to
be automatically unreconciled. So if in June you unreconcile a statement from
April, then statements from May and June will also be unreconciled.
List Cancelled Bank Transactions
Use this screen to view bank transactions that have been cancelled.
You can change the display sequence of the transactions, by clicking the
hyperlinked column name to re-order the display of the entries. For example,
clicking on Date will order the display in ascending or descending order.
Clicking on Amount will order by the amount.
VAT
There are two reports to help you with the reports you submit to HMRC for VAT.
58
Chapter 7 Bank & Cash
Tip: Set up a separate VAT user account to keep track of any VAT refunded
to you by HMRC and directly credit any VAT refunds to this account. Don’t
transfer refunded VAT amounts into individual accounts because this will
affect the figures provided by the Include VAT check box on the Search
Account Balances report.
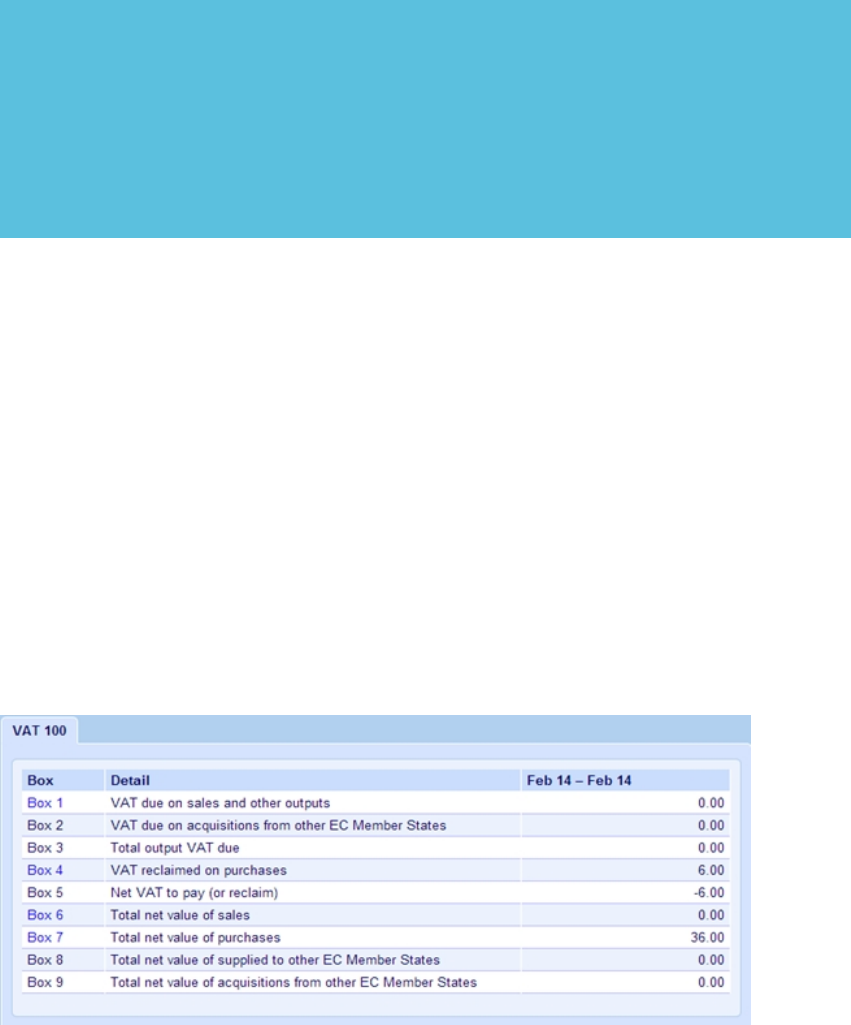
Generate VAT 100
This report displays all the relevant fields for your HMRC return.
Set an end date for the report; this is likely to be the end of your VAT reporting
period. Fund Manager will total up all VAT transactions since the last report,
including any that weren’t included on a previous VAT 100 report.
The VAT 100 report displays the nine boxes that you are required to fill when
completing the HMRC VAT Return. The boxes that appear in blue can be
clicked to get a breakdown of evidence for that box, should the Inland Revenue
ask for it.
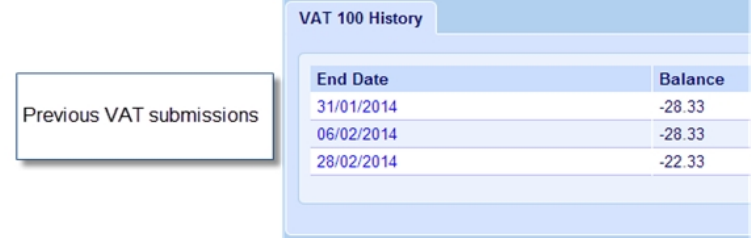
Previous VAT 100 Submissions
You can view previous VAT 100 reports, by selecting them from a list. The
display is the same as before.
59
Fund Manager User Guide
60

Register
Note: This menu only appears if you have requested it and Pebble has
activated it for you. If you would like to make use of this please contact us and
let us know.
This menu allows you to record attendance for various items taken at school e.g.
meals, clubs, events.
You can record attendance using a Tablet device you have purchased from
Pebble, via the Register App. If you haven’t purchased your Tablet from Pebble,
contact us to see if your device is compatible with the Register App.
Money received for a Register account is entered as a receipt and then
attendance or take-up recorded on the Register tab. You can then run various
reports from the Register tab on taken items. This also debits pupils’ money
previously credited to the Register Account.
Tip: Remember you can get more help on anything you read in this chapter
by checking the help on the Fund Manager screens. For more information,
see How to access Fund Manager.
61
Chapter 8
Fund Manager User Guide
Prerequisites
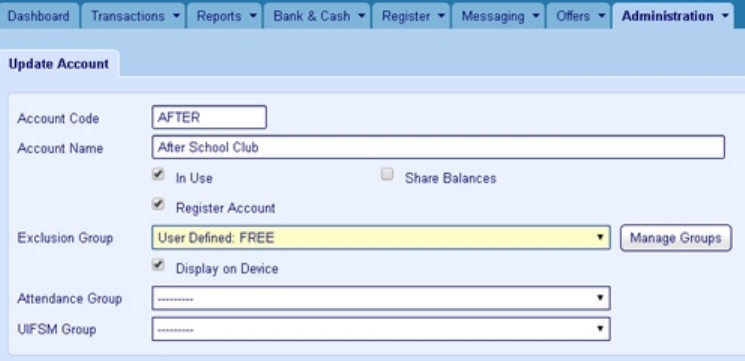
To use the Register menu, you must ensure that the account you want to record
attendance against has been set up in the following way:
lThe Register Account check box must be selected for the account through
Administration > Manage Accounts.
lYou must have defined an Exclusion Group even if it has no pupils in it.
This is a group that would not be expected to pay for the item you are
recording as taken in the Register menu. Pupils can be added to this group
through Administration > Manage Names.
lDisplay on Device should be selected if you record attendance on a
Tablet. You may need to speak to us if you haven’t purchased your Tablet
direct from us so see if it is compatible with the Register App.
lAttendance Group and UISFM Group boxes are for recording pupil meals
and Universal Free School Meals.
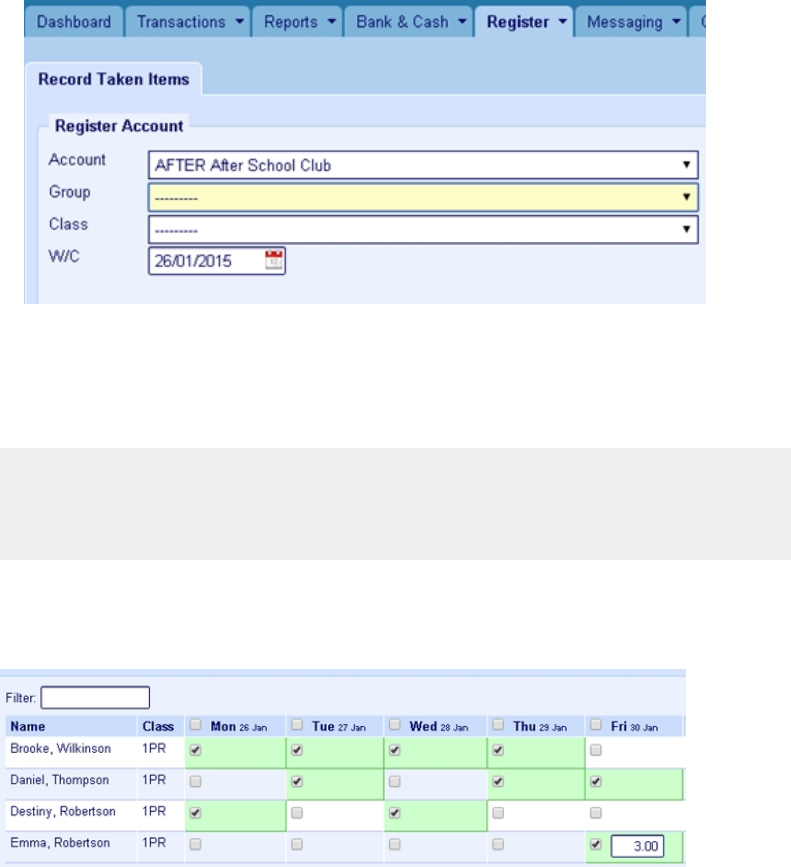
Record Taken Items
Use this option to mark attendance or items taken for a pupil.
62
Chapter 8 Register
1. Select the Account.
2. Select the Group and or Class if applicable..
Note: Don’t select either of these if you want to produce a report for the
whole school.
3. Choose the W/C (week commencing) date.
4. Click Search to display a report for you to select taken items.
5. Select the boxes of the pupils you want to record attendance against.
6. If any amount differs from the Unit Cost for the item, click and enter the
different amount in the Amount box. The pupil will then be charged the
altered amount.
Entries are automatically saved as you enter them. If you need to make further
changes, just overtype.
Reports
A number of reports help you to see what items have been taken, what each
pupil has taken and a statement of receipts and balances for pupils.
63

Fund Manager User Guide
Taken Items
This report shows you which item (Account) has been recorded as taken weekly.
If applicable you can filter the report by Group and Class.
P - The pupil has Paid for that Item F - The pupil is receiving that Item for Free
You can see the Balance of each Pupil’s Receipts to that Account, the Record of
Recorded Items for the Week and the Final Balance each Pupil has remaining
from Receipts entered through Fund Manager for that Account.
Note: Pupils assigned to a Universal Infant Free School Meals group will
show taken items as “U” (UIFSM). Pupils assigned to a Free School Meals
group will show taken items as “F” (Free). Pupils assigned to neither group
will show taken items as “P” (Paid).
Name Summary
Use this report to see individual pupil balances.
1. Select the Account, Group and Dates to display the pupils you are
interested in.
2. Click Search.
64
Chapter 8 Register
The Name Summary report is produced.
Note: The Receipts, Payments, Balance and Final Balance columns are the
sum the amount (£) for each pupil; the Paid, Free and UIFSM columns are a
count of the number of meals taken.
There is the option to Print or Export CSV at the bottom of the screen. If you
choose Export CSV you can open the report in Excel.
It is your responsibility to handle personal data in accordance with GDPR law.
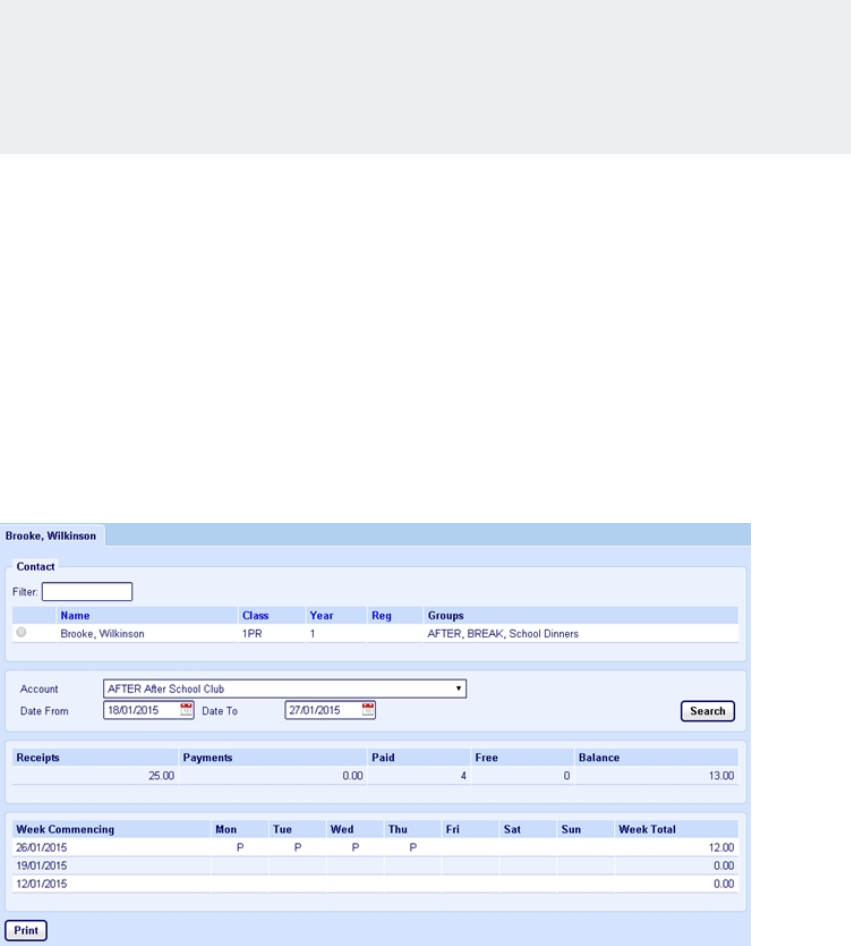
Statement
To see a pupil’s statement, use this report.
Select the Contact, the Account, the Date From the Date To then click Search.
You can see the pupil’s Receipts, Payments, Paid taken items, Free taken items
and Balance (the difference remaining between Receipts and Payments and the
Paid taken Items).
65
Fund Manager User Guide
Special
Universal Infant Free School Meals
From September 2014, all pupils in reception, year 1 and year 2 in state-funded
schools in England became eligible for free school meals (UIFSMs).
Use this report to see the total meals taken, the total number of free meals and
the total number of Universal Free School Meals. In order to see anything on this
report you need to set up and record items taken in the following way.
How to set up and record universal infant free school meals
There are a number of steps to this:
1. Create a UIFSM group and add eligible pupils.
1. Open Administration > Manage Names and click Create Group in the
Group Actions section.
2. Enter a name for the group e.g. UIFSM.
3. Select User Defined as the Group Type.
4. Click Add Group.
2. Add pupils to this group.
1. Open Administration > Manage Names and select the group you
created in step 1 from the Group drop-down in the Group Actions
section.
2. Select the pupil names you want to add to the group by selecting the
checkbox next to the pupil’s name.
3. In the Group Actions section, click Add to Group.
3. Assign the UIFSM group to your Register Account.
1. Open Administration > Manage Accounts.
2. Locate the Register Account in the list of accounts and click the
Account name to open the Update Account screen.
66
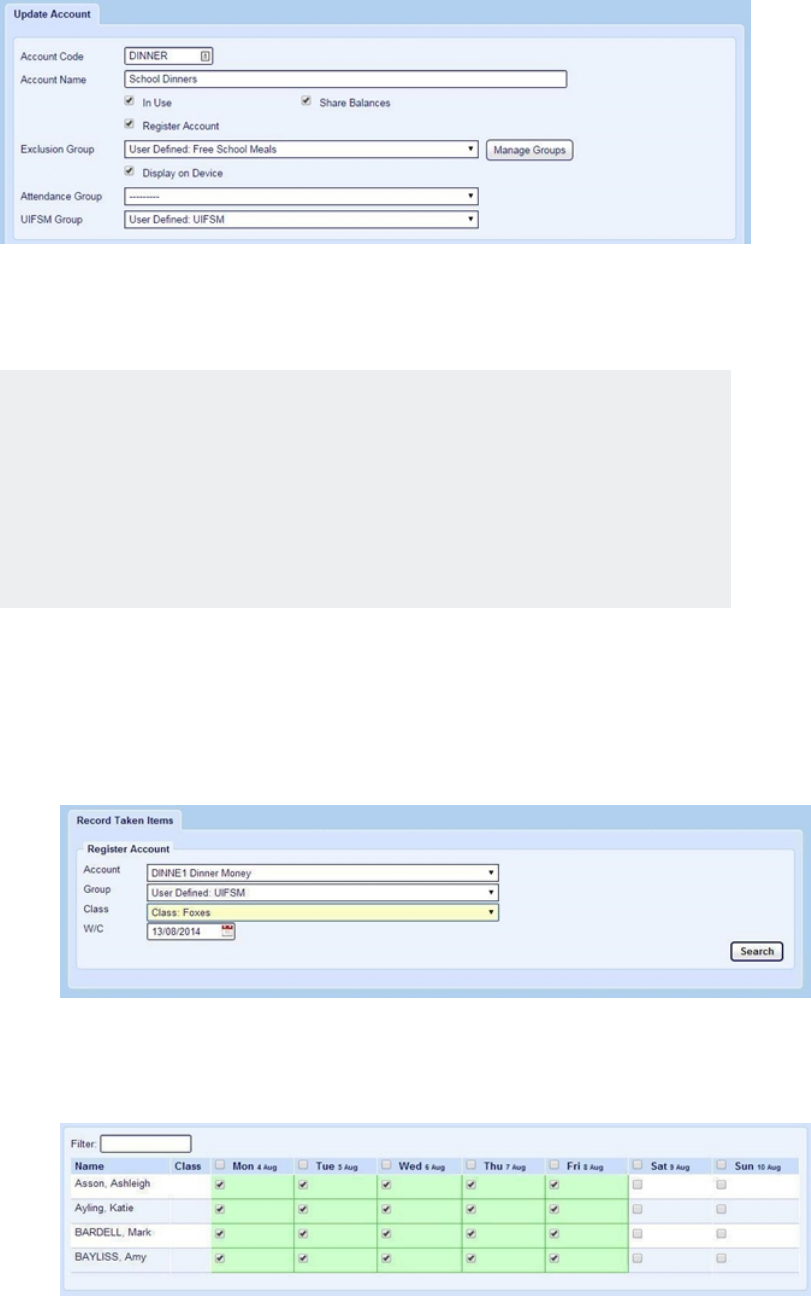
Chapter 8 Register
3. Select the UIFSM Group that you have created in step 1 from the
UIFSM Group drop-down.
Note: Free School Meals take precedence over Universal Infant
Free School Meals. If you have pupils who are eligible for Free
School Meals, you need to ensure those pupils are added to the
Free School Meals group and that the Free School Meals group is
selected from the Exclusion Group drop-down.
4. Record UIFSM taken items.
1. Open Register > Record Taken Items
2. Select the Account, Group, Class and Week Commencing Date
that you want to record the items for and click Search.
3. In the list of pupils that is displayed, select the checkbox next to
each pupil for the days you want to record taken items for.
67

Fund Manager User Guide
Account Summary
Use this report to see statements for the user accounts.
Select the Account and the Date From/To and click Search.
A summary is given of the number of Groups assigned to the account, the
amount in Receipts and in Payments as well as the Balance for the account, the
number of items which were Paid, Free, UIFSM and in Total.
There is the option to Print or Export CSV at the bottom of the screen. If you
choose Export CSV you can open the report in Excel.
Upload Register File
Use this option to upload a CSV file of taken items for a school, where the
automatic process hasn’t worked.
Note: It is your responsibility to handle personal data in accordance with
GDPR law.
68

SIMs Software Integrations
You can use Joinos - Pebble’s platform for helping you and the parents of your
pupils communicate, pay for trips, school activities and meals or you can use
ParentPay or sQuid - third party online e-payment SIMs which do the same.
Each of these has a separate menu as outlined below.
You can also integrate with ParentMail, SchoolComms and SchoolMoney but
these integrations do not have a separate menu in Fund Manager. If you are
integrating with these platforms, you need to export a CSV file of the information
from the platform and then import it into Fund Manager, using the Transactions
> Import Transactions option.
Note: It is your responsibility to handle personal data in accordance with
GDPR law.
Tip: Remember you can get more help on anything you read in this chapter
by checking the help on the Fund Manager screens. For more information,
see How to access Fund Manager.
69
Chapter 9

Fund Manager User Guide
Joinos
If you use Joinos there are also Joinos options available on the Administration
menu (see Administration on page 7).
There are two ways of creating offers at present; one is available to all while one
is being beta tested currently.
Create Offer v2
1. Select the Account the Offer is associated with.
2. Select a VAT Code (the default is zero).
3. Choose a Ledger, if applicable.
4. Choose the Fund Manager Settlement Account which transactions will be
recorded against.
5. Enter a Title and Description for the offer. You can also choose an icon to
be displayed to users within their Joinos portal.
6. Select Gift Aid if you would like to claim Gift Aid on the offer.
7. Select Consent Required if you would like your parent/carers to give
online consent.
8. Select Required if you require the parent or carer to make the payment.
9. Select the Start Date and End Date for the offer. Select No end date if the
Offer has no end date. Select whether the Offer can only be purchased
once or the Offer can be purchased multiple times or in instalments.
10. Enter the Offer Costs, including the Total number of items you have and
the Cost of the item.
11. Attach any files you would like to make available for parents to view on the
offer screen. You can attach new files or files you have uploaded
previously.
12. Select the names of pupils who are eligible for the Offer. You can use the
Add Group button to add names to an offer in bulk by the Group they’re
attached to.
70
Chapter 9 SIMs Software Integrations
13. When you are ready to post your offer to parents/carers, select Post this
offer and click Save.
Create Offer
1. Select the Account the offer is to be receipted against in Fund Manager.
2. Choose a VAT code if applicable.
3. Select your Settlement Account.
4. Enter the Offer Details.
1. Give your Offer a short Title.
2. Give your Offer a Description, i.e. Total cost of visit is £300. This can
be paid altogether or by instalments of £50 – let your parents/carers
know exactly what you want them to do, how you want them to pay
and when.
3. Specify whether consent is required. Select the check box if you
want to ensure that parents or carers cannot pay unless they agree to
giving online consent.
4. Enter the Amount if the Offer is a set amount.
5. If the Offer is open to multiple payments or the parent/carer can
decide how much to pay for each instalment, select the Unspecified
check box.
If you want parents/carers to see what they have paid:
1. Open Administration > Manage Accounts.
2. Select the account for the offer you want to share.
3. Ensure the account is marked In Use.
4. Select the Share Balances check box.
6. If you want to ensure parents and carers cannot pay below a certain
amount, enter the amount in the Minimum box.
5. Enter the Offer Dates.
1. Choose the Start Date from when you want parents/carers to see the
Offer.
71

Fund Manager User Guide
2. Choose the End Date - this is the date the Offer will no longer be
available to parents/carers.
Note: If you want to close an offer early, or cancel it, change the
End Date to the current or previous day.
3. Select Recurring if you want parents/carers to be able to pay more
than once for the same offer.
6. Enter the Offer Quantities.
lMin = 1 Max = 1 Means usually one pupil one time/trip/visit/occasion.
lMin = 1 Max = 2 + Means usually one or more item/ticket/place/tie
can be purchased in one transaction.
lItems Available means usually how many seats/tickets/coach spaces
are available. Once the number of available items is sold no one else
can buy, the Offer is ‘Sold Out’.
lUnlimited means you will never exhaust supply.
7. Select any Attachments that you want to include with the Offer.
Note: Documents are only listed here if they have been uploaded first
using Upload Documents.
8. Select the names of pupils who are eligible for the Offer.
9. Either Post Offer or Save without Posting (which saves a draft for you to
complete later). When you post the offer, it becomes visible to
parents/carers on the Offer Start Date. An email is also sent to
parents/carers notifying them of the Offer being posted.
Active Offers
You can access active, pending and expired offers from the Active Offers menu
option. Selecting Active Offers displays a screen with three tabs - Active Offers,
Pending Offers and Expired Offers.
To amend an offer:
72
Chapter 9 SIMs Software Integrations
1. Locate the offer in the list of offers and click Amend.
2. Amend the details required.
To close an offer or cancel it:
1. Locate the offer in the list of offers and click Amend.
2. Change the End Date to the current or previous day.
To extend an offer:
1. Locate the offer in the list of offers and click Extend.
2. Enter the date you want to extend the offer to.
Pending Offers
You can access active, pending and expired offers from the Pending Offers
menu option. Selecting Pending Offers displays a screen with three tabs - Active
Offers, Pending Offers and Expired Offers.
Use the Pending Offers tab to view what offers are currently pending. Offers will
show up in this list as long as they have been saved but not posted or if their
Start Date is in the future.
You can amend pending offers, posting them or removing them as required.
Expired Offers
You can access active, pending and expired offers from the Active Offers or
Pending Offers menu options. Selecting either menu option displays a screen
with three tabs - Active Offers, Pending Offers and Expired Offers.
Use the Expired Offers tab to view offers that have expired. Offers will show up
in this tab if they have been posted and the End Date has passed.
Documents
Upload Document
Use this option to upload documents that you want to attach to offers, for
example, trip itineraries or cost breakdowns or newsletters.
73
Fund Manager User Guide
Warning! Do not upload any private or sensitive information.
Documents
Use this option to view documents that you have uploaded to attach to offers.
If a document is attached to an offer you can view the offer by clicking Attached
Offers.
To detach a document from an offer, click Attached Offers and then click
Remove.
How to transfer Joinos payments so you can reconcile your bank
statements
Within Fund Manager, you are required to have a Joinos Settlement Account
that all of the money is imported into and this should have been set up for you
before or during Training.
Transfer the amount
Once you have received your Bank Statement you will be able to transfer the
total transaction net amount credited on your Bank Statement from the Joinos
Settlement Account to your chosen Bank Account so you can reconcile the bank
account in Fund Manager;
1. Open Bank & Cash > Transfer between Bank Accounts.
2. Select the Transfer From Settlement Account.
74
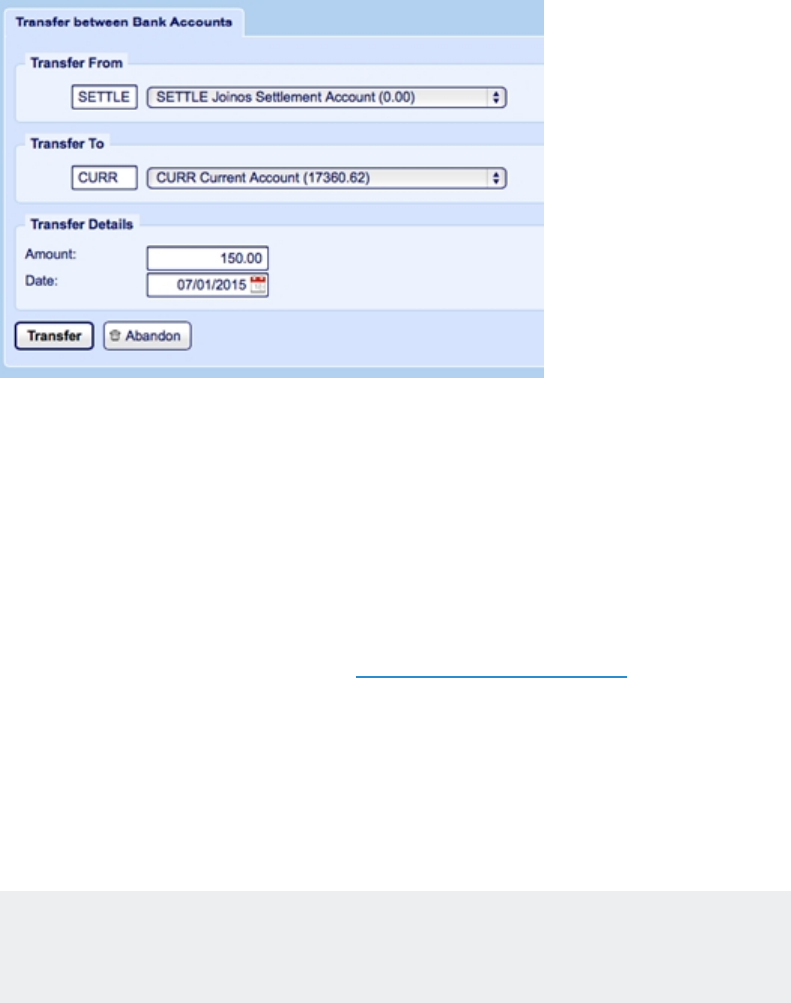
Chapter 9 SIMs Software Integrations
Record Joinos Charges
After the transfer(s) are complete, you must now record any ‘bank charges’ back
into the Current Account. To do this, you must have a user account set up called
e.g. Bank Charges. You should also have an organisation name to transact
against e.g. Joinos Bank Charges. For more information on setting up bank
accounts and organisation names, see Administration on page 7
1. Record a Payment (Direct Debit) against the Current Bank account of the
amount of the Charges. You will already have transferred the GROSS
amount from the Settlement Bank account which includes the e-payments
and also includes your charge(s).
Note: You MUST record these back in against your Current Account as
a Direct Debit and NOT against the Settlement Account.
2. You will now be ready to record the transaction, to do this, go to
Transactions > Record a Payment.
3. In this screen you will now select your user account (Bank Charges) and of
course, your new name. Fill out the relevant information and the amount of
your charge then select your Type as Direct Debit.
You must ensure your bank account (in the centre of your payments
screen) is your Current Account.
75
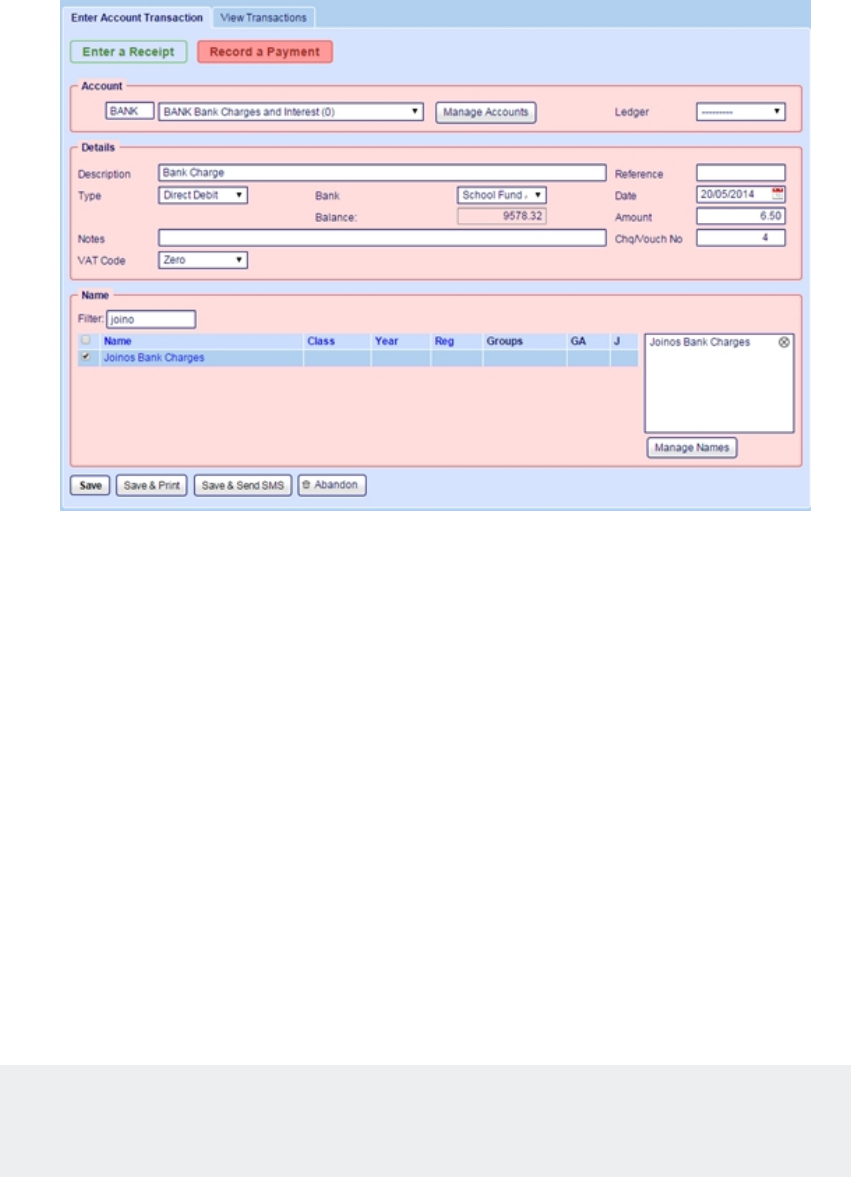
Fund Manager User Guide
4. Select Save.
You now have your original gross transfer and the direct debit
refund/charge against your current account ready to reconcile.
Messaging
New Message
Use this screen to compose and send email messages and SMS text messages
to pupils’ parents and carers. You can only send messages to people who have
provided an email address or a contact phone number, preferably a mobile
number. These can all be added to a student’s name, using Administration
> Manage Names.
Note: Using MISapp will automatically import your pupil’s names into Fund
Manager if you have SIMS MIS.
1. Open Messaging > New Message.
2. Enter the Title and Body of the message.
3. Select any attachments that you want to include with the message.
76
Chapter 9 SIMs Software Integrations
Note: Before you can select attachments to include with the message,
you must upload these using Joinos > Upload Document.
4. Select the names in the Contacts list to send the message to.
5. To send the message as an SMS Notification, select Send selected
contacts a message alert via SMS.
Note: This will only work where the student has a phone number listed.
Most, but not all, home telephones are able to receive test messages,
but where possible a mobile number is preferable. You can specify
which phone number is primary if there are two or more numbers listed
for a student. For more information, use the Manage Phone Numbers
tab under Administration > Manage Names.
6. Click Send.
Confirmation is shown at the top of the screen.
The message will appear within a short time in the parent/carers Joinos. If
they are already logged on they may need to refresh their screen to see the
latest messages.
History
Use this screen to review the messages that have been sent.
Clicking the title of the message displays the message detail. This is the Title
and Body of the message along with the contacts who the message was sent to.
You can also see whether the message has been read or not here.
ParentPay
ParentPay transactions can be imported into Fund Manager manually in the
same way as ParentMail, SchoolComms and SchoolMoney transactions,
77

Fund Manager User Guide
manually importing via CSV files, but we recommend that you import them
automatically. The automatic integration is described here.
Map Names
Names should map automatically in Fund Manager from your MIS or MISapp
using the Pupil's unique MIS number in the same way as ParentPay uses the
Pupil MIS number to collect payments. Sometimes Names are not automatically
Mapped, often Staff Names or Pupils that are not part of the usual Pupil cohort
and not held within your MIS system with a permanent upn.
If this is the case use ParentPay > Map Names to match the Name on the right to
the drop down Name on the left and, this will automatically tick the box to the left
of the left hand side Name for you. If there is no Name to match it to on the right
then ignore that Name for the time being and move onto the next one, repeat the
process through all of the pages then click Import Names. If you click Import 100,
Fund Manager will automatically import the first 100 names on the list.
Note: If you import names and then have duplicate names, you will need to
merge the names. For more information on this, see Consolidating Pupil
Names in Administration on page 7.
Accounts
Map Accounts/Payment Items
You will need to Map your Accounts in Fund Manager with your Payment Items
(Accounts) in ParentPay in order for the Transactions to Import into the correct
Names and Accounts in Fund Manager
1. Open ParentPay > Map Accounts/Payment Items.
2. Match the ParentPay account on the left with the Fund Manager account
on the right.
lIf you don’t want to import transactions into some accounts because
the money is going to a different bank account for example, click
Hide alongside the account.
78

Chapter 9 SIMs Software Integrations
lIf you can’t find the account in Fund Manager, you will need to create
a new account, using Administration > Manage Accounts > Create
New Account. You can do this later and return to map those later.
Finish the mappings as far as you can for now.
3. Click Map Payment Items.
Note: You will need to map each new account in Fund Manager every time
you create a new one in ParentPay if these Transactions need Importing into
Fund Manager, however you will only see the new Payment Item in Fund
Manager after the first transaction is processed, you will then be able to map
this Payment Item to an Account in Fund Manager.
Tip: If you prefer you can map the Payment Item in your ParentPay software.
When you set up a new Payment Item you will need to populate the ‘Group 1’
Code and Description at the bottom of the setup form with the same Account
Code and Description you would like the transactions to flow into in Fund
Manager, before you save the Payment Item. This mapping will be mirrored in
Fund Manager so please be sure you use the correct Account Code and
associated Bank Account when you enter these fields in ParentPay
Map Settlement Accounts
Note: This is usually completed at Training, but if you add a further Bank
Account to ParentPay and you wish to see these Transactions in Fund
Manager then Pebble can map this Bank Account for you.
Fund Manager needs to place your Imported Transactions into a Virtual Holding
Bank Account called a ParentPay Settlement Account until you are ready to
Reconcile your Bank Statement/s. This is because Parents/Carers pay for
Payment Items in Full and this needs to be reflected in both ParentPay and in
Fund Manager as a complete Payment for an Item against a Pupil Name.
However ParentPay Settles to your designated Bank Account/s once a week as
a NET Transaction NOT GROSS. The difference between the net amount paid
to your designated Bank Account and gross figure is the Transaction Invoice/s
79

Fund Manager User Guide
that ParentPay supplies you with online via: ParentPay
site>Finance>Reports>Collection Service Invoices
Note: You can also check via ParentPay site>Finance>Reports>Collection
Service Statements that your Settlements to your designated Bank/s
balances with the Transactions taken Online and through PayPoint (if used)
Reports
Unmapped ParentPay Transactions
Any transactions that have not been or do not need to be mapped will be seen in
the Unmapped Transactions tab. Once the initial Integration has taken place the
most recent transactions will appear at the top of this list. If you identify a
Payment Item that you cannot see in Fund Manager it might be because you
have not mapped a name and/or account to this transaction type. If this is the
case you will need to do this by using the option Map Accounts / Payment Items
or contacting Pebble to ask for another settlement account to be mapped.
Other
Authenticate
This screen is used to enter ParentPay credentials and specify the date from
which you want to import transactions from ParentPay into Fund Manager (if this
is different from the default period beginning date) but this is done for you before
you complete training.
How to transfer money so you can reconcile your bank
statements
Once your ParentPay Transactions have started Importing into Fund Manager
you will see the ParentPay Settlement Bank Account credited with ‘Virtual’
money.
80

Chapter 9 SIMs Software Integrations
Transfer the amount
Once you have received your Bank Statement you will be able to transfer the
total transaction net amount credited on your Bank Statement from the
ParentPay Settlement Account to your chosen Bank Account so you can
reconcile the bank account in Fund Manager;
1. Open Bank & Cash > Transfer between Bank Accounts.
2. Select the Transfer From Settlement Account.
3. Select the Transfer To Bank Account.
4. Enter Amount
5. Enter Date
6. Click Transfer
Record payment
You can then ‘Record a Payment’ in Fund Manager for the debited fees, the
difference between the net amount paid to you and the gross amount paid by the
parents on your Bank Account Statement to balance your ParentPay Settlement
Account.
Note: You can find these transaction service invoices in ParentPay in the
reporting section.
1. Open Transactions > Record a Payment
2. Select the Settlement Bank Account.
3. Enter the transaction details and select Direct Debit for the Type against
the Settlement Bank Account
4. Click Save and then split the payment to the different accounts if you want.
sQuid
Setting up, posting and amending offers is all done in sQuid now and so
provided everything is set up and working in sQuid and you map the sQuid
81

Fund Manager User Guide
offers to Fund Manager accounts, importing sQuid transactions is an automatic
process.
View Offers
Use this to amend offers you have already posted.
You will now be able to see the offers that are live on this screen, please note
you must select the offer title to view.
You will now be able to make any necessary adjustments to your offer, this can
include adding/removing names or changing dates etc. Please ensure you
select Post Offer before leaving to allow the updated information to reach the
parents.
To remove an offer from sQuid, you must first repeat the steps of going into
amend your offer. Once inside the offer, you can simply change your current end
date to BEFORE the start date. This process will immediately remove the offer
from Fund Manager AND sQuid.
Note: You will not be able to view expired/removed offers
Post New Offer
Listed below are the fields that you are required to fill in when creating an offer.
To post an offer, you must go to sQuid>Post New Offer
82

Chapter 9 SIMs Software Integrations
lAccount - The user account into which the money will be recorded
lTitle - What the parents see on their sQuid portal when looking at the offers
lAmount - The amount you want the parent to pay. This can be set to
‘Unspecified’ which will allow the parent to pay any amount they like
towards the offer
lStart Date - when the offer will appear, End Date - when the offer will be
removed/deleted, Deadline - when the School would like the money to be
paid -
Note: The offer will not display to the parents if a future date has been
set as the Start Date
lMin -the minimum amount of ‘slots, items or places’ available, Maximum -
how many the parent can buy, Items Available - how many slots e.g. seats
available on a coach trip etc
Note: Please ensure Maximum items does not exceed 100,000
lRecurring - can be used on offers for school uniform eg ties etc. Something
that the user would like to have available for a set period of time
lMandatory Checkbox Text & Optional Checkbox - Displays a checkbox for
the parent to tick, similar to a Terms and Conditions checkbox when
downloading a program to your pc. Not necessary to complete these
lNames - At least one name MUST be selected to post an offer correctly
Map Offers to Accounts
Use this to map the sQuid offers to Fund Manager accounts so that imported
transactions are added to the correct user accounts and names in Fund
Manager. The money will be added to the sQuid Settlement Account.
sQuid offers are listed in the Name column.
1. Select a Fund ManagerAccount for each sQuid offer.
2. Click Map Payment Items.
83

Fund Manager User Guide
Map Contacts
In most cases, names will map automatically in Fund Manager from your MIS or
MISapp. Sometimes Names are not automatically Mapped and this can mean
some transactions aren’t imported. Use sQuid > Map Contacts to ensure that all
the contacts have mapped and to map any that haven’t mapped automatically.
1. Open sQuid > Map Contacts.
The list of contacts in sQuid is displayed. The Imported Name is the name
of the contact in sQuid.
2. Select the Fund Manager name to match from the Choose Name drop-
down.
3. If there is no matching Name to select in the Choose Name drop-down,
you will need to import the names.To import names:
1. Select the check box to the left of the Imported Name,
2. Click Import Names.
Note: If you import names and then have duplicate names, you will need to
merge the names. For more information on this, see Consolidating Pupil
Names in Administration on page 7.
Pending Import
Import of sQuid transactions into Fund Manager is automatic, provided you have
mapped sQuid offers to accounts in Fund Manager.
Until you have mapped sQuid offers to Fund Manager accounts, the list of
transactions to import will be greyed out as in this example:
84
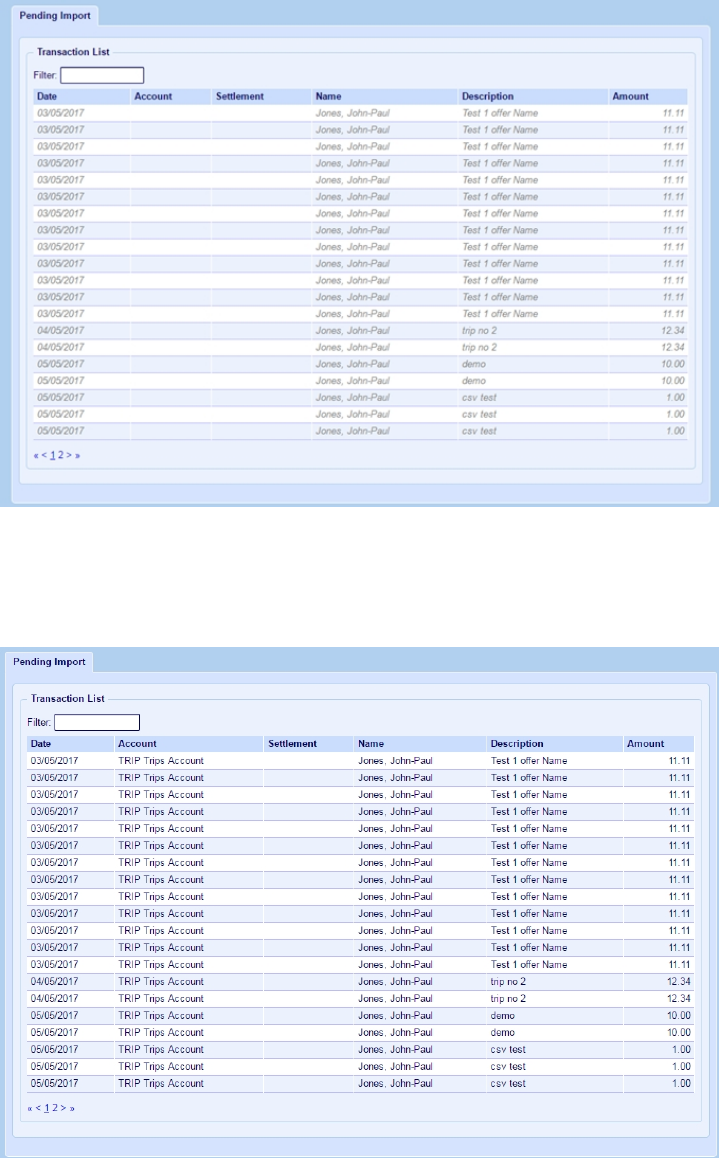
Chapter 9 SIMs Software Integrations
When you have mapped sQuid offers to Fund Manager accounts, the list is no
longer greyed out:
85

Fund Manager User Guide
Where’s the money
Import sQuid Sales
After the offers have been posted and parents start to pay, you will use the
screen below to import the transactions for the students/user account.
You must:
lSelect the Settlement Account for the money to be imported into
lTick any transactions to be imported
lSelect ‘Import’
Once imported, your transactions will show in Fund Manager against the correct
user accounts and names. The money will be added to the sQuid Settlement
Account.
Configuration
Register Pupils
Each pupil has an SRN (sQuid Registration Number) and a CVV (Card
Verification Value). This information is provided by sQuid and is needed before
registering.
86
Chapter 9 SIMs Software Integrations
The students details can be viewed by going to sQuid > Register Pupils >
Manual Registration.
The other tabs available within sQuid > Register Pupils are:
lRegister Names With sQuid - You can register students here who are not
already setup on sQuid - If you are an IMPACT school and receive your
card numbers from a catering company, please ensure you speak to us
about your file before attempting to Register these pupils. To Register a
pupil, Find the name to register, click the small square to the left of the
name (you can select multiple names) then click the Register Names
button. This is automatically sent to Squid to process and when they have
completed this, the name(s) will appear in the View Registered Names tab.
lView Registered Names - You can use the tab to see who is registered
with sQuid. It will also show ALL cards registered to that child
(old/lost/expired etc.) Fund Manager, however, will know which card is
linked to sQuid and use the correct number. These are NOT duplications
in the system. Remember to ensure that the card has the correct purses
added. When the new intake of pupils is registered you can then print out
all their registration letters at one go. Select the year group and click
Search > Print Registration Letters.
lManual Registration - If you require to add/amend a pupils sQuid
information manually, you can use this screen to do that. Simply Search for
and select the pupils name (in blue) and it will allow you to edit the card
details.
Configure sQuid
Use this screen to set up the integration between the sQuid e-payment system
and the school in Fund Manager. All of the information required is provided by
sQuid to Pebble.
87
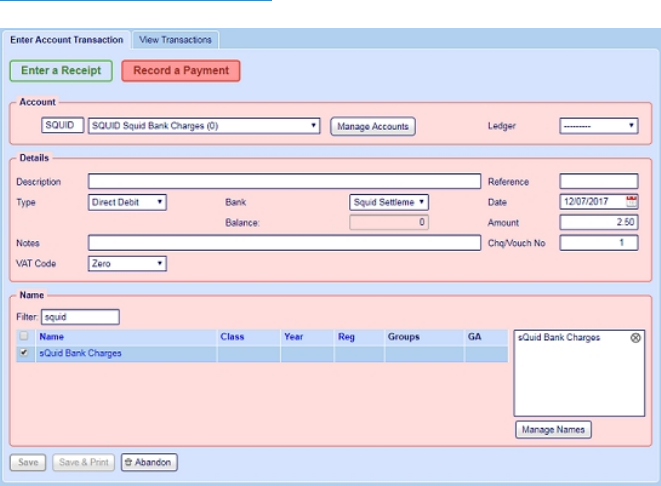
Fund Manager User Guide
How to transfer sQuid payments money so you can reconcile
your bank statements
Within Fund Manager, you are required to have a sQuid Settlement Account that
all of the money is imported into (via the sQuid > Import sQuid Sales).
Transfer the amount
Once you have imported your transactions, you will be able to transfer the total
Transaction amount from the Settlement Account to your chosen Bank Account
by doing the following:
1. Open Bank & Cash > Transfer Between Bank Accounts.
2. Transfer from Settlement Account.
3. Transfer to desired bank account to reconcile.
4. Enter Amount.
5. Enter Date.
Record charges
After the transfer(s) are complete, you must now record any ‘bank charges’ back
into the Settlement Account. To do this, you must have a user account set up
labeled
sQuid Bank Charges
. For more information, see Manage Accounts in
Administration on page 7.
88

Chapter 9 SIMs Software Integrations
You must record a Payment (Direct Debit) back against the sQuid Settlement
Bank account for the amount needed. This will reduce the Settlement Bank
account to now include your charges.
When to contact us
Pebble sQuid
Any issues with
regard to Any issues with regard to
lRegistering
pupils
through FM
lPosting
offers
through FM
lImporting
sQuid sales
into FM
lsQuid schedule and sQuid T&Cs
lThe provision of the existing SRNs/C.V.V’s from the
school’s chosen cashless catering provider to
Pebble.
lThe provision of sQuid Comms options to Pebble for
setup in FM
lQueries regarding sQuid responsibility for the
transfer of monies between the sQuid settlement
account(s) and the school Bank account(s)
lQueries from the school regarding parents
lQueries from parents
lMapping
sQuid offers
to
FM accounts
lImporting
sQuid
transactions
into FM
lsQuid schedule and sQuid T&Cs
lSetting up, posting and amending offers in sQuid
lThe provision of the existing SRNs/C.V.V’s from the
school’s chosen cashless catering provider to
Pebble.
lQueries regarding sQuid responsibility for the
transfer of monies between the sQuid settlement
account(s) and the school Bank account(s)
lQueries from the school regarding parents
lQueries from parents
89
Fund Manager User Guide
90
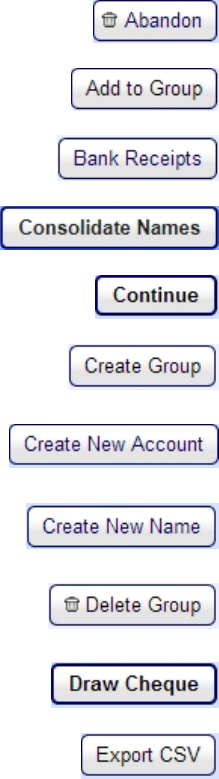
Fund Manager Action Buttons
Leave a page / Abandon a task
Add pupils / staff / organisations to a Group
A quick link to paying in
Merge duplicate Names
Continue to the next part or process
Create an ad-hoc Group of your choosing
Create a New Account heading to post
Receipts to and send Payments from
Create a new pupil / staff / organisation Name
Delete an ad-hoc Group that you no longer
need
Use this button to draw a Cheque for Cash
Allows you to open up your report in Excel
91
Appendix
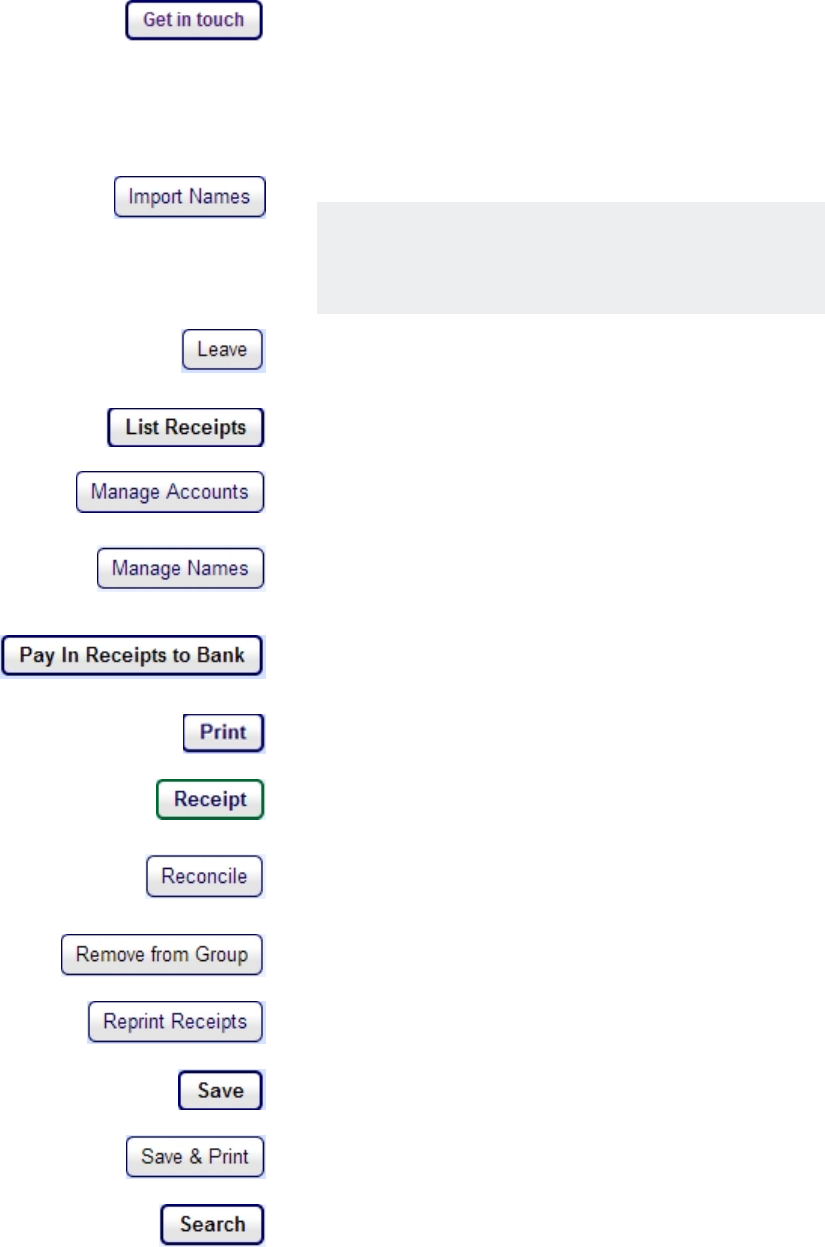
Fund Manager User Guide
Need some help - check out our Support pages
and click here if you can’t find a solution to your
issue
Import your pupils’ Names from your MIS via a
CSV template.
Note: It is your responsibility to handle
personal data in accordance with GDPR law.
Leave the page and return later to where you
were
Create a list of who has paid money
Manage / Edit / Create your Accounts
Manage / Edit / Create your pupil / staff / organ-
isation Names
Complete your Paying-in Slip and then click this
Button
Print any page using this Button
Record the money taken in school
A quick link to Reconciling your Statements /
Reconcile your Statement
Remove Names / Accounts from a Group
Allows you to Reprint your Receipts
Save your entries
Save and Print your entries
Search your query
92
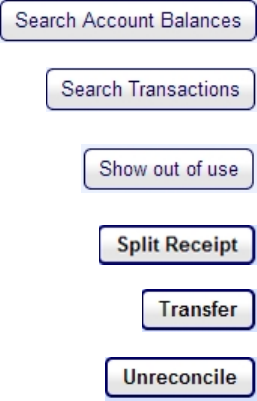
Fund Manager Action Buttons
Shows your current status of all your Accounts
Search transactions.
Reveal names or accounts that have been
taken out of use
Allows you to split your Receipts and Payments
Action your Transfer
Click to Unreconcile Bank Statements
93
Fund Manager User Guide
94

Glossary
B
Bank Account
An account held with a bank for
purposes of managing your
funds, e.g. current account, sav-
ings account.
Box
Another name for an entry field in
software e.g. a text box where
you can enter text information to
be used by the program.
Browser
A program, sometimes known as
a web browser, which lets you
navigate and browse the Internet
e.g. Microsoft Internet Explorer,
Google Chrome, Mozilla Firefox
or Apple Safari.
Budget
The expected level of expendit-
ure.
Button
Something which you can click
in the program to make some-
thing happen e.g. clicck the Save
button to save the information.
C
Charity
An organisation - normally non-
profit-making - which has a char-
itable status within the UK gov-
ernment's definition.
Cheque in Hand
A cheque or cheques which you
have not yet paid into the bank.
95
Glossary

Close a Period
The objectives of closing a period
are to: draw a line under your trans-
actions for the period; close any
accounts that will not be used in
the next period; determine which
accounts will have their balances
transferred to the new period; bal-
ance your income and expenditure
for the period with that of your bank
Closedown
See Close a period.
Comma Separated Value
The name given to a file which
stores values that can be read by
computer programs. Each line in
the file is a record and each record
is separated by a comma.
CSV
The name given to a file which
stores values that can be read by
computer programs. Each line in
the file is a record and each record
is separated by a comma.
CVV
Three digit card security number,
usually on the back of the card.
D
Dashboard
A particular screen within a pro-
gram which provides you with the
ability to access and use the fea-
tures within a module.
Database
A store of information for use in a
computer.
Dfe Number
A seven digit number, identifying
English or Welsh schools.
Direct Credit
Payment direct into a person's or
organisation's bank account. For
example, payment via BACS or
bank interest.
Direct Debit
Payment direct out of a person's or
organisation's bank account. For
example, payment via BACS or bill
payment.
96
Fund Manager User Guide

Draft Period End
A preview of what the period end
report will show. Producing a
draft period end will generate all
the reports required for a financial
period e.g. Account Summary
Income and Expenditure; Trans-
actions; Account Balances; Bank
History; Cash History; Closing
Bank Balances.
E
ePayment
Payment made across the Inter-
net, for example, parent online
transactions.
eReceipt
Payment received across the
Internet, for example, Paypal
transactions.
F
Field
The name given to a box where
you enter information in a com-
puter program. This may be text,
numbers or a date, depending on
the type of field.
Financial Period
A period of time in which financial
statements are prepared.
Fiscal Accountability
Accountability for the way that
money in your school is used and
managed. This may be the
domain of the school business
manager but will more likely
involve a number of senior man-
agement staff within the school.
For Profit
This is used to describe an organ-
isation whose purpose is to make
a profit. Charities are not for profit.
Free School Meals
Pupils can qualify for free school
meals if their parent/carer claims
certain benefits. For more inform-
ation, see https://www.gov-
.uk/apply-free-school-meals
Fund Manager
Pebble's fund management soft-
ware, helping you to manage the
income that comes in and goes
out of your school.
97
Glossary

G
Gift Aid
This is a UK government scheme
which lets registered charities
reclaim a percentage of tax on
donations from UK taxpayers.
H
HMRC
Her Majesty's Revenue and Cus-
toms department within the UK gov-
ernment.
I
Icon
A button in a computer program
which represents an action or an
object and is usually identified by a
picture.
Intercom
Pebble's online support platform.
This is what you use when you
communicate with our support
team.
J
Joinos
Pebble's platform for helping you
and the parents of your pupils com-
municate, pay for trips, school activ-
ities and meals.
Journal
Holds the details of accounting
transactions in a given tinme
period.
L
Ledger Code
A code which integrates with an
external financial system, allowing
you to provide unified VAT report-
ing across both systems.
M
MISapp
Pebble's tool to assist you in
importing pupil names from your
school administration database.
98
Fund Manager User Guide

N
Negative Payments
Payments where monies are
returned to the pupil for over-
payment or refund.
O
Offline
An activity which takes place on
a computer while the computer is
not connected to the Internet.
Opening Balance
The amount of money an account
owns on the date the account is
created in Fund Manager.
P
ParentMail
An ePayment system which
allows parents (also staff) to pay
for items online.
ParentPay
An ePayment system which
allows parents (also staff) to pay
for items online.
Payment
A transaction that pays a person
or organisation.
Pop-up
A window in the computer pro-
gram which pops up on top of
another window on a computer
screen.
R
Receipt
A transaction that records money
received from a person or organ-
isation.
Reconciliation
The process of comparing the
transactions recorded on your
bank statement with the trans-
actions listed in Fund Manager.
Register
A Fund Manager menu that
allows you to record items taken,
such as attendance, meals, etc.
99
Glossary

S
School Reference Number
A seven digit number, usually
made up from three digits and four
digits.
SchoolComms
An ePayment system which allows
parents (also staff) to pay for items
online.
SchoolMoney
An ePayment system which allows
parents (also staff) to pay for items
online.
Screen
A window of the computer program
e.g. the dashboard of a module.
Settlement Account
A bank account used for electronic
transactions.
SIMS
School Information Management
System.
SMS Messaging
Short Message System. You can
send short messages for Joinos for
Parents using the Joinos menu.
sQuid
An online payment system which
can be integrated with Fund Man-
ager.
Support
Material assistance for your pro-
jects. Or in the case of software
queries, advice and guidance on
how to provide a solution.
T
Tab
A sub-division of a screen, offering
the ability to view two separate
screens in one, by clicking on the
tabs to swap views.
Taken Items
Items such as attendance, school
meals etc can be recorded on the
Register Menu in Fund Manager,
once they have been taken.
100
Fund Manager User Guide

Transaction
An agreement over supply and
demand e.g. a contract to
exchange goods and services for
money.
Transfer
Move money between accounts
or names in Fund Manager.
U
Universal Free School Meals
From September 2014 pupils in
Reception and Years 1 and 2 at
state schools in England qualify
for universal free school meals.
For more information, see
https://www.gov-
.uk/guidance/universal-infant-
free-school-meals-guide-for-
schools-and-local-authorities.
Unpresented Transactions
Transactions that have not been
presented to the bank. For
example, you have received mon-
ies in or made payments out but
these have not yet been recorded
by the bank and so don't appear
on bank statements.
Unreconciled Transactions
Synonymous with Unpresented
transactions.
V
VAT 100
A report that displays the 9 boxes
you are required to fill when com-
pleting an HMRC VAT Return.
W
Web Browser
A program, sometimes known as
a web browser. which lets you
navigate and browse the Internet
e.g. Internet Explorer, Google
Chrome, Mozilla Firefox or Apple
Safari.
Window
A screen in the computer pro-
gram e.g. the dashboard of a mod-
ule.
101
Glossary

102
Fund Manager User Guide

A
Accessing
Fund Manager 1
help 1
Account Balances
differences 44-45
Account Code 14
Account Summary Report 43
Accounts
archive 17
bank accounts 20
cost centre 14
create 18
edit 14-15
in use 15
transfers 39
view 14
Active Joinos Offers 72
Adding
accounts 18
bank accounts 20
cost centres 18
names 11
organisations 11
Administration 7
Aggregated Name 44
Amend Opening Balance 16
Amending
Joinos for Parents offer 72
opening balance 16
paying-in slip 57
103
Index

Archiving
pupils and staff 9, 12
Assigning names to groups 11
Attaching
Joinos for Parents offer
documents 73
Attendance Group 62
B
Backdated Gift Aid Claims 50
Balance of Accounts 6
Bank & Cash Summary Report 53
Bank Accounts
add 20
balance 6
default 20
opening balance 21
reconciled bank balance 21
transfers 57
Bank and Cash 6, 53
Bank History Report 54
Bank Statements
reconcile 56
unreconcile 58
Batch Actions
accounts 17
names 10
Browser configuration 3
Budget Value 17
C
Cancelling
cheque for cash 56
Joinos for Parents offers 73
paying-in slip 57
payments 41
receipts 41
Cash History Report 54
Claim History Report 50
Class Group 10
Closing
gift aid donation period 49
Joinos for Parents Offer 73
104
Fund Manager User Guide

period end 25
Configuring Browsers 3
Consolidating Names 12
Cost Centre 14
Cost Centres 18
Creating
bank accounts 20
Joinos codes 26
Joinos for Parents offers 70-71
CSV Export
accounts summary 43
bank & cash summary 53
bank history 54
cash history 54
gift aid claim history 50
list all transfers 47
list of cancellations 47
new gift aid claim 49
search account balances 45
search transactions 44
user account summary 68
who's not paid 47
D
Dashboard 5
Default Bank Account 20
Differences in Account Balances 44-
45
Display on Device 62
Draw Cheque for Cash 55
E
Entering
payments 34
receipts 30
Exclusion Group 62
Expired Joinos for Parents Offers 73
Exporting
accounts summary 43
bank & cash summary 53
bank history 54
cash history 54
gift aid claim history 50
list all transfers 47
list of cancellations 47
105
Index

new gift aid claim 49
search account balances 45
search transactions 44
user account summary 68
who's not paid 47
Extend Joinos for Parents Offers 73
F
Financial Period
number of days in 6
start date 6
G
Gift Aid
backdated claims 50
close donation period 49
in a closed period 32
manage donors 49
new claim for donations 49
preview donations 49
report 48
Groups
account actions 18
assigning names 11
attendance 62
class 10
exclusion 62
names actions 10
registration 10
UISFM 62
user defined 10
year 10
H
Help 1
Hide out of use 18
I
Importing
CSV register file 68
ParentPay transactions 77
transactions 41
In Use 10-11, 15, 21
Integrated SIMS 69
J
Joinos 74
106
Fund Manager User Guide

Joinos for Parents
active offers 72
amend offer 72
cancel offer 73
close offer 73
code expiry 26
create codes 26
create offer 71
create offer beta 70
expired offers 73
extend offer 73
message history 77
new message 76
offers 70
pending offers 73
share balances 15, 71
upload documents to attach to
offers 73
Journal Reports 48
L
Ledger Code 31, 35
List Cancelled Bank Transactions 58
Lists
cancellations 47
payments by cheque/voucher num-
ber 46
receipts by receipt number 46
reconciled bank accounts 54
transfers 46
Logging in 1
M
Manage Gift Aid Donors 49
Mapping
ParentPay accounts 78
ParentPay names 78
ParentPay settlement accounts 79
Menus
administration 7
bank and cash 6, 53
register 61
reports 6, 43
transactions 6, 27
Merging Names 12
107
Index

Messaging
Joinos for Parents 76-77
MISapp 9
N
Names 9
adding 11
consolidating 12
merging 12
summary report 64
transfers 39
Negative Balance 39
New Claim for Donations 49
New Joinos for Parents Message 76
O
Opening Balance 6, 16
Organisations
adding 11
names 9
summary 6
Out of Use 10, 14, 17, 21
P
ParentMail 41, 69
ParentPay
import transactions 77
map accounts 78
map names 78
map settlement accounts 79
payment items 78
unmapped transactions 80
Part-complete Reconciliation 57
Password 1
Password Reset 1
Pay Receipts to Bank 54
Paying-in Slips
amend 57
cancel 57
duplicate numbers 55
reprinting 54
Payments
cancel 41
ParentPay items 78
108
Fund Manager User Guide

payment types 35
printing 46
reprinting 46
signature boxes 46
splitting 37
Pending Joinos for Parents Offers 73
Period End
bank history report 54
closedown 25
view opening balances 24
Petty Cash 55
Previous VAT 100 Submissions 59
Printing
accounts summary 43
bank & cash summary 53
bank history 54
cash history 54
gift aid claim history 50
list all transfers 47
list of cancellations 47
new gift aid claim 49
payments 46
receipts 46
search account balances 45
search transactions 44
user account summary 68
who's not paid 47
Pupil
archive 9, 12
attendance 15
meals 15
names 9
statement report 65
view balances 64
R
Receipts
cancel 41
printing 46
receipt type 31
reprinting 46
splitting 37
Reconcile Bank Statement 56
109
Index

Reconciled Bank Balance 21
Recording
attendance 61
items taken 61
payments 34
receipts 30
taken items 62
transactions 29
universal free school meals 66
Register Account
attendance group 62
display on device 62
exclusion group 62
setup 15, 62
UISFM group 62
Registration Group 10
Reports
accounts summary 43
bank & cash summary 53
bank history 54
cash history 54
gift aid 48
gift aid claim history 50
journal 48
list all transfers 46
list of cancellations 47
list receipts by receipt number 46
list reconciled bank accounts 54
name summary 64
payments by cheque/voucher num-
ber 46
previous VAT 100 submissions 59
pupil's statement 65
search account balances 45
search transactions 44
special 47
taken items 64
universal free school meals 66
unmapped ParentPay
transactions 80
user account summary 68
VAT 100 59
who's not paid 47
110
Fund Manager User Guide

Reprinting
paying-in slips 54
payments 46
receipts 46
Reset Password 1
S
SchoolComms 41, 69
SchoolMoney 41, 69
Search Account Balances Report 45
Search Transactions Report 44
Send Text Message 77
Set Up Register Account 62
Settlement Bank Account 21, 56
Share Joinos for Parents
Balances 15, 71
Show Out of Use 10, 17
Show Paid Balances 47
Signature Boxes for Payments 46
SIMS 69
SMS
send text message 77
Special Reports 47
Split Payment 37
Splitting Receipts and Payments 37
Staff
archive 9, 12
names 9
T
Tablet Devices 16, 61
Taken Items
recording 62
report 64
Transactions
cancelled bank 58
import 41
payments 35
processing 27
receipts 30
splitting 37
unmapped ParentPay
transactions 80
VAT rate 32, 36
Transfers
between accounts 39
111
Index

between bank accounts 57
between names 39
negative balance 39
Type of Payment 35
Type of Receipt 31
U
UISFM Group 62
Unit Cost 17, 48
Universal Free School Meals
record 66
report 66
set up 66
Unmapped ParentPay Transactions 80
Unreconciled Bank Statement 58
Unreconciled Transactions 54
Uploading
Joinos for Parents offer
documents 73
register file 68
User Account Summary Report 68
User Defined Group 10
V
VAT
code 32, 36
rate 32, 36
VAT 100 report 59
Viewing
accounts 14
archived Gift Aid claims 50
archived VAT 100 reports 59
cancelled bank transactions 58
expired Joinos offers 73
Gift Aid donations 49
help 1
Joinos for Parents message
history 77
opening balances 24
pending Joinos offers 73
reconciled bank statements 54
sQuid offers 82
sQuid student details 87
transactions 30, 35, 43-44
112
Fund Manager User Guide


114
Fund Manager User Guide
