GBx Cart RW Manual Rev31
User Manual:
Open the PDF directly: View PDF ![]() .
.
Page Count: 32
Page 1 GBxCart RW Manual Revision 31
GBxCart RW v1.1/v1.2/v1.3
A device for backing up GB, GBC and GBA cart’s game ROMs,
save games to your PC and restoring saves from your PC.
Main Features
Backup games ROM to your PC
Backup/Restore save games to/from your PC
Supports Gameboy, Gameboy Colour, Gameboy
Advance cartridges
Supports SRAM/Flash/EEPROM saves for Gameboy
Advance cartridges
GUI or Console interfacing programs
Other Features
Backup GB Camera (active images) to BMP with a one
click program called GB Camera Saver
GB Sachen ROM mapper reading support
GBA “24-in-1” Flash cart ROM mapper reading
support (may not work for all flash carts)
Gameboy Flash Carts/Flash Chips supported
AM29F010B, SST39SF010A, SST39SF040, AT49F040
(Audio/WR), Catskull / BV5, ES29LV160 Flash (PCB 0883_DRV),
AM29LV160DB, 29LV160CTTC, AM29F016B, 256M29,
M29W640
Check your cart – Jump to the Supported Flash Cart page
Gameboy Advance Flash Carts supported
MSP55LV128, MSP55LV128M, 29GL128EHMC, 29LV128DTMC,
256M29EWH, M36L0R706 (36LOR-DRV), 256L30B
(28F256L03B-DRV), MX29LV320
Check your cart – Jump to the Supported Flash Cart page
Read/Write Speeds (using Windows GUI Interface)
Gameboy
1MByte ROM Read
16s
32KByte SRAM Read/Write
3s
32KByte Flash Cart Write
5s
2MByte Flash Cart Write
~2.5m
Gameboy Advance
8MByte ROM Read
1.5m
256Kbit SRAM Read/Write
3s
512Kbit Flash Read
3s
512Kbit Flash Write
~8s
64Kbit EEPROM Read
3s
64Kbit EEPROM Write
13s
16MByte Flash Cart Write
~10-13m
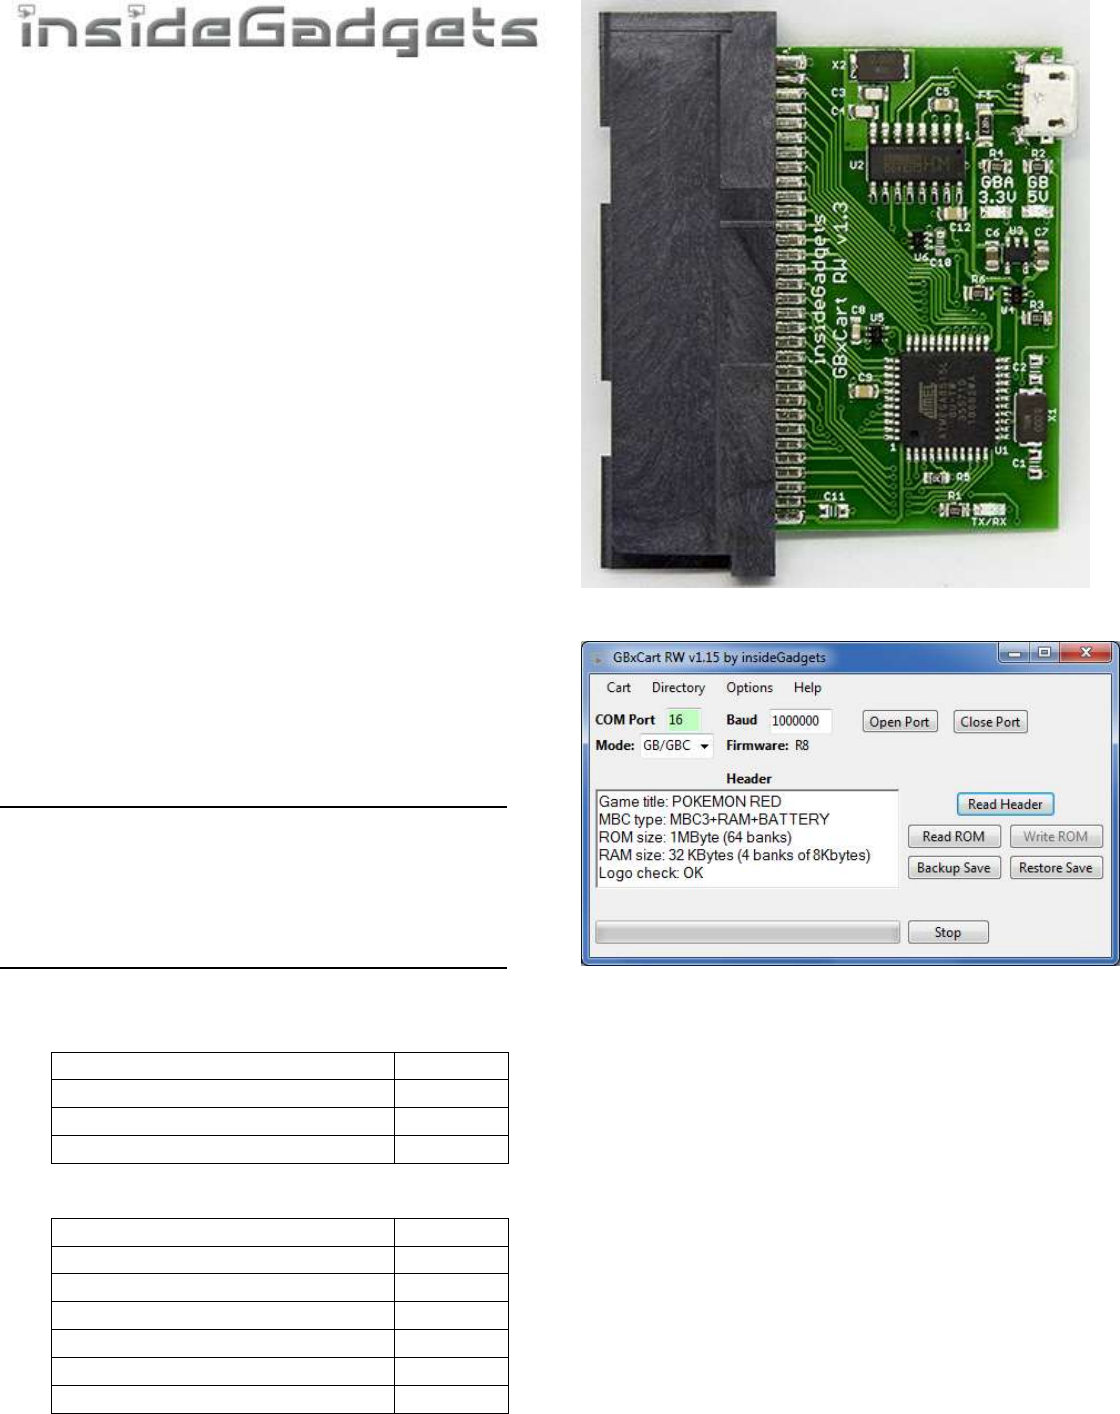
(v1.3 PCB pictured)
(GUI Pictured)
Specifications
Size: 54mm (L) x 57mm (W) x 9mm (H)
Voltage: Switchable between 3.3V (for GBA) and 5V (for
GB/C)
Weight: 18 grams
Requirements
v1.2/v1.3 Board - Micro USB or USB-C cable
v1.1 Board - Mini USB cable
OS Compatibility
Windows XP or higher
Linux (console version)

Page 2 GBxCart RW Manual Revision 31
Contents
Quick How to Use ......................................................................................................................................................3
Troubleshooting ........................................................................................................................................................3
GUI Program ..............................................................................................................................................................4
Setup ................................................................................................................................................................................... 4
Inserting/Removing Cartridges ........................................................................................................................................... 4
Reading the Header ............................................................................................................................................................ 5
Read the ROM ..................................................................................................................................................................... 5
Backup save from Cartridge to PC ...................................................................................................................................... 6
Restore save from PC to Cartridge ...................................................................................................................................... 6
Erase save from cartridge ................................................................................................................................................... 6
Write ROM to Flash cart ..................................................................................................................................................... 7
Change the directory to save to and load from .................................................................................................................. 8
Options: Add date/time to Save File and Prompt for Save Game file when restoring ....................................................... 8
Console Program ........................................................................................................................................................9
Setup ................................................................................................................................................................................... 9
Inserting/Removing Cartridges ........................................................................................................................................... 9
Reading the Header ............................................................................................................................................................ 9
Read the ROM ................................................................................................................................................................... 10
Backup save from Cartridge to PC .................................................................................................................................... 10
Restore save from PC to Cartridge .................................................................................................................................... 10
Erase save from cartridge ................................................................................................................................................. 10
Sachen ROM Mapper support .......................................................................................................................................... 11
GBA Flash Cart ROM Mapper support .............................................................................................................................. 11
Raw I/O Access .................................................................................................................................................................. 12
Dedicated Console Programs .................................................................................................................................... 14
Gameboy Camera Saver .................................................................................................................................................... 14
Console Flasher ................................................................................................................................................................. 14
Update the Firmware ............................................................................................................................................... 16
On R3+ devices .................................................................................................................................................................. 16
On R2 or lower devices or Re-program the ATmega using an AVR programmer ............................................................. 16
Flash Cart Support.................................................................................................................................................... 19
Supported Gameboy Flash Cart PCB Pictures ................................................................................................................... 19
Supported Gameboy Advance Flash Cart PCB Pictures .................................................................................................... 21
Software Revision History ........................................................................................................................................ 23
Hardware/Firmware Revision History ....................................................................................................................... 30

Page 3 GBxCart RW Manual Revision 31
Quick How to Use
1. Before inserting the cartridge, select the correct voltage for your cartridge using the switch (GB/GBC use 5V while
GBA uses 3.3V). If you have the v1.3 board, this is controlled by software – in the GUI you choose GB or GBA mode
and press connect.
2. Connect the USB cable to ensure the correct voltage LED lights up. If the device isn’t automatically detected, you will
need to open up Device manager, find the “USB 2.0 Serial” device and update the driver using the files in the
\Drivers folder.
3. Unplug the device from your computer. Insert your cartridge to the device (make sure the cartridge sticker is facing
up) and connect the device again.
4. For the GUI interface, follow “GUI Program” steps or for the console program follow “Console Program” steps.
5. When changing cartridges, always unplug the USB cable from the device, swap the cartridge and then reconnect the
USB cable.
Troubleshooting
If no lights are showing when plugging in the device or the device isn’t being detected
Try using a different USB cable (preferably a non-phone type USB cable).
Try using a non-USB 3.0 port if you are using one.
Try to unplug all other USB devices except your keyboard and mouse.
Uninstall the device from Device Manager and choose to delete the driver files as well, then try to re-install the
drivers and ensure the device shows as CH340.
If it’s timing out when performing any of the functions
Try using a different USB cable (preferably a non-phone type USB cable).
Check to see that you have no other software which monitors COM ports such as the Arduino IDE running in the
background.
If you’ve tried all the above steps but are still experiencing issues, please contact us at support@insidegadgets.com
Page 4 GBxCart RW Manual Revision 31
GUI Program
Setup
1. Download and Install Microsoft Visual C++ Redistributable Packages (x86 and x64) for Visual Studio 2015 -
https://www.microsoft.com/en-us/download/details.aspx?id=53840
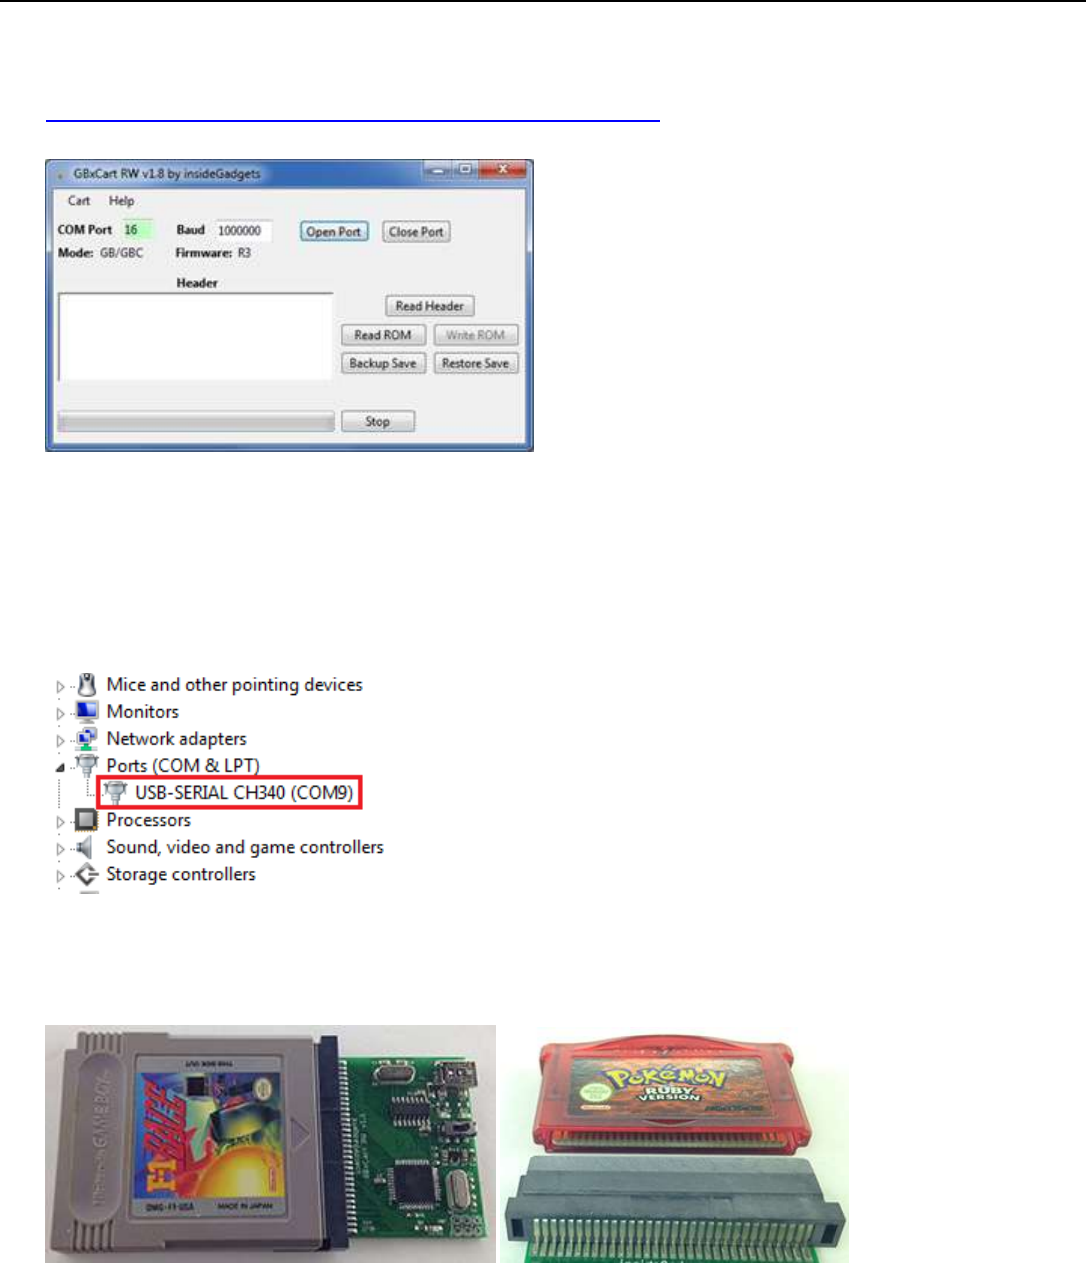
2. Open \Interface_Programs\GBxCart_RW_vx.x_GUI_Interface\GBxCart_RW_vx.x.exe and click the Open Port button.
It should automatically detect the COM port that the device is using. The COM port text box should turn green if it
has successfully connected. Once the port is successfully opened, the port number and baud rate will be
remembered for next time. You will see the mode currently selected GB/GBC or GBA and the Hardware Firmware
version.
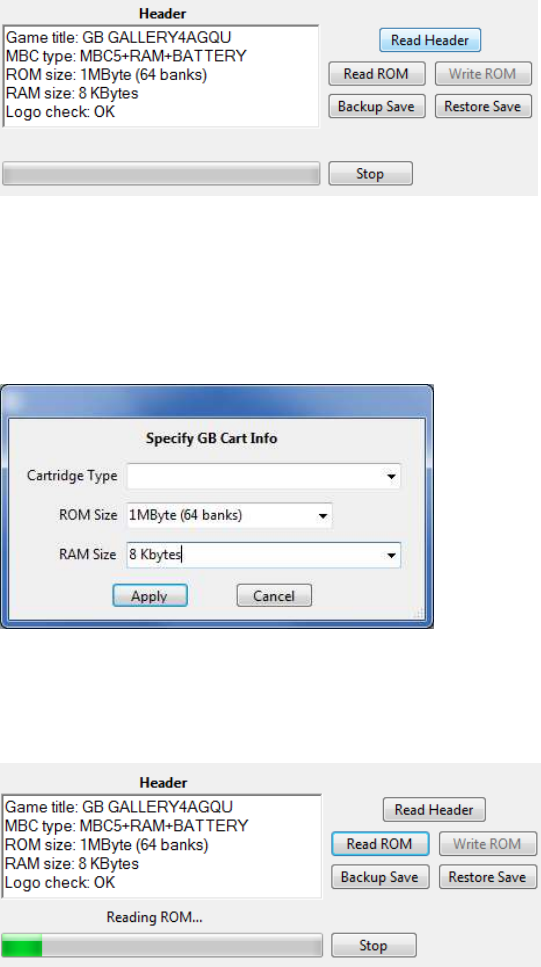
(If the COM port turns red, you may have to manually change the COM port number to match the COM port your
operating system has assigned the device, this can be found in device manager.)
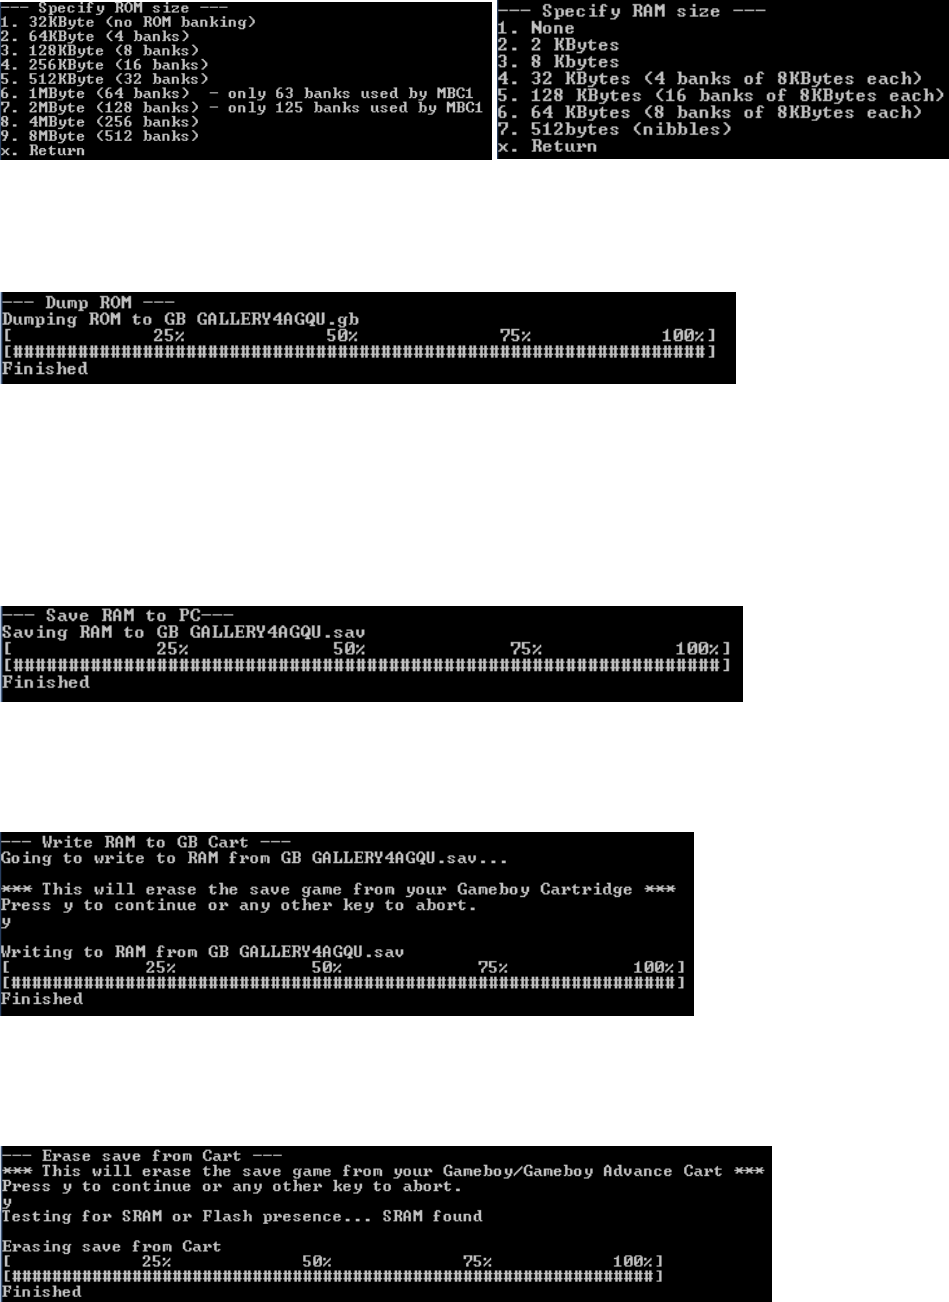
Inserting/Removing Cartridges
1. Before inserting the cartridge, select the correct voltage for your cartridge using the switch (GB/GBC use 5V while
GBA uses 3.3V). If you have the v1.3 board, this is controlled by software – in the GUI you choose GB or GBA mode
and press connect. Connect the USB cable to ensure the correct voltage LED lights up.
Page 5 GBxCart RW Manual Revision 31
2. Unplug the device from your computer. Insert your cartridge to the device (make sure the cartridge sticker is facing
up and that you can see the pins on the bottom of the cartridge), connect the device again and click Open Port as
before.
3. You can now read the header, read the ROM, etc.
4. When removing cartridges, always unplug the USB cable from the device first before removing the cartridge.
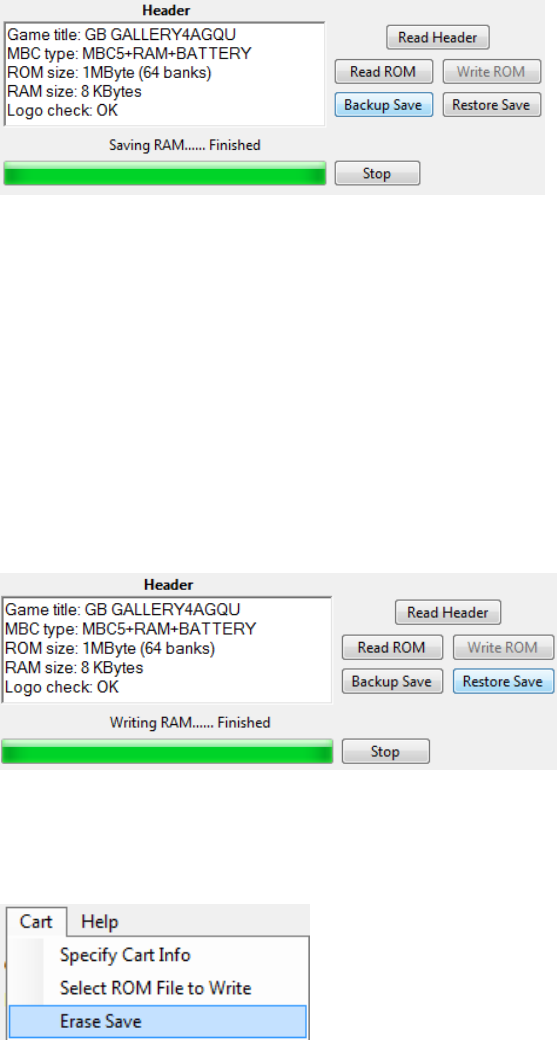
Reading the Header
Press the Read Header button and the cartridge information should show up (GBA carts can take 4 seconds as tests are
being performed to determine the ROM and SRAM/Flash/EEPROM sizes). Note: You don’t need to read the header for
Flash Carts.
Make sure that the “Logo check” comes back as OK otherwise the cartridge may not be read correctly and you will
have to disconnect the device, remove and re-insert the cartridge.
If the cartridge information doesn’t match what you know to be correct, you can select “Cart” from the top menu and
select “Specify Cart Info” button to change the ROM size and RAM size/type.
Read the ROM
You can now press the “Read ROM” button to download the ROM from the cartridge to your PC, it will be saved as
<Gametitle>.gb or <Gametitle>.gba.
We recommended verifying your Gameboy/Gameboy Advance ROMs and Saves by using emulators such as BGB for
Gameboy and VisualBoyAdvance for Gameboy Advance.
Page 6 GBxCart RW Manual Revision 31
Backup save from Cartridge to PC
You can download the save game from your cartridge to your PC by pressing the “Save RAM” button, it will be saved as
<Gametitle>.sav. If a save file exists on your PC, you will be asked to confirm you wish to overwrite the save file or save
the file with the date/time added to it.
If you are backing up a game regularly as you progress through it, it’s best to turn on the Option > “Always add
date/time to backed up Save Game files” to Yes. This will add the date/time to your save file so you can have multiple
save files on your PC.
We recommended verifying your Gameboy/Gameboy Advance ROMs and Saves by using emulators such as BGB for
Gameboy and VisualBoyAdvance for Gameboy Advance.
Restore save from PC to Cartridge
You can upload the save game from your PC to your cartridge by pressing the “Write RAM” button, it will load the save
file <Gametitle>.sav. You will always be asked to confirm you wish to overwrite the save game on the cartridge.
Erase save from cartridge
You can erase the save game from the cartridge by pressing the “Cart” menu item and selecting “Erase Save”. You will
always be asked to confirm. This is useful if you wish to wipe the cartridge and insert it back to the Gameboy/Gameboy
Advance to start a new save.
Page 7 GBxCart RW Manual Revision 31
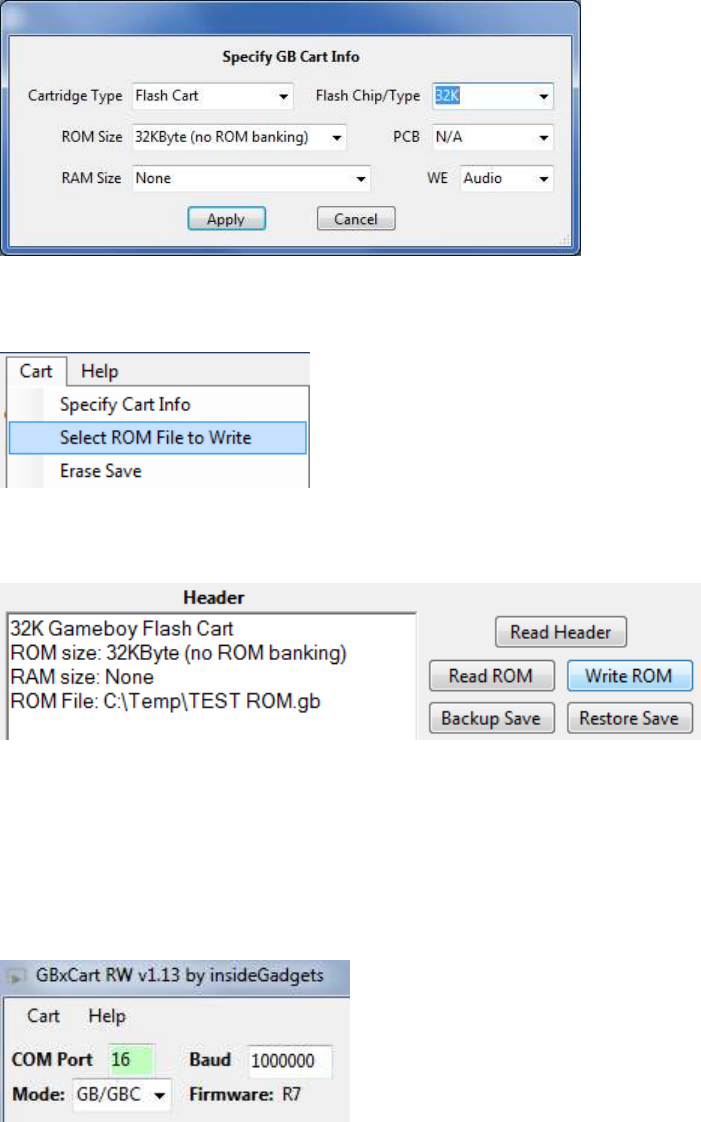
Write ROM to Flash cart
Please check the first page to see supported Flash carts. You don’t need to read the header before specifying the cart
info.
From the “Cart” menu, select “Specify Cart Info” and then from the Cartridge Type choose Flash Cart. Additional fields
will show up allow you to select the Flash Chip/Type, PCB and WE (if applicable).
You will need to select the ROM file to write from the “Cart” menu, select “Select ROM File to Write” and then browse
to your ROM file.
Now you can press the “Write ROM” button to write the ROM file to the Flash cart.
Note:
A few Gameboy flash carts may require that you switch the voltage to 3.3V before they will allow you to write to them,
you will receive a prompt if that’s the case. If you have the v1.3 board, it will automatically switch to 3.3V for you.
You can do this by unplugging the device, switching to 3.3V, pressing the Open Port button and then changing the
Mode from “GBA” to “GB/GBC”.
Page 8 GBxCart RW Manual Revision 31
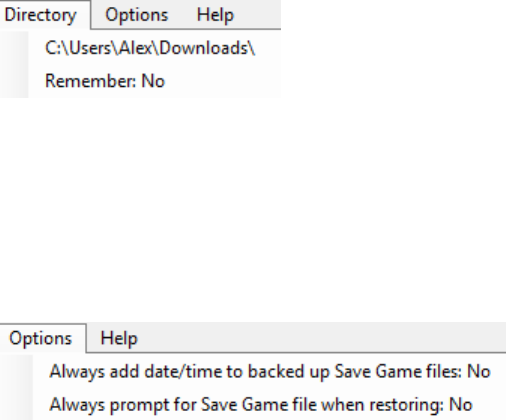
Change the directory to save to and load from
You can change the directory where ROMs are saved to and where save games are saved to and loaded from. This
might be useful if you have multiple saves for the same game.
When you click “Directory” in the menu it will advise you the folder where you opened the software from.
You can then click the folder listed and it will let you change the folder location.
To always remember the location, make sure “Remember” is set to Yes.
Options: Add date/time to Save File and Prompt for Save Game file when restoring
The “Always add date/time to backed up Save Game files” option is useful if you are backing up a game regularly as
you progress through it. This will add the date/time to your save file so you won’t overwrite your existing save file, for
example, F1RACE_2018.02.25-15.33.12.sav.
The “Always prompt for Save Game file when restoring” option will allow you to choose your save file to restore, this is
useful if you use the option above.
Page 9 GBxCart RW Manual Revision 31
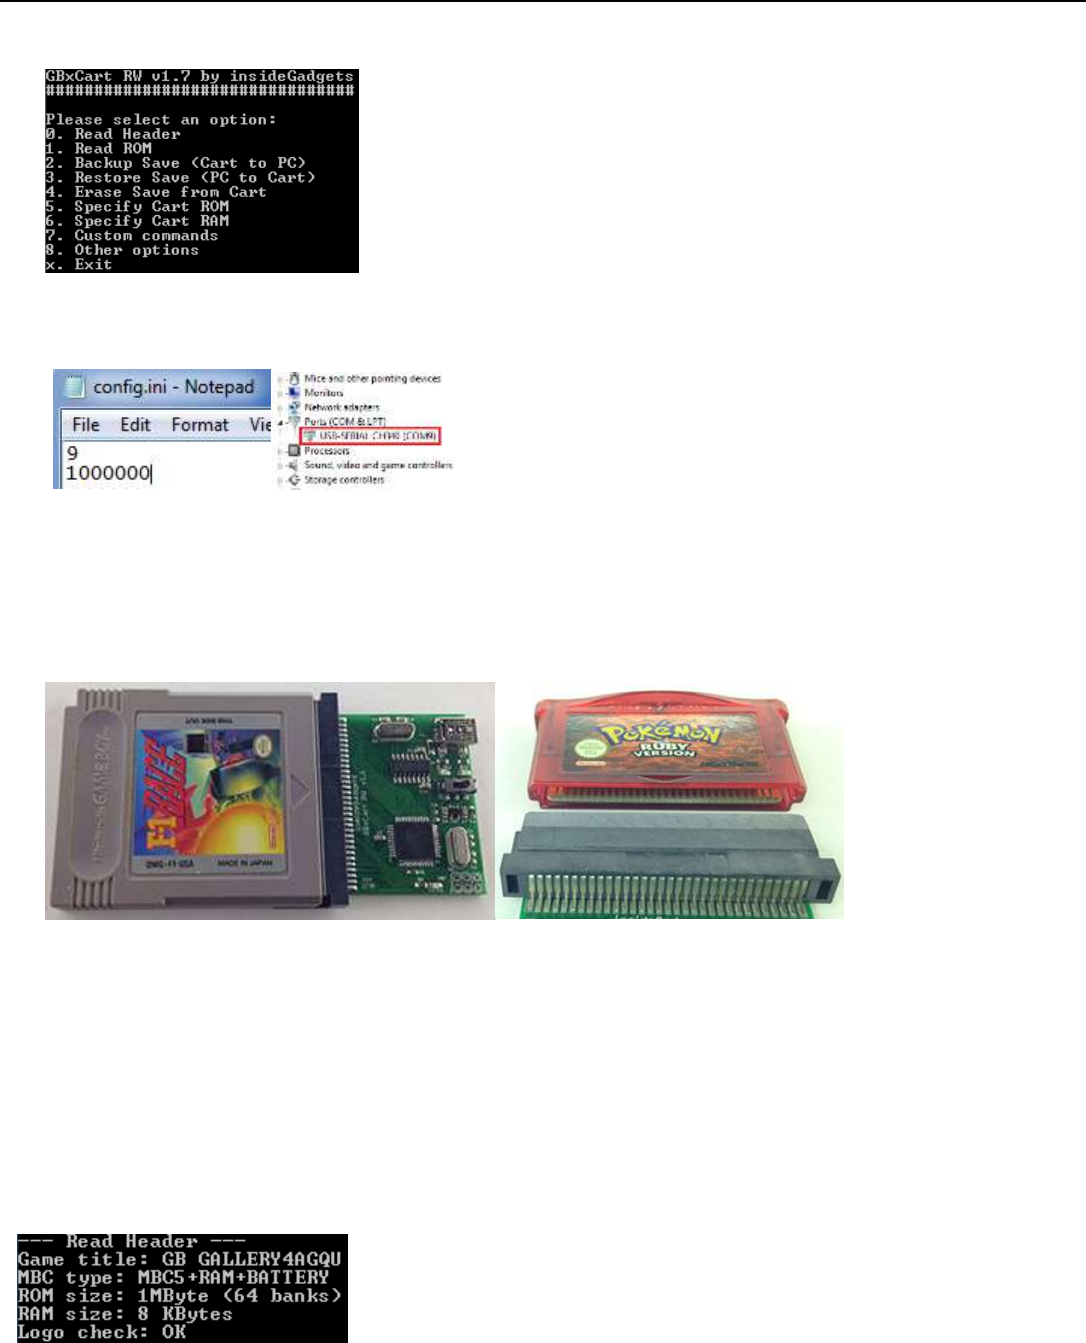
Console Program
Setup
1. Open \Interface_Programs\GBxCart_RW_vx.x_Console_Interface\GBxCart_RW_Console_vx.x.exe and the options
menu should appear.
2. If the device couldn’t be autoamatically detected, open the
\Interface_Programs\GBxCart_RW_vx.x_Console_Interface\config.ini file and change the first number to your
COM port, e.g. 9 = COM9 and change the second number to the baud rate, default is 1Mbit (1000000) which
should work fine. Your COM port can be found in device manager.
Inserting/Removing Cartridges
1. Before inserting the cartridge, select the correct voltage for your cartridge using the switch (GB/GBC use 5V while
GBA uses 3.3V). If you have the v1.3 board, this is controlled by software – in the GUI you choose GB or GBA mode
and press connect. Connect the USB cable to ensure the correct voltage LED lights up.
2. Unplug the device from your computer. Insert your cartridge to the device (make sure the cartridge sticker is facing
up and that you can see the pins on the bottom of the cartridge), connect the device again and click Open Port as
before.
3. You can now read the header, read the ROM, etc.
4. When removing cartridges, always unplug the USB cable from the device first before removing the cartridge.
Reading the Header
Page 10 GBxCart RW Manual Revision 31
Press “0” and hit enter to read the cartridge information. Make sure that the “Logo check” comes back as OK
otherwise the cartridge may not be read correctly and you will have to disconnect the device, remove and re-insert the
cartridge.
If the cartridge information doesn’t match what you know to be correct, you can press “4” or “5” and hit change the
ROM size and RAM size/type.
Read the ROM
You can press “1” and hit enter to button to download the ROM from the cartridge to your PC, it will be saved as
<Gametitle>.gb or <Gametitle>.gba.
We recommended verifying your Gameboy/Gameboy Advance ROMs and Saves by using emulators such as BGB for
Gameboy and VisualBoyAdvance for Gameboy Advance.
Backup save from Cartridge to PC
You can download the save game from your cartridge to your PC by pressing “2” and hit enter, it will be saved as
<Gametitle>.sav. If a save file exists on your PC, you will be asked to confirm you wish to overwrite the save file.
Restore save from PC to Cartridge
You can upload the save game from your PC to your cartridge by pressing “3” and hit enter, it will load the save file
<Gametitle>.sav. You will always be asked to confirm you wish to overwrite the save game on the cartridge.
Erase save from cartridge
Page 11 GBxCart RW Manual Revision 31
You can erase the save game from the cartridge by pressing “4” and hit enter. You will always be asked to confirm. This
is useful if you wish to wipe the cartridge and insert it back to the Gameboy/Gameboy Advance to start a new save.
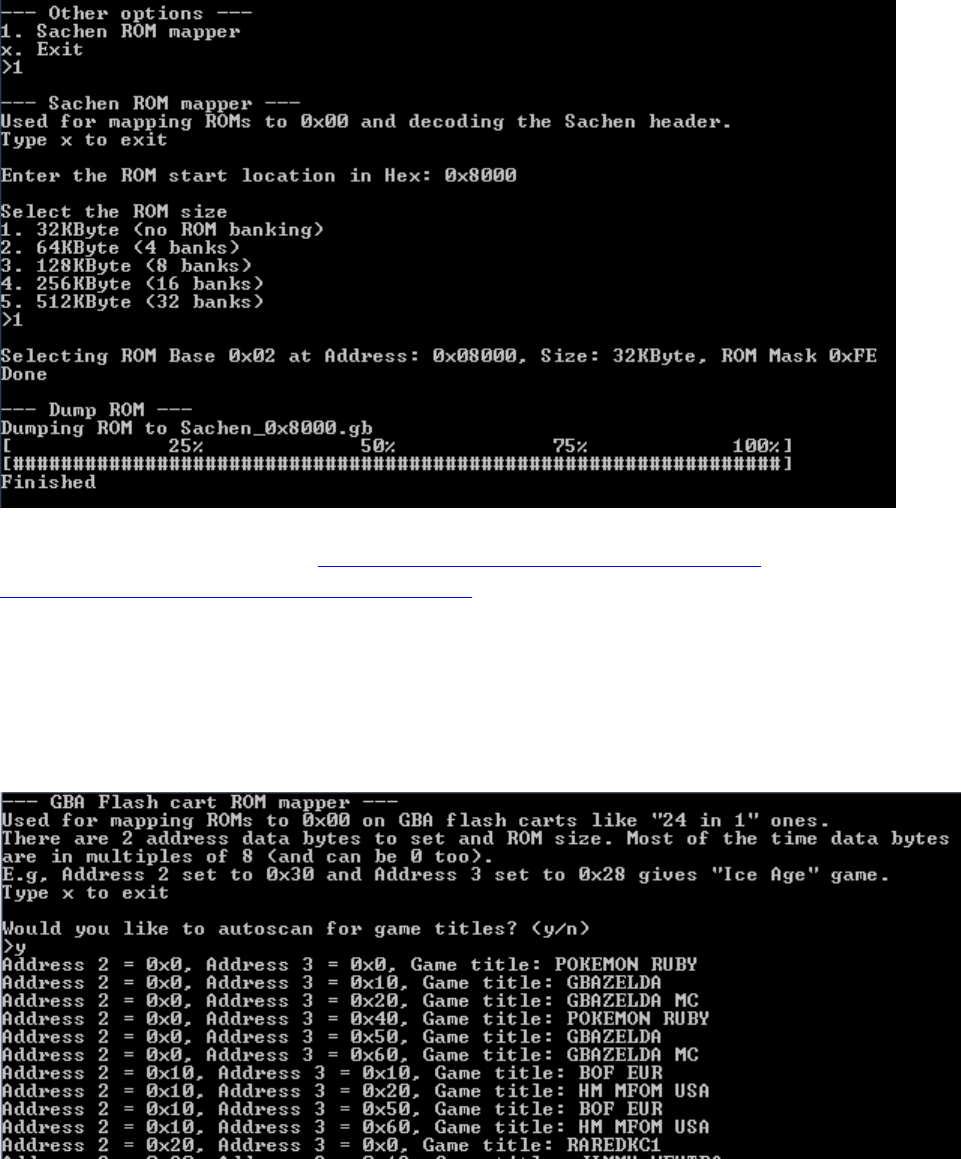
Sachen ROM Mapper support
You can use the “Other options” in console program to select ROMs to dump within a Sachen cart; the ROMs will be
dumped into their own file. You will be required to input the ROM starting address in hex and the number of banks.
For more information please check https://wiki.tauwasser.eu/view/Sachen_Mappers and
https://board.byuu.org/viewtopic.php?f=16&t=1557
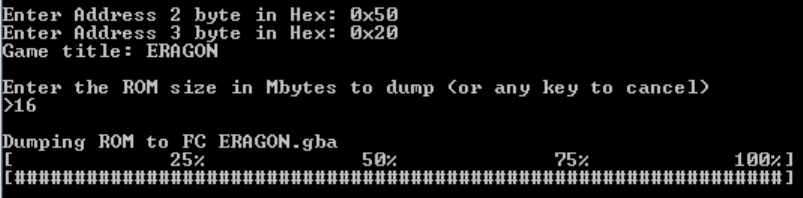
GBA Flash Cart ROM Mapper support
You can use the “Other options” in console program to select ROMs to dump within a GBA Flash Cart similar to the
“24-in-1” carts; the ROMs will be dumped into their own file named “FC_<Gametitle>.gba” after you select Address 2
and Address 3/4. Some ROMs may not work properly in emulators.
Page 12 GBxCart RW Manual Revision 31
Once entering the menu, it will prompt you if you wish to automatically scan the addresses for Game Titles.
You will be required to input the Address 2 and Address 3/4 in hex and enter the ROM size you wish to dump.
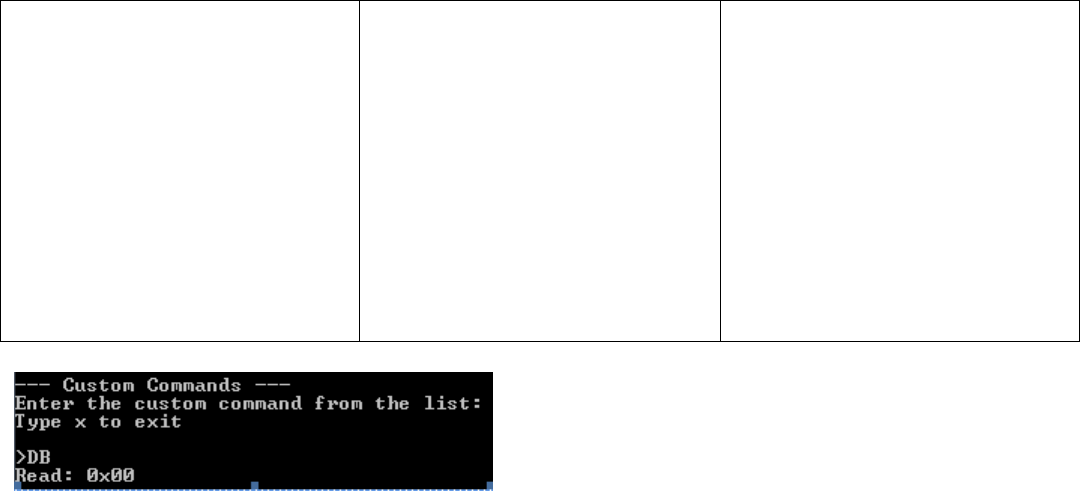
Raw I/O Access
If you wish to read/write to a special cartridge which the regular functions don’t support, you can access the raw I/O of
the ATmega8515L on board with the following COM commands. Commands should be sent as characters, a null
terminator byte (0) is used to determine the end of some strings sent. No responses will be returned except for
reading a PORT.
Enable/Disable common lines RD/WR/MREQ-CS/Reset-CS2 set high after each command
(recommended to disable so you drive these lines yourself)
To enable: M1 To disable: M0
Set pins as inputs/output
To set PB7 as an input: IB0x80 (include a null-terminator byte at the end)
The value set will be applied as DDR &= ~(setValue);
To set PB7 as an output: OB0x80 (include a null-terminator byte at the end)
The value set will be applied as DDR |= (setValue);
Set output low
To set PB7 low: LB0x80 (include a null-terminator byte at the end)
The value set will be applied as PORTB &= ~(setValue);
Set output high
To set PB7 high: HB0x80 (include a null-terminator byte at the end)
The value set will be applied as PORTB |= (setValue);
Read all pins of a PORT
Returns a byte representing all pins of that port, e.g. 128
To read PORTB: DB
Page 13 GBxCart RW Manual Revision 31
Port mappings to Gameboy Slot pins (for PCB v1.1/v1.2)
PB0 = A0
PB1 = A1
PB2 = A2
PB3 = A3
PB4 = A4
PB5 = A5
PB6 = A6
PB7 = A7
PD6 = *WR
PD5 = *RD
PA0 = A8
PA1 = A9
PA2 = A10
PA3 = A11
PA4 = A12
PA5 = A13
PA6 = A14
PA7 = A15
PD4 = *MREQ/CS
PE2 = *RESET/CS2
PC0 = D0/A16
PC1 = D1/A17
PC2 = D2/A18
PC3 = D3/A19
PC4 = D4/A20
PC5 = D5/A21
PC6 = D6/A22
PC7 = D7/A23
PE1 = Audio In
You can use “Custom commands” the console program to input these commands into by selecting option 6 (it will
automatically add null terminator bytes when needed).

Page 14 GBxCart RW Manual Revision 31
Dedicated Console Programs
Gameboy Camera Saver
This program is useful if you are constantly using the Gameboy Camera and wish to save the images quickly to BMP files.
Found in the \Interface_Programs\GBxCart_RW_GBCamera_Saver_vx.x folder.
Automatically creates a folder with the current date/time (<year>-<month>-<date>_<hour>-<minute>-<second>), saves
the GB camera memory to this folder and extracts the active (non-deleted) images from the save to separate BMP files
labelled 1.bmp to 30.bmp. It’s a good idea to check the images created match the images stored on the GB Camera.
If you wish to change where the folder is created, you can create a config-folder.ini file and enter in the directory where
you wish the folder should be created in.
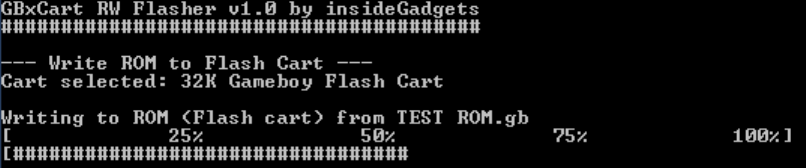
Console Flasher
This program is useful if you would like drag and drop interface to write ROMs to your flash carts. Please check the list of
supported flash carts on the first page of this manual.
Found in the \Interface_Programs\GBxCart_RW_Console_Flasher_vx.x folder.
Open the program first and select the Flash Cart you will be writing the ROM to.
Page 15 GBxCart RW Manual Revision 31
Now you can drag and drop your ROM file to gbxcart_rw_flasher_vx.x.exe without having to select the Flash cart type
again.
Page 16 GBxCart RW Manual Revision 31
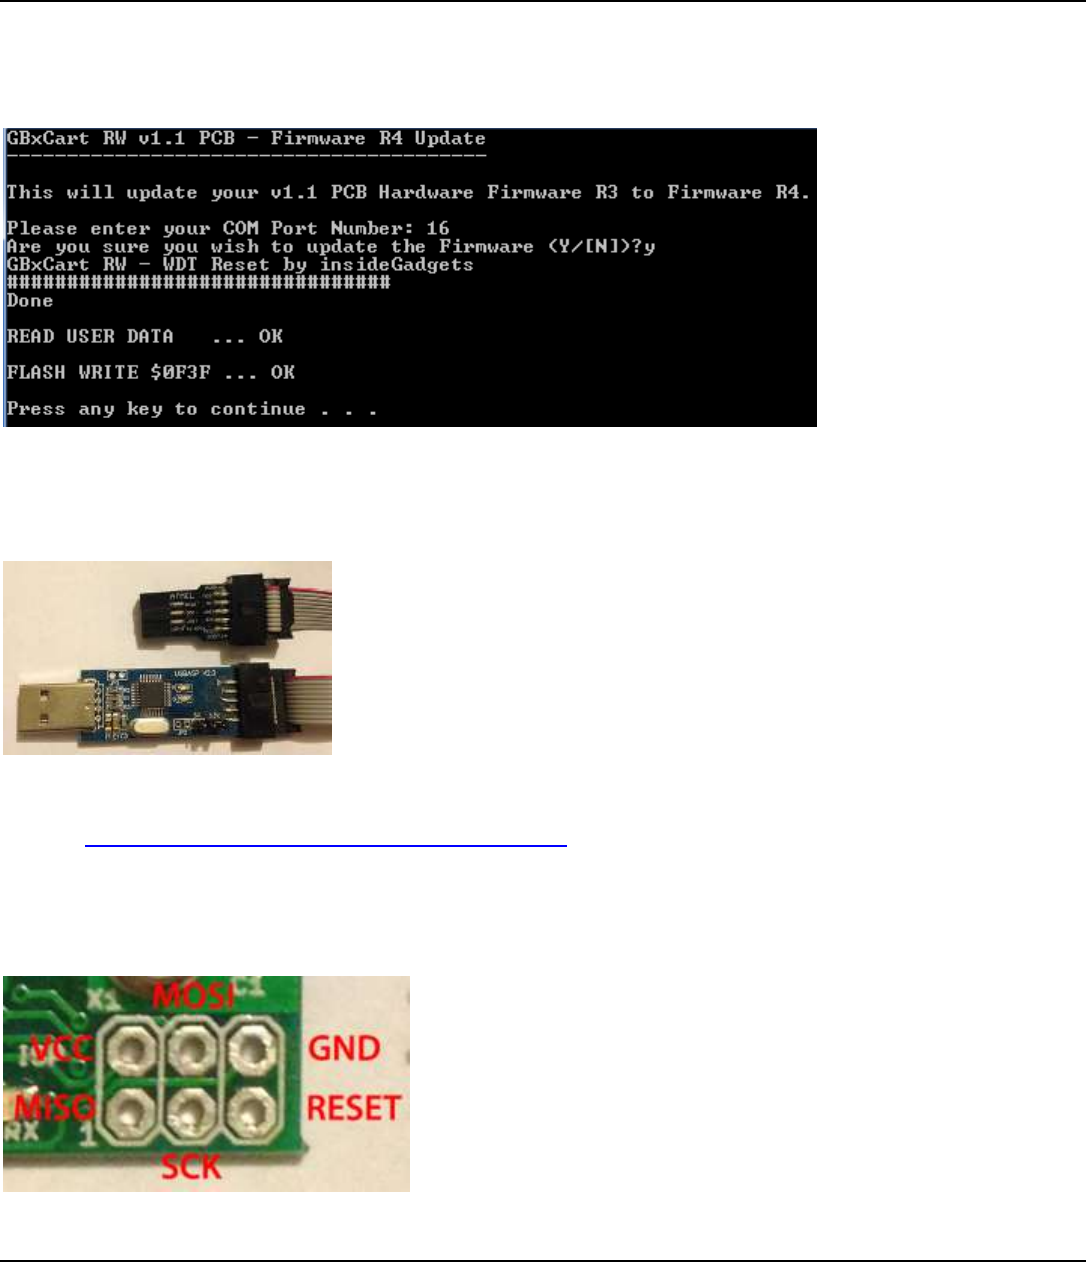
Update the Firmware
On R3+ devices
If you have Firmware R3 or higher you can use the below steps to update to the latest firmware.
Run the file \Firmware_Update\Rx_Firmware.bat which will prompt you for your COM port number and if you wish to
continue. After a few seconds you should see “OK” shown twice as above, the new firmware has now been uploaded.
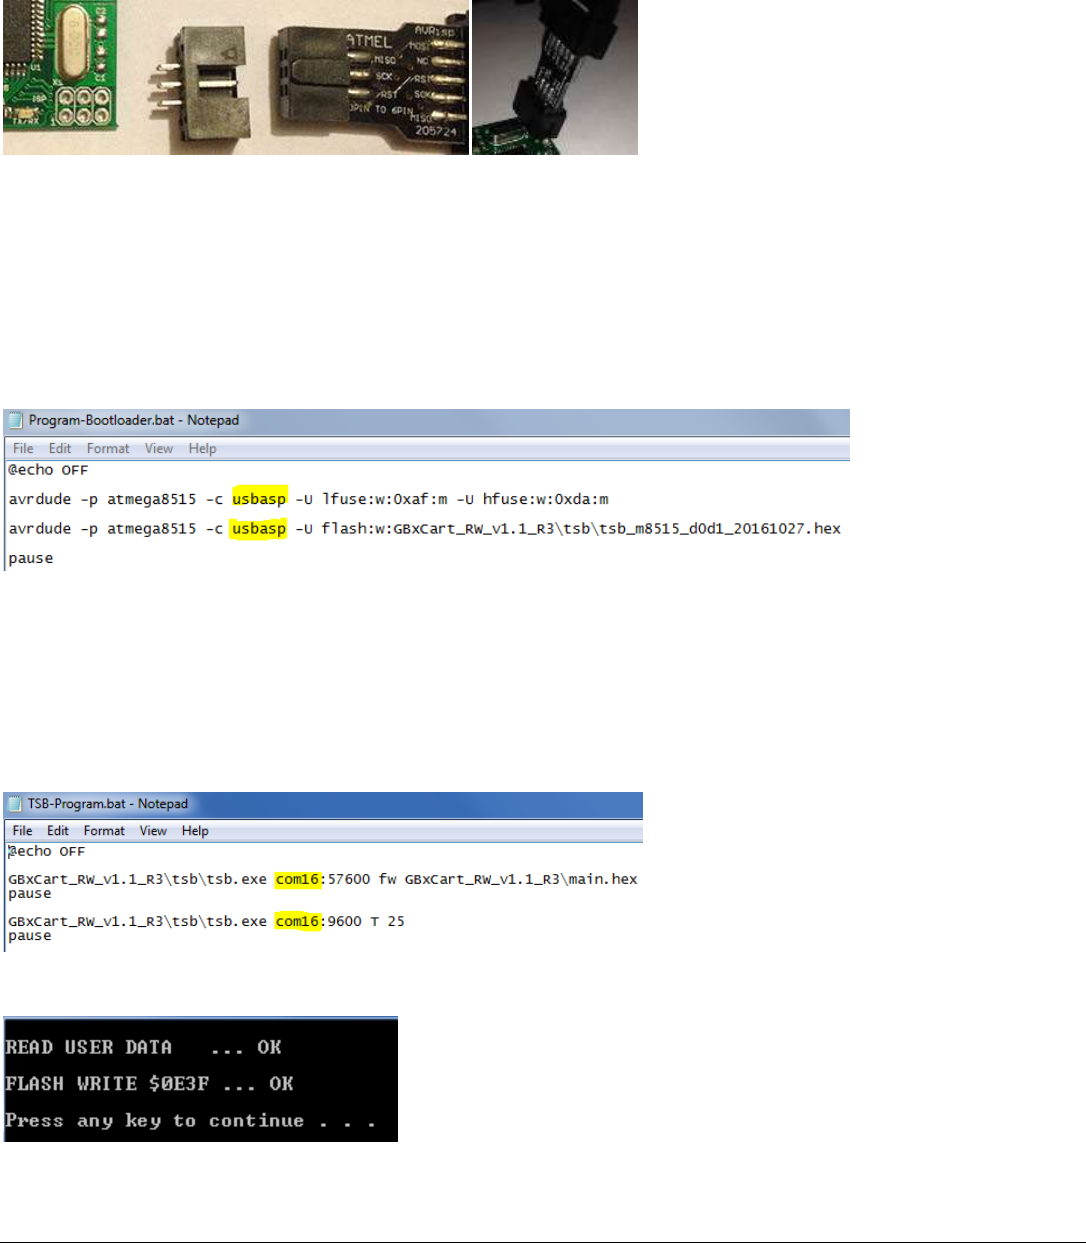
On R2 or lower devices or Re-program the ATmega using an AVR programmer
You will require an AVR programmer such as USBTinyISP, USBasp, etc, one that has a 6 pin interface (if the device has a
10 pin interface you can use a 10 pin to 6 pin converter cable). You’ll also need to download the Hardware/Firmware zip
file from https://www.insidegadgets.com/projects/gbxcart-rw/
Make sure that the voltage selected on the AVR programmer matches the 3.3V or 5V that you have selected on the
GBxCart RW board.
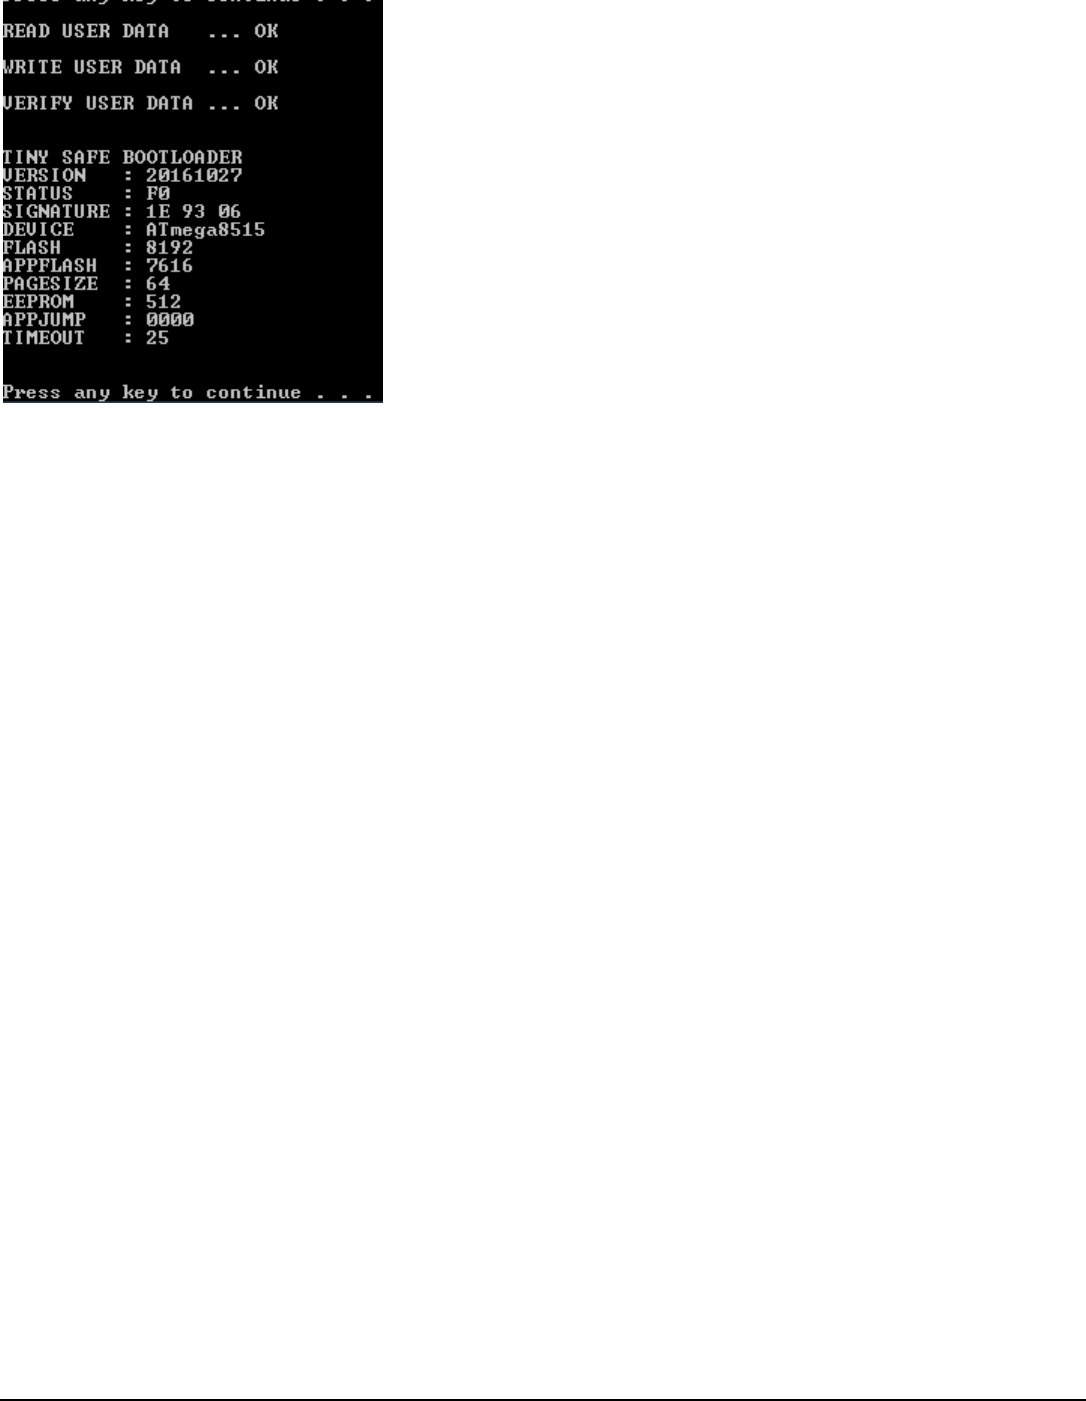
The PCB has an ISP 6 pin interface where you can solder male headers.
Page 17 GBxCart RW Manual Revision 31
If you don’t wish to do any soldering or would rather keep it clean, you can buy a DC3-6P connector, plug it into the AVR
programmer then insert it into the pins and hold it at an angle so the pins touch the pads.
You now have 2 options, either program the new firmware release directly or program TinySafeBoot which becomes the
boot loader so you can easily program any future updates without the need of an AVR programmer.
If you wish to program the boot loader and new firmware release
Depending on your programmer, you may need to open the /MCU_Files/Program-Bootloader.bat file to change the
programmer to suit, by default its set to “usbasp”.
Once you have the programmer pins connected to the board, insert the USB cable for your programmer and then run
the /MCU_Files/Program- Bootloader.bat file which should show it uploading and should return “Avrdude Done”.
Please unplug the AVR programmer.
Open up the /MCU_Files/ TSB-Program.bat, you will need to change the COM port to suit.
Plug in the USB cable to the GBxCart RW board. Run /MCU_Files/TSB-Program.bat and you should see the above result.
You should also see the LEDs on the board light up.
Page 18 GBxCart RW Manual Revision 31
Unplug and reconnect the USB cable then press a key and you should see the above result.
The boot loader and new firmware have now been uploaded.
If you wish to program the new firmware release directly without a boot loader
Depending on your programmer, you may need to open the /MCU_Files/Program.bat file to change the programmer to
suit, by default its set to “usbasp”.
Once you have the programmer pins connected to the board, insert the USB cable for your programmer and then run
the /MCU_Files/Program.bat file which should show it uploading and should return “Avrdude Done”.
Page 19 GBxCart RW Manual Revision 31
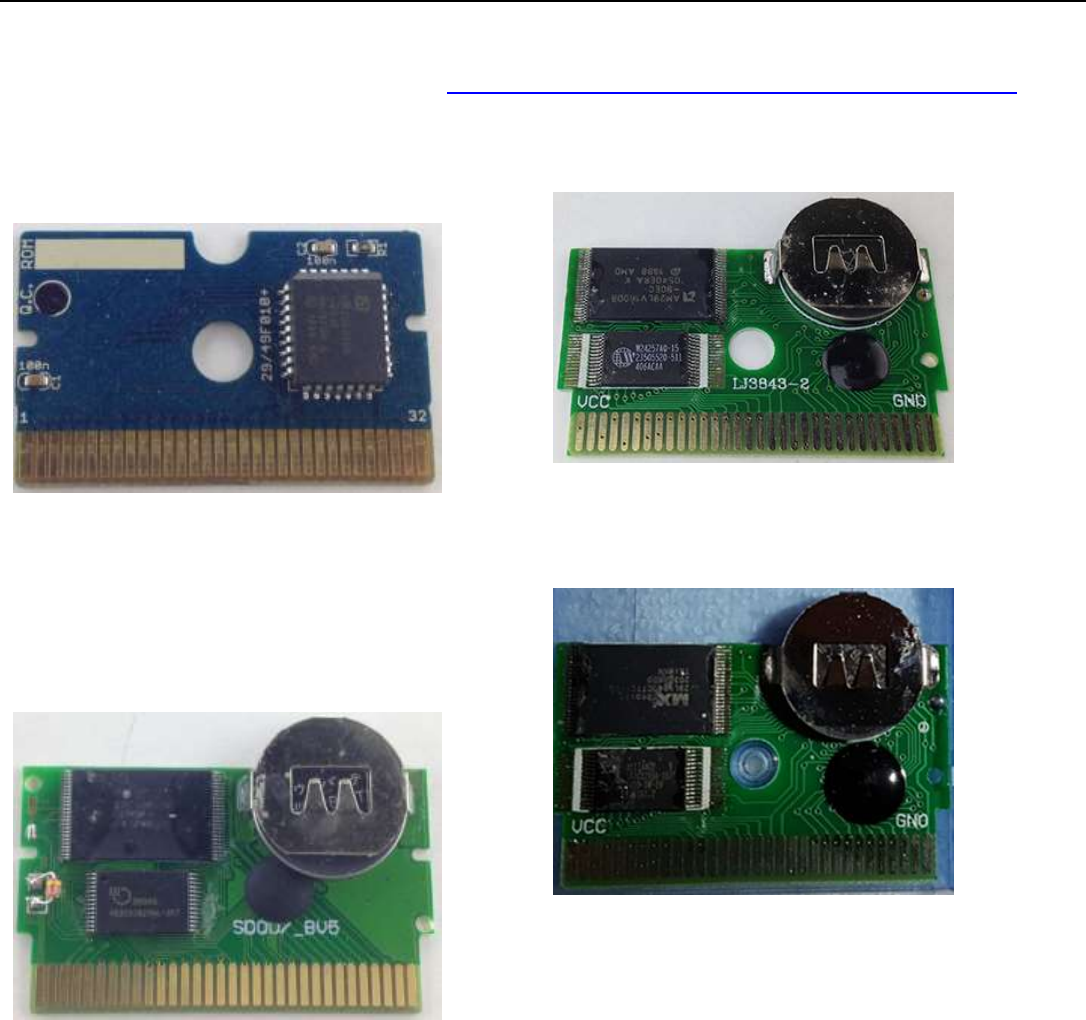
Flash Cart Support
Supported Gameboy Flash Cart PCB Pictures
For a larger view of the boards, please check out: https://www.insidegadgets.com/gbxcart-rw-flash-cart-support/
Catskull / DIY Carts - AM29F010B, SST39SF010A,
AT49F040 – 32KByte
Audio pin or WR pin as WE.
AM29LV160DB – 2MByte
Requires 3.3V to erase/program. PCB Text: LJ3843-2
SST39SF040 - 512KByte
Audio pin as WE.
Catskull / BV5 – 2MByte
PCB Text: SDOO/_BV5
29LV160CTTC – 2MByte
Requires 3.3V to erase/program.
[Image courtesy of Stephan G.]
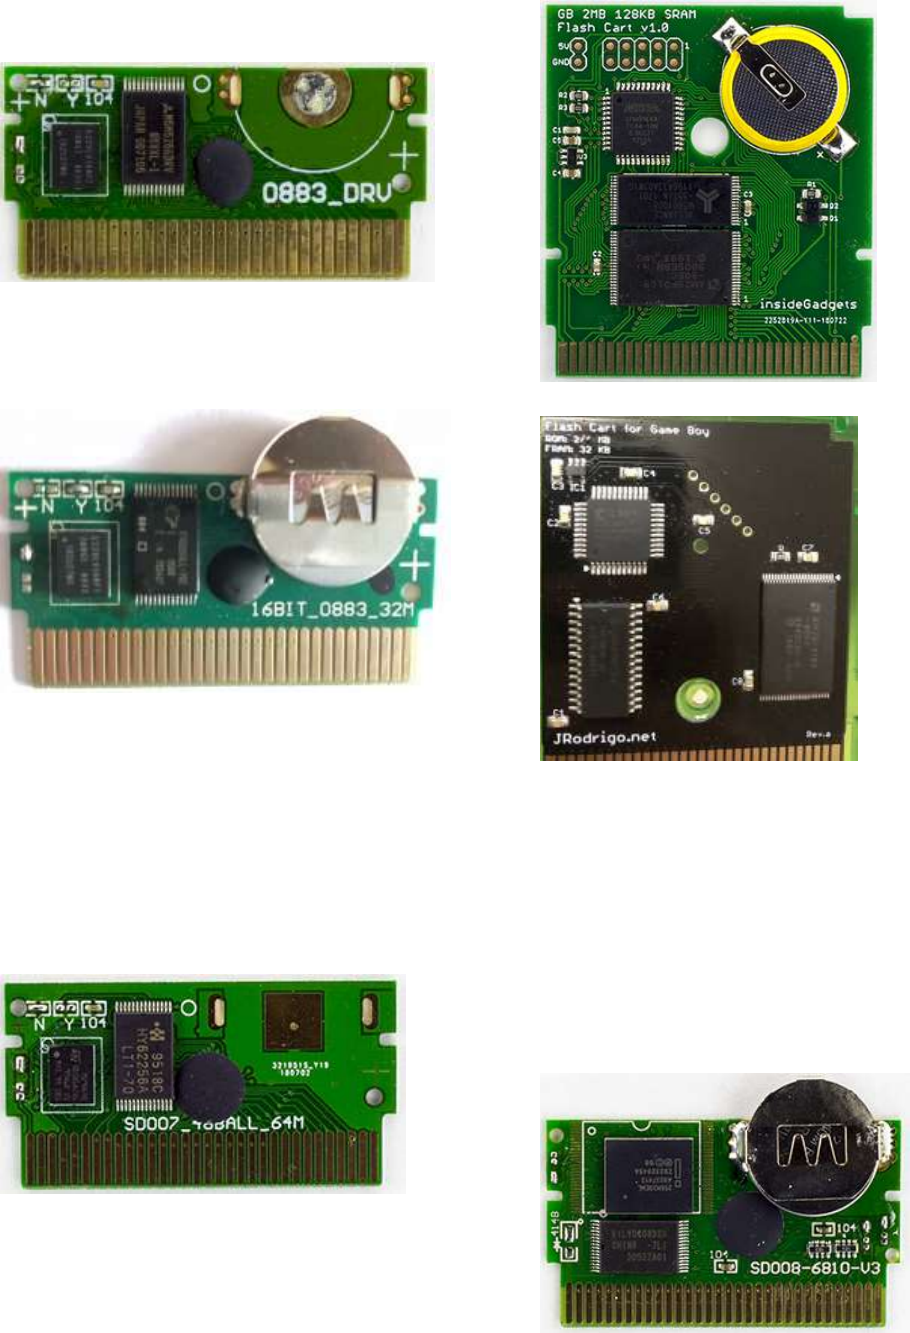
Page 20 GBxCart RW Manual Revision 31
ES29LV160 - 1MByte
Requires 3.3V to erase/program.
PCB Text: 0883_DRV
Originally purchased as Tetris DX.
PCB Text: 16BIT_0883_32M
[Image courtesy of Brian N.]
M29W640 – 4MByte
Requires 3.3V to erase/program. If you install a CR2032
coin cell battery, the battery will only last about 1 year as
the cart consumes about 19uA for its data retention. .
Originally purchased as a “Shantae”.
PCB Text: SD007_48BALL-64M
AM29F016B - 2MByte
256M29 - 32 MByte (4x 8MB Banks)
Requires 3.3V to erase/program. You need remove the
solder bridge on the top left to the one a little bit lower.
If using a Multi-game loader, you need to power cycle
GBxCart RW when writing to a different 8MB Bank.
Originally purchased as a "22 in 1" Pokemon cart (yellow
cartridge).
PCB Text: SD008-6810-V3
Page 21 GBxCart RW Manual Revision 31
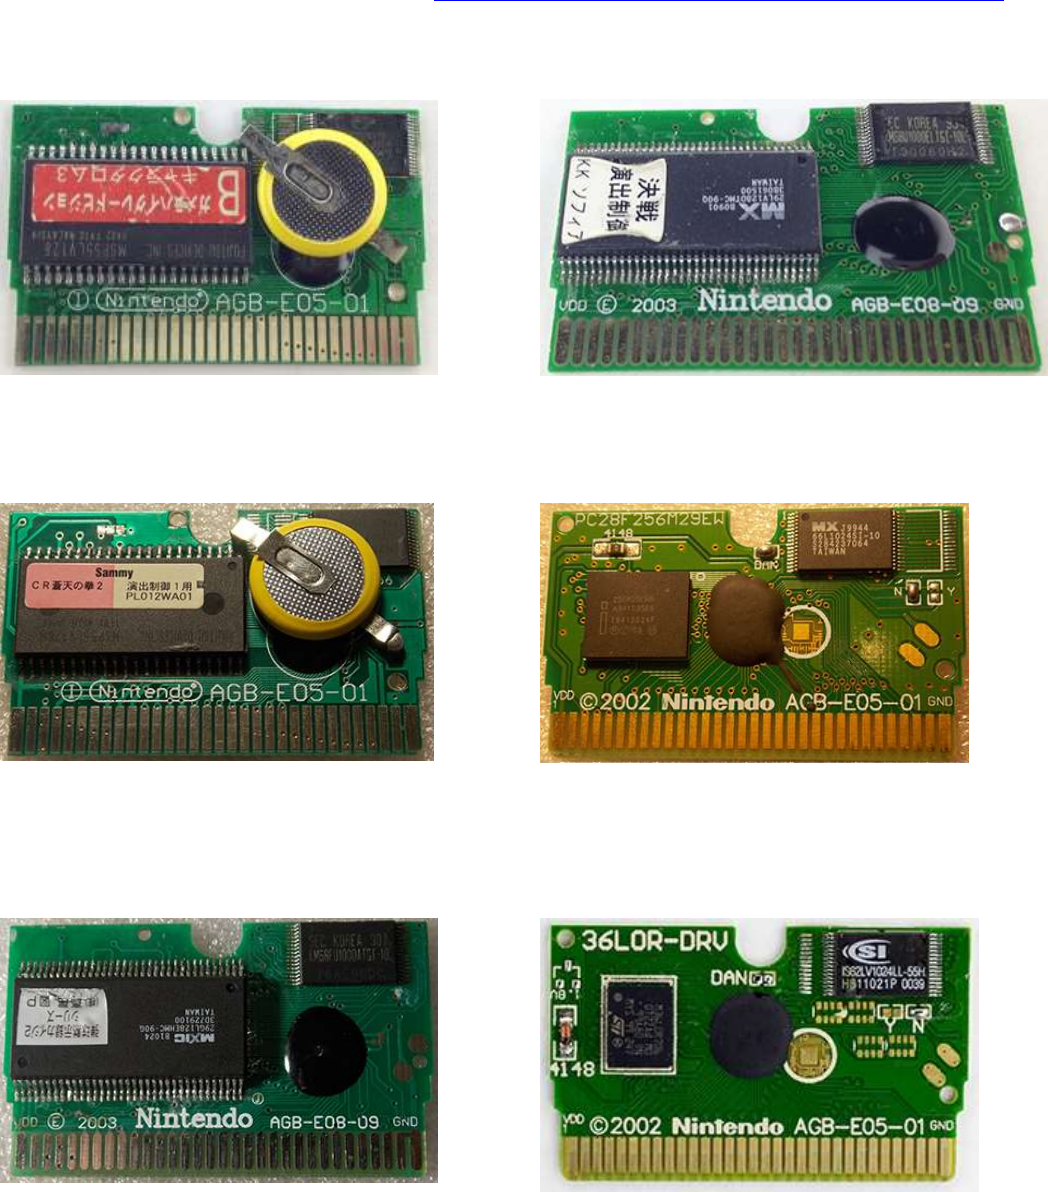
Supported Gameboy Advance Flash Cart PCB Pictures
For a larger view of the boards, please check out: https://www.insidegadgets.com/gbxcart-rw-flash-cart-support/
MSP55LV128 – 16MByte
PCB Text: AGB-E05-01
29LV128DTMC – 16MByte
PCB Text: AGB-E08-09
MSP55LV128M – 16MByte
PCB Text: AGB-E05-01
[Image courtesy of Jonas S]
256M29EWH – 32MByte
PCB Text: PC28F256M29EW / AGB-E05-01
[Image courtesy of Jonas S]
29GL128EHMC – 16MByte
PCB Text: AGB-E08-09
[Image courtesy of Jonas S]
M36L0R706 – 16MByte
PCB Text: 36LOR-DRV / AGB-E05-01
Page 22 GBxCart RW Manual Revision 31
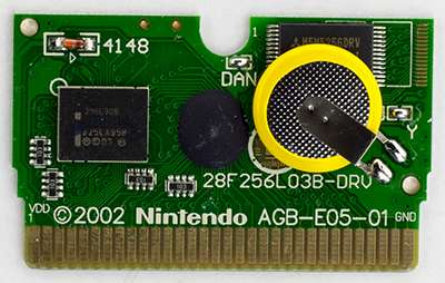
256L30B – 32MByte
Use 256L30B (2) if the first option doesn't write to your
cart. It seems there is a little issue which prohibits writing
to certain variants of this cart. Originally purchased as a
"150 Games, NES Classic" transparent red cart.
PCB Text: 28F256L03B-DRV

Page 23 GBxCart RW Manual Revision 31
Software Revision History
GUI Interface
v1.23 – 4 December 2018
Added support for 4 MByte (MX29LV320) Gameboy Advance Flash Cart
Added MBC type selection to GB Cart Info section
Changed GB / GBA mode drop down box to radio buttons
Added support for v1.3 PCB & GBxCart Mini RW v1.0
v1.22 – 5 October 2018
Added support for M29W640 – 4MByte Gameboy Flash Cart and provided another method “(2)” for flashing
M36L0R706 & 256L30B Gameboy Advance Flash Carts
v1.21 – 13 September 2018
Added support for SST39SF040 - 512KB & 256M29 - 32MB (4x 8MB Banks) Gameboy Flash Carts [Thanks to
David D. for the loan cart & Bart C. for testing]
Added progress bar in the task bar (for Windows 7+) [Thanks to Jonas S for the suggestion]
Added a taskbar pop-up to alert you when the functions such as reading the ROM, writing the ROM, etc is
completed and if the progress bar hasn’t moved for 1 minute, if the software is minimized. [Thanks to Jonas S for
the suggestion]
Added support for reading 8MB Gameboy Carts
v1.20 – 2 August 2018
Fixed bug when a colon “:” was in the Game title, reading the ROM/RAM wouldn’t write anything to the PC.
[Thanks to Casey F. for reporting]
v1.19 – 14 July 2018
Fix bug when backing up saves with automatic date/time set then unset, sometimes it continue to be set and
when prompting to restore save files, it wouldn’t work if the base save wasn’t present.
Small bug fix for M36L0R706 & 256L30B Gameboy Advance Flash Carts
Fixed bug when checking for EEPROM on Intel based GBA Flash Carts, it wouldn’t allow the end 2MB to be read.
Now we check if an Intel chip is present and skip the EEPROM check if so
v1.18 – 19 June 2018
Speed up writing to Gameboy / Gameboy Advance Flash carts
Slightly speed up reading Gameboy Advance ROMs
Added support for M36L0R706 (36LOR-DRV) & 256L30B (28F256L0RB-DRV) – 16MB/32MB Gameboy Advance
Flash Carts [Thanks to Sanni’s Cartreader project and Chris K. for loaning me a cart]
Added checkbox option to not erase a flash chip before writing to it. Useful if you have a DIY Gameboy Multi-
cart with an MCU controlling the ROM chip address lines or using DIP switches [Thanks to Jonas S for the
suggestion/testing]
v1.17 – 30 March 2018
Added auto detecting of COM port if the COM port from the configuration file doesn’t respond correctly
Page 24 GBxCart RW Manual Revision 31
Added support for AM29F016B – 2MB Gameboy Flash Carts [Thanks to Davide I. for reporting/testing]
v1.16 – 19 March 2018
Added a more thorough check for GBA SRAM/Flash saves
Added support for SST39SF010A & AT49F040 – 32K Gameboy Flash Carts (Firmware update R9 required) [Thanks
to Jonas S. & Wes for reporting/testing]
v1.15 – 28 February 2018
Added option to remember the specified folder where everything should save to and load from if you changed it
Added the option to add date/time to your save game file name when backing it up and also an option to
prompt for the save game file to restore (useful if you are backing up your progress when playing a game)
v1.14 – 15 February 2018
Fixed issue where some Gameboy Advance games with Flash saves weren’t restoring save games properly
[Thanks to Patrick R. for reporting and testing]
Added support for 29LV128DTMC (16MByte) & 256M29EWH (32MByte) Gameboy Advance Flash Carts [Thanks
to Jonas S. for testing]
Added support for AM29LV160DB & 29LV160CTTC – 2MByte Gameboy Flash Carts (Firmware update R8
required) [Thanks to Stephan G. for testing]
Added support for specifying a folder where everything should save to and load from [Thanks to Bart C. for the
suggestion]
v1.13 – 17 January 2018
Added support for 32K Gameboy Carts that use WR pin instead of the Audio pin [Thanks to Jonas S. for the
suggestion and testing]
Added support for Gameboy ES29LV160 - 1MByte Flash Cart
v1.12 – 26 December 2017
Added support for GBA (MSP55LV128M / 29GL128EHMC) 16MByte Flash Carts [Thanks to Jonas S. for reporting
and testing]
v1.11 – 5 December 2017
Added support for 16MByte MSP55LV128 Gameboy Advance Flash cart [Thanks to Sanni’s Cartreader project]
v1.10 – 28 November 2017
Adjusted check for EEPROM to occur before SRAM/Flash check (MCU pins would be floating if no SRAM/Flash
was present, can cause false positives)
v1.9 – 15 October 2017
Added support for 2Mbyte BV5 Gameboy Flash Carts (R4 Firmware required)
v1.8 – 5 September 2017
Added erase cart memory option [Thanks to Jonas S. for the suggestion]
Allow “_” in GB/GBA title
Fixed bug when selecting 64Kbit EEPROM option in Specify cart info
Page 25 GBxCart RW Manual Revision 31
Changed text on some buttons
v1.7 – 26 August 2017
Added support for writing ROMs to Gameboy 32K Flash Carts (works with R2+, faster with R3+)
Updated check of SRAM/Flash, re-read the first 64 bytes twice (if the cart has an EEPROM, sometimes data lines
can come back with random data in the first 64 bytes read).
Changed GUI text font, added “Manual” and “Check for updates” options
v1.6 – 17 August 2017
Added better checks for 512Kbit or 1Mbit Flash
Added a check for flash sector erases that may take longer than the usual 25ms, waits until byte 0x00 of the
sector reads 0xFF. [Thanks to EGJ for reporting the issue and assisting in troubleshooting]
v1.5 – 13 August 2017
Fixed bug when writing to a GBA 1Mbit Flash save, wasn’t ending the write before switching banks
Fixed bug where some GBA cartridges would be stuck in Flash ID mode and would keep repeating some bytes
over and over again when backing up the save to the PC. We now exit Flash ID mode another way.
[Thanks to Black Phoenix for bringing both of the above issues up and for the vast amount of time spent
troubleshooting it]
v1.4 – 24 June 2017
Added check to see if device is still connected before “Read Header”, “Read ROM”, etc buttons are pressed
Added the current mode (GBA or GB/GBC) and firmware version once connected
v1.3 – 8 May 2017
Added alternative method (very slow) to read Gameboy Camera if you aren’t able to re-program the firmware to
R2
Added additional check for carts with EEPROM that seemed to allow 4Kbit or 64Kbit reads without any issues
Added special check for “Chu-Chu Rocket!” SRAM size
Added support for “.” in GBA game title
Fixed bug when reading EEPROM with GBA 32MB carts (firmware update R2 required)
v1.2 – 4 May 2017
Fixed a bug when opening/closing COM port that would cause the program to lock up
Fixed a bug that wouldn’t open the “Specify Cart Info” menu when a GBA cart was inserted
Updated ROM size check from 16MB to 32MB
Update the check for GBA SRAM/Flash between 256k/512k to correct some carts been detected as 256k
v1.1 – 4 April 2017
Updated some text labels
v1.0 – 11 March 2017
Initial Release
Page 26 GBxCart RW Manual Revision 31
Console Interface
v1.18 – 4 December 2018
Advises you which COM port number it’s connected on [Thanks to Kim R. for the suggestion]
Added MBC type selection to GB Cart Info section
Added support for v1.3 PCB & GBxCart Mini RW v1.0
v1.17 – 5 October 2018
Added another COM port for Apple Mac [Thanks to rebbTRSi]
v1.16 – 14 September 2018
Added support for reading 8MB Gameboy Carts
v1.15 – 2 August 2018
Fixed bug when a colon “:” was in the Game title, reading the ROM/RAM wouldn’t write anything to the PC.
[Thanks to Casey F. for reporting]
Fixed up Linux compiling issues after MacOS support was added [Thanks to Jan B. for reporting]
v1.14 – 14 July 2018
Fixed bug when checking for EEPROM on Intel based GBA Flash Carts, it wouldn’t allow the end 2MB to be read.
Now we check if an Intel chip is present and skip the EEPROM check if so
v1.13 – 19 June 2018
Slightly speed up reading Gameboy Advance ROMs
Added MacOS support (untested) [Thanks to grosshei]
v1.12 – 30 March 2018
Added auto detecting of COM port if the COM port from the configuration file doesn’t respond correctly
v1.11 – 19 March 2018
Added a more thorough check for GBA SRAM/Flash saves
Added support for SST39SF010A & AT49F040 – 32K Gameboy Flash Carts (Firmware update R9 required)
[Thanks to Jonas S. & Wes for reporting/testing]
v1.10 – 15 February 2018
Fixed issue where some Gameboy Advance games with Flash saves weren’t restoring save games properly
[Thanks to Patrick R. for reporting and testing]
v1.9 – 28 November 2017
Adjusted check for EEPROM to occur before SRAM/Flash check (MCU pins would be floating if no SRAM/Flash
was present, can cause false positives)
v1.8 – 4 November 2017
Added support for Linux [Thanks to Michael C]
v1.7 – 5 September 2017
Page 27 GBxCart RW Manual Revision 31
Added erase cart memory option [Thanks to Jonas S. for the suggestion]
Allow “_” in GB/GBA title
v1.6 – 26 August 2017
Remove check for EEPROM if SRAM/Flash found
Updated check of SRAM/Flash, re-read the first 64 bytes twice (if the cart has an EEPROM, sometimes data lines
can come back with random data in the first 64 bytes read).
v1.5 – 17 August 2017
Added better checks for 512Kbit or 1Mbit Flash
Added a check for flash sector erases that may take longer than the usual 25ms, waits until byte 0x00 of the
sector reads 0xFF. [Thanks to EGJ for reporting the issue and assisting in troubleshooting]
v1.4 – 13 August 2017
Fixed bug when writing to a GBA 1Mbit Flash save, wasn’t ending the write before switching banks
Fixed bug where some GBA cartridges would be stuck in Flash ID mode and would keep repeating some bytes
over and over again when backing up the save to the PC. We now exit Flash ID mode another way.
[Thanks to Black Phoenix for bringing both of the above issues up and for the vast amount of time spent
troubleshooting it]
Fixed bug where specify flash type/size was not taking effect
Updated Sachen ROM mapper to support v1.1 PCB
Added support for reading ROMs from GBA “24-in-1” Flash Carts (may not work for all flash carts)
v1.3 – 8 May 2017
Added alternative method (very slow) to read Gameboy Camera if you aren’t able to re-program the firmware to
R2
Added additional check for EEPROMs which seem to allow 4Kbit or 64Kbit reads without any issues
Added special check for “Chu-Chu Rocket!” SRAM
Added support for “.” in game title
Fixed bug when reading EEPROM with GBA 32MB carts (firmware update R2 required)
v1.2 – 4 May 2017
Updated ROM size check from 16MB to 32MB
Update the check for GBA SRAM/Flash between 256k/512k to correct some carts been detected as 256k
v1.1 – 4 April 2017
Added custom commands functionality for raw I/O access
Added Sachen mapper support so you can dump ROMs from the Sachen cart into their own files
[Thanks to Voltagex for bringing this up and helping with troubleshooting]
[Thanks to Tauwasser for the Sachen information/post explaining how it works]
v1.0 – 11 March 2017
Initial Release
Page 28 GBxCart RW Manual Revision 31
GB Camera Saver
v1.6 – 4 December 2018
Advises you which COM port number it’s connected on [Thanks to Kim R. for the suggestion]
Added a variant to to also include deleted images as well [Thanks to Santiago C. for the suggestion]
v1.5 – 5 October 2018
Added another COM port for Apple Mac [Thanks to rebbTRSi]
v1.4 – 2 August 2018
Fixed up Linux compiling issues after MacOS support was added [Thanks to Jan B. for reporting]
v1.3 – 30 March 2018
Added auto detecting of COM port if the COM port from the configuration file doesn’t respond correctly
v1.2 – 15 February 2018
Added support for specifying a folder to save to in config-folder.ini [Thanks to Bart C for the suggestion]
v1.1 – 4 November 2017
Added support for Linux [Thanks to Michael C]
v1.0 – 12 July 2017
Initial Release
Console Flasher
v1.14 – 4 December 2018
Advises you which COM port number it’s connected on [Thanks to Kim R. for the suggestion]
Added support for GB 64 MB Mighty Flash Cart and 4 MByte (MX29LV320) Gameboy Advance Flash Cart
For Windows: Moved config.ini and config-flash.ini file to C:\Users\<username> folder so ROMs can be dragged
and dropped from anywhere
v1.13 – 5 October 2018
Added support for M29W640 – 4MByte Gameboy Flash Cart and provided another method “(2)” for flashing
M36L0R706 & 256L30B Gameboy Advance Flash Carts
Added another COM port for Apple Mac [Thanks to rebbTRSi]
v1.12 – 14 September 2018
Added support for SST39SF040 - 512KB & 256M29 - 32MB (4x 8MB Banks) Gameboy Flash Carts [Thanks to
David D. for the loan cart & Bart C. for testing]
v1.11 – 2 August 2018
Fixed bug when a colon “:” was in the Game title, reading the ROM/RAM wouldn’t write anything to the PC.
[Thanks to Casey F. for reporting]
Fixed up Linux compiling issues after MacOS support was added [Thanks to Jan B. for reporting]
Page 29 GBxCart RW Manual Revision 31
v1.10 – 14 July 2018
Small bug fix for M36L0R706 & 256L30B Gameboy Advance Flash Carts
v1.9 – 19 June 2018
Speed up writing to Gameboy / Gameboy Advance Flash carts
Added support for M36L0R706 (36LOR-DRV) & 256L30B (28F256L0RB-DRV) – 16MB/32MB Gameboy Advance
Flash Carts [Thanks to Sanni’s Cartreader project and Chris K. for loaning me a cart]
Added MacOS support (untested) [Thanks to grosshei]
v1.8 – 30 March 2018
Added auto detecting of COM port if the COM port from the configuration file doesn’t respond correctly
Added support for AM29F016B – 2MB Gameboy Flash Carts [Thanks to Davide I. for reporting/testing]
v1.7 – 19 March 2018
Added support for SST39SF010A & AT49F040 – 32K Gameboy Flash Carts [Thanks to Jonas S. & Wes for
reporting/testing]
v1.6 – 15 February 2018
Added support for 29LV128DTMC (16MByte) & 256M29EWH (32MByte) Gameboy Advance Flash Carts [Thanks
to Jonas S. for testing]
Added support for AM29LV160DB & 29LV160CTTC – 2MByte Gameboy Flash Carts (Firmware update R8
required) [Thanks to Stephan G. for testing]
v1.5 – 17 January 2018
Added support for 32K Gameboy Carts that use WR pin instead of the Audio pin [Thanks to Jonas S. for the
suggestion and testing]
Added support for ES29LV160 - 1MByte Flash Cart
v1.4 – 26 December 2017
Added support for GBA (MSP55LV128M / 29GL128EHMC) 16MByte Flash Carts [Thanks to Jonas S. for reporting
and testing]
v1.3 – 5 December 2017
Added support for 16MByte Gameboy Advance MSPLV128 Flash cart [Thanks to Sanni’s Cartreader project]
v1.2 – 4 November 2017
Added support for Linux [Thanks to Michael C]
v1.1 – 15 October 2017
Added support for Gameboy 2Mbyte BV5 Flash Carts
v1.0 – 26 August 2017
Initial Release - Support for writing ROMs to Gameboy 32K Flash Carts (works with R2+, faster with R3+)

Page 30 GBxCart RW Manual Revision 31
Hardware/Firmware Revision History
PCB v1.1 / v1.2 / v1.3 Firmware
Firmware R12 – 4 December 2018
Added support for GB 64 MB Mighty Flash Cart and 4 MByte (MX29LV320) Gameboy Advance Flash Cart
Firmware R11 – 14 September 2018
Added support for SST39SF040 - 512KB & 256M29 - 32MB (4x 8MB Banks) Gameboy Flash Carts [Thanks to
David D. for the loan cart & Bart C. for testing]
Set reset pin low for 50ms to reset the cart at startup (for some CPLD carts to initialise properly)
Firmware R10 – 19 June 2018
Speed up writing to Gameboy / Gameboy Advance Flash carts
Slightly speed up reading Gameboy Advance ROMs
Added support for M36L0R706 (36LOR-DRV) & 256L30B (28F256L0RB-DRV) – 16MB/32MB Gameboy Advance
Flash Carts [Thanks to Sanni’s Cartreader project and Chris K. for loaning me a cart]
Firmware R9 – 19 March 2018
Re-written Gameboy flash cart writing functions
Added support for SST39SF010A & AT49F040 – 32K Gameboy Flash Carts [Thanks to Jonas S. & Wes for
reporting/testing]
Firmware R8 – 15 February 2018
Added support for AM29LV160DB & 29LV160CTTC – 2MByte Gameboy Flash Carts [Thanks to Stephan G. for
testing]
Firmware R7 – 17 January 2018
Added support for 32K Gameboy Carts that use WR pin instead of the Audio pin [Thanks to Jonas S. for the
suggestion and testing]
Added support for Gameboy ES29LV160 - 1MByte Flash Cart
Firmware R6 – 26 December 2017
Verifies bytes when programming all flash carts
Firmware R5 – 5 December 2017
Added support for writing ROMs to 16MByte MSP55LV128 Gameboy Advance Flash cart [Thanks to Sanni’s
Cartreader project]
Firmware R4 – 15 October 2017
Added support for writing ROMs to Gameboy 2Mbyte BV5 Flash Carts
Firmware R3 – 26 August 2017
Now using TinySafeBoot bootloader so ATmega MCU can be reprogrammed without the need for a
programmer. (If you purchased a board before 23 August 2017, you will require an AVR programmer, please
check “Reprogramming the MCU” section in the manual)
Page 31 GBxCart RW Manual Revision 31
Added support for writing ROMs to Gameboy 32K Flash Carts
Firmware R2 – 8 May 2017
Added extra nop when reading Gameboy Camera SRAM as some of data would change sometimes leading to
artifacts on the pictures
Changed A0-A23 address when preparing to read EEPROM from 0xFFFFFF to 0xFFFF00 to support GBA 32MB
carts
Firmware R1 – 27 April 2017
Switched from ATmega32A to ATmega8515L, some assigned ports have changed
PCB v1.0 Firmware
(Firmware R2) – 8 May 2017
Added extra nop when reading Gameboy Camera SRAM as some of data would change sometimes leading to
artifacts on the pictures
Changed A0-A23 address when preparing to read EEPROM from 0xFFFFFF to 0xFFFF00 to support GBA 32MB
carts
(Firmware R1) – 11 March 2017
Initial Release (Errata - The switch operates in reverse, for example, moving it to the left should select 3.3V but it
selects 5V and moving it to the right should select 5V but it selects 3.3V.)
PCB Hardware
v1.3 – 4 December 2018
Removed switch to select voltage, it’s now software controlled.
v1.2b – 19 July 2018
Added 10K pull-up to Reset/CS2 line as some GBA flash cart’s SRAM may corrupt a few bytes when the device is
plugged/unplugged
Added 2 extra pads for to hold micro USB port more securely
v1.2a – 5 March 2018
Added “GB” and “GBA” silkscreen to existing “5V” and “3V” text
v1.2 – 29 December 2017
Changed through-hole crystals to SMD crystals
Changed Mini USB connector to Micro USB connector
v1.1 – 27 April 2017
Changed ATmega169A to ATmega8515L