GE_Web_QIG_TK 803R_1603R GE_QIG_TK GE QIG TK 803R 1603R
GE_QIG_TK-803R_1603R GE_QIG_TK-803R_1603R .trendnet.com - /TK-803R/manual/
User Manual: GE_QIG_TK-803R_1603R .trendnet.com - /TK-1603R/manual/
Open the PDF directly: View PDF ![]() .
.
Page Count: 14
TK-803R
TK-1603R
Quick Installation Guide

Table of Contents
Table of Contents
Version 10.27.2006
Deutsch .....................................................................................................
Specifications ............................................................................................
Troubleshooting .........................................................................................
1
1
2
4
7
8
1. Bevor Sie anfangen ...........................................................................
2. Installation .........................................................................................
3. Bedienung .........................................................................................
1. Bevor Sie anfangen
Deutsch
1
Anwendung
Systemanforderungen
PS/2- oder USB-Tastatur
PS/2- oder USB-Maus
VGA-kompatibler Monitor
Windows 98SE/ME/2000/XP/2003-Server, Linux und Mac
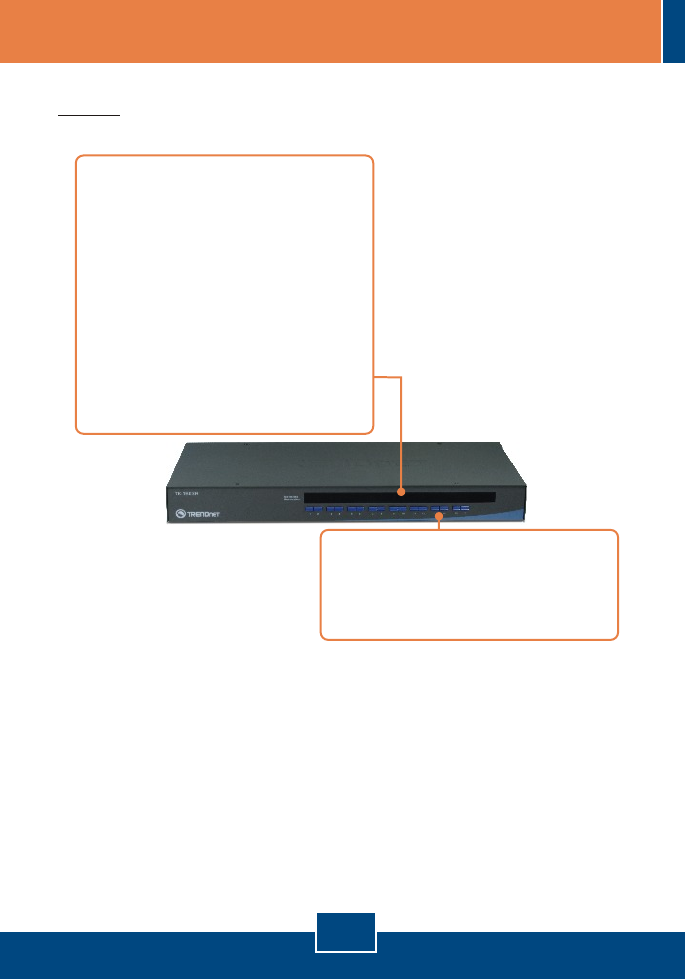
KVM-Kabel
TK-803R/TK-1603R
Netzteil (9V DC, 1A)
Anleitung zur Schnellinstallation
Montagesatz für Gestell
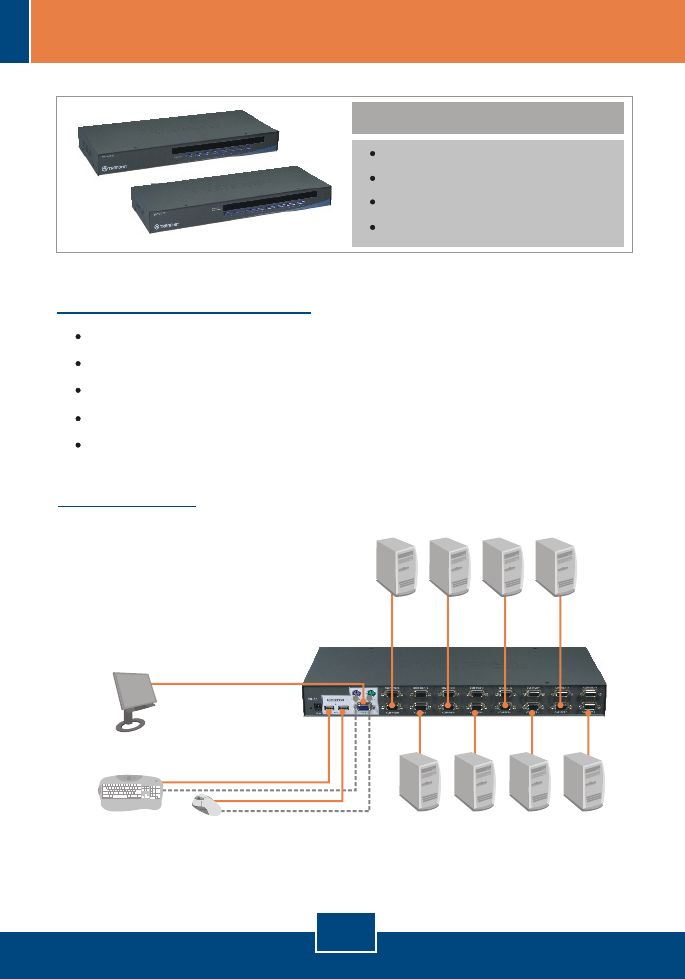
Packungsinhalt
8/16 Ports Rack Mount
USB KVM Switch
(TK-803R/TK-1603R)
PC 2PC 4PC 6PC 8
Monitor
USB or PS/2
Mouse
USB or PS/2
Keyboard
PC 1PC 3PC 5PC 7
2. Installation
Deutsch
2
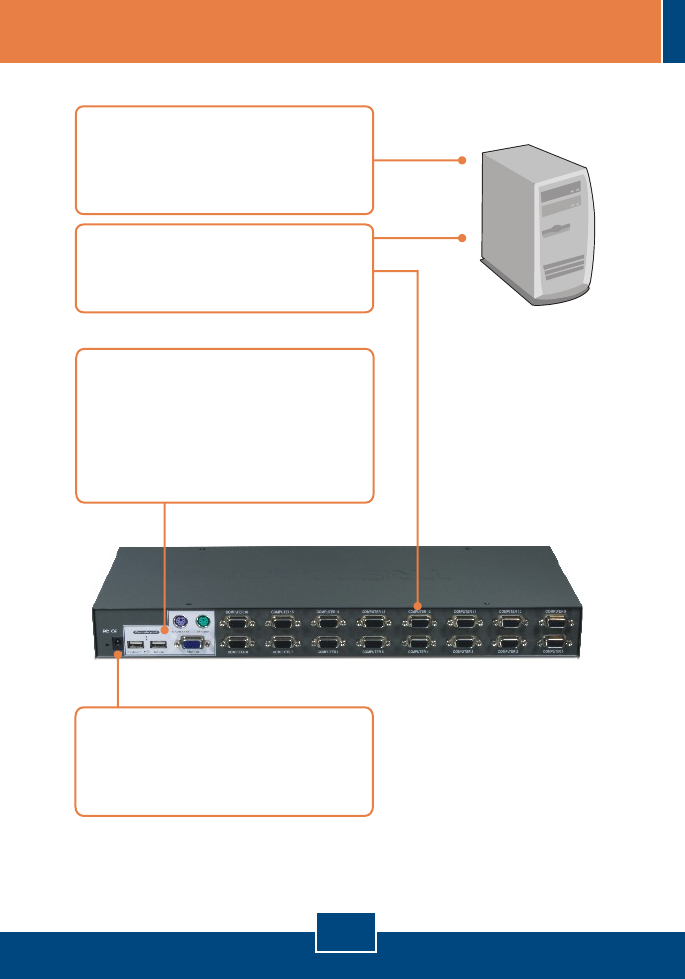
4. Verbinden Sie das beiliegende
Netzteil mit dem KVM-Umschalter
und stecken Sie es in eine
Steckdose.
1. Schalten Sie alle Computer und
Peripheriegeräte aus und trennen
Sie alle Stromversorgungskabel
ab.
2. Verbinden Sie die Computer über
die KVM-Kabel mit dem KVM-
Umschalter.
3. Verbinden Sie die gemeinsam
genutzte PS/2- bzw. USB-Tastatur,
den Monitor und die PS/2- bzw.
USB-Maus mit dem Konsolen-
Port des KVM-Umschalters. (im
Bild: TK-1603R)
Deutsch
3
Ihre Installation ist beendet!
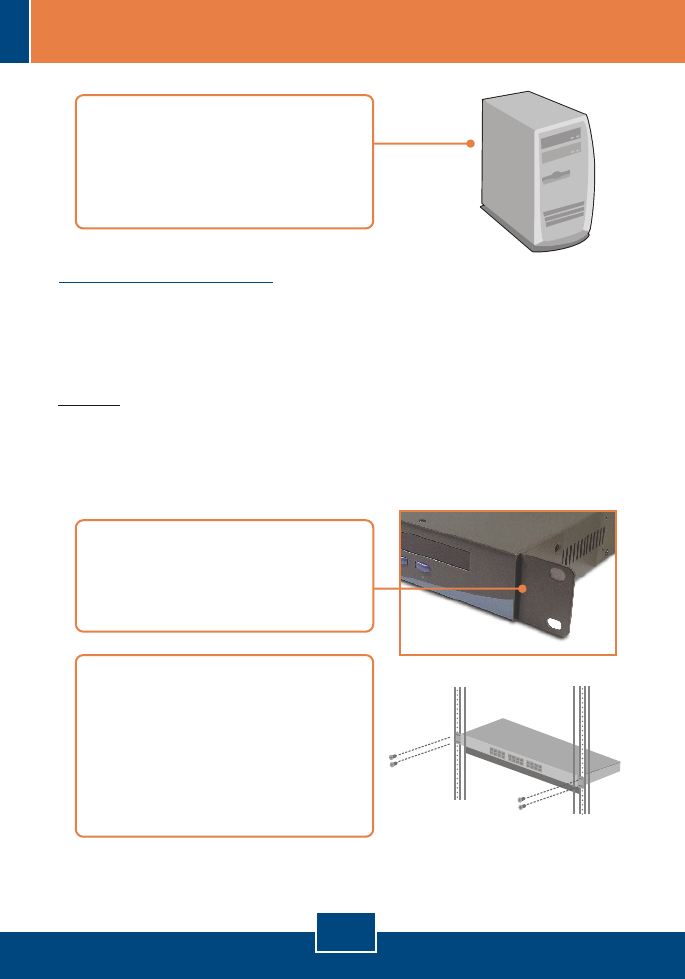
Der Umschalter lässt sich in ein standardmäßiges 19-Zoll EIA-Gestell
einbauen, das seinerseits gemeinsam mit anderen Geräten in einen
Kabelschrank montiert werden kann.
Hinweis: Wenn Sie den KVM-Umschalter auf ein EIA-19”-Gestell montieren
wollen, befestigen Sie die beiliegenden Montageklammern mit den Schrauben
an den Seiten des KVM-Umschalters und bringen Sie den Umschalter dann mit
Hilfe der Ausrüstungen des Gestellproduzenten am Gestell an.
Montage in Gestell
5. Schalten Sie die miteinander
verbundenen Computer
nacheinander ein und warten Sie,
bis die Computer vollständig
hochgefahren sind.
6. Bringen Sie die Befestigungsbügel
mit den mitgelieferten Schrauben
an beiden Seiten des Umschalters
an.
7. Setzen Sie den Umschalter
sorgfältig in das Gestell ein.
Richten Sie den Bügel an den
Schraubenlöchern im Gestell aus
und befestigen Sie den Umschalter
mit den zum Gestell gehörenden
Schrauben.
Deutsch
4
3. Bedienung
Hinweis: Um von einem Computer zum anderen zu wechseln, können Sie
Tastenkombinationen.
LED-Anzeigen
Rote LED leuchtet: Das KVM-Kabel
ist angeschlossen, der KVM-
Umschalter wird vom PC
angesteuert.
Grüne LED leuchtet: Der
ausgewählte PC-Anschluss ist aktiv,
unabhängig davon, ob der Computer
ein- oder ausgeschaltet ist.
Drucktasten
Drücken Sie auf eine Taste, um zu
einem anderen Computer
umzuschalten.
3.2 Tastenkombinationen
Eine Tastenkombination setzt sich aus drei Tasten zusammen:
Tastenkombination = ScrLk (ROLLEN) + ScrLk (ROLLEN) +
Befehlstaste(n)
Sobald Sie die ScrLk-Taste (ROLLEN-Taste) gedrückt haben, müssen Sie die
Taste innerhalb von 2 Sekunden nochmals drücken. Innerhalb der nächsten 2
Sekunden müssen Sie dann eine Befehlstaste drücken. Wenn Sie innerhalb
von 2 Sekunden keine Taste drücken, wird die Tastenkombination nicht
wirksam.
Deutsch
5
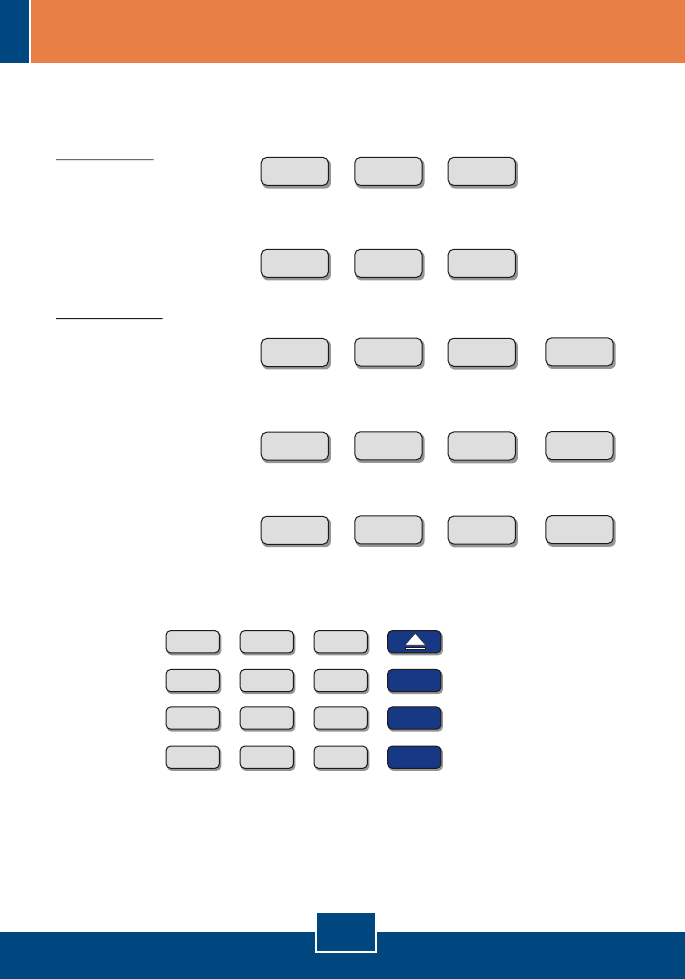
Auswahl eines bestimmten PC-Anschlusses:
Für TK-803R
nur PC-Kanal auswählen =
:
nur PC-Kanal auswählen =
Für TK-1603R
nur PC-Kanal auswählen =
nur PC-Kanal auswählen
nur PC-Kanal auswählen
Um am TK-803R z.B. Anschluss 1 auszuwählen, drücken Sie bitte
Um am TK-1603R z.B. Anschluss 1 auszuwählen, drücken Sie bitte:
=
Um am TK-1603R Anschluss 10 auszuwählen, drücken Sie bitte:
=
Mac-Benutzer
Zuordnung der Standard-PC-Tastatur zur Mac-Tastatur:
ScrLk ScrLk 1
+ +
ScrLk ScrLk Y
+ +
ScrLk ScrLk 10
+ + +
ScrLk ScrLk YZ
+ + +
ScrLk ScrLk 01
+ + +
In der folgenden Übersicht finden Sie eine Zusammenfassung aller
Tastenkombinationen.
ScrLk ScrLk C
+ + = CD/DVD drive
eject key
ScrLk ScrLk F10
+ + =
ScrLk ScrLk F11
+ + =
ScrLk ScrLk F12
+ + =
F13
F15
F14
Deutsch
6
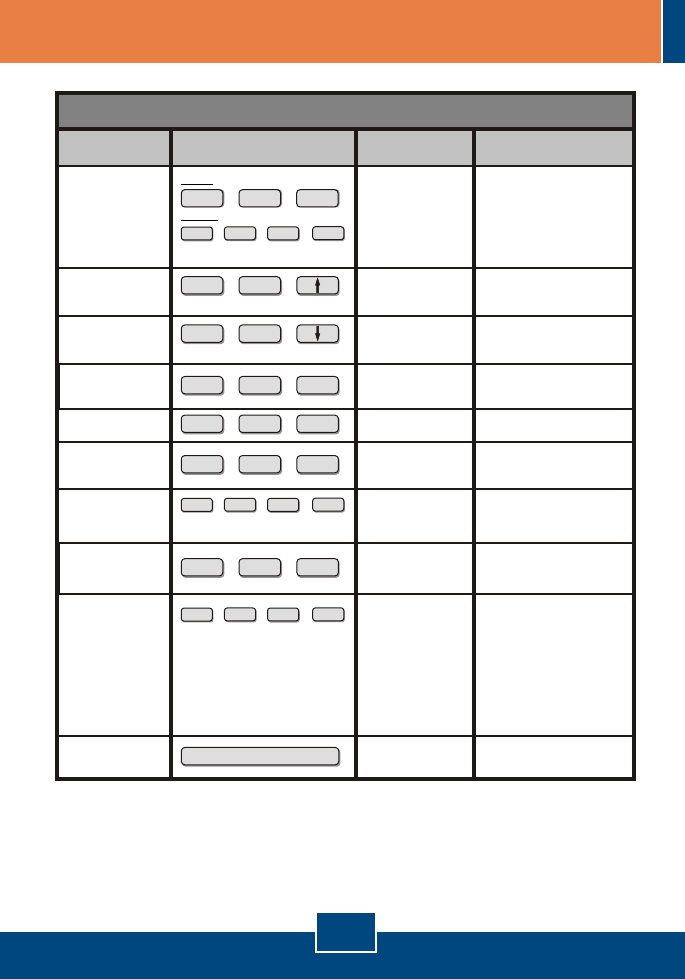
Schnellübersicht für den TK-803R/TK-1603R
nur PC-Kanal
auswählen
Unmittelbar darunter
liegender Kanal
Autoscan
Unmittelbar darüber
liegender Kanal
Autoscan mit
programmierbarer
Verweilzeit
Signalton für
Autoscan Ein/Aus
Maus/Tastatur
zurücksetzen
Einstellungen auf
Herstellerstandard
zurücksetzen
Schnelltaste
festlegen
(Standard = ROLLEN
+ ROLLEN)
Autoscan beenden
ScrLk ScrLk
+ +
(Pfeil nach oben)
ScrLk ScrLk
+ +
(Pfeil nach unten)
ScrLk ScrLk
+ + B
ScrLk ScrLk
+ + END
ScrLk ScrLk
+ + R
ScrLk ScrLk
+ + S
Beliebige Taste drücken
Wählt den aktiven PC-Kanal
aus
Wenn Sie auf eine
Taste drücken,
wechseln Sie zum
entsprechenden
Anschluss
Wählt den unmittelbar darunter
liegenden PC-Kanal aus
Fragt zur schnellen Durchsicht
der Bildschirmanzeigen
automatisch alle verbundenen
Kanäle ab
Wählt den unmittelbar darüber
liegenden PC-Kanal aus
Springt zur schnellen Durchsicht
der Bildschirmanzeigen nach
jeweils x Sekunden zum
nächsten verbundenen Kanal
weiter
Schaltet den Signalton während
der automatischen Abfrage
ein/aus
Richtet Maus/Tastatur neu ein
Stellt die Einstellungen auf
Herstellerstandard zurück
Wählt die Schnelltaste aus 5
möglichen Optionen aus
Beendet die automatische
Abfrage
Drücken Sie eine
beliebige Taste
- - -
- - -
- - -
- - -
- - -
- - -
- - -
- - -
ScrLk ScrLk Y
+ +
(yz)= 2-stellige Kanalnummer
TK-803R
TK-1603R
ScrLk ScrLk YZ
+ + +
Y = ROLLEN, Feststelltaste, Esc, F12
oder NUM
ScrLk ScrLk HY
+ + +
(X) = 0~9
1 = 10 Sekunden
2 = 20 Sekunden
3 = 30 Sekunden
4 = 40 Sekunden
5 = 50 Sekunden
6 = 60 Sekunden
7 = 70 Sekunden
8 = 80 Sekunden
9 = 90 Sekunden
0 = 100 Sekunden
ScrLk ScrLk SX
+ + +
Hinweis: Falls Sie eine andere Schnelltaste festgelegt haben (z.B.
Feststelltaste, Esc, F12), müssen Sie statt ROLLEN diese Taste drücken.
Wenn Sie zum Beispiel den Piepton ausschalten wollen und als Schnelltaste
F12 definiert haben, drücken Sie also F12 + F12 + B.
Befehl Tastenkombination Beschreibung
Drucktasten auf
der Frontplatte
7
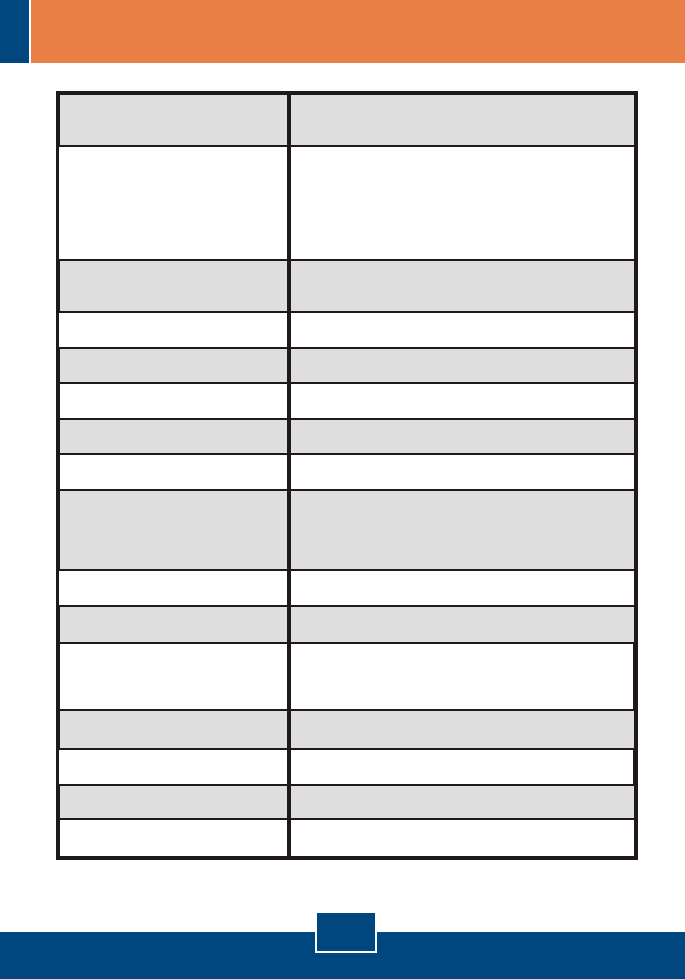
Port Selection: Push Button and Hot-Key Commands
Keyboard State:
Power:
Saved and restored
LED Segment: Per Port : PC Link (Green) ; PC Active (Red)
Management: TK-803R: 8 computers
TK-1603R: 16 computers
Console Port Connectors:
1 x USB keyboard Type A
1 x USB mouse Type A
1 x PS/2 keyboard 6-pin mini din female
1 x PS/2 mouse 6-pin mini din female
1 x VGA HDB 15-pin female
PC Port Connectors:
(all female)
TK-803R: 8 x VGA HDB 15-pin
TK-1603R: 16 x VGA HDB 15-pin
VGA Resolution: 2048 x 1536
Specifications
Weight: TK-803R : 1.84 kg (4.05 lbs)
TK-1603R : 2.04 kg (4.5 lbs)
0ºC ~ 40ºC (32ºF ~104ºF)Operating Temperature:
-20ºC ~ 60ºC (-4ºF ~ 140ºF)Storage Temperature:
0%~90%, Non-Condensing
Humidity:
FCC and CECertifications:
Auto-Scan Intervals: 10 ~ 100 seconds
PS/2 Interface Power
USB Interface Power
External AC Power Adapter : 9V DC, 1A
Size (19" Rack mount):
Dimensions:
1RU
405 x 163 x 44 mm (15.94 x 6.42 x 1.74 in.)

8
Troubleshooting
Q1:
A1:
Q2:
A2:
Q3:
A3:
Q4:
A4:
Q5:
A5:
Q6:
A6:
Do I need to use the included external AC adapter?
It is recommended that you use the included external AC adapter with the
TK-803R/TK-1603R KVM switch.
I have the KVM switch connected properly, but my USB keyboard and mouse
don't work.
First, make sure your USB port is working properly by testing it with your other
USB devices. Second, once you confirm that the USB port is functional, please
reboot your computers, and try to use the KVM switch again. Third, if your
computer is running Windows 98SE, you may need to download and install the
USB hot fix. Please go to this link for download and installation instructions:
http://support.microsoft.com/kb/q240075. Once the hot fix is installed, follow the
installation instructions in Section 2.
Can I connect or disconnect the KVM cables while the computers are turned
on?
Yes, you can connect or disconnect the KVM cables while the computers are
turned on, because the interface is Hot-Pluggable.
Yes, the KVM switch will restore the keyboard settings when switching
between computers. (i.e.: Caps Lock, Num Lock, etc.)
Go to Section 3 Operation for more information.
If you still encounter problems or have any questions regarding the TK-803R/
TK-1603R please contact TRENDnet's Technical Support Department.
Will the KVM switch restore the keyboard settings when switching between
computers?
How do I switch from one computer to another with the KVM switch?
You can switch PCs by pressing the push button on the KVM switch or by
using the Hot-Key commands.
How to upgrade new firmware to my KVM switch?
Please go to the TRENDnet website (www.trendnet.com) to check if there is a
new firmware available for your KVM switch and follow the installation procedure
to perform the update.

Limited Warranty
TRENDnet warrants its products against defects in material and
workmanship, under normal use and service, for the following lengths of
time from the date of purchase.
TK-803R/TK-1603R - 2-Year Warranty
If a product does not operate as warranted above during the applicable
warranty period, TRENDnet shall, at its option and expense, repair the
defective product or part, deliver to customer an equivalent product or
part to replace the defective item, or refund to customer the purchase
price paid for the defective product. All products that are replaced will
become the property of TRENDnet. Replacement products may be new
or reconditioned.
TRENDnet shall not be responsible for any software, firmware,
information, or memory data of customer contained in, stored on, or
integrated with any products returned to TRENDnet pursuant to any
warranty.
There are no user serviceable parts inside the product. Do not remove
or attempt to service the product by any unauthorized service center.
This warranty is voided if (i) the product has been modified or repaired
by any unauthorized service center, (ii) the product was subject to
accident, abuse, or improper use (iii) the product was subject to
conditions more severe than those specified in the manual.
Warranty service may be obtained by contacting TRENDnet office within
the applicable warranty period for a Return Material Authorization (RMA)
number, accompanied by a copy of the dated proof of the purchase.
Products returned to TRENDnet must be pre-authorized by TRENDnet
with RMA number marked on the outside of the package, and sent
prepaid, insured and packaged appropriately for safe shipment.
9

WARRANTIES EXCLUSIVE: IF THE TRENDnet PRODUCT DOES NOT
OPERATE AS WARRANTED ABOVE, THE CUSTOMER'S SOLE
REMEDY SHALL BE, AT TRENDnet'S OPTION, REPAIR OR
REPLACEMENT. THE FOREGOING WARRANTIES AND REMEDIES
ARE EXCLUSIVE AND ARE IN LIEU OF ALL OTHER WARRANTIES,
EXPRESSED OR IMPLIED, EITHER IN FACT OR BY OPERATION OF
LAW, STATUTORY OR OTHERWISE, INCLUDING WARRANTIES OF
MERCHANTABILITY AND FITNESS FOR A PARTICULAR PURPOSE.
TRENDnet NEITHER ASSUMES NOR AUTHORIZES ANY OTHER
PERSON TO ASSUME FOR IT ANY OTHER LIABILITY IN
CONNECTION WITH THE SALE, INSTALLATION MAINTENANCE OR
USE OF TRENDnet'S PRODUCTS.
TRENDnet SHALL NOT BE LIABLE UNDER THIS WARRANTY IF ITS
TESTING AND EXAMINATION DISCLOSE THAT THE ALLEGED
DEFECT IN THE PRODUCT DOES NOT EXIST OR WAS CAUSED BY
CUSTOMER'S OR ANY THIRD PERSON'S MISUSE, NEGLECT,
IMPROPER INSTALLATION OR TESTING, UNAUTHORIZED
ATTEMPTS TO REPAIR OR MODIFY, OR ANY OTHER CAUSE
BEYOND THE RANGE OF THE INTENDED USE, OR BY ACCIDENT,
FIRE, LIGHTNING, OR OTHER HAZARD.
LIMITATION OF LIABILITY: TO THE FULL EXTENT ALLOWED BY LAW
TRENDnet ALSO EXCLUDES FOR ITSELF AND ITS SUPPLIERS ANY
LIABILITY, WHETHER BASED IN CONTRACT OR TORT (INCLUDING
NEGLIGENCE), FOR INCIDENTAL, CONSEQUENTIAL, INDIRECT,
SPECIAL, OR PUNITIVE DAMAGES OF ANY KIND, OR FOR LOSS OF
REVENUE OR PROFITS, LOSS OF BUSINESS, LOSS OF
INFORMATION OR DATE, OR OTHER FINANCIAL LOSS ARISING OUT
OF OR IN CONNECTION WITH THE SALE, INSTALLATION,
MAINTENANCE, USE, PERFORMANCE, FAILURE, OR INTERRUPTION
OF THE POSSIBILITY OF SUCH DAMAGES, AND LIMITS ITS LIABILITY
TO REPAIR, REPLACEMENT, OR REFUND OF THE PURCHASE PRICE
PAID, AT TRENDnet’S OPTION. THIS DISCLAIMER OF LIABILITY FOR
DAMAGES WILL NOT BE AFFECTED IF ANY REMEDY PROVIDED
HEREIN SHALL FAIL OF ITS ESSENTIAL PURPOSE.
Governing Law: This Limited Warranty shall be governed by the laws of
the state of California.
AC/DC Power Adapter, Cooling Fan,Power Supply, and Cables carry a
1 Year Warranty
10
Certifications
This equipment has been tested and found to comply with FCC and CE Rules.
Operation is subject to the following two conditions:
(1) This device may not cause harmful interference.
(2) This device must accept any interference received. Including interference that may
cause undesired operation.
NOTE: THE MANUFACTURER IS NOT RESPONSIBLE FOR ANY RADIO OR TV
INTERFERENCE CAUSED BY UNAUTHORIZED MODIFICATIONS TO THIS
EQUIPMENT. SUCH MODIFICATIONS COULD VOID THE USER’S AUTHORITY TO
OPERATE THE EQUIPMENT.
Waste electrical and electronic products must not
be disposed of with household waste. Please
recycle where facilities exist. Check with you Local
Authority or Retailer for recycling advice.
ADVERTENCIA
En todos nuestros equipos se mencionan claramente las caracteristicas del adaptador de
alimentacón necesario para su funcionamiento. El uso de un adaptador distinto al
mencionado puede producir daños fisicos y/o daños al equipo conectado. El adaptador
de alimentación debe operar con voltaje y frecuencia de la energia electrica domiciliaria
existente en el pais o zona de instalación.

Copyright ©2006. All Rights Reserved. TRENDnet.
20675 Manhattan Place
Torrance, CA 90501
USA
TRENDnet Technical Support
Product Warranty Registration
Please take a moment to register your product online.
Go to TRENDnet’s website at http://www.trendnet.com
US Canada
24/7 Tech Support
Toll Free Telephone: 1(866) 845-3673
Europe (Germany France Italy Spain Switzerland UK)
English/Espanol - 24/7
Francais/Deutsch - 11am-8pm, Monday - Friday MET
English/Espanol - 24/7
Francais/Deutsch - 11am-8pm, Monday - Friday MET
Worldwide
Telephone: +(31) (0) 20 504 05 35
Toll Free Telephone: +00800 60 76 76 67
.
. . . . .
