3548 User Guide.Qx4 GUIDE
GUIDE Advanced Communications Homepage
GUIDE GUIDE
User Manual: GUIDE
Open the PDF directly: View PDF ![]() .
.
Page Count: 49

FRONT DESK USER GUIDE
Aria Communications Pty. Ltd.
Hospitality
Digital Business Systems

INTRODUCTION........................................................................................ 3-6
ATTENDANT USER GUIDE ON SELECT 30 BUTTON DISPLAY AND
ELITE EXECUTIVE KEYSTATIONS ....................................................... 7-29
CHECK-IN GUESTS...................................................................................... 9
CHECK-IN FUNCTIONS........................................................................ 10-17
Authorisation Code Register / Change ......................................................... 15
Call Charge Rates Assign............................................................................. 17
Dialling Privileges Register / Change Station COS ..................................... 11
Guest Name Register / Change .................................................................... 10
Prepaid Money Register / Change................................................................ 16
Room To Room Call Group Register / Change............................................. 14
Set Intercom Call Enable / Disable............................................................... 13
Wake-Up Time To Register / Change Guest Station ..................................... 14
CHANGE ROOM STATUS..................................................................... 18-29
Call Charge Rate Register/Change ............................................................... 18
Check-Out .............................................................................................. 19-20
Check-out With / Without Payment Method................................................ 19
Cost At Service Station Register................................................................... 29
Costing Guests Expenses (see Cost at Service Station Register).................. 29
Hotel Name Register .................................................................................... 22
Intercom Call Enable / Disable..................................................................... 22
LCD Display Language Change ................................................................... 21
One Time External Call Enable ..................................................................... 21
Part Time Accommodation........................................................................... 24
Reminder Calls (see Wake-Up calls)............................................................ 27
Room Charge Display .................................................................................. 23
Room Rate Programming............................................................................. 25
Room Rate Time Ranges Register/Change ................................................... 24
Room Rate to Rooms Assign.........................................................................18
Room Status Report ..................................................................................... 26
Room Status Resetting Clean / Dirty ............................................................ 28
Room To Room Call Group Register / Clear................................................. 23
Room to Room Call Restriction (see Room to Room Call Group)................. 23
Tax Rates ..................................................................................................... 26
Wake-Up Calls............................................................................................. 27
Wake-Up Call Cancel............................................................................... 27
Wake-Up Call Set..................................................................................... 27
CHANGE ROOM STATUS (Cont..)....................................................... 18-29
Room Rate to Rooms Assign........................................................................ 18
Room Status Report ..................................................................................... 26
Room Status Resetting Clean / Dirty ............................................................ 28
Room To Room Call Group Register / Clear................................................. 23
Room to Room Call Restriction (see Room to Room Call Group)................. 23
Tax Rates ..................................................................................................... 26
Wake-Up Calls............................................................................................. 27
Wake-Up Call Cancel............................................................................... 27
Wake-Up Call Set..................................................................................... 27
INDEX FOR SELECT 30 BUTTON DISPLAY
AND ELITE EXECUTIVE KEYSTATIONS 1

INTRODUCTION ....................................................................................... 3-6
ATTENDANT USER GUIDE ON SELECT 30 BUTTON DISPLAY
KEYSTATION WITH DSS CONSOLE (DLS MAP 1)............................ 30-46
CHECK-IN GUESTS ................................................................................... 31
CHECK-IN FUNCTIONS ....................................................................... 31-37
Authorisation Code Register / Change......................................................... 37
Dialling Privileges Register / Change Station COS...................................... 33
Guest Name Register / Change.................................................................... 32
Prepaid Money Register / Change............................................................... 38
Room To Room Call Group Register / Change ............................................ 36
Set Intercom Call Enable / Disable .............................................................. 35
Wake-Up Time To Register / Change Guest Station .................................... 34
CHANGE ROOM STATUS .................................................................... 38-46
Call Charge Rate Assign...............................................................................39
Check-Out................................................................................................... 40
Check-Out With/Without Payment Method..................................................40
Cost At Service Station Register.................................................................. 46
Costing Guests Expenses (see Cost at Service Station Register)................. 46
Intercom Call Enable / Disable .................................................................... 42
One Time External Call Enable / Disable...................................................... 42
Reminder Calls (see Wake-Up Calls) ......................................................... 44
Room Charge Display.................................................................................. 43
Room Charge Printed Format.......................................................................41
Room Status Report..................................................................................... 43
Room Status Resetting Clean / Dirty............................................................ 45
Room To Room Call Group Register / Clear................................................ 43
Room to Room Call Restriction (see Room to Room Call Group)................ 43
Wake-Up Calls ............................................................................................ 44
Wake-Up Call Cancel .............................................................................. 44
Wake-Up Call Set.................................................................................... 44
INDEX FOR SELECT 30 BUTTON DISPLAY
OR ELITE EXECUTIVE WITH DSS CONSOLE 2

Congratulations on your selection of the Aria Hospitality system
which has been specifically developed for use in small to medium
hospitality applications. Aria Hospitality is a flexible system
designed to be configured to your requirements. Therefore your
installer will have discussed your needs prior to programming your
system according to the requirements specified by management. If
you feel some aspect of operation is not to your satisfaction check
with your installer as to whether the programming can be modified
or options added to satisfy your requirements.
The hospitality documentation consists of a number of User
Guides which include;
• Front Desk User Guides:
1. Front Desk Station User Guide
2. Front Desk Quick Reference Guide
3. Digital Keystation User Guide
• Service Keystation and Room Attendant User Guide
• Guest Extension User Guide
The Front Desk User Guide and Quick Reference Guide
for attendants have been written to provide general understanding
of the guest features of the Aria Hospitality system. Operational
instructions are given to enable you to familiarise yourself with the
system quickly and be in a position to establish procedures which
will best serve your guests.
This User Guide has been divided into two major sections:
The first section covers the attendant operation on a Aria Select 30
Button Display or Elite Executive Keystation without a DSS Console.
The second section covers the attendant operation on Aria Select
30 Button Display or Elite Executive Keystation with a DSS Console
(see DSS Map 1 on page 4).
Up to 4 consoles can be connected to each attendant or service
station. The pre-programmed flexible button assignment is
illustrated in DSS Map 1.
INTRODUCTION
ARIA HOSPITALITY
FRONT DESK USER GUIDE 3
ARIA HOSPITALITY
FRONT DESK USER GUIDE 4
DSS Map 1 is used in this User Guide; there are four other maps
available. If management have selected a different DSS Map you
should place a copy of it in this guide to avoid confusion (see your
system installation specialist).
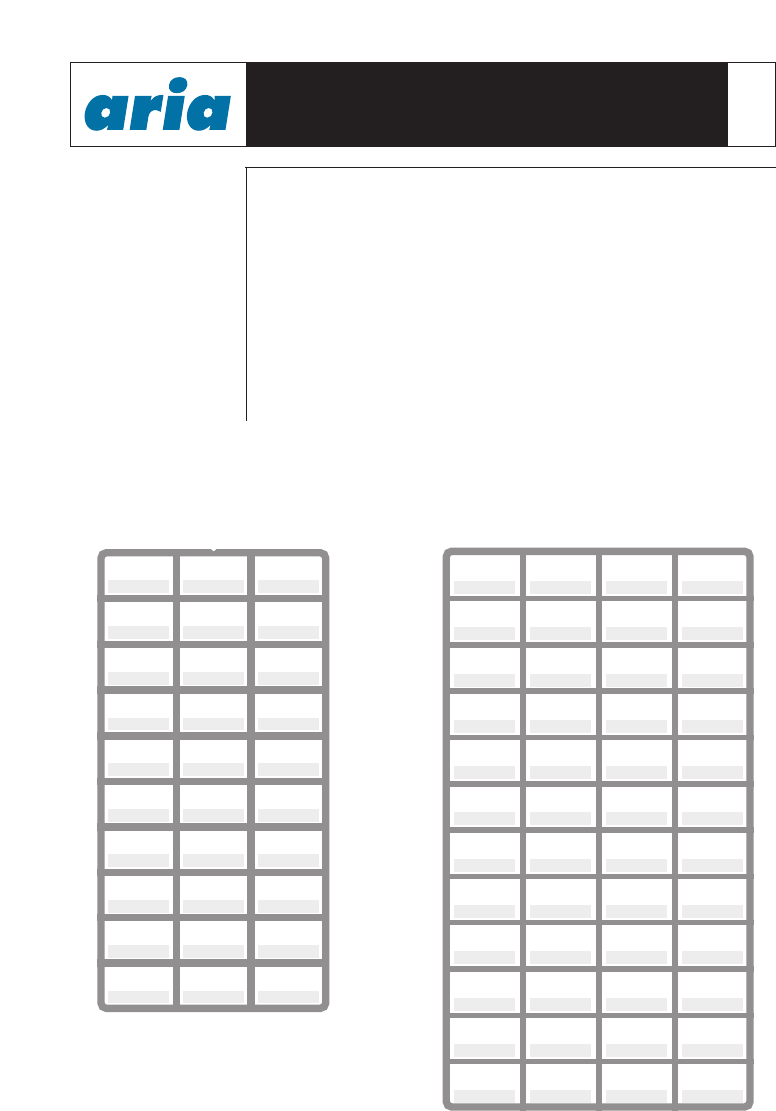
The assignments have been designed to assist the attendant in
offering faster and more efficient service, by having the most
frequently used functions pre-programmed for one touch operation.
Note: The word Attendant will be used through this user guide.
In this instance it refers to the front desk, reception and receptionist.
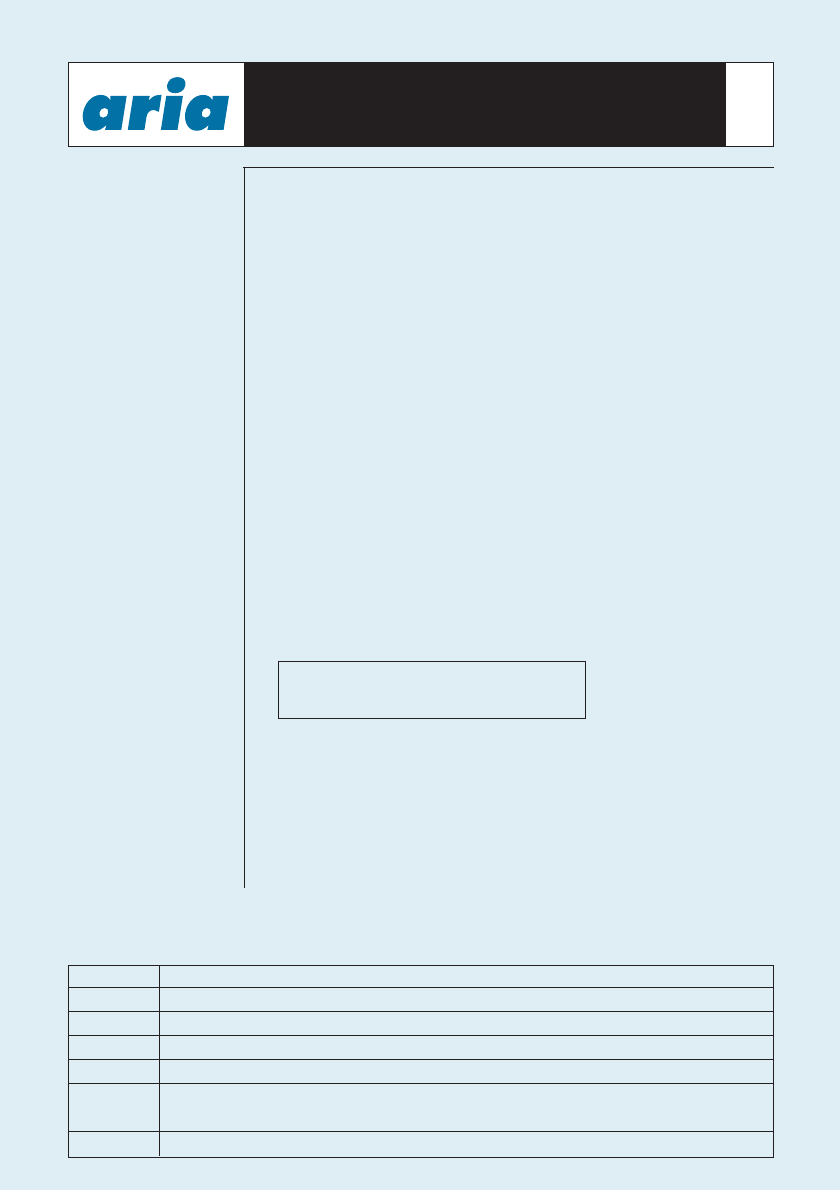
Hospitality Keystation Underlay
LINE 1 LINE 2 LINE 3
LINE 4 LINE 5 LINE 6
LINE 7 LINE 8 LINE 9
LINE 10 LINE 11 LINE 12
LINE 13 LINE 14 LINE 15
CHECK-IN
ROOM STATUS
PRINT
ONE TIME
CO CALL
ICM ENABLE
ROOM TYPE
ICM DISABLE
ROOM TYPE
CHECK-OUT DISPLAY ROOM
CHARGE
ROOM 100 ROOM 101 ROOM 102 ROOM 103
ROOM 104 ROOM 105 ROOM 106 ROOM 107
ROOM 108 ROOM 109 ROOM 110 ROOM 111
ROOM 112 ROOM 113 ROOM 114 ROOM 115
ROOM 116 ROOM 117 ROOM 118 ROOM 119
ROOM 120 ROOM 121 ROOM 122 ROOM 123
ROOM 124 ROOM 125 ROOM 126 ROOM 127
ROOM 128 ROOM 129 ROOM 130 ROOM 131
ROOM 132 ROOM 133 ROOM 134 ROOM 135
ROOM 136 ROOM 137 ROOM 138 ROOM 139
ROOM 140 ROOM 141 ROOM 142 ROOM 143
ROOM 144 ROOM 145 ROOM 146 ROOM 147
Hospitality DSS Console Underlay
- using DSS Map 1 Underlay
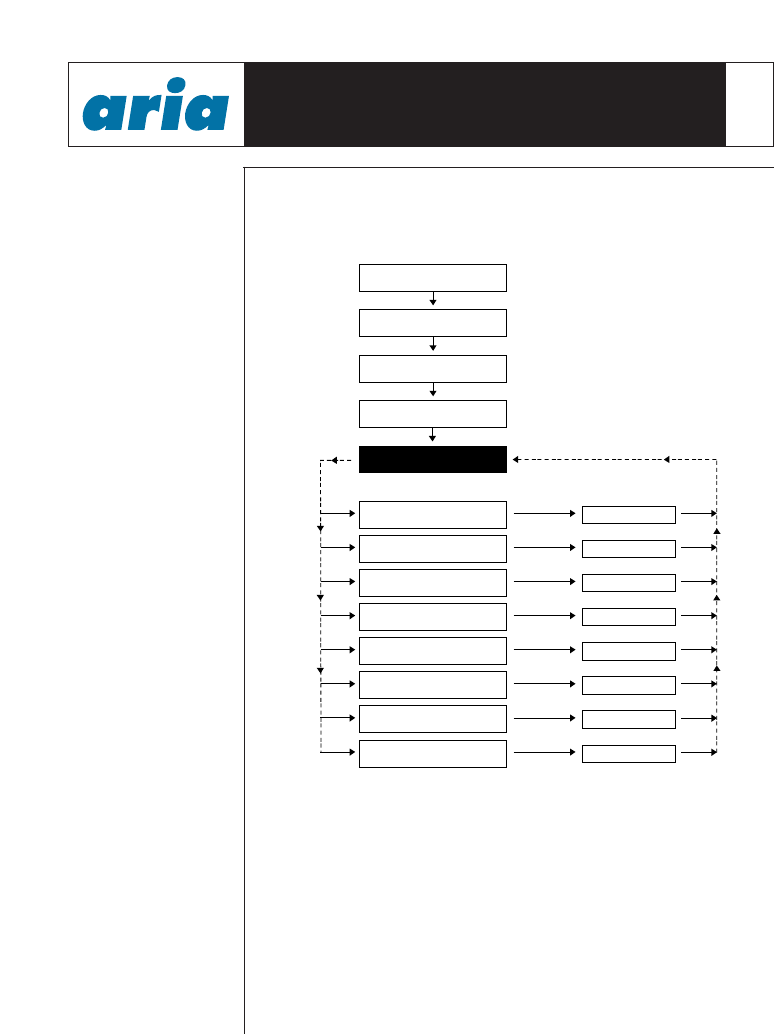
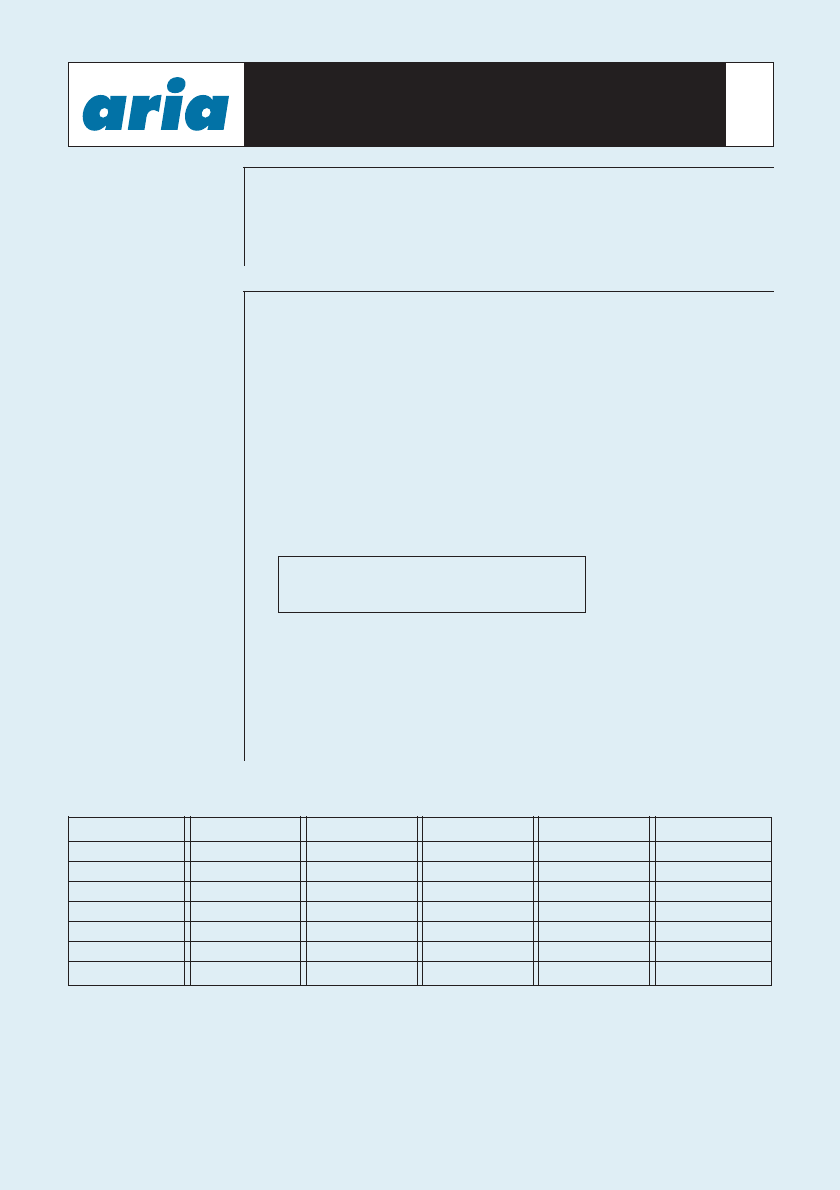
While Checking-in a new guest a number of important functions are
entered into the system. The diagram below illustrates Check-in
Menu together with the steps involved in Checking-in a guest:
Check-in is performed directly from the Attendant keystation.
Due to space availability on the LCD and the fact that you may not
need to enter data against all the options each step in the menu is
performed separately. Following the completion of each function
the menu returns to the Check-in Menu where the next option is
selected.
Each of the Check-in Menu functions are individually covered in
this User Guide with a detailed description and step by step
explanation of the operation involved.
ARIA HOSPITALITY
FRONT DESK USER GUIDE 5
[1] Register Guest Name
Press [SPEED] button
Enter Room Number(s) [1-9999]
Dial [1] [0]
Press [TRANS/PGM]
CHECK–IN MENU
Press [HOLD/SAVE]
Press [HOLD/SAVE]
Press [HOLD/SAVE]
Press [HOLD/SAVE]
Press [HOLD/SAVE]
Press [HOLD/SAVE]
Press [HOLD/SAVE]
Press [HOLD/SAVE]
[2] Change Class of Service
[3] Register Wake-Up Time
[4] Set ICM Enable/Disable
[5] Set Room to Room Call Group
[6] Register Authorisation Code
[7] Register Prepaid Money
[8] Register Call Charge Rate

ARIA HOSPITALITY
FRONT DESK USER GUIDE
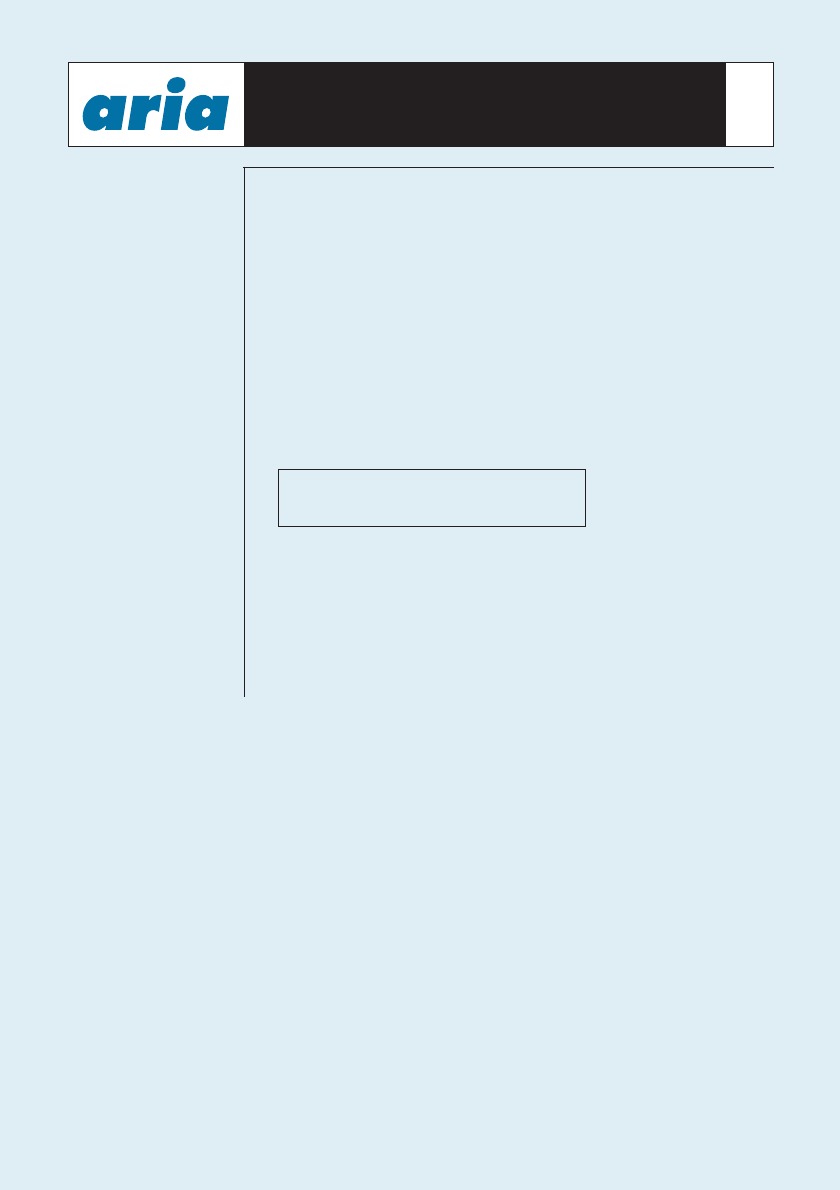
The User Guide also concentrates on servicing guest requirements
and one off requests during their stay in the hotel. Functions have
been developed to simplify Attendant operation requirements.
Functions can be directly entered into the system without searching
through the Check-in screen. This also provides for certain
functions to be activated for a range of rooms in one command,
example room to room call group and ICM call enable/disable.
These options are covered by separate menus which are
individually described from pages 18-29.
Please Note : Guests can call Service Stations even in cases
where the guest’s extension has been barred to all other calls.
6
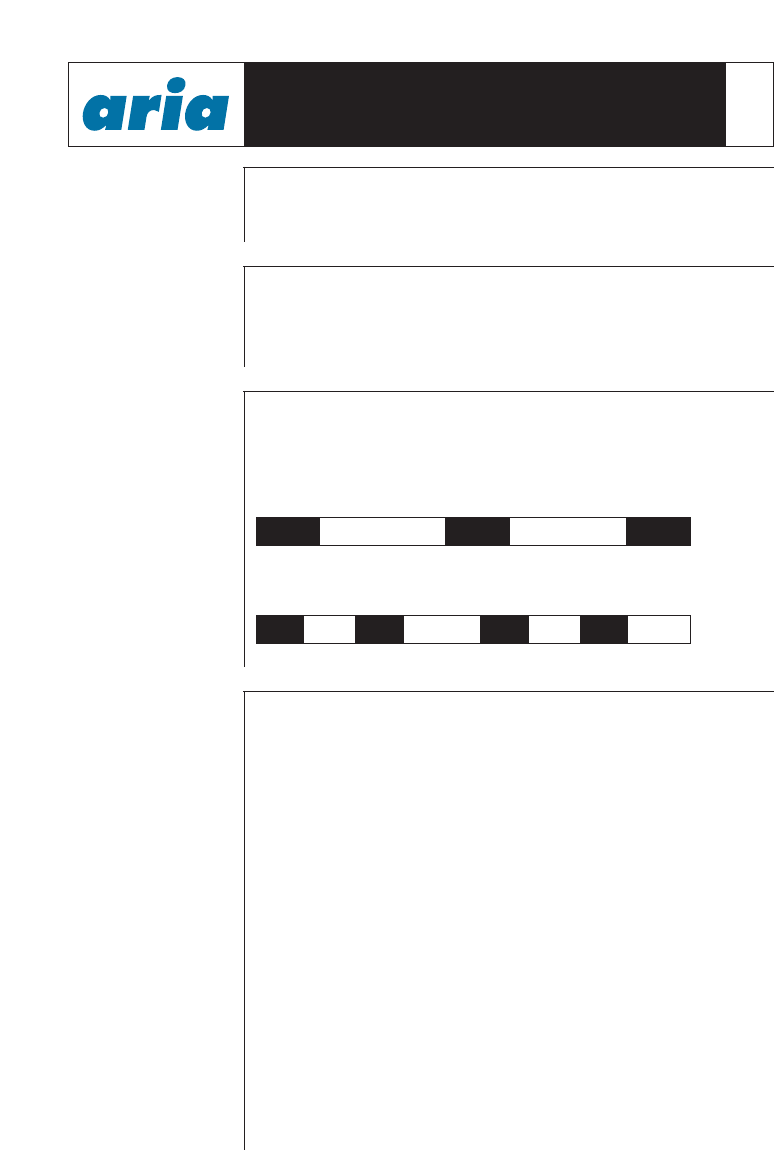
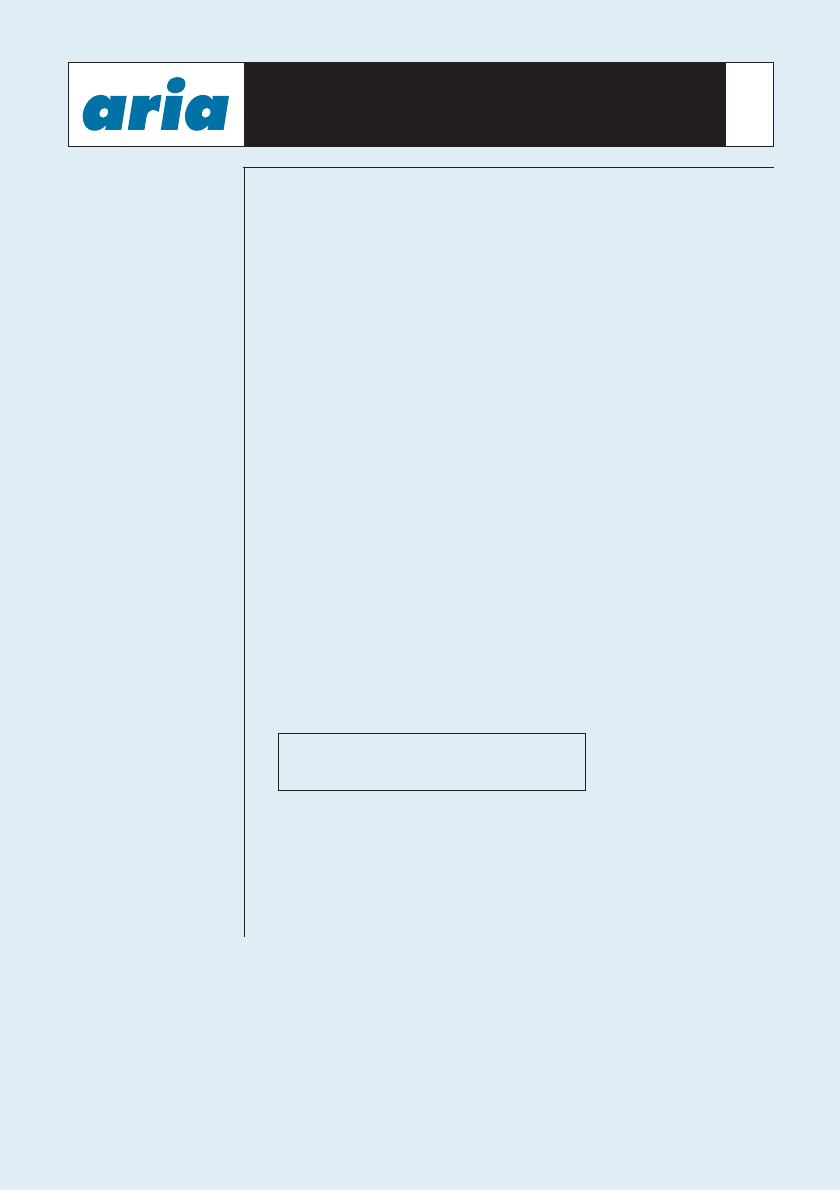
TO SIMPLIFY
ROOM
NUMBER SEARCH
PRINTER PAPER
FEED
RING PATTERNS
ON YOUR
KEYSTATION AND
GUEST
EXTENSIONS
Internal Call
Ring Pattern
Incoming Call
Ring Pattern
Printing reports such as Room Status, Total Charge Report etc., are
an important function of the Aria Hospitality system. Please note
that your printer will line feed 1 page prior to printing each report.
Incorrect feeding of paper will cause printing errors.
INDICATOR LIGHT
PATTERNS ON
YOUR KEYSTATION
AND DSS CONSOLE
The LED status of each exchange line, staff extension and guest
room phone is shown as follows:
Button Not Lit
Line is not in use extension is free
Button Flashing
Outside call to be answered, extension is ringing or call on hold
Button Lit Continuously
Line or extension is busy
To help you familiarise yourself with the system, we urge you to
take a few minutes to read this User Guide. It will provide you with
a concise understanding of all the functions available to you in
servicing guest requirements.
Please Note: If a Proprietary Management System has been
installed, operation of the functions in this User Guide will be
different. Please consult with the manufacturer of your PMS system
for Front Desk operation information.
ARIA HOSPITALITY
FRONT DESK USER GUIDE 7
800ms 2.4sec 800ms 2.4sec 800ms
RING RING RING
400ms 200ms 400ms 2 sec 400ms 200ms 400ms 2secs
RING RING RING RING
Ringing on attendant, service keystations and guest extensions
have different patterns depending on the type of call. The following
diagram illustrates these patterns to help you recognise the source
of the call.
If a room number has been selected on the LCD display, the status
of the previous room and next room can be reached by pressing the
[UP/DOWN] key until the desired room is displayed.
ATTENDANT USER GUIDE SELECT 30 BUTTON
DISPLAY & ELITE EXECUTIVE KEYSTATIONS 8
LINE 1 LINE 2 LINE 3
LINE 4 LINE 5 LINE 6
LINE 7 LINE 8 LINE 9
LINE 10 LINE 11 LINE 12
LINE 13 LINE 14 LINE 15
CHECK-IN CHECK-OUT
ICM ENABLE
DISPLAY ROOM
CHARGE
ROOM STATUS
PRINT
ONE TIME
CO CALL ROOM TYPE ROOM TYPE
ICM DISABLE
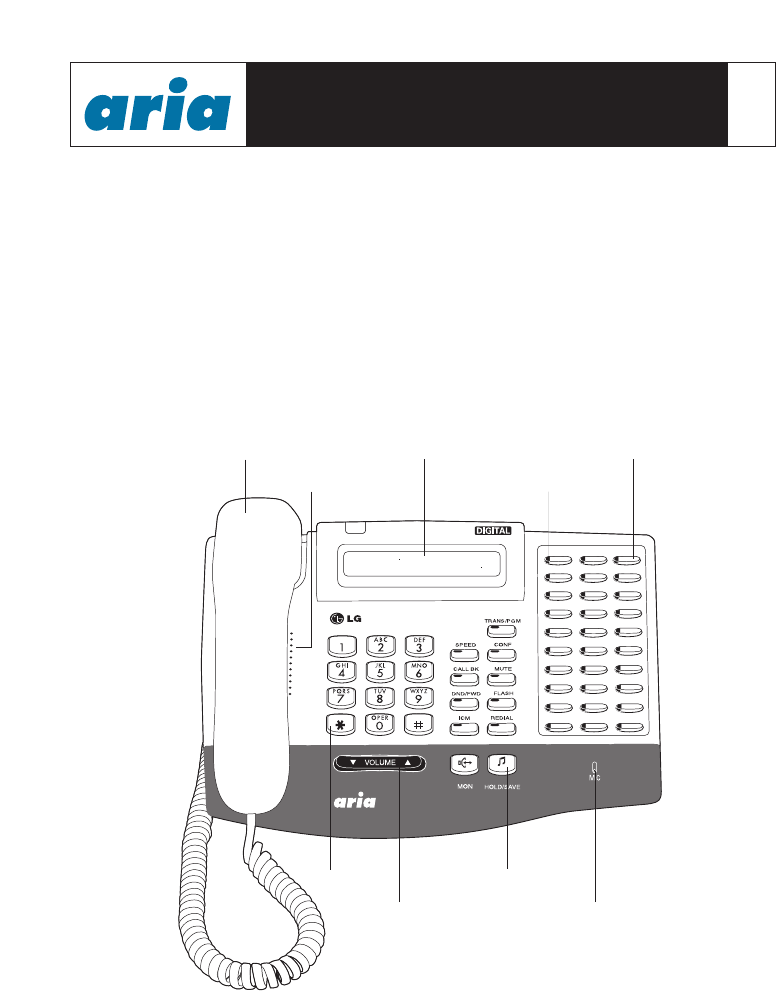
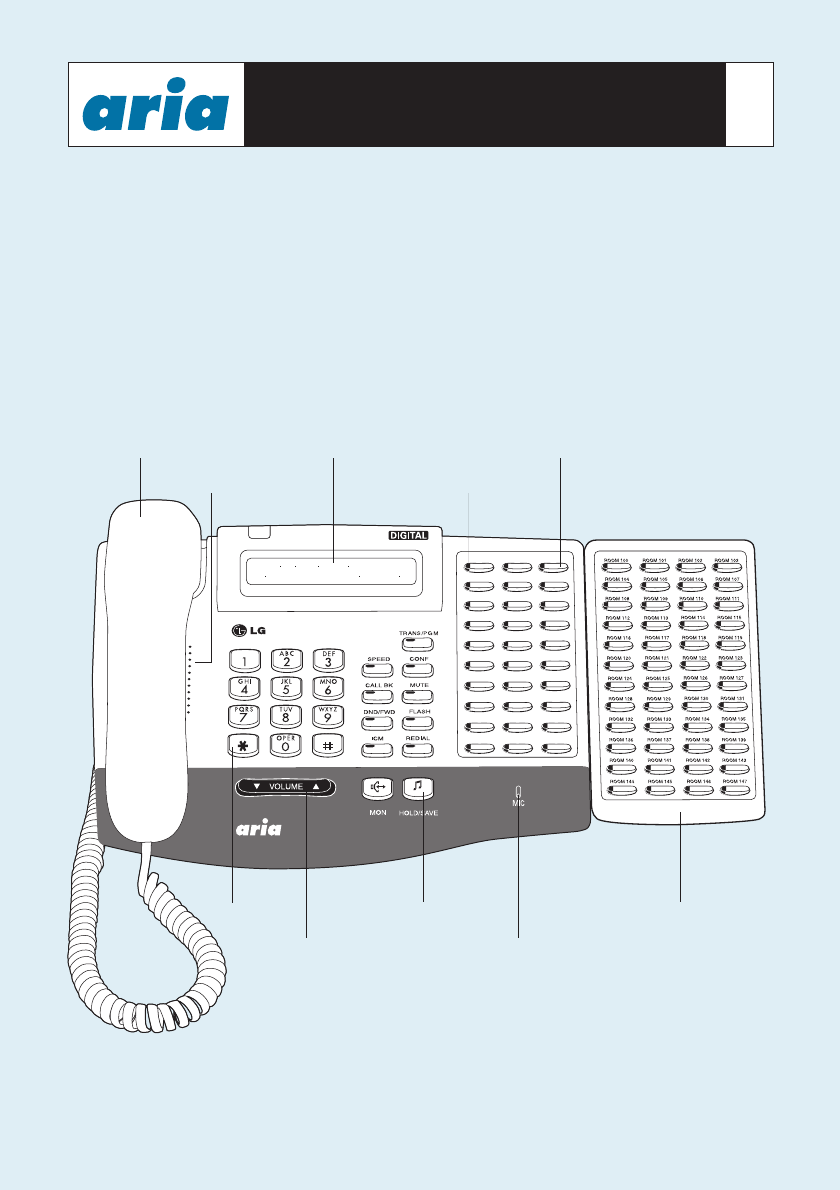
Handpiece
Electronic
Volume Control
LCD Display
Indicator Lights
Flexible Keys
Function Keys
Keypad
Speaker
Microphone

CHECK-IN GUESTS This feature allows the System Attendant to view the status of a
room and to Check-in a guest.
The desired Check-in functions are entered one at a time and saved.
The display will return to the Check-in Menu each time.
This process is repeated until all desired Check-in Functions have
been entered. Press the [MON] Key to exit the Check-in Menu.
A Check-in Status report is printed upon completion of each guests
Check-in. The eight functions are individually covered in the
following pages with a detailed description and step by step
explanation of the operation involved in each function.
1. Press [TRANS/PGM] button
2. Dial [1] [0]
3. Enter room Number(s) [1-9999]
or
Press {DSS} key(s) assigned to room number(s)
4. Press [SPEED] button
5. The system is now ready for Check-in. The following options are
available; you are not required to enter data against each one, only
the options required to satisfy your management requirements
6. Dial Check-in function
[1] Register/change guest name screen
(12 character-see character set). Press [SPEED] (page 10)
[2] Change COS (page 11)
[3] Register/Change Wake-Up Time (page 12)
[4] Set ICM Enable/Disable (page 13)
[5] Set Room to Room Call Group (page 14)
[6] Register/Change Authorisation Code (page 15)
[7] Register/Change Prepaid Money (page 16)
[8] Register/Change Call Charge Rate (page 17)
• Press [HOLD/SAVE] button
• After each option the system will return to your Check-in
function. To complete Check-in simply hang up handset or
press [MON]
• In case of multiple room Check-in/Change Status, status of first
room selected is shown on screen, however changes will affect
all stations selected when [HOLD/SAVE] is pressed
(Authorisation codes are exempt)
CHECK-IN FUNCTIONS 9

This feature allows the System Attendant to register/change Guest
Name. The Guest Name appears on all printed reports and on the
station display.
1. Press [TRANS/PGM] button
2. [TRANS/PGM] button flashes [MON] LED lights steady
3. Dial [1] [0] (Check-in/Change Room Status)
4. Dial [Room Number(s)]
or
Press {DSS} key(s) assigned to room number(s)
5. Press [SPEED] button
LCD shows current status of Room Number eg., after entering
Room No. 100, LCD shows Room Status as follows:
6. Dial [1] to Register/Change Guest Name
• Enter [Guest’s Name] 12 characters maximum
(If Guest’s Name is less than 12 characters, then press the
[SPEED] button)
• Press the [HOLD/SAVE] button
• System returns to Check-in Menu
10
Steps 1 to 5 are used only to gain access to the Check-in function.
Once the Check-in function is invoked (Step 6) the attendant is not
required to enter data against each one of the seven functions, only
against those options required to satisfy your management
requirements.
REGISTER /
CHANGE GUEST
NAME
CHECK-IN FUNCTIONS
100 (CLEAN) . . . . . .
COS77 . . : . . I(X) G(. . ) . . .
A21 I43 Q7* Y93 660 (#1
B22 J51 R72 Z9# 770 )#2
C23 K52 S73 000 880 -#3
D31 L53 T81 110 990
E32 M61 U82 220 .13
F33 N62 V83 330 space *1
G41 O63 W91 440 ;*2
H42 P71 X92 550 ,*3
CHARACTER SET
Chk-In Room Check-In Guest Name COS ICM GRP WAKE AUTH PRE-PAID C-RT CHARGE
0100 12/29-18 . . . . . . . . 1 No . . . . : . . No 0 . 0
Changed Room Check-In Guest Name COS ICM GRP WAKE AUTH PRE-PAID C-RT CHARGE
0100 12/29-18 J. CITIZEN 1 Yes 01 06:00 Yes 200.00 . 0
After Check-in, the Room Status is printed via a printer in the following format:
This feature allows the application of dialling privileges through
Class of Service Assignments. These COS assignments can be
allocated to all stations and external lines. Guest Rooms are set at
default of COS22 at Check-in on Day and Night modes. COS22
allows for external line restrictions, as configured by the installer.
This may be changed to any of the seven COS during guest
Check-in.
Your manager will advise your organisation's policy on guest
dialling privileges after consultation with your systems installer.
If you are concerned about a guest’s ability to pay, you can request
a prepayment for calls. Please refer to page 20 of this manual.
1. Press [TRANS/PGM] button
2. [TRANS/PGM] button flashes, [MON] LED lights steady
3. Dial [1] [0] for Check-in/Change Room Status
4. Dial [Room Number(s)]
or
Press {DSS} key(s) assigned room number(s)
5. Press [SPEED] button
LCD shows current status of Room Number eg., entering room
No. 100, LCD shows Room Status as follows:
6. Dial [2] for Register/Change Room COS
• Dial Room Day and Night COS (Range 1-7)
Note - 2 digits one is for day and other is for night COS
e.g., COS 15 = Class of Service 1 for day and 5 for night
• Press [HOLD/SAVE] button
• System returns to Check-in Menu
11
DIALLING
PRIVILEGES
CHECK-IN FUNCTIONS
100 (CLEAN) . . . . . .
COS77 . . : . . I(X) G(. . ) . . .
STA COS 1 No Restrictions
STA COS 2 Please check with management or installation technician for programmed privileges
STA COS 3 Please check with management or installation technician for programmed privileges
STA COS 4 Please check with management or installation technician for programmed privileges
STA COS 5 The leading digit dialled cannot be a long distance code. The dialled digits can be longer than 8 digits.
STA COS 6 The leading digits cannot be a long distance code. Only eight digits maximum can be dialled.
For example 92636600.
STA COS 7 Intercom only calls are allowed.
There are seven Station Class of Service assignments options that can be
programmed for each station. The COS options are as follows :
REGISTER /
CHANGE STATION
COS

TO
REGISTER/CHANGE
GUEST STATION
WAKE-UP TIME
12
This feature allows you to set a wake-up time upon guest request.
Wake-up setting may be programmed once-off or permanently.
On wake-up signalling, user lifts handset and receives Music On
Hold, Message or Internal Chimes (dependent on programming
and options available on the system).
At wake-up time the telephone will ring for 30 Secs. ON and 90
Secs. OFF for a maximum of 3 times on the Guest Station unless
the telephone is answered.
If not answered, the wake-up fail alarm is sent to the
Attendant Station(Attendant). The LCD at System Attendant
displays the designated station.
The wake-up fail alarm can be deleted by dialling the station
number or pressing DSS button at System Attendant Station.
This cancels the alarm and prints a report of wake-up fail. This
report indicates that wake-up alarm has been activated and that
the guest has not responded.
1. Press [TRANS/PGM] button
2. [TRANS/PGM] button flashes [MON] LED lights steady
3. Dial [1] [0] for Check-in/Change Room Status
4. Dial [Room Number(s)]
or
Press the {DSS} key(s) assigned to room number(s)
5. Press [SPEED] button
LCD shows current status of Room Number eg., after entering
Room No. 100, LCD shows Room Status as follows:
6. Dial [3] to Register/Change Wake-up Time.
• Enter Wake-up Time [HH:MM] (HH:MM = 24-hour format-ring
e.g., 7:30 AM= 0730 hours, 10:00 PM = 2200 hours)
• Press [SPEED] button for only one time wake-up call
or
Press [#] button for permanent wake-up call set.
• Press [HOLD/SAVE] button
• System returns to Check-in Menu
CHECK-IN FUNCTIONS
100 (CLEAN) . . . . . .
COS77 . . : . . I(X) G(. . ) . . .
13
SET INTERCOM
CALL ENABLE /
DISABLE
This feature enables a Guest Station to call other stations in the
system. By default Guest Stations can only call the Attendant and
Service Stations. After a guest Checks out, the rooms ICM call status
is returned to default ready for the requirements of the next Guest.
1. Press [TRANS/PGM] button
2. [TRANS/PGM] button flashes [MON]
LED lights steady
3. Dial [1] [0] for Check-in/Change Room Status
4. Dial [Room Number(s)]
or
Press the {DSS} key(s) assigned to room number(s)
5. Press [SPEED] button
LCD shows current status of Room Number eg., after entering
Room No. 100, LCD shows Room Status as follows:
6. Dial [4] for Enable/Disable ICM Call, then ICM call status
is changed (toggle setting). LCD shows current status of
station number
| (X) = Station ICM disabled
| (0) = Station ICM enabled
• Press [HOLD/SAVE] button
• System returns to Check-in Menu
CHECK-IN FUNCTIONS
100 (CLEAN) . . . . . .
COS77 . . : . . I(X) G(. . ) . . .
REGISTER/CHANGE
ROOM TO ROOM
CALL GROUP
The default setting of Aria-186 Hospitality system is that all guests
are barred from dialling other guest stations. Where required the
Attendant can enable groups of guest stations to call each other.
This is done by putting rooms into groups; when room to room call
restriction is turned on, guests can only call those extension rooms
which are in the same group. Stations in the system can be
arranged in up to 100 Room to Room Call Groups, each containing
an unlimited number of stations. A Guest Station can belong to
only one Room to Room Call Group. Guest stations can also call
Attendant Station, Service Stations, and rooms in the same Room to
Room Call Group, even if ICM Call feature is disabled.
After Check-Out, Room to Room Call Group is returned to default
settings ready for the next guest
1. Press [TRANS/PGM] button
2. [TRANS/PGM] button flashes, [MON] LED lights steady
3. Dial [1] [0] for check-in/change room status
4. Dial [Room Number(s)]
or
Press {DSS} key(s) assigned to room number(s)
5. Press [SPEED] button
LCD shows current status of Room Number eg., after entering
Room No. 100, LCD shows Room Status as follows:
6. Dial [5] to Register/Change Room to Room Call Group
• Enter room to room call group number [00-99] eg., G(56)
• Press [HOLD/SAVE] button
• System returns to Check-in Menu
CHECK-IN FUNCTIONS 14
100 (CLEAN) . . . . . .
COS77. . : . . I(X) G(56 ) . . .

REGISTER /
CHANGE
AUTHORISATION
CODE
This feature provides a means for barred stations ( i.e. no external
dialling privileges) to access external lines. The system allows for
192 Authorisation codes, but they cannot be duplicated, i.e. one
code only can be entered by any employee to access an external line.
Verification codes are required for the following two call types;
1. To Access Denied External Line:
A user, must enter their Authorisation Code. If correct Authorisation
Code is matched, external Dial Tone is presented.
2. To Access an External Line from a Service Station:
A user must enter Authorisation Code. This function is only
applicable in cases where the service station has been set at COS 7
(i.e. external line access is denied.)
1. Press [TRANS/PGM] button
2. [TRANS/PGM] button flashes, [MON] LED lights steady
3. Dial [1] [0] for check-in/change room status
4. Dial [Room Number]
or
Press {DSS} key(s) assigned to room number(s)
5. Press [SPEED] button
LCD shows current status of Room Number eg., after entering
Room No. 100, LCD shows Room Status as follows:
If Authorisation Code is registered, LCD displays “A”
6. Dial [6] for Register/Change Authorisation Code
• Enter [Guest’s Authorisation Code] (5 digit code)
• Press [HOLD/SAVE] button
• System returns to Check-in Menu
CHECK-IN FUNCTIONS 15
100 (CLEAN) . . . . . .
COS77 . . : . . I(X) G(. . ) . ‘A’. .
REGISTER /
CHANGE
PREPAID MONEY
This feature allows the guest station to make calls in accordance
with their prepaid money. The prepaid money must be twice the
single unit charging rate determined by the hotel and programmed
by the technician (i.e., if 60¢ is charged for a local call from a guest
room, the prepaid money must be a minimum of $1.20) in order for
the guest to make a call.
If the prepaid money goes into debit, equal to a single unit charging
rate of the call during a conversation, a warning tone is given and
the call will be disconnected. You will need to advise the guest of
this if the prepayment feature is used. Prepaid money is included
as part of the guest’s room charge status report.
Total Room Charge = Total Charge - Prepaid Money
1. Press [TRANS/PGM] button
2. [TRANS/PGM] button flashes, [MON] LED lights steady
3. Dial [1] [0] for Check-in/Change Room Status
4. Dial [Room Number(s)]
or
Press {DSS} key(s) assigned to room number(s)
5. Press [SPEED] button
LCD shows current status of Room Number eg., after entering
room No. 100, LCD shows Room Status as follows:
If Prepaid Money is registered, LCD displays “P” for Prepaid
Money
6. Dial [7] to Register/Change Prepaid Money
• Enter [Prepaid Money] (e.g., service costs $4.75, press 475)
• Press [SPEED] button
• LCD shows database (“P”)
• Press [HOLD/SAVE] button
• System returns to Check-in Menu
Please note: If a guest returns at a later time to further prepay
calls the attendant must enter the total credit plus the extra credit
being added into the system. Eg. if total credit from the initial
prepaid money is $73 and the guest would like to prepay an extra
$50, the total sum must be entered into the system of $123.
CHECK-IN FUNCTIONS 16
100 (CLEAN) . . . . . .
COS77 . . : . . I(X) G(. . ) .P . .

CHECK-IN FUNCTIONS 17
ASSIGN CALL
CHARGE RATE(S) This feature allows the system attendant to assign a variable call
charge rate to rooms at the time of Check-in. Up to six different
rates are supported ranging from 000-999% of standard
programmed call cost. These rates are assigned by the technician
at the time of installation. For details of programmed rates for 1-6
please refer to management. (Eg. 60c may be charged for a local
call, a hotel may increase the premium on weekends by charging
50% on top of the standard rate i.e. 90c).
1. Press {Check-In} button
2. Dial [Room Number(s)]
or
Press {DSS} key(s) assigned to room number(s)
3. Press [SPEED] button
4. LCD shows current status of Room Number e.g., after entering
Room No. 100, LCD shows Room Status as follows:
If a call charge rate is assigned, LCD displays rate number (eg.1)
5. Dial [8] to Register/Change call charge rate.
• Enter [Call Charge Rate] as required (0-6)
or
Press [SPEED] button to erase
• LCD shows Call Charge Rate
• Press [HOLD/SAVE] button
• System returns to Check-in Menu
100 (CLEAN) . . . . . .
COS77 . . : . . I(X) G(. . ) .1 . .
CHANGE ROOM STATUS 18
CALL CHARGE
RATE ASSIGN
This feature allows the system attendant to assign a variable call
charge rate to rooms at the time of Check-in. Up to six different
rates are supported from 000%-999% of standard programmed
call cost. The standard programmed call cost is set by the
technician.
• Press [TRANS/PGM] button
• Dial [2] [2]
• Confirmation tone - LCD displays the Call Charge Rate and Call
Charge Rate type of the first option
• Enter Call Charge Rate required. [0]-[5]
• To program a Call Charge Rate Number currently not displayed
• Press Flexible button [1]
• Press Call Charge Rate (3 digits) eg., 050%
• To register a Call Charge type
• Press Flexible button [2]
• Enter Call Charge type eg, Holiday
• Press [HOLD/SAVE] button
• Press [TRANS/PGM] button
• Dial [2] [3]
• Enter room range [1-9999]
• Enter Call Charge Rate required. [0]-[5]
• Press [HOLD/SAVE] button
REGISTER AND
CHANGE CALL
CHARGE RATE
ASSIGN DEFAULT
CALL RATE TO
ROOM(S)
CHECK ROOM
STATUS Check room status may be used after a guest is checked in and
Attendant needs to view or modify details against guest’s room.

CHECK OUT
WITH OUT
PAYMENT METHOD
CHECK OUT This feature allows the system attendant to Check-out a guest.
When Check-out is completed, the Room Status is changed to
“DIRTY” as part of default settings. The following functions are
automatically reset on the system for the next guest: message
waiting, wake-up time, maid status, station COS, prepaid money
etc.
The attendant can also designate the payment method which is
printed out on the invoice (eg. CASH, VISA, AMEX etc.). Ten
different payment options are available. For payment options
available please speak to your management, as these must be
programmed by a technician.
Checking-out a guest automatically prints out a detailed guest
account, which can be given to the guest upon their departure.
• Press [TRANS/PGM] button
• Dial [1] [1]
• Enter room number [1-9999]
or
Press {DSS} key(s) assigned to room number(s)
• Press [SPEED] + [BIN] (0-9) for designating payment
method
• Press [HOLD/SAVE] button
• Press [TRANS/PGM] button
• Dial [1] [1]
• Enter room number [1-9999]
or
Press {DSS} key(s) assigned to room number(s)
• Press [HOLD/SAVE] button
CHANGE ROOM STATUS 19
CHECK OUT
CHECK OUTCHECK OUT WITH
PAYMENT METHOD

BARNIES PALACE
TOTAL CHARGE IN ROOM 100(Guest-Name : D. JONES )
Check - In : 94/12/26 - 18
Check - Out : 94/12/31 - 11 ( 5 days )
Start-Time CO Duration Dialled-No. Count Call-Cost Remark
12/27-13 :10 01 00:00:32 00018234507951 0 0 Unanswered
12/27-13 : 30 01 00:01:23 000182343507951 3 15.00
12/28-21 : 22 02 00:10:18 000182343507953 31 155.00
Charge-Time Charged-STA Item Bar-Cost
12/28-21 : 32 COFFEE-SHOP COFFEE 2.00
12/29-10 : 10 FRONT-DESK COKE (MINI-BAR) 3.00
ITEM CHARGE Tax(Rate) Sum
(1) ROOM CHARGE : 300.00 30 (10.00%) 330
(rate 02 : GOLD)
(2) CALL CHARGE : 170.00 17(10.00%) 187
(3) BAR CHARGE : 80.00
(4) PRE-PAID -200
Method of payment : VISA
TOTAL : 397.00 AUD
CHANGE ROOM STATUS 20
During check out process, total charge for room is printed.
Printed format is as follows:
DIAL BY NAME This feature automatically builds an internal directory of registered
Service Stations and Guests Checked-in. Once the guest names
have been added during Check-in function, names may be chosen
from the list for dialling and transferring calls.* The guest’s name is
automatically deleted once check-out is complete.
• Press [SPEED] button twice
• Dial [1] for internal Speed dial directory
• Press the [Up/Down] button until name is found.
• The LCD displays 2 names at one given time
• For Line 1 dial [1]
or
For Line 2 Dial [2}
• Press [HOLD/SAVE] button
* Please note a display station is required for this function
to operate

ENABLE
ONE TIME
EXTERNAL CALL
Guests can make an external call from a Service Station or another
room and charge it back to their room; this feature must be
activated from the attendant station (charged guest station must be
a Checked-in room.)
If an external call has been attempted unsuccessfully the system
automatically resets barring facilities to default. Therefore, it may
be necessary to repeat the function until the call has been
successfully completed.
• Press [TRANS/PGM] button
• Dial [1] [8]
• Dial [Service Station]
or
[Room Number] where call is to be made from
• Dial [Room Number] where the call is to be charged to
• Press [HOLD/SAVE] button
• Notify guest that one time External Call has been enabled
CHANGE ROOM STATUS 21
No. STA CO TIME START DIALLED COUNT COST Remark
0001 104 01 00:01:23 12/29/94 08:16 0001034507950 3 15 R 0112
Print format called from station 112 and charged station 104:
LCD DISPLAY
LANGUAGE
CHANGE
This feature enables the attendant to change the LCD Language of
any guest keystation. The system supports 8 different LCD
Languages. After a guest Checks-out the guest station language is
returned to default for the requirements of the next guest.
• Press [TRANS/PGM] button
• Dial [5] [1]
• Enter Room Number Range [1-9999]
• Press [0] English [6] Finnish
[1] Korean [7] Dutch
[2] Italian [8] Spanish
[3] Invalid [10] Danish
[4] Swedish [11] German
[5] Norwegian [13] Estonian
• Press [HOLD/SAVE] button

CHANGE ROOM STATUS 22
INTERCOM CALL
ENABLE/ DISABLE This feature disables a Guest Station’s ability to call another station
in the system. Guest stations can call Attendant, Service and Room
to Room Call Group stations even though ICM call function is
disabled. After Check-out ICM call status is disabled ready for
next guest.
• Press [TRANS/PGM] button
• Dial [1] [4] to Enable
or
Dial [1] [5] to Disable
• Enter Room Range [1-9999]
or
Press {DSS} key(s) assigned to room number(s)
• Press [HOLD/SAVE] button
REGISTER HOTEL
NAME This feature allows the system attendant to register or change the
hotel name, which will be printed on guest invoices.
• Press [TRANS/PGM] button
• Dial [2] [1]
• Enter [Hotel Name] (up to 24 characters)
• Press [HOLD/SAVE] button
see character set on page 10 for hotel name programming
REGISTER/CLEAR
ROOM TO ROOM
CALL GROUP
Stations in the system can belong to one room to room call group
allowing guests in the same group to call each other, while
excluding calls to other guests not in the group.
• Press [TRANS/PGM] button
• Dial [1] [6] to register
or
Dial [1] [7] to clear
• Enter room call group number [01-99]
• Enter room range [1-9999]
or
Press {DSS} key(s) assigned to room number(s)
• Press [HOLD/SAVE] button
ROOM CHARGE
DISPLAY System Attendant can view the total charge of a single room on the
LCD display or send it to printer at any time for hotel requirements
or on guest’s request.
• Press [TRANS/PGM] button
• Dial [1] [2]
• Enter room number [1-9999]
or
Press {DSS} key(s) assigned to room number(s)
• Detailed Room Charge is displayed
• Press [#] to print detailed room charge via printer
• Press [HOLD/SAVE] button
CHANGE ROOM STATUS 23
CHANGE ROOM STATUS 24
PART-TIME
ACCOMMODATION In cases where the duration of stay at the hotel is less than 24
hours, a part-time fee may be charged according to hotel policy.
Each room type may have up to 6 fields for different part-time
ranges e.g. a guest may stay in a hotel for 00-03 hours or 06-09
hours and be charged the same or different rate. There are 32
part-time ranges available on the Aria Hospitality system.
Each room may be assigned 6 of 32 part-time ranges. Costs are
automatically calculated by the system at Check-out.
• Press [TRANS/PGM] button
• Dial [2] [4]
• Hear Confirmation tone
• LCD displays the time range of first option
• To program a new time range that is not currently assigned
• Enter option to be programmed [00]-[31]
• Press Flexible button [1]
• Dial 4 digits eg. 04-12 hours is 0412
• To assign charge rate
• Press Flexible button [2]
• Enter range of the rate from 000% to 100% eg., for 50%
enter 050
• Press [HOLD/SAVE] button
LCD displays the time range of staying at hotel and fee for that
range
e.g. Room type table
If room 100 is type SINGLE and room is used for 3 hours then $50
charge will apply. For 13 hours occupation, $100 will be charged
because room type SINGLE has no part time bin No 04 allocated.
Rate (00)
01-03 : 050%
REGISTER AND
CHANGE ROOM
RATE(S) / TIME
RANGES
ROOM TYPE TABLE
Room type Charge Part time bins
::
::
SINGLE $100 01,03
:::
:::
PART TIME TABLE
Bin Part time range Rate
00 : :
01 00 -03 hours 50%
02
03 04-12 hours 80%
04 13-15 hours 90%
:::
:::

CHANGE ROOM STATUS 25
ROOM RATE
ASSIGN This feature allows the system attendant to assign a room rate to
individual rooms. Setting of up to 20 different room rates are
possible on the system. This information will be included on the
Guest bill at Check-out.
• Press [TRANS/PGM] button
• Dial [1] [9]
• Hear Confirmation Tone
• LCD displays the room cost and room type name of the first
option programmed
• To program another Room Rate Number, that is currently not
assigned/defined.
Enter Room Rate number [00]-[19]
• To assign room cost
• Press Flexible button [1]
• Dial Room Cost (max 7 digits ) eg., 0000100 equals $100 or
Press eg 100 + [SPEED] button for less than 7 digits
(if no decimal place is programmed)
• Otherwise must make allowance (eg. cost $100, press 10000
then [SPEED] button)
• Press Button [2] to type room name
• Dial Room Type Name (max. 6 digits) eg., SINGLE, DOUBLE etc.
• Press [HOLD/SAVE] button
• Press [TRANS/PGM] button
• Dial [2] [0]
• Enter Room Range [1-9999]
• Enter Room Rate Option Number [00]-[19]
• Press [HOLD/SAVE] button
LCD displays currently assigned Room Rate Option
100-105
01: 0000200 SINGLE
ASSIGN ROOM
RATE TO ROOMS
PROGRAMMING
ROOM RATE

CHANGE ROOM STATUS 26
ROOM STATUS
REPORT This feature allows a Room Status report to be printed, providing
an up to date report summarising the status for every room.
If room is vacant the Room Attendant status is printed.
• Press [TRANS/PGM] button
• Dial [1] [3]
• Enter room range [1-9999]
or
Press {DSS} key(s) assigned room number(s)
• Press [HOLD/SAVE] button
• Room Status Report is printed via printer
Note: Charge is the total balance due by the customer to the hotel
or balance of (prepaid money - total costs).
S ROOM CHECK-IN GUEST NAME COS ICM GRP WAKE AUTH PRE-PAID C-RT CHARGE
C 0100 12/29-23 J. Smith 1 Yes . . . . 200 . 12345
C 0102 12/25-18 J. Citizen 1 No . . 07 : 00 No 1 500
C 0103 12/29-15 J. Anderson 1 No . . 08 : 00 Yes 2 600
D 0104 Vacant
C 0105 Vacant
- S means maid status, C clean and D dirty
- C-RT means call charge rate
TAX RATES This feature allows up to 5 different tax rates to be charge against
bar items. These are programmed by your installer. Tax rates for
call charge and room charge is set always at the first tax rate.
For further information please do not hesitate to contact your
support specialist.
ROOM STATUS
REPORT
ROOM STATUS
REPORT FORMAT

WAKE-UP CALLS
To set Wake-Up
Call Once Off
Permanent
To Cancel
Wake-Up Call
This feature is used as a Wake-up or timed reminder call to one or a
group of stations when a meeting or other engagement has been
scheduled. The telephone will ring 30 seconds ON and 90 seconds
OFF for a maximum of 3 times in the Guest Station. If not answered
the wake-up fail alarm ring is sent to Attendant Station.
• Press [TRANS/PGM] button
• Dial [4] [1]
• Hear Confirmation tone
• Enter Room Range [1-9999]
or
Press {DSS} key(s) assigned to room number(s)
• Enter wake-up time 24 hour [HH:MM]*
• Enter [#] for permanent wake-up time
• Press [HOLD/SAVE] button
• Hear Confirmation tone
* These instructions enable the setting of a once off wake-up time.
You can set a permanent wake-up call (i.e. to ring at the same time
daily, simply by entering a [#] after entering the wake-up times.
LCD shows current Room number status as “C” for continuous or
“S” for single wake-up call.
• Press [TRANS/PGM] button
• Dial [4] [2]
• Hear Confirmation tone
• Enter room range [1-9999]
or
Press {DSS} key(s) assigned to room number(s)
• Press [HOLD/SAVE] button
• Hear Confirmation tone
CHANGE ROOM STATUS 27

RESETTING ROOM
STATUS
CLEAN/DIRTY
From Front-Desk
(Attendant)
To Register
“Clean”
To Register
“Dirty”
From Guest
Extension
To Register
“Clean”
To Register
“Dirty”
The room status feature serves to assist the attendant to ensure that a
room is clean for Check-in. When a guest is checked-out the status of
the room is registered as “DIRTY”. The room attendant can then
prepare the room for the next guest. Once the room is ready the maid
or main attendant can enter the relevant code (as described below).
The status of the room is changed to “CLEAN”.
The code below can also be used by the main attendant to override
a “Dirty”/“Clean” room status - when required.
• Press [TRANS/PGM] button
• Dial [7] [8]
• Hear Confirmation tone
• Enter room range [1-9999]
or
• Press {DSS} key(s) assigned to room number(s)
• Hear Confirmation tone
• Press [HOLD/SAVE] button
• Hear Confirmation tone
• Press [TRANS/PGM] button
• Dial [7] [9]
• Hear Confirmation tone
• Enter room range [1-9999]
or
• Press {DSS} key(s) assigned to room number(s)
• Hear Confirmation tone
• Press [HOLD/SAVE] button
• Hear Confirmation tone
• Press [*] [3]
• Confirmation tone is heard
• Dial [7] [8]
• Confirmation tone is heard
• Press [*] [3]
• Confirmation tone is heard
• Dial [7] [9]
• Confirmation tone is heard
CHANGE ROOM STATUS 28
Note: This assumes that an industry Standard Telephone is used for Guest rooms,
if a keystation is used in the guest room [*] [3] is replaced by [TRANS/PGM].

CHANGE ROOM STATUS 29
REGISTER COST
AT SERVICE
STATION
Guest purchases of products or services can be directly billed against
their room. This can be performed from any Attendant or service
station.
• Press [TRANS/PGM] button
• Dial [7] [1]
• Dial Room Number to be charged
• Dial Product code [00]-[99]
• Dial [Product Cost] ( e.g., service costs $4.75, press 475)
max 6 digits.
• Press [SPEED] if cost entered is less than 6 digits
• Otherwise must make allowance (eg. cost $100, press 10000
then [SPEED] button)
• Press [HOLD/SAVE] button
• Confirmation tone is heard
Note: Guest Stations can call Service Stations either by dialling the
extensions number or by dialling a predetermined digit service code
(as set by system installer).
Guests can call Service Stations even in cases where the guest's
extension has been barred to all other calls.
ATTENDANT USER GUIDE 30 BUTTON DISPLAY
EXECUTIVE KEYSTATIONS WITH DSS 30
LINE 1 LINE 2 LINE 3
LINE 4 LINE 5 LINE 6
LINE 7 LINE 8 LINE 9
LINE 10 LINE 11 LINE 12
LINE 13 LINE 14 LINE 15
CHECK-IN CHECK-OUT
ICM ENABLE
DISPLAY ROOM
CHARGE
ROOM STATUS
PRINT
ONE TIME
CO CALL ROOM TYPE ROOM TYPE
ICM DISABLE
Handpiece
Electronic
Volume Control
LCD Display
Indicator Lights
Flexible Keys
Function Keys
Keypad
Speaker
Microphone
DSS Console

CHECK-IN GUESTS This feature allows the System Attendant to view the Status of a
room and to Check-in a guest.
The desired Check-in functions are entered one at a time and saved.
The display will return to the Check-in menu each time.
This process is repeated until all desired Check-in functions have
been entered. Press the [MON] Key to exit the Check-in menu.
During the Check-in process all DSS buttons show room status,
i.e., whether guest rooms are vacant or occupied. A Check-in
status report is printed upon completion of each guests check-in.
The eight functions are individually covered in the following pages
with a detailed description and step by step explanation of the
operation involved in each function.
1. Press {Check-In} button
2. Dial [Room Number(s)]
or
Press {DSS} key(s) assigned to room number(s)
3. Press [SPEED] button
4. The system is now ready for Check-in. The following options
are available; you are not required to enter data against each one,
only the options required to satisfy your management
requirements.
5. Dial check-in function
[1] Register/Change Guest Name Screen
(12 Character-see Character set). Press [SPEED] (page 32)
[2] Change COS (page 33)
[3] Register/Change Wake-Up Time (page 34)
[4] Set ICM Enable/Disable (page 35)
[5] Set Room to Room Call Group (page 36)
[6] Register/Change Authorisation Code (page 37)
[7] Register/Change Prepaid Money (page 38)
[8] Register/Change Call Charge Rate (page 39)
• Press [HOLD/SAVE] button
After each option the system will return to your Check-in
function. To complete Check-in simply hang up Handset.
CHECK-IN FUNCTIONS
31
After check-in, the room status is printed via a printer in the following format:
Chk-In Room Check-In Guest Name COS ICM GRP WAKE AUTH PRE-PAID C-RT CHARGE
0100 12/29-18 . . . . . . . . 1 No . . . . : . . No 0 . 0
Changed Room Check-In Guest Name COS ICM GRP WAKE AUTH PRE-PAID C-RT CHARGE
0100 12/29-18 J. CITIZEN 1 Yes 01 06:00 Yes 200.00 . 0
Steps 1 to 4 are used only to gain access to the Check-in function.
Once in the Check-in function (Step 5) the attendant is not required
to enter data against each one of the eight functions, only against
those options required to satisfy your management requirements.
REGISTER /
CHANGE GUEST
NAME
This feature allows the System Attendant to register/change Guest
Name. The guest name appears on all printed reports, but not on
the station display.
1. Press {Check-In} button
2. Dial [Room Number(s)]
or
Press {DSS} key(s) assigned to room number(s)
3. Press [SPEED] button
4. LCD shows current status of Room Number e.g., after entering
Room No. 100, LCD shows Room Status as follows:
5. Dial Check-in function
• Dial [1] to Register/Change Guest Name
• Enter [Guest’s Name] 12 characters maximum. (If guest’s name
is less than 12 characters, then press the [SPEED] button)
• Press the [HOLD/SAVE] button
• System returns to Check-in Menu
CHECK-IN FUNCTIONS
CHARACTER SET
100 (CLEAN) . . . . . .
COS77 . . : . . I(X) G(. . ) . . .
A21 I43 Q7* Y93 660 (#1
B22 J51 R72 Z9# 770 )#2
C23 K52 S73 000 880 -#3
D31 L53 T81 110 990
E32 M61 U82 220 .13
F33 N62 V83 330 space *1
G41 O63 W91 440 ;*2
H42 P71 X92 550 ,*3
32
REGISTER/CHANGE
STATION
COS - DIALLING
PRIVILEGES
This feature allows the application of dialling privileges through
Class of Service Assignments. These COS assignments can be
allocated to all stations and external lines. Guest Rooms are set at
Check-in at default of COS22, for Day and night modes which
allows for external line restrictions, as configured by the installer.
This may be changed to any of the seven COS’s during guest
check-in.
Your manager will advise your organisation's policy on guest
dialling privileges after consultation with your systems installer.
If you are concerned about a guest’s ability to pay, you can request
a prepayment for calls. Please refer to page 38 of this manual.
1. Press {Check-In} button
2. Dial [Room Number(s)]
or
Press {DSS} key(s) assigned to room number(s)
3. Press [SPEED] button
4. LCD shows current status of room number e.g., after entering
room No. 100, LCD shows room status as follows:
5. Dial check-in function
• Dial [2] for Register/Change Room COS
• Dial Room Day and Night COS (Range 1-7)
Note - 2 digits one is for day and other is for night COS e.g.,
COS is 15 = Class of Service 1 for day and 5 for night
• Press [HOLD/SAVE] button
• System returns to Check-in Menu
CHECK-IN FUNCTIONS 33
100 (CLEAN) . . . . . .
COS77 . . : . . I(X) G(. . ) . . .
STA COS 1 No Restrictions
STA COS 2 Please check with management or installation technician for programmed privileges
STA COS 3 Please check with management or installation technician for programmed privileges
STA COS 4 Please check with management or installation technician for programmed privileges
STA COS 5 The leading digit dialled cannot be a long distance code. The dialled digits can be longer than 8 digits.
STA COS 6 The leading digits cannot be a long distance code. Only eight digits maximum can be dialled.
For example 92636600.
STA COS 7 Intercom only calls are allowed.
There are seven Station Class of Service assignments available to each
station. The COS’s are as follows:

TO
REGISTER/CHANGE
GUEST STATION
WAKE-UP TIME
This feature allows you to set a Wake-up time upon guest request.
Wake-up setting operates only one time*. Wake-up setting is
erased automatically after Wake-up call has been answered.
On wake-up signalling, user lifts handset and receives Music On
Hold, Message or Internal Chimes (dependent on programming and
options available on the system).
At Wake-up time the telephone will ring for 30 Secs. ON and 90
Secs. OFF for a maximum of 3 times on the Guest Station unless
the telephone is answered.
If not answered, the wake-up fail alarm is sent to Attendant
Station. The LCD at System Attendant displays the designated
station.
The wake-up fail alarm can be deleted by dialling the station
number or pressing DSS button at System Attendant Station. This
cancels the alarm and prints a report of Wake-up fail. This report
indicates that Wake-up alarm has been activated and that the guest
has not responded.
1. Press {Check-In} button
2. Dial [Room Number(s)]
or
Press {DSS} key(s) assigned to room number(s)
3. Press [SPEED] button
4. LCD shows current status of Room Number e.g., after entering
Room No. 100, LCD shows room status as follows:
5. Dial Check-in function
• Dial [3] to Register/Change Wake-Up time
• Enter Wake-Up Time [HH:MM] (HH:MM = 24-hour
format - ring e.g., 7:30 AM= 0730 hours, 10:00 PM = 2200 hours)
• Press [SPEED] button
or
Press [#] button for permanent wake-up call set
• Press [HOLD/SAVE] button
• System returns to Check-in Menu
CHECK-IN FUNCTIONS 34
100 (CLEAN) . . . . . .
COS77 . . : . . I(X) G(. . ) . . .
SET ICM CALL
ENABLE / DISABLE This feature enables a Guest Station to call other stations in the
system. By default Guest Stations can only call the Attendant and
Service Stations. After a guest Checks out the rooms ICM call status
is returned to default ready for the requirements of the next Guest.
1. Press {Check-In} button
2. Dial [Room Number(s)]
or
Press {DSS} key(s) assigned to room number(s)
3. Press [SPEED] button
4. LCD shows current status of Room Number e.g., after entering
Room No. 100, LCD shows Room Status as follows:
5. Dial check-in function
• Dial [4] for Enable/Disable ICM Call, then ICM Call status is changed
(toggle setting). LCD shows current status of Station Number.
| (X) = Station ICM disabled
| (0) = Station ICM enabled
• Press [HOLD/SAVE] button
• System returns to Check-in Menu
CHECK-IN FUNCTIONS 35
100 (CLEAN) . . . . . .
COS77 . . : . . I(X) G(. . ) . . .

CHECK-IN FUNCTIONS
REGISTER /
CHANGE ROOM
TO ROOM CALL
GROUP
The default setting of Aria Hospitality system is that all guests are
barred from dialling other guest stations. Where required the
Attendant can enable groups of guest stations to call each other.
This is done by putting rooms into groups; when room to room call
restriction is turned on, guests can only call those extensions which
are in the same group. Stations in the system can be arranged in
up to 100 Room to Room Call Groups, each containing an
unlimited number of stations. A guest station can belong to only
one Room to Room Call Group. Guest Stations can also call
Attendant Station, Service Stations and rooms in the same Room to
Room Call Group, even if ICM Call is disabled.
After Check-out, Room to Room Call Group is returned to default
settings ready for the next guest
1. Press {Check-In} button
2. Dial [Room Number(s)]
or
Press {DSS} key(s) assigned to room number(s)
3. Press [SPEED] button
4. LCD shows current status of Room Number e.g., after entering
Room No. 100, LCD shows Room Status as follows:
5. Dial Check-in function
• Dial [5] to Register/Change Room to Room Call Group
• Enter Room to Room Call Group Number [00-99] e.g., G(56)
• Press [HOLD/SAVE] button
• System returns to Check-in Menu
100 (CLEAN) . . . . . .
COS77 . . : . . I(X) G(56 ) . . .
36
CHECK-IN FUNCTIONS 37
REGISTER /
CHANGE
AUTHORISATION
CODE
This feature provides a means for barred stations (ie no external
dialling privileges) to access external lines. The system allows for
192 Authorisation codes, but they cannot be duplicated (i.e., one code
only can be entered at one particular station to access an external
line.) Verification codes required for the following two call types;
1. To Access Denied External Line:
A use must enter their Authorisation Code. If correct Authorisation
Code is matched, external Dial Tone is presented.
2. To Access an External Line from a Service Station:
A user must enter Authorisation Code. This function is only
applicable in cases where the service station has been set at COS 7
(i.e., external line access is denied).
1. Press {Check-In} button
2. Dial [Room Number(s)]
or
Press {DSS} key(s) assigned to room number(s)
3. Press [SPEED] button
4. LCD shows current status of Room Number
e.g., after entering Room No. 100, LCD shows Room Status
as follows:
5. Dial check-in function
If Authorisation Code is registered, LCD displays “A”.
• Dial [6] for Register/Change Authorisation Code
• Enter [Guest’s Authorisation Code] (5 digit code)
• Press [HOLD/SAVE] button
• System returns to Check-in Menu
100 (CLEAN) . . . . . .
COS77 . . : . . I(X) G(. . ) .A . .

CHANGE ROOM STATUS 38
REGISTER /
CHANGE
PREPAID
MONEY
This feature allows the guest station to make calls in accordance
with their prepaid money. If the Prepaid Money is less than twice
the single unit charging rate determined by the hotel (that has been
programmed by the technician) i.e., if 60¢ is charged for a local call
from a guest room, the prepaid money has to be a minimum of
$1.20) in order for the guest to make a call.
If the prepaid money goes into debit, equal to a single unit charging
rate of the call during a conversation, a warning tone is given and
the call will be disconnected. You will need to advise the guest of
this if the prepayment feature is used. Prepaid money is included as
part of the guest’s room charge status.
Total Room Charge = Total Charge - Prepaid Money
1. Press {Check-In} button
2. Dial [Room Number(s)]
or
Press {DSS} key(s) assigned to room number(s)
3. Press [SPEED] button
4. LCD shows current status of Room Number e.g., after entering
Room No. 100, LCD shows Room Status as follows:
5. Dial Check-in function
If prepaid money is registered, LCD displays “P” for Prepaid
Money
• Dial [7] to Register/Change Prepaid Money
• Enter [Prepaid Money] (e.g., service costs $4.75, press 475)
• Press [SPEED] button if cost entered is less than 6 digits
• Otherwise must make allowance (eg. cost $100, press 10000
then [SPEED] button)
• LCD shows database (“P”)
• Press [HOLD/SAVE] button
• System returns to Check-in Menu
Note: If a guest returns at a later time to further prepay calls the
attendant must enter the total credit plus the extra credit being added
to the system. Eg. if total credit from the initial prepaid money is $73
and the guest would like to prepay an extra $50, the total sum must be
entered into the system of $123.
100 (CLEAN) . . . . . .
COS77 . . : . . I(X) G(. . ) . P . .
CHANGE ROOM STATUS 39
ASSIGN CALL
CHARGE RATE This feature allows the system attendant to assign a variable call
charge rate to rooms at time of Check-In. Up to six different rates
are supported ranging from 000-999% of standard SMDR call cost.
These rates are assigned by the technician.
1. Press {Check-In} button
2. Dial [Room Number(s)]
or
Press {DSS} key(s) assigned to room number(s)
3. Press [SPEED] button
4. LCD shows current status of Room Number e.g., after entering
Room No. 100, LCD shows Room Status as follows:
5. Dial Check-in function
If a call charge rate is assigned, LCD displays rate number (eg. 1).
• Dial [8] to Register/Change call charge rate
• Enter [Call Charge Rate] as required (0-6)
or
• Press [SPEED] button to erase
• LCD shows Call Charge Rate
• Press [HOLD/SAVE] button
• System returns to Check-in Menu
100 (CLEAN) . . . . . .
COS77 . . : . . I(X) G(. . ) .1 . .
CHANGE ROOM STATUS 40
CHECK OUT
Change room status may be used after a guest is checked in and
Attendant needs to view or modify details against guest's room.
This feature allows the system attendant to Check Out a guest.
When Check-out is completed, the Room Status is changed to
“DIRTY” as part of default settings. The following functions are
automatically reset on the system for the next guest: message
waiting, wake-up time, maid status, station COS, prepaid money etc.
The attendant can also designate tha payment method which is
printed out on the invoice (eg CASH, VISA, AMEX etc.).
Ten different payment options are available.
Checking-out a guest automatically prints out a detailed guest
account, which can be given to the guest upon their departure.
• Press {Check out} button
• Enter room range [1-9999]
or
Press {DSS} key(s) assigned to room number(s)
• Press [SPEED] + [BIN] (0-9) for designated payment method
• Press [HOLD/SAVE] button
• Press {Check out} button
• Enter room range [1-9999]
or
Press {DSS} key(s) assigned to room number(s)
• Press [HOLD/SAVE] button
CHECK OUT
WITH OUT
PAYMENT METHOD
CHECK OUT WITH
PAYMENT METHOD
During Check Out Process, Total Charge for room is printed.
Printed format is as follows:
CHANGE ROOM STATUS 41
BARNIES PALACE
TOTAL CHARGE IN ROOM 100(Guest-Name : D. JONES )
Check - In : 94/12/26 - 18
Check - Out : 94/12/31 - 11 ( 5 days )
Start-Time CO Duration Dialled-No. Count Call-Cost Remark
12/27-13 :10 01 00:00:32 00018234507951 0 0 Unanswered
12/27-13 : 30 01 00:01:23 000182343507951 3 15.00
12/28-21 : 22 02 00:10:18 000182343507953 31 155.00
Charge-Time Charged-STA Item Bar-Cost
12/28-21 : 32 COFFEE-SHOP COFFEE 2.00
12/29-10 : 10 FRONT-DESK COKE (MINI-BAR) 3.00
ITEM CHARGE Tax(Rate) Sum
(1) ROOM CHARGE : 300.00 30 (10.00%) 330
(rate 02 : GOLD)
(2) CALL CHARGE : 170.00 17(10.00%) 187
(3) BAR CHARGE : 80.00
(4) PRE-PAID -200
Method of payment : VISA
TOTAL : 397.00 AUD

This feature disables a Guest Station’s ability to call another station
in the system. Guest stations can call Attendant, Service and Room
to Room Call Group stations even though ICM call function is
disabled. After Check out ICM call status is disabled ready for next
Guest.
• Press {ICM Call Enable} button
or
Press {ICM Call Disable} button
• Enter Room Range [1-9999]
or
Press {DSS} key(s) assigned to room number(s)
• Press [Hold/Save] button
CHANGE ROOM STATUS 42
ENABLE
ONE TIME
EXTERNAL CALL
Guests can make an external Call from a Service Station or another
room and charge it back to their room; this feature must be
activated from the attendant station (charged guest station must be
a checked in room).
If an external call has been attempted unsuccessfully the system
automatically resets to default. Therefore, it may be necessary to
repeat the function until the call has been successfully completed.
• Press {One-time CO Call Enable} button
• Dial [Service Station]
or
[Room Number] where call is to be made from
• Dial [Room Number] where the call is to be charged to
• Press [HOLD/SAVE] button
• Notify guest that One time External Call has been enabled
INTERCOM CALL
ENABLE/ DISABLE
No. STA CO TIME START DIALLED COUNT COST C-RT Remark
0001 105 01 00:01:23 12/29/94 08:16 0001034507950 3 500 . R 0112
Print format called from station 112 and charged station 105:

CHANGE ROOM STATUS 43
REGISTER/CLEAR
ROOM TO ROOM
CALL GROUP
Stations in the system can belong to one room to room call group
allowing guests in the same group to call each other, while
excluding calls to other guests not in the group.
• Press {Room Group Call Enable} button
or
Press {Room Group Call Disable} button
• Enter Room Call Group Number [01-99]
• Enter room range [1-9999]
or
Press {DSS} key(s) assigned to Room Number(s)
• Press [HOLD/SAVE] button
ROOM CHARGE
DISPLAY System attendant can view the total charge of a single room on the
LCD display or send it to printer at any time for hotel requirements
or on guest’s request.
• Press {Display Call Charge} button
• Enter Room Number [1-9999]
or
Press {DSS} key(s) assigned to room number(s)
• Total Room Charge is displayed
• Press [#] to print detailed Room Charge via printer
• Press [HOLD/SAVE] button
ROOM STATUS
REPORT • Press {Print Room Status} button
• Enter Room Range [1-9999]
or
Press {DSS} key(s) assigned to room number(s)
• Press [HOLD/SAVE] button
• Room Status Report is printed via printer
Note: Charge is the total balance due by the customer to the hotel
or Balance of (prepaid money - total costs).
STATUS ROOM CHECK-IN GUEST NAME COS ICM GRP WAKE AUTH PRE-PAID C-RT CHARGE
Clean 0100 12/29-23 J. Smith 1 Yes . . . . : . . No 20.00 . 12.34
Clean 0102 12/25-18 J. Citizen 1 No . . 07 : 00 No . 500.00
Clean 0103 12/29-15 J. Anderson 1 No . . 08 : 00 Yes . .50
Dirty 0104
Clean 0105

CHANGE ROOM STATUS 44
WAKE-UP CALLS
To set Wake-Up
Call
One Wake-Up Call
only
Wake-Up Call
Every Day
To Cancel a
Wake-Up Call
This feature is used as a Wake-up or timed reminder call to one or a
group of stations for when a meeting, or other engagement has
been scheduled. The telephone will ring 30 seconds ON and 90
seconds OFF for a maximum of 3 times in the Guest Station. If not
answered, the wake-up fail alarm ring is sent to Attendant station.
• Press {Wake-Up Set} button
• Enter room range [1-9999]
or
Press {DSS} key(s) assigned to room number(s)
• Enter Wake-up time 24 hour [HH:MM]
• Press [HOLD/SAVE] button
• Hear Confirmation tone
• Press {Wake-Up Set} button
• Hear Confirmation tone
• Enter Room Range [1-9999]
or
Press {DSS} key(s) assigned to room number(s)
• Enter Wake-up time 24 hour [HH:MM]*
• Dial [#]
• Press [HOLD/SAVE] button
• Hear Confirmation tone
* These instructions enable the setting of a once-off wake-up time.
You can set a permanent wake-up call (i.e. to ring at the same time
daily, simply by entering a [#] after entering the wake-up time).
LCD shows current Room number status as “C” for continuous or
“S” for single wake-up call.
• Press {Wake-Up Erase} button
• Hear Confirmation tone
• Enter Room Range [1-9999]
or
Press {DSS} key(s) assigned to room number(s)
• Press [HOLD/SAVE] button
• Hear Confirmation tone

CHANGE ROOM STATUS 45
RESETTING ROOM
STATUS
CLEAN/DIRTY
From Front-Desk
(Attendant)
To Register
“Clean”
To Register
“Dirty”
From Guest
Extension
To Register
“Clean”
To Register
“Dirty”
The room status feature serves to assist the attendant to ensure that
a room is clean for Check-in. When a guest is checked out the
status of the room is registered as “DIRTY”. The room attendant
can then prepare the room for the next guest by entering the
relevant code (as described below). The status of the room is
changed to “CLEAN”.
The code below can also be used by the main attendant to overide a
“Dirty”/“Clean” room status - when required.
• Press [TRANS/PGM] button
• Dial [7] [8]
• Hear Confirmation tone
• Press {DSS} key(s) assigned to room number(s)
• Hear Confirmation tone
• Press [HOLD/SAVE] button
• Hear Confirmation tone
• Press [TRANS/PGM] button
• Dial [7] [9]
• Hear Confirmation tone
• Press {DSS} key(s) assigned to room number(s)
• Hear Confirmation tone
• Press [HOLD/SAVE] button
• Hear Confirmation tone
• Press [*] [3]
• Confirmation tone is heard
• Dial [7] [8]
• Confirmation tone is heard
• Press [*] [3]
• Confirmation tone is heard
• Dial [7] [9]
• Confirmation tone is heard
Note: This assumes that an industry Standard Telephone is
used for Guest rooms. If a keystation is used [*] [3] is replaced
by [TRANS/PGM].

CHANGE ROOM STATUS 46
Guest purchases of products or services can be directly billed
against their room. This can be performed from any Attendant or
service station.
• Press [TRANS/PGM] button
• Dial [7] [1]
• Dial Room Number to be charged
• Dial Product Code [00-99]
• Dial [Product Cost] ( e.g., service costs $4.75, press 475)
max 6 digits.
• Press [SPEED] button if cost entered is less than 6 digits
• Otherwise must make allowance (eg. cost $100, press 10000
then [SPEED] button)
• Press [HOLD/SAVE] button
• Confirmation tone is heard
REGISTER COST
AT SERVICE
STATION

NOTES 47

Aria Communications Pty. Ltd.
1800 351 119
ACN 090 723 925
Specifications are subject to change without prior notice
Group
