Windows Generic Plus PCL6 Printer Driver User's Guide V130 UG EN
User Manual: Canon imageCLASS MF416dw User Manual Pdf | User Manual PDF
Open the PDF directly: View PDF ![]() .
.
Page Count: 137 [warning: Documents this large are best viewed by clicking the View PDF Link!]

Windows
Generic Plus PCL6 Printer Driver
User's Guide
USRMA-1079-01 2017-03 en Copyright CANON INC. 2017
Contents
Introduction ....................................................................................................................................................... 2
How to Use the Manual ............................................................................................................................................. 3
Notations Used in the Manual ................................................................................................................................ 4
Disclaimers ............................................................................................................................................................... 5
Copyright .................................................................................................................................................................. 6
Trademarks .............................................................................................................................................................. 7
About This Driver ........................................................................................................................................... 9
Before Use ......................................................................................................................................................... 12
How to Refer to the Manual of the Device ............................................................................. 14
Printing ................................................................................................................................................................ 16
Printing from a Computer ....................................................................................................................................... 17
Scaling .................................................................................................................................................................... 20
Watermark Printing ................................................................................................................................................ 21
Poster Printing ........................................................................................................................................................ 22
Printing Over a Fixed Form ...................................................................................................................................... 26
Attaching Encryption When Printing ........................................................................................................................ 28
Putting Print Jobs on Hold ....................................................................................................................................... 29
Storing Print Data ................................................................................................................................................... 30
Priority Printing ...................................................................................................................................................... 31
Changing the Default Settings ................................................................................................................................. 32
Creating a Booklet When Printing ................................................................................................ 34
Booklet Printing ...................................................................................................................................................... 35
Creating a Booklet in Sets ........................................................................................................................................ 36
Correcting Displacement During Booklet Printing .................................................................................................... 37
Saddle Stitched Booklet Printing .............................................................................................................................. 38
Saddle Press Processing When Creating Saddle Stitched Booklets ............................................................................. 39
Trimming Pages When Creating Saddle Stitched Booklets ......................................................................................... 40
Perfect Binding ....................................................................................................................................................... 41
Using Various Types of Paper ............................................................................................................ 43
Registering Custom Paper Sizes ............................................................................................................................... 44
Inserting Sheets Between Transparencies ................................................................................................................ 45
Inserting Sheets ...................................................................................................................................................... 46
Inserting Tab Paper ................................................................................................................................................. 47
Printing on Tab Paper .............................................................................................................................................. 49
I
Adding Cover Sheets ............................................................................................................................................... 50
Printing Multiple Files Together ..................................................................................................... 52
About the [Edit and Preview] Function ..................................................................................................................... 53
Printing Files Together ............................................................................................................................................ 54
Checking the Print Preview ...................................................................................................................................... 56
Changing the Print Settings of the Combined File ..................................................................................................... 58
Editing Favorite Settings ....................................................................................................................... 61
Registering Favorite Settings ................................................................................................................................... 62
Editing the Favorite Settings List ............................................................................................................................. 63
Coordinating with the Device Functions ................................................................................. 66
Setting Device Information ...................................................................................................................................... 67
Device Functions Settings ........................................................................................................................................ 72
Paper Sources and Output Destinations Settings ...................................................................................................... 73
Exporting a Conguration Prole ............................................................................................................................. 82
Importing a Conguration Prole ............................................................................................................................ 84
Setting the Authentication Function ........................................................................................................................ 87
Setting the User Name ............................................................................................................................................ 89
Settings List ..................................................................................................................................................... 91
Common Settings for All Sheets ............................................................................................................................... 92
[Basic Settings] Sheet .............................................................................................................................................. 95
[Page Setup] Sheet .................................................................................................................................................. 98
[Finishing] Sheet ................................................................................................................................................... 101
[Paper Source] Sheet ............................................................................................................................................. 108
[Quality] Sheet ...................................................................................................................................................... 110
[Device Settings] Sheet .......................................................................................................................................... 114
[Prole] Sheet ....................................................................................................................................................... 119
Canon PageComposer ........................................................................................................................................... 121
Troubleshooting ......................................................................................................................................... 125
Driver settings cannot be set ................................................................................................................................. 126
Print results are unsatisfactory ............................................................................................................................. 127
Printing takes a long time ..................................................................................................................................... 129
Print results are too dark or too bright .................................................................................................................. 130
Overlay printing will not execute ........................................................................................................................... 131
Cannot use the acquire device information function or authentication function ..................................................... 132
II
Introduction
Introduction .......................................................................................................................................................... 2
How to Use the Manual ......................................................................................................................................... 3
Notations Used in the Manual .......................................................................................................................... 4
Disclaimers ............................................................................................................................................................. 5
Copyright ............................................................................................................................................................... 6
Trademarks ............................................................................................................................................................ 7
Introduction
1


Notations Used in the Manual
This explains symbols and settings used in this manual.
Symbols Used in This Manual
In this manual, explanations of items and operations that must be followed while using the driver are set forth
the symbols that indicate the following.
IMPORTANT
●Indicates operational requirements and restrictions. Be sure to read these items carefully to operate the
product correctly, and avoid damage to the product.
NOTE
●Indicates a clarication of an operation, or contains additional explanations for a procedure. Reading these
notes is highly recommended.
About Settings
In this manual, setting names displayed on the computer screen are represented as shown in the following
examples.
Example:
[Print]
[OK]
Introduction
4

Disclaimers
The information in this document is subject to change without notice.
CANON INC. MAKES NO WARRANTY OF ANY KIND WITH REGARD TO THIS MATERIAL, EITHER EXPRESS OR
IMPLIED, EXCEPT AS PROVIDED HEREIN, INCLUDING WITHOUT LIMITATION, THEREOF, WARRANTIES AS TO
MARKETABILITY, MERCHANTABILITY, FITNESS FOR A PARTICULAR PURPOSE OF USE OR NON-INFRINGEMENT.
CANON INC. SHALL NOT BE LIABLE FOR ANY DIRECT, INCIDENTAL, OR CONSEQUENTIAL DAMAGES OF ANY
NATURE, OR LOSSES OR EXPENSES RESULTING FROM THE USE OF THIS MATERIAL.
Introduction
5

Copyright
Copyright CANON INC. 2017
No part of this publication may be reproduced, transmitted, transcribed, stored in a retrieval system, or
translated into any language or computer language in any form or by any means, electronic, mechanical,
magnetic, optical, chemical, manual, or otherwise, without the prior written permission of Canon Inc.
Introduction
6

Trademarks
Microsoft, Windows, and Windows Vista are either registered trademarks or trademarks of Microsoft
Corporation in the United States and/or other countries.
macOS is a trademark of Apple Inc.
Other product and company names herein may be the trademarks of their respective owners.
Introduction
7
About This Driver
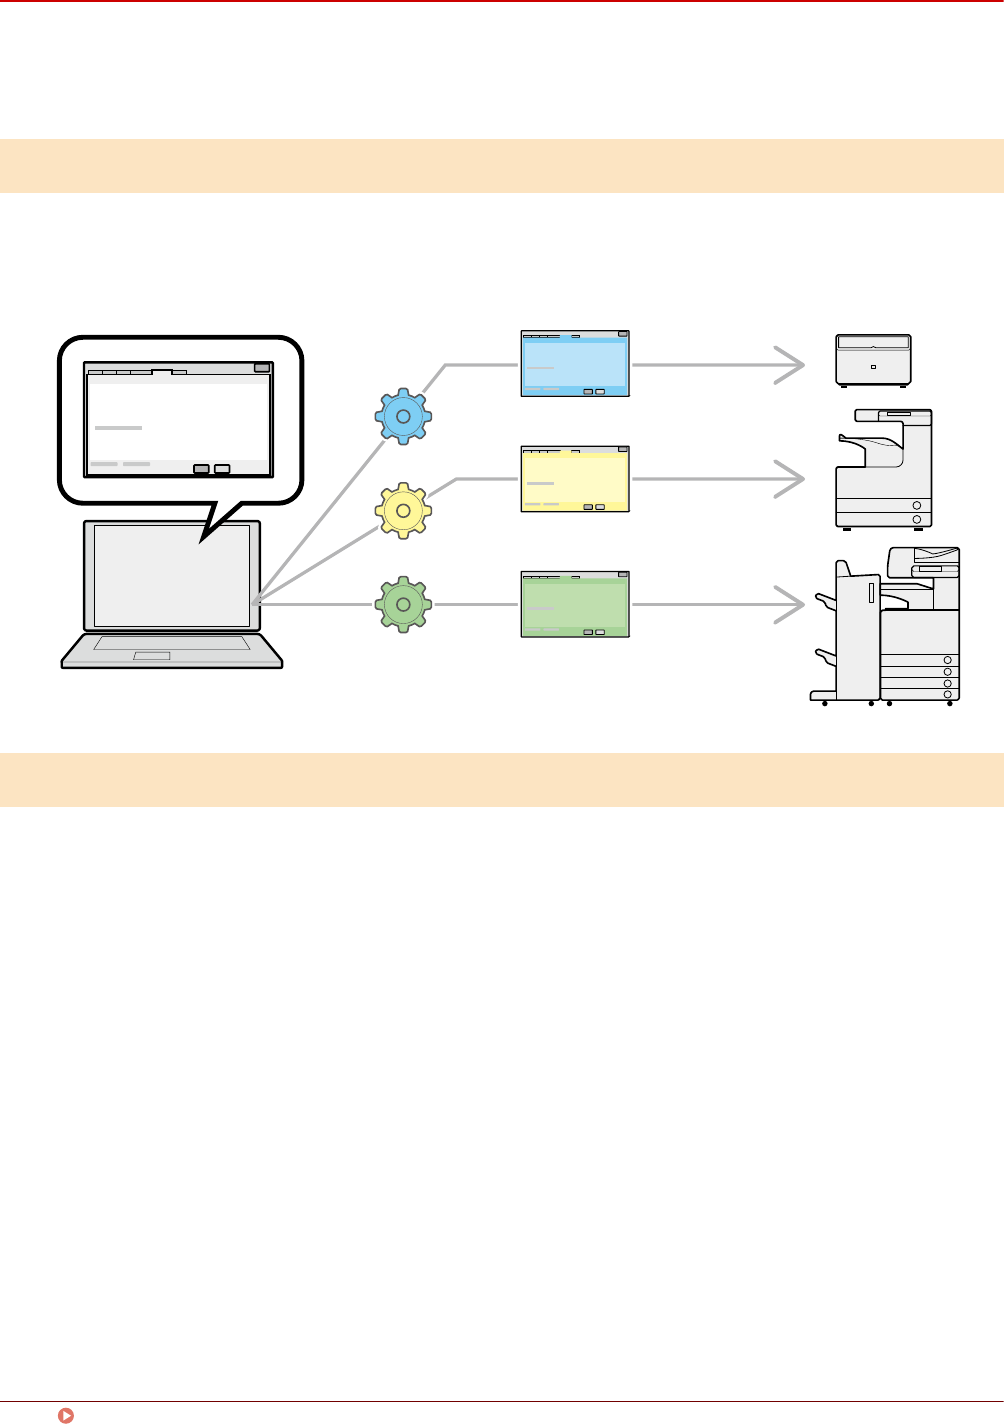
This is a generic printer driver that supports various devices. You can use the same driver for all printer models
by changing the settings for the printing port and device information.
Features
●Information regarding the functions and options of the device are collectively dened in a "conguration
prole." By switching "conguration proles," you can switch the driver settings screen to match the
functions of the device.
●You do not need to reinstall the driver when you add or replace a device.
Utilizing Conguration Proles
Conguration proles corresponding to each printer model have been prepared beforehand. You can
customize and use a conguration prole corresponding to your printer operation management.
By applying a conguration prole to the driver, the settings in the [Device Settings] sheet can be changed and
the functions specic to the device can be set. You can also export and save the function and option settings for
the device in the [Device Settings] sheet as a conguration prole.
Examples of How to Utilize Conguration Proles
●Making a driver settings screen for the printer model you are using
When you can acquire the printer model information from the device, a conguration prole is applied
automatically and the settings screen changes to match the device. When you cannot acquire the information,
apply a conguration prole manually.
●Eciently conguring driver settings for multiple computers
You can export and save the device function and options settings of the [Device Settings] sheet as a
conguration prole. The device information of drivers used in other computers can be easily batch set by
importing the exported conguration prole.
If you cannot acquire the device information, you can apply it by importing a conguration prole exported in
an environment where the information could be acquired.
Related Topics
Setting Device Information(P. 67)
About This Driver
9


Before Use
●When using this driver, the following restrictions apply.
- In order to set and print with the functions supported by the printer model you are using, you need to set
a conguration prole suitable for the printer model and set the option status of the device. You can
congure these settings in the [Device Settings] sheet.
- If you set functions in the driver that are not available for the device you are using, it may result in
unintended print results.
- If you specify color printing for a black and white printer, the print data will be output in black and white,
but the print quality may deteriorate and printing may take some time.
- If you set functions that are not supported by this driver on the control panel of the device you are using,
those functions are enabled when printing.
- Depending on the combination of the device and options you are using, you may not be able to identify
the attached options in the [Device Settings] sheet > [ ] (Retrieve Device Status Information). To use
the options that cannot be identied, congure the settings manually in the [Device Settings] sheet.
●The newest driver software is posted on the Canon web site. Please verify the operating environment etc.
and download the appropriate software as required.
Canon Global Site: http://www.canon.com/
●The functions that you can use may vary according to the following conditions.
- The device you are using and its settings
- The rmware version of the device
- The option structure
- The driver version
- The computer environment you are using
●When printing from a Windows Store app, because you cannot display the print settings screen of the driver,
the number of functions you can set is limited.
●The screen content, procedures, etc. displayed and described in the manual may differ from those actually
displayed.
●In this manual, examples using Windows 10 (64-bit version) are explained.
Before Use
12

How to Refer to the Manual of the Device
There are cases when, in order to use the functions of this driver, operations must be carried out at the device
beforehand.
For information about how to operate the device, refer to the manual of the device.
How to Refer to the Manual of the Device
14
Printing
Printing .................................................................................................................................................................. 16
Printing from a Computer ................................................................................................................................... 17
Scaling .................................................................................................................................................................. 20
Watermark Printing ............................................................................................................................................ 21
Poster Printing .................................................................................................................................................... 22
Printing Over a Fixed Form ................................................................................................................................. 26
Attaching Encryption When Printing ................................................................................................................. 28
Putting Print Jobs on Hold .................................................................................................................................. 29
Storing Print Data ................................................................................................................................................ 30
Priority Printing ................................................................................................................................................... 31
Changing the Default Settings ........................................................................................................................... 32
Printing
15

Printing
Printing from a Computer(P. 17)
Scaling(P. 20)
Watermark Printing(P. 21)
Poster Printing(P. 22)
Printing Over a Fixed Form(P. 26)
Attaching Encryption When Printing(P. 28)
Putting Print Jobs on Hold(P. 29)
Storing Print Data(P. 30)
Priority Printing(P. 31)
Changing the Default Settings(P. 32)
Printing
16
Printing from a Computer
This explains the basic procedure for printing conguring the printer driver settings.
NOTE
●When using a device connected via a WSD port, enable [Use WSD] at the device.
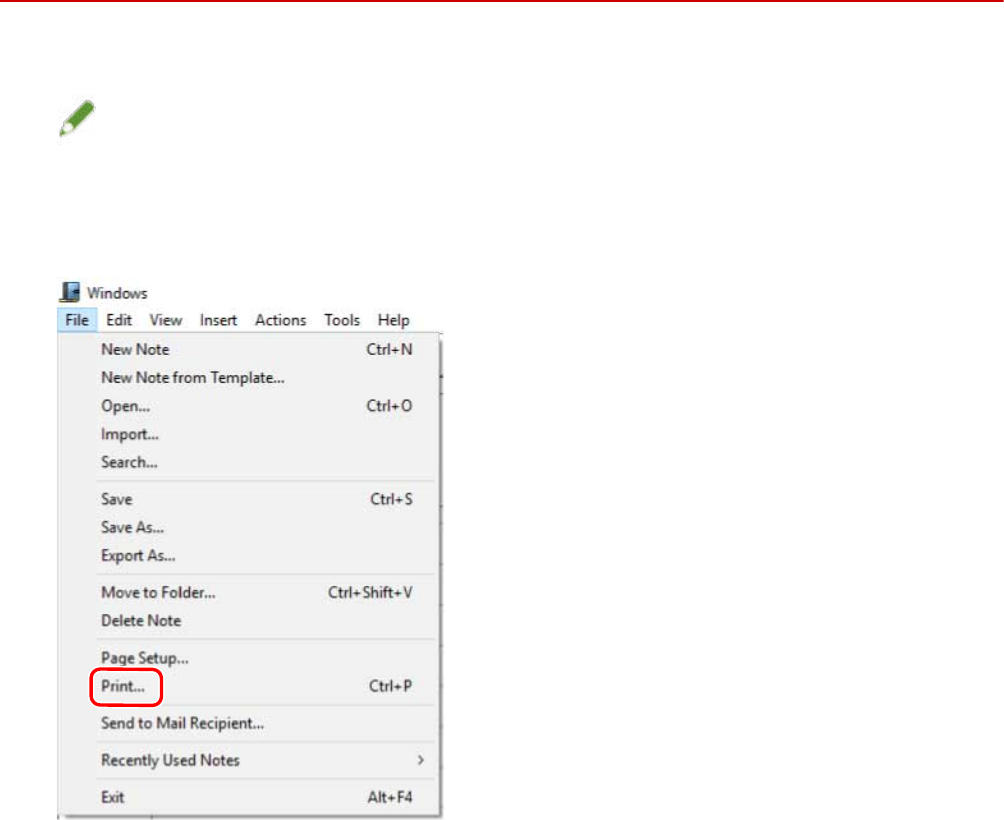
1Select [Print] from the menu of the application.
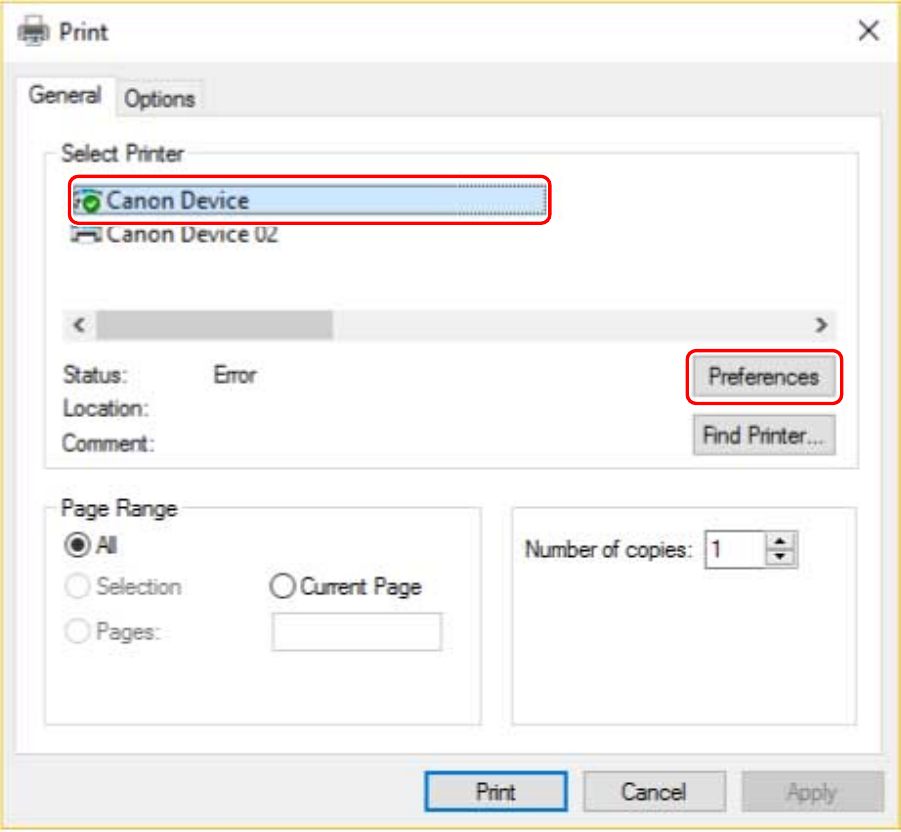
2In the print screen, select the device you are using → click [Preferences], [Printer
properties], or [Properties].
Printing
17
3In the print settings screen of the driver, set the required items.
If necessary, switch sheets and congure relevant settings.
Printing
18
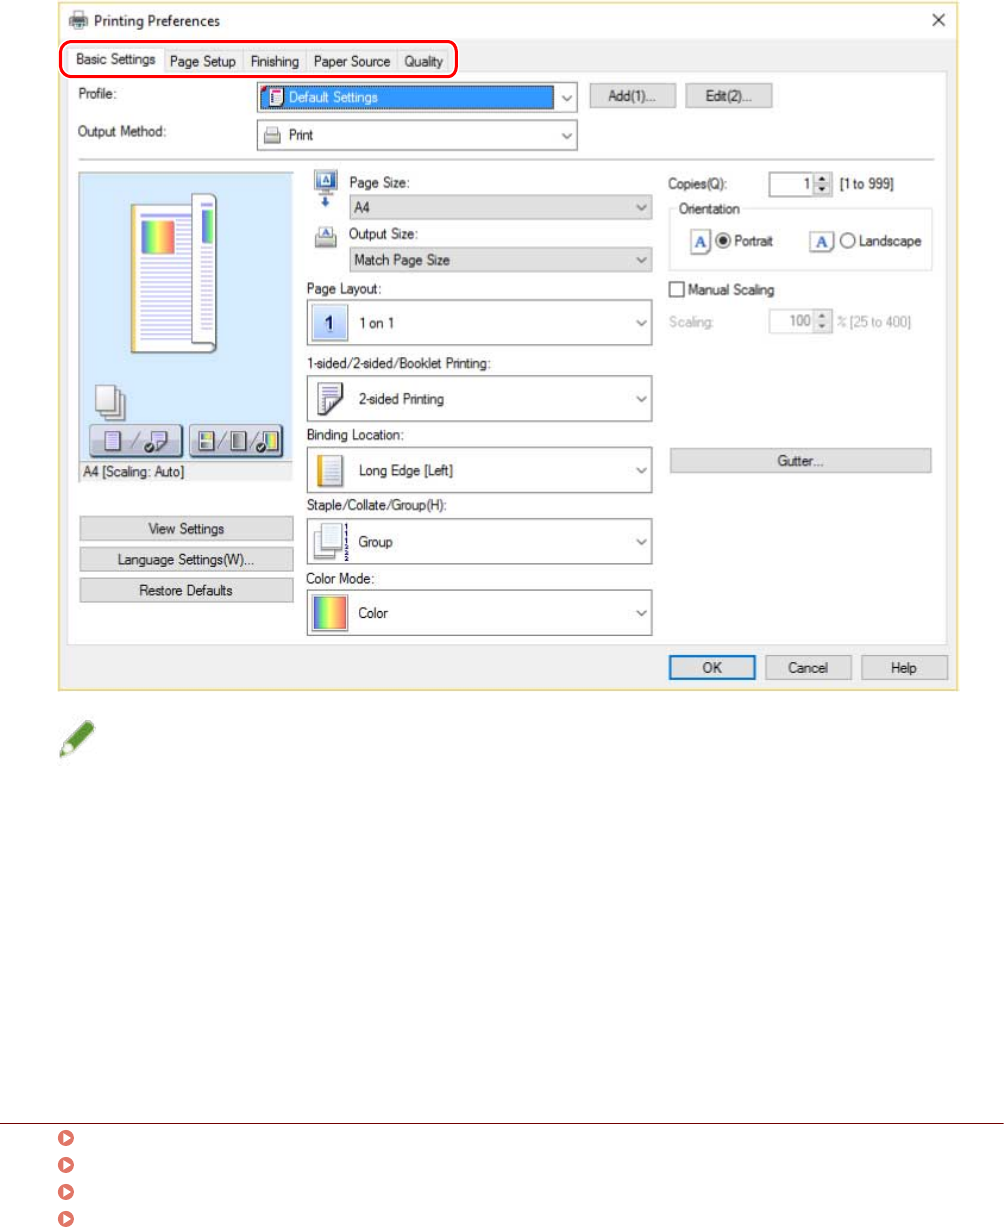
NOTE
●If the function you want to use is not displayed in the print settings screen, congure the print settings after
enabling the functions of the device by acquiring the device information etc.
4Click [OK].
5In the print screen, click [Print] or [OK].
Related Topics
About This Driver(P. 9)
Changing the Default Settings(P. 32)
Setting Device Information(P. 67)
Driver settings cannot be set(P. 126)
Printing
19
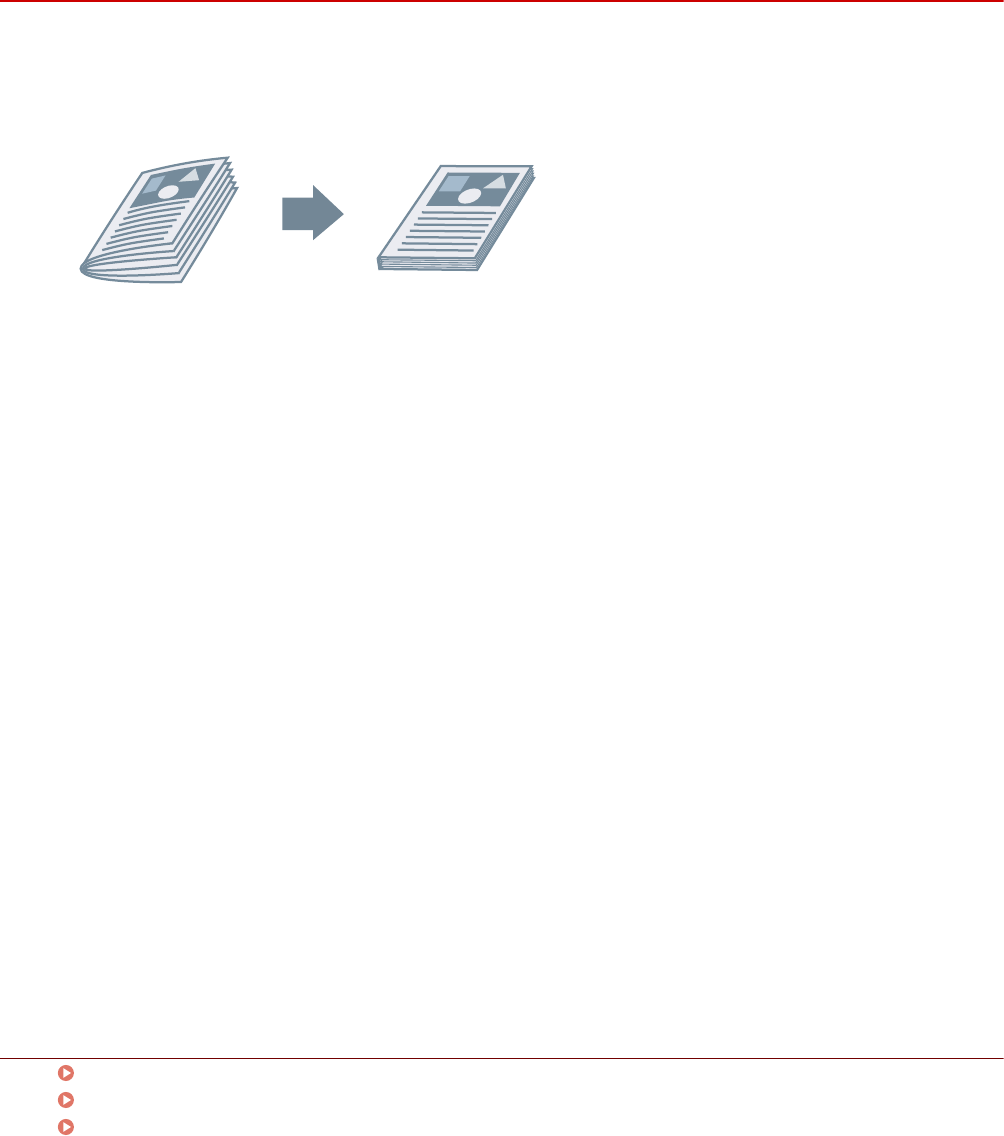
Scaling
You can enlarge or reduce the print data when printing.
To Scale to the Output Page Size
1Display the [Basic Settings] or [Page Setup] sheet.
2Select the paper size set in the application from [Page Size].
3Select the paper size you want to print on from [Output Size].
To Specify a Desired Scale
1Display the [Basic Settings] or [Page Setup] sheet.
2Select [Manual Scaling] → specify the magnication in [Scaling].
Related Topics
[Basic Settings] Sheet(P. 95)
[Page Setup] Sheet(P. 98)
Registering Custom Paper Sizes(P. 44)
Driver settings cannot be set(P. 126)
Printing
20

Watermark Printing
You can superimpose and print semi-transparent characters such as [TOP SECRET] or [DRAFT] over print data.
You can also create new watermarks.
To Attach and Print a Watermark
1Display the [Page Setup] sheet.
2Select [Watermark] → select a watermark name.
To Create New Watermarks
1Display the [Page Setup] sheet.
2Select [Watermark] → click [Edit Watermark].
3In the [Edit Watermark] dialog box, click [Add] → enter a name in [Name].
4In [Attributes], set the characters and attributes for the watermark.
5In [Alignment], set the positioning of the watermark.
6In [Print Style], set the border and superimposition of the watermark → click [OK].
7In the [Edit Watermark] dialog box, click [OK].
The created watermark is added to the list in the [Page Setup] sheet > [Watermark].
Related Topics
[Page Setup] Sheet(P. 98)
Printing
21
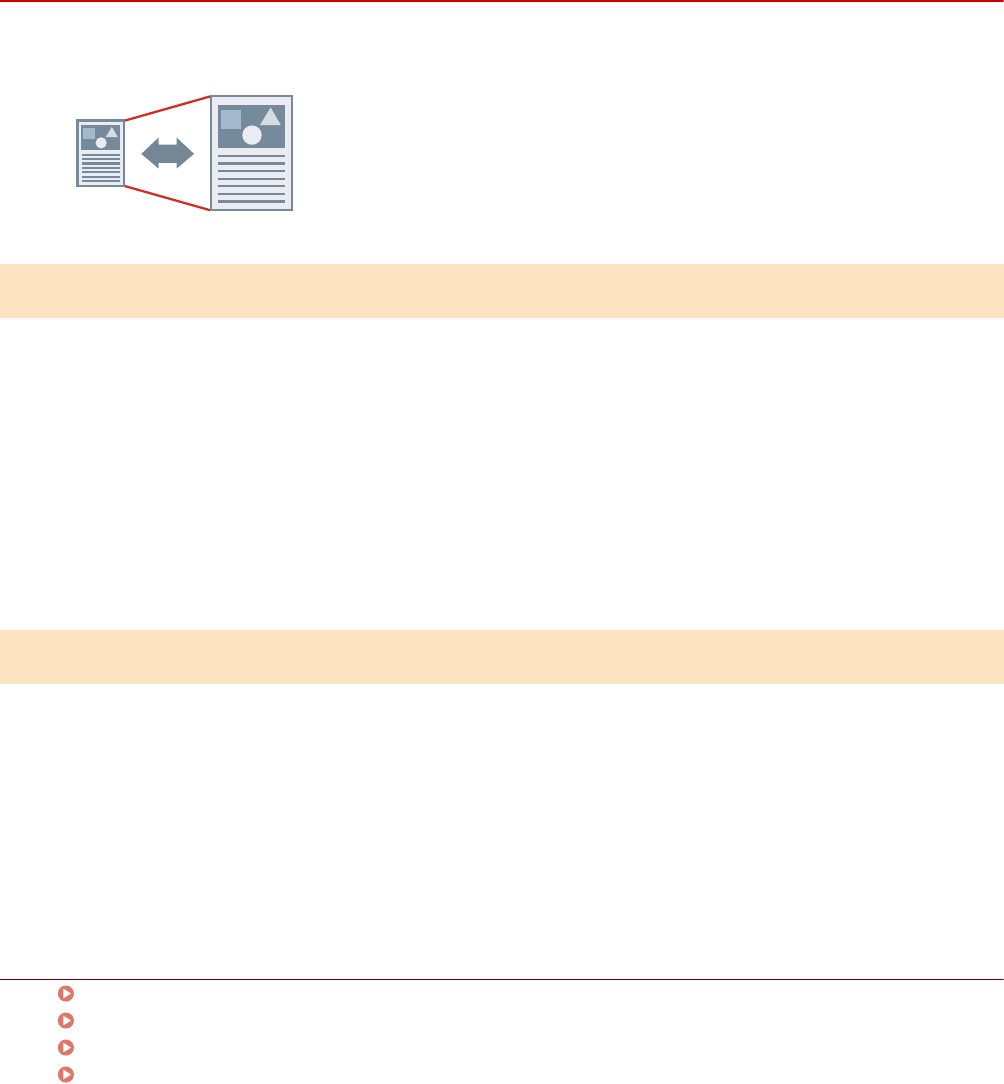
Poster Printing
You can enlarge the print data of one page and print it over multiple sheets of paper. When the output sheets
are joined together, they form a large print like a poster.
This topic also introduces poster printing setting and output examples.
Poster Printing Setting and Output Examples(P. 22)
To Perform Poster Printing
1Display the [Basic Settings] sheet.
2Select [1-sided Printing] from [1-sided/2-sided/Booklet Printing].
3Display the [Basic Settings] or [Page Setup] sheet.
4Select [Poster [N x N]] from [Page Layout].
N x N represents the number of sheets of paper over which the print data will be divided and printed.
When printing with border lines, or when setting margins or the range of pages to be printed, perform the
following procedure.
5Click [Poster Details].
6In the [Poster Details] dialog box, set any necessary items → click [OK].
Poster Printing Setting and Output Examples
This shows combinations of setting examples and output results relating to poster printing. The setting
examples are shown in combination with the setting state in the [Poster Details] dialog box whenever required.
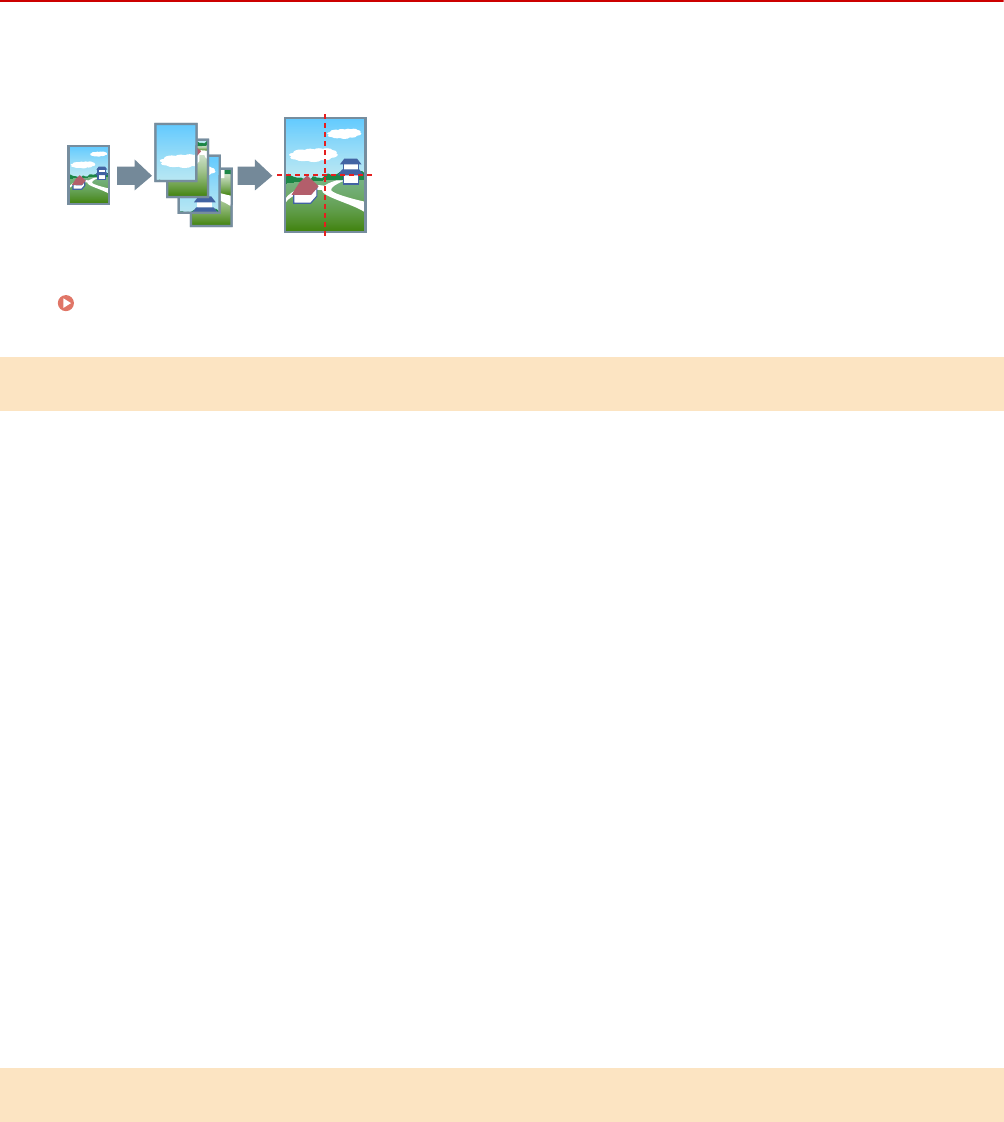
Setting Example 1.
●[Basic Settings] sheet > [Orientation]: [Portrait]
●[Basic Settings] or [Page Setup] sheet > [Page Layout]: [Poster [1 x 2]]
Printing
22
Output Result
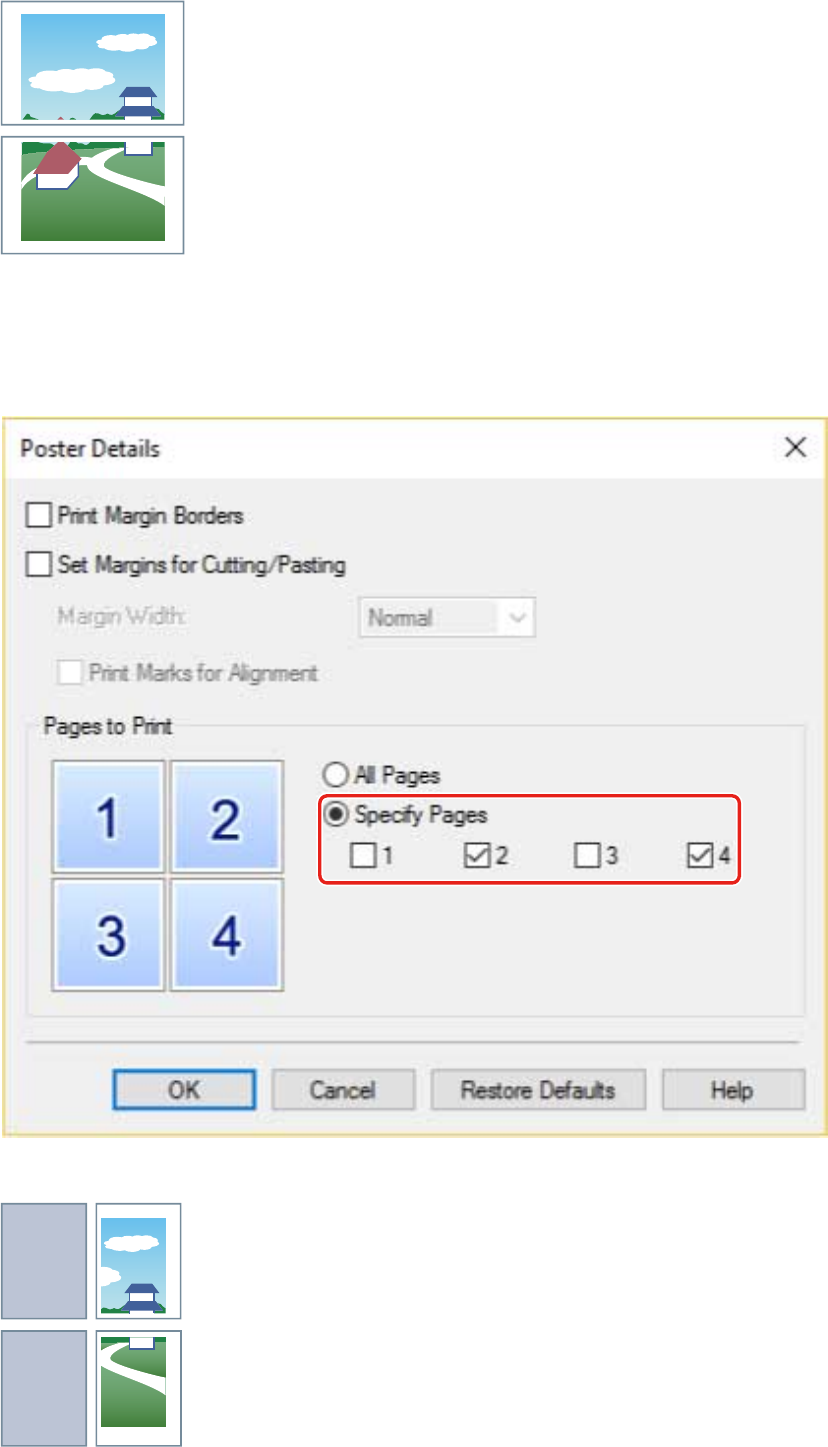
Setting Example 2.
●[Basic Settings] or [Page Setup] sheet > [Page Layout]: [Poster [2 x 2]]
●[Poster Details] dialog box > [Pages to Print] > [Specify Pages]: [2] and [4]
Output Result
Printing
23
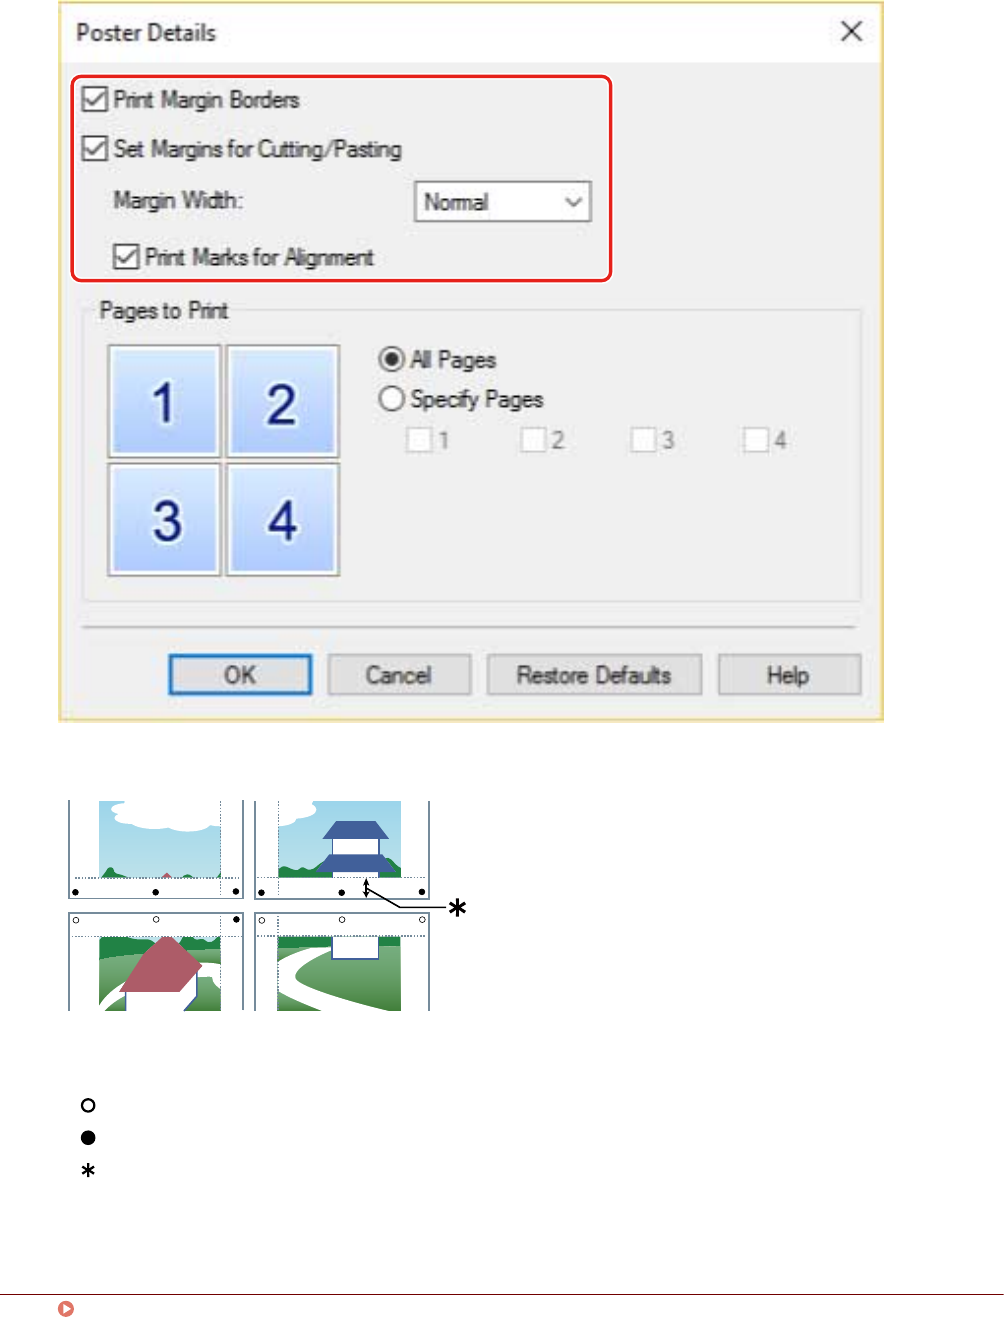
Setting Example 3.
●[Basic Settings] or [Page Setup] sheet > [Page Layout]: [Poster [2 x 2]]
●[Poster Details] dialog box: [Print Margin Borders], [Set Margins for Cutting/Pasting], and [Print Marks for
Alignment]
Output Result
Legend
Broken line: border
: paste mark
: cut mark
: the margin set for [Margin Width] (10 mm (0.39 inches) when [Normal] is selected.)
Related Topics
[Basic Settings] Sheet(P. 95)
Printing
24

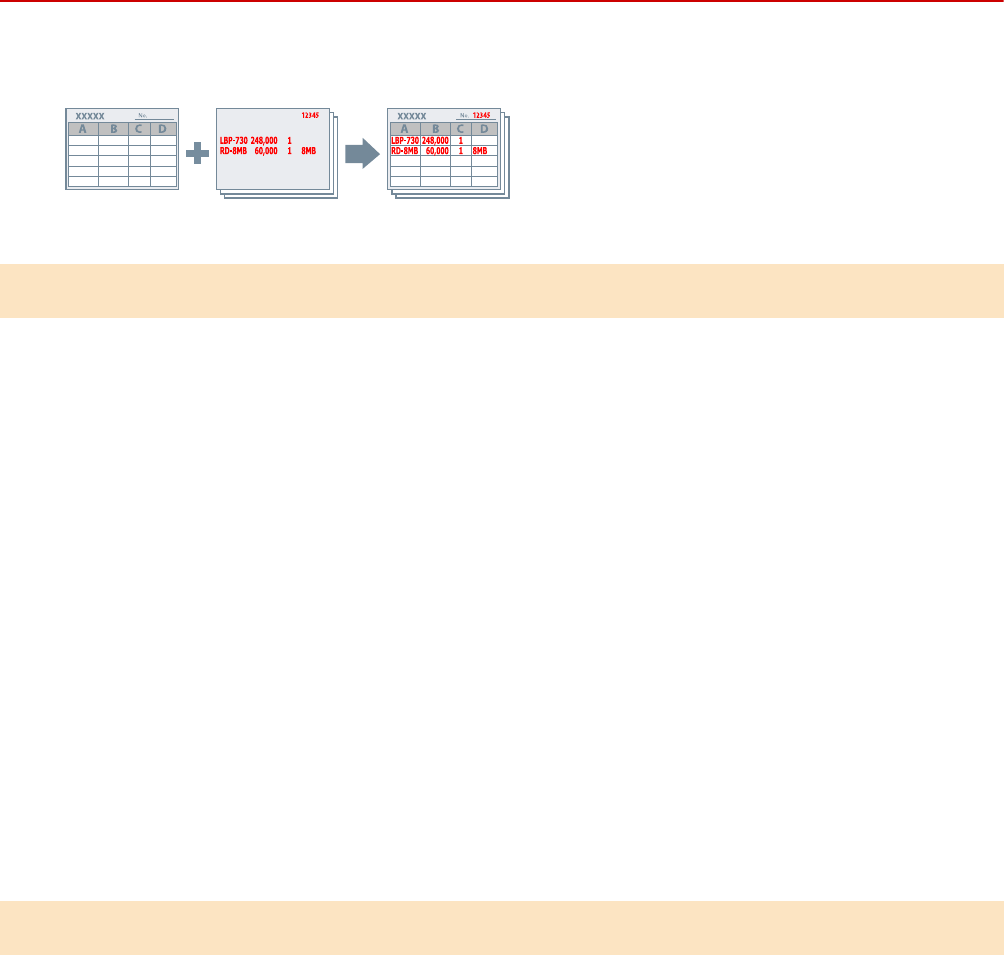
Printing Over a Fixed Form
You can print data overlapping a xed form stored in the device. This function is known as overlay printing.
To Save a Fixed Form in the Computer or the Device
1Display the [Page Setup] sheet.
2Click [Page Options].
3In the [Page Options] dialog box, display the [Overlay] sheet.
4Select [Processing Method] > [Create a Form File] → select a destination from [Store in]
→ specify a le name.
If you select [Host] from [Store in], click [Browse] → select a le name → click [Save]. Enter titles in [Title] and
[Sub-title] as necessary.
If you select [Device] from [Store in], enter a le name in [File Name].
5Click [OK].
To Perform Overlay Printing
1Display the [Page Setup] sheet.
2Click [Page Options].
3In the [Page Options] dialog box, display the [Overlay] sheet.
4Select [Processing Method] > [Use Overlay Printing] → select the form le to use from
[Form File to Use].
If you select [Form File on Host] from [Form File to Use], click [Browse] → select a le name → click [Open].
Enter text in [File Info], as necessary.
Printing
26

If you select [Form File on Device] from [Form File to Use], click [Retrieve Form File Information] → select a le
name from [File List] → select which side to apply overlay printing to in [Apply to] when performing two-sided
printing. When you cannot acquire information from the device, enter the form le name in [File Name].
5Click [OK].
Related Topics
[Page Setup] Sheet(P. 98)
Overlay printing will not execute(P. 131)
Printing
27
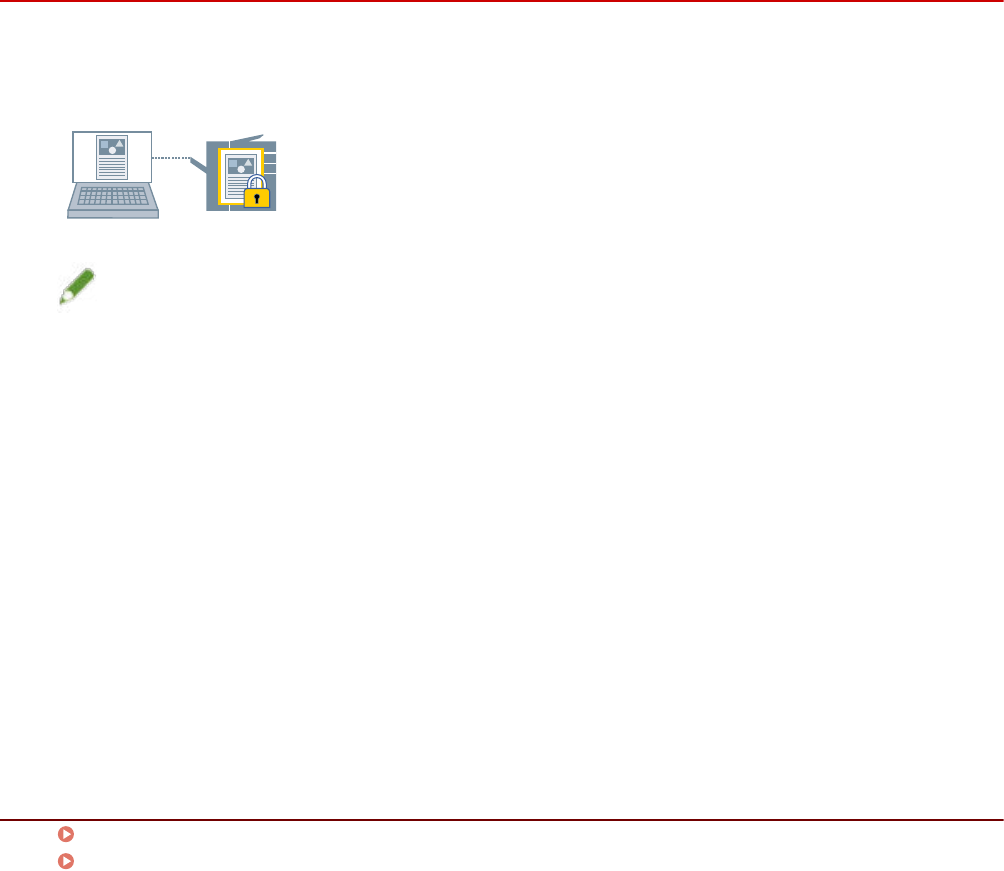
Attaching Encryption When Printing
You can attach a PIN to print data and save it in the device. When you print the saved data, enter the PIN in the
control panel of the device. This function is useful when printing condential documents etc.
NOTE
●If you register the PIN used in secured printing as a default setting, you can reduce the effort required to
congure settings when printing.
1Display the [Basic Settings], [Page Setup], [Finishing], [Paper Source], or [Quality] sheet.
2Select [Secure Print] from [Output Method] → click [Yes].
3In the [Secure Print Details] dialog box, enter [User Name] and [PIN] → click [OK].
If the [Conrm PIN] dialog box is displayed when performing secured printing, conrm or set the data name,
user name, and PIN.
Related Topics
Common Settings for All Sheets(P. 92)
Changing the Default Settings(P. 32)
Printing
28
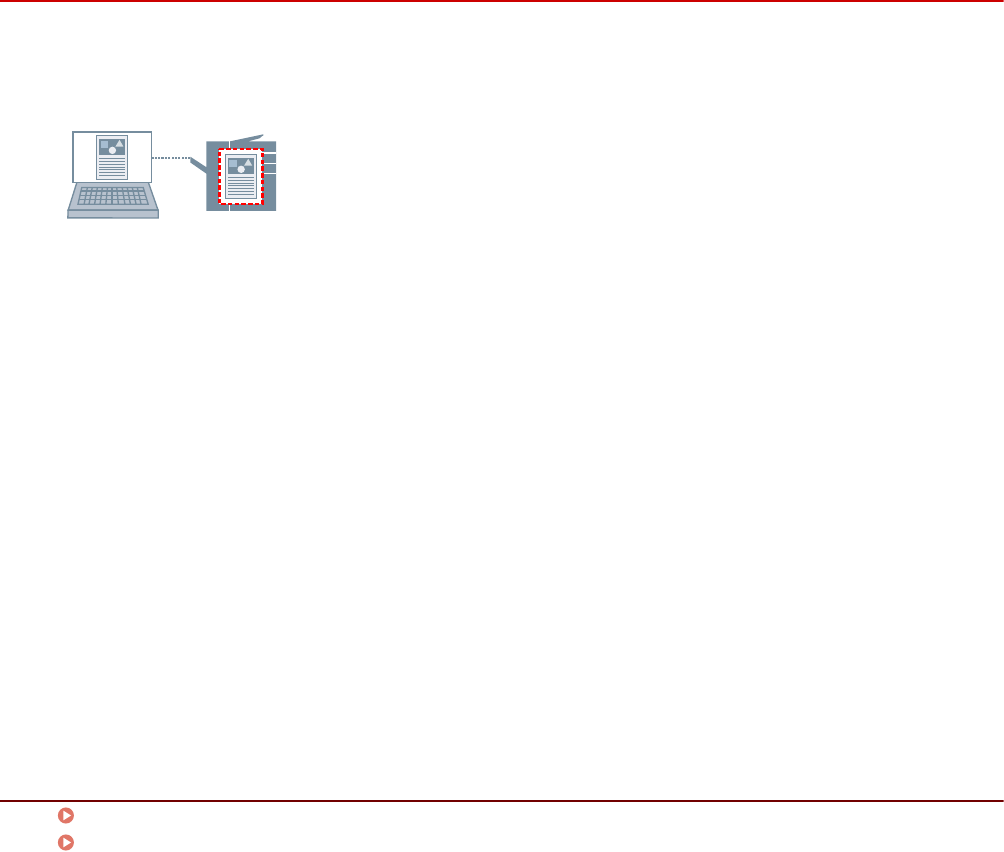
Putting Print Jobs on Hold
You can send print data to a hold queue (temporary storage area) in the device. You can also change the print
order or settings of the stored data from the control panel of the device or the Remote UI.
1Display the [Basic Settings], [Page Setup], [Finishing], [Paper Source], or [Quality] sheet.
2Select [Hold] from [Output Method] → click [Details].
3In the [Hold Details] dialog box, set the name of data.
If you want to specify a desired name, select [Name of Data to Hold] > [Enter Name] → enter the name in
[Name].
4Click [OK].
When performing hold printing, you can conrm or set the name of data in the displayed dialog box.
Related Topics
Common Settings for All Sheets(P. 92)
Changing the Default Settings(P. 32)
Printing
29
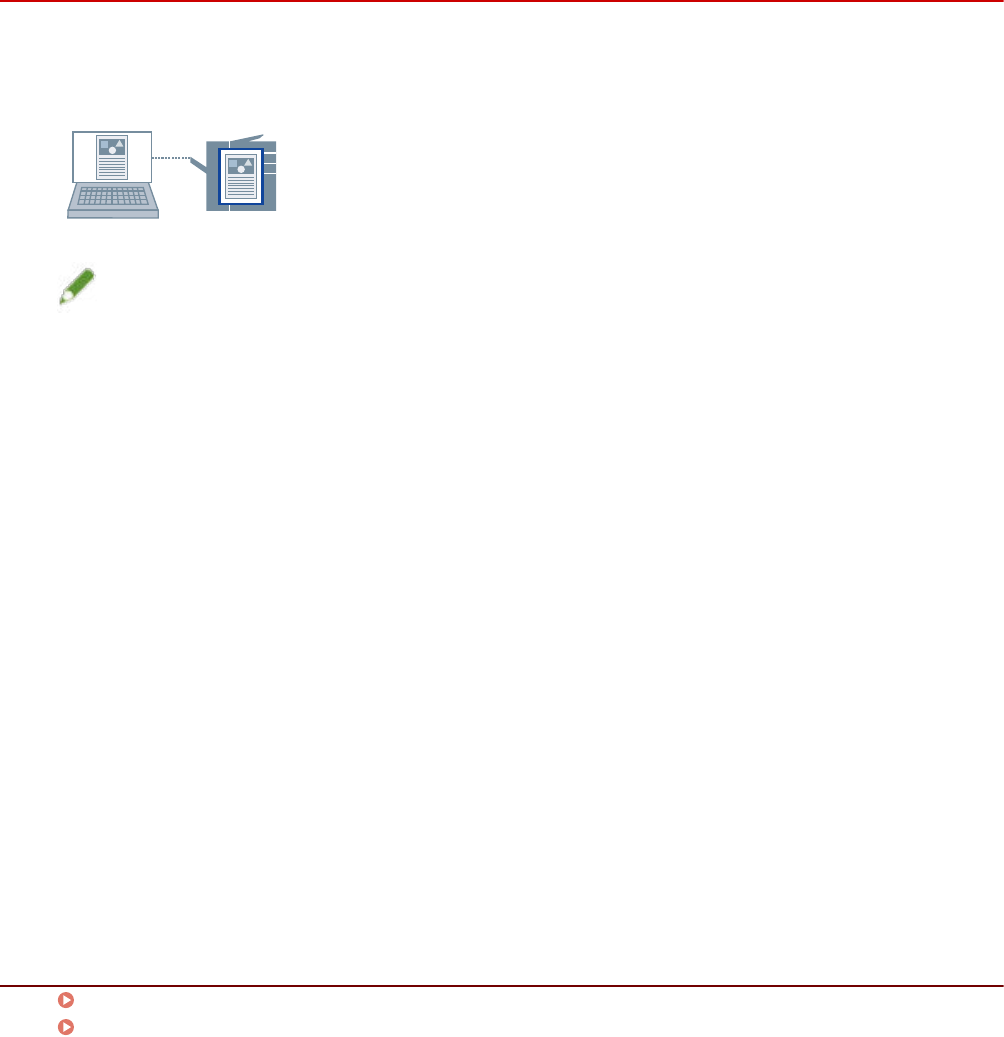
Storing Print Data
You can store the print data in a box in the device. You can also change the settings of or combine the stored
data with other stored data from the control panel of the device or the Remote UI.
NOTE
●If you register the box number used in stored printing as a default setting, you can reduce the effort required
to congure settings when printing.
1Display the [Basic Settings], [Page Setup], [Finishing], [Paper Source], or [Quality] sheet.
2Select [Store] from [Output Method] → click [Yes].
3In the [Store Details] dialog box, set the name of data.
If you want to specify a desired name, select [Data Name] > [Enter Name] → enter the name in [Name].
4Click [Retrieve Mail Box Information] → select a storage destination from [Mail Boxes].
You can select multiple boxes by pressing the [Ctrl] or [Shift] key.
5Click [OK].
Related Topics
Common Settings for All Sheets(P. 92)
Changing the Default Settings(P. 32)
Printing
30

Priority Printing
You can print a document with higher priority than other print jobs that are in a standby state in the device.
When performing priority printing, if there is a print job being processed at the device, priority printing is
started as soon as that job is nished.
1Display the [Basic Settings], [Page Setup], [Finishing], [Paper Source], or [Quality] sheet.
2Select [Promote Print] from [Output Method].
Related Topics
Common Settings for All Sheets(P. 92)
Printing
31

Changing the Default Settings
You can change the default settings to desired print settings. If you change them to settings that you use
frequently, you can reduce the effort required to congure settings when printing.
1Display [Devices and Printers] from the [Control Panel] of Windows.
2Right-click the icon of the device you are going to set → select [Printing Preferences]
from the displayed menu.
If you are using the driver with multiple device models, select the model you are going to set after selecting
[Printing Preferences].
3In the print settings screen of the driver, set the required items.
If necessary, switch sheets and congure relevant settings.
4Click [OK].
Printing
32
Creating a Booklet When Printing
Creating a Booklet When Printing ......................................................................................................... 34
Booklet Printing .................................................................................................................................................. 35
Creating a Booklet in Sets ................................................................................................................................... 36
Correcting Displacement During Booklet Printing ........................................................................................... 37
Saddle Stitched Booklet Printing ........................................................................................................................ 38
Saddle Press Processing When Creating Saddle Stitched Booklets .................................................................. 39
Trimming Pages When Creating Saddle Stitched Booklets ............................................................................... 40
Perfect Binding .................................................................................................................................................... 41
Creating a Booklet When Printing
33

Creating a Booklet When Printing
Booklet Printing(P. 35)
Creating a Booklet in Sets(P. 36)
Correcting Displacement During Booklet Printing(P. 37)
Saddle Stitched Booklet Printing(P. 38)
Saddle Press Processing When Creating Saddle Stitched Booklets(P. 39)
Trimming Pages When Creating Saddle Stitched Booklets(P. 40)
Perfect Binding(P. 41)
Creating a Booklet When Printing
34
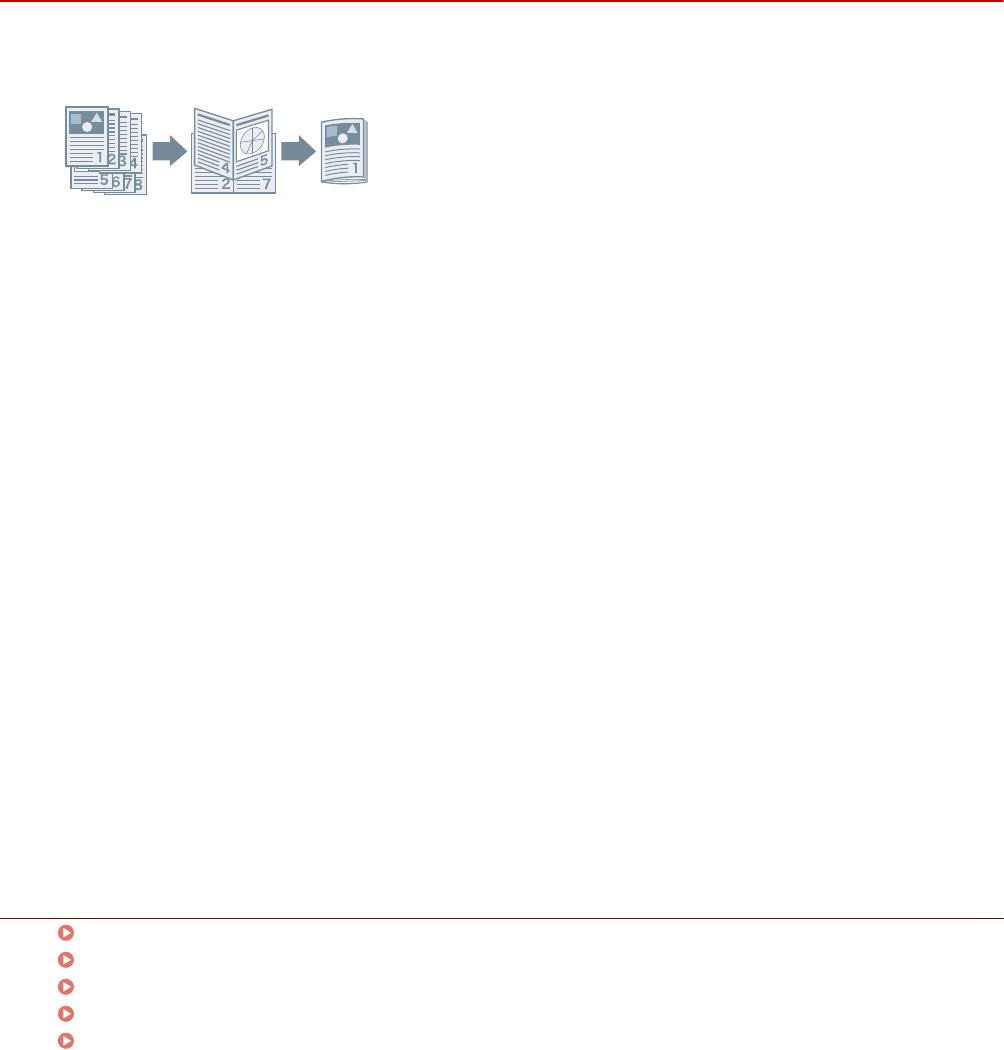
Booklet Printing
You can print with the pages automatically arranged so they create a booklet when folded in half.
1Display the [Basic Settings] or [Finishing] sheet.
2Select [Booklet Printing] from [1-sided/2-sided/Booklet Printing] or [Print Style].
To set the binding position and gutter, follow the procedure below.
3Click [Booklet].
4In the [Detailed Settings for Booklet] dialog box, select the binding position from [Book
Opening].
5Select [Specify Booklet Gutter] → specify a gutter width in [Booklet Gutter].
6Click [OK].
Related Topics
[Basic Settings] Sheet(P. 95)
[Finishing] Sheet(P. 101)
Creating a Booklet in Sets(P. 36)
Correcting Displacement During Booklet Printing(P. 37)
Saddle Stitched Booklet Printing(P. 38)
Creating a Booklet When Printing
35
Creating a Booklet in Sets
When creating a booklet from a document with a large number of pages, you can divide the pages into multiple
sets and print them.
1Display the [Basic Settings] or [Finishing] sheet.
2Select [Booklet Printing] from [1-sided/2-sided/Booklet Printing] or [Print Style].
3Click [Booklet].
4Select [Booklet Printing Method] > [Divide into Sets].
5Specify the number of pages contained in each set in [Sheets per Set].
6Click [OK].
Related Topics
[Basic Settings] Sheet(P. 95)
[Finishing] Sheet(P. 101)
Booklet Printing(P. 35)
Creating a Booklet When Printing
36
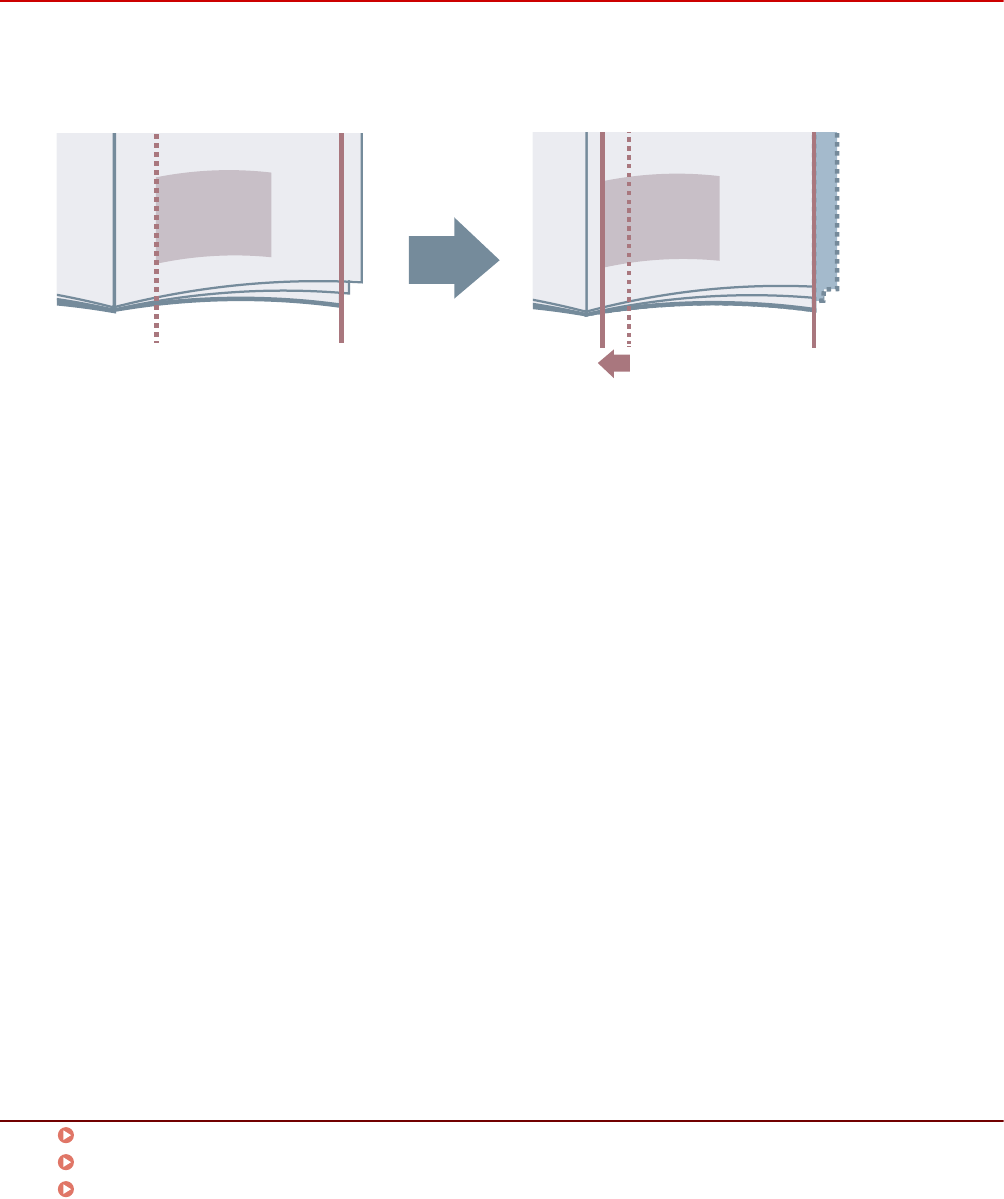
Correcting Displacement During Booklet Printing
You can create and print a booklet while correcting the displacement between outer and inner pages that
occurs during booklet printing. If you trim the edges of the pages using a trimmer, you can adjust the amount
of margin so that the position of the print data on the page does not deviate between pages.
1Display the [Basic Settings] or [Finishing] sheet.
2Select [Booklet Printing] from [1-sided/2-sided/Booklet Printing] or [Print Style].
3Click [Booklet].
4Select [Booklet Printing Process] > [With Device Settings].
5Select [Use Creep (Displacement) Correction] → select a correction method in
[Displacement Correction Method].
If you select [Manual Correction], specify the amount of print area displacement between the outermost page
and centermost page in [Correction Width].
6Click [OK].
Related Topics
[Basic Settings] Sheet(P. 95)
[Finishing] Sheet(P. 101)
Booklet Printing(P. 35)
Creating a Booklet When Printing
37
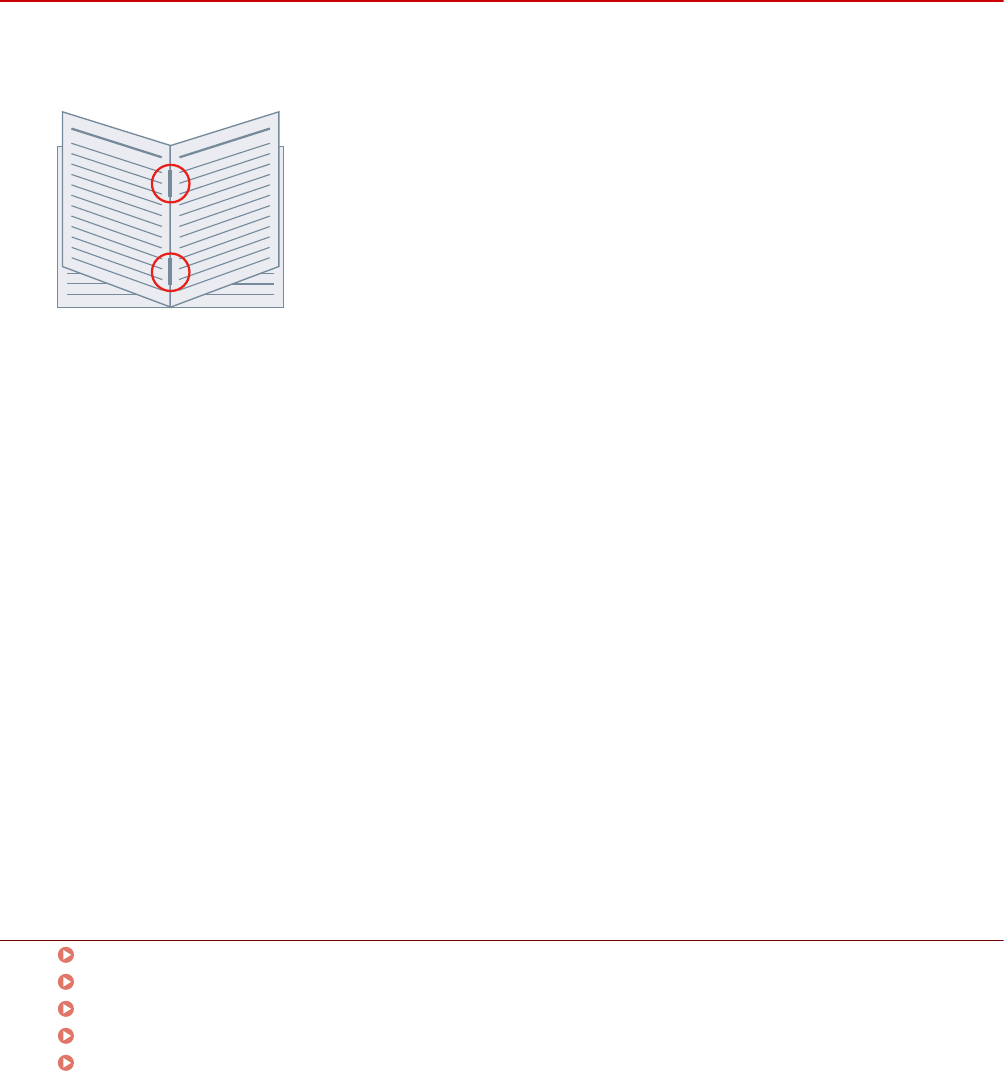
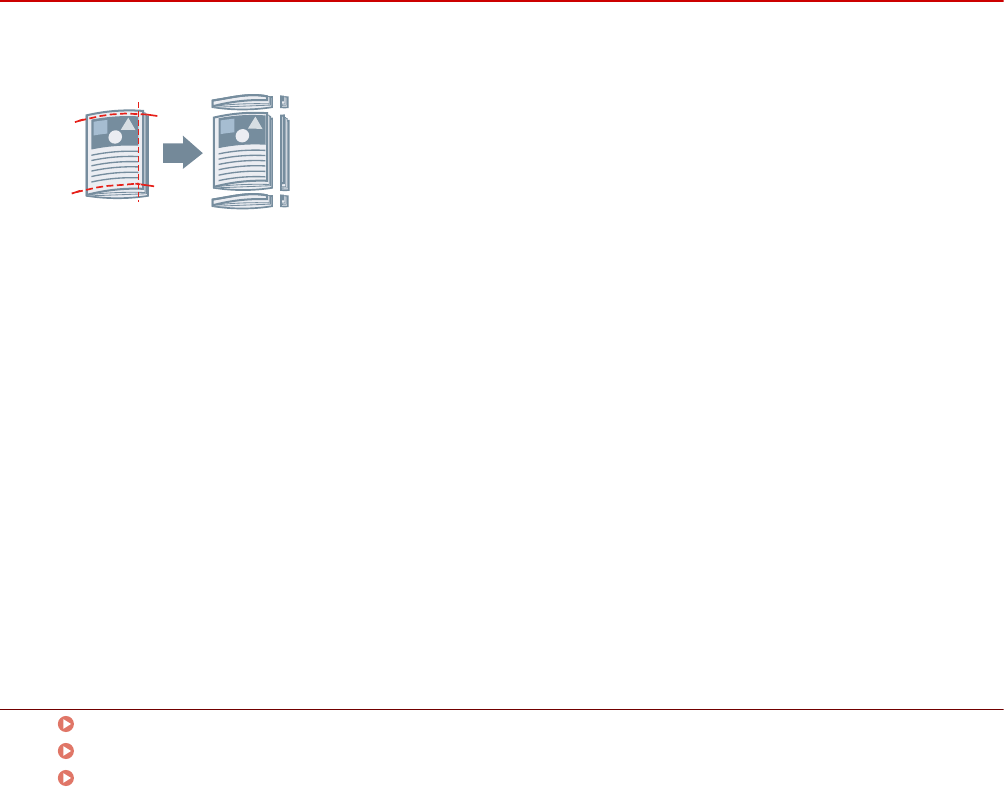
Saddle Stitched Booklet Printing
When creating and printing a booklet, you can output pages that are stapled in the center. Depending on the
device, you can also trim and align the edges of the pages.
1Display the [Basic Settings] or [Finishing] sheet.
2Select [Booklet Printing] from [1-sided/2-sided/Booklet Printing] or [Print Style].
3Select a nishing method from [Saddle Stitch Setting].
If you select [Fold + Saddle Stitch + Trim]/[Fold + Trim] from [Saddle Stitch Setting], perform the following
procedure.
4Display the [Finishing] sheet.
5Select a trim width adjustment method from [Trim Settings] → specify the values
according to the method that you select.
Related Topics
[Basic Settings] Sheet(P. 95)
[Finishing] Sheet(P. 101)
Booklet Printing(P. 35)
Saddle Press Processing When Creating Saddle Stitched Booklets(P. 39)
Trimming Pages When Creating Saddle Stitched Booklets(P. 40)
Creating a Booklet When Printing
38
Saddle Press Processing When Creating Saddle Stitched
Booklets
When performing saddle stitched booklet printing, you can press the bound portion so that it is attened.
1Display the [Basic Settings] or [Finishing] sheet.
2Select [Booklet Printing] from [1-sided/2-sided/Booklet Printing] or [Print Style].
3Select a nishing method from [Saddle Stitch Setting].
If you select [Fold + Saddle Stitch + Trim]/[Fold + Trim] from [Saddle Stitch Setting], set the trim width
adjustment method in the [Finishing] sheet.
4Click [Booklet].
5Select [Saddle Press] → specify the force of saddle press processing in [Saddle Press
Adjustment].
6Click [OK].
Related Topics
[Basic Settings] Sheet(P. 95)
[Finishing] Sheet(P. 101)
Saddle Stitched Booklet Printing(P. 38)
Creating a Booklet When Printing
39
Trimming Pages When Creating Saddle Stitched
Booklets
When performing saddle stitched booklet printing, you can trim and align the edges of the pages.
1Display the [Finishing] sheet.
2Select [Booklet Printing] from [Print Style].
3Select [Fold + Saddle Stitch + Trim]/[Fold + Trim] from [Saddle Stitch Setting].
4Select a trim width adjustment method from [Trim Settings] → specify the values
according to the method that you select.
Related Topics
[Basic Settings] Sheet(P. 95)
[Finishing] Sheet(P. 101)
Saddle Stitched Booklet Printing(P. 38)
Creating a Booklet When Printing
40
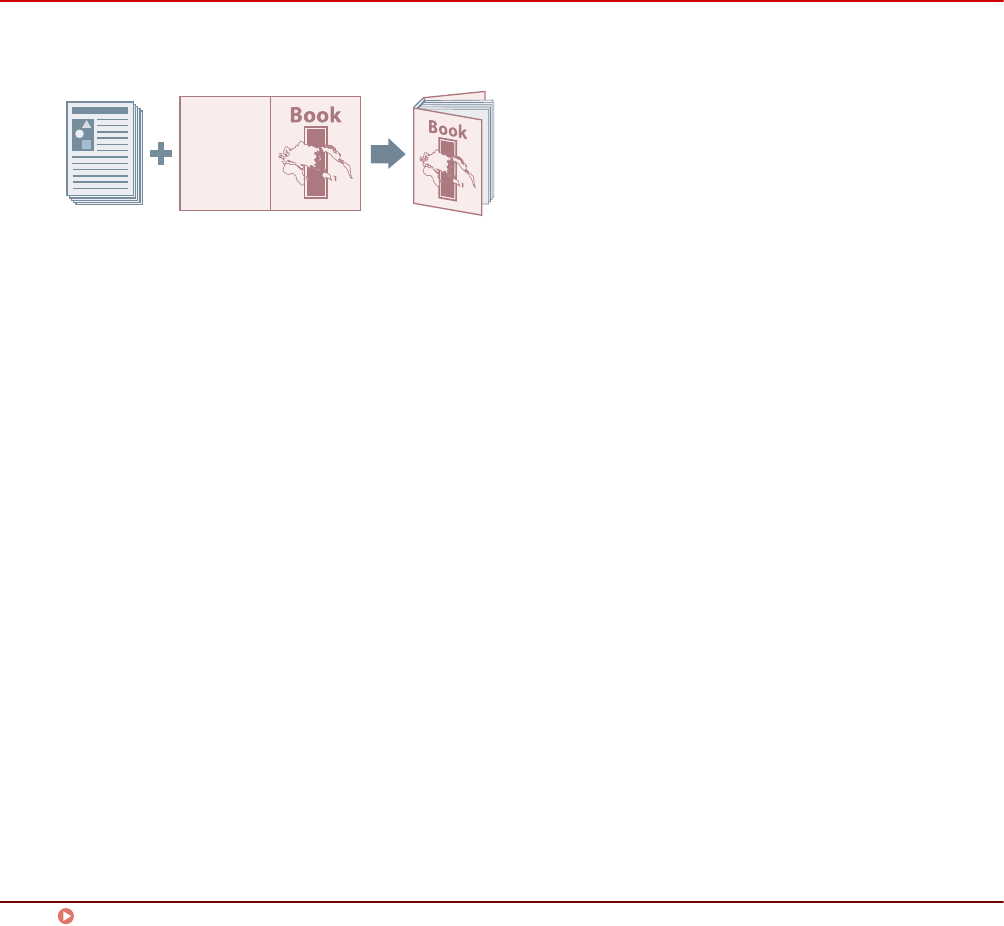
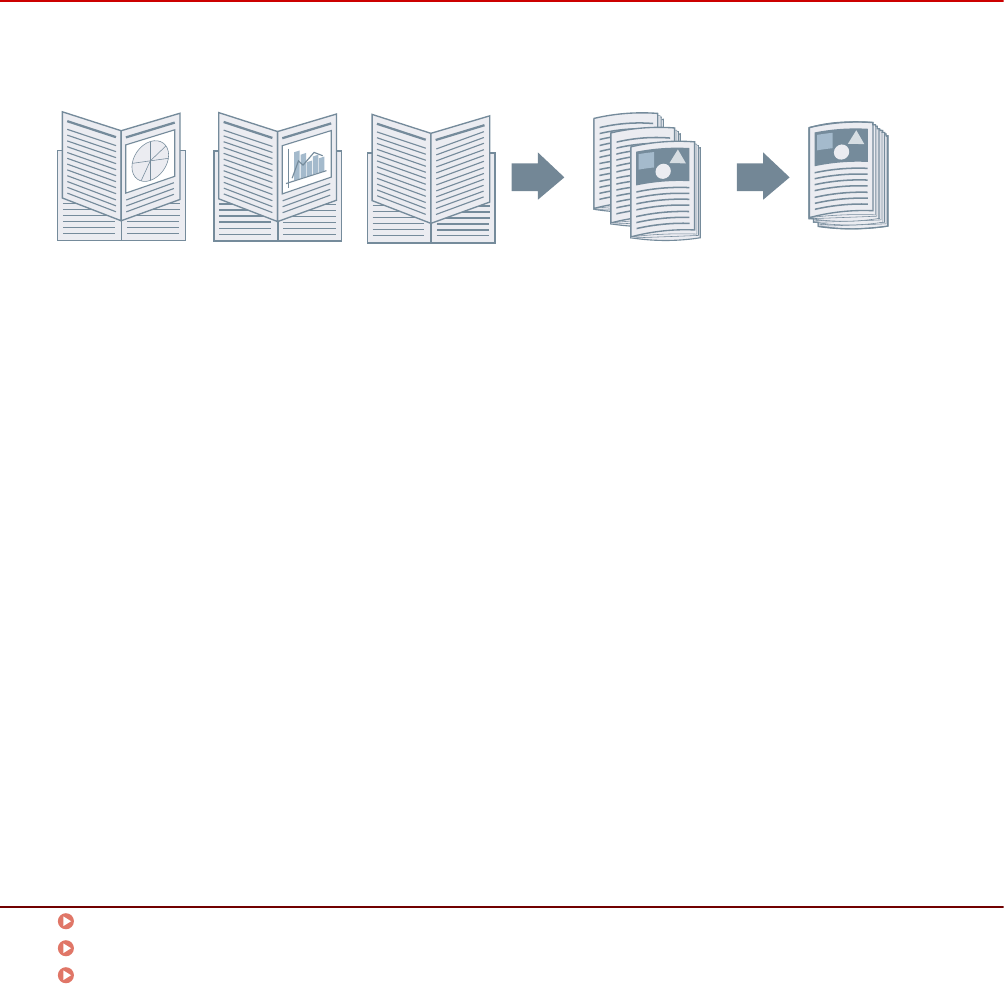
Perfect Binding
You can apply glue to the gutter side of the contents and encloses them in a cover to create a booklet.
1Display the [Finishing] sheet.
2Select [Perfect Binding [1-sided]] or [Perfect Binding [2-sided]] from [Print Style].
3Conrm the content of [Setting List].
4If you want to change the settings, click [Perfect Binding Settings] → set the required
items.
When printing on a cover, select [Lay out Data the Same Size as Cover] from [Perfect Bound Cover Settings] >
[Print Style] → specify [Front Cover Print Side]/[Back Cover Print Side].
When adjusting the nishing size, click [Finishing Adjustment] → congure the appropriate settings → click
[OK].
5Click [OK].
Related Topics
[Finishing] Sheet(P. 101)
Creating a Booklet When Printing
41
Using Various Types of Paper
Using Various Types of Paper .................................................................................................................... 43
Registering Custom Paper Sizes ......................................................................................................................... 44
Inserting Sheets Between Transparencies ........................................................................................................ 45
Inserting Sheets .................................................................................................................................................. 46
Inserting Tab Paper ............................................................................................................................................. 47
Printing on Tab Paper .......................................................................................................................................... 49
Adding Cover Sheets ........................................................................................................................................... 50
Using Various Types of Paper
42


Registering Custom Paper Sizes
You can register a desired paper size and use it for printing. You can also use registered custom paper sizes to
print with other devices from the computer you are using.
1Display [Devices and Printers] from the [Control Panel] of Windows.
2Right-click the icon of the device you are going to set → select [Printing Preferences]
from the displayed menu.
3Display the [Page Setup] sheet.
4Click [Custom Paper Size].
5In the [Custom Paper Size Settings] dialog box, set [Name of Custom Paper Size], [Unit],
and [Paper Size] → click [Register].
6Click [OK].
Related Topics
[Page Setup] Sheet(P. 98)
Using Various Types of Paper
44

Inserting Sheets Between Transparencies
You can print with sheets of paper inserted between transparencies. You can also print on the inserted sheets.
1Display the [Paper Source] sheet.
2Select [Select by] > [Paper Source]/[Paper Type].
3Select [Transparency Cover Sheets] from [Paper Selection].
4Set [Cover Sheets] and [Transparencies].
If you select [Select by] > [Paper Source], select the paper source in which the paper to be used is set.
If you select [Select by] > [Paper Type], select the type of paper to be used.
5If you also want to print on inserted sheets, select [Print on Cover Sheets].
6Click [OK].
Related Topics
[Paper Source] Sheet(P. 108)
Using Various Types of Paper
45
Inserting Sheets
You can insert sheets of paper between specied pages.
1Display the [Paper Source] sheet.
2Select [Select by] > [Paper Source] or [Paper Type].
3Select [Insert Sheets] from [Paper Selection] → click [Insert Sheets Settings].
4In the [Insert Sheets Settings] dialog box, select [Inserted Sheets] from [Sheets to
Insert].
5Set [Paper Source], [Print on], and [Insert] → click [Add].
The settings for inserting sheets are added to [Setting List].
6Click [OK].
7Select the paper for content pages from [Original Paper Source] or [Original Paper
Type].
Related Topics
[Paper Source] Sheet(P. 108)
Inserting Tab Paper(P. 47)
Using Various Types of Paper
46

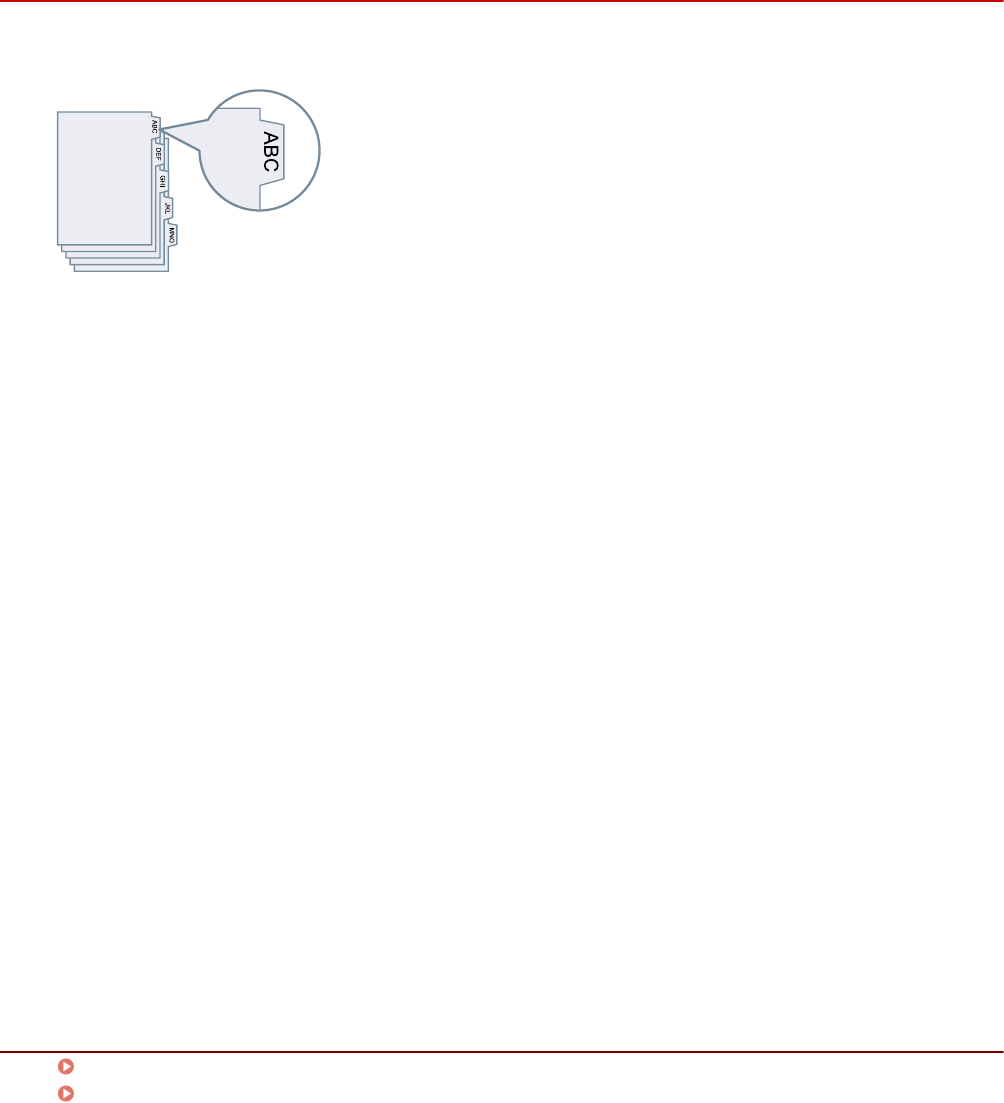
Inserting Tab Paper
You can insert tab paper between specied pages. You can also print on the tab part.
1Display the [Paper Source] sheet.
2Select [Select by] > [Paper Source] or [Paper Type].
3Select [Insert Sheets] from [Paper Selection] → click [Insert Sheets Settings].
4In the [Insert Sheets Settings] dialog box, select [Tab Paper] from [Sheets to Insert].
5Set [Paper Source], [Print on], and [Insert].
6If you want to change the paper type of the tab paper, click [Tab Paper] > [Settings] →
select the paper type to be used from [Paper Type] → click [OK].
To set the print position on the tab paper, follow the procedure below.
7Click [Tab Details].
8In the [Tab Details] dialog box, set [Printing Position on Tab] → click [OK].
To shift the print data to the tab part, select [Offset Printing Position] → specify the distance to shift the data in
[Offset Width] → click [OK].
To print the print data without shifting it, select [Do Not Offset Printing Position] → select the tab paper size
from [Tab Paper Size] → click [OK].
9In the [Insert Sheets Settings] dialog box, click [OK].
10 Select the paper for content pages from [Original Paper Source] or [Original Paper
Type].
Related Topics
[Paper Source] Sheet(P. 108)
Using Various Types of Paper
47

Printing on Tab Paper
You can print on the tab part of tab paper.
1Display the [Paper Source] sheet.
2Select [Select by] > [Paper Type].
3Click [Paper Type] > [Settings].
4In the [Paper Type Settings] dialog box, select tab paper from [Paper Type] → click [OK].
To set the print position on the tab paper, follow the procedure below.
5Click [Tab Details].
6In the [Tab Details] dialog box, set [Printing Position on Tab] → click [OK].
To shift the print data to the tab part, select [Offset Printing Position] → specify the distance to shift the data in
[Offset Width] → click [OK].
To print the print data without shifting it, select [Do Not Offset Printing Position] → select the tab paper size
from [Tab Paper Size] → click [OK].
Related Topics
[Paper Source] Sheet(P. 108)
Inserting Tab Paper(P. 47)
Using Various Types of Paper
49
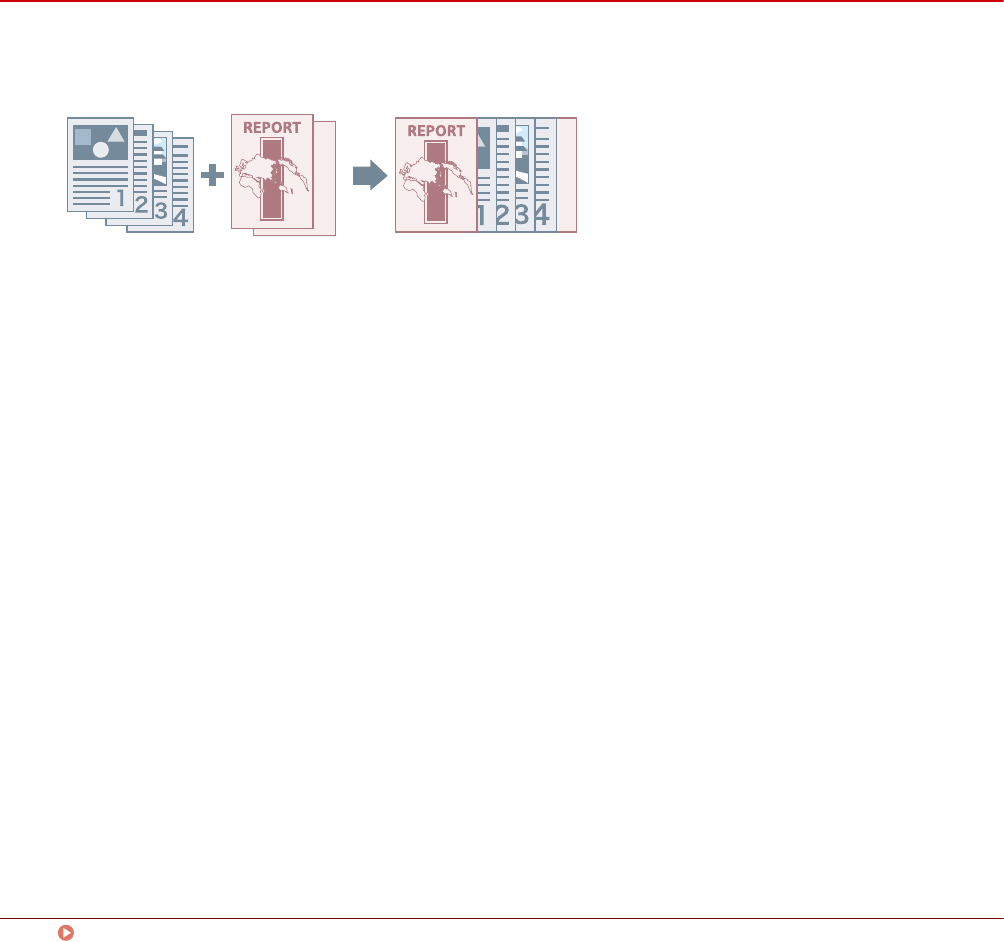
Adding Cover Sheets
You can add front and back covers to print data. You can also use paper that differs from that of the content
pages, and specify which side(s) of the cover(s) to print on.
1Display the [Paper Source] sheet.
2Click [Front/Back Cover Settings].
3In the [Front/Back Cover Settings] dialog box, select the cover(s) to add from [Cover
Settings].
4If you want to set the front cover, set [Front Cover] > [Paper Source] and [Print on].
5If you want to set the back cover, set [Back Cover] > [Paper Source] and [Print on].
6Click [OK].
Related Topics
[Paper Source] Sheet(P. 108)
Using Various Types of Paper
50
Printing Multiple Files Together
Printing Multiple Files Together .............................................................................................................. 52
About the [Edit and Preview] Function ............................................................................................................... 53
Printing Files Together ........................................................................................................................................ 54
Checking the Print Preview ................................................................................................................................ 56
Changing the Print Settings of the Combined File ............................................................................................ 58
Printing Multiple Files Together
51

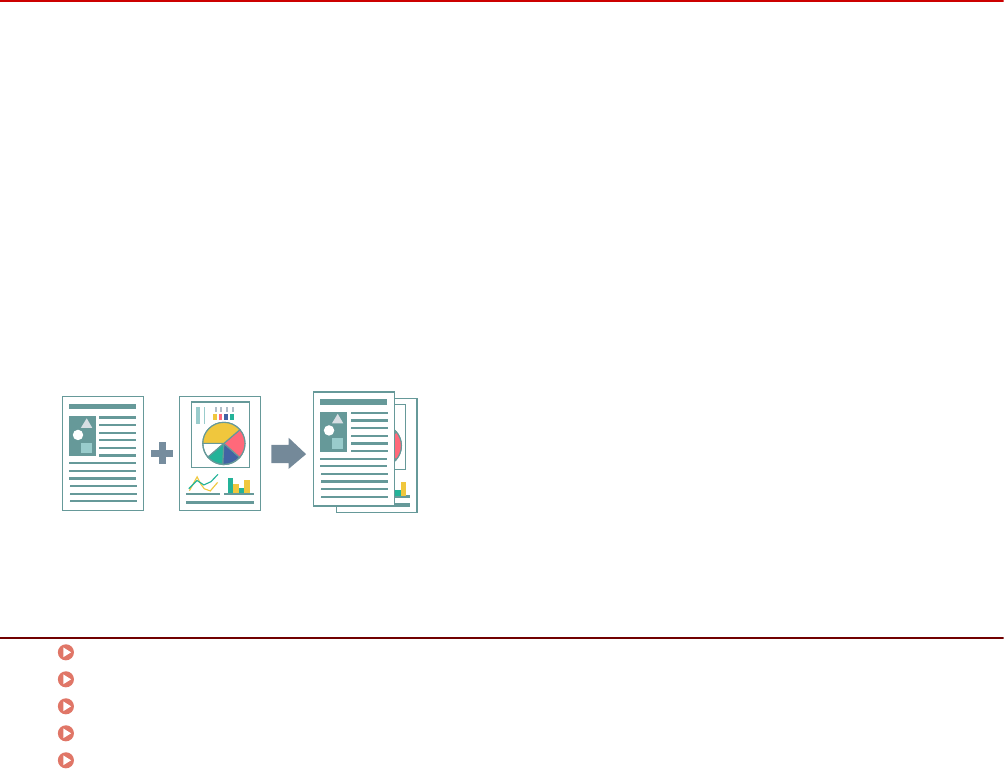
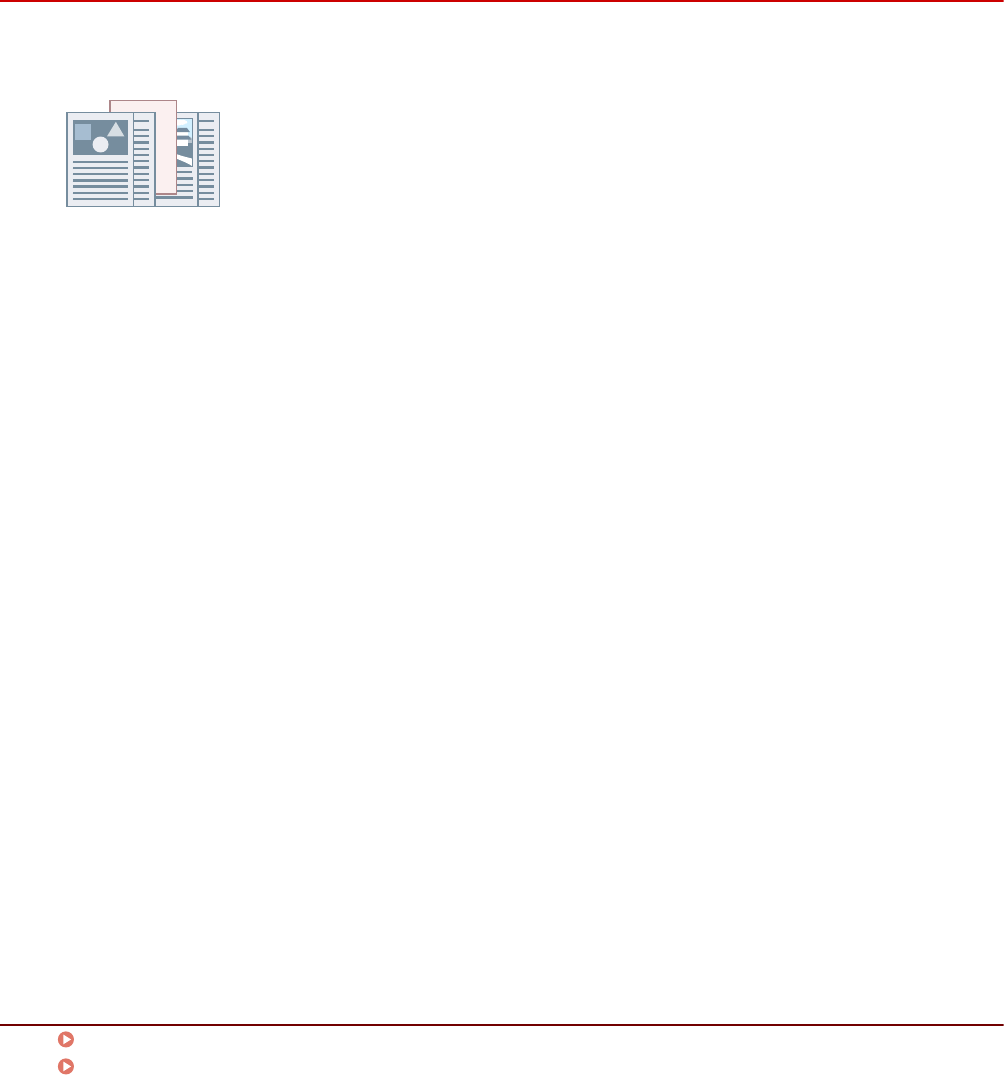
About the [Edit and Preview] Function
The [Edit and Preview] Function allows you to combine multiple les into one for printing.
You can set the [Edit and Preview] function from [Output Method] in each sheet of the print settings screen.
When you click the print button of an application, the Canon PageComposer main screen opens, and you can
also do the following:
●Preview the print data for conrmation
●Change the print settings after checking the preview
●Delete unnecessary pages
●Perform proof printing
●Combine data created with different applications into one le for printing
●Unify the print settings when combining multiple les
Related Topics
Common Settings for All Sheets(P. 92)
Canon PageComposer(P. 121)
Printing Files Together(P. 54)
Checking the Print Preview(P. 56)
Changing the Print Settings of the Combined File(P. 58)
Printing Multiple Files Together
53
Printing Files Together
You can combine multiple les into one le and print it. You can change the print settings for editing the
combined le using Canon PageComposer.
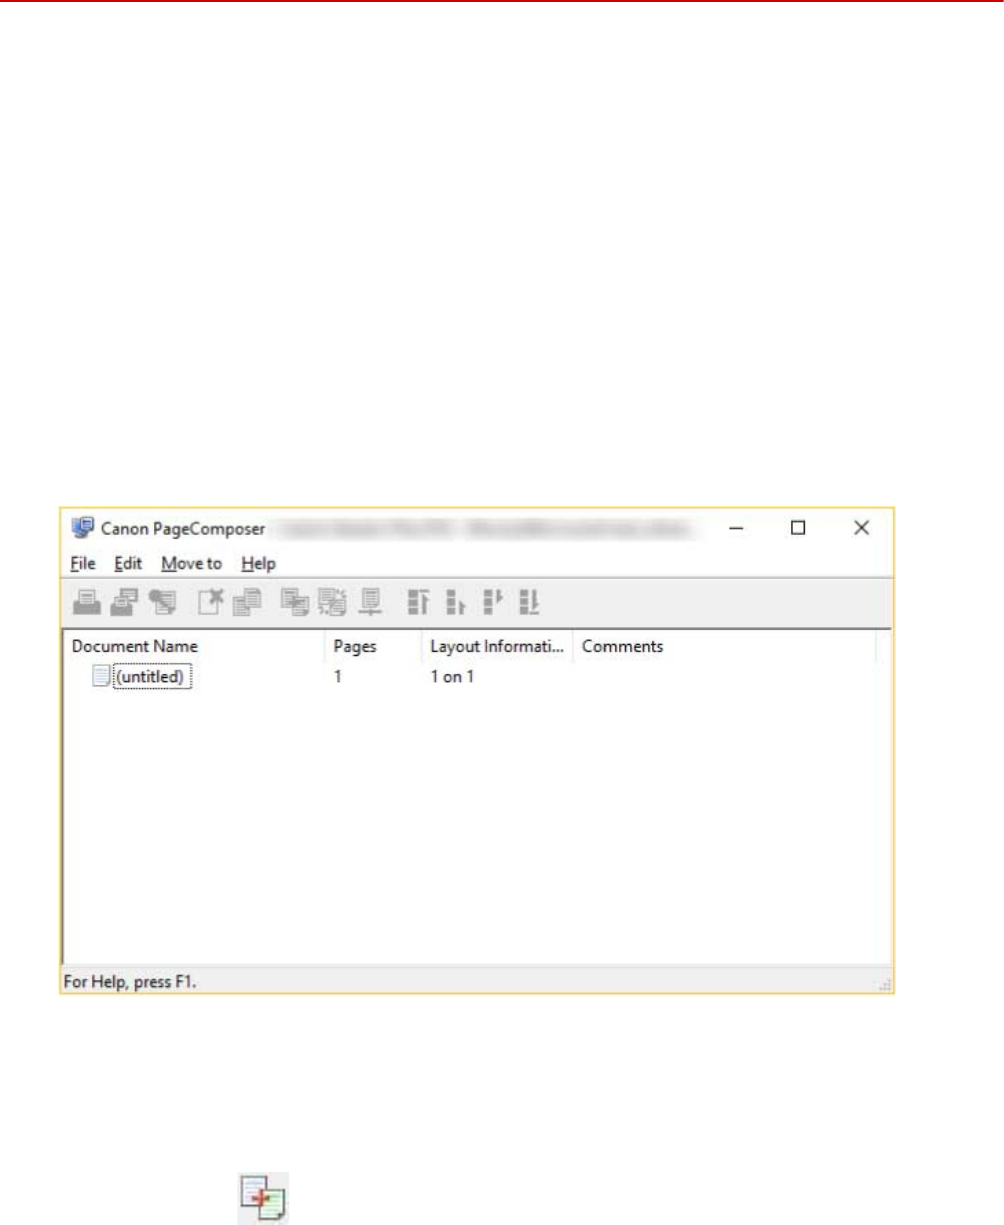
Here, the procedure for performing operations from the icons in the toolbar of Canon PageComposer will be
explained. You can also perform operations from the menu.
1Display the [Basic Settings], [Page Setup], [Finishing], [Paper Source], or [Quality] sheet.
2Select [Edit and Preview] from [Output Method] → click [OK].
If you want to set the output method after combining les, click [Details] → select the output method from
[Output Method After Edit and Preview] → click [OK].
3Click [OK] → click [Print] or [OK] in the print screen.
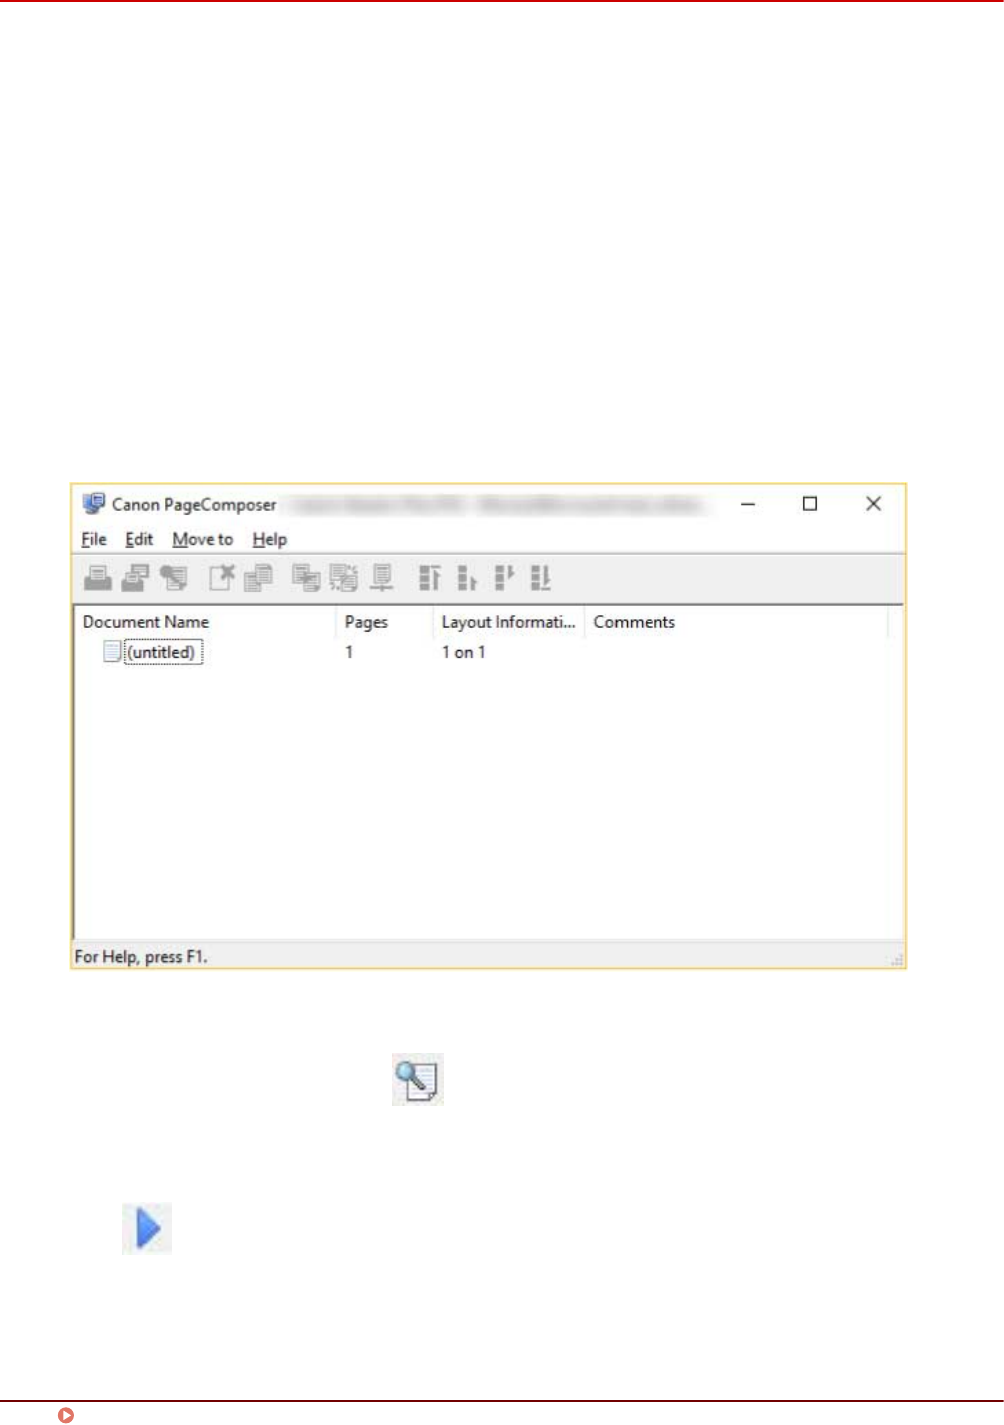
The Canon PageComposer main screen is displayed.
4Repeat steps 1 to 3 for each le you want to combine.
5In the Canon PageComposer main screen, select the les you want to combine from
the list → click [ ] (Combine Documents).
6In the [Combine] dialog box, set a name in [Document Name] if required.
7If you want to change the print settings, click [Print Settings] sheet → set the required
items → click [Combine].
Printing Multiple Files Together
54
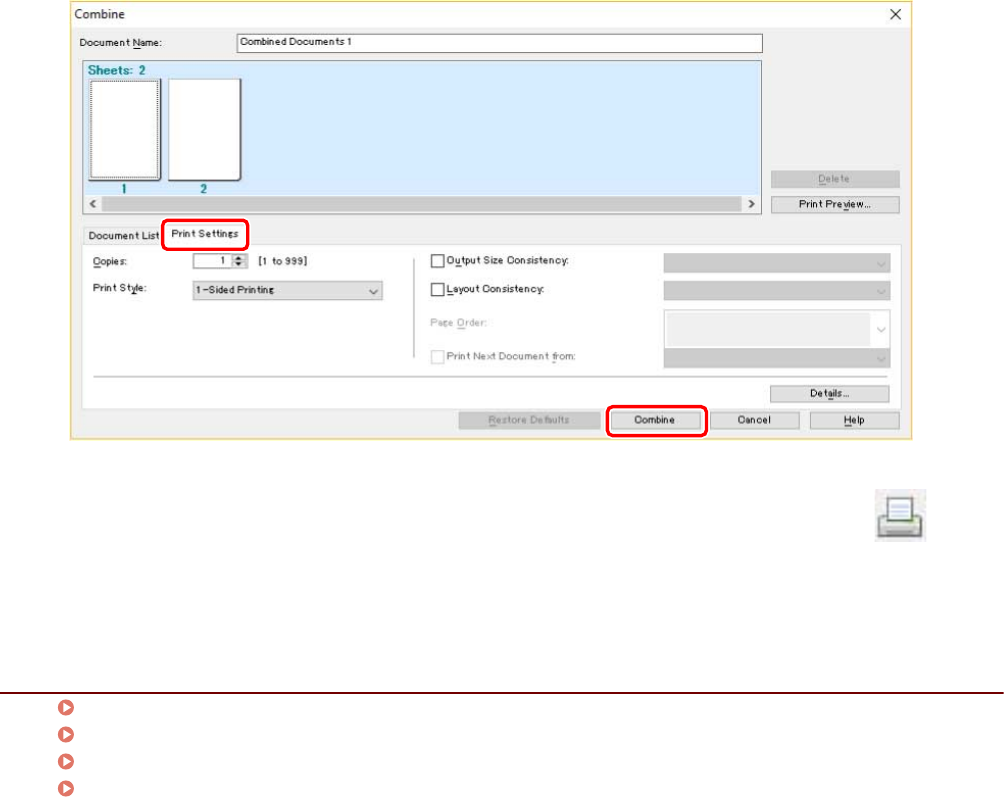
You can check the current settings in the preview.
If you want to delete a page, select the page in the preview → click [Delete].
8In the Canon PageComposer main screen, select the combined le → click [ ]
(Print).
Related Topics
Common Settings for All Sheets(P. 92)
Canon PageComposer(P. 121)
Checking the Print Preview(P. 56)
Changing the Print Settings of the Combined File(P. 58)
Printing Multiple Files Together
55
Checking the Print Preview
You can preview the print data and check the page layout settings before printing.
Here, the procedure for performing operations from the icons in the toolbar of Canon PageComposer will be
explained. You can also perform operations from the menu.
1Display the [Basic Settings], [Page Setup], [Finishing], [Paper Source], or [Quality] sheet.
2Select [Edit and Preview] from [Output Method] → click [OK].
If you want to set the output method after combining les, click [Details] → select the output method from
[Output Method After Edit and Preview] → click [OK].
3Click [OK] → click [Print] or [OK] in the print screen.
The Canon PageComposer main screen is displayed.
4In the Canon PageComposer main screen, select the le whose print preview you want
to check from the list → click [ ] (Print Preview).
5In the [Print Preview] dialog box, check the preview → click [Close].
Click [ ] (Next) to display the next page.
Click the page image to zoom in or out.
Related Topics
Common Settings for All Sheets(P. 92)
Printing Multiple Files Together
56

Changing the Print Settings of the Combined File
You can change the print settings of the combined le using Canon PageComposer. When editing les with
different page sizes or layouts, you can unify the settings.
Here, the procedure for performing operations from the icons in the toolbar of Canon PageComposer will be
explained. You can also perform operations from the menu.
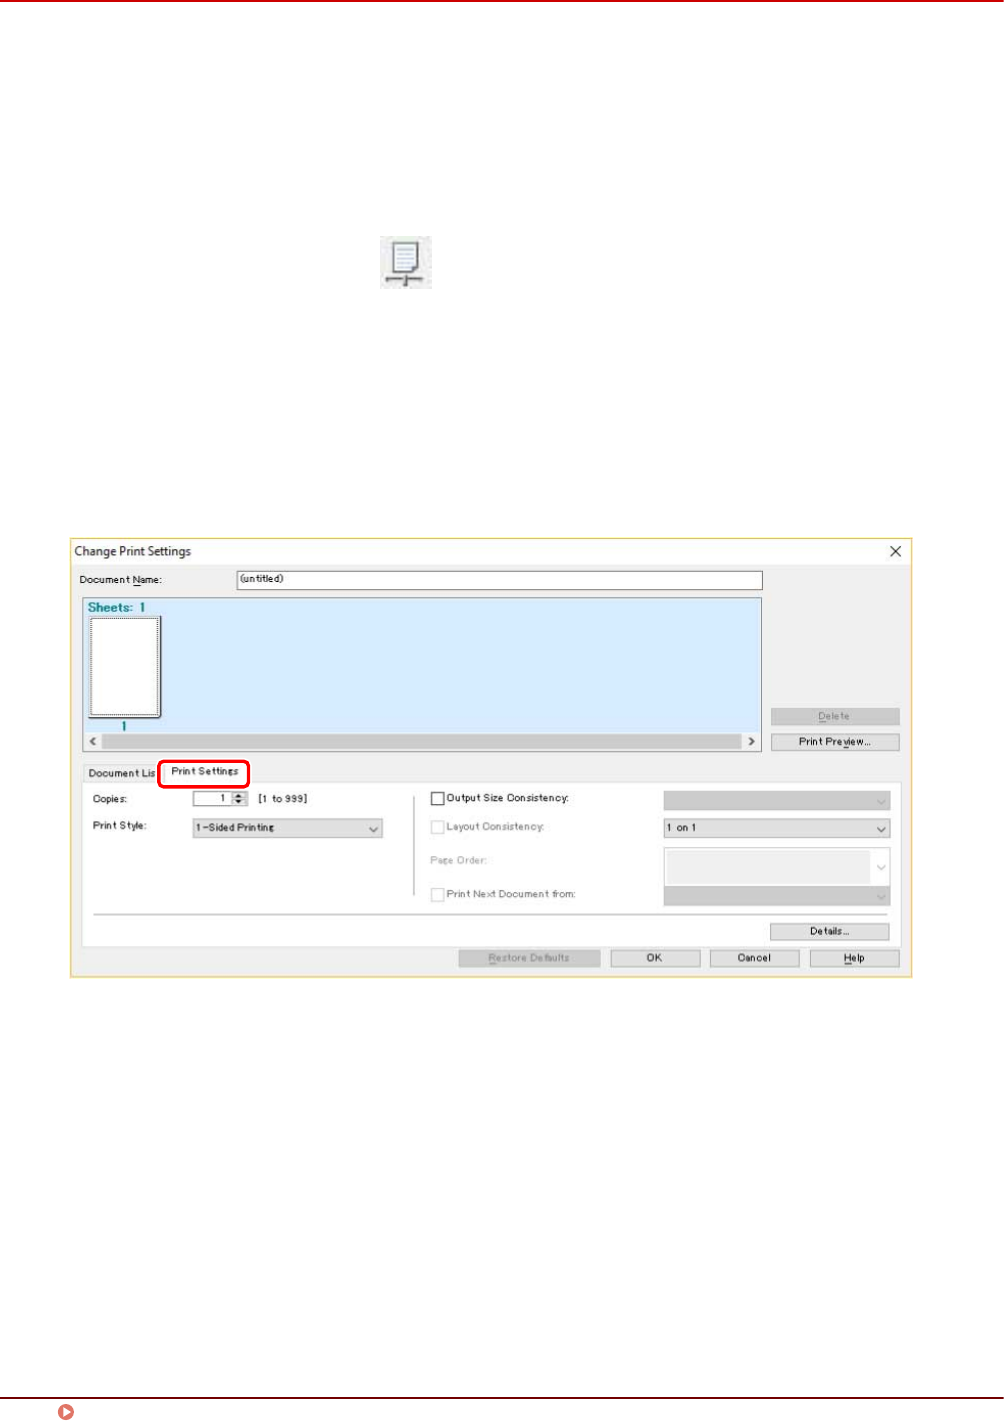
1In the Canon PageComposer main screen, select the le whose settings you want to
change from the list → click [ ] (Change Print Settings).
2In the [Change Print Settings] dialog box, set a name in [Document Name] if required.
3Click [Print Settings] sheet → set the required items.
If you want to unify the output size settings, select [Output Size Consistency] → select a paper size.
If you want to unify the page layout settings, select [Layout Consistency] → select a layout setting.
4If you want to set where to start printing the next le from when combining les,
select [Print Next Document from] → select an item.
5If you want to specify detailed settings in the print settings screen of the driver, click
[Details] → specify the relevant settings → click [OK].
6In the [Change Print Settings] dialog box, click [OK].
Related Topics
Canon PageComposer(P. 121)
Printing Multiple Files Together
58

Editing Favorite Settings
Editing Favorite Settings ............................................................................................................................. 61
Registering Favorite Settings ............................................................................................................................. 62
Editing the Favorite Settings List ....................................................................................................................... 63
Editing Favorite Settings
60


Registering Favorite Settings
You can register frequently used settings as a prole.
1Display the [Basic Settings], [Page Setup], [Finishing], [Paper Source], or [Quality] sheet
→ congure the settings you want to register.
2Click [Add] to the right of [Prole].
3In the [Add Prole] dialog box, set [Name] and [Icon].
Enter a comment in [Comment] if required.
4Click [OK].
The new prole is added to [Prole]. You can apply registered print settings by simply selecting an item from
[Prole].
Related Topics
Common Settings for All Sheets(P. 92)
Editing Favorite Settings
62

Editing the Favorite Settings List
You can edit the [Prole] list, and import or export it to be used on other computers.
To Edit the [Prole] List
1Display the [Basic Settings], [Page Setup], [Finishing], [Paper Source], or [Quality] sheet.
2Click [Edit] to the right of [Prole].
3In the [Edit Prole] dialog box, select the prole you want to edit from [Prole List] →
set [Name] and [Icon].
Enter a comment in [Comment] if required.
If you want to delete a prole, select the prole from [Prole List] → click [Delete] → click [Yes].
4Click [OK].
To Export a Prole
1Display the [Basic Settings], [Page Setup], [Finishing], [Paper Source], or [Quality] sheet.
2Click [Edit] to the right of [Prole].
3In the [Edit Prole] dialog box, select the prole you want to export from [Prole List]
→ click [Export].
4Specify the storage location and le name → click [Save] or [OK].
5Click [OK].
The selected prole is saved as a "*.cfg" le.
To Import a Prole
1Display the [Basic Settings], [Page Setup], [Finishing], [Paper Source], or [Quality] sheet.
Editing Favorite Settings
63

Coordinating with the Device
Functions
Coordinating with the Device Functions ............................................................................................ 66
Setting Device Information ................................................................................................................................ 67
Device Functions Settings ................................................................................................................................... 72
Paper Sources and Output Destinations Settings ............................................................................................. 73
Exporting a Conguration Prole ...................................................................................................................... 82
Importing a Conguration Prole ...................................................................................................................... 84
Setting the Authentication Function ................................................................................................................. 87
Setting the User Name ........................................................................................................................................ 89
Coordinating with the Device Functions
65

Coordinating with the Device Functions
Setting Device Information(P. 67)
Device Functions Settings(P. 72)
Paper Sources and Output Destinations Settings(P. 73)
Exporting a Conguration Prole(P. 82)
Importing a Conguration Prole(P. 84)
Setting the Authentication Function(P. 87)
Setting the User Name(P. 89)
Coordinating with the Device Functions
66

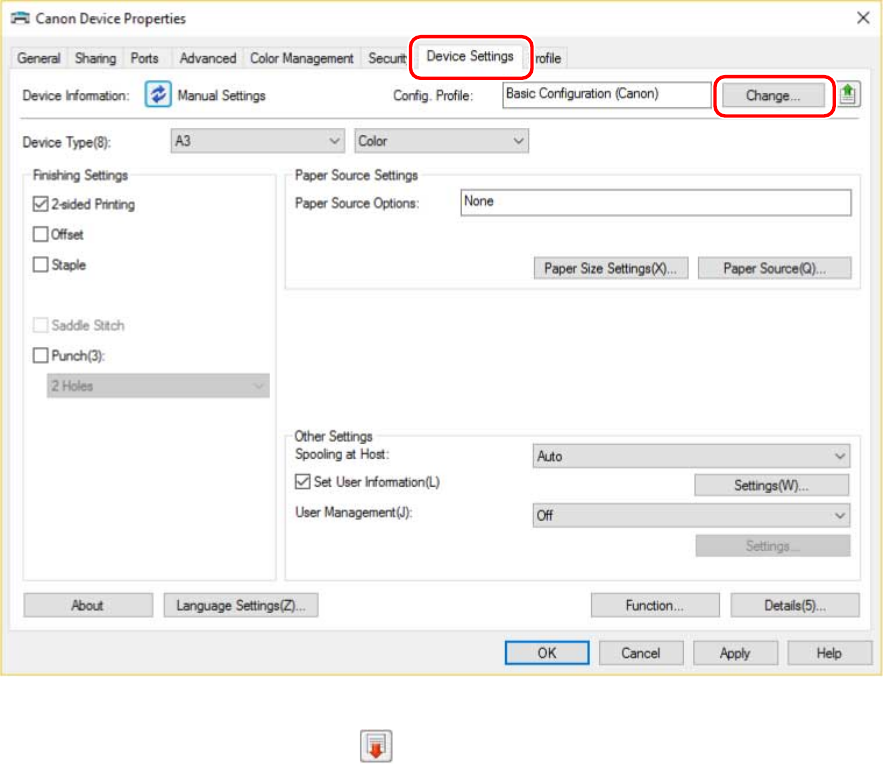
Setting Device Information
This explains the procedure for setting options installed in the device and making functions exclusive to the
device usable. First, apply the conguration prole that matches the printer model to the driver, and change the
settings in the [Device Settings] sheet. Next, set the device function and option information. If you can use the
acquire device information function, the function and option information of the device can be set automatically.
Perform a response according to the situation as shown below.
●If you installed using the installer with a network connection:
Normally, when installing, device information is acquired, and the conguration prole and device function
and option information is automatically set. According to the following procedure, check that the
conguration prole that matches the printer model is applied and that [Device Information] is set to [Auto].
●If you installed using the installer with a USB connection:
During installation, the conguration prole corresponding to the printer model is automatically set. The
acquire device information function is not supported in USB environments. According to the following
procedure, check that the conguration prole that matches the printer model is applied and set the device
function and option information manually.
●If the device information was not acquired during installation, or if you cannot use the device
functions and options:
According to the following procedure, set the conguration prole and device function and option
information automatically or manually.
●If you have added an option to the device:
According to the following procedure, check that the conguration prole that matches the printer model is
applied and set the added option automatically or manually.
●If you change the printer model you are using:
After changing the port, and set the conguration prole and device function and option information
automatically or manually, according to the following procedure.
Prerequisites
Conrm that the following conditions are satised. Make sure all preparations have been completed.
●Settings at the device
- If the device is connected via a WSD port, [Use WSD Browsing] is already set to on.
- If the device is connected by specifying a standard TCP/IP port, [Retrieve Printer Mngt. Information from
Host] is already set to on.
For details, refer to the manual of the device.
●When starting the computer, log on as a member of Administrators.
●When changing the printer model you are using, change the settings for the printing port.
Procedure
1Display [Devices and Printers] from the [Control Panel] of Windows.
2Right-click the icon of the device you are going to set → select [Printer properties]
from the displayed menu.
Coordinating with the Device Functions
67
If you are using the driver with multiple device models, select the model you are going to set after selecting
[Printer properties].
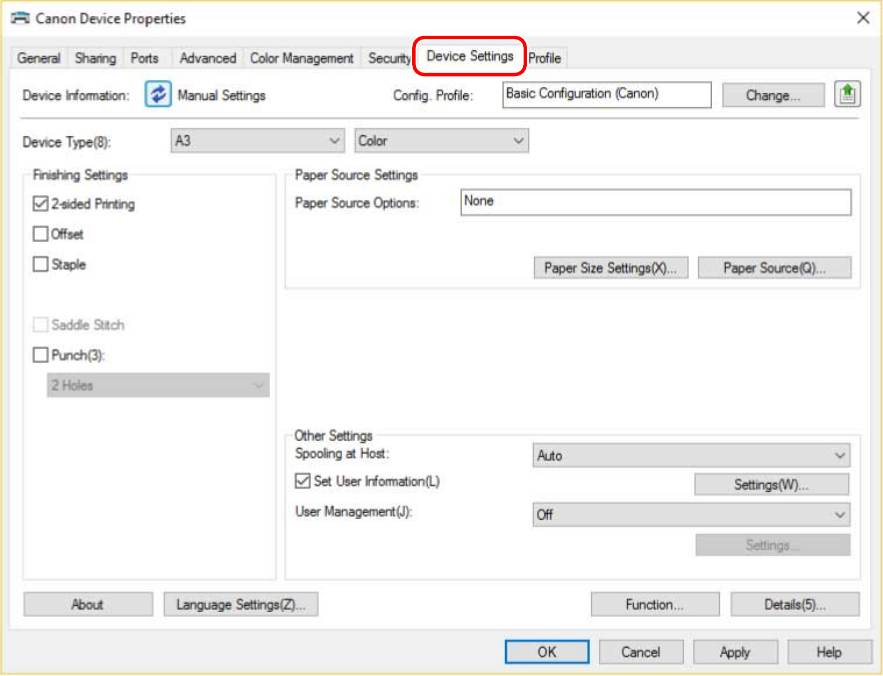
3Display the [Device Settings] sheet.
4Check whether the conguration prole is suitable for the device you are using → if it
does not match printer model, click [Change].
If a conguration prole that matches the printer model is set, skip to step 6.(P. 70)
Coordinating with the Device Functions
68
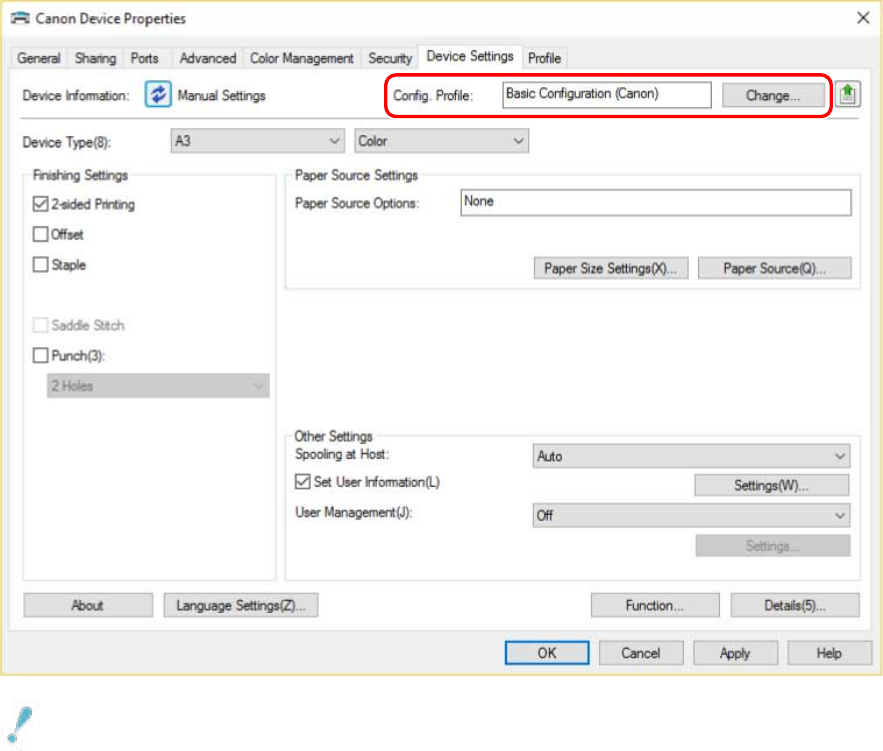
IMPORTANT
●If you have not selected a conguration prole suitable for the device you are using, the device information
may not be appropriately applied and some of the functions of the device may not be usable. Select a
suitable conguration prole to display the required settings in the [Device Settings] sheet. Settings not
displayed in the [Device Settings] sheet have not had the acquired device information applied to them.
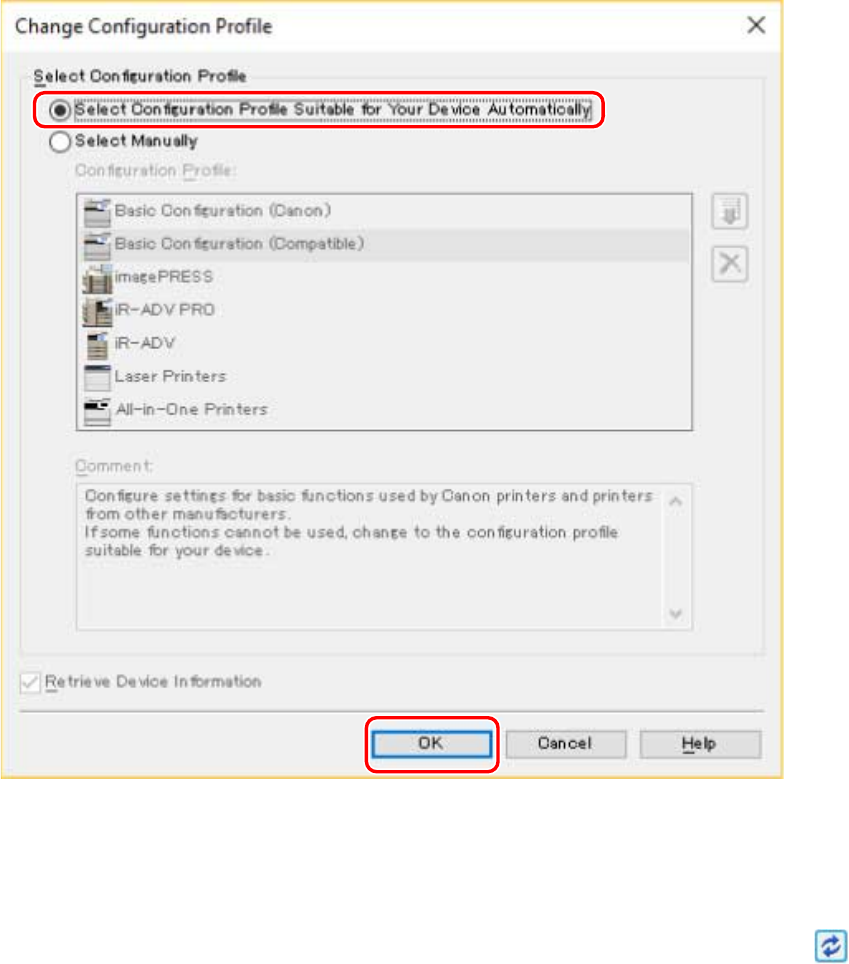
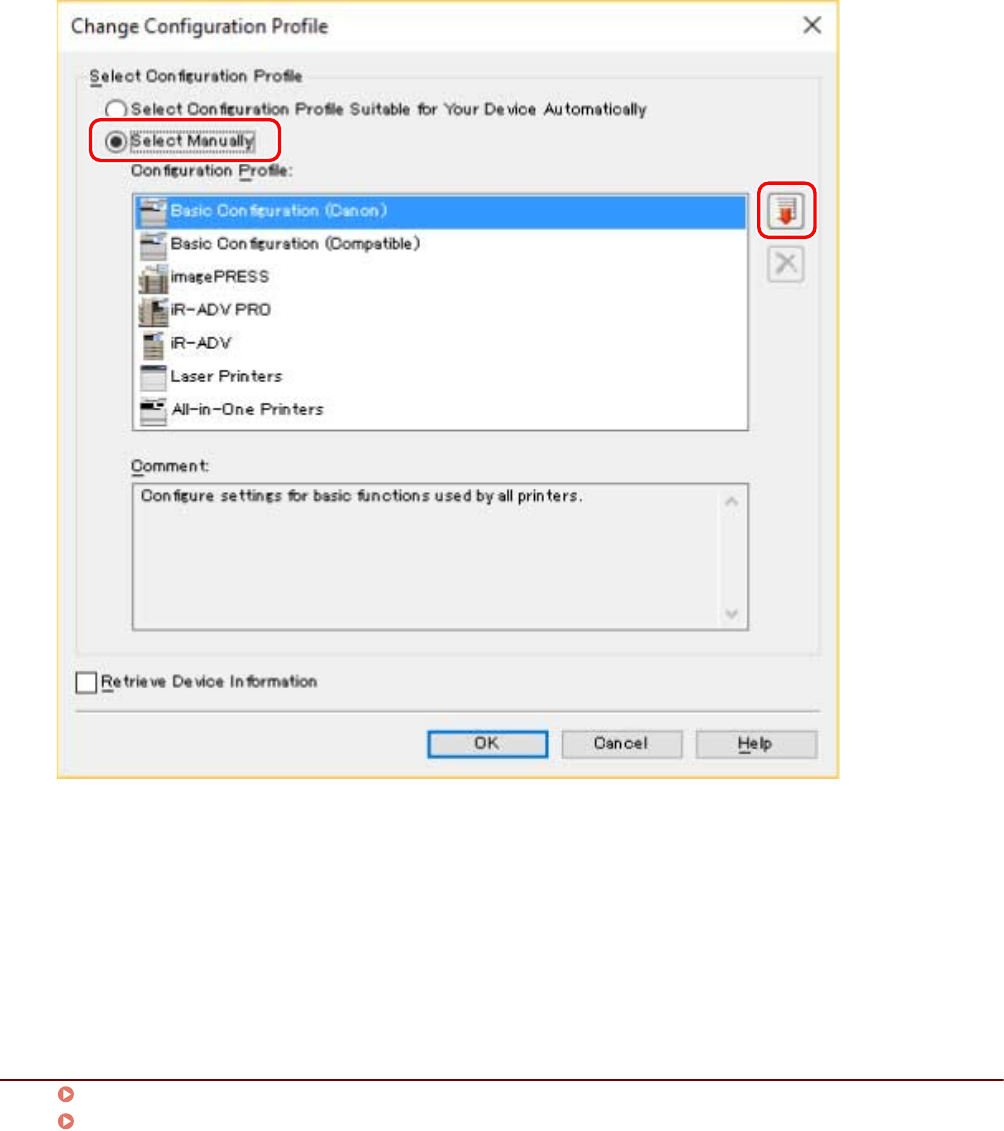
5Select [Select Conguration Prole Suitable for Your Device Automatically] → click
[OK].
Only when the device is oine or you need to select a conguration prole manually, select [Select Manually]
→ select a conguration prole from [Conguration Prole] → click [OK].
Coordinating with the Device Functions
69
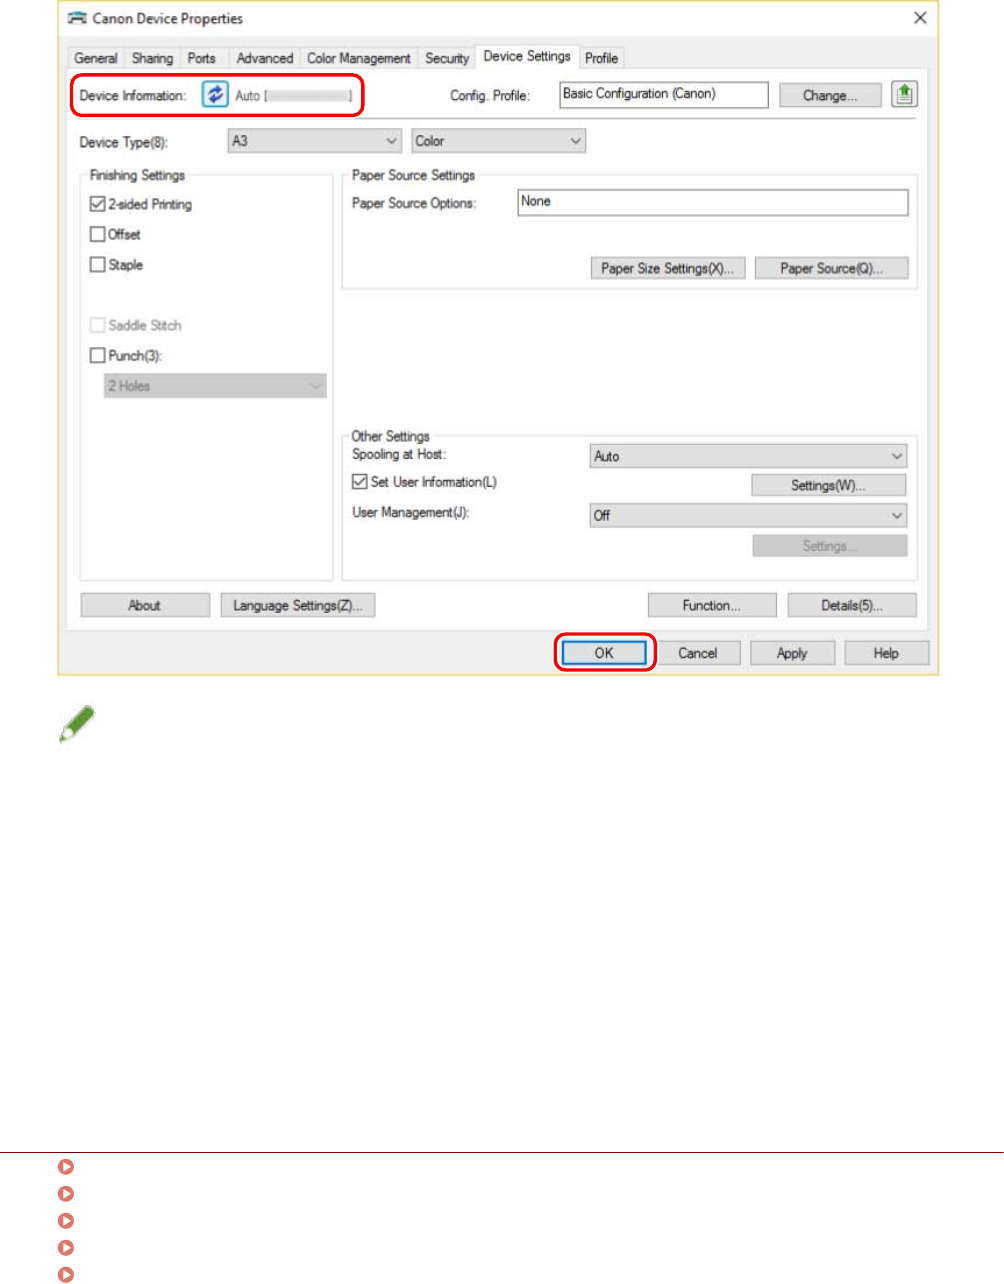
6Conrm that [Device Information] is set to [Auto] → click [OK].
If [Device Information] is set to [Auto], the device information is acquired and the device function and option
information is set automatically.
If you want to acquire the device information again when you have added an option etc., click [ ] (Retrieve
Device Status Information).
If [Device Information] is set to [Manual Settings], the device information is not acquired. Set the options
attached to the device and the functions supported by the device manually.
Coordinating with the Device Functions
70
NOTE
●Even if you can use the acquire device information function, some device information must be set manually.
For details, refer to the explanation of the device functions settings.
●In any of the following cases, there is a possibility that you may not be able to acquire some of the device
information. If that happens, set the options manually.
-When using a USB connection
-When using a device or port that cannot acquire device information
-When the conguration prole is set to [Basic Conguration (Compatible)]
●You can export and save the device information settings in the [Device Settings] sheet as a conguration
prole. By importing the exported conguration prole, you can set all of the device information at once.
Related Topics
[Device Settings] Sheet(P. 114)
Device Functions Settings(P. 72)
Paper Sources and Output Destinations Settings(P. 73)
Importing a Conguration Prole(P. 84)
Cannot use the acquire device information function or authentication function(P. 132)
Coordinating with the Device Functions
71

Device Functions Settings
This explains the functions that are set automatically by the acquire device information function and functions
that must be set manually because their information cannot be acquired.
NOTE
●When connected by a TCP/IP or IPP network, the device information can be acquired only by the driver.
●In a print server environment, the device information can be acquired when the "Canon Driver Information
Assist Service" is installed in the server computer. You can install the service using the driver installer.
●When using a USB Connection, the device information cannot be acquired. Set the device functions and
installed options manually.
Functions that are set automatically
●[Device Type]
●[Finishing Settings]
●[Paper Source Settings]
●[Paper Source Options]
●[Output Settings]
●[Other Settings]
- [User Management]
- [Secure Printing Function of Device]
●[Function]
●[Details] > items with [ ]
Functions that must be set manually
●[Cong. Prole]
●[Paper Size Settings] > [Paper Size to Use as Custom Paper Size]
●[Other Settings]
- [Spooling at Host]
- [Set User Information]
- [User Management] > [Department ID Management] > [Settings]
●[Details] > items with [ ]
●[Language Settings]
Related Topics
[Device Settings] Sheet(P. 114)
Paper Sources and Output Destinations Settings(P. 73)
Cannot use the acquire device information function or authentication function(P. 132)
Coordinating with the Device Functions
72
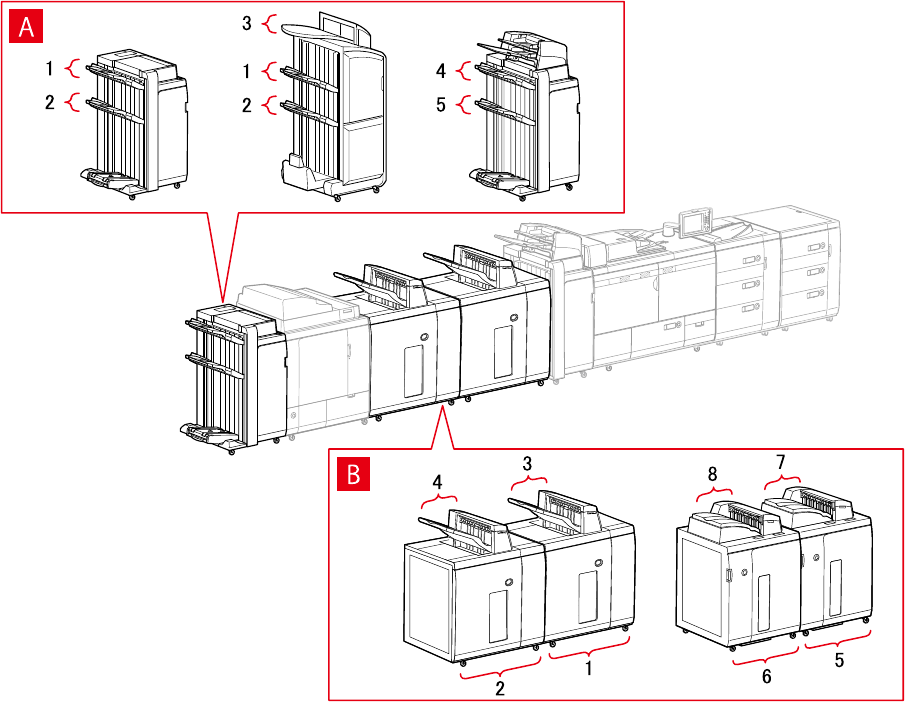
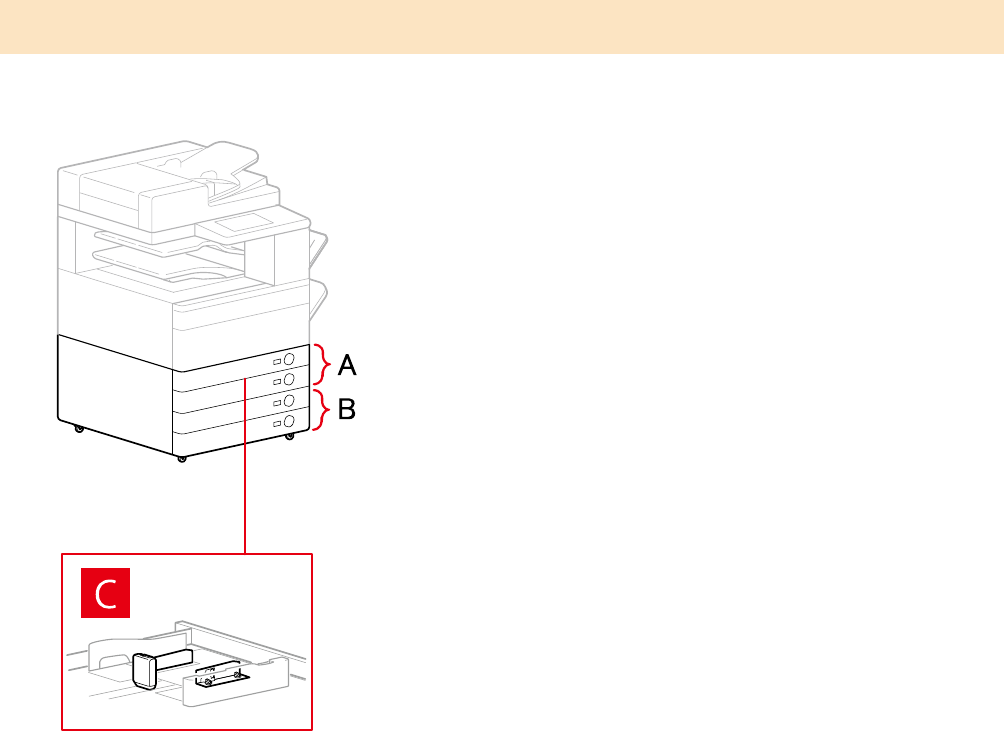
Paper Sources and Output Destinations Settings
This explains the mapping between the driver settings and paper source and output destination options. Refer
to the device settings of the conguration prole selected for [Cong. Prole] in the [Device Settings] sheet.
If [Fiery Print Controller] or [Basic Conguration (Canon)] is selected for [Cong. Prole], refer to the settings for
the printer model you are using.
Laser Printers(P. 73)
iR-ADV(P. 74)
iR-ADV PRO(P. 76)
imagePRESS(P. 78)
All-in-One Printers(P. 80)
NOTE
●Some options may not be usable depending on the driver and device you are using.
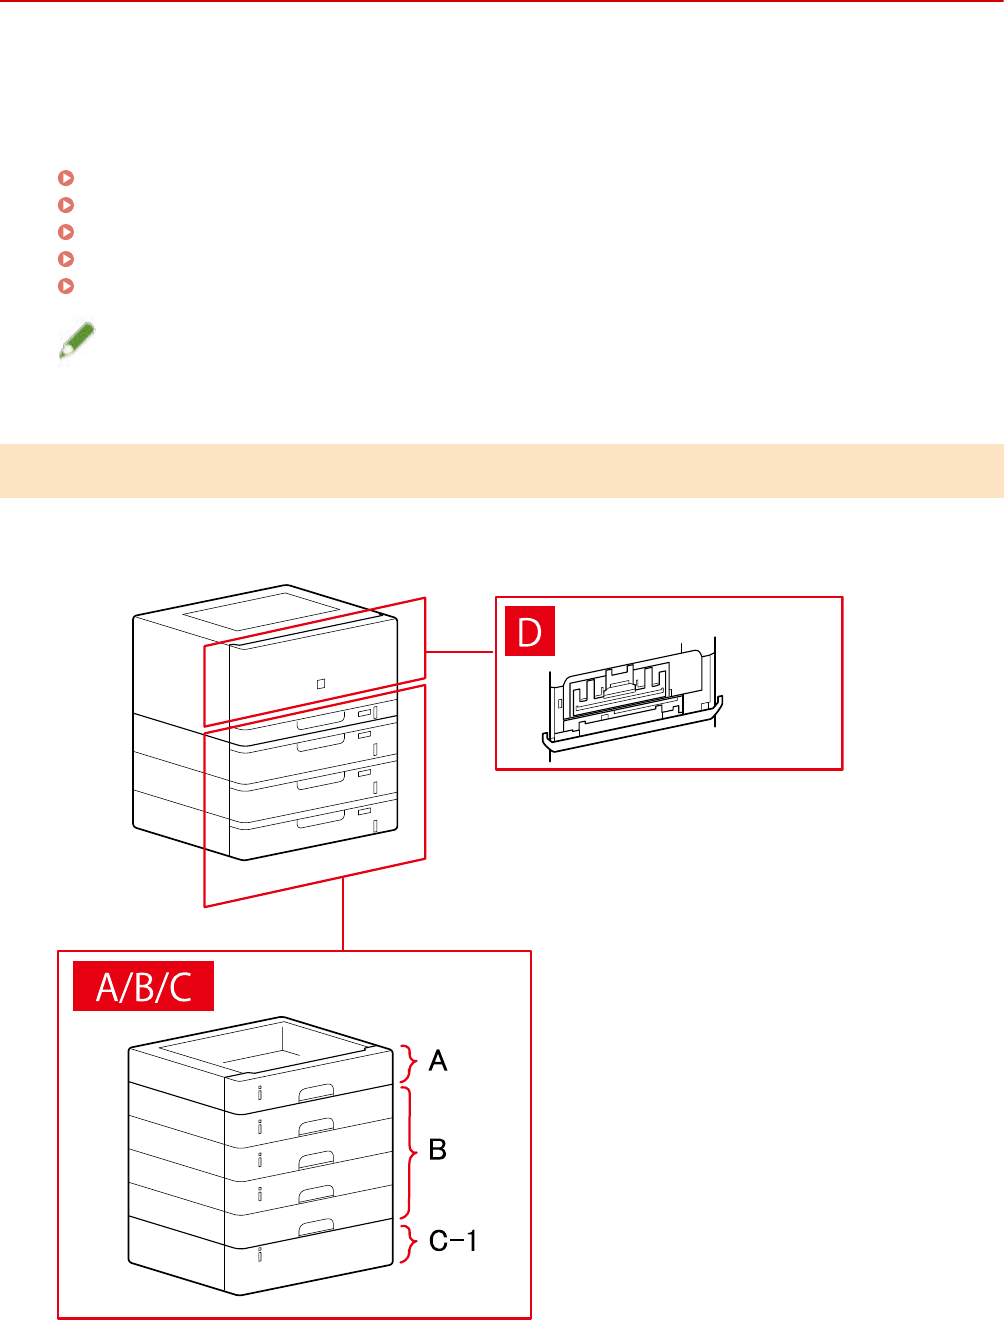
Laser Printers
Paper Source Settings
Coordinating with the Device Functions
73
[Paper Source] Dialog Box
[Standard Paper Source]
A-1 [Drawer x 1]
[Optional Drawer/Cassette]
B-1 [Drawer x 1]
B-2 [Drawer x 2]
B-3 [Drawer x 3]
B-4 [Drawer x 4]
[Optional Deck]
C-1 [Paper Deck Unit]
D [Envelope Tray]
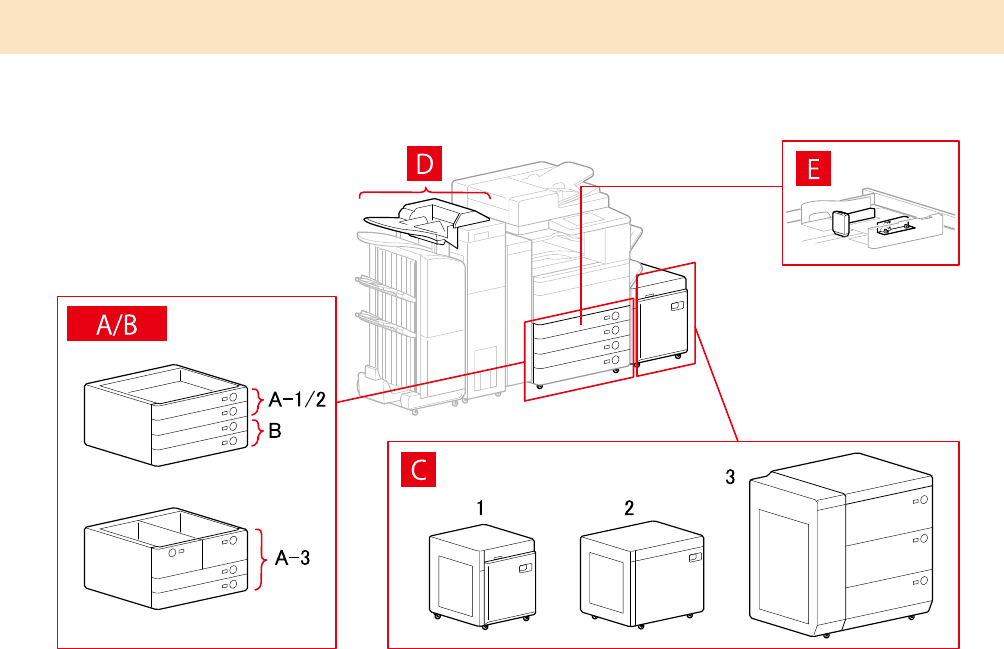
iR-ADV
Paper Source Settings
[Paper Source] Dialog Box
[Standard Paper Source]
A-1 [Drawer x 1]
A-2 [Drawer x 2]
A-3 [Deck x 2 + Drawer x 2]
Coordinating with the Device Functions
74
[Optional Drawer/Cassette]
B-1 [Drawer x 1]
B-2 [Drawer x 2]
B-3 [Drawer x 3]
B-4 [1-Cassette Feeding Unit]
B-5 [2-Cassette Feeding Unit]
B-6 [3-Cassette Feeding Unit]
B-7 [High Capacity Cassette Feeding Unit]
[Optional Deck]
C-1 [Paper Deck Unit]
C-2 [POD Deck Lite]
C-3 [Multi-drawer Paper Deck]
[Inserter]
D-1 [Document Insertion Unit (Tray x 2)]
D-2 [Inserter of Paper Folding Unit/Document Insertion Unit (Tray x 1)]
[Envelope Feeder]
E-1 [Drawer 1]
E-2 [Drawer 2]
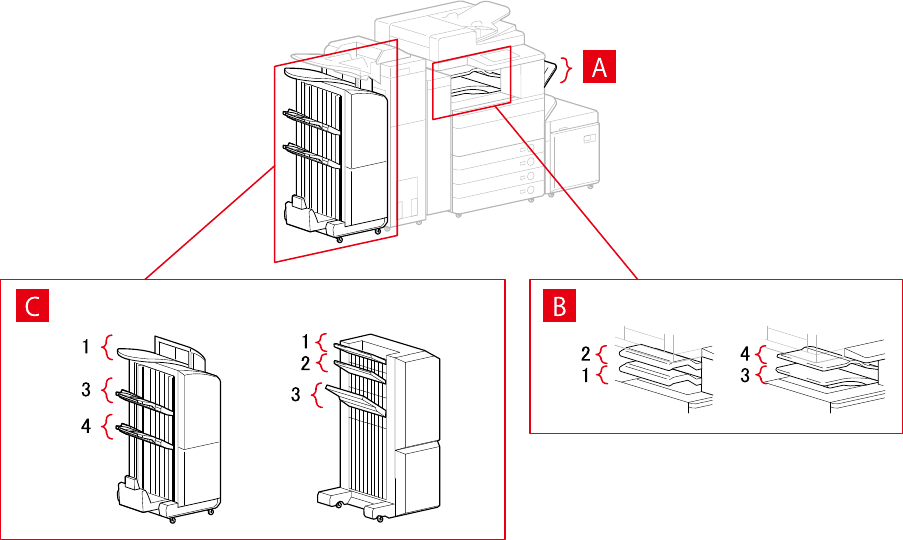
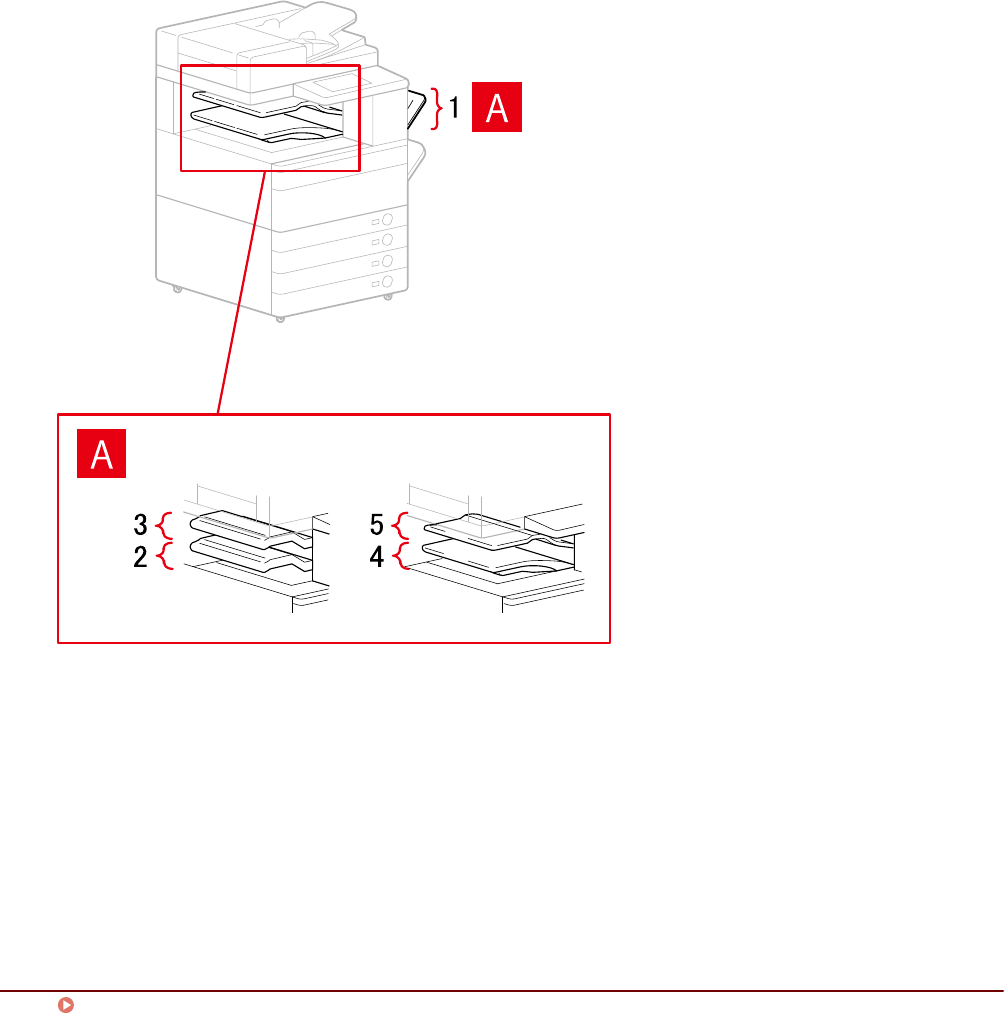
Output Destinations Settings
[Paper Output Settings] Dialog Box
A-1 [Copy Tray]
B-1 [Inner Finisher Tray]
B-2 [Inner Finisher Additional Tray]
Coordinating with the Device Functions
75

B-3 [Inner Tray 1]
B-4 [Inner Tray 2]
C-1 [Finisher Tray 1 [No Collating]]
C-2 [Finisher Tray 2 [No Collating]]
C-3 [Finisher Tray 1]
C-4 [Finisher Tray 2]
iR-ADV PRO
Paper Source Settings
[Paper Source] Dialog Box
[Standard Paper Source]
A-1 [Deck x 2 + Drawer x 2]
[Optional Deck]
B-1 [Paper Deck Unit]
B-2 [POD Deck Lite]
B-3 [Multi-drawer Paper Deck]
[Inserter]
C-1 [Document Insertion Unit (Tray x 2)]
Coordinating with the Device Functions
76
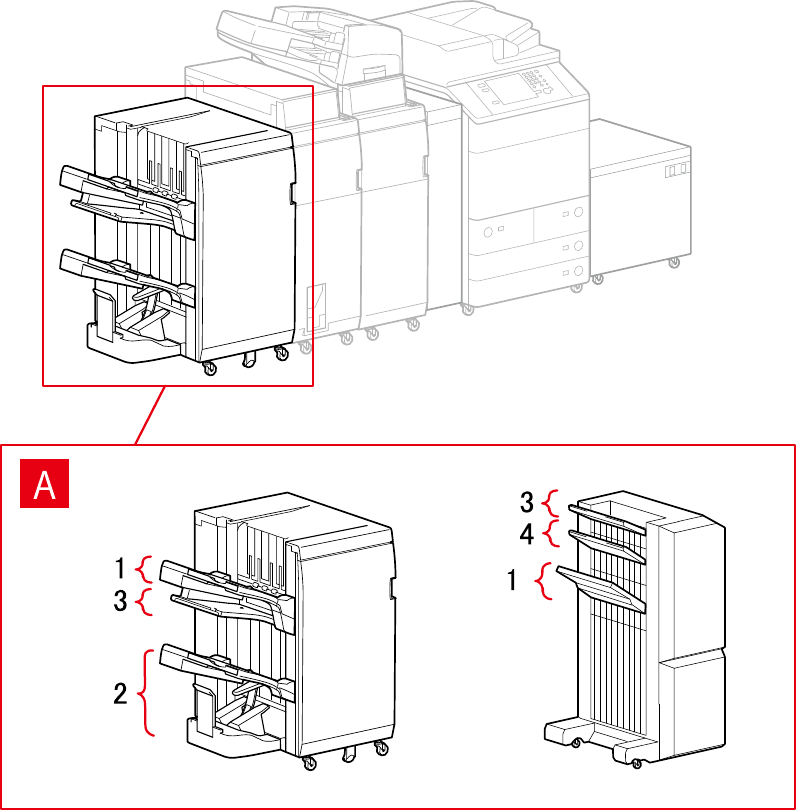
C-2 [Inserter of Paper Folding Unit/Document Insertion Unit (Tray x 1)]
Output Destinations Settings
[Paper Output Settings] Dialog Box
Finisher Tray
A-1 [Finisher Tray 1]
A-2 [Finisher Tray 2]
A-3 [Finisher Tray 1 [No Collating]]
A-4 [Finisher Tray 2 [No Collating]]
Coordinating with the Device Functions
77
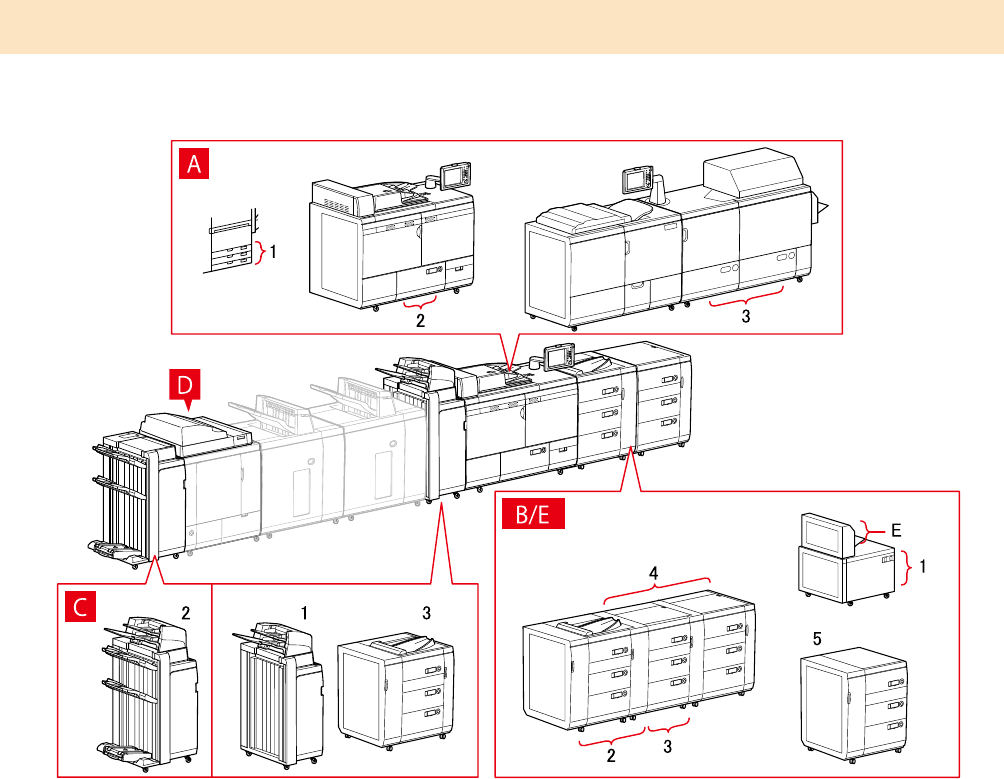
imagePRESS
Paper Source Settings
[Paper Source] Dialog Box
[Standard Paper Source]
A-1 [Drawer x 3]
A-2 [Deck x 1]
A-3 [Deck x 2]
[Optional Deck]
B-1 [POD Deck Lite]
B-2 [POD Deck]
B-3 [POD Deck + Secondary POD Deck]
B-4 [POD Deck + Secondary POD Deck x 2]
B-5 [Multi-drawer Paper Deck]
[Inserter]
C-1 [Document Insertion Unit (Tray x 2)]
C-2 [Document Insertion Unit [iPR C7010VP/6010]]
C-3 [Multi Drawer Document Insertion Unit]
Coordinating with the Device Functions
78
D [Inserters of Perfect Binder]
E [Multi-purpose Tray]
Output Destinations Settings
[Paper Output Settings] Dialog Box
Finisher Tray
A-1 [Finisher Tray 1]
A-2 [Finisher Tray 2]
A-3 [Finisher Tray 1 [No Collating]]
A-4 [Finisher Tray 1 [iPR C7010VP/6010]]
A-5 [Finisher Tray 2 [iPR C7010VP/6010]]
Stacker
B-1 [Stacker a [Stack]]
B-2 [Stacker b [Stack]]
B-3 [Stacker a [Output Tray]]
B-4 [Stacker b [Output Tray]]
B-5 [Stacker a [Stack] [iPR C7010VP/6010]]
B-6 [Stacker b [Stack] [iPR C7010VP/6010]]
Coordinating with the Device Functions
79
B-7 [Stacker a [Output Tray] [iPR C7010VP/6010]]
B-8 [Stacker b [Output Tray] [iPR C7010VP/6010]]
All-in-One Printers
Paper Source Settings
[Paper Source] Dialog Box
[Standard Paper Source]
A-1 [Drawer x 1]
A-2 [Drawer x 2]
[Optional Drawer/Cassette]
B-1 [Drawer x 1]
B-2 [Drawer x 2]
B-3 [Drawer x 3]
B-4 [1-Cassette Feeding Unit]
B-5 [2-Cassette Feeding Unit]
B-6 [3-Cassette Feeding Unit]
[Envelope Feeder]
C-1 [Drawer 1]
C-2 [Drawer 2]
Coordinating with the Device Functions
80

Exporting a Conguration Prole
The settings in the [Device Settings] sheet can be exported and saved as a conguration prole le (*.typ). You
can congure the same settings by importing the exported conguration prole.
This function is useful when streamlining driver settings for multiple computers or changing the items that can
be set for each user.
NOTE
●You can import an exported conguration prole by clicking [Change] > [ ] (Import Conguration Prole)
in the [Device Settings] sheet or by using the driver installer.
Prerequisites
Conrm that the following conditions are satised. Make sure all preparations have been completed.
●Settings at the device
- If the device is connected via a WSD port, [Use WSD Browsing] is already set to on.
- If the device is connected by specifying a standard TCP/IP port, [Retrieve Printer Mngt. Information from
Host] is already set to on.
For details, refer to the manual of the device.
●When starting the computer, log on as a member of Administrators.
Procedure
1Display [Devices and Printers] from the [Control Panel] of Windows.
2Right-click the icon of the device you are going to set → select [Printer properties]
from the displayed menu.
If you are using the driver with multiple device models, select the model you are going to set after selecting
[Printer properties].
3Click the [Device Settings] sheet.
4Check the displayed settings and option status → set the options manually as
required.
5Click [ ] (Export).
6In the [Export Conguration Prole] dialog box, set [Name] and [Icon].
Enter a comment in [Comment] if required.
Coordinating with the Device Functions
82


Importing a Conguration Prole
This explains the procedure for importing an exported conguration prole le (*.typ) and setting the device
information.
If you cannot acquire the device information, you can apply it by importing a conguration prole exported in
an environment where the information could be acquired.
IMPORTANT
●If a conguration prole suitable for the device you are using is not selected, some of the device functions
may not be usable.
Prerequisites
Conrm that the following conditions are satised. Make sure all preparations have been completed.
●Settings at the device
- If the device is connected via a WSD port, [Use WSD Browsing] is already set to on.
- If the device is connected by specifying a standard TCP/IP port, [Retrieve Printer Mngt. Information from
Host] is already set to on.
For details, refer to the manual of the device.
●When starting the computer, log on as a member of Administrators.
Procedure
1Display [Devices and Printers] from the [Control Panel] of Windows.
2Right-click the icon of the device you are going to set → select [Printer properties]
from the displayed menu.
If you are using the driver with multiple device models, select the model you are going to set after selecting
[Printer properties].
3Display the [Device Settings] sheet → click [Change].
Coordinating with the Device Functions
84
4Select [Select Manually] → click [ ] (Import Conguration Prole).
Coordinating with the Device Functions
85
Setting the Authentication Function
You can manage printing by means of the department ID management function or the user authentication
function.
Prerequisites
Conrm that the following conditions are satised. Make sure all preparations have been completed.
●When starting the computer, log on as a member of Administrators.
Procedure
1Display [Devices and Printers] from the [Control Panel] of Windows.
2Right-click the icon of the device you are going to set → select [Printer properties]
from the displayed menu.
If you are using the driver with multiple device models, select the model you are going to set after selecting
[Printer properties].
3Click the [Device Settings] sheet.
4Select the authentication function you want to use from [User Management] → click
[Settings].
5Select [Allow PIN Setting]/[Allow Password Settings] → enter the authentication
information.
To use the department ID management function, enter the information in [Department ID] and [PIN].
To use the user authentication function, enter the information in [User Name] and [Password].
If you want to check that the authentication information set in the device and the entered content match, click
[Verify].
6Set the relevant settings → click [OK].
7Click [Apply] in the [Device Settings] sheet.
If the [Conrm Department ID/PIN]/[Conrm User Name/Password] dialog box is displayed when printing,
conrm or set the authentication information.
Coordinating with the Device Functions
87


Setting the User Name
You can set a user name for print jobs and a PIN for secured printing. The set user name is displayed on the
control panel of the device, and is printed as the user name for headers or footers.
Prerequisites
Conrm that the following conditions are satised. Make sure all preparations have been completed.
●When starting the computer, log on as a member of Administrators.
Procedure
1Display [Devices and Printers] from the [Control Panel] of Windows.
2Right-click the icon of the device you are going to set → select [Printer properties]
from the displayed menu.
If you are using the driver with multiple device models, select the model you are going to set after selecting
[Printer properties].
3Click the [Device Settings] sheet.
4Select [Set User Information] → click [Settings].
5Enter the user information in [User Name] and [PIN for Secure Print] → click [OK].
If you want to change the default user name setting, click [Default Value Settings] → set [Name to Set for User
Name] → click [OK].
If you want to prevent changes to user names: Click [Default Value Settings] → select [Do Not Allow User Name
Changes] → click [OK].
6Click [Apply] in the [Device Settings] sheet.
Related Topics
[Device Settings] Sheet(P. 114)
Coordinating with the Device Functions
89
Settings List
Settings List ......................................................................................................................................................... 91
Common Settings for All Sheets ......................................................................................................................... 92
[Basic Settings] Sheet .......................................................................................................................................... 95
[Page Setup] Sheet ............................................................................................................................................... 98
[Finishing] Sheet ................................................................................................................................................ 101
[Paper Source] Sheet ......................................................................................................................................... 108
[Quality] Sheet ................................................................................................................................................... 110
[Device Settings] Sheet ..................................................................................................................................... 114
[Prole] Sheet .................................................................................................................................................... 119
Canon PageComposer ....................................................................................................................................... 121
Settings List
90

Common Settings for All Sheets
This explains what you can do from any one of the [Basic Settings], [Page Setup], [Finishing], [Paper Source], or
[Quality] sheets.
[Prole]
Applies registered settings as selecting a prole. You can register frequently used settings as a prole.
[Add] > [Add Prole] Dialog Box
Registers the current print settings as a prole. Set [Name] and [Icon]. Enter a comment in [Comment] if
required. If you want to check the current settings in a list, click [View Settings].
[Edit] > [Edit Prole] Dialog Box
Enables you to edit, import, and export proles.
[Prole List]
Displays registered proles as a list. You can change the order by selecting a prole and clicking [ ]
(Move Up) or [ ] (Move Down).
[View Settings]
Displays the content of the selected prole as a list.
[Delete]
Deletes the selected prole.
[Name], [Icon], [Comment]
Displays the name, icon, and comment of the selected prole. You can edit the name, icon, and comment of
user-registered proles.
[Import]
Imports a prole saved as a "*.cfg" le and adds it to [Prole List].
[Export]
Exports the prole selected in [Prole List] and saves it as a "*.cfg" le.
[Apply Settings from Application]
Gives priority to the [Page Size], [Orientation], and [Copies] settings from the application over the driver
settings.
NOTE
●Proles with a red dot ( ) next to them are pre-registered proles and cannot be edited or deleted.
[Output Method]
Switches the method for outputting print data. You can save the data to the device, move a print job in the print
queue ahead of other jobs and print it, etc.
[Print]
Performs normal printing.
[Hold]
Saves print data in a hold queue (temporary storage area) in the device. You can change the print order or
settings of the stored data from the control panel of the device or the Remote UI.
[Details] > [Hold Details] Dialog Box
Enables you to set the name of data.
Settings List
92
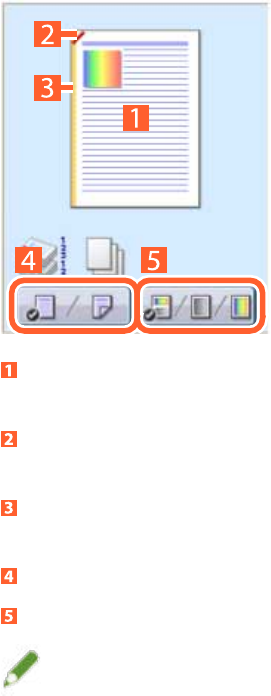
[Secure Print]
Attaches a PIN to print data and saves it in the device. The saved data can be printed by entering the PIN in the
control panel of the device.
[Details] > [Secure Print Details] Dialog Box
Enables you to set the user name and PIN.
[Conrm PIN] Dialog Box
Enables you to conrm or set a name for the print data, user name, and PIN when printing.
[Store]
Stores the print data to a box in the device. You can change the settings of or combine the stored data with
other stored data from the control panel of the device or the Remote UI.
[Details] > [Store Details] Dialog Box
Enables you to set the storage destination.
[Promote Print]
Gives print data priority over other print data that is waiting to be printed by the device.
[Edit and Preview]
Enables you to combine multiple les into one for printing. You can also preview the print data for conrmation
and change the print settings. If you want to lock the setting, display the print settings screen from [Devices and
Printers], select [Lock] to the right of [Edit and Preview]. This function is useful for restricting the output
methods of clients in a shared printer environment.
[Details] > [Edit and Preview Details] Dialog Box
Enables you to set the output method after Edit and Preview.
[Settings Preview]
Displays the current print settings in a preview. You can set basic print functions by clicking on the preview.
N on 1 printing
Arranges N pages of print data on each sheet of paper.
Stapling
Click where you want the page to be stapled.
Binding location
Click the edge of the page where you want to set the binding location.
Switch between 1-sided printing and 2-sided printing
Switch between color and black and white printing (color printers only)
NOTE
●In the [Quality] sheet, the current settings for [Objective] is displayed in the preview.
Settings List
93

[View Settings] > [View Settings] Dialog Box
Displays the current driver settings in a list.
[Language Settings] > [Language Settings] Dialog Box
Enables you to switch the display language.
Related Topics
About the [Edit and Preview] Function(P. 53)
Printing Files Together(P. 54)
Attaching Encryption When Printing(P. 28)
Putting Print Jobs on Hold(P. 29)
Storing Print Data(P. 30)
Priority Printing(P. 31)
Registering Favorite Settings(P. 62)
Editing the Favorite Settings List(P. 63)
Settings List
94

[Basic Settings] Sheet
You can set basic print functions.
[Page Size]
Displays the paper size of the print data prepared in the application.
[Output Size]
Species the actual paper size to be printed on. If you select a size that differs from [Page Size], the print data is
enlarged or reduced to t the set page size when printing.
[Copies]
Species the number of copies to be printed.
[Orientation]
Species the orientation of print data.
[Page Layout]
Species how many pages to print on each sheet of paper.
[Manual Scaling]
Species an enlargement or reduction ratio for printing.
[1-sided/2-sided/Booklet Printing]
Species a method for outputting print data.
[Booklet] > [Detailed Settings for Booklet] Dialog Box
Enables you to set detailed settings such as gutter, displacement correction for booklet printing.
[Booklet Printing Process]
Switches the settings to be applied. Select [With Driver Settings] when using driver functions such as dividing
the document into sets, gutter settings, etc. Select [With Device Settings] when using the creep (displacement)
correction function.
[Booklet Printing Method]
Switches the booklet printing method. When creating a booklet in multiple sets, select [Divide into Sets] and
then specify how many sheets are in each set in [Sheets per Set].
[Book Opening]
Species the direction the booklet opens.
[Specify Booklet Gutter]
Species the gutter width.
[Use Creep (Displacement) Correction]
Settings List
95

Corrects displacement between outer and inner pages that occurs during booklet printing. Select a correction
method from [Displacement Correction Method]. When specifying the displacement width of the print area
between the outermost page and centermost page, select [Manual Correction] and specify a correction amount
in [Correction Width].
[Saddle Press]
Presses the pages so that they are attened when using saddle stitching with booklet printing. You can adjust
the strength of the press by setting [Saddle Press Adjustment].
[Saddle Stitch Setting]
Prints a booklet folded in half and stapled in the middle. When trimming to align the edges of the pages, select
[Fold + Saddle Stitch + Trim]/[Fold + Trim], and then set [Trim Settings] in the [Finishing] sheet.
[Binding Location]
Sets the edge of the paper to bind.
If you change [Orientation] in the [Basic Settings]/[Page Setup] sheet, [Binding Location] is changed to the left
or top. The long edge/short edge positional relationship is maintained.
[Gutter] > [Gutter Settings] Dialog Box
Enables you to set the gutter width.
[Staple/Collate/Group]
Sets the order of pages and whether to staple the pages when printing multiple copies.
Collate Group Staple
Eco (Staple-Free)
[Collate]
Outputs the specied number of copies in page order.
[Group]
Outputs the specied number of copies with all pages having the same page number grouped together.
[Staple + Collate]/[Eco (Staple-Free) + Collate]/[Staple + Group]/[Eco (Staple-Free) + Group]
Outputs the pages in the order specied for [Collate] or [Group] stapled together. "Eco (Staple-Free)" is a
method of xing pages together without using staples, and can be used when a nisher that supports binding
without staples is installed.
[Staple Position] > [Staple Position] Dialog Box
Enables you to set the position of the staple(s).
[Color Mode]
Switches between printing in color or in black-and-white. To detect automatically whether each page should be
printed in color or in black-and-white, select [Auto [Color/B&W]].
Settings List
96

[Restore Defaults]
Returns all the print settings of the driver to their default values.
Related Topics
Common Settings for All Sheets(P. 92)
Scaling(P. 20)
Poster Printing(P. 22)
Booklet Printing(P. 35)
Saddle Stitched Booklet Printing(P. 38)
Driver settings cannot be set(P. 126)
Print results are unsatisfactory(P. 127)
Settings List
97

[Page Setup] Sheet
You can set the page size, print orientation, layout options, etc.
[Page Size]
Displays the paper size of the print data prepared in the application.
[Output Size]
Species the actual paper size to be printed on. If you select a size that differs from [Page Size], the print data is
enlarged or reduced to t the set page size when printing.
[Copies]
Species the number of copies to be printed.
[Orientation]
Species the orientation of print data.
[Page Layout]
Species how many pages to print on each sheet of paper.
[Poster Details] > [Poster Details] Dialog Box
Enables you to set detailed settings when printing a poster.
The poster printing function enlarges the print data of one page and prints it over multiple sheets of paper.
When the output sheets are joined together, they form a large print like a poster.
[Print Margin Borders]
Prints borders with other sheets as a guide to paste sheets together.
[Set Margins for Cutting/Pasting]
Sets margins for cutting or pasting. Select a width from [Margin Width]. When printing marks indicating the
cutout or margin section(s), select [Print Marks for Alignment].
[Pages to Print]
Species the page(s) to print.
[Page Order]
Species the page order to print.
[Manual Scaling]
Species an enlargement or reduction ratio for printing.
[Use 1 on 1 for Single-Page Data]
When printing multiple pages on each sheet, prints single page data over one sheet.
Settings List
98

[Watermark]
Superimposes and prints semi-transparent characters such as [TOP SECRET] or [DRAFT] over print data.
[Edit Watermark] > [Edit Watermark] Dialog Box
Enables you to create and add a new watermark.
[Watermark List]
Displays registered watermarks as a list. When selecting a watermark, a preview is displayed to the left.
[Add]
Adds a new watermark to [Watermark List] as [Untitled]. You can set the name of the watermark in [Name]
and its settings in the [Attributes], [Alignment], and [Print Style] sheets.
[Delete]
Deletes the selected watermark.
[Name]
Displays the name of the watermark selected in [Watermark List]. When adding a new watermark, enter the
name of the watermark.
[Attributes] Sheet
Species the settings relating to the text in a watermark.
[Alignment] Sheet
[Position] species the position of the watermark as coordinates relative to the center (0) of the document. [Tilt]
sets the angle of the watermark.
[Print Style] Sheet
[Watermark Border] sets whether a frame is printed around the text. [Watermark Position] sets the overlap
position with respect to the print data. When printing the watermark on only the rst page, select [Print on First
Page Only].
[Custom Paper Size] > [Custom Paper Size Settings] Dialog Box
Enables you to register a desired paper size and use it for printing. Papers with a red dot ( ) next to them are
standard paper sizes and cannot be edited or deleted.
[Page Options] > [Page Options] Dialog Box
Species layout options such as borders, date, page numbers, etc. and overlay printing settings.
[Format Settings] > [Format Settings] Dialog Box
Enables you to congure font settings when printing the date, user name, and/or page numbers.
[Restore Defaults]
Returns all the settings to their default values.
Related Topics
Common Settings for All Sheets(P. 92)
Scaling(P. 20)
Watermark Printing(P. 21)
Poster Printing(P. 22)
Printing Over a Fixed Form(P. 26)
Settings List
99

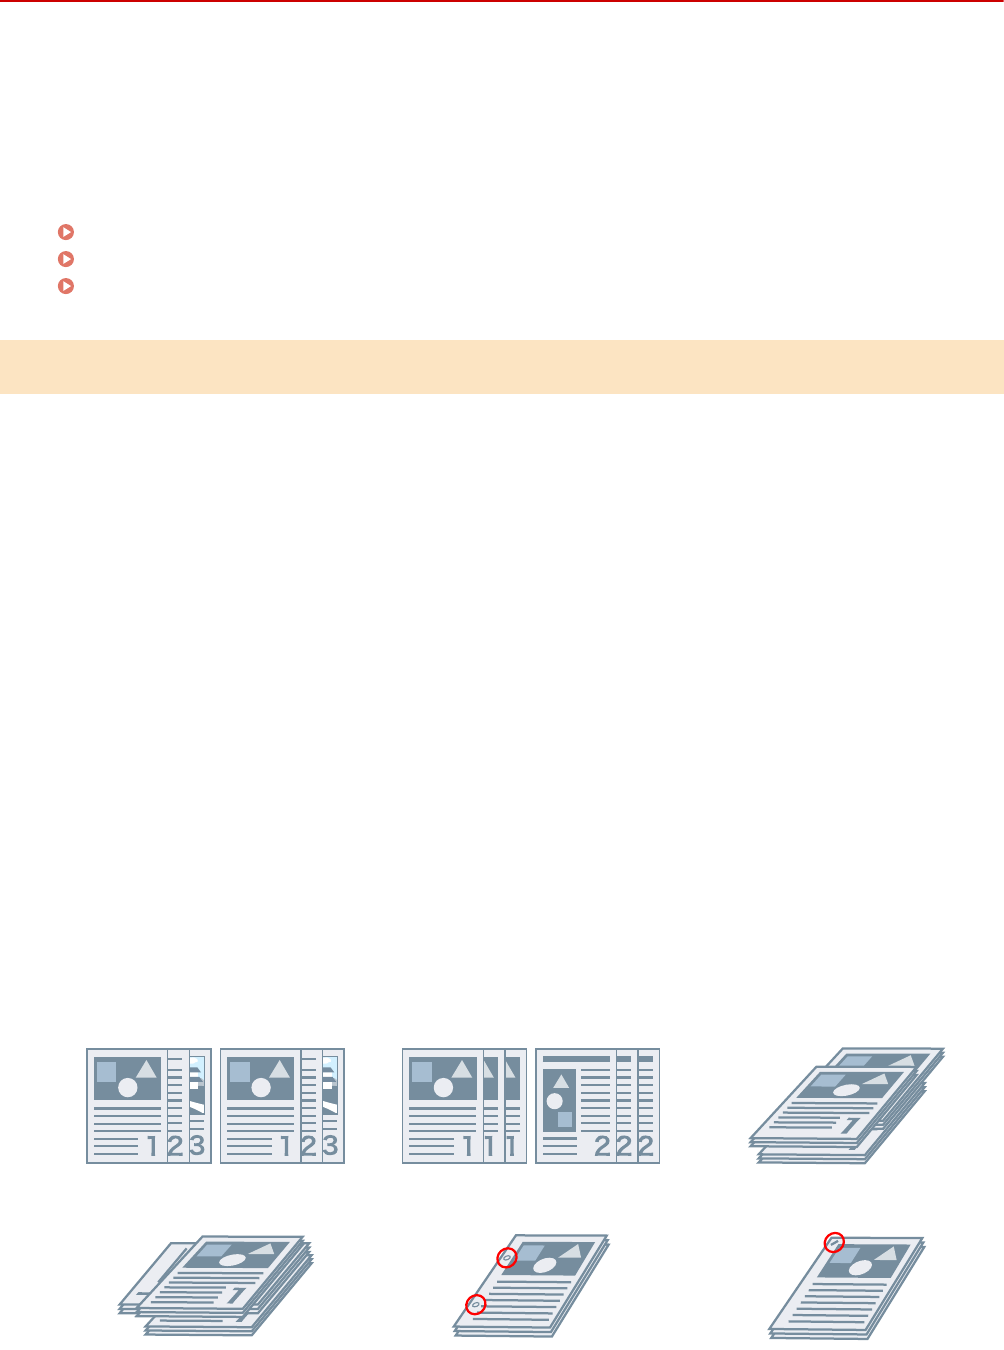
[Finishing] Sheet
You can congure settings relating to layout printing and nishing such as sorting, collating, stapling, etc.
[Print Style]
Species a method for outputting print data. According to what you select for [Print Style], the displayed
settings change as follows.
When [1-sided Printing] or [2-sided Printing] is selected(P. 101)
When [Booklet Printing] is selected(P. 103)
When [Perfect Binding [1-sided]] or [Perfect Binding [2-sided]] is selected(P. 104)
When [1-sided Printing] or [2-sided Printing] is selected
[Print with Mixed Paper Sizes/Orientations]/[Print in Different Orientations]
Enables you to print data in which the size and orientation differ from page to page.
[Details] > [Detailed Settings] Dialog Box
Enables you to set the combination of sizes and alignment method of pages.
[Binding Location]
Sets the edge of the paper to bind.
If you change [Orientation] in the [Basic Settings]/[Page Setup] sheet, [Binding Location] is changed to the left
or top. The long edge/short edge positional relationship is maintained.
[Gutter] > [Gutter Settings] Dialog Box
Enables you to set the gutter width.
[Finishing]
Sets the order of pages and whether to staple the pages when printing multiple copies.
Collate Group Offset
Rotate Hole Punch Staple
Eco (Staple-Free)
Settings List
101

[Collate]
Outputs the specied number of copies in page order.
[Group]
Outputs the specied number of copies with all pages having the same page number grouped together.
[Staple + Collate]/[Eco (Staple-Free) + Collate]/[Staple + Group]/[Eco (Staple-Free) + Group]
Outputs the pages in the order specied for [Collate] or [Group] stapled together. "Eco (Staple-Free)" is a
method of xing pages together without using staples, and can be used when a nisher that supports binding
without staples is installed.
[Staple Position] > [Staple Position] Dialog Box
Enables you to set the position of the staple(s).
[Offset]
Outputs each copy separately. You can set how many copies are offset in [Number of Copies for Offset].
[Rotate]
Outputs each copy at a 90 degree angle relative to the copy before and after it.
[Hole Punch]
Outputs the document with multiple holes for ring binding.
[Fold]
Folds pages into one of a variety of forms when outputting them.
C-fold Z-fold Half Fold (Saddle
Fold)
Accordion Z-fold Double Parallel Fold
[Fold Details] > [Fold Details] Dialog Box
Enables you to set the fold direction.
[Paper Output]
Species a printed paper output destination.
[Stack Details] > [Stack Details] Dialog Box
Enables you to set the number of copies to output and the automatic ejection timing.
Settings List
102

When [Booklet Printing] is selected
[Booklet] > [Detailed Settings for Booklet] Dialog Box
Enables you to set detailed settings for booklet printing such as gutters and displacement correction.
[Booklet Printing Process]
Switches the settings to be applied. Select [With Driver Settings] when using driver functions such as dividing
the document into sets, gutter settings, etc. Select [With Device Settings] when using the creep (displacement)
correction function.
[Booklet Printing Method]
Switches the booklet printing method. When creating a booklet in multiple sets, select [Divide into Sets] and
then specify how many sheets are in each set in [Sheets per Set].
[Book Opening]
Species the direction in which the booklet opens.
[Specify Booklet Gutter]
Species the gutter width.
[Use Creep (Displacement) Correction]
Corrects displacement between outer and inner pages that occurs during booklet printing. Select a correction
method from [Displacement Correction Method]. When specifying the displacement width of the print area
between the outermost page and centermost page, select [Manual Correction] and specify a correction amount
in [Correction Width].
[Saddle Press]
Presses the pages so that they are attened when using saddle stitching with booklet printing. You can adjust
the strength of the press by setting [Saddle Press Adjustment].
[Saddle Stitch Setting]
Prints a booklet folded in half and stapled in the middle. When trimming to align the edges of the pages, select
[Fold + Saddle Stitch + Trim], and then set [Trim Settings] in the [Finishing] sheet.
[Crease Settings] > [Crease Settings] Dialog Box
Enables you to specify the target sheets when creasing to facilitate folding.
[Trim Settings]
Switches the trim width adjustment method.
[Apply Device Settings]
Follows the device setting.
[Specify Trim Width of Fore]
Trims the opening edges only. You can specify a desired trimming width.
[Specify Trim Width of Fore and Top/Bottom]
Trims the opening, top, and bottom edges. You can specify a desired trimming width.
[Specify Finishing Width]
Trims by automatically adjusting to the specied nishing width.
[Specify Finishing Width and Height]
Settings List
103

Trims by automatically adjusting to the specied nishing width and height.
[Offset]
Outputs each copy separately. You can set how many copies are offset in [Number of Copies for Offset].
When [Perfect Binding [1-sided]] or [Perfect Binding [2-sided]] is selected
[Setting List]
Displays the current settings for perfect printing in a list.
[Perfect Binding Settings] > [Perfect Binding Settings] Dialog Box
Enables you to set the paper size, covers, and nishing size for perfect binding.
[Book Opening]
Species the direction the booklet opens.
[Perfect Bound Cover Settings]
Species the paper size and paper source of covers. When printing on covers, select [Lay out Data the Same Size
as Cover] for [Print Style], and specify [Front Cover Print Side] and [Back Cover Print Side].
[Content Page Size]
Species the paper size for printing the content pages.
[Specify Finishing by]
Switches the adjustment method. When specifying the trim widths, select [Trim Width] and specify [Trim Width
of Fore] and [Trim Width of Top/Bottom].
[Finishing Size]
Species the nal nished size for perfect binding.
[Finishing Adjustment] > [Finishing Adjustment] Dialog Box
Enables you to adjust the printing position for content pages and covers, and the trimming angle and locations.
[Advanced Settings] > [Advanced Settings] Dialog Box
Enables you to set detailed nishing settings. Select the setting item you want to specify in [List of Settings], and
select a setting from the drop-down list.
[Print Banner Page]
Prints a banner page showing the user's login name, the time the print job was printed, and the document le
name.
[Details] > [Banner Page Print Details] Dialog Box
Enables you to set the paper source or paper type of a banner page.
[Expand Print Region and Print]
Expands the print area when printing.
[Detect Paper Size in Tray]
Checks the print data and paper size in the paper source tray, and displays a message on the control panel of
the device if they do not match. This function is useful if you want to continue printing with a different paper
size.
Settings List
104
[Set Margin to 1/6 Inches]
Prints with a 1/6 inch margin on the top, bottom, left, and right edges of the page.
[Rotate Print Data 180 Degrees]
This function is useful when you want to print on tab paper, envelopes, etc. that need to be fed in a specic
direction.
[Line Renement]
Thickens thin lines when printing. This function is useful when printing small text and barcodes. This setting
may be disabled when the resolution is set to 600 dpi.
[Skip Blank Pages Mode]
Enables you to set whether pages that contain no print data are output as blank pages.
[Auto 1]
Skips blank pages. When performing 2-sided printing, page layout is given priority.
[Auto 2]
Skips blank pages. Because priority is given to skipping blank pages when performing 2-sided printing, the
page layout may be incorrect.
[Off]
Outputs blank pages.
[Face Up/Face Down]
Enables you to set whether a document will be output face up or face down.
[Printer Default]
Uses the printer setting.
[Face Down [Normal Output Order]]
Outputs the document with the printed surface face down in order starting from the rst page.
[Face Up [Reverse Output Order]]
When printing on one side, outputs the document with the printed surface page up in order from the rst
page. When printing on both sides, outputs the document with odd numbered pages face up in order from
the rst sheet.
[Output Order]
Sets the page order in which the document is output.
[Print on Back Sides]
Enables you to congure the layout of the reverse side of a sheet of paper when printing portrait print data on
one side of the sheet, and landscape print data on the other side.
[Rotate Pages for Layout]
Rotates the pages according to the orientation of the rst page and aligns the size of each page when
performing N on 1 printing or booklet printing of print data with pages whose orientation varies.
[Details] > [Rotate Pages for Layout Details] Dialog Box
Enables you to set a rotation direction.
[Auto]
Prints with the second page onward automatically rotated 90 degrees to the left or 90 degrees to the right
according to the orientation of the rst page.
[Right 90 Degrees]
Prints with pages whose orientation differs from the rst page rotated 90 degrees to the right.
[Left 90 Degrees]
Prints with pages whose orientation differs from the rst page rotated 90 degrees to the left.
[Secure Printing Function of Device]
Embeds restriction and tracking information into the print data as a dot pattern. This function is useful when
printing condential documents.
[Copy Set Numbering]
Settings List
105
Enables you to print a serial number in semi-transparent text on each copy when you are printing several copies
of a document. This function is useful when printing condential documents. The serial number is printed in
ve positions, on the upper left, upper right, lower left, lower right, and center of the page.
[Details] > [Copy Set Numbering Details] Dialog Box
Enables you to set the starting number.
[Image Renement]
Enables you to set whether to use smoothing processing, which adjusts the contours of text and diagrams to
make them smoother. If you select [Printer Default], the default setting of the device is used.
[Image Special Process]
If bold characters or centers of lines are missing from printed data, select [Level 1]. If this does not solve the
problem, select [Level 2].
[Special Print Adjustment A], [Special Print Adjustment B], [Special Print Adjustment C]
If lines appear in the printed output, you can adjust the print settings to compensate.
[Special Print Adjustment A] thins out the dots when printing. Try [Mode 1] rst.
[Special Print Adjustment B] strengthens toner xing. Try [Mode 1] rst.
[Special Print Adjustment C] reduces the print speed.
Using the [Special Print Adjustment A] function may result in thinner print density and rough print results.
[Special Smoothing Mode]
Smooths the contours of text, lines, and diagrams, and internal gradations.
[Printer Default]
Uses the default setting of the device.
[Mode 1]
Prints the edges of dark colored text, lines, and diagrams smoothly. Normally, you should print with the [Mode
1] setting.
[Mode 2]
Prints not only the edges, but also the interior halftones of diagrams smoothly. If the interior halftones of dark
colored large text and broad lines exhibit color shift and do not print smoothly with the [Mode 1] setting, try
printing with [Mode 2].
[Mode 3]
Prints dark colored text and lines smoothly on halftone backgrounds. If the interior halftones of dark colored
large text and broad lines exhibit color shift, and the edges of light colored text and lines are uneven and do
not print smoothly with the [Mode 1] setting, try printing with [Mode 3].
[Mode 4]
Prints the edges of a variety of objects smoothly. If the edges of light colored large text and broad lines are
uneven and do not print smoothly with the [Mode 1] setting, try printing with [Mode 4].
[Mode 5]
Prints images and halftone objects evenly. If the color bands of images, diagrams, and gradations are uneven,
and shading patterns to not print uniformly with the [Mode 1] setting, try printing with [Mode 5].
[Mode 6]
Prints entire objects smoothly. If there is halftone shift and unevenness throughout images with the [Mode 1]
setting, try printing with [Mode 6].
[Curl Correction]
If curling occurs, causing paper jams, use this function to alleviate the curling.
[Wrinkle Correction]
If wrinkling occurs, causing paper jams, use this function to alleviate the wrinkling. Try [Mode 1] rst.
Depending on the printer model, [Mode 1] corrects wrinkles when printing with envelopes, and [Mode 2] when
printing with paper whose edges are moist.
[EMF Spooling]
Spools print data in EMF format. When printing from an application, this shortens the time taken for the
application to send the data to the printer.
Settings List
106

When spooling in EMF format, problems such as the printed result differing from the image shown on the
monitor, and more time being required for printing than normal, may occur depending on the application being
used. If such problems occur, change the setting for [EMF Spooling] to [Off].
[Print Mixed Color/B&W Documents at High Speed]
This function reduces the print time when printing data that contains a mixture of color pages and grayscale
(black and white) pages.
[Print Last Page in 1-sided Mode When 2-sided Printing is Set]
When using 2-sided printing to output print data containing an odd number of pages, this function prints the
last page in 1-sided print mode to reduce the print time.
[Special Print Mode]
Enables you to set a special print mode for adjusting text and lines so that they print more clearly. This function
is useful for printing barcodes, text, and images in documents that have strong contrast.
[Barcode Adjustment Mode]
In cases where barcode printing is unsatisfactory, such as when a barcode on a printed article is unreadable,
this function adjusts the thickness of the printed lines.
[Special Print Mode [Plain Paper]]
Solves xing problems such as curling when printing with plain paper.
[Printing Start Position Settings]
Shifts the starting point for printing data in the long edge (upward) and short edge (rightward) directions. This
function is useful for adjusting margins when the widths of the top and bottom margins and right and left
margins differ, and for hiding the header information of faxes.
[Details] > [Printing Start Position Details] Dialog Box
Enables you to specify print starting positions.
[Increase Print Speed for Forms]
Use this function with the [Printer Default] setting.
[Restore Defaults]
Returns all the settings to their default values.
Related Topics
Common Settings for All Sheets(P. 92)
Booklet Printing(P. 35)
Saddle Stitched Booklet Printing(P. 38)
Perfect Binding(P. 41)
Driver settings cannot be set(P. 126)
Print results are unsatisfactory(P. 127)
Printing takes a long time(P. 129)
Settings List
107

[Paper Source] Sheet
You can set the paper type and paper source.
[Select by]
Selects whether to specify the paper to print on by paper source or by paper type.
[Paper Selection]
Species the paper source method depending on the page.
[Paper Source]
Species the paper to print on by paper source.
[Paper Type]
Species the paper to print on by paper type.
[Settings] > [Paper Type Settings] Dialog Box
Enables you to change the paper type. When acquiring the paper type information from the device, click
[Retrieve Paper Information].
[Insert Sheets Settings] > [Insert Sheets Settings] Dialog Box
Enables you to congure settings relating to inserted sheets.
[Setting List]
Displays the sheets to be inserted and their positions in a list.
[Delete]
Deletes the selected sheet insertion settings from [Setting List].
[Sheets to Insert]
Species the paper type of the sheets to be inserted.
[Paper Source]
Species the paper source of the sheets to be inserted.
[Print on]
Prints on the selected side(s) of sheets to be inserted.
[Insert]
Inserts sheets for separating the document into sections.
[Tab Paper]
Inserts tab paper into the document.
[Settings] > [Paper Type Settings] Dialog Box
Enables you to change the paper type of the tab paper.
[Tab Details] > [Tab Details] Dialog Box
Enables you to set the printing position on the tab papers.
Settings List
108

[Add]
Adds the sheet insertion settings to [Setting List].
[Original Paper Source]
Species the paper source for print data.
[Original Paper Type]
Species the paper type for print data.
[Cover Sheets]
Species the paper source or paper type used for cover sheets to insert between transparencies. When
selecting various paper types registered in the device, click [Settings].
[Transparencies]
Species the paper source or paper type used for transparencies. When selecting various paper types
registered in the device, click [Settings].
[Tab Details] > [Tab Details] Dialog Box
Enables you to set the printing position on the tab papers.
[Paper Source Information] > [Paper Source Information] Dialog Box
Displays information about the paper set in the paper sources. To acquire the paper source information from
the device, click [Retrieve Paper Source Information].
[Front/Back Cover Settings] > [Front/Back Cover Settings] Dialog Box
Inserts front and back covers. You can also set the paper source of the front and back covers and whether to
print on them.
[Print on the Other Side]
If you want to print on both sides of paper fed manually into the stack bypass or multi-purpose tray, select this
function to print on the other side of the paper.
[Restore Defaults]
Returns all the settings to their default values.
Related Topics
Common Settings for All Sheets(P. 92)
Inserting Sheets(P. 46)
Inserting Tab Paper(P. 47)
Printing on Tab Paper(P. 49)
Adding Cover Sheets(P. 50)
Settings List
109

[Quality] Sheet
You can set detailed print quality settings.
[Objective]
Enables you to set a print quality mode that matches the purpose of the print data by simply selecting a setting.
[Advanced Settings] > [Advanced Settings] Dialog Box
Enables you to set print quality details such as resolution, gradation, toner amount, etc.
[Rendering Rate]
Sets the image rasterizing method for print data.
[1 BPP [Enhanced]]
Expresses gradation as halftones and prints at high speed. Prints characters and thin lines in black.
[24 BPP]
Takes longer to print than [1 BPP [Enhanced]], but prints higher quality.
[Resolution]
Sets the print resolution.
[Gradation]
Sets the gradation method. [High 2] uses ner gradations than [High 1] to smooth gradations.
[Halftones]
Sets dither patterns for representing halftones (areas between dark areas and light areas).
[Printer Default]
Uses the settings of the device.
[Resolution]
Gives priority to resolution and prints contours smoothly.
[Gradation]
Gives priority to gradation and prints gradations smoothly.
[Error Diffusion]
Prints small characters and thin lines nely.
[Pattern 1] to [Pattern 7]
Applies the following halftone processing settings independently to text, graphic, and image data.
Where there are 7 patterns:
Text Graphics Images
Pattern 1 Error Diffusion Error Diffusion Resolution
Pattern 2 Error Diffusion Error Diffusion Gradation
Pattern 3 Error Diffusion Resolution Resolution
Pattern 4 Error Diffusion Gradation Gradation
Pattern 5 Resolution Resolution Gradation
Pattern 6 Resolution Gradation Gradation
Pattern 7 Error Diffusion Resolution Gradation
Where there are 6 patterns:
Settings List
110

Text Graphics Images
Pattern 1 Resolution Resolution Gradation
Pattern 2 Resolution Gradation Gradation
Pattern 3 Resolution Gradation Resolution
Pattern 4 Gradation Resolution Resolution
Pattern 5 Gradation Resolution Gradation
Pattern 6 Gradation Gradation Resolution
[Retrieve Calibration Information When Printing]
Obtains calibration information from the device and adjusts colors automatically.
[Toner Save]
Thins out the print data to save toner.
[Toner Density]
Adjusts the toner density.
[Details] > [Toner Density Details] Dialog Box
Enables you to adjust the density of each color.
[Advanced Smoothing]
Creates smooths gradations. [Smooth 2] performs stronger smoothing processing than [Smooth 1].
[Toner Volume Correction]
Adjusts the amount of toner to match the content of the print data. [Gradation Priority] uses the optimum
amount of toner for print data that includes large amounts of graphics and CG gradations. [Text Priority] uses
the optimum amount of toner for print data that contains mainly text.
[Line Control]
Improves reproduction of text and lines. [Resolution Priority] gives priority to resolution. [Gradation Priority]
gives priority to gradation.
[Sharpness]
Adjusts the sharpness of the contours of images.
[Sharpness (Photo)]
Strengthens the contours of images.
[Use Printer Fonts]
Use the TrueType fonts that reside within the device.
[TrueType Mode]
Sets the method used to print TrueType fonts. [Download as TrueType] sends TrueType fonts directly to the
device where they are rasterized. [Download as Bit Image] rasterizes all TrueType fonts automatically and sends
them as bitmapped data to the device.
[Dither Image Data on Device]
Performs dithering of image data at the device.
[Density Fine Adjustment]
Adjusts the print density for small-sized text and thin lines. This function is useful for correcting "cracks" in text
and lines.
[Gray Compensation]
Prints black and gray data reliably in black and gray.
[Line Control [Gray Compensation]]
Improves reproduction of text and lines.
Settings List
111
[Gradation Smoothing]
Prints transitions between colors in gradations smoothly. [Smooth 2] performs a stronger smoothing process
than [Smooth 1].
[Image Compression]
Adjusts the print data compression ratio when sending it to the device, and prints with priority given to either
image quality or print speed.
[Image Compression Optimization]
Uses an optimization method that switches between irreversible and reversible, or uses a uniform compression
method without optimization. If the image is compressed with optimization, JPEG block noise is suppressed.
[Compression Processing for Data Transfer]
Switches between giving priority to image quality and giving priority to speed when compressing and
transferring image data.
[Width Adjustment]
Adjusts the thickness of specic objects such as text and lines.
[Trapping]
Performs an overlapping process at the borders between text or graphics and the background to prevent white
lines around the edge portions of the text or graphics.
[Details] > [Trapping Details] Dialog Box
Enables you to set the trapping width and density.
[Adjust Toner Volume Used for Color Printing]
Adjusts the amount of toner to prevent too much toner being used when color printing. [Level 1] slightly
reduces the amount of toner in areas of strong color. [Level 2] reduces the amount of toner overall.
[Use Driver Grayscale Conversion When B&W Printing]
Gives the driver grayscale conversion priority over the conversion of the application when black-and-white
printing.
[CanoFine]
Adjusts the contrast and color balance of images to print distinct images.
[Details] > [CanoFine Details] Dialog Box
Enables you to set the print processing method using the [CanoFine] function.
[Color Mode]
Switches between printing in color or in black-and-white. To detect automatically whether each page should be
printed in color or in black-and-white, select [Auto [Color/B&W]].
[Manual Color Settings]/[Manual Grayscale Settings] > [Color Settings]/[Grayscale Settings]
Dialog Box
Enables you to adjust color, brightness, contrast, and color matching.
[Color Adjustment]/[Grayscale Adjustment] Sheet
[Original]/[Preview]
Enables you to check the adjusted image.
[Increase (Color)]
Adjusts the color. Click and drag the image toward the color(s) you want to strengthen.
[Brightness]
Adjusts the brightness. Use the side bar to lighten or darken the image.
[Contrast]
Adjusts the contrast. Use the side bar to increase or decrease the contrast of the image.
Settings List
112

[Restore Defaults]
Returns all the settings to their default values.
[Matching] Sheet
[Matching Mode]
Sets whether to perform color matching on the device side or the driver side, or whether color matching is not
performed by the driver.
[Application Color Matching Priority]
Gives priority over the application settings when performing matching processing.
[Matching Method]
Sets what factor is prioritized when matching.
[Monitor Prole]
Enables you to select the setting suitable for your monitor when [Device Matching Mode] is selected for
[Matching Mode]. If several gamma values are provided for one option, to obtain better results select the
higher gamma value if the printed image is lighter than that of the monitor.
[Gamma]
Enables you to adjust gamma when [Gamma Adjustment] is selected for [Matching Mode].
[Add-in Information]
Displays information concerning add-in modules (expanded functions) added to the driver.
[About]
Displays the version of the driver.
[Restore Defaults]
Returns all the settings to their default values.
Related Topics
Common Settings for All Sheets(P. 92)
Print results are too dark or too bright(P. 130)
Settings List
113
[Device Settings] Sheet
You can congure device option settings and administrator settings.
[Device Information]
Displays whether the device status is set automatically or manually. When acquiring the device information and
applying it to the settings in the [Device Settings] sheet, click [ ] (Retrieve Device Status Information).
NOTE
●If you select [On] from [Other Settings] > [Change Conguration Prole When Retrieving Device Information]
in the [Detailed Settings] dialog box, the conguration prole is automatically changed according to the
retrieved device information.
[Cong. Prole]
Displays the applied conguration prole.
[Change] > [Change Conguration Prole] Dialog Box
Enables you to change or import a conguration prole.
[Select Conguration Prole]
[Select Conguration Prole Suitable for Your Device Automatically]
Sets the conguration prole suitable for the printer model you are using.
[Select Manually]
Enables you to manually set a conguration prole.
[] (Import Conguration Prole)
Imports an exported conguration prole le (*.typ).
[ ] (Delete)
Deletes the imported conguration prole selected from [Conguration Prole].
[Retrieve Device Information]
Acquires the device information and applies it to the settings in the [Device Settings] sheet.
[ ] (Export) > [Export Conguration Prole] Dialog Box
Enables you to export and save the current settings in the [Device Settings] sheet as a conguration prole le
(*.typ).
[Device Type]
Sets the type of device.
[Finishing Settings]
Sets the nishing functions of the device.
Settings List
114
[Paper Source Settings]
Displays the paper source options attached to the device.
[Form to Tray Assignment] > [Form to Tray Assignment] Dialog Box
Enables you to set the paper size and paper type set in each paper source.
[Paper Size Settings] > [Paper Size Settings] Dialog Box
Enables you to set paper sizes to be used.
[Paper Source] > [Paper Source] Dialog Box
Enables you to set the paper source options attached to the device.
[Output Settings]
Displays the paper output options attached to the device.
[Paper Output Settings] > [Paper Output Settings] Dialog Box
Enables you to set the paper output options attached to the device.
[Other Settings]
Enables you to congure administrator settings relating to the device.
[Spooling at Host]
Sets whether processing of the print data is performed at the host (computer) or at the device. If you select
[Auto], processing is performed at the device when it is possible using only the device functions, increasing the
print speed.
[Set User Information]
Enables you to set a user name to be used for print jobs and the PIN used in secured printing.
[Settings] > [User Information Settings] Dialog Box
[User Name]
Sets a user name to be used for print jobs.
[PIN for Secure Print]
Sets a PIN for secured printing.
[Always Conrm User Information When Performing Secure Print]
Displays the [Conrm PIN] dialog box for conrming or setting a name for the print data, user name, and PIN
when performing secured printing.
[Conrm User Name When Printing]
Displays the [Conrm User Name] dialog box for conrming or setting a user name when printing.
[Display Previously Entered Information When Conrming]
Displays conrmation dialog boxes with the user name and PIN you entered last time automatically entered.
[User Name Management]/[Default Value Settings] > [User Name Management]/[Default Value Settings]
Dialog Box
Enables you to congure the default settings for the user name and PIN.
[Name to Set for User Name]
Enables you to specify the Windows logon name, computer name, or any desired name for the user name.
[PIN for Secure Print]
Set a PIN for secured printing.
[Always Conrm User Information When Performing Secure Print]
Settings List
115
Displays the [Conrm PIN] dialog box for conrming or setting a name for the print data, user name, and PIN
when performing secured printing.
[Conrm User Name When Printing]
Displays the [Conrm User Name] dialog box for conrming or setting a user name when printing.
[Do Not Allow User Name Changes]
Prohibits changes to the user name in the [User Information Settings] dialog box.
[Fix [User Information Settings]-[Always Conrm User Information When Performing Secure Print]
Setting]
Fixes the [Always Conrm User Information When Performing Secure Print] setting to the setting set in the
[Default Value Settings] dialog box.
[Fix [User Information Settings]-[Conrm User Name When Printing] Setting]
Fixes the [Conrm User Name When Printing] setting to the setting set in the [User Name Management] or
[Default Value Settings] dialog box.
[User Management]
Sets the type of authentication function to use.
[Settings] > [Department ID/PIN Settings] Dialog Box
Enables you to congure the detailed settings when you select [Department ID Management] from [User
Management].
[Allow PIN Setting]
Enables you to set the PIN in this dialog box. In a shared printer environment, deselect this item at the server if
you want to disable PIN or password settings at the client computers.
[Department ID]
Sets the department ID which has been set at the device.
[PIN]
Sets a PIN for the department ID management. If the PIN has not been set at the device, leave this box blank.
[Verify]
Veries whether the entered department ID and PIN match those set at the device.
[Conrm Department ID/PIN When Printing]
Displays the [Conrm Department ID/PIN] dialog box for conrming or setting the department ID and the PIN
when printing.
[Do Not Use Department ID Management When B&W Printing]
Enables you to print without applying department ID management when printing in black and white.
[Authenticate Department ID/PIN at Device]
Performs authentication of the department ID and PIN at the device.
[Settings] > [User Authentication Settings] Dialog Box
Enables you to congure the detailed settings when you select [User Authentication] from [User Management].
[Allow Password Settings]
Enables you to set a password. If you do not set a password here, input the password when printing.
[User Name]
Sets a user name to be used for user authentication.
[Password]
Sets a password for user authentication. If the password has not been set at the device, leave this box blank.
[Verify]
Veries whether the entered password matches that set at the device.
[Conrm Authentication Information When Printing]
Settings List
116

Displays the [Conrm User Name/Password] dialog box for conrming or setting authentication information
when printing.
[Perform Authentication at Device]
Performs the authentication process at the device.
[Secure Printing Function of Device]
Embeds restriction and tracking information into the print data as a dot pattern when using the job lock
extension kit.
[About]
Displays the version of the driver.
[Language Settings] > [Language Settings] Dialog Box
Enables you to switch the display language.
[Add-in Information]
Displays information concerning add-in modules (expanded functions) added to the driver.
[Function] > [Device Function Settings] Dialog Box
Displays the controller function ID and function version of the device. You can also set a name for the device.
[Details] > [Detailed Settings] Dialog Box
Enables you to congure the settings in the print settings screen of the driver. Items with [ ] are set
automatically by the acquire device information function. Items with [ ] must be set manually.
IMPORTANT
●If you set a paper source that is not installed in the device, paper will be supplied from the device's priority
paper source.
●If the paper source you have specied and the paper size/type do not match, an error will occur.
●If you specify [Finishing Settings] (2-sided printing, stapling, etc.) functions for a device that does not have
those functions, printing will be performed without those functions. For example, if you specify 2-sided
printing for a device that does not support 2-sided printing, the data will be printed on one side of the paper.
●If you select [Store] from [Output Method] when printing from a device that does not support box storage,
the data will be printed normally. If an error is displayed on the touch panel display of the device and the
device goes oine, the data is printed when the device goes online again.
●If you set the department ID management function or the user authentication function when printing for a
device that does not have those functions, an error will occur.
Related Topics
Setting Device Information(P. 67)
Device Functions Settings(P. 72)
Paper Sources and Output Destinations Settings(P. 73)
Importing a Conguration Prole(P. 84)
Exporting a Conguration Prole(P. 82)
Settings List
117


[Prole] Sheet
You can edit, import, and export proles. If you edit proles on the server side in a shared printer environment,
the changes are reected in the client proles.
[Prole List]
Displays registered proles as a list. You can change the order by selecting a prole and clicking [ ] (Move
Up) or [ ] (Move Down).
NOTE
●Proles with a red dot ( ) next to them are pre-registered proles and cannot be edited or deleted.
[View Settings]
Displays the content of the selected prole as a list.
[Add]/[Edit] > [Add/Edit Prole] Dialog Box
Enables you to add a new prole or edit the settings of a user-registered prole. Set [Name] and [Icon]. Enter a
comment in [Comment] if required. Switch sheets and congure relevant settings. If you want to check the
current settings in a list, click [View Settings].
[Edit]
Enables you to edit the settings of a user-registered prole.
[Delete]
Deletes the selected prole.
[Name], [Comment]
Displays the name and comment of the selected prole. You can edit the name and comment of user-registered
proles.
[Import]
Imports a prole saved as a "*.cfg" le and adds it to [Prole List].
[Export]
Exports the prole selected in [Prole List] and saves it as a "*.cfg" le.
[Dene Document Property]
Allows settings in the print settings screen of the driver. This function is useful when restricting usage of the
print settings in client computers in a shared printer environment.
Settings List
119

If you deselect the following settings at the server, the settings of all client computers are xed at those
congured at the server.
[Allow Prole Selection]
Enables you to select proles in the print settings screen.
[Allow Editing of Settings]
Enables you to congure print settings other than selecting proles in the print settings screen. This setting
can be selected when [Allow Prole Selection] is selected.
Related Topics
Driver settings cannot be set(P. 126)
Settings List
120
Canon PageComposer
You can combine multiple les created with different applications into one le for printing.
The Canon PageComposer main screen opens when you print using the [Edit and Preview] function of the
driver.
[File] Menu
[Print]/[ ] (Print)
Prints the selected le(s).
[Print Sample]/[ ] (Print Sample)
Performs proof printing of the selected le(s).
[Print Preview]/[ ] (Print Preview)
Displays a print preview of the selected le.
[Exit]
Closes the Canon PageComposer main screen.
[Edit] Menu
[Delete]/[ ] (Delete Document)
Deletes the selected le(s).
[Duplicate]/[ ] (Duplicate Document)
Duplicates the selected le(s).
[Combine]/[ ] (Combine Documents) > [Combine] Dialog Box
Combines the selected multiple les into one, and enables you to specify a name and congure the settings of
the combined le.
Displays the current settings for each page as thumbnail images.
[Document Name]
Settings List
121
Sets the name of the combined le.
[Delete]
Deletes the selected page.
[Print Preview]
Displays a print preview of the selected page.
[Document List] Sheet
Changes the order of les in the combined le or deletes a le from the combined le.
[Print Settings] Sheet
Changes the print settings of the combined le. When unifying the output size settings, select [Output Size
Consistency]. When unifying the page layout settings, select [Layout Consistency].
If you want to specify detailed settings in the print settings screen of the driver, click [Details].
[Separate]/[ ] (Separate Documents)
Separates the selected le you have combined.
[Change Print Settings]/[ ] (Change Print Settings) > [Change Print Settings] Dialog
Box
Changes the name and settings of the selected le.
Displays the current settings for each page as thumbnail images.
[Document Name]
Sets the name of the le.
[Delete]
Deletes the selected page.
[Print Preview]
Displays a print preview of the selected page.
[Document List] Sheet
Changes the order of les when combining multiple les or deletes a le from the combined le.
[Print Settings] Sheet
Changes the print settings of the le.
[Copies]
Species the number of copies to be printed.
[Print Style]
Species a method for outputting print data.
[Staple]
Outputs the pages stapled together.
[Saddle Stitch]
Prints a booklet folded in half and stapled in the middle.
[Output Size Consistency]
Enables you to use the paper of the same size selected from the drop-down list box for a combined le
consisting of les with different page sizes.
[Layout Consistency]
Settings List
122
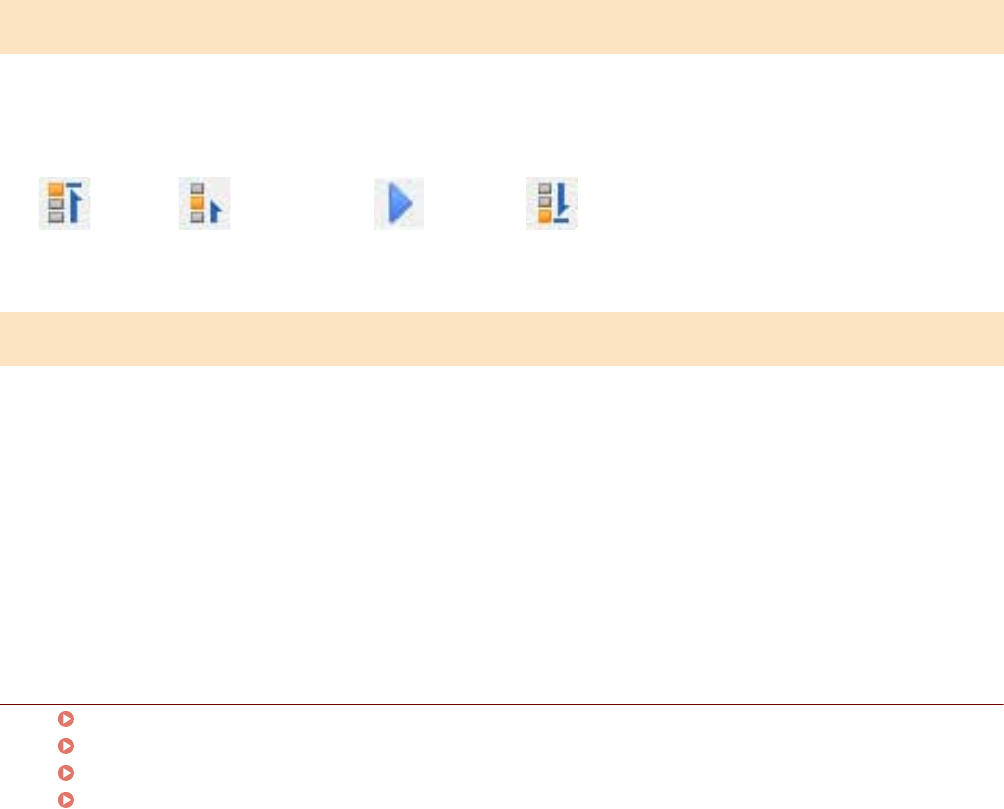
Enables you to set a single layout selected from the drop-down list box for a combined le consisting of les
with different layout.
[Page Order]
Species the page order to print.
[Print Next Document from]
Enables you to set where to start printing the next le from when combining les.
[Details]
Enables you to specify detailed settings in the print settings screen of the driver.
[Select All]
Selects all les in the list.
[Move to] Menu
[Top]/[Previous]/[Next]/[Last]
[ ] (Top)/[ ] (Previous)/[ ] (Next)/[ ] (Last)
Allows you to change the order by moving the selected le(s).
[Help] Menu
[Help]
Displays the online help.
[About]
Displays the version of Canon PageComposer.
Related Topics
About the [Edit and Preview] Function(P. 53)
Printing Files Together(P. 54)
Checking the Print Preview(P. 56)
Changing the Print Settings of the Combined File(P. 58)
Settings List
123
Troubleshooting
Troubleshooting ............................................................................................................................................. 125
Driver settings cannot be set ........................................................................................................................... 126
Print results are unsatisfactory ....................................................................................................................... 127
Printing takes a long time ................................................................................................................................ 129
Print results are too dark or too bright ........................................................................................................... 130
Overlay printing will not execute ..................................................................................................................... 131
Cannot use the acquire device information function or authentication function ........................................ 132
Troubleshooting
124

Troubleshooting
This explains solutions to common problems.
Driver settings cannot be set(P. 126)
Print results are unsatisfactory(P. 127)
Printing takes a long time(P. 129)
Print results are too dark or too bright(P. 130)
Overlay printing will not execute(P. 131)
Cannot use the acquire device information function or authentication function(P. 132)
Troubleshooting
125

Driver settings cannot be set
Page size, orientation, paper selection settings are not valid
Cause
Depending on the application you are using, the settings corresponding to these in the application are
given priority over the driver settings.
Remedy
Congure these settings in the application.
The [Device Settings] and [Prole] sheet can be displayed, but settings are
unavailable
Cause
Your account does not have full control permission for the printer.
Remedy
Logon to the computer as a member of Administrators. Contact your system administrator for further
information.
Related Topics
Printing from a Computer(P. 17)
Troubleshooting
126

Print results are unsatisfactory
Page layout is not correct
If the printing area on the page is not positioned correctly, or if part of the printed area is missing, check the
following.
Cause 1.
Print data is not set in the printable area.
Remedy
Conrm the printable area of the device, and correct the print data in the application you are using.
Cause 2.
The [Output Size] settings in the [Basic Settings] or [Page Setup] sheet does not match the actual size of
the paper loaded in the device.
Remedy
Conrm that the [Output Size] setting matches the size of the paper in the device.
Cause 3.
The magnication ratio is not set properly for the print data.
Remedy
Change the settings in the [Basic Settings] or [Page Setup] sheet > [Manual Scaling] > [Scaling].
Cause 4.
The gutter setting is too large, so that there is not enough space on the page for the printout.
Remedy
Change the settings in the [Finishing] sheet > [Gutter].
Part of the printout does not match what you see on the screen
Cause
The application uses EMF format data which cannot be processed by page printers.
Remedy
In the [Finishing] sheet, click [Advanced Settings], and then select [On] from [EMF Spooling].
Troubleshooting
127


Print results are too dark or too bright
Cause
The colors on the computer monitor and in the print results differ because their color representation
methods differ.
Remedy
Change the color settings according to the following procedure.
(1) Display the [Quality] sheet.
(2) Select [Manual Color Settings] or [Manual Grayscale Settings] → click [Color Settings]/[Grayscale Settings].
(3) In the [Color Adjustment]/[Grayscale Adjustment] sheet, adjust the brightness with the slide bar.
Related Topics
[Quality] Sheet(P. 110)
Troubleshooting
130

Overlay printing will not execute
Cannot perform overlay printing
Cause
The resolution of the print data differs from that of the form le.
Remedy
Set the same resolution as the form le in the [Quality] sheet > [Advanced Settings] > [Resolution].
Cannot use previously stored overlay form
Cause
The overlay print settings are not congured correctly.
Remedy
Check the settings according to the following procedure.
(1) Display the [Page Setup] sheet.
(2) Click [Page Options].
(3) In the [Page Options] sheet, display the [Overlay] sheet.
(4) Conrm that [Processing Method] > [Use Overlay Printing] is selected.
Related Topics
[Page Setup] Sheet(P. 98)
[Quality] Sheet(P. 110)
Troubleshooting
131

Cannot use the acquire device information function or
authentication function
If you cannot acquire the device information, or cannot use the department ID management function or the
user authentication function in the [Device Settings] sheet, check the following.
Cause 1.
The device is turned off, or the cable is not plugged in properly.
Remedy
Check the status of the device.
Cause 2.
The settings for your connection environment have not been congured correctly.
Remedy
Conrm the printable area of the device, and correct the print data in the application you are using.
In a print server environment
●Install the "Canon Driver Information Assist Service" in the server computer using the driver installer.
●Install TCP/IP as a protocol in your environment from the CD-ROM for the operating system you are using.
When using a USB connection or using a port connection environment in which you cannot use these
functions
Use another connection environment such as TCP/IP network connection, etc.
You cannot use these functions with the following port connection environments:
- An environment in which computers are directly connected to the printer using SMB.
- An environment in which [Enable printer pooling] is selected in the [Ports] sheet of the printer properties
screen.
- An environment in which computers are connected to the printer using Web Services on Devices (WSD)
ports.
Cause 3.
The name of the device is too long.
Remedy
Conrm that the number of characters in the name of the printer do not exceed the following values. If they
do, change the name in the [General] or [Sharing] sheet of the printer properties screen.
- Name to share the printer with: 260 characters or less.
- Printer name: 209 characters or less.
Troubleshooting
132
This Font Software is licensed under the SIL Open Font License,
Version 1.1.
This license is copied below, and is also available with a FAQ at:
http://scripts.sil.org/OFL
-----------------------------------------------------------
SIL OPEN FONT LICENSE Version 1.1 - 26 February 2007
-----------------------------------------------------------
PREAMBLE
The goals of the Open Font License (OFL) are to stimulate worldwide
development of collaborative font projects, to support the font
creation efforts of academic and linguistic communities, and to
provide a free and open framework in which fonts may be shared and
improved in partnership with others.
The OFL allows the licensed fonts to be used, studied, modied and
redistributed freely as long as they are not sold by themselves. The
fonts, including any derivative works, can be bundled, embedded,
redistributed and/or sold with any software provided that any reserved
names are not used by derivative works. The fonts and derivatives,
however, cannot be released under any other type of license. The
requirement for fonts to remain under this license does not apply to
any document created using the fonts or their derivatives.
DEFINITIONS
"Font Software" refers to the set of les released by the Copyright
Holder(s) under this license and clearly marked as such. This may
include source les, build scripts and documentation.
"Reserved Font Name" refers to any names specied as such after the
copyright statement(s).
"Original Version" refers to the collection of Font Software
components as distributed by the Copyright Holder(s).
"Modied Version" refers to any derivative made by adding to,
deleting, or substituting -- in part or in whole -- any of the
components of the Original Version, by changing formats or by porting
the Font Software to a new environment.
"Author" refers to any designer, engineer, programmer, technical
writer or other person who contributed to the Font Software.
PERMISSION & CONDITIONS
Permission is hereby granted, free of charge, to any person obtaining
a copy of the Font Software, to use, study, copy, merge, embed,
modify, redistribute, and sell modied and unmodied copies of the
Font Software, subject to the following conditions:
SIL OPEN FONT LICENSE
133
1) Neither the Font Software nor any of its individual components, in
Original or Modied Versions, may be sold by itself.
2) Original or Modied Versions of the Font Software may be bundled,
redistributed and/or sold with any software, provided that each copy
contains the above copyright notice and this license. These can be
included either as stand-alone text les, human-readable headers or
in the appropriate machine-readable metadata elds within text or
binary les as long as those elds can be easily viewed by the user.
3) No Modied Version of the Font Software may use the Reserved Font
Name(s) unless explicit written permission is granted by the
corresponding Copyright Holder. This restriction only applies to the
primary font name as presented to the users.
4) The name(s) of the Copyright Holder(s) or the Author(s) of the Font
Software shall not be used to promote, endorse or advertise any
Modied Version, except to acknowledge the contribution(s) of the
Copyright Holder(s) and the Author(s) or with their explicit written
permission.
5) The Font Software, modied or unmodied, in part or in whole,
must be distributed entirely under this license, and must not be
distributed under any other license. The requirement for fonts to
remain under this license does not apply to any document created using
the Font Software.
TERMINATION
This license becomes null and void if any of the above conditions are
not met.
DISCLAIMER
THE FONT SOFTWARE IS PROVIDED "AS IS", WITHOUT WARRANTY OF ANY KIND,
EXPRESS OR IMPLIED, INCLUDING BUT NOT LIMITED TO ANY WARRANTIES OF
MERCHANTABILITY, FITNESS FOR A PARTICULAR PURPOSE AND NONINFRINGEMENT
OF COPYRIGHT, PATENT, TRADEMARK, OR OTHER RIGHT. IN NO EVENT SHALL THE
COPYRIGHT HOLDER BE LIABLE FOR ANY CLAIM, DAMAGES OR OTHER LIABILITY,
INCLUDING ANY GENERAL, SPECIAL, INDIRECT, INCIDENTAL, OR CONSEQUENTIAL
DAMAGES, WHETHER IN AN ACTION OF CONTRACT, TORT OR OTHERWISE, ARISING
FROM, OUT OF THE USE OR INABILITY TO USE THE FONT SOFTWARE OR FROM
OTHER DEALINGS IN THE FONT SOFTWARE.
SIL OPEN FONT LICENSE
134
