Commoduser Gentran_Communications_Module_User_Guide Gentran Communications Module User Guide
User Manual: Gentran_Communications_Module_User_Guide user guide pdf - FTP File Search (14/20)
Open the PDF directly: View PDF ![]() .
.
Page Count: 678 [warning: Documents this large are best viewed by clicking the View PDF Link!]
- Table of Contents
- 1 Overview
- 2 System Essentials
- 3 Environment Control
- 4 Using Communications
- In this Chapter
- What Is Communications?
- What Does the Communications Subsystem Do?
- Take a Closer Look at Communications
- Panel Quick Reference
- Access the Communications Subsystem
- Communications Setup
- Copy Profiles and Scripts
- Operations and Management of Communications
- Use the ezCOMM Command
- Reports
- Common Questions
- 5 Using Scripts
- 6 Bisync Communications Support
- 7 SNA Communications Support
- 8 SNA LU6.2 Communications Support
- 9 Asynchronous Communication Support
- Overview of Asynchronous Data Transmission
- Asynchronous Protocols
- Modem Considerations
- Error Detection and Correction
- Clear To Send
- AT or V.25bis Command Set
- Default Modem Strings in the Profile
- Modem Initialization Commands
- Modem Dialing Commands
- Receive Calls
- Flow Control
- Translation
- Translation Examples
- Scripting Considerations
- Basic Scripting Concepts
- Supported Script Transaction Types and Actions
- Use of ETX, EOT, and End-of-Cmd Characters
- Use of the Command Field
- Explanation of Script Indicators
- Asynchronous Extended Script Logic
- “Create Your Own” Protocol
- Print Control
- Dynamic Scripting
- Remote Command Support
- Transparent Data
- Evoke Considerations
- Asynchronous (ASC) Communication Examples
- Asynchronous (XAS) via X.25 Examples
- 10 XMODEM File Transfer Support
- 11 OFTP Communication Support
- 12 FTP Communication Support
- 13 Using Line Pools
- 14 MQSeries Interface
- 15 Gentran IFS Gateway
- 16 Job Scheduler
- 17 System Configuration File
- 18 Gentran File Tracking
- In this Chapter
- What is Gentran File Tracking?
- Panel Quick Reference
- Access the Gentran File Tracking Subsystem
- Configure Gentran File Tracking
- Work with Gentran File Tracking
- Print the Gentran File Tracking Report
- Purge the File Tracking Entries (PRGFILETRK)
- Retrieve the Gentran File Tracking Entries (RTVFILETRK)
- Reports
- A Modems: Configuration and Troubleshooting
- B Translating between ASCII and EBCDIC
- Glossary
- Index

Gentran:Server® for iSeries®
Communications Module
User Guide
Release 3.5
Sterling Commerce (Mid America), Inc.
4600 Lakehurst Court Dublin, OH 43016-2000 * 614/793-4000
© Copyright 1988–2008—Sterling Commerce, Inc.
0281-350-USER01-0000

April 2008
Gentran:Server for iSeries
© Copyright 1988 – 2008
Sterling Commerce, Inc.
ALL RIGHTS RESERVED
Sterling Commerce Software
Trade Secret Notice
THE GENTRAN:SERVER FOR ISERIES SOFTWARE (“STERLING COMMERCE
SOFTWARE”) IS THE CONFIDENTIAL AND TRADE SECRET PROPERTY OF STERLING
COMMERCE, INC., ITS AFFILIATED COMPANIES OR ITS OR THEIR LICENSORS, AND IS
PROVIDED UNDER THE TERMS OF A LICENSE AGREEMENT. NO DUPLICATION OR
DISCLOSURE WITHOUT PRIOR WRITTEN PERMISSION. RESTRICTED RIGHTS.
This documentation, the Sterling Commerce Software it describes, and the information and know-how they contain
constitute the proprietary, confidential and valuable trade secret information of Sterling Commerce, Inc., its affiliated
companies or its or their licensors, and may not be used for any unauthorized purpose, or disclosed to others without
the prior written permission of the applicable Sterling Commerce entity. This documentation and the Sterling
Commerce Software that it describes have been provided pursuant to a license agreement that contains prohibitions
against and/or restrictions on their copying, modification and use. Duplication, in whole or in part, if and when
permitted, shall bear this notice and the Sterling Commerce, Inc. copyright notice.
As and when provided to any governmental entity, government contractor or subcontractor subject to the FARs, this
documentation is provided with RESTRICTED RIGHTS under Title 48 CFR 52.227-19. Further, as and when provided
to any governmental entity, government contractor or subcontractor subject to DFARs, this documentation and the
Sterling Commerce Software it describes are provided pursuant to the customary Sterling Commerce license, as
described in Title 48 CFR 227-7202 with respect to commercial software and commercial software documentation.
These terms of use shall be governed by the laws of the State of Ohio, USA, without regard to its conflict of laws
provisions. If you are accessing the Sterling Commerce Software under an executed agreement, then nothing in these
terms and conditions supersedes or modifies the executed agreement.
Product names mentioned herein may be trademarks and/or registered trademarks of their respective companies.
GENTRAN and GENTRAN:Server are registered trademarks of Sterling Commerce, Inc.
Third Party Software:
Portions of the Sterling Commerce Software may include products, or may be distributed on the same storage media
with products, (“Third Party Software”) offered by third parties (“Third Party Licensors”).
Warranty Disclaimer
This documentation and the Sterling Commerce Software which it describes are licensed either "AS IS" or with a
limited warranty, as set forth in the Sterling Commerce license agreement. Other than any limited warranties provided,
NO OTHER WARRANTY IS EXPRESSED AND NONE SHALL BE IMPLIED, INCLUDING THE WARRANTIES OF
MERCHANTABILITY AND FITNESS FOR USE OR FOR A PARTICULAR PURPOSE. The applicable Sterling
Commerce entity reserves the right to revise this publication from time to time and to make changes in the content
hereof without the obligation to notify any person or entity of such revisions or changes.
The Third Party Software is provided 'AS IS' WITHOUT ANY WARRANTY AND ANY EXPRESSED OR IMPLIED
WARRANTIES, INCLUDING BUT NOT LIMITED TO, THE IMPLIED WARRANTIES OF MERCHANTABILITY, AND
FITNESS FOR A PARTICULAR PURPOSE ARE DISCLAIMED. FURTHER, IF YOU ARE LOCATED OR ACCESSING
THIS SOFTWARE IN THE UNITED STATES, ANY EXPRESS OR IMPLIED WARRANTY REGARDING TITLE OR
NON-INFRINGEMENT ARE DISCLAIMED.

Gentran:Server for iSeries Communications Module Release 3.5 User Guide i
Table of Contents
Chapter 1 Overview ..........................................................................................1-1
How is the Documentation Organized?.................................................................... 1-1
In this Book .............................................................................................................. 1-1
What is in Each Chapter? ......................................................................................... 1-2
Other Gentran:Server for iSeries Communications Module Guides........................ 1-4
Chapter 2 System Essentials ...........................................................................2-1
In this Chapter .......................................................................................................... 2-1
Take a Closer Look at the Communications Module............................................... 2-3
Gentran:Server Panels .............................................................................................. 2-5
Getting Help ........................................................................................................... 2-23
Print Reports in Gentran:Server ............................................................................. 2-29
Product Support and Remote Maintenance ............................................................ 2-31
Chapter 3 Environment Control .......................................................................3-1
In this Chapter .......................................................................................................... 3-1
What is Environment Control?................................................................................. 3-1
What Does the Environment Control Subsystem Do? ............................................. 3-2
Panel Quick Reference ............................................................................................. 3-2
Environment Control Panels..................................................................................... 3-3
Reports.................................................................................................................... 3-14
Common Questions ................................................................................................ 3-17
Chapter 4 Using Communications ..................................................................4-1
In this Chapter .......................................................................................................... 4-1
What Is Communications? ....................................................................................... 4-2
What Does the Communications Subsystem Do?.................................................... 4-2
Take a Closer Look at Communications .................................................................. 4-3
Panel Quick Reference ............................................................................................. 4-5
Access the Communications Subsystem ................................................................ 4-12
Communications Setup........................................................................................... 4-15
Copy Profiles and Scripts ....................................................................................... 4-58
Operations and Management of Communications ................................................. 4-64
Use the ezCOMM Command ............................................................................... 4-123
Reports.................................................................................................................. 4-126
Common Questions .............................................................................................. 4-129

Table of Contents
ii Gentran:Server for iSeries Communications Module Release 3.5 User Guide
Chapter 5 Using Scripts ...................................................................................5-1
Work with Session Control Scripts .......................................................................... 5-1
Script Decision Tables............................................................................................ 5-11
Extended Script Logic ............................................................................................ 5-24
Remote Command Support .................................................................................... 5-29
What is Dynamic Scripting?................................................................................... 5-41
Sync Extended Script Logic ................................................................................... 5-45
Chapter 6 Bisync Communications Support ..................................................6-1
Introduction .............................................................................................................. 6-1
Bisync Configuration................................................................................................ 6-2
BSC Tables............................................................................................................. 6-13
BSC Print Carriage Control Conversion ............................................................... 6-16
Requirements Checklist.......................................................................................... 6-17
Chapter 7 SNA Communications Support ......................................................7-1
Introduction .............................................................................................................. 7-1
SNA/LU0 Configuration .......................................................................................... 7-2
SNA/LU0 Tables .................................................................................................... 7-11
Remote Program Start Request .............................................................................. 7-14
Connect:Mailbox/Supertracs .................................................................................. 7-21
Communicate with JES2 SNA ............................................................................... 7-29
Chapter 8 SNA LU6.2 Communications Support ...........................................8-1
Introduction .............................................................................................................. 8-1
LU6.2 Configuration ................................................................................................ 8-2
X62/L62 Tables...................................................................................................... 8-11
LU6.2 via SDLC Examples................................................................................... 8-14
LU6.2 via X.25 Examples ..................................................................................... 8-34
Chapter 9 Asynchronous Communication Support ......................................9-1
Overview of Asynchronous Data Transmission....................................................... 9-1
Asynchronous Protocols.......................................................................................... 9-1
Modem Considerations............................................................................................. 9-2
Error Detection and Correction ................................................................................ 9-3
Clear To Send........................................................................................................... 9-4
AT or V.25bis Command Set ................................................................................... 9-5
Default Modem Strings in the Profile ...................................................................... 9-6
Modem Initialization Commands............................................................................. 9-7
Modem Dialing Commands ..................................................................................... 9-8
Receive Calls............................................................................................................ 9-9
Flow Control........................................................................................................... 9-10

Table of Contents
Gentran:Server for iSeries Communications Module Release 3.5 User Guide iii
Translation.............................................................................................................. 9-11
Translation Examples ............................................................................................. 9-13
Scripting Considerations ........................................................................................ 9-14
Basic Scripting Concepts........................................................................................ 9-14
Supported Script Transaction Types and Actions .................................................. 9-16
Use of ETX, EOT, and End-of-Cmd Characters.................................................... 9-19
Use of the Command Field..................................................................................... 9-20
Explanation of Script Indicators............................................................................. 9-21
Asynchronous Extended Script Logic.................................................................... 9-25
“Create Your Own” Protocol.................................................................................. 9-33
Print Control ........................................................................................................... 9-34
Dynamic Scripting.................................................................................................. 9-35
Remote Command Support .................................................................................... 9-36
Transparent Data .................................................................................................... 9-37
Evoke Considerations............................................................................................. 9-38
Asynchronous (ASC) Communication Examples.................................................. 9-40
Asynchronous (XAS) via X.25 Examples.............................................................. 9-50
Chapter 10 XMODEM File Transfer Support ...................................................10-1
Introduction ............................................................................................................ 10-1
Considerations ........................................................................................................ 10-2
Configuration.......................................................................................................... 10-4
Chapter 11 OFTP Communication Support ....................................................11-1
Overview ................................................................................................................ 11-1
Create an OFTP Profile .......................................................................................... 11-4
Create an OFTP Script.......................................................................................... 11-13
Chapter 12 FTP Communication Support .......................................................12-1
Introduction ............................................................................................................ 12-1
Considerations ........................................................................................................ 12-2
Gentran:Server FTP Configuration ........................................................................ 12-7
FTP Communication Session Control Scripts...................................................... 12-12
Use the FTP Server Interface ............................................................................... 12-33
Chapter 13 Using Line Pools ...........................................................................13-1
Introduction ............................................................................................................ 13-1
Create a Line Pool .................................................................................................. 13-3
Set Up a Line Pool with a Comm Profile............................................................... 13-4

Table of Contents
iv Gentran:Server for iSeries Communications Module Release 3.5 User Guide
Chapter 14 MQSeries Interface ........................................................................14-1
In this Chapter ........................................................................................................ 14-1
Overview of MQSeries Interface............................................................................ 14-1
MQ Link Panels...................................................................................................... 14-3
Gentran MQSeries Configuration......................................................................... 14-11
Send Files to MQSeries........................................................................................ 14-13
Receive Files from MQSeries .............................................................................. 14-15
Report ................................................................................................................... 14-17
Chapter 15 Gentran IFS Gateway ....................................................................15-1
In this Chapter ........................................................................................................ 15-1
What is GIFSGATE?.............................................................................................. 15-2
How to use the GIFSGATE command................................................................... 15-4
Stopping the IFS Gateway.................................................................................... 15-10
How to Use the GENIBQIFS Command.............................................................. 15-11
Chapter 16 Job Scheduler ................................................................................16-1
In this Chapter ........................................................................................................ 16-1
What is the Job Scheduler?..................................................................................... 16-1
What does the Job Scheduler Function Do?........................................................... 16-2
Take a Closer Look at the Job Scheduler ............................................................... 16-2
Start the Subsystem Used by the Job Scheduler..................................................... 16-3
Panel Quick Reference ........................................................................................... 16-3
Use the Job Scheduler Panels................................................................................. 16-5
Common Questions .............................................................................................. 16-31
Chapter 17 System Configuration File ............................................................17-1
In this Chapter ........................................................................................................ 17-1
What is the System Configuration File?................................................................. 17-2
Use the System Configuration Menu ..................................................................... 17-4
Chapter 18 Gentran File Tracking ...................................................................18-1
In this Chapter ........................................................................................................ 18-1
What is Gentran File Tracking? ............................................................................. 18-1
Panel Quick Reference ........................................................................................... 18-2
Access the Gentran File Tracking Subsystem ........................................................ 18-3
Configure Gentran File Tracking ........................................................................... 18-5
Work with Gentran File Tracking .......................................................................... 18-8
Print the Gentran File Tracking Report................................................................ 18-18
Purge the File Tracking Entries (PRGFILETRK)................................................ 18-23
Retrieve the Gentran File Tracking Entries (RTVFILETRK).............................. 18-27
Reports.................................................................................................................. 18-30

Table of Contents
Gentran:Server for iSeries Communications Module Release 3.5 User Guide v
Appendix A Modems: Configuration and Troubleshooting ............................. A-1
Overview ................................................................................................................. A-1
Configuration Requirements ................................................................................... A-4
Troubleshooting Problems....................................................................................... A-4
Appendix B Translating between ASCII and EBCDIC....................................... B-1
Outbound Translation Table (EBCDIC-to-ASCII) .................................................. B-2
Inbound Translation Table (ASCII-to-EBCDIC)..................................................... B-3
Glossary
Index

Table of Contents
vi Gentran:Server for iSeries Communications Module Release 3.5 User Guide

Chapter
Gentran:Server for iSeries Communications Module Release 3.5 User Guide 1 - 1
1 Overview
How is the Documentation Organized?
Information about the Gentran:Server for iSeries Communications Module is available through
both online help and the user documentation (provided on CD-ROM). Online help contains
reference material (panel definitions, field definitions, etc.). It gives you quick access to relevant
documentation as you are using the Communications Module. The user documentation describes
procedures (“how to. . .”) and is intended to complement and enhance the online help.
In this Book
The User Guide is comprised of 17 chapters, two appendices, a glossary of communication terms,
and an index. The Using Communications chapter is presented in tutorial format and is intended as
an instructional procedural reference. The other chapters cover specific communications topics,
such as one of the supported protocols or line pools, in greater detail. To get the most out of these
chapters, we recommend that you start by reading the first chapter thoroughly to familiarize
yourself with the basics of the Communications Module. The other chapters are intended for more
referential use, and they will be more easily understood if you are familiar with the basic
information presented in the Using Communications chapter.
# NOTE
Due to the uniqueness of each implementation, the predefined Communication scripts are
provided as examples only and are intended to assist you in getting stated. Please read the
User Guide provided by your value-added network or communication partner to ensure that
the setup correctly reflects their specific requirements.

What is in Each Chapter? Overview
1 - 2 Gentran:Server for iSeries Communications Module Release 3.5 User Guide
What is in Each Chapter?
1. Overview
This chapter provides information about how this guide is organized and a summary of the
contents of each chapter.
2. System Essentials
This chapter provides an overview of the Gentran:Server for iSeries Communications
Module, including the online help feature. The chapter covers general techniques for using
the system. It explains how to move from one panel to the next, how to use the function
keys and options, and other important information. We recommend that everyone read this
chapter.
3. Environment Control
This chapter presents the procedures for setting up each user’s work environment,
including parameters for output destinations, batch job description, and data formats. The
chapter also covers the procedures for defining security at the subsystem, function and
data levels.
The audience for this chapter is the System Administrator or Security Officer
(QSECOFR), who should be solely responsible for these tasks.
4. Using Communications
This chapter illustrates the use of the communications subsystem within Gentran:Server
for iSeries. General information sections explain the capabilities of the software and the
concepts on which the subsystem is based. The general information is supplemented by
step-by-step examples, presented in a tutorial format, that detail how the communications
subsystem is used. Information in this section is intended for all users of the
communications subsystem.
5. Using Scripts
This chapter contains detailed information about creating and using communications
scripts, including extended script logic, remote command support, and dynamic scripting.
6. Bisync Communications Support
This chapter covers specific information about using bisynchronous communications with
the Gentran:Server communications subsystem.
7. SNA Communications Support
This chapter covers specific information about using SNA/LU0 communications with the
Gentran:Server communications subsystem.
8. SNA LU6.2 Communications Support
This chapter covers specific information about using the optional add-on SNA LU6.2
module (purchased separately) with the Gentran:Server communications subsystem.

Overview What is in Each Chapter?
Gentran:Server for iSeries Communications Module Release 3.5 User Guide 1 - 3
9. Asynchronous Communication Support
This chapter covers specific information about using the optional add-on asynchronous
module (purchased separately) with the Gentran:Server communications subsystem.
10. XMODEM File Transfer Support
This chapter contains information about using XMODEM. You must also have the
asynchronous add-on module to use XMODEM.
11. OFTP Communication Support
This chapter contains information about using the Odette File Transfer Protocol (OFTP).
You must also have the asynchronous add-on module to use OFTP.
12. FTP Communication Support
This chapter covers specific information about using the optional add-on File Transfer
Protocol (FTP) module (purchased separately) with the Gentran:Server communications
subsystem.
13. Using Line Pools
This chapter covers specific information about using line pools with Gentran:Server
communications. Line pools enable you to have a number of communications jobs active
at one time, all sharing the same “pool” of up to five iSeries line resources.
14. MQSeries Interface
This chapter covers information about the Gentran:Server interface with MQSeries.
15. Gentran IFS Gateway
This chapter covers specific information about the Gentran IFS Gateway (GIFSGATE).
GIFSGATE is an interface between the Gentran:Server for iSeries Communications
Module and the Integrated File System (IFS).
16. Job Scheduler
This chapter covers the tasks associated with the Job Scheduler, which is a function that
allows you to specify the dates, times, frequency, and other parameters for running jobs in
an unattended mode.
The audience for this chapter is the System Administrator or Security Officer
(QSECOFR), who is normally responsible for these tasks.
17. System Configuration File
This chapter provides the procedures to set the break year and date format for commands.
Appendix A. Modems: Configuration and Troubleshooting
This appendix contains a list of recommended modems for use with
Gentran:Server and troubleshooting tips.
Appendix B. Translating between ASCII and EBCDIC
This appendix contains a translation table for EBCDIC to ASCII, and one for
ASCII to EBCDIC translations.

Other Gentran:Server for iSeries Communications Module Guides Overview
1 - 4 Gentran:Server for iSeries Communications Module Release 3.5 User Guide
Other Gentran:Server for iSeries
Communications Module Guides
The Gentran:Server for iSeries Communications Module documentation set includes other guides
and instructional materials. The following publications are available as part of the licensed system:
Gentran:Server for iSeries Communications Module Release 3.5 Release Notes and
Impact Information
• The Release Notes describe system enhancements and new functionality that have been
incorporated into this release. Please read the 3.5 Release Notes carefully prior to
installing Gentran:Server.
• The Impact Information gives users of previous releases information on structural
changes, including any changes to commands, CLs, and database files. These may
necessitate changes to your implementation of Gentran:Server for iSeries
Communications Module. Please read the Impact section carefully prior to installation.
Gentran:Server for iSeries Communications Module Release 3.5 Installation Guide
The Installation Guide provides step-by-step product installation instructions and cumulative
fix installation instructions. Please read all the instructions prior to beginning the installation.

Chapter
Gentran:Server for iSeries Communications Module Release 3.5 User Guide 2 - 1
2 System Essentials
In this Chapter
Thank you for selecting the Gentran:Server for iSeries Communications Module (the
Communications Module).
To take full advantage of this powerful system, it is important that you understand some basic
concepts before you begin. “System Essentials” serves as an introductory chapter to help you
become familiar with the system’s purpose, features, organization, and operation. This chapter
covers the following topics:
¾What is the Communications Module?............................................................................ 2-2
¾Take a Closer Look at the Communications Module....................................................... 2-3
¾Gentran:Server Panels...................................................................................................... 2-5
• The ‘Work With’ Concept ......................................................................................... 2-6
• Understand the Panel Structure ................................................................................. 2-6
• The Components of a Gentran:Server Panel ............................................................. 2-8
¾Shortcuts......................................................................................................................... 2-18
• Access a Panel from a Service................................................................................. 2-20
• Use the Command Line........................................................................................... 2-21
¾Getting Help................................................................................................................... 2-23
• Use Online Help ...................................................................................................... 2-23
• Use the Search Index............................................................................................... 2-28
¾Print Reports in Gentran:Server..................................................................................... 2-29
¾Product Support and Remote Maintenance.................................................................... 2-31

In this Chapter System Essentials
2 - 2 Gentran:Server for iSeries Communications Module Release 3.5 User Guide
What is the Communications Module?
The Gentran:Server Communications Module enables you to send/receive data electronically with
communication partners, while tracking and monitoring the entire process. The Communications
Module enables you to perform these tasks:
Create communication profiles for many different protocols
Create scripts
Monitor active communication sessions
View the history log
Manage the data sent and received
Schedule jobs
Perform traces
Purge and retrieve data.

System Essentials Take a Closer Look at the Communications Module
Gentran:Server for iSeries Communications Module Release 3.5 User Guide 2 - 3
Take a Closer Look at the Communications
Module
This section explains the organization of the Gentran:Server for iSeries Communications Module.
Gentran:Server acts as an interface between your in-house applications and your communication
partners. The communications process can be fully automated. You can initiate communications
processing through the menu interface or by scheduling it to run at a predefined time. Application
processing jobs to add or extract data from the communication queues can also be scheduled.
Day-to-day user interaction is recommended to review the online Communications history log,
communication queues, and job scheduler entries to monitor the flow of data.
How is the Communications Module Organized?
The Gentran:Server for iSeries Communications Module is comprised of several integrated
program subsystems. The following table lists the subsystems and highlights their functionality.
Subsystem Purpose
Communications Set up the profiles and scripts for data transmissions between you
and your partner(s).
Environment Control Define environment parameters (such as libraries and print
queues) and the security privileges for each Gentran:Server user.
Security controls access at the subsystem and function levels as
well as data update authority.
System Administration
Job Scheduler
System Configuration
Control system activities such as the Job Scheduler and System
Configuration.

Take a Closer Look at the Communications Module System Essentials
2 - 4 Gentran:Server for iSeries Communications Module Release 3.5 User Guide
Find Subsystems and Functions within the Communications
Module
Gentran:Server subsystems are used to group similar programs and commands into a category.
Each subsystem is made up of a group of functions (commands and programs), each of which
performs a specific activity such as setting up a communication partner. Typically, entries on the
main menu identify a subsystem. In the Communications Module, however, the job scheduler and
system configuration menu are both in the system administration subsystem, as shown in
Figure 2.1.
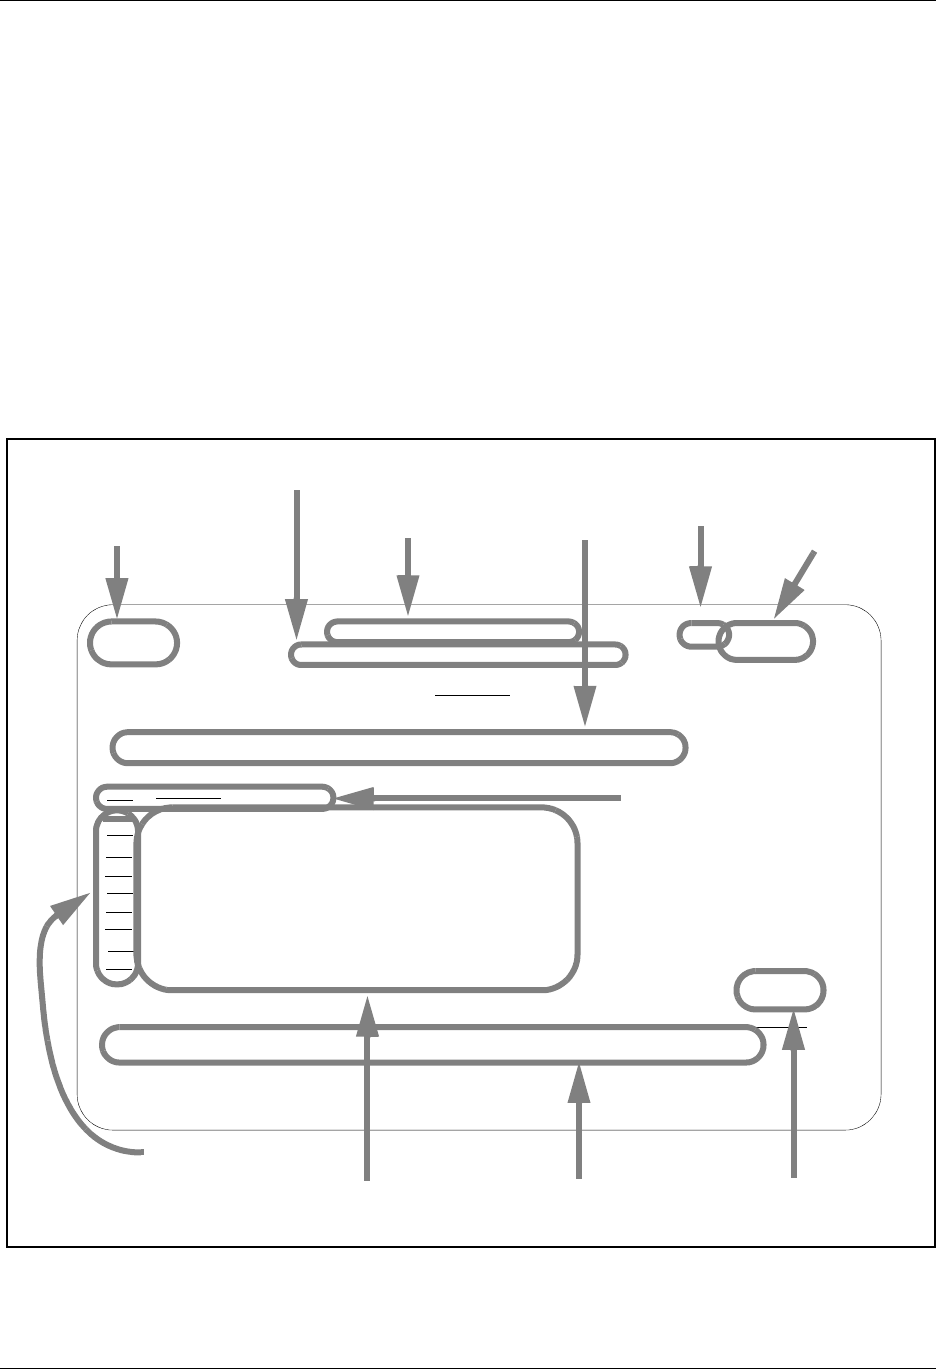
Figure 2.1 Subsystems and functions within Gentran:Server
Select option 1 on the GENMAIN menu and press Enter. The Communications menu is
displayed.
As you use Gentran:Server, keep in mind that the functions within each subsystem are linked
together like a network. Your path (the sequence of panels that appear) depends on the data that
you enter on each panel. This flexible structure allows Gentran:Server to move quickly between
the functions without multiple layers of menu trees.
# NOTE
In addition to the subsystems, the main menu includes the Gentran:Server Search Index,
which displays online help for glossary terms, field definitions, and other topical information
available as hypertext. This index is comprehensive for the entire Gentran:Server product and
is not limited to the Communications Module.
GENMAIN Gentran:Server for iSeries Communications 3.5
System: ISDDEV01
Select one of the following:
1. Communications Menu (GENCOM)
2. Work with Job Scheduler
3. Work with Environment Control
4. System Configuration Menu (GENSYSCFG)
10. Gentran:Server Search Index
13. Gentran File Tracking Menu (GENFILETRK)
90. Sign off
Bottom
Selec
===>
F3=Exi
(C) CO
Gentran:Server for iSeries Communications 3.5 Main Menu
GENCOM Gentran:Server Communications 3.5
System: ISDDEV01
Select one of the following:
1. Work with Communications
2. Work with Session Scripts
3. Work with Comm History File
4. Work with Outbound Queue
5. Work with Inbound Queue
6. Work with Active Comm Jobs
7. Work with Network Profiles
8. Work with MQ Links
10. Start a Comm Session (STRCOMSSN)
11. Start a Comm Session with Trace (STRCOMSSNT)
12. End Active Comm Jobs (SHUTDOWN)
13. Gentran Line Pools (GENLINP)
14. Purge All Communication Files (PRGALL)
More...
Selection or command
===>
F3=Exit F4=Prompt F9=Retrieve F12=Cancel F13=User Support
(C) COPYRIGHT Sterling Commerce Inc., 2008, ALL RIGHTS RESERVED.
Functions in Gentran:Server
Communications Module
Subsystems in Gentran:Server
Communications Module

System Essentials Gentran:Server Panels
Gentran:Server for iSeries Communications Module Release 3.5 User Guide 2 - 5
Gentran:Server Panels
This section presents basic instructions for using the Gentran:Server panels and commands.
Although the many system features vary in complexity from “simple” to “expert” level, most of
the system can be operated with just a few basic commands.
To use Gentran:Server, you must have a valid iSeries user profile. Gentran:Server uses your
iSeries User ID to identify who you are, to control which subsystems and functions you can access,
and to track the changes that you make in any files.
Your iSeries Security Officer can give you instructions for using the terminal hardware and
operating system at your location. You should be familiar with basic iSeries concepts prior to using
Gentran:Server.
Based on the configuration of your iSeries user profile and the conventions in place at your site,
you might start up Gentran:Server in one of three ways.
As Part of Your Login Routine
Your iSeries user profile can be set up so that each time you log on to the iSeries, you
automatically access the Gentran:Server main menu. If this is the case, you can immediately
begin to use Gentran:Server menu options.
From a Menu
Many sites set up their own menu structure or customize third-party software so Gentran can
be invoked from a menu.
From the iSeries Command Line
If Gentran:Server is not offered as a menu option at your site, you can invoke it by using the
iSeries GO (go to menu) command. Type GO GENMAIN on the iSeries command line and press
the Enter key. The Gentran:Server main menu appears, allowing you to begin accessing
Gentran’s menu options.
Two other Gentran:Server menus available from the command line are: the Communications
menu (GO GENCOM) and the System Configuration menu (GO GENSYSCFG).
# NOTE
Prior to accessing Gentran, you may have to add one or more Gentran:Server libraries to your
library list. If you are unsure about this process, please contact your System Administrator
for instructions on adding or modifying entries in your library list. The default libraries that
are supplied with Gentran:Server are G35DTA and G35PGM. Make sure the library QTEMP
is in your library list.

Gentran:Server Panels System Essentials
2 - 6 Gentran:Server for iSeries Communications Module Release 3.5 User Guide
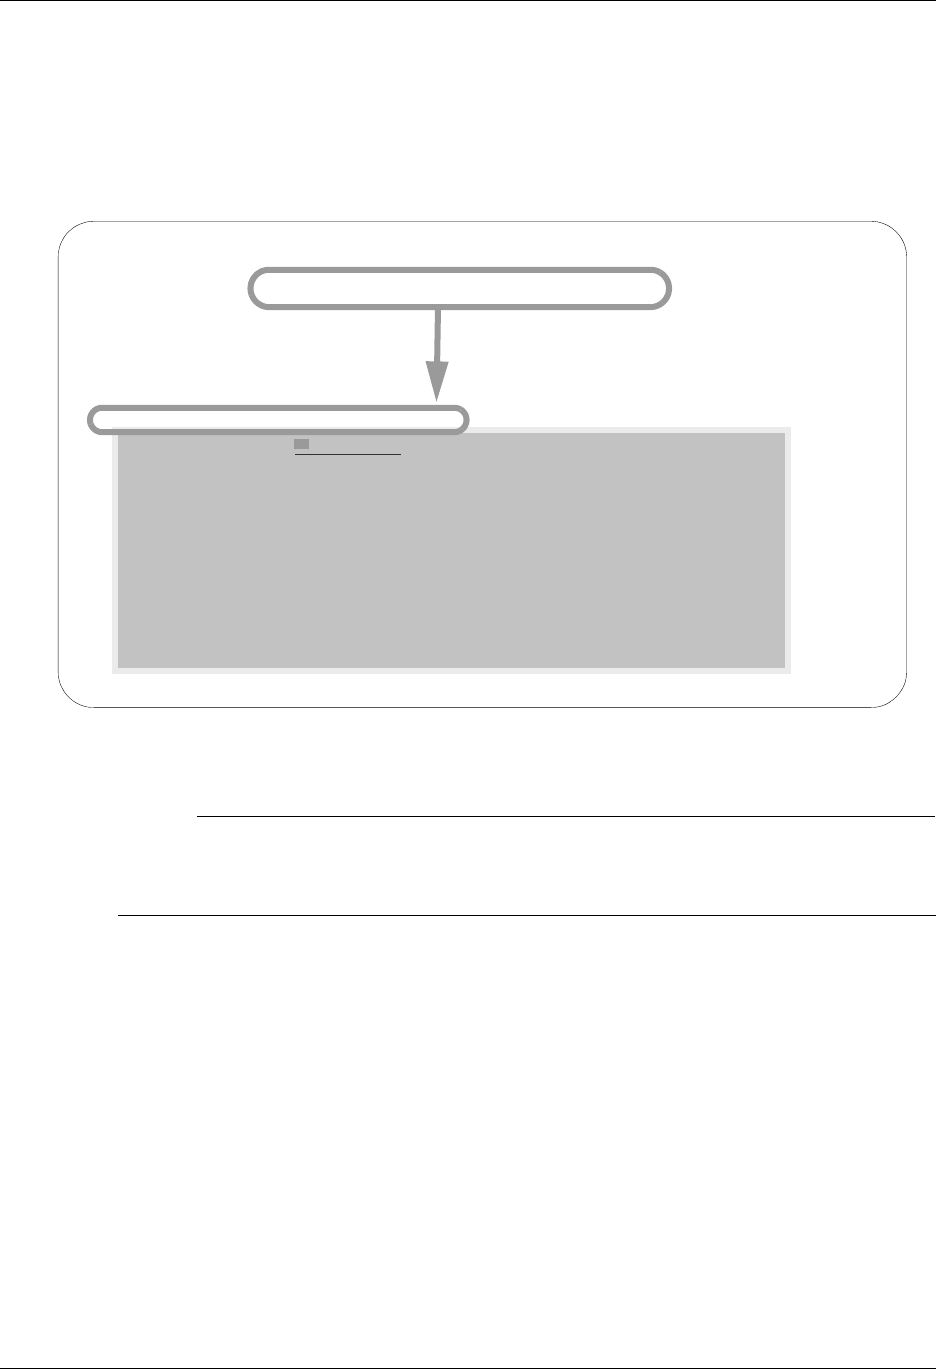
The ‘Work With’ Concept
Gentran:Server uses the iSeries ‘Work With’ concept. When you first access the Gentran:Server
system, the main menu (GENMAIN) appears as shown in Figure 2.2. From GENMAIN, you can
access any of the Gentran:Server subsystems by typing the associated option number on the
command line and pressing the Enter key. For example, if you want to access Communications,
type 1 on the command line and press Enter.
Figure 2.2 Enter the subsystem number on the command line.
Gentran:Server displays the Gentran:Server Communications (GENCOM) menu.
If Gentran:Server does not display a menu, the next panel to appear depends on the entries that you
made on the previous panel. In a sense, Gentran:Server “protects” you from making mistakes or
omissions. Based on the entries you make on various Gentran:Server panels, the system leads you
through a series of related panels on which you need to fill in information before you can complete
the task. This “captive” feature ensures that the profiles and scripts you create have all the
information necessary to be processed successfully.
Understand the Panel Structure
The online screens Gentran:Server displays are called “panels”. All Gentran:Server panels have
the same “look and feel”. That is, all panels have the same general appearance and respond to your
input in a similar way. There are several components on a Gentran:Server panel. Some
components are always present; other components occur only on certain types of panels.
These components appear on all Gentran:Server panels:
Program and Format Name
Panel Description
User’s Initials
Message Line
GENMAIN Gentran:Server for iSeries Communications 3.5
System: ISDDEV01
Select one of the following:
1. Communications Menu (GENCOM)
2. Work with Job Scheduler
3. Work with Environment Control
4. System Configuration Menu (GENSYSCFG)
10. Gentran:Server Search Index
13. Gentran File Tracking Menu (GENFILETRK)
90. Sign off
Bottom
Selection or command
===> 1
F3=Exit F4=Prompt F9=Retrieve F12=Cancel F13=User Support
(C) COPYRIGHT Sterling Commerce Inc., 2008, ALL RIGHTS RESERVED.
System Essentials Gentran:Server Panels
Gentran:Server for iSeries Communications Module Release 3.5 User Guide 2 - 7
Function Keys
Panel Fields
System Date/Time
These components appear only on some Gentran:Server panels:
Option Fields
Option Codes
Panel Continuation
Command Line
Key Entry Line
Figure 2.3 shows the components of a typical Gentran:Server panel.
Figure 2.3 The components of a typical Gentran:Server panel
EDIX400 Work with Communications EDI 04/30/08
FMT01 pgmlib: G3X5PGM dtalib: G3X5DTA 12:00:00
Position to Profile ID . . . . . .
Type option (and Information), press Enter.
1=Create 2=Revise 3=Copy 4=Delete 5=View 11=Line/Ctl/Dev
Opt Profile ID Company
ADVBSC ADVANTIS BSC
ADVLU0 ADVANTIS SDLC
ATLASFTX Atlas in France via OFTP/X.25
ATTEASY AT&T EASYLINK SERVICES
ATTUK AT&T IN THE UNITED KINGDOM
AUTOANS TEST AUTOANSWER CONFIG
BTASCL BT UK GNS EDI*NET Async "Live" Sys
BTASCT BT UK GNS EDI*NET Async "Test" Sys
BTOFTP BT UK GNS EDI*NET OFTP via Async
More...
Parameters or command
===>
F1=Help F3=Exit F12=Cancel F15=Sort F23=More Options F24=More Keys
option fields
panel fields function keys panel
continuation
user’s
initials
option
codes
program and
format name
key
entry
line
current
system
date &
time
panel description
current active program
and data libraries

Gentran:Server Panels System Essentials
2 - 8 Gentran:Server for iSeries Communications Module Release 3.5 User Guide
The Components of a Gentran:Server Panel
Program and Format Name
Most Gentran:Server panels have a unique program name and format name on the upper left
corner of the panel. The program name remains the same for all panels in a multi-panel function.
The format name will change for each panel in a multi-panel function.
Panel Description
This is a textual name for the panel. Since panel descriptions are not always unique, be careful
when you refer to panels by name. Always check both the panel description and the
program/format name.
# NOTE
Using Captive Panels
Many Gentran:Server panels are “captive”. This means that the panel automatically appears
based on the values you entered on a previous panel. You can tell whether a new panel has
appeared by checking the program name and format name, which are unique identifiers
located on the upper left corner of the panel. (SEE the sections on options and function keys
later in this chapter for more information about moving between panels.)
Program and Data Libraries
The current active program and data libraries are shown below the panel description. This
information is retrieved from the data area GENLIB.
Option Codes
Option codes appear only on panels that display multiple records. Option codes are numbers that
represent actions to be performed on one or more of the records. For example, in the previous
figure, the panel displays multiple elements for a segment in a particular standards transaction. The
option codes represent actions that can be performed on one or more of the elements. Additional
option codes can be shown by pressing F23 (More Options), where available.
Option Fields
To select an option, type the number in the Option field to the left of the appropriate line item(s)
and press Enter. You can perform more than one option (i.e., View, Copy, Add, Change, Delete)
associated with a field maintenance task at a time. Enter as many option codes in the option fields
as you like, then press Enter. The system performs the options starting at the top of the panel and
continuing down to the bottom of the page.
# NOTE
With the exception of “Work with” panels, options can be carried forward from one page to
the next.

System Essentials Gentran:Server Panels
Gentran:Server for iSeries Communications Module Release 3.5 User Guide 2 - 9
Panel Fields
You will need to enter values in one or more fields on each panel. These fields describe the profiles
and scripts you are creating and/or instruct Gentran:Server on what to do with the profiles you are
creating. Depending on the types of information being entered, the panel fields appear on various
areas of the panel. The field values that you type in are not entered into the system until you press
a specific function key, usually the Enter or F10 (Update) key. Pressing this key enters all the field
values on the panel into the system at the same time. (SEE the “Function Keys” section later in this
chapter for more information about entering data into the system).
User’s Initials
Your initials are defined in the Environment Control subsystem. These always display in the upper
right corner of the panel. (By the way, have you been introduced to Elizabeth D. Ingram? Liz was
kind enough to supply all the tutorial materials for this manual and her initials (EDI) appear on
every panel.)
System Date and Time
The current date and time are shown in the upper right corner of the panel. The date is displayed in
a variety of date formats with various separators and can be customized for each user.
Key Entry Line
This is the blank line at the top of the subfile in which you enter the key fields necessary to
advance to the next panel, as specified by the option code selected.
Message Line
In response to actions that you perform, the system displays messages just below the function
keys. Always be sure to read the messages displayed in this area. For additional information, place
the cursor on the message and press F1 (Help). This is available for most messages.
Function Keys
The list of function keys appears at the bottom of the panel. Function keys perform many actions
such as exiting from a panel, printing a report or sorting a file. Gentran:Server uses a wide variety
of function keys. Each panel displays only those functions keys that are active for that particular
panel. Consult your hardware manual for information about using multiple key strokes to access
the higher numbered function keys. Additional function keys can be shown by pressing F24 (More
Keys).
Panel Continuation
Some panels contain more information than the screen can hold at one time. These panels appear
as multiple “pages”. Panels with multiple pages have the word “More...” at the bottom right
corner of the panel. Use the Page Up (Roll Down) and Page Down (Roll Up) keys on your
keyboard to move between the multiple pages of the panel.

Gentran:Server Panels System Essentials
2 - 10 Gentran:Server for iSeries Communications Module Release 3.5 User Guide
Basic System Terms and Concepts
Before we can explain the options and function keys available in Gentran:Server, we must first
define some basic terms that are used throughout this manual in discussing the panels.
Access Mode
This defines the type of activity you can perform on a panel. Typically, the mode is
determined by the option you selected on the previous panel. For example, you could
select option 1 (Create) on a panel so the next panel is accessed in “create mode”,
allowing you to add a new record.
Captive Panel
Captive panels refer to panels that are “tied” together and must be reviewed before
“creates” are performed. This arrangement prevents you from inadvertently missing a
panel that contains important information critical for processing.
In create mode, if F10 (Update) is pressed from a panel that has associated captive panels,
the system displays the next captive panel with a message indicating that you must review
this panel before updating. Once all captive panels have been reviewed, press F10 again to
actually add the record and return to the calling panel.
To access captive panels in any mode, press Enter or F8 (Next) to advance forward or
press F7 (Back) to advance backward. To confirm updates, press F10.
Key Entry Line
This is the blank line at the top of the list on a “Work with” panel in which you enter the
key fields necessary to advance to the next panel, as specified by the option code selected.
Use the Function Keys
Active function keys appear at the bottom of each panel. Press F24 (More Keys) repeatedly to
display additional function keys. The following standard function keys are active on most panels:
F1=Help
Provides either additional information about the panel in general or about a specific field
within the panel depending on the where the cursor is located on the panel when you press F1.
When displaying help information for a field, you can press F2 (Extended help) to get panel
help. This help can be printed. (SEE “Getting Help” later in this chapter for more information
about online help.)
F3=Exit
Ends the current function and returns you to the display from which the function was
started.
F4=Prompt
Supplies a window containing valid field values or a selection list for the appropriate file.
When you press F4 on a menu or in a field on a “Work with” panel for which no values
have been defined, the system displays the iSeries’ Major Command Groups (MAJOR)
panel. Press F3 (Exit) or F12 (Cancel) to return to the active panel.

System Essentials Gentran:Server Panels
Gentran:Server for iSeries Communications Module Release 3.5 User Guide 2 - 11
F5=Refresh
Redisplays the panel with the most recent information and removes any outstanding
selections or keyed data.
F7=Back
Displays the previous panel associated with a captive panel (associated with the same
record).
F8=Next
Displays the next panel associated with a captive panel.
F9=Retrieve
Shows the last command entered on the command line along with any included
parameters. Press this key once to retrieve the last command you ran. Press this key twice
to retrieve the next to the last command you ran. Continue pressing this key until you have
retrieved all commands entered.
If no commands were entered, or, you are not authorized to use the iSeries command line
(as defined in your iSeries user profile), no command is retrieved and the panel redisplays.
F10=Update
Updates the record and returns to the calling program from which you invoked this panel.
F11=Delete
Confirms the delete operation and deletes all records associated with this ID. The system
automatically returns to the calling program from which you invoked this panel.
F12=Cancel
Returns to the previous menu or display. When on a single record panel, outstanding
updates (must apply using (Update)) are cancelled.
On a multi-record panel, updates applied by pressing Enter are not lost when F12
(Cancel) is pressed.
F13=Services
Displays a pop-up window with available options for other functions that can be invoked.
The system suspends actions for the current panel and branches to the selected function (if
authorized). Upon completion, the system returns to the Services Window. You can select
another option or cancel (F12) to the calling program from which you invoked the
Services function. Typically, options are available for tasks related to the current panel.
F15=Sort
Displays a pop-up window with available sort criteria. The cursor is positioned next to the
field currently controlling the Sort order for the display. Selecting different sorting options
affects the Position-to field(s) shown at the top of the panel. The default sort order for each
of the “Work With” panels is set in the System Configuration file (SEE the “System
Configuration” chapter in this guide for more information about the System Configuration
file.)

Gentran:Server Panels System Essentials
2 - 12 Gentran:Server for iSeries Communications Module Release 3.5 User Guide
F16=Record-1(Rolling Update)
Displays the previous record in the file for the current panel. Edits are performed and, if
successful, the data is updated prior to displaying the previous record.
If a record is protected, the rolling update is prohibited. If a record is not protected, the
system performs a rolling update. In view mode, rolling is performed, but no data is
updated.
F17=Record+1 (Rolling Update)
Displays the next record in the file for the current panel. Edits are performed and, if
successful, the data is updated prior to displaying the next record.
If a record is protected, the rolling update is prohibited. If a record is not protected, the
system performs a rolling update. In view mode, rolling is performed, but no data is
updated.
F21=Print
Submits the appropriate Print Report job to be executed.
F22=Resequence
Redisplays this multi-record panel forcing any re-sequencing of records to occur.
Typically, a sequence number is used as a key field. As new records are added, you can
refresh the panel with F22 (Resequence) to display all the records in their new order based
on the sequence number used.
F23=More Options
Displays additional option codes available with this panel. You can scroll through all
available option codes by pressing F23 (More Options) repeatedly.
F24=More Keys
Displays additional function keys available with this panel. You can scroll through all
available function keys by pressing F24 (More Keys) repeatedly.
On Command panels, the following keys have different functions:
F9=All Parameters
Shows parameters that are normally displayed only when specific values are entered in
other fields.
F10=Additional Parameters
Provides selections usually related to printing and job options.

System Essentials Gentran:Server Panels
Gentran:Server for iSeries Communications Module Release 3.5 User Guide 2 - 13
Additional Function Keys that are used include:
Enter
Enter can be used for positioning into a display list or advancing to a function when using
an option. Enter is also used to update information on panels. In this case, edits are
performed and, if successful, the data is updated. On single record panels, F10 (Update)
must be pressed to confirm the update, otherwise changes are lost when F12 (Cancel) is
pressed.
Help
Provides additional information about using the panel or a specific field on the panel.
Some keyboards have a specific Help key that can also be used to access the same Help
information as F1 (Help).
Home
When pressed on a Gentran panel, Home moves the cursor to the primary “Position-to”
field at the top of the panel.
Page Down (Roll Up)
Pages down to the next set of items until the bottom of the file is reached. The indicator
“Bottom” is displayed at the end of the file; “More...” is displayed if more items remain.
Page Up (Roll Down)
Pages up to the previous set of items until the top of the file is reached.
Print
Prints information currently displayed. The Print key does not print data from files. Use
the separate options and function keys within Gentran to print data.
Tab Key
The Tab Key moves the cursor from one field to the next on the panel, left to right, top to
bottom. To move the cursor in reverse (bottom to top, right to left), press the Shift and Tab
keys simultaneously.
Use a mouse
If your computer hardware is configured with a mouse, you can position the mouse cursor
on a panel field anywhere on the panel, click the mouse button and begin to enter values in
the field. Additionally, to execute a menu option or function key, you can double click the
mouse button on that menu option or function key. See your System Administrator to
determine if you have the proper hardware and software to use your mouse with the
iSeries.

Gentran:Server Panels System Essentials
2 - 14 Gentran:Server for iSeries Communications Module Release 3.5 User Guide
Use the Option Codes
In Gentran:Server, option codes are grouped in categories for consistency as shown below (greater
than 10 have special uses as shown).
• 1 – 10 standard option codes
• 11 – 29 vary according to the panel on which they appear
• 30 – 39 invoke Processing commands
• 40 – 49 invoke purge and retrieve commands
• 50 invokes ezEDI commands
Many panels include a list of available option codes you can use for navigation to advance to a
desired panel or function. Available option codes appear in the top portion of the panel. Press F23
(More Options) repeatedly to display additional option codes.
To use the options, type the option code in the Opt (Option) field next to the desired identifiers and
press Enter. You can type option codes next to more than one entry at a time to perform more than
one task, one after the other.
The key entry line must be used when creating a record. It can also be used for other options with
entry of the specific parameters.
1=Create
To create a new record, type 1 in the option field, fill in the required identifier(s) on the
key entry line and press Enter. The system advances you to a subsequent panel in create
mode, where you can add the record by completing the required fields and pressing F10
(Update).
2=Revise
To revise an existing record, type 2 in the option field next to the desired entry and press
Enter. You can also type in the desired identifier(s) on the key entry line with option 2 and
press Enter. The system advances you to a subsequent panel in revise mode where you
can modify the record by updating the desired fields and pressing F10 (Update).
3=Copy
The copy function can be performed at several levels. When selected on a “Work with”
panel, the entire selected definition is copied to a new definition. For example, if the copy
function was selected from the Work with Communications panel (EDIX400-FMT01), the
entire profile is copied to a new profile (including all scripts).
On lower levels within a subsystem, the copy function, in many places, only copies a
single record. For example, if the copy function was selected on the Communication
Session Control panel (EDIX403), only a single record is copied.
When the copy function is invoked, a pop-up window displays to allow entry of the key
fields necessary to create the new record(s). For more information, press F1 (Help) while
in the copy window.

System Essentials Gentran:Server Panels
Gentran:Server for iSeries Communications Module Release 3.5 User Guide 2 - 15
4=Delete
The delete function can be performed at several levels. When using this function on a
“Work with” panel, the entire selected definition is deleted. On lower levels within a
subsystem, the delete function might only delete a single record. For example, if the delete
function was selected on the Communications Session Control panel (EDIX403), only a
single record is deleted.
When accessing a single record panel in delete mode such as the Communication Profile
panel (EDIX401), F11 (Delete) must be pressed to confirm the deletion, On multi-record
panels, option 4 must be entered to indicate the records to be deleted. In this case, no
confirmation is requested.
5=View
The view option is selected as an access mode for single record panels when no
information should be changed. When using F16 (Record-1) and F17 (Record+1), records
will be accessed in a rolling view mode instead of a rolling update mode.
Since you cannot specify a view-only mode on multi-record panels, you must ensure no
changes are made. The data rights for a subsystem can be set to 3 to ensure a user can only
view data throughout that entire subsystem. Alternately, the entire definition can be
protected by setting the Update-Allowed flag to N. (SEE the “Environment Control”
chapter for more information about the Update-Allowed flag.)
6=Print
The print option prompts the appropriate print report command for the user to submit. If
selected beside an ID on a “Work with” panel, the identifier is pre-loaded into the
command.
The print function is also available on many panels by using F21 (Print). This function
automatically submits the appropriate print report to batch for the currently displayed
identifier.
Using the Prompt Key
When you are creating or editing existing entries, Gentran:Server requires you to enter specific
information. These entries may be either a reference to a record that you created elsewhere in the
system, or a value from a list of valid choices.
The F4 (Prompt) key is very helpful in these situations, and may be pressed while on a field. This
function key appears at the bottom of many Gentran:Server panels such as the one in the following
figure.
On “Work with” panels, an option must be entered on the key entry line, with F4 (Prompt) pressed
on any field on the key entry line; if available, a list of valid values will be shown. If F4 (Prompt)
is pressed without an option specified or pressed outside the key entry line, the system displays the
Major Command Groups (MAJOR) menu.
The following two examples illustrate using the F4 (Prompt) feature from a file maintenance panel
and a “Work with” panel.
Gentran:Server Panels System Essentials
2 - 16 Gentran:Server for iSeries Communications Module Release 3.5 User Guide
Select a Value from a File Maintenance Panel
In Figure 2.4, the cursor is placed on the Protocol field. The system requires you to specify a
Protocol. If you know the Protocol, you can type it in and press Tab to move the cursor to the next
field. However, you could also move the cursor to the field and then press F4 (Prompt). You would
then see a pop-up window with a list of Protocols. At this point you could select an entry by typing
1 in the option field next to the Protocol and then pressing Enter.
Figure 2.4 Use the F4 (Prompt) Function Key from a File Maintenance panel
# NOTE
If an option is entered and the cursor is on a field for which there is no prompt information
available when F4 (Prompt) is pressed, the system displays the message Prompt function
not defined for (fieldname).
EDIX401 Communication Profile EDI 04/30/08
FMT01 12:00:00
Comm Profile ID. . . . . . . . . .
Company. . . . . . . . . . . . . . COMMERCE: Network RELEASE3
Contact. . . . . . . . . . . . . . NETWORK COMMUNICATIONS
Phone. . . . . . . . . . . . . . . (614 ) 793 - 7000 x
International Dial Code. . . . . .
Protocol . . . . . . . . . . . . . BSC
D
F Position to Code
U 1=Select
Protocol Description
ASC Asynchronous Communication
ASX Asynchronous Communication with XMODEM
BSC Binary Synchronous Communication
FTP TCP/IP FTP Client
More...
F3=Exit F12=Cancel
F
Put cursor here and press F4 (Prompt)

System Essentials Gentran:Server Panels
Gentran:Server for iSeries Communications Module Release 3.5 User Guide 2 - 17
Use F4 on a “Work with” Panel
On “Work with” panels, an option must be entered on the key entry line before pressing F4
(Prompt) to see a list of valid values. Figure 2.5 illustrates using the Work with Communications
Session panel (EDIX402) to create a session script record of a comm profile ID. The option 1
(Create) has been entered on the key entry line. Pressing F4 while the cursor is on the comm
Profile ID field will bring up a window containing a list of available comm Profiles.
Figure 2.5 Use the F4 (Prompt) Function Key on a “Work with” panel
# NOTE
If an option is entered and the cursor is on a field for which there is no prompt information
available when F4 (Prompt) is pressed, the system displays the message “Prompt function
not defined for (fieldname)”.
EDIX402 Work with Communications Session EDI 04/30/08
FMT01 pgmlib: G3X5PGM dtalib: G3X5DTA 12:00:00
Position to Profile ID . . . . . .
Type option (and Information), press Enter.
1=Create 2=Revise 3=Copy 4=Delete 5=View 6=Print 30=Start Session
Opt Profile SN Company
1
Position to Profile ID . . . . . .
1=Select
Profile ID Company
ADVBSC ADVANTIS BSC
ADVLU0 ADVANTIS SDLC
ATLASFTX Atlas in France via OFTP/X.25
ATTEASY AT&T EASYLINK SERVICES
More...
F1=Help F3=Exit F12=Cancel F15=Sort
Par
===
F1=
Place the cursor on the key entry line and press F4 (Prompt)

Gentran:Server Panels System Essentials
2 - 18 Gentran:Server for iSeries Communications Module Release 3.5 User Guide
Shortcuts
Gentran:Server provides many features to make your work quicker and easier. The following
shortcuts can be used by novice as well as experienced Gentran:Server users.
Access Panels Directly from the Command Line
Sometimes you may prefer not to access panels through the “Work with” subsystems and the
various functions below them. Gentran has a special feature that allows you to directly access most
Gentran functions from the command line. EXCPGM is a specialized “call” command that is
supplied with Gentran to give you direct access to most functions.
To directly access a Gentran function, type the following command on the command line and press
Enter:
EXCPGM EDIXnnn Where nnn is the panel number.
This feature could be useful in many situations. Perhaps a co-worker asks you for information
about EDI information in Gentran that is totally unrelated to the work that you are currently doing.
If you know the program name of the function that contains this information, you can use the
EXCPGM command to quickly display that function and then return to your work.

System Essentials Gentran:Server Panels
Gentran:Server for iSeries Communications Module Release 3.5 User Guide 2 - 19
For example, in Figure 2.6, the Work with Outbound Queue panel (EDIX404) is accessed from the
command line.
Figure 2.6 Use the EXCPGM feature to access a function directly from the command line
GENMAIN Gentran:Server for iSeries Communications 3.5
System: ISDDEV01
Select one of the following:
1. Communications Menu (GENCOM)
2. Work with Job Scheduler
3. Work with Environment Control
4. System Configuration Menu (GENSYSCFG)
10. Gentran:Server Search Index
13. Gentran File Tracking Menu (GENFILETRK)
90. Sign off
Bottom
Selection or command
===> EXCPGM EDIX404
F3=Exit F4=Prompt F9=Retrieve F12=Cancel F13=User Support
(C) COPYRIGHT
EDIX404 Work with Outbound Queue Control EDI 04/30/08
FMT01 pgmlib: G3X5PGM dtalib: G3X5DTA 12:00:00
Position to Profile ID . . . . . . Profile Seq 9999999
Type option (and Information), press Enter.
2=Revise 4=Delete 5=View 6=Print 30=Extract Data 31=Find String
Profile Comm Batch Batch
Opt Profile Sts Seq # Date Time Records Stamp Seq # ID
CN3BSC Q 187 12/13/01 11:40:20 3 241
CN3BSC Q 186 12/13/01 11:40:20 4 240
CN3BSC Q 185 12/11/01 14:28:01 4 239
CN3BSC Q 184 12/11/01 14:28:01 4 238
CN3BSC Q 183 12/11/01 14:28:01 4 237
CN3BSC Q 182 05/25/00 14:22:42 4 236
CN3BSC Q 181 05/25/00 14:20:18 4 234
CN3BSC Q 180 05/25/00 11:06:01 4 233
CN3BSC Q 179 05/25/00 11:03:18 4 231
More...
Parameters or command
===>
F1=Help F3=Exit F12=Cancel F15=Sort F24=More Keys
Gentran:Server Panels System Essentials
2 - 20 Gentran:Server for iSeries Communications Module Release 3.5 User Guide
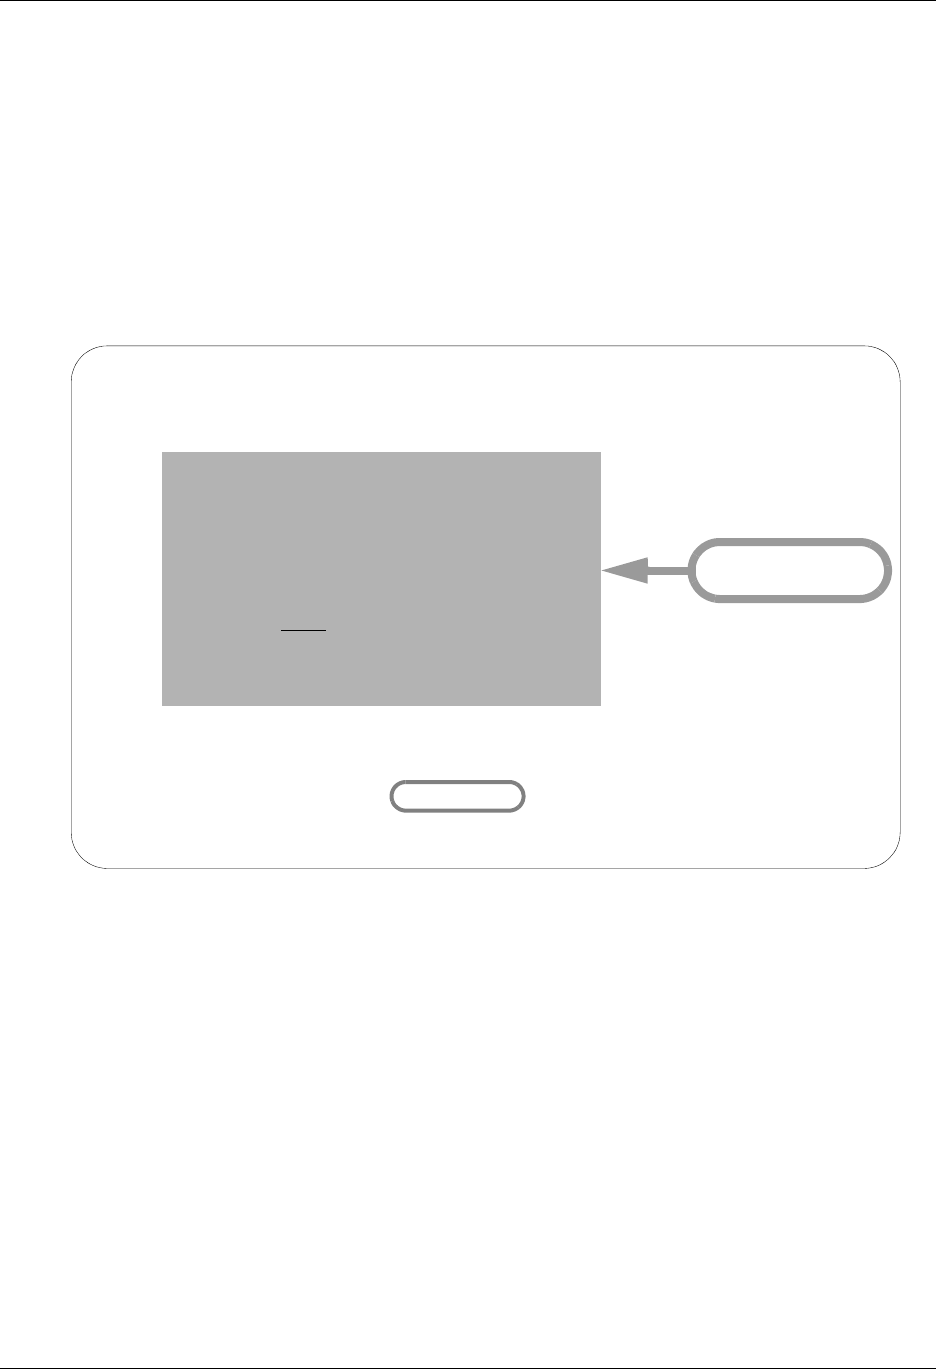
Access a Panel from a Service
There may be times when you want to access another related function without leaving the current
panel. For example, you might be entering information on a certain panel and realize that you need
some information from another function. Maybe you forgot an entry on another panel or you need
to change an entry that relates to the information you are entering on the current panel. You want to
enter the new information, but you don’t want to use the F12 (Cancel) key to leave your work on
the current panel.
Gentran has another special “shortcut” feature to handle this situation. On some Gentran panels,
you may notice the F13 (Services) function key. Pressing this key displays a pop-up window with
a list of menu options related to your current task.
Figure 2.7 Shortcuts for Accessing Panels using Services
If, for example, you are entering values on the Communication Profile panel (EDIX401), pressing
the F13 (Services) function key displays a pop-up window as shown in Figure 2.7. In this example,
option 1 advances you to the Work with Communications Session panel to work with any scripts
defined for the profile.
At this point, you can select any one of the menu options, and Gentran:Server displays a new
panel. Enter all the field values as you would normally do. When you are finished with the panel,
press the appropriate key to exit. Gentran returns to the Service Menu again. At this point, you can
select another menu option or press F12 (Cancel) or F3 (Exit) to return to the exact point at which
you left the original panel.
EDIX401 Communication Profile EDI 04/30/08
FMT01 12:00:00
Comm Profile ID. . . . . . . . . . CN3BSC
Compan Service Menu EASE3
Contac NS
Phone. x
Intern 1. Work with Communications Session
Protoc 2. Work with Communication Inbound Que
Days t 3. Work with Communication Outbound Qu
FIFO/L
Update
Service: 1
F3=Exit F12=Cancel
F1=Help F10=Update F12=Cancel F13=Services F24=More Keys
Select a Service

System Essentials Gentran:Server Panels
Gentran:Server for iSeries Communications Module Release 3.5 User Guide 2 - 21
Use the Command Line
Any iSeries, Gentran-specific, or user-specific command may be executed from the command line
(Gentran supports iSeries security authorization). To use the command line, type the command,
then press F4 to prompt or Enter to execute. The following figure shows the STRCOMSSN
command entered on the GENMAIN command line. Entering the command displays the Start
Communications Session (STRCOMSSN) panel, where parameters can be entered and the job
submitted.
# NOTE
Command line usage is determined by your iSeries user profile. SEE your System
Administrator for more information.

Gentran:Server Panels System Essentials
2 - 22 Gentran:Server for iSeries Communications Module Release 3.5 User Guide
Figure 2.8 illustrates prompting the Start Communications Session (STRCOMSSN) command
from the command line using F4.
Figure 2.8 Using the STRCOMSSN command from the command line
# NOTE
When you execute a Gentran-specific command from the command line, information is
retrieved from your Gentran:Server environment profile to control the runtime environment.
(SEE the “Environment Control” chapter for more information.)
Start Communications Session (STRCOMSSN)
Type choices, press Enter.
Communications Profile ID . . . CN3BSC Comm Profile Id
Session Type . . . . . . . . . . Name
Delete Previous Jobs? . . . . . *YES *YES, *NO
Schedule Job? . . . . . . . . . *NO *YES, *NO
Run Continually? . . . . . . . . *NO *YES, *NO
Bottom
F3=Exit F4=Prompt F5=Refresh F10=Additional parameters F12=Cancel
F13=How to use this display F24=More keys
GENMAIN Gentran:Server for iSeries Communications 3.5
System: ISDDEV01
Select one of the following:
1. Communications Menu (GENCOM)
2. Work with Job Scheduler
3. Work with Environment Control
4. System Configuration Menu (GENSYSCFG)
10. Gentran:Server Search Index
13. Gentran File Tracking Menu (GENFILETRK)
90. Sign off
Bottom
Selection or command
===> STRCOMSSN
F3=Exit F4=Prompt F9=Retrieve F12=Cancel F13=User Support
Start Communications Session Command
Start Communications Session (STRCOMSSN)
Type choices, press Enter.
Communications Profile ID . . . CN3BSC__ Co m m P ro f il e I d
Session Type . . . . . . . . . . ____ Name
Delete Previous Jobs? . . . . . *YES__ *Y ES, *NO
Schedule Job? . . . . . . . . . *NO *YES, *NO
Run Continually? . . . . . . . . *NO *YES, *NO
Bottom
F3=Exit F4=Prompt F5=Refresh F10=Additional parameters F12=Cancel
F13=How to use this display F24=More keys

System Essentials Getting Help
Gentran:Server for iSeries Communications Module Release 3.5 User Guide 2 - 23
Getting Help
Additional help for using Gentran:Server for iSeries Communications Module, beyond what you
will find in the documentation set, is available in a variety of ways.
Use Online Help
One of the most exciting features in Gentran:Server for iSeries Communications Module Release
3.5 is the online help. Gentran:Server uses the iSeries User Interface Manager (UIM)© Search
Index/Help feature. Through online help, you can access information such as field definitions and
panel descriptions while you are working, without interrupting any data entry activities.
Gentran:Server for iSeries Communications Module’s online help is “context-sensitive”. This
means that the information displayed is based on the current panel and the position of the cursor on
the panel. This allows you to access either specific information about a field or general
information about the whole panel.
Online help is accessed by first positioning the cursor in one of the context-sensitive areas of the
panel, as shown in the following figure. Press the F1 (Help) key (or the HELP key, depending on
your keyboard) and a pop-up help window appears on top of the current panel so that the given
field is still visible.
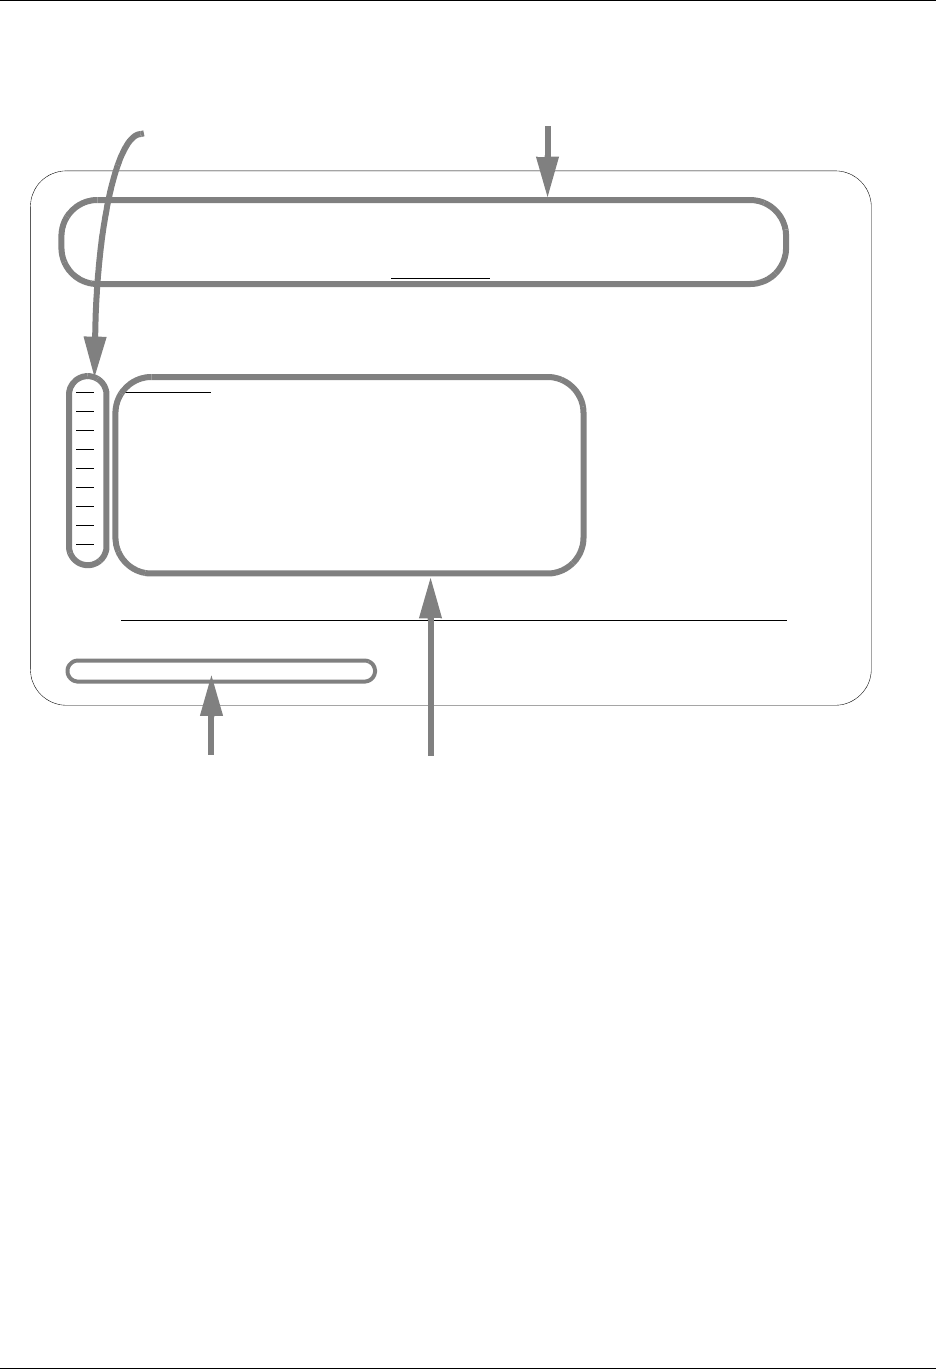
Getting Help System Essentials
2 - 24 Gentran:Server for iSeries Communications Module Release 3.5 User Guide
Figure 2.9 shows the areas on a panel for which Gentran:Server for iSeries Communications
Module provides context-sensitive help.
Figure 2.9 The context-sensitive online help areas of a typical panel
Pressing the F1 (Help) key with the cursor in the System message area activates the iSeries help
utility for system messages. All messages issued for the online panels have first level help. Many
errors also have second level help that further explains that specific error, identifies its cause, or
suggests a course of action to remedy the error. To display second level help, place the cursor on
any message and press F1 (Help).
Sometimes more than one message is issued. A plus sign (+) displays at the right side of the
message line whenever additional messages exist. Move the cursor to the message line and press
Page Down (Roll Up) or Page Up (Roll Down) to scroll through all error messages issued.
Messages are shown from the language-specific error message file, GENERRxxx, where xxx
represents the language ID (i.e., GENERRENU is the English error message file).
EDIX400 Work with Communications EDI 04/30/08
FMT01 pgmlib: G3X5PGM dtalib: G3X5DTA 12:00:00
Position to Profile ID . . . . . .
Type option (and Information), press Enter.
1=Create 2=Revise 3=Copy 4=Delete 5=View 11=Line/Ctl/Dev
Opt Profile ID Company
ADVBSC ADVANTIS BSC
ADVLU0 ADVANTIS SDLC
ATLASFTX Atlas in France via OFTP/X.25
ATTEASY AT&T EASYLINK SERVICES
ATTUK AT&T IN THE UNITED KINGDOM
AUTOANS TEST AUTOANSWER CONFIG
BTASCL BT UK GNS EDI*NET Async "Live" Sys
BTASCT BT UK GNS EDI*NET Async "Test" Sys
BTOFTP BT UK GNS EDI*NET OFTP via Async
More...
Parameters or command
===>
F1=Help F3=Exit F12=Cancel F15=Sort F23=More Options F24=More Keys
Comm Profile ID cannot be blank.
Help for the Entire Panel
Help for Options
Help for Field
Definitions
Help for System
Messages

System Essentials Getting Help
Gentran:Server for iSeries Communications Module Release 3.5 User Guide 2 - 25
Online Help for a Single Field Definition
Online help is also available for individual field definitions. Position the cursor anywhere on a
field and press F1 (Help), as shown in Figure 2.10. For field information specific to the current
panel, refer to the online help for the whole panel and to the paper documentation.
# NOTE
In most cases, the generic field definitions are not included in the paper documentation. As
you read the manuals, you may find it convenient to have an active Gentran session in front
of you so that you can access the field definitions and other online information.
Figure 2.10 Access online help for a field definition
EDIX400 Work with Communications EDI 04/30/08
FMT01 pgmlib: G3X5PGM dtalib: G3X5DTA 12:00:00
Position to Profile ID . . . . . .
Type option (and Information), press Enter.
1=Create 2=Revise 3=Copy 4=Delete 5=View 11=Line/Ctl/Dev
Opt Profile ID Company
ADVBSC
ADVLU0 Profile ID - Help
ATLASFTX
ATTEASY The Communication Profile ID is a unique identifier for a
ATTUK collection of information required to communicate with a
AUTOANS remote computer system or network.
BTASCL Bottom
BTASCT F2=Extended help F10=Move to top F11=Search Index
BTOFTP F12=Cancel F13=Information Assistant F24=More keys
Parameters or
===>
F1=Help F3=Exit F12=Cancel F15=Sort F23=More Options F24=More Keys
Comm Profile ID cannot be blank.
Press F1 (Help)

Getting Help System Essentials
2 - 26 Gentran:Server for iSeries Communications Module Release 3.5 User Guide
Online Help for a Whole Panel
To display online help for the entire panel, move the cursor anywhere outside a field and press F1
(Help), as shown in Figure 2.11. Another method of accessing help for the whole panel is to press
F2 (Extended Help) while you are in help mode for a field.
Figure 2.11 Access online help for a whole panel
While there is some variation in content for individual panel descriptions, in general, the help for
the entire panel typically includes an Overview that describes the purpose of the panel; activities
that can be performed from the panel; related topics; field definitions; and function key definitions.
EDIX400 Work with Communications EDI 04/30/08
..............................................................................
: Work with Communications (EDIX400) - Help :
: :
: Work with Communications (EDIX400-FMT01) :
: :
: The Work with Communications panel (EDIX400-FMT01) allows you to :
: initiate set up and maintenance functions for communication profiles :
: and provides access to other functional areas associated with :
: communications such as communication sessions, inbound and outbound :
: queue maintenance and inquiry, etc. A communication profile is a :
: set of communication parameters associated with a given company or :
: application in Gentran:Server for iSeries. The profile contains :
: information specific to the communication such as phone numbers, :
: protocol, and contact names. :
: :
: Panel Activities :
: :
: The ability to select the mode for accessing a panel for creating, :
: More... :
: F3=Exit help F10=Move to top F11=Search Index F12=Cancel :
: F13=Information Assistant F14=Print help :
: :
:............................................................................:
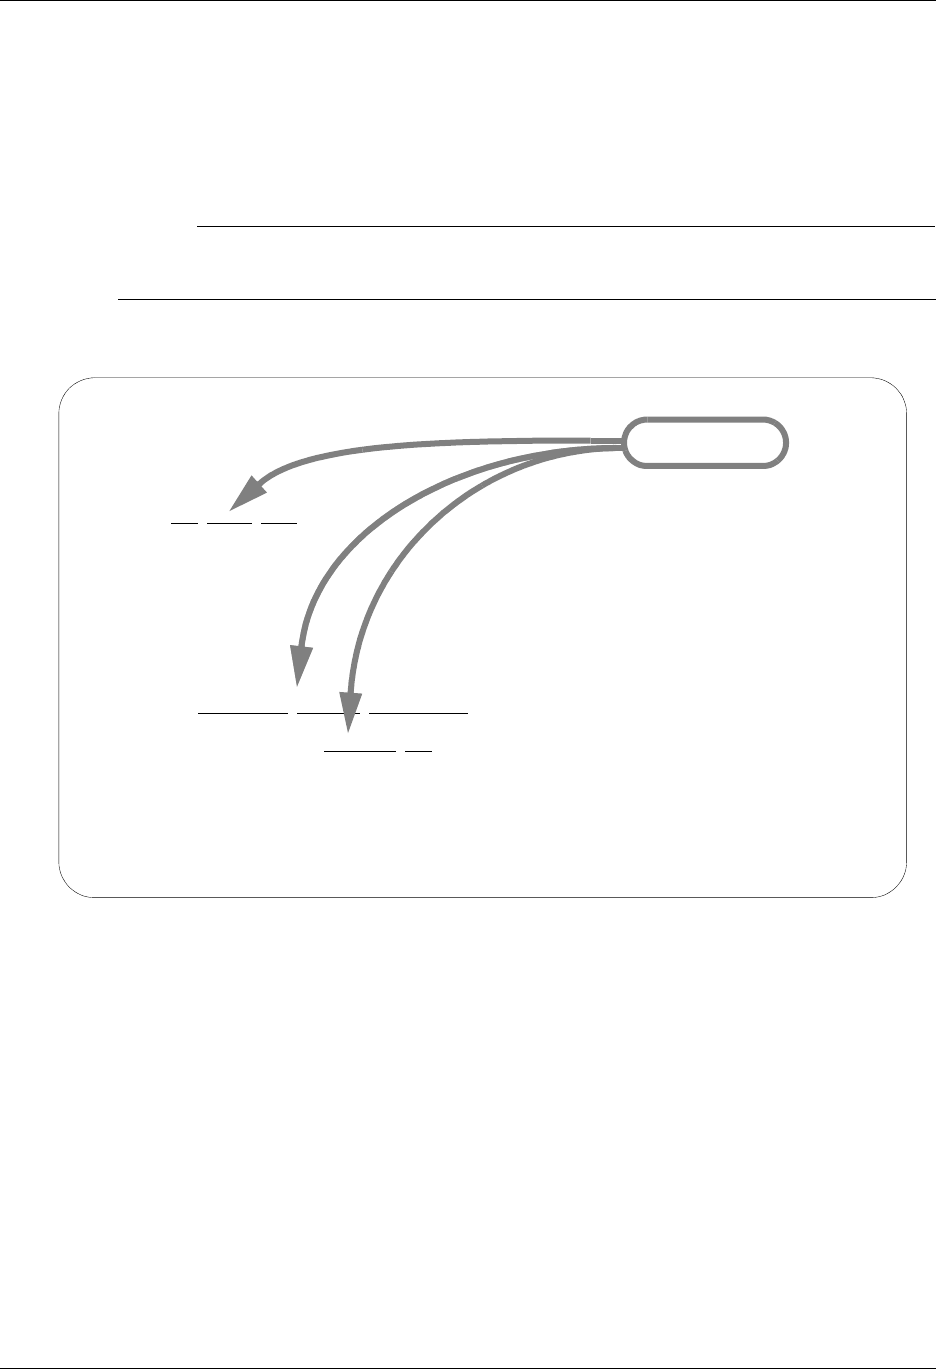
System Essentials Getting Help
Gentran:Server for iSeries Communications Module Release 3.5 User Guide 2 - 27
Use Hypertext
On some online help panels, certain words or phrases are underlined and/or highlighted in
high-intensity. This indicates that additional information (hypertext) is available for the
highlighted text. To display the additional information, either move the mouse or press Tab until
the cursor is positioned in the highlighted text. Press Enter.
# NOTE
All of the definitions available through hypertext are also available through the Search Index.
(SEE “Using the Search Index” section.)
Figure 2.12 shows words that have hypertext definitions available through Gentran online help.
Figure 2.12 Access hypertext definitions by moving the cursor onto the word
and pressing Enter
EDIX400 Work with Communications EDI 04/30/08
..............................................................................
: Work with Communications (EDIX400) - Help :
: :
: revising, deleting, or viewing information can be performed from :
: this panel. For example, to create a record, use option '1' on the :
: key entry line with an ID to be added. This will advance you :
: forward into the panel in create mode, where you can actually add :
: the ID. :
: :
: Note: You can only "create", or create by "copy", Communication :
: Profile ID's that are not currently on file. All other options can :
: only be performed if a Communication Profile ID record exists. :
: :
: Related Topics :
: :
: => Additional Message Information :
: :
: ***** Field and Function Key Definitions ***** :
: More... :
: F3=Exit help F10=Move to top F11=Search Index F12=Cancel :
: F13=Information Assistant F14=Print help :
: :
:............................................................................:
Hypertext

Getting Help System Essentials
2 - 28 Gentran:Server for iSeries Communications Module Release 3.5 User Guide
Use the Search Index
The Search Index is another way to obtain online help. Here are two ways that you can access the
Search Index from Gentran:Server:
From any online help panel: press F11
From the Gentran:Server main menu (GENMAIN): select menu option 10 (Search Index)
# NOTE
The Gentran:Server Search Index is called “GENSCHIDX” and is found in the
Gentran:Server data library (G35DTA).
How to Select Topics in the Search Index
The Search Index contains an alphabetic list of all topics that are linked to hypertext throughout
the Gentran documentation. It also contains other topical entries that are found only here. You can
view topics in one of two ways:
Using either the mouse or the Tab key, position the cursor in the option field next to the
selection you would like to view or print. Type in 5 to view the topic; type 6 to print the topic.
Multiple entries may be selected at one time.
Type a key word or a portion of a key word or phrase on the command line and press the Enter
key. The system searches an internal table of key words and synonyms and displays a list of
topics that best match the words you entered. Type in 5 to view the topic; type 6 to print the
topic.
Hints for Entering Search Words
The following tips can help you take full advantage of the Search Index.
You can use either upper or lowercase letters – the search is not case sensitive.
Make the topic you enter as complete and specific as possible. For example, if you enter only
the word “job”, the system will display a long list of topics about jobs. For a shorter list of
more specific topics, you could enter “changing the position of a job queue”.
(SEE the iSeries documentation for more information.)

System Essentials Print Reports in Gentran:Server
Gentran:Server for iSeries Communications Module Release 3.5 User Guide 2 - 29
Print Reports in Gentran:Server
Reports are integrated throughout the Gentran:Server system. Report options are found throughout
the subsystems on panels wherever appropriate. Reports can also be run from the command line
using one of the command prompts (see information earlier in this chapter).
There are two general types of reports in Gentran:Server; User-generated reports and
System-generated reports, which are illustrated in the following figures.
User-generated reports
User-generated reports are optional reports that are initiated by a user request. This usually occurs
when you select option 6 (Print) or you press the F21 (Print) function key. Many of these reports
can also be generated from the command line.
System-generated reports
System-generated reports occur automatically, regardless of requests by the user. These types of
reports generally occur when activities such as purges and processing occur. At these times the
system automatically creates a report documenting the task just performed.
System-generated reports are generated automatically as a result of executing a job. Figure 2.13
shows an example of this situation. When the Purge All Communication Files (PRGALL)
command is executed, the system generates the Purge Communication reports (one for each group
of files purged).
Figure 2.13 Purge Comm reports are generated automatically
Purge All Comm Files (PRGALL)
Type choices, press Enter.
Selection Criteria for Purge . . *DATE, *DAYS, *ALL
Comm Profile Id . . . . . . . . *ALL *ALL, Comm Profile Id
+ for more values
Status . . . . . . . . . . . . . *ALL *ALL, RN, RA, PI, SN, SA, QE,H
+ for more values
Schedule Job ? . . . . . . . . . *NO *YES, *NO
Purge Method? . . . . . . . . . *TAPE, SAVF, *NONE, *CL
Bottom
F3=Exit F4=Prompt F5=Refresh F10=Additional parameters F12=Cancel
F13=How to use this display F24=More keys

Print Reports in Gentran:Server System Essentials
2 - 30 Gentran:Server for iSeries Communications Module Release 3.5 User Guide
User-generated reports generally have a panel for entering report parameters similar to the one
shown in Figure 2.14 for the Comm Profile script. This can be particularly useful for tailoring the
report to exactly the kind of information that you need.
Each report has a unique identifier. The program name of the program that generated the report is
always displayed in the top left corner of the report.
Figure 2.14 Enter parameters for the Comm Script report
By default, all reports go to the iSeries Output Queue defined for your user ID. (SEE the
“Environment Control” chapter for more information on defining Output Queues in a user’s
Environment Profile.) If you like, you can also customize the print job.
Print Comm Control Script (PRTCOM)
Type choices, press Enter.
Comm Profile Id to Print . . . . CN3BSC Comm Profile Id
Session Type to Print . . . . . RA Session Type
Bottom
F3=Exit F4=Prompt F5=Refresh F12=Cancel F13=How to use this display
F24=More keys

System Essentials Product Support and Remote Maintenance
Gentran:Server for iSeries Communications Module Release 3.5 User Guide 2 - 31
Product Support and Remote Maintenance
Sterling Commerce Software Support (SSS)
General Information
Sterling Commerce Software Support (SSS) configures a temporary, dial-up connection between
Sterling Commerce’s Customer Service iSeries system and your system. This connection allows
Sterling Commerce to directly assist you with the resolution of software problems.
The SSS connection uses display station pass-through and SNADS. This enables the support
personnel to sign on to your system and diagnose the problem. If necessary, they can retrieve
diagnostic data for further analysis or send you a program fix.
This allows Sterling Commerce to be responsive to critical situations that demand the ultimate in
customer support.
The following commands are used to configure and control SSS:
SSSCONFIG – Create objects and configuration entries needed for SSS
SSSREMOVE – Delete SSS objects and configuration entries
SSSON – Enable access to your system via SSS
SSSOFF – Disable access to your system via SSS
SSS requires a number of objects and SNADS configuration entries. These are created when you
issue the SSSCONFIG command. They will all be given names starting with SSSx, where x is the
“User qualifier character” specified on the SSSCONFIG command. The user qualifier character
you use will be determined by the support person with whom you are working.
System Requirements
These are the requirements for using SSS:
1. A user profile will be created by SSSCONFIG. The profile will be named SSSxUSER,
where x is the user qualifier character. The SSSxUSER profile will be used by Sterling
Commerce customer support to access your system.
2. A user profile with at least SECADM authority must be used to run SSSCONFIG. This is
necessary to create the SSSxUSER profile and make the necessary SNADS distribution
directory entries. Likewise, SECADM is required for SSSREMOVE.

Product Support and Remote Maintenance System Essentials
2 - 32 Gentran:Server for iSeries Communications Module Release 3.5 User Guide
3. Your system must have the subsystems QSNADS and QCMN active, and must have a
communications entry for device *ALL and mode *ANY in the QCMN subsystem. You
can see which subsystems are active by using the WRKSBS command. Both subsystems
must appear on the Work with Subsystems display. Assuming QCMN appears, you can
check for the communications entry by doing an option 5 (Display subsystem description)
and then 8 (Communications entries). SSSCONFIG will not set up the subsystems or
communications entry.
4. Your system must have a communications line and synchronous modem available. Your
best bet is to use the line and modem that are used for IBM ECS (Electronic Customer
Support). You will need to know the resource name (LINxxx) that the modem is attached
to. Tell the support person working with you the phone number to dial to connect to that
modem.
Sterling Commerce Software Support
Perform the following steps to configure and use Sterling Software Support:
1. Verify the availability of the system requirements listed previously. Tell the customer
support person the phone number to dial to connect to your modem.
2. Use the SSSCONFIG command to configure your system to answer. Specify the user
qualifier character given to you by customer support.
3. If the customer support person will need to access your Gentran:Server system, use the
“Work with Environment Control” option from the GENMAIN menu to add the user id
SSSxUSER that corresponds to the user profile created by SSSCONFIG.
# NOTE
Replace the x in SSSxUSER with the user qualifier character from step 2.
4. Wait for the connection to be initiated by customer support.
5. When customer support has finished using the connection, use the SSSOFF command to
make the SSS connection unavailable, and make your line and modem available for other
uses.
6. If customer support needs to access your machine again, use the SSSON command to
make the SSS connection available.
7. When the problem has been resolved to the point that customer support will no longer
need to access your system, delete the SSS configuration by using the SSSREMOVE
command. Specify the same user qualifier character that was used for SSSCONFIG.

System Essentials Product Support and Remote Maintenance
Gentran:Server for iSeries Communications Module Release 3.5 User Guide 2 - 33
Command Descriptions
SSSCONFIG
The SSSCONFIG command is used to configure your system to run Sterling Software Support.
This includes creating line, controller, and device descriptions, creating the SSSxUSER profile,
and adding the entries needed for SNADS. To make them easy to identify, all of the objects created
will have names starting with SSSx, where x is the user qualifier character.
When prompted using F4, the SSSCONFIG command appears as (Figure 2.15):
Figure 2.15 SSCONFIG Command
# NOTE
The SSSCONFIG command requires at least SECADM authority to run. Since not everyone
has SECADM authority, you may need to get the system administrator to run the
SSSCONFIG command.
Once configured, the system can be enabled and disabled without any special authority, so the
system administrator will not be needed again until you want to delete the SSS configuration.
Field Definitions
User Qualifier Character
This parameter specifies the character that will be used to qualify all names of objects used
for the SSS connection. For example, if the user qualifier is A, the profile SSSAUSER will
be created, and the session will use line SSSALN, controller SSSACT, and device
SSSADV. The support person you are working with will tell you the user qualifier
character to use.
Config Sterling Commerce Supt. (SSSCONFIG)
Type choices, press Enter.
User qualifier character . . . . A-Z
Comm Line Resource Name . . . . CMN01 Name
Configure this system to . . . . *ANS *ANS, *DIAL
Bottom
F3=Exit F4=Prompt F5=Refresh F10=Additional parameters F12=Cancel
F13=How to use this display F24=More keys

Product Support and Remote Maintenance System Essentials
2 - 34 Gentran:Server for iSeries Communications Module Release 3.5 User Guide
Comm Line Resource Name
This parameter specifies the iSeries line name that is attached to the modem and phone
line that you want to use. The field will initially be displayed with the default: CMN01.
Configure this System to
This parameter determines whether your system will be configured to dial or answer the
call. The Sterling Commerce system will initiate the connection to your system, so you
should always accept the default of *ANS.
Model Profile for SSSxUSER
The Model profile parameter specifies the user profile that will be copied to create
SSSxUSER. The SSSxUSER profile does not have to have any special authority and can
be modeled after any profile on your system.
) RECOMMENDATION
Ideally, the SSSxUSER profile should be modeled after the profile used by the
person working with customer support. That way, when customer support signs on
as SSSxUSER, they will have the same library list, job description, authorities, and
see the same displays and menus as the person with whom they are working.
SSSxUSER Profile Password
You may optionally specify the password that will be assigned to the SSSxUSER profile.
If you do not specify one, it will default to *USRPRF, which will make the password the
same as the user profile name. Obviously, the password you choose is a security
consideration.
As the SSSCONFIG command configures your system, progress messages will be displayed. The
command should complete in a minute or two. If it completes successfully, your system will be
waiting to answer a call from Sterling Commerce’s customer service system.

System Essentials Product Support and Remote Maintenance
Gentran:Server for iSeries Communications Module Release 3.5 User Guide 2 - 35
SSSREMOVE
The SSSREMOVE command allows you to “clean up” your system after Sterling Commerce
customer support has finished using SSS. It will delete all the objects and SNADS entries that SSS
created. It will not delete the SSS programs and commands, so SSS can be reconfigured any time
you need it.
# NOTE
This command must be run from a user profile with at least SECADM authority.
You must not be signed on as SSSxUSER when you issue the SSSREMOVE command, because it
needs to delete the user profile.
The SSSREMOVE command requires one parameter, which is the user qualifier character. Specify
the same user qualifier character that was used on the SSSCONFIG command.
SSSON
The SSSON command varies on the line (SSSxLN), controller (SSSxCT), and device (SSSxDV)
used by SSS and verifies that they achieve the proper state for connection. If they do not, a
warning message will be issued.
When the line, controller, and device are varied on, the communications line and modem are
available for SSS, and are not available for other uses.
The line, controller, and device must be varied on before the modem will answer calls and allow a
connection to be established.
The SSSON command accepts one optional parameter: the user qualifier character. You should not
need to specify this parameter.
SSSOFF
The SSSOFF command varies off the line, controller, and device and verifies that they all achieve
varied off status.
You should use the SSSOFF command after Sterling Commerce has finished using your machine.
This stops your system from answering calls, and makes the SSS connection temporarily
unavailable. If Sterling Commerce needs to access your system again, you can use the SSSON
command to make the connection available.
Varying off the configuration makes the communications line and modem available for other uses,
such as ECS. Therefore, you should always keep the configuration varied off when the SSS
connection is not needed.
The SSSOFF command accepts one optional parameter: the user qualifier character. You should
not need to specify this parameter.

Product Support and Remote Maintenance System Essentials
2 - 36 Gentran:Server for iSeries Communications Module Release 3.5 User Guide
Command Examples
Example 1: SSSCONFIG QUALIFIER(A)
This command will configure SSS to answer calls on the default, CMN01, and will create
a user profile called SSSAUSER with password SSSAUSER. The SSSAUSER profile
will be a copy of the profile that issues the SSSCONFIG command.
After completing the SSSCONFIG command, the SSS system will be varied on and
waiting to answer a call.
# NOTE
The user profile issuing the SSSCONFIG command must have at least SECADM
authority. Therefore, the SSSAUSER profile in this example would be created with
equivalent authority because the MODEL parameter was allowed to default to
*CURRENT.
Example 2: SSSCONFIG QUALIFIER(B) LINE(LIN031) MODEL(JOE)
This command will configure SSS to answer calls on LIN031. It will create an
SSSBUSER profile that is a copy of the user profile JOE, with password SSSBUSER.
After completing this command, the SSS system will be varied on and waiting to answer a
call.
Example 3: SSSREMOVE QUALIFIER(A)
This command will delete all SSSA objects and SSSA SNADS configuration entries from
your system.

Chapter
Gentran:Server for iSeries Communications Module Release 3.5 User Guide 3 - 1
3 Environment Control
In this Chapter
¾What is Environment Control? ........................................................................................ 3-1
¾What Does the Environment Control Subsystem Do?..................................................... 3-2
¾Panel Quick Reference..................................................................................................... 3-2
¾Environment Control Panels ............................................................................................ 3-3
¾Define the Environment Profile ....................................................................................... 3-7
¾Define the Security Profile............................................................................................... 3-8
¾Reports ........................................................................................................................... 3-14
¾Common Questions........................................................................................................ 3-17
What is Environment Control?
Environment Control is an administration tool for creating and managing Gentran:Server user
profiles for each user on the system. In this chapter, the term “user profile” refers to the
combination of these two files:
1. Environment profile – parameters (such as the User ID, Name, Division, Output Queue,
Language ID, Date Format, etc.) that affect the environment in which the user runs jobs
2. Security profile – authority codes that define which Gentran:Server subsystems and
functions the user can access and whether the user has privilege to view data only or to
update data

What Does the Environment Control Subsystem Do? Environment Control
3 - 2 Gentran:Server for iSeries Communications Module Release 3.5 User Guide
What Does the Environment Control
Subsystem Do?
The Environment Control subsystem provides these capabilities:
Add new users by creating a new user profile or copying an existing one.
View, modify, or delete existing user profiles.
Define environment options that control how the user’s jobs run.
Identify which subsystems and functions each user can access.
Define each user’s update privileges for the subsystems and/or functions to which they have
access.
Panel Quick Reference
The following table gives the purpose and access methods for the primary Environment Control
panels.
Panel Name Purpose Access Methods
EDIX200-FMT01
Work with
Environment Control
Create, revise, copy, delete, or
view a user profile.
Select option 3 on the GENMAIN
Menu.
Enter EXCPGM EDIX200 on the
command line.
EDIX201-FMT01
Environ. Control
Define the user’s environment
profile.
Select an option and User ID on
panel EDIX200-FMT01.
Enter EXCPGM EDIX201 on the
command line.
EDIX201-CTL02
Environ. Control
Define the user’s security
profile.
Press Enter or F8 on panel
EDIX201-FMT01.
Press F10 in create mode on panel
EDIX201-FMT01.
PRTENV
Print Environment
Control
Print an environmental control
profile
Select option 6 (Print) on panel
EDIX200-FMT01.
Press F21 (Prt Env) on panel
EDIX201-FMT01 or
EDIX201-CTL02.
Enter PRTENV on the command
line.

Environment Control Environment Control Panels
Gentran:Server for iSeries Communications Module Release 3.5 User Guide 3 - 3
Environment Control Panels
Access the Subsystem
To access the Environment Control subsystem, select option 3 (Work with Environment Control)
on the GENMAIN menu, as shown in Figure 3.1.
Figure 3.1 Access the Environment Control subsystem from GENMAIN
Manage User Profiles
After you select the Environment Control subsystem on the GENMAIN menu, the next panel that
appears is the Work with Environment Control panel (EDIX200-FMT01). This panel lists all User
IDs currently defined on the Gentran:Server system.
# NOTE
All Gentran:Server User IDs must be valid User IDs on the iSeries system. See your Security
Officer (QSECOFR) for the iSeries User IDs for your site.
GENMAIN Gentran:Server for iSeries Communications 3.5
System: ISDDEV01
Select one of the following:
1. Communications Menu (GENCOM)
2. Work with Job Scheduler
3. Work with Environment Control
4. System Configuration Menu (GENSYSCFG)
10. Gentran:Server Search Index
13. Gentran File Tracking Menu (GENFILETRK)
90. Sign off
Bottom
Selection or command
===> 3
F3=Exit F4=Prompt F9=Retrieve F12=Cancel F13=User Support
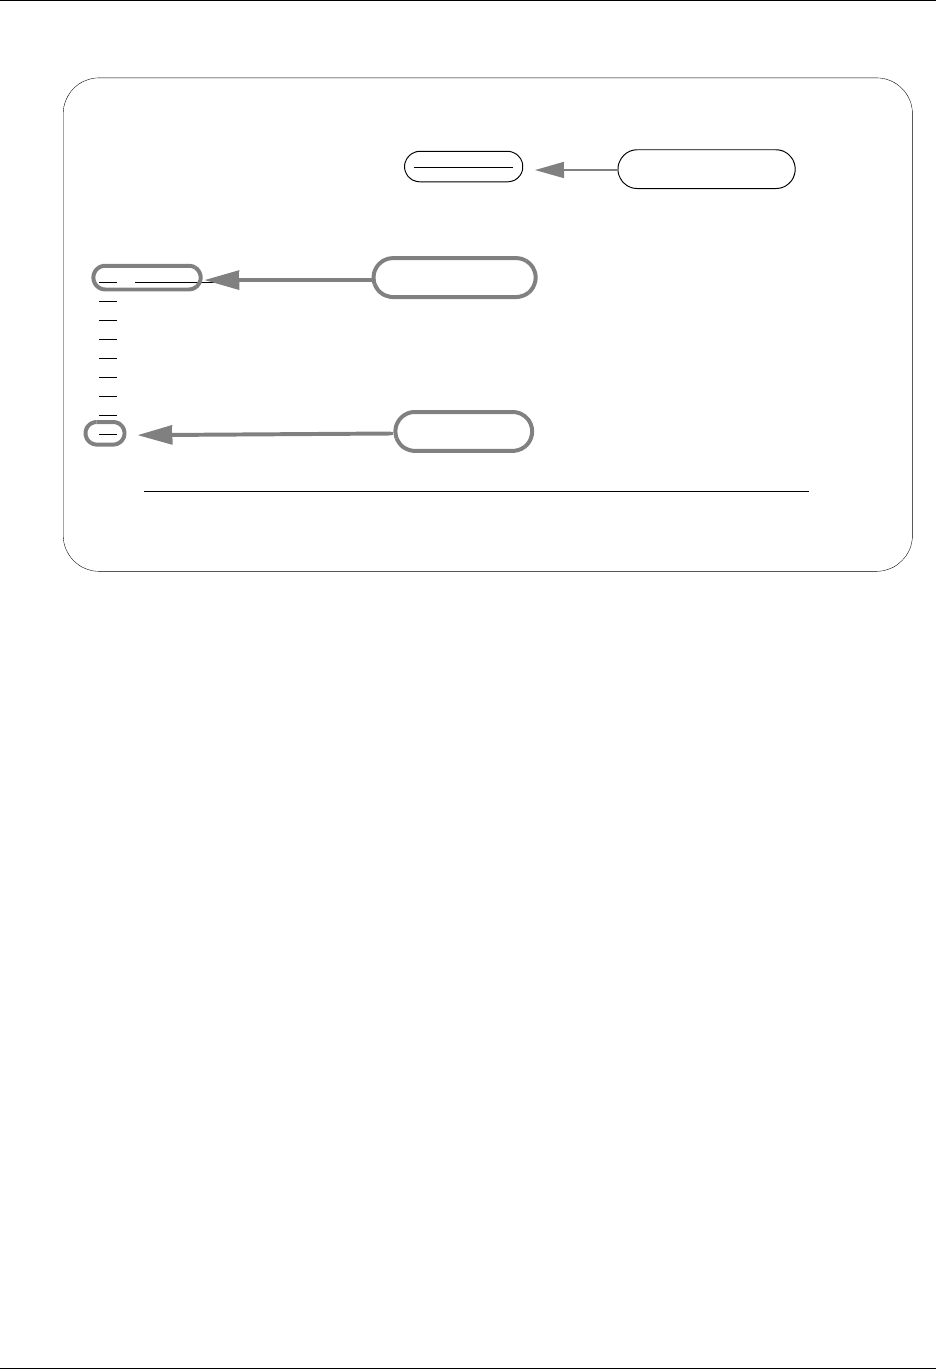
Environment Control Panels Environment Control
3 - 4 Gentran:Server for iSeries Communications Module Release 3.5 User Guide
Figure 3.2 shows panel EDIX200-FMT01 and three ways to use it.
Figure 3.2 Work with Environment Control panel (EDIX200-FMT01)
Select an Option
The Work with Environment Control panel (EDIX200-FMT01) has five options:
1 = Create a new user profile
2 = Revise an existing user profile
3 = Copy an existing user profile to create a new user profile
4 = Delete an existing user profile
5 = View an existing user profile
To create a user profile, you must specify a valid iSeries user profile that is not yet defined in
Gentran:Server. All other options (revise, copy, delete, and view) can be performed only after a
User ID has been created in Gentran:Server.
EDIX200 Work with Environment Control EDI 04/30/08
FMT01 pgmlib: G3X5PGM dtalib: G3X5DTA 12:00:00
Position to User ID. . . . . . . .
Type option (and Information), press Enter.
1=Create 2=Revise 3=Copy 4=Delete 5=View 6=Print
Opt User ID Name Init Div
EDI
BXK Kay, Brendan X. BXK 000
CBCOMM carol, b CB 000
CF Fry, Cheryl CF 000
CSG Grear, Christy S. CSG 000
CSGCHK GREAR, CH S. CSG 000
CSGLIMIT TESTING, TEST S. CSG 000
CSGSEC GREAR, CHRISTY S. CSG 000
DCS SMITH, DON C. DCS 000
More...
Parameters or command
===>
F1=Help F3=Exit F12=Cancel F15=Sort F24=More Keys
Position to field
Key Entry Line
Option field

Environment Control Environment Control Panels
Gentran:Server for iSeries Communications Module Release 3.5 User Guide 3 - 5
Specify a User ID
There are three ways to specify a User ID on panel EDIX200-FMT01:
Use the option field
Move the cursor next to the User ID you want to select, type the appropriate option (2, 3, 4, or 5)
in the option field and press Enter.
Use the key entry line
Type the appropriate option (1, 2, 3, 4, or 5) and the User ID on the key entry line and press Enter.
When creating a new User ID from scratch, the key entry line must be used.
Use the Position to field
Type a complete or partial User ID in the Position to User ID field and press Enter. The system
displays the closest match at the top of the list of users. To select a User ID, you still have to use
one of the methods above.
Create a User Profile
Use this option if you are creating a new User Profile. If you are adding a user who will have the
same security profile as a current user on the system, it might be easier to use option 3 (Copy).
1. Type 1 and the new User ID on the key entry line and press Enter. (The value you enter
for User ID must be a valid iSeries User ID.)
2. The system displays the Environment Control panel (EDIX201-FMT01), which defines
the user’s environment profile. (This panel is shown later in the chapter.) Notice that the
field entries are the environment parameters from the user’s iSeries user profile. Change
the appropriate fields and press Enter, F8 (Next), or F10 (Update).
When you create a new Gentran:Server User ID through the copy option, the system
copies the specified environment profile as it currently exists. The copy option does not
retrieve the parameters from the user’s iSeries user profile.
3. The system advances to the Environment Control panel (EDIX201-CTL02), which
defines the user’s Security Profile. (This panel is also described later in the chapter.)
Change the appropriate authority codes and press F10 (Update).
4. The system adds the new Gentran:Server User ID and returns to the Work with
Environment Control panel (EDIX200-FMT01).

Environment Control Panels Environment Control
3 - 6 Gentran:Server for iSeries Communications Module Release 3.5 User Guide
Revise a User Profile
1. Type 2 in the option field next to the appropriate User ID and press Enter.
—OR—
Type 2 and the User ID on the key entry line and press Enter.
2. The system displays the Environment Control panel (EDIX201-FMT01), which defines
the Environment Profile. (This panel is shown later in the chapter.) Type the new
information in the appropriate fields and press Enter or F8 (Next).
3. The system displays the Environment Control panel (EDIX201-CTL02), which defines
the user’s Security Profile. (This panel is also described later in the chapter.) Change the
appropriate authority codes and press F10 (Update).
Copy an Existing User Profile
1. Type 3 in the option field next to the appropriate User ID and press Enter.
—OR—
Type 3 and the existing User ID on the key entry line and press Enter.
2. A pop-up window appears with a single field “Copy To”. Enter the User ID for the new
User Profile in this field. (Remember that you must enter a valid iSeries User ID.) The
system displays panel EDIX201-FMT01.
3. If you need to make changes to the new User Profile, follow Steps 2, 3, and 4 under
“Creating a User Profile”.
Delete a User Profile
1. Type 4 in the option field next to the appropriate User ID and press Enter.
—OR —
Type 4 and the User ID on the key entry line and press Enter.
2. Confirm that you want to delete the record by pressing F11 (Delete). To cancel the Delete
function, press F12 (Cancel).
View an Existing User Profile
1. Type 5 in the option field next to the appropriate User ID and press Enter.
—OR—
Type 5 and the User ID on the key entry line and press Enter.

Environment Control Environment Control Panels
Gentran:Server for iSeries Communications Module Release 3.5 User Guide 3 - 7
2. The system displays the Environment Control panel (EDIX201-FMT01), which defines
the environment profile and is described later in the section.
3. To view the security profile, press Enter or F8 (Next) and the system displays the
Environment Control panel (EDIX201-CTL02), which is described later in the section.
Define the Environment Profile
The Environment Control panel (EDIX201-FMT01), as shown in Figure 3.3, defines a user’s
environment profile. The fields on this panel determine the controlling environment under which
processing runs.
Figure 3.3 Environment Control panel (EDIX201-FMT01)
When you first access panel EDIX201-FMT01 to create a new user, the fields contain the run time
parameters from the user’s iSeries user profile. (SEE the iSeries documentation or your Security
Officer (QSECOFR) for more information.) Any values you change on this panel will override the
user’s iSeries options for Gentran jobs that are executed.
EDIX201 Environment Control EDI 04/30/08
FMT01 12:00:00
User ID. . . . . . . . . . . . . . EDI
Division . . . . . . . . . . . . . 000
Last Name. . . . . . . . . . . . . Ingram
First Name . . . . . . . . . . . . Elizabeth
MI . . . . . . . . . . . . . . . . D
Initials . . . . . . . . . . . . . EDI
Job Description. . . . . . . . . . GENTRAN
Print Device . . . . . . . . . . . QPRINT
Output Queue . . . . . . . . . . . QPRINT
Message Queue. . . . . . . . . . . EDI
Job Queue. . . . . . . . . . . . . QBATCH
Print File . . . . . . . . . . . . QSYSPRT
Gentran:Server Program Library . . G35PGM
Gentran:Server Data Library. . . . G35DTA
Date Format/Date Separator . . . . *MDY /
Language ID. . . . . . . . . . . . *SYSVAL
F1=Help F8=Next F12=Cancel F24=More Keys

Environment Control Panels Environment Control
3 - 8 Gentran:Server for iSeries Communications Module Release 3.5 User Guide
Field Information
This section contains information about specific fields, and in some cases, recommendations for
settings.
Output Queue Field
For the Output Queue field, we recommend you specify a queue that is not associated with an
active writer. This allows both system-generated and user-generated reports to be spooled rather
than printed immediately. At any time, you can print the spooled output by moving it to a queue
associated with an active writer. (SEE the iSeries online help for more information about queues,
devices, and printing.)
Date Format and Date Separator Fields
The default value in both the Date Format and Date Separator fields is *SYSVAL. When *SYSVAL
is used, Gentran:Server retrieves the date format from the system value in QDATFMT and the date
separator from the system value in QDATSEP. To see a list of valid options for the current field,
press F4 (Prompt). If new values are specified, the following dates are impacted by these settings.
Date fields on panels (excluding commands, which are controlled through the system
configuration file – see Note below)
Report dates
# NOTE
To apply these date settings to command panels, use *ENVCTL as the value in the ‘Set
Gentran Date Formats for Commands’ option on the system configuration file. (SEE the
“System Configuration” chapter in this guide for more information.)
Define the Security Profile
Gentran:Server uses a hierarchical security scheme based on authority codes that are defined at
three levels: subsystem, function, and data. These authority codes determine both the user’s system
access and data update privileges.
The Environment Control panel (EDIX201-CTL02) defines a user’s security profile. This panel
allows the EDI Coordinator to control each user’s access to whole subsystems and to individual
functions within subsystems. Panel EDIX201-CTL02 also determines the data privileges (view
only or update) for the subsystems and/or functions to which the user has access.
)RECOMMENDATION
The EDI Coordinator (System Administrator) and iSeries Security Officer (QSECOFR)
should be the only ones with update access to the Environment Control panel
(EDIX201-CTL02). This is necessary to protect the integrity of the system.

Environment Control Environment Control Panels
Gentran:Server for iSeries Communications Module Release 3.5 User Guide 3 - 9
Figure 3.4 shows the primary components on the Environment Control panel (EDIX201-CTL02).
Figure 3.4 Environment Control panel (EDIX201-CTL02)
# NOTE
All the subsystems in the Gentran:Server product are displayed even if you only have the
Communications Module installed.
As you work with panel EDIX201-CTL02, keep in mind that you can use online help to display
the valid authority codes (and their meanings) for each level. To do this, move the cursor to the
authority code field and press F1 (Help). To select a code, press F4 (Prompt).
When you create a new user profile, all the authority codes are initially set to 1. To change the
authority codes, move the cursor and type over the existing value. When you finish making
changes, press Enter or F10 (Update). Press Enter to resequence information on the panel (the
subsystem, function, and data level entries) based on the new authority codes you typed on the
panel. Press F10 (Update) to confirm the add of the new user profile and return to the Work with
Environment Control panel (EDIX200-FMT01).
EDIX201 Environment Control EDI 04/30/08
CTL02 12:00:00
User ID. . . . . . . . . . . . . . EDI
Name . . . . . . . . . . . . . . . Elizabeth D. Ingram
Subsystem Level Function Name
1 Application Definition Subsystem
1 Application Definition Data
1 Audit Subsystem
1 Audit Data
1 Communications Subsystem
1 Communications Data
1 Environment Control Subsystem
1 Environment Control Data
1 Message Center Subsystem
1 Message Center Data
1 Partner Subsystem
1 Partner Data
1 Processing Subsystem
1 Processing Data
More...
F1=Help F4=Prompt F7=Back F10=Update F12=Cancel F24=More Keys
Authority Code

Environment Control Panels Environment Control
3 - 10 Gentran:Server for iSeries Communications Module Release 3.5 User Guide
Define Authority Codes
To fully explain the authority codes, we must first define the other fields on the Environment
Control panel (EDIX201-CTL02).
Subsystem
This field lists the subsystems (the asterisks indicate subsystems included in the Communications
Module):
Application Definition
Audit
Communications*
Environment Control*
Partner
Gentran:Server Processing
SAP Extension
Standards
Gentran:Server System Administration (*Job Scheduler and System Configuration)
Transaction Mapping
Viewpoint
# NOTE
The Utilities subsystem also appears on the list of Gentran:Server subsystems on the
Environment Control panel (EDIX201-CTL02). This subsystem is for internal use only. The
authority code should be set to 1.
Level
This field defines the scope of the authority code. Security can be defined for these three levels:
Subsystem – The authority code applies to accessing the whole subsystem identified
underneath “Subsystem” on the panel.
Function – The authority code applies to accessing the part of the subsystem identified
underneath “Function Name” on the panel. Function names are either panel names (like Work
with Application Definition and Application Fields) or F4 (Prompt) windows such as
Application Definition Search. Function levels appear on the panel only if the Subsystem level
authority code is 2 (partial access). The valid values for authority codes are explained under
“Authority Codes”.
Data – The authority code applies to the data on the panels within the whole subsystem (if the
Subsystem level authority code is 1) or within a function (if the Subsystem level authority
code is 2). Data levels do not appear on the panel if the Subsystem level authority code is 3 (no
access).

Environment Control Environment Control Panels
Gentran:Server for iSeries Communications Module Release 3.5 User Guide 3 - 11
Function Name
When the Level field is set to Function, there is an entry in the Function Name field, otherwise this
field is blank. The function name consists of the program or command name and a corresponding
description.
Authority Codes
The authority codes vary in meaning based on whether the Level field (two columns to the right of
the authority code) contains “Subsystem”, “Function”, or “Data”.
Subsystem Level Authority Codes
Subsystem level can have an authority code of 1, 2, or 3, as explained below.
1 ALL – The user has access to the entire subsystem. When the Subsystem level authority
code is 1, the panel does not display individual functions since the user has access to all
functions in the subsystem. The panel displays the Data level authority code, which
determines the user’s data update privileges for the given subsystem. In the security
profiles for the EDI coordinator and Security Officer (QSECOFR), every Subsystem level
authority code should be 1.
2 PARTIAL – The user’s access to the subsystem is defined on a function-by-function basis.
Access is determined by the authority code on each line that contains Function in the
Level field. (SEE “Function” below for details.) When the Subsystem level authority code
is 2, the panel displays all the functions in the subsystem, with an authority code
associated with each one. The panel also displays the Data level authority codes, which
determines the user’s data update privileges for the subsystem.
# NOTE
The Subsystem level authority code must be set to 2 (PARTIAL) if you want to define access
at the Function level (on a function-by-function basis).
3 NONE – The user cannot access the subsystem. (The subsystem still appears on the
GENMAIN menu, but the user cannot access the subsystem panels.) When the Subsystem
level authority code is 3, the panel does not display Function level or Data level authority
codes since they have no meaning in this case.
Function Level Authority Codes
Function level can have an authority code of 1 or 3, as explained below.
1 ALL – The user can access the function listed under “Function Name”.
3 NONE – The user cannot access the function listed under “Function Name”.

Environment Control Panels Environment Control
3 - 12 Gentran:Server for iSeries Communications Module Release 3.5 User Guide
Data Level Authority Codes
# NOTE
The Data level authority code determines the user’s data update privileges for the subsystem.
To define Data level privileges, the Subsystem level authority code must be set to 1 (ALL) or
2 (PARTIAL).
If the Subsystem level authority code is 1, then the Data level code applies to the data on any
panel within the whole subsystem.
If the Subsystem level authority code is 2, then the Data level authority code applies to data
on only those panels within the given function.
Data level can have an authority code of 1, 2, or 3, as explained below.
1 ALL – The user can update the data if the Update Allowed field is set to Y. The user can
change the Update Allowed field.
2 PARTIAL – The user can update the data if the Update Allowed field is Y. The user has
display only rights if the Update Allowed field is N. The user cannot change the Update
Allowed field.
3 NONE – The user can only display the data. The user cannot change the data or the
Update Allowed field.

Environment Control Environment Control Panels
Gentran:Server for iSeries Communications Module Release 3.5 User Guide 3 - 13
Quick Reference for Setting Authority Codes
The following table gives an overview of the security scheme. It shows the possible combinations
of authority codes and their meanings.
Subsystem
Level Authority
Code:
Function
Level Authority
Code:
Data
Level Authority
Code:
User’s Rights:
1 — 1 Access all functions within
the subsystem. Can update
data if the Update Allowed
field is Y. Can change the
Update Allowed field.
1 — 2 Access all functions within
the subsystem. Can update
data if the Update Allowed
field is Y. Cannot change the
Update Allowed field.
1 — 3 Access all functions within
the subsystem with view only
privileges.
2 1 1 Access the given function.
Can update data if the Update
Allowed field is Y. Can
change the Update Allowed
field.
2 1 2 Access the given function.
Can update data if the Update
Allowed field is Y. Cannot
change the Update Allowed
field.
2 1 3 Access the given function
with view only privileges
23—Cannot access the function.
3 ——Cannot access the subsystem.

Reports Environment Control
3 - 14 Gentran:Server for iSeries Communications Module Release 3.5 User Guide
Reports
EBDI201—Environment Control Report
Contents of the Report
The Environment Control Report contains information about the user’s profile and authority
assigned to each subsystem.
How to Identify the Report
The identifier “EBDI201” displays in the upper left corner of the report. The report title
“ENVIRONMENT CONTROL PROFILE REPORT” displays in the center at the top of the
report. The identifier “EBDI201” also displays in the User Data field associated with the spooled
report in the Output Queue.
How to Generate the Report
This is a user-generated report. It can be generated by selecting option ‘6’ (Print) on the Work with
Environment Control panel (EDIX200-FMT01) and entering the appropriate information on the
Print Environment Control (PRTENV) panel. It can also be generated by pressing F21 (Prt Env) on
the environment control panels.
Special Considerations
Like all other Gentran:Server reports, the Environment Control Profile Report automatically goes
to the Output Queue defined for the user running the job.

Environment Control Reports
Gentran:Server for iSeries Communications Module Release 3.5 User Guide 3 - 15
Sample Report
EBDI201 RUN DATE 04-30-08 ENVIRONMENT CONTROL PROFILE REPORT RUN TIME 16:40:06 PAGE 1
USER ID. . . . . . . QSECOFR JOB DESCRIPTION. . . GENTRAN PRINT FILE. . . . . . . . . . . . . QSYSPRT
DIVISION . . . . . . 000 PRINT DEVICE . . . . PRTHOLD GENTRAN:SERVER PROGRAM LIBRARY. . . G3X5PGM
LAST NAME. . . . . . Officer OUTPUT QUEUE . . . . PRTHOLD GENTRAN:SERVER DATA LIBRARY . . . . G3X5TSTDTA
FIRST NAME . . . . . Security MESSAGE QUEUE. . . . QSECOFR DATE FORMAT/DATE SEPARATOR. . . . . *SYSVAL *SYSVAL
MIDDLE INITIAL . . . JOB QUEUE. . . . . . QBATCH LANGUAGE ID . . . . . . . . . . . . ENU
INITIALS . . . . . . SEC
SEC SUBSYSTEM LEVEL FUNCTION NAME
------------------------------------------------------------------------------------------------------------------------------------
1 Application Definition Subsystem
1 Application Definition Function APPCPY Copy Application ID
1 Application Definition Function APPRENBR Application Renumber
1 Application Definition Function APPSYNCH Application Synchronization
1 Application Definition Function EDIX550 Work with Application Definition
1 Application Definition Function EDIX551 Application Definition Search
1 Application Definition Function EDIX552 Application Definition
1 Application Definition Function EDIX553 Application Records
1 Application Definition Function EDIX554 Application Fields
1 Application Definition Function EDIX556 Application Key Structure
1 Application Definition Function EDIX556S Application Field Key Prompt
1 Application Definition Function EDIX559 Application Partner Reference
1 Application Definition Function EDIX559S Application Partner Reference Prompt
1 Application Definition Function EDIX560 Application Envelope Definition
1 Application Definition Function EZAPPDEF ez Application Definition
1 Application Definition Function EZAPPDEF2 ez Application Definition
1 Application Definition Function PRTAPP Print Application Definition
1 Application Definition Data
1 Audit Subsystem
1 Audit Function AUDITPURGE Purge Audit (AUDITPURGE)
1 Audit Function EBDIEDIT Edit Extracted Edi Data for Requeue
1 Audit Function EDIX251 Work with Audit Interchange Status
1 Audit Function EDIX252 Work with Audit Group Status
1 Audit Function EDIX253 Work with Audit Transaction Status
1 Audit Function EDIX254 Audit Acknowledgements
1 Audit Function EDIX255 Audit Deletes
1 Audit Function EDIX256 Audit Interchange Search
1 Audit Function EDIX257 Audit Group Search
1 Audit Function EDIX259 Work with Selected Audit Records
1 Audit Function EDIX451 Audit Interchange Data Inquiry
1 Audit Function EDIX452 Audit Group Data Inquiry
1 Audit Function EDIX453 Audit Transaction Data Inquiry
1 Audit Function EDIX454 Segment Inquiry
1 Audit Function EDIX455 Data Element Definition
1 Audit Function GENAUD Audit Menu
1 Audit Function PRGAUD Purge Audit
1 Audit Function PRGNET Purge Network Status File
1 Audit Function PRTAUD Print Audit
1 Audit Function PRTNETSTS Print Network Status Report
1 Audit Function REQUEUE Requeue EDI Data from Audit
1 Audit Function RTVAUD Retrieve Audit
1 Audit Function RTVNET Retrieve Network Status File
1 Audit Function SLTAUD Audit Search Utility
1 Audit Data
1 Communications Subsystem
1 Communications Function CHGDUP Change Duplex
1 Communications Function CHGNRZI Change NRZI Setting
1 Communications Function CHGPHNUM Change Phone Number
Sterling Commerce

Reports Environment Control
3 - 16 Gentran:Server for iSeries Communications Module Release 3.5 User Guide
Fields on the Environment Control Profile Report (EBDI201)
Field Name Description
Report Header
User ID Displays the user ID.
Job Description Specifies the job description under which the Gentran server jobs are
executed.
Print File Displays the type of output for printed document.
Division Displays the division.
Print Device Displays the printer where the output is directed.
Gentran:Server
Program Library
Name of the library where all Gentran:Server programs are stored.
Last Name Displays the user’s last name.
Output Queue Specifies the name of the output queue to which the output files will be
printed.
Gentran:Server Data
Library
Specifies the name of the library where all Gentran:Server data files are
stored.
First Name Displays the user’s first name.
Message Queue Specifies the name of the queue where the messages are stored.
Date Format/
Date Separator
Specifies the format and separator used when displaying dates on
screen and in printed reports.
Middle Initial Displays the user’s middle initial.
Job Queue Specifies the name of the job queue to which the jobs are submitted.
Language ID Identifies the language-specific message file for Gentran processing.
Initials Displays the three-letter initials of the user.
Detail Section
Sec(urity) Code Identifies whether the user can access a subsystem or function.
Subsystem Identifies the name of the subsystem.
Level Displays the level of security.
Function Displays the name of the program or command.
Name Displays a description of the program or command.

Environment Control Common Questions
Gentran:Server for iSeries Communications Module Release 3.5 User Guide 3 - 17
Common Questions
What if I want two Gentran:Server User IDs?
If you are both the QSECOFR (or EDI Coordinator) and a Gentran:Server user, you may want two
User IDs with different Security Profiles. Another reason for two User IDs is to define two
different environment profiles (i.e. different job descriptions or division codes).
To have two Gentran:Server User IDs, you need two separate iSeries User IDs and then follow the
steps in “Creating a User ID.”
How can I create a uniform running environment for multiple
users?
When multiple users are using Gentran:Server, it is typical for each user to have their own
environment and security profile for testing. For production processing in this scenario, it is more
appropriate to set up a unique user that will always have the same environment parameters. You
may choose to create an iSeries user profile called “COM” and then create a Gentran:Server user
profile for this User ID with specific environment parameters. This User ID could be used for
scheduling jobs or submitting jobs manually for all production work.
The dates on command panels are showing in a different
format from the dates on panels and reports – why are they
different?
The format for dates displayed on panels (other than commands) is controlled through each user’s
Gentran:Server environment profile. The date format for command panels is controlled by the
Gentran:Server System Configuration file. If you prefer to have each individual user’s
environment profile settings apply, however, make *ENVCTL the value in the ‘Set Gentran Date
Format’ option in the system configuration file.
Previously, date parameters on commands were defined to use IBM’s *DATE attribute to allow for
automatic date validation, which required the date to be entered in the job-date format. With the
Gentran:Server for iSeries Communications Module Release 3.1 and higher, you can decide which
format to use when entering dates on commands.
# NOTE
See “Define the Environment Profile” on page 7 in this chapter for more information about
setting up environment profiles, and see the “System Configuration” chapter in this guide for
more information about working with the system configuration file.

Common Questions Environment Control
3 - 18 Gentran:Server for iSeries Communications Module Release 3.5 User Guide

Chapter
Gentran:Server for iSeries Communications Module Release 3.5 User Guide 4 - 1
4Using Communications
In this Chapter
Gentran:Server for iSeries Communications Module allows you to configure, operate, and manage
communications between your system and third-party networks or direct communication partners.
This chapter includes specific information and exercises to help you set up and manage your
communications. This chapter covers the following topics:
¾What Is Communications?............................................................................................... 4-2
¾What Does the Communications Subsystem Do?............................................................ 4-2
¾Take a Closer Look at Communications .......................................................................... 4-3
¾Panel Quick Reference..................................................................................................... 4-5
¾Access the Communications Subsystem........................................................................ 4-12
¾Communications Setup .................................................................................................. 4-15
• Communication Profiles.......................................................................................... 4-16
• Communications Session Control Scripts ............................................................... 4-28
• Network Scripts....................................................................................................... 4-38
¾Copy Profiles and Scripts............................................................................................... 4-58
¾Operations and Management of Communications......................................................... 4-64
• Initiate Communication Sessions ............................................................................ 4-65
• Monitor Active Communication Sessions............................................................... 4-71
• View the Communications History Log.................................................................. 4-73
• Manage the Outbound Queue.................................................................................. 4-79
• Manage the Inbound Queue..................................................................................... 4-92
• Purge the Communications Files........................................................................... 4-114
¾Use the ezCOMM Command....................................................................................... 4-123
¾Reports ......................................................................................................................... 4-126
¾Common Questions...................................................................................................... 4-129

What Is Communications? Using Communications
4 - 2 Gentran:Server for iSeries Communications Module Release 3.5 User Guide
What Is Communications?
Communications is the process by which you send/receive data to/from value-added networks
(VANs) or direct communication partners. To do this, you must define communication profiles,
write and/or copy scripts, and initiate communication sessions. Successful communications
requires hardware information related to modems, dialers, and lines, as well as software related
information such as options regarding record separators and blank suppression.
What Does the Communications Subsystem
Do?
The Communications subsystem provides the following capabilities:
Create, copy, and maintain Communication Profiles and scripts (predefined profiles and
scripts are provided for major EDI networks).
Initiate and terminate communication sessions.
Monitor active communication sessions.
Manage the data in the Inbound and Outbound Queues (repositories for the EDI data that is
sent and received).
View the Communication History log to see the results of communication sessions.
Purge and retrieve the History log and the Inbound and Outbound Queues.
Perform Dynamic Scripting and Remote Command Support.
Continuously process communication sessions.
Perform a Communications Trace for troubleshooting.

Using Communications Take a Closer Look at Communications
Gentran:Server for iSeries Communications Module Release 3.5 User Guide 4 - 3
Take a Closer Look at Communications
The Communications feature can be divided into two major components: the communications
setup (profiles and scripts) and the operations and management of communications.
Communications Setup
Gentran:Server provides predefined communication profiles (comm profiles) and scripts for the
major EDI networks. When setting up for your communication sessions, you can modify one of
these predefined profiles or create a new profile with the information about your configuration.
The profile contains information (i.e., protocol, manual or auto dial, the number to dial) necessary
to establish and use the link to the remote system. The script defines the “conversation” that the
two systems conduct over the communications line.
Gentran:Server provides a utility, the Network Profile feature, that can be used with most of the
predefined profiles and scripts for quick “customizing.” It recognizes the network values and
replaces them with your identifiers supplied by the VAN, such as the Mailbox ID and the
password. This utility can be used with any profile classified as a “network profile.”
# NOTE
Due to the uniqueness of each implementation, the predefined Communication scripts are
provided as examples only and are intended to assist in getting you started. Please read the
User Guide provided by your value-added network or communication partner to ensure that
the setup correctly reflects their specific requirements.
Operations and Management of Communications
Operations refers to the initiation and monitoring of communication sessions. A “session” is when
the actual transfer of data occurs. Each session is a planned connection between your system and a
specific network or a particular direct communication partner. The Start Communications Session
(STRCOMSSN) command can be run one of three ways:
Scheduled to run in batch at a later time
Submitted to run in batch immediately
Executed interactively (immediately)
# NOTE
SEE the “Job Scheduler” chapter in this guide for more information on scheduling
communication sessions.
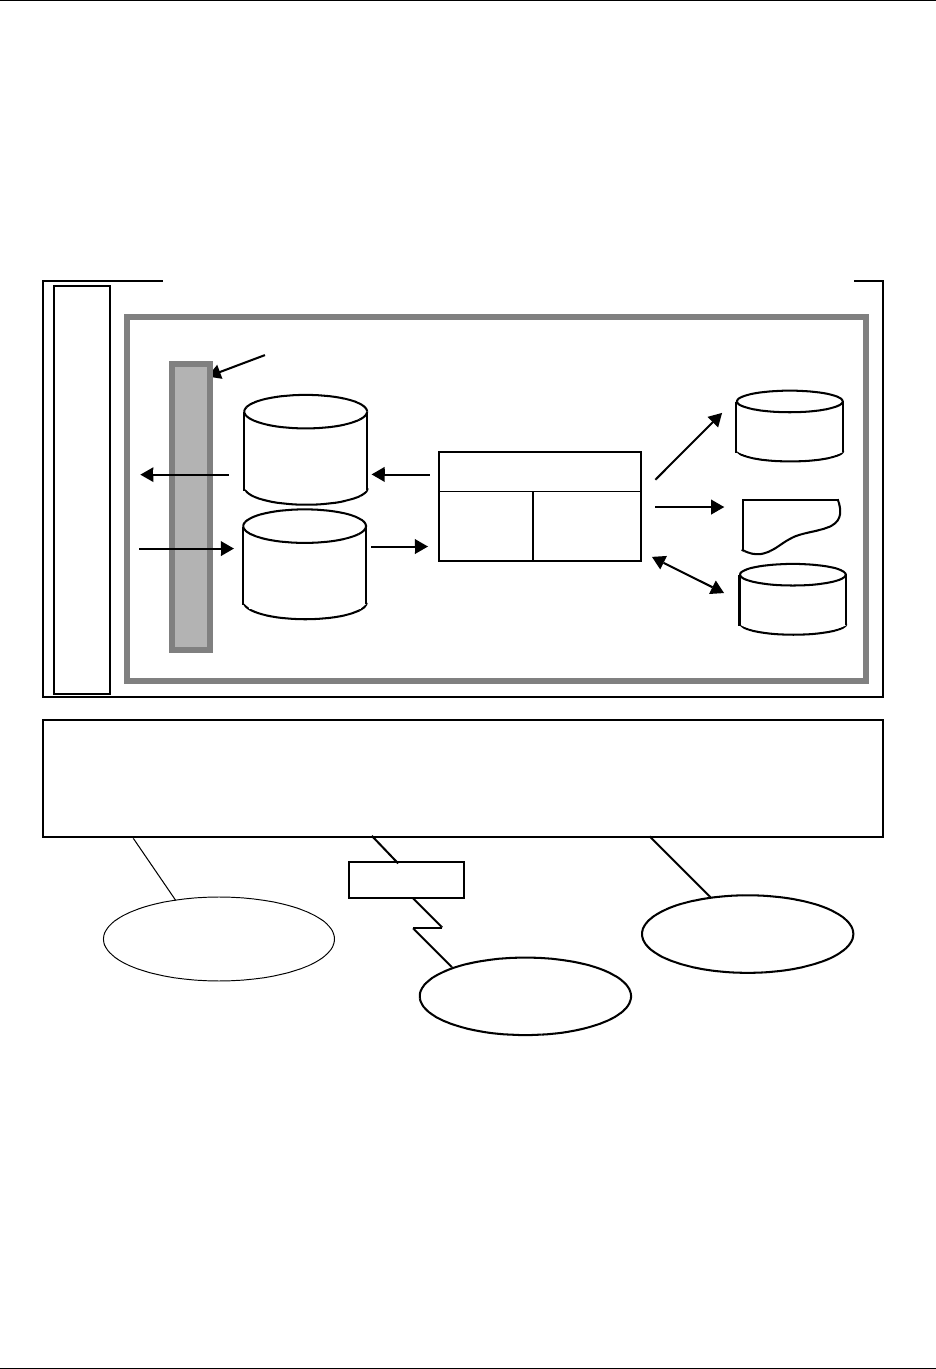
Take a Closer Look at Communications Using Communications
4 - 4 Gentran:Server for iSeries Communications Module Release 3.5 User Guide
Active sessions can be monitored from within Gentran:Server allowing the user to perform all
operational tasks on the session from a central location. Effective management of the
communications data is an essential process in the day-to-day operation of your Communications
system. This includes managing and controlling the actual data to queue, de-queue, view, purge,
and retrieve. Details of all comm sessions can be viewed in the History log and later purged.
Periodic purges help to maintain efficient throughput.
Figure 4.1 depicts the Communications subsystem.
Figure 4.1 Communications Subsystem Diagram
Trading Partner
VAN
(Leased Line)
(Switched Line)
History
User File
SPOOL
Outbound
Queue
Gentran:Server for iSeries Communications Module
Modem
Communications
Profile Script
WAN/Internet
U
S
E
R
A
P
P
L
I
C
A
T
I
O
N
S
iSeries
Inbound
Queue
IFS Gateway

Using Communications Panel Quick Reference
Gentran:Server for iSeries Communications Module Release 3.5 User Guide 4 - 5
Panel Quick Reference
The following table gives the purpose and access method for all of the Work with Communication
panels in this chapter.
Panel Name Purpose Access Methods
Gentran:Server
Communications Menu
(GENCOM)
Access all communications
functions.
Select option 1 on the GENMAIN menu.
Enter GO GENCOM on the command line.
EDIX400-FMT01
Work with
Communications
Access all Communications
functions.
Select option 1 on the GENCOM menu.
Enter EXCPGM EDIX400 on the command
line.
EDIX401-FMT01
Communication Profile
— Part 1
Define the Protocol and
FIFO/LIFO method.
Select an option (1-5) on panel
EDIX400-FMT01.
Enter EXCPGM EDIX401 on the command
line.
EDIX401-FMTnn
Communication Profile
— Part 2 (where ‘nn’ is
02 – 09)
Define the configuration
information for the profile.
Formats will vary
depending on the protocol.
Press Enter or F8 (Next) on panel
EDIX401-FMT01.
Press F10 (Update) in add mode on panel
EDIX401.
EDIX401-FMT20
Communication Profile
— Part 3
Define the line, controller,
and device description.
Press Enter or F8 (Next) on
Communications Profile Part 2
(EDIX401-FMT02 thru EDIX401-FMT09).
EDIX819-FMT01
Communication
Line/Control/
Device
View or revise the line,
control, and device
description names.
Select option 11 on panel
EDIX400-FMT01.
Enter EXCPGM EDIX819 on the command
line.
EDIX402-FMT01
Work with
Communications
Session
Access session control
scripts for comm profiles.
Select option 2 on the GENCOM menu.
Select option 12 on panel
EDIX400-FMT01.
Enter EXCPGM EDIX402 on the command
line.
EDIX403-CTL01
Communication
Session Control
Define detailed instructions
(action data) for a session
script.
Select option 1 or 2 on panel
EDIX402-FMT01.
Enter EXCPGM EDIX403 on the command
line.

Panel Quick Reference Using Communications
4 - 6 Gentran:Server for iSeries Communications Module Release 3.5 User Guide
EDIX43B-FMT01
Communication
Session Control
Extended Parms
Define extended parameters
for each script record or
maintain the “command” in
hex mode.
Select option 11 on panel
EDIX403-FMT01.
Enter EXCPGM EDIX43B on the command
line.
EDIX43C-FMT01
Communication Evoke
Define the Evoke record
used for X62 and L62
protocols to start a comm
session on a remote system.
Add a script record on panel
EDIX403-CTL01 with Tran type E.
Press F13 (Services) on panel EDIX403 or
EDIX43B and select the option for
‘Communication Evoke’.
Enter EXCPGM EDIX43C on the command
line.
EDIX817-FMT01
Work with
Communication Jobs
Monitor and control active
comm jobs.
Select option 6 on the GENCOM menu.
Select option 13 on panel
EDIX400-FMT01.
Enter EXCPGM EDIX817 on the command
line.
EDIX406-FMT01
Work with
Communications
History Log
View the history
information for previous
communication sessions.
Select option 3 on the GENCOM menu.
Select option 14 on panel
EDIX400-FMT01.
Enter EXCPGM EDIX406 on the command
line.
EDIX404-FMT01
Work with Outbound
Queue Control
Access Outbound data and
change the status of batches.
Select option 4 on the GENCOM menu.
Select option 15 on panel
EDIX400-FMT01.
Enter EXCPGM EDIX404 on the command
line.
EDIX405
Outbound Queue
Inquiry
View the actual data on a
selected Outbound batch.
Select option 5 on panel EDIX404-FMT01.
Select option 11 on panel
EDIX406-FMT01 for an Outbound session.
EDIX407-FMT01
Work with Inbound
Queue Control
Access Inbound data and
change the status of batches.
Select option 5 on the GENCOM menu.
Select option 16 on panel
EDIX400-FMT01.
Enter EXCPGM EDIX407 on the command
line.
Panel Name Purpose Access Methods

Using Communications Panel Quick Reference
Gentran:Server for iSeries Communications Module Release 3.5 User Guide 4 - 7
EDIX408
Inbound Queue Inquiry
View the actual data in a
selected Inbound batch.
Select option 5 on panel EDIX407-FMT01.
Select option 11 on panel
EDIX406-FMT01 for an Inbound session.
EDIX820-FMT01
Work with Network
Profiles
Access network profiles that
can be used by the
automatic network update
utility.
Select option 7 on the GENCOM menu.
Select option 17 on panel
EDIX400-FMT01.
Enter EXCPGM EDIX820 on the command
line.
EDIX821-FMT01
Network Profiles
Define the network
identifiers for your
company to be updated
automatically in all the
scripts for a given profile.
Select option 2 or 5 on panel
EDIX820-FMT01.
Enter EXCPGM EDIX821 on the command
line.
EDIX460-FMT01
Work with MQ Links
Access all the queue
information supported in the
Gentran system.
Select option 8 on the GENCOM menu.
Select option 18 on panel
EDIX400-FMT01.
Enter EXCPGM EDIX460 on the command
line.
Enter J MQ on the command line.
EDIX461-FMT01
MQ Link
Configuration
Define the queues to be
used in sending/receiving
files within MQSeries.
Select an option (1 – 5) on panel
EDIX460-FMT01.
Enter EXCPGM EDIX461 on the command
line.
STRCOMSSN
Start Communications
Session
Initiate a communication
session for a specified
comm profile and script
name.
Select option 10 on the GENCOM menu.
Select option 30 on panel
EDIX400-FMT01 or on panel
EDIX402-FMT01.
Select option 33 on panel
EDIX404-FMT01.
Prompt STRCOMSSN on the command line.
SHUTDOWN
End active Comm Jobs
End active Communication
Jobs.
Select option 12 on the GENCOM menu.
Select option 31 on panel
EDIX400-FMT01.
Prompt SHUTDOWN on the command line.
Panel Name Purpose Access Methods

Panel Quick Reference Using Communications
4 - 8 Gentran:Server for iSeries Communications Module Release 3.5 User Guide
GENLINP
Gentran Line Pool
Create line pool description
and identify modem lines to
be used in pool for
Gentran:Server
communications.
Select option 13 on the GENCOM menu.
Select option 33 on panel
EDIX400-FMT01.
Prompt GENLINP on the command line.
PRGCHF
Purge Comm History
File
Purge the Communication
History Log using selection
criteria.
Select option 15 on the GENCOM menu.
Select option 40 on panel
EDIX400-FMT01.
Prompt PRGCHF on the command line.
PRGOBQ
Purge Outbound Queue
Purge the Outbound Queue
(control and data files)
using selection criteria.
Select option 17 on the GENCOM menu.
Select option 41 on panel
EDIX400-FMT01.
Prompt PRGOBQ on the command line.
PRGIBQ
Purge Inbound Queue
Purge the Inbound Queue
(control and data files)
using selection criteria.
Select option 16 on the GENCOM menu.
Select option 42 on panel
EDIX400-FMT01.
Prompt PRGIBQ on the command line.
PRGALL
Purge All Comm Files
Purge all Communication
files (History Log,
Outbound and Inbound
Queue) using the same
selection criteria.
Select option 14 on the GENCOM menu.
Select option 43 on panel
EDIX400-FMT01.
Prompt PRGALL on the command line.
RTVCHF
Retrieve Comm
History File
Retrieve the
Communication History
Log using selection criteria.
Select option 19 on the GENCOM menu.
Select option 44 on panel
EDIX400-FMT01.
Prompt RTVCHF on the command line.
RTVOBQ
Retrieve Outbound
Queue
Retrieve the Outbound
Queue (control and data
files) using selection
criteria.
Select option 21 on the GENCOM menu.
Select option 45 on panel
EDIX400-FMT01.
Prompt RTVOBQ on the command line.
RTVIBQ
Retrieve Inbound
Queue
Retrieve the Inbound Queue
(control and data files)
using selection criteria.
Select option 20 on the GENCOM menu.
Select option 46 on panel
EDIX400-FMT01.
Prompt RTVIBQ on the command line.
Panel Name Purpose Access Methods

Using Communications Panel Quick Reference
Gentran:Server for iSeries Communications Module Release 3.5 User Guide 4 - 9
RTVALL
Retrieve All Comm
Files
Retrieve all Comm files
(History Log, Outbound and
Inbound Queue) using the
same selection criteria.
Select option 18 on the GENCOM menu.
Select option 47 on panel
EDIX400-FMT01.
Prompt RTVALL on the command line.
PRGALLA
Purge all Comm Files
Purge all Comm files
automatically at the end of
each Comm session, if
activated.
Enter a value in “Days to Purge” on panel
EDIX401-FMT01 (not 999) and the
command will run at the end of a comm
session.
PRTEDIDTA
Print EDI Data
Print EDI data for a selected
batch at the segment level.
This data can be directed to
the printer or an output file.
Press F21 on panel EDIX405 or EDIX408.
Select option 6 on panel EDIX404 or
EDIX407.
Select option 37 on the GENCOM menu.
Prompt PRTEDIDTA on the command line.
PRTCOM
Print Comm Control
Script
Print the session control
records for a specified
comm profile and script
name.
Select option 6 on panel EDIX402-FMT01.
Prompt PRTCOM on the command line.
PRTCOMHST
Print Communications
History
Print the Communications
History records for the
selected entries.
Select option 22 on the GENCOM menu.
Prompt PRTCOMHST on the command line.
Select *YES for the ‘Print Comm Session
Log’ parameter on the STRCOMSSN
command.
Select option 34 from the EDIX406 panel.
GENMQSND
Send File to MQ Queue
Send a file to an MQSeries
queue.
Select option 39 on the GENCOM menu.
Prompt GENMQSND on the command line.
Enter J MQS on the command line.
GENMQRCV
Receive File from MQ
Queue
Receive a file from an
MQSeries queue.
Select option 38 on the GENCOM menu.
Prompt GENMQRCV on the command line.
Enter J MQR on the command line.
FNDSTRCOM
Find String in Comm
Queues
Locate a string of data in the
inbound or outbound queues
for any profile.
Select option 36 on the GENCOM menu.
Select option 31 on panel EDIX404.
Select option 31 on panel EDIX407.
Prompt FNDSTRCOM on the command line.
Panel Name Purpose Access Methods

Panel Quick Reference Using Communications
4 - 10 Gentran:Server for iSeries Communications Module Release 3.5 User Guide
GIFSGATE
Gentran IFS Gateway
Allow data to be moved
back and forth from the
Gentran Comm queues to
the integrated file system
Select option 41 on the GENCOM menu.
Prompt GIFSGATE on the command line.
Select option 32 on panel EDIX404.
GENIBQIFS
Gentran IBQ to IFS
Gateway
Allow batches from
inbound communication
queue to be copied to the
IFS file system.
Select option 42 on t he GENCOM menu.
Select option 32 on panel EDIX407.
Prompt GENIBQIFS on the command line.
ADD
Add Data to Queues
Add a batch of data to the
inbound or outbound queue.
Select option 30 on the GENCOM menu.
Prompt ADD on the command line.
EXTRACT
Extract Data from
Queues
Extract (make a copy of the
data) a batch of data from
the inbound or outbound
queue.
Select option 31 on the GENCOM menu.
Prompt EXTRACT on the command line.
Select option 30 on panel EDIX404 or
EDIX407
STATFLG
Change Status
Changes the status of a
batch on the inbound or
outbound queue.
Select option 32 on the GENCOM menu.
Prompt EXTRACT on the command line.
Select option 30 on panel EDIX404 or
EDIX407.
CHGDUP
Change Duplex
Changes the Duplex switch
for a comm profile between
full and half duplex.
Select option 33 on the GENCOM menu.
Prompt CHGDUP on the command line.
CHGPHNUM
Change Phone Number
Change the phone number
for a comm profile.
Select option 34 on the GENCOM menu.
Prompt CHGPHNUM on the command line.
CHGNRZI
Change NRZI
Change the NRZI setting for
a comm profile.
Select option 35 on the GENCOM menu.
Prompt CHGNRZI on the command line.
STRRPSR
Start Rmt Pgm Start
Requests
Varies on all configured
Gentran Remote Program
Start Requestable devices so
that they are available to
respond to incoming
program start requests
Select option 40 on the GENCOM menu.
Prompt STRRPSR on the command line.
Panel Name Purpose Access Methods

Using Communications Panel Quick Reference
Gentran:Server for iSeries Communications Module Release 3.5 User Guide 4 - 11
CHGCOMPRF
Change Partner Comm
Profiels
Change the Comm Profile
listed on the partner
interchange records or
group record
Select option 43 on the GENCOM menu.
Prompt CHGCOMPRF on the command line.
RPLCHARS
Replace Characters
Find and replace characters
on the user defined file
Select option 44 on the GENCOM menu.
Prompt RPLCHARS on the command line.
Panel Name Purpose Access Methods

Access the Communications Subsystem Using Communications
4 - 12 Gentran:Server for iSeries Communications Module Release 3.5 User Guide
Access the Communications Subsystem
Figure 4.2 Gentran:Server Communications Main Menu (GENMAIN)
To access the Communications subsystem, select option 1 (Communications Menu) on the main
menu (Figure 4.2) or type GO GENCOM on the command line and press Enter.
GENMAIN Gentran:Server for iSeries Communications 3.5
System: ISDDEV01
Select one of the following:
1. Communications Menu (GENCOM)
2. Work with Job Scheduler
3. Work with Environment Control
4. System Configuration Menu (GENSYSCFG)
10. Gentran:Server Search Index
13. Gentran File Tracking Menu (GENFILETRK)
90. Sign off
Bottom
Selection or command
===> 1
F3=Exit F4=Prompt F9=Retrieve F12=Cancel F13=User Support
(C) COPYRIGHT Sterling Commerce Inc., 2008, ALL RIGHTS RESERVED.

Using Communications Access the Communications Subsystem
Gentran:Server for iSeries Communications Module Release 3.5 User Guide 4 - 13
The Gentran:Server Communications menu (GENCOM) is displayed (Figure 4.3).
Figure 4.3 Gentran:Server Communications menu (GENCOM)
Select option 1 (Work with Communications) on the GENCOM menu. The system displays the
Work with Communications panel (EDIX400-FMT01), as shown in Figure 4.4. All tasks
associated with communications are performed from either the GENCOM menu or the Work with
Communications panel.
GENCOM Gentran:Server Communications 3.5
System: ISDDEV01
Select one of the following:
1. Work with Communications
2. Work with Session Scripts
3. Work with Comm History File
4. Work with Outbound Queue
5. Work with Inbound Queue
6. Work with Active Comm Jobs
7. Work with Network Profiles
8. Work with MQ Links
10. Start a Comm Session (STRCOMSSN)
11. Start a Comm Session with Trace (STRCOMSSNT)
12. End Active Comm Jobs (SHUTDOWN)
13. Gentran Line Pools (GENLINP)
14. Purge All Communication Files (PRGALL)
More...
Selection or command
===> 1
F3=Exit F4=Prompt F9=Retrieve F12=Cancel F13=User Support
(C) COPYRIGHT Sterling Commerce Inc., 2008, ALL RIGHTS RESERVED.

Access the Communications Subsystem Using Communications
4 - 14 Gentran:Server for iSeries Communications Module Release 3.5 User Guide
The Work with Communications panel (EDIX400-FMT01) contains a list of Communication
Profile IDs from which all options can be accessed.
Figure 4.4 Work with Communications Panel (EDIX400-FMT01)
The initial sort order for panel EDIX400-FMT01 is by the comm profile ID. An alternate sort
option, accessed with F15 (Sort), is available by Company (Profile Description). The Position To
field may be used to access the desired Profile ID more quickly.
You can perform the following tasks from panel EDIX400-FMT01:
Set up communications
• Create or modify a Communications Profile
• View the Line/Controller/Device description setup
• Maintain communication session control scripts
• Use the automatic Network script and profile update feature
Operate and manage communications
• Initiate a communication session
• Monitor active communication sessions
• Work with the Outbound Queue (outgoing EDI data)
• Work with the Inbound Queue (EDI data received)
• View the Communication History log
• Purge communication data (History log and Inbound and Outbound Queues)
EDIX400 Work with Communications EDI 04/30/08
FMT01 pgmlib: G3X5PGM dtalib:G3X5DTA 12:00:00
Position to Profile ID . . . . . .
Type option (and Information), press Enter.
1=Create 2=Revise 3=Copy 4=Delete 5=View 11=Line/Ctl/Dev
Opt Profile ID Company
ADVBSC ADVANTIS BSC
ADVLU0 ADVANTIS SDLC
ATLASFTX Atlas in France via OFTP/X.25
ATTEASY AT&T EASYLINK SERVICES
ATTUK AT&T IN THE UNITED KINGDOM
AUTOANS TEST AUTOANSWER CONFIG
BTASCL BT UK GNS EDI*NET Async "Live" Sys
BTASCT BT UK GNS EDI*NET Async "Test" Sys
BTOFTP BT UK GNS EDI*NET OFTP via Async
More...
Parameters or command
===>
F1=Help F3=Exit F12=Cancel F15=Sort F23=More Options F24=More Keys

Using Communications Communications Setup
Gentran:Server for iSeries Communications Module Release 3.5 User Guide 4 - 15
Communications Setup
The setup of Communications pertains to defining communications profiles and scripts necessary
to establish a communications link with another party.
Create and manage a Communication Profile
Each third party network or direct communication partner with whom you wish to communicate
must have a defined communication profile (comm profile). A typical comm profile contains
hardware information such as modems, dialers, and lines, as well as software related information
such as options regarding record separators and blank suppression.
Modify a Communication Session Control Script
Session Control records are the detailed instructions for conducting a communication session. One
or more session control records may be combined to form a session control script. The script
consists of the step-by-step instructions that control how the transmission and/or reception of data
will take place. An example of a script type is ‘SR’ (send first, then receive).
# NOTE
You must have *IOSYSCFG authority to add, create, and delete user profiles when working
with any protocol other than FTP.

Communications Setup Using Communications
4 - 16 Gentran:Server for iSeries Communications Module Release 3.5 User Guide
Communication Profiles
Each third party network or direct communication partner with whom you wish to communicate
must have a defined communication profile (comm profile). A typical comm profile contains
software and hardware information related to your configuration, such as modems, dialers, lines,
record separators, and blank suppression. Gentran:Server supplies predefined profiles for the
major EDI networks. If necessary, a new profile can be created for a unique communication
partner.
Figure 4.5 Work with Communications Panel (EDIX400-FMT01)
As shown in Figure 4.5, from the Work with Communications panel (EDIX400-FMT01), type 2
(Revise) in the option field next to the desired Profile ID and press Enter. If creating a new Profile
ID, type 1 (Create) and a Profile ID on the key entry line and press Enter.
# NOTE
Due to the uniqueness of each implementation, the predefined Communication scripts are
provided as examples only and are intended to assist in getting you started. Please read the
User Guide provided by your value-added network or communication partner to ensure that
the setup correctly reflects their specific requirements.
EDIX400 Work with Communications EDI 04/30/08
FMT01 pgmlib: G3X5PGM dtalib:G3X5DTA 12:00:00
Position to Profile ID . . . . . .
Type option (and Information), press Enter.
1=Create 2=Revise 3=Copy 4=Delete 5=View 11=Line/Ctl/Dev
Opt Profile ID Company
BTOFTPX BT UK GNS EDI*NET OFTP via X.25
BTUK BT UK GNS EDI*NET BISYNC
BTXAS BT UK GNS EDI*NET ASYNC VIA X.25
CHRY CHRYSLER CTX MAILBOX
CHRY480 CHRYSLER - 830, 861, 862
CHRY512 CHRYSLER - 824, 856, 997
CNBTASC COMMERCE:NETWORK via BT async pad
CNFALASC COMMERCE:NETWORK via Australian FAL
2 CN3BSC COMMERCE:NETWORK RELEASE3
More...
Parameters or command
===>
F1=Help F3=Exit F12=Cancel F15=Sort F23=More Options F24=More Keys

Using Communications Communications Setup
Gentran:Server for iSeries Communications Module Release 3.5 User Guide 4 - 17
Set Protocol-Independent Parameters for a Communication Profile
The Communication Profile panel (EDIX401-FMT01), as shown in Figure 4.6, is the first panel
used to define the comm profile. The next panel that is shown for the comm profile ID will vary
depending on the protocol specified, for example, BSC or SNA.
Figure 4.6 Communication Profile Panel (EDIX401-FMT01)
Enter or change the desired information and press Enter or F8 (Next) to advance to the
configuration panel (Protocol-Specific Parameters) for the corresponding protocol. Pressing F10
(Update) in create mode also advances you to the configuration panel.
Field Definitions
Company
A 35-position alphanumeric field used to enter your direct communication partner’s
company name.
Contact
A 35-position alphanumeric field used to enter the name of a personal contact at your
direct communication partner’s company.
Phone
A 14-position alphanumeric field used to enter the contact’s phone number. Format is nnn
nnn-nnnn nnnn. You may enter the area code, phone number, and internal company
extension.
International Dial Code
A 3-position alphanumeric field used to enter an international dial code with the telephone
number. Format is nnn where nnn is the international access code.
EDIX401 Communication Profile EDI 04/30/08
FMT01 12:00:00
Comm Profile ID. . . . . . . . . . CN3BSC
Company. . . . . . . . . . . . . . COMMERCE:NETWORK RELEASE3
Contact. . . . . . . . . . . . . . NETWORK COMMUNICATIONS
Phone. . . . . . . . . . . . . . . ( 614 ) 793 - 7000 x
International Dial Code. . . . . .
Protocol . . . . . . . . . . . . . BSC
Days to Purge. . . . . . . . . . . 999
FIFO/LIFO. . . . . . . . . . . . . F
Used Most Frequently . . . . . . . N
Update Allowed . . . . . . . . . . Y
F1=Help F10=Update F12=Cancel F13=Services F24=More Keys

Communications Setup Using Communications
4 - 18 Gentran:Server for iSeries Communications Module Release 3.5 User Guide
Protocol
Valid values are: SNA, BSC, LU0, GMC, L62, X62, ASC, XAS, FTP, OFA, OFX, ASX.
# NOTE
Please note that LU62 (for L62/X62), Async (for ASC, XAS, OFA, OFX, and ASX), and
FTP are optional add-on modules that may be purchased separately.
The following table lists the valid protocols and their configurations.
The configuration panel that will be used will differ based on the specified protocol. SEE
the Using Scripts chapter in this guide for sample profile definitions for well-known
communication products.
Protocol
Specified Configuration Used
SNA SNA LU1 profile will be used.
The SNA specification should be used when communicating with
Connect:Supertracs (SNA), Connect:Tracs for MVS (SNA), JES2, and
JES3 using SNA LU1.
BSC Bisync profile will be used
LU0 Should be used when communicating with Advantis CICS SNA LU0
GMC Bisync profile with GM-specific header information will be used
L62 SNA LU6.2 SDLC/APPC profile will be used
X62 SNA LU6.2 SDLC/APPC profile running over an X.25 line will be
used
ASC Asynchronous profile will be used
XAS Asynchronous profile running over an X.25 line will be used
FTP FTP profile using customer’s existing TCP/IP configuration will be
used
OFA OFTP profile using an async line will be used
OFX OFTP profile using an X.25 line will be used
ASX XMODEM profile using an async line will be used

Using Communications Communications Setup
Gentran:Server for iSeries Communications Module Release 3.5 User Guide 4 - 19
Days to Purge
A 3-position numeric field used to indicate the number of days for automatic purge option.
Use spaces or 999 or 000 to bypass the automatic purge function.
When auto purge is enabled, the following files will be purged of any data retained longer
than the Days to Purge specified at the conclusion of a communication session for the
comm profile ID:
Communication History
Inbound Queue Control File
Outbound Queue Control File
Inbound Queue Data File
Outbound Queue Data File
If the Days to Purge field contains a value other than 999, 000, or blanks, then the
automatic Purge All Communication Files (communication PRGALLA) command is
executed at the end of every communication session performed for the comm profile ID.
)RECOMMENDATION
Set this value to 999 or 000 or leave it blank to deactivate the automatic purge procedure.
Data can be purged during “off-hours” independent of the communication sessions, using the
other purge commands available.
# NOTE
Auto purge and continuous processing cannot be selected at the same time.
FIFO/LIFO (Mandatory)
A 1-position alphanumeric field that identifies the order in which batches are sent from the
Outbound Queue during a Comm session – in either FIFO (first in, first out) or LIFO (Last
in, first out) sequence.
)RECOMMENDATION
Set this value to F (FIFO) to ensure the data is sent in the order in which it was processed.
This maintains the sequence of Control numbers generated for the envelopes.
Used Most Frequently
This flag is used for online display purpose only. To display a sublist of communication
profile IDs used most often, set this flag to ‘Y’ and then sort to that field on the Work with
Communication panel (EDIX400) or permanently in the Syste Config Menu
(GENSYSCFG) by selecting option 22, Set W/W Communications Sort Option
(SETCOMMSRT).
Update Allowed
A 1-position alphanumeric field defining whether or not the communication information
for this Profile ID can be updated and maintained by users with a security level of “2.”
Valid values are Y – yes, and N – no.

Communications Setup Using Communications
4 - 20 Gentran:Server for iSeries Communications Module Release 3.5 User Guide
Set Protocol-Specific Parameters for a Communication Profile
The configuration panel for the comm profile will vary depending on the protocol specified. The
specific fields presented will be the parameters required by the protocol being used. For additional
information on these fields, see the online help (F1). The following example depicts a BSC
protocol. Some protocols support a novice setup panel to aid in “quick” changes to the
configuration information. These panels are referred to as “basic” views. They provide a
simplified configuration process requiring fewer parameters and providing more standard default
values automatically, requiring you to do less input.
Each time a new BSC (or other protocol that supports basic views) profile is created, the basic
view will be shown first. If the basic configuration values are not sufficient, you can toggle to an
extended view by pressing F2 (More/Less). The extended view enables you to change additional
parameters.
# NOTE
Hint: Your next session will begin in the mode from which you last exited. If you have been
working in extended view, and prefer to begin sessions in basic view, toggle back to basic
view by pressing F2 (More/Less) before exiting from a session.

Using Communications Communications Setup
Gentran:Server for iSeries Communications Module Release 3.5 User Guide 4 - 21
Both basic and extended view panels are shown in Figure 4.7.
Figure 4.7 Basic and extended view of Communication Profile panel
(EDIX401-FMT03 and EDIX401-FMT02)
Enter or change the desired information and press Enter or F8 (Next) to advance to the
Line/Control/Device panel. If you do not want to change any of the default settings that are shown
in Figure 4.8, press F10 (Update) to create the profile and return to the Work with
Communications panel (EDIX400-FMT01).
Field Definitions (Basic View)
Comm Profile ID
An 8-position alphanumeric field used to enter the Profile ID.
Company (Protected)
Displays the direct communication partner’s company name.
EDIX401 Communication Profile EDI 04/30/08
FMT03 BSC 12:00:00
Comm Profile ID. . . . . . . . . . CN3BSC
Company. . . . . . . . . . . . . . COMMERCE:NETWORK RELEASE3
Modem Port . . . . . . . . . . . . LIN021
Dial . . . . . . . . . . . . . . . 18006275883
EDIX401 Communication Profile EDI 04/30/08
FMT02 BSC 12:00:00
Comm Profile ID. . . . . CN3BSC
Company. . . . . . . . . COMMERCE:NETWORK RELEASE3
Modem Port . . . . . . . LIN021 Retries. . . . . . . . 02
Switched Line. . . . . . Y (Y/N) Auto Dial. . . . . . . Y (Y/N)
Auto Call Unit . . . . . V Auto Call Port . . . .
Dial . . . . . . . . . . 18006275883
Host ID Verify . . . . . N (Y/N) Duplex . . . . . . . . *FULL
Local Site ID. . . . . .
Record Size. . . . . . . 0080 Block Size . . . . . . 0512
Inter-Record Separator . 3780
Transparency . . . . . . N (Y/N)
Blank Compress . . . . . N (Y/N)
Trailing Blank Trunc . . N (Y/N) Remote Cmd Password. . *NONE
F1=Help F2=More/Less F4=Prompt F10=Update F12=Cancel F24=More Keys
Prompt function not defined for field (CPFDUP)
F2=More/Less function key
for basic and extended view

Communications Setup Using Communications
4 - 22 Gentran:Server for iSeries Communications Module Release 3.5 User Guide
Modem Port
A 6-position alphanumeric field specifying the iSeries Resource Name associated with the
communication port to be used with this profile. The port named by this field must be
attached to communication hardware that is compatible with the rest of the entries made
on this panel.
Dial
A 32-position alphanumeric field used to define the phone number to be passed to the
autodialer or modem, or it may be displayed to the operator’s console if manual dial is
used. This field may also contain control characters.
# NOTE
When manual dial is used, the number to be dialed must be present. Omitting the number will
cause an assumed Auto answer configuration by the system and outgoing calls will fail.
Field Definitions (Extended View)
Retries
A 2-position numeric field used to define the number of dial retries you permit your
system to attempt before it discontinues dialing the Remote ID. Valid values are 00
through 99.
Switched Line
A 1-position alphabetic field used to designate whether or not a switched line will be used
(as opposed to a dedicated line) for remote communication.
Auto Dial (Required for Auto Call)
A 1-position alphabetic field used to designate whether or not the auto dial feature will be
used for remote communication. If “N,” this indicates that you will be MANUALLY
dialing or auto answering for sessions that use this communication profile ID. Auto Dial
may be specified for self-dialing modems or separate modems/auto dial units.
Auto Call Unit
A 1-position alphabetic field used to designate whether or not an auto call device will be
used for remote communication. If Y (use Auto Call Unit) is designated, an Auto Call Port
must also be entered. If N, do not enter an Auto Call Port. A value of N must be selected
when using a self-dialing modem (a modem with its own autodial capabilities). Valid
values are:
Y– 801 Auto Call Unit on a second port.
V– V25BIS Autodialing Modem.
N– UDS201C/D or UDS208B/D self-dialing Bisync modem (or compatible), or if
auto dial also equals N, manual dial or Auto Answer is used.

Using Communications Communications Setup
Gentran:Server for iSeries Communications Module Release 3.5 User Guide 4 - 23
Auto Call Port (Required for use with Auto Call)
A 6-position alphanumeric field used to define the auto call port of the auto call unit. If the
Auto Call feature is selected, an auto call port must be designated. Format is “LINXX2” or
“CMNX2”, where XX is the communication Port ID, and 2 is a literal “2,” representing
the second line on that port. The Auto Call Port must be the second line on the same port
that the modem is connected to. This field is not used for self-dialing modems.
To configure dialing or answering modes, set parameters accordingly in the Switched
Line, Auto Call, and Auto Dial fields in Extended View mode. The following chart lists
the values for each parameter and each dial setting.
Host ID Verify
A 1-position alphabetic field used to designate whether or not the Host ID Verify feature
will be used for remote communication. This feature provides the capability to verify an
Exchange ID function between your system and the remote site’s system. The Host ID
Verify is often referred to as the Exchange ID function or “handshake.” If this field
contains a Y, the Local Site ID field must contain the code value expected by the remote
site.
Duplex (Required)
Determines the duplex setting that will be used on the line description that is created. The
value may be either *FULL or *HALF and must correspond to the modem that is being
used. The default response is *FULL and is appropriate for most v.25bis dial, autoanswer,
and leased line configurations. Some older hardware may require *HALF duplex.
Local Site ID (Required for use with Host ID Verify)
A 15-position alphanumeric field used to define the name or identification code of the
Local ID Verifier that you expect to send to the Remote Site location when initiating a
communication session. This field is required if a value of Y exists in the “Host ID Verify”
field.
Dial Settings
Field Names Two-Port
Autodial
One-Port
Non-V.25bis
Autodial
Manual Dial
One-Port
V.25bis
Autodial
Auto
Answer
Switched Line YYYYY
Auto Dial YYNYN
Auto Call Unit YNNVN
Auto Call Port Include an
entry
Leave blank Leave blank Leave blank Leave
blank
Phone Number Include an
entry
Include an
entry
Include an
entry
Include an
entry
Leave
blank

Communications Setup Using Communications
4 - 24 Gentran:Server for iSeries Communications Module Release 3.5 User Guide
Record Size
A 4-position numeric field used to indicate the maximum record size to be transmitted
from or received to a user specified file or to the Gentran:Server for iSeries data queues.
Data received to the print spool is excluded from the normal rules used to handle incoming
data streams, and should not be used as a factor in calculating record or block sizes. Data
sent from or received to Gentran:Server may use any record size between 1 and 4096, as
long as the record size is not greater than the block size.
Block Size
A 4-position numeric field used to define the maximum block size of data that your system
may send to a remote network. Valid values are 80 through 4096. Accepted industry
standards are:
“400” for 2780
“512” for 3780
Block Size dictates the maximum block size to be transmitted or received during a
communication session. When none is selected for the inter-record separator field on this
panel, it is assumed that all data received will have a record size equal to the block size
specified.
Inter-Record Separator
A 4-position numeric field used to define the inter-record separator number of a character
used by the system to separate records.
Valid values are 3780, 2780, or NONE, where 3780 represents HEX 1E, and 2780
represents HEX 1F.
The selection of NONE for the Inter-Record Separator field on this panel has an effect on
the way the records are handled during a communication session. When this option is
selected, it will cause the record sizes to appear equal to the block size selected. When a
record size of 80 has been selected, but the inter-record separator is set to NONE the block
will be filled with as many full 80-byte records as can be placed into the block with no
record separators. It will appear as though the actual record size is much larger than 80.
When the records are placed into the block, one record is moved to the block, and the
remaining space is calculated. When there is not enough space to fit another full record
into the block, the end of the block will be marked and it will be transmitted. When the
block size is evenly divisible by the record size, the block size and the record size will be
the same. As an example, the record size is set to 80, the block size is set to 400, the
inter-record separator is set to NONE – five 80-byte records will be placed into the block
(5 X 80=400), and with no record separators. The block will be transmitted as a 400-byte
block containing one 400-byte record. When the block size is not evenly divisible by the
record size, the block size and the record size will be equal to the number of whole records
that will fit into the block size, multiplied by the record size. As an example, the record
size is set to 100, the block size is set to 512, and the inter-record separator is set to NONE.
Five 100-byte records will be placed into the block (5 X 100=500). No more full records
will fit into the block, so the end of the block is marked and the block is sent with both the
record and the block size equal to 500.
If Inter-Record Separator: 2780 (Hex 1F) is selected, only Transparency is valid.

Using Communications Communications Setup
Gentran:Server for iSeries Communications Module Release 3.5 User Guide 4 - 25
Transparency
A 1-position alphabetic field used to designate whether or not the Transparency feature
will be used for remote communication. This feature enables you to transmit codes (i.e.,
control characters) without interfering with the communication. The codes remain
“transparent” to the system. This option must be set to Y if the Remote System will be
sending transparent data.
Blank Compress
A 1-position alphabetic field used to designate whether or not the Blank Compress feature
may be used for remote communication. This feature automatically compresses blanks as
they exist in the communicated raw data. This option must be set to Y if the Remote
System will be sending compressed data.
Trailing Blank Trunc
A 1-position alphabetic field used to designate whether or not the Trailing Blank
Truncation feature will be used for remote communication. This feature automatically
truncates all blanks as they exist at the end of each record sent to the remote site.
# NOTE
The options for Transparency, Blank compress, and Trailing Blank Truncation are mutually
exclusive and only one of the options may be used at a time.
Remote Cmd Password
Defines the optional password that will be used to validate commands received from the
remote system, while in Remote Command mode. The specified value must be received as
the password parameter of the remote command. If the correct password is not received,
the communication session will be terminated. The default *NONE, specifies that no
password is required.
# NOTE
An option called the Global Inactivity Timer, which is an option for setting a global inactivity
timer for BSC (which operates like receive timer for SNA), is available by issuing the
command SETTIMER. The data is numeric, 6 positions with an HHMMSS
(Hours/Minutes/Seconds) format. Once the timer is set, it is used by all BSC profiles. This
may be changed at any time. The default time is 5 minutes as shipped. The global receive
timer is checked for all receive steps that do not contain a receive timer value on the script
record.

Communications Setup Using Communications
4 - 26 Gentran:Server for iSeries Communications Module Release 3.5 User Guide
Set Line/Controller/Device Descriptions for a Communication Profile
# NOTE
The Line/Controller/Device panel (EDIX819-FMT01) can also be accessed later by selecting
option 11 from the Work with Communications panel (EDIX400-FMT01).
By default, the system creates the line, controller, and device descriptions when you create or
modify a comm profile. This is most helpful when the connection is through a dial-up line.
The Communication Line/Controller/Device panel (EDIX401-FMT20), as shown in Figure 4.8,
allows you to override the default names for the line, controller, and device descriptions or to
override the automatic creation of some of these objects if you have a protocol of SNA LU0, X62,
XAS, or OFX.
Figure 4.8 Communications Line/Controller/Device Panel (EDIX401-FMT20)
Modify the desired information and press F10 (Update). When the profile is updated, the system
creates the associated line, controller, and device descriptions on the iSeries. These objects are
required to perform communication sessions. To exit without updating information, press F12
(Cancel).
The names for the line, controller, and device descriptions are generated automatically by using
the comm profile ID concatenated with a two-byte identifier for the line (LN), controller (CT), and
device (DV).
When the connection is to be made over an existing leased line, a compatible line may already
exist.
For SNA, LU0, and L62 protocols, you may want to prevent the line and controller descriptions
from being created if you are using a leased line that may be shared with other devices. To do this,
type N in the Create Line/Controller field. If N (No) is specified, only the device description is
created.
EDIX819 Communication Line/Control/Device EDI 04/30/08
FMT01 12:00:00
Comm Profile ID. . . . . . . . . . CN3BSC
Company. . . . . . . . . . . . . . COMMERCE:NETWORK RELEASE3
Create Line/Controller . . . . . . Y
Line Name. . . . . . . . . . . . . CN3BSCLN
Controller Name. . . . . . . . . . CN3BSCCT
Device Name. . . . . . . . . . . . CN3BSCDV
Remote Location. . . . . . . . . . CN3BSC
F1=Help F4=Prompt F5=Refresh F10=Update F12=Cancel F24=More Keys

Using Communications Communications Setup
Gentran:Server for iSeries Communications Module Release 3.5 User Guide 4 - 27
For X62, XAS, and OFX protocols, you may want to prevent the line description from being
created if you are making a connection over an existing X.25 line. To do this, type N (No) in the
Create Line field. If N (No) is specified, only the controller and device descriptions are created.
After you have successfully created a communication profile, you must create a communication
session control script.

Communications Setup Using Communications
4 - 28 Gentran:Server for iSeries Communications Module Release 3.5 User Guide
Communications Session Control Scripts
The session control script defines the conversation two systems conduct over the communications
line. Session Control records are the detailed instructions for conducting a communication session.
One or more session control records may be combined to form a session control script. The script
consists of the step-by-step instructions that control how the transmission and/or reception of data
will take place. An example of a script name is SR (Send first, then receive).
The concept is much the same as a telephone conversation between two people. The most notable
difference is that during a phone conversation, people have the ability to “sense” when another
person has finished saying what is necessary. For example, when a friend calls and asks “How was
your day?”, the friend doesn’t have to tell you that there’s nothing more to say or that it’s your turn
to talk. Machines, unfortunately, are not that smart. When a machine sends a message to another
machine, it must indicate that it has finished “speaking” by sending special protocol characters.
Figure 4.9 depicts a telephone conversation between two people and the relationship between two
computers using the script.
Figure 4.9 Script Conversation Example
People Machines
Cliff Marty iSeries Partner’s Computer
Start Communications
using STRCOMSSN
Software running
awaiting call
Dials Answers Dials (per Profile)
(begins script)
Answers
<-Hello <- Partner’s logon screen
Marty, it’s Cliff. -> Logon and password ->
<- Hi, Cliff. <- Welcome to your
Partner’s Network
How about going to
lunch today at 11:45?
-> Purchase Orders ->
<- Sounds good. Meet
me in the lobby.
<- Acknowledgment
report from your
Partner’s Network
OK Marty. See you
later, bye.
-> Logoff command ->
Hangup Hangup Disconnect Disconnect

Using Communications Communications Setup
Gentran:Server for iSeries Communications Module Release 3.5 User Guide 4 - 29
Gentran:Server provides the capability to create one or more scripts that are associated with each
comm profile. Each script for a given profile is identified by a two-character Session Name and
may contain up to 999 session control records. This Session Name is used in conjunction with the
comm profile ID to execute a communication session.
Figure 4.10 Work with Communications Panel (EDIX400-FMT01)
To access session control scripts, type 12 (Session Ctrl) in the option field next to the desired
comm profile ID and press Enter, as shown in Figure 4.10. To access scripts for all profiles, type
12 on the key entry line and press Enter.
EDIX400 Work with Communications EDI 04/30/08
FMT01 pgmlib: G3X5PGM dtalib:G3X5DTA 12:00:00
Position to Profile ID . . . . . . CN3BSC
Type option (and Information), press Enter.
12=Session Ctrl 13=Jobs 14=History Log 15=Outb Queue 16=Inb Queue
Opt Profile ID Company
12 CN3BSC COMMERCE:NETWORK RELEASE3
CN3SNA COMMERCE:NETWORK RELEASE3 SNA
DEFAULT STERLING DEFAULT
DOCDEMO this is a demo web comm profile
EIROFTP INS LTD OFTP via EIRPAC Async PAD
EIROFTPX INS LTD OFTP via EIRPAC X.25
EVAL STERLING COMMERCE RELEASE3
FORD FORD SOLMIS NETWORK
GEIS GENERAL ELECTRIC INFO SYSTEMS
More...
Parameters or command
===>
F1=Help F3=Exit F12=Cancel F15=Sort F23=More Options F24=More Keys

Communications Setup Using Communications
4 - 30 Gentran:Server for iSeries Communications Module Release 3.5 User Guide
Work with Session Control Scripts
The Work with Communications Session panel (EDIX402-FMT01), shown in Figure 4.11,
enables you to add, update, copy, delete, and view the session control scripts for a specified
Communications Profile ID. The “script” contains action data that is used to control the sessions
initiated for each profile.
Figure 4.11 Work with Communications Sessions Panel (EDIX402-FMT01)
To select a session control script, type 2 in the option field next to the desired session name and
press Enter. When creating a script, type 1 and a Session Name on the key entry line and press
Enter.
# NOTE
The first character of the session name cannot be numeric.
The Communication Session panel (EDIX403-CTL01) appears, as shown in Figure 4.12.
# NOTE
Sometimes it is easier to copy an existing script than to build a new one. (SEE the section
“Copying Communications Scripts” later in this chapter for more information.)
EDIX402 Work with Communications Session EDI 04/30/08
FMT01 12:00:00
Position to Session Name . . . . . For CN3BSC
Type option (and Information), press Enter.
1=Create 2=Revise 3=Copy 4=Delete 5=View 6=Print 30=Start Session
Opt SN Company
RA COMMERCE:NETWORK RELEASE3
RD COMMERCE:NETWORK RELEASE3
RR COMMERCE:NETWORK RELEASE3
SO COMMERCE:NETWORK RELEASE3
2 SR COMMERCE:NETWORK RELEASE3
ST COMMERCE:NETWORK RELEASE3
Bottom
Parameters or command
===>
F1=Help F3=Exit F4=Prompt F12=Cancel F15=Sort F24=More Keys

Using Communications Communications Setup
Gentran:Server for iSeries Communications Module Release 3.5 User Guide 4 - 31
Session Control Maintenance
A record exists for each action (command) that occurs when communicating with a remote site.
You can display these “command lines” for each session, or use the unfolded view to see the
“control data lines” as well.
Press F9 (Fold/Unfold) to toggle between the basic and extended views.
Figure 4.12 Folded and Unfolded Views of the Communication Session Control Panel
(EDIX403-CTL01)
EDIX403 Communication Session Control EDI 04/30/08
CTL01 12:00:00
Comm Profile ID. . . . . . . . . . CN3BSC
Session Name . . . . . . . . . . . SR
Company. . . . . . . . . . . . . . COMMERCE:NETWORK RELEASE 3
Type option, press Enter.
3=Copy Seq# 4=Delete 11=Extended Parms
Opt Seq No Tran File File Name Ind Description
20 C 0 SEND REQUEST FOR REPORTS
$$REQUEST ID=SX999R BATCHID='TEST'
30 C 0 SEND REQUEST FOR X12 DATA
$$REQUEST ID=SX999D BATCHID='TEST'
40 C 0 SEND $$ADD RECORD
$$ADD ID=SX999D BATCHID='TEST'
50 S OQ 2 SEND X12 DATA FROM OUTQUE
60 R SP 7 RECEIVE REPORTS TO SPOOL
*** ERROR *** NO BATCHES FOR TRANSMISSION
More...
F1=Help F4=Prompt F9=Fold/Unfold F10=Update F12=Cancel F24=More Keys
EDIX403 Communication Session Control EDI 04/30/08
CTL01 12:00:00
Comm Profile ID. . . . . . . . . . CN3BSC
Session Name . . . . . . . . . . . SR
Company. . . . . . . . . . . . . . COMMERCE:NETWORK RELEASE 3
Type option, press Enter.
3=Copy Seq# 4=Delete 11=Extended Parms
Opt Seq No Tran File File Name Ind Description
20 C 0 SEND REQUEST FOR REPORTS
30 C 0 SEND REQUEST FOR X12 DATA
40 C 0 SEND $$ADD RECORD
50 S OQ 2 SEND X12 DATA FROM OUTQUE
60 R SP 7 RECEIVE REPORTS TO SPOOL
70 R IQ 7 RECEIVE X12 DATA TO INQUE
More...
F1=Help F4=Prompt F9=Fold/Unfold F10=Update F12=Cancel F24=More Keys

Communications Setup Using Communications
4 - 32 Gentran:Server for iSeries Communications Module Release 3.5 User Guide
The creation of script records is protocol-specific. However, many general characteristics are
applicable to all protocols. The following information describes the general concepts. For specific
information, see the chapter for the protocol you are using.
Field Definitions
Seq No
A 3-position numeric field used to define the sequence number assigned by the user to
each protocol session record.
Leaving gaps between sequence number assignments may be useful for inserting
additional control records at a later time.
Tran
A 1-position alphabetic field used to define the transaction type code identifying the type
of record displayed. Valid values are:
CSend the literal that is entered in the control data line. For example,
this can be used for sending signon cards or other control data that is
required by the remote.
SSend data to the remote site followed by any special characters as
instructed by the indicator field.
RReceive data from the remote system.
DWait to receive a literal as specified on the control data line. This
transaction type can be used for verification of incoming data or for
trapping and discarding prompt messages.
ESend an Evoke Record to the Remote System. This must be the first
record of the script. This code is only used if your system starts the
session and is valid only for the X62, L62, and XAS protocols. Use
the F16=Evoke Record Maint key to access the Evoke Record
Maintenance panel.
XInvoke extended script logic functions.
File
A 2-position alphabetic field used to define the file type code that identifies the type of file
that the transaction record is written to. Valid values are as follows:
OQ Outbound Queue; only valid for Tran Type S.
OM Outbound Multiple; only valid for type S.
Sends the outbound data in such a way that individual batches can be
separated as they are received by the remote. This function is
complementary to IM, which is defined below.
OF Outbound File; only valid for Tran Type S.
IQ Inbound Queue; only valid for Tran Type R.

Using Communications Communications Setup
Gentran:Server for iSeries Communications Module Release 3.5 User Guide 4 - 33
IM Inbound Multiple; only valid for type R.
Receive inbound data so that individual batches can be separated as
they are received by your system. This function is complementary to
OM, which is defined above.
IF Inbound File; only valid for Tran Type R.
“IF” (Inbound File) receive to an inbound user file and overwrite all
existing data in the file.
IA Inbound Append; Append to existing data in user file.
ID Inbound Device; only valid for Tran Type R and BSC sessions.
Received data is sorted to the inbound queue or to the spool file based
on the device selection codes that precede the data during the receive
process.
SP Spool File; only valid for Tran Type R.
JR JES Receive; only valid for Tran type R and SNA sessions. Print data
will be sent to the spool and punch data will be stored on the
Gentran:Server for iSeries inbound queue.
JQ JES Queue; only valid for Tran Type R and SNA sessions. All data
received from JES is placed on the Gentran:Server for iSeries
inbound queue.
File Name (Required for File Types OF, IF, and IA)
A 10-position alphanumeric field used to enter the name of the file where inbound and
outbound data will be stored. The file must exist in a library, in the library list used by the
Gentran:Server job because the file must be retrieved before the data can be sent or
received from the remote network.
Ind
A 1-position numeric field used in conjunction with the transaction type to indicate what
processing will be done. Refer to the tables at the end of this section to determine the
allowed values for specific transactions. These values will differ based on the protocol
used.
Description
A 30-position alphanumeric field used to document the session protocol record.

Communications Setup Using Communications
4 - 34 Gentran:Server for iSeries Communications Module Release 3.5 User Guide
Comm Session Control — Extended Parameters
There are additional fields, collectively referred to as “extended parms,” that provide complete
flexibility and are available for each script record. These fields include Batch ID, Receive Timer,
Timeout Continue flag, and Timeout Status flag.
Figure 4.13 Communications Session Control Panel (EDIX403-CTL01)
To access the extended parameters, type 11 (Extended Parms) next to the selected script records
(from either folded or unfolded view) and press Enter, as shown in Figure 4.13.
The Communication Session Control panel (EDIX43B-FMT01) appears, as shown in Figure 4.14.
It can be used to edit a session control record in hex, simplifying the construction of script records
that require nondisplayable characters. Additional parameters may be used to control the script
processing, such as Receive Timer and Timeout flags.
# NOTE
Due to the uniqueness of each implementation, the predefined Communication scripts are
provided as examples only and are intended to assist in getting you started. Please read the
User Guide provided by your value-added network or communication partner to ensure that
the setup correctly reflects their specific requirements.
EDIX403 Communication Session Control EDI 04/30/08
CTL01 12:00:00
Comm Profile ID. . . . . . . . . . CN3BSC
Session Name . . . . . . . . . . . SR
Company. . . . . . . . . . . . . . COMMERCE:NETWORK RELEASE 3
Type option, press Enter.
3=Copy Seq# 4=Delete 11=Extended Parms
Opt Seq No Tran File File Name Ind Description
20 C 0 SEND REQUEST FOR REPORTS
30 C 0 SEND REQUEST FOR X12 DATA
11 40 C 0 SEND $$ADD RECORD
50 S OQ 2 SEND X12 DATA FROM OUTQUE
60 R SP 7 RECEIVE REPORTS TO SPOOL
70 R IQ 7 RECEIVE X12 DATA TO INQUE
More...
F1=Help F4=Prompt F9=Fold/Unfold F10=Update F12=Cancel F24=More Keys
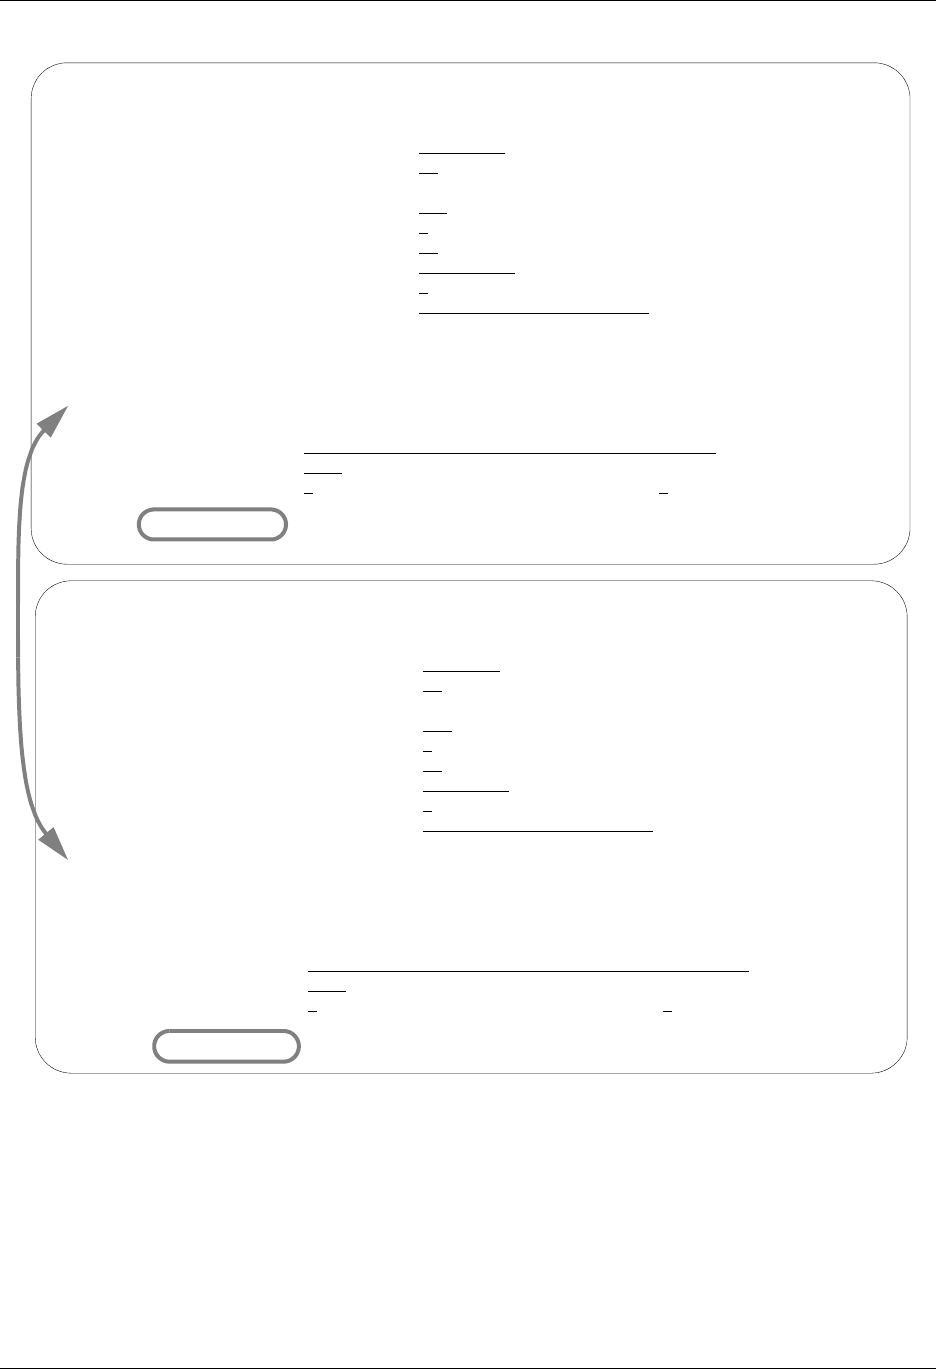
Using Communications Communications Setup
Gentran:Server for iSeries Communications Module Release 3.5 User Guide 4 - 35
Figure 4.14 Comm Session Control – Extended Parms Panel with Character/Hex Views
To toggle between the character and hex display of the command, press F2 (Hex On/Off). Make
the desired changes and press F10 (Update). The record is updated and you are returned to the
Communication Session Control panel (EDIX403-FMT01).
Optionally, you can continue editing script records from the Extended Parms panel
(EDIX43B-FMT01) by pressing F16 (Record-1) or F17 (Record+1), which advances you to the
next session control record after updating the modified record.
EDIX43B Communication Session Control EDI 04/30/08
FMT01 12:00:00
Comm Profile ID. . . . . . . . . . CN3BSC
Session Name . . . . . . . . . . . SR
Company. . . . . . . . . . . . . . COMMERCE:NETWORK RELEASE 3
Sequence Number. . . . . . . . . . 40
Transaction Code . . . . . . . . . C
File . . . . . . . . . . . . . . .
File Name. . . . . . . . . . . . .
Indicator. . . . . . . . . . . . . 0
Description. . . . . . . . . . . . SEND $$ADD RECORD
Command: (Top Line CHAR, Bottom Lines HEX)
$$ADD ID=SX999D BATCHID='TEST'
55CCC4CC7EEFFFC4CCECCCC77ECEE744444444444444444444444444444444444444444444444444
BB144094E27999402133894ED3523D00000000000000000000000000000000000000000000000000
Batch ID . . . . . . .
Receive Timer. . . . . 0000 (MMSS)
Timeout Continue . . . Timeout Status . . . .
F1=Help F2=Hex On/Off F4=Prompt F10=Update F12=Cancel F24=More Keys
EDIX43B Communication Session Control EDI 04/30/08
FMT01 12:00:00
Comm Profile ID. . . . . . . . . . CN3BSC
Session Name . . . . . . . . . . . SR
Company. . . . . . . . . . . . . . COMMERCE:NETWORK RELEASE 3
Sequence Number. . . . . . . . . . 40
Transaction Code . . . . . . . . . C
File . . . . . . . . . . . . . . .
File Name. . . . . . . . . . . . .
Indicator. . . . . . . . . . . . . 0
Description. . . . . . . . . . . . SEND $$ADD RECORD
Command:
$$ADD ID=SX999D BATCHID='TEST'
Batch ID . . . . . . .
Receive Timer. . . . . 0000 (MMSS)
Timeout Continue . . . Timeout Status . . . .
F1=Help F2=Hex On/Off F4=Prompt F10=Update F12=Cancel F24=More Keys

Communications Setup Using Communications
4 - 36 Gentran:Server for iSeries Communications Module Release 3.5 User Guide
Extended Parameter Field Definitions
# NOTE
SEE the field definitions under “Session Control Maintenance” for descriptions of the basic
parameter fields.
Command
This 80-position alphanumeric and/or hexadecimal field is used to edit and display session
Command records. The command record is used for several purposes depending on the
Transaction Type of the script record in which the Command record appears:
The Command field on the EDIX43B panel has a “hex mode” that can be toggled on and
off by pressing the F2=Hex On key. When hex mode is off, the field allows entry of
alphanumeric data, just like the Command fields on the unfolded view of the EDIM403
panel. When hex mode is on, the field also allows entry of hexadecimal data. The panel
will initially be displayed with hex mode off. For more information, see Hex Mode
Command Editing.
Batch ID
This 44-position alphanumeric field is used to specify the Batch ID of the data that is
being sent or received. For send commands, Batch ID will be used to select the data that
will be transmitted from the outbound queue. For receive commands, data that is received
to the inbound queue will be assigned the Batch ID that has been specified. When Batch
ID is left blank, the system interprets the value as meaning that no particular Batch ID has
been assigned.
Receive Timer
This four-position numeric field is used in receive steps and data traps to specify the
length of time that the system will wait for data to be received before considering it a
timeout. This allows varying timeout periods to be specified for individual steps within a
communication script. If this field is left blank or filled with zeros, then the receive timer
value for this step will automatically be copied from one of two places; BSC profiles will
take the value from the system-wide bisync timer (accessed via the SETTIMER command),
and the SNA profiles will take the value from the Inactivity Timer field within the
EDIM818 Communication Profile Maintenance panel. Valid values for this field are
0000 –9999. The default is 0000. (The units are MMSS, minutes/seconds).
Timeout Continue
This one-position alphanumeric field specifies the action that the system is to take if a
receive timeout occurs in this script step. If the Timeout Continue field is set to Y, then
script execution will continue with the next step. This is the default. If the Timeout
Continue field is set to N, then script execution will terminate.
Timeout Status
This one-position alphabetic field specifies the batch status that is to be assigned to the
data that has been received to the inbound queue during this script step, in the event that a
receive timeout occurs in this step. Valid values are N to mark the data Received Normal,
or A to mark the data Received Abnormal. The default value is N.

Using Communications Communications Setup
Gentran:Server for iSeries Communications Module Release 3.5 User Guide 4 - 37
Hex Mode Command Editing
The EDIM43B hex mode Command editor allows for the entry of nondisplayable data within the
session Command field. This capability may be necessary for the construction of certain
communication scripts, such as those for remotes that are not based on the EBCDIC character set.
This can also be useful when constructing scripts for international communication, where
differences in language, keyboards, and display devices could present barriers to the entry of valid
Command data if a character-only input field was used.
The hex mode editor can be toggled on and off by pressing the F2=Hex Mode key. When hex
mode is active, two additional lines of data will be displayed immediately below the Command
field. These lines will contain the hexadecimal values that represent the character appearing above
them in the top line of the Command input field. For example, the Command data LOGON
SUCCESSFUL would appear as:
COMMAND:
LOGON SUCCESSFUL______________________________________________
DDCDD4EECCCEECED4444444444444444444444444444444444444444444444
36765024335226430000000000000000000000000000000000000000000000
where the first character, L, is represented by the hexadecimal value D3, which is displayed
directly below the character, with the high-order hex digit D on the second line, and the low-order
hex digit 3 on the third line. Continuing, O is represented by hex D6, G is represented by hex C7,
etc.
When the Command record contains nondisplayable characters (values below hex 40), the period
character (“.”) will be displayed in the first line (character representation) of the Command field.
For example, the Command data shown above is followed by the carriage return (hex 0D) and
newline (hex 15) characters. The display would appear as:
COMMAND:
LOGON SUCCESSFUL..____________________________________________
DDCDD4EECCCEECED0144444444444444444444444444444444444444444444
3676502433522643D500000000000000000000000000000000000000000000
To use the hex mode Command editor in an Add or Update operation, first use the F2=Hex Mode
key to activate hex mode. Then enter session control data as necessary. In the Command field,
enter character data on the first line, and/or hexadecimal data on the second and third lines. Press
ENTER to redisplay or F10 to add or update the current script record and display the updated
record. Note that using F16 or F17 to move to previous or next record will also execute an update.
Both character data and hex data can be entered at the same time. However, if both the character
and hex values are changed for the same byte within the Command record, the hex changes will
take precedence. If invalid data (characters other than 0 – 9 and A – F) is entered in the hex portion
of the input field, then the value from the character portion of the input field will be used.
# NOTE
The use of the INSERT and DELETE keys may cause unexpected results when editing with
hex mode on, or when editing records that contain nondisplayable characters with hex mode
off. The use of these keys is not supported.

Communications Setup Using Communications
4 - 38 Gentran:Server for iSeries Communications Module Release 3.5 User Guide
Network Scripts
Gentran:Server supplies predefined session control scripts for the major EDI networks. These
scripts need to be modified with your network identifiers, such as the Mailbox ID and password,
before they can be used for a communication session.
There are two methods for updating the predefined scripts:
Manually edit the necessary session control records in each script defined for the comm profile
Automatically update all scripts for a designated comm profile ID (only network profiles can
be updated automatically)
Manually Update Network Scripts
This section identifies the information that needs to be manually changed for each of the
predefined scripts. Script examples are included for the comm profiles shown in the following
table.
# NOTE
Due to the uniqueness of each implementation, the predefined Communication scripts are
provided as examples only and are intended to assist in getting you started. Please read the
User Guide provided by your value-added network or communication partner to ensure that
the setup correctly reflects their specific requirements.
Comm Profile ID Network Name
ADVBSC Advantis Network (BSC)
ADVLU0 Advantis Network (SNA/LU0)
ATTEASY AT&T EasyLink Network
ATTUK AT&T in the United Kingdom
BTASC British Telecom United Kingdom (ASC)
BTUK British Telecom United Kingdom (BSC)
BTXAS British Telecom United Kingdom (XAS)
CN2BSC Commerce:Network Release 2 Network (BSC)
CN3BSC Commerce:Network Release 3 Network (BSC)
CN3SNA Commerce:Network Release 3 (SNA)
GEIS GE Information Services
KLEIN Kleinschmidt Network
MCIBSC MCI (BSC)
SEARS Sears Information Services
TRANS Transettlements
WSUN Western Union

Using Communications Communications Setup
Gentran:Server for iSeries Communications Module Release 3.5 User Guide 4 - 39
# NOTE
If you wish to communicate with a public network not included in this list, contact Product
Support. A technical support person can assist you in building and testing communication
scripts for other networks. To establish custom scripts for communicating with specific
partners, SEE the “Exercise: Creating a Direct Communication Partner” in this chapter.
In the following section, refer to the appropriate Network Profile example for your system’s
configuration.
Advantis BSC (Comm Profile ID: ADVBSC)
Session Names
Contact the Advantis Network to obtain User ID, password, and account information, and replace
the values on the specified Record Sequences as follows:
RA (Receive All)
Replace ACCT with the Account Number on Record Seqs 015 and 025.
Replace USRID with the User ID on Record Seqs 015 and 025.
Replace PSWD with the Password on Record Seqs 015 and 025.
SO (Send Only)
Replace ACCT with the Account Number on Record Seqs 015 and 025.
Replace USRID with the User ID on Record Seqs 015 and 025.
Replace PSWD with the Password on Record Seqs 015 and 025.
SR (Send Receive)
Replace ACCT with the Account Number on Record Seqs 015 and 025.
Replace USRID with the User ID on Record Seqs 015 and 025.
Replace PSWD with the Password on Record Seqs 015 and 025.
Figure 4.15 Session Control for Comm Profile ID: Advantis (ADVBSC)
EDIX403 Communication Session Control EDI 04/30/08
CTL01 12:00:00
Comm Profile ID. . . . . . . . . . ADVBSC
Session Name . . . . . . . . . . . RA
Company. . . . . . . . . . . . . . IBM INFORMATION NETWORK
Type option, press Enter.
3=Copy Seq# 4=Delete 11=Extended Parms
Opt Seq No Tran File File Name Ind Description
5 C 2 SEND EXCHANGE I.D.
RJE2
10 R SP 7 RECV IBM INFO NETWORK LOGO
15 C 2 SEND IBM LOGON
/*L ACCT,USRID,PSWD/*S EDIRECT/*U BSCEDI
20 R SP 7 RECV WELCOME MESSAGE
25 C 2 SEND INFO EXCHANGE LOGON
IELOGON ACCOUNT(ACCT) USERID(USRID) PASSWORD(PSWD);
More...
F1=Help F4=Prompt F9=Fold/Unfold F10=Update F12=Cancel F24=More Keys

Communications Setup Using Communications
4 - 40 Gentran:Server for iSeries Communications Module Release 3.5 User Guide
Advantis LU0 (Comm Profile ID: ADVLU0)
Session Names
Contact the Advantis Network to obtain User ID, password, and account information, and replace
the values on the specified Record Sequences as follows:
RA (Receive All)
Replace ACCT with the Account Number on Record Seqs 010 and 050.
Replace USRID with the User ID on Record Seqs 010 and 050.
Replace PSWD with the Password on Record Seq 010.
SO (Send Only)
Replace ACCT with the Account Number on Record Seqs 020 and 050.
Replace USRID with the User ID on Record Seqs 020 and 050.
Replace PSWD with the Password on Record Seq 020.
SR (Send Receive)
Replace ACCT with the Account Number on Record Seqs 010 and 040.
Replace USRID with the User ID on Record Seqs 010 and 040.
Replace PSWD with the Password on Record Seq 010.
Figure 4.16 Session Control for Comm Profile ID: Advantis (ADVSNA)
EDIX403 Communication Session Control EDI 04/30/08
CTL01 12:00:00
Comm Profile ID. . . . . . . . . . ADVSNA
Session Name . . . . . . . . . . . RA
Company. . . . . . . . . . . . . . IBM INFORMATION NETWORK
Type option, press Enter.
3=Copy Seq# 4=Delete 11=Extended Parms
Opt Seq No Tran File File Name Ind Description
5 C 2 SEND EXCHANGE I.D.
RJE2
10 R SP 7 RECV IBM INFO NETWORK LOGO
15 C 2 SEND IBM LOGON
/*L ACCT,USRID,PSWD/*S EDIRECT/*U BSCEDI
20 R SP 7 RECV WELCOME MESSAGE
25 C 2 SEND INFO EXCHANGE LOGON
IELOGON ACCOUNT(ACCT) USERID(USRID) PASSWORD(PSWD);
More...
F1=Help F4=Prompt F9=Fold/Unfold F10=Update F12=Cancel F24=More Keys

Using Communications Communications Setup
Gentran:Server for iSeries Communications Module Release 3.5 User Guide 4 - 41
AT&T EASYLINK SERVICES (Comm Profile ID: ATTEASY)
Session Names
Contact AT&T EasyLink Services to obtain User ID and password information, and replace the
values on the specified Record Sequences as follows:
SR (Receive and Send)
Replace USRNM with the User Name on the Record Seq 010.
Replace PSWD with the Password on the Record Seq 010.
RO (Receive Only)
Replace USRNM with the User Name on the Record Seq 010.
Replace PSWD with the Password on the Record Seq 010.
SO (Send Only)
Replace USRNM with the User Name on the Record Seq 010.
Replace PSWD with the Password on the Record Seq 010.
Figure 4.17 Session Control for Communication Profile ID: ATTEASY
EDIX403 Communication Session Control EDI 04/30/08
CTL01 12:00:00
Comm Profile ID. . . . . . . . . . ATTEASY
Session Name . . . . . . . . . . . SR
Company. . . . . . . . . . . . . . AT&T EASYLINK SERVICES
Type option, press Enter.
3=Copy Seq# 4=Delete 11=Extended Parms
Opt Seq No Tran File File Name Ind Description
10 C 0 SEND THE SIGNON RECORD
+:SIGNON USERNAME=USRNM PASSWORD=PSWD
20 S OQ 2 SEND DATA THEN EOT
30 R IM 7 RECV MSG BUNDLES UNTIL EOT
More...
F1=Help F4=Prompt F9=Fold/Unfold F10=Update F12=Cancel F24=More Keys

Communications Setup Using Communications
4 - 42 Gentran:Server for iSeries Communications Module Release 3.5 User Guide
AT&T in the UK (Comm Profile ID: ATTUK)
Session Names
Contact AT&T to obtain User ID and password information, and replace the values on the
specified Record Sequences as follows:
SR (Receive and Send)
Replace USRNM with the User Name on the Record Seq 010.
Replace PSWD with the Password on the Record Seq 010.
RO (Receive Only)
Replace USRNM with the User Name on the Record Seq 010.
Replace PSWD with the Password on the Record Seq 010.
SO (Send Only)
Replace USRNM with the User Name on the Record Seq 010.
Replace PSWD with the Password on the Record Seq 010.
Figure 4.18 Session Control for Communication Profile ID: ATTUK
EDIX403 Communication Session Control EDI 04/30/08
CTL01 12:00:00
Comm Profile ID. . . . . . . . . . ATTUK
Session Name . . . . . . . . . . . SR
Company. . . . . . . . . . . . . . AT&T IN THE UNITED KINGDOM
Type option, press Enter.
3=Copy Seq# 4=Delete 11=Extended Parms
Opt Seq No Tran File File Name Ind Description
10 C 0 SEND THE SIGNON RECORD
/*SIGNON USERNAME=USRNM PASSWORD=PSWD
30 S OM 2 SEND FROM OUTQUE
40 R IM 8 RECV EDI TO INQUE
NO DATA AVAILABLE
50 R SP 8
More...
F1=Help F4=Prompt F9=Fold/Unfold F10=Update F12=Cancel F24=More Keys

Using Communications Communications Setup
Gentran:Server for iSeries Communications Module Release 3.5 User Guide 4 - 43
BT UK GNS EDI*NET in the UK Async (Comm Profile ID: BTASC)
Session Names
Contact British Telecom to obtain User ID and password information, and replace the values on
the specified Record Sequences as follows:
RS (Receive and Send)
Replace &MBX with the Mailbox ID on the Record Seq 020.
Replace &PSW with the Password on the Record Seq 020.
RO (Receive Only)
Replace &MBX with the Mailbox ID on the Record Seq 020.
Replace &PSW with the Password on the Record Seq 020.
SO (Send Only)
Replace &MBX with the Mailbox ID on the Record Seq 020.
Replace &PSW with the Password on the Record Seq 020.
Figure 4.19 Session Control for Communication Profile ID: BTASC
EDIX403 Communication Session Control EDI 04/30/08
CTL01 12:00:00
Comm Profile ID. . . . . . . . . . BTASC
Session Name . . . . . . . . . . . RS
Company. . . . . . . . . . . . . . BT UK GNS EDI*NET ASYNC
Type option, press Enter.
3=Copy Seq# 4=Delete 11=Extended Parms
Opt Seq No Tran File File Name Ind Description
10 D 0 WAIT FOR WELCOME MESSAGE
and press RETURN: .
12 C 0 SEND SYSTEM PASSWORD
BGLEFBOLLN..
14 D 0 WAIT FOR X.25 CONNECT MSG
Connected to 23421231102001...
20 C 0 SEND LOGON SEQUENCE
&MBX;&PSW;A120;..
40 D 7 RECV LOGON MSG OR ABORT SCRIPT
WELCOME TO EDI*NET .
More...
F1=Help F4=Prompt F9=Fold/Unfold F10=Update F12=Cancel F24=More Keys

Communications Setup Using Communications
4 - 44 Gentran:Server for iSeries Communications Module Release 3.5 User Guide
BT UK GNS EDI*NET in the UK Bisync (Comm Profile ID: BTUK)
Session Names
Contact British Telecom to obtain User ID and password information, and replace the values on
the specified Record Sequences as follows:
RS (Receive and Send)
Replace &MBX with the Mailbox ID on the Record Seq 020.
Replace &PSW with the Password on the Record Seq 020.
RO (Receive Only)
Replace &MBX with the Mailbox ID on the Record Seq 030.
Replace &PSW with the Password on the Record Seq 030.
SO (Send Only)
Replace &MBX with the Mailbox ID on the Record Seq 030.
Replace &PSW with the Password on the Record Seq 030.
Figure 4.20 Session Control for Communication Profile ID: BTUK
EDIX403 Communication Session Control EDI 04/30/08
CTL01 12:00:00
Comm Profile ID. . . . . . . . . . BTUK
Session Name . . . . . . . . . . . RS
Company. . . . . . . . . . . . . . BT UK GNS EDI*NET BISYNC
Type option, press Enter.
3=Copy Seq# 4=Delete 11=Extended Parms
Opt Seq No Tran File File Name Ind Description
10 C 0 SEND LOGON COMMAND
/$NETCMD LOGON UKLBSX
20 C 2 SEND LOGON SEQUENCE & EOT
&MBX;&PSW;A120;
30 D 7 RECV GARBAGE RECORD
INTENTIONAL NO MATCH
40 D 0 RECV LOGON MSG OR ABORT SCRIPT
WELCOME TO EDI*NET ...................................
50 D 7 RECV ETX/EOT AFTER LOGON MSG
INTENTIONAL NO MATCH
More...
F1=Help F4=Prompt F9=Fold/Unfold F10=Update F12=Cancel F24=More Keys

Using Communications Communications Setup
Gentran:Server for iSeries Communications Module Release 3.5 User Guide 4 - 45
BT UK GNS EDI*NET in the UK XAS (Comm Profile ID: BTXAS)
Session Names
Contact British Telecom to obtain User ID and password information, and replace the values on
the specified Record Sequences as follows:
RS (Receive and Send)
Replace &MBX with the Mailbox ID on the Record Seq 010.
Replace &PSW with the Password on the Record Seq 010.
RO (Receive Only)
Replace &MBX with the Mailbox ID on the Record Seq 010.
Replace &PSW with the Password on the Record Seq 010.
SO (Send Only)
Replace &MBX with the Mailbox ID on the Record Seq 010.
Replace &PSW with the Password on the Record Seq 010.
Figure 4.21 Session Control for Communication Profile ID: BTXAS
EDIX403 Communication Session Control EDI 04/30/08
CTL01 12:00:00
Comm Profile ID. . . . . . . . . . BTXAS
Session Name . . . . . . . . . . . RS
Company. . . . . . . . . . . . . . BT UK GNS EDI*NET ASYNC VIA X.25
Type option, press Enter.
3=Copy Seq# 4=Delete 11=Extended Parms
Opt Seq No Tran File File Name Ind Description
10 C 0 SEND LOGON SEQUENCE
&MBX;&PSW;A120;..
20 D 7 RECV LOGON MSG OR ABORT SCRIPT
WELCOME TO EDI*NET .
30 R IQ 7 RECV EDI DATA UNTIL EOT
NO DATA TO SEND FROM EDI*NET
40 S OQ 2 SEND EDI DATA AND EOT
NO DATA TO SEND FROM EDI*NET
50 R SP 7 RECV STATISTICS FILE UNTIL EOT
More...
F1=Help F4=Prompt F9=Fold/Unfold F10=Update F12=Cancel F24=More Keys

Communications Setup Using Communications
4 - 46 Gentran:Server for iSeries Communications Module Release 3.5 User Guide
Commerce:Network – Release 2 BSC (Comm Profile ID: CN2BSC)
Session Names
Contact the Commerce:Network — Release 2 Network to obtain Mailbox ID and password
information, and replace the values on the specified Record Sequences as follows:
SR Send Receive
Replace X999 with the Mailbox ID on Record Seq 001.
Replace 99999 with the Mailbox ID on Record Seq 010.
Replace PASSWRD with the password on Record Seqs 001 and 020.
SO Send Only
Replace X999 with the alpha Mailbox ID on Record Seq 001.
Replace 99999 with the Mailbox ID on Record Seq 005.
Replace PASSWRD with the password on Record Seqs 001 and 015.
RR Receive Reports
Replace X999 with the alpha Mailbox ID.
Replace PASSWRD with the password on Record Seq 001.
RA Receive All
Replace X999 with the alpha Mailbox ID.
Replace PASSWRD with the password on Record Seq 001.
Figure 4.22 Session Control for Comm Profile ID: CN2BSC
EDIX403 Communication Session Control EDI 04/30/08
CTL01 12:00:00
Comm Profile ID. . . . . . . . . . CN2BSC
Session Name . . . . . . . . . . . SO
Company. . . . . . . . . . . . . . STERLING COMMERCE COMMERCENET RELEASE2
Type option, press Enter.
3=Copy Seq# 4=Delete 11=Extended Parms
Opt Seq No Tran File File Name Ind Description
1 C 2 SEND SIGNON
/*SIGNON CN2BSC MX999 A PASSWRD
5 C 0 SEND BATCH RECORD
$$BATCH ONUC A A 999990101
10 C 0 SEND NETWORK APPLICATION REC
*.NTAP 02001+
15 C 0 SEND PASSWORD RECORD
*.PASS PASSWRD
20 S OQ 2 SEND UCS DATA
More...
F1=Help F4=Prompt F9=Fold/Unfold F10=Update F12=Cancel F24=More Keys

Using Communications Communications Setup
Gentran:Server for iSeries Communications Module Release 3.5 User Guide 4 - 47
Commerce:Network – Release 3 BSC (Comm Profile ID: CN3BSC)
Session Names
Contact the Commerce:Network — Release 3 Network to obtain Mailbox ID and Batch
ID/password information, and replace the values on the specified Record Sequences as follows:
SR (Send Receive)
Replace SX999R with the Report Mailbox ID on Record Seq 020.
Replace SX999D with Data Mailbox ID on Record Seqs 030 and 040.
Replace TEST with the Batch ID/Password on Record Seqs 020, 030, and 040.
SO (Send Only)
Replace SX999D with the Data Mailbox ID on Record Seq 020.
Replace TEST with the Batch/ID Password on Record Seq 020.
RR (Receive Reports)
Replace SX999R with the Report Mailbox ID on Record Seq 020.
Replace TEST with the Batch ID/Password on Record Seq 020.
RD (Receive Data)
Replace SX999D with the Data Mailbox ID on Record Seq 020.
Replace TEST with the Batch ID/Password on Record Seq 020.
RA (Receive All)
Replace SX999R with the Report Mailbox ID on Record Seq 020.
Replace SX999D with Data Mailbox ID on Record Seq 030.
Replace TEST with the Batch ID/Password on Record Seqs 020 and 030.
ST (Receive Network Reports)
Replace SX999D with the Data Mailbox ID and TEST with the Batch ID/Password on
Record Seqs 020 and 030.
Figure 4.23 Session Control for Comm ID: CN3BSC
EDIX403 Communication Session Control EDI 04/30/08
CTL01 12:00:00
Comm Profile ID. . . . . . . . . . CN3BSC
Session Name . . . . . . . . . . . RA
Company. . . . . . . . . . . . . . STERLING COMMERCE COMMERCENET RELEASE3
Type option, press Enter.
3=Copy Seq# 4=Delete 11=Extended Parms
Opt Seq No Tran File File Name Ind Description
20 C 0 SEND REQUEST FOR REPORTS
$$REQUEST ID=SX999R BATCHID='TEST'
30 C 2 SEND REQUEST FOR X12 DATA
$$REQUEST ID=SX999D BATCHID='TEST'
40 R SP 7 RECEIVE REPORT DATA TO SPOOL
*** ERROR *** NO BATCHES FOR TRANSMISSION
50 R IQ 7 RECV X12 DATA TO INQUE
*** ERROR *** NO BATCHES FOR TRANSMISSION
More...
F1=Help F4=Prompt F9=Fold/Unfold F10=Update F12=Cancel F24=More Keys

Communications Setup Using Communications
4 - 48 Gentran:Server for iSeries Communications Module Release 3.5 User Guide
Commerce:Network – Release 3 SNA (Comm Profile ID: CN3SNA)
Session Names
Contact the Commerce:Network — Release 3 Network (SNA) to obtain Mailbox ID and Batch
ID/password information, and replace the values on the specified Record Sequences as follows:
RA (Receive All)
Replace SX999R with the Report Mailbox ID on Record Seq 050.
Replace SX999D with the Data Mailbox ID on Record Seq 030.
Replace TEST with the Batch ID/Password on Record Seqs 030 and 050.
RD (Receive Data)
Replace SX999D with the Data Mailbox ID on Record 030.
Replace TEST with the Batch ID/Password on Record Seq 030.
RR (Receive Reports)
Replace SX999R with the Report Mailbox ID on Record Seq 030.
Replace TEST with the Batch ID/Password Record Seq 030.
SO (Send Only)
Replace SX999D with the Data Mailbox ID on Record Seq 030.
Replace TEST with the Batch ID/Password on Record Seq 030.
SR (Send Receive)
Replace SX999D with the Data ID and TEST with the Batch ID/Password on Seq 030.
Replace SX999R with the Report Mailbox ID on Record Seq number 030, 060, and 080.
ST (Receive Network Reports)
Replace SX999D with the Data ID and TEST with the Batch ID/Password on Seqs 030 and
040.
Figure 4.24 Session Control for Comm Profile ID: CN3SNA
EDIX403 Communication Session Control EDI 04/30/08
CTL01 12:00:00
Comm Profile ID. . . . . . . . . . CN3SNA
Session Name . . . . . . . . . . . SO
Company. . . . . . . . . . . . . . COMMERCE:NETWORK RELEASE 3
Type option, press Enter.
3=Copy Seq# 4=Delete 11=Extended Parms
Opt Seq No Tran File File Name Ind Description
10 R SP 7 TRAP SUPERTRACS READY MSG
SUCCESSFUL LOGON TO GENTRAN/SUPERTRACS
20 R SP 7 TRAP SUPERTRACS READY MSG
*** SUPERTRACS READY FOR INPUT
30 C 0 SEND ADD RECORD
$$ADD ID=SX999D BATCHID='TEST'
40 S OQ 3 SEND FROM OUTBOUND QUEUE
50 C 0 SEND LOGOFF TO END SESSION
$$LOGOFF APPLID=APPLIDNAME RMT=LUNAME
More...
F1=Help F4=Prompt F9=Fold/Unfold F10=Update F12=Cancel F24=More Keys

Using Communications Communications Setup
Gentran:Server for iSeries Communications Module Release 3.5 User Guide 4 - 49
GE Information Services (Comm Profile ID: GEIS)
Session Names
Contact the GEIS Network to obtain User ID and password information, and replace the values on
the specified Record Sequences as follows:
RA (Receive All)
Replace IDX with the User ID in Record Seq 005 and 015.
Replace PASSW with the password on Record Seq 005.
SR (Send and Receive)
Replace IDX with the User ID in Record Seqs 005, 015, 020, and 035.
Replace PASSW with the password on Record Seq 005.
RP (Receive Prior -repeats last received documents)
Replace IDX with the User ID in Record Seqs 005 and 015.
Replace PASSW with the password on Record Seq 005.
RR (Receive Reports—receive status reports)
Replace IDX with the User ID in Record Seqs 005, 015, and 038.
Replace PASSW with the password on Record Seq 005.
RM (Receive Mailbox — receive specific mailbox: trading partner)
Replace IDX with the User ID in Record Seqs 005 and 015.
Replace PASSW with the password on Record Seq 005.
Replace MAILNUM with the selected mailbox number (up to 8) on Record Seq 037.
RV (Receive Network Reports)
Replace IDX with the User ID in Record Seqs 005, 020, 040,and 060.
Replace PASSW with the password on Record Seq 005.
Figure 4.25 Session Control for Comm Profile ID: GEIS
EDIX403 Communication Session Control EDI 04/30/08
CTL01 12:00:00
Comm Profile ID. . . . . . . . . . GEIS
Session Name . . . . . . . . . . . RA
Company. . . . . . . . . . . . . . GENERAL ELECTRIC INFO SYSTEMS
Type option, press Enter.
3=Copy Seq# 4=Delete 11=Extended Parms
Opt Seq No Tran File File Name Ind Description
5 C 0 SEND USER ID & PASSWORD
IDX,PASSW,MAILA
10 C 0 SEND MAILBOX/PUNCH RECORD
*LTID MAILBOXA,CPUNCH
15 C 0 SEND MODE INPUT RECORD
*MODE INPUT(OUTPUT(HISTIDXA),LIST),WAIT,TAB(HSSTABLE)
37 C 0 SEND RECEIVE REQUEST
/EDXRCV
45 C 2 SEND END OF SESSION RECORD
*EOS
More...
F1=Help F4=Prompt F9=Fold/Unfold F10=Update F12=Cancel F24=More Keys

Communications Setup Using Communications
4 - 50 Gentran:Server for iSeries Communications Module Release 3.5 User Guide
Kleinschmidt (Comm Profile ID: KLEIN)
Session Names
Contact the Kleinschmidt Network to obtain User ID and password information, and replace the
values on the specified Record Sequences as follows:
RA (Receive ALL)
Replace USERID with the User ID and PASSWORD with the Password on Record Seq 005.
SO (Send Only)
Replace USERID with the User ID and PASSWORD with the Password on Record Seq 005.
SR (Send Receive)
Replace USERID with the User ID and PASSWORD with the Password on Record Seq 005.
Figure 4.26 Session Control for Comm Profile ID: Klein
EDIX403 Communication Session Control EDI 04/30/08
CTL01 12:00:00
Comm Profile ID. . . . . . . . . . KLEIN
Session Name . . . . . . . . . . . RA
Company. . . . . . . . . . . . . . KLEINSCHMIDT NETWORK
Type option, press Enter.
3=Copy Seq# 4=Delete 11=Extended Parms
Opt Seq No Tran File File Name Ind Description
5 C 2 SEND SIGNON RECORD
#SIGNON USERID,PASSWORDX
10 C 2 SEND REQUEST FOR OUTPUT
#SEND TSTDATA
15 R IQ 7 RECV X12 DATA TO INBOUND QUEUE
NO ACTIVITY SINCE LAST REQUEST
20 C 2 SEND SIGNOFF
#SIGNOFF
More...
F1=Help F4=Prompt F9=Fold/Unfold F10=Update F12=Cancel F24=More Keys

Using Communications Communications Setup
Gentran:Server for iSeries Communications Module Release 3.5 User Guide 4 - 51
MCI Bisync (Comm Profile ID: MCIBSC)
Session Names
Contact MCI to obtain User ID and password information, and replace the values on the specified
Record Sequences as follows:
SR (Receive and Send)
Replace MAILBOXID with the Mailbox ID on the Record Seq 012.
Replace PASSWD with the Password on the Record Seq 012.
RO (Receive Only)
Replace MAILBOXID with the Mailbox ID on the Record Seq 012.
Replace PASSWD with the Password on the Record Seq 012.
SO (Send Only)
Replace MAILBOXID with the Mailbox ID on the Record Seq 012.
Replace PASSWD with the Password on the Record Seq 012.
Figure 4.27 Session Control for Communication Profile ID: MCIBSC
EDIX403 Communication Session Control EDI 04/30/08
CTL01 12:00:00
Comm Profile ID. . . . . . . . . . MCIBSC
Session Name . . . . . . . . . . . SR
Company. . . . . . . . . . . . . . MCI
Type option, press Enter.
3=Copy Seq# 4=Delete 11=Extended Parms
Opt Seq No Tran File File Name Ind Description
5 C 0 SEND PROFILE & TYPE
/$NETCMD PROFILE TYPE2
10 C 0 SEND SIGNON
/$NETCMD SIGNON EDIBSC01;BSC*EDI
12 C 2 SEND HOST SIGNON & DIALOG
MAILBOXID;PASSWD;B135;
14 R SP 7 RECV WELCOME MSG
20 R IQ 7 RECV X12 EDI DATA
NO DATA TO SEND FROM EDI*NET
More...
F1=Help F4=Prompt F9=Fold/Unfold F10=Update F12=Cancel F24=More Keys

Communications Setup Using Communications
4 - 52 Gentran:Server for iSeries Communications Module Release 3.5 User Guide
SEARS Communication Network (Comm Profile ID: SEARS)
Session Names
Contact the Sears Network to obtain ID number and password information, and replace the values
on the specified Record Sequences. The following three session names share the same replacement
instructions.
SR (Send Receive)
RA (Receive All)
SO (Send Only
Replace IDXXXXX with the ID Number on Record Seq 005.
Replace PASSWORD with the password on Record Seq 005.
Figure 4.28 Session Control for Comm Profile ID: Sears
EDIX403 Communication Session Control EDI 04/30/08
CTL01 12:00:00
Comm Profile ID. . . . . . . . . . SEARS
Session Name . . . . . . . . . . . SR
Company. . . . . . . . . . . . . . SEARS INFORMATION NETWORK
Type option, press Enter.
3=Copy Seq# 4=Delete 11=Extended Parms
Opt Seq No Tran File File Name Ind Description
5 C 0 SEND SIGNON
.LOGON SEARSEDI,IDXXXXX,PASSWORD
15 R IQ 7 RECV X12 FROM PARTNERS
More...
F1=Help F4=Prompt F9=Fold/Unfold F10=Update F12=Cancel F24=More Keys

Using Communications Communications Setup
Gentran:Server for iSeries Communications Module Release 3.5 User Guide 4 - 53
Transettlements (Comm Profile ID:TRANS)
Session Names
Contact the Transettlements Network to obtain Account number and password information, and
replace the values on the specified Record Sequences. The following three session names share the
same replacement instructions.
RA (Receive All)
SO (Send Only)
SR (Send Receive)
Replace ACCT with the Account number on Record Seq 001.
Replace PASSWORD with the password on Record Seq 001.
Figure 4.29 Session Control for Comm Profile ID:TRANS
EDIX403 Communication Session Control EDI 04/30/08
CTL01 12:00:00
Comm Profile ID. . . . . . . . . . TRANS
Session Name . . . . . . . . . . . RA
Company. . . . . . . . . . . . . . TRANSETTLEMENTS NETWORK
Type option, press Enter.
3=Copy Seq# 4=Delete 11=Extended Parms
Opt Seq No Tran File File Name Ind Description
1 C 2 SEND ACCT. NO. & PASSWORD
LOG 2434,ACCT,PASSWORD
2 D 7 RECV PROMPT FOR SECUITY CODE
SECURITY CODE >
3 C 2 SEND SECURITY CODE
SECURITY
6 D 7 RECV PROMPT FOR NEXT COMMAND
COMMAND >
40 C 2 SEND A REQUEST TO RECEIVE DATA
RECEIVE
More...
F1=Help F4=Prompt F9=Fold/Unfold F10=Update F12=Cancel F24=More Keys

Communications Setup Using Communications
4 - 54 Gentran:Server for iSeries Communications Module Release 3.5 User Guide
Western Union (Comm Profile ID: WSUN)
Session Names
Contact the Western Union Network to obtain Account number and password information, and
replace the values on the specified Record Sequences. The following three session names share the
same replacement instructions.
SR (Send Receive)
SO (Send Only)
RA (Receive All)
Replace ACCOUNT99 with the Account number on Record Seq 005.
Replace PASSW.PASSW with the password on Record Seq 005.
Figure 4.30 Session Control for Comm Profile ID:WSUN
EDIX403 Communication Session Control EDI 04/30/08
CTL01 12:00:00
Comm Profile ID. . . . . . . . . . WSUN
Session Name . . . . . . . . . . . SR
Company. . . . . . . . . . . . . . WESTERN UNION
Type option, press Enter.
3=Copy Seq# 4=Delete 11=Extended Parms
Opt Seq No Tran File File Name Ind Description
5 C 0 SEND SIGNON
SIGNON ACCOUNT99 PASSW.PASSW
10 C 0 SEND SEND-RECORD
#SENDEDI
15 S OQ 0 SEND X12 DATA
20 C 2 SEND RECEIVE REQUEST RECORD
#RCVEDI
25 R IQ 8 RECEIVE X12 FROM PARTNERS
More...
F1=Help F4=Prompt F9=Fold/Unfold F10=Update F12=Cancel F24=More Keys

Using Communications Communications Setup
Gentran:Server for iSeries Communications Module Release 3.5 User Guide 4 - 55
Automatically Update Network Scripts
Gentran:Server offers a utility that can be used with network profiles to automatically update the
predefined scripts with your identifiers provided by the network. The utility is referred to as the
“Network Profile” feature.
This feature simplifies the customization of communication scripts for networks by automatically
updating the network scripts with the unique values associated with that network user.
For example, rather than manually editing each of the scripts to insert your unique User ID and
password where required, the User ID and password can be entered on the Network Profile panel
(EDIX821-FMT01). The system then finds old network values and replaces them with new
network values for all scripts for that network profile. Later, if your password changes, you can
again update all the scripts for a specific network by typing a new password into the Password
field on panel EDIX821-FMT01. Several major network profiles are included in the “Network
Profile” section.
Figure 4.31 Work with Communications Panel (EDIX400-FMT01)
To access the Network Profiles, type 17 (Network Prf) on the key entry line and press Enter, as
shown in Figure 4.31
EDIX400 Work with Communications EDI 04/30/08
FMT01 pgmlib: G3X5PGM dtalib:G3X5DTA 12:00:00
Position to Profile ID . . . . . .
Type option (and Information), press Enter.
17=Network Prf 18=MQ Links 30=Start Session 31=End Session 32=Copy Comm
Opt Profile ID Company
17
CN3BSC COMMERCE:NETWORK RELEASE 3
CN3SNA COMMERCE:NETWORK RELEASE 3
REDINET CONTROL DATA / REDINET NETWORK
RMTDAA Remote Dial Line/Answer/ASYNC
RMTDAL Remote Dial Line/Answer/SDLC/APPC
RMTDAN Remote Dial/Answer/No X25 Network
RMTLAL Remote Leased-line/answer/SDLC/APPC
RMTLAN Remote Lease Lin/Answer/No X25 Netw
RMTLAX Remote Leased Line/Answer/X25 Netwk
More...
Parameters or command
===>
F1=Help F3=Exit F12=Cancel F15=Sort F23=More Options F24=More Keys

Communications Setup Using Communications
4 - 56 Gentran:Server for iSeries Communications Module Release 3.5 User Guide
The Work with Network Profile panel (EDIX820-FMT01), shown in Figure 4.32, contains a list of
comm profile IDs that have been classified as “Network Profiles.” When this panel is accessed
with option 17 (Network Prf) next to a specific Profile ID, the list is automatically positioned to
the closest matching entry. Many EDI networks are supported by this automatic script update
utility.
Figure 4.32 Work with Network Profile Panel (EDIX820-FMT01)
To perform the automatic script update procedure, type 2 in the option field next to the selected
Network ID (Network comm profile ID) and press Enter.
EDIX820 Work with Network Profile EDI 04/30/08
FMT01 pgmlib: G3X5PGM dtalib: G3X5DTA 12:00:00
Position to Network ID . . . . . . CN3BSC
Type option (and Information), press Enter.
2=Revise 5=View
Last Update
Opt Network ID Network Name Date User
2 CN3BSC COMMERCE:NETWORK RELEASE 3 12/27/01 EDI
CN3SNA COMMERCE:NETWORK RELEASE 3 05/12/97 DSH
SEARS SEARS INFORMATION NETWORK 07/21/97 COM
TRANS TRANSETTLEMENTS NETWORK 03/29/97 XXX
WSUN WESTERN UNION 08/13/97 JBS
Bottom
Parameters or command
===>
F1=Help F3=Exit F12=Cancel F15=Sort F24=More Key

Using Communications Communications Setup
Gentran:Server for iSeries Communications Module Release 3.5 User Guide 4 - 57
The Network Profile panel (EDIX821-FMT01) appears, as shown in Figure 4.6.
Figure 4.33 Network Profile Panel (EDIX821-FMT01)
After making any necessary changes, press F10 (Update).
The system scans all scripts for this comm profile ID, looking for a match on the old identifiers. If
found, they are replaced with the new identifiers. The system returns you to panel
EDIX820-FMT01 with a message indicating the scripts were updated.
Additionally, the Dial number can be updated for the comm profile from this panel. If you change
the Dial number, the system updates the profile, and then recreates the line, controller, and device
descriptions.
# NOTE
Users converting to Gentran:Server for iSeries Release 3.5 from a prior release may have an
out-of-sync problem with their scripts that should be corrected before using this utility. (SEE
the “Common Questions” section in this chapter for more information on how to convert the
scripts in preparation for using the automatic script update utility.)
EDIX821 Network Profile EDI 04/30/08
FMT01 12:00:00
Comm Profile ID. . . . . . . . . . CN3BSC
Network Name . . . . . . . . . . . COMMERCE:NETWORK RELEASE 3
Dial . . . . . . . . . . . . . . . 1800627588312
Data Mailbox ID. . . . . . . . . . SX222D
Report Mailbox ID. . . . . . . . . SX999R
Batch ID/Password. . . . . . . . . TEST
F1=Help F4=Prompt F10=Update F12=Cancel F24=More Keys

Copy Profiles and Scripts Using Communications
4 - 58 Gentran:Server for iSeries Communications Module Release 3.5 User Guide
Copy Profiles and Scripts
When creating custom profiles, it may be easier to copy an existing profile and/or script and
modify it to meet your requirements.
Copy Communication Profiles
The copy function for the profile copies the comm profile ID and all session scripts from the
source Profile. If the scripts are not needed, you can delete them after copying.
Figure 4.34 Work with Communications Panel (EDIX400-FMT01)
To copy a Profile ID, advance to the Work with Communications panel (EDIX400-FMT01),
type 3 (Copy) in the option field next to the selected profile and press Enter, as shown in Figure
4.34. A pop-up window is shown to specify the new comm profile ID. Type the new ID and press
Enter.
EDIX400 Work with Communications EDI 04/30/08
FMT01 pgmlib: G3X5PGM dtalib:G3X5DTA 12:00:00
Position to Profile ID . . . . . . CN3BSC
Type option (and Information), press Enter.
1=Create 2=Revise 3=Copy 4=Delete 5=View 11=Line/Ctl/Dev
Opt Profile ID Company
3 CN3BSC COMMERCE:NETWORK RELEASE 3
Copy To
TESTCOPY
F3=Exit F12=Cancel
RMTLAX Remote Leased Line/Answer/X25 Netwrk
More...
Parameters or command
===>
F1=Help F3=Exit F12=Cancel F15=Sort F23=More Options F24=More Keys

Using Communications Copy Profiles and Scripts
Gentran:Server for iSeries Communications Module Release 3.5 User Guide 4 - 59
The system copies the necessary information and advances you to the comm profile ID panel
(EDIX401-FMT01) to let you customize the profile and configuration information before the copy
is performed.
Figure 4.35 Communication Profile Panel (EDIX401-FMT01)
Make any necessary changes to the new comm profile and press Enter, as shown in Figure 4.35.
EDIX401 Communication Profile EDI 04/30/08
FMT01 12:00:00
Comm Profile ID. . . . . . . . . . TESTCOPY
Company. . . . . . . . . . . . . . COMMERCE:NETWORK RELEASE3
Contact. . . . . . . . . . . . . . NETWORK COMMUNICATIONS
Phone. . . . . . . . . . . . . . . ( 614 ) 793 - 7000 x
International Dial Code. . . . . .
Protocol . . . . . . . . . . . . . BSC
Days to Purge. . . . . . . . . . . 999
FIFO/LIFO. . . . . . . . . . . . . F
Used Most Frequently . . . . . . . N
Update Allowed . . . . . . . . . . Y
F1=Help F10=Update F12=Cancel F13=Services F24=More Keys

Copy Profiles and Scripts Using Communications
4 - 60 Gentran:Server for iSeries Communications Module Release 3.5 User Guide
Figure 4.36 Communication Line/Control/Device panel (EDIX401-FMT02)
Make necessary changes and press F10 (Update), as shown in Figure 4.36.
The Profile ID is created and the system automatically creates the line, controller, and device
descriptions.
# NOTE
The system also copies all session scripts from the source Profile to the new Profile ID.
Review each script.
EDIX401 Communication Profile EDI 04/30/08
FMT02 BSC 12:00:00
Comm Profile ID. . . . . TESTCOPY
Company. . . . . . . . . COMMERCE:NETWORK RELEASE3
Modem Port . . . . . . . LIN021 Retries. . . . . . . . 02
Switched Line. . . . . . Y (Y/N) Auto Dial. . . . . . . Y (Y/N)
Auto Call Unit . . . . . V Auto Call Port . . . .
Dial . . . . . . . . . . 18006275883
Host ID Verify . . . . . N (Y/N) Duplex . . . . . . . . *FULL
Local Site ID. . . . . .
Record Size. . . . . . . 0080 Block Size . . . . . . 0512
Inter-Record Separator . 3780
Transparency . . . . . . N (Y/N)
Blank Compress . . . . . N (Y/N)
Trailing Blank Trunc . . N (Y/N) Remote Cmd Password. . *NONE
F1=Help F2=More/Less F4=Prompt F10=Update F12=Cancel F24=More Keys

Using Communications Copy Profiles and Scripts
Gentran:Server for iSeries Communications Module Release 3.5 User Guide 4 - 61
Copying Communication Scripts
The copy function is also available to copy a session control script within a comm profile or
between Profiles.
Figure 4.37 Work with Communications Panel (EDIX400-FMT01)
Copy Scripts between Profiles
On the Work with Communications panel (EDIX400-FMT01), shown in Figure 4.37, type 12
(Session Ctrl) in the option field on the key entry line and press Enter. All scripts for all profiles
are shown.
Copy Scripts within a Profile
On the Work with Communications panel (EDIX400-FMT01), shown in Figure 4.37, type 12
(Session Ctrl) in the option field next to the selected Profile ID. All scripts for the selected profile
are shown.
EDIX400 Work with Communications EDI 04/30/08
FMT01 pgmlib: G3X5PGM dtalib:G3X5DTA 12:00:00
Position to Profile ID . . . . . .
Type option (and Information), press Enter.
12=Session Ctrl 13=Jobs 14=History Log 15=Outb Queue 16=Inb Queue
Opt Profile ID Company
12
ATTEASY AT&T EASYLINK SERVICES
ATTUK AT&T IN THE UNITED KINGDOM
AUTOANS TEST AUTOANSWER CONFIG
BSCRMT Test for BSC REMOTE
BTASC BT UK GNS EDI*NET ASYNC
BTUK BT UK GNS EDI*NET BISYNC
BTXAS BT UK GNS EDI*NET ASYNC VIA X.25
CHRY CHRYSLER CTX MAILBOX
CHRY480 CHRYSLER - 830, 861, 862
More...
Parameters or command
===>
F1=Help F3=Exit F12=Cancel F15=Sort F23=More Options F24=More Keys

Copy Profiles and Scripts Using Communications
4 - 62 Gentran:Server for iSeries Communications Module Release 3.5 User Guide
The Work with Communications Session panel (EDIX402-FMT01) is shown in Figure 4.38. This
panel will appear slightly different when accessed for all profiles or for a single profile.
Figure 4.38 Work with Communications Session Panel (EDIX402-FMT01)
To copy the session script, type 3 (Copy) next to the selected profile and session name (or just
session if the list was accessed for a specific profile) and press Enter. A pop-up window is shown
to specify the new profile and session name. Type the target information and press Enter.
The system copies all session control records for the script and re-displays panel
EDIX402-FMT01.
EDIX402 Work with Communications Session EDI 12/27/01
FMT01 12:00:00
Position to Session Name . . . . . CN3BSC
Type option (and Information), press Enter.
1=Create 2=Revise 3=Copy 4=Delete 6=Print
Opt PROFILE SN Company
CN3BSC RA COMMERCE:NETWORK RELEASE 3
CN3BSC RD COMMERCE:NETWORK RELEASE 3
CN3BSC RR COMMERCE:NETWORK RELEASE 3
CN3BSC SO COMMERCE:NETWORK RELEASE 3
3 CN3BSC SR COMMERCE:NETWORK RELEASE 3
Copy To
TESTCOPY SR
F3=Exit F12=Cancel
Pa
===>
F1=Help F3=Exit F12=Cancel F15=Sort F24=More Keys

Using Communications Copy Profiles and Scripts
Gentran:Server for iSeries Communications Module Release 3.5 User Guide 4 - 63
Copy Communication Script Records
The copy function is also available to copy a session control script record within a script or
between profiles.
Figure 4.39 Work with Communication Session Control Panel (EDIX403-CTL01)
Copy Script Record between Profiles
On the Communication Session Control panel (EDIX403-CTL01), as shown in Figure 4.39, type 3
(Copy) in the option field next to the selected sequence number (and, optionally, type a new
sequence number over the selected sequence number) and press Enter. A pop-up window is
shown to specify the new profile and session name. Type the target information over the current
profile or current session name and press Enter.
The system copies the sequence number and re-displays panel EDIX403-CTL01.
Copy Script Record within a Script
On the Communication Session Control panel (EDIX403-CTL01), as shown in Figure 4.39, type 3
(Copy) in the option field next to the selected sequence number and type the new sequence number
desired over the selected sequence number and press Enter. A pop-up window is shown to
(optionally) specify a new profile and session name. If the copy is within the current profile and
session name, press Enter without changing the profile or session name.
The system copies the session control record to the new sequence number and re-displays panel
EDIX403-CTL01.
EDIX403 Communication Session Control EDI 04/30/08
CTL01 12:00:00
Comm Profile ID. . . . . . . . . . CN3BSC
Session Name . . . . . . . . . . . SR
Company. . . . . . . . . . . . . . Commerce:Network RELEASE 3
Type option, press Enter.
3=Copy Seq# 4=Delete 11=Extended Parms
Opt Seq No Tran File File Name Ind Description
20 C 0 SEND REQUEST FOR REPORTS
30 C 0 SEND REQUEST FOR X12 DATA
40 C 0 SEND $$ADD RECORD
50 S OQ 2 SEND X12 DATA FROM OUTQUE
60 R SP 7 RECEIVE REPORTS TO SPOOL
3 70 R IQ 7 RECEIVE X12 DATA TO INQUE
Copy To
CN3BSC SR
F3=Exit F12=Cancel

Operations and Management of Communications Using Communications
4 - 64 Gentran:Server for iSeries Communications Module Release 3.5 User Guide
Operations and Management of
Communications
Operations and management allows the user to initiate (or schedule) specific communications
sessions, work with active sessions, work with the data in the Inbound and Outbound Queues,
view the history of previous transmissions, and perform routine file maintenance on the
communications files.
Operations
Prior to initiating communication sessions, the setup of profiles and scripts must already be done.
These profiles and scripts are the foundation of the comm session. Data needs to be added to the
queue via the ADD command (will have a ready status of Q) before it can be transmitted.
Data remains in the Outbound Queue until you send it to a communication partner via a comm
session. Typically, these jobs add data to the queue and initiate comm sessions that are scheduled
to run on a routine basis (that is, every day at 10:00 and 2:00) in an unattended mode.
Data received during a comm session is placed in the Inbound Queue with a status of RN (Received
Normal). The data remains in the Inbound Queue until you run an EXTRACT command to copy
the data into a file and the status is updated to PI (processed inbound) These jobs are also typically
scheduled to run at specific times in an unattended mode.
Management
From time to time, data may need to be retransmitted or reprocessed. This can be accomplished by
resetting the status of the batch and executing the comm session (STRCOMSSN) or EXTRACT
jobs again. History of previous transmissions can be accessed to ensure all sessions have
completed successfully, and detailed information can be examined when troubleshooting. Another
management function that should be performed on a routine basis is file clean up. Several purge
jobs are available to purge individual or all communication files that meet the purge criteria. These
purge jobs are commonly scheduled to be run on a routine basis during “off-hours” and can be
optionally purged to tape or save file. If the data is purged to tape or save file, it can be restored
using the various retrieve commands.

Using Communications Operations and Management of Communications
Gentran:Server for iSeries Communications Module Release 3.5 User Guide 4 - 65
Initiate Communication Sessions
When you initiate a communication session, the system determines the type of session to be
performed based on the parameters you set for the comm profile. These parameters may include
Switched Line, Auto Dial, Auto Call Unit/Port, and Dial. The following types of sessions are
performed by the system:
Auto Dial
Manual Dial
Auto Answer
Auto dial sessions are the most common but require an auto-dial modem or a manual-dial modem
with an auto call unit attached on a secondary line. (This enables the modem to become an
auto-dial modem.) Your system initiates the call and can be set up to run unattended at scheduled
times.
Manual dial sessions are also initiated by your system but require operator intervention. An
operator needs to manually dial the number and respond once the connection is established.
Auto answer sessions are initiated by a remote system. Your system must be ready to receive. This
type of session requires you to start the session and then wait for the remote to call you. You have
the ability to place the system in a continuous “ready-to-receive” mode by setting the Run
Continually parameter to Y.
# NOTE
Only one active session per physical line can take place at any time.

Operations and Management of Communications Using Communications
4 - 66 Gentran:Server for iSeries Communications Module Release 3.5 User Guide
Access the Work with Communications panel (EDIX400-FMT01) to initiate communications
sessions by selecting option 1 from the GENMAIN menu and then selecting 1 from the GENCOM
menu.
Figure 4.40 Work with Communications Panel (EDIX400-FMT01)
To start a communication session, type 30 (Start Session) next to the desired comm profile ID and
press Enter, as shown in Figure 4.40.
There are two other ways to run the STRCOMSSN command.
1. From the Work with Comm Session panel (EDIX402) using option ‘30.’ From this screen,
the Profile ID and Session Name are both pre-loaded.
2. From the Work with Outbound Queue Control page (EDIX404) using option ‘33’ and
press Enter. Press F4 on the Profile ID and session name for a list of valid profile IDs and
session names.
The Start Communication Session (STRCOMSSN) command panel is shown with the selected
comm profile ID pre-loaded.
EDIX400 Work with Communications EDI 04/30/08
FMT01 pgmlib: G3X5PGM dtalib:G3X5DTA 12:00:00
Position to Profile ID . . . . . . CN3BSC
Type option (and Information), press Enter.
17=Network Prf 30=Start Session 31=End Session 32=Copy Comm 33=Line Pool
Opt Profile ID Company
30 CN3BSC COMMERCE:NETWORK RELEASE 3
CN3SNA COMMERCE:NETWORK RELEASE 3
REDINET CONTROL DATA / REDINET NETWORK
RMTDAA Remote Dial Line/Answer/ASYNC
RMTDAL Remote Dial Line/Answer/SDLC/APPC
RMTDAN Remote Dial/Answer/No X25 Network
RMTLAL Remote Leased-line/answer/SDLC/APPC
RMTLAN Remote Lease Lin/Answer/No X25 Netw
RMTLAX Remote Leased Line/Answer/X25 Netwk
More...
Parameters or command
===>
F1=Help F3=Exit F12=Cancel F15=Sort F23=More Options F24=More Keys

Using Communications Operations and Management of Communications
Gentran:Server for iSeries Communications Module Release 3.5 User Guide 4 - 67
The Start Communications Session (STRCOMSSN) command panel, as shown in Figure 4.41, is
used to initiate a communication session, whether auto dial, manual, or auto answer.
# NOTE
Only one session per communication profile can be executed at the same time.
Figure 4.41 Start Communications Session Panel (STRCOMSSN)
Comm Profile ID
The comm profile ID is passed into the command when selected from the Work with
Communications panel with option 30 (Start Session). The session type must also be
specified to indicate the script to be used. For example, SR indicates that the “Send and
Receive” script should be used.
Press F10 (Additional Parameters) to specify additional parameters. Press F1 (Help) on
any parameter to obtain help for the parameter or for the command in general.
Trace
The Trace parameter is extremely useful when resolving communication error problems,
since it generates additional job log messages and trace files. The default is *No (do not
trace the job). The Trace parameter is also an excellent tool to use when creating new
scripts and profiles, or when running initial tests with a script or profile.
CAUTION
STOP
Setting the Trace parameter to *YES generates additional system overhead and should only
be used for diagnostic purposes.
Trace cannot be run on more than one session at a time. If you run concurrent sessions with
Trace on in both sessions, you will encounter failures.
Start Communications Session (STRCOMSSN)
Type choices, press Enter.
Communications Profile ID . . . > 'CN3BSC' Comm Profile Id
Session Type . . . . . . . . . . Name
Delete Previous Jobs? . . . . . *YES *YES, *NO
Schedule Job? . . . . . . . . . *NO *YES, *NO
Run Continually? . . . . . . . . *NO *YES, *NO
Bottom
F3=Exit F4=Prompt F5=Refresh F10=Additional parameters F12=Cancel
F13=How to use this display F24=More keys

Operations and Management of Communications Using Communications
4 - 68 Gentran:Server for iSeries Communications Module Release 3.5 User Guide
# NOTE
To gather additional diagnostic data, use the STRCOMSSNT command. This command is the
same as the STRCOMSSN command, except that it also generates OS/400 ICF and OS/400
Communications traces.
Connect If No Data
The Connect If No Data parameter can be used to force the system to start a comm session
even when there’s no data to be sent. When set to *YES, the system connects without
checking the Outbound Queue. A value of *NO makes the system check the Outbound
Queue for data. It then decides to initiate a session if outbound data is present and if the
script contains a send from the Outqueue command. The default value is set to *YES.
Reset Queues on Fail
If the Reset Queues on Fail parameter is set to *YES, Gentran:Server will interpret a
failure that occurs at any point in a session to be a failure of the entire session, even if
some data has already been transferred successfully. If RESETQ(*YES) is specified and
the communication session ends with a failed completion status, Gentran:Server will set
any inbound queue batches that were received during the session to status RA (Received
Abnormally), so that they will not automatically be processed by Gentran:Server inbound
processing. Gentran:Server will set any outbound queue batches that were transmitted
during the session to status SA (Sent Abnormally), so that they will be transmitted again
the next time an outbound communication session is run for the same communication
profile. The default value is set to *NO.
Number of Restarts
The Number of Restarts parameter specifies the number of times the communication
session should be retried if the first attempt completes with a failed status. Valid values
range from 0 to 99. The number entered does not include the initial communication
session attempt. The default value is set to 0.
When transmitting data from the Outbound Queue, a copy of the data is sent if the batch
status is Q (Queued), IP (In Progress), or SA (Sent Abnormal). After data is transmitted,
the system updates the status to SN or SA. Outbound batches can contain the following
status codes:
Q (Queued)
QE (Queued with errors — rejected data)
SN (Sent Normal)
SA (Sent Abnormal)
IP (In Progress)
H (Held)
# NOTE
Batches are sent in the order specified for the comm profile ID on panel EDIX400-FMT01.
They are sent by either the FIFO (First in, first out) or LIFO (Last in, first out) method.

Using Communications Operations and Management of Communications
Gentran:Server for iSeries Communications Module Release 3.5 User Guide 4 - 69
When receiving data to the Inbound Queue, the batches are given a status of RN (Received
Normal) or RA (Received Abnormal). Only batches with a RN status are processed. After
each batch is extracted inbound, the system updates the status to PI. Inbound batches can
contain the following status codes:
RN (Received Normal)
RA (Received Abnormal)
CP (Currently in Progress – temporary status assigned by the Inbound Editor
during processing.
PI (Processed Inbound)
H (Held)
The STRCOMSSN command can be executed in one of three ways:
Submitting it to run as a batch job immediately
Scheduling it to run as a batch job at a later time
Executing it interactively (immediately)
To submit the command to run the job as a batch job immediately, keep the default
value *No in the Schedule Job and Run Interactively parameters. The job is submitted to
batch as soon as you press Enter.
To schedule the command to run as a batch job (at a later time), type *YES in the
Schedule Job parameter. The system displays the Schedule Job (SCHJOB) command
panel, which contains the job run parameters.
To execute the command interactively (immediately), keep the default value *NO in the
Schedule Job parameter and type *YES in the Run Interactively parameter. (Press F10
[Additional Parameters] to modify.)
# NOTE
Executing a command interactively locks up your terminal until the job is complete.

Operations and Management of Communications Using Communications
4 - 70 Gentran:Server for iSeries Communications Module Release 3.5 User Guide
If you specify *YES in the Schedule Job field, the Schedule Job panel (SCHJOB) panel appears, as
shown in Figure 4.42.
Figure 4.42 Schedule Job Panel (SCHJOB)
To schedule the session, press Enter. To cancel the scheduling of the command, press F12
(Cancel).
Schedule Job (SCHJOB)
Type choices, press Enter.
Command to Exec . . . . . . . . > STRCOMSSN PROFIL('CN3BSC') SSN(SR) DELETE('*
YES') SCHED(*NO) CONT('*NO') TRACE('*NO') INT(*YES) DOCONNECT('*YES') RESETQ('*N
O') RERUNCT('00') COMPRS('*NO') PROCNAME('STRCOMSSN') SESSLOG('*NO')
Job Name . . . . . . . . . . . . > CN3BSC Name, *JOBD
Date of First Run . . . . . . . *CURRENT Date, *CURRENT
Date of Last Run . . . . . . . . *FSTRUN Date, *NONE, *FSTRUN
Time of Day to Start Run . . . . *CURRENT Time, *CURRENT
Run Frequency . . . . . . . . . 1 1-99, *NONE
Run Occurrence . . . . . . . . . *DAILY *MINUTE, *HOURLY, *DAILY...
Job Description . . . . . . . . > GENTRAN Name, *USRPRF
User profile . . . . . . . . . . *CURRENT Name, *CURRENT
MSGQ for completion message . . > CBCOMM Name, *USRPRF
More...
F3=Exit F4=Prompt F5=Refresh F12=Cancel F13=How to use this display
F24=More keys

Using Communications Operations and Management of Communications
Gentran:Server for iSeries Communications Module Release 3.5 User Guide 4 - 71
Monitor Active Communication Sessions
While communication sessions are active, you may want to monitor and control the jobs from a
central location.
Figure 4.43 Work with Communications Panel (EDIX400-FMT01)
To access the Work with Communication Jobs panel (EDIX817-FMT01), type 13 (Jobs) in the
option field on the key entry line and press Enter, as shown in Figure 4.43.
EDIX400 Work with Communications EDI 04/30/08
FMT01 pgmlib: G3X5PGM dtalib:G3X5DTA 12:00:00
Position to Profile ID . . . . . . CN3BSC
Type option (and Information), press Enter.
12=Session Ctrl 13=Jobs 14=History Log 15=Outb Queue 16=Inb Queue
Opt Profile ID Company
13
CN3BSC COMMERCE:NETWORK RELEASE 3
CN3SNA COMMERCE:NETWORK RELEASE 3
REDINET CONTROL DATA / REDINET NETWORK
RMTDAA Remote Dial Line/Answer/ASYNC
RMTDAL Remote Dial Line/Answer/SDLC/APPC
RMTDAN Remote Dial/Answer/No X25 Network
RMTLAL Remote Leased-line/answer/SDLC/APPC
RMTLAN Remote Lease Lin/Answer/No X25 Netw
RMTLAX Remote Leased Line/Answer/X25 Netwk
More...
Parameters or command
===>
F1=Help F3=Exit F12=Cancel F15=Sort F23=More Options F24=More Keys

Operations and Management of Communications Using Communications
4 - 72 Gentran:Server for iSeries Communications Module Release 3.5 User Guide
Work with Communication Jobs
The Work with Communication Jobs panel (EDIX817-FMT01), shown in Figure 4.44, enables
you to display the communication job details for active communication jobs. All information
related to the job can be accessed using the appropriate option codes.
Figure 4.44 Communication Job Inquiry Panel (EDIX817-FMT01)
To work with active communications jobs, select the option code to access the desired
information. From this panel, you can access the Inbound and Outbound Queues to work with
batches of EDI data being sent of received, or you can cancel an active job and end it immediately.
For complete flexibility in working with jobs, some iSeries commands can be accessed directly by
using an option code. For example, option 30 (Joblog) executes the iSeries command
DSPJOBLOG (Display Job Log) and option 34 (Workjob) executes the iSeries command
WRKUSRJOB (Work with User Job).
# NOTE
Ending jobs external to Gentran can cause entries for jobs to show up on the Work with
Communications Jobs panel, even though the jobs may have actually ended. Use option
15 (End) or option 4 (Delete) to remove these false job entries.
EDIX817 Work with Communication Jobs EDI 04/30/08
FMT01 pgmlib: G3X5PGM dtalib: G3X5DTA 12:00:00
Position to Job Name . . . . . . .
Type option (and Information), press Enter.
4=Delete 11=Inbound 12=Outbound 13=Profile 14=Session 15=End 30=Joblog
Initial Id/ Comm Active Id/ Active Start Elapsed
Opt Job Name Line Id Type Session Name Function Time Time
TS20S1 /ON LIN012 BSC CN3BSC /ON SEND 12:00:00 00:50:06
Parameters or command
===>
F1=Help F3=Exit F12=Cancel F15=Sort F23=More Options F24=More Keys

Using Communications Operations and Management of Communications
Gentran:Server for iSeries Communications Module Release 3.5 User Guide 4 - 73
View the Communications History Log
The Communications History log contains detailed history information for all communication
sessions. These details can be viewed when troubleshooting problems in communications sessions.
Figure 4.45 Work with Communications Panel (EDIX400-FMT01)
To access the History log for a specific comm profile ID, type 14 in the option field next to the
selected ID and press Enter, as shown in Figure 4.45. Only entries for that comm profile ID will
be shown. Type 14 on the key entry line and press Enter to see entries for all comm profile IDs.
EDIX400 Work with Communications EDI 04/30/08
FMT01 pgmlib: G3X5PGM dtalib:G3X5DTA 12:00:00
Position to Profile ID . . . . . . CN3BSC
Type option (and Information), press Enter.
12=Session Ctrl 13=Jobs 14=History Log 15=Outb Queue 16=Inb Queue
Opt Profile ID Company
14 CN3BSC COMMERCE:NETWORK RELEASE 3
CN3SNA COMMERCE:NETWORK RELEASE 3
REDINET CONTROL DATA / REDINET NETWORK
RMTDAA Remote Dial Line/Answer/ASYNC
RMTDAL Remote Dial Line/Answer/SDLC/APPC
RMTDAN Remote Dial/Answer/No X25 Network
RMTLAL Remote Leased-line/answer/SDLC/APPC
RMTLAN Remote Lease Lin/Answer/No X25 Netw
RMTLAX Remote Leased Line/Answer/X25 Netwk
More...
Parameters or command
===>
F1=Help F3=Exit F12=Cancel F15=Sort F23=More Options F24=More Keys

Operations and Management of Communications Using Communications
4 - 74 Gentran:Server for iSeries Communications Module Release 3.5 User Guide
The Work with Communications History Log panel (EDIX406-FMT01) appears as shown in
Figure 4.46, and displays the results of all communication sessions. Once you determine exactly
where and when the problems occur, you can make the necessary corrections and re-send or
re-receive data. Each session is logged with statistical information including the start, end, and
elapsed times.
Figure 4.46 Work with Communications History Log (EDIX406-FMT01) basic view
If you chose a specific comm profile ID on the Work with Communications panel
(EDIX400-FMT01), the information on the Work with Communications History Log panel will be
sorted by Comm Stamp (in descending order), and Session Control Sequence Number (in
ascending order).
If you selected to view batches for all comm profile IDs on the Work with Communications panel
(EDIX400-FMT01), the information will appear sorted by the comm profile ID (in ascending
order) and the History Record Sequence (in ascending order). When viewing batches for all Profile
IDs, you can press F15 (Sort) and select Start Date as an alternate sort option. The Position-To
fields can also be used to selectively search for desired information.
Press F1 (Help) on any field for additional information. Some History log fields are explained as
follows:
The Comm Stamp field number indicates steps that are part of the same communication
session.
The File Name (FN) field indicates where the data is sent or received (that is, OQ for
Outbound Queue).
The Transaction Code (TT) field displays the action taken, either B (Beginning) or E (Ending).
The Status (ST) field indicates that the send or receive was N (Normal) or A (Abnormal).
EDIX406 Work with Communications History Log EDI 04/30/08
FMT01 12:00:00
Position to Comm Stamp . . . . . . Seq CN3BSC
Type option (and Information), press Enter.
6=Print Session 11=Queue Inq 34=PRTCOMHST Cmd
Opt Comm Sess Comm Start Start End Elapsed F T S
Prof ID Name Stamp Seq Date Time Time Time N T T
CN3BSC SR 6 1 04/30/08 15:05:55 15:05:55 00:00:00 B N
CN3BSC SR 6 23 04/30/08 15:07:19 15:07:19 00:01:25 E N
CN3BSC SR 1 1 04/30/08 14:57:54 14:57:54 00:00:00 B N
CN3BSC SR 1 13 04/30/08 15:00:08 15:00:08 00:04:14 E N
Bottom
Parameters or command
===>
F1=Help F2=More/Less F6=Msg On/Off F9=Retrieve F12=Cancel F24=More Keys

Using Communications Operations and Management of Communications
Gentran:Server for iSeries Communications Module Release 3.5 User Guide 4 - 75
To access the Inbound and Outbound Queues, type 11 in the option field next to the selected batch.
F2 (More/Less) toggles between a basic and extended view of the history information. Initially,
the basic view is displayed with only the first and last session history records shown. This enables
you to identify quickly the session control sequence numbers that ended abnormally, based on the
Status (ST) field. The extended view displays all session control records performed during the
comm session.
Figure 4.47 illustrates pressing F2 (More/Less) to see the extended view.
Figure 4.47 Work with Communications History Log (EDIX406-FMT01) extended view
F6 (Msg On/Off) toggles between displaying and hiding history messages. The message identifies
the action performed for the session control record, such as COMMUNICATION START-UP, and the
success or failure of that step.
EDIX406 Work with Communications History Log EDI 04/30/08
FMT01 12:00:00
Position to Comm Stamp . . . . . . Seq CN3BSC
Type option (and Information), press Enter.
6=Print Session 11=Queue Inq 34=PRTCOMHST Cmd
Opt Comm Sess Comm Start Start End Elapsed F T S
Prof ID Name Stamp Seq Date Time Time Time N T T
CN3BSC SR 6 1 04/30/08 15:05:55 15:05:55 00:00:00 B N
CN3BSC SR 6 2 04/30/08 15:05:58 15:06:17 00:00:19 C N
CN3BSC SR 6 3 04/30/08 15:06:17 15:06:17 00:00:00 C N
CN3BSC SR 6 4 04/30/08 15:06:18 15:06:18 00:00:00 C N
CN3BSC SR 6 5 04/30/08 15:06:19 15:06:19 00:00:00 OQ S N
CN3BSC SR 6 6 04/30/08 15:06:19 15:06:21 00:00:02 OQ S N
CN3BSC SR 6 7 04/30/08 15:06:21 15:06:22 00:00:01 OQ S N
CN3BSC SR 6 8 04/30/08 15:06:22 15:06:23 00:00:01 OQ S N
More...
Parameters or command
===>
F1=Help F2=More/Less F6=Msg On/Off F9=Retrieve F12=Cancel F24=More Keys

Operations and Management of Communications Using Communications
4 - 76 Gentran:Server for iSeries Communications Module Release 3.5 User Guide
Figure 4.48 illustrates the combination of pressing F2 (More/Less) and F6 (Msg On/Off).
Figure 4.48 Basic and Extended View of the History Log with Messages
EDIX406 Work with Communications History Log EDI 04/30/08
FMT01 12:00:00
Position to Comm Stamp . . . . . . Seq CN3BSC
Type option (and Information), press Enter.
6=Print Session 11=Queue Inq 34=PRTCOMHST Cmd
Opt Comm Sess Comm Start Start End Elapsed F T S
Prof ID Name Stamp Seq Date Time Time Time N T T
CN3BSC SR 6 1 04/30/08 15:05:55 15:05:55 00:00:00 B N
COMMUNICATIONS START-UP Rtn Code: STRT
CN3BSC SR 6 23 04/30/08 15:07:19 15:07:19 00:01:25 E N
COMMUNICATIONS COMPLETED SUCCESSFULLY Rtn Code: GOOD
CN3BSC SR 1 1 04/30/08 14:57:54 14:57:54 00:00:00 B N
COMMUNICATIONS START-UP Rtn Code: STRT
CN3BSC SR 1 13 04/30/08 15:00:08 15:00:08 00:04:14 E N
COMMUNICATIONS COMPLETED SUCCESSFULLY Rtn Code: GOOD
Bottom
Parameters or command
===>
F1=Help F2=More/Less F6=Msg On/Off F9=Retrieve F12=Cancel F24=More Keys
EDIX406 Work with Communications History Log EDI 04/30/08
FMT01 12:00:00
Position to Comm Stamp . . . . . . Seq CN3BSC
Type option (and Information), press Enter.
6=Print Session 11=Queue Inq 34=PRTCOMHST Cmd
Opt Comm Sess Comm Start Start End Elapsed F T S
Prof ID Name Stamp Seq Date Time Time Time N T T
CN3BSC SR 6 1 04/30/08 15:05:55 15:05:55 00:00:00 B N
COMMUNICATIONS START-UP Rtn Code: STRT
CN3BSC SR 6 2 04/30/08 15:05:58 15:06:17 00:00:19 C N
CNTL RECORD SEND COMPLETED Rcds: 1 Rtn Code: 0000
CN3BSC SR 6 3 04/30/08 15:06:17 15:06:17 00:00:00 C N
CNTL RECORD SEND COMPLETED Rcds: 1 Rtn Code: 0000
CN3BSC SR 6 4 04/30/08 15:06:18 15:06:18 00:00:00 C N
CNTL RECORD SEND COMPLETED Rcds: 1 Rtn Code: 0000
More...
Parameters or command
===>
F1=Help F2=More/Less F6=Msg On/Off F9=Retrieve F12=Cancel F24=More Keys

Using Communications Operations and Management of Communications
Gentran:Server for iSeries Communications Module Release 3.5 User Guide 4 - 77
Field Definitions
Comm Prof ID (Protected)
Displays the Profile ID for which the communication session occurred.
Session Name (Protected)
Displays the session script name.
Comm Stamp
A 6-position numeric field used to specify a communication stamp from which to begin
viewing communication sessions.
Comm Stamp (Protected)
A 6-position numeric field displaying a communication “stamp” (sequential number)
assigned for each communication session you have initiated, to date.
Seq (Protected)
A 7-position numeric field displaying the specific communication record sequence
number (script step) within the session.
Start Date (Protected)
An 8-position numeric field displaying the date on which the communication session
began for this record.
Start Time (Protected)
An 8-position numeric field displaying the time that this script step began (the format is
HH:MM:SS).
End Time (Protected)
An 8-position numeric field displaying the time that this script step finished (the format is
HH:MM:SS).
Elapsed Time (Protected)
An 8-position numeric field displaying the total length of time required during the
communication session to perform this functional step.
F N (File name) (Protected)
A 2-position alphanumeric field used to define the file type code that identifies the type of
file that the transaction record is written to. Valid values are as follows:
OQ Outbound Queue; only valid for Tran Type S
OM Outbound Multiple; only valid for Tran Type S
OF Outbound File; only valid for Tran Type S
IQ Inbound Queue; only valid for Tran Type R
IM Inbound Multiple; only valid for Tran Type R
IF Inbound File; only valid for Tran Type R
IA Inbound Append; only valid for Tran Type R
SP Spool File; only valid for Tran Type R

Operations and Management of Communications Using Communications
4 - 78 Gentran:Server for iSeries Communications Module Release 3.5 User Guide
TT (Protected)
A 1-position alphanumeric field displaying the transaction type code identifying the type
of record displayed. You will see all codes at “Low Level” viewing, but only “Beginning”
(B) and Ending (E) codes at “High Level” viewing. Valid values are:
CControl record
SSend record
RReceive record
DData trap record
AAutodial status for self-dialing modem
BBeginning of session record
TTotal records sent/received
EEnd of session record
KInvalid key error
VEvoke record
ST (Protected)
A 1-position alphabetic field displaying the record’s Status Code. The Status Code defines
the communication status for each record in a session. Valid values are:
NNormal completion
AAbnormal completion

Using Communications Operations and Management of Communications
Gentran:Server for iSeries Communications Module Release 3.5 User Guide 4 - 79
Manage the Outbound Queue
All data that you process from your applications using the ADD command appears on the
Outbound Queue. This queue is a collection of “mailboxes,” and the address for each mailbox is
the comm profile ID.
When you initiate a “send” communication session for a specific EDI network or an individual
direct communication partner, you transmit a copy of all data in the mailbox FOR the
corresponding comm profile. Data with a batch status of one of the following is sent:
Q (Queued)
IP (In Progress)
SA (Sent Abnormal)
When the communication session is completed the status is changed to either of the following:
SN (Sent Normal)
SA (Sent Abnormal)
# NOTE
It is important to remember that you are sending a copy of the data on the queue. The actual
data remains on the queue until the queue is purged. However, if you change batch status to
H(Hold), the data is placed on Hold and is not transmitted.
If a failure occurs during the send process, the batch status is changed to SA. When you start
another session for the same comm profile, the send begins with batches marked SA so that you do
not have to manually reset the status of the batch back to Q.
When researching problems, you can review the Communication History Log panel
(EDIX406-FMT01) to determine where they occur; use the Work with the Outbound Queue
control to change the batch status to Q; and re-initiate a session for the comm profile. For example,
a common problem relating to the communication process is the dropping of a communication line
before the send action is complete. If this happens, you can look at the History log for a system
message.

Operations and Management of Communications Using Communications
4 - 80 Gentran:Server for iSeries Communications Module Release 3.5 User Guide
Access the Outbound Queue
You can access the Outbound Queue from the Work with Communications panel
(EDIX400-FMT01), as shown in Figure 4.49.
Figure 4.49 Work with Communications Panel (EDIX400-FMT01)
To see data batches for a specific comm profile ID, type 15 (Outb Queue) in the option field next
to the selected ID and press Enter. Only batches for that comm profile ID will be shown. Type 15
(Outb Queue) on the key entry line and press Enter to see batches for all comm profile IDs.
EDIX400 Work with Communications EDI 04/30/08
FMT01 pgmlib: G3X5PGM dtalib:G3X5DTA 12:00:00
Position to Profile ID . . . . . . CN3BSC
Type option (and Information), press Enter.
12=Session Ctrl 13=Jobs 14=History Log 15=Outb Queue 16=Inb Queue
Opt Profile ID Company
15 CN3BSC COMMERCE:NETWORK RELEASE 3
CN3SNA COMMERCE:NETWORK RELEASE 3
REDINET CONTROL DATA / REDINET NETWORK
RMTDAA Remote Dial Line/Answer/ASYNC
RMTDAL Remote Dial Line/Answer/SDLC/APPC
RMTDAN Remote Dial/Answer/No X25 Network
RMTLAL Remote Leased-line/answer/SDLC/APPC
RMTLAN Remote Lease Lin/Answer/No X25 Netw
RMTLAX Remote Leased Line/Answer/X25 Netwk
More...
Parameters or command
===>
F1=Help F3=Exit F12=Cancel F15=Sort F23=More Options F24=More Keys

Using Communications Operations and Management of Communications
Gentran:Server for iSeries Communications Module Release 3.5 User Guide 4 - 81
Work with Outbound Queue Control
The Work with Outbound Queue Control panel (EDIX404-CTL01), as shown in Figure 4.50,
displays all data batches sent and batches ready to be sent via a communication session. The
Outbound Queue consists of two files: the control file (OUTCTL), which identifies the batch
number and status, and the data file (OUTDTA), which contains the actual data to be sent.
Figure 4.50 Work with the Outbound Queue Control Panel (EDIX404-CTL01)
If you chose a specific comm profile ID on the Work with Communications panel
(EDIX400-FMT01), the information on the Outbound Queue Control panel will be sorted by
Profile Sequence in descending order.
If you selected to view batches for all comm profile IDs on the Work with Communications panel
(EDIX400-FMT01), the information will appear sorted by the comm profile ID (in ascending
order) and the Profile Sequence (in descending order). When viewing batches for all Profile IDs,
you can press F15 (Sort) and select Status Code as an alternate sort option. The Position-To
fields can also be used to selectively search for desired information.
To view the actual data received, type 5 in the option field next to the selected batch and press
Enter. The Outbound Queue Inquiry panel (EDIX405) is shown.
EDIX404 Work with Outbound Queue Control EDI 04/30/08
FMT01 12:00:00
Position to Profile Seq For CN3BSC
Type option (and Information), press Enter.
2=Revise 4=Delete 5=View 6=Print 30=Extract Data 31=Find String
Profile Comm Batch Batch
Opt Profile Sts Seq # Date Time Records Stamp Seq # ID
5 CN3BSC Q 187 04/30/08 11:40:20 3 241
CN3BSC Q 186 04/30/08 11:40:20 4 240
CN3BSC Q 185 04/30/08 14:28:01 4 239
CN3BSC Q 184 04/30/08 14:28:01 4 238
CN3BSC Q 183 04/30/08 14:28:01 4 237
CN3BSC Q 182 04/30/08 14:22:42 4 236
CN3BSC Q 181 04/30/08 14:20:18 4 234
CN3BSC Q 180 04/30/08 11:06:01 4 233
CN3BSC Q 179 04/30/08 11:03:18 4 231
More...
Parameters or command
===>
F1=Help F3=Exit F12=Cancel F15=Sort F24=More Keys

Operations and Management of Communications Using Communications
4 - 82 Gentran:Server for iSeries Communications Module Release 3.5 User Guide
Outbound Queue Inquiry (Character Display)
The Outbound Queue Inquiry panel (EDIX405), as shown in Figure 4.51, displays the actual data
contained in the selected batch.
Figure 4.51 Character Display Mode of the Outbound Queue Inquiry panel (EDIX405)
To see the remaining data for each line number, press F19 (Left) and F20 (Right) to window left
and right when the data is displayed in character mode.
The display will automatically display the first record in the batch. To position to a specific line
number or batch record, type the new line number in the Line Number field and press Enter.
Press F2 (Hex) to toggle between character and hexadecimal mode. Figure 4.52 illustrates the
hexadecimal display.
EDIX405 Outbound Queue Inquiry EDI 04/30/08
12:00:00
Comm Profile Id . . CN3BSC Line Number . . . . 000000001
Profile Seq . . . . 000089 Status. . . . . . . Q
Add Date. . . . . . 04/30/08 Batch Seq Number. . 0000202
Add Time. . . . . . 12:06
Batch-Id. . . . . .
ISA*00* *00* *01*123456789 *01*987654321 *971029*
6*U*00200*000000033*0*T*>®GS*IN*123456789*987654321*971029*1206*758*X*002040®
810*000000021®BIG*970902*0902000002*970830*0830000001***CA®N1*ST*CASTELBERRY
TINGS®N3*1234 SOUTH MAIN STREET®N4*COLUMBUS*OH®N1*BT*CASTELBERRY PLANT®N3*999
ORTH MAIN STREET®N4*COLUMBUS*OH*432201234®IT1**330*CA*4.64**PI®ITD**3®IT1**65
X*6.76**PI*PART-123®ITD**3®TDS*9876543®CTT*2*980®SE*15*000000021®GE*1*758®IEA
000000033®
Bottom
F1=Help F2=Hex F5=Refresh F12=Cancel F17=Next Rcd
F19=Left F20=Right F21=Prt Dta

Using Communications Operations and Management of Communications
Gentran:Server for iSeries Communications Module Release 3.5 User Guide 4 - 83
Outbound Queue Inquiry (Hexadecimal Display)
Figure 4.52 illustrates the Outbound Queue Inquiry panel (EDIX405) in hexadecimal mode.
Figure 4.52 Hexadecimal Mode of the Outbound Queue Inquiry panel
(EDIX405)
Press F2 (Chr) to toggle between hexadecimal and character displays.
In hexadecimal mode, only one line number is shown at a time. In this mode, F19 (Left) and F20
(Right) are not necessary, since the full line of data can be viewed at one time. Press Page
Up/Page Down to scroll through the entire batch of data.
To advance to a specific line number, type the desired line number at the top of the panel and press
Enter.
Press F12 (Cancel) to return to the Work with Outbound Queue Control panel.
EDIX405 Outbound Queue Inquiry EDI 04/30/08
12:00:00
Comm Profile Id . . CN3BSC Line Number . . . . 000000001
Profile Seq . . . . 000089 Status. . . . . . . Q
Add Date. . . . . . 04/30/08 Batch Seq Number. . 0000002
Add Time. . . . . . 09:34
Batch-Id. . . . . .
POS 001-064 ISA+00+ +00+ +ZZ+STERLING SFW +ZZ+BULK PAPER
CEC4FF444444444444FF444444444444EE4EECDDCDC4ECE4444EE4CEDD4DCDCD
921E00E0000000000E00E0000000000E99E235939570266000E99E2432071759
POS 065-080 CO +970711+093
4CD444FFFFFF4FFF444444444444444444444444444444444444444444444444
03600E970711E093000000000000000000000000000000000000000000000000
More...
F1=Help F2=Chr F5=Refresh F12=Cancel F17=Next Rcd
F19=Left F20=Right F21=Prt Dta

Operations and Management of Communications Using Communications
4 - 84 Gentran:Server for iSeries Communications Module Release 3.5 User Guide
View Additional Fields from the Work with Outbound Queue Control Panel
Press F6 (More/Less) from the Work with Outbound Queue Control panel to view the subfile with
an additional row of information, as shown in Figure 4.53.
Figure 4.53 Work with Outbound Queue Control with an additional row of information
EDIX404 Work with Outbound Queue Control EDI 04/30/08
FMT01 12:00:00
Position to Profile Seq For CN3BSC
Type option (and Information), press Enter.
2=Revise 4=Delete 5=View 6=Print 30=Extract Data 31=Find String
Profile Comm Batch Batch
Opt Profile Sts Seq # Date Time Records Stamp Seq # ID
CN3BSC Q 205 04/30/08 12:00:00 18 259
Last Update User Date Time 00:00:00
CN3BSC Q 204 04/30/08 12:00:00 21 258
Last Update User Date Time 00:00:00
CN3BSC Q 203 04/30/08 12:00:00 18 257
Last Update User Date Time 00:00:00
CN3BSC Q 202 04/30/08 12:00:00 22 256
Last Update User Date Time 00:00:00
More...
Parameters or command
===>
F1=Help F6=More/Less F12=Cancel F15=Sort F23=More Options F24=More Keys

Using Communications Operations and Management of Communications
Gentran:Server for iSeries Communications Module Release 3.5 User Guide 4 - 85
Revise the Batch Status on the Outbound Queue
There may be times when it is necessary to retransmit Outbound EDI data or to hold a batch to
prevent it from being sent. To transmit a copy of the batch data during a communication session,
the status must be Q (Queued). Batches that have been transmitted are updated with a status of SN
(Sent Normal) or SA (Sent Abnormal).
# NOTE
Batches with a status of SA and IP will automatically be retransmitted when a comm session
for the Profile ID is initiated. These statuses do not have to be changed to a Q status.
Figure 4.54 Work with Outbound Queue Control (EDIX404-FMT01)
To revise a status, type 2 (Revise) next to the selected batch or batches of data and press Enter. A
pop-up window appears and allows you to specify the new status code, as shown in Figure 4.54.
Press F4 (Prompt) to see a list of all status codes for outbound batches.
# NOTE
The status code can only be changed to Q for retransmitting or H to put the batch on hold.
EDIX404 Work with Outbound Queue Control EDI 04/30/08
FMT01 12:00:00
Position to Profile Seq For CN3BSC
Type option (and Information), press Enter.
2=Revise 4=Delete 5=View 6=Print 30=Extract Data 31=Find String
Profile Comm Batch Batch
Opt Profile Sts Seq # Date Time Records Stamp Seq # ID
2 CN3BSC Q 187 04/30/08 11:40:20 3 241
Change Status to
RN
F3=Exit F12=Cancel
CN3BSC Q 179 04/30/08 11:03:18 4 231
More...
Parameters or command
===>
F1=Help F3=Exit F12=Cancel F15=Sort F24=More Keys

Operations and Management of Communications Using Communications
4 - 86 Gentran:Server for iSeries Communications Module Release 3.5 User Guide
Delete Batches from the Outbound Queue
You can delete any batch from the Outbound Queue file at any time if you have the proper
authority. Care should be taken whenever the delete option is used.
To delete an entry from any Outbound Queue panel:
Type 4 in the option field next to the entry that you want to delete and press Enter.
Figure 4.55 shows the deletion of a batch from the outbound queue.
Figure 4.55 Work with Outbound Queue panel (EDIX404 - FMT01)
EDIX404 Work with Outbound Queue Control EDI 04/30/08
FMT01 12:00:00
Position to Profile Seq For CN3BSC
Type option (and Information), press Enter.
2=Revise 4=Delete 5=View 6=Print 30=Extract Data 31=Find String
Profile Comm Batch Batch
Opt Profile Sts Seq # Date Time Records Stamp Seq # ID
CN3BSC Q 187 04/30/08 11:40:20 3 241
CN3BSC Q 186 04/30/08 11:40:20 4 240
CN3BSC Q 185 04/30/08 14:28:01 4 239
4 CN3BSC Q 184 04/30/08 14:28:01 4 238
CN3BSC Q 183 04/30/08 14:28:01 4 237
CN3BSC Q 182 04/30/08 14:22:42 4 236
CN3BSC Q 181 04/30/08 14:20:18 4 234
CN3BSC Q 180 04/30/08 11:06:01 4 233
CN3BSC Q 179 04/30/08 11:03:18 4 231
More...
Parameters or command
===>
F1=Help F3=Exit F12=Cancel F15=Sort F24=More Keys

Using Communications Operations and Management of Communications
Gentran:Server for iSeries Communications Module Release 3.5 User Guide 4 - 87
A confirmation panel will be displayed, showing the entry or entries to be deleted, as shown in
Figure 4.56.
Figure 4.56 Work with Outbound Queue Control panel (EDIX404-CTL02)
EDIX404 Work with Outbound Queue Control EDI 04/30/08
CTL02 12:00:00
Press Enter to confirm your choices for Delete.
Press F12=Cancel to return to change your choices.
Profile Comm Batch Batch
Profile Sts Seq # Date Time Records Stamp Seq # ID
CN3BSC Q 184 04/30/08 14:28:01 4 238
Bottom
F12=Cancel

Operations and Management of Communications Using Communications
4 - 88 Gentran:Server for iSeries Communications Module Release 3.5 User Guide
Print Outbound Queue Data
There may be many times when it is necessary to print or place Outbound EDI data in a work file.
This option will print the data or place it in an output file breaking at the segment level.
# NOTE
If the data being printed is non-EDI data, you will receive a message that states:
Starting record number passed does not begin with an Interchange
record. No valid interchange found. Printing data as is.
If this situation occurs, the data will be printed as it sits on the Comm queue.
Figure 4.57 Print EDI Data (PRTEDIDTA) Command
To print an entry, type 6 (Print) next to the selected batch or batches of data and press Enter. The
PRTEDIDTA command will be displayed allowing the user to modify the print level, output type,
and starting and ending record sequence number, as shown in Figure 4.57.
Print EDI Data (PRTEDIDTA)
Type choices, press Enter.
Comm Profile Id to Print . . . . > CN3BSC Comm Profile Id
>
Output . . . . . . . . . . . . . > *PRINT *PRINT, *OUTFILE
File to receive output . . . . . > ' ' NAME
Library . . . . . . . . . . . . > *LIBL Name, *LIBL, *CURLIB
Output Member Options:
Member to receive output . . . > ' ' Name, *FILE
Replace or add records . . . . *REPLACE *REPLACE *ADD
Create File? . . . . . . . . . . > *YES *NO, *YES
Additional Parameters
Inbound/Outbound . . . . . . . . > *O *I, *O
Start Record Sequence Number . . > 1 Number
End Record Sequence Number . . . > 999999 Number
Start Batch Sequence Number . . > 241 Number
More...
F3=Exit F4=Prompt F5=Refresh F12=Cancel F13=How to use this display
F24=More keys

Using Communications Operations and Management of Communications
Gentran:Server for iSeries Communications Module Release 3.5 User Guide 4 - 89
Extract Data from Outbound Queue
The Extract Data from Outbound Queue function executes the EXTRACT command. This command
allows you to copy data residing in the outbound queue and place the data in a user-defined file on
the iSeries.
Figure 4.58 Extract Data from Outbound Queue
To extract the data, type 30 (Extract Data) next to the selected batch of data and press Enter. The
EXTRACT command panel will be displayed, allowing the user to modify other parameters. Both
screens are shown in Figure 4.58.
EDIX404 Work with Outbound Queue Control EDI 04/30/08
FMT01 12:00:00
Position to Profile Seq For CN3BSC
Type option (and Information), press Enter.
2=Revise 4=Delete 5=View 6=Print 30=Extract Data 31=Find String
Profile Comm Batch Batch
Opt Profile Sts Seq # Date Time Records Stamp Seq # ID
30 CN3BSC Q 187 04/30/08 11:40:20 3 241
CN3BSC Q 186 04/30/08 11:40:20 4 240
CN3BSC Q 185 04/30/08 14:28:01 4 239
CN3BSC Q 184 04/30/08 14:28:01 4 238
CN3BSC Q 183 04/30/08 14:28:01 4 237
CN3BSC Q 182 04/30/08 14:22:42 4 236
CN3BSC Q 181 04/30/08 14:20:18 4 234
CN3BSC Q 180 04/30/08 11:06:01 4 233
CN3BSC Q 179 04/30/08 11:03:18 4 231
More...
Parameters or command
===>
F1=Help F3=Exit F12=Cancel F15=Sort F24=More Keys
Extract Data From Queues (EXTRACT)
Type choices, press Enter.
Comm Profile Id to DeQueue . . . > CN3BSC Profile Id, *ALL
Batchid to Dequeue . . . . . . . *ALL
Extract Inqueue or Outqueue . . > *OUT *IN, *OUT
Start Profile Sequence Number . > 187 Number
End Profile Sequence Number . . > 187 Number
File Name . . . . . . . . . . . Character value
Library Name . . . . . . . . . . Library Name, Blanks
Member Name . . . . . . . . . . Member Name, Blanks
Create File ? . . . . . . . . . *NO *YES, *NO
Record Length . . . . . . . . . Number
Run Interactively? . . . . . . . > *YES *YES, *NO
Additional Parameters
Update Status Flag? . . . . . . > *NO *YES, *NO
Bottom
F3=Exit F4=Prompt F5=Refresh F10=Additional parameters F12=Cancel
F13=How to use this display F24=More keys

Operations and Management of Communications Using Communications
4 - 90 Gentran:Server for iSeries Communications Module Release 3.5 User Guide
Find String in the Outbound Queue
This command allows you to search for a selected string of data in the comm queues (inbound or
outbound).
Figure 4.59 Find String in Comm Queues (FNDSTRCOM) Command
To print an entry, type 31 (Find String) next to the selected batch or batches of data and press
Enter. The FNDSTRCOM command will be displayed allowing the user to select from the available
parameters to narrow the scope of the search, as shown in Figure 4.59. The output is a generated
report identifying where the match was found, and including the profile, batch sequence, and
unwrapped record number. The unwrapped record that corresponds to the match is printed.
Find String in Comm Queues (FNDSTRCOM)
Type choices, press Enter.
Comm Profile ID . . . . . . . . > CN3BSC *ALL, Character
Direction . . . . . . . . . . . > *OUT *IN, *OUT
Batch Sequence Number . . . . . > 000241 Number, *ALL
String to find . . . . . . . . .
Beginning Date . . . . . . . . . *BEGIN Date, *CURRENT, *BEGIN
Ending Date . . . . . . . . . . *END Date, *CURRENT, *END
Beginning Time . . . . . . . . . *AVAIL Time, *CURRENT, *AVAIL
Ending Time . . . . . . . . . . *AVAIL Time, *CURRENT, *AVAIL
Number of Matches . . . . . . . *ALL Number, *ALL
Bottom
F3=Exit F4=Prompt F5=Refresh F10=Additional parameters F12=Cancel
F13=How to use this display F24=More keys

Using Communications Operations and Management of Communications
Gentran:Server for iSeries Communications Module Release 3.5 User Guide 4 - 91
Gentran IFS Gateway
Gentran:Server enables you to transfer data in the outbound queue and place the data in the
integrated file system (IFS) by executing the GIFSGATE command from the Work with Outbound
Queue Control panel (EDIX404-FMT01).
Figure 4.60 Perform Gentran IFS Gateway Command (GIFSGATE)
To perform Gentran IFS Gateway, type 32 (GIFSGATE) next to the selected batch of data and
press Enter. The GIFSGATE command displays, as shown in Figure 4.60, enabling you to modify
other parameters. (SEE Chapter 12 for more information about the GIFSGATE command and
field descriptions.)
EDIX404 Work with Outbound Queue Control XX 04/30/08
FMT01 12:00:00
Position to Profile ID . . . . . . Profile Seq 9999999
Type option (and Information), press Enter.
32=GIFSGATE 33=Start Session
Profile Comm Batch Batch
Opt Profile Sts Seq # Date Time Records Stamp Seq # ID
32 CN3BSC Q 205 04/30/08 12:00:00 18 259
CN3BSC Q 204 04/30/08 12:00:00 21 258
CN3BSC Q 203 04/30/08 12:00:00 18 257
CN3BSC Q 202 04/30/08 12:00:00 22 256
CN3BSC Q 201 04/30/08 12:00:00 4 255
CN3BSC Q 200 09/01/03 12:00:00 7 254
CN3BSC Q 199 11/27/03 11:57:03 7 253
Gentran IFS Gateway (GIFSGATE)
Type choices, press Enter.
Communication profile id . . . . > CN3BSC Name
+ for more values
Data direction . . . . . . . . . > *OUT *IN, *OUT, *BOTH
Outbound IFS directory . . . . .
Outbound IFS file . . . . . . .
Outbound End of Line . . . . . . *FIXED *CRLF, *CR, *LF, *LFCR...
Append Data? . . . . . . . . . . *NO *YES, *NO
Periodic polling . . . . . . . . *NO, *YES
Additional Parameters
Process Name . . . . . . . . . . GIFSGATE
Start Profile Sequence Number . > 200 Number
End Profile Sequence Number . . > 200 Number
Run interactively . . . . . . . > *YES *YES, *NO
More...
F3=Exit F4=Prompt F5=Refresh F12=Cancel F13=How to use this display
F24=More keys

Operations and Management of Communications Using Communications
4 - 92 Gentran:Server for iSeries Communications Module Release 3.5 User Guide
Manage the Inbound Queue
The Inbound Queue is the repository for data received from networks or direct communication
partners. After a communications session is completed, any data received for the Inbound Queue is
placed on the queue with a status of:
RN (Received Normal)
RA (Received Abnormal)
Once the data has been extracted, the system changes the status to PI (Processed Inbound).
Data extracted from the Inbound queue will remain on the queue until the queue is purged by the
System Administrator or by the automatic purge function specified with the “Days to Purge” on
the Communication Profile panel (EDIX401-FMT01). If you experience problems in processing,
you may change the status from PI to RN, and extract the data contained in the batches again.
Access the Inbound Queue
You can access the Inbound Queue from the Work with Communications panel
(EDIX400-FMT01).
Figure 4.61 Work with Communications Panel (EDIX400-FMT01)
To see data batches for a specific comm profile ID, type 16 (Inb Queue) in the option field next to
the selected ID and press Enter, as shown in Figure 4.61. Only batches for that comm profile ID
will be shown. Type 16 (Inb Queue) on the key entry line and press Enter to see batches for all
comm profile IDs.
EDIX400 Work with Communications EDI 04/30/08
FMT01 pgmlib: G3X5PGM dtalib:G3X5DTA 12:00:00
Position to Profile ID . . . . . . CN3BSC
Type option (and Information), press Enter.
12=Session Ctrl 13=Jobs 14=History Log 15=Outb Queue 16=Inb Queue
Opt Profile ID Company
16 CN3BSC COMMERCE:NETWORK RELEASE 3
CN3SNA COMMERCE:NETWORK RELEASE 3
REDINET CONTROL DATA / REDINET NETWORK
RMTDAA Remote Dial Line/Answer/ASYNC
RMTDAL Remote Dial Line/Answer/SDLC/APPC
RMTDAN Remote Dial/Answer/No X25 Network
RMTLAL Remote Leased-line/answer/SDLC/APPC
RMTLAN Remote Lease Lin/Answer/No X25 Netw
RMTLAX Remote Leased Line/Answer/X25 Netwk
More...
Parameters or command
===>
F1=Help F3=Exit F12=Cancel F15=Sort F23=More Options F24=More Keys

Using Communications Operations and Management of Communications
Gentran:Server for iSeries Communications Module Release 3.5 User Guide 4 - 93
Work with Inbound Queue Control
The Work with Inbound Queue Control panel (EDIX407-CTL01), as shown in Figure 4.62,
displays all data batches received during communication sessions. The Inbound Queue consists of
two files: the control file (INBCTL), which identifies the batch number and status, and the data file
(INBDTA), which contains the actual data received.
Figure 4.62 Work with the Inbound Queue Control Panel (EDIX407-CTL01)
If you chose a specific comm profile ID on the Work with Communications panel
(EDIX400-FMT01), the information on the Inbound Queue Control panel will be sorted by Profile
Sequence in descending order.
If you selected to view batches for all comm profile IDs on the Work with Communications panel
(EDIX400-FMT01), the information will appear sorted by the comm profile ID (in ascending
order) and the Profile Sequence (in descending order). When viewing batches for all Profile IDs,
you can press F15 (Sort) and select Status Code as an alternate sort option. The Position-To
fields can also be used to selectively search for desired information.
To view the actual data received, type 5 in the option field next to the selected batch and press
Enter. The Inbound Queue Inquiry panel (EDIX408) is shown.
EDIX407 Work with Inbound Queue Control EDI 04/30/08
FMT01 12:00:00
Position to Profile Seq For CN3BSC
Type option (and Information), press Enter.
2=Revise 4=Delete 5=View 6=Print 30=Extract Data 31=Find String
Profile Comm Batch Batch
Opt Profile Sts Seq # Date Time Records Stamp Seq # ID
CN3BSC PI 5 04/30/08 11:09:17 12 9 10 POINB
CN3BSC PI 3 04/30/08 14:13:34 7 2 3 Edifact
5 CN3BSC PI 2 04/30/08 17:35:37 6 2 2 SEMPOAP
CN3BSC PI 1 04/30/08 17:36:16 16 3 1 INVFILE
Bottom
Parameters or command
===>
F1=Help F3=Exit F12=Cancel F15=Sort F24=More Keys

Operations and Management of Communications Using Communications
4 - 94 Gentran:Server for iSeries Communications Module Release 3.5 User Guide
Inbound Queue Inquiry (Character Display)
The Inbound Queue Inquiry panel (EDIX408), shown in Figure 4.63, displays the actual data
contained in the selected batch.
Figure 4.63 Character Display Mode of the Inbound Queue Inquiry Panel (EDIX408)
To see the remaining data for each line number, Press F19 (Left) and F20 (Right) to window left
and right when the data is displayed in character mode.
F2 (Hex) can be pressed to toggle between character and hexadecimal mode. Figure 4.64
illustrates the hexadecimal display.
EDIX408 Inbound Queue Inquiry EDI 04/30/08
12:00:00
Comm Profile Id . . CN3BSC Line Number . . . . 000000001
Profile Seq . . . . 000005 Status. . . . . . . PI
Date Received . . . 04/30/08 Batch Seq Number. . 0008735
Time Received . . . 11:29
Batch-Id. . . . . . SEMPOAPPL
ISA*00* *00* *01*987654321 *01*123456789 *971012*
1*U*00200*000000001*0*T*#?GS*PO*987654321 *123456789 *971012*1500*000000001*X
2040?ST*850*000001?BEG*00*NE*01120001**971012?N1*SF***100?PO1**10*EA*5.12**PI
RT-123?PO1**30*DA*10.0**PI*PART-456?PO1**5*CA*8.25**PI*PART-789?CTT*3?SE*8*00
ST*850*0002?BEG*00*NE*01120030**971017?N1*SF**3*200?PO1**20*BX*9.5**PI*PART-1
PO1**500*CA*22.79**PI*PART-456?CTT*2?SE*7*0002?GE*2*000000001?IEA*1*000000001
Bottom
F1=Help F2=Hex F5=Refresh F12=Cancel F17=Next Rcd
F19=Left F20=Right F21=Prt Dta
Bottom of data records

Using Communications Operations and Management of Communications
Gentran:Server for iSeries Communications Module Release 3.5 User Guide 4 - 95
Inbound Queue Inquiry (Hexadecimal Display)
Figure 4.64 illustrates the Inbound Queue Inquiry panel (EDIX408) in hexadecimal mode.
Figure 4.64 Hexadecimal Mode of the Inbound Queue Inquiry Panel (EDIX408)
Press F2 (Chr) to toggle between hexadecimal and character displays.
In hexadecimal mode, only one line number is shown at a time. In this mode, F19 (Left) and F20
(Right) are not necessary, since the full line of data can be viewed at one time. Page Up/Page
Down may be pressed to scroll through the entire batch of data
To advance to a specific line number, type the desired line number at the top of the panel and press
Enter.
Press F12 (Cancel) to return to the Work with Inbound Queue Control panel.
EDIX408 Inbound Queue Inquiry EDI 04/30/08
12:00:00
Comm Profile Id . . CN3BSC Line Number . . . . 000000001
Profile Seq . . . . 000005 Status. . . . . . . PI
Date Received . . . 04/30/08 Batch Seq Number. . 0000735
Time Received . . . 11:29
Batch-Id. . . . . . SEMPOAPPL
POS 001-064 ISA*00* *00* *01*987654321 *01*123456789
CEC5FF544444444445FF544444444445FF5FFFFFFFFF4444445FF5FFFFFFFFF4
921C00C0000000000C00C0000000000C01C987654321000000C01C1234567890
POS 065-080 *971012*150
444445FFFFFF5FFF444444444444444444444444444444444444444444444444
00000C971012C150000000000000000000000000000000000000000000000000
More...
F1=Help F2=Chr F5=Refresh F12=Cancel F17=Next Rcd
F19=Left F20=Right F21=Prt Dta

Operations and Management of Communications Using Communications
4 - 96 Gentran:Server for iSeries Communications Module Release 3.5 User Guide
View Additional Fields from the Work with Inbound Queue Control Panel
Press F6 (More/Less) from the Work with Inbound Queue Control panel to view the subfile with
an additional row of information, as shown in Figure 4.65.
Figure 4.65 Inbound Queue Inquiry Panel (EDIX408) Additional Fields
EDIX407 Work with Inbound Queue Control EDI 04/30/08
FMT01 12:00:00
Position to Profile Seq For CN3BSC
Type option (and Information), press Enter.
2=Revise 4=Delete 5=View 6=Print 30=Extract Data 31=Find String
Profile Comm Batch Batch
Opt Profile Sts Seq # Date Time Records Stamp Seq # ID
CN3BSC PI 6 04/30/08 12:00:00 7 10 11 EDIFACT
Last Update User Date 04/30/08 Time 12:00:00
CN3BSC PI 5 04/30/08 12:00:00 12 9 10 POINB
Last Update User Date Time 00:00:00
CN3BSC H 3 04/30/08 12:00:00 7 2 3 Edifact
Last Update User Date Time 00:00:00
CN3BSC PI 2 04/30/08 12:00:00 6 2 2 SEMPOAP
Last Update User Date Time 00:00:00
More...
Parameters or command
===>
F1=Help F6=More/Less F12=Cancel F15=Sort F23=More Options F24=More Keys
Unable to Page Down from this point.

Using Communications Operations and Management of Communications
Gentran:Server for iSeries Communications Module Release 3.5 User Guide 4 - 97
Revise the Batch Status on the Inbound Queue
There may be times when it is necessary to reprocess inbound EDI data. To pass a copy of the
batch data to the Inbound processing job, the status must be RN (Received Normal). Batches that
have been processed are updated with a status of PI (Processed Inbound).
Figure 4.66 Work with Inbound Queue Control panel (EDIX407)
To revise a status, type 2 (Revise) next to the selected batch or batches of data and press Enter. A
pop-up window appears and allows you to specify the new status code, as shown in Figure 4.66.
Press F4 (Prompt) to see a list of all status codes for inbound batches.
# NOTE
The status code can only be changed to RN for reprocessing or H to put the batch on hold.
EDIX407 Work with Inbound Queue Control EDI 04/30/08
FMT01 12:00:00
Position to Profile Seq For CN3BSC
Type option (and Information), press Enter.
2=Revise 4=Delete 5=View 6=Print 30=Extract Data 31=Find String
Profile Comm Batch Batch
Opt Profile Sts Seq # Date Time Records Stamp Seq # ID
CN3BSC PI 5 04/30/08 11:09:17 12 9 10 POINB
CN3BSC PI 3 04/30/08 14:13:34 7 2 3 Edifact
2 CN3BSC PI 2 04/30/08 17:35:37 6 2 2 SEMPOAP
ILE
Change Status to
RN
F3=Exit F12=Cancel
om
Parameters or command
===>
F1=Help F3=Exit F12=Cancel F15=Sort F24=More Keys

Operations and Management of Communications Using Communications
4 - 98 Gentran:Server for iSeries Communications Module Release 3.5 User Guide
Delete Batches from the Inbound Queue
You can delete any batch from the Inbound Queue file at any time if you have the proper authority.
Care should be taken whenever the delete option is used.
To delete an entry from any Inbound Queue panel:
Type 4 in the option field next to the entry that you want to delete and press Enter.
Figure 4.67 shows the deletion of a batch from the inbound queue.
Figure 4.67 Delete batch from Inbound Queue
EDIX407 Work with Inbound Queue Control EDI 04/30/08
FMT01 12:00:00
Position to Profile Seq For CN3BSC
Type option (and Information), press Enter.
2=Revise 4=Delete 5=View 6=Print 30=Extract Data 31=Find String
Profile Comm Batch Batch
Opt Profile Sts Seq # Date Time Records Stamp Seq # ID
CN3BSC PI 5 04/30/08 11:09:17 12 9 10 POINB
CN3BSC PI 3 04/30/08 14:13:34 7 2 3 Edifact
4 CN3BSC RN 2 04/30/08 17:35:37 6 2 2 SEMPOAP
CN3BSC RN 1 04/30/08 17:36:16 16 3 1 INVFILE
Bottom
Parameters or command
===>
F1=Help F3=Exit F12=Cancel F15=Sort F24=More Keys

Using Communications Operations and Management of Communications
Gentran:Server for iSeries Communications Module Release 3.5 User Guide 4 - 99
A confirmation panel will be displayed, showing the entry or entries to be deleted.
Figure 4.68 Work with Inbound Queue Control panel (EDIX407 - CTL02)
Press Enter to confirm the deletion for all selected entries.
EDIX407 Work with Inbound Queue Control EDI 04/30/08
CTL02 12:00:00
Press Enter to confirm your choices for Delete.
Press F12=Cancel to return to change your choices.
Profile Comm Batch Batch
Profile Sts Seq # Date Time Records Stamp Seq # ID
CN3BSC RN 2 04/30/08 17:35:37 6 2 2 SEMPOAP
Bottom
F12=Cancel

Operations and Management of Communications Using Communications
4 - 100 Gentran:Server for iSeries Communications Module Release 3.5 User Guide
Print Inbound Queue Data
There may by many times when it is necessary to print or place Inbound EDI data in a work file.
This option will print the data or place it in an output file breaking at the segment level.
# NOTE
If the data being printed is non-EDI data, you will receive a message that states:
Starting record number passed does not begin with an interchange
record. No valid interchange found. Printing data as is.
If this situation occurs, the data will be printed as it sits on the Comm queue.
Figure 4.69 Print EDI Data (PRTEDIDTA) Command
To print an entry, type 6 (Print) next to the selected batch or batches of data and press Enter. The
PRTEDIDTA command will be displayed allowing the user to modify the print level, output type,
and starting and ending record sequence number.
Print EDI Data (PRTEDIDTA)
Type choices, press Enter.
Comm Profile Id to Print . . . . > CN3BSC Comm Profile Id
>
Output . . . . . . . . . . . . . > *PRINT *PRINT, *OUTFILE
File to receive output . . . . . > ' ' NAME
Library . . . . . . . . . . . . > *LIBL Name, *LIBL, *CURLIB
Output Member Options:
Member to receive output . . . > ' ' Name, *FILE
Replace or add records . . . . *REPLACE *REPLACE *ADD
Create File? . . . . . . . . . . > *YES *NO, *YES
Additional Parameters
Inbound/Outbound . . . . . . . . > *I *I, *O
Start Record Sequence Number . . > 1 Number
End Record Sequence Number . . . > 999999 Number
Start Batch Sequence Number . . > 2 Number
More...
F3=Exit F4=Prompt F5=Refresh F12=Cancel F13=How to use this display
F24=More keys

Using Communications Operations and Management of Communications
Gentran:Server for iSeries Communications Module Release 3.5 User Guide 4 - 101
Extract Data from Inbound Queue
The Extract Data from Inbound Queue function executes the EXTRACT command. This command
allows you to copy data residing in the inbound queue and place the data in a user-defined file on
the iSeries.
Figure 4.70 Extract data from Inbound Queue
To extract data, type 30 (Extract Data) next to the selected batch of data and press Enter. The
EXTRACT command will be displayed, allowing the user to modify other parameters.
Press F1 (Help) on any parameter for additional information. Press Enter to submit, or press F12
(Cancel) to cancel the command.
EDIX407 Work with Inbound Queue Control EDI 04/30/08
FMT01 12:00:00
Position to Profile Seq For CN3BSC
Type option (and Information), press Enter.
2=Revise 4=Delete 5=View 6=Print 30=Extract Data 31=Find String
Profile Comm Batch Batch
Opt Profile Sts Seq # Date Time Records Stamp Seq # ID
30 CN3BSC PI 5 04/30/08 11:09:17 12 9 10 POINB
CN3BSC PI 3 04/30/08 14:13:34 7 2 3 Edifact
CN3BSC RN 2 04/30/08 17:35:37 6 2 2 SEMPOAP
CN3BSC RN 1 04/30/08 17:36:16 16 3 1 INVFILE
Bottom
Extract Data From Queues (EXTRACT)
Type choices, press Enter.
Comm Profile Id to DeQueue . . . > CN3BSC Profile Id, *ALL
Batchid to Dequeue . . . . . . . *ALL
Extract Inqueue or Outqueue . . > *IN *IN, *OUT
Start Profile Sequence Number . > 5 Number
End Profile Sequence Number . . > 5 Number
File Name . . . . . . . . . . . Character value
Library Name . . . . . . . . . . Library Name, Blanks
Member Name . . . . . . . . . . Member Name, Blanks
Create File ? . . . . . . . . . *NO *YES, *NO
Record Length . . . . . . . . . Number
Run Interactively? . . . . . . . > *YES *YES, *NO
Additional Parameters
Update Status Flag? . . . . . . > *NO *YES, *NO
Bottom
F3=Exit F4=Prompt F5=Refresh F10=Additional parameters F12=Cancel
F13=How to use this display F24=More keys

Operations and Management of Communications Using Communications
4 - 102 Gentran:Server for iSeries Communications Module Release 3.5 User Guide
Find String in the Inbound Queue
This command allows you to search for a selected string of data in the comm queues (inbound or
outbound).
Figure 4.71 Find String in Comm Queues (FNDSTRCOM) Command
To print an entry, type 31 (Find String) next to the selected batch or batches of data and press
Enter. The FNDSTRCOM command will be displayed allowing the user to select from the available
parameters to narrow the scope of the search. The output is a generated report identifying where
the match was found, and including the profile, batch sequence, and unwrapped record number.
The unwrapped record that corresponds to the match is printed.
Find String in Comm Queues (FNDSTRCOM)
Type choices, press Enter.
Comm Profile ID . . . . . . . . > CN3BSC *ALL, Character
Direction . . . . . . . . . . . > *IN *IN, *OUT
Batch Sequence Number . . . . . > 000010 Number, *ALL
String to find . . . . . . . . .
Beginning Date . . . . . . . . . *BEGIN Date, *CURRENT, *BEGIN
Ending Date . . . . . . . . . . *END Date, *CURRENT, *END
Beginning Time . . . . . . . . . *AVAIL Time, *CURRENT, *AVAIL
Ending Time . . . . . . . . . . *AVAIL Time, *CURRENT, *AVAIL
Number of Matches . . . . . . . *ALL Number, *ALL
Bottom
F3=Exit F4=Prompt F5=Refresh F10=Additional parameters F12=Cancel
F13=How to use this display F24=More keys

Using Communications Operations and Management of Communications
Gentran:Server for iSeries Communications Module Release 3.5 User Guide 4 - 103
Gentran IBQ to IFS Gateway
The Gentran IBQ to IFS Gateway function executes the GENIBQIFS command. This command
enables you to transfer data in the inbound queue to the integrated file system (IFS).
Figure 4.72 Perform Gentran IBQ to IFS Gateway Command (GENIBQIFS)
To perform Gentran IBQ to IFS Gateway, type 32 (GENIBQIFS) next to the selected batch of data
and press Enter. The GENIBQIFS command displays, enabling you to modify other parameters.
(SEE Chapter 12 for more information about this command, and field descriptions.)
EDIX407 Work with Inbound Queue Control XX 04/30/08
FMT01 12:00:00
Position to Profile ID . . . . . . Profile Seq 9999999
Type option (and Information), press Enter.
32=GENIBQIFS
Profile Comm Batch Batch
Opt Profile Sts Seq # Date Time Records Stamp Seq # ID
32 CN3BSC PI 6 04/30/08 12:00:00 7 10 11 EDIFACT
CN3BSC PI 5 04/30/08 12:00:00 12 9 10 POINB
CN3BSC H 3 04/30/08 12:00:00 7 2 3 Edifact
Gentran IBQ to IFS Gateway (GENIBQIFS)
Type choices, press Enter.
Communication profile id . . . . > CN3BSC Name
Outbound IFS directory . . . . .
Outbound IFS file . . . . . . .
Outbound End of Line . . . . . . *FIXED *CRLF, *CR, *LF, *LFCR...
Periodic polling . . . . . . . . *NO, *YES
Additional Parameters
Process Name . . . . . . . . . . GIFSGATE
Append Data? . . . . . . . . . . *NO *YES, *NO
Start Profile Sequence Number . > 6 Number
End Profile Sequence Number . . > 6 Number
Run interactively . . . . . . . > *YES *YES, *NO
Schedule job . . . . . . . . . . > *NO *YES, *NO
Bottom
F3=Exit F4=Prompt F5=Refresh F12=Cancel F13=How to use this display
F24=More keys

Operations and Management of Communications Using Communications
4 - 104 Gentran:Server for iSeries Communications Module Release 3.5 User Guide
Add Data to Queues
The Add Data to Queues function runs the ADD command. This command allows you to add data
to the inbound or outbound queue from a user-defined file, or from an MQSeries queue. Here are
two examples of how to use the command:
1. You can use the ADD command to add data to the outbound queue. This allows non-EDI
data or a file that is generated outside of EDI to be added to the outbound queue for
transmission.
2. You can use the ADD command to add data to the inbound queue that was not received
through a Gentran:Server communication session. (This situation might occur when you
receive data on a tape or diskette. It could also be received from an MQSeries queue.)
When you select option 30 (Add Data to Queues) on the GENCOM menu, the system displays the
Add Data to Queues panel (ADD). This is actually the same command prompt panel that the
system displays if you type ADD on the command line and press F4 (Prompt). The minimum
information you need to provide on this panel is ‘Add Data to In or Out Queue’ and ‘File Name to
Queue.’ For a description of these or any other parameters, move the cursor to the parameter and
press F1 (Help) to display online help.
As you use this panel, keep in mind the following points:
When data is added to the outbound queue, the system sets the status of the batch to Q
(Queued). When data is added to the inbound queue, the system sets the status of the batch to
RN (Received Normally).
The maximum record length of the file being added can be no longer than 32,000 bytes.
If you do not specify a library (by leaving the Library Name parameter blank), the system uses
the first file found in your library list that matches the value you entered in the File Name to
Queue parameter.
If you leave the Comm Profile ID to Queue parameter blank, the system uses the Comm
Profile ID from the $$ADD records that you provided in the data file. ($$ADD records are
instruction cards that precede the data and identify which Comm Profile ID the system should
place the data under in the inbound or outbound queue file.) The file may contain multiple
$$ADD cards to direct the batches of data to different Comm Profile IDs.
When data is added to the inbound queue, you have the option of specifying a maximum of 2
HEX characters to be removed from the data before adding to queue.
CAUTION
STOP
Do not delete the Comm Profile ID DEFAULT. If you do not specify a Comm Profile ID and
the file has no $$ADD records, the system adds the data under the Comm Profile ID
DEFAULT.

Using Communications Operations and Management of Communications
Gentran:Server for iSeries Communications Module Release 3.5 User Guide 4 - 105
# NOTE
The MQ Link and File Name parameters are mutually exclusive; only one parameter can be
specified. If the data to be added is in a database file, specify the file name. If the data to be
added resides on an MQSeries queue, specify the MQ Link name.
Figure 4.73 shows the Add Data to Queues (ADD) panel.
Figure 4.73 Add Data to Queues (panel 1)
Add Data to Queues (ADD)
Type choices, press Enter.
Comm Profile Id to Queue . . . . Comm Profile Id
Batchid to Queue . . . . . . . .
Add Data to In or Out Queue . . *OUT *IN, *OUT
File Name to Queue . . . . . . . File Name
Library Name . . . . . . . . . . Library Name, Blanks
Member Name . . . . . . . . . . Member, *All, Blanks
Run Interactively ? . . . . . . *NO *YES, *NO
Additional Parameters
Process Name . . . . . . . . . . ADD
Keep Add Records? . . . . . . . *NO *YES, *NO
MQ Link . . . . . . . . . . . . Name
Text File . . . . . . . . . . . *NO *NO, *YES
Record Length . . . . . . . . . *FILE 1-32000, *FILE
More...
F3=Exit F4=Prompt F5=Refresh F12=Cancel F13=How to use this display
F24=More keys

Operations and Management of Communications Using Communications
4 - 106 Gentran:Server for iSeries Communications Module Release 3.5 User Guide
Figure 1.74 Add Data to Queues (panel 2)
Additional Parameters for ADD
When you press F10 (Additional parameters), the system displays the Process Name, Keep Add
Records, MQ Link, and the Schedule Job parameters. For a description of these or any other
parameters, move the cursor to the parameter and press F1 (Help) to display online help.
Keep Add Records
The default value for the Keep Add Records parameter is *NO. You can retain or discard the
$$ADD record to simplify sending data to another site. The $$ADD retention option enables the
user to separate data into batches based on the $$ADD, but leaves the $$ADD as the first record of
the batch. This allows the $$ADD records added under a global profile ID to be sent as individual
$$ADD IDs to a remote site. Batches added using the $$ADD records and then retaining the
$$ADD records would be used to add multiple IDs during a single ADD run. This scenario would
send batches with $$ADD records in separate Gentran:Server sessions or to separate sites.
Text File
This field determines whether text record separators (Carriage Return, Line Feed) will be added to
the data when it is added to the queue. *YES indicates that CRLF will be added at the interval
determined by the Record Length parameter. *NO indicates that CRLF will not be added.
Add Data to Queues (ADD)
Type choices, press Enter.
Lock the File? . . . . . . . . . *YES *NO, *YES
Schedule Job ? . . . . . . . . . *NO *YES, *NO
Bottom
F3=Exit F4=Prompt F5=Refresh F12=Cancel F13=How to use this display
F24=More keys

Using Communications Operations and Management of Communications
Gentran:Server for iSeries Communications Module Release 3.5 User Guide 4 - 107
Record Length
This field specifies the interval at which text record separators will be added to the data when the
Text File parameter is *YES. Specify any fixed interval from 1 to 32000. Specify *FILE to use the
record length of the input file.
Lock the File
The default value for Lock the File parameter is *YES. It allows you to check for an object lock. If
the object is locked, the program will wait 10 seconds and try allocating it again. If it is still
allocated, the job ends and the file will not be added to the queue.

Operations and Management of Communications Using Communications
4 - 108 Gentran:Server for iSeries Communications Module Release 3.5 User Guide
Extract Data from Queues
The EXTRACT Data from Queues function runs the EXTRACT command. This command allows
you to copy data received from the inbound or outbound queue and place the data in a user-defined
file on the iSeries, or send it to an MQSeries queue. Here are two situations in which this
command is useful:
1. For the outbound queue, you can use the EXTRACT command to pull translated EDI data
that you do not want to transmit through a Gentran:Server communication session. (This
situation might occur when you are sending out data on a tape or a diskette.)
2. For the inbound queue, you can use the EXTRACT command when you are using a
Gentran:Server communication session to receive data that you do not want to translate.
(This situation occurs when you are receiving non-EDI data or a file that needs to be
passed on to another division.)
When you select option 31 (Extract Data from Queues) on the GENCOM menu, the system
displays the Extract Data from Queues (EXTRACT) panel. This is the same command prompt
panel that the system displays if you type EXTRACT on the command line and press F4 (Prompt).
The minimum information you need to provide on this panel is Extract Inqueue or Outqueue, File
Name or MQ Link name, and either Comm Profile ID to Dequeue or Batchid to Dequeue. (SEE the
parameters on the EXTRACT panel in Figure 1.16.) For a description of these or any other
parameters, move the cursor to the parameter and press F1 (Help) to display online help.
As you use this panel, keep in mind the following points:
When the Extract Inqueue or Outqueue parameter is set to *IN, the system extracts the data
with a status of RN (Received Normally) from the inbound queue. When Extract Inqueue or
Outqueue is set to *OUT, the system extracts the data with a status of Q (Queued) from the
outbound queue. The parameters Start Profile Sequence Number and End Profile Sequence
Number allow you to specify the batch numbers on which extract Processing should begin and
end.
If the file you specify for the File Name parameter does not exist, be sure to set the Create File
parameter to *YES and specify a value for the Record Length parameter. We recommend that
you also specify the library in which the new file will reside. If no library is specified, the file
is created in the library specified in the user’s environment control profile.
The maximum record length for the file receiving the extracted data can be no longer than
32,000 bytes.
If the Batchid to Dequeue parameter is set to *ALL, the system extracts all batches with the
specified Comm Profile ID to Dequeue from the queue, regardless of their Batch ID. When
you specify a value for Batchid to Dequeue, the system extracts only batches containing that
Batch ID. If you enter *BLANKS, it will only extract batches that have a blank batch ID.
# NOTE
The MQLink and File Name parameters are mutually exclusive; only one parameter can be
specified. If the data is to be extracted to a database file, specify the file name. If the data to
be extracted is to be sent to an MQSeries queue, specify the MQ Link name.

Using Communications Operations and Management of Communications
Gentran:Server for iSeries Communications Module Release 3.5 User Guide 4 - 109
Figure 4.75 shows the Extract Data From Queues (EXTRACT) panels.
Figure 4.75 Extract Data From Queues (panels 1 and 2)
Extract Data From Queues (EXTRACT)
Type choices, press Enter.
Comm Profile Id to DeQueue . . . CN3BSC Profile Id, *ALL
Batchid to Dequeue . . . . . . . *ALL
Extract Inqueue or Outqueue . . *IN *IN, *OUT
Start Profile Sequence Number . 0 Number
End Profile Sequence Number . . 999999 Number
File Name . . . . . . . . . . . NONEDIFILE Character value
Library Name . . . . . . . . . . QGPL Library Name, Blanks
Member Name . . . . . . . . . . Member Name, Blanks
Create File ? . . . . . . . . . *NO *YES, *NO
Record Length . . . . . . . . . Number
Run Interactively? . . . . . . . *NO *YES, *NO
Additional Parameters
Process Name . . . . . . . . . . EXTRACT
More...
F3=Exit F4=Prompt F5=Refresh F12=Cancel F13=How to use this display
F24=More keys
Extract Data From Queues (EXTRACT)
Type choices, press Enter.
Update Status Flag? . . . . . . *YES *YES, *NO
Fifo or Lifo Method . . . . . . *FIFO *FIFO, *LIFO
Append to Existing Data? . . . . *NO *YES, *NO
MQ Link . . . . . . . . . . . . Name
Text File . . . . . . . . . . . *NO *NO, *YES
Lock the File? . . . . . . . . . *YES *YES, *NO
Schedule Job? . . . . . . . . . *NO *YES, *NO
Bottom
F3=Exit F4=Prompt F5=Refresh F12=Cancel F13=How to use this display
F24=More keys

Operations and Management of Communications Using Communications
4 - 110 Gentran:Server for iSeries Communications Module Release 3.5 User Guide
Additional Parameters for EXTRACT
When you press F10 (Additional parameters), the system displays the remaining parameters for
the command. Press Page Down/Page Up to access the parameters.
Process Name
This parameter is used to label the command for the Message Center. The default for this prompt is
the command name, but it can be changed to any 15-byte field to help further identify this process.
The process name appears on the first panel of the Work with Message Center screen (EDIX600)
and can be sorted and reported on using this name.
Update Status Flag
The Update Status Flag parameter allows you to specify whether or not the system updates the
status flag when you extract a batch of data.
FIFO or LIFO Method
This field indicates the order in which the data should be extracted. The default is *FIFO, first in,
first out processing. *LIFO is used for last in, first out processing.
Append to Existing Data
This field indicates whether the existing data in the file should be appended to a specified file or
overwritten. The default is *NO (the file member will be cleared first).
MQ Link
If data should be extracted to a MQ Queue, specify the MQ Link that represents the MQ Queue.
Text File
This field determines whether text record separators (Carriage Return, Line Feed, Newline) will be
removed from the data and cause a break to a new record when the data is extracted from the
queue. *YES indicates that the text record separators will be processed and removed. *NO indicates
that they will be ignored and left in the data. When *YES is specified, any trailing spaces on the
last queue record will be considered pad characters and will not be copied to the output file.
Lock the File?
This field determines whether the file that the data is being copied to is to be locked. The default is
*YES.
Schedule Job
Indicates whether the job should be scheduled to run at a later time or immediately.

Using Communications Operations and Management of Communications
Gentran:Server for iSeries Communications Module Release 3.5 User Guide 4 - 111
Replace Characters
The Replace Characters function runs the RPLCHARS command. This command allows you to
replace up to five characters in a specified file.
When you select option '44' (Replace Characters) on the GENCOM menu, the system displays the
Replace Characters panel (RPLCHARS). This is actually the same command prompt panel that the
system displays if you type 'RPLCHARS' on the command line and press F4 (Prompt).
Figure 4.76 shows the Replace Characters (RPLCHARS) panels.
Replace Characters (RPLCHARS)
Type choices, press Enter.
File Name . . . . . . . . . . . __________ Character value
Library Name . . . . . . . . . . *LIBL Library Name, *LIBL
Member Name . . . . . . . . . . *FIRST Member Name, *FIRST
Replace Existing File? . . . . . *NO *YES, *NO
Find HEX Characters:
1st Hex Char . . . . . . . . . __ Character value
2nd Hex Char . . . . . . . . . __ Character value
3rd Hex Char . . . . . . . . . __ Character value
4th Hex Char . . . . . . . . . __ Character value
5th Hex Char . . . . . . . . . __ Character value
Replace HEX Characters with:
1st Hex Char . . . . . . . . . __ Character value
2nd Hex Char . . . . . . . . . __ Character value
3rd Hex Char . . . . . . . . . __ Character value
4th Hex Char . . . . . . . . . __ Character value
5th Hex Char . . . . . . . . . __ Character value
More...
F3=Exit F4=Prompt F5=Refresh F10=Additional parameters F12=Cancel
F13=How to use this display F24=More keys

Operations and Management of Communications Using Communications
4 - 112 Gentran:Server for iSeries Communications Module Release 3.5 User Guide
Figure 4.76 Replace Characters (panels 1 and 2)
Press F1 (Help) on any parameter for additional information. Press Enter to submit, or press F12
(Cancel) to cancel the command.
Field Descriptions
File Name
Enter the name of a specific file that you want to perform the replace characters on.
Library Name
This field is used to indicate the library name where the file exists. Specify a 10-position
library name or enter *LIBL if the file is in your library list.
Member Name
A 10-position alphanumeric field used to specify a file member name. Enter a specific
member name or select the default of *FIRST for the first member.
Replace Existing File?
The default is *NO. The modified file with the characters replaced will be written to a new
location specified by you. If *YES, the original file will be replaced with the modified file.
Find Hex Characters
There are up to 5 characters you can specify to replace.
Replace Hex Characters with
There are up to 5 characters you can specify to replace with.
Replace Characters (RPLCHARS)
Type choices, press Enter.
To File . . . . . . . . . . . . __________ Character value
To Library . . . . . . . . . . . __________ Library
Run Interactively? . . . . . . . *NO *YES, *NO
Bottom
F3=Exit F4=Prompt F5=Refresh F10=Additional parameters F12=Cancel
F13=How to use this display F24=More keys

Using Communications Operations and Management of Communications
Gentran:Server for iSeries Communications Module Release 3.5 User Guide 4 - 113
To File
This parameter is valid only when *NO is specified for the REPLACE (Replace Existing
File?) parameter. Specify the file name for the modified file.
To Lib rary
This prompt is only utilized when *NO is specified for the REPLACE (Replace Existing
File?) parameter. Indicate the library name where the changed file is to written to.
Run Interactively?
It allows you to perform the process interactively (immediately). If you select to run the
command in an interactive mode, you can monitor system messages that occur during
processing. However, if you choose this option, your terminal is locked until the process
is completed.

Operations and Management of Communications Using Communications
4 - 114 Gentran:Server for iSeries Communications Module Release 3.5 User Guide
Purge the Communications Files
An important task of managing communications is purging the communications files on a routine
basis. All batches of data received during communications sessions remain in the Inbound Queue
until purged (including data that has been extracted). Likewise, all batches of data added outbound
remain in the Outbound Queue until purged (including data that has been transmitted or extracted).
The Communications History log contains detailed history information for all communication
sessions. This file also needs to be purged.
The purge commands should be used to perform routine housekeeping to limit the size of the
queues. These commands can also be used for ad-hoc purges of specific data, if necessary. Data
can optionally be purged to tape or save file and later retrieved.
As with the Start Communication Session (STRCOMSSN) command, the various purge commands
can be executed one of three ways:
Submitted to run in batch immediately
Scheduled to run in batch at a later time
Executed interactively immediately
The communications files that need to be purged are the Outbound Queue (control and data files)
and the Inbound Queue (control and data files), and the Communications History log. The
commands that are available to purge and retrieve the data can be accessed from any one of the
following:
the Work with Communications panel (EDIX400-FMT01)
the GENCOM menu
prompted from the command line
The options and commands are described in this table.
GENCOM
Menu
Options
EDIX400
Option Codes Commands Description
15 40 PRGCHF Purge the Communication History file
17 41 PRGOBQ Purge the Outbound Queue
16 42 PRGIBQ Purge the Inbound Queue
14 43 PRGALL Purge all Communication files
19 44 RTVCHF Retrieve the Communications History file
21 45 RTVOBQ Retrieve the Outbound Queue
20 46 RTVIBQ Retrieve the Inbound Queue
18 47 RVTALL Retrieve all Communication files

Using Communications Operations and Management of Communications
Gentran:Server for iSeries Communications Module Release 3.5 User Guide 4 - 115
Another way data can be routinely purged is by using the automatic purge process. At the end of
every communications session, a purge command can be optionally executed to perform routine
housekeeping on all communications files. The indicator that triggers the execution of the Purge
All Comm Files (PRGALLA) command is the coding of a value in the Days to Purge field on the
comm profile ID panel (EDIX401-FMT01). If the field is not blank and does not contain 999, the
system executes the PRGALLA command.
In this case, the command only purges data for the specific comm profile ID and only if the data is
older than the number of days specified in the Days to Purge field. No selection can be made on
the batch status when this command is invoked.
)RECOMMENDATION
Define a schedule to purge the communications files on a routine basis during non-peak
hours such as nights and weekends.
Purge the Communications History Log (PRGCHF)
To access the PRGCHF command, select option 15 on the GENCOM menu or select option 40
(Purge History) on the Work with Communications panel (EDIX400-FMT01) or prompt PRGCHF
on the command line. The command panel appears as shown in Figure 4.77.
Figure 4.77 Purge Comm History File (PRGCHF) panel
Press F1 (Help) on any parameter for additional information. Press Enter to submit, or press F12
(Cancel) to cancel the command.
Purge Comm History File (PRGCHF)
Type choices, press Enter.
Selection Criteria for Purge . . *DAYS *DATE, *DAYS, *ALL
Comm Profile Id . . . . . . . . > *ALL *ALL, Comm Profile Id
+ for more values
Schedule Job ? . . . . . . . . . *NO *YES, *NO
Purge Method? . . . . . . . . . *NONE *TAPE, *SAVF, *NONE, *CL
Days to Retain on File . . . . . 0 Number
Additional Parameters
Run Interactively? . . . . . . . *NO *YES, *NO
Reorganize Files? . . . . . . . *YES *YES, *NO
Process Name . . . . . . . . . . PRGCHF
Bottom
F3=Exit F4=Prompt F5=Refresh F12=Cancel F13=How to use this display
F24=More keys

Operations and Management of Communications Using Communications
4 - 116 Gentran:Server for iSeries Communications Module Release 3.5 User Guide
Purge the Outbound Queue (PRGOBQ)
To access the PRGOBQ command, select option 17 on the GENCOM menu or select option 41
(Purge Outbound) on the Work with Communications panel (EDIX400-FMT01) or prompt
PRGOBQ on the command line. The command panel appears as shown in Figure 4.78.
Figure 4.78 Purge Outbound Queue (PRGOBQ) panel
The comm profile ID is passed into the command when selected from the Work with
Communications panel next to a Profile ID.
Press F1 (Help) on any parameter for additional information. Press Enter to submit, or press F12
(Cancel) to cancel the command.
Purge Outbound Queue (PRGOBQ)
Type choices, press Enter.
Selection Criteria for Purge . . *DAYS *DATE, *DAYS, *ALL
Comm Profile Id . . . . . . . . *ALL *ALL, Comm Profile Id
+ for more values
Batch-Id to Purge . . . . . . . *ALL
Status . . . . . . . . . . . . . *ALL *ALL, SN, SA, Q, IP, H
+ for more values
Schedule Job ? . . . . . . . . . *NO *YES, *NO
Purge Method? . . . . . . . . . *TAPE, *SAVF, *NONE, *CL
Additional Parameters
Run Interactively? . . . . . . . *NO *YES, *NO
Reorganize Files? . . . . . . . *YES *YES, *NO
Process Name . . . . . . . . . . PRGOBQ
Bottom
F3=Exit F4=Prompt F5=Refresh F12=Cancel F13=How to use this display
F24=More keys

Using Communications Operations and Management of Communications
Gentran:Server for iSeries Communications Module Release 3.5 User Guide 4 - 117
Purge the Inbound Queue (PRGIBQ)
To access the PRGIBQ command, select option 16 on the GENCOM menu or select option 42
(Purge Inbound) on the Work with Communications panel (EDIX400-FMT01) or prompt PRGIBQ
on the command line. The command panel appears as shown in Figure 4.79.
Figure 4.79 Purge Inbound Queue (PRGIBQ) panel
The comm profile ID is passed into the command when selected from the Work with
Communications panel next to a Profile ID.
Press F1 (Help) on any parameter for additional information. Press Enter to submit, or press F12
(Cancel) to cancel the command.
Purge Inbound Queue (PRGIBQ)
Type choices, press Enter.
Selection Criteria for Purge . . *DAYS *DATE, *DAYS, *ALL
Comm Profile Id . . . . . . . . > *ALL *ALL, Comm Profile Id
+ for more values
Batch-Id to Purge . . . . . . . *ALL
Status . . . . . . . . . . . . . *ALL *ALL, RN, RA, PI, H
+ for more values
Schedule Job ? . . . . . . . . . *NO *YES, *NO
Purge Method? . . . . . . . . . *TAPE, *SAVF, *NONE, *CL
Additional Parameters
Run Interactively?. . . . . . . . *NO *YES, *NO
Reorganize Files? . . . . . . . . *YES *YES, *NO
PROCESS NAME . . . . . . . . . . PRGIBQ
Bottom
F3=Exit F4=Prompt F5=Refresh F12=Cancel F13=How to use this display
F24=More keys

Operations and Management of Communications Using Communications
4 - 118 Gentran:Server for iSeries Communications Module Release 3.5 User Guide
Purge All Communications Files (PRGALL)
To access the PRGALL command, select option 14 on the GENCOM menu or select option 43
(Purge All) on the Work with Communications panel (EDIX400-FMT01) or prompt PRGALL on
the command line. The command panel appears as shown in Figure 4.80.
Figure 4.80 Purge All Comm Files (PRGALL) panel
The comm profile ID is passed into the command when selected from the Work with
Communications panel next to a Profile ID.
Press F1 (Help) on any parameter for additional information. Press Enter to submit, or press F12
(Cancel) to cancel the command.
Purge All Comm Files (PRGALL)
Type choices, press Enter.
Selection Criteria for Purge . . *DATE, *DAYS, *ALL
Comm Profile Id . . . . . . . . > 'CN3BSC' *ALL, Comm Profile Id
+ for more values
Status . . . . . . . . . . . . . *ALL *ALL, RN, RA, PI, SN, SA, QE,H
+ for more values
Schedule Job ? . . . . . . . . . *NO *YES, *NO
Purge Method? . . . . . . . . . *TAPE, SAVF, *NONE, *CL
Additional Parameters
Run Interactively? . . . . . . . *NO *YES, *NO
Reorganize Files? . . . . . . . *YES *YES, *NO
Process Name . . . . . . . . . . PRGALL
Bottom
F3=Exit F4=Prompt F5=Refresh F12=Cancel F13=How to use this display
F24=More keys

Using Communications Operations and Management of Communications
Gentran:Server for iSeries Communications Module Release 3.5 User Guide 4 - 119
Retrieve the Communications History Log (RTVCHF)
To access the RTVCHF command, select option 19 on the GENCOM menu or select option 44
(Retrieve History) on the Work with Communications panel (EDIX400-FMT01) or prompt
RTVCHF on the command line. The command panel appears as shown in Figure 4.81.
Figure 4.81 Retrieve Comm History File (RTVCHF) panel
Press F1 (Help) on any parameter for additional information. Press Enter to submit, or press F12
(Cancel) to cancel the command.
Retrieve Comm Hst from Tape (RTVCHF)
Type choices, press Enter.
Communication History File . . . COMHST Character value
Library . . . . . . . . . . . . G3X5DTA Character value
Retrieve Method . . . . . . . . _____ *TAPE, *SAVF
Additional Parameters
Run Interactively? . . . . . . . *NO *YES, *NO
Bottom
F3=Exit F4=Prompt F5=Refresh F12=Cancel F13=How to use this display
F24=More keys

Operations and Management of Communications Using Communications
4 - 120 Gentran:Server for iSeries Communications Module Release 3.5 User Guide
Retrieve the Outbound Queue (RTVOBQ)
To access the RTVOBQ command, select option 21 on the GENCOM menu or select option 45
(Retv Outbound) on the Work with Communications panel (EDIX400-FMT01) or prompt RTVOBQ
on the command line. The command panel appears as shown in Figure 4.82.
Figure 4.82 Retrieve Outbound Queue (RTVOBQ) panel
Press F1 (Help) on any parameter for additional information. Press Enter to submit, or press F12
(Cancel) to cancel the command.
Retrieve Outbnd Que from Tape (RTVOBQ)
Type choices, press Enter.
Outbound Control File . . . . . OUTCTL Character value
Outbound Data File . . . . . . . OUTDTA Character value
Library . . . . . . . . . . . . G3X5DTA Character value
Retrieve Method . . . . . . . . *TAPE, *SAVF
Additional Parameters
Run Interactively? . . . . . . . *NO *YES, *NO
Bottom
F3=Exit F4=Prompt F5=Refresh F12=Cancel F13=How to use this display
F24=More keys

Using Communications Operations and Management of Communications
Gentran:Server for iSeries Communications Module Release 3.5 User Guide 4 - 121
Retrieve the Inbound Queue (RTVIBQ)
To access the RTVIBQ command, select option 20 on the GENCOM menu or select option 46
(Retrieve Inbound) on the Work with Communications panel (EDIX400-FMT01) or prompt
RTVIBQ on the command line. The command panel appears as shown in Figure 4.83.
Figure 4.83 Retrieve Inbound Queue (RTVIBQ) panel
Press F1 (Help) on any parameter for additional information. Press Enter to submit, or press F12
(Cancel) to cancel the command.
Retrieve Inbound Que from Tape (RTVIBQ)
Type choices, press Enter.
Inbound Control File . . . . . . INBCTL Character value
Inbound Data File . . . . . . . INBDTA Character value
Library . . . . . . . . . . . . G3X5DTA Character value
Retrieve Method . . . . . . . . *TAPE, *SAVF
Additional Parameters
Run Interactively? . . . . . . . *NO *YES, *NO
Bottom
F3=Exit F4=Prompt F5=Refresh F12=Cancel F13=How to use this display
F24=More keys

Operations and Management of Communications Using Communications
4 - 122 Gentran:Server for iSeries Communications Module Release 3.5 User Guide
Retrieve All Communications Files (RTVALL)
To access the RTVALL command, select option 18 on the GENCOM menu or select option 47
(Retrieve All) on the Work with Communications panel (EDIX400-FMT01) or prompt RTVALL on
the command line. The command panel appears as shown in Figure 4.84.
Figure 4.84 Retrieve All Comm Files (RTVALL) panel
Press F1 (Help) on any parameter for additional information. Press Enter to submit, or press F12
(Cancel) to cancel the command.
Retrieve ALL info from Tape (RTVALL)
Type choices, press Enter.
Inbound Control File . . . . . . INBCTL Character value
Inbound Data File . . . . . . . INBDTA Character value
Outbound Control File . . . . . OUTCTL Character value
Outbound Data File . . . . . . . OUTDTA Character value
Communication History File . . . COMHST Character value
Library . . . . . . . . . . . . G3X5DTA Character value
Retrieve Method . . . . . . . . *TAPE, *SAVF
Additional Parameters
Run Interactively . . . . . . . *NO *YES, *NO
Bottom
F3=Exit F4=Prompt F5=Refresh F12=Cancel F13=How to use this display
F24=More keys

Using Communications Use the ezCOMM Command
Gentran:Server for iSeries Communications Module Release 3.5 User Guide 4 - 123
Use the ezCOMM Command
The ezCOMM command is a tool that helps you customize the communication profile (CN3BSC for
BSC or CN3SNA for SNA) supplied with the software to communicate with Commerce:Network
(the value-added network for Sterling Commerce). The communication profile contains
information necessary for the system to create a line, controller, and device description, which is
used in the actual communication session. It is necessary to modify the default parameters to work
with your modem and choice of protocol (that is, line speed and manual or auto-dial) and specific
phone number to be dialed.
The ezCOMM command steps you through the panels essential for customizing the CN3BSC or
CN3SNA profile. This includes the Profile maintenance panels and the Network Profile panel,
which is used to define your mailbox ID and password to access Commerce:Network.
The ezCOMM command is accessed from the Work with Communications panel
(EDIX400-FMT01).
Figure 4.85 Work with Communication
Type option 50 (ezCOMM) on the key entry line and press Enter. Optionally, you can type the
command ezCOMM on the command line and press Enter.
EDIX400 Work with Communications EDI 04/30/08
FMT01 pgmlib: G3X5PGM dtalib:G3X5DTA 12:00:00
Position to Profile ID . . . . . .
Type option (and Information), press Enter.
44=Retv History 45=Retv Outbound 46=Retv Inbound 47=Retv All 50=ezCOMM
Opt Profile ID Company
50
ATTEASY AT&T EASYLINK SERVICES
ATTUK AT&T IN THE UNITED KINGDOM
AUTOANS TEST AUTOANSWER CONFIG
BSCRMT Test for BSC REMOTE
BTASC BT UK GNS EDI*NET ASYNC
BTUK BT UK GNS EDI*NET BISYNC
BTXAS BT UK GNS EDI*NET ASYNC VIA X.25
CHRY CHRYSLER CTX MAILBOX
CHRY480 CHRYSLER - 830, 861, 862
More...
Parameters or command
===>
F1=Help F3=Exit F12=Cancel F15=Sort F23=More Options F24=More Keys

Use the ezCOMM Command Using Communications
4 - 124 Gentran:Server for iSeries Communications Module Release 3.5 User Guide
The easy Communications panel (ezCOMM-FMT02), as shown in Figure 4.86, introduces the
ezCOMM command. This command can be used to customize the pre-defined profiles for
Commerce:Network (Sterling Commerce’s VAN).
Figure 4.86 Communications (ezCOMM) panel
After reviewing this panel, type B for BSC or S for SNA protocol and press Enter. If left blank,
the system defaults to B (BSC).
CAUTION
STOP
The ezCOMM command proceeds FORWARD ONLY through all associated panels.
ezCOMM Communications (ezCOMM) 04/30/08
FMT02 12:00:00
The ezCOMM command is a tool that helps you customize the communication
profile (CN3BSC for BSC or CN3SNA for SNA) supplied with the software to
communicate with COMMERCE:Network (the Value Added Network for Sterling
Software). The communication profile contains information necessary for the
system to create a line, controller, and device description, which is used
in the actual communication session. It is necessary to modify the default
parameters to work with your modem and choice of protocol (ie., line speed
and manual or auto-dial) and specific phone number to be dialed.
The ezCOMM command steps you through the panels essential for customizing
the CN3BSC or CN3SNA profile. This includes the Profile maintenance panels
and the Network Profile panel, which is used to define your mailbox ID and
password to access COMMERCE:Network.
Enter (B) for Binary Synchronous Communication (BSC)
Enter (S) for Systems Network Architecture (SNA)
BSC or SNA? . . . . . . . . . . . . . B
F3=Exit Press ENTER to continue.
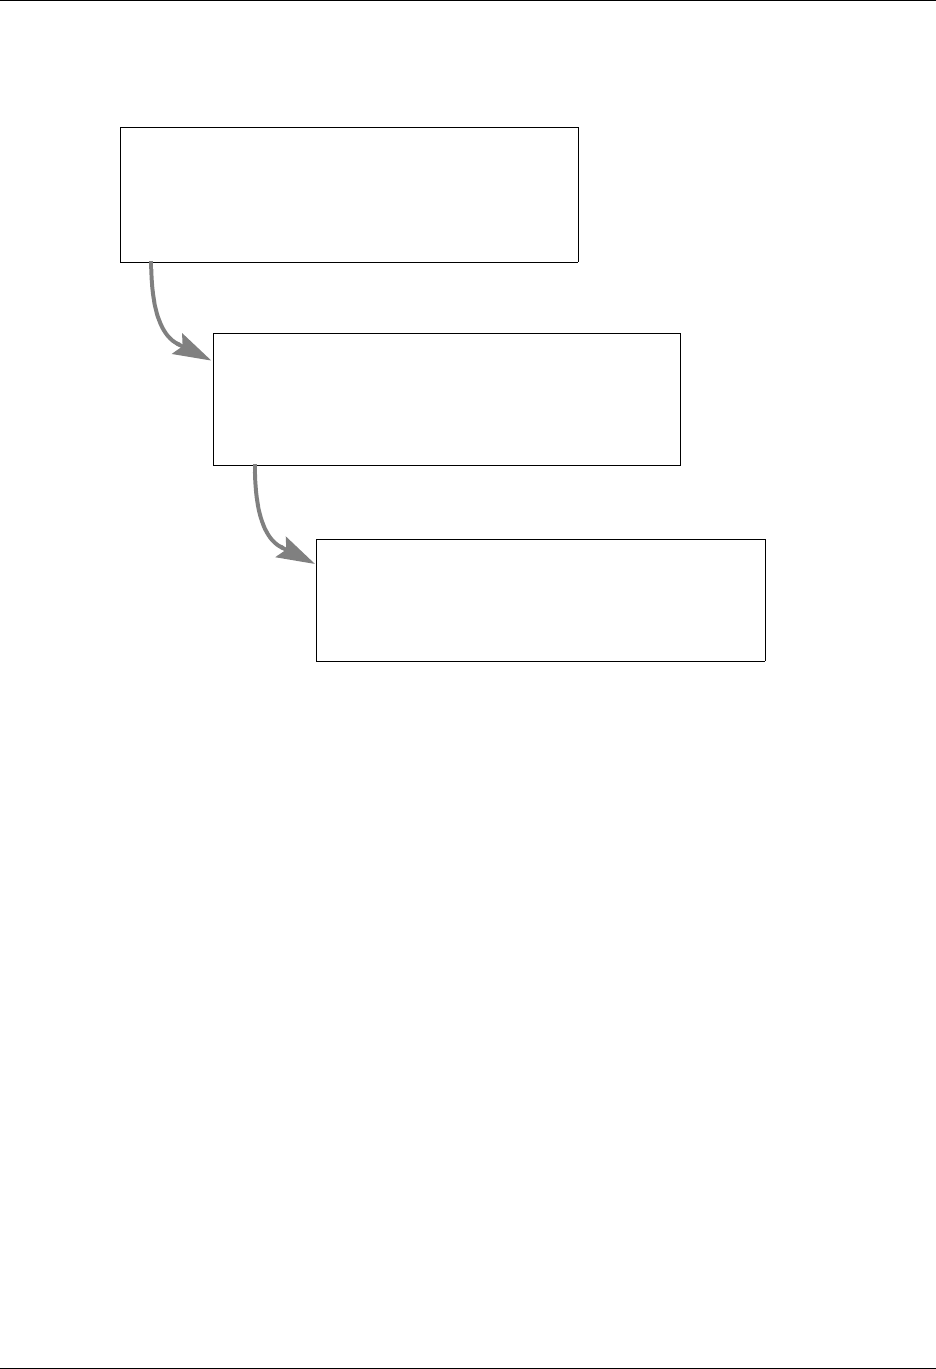
Using Communications Use the ezCOMM Command
Gentran:Server for iSeries Communications Module Release 3.5 User Guide 4 - 125
The ezCOMM command steps you through a series of panels to define the Communication profile
and scripts necessary to establish communications with Commerce:Network. These panels are
documented earlier in this chapter.
Figure 4.87 The ezCOMM Panels
Communication Profile — Part 1
(EDIX401-FMT01)
See Section:
Communications Setup
Communication Profile — Part 2
(EDIX401-FMTnn)
Communications Setup
See Section:
Network Profile
(EDIX821-FMT01)
See Section:
Network Scripts (Automatic Network Updates)

Reports Using Communications
4 - 126 Gentran:Server for iSeries Communications Module Release 3.5 User Guide
Reports
EBDI078 — Gentran EDI Data Print Report
Contents of the Report
This report contains control information and data contained on the Inbound and Outbound Queues.
How to Identify the Report
The name of the Gentran:Server program that generates this report (EBDI078) appears in the
upper left-hand corner of the actual report. The report title, GENTRAN EDI PRINT REPORT, is
centered at the top of the page.
How to Generate the Report
This report is generated when you press F21 (Prt Dta) while on the Outbound Queue Inquiry panel
(EDIX405) or the Inbound Queue Inquiry panel (EDIX408), or by typing 6 next to a batch of data
while on the Work with Outbound Queue Control panel (EDIX404), or the Work with Inbound
Queue Control panel (EDIX407). The Print EDI Data (PRTEDIDTA) command is shown with the
selection criteria pre-loaded for the batch of data chosen when you select one of the options
mentioned above. The start or end sequence numbers can be altered if the entire batch is not
required to print.
This function can also place the EDI data into an output file specified by the user if desired. To
place the EDI data into an output file, change the OUTPUT option to *OUTFILE and enter the
related file information. This will direct the output to the file instead of the printer.

Using Communications Reports
Gentran:Server for iSeries Communications Module Release 3.5 User Guide 4 - 127
Figure 4.88 EDI Print Report (EBDI078)
EBDI078 RUN DATE 04/30/08 GENTRAN EDI PRINT REPORT TIME 12:00:00 PAGE 1
COMM PROFILE: EDICOMM INBOUND BATCH NUMBER 1306 THRU 1306 SEQ. NUMBER 1 THRU 999999
BATCH SEQUENCE: 1306
ISA* * *00* *ZZ*EDIISAPART *ZZ*EDIINBOUND *970212*165
2*U*00300*000002824*0*T**?
GS*PO*EDIISAPART*EDIINBOUND*971010*1652*987*X*003060?
ST*850*000987001?
BEG*00*NE*14**971101?
NTE*ALL*#### PURCHASE ORDER INSTRUCTIONS?
NTE*GEN*#### ALL ITEMS MUST BE SENT BY REQUESTED SHIP DATE OR ####?
NTE*GEN*#### ENTIRE ORDER IS SUBJECT TO CANCELLATION ####?
NTE*GEN*######### ####?
NTE*GEN*#### NO SUBSTITUTION OF ITEMS W/O PRIOR BUYER APPROVAL ####?
NTE*GEN* ####?
NTE*GEN*#####################################?
ITD**3***07******* 60?
DTM*010*970405?
DTM*001*970405?
DTM*002*970405?
N1*BT*MILLER & HARTMAN*92*1159001?
REF*DP*124?
NTE*GEN*JUST ONE MORE NOTE?
PO1*1*-48*BA*25*SK*-15?
PO4*12?
ITA*A***ZZ***30?
NTE*GEN*T1?
NTE*GEN*T2?
SLN*XX**A*20.5*AA?
PID*F*02*AA*TEST?
NTE*GEN*FTERPID?
CTT*1*48?
SE*27*000987001?
GE*1*987?
IEA*1*000002824?

Reports Using Communications
4 - 128 Gentran:Server for iSeries Communications Module Release 3.5 User Guide
Fields on the EDI Print Report (EBDI078)
The fields on the report are defined as follows:
Field Names Description
Comm Profile Displays the comm profile for the batch of data that is
printing.
Batch Number Displays the batch number range that is printing on the
report.
Seq. Number Displays the Sequence number range that is printing on
the report.
Batch Sequence Displays the batch number of data that follows.

Using Communications Common Questions
Gentran:Server for iSeries Communications Module Release 3.5 User Guide 4 - 129
Common Questions
How can I implement security in auto answer sessions to
guard against unauthorized access?
The script for an Auto Answer session can have a control record with a Transaction code of D
(Data-trap) and an indicator of 0 (receive) as its first step for security measures.
This security measure allows the system to verify that it is in communication with the correct
network or direct communication partner. If the first control record received does not match the
control record of the data trap, the session is terminated. If this first step is omitted, any remote can
connect and communicate with no security.
A more in-depth view of an Auto Answer session is as follows:
1. Initiate the session from the STRCOMSSN panel.
2. Your partner’s system then calls your system.
3. Your partner sends “Hello, this is Dr. Bob” as an identifying control record.
4. Your system verifies the “Hello, this is Dr. Bob” against the literal on the command line
for the data trap step, and if it matches, continues with the remainder of the script.

Common Questions Using Communications
4 - 130 Gentran:Server for iSeries Communications Module Release 3.5 User Guide
How can I initiate process Inbound data immediately at the
end of a communication session?
At the end of every communication session, the supplied user-exit, EDCLUSER is executed.
Currently, this is a skeleton CL program that simply receives parameters from the comm session
and sends program messages to display the parameters.
The CL can be modified or a new CL can be written. The name of the CL must be EDCLUSER
and the object must reside in the Gentran:Server program library (G35PGM).
The following parameters are passed to EDCLUSER:
The user needs to decide what steps need to be taken by interrogating the Status flag. A status of S
indicates the Communication session ended successfully. A status of F indicates the session failed.
Many batches of data may have been received normally before a failure occurred.
When the status is F, the user may want to be notified so the History log could be reviewed for
problem resolution.
When the status is S, the user may want to automatically extract the data and process using their
applications.
Parameter Length Type Values
Profile (Profile ID) 8 *CHAR any
SSN (Session Name) 2 *CHAR any
DELETE (Delete Flag) 4 *CHAR *Yes/*No
CONT (Continuous Processing Flag) 4 *CHAR *Yes/*No
TRACE (Trace Flag) 4 *CHAR *Yes/*No
DOCONNECT (Connect if no data to send) 4 *CHAR *Yes/*No
STATUS (Status Flag) 1 *CHAR S/F
MSGQ (Message Queue) 10 *CHAR Msg Queue Name
SNDTOT (Send Total) 6 *DEC 0-999999
RCVTOT (Receive Total) 6 *DEC 0-999999
COMLOG 6 *DEC 0-999999
COMPRS 4 *CHAR *Yes/*No
PRCNAM 15 *CHAR any
MCSEQ 9 *DEC 0-not used

Using Communications Common Questions
Gentran:Server for iSeries Communications Module Release 3.5 User Guide 4 - 131
How can I control the inactivity timer used during
communication sessions?
Gentran:Server is flexible in providing varying levels of control over the amount of “inactive
time” allowed during a receive step in a communication session. There may be times when you
want to increase the wait time while communicating with partners or networks that respond a little
slower. At other times, you may demand a quicker response (for example, within 30 seconds or the
session should be cancelled) to better control your own resources. Gentran:Server provides global
or default options that are used if the inactivity option is not used on the individual session control
records within a given script. Some of these options are discussed below.
BSC
For BSC profiles, there is a global inactivity timer that is used as a default when a receive step is
executed that does not contain a receive timer value. The value of the global inactivity timer is five
minutes and is stored in the EDIATIMER data area in the Gentran:Server data library (G35DTA).
This means that Gentran:Server waits for five minutes for a response from the remote system after
a receive step has been executed before it bypasses that step and advances to the next script record.
To change this value, type the command SETTIMER on the command line and press F4 (Prompt).
The current delay time is shown in HHMMSS (hours, minutes, seconds) format. To change, type
in the new delay time and press Enter. For example, to change the value to eight minutes, type the
value 000800 and press Enter.
# NOTE
In some cases, increasing the timeout value still may not prevent a timeout. This can occur if
the remote system is too busy to process your request immediately. In this situation, the
remote system may begin to send you TTD (Temporary Text Delay) sequences. The TTDs
are the other system’s way of saying “Please be patient, I will start sending your data as soon
as possible.” However, there is a limit to the number of TTDs that can be received before an
error is reported. This limit is set by the RCVRTY parameter in the line description. This
parameter has a default value of 60 and can be changed if necessary.
SNA
For SNA profiles, a value can be defined for each profile on the comm profile ID maintenance
panel (EDIX401-FMT04) that defines the amount of time in seconds that Gentran:Server waits for a
response after a receive step is executed. This field is called the inactivity timer and is only used
when a receive step that does not contain a receive timer value is executed. If the amount of
inactive time is exceeded, the receive step ends and the next script record is read and processed.
All Protocols Except FTP
For complete flexibility, a receive timer value can be defined for each receive step on the script
record by using the Communications Session Control (Extended Parms) panel
(EDIX43B-FMT01). By using this method, you can make decisions on whether the session should
be terminated immediately when the delay time has been exceeded or the step should just be
skipped and continue with the next script record. Additionally, if data was received prior to
exceeding the delay time, you can define whether the batch of data received to the Inbound Queue
(only valid if the file type is IQ or IM) is given a normal (RN) or abnormal (RA) status. The fields
used to control this functionality on EDIX43B-FMT01 are: Receive Timer, Timeout Continue, and
Timeout status.

Common Questions Using Communications
4 - 132 Gentran:Server for iSeries Communications Module Release 3.5 User Guide
How can the Network Scripts be converted to use the
Automatic Network Update feature?
# NOTE
This conversion process applies to software upgrades only, not new installations.
The network profiles provided with Gentran:Server can be used with the automatic Network
update feature. The scripts are scanned for the old identifiers and then replaced with the new
identifiers provided by the network to uniquely identify your company.
If you converted from a prior release of Gentran:Server and you were manually updating network
scripts, you may encounter an out-of-sync situation when attempting to use the automatic update
feature. Being “out-of-sync” means the identifiers provided with the network profile don’t match
the identifiers in the scripts, which have been manually updated. The conversion process gets these
files back “in-sync” so the system knows what to search for the next time a change is made. Once
the files are converted, you can use the automatic network update feature to execute the
find-and-replace process.
If you try to use the automatic update feature without first executing the conversion process, the
system won’t know what values to find and replace.
If the conversion process is not executed, you must continue manually updating the scripts if the
identifiers change.
The update process consists of manually transferring the necessary network values from your
existing network scripts to the Network Profile panel (EDIX821-FMT01), and then using the
update function to synchronize the Communication Profile file with the network scripts.
The conversion process is divided into two steps:
Recording network values from existing scripts
Updating the Communication Profile

Using Communications Common Questions
Gentran:Server for iSeries Communications Module Release 3.5 User Guide 4 - 133
Step 1: Record Network Values from Existing Scripts
For each Network Profile that needs to be updated, access the unfolded view of the
Communication Session Control panel (EDIX403-CTL01) and record the necessary network
values on the work sheets provided after this question. (SEE the “Communication Session Control
Scripts” section of this chapter for instructions on how to access this panel.)
Step 2: Update the Communication Profile
Enter these values on the Network Profile panel (EDIX821-FMT01). (SEE the steps for accessing
this panel in the “Automatic Network Updates” part of this section.)
To access panel EDIX821-FMT01, follow the steps detailed in the section “Automatic Network
Updates.”
For each Network Profile:
1. Enter the Network Profile ID in the Comm Profile ID field.
2. Replace the values that are displayed with the values from your script file. (These
were recorded in Step 1 of this process.)
3. Press F10 (Update) to update the Network Profile.
After the profile is updated, the system displays the message: “Profile Updated but no changes
were made in network scripts.” This means that the find-and-replace operation did not find the
“old” values in the script records that it scanned. However, this is understandable because the
scripts are not “in-sync” with the Communication Profile, and that is the reason you have executed
the conversion process. At this point, the files are then synchronized, and future updates result in
the display of the message: “Network scripts updated.”
Use the worksheets on the following pages to record the necessary network values from your
existing communication scripts.
# NOTE
In this step, the Communication Profile file is updated with the values that currently exist in
your network scripts. Therefore, in the future, the software has the correct information to use
for the find-and-replace operations.
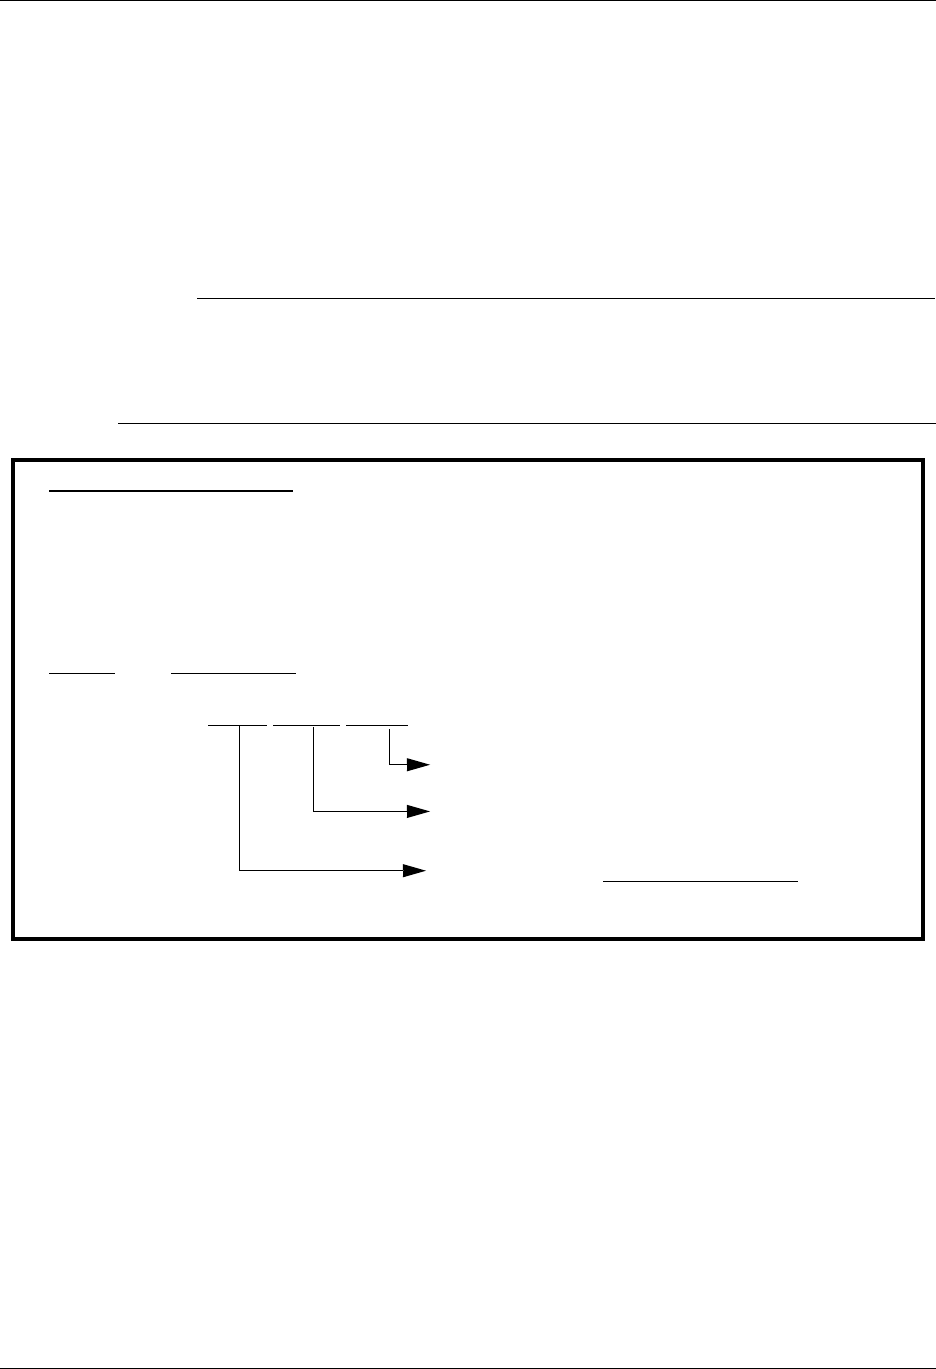
Common Questions Using Communications
4 - 134 Gentran:Server for iSeries Communications Module Release 3.5 User Guide
Network Profile Worksheets
This section contains worksheets with specific examples for each of the supported networks. For
each network, examine the records in your communication scripts that correspond to the samples
shown, and record the actual values that appear in your scripts.
The example script records, in most cases, contain the values for which you are looking. In some
cases, you need to look at more than one record to obtain all the necessary values. Use other
records if you have modified your scripts to the extent that they do not match the examples.
# NOTE
This process assumes that all of the existing scripts for a given Network Profile are fully
customized. For example, if your Account ID for IBM is “IBM1,” all of the scripts for the
IBM Profile are changed to “IBM1” every place the Account ID is needed. The same is true
for passwords or other necessary fields.
Figure 4.89 Advantis Network Conversion Worksheet
Advantis Network Bisync
Profile ID: ADVBSC
Session to View: RA
Sample Script Record:
Seq No Script Record
015 /*L ACCT,USRID,PSWD/*S EDIRECT/*U BSCEDI
Password: _________________
User ID: _________________
Account ID:
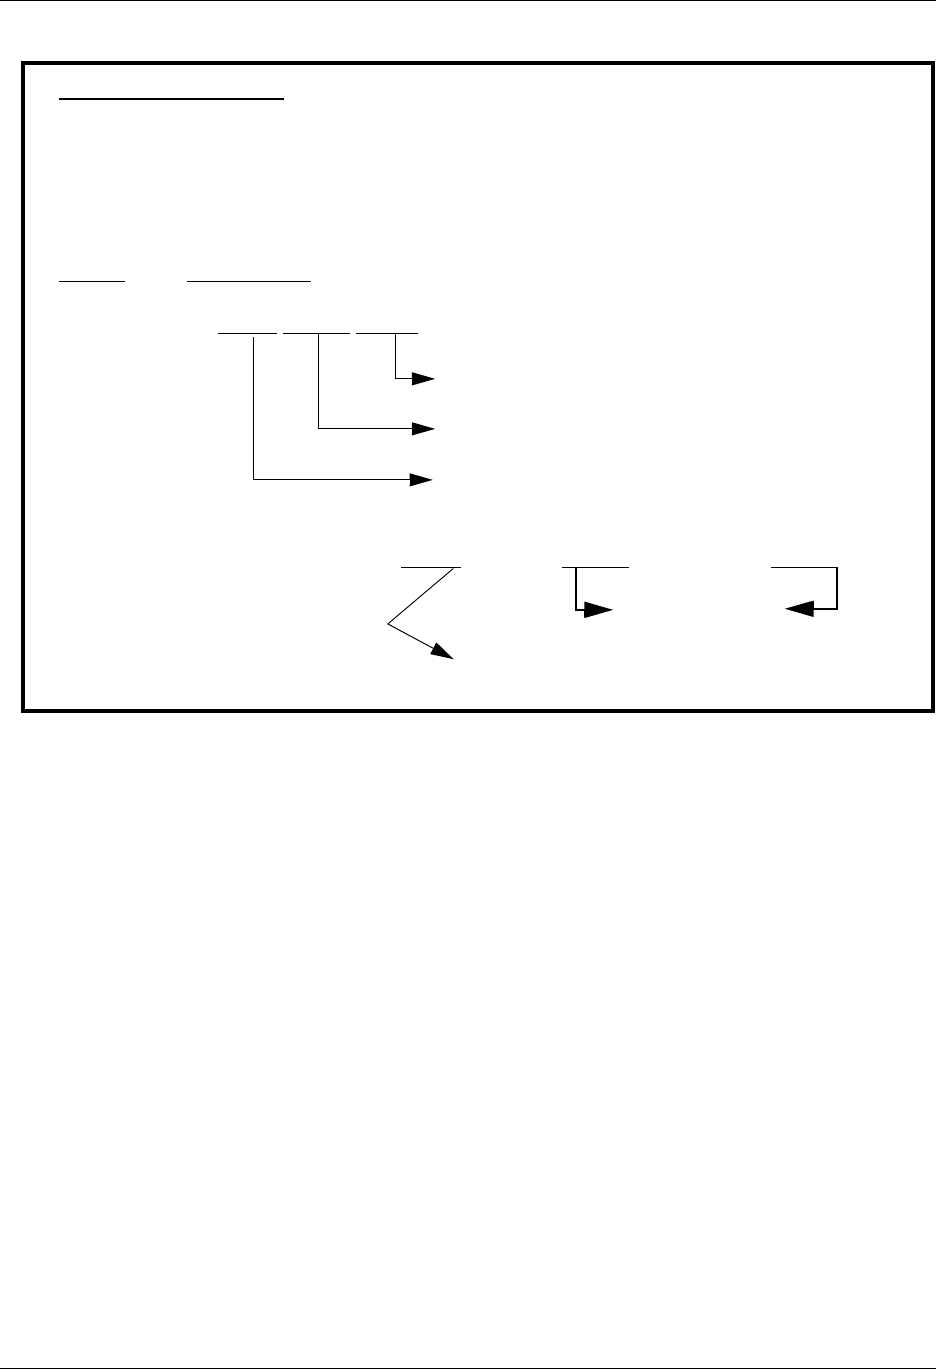
Using Communications Common Questions
Gentran:Server for iSeries Communications Module Release 3.5 User Guide 4 - 135
Figure 4.90 Advantis Network Conversion Worksheet
Advantis Network SNA
Profile ID: ADVSNA
Session to View: RA
Sample Script Record:
Seq No Script Record
015 /*L ACCT,USRID,PSWD/*S EDIRECTS/*U SNAEDI
Password: _________________
User ID: _________________
Account ID: _________________
050 IELOGON ACCOUNT(ACCT) USERID(USRID) PASSWORD(USRID);
User ID: _________________
Account ID: _________________

Common Questions Using Communications
4 - 136 Gentran:Server for iSeries Communications Module Release 3.5 User Guide
Figure 4.91 AT&T Easy Network Conversion Worksheet
Figure 4.92 AT&T in the U.K. Network Conversion Worksheet
AT&T Easylink Services
Profile ID: ATTEASY
Session to View: SR
Sample Script Record:
Seq No Script Record
010 +:SIGNON USERNAME=USRNM PASSWORD=PSWD
Password: _________________
User ID: _________________
AT&T in the U.K
Profile ID: ATTUK
Session to View: SR
Sample Script Record:
Seq No Script Record
010 /*SIGNON USERNAME=USRNM PASSWORD=PSWD
Password: _________________
User ID: _________________
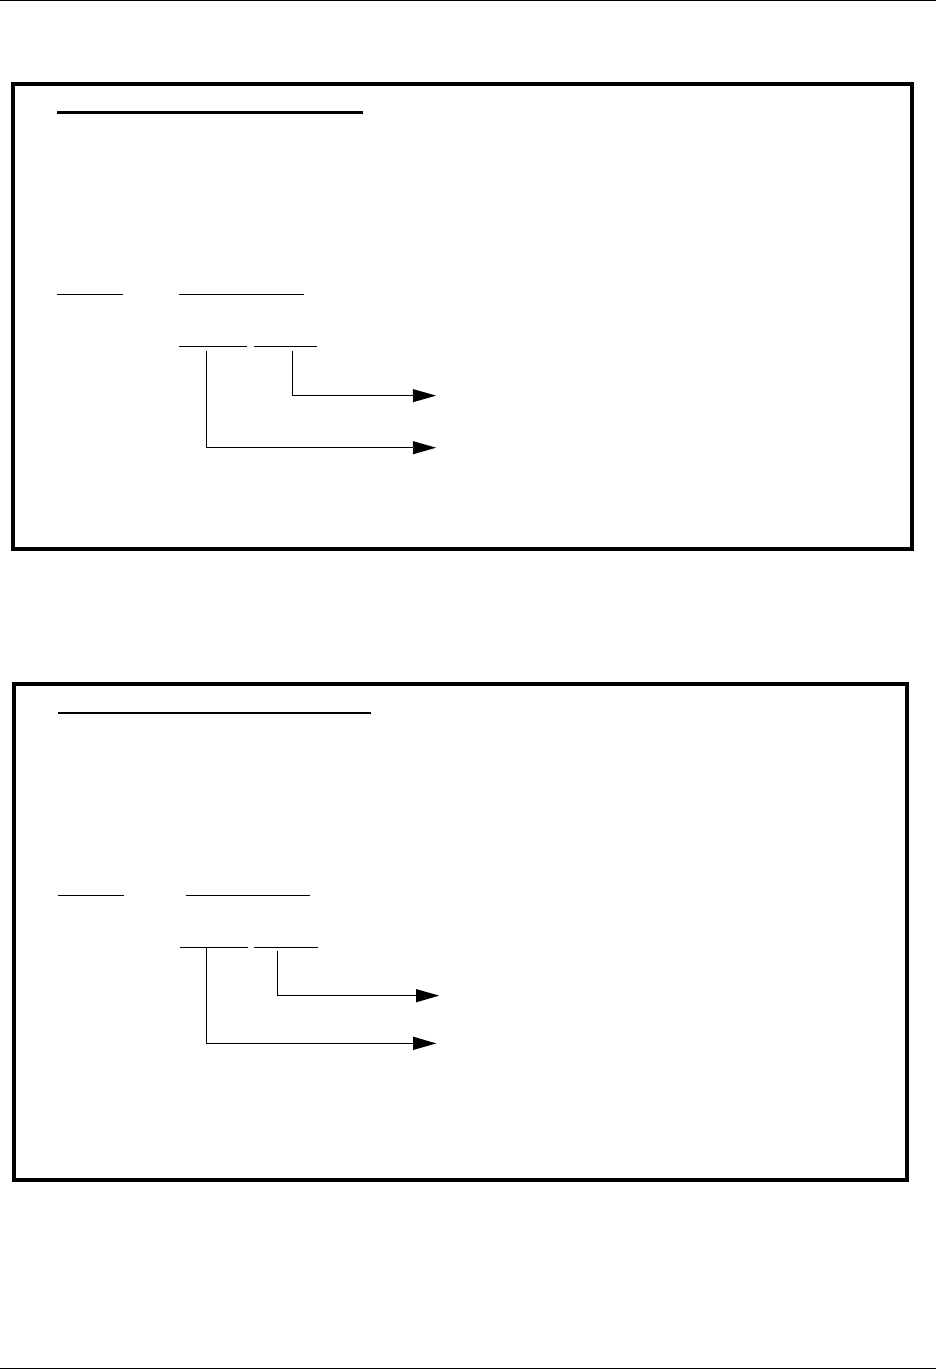
Using Communications Common Questions
Gentran:Server for iSeries Communications Module Release 3.5 User Guide 4 - 137
Figure 4.93 BTASC Network Conversion Worksheet
Figure 4.94 BTUK Network Conversion Worksheet
BT UK GNS EDI*NET ASYNC
Profile ID: BTASC
Session to View: RS
Sample Script Record:
Seq No Script Record
020 &MBX;&PSW;A120;
Password: _________________
Mailbox ID: _________________
BT UK GNS EDI*NET BISYNC
Profile ID: BTUK
Session to View: RS
Sample Script Record:
Seq No Script Record
020 &MBX;&PSW;A120;
Password: _________________
Mailbox ID: _________________
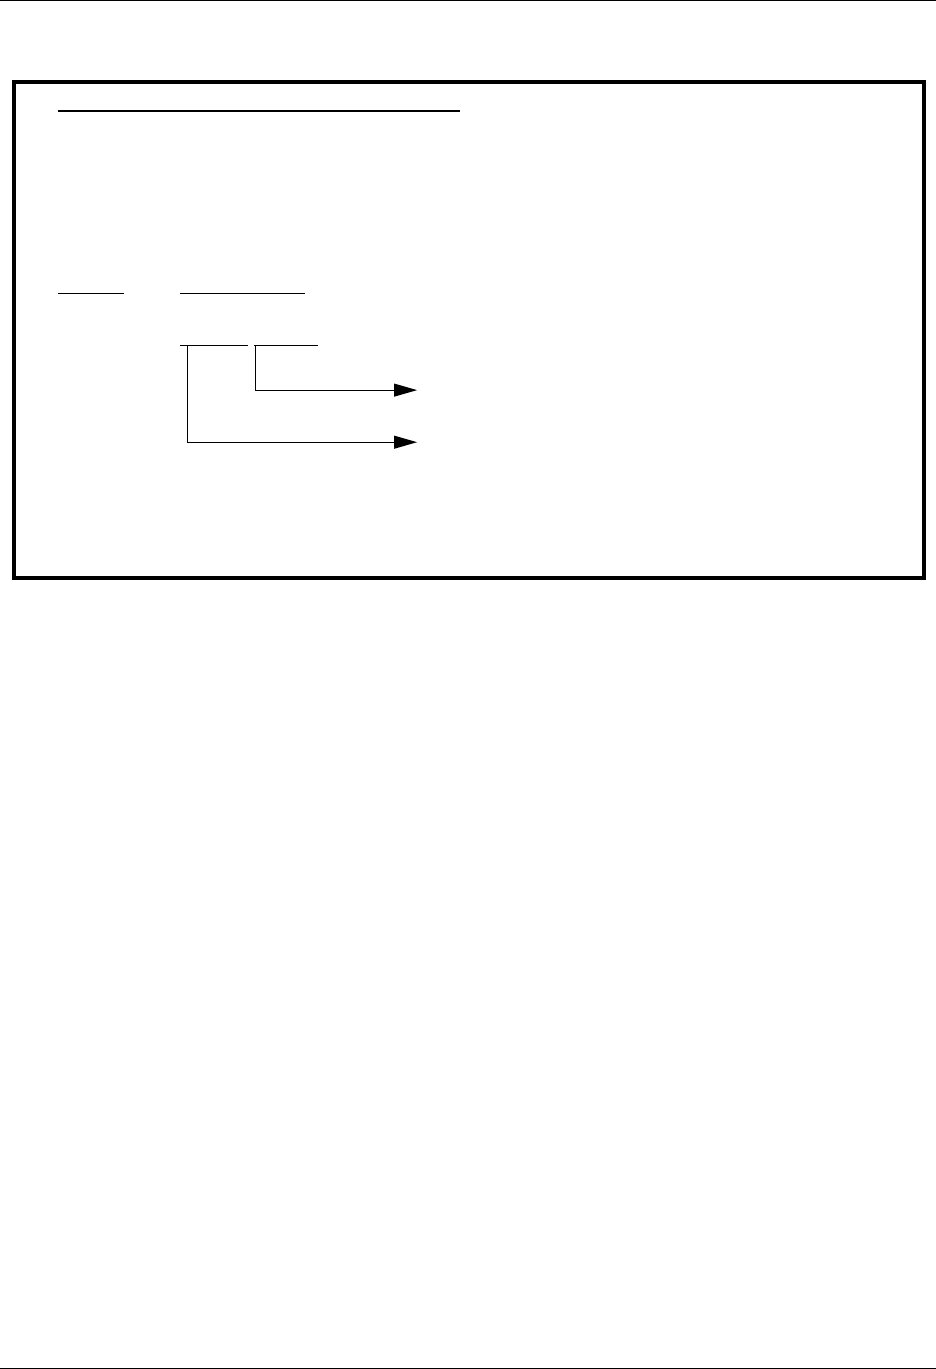
Common Questions Using Communications
4 - 138 Gentran:Server for iSeries Communications Module Release 3.5 User Guide
Figure 4.95 BTXAS Network Conversion Worksheet
BT UK GNS EDI*NET ASYNC VIA X.25
Profile ID: BTXAS
Session to View: RS
Sample Script Record:
Seq No Script Record
010 &MBX;&PSW;A120;
Password: _________________
Mailbox ID: _________________
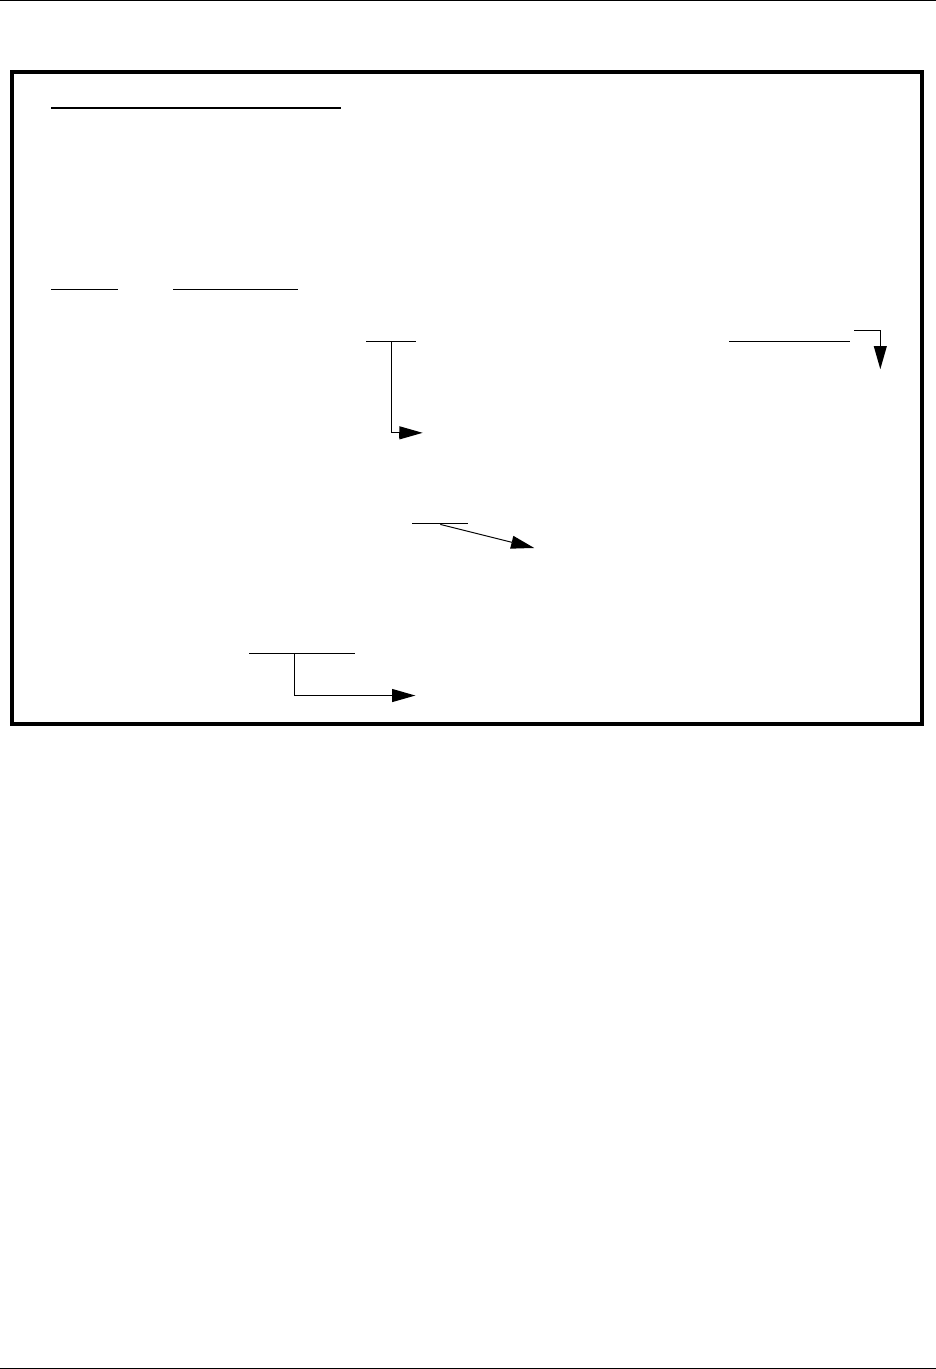
Using Communications Common Questions
Gentran:Server for iSeries Communications Module Release 3.5 User Guide 4 - 139
Figure 4.96 Commerce:Network Release 2 Conversion Worksheet
Commerce:Network Release 2
Profile ID: CN2BSC
Session to View: SR
Sample Script Record:
Seq No Script Record
003 /*SIGNON ONET MX999 A PASSWORD
Password: _________________
Alpha Mailbox ID: _________________
010 $$BATCH ONUC A A 999990101
Numeric Mailbox ID: ________________
020 *.PASS PASSWRD
Password: _________________
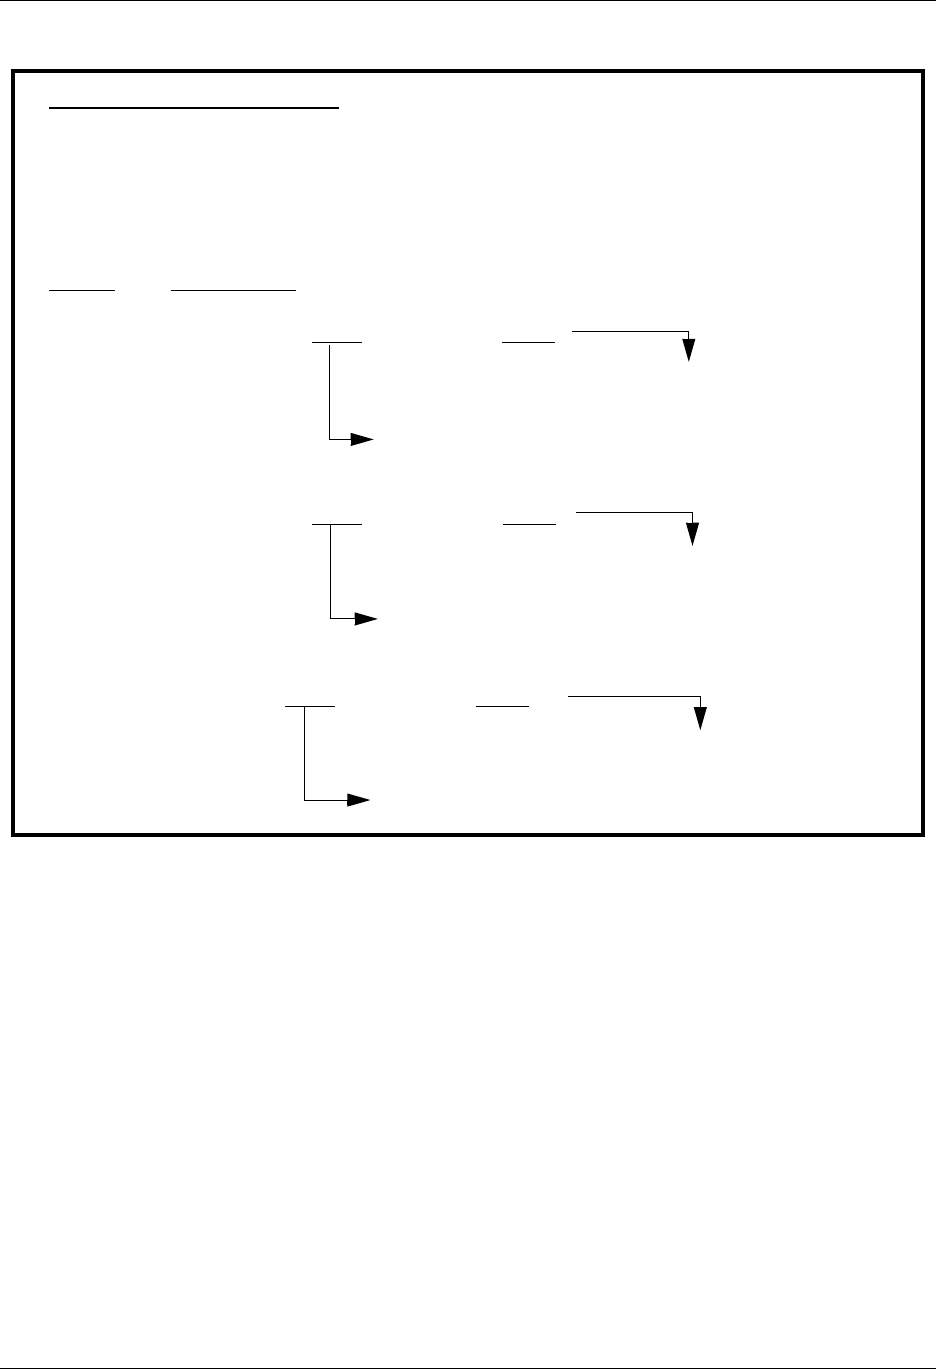
Common Questions Using Communications
4 - 140 Gentran:Server for iSeries Communications Module Release 3.5 User Guide
Figure 4.97 Commerce:Network Release 3 Conversion Worksheet
Commerce:Network Release 3
Profile ID: CN3BSC
Session to View: SR
Sample Script Record:
Seq No Script Record
020 $$REQUEST SX999R BATCHID=‘TEST’
Batch ID/Password: _________________
Report Mailbox ID: _________________
030 $$REQUEST SX999D BATCHID=‘TEST’
Batch ID/Password: _________________
Data Mailbox ID: _________________
040 $ADD ID=SX999D BATCHID=‘TEST’
Batch ID/Password: _________________
Data Mailbox ID: _________________
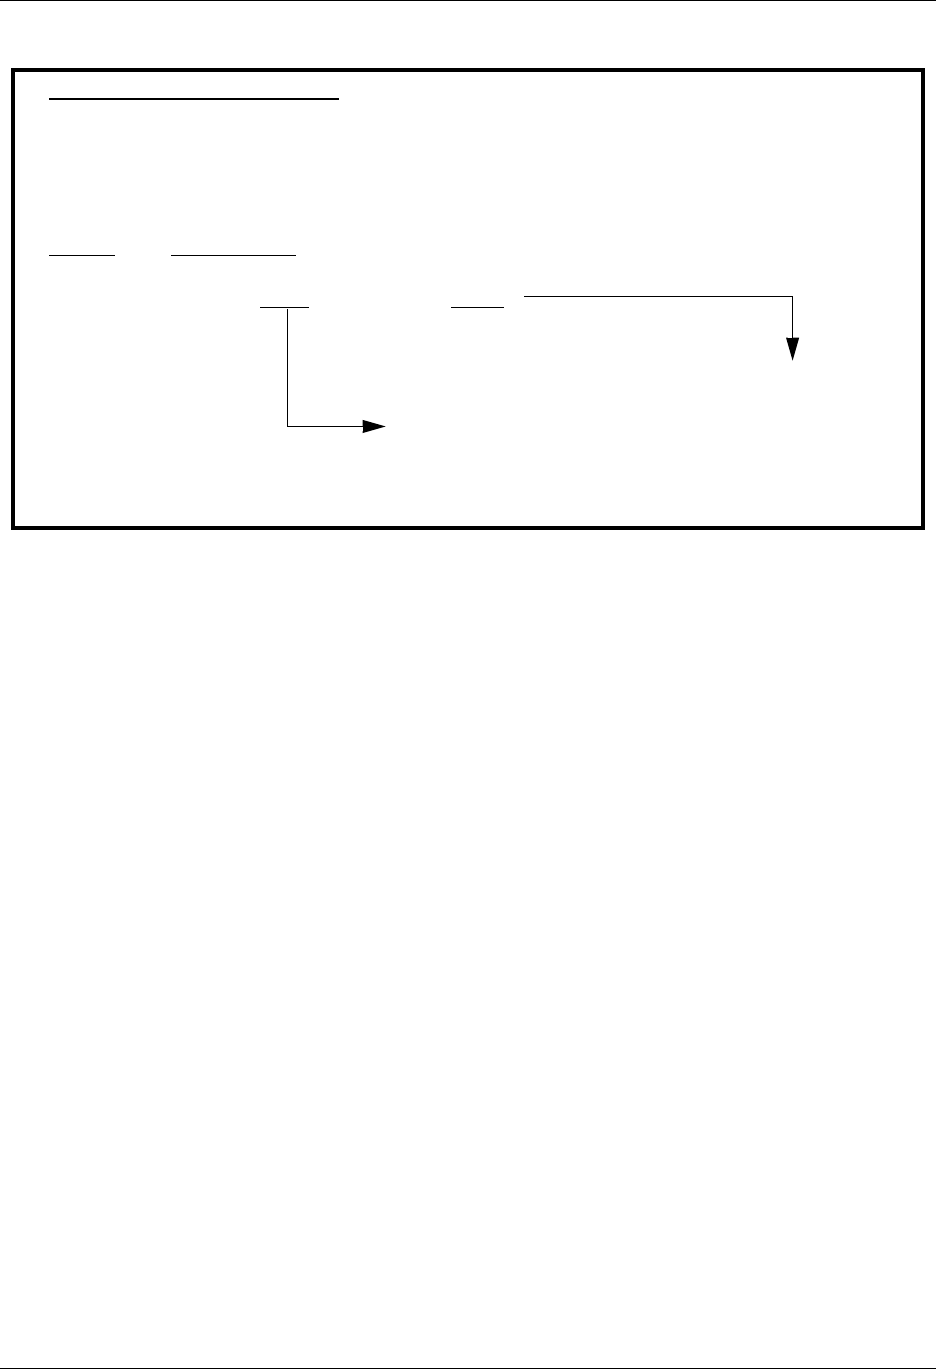
Using Communications Common Questions
Gentran:Server for iSeries Communications Module Release 3.5 User Guide 4 - 141
Figure 4.98 Commerce:Network Release 3 Conversion Worksheet
Commerce:Network Release 3
Profile ID: CN3SNA
Session to View: SO
Sample Script Record:
Seq No Script Record
030 $$ADD SX999D BATCHID=’TEST’
Batch ID/Password: _________________
Data Mailbox ID: _________________

Common Questions Using Communications
4 - 142 Gentran:Server for iSeries Communications Module Release 3.5 User Guide
Figure 4.99 General Electric Network Conversion Worksheet
Figure 4.100 Kleinschmidt Network Conversion Worksheet
GE Information Services
Profile ID: GEIS
Session to View: RA
Sample Script Record:
Seq No Script Record
005 IDX,PASSW,MAILA
Password: _________________
User ID: _________________
037 /EDXRCV MAILNUM
Mailbox: _________________
Kleinschmidt Network
Profile ID: KLEIN
Session to View: SR
Sample Script Record:
Seq No Script Record
005 #SIGNON USERID,PASSWORDX
Password: _________________
User ID: _________________

Using Communications Common Questions
Gentran:Server for iSeries Communications Module Release 3.5 User Guide 4 - 143
Figure 4.101 MCI Bisync Network Conversion Worksheet
Figure 4.102 Sears Communication Network Conversion Worksheet
MCI Bisync
Profile ID: MCI
Session to View: SR
Sample Script Record:
Seq No Script Record
012 MAILBOXID;PASSWD;B135;
Password: _________________
Mailbox ID: _________________
Sears Communication Network
Profile ID: SEARS
Session to View: SR
Sample Script Record:
Seq No Script Record
005 +LOGON SEARSEDI,IDXXXXX,PASSWORD
Password: _________________
ID Number: _________________
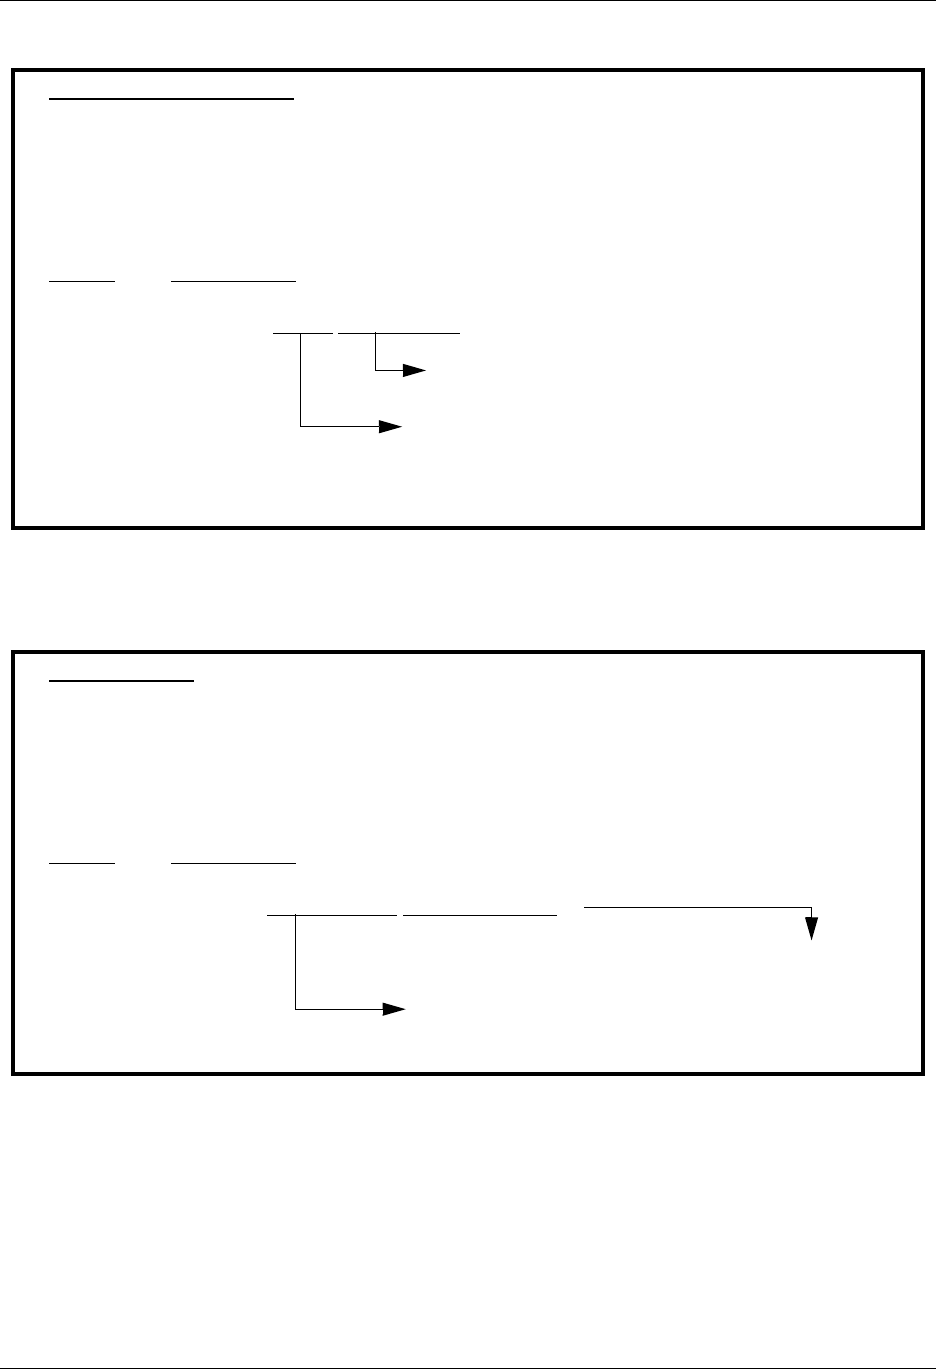
Common Questions Using Communications
4 - 144 Gentran:Server for iSeries Communications Module Release 3.5 User Guide
Figure 4.103 Transettlements Network Conversion Worksheet
Figure 4.104 Western Union Conversion Worksheet
Transettlements Network
Profile ID: TRANS
Session to View: RA
Sample Script Record:
Seq No Script Record
001 LOG 2434,ACCT,PASSWORD
Password: _________________
Account Number:_________________
Western Union
Profile ID: WSUN
Session to View: SR
Sample Script Record:
Seq No Script Record
005 SIGNON ACCOUNT99,PASSW.PASSW
Password: _________________
Account Number: _________________

Chapter
Gentran:Server for iSeries Communications Module Release 3.5 User Guide 5 - 1
5Using Scripts
Work with Session Control Scripts
The Work with Communications Session panel (EDIX402-FMT01) enables you to add, update,
copy, and delete the session control scripts for a specified Communications Profile ID. The
“script” contains action data that is used to control the sessions initiated for each profile.
Figure 5.1 Work with Communications Sessions Panel (EDIX402-FMT01)
To select a session control script, type 2 in the Option field next to the desired session name to edit
(or 5 in the Option field to view) and press Enter, as shown in Figure 5.1. To create a script, type
1 and a Session Name on the key entry line and press Enter.
# NOTE
The first character of the session name cannot be numeric.
The Communication Session panel (EDIX403-CTL01) appears, as shown in Figure 5.2.
# NOTE
Sometimes it is easier to copy an existing script than to build a new one. (SEE the section
“Copying Communications Scripts” later in this chapter for more information.)
EDIX402 Work with Communications Session EDI 04/30/08
FMT01 pgmlib: G3X5PGM dtalib: G3X5DTA 12:00:00
Position to Session Name . . . . . For CN3BSC
Type option (and Information), press Enter.
1=Create 2=Revise 3=Copy 4=Delete 5=View 6=Print 30=Start Session
Opt SN Company
RA COMMERCE:NETWORK RELEASE3
RD COMMERCE:NETWORK RELEASE3
RR COMMERCE:NETWORK RELEASE3
SO COMMERCE:NETWORK RELEASE3
2 SR COMMERCE:NETWORK RELEASE3
ST COMMERCE:NETWORK RELEASE3
Bottom
Parameters or command
===>
F1=Help F3=Exit F4=Prompt F12=Cancel F15=Sort F24=More Keys
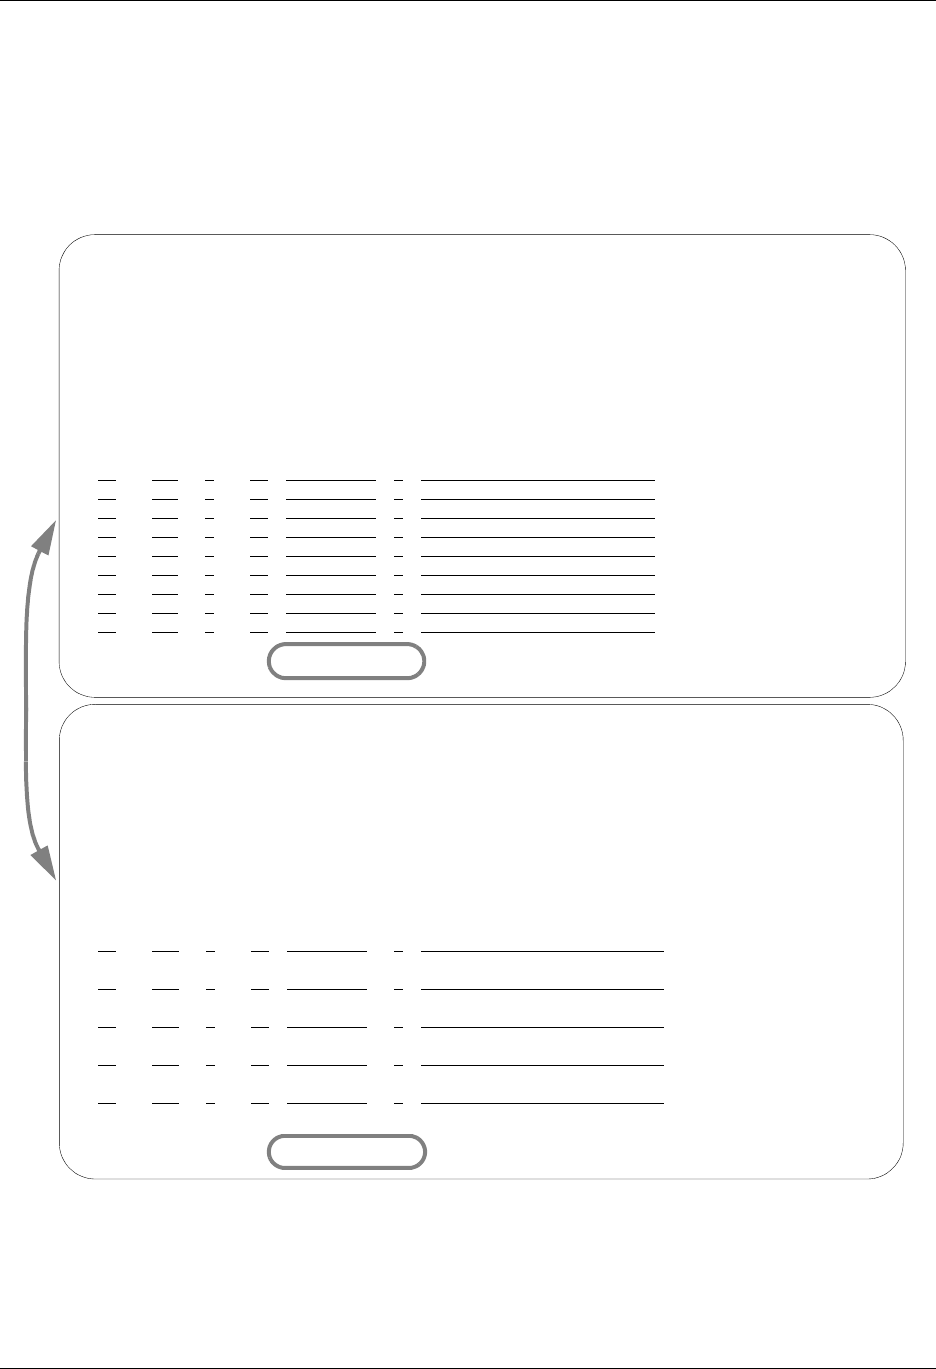
Work with Session Control Scripts Using Scripts
5 - 2 Gentran:Server for iSeries Communications Module Release 3.5 User Guide
Session Control Maintenance
A record exists for each action (command) that occurs when communicating with a remote site.
You can display these “command lines” for each session, or use the unfolded view to see the
“control data lines” as well.
Press F9 (Fold/Unfold) to toggle between the basic and extended views, as shown in Figure 5.2.
Figure 5.2 Folded and Unfolded Views of the Communication Session Control Panel
(EDIX403-CTL01)
EDIX403 Communication Session Control EDI 04/30/08
CTL01 12:00:00
Comm Profile ID. . . . . . . . . . CN3BSC
Session Name . . . . . . . . . . . SR
Company. . . . . . . . . . . . . . COMMERCE:NETWORK RELEASE 3
Type option, press Enter.
3=Copy Seq# 4=Delete 11=Extended Parms
Opt Seq No Tran File File Name Ind Description
20 C 0 SEND REQUEST FOR REPORTS
$$REQUEST ID=SX999R BATCHID='TEST'
30 C 0 SEND REQUEST FOR X12 DATA
$$REQUEST ID=SX999D BATCHID='TEST'
40 C 0 SEND $$ADD RECORD
$$ADD ID=SX999D BATCHID='TEST'
50 S OQ 2 SEND X12 DATA FROM OUTQUE
60 R SP 7 RECEIVE REPORTS TO SPOOL
*** ERROR *** NO BATCHES FOR TRANSMISSION
More...
F1=Help F4=Prompt F9=Fold/Unfold F10=Update F12=Cancel F24=More Keys
EDIX403 Communication Session Control EDI 04/30/08
CTL01 12:00:00
Comm Profile ID. . . . . . . . . . CN3BSC
Session Name . . . . . . . . . . . SR
Company. . . . . . . . . . . . . . COMMERCE:NETWORK RELEASE 3
Type option, press Enter.
3=Copy Seq# 4=Delete 11=Extended Parms
Opt Seq No Tran File File Name Ind Description
20 C 0 SEND REQUEST FOR REPORTS
30 C 0 SEND REQUEST FOR X12 DATA
40 C 0 SEND $$ADD RECORD
50 S OQ 2 SEND X12 DATA FROM OUTQUE
60 R SP 7 RECEIVE REPORTS TO SPOOL
70 R IQ 7 RECEIEVE X12 DATA TO INQUE
More...
F1=Help F4=Prompt F9=Fold/Unfold F10=Update F12=Cancel F24=More Keys

Using Scripts Work with Session Control Scripts
Gentran:Server for iSeries Communications Module Release 3.5 User Guide 5 - 3
# NOTE
The creation of script records is protocol-specific. However, many general characteristics are
applicable to all protocols. The following information describes the general concepts. For
specific information, see the chapter for the protocol you are using.
Field Definitions
Seq No
A 3-position numeric field used to define the sequence number assigned by the user to
each protocol session record.
Leaving gaps between sequence number assignments may be useful for inserting
additional control records at a later time.
Tran
A 1-position alphabetic field used to define the transaction type code identifying the type
of record displayed. Valid values are:
CSend the literal that is entered in the control data line. For example,
this can be used for sending signon cards or other control data that is
required by the remote.
SSend data to the remote site followed by any special characters as
instructed by the indicator field.
RReceive data from the remote system.
DWait to receive a literal as specified on the control data line. This
transaction type can be used as a signon or verification of incoming
data or for trapping and discarding prompt messages.
ESend an Evoke Record to the Remote System. This must be the first
record of the script. This code is only used if your system starts the
session and is valid only for the X62, L62, and XAS protocols. Use
the F16=Evoke Record Maint key to access the Evoke Record
Maintenance panel.
XInvoke extended script logic functions.
File
A 2-position alphabetic field used to define the file type code that identifies the type of file
that the transaction record is written to. Valid values are as follows:
OQ Outbound Queue; only valid for Tran Type S
OM Outbound Multiple; only valid for type S
Sends the outbound data in such a way that individual batches can be
separated as they are received by the remote. This function is
complementary to IM, which is defined below.

Work with Session Control Scripts Using Scripts
5 - 4 Gentran:Server for iSeries Communications Module Release 3.5 User Guide
OF Outbound File; only valid for Tran Type S
IQ Inbound Queue; only valid for Tran Type R
IM Inbound Multiple; only valid for type R
Receive inbound data so that individual batches can be separated as
they are received by your system. This function is complementary to
OM, which is defined above.
IF Inbound File; only valid for Tran Type R
IF (Inbound File) receive to an inbound user file and overwrite all
existing data in the file.
IA Inbound Append; Append to existing data in user file.
ID Inbound Device; only valid for Tran Type R and BSC sessions.
Received data is sorted to the inbound queue or to the spool file based
on the device selection codes that precede the data during the receive
process.
SP Spool File; only valid for Tran Type R
JR JES Receive; only valid for Tran type R and SNA sessions. Print data
will be sent to the spool and punch data will be stored on the
Gentran:Server for iSeries inbound queue.
JQ JES Queue; only valid for Tran Type R and SNA sessions. All data
received from JES is placed on the Gentran:Server for iSeries
inbound queue.
File Name: (Required for File Types OF, IF and IA)
A 10-position alphanumeric field used to enter the name of the file where inbound and
outbound data will be stored. The file name must exist in a library in the library list where
the Gentran:Server libraries are for each session because the file must be retrieved before
the data can be sent or received from the remote network.
Ind
A 1-position numeric field used in conjunction with the transaction type to indicate what
processing will be done. Refer to the tables at the end of this section to determine the
allowed values for specific transactions. These values will differ based on the protocol
used.
Description
A 30-position alphanumeric field used to document the session protocol record.

Using Scripts Work with Session Control Scripts
Gentran:Server for iSeries Communications Module Release 3.5 User Guide 5 - 5
Comm Session Control — Copying Script Sequence Numbers
You can copy an existing communication script sequence number to a different sequence number
within the same script.
The following figure shows how to copy a script sequence number.
To copy a sequence number:
1. From the Communication Session Control panel (EDIX403-CTL01), type 7 (Copy Seq#)
in the Option field next to the selected sequence number you want to copy and press
Enter.
2. The Copy To will display as shown above. Type the sequence number of the new record
and press Enter.
EDIX403 Communication Session Control EDI 04/30/08
CTL01 12:00:00
Comm Profile ID. . . . . . . . . . CN3BSC
Session Name . . . . . . . . . . . SR
Company. . . . . . . . . . . . . . COMMERCE:NETWORK
Type option, press Enter.
3=Copy Seq# 4=Delete 11=Extended Parms
Opt Seq No Tran File File Name Ind Description
7 10 C 1
More...
F1=Help F4=Prompt F9=Fold/Unfold F10=Update F12=Cancel F24=More Keys
Copy To
20
F3=Exit F12=Cancel

Work with Session Control Scripts Using Scripts
5 - 6 Gentran:Server for iSeries Communications Module Release 3.5 User Guide
Comm Session Control — Extended Parameters
There are additional fields, collectively referred to as “extended parms,” which provide complete
flexibility and are available for each script record. These fields include Batch ID, Receive Timer,
Timeout Continue flag, and Timeout Status flag.
Figure 5.3 Communications Session Control Panel (EDIX403-CTL01)
To access the extended parameters, type 11 (Extended Parms) next to the selected script records
(from either folded or unfolded view) and press Enter, as shown in Figure 5.3.
The Communication Session Control panel (EDIX43B-FMT01) appears, as shown in Figure 5.4.
It can be used to edit a session control record in hex, simplifying the construction of script records
that require non-displayable characters. Additional parameters may be used to control the script
processing, such as Receive Timer and Timeout flags.
EDIX403 Communication Session Control EDI 04/30/08
CTL01 12:00:00
Comm Profile ID. . . . . . . . . . CN3BSC
Session Name . . . . . . . . . . . SR
Company. . . . . . . . . . . . . . COMMERCE:NETWORK RELEASE 3
Type option, press Enter.
3=Copy Seq# 4=Delete 11=Extended Parms
Opt Seq No Tran File File Name Ind Description
20 C 0 SEND REQUEST FOR REPORTS
30 C 0 SEND REQUEST FOR X12 DATA
11 40 C 0 SEND $$ADD RECORD
50 S OQ 2 SEND X12 DATA FROM OUTQUE
60 R SP 7 RECEIVE REPORTS TO SPOOL
70 R IQ 7 RECEIEVE X12 DATA TO INQUE
More...
F1=Help F4=Prompt F9=Fold/Unfold F10=Update F12=Cancel F24=More Keys
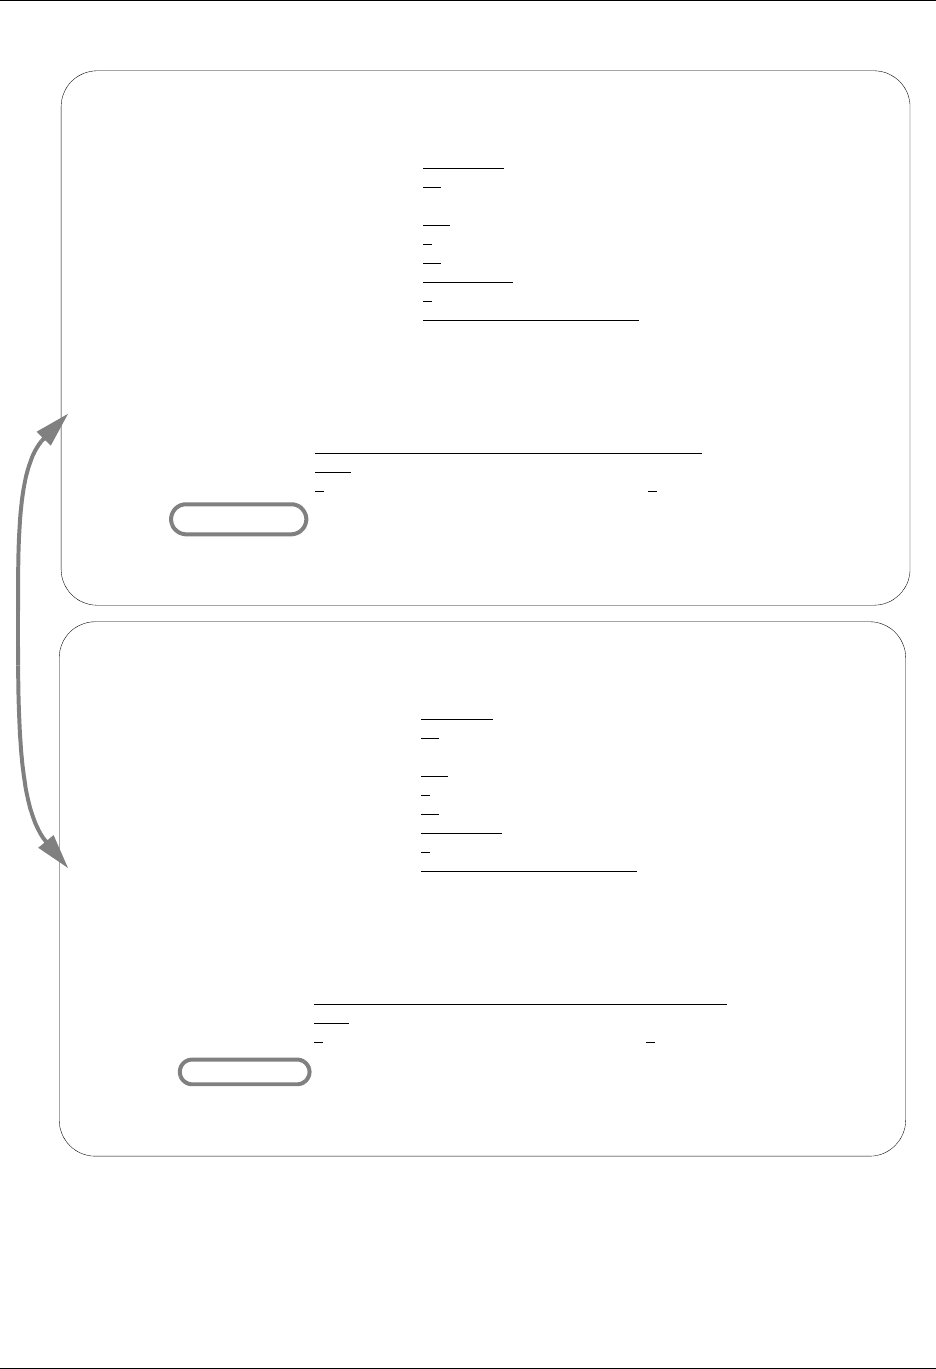
Using Scripts Work with Session Control Scripts
Gentran:Server for iSeries Communications Module Release 3.5 User Guide 5 - 7
Figure 5.4 Comm Session Control – Extended Parms Panel with Character/Hex Views
(EDIX43B-FMT01)
EDIX43B Communication Session Control EDI 04/30/08
FMT01 12:00:00
Comm Profile ID. . . . . . . . . . CN3BSC
Session Name . . . . . . . . . . . SR
Company. . . . . . . . . . . . . . COMMERCE:NETWORK RELEASE 3
Sequence Number. . . . . . . . . . 40
Transaction Code . . . . . . . . . C
File . . . . . . . . . . . . . . .
File Name. . . . . . . . . . . . .
Indicator. . . . . . . . . . . . . 0
Description. . . . . . . . . . . . SEND $$ADD RECORD
Command: (Top Line CHAR, Bottom Lines HEX)
$$ADD ID=SX999D BATCHID='TEST'
55CCC4CC7EEFFFC4CCECCCC77ECEE744444444444444444444444444444444444444444444444444
BB144094E27999402133894ED3523D00000000000000000000000000000000000000000000000000
Batch ID . . . . . . .
Receive Timer. . . . . 0000 (MMSS)
Timeout Continue . . . Timeout Status . . . .
F1=Help F2=Hex On/Off F4=Prompt F10=Update F12=Cancel F24=More Keys
EDIX43B Communication Session Control EDI 04/30/08
FMT01 12:00:00
Comm Profile ID. . . . . . . . . . CN3BSC
Session Name . . . . . . . . . . . SR
Company. . . . . . . . . . . . . . COMMERCE:NETWORK RELEASE 3
Sequence Number. . . . . . . . . . 40
Transaction Code . . . . . . . . . C
File . . . . . . . . . . . . . . .
File Name. . . . . . . . . . . . .
Indicator. . . . . . . . . . . . . 0
Description. . . . . . . . . . . . SEND $$ADD RECORD
Command:
$$ADD ID=SX999D BATCHID='TEST''
Batch ID . . . . . . .
Receive Timer. . . . . 0000 (MMSS)
Timeout Continue . . . Timeout Status . . . .
F1=Help F2=Hex On/Off F4=Prompt F10=Update F12=Cancel F24=More Keys

Work with Session Control Scripts Using Scripts
5 - 8 Gentran:Server for iSeries Communications Module Release 3.5 User Guide
To toggle between the character and hex display of the command, press F2 (Hex On/Off). Make
the desired changes and press F10 (Update). The record is updated and you are returned to the
Communication Session Control panel (EDIX403-FMT01).
Optionally, you can continue editing script records from the Extended Parms panel
(EDIX43B-FMT01) by pressing F16 (Record-1) or F17 (Record+1), which advances you to the
next session control record after updating the modified record.
Extended Parameter Field Definitions
# NOTE
SEE the field definitions under “Session Control Maintenance” for descriptions of the basic
parameter fields.
Command
This 80-position alphanumeric and/or hexadecimal field is used to edit and display session
Command records. The command record is used for several purposes depending on the
Transaction Type of the script record in which the Command record appears:
The Command field on the EDIX43B panel has a “hex mode” that can be toggled on and
off by pressing the F2=Hex On key. When hex mode is off, the field allows entry of
alphanumeric data, just like the Command fields on the EDIM43A panel. When hex mode
is on, the field also allows entry of hexadecimal data. The panel will initially be displayed
with hex mode off. For more information, see Hex Mode Command Editing.
Batch ID
This 44-position alphanumeric field is used to specify the Batch ID of the data that is
being sent or received. For send commands, Batch ID will be used to select the data that
will be transmitted from the outbound queue. For receive commands, data that is received
to the inbound queue will be assigned the Batch ID that has been specified. When Batch
ID is left blank, the system interprets the value as meaning that no particular Batch ID has
been assigned.
Receive Timer
This four-position numeric field is used in receive steps and data traps to specify the
length of time that the system will wait for data to be received before considering it a
timeout. This allows varying timeout periods to be specified for individual steps within a
communication script. If this field is left blank or filled with zeros, then the receive timer
value for this step will automatically be copied from one of two places; BSC profiles will
take the value from the system-wide bisync timer (accessed via the SETTIMER
command), and the SNA profiles will take the value from the Inactivity Timer field within
the EDIM818 Communication Profile Maintenance panel. Valid values for this field are
0000 – 9999. The default is 0000. (The units are MMSS, minutes/seconds).

Using Scripts Work with Session Control Scripts
Gentran:Server for iSeries Communications Module Release 3.5 User Guide 5 - 9
Timeout Continue
This one-position alphanumeric field specifies the action that the system is to take if a
receive timeout occurs in this script step. If the Timeout Continue field is set to Y, then
script execution will continue with the next step. This is the default. If the Timeout
Continue field is set to N, then script execution will terminate.
Timeout Status
This one-position alphabetic field specifies the batch status that is to be assigned to the
data that has been received to the inbound queue during this script step, in the event that a
receive timeout occurs in this step. Valid values are N to mark the data “Received
Normal,” or A to mark the data “Received Abnormal.” The default value is N.
Hex Mode Command Editing
The EDIM43B hex mode Command editor allows for the entry of non-displayable data within the
session Command field. This capability may be necessary for the construction of certain
communication scripts, such as those for remotes that are not based on the EBCDIC character set.
This can also be useful when constructing scripts for international communication, where
differences in language, keyboards, and display devices could present barriers to the entry of valid
Command data if a character-only input field was used.
The hex mode editor can be toggled on and off by pressing the F2=Hex Mode key. When hex
mode is active, two additional lines of data will be displayed immediately below the Command
field. These lines will contain the hexadecimal values that represent the character appearing above
them in the top line of the Command input field. For example, the Command data LOGON
SUCCESSFUL would appear as:
COMMAND:
LOGON SUCCESSFUL______________________________________________
DDCDD4EECCCEECED4444444444444444444444444444444444444444444444
36765024335226430000000000000000000000000000000000000000000000
where the first character, L, is represented by the hexadecimal value D3, which is displayed
directly below the character, with the high-order hex digit D on the second line, and the low-order
hex digit 3 on the third line. Continuing, O is represented by hex D6, G is represented by hex C7,
etc.
When the Command record contains non-displayable characters (values below hex 40), the period
character (“.”) will be displayed in the first line (character representation) of the Command field.
For example, the Command data shown above is followed by the carriage return (hex 0D) and
newline (hex 15) characters. The display would appear as:
COMMAND:
LOGON SUCCESSFUL.. ___________________________________________
DDCDD4EECCCEECED0144444444444444444444444444444444444444444444
3676502433522643D500000000000000000000000000000000000000000000
To use the hex mode Command editor in an Add or Update operation, first use the F2=Hex Mode
key to activate hex mode. Then enter the Add (2) or Update (3) Action code and other session

Work with Session Control Scripts Using Scripts
5 - 10 Gentran:Server for iSeries Communications Module Release 3.5 User Guide
control data as necessary. In the Command field, enter character data on the first line, and/or
hexadecimal data on the second and third lines. Press ENTER to add or update the current script
record and display the updated record.
Both character data and hex data can be entered at the same time. However, if both the character
and hex values are changed for the same byte within the Command record, the hex changes will
take precedence. If invalid data (characters other than 0 – 9 and A – F) is entered in the hex portion
of the input field, then the value from the character portion of the input field will be used.
# NOTE
The use of the INSERT and DELETE keys may cause unexpected results when editing with
hex mode on or when editing records that contain non-displayable characters with hex mode
off. The use of these keys is not supported.

Using Scripts Script Decision Tables
Gentran:Server for iSeries Communications Module Release 3.5 User Guide 5 - 11
Script Decision Tables
The following section contains script decision tables used for creating scripts that communicate
with BSC, SNA, X62, and async devices/software. Tables included in this section are as follows:
BSC tables
— BSC transaction codes/actions
— BSC send indicators
— BSC receive indicators
SNA/LU0/LU1 tables
— SNA/LU0/LU1transaction codes/actions
— SNA/LU0/LU1 send indicators
— SNA/LU0/LU1 receive indicators
X62/L62 tables
— X62/L62 transaction codes/actions
— X62/L62 send indicators
— X62/L62 receive indicators
Async tables (ASC, XAS, ASX, OFA, OFX)
— Async send/receive indicators
— Async transaction code/actions
— Async send indicators
— Async receive indicators

Script Decision Tables Using Scripts
5 - 12 Gentran:Server for iSeries Communications Module Release 3.5 User Guide
BSC Tables
This section contains the following tables:
Table 5.1: BSC Transaction Codes/Actions
Table 5.2: BSC Send Indicators
Table 5.3: BSC Receive Indicators
Table 5.1: BSC Transaction Codes/Actions
Tran
Codes Descriptions Actions Valid Indicators
CSend Control
Record
Send Literal from Command
Line.
0, 1, 2, 3
DReceive Control
Record
Attempt to match the
command line record with a
record received from the
remote system.
0, 6, 7, 8, 9
or 1 – 5
SSend Data OQ – Send from
Outbound Queue
OM – Send from
Outbound Queue as
Multiples
OF – Send from Outbound
File
0, 1, 2, 3
RReceive Data IQ – Receive data to
Inbound Queue
IM – Receive data to
Inbound Queue as
Multiples
IF – Receive data to
Inbound File
IA – Receive data and
append to an Inbound File
SP – Receive data to
Spool Printer File
0, 6, 7, 8, 9
or 1 – 5
XSpecial Extended
Logic
Not used. Not used.

Using Scripts Script Decision Tables
Gentran:Server for iSeries Communications Module Release 3.5 User Guide 5 - 13
Table 5.2: BSC Send Indicators
Desired Actions Definitions Indicators
Continue to next step in the
script
No termination character is
sent at end-of-file or at the
end of a control record.
0
Send End-of-Text character
at the end of the current
script step
An End-of-Text character
(ETX) is sent at end-of-file or
at the end of a control
record.
1
Send End-of-Transmission
character at end of the
current script step
An End-of-Transmission
character (EOT) is sent at
End-of-File or at the end of a
control record.
2
End transmission A remote disconnect
sequence (DLE/EOT) is sent
at end-of-file or at the end of
a control record.
3

Script Decision Tables Using Scripts
5 - 14 Gentran:Server for iSeries Communications Module Release 3.5 User Guide
# NOTE
When using a Data-trap (D) command and a zero (0) indicator, the Command Line record
compares only the first record received. If a match occurs, the step completes. If the first
record received does not match, the data-trap fails, and the session aborts.
Table 5.3: BSC Receive Indicators
Desired Actions Definitions Indicators
Verify that the command line
literal matches the incoming
control record
No termination character is
expected at the end of the file.
Forced timer wait.
0
Indicate the end of the
receive using an ETX
An End-of-Text character
(ETX) is expected to indicate
the end of the file (receive
complete).
6
Indicate the end of the
receive using an EOT
An End-of-Transmission
character (EOT) is expected at
the end of the file (receive
complete).
7
End transmission A remote disconnect sequence
(DLE/EOT) is expected at the
end of the file (receive
complete).
8
Indicate the end of the
receive when the device
selection code changes
A change in device selection
codes (print to punch/punch to
print) indicates End-of-File
(receive complete).
9
Indicate the end of the
receive using multiple EOTs.
This is used to hold the line
open long enough for the
communication partner to
respond. (This is normally
used when receiving data
from a Shared DASD JES
host.)
Indicators 1 to 5 will specify the
number of times that 5
consecutive
End-of-Transmission
characters or physical data
must be received before the
receive step is complete (i.e., 3
says that 15 EOTs or physical
data must be received).
1 – 5

Using Scripts Script Decision Tables
Gentran:Server for iSeries Communications Module Release 3.5 User Guide 5 - 15
SNA/LU0 Tables
This section contains the following tables:
Table 5.4: SNA/LU0 Transaction Codes/Actions
Table 5.5: SNA/LU0 Send Indicators
Table 5.6: SNA/LU0 Receive Indicators
Table 5.4: SNA/LU0 Transaction Codes/Actions
Tran
Codes Descriptions Actions Valid Indicators
CSend Control
Record
Send Literal from Command
Line.
0, 1, 2, 3
DReceive Control
Record
Attempt to match the
command line record with a
record received from the
remote system.
0, 5, 6, 7, 8
SSend Data OQ – Send from
Outbound Queue
OM – Send from
Outbound Queue as
Multiples
OF – Send from Outbound
File
0, 1, 2, 3
RReceive Data IQ – Receive data to
Inbound Queue
IM – Receive data to
Inbound Queue as
Multiples
IF – Receive data to
Inbound File
IA – Receive data and
append to an Inbound File
SP – Receive data to
Spool Printer File
JR – JES Receive to
Spool and Inqueue
JQ – Receive all data to
Inqueue
0, 5, 6, 7, 8, 9

Script Decision Tables Using Scripts
5 - 16 Gentran:Server for iSeries Communications Module Release 3.5 User Guide
Table 5.5: SNA/LU0 Send Indicators
Desired Actions Definitions Indicators
Send then continue to next
step in the script.
No termination character is
sent at end-of-file or at the
end of a control record.
0
Send
End-of-Chain character at
the end of the current script
step.
An End-of-Chain (EC)
indicator is sent at
End-of-File (EOF) or at the
end of a control record.
1
Send
End-of-Chain followed by a
change direction at
End-of-File or control record.
An End-of-Chain (EC)
followed by a change
direction (CD) is sent at the
End-of-File (EOF) or control
record.
2
Send
End-of-Chain followed by
End Bracket at the end of the
current script step.
An End-of-Chain (EC)
followed by an End Bracket
(EB) is sent at End-of-File
(EOF) or at the end of a
control record.
3

Using Scripts Script Decision Tables
Gentran:Server for iSeries Communications Module Release 3.5 User Guide 5 - 17
# NOTE
When using a Data-trap (D) command and a zero (0) indicator, the Command Line record
compares only the first record received. If a match occurs, the step completes. If the first
record received does not match, the data-trap fails, and the session aborts.
If the indicator is 6, 7, or 8 on a data-trap, then all records received drop until a match occurs,
or (6, 7, 8) End Chain, Change Direction, or End Bracket is received.
Table 5.6: SNA/LU0 Receive Indicators
Desired Actions Definitions Indicators
Verify that the command line
literal matches the incoming
control record.
No termination character is
expected at the end of the
file.
0
Receive until inactivity timer
expires, as specified in
Profile Maintenance panel
#2.
Receive all data into the
designated output file until
the inactivity timer expires,
with no data received for the
length of the timer.
5
Indicate the end of the
receive using an End-
of-Chain.
An End-of-Chain (EOC) is
expected to indicate the end
of the file (receive complete).
6
Indicate the end of the
receive using a Change
Direction Indicator.
A Change Direction (CD) is
expected at the end of the
file (receive complete).
7
End transmission. An End Bracket (EB) is
expected at the End of File
(EOF) (receive complete).
8

Script Decision Tables Using Scripts
5 - 18 Gentran:Server for iSeries Communications Module Release 3.5 User Guide
X62/L62 Tables
The section contains the following tables:
Table 5.7: X62/L62 Transaction Codes/Actions
Table 5.8: X62/L62 Send Indicators
Table 5.9: X62/L62 Receive Indicators
Table 5.7: X62/L62 Transaction Codes/Actions
Tran
Codes Descriptions Actions Valid Indicators
CSend Control
Record
Send Literal from Command
Line.
0, 1, 2
DReceive Control
Record
Attempt to match the
command line record with a
record received from the
remote system.
0, 6, 7, 8
ESend Evoke Record Send the Evoke Record to
start a session on the remote
system.
0, 1, 2
SSend Data OQ – Send from
Outbound Queue
OM – Send from
Outbound Queue as
Multiples
OF – Send from Outbound
File
0, 1, 2
RReceive Data IQ – Receive data to
Inbound Queue
IM – Receive data to
Inbound Queue as
Multiples
IF – Receive data to
Inbound File
IA – Receive data and
append to an Inbound File
SP – Receive data to
Spool Printer File
0,6,7,8

Using Scripts Script Decision Tables
Gentran:Server for iSeries Communications Module Release 3.5 User Guide 5 - 19
The following table lists the valid Send indicators for use with protocol type L62 (APPC using
SDLC) and X62 (APPC using an X.25 line). This table is common to both protocols.
Table 5.8: X62/L62 Send Indicators
Desired Actions Definitions Indicators
Send then continue to next
step in the script.
Send the record or file with no
terminator, read the next script
command and continue.
0
Send
Followed by confirm request.
Send the record or file followed by a
confirm request. This demands that
the remote system confirm receipt of
the data sent. When a positive
confirmation is received from the
remote, the next script step is
executed. When a negative
confirmation is received from the
remote, the session will end with an
error.
1
Send
Followed by a confirm
request and a change
direction.
Send the record or file followed by a
confirm request and a change
direction. This demands that the
remote system confirm receipt of the
data sent, and indicates that you have
finished sending and are ready to
receive data. When a positive
confirmation is received from the
remote, the next script step is
executed. When a negative
confirmation is received from the
remote, the session will end with an
error.
2

Script Decision Tables Using Scripts
5 - 20 Gentran:Server for iSeries Communications Module Release 3.5 User Guide
The following table lists the valid Receive indicators for use with protocol type L62 (APPC using
SDLC) and X62 (APPC using an X.25 line). This table is common to both protocols.
# NOTE
When using a Data-trap (D) command and a zero (0) indicator, the Command Line record
compares only the first record received. If a match occurs, the step completes. If the first
record received does not match, the data-trap fails, and the session aborts.
# NOTE
The iSeries operating system places certain restrictions on the flow of data between 2
machines when using APPC. When a file or record is sent to the remote system, and the send
step uses an indicator type “2” (change direction), the user is unable to specify another send
step without executing a receive step first. The remote system must send a Change Direction
to your system before any additional data can be sent by your system.
Table 5.9: X62/L62 Receive Indicators
Desired Actions Definitions Indicators
Used to receive with a data
trap.
If the first record received matches
the data trap record, the trap ends
successfully. If the first record
received does not match the data
trap record, then the data trap fails.
0
Used to force a receive until
time expires condition.
A null receive indicator means
receive until inactivity time-out
occurs.
5
Demands that your system
confirm receipt of the data
just received.
Receive data until the remote
system sends a confirmation
request.
6
Change direction. Receive data until the remote
system send change direction
indicating they have finished
sending and can receive.
7
Normally used as the last
step of a script while waiting
for the remote system to
disconnect.
Receive data until an
End-of-Session is received.
8

Using Scripts Script Decision Tables
Gentran:Server for iSeries Communications Module Release 3.5 User Guide 5 - 21
ASYNC Tables
This section contains the following tables:
Table 5.10: ASYNC Send / Receive Indicators
Table 5.11: ASYNC Transaction Codes/ Actions
Table 5.12: ASYNC Send Indicators
Table 5.13: ASYNC Receive Indicators
Table 5.10: ASYNC Send / Receive Indicators
Indicator Indicator Represents
0 No control character
1, 6 ETX character as defined in Comm Profile
2, 7 EOT character as defined in Comm Profile
X XMODEM file transfer protocol will be used

Script Decision Tables Using Scripts
5 - 22 Gentran:Server for iSeries Communications Module Release 3.5 User Guide
Table 5.11: ASYNC Transaction Codes/ Actions
Trans.
Codes Descriptions Actions Valid
Indicators
CSend Control Record Send Literal from Command
Line
0, 1, 2
DReceive Control
Record (Data Trap)
Wait for data in Command line
to be received from the
remote system
0, 6, 7
EEvoke Remote
Program
Send Evoke record to the
remote system and wait to
receive evoke confirmation
message
0, 1, 2
SSend Data OQ – Send from Outbound
Queue
OM – Send from Outbound
Queue separating multiple
batches
OF – Send from Outbound
File
0, 1, 2
RReceive Data IQ – Receive to Inbound
Queue
IM – Receive to Inbound
Queue separating multiple
batches
IF – Receive to Inbound
File
IA – Receive and Append to
Inbound File
SP – Receive data to
SPOOL (print file)
0, 6, 7
X Extended Script
Logic
Invoke extended script logic
functions
(space)

Using Scripts Script Decision Tables
Gentran:Server for iSeries Communications Module Release 3.5 User Guide 5 - 23
Table 5.12: ASYNC Send Indicators
Desired Actions Definitions Indicator
Send Data or Command line
alone, without any additional
control characters
No control character is sent at the end of
the outbound data or Command line
image
0
Send an End of Text (ETX)
character at the end of the
current script step
An ETX character, as defined in the
Comm Profile, is sent following the data
for this step
1
Send an End of Transmission
(EOT) character at the end of
the current script step
An EOT character, as defined in the
Comm Profile, is sent following the data
for this step
2
Send data using XMODEM XMODEM protocol will be used X
Table 5.13: ASYNC Receive Indicators
Desired Actions Definitions Indicators
Recognize the Command line
data alone, without any
additional control character
The Command line data is used for a
Data Trap or to indicate the end of the
receive, without expecting it to be
followed by any control character
0
Receive until an ETX character
has been received
An ETX character is expected at the end
of the inbound data or Command line
data
6
Receive until an EOT character
has been received
An EOT character is expected at the end
of the inbound data or Command line
data
7
Receive data using XMODEM XMODEM protocol will be used X

Extended Script Logic Using Scripts
5 - 24 Gentran:Server for iSeries Communications Module Release 3.5 User Guide
Extended Script Logic
Introduction
Extended script logic extends the basic communications scripting language to include operations
that cannot be coded using the conventional fixed-format script records.
Some of the services provided by extended script logic are:
Conditional logic
Branching and looping
Specialized functions to support additional protocols and networks
In general, extended script logic allows you to create more powerful scripts. This enables you to
communicate with more types of remote systems and networks.
Extended script logic uses session control records with Transaction Type X. To include extended
logic in a script, simply create a script record with Transaction Type X and type the appropriate
extended logic keywords in the Command field. The other session control fields will be ignored.

Using Scripts Extended Script Logic
Gentran:Server for iSeries Communications Module Release 3.5 User Guide 5 - 25
Extended Logic Keywords
Many extended logic keywords are available. The Communications Module interprets the
keywords that are applicable to it. Table 5.14 shows the protocols to which each of the keywords
apply.
Table 5.14: Extended Logic Keywords
Extended Logic
Keyword
Profile Protocol Type
BSC GMC SNA LU0 L62 X62 ASC XAS OFA OFX ASX FTP
INDICATOR x x x x x x
LOOP-START x x x x x x
LOOP-END x x x x x x
GOTO x x x x x x x x x x x
MATCH x x x x x x x x x x x
CLEARBUF x x x x x
IF x x x x x
NOT x x x x x
OQDATA x x x x x
CONTAINS x x x x x
SENDOK x
SENDFAIL x
SESSABORT x x x x x
SESSEND x x x x x
SESSFAIL x x x x x
CMLOGON x
SET x
APPEND x x
AUTOEERP x x
CREDITS x
INFILE x x
LOCID x x

Extended Script Logic Using Scripts
5 - 26 Gentran:Server for iSeries Communications Module Release 3.5 User Guide
LOCPW x x
NOCOMPRESS x x
OUTFILE x x
OUTFMT x x
OUTLRECL x x
RECVONLY x x
RESPOND x x
REVERSEEERP x x
RMTID x x
RMTPW x x
SENDONLY x x
SFIDDATE x x
SFIDDEST x x
SFIDFMT x x
SFIDLRECL x x
SFIDDSN x x
SFIDORIG x x
SFIDTIME x x
SFIDUSER x x
SPECIAL x x
SSIDUSER x x
STARTOFTP x x
TIMEOUT x x
TRANSPARENT x x
VERIFY x x
Table 5.14: Extended Logic Keywords
Extended Logic
Keyword
Profile Protocol Type
BSC GMC SNA LU0 L62 X62 ASC XAS OFA OFX ASX FTP

Using Scripts Extended Script Logic
Gentran:Server for iSeries Communications Module Release 3.5 User Guide 5 - 27
All of the extended logic keywords can be entered into any communications script. However, they
will only function properly with the protocol for which they were designed.
XBUFSIZE x x
FTP
Subcommand x
AEXLATE x
CHGRECSEPI x
CHGRECSEPO x
RMVCHR x
EAXLATE x
EMPTYBATCHIN x
RECSEPI x
RECSEPO x
RECSIZE x
SKIPBLANKEOF
x
XLATEI x
XLATEO x
AUTODELETE x
AUTORENAME X
FTPCCSID x
FTPTBLOUT x
FTPTBLIN x
SETSEQ x
SAVSEQ x
RTVSEQ x
TIMEFMT x
Table 5.14: Extended Logic Keywords
Extended Logic
Keyword
Profile Protocol Type
BSC GMC SNA LU0 L62 X62 ASC XAS OFA OFX ASX FTP

Extended Script Logic Using Scripts
5 - 28 Gentran:Server for iSeries Communications Module Release 3.5 User Guide
For example, SENDFAIL and SENDOK are only applicable to ASX (XMODEM) sessions. If you
coded them in a BSC script, an error would occur during execution of the script because the bisync
communications module would not understand those keywords. Likewise, if you were to use the
STARTOFTP keyword to invoke OFTP support during an XMODEM session, it would not function
properly. The chapters that discuss each individual protocol discuss the extended script logic that
corresponds specifically to that protocol.
All extended script logic keywords must be entered in upper case, as shown, or they will not be
recognized.
Only the first keyword on a script line will be processed. The exceptions to this are when coding
an “IF” statement and when using the OFTP keywords. In these cases, multiple extended logic
keywords may appear on the same script line.
SEE the following sections for more information on extended script logic:
“Sync Extended Script Logic” for BSC, SNA, L62, X62
“Async Extended Script Logic” for ASC, ASX, XAS, OFA, OFX in the Async
Communications Support chapter
“Creating an OFTP Script” in the OFTP Communications Support chapter
“FTP Script Transactions” in the FTP Communications Support chapter

Using Scripts Remote Command Support
Gentran:Server for iSeries Communications Module Release 3.5 User Guide 5 - 29
Remote Command Support
The following section describes the Remote Command Support feature.
Included in this section is a description of the feature, which is supported by ASC, BSC, and SNA
LU0/LU1/LU6.2 communication.
Remote Command Support Session Control Script Values
The Remote Command Support feature, activated from within a session control script, allows the
remote system to control temporarily the communication session by sending command records.
Thus, with this feature, the remote system dictates which files, Profile IDs, Batch IDs, and file
types are used for sending and receiving data. To enable the Remote Command Support feature
within your Gentran:Server, you must create a session control script record with the following
values:
Set Transaction Type to C.
Set Indicator code to 1.
Set Control Record field to SET MODE=RMT.

Remote Command Support Using Scripts
5 - 30 Gentran:Server for iSeries Communications Module Release 3.5 User Guide
The Communication Session Control panel (EDIX403-CTL01), shown in Figure 5.5, displays
correct session control script record values.
Figure 5.5 Communication Session Control panel (EDIX403-CTL01)
This control record may appear anywhere within a given script and may have other commands
preceding and following it. If you fail to create the correct control record image within a session
control script, Remote Command Support does not activate.
All commands executed prior to your Gentran:Server entering Remote Command mode are
executed normally. All commands following are executed normally only if the remote system
sends a $$CMD END command record, which ends Remote Command Support and allows
Gentran:Server to return to its normal script processing mode. While in Remote Command mode,
receipt of a $$LOGOFF control record causes Gentran:Server to terminate the session, regardless
of any script steps remaining.
EDIX403 Communication Session Control EDI 04/30/08
CTL01 12:00:00
Comm Profile ID. . . . . . . . . . CN3BSC
Session Name . . . . . . . . . . . SR
Company. . . . . . . . . . . . . . COMMERCE:NETWORK RELEASE 3
Type option, press Enter.
3=Copy Seq# 4=Delete 11=Extended Parms
Opt Seq No Tran File File Name Ind Description
20 C 1 ENTER RMT COMMAND MODE
SET MODE=RMT
More...
F1=Help F4=Prompt F9=Fold/Unfold F10=Update F12=Cancel F24=More Keys

Using Scripts Remote Command Support
Gentran:Server for iSeries Communications Module Release 3.5 User Guide 5 - 31
Remote Commands
Gentran:Server supports the use of five unique remote commands. These commands, received
from the remote system and processed by Gentran:Server, are as follows:
$$ADD command record is sent as the first record of a group by the remote system to add
data your Gentran:Server Inbound Queue, an Inbound user file, or a Spool file.
$$REQUEST command record is sent by the remote system to request transmission of data
from the Outbound Queue (or a user file) on your system to the remote system.
$$DIR command record is sent by the remote system to request a list of the batches of data
currently in the Gentran communications queues for the specified profile. This command is
only available when using asynchronous communications.
$$CMD END command record is sent by the remote system to instruct your Gentran:Server
to end Remote Command Support, stop reading remote commands from the communication
line, and return to reading and executing commands from the session control script that was
specified at the beginning of the communication session.
$$LOGOFF command record is sent by the remote system to instruct your Gentran:Server
to end the communication session.
The following sections discuss commands, syntax, and details of the system’s capabilities.
$$ADD Remote Command
The $$ADD command is the first record of a group sent by the remote system. It indicates that
data following the $$ADD command is added to the Inbound Queue, a user file, or a Spool file on
your system.
Conditions for Using the $$ADD Command
Once the initial $$ADD is sent, additional $$ADD commands can appear anywhere within a file to
indicate the beginning of a new batch of data that is added to your Gentran:Server.
Keyword Parameters
You create the $$ADD command by placing the appropriate keywords and their parameters into a
record beginning with the characters $$ADD. Keywords must fit the following parameters:
May appear in any order
Must be separated by one or more spaces
May be of any length not exceeding the maximum length

Remote Command Support Using Scripts
5 - 32 Gentran:Server for iSeries Communications Module Release 3.5 User Guide
Keyword Values and Definitions
The following chart illustrates keyword parameters. Definitions of the keywords used in this
example appear after the example.
FT= keyword uses a 2-character parameter to indicate both the placement of the data added by
the remote system and the type of add. This is a mandatory keyword for all $$ADDs. The
following chart displays valid parameter values for the FT= keyword:
FN= keyword uses a 10-character parameter to specify the name of an inbound user file in
your library list to which data from the remote system is written. The specified file must exist
on your system or an error occurs. When data is added to the Inbound Queue or Spool file, do
not use this keyword as no file name is applicable.
ID= keyword uses a 8-character parameter to specify the Profile ID that the data will be
assigned when added to the Inbound Queue on your system. Gentran:Server verifies the
Profile ID, and if not defined on your system, changes it to a value of DEFAULT. When you add
data to an Inbound user file or Spool file, do not use this keyword, since no Profile ID
corresponds with the user or Spool files.
Table 6:
Keyword Meaning Type Max. Length
FT=XX File Type Alphanumeric 2
FN=XXXXXXXXXX File Name Alphanumeric 10
ID=XXXXXXXX Profile ID Alphanumeric 8
BID=XXXXXXXX Batch ID Alphanumeric 44
PASSWORD=XXXXX Password Alphanumeric 10
Table 7:
FT= Keyword Values Descriptions
IQ Places all data sent by the remote on your Inbound Queue as
a single batch
IM Places all data sent by the remote on your Inbound Queue
multiple batches when the remote sends and correctly
delimits multiple batches
IF Places all data sent by the remote into the Inbound user file
named in the ‘FN=XXXXXXXX’ keyword, and overwrites any
existing data in the file
IA Places all data sent by the remote into the Inbound user file
named in the ‘FN=XXXXXXXX’ keyword, and appends the
data to any existing data in the file
SP Places all data sent by the remote into separate Spool files

Using Scripts Remote Command Support
Gentran:Server for iSeries Communications Module Release 3.5 User Guide 5 - 33
BID= keyword uses a 44-character parameter to specify the Batch ID that the data contains
when added to the Inbound Queue on your system. When data is added to an Inbound user file
or Spool file, this keyword is not used, since no Batch ID is associated with user or Spool files.
This parm is optional.
PASSWORD= keyword specifies a character value that will be compared to the Remote
Command Password value specified in the communications profile named by the ID=
parameter. If the passwords are equal, the remote command will be processed. Otherwise, the
communication session will be terminated. Password checking is only performed for $$ADD
and $$REQUEST commands with File Type IQ or OQ. If the communication profile specifies
password *NONE, then the PASSWORD= keyword need not be used. PASSWORD= may also be
abbreviated PSWD=, PWD=, or PSW=.
# NOTE
If multiple remote commands are combined and transferred as a single file, it is possible that
some commands will be processed and some will not, even though the entire file was
received successfully. If a remote command containing an invalid password is encountered,
the session will be considered a failure and any remaining commands and data will be
discarded.
Uses for $$ADD
The following list details some of the uses of the $$ADD command:
Add data to your Gentran:Server Inbound Queue, an Inbound user file, or a Spool file on your
system
Add data to the Inbound Queue by using multiple $$ADD commands and a Profile ID different
than the Profile ID that is used when the communication session starts
Add multiple files or batches, all using different Profile IDs, Batch IDs, and file types in a
single session.
Add data to multiple user files on your system by using multiple $$ADD command records
ahead of each file or batch sent.
Send multiple $$ADD commands and data from a single file, multiple files each containing a
$$ADD command and data, or multiple files containing multiple $$ADD commands and data
batches.
# NOTE
If $$ADD commands are used, all $$ADD commands and associated data must be sent by the
remote first, before any other command records. Once a non-add command is sent, another
$$ADD may only be used if it is the first record of a separate and new file from the remote
system, and all $$REQUEST commands sent by the remote in a previous send step have
already been serviced by your Gentran:Server for iSeries.

Remote Command Support Using Scripts
5 - 34 Gentran:Server for iSeries Communications Module Release 3.5 User Guide
Protocol Specific Considerations for $$ADD
The following sections detail certain protocol considerations for the $$ADD command.
SNA Considerations
All $$ADD commands used during SNA communication for adding data to Inbound user files on
your system acquires their record length from the user file as the data is added. In the event that the
record length used by the remote system does not match the actual record length of the file,
Gentran:Server converts the records received to the actual record length of the file.
BSC Considerations
All $$ADD commands used during BSC communication for adding data to Inbound user files on
your system cause the system to read data directly from the communication line and write directly
to the user file. Gentran:Server assumes data sent has the correct record length and makes no effort
to convert the records. Records received from the remote system with a length less than the length
of the user files are “blank-padded”. Records received from the remote system with a length
greater than the length of the user file are truncated.
ASC Considerations
Gentran:Server only supports $$ADD commands during asynchronous communications with
Connect:Mailbox Client for Windows. Client for Windows sends the $$ADD command in ASCII
text mode before entering ZMODEM mode to perform the file transfer. Gentran:Server interprets the
$$ADD command and then enters ZMODEM protocol to receive the file. To enable this to happen,
you must include the extended logic command SET PROTOCOL=ZMODEM in your script before the
command to enter remote command mode.
After the ZMODEM transfer, Gentran:Server issues a command prompt and waits for the next remote
command. Gentran:Server does not support $$ADD commands within the ZMODEM protocol
(embedded within the data file). Client for Windows may include parameters on the $$ADD
command that are not supported by Gentran:Server for iSeries. These parameters are ignored. If no
file type is specified on the $$ADD command, the default is to add data to the inbound queue.

Using Scripts Remote Command Support
Gentran:Server for iSeries Communications Module Release 3.5 User Guide 5 - 35
$$ADD Command Examples
1. This example shows the remote system adding one batch to the Inbound Queue of your
Gentran:Server. The data file received appears on the Inbound Queue with the Profile ID
of REMOTEID and a Batch ID of TEST FILE NUMBER ONE.
2. This next example shows the remote system adding one file with two batches to the
Inbound Queue of your Gentran:Server. The system receives the first batch and places it
on the Inbound Queue with a Profile ID SENDER01, and a Batch ID of SENDER01
INVOICE FILE. The system receives the second batch and places it in the Inbound Queue
with a Profile ID of SENDER02 and a Batch ID of SENDER02 PURCHASE ORDERS. Note
that the remote can send the same data in two separate files, one with SENDER01 data, and
the other with SENDER02 data. Both conditions ensure that the same data appears on your
Inbound Queue in the same way.
3. The following example shows the remote system sending one file with one batch to an
Inbound user file on your system. The data received is placed into the file RMTDATA01.
$$ADD FT=IQ ID=REMOTEID BID=TEST FILE NUMBER ONE
DATA RECORD #1
DATA RECORD #2
.
.
.
LAST DATA RECORD OF FILE
$$ADD FT=IQ ID=SENDER01 BID=SENDER01 INVOICE FILE
DATA RECORD #1
DATA RECORD #2
.
.
.
LAST DATA RECORD OF SENDER01 INVOICE FILE
$$ADD FT=IQ ID=SENDER02 BID=SENDER02 PURCHASE ORDERS
DATA RECORD #1
DATA RECORD #2
.
.
.
LAST DATA RECORD OF SENDER02 PURCHASE ORDERS
$$ADD FT=IF FN=RMTDATA01
DATA RECORD #1
DATA RECORD #2
.
.
.
.
LAST DATA RECORD TO LOAD IN FILE RMTDATA01

Remote Command Support Using Scripts
5 - 36 Gentran:Server for iSeries Communications Module Release 3.5 User Guide
4. This next example shows the remote system sending one file with two batches to two
unique Inbound user files on your system. The first batch received is placed into the file
RMTDATA01 and overwrites any existing data in the file. The second batch appended to
existing data in the file called RMTAPPEND. Note that the remote system can send two
batches from two separate files, each containing the $$ADD command and its associated
data. The end result on your system is still the same.
$$ADD FT=IF FN=RMTDATA01
DATA RECORD #1
DATA RECORD #2
.
.
.
.
LAST DATA RECORD TO LOAD IN FILE RMTDATA01
$$ADD FT=IA FN=RMTAPPEND
DATA RECORD #1
DATA RECORD #2
.
.
.
.
LAST DATA RECORD TO APPEND TO FILE RMTAPPEND

Using Scripts Remote Command Support
Gentran:Server for iSeries Communications Module Release 3.5 User Guide 5 - 37
$$REQUEST Remote Command
The $$REQUEST command allows the remote system to “request” output from your system. The
remote can request data from your Outbound Queue or from an Outbound user file.
Options for Using the $$Request Command
$$REQUEST commands can be sent two ways. The option you should use is generally dictated by
the capabilities of the remote system.
Multiple Command Transmission: $$REQUEST commands are sent one after another from a
single file by the remote system, with a limit of 50 $$REQUEST commands before the remote
system must stop sending, go into receive mode, and await output from Gentran:Server. When
using this method of sending multiple $$REQUEST commands in a single send step, once all
commands are received, your Gentran:Server system will begin servicing the requests and
sending output to the remote system. These commands may request output for multiple Profile
IDs, Batch IDs, Outbound user files, and file types.
# NOTE
Multiple Command Transmission only supported for SNA profiles.
Single Command Transmission: the remote system sends only one $$REQUEST, goes into
receive mode, and has your Gentran:Server service that request, and then sends the next
$$REQUEST for servicing.
# NOTE
An $$ADD command may not be sent in the same send step by the remote system unless it is
placed before the $$REQUEST commands. Once all $$REQUEST commands are sent, the
remote system must stop sending and wait for servicing of all requests to finish before
sending another $$ADD command.
Keyword Parameters
The $$REQUEST command is created by placing the appropriate keywords and their parameters
into a record beginning with the characters $$REQUEST. Keywords must fit the following
parameters:
May appear in any order
Must be separated by one or more spaces
May be of any length not exceeding the maximum length

Remote Command Support Using Scripts
5 - 38 Gentran:Server for iSeries Communications Module Release 3.5 User Guide
Keyword Values and Definitions
The following example illustrates the use of keywords. Definitions of keywords used in this
example appear after the example.
FT= keyword uses a 2-character parameter to indicate both the location of the data requested
by the remote system and the type of request to be performed. This is a mandatory keyword for
all $$REQUESTs. The remote system can request data from your Outbound Queue or an
Outbound user file on your system. The valid parameter values for this keyword are displayed
in the following chart:
FN= keyword uses a 10-character parameter to specify the name of an outbound user file from
which data will be transmitted to the remote system. The specified file must exist in the library
list of communications jobs or an error occurs.
ID= and Batch ID= in a $$REQUEST command dictate what Profile ID and Batch ID are used
by Gentran:Server to decide which batches on your Outbound Queue are transmitted to the
remote system. In the event that an ID is specified, but the Batch ID is left blank, all batches
for the specified ID are sent to the remote system.
# NOTE
Profile ID in a $$REQUEST command causes Gentran:Server to retrieve the record length of
the specific profile on your system and use that length when sending data from the Outbound
Queue. A remote system issuing a $$REQUEST, however, may receive a record length it does
not expect, depending upon the Profile ID specified in the $$REQUEST command and the
record length specified in that profile on your system.
Table 8:
Keyword Meaning Type Max. Length
FT=XX File Type Alphanumeric 2
FN=XXXXXXXXXX File Name Alphanumeric 10
ID=XXXXXXXX Profile ID Alphanumeric 8
BID=XXXXXXXX Batch ID Alphanumeric 44
PASSWORD=XXXXXX Password Alphanumeric 10
Table 9:
FT=Keyword Descriptions
OQ Sends all data from your Outbound Queue with the correct Profile ID
and Batch ID to the remote as a single batch
OM Sends all data from your Outbound Queue with the correct Profile ID
and Batch ID to the remote as separate batches
OF Sends an Outbound user file to the remote

Using Scripts Remote Command Support
Gentran:Server for iSeries Communications Module Release 3.5 User Guide 5 - 39
PASSWORD= keyword specifies a character value that will be compared to the Remote
Command Password value specified in the communications profile named by the ID=
parameter. If the passwords are equal, the remote command will be processed. Otherwise, the
communication session will be terminated. Password checking is only performed for $$ADD
and $$REQUEST commands with File Type IQ or OQ. If the communication profile specifies
password *NONE, then the PASSWORD= keyword need not be used. PASSWORD= may also be
abbreviated PSWD=, PWD=, or PSW=.
# NOTE
If multiple remote commands are combined and transferred as a single file, it is possible that
some commands will be processed and some will not, even though the entire file was
received successfully. If a remote command containing an invalid password is encountered,
the session will be considered a failure and any remaining commands and data will be
discarded.
Protocol Specific Considerations for $$REQUEST
The following sections detail certain protocol considerations for the $$REQUEST command.
ASC Considerations
Gentran:Server only supports $$REQUEST commands during asynchronous communications with
Connect:Mailbox Client for Windows. $$REQUEST may be abbreviated $$REQ. Client for
Windows sends a $$REQ command in ASCII text mode before entering ZMODEM mode to perform
the file transfer. Gentran:Server interprets the $$REQ command and then enters ZMODEM protocol
to send the file. To enable this to happen, you must include the extended logic command SET
PROTOCOL=ZMODEM in your script before the command to enter remote command mode.
After the ZMODEM transfer, Gentran:Server issues a command prompt and waits for the next remote
command. Client for Windows may include parameters on the $$ADD command that are not
supported by Gentran:Server for iSeries. These parameters are ignored. If no file type is specified
on the $$REQ command, the default is to transmit data from the outbound queue.
$$REQUEST Command Examples
1. This example shows the remote system requesting all batches from your system with a
Profile ID of REMOTEID and a Batch ID of INVOICES sent as one batch to their system.
$$REQUEST FT=OQ ID=REMOTEID BID=INVOICES
2. This example shows the remote system requesting all batches from your system with a
Profile ID of DALLAS and a Batch ID of DALLAS FILES FROM DIVISION #6 sent as
multiple batches to their system.
$$REQUEST FT=OM ID=DALLAS BID=DALLAS FILES FROM DIVISION #6
3. This example shows the remote system requesting an Outbound user file titled PAYROLL
sent from your system to theirs.
$$REQUEST FT=OF FN=PAYROLL

Remote Command Support Using Scripts
5 - 40 Gentran:Server for iSeries Communications Module Release 3.5 User Guide
$$DIR Remote Command
The $$DIR remote command allows the remote system to request a listing of the batches in the
inbound and outbound queues of the specified profile. $$DIR commands are only supported
during asynchronous communications with Client for Windows. Client for Windows sends a
$$DIR command in ASCII text mode followed by a carriage return. Gentran:Server processes the
$$DIR command and outputs the listing to allow the remote user to select batches to be requested.
The format of the $$DIR command is:
$$DIR ID=profileid
$$CMD END Remote Command
The $$CMD END command is issued by the remote system to end Remote Command Support and
instruct your Gentran:Server to continue reading commands from the session control script
specified at the beginning of the session. In the event that there are no commands remaining in the
session control script, the session ends normally.
The ability to exit from Remote Command Support and return to “local” processing is useful for
performing certain tasks after the remote system completes its processing. It’s possible, for
instance, for the remote to complete the steps it wants to perform in Remote Command Support
mode; then have the remote send a $$CMD END command. At this time, your local session control
script may contain a send user file command that you wish to transmit to all users who access this
line.
The format of the $$CMD END command has no parameters and is as follows:
$$CMD END
$$LOGOFF Remote Command
The $$LOGOFF command is used by the remote system to indicate that it wishes to end the
communication session. Upon receiving the $$LOGOFF command, Gentran:Server ignores any
commands that are waiting in the “local” session control script and immediately ends the
connection. When a return to local session control processing is not desired by your location, the
remote system is instructed to always send a $$LOGOFF command for proper session termination.
The format of the $$LOGOFF command has no parameters and is as follows:
$$LOGOFF

Using Scripts What is Dynamic Scripting?
Gentran:Server for iSeries Communications Module Release 3.5 User Guide 5 - 41
What is Dynamic Scripting?
Dynamic Scripting
Dynamic scripting is a feature that enables the remote system you are communicating with to
determine what communications session script your system should follow.
The dynamic scripting feature is most useful in an auto-answer mode, in which multiple
companies send your system data at unknown times, and for which you might need to use different
processing for each incoming call.
For example, one remote system might need to retrieve data from your outbound queue. Another
remote system might need to send data to your inbound queue. A third might need to do both. One
way you could accommodate all three remote systems is to create a profile and a script for each
remote system, and dedicate a phone line and a modem to each of them, so that they could call
whenever they were ready. If you had only one phone line or modem to use, you could force the
remotes to call at specific times. Then, you could schedule a fixed sequence of communications
jobs so that you always would have the appropriate job running for the remote that was scheduled
to call. However, if the needs of any of the remotes varied from day to day, this technique would
not work.
Dynamic scripting gives your system the flexibility to accommodate the above scenario (three
remote systems) easily, using a single phone line and communications job.

What is Dynamic Scripting? Using Scripts
5 - 42 Gentran:Server for iSeries Communications Module Release 3.5 User Guide
How to Use Dynamic Scripting
Dynamic scripting is invoked by specifying the special value “$$” for the session name when you
start a communications session. The communications session can be started through any of the
standard Gentran:Server facilities, including the STRCOMSSN or START command, or by using the
job scheduler.
# NOTE
The communications session script named “$$” does not actually exist—”$$” is simply the
special value that triggers the dynamic scripting logic in Gentran:Server.
When you start communications using session name “$$,” the Communications Module first
establishes a connection to the remote system according to the information in the communications
profile. Usually, this involves waiting for a call from the remote system.
After the connection is established, your system enters into a receive state and waits for the remote
system to transmit a $$SCRIPT record. This record tells your system what communications
session script to execute. The format of the record must be the following:
$$SCRIPT ID=profilename SESSION=scriptname
Where profilename is a communications profile ID and scriptname is a session name that has been
created for that profile.
# NOTE
If the remote user sends a profilename of fewer than eight characters, he or she must fill the
name with spaces to attain a total length of eight, or the $$SCRIPT command is considered
invalid and the session is terminated.
After receiving a valid $$SCRIPT record, your system conducts the rest of the communications
session according to the instructions in the script identified by the $$SCRIPT record.

Using Scripts What is Dynamic Scripting?
Gentran:Server for iSeries Communications Module Release 3.5 User Guide 5 - 43
Protocol-Specific Considerations for Dynamic Scripting
For all bisynchronous (BSC and GMC) profiles:
The first record received from the remote system must be the $$SCRIPT record. If the first
record received is not the $$SCRIPT record, then the communications session ends with a
failed status.
The length of the $$SCRIPT record must be equal to or less than the block size defined in the
communications profile. The unused portion of the record should be filled with spaces.
The remote system must send an End of Transmission (EOT) following the $$SCRIPT record.
For all asynchronous (ASC, ASX, XAS, OFA, and OFX) profiles:
The remote system must transmit the $$SCRIPT record as an 80-byte record image. The
unused portion of the record should be filled with spaces.
No termination character should be transmitted after the $$SCRIPT record. The system simply
expects to receive 80 bytes, starting with $$SCRIPT.
Any data received preceding $$SCRIPT is discarded.
After connecting, the remote system must transmit the $$SCRIPT record within 90 seconds or
the communications session will end with a failed status. The 90-second time limit cannot be
changed.
For all SNA LU1 (SNA) profiles:
The first record received from the remote system must be the $$SCRIPT record. If the first
record received is not the $$SCRIPT record, then the communications session ends with a
failed status.
The remote system must send End-Chain, End-Bracket, Change-Direction following the
$$SCRIPT record.
For all SNA LU0 (LU0) profiles:
The LU0 protocol as implemented in the Communications Module is specifically designed to
communicate with the IBM CICS host, so the dynamic scripting feature is not applicable to
LU0 profiles.
For all SNA LU6.2 (L62, X62) profiles:
The ability to start a specific profile and session is inherent in the LU6.2 evoke, so the
dynamic scripting feature is not applicable to LU6.2 profiles.

What is Dynamic Scripting? Using Scripts
5 - 44 Gentran:Server for iSeries Communications Module Release 3.5 User Guide
Typical Implementation
Dynamic scripting usually is used with an auto-answer profile. By starting session “$$” for this
profile, you enable the remote system to request execution of an appropriate session control script
for what the remote system needs to do. Specifying *YES in the Run Continually field on the Start
Communications Session (STRCOMSSN) panel when you start the session causes your
communications job to loop, so that it can accept call after call.
If you need to have multiple lines available to accept calls, you can create multiple profiles (one
per line). If you specify Continuous Processing = Y and Script = $$ on the profile
screen, you can use the START and SHUTDOWN commands to more easily control these jobs.
# NOTE
To schedule either the START or SHUTDOWN command, you must enter them into the
scheduler manually.
START Command
When the START command is issued, the Communications Module searches all existing
communications profiles to find those that have Continuous Processing = Y. For each of
these profiles, a communications job is submitted to batch. This job executes the session specified
by the Script field on the profile screen. The job is run in continuous process mode to allow it to
accept multiple calls.
This command is beneficial for jobs that must be started every day.
SHUTDOWN Command
The SHUTDOWN command will terminate all active Gentran:Server communications jobs. This
command usually is used during end-of-day processing to stop all the jobs that were started with
the START command.

Using Scripts Sync Extended Script Logic
Gentran:Server for iSeries Communications Module Release 3.5 User Guide 5 - 45
Sync Extended Script Logic
This section describes the Extended Logic keywords that are applicable to scripting for all
variations of synchronous protocols (bisync and SNA) as shown in the Extended Logic keywords
table in figure 2.5.
The X type session record is used to execute special extended logic processing within a script. The
following functions can be performed with extended logic records:
Set up loops within a script.
Specify GOTO commands that alter the order in which steps are executed.
Change the logic flow of a script based on certain data-match or received-indicator conditions.
The extended logic records use a transaction type of X, an indicator of 0 – 9, and keywords that are
specified on the control data line.
Create Extended Logic Records
To create extended logic records, access the Communication Session Control panel
(EDIX403-CTL01), as shown in Figure 5.6.
Figure 5.6 Communication Session Control panel (EDIX403-CTL01)
EDIX403 Communication Session Control EDI 04/30/08
CTL01 12:00:00
Comm Profile ID. . . . . . . . . . CN3BSC
Session Name . . . . . . . . . . . SR
Company. . . . . . . . . . . . . . COMMERCE:NETWORK RELEASE 3
Type option, press Enter.
3=Copy Seq# 4=Delete 11=Extended Parms
Opt Seq No Tran File File Name Ind Description
20 C 1 ENTER RMT COMMAND MODE
SET MODE=RMT
More...
F1=Help F4=Prompt F9=Fold/Unfold F10=Update F12=Cancel F24=More Keys

Sync Extended Script Logic Using Scripts
5 - 46 Gentran:Server for iSeries Communications Module Release 3.5 User Guide
Transaction Type “X” (only valid value)
File Type (Not used)
Filename (Not used)
Indicator (All valid)
Description (Any value)
Control Data (Keywords detailed below)
LOOP-START
Specifies the beginning of a loop.
LOOP-END MATCH
Specifies end the loop when the prior script step ended with a control data match. The data
received on the communications line must exactly match the data specified on the prior
records control data field for the match to be considered complete. The next step of the
script will be executed when a match condition occurs. When this script record is read and
the prior script record did not end with a match condition, execution of the script will jump
to the LOOP-START record.
LOOP-END MATCH GOTO 999
Specifies end the loop when the prior script step ended with a control data match. The data
received on the communications line must exactly match the data specified on the prior
records control data field. Execution of the script will continue at script sequence number
999 when a match occurs. When this script record is read and the prior script record did
not end with a match condition, execution of the script will jump to the LOOP-START
record.
LOOP-END INDICATOR 0-9
Specifies end the loop when this script step is executed and there is an indicator match
with the indicator specified on this record. The indicator specified on this record may be
same, or a different indicator than used by the prior script step. Execution of the script will
continue at the next script step when an indicator match occurs. When this script record is
read and there is not an indicator match condition, execution of the script will jump to the
LOOP-START record.
LOOP-END INDICATOR 0-9 GOTO 999
Specifies end the loop when this script step is executed and there is an indicator match.
Execution of the script will continue at script sequence number 999 when an indicator
match occurs. The indicator specified on this record may be the same, or a different
indicator than used by the prior script step. When this script record is read and there is not
an indicator match condition, execution of the script will jump to the LOOP-START
record.

Using Scripts Sync Extended Script Logic
Gentran:Server for iSeries Communications Module Release 3.5 User Guide 5 - 47
MATCH GOTO 999
Specifies that when the prior script step ended with a control data match condition,
execution of the script will continue at script sequence number 999. The data received on
the communications line must exactly match the data specified on the prior records control
data field. When this script record is read and the prior script record did not end with a
match condition, execution of the script will continue at the next script record. No loop is
needed to use this extended logic record.
INDICATOR 1-9 GOTO 999
Specifies when this script step is executed and there is an indicator match, execution of the
script will continue at script sequence number 999. The indicator specified on this record
may be same, or a different indicator than used by the prior script step. Execution of the
script will continue at the next script step when no indicator match occurs. No loop is
needed to use this extended logic record.
GOTO 999
Specifies an unconditional GOTO script sequence number. Execution of the script will
continue at script sequence number 999. No loop is needed to use this extended logic
record.
# NOTE
Loops may not be nested.
# NOTE
A GOTO must not specify the script sequence number of another X type extended
logic record.
# NOTE
Any indicator may be used on any of the extended logic records. Only when the
keyword INDICATOR is used will the indicator actually be used in any decision
process.

Sync Extended Script Logic Using Scripts
5 - 48 Gentran:Server for iSeries Communications Module Release 3.5 User Guide
The TELEBOX/400 network used by European customers calls for specific logic to be used during
a receive operation when receiving data files for processing. The following example outlines one
method for performing this receive operation. The actual keywords used on the control records
must adhere to the network specifications.
10 C __ ___________ 2 SEND THE SIGNON REC
SIGNON USERID PASSWORD RECEIVE
20 C __ ___________ 2 SEND REQUEST FOR FILENAME
RECEIVE_FILENAME
30 R __ ___________ 7 RECV FILENAME OR END CMD
END
40 X __ ___________ 0 GOTO SIGNOFF IF END RECVD
MATCH GOTO 80
50 C __ ___________ 2 SEND REQUEST FOR DATA
RECEIVE_FILE_DATA
60 R IQ ___________ 7 RECV DATA TO INQUE
70 X __ ___________ 0 GOTO TOP OF LOOP
GOTO 20
80 C __ ___________ 2 SEND THE SIGNOFF REC
SIGNOFF

Chapter
Gentran:Server for iSeries Communications Module Release 3.5 User Guide 6 - 1
6Bisync
Communications
Support
Introduction
The Communications Module supports binary synchronous communications (Bisync) as defined
by the IBM 2780 and 3780 component description. Strengths of bisync include:
Implemented on many platforms, very reliable
It is supported by the vast majority of communications networks
Ease of configuration
In addition to providing basic bisync file transfers, the Communications Module includes features
that provide additional capabilities and enable you to use a single line on your system to
communicate with multiple remote systems with different requirements. These features include:
Dynamic scripting, which allows the remote system to choose among sessions that you define,
without requiring significant sophistication from the remote system
Remote command support, which allows the remote system to direct the events in the session
according to its needs
Operation is supported using both leased and switched lines. Your system can be configured to dial
or answer, and use various types of autodialing.

Bisync Configuration Bisync Communications Support
6 - 2 Gentran:Server for iSeries Communications Module Release 3.5 User Guide
Bisync Configuration
Like the other communication protocols within the Communications Module, configuring for
bisync communications consists of two parts:
1. Create a communication profile.
2. Create a communication session control script.
)RECOMMENDATION
You may want to copy and customize one of the sample bisync scripts shipped with your
copy of Gentran:Server for iSeries Communications Module, rather than creating the profile
and script.
The specifics of creating profiles and scripts for bisync are discussed in the following sections.

Bisync Communications Support Bisync Configuration
Gentran:Server for iSeries Communications Module Release 3.5 User Guide 6 - 3
Create a Bisync (BSC) Profile
Figure 6.1 Set up a BSC Communication Profile
Complete the panels necessary to configure for BSC communications, as shown in Figure 6.1. For
information on any specific field, press F1 (Help) while the cursor is positioned in the field. (SEE
the “Using Communications” chapter for basic information on creating profiles.)
On EDIX401-FMT01, specify BSC as Protocol.
On EDIX401-FMT03, press F2 (More/Less).
EDIX401 Communication Profile EDI 04/30/08
FMT01 12:00:00
Comm Profile ID. . . . . . . . . . CN3BSC
Company. . . . . . . . . . . . . . COMMERCE:Network RELEASE 3
Contact. . . . . . . . . . . . . . NETWORK COMMUNICATIONS
Phone. . . . . . . . . . . . . . . ( 614 ) 793 - 7000 x
International Dial Code. . . . . .
Protocol . . . . . . . . . . . . . BSC
Days to Purge. . . . . . . . . . . 999
FIFO/LIFO. . . . . . . . . . . . . F
Update Allowed . . . . . . . . . . Y
EDIX401 Communication Profile EDI 04/30/08
FMT03 BSC 12:00:00
Comm Profile ID. . . . . . . . . . CN3BSC
Company. . . . . . . . . . . . . . COMMERCE:Network RELEASE 3
Modem Port . . . . . . . . . . . . LIN021
Dial . . . . . . . . . . . . . . . 1800627588312
EDIX401 Communication Profile EDI 04/30/08
FMT02 BSC 12:00:00
Comm Profile ID. . . . . CN3BSC
Company. . . . . . . . . COMMERCE:Network RELEASE3
Modem Port . . . . . . . LIN021 Retries. . . . . . . . 02
Switched Line. . . . . . Y (Y/N) Auto Dial. . . . . . . Y (Y/N)
Dial . . . . . . . . . . 18006275883
Host ID Verify . . . . . N (Y/N) Duplex . . . . . . . . *FULL
Local Site ID. . . . . .
Record Size. . . . . . . 0080 Block Size . . . . . . 0512
Inter-Record Separator . 3780
Transparency . . . . . . N (Y/N)
Blank Compress . . . . . N (Y/N)
Trailing Blank Trunc . . N (Y/N) Remote Cmd Password. . *NONE
F1=Help F2=More/Less F4=Prompt F10=Update F12=Cancel F24=More Keys

Bisync Configuration Bisync Communications Support
6 - 4 Gentran:Server for iSeries Communications Module Release 3.5 User Guide
On EDIX401-FMT02, complete the following fields:
Dial settings: Switched line, Auto-dial, Auto call unit, Auto call port, Phone number
Inter-record separator
A 4-position numeric field used to define the inter-record separator number of a character
used by the system to separate records.
Valid values are 3780, 2780, and NONE, where 3780 represents HEX 1E, and 2780
represents HEX 1F.
The selection of NONE for the Inter-Record Separator field on this panel affects on the way
the records are handled during a particular communication session. When this option is
selected, it will cause the record sizes to appear equal to the block size selected. When a
record size of 80 has been selected, but the inter-record separator is set to NONE the block
will be filled with as many full 80-byte records as can be placed into the block with no
record separators. It will appear as though the actual record size is much larger than 80.
When the records are placed into the block, one record is moved to the block, and the
remaining space is calculated. When there is not enough space to fit another full record
into the block, the end of the block will be marked and it will be transmitted.
When the block size is evenly divisible by the record size, the block size and the record
size will be the same. As an example, the record size is set to 80, the block size is set to
400, the inter-record separator is set to NONE – five 80-byte records will be placed into the
block (5 X 80=400), and with no record separators. The block will be transmitted as a
400-byte block containing one 400-byte record.
When the block size is not evenly divisible by the record size, the block size and the
record size will be equal to the number of whole records that will fit into the block size,
multiplied by the record size. As an example, the record size is set to 100, the block size is
set to 512, and the inter-record separator is set to NONE. Five 100-byte records will be
Dial Settings
Field Names Two-Port
Autodial
One-Port
Non-V.25bis
Autodial
Manual Dial
One-Port
V.25bis
Autodial
Auto
Answer
Switched Line Y Y Y Y Y
Auto Dial Y Y N Y N
Auto Call Unit Y N N V N
Auto Call Port Include an
entry
Leave blank Leave blank Leave blank Leave
blank
Phone Number Include an
entry
Include an
entry
Include an
entry
Include an
entry
Leave
blank

Bisync Communications Support Bisync Configuration
Gentran:Server for iSeries Communications Module Release 3.5 User Guide 6 - 5
placed into the block (5 X 100=500). No more full records will fit into the block, so the
end of the block is marked and the block is sent with both the record and the block size
equal to 500.
# NOTE
If Inter-Record Separator: 2780 (Hex 1F) is selected, only Transparency is valid.
# NOTE
The options for Blank compress, Transparency, and Trailing Blank Truncation are
mutually exclusive and only one of the options may be used at a time.
# NOTE
An option called the Global Inactivity Timer (for setting a global inactivity timer for BSC,
which operates like receive timer for SNA) is available by issuing the command SETTIMER.
The data is numeric, six positions in HHMMSS (Hours/Minutes/Seconds) format. Once the
timer is set, it is used by all BSC profiles. This may be changed at any time. The default time
is 5 minutes as shipped. The global receive timer is checked for all receive steps that do not
contain a receive timer value on the script record.
Once you have completed panel EDIX041-FMT02, press F10 (Update) to create the Profile using
the default line/controller/device names, or press Enter or F8 (Next) to advance to the
Line/Controller/Device panel (EDIX401-FMT20), which is shown in Figure 6.2, to specify your
own line/controller/device names.

Bisync Configuration Bisync Communications Support
6 - 6 Gentran:Server for iSeries Communications Module Release 3.5 User Guide
Figure 6.2 Line/Controller/Device panel (EDIX401-FMT20) shown during profile setup
You can accept the default names provided for the Line, Controller, Device, and Remote Location
name, or specify your own names for these fields. Once you have completed your entries, press
F10 (Update) to create the Profile.
EDIX401 Communication Profile EDI 04/30/08
FMT02 BSC 12:00:00
Comm Profile ID. . . . . CN3BSC
Company. . . . . . . . . COMMERCE:Network RELEASE3
Modem Port . . . . . . . LIN021 Retries. . . . . . . . 02
Switched Line. . . . . . Y (Y/N) Auto Dial. . . . . . . Y (Y/N)
Auto Call Unit . . . . . V Auto Call Port . . . .
Dial . . . . . . . . . . 18006275883
Host ID Verify . . . . . N (Y/N) Duplex . . . . . . . . *FULL
Local Site ID. . . . . .
Record Size. . . . . . . 0080 Block Size . . . . . . 0512
Inter-Record Separator . 3780
Transparency . . . . . . N (Y/N)
Blank Compress . . . . . N (Y/N)
Trailing Blank Trunc . . N (Y/N) Remote Cmd Password. . *NONE
EDIX401 Communication Profile EDI 04/30/08
FMT20 Lin/Ctl/Dev Options 12:00:00
Comm Profile ID. . . . . . . . . . CN3BSC
Company. . . . . . . . . . . . . . COMMERCE:Network RELEASE3
Create Line/Controller . . . . . . Y
Line Name. . . . . . . . . . . . . CN3BSCLN
Controller Name. . . . . . . . . . CN3BSCCT
Device Name. . . . . . . . . . . . CN3BSCDV
Remote Location. . . . . . . . . . CN3BSC
F1=Help F4=Prompt F5=Refresh F10=Update F12=Cancel F24=More Keys

Bisync Communications Support Bisync Configuration
Gentran:Server for iSeries Communications Module Release 3.5 User Guide 6 - 7
BSC Communication Session Control Scripts
After creating a BSC communication profile, you must provide an appropriate communication
session control script. The script will contain any commands necessary to prepare the remote
system for file transfer, as well as the steps that transfer the files. The exact contents of the script
will be determined by the remote system’s requirements and capabilities, and by the work that
must be accomplished by the script.
Create a BSC Script
BSC scripts are created and edited using the same facilities as the other communication types
within the Communications Module. (SEE the “Using Communications” chapter for basic
information on scripting.)
A BSC script is coded similarly to scripts for the other protocols supported by the
Communications Module. The following list contains all the valid transaction types that are
supported by BSC profiles.
# NOTE
The exact action performed by any script step is determined by the combination of
Transaction type, the File type, and the Indicator selected. (SEE the “BSC Tables” section
later in this chapter for detailed information on valid combinations.)
BSC Script Transactions
C – Control Record
Used to send the literal coded in the Command field to the remote system as an 80-byte
record image, followed by the action specified in the Indicator field. A typical use for this
transaction type would be sending a fixed signon record to the remote system, followed by
an ‘End-of-Transmission’ character (indicator 2).
R – Receive
Used to receive a file from the remote system to your system. By specifying a file type of
IQ, IM, IF, IA, or SP, you can direct the inbound data to the inbound queue, a
Trans Description Use
C Control Record Used to send a literal from the control data field to the
remote system.
R Receive Used to receive a file from the remote system to your
system
S Send Used to send a file from your system to the remote
system
D Data Trap Used to compare data received to the literal on the
control data field
X Extended Logic Used to execute an extended logic command

Bisync Configuration Bisync Communications Support
6 - 8 Gentran:Server for iSeries Communications Module Release 3.5 User Guide
user-provided file, append to a user-provided file, or write the data to a spool file. The
Receive will normally be terminated when the action specified by the Indicator field
occurs.
BSC Receive transactions may be combined with File options as follows:
R/IQ Receive to Gentran:Server inbound queue as a single batch.
R/IM Receive to Gentran:Server inbound queue, separating multiple batches.
R/ID Receive to Gentran:Server inbound queue or spool file based on device
selection codes.
R/IF Receive to inbound file provided by user.
R/IA Receive and append to inbound file provided by user.
R/SP Receive to spool file.
For R/IQ, all data received will be placed on the Gentran:Server inbound queue as a single
batch.
For R/IM, multiple files received will be placed on the Gentran:Server inbound queue.
Unlike R/IQ, which creates a singe inbound queue batch, R/IM indicates that each time a
logical file separator of ETX (end-of-text) is received, the current batch will be marked
received normal and closed, and a new inbound queue batch will be opened. R/IM will
create a single inbound queue batch only if the remote sends a single file, or does not
support the separating of logical files by use of the ETX character.
For R/ID, multiple files will be received and separated in the same fashion as in the R/IM
transaction above. In addition, by examining the device selection characters received
ahead of each file, all files preceded by a “punch” device selection code will be written to
the Gentran:Server inbound queue, and all files preceded by a “print” device selection
code will be written to a spool file.
For R/IF and R/IA, data will be received into the file named by the File Name field in the
Receive step of the script. This file must exist (be pre-allocated) on your iSeries before the
communication session is started, and must be accessible via the library list of the job used
to conduct the session.
For R/SP, all data will be received to a spool file. This file may contain carriage control
characters. These characters will be interpreted as described in the Print Control table at
the end of this section. If the remote system sends multiple logical files separated by the
ETX (end-of-text) character, each occurrence of the ETX character will close the current
spool file, and open a new spool for receiving, as with the R/IM transaction.

Bisync Communications Support Bisync Configuration
Gentran:Server for iSeries Communications Module Release 3.5 User Guide 6 - 9
When receiving data with any R transaction, the command line performs special functions,
depending on the Indicator specified.
When a non-zero Indicator is used, the first record received is compared against the
literal. When a match occurs, the Receive step will end with a “no data to be received”
condition, and execution will continue with the next script step. This is useful if the
remote system is capable of sending a message that indicates there is no data to send.
This option allows the “no data” message to be received without having it written to
an output file.
When a zero Indicator is used, all records received are compared against the literal.
When a match occurs, the Receive step will end , and execution will continue with the
next script step. This is useful if the remote system is sending an “end-of-data” record
that must be recognized . The “end-of-data’ record will be discarded.
S – Send
Used to send a file from your system to the remote system. By specifying File Type OQ,
OM, or OF, you can transmit data from the outbound queue or a user-provided file.
BSC Send transactions may be combined with File options as follows:
S/OQ Send from Gentran:Server outbound queue.
S/OM Send from Gentran:Server outbound queue, separating multiple batches.
S/OF Send from outbound file provided by user.
For S/OQ, all eligible data batches on the outbound queue will be transmitted to the remote
system as a single file, followed by the action specified in the Indicator field. When a
literal is entered in the Command line field, the literal will be sent to the remote system as
an 80-byte image if there are no eligible batches on the outbound queue to send. The literal
will be followed by the action specified by the Indicator field. If no literal is entered in the
Command line, then no data will be sent, no action will occur regardless of the Indicator,
and execution will continue with the next script step.
For S/OM, each eligible batch on the outbound queue will be transmitted to the remote
system followed by an ETX (end-of-text) character as a file separator. The final outbound
queue batch will be followed by the action specified in the Indicator field. If there are no
eligible batches to send from the outbound queue, a default message in the form of an
80-byte record will be sent to the remote system followed by the action specified in the
Indicator field. The format of the message is:
*** ERROR *** NO BATCHES FOR TRANSMISSION.
When a literal is entered in the Command line field, the literal will be sent as an 80-byte
record image to the remote system as a file “header” ahead of each batch sent from the
outbound queue.
For S/OF, the iSeries physical file named by the File Name field in the Send step of the
script will be transmitted to the remote system, followed by the action specified in the
Indicator field. This file must exist on your iSeries and must be accessible via the library
list of the job used to execute the communication session.

Bisync Configuration Bisync Communications Support
6 - 10 Gentran:Server for iSeries Communications Module Release 3.5 User Guide
D – Data Trap
Used to wait for the literal that is specified in the Command line field of the script step.
This can be useful in “trapping” prompts, messages, or commands from the remote
system. The data received using this transaction is discarded, and not written to an output
file. This transaction is also useful for ensuring a certain message is received as expected,
and if not, can abort the communications session depending upon the indicator used. Data
trap transactions/Indicator combinations are:
D with Indicator zero. This transaction will compare only the first record received
against the Command line literal. If a match occurs, the data trap ends, and execution
continues with the next script step. When the first record received does not match the
Command line literal, the session will end with a “no-match” error.
# NOTE
If the data trap completes with a successful match condition, and the data received is
followed by additional control characters or data, then the data trap must be followed
by another Receive type transaction to process the additional data.
D with Indicator other than zero. This transaction will compare all records received
against the Command line literal. If either a match, or the specified Indicator condition
occurs, the data trap ends and execution continues with the next script step. All
records received until the data trap ends are discarded. When a non-zero Indicator is
specified, the data trap may end with a “no-match” condition, but will not end the
session with an error.
# NOTE
If the data trap completes with a successful match condition, and the data received is
followed by additional control characters or data, then the data trap must be
followed by another Receive type transaction to process the additional data.
X – Extended Script Logic
Used to execute extended script logic commands. The following extended logic keywords
are valid for BSC communication scripts.
LOOP START
LOOP END
MATCH
INDICATOR
GOTO
SEE the “SYNC Extended Script Logic” section in the “Using Scripts” chapter for
detailed information on using Extended Script Logic commands.

Bisync Communications Support Bisync Configuration
Gentran:Server for iSeries Communications Module Release 3.5 User Guide 6 - 11
BSC Script Example
Figure 6.3 is an example of how a BSC script could be used to send and receive files.
Figure 6.3 Example BSC Session Control Script
The above session script example performs the following actions:
Sequence #10 – Send the signon literal as entered on the Command line to the remote
system as an 80-byte record, followed by an EOT (end-of-transmission) character.
Sequence #20 – DATA TRAP – Wait to receive the literal as entered in the Command
line. If the literal specified on the Command line is not the first record received, then
end the session with an error. Only continue to the next script step after the remote
signals the signon was successful.
Sequence #30 – Wait to receive the EOT (end-of-transmission) character that follows
the SIGNON SUCCESSFUL message. This script step will only be executed if the
Command line literal message was received during the Data Trap transaction in script
sequence #20 shown above. The Receive to Spool (R/SP) was used to perform this
function, but because only the EOT will be received – not “real” data – no data will be
written to a spool file.
# NOTE
The same result can be achieved by using a data trap transaction with any literal on
the command line. The command line literal would not matter, since no actual data
would be received, only the EOT character.
EDIX403 Communication Session Control EDI 04/30/08
CTL01 12:00:00
Comm Profile ID. . . . . . . . . . SAMPPROF
Session Name . . . . . . . . . . . SR
Company. . . . . . . . . . . . . . Sample profile
Type option, press Enter.
3=Copy Seq# 4=Delete 11=Extended Parms
Opt Seq No Tran File File Name Ind Description
__ _10 C __ __________ 2 Send the Signon record & EOT_______
/*SIGNON_USERID_PASSWORD________________________________________________
__ _20 D __ __________ 0 Data_Trap_Successful_msg_or_quit___
SIGNON SUCCESSFUL_______________________________________________________
__ _30 R SP 7 Get_EOT_following_SUCCESSFUL_msg___
________________________________________________________________________
__ _40 R IQ __________ 7 Receive EDI to Inque till EOT______
NO_DATA_TO_SEND_________________________________________________________
__ _50 S OQ __________ 2 Send_outbound_queue_data & EOT_____
NO_DATA_TO_SEND_________________________________________________________
__ _60 C __ __________ 2 Send the Signoff record & EOT______
/*SIGNOFF_______________________________________________________________
F1=Help F4=Prompt F9=Fold/Unfold F10=Update F12=Cancel F24=More Keys

Bisync Configuration Bisync Communications Support
6 - 12 Gentran:Server for iSeries Communications Module Release 3.5 User Guide
Sequence #40 – Receive EDI data from the remote system to the Gentran:Server
inbound queue until an EOT (end-of-transmission) character is received. If the remote
system has no EDI data to send, it will send the literal NO DATA TO SEND. If this
literal is the first record received, the Receive step will wait for the EOT character, post
a No data to be received from remote message to the communications
history file, and end. No data will be written to the Gentran:Server inbound queue if
the literal is received.
Sequence #50 – Send all eligible batches from the Gentran:Server outbound queue to
the remote system as a single file, and follow it with an EOT (end-of-transmission)
character. In the event there are no eligible batches to send from the outbound queue,
send the Command line literal NO DATA TO SEND as an 80-byte record, followed by
the EOT character.
Sequence #60 – Send the signoff literal as entered in the Command line to the remote
system as an 80-byte record, followed by the EOT (end-of-transmission) character.
Start a BSC Communication Session
After creating an appropriate communication profile and script, a BSC communication session can
be started by using option 30 from the EDIX400-FMT01 panel, the STRCOMSSN command, or the
job scheduler. (SEE the “Initiating Communication Sessions” section in the “Using
Communications” chapter for more information.)

Bisync Communications Support BSC Tables
Gentran:Server for iSeries Communications Module Release 3.5 User Guide 6 - 13
BSC Tables
This section contains the following tables:
Table 6.1: BSC Transaction Codes/Actions
Table 6.2: BSC Send Indicators
Table 6.3: BSC Receive Indicators
Table 6.1: BSC Transaction Codes/Actions
Tran
Codes Descriptions Actions Valid Indicators
CSend Control
Record
Send Literal from Command
Line.
0, 1, 2, 3
DReceive Control
Record
Attempt to match the
command line record with a
record received from the
remote system.
0, 6, 7, 8, 9
or 1 – 5
SSend Data OQ – Send from
Outbound Queue
OM – Send from
Outbound Queue as
Multiples
OF – Send from
Outbound File
0, 1, 2, 3
RReceive Data IQ – Receive data to
Inbound Queue
IM – Receive data to
Inbound Queue as
Multiples
IF – Receive data to
Inbound File
IA – Receive data and
append to an Inbound
File
SP – Receive data to
Spool Printer File
0, 6, 7, 8, 9
or 1 – 5
XSpecial Extended
Logic
Not used. Not used.

BSC Tables Bisync Communications Support
6 - 14 Gentran:Server for iSeries Communications Module Release 3.5 User Guide
Table 6.2: BSC Send Indicators
Desired Actions Definitions Indicators
Continue to next step in the
script
No termination character is
sent at end-of-file or at the
end of a control record.
0
Send End-of-Text character
at the end of the current
script step
An End-of-Text character
(ETX) is sent at end-of-file
or at the end of a control
record.
1
Send End-of-Transmission
character at end of the
current script step
An End-of-Transmission
character (EOT) is sent at
End-of-File or at the end of
a control record.
2
End transmission A remote disconnect
sequence (DLE/EOT) is
sent at end-of-file or at the
end of a control record.
3

Bisync Communications Support BSC Tables
Gentran:Server for iSeries Communications Module Release 3.5 User Guide 6 - 15
# NOTE
When using a Data-trap (D) command and a zero (0) indicator, the Command Line record
compares only the first record received. If a match occurs, the step completes. If the first
record received does not match, the data-trap fails, and the session aborts.
Table 6.3: BSC Receive Indicators
Desired Actions Definitions Indicators
Verify that the command
line literal matches the
incoming control record
No termination character is
expected at the end of the file.
Forced timer wait.
0
Indicate the end of the
receive using an ETX
An End-of-Text character
(ETX) is expected to indicate
the end of the file (receive
complete).
6
Indicate the end of the
receive using an EOT
An End-of-Transmission
character (EOT) is expected at
the end of the file (receive
complete).
7
End transmission A remote disconnect
sequence (DLE/EOT) is
expected at the end of the file
(receive complete).
8
Indicate the end of the
receive when the device
selection code changes
A change in device selection
codes (print to punch/punch to
print) indicates End-of-File
(receive complete).
9
Indicate the end of the
receive using multiple
EOTs. This is used to hold
the line open long enough
for the communication
partner to respond. (This is
normally used when
receiving data from a
Shared DASD JES host.)
Indicators 1 to 5 will specify
the number of times that 5
consecutive
End-of-Transmission
characters or physical data
must be received before the
receive step is complete (i.e.,
3 says that 15 EOTs or
physical data must be
received).
1 – 5

BSC Print Carriage Control Conversion Bisync Communications Support
6 - 16 Gentran:Server for iSeries Communications Module Release 3.5 User Guide
BSC Print Carriage Control Conversion
This section contains a table detailing Print Carriage Control conversions. The table is divided into
data received, conversion characters, and subsequent actions.
Received 3780 Print
Carriage Control
Converted to
Character (hex) Action Performed
ESC M (X'27D4') + (x'4E') Suppress space
ESC / (X'2761') (blank)(x'40') Space 1 line
ESC S (X'27E2') 0 (x'F0') Space 2 lines
ESC T (X'27E3') - (x'60') Space 3 lines
ESC A (X'27C1') 1 (x'F1') Skip to Channel 1
ESC B (X'27C2') 2 (x'F2') Skip to Channel 2
ESC C (X'27C3') 3 (x'F3') Skip to Channel 3
ESC D (X'27C4') 4 (x'F4') Skip to Channel 4
ESC E (X'27C5') 5 (x'F5') Skip to Channel 5
ESC F (X'27C6') 6 (x'F6') Skip to Channel 6
ESC G (X'27C7') 7 (x'F7') Skip to Channel 7
ESC H (X'27C8') 8 (x'F8') Skip to Channel 8
ESC I (X'27C9') 9 (x'F9') Skip to Channel 9
ESC J (X'27D1') A (x'C1') Skip to Channel 10
ESC K (X'27D2') B (x'C2') Skip to Channel 11
ESC L (X'27D3') C (x'C3') Skip to Channel 12

Bisync Communications Support Requirements Checklist
Gentran:Server for iSeries Communications Module Release 3.5 User Guide 6 - 17
Requirements Checklist
Obtain the following information from the BSC remote site communication person:
9______ Will host ID verification be required? ____
This is indicated in the Host ID Verify field of the Communication Profile panel
(EDIX401-FMT02).
9______ Will blank compression be required? ____
This is indicated in the Blank Compress field of the Communication Profile panel
(EDIX401-FMT02).
9______ Will transparency be required? ____
This is indicated in the Transparency field of the Communication Profile panel
(EDIX401-FMT02).
9______ What block size will be used? ____
This is indicated in the Block Size field of the Communication Profile panel
(EDIX401-FMT02).
9______ What record separation technique will be used? ________
(3780 uses hex 1E; 2780 uses hex 1F; or none. 3780 is the most common.) This is
indicated in the Inter-Record Separator field of the Communication Profile panel
(EDIX401-FMT02).

Requirements Checklist Bisync Communications Support
6 - 18 Gentran:Server for iSeries Communications Module Release 3.5 User Guide

Chapter
Gentran:Server for iSeries Communications Module Release 3.5 User Guide 7 - 1
7SNA Communications
Support
Introduction
The Communications Module supports SNA communications as a secondary logical unit type zero
(LU0) or type one (LU1). Strengths of SNA include:
Implemented on many platforms, very reliable
Supported by many communications networks
Extended multiple device type support
Concurrent sharing of a single communications line with other applications
Improved security
Transparent and non-transparent data transport in a single session
In addition to providing basic SNA file transfers, the Communications Module includes features
that provide additional capabilities and enable you to use a single line on your system to
communicate with multiple remote systems with different requirements. These features include:
Dynamic scripting, which allows the remote system to choose among sessions that you define,
without requiring significant sophistication from the remote system.
Remote command support, which allows the remote system to direct the events in the session
according to its needs.
Remote Program Start Request (RPSR) which is needed to allow a primary logical unit
(usually MVS) to start a connection to the iSeries when a leased line is being used. (SEE the
“Remote Program Start Request” section later in this chapter for detailed information).
# NOTE
RPSR is not needed when a switched line is in use.
Operation is supported using both leased and switched lines. Your system can be configured to dial
or answer and to use various types of autodialing.

SNA/LU0 Configuration SNA Communications Support
7 - 2 Gentran:Server for iSeries Communications Module Release 3.5 User Guide
SNA/LU0 Configuration
Protocol type SNA creates an LU1 configuration. Use this configuration when communicating
with MVS JES2/JES3, Connect:Mailbox, Connect:Tracs, and other mainframe applications.
Protocol type LU0 is specifically for communicating with the Advantis (formally IBM) network.
The differences between SNA (LU1) and LU0 configurations are minimal, but an LU0
configuration should ONLY be used when communicating the Advantis network.
Throughout this chapter, SNA and LU0 are presented as “SNA/LU0”, with no distinction between
the two configurations.
Like the other communication protocols within the Communications Module, configuring for
SNA/ LU0 communications consists of two parts:
1. Create a communication profile.
2. Create a communication session control script.
)RECOMMENDATION
You may want to copy and customize one of the sample SNA/LU0 scripts shipped with your
copy of Gentran:Server for iSeries Communications Module, rather than creating the profile
and script.
SEE the “Using Communications” chapter for basic information on creating profiles.
The specifics of creating profiles and scripts for SNA/LU0 are discussed in the following sections.
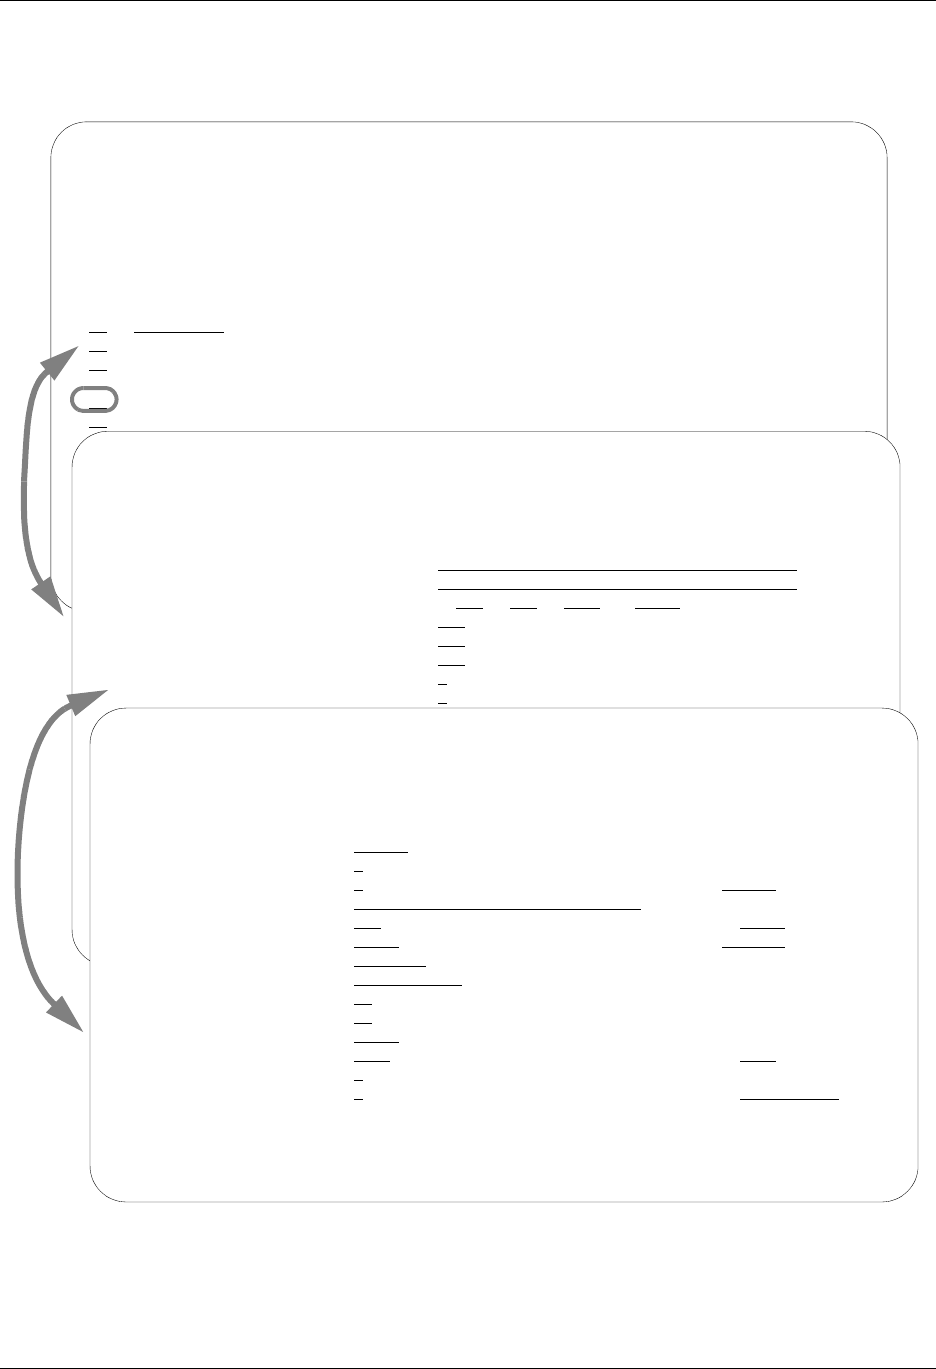
SNA Communications Support SNA/LU0 Configuration
Gentran:Server for iSeries Communications Module Release 3.5 User Guide 7 - 3
Creating an SNA/LU0 profile
Figure 7.1 SNA Communication Profile Panels
EDIX400 Work with Communications EDI 04/30/08
FMT01 pgmlib: G3X5PGM dtalib:G3X5DTA 12:00:00
Position to Profile ID . . . . . .
Type option (and Information), press Enter.
1=Create 2=Revise 3=Copy 4=Delete 5=View 11=Line/Ctl/Dev
Opt Profile ID Company
IBMLU0 IBM INFORMATION NETWORK SDLC
INSIRLXA XAS INTO INS IRELAND (EIRTRADE)
INSNET INTERNATIONAL NETWORK SERVICES BSC
2 JES2 Generic Manufacturing Headquarters
KLEIN KLEINSCHMIDT NETWORK
EDIX401 Communication Profile EDI 04/30/08
FMT01 12:00:00
Comm Profile ID. . . . . . . . . . JES2
Company. . . . . . . . . . . . . . Generic Manufacturing Headquarters
Contact. . . . . . . . . . . . . . Your Contact Person
Phone. . . . . . . . . . . . . . . ( 999 ) 123 - 4567 x
International Dial Code. . . . . .
Protocol . . . . . . . . . . . . . SNA
Days to Purge. . . . . . . . . . . 999
FIFO/LIFO. . . . . . . . . . . . . F
Update Allowed . . . . . . . . . . Y
EDIX401 Communication Profile EDI 04/30/08
FMT04 SNA 12:00:00
Comm Profile ID. . . . . JES2
Company. . . . . . . . . Generic Manufacturing Headquarters
Modem Port . . . . . . . LIN021 Retries. . . . . . . . 01
Switched Line. . . . . . Y (Y/N) Auto Dial. . . . . . . N
Auto Call Unit . . . . . N Auto Call Port . . . .
Dial . . . . . . . . . . 19166355555
Inactivity Timer . . . . 030 Duplex . . . . . . . . *FULL
Remote Network ID. . . . *NONE Remote Cntl Point. . .
Exchange Id. . . . . . . 05698703
SSCP Id. . . . . . . . . 05F0F0F9F9F8
Local Address. . . . . . 02
Station Address. . . . . C2
Application ID . . . . . JES2
Record Size. . . . . . . 0080 Max Ru Size. . . . . . 0256
Separate Files . . . . . N (Y/N)
Wrap Data Flag . . . . . Y (Y/N) Remote Cmd Password. . *NONE
F1=Help F2=More/Less F4=Prompt F10=Update F12=Cancel F24=More Keys

SNA/LU0 Configuration SNA Communications Support
7 - 4 Gentran:Server for iSeries Communications Module Release 3.5 User Guide
Complete the panels necessary to configure for SNA/LU0 communications, as shown in
Figure 7.1. For information on any specific field, press F1 (Help) while the cursor is positioned in
the field. (SEE the “Using Communications” chapter for basic information on creating profiles.)
On EDIX401-FMT01, specify SNA or LU0 as the Protocol.
On EDIX401-FMT05, press F2 (More/Less).
On EDIX401-FMT04, complete the following fields:
Dial settings: Switched line, Auto-dial, Auto call unit, Auto call port, Phone number
Exchange ID
SSCP ID
Remote Network ID
Remote Control Point Name
Application ID
Station Address
Local Address
All the preceding parameters, with the exception of Dial settings, are normally provided by the
MVS communications/systems programmer at the host location. (SEE the “Requirements
Checklist” at the end of this chapter, which is provided for your assistance.)
By default, the Communications Module automatically creates the iSeries line, controller, and
device descriptions needed, using default names. (SEE the “Using Communications” chapter for
information about running communications on an existing line and controller, or changing the
names.)
Dial Settings
Field Names Two-Port
Autodial
One-Port
Non-V.25bis
Autodial
Manual Dial
One-Port
V.25bis
Autodial
Auto
Answer
Switched Line YYYYY
Auto Dial YYNYN
Auto Call Unit YNNVN
Auto Call Port Include an
entry
Leave blank Leave blank Leave blank Leave
blank
Phone Number Include an
entry
Include an
entry
Include an
entry
Include an
entry
Leave
blank

SNA Communications Support SNA/LU0 Configuration
Gentran:Server for iSeries Communications Module Release 3.5 User Guide 7 - 5
SNA/LU0 Communication Session Control Scripts
After creating an SNA/LU0 communication profile, you must provide an appropriate
communication session control script. The script will contain any commands necessary to prepare
the remote system for file transfer, as well as the steps that transfer the files. The exact content of
the script will be determined by the remote system’s requirements and capabilities, and by the
work that must be accomplished by the script.
Create an SNA/LU0 Script
SNA/LU0 scripts are created and edited using the same facilities as the other communication types
within Gentran:Server for iSeries Communications Module. (SEE the “Using Communications”
chapter for basic information on scripting.)
An SNA/LU0 script is coded similarly to scripts for the other protocols supported by the
Communications Module. The following list contains all the valid transaction types supported by
SNA/LU0 profiles.
# NOTE
The exact action performed by any script step is determined by the combination of
Transaction type, File type, and Indicator selected. SEE the “SNA/LU0 Tables” section later
in this chapter for detailed information on valid combinations.
Trans Description Use
CControl Record Used to send a literal from the control data field to
the remote system
RReceive Used to receive a file from the remote system to your
system
SSend Used to send a file from your system to the remote
system
DData Trap Used to compare data received to the literal on the
control data field
XExtended Logic Used to execute an extended logic command

SNA/LU0 Configuration SNA Communications Support
7 - 6 Gentran:Server for iSeries Communications Module Release 3.5 User Guide
SNA/LU0 Script Transactions
C – Control Record
Used to send the literal coded in the Command field to the remote system as an 80-byte
record image, followed by the action specified in the Indicator field.
A typical use for this transaction type would be sending a fixed signon record to the
remote system followed by a “change-direction” indicator.
R – Receive
Used to receive a file from the remote system to your system. By specifying a file type of
IQ, IM, IF, IA, or SP, you can direct the inbound data to the inbound queue, a
user-provided file, append to a user-provided file, or write the data to a spool file. The
Receive will normally be terminated when the action specified by the Indicator field
occurs.
SNA/LU0 Receive transactions can be combined with File options as follows:
R/IQ Receive to Gentran:Server inbound queue as a single batch
R/IM Receive to Gentran:Server inbound queue, separate multiple batches
R/JR Receive to Gentran:Server inbound queue or spool file by recognizing
punch/print device selection codes
R/IF Receive to inbound file provided by user
R/IA Receive and append to inbound file provided by user
R/SP Receive to spool file
For R/IQ, all data received will be placed on the Gentran:Server inbound queue as a single
batch.
For R/IM, multiple files received will be placed on the Gentran:Server inbound queue.
Unlike R/IQ, which creates a single inbound queue batch, R/IM indicates each time a
logical file separator of “end-chain” is received, the current batch will be marked received
normal and closed, and a new inbound queue batch will be opened. R/IM will create a
single inbound queue batch only if the remote sends a single file or does not support the
separating of logical files by use of the “end-chain”.
For R/JR, multiple files will be received and separated in the same fashion as in the
preceding R/IM transaction. In addition, by examining the device selection characters
received ahead of each file, all files preceded by a “punch” device selection code will be
written to the Gentran:Server inbound queue, and all files preceded by a “print” device
selection code will be written to a spool file.
For R/IF and R/IA, data will be received into the file named by the File Name field in the
Receive step of the script. This file must exist (be pre-allocated) on your iSeries before the
communication session is started, and must be accessible via the library list of the job used
to conduct the session.

SNA Communications Support SNA/LU0 Configuration
Gentran:Server for iSeries Communications Module Release 3.5 User Guide 7 - 7
For R/SP, all data will be received to a spool file. This file may contain carriage control
characters. If the remote system sends multiple logical files separated by the “end-chain”
indicator, each occurrence of the “end-chain” indicator will close the current spool file and
open a new spool for receiving, as with the R/IM transaction.
When receiving data with any R transaction, the Command Line field has a special
function. When a literal is entered on the Command Line, the first record received is
compared against the literal. When a match occurs, the Receive step will end with a “no
data to be received” condition, and execution will continue with the next script step. This
is useful if the remote system is capable of sending a message that indicates it has no data
to send. This option allows the “no data” message to be received without having it written
to an output file.
S – Send
Used to send a file from your system to the remote system. By specifying File Type OQ,
OM, or OF, you can transmit data from the outbound queue or a user-provided file.
SNA/LU0 Send transactions may be combined with File options as follows:
S/OQ Send from Gentran:Server outbound queue
S/OM Send from Gentran:Server outbound queue, separating multiple batches
S/OF Send from outbound file provided by user
For S/OQ, all eligible data batches on the outbound queue will be transmitted to the remote
system as a single file, followed by the action specified in the Indicator field. When a
literal is entered in the Command Line field, the literal will be sent to the remote system
when there are no eligible batches on the outbound queue to send. The literal will be
followed by the action specified in the Indicator field. If no literal is entered on the
Command Line, then no data will be sent, no action will occur regardless of the Indicator,
and execution will continue with the next script step.
For S/OM, each eligible batch on the outbound queue will be transmitted to the remote
system followed by an “end-chain” indicator as a file separator. The final outbound queue
batch will be followed by the action specified in the Indicator field. If there are no eligible
batches to send from the outbound queue, a default message in the form of an 80-byte
record will be sent to the remote system, followed by the action specified in the Indicator
field. The format of the message is:
*** ERROR *** NO BATCHES FOR TRANSMISSION.
When a literal is entered in the Command Line field, the literal will be sent as an 80-byte
record image to the remote system as a file “header” ahead of each batch sent from the
outbound queue.
For S/OF, the iSeries physical file named by the File Name field in the Send step of the
script will be transmitted to the remote system, and followed by the action specified in the
Indicator field. This file must exist on your iSeries and must be accessible via the library
list of the job used to execute the communication session.

SNA/LU0 Configuration SNA Communications Support
7 - 8 Gentran:Server for iSeries Communications Module Release 3.5 User Guide
D – Data Trap
Used to wait for the literal that is specified in the Command Line field of the script step.
This can be useful in “trapping” prompts, messages, or commands from the remote
system. The data received using this transaction is discarded and not written to an output
file. This transaction is also useful for ensuring a certain message is received as expected,
and if not, can abort the communications session depending upon the indicator used. Data
trap transactions/ Indicator combinations are:
D with Indicator zero. This transaction will compare only the first record received
against the Command Line literal. If a match occurs, the data trap ends, and execution
continues with the next script step. When the first record received does not match the
Command Line literal, the session will ended with a “no-match” error.
# NOTE
If the data trap completes with a successful match condition and the data received is
followed by additional control characters or data, then the data trap must be followed
by another Receive type transaction to process the additional data.
D with Indicator other than zero. This transaction will compare all records received
against the Command Line literal. If either a match, or the specified indicator
condition occurs, the data trap ends and execution continues with the next script step.
All records received until the data trap ends are discarded. When a non-zero Indicator
is specified, the data trap may end with a “no-match” condition, but will not end the
session with an error.
# NOTE
If the data trap completes with a successful match condition and the data received is
followed by additional control characters or data, then the data trap must be followed
by another Receive type transaction to process the additional data.
X – Extended Script Logic
Used to execute extended script logic commands. The following extended logic keywords
are valid for SNA/LU0 communication scripts.
LOOP START
LOOP END
MATCH
INDICATOR
GOTO
SEE the “SYNC Extended Script Logic” section in the “Using Scripts” chapter for
detailed information on using Extended Script Logic commands.

SNA Communications Support SNA/LU0 Configuration
Gentran:Server for iSeries Communications Module Release 3.5 User Guide 7 - 9
SNA/LU0 Script Example
Figure 7.2 is an example of how an SNA/LU0 script could be used to send and receive files.
Figure 7.2 Example SNA/LU0 Session Control Script
The session script example in the preceding figure performs the following actions:
Sequence #10 – Send the signon literal as entered on the Command Line to the remote
system as an 80-byte record, followed by a “change-direction” indicator.
Sequence #20 – DATA TRAP, wait to receive the literal as entered on the Command
Line. If the literal specified on the Command Line is not the first record received, then
end the session with an error. Only continue to the next script step after the remote
system signals that the signon was successful.
Sequence #30 – Receive to spool until a “change-direction” indicator is received. This
transaction is used to receive no “real” data, but to receive the control characters that
follow the SIGNON SUCCESSFUL message in sequence #20 above. This script step
will only be executed if the Command Line literal message was received during the
Data Trap transaction in script sequence #20 shown above.
# NOTE
The same result can be achieved using a Data Trap transaction with any literal on the
Command Line. The Command Line literal would not matter, since no actual data
would be received, only the “change-direction” character.
EDIX403 Communication Session Control EDI 04/30/08
CTL01 12:00:00
Comm Profile ID. . . . . . . . . . SAMPPROF
Session Name . . . . . . . . . . . SR
Company. . . . . . . . . . . . . . Sample profile
Type option, press Enter.
3=Copy Seq# 4=Delete 11=Extended Parms
Opt Seq No Tran File File Name Ind Description
__ _10 C __ __________ 2 Send_the_Signon_record_&_Change-dir________
/*SIGNON_USERID_PASSWORD________________________________________________________
__ _20 D __ __________ 0 Data_Trap_Successful_msg_or_quit___________
SIGNON_SUCCESSFUL_______________________________________________________________
__ _30 R SP __________ 7 Receive Change-dir_following_successful_msg
________________________________________________________________________________
__ _40 R IQ __________ 7 Receive_EDI_to_Inque_till_Change-dir_______
NO_DATA_TO_SEND_________________________________________________________________
__ _50 S OQ __________ 2 Send_outbound_queue_data & Change-dir_____
NO_DATA_TO_SEND_________________________________________________________________
__ _60 C __ __________ 2 Send_the_Signoff_record_&_Change-dir_______
/*SIGNOFF_______________________________________________________________________
More...
F1=Help F4=Prompt F9=Fold/Unfold F10=Update F12=Cancel F24=More Keys

SNA/LU0 Configuration SNA Communications Support
7 - 10 Gentran:Server for iSeries Communications Module Release 3.5 User Guide
Sequence #40 – Receive EDI data from the remote system to the Gentran:Server
inbound queue until a “change-direction” indicator is received. If the remote system
has no EDI data to send, it will send the literal NO DATA TO SEND. If this literal is the
first record received, the Receive step will wait for the “change-direction” indicator,
post a No data to be received from remote message to the communications
history file, and end. No data will be written to the Gentran:Server inbound queue
when the literal is received.
Sequence #50 – Send all eligible batches from the Gentran:Server outbound queue to
the remote system as a single file and follow it with a “change-direction” indicator. If
there are no eligible batches to send from the outbound queue, send the Command
Line literal NO DATA TO SEND as an 80-byte record, followed by the
“change-direction” indicator.
Sequence #60 – Send the signoff literal as entered on the Command Line to the remote
system as an 80-byte record, followed by the “change-direction” indicator.
Start an SNA/LU0 Communication Session
After creating an appropriate communication profile and script, an SNA/LU0 communication
session can be started by using option 30 from the Work with Communications panel
(EDIX400-FMT01), the STRCOMSSN command, or the job scheduler. (SEE the “Initiating
Communication Sessions” section in the “Using Communications” chapter for more information.)

SNA Communications Support SNA/LU0 Tables
Gentran:Server for iSeries Communications Module Release 3.5 User Guide 7 - 11
SNA/LU0 Tables
This section contains the following tables:
Table 7.1: SNA/LU0 Transaction Codes/Actions
Table 7.2: SNA/LU0 Send Indicators
Table 7.3: SNA/LU0 Receive Indicators
Table 7.1: SNA/LU0 Transaction Codes/Actions
Tran
Codes Descriptions Actions Valid Indicators
CSend Control
Record
Send Literal from Command
Line.
0, 1, 2, 3
DReceive Control
Record
Attempt to match the
command line record with a
record received from the
remote system.
0, 5, 6, 7, 8
SSend Data OQ – Send from
Outbound Queue
OM – Send from
Outbound Queue as
Multiples
OF – Send from
Outbound File
0, 1, 2, 3
RReceive Data IQ – Receive data to
Inbound Queue
IM – Receive data to
Inbound Queue as
Multiples
IF – Receive data to
Inbound File
IA – Receive data and
append to an Inbound
File
SP – Receive data to
Spool Printer File
JR – JES Receive to
Spool and Inqueue
JQ – Receive all data to
Inqueue
0, 5, 6, 7, 8, 9

SNA/LU0 Tables SNA Communications Support
7 - 12 Gentran:Server for iSeries Communications Module Release 3.5 User Guide
Table 7.2: SNA/LU0 Send Indicators
Desired Actions Definitions Indicators
Send then continue to next
step in the script.
No termination character is
sent at end-of-file or at the
end of a control record.
0
Send
End-of-Chain character at
the end of the current script
step.
An End-of-Chain (EC)
indicator is sent at
End-of-File (EOF) or at the
end of a control record.
1
Send
End-of-Chain followed by a
change direction at
End-of-File or control
record.
An End-of-Chain (EC)
followed by a change
direction (CD) is sent at the
End-of-File (EOF) or control
record.
2
Send
End-of-Chain followed by
End Bracket at the end of
the current script step.
An End-of-Chain (EC)
followed by an End Bracket
(EB) is sent at End-of-File
(EOF) or at the end of a
control record.
3

SNA Communications Support SNA/LU0 Tables
Gentran:Server for iSeries Communications Module Release 3.5 User Guide 7 - 13
# NOTE
When using a Data-trap (D) command and a zero (0) indicator, the Command Line record
compares only the first record received. If a match occurs, the step completes. If the first
record received does not match, the data-trap fails, and the session aborts.
If the indicator is 6, 7, or 8 on a data-trap, then all records received are dropped until a match
occurs, or (6,7,8) End Chain, Change Direction, or End Bracket is received.
Table 7.3: SNA/LU0 Receive Indicators
Desired Actions Definitions Indicators
Verify that the command
line literal matches the
incoming control record.
No termination character is
expected at the end of the
file.
0
Receive until inactivity timer
expires, as specified in
Profile Maintenance panel
#2.
Receive all data into the
designated output file until
the inactivity timer expires,
with no data received for the
length of the timer.
5
Indicate the end of the
receive using an End-
of-Chain.
An End-of-Chain (EOC) is
expected to indicate the end
of the file (receive
complete).
6
Indicate the end of the
receive using a Change
Direction Indicator.
A Change Direction (CD) is
expected at the end of the
file (receive complete).
7
End transmission. An End Bracket (EB) is
expected at the End of File
(EOF) (receive complete).
8

Remote Program Start Request SNA Communications Support
7 - 14 Gentran:Server for iSeries Communications Module Release 3.5 User Guide
Remote Program Start Request
# NOTE
Remote Program Start Request (RPSR) is only needed when a leased line is in use.
The following section describes the Remote Program Start Request Feature.
Included in this section is a sample implementation of a session initiated by a host system (PLU)
with the Communications Module in a dedicated-line environment.
Configuration Information
Please note that the Remote Program Start Request, an extension of “Dynamic Scripting”
capability, is available for SNA LU1 only. It acts as a “wake-up call” to tell the Communications
Module that the host system wants to start a communication session. The “wake-up call” is needed
to overcome a basic shortcoming in iSeries communication support. The base function
communication support allows the iSeries to receive only a single file. It does not send any data to
the host when a program is started by a connection from the host. The host system initiates the
connection with the Communications Module and sends a single record with Profile ID and
session name. The ID and name adhere to the following format:
$$SCRIPT ID=XXXXXXXX SESSION=XX
Parameters are positional, and an ID of less than eight characters must be blank filled to achieve a
total length of eight characters.
Profile ID Information
Configure specific Profile ID information as follows:
The Profile IDs currently supported for this function are named RPSR01 through RPSR05
(Remote Program Start Request 1 – 5).
The Dial field (phone number) must contain the entry REMOTE as the first six characters and be
blank filled to the end.
Be certain that the information used in all fields on the Communication screens is correct.
Once information is entered, the system may require that you vary off the line and controller
before allowing any changes or updates.

SNA Communications Support Remote Program Start Request
Gentran:Server for iSeries Communications Module Release 3.5 User Guide 7 - 15
Subsystem Information
You must add a communication entry to the subsystem QCMN.
The QCMN subsystem must be ended prior to making the communication entry. This should
be coordinated with your system or operations manager.
The subsystem must contain an entry for each device used (RPSR01DV through RPSR05DV).
The entry specifies a user profile under which the jobs started by the remote system run. Be
certain the user profile specified contains the Gentran:Server libraries in its library list, and the
user profile has been defined within Environment Control, and is authorized to use the
Communications subsystem.
Enable the Remote Device
Once all configurations are complete, you enable the remote device to accept a connection from
the host system. The Start Remote Program Start Request (STRRPSR) command followed by F4
(Prompt) allows you to enable one or all devices by specifying the Profile ID name or *ALL.
Configure the Host System
The host system must have two VTAM LU definitions using unique addresses. These are
mandatory because the iSeries prevents a device used to receive a remote start request from
initiating a session from the iSeries to the host.
The first VTAM LU definition is reserved for connections started by the host (using the
address from the RPSRxx profile).
The second VTAM LU definition is reserved for connections started by Gentran:Server (using
the address specified by a Profile ID appearing in the Script Start record).
# NOTE
When the PLU is a Connect:Supertracs or Connect:Mailbox (SNA) mainframe product, the
remote used to initiate the connection to Gentran:Server is configured with the keyword
FMH=NO in the Remote section.

Remote Program Start Request SNA Communications Support
7 - 16 Gentran:Server for iSeries Communications Module Release 3.5 User Guide
Access the Communication Profile panel (EDIX401-FMT04)
To access the Communication Profile panel (EDIX401-FMT04), perform the following procedure:
1. From the Work with Communication panel (EDIX400-FMT01), type 2 in the Opt
(Option) field next to the RPSR01 Profile ID.
2. Press Enter to see the extended view of this panel. The Communication Profile panel
(EDIX401-FMT04), as shown in Figure 7.3, appears.
3. Press F12 (Cancel) to exit this panel.
Figure 7.3 Extended View of the Communication Profile panel (EDIX401-FMT04)
EDIX401 Communication Profile EDI 04/30/08
FMT04 SNA 12:00:00
Comm Profile ID. . . . . RPSR01
Company. . . . . . . . . REMOTE PGM START REQUEST 01 DEVICE
Modem Port . . . . . . . LIN061 Retries. . . . . . . . 00
Switched Line. . . . . . N (Y/N) Auto Dial. . . . . . . N
Auto Call Unit . . . . . N Auto Call Port . . . .
Dial . . . . . . . . . . REMOTE
Inactivity Timer . . . . 090 Duplex . . . . . . . . *FULL
Remote Network ID. . . . SSNET Remote Cntl Point. . . SSHOST
Exchange Id. . . . . . . 05628403
SSCP Id. . . . . . . . . 05F0F0F9F9F8
Local Address. . . . . . 21
Station Address. . . . . C1
Application ID . . . . . ORDERNET
Record Size. . . . . . . 0080 Max Ru Size. . . . . . 0256
Separate Files . . . . . Y (Y/N)
Wrap Data Flag . . . . . N (Y/N) Remote Cmd Password. . *NONE
F1=Help F2=More/Less F4=Prompt F10=Update F12=Cancel F24=More Keys

SNA Communications Support Remote Program Start Request
Gentran:Server for iSeries Communications Module Release 3.5 User Guide 7 - 17
Access the Add Communication Entry panel (ADDCMNE)
Use the Add Communication Entry panel (ADDCMNE) to add the communication entry to the
QCMN subsystem.
1. On any panel, type ADDCMNE on the command line. The Add Communication Entry panel
(ADDCMNE) appears as shown in Figure 7.4.
2. Press F12 (Cancel) to exit the panel.
Figure 7.4 Add Communications Entry (ADDCMNE)
Add Communications Entry (ADDCMNE)
Type choices, press Enter.
Subsystem description . . . . . Name
Library . . . . . . . . . . . *LIBL Name, *LIBL, *CURLIB
Device . . . . . . . . . . . . . Name, generic*, *ALL...
Remote location . . . . . . . . Name
Job description . . . . . . . . *USRPRF Name, *USRPRF, *SBSD
Library . . . . . . . . . . . Name, *LIBL, *CURLIB
Default user profile . . . . . . *NONE Name, *NONE, *SYS
Mode . . . . . . . . . . . . . . *ANY Name, *ANY
Maximum active jobs . . . . . . *NOMAX 0-1000, *NOMAX
Bottom
F3=Exit F4=Prompt F5=Refresh F12=Cancel F13=How to use this display
F24=More keys

Remote Program Start Request SNA Communications Support
7 - 18 Gentran:Server for iSeries Communications Module Release 3.5 User Guide
Gentran:Server Requirements for Host Initiated
Communication on a Dedicated Line to Connect:Supertracs
for MVS
The following section contains these requirements:
Running Gentran:Server through two lines to two other Gentran:Server for iSeries locations
Connect:Supertracs (SNA) Option Definition File Entries
Gentran:Server Requirements for two Dedicated Lines to two
iSeries Locations Running Gentran:Server
VTAM Definitions:
DAL PU ISTATUS=ACTIVE,MODETAB=MODETB...
LU001 LU LOCADDR=001,DLOGMOD=STC400
LU002 LU LOCADDR=002,DLOGMOD=STC400,USSTAB=DALLAS
HOU PU ISTATUS=ACTIVE,MODETAB=MODETB...
LU011 LU LOCADDR=011,DLOGMOD=STC400
LU012 LU LOCADDR=012,DLOGMOD=STC400,USSTAB=HOUSTON
DALLAS USSTAB
LOGON USSCMD CMD=LOGON,REP=LOGON,FORMAT=PL1
USSPARM PARM=APPLID,DEFAULT=SUPTRACS
USSPARM PARM=DATA,DEFAULT=DALLAS
USSMSG MSG=10,SUPP=ALWAYS
HOUSTON USSTAB
LOGON USSCMD CMD=LOGON,REP=LOGON,FORMAT=PL1
USSPARM PARM=APPLID,DEFAULT=SUPTRACS
USSPARM PARM=DATA,DEFAULT=HOUSTON
USSMSG MSG=10,SUPP=ALWAYS
STCS400 MODEENT LOGMODE=STC400,
FMPROF=X'03',TSPROF=X'03',
PRIROT=X'B1',SECROT=X'A3',COMPROT=X'7080',
RUSIZES=X'8585',
PSERVIC=X'0110200F100E00000010040'

SNA Communications Support Remote Program Start Request
Gentran:Server for iSeries Communications Module Release 3.5 User Guide 7 - 19
Connect:Supertracs (SNA) Option Definition File Entries
*OPTIONS
APPLID=SUPTRACS
CONSLOG=YES
LOG=YES
VTAM=YES
*CONNECT
LISTNAME=DALLAS
TYPE=LU1RJE
DISCINTV=30
DALCTL
LISTNAME=HOUSTON
TYPE=LU1RJE
DISCINTV=30
HOUSCTL
*REMOTES
NAME=DALCTL
TYPE=LU1RJE
LUNAME=LU001
CONSOLE=NO
COMPRESS=NO
MEDIA=PU
FMH=NO
NAME=DALLAS
TYPE=LU1RJE
LUNAME=LU002
CONSOLE=YES
COMPRESS=NO
MEDIA=CN
DISCINTV=60
BLKSIZE=256
NAME=HOUSCTL
TYPE=LU1RJE
LUNAME=LU011
CONSOLE=NO
COMPRESS=NO
MEDIA=PU
FMH=NO
NAME=HOUSTON
TYPE=LU1RJE
LUNAME=LU012
CONSOLE=YES
COMPRESS=NO
MEDIA=CN
DISCINTV=60
BLKSIZE=256

Remote Program Start Request SNA Communications Support
7 - 20 Gentran:Server for iSeries Communications Module Release 3.5 User Guide
Prepare Connect:Supertracs for MVS (SNA)
To prepare Connect:Supertracs for MVS (SNA) to send the required $$SCRIPT command to the
iSeries, execute the following steps:
1. Execute the STOUTL ADD utility to add the following record to the DALCTL Remote ID:
$$SCRIPT ID=XXXXXXXX SESSION=YY
2. Execute the STOUTL ADD utility to add the following record to the HOUSCTL Remote
ID:
$$SCRIPT ID=XXXXXXXX SESSION=YY
XXXXXXXX gives the name of the Gentran:Server for iSeries Comm Profile ID, and YY gives the
script name within the profile to execute.
Connect:Supertracs (SNA) will transmit these $$REQUEST cards to the two iSeries after the
$$CON command is issued, as described in the following example.
Example
The following example is for DALLAS.
# NOTE
The equivalent process would also be executed for the HOUSTON ISERIES, using the
command: F SUPTRACS,$$CON L=HOUSCTL
Connect:Supertracs (SNA) Gentran:Server for iSeries
1. Operator enters:
F SUPTRACS,$$CON L=DALCTL
2. Connect:Supertracs sends (VIA LU001):
$$SCRIPT ID=DAL4001 SESSION=SR
3. Receives script record and ends session.
Gentran:Server for iSeries starts a profile
named DAL4001 with script SR. The profile
will log on as DALLAS (VIA LU002). The
script (SR) should be constructed to send to
Connect:Supertracs a $$REQ ID=DALLAS
control record to instruct Connect:Supertracs
to return all batches in the DALLAS queue.
4. Connect:Supertracs receives the:
$$REQ ID=DALLAS
and sends all batches that were queued for:
ID=DALLAS

SNA Communications Support Connect:Mailbox/Supertracs
Gentran:Server for iSeries Communications Module Release 3.5 User Guide 7 - 21
Connect:Mailbox/Supertracs
Overview
This section is divided into three topics:
Connect:Mailbox/Supertracs (SNA)
Connect:Mailbox/Supertracs (SNA – Leased)
Connect:Mailbox/Supertracs (BSC)
These will assist you in setting up and using Mailbox/Supertracs.
Communicate with Connect:Mailbox/Supertracs (SNA)
For Gentran:Server for iSeries to communicate correctly with Connect:Mailbox/Supertracs (SNA)
on the mainframe using an SNA protocol, these definitions must be correct:
Host VTAM and NCP Definitions
Connect:Mailbox/Supertracs (SNA) Remote Definition on the Host
Requirements Checklist
9______ Ensure that Connect:Mailbox/Supertracs (SNA) Version 3 Release 01 or above is
installed on the mainframe. Lower versions result in a sense code 0801 and show
INVALID SESSION PARMS in a SNAP dump.
9______ FAX the Connect:Mailbox/Supertracs (SNA) to Gentran:Server Requirements
and the VTAM/NCP Definition Requirements to the host system programmer
responsible for Connect:Mailbox/Supertracs (SNA) implementation.
9______ Ensure that Gentran:Server is defined as a remote to Connect:Mailbox/Supertracs
(SNA) using Connect:Mailbox/Supertracs (SNA) to Gentran:Server
Requirements as a guideline and the VTAM/NCP Definition Requirements.
Obtain the following information from the mainframe systems programmer responsible for VTAM
definitions:
9______ The LU local address in hex is ____________.
This is used in the Local Address field of the Communication Profile panel
(EDIX401-FMT04). This field uniquely identifies the Gentran:Server session and
cannot be in use by any other iSeries communication product (like RJE).
9______ The Mainframe Exchange ID is ____________.
This is used in the Exchange ID field of the Communication Profile panel
(EDIX401-FMT04) only if a new communication line or a dial line is used. If an
existing leased communication line is used, put 05600000.

Connect:Mailbox/Supertracs SNA Communications Support
7 - 22 Gentran:Server for iSeries Communications Module Release 3.5 User Guide
9______ The Mainframe SSCP ID is ____________.
This is used in the SSCP ID field of the Communication Profile panel
(EDIX401-FMT04) only if a new communication line or a dial line is used. If an
existing leased communication line is used, put 050000000000.
9______ The Station address in hex is ____________.
This is used in the Station Address field of the Communication Profile panel
(EDIX401-FMT04).
9______ The maximum RU size is ____________.
This is used in the Max RU Size field of the Communication Profile panel
(EDIX401-FMT04). This value is either 256, 512, 1024, or 2048.
VTAM Mode Table Entry to Support a Gentran:Server Session with the Mainframe
The RUSIZE must be compatible with the BLKSIZE parameter in the
Connect:Mailbox/Supertracs (SNA) options definition:
RUSIZE BLKSIZE
8585 256
8686 512
8989 4096
STCS400 MODEENT LOGMODE=STCS400, *
FMPROF=X'03',TSPROF=X'03', *
PRIPROT=X'B1',SECPROT=X'A3',COMPROT=X'7080', *
RUSIZES=X'8585', *
PSERVIC=X'01102000F100E00000010040'
MODEEND

SNA Communications Support Connect:Mailbox/Supertracs
Gentran:Server for iSeries Communications Module Release 3.5 User Guide 7 - 23
VTAM USS Table Entry to Support a Gentran:Server Session with
Connect:Mailbox/Supertracs (SNA) on the Mainframe
Gentran:Server for iSeries sends the following logon command:
LOGON APPLID(applid)
applid is supplied within the OS/400 device description. Because logon data accompanies the
logon to Connect:Mailbox/Supertracs (SNA) on the mainframe, you must also create USS table
entry in VTAM. The following is a sample USS table entry to logon to
Connect:Mailbox/Supertracs (SNA) on the mainframe as remote name.
# NOTE
The “remote name” must match a valid Connect:Mailbox/Supertracs (SNA) remote name as
defined in the Connect:Mailbox/Supertracs (SNA) Option Definition File.
Sample NCP LU Definition
Add an LU definition for each concurrent session required with Gentran:Server.
Gentran:Server Remote Definition
Gentran:Server can be defined to Connect:Mailbox/Supertracs (SNA) as an SNA LU1RJE remote.
The following sample definition illustrates in bold-faced type those parameters that are mandatory
and constant for correct communication.
LOGON USSCMD CMD=LOGON,REP=LOGON,FORMAT=PL1
USSPARM PARM=APPLID,DEFAULT=SUPTRACS
USSPARM PARM=DATA,DEFAULT=remote name
USSMSG MSG=10,SUPP=ALWAYS
luname LU LOCADDR=localaddr, *
DLOGMOD=STCS400 *
USSTAB=usstable

Connect:Mailbox/Supertracs SNA Communications Support
7 - 24 Gentran:Server for iSeries Communications Module Release 3.5 User Guide
*OPTIONS
APPLID=SUPTRACS
VTAM=YES
.
.
.
.
**********************************************
** Define the remote
**********************************************
*REMOTE
.
.
NAME=rmtname1 Installation Defined Remote Name
CONSOLE=YES
COMPRESS=NO
MEDIA=CN
DISCINTV=60
BLKSIZE=256
.
.
.
**********************************************
** Sample connect
**********************************************
*CONNECT
.
.
LISTNAME=listname
TYPE=LU1RJE
ACSESS#=1
DISCINTV=30
RETRY=2
MAXRMT#=1
rmtname1 MEDIA=CN
.
.
.

SNA Communications Support Connect:Mailbox/Supertracs
Gentran:Server for iSeries Communications Module Release 3.5 User Guide 7 - 25
Communicate with Connect:Mailbox/Supertracs (SNA)
(Leased)
This section describes Gentran:Server and its requirements for communication with
Connect:Mailbox/Supertracs (SNA) over a leased line, VTAM, and NCP, including a sample
implementation of a session between Connect:Mailbox/Supertracs (SNA) and Gentran:Server.
Step-by-step instructions are provided in an easy to follow script.
Requirements Checklist
9______ Ensure that Connect:Mailbox/Supertracs (SNA) Version 3 Release 01 or above is
installed on the mainframe. Lower versions result in a sense code 0801 and shows
INVALID SESSION PARMS in a SNAP dump.
9______ FAX the Connect:Mailbox/Supertracs (SNA) to Gentran:Server Requirements
and the VTAM/NCP Definition Requirements to the host systems programmer
responsible for Connect:Mailbox/Supertracs (SNA) implementation.
9______ Ensure that Gentran:Server is defined as a remote to Connect:Mailbox/Supertracs
(SNA) using the Connect:Mailbox/Supertracs (SNA) to Gentran:Server
Requirements as a guideline and the VTAM/NCP Definition Requirements.
Obtain the following from the mainframe systems programmer responsible for VTAM definitions:
9 ______ The LU local address in hex is ____________.
This is used in the Gentran:Server Local Address field of the Communication
Profile panel (EDIX401-FMT04). This field uniquely identifies the
Gentran:Server session and cannot be in use by any other iSeries communication
product (like RJE).
9______ The Connect:Mailbox/Supertracs (SNA) application ID is ____________.
This is used in the Application ID field of the Communication Profile panel
EDIX401-FMT04.
9______ The Mainframe Exchange ID is ____________.
This is used in the Exchange ID field of the Communication Profile panel
(EDIX401-FMT04) only if a new communication line or a dial line is used. If an
existing leased communication line is used, put 05600000.
9______ The Mainframe SSCP ID is ____________.
This is used in the SSCP ID field of the Communication Profile panel
(EDIX401-FMT04) only if a new communication line or a dial line is used. If an
existing leased communication line is used, put 050000000000.
9______ The Station address in hex is ____________.
This is used in the Station Address field of the Communication Profile panel
(EDIX401-FMT04).
9______ The maximum RU size is ____________.
This is used in the Max RU Size field of the Communication Profile panel
(EDIX401-FMT04). This value is either 256, 512, 1024, or 2048.This value
should also match the BLKSIZE parameter in the Connect:Mailbox/Supertracs
(SNA) Options Definition.

Connect:Mailbox/Supertracs SNA Communications Support
7 - 26 Gentran:Server for iSeries Communications Module Release 3.5 User Guide
VTAM Mode Table Entry to Support a Gentran:Server Session with
Connect:Mailbox/Supertracs (SNA) on the Mainframe
The RUSIZE is compatible with the BLKSIZE parameter in the Connect:Mailbox/Supertracs
(SNA) options definition:
This example requires 512 byte BLKSIZE, thus a RUSIZE of 8686.
VTAM USS Table Entry to Support a Gentran:Server Session with
Connect:Mailbox/Supertracs (SNA) on the Mainframe
Gentran:Server for iSeries sends the following logon command:
applid is supplied within the OS/400 device description. Because logon data accompanies the
logon to Connect:Mailbox/Supertracs (SNA) on the mainframe, a USS table entry in VTAM is
created. The following is a sample USS table entry to logon to Connect:Mailbox/Supertracs (SNA)
on the mainframe as remote name.
The remote name matches a valid Connect:Mailbox/Supertracs (SNA) remote name as defined in
the Connect:Mailbox/Supertracs (SNA) Option Definition File.
RUSIZE BLKSIZE
8585 256
8686 512
8989 4096
STCS400 MODEENT LOGMODE=STCS400, *
FMPROF=X'03',TSPROF=X'03', *
PRIPROT=X'B1',SECPROT=X'A3',COMPROT=X'7080', *
RUSIZES=X'8686', *
PSERVIC=X'01102000F100E00000010040'
MODEEND
LOGON APPLID(applid)
LOGON USSCMD CMD=LOGON,REP=LOGON,FORMAT=PL1
USSPARM PARM=APPLID,DEFAULT=SUPTRACS
USSPARM PARM=DATA,DEFAULT=remote name
USSMSG MSG=10,SUPP=ALWAYS

SNA Communications Support Connect:Mailbox/Supertracs
Gentran:Server for iSeries Communications Module Release 3.5 User Guide 7 - 27
Sample NCP LU Definition
Add an LU definition for each concurrent session required with Gentran:Server.
Gentran:Server Remote Definition
Gentran:Server is defined to Connect:Mailbox/Supertracs (SNA) as an SNA LU1RJE remote.
luname LU LOCADDR=localaddr, *
DLOGMOD=STCS400, *
USSTAB=usstable
*OPTIONS
APPLID=SUPTRACS
VTAM=YES
.
.
.
.
********************************************************
** Define the remotes
********************************************************
*REMOTES
.
.
NAME=rmtname1 Installation Defined Remote Name
CONSOLE=YES
COMPRESS=NO
MEDIA=CN
DISCINTV=60
BLKSIZE=512
.
.
.
********************************************************
** Sample connect
********************************************************
*CONNECT
.
.
LISTNAME=listname
TYPE=LU1RJE
ACSESS#=1
DISCINTV=30
RETRY=2
MAXRMT#=1
rmtname1 MEDIA=CN
.
.
.

Connect:Mailbox/Supertracs SNA Communications Support
7 - 28 Gentran:Server for iSeries Communications Module Release 3.5 User Guide
Customize the Line/Controller/Device Settings
1. From the Work with Communications panel (EDIX400-FMT01), type 11 in the Option
field next to the SNDPO Profile ID. The Communication Line/Controller/Device panel
(EDIX819-FMT01) appears as shown in Figure 7.5.
In that description names are created by the system, you do not want a new line and
controller, since an existing leased line in place. However, you need to make some
changes on this screen before continuing.
Panel EDIX819-FMT01 shows the line, controller, and device description names that are
used. These are overridden, and for this test (because you are using an existing leased
line), you want to change three items before updating the definitions.
2. Change the Create Line/Controller field from Y to N.
3. Change the Line Name field to the name of the existing SNA line that you intend to use.
4. Change the Controller Name field name to the name of the existing controller that you
intend to use for Gentran:Server sessions.
5. Press F10 (Update) to update the definitions.
If for some reason, an error occurs, look at the job log to determine the specific
information or reasons. A common error, for example, might be creating a new device
description with a LOCADDR that is already in use by an existing device. The iSeries
does not allow duplicate LOCADDRs on a single controller.
Figure 7.5 Communication Line/Controller/Device panel (EDIX819-FMT01)
EDIX819 Communication Line/Control/Device EDI 04/30/08
FMT01 12:00:00
Comm Profile ID. . . . . . . . . . SNDPO
Company. . . . . . . . . . . . . . Send PO Data to Headquarters
Create Line/Controller . . . . . . Y
Line Name. . . . . . . . . . . . . SNDPOLN
Controller Name. . . . . . . . . . SNDPOCT
Device Name. . . . . . . . . . . . SNDPODV
Remote Location. . . . . . . . . . SNDPO
F1=Help F4=Prompt F5=Refresh F10=Update F12=Cancel F24=More Keys

SNA Communications Support Communicate with JES2 SNA
Gentran:Server for iSeries Communications Module Release 3.5 User Guide 7 - 29
Communicate with JES2 SNA
The following section describes JES2 communicating with Gentran:Server for iSeries when using
an SNA LU1 protocol.
Included in this section is a sample implementation of a session between JES2 SNA and
Gentran:Server. Step-by-step instructions are provided in an easy to follow script.
Requirements Checklist
9______ FAX the JES2 and the VTAM/NCP Definition Requirements to the host systems
programmer responsible for JES2 implementation.
9______ Ensure that Gentran:Server is defined as a remote to JES2 using the JES2
Definition Requirements guidelines and the VTAM/NCP Definition
Requirements.
Obtain the following information from the mainframe systems programmer responsible for VTAM
definitions:
9______ The LU local address in hex is ____________.
This is used in the Local Address field of the Communication Profile panel
(EDIX401-FMT04). This field uniquely identifies the Gentran:Server session and
cannot be in use by any other iSeries communication product (like RJE).
9______ The JES2 application ID is ____________.
This is used in the Application ID field of the Communication Profile panel
(EDIX401-FMT04).
9______ The Mainframe Exchange ID is ____________.
This is used in the Exchange ID field of the Communication Profile panel
(EDIX401-FMT04) only if a new communication line or a dial line is used. If an
existing leased communication line is used, put 05600000.
9______ The Mainframe SSCP ID is ____________.
This is used in the SSCP ID field of the Communication Profile panel
(EDIX401-FMT04) only if a new communication line or a dial line is used. If an
existing leased communication line is used, put 050000000000.
9______ The Station address in hex is ____________.
This is used in the Station Address field of the Communication Profile panel
(EDIX401-FMT04).
9______ Maximum RU size ____________.
This is used in the Max RU Size field of the Communication Profile panel
(EDIX401-FMT04). This value is either 256, 512, 1024, or 2048.

Communicate with JES2 SNA SNA Communications Support
7 - 30 Gentran:Server for iSeries Communications Module Release 3.5 User Guide
VTAM/NCP Definition Requirements
The following section contains information pertaining to VTAM mode table entry, VTAM USS
table entry, NCP LU definition, and JES2 definition requirements.
VTAM Mode Table Entry
VTAM USS Table Entry
The Gentran:Server product sends the following logon command:
LOGON APPLID(applid)
applid is supplied within the Gentran:Server profile description. Because logon data accompanies
the logon to JES2 on the mainframe, a USS table entry in VTAM is created. The following is the
required USS table entry to logon to JES2 on the mainframe as remote name:
The remote name MUST match a valid JES2 remote name as defined in the JES2 start-up
parameters.
STCS400 MODEENT LOGMODE=STCS400, *
FMPROF=X'03',TSPROF=X'03', *
PRIPROT=X'B1', *
SECPROT=X'A3', *
COMPROT=X'7080', *
RUSIZES=X'8585', *
PSERVIC=X'01102000F100E00000010040'
MODEEND
LOGON USSCMD CMD=LOGON,REP=LOGON,FORMAT=PL1
USSPARM PARM=APPLID,DEFAULT=JES2
USSPARM PARM=DATA,DEFAULT=remote name
USSMSG MSG=10,SUPP=ALWAYS

SNA Communications Support Communicate with JES2 SNA
Gentran:Server for iSeries Communications Module Release 3.5 User Guide 7 - 31
NCP LU Definition
Add an LU definition for each concurrent session required with Gentran:Server.
JES2 Definition Requirements
For Gentran:Server to communicate correctly with JES2 on the mainframe using an SNA
LU0/LU1 protocol, the remote definition must be correct.
Gentran:Server is defined to JES2 as an “SNA RJE remote”. In the following sample definition,
those parameters that are mandatory and constant for correct communication are shown in
bold-faced type. Those values not in bold are recommended but not required. The value nnnn
represents the installation defined remote number.
luname LU LOCADDR=localaddr, *
DLOGMOD=STCS400, *
USSTAB=usstable
******************************************************
* Remote definition for Gentran:Server
******************************************************
RMTnnnn LUTYPE1,
NOCMPCT,
NOCOMP,
NOCON,
SETUPMSG,
SETUPINF,
NUMRD=1,
NUMPU=1,
NUMPR=1,
BUFSIZE=256,
DISCINTV=64
Rnnnn.PR1 NOSEP,NOSUSPND,
PRWIDTH=133,
WS=(W,R,Q,PMD,LIM,F/P)
Rnnnn.RD1 CLASS=job class
Rnnnn.PU1 NOSEP,NOSUSPND

Communicate with JES2 SNA SNA Communications Support
7 - 32 Gentran:Server for iSeries Communications Module Release 3.5 User Guide
Gentran:Server Profile Sample
When defining a Profile ID for JES2 SNA within Gentran:Server, use the following procedure to
create a manual dial-up definition.
1. From the Work with Communication panel (EDIX400-FMT01), type 2 in the Option field
next to the JES2 Profile ID and press Enter.
2. When the panel EDIX401-FMT01 appears, press Enter. The basic view, panel
EDIX401-FMT05 or extended view, panel EDIX401-FMT04 of the Communication
Profile panel appears.
3. Press F2 (More/Less) to see the extended view of panel EDIX401-FMT04 as shown in
Figure 7.6.
Figure 7.6 Extended View of Communication Profile panel (EDIX401-FMT04)
EDIX401 Communication Profile EDI 04/30/08
FMT04 SNA 12:00:00
Comm Profile ID. . . . . JES2
Company. . . . . . . . . Generic Manufacturing Headquarters
Modem Port . . . . . . . LIN021 Retries. . . . . . . . 01
Switched Line. . . . . . Y (Y/N) Auto Dial. . . . . . . N
Auto Call Unit . . . . . N Auto Call Port . . . .
Dial . . . . . . . . . . 19166355555
Inactivity Timer . . . . 030 Duplex . . . . . . . . *FULL
Remote Network ID. . . . *NONE Remote Cntl Point. . .
Exchange Id. . . . . . . 05698703
SSCP Id. . . . . . . . . 05F0F0F9F9F8
Local Address. . . . . . 02
Station Address. . . . . C2
Application ID . . . . . JES2
Record Size. . . . . . . 0080 Max Ru Size. . . . . . 0256
Separate Files . . . . . N (Y/N)
Wrap Data Flag . . . . . Y (Y/N) Remote Cmd Password. . *NONE
F1=Help F2=More/Less F4=Prompt F10=Update F12=Cancel F24=More Keys

SNA Communications Support Communicate with JES2 SNA
Gentran:Server for iSeries Communications Module Release 3.5 User Guide 7 - 33
Gentran:Server Script Sample
When defining a communication session control script for JES2 SNA within Gentran:Server, use
the following procedures to create a basic script as outlined in Examples 1, 2, and 3.
Example 1
This first example shows how to receive an unknown number of files and separate print and punch
data. Punch data is placed on the Inbound Queue and print data is sent to the spool.
To access the Communication Session Control panel (EDIX403-CTL01), execute the following
steps:
1. On the Work with Communication panel (EDIX400-FMT01), type 12 in the Option field
next to the JES2 Profile ID and press Enter. The Work with Communication Session
panel (EDIX402-FMT01) panel appears.
2. On panel EDIX402-FMT01, type 2 in the Option field next to RA and press Enter. The
Communication Session Control panel (EDIX403-CTL01) appears as shown in
Figure 7.7.
Figure 7.7 Communication Session Control panel (EDIX403-CTL01)
EDIX403 Communication Session Control EDI 04/30/08
CTL01 12:00:00
Comm Profile ID. . . . . . . . . . JES2
Session Name . . . . . . . . . . . RA
Company. . . . . . . . . . . . . . Generic Manufacturing Headquarters
Type option, press Enter.
3=Copy Seq# 4=Delete 11=Extended Parms
Opt Seq No Tran File File Name Ind Description
10 C JR 2 SEND JES SIGNON RECORD
/*SIGNON RMTXXXX PASSWRD
50 R JR 8 RECV DATA TO SPOOL/INQUE
60 C 2 SEND JES2 SIGNOFF RECORD
/*SIGNOFF
More...
F1=Help F4=Prompt F9=Fold/Unfold F10=Update F12=Cancel F24=More Keys

Communicate with JES2 SNA SNA Communications Support
7 - 34 Gentran:Server for iSeries Communications Module Release 3.5 User Guide
Example 2
This example shows how to send data from the Outbound Queue along with the JCL necessary to
process data on the host.
To access the Communication Session Control panel (EDIX403-CTL01), execute the following
steps:
1. On the Work with Communication panel (EDIX400-FMT01), type 12 in the Option field
next to the JES2 Profile ID. The Work with Communication Session panel
(EDIX402-FMT01) appears.
2. On panel EDIX402-FMT01, type 2 in the Option field next to SO. The Communication
Session Control panel (EDIX403-CTL01) appears as shown in Figure 7.8.
Figure 7.8 Communication Session Control panel (EDIX403-CTL01)
EDIX403 Communication Session Control EDI 04/30/08
CTL01 12:00:00
Comm Profile ID. . . . . . . . . . JES2
Session Name . . . . . . . . . . . SO
Company. . . . . . . . . . . . . . Generic Manufacturing Headquarters
Type option, press Enter.
3=Copy Seq# 4=Delete 11=Extended Parms
Opt Seq No Tran File File Name Ind Description
10 C 2 SEND JES2 SIGNON RECORD
/*SIGNON RMTXXXX PASSWRD
20 S OF JES2JCL 0 SEND JCL TO RUN JOB FROM QUEUE
30 S OQ 0 SEND DATA FROM OUTQUEUE
40 C 1 SEND ENDING JCL REC
//
60 C 2 SEND JES2 SIGNOFF RECORD
/*SIGNOFF
More...
F1=Help F4=Prompt F9=Fold/Unfold F10=Update F12=Cancel F24=More Keys

SNA Communications Support Communicate with JES2 SNA
Gentran:Server for iSeries Communications Module Release 3.5 User Guide 7 - 35
Example 3
This third example shows how to combine send and receive steps, in cases where a sequence of
receive and send activity is known.
To access the Communication Session Control panel (EDIX403-CTL01), execute the following
steps:
1. On the Work with Communication panel (EDIX400-FMT01), type 12 in the Option field
next to the JES2 Profile ID. The Work with Communication Session panel
(EDIX402-FMT01) panel appears.
2. On panel EDIX402-FMT01, type 2 in the Option field next to SR. The Communication
Session Control panel (EDIX403-CTL01) appears as shown in Figure 7.9.
3. Press F9 (Fold/Unfold) to view more information.
Figure 7.9 Communication Session Control panel (EDIX403-CTL01)
EDIX403 Communication Session Control EDI 04/30/08
CTL01 12:00:00
Comm Profile ID. . . . . . . . . . JES2
Session Name . . . . . . . . . . . SR
Company. . . . . . . . . . . . . . Generic Manufacturing Headquarters
Type option, press Enter.
3=Copy Seq# 4=Delete 11=Extended Parms
Opt Seq No Tran File File Name Ind Description
10 C 2 SEND JES2 SIGNON RECORD
/*SIGNON RMTXXXX PASSWRD
20 S OF JES2JCL 0 SEND JCL TO RUN JOB FROM FILE
30 S OQ 0 SEND DATA FROM OUTQUE
40 C 2 SEND ENDING JCL REC
//
50 R JR 8 RECV DATA TO SPOOL/INQUE
More...
F1=Help F4=Prompt F9=Fold/Unfold F10=Update F12=Cancel F24=More Keys

Communicate with JES2 SNA SNA Communications Support
7 - 36 Gentran:Server for iSeries Communications Module Release 3.5 User Guide

Chapter
Gentran:Server for iSeries Communications Module Release 3.5 User Guide 8 - 1
8SNA LU6.2
Communications
Support
# NOTE
This feature is an optional add-on product that may be purchased separately.
Introduction
The Communications Module supports SNA LU6.2 APPC communications. Strengths of SNA
LU6.2 include:
Implemented on many platforms, very stable
Concurrent sharing of a single communications line with other applications
Improved security
Transparent and non-transparent data transport in a single session
Ability to start jobs on a remote system
In addition to providing basic LU6.2 file transfers, the Communications Module includes features
that provide additional capabilities and allow you to use a single line on your system to
communicate with multiple remote systems. These features include:
Dynamic scripting is not supported in L62/X62. However, the Evoke function described later
in this chapter enables the local system to start communications on the remote system and
specify which script will be used by the remote system.
Remote command support, which allows the remote system to direct the events in the session
according to its needs
Operation is supported using both leased and switched lines. Your system can be configured to dial
or answer, and use various types of autodialing.
The current L62/X62 Profile types are used for communicating between two iSeries that are both
using Gentran:Server. While it is possible that an L62/X62 configuration might communicate with
another product or machine type, it is neither implied nor expressed that this is supported.

LU6.2 Configuration SNA LU6.2 Communications Support
8 - 2 Gentran:Server for iSeries Communications Module Release 3.5 User Guide
LU6.2 Configuration
Like the other communication protocols within Gentran:Server, configuring for LU6.2
communications consists of two parts:
1. Create a communication profile.
2. Create a communication session control script.
)RECOMMENDATION
It may be easier to copy and customize one of the sample LU6.2 scripts shipped with your
copy of Gentran:Server for iSeries Communications Module, rather than creating the profile
and script.
# NOTE
SEE the “Using Communications” chapter for basic information on creating profiles.
The specifics of creating profiles and scripts for LU6.2 are discussed in the following sections.
Create an L62/X62 profile
The L62/X62 type configurations both use the same programs. The difference between the two is
that L62 uses an SDLC line configuration, while X62 uses an X.25 line configuration. With the
exception of some configuration parameters, the two profile types require the same setup. The
remainder of this document will show no distinction between the two.

SNA LU6.2 Communications Support LU6.2 Configuration
Gentran:Server for iSeries Communications Module Release 3.5 User Guide 8 - 3
Figure 8.1 LU62 Communication Profile Panels
EDIX401 Communication Profile EDI 04/30/08
FMT01 12:00:00
Comm Profile ID. . . . . . . . . . LOCLDL
Company. . . . . . . . . . . . . . Local Leased Line/Dial/SDLC/APPC
Contact. . . . . . . . . . . . . . Test Contact
Phone. . . . . . . . . . . . . . . ( 614 ) 555 - 1212 x
International Dial Code. . . . . .
Protocol . . . . . . . . . . . . . L62
Days to Purge. . . . . . . . . . . 999
FIFO/LIFO. . . . . . . . . . . . . F
Used Most Frequently . . . . . . . N
Update Allowed . . . . . . . . . . Y
EDIX401 Communication Profile EDI 04/30/08
FMT08 L62 12:00:00
Comm Profile ID. . . . . LOCLDL
Company. . . . . . . . . Local Leased Line/Dial/SDLC/APPC
Modem Port . . . . . . . LIN072 Retries. . . . . . . . 02
Switched Line. . . . . . N (Y/N) Auto Dial. . . . . . . N (Y/N)
Auto Call Unit . . . . . N Auto Call Port . . . .
Dial . . . . . . . . . .
Inactivity Timer . . . . 300
Local Exchange ID. . . . 05601232 Remote Exchange ID . . 05601231
Local Location Name. . . LOCLDL Remote Location Name . RMTLAL
Remote Network ID. . . . *NONE Remote Cntl Point. . .
Mode Name. . . . . . . . *NETATR
Station Address. . . . . 01
Wrap Data Flag . . . . . Y (Y/N) Remote Cmd Password. .
Record Size. . . . . . . 0080 Max Ru Size. . . . . . 1024
F1=Help F4=Prompt F5=Refresh F10=Update F12=Cancel F24=More Keys
Enter ‘L62’ to go to L62 setup panel
or enter ‘X62’ to go to X62 setup panel
EDIX401 Communication Profile EDI 04/30/08
FMT09 X62 12:00:00
Comm Profile ID. . . . LOCLDL
Company. . . . . . . . Local Leased Line/Dial/SDLC/APPC
Modem Port . . . . . . Lgl Channel Type . . . *SVCBOTH
Switched Line. . . . . N (Y/N) Lgl Channel ID . . . . 001
Inactivity Timer . . . 300 Mode Name. . . . . . . *NETATR
Session Initiator. . . *DIAL X25 Password . . . . .
Net Connection Init. . *LOCAL Reverse Charge . . . . *NONE
Remote Net Addr. . . . DCE Support. . . . . . N (Y/N)
Local Net Addr . . . . Record Size. . . . . . 0080
Local Exchange ID. . . Max Ru Size. . . . . . 1024
Remote Exchange ID . . Modulus. . . . . . . . 8
Local Location . . . . Window Size. . . . . . 02
Remote Location. . . . LOCLDL Packet Size. . . . . . 0128
Remote Network ID. . . *NONE Wrap Data Flag . . . . Y (Y/N)
Remote Cntl Point. . . Remote Cmd Password. . *NONE
F1=Help F4=Prompt F5=Refresh F10=Update F12=Cancel F24=More Keys

LU6.2 Configuration SNA LU6.2 Communications Support
8 - 4 Gentran:Server for iSeries Communications Module Release 3.5 User Guide
Complete the panels necessary to configure for L62/X62 communications, as shown in Figure 8.1.
For information on any specific field, press F1 (Help) while the cursor is positioned in the field.
(SEE the “Using Communications” chapter for basic information on creating profiles.)
On EDXI401-FMT01, specify L62 or X62 as the Protocol.
For L62, on EDXI401-FMT08, complete the following fields:
Dial settings: Switched line, Auto-dial, Auto call unit, Auto call port, Phone number
Local and Remote Exchange ID
Local and Remote Location Names
Mode Name
Station Address
Dial Settings
Field Names Two-Port
Autodial
One-Port
Non-V.25bis
Autodial
Manual Dial
One-Port
V.25bis
Autodial
Auto
Answer
Switched Line YYYYY
Auto Dial YYNYN
Auto Call Unit YNNVN
Auto Call Port Include an
entry
Leave blank Leave blank Leave blank Leave
blank
Phone Number Include an
entry
Include an
entry
Include an
entry
Include an
entry
Leave
blank

SNA LU6.2 Communications Support LU6.2 Configuration
Gentran:Server for iSeries Communications Module Release 3.5 User Guide 8 - 5
For X62, complete the following fields on EDXI401-FMT09:
Dial settings: Switched line, Auto-dial, Auto call unit, Auto call port, Phone number
Session Initiator
Network Connection Initiation
Window Size
Packet Size
Local Network Address
Remote Network Address
Local and Remote Exchange ID
Mode Name
By default, the Communications Module automatically creates the iSeries line, controller, and
device descriptions needed using default names. (SEE the “Using Communications” chapter for
information about using communications on an existing line and controller, or changing the line,
controller, and device names.)
Dial Settings
Field Names Two-Port
Autodial
One-Port
Non-V.25bis
Autodial
Manual Dial
One-Port
V.25bis
Autodial
Auto
Answer
Switched Line YYYYY
Auto Dial YYNYN
Auto Call Unit YNNVN
Auto Call Port Include an
entry
Leave blank Leave blank Leave blank Leave
blank
Phone Number Include an
entry
Include an
entry
Include an
entry
Include an
entry
Leave
blank

LU6.2 Configuration SNA LU6.2 Communications Support
8 - 6 Gentran:Server for iSeries Communications Module Release 3.5 User Guide
L62/X62 Communication Session Control Scripts
After creating an L62/X62 communication profile, you must provide an appropriate
communication session control script. The script will contain any commands necessary to prepare
the remote system for file transfer, as well as the steps that transfer the files. The exact contents of
the script will be determined by the remote system’s requirements and capabilities, and by what
you want accomplished using the script.
Create an L62/X62 Script
L62/X62 scripts are created and edited using the same facilities as the other communication types
within Gentran:Server for iSeries Communications Module. (SEE the “Using Communications”
chapter for basic information about creating scripts.)
An L62/X62 script is coded similarly to scripts for the other protocols supported by the
Communications Module. The following list contains all the valid transaction types that are
supported by an L62/X62 profile.
# NOTE
The exact action performed by any script step is determined by the combination of
Transaction type, File type, and Indicator selected. (SEE the “L62/X62 Tables” section later
in this chapter for detailed information on valid combinations.)
Trans Description Use
C Control Record Used to send a literal from the control data field to the remote
system.
R Receive Used to receive a file from the remote system to your system
S Send Used to send a file from your system to the remote system
D Data Trap Used to compare data received to the literal on the control data
field
X Extended Logic Used to execute an extended logic command
E Evoke Record Used to send the Evoke command and parameters to the remote
system

SNA LU6.2 Communications Support LU6.2 Configuration
Gentran:Server for iSeries Communications Module Release 3.5 User Guide 8 - 7
L62/X62 Script Transactions
C – Control Record
Used to send the literal coded in the Command field to the remote system as an 80-byte
record image, followed by the action specified in the Indicator field.
A typical use for this transaction type would be to send a fixed signon record to the remote
system, followed by a “change-direction” character.
R – Receive
Used to receive a file from the remote system to your system. By specifying a file type of
IQ, IM, IF, IA, or SP, you can direct the inbound data to the inbound queue, a
user-provided file, append to a user-provided file, or write the data to a spool file. The
Receive will normally be terminated when the action specified by the Indicator field
occurs.
L62/X62 Receive transactions may be combined with File options as follows:
R/IQ Receive to Gentran:Server inbound queue as a single batch
R/IM Receive to Gentran:Server inbound queue, separate multiple batches
R/IF Receive to inbound file provided by user
R/IA Receive and append to inbound file provided by user
R/SP Receive to spool file
For R/IQ, all data received will be placed on the Gentran:Server inbound queue as a single
batch.
For R/IM, multiple files received will be placed on the Gentran:Server inbound queue.
Unlike R/IQ that creates a single inbound queue batch, R/IM indicates that each time a
logical file separator of “confirm” is received, the current batch will be marked received
normal and closed, and a new inbound queue batch will be opened. R/IM will create a
single inbound queue batch only if the remote sends a single file, or does not support the
separating of logical files by use of the “confirm” indicator as a file separator.
For R/IF and R/IA, data will be received into the file named by the File field in the
Receive step of the script. This file must exist (be pre-allocated) on your iSeries before the
communication session is started, and must be accessible via the library list of the job used
to conduct the session.
For R/SP, all data will be received to a spool file. This file may contain carriage control
characters. These characters will be interpreted as described in the Print Control table at
the end of this section. If the remote system sends multiple logical files separated by the
“confirm” indicator, then as with the R/IM transaction, each occurrence of the “confirm”
indicator will close the current spool file, and open a new spool for receiving.

LU6.2 Configuration SNA LU6.2 Communications Support
8 - 8 Gentran:Server for iSeries Communications Module Release 3.5 User Guide
When receiving data with any R transaction, the command line has a special function.
When a literal is entered on the command line, the first record received is compared
against the literal. When a match occurs, the Receive step will end with a no data to
be received condition and execution will continue with the next script step.This is
useful if the remote system is capable of sending a message that indicates there is no data
to send. This option allows the “no data” message to be received, without having it written
to an output file.
S – Send
Used to send a file from your system to the remote system. By specifying File Type OQ,
OM, or OF, you can transmit data from the outbound queue or a user-provided file.
SNA/LU0 Send transactions may be combined with File options as follows:
S/OQ Send from Gentran:Server outbound queue
S/OM Send from Gentran:Server outbound queue, separating multiple batches
S/OF Send from outbound file provided by user
For S/OQ, all eligible data batches on the outbound queue will be transmitted to the remote
system as a single file, followed by the action specified in the Indicator field. When a
literal is entered in the Command line field, the literal will be sent to the remote system
when there are no eligible batches on the outbound queue to send. If no literal is entered in
the Command line, then no data will be sent, no action will occur regardless of the
Indicator, and execution will continue with the next script step.
For S/OM, each eligible batch on the outbound queue will be transmitted to the remote
system followed by a “confirm” indicator as a file separator. The final outbound queue
batch will be followed by the action specified in the Indicator field. If there are no eligible
batches to send from the outbound queue, a default message in the form of an 80-byte
record will be sent to the remote system followed by the action specified by the Indicator
field. The format of the message is:
*** ERROR *** NO BATCHES FOR TRANSMISSION.
When a literal is entered in the Command line field, the literal will be sent as an 80-byte
record image to the remote system as a file “header” ahead of each batch sent from the
outbound queue.
For S/OF, the iSeries physical file named by the File Name field in the Send step of the
script will be transmitted to the remote system, and followed by the action specified in the
Indicator field. This file must exist on your iSeries and must be accessible via the library
list of the job used to execute the communication session.

SNA LU6.2 Communications Support LU6.2 Configuration
Gentran:Server for iSeries Communications Module Release 3.5 User Guide 8 - 9
D – Data Trap
Used to wait for the literal that is specified in the Command line field of the script step.
This can be useful in “trapping” prompts, messages, or commands from the remote
system. The data received using this transaction is not written to an output file, but is
discarded. This can be useful if you wish to discard prompts or messages from the remote
system. This transaction is also useful for ensuring a certain message is received as
expected, and if not, can abort the communications session depending upon the indicator
used. Data trap transactions/Indicator combinations are:
D with Indicator zero. This transaction will compare only the first record received
against the Command line literal. If a match occurs, the data trap ends and execution
continues with the next script step. When the first record received does not match the
Command line literal, the session will ended with a “no-match” error.
# NOTE
If the data trap completes with a successful match condition and the data received is
followed by additional control characters or data, then the data trap must be followed
by another Receive type command to process the additional data.
D with Indicator other than zero. This transaction will compare all records received
against the Command line literal. If either a match or the specified indicator condition
occurs, the data trap ends and execution will continue with the next script step. All
records received until the data trap ends are discarded. When a non-zero Indicator is
specified, the data trap may end with a “no-match” condition, but will not end the
session with an error.
# NOTE
If the data trap completes with a successful match condition and the data received is
followed by additional control characters or data, then the data trap must be followed
by another Receive type transaction to process the additional data.
X – Extended Script Logic
Used to execute extended script logic commands. The following extended logic keywords
are valid for SNA/LU0 communication scripts.
LOOP START
LOOP END
MATCH
INDICATOR
GOTO
SEE the “Extended Script Logic” section in the “Using Scripts” chapter for detailed
information on using Extended Script Logic commands.

LU6.2 Configuration SNA LU6.2 Communications Support
8 - 10 Gentran:Server for iSeries Communications Module Release 3.5 User Guide
E – Evoke Command
Indicates an Evoke record and associated parameters will be sent to the remote system.
The transmitting of the Evoke record will start a communications job on the remote
system. The Evoke record must be the first record of any session control script that is
created. The Evoke record is created by entering panel EDIX43C-FMT01 and providing
parameters to indicate the program, its location, and how it is to run on the remote system.
(SEE the section “L62/X62 Examples” later in this chapter for detailed information on
creating Profiles and session control scripts.)
Start an L62/X62 Communication Session
After creating an appropriate communication profile and script, an SNA/LU0 communication
session can be started by using option 30 from the EDIX400-FMT01 panel, the STRCOMSSN
command, or the job scheduler. (SEE the “Initiating Communication Sessions” section in the
“Using Communications” chapter for more information about starting communications sessions.)

SNA LU6.2 Communications Support X62/L62 Tables
Gentran:Server for iSeries Communications Module Release 3.5 User Guide 8 - 11
X62/L62 Tables
The section contains the following tables:
Table 8.1: X62/L62 Transaction Codes/Actions
Table 8.2: X62/L62 Send Indicators
Table 8.3: X62/L62 Receive Indicators
Table 8.1: X62/L62 Transaction Codes/Actions
Tran
Codes Descriptions Actions Valid Indicators
CSend Control
Record
Send Literal from
Command Line.
0, 1, 2
DReceive Control
Record
Attempt to match the
command line record with a
record received from the
remote system.
0, 6, 7, 8
ESend Evoke Record Send the Evoke Record to
start a session on the remote
system.
0, 1, 2
SSend Data OQ – Send from
Outbound Queue
OM – Send from
Outbound Queue as
Multiples
OF – Send from
Outbound File
0, 1, 2
R Receive Data IQ – Receive data to
Inbound Queue
IM – Receive data to
Inbound Queue as
Multiples
IF – Receive data to
Inbound File
IA – Receive data and
append to an Inbound
File
SP – Receive data to
Spool Printer File
0, 6, 7, 8

X62/L62 Tables SNA LU6.2 Communications Support
8 - 12 Gentran:Server for iSeries Communications Module Release 3.5 User Guide
The following table lists the valid Send indicators for use with protocol type L62 (APPC using
SDLC) and X62 (APPC using an X.25 line). This table is common to both protocols.
Table 8.2: X62/L62 Send Indicators
Desired Actions Definitions Indicators
Send then continue to next
step in the script.
Send the record or file with no
terminator, read the next script
command and continue.
0
Send
Followed by confirm
request.
Send the record or file followed by a
confirm request. This demands that
the remote system confirm receipt of
the data sent. When a positive
confirmation is received from the
remote, the next script step is
executed. When a negative
confirmation is received from the
remote, the session will end with an
error.
1
Send
Followed by a confirm
request and a change
direction.
Send the record or file followed by a
confirm request and a change
direction. This demands that the
remote system confirm receipt of the
data sent, and indicates that you have
finished sending and are ready to
receive data. When a positive
confirmation is received from the
remote, the next script step is
executed. When a negative
confirmation is received from the
remote, the session will end with an
error.
2

SNA LU6.2 Communications Support X62/L62 Tables
Gentran:Server for iSeries Communications Module Release 3.5 User Guide 8 - 13
The following table lists the valid Receive indicators for use with protocol type L62 (APPC using
SDLC) and X62 (APPC using an X.25 line). This table is common to both protocols.
# NOTE
When using a Data-trap (D) command and a zero (0) indicator, the Command Line record
compares only the first record received. If a match occurs, the step completes. If the first
record received does not match, the data-trap fails, and the session aborts.
# NOTE
The iSeries operating system places certain restrictions on the flow of data between 2
machines when using APPC. When a file or record is sent to the remote system, and the send
step uses an indicator type 2 (change direction), the user is unable to specify another send
step without executing a receive step first. The remote system must send a Change Direction
to your system before any additional data can be sent by your system.
Table 8.3: X62/L62 Receive Indicators
Desired Actions Definitions Indicators
Used to receive with a data
trap.
If the first record received
matches the data trap record, the
trap ends successfully. If the first
record received does not match
the data trap record, then the data
trap fails.
0
Used to force a receive until
time expires condition.
A null receive indicator means
receive until inactivity time-out
occurs.
5
Demands that your system
confirm receipt of the data
just received.
Receive data until the remote
system sends a confirmation
request.
6
Change direction. Receive data until the remote
system send change direction
indicating they have finished
sending and can receive.
7
Normally used as the last
step of a script while
waiting for the remote
system to disconnect.
Receive data until an
End-of-Session is received.
8

LU6.2 via SDLC Examples SNA LU6.2 Communications Support
8 - 14 Gentran:Server for iSeries Communications Module Release 3.5 User Guide
LU6.2 via SDLC Examples
# NOTE
This feature is an optional add-on product that may be purchased separately.
The following section describes the configuration and execution of L62 protocol support when
communicating with Gentran:Server over dial and leased line connections.
Included in this section are examples detailing the specifics of L62 communications.
Overview of Naming Conventions
The L62 communication support provides an SDLC APPC connection to the remote system using
an SDLC line configuration. It is assumed that the remote system with which you are
communicating is an iSeries system using a Sterling Commerce communication product that
supports this connection type.
The following examples, for both dial-up and leased line connections, use a standard naming
convention to help illustrate the configuration type in use. The naming convention includes the
following:
System type (local or remote)
Physical line type (dial-up or leased)
Session initiation type (dial or answer)
Protocol type
Naming Convention Parameters
Naming convention adhere to the following rules:
The first three characters of each Profile ID indicate the system type. A local system definition
represents your machine and uses LOC as the first three characters in each example, while the
remote system definitions use RMT.
The fourth character of each Profile ID represents the type of physical line connection in use.
A dial-up line type is represented by the character D while a leased line is represented by the
character L.
The fifth character of each Profile ID represents the session initiation type. The character D
indicates that you are the “dialer” and are initiating the session. The character A indicates that
you “answer” (wait for the Remote System to initiate the session with your system).
The sixth character of each Profile ID represents the protocol type of LU62 (L).

SNA LU6.2 Communications Support LU6.2 via SDLC Examples
Gentran:Server for iSeries Communications Module Release 3.5 User Guide 8 - 15
Configuration Examples
The examples include all parameters used in building the Profile ID, the Session Scripts, and the
Evoke record. Each example has been tested to ensure accuracy.
There are currently two pairs of configuration examples. These are the most common L62
configurations, and should be useful for most environments.
Each example contains a configuration defining the local system parameters and a configuration
defining the remote system parameters.
Example 1
LOCLDL — Local system configured for leased line, initiate the connection (dial), SDLC
APPC protocol in use
RMTLAL — Remote system configured for leased line, answer incoming calls initiated by
another system, SDLC APPC protocol in use
Example 2
LOCDDL — Local system configured for dial-up, initiate the connection, SDLC/APPC
RMTDAL — Remote system configured for dial-up line, answer incoming calls initiated by
another system, SDLC/APPC

LU6.2 via SDLC Examples SNA LU6.2 Communications Support
8 - 16 Gentran:Server for iSeries Communications Module Release 3.5 User Guide
LU6.2 via SDLC, Example 1
Example 1: Create a Profile for the Local System
This example uses the following profiles:
LOCLDL — Local system configured for leased line, initiate the connection (dial), SDLC
APPC protocol in use
RMTLAL —Remote system configured for leased line, answer incoming calls initiated by
another system, SDLC APPC protocol in use
To create the profile, execute the following steps:
1. From the GENMAIN menu, type 1 on the command line and press Enter. The
Gentran:Server Communications menu is displayed.
2. Type 1 on the command line and press Enter. The Work with Communication panel
(EDIX400-FMT01) is displayed, as shown in Figure 8.2.
3. Because you are creating a new profile, type LOCLDL in the Profile ID field.
4. Type 1 in the Option field next to the LOCLDL Profile ID, then press Enter.
Figure 8.2 Work with Communications panel (EDIX400-FMT01)
EDIX400 Work with Communications EDI 04/30/08
FMT01 pgmlib: G3X5PGM dtalib:G3X5DTA 12:00:00
Position to Profile ID . . . . . .
Type option (and Information), press Enter.
1=Create 2=Revise 3=Copy 4=Delete 5=View 11=Line/Ctl/Dev
Opt Profile ID Company
1 LOCLDL
ATTEASY AT&T EASYLINK SERVICES
ATTUK AT&T IN THE UNITED KINGDOM
AUTOANS TEST AUTOANSWER CONFIG
BSCRMT Test for BSC REMOTE
BTASC BT UK GNS EDI*NET ASYNC
BTUK BT UK GNS EDI*NET BISYNC
BTXAS BT UK GNS EDI*NET ASYNC VIA X.25
CHRY CHRYSLER CTX MAILBOX
CHRY480 CHRYSLER - 830, 861, 862
More...
Parameters or command
===>
F1=Help F3=Exit F12=Cancel F15=Sort F23=More Options F24=More Keys

SNA LU6.2 Communications Support LU6.2 via SDLC Examples
Gentran:Server for iSeries Communications Module Release 3.5 User Guide 8 - 17
The Communication Profile panel (EDIX401-FMT01) appears, as shown in Figure 8.3, and it
displays Local Leased Line/Dial/SDLC/ APPC information
5. Fill in the necessary information and press Enter to see the next panel.
Figure 8.3 Communication Profile panel (EDIX401-FMT01)
The Communication Profile panel (EDIX401-FMT08) appears.
6. Enter the data into appropriate fields, as shown in Figure 8.4, and press F10 (Update) to
update the protocol information for this profile. The system returns you to panel
EDIX400-FMT01. The message at the bottom of the panel, Create Operation
Successful, indicates that the profile is created.
Figure 8.4 Communication Profile panel (EDIX401-FMT08)
EDIX401 Communication Profile EDI 04/30/08
FMT01 12:00:00
Comm Profile ID. . . . . . . . . . LOCLDL
Company. . . . . . . . . . . . . . Local Leased Line/Dial/SDLC/APPC
Contact. . . . . . . . . . . . . . Test Contact
Phone. . . . . . . . . . . . . . . ( 614 ) 555 - 1212 x
International Dial Code. . . . . .
Protocol . . . . . . . . . . . . . L62
Days to Purge. . . . . . . . . . . 999
FIFO/LIFO. . . . . . . . . . . . . F
Used Most Frequently . . . . . . . N
Update Allowed . . . . . . . . . . Y
F1=Help F4=Prompt F10=Update F12=Cancel F24=More Keys
EDIX401 Communication Profile EDI 04/30/08
FMT08 L62 12:00:00
Comm Profile ID. . . . . LOCLDL
Company. . . . . . . . . Local Leased Line/Dial/SDLC/APPC
Modem Port . . . . . . . LIN072 Retries. . . . . . . . 02
Switched Line. . . . . . N (Y/N) Auto Dial. . . . . . . N (Y/N)
Auto Call Unit . . . . . N Auto Call Port . . . .
Dial . . . . . . . . . .
Inactivity Timer . . . . 300
Local Exchange ID. . . . 05601232 Remote Exchange ID . . 05601231
Local Location Name. . . LOCLDL Remote Location Name . RMTLAL
Remote Network ID. . . . *NONE Remote Cntl Point. . .
Mode Name. . . . . . . . *NETATR
Station Address. . . . . 01
Wrap Data Flag . . . . . Y (Y/N) Remote Cmd Password. . *NONE
Record Size. . . . . . . 0080 Max Ru Size. . . . . . 1024
F1=Help F12=Cancel F13=Services F24=More Keys

LU6.2 via SDLC Examples SNA LU6.2 Communications Support
8 - 18 Gentran:Server for iSeries Communications Module Release 3.5 User Guide
Example 1: Create the Session Script for the Local System
At this point, you have created an LOCLDL L62 profile with the correct communication
characteristics, but you still need to define how the conversation between the remote system and
Gentran:Server proceeds.
1. On the Work with Communication panel (EDIX400-FMT01), type 12 in the Option field
next to the “LOCLDL” Profile ID and press Enter. The Work with Communications
Session panel (EDIX402-FMT01) appears.
2. On panel EDIX402-FMT01, type 1 in the Option field and T1 in the SN field and press
Enter. The Communications Session Control panel (EDIX403-CTL01) appears.
3. Press F9 (Fold/Unfold) to see the unfolded view of panel EDIX403-CTL01. The unfolded
view of panel EDIX403-CTL01 appears, as shown in Figure 8.5.
Figure 8.5 Unfolded View of the Communication Session Control panel (EDIX403-CTL01)
4. Complete the fields shown on panel EDIX403-CTL01.
5. Press F10 (Update) or Enter to add the lines to the script.
# NOTE
Please note the $$EOS (end-of-session) literal in the last script record on panel
EDIX403-CTL01. This is the syntax used to end the session if the session is initiated by your
local system. The remote system is aware that you end the session. If both systems attempt to
use the $$EOS command, an error occurs.
If the script contains an Evoke (E type) record when the record is added, you are automatically
taken to the Communication Evoke panel (EDIX43C-FMT01), as shown in Figure 8.6, to
complete the creation of the evoke record.
EDIX403 Communication Session Control EDI 04/30/08
CTL01 12:00:00
Comm Profile ID. . . . . . . . . . LOCLDL
Session Name . . . . . . . . . . . T1
Company. . . . . . . . . . . . . . Local Leased Line/Dial/SDLC/APPC
Type option, press Enter.
3=Copy Seq# 4=Delete 11=Extended Parms
Opt Seq No Tran File File Name Ind Description
10 E 0 SEND EVOKE RECORD TO RMT SYSTM
20 C 2 SEND AWAITING READY MSG
AWAITING READY STATUS
30 R SP 7 RECV EVOKE COMPLETE MSG
EVOKE COMPLETE, SYSTEM READY
40 S OQ 1 SEND DATA FROM OUTQUEUE
60 C 0 END THE SESSION
$$EOS
More...
F1=Help F4=Prompt F9=Fold/Unfold F10=Update F12=Cancel F24=More Keys

SNA LU6.2 Communications Support LU6.2 via SDLC Examples
Gentran:Server for iSeries Communications Module Release 3.5 User Guide 8 - 19
6. After completing the Evoke record, press F10 (Update). Once the Evoke record is
properly created on panel EDIX43C-FMT01, you only need to update it when revisions
are necessary.
CAUTION
STOP
You must press F10 before leaving panel EDIX43C-FMT01 or the system will not save your
work and the Evoke record and the script you created will not be usable.
Figure 8.6 Communication Evoke panel (EDIX43C-FMT01)
You now have a Profile ID LOCLDL and a session script named T1 that you can use to begin
communications. You want the send all data for the LOCLDL profile to the remote system. When
the system executes a communication job using this profile and script name, Gentran:Server
initiates a LU6.2 session with the remote system and sends its data from the Outbound Queue.
After completing the script, the communication job ends.
EDIX43C Communication Evoke EDI 04/30/08
FMT01 12:00:00
Comm Profile ID. . . . . . . . . . LOCLDL
Session Name . . . . . . . . . . . T1
Company. . . . . . . . . . . . . . Local Leased Line/Dial/SDLC/APPC
Library Name . . . . . . . . . . . G7X0PGM
Program Name . . . . . . . . . . . STRCOM62
Profile to Evoke . . . . . . . . . RECV62
Session to Evoke . . . . . . . . . T1
Trace *YES or *NO. . . . . . . . . *NO
User ID. . . . . . . . . . . . . . QPGMR
Password . . . . . . . . . . . . . QPGMR
F1=Help F4=Prompt F5=Refresh F10=Update F12=Cancel

LU6.2 via SDLC Examples SNA LU6.2 Communications Support
8 - 20 Gentran:Server for iSeries Communications Module Release 3.5 User Guide
Revise the Evoke Record
If you need to revise an existing Evoke record, execute the following steps:
1. On the Work with Communication panel (EDIX400-FMT01), type 12 in the Option field
next to the LOCLDL Profile ID and press Enter. The Work with Communications Session
panel (EDIX402-FMT01) appears.
2. On panel EDIX402-FMT01, type 2 in the Option field next to T1 in the SN field and press
Enter. The Communications Session Control panel (EDIX403-CTL01) appears.
3. Press F13 (Services), and a Service Menu window appears.
4. In the Service field, type 1 for Communication Evoke and press Enter.
The Communication Evoke panel (EDIX43C-FMT01) appears and displays the current
contents of the Evoke record. You may now make any necessary changes.
Example 1: Create a Profile for the Remote System
To create the remote profile, execute the following steps:
1. From the GENMAIN menu, type 1 on the command line and press Enter. The
Gentran:Server Communications menu is displayed.
2. Type 1 on the command line and press Enter. The Work with Communication panel
(EDIX400-FMT01) is displayed, as shown in Figure 8.7.
3. Because you are creating a new profile, type RMTLAL in the Profile ID field.
4. Type 1 in the Option field next to the RMTLAL Profile ID and press Enter.
Figure 8.7 Work with Communications panel (EDIX400-FMT01)
EDIX400 Work with Communications EDI 04/30/08
FMT01 pgmlib: G3X5PGM dtalib:G3X5DTA 12:00:00
Position to Profile ID . . . . . .
Type option (and Information), press Enter.
1=Create 2=Revise 3=Copy 4=Delete 5=View 11=Line/Ctl/Dev
Opt Profile ID Company
1 RMTLAL
CNBTASC COMMERCE:Network via BT Async Pad
CN2BSC COMMERCE:Network RELEASE 2
CN3BSC COMMERCE:Network RELEASE 3
CN3SNA COMMERCE:Network RELEASE 3
REDINET CONTROL DATA / REDINET NETWORK
RMTDAA Remote Dial Line/Answer/ASYNC
RMTDAL Remote Dial Line/Answer/SDLC/APPC
RMTDAN Remote Dial/Answer/No X25 Network
More...
Parameters or command
===>
F1=Help F3=Exit F12=Cancel F15=Sort F23=More Options F24=More Keys

SNA LU6.2 Communications Support LU6.2 via SDLC Examples
Gentran:Server for iSeries Communications Module Release 3.5 User Guide 8 - 21
The Communication Profile panel (EDIX401-FMT01) appears, displaying the Remote
Leased-line/answer/SDLC/ APPC information.
5. Fill in the panel with the data displayed in Figure 8.8 and press Enter.
Figure 8.8 Communication Profile panel (EDIX401-FMT01)
EDIX401 Communication Profile EDI 04/30/08
FMT01 12:00:00
Comm Profile ID. . . . . . . . . . RMTLAL
Company. . . . . . . . . . . . . . Remote Leased-line/answer/SDLC/APPC
Contact. . . . . . . . . . . . . . Test Contact
Phone. . . . . . . . . . . . . . . ( 614 ) 555 - 1212 x
International Dial Code. . . . . .
Protocol . . . . . . . . . . . . . L62
Days to Purge. . . . . . . . . . . 999
FIFO/LIFO. . . . . . . . . . . . . F
Used Most Frequently . . . . . . . N
Update Allowed . . . . . . . . . . Y
F1=Help F4=Prompt F10=Update F12=Cancel F24=More Keys

LU6.2 via SDLC Examples SNA LU6.2 Communications Support
8 - 22 Gentran:Server for iSeries Communications Module Release 3.5 User Guide
The Communication Profile panel (EDIX401-FMT08) appears.
6. Enter the data, as shown in Figure 8.9, into appropriate fields.
7. Once the fields are filled, press F10 (Update) to update the protocol information for this
profile.
The system returns you to panel EDIX400-FMT01, and the message at the bottom of the
panel, Create Operation Successful, indicates that the profile is created.
Figure 8.9 Communication Profile panel (EDIX401-FMT08)
EDIX401 Communication Profile EDI 04/30/08
FMT08 L62 12:00:00
Comm Profile ID. . . . . RMTLAL
Company. . . . . . . . . Remote Leased-line/answer/SDLC/APPC
Modem Port . . . . . . . LIN031 Retries. . . . . . . . 02
Switched Line. . . . . . N (Y/N) Auto Dial. . . . . . . N (Y/N)
Auto Call Unit . . . . . N Auto Call Port . . . .
Dial . . . . . . . . . .
Inactivity Timer . . . . 300
Local Exchange ID. . . . 05601231 Remote Exchange ID . . 05601232
Local Location Name. . . RMTLAL Remote Location Name . LOCLDL
Remote Network ID. . . . *NONE Remote Cntl Point. . .
Mode Name. . . . . . . . *NETATR
Station Address. . . . . 01
Wrap Data Flag . . . . . Y (Y/N) Remote Cmd Password. . *NONE
Record Size. . . . . . . 0080 Max Ru Size. . . . . . 1024
F1=Help F4=Prompt F5=Refresh F10=Update F12=Cancel F24=More Keys

SNA LU6.2 Communications Support LU6.2 via SDLC Examples
Gentran:Server for iSeries Communications Module Release 3.5 User Guide 8 - 23
Example 1: Create the Session Script for the Remote System
At this point, you have created an RMTLAL L62 profile with the correct communication
characteristics, but you still need to define how the conversation between LU62, via SDLC, and
Gentran:Server proceeds.
1. On the Work with Communication panel (EDIX400-FMT01), type 12 in the Option field
next to the RMTLAL Profile ID and press Enter. The Work with Communications Session
panel (EDIX402-FMT01) appears.
2. On panel EDIX402-FMT01, type 1 in the Option field and T1 in the SN field and press
Enter. The Communications Session Control panel (EDIX403-CTL01) appears.
3. Press F9 (Fold/Unfold) to see the unfolded view of panel EDIX403-CTL01. The unfolded
view of panel EDIX403-CTL01 appears, as shown in Figure 8.10.
Figure 8.10 Unfolded View of Communication Session Control panel (EDIX403-CTL01)
4. Complete the fields shown on panel EDIX403-CTL01.
5. Press F10 (Update) or Enter to add the lines to the script.
# NOTE
Please note that the local system initiates the session to the remote system, and the remote
system requires no evoke record creation. Also note that the local and remote location names
and exchange IDs appear in the opposite order (local vs. remote) between the two systems.
You now have a Profile ID RMTLAL and a session script named T1 that you can use to begin
communications. You want the RMTLAL profile to receive all data to the Inbound Queue. When
the system executes a communication job using this profile and script name, Gentran:Server waits
for a session to be initiated with the remote system using LU6.2 via SDLC and receives its data to
the Inbound Queue.
EDIX403 Communication Session Control EDI 04/30/08
CTL01 12:00:00
Comm Profile ID. . . . . . . . . . RMTLAL
Session Name . . . . . . . . . . . T1
Company. . . . . . . . . . . . . . Remote Leased-line/answer/SDLC/APPC
Type option, press Enter.
3=Copy Seq# 4=Delete 11=Extended Parms
Opt Seq No Tran File File Name Ind Description
10 R SP 7 RECV AWAITING READY MSG
AWAITING READY STATUS
20 C 2 SEND EVOKE COMPLETE MSG
EVOKE COMPLETE, SYSTEM READY
30 R IQ 7 RECV TEST DATA TO INB QUEUE
40 R SP 8 RECV TILL END-OF-SESSION, QUIT
More...
F1=Help F4=Prompt F9=Fold/Unfold F10=Update F12=Cancel F24=More Keys

LU6.2 via SDLC Examples SNA LU6.2 Communications Support
8 - 24 Gentran:Server for iSeries Communications Module Release 3.5 User Guide
LU6.2 via SDLC, Example 2
Example 2: Create a Profile for the Local System
This example uses the following profiles:
LOCDDL – Local system configured for dial-up, initiate the connection, SDLC/APPC
RMTDAL – Remote system configured for dial-up line, answer incoming calls initiated by
another system, SDLC/APPC
To create the profile, execute the following steps:
1. From the GENMAIN menu, type 1 on the command line and press Enter. The
Gentran:Server Communications menu is displayed.
2. Type 1 on the command line and press Enter. The Work with Communication panel
(EDIX400-FMT01) is displayed, as shown in Figure 8.11.
3. Because you are creating a new profile, type LOCDDL in the Profile ID field.
4. Type 1 in the Option field next to the LOCDDL Profile ID; then press Enter.
Figure 8.11 Work with Communications panel (EDIX400-FMT01)
EDIX400 Work with Communications EDI 04/30/08
FMT01 pgmlib: G3X5PGM dtalib:G3X5DTA 12:00:00
Position to Profile ID . . . . . .
Type option (and Information), press Enter.
1=Create 2=Revise 3=Copy 4=Delete 5=View 11=Line/Ctl/Dev
Opt Profile ID Company
1 LOCDDL
IBMLU0 IBM INFORMATION NETWORK SDLC
IBMSNA IBM INFORMATION NETWORK SDLC
INS INTERNATIONAL NETWORK SERVICES
INSNTEL TEST X.25 N. TELECOM (IRL) TO INS
JES2 Generic Manufacturing Headquarters
KLEIN KLEINSCHMIDT NETWORK
LOCDAA Test ASC Answer with AT commands
LOCDDA Local Dial Line/Dial/ASYNC
More...
Parameters or command
===>
F1=Help F3=Exit F12=Cancel F15=Sort F23=More Options F24=More Keys

SNA LU6.2 Communications Support LU6.2 via SDLC Examples
Gentran:Server for iSeries Communications Module Release 3.5 User Guide 8 - 25
The Communication Profile panel (EDIX401-FMT01) appears, displaying the Local Dial
Line/Dial/SDLC/ APPC information
5. Fill in the panel with the data displayed in Figure 8.12 and press Enter.
Figure 8.12 Communication Profile panel (EDIX401-FMT01)
EDIX401 Communication Profile EDI 04/30/08
FMT01 12:00:00
Comm Profile ID. . . . . . . . . . LOCDDL
Company. . . . . . . . . . . . . . Local Dial Line/Dial/SDLC/APPC
Contact. . . . . . . . . . . . . . Test Contact
Phone. . . . . . . . . . . . . . . ( 614 ) 555 - 1212 x
International Dial Code. . . . . .
Protocol . . . . . . . . . . . . . L62
Days to Purge. . . . . . . . . . . 999
FIFO/LIFO. . . . . . . . . . . . . F
Used Most Frequently . . . . . . . N
Update Allowed . . . . . . . . . . Y
F1=Help F4=Prompt F10=Update F12=Cancel F24=More Keys

LU6.2 via SDLC Examples SNA LU6.2 Communications Support
8 - 26 Gentran:Server for iSeries Communications Module Release 3.5 User Guide
The Communication Profile panel (EDIX401-FMT08) appears.
6. Enter the data, as shown in Figure 8.13, into the appropriate fields.
7. Once the fields are filled, press F10 (Update) to update the protocol information for this
profile.
The system returns you to panel EDIX400-FMT01. The message at the bottom of the
panel, Create Operation Successful, indicates that the profile is created.
Figure 8.13 Communication Profile panel (EDIX401-FMT08)
EDIX401 Communication Profile EDI 04/30/08
FMT08 L62 12:00:00
Comm Profile ID. . . . . LOCDDL
Company. . . . . . . . . Local Dial Line/Dial/SDLC/APPC
Modem Port . . . . . . . LIN072 Retries. . . . . . . . 02
Switched Line. . . . . . Y (Y/N) Auto Dial. . . . . . . Y (Y/N)
Auto Call Unit . . . . . V Auto Call Port . . . .
Dial . . . . . . . . . . 5551212
Inactivity Timer . . . . 300
Local Exchange ID. . . . 05601232 Remote Exchange ID . . 05601231
Local Location Name. . . LOCDDL Remote Location Name . RMTDAL
Remote Network ID. . . . *NONE Remote Cntl Point. . .
Mode Name. . . . . . . . *NETATR
Station Address. . . . . 01
Wrap Data Flag . . . . . Y (Y/N) Remote Cmd Password. . *NONE
Record Size. . . . . . . 0080 Max Ru Size. . . . . . 1024
F1=Help F4=Prompt F5=Refresh F10=Update F12=Cancel F24=More Keys

SNA LU6.2 Communications Support LU6.2 via SDLC Examples
Gentran:Server for iSeries Communications Module Release 3.5 User Guide 8 - 27
Example 2: Create the Session Script for the Local System
At this point, you have created an LOCDDL L62 profile with the correct communication
characteristics, but you still need to define how the conversation between the remote system and
Gentran:Server proceeds.
1. On the Work with Communication panel (EDIX400-FMT01), type 12 in the Option field
next to the LOCDDL Profile ID and press Enter. The Work with Communications Session
panel (EDIX402-FMT01) appears.
2. On panel EDIX402-FMT01, type 1 in the Option field and T1 in the SN field and press
Enter. The Communications Session Control panel (EDIX403-CTL01) appears.
3. Press F9 (Fold/Unfold) to see the unfolded view of panel EDIX403-CTL01. The unfolded
view of panel EDIX403-CTL01 appears, as shown in Figure 8.14.
Figure 8.14 Unfolded View of the Communication Session Control panel
(EDIX403-CTL01)
4. Complete the fields shown on panel EDIX403-CTL01.
5. Press F10 (Update) or Enter to add the lines to the script.
# NOTE
Please note the $$EOS (end-of-session) literal in the last script record on panel
EDIX403-CTL01. This is the syntax used to end the session if the session is initiated by your
local system. The remote system is aware that you end the session. If both systems attempt to
use the $$EOS command, an error occurs.
EDIX403 Communication Session Control EDI 04/30/08
CTL01 12:00:00
Comm Profile ID. . . . . . . . . . LOCDDL
Session Name . . . . . . . . . . . T1
Company. . . . . . . . . . . . . . Local Dial Line/Dial/SDLC/APPC
Type option, press Enter.
3=Copy Seq# 4=Delete 11=Extended Parms
Opt Seq No Tran File File Name Ind Description
10 E 0 SEND EVOKE RECORD TO RMT SYSTM
20 C 2 SEND AWAITING READY MSG
AWAITING READY STATUS
30 R SP 7 RECV EVOKE COMPLETE MSG
EVOKE COMPLETE, SYSTEM READY
40 S OF SNDFIL.X12 1 SEND A TEST FILE
60 C 0 END THE SESSION
$$EOS
More...
F1=Help F4=Prompt F9=Fold/Unfold F10=Update F12=Cancel F24=More Keys

LU6.2 via SDLC Examples SNA LU6.2 Communications Support
8 - 28 Gentran:Server for iSeries Communications Module Release 3.5 User Guide
If the script contains an Evoke (E type) record when the record is added, you are automatically
taken to the Communication Evoke panel (EDIX43C-FMT01), as shown in Figure 8.15, to
complete the creation of the evoke record.
6. After completing the Evoke record, press F10 (Update). Once the Evoke record is
properly created on panel EDIX43C-FMT01, you only need to update it when revisions
are necessary.
CAUTION
STOP
You must press F10 before leaving panel EDIX43C-FMT01 or the system will not save your
work and the Evoke record and the script you created will not be usable.
Figure 8.15 Communication Evoke panel (EDIX43C-FMT01)
You now have a Profile ID LOCDDL and a session script named T1 that you can use to begin
communications. You want the LOCDDL profile to send all data to the remote system. When the
system executes a communication job using this profile and script name, Gentran:Server initiates a
session with LU6.2 via SDLC and sends its data from the Outbound Queue. After completing the
script, and in this case after sending the data, the communication job stops.
EDIX43C Communication Evoke EDI 04/30/08
FMT01 12:00:00
Comm Profile ID . . . LOCDDL
Session Name . . . . T1
Company . . . . . . . Local Dial Line/Dial/SDLC/APPC
Library Name . . . . . . . . G7X0PGM
Program Name . . . . . . . . STRCOM62
Profile to Evoke . . . . . . RMTDAL
Session to Evoke . . . . . . T1
Trace *YES or *NO. . . . . . *YES
User ID. . . . . . . . . . . QPGMR
Password . . . . . . . . . . QPGMR
F1=Help F4=Prompt F5=Refresh F10=Update F12=Cancel

SNA LU6.2 Communications Support LU6.2 via SDLC Examples
Gentran:Server for iSeries Communications Module Release 3.5 User Guide 8 - 29
Revise the Evoke Record
If you need to revise an existing Evoke record, execute the following steps:
1. On the Work with Communication panel (EDIX400-FMT01), type 12 in the Option field
next to the LOCDDL Profile ID and press Enter. The Work with Communications Session
panel (EDIX402-FMT01) appears.
2. On panel EDIX402-FMT01, type 2 in the Option field next to T1 in the SN field and press
Enter. The Communications Session Control panel (EDIX403-CTL01) appears.
3. Press F13 (Services), and a Service Menu window appears.
4. In the Service field, type 1 for Communication Evoke and press Enter. The
Communication Evoke panel (EDIX43C-FMT01) appears and displays the current
contents of the Evoke record. You may now make any necessary changes.
Example 2: Create a Profile for the Remote System
To create the remote profile, execute the following steps:
1. From the GENMAIN menu, type 1 on the command line and press Enter. The
Gentran:Server Communications menu is displayed.
2. Type 1 on the command line and press Enter. The Work with Communication panel
(EDIX400-FMT01) is displayed, as shown in Figure 8.16.
3. Because you are creating a new profile, type RMTDAL in the Profile ID field.
4. Type 1 in the Option field next to the RMTDAL Profile ID and press Enter.
Figure 8.16 Work with Communications panel (EDIX400-FMT01)
EDIX400 Work with Communications EDI 04/30/08
FMT01 pgmlib: G3X5PGM dtalib:G3X5DTA 12:00:00
Position to Profile ID . . . . . .
Type option (and Information), press Enter.
1=Create 2=Revise 3=Copy 4=Delete 5=View 11=Line/Ctl/Dev
Opt Profile ID Company
1 RMTDAL
CNBTASC COMMERCE:Network via BT Async Pad
CN2BSC COMMERCE:Network RELEASE 3
CN3BSC COMMERCE:Network RELEASE 3
CN3SNA COMMERCE:Network RELEASE 3
REDINET CONTROL DATA / REDINET NETWORK
RMTDAA Remote Dial Line/Answer/ASYNC
RMTDAN Remote Dial/Answer/No X25 Network
RMTLAL Remote Leased-line/answer/SDLC/APPC
More...
Parameters or command
===>
F1=Help F3=Exit F12=Cancel F15=Sort F23=More Options F24=More Keys

LU6.2 via SDLC Examples SNA LU6.2 Communications Support
8 - 30 Gentran:Server for iSeries Communications Module Release 3.5 User Guide
The Communication Profile panel (EDIX401-FMT01) appears, displaying the Remote Dial
Line/Answer/SDLC/APPC information
5. Fill in the panel with the data displayed in Figure 8.17 and press Enter.
Figure 8.17 Communication Profile panel (EDIX401-FMT01)
EDIX401 Communication Profile EDI 04/30/08
FMT01 12:00:00
Comm Profile ID. . . . . . . . . . RMTDAL
Company. . . . . . . . . . . . . . Remote Dial Line/Answer/SDLC/APPC
Contact. . . . . . . . . . . . . . Test Contact
Phone. . . . . . . . . . . . . . . ( 614 ) 555 - 1212 x
International Dial Code. . . . . .
Protocol . . . . . . . . . . . . . L62
Days to Purge. . . . . . . . . . . 999
FIFO/LIFO. . . . . . . . . . . . . F
Used Most Frequently . . . . . . . N
Update Allowed . . . . . . . . . . Y
F1=Help F4=Prompt F10=Update F12=Cancel F24=More Keys

SNA LU6.2 Communications Support LU6.2 via SDLC Examples
Gentran:Server for iSeries Communications Module Release 3.5 User Guide 8 - 31
The Communication Profile panel (EDIX401-FMT08) appears.
6. Enter the data, shown in Figure 8.18, into appropriate fields.
7. Once the field are filled, press F10 (Update) to update the protocol information for this
profile. The system returns you to panel EDIX400-FMT01. The message at the bottom of
the panel, Create Operation Successful, indicates that the profile is created.
Figure 8.18 Communication Profile panel (EDIX401-FMT08)
EDIX401 Communication Profile EDI 04/30/08
FMT08 L62 12:00:00
Comm Profile ID. . . . . RMTDAL
Company. . . . . . . . . Remote Dial Line/Answer/SDLC/APPC
Modem Port . . . . . . . LIN031 Retries. . . . . . . . 02
Switched Line. . . . . . Y (Y/N) Auto Dial. . . . . . . N (Y/N)
Auto Call Unit . . . . . N Auto Call Port . . . .
Dial . . . . . . . . . .
Inactivity Timer . . . . 300
Local Exchange ID. . . . 05601231 Remote Exchange ID . . 05601232
Local Location Name. . . RMTDAL Remote Location Name . LOCDDL
Remote Network ID. . . . *NONE Remote Cntl Point. . .
Mode Name. . . . . . . . *NETATR
Station Address. . . . . 01
Wrap Data Flag . . . . . Y (Y/N) Remote Cmd Password. . *NONE
Record Size. . . . . . . 0080 Max Ru Size. . . . . . 1024
F1=Help F4=Prompt F5=Refresh F10=Update F12=Cancel F24=More Keys
F3 not valid at this time.

LU6.2 via SDLC Examples SNA LU6.2 Communications Support
8 - 32 Gentran:Server for iSeries Communications Module Release 3.5 User Guide
Example 2: Create the Session Script for the Remote System
At this point, you have created an RMTDAL L62 profile with the correct communication
characteristics, but you still need to define how the conversation between the remote system and
Gentran:Server proceeds.
1. On the Work with Communication panel (EDIX400-FMT01), type 12 in the Option field
next to the RMTDAL Profile ID and press Enter. The Work with Communications Session
panel (EDIX402-FMT01) appears.
2. On panel EDIX402-FMT01, type 1 in the Option field and T1 in the SN field and press
Enter. The Communications Session Control panel (EDIX403-CTL01) appears.
3. Press F9 (Fold/Unfold) to see the unfolded view of panel EDIX403-CTL01. The unfolded
view of panel EDIX403-CTL01 appears, as shown in Figure 8.19.
F9 allows you to enter additional literal data associated with the script transaction. You do
not want to embed the command in the data, so incorporate the command as part of the
script. When you press F9, the panel displays an additional command line for each script
line.
Figure 8.19 Unfolded View of Communication Session Control panel (EDIX403-CTL01)
4. Complete the fields shown on panel EDIX403-CTL01.
5. Press F10 (Update) or Enter to add the lines to the script. If you press Enter, the changes
are made and you need to press F12 (Cancel) to leave the panel. If you press F10, changes
are made and you exit automatically. If you make a mistake, simply overtype the
appropriate lines and press Enter.
EDIX403 Communication Session Control EDI 04/30/08
CTL01 12:00:00
Comm Profile ID. . . . . . . . . . RMTDAL
Session Name . . . . . . . . . . . T1
Company. . . . . . . . . . . . . . Remote Dial line/answer/SDLC/APPC
Type option, press Enter.
3=Copy Seq# 4=Delete 11=Extended Parms
Opt Seq No Tran File File Name Ind Description
10 R SP 7 RECV AWAITING READY MSG
AWAITING READY STATUS
20 C 2 SEND EVOKE COMPLETE MSG
EVOKE COMPLETE, SYSTEM READY
30 R IQ 7 RECV TEST DATA TO INB QUEUE
40 R SP 8 RECV TILL END-OF-SESSION, QUIT
More...
F1=Help F4=Prompt F9=Fold/Unfold F10=Update F12=Cancel F24=More Keys

SNA LU6.2 Communications Support LU6.2 via SDLC Examples
Gentran:Server for iSeries Communications Module Release 3.5 User Guide 8 - 33
# NOTE
Please note that the local system initiates the session to the remote system, and the
remote system requires no evoke record creation. Also note that the local and remote
location names and exchange IDs appear in the opposite order (local vs. remote)
between the two systems.
You now have a Profile ID RMTDAL and a session script named T1 that you can use to
begin communications. You want the RMTDAL profile to receive all data to the Inbound
Queue. When the system executes a communication job using this profile and script name,
Gentran:Server waits for a session to be initiated with the remote system and receives its
data to the Inbound Queue. After completing the script, the communication job ends.

LU6.2 via X.25 Examples SNA LU6.2 Communications Support
8 - 34 Gentran:Server for iSeries Communications Module Release 3.5 User Guide
LU6.2 via X.25 Examples
# NOTE
This feature is an optional add-on product that may be purchased separately.
The following section describes the configuration and execution of LU6.2 via X.25 protocol
support when communicating with Gentran:Server over leased lines and dial-up line connections.
Included in this section are examples detailing the specifics of LU6.2 via X.25 communications.
Overview of Naming Conventions
The X6.2 communication support provides an SDLC APPC connection to the remote system using
an X.25 line configuration. It is assumed that the remote system with which you are
communicating is an iSeries system using a Sterling Commerce communication product that
supports this connection type.
The following examples, for both dial-up and leased line connections, use a standard naming
convention to help illustrate the configuration type in use. The naming convention includes the
following:
System type (local or remote)
Physical line type (dial-up or leased)
Session initiation type (dial or answer)
X.25 usage type (X.25 or no X.25)
Naming Convention Parameters
Naming convention adhere to the following rules:
The first three characters of each Profile ID indicate the system type. A local system definition
represents your machine and uses LOC as the first three characters in each example, while the
remote system definitions use RMT.
The fourth character of each Profile ID represents the type of physical line connection in use.
A dial-up line type is represented by the character D while a leased line is represented by the
character L.
The fifth character of each Profile ID represents the session initiation type. The character D
indicates that you are the “dialer” and are initiating the session. The character A indicates that
you “answer” (wait for the Remote System to initiate the session with your system).
The sixth character of each Profile ID represents whether an X.25 packet switched network is
in use. The character X indicates that the X.25 network is in use. The character N indicates no
X.25 network is in use, and the connection is direct between the iSeries systems.

SNA LU6.2 Communications Support LU6.2 via X.25 Examples
Gentran:Server for iSeries Communications Module Release 3.5 User Guide 8 - 35
Configuration Examples
The examples include all parameters used in building the Profile ID, the Session Scripts, and the
Evoke record. Each example is tested to ensure accuracy.
There are currently three pairs of configuration examples. These are the most common X.25
configurations, and should be useful for most environments.
Each example contains a configuration defining the local system parameters and a configuration
defining the remote system parameters.
Example 1
LOCLDX – Local system configured for leased line, initiate the connection, X.25 switched
packet in use
RMTLAX – Remote system configured for leased line, answer incoming calls initiated by
another system, X.25 switched packet in use
Example 2
LOCLDN – Local system configured for leased line, initiate the connection, X.25 switched
packet not in use
RMTLAN – Remote system configured for leased line, answer incoming calls initiated by
another system, X.25 switched packet not in use
Example 3
LOCDDN – Local system configured for dial-up line, initiate the connection, X.25 switched
packet not in use
RMTDAN – Remote system configured for dial-up line, answer incoming calls initiated by
another system, X.25 switched packet not in use

LU6.2 via X.25 Examples SNA LU6.2 Communications Support
8 - 36 Gentran:Server for iSeries Communications Module Release 3.5 User Guide
LU6.2 via X.25, Example 1
Example 1: Create a Profile for the Local System
This example uses the following profiles:
LOCLDX — Local system configured for leased line, initiate the connection, X.25 switched
packet in use
RMTLAX — Remote system configured for leased line, answer incoming calls initiated by
another system, X.25 switched packet in use. To create the profile, execute the following
steps:
1. From the GENMAIN menu, type 1 on the command line and press Enter. The
Gentran:Server Communications menu is displayed.
2. Type 1 on the command line and press Enter. The Work with Communication panel
(EDIX400-FMT01) is displayed, as shown in Figure 8.20.
3. Because you are creating a new profile, type LOCLDX in the Profile ID field.
4. Type 1 in the Option field next to the LOCLDX Profile ID and press Enter.
Figure 8.20 Work with Communications panel (EDIX400-FMT01)
EDIX400 Work with Communications EDI 04/30/08
FMT01 pgmlib: G3X5PGM dtalib:G3X5DTA 12:00:00
Position to Profile ID . . . . . .
Type option (and Information), press Enter.
1=Create 2=Revise 3=Copy 4=Delete 5=View 11=Line/Ctl/Dev
Opt Profile ID Company
1 LOCLDX
LOCDDN Local Dial-Line/Dial/No X25 Network
LOCLDL Local Leased Line/Dial/SDLC/APPC
LOCLDN Local Leased Line/Dial/No X25 Netwk
LXADDVN Dial Line/Dial/V25 CMDS/No Network
LXADDVX Dial Line/Dial/V25 CMDS/X25 Netwk
LXALDNN Leased Line/Dial/No CMDS/No Network
LXALDNX Local Leased/Dial/No CMDS/X25 Netwk
MCDONELL MCDONNELL DOUGLAS/BRITISH TELECOM
More...
Parameters or command
===>
F1=Help F3=Exit F12=Cancel F15=Sort F23=More Options F24=More Keys

SNA LU6.2 Communications Support LU6.2 via X.25 Examples
Gentran:Server for iSeries Communications Module Release 3.5 User Guide 8 - 37
The Communication Profile panel (EDIX401-FMT01) appears, displaying the Local Leased
Line/Dial/X25 Network information.
5. Fill in the panel with the data displayed in Figure 8.21 and press Enter.
Figure 8.21 Communication Profile panel (EDIX401-FMT01)
EDIX401 Communication Profile EDI 04/30/08
FMT01 12:00:00
Comm Profile ID. . . . . . . . . . LOCLDX
Company. . . . . . . . . . . . . . Local Leased Line/Dial/X25 Network
Contact. . . . . . . . . . . . . . Test Contact
Phone. . . . . . . . . . . . . . . (614) 555 - 1212 x
International Dial Code. . . . . .
Protocol . . . . . . . . . . . . . X62
Days to Purge. . . . . . . . . . . 999
FIFO/LIFO. . . . . . . . . . . . . F
Used Most Frequently . . . . . . . N
Update Allowed . . . . . . . . . . Y
F1=Help F4=Prompt F10=Update F12=Cancel F24=More Keys

LU6.2 via X.25 Examples SNA LU6.2 Communications Support
8 - 38 Gentran:Server for iSeries Communications Module Release 3.5 User Guide
The Communication Profile panel (EDIX401-FMT09) appears.
6. Enter the data, as shown in Figure 8.22, into the appropriate fields.
7. Once the fields are filled, press F10 (Update) to update the protocol information for this
profile. The system returns you to panel EDIX400-FMT01. The message at the bottom of
the panel, Create Operation Successful, indicates that the profile is created.
Figure 8.22 Communication Profile panel (EDIX401-FMT09)
EDIX401 Communication Profile EDI 04/30/08
FMT09 X62 12:00:00
Comm Profile ID. . . . LOCLDX
Company. . . . . . . . Local Leased Line/Dial/X25 Network
Modem Port . . . . . . LIN032 Lgl Channel Type . . . *SVCBOTH
Switched Line. . . . . N (Y/N) Lgl Channel ID . . . . 001
Inactivity Timer . . . 300 Mode Name. . . . . . . *NETATR
Session Initiator. . . *DIAL X25 Password . . . . . X62TEST
Net Connection Init. . *WAIT Reverse Charge . . . . *NONE
Remote Net Addr. . . . 311012345677 DCE Support. . . . . . N (Y/N)
Local Net Addr . . . . 311012345678 Record Size. . . . . . 0080
Local Exchange ID. . . 05600007 Max Ru Size. . . . . . 1024
Remote Exchange ID . . 05600006 Modulus. . . . . . . . 8
Local Location . . . . ORDERNET Window Size. . . . . . 02
Remote Location. . . . AS400A Packet Size. . . . . . 0128
Remote Network ID. . . *NONE Wrap Data Flag . . . . Y (Y/N)
Remote Cntl Point. . . Remote Cmd Password. . *NONE
F1=Help F4=Prompt F5=Refresh F10=Update F12=Cancel F24=More Keys

SNA LU6.2 Communications Support LU6.2 via X.25 Examples
Gentran:Server for iSeries Communications Module Release 3.5 User Guide 8 - 39
Example 1: Create the Session Script for the Local System
At this point, you have created an LOCLDX profile with the correct communication
characteristics, but you still need to define how the conversation between the remote system and
Gentran:Server proceeds.
1. On the Work with Communication panel (EDIX400-FMT01), type 12 in the Option field
next to the LOCLDX Profile ID and press Enter. The Work with Communications Session
panel (EDIX402-FMT01) appears.
2. On panel EDIX402-FMT01, type 1 in the Option field and T1 in the SN field and press
Enter. The Communications Session Control panel (EDIX403-CTL01) appears.
3. Press F9 (Fold/Unfold) to see the unfolded view of panel EDIX403-CTL01. The unfolded
view of panel EDIX403-CTL01 appears, as shown in Figure 8.23 and Figure 8.24.
Figure 8.23 Unfolded View of the Communication Session Control panel
(EDIX403-CTL01)
EDIX403 Communication Session Control EDI 04/30/08
CTL01 12:00:00
Comm Profile ID. . . . . . . . . . LOCLDX
Session Name . . . . . . . . . . . T1
Company. . . . . . . . . . . . . . Local Leased Line/Dial/X25 Network
Type option, press Enter.
3=Copy Seq# 4=Delete 11=Extended Parms
Opt Seq No Tran File File Name Ind Description
10 E 0 SEND EVOKE RECORD TO RMT SYS
20 C 2 SEND AWAITING READY MSG
AWAITING READY STATUS
30 R SP 7 RECV EVOKE COMPLETE MSG
EVOKE COMPLETE, SYSTEM READY
40 S OQ 2 DATA FROM OUTBQUEUE
50 R SP 7 RECV A TEST FILE
More...
F1=Help F4=Prompt F9=Fold/Unfold F10=Update F12=Cancel F24=More Keys

LU6.2 via X.25 Examples SNA LU6.2 Communications Support
8 - 40 Gentran:Server for iSeries Communications Module Release 3.5 User Guide
Figure 8.24 Unfolded View of Communication Session Control panel
(EDIX403-CTL01) (Cont’d)
4. Page Down and complete the fields shown on panel EDIX403-CTL01.
5. Press F10 (Update) or Enter to add the lines to the script.
# NOTE
Note that the indicator (Ind) field in the script describes what Gentran:Server waits to see
before continuing to the next script step.
If the script contains an Evoke (E type) record, when the record is added, you are automatically
taken to the Communication Evoke panel (EDIX43C-FMT01), as shown in Figure 8.25, to
complete the creation of the evoke record.
6. After completing the Evoke record, press F10 (Update). Once the Evoke record is
properly created on panel EDIX43C-FMT01, you only need to update it when revisions
are necessary.
CAUTION
STOP
You must press F10 before leaving panel EDIX43C-FMT01 or the system will not save your
work and the Evoke record and the script you created will not be usable.
EDIX403 Communication Session Control EDI 04/30/08
CTL01 12:00:00
Comm Profile ID. . . . . . . . . . LOCLDX
Session Name . . . . . . . . . . . T1
Company. . . . . . . . . . . . . . Local Leased Line/Dial/X25 Network
Type option, press Enter.
3=Copy Seq# 4=Delete 11=Extended Parms
Opt Seq No Tran File File Name Ind Description
60 C 2 END THE SESSION
$$EOS
More...
F1=Help F4=Prompt F9=Fold/Unfold F10=Update F12=Cancel F24=More Keys

SNA LU6.2 Communications Support LU6.2 via X.25 Examples
Gentran:Server for iSeries Communications Module Release 3.5 User Guide 8 - 41
Figure 8.25 Communication Evoke panel (EDIX43C-FMT01)
You now have a Profile ID LOCLDX and a session script named T1 that you can use to begin
communications. You want the LOCLDX profile to send all data to the remote system. When the
system executes a communication job using this profile and script name, Gentran:Server initiates a
session with the remote system and sends its data from the Outbound Queue. It then receives data
to a spool file. After completing the script, the communication job ends.
Revise the Evoke Record
If you need to revise an existing Evoke record, execute the following steps:
1. On the Work with Communication panel (EDIX400-FMT01), type 12 in the Option field
next to the LOCLDX Profile ID. The Work with Communications Session panel
(EDIX402-FMT01) appears.
2. On panel EDIX402-FMT01, type 2 in the Option field next to T1 in the SN field and
press Enter.The Communications Session Control panel (EDIX403-CTL01) appears.
3. Press F13 (Services), and a Service Menu window appears.
4. In the Service field, type 1 for Communication Evoke. The Communication Evoke panel
(EDIX43C-FMT01) appears and displays the current contents of the Evoke record. You
may now make any necessary changes.
EDIX43C Communication Evoke EDI 04/30/08
FMT01 12:00:00
Comm Profile ID. . . . . . . . . . LOCLDX
Session Name . . . . . . . . . . . T1
Company. . . . . . . . . . . . . . Local Leased Line/Dial/X25 Network
Library Name . . . . . . . . . . . G7X0PGM
Program Name . . . . . . . . . . . STRCOM62
Profile to Evoke . . . . . . . . . RMTLAX
Session to Evoke . . . . . . . . . T1
Trace *YES or *NO. . . . . . . . . *NO
User ID. . . . . . . . . . . . . . QPGMR
Password . . . . . . . . . . . . . QPGMR
F1=Help F4=Prompt F5=Refresh F10=Update F12=Cancel

LU6.2 via X.25 Examples SNA LU6.2 Communications Support
8 - 42 Gentran:Server for iSeries Communications Module Release 3.5 User Guide
Example 1: Create a Profile for the Remote System
To create the remote profile, execute the following steps:
1. From the GENMAIN menu, type 1 on the command line and press Enter. The
Gentran:Server Communications menu is displayed.
2. Type 1 on the command line and press Enter. The Work with Communication panel
(EDIX400-FMT01) is displayed as shown in Figure 8.26.
3. Since you are creating a new profile, type RMTLAX in the Profile ID field.
4. Type 1 in the Option field next to the RMTLAX Profile ID and press Enter.
Figure 8.26 Work with Communications panel (EDIX400-FMT01)
EDIX400 Work with Communications EDI 04/30/08
FMT01 pgmlib: G3X5PGM dtalib:G3X5DTA 12:00:00
Position to Profile ID . . . . . .
Type option (and Information), press Enter.
1=Create 2=Revise 3=Copy 4=Delete 5=View 11=Line/Ctl/Dev
Opt Profile ID Company
1 RMTLAX
CNBTASC COMMERCE:Network via BT Async Pad
CN2BSC COMMERCE:Network RELEASE 2
CN3BSC COMMERCE:Network RELEASE 3
CN3SNA COMMERCE:Network RELEASE 3
REDINET CONTROL DATA / REDINET NETWORK
RMTDAA Remote Dial Line/Answer/ASYNC
RMTDAL Remote Dial Line/Answer/SDLC/APPC
RMTDAN Remote Dial/Answer/No X25 Network
More...
Parameters or command
===>
F1=Help F3=Exit F12=Cancel F15=Sort F23=More Options F24=More Keys

SNA LU6.2 Communications Support LU6.2 via X.25 Examples
Gentran:Server for iSeries Communications Module Release 3.5 User Guide 8 - 43
The Communication Profile panel (EDIX401-FMT01) appears, displaying the Remote Leased
Line/Answer/X25 Netwk information.
5. Fill in the panel with the data displayed in Figure 8.27.
6. Once the fields are filled, press Enter.
Figure 8.27 Communication Profile panel (EDIX401-FMT01)
EDIX401 Communication Profile EDI 04/30/08
FMT01 12:00:00
Comm Profile ID. . . . . . . . . . RMTLAX
Company. . . . . . . . . . . . . . Remote Leased Line/Answer/X25 Netwk
Contact. . . . . . . . . . . . . . Test Contact
Phone. . . . . . . . . . . . . . . ( 614 ) 555 - 1212 x
International Dial Code. . . . . .
Protocol . . . . . . . . . . . . . X62
Days to Purge. . . . . . . . . . . 999
FIFO/LIFO. . . . . . . . . . . . . F
Used Most Frequently . . . . . . . N
Update Allowed . . . . . . . . . . Y
F1=Help F4=Prompt F10=Update F12=Cancel F24=More Keys

LU6.2 via X.25 Examples SNA LU6.2 Communications Support
8 - 44 Gentran:Server for iSeries Communications Module Release 3.5 User Guide
The Communication Profile panel (EDIX401-FMT09) appears.
7. Enter the data, as shown in Figure 8.28, into the appropriate fields.
8. Once the fields are filled, press F10 (Update) to update the protocol information for this
profile.
The system returns you to panel EDIX400-FMT01. The message at the bottom of the
panel, Create Operation Successful, indicates that the profile is created.
Figure 8.28 Communication Profile panel (EDIX401-FMT09)
EDIX401 Communication Profile EDI 04/30/08
FMT09 X62 12:00:00
Comm Profile ID. . . . RMTLAX
Company. . . . . . . . Remote Leased Line/Answer/X25 Netwk
Modem Port . . . . . . LIN011 Lgl Channel Type . . . *SVCBOTH
Switched Line. . . . . N (Y/N) Lgl Channel ID . . . . 001
Inactivity Timer . . . 300 Mode Name. . . . . . . *NETATR
Session Initiator. . . *ANS X25 Password . . . . . X62TEST
Net Connection Init. . *WAIT Reverse Charge . . . . *NONE
Remote Net Addr. . . . 311012345678 DCE Support. . . . . . N (Y/N)
Local Net Addr . . . . 311012345677 Record Size. . . . . . 0080
Local Exchange ID. . . 05600006 Max Ru Size. . . . . . 1024
Remote Exchange ID . . 05600007 Modulus. . . . . . . . 8
Local Location . . . . AS400A Window Size. . . . . . 2
Remote Location. . . . ORDERNET Packet Size. . . . . . 0128
Remote Network ID. . . *NONE Wrap Data Flag . . . . Y (Y/N)
Remote Cntl Point. . . Remote Cmd Password. . *NONE
F1=Help F4=Prompt F5=Refresh F10=Update F12=Cancel F24=More Keys

SNA LU6.2 Communications Support LU6.2 via X.25 Examples
Gentran:Server for iSeries Communications Module Release 3.5 User Guide 8 - 45
Example 1: Create the Session Script for the Remote System
At this point, you have created an RMTLAX X62 profile with the correct communication
characteristics, but you still need to define how the conversation between the remote system and
Gentran:Server proceeds.
1. On the Work with Communication panel (EDIX400-FMT01), type 12 in the Option field
next to the RMTLAX Profile ID and press Enter. The Work with Communications Session
panel (EDIX402-FMT01) appears.
2. On panel EDIX402-FMT01, type 1 in the Option field and T1 in the SN field and press
Enter. The Communications Session Control panel (EDIX403-CTL01) appears.
3. Press F9 (Fold/Unfold) to see the unfolded view of panel EDIX403-CTL01. The unfolded
view of panel EDIX403-CTL01 appears, as shown in Figure 8.29.
Figure 8.29 Unfolded View of Communication Session Control panel (EDIX403-CTL01)
4. Complete the fields shown on panel EDIX403-CTL01.
5. Press F10 (Update) or Enter to add the lines to the script.
# NOTE
Please note that the local system initiates the session to the remote system, and the remote
system requires no evoke record creation. Also note that the local and remote location names
and exchange IDs appear in the opposite order (local vs. remote) between the two systems.
# NOTE
Note that the indicator (Ind) field in the script describes what Gentran:Server waits to see
before continuing to the next script step.
EDIX403 Communication Session Control EDI 04/30/08
CTL01 12:00:00
Comm Profile ID. . . . . . . . . . RMTLAX
Session Name . . . . . . . . . . . T1
Company. . . . . . . . . . . . . . Remote Leased-line/Answer/X25 Netwk
Type option, press Enter.
3=Copy Seq# 4=Delete 11=Extended Parms
Opt Seq No Tran File File Name Ind Description
10 R SP 7 RECV AWAITING READY MSG
AWAITING READY STATUS
20 C 2 SEND EVOKE COMPLETE MSG
EVOKE COMPLETE, SYSTEM READY
30 R IQ 7 RECV TEST DATA TO INB QUEUE
40 S OQ 2 SEND DATA FROM OUTQUEUE
50 R SP 8 RECV TILL END-OF-SESSION
More...
F1=Help F4=Prompt F9=Fold/Unfold F10=Update F12=Cancel F24=More Keys

LU6.2 via X.25 Examples SNA LU6.2 Communications Support
8 - 46 Gentran:Server for iSeries Communications Module Release 3.5 User Guide
You now have a Profile ID RMTLAX and a session script named T1 that you can use to begin
communications. You want the RMTLAX profile to send all data to the remote system. When the
system executes a communication job using this profile and script name, Gentran:Server waits for
the session to be initiated with the remote system and receives its data to the Inbound Queue. It
then transmits its data from the Outbound Queue. After completing the script, the communication
job ends.

SNA LU6.2 Communications Support LU6.2 via X.25 Examples
Gentran:Server for iSeries Communications Module Release 3.5 User Guide 8 - 47
LU6.2 via X.25, Example 2
Example 2: Create a Profile for the Local System
This example uses the following profiles:
LOCLDN — Local system configured for leased line, initiate the connection, X.25 switched
packet not in use
RMTLAN — Remote system configured for leased line, answer incoming calls initiated by
another system, X.25 switched packet not in use
To create the profile, execute the following steps:
1. From the GENMAIN menu, type 1 on the command line and press Enter. The
Gentran:Server Communications menu is displayed.
2. Type 1 on the command line and press Enter. The Work with Communication panel
(EDIX400-FMT01) appears, as shown in Figure 8.30.
3. Because you are creating a new profile, type LOCLDN in the Profile ID field.
4. Type 1 in the Option field next to the LOCLDN Profile ID; then press Enter.
Figure 8.30 Work with Communications panel (EDIX400-FMT01)
EDIX400 Work with Communications EDI 04/30/08
FMT01 pgmlib: G3X5PGM dtalib:G3X5DTA 12:00:00
Position to Profile ID . . . . . .
Type option (and Information), press Enter.
1=Create 2=Revise 3=Copy 4=Delete 5=View 11=Line/Ctl/Dev
Opt Profile ID Company
1 LOCLDN
LOCDDN Local Dial-Line/Dial/No X25 Network
LOCLDL Local Leased Line/Dial/SDLC/APPC
LXADDVN Dial Line/Dial/V25 CMDS/No Network
LXADDVX Dial Line/Dial/V25 CMDS/X25 Netwk
LXALDNN Leased Line/Dial/No CMDS/No Network
LXALDNX Local Leased/Dial/No CMDS/X25 Netwk
MCDONELL MCDONNELL DOUGLAS/BRITISH TELECOM
More...
Parameters or command
===>
F1=Help F3=Exit F12=Cancel F15=Sort F23=More Options F24=More Keys

LU6.2 via X.25 Examples SNA LU6.2 Communications Support
8 - 48 Gentran:Server for iSeries Communications Module Release 3.5 User Guide
The Communication Profile panel (EDIX401-FMT01) appears, displaying the Local Leased
Line/Dial/No X.25 Netwk information.
5. Fill in the panel with the data displayed in Figure 8.31 and press Enter.
Figure 8.31 Communication Profile panel (EDIX401-FMT01)
EDIX401 Communication Profile EDI 04/30/08
FMT01 12:00:00
Comm Profile ID. . . . . . . . . . LOCLDN
Company. . . . . . . . . . . . . . Local Leased Line/Dial/No X25 Netwk
Contact. . . . . . . . . . . . . . Test Contact
Phone. . . . . . . . . . . . . . . (614) 555 - 1212 x
International Dial Code. . . . . .
Protocol . . . . . . . . . . . . . X62
Days to Purge. . . . . . . . . . . 999
FIFO/LIFO. . . . . . . . . . . . . F
Used Most Frequently . . . . . . . N
Update Allowed . . . . . . . . . . Y
F1=Help F4=Prompt F10=Update F12=Cancel F24=More Keys

SNA LU6.2 Communications Support LU6.2 via X.25 Examples
Gentran:Server for iSeries Communications Module Release 3.5 User Guide 8 - 49
The Communication Profile panel (EDIX401-FMT09) appears.
6. Enter the data, as shown in Figure 8.32, into the appropriate fields.
7. Once the fields are filled, press F10 (Update) to update the protocol information for this
profile.
The system returns you to panel EDIX400-FMT01. The message at the bottom of the
panel, Create Operation Successful, indicates that the profile is created.
Figure 8.32 Communication Profile panel (EDIX401-FMT09)
EDIX401 Communication Profile EDI 04/30/08
FMT09 X62 12:00:00
Comm Profile ID. . . . LOCLDN
Company. . . . . . . . Local Leased Line/Dial/No X25 Netwk
Modem Port . . . . . . LIN032 Lgl Channel Type . . . *SVCBOTH
Switched Line. . . . . N (Y/N) Lgl Channel ID . . . . 001
Inactivity Timer . . . 300 Mode Name. . . . . . . *NETATR
Session Initiator. . . *DIAL X25 Password . . . . . X62TEST
Net Connection Init. . *LOCAL Reverse Charge . . . . *NONE
Remote Net Addr. . . . 311012345677 DCE Support. . . . . . Y (Y/N)
Local Net Addr . . . . 311012345678 Record Size. . . . . . 0080
Local Exchange ID. . . 05600007 Max Ru Size. . . . . . 1024
Remote Exchange ID . . 05600006 Modulus. . . . . . . . 8
Local Location . . . . ORDERNET Window Size. . . . . . 2
Remote Location. . . . AS400A Packet Size. . . . . . 0128
Remote Network ID. . . *NONE Wrap Data Flag . . . . Y (Y/N)
Remote Cntl Point. . . Remote Cmd Password. . *NONE
F1=Help F4=Prompt F5=Refresh F10=Update F12=Cancel F24=More Keys

LU6.2 via X.25 Examples SNA LU6.2 Communications Support
8 - 50 Gentran:Server for iSeries Communications Module Release 3.5 User Guide
Example 2: Create the Session Script for the Local System
At this point, you have created an LOCLDN profile with the correct communication
characteristics, but you still need to define how the conversation between the remote system and
Gentran:Server proceeds.
1. On the Work with Communication panel (EDIX400-FMT01), type 12 in the Option field
next to the LOCLDN Profile ID and press Enter. The Work with Communications Session
panel (EDIX402-FMT01) appears.
2. On panel EDIX402-FMT01, type 1 in the Option field and T1 in the SN field and press
Enter. The Communications Session Control panel (EDIX403-CTL01) appears.
3. Press F9 (Fold/Unfold) to see the unfolded view of panel EDIX403-CTL01. The unfolded
view of panel EDIX403-CTL01 appears, as shown in Figure 8.33 and Figure 8.34.
Figure 8.33 Unfolded View of the Communication Session Control panel
(EDIX403-CTL01)
EDIX403 Communication Session Control EDI 04/30/08
CTL01 12:00:00
Comm Profile ID. . . . . . . . . . LOCLDN
Session Name . . . . . . . . . . . T1
Company. . . . . . . . . . . . . . Local Leased Line/Dial/No X25 Netwk
Type option, press Enter.
3=Copy Seq# 4=Delete 11=Extended Parms
Opt Seq No Tran File File Name Ind Description
10 E 0 SEND EVOKE RECORD TO RMT SYS
20 C 2 SEND AWAITING READY MSG
AWAITING READY STATUS
30 R SP 7 RECV EVOKE COMPLETE MSG
EVOKE COMPLETE, SYSTEM READY
40 S OQ 2 DATA FROM THE OUTQUEUE
50 R SP 7 RECV A TEST FILE
More...
F1=Help F4=Prompt F9=Fold/Unfold F10=Update F12=Cancel F24=More Keys

SNA LU6.2 Communications Support LU6.2 via X.25 Examples
Gentran:Server for iSeries Communications Module Release 3.5 User Guide 8 - 51
Figure 8.34 Unfolded View of Communication Session Control panel
(EDIX403-CTL01) (Cont’d)
4. Page Down and complete the fields shown on panel EDIX403-CTL01.
5. Press F10 (Update) or Enter to add the lines to the script.
# NOTE
Note that the indicator (Ind) field in the script describes what Gentran:Server waits to see
before continuing to the next script step.
EDIX403 Communication Session Control EDI 04/30/08
CTL01 12:00:00
Comm Profile ID. . . . . . . . . . LOCLDN
Session Name . . . . . . . . . . . T1
Company. . . . . . . . . . . . . . Local Leased Line/Dial/No X25 Network
Type option, press Enter.
3=Copy Seq# 4=Delete 11=Extended Parms
Opt Seq No Tran File File Name Ind Description
60 C 2 END THE SESSION
$$EOS
More...
F1=Help F4=Prompt F9=Fold/Unfold F10=Update F12=Cancel F24=More Keys

LU6.2 via X.25 Examples SNA LU6.2 Communications Support
8 - 52 Gentran:Server for iSeries Communications Module Release 3.5 User Guide
If the script contains an Evoke (E type) record when the record is added, you are automatically
taken to the Communication Evoke panel (EDIX43C-FMT01), as shown in Figure 8.35 to
complete the creation of the evoke record.
6. After completing the Evoke record, press F10 (Update). Once the Evoke record is
properly created on panel EDIX43C-FMT01, you only need to update it when revisions
are necessary.
CAUTION
STOP
You must press F10 before leaving panel EDIX43C-FMT01 or the system will not save your
work and the Evoke record and the script you created will not be usable.
Figure 8.35 Communication Evoke panel (EDIX43C-FMT01)
You now have a Profile ID LOCLDN and a session script named T1 that you can use to begin
communications. You want the LOCLDN profile to send all data to the remote system. When the
system executes a communication job using this profile and script name, Gentran:Server initiates a
session with the remote system and sends its data from the Outbound Queue. It then receives data
to a spool file. After completing the script, the communication job ends.
EDIX43C Communication Evoke EDI 04/30/08
FMT01 12:00:00
Comm Profile ID. . . . . . . . . . LOCLDN
Session Name . . . . . . . . . . . T1
Company. . . . . . . . . . . . . . Local Leased Line/Dial/No X25 Netwk
Library Name . . . . . . . . . . . G7X0PGM
Program Name . . . . . . . . . . . STRCOM62
Profile to Evoke . . . . . . . . . RMTLAN
Session to Evoke . . . . . . . . . T1
Trace *YES or *NO. . . . . . . . . *NO
User ID. . . . . . . . . . . . . . QPGMR
Password . . . . . . . . . . . . . QPGMR
F1=Help F4=Prompt F5=Refresh F10=Update F12=Cancel

SNA LU6.2 Communications Support LU6.2 via X.25 Examples
Gentran:Server for iSeries Communications Module Release 3.5 User Guide 8 - 53
Revise the Evoke Record
If you need to revise the existing Evoke record, execute the following steps:
1. On the Work with Communication panel (EDIX400-FMT01), type 12 in the Option field
next to the LOCLDN Profile ID and press Enter. The Work with Communications Session
panel (EDIX402-FMT01) appears.
2. On panel EDIX402-FMT01, type 2 in the Option field next to T1 in the SN field and press
Enter. The Communications Session Control panel (EDIX403-CTL01) appears.
3. Press F13 (Services), and a Service Menu window appears.
4. In the Service field, type 1 for Communication Evoke.
The Communication Evoke panel (EDIX43C-FMT01) appears and displays the current
contents of the Evoke record. You may now make any necessary changes.

LU6.2 via X.25 Examples SNA LU6.2 Communications Support
8 - 54 Gentran:Server for iSeries Communications Module Release 3.5 User Guide
Example 2: Create a Profile for the Remote System
To create the remote profile, execute the following steps:
1. From the GENMAIN menu, type 1 on the command line and press Enter. The
Gentran:Server Communications menu is displayed.
2. Type 1 on the command line and press Enter. The Work with Communication panel
(EDIX400-FMT01) is displayed, as shown in Figure 8.36.
3. Because you are creating a new profile, type RMTLAN in the Profile ID field.
4. Type 1 in the Option field next to the RMTLAN Profile ID, then press Enter.
Figure 8.36 Work with Communications panel (EDIX400-FMT01)
EDIX400 Work with Communications EDI 04/30/08
FMT01 pgmlib: G3X5PGM dtalib:G3X5DTA 12:00:00
Position to Profile ID . . . . . .
Type option (and Information), press Enter.
1=Create 2=Revise 3=Copy 4=Delete 5=View 11=Line/Ctl/Dev
Opt Profile ID Company
1 RMTLAN
CNBTASC COMMERCE:Network via BT Async Pad
CN2BSC COMMERCE:Network RELEASE 2
CN3BSC COMMERCE:Network RELEASE 3
CN3SNA COMMERCE:Network RELEASE 3
REDINET CONTROL DATA / REDINET NETWORK
RMTDAA Remote Dial Line/Answer/ASYNC
RMTDAL Remote Dial Line/Answer/SDLC/APPC
RMTDAN Remote Dial/Answer/No X25 Network
More...
Parameters or command
===>
F1=Help F3=Exit F12=Cancel F15=Sort F23=More Options F24=More Keys

SNA LU6.2 Communications Support LU6.2 via X.25 Examples
Gentran:Server for iSeries Communications Module Release 3.5 User Guide 8 - 55
The Communication Profile panel (EDIX401-FMT01) appears, displaying the Remote Leased
Line/Answer/No X25 Netwk information.
5. Fill in the panel with the data displayed in Figure 8.37.
6. Once the fields are filled, press Enter.
Figure 8.37 Communication Profile panel (EDIX401-FMT01)
EDIX401 Communication Profile EDI 04/30/08
FMT01 12:00:00
Comm Profile ID. . . . . . . . . . RMTLAN
Company. . . . . . . . . . . . . . Remote Leased Lin/Answer/No X25 Netw
Contact. . . . . . . . . . . . . . Test Contact
Phone. . . . . . . . . . . . . . . ( 614 ) 555 - 1212 x
International Dial Code. . . . . .
Protocol . . . . . . . . . . . . . X62
Days to Purge. . . . . . . . . . . 999
FIFO/LIFO. . . . . . . . . . . . . F
Used Most Frequently . . . . . . . N
Update Allowed . . . . . . . . . . Y
F1=Help F4=Prompt F10=Update F12=Cancel F24=More Keys

LU6.2 via X.25 Examples SNA LU6.2 Communications Support
8 - 56 Gentran:Server for iSeries Communications Module Release 3.5 User Guide
The Communication Profile panel (EDIX401-FMT09) appears.
7. Enter the data, as shown in Figure 8.38, into the appropriate fields.
8. Once the fields are filled, press F10 (Update) to update the protocol information for this
profile. The system returns you to panel EDIX400-FMT01. The message at the bottom of
the panel, Create Operation Successful, indicates that the profile is created.
Figure 8.38 Communication Profile panel (EDIX401-FMT09)
EDIX401 Communication Profile EDI 04/30/08
FMT09 X62 12:00:00
Comm Profile ID. . . . RMTLAN
Company. . . . . . . . Remote Lease Lin/Answer/No X25 Netw
Modem Port . . . . . . LIN011 Lgl Channel Type . . . *SVCBOTH
Switched Line. . . . . N (Y/N) Lgl Channel ID . . . . 001
Inactivity Timer . . . 300 Mode Name. . . . . . . *NETATR
Session Initiator. . . *ANS X25 Password . . . . . X62TEST
Net Connection Init. . *REMOTE Reverse Charge . . . . *NONE
Remote Net Addr. . . . 311012345678 DCE Support. . . . . . N (Y/N)
Local Net Addr . . . . 311012345677 Record Size. . . . . . 0080
Local Exchange ID. . . 05600006 Max Ru Size. . . . . . 1024
Remote Exchange ID . . 05600007 Modulus. . . . . . . . 8
Local Location . . . . AS400A Window Size. . . . . . 2
Remote Location. . . . ORDERNET Packet Size. . . . . . 0128
Remote Network ID. . . *NONE Wrap Data Flag . . . . Y (Y/N)
Remote Cntl Point. . . Remote Cmd Password. . *NONE
F1=Help F4=Prompt F5=Refresh F10=Update F12=Cancel F24=More Keys

SNA LU6.2 Communications Support LU6.2 via X.25 Examples
Gentran:Server for iSeries Communications Module Release 3.5 User Guide 8 - 57
Example 2: Create the Session Script for the Remote System
At this point, you have created an RMTLAN X62 profile with the correct communication
characteristics, but you still need to define how the conversation between LU6.2, without X.25,
and Gentran:Server proceeds.
1. On the Work with Communication panel (EDIX400-FMT01), type 12 in the Option field
next to the RMTLAN Profile ID and press Enter. The Work with Communications Session
panel (EDIX402-FMT01) appears.
2. On panel EDIX402-FMT01, type 1 in the Option field and T1 in the SN field and press
Enter. The Communications Session Control panel (EDIX403-CTL01) appears.
3. Press F9 (Fold/Unfold) to see the unfolded view of panel EDIX403-CTL01. The unfolded
view of panel EDIX403-CTL01 appears, as shown in Figure 8.39.
Figure 8.39 Unfolded View of Communication Session Control panel (EDIX403-CTL01)
4. Complete the fields shown on panel EDIX403-CTL01.
5. Press F10 (Update) or Enter to add the lines to the script.
# NOTE
Please note that the local system initiates the session to the remote system, and the remote
system requires no evoke record creation. Also note that the local and remote location names
and exchange IDs appear in the opposite order (local vs. remote) between the two systems.
You now have a Profile ID RMTLAN and a session script named T1 that you can use to begin
communications. You want the RMTLAN profile to receive all data to Inbound Queue. When the
system executes a communication job using this profile and script name, Gentran:Server waits for
a session to be initiated with the remote system and receives its data from the Inbound Queue. It
then transmits its data from the Outbound Queue. After completing the script, the communication
job ends.
EDIX403 Communication Session Control EDI 04/30/08
CTL01 12:00:00
Comm Profile ID. . . . . . . . . . RMTLAN
Session Name . . . . . . . . . . . T1
Company. . . . . . . . . . . . . . Remote Leased-line/Answer/X25 Netwk
Type option, press Enter.
3=Copy Seq# 4=Delete 11=Extended Parms
Opt Seq No Tran File File Name Ind Description
10 R SP 7 RECV AWAITING READY MSG
AWAITING READY STATUS
20 C 2 SEND EVOKE COMPLETE MSG
EVOKE COMPLETE, SYSTEM READY
30 R IQ 7 RECV TEST DATA TO INB QUEUE
40 S OQ 2 SEND FROM OUTQUE
50 R SP 8 RECV TILL END-OF-SESSION
More...
F1=Help F4=Prompt F9=Fold/Unfold F10=Update F12=Cancel F24=More Keys

LU6.2 via X.25 Examples SNA LU6.2 Communications Support
8 - 58 Gentran:Server for iSeries Communications Module Release 3.5 User Guide
LU6.2 via X.25, Example 3
Example 3: Create a Profile for the Local System
This example uses the following profiles:
LOCDDN — Local system configured for dial-up line, initiate the connection, X.25 switched
packet not in use
RMTDAN — Remote system configured for dial-up line, answer incoming calls initiated by
another system, X.25 switched packet not in use
To create the profile, execute the following steps:
1. From the GENMAIN menu, type 1 on the command line and press Enter. The
Gentran:Server Communications menu is displayed.
2. Type 1 on the command line and press Enter. The Work with Communication panel
(EDIX400-FMT01) is displayed, as shown in Figure 8.40.
3. Because you are creating a new profile, type LOCDDN in the Profile ID field.
4. Type 1 in the Option field next to the LOCDDN Profile ID and press Enter.
Figure 8.40 Work with Communications panel (EDIX400-FMT01)
EDIX400 Work with Communications EDI 04/30/08
FMT01 pgmlib: G3X5PGM dtalib:G3X5DTA 12:00:00
Position to Profile ID . . . . . .
Type option (and Information), press Enter.
1=Create 2=Revise 3=Copy 4=Delete 5=View 11=Line/Ctl/Dev
Opt Profile ID Company
1 LOCDDN
LOCLDL Local Leased Line/Dial/SDLC/APPC
LOCLDN Local Leased Line/Dial/No X25 Netwk
LXADDVN Dial Line/Dial/V25 CMDS/No Network
LXADDVX Dial Line/Dial/V25 CMDS/X25 Netwk
LXALDNN Leased Line/Dial/No CMDS/No Network
LXALDNX Local Leased/Dial/No CMDS/X25 Netwk
MCDONELL MCDONNELL DOUGLAS/BRITISH TELECOM
More...
Parameters or command
===>
F1=Help F3=Exit F12=Cancel F15=Sort F23=More Options F24=More Keys

SNA LU6.2 Communications Support LU6.2 via X.25 Examples
Gentran:Server for iSeries Communications Module Release 3.5 User Guide 8 - 59
The Communication Profile panel (EDIX401-FMT01) appears, displaying the Local
Dial-Line/Dial/No X.25 Network information.
5. Fill in the panel with the data displayed in Figure 8.41 and press Enter.
Figure 8.41 Communication Profile panel (EDIX401-FMT01)
EDIX401 Communication Profile EDI 04/30/08
FMT01 12:00:00
Comm Profile ID. . . . . . . . . . LOCDDN
Company. . . . . . . . . . . . . . Local Dial-Line/Dial/No X25 Netwk
Contact. . . . . . . . . . . . . . Test Contact
Phone. . . . . . . . . . . . . . . (614) 555 - 1212 x
International Dial Code. . . . . .
Protocol . . . . . . . . . . . . . X62
Days to Purge. . . . . . . . . . . 999
FIFO/LIFO. . . . . . . . . . . . . F
Used Most Frequently . . . . . . . N
Update Allowed . . . . . . . . . . Y
F1=Help F4=Prompt F10=Update F12=Cancel F24=More Keys

LU6.2 via X.25 Examples SNA LU6.2 Communications Support
8 - 60 Gentran:Server for iSeries Communications Module Release 3.5 User Guide
The Communication Profile panel (EDIX401-FMT09) appears.
6. Enter the data, as shown in Figure 8.42, into the appropriate fields.
7. Once the fields are filled, press F10 (Update) to update the protocol information for this
profile.
The system returns you to panel EDIX400-FMT01. The message at the bottom of the
panel, Create Operation Successful, indicates that the profile is created.
Figure 8.42 Communication Profile panel (EDIX401-FMT09)
EDIX401 Communication Profile EDI 04/30/08
FMT09 X62 12:00:00
Comm Profile ID. . . . LOCDDN
Company. . . . . . . . Local Dial-Line/Dial/No X25 Network
Modem Port . . . . . . LIN032 Lgl Channel Type . . . *SVCBOTH
Switched Line. . . . . Y (Y/N) Lgl Channel ID . . . . 001
Inactivity Timer . . . 300 Mode Name. . . . . . . BLANK
Session Initiator. . . *DIAL X25 Password . . . . . X62TEST
Net Connection Init. . *LOCAL Reverse Charge . . . . *NONE
Remote Net Addr. . . . 311012345677 DCE Support. . . . . . Y (Y/N)
Local Net Addr . . . . 311012345678 Record Size. . . . . . 0080
Local Exchange ID. . . 05600007 Max Ru Size. . . . . . 1024
Remote Exchange ID . . 05600006 Modulus. . . . . . . . 8
Local Location . . . . ORDERNET Window Size. . . . . . 2
Remote Location. . . . AS400A Packet Size. . . . . . 0128
Remote Network ID. . . *NONE Wrap Data Flag . . . . Y (Y/N)
Remote Cntl Point. . . Remote Cmd Password. . *NONE
Retries. . . . . . . . 02 Auto Dial. . . . . . . Y (Y/N)
Auto Call Unit . . . . V Auto Call Port . . . .
Dial . . . . . . . . . 5551212
F1=Help F4=Prompt F5=Refresh F10=Update F12=Cancel F24=More Keys

SNA LU6.2 Communications Support LU6.2 via X.25 Examples
Gentran:Server for iSeries Communications Module Release 3.5 User Guide 8 - 61
Example 3: Create the Session Script for the Local System
At this point, you have created an LOCDDN profile with the correct communication
characteristics, but you still need to define how the conversation between the remote system and
Gentran:Server proceeds.
1. On the Work with Communication panel (EDIX400-FMT01), type 12 in the Option field
next to the LOCDDN Profile ID and press Enter. The Work with Communications Session
panel (EDIX402-FMT01) appears.
2. On panel EDIX402-FMT01, type 1 in the Option field and T1 in the SN field and press
Enter. The Communications Session Control panel (EDIX403-CTL01) appears.
3. Press F9 (Fold/Unfold) to see the unfolded view of panel EDIX403-CTL01. The unfolded
view of panel EDIX403-CTL01 appears, as shown in Figure 8.43 and Figure 8.44.
Figure 8.43 Unfolded View of the Communication Session Control panel
(EDIX403-CTL01)
EDIX403 Communication Session Control EDI 04/30/08
CTL01 12:00:00
Comm Profile ID. . . . . . . . . . LOCDDN
Session Name . . . . . . . . . . . T1
Company. . . . . . . . . . . . . . Local Dial-Line/Dial/No X25 Netwk
Type option, press Enter.
3=Copy Seq# 4=Delete 11=Extended Parms
Opt Seq No Tran File File Name Ind Description
10 E 0 SEND EVOKE RECORD TO RMT SYS
20 C 2 SEND AWAITING READY MSG
AWAITING READY STATUS
30 R SP 7 RECV EVOKE COMPLETE MSG
EVOKE COMPLETE, SYSTEM READY
40 S OQ 2 SEND FROM OUTQUE
50 R SP 7 RECV A TEST FILE
More...
F1=Help F4=Prompt F9=Fold/Unfold F10=Update F12=Cancel F24=More Keys

LU6.2 via X.25 Examples SNA LU6.2 Communications Support
8 - 62 Gentran:Server for iSeries Communications Module Release 3.5 User Guide
Figure 8.44 Unfolded View of Communication Session Control panel
(EDIX403-CTL01)(Cont’d)
4. Page Down and complete the fields shown on panel EDIX403-CTL01.
5. Press F10 (Update) or Enter to add the lines to the script.
If the script contains an Evoke (E type) record when the record is added, you are
automatically taken to the Communication Evoke panel (EDIX43C-FMT01), as shown in
Figure 8.45, to complete the creation of the evoke record.
6. After completing the Evoke record, press F10 (Update). Once the Evoke record is
properly created on panel EDIX43C-FMT01, you only need to update it when revisions
are necessary.
CAUTION
STOP
You must press F10 before leaving panel EDIX43C-FMT01 or the system will not save your
work and the Evoke record and the script you created will not be usable.
EDIX403 Communication Session Control EDI 04/30/08
CTL01 12:00:00
Comm Profile ID. . . . . . . . . . LOCDDN
Session Name . . . . . . . . . . . T1
Company. . . . . . . . . . . . . . Local Dial-Line/Dial/No X25 Network
Type option, press Enter.
3=Copy Seq# 4=Delete 11=Extended Parms
Opt Seq No Tran File File Name Ind Description
60 C 2 END THE SESSION
$$EOS
More...
F1=Help F4=Prompt F9=Fold/Unfold F10=Update F12=Cancel F24=More Keys

SNA LU6.2 Communications Support LU6.2 via X.25 Examples
Gentran:Server for iSeries Communications Module Release 3.5 User Guide 8 - 63
Figure 8.45 Communication Evoke panel (EDIX43C-FMT01)
You now have a Profile ID LOCDDN and a session script named T1 that you can use to begin
communications. You want the LOCDDN profile to send all data to the remote system. When the
system executes a communication job using this profile and script name, Gentran:Server initiates a
session with the remote system and sends its data from the Outbound Queue then receives data to a
spool file. After completing the script, the communication job ends.
Revise the Evoke Record
If you need to revise the Evoke record, execute the following steps:
1. On the Work with Communication panel (EDIX400-FMT01), type 12 in the Option field
next to the LOCDDN Profile ID and press Enter. The Work with Communications Session
panel (EDIX402-FMT01) appears.
2. On panel EDIX402-FMT01, type 2 in the Option field next to T1 in the SN field and press
Enter. The Communications Session Control panel (EDIX403-CTL01) appears.
3. Press F13 (Services), and a Service Menu window appears.
4. In the Service field, type 1 for Communication Evoke. The Communication Evoke panel
(EDIX43C-FMT01) appears and displays the current contents of the Evoke record. You
may now make any necessary changes.
EDIX43C Communication Evoke EDI 04/30/08
FMT01 12:00:00
Comm Profile ID. . . . . . . . . . LOCDDN
Session Name . . . . . . . . . . . T1
Company. . . . . . . . . . . . . . Local Dial-Line/Dial/No X25 Network
Library Name . . . . . . . . . . . G7X0PGM
Program Name . . . . . . . . . . . STRCOM62
Profile to Evoke . . . . . . . . . RMTDAN
Session to Evoke . . . . . . . . . T1
Trace *YES or *NO. . . . . . . . . *YES
User ID. . . . . . . . . . . . . . QPGMR
Password . . . . . . . . . . . . . QPGMR
F1=Help F4=Prompt F5=Refresh F10=Update F12=Cancel

LU6.2 via X.25 Examples SNA LU6.2 Communications Support
8 - 64 Gentran:Server for iSeries Communications Module Release 3.5 User Guide
Example 3: Create a Profile for the Remote System
To create the remote profile, execute the following steps:
1. From the GENMAIN menu, type 1 on the command line and press Enter. The
Gentran:Server Communications menu is displayed.
2. Type 1 on the command line and press Enter. The Work with Communication panel
(EDIX400-FMT01) is displayed, as shown in Figure 8.46.
3. Because you are creating a new profile, type RMTDAN in the Profile ID field.
4. Type 1 in the Option field next to the RMTDAN Profile ID, then press Enter.
Figure 8.46 Work with Communications panel (EDIX400-FMT01)
EDIX400 Work with Communications EDI 04/30/08
FMT01 pgmlib: G3X5PGM dtalib:G3X5DTA 12:00:00
Position to Profile ID . . . . . .
Type option (and Information), press Enter.
1=Create 2=Revise 3=Copy 4=Delete 5=View 11=Line/Ctl/Dev
Opt Profile ID Company
1 RMTDAN
CNBTASC COMMERCE:Network via BT Async Pad
CN2BSC COMMERCE:Network RELEASE 2
CN3BSC COMMERCE:Network RELEASE 3
CN3SNA COMMERCE:Network RELEASE 3
REDINET CONTROL DATA / REDINET NETWORK
RMTDAA Remote Dial Line/Answer/ASYNC
RMTDAL Remote Dial Line/Answer/SDLC/APPC
More...
Parameters or command
===>
F1=Help F3=Exit F12=Cancel F15=Sort F23=More Options F24=More Keys

SNA LU6.2 Communications Support LU6.2 via X.25 Examples
Gentran:Server for iSeries Communications Module Release 3.5 User Guide 8 - 65
The Communication Profile panel (EDIX401-FMT01) appears, displaying the Remote Dial
Line/Answer/No X25 Netwk information
5. Fill in the panel with the data displayed in Figure 8.47.
6. Once the fields are filled, press Enter.
Figure 8.47 Communication Profile panel (EDIX401-FMT01)
EDIX401 Communication Profile EDI 04/30/08
FMT01 12:00:00
Comm Profile ID. . . . . . . . . . RMTDAN
Company. . . . . . . . . . . . . . Remote Dial Line/Answer/No X25 Netwk
Contact. . . . . . . . . . . . . . Test Contact
Phone. . . . . . . . . . . . . . . ( 614 ) 555 - 1212 x
International Dial Code. . . . . .
Protocol . . . . . . . . . . . . . X62
Days to Purge. . . . . . . . . . . 999
FIFO/LIFO. . . . . . . . . . . . . F
Used Most Frequently . . . . . . . N
Update Allowed . . . . . . . . . . Y
F1=Help F4=Prompt F10=Update F12=Cancel F24=More Keys

LU6.2 via X.25 Examples SNA LU6.2 Communications Support
8 - 66 Gentran:Server for iSeries Communications Module Release 3.5 User Guide
The Communication Profile panel (EDIX401-FMT09) appears.
7. Enter the data, as shown in Figure 8.48, into the appropriate fields.
8. Once the fields are filled, press F10 (Update) to update the protocol information for this
profile.
The system returns you to panel EDIX400-FMT01. The message at the bottom of the
panel, Create Operation Successful, indicates that the profile is created.
Figure 8.48 Communication Profile panel (EDIX401-FMT09)
EDIX401 Communication Profile EDI 04/30/08
FMT09 X62 12:00:00
Comm Profile ID. . . . RMTDAN
Company. . . . . . . . Remote Dial/Answer/No X25 Network
Modem Port . . . . . . LIN011 Lgl Channel Type . . . *SVCBOTH
Switched Line. . . . . N (Y/N) Lgl Channel ID . . . . 001
Inactivity Timer . . . 300 Mode Name. . . . . . . *NETATR
Session Initiator. . . *ANS X25 Password . . . . . X62TEST
Net Connection Init. . *REMOTE Reverse Charge . . . . *NONE
Remote Net Addr. . . . 311012345678 DCE Support. . . . . . N (Y/N)
Local Net Addr . . . . 311012345677 Record Size. . . . . . 0080
Local Exchange ID. . . 05600006 Max Ru Size. . . . . . 1024
Remote Exchange ID . . 05600007 Modulus. . . . . . . . 8
Local Location . . . . AS400A Window Size. . . . . . 2
Remote Location. . . . ORDERNET Packet Size. . . . . . 0128
Remote Network ID. . . *NONE Wrap Data Flag . . . . Y (Y/N)
Remote Cntl Point. . . Remote Cmd Password. . *NONE
F1=Help F4=Prompt F5=Refresh F10=Update F12=Cancel F24=More Keys

SNA LU6.2 Communications Support LU6.2 via X.25 Examples
Gentran:Server for iSeries Communications Module Release 3.5 User Guide 8 - 67
Example 3: Create the Session Script for the Remote System
At this point, you have created an RMTDAN X62 profile with the correct communication
characteristics, but you still need to define how the conversation between LU6.2 without X.25 and
Gentran:Server proceeds.
1. On the Work with Communication panel (EDIX400-FMT01), type 12 in the Option field
next to the RMTDAN Profile ID and press Enter. The Work with Communications Session
panel (EDIX402-FMT01) appears.
2. On panel EDIX402-FMT01, type 1 in the Option field and T1 in the SN field and press
Enter. The Communications Session Control panel (EDIX403-CTL01) appears.
3. Press F9 (Fold/Unfold) to see the unfolded view of panel EDIX403-CTL01. The unfolded
view of panel EDIX403-CTL01 appears, as shown in Figure 8.49.
Figure 8.49 Unfolded View of Communication Session Control panel (EDIX403-CTL01)
4. Complete the fields shown on panel EDIX403-CTL01.
5. Press F10 (Update) or Enter to add the lines to the script.
# NOTE
Please note that the local system initiates the session to the remote system, and the remote
system requires no evoke record creation. Also note that the local and remote location names
and exchange IDs appear in the opposite order (local vs. remote) between the two systems.
You now have a Profile ID RMTDAN and a session script named T1 that you can use to begin
communications. You want the RMTDAN profile to send all data to the remote system. When the
system executes a communication job using this profile and script name, Gentran:Server initiates a
session with the remote system and receives data to the Inbound Queue. It then sends data from the
Outbound Queue and waits for the other system to end the session. After completing the script, the
communication job ends.
EDIX403 Communication Session Control EDI 04/30/08
CTL01 12:00:00
Comm Profile ID. . . . . . . . . . RMTDAN
Session Name . . . . . . . . . . . T1
Company. . . . . . . . . . . . . . Remote Dial Line/Answer/No X25 Netwk
Type option, press Enter.
3=Copy Seq# 4=Delete 11=Extended Parms
Opt Seq No Tran File File Name Ind Description
10 R SP 7 RECV AWAITING READY MSG
AWAITING READY STATUS
20 C 2 SEND EVOKE COMPLETE MSG
EVOKE COMPLETE, SYSTEM READY
30 R IQ 7 RECV TEST DATA TO INB QUEUE
40 S OQ 2 SEND FROM QUE
50 R SP 8 RECV TILL END-OF-SESSION
More...
F1=Help F4=Prompt F9=Fold/Unfold F10=Update F12=Cancel F24=More Keys

LU6.2 via X.25 Examples SNA LU6.2 Communications Support
8 - 68 Gentran:Server for iSeries Communications Module Release 3.5 User Guide

Chapter
Gentran:Server for iSeries Communications Module Release 3.5 User Guide 9 - 1
9Asynchronous
Communication
Support
# NOTE
This feature is an optional add-on product that may be purchased separately.
The following section discusses various aspects of the asynchronous communication support and
considerations for its use.
Overview of Asynchronous Data
Transmission
“Asynchronous data transmission” means that characters are transmitted at no particular interval.
Asynchronous lines are often referred to as “start/stop” lines because of this unsteady transmission
of characters. This makes asynchronous communication ideal for communicating with TTY type
devices, which may receive input from a human operator at a keyboard. However, because these
devices are generally not “intelligent,” there is no inherent protocol to provide functions such as
error detection and correction. Although there are many file transfer protocols that can operate
over asynchronous connections, they are not standardized. Therefore, many asynchronous hosts
simply transmit and receive streams of characters without using any higher level protocol. This
enables communication with even the simplest of devices, but it places the burden of error
detection and correction on the hardware or application software.
Asynchronous Protocols
Asynchronous communication support within this product is invoked by executing a
communication session for a communication profile that specifies protocol type ASC, ASX, OFA,
OFX, or XAS, OFT.
Protocol type ASC supports communication with asynchronous devices that require plain
ASCII text (TTY) and/or ZMODEM file transfer protocol.
Protocol type ASX supports communication with standard asynchronous devices that
implement the XMODEM file transfer protocol.

Modem Considerations Asynchronous Communication Support
9 - 2 Gentran:Server for iSeries Communications Module Release 3.5 User Guide
Protocol type OFA supports communication with asynchronous devices that implement the
ODETTE file transfer protocol (OFTP).
Protocol type OFX supports communication with asynchronous devices that implement the
ODETTE file transfer protocol (OFTP) over an X.25 connection.
Protocol type XAS supports asynchronous communication via X.25 connections.
Protocol type OFT supports communication over a TCP/IP connection with other devices
that implement the ODETTE File Transfer protocol.
Typically, ASC is used for communications using an asynchronous modem, However
communication with other serially attached asynchronous devices can potentially be
accomplished. An asynchronous modem can be used to communicate with any other asynchronous
system, such as an X.25 network PAD (X.28), or a personal computer.
XAS supports a connection that is typically a leased line to an X.25 network. However, dial-up
X.25 (X.32) is also supported, as well as direct X.25 connection to another iSeries without using
an X.25 network.
# NOTE
SEE the “XMODEM Support” and “OFTP Support” chapters for more information on ASX,
OFA, and OFX.
Even though OFTP over TCP/IP is not ‘asynchronous’ in the sense of the other protocol options,
where you must configure the data link layer, modems, and so forth, because the OFTP protocol
engine is contained in Gentran’s Asynchronous Communication Module. Because of this, OFTP
over TCP/IP has been included in the list of asynchronous protocols.
# NOTE
The OFTP protocol engine is contained in the Gentran Asynchronous communication
module, OFTP over TCP/IP has been included in this list of asynchronous protocols.
Modem Considerations
There are several factors that must be considered when configuring your modems for use with this
software. These considerations generally apply to a switched-line environment. They are
explained in the following paragraphs. This software was tested for operation over switched lines
using the following modems:
Profile Type Dialing Command Operating Mode Modems Tested
ASC, ASX, OFA AT commands Asynchronous UDS V.3225,
UDS V.3229,
IBM 7855-10

Asynchronous Communication Support Error Detection and Correction
Gentran:Server for iSeries Communications Module Release 3.5 User Guide 9 - 3
Any modem-specific information in the following discussions should only be considered
applicable to the modems that were tested.
# NOTE
Other modems can be used in addition to the ones listed, but it is the customer’s
responsibility to configure them.
Error Detection and Correction
CAUTION
STOP
Use of this software without error correcting communication hardware is strongly
discouraged.
When using an asynchronous profile, always use error correcting modems. To ensure the integrity
of the data that is transmitted and received, both your modem and the remote modem must support
error correction (MNP, LAPM or V.42), and they must establish an error correcting connection. To
guarantee that an error correcting connection is established, you should configure your modem to
disconnect if an error correcting connection cannot be established. If the two modems are allowed
to connect without some type of error control, the integrity of your data can be seriously
jeopardized.
Because MNP negotiation occurs after the modems have connected, communication session
control scripts for connections that are to use MNP error control should allow some time for the
modems to perform the MNP negotiation. This can be achieved by coding your script as follows:
Make the first script step a Data Trap (D-type) record.
Set the Command field to INTENTIONAL NO MATCH.
Set the Receive Timer value to 10 seconds.
Set the Timeout Continue flag to Y.
Error correction is not an issue for X.25 connections (XAS profiles). When using an XAS profile
over a switched line, synchronous HDLC protocol is used, and this ensures reliable data transfer to
the next network node.
ASC, ASX, OFA V.25bis async Asynchronous IBM 7855-10
XAS, OFX V.25bis sync Synchronous UDS V.3225,
UDS V.3229
Profile Type Dialing Command Operating Mode Modems Tested

Clear To Send Asynchronous Communication Support
9 - 4 Gentran:Server for iSeries Communications Module Release 3.5 User Guide
Clear To Send
In order for the iSeries to send initialization and dial commands to the modem, the modem must
present the Clear To Send (CTS) signal on the serial interface to the iSeries. Most asynchronous
modems (or sync/async modems operating in async mode) hold CTS high by default. Make sure
that this is the default for the modem that you intend to use. If it is not the default, you must
configure the modem to present CTS at all times.

Asynchronous Communication Support AT or V.25bis Command Set
Gentran:Server for iSeries Communications Module Release 3.5 User Guide 9 - 5
AT or V.25bis Command Set
There are no command set options for XAS profiles. XAS profiles require the modem to be
configured for synchronous operation, and this disables their asynchronous command capability.
Switched XAS profiles configured for autodial only work with V.25bis SDLC dialing modems.
ASC profiles offer a choice of which asynchronous command set should be used to control the
modem. The Command Set field in the profile may be set to the following values:
A (AT command set)
V (V.25bis async command set)
N (no command set)
The AT command set option should support most typical AT command capable modems, although
testing of this software was performed using the UDS V.3225, UDS V.3229, and IBM 7855-10.
The V.25bis option is for use with modems that support the V.25bis asynchronous command set as
implemented on the IBM 7855-10 modem.
# NOTE
Use of AT command capable modems and the AT command set is recommended for ASC
profiles.
N — When N is selected, the modem is expected to be configured with AT commands
disabled. No initialization or dial commands are sent to the modem. The modem should be
configured to dial on DTR or have a manual dial performed by the operator. No result
messages are expected from the modem.
A — When A is selected, the modem is expected to respond to the AT command set with the
result messages defined in the Modem OK Message and Modem Connect Message fields in
the profile. Before any dial commands are sent to the modem, an attention command
consisting of AT<CR> (<CR> = Carriage Return) is sent.
V — When V is selected, the modem is expected to respond to the asynchronous V.25bis
command set, as implemented by the IBM 7855-10 modem. The modem is expected to
respond with the result messages defined in the Modem OK Message and Modem Connect
Message fields in the profile. Before any dial commands are sent to the modem, an attention
command consisting of CNL<CR> is sent.
After the attention command is sent to the modem, the modem is expected to respond with the
string defined in the Modem OK Message field in the profile. If this response is not received, a
break sequence, consisting of a series of three of the characters defined in the Modem Break
Character field, is sent. If the Modem OK Message is not received after the break sequence is sent,
the session terminates with a message in the joblog indicating that the Modem failed to
respond to the Attn/Break sequence.
Default Modem Strings in the Profile Asynchronous Communication Support
9 - 6 Gentran:Server for iSeries Communications Module Release 3.5 User Guide
Default Modem Strings in the Profile
ASC communication profiles operating over switched lines and configured for Command Set A or
V control the local modem using commands and response messages that are defined in the
communication profile. When an ASC profile is created, the modem Command Set defaults to A
for AT commands. Likewise, modem commands and responses suitable for AT command capable
modems are assigned. These defaults are as follows:
If you are configuring a communication profile for use with a modem requiring the V.25bis
command set as implemented by the IBM 7855-10, you must change the modem strings
accordingly. The equivalent values for the V.25bis command set are as follows:
The defaults shown in the previous charts should work with many modems. However they may not
address all of the configuration needs for your particular application. This is because the AT
command set is not a true standard. While the V.25bis async command set is a standard, it does not
include a full set of modem configuration commands, and must, therefore, adopt portions of the
nonstandard AT command set to perform modem configuration. For information on the commands
and result strings used by your particular modem, consult the documentation provided by the
modem manufacturer.
Profile Field Default Value
Modem Auto-Answer Command ATS0=1
Modem Init. Command ATQ0V1X4
Modem OK Message OK<CR><LF>
Modem Connect Message CONNECT<?><CR><LF>
Profile Field Default Value
Modem Auto-Answer Command CNLS0=1
Modem Init. Command CNLQ0V1X4
Modem OK Message VAL<CR><LF>
Modem Connect Message CNX<CR><LF>

Asynchronous Communication Support Modem Initialization Commands
Gentran:Server for iSeries Communications Module Release 3.5 User Guide 9 - 7
Modem Initialization Commands
Initialization commands are not sent to the modem for XAS profiles, since XAS profiles require
the modem to be configured for synchronous operation, which disables their asynchronous
command capability.
ASC profiles transmit an initialization command to the modem if the Command Set option in the
profile is set to A or V. This command can be used to set configuration options on the modem, such
as enabling extended verbose result codes and disabling protocol fallback to guarantee an error
correcting connection.
The initialization command is sent at the beginning of every communication session, and after it is
sent, the software expects to receive the response defined in the Modem OK Message field in the
profile. If the response is not received, it is considered a modem initialization failure, and the
communication session terminates.
The specific initialization command that is sent is taken from the Modem Init. Command field in
the communication profile. A Carriage Return character (hex 0D) automatically is appended to the
Modem Init. Command string by the software.
In general, you should configure your modem as follows:
Quiet mode disabled (Q0)
Verbal responses (V1)
Extended result codes enabled (X4)
This combination provides the most easily interpreted feedback to the system during connection
establishment.

Modem Dialing Commands Asynchronous Communication Support
9 - 8 Gentran:Server for iSeries Communications Module Release 3.5 User Guide
Modem Dialing Commands
There are a variety of options for sending dialing commands to the modem. The profile is
configured for autodial when the communication profile indicates the following values:
Switched Line = Y
Auto Dial = Y
Dial field contains an entry
For XAS and OFX profiles, the only type of autodial supported is V.25bis dialing. Therefore, any
time an XAS or OFX profile has the Auto Dial option set to ‘Y,’ V.25bis dial commands are sent to
the modem. This dialing is controlled by the iSeries rather than by the Gentran:Server
Communications Module software. To autodial with an XAS or OFX profile, the modem must be
configured for V.25bis SDLC dialing.
For ASC/OFA/ASX profiles with Command Set = ‘A’
The dial command sent to the modem consists of ‘ATDT’ + phone number from Dial field +
Carriage Return.
For ASC/OFA/ASX profiles with Command Set = ‘V’
The dial command sent to the modem consists of ‘CRNT’ + phone number from Dial field +
Carriage Return.
After issuing the dial command, the system waits for the modem to respond with the string defined
by the Modem Connect Message field in the communication profile. Any other response is
discarded. If the connect message is not received within 90 seconds, or if the modem raises and
drops the Carrier Detect (CD/RLSD) signal to the iSeries, then the dial attempt is considered a
failure. The system may attempt a redial if the number of Retries specified in the communication
profile is greater than 0.
# NOTE
This software defaults to the use of touch-tone dialing with both AT and V.25bis dial
commands. If your telephone circuit requires rotary (pulse) dialing, specify ‘P’ as the first
character in the Dial (telephone number) field in the communication profile.

Asynchronous Communication Support Receive Calls
Gentran:Server for iSeries Communications Module Release 3.5 User Guide 9 - 9
Receive Calls
This discussion applies to communication profiles configured to receive incoming calls on a
switched line. This means that the profile is configured:
Auto Dial = ‘N’
No entry in the Dial field.
Explanations for the various profiles are as follows:
For XAS/OFX profiles and ASC/OFA/ASX profiles with Command Set = ‘N’
The software detects an incoming call when the modem presents the Carrier Detect signal on
the serial interface to the iSeries. XAS and OFX profiles then expect to begin a link level
connection via a SABM/UA sequence, and a packet level connection via receipt of an
acceptable an “Incoming Call” packet.
For ASC/OFA/ASX profiles using AT or V.25bis commands
The software first initializes the modem, as described previously. Then the Modem
Auto-Answer Command defined in the communication profile is transmitted followed by a
Carriage Return. If the modem responds with the Modem OK Message, then the modem is
assumed to have been placed appropriately into auto-answer mode by the Modem
Auto-Answer Command. The software then waits to receive the string defined by the Modem
Connect Message field in the communication profile. Any other responses received from the
modem is discarded.

Flow Control Asynchronous Communication Support
9 - 10 Gentran:Server for iSeries Communications Module Release 3.5 User Guide
Flow Control
Flow Control is a mechanism used to avoid the potential data overrun that could occur when
devices with varying throughput capabilities attempt to communicate. Flow control must be used
when some parts of the communication link may not be able to receive data as fast as the adjacent
parts that transmit data to them. For example, you may configure your ASC profile for a Line
Speed of 9600bps because that is the fastest connection you can achieve with your modem.
However, the same profile may have to allow connections with 2400bps modems. The iSeries
would then be sending data to the modem faster (9600bps) than the modem could transmit the data
to the remote (2400bps). Some method of flow control must be used to limit the data transmitted
from the iSeries to the modem, to an amount that the modem can handle.
There are two standard methods of flow control:
Hardware (RTS/CTS) flow control
Software (XON/XOFF) flow control
Hardware flow control, also called RTS/CTS flow control, is generally better and is the preferred
method. However, only later versions of the OS/400 and iSeries hardware support hardware flow
control on asynchronous lines. If your system cannot support hardware flow control, you will
receive configuration errors when you attempt to create or update a communications profile using
it. In this case, you must consider using software flow control.
# NOTE
Use of XON/XOFF flow control prohibits transmission of data containing the XON (hex
‘11’) and XOFF (hex ‘13’) characters.
Configuring for software XON/XOFF flow control requires proper settings on both your software
and modem:
The software is configured by setting the Flow Control field in the communication profile to
‘Y.’ This causes the iSeries line description to be created with FLOWCNTL=*YES.
Set the Line Speed value to at least the highest rate of throughput that must be supported by
this profile.
Configure your modem such that there is a constant data rate between the modem (DCE) and
iSeries (DTE). This must be the same speed used for the Line Speed value in the
communication profile.
The modem flow control options must be configured such that XON/XOFF flow control
(rather than RTS/CTS) is used between the modem (DCE) and iSeries (DTE). This means the
modem must generate an XOFF when its buffer approaches overflow, and an XON when it is
ready to accept more data. This accommodates differences between the iSeries line speed and
the modem connect speed. The modem should also be configured to disable the pass-through
of XON/XOFF characters to the remote system. This setting is dependent on the modem also
being configured to guarantee a flow controlled link (MNP or LAPM).

Asynchronous Communication Support Translation
Gentran:Server for iSeries Communications Module Release 3.5 User Guide 9 - 11
Translation
Translation of inbound and outbound asynchronous data occurs at two levels:
System Level
Application Level
System Level Translation
System Level Translation is performed by iSeries asynchronous communication support and is
concerned with translating between the ASCII and EBCDIC character sets. This translation is
performed because the iSeries uses IBM’s EBCDIC character set, while most devices that are
communicated with asynchronously use the ASCII (International Alphabet #5) character set.
All inbound data is translated according to an ASCII to EBCDIC translation table. All outbound
data is translated according to an EBCDIC to ASCII translation table. (SEE the
“EBCDIC-to-ASCII and ASCII-to-EBCDIC” section of this chapter for specific information.)
Because System Level Translation is performed by the operating system, outside the control of the
communication application, the application always operates on inbound data after it has been
translated and outbound data before it has been translated. Therefore, any values you enter to
configure communication, including the communication profile and communication session
control scripts, should always be coded using the EBCDIC character set.
For example, if you are coding the Command field in a communication session control script Data
Trap step (inbound data), and you want to include a linefeed character (hex ‘OA’ ASCII) in the
record, you actually code an EBCDIC newline character (hex ‘15’), because the ASCII to
EBCDIC translation table indicates that an ASCII hex ‘OA’ is translated to an EBCDIC hex ‘15.’
The value you are coding for inbound data represents the data after ASCII to EBCDIC translation.
If you were instead coding the Command field for a Control Record send (outbound data), and you
wanted to send a linefeed (hex ‘OA’ ASCII) to the remote system, you would actually code an
EBCDIC newline character (hex ‘15’) because the EBCDIC to ASCII translation table indicates
that an EBCDIC hex ‘15’ is translated to an ASCII hex ‘OA.’ The value you are coding for
outbound data represents the data before EBCDIC to ASCII translation. In both cases, the value
you code refers to the EBCDIC representation of the data.
# NOTE
System Level Translation does not occur during ZMODEM file transfers. Instead, the
ZMODEM engine performs the translation.

Translation Asynchronous Communication Support
9 - 12 Gentran:Server for iSeries Communications Module Release 3.5 User Guide
Application Level Translation
In addition to the system level translation performed by the iSeries, the communication application
includes a translation feature. The application level translation feature is designed to accommodate
needs that may arise when exchanging data with asynchronous devices such as personal
computers. An example of this is removing carriage return/linefeed combinations from the data.
The Translation fields allow you to define a sequence of characters that is to be translated to a
different sequence of characters by the asynchronous communicator as data is exchanged with the
remote system. These character sequences can be zero, one, or two characters in length, and may
consist of any characters you define. Inbound and outbound translation sequences may differ.
Inbound translation only affects data that is being received to the inbound queue or to a user file.
Data received to SPOOL or during a Data Trap script step is not translated. Likewise, outbound
translation only effects data that is being transmitted from the Outbound Queue or from a user file.
Data transmitted as the result of a Control Record script step is not translated. Data transmitted as
the batch header in a Send Outbound Multiple step or as the result of a “no data” condition is not
translated.
The asynchronous communication profile panels (EDIX401-FMT06 and EDIX401-FMT07) and
the OFTP over TCP/IP panel (EDIX401-FMT21) contain four fields that control inbound
translation and four fields that control outbound translation. For both inbound and outbound, two
fields define the characters that are to be translated “from,” and two fields define the characters
that they are to be translated “to”. Each individual field consists of two hexadecimal digits that
represent one EBCDIC character.
The translation fields on the panels EDIX401-FMT06, EDIX401-FMT07, and EDIX401-FMT21
appear as follows:
# NOTE
The translation settings are ignored for ZMODEM file transfers.
Translation:
Inbound (from) . __ __ (01 - FF)
Inbound (to) . . __ __ (01 - FF)
Outbound (from). __ __ (01 - FF)
Outbound (to). . __ __ (01 - FF)

Asynchronous Communication Support Translation Examples
Gentran:Server for iSeries Communications Module Release 3.5 User Guide 9 - 13
Translation Examples
The following four examples illustrate the use of the application level translation fields.
1. Remove all carriage return/linefeed combinations from the inbound data
2. Add carriage return/linefeeds to the end of outbound data records
3. Remove all carriage return/linefeed combinations from the inbound data and add carriage
return/linefeeds to the end of outbound data records
4. Remove linefeed following carriage return from the inbound data and add linefeeds after
carriage returns in outbound data records
In all the preceding examples, the linefeed (hex ‘0A’ ASCII) is represented by a hex ‘15’
(EBCDIC newline). This is because the values entered in the profile screen represent data that has
already undergone system level translation, as described in the discussion of system level
translation.
Translation:
Inbound (from) . 0D 15 (01 - FF)
Inbound (to) . . __ __ (01 - FF)
Outbound (from). __ __ (01 - FF)
Outbound (to). . __ __ (01 - FF)
Translation:
Inbound (from) . __ __ (01 - FF)
Inbound (to) . . __ __ (01 - FF)
Outbound (from). __ __ (01 - FF)
Outbound (to). . 0D 15 (01 - FF)
Translation:
Inbound (from) . 0D 15 (01 - FF)
Inbound (to) . . __ __ (01 - FF)
Outbound (from). __ __ (01 - FF)
Outbound (to). . 0D 15 (01 - FF)
Translation:
Inbound (from) . 0D 15 (01 - FF)
Inbound (to) . . 0D __ (01 - FF)
Outbound (from). 0D __ (01 - FF)
Outbound (to). . 0D 15 (01 - FF)

Scripting Considerations Asynchronous Communication Support
9 - 14 Gentran:Server for iSeries Communications Module Release 3.5 User Guide
Scripting Considerations
Scripting considerations include the following:
Basic scripting concepts
Supported script transaction types and actions
Use of ETX, EOT, and End-of Cmd characters
Basic Scripting Concepts
The communication scripting capability within this product is one of its most powerful features. It
enables you to program your system to communicate with a multitude of different remote systems,
each of which may require a unique conversation. Each communication session control script
describes the conversation necessary to perform a specific function (or functions) with a specific
type of remote.
The following information is used when creating asynchronous communication session control
scripts. Although some of the general concepts may also apply to the other communication
protocols supported by this product, the details should only be considered applicable to scripts for
asynchronous profiles. This is because there are differences in the way the scripts are interpreted to
accommodate the unique characteristics of the communication protocol being used.
Before creating a script, you must first create a communication profile to describe the remote
system with which you communicate. This is done by using the Communication Profile
Maintenance panels. Communication session control scripts for that profile can then be created
using the EDIX403 and EDIX43B, communication session control panels.
A communication session control script consists of a series of records that define the steps of the
conversation that is to be conducted. The fields in each script record include:
Sequence Number
The “Seq No” field controls the placement of this script step relative to the other steps
within the script. Any unique number from 001 to 999 can be assigned. The script steps
are executed in ascending sequence based on this field.
Transaction
Determines what general action is to be performed in this step (for example, Send or
Receive).
File
Determines the source or the destination for data that is to be sent or received.
File Name
Identifies the file that is used for Sends/Receives from/to user files.
Indicator
The “Ind” field represents a control character that is sent or received at the end of a script
step. The Indicator field is described in the “Explanation of Script Indicators” section.

Asynchronous Communication Support Basic Scripting Concepts
Gentran:Server for iSeries Communications Module Release 3.5 User Guide 9 - 15
Description
Free form text description of the script step.
Command
Defines a string of up to 80 bytes that is used for various purposes depending on the type
of script record in which it is used. The uses of the Command field are described in “Use
of the Command Field” later in this section.
Batch ID
Allows Sends and Receives using the queues to refer to specific user-defined categories of
data.
Receive Timer
Defines a time limit after which Receive and Data Trap steps terminate with a “timed out”
status.
Timeout Continue
Determines whether the script should continue executing if a receive timeout occurs
during a Receive or Data Trap step.
Timeout Status
If a receive timeout occurs while receiving data to the inbound queue, this field determines
whether the data batch being received when the timeout occurred is marked as received
“Normal” or “Abnormal”.
# NOTE
Batch ID, Receive Timer, Timeout Continue, and Timeout Status fields are only accessible
from the EDIX43B extended mode communication session control maintenance panel.

Supported Script Transaction Types and Actions Asynchronous Communication Support
9 - 16 Gentran:Server for iSeries Communications Module Release 3.5 User Guide
Supported Script Transaction Types and
Actions
The supported script Transaction types and their actions are as follows:
C (Control Record)
Transmits the data in the Command field, followed by the control character identified by
the Indicator field.
D (Data Trap)
Waits for the data in the Command field to be received, followed by the control character
identified by the Indicator field. All data received up to and including the Command
record image and control character is discarded. If the matching data has not been received
within the time limit specified by the Receive Timer value for this step, the Data Trap
terminates abnormally, and subsequent script steps may or may not be executed,
depending on the Timeout Continue value for this step.
R (Receive)
Receives data to the inbound queue, a user file, or to Spool depending on the contents of
the File and File Name fields.
S (Send)
Sends data from the Outbound Queue or a user file, depending on the contents of the File
and File Name fields.
E (Evoke)
Attempts to start a program to communicate with on the remote system. Refer to the
“Evoke Considerations” section for more information.
The File and File Name fields are used to specify the source or destination of data that is
transmitted and received by Send/Receive steps in the script. The supported File values
and their meanings are:
X (Extended Script Logic)
Enables the session control script to use conditional logic and branching. SEE the
“Asynchronous Extended Script Logic” section later in this chapter for more information.
OQ (Outbound Queue)
All Outbound Queue data associated with this Profile ID is to be sent to the remote
system. If more than one batch is queued, all eligible batches are sent as a continuous
stream, with no characters inserted to separate the individual batches. If there is no data on
the Outbound Queue that is eligible for transmission, the “no data” message defined by the
Command field is sent. If the Command field is blank, nothing is sent as a “no data”
indication. At the end of the step, if anything was sent during the step, the control
character identified by the Indicator field is sent.

Asynchronous Communication Support Supported Script Transaction Types and Actions
Gentran:Server for iSeries Communications Module Release 3.5 User Guide 9 - 17
OM (Outbound Multiple)
All Outbound Queue data associated with this profile ID is to be sent to the remote system.
If more than one batch is queued, all eligible batches are sent, and the control character
defined as the ETX character in the profile is sent between the individual batches to allow
the remote system to separate the batches. If the Command field is nonblank, then the
Command field image is transmitted at the beginning of every outbound batch. If there is
no data on the Outbound Queue that is eligible for transmission, the default “no data”
message “*** ERROR *** NO BATCHES FOR TRANSMISSION” is sent. At the end of
the step, the control character identified by the Indicator field is sent.
OF (Outbound File)
Data is to be transmitted from the file identified by the File Name field. The file must exist
or the send step terminates abnormally. The library list is searched to locate the file. If the
outbound file contains no records and the Command field is nonblank, then the “no data”
message defined in the Command field is sent. If the outbound file contains no records and
the Command field is blank, then the default “no data” message “*** ERROR *** NO
BATCHES FOR TRANSMISSION” is sent. At the end of the step, the control character
identified by the Indicator field is sent.
IQ (Inbound Queue)
All received data is to be written to the inbound queue as a single batch. Several
conditions can cause the receive step to end, as follows. The receive step ends when the
control character identified by the Indicator field is received. If the Command field is
nonblank, the receive step ends when the record image from the Command field followed
by the control character identified by the Indicator field is received. If the Command field
is blank, the receive step ends when the default message “*** ERROR *** NO
BATCHES FOR TRANSMISSION” followed by the control character identified by the
Indicator field is received. The receive step ends if the default message “***
SUPERTRACS READY FOR INPUT<CR><EOT>” is received. The receive step ends as
a timeout if no data is received during the period of time specified by the Receive Timer
field. If a timeout occurs, subsequent processing is determined by the values in the
Timeout Continue and Timeout Status fields.
IM (Inbound Multiple)
All received data is to be written to the inbound queue. If the character defined as the ETX
character in the profile is received in the inbound data stream, it is interpreted as marking
the end of a data batch, and data received following the ETX is written to the queue as a
separate batch. Several conditions can cause the receive step to end, as follows. The
receive step ends when the EOT character defined in the profile is received. If the
Command field is nonblank, the receive step ends when the record image from the
Command field followed by the control character identified by the Indicator field is
received. If the Command field is blank, the receive step ends when the default message
“*** ERROR *** NO BATCHES FOR TRANSMISSION” followed by the control
character identified by the Indicator field is received. The receive step ends if the default
message “*** SUPERTRACS READY FOR INPUT<CR><EOT>” is received. The
receive step ends as a timeout if no data is received during the period of time specified by
the Receive Timer field. If a timeout occurs, subsequent processing is determined by the
values in the Timeout Continue and Timeout Status fields.

Supported Script Transaction Types and Actions Asynchronous Communication Support
9 - 18 Gentran:Server for iSeries Communications Module Release 3.5 User Guide
IF (Inbound File)
All received data is to be written to the file identified by the File Name field. The file must
already exist on the receiving system, and must be a physical file containing a single
member comprised of fixed-length records. The library list is searched to locate the file.
The receive step ends under the same conditions that were described for IQ (Inbound
Queue).
IA (Inbound Append)
Same as IF (Inbound File), except the received data is appended to the existing file.
SP (SPOOL)
All received data is written to the SPOOL (output queue). The output is written using the
name “EDIPRINT”. The receive step ends under the same conditions that were described
for IQ (Inbound Queue). For more information about receiving to SPOOL, refer to the
section titled “Print Control”.

Asynchronous Communication Support Use of ETX, EOT, and End-of-Cmd Characters
Gentran:Server for iSeries Communications Module Release 3.5 User Guide 9 - 19
Use of ETX, EOT, and End-of-Cmd
Characters
The asynchronous communication profile panels (EDIX401-FMT06 and EDIX401-FMT07) and
the OFTP over TCP/IP panel (EDIX401-FMT21) allow you to define certain characters that are
used for interpreting communication session control scripts. These include ETX, EOT, and
End-of-Command characters. Each field consists of two hexadecimal digits for entering the
EBCDIC representation of the character you want to use. Remember, the values you enter must
represent the characters in EBCDIC, but the actual characters transmitted or received over the
communication line are the equivalent characters represented in ASCII.
The ETX character that you define is sent whenever a send step (transaction type ‘S’ or ‘C’) uses
an indicator 1. It is expected to be received whenever a receive step (transaction type ‘R’ or ‘D’)
uses an indicator 6. This character can also be used as the batch separator character during Send
Outbound Multiple and Receive Inbound Multiple script steps.
The EOT character that you define is sent whenever a send step uses an indicator 2. It is expected
to be received whenever a receive step uses an indicator 7.
The End-of-Cmd character that you define can be used to mark the explicit end-of-data in the
Command field of communication session control scripts. By default, any data entered in the
Command field of a script is interpreted as an 80-byte record, filling the entire 80-byte input field.
By inserting the End-of-Cmd character into the Command field, you can mark its length at 0-79
bytes. This provides the ability to send and receive messages that are less than 80 bytes in length.
If the End-of-Cmd character is defined to be a non-printable character, such as the default value of
‘00,’ then it can be entered into the script using the extended view EDIX43B communication
session control maintenance panel.

Use of the Command Field Asynchronous Communication Support
9 - 20 Gentran:Server for iSeries Communications Module Release 3.5 User Guide
Use of the Command Field
The Command field is used by most communication session control transactions. The Command
field can be accessed from the EDIX403 and EDIX43B communication session control
maintenance panels.
Although the field is simply titled “Command”, it is actually used for several different purposes
depending on the transaction type of the communication session control record in which it appears.
This section summarizes the various uses of the Command field when used in asynchronous
communication session control scripts.
Trans. Type Use of Command field
C Defines record image that is transmitted to remote system.
D Defines record image to wait for.
S Defines the “No Data” message that is transmitted to the remote if
there is no data to send. For Send Outbound Multiple steps, defines a
record to be transmitted before every batch.
R Defines an End of Data message that triggers the end of the receive
step if it is received from the remote system.
E Transmit an Evoke record to remote system
X Invoke extended script logic

Asynchronous Communication Support Explanation of Script Indicators
Gentran:Server for iSeries Communications Module Release 3.5 User Guide 9 - 21
Explanation of Script Indicators
The “Ind” (Indicator) field in a communication session control record represents a control
character that is sent or received to mark the end of the associated script step. The actual character
values for the ETX and EOT characters are defined in the communications profile.
Async Send /Receive Indicators
# NOTE
Indicators for ZMODEM transfers have special meanings. Please refer to the ZMODEM
Send Indicator Table and ZMODEM Receive Indicator Table later in this section.
Async Transaction Code/Action Table
Indicator Indicator Represents
0 No control character
1, 6 ETX character as defined in communication profile
2, 7 EOT character as defined in communication profile
X XMODEM file transfer protocol will be used
Trans. Code Description Action Valid
Indicators
C Send Control Record Send Literal from Command
Line
0, 1, 2
D Receive Control
Record (Data Trap)
Wait for data in Command line
to be received from the remote
system
0, 6, 7
E Evoke Remote
Program
Send Evoke record to the
remote system and wait to
receive evoke confirmation
message
0, 1, 2
SSend Data OQ – Send from Outbound
Queue OM – Send from
Outbound Queue separating
multiple batches
OF – Send from Outbound
File
0, 1, 2

Explanation of Script Indicators Asynchronous Communication Support
9 - 22 Gentran:Server for iSeries Communications Module Release 3.5 User Guide
R Receive Data IQ – Receive to Inbound
Queue IM – Receive to
Inbound Queue separating
multiple batches
IF – Receive to Inbound File
IA – Receive and Append to
Inbound File
SP – Receive data to SPOOL
(print file)
0, 6, 7
X Extended Script
Logic
Invoke extended script logic
functions
(space)
Trans. Code Description Action Valid
Indicators

Asynchronous Communication Support Explanation of Script Indicators
Gentran:Server for iSeries Communications Module Release 3.5 User Guide 9 - 23
Async Send Indicator Table
# NOTE
Indicators for ZMODEM transfers have special meanings. Please refer to the ZMODEM
Send Indicator Table and ZMODEM Receive Indicator Table later in this section.
Async Receive Indicator Table
# NOTE
Indicators for ZMODEM transfers have special meanings. Please refer to the ZMODEM
Send Indicator Table and ZMODEM Receive Indicator Table later in this section.
Desired Action Definition Indicator
Send Data or Command line
alone, without any additional
control characters
No control character is sent at the end of
the outbound data or Command line image
0
Send an End of Text (ETX)
character at the end of the
current script step
An ETX character, as defined in the
communication profile, is sent following
the data for this step
1
Send an End of Transmission
(EOT) character at the end of
the current script step
An EOT character, as defined in the
communication profile, is sent following
the data for this step
2
Send data using XMODEM XMODEM protocol will be used X
Desired Action Definition Indicator
Recognize the Command line
data alone, without any
additional control character
The Command line data is used for a Data
Trap or to indicate the end of the receive,
without expecting it to be followed by
any control character
0
Receive until an ETX character
has been received
An ETX character is expected at the end
of the inbound data or Command line
data
6
Receive until an EOT character
has been received
An EOT character is expected at the end
of the inbound data or Command line
data
7
Receive data using XMODEM XMODEM protocol will be used X

Explanation of Script Indicators Asynchronous Communication Support
9 - 24 Gentran:Server for iSeries Communications Module Release 3.5 User Guide
ZMODEM Send Indicator Table
ZMODEM Receive Indicator Table
Desired Action Definition Indicator
Send all batches as one file This action sends the data for the current
script step without sending a ZEOF at the
end of the transfer. This causes the data
from this batch and the next batch to be
seen by the remote system as one file.
0
Send each batch as a separate
file.
This action sends the data for the current
script step and sends a ZEOF at the end of
the transfer. This causes the remote
system to close the file it is processing,
causing each batch to be treated as a
separate file.
1
End session after this batch This action sends the data for the current
script step and sends a ZEOF followed by
a ZFIN at the end of the transfer. This
causes the remote system to close the file
it is processing and terminate the session.
This indicator must only be used on the
last step of a script.
2
Desired Action Definition Indicator
Receive all files into one batch This action receives all data into one
batch or file. The ZEOF from the remote
system is ignored and the data from the
next remote file is appended onto this
batch or file.
5
Receive each file as a separate
batch or file
This action receives each file as a
separate file. The ZEOF from the remote
system is processed, the batch is closed,
and the session continues with the next
script step.
6
End session after this batch This action works much like script
indicator 6 except that ZFIN is expected
after the file and the session is ended.
This indicator must only be used as the
last step of a script.
7

Asynchronous Communication Support Asynchronous Extended Script Logic
Gentran:Server for iSeries Communications Module Release 3.5 User Guide 9 - 25
Asynchronous Extended Script Logic
Introduction
In the asynchronous communication module, extended script logic is used to allow a
communication session control script to use conditional logic and branching, and to support
ODETTE File Transfer Protocol (OFTP) and XMODEM.
(SEE the Scripting Considerations topic in the “Asynchronous Communication Support” section
in this chapter for general information on scripting. SEE the “Extended Script Logic” section in
this chapter for general information on extended script logic.)
Asynchronous Extended Script Logic Keywords
The asynchronous communications module recognizes the following extended script logic
keywords:
CLEARBUF
GOTO line#
IF [NOT] condition action
SENDFAIL
SENDOK
SESSABORT
SESSEND
SESSFAIL
CMLOGON
SET
OFTP Keywords
The following paragraphs describe the asynchronous extended script logic keywords in more
detail, except the OFTP keywords, which are discussed in the “OFTP Communication Support”
section in this chapter.
CLEARBUF
The CLEARBUF keyword causes all data that has already been received from ICF but has not yet
been processed (by a data trap or receive step) to be discarded.
GOTO line#
Causes script execution to unconditionally branch to the specified script line number (Seq No). If
the specified line does not exist, execution will continue with the script record following the
invalid GOTO.

Asynchronous Extended Script Logic Asynchronous Communication Support
9 - 26 Gentran:Server for iSeries Communications Module Release 3.5 User Guide
Without the GOTO keyword, the lines of an asynchronous communication session control script
will be executed in ascending sequence according to the Seq No field.
When used as the action clause in an IF statement, the keyword GOTO is optional (the line# can be
coded by itself).
SENDOK and SENDFAIL
These keywords are only applicable to XMODEM (ASX) session control scripts.
In Gentran:Server communications other than XMODEM, an outbound queue batch will be
marked “Sent Normal” as soon as the entire batch has been transmitted to the remote system. This
may not be appropriate for some networks, such as the GEIS asynchronous XMODEM interface,
EDI*EXPRESS MARK III. This interface requires that the file transfer step be followed by
additional network commands before the transfer can be considered complete.
The SENDOK and SENDFAIL keywords address this situation by allowing the session control
script to explicitly cause transmitted batches to be marked “Sent Normal” or “Sent Abnormal”.
When Gentran:Server XMODEM begins sending a batch from the outbound queue, the batch’s
status is marked “In Progress.” If an error occurs while transmitting the batch, the status is changed
to “Sent Abnormal”. If transmission of the batch completes, the batch’s unique identifier is added
to an internal list.
When a SENDOK or SENDFAIL keyword is encountered in the script, the status of all batches in
the internal list is changed to “Sent Normal” or “Sent Abnormal,” respectively, and the batches are
removed from the list.
This allows the script to perform one or more XMODEM sends, each of which may transmit one
or more batches, then perform additional processing as necessary, and finally set the batch status
by using SENDOK or SENDFAIL.
# NOTE
Use of the SENDOK and SENDFAIL keywords to explicitly set the outbound batch status is
not mandatory. If the script does not use these keywords, then the status will be updated
automatically at the end of the communication session. If the session completes successfully,
the batches will be marked “Sent Normal.” If the communication session fails, the batches
will be marked “Sent Abnormal.”
SESSFAIL
Sets the session completion status to “Failed.”
When the communication session begins, the session status is initialized to “Successful.” If a
communication error occurs, the status is changed to “Failed.” SESSFAIL allows a script to
explicitly set the status to “Failed” due to some condition other than those that would ordinarily be
considered a session failure.
SESSFAIL does not terminate the session, it only changes the session completion status.

Asynchronous Communication Support Asynchronous Extended Script Logic
Gentran:Server for iSeries Communications Module Release 3.5 User Guide 9 - 27
SESSEND
Causes the session to terminate immediately.
This keyword does not alter the session completion status. It simply ends the session with the
current session completion status, as determined by prior events in the session.
SESSABORT
Causes the communications session to terminate immediately with a “Failed” status.
This keyword is equivalent to SESSFAIL followed by SESSEND.
CMLOGON
Used to authenticate the remote user or computer system by requiring transmission of a userid and
password. The Gentran:Server system will prompt the remote user for the login id and then the
password. The remote user will be given three attempts to send the correct values, terminated by
carriage returns. If the correct values are supplied, script execution continues with the step
following the CMLOGON command. If not, the session will be terminated.
CMLOGON ID=userid PWD=password
ID may be up to 8 alphanumeric characters, not containing spaces.
PWD may be up to 8 alphanumeric characters, not containing spaces.
Validation of the logon strings are performed case-insensitive.
SET
Sets various options related to asynchronous file transfers.
SET PROTOCOL=ASCII|ZMODEM
Determines what file transfer protocol will be used for any subsequent Send and Receive steps,
including commands received in remote command mode.
SET PROTOCOL=ZMODEM specifies that ZMODEM protocol will be used for file transfers.
SET PROTOCOL=ASCII specifies that plain ASCII text transfers with no protocol will be used
for file transfers. If a Send or Receive step is encountered before any SET PROTOCOL record, the
transfer protocol will default to ASCII.
SET XFER_MODE=TEXT|BINARY
TEXT specifies that the data being transferred is a text file. BINARY specifies that it is not. This
setting only affects ZMODEM transfers.
SET XLATE=YES|NO
Specifies whether data should be translated between ASCII and EBCDIC. This setting only affects
ZMODEM transfers.

Asynchronous Extended Script Logic Asynchronous Communication Support
9 - 28 Gentran:Server for iSeries Communications Module Release 3.5 User Guide
IF condition action
Allows an action to be taken depending on the outcome of the evaluation of a condition. If the
specified condition evaluates “True”, the specified action will be taken. If the condition evaluates
“False,” the action will be ignored.
The IF keyword must be combined with additional keywords to form a complete IF statement. The
additional keywords are used to specify the condition to be tested and the resulting action. The
keywords that may be used as conditions and actions are discussed in the following paragraphs.
Condition Keywords (Only valid following an IF keyword)
NOT
Causes the result of the next condition keyword to be reversed before determining whether
to execute the action. This keyword is not valid by itself. It can only be specified
preceding one of the other valid condition keywords.
MATCH
Tests the result of the last data trap step that was executed. Evaluates “True” if the data
trap found a match. Evaluates “False” if the data trap ended without a match.
OQDATA
Tests the availability of data on the outbound queue. Evaluates “True” if one or more
batches for this profile are eligible for transmission (batch status Q, IP, or SA). Evaluates
“False” if no eligible batches are available for this profile.
CONTAINS “string”
Tests whether the specified character string was received during the last data trap step.
Regardless of the text that was specified in the Command field of the data trap step, all
data that was received during that step was stored in a buffer (see note). This keyword
causes the buffer to be searched for the specified string. The condition evaluates “True” if
the string is found, or “False” if it is not found.
# NOTE
The buffer is 4096 bytes in length. If the data received by the last data trap step
exceeds this length, only the last 4096 bytes received will be available in the buffer.
The search argument (“string”) must be delimited by quotes. Either double (“ “) or single
(‘’) quotes may be used, but the closing delimiter must be the same as the opening
delimiter. The quote that is used as the delimiter cannot appear within the string. This
allows you to search for a string containing quotes of either style, but not both.
The hex mode of the EDIX43C panel can be used to include non-character (binary) data in
the search string if necessary, however the null character (hex ‘00’) should not be used.
(SEE the section “Work with Communications Control Scripts” in the “Work with
Communications” chapter for more information.)

Asynchronous Communication Support Asynchronous Extended Script Logic
Gentran:Server for iSeries Communications Module Release 3.5 User Guide 9 - 29
Action Keywords (see preceding paragraphs for explanations of each keyword)
CLEARBUF
[GOTO] line#
SENDOK
SENDFAIL
SESSFAIL
SESSEND
SESSABORT

Asynchronous Extended Script Logic Asynchronous Communication Support
9 - 30 Gentran:Server for iSeries Communications Module Release 3.5 User Guide
Asynchronous Extended Script Logic Example
The example script in Figure 9.1 shows how some of the extended script logic keywords discussed
previously might be used to set up a machine to transmit batches from the outbound queue to
someone dialing in using an asynchronous PC communication product.
Figure 9.1 Asynchronous Extended Script Logic Example
Opt Seq No Tran File File Name Ind Description
__ _10 C __ __________ 2 Send_connect_confirmation_____
.Welcome_to_the_machine@________________________________________________________
__ _20 X __ __________ _ Check_for_outbound_data_______
IF_NOT_OQDATA_GOTO_200__________________________________________________________
__ _30 C __ __________ 2 Data_is_available_____________
.Data_is_available_for_you,_if_you_want_to_receive,_enter_YES_now@______________
__ _40 D __ __________ 7 Wait_for_YES_response_________
YES@____________________________________________________________________________
__ _50 X __ __________ _ If_response_not_YES,_goto_end_
IF_NOT_MATCH_210________________________________________________________________
__ _60 C __ __________ 2 Send_ready_msg________________
.Please_start_your_XMODEM_receive_process_now@__________________________________
__ _70 S OM __________ X Send_next_batch_using_XMODEM__
this_Command_field_does_not_get_used_in_XMODEM_sends_and_receives_______________
__ _80 C __ __________ 2 Send_completion_msg/prompt____
.Send_complete,_enter_YES_if_the_file_was_received_successfully@________________
__ _90 D __ __________ 7 Wait_for_response_until_CR____
@_______________________________________________________________________________
__ 100 X __ __________ _ Test_response_________________
IF_NOT_CONTAINS_"YES"_SESSABORT_________________________________________________
__ 110 X __ __________ _ Batch_transmitted_successfully
SENDOK__________________________________________________________________________
__ 120 X __ __________ _ Go_check_for_more_data________
GOTO_20_________________________________________________________________________
__ 200 C __ __________ 2 Send_end_of_session_msg_______
.No_data_is_available_for_you@__________________________________________________
__ 210 C __ __________ 2 Send_end_of_session_msg_______
.Thank_you_for_using_SuperNet,_Goodbye@_________________________________________

Asynchronous Communication Support Asynchronous Extended Script Logic
Gentran:Server for iSeries Communications Module Release 3.5 User Guide 9 - 31
Notes About Example
The example makes the following assumptions about the communication profile being used:
It is an ASX profile, so we can use asynchronous extended script logic and XMODEM
protocol.
The EOT character is defined as carriage return (hex “0D”). This means that all control record
steps using indicator 2 will append a carriage return to the data being transmitted. All data trap
steps using indicator 7 will expect to receive a carriage return in addition to the data being
trapped.
The End-of-Cmd character is defined as “@” (hex “7C”). This means that “@” can be used in
the Command field to limit its length to less than the full 80 byte capacity of the field.
The notes in the following table explain each line of the script in more detail.
Seq No Explanation
10 Sends a message to the remote operator, confirming a connection to
your system. The message text is coded in the Command field. Notice
that the End-of-Cmd character (“@”) has been used to limit the length
of the message. Notice the period at the beginning of the message. This
represents a non-displayable character, which in this case is a line feed.
Non-displayable characters can be manipulated using the hex mode of
the EDIX43C communication session control panel. Because indicator
2 has been specified, a carriage return will be transmitted following the
message.
20 Checks to see if the profile that is executing this script has any data
batches on the outbound queue that are eligible for transmission. If no
batches are available, control is transferred to the end of session
processing.
30 Since the GOTO in step 20 was not executed, a message is transmitted
indicating that there is data available, and asking the remote operator if
they want to receive it. The remote operator is prompted to enter YES to
receive the file.
40 Waits to receive “YES”. Note that the “@” End-of-Cmd character has
been used to limit the data being waited for to the three characters Y E
S. This step will end when YES has been received or the receive timer
expires. The time limit can be accessed by using the EDIX43C
communication session control panel.
50 Tests whether the last data trap step (Seq No 40) ended with a match
condition or not. If not, the script transfers control to the end of session
logic. Otherwise, execution continues with the send logic portion of the
script. Notice that the word GOTO has not been used, which is optional
in the action clause of an IF statement. Compare the syntax of this script
line with Seq No 20.
60 Instructs the remote operator to prepare to receive a file using
XMODEM protocol.

Asynchronous Extended Script Logic Asynchronous Communication Support
9 - 32 Gentran:Server for iSeries Communications Module Release 3.5 User Guide
70 Sends data from the outbound queue to the remote system using
XMODEM protocol. Because File “OM” (Outbound Multiple) was
specified, only one batch will be transmitted. If “OQ” had been
specified, all eligible batches would have been transmitted in succession
as a single XMODEM file. Note that when using XMODEM, the
contents of the Command field are not used.
80 Sends a completion message to the remote operator indicating that the
file transfer has completed, and prompting them to confirm that the file
was received successfully.
90 Waits for confirmation from the remote operator. Note that this step
combines an indicator 7 with an End-of-Cmd character in the first
position of the Command field. This causes the system to wait to receive
a carriage return. The example assumes that the remote operator will
transmit some kind of message ending with carriage return, in response
to the prompt issued by the previous step.
100 Tests the data that was received during the previous data trap step to
determine if the response received from the remote operator indicates a
successful file transfer. If not, the SESSABORT keyword will cause the
transmitted batch to be marked “Sent Abnormal”, the session
completion status will be set to failed, and the session will terminate
immediately.
110 Since the session was not terminated by the previous step, we know the
file reached the remote system, so the transmitted batch is now marked
“Sent Normal” by the SENDOK keyword.
120 Unconditionally transfers control back to the beginning of the “send
loop” (Seq No 20).
200 Transmits a message to the remote operator indicating that no more data
needs to be transferred.
210 Transmits a message indicating that the session is ending. After this, the
end of the script is encountered and the system ends the session and
terminates the connection to the remote system.
Seq No Explanation

Asynchronous Communication Support “Create Your Own” Protocol
Gentran:Server for iSeries Communications Module Release 3.5 User Guide 9 - 33
“Create Your Own” Protocol
When constructing communication session control scripts for asynchronous remotes, it is
important to keep in mind that no “handshaking” is performed at the line protocol level, as there is
in most synchronous communication. Among other things, this means that the conversation
occurring between two systems can not be kept synchronized by adherence to rules of protocol.
Since this synchronization (who is sending and who is receiving) is not enforced by asynchronous
communication, it should be made part of the asynchronous conversation by including
handshaking steps in the communication session control script. This can be done easily using Data
Trap (D) Transaction and Control Record Send (C) Transaction script steps.
For example, if you are setting up two systems where one system transmits Outbound Queue data
to the other, you could simply code a Send step on one system and a Receive step on the other:
Example script on Receiving system:
Example script on Sending system:
The scripts above might work fine most of the time. However, to improve the reliability of the
communication conversation, you should include additional script steps to perform some basic
handshaking between the two systems:
Example script on Receiving system:
Seq No Tran File File Name Ind Description
010 R IQ __________ 2 RECEIVE TO INQUEUE
*** ERROR *** NO BATCHES FOR TRANSMISSION
Seq No Tran File File Name Ind Description
010 S OQ __________ 2 SEND FROM OUTQUEUE
*** ERROR *** NO BATCHES FOR TRANSMISSION
Seq No Tran File File Name Ind Description
010 C __ __________ 0 SEND READY MESSAGE
READY TO RECEIVE
020 R IQ __________ 7 RECEIVE TO INQUEUE
*** ERROR *** NO BATCHES FOR TRANSMISSION
030 C __ __________ 0 SEND COMPLETION MESSAGE
RECEIVE COMPLETED

Print Control Asynchronous Communication Support
9 - 34 Gentran:Server for iSeries Communications Module Release 3.5 User Guide
Example script on Sending system:
At the beginning of the script for the receiving system, a “READY TO RECEIVE” message is
transmitted to the sending system. The sending system waits for the message before beginning to
send. After the data has been received, the receiving system transmits a “RECEIVE COMPLETE”
message to the sending system, indicating that the receive step has ended. The sending system
waits for this message before ending its script and disconnecting the line. This avoids potential
data loss that could occur if the sender was to disconnect before the receiver had finished receiving
and writing the data to the inbound queue. These additional script steps ensure that the two
systems remain synchronized.
In many cases, the script you create is dictated by the operation of an existing network or remote
system you need to communicate with. You will not necessarily be able to include your own
special messages as described above. However, the handshaking concepts can still be applied in
many cases, and should be whenever possible. For example, if you are transmitting data into a
network, you should wait for any message the network may provide as your completion message.
The network may transmit a message such as “READY FOR NEXT COMMAND,” which can
serve the same purpose as the “RECEIVE COMPLETE” message in the example above. If the
network provides a logoff procedure, you should always include script logic to perform the logoff
steps and wait for any messages that are returned from the network, to keep the conversation
synchronized and ensure that both systems reach what they consider to be a successful end of
session.
Print Control
When receiving data destined for SPOOL, this product performs as follows with regard to printer
control. A receive to SPOOL is requested by specifying communication session control
Transaction Type ‘R’ and File ‘SP’ in a communication session control script.
Carriage returns always cause a carriage return and linefeed.
The linefeed following a carriage return is ignored.
If the “maximum print width” characters are received without receiving a carriage return, a
carriage return and linefeed is generated automatically. The maximum print width is defined
by the Print Record Size field in the communication profile.
Form feed characters advance the printer to the first print line of the next page.
If 60 lines are received without receiving a form feed, a form feed is generated automatically.
The printer output from each Receive to SPOOL step generates a separate SPOOL file named
EDIPRINT.
Seq No Tran File File Name Ind Description
010 D __ _______ 0 WAIT FOR READY MESSAGE
READY TO RECEIVE
020 S OQ ______ 2 SEND FROM OUTQUEUE
*** ERROR *** NO BATCHES FOR TRANSMISSION
030 D __ 0 WAIT FOR COMPLETION MESSAGE
RECEIVE COMPLETED

Asynchronous Communication Support Dynamic Scripting
Gentran:Server for iSeries Communications Module Release 3.5 User Guide 9 - 35
Dynamic Scripting
Dynamic scripting, as implemented in the bisynchronous and SNA communicators in this
software, is also supported by the asynchronous communicator for both ASC and XAS profiles.
Dynamic scripting allows a communication session to be started without specifying a specific
session type. Rather, when the connection to the remote system has been established, the remote
system transmits a record that indicates which communication session control script is to be
executed.
To use Dynamic Scripting, start a communication session and specify a session name of ‘$$.’ The
profile that is started may initiate the connection (dial) or wait for the remote system to initiate
(answer).
After the connection has been established, the remote system must transmit an 80 byte record with
the following format:
After the $$SCRIPT record has been received, the system attempts to execute the specified
communication session control script.
$$SCRIPT ID=pppppppp SSN=ss
or
$$SCRIPT PROFILEID=pppppppp SESSION=ss
where: pppppppp specifies the communication profile
name that is to be executed
ss specifies the communication session
control script that is to be executed

Remote Command Support Asynchronous Communication Support
9 - 36 Gentran:Server for iSeries Communications Module Release 3.5 User Guide
Remote Command Support
Remote command support is described in Chapter 5. Chapter 5 includes additional information
specific to async remote commands under the “Protocol Specific” topics describing the individual
remote commands.
All asynchronous remote commands can be variable length and must be terminated by a carriage
return.
Gentran asynchronous remote command support is specifically designed to enable
communications with the Connect:Mailbox Client for Windows product (as shown in Figure 9.2),
but with proper consideration and testing, could also be used with other remote software such as
Procomm (as shown in Figure 9.3).
Figure 9.2 Sample script for Connect:Mailbox Client for Windows
EDIX403 Communication Session Control EDI 04/30/08
CTL01 12:00:00
Comm Profile ID. . . . . . . . . . ASCMBXW
Session Name . . . . . . . . . . . RC
Company. . . . . . . . . . . . . . Test Mailbox Client for Windows
Type option, press Enter.
3=Copy Seq# 4=Delete 11=Extended Parms
Opt Seq No Tran File File Name Ind Description
10 X Prompt user to login
CMLOGON ID=userid PWD=password
20 C 0 Mbx Client expects this
PROTOCOL
30 X Set Xfer protocol
SET PROTOCOL=ZMODEM
40 C 1 Enter Remote Cmd Mode
SET MODE=RMT
More...
F1=Help F4=Prompt F9=Fold/Unfold F10=Update F12=Cancel F24=More Keys

Asynchronous Communication Support Transparent Data
Gentran:Server for iSeries Communications Module Release 3.5 User Guide 9 - 37
Figure 9.3 Sample Script for Procomm
# NOTE
For more information on the Control Record (C) transactions in the examples, see
the“Remote Command Support” topic in Chapter 5, Using Scripts. For more information on
the Extended Logic (X) transactions, see the topic, “Asynchronous Extended Script Logic”
on page 9-25 in this chapter.
Transparent Data
Transmission of transparent (binary) data is not supported by the base asynchronous
communicator in this software, but is supported when using the OFTP, XMODEM, and
ZMODEM extensions.
EDIX403 Communication Session Control EDI 04/30/08
CTL01 12:00:00
Comm Profile ID. . . . . . . . . . ASCMBXW
Session Name . . . . . . . . . . . RC
Company. . . . . . . . . . . . . . Test Mailbox Client for Windows
Type option, press Enter.
3=Copy Seq# 4=Delete 11=Extended Parms
Opt Seq No Tran File File Name Ind Description
10 X Prompt user to login
CMLOGON ID=userid PWD=password
20 X Set Xfer protocol
SET PROTOCOL=ZMODEM
30 X 1 Enter Remote COmmand Mode
SET MODE=RMT
More...
F1=Help F4=Prompt F9=Fold/Unfold F10=Update F12=Cancel F24=More Keys

Evoke Considerations Asynchronous Communication Support
9 - 38 Gentran:Server for iSeries Communications Module Release 3.5 User Guide
Evoke Considerations
Evoke support provides a method for one system to initiate a connection to another iSeries and
start a program to communicate with, rather than having a program already running, waiting to
answer the call. The Evoke capability must also be used for receiving multiple concurrent
incoming call requests for asynchronous conversations over the same X.25 line (XAS and OFX
communication profiles).
The Evoke feature is only supported between two iSeries that are both running this software.
To make your system evoke a program on the remote system, include an Evoke (E-type) record as
the first record of your communication session control script. The Evoke record is only valid as the
first record. Each time you add an Evoke record in a script, the system presents the
Communication Evoke panel (EDIX43C-FMT01). This panel, shown in Figure 9.4, allows you to
specify the information necessary for evoking the asynchronous communicator on the remote
system.
Figure 9.4 Communication Evoke panel (EDIX43C-FMT01)
The User ID and Password must name a valid user ID and password on the remote system. The
user profile for this User ID must use a Job Description that specifies a library list that includes
this product’s libraries.
The Profile to Evoke and Session to Evoke fields must name a communication profile and session
control script that exist on the remote system and correspond to the script being executed on the
local system.
The remote system must have appropriate line, controller, and device descriptions created and they
must have a status of “Varied On” or “Vary On Pending”.
EDIX43C Communication Evoke EDI 04/30/08
FMT01 12:00:00
Comm Profile ID. . . . . . . . . . LOCLDX
Session Name . . . . . . . . . . . T1
Company. . . . . . . . . . . . . . Local Leased Line/Dial/X25 Network
Library Name . . . . . . . . . . . G7X0PGM
Program Name . . . . . . . . . . . STRCOM62
Profile to Evoke . . . . . . . . . RMTLAX
Session to Evoke . . . . . . . . . T1
Trace *YES or *NO. . . . . . . . . *NO
User ID. . . . . . . . . . . . . . QPGMR
Password . . . . . . . . . . . . . QPGMR
F1=Help F4=Prompt F5=Refresh F10=Update F12=Cancel

Asynchronous Communication Support Evoke Considerations
Gentran:Server for iSeries Communications Module Release 3.5 User Guide 9 - 39
This product automatically exchanges the Evoke record and an evoke confirmation, so you do not
have to include any additional logic for that purpose in your session control scripts. When the local
system encounters an E-type (Evoke) record in a script, it transmits an Evoke record to the remote
system to attempt to start the “target” program on the remote system. It then waits for a
confirmation message from the target program indicating that the evoke was successful. If the
target is evoked successfully, it sends the confirmation message and starts executing at the first
step of the script named in the Evoke record on the local system. After receiving the confirmation
message, the local system resumes script execution at the second script step (immediately
following the Evoke step).

Asynchronous (ASC) Communication Examples Asynchronous Communication Support
9 - 40 Gentran:Server for iSeries Communications Module Release 3.5 User Guide
Asynchronous (ASC) Communication
Examples
# NOTE
This feature is an optional add-on product that may be purchased separately.
This section provides examples for configuring and executing communication using the ASC
(asynchronous) protocol. The ASC communication support provides an asynchronous connection
to the remote system. Two examples are shown. The first shows the local iSeries communicating
with another iSeries that is using this product. The second shows the local iSeries communicating
with a personal computer. Both examples use dial-up (switched line) connections.
The examples use a standard naming convention to help illustrate the configuration type being
used. The naming convention includes the system type (local or remote), the physical line type
(dial-up), the session initiation type (dial or answer), and the protocol type. The naming
convention adheres to the following rules:
The first three characters of each Profile ID indicate the system type. A local system definition
represents your machine and uses “LOC” as the first three characters in each example, while
the remote system definitions use “RMT.”
The fourth character of each Profile ID represents the type of physical line connection being
used. A dial-up (switched) line type is represented by the character “D.” It is assumed that all
asynchronous connections will be using a dial-up line.
The fifth character of each Profile ID represents the session initiation type. The character “D”
(dialer) indicates that you will be starting the session with the remote system, while the
character “A” (answerer) indicates that you will be waiting for the remote system to contact
you.
The sixth character of each Profile ID represents the protocol type of ASC (A). The examples
include all parameters used in building the Profile ID and the Session Scripts.
The examples use typical asynchronous configurations, and should be applicable to many
environments.
The examples show the communication profile and communication session control scripts for both
the local and remote iSeries systems. The PC example shows a sample communication script for a
PC using the PROCOMM PLUS product by DATASTORM TECHNOLOGIES, INC.

Asynchronous Communication Support Asynchronous (ASC) Communication Examples
Gentran:Server for iSeries Communications Module Release 3.5 User Guide 9 - 41
The example communication profile names and the configurations they represent are:
Example 1
LOCDDA – Local system configured for dial line, initiate the connection (dial), ASC protocol
in use.
RMTDAA – Remote system configured for dial line, answer incoming calls initiated by
another system, ASC protocol in use.
Example 2
LOCDAA – Local system configured for dial line, answer incoming calls initiated by another
system, ASC protocol in use.
Remote PC – Communication profile not shown (not applicable to PROCOMM PLUS).
Example script initiates a dial-up connection to LOCDAA and performs file transfers.
Figure 9.5 shows the Communication Profile for a local system, dial line, initiate call, ASC in use
configuration.
Figure 9.5 Communication Profile panel (EDIX401-FMT01)
EDIX401 Communication Profile EDI 04/30/08
FMT01 12:00:00
Comm Profile ID. . . . . . . . . . LOCDDA
Company. . . . . . . . . . . . . . Local Dial Line/Dial/ASYNC
Contact. . . . . . . . . . . . . . Test Contact
Phone. . . . . . . . . . . . . . . ( 614 ) 555 - 1212 x
International Dial Code. . . . . .
Protocol . . . . . . . . . . . . . ASC
Days to Purge. . . . . . . . . . . 999
FIFO/LIFO. . . . . . . . . . . . . F
Used Most Frequently . . . . . . . N
Update Allowed . . . . . . . . . . Y
F1=Help F4=Prompt F10=Update F12=Cancel F24=More Keys

Asynchronous (ASC) Communication Examples Asynchronous Communication Support
9 - 42 Gentran:Server for iSeries Communications Module Release 3.5 User Guide
Figure 9.6 shows the extended view of the previous Communication panel.
Figure 9.6 Extended View of Communication panel (EDIX401-FMT06)
EDIX401 Communication Profile EDI 04/30/08
FMT06 ASC 12:00:00
Comm Profile ID. . . . . LOCDDA
Company. . . . . . . . . Local Dial Line/Dial/ASYNC
Modem Port . . . . . . . LIN061 Retries. . . . . . . . 02
Switched Line. . . . . . Y Auto Dial. . . . . . . Y (Y/N)
Dial . . . . . . . . . . 5551212
Remote Location. . . . . LOCDDA Job Termination Delay. N
Line Speed . . . . . . . 09600 End-of-Cmd Character . 00
Print Record Size. . . . 132 EOT Character. . . . . 3F
Outbound Block Size. . . 1024 ETX Character. . . . . 03
Command Set. . . . . . . A Translation:
Flow Control . . . . . . N (Y/N/H) Inbound (from) . . . .
Remote Cmd Password. . . *NONE Inbound (to) . . . . .
Outbound (from). . . .
Modem Break Character. . + Outbound (to). . . . .
Modem Auto-Answer Command ATS0=1
Modem Init. Command. . . ATQ0V1X4
Modem OK Message . . . . OK<CR><LF>
Modem Connect Message. . CONNECT<?><CR><LF>
F1=Help F4=Prompt F5=Refresh F10=Update F12=Cancel F24=More Keys

Asynchronous Communication Support Asynchronous (ASC) Communication Examples
Gentran:Server for iSeries Communications Module Release 3.5 User Guide 9 - 43
Figure 9.7 shows the Communication Session Control panel (EDIX403-CTL01) for the local
system, dial line, initiate call, ASC in use configuration.
Figure 9.7 Communication Session Control panel (EDIX403-CTL01)
This example script shows the following steps:
1. The local system sends a test file called “TESTSND.01” to the remote system. Indicator 2
specifies that an EOT character should be sent following the file. The EDIX401-FMT06
configuration panel defines EOT as x'3F' (EBCDIC SUB), so the equivalent ASCII SUB
(x'1A') will be transmitted to mark the end of file.
2. The remote system sends data that will be received by the local system into a file called
“TESTRCV.01”. Indicator 7 specifies that the remote will mark the end of file with an
EOT character. The EDIX401-FMT06 configuration panel defines EOT as x'3F'
(EBCDIC SUB), so the receive step will end when the equivalent ASCII SUB (x'1A') is
received from the remote.
3. The local system sends all data with the Profile ID “LOCDDA” from the Outbound Queue
to the remote system. In the event that there is no data on the Outbound Queue to send to
the remote system, the message “*** ERROR *** NO BATCHES FOR
TRANSMISSION” will be sent. The EOT character will be transmitted after all batches
have been transmitted.
4. The remote system sends data that will be received by the local system to the inbound
queue under Profile ID “LOCDDA”. The receive step will end when an EOT character is
received from the remote. Although it is not apparent looking at the script above (because
it is a default), the message “*** ERROR *** NO BATCHES FOR TRANSMISSION”,
followed by an EOT character would also indicate the end of the receive step.
This concludes the configuration for local system, dial line, dial, ASC protocol (LOCDDA)
example. The configuration for the remote system (RMTDAA) begins on the next page.
EDIX403 Communication Session Control EDI 04/30/08
CTL01 12:00:00
Comm Profile ID. . . . . . . . . . LOCDDA
Session Name . . . . . . . . . . . T1
Company. . . . . . . . . . . . . . Local Dial Line/Dial/ASYNC
Type option, press Enter.
3=Copy Seq# 4=Delete 11=Extended Parms
Opt Seq No Tran File File Name Ind Description
10 S OF TESTSND.01 2 SEND A TEST FILE FROM RMT
20 R IF TESTRCV.01 7 RECV TEST FILE FROM RMT
30 S OQ 2 SEND FROM OUT QUEUE
*** ERROR *** NO BATCHES FOR TRANSMISSION
40 R IQ 7 RECV FROM RMT TO INB QUEUE
F1=Help F4=Prompt F9=Fold/Unfold F10=Update F12=Cancel F24=More Keys

Asynchronous (ASC) Communication Examples Asynchronous Communication Support
9 - 44 Gentran:Server for iSeries Communications Module Release 3.5 User Guide
This begins the definitions for the remote system in dial line, answer (wait for the other system to
contact you), ASC (asynchronous) configuration. This configuration is used by the remote system
to communicate with the local system that uses the LOCDDA configuration.
Figure 9.8 shows the Communication Profile for a remote system, dial line, answer, ASC in use
configuration.
Figure 9.8 Communication Profile panel (EDIX401-FMT01)
Figure 9.9 shows the extended view of the previous panel.
Figure 9.9 Extended View of Communication Profile (EDIX401-FMT06)
EDIX401 Communication Profile EDI 04/30/08
FMT01 12:00:00
Comm Profile ID. . . . . . . . . . RMTDAA
Company. . . . . . . . . . . . . . Remote Dial Line/Answer/ASYNC
Contact. . . . . . . . . . . . . . Test Contact
Phone. . . . . . . . . . . . . . . ( 614 ) 555 - 1212 x
International Dial Code. . . . . .
Protocol . . . . . . . . . . . . . ASC
Days to Purge. . . . . . . . . . . 999
FIFO/LIFO. . . . . . . . . . . . . F
Used Most Frequently . . . . . . . N
Update Allowed . . . . . . . . . . Y
F1=Help F4=Prompt F10=Update F12=Cancel F24=More Keys
EDIX401 Communication Profile EDI 04/30/08
FMT06 ASC 12:00:00
Comm Profile ID. . . . . RMTDAA
Company. . . . . . . . . Remote Dial Line/Answer/ASYNC
Modem Port . . . . . . . LIN032 Retries. . . . . . . . 02
Switched Line. . . . . . Y Auto Dial. . . . . . . N (Y/N)
Dial . . . . . . . . . .
Remote Location. . . . . RMTDAA Job Termination Delay. N
Line Speed . . . . . . . 09600 End-of-Cmd Character . 00
Print Record Size. . . . 132 EOT Character. . . . . 3F
Outbound Block Size. . . 1024 ETX Character. . . . . 03
Command Set. . . . . . . A Translation:
Flow Control . . . . . . Y (Y/N/H) Inbound (from) . . . .
Remote Cmd Password. . . *NONE Inbound (to) . . . . .
Outbound (from). . . .
Modem Break Character. . + Outbound (to). . . . .
Modem Auto-Answer Command ATS0=1
Modem Init. Command. . . ATQ0V1X4
Modem OK Message . . . . OK<CR><LF>
Modem Connect Message. . CONNECT<?><CR><LF>
F1=Help F4=Prompt F5=Refresh F10=Update F12=Cancel F24=More Keys

Asynchronous Communication Support Asynchronous (ASC) Communication Examples
Gentran:Server for iSeries Communications Module Release 3.5 User Guide 9 - 45
Figure 9.10 shows the Communication Session Control panel (EDIX403-CTL01) for a remote
system, dial line, answer, ASC in use configuration.
Figure 9.10 Communication Session Control panel (EDIX403-CTL01)
This example script shows the following steps:
1. The local system sends data that will be received by the remote system into a file called
“INFILE”. Indicator 7 specifies that the receive step is to end when an EOT character is
received. Since the EDIX401-FMT06 profile panel defines EOT as x'3F' (EBCDIC SUB),
the receive will end when the equivalent ASCII SUB (x'1A') is received.
2. The remote system sends a test file called “OUTFILE” to the local system. Indicator 2
specified that an EOT character be sent following the file. Since the EDIX401-FMT06
profile panel defines EOT as x'3F' (EBCDIC SUB), the system will transmit the
equivalent ASCII SUB (x'1A') at the end of the file.
3. The local system sends data that will be received by the remote system to the Inbound
Queue under Profile ID “RMTDAA.” The receive step will end when an EOT character is
received. Although it is not apparent looking at the script above (because it is a default),
the message “*** ERROR *** NO BATCHES FOR TRANSMISSION”, followed by an
EOT character would also indicate the end of the receive step.
4. The remote system sends all data with the Profile ID “RMTDAA” from the outbound
queue to the local system. In the event that there is no data on the outbound queue to send,
the message “*** ERROR *** NO BATCHES FOR TRANSMISSION” will be sent.
This concludes the example for the remote system, dial line, answer, ASC configuration.
EDIX403 Communication Session Control EDI 04/30/08
CTL01 12:00:00
Comm Profile ID. . . . . . . . . . RMTDAA
Session Name . . . . . . . . . . . T1
Company. . . . . . . . . . . . . . Remote Dial Line/Answer/ASYNC
Type option, press Enter.
3=Copy Seq# 4=Delete 11=Extended Parms
Opt Seq No Tran File File Name Ind Description
10 R IF INFILE 7 RECV TEST FILE FROM RMT
20 S OF OUTFILE 2 SEND TEST FILE TO RMT
30 R IQ 7 RECV FROM RMT TO INB QUEUE
40 S OQ 2 SEND FROM OUT QUEUE TO RMT
*** ERROR *** NO BATCHES FOR TRANSMISSION
More...
F1=Help F4=Prompt F9=Fold/Unfold F10=Update F12=Cancel F24=More Keys

Asynchronous (ASC) Communication Examples Asynchronous Communication Support
9 - 46 Gentran:Server for iSeries Communications Module Release 3.5 User Guide
This begins the definitions for the local system in dial line, answer (wait for the other system to
contact you), ASC (asynchronous) configuration. This configuration is used on the local system to
answer a call from a remote PC.
Figure 9.11 shows the Communication Profile panel (EDIX401-FMT01) for the local system, dial
line, answer, ASC in use configuration.
Figure 9.11 Communication Profile panel (EDIX401-FMT01)
Figure 9.12 shows the expanded view of the previous panel.
Figure 9.12 Expanded View of Communication Profile panel (EDIX401-FMT06)
EDIX401 Communication Profile EDI 04/30/08
FMT01 12:00:00
Comm Profile ID. . . . . . . . . . LOCDAA
Company. . . . . . . . . . . . . . Test ASC Answer with AT commands
Contact. . . . . . . . . . . . . . Test Contact
Phone. . . . . . . . . . . . . . . ( 614 ) 555 - 1212 x
International Dial Code. . . . . .
Protocol . . . . . . . . . . . . . ASC
Days to Purge. . . . . . . . . . . 999
FIFO/LIFO. . . . . . . . . . . . . F
Used Most Frequently . . . . . . . N
Update Allowed . . . . . . . . . . Y
F1=Help F4=Prompt F10=Update F12=Cancel F24=More Keys
EDIX401 Communication Profile EDI 04/30/08
FMT06 ASC 12:00:00
Comm Profile ID. . . . . LOCDAA
Company. . . . . . . . . Test ASC Answer with AT commands
Modem Port . . . . . . . LIN061 Retries. . . . . . . . 02
Switched Line. . . . . . Y Auto Dial. . . . . . . N (Y/N)
Dial . . . . . . . . . . 5551212
Remote Location. . . . . LOCDAA Job Termination Delay. N
Line Speed . . . . . . . 09600 End-of-Cmd Character . 00
Print Record Size. . . . 132 EOT Character. . . . . 3F
Outbound Block Size. . . 1024 ETX Character. . . . . 03
Command Set. . . . . . . A Translation:
Flow Control . . . . . . N (Y/N/H) Inbound (from) . . . .
Remote Cmd Password. . . *NONE Inbound (to) . . . . .
Outbound (from). . . .
Modem Break Character. . + Outbound (to). . . . . 0D 15
Modem Auto-Answer Command ATS0=1
Modem Init. Command. . . ATQ0V1X4
Modem OK Message . . . . OK<CR><LF>
Modem Connect Message. . CONNECT<?><CR><LF>
F1=Help F4=Prompt F5=Refresh F10=Update F12=Cancel F24=More Keys

Asynchronous Communication Support Asynchronous (ASC) Communication Examples
Gentran:Server for iSeries Communications Module Release 3.5 User Guide 9 - 47
Figure 9.13 shows the Communication Session Control panel (EDIX403-CTL01) for the local
system, dial line, answer, ASC in use configuration.
Figure 9.13 Communication Session Control panel (EDIX403-CTL01)
Figure 9.14 shows the continuation of the Communication Session Control panel
(EDIX403-CTL01) for the local system, dial line, answer with AT commands.
Figure 9.14 Communication Session Control panel (EDIX403-CTL01)
EDIX403 Communication Session Control EDI 04/30/08
CTL01 12:00:00
Comm Profile ID. . . . . . . . . . LOCDAA
Session Name . . . . . . . . . . . PC
Company. . . . . . . . . . . . . . Test ASC Answer with AT commands
Type option, press Enter.
3=Copy Seq# 4=Delete 11=Extended Parms
Opt Seq No Tran File File Name Ind Description
10 D 0 WAIT FOR READY MESSAGE
PC READY TO RECEIVE.
20 S OF SNDFIL80 2 SEND OUTBOUND DATA
NO DATA AVAILABLE ON iSeries.
30 D 0 WAIT FOR RCV CONFIRMATION
PC RECEIVE COMPLETE.
40 C 0 SEND READY MESSAGE
iSeries READY TO RECEIVE.
50 R IQ 7 RECEIVE TO INB QUEUE
NO DATA AVAILABLE ON PC.
More...
F1=Help F4=Prompt F9=Fold/Unfold F10=Update F12=Cancel F24=More Keys
EDIX403 Communication Session Control EDI 04/30/08
CTL01 12:00:00
Comm Profile ID. . . . . . . . . . LOCDAA
Session Name . . . . . . . . . . . PC
Company. . . . . . . . . . . . . . Test ASC Answer with AT commands
Type option, press Enter.
3=Copy Seq# 4=Delete 11=Extended Parms
Opt Seq No Tran File File Name Ind Description
60 C 0 SEND CONFIRMATION MESSAGE
iSeries RECEIVE COMPLETE.
More...
F1=Help F4=Prompt F9=Fold/Unfold F10=Update F12=Cancel F24=More Keys

Asynchronous (ASC) Communication Examples Asynchronous Communication Support
9 - 48 Gentran:Server for iSeries Communications Module Release 3.5 User Guide
The communication session control script shown above waits for a ready message from the PC,
sends an outbound file, and waits for a confirmation of the receive. After confirmation is received,
it transmits a ready message to the PC, and then receives data to the Inbound Queue until an EOT
character is received. After the receive completes, a confirmation message is sent to the PC.
Please note that the “.” (period) characters at the end of the Command lines in the communication
session control scripts above actually represent the non-displayable End of Record character,
which was defined to be 00 in the communication profile. The End of Record character would
have to be entered for each script record by using the hex mode of the EDIX43B panel for the last
script record (Seq No 060).
Figure 9.15 shows the extended view of the communication session control record sequence #60
accessed by using Option 11 on panel EDIX403-CTL01.
Figure 9.15 Communication Session Control panel (EDIX43B-FMT01)
This concludes the example of local system, dial line, answer call, ASC protocol (LOCDAA). The
corresponding example communication script for the remote PC begins on the next page.
EDIX43B Communication Session Control EDI 04/30/08
FMT01 12:00:00
Comm Profile ID. . . . . . . . . . LOCDAA
Session Name . . . . . . . . . . . PC
Company. . . . . . . . . . . . . . Test ASC Answer with AT commands
Sequence Number. . . . . . . . . . 60
Transaction Code . . . . . . . . . C
File . . . . . . . . . . . . . . .
File Name. . . . . . . . . . . . .
Indicator. . . . . . . . . . . . . 0
Description. . . . . . . . . . . . SEND CONFIRMATION MESSAGE
Command: (Top Line CHAR, Bottom Lines HEX)
iSeries RECEIVE COMPLETE.
CE6FFF4DCCCCEC4CDDDDCEC04444444444444444444444444444444444444444444444444444444
1214000953595503647353500000000000000000000000000000000000000000000000000000000
Batch ID . . . . . . .
Receive Timer. . . . . (MMSS)
Timeout Continue . . . Timeout Status . . . .
F1=Help F2=Hex On/Off F4=Prompt F10=Update F12=Cancel F24=More Keys

Asynchronous Communication Support Asynchronous (ASC) Communication Examples
Gentran:Server for iSeries Communications Module Release 3.5 User Guide 9 - 49
This example of a PC communication script could be used to communicate with the preceding
iSeries configuration, LOCDAA. The script shown uses the Aspect script language supported by
PROCOMM PLUS, a product of DATASTORM TECHNOLOGIES, INC.
# NOTE
The example script in Figure 9.16 illustrates only basic send/receive functionality. It does not
contain the logic for error handling or no-data conditions, and is not intended for use in a
production environment.
Figure 9.16 Example PC Communication Script
Please note that different techniques are used to trigger the end of the receive step on the two
systems. The end of receive step on the PC is triggered by an inactivity timeout (30 seconds) when
the iSeries finishes sending its outbound file and begins its Data Trap. The end of the receive step
on the iSeries is triggered when the PC sends the Ctrl-Z (hex “1A”, ASCII SUB). The iSeries
receives the ASCII SUB and translates it to an EBCDIC SUB, which is hex
“3F”. Hex “3F” is the EOT character defined in the communication profile for LOCDAA. Because
Indicator 7 is used on the Receive step in the iSeries script, receipt of the EOT character ends the
receive step.
This concludes the example for the remote PC, dial line, dial, asynchronous communication using
PROCOMM PLUS.
;
; SAMPLE PROCOMM PLUS 2.X ASPECT SCRIPT FILE FOR COMMUNICATING
; WITH Gentran:Server FOR THE iSeries
;
proc main ; DECLARE MAIN PROCEDURE
set softflow on ; ENABLE XON/XOFF FLOW CONTROL
set ascii charpace 0 ; NO CHARACTER PACING NEEDED
set ascii linepace 0 ; NO LINE PACING NEEDED
set ascii up_cr strip ; STRIP OUTBOUND CR/LF
set ascii dn_to 30 ; SET RCV TIMEOUT FOR 30 SECS
mdial "5551212" ; INITIATE CALL TO iSeries
waitfor "CONNECT" ; WAIT FOR CONNECTION
waitquiet 5 ; WAIT FOR QUIET LINE
rflush ; CLEAR RECEIVE BUFFER
transmit "PC READY TO RECEIVE" ; SEND READY MESSAGE
getfile ascii "\RECEIVED.DAT" ; RECEIVE DATA FROM iSeries
transmit "PC RECEIVE COMPLETE" ; SEND CONFIRMATION MESSAGE
waitfor "iSeries READY TO RECEIVE" ; WAIT FOR READY MESSAGE
sendfile ascii "\RECEIVED.DAT" ; SEND SAME DATA RECEIVED
transmit "^Z" ; SEND CTRL-Z "EOT" CHARACTER
waitfor "iSeries RECEIVE COMPLETE" ; WAIT FOR CONFIRMATION MESSAGE
hangup ; DISCONNECT
endproc ; END OF MAIN PROCEDURE

Asynchronous (XAS) via X.25 Examples Asynchronous Communication Support
9 - 50 Gentran:Server for iSeries Communications Module Release 3.5 User Guide
Asynchronous (XAS) via X.25 Examples
# NOTE
This feature is an optional add-on product that may be purchased separately.
This section provides examples for configuring and executing communication using the XAS
protocol support. The XAS communications support provides an asynchronous connection to the
remote system using an X.25 line configuration. There are no assumptions made as to the remote
system you may be communicating with. The remote may be an X.25 network, a PC, or another
iSeries. Examples for both dial-up and leased line connections are provided.
The following examples use a standard naming convention to help illustrate the configuration type
being used. The naming convention includes the system type (local or remote), the physical line
type (dial-up or leased), the session initiation type (dial or answer), and a modem command set
indicator. The naming convention adheres to the following rules:
The first character of each Profile ID indicates the system type. A local system definition
represents your machine and uses “L” as the first character in each example, while the remote
system definitions use “R.”
The second and third characters of each Profile ID represent the type of protocol support being
used. Each example uses “XA” indicating X.25 with asynchronous support.
The fourth character of each Profile ID indicates the physical connection type being used. The
character “D” indicates a dial-up type line, while the character “L” indicates a leased line
connection.
The fifth character of each Profile ID represents the session initiation type. The character “D”
(dialer) indicates that you will be starting the session with the remote system, while the
character “A” (answer) indicates that you will be waiting for the remote system to contact you.
The sixth character of each Profile ID represents the modem command set being used. The
character “V” indicates that the modem supports the V.25bis command set. The character “N”
(None) indicates that the modem does not use a command set, and will not send responses or
receive any commands. The character “N” would be appropriate when using a leased line
configuration, or when doing a manual dial in a switched line environment.
The seventh character indicates whether an X.25 network is being used. The character “X”
indicates that an X.25 network is being used, while the character “N” indicates no X.25
network is being used.
The examples include all parameters used in building the Profile ID and the Session Scripts.

Asynchronous Communication Support Asynchronous (XAS) via X.25 Examples
Gentran:Server for iSeries Communications Module Release 3.5 User Guide 9 - 51
There are currently four pairs of configuration examples. These are the most common XAS
configurations and should be useful in many environments. Each example contains one
configuration defining the local system parameters and a second configuration defining the remote
system parameters. The four pairs are listed below:
LXALDNX – Local system configured for leased line, initiate the connection (dial), no dial
commands in use, X.25 network in use.
RXALANX – Remote system configured for leased line, answer incoming calls initiated by
another system, no dial commands in use, X.25 network in use.
LXADDVX – Local system configured for dial line, initiate the connection (dial) to network
PAD, V.25bis dial commands in use, X.25 network in use.
RXALANX – Remote system configured for leased line, answer incoming calls initiated by
another system, no dial commands in use, X.25 network in use.
LXADDVN – Local system configured for dial line, initiate the connection (dial), V.25bis dial
commands, no X.25 network in use.
RXADANN – Remote system configured for dial line, answer incoming calls initiated by
another system, no dial commands, no X.25 network in use.
LXALDNN – Local system configured for leased line, initiate the connection (dial), no
command set, no X.25 network in use.
RXALANN – Remote system configured for leased line, answer incoming calls initiated by
another system, no dial commands, no X.25 network in use.

Asynchronous (XAS) via X.25 Examples Asynchronous Communication Support
9 - 52 Gentran:Server for iSeries Communications Module Release 3.5 User Guide
Figure 9.17 shows a Communication Profile for a Local System, Leased Line, Dial (initiate), No
Commands, X.25 Network in use configuration.
Figure 9.17 Communication Profile panel (EDIX401-FMT01)
Figure 9.18 shows the extended view of the previous panel.
Figure 9.18 Extended View of Communication Profile panel (EDIX401-FMT07)
EDIX401 Communication Profile EDI 04/30/08
FMT01 12:00:00
Comm Profile ID. . . . . . . . . . LXALDNX
Company. . . . . . . . . . . . . . Local Leased/Dial/No CMDS/X25 Netwk
Contact. . . . . . . . . . . . . . Test Contact
Phone. . . . . . . . . . . . . . . ( 614 ) 555 - 1212 x
International Dial Code. . . . . .
Protocol . . . . . . . . . . . . . XAS
Days to Purge. . . . . . . . . . . 999
FIFO/LIFO. . . . . . . . . . . . . F
Used Most Frequently . . . . . . . N
Update Allowed . . . . . . . . . . Y
F1=Help F4=Prompt F10=Update F12=Cancel F24=More Keys
EDIX401 Communication Profile EDI 04/30/08
FMT07 XAS 12:00:00
Comm Profile ID. . . . . LXALDNX
Company. . . . . . . . . Local Leased/Dial/No CMDS/X25 Netwk
Modem Port . . . . . . . LIN032 Retries. . . . . . . . 02
Switched Line. . . . . . N (Y/N) Auto Dial. . . . . . . N (Y/N)
Dial . . . . . . . . . .
Session Initiator. . . . *DIAL
Net Connection Init. . . *WAIT End-of-Cmd Character . 00
Remote Net Addr. . . . . 311012345678 EOT Character. . . . . 3F
Local Net Addr . . . . . 311087654321 ETX Character. . . . . 03
Remote Location. . . . . LXALDNX
Lgl Channel Type . . . . *SVCBOTH Translation:
Lgl Channel ID . . . . . 001 Inbound (from) . . . .
Modulus. . . . . . . . . 8 Inbound (to) . . . . .
Window Size. . . . . . . 2 Outbound (from). . . .
Packet Size. . . . . . . 0128 Outbound (to). . . . .
Print Record Size. . . . 132
Outbound Block Size. . . 1024 Remote Cmd Password. . *NONE
Reverse Charge . . . . . *NONE DCE Support. . . . . . N (Y/N)
F1=Help F4=Prompt F5=Refresh F10=Update F12=Cancel F24=More Keys

Asynchronous Communication Support Asynchronous (XAS) via X.25 Examples
Gentran:Server for iSeries Communications Module Release 3.5 User Guide 9 - 53
Figure 9.19 shows the Session Control panel (EDIX403-CTL01) for the LXALDNX
Communication Profile.
Figure 9.19 Communication Session Control panel (EDIX403-CTL01)
Figure 9.20 shows the Communication Evoke panel (EDIX43C-FMT01) for the Local System,
Leased Line, Dial (Initiate), No Commands, X.25 Network in Use configuration.
Figure 9.20 Communication Evoke panel (EDIX43C-FMT01)
This ends the configuration for the local system, leased line, dial (initiate), no command set, X.25
network in use configuration (LXALDNX). The configuration for the remote system
(RXALANX) begins on the next page.
EDIX403 Communication Session Control EDI 04/30/08
CTL01 12:00:00
Comm Profile ID. . . . . . . . . . LXALDNX
Session Name . . . . . . . . . . . T1
Company. . . . . . . . . . . . . . Local Leased/Dial/No CMDS/X25 Netwk
Type option, press Enter.
3=Copy Seq# 4=Delete 11=Extended Parms
Opt Seq No Tran File File Name Ind Description
5 E 0 EVOKE THE TARGET PROGRAM
30 S OM 2 SEND FROM OUTB QUEUE
40 R IM 7 RECV DATA TO INB QUEUE
More...
F1=Help F4=Prompt F9=Fold/Unfold F10=Update F12=Cancel F24=More Keys
EDIX43C Communication Evoke EDI 04/30/08
FMT01 12:00:00
Comm Profile ID. . . . . . . . . . LXALDNX
Session Name . . . . . . . . . . . T1
Company. . . . . . . . . . . . . . Local Leased/Dial/No CMDS/ X25 Network
Library Name . . . . . . . . . . . G7X0PGM
Program Name . . . . . . . . . . . STRCOM62
Profile to Evoke . . . . . . . . . RXALANX
Session to Evoke . . . . . . . . . T1
Trace *YES or *NO. . . . . . . . . *YES
User ID. . . . . . . . . . . . . . QPGMR
Password . . . . . . . . . . . . . QPGMR
F1=Help F4=Prompt F5=Refresh F10=Update F12=Cancel

Asynchronous (XAS) via X.25 Examples Asynchronous Communication Support
9 - 54 Gentran:Server for iSeries Communications Module Release 3.5 User Guide
This begins the definitions for the remote system in leased line, answer (wait for the other system
to contact you), no command set, X.25 network in use configuration. This configuration is used by
the remote system to communicate with the local system that uses the LXALDNX configuration.
Figure 9.21 shows the Communication Profile panel (EDIX401-FMT01) for the Remote System,
Leased Line, Answer, No Commands, X.25 Network in Use configuration.
Figure 9.21 Communication Profile panel (EDIX401-FMT01)
Figure 9.22 shows the Communication Profile panel (EDIX401-FMT07) for the Remote System,
Leased Line, Answer, No Commands, X.25 Network in Use configuration.
Figure 9.22 Communication Profile panel (EDIX401-FMT07)
EDIX401 Communication Profile EDI 04/30/08
FMT01 12:00:00
Comm Profile ID. . . . . . . . . . RXALANX
Company. . . . . . . . . . . . . . Leased Line/Answer/No CMDS/X25 Netw
Contact. . . . . . . . . . . . . . Test Contact
Phone. . . . . . . . . . . . . . . ( 614 ) 555 - 1212 x
International Dial Code. . . . . .
Protocol . . . . . . . . . . . . . XAS
Days to Purge. . . . . . . . . . . 999
FIFO/LIFO. . . . . . . . . . . . . F
Used Most Frequently . . . . . . . N
Update Allowed . . . . . . . . . . Y
F1=Help F4=Prompt F10=Update F12=Cancel F24=More Keys
EDIX401 Communication Profile EDI 04/30/08
FMT07 XAS 12:00:00
Comm Profile ID. . . . . RXALANX
Company. . . . . . . . . Remote Line/Answer/No CMDS/X25 Netw
Modem Port . . . . . . . LIN021 Retries. . . . . . . . 02
Switched Line. . . . . . N (Y/N) Auto Dial. . . . . . . N (Y/N)
Dial . . . . . . . . . .
Session Initiator. . . . *ANS
Net Connection Init. . . *WAIT End-of-Cmd Character . 00
Remote Net Addr. . . . . *ANY EOT Character. . . . . 3F
Local Net Addr . . . . . 311012345678 ETX Character. . . . . 03
Remote Location. . . . . RXALANX
Lgl Channel Type . . . . *SVCBOTH Translation:
Lgl Channel ID . . . . . 001 Inbound (from) . . . .
Modulus. . . . . . . . . 8 Inbound (to) . . . . .
Window Size. . . . . . . 02 Outbound (from). . . .
Packet Size. . . . . . . 0128 Outbound (to). . . . .
Print Record Size. . . . 132
Outbound Block Size. . . 1024 Remote Cmd Password. . *NONE
Reverse Charge . . . . . *ACCEPT DCE Support. . . . . . N (Y/N)
F1=Help F4=Prompt F5=Refresh F10=Update F12=Cancel F24=More Keys

Asynchronous Communication Support Asynchronous (XAS) via X.25 Examples
Gentran:Server for iSeries Communications Module Release 3.5 User Guide 9 - 55
Figure 9.23 shows the Communication Session Control panel (EDIX403-CTL01) for the Remote
System, Leased Line, Answer, No Commands, X.25 Network in Use configuration.
Figure 9.23 Communication Session Control (EDIX403-CTL01)
Note that the local system initiates the session to the remote system, and this remote system
requires no evoke record creation.
This ends the example for the remote system, leased line, answer, no commands, X.25 network in
use configuration.
EDIX403 Communication Session Control EDI 04/30/08
CTL01 12:00:00
Comm Profile ID. . . . . . . . . . RXALANX
Session Name . . . . . . . . . . . T1
Company. . . . . . . . . . . . . . Leased Line/Answer/No CMDS/X25 Netw
Type option, press Enter.
3=Copy Seq# 4=Delete 11=Extended Parms
Opt Seq No Tran File File Name Ind Description
30 R IM 7 RECV DATA TO INB QUEUE
40 S OM 2 SEND FROM OUT QUEUE
More...
F1=Help F4=Prompt F9=Fold/Unfold F10=Update F12=Cancel F24=More Keys

Asynchronous (XAS) via X.25 Examples Asynchronous Communication Support
9 - 56 Gentran:Server for iSeries Communications Module Release 3.5 User Guide
This begins the Local System, Dial Line, Dial (initiate the session), V.25bis Dial Commands, X.25
Network in Use configuration.
Figure 9.24 shows the Communication Profile panel (EDIX401-FMT01) for the Local System,
Dial Line, Dial (Initiate), V.25bis Commands, X.25 Network in Use configuration.
Figure 9.24 Communication Profile panel (EDIX401-FMT01)
Figure 9.25 shows the expanded view of the previous panel.
Figure 9.25 Expanded View of the Communication Profile panel (EDIX401-FMT07)
EDIX401 Communication Profile EDI 04/30/08
FMT01 12:00:00
Comm Profile ID. . . . . . . . . . LXADDVX
Company. . . . . . . . . . . . . . Dial Line/Dial/V25 CMDS/X25 Netwk
Contact. . . . . . . . . . . . . . Test Contact
Phone. . . . . . . . . . . . . . . ( 614 ) 555 - 1212 x
International Dial Code. . . . . .
Protocol . . . . . . . . . . . . . XAS
Days to Purge. . . . . . . . . . . 999
FIFO/LIFO. . . . . . . . . . . . . F
Update Allowed . . . . . . . . . . Y
F1=Help F4=Prompt F10=Update F12=Cancel F24=More Keys
EDIX401 Communication Profile EDI 04/30/08
FMT01 12:00:00
Comm Profile ID. . . . . . . . . . LXADDVX
Company. . . . . . . . . . . . . . Dial Line/Dial/V25 CMDS/X25 Netwk
Contact. . . . . . . . . . . . . . Test Contact
Phone. . . . . . . . . . . . . . . ( 614 ) 555 - 1212 x
International Dial Code. . . . . .
Protocol . . . . . . . . . . . . . XAS
Days to Purge. . . . . . . . . . . 999
FIFO/LIFO. . . . . . . . . . . . . F
Used Most Frequently . . . . . . . N
Update Allowed . . . . . . . . . . Y
F1=Help F4=Prompt F10=Update F12=Cancel F24=More Keys
EDIX401 Communication Profile EDI 04/30/08
FMT07 XAS 12:00:00
Comm Profile ID. . . . . LXADDVX
Company. . . . . . . . . Dial Line/Dial/V25 CMDS/X25 Netwk
Modem Port . . . . . . . LIN072 Retries. . . . . . . . 02
Switched Line. . . . . . Y (Y/N) Auto Dial. . . . . . . Y (Y/N)
Dial . . . . . . . . . . 5551234
Session Initiator. . . . *DIAL
Net Connection Init. . . *WAIT End-of-Cmd Character . 00
Remote Net Addr. . . . . 311012345678 EOT Character. . . . . 3F
Local Net Addr . . . . . 311087654321 ETX Character. . . . . 03
Remote Location. . . . . LXADDVX
Lgl Channel Type . . . . *SVCBOTH Translation:
Lgl Channel ID . . . . . 001 Inbound (from) . . . .
Modulus. . . . . . . . . 8 Inbound (to) . . . . .
Window Size. . . . . . . 2 Outbound (from). . . .
Packet Size. . . . . . . 0128 Outbound (to). . . . .
Print Record Size. . . . 132
Outbound Block Size. . . 1024 Remote Cmd Password. . *NONE
Reverse Charge . . . . . *REQUEST DCE Support. . . . . . N (Y/N)
F1=Help F4=Prompt F5=Refresh F10=Update F12=Cancel F24=More Keys

Asynchronous Communication Support Asynchronous (XAS) via X.25 Examples
Gentran:Server for iSeries Communications Module Release 3.5 User Guide 9 - 57
In the previous example, note that the reverse charge field is set to “*REQUEST”. This option is
selected because the local system is dialing an X.25 PAD, and cannot be billed directly by the X.25
network. The “*REQUEST” option indicates that the remote system be requested to pay the X.25
network charges for this call. This option is dependent upon the remote system using the
“*ACCEPT” option for the reverse charge field on their system. If the remote system does not use
the “*ACCEPT” option for reverse charge, then the call will fail.
Figure 9.26 shows the Communication Session Control panel (EDIX403-CTL01) for the Local
System, Dial Line, Dial (Initiate), V.25bis Commands, X.25 Network in Use configuration.
Figure 9.26 Communication Session Control panel (EDIC403-CTL01)
EDIX403 Communication Session Control EDI 04/30/08
CTL01 12:00:00
Comm Profile ID. . . . . . . . . . LXADDVX
Session Name . . . . . . . . . . . T1
Company. . . . . . . . . . . . . . Dial Line/Dial/V25 CMDS/X25 Netwk
Type option, press Enter.
3=Copy Seq# 4=Delete 11=Extended Parms
Opt Seq No Tran File File Name Ind Description
5 E 0 EVOKE THE TARGET PROGRAM
30 S OM 2 SEND FROM OUTQUEUE
40 R IM 7 RECV DATA TO INQUEUE
More...
F1=Help F4=Prompt F9=Fold/Unfold F10=Update F12=Cancel F24=More Keys

Asynchronous (XAS) via X.25 Examples Asynchronous Communication Support
9 - 58 Gentran:Server for iSeries Communications Module Release 3.5 User Guide
Figure 9.27 shows the Communication Evoke panel (EDIX43C-FMT01) for the Local System,
Dial Line, Dial (Initiate), V.25bis Commands, X.25 Network in Use configuration.
Figure 9.27 Communication Evoke panel (EDIX43C-FMT01)
This ends the configuration for the local system, dial line, dial (initiate), V.25bis commands, X.25
network in use configuration (LXADDVX). The configuration for the remote system
(RXALANX) begins on the next page.
EDIX43C Communication Evoke EDI 04/30/08
FMT01 12:00:00
Comm Profile ID. . . . . . . . . . LXADDVX
Session Name . . . . . . . . . . . T1
Company. . . . . . . . . . . . . . Dial Line/Dial/V25 CMDS/X25 Netwk
Library Name . . . . . . . . . . . G7X0PGM
Program Name . . . . . . . . . . . STRCOM62
Profile to Evoke . . . . . . . . . RXALANXA
Session to Evoke . . . . . . . . . T1
Trace *YES or *NO. . . . . . . . . *YES
User ID. . . . . . . . . . . . . . QPGMR
Password . . . . . . . . . . . . . QPGMR
F1=Help F4=Prompt F5=Refresh F10=Update F12=Cancel

Asynchronous Communication Support Asynchronous (XAS) via X.25 Examples
Gentran:Server for iSeries Communications Module Release 3.5 User Guide 9 - 59
This begins the definitions for the remote system in leased line, answer (wait for the other system
to contact you), no command set, X.25 network in use configuration. This configuration is used by
the remote system to communicate with the local system that uses the LXADDVX configuration.
Figure 9.28 shows the Communication Profile panel (EDIX401-FMT01) for the Remote System,
Leased Line, Answer, No Commands, X.25 Network in Use configuration.
Figure 9.28 Communication Profile panel (EDIX401-FMT01)
Figure 9.29 shows the extended view of the previous panel.
Figure 9.29 Extended View of the Communication Profile panel (EDIX401-FMT07)
EDIX401 Communication Profile EDI 04/30/08
FMT01 12:00:00
Comm Profile ID. . . . . . . . . . RXALANX
Company. . . . . . . . . . . . . . Remote Line/Answer/No CMDS/X25 Netw
Contact. . . . . . . . . . . . . . Test Contact
Phone. . . . . . . . . . . . . . . ( 614 ) 555 - 1212 x
International Dial Code. . . . . .
Protocol . . . . . . . . . . . . . XAS
Days to Purge. . . . . . . . . . . 999
FIFO/LIFO. . . . . . . . . . . . . F
Used Most Frequently . . . . . . . N
Update Allowed . . . . . . . . . . Y
F1=Help F4=Prompt F10=Update F12=Cancel F24=More Keys
EDIX401 Communication Profile EDI 04/30/08
FMT07 XAS 12:00:00
Comm Profile ID. . . . . RXALANX
Company. . . . . . . . . Remote Line/Answer/No CMDS/X25 Netw
Modem Port . . . . . . . LIN021 Retries. . . . . . . . 02
Switched Line. . . . . . N (Y/N) Auto Dial. . . . . . . N (Y/N)
Dial . . . . . . . . . .
Session Initiator. . . . *ANS
Net Connection Init. . . *WAIT End-of-Cmd Character . 00
Remote Net Addr. . . . . *ANY EOT Character. . . . . 3F
Local Net Addr . . . . . 311012345678 ETX Character. . . . . 03
Remote Location. . . . . RXALANX
Lgl Channel Type . . . . *SVCBOTH Translation:
Lgl Channel ID . . . . . 001 Inbound (from) . . . .
Modulus. . . . . . . . . 8 Inbound (to) . . . . .
Window Size. . . . . . . 02 Outbound (from). . . .
Packet Size. . . . . . . 0128 Outbound (to). . . . .
Print Record Size. . . . 132
Outbound Block Size. . . 1024 Remote Cmd Password. . *NONE
Reverse Charge . . . . . *ACCEPT DCE Support. . . . . . N (Y/N)
F1=Help F4=Prompt F5=Refresh F10=Update F12=Cancel F24=More Keys

Asynchronous (XAS) via X.25 Examples Asynchronous Communication Support
9 - 60 Gentran:Server for iSeries Communications Module Release 3.5 User Guide
Figure 9.30 shows the Communication Session Control panel (EDIX403-CTL-01) for the Remote
System, Leased Line, Answer, No Commands, X.25 Network in Use configuration.
Figure 9.30 Communication Session Control panel (EDIX403-CTL01)
Please note that the local system initiates the session to the this remote system, and this remote
system requires no evoke record creation.
This ends the example for the remote system, leased line, answer, no commands, X.25 network in
use configuration.
EDIX403 Communication Session Control EDI 04/30/08
CTL01 12:00:00
Comm Profile ID. . . . . . . . . . RXALANX
Session Name . . . . . . . . . . . T1
Company. . . . . . . . . . . . . . Leased Line/Answer/No CMDS/X25 Netw
Type option, press Enter.
3=Copy Seq# 4=Delete 11=Extended Parms
Opt Seq No Tran File File Name Ind Description
30 R IM 7 RECV TO INB QUEUE
40 S OM 2 SEND FROM OUT QUEUE
More...
F1=Help F4=Prompt F9=Fold/Unfold F10=Update F12=Cancel F24=More Keys

Asynchronous Communication Support Asynchronous (XAS) via X.25 Examples
Gentran:Server for iSeries Communications Module Release 3.5 User Guide 9 - 61
This begins the definitions for the local system, dial line, dial (initiate), V25bis commands, no
X.25 network used configuration.
Figure 9.31 shows the Communication Profile panel (EDIX401-FMT01) for the Local System,
Dial Line, Dial (Initiate), V.25bis Commands, No X.25 Network in Use configuration.
Figure 9.31 Communication Profile panel (EDIX401-FMT01)
Figure 9.32 shows the extended view of the previous panel.
Figure 9.32 Extended View of Communication Profile panel (EDIX401-FMT07)
EDIX401 Communication Profile EDI 04/30/08
FMT01 12:00:00
Comm Profile ID. . . . . . . . . . LXADDVN
Company. . . . . . . . . . . . . . Dial Line/Dial/V25 CMDS/No Network
Contact. . . . . . . . . . . . . . Test Contact
Phone. . . . . . . . . . . . . . . ( 614 ) 555 - 1212 x
International Dial Code. . . . . .
Protocol . . . . . . . . . . . . . XAS
Days to Purge. . . . . . . . . . . 999
FIFO/LIFO. . . . . . . . . . . . . F
Used Most Frequently . . . . . . . N
Update Allowed . . . . . . . . . . Y
F1=Help F4=Prompt F10=Update F12=Cancel F24=More Keys
EDIX401 Communication Profile EDI 04/30/08
FMT07 XAS 12:00:00
Comm Profile ID. . . . . LXADDVN
Company. . . . . . . . . Dial Line/Dial/V25 CMDS/No Network
Modem Port . . . . . . . LIN032 Retries. . . . . . . . 02
Switched Line. . . . . . Y (Y/N) Auto Dial. . . . . . . Y (Y/N)
Dial . . . . . . . . . . 5551212
Session Initiator. . . . *DIAL
Net Connection Init. . . *LOCAL End-of-Cmd Character . 00
Remote Net Addr. . . . . 311012345678 EOT Character. . . . . 3F
Local Net Addr . . . . . 311087654321 ETX Character. . . . . 03
Remote Location. . . . . LXADDVN
Lgl Channel Type . . . . *SVCBOTH Translation:
Lgl Channel ID . . . . . 001 Inbound (from) . . . .
Modulus. . . . . . . . . 8 Inbound (to) . . . . .
Window Size. . . . . . . 2 Outbound (from). . . .
Packet Size. . . . . . . 0128 Outbound (to). . . . .
Print Record Size. . . . 132
Outbound Block Size. . . 1024 Remote Cmd Password. . *NONE
Reverse Charge . . . . . *NONE DCE Support. . . . . . Y (Y/N)
F1=Help F4=Prompt F5=Refresh F10=Update F12=Cancel F24=More Keys

Asynchronous (XAS) via X.25 Examples Asynchronous Communication Support
9 - 62 Gentran:Server for iSeries Communications Module Release 3.5 User Guide
Figure 9.33 shows the Communication Session Control panel (EDIX403-CTL01) for the Local
System, Dial Line, Dial (Initiate), V.25bis Commands, No X.25 Network in Use configuration.
Figure 9.33 Unfolded Communication Session Control panel (EDIX403-CTL01)
Figure 9.34 shows the Evoke Communication panel for the Local System, Dial Line, Dial
(Initiate), V.25bis Commands, No X.25 Network in Use configuration.
Figure 9.34 Communication Evoke panel (EDIX43C-FMT01)
This ends the configuration for the local system, dial line, dial (initiate), V.25bis commands, no
X.25 network configuration (LXADDVN). The configuration for the remote system (RXADANN)
begins on the next page.
EDIX403 Communication Session Control EDI 04/30/08
CTL01 12:00:00
Comm Profile ID. . . . . . . . . . LXADDVN
Session Name . . . . . . . . . . . T1
Company. . . . . . . . . . . . . . Dial Line/Dial/V25 CMDS/No Network
Type option, press Enter.
3=Copy Seq# 4=Delete 11=Extended Parms
Opt Seq No Tran File File Name Ind Description
5 E 0 EVOKE THE TARGET PROGRAM
30 S OM 2 SEND FROM OUTQUEUE
40 R IM 7 RECV DATA TO INQUEUE
_ __
_ __
More...
F1=Help F4=Prompt F9=Fold/Unfold F10=Update F12=Cancel F24=More Keys
EDIX43C Communication Evoke EDI 04/30/08
FMT01 12:00:00
Comm Profile ID. . . . . . . . . . LXADDVN
Session Name . . . . . . . . . . . T1
Company. . . . . . . . . . . . . . Dial Line/Dial/V25 CMDS/No X25 Netwk
Library Name . . . . . . . . . . . G7X0PGM
Program Name . . . . . . . . . . . STRCOM62
Profile to Evoke . . . . . . . . . RXADANN
Session to Evoke . . . . . . . . . T1
Trace *YES or *NO. . . . . . . . . *YES
User ID. . . . . . . . . . . . . . QPGMR
Password . . . . . . . . . . . . . QPGMR
F1=Help F4=Prompt F5=Refresh F10=Update F12=Cancel

Asynchronous Communication Support Asynchronous (XAS) via X.25 Examples
Gentran:Server for iSeries Communications Module Release 3.5 User Guide 9 - 63
This begins the definitions for the remote system in dial line, answer (wait for the other system to
contact you), no command set, no X.25 network used configuration. This configuration is used by
the remote system to communicate with the local system that uses the LXADDVN configuration.
Figure 9.35 shows the Communication Profile panel (EDIX401-FMT01) for the Remote System,
Dial Line, Answer, No Commands, No X.25 Network in Use configuration.
Figure 9.35 Communication Profile panel (EDIX401-FMT01)
EDIX401 Communication Profile EDI 04/30/08
FMT01 12:00:00
Comm Profile ID. . . . . . . . . . RXADANN
Company. . . . . . . . . . . . . . Dial Line/Answer/No CMDS/No Network
Contact. . . . . . . . . . . . . . Test Contact
Phone. . . . . . . . . . . . . . . ( 614 ) 555 - 1212 x
International Dial Code. . . . . .
Protocol . . . . . . . . . . . . . XAS
Days to Purge. . . . . . . . . . . 999
FIFO/LIFO. . . . . . . . . . . . . F
Used Most Frequently . . . . . . . N
Update Allowed . . . . . . . . . . Y
F1=Help F4=Prompt F10=Update F12=Cancel F24=More Keys

Asynchronous (XAS) via X.25 Examples Asynchronous Communication Support
9 - 64 Gentran:Server for iSeries Communications Module Release 3.5 User Guide
Figure 9.36 shows and extended view of the previous panel.
Figure 9.36 Communication Profile panel (EDIX401-FMT07)
Please note that in this example the option “*REMOTE” is used for the network connection
initiation field. This option indicates that the remote will send SABM (set asynchronous balanced
mode) to this remote system to start the X.25 connection. Note also that the reverse charge option
is set to “*NONE” because the incoming call is placed directly to this machine and no X.25
network is in use.
EDIX401 Communication Profile EDI 04/30/08
FMT07 XAS 12:00:00
Comm Profile ID. . . . . RXADANN
Company. . . . . . . . . Dial Line/Answer/No CMDS/No Network
Modem Port . . . . . . . LIN021 Retries. . . . . . . . 02
Switched Line. . . . . . Y (Y/N) Auto Dial. . . . . . . N (Y/N)
Dial . . . . . . . . . .
Session Initiator. . . . *ANS
Net Connection Init. . . *REMOTE End-of-Cmd Character . 00
Remote Net Addr. . . . . *ANY EOT Character. . . . . 3F
Local Net Addr . . . . . 311012345678 ETX Character. . . . . 03
Remote Location. . . . . RXADANN
Lgl Channel Type . . . . *SVCBOTH Translation:
Lgl Channel ID . . . . . 001 Inbound (from) . . . .
Modulus. . . . . . . . . 8 Inbound (to) . . . . .
Window Size. . . . . . . 2 Outbound (from). . . .
Packet Size. . . . . . . 0128 Outbound (to). . . . .
Print Record Size. . . . 132
Outbound Block Size. . . 1024 Remote Cmd Password. . *NONE
Reverse Charge . . . . . *NONE DCE Support. . . . . . Y (Y/N)
F1=Help F4=Prompt F5=Refresh F10=Update F12=Cancel F24=More Keys

Asynchronous Communication Support Asynchronous (XAS) via X.25 Examples
Gentran:Server for iSeries Communications Module Release 3.5 User Guide 9 - 65
Figure 9.37 shows the unfolded view of the Communication Session Control panel
(EDIX403-CTL01) for the Remote System, Dial Line, Answer, No Commands, No X.25 Network
in Use configuration.
Figure 9.37 Communication Session Control panel (EDIX403-CTL01)
Please note that the local system initiates the session to the this remote system, and this remote
system requires no evoke record creation.
This ends the example for the remote system, dial line, answer, no commands, no X.25 network in
use configuration.
EDIX403 Communication Session Control EDI 04/30/08
CTL01 12:00:00
Comm Profile ID. . . . . . . . . . RXADANN
Session Name . . . . . . . . . . . T1
Company. . . . . . . . . . . . . . Dial Line/Answer/No CMDS/No Network
Type option, press Enter.
3=Copy Seq# 4=Delete 11=Extended Parms
Opt Seq No Tran File File Name Ind Description
30 R IM 7 RECV TO INB QUEUE
40 S OM 2 SEND FROM OUT QUEUE
More...
F1=Help F4=Prompt F9=Fold/Unfold F10=Update F12=Cancel F24=More Keys

Asynchronous (XAS) via X.25 Examples Asynchronous Communication Support
9 - 66 Gentran:Server for iSeries Communications Module Release 3.5 User Guide
This begins the local system, leased line, dial (initiate the session), no dial commands, no X.25
network in use configuration.
Figure 9.38 shows the Communication Profile panel (EDIX401-FMT01) for the Local System,
Leased Line, Dial (Initiate), No Dial Commands, No X.25 Network in Use configuration.
Figure 9.38 Communication Profile panel (EDIX401-FMT01)
Figure 9.39 show the extended view of the previous panel.
Figure 9.39 Communication Profile panel (EDIX401-FMT07)
EDIX401 Communication Profile EDI 04/30/08
FMT01 12:00:00
Comm Profile ID. . . . . . . . . . LXALDNN
Company. . . . . . . . . . . . . . Leased Line/Dial/No CMDS/No Network
Contact. . . . . . . . . . . . . . Test Contact
Phone. . . . . . . . . . . . . . . ( 614 ) 555 - 1212 x
International Dial Code. . . . . .
Protocol . . . . . . . . . . . . . XAS
Days to Purge. . . . . . . . . . . 999
FIFO/LIFO. . . . . . . . . . . . . F
Used Most Frequently . . . . . . . N
Update Allowed . . . . . . . . . . Y
F1=Help F4=Prompt F10=Update F12=Cancel F24=More Keys
EDIX401 Communication Profile EDI 04/30/08
FMT07 XAS 12:00:00
Comm Profile ID. . . . . LXALDNN
Company. . . . . . . . . Leased Line/Dial/No CMDS/No Network
Modem Port . . . . . . . LIN072 Retries. . . . . . . . 02
Switched Line. . . . . . N (Y/N) Auto Dial. . . . . . . N (Y/N)
Dial . . . . . . . . . .
Session Initiator. . . . *DIAL
Net Connection Init. . . *LOCAL End-of-Cmd Character . 00
Remote Net Addr. . . . . 311012345678 EOT Character. . . . . 3F
Local Net Addr . . . . . 311087654321 ETX Character. . . . . 03
Remote Location. . . . . RXALANN
Lgl Channel Type . . . . *SVCBOTH Translation:
Lgl Channel ID . . . . . 001 Inbound (from) . . . .
Modulus. . . . . . . . . 8 Inbound (to) . . . . .
Window Size. . . . . . . 02 Outbound (from). . . .
Packet Size. . . . . . . 0128 Outbound (to). . . . .
Print Record Size. . . . 132
Outbound Block Size. . . 1024 Remote Cmd Password. . *NONE
Reverse Charge . . . . . *NONE DCE Support. . . . . . Y (Y/N)
F1=Help F4=Prompt F5=Refresh F10=Update F12=Cancel F24=More Keys

Asynchronous Communication Support Asynchronous (XAS) via X.25 Examples
Gentran:Server for iSeries Communications Module Release 3.5 User Guide 9 - 67
Figure 9.40 shows the Communication Session Control panel (EDIX403-CTL01) for the Local
System, Leased Line, Dial (Initiate), No Dial Commands, No X.25 Network in Use configuration.
Figure 9.40 Communication Session Control panel (EDIX403-CTL01)
Figure 9.41 shows the Communication Evoke panel (EDIX43C-FMT01) the Local System,
Leased Line, Dial (Initiate), No Dial Commands, No X.25 Network in Use configuration.
Figure 9.41 Communication Evoke panel (EDIX43C-FMT01)
This ends the configuration for the local system, leased line, dial (initiate), no dial commands, no
X.25 network in use configuration (LXALDNN). The configuration for the remote system
(RXALANN) begins on the next page.
EDIX403 Communication Session Control EDI 04/30/08
CTL01 12:00:00
Comm Profile ID. . . . . . . . . . LXALDNN
Session Name . . . . . . . . . . . T1
Company. . . . . . . . . . . . . . Leased Line/Dial/No CMDS/No X25 Netwk
Type option, press Enter.
3=Copy Seq# 4=Delete 11=Extended Parms
Opt Seq No Tran File File Name Ind Description
5 E 0 EVOKE THE TARGET PROGRAM
30 S OM 2 SEND FROM OUTQUEUE
40 R IM 7 RECV DATA TO INQUEUE
More...
F1=Help F4=Prompt F9=Fold/Unfold F10=Update F12=Cancel F24=More Keys
EDIX43C Communication Evoke EDI 04/30/08
FMT01 12:00:00
Comm Profile ID. . . . . . . . . . LXALDNN
Session Name . . . . . . . . . . . T1
Company. . . . . . . . . . . . . . Leased Line/Dial/No CMDS/No X25 Netwk
Library Name . . . . . . . . . . . G7X0PGM
Program Name . . . . . . . . . . . STRCOM62
Profile to Evoke . . . . . . . . . RXALANN
Session to Evoke . . . . . . . . . T1
Trace *YES or *NO. . . . . . . . . *YES
User ID. . . . . . . . . . . . . . QPGMR
Password . . . . . . . . . . . . . QPGMR
F1=Help F4=Prompt F5=Refresh F10=Update F12=Cancel

Asynchronous (XAS) via X.25 Examples Asynchronous Communication Support
9 - 68 Gentran:Server for iSeries Communications Module Release 3.5 User Guide
This begins the definitions for the remote system in leased line, answer (wait for the other system
to contact you), no command set, no X.25 network in use configuration. This configuration is used
by the remote system to communicate with the local system that uses the LXADDNN
configuration.
Figure 9.42 shows the Communication Profile panel (EDIX401-FMT01) for the Remote System,
Leased Line, Answer, No Commands, No X.25 Network in Use configuration.
Figure 9.42 Communication Profile panel (EDIX401-FMT01)
EDIX401 Communication Profile EDI 04/30/08
FMT01 12:00:00
Comm Profile ID. . . . . . . . . . RXALANN
Company. . . . . . . . . . . . . . Leased Line/Answer/No CMDS/No Netwk
Contact. . . . . . . . . . . . . . Test Contact
Phone. . . . . . . . . . . . . . . ( 614 ) 555 - 1212 x
International Dial Code. . . . . .
Protocol . . . . . . . . . . . . . XAS
Days to Purge. . . . . . . . . . . 999
FIFO/LIFO. . . . . . . . . . . . . F
Used Most Frequently . . . . . . . N
Update Allowed . . . . . . . . . . Y
F1=Help F4=Prompt F10=Update F12=Cancel F24=More Keys

Asynchronous Communication Support Asynchronous (XAS) via X.25 Examples
Gentran:Server for iSeries Communications Module Release 3.5 User Guide 9 - 69
Figure 9.43 shows the extended view of the previous panel.
Figure 9.43 Communication Profile panel (EDIX401-FMT07)
Please note that in this example the option “*REMOTE” is used for the network connection
initiation field. This option indicates that the remote will send SABM (set asynchronous balanced
mode) to this remote system to start the X.25 connection. Note also that the reverse charge option
is set to “*NONE” because the incoming call is placed directly to this machine and no X.25
network is in use.
EDIX401 Communication Profile EDI 04/30/08
FMT07 XAS 12:00:00
Comm Profile ID. . . . . RXALANN
Company. . . . . . . . . Leased Line/Answer/No CMDS/No Netwk
Modem Port . . . . . . . LIN021 Retries. . . . . . . . 02
Switched Line. . . . . . N (Y/N) Auto Dial. . . . . . . N (Y/N)
Dial . . . . . . . . . .
Session Initiator. . . . *ANS
Net Connection Init. . . *REMOTE End-of-Cmd Character . 00
Remote Net Addr. . . . . *ANY EOT Character. . . . . 3F
Local Net Addr . . . . . 311012345678 ETX Character. . . . . 03
Remote Location. . . . . RXALANN
Lgl Channel Type . . . . *SVCBOTH Translation:
Lgl Channel ID . . . . . 001 Inbound (from) . . . .
Modulus. . . . . . . . . 8 Inbound (to) . . . . .
Window Size. . . . . . . 2 Outbound (from). . . .
Packet Size. . . . . . . 0128 Outbound (to). . . . .
Print Record Size. . . . 132
Outbound Block Size. . . 1024 Remote Cmd Password. . *NONE
Reverse Charge . . . . . *NONE DCE Support. . . . . . N (Y/N)
F1=Help F4=Prompt F5=Refresh F10=Update F12=Cancel F24=More Keys

Asynchronous (XAS) via X.25 Examples Asynchronous Communication Support
9 - 70 Gentran:Server for iSeries Communications Module Release 3.5 User Guide
Figure 9.44 shows the Communication Session Control panel (EDIX403-CTL01) for the Remote
System, Leased Line, Answer, No Commands, No X.25 Network in Use configuration.
Figure 9.44 Communication Session Control panel (EDIC403-CTL01)
Please note that the local system initiates the session to the remote system, and this remote system
requires no evoke record creation.
This ends the example for the remote system, leased line, answer, no commands, no X.25 network
in use configuration.
EDIX403 Communication Session Control EDI 04/30/08
CTL01 12:00:00
Comm Profile ID. . . . . . . . . . RXALANN
Session Name . . . . . . . . . . . T1
Company. . . . . . . . . . . . . . Leased Line/Answer/No CMDS/No X25 Netw
Type option, press Enter.
3=Copy Seq# 4=Delete 11=Extended Parms
Opt Seq No Tran File File Name Ind Description
30 R IM 7 RECV TO INB QUEUE
40 S OM 2 SEND DATA FROM OUT QUEUE
More...
F1=Help F4=Prompt F9=Fold/Unfold F10=Update F12=Cancel F24=More Keys

Chapter
Gentran:Server for iSeries Communications Module Release 3.5 User Guide 10 - 1
10 XMODEM File Transfer
Support
Introduction
Asynchronous communication, in its basic form, simply allows characters to be transferred in both
directions. This allows data to be transferred between machines, but does nothing to ensure that the
data received is the same as what was transmitted. This problem is addressed through the use of
error correcting hardware or file transfer protocols or both.
The XMODEM file transfer protocol was designed in the late 1970s and provides basic
mechanisms for error detection and recovery. Because of its age and relative simplicity, it has been
implemented on many types of computer systems. It is supported by the vast majority of
asynchronous PC communications products as well as many larger systems and networks.
XMODEM file transfer support is provided by the Gentran:Server optional asynchronous
communication module. This support allows XMODEM file transfers over a switched
asynchronous connection.
Many variations of XMODEM have evolved since its introduction. The original protocol was
based on 128 byte blocks with checksum error detection. Later enhancements included larger 1024
byte blocks for improved throughput, and CRC-16 error detection for improved assurance of data
integrity. Gentran:Server can be configured to use either standard blocksize as well as either
method of error detection. This should provide compatibility with most systems that claim to
support the XMODEM or XMODEM-1K file transfer protocol.

Considerations XMODEM File Transfer Support
10 - 2 Gentran:Server for iSeries Communications Module Release 3.5 User Guide
Considerations
All of the considerations detailed in the “Asynchronous Communication Support” chapter also
apply to XMODEM, with the following differences:
The necessity for error correcting hardware is eliminated by the error control provided by
XMODEM. However, error correcting hardware is still strongly recommended to avoid
communication failures that could occur outside the XMODEM portion of the communication
session.
By using XMODEM between two Gentran:Server systems, you can exchange transparent data
via an asynchronous connection. This is not possible with the Gentran:Server standard
asynchronous communications.
# NOTE
This is accomplished by configuring both Gentran:Server XMODEM communication
profiles to not perform ASCII-EBCDIC translation.
While executing the parts of your communication session control script that do not invoke
XMODEM support (control records, data traps, etc.), the asynchronous communicator
employs the system level translation described in the Asynchronous Communication Support
chapter. This translation cannot be disabled or altered.
While executing the parts of your communication session control script that invoke
XMODEM support, all queue and print data will be translated according to the translate tables
GENASCII and GENEBCDIC in your Gentran:Server program library. These tables provide
translation equivalent to the system level translation described in the Asynchronous
Communication Support chapter. This translation can be disabled in your XMODEM
communication profile. You should not modify or override these translation tables.

XMODEM File Transfer Support Considerations
Gentran:Server for iSeries Communications Module Release 3.5 User Guide 10 - 3
XMODEM Flow Control Considerations
XMODEM protocol uses all possible 8-bit binary characters, including all control characters.
Therefore, XMODEM cannot be used with any hardware or communications network that
reserves certain characters for control purposes.
For example, XON/XOFF flow control is based on the transmission of special control characters.
This makes it incompatible with XMODEM. Since XON/XOFF is the only flow control
mechanism currently supported by the iSeries, flow control cannot be used when running
XMODEM on the iSeries. Flow control will automatically be disabled in the XMODEM
communications configuration that is created by Gentran:Server.
An additional consequence of these facts is that because no flow control is possible between your
iSeries and modem, you must ensure that your communications port is operating at the same speed
as the connection between your modem and the remote modem. This can be accomplished by:
1. Configuring your modem to return a connection message that indicates the true speed of
the connection to the remote modem.
2. Configuring your modem to only establish a connection at the line speed you have
specified in your communication profile.
3. Configuring your modem to disable all flow control between the iSeries and itself.
4. Changing the modem connect message in your communications profile to check for the
line speed in the message that is expected because of items 1 and 2. The default modem
connect message allows a variety of connect messages, which we do not want so it must
be changed.
# NOTE
You must ensure that the steps listed above are carried out. Items 1, 2, and 3 can generally be
accomplished either via hardware (switches or buttons on the modem) or software (modem
commands that can be included in the Modem Initialization Command in your
communication profile). Item number 4 requires that you determine the exact connect
message that will be issued by your modem. You should consult your modem documentation
to determine the most appropriate way to accomplish these goals.

Configuration XMODEM File Transfer Support
10 - 4 Gentran:Server for iSeries Communications Module Release 3.5 User Guide
Configuration
Like the other communication protocols within Gentran:Server, configuring for XMODEM
communication consists of two parts:
1. Create a communication profile.
2. Create a communication session control script.
# NOTE
You may wish to copy and customize one of the sample XMODEM profiles that are shipped
with the product, rather than creating the profile and script yourself.
The specifics of creating profiles and scripts for XMODEM are discussed in the following
sections.

XMODEM File Transfer Support Configuration
Gentran:Server for iSeries Communications Module Release 3.5 User Guide 10 - 5
Create an XMODEM Profile
After choosing Option 1 (Create) on the Work with Communications panel (EDIX400-FMT01),
the Communications Profile panel (EDIX401-FMT01) is displayed. To create a profile for
XMODEM communication, fill in the required information on the Communications Profile panel
and specify ASX for Protocol, as shown in Figure 10.1.
Figure 10.1 Create an ASX profile for using XMODEM over an asynchronous line
XMODEM is a higher level protocol that is dependent on the basic asynchronous communication
support within Gentran:Server. Therefore, the next step in creating an XMODEM profile is to
complete the configuration panel for basic asynchronous communication type ASC.
EDIX401 Communication Profile EDI 04/30/08
FMT01 12:00:00
Comm Profile ID. . . . . . . . . . MUXMA
Company. . . . . . . . . . . . . . Test_XMODEM_answerer
Contact. . . . . . . . . . . . . . MU
Phone. . . . . . . . . . . . . . . ( ) - x
International Dial Code. . . . . .
Protocol . . . . . . . . . . . . . ASX
Days to Purge. . . . . . . . . . . 999
FIFO/LIFO. . . . . . . . . . . . . F
Used Most Frequently . . . . . . . N
Update Allowed . . . . . . . . . . Y
F1=Help F10=Update F12=Cancel F13=Services F24=More Keys

Configuration XMODEM File Transfer Support
10 - 6 Gentran:Server for iSeries Communications Module Release 3.5 User Guide
After you press Enter to complete the EDIX401-FMT01 panel, the Basic Asynchronous (ASC)
Configuration panel (EDIX401-FMT06) is displayed.
Figure 10.2 ASC configuration panel for XMODEM over an asynchronous line
Complete the Communication Profile – ASC panel (EDIX401-FMT06), such as shown in
Figure 10.2. (SEE the “Asynchronous Communications Examples” section in the Asynchronous
Communication Support chapter for more information.)
You may notice the following differences in the behavior of the Communication Profile – ASC
panel (EDIX401-FMT06) when configuring for XMODEM (ASX) as opposed to basic async
(ASC):
1. The Outbound Block Size field will only accept a value of 128 or 1024. The value you
specify will determine the size of the XMODEM blocks your system transmits and
expects to receive. The correct setting is determined by the capabilities of the remote
system. Failure to configure the proper blocksize can cause your XMODEM transfers to
operate with reduced efficiency or fail entirely. Basic XMODEM uses 128 byte blocks.
Many systems support 1024 byte blocks for better throughput – this is sometimes referred
to as XMODEM-1K.
2. The Flow Control field will only accept a value of N. This was explained in more detail in
the section titled “XMODEM Flow Control Considerations”.
The Modem Init. Command and Modem Connect Message shown in the example Communication
Profile – ASC panel (EDIX401-FMT06) above are for a UDS V.3229 modem. Through these
fields, the example addresses the points mentioned in the prior topic titled “XMODEM Flow
Control Considerations”.
EDIX401 Communication Profile EDI 04/30/08
FMT06 ASC 12:00:00
Comm Profile ID. . . . . MUXMA
Company. . . . . . . . . Test_XMODEM_answerer
Modem Port . . . . . . . LIN041 Retries. . . . . . . . 02
Switched Line. . . . . . Y Auto Dial. . . . . . . N (Y/N)
Dial . . . . . . . . . .
Remote Location. . . . . MUXMA Job Termination Delay. N
Line Speed . . . . . . . 09600 End-of-Cmd Character . 00
Print Record Size. . . . 132 EOT Character. . . . . 0D
Outbound Block Size. . . 1024 ETX Character. . . . . 03
Command Set. . . . . . . A Translation:
Flow Control . . . . . . N (Y/N/H) Inbound (from) . . . .
Remote Cmd Password. . . *NONE Inbound (to) . . . . .
Outbound (from). . . .
Modem Break Character. . + Outbound (to). . . . .
Modem Auto-Answer Command ATS0=1
Modem Init. Command. . . ATQ0V1X4\Q
Modem OK Message . . . . OK<CR><LF>
Modem Connect Message. . CONNECT_9600<?><CR><LF>
F1=Help F4=Prompt F5=Refresh F10=Update F12=Cancel F24=More Keys

XMODEM File Transfer Support Configuration
Gentran:Server for iSeries Communications Module Release 3.5 User Guide 10 - 7
After pressing Enter to complete the Communication Profile – ASC panel (EDIX401-FMT06),
the EDIX401 FMT12 panel is displayed. This panel, as shown in Figure 10.3, contains the
parameters that are used to conduct the XMODEM portion of the communication session with the
remote system.
Figure 10.3 XMODEM Configuration Panel
Field Descriptions
Error Control Method
Specify 1 to perform error control based on standard 16-bit Cyclic Redundancy Check
(CRC). Specify 2 to perform error control based on an 8-bit checksum. The value you
should use is determined by the capabilities of the remote system. Because CRC checking
is much more reliable than checksum, 1 (the default) should always be used unless the
remote does not support CRC16.
Outbound Block Pad Character
Because XMODEM uses a fixed block size without regard for the length of the file you
are transmitting, there will almost always be extra bytes at the end of the last block of a
file. This field specifies the hexadecimal value of the EBCDIC character that should be
used to fill these extra bytes. You should select the most appropriate pad character for the
system that will be receiving your data.
For example, the default 3F specifies that the last block be padded with EBCDIC SUB
characters. When transmitted, these will be translated to ASCII SUB characters (hex 1A,
or Ctrl-Z). Ctrl-Z is used on MS-DOS systems as an End-of-File marker for ASCII text
files. Therefore, this could be an appropriate pad character for transmitting data to a PC.
You may prefer to pad with spaces. If so, you would specify the EBCDIC value of a space
(hex 40), which would subsequently be translated to an ASCII space (hex 20) and
transmitted. (SEE the “System Level Translation” section in the Asynchronous
Communication Support chapter for more information on translation.)
You must specify a valid hexadecimal value (00 – FF) for Outbound Block Pad Character.
EDIX401 Communication Profile EDI 04/30/08
FMT12 XMODEM 12:00:00
Comm Profile ID. . . . . . . . . . MUXMA
Company. . . . . . . . . . . . . . Test XMODEM answerer
Error Control Method . . . . . . . 1 (1=CRC, 2=Checksum)
Outbound Block Pad Character . . . 3F
Inbound Block Trim Character . . . 3F
Line Timeout (HHMMSS). . . . . . . 000045
ASCII-EBCDIC Translation . . . . . Y
F1=Help F12=Cancel F13=Services F24=More Key

Configuration XMODEM File Transfer Support
10 - 8 Gentran:Server for iSeries Communications Module Release 3.5 User Guide
Inbound Block Trim Character
This performs the function complementary to the Outbound Block Pad Character field
discussed previously. It causes your system to ignore any matching characters at the end of
the final block of a received XMODEM file. This allows you to reduce or eliminate
unneeded pad characters that would otherwise be written to the inbound queue, user file,
or SPOOL file.
The Inbound Block Trim Character field may be left blank to indicate that no received
characters should be trimmed, or it may specify the valid hexadecimal value (00-FF) of
the EBCDIC representation of the character that is to be trimmed.
If you do not leave the field blank, in addition to removing the character you specify, your
system will also remove all SUB characters (hex 3F). This allows you to remove SUBs
plus another character. This capability is useful for remotes that use a SUB and another
pad character. For example, the GEIS EDI*EXPRESS Mark III XMODEM interface pads
the last block with one SUB and the remainder spaces. By specifying a value of hex 40
(EBCDIC space), you tell your system to remove the spaces and it removes the SUB
automatically, thus eliminating all the pad characters.
Line Timeout
Specifies the time (in format HHMMSS) that your system will wait to receive an
XMODEM block or response during data transfer. After the specified time elapses, your
system will take the recovery actions specified by XMODEM protocol. You should use
the default value of 000045 unless you need to increase it due to the response time of the
remote.
ASCII-EBCDIC Translation
Specify Y or N to determine whether inbound data will be translated from ASCII to
EBCDIC and outbound data will be translated from EBCDIC to ASCII. This setting only
effects the XMODEM file transfer steps of your communication script. Other portions of
the script, such as data traps and control records, will always use translation, regardless of
this setting.
The default value of Y causes translation to be performed, because most systems that one
would be likely to communicate with using XMODEM use the ASCII character set.
You may wish to specify N to disable translation if you are communicating with another
EBCDIC machine, such as another iSeries using Gentran:Server, or if you are transferring
transparent (binary) data.

XMODEM File Transfer Support Configuration
Gentran:Server for iSeries Communications Module Release 3.5 User Guide 10 - 9
Create an XMODEM Script
After creating an XMODEM communication profile, you must provide an appropriate
communication session control script. This script will contain the commands transmitted and
responses expected for connecting to and navigating about the remote system. The script can
invoke the Gentran:Server XMODEM support to conduct the file transfer portions of the session
as needed.
XMODEM scripts are created and edited using the same facilities as the other communication
types within Gentran:Server for iSeries. (SEE the “Using Communications” and “Using Scripts”
chapters for basic information on scripting.)
Invoke XMODEM Support
An XMODEM script is coded the same way as a standard asynchronous script, using control
record steps and data trap steps to converse with the remote system, and send and receive steps to
transfer data.
When you wish to invoke the Gentran:Server XMODEM support to perform a file transfer, you
indicate this by specifying X for the Ind (Indicator) field of a send or receive step.
The following transaction/file options are supported for XMODEM file transfers:
S/OQ Send from Gentran:Server Outbound Queue.
S/OM Send from Gentran:Server Outbound Queue, allowing separation of multiple
batches.
S/OF Send from Outbound File provided by user.
R/IQ Receive to Gentran:Server Inbound Queue.
R/IF Receive to Inbound File provided by user.
R/IA Receive and Append to Inbound File provided by user.
R/SP Receive to SPOOL file.

Configuration XMODEM File Transfer Support
10 - 10 Gentran:Server for iSeries Communications Module Release 3.5 User Guide
XMODEM Scripting Differences
The XMODEM communication session control script will be interpreted as described in the
“Scripting Considerations” section in the Asynchronous Communications Support chapter, with
the following differences for send or receive steps that invoke XMODEM:
The Command field will not be not used. Therefore, its special uses as a “No Data” message
for sends and receives, and as a batch separator for send outbound multiple, do not apply to
XMODEM.
Receive inbound multiple (R/IM) is not applicable. Each XMODEM receive will create one
batch on the inbound queue. Multiple receives would be used to produce multiple inbound
batches.
The ETX, EOT, and End-of-Cmd characters defined in the profile are not used during
XMODEM send or receive steps because the protocol defines all necessary control characters.
However, these characters still have the same significance during the portions of the script that
are not XMODEM send or receive steps. (SEE “Scripting Considerations” in the
Asynchronous Communication Support chapter for general information on asynchronous
scripting.)
# NOTE
You can use all the standard asynchronous send and receive commands in the same script
with XMODEM sends and receives. When Indicator X is specified, XMODEM will be used.
When any other valid Indicator value is specified, the standard asynchronous send/receive
logic will be used.

XMODEM File Transfer Support Configuration
Gentran:Server for iSeries Communications Module Release 3.5 User Guide 10 - 11
The sample XMODEM script in Figure 10.4 uses XMODEM to send outbound queue data to a PC
and retrieve a text file to be printed.
Figure 10.4 Simple Session Control Script Using XMODEM
Extended Script Logic
Many of the systems that one would be likely to communicate with using XMODEM would
require more complex scripting than the simple top-down example presented above.
To accommodate these situations, the Gentran:Server asynchronous communications module
includes Asynchronous Extended Script Logic. This provides script commands that support
conditional logic and branching, which allows you to create significantly more powerful scripts.
(SEE the “Asynchronous Extended Script Logic” section in the Asynchronous Communication
Support chapter for more information.)
EDIX403 Communication Session Control EDI 04/30/08
CTL01 12:00:00
Comm Profile ID. . . . . . . . . . MUXMA
Session Name . . . . . . . . . . . M1
Company. . . . . . . . . . . . . . Test XMODEM answerer
Type option, press Enter.
3=Copy Seq# 4=Delete 11=Extended Parms
Opt Seq No Tran File File Name Ind Description
__ _10 C __ __________ 2 Send_msg_to_remote_operator___
You_are_connected_to_iSeries._Start_your_XMODEM_receive_now._____________________
__ _20 S OQ __________ X Send_data_using_XMODEM________
________________________________________________________________________________
__ _30 C __ __________ 2 Send_msg_to_remote_operator___
iSeries_finished_sending._Start_an_XMODEM_send_from_PC_to_iSeries_now.____________
__ _40 R SP __________ X Receive_text_file_using_XMODEM
________________________________________________________________________________
__ _50 C __ __________ 2 Send_msg_to_remote_operator___
Receive_completed._iSeries_disconnecting.________________________________________
More...
F1=Help F4=Prompt F9=Fold/Unfold F10=Update F12=Cancel F24=More Keys

Configuration XMODEM File Transfer Support
10 - 12 Gentran:Server for iSeries Communications Module Release 3.5 User Guide

Chapter
Gentran:Server for iSeries Communications Module Release 3.5 User Guide 11 - 1
11 OFTP Communication
Support
Overview
Gentran:Server for iSeries Communications Module provides support for the ODETTE File
Transfer Protocol (OFTP) version 1.2 as defined by the Organization for Data Exchange by
Teletransmission in Europe.
OFTP support is provided by the Gentran:Server optional asynchronous communication module.
# NOTE
This feature is an optional add-on product that may be purchased separately.
The connection to the OFTP host system can be:
Asynchronous, using a switched (dial-up) line. Use this option if you need to access the OFTP
host by dialing a network PAD. The communication profile protocol type for this connection is
OFA.
Synchronous, usually using a nonswitched (leased) X.25 line. Use this option if you need to
access the OFTP host via a direct connection to an X.25 network. The communication profile
protocol type for this connection is OFX.
Via a TCP/IP connection. Use this option if you need to access the OFTP host via your
LAN/WAN and the Internet. you must install and configure TCP/IP support on your iSeries
system according to IBM instructions.
In addition to supporting the OFTP Initiator role (i.e. dialer), the Communications Module also
provides limited support for the OFTP Responder role (i.e. answerer), which allows it to act as an
OFTP host. Although full host functionality (data forwarding to adjacent nodes, etc.) is not
supported directly by the communication subsystem, Responder mode allows you to:
Use OFTP between two Gentran:Server systems
Communicate with OFTP products that only support OFTP Initiator role
Considerations
All of the considerations detailed in the “Asynchronous Communication Support” chapter also
apply to OFTP, with the following differences:

Overview OFTP Communication Support
11 - 2 Gentran:Server for iSeries Communications Module Release 3.5 User Guide
The necessity for error correcting hardware is eliminated by the error control provided by
OFTP. However, error correcting hardware is still strongly recommended to avoid
communication failures that could occur outside the OFTP portion of the communication
session.
By using OFTP between two Gentran:Server systems, you can exchange transparent data via
an asynchronous connection. This is not possible with the Gentran:Server standard
(non-OFTP) asynchronous communications.
# NOTE
This is accomplished by configuring one system as Initiator, the other as Responder,
and both for OFTP transparent mode.
While executing the parts of your communication session control script that do not invoke
OFTP support (control records, data traps, etc.), the asynchronous communicator employs the
system level translation described in the “Asynchronous Communication Support” chapter.
This translation cannot be disabled or altered.
While executing the parts of your communication session control script that invoke OFTP
support, all queue and print data will be translated according to the translate tables GENASCII
and GENEBCDIC in your Gentran:Server program library. These tables provide translation
equivalent to the system level translation described in the “Asynchronous Communication
Support” chapter. This translation can be disabled by specifying the Gentran:Server OFTP
transparent mode in your communication profile or script. You should not modify or override
these translation tables.
If you are using an X.25 connection (profile protocol type OFX) over which your system will
initiate the connection, your system will always include the protocol identifier hex C0 as the
first byte of Call User Data in the X.25 Call Request packet. The X.25 network and the remote
system must be able to accommodate this protocol identifier.
If you are using an X.25 connection (profile protocol type OFX) over which the remote system
will initiate the connection, the remote system must send hex C0 as the protocol identifier in
the first byte of Call User Data in the X.25 Call Request packet. Your system must receive this
protocol identifier in the X.25 Incoming Call packet in order to accept the connection.
Implementation
The following notes are specific to the OFTP implementation within Gentran:Server.
Each outbound queue batch will be transmitted as a separate OFTP file. Data can optionally be
sent from a user-provided file.
An outbound batch or file will be considered “Sent Normal” after a positive acknowledgment
(EFPA) has been received.
Each OFTP file that is received will be added to the inbound queue as a separate batch. Data
can optionally be received to a user-provided file.
An inbound batch or file will be considered “Received Normal” after a positive
acknowledgment (EFPA) has been transmitted.

OFTP Communication Support Overview
Gentran:Server for iSeries Communications Module Release 3.5 User Guide 11 - 3
OFTP specifies that a filename, date, and time are used to uniquely identify each file. When
Gentran:Server transmits a file, the filename comes from the communication session control
script, and the date and time are acquired from the iSeries system clock when the file
transmission begins. When Gentran:Server receives a file, the filename, date, and time
received from the remote system are not used, but are recorded in the communication history
log.
The OFTP specification defines several record formats that can be used to transfer files. The
format that will be used to send outbound data is controlled by the communication session
control script. The format of inbound data is controlled by the remote system. Gentran:Server
will allow the receipt of inbound OFTP files having any valid OFTP record format. To
facilitate the exchange of EDI data, inbound data of any format is treated as a continuous
stream, so all protocol characters are removed and record boundaries are ignored (records are
wrapped into the inbound queue or user file).
Gentran:Server OFTP can optionally generate OFTP End-to-End Response commands
(EERPs) when a file has been received, if this is required by the remote with which you are
communicating.
Gentran:Server does not require that EERPs be received in response to outbound data.
However, if an EERP is received by Gentran:Server, it will not be used, but its receipt will be
recorded in the communication history log.
The receipt of print data using OFTP is not supported. However, it is possible to include
Receive-to-SPOOL steps in the non-OFTP portion of an OFTP communication session control
script.
Configuration
Like the other communication protocols within Gentran:Server for iSeries Communications
Module, configuring for OFTP communication consists of two parts:
Create a communication profile.
Create a communication session control script.
# NOTE
You may wish to copy and customize one of the sample OFTP profiles that are shipped with
the product, rather than creating the profile and script yourself.
The specifics of creating profiles and scripts for OFTP are discussed in the following sections.

Create an OFTP Profile OFTP Communication Support
11 - 4 Gentran:Server for iSeries Communications Module Release 3.5 User Guide
Create an OFTP Profile
After choosing option 1 (Create) on the Work with Communications panel (EDIX400-FMT01),
the Communications Profile panel (EDIX401-FMT01) is displayed. To create a profile for OFTP
communication, fill in the required information on EDIX401- FMT01 and specify one of the
following values for Protocol:
OFA Creates a profile that will communicate over a switched asynchronous connection. Use
OFA if you access your OFTP host by using an asynchronous modem to dial into a network
PAD, which subsequently connects you to the host. Creating an OFA profile is illustrated
in Figure 11.1.
Figure 11.1 Create an OFA profile for using OFTP over an asynchronous line
EDIX401 Communication Profile EDI 04/30/08
FMT01 12:00:00
Comm Profile ID. . . . . . . . . . BTOFTP
Company. . . . . . . . . . . . . . BT_UK_GNS_EDI*NET_OFTP_VIA_ASYNC___
Contact. . . . . . . . . . . . . . CHRIS BARBER_______________________
Phone. . . . . . . . . . . . . . . ( 442 ) 231 - 711_ x ____
International Dial Code. . . . . . 441
Protocol . . . . . . . . . . . . . OFA
Days to Purge. . . . . . . . . . . 999
FIFO/LIFO. . . . . . . . . . . . . F
Used Most Frequently . . . . . . . N
Update Allowed . . . . . . . . . . Y
F1=Help F10=Update F12=Cancel F13=Services F24=More Keys

OFTP Communication Support Create an OFTP Profile
Gentran:Server for iSeries Communications Module Release 3.5 User Guide 11 - 5
OFX Creates a profile that will communicate over a synchronous connection. Use OFX if you
access your OFTP host by using an X.25 leased line. Creating an OFX profile is illustrated
in Figure 11.2.
Figure 11.2 Create an OFX profile for using OFTP over an X.25 leased line
EDIX401 Communication Profile EDI 04/30/08
FMT01 12:00:00
Comm Profile ID. . . . . . . . . . BTOFTPX
Company. . . . . . . . . . . . . . BT UK GNS EDI*NET OFTP via X.25
Contact. . . . . . . . . . . . . . Chris Barber
Phone. . . . . . . . . . . . . . . ( 442 ) 231 - 711 x
International Dial Code. . . . . . 441
Protocol . . . . . . . . . . . . . OFX
Days to Purge. . . . . . . . . . . 999
FIFO/LIFO. . . . . . . . . . . . . F
Used Most Frequently . . . . . . . N
Update Allowed . . . . . . . . . . Y
F1=Help F10=Update F12=Cancel F13=Services F24=More Keys

Create an OFTP Profile OFTP Communication Support
11 - 6 Gentran:Server for iSeries Communications Module Release 3.5 User Guide
OFT Creates a profile that will communicate over a TCP/IP connection. Use OFT if you access
your OFTP host by using a LAN/WAN and the Internet. Creating an OFT profile is
illustrated in the following figure.
Figure 11.3 Creating an OFT profile for using OFTP over TCP/IP
The next step in creating an OFTP profile is to complete the panels corresponding to the
communication type your are using—that is, asynchronous, X.25, or TCP/IP. Gentran will lead
you through the appropriate panels. After you press Enter to complete the EDIX401-FMT01
panel, the necessary configuration panels display.
EDIX401 Communication Profile EDI 04/30/08
FMT01 12:00:00
Comm Profile ID. . . . . . . . . . MYOFTC
Company. . . . . . . . . . . . . . My test OFT client_________________
Contact. . . . . . . . . . . . . . CHRIS_SMITH_______________________
Phone. . . . . . . . . . . . . . . ( 614 ) 793 - 7000_ x ____
International Dial Code. . . . . . ___
Protocol . . . . . . . . . . . . . OFT
Days to Purge. . . . . . . . . . . 999
FIFO/LIFO. . . . . . . . . . . . . F
Used Most Frequently . . . . . . . N
Update Allowed . . . . . . . . . . Y
F1=Help F10=Update F12=Cancel F13=Services F24=More Keys

OFTP Communication Support Create an OFTP Profile
Gentran:Server for iSeries Communications Module Release 3.5 User Guide 11 - 7
If you specified protocol OFT, first the OFTP configuration panel, EDIX401-FMT10, will be
displayed, as shown in the Figure 11.7 further in this chapter, then the TCP/IP configuration
panel, EDIX401-FMT21, will be displayed as follows.
Figure 11.4 Creating an OFT profile for using OFTP over TCP/IP
Field Descriptions
Port Number
This field determines the TCP/IP port that will be used for OFTP communications.
*DEFAULT causes the standard OFTP port (3305) to be used
*SYSTEM causes the port number to be determined by the “odette-ftp” entry in the
system service table.
A numeric value between 1025 and 65535 specifies the port number that should be
used.
Host Name or IP Address
This field determines the host (remote system) with which an OFTP communications
session is to be initiated.
Valid values are a host name or IP address. If a host name is specified, it must be defined
in the system host table or be available via the system DNS configuration.
Valid characters for a host name are A-Z, a-z, 0-9, underscore, minus sign (dash), period
(but not consecutive periods). Host names are not case-sensitive but it is “normal” to
retain the case that a user enters.
EDIX401 Communication Profile EDI 04/30/08
FMT01 12:00:00
Comm Profile ID. . . . . . . . . MYOFTC
Port Number . . . . . . . . . . *DEFAULT *DEFAULT, *SYSTEM, 1025-65535
Host Name or IP Address . . . . . 127.0.0.1
End-of-Cmd Character. . . . . . . 00
EOT Character . . . . . . . . . . OD
ETX Character . . . . . . . . . . OD
Translation:
Inbound (from). . . . . . . . . . __ __
Inbound (to). . . . . . . . . . . __ __
Outbound (from) . . . . . . . . . __ __
Outbound (to). . . . . . . . . . . __ __
F1=Help F10=Update F12=Cancel F13=Services F24=More Keys

Create an OFTP Profile OFTP Communication Support
11 - 8 Gentran:Server for iSeries Communications Module Release 3.5 User Guide
Valid values for an IP address are n.n.n.n, where n is a number from 0 - 255.
# NOTE
If the EDIX401-FMT10 screen field “Act as Responder (Host)” (CPFORS) is set to
“Y,” then this field will not be used.
End-of-Command, EOT Character, ETX Character
These fields are described in the topic “Use of ETX, EOT, and End-of-Characters” in the
“Asynchronous Communication Support” Chapter.
Translation Field
These fields are described in the topic “Application Level Translation” on page 11 in the
“Asynchronous Communication Support” Chapter.
After completing the EDIX401-FMT21 panel, the OFTP configuration panel
EDIX401-FMT10 displays as described in the next section.
If you specified protocol OFA, the basic asynchronous (ASC) configuration panel
EDIX401-FMT06 will be displayed, as shown in Figure 11.5.
Figure 11.5 ASC configuration panel for OFTP over an asynchronous line
EDIX401 Communication Profile EDI 04/30/08
FMT06 ASC 12:00:00
Comm Profile ID. . . . . BTOFTP
Company. . . . . . . . . BT UK GNS EDI*NET OFTP via Async
Modem Port . . . . . . . LIN051 Retries. . . . . . . . 01
Switched Line. . . . . . Y Auto Dial. . . . . . . Y (Y/N)
Dial . . . . . . . . . . 5551212
Remote Location. . . . . BTOFTP Job Termination Delay. N
Line Speed . . . . . . . 09600 End-of-Cmd Character . 00
Print Record Size. . . . 132 EOT Character. . . . . 3F
Max Exchange Buffer. . . 1000 ETX Character. . . . . 03
Command Set. . . . . . . A Translation:
Flow Control . . . . . . Y (Y/N/H) Inbound (from) . . . .
Remote Cmd Password. . . *NONE Inbound (to) . . . . .
Outbound (from). . . .
Modem Break Character. . + Outbound (to). . . . .
Modem Auto-Answer Command ATS0=1
Modem Init. Command. . . ATQ0V1X4
Modem OK Message . . . . OK<CR><LF>
Modem Connect Message. . CONNECT<?><CR><LF>
F1=Help F4=Prompt F5=Refresh F10=Update F12=Cancel F24=More Keys

OFTP Communication Support Create an OFTP Profile
Gentran:Server for iSeries Communications Module Release 3.5 User Guide 11 - 9
If you specified Protocol OFX, the basic asynchronous-over-X.25 (XAS) configuration panel
EDIX401-FMT07 will be displayed, as shown in Figure 11.6.
Figure 11.6 XAS configuration panel for OFTP over an X.25 leased line
Complete the panel displayed. (SEE the sections “Asynchronous Communications Examples” and
“Asynchronous via X.25 Examples” in the Asynchronous Communication Support chapter for
more information.)
You may notice one difference on the EDIX401-FMT06 or FMT07 panel when configuring for
OFTP. The field labeled Outbound Block Size on the ASC and XAS versions of the panel has
been replaced by Max Exchange Buffer on the OFA and OFX panels. This is because the
OFTP exchange buffer size, like the outbound block size, governs the amount of data that is
written by Gentran:Server to the iSeries communications support.
The value that you enter for Max Exchange Buffer determines the exchange buffer size that
your system will attempt to negotiate with the remote. The actual value used may be less,
depending on the outcome of the negotiation. You should accept the default for this field unless
you have a specific reason to change it.
EDIX401 Communication Profile EDI 04/30/08
FMT07 XAS 12:00:00
Comm Profile ID. . . . . BTOFTPX
Company. . . . . . . . . BT UK GNS EDI*NET OFTP via X.25
Modem Port . . . . . . . LIN052 Retries. . . . . . . . 02
Switched Line. . . . . . N (Y/N) Auto Dial. . . . . . . N (Y/N)
Dial . . . . . . . . . .
Session Initiator. . . . *DIAL
Net Connection Init. . . *WAIT End-of-Cmd Character . 00
Remote Net Addr. . . . . 23421231101705 EOT Character. . . . . 3F
Local Net Addr . . . . . 999999999999 ETX Character. . . . . 03
Remote Location. . . . . BTOFTPX
Lgl Channel Type . . . . *SVCBOTH Translation:
Lgl Channel ID . . . . . 001 Inbound (from) . . . .
Modulus. . . . . . . . . 8 Inbound (to) . . . . .
Window Size. . . . . . . 07 Outbound (from). . . .
Packet Size. . . . . . . 0128 Outbound (to). . . . .
Print Record Size. . . . 080
Max Exchange Buffer. . . 1024 Remote Cmd Password. . *NONE
Reverse Charge . . . . . *NONE DCE Support. . . . . . N (Y/N)
F1=Help F4=Prompt F5=Refresh F10=Update F12=Cancel F24=More Keys

Create an OFTP Profile OFTP Communication Support
11 - 10 Gentran:Server for iSeries Communications Module Release 3.5 User Guide
After pressing Enter to complete the EDIX401-FMT06 or FMT07 Communication Profile panel,
the EDIX401-FMT10 panel is displayed, as shown in Figure 11.7. This panel contains the
parameters that are used to conduct the OFTP portion of the communication session with the
remote system. The same panel is used for both OFA (asynchronous) and OFX (X.25)
configurations.
Figure 11.7 OFTP Configuration Panel
Field Descriptions
Local OFTP ID
Up to 25 characters consisting of A – Z, 0 – 9, space, and hyphen. Identifies your system
to the remote OFTP system with which you are communicating. Normally, this ID will be
assigned to you by the OFTP host network you have subscribed to. This value will be
transmitted by your system to the remote system in the OFTP SSID command.
Local OFTP Password
Up to 8 characters consisting of A – Z, 0 – 9, “/”, “-”, “.”, “&”, “(“, and “)”. This is the
password that corresponds to the Local OFTP ID. This value will be transmitted by your
system to the remote system in the OFTP SSID command.
Remote OFTP ID
Up to 25 characters consisting of A – Z, 0 – 9, space, and hyphen. Identifies the remote
system that you are communicating with. The remote system will transmit its ID to you in
the OFTP SSID command. Your system will also use this value as the destination ID in the
OFTP SFID command that is transmitted to identify outbound data files.
EDIX401 Communication Profile EDI 04/30/08
FMT10 OFTP 12:00:00
Comm Profile ID. . . . . . . . . . BTOFTP
Company. . . . . . . . . . . . . . BT UK GNS EDI*NET OFTP VIA ASYNC
Local OFTP ID. . . . . . . . . . . MYOFTPID_________________
Local OFTP Password. . . . . . . . MYOFTPPW
Remote OFTP ID . . . . . . . . . . EDI-NET_ODETTE_FTP_______
Remote OFTP Password . . . . . . . ________
Verify Remote ID and/or Password . Y
Automatically Send EERPs . . . . . Y
Data for SSIDUSER field. . . . . . ________
Transparent Mode . . . . . . . . . N
Act as Responder (Host). . . . . . N
Use Special Logic. . . . . . . . . Y
Maximum Credits (Window Size). . . __1
Receive Timeout (hhmmss) . . . . . 000045
F1=Help F4=Prompt F5=Refresh F10=Update F12=Cancel F24=More Keys

OFTP Communication Support Create an OFTP Profile
Gentran:Server for iSeries Communications Module Release 3.5 User Guide 11 - 11
Remote OFTP Password
Up to 8 characters consisting of A – Z, 0 – 9, “/”, “-”, “.”, “&”, “(“, and “).” This password
identifies the remote system that you are communicating with. The remote system will
transmit its password to you in the OFTP SSID command.
Verify Remote ID and/or Password
Valid values are Y and N. Controls validation of the ID and password received from the
remote system with which you are communicating. If you specify Y for this field, then the
ID and/or password values received from the remote in the OFTP SSID command will be
compared to Remote OFTP ID and/or Remote OFTP Password values on the EDIX401
FMT10 panel. If the values do not match, the OFTP session will be canceled. If either of
the panel fields is left blank, then validation of that field will not be performed.
Automatically Send EERPs
Valid values are Y and N. Specifying Y causes OFTP End-to-End Response commands to
be sent to the remote system. Each time a file is received successfully, an EERP will
immediately be generated and transmitted to the remote system. If you specify N, then
EERPs will not be generated or transmitted. The network you are communicating with
will determine whether you need to send EERPs.
# NOTE
If you are using the automatic EERP feature and a communication failure prevents
the transmission of an EERP for a file that has already been received, the EERP will
be stored and transmitted during the next OFTP session that is run using that
communication profile.
Data for SSIDUSER Field
The OFTP specification allows for eight bytes of user defined data to be exchanged in the
SSID command. Some networks use this field to perform special functions, such as
establish or change passwords, etc. You should leave this field blank unless instructed to
use it by the network you are communicating with.
Transparent Mode
Valid values are Y and N. Specifying “Y” bypasses ASCII-EBCDIC translation of the data
being sent and received. You should only specify Y if you are communicating directly (not
through a network) with another copy of Gentran:Server for iSeries OFTP. For files
containing text data, transparent mode is optional and eliminates the overhead of
translating the data to and from ASCII as it is sent and received. For files containing
non-text (binary) data, transparent mode is required to avoid corruption of the data.
Act as Responder (Host)
Valid values are Y and N. In an OFTP session, the system that requests the connection is
referred to as the Initiator and the system that answers the request is referred to as the
Responder. Normally, when communicating with an OFTP network, you will be the
Initiator, so you should leave this field set to the default N. However, if you are
communicating directly (not through a network) with another Gentran:Server for iSeries
OFTP (or other OFTP communication product) one of the systems will have to be
configured as Responder. This can be accomplished in Gentran:Server for iSeries by
specifying Y for this field.

Create an OFTP Profile OFTP Communication Support
11 - 12 Gentran:Server for iSeries Communications Module Release 3.5 User Guide
Use Special Logic
Valid values are Y and N. Determines whether OFTP special logic will be used during the
session. OFTP special logic performs error checking to ensure the integrity of transferred
data. It should generally be used for all connections. However, you can reduce
communication overhead by not using special logic if you can guarantee an error free link
to the remote system and if you perform enough testing to satisfy yourself that data can be
exchanged reliably without using special logic. Since the use of special logic is negotiated
between the two OFTP systems, the value you specify may not actually be used to conduct
the session.
Maximum Credits (Window Size)
Determines the number of outstanding OFTP data frames that will be exchanged with the
remote system before an acknowledgment must be exchanged via an OFTP CDT
command. A setting of 1 requires acknowledgment after every data frame. A higher
number may improve throughput if you are using a reliable communication link. Because
the credit value is negotiated between the two systems, the actual value used during the
OFTP session may be less than what you specify.
Receive Timeout (hhmmss)
Specifies the maximum time that your system will wait for an expected response from the
remote system before considering the situation an error. The function of this value is
roughly equivalent to the T1 timer as defined in the OFTP specification Enhancements to
the OFTP Extension revision 1.0. The default value of 45 seconds should be used unless
you are communicating with a system or network that frequently generates longer delays.

OFTP Communication Support Create an OFTP Script
Gentran:Server for iSeries Communications Module Release 3.5 User Guide 11 - 13
Create an OFTP Script
After creating an OFTP communication profile, you must provide an appropriate communication
session control script. This script will contain the commands transmitted and responses expected
for connecting your system to the OFTP host system. Once connected, the script will invoke the
Gentran:Server OFTP support to conduct the OFTP portion of the session.
OFTP scripts are created and edited using the same facilities as the other communication types
within Gentran:Server for iSeries Communications Module. (SEE the “Using Communications”
and “Using Scripts” chapters for basic information on scripting.)
Extended Script Logic
OFTP is implemented with Extended Script Logic records, which use session control records with
Transaction Type X. When an X record is processed, the contents of the Command fields are
interpreted and corresponding actions are taken. The other session control fields are ignored.
After preparing the appropriate script logic to connect your system to the OFTP host, you must
invoke OFTP support by coding an X type record with the Extended Logic keyword STARTOFTP
in the Command field.
In addition to the STARTOFTP command, there are many other Extended Logic keywords that can
be used to set and/or override various options for the OFTP session. In cases where a keyword
value specified in the session control script conflicts with a value in the profile, the script value
will override the profile value.
You may combine multiple OFTP keywords in a single X record, and you may use multiple X
records, but a keyword may not span records. The sequence of keywords does not matter, except
that the STARTOFTP keyword must be placed on the last X record.
Optionally, single or double quotes may be used to delimit the value you are assigning to a
keyword. This is necessary if you are coding a string value that contains embedded spaces.
Extended Logic Keywords
The following are the Extended Script Logic keywords that can be used with OFTP.
APPEND
Causes inbound data destined for a user file to be appended to the file. Otherwise, the file
will be cleared before data is written to it. This keyword only has meaning if the INFILE
keyword is also specified.
AUTOEERP
Equivalent to specifying Y for Automatically Send EERPs as described in the
“Creating an OFTP Profile” section.
CREDITS=number
Same function as Maximum Credits field described in the “Creating an OFTP Profile”
section.

Create an OFTP Script OFTP Communication Support
11 - 14 Gentran:Server for iSeries Communications Module Release 3.5 User Guide
INFILE=filename
Specifies that data received during the OFTP session should be written to a user provided
file rather than the inbound queue. Specify a valid OS/400 file name, up to 10 characters.
The file must already exist and must be in the library list. This achieves the same result as
using a Receive to Inbound File step in a non-OFTP script.
LOCID=string
Same function as Local OFTP ID field described in the “Creating an OFTP Profile”
section.
LOCPW=string
Same function as Local OFTP Password field described in the “Creating an OFTP
Profile” section.
NOCOMPRESS
Causes your system to negotiate to establish a session that will not use OFTP data
compression.If this keyword is not specified, then your system will negotiate to establish a
session that does use OFTP data compression.
OUTFILE=filename
Specifies that data transmitted during the OFTP session should be read from a user
provided file rather than the outbound queue. Specify a valid OS/400 file name, up to 10
characters. The file must exist and must be in the library list. This achieves the same result
as using a Send from Outbound File step in a non-OFTP script.
OUTFMT=U/F/V/T
Selects one of the OFTP defined record formats that determine how your outbound data
will be mapped to the OFTP virtual file for transmission to the remote system. If this
keyword is not specified, format U will be used. The available formats and their
descriptions are:
U (Unstructured) The entire file will be transmitted as a single record, using the
OFTP End-of-Record (EOR) bit in only the final subrecord
header of the file.
F (Fixed) Each outbound record will be delimited by the OFTP EOR bit.
The length of the transmitted records will be determined by the
OUTLRECL keyword.
V (Variable) Each outbound record will be delimited by the OFTP EOR bit.
Because the records on the outbound queue or user file are
fixed-length, OUTFMT=V will transmit the data the same way as
OUTFMT=F, except that the value of the SFIDFMT field in the
SFID command will be V.
T (Text) Each outbound record will be delimited by the insertion (by
Gentran:Server OFTP) of a carriage return and linefeed, in
addition to using the OFTP EOR bit. The length of the
transmitted records will be determined by the OUTLRECL
keyword.

OFTP Communication Support Create an OFTP Script
Gentran:Server for iSeries Communications Module Release 3.5 User Guide 11 - 15
OUTLRECL=number
Determines the record length that will be used to format your outbound data for
transmission when OUTFMT=F/V/T. The supported range of values is 1 – 4096. If this
keyword is not specified, the record length used will be the record length of the outbound
data source. This would be 80 bytes if sending from the queue, or the actual record length
of an outbound user file. For OUTFMT=U files, OUTLRECL is not applicable because the
entire file will be transmitted as a single record.
RECVONLY
Specifies that no outbound data is to be transmitted from your system to the remote system
during the OFTP session. The local system will attempt to negotiate a receive only session
during the SSID phase of session establishment.
RESPOND
Equivalent to specifying Y for Act as Responder as described in the “Creating an
OFTP Profile” section.
REVERSEEERP
Causes outbound EERPs to be formatted with the contents of the EERPORIG (originator)
and EERPDEST (destination) fields reversed from what is described by the OFTP
specification. This may be required for communication with certain OFTP remotes, such
as TRADANET networks.
RMTID=string
Same function as Remote OFTP ID field described in the “Creating an OFTP Profile”
section.
RMTPW=string
Same function as Remote OFTP Password field described in the “Creating an OFTP
Profile” section.
SENDONLY
Specifies that no data is to be transmitted from the remote system to your system during
the OFTP session. The local system will attempt to negotiate a send only session during
the SSID phase of session establishment.
SFIDDATE=yymmdd
Causes the specified date to be used in the OFTP SFID command that identifies all
outbound files. By default, the current system date is used.
SFIDDEST=string
Specifies the OFTP Destination ID that will be used in the OFTP SFID command that
identifies all outbound files. By default, the Remote OFTP ID from the communication
profile is used.
SFIDFMT=U/F/V/T
Specifies the value that will be transmitted in the SFIDFMT field, which indicates the
record format of the OFTP virtual file. If this keyword is not specified, the value will be
determined by the OUTFMT keyword. By using this keyword, you can essentially ‘lie’ to
the remote system about how your output data will be formatted. This may be necessary
for communication with certain OFTP remotes.

Create an OFTP Script OFTP Communication Support
11 - 16 Gentran:Server for iSeries Communications Module Release 3.5 User Guide
SFIDLRECL=number
Specifies the value that will be transmitted in the SFIDLRECL field, which indicates the
length of the longest record in the record in the OFTP virtual file. If this keyword is not
specified, the SFIDLRECL field will be determined by the OUTLRECL keyword. The
supported range of values is 0 – 99999.
SFIDDSN=string
Specifies the OFTP file name that will be used in the OFTP SFID command that identifies
all outbound files.
SFIDORIG=string
Specifies the OFTP Originator ID that will be used in the OFTP SFID command that
identifies all outbound files. By default, the Local OFTP ID from the communication
profile is used.
SFIDTIME=hhmmss
Causes the specified time to be used in the OFTP SFID command that identifies all
outbound files. By default, the current system time is used.
SFIDUSER=string
The OFTP specification allows for eight bytes of user defined data to be exchanged in the
SFID command. The use of this field is optional and is dictated by the remote system. You
should leave this field blank unless specifically instructed to use it by the network you are
communicating with.
SPECIAL
Equivalent to specifying Y for Use Special Logic as described in the “Creating an
OFTP Profile” section.
SSIDUSER=string
Same function as Data for SSIDUSER Field field described in the “Creating an OFTP
Profile” section.
STARTOFTP
Invokes Gentran:Server for iSeries OFTP support to conduct an OFTP session using the
parameter values from the communication profile and session control script.
# NOTE
The keyword STARTOFTP is mandatory. If omitted, the OFTP portion of the
session will not run and no data will be transmitted.
TIMEOUT=hhmmss
Same function as Receive Timeout field described in the “Creating an OFTP Profile”
section.
TRANSPARENT
Equivalent to specifying Y for Transparent Mode as described in the “Creating an
OFTP Profile” section.

OFTP Communication Support Create an OFTP Script
Gentran:Server for iSeries Communications Module Release 3.5 User Guide 11 - 17
VERIFY
Equivalent to specifying Y for Verify Remote ID and/or Password as described in
the “Creating an OFTP Profile” section.
XBUFSIZE=number
Same function as Max Exchange Buffer field described in the “Creating an OFTP
Profile” section.
When to use the OFTP Keywords
The various OFTP extended logic keywords provide a great deal of flexibility in controlling your
OFTP sessions. They allow you to override values from the profile, as well as set certain
parameters that cannot be set in the profile. The defaults that are built into the system were chosen
to allow the most common type of session to be run with a minimum of keywords.
The only OFTP keyword that is absolutely required is the STARTOFTP keyword. It invokes the
OFTP communication support to conduct the OFTP session. This keyword should be placed in the
script after the point at which the connection to the OFTP host has been established. This is
illustrated by the OFTP scripting examples in the next two sections.
Normally, you will be running a Send/Receive script. Therefore, you will also need to use the
SFIDDSN keyword to set the OFTP filename that will identify your outbound data to the OFTP
host system.
Assuming that the only keywords you specify are STARTOFTP and SFIDDSN, the following
defaults will be in effect for your session:
All values from the Communications Profile will be used
A Send/Receive session will be allowed
Data will be received to the inbound queue
Data will be transmitted from the outbound queue
The current date and time will be used to timestamp the outbound data file(s)
The Local OFTP ID from the profile will be used as the file Originator
The Remote OFTP ID from the profile will be used as the file Destination
OUTFMT=U and SFIDFMT=U will be used
OFTP data compression will be used if supported by the remote system.
If you require different processing than what was just described, then you will need to include the
appropriate keywords in your script to override the defaults. Some examples of this would be:
Running a Send Only or Receive Only session (SENDONLY and RECVONLY keywords)
Receiving inbound data to a file instead of the queue (INFILE keyword)
Appending inbound data to a file instead of the queue (APPEND keyword)
Sending outbound data from a file instead of the queue (OUTFILE keyword)
Sending an OFTP Destination ID for your files that is different from the Remote OFTP ID
specified in the profile (SFIDDEST keyword)

Create an OFTP Script OFTP Communication Support
11 - 18 Gentran:Server for iSeries Communications Module Release 3.5 User Guide
Sending an OFTP Originator ID for your files that is different from the Local OFTP ID
specified in the profile (SFIDORIG keyword)
Sending a specific date and/or time to identify your outbound files, rather than the system date
and time (SFIDDATE and SFIDTIME keywords)
Specifying a value to be used in the SSIDUSER or SFIDUSER commands to control special
processing by the OFTP host system you are using (SSIDUSER and SFIDUSER keywords)
Overriding an OFTP parameter from the communications profile so that you can perform a
test without having to actually modify the profile (CREDITS keyword, for example)
Sending outbound data using an OFTP record format other than U, such as F, V, or T (OUTFMT
keyword)
Sending outbound data using record format F, V, or T with a record length other than the actual
length of the outbound data source (OUTLRECL keyword)
Sending the SFID command with values for the SFIDFMT and/or SFIDLRECL fields, which
would not be the default values considering the OUTFMT and OUTLRECL being used (SFIDFMT
and SFIDLRECL keywords)
Forcing your OFTP session to run without using OFTP data compression (NOCOMPRESS
keyword)
# NOTE
Certain keywords and keyword combinations can cause Gentran:Server OFTP to operate
‘outside’ the OFTP specification. This capability is provided to accommodate the
peculiarities of certain networks and OFTP products with which Gentran:Server must
communicate. Incorrect use of these keywords can cause problems. In general, you should
allow the defaults to control the OFTP session, and specify as few keywords as possible,
using them only when you have a specific reason to do so.

OFTP Communication Support Create an OFTP Script
Gentran:Server for iSeries Communications Module Release 3.5 User Guide 11 - 19
OFTP Asynchronous (OFA) Scripting Example
The communication session control script in Figure 11.8 illustrates a typical asynchronous
implementation, in which we must make contact with a network PAD, request a connection to a
host computer, and conduct an OFTP session.
Figure 11.8 Example script for asynchronous OFTP session
This script would be used with the BTOFTP profile shown earlier in this section. The BTOFTP
profile is an OFA profile, which means it runs OFTP over an asynchronous connection.
When the communication session is started, the information in the profile causes the modem to
dial and connect to a British Telecom network PAD. Once the modems have connected, the session
control script begins executing.
The first four lines of the script (sequence nos. 10-40) are concerned with establishing a
connection with the OFTP host system. First, the PAD connection message is received, then a
command is issued that requests a connection from the PAD to the OFTP host.
After the connection to the host has been established, the extended logic record on line 50 starts
the OFTP session. The session will be conducted using the OFTP parameters from the
EDIX401-FMT10 Communication Profile panel. The SFIDDSN keyword specifies that all
outbound data transmitted to the OFTP host will be given the OFTP filename of TEST FILE
NAME.
EDIX403 Communication Session Control EDI 04/30/08
CTL01 12:00:00
Comm Profile ID. . . . . . . . . . BTOFTP
Session Name . . . . . . . . . . . SR
Company. . . . . . . . . . . . . . BT UK GNS EDI*NET OFTP VIA ASYNC
Type option, press Enter.
3=Copy Seq# 4=Delete 11=Extended Parms
Opt Seq No Tran File File Name Ind Description
__ _10 D __ __________ 0 WAIT_FOR_BT_CONNECT_MESSAGE___
and_press_RETURN:_.__________________________________________________________
__ _20 C __ __________ 0 SEND_PAD_PASSWORD_____________
AIJMEAJNNE.._________________________________________________________________
__ _30 D __ __________ 0 Wait_for_”Connected_to”_______
Connected_to.________________________________________________________________
__ _40 D __ __________ 0 Wait_for_CR/LF________________
...__________________________________________________________________________
__ _50 X __ __________ _ Start_OFTP_session____________
STARTOFTP SFIDDSN=”TEST FILE NAME”__________________________________________
More...
F1=Help F4=Prompt F9=Fold/Unfold F10=Update F12=Cancel F24=More Keys

Create an OFTP Script OFTP Communication Support
11 - 20 Gentran:Server for iSeries Communications Module Release 3.5 User Guide
Because no other OFTP extended logic keywords were coded, defaults will be used to control
other aspects of the OFTP session. These defaults will result in the following:
A Send/Receive session will be allowed
Data will be received to the inbound queue
Data will be transmitted from the outbound queue
The current date/time will be used to timestamp the outbound data file(s)
The Local OFTP ID from the profile will be used as the file Originator
The Remote OFTP ID from the profile will be used as the file Destination
OUTFMT=U and SFIDFMT=U will be used
OFTP data compression will be used if supported by the remote system.

OFTP Communication Support Create an OFTP Script
Gentran:Server for iSeries Communications Module Release 3.5 User Guide 11 - 21
OFTP X.25 (OFX) Scripting Example
The communication session control script in Figure 11.9 performs the same function as the script
in the previous example, but it is used with an OFX profile that communicates with the OFTP host
over an X.25 leased line.
Figure 11.9 Example script for X.25 OFTP session
This script would be used with the BTOFTPX profile shown earlier in this section.
When the communication session is started, the information in the profile causes an X.25 call
request to be issued from the local iSeries to the British Telecom OFTP host. After the call is
connected, the session control script begins executing.
Because the connection to the OFTP host system is established automatically by the iSeries’ X.25
support, the initial script lines from the previous example are not necessary. All the script needs to
do is start the OFTP session with a single extended logic record.
Like the first example, the OFTP session will be conducted using the parameters from the
EDIX401-FMT10 Communication Profile panel. The SFIDDSN keyword specifies that all
outbound data transmitted to the OFTP host will be given the OFTP filename of TEST FILE
NAME.
EDIX403 Communication Session Control EDI 04/30/08
CTL01 12:00:00
Comm Profile ID. . . . . . . . . . BTOFTPX
Session Name . . . . . . . . . . . SR
Company. . . . . . . . . . . . . . BT UK GNS EDI*NET OFTP VIA X.25
Type option, press Enter.
3=Copy Seq# 4=Delete 11=Extended Parms
Opt Seq No Tran File File Name Ind Description
__ _10 X __ __________ _ Start_OFTP_session____________
STARTOFTP SFIDDSN=”OFTP FILE NAME”___________________________________________
__ ___ _ __ __________ _ ______________________________
_____________________________________________________________________________
__ ___ _ __ __________ _ ______________________________
_____________________________________________________________________________
__ ___ _ __ __________ _ ______________________________
_____________________________________________________________________________
__ ___ _ __ __________ _ ______________________________
_____________________________________________________________________________
More...
F1=Help F4=Prompt F9=Fold/Unfold F10=Update F12=Cancel F24=More Keys

Create an OFTP Script OFTP Communication Support
11 - 22 Gentran:Server for iSeries Communications Module Release 3.5 User Guide
Because no other OFTP extended logic keywords were coded, defaults will be used to control
other aspects of the OFTP session. These defaults will result in the following:
A Send/Receive session will be allowed
Data will be received to the inbound queue
Data will be transmitted from the outbound queue
The current date/time will be used to timestamp the outbound data file(s)
The Local OFTP ID from the profile will be used as the file Originator
The Remote OFTP ID from the profile will be used as the file Destination
OUTFMT=U and SFIDFMT=U will be used
OFTP data compression will be used if supported by the remote system

OFTP Communication Support Create an OFTP Script
Gentran:Server for iSeries Communications Module Release 3.5 User Guide 11 - 23
OFTP TCP/IP (OFT) Scripting Example
The following communication session control script performs the same function as the script in the
previous example, but it is used with an OFT profile which communicates with the OFTP host
over a TCP/IP connection.
Figure 8.10 Example script for X.25 OFTP session
This script would be used with the MYOFTC profile shown earlier in this section.When the
communication session is started, the information in the profile causes a TCP/IP connection to be
initiated from the local iSeries to the OFTP host. After the connection is established, the session
control script begins executing.
Because the connection to the OFTP host system is established automatically by iSeries TCP/IP
support, the initial script lines from the OFA example are not necessary. All the script needs to do
is start the OFTP session with a single extended logic record, just as the OFX example did.
Like the OFX example, the OFTP session will be conducted using the parameters from the
EDIX401-FMT10 Communication Profile panel. The SFIDDSN keyword specifies that all
outbound data transmitted to the OFTP host will be given the OFTP filename of “TEST FILE
NAME”.
EDIX403 Communication Session Control EDI 04/30/08
CTL01 12:00:00
Comm Profile ID. . . . . . . . . . MYOFTC
Session Name . . . . . . . . . . . SR
Company. . . . . . . . . . . . . . My text OFT client
Session Description. . . . . . . . Standard OFTP session
Type option, press Enter.
3=Copy Seq# 4=Delete 11=Extended Parms
Opt Seq No Tran File File Name Ind Description
__ _50 X __ __________ _ Start_OFTP_session____________
STARTOFTP SFIDDSN=”TEST FILE NAME”
__ ___ _ __ __________ _ ______________________________
_____________________________________________________________________________
__ ___ _ __ __________ _ ______________________________
_____________________________________________________________________________
__ ___ _ __ __________ _ ______________________________
_____________________________________________________________________________
__ ___ _ __ __________ _ ______________________________
_____________________________________________________________________________
More...
F1=Help F4=Prompt F9=Fold/Unfold F10=Update F12=Cancel F24=More Keys

Create an OFTP Script OFTP Communication Support
11 - 24 Gentran:Server for iSeries Communications Module Release 3.5 User Guide
Because no other OFTP extended logic keywords were coded, defaults will be used to control
other aspects of the OFTP session. These defaults will result in the following:
A Send/Receive session will be allowed
Data will be received to the inbound queue
Data will be transmitted from the outbound queue
The current date/time will be used to timestamp the outbound data file(s)
The Local OFTP ID from the profile will be used as the file Originator
The Remote OFTP ID from the profile will be used as the file Destination
OUTFMT=U and SFIDFMT=U will be used
OFTP data compression will be used if supported by the remote system.

Chapter
Gentran:Server for iSeries Communications Module Release 3.5 User Guide 12 - 1
12 FTP Communication
Support
# NOTE
This feature is an optional add-on product that may be purchased separately.
Introduction
Beginning with V3R1 of OS/400, the iSeries included support for TCP/IP and many of the
common higher level TCP/IP protocols, such as File Transfer Protocol (FTP). This simplifies
connectivity between the iSeries and the many systems on which these “open” standards have been
implemented, such as UNIX machines. This connectivity may be intra-company, between
machines attached to your company’s LAN or WAN, or inter-company, via a private WAN or the
Internet.
The Communications Module includes an interface that allows you to use iSeries TCP/IP support
to exchange EDI data with other systems using FTP. This interface consists of two parts:
FTP Client Interface – The FTP client is the component within FTP that allows your system to
log in to a remote FTP server and send and receive files. The events in the session are
controlled from the local system (client).
FTP Server Interface – The FTP server is the component within FTP that allows a remote FTP
client to log in to your system and send and receive files. The events in the session are
controlled from the remote system (client).
# NOTE
With either interface, the FTP client controls the session by sending commands to the FTP
server. This relationship is inherent in FTP communications.
For more information on TCP/IP and FTP on the iSeries, see your iSeries TCP/IP documentation.

Considerations FTP Communication Support
12 - 2 Gentran:Server for iSeries Communications Module Release 3.5 User Guide
Considerations
Gentran:Server/FTP Integration
Although the FTP communication is performed by the iSeries FTP support, this interface
integrates iSeries FTP with Gentran:Server by providing many familiar Gentran:Server
communication features, such as:
Communication profiles
Communication session control scripts
Management of data via the inbound and outbound communication queues
Recording of activity in the communication history log
Communication job scheduling (only applicable to the FTP client interface)
Installation
All of the components of the Gentran:Server FTP interface are loaded during the Gentran:Server
for iSeries Communications Module installation process, without any additional effort on your
part.
You must also install the iSeries TCP/IP Connectivity Utilities licensed program, following IBM’s
instructions.
# NOTE
Because the FTP interface is an optionally licensed component of Gentran, an activation key
will need to be obtained and entered before the FTP interface can be used.
iSeries FTP Configuration
You must configure your iSeries for TCP/IP and FTP using the facilities and procedures detailed in
the iSeries TCP/IP Configuration and Reference.
Use the TCP/IP host table to assign names for all systems with which you will communicate using
the Gentran:Server FTP client interface.
When you have completed the iSeries configuration, perform the tests described in the next two
sections (Configuration Verification Tests for FTP Client Interface and Configuration Tests for
FTP Server Interface) to verify that the support required by the Gentran:Server interface works
properly.

FTP Communication Support Considerations
Gentran:Server for iSeries Communications Module Release 3.5 User Guide 12 - 3
Configuration Verification Tests for FTP Client Interface
1. From a command line on the local iSeries, use the PING command to contact the remote
(server) system, using a name from the TCP/IP host table.
2. From a command line on the local iSeries, use the FTP command to connect to and log in
to the remote (server) system, using the same host name that was used in step 1.
3. After logging into the server as described in step 2, use the FTP subcommands BINARY,
PUT, and GET to send and receive files to and from the server system using FTP binary
image mode.
4. Log out and end the connection to the server by using the QUIT subcommand.
# NOTE
The Gentran interface reads messages generated by the FTP client to evaluate the results of
the communications session. Currently, English and German language messages are
supported. If your needs require the FTP client interface on the iSeries system in any other
language, please contact your Customer Service Representative.
Configuration Verification Tests for FTP Server Interface
1. From a command line on the remote (client) system, use the PING command to contact
your iSeries.
2. From a command line on the remote (client) system, use the FTP command to connect to
and log in to your iSeries’ FTP server.
3. After logging into the iSeries FTP server as described in step 2, use the FTP subcommands
BINARY, PUT, and GET to send and receive files to and from the iSeries using FTP binary
image mode.
4. Use the QUOTE subcommand to send subcommands to the iSeries FTP server.
5. Log out and end the connection to the iSeries by using the QUIT subcommand.
# NOTE
You will not be able to use the Gentran:Server FTP interface successfully until you can
complete all of the applicable tests. These tests represent the minimum subset of FTP
subcommands required to perform basic send and receive functions. More advanced
functions may require additional subcommands.

Considerations FTP Communication Support
12 - 4 Gentran:Server for iSeries Communications Module Release 3.5 User Guide
Remote System Requirements
The iSeries FTP support should allow communication with a variety of systems. The remote
system must provide support for the basic FTP functions required by the tests that were outlined in
the previous topic.
The Gentran:Server FTP interface was tested using the following operating systems as remotes:
OS/400
AIX
OS/2
DOS/Windows
Sun/OS
HP/UX
Security
There are a multitude of security issues regarding the use of TCP/IP protocols, especially where
the Internet is concerned. The Gentran:Server FTP interface makes this situation neither better nor
worse. It is your responsibility to adequately secure your system and protect your data. For more
information on this topic, you should start with the iSeries TCP/IP Configuration and Reference
and the iSeries Security Guide and Reference.
CAUTION
STOP
It is crucial that you give extra attention to security when using TCP/IP and FTP. By
allowing a client system access to your FTP server, you not only grant the ability to
transfer files, but also to create and delete objects and to execute commands. Failure to
control remote users’ access could introduce serious security exposures.

FTP Communication Support Considerations
Gentran:Server for iSeries Communications Module Release 3.5 User Guide 12 - 5
ASCII and BINARY File Transfer Types
ASCII and BINARY are two file transfer types commonly encountered in FTP communications.
ASCII type transfers are designed for transferring text files, such as source code, which can be
represented using all printable characters and predictable record separators. This type of data is
relatively simple and performing conversions between unlike systems is straightforward for the
FTP programs. These conversions include ASCII-EBCDIC translation, adding or deleting trailing
spaces, and inserting or removing record separators between a record-oriented EBCDIC system
(i.e., the OS/400 QSYS.LIB file system) and a stream-oriented ASCII system (i.e., a PC or UNIX
system).
BINARY type transfers are designed for other types of files, such as executable code, which are
destroyed if altered by the conversion mechanisms described above. BINARY essentially tells the
FTP client and server not to attempt to interpret, modify, translate, or convert data in any way.
Although most EDI data can be represented using only printable characters, it is common to find
various communication control characters used as delimiters and to find things such as
fixed-length data elements in which spaces are significant. These characteristics of EDI data
conflict with the conversions performed by the OS/400 FTP client and EDI data cannot be reliably
transferred from the OS/400 QSYS.LIB file system using FTP ASCII type transfers.
FTP BINARY transfer type can be used to avoid this conflict. Any necessary data conversions
must be performed separately outside the file transfer process. This is the safest way to transfer
EDI data between unlike systems because it entrusts the data conversion process to a specialized
application rather than the generic FTP utilities. This is how the Gentran interface works by
default.
There are cases when an FTP server does not support the BINARY transfer type. To accommodate
these rare situations, the Gentran FTP interface will allow the ASCII type transfer to be used. This
imposes very strict requirements on the format of the data transmitted and received and should
only be used if absolutely necessary under the direction of Gentran communications support.
# NOTE
Do not confuse ASCII transfer type with ASCII data. It is common for an FTP server or VAN
FTP interface to expect transmission and receipt of ASCII data because the origins of FTP
were ASCII machines. This does not mean the ASCII transfer type must be used. ASCII data
can be transferred using the FTP BINARY transfer type. This is the Gentran default and
recommended mode of operation that can be used in almost all situations.

Considerations FTP Communication Support
12 - 6 Gentran:Server for iSeries Communications Module Release 3.5 User Guide
ASCII-EBCDIC Translation
The iSeries uses the EBCDIC character set. Because many of the systems that one would be likely
to communicate with using FTP use the ASCII character set, data translation must be performed.
All inbound data will be translated from ASCII to EBCDIC. All outbound data will be translated
from EBCDIC to ASCII.
When the FTP BINARY transfer type (Gentran default) is in use, translation will be performed
using the translate tables GENASCII and GENEBCDIC, which reside in the Gentran:Server
program library (G35PGM). These tables perform the translation described in Appendix B,
“Translating between ASCII and EBCDIC”.
CAUTION
STOP
You should not modify or override these translation tables.
Translation can be disabled in your FTP communication profile. This could be used to eliminate
the overhead of translation if you were communicating with another iSeries (or other EBCDIC
machine).
Translation should also be disabled in an FTP communication profile if the FTP ASCII transfer
type is being used. In this case, translation is performed by the OS/400 FTP client rather than by
Gentran:Server.
# NOTE
ASCII type transfers are not recommended with Gentran:Server.

FTP Communication Support Gentran:Server FTP Configuration
Gentran:Server for iSeries Communications Module Release 3.5 User Guide 12 - 7
Gentran:Server FTP Configuration
Like the other communication protocols within Gentran:Server, configuring for FTP
communication consists of two parts:
1. Create a communication profile
2. Create a communication session control script (FTP client interface only)
The FTP communication profile that you create can be used by both the client and server
interfaces. Communication session control scripts are only required for the FTP client interface.
The specifics of creating profiles and scripts for FTP are discussed in the following sections.
Create an FTP Profile
Figure 12.1 Work with Communications Panel (EDIX400-FMT01)
On the Work with Communications panel (EDIX400-FMT01), type 1 (Create) in the Option field
on the key entry line. Type SAMPFTP in the Profile ID field on the key entry line and press Enter,
as shown in Figure 12.1.
EDIX400 Work with Communications EDI 04/30/08
FMT01 pgmlib: G3X5PGM dtalib:G3X5DTA 12:00:00
Position to Profile ID . . . . . .
Type option (and Information), press Enter.
1=Create 2=Revise 3=Copy 4=Delete 5=View 11=Line/Ctl/Dev
Opt Profile ID Company
1 SAMPFTP
CN3BSC COMMERCE:Network RELEASE 3
CN3SNA COMMERCE:Network RELEASE 3
REDINET CONTROL DATA / REDINET NETWORK
RMTDAA Remote Dial Line/Answer/ASYNC
RMTDAL Remote Dial Line/Answer/SDLC/APPC
RMTDAN Remote Dial/Answer/No X25 Network
RMTLAL Remote Leased-line/answer/SDLC/APPC
RMTLAN Remote Lease Lin/Answer/No X25 Netw
RMTLAX Remote Leased Line/Answer/X25 Netwk
More...
Parameters or command
===>
F1=Help F3=Exit F12=Cancel F15=Sort F23=More Options F24=More Keys

Gentran:Server FTP Configuration FTP Communication Support
12 - 8 Gentran:Server for iSeries Communications Module Release 3.5 User Guide
The Communications Profile panel (EDIX401-FMT01) is displayed, as shown in Figure 12.2.
Figure 12.2 Create an FTP communication profile
On the Communications Profile panel (EDIX401-FMT01), type your company name in the
Company field and FTP in the Protocol field. Press Enter.
The FTP Communication Profile panel (EDIX401-FMT11) is displayed, as shown in Figure 12.3.
Figure 12.3 Create an FTP communication profile
EDIX401 Communication Profile EDI 04/30/08
FMT01 12:00:00
Comm Profile ID. . . . . . . . . . SAMPFTP
Company. . . . . . . . . . . . . . Sample FTP Profile
Contact. . . . . . . . . . . . . . Customer Service
Phone. . . . . . . . . . . . . . . ( ) - x
International Dial Code. . . . . .
Protocol . . . . . . . . . . . . . FTP
Days to Purge. . . . . . . . . . . 999
FIFO/LIFO. . . . . . . . . . . . . F
Used Most Frequently . . . . . . . N
Update Allowed . . . . . . . . . . Y
F1=Help F10=Update F12=Cancel F13=Services F24=More Keys
EDIX401 Communication Profile EDI 04/30/08
FMT11 FTP 12:00:00
Comm Profile ID. . . . . . . . . . SAMPFTP
Company. . . . . . . . . . . . . . Sample FTP Profile
FTP Server Name. . . . . . . . . . FTPHOSTNAME
Login ID . . . . . . . . . . . . . MYID
Login Password . . . . . . . . . . MYPWD
Record Size. . . . . . . . . . . . 0080
Inbound Record Separator (hex) . .
Outbound Record Separator (hex). .
ASCII/EBCDIC Translation . . . . . Y
Secure Connection. . . . . . . . . *DFT
F1=Help F4=Prompt F5=Refresh F10=Update F12=Cancel F24=More Keys

FTP Communication Support Gentran:Server FTP Configuration
Gentran:Server for iSeries Communications Module Release 3.5 User Guide 12 - 9
Type the name of the remote in the FTP Server Name field. For this example, type FTPHOSTNAME.
Type the login ID that will be used for access to the host in the Login ID field, and type the
password that will be used to access the host in the Login Password field. Press F10 (Update) to
create the profile.
Field Descriptions
FTP Server Name
Specifies the name of the FTP server, as defined in the iSeries TCP/IP host table, that will
be used by the FTP client interface to establish a connection to the remote system. This
field is not used by the FTP server interface.
Login ID
Specifies the user ID that will be used by the FTP client interface to log in to the FTP
server. This field is not used by the FTP server interface. When a communications session
is started for a Gentran:Server FTP client communication profile, these are the default
processing steps:
1. Gentran:Server issues the command FTP rmtsys, where rmtsys is the host
name or IP address of the server system. The host name or IP address used as
rmtsys is specified in the FTP Server Name on the communications profile. The
command invokes the OS/400 FTP client program, and opens a connection to the
FTP server.
2. The server issues a login prompt, requesting identification from the client system.
3. Gentran:Server responds to the login prompt with a login string username
password, where username is the Login ID and password is the Login
Password specified in the communications profile.
4. The server issues a message confirming the login, and the FTP client program
waits for the next FTP subcommand.
5. Gentran:Server issues the BINARY subcommand, which is the recommended file
transfer type for all Gentran:Server FTP communications.
6. The session is switched to binary file transfer mode, the server issues a
confirmation message, and the FTP client program waits for the next
subcommand.
7. Processing of the communications session control script now begins.
# NOTE
Steps 1 – 6 are normally performed automatically by Gentran:Server, based on the
information in the communications profile.
In some situations, this default processing may not be appropriate for the FTP server with
which you are communicating. For example, the FTP server may require a username or
password longer than the 10-character fields on the Gentran:Server communications
profile panel (EDIX401-FMT01). For these situations, you can specify *NOLOGIN for the
Login ID field in the communications profile. This special value instructs Gentran:Server
not to perform the login sequence (steps 2 – 6) automatically. Instead, Gentran:Server

Gentran:Server FTP Configuration FTP Communication Support
12 - 10 Gentran:Server for iSeries Communications Module Release 3.5 User Guide
performs step 1, then proceeds directly to step 7. This allows you to control login
processing with commands in your communications session control script. Continuing
with the previous example, if your FTP server requires a username or password longer
than 10 characters, you can code a control record send as the first step in your script. This
record would then be sent in response to the initial login prompt form the FTP server.
Using this technique, you would then have up to 80 characters to use for your username
and password.
# NOTE
If you use the *NOLOGIN option, you must include the BINARY or ASCII
subcommand as a control record sent in your communication session control script
immediately following the script steps used to log in. This is generally the BINARY
subcommand since FTP ASCII type transfers are not recommended for exchanging
EDI data.
Login Password
Specifies the password that will be used by the FTP client interface to log in to the FTP
server. This password must correspond to the Login ID that was specified. This field is not
used by the FTP server interface, or when *NOLOGIN is specified for the Login ID field.
Record Size
Specifies the record length that will be used to prepare outbound data for transmission by
both the FTP client and FTP server interfaces.This field determines the interval at which
the record separator characters specified by the Outbound Record Separator fields will be
added to the outbound data.Valid values range from 1 – 4096.
Inbound Record Separator
Specifies a sequence of characters that will be considered to be record separators and will
be eliminated from data that is received by both the FTP client and FTP server interfaces.
# NOTE
To facilitate the transmission of EDI data, the record separators will not be observed
(not cause a “short” inbound record to be considered complete) but will be removed.
This results in the input data stream being continuously ”wrapped” into its
destination records, without any record separators.
If the Inbound Record Separator fields are left blank, then no characters will be removed
from inbound data. If one or two characters are specified, then all occurrences of that
character or character sequence will be removed before the data is written to the inbound
queue or user file. The Inbound Record Separator fields specify the hexadecimal value of
the characters that are to be removed from the data. If translation is enabled in the profile
(the default), then these fields specify the character representation after translation has
been performed according to the ASCII-EBCDIC translation table in the Communications
Reference. Therefore, these fields should normally contain the EBCDIC representation of
the record separator characters to be removed.

FTP Communication Support Gentran:Server FTP Configuration
Gentran:Server for iSeries Communications Module Release 3.5 User Guide 12 - 11
Outbound Record Separator
Specifies a sequence of characters that will be added to transmitted data to allow the
remote system to delimit records when the data is processed. If the Outbound Record
Separator fields are left blank, then no record separator characters will be added to
outbound data. If one or two characters are specified, then that character or character
sequence will be added to all outbound data at the fixed interval specified by the Record
Size field.
The Outbound Record Separator fields specify the hexadecimal value of the characters to
be added to the data. If translation is enabled in the profile (the default), then these fields
specify the character representation before translation has been performed according to the
EBCDIC-ASCII translation table in the Communications Reference. Therefore, these
fields should normally contain the EBCDIC representation of the record separator
characters to be added.
ASCII-EBCDIC Translation
Specify Y or N to determine whether inbound data will be translated from ASCII to
EBCDIC and outbound data will be translated from EBCDIC to ASCII. This setting only
affects queue, file, and print data that is sent and received during FTP communications. It
does not affect other types of data, such as control records, extended logic records, or
remote commands received from an FTP client.
Secure Connection
Specifies the type of security mechanism to be used for protecting information transferred
on the FTP control connection, including the password used to authenticate the session
with the FTP server. Enter ‘*DFT’ when you want to take the iSeries default value. Enter
‘*SSL’ to use encryption to protect data from being viewed during transmission and to
verify that data loss or corruption does not occur. When *SSL is used, after connecting to
the specified FTP server, the FTP client sends an AUTH (authorization) subcommand
requesting a TLS/SLL protected session. If the server supports SSL, an SSL negotiation is
performed. If the server does not support SSL or if the SSL negotiation fails, the
connection is closed.
# NOTE
When *SSL is used, there is configuration required on the OS/400. Please refer to the IBM
manuals for SSL setup for your system.

FTP Communication Session Control Scripts FTP Communication Support
12 - 12 Gentran:Server for iSeries Communications Module Release 3.5 User Guide
FTP Communication Session Control Scripts
# NOTE
Session control scripts are only required by the FTP client interface, not the FTP server
interface. The FTP client interface uses the session control script to control the FTP session.
In contrast, the FTP server interface requires the remote system to control the session,
therefore scripts are not needed.
After creating an FTP communication profile, you must provide an appropriate communication
session control script. The script will contain any commands necessary to prepare the remote
system for file transfer, as well as the steps that transfer files. The exact contents of the script will
be determined by the remote system’s requirements and capabilities, and by the work that must be
accomplished with the script.
Create an FTP Script
FTP scripts are created and edited using the same facilities as the other communication types
within Gentran:Server for iSeries Communications Module. (SEE the “Using Communications”
and “Using Scripts” chapters for basic information about scripting.)
An FTP script is coded similarly to scripts for the other protocols supported by Gentran:Server.
The following script transactions can be used:
FTP Script Transactions
C – Control Record
Used to execute an FTP subcommand. The FTP subcommand must be supported by both the local
(client) and remote (server) systems. For more information on applicable subcommands and their
syntax, see your iSeries TCP/IP documentation, and the documentation for the FTP server with
which you are communicating.
Trans Description Use
C Control Record Used to execute an FTP subcommand
R Receive Used to receive a file from the FTP
server to your system
S Send Used to send a file from your system to
the FTP server
XExtended Logic Used to execute an extended logic
keyword

FTP Communication Support FTP Communication Session Control Scripts
Gentran:Server for iSeries Communications Module Release 3.5 User Guide 12 - 13
The text coded in the Command field of the script record will be passed unchanged to the iSeries
FTP client program. Because the FTP server will frequently be case sensitive, be sure to use the
correct case when entering FTP subcommands in a script.
A typical FTP subcommand that would be executed using this facility is CD, which would be used
to change to the appropriate directory on the remote system before performing a file transfer.
# NOTE
Control Records are very powerful and provide you with the ability to insert FTP
subcommands beyond the control of Gentran. Therefore, it is possible that some
subcommands or subcommand sequences may interfere with the operation of the Gentran
FTP interface. It is the user’s responsibility to identify any of these subcommands or
sequences and avoid use of those which may affect the Gentran FTP interface.
R – Receive
Used to receive a file from the FTP server to your system. By typing one of the following values in
the File Type field, you can direct the inbound data to a specific location.
The Command field of the script record is used to specify the name of the file to be received from
the server. The filename must be specified using the correct syntax for the type of system with
which you are communicating. The filename can optionally include a path specification. For
example:
C:\EDI\X12.DAT might specify the name of a file on a PC,
while
/usr/bob/EDI/X12_data might specify the name of a file on a UNIX system.
FTP Receive transactions may be combined with File options as follows:
R/IQ Receive to Gentran Inbound Queue
R/IM Receive to Gentran Inbound Queue
R/IF Receive to Inbound File provided by user
R/IA Receive and Append to Inbound File provided by user
R/SP Receive to spool file
For R/IQ and R/IM, data is received to the Gentran:Server inbound queue. The data to be received
is determined by the filespec specified in the Command field in the Receive step of the script.
Multiple files may be received from the server if the filespec contains the wildcard character, “*”.
If more than one file is received, each file is received into a separate batch on the queue.
For R/IF and R/IA, the server file named by the Command field in the receive step of the script
will be received to the iSeries file named by the File Name field. This file must exist (be
pre-allocated) on your iSeries before the communication session is started, and must be accessible
via the library list of the job used to conduct the session.

FTP Communication Session Control Scripts FTP Communication Support
12 - 14 Gentran:Server for iSeries Communications Module Release 3.5 User Guide
When R/IF is specified, the destination file is cleared before any received data is written to it.
When R/IA is specified, the file is not cleared, and data received is appended. Multiple files may
be received from the server if the filespec in the Command field contains the wildcard character,
“*”. If more than one file is received, all of the received files are concatenated into the specified
inbound file. Due to stream/record conversion, the resulting file may contain pad characters
between the data that was received from the individual files.
CAUTION
STOP
When specifiying the name of the iSeries file in the File Name field, avoid the use of the
period character (.) in the name (e.g., EDI.DATA). Although these are valid iSeries file
names, they cause problems for the OS/400 FTP client.
For R/SP, the server file named by the Command field in the receive step will be received to a
spool file. This file may contain ASCII carriage control characters such as carriage returns, line
feeds, and form feeds. These characters are interpreted as described in the Print Control topic of
the “Async Communications Support” chapter. Multiple files may be received from the server if
the filespec in the Command field contains the wildcard character, “*”. If more than one file is
received, each file will produce a separate spool file.
CAUTION
STOP
Print control characters will be consumed by the file transfer process when the ASCII file
transfer type is used for receiving print data. This results in incorrect input. To avoid this, the
BINARY file transfer type should be used to receive print data.
For all FTP receive transactions, the Indicator field in the script will not be used.
# NOTE
The Command field in the receive step of the script is a filespec that can include the wildcard
character, ”*”. The filespec may resolve to multiple files on the server. The LS subcommand
is used to resolve the filespec. The syntax used for the filespec must be such that it would
cause the LS subcommand to return the desired list of files, considering the file system
employed by the FTP server. For example, to receive all files beginning with the characters
TEST you can specify the filespec as TEST* for a UNIX FTP server, while using TEST*.*
would achieve the desired results with a native OS/400 FTP server.
S – Send
Used to send a file from your system to the FTP server. By specifying File Type OQ or OF, you can
transmit data from the outbound queue or a user-provided file.
The Command field of the script record is used to specify the name of the file to which your
outbound data will be written on the server system. The filename must be specified using the
correct syntax for the type of system with which you are communicating. The filename can
optionally include a path specification. For example:
C:\EDI\X12.DAT might specify the name of a file on a PC,

FTP Communication Support FTP Communication Session Control Scripts
Gentran:Server for iSeries Communications Module Release 3.5 User Guide 12 - 15
while
/usr/bob/EDI/X12_data might specify the name of a file on a UNIX system.
FTP Send transactions may be combined with File options as follows:
S/OQ Send from Gentran:Server Outbound Queue
S/OM Send from Gentran:Server Outbound Queue, separating multiple batches
S/OF Send from Outbound File provided by user
For S/OQ, all eligible data batches on the outbound queue will be transmitted to the file (on the
FTP server system) that is named by the Command field in the send step of the script. All batches
will be transmitted to a single file on the server.
For S/OM, each eligible batch on the outbound queue will be transmitted to a separate file on the
FTP server system. The file names on the server will be determined by the Command field in the
send step of the script. This name should be coded to include the special character sequence
“####”. This sequence will be replaced by a 4-digit number that will start with 0001 and will be
incremented for every batch transmitted by the current send step. For example, if there were three
eligible outbound batches and the Command field contained the name Data_from_AS400_####,
the batches would be transmitted to the server using the file names Data_from_AS400_0001,
Data_from_AS400_0002, and Data_from_AS400_0003.
Alternatively, this action may be modified (for example, to retain the sequence number between
sessions) using the FTP Extended Logic keywords SETSEQ, SAVSEQ, and RTVSEQ. Figure 9.5
illustrates an example of an FTP Control Script using these Extended Logic keywords. SEE the
“X-Extended Script Logic” section of this chapter for detailed descriptions of these keywords.
# NOTE
The sequence number is reset to 0001 for every communication session. Or, use the FTP
Extended Logic keywords above to modify this action.
For S/OM, two additional special character sequences may be used to assist in the creating unique
file names on the FTP server system. Specifying +BATSEQ+ in the command field of the Send
step will insert the batch sequence number that identifies the outbound data batch. Similarly,
specifying +PRFSEQ+ will insert the profile sequence number of the batch.
For S/OF, the iSeries physical file named by the File Name field in the send step of the script will
be transmitted to the file (on the FTP server system) that is named by the Command field. This file
must exist on your iSeries and must be accessible via the library list of the job used to execute the
communication session.
CAUTION
STOP
When specifying the name of the iSeries file in the File Name field, avoid the use of the
period character (.) in the name (for example, EDI.DATA). Although these are valid iSeries
file names, they cause problems for the OS/400 FTP client.
For all FTP send transactions, the Indicator field in the script will not be used.

FTP Communication Session Control Scripts FTP Communication Support
12 - 16 Gentran:Server for iSeries Communications Module Release 3.5 User Guide
For S/OQ and S/OF, you can specify a date/time string for the full or partial name on the host.
Specifying +DTSTAMP+ in the command field of the send step will insert a default date/time string
in its place. The default date/time string format is YYYYMMDDHHMM. If a different date/time string is
required, build it using the Extended Logic keyword TIMEFMT. Refer to “X – Extended Script
Logic” on page 12-17.
For S/OM, if there are multiple batches to send, use the ### option in the command line to get the
unique file name. Use the #### option in conjunction with the +DTSTAMP+ to ensure a unique file
name for each batch sent. Use the same date/time string for each file sent within the S/OM.
The following examples show how to use the +DTSTAMP+ function. This example assumes that the
communications session was initiated on April 1, 2008 at 15:45.
The file name prefix (prior to the +DTSTAMP+) and the suffix (after the +DTSTAMP+) are limited to
25 characters each. A period is not required by Gentran:Server for the use of a suffix. If it exceeds
80 characters, the filename will be truncated.
CAUTION
STOP
If +DTSTAMP+ is used multiple times within the same Session Control script, the same
date/time string will be used for each send step. This may cause the files on the FTP Server
to be overwritten due to duplicate names. To avoid this situation, specify a unique prefix or
suffix along with the +DTSTAMP+ on each send steps command line. Otherwise, use the
Extended Logic Keyword TIMEFMT to specify a different string prior to each send step.
Command Field File Names on Host
+DTSTAMP+ 200804011545
+DTSTAMP+INV 200804011545INV
+DTSTAMP+.TXT 200804011545.TXT
MYCO+DTSTAMP+.TXT MYCO200804011545.TXT
If S/OM is specified with
three batches to transmit:
+DTSTAMP+####
200804011545001
200804011545002
200804011545003

FTP Communication Support FTP Communication Session Control Scripts
Gentran:Server for iSeries Communications Module Release 3.5 User Guide 12 - 17
X – Extended Script Logic
Used to execute extended script logic keywords. When a keyword is used to set an option, the
selected option will remain in effect for the duration of the session unless it is changed by another
occurrence of the keyword.
# NOTE
All FTP extended logic keywords must begin in the first column of the Command field. Only
one extended logic keyword can be specified on a session control record. If more than one
extended logic keyword is needed, they may be specified by using multiple control records.
)RECOMMENDATION
Some of the following extended keywords provide additional control of record separators
and character set translation. It is strongly recommended that you read the definitions for the
fields titled, “Inbound Record Separator,” “Outbound Record Separator,” and
“ASCII-EBCDIC Translation” that appear earlier in this chapter.
RECSIZE=nnnn
When outbound data is prepared for transmission via FTP, the communication profile can
specify record separator characters that will be inserted into the data at a fixed interval. By
default, this interval is determined by the Record Size field in the profile.
The RECSIZE keyword can be used to override the record size from the profile. This is
accomplished by coding an extended logic record and specifying the Command field as
RECSIZE=nnnn, where nnnn is a 1- to 4-digit number with a value from 1 to 4096. The
specified value will be used to prepare the outbound data for all subsequent send
transactions (or until another RECSIZE keyword is encountered).
SKIPBLANKEOF=Y or N
When a file is transferred via the Gentran Communications Outbound Queue, pad
characters may be introduced at the end of the file.This occurs when the record length of
the file being transferred and the outbound queue itself are not even multiples.
For example, a 1055-byte record length version 3 SAPIN IDOC file is to be transferred
from GENTRAN/400 to a UNIX system where it will be processed by SAP. An FTP
ASCII type transfer will be used to perform the necessary EBCDIC-to-ASCII translation,
trailing blank truncation, and addition of record separators. When the SAPIN file is
ADDed to the outbound queue, the last record will almost always contain some number of
pad spaces because 1055 is not an even multiple of 80 (the outbound queue size). When
this data is taken from the outbound queue and reformatted into 1055-byte records again
for transmission, the pad characters that were added to the queue result in the creation of
an extra 1055-byte blank record at the end of the file. This record contains only pad
(space) characters.
Generally this is not a problem, as most applications are not sensitive to “white space”
characters after the logical end of the data that is to be processed. For those applications
that are, the SKIPBLANKEOF keyword can be used. When Y is specified, Gentran will not
create this extra blank record that is composed entirely of pad (space) characters.

FTP Communication Session Control Scripts FTP Communication Support
12 - 18 Gentran:Server for iSeries Communications Module Release 3.5 User Guide
Once this keyword has been used in a communications session control script, its setting
remains in effect until the end of the script or until it is used again. If this keyword does
not appear in a script, the default value N will be used.
# NOTE
This keyword is only for use in specific situations such as the example presented above. It
will not eliminate all pad characters in all situations.
AUTODELETE=Y or N
This keyword provides a mechanism for automatically deleting files from the FTP server
after they have been received by the Receive Inbound Multiple (R/IM) function. When
AUTODELTE=Y is specified, each file received by R/IM will be deleted after it has been
received.
Once an AUTODELETE=Y script record has been processed, the option will remain in effect
for every R/IM step until the end of the script or AUTODELETE=N is encountered.
If no AUTODELETE record is included in a script, the default (AUTODELTE=N) will be used.
AUTORENAME=string
When the S/OM function is used to send multiple files to the FTP server, the
AUTORENAME keyword will cause a REName subcommand to be generated after each
PUT subcommand. This can be used with certain servers that require that the entire file be
sent and then renamed or moved to trigger the server to process the file.
string is a filename mask that will determine what the file will be renamed to and must be
specified in the same format as the filename on the Send. For more information about this
syntax, see the description on how files names are determined for S/OM, special
characters sequences “####” information, and “+DTSTAMP+” information in the topic
“X – Extended Script Logic” on page 12-17.
For example, the following script records will send all eligible outbound queue batches to
directory “/home/mydir” on the server, and the files will initially be named
“mydata.+DTSTAMPT+.####,” where +DTSTAMP+ is replaced by a data/time stamp
and #### is replaced by a sequence number. After each FTP PUT is completed, an FTP
REName subcommand will be issued to rename the file to the same name, but add the
suffix “.rename” and include a directory specification that will cause the file to be moved

FTP Communication Support FTP Communication Session Control Scripts
Gentran:Server for iSeries Communications Module Release 3.5 User Guide 12 - 19
to “/home/newdir.” Rules imposed by the server system will determine the specifics of
how the renamed mask should be formatted.
The X record containing the AUTORENAME keyword must appear before any Send
steps to which it will apply.
Omitting string will cancel the auto-rename function; for example, “AUTRENAME=”
will cause subsequent S/OM steps not to generate REName commands.
RECSEPO=Y or N
This keyword allows the user to specify whether record separators will be inserted at a
fixed interval into outbound data. Specifying Y indicates that record separators will be
inserted at a fixed interval. Specifying N disables record separator insertion. The record
separators used for insertion must be defined by the Outbound Record Separator field on
screen EDIX401 FMT11, or by using the extended logic command CHGRECSEPO, as
indicated below.
RECSEPI=Y or N
This keyword allows the user to specify whether record separators will be removed from
inbound data. Specifying Y indicates that record separators will be removed. Specifying N
disables the removal of record separators. The record separators to be removed must be
defined by the Inbound Record Separator field on screen EDIX401 FMT11, or by using
the extended logic command CHGRECSEPI, as indicated below.
CHGRECSEPO=XX
This keyword allows the user to specify one or two characters that will be inserted as
record separators at a fixed interval into outbound data. When used, this keyword
overrides the value(s) specified for the Outbound Record Separator on screen EDIX401
FMT11, or the value(s) specified by a prior CHGRECSEPO command. Hex character
representation can be entered using the Extended Parameters screen (EDIX43B) of
Communications Session Control.
EDIX403 Communication Session Control EDI 04/30/08
CTL01 12:00:00
Comm Profile ID. . . . . . . . . . MUFTPR
Session Name . . . . . . . . . . . M4
Company. . . . . . . . . . . . . . TEST FTP to UNIX server
Session Description. . . . . . . . Auto-rename session
Type option, press Enter.
3=Copy Seq# 4=Delete 11=Extended Parms
Opt Seq No Tran File File Name Ind Description
20 C cd to my directory
cd /home/mydir
25 X __ Set filename mask for rename
AUTORENAME=/home/newdir/mydata.+DTSTAMPT+.####.RENAME
30 X Send OM and rename files
mydata.+DTSTAMP+
More...
F1=Help F4=Prompt F9=Fold/Unfold F10=Update F12=Cancel F24=More Keys

FTP Communication Session Control Scripts FTP Communication Support
12 - 20 Gentran:Server for iSeries Communications Module Release 3.5 User Guide
CHGRECSEPI=XX
This keyword allows the user to specify one or two characters that will be considered
record separators, and will be removed from inbound data. When used, this keyword
overrides the value(s) specified for the Inbound Record Separator on screen EDIX401
FMT11, or the value(s) specified by a prior CHGRECSEPI command. Hex character
representation can be entered using the Extended Parameters screen (EDIX43B) of
Communications Session Control.
RMVCHR=”string”
This keyword can be used to remove characters from FTP inbound data. This is similar in
function to the CHGRECSEPI keyword and the inbound record separator characters
specified on the FTP communications profile.
# NOTE
It is more efficient to use the inbound record separators or CHGRECSEPI facilities.
RMVCHR should be used only if additional characters or longer strings must be
removed.
“string” may be any sequence of characters from 1 to 71 characters in length, enclosed by
delimiters and preceded by “RMVCHR=”. The delimiter character may be any character.
The character immediately following the equal sign will be the delimiter and must also
appear at the end of the string. X is the delimiter in the following example:
RMVCHR-Xmy string contains “quotes”X
In non-printable characters are to be removed, they may be entered using the EDIX43B
Hex mode screen.
# NOTE
This feature operates on data before it passes through ASCII-EBCDIC translation.
Therefore, the “string” to remove must be specified in the character set of the host
system. For example, if you want to remove the linefeed character that appears in the
inbound queue as an EBCDIC x’15’ and the data originated on a UNIX machine
using ASCII, the original character was most likely a x’0A’. Therefore, your script
should specify the x’0A’ character in the RMVCHR statement of the communication
session control script.
Up to ten RMVCHR statements may appear in a communication session control script and
they must appear before any Receive step to which they should apply. If more than 10
occur in a script, those beyond the tenth will be ignored.
Unexpected results may occur if one RMVCHR string is a substring of another (for
example, an RMVCHR string for x’0A’ and another for x’0D0A’). In most cases, the
desired results would be achieved by specifying the longer string first; thus, x’0D0A’ on
the first RMVCHR statement and x’0A’ on the second.

FTP Communication Support FTP Communication Session Control Scripts
Gentran:Server for iSeries Communications Module Release 3.5 User Guide 12 - 21
XLATEO=Y or N
This keyword allows the user to specify whether character translation from the EBCDIC
code set to the ASCII code set will be used for outbound data. Specifying Y will enable
translation.
XLATEI=Y or N
This keyword allows the user to specify whether character translation from the ASCII
code set to the EBCDIC code set will be used for inbound data. Specifying Y will enable
translation.
AEXLATE=XXXXXXXXXX
This keyword allows the user to specify the name (up to ten characters) of a translation
table that will be used for translating inbound data. When used, this table name will
override the default translation table that would normally be used during communications.
It can also override a translation table name specified by a prior “AEXLATE” command.
Translation will occur if either the ASCII/EBCDIC Translation field on the
communication profile screen is set to Y or the XLATEI=Y command has been issued prior
to this command.
EALXATE=XXXXXXXXXX
This keyword allows the user to specify the name (up to ten characters) of a translation
table that will be used for translating outbound data. When used, this table name will
override the default translation table that would normally be used during communications.
It can also override a translation table name specified by a prior EAXLATE command.
Translation will occur if either the ASCII/EBCDIC Translation field on the
communication profile screen is set to Y or the XLATEO=Y command has bee issued prior
to this command.
EMPTYBATCHIN=Y or N
This keyword allows the user to optionally bypass creation of empty batches on the
Gentran inbound queue when a zero length file is received from the server. This may
occur with certain hosts, such as Ford ANX.
FTPCCSID=nnnnn
Overrides the default value of the coded character set identifier (CCSID) parameter used
to execute the OS/400 FTP command to conduct a Gentran FTP client session when the
FTP type is set to ASCII (not recommended).
It specifies the ASCII CCSID that is used for single-byte character set (SBCS) ASCII file
transfers. The CCSID value chosen is the default used by the FTP client for
ASCII-to-EBCDIC and EBCDIC-to-ASCII translation. Translation is determined using
the specified ASCII CCSID and the EBCDIC CCSID of the job.
If this keyword is not used, the value *DFT is passed to the FTP command and the default
00819 (ISO 8859-1 8-bit ASCII) is used.
CAUTION
STOP
Use of this keyword may have undesirable results. Avoid using this keyword except when
directed by Gentran Communications Support.

FTP Communication Session Control Scripts FTP Communication Support
12 - 22 Gentran:Server for iSeries Communications Module Release 3.5 User Guide
FTPTBLOUT=xxxxxxxxxx
Overrides the default value of the TBLFTPOUT parameter used to execute the OS/400 FTP
command to conduct a Gentran FTP client session when the FTP type is set to ASCII (not
recommended).
It specifies the table object that is to be used to map all outgoing data in the FTP client.
Outgoing data is translated from EBCDIC to ASCII. If a table object is specified for
FTPTBLOUT, the table object is used for outgoing translation. Otherwise, the FTPCCSID
value is used to determine outgoing translation.
The specified table must be available in the library list of the job when the
communications session is executed.
# NOTE
This is not the same as the EAXLATE keyword. EAXLATE affects character translation
performed by Gentran and is generally used only with BINARY type file transfers.
FTPTBLOUT affects character translation performed by the OS/400 FTP client during ASCII
type file transfers.
CAUTION
STOP
This keyword affects other character translation in the FTP client in addition to that which
occurs during file transfers. Use of this keyword may have undesirable results. Avoid using
this keyword except when directed by Gentran Communications Support.
FTPTBLIN=xxxxxxxxxx
Overrides the default value of the TBLFTPIN parameter used to execute the OS/400 FTP
command to conduct a Gentran FTP client session when the FTP type is set to ASCII (not
recommended).
It specifies the table object that is to be used to translate all incoming data in the FTP
client. Incoming data is translated from ASCII to EBCDIC. If a table object is specified
for FTPTBLIN, the table object is used for incoming translation. Otherwise, the FTPCCSID
value is used to determine incoming translation.
The specified table must be available in the library list of the job when the
communications session is executed.
# NOTE
This is not the same as the AEXLATE keyword. AEXLATE affects character translation
performed by Gentran and is generally used only with BINARY type file transfers.

FTP Communication Support FTP Communication Session Control Scripts
Gentran:Server for iSeries Communications Module Release 3.5 User Guide 12 - 23
FTPTBLIN affects character translation performed by the OS/400 FTP client during ASCII
type file transfers.
CAUTION
STOP
This keyword affects other character translation in the FTP client in addition to that which
occurs during file transfers. Use of this keyword may have undesirable results. Avoid using
this keyword except when directed by Gentran Communications Support.
SETSEQ=nnnn
This keyword sets the sequence number used with the S/OM #### feature. The internal
last-used sequence number is set to one less than the value specified so that the value
specified is the next number used to replace #### in an S/OM file name.
Syntax:
SETSEQ Value = nnnn
Where:
nnnn is a one- to four-digit number ranging from 0 to 9999.
# NOTE
Sequence number zero is never used. If zero is specified, the next sequence number is 0001.
SAVSEQ
This keyword stores the last-used S/OM #### sequence number in an OS/400 data area. It
can be used in combination with RTVSEQ to retain the sequence number between
communications sessions.
Syntax:
SAVSEQ DTAARA = dtaaraname [LIB=libname]
Where:
dtaaraname is the name of the data area where you want to store the sequence number. If
a data area does not exist, it is created.
libname is the name of the library where the data resides. If libname is not specified, the
library list is used to locate the data area. Further, if libname is not specified and the data
area must be created, it is created in the job’s current library.
The keywords dtaaraname and libname can be specified in either order.
CAUTION
STOP
dtaaraname and libname must be valid OS/400 object names. If invalid names are
specified, runtime errors occur during the communication session when the script is
executed.

FTP Communication Session Control Scripts FTP Communication Support
12 - 24 Gentran:Server for iSeries Communications Module Release 3.5 User Guide
RTVSEQ
This keyword retrieves the last-used S/OM #### sequence number from an OS/400 data
area. It can be used in combination with SAVSEQ to retain the sequence number between
communication sessions.
Syntax:
RTVSEQ DTAARA = dtaaraname [LIB=libname]
Where:
dtaaraname is the name of the data area where the sequence number was previously
saved.
libname is the name of the library where the data area resides. If libname is not specified,
the library list is used to locate the data area.
The keywords dtaaraname and libname can be specified in either order.
# NOTE
If dtaaraname and libname do not identify an existing data area, the last-used sequence
number is set to zero and results in a sequence number of 0001 for the next #### file name
generated.
TIMEFMT=”formatstring”
Using this Extended Logic keyword allows a date/time string to be included in the remote
file name during the FTP communications session. It is used in conjunction with S/OQ and
S/OF by placing a +DTSTAMP+ in the command line of the send step. When the script is
interpreted, the +DTSTAMP+ will be replaced by a character string of the specified format.
You can also use it with S/OM and #### for sequential numbering of the outbound files.
The double quotes are required for the formatstring within the command line of the
TIMEFMT Extended Logic. The date/time string created by the TIMEFMT Extended Logic
is used for all +DTSTAMP+ occurrences until another TIMEFMT Extended Logic is
encountered within the Session Control script. Please see sample scripts for examples.
# NOTE
Because the script is interpreted prior to execution of the FTP session, the generated time
stamp may not be the exact time that the file was transmitted. If you anticipate that more than
one file may be transmitted with the same time stamp, you may need to include #### to
guarantee a unique file name.
The format of the date/time string is determined by using one or more of the following
format specifiers in the formatstring parameter of the TIMEFMT Extended Logic record.
The number of parameters is only limited to a resulting filename length of 80 bytes. The
FTP server receiving the data may have a file name length that is smaller than 80 bytes.

FTP Communication Support FTP Communication Session Control Scripts
Gentran:Server for iSeries Communications Module Release 3.5 User Guide 12 - 25
Coordinate with your trading partners to ensure the date/time string is compatible. Each
format specifier is case sensitive.
Specifier Result Example
%a Abbreviated name of current weekday Monday is displayed: Mon
%A Full name of current weekday Monday
%b Abbreviated name of current month July is displayed: Jul
%B Full name of current month July
%C Century number – Year divided by 100 2008 is displayed: 20
%d Day of month Displayed as 01 – 31
%D Current month, date, year Displayed with / as delimiter:
01/01/08
%H Current Hour – 24-hour clock 9:00 PM displayed as 21
%I Current Hour – 12-hour clock 9:00 PM or AM displayed as 09
%j Current day of the year – Julian Date 01/01/08 displayed as 001
%m Current month numeric July is displayed: 07
%M Current minute Displayed in two digits: 15
%p AM or PM of current time Displayed as: AM or PM
%R Current time – 24-hour clock with ‘:’ 5:00 PM is displayed: 17:00
%S Current second Displayed in two digits: 14
%T Current time Hour Minute Second with ‘:’ Displayed as: 08:00:00
%u Current weekday as decimal number with
Monday as 1 and Sunday as 7
Displayed as single digit. Monday
displayed as 1
%U Week number of the year where Sunday is
the first day of the week
Displayed as two digits: 00-53
%V Week number of the year where Monday
is the first day of the week. First week of
year must have four days to be considered
week 01. Otherwise it is week 53 of
previous year.
Displayed as two digits: 00 – 53
%w Current weekday with Sunday as 0 Displayed as single digit: Sunday is 0,
Saturday is 6

FTP Communication Session Control Scripts FTP Communication Support
12 - 26 Gentran:Server for iSeries Communications Module Release 3.5 User Guide
CAUTION
STOP
Many of the time stamps indicated above use ‘:’ and ‘/’ as separators. This may cause
adverse effects on some FTP servers because of the file structure. For example, using %x as
the time stamp will create a PUT command, as PUT localfilename 07/23/08. The
07/23/08 as the remote filename may cause the server to attempt to put the file in directory
07, subdirectory 23, filename 08. Therefore, you should always coordinate with your trading
partner for the exact filename format. An alternative to this example would be to use the
string of “$m%d%y”.
Within the format string, you can insert non-specifier characters to act as separators of the
elements. For example, TIMEFMT=”%m$%d$%y” would result in a date/time string of
07$26$08. Any character(s) can be used in this manner. If you use a space, then you must
encapsulate the filename in the command line of the send step with “ “. Please review the
sample scripts for an example of this feature.
%W Week number of the year where Monday
is the first day of the week
Displayed as two digits: 00-53
%x Current date representation of locale.
Typically MM/DD/YY
July 23, 2008 displayed as: 07/23/08
%X Current time representation of locale.
Typically HH:MM:SS
08:00 AM displayed as 08:00:00
%y Current year without century Year 2001 displayed as: 01
%Y Current year Four digit year displayed: 2008
Specifier Result Example

FTP Communication Support FTP Communication Session Control Scripts
Gentran:Server for iSeries Communications Module Release 3.5 User Guide 12 - 27
FTP Script Example 1
The script in Figure 12.4 is an example of how the FTP client interface could be used to send and
receive files. In the example, script record Seq Nos. 10 and 30 are used to change directory on
the server to the appropriate directories for the file transfers. Script record Seq Nos. 20 and 40
perform the FTP file transfers.
Figure 12.4 Example 1: FTP Session Control Script
EDIX403 Communication Session Control EDI 04/30/08
CTL01 12:00:00
Comm Profile ID. . . . . . . . . . SAMPFTP
Session Name . . . . . . . . . . . SR
Company. . . . . . . . . . . . . . Sample FTP Profile
Type option, press Enter.
3=Copy Seq# 4=Delete 11=Extended Parms
Opt Seq No Tran File File Name Ind Description
10 C Change directory on server
cd /usr/EDI/outbound
20 R IQ Receive data to inbound queue
filename.to.receive
30 C Change directory on server
cd/usr/EDI/inbound
40 S OQ Send data from outbound queue
destination.file.name
More...
F1=Help F4=Prompt F9=Fold/Unfold F10=Update F12=Cancel F24=More Keys

FTP Communication Session Control Scripts FTP Communication Support
12 - 28 Gentran:Server for iSeries Communications Module Release 3.5 User Guide
FTP Script Example 2
The communications session control script in Figure 12.5 shows how the SAVSEQ and RTVSEQ
Extended Logic keywords can be used to retain the Outbound Multiple #### sequence number
between sessions.
Figure 12.5 Example 2: FTP Session Control Script
The first time the script is executed, the data area does not exist; therefore, the RTVSEQ control
record results in a last-used sequence number of zero and the first batch transmitted from the
outbound queue is named MULTISEND0001. If three batches were transmitted, they are named
MULTISEND0001, MULTISEND0002, and MULTISEND0003, respectively. When the SAVSEQ
control record is executed, the last-used sequence number, 0003, is saved in the data area
PRODLIB/FTPTEST.
On the next run of this script, the RTVSEQ retrieves the last-used sequence number of 0003 from
the data area PRODLIB/FTPTEST. If two outbound batches are transmitted, they are named
MULTISEND0004 and MULTISEND0005, respectively. When the SAVSEQ control record is
executed, the last-used sequence number, 0005, is saved in the data area PRODLIB/FTPTEST.
EDIX403 Communication Session Control EDI 04/30/08
CTL01 12:00:00
Comm Profile ID. . . . . . . . . . FTPTEST
Session Name . . . . . . . . . . . T1
Company. . . . . . . . . . . . . . TEST FTP PROFILE
Type option, press Enter.
3=Copy Seq# 4=Delete 11=Extended Parms
Opt Seq No Tran File File Name Ind Description
10 X Restore last used seq num
RTVSEQ DTAARA=FTPTEST LIB=PRODLIB
20 S OM Send outbound multiple
MULTISEND####
30 X Save seq num for next run
SAVSEQ DTAARA=FTPTEST LIB=PRODLIB
More...
F1=Help F4=Prompt F9=Fold/Unfold F10=Update F12=Cancel F24=More Keys

FTP Communication Support FTP Communication Session Control Scripts
Gentran:Server for iSeries Communications Module Release 3.5 User Guide 12 - 29
Sample Scripts using TIMEFMT
Figure 12.6 shows the TIMEFMT=Extend logic using the parameter of “%d%m%y”, which
translates to the current DDMMYY. The +DTSTAMP+ in the S/OQ step indicates that only the
date/time stamp will be used as the remote filename.
Figure 12.6 Sample TIMEFMT Script Session T1
The +DTSTAMP+ can be preceded and followed by text for further file naming, as shown in
Figure 12.7.
Figure 12.7 Sample TIMEFMT Script Session T2
EDIX403 Communication Session Control EDI 04/30/08
CTL01 12:00:00
Comm Profile ID. . . . . . . . . . FTPSAMP
Session Name . . . . . . . . . . . T1
Company. . . . . . . . . . . . . . Sample FTP Profile
Type option, press Enter.
3=Copy Seq# 4=Delete 11=Extended Parms
Opt Seq No Tran File File Name Ind Description
10 X Set Date/Time Stamp
TIMEFMT="%d%m%y"
20 S OQ Send From OQ
+DTSTAMP+
More...
F1=Help F4=Prompt F9=Fold/Unfold F10=Update F12=Cancel F24=More Keys
EDIX403 Communication Session Control EDI 09/01/03
CTL01 12:00:00
Comm Profile ID. . . . . . . . . . FTPSAMP
Session Name . . . . . . . . . . . T2
Company. . . . . . . . . . . . . . Sample FTP Profile
Type option, press Enter.
3=Copy Seq# 4=Delete 11=Extended Parms
Opt Seq No Tran File File Name Ind Description
10 X Set Date/Time Stamp
TIMEFMT="%d%m%y"
20 S OQ Send From OQ
INVOICE+DTSTAMP+.TXT
More...
F1=Help F4=Prompt F9=Fold/Unfold F10=Update F12=Cancel F24=More Keys

FTP Communication Session Control Scripts FTP Communication Support
12 - 30 Gentran:Server for iSeries Communications Module Release 3.5 User Guide
The previous example creates a file on the remote FTP server with the file name of
INVOICE072308.TXT. The +DTSTAMP+ must appear in the Send Step, otherwise only the name in
the command line will be used as the file name. The file name prior to and after the +DTSTAMP+ is
limited to 25 characters each.
The example in Figure 12.8 creates an individual file name for each batch transmitted in the
Outbound Queue that is distinguished with a sequential number. In this instance the remote file
names are 0723080001, 0723080002, 0723080003, through 072308nnnn.
Figure 12.8 Sample TIMEFMT Script Session T3
# NOTE
Refer to the earlier examples for more information about the RTVSEQ and SAVSEQ Extended
Logic scripting functions and the use of ####, which starts on page 12-23.
EDIX403 Communication Session Control EDI 04/30/08
CTL01 12:00:00
Comm Profile ID. . . . . . . . . . FTPSAMP
Session Name . . . . . . . . . . . T3
Company. . . . . . . . . . . . . . Sample FTP Profile
Type option, press Enter.
3=Copy Seq# 4=Delete 11=Extended Parms
Opt Seq No Tran File File Name Ind Description
10 X Set Date/Time Stamp
TIMEFMT="%d%m%y"
20 S OM Send From OQ
+DTSTAMP+####
More...
F1=Help F4=Prompt F9=Fold/Unfold F10=Update F12=Cancel F24=More Keys

FTP Communication Support FTP Communication Session Control Scripts
Gentran:Server for iSeries Communications Module Release 3.5 User Guide 12 - 31
The example in Figure 12.9 creates a date/time string that is separated by a hyphen. The file name
would appear as 09-01-08.
Figure 12.9 Sample TIMEFMT Script Session T4
The example in Figure 12.10 uses spaces to separate the date/time string elements.
Figure 12.10 Sample TIMEFMT Script Session T4
For this example to work successfully, the entire file name in the send step must be encapsulated
with double quotes (“filename”).
EDIX403 Communication Session Control EDI 04/30/08
CTL01 12:00:00
Comm Profile ID. . . . . . . . . . FTPSAMP
Session Name . . . . . . . . . . . T4
Company. . . . . . . . . . . . . . Sample FTP Profile
Type option, press Enter.
3=Copy Seq# 4=Delete 11=Extended Parms
Opt Seq No Tran File File Name Ind Description
10 X Set Date/Time Stamp
TIMEFMT="%d-%m-%y"
20 S OM Send From OQ
“+DTSTAMP+”
More...
F1=Help F4=Prompt F9=Fold/Unfold F10=Update F12=Cancel F24=More Keys
EDIX403 Communication Session Control EDI 04/30/08
CTL01 12:00:00
Comm Profile ID. . . . . . . . . . FTPSAMP
Session Name . . . . . . . . . . . T5
Company. . . . . . . . . . . . . . Sample FTP Profile
Type option, press Enter.
3=Copy Seq# 4=Delete 11=Extended Parms
Opt Seq No Tran File File Name Ind Description
10 X Set Date/Time Stamp
TIMEFMT="%d %m %y"
20 S OM Send From OQ
+DTSTAMP+
More...
F1=Help F4=Prompt F9=Fold/Unfold F10=Update F12=Cancel F24=More Keys

FTP Communication Session Control Scripts FTP Communication Support
12 - 32 Gentran:Server for iSeries Communications Module Release 3.5 User Guide
Start an FTP Client Communication Session
After creating an appropriate communication profile and script, an FTP client communication
session can be started by using the STRCOMSSN command or the job scheduler. (SEE the section
“Initiating Communication Sessions” in the “Using Communications” chapter for more
information.)
# NOTE
The STRCOMSSN command and job scheduler cannot be used to start FTP server sessions.
These sessions will be initiated by the remote system when it wishes to communicate.
When an FTP client communication session is initiated, the profile and script are used to create a
series of commands that will be passed to the iSeries FTP client program for execution. Control
record transactions will be passed directly to FTP, and send and receive transactions will be
converted to FTP PUT and GET subcommands, respectively.

FTP Communication Support Use the FTP Server Interface
Gentran:Server for iSeries Communications Module Release 3.5 User Guide 12 - 33
Use the FTP Server Interface
The Gentran:Server FTP server interface allows data to be exchanged between the Gentran:Server
communication queues and a remote (client) system.
The following steps are necessary to prepare the Gentran:Server FTP server interface for use:
1. Configure your iSeries FTP server using the information in the “iSeries TCP/IP
Configuration and Reference”.
2. Create an appropriate FTP communication profile using the information in the previous
section, “Gentran:Server FTP Configuration”.
3. Configure the remote (client) system for FTP communication with your iSeries.
4. Configure the FTP library using the new command GENFTPSLL.
FTP server sessions are conducted “outside” of Gentran:Server using the iSeries FTP server, under
the control of the remote (client) system. The client will issue standard FTP subcommands to
establish the FTP connection, set file transfer parameters, and perform file transfers.
The interface to Gentran:Server is provided by several additional commands that will be submitted
to the iSeries FTP server by using the QUOTE RCMD facility from the FTP client. These
commands are used to copy data to and from the Gentran:Server communication queues, and
perform necessary data formatting and character translation.
# NOTE
If errors occur while processing Gentran:Server FTP server interface commands, messages
will be written to the QSYSOPR message queue.
Because the responsibility for establishing and controlling the session is the client’s, you must
determine and implement the most effective method for each specific FTP client to create and
execute the appropriate FTP subcommands. Control of the FTP client can be manual, by typing
commands directly into the FTP client program, or automated, using an FTP command file or
other facility available on the client system.
GENFTPSLL (Gentran FTP Set Lib List) is a command that allows the user to change the Gentran
FTP server production and test library names at any time. Prompt the command GENFTPSLL and
specify program and data library names for both a production and test environment. This
command changes the library names added to the library list of an FTP client using the Gentran
FTP server.

Use the FTP Server Interface FTP Communication Support
12 - 34 Gentran:Server for iSeries Communications Module Release 3.5 User Guide
FTP Server Session Flow
The remote system must perform the following actions using its FTP client program:
1. Connect to the iSeries FTP server. This can be accomplished by using the FTP command
or the OPEN subcommand.
2. Log in to the iSeries FTP server using a valid iSeries user profile and password. This can
be accomplished by responding to the prompts for user and password or by using the
USER subcommand.
3. Execute the GENFTPLIBL command on the iSeries to create the environment for the
Gentran:Server FTP server interface programs.
4. Use the FTP BINARY subcommand to place your FTP session into binary image transfer
mode.
5. If you need to send data to Gentran:Server, perform these steps for each file you need to
send:
a. Use the FTP PUT subcommand to transfer the file from the client system to the
iSeries.
b. Execute the GENFTPADD command on the iSeries to add the file to the
Gentran:Server inbound queue.
6. If you need to receive data from Gentran:Server:
a. Execute the GENFTPEXT command on the iSeries to extract eligible batches from
the outbound queue into a file.
b. Use the FTP GET subcommand to transfer the file from the iSeries to the client
system.
7. After the file transfers have been completed, execute the GENFTPUPDT command on the
iSeries to cause Gentran:Server to update the communications history and batch status to
reflect the file transfers that have occurred.
8. Use the FTP QUIT subcommand to log out of the iSeries FTP server and close the FTP
connection.

FTP Communication Support Use the FTP Server Interface
Gentran:Server for iSeries Communications Module Release 3.5 User Guide 12 - 35
FTP Server Interface Commands
The commands described in this section constitute the interface between Gentran:Server and the
iSeries FTP server. These commands are submitted from the remote FTP client to the iSeries FTP
server to invoke the Gentran:Server interface functions.
The commands are submitted for processing by using the QUOTE subcommand on the FTP client
system to pass the RCMD subcommand to the iSeries FTP server. This combination causes the text
that follows QUOTE RCMD to be passed to the server’s command interpreter for execution.
For example, if you wanted to execute a command requiring the syntax XYZCMD PARM1 PARM2
on the FTP server, you would issue the following command to the FTP client program:
QUOTE RCMD XYZCMD PARM1 PARM2
The following paragraphs describe the syntax of the Gentran:Server FTP server interface
commands.
GENFTPLIBL
This command creates an environment (within the iSeries FTP server job) that will support the use
of the other Gentran:Server FTP server interface commands.
This command must be executed immediately after the commands used to connect to and log in to
the iSeries FTP server, before any other Gentran:Server FTP server interface commands are used.
TEST is an optional parameter of the command GENFTPLIBL to quickly move clients between
production and test environments and add test library names to an FTP client’s library list. This
provides a method for switching FTP clients between a production and a test environment.
When an FTP client executes the GENFTPLIBL command with no parameters, it will default to
adding the library names specified as production in the GENFTPSLL command to the client’s
library list. To run in a test environment, an FTP client would instead issue the command
GENFTPLIBL, followed by a single space, and the parameter TEST. This will cause the library
names specified as test in the GENFTPSLL command to be added to the client’s library list. The two
formats of the command are listed below.
GENFTPLIBL Add libraries specified as production in GENFTPSLL command.
GENFTPLIBL TEST Add libraries specified as test in GENFTPSLL command.

Use the FTP Server Interface FTP Communication Support
12 - 36 Gentran:Server for iSeries Communications Module Release 3.5 User Guide
GENFTPEXT
This command causes data to be extracted from the Gentran:Server outbound queue. The data will
be formatted for FTP binary transmission by adding record separators and translating the data from
EBCDIC to ASCII. The data will then be written to an iSeries physical file. The GENFTPEXT
command accepts parameters that allow the actions of the command to be tailored to your needs.
The complete syntax of the command is shown below. Optional parameters are shown enclosed in
brackets.
GENFTPEXT COMPRF(profileid)
[BID(batchid | *ALL)]
FLNAME(filename)
LBNAME(libraryname)
[RECSZE(nnnn)]
COMPRF specifies the communication profile ID for which data is to be extracted.
BID specifies the batch ID that can be used to limit the data that is extracted to only those batches
whose batch ID matches the one specified. The batch ID can be up to 44 characters and can be
assigned to batches when they are added to the communication queues. If BID is not specified,
then all eligible outbound batches with no batch ID (spaces) will be extracted. If *ALL is specified,
then all eligible outbound batches will be extracted, regardless of batch ID.
# NOTE
Eligible outbound batches are those with a batch status of Q (queued), IP (in progress), or SA
(sent abnormal).
FLNAME specifies the name of the file that the outbound data will be written to. The file will be
created automatically.
LBNAME specifies the name of the library in which the file will be created.
RECSZE specifies the record length of the physical file into which data will be extracted for
transmission. The record length used may be increased by up to two bytes if outbound record
separator characters have been specified in the communication profile. If RECSZE is not specified,
the record length from the communication profile will be used.
GENFTPADD
This command causes data to be added to the Gentran:Server inbound queue. The data will be
reformatted by translating the data from ASCII to EBCDIC and removing record separators. The
data will then be written to the Gentran:Server inbound queue.
The GENFTPADD command accepts parameters that allow the actions of the command to be
tailored to your needs.

FTP Communication Support Use the FTP Server Interface
Gentran:Server for iSeries Communications Module Release 3.5 User Guide 12 - 37
The complete syntax of the command is shown below. Optional parameters are shown enclosed in
brackets.
GENFTPADD COMPRF(profileid)
[BID(batchid)]
FLNAME(filename)
[LBNAME(libraryname)]
COMPRF specifies the communication profile ID for which data is to be added. The profile that is
specified must have previously been defined within Gentran:Server communications.
BID specifies the batch ID that will be assigned to the data batch on the Gentran:Server inbound
queue. The batch ID can be up to 44 characters. If BID is not specified, then no batch ID will be
assigned to the inbound batch.
FLNAME specifies the name of the physical file from which inbound data is to be read. This file
must exist. It should be the same file to which data was previously written by an FTP file transfer.
LBNAME specifies the name of the library in which the file resides. If LBNAME is not specified, then
the library list will be searched.
GENFTPUPDT
This command causes the Gentran:Server communication history log and communication queue
control files to be updated to reflect the batches that have been sent and received during the current
FTP session.
Batches that were extracted by the GENFTPEXT command will be updated to status “sent normal”,
and history records will be created to indicate their successful transmission. Batches that were
added by the GENFTPADD command will also be recorded in the communication history.
This command allows the FTP client to control the final batch status and communications history
within Gentran:Server for iSeries Communications Module. Therefore, it is the client system’s
responsibility to issue this command at the end of every FTP session that uses the Gentran:Server
FTP server interface.
CAUTION
STOP
If the client system fails to execute the GENFTPUPDT command, then the Gentran:Server
communication history and outbound queue batch status will not be correct.

Use the FTP Server Interface FTP Communication Support
12 - 38 Gentran:Server for iSeries Communications Module Release 3.5 User Guide

Chapter
Gentran:Server for iSeries Communications Module Release 3.5 User Guide 13 - 1
13 Using Line Pools
In this Chapter
This chapter contains the following sections:
¾Introduction.................................................................................................................... 13-1
¾How Line Pools Work with Gentran:Server Communications ...................................... 13-1
¾Requirements for Using Line Pools............................................................................... 13-1
¾When Line Pools Can Be Used...................................................................................... 13-2
¾Create a Line Pool.......................................................................................................... 13-3
¾Set Up a Line Pool with a Comm Profile....................................................................... 13-4
Introduction
The use of line pools within the Gentran:Server for iSeries Communications Module is an
extension to the communications subsystem. Line pools enable you to have a number of
communications jobs active at one time, all sharing the same “pool” of up to five iSeries line
resources.
How Line Pools Work with Gentran:Server Communications
Line pools prevent a communications job from failing when attempting to use a line resource that
is already in use by another job. When you use a line pool, a communications job will check the
status of each resource named in the line pool, attempting to find the first available resource. If an
available resource is found, communications will begin over that resource. If all resources in the
pool are checked and none has an available status, the job will delay for one minute, then start the
status checking process again.
Requirements for Using Line Pools
All resources named in the line pool must be using the same modem and autodial type.
Multiple line pools may be defined on a single machine and used at the same time by different
jobs.
Only one line pool can be defined within a single Profile. For instance, it may beneficial to
have one pool for all asynchronous communication jobs, and a second for all synchronous
communication jobs. Using this scenario, multiple asynchronous jobs sharing one line pool,
and multiple synchronous jobs sharing another line pool can all be active at the same time.

Introduction Using Line Pools
13 - 2 Gentran:Server for iSeries Communications Module Release 3.5 User Guide
There are no limitations on the number of line pools that may be used.
Up to 5 communication resources can be defined in a line pool.
)RECOMMENDATION
You may want to set up one pool for production jobs, and another for test jobs to keep the
maximum number of lines/modems available to your production environment.
When Line Pools Can Be Used
Line pools can only be used for switched line, outbound dial applications.
Line pools are not supported in the following environments:
Stand alone auto-dialers on a separate port from the modem (801/ACU)
Leased line connections
LAN connections
Auto-answer / Incoming calls

Using Line Pools Create a Line Pool
Gentran:Server for iSeries Communications Module Release 3.5 User Guide 13 - 3
Create a Line Pool
To create a line pool, from the Work with Communications panel (EDIX400-FMT01), type 33
(Line Pools) on the key entry line and press Enter. The Gentran:Server Line Pool (GENLINP)
panel is displayed as shown in Figure 13.1.
Figure 13.1 Gentran:Server Line Pool (GENLINP) panel
The Gentran:Server Line Pool (GENLINP) panel is used to define line pool information. This
panel enables you to create, update, and delete line pools and their contents.
# NOTE
The Gentran:Server Line Pool command can also be accessed by typing GENLINP on the
command line and pressing Enter.
This panel allows you to specify a five-character pool name, the library where the pool will reside,
up to 30 characters as a description, and up to five resource names. Press F1 (Help) for additional
information on a field. Pool name, library name, and resource name are mandatory.
Gentran Line Pool (GENLINP)
Type choices, press Enter.
Line Pool Name . . . . . . . . . SYNC1 Name
Library . . . . . . . . . . . . *GENDTA Name, *GENDTA
Description . . . . . . . . . . Line Pool #1
Resource Name 1 . . . . . . . . LIN031 Name, *RMV
Resource Name 2 . . . . . . . . LIN032 Name, *RMV
Resource Name 3 . . . . . . . . Name, *RMV
Resource Name 4 . . . . . . . . Name, *RMV
Resource Name 5 . . . . . . . . Name, *RMV
Bottom
F3=Exit F4=Prompt F5=Refresh F12=Cancel F13=How to use this display
F24=More keys

Set Up a Line Pool with a Comm Profile Using Line Pools
13 - 4 Gentran:Server for iSeries Communications Module Release 3.5 User Guide
Set Up a Line Pool with a Comm Profile
Once a line pool has been created, you can associate that pool with each of the communications
profiles that is to use it.
To associate a line pool with a particular comm profile, update the modem port field for that
profile:
1. On the Work with Communications panel (EDIX400-FMT01), type 2 (Revise) in the
Option field next to the desired Profile ID and press Enter.
2. On the Communication Profile panel (EDIX401-FMTnn, where nn is 02 – 09, depending
on the protocol defined for this profile), press F8 (Next) to see protocol-specific
parameters.
3. Type the name of the line pool, preceded by an asterisk (*), in the Modem Port field and
press F10 (Update). The asterisk informs Gentran:Server you are naming a line pool,
rather than a single line resource. For example, to use a line pool named SYNC1, update the
Modem Port field with the value *SYNC1, as shown in Figure 13.2.
Figure 13.2 Example of Profile with Line Pool information
4. Repeat steps 1 – 3 for each profile that will use the line pool.
For more information about working with comm profiles, see the “Using Communications”
chapter.
EDIX401 Communication Profile EDI 04/30/08
FMT02 BSC 12:00:00
Comm Profile ID. . . . . CN3BSC
Company. . . . . . . . . COMMERCE:Network RELEASE3
Modem Port . . . . . . . *SYNC1 Retries. . . . . . . . 02
Switched Line. . . . . . Y (Y/N) Auto Dial. . . . . . . Y (Y/N)
Auto Call Unit . . . . . V Auto Call Port . . . .
Dial . . . . . . . . . . 916145551212
Host ID Verify . . . . . N (Y/N)
Local Site ID. . . . . .
Record Size. . . . . . . 0080 Block Size . . . . . . 0512
Inter-Record Separator . 3780
Transparency . . . . . . N (Y/N)
Blank Compress . . . . . N (Y/N)
Trailing Blank Trunc . . N (Y/N)
Continuous Processing. . N (Y/N) Script . . . . . . . .
F1=Help F10=Update F12=Cancel F13=Services F24=More Keys

Chapter
Gentran:Server for iSeries Communications Module Release 3.5 User Guide 14 - 1
14 MQSeries Interface
In this Chapter
This chapter covers the following topics:
¾Overview of MQSeries Interface . . . . . . . . . . . . . . . . . . . . . . . . . . . . . . . . . . . . . . . . . 14-1
¾MQ Link Panels . . . . . . . . . . . . . . . . . . . . . . . . . . . . . . . . . . . . . . . . . . . . . . . . . . . . . . 14-3
¾Gentran MQSeries Configuration . . . . . . . . . . . . . . . . . . . . . . . . . . . . . . . . . . . . . . . . 14-11
¾Send Files to MQSeries. . . . . . . . . . . . . . . . . . . . . . . . . . . . . . . . . . . . . . . . . . . . . . . . 14-13
¾Receive Files from MQSeries. . . . . . . . . . . . . . . . . . . . . . . . . . . . . . . . . . . . . . . . . . . 14-15
¾Report . . . . . . . . . . . . . . . . . . . . . . . . . . . . . . . . . . . . . . . . . . . . . . . . . . . . . . . . . . . . . 14-17
Overview of MQSeries Interface
Gentran:Server for iSeries communications includes an MQSeries interface. This interface allows
you to transfer files to and from other systems using MQSeries.
# NOTE
This form of communication requires MQSeries to be loaded and configured on both the
sending and receiving systems.
The Gentran:Server interface with MQSeries allows files to be transferred directly from a database
file, or they can be transferred from the Gentran communications queues. You can also receive
files directly into the Gentran communications queues, or to a database file. By entering the MQ
Link on the ADD, EXTRACT, PRCTRNIN, or PRCTRNOUT commands, the data is
transferred/received directly from any of these points.
In addition to the current functionality, MQ Link provides additional capabilities. On the ADD
command, you can take data from an MQSeries queue and place it in the Gentran communication
queues. The EXTRACT command takes data directly from the Gentran communication queue and
sends it to MQSeries. The PRCTRNIN command sends the intermediate application files to

Overview of MQSeries Interface MQSeries Interface
14 - 2 Gentran:Server for iSeries Communications Module Release 3.5 User Guide
MQSeries for each application processed. The PRCTRNOUT command pulls the data from
MQSeries and places it in the application file prior to processing the application.
# NOTE
When using the MQSeries interface with the PRCTRNOUT process, you can only specify
one application ID per run, and that application definition can only have one file defined to it.
Gentran provides the capability to insert or remove carriage return/line feed characters from the
data. This would be used when transferring or receiving data from systems, such as Windows NT,
that require those fields to be used as record separators. MQSeries performs the data conversion
from ASCII to EBCDIC when you receive data from an ASCII source, provided the convert data
parameter is marked on the MQ Link definition.
# NOTE
To use the MQSeries interface, you must have a good working knowledge of MQSeries.
Sterling Commerce does not provide a means to maintain the MQSeries queues, channels,
and managers. These functions and items must be maintained separately outside of the
Gentran product. The interface has been based upon having the MQSeries queues defined at
4MB on the iSeries system where Gentran:Server resides.
This diagram illustrates inbound processing using the MQSeries interface. The MQ Series
interface places all application files to a defined MQSeries Queue.
This diagram illustrates outbound processing using the MQSeries interface. The application file is
populated with the data received from an MQSeries Queue.
GENTRAN Comm
Queue
Inbound
Editor Splitter Inbound
Mapper Application
Files
MQ Series
Queue
GENTRAN Comm
Queue
Outbound
Editor
Outbound
Mapper
MQ Series
Queue Application
File

MQSeries Interface MQ Link Panels
Gentran:Server for iSeries Communications Module Release 3.5 User Guide 14 - 3
MQ Link Panels
The MQ Links panels enable you to set up and configure link definitions to transport files between
Gentran:Server, MQSeries, and other systems that are MQSeries enabled.
Access MQ Link Panels
The MQ Link panels are accessed from the Gentran:Server Communications menu. Select
option 4 on the GENMAIN menu or type GO GENCOM on the command line and press Enter. The
system displays the Gentran:Server Communications menu.
Figure 14.1 The Gentran:Server Communications menu
To access Work with MQ Links, type 8 on the command line and press Enter, as shown in
Figure 14.1
The MQ Links panels are used for the following tasks:
Create an MQ Link
View an MQ Link
Delete an MQ Link
Print an MQ Link
Copy an MQ Link
Revise an MQ Link
GENCOM Gentran:Server Communications 3.5
System: ISDDEV01
Select one of the following:
1. Work with Communications
2. Work with Session Scripts
3. Work with Comm History File
4. Work with Outbound Queue
5. Work with Inbound Queue
6. Work with Active Comm Jobs
7. Work with Network Profiles
8. Work with MQ Links
10. Start a Comm Session (STRCOMSSN)
11. Start a Comm Session with Trace (STRCOMSSNT)
12. End Active Comm Jobs (SHUTDOWN)
13. Gentran Line Pools (GENLINP)
14. Purge All Communication Files (PRGALL)
More...
Selection or command
===>8
F3=Exit F4=Prompt F9=Retrieve F12=Cancel F13=User Support
(C) COPYRIGHT Sterling Commerce Inc., 2008, ALL RIGHTS RESERVED.

MQ Link Panels MQSeries Interface
14 - 4 Gentran:Server for iSeries Communications Module Release 3.5 User Guide
Create a New MQ Link
The Work with MQ Links panel (EDIX460-FMT01) is used to create and maintain MQ Link
definitions.
Figure 14.2 Work with MQ Links Panel (EDIX460-FMT01)
To create an MQ Link, complete these steps (shown in Figure 14.2).
1. Type 1 (Create) in the Option field.
2. Select an alphanumeric name (up to 10 bytes) to represent an MQ Link that Gentran will
use to access an existing MQSeries data queue. Enter the complete MQ Series queue name
that ties the MQ Link and the MQSeries queue together and press Enter.
The MQ Link Configuration panel (EDIX461-FMT01) is displayed.
Field Descriptions
MQ Link
This 10-position alphanumeric field is a short alias name for the MQ queue.
MQ Queue Name
This 48-position alphanumeric field is the actual MQ queue name.
# NOTE
The MQ Link name cannot be used more than once.
EDIX460 Work with MQ Links EDI 04/30/08
FMT01 pgmlib: G3X5PGM dtalib: G3X5DTA 12:00:00
Position to MQ Link Name . . . . . . . .
Type option (and Information), press Enter.
1=Create 2=Revise 3=Copy 4=Delete 5=View 6=Print
Opt MQ Link MQ Queue
1 IHFILE SYSTEM.GENTRAN.IHQUEUE
POFILES SYSTEM.GENTRAN.POQUEUE
Bottom
Parameters or command
===>
F1=Help F3=Exit F5=Refresh F9=Retrieve F12=Cancel F15=Sort

MQSeries Interface MQ Link Panels
Gentran:Server for iSeries Communications Module Release 3.5 User Guide 14 - 5
Figure 14.3 shows the MQ Link Configuration panel (EDIX461-FMT01).
Figure 14.3 MQ Link Configuration Panel (EDIX461-FMT01)
Enter the appropriate information in the fields and press F10 (Update) to create a new MQ Link.
Field Descriptions
MQ Queue Manager
A 48-byte alphanumeric field used to identify the queue manager that is associated with
the MQ Queue. Use *Default when the MQ Queue is assigned to the default queue
manager.
Method of transferring files
A 1-position alphanumeric field used to define the method of transferring/receiving files.
1Segmentation
This is the preferred method of transfer. However, your MQSeries system
must support segmentation in order for this option to function. This method
sends your file as one message and segments as needed. If the file being
transferred is larger than the maximum queue size, then segmentation occurs.
By using this method, you need not worry about the size of the file that will be
transferred.
2One record per message
This method sends a message for every record that you have in your file. This
method is used when your file has a very large logical record length and your
MQSeries does not support segmentation.
EDIX461 MQ Link Configuration EDI 04/30/08
FMT01 12:00:00
MQ Link Name . . . . . . . . IHFILE
MQ Queue Name. . . . . . . . SYSTEM.GENTRAN.IHQUEUE
MQ Queue Manager . . . . . . *DEFAULT_____________________________________
Method of transferring files 1
File name in header record?. Y
Message Descriptor Version . 2
Sending Information:
Message Priority . . . . . .
Notification . . . . . . . . *NONE
Reply Queue. . . . . . . . .
Translation . . . . . (from)
(to)
Receiving Information:
Convert Data?. . . . . . . . Y
Break at Record Separators? N
Translation . . . . . (from)
(to)
F1=Help F4=Prompt F10=Update F12=Cancel F24=More Keys

MQ Link Panels MQSeries Interface
14 - 6 Gentran:Server for iSeries Communications Module Release 3.5 User Guide
3One file per message
This method sends one file as one message. It does not use segmentation;
therefore, if the file is larger than the defined queue size, an error occurs and
you are not able to send the file. This method is used if your MQSeries does
not support segmentation.
File Name in Header Record
A 1-position alphanumeric field used to identify whether the file name should be
contained in the Message Descriptor. Valid values include:
NThe file name is not included in the Message Descriptor.
YThe file name is in the Message Descriptor in the Application Identity Data in
the format of LIBRARY/FILENAME/MEMBER.
Message Descriptor Version
A 1-position numeric field used to identify the version of MQSeries that is running on
your system.
1Ver s i o n 1
2Version 2 with segmentation support
Send Information
Message Priority
A 1-position numeric field used to identify the priority of the message being sent. Valid
values are 0 to 9.
Notification
A 5-position alphanumeric field used to identify whether there are any special instructions
when delivering the message.
*NONE There will be no notification when the message is delivered.
COA Enter this when you want to use the Confirm on Arrival option to verify a
message was added to the remote system MQ Queue.
COD Enter this when you want to use the Confirm on Delivery option to verify a
message was retrieved from a remote system MQ Queue.
Reply Queue
A 48-byte alphabetic field used to hold the name of the MQSeries queue on your system
that is to be used to receive a reply from the remote system. Information can only be
entered in this field if COA or COD is entered for the notification type.
Translation (From/To)
The combination of these fields define the characters that are to be translated “from” and
the characters that are to be translated “to.” Each field consists of two hexadecimal digits
that represent one EBCDIC character. The easiest way to understand the operation of
translation is to consider this example.

MQSeries Interface MQ Link Panels
Gentran:Server for iSeries Communications Module Release 3.5 User Guide 14 - 7
Example—Adding Carriage Return/Line Feeds to Outbound Data
In this example, data is being transmitted from the iSeries to a remote device that expects
each record to end with a carriage return/line feed. The data that is ready for transmission
does not contain these characters at the end of the record because the application was
unable to generate the data that way. The carriage returns and line feeds can be added to
the outbound data as it is transmitted by specifying the following translation entries:
Translation:
(from) ...
(to) ... OD 15
The “Outbound (from)” entries have been left blank. The “Outbound (to)” entry shows
that we are translating to a carriage return/new line (hex 0D15).Although we obviously
cannot translate from “nothing” to “something,” as this example suggests, using the
translation fields in this manner has special meaning to the MQSeries interface. If the
“Outbound (from)” entries are left blank and one or more of the “Outbound (to)” entries
are filled in, then the characters entered for “Outbound (to)” will be transmitted following
every data record. If the file is 100 bytes long, a carriage return/line feed will be
transmitted after every 100 bytes of data, and placed on the remote system MQ Queue that
way. When the data is pulled off the queue and received by an ASCII machine, an
EBCDIC/ASCII translation occurs, changing it from a hex 0D15 to a hex 0D0A.
Receive Information
Convert Data?
This is a 1-position alphabetic field that tells MQSeries whether or not to convert the data
when it is removed from the MQSeries queue. This should always be turned on (specify Y)
if the data is coming from an ASCII system. If the data is already in EBCDIC format, then
a conversion is not necessary (specify N).
Break at Record Separators?
When receiving data from other devices such as PCs, the data is stored as one long string
of data. When receiving data into the iSeries, it is placed into fixed-length records. If this
situation occurs, you can use the record separators to determine the starting point of each
new record. If you wish to start a new record each time a carriage return/line feed is
encountered, type Y in this field. This field is used in conjunction with the Translation
from field. There must be a hexidecimal value entered in the Translation from field in
order to identify when the record is to break.
By entering an N in this field, the data is placed in the file on the iSeries as received from
the MQSeries queue.
Translation (From) (To)
The combination of these fields define the characters that are to be translated “from” and
the characters that are to be translated “to” when receiving information. Each field
consists of two hexadecimal digits that represent one EBCDIC character. The easiest way
to understand the operation of translation is to consider these examples.

MQ Link Panels MQSeries Interface
14 - 8 Gentran:Server for iSeries Communications Module Release 3.5 User Guide
MQ Translation Example 1—Removing Carriage Return/Line Feeds from Inbound Data
In this example, a remote PC transmits data to the iSeries using MQSeries. The PC data is
stored on disk as fixed-length records delimited by Carriage Return/Line feed
combinations, as is common on MS-DOS machines. When the iSeries receives this data,
the Carriage Return/Line feeds are not needed. They can be removed from the inbound
data as it is received by specifying the following translation fields:
Translation:
(from) ... 0D 15
(to) ... __ __
The “Inbound (from)” entries configure the communicator to translate from the character
sequence carriage return/line feed. The “Inbound (to)” entries have been left blank,
meaning that the carriage return/line feed sequence should be translated to “nothing.” This
results in the elimination of all carriage return/line feed sequences from the data that is
received. Notice that the inbound line feed character is represented as hexadecimal 15.
Although the line feed is transmitted by the PC as a hexadecimal 0A (ASCII line feed), it
is translated to an EBCDIC new line (hex 15). This ASCII-EBCDIC translation is
performed by MQSeries as the data is retrieved from the queue. Therefore, the values you
enter in the translation fields (which control translation at the application level) should
always reflect the EBCDIC representation of the data after it has been translated by
MQSeries.
MQ Translation Example 2—Adding Line Feeds after Carriage Returns
In this example, suppose that data is to be received to a user file on the iSeries from a
system that sends every record followed by a carriage return. Once the data has been
received to the user file, it is sent on to several different remote offices using PCs. The PCs
expect all records to be terminated by a carriage return/line feed combination.
Since the data originally received to the user file only included carriage returns, some
translation needs to occur. This translation could be performed as the data is received
(inbound) or as the data is transmitted (outbound). Additional CPU overhead (which could
reduce throughput) is required to do the translation in either direction. Since the data is
only received once, but transmitted multiple times, it is more efficient to do the translation
during the inbound session. The line feeds can be added to the data as it is received by
specifying the following translation entries:
Translation:
(from) ...0D
(to) ...0D 15
This adds the necessary line feed after every carriage return as the data is received and
written to the user file. The data is ready for distribution to the PCs.

MQSeries Interface MQ Link Panels
Gentran:Server for iSeries Communications Module Release 3.5 User Guide 14 - 9
Copy an MQ Link
It is sometimes easier to create a new MQ Link definition from an existing MQ Link definition.
This section describes how to copy an existing MQ Link.
Figure 14.4 Work with MQ Links panel (EDIX460-FMT01)
Type 3 (Copy) in the Option field next to the definition you want to copy and press Enter. This
action displays the “Copy To” window. Type the name of the new MQ Link definition and the MQ
Queue name and press Enter, as shown in Figure 14.4.
The MQ Link Configuration panel (EDIX461-FMT01) is displayed.
EDIX460 Work with MQ Links EDI 04/30/08
FMT01 pgmlib: G3X5PGM dtalib: G3X5DTA 12:00:00
Position to MQ Link Name . . . . . . . . POFILES
Type option (and Information), press Enter.
1=Create 2=Revise 3=Copy 4=Delete 5=View 6=Print
Opt MQ Link MQ Queue
3 IHFILE SYSTEM.GENTRAN.IHQUEUE
Copy To
IHTESTFILE SYSTEM.GENTRAN.IHQUEUE
F3=Exit F12=Cancel
Bottom
Parameters or command
===>
F1=Help F3=Exit F5=Refresh F9=Retrieve F12=Cancel F15=Sort
Create Operation Successful.

MQ Link Panels MQSeries Interface
14 - 10 Gentran:Server for iSeries Communications Module Release 3.5 User Guide
Figure 14.5 shows the MQ Configuration panel.
Figure 14.5 MQ Link Configuration panel (EDIX461-FMT01)
Gentran:Server populates the fields with the values from the original MQ Link. You can accept the
new MQ Link as it is or modify the field values. Press F10 (Update) to create the MQ Link and
returns to the Work with MQ Links panel (EDIX460-FMT01).
EDIX461 MQ Link Configuration EDI 04/30/08
FMT01 12:00:00
MQ Link Name . . . . . . . . IHTESTFILE
MQ Queue Name. . . . . . . . SYSTEM.GENTRAN.IHQUEUE
MQ Queue Manager . . . . . . *DEFAULT_____________________________________
Method of transferring files 3
File name in header record?. Y
Message Descriptor Version . 2
Sending Information:
Message Priority . . . . . . 0
Notification . . . . . . . . COD
Reply Queue. . . . . . . . . SYSTEM.GENTRAN.REPLY.QUEUE
Translation . . . . . (from)
(to)
Receiving Information:
Convert Data?. . . . . . . . Y
Break at Record Separators? N
Translation . . . . . (from)
(to)
F1=Help F4=Prompt F10=Update F12=Cancel F24=More Keys

MQSeries Interface Gentran MQSeries Configuration
Gentran:Server for iSeries Communications Module Release 3.5 User Guide 14 - 11
Gentran MQSeries Configuration
In order to access MQSeries, a 10-byte MQ Link name must be defined to correspond to an
existing MQSeries queue. This definition contains the information necessary to exchange files
using MQSeries. The MQ Link may be specified any time MQSeries is to be accessed.
MQ Link Definition for MQSeries
MQ Link provides the parameters needed to establish a link between Gentran and MQSeries.
MQSeries provides a method to transfer information to and from most any type of computer
system, providing that the MQSeries product is loaded and configured on each of the systems that
you are working with. MQSeries performs an ASCII/EBCDIC conversion when necessary. The
MQ Link definition provides the parameters necessary to perform the MQSeries transfer.
Revise MQ Links
The Work with MQ Links panel (EDIX460-FMT01) enables you to revise and delete the MQ Link
configurations. The MQ Link configuration contains information that is needed to perform an
MQSeries send or receive.
Figure 14.6 Work with MQ Links panel (EDIX460-FMT01)
To select an MQ Link configuration, type 2 in the Option field next to the selected name and press
Enter, as shown in Figure 14.6.
EDIX460 Work with MQ Links EDI 04/30/08
FMT01 pgmlib: G3X5PGM dtalib: G3X5DTA 12:00:00
Position to MQ Link Name . . . . . . . .
Type option (and Information), press Enter.
1=Create 2=Revise 3=Copy 4=Delete 5=View 6=Print
Opt MQ Link MQ Queue
IHTESTFILE SYSTEM.GENTRAN.IHQUEUE
2 POFILES SYSTEM.GENTRAN.POQUEUE
Bottom
Parameters or command
===>
F1=Help F3=Exit F5=Refresh F9=Retrieve F12=Cancel F15=Sort

Gentran MQSeries Configuration MQSeries Interface
14 - 12 Gentran:Server for iSeries Communications Module Release 3.5 User Guide
The MQ Link Configuration panel (EDIX461-FMT01) is displayed, as shown in Figure 14.7.
Figure 14.7 MQ Link Configuration panel (EDIX461-FMT01)
EDIX461 MQ Link Configuration EDI 04/30/08
FMT01 12:00:00
MQ Link Name . . . . . . . . POFILES
MQ Queue Name. . . . . . . . SYSTEM.GENTRAN.POQUEUE
MQ Queue Manager . . . . . . *DEFAULT_____________________________________
Method of transferring files 3
File name in header record?. Y
Message Descriptor Version . 2
Sending Information:
Message Priority . . . . . . 7
Notification . . . . . . . . *NONE
Reply Queue. . . . . . . . .
Translation . . . . . (from)
(to)
Receiving Information:
Convert Data?. . . . . . . . Y
Break at Record Separators? N
Translation . . . . . (from)
(to)
F1=Help F4=Prompt F10=Update F12=Cancel F24=More Keys

MQSeries Interface Send Files to MQSeries
Gentran:Server for iSeries Communications Module Release 3.5 User Guide 14 - 13
Send Files to MQSeries
In addition to the EXTRACT and PRCTRNIN commands, the GENMQSND command allows you to
send database files to MQSeries. To access the GENMQSND command, select option 39 (Send File
to MQ Queue) on the GENCOM menu or type GENMQSND on a command line and press F4
(Prompt). The system displays the Send File to MQ Queue panel (Figure 14.8).
Figure 14.8 Send File to MQ Queue (GENMQSND) command
To run the Send File to MQ Queue command, specify the selection criteria and press Enter.
Field Descriptions
MQ Link
This is the name that connects Gentran to MQSeries. The MQ Link must be defined on the
Work with MQ Links (EDIX460) panel. By entering this name, all of the information
needed to send data to MQSeries is provided.
File Name to Queue
Enter the name of the file that is to be sent to MQSeries.
Library Name
Leave the default as *LIBL or change it to *CURLIB or the specific name of the library
where the file resides.
Member Name
A 10-position alphanumeric field used to specify a member of a file to be loaded. If you
enter *FILE, the system uses the filename as the member name. A specific member can
be entered. *FIRST is the default that loads the first member.
Send File to MQ Queue (GENMQSND)
Type choices, press Enter.
MQ Link . . . . . . . . . . . . Name
File Name to Queue . . . . . . . File Name
Library Name . . . . . . . . . . *LIBL Name, *LIBL, *CURLIB
Member Name . . . . . . . . . . *FIRST Member, *FIRST, *FILE
Run Interactively? . . . . . . . *NO *YES, *NO
Additional Parameters
Process Name . . . . . . . . . . GENMQSND
Schedule Job? . . . . . . . . . *NO *YES, *NO
Bottom
F3=Exit F4=Prompt F5=Refresh F12=Cancel F13=How to use this display
F24=More keys

Send Files to MQSeries MQSeries Interface
14 - 14 Gentran:Server for iSeries Communications Module Release 3.5 User Guide
Run Interactively?
This parameter allows you to perform the process interactively. If you choose to run the
command in an interactive mode (*YES), you can monitor system messages that occur
during processing. However, you are locked out of the system from the terminal the job
was submitted on until the process is complete.
Process Name
This prompt is used to identify the process name for the Message Center. The default for
this prompt is the command name, but can be changed to any 15-byte field to help further
identify this process. The process name is displayed on the first of the Work with Message
Center panels (EDIX600) and always tracks under this name.
Schedule Job?
This is used to designate whether you want to run the job as a scheduled job. The default
value for this field is *NO. If you specify *YES, the system displays the Schedule Job
(SCHJOB) command to further define the job run requirements.

MQSeries Interface Receive Files from MQSeries
Gentran:Server for iSeries Communications Module Release 3.5 User Guide 14 - 15
Receive Files from MQSeries
In addition to the ADD and PRCTRNOUT commands, the GENMQRCV command allows you to
receive database files from MQSeries. To access the GENMQRCV command, select option 38
(Receive File from MQ Queue) on the GENCOM menu or type GENMQRCV on a command line
and press F4 (Prompt). The system displays the Receive File from MQ Queue panel (Figure 14.9).
Figure 14.9 Receive File From MQ Queue (GENMQRCV) command
To run the Receive File from MQ Queue command, specify the selection criteria and press Enter.
Field Descriptions
MQ Link
This is the name that connects Gentran to MQSeries. The MQ Link must be defined on the
Work with MQ Links (EDIX460) panel. By entering this name, all of the information
needed to receive data from MQSeries is provided.
File Name to Queue
Enter the name of the file that is to receive the data from MQSeries.
# NOTE
Leave this field blank when data will be added directly to the Gentran
communications queue.
Library Name
Leave the default as *LIBL or change it to *CURLIB or the specific name of the library
where the file resides.
Receive File from MQ Queue (GENMQRCV)
Type choices, press Enter.
MQ Link . . . . . . . . . . . . Name
File Name . . . . . . . . . . . File Name
Library Name . . . . . . . . . . *LIBL Name, *LIBL, *CURLIB
Member Name . . . . . . . . . . *FIRST Member, *FIRST, *FILE
Create File? . . . . . . . . . . *NO *YES, *NO
Record Length . . . . . . . . . Number
Comm Profile Id to Queue . . . . Comm Profile Id
Add Data to In or Out Queue . . *OUT *IN, *OUT
Batch ID to Queue . . . . . . .
Run Interactively? . . . . . . . *NO *YES, *NO
Bottom
F3=Exit F4=Prompt F5=Refresh F10=Additional parameters F12=Cancel
F13=How to use this display F24=More keys

Receive Files from MQSeries MQSeries Interface
14 - 16 Gentran:Server for iSeries Communications Module Release 3.5 User Guide
Member Name
A 10-position alphanumeric field used to specify a member of a file to receive data from
MQSeries. If you enter *FILE, the system uses the filename as the member name. A
specific member can be entered. *FIRST is the default that loads the first member.
Create File
Specify *YES if you are receiving this data to a file and the file entered does not exist.
Leave the default of *NO if the file already exists, or you are sending the data directly to
the Gentran communication queue.
Record Length
This is only required when *YES was specified for the Create File parameter. Enter the
length of the file that is to be created.
Comm Profile ID to Queue
Enter the name of the Gentran communications profile that you want the data to be placed
under.
# NOTE
Leave this field blank when receiving the data into a database file.
Add Data to In or Out Queue
This field is only required when directing the data to the Gentran communications queue.
Enter *IN if you want the data to be directed to the inbound queue, or enter *OUT if you
want the data to be directed to the outbound queue.
Run Interactively?
This parameter allows you to perform the process interactively. If you select to run the
command in an interactive mode (*YES), you can monitor system messages that occur
during processing. However, you are locked out of the system from the terminal the job
was submitted on until the process is complete.
Process Name
This prompt is used to identify the process name for the Message Center. The default for
this prompt is the command name, but can be changed to any 15-byte field to help further
identify this process. The process name appears on the first of the Work with Message
Center panels (EDIX600) and always tracks under this name.
Schedule Job?
This is used to designate whether you want to run the job as a scheduled job. The default
value for this field is *NO. If you specify *YES, the system displays the Schedule Job
(SCHJOB) command to further define the job run requirements.

MQSeries Interface Report
Gentran:Server for iSeries Communications Module Release 3.5 User Guide 14 - 17
Report
EBDI461 — MQ Links Configuration Report
Overview
Gentran:Server provides the ability to print a hard copy report displaying the contents of a specific
MQ Link definition.
Contents of the Report
The MQ Links Configuration Report is a user-generated report that contains information necessary
to perform the sends/receives within MQSeries.
How to Identify the Report
The name of the Gentran:Server program that generates this report (EBDI461) is printed in the
upper left-hand corner of the report. The identifier EBDI461 is also displayed in the User Data
field associated with the spooled report in the Output Queue. The report title, “MQ Links
Configuration Report,” is centered at the top of the page.
How to Generate the Report
This report is generated by selecting option 6 (Print) on the Work with MQ Links panel
(EDIX460).
Figure 14.10 shows the MQ Links Configuration report.
Figure 14.10 MQ Links Configuration Report — EBDI461
EBDI461 RUN DATE 04/30/08 MQLINKS CONFIGURATION REPORT RUN TIME 12:00:00 PAGE 1
MQ LINK ....................POFILES
MQ QUEUE NAME...............SYSTEM.GENTRAN.POQUEUE
METHOD OF TRANSFERRING FILES.....3
FILE NAME IN HEADER RECORD?......Y
MESSAGE DESCRIPTOR VERSION.......2
SENDING INFORMATION:
MESSAGE PRIORITY........7
NOTIFICATION............*NONE
REPLY QUEUE.............
TRANSLATION........(FROM)
(TO)
RECEIVING INFORMATION:
CONVERT DATA?...................Y
BREAK AT RECORD SEPARATORS?.....N
TRANSLATION.......(FROM)
(TO)
Sterling Commerce

Report MQSeries Interface
14 - 18 Gentran:Server for iSeries Communications Module Release 3.5 User Guide
Fields on the MQ Links Configuration Report (EBDI461)
The fields on the report are defined as follows:
Field Names Description
MQ Link Displays the 10-byte MQ Link definition name.
MQ Queue Name Displays the 48-byte MQ queue name.
Method of Transferring
Files
Indicates how the files are to be transferred.
File Name in the
Header Record
Indicates whether the library/file name/member name is
to be included in the message descriptor of the MQ
message.
Message Descriptor
Version
Indicates the version of MQSeries that is installed on
your system.
Sending Information
Message Priority Indicates the priority for the message sent.
Notification Indicates how the message notification is to occur.
Reply Queue Displays the location of the reply queue.
Translation
(From)/(To)
These fields define the characters that are to be translated
from and the characters that they are translated to.
Receiving Information
Convert Data Indicates whether or not the data is to be converted.
Break at Record
Separators?
Used with the Translation from field to determine the
starting point of each new record.
Translation
(From)/(To)
These fields define the characters that are to be translated
from and the characters that they are translated to.

Chapter
Gentran:Server for iSeries Communications Module Release 3.5 User Guide 15 - 1
15 Gentran IFS Gateway
In this Chapter
This chapter covers the following topics:
¾What is GIFSGATE?...................................................................................................... 15-2
¾How to use the GIFSGATE command........................................................................... 15-4
¾Stopping the IFS Gateway ........................................................................................... 15-10
¾How to Use the GENIBQIFS Command ..................................................................... 15-11
What is GIFSGATE? Gentran IFS Gateway
15 - 2 Gentran:Server for iSeries Communications Module Release 3.5 User Guide
What is GIFSGATE?
Overview
GIFSGATE is an interface between the Gentran:Server for iSeries Communications Module and
the Integrated File System (IFS). The IFS gateway is installed as a standard part of Gentran:Server
for iSeries Communications Module and no additional installation procedures are required.
The Gentran IFS gateway is logically positioned between the Gentran:Server communications
queues and the IFS files that serve as the hand-off point between Gentran:Server and an external
software product, as shown in Figure 15.1.
Figure 15.1 Gentran:Server for iSeries IFS Gateway
Two functions are performed by the gateway: inbound data transfer and outbound data transfer.
You may configure the gateway to perform either function or both functions. The gateway can be
configured many ways depending on your needs, however the two major ways are periodic polling
and normal scheduled batch jobs.
Periodic Polling
Periodic polling simply means checking periodically for data in a specified location and taking
some action if data is present. This method is used by many PC and UNIX products. Using the IFS
gateway in this way extends that concept to take the data as far as the Gentran communications
queues.
Application
Output File
Application
Input File
External IFS
Application or
Process
Gentran IFS
Gateway
Gentran or
other
Application
QSYS.LIB File System Polling or
Batch
Integrated File System
Polling or
Batch
Outbound
Comm
Queue
Inbound
Comm
Queue

Gentran IFS Gateway What is GIFSGATE?
Gentran:Server for iSeries Communications Module Release 3.5 User Guide 15 - 3
Scheduled Batch Jobs
If you prefer, you can run the gateway without polling, as a single-pass process. Using it this way,
it can be an extension of your existing batch processes. Jobs may be scheduled and executed using
your existing operations facilities. Each time the job is run, inbound and/or outbound data will be
transferred between the Gentran communications queues and the external application input and
output directories.
Gentran Communications Profiles
Although the traditional Gentran communication subsystem is not used for communication via the
IFS gateway, a communication profile is used to identify data moving through the Gentran
inbound and outbound communications queues. A communication profile named IDXGATE is
included with Gentran for this purpose. If you wish, you may use this profile or create one of your
own. If you create a profile, you may use any protocol. Because the profile is only used to identify
data on the queues and not for actual communications, the protocol and other protocol-specific
fields are not important.

How to use the GIFSGATE command Gentran IFS Gateway
15 - 4 Gentran:Server for iSeries Communications Module Release 3.5 User Guide
How to use the GIFSGATE command
This procedure includes the steps necessary to use the GIFSGATE command that starts the IFS
gateway. A table of field definitions for the GIFSGATE command follows the procedure.
1. Enter the command GIFSGATE at the command line and press F4 (Prompt), as shown in
Figure 15.2.
Figure 15.2 The Gentran:Server Communications Module GENMAIN Menu
System Response: The GIFSGATE command is displayed (Figure 15.3).
Figure 15.3 The Gentran IFS Gateway (GIFSGATE) command panel
GENMAIN Gentran:Server for iSeries Communications 3.5
System: ISDDEV01
Select one of the following:
1. Communications Menu (GENCOM)
2. Work with Job Scheduler
3. Work with Environment Control
4. System Configuration Menu (GENSYSCFG)
10. Gentran:Server Search Index
13. Gentran File Tracking Menu (GENFILETRK)
90. Sign off
Bottom
Selection or command
===> GIFSGATE
F3=Exit F4=Prompt F9=Retrieve F12=Cancel F13=User Support
(C) COPYRIGHT Sterling Commerce Inc., 2008, ALL RIGHTS RESERVED.
Gentran IFS Gateway (GIFSGATE)
Type choices, press Enter.
Communication profile id . . . . Name
Data direction . . . . . . . . . *IN, *OUT, *BOTH
Bottom
F3=Exit F4=Prompt F5=Refresh F10=Additional parameters F12=Cancel
F13=How to use this display F24=More keys
Parameter COMPRF required. +

Gentran IFS Gateway How to use the GIFSGATE command
Gentran:Server for iSeries Communications Module Release 3.5 User Guide 15 - 5
2. Enter the following responses to the prompts:
Press Enter.
System Response: Additional fields are displayed (Figure 15.4).
Figure 15.4 The GIFSGATE command panel with additional fields displayed
Prompt Response
Communications profile
ID
In this instance, use the sample ID provided with the
Gentran:Server
IDXGATE
Data direction Enter the direction that the gateway will send the data:
*IN (data coming in from the integrated file system)
*OUT (data going from Gentran: Server to integrated
file system)
*BOTH (in and out)
Gentran IFS Gateway (GIFSGATE)
Type choices, press Enter.
Communication profile id . . . . > IDXGATE Name
Data direction . . . . . . . . . > *BOTH *IN, *OUT, *BOTH
Inbound IFS directory . . . . .
Inbound IFS file . . . . . . . .
Inbound End of Line . . . . . . *FIXED *CRLF, *CR, *LF, *LFCR...
Remove Hex Characters . . . . . *NO *NO, *YES
Outbound IFS directory . . . . .
Outbound IFS file . . . . . . .
Outbound End of Line . . . . . . *FIXED *CRLF, *CR, *LF, *LFCR...
Append Data? . . . . . . . . . . *NO *NO, *YES
Include SA Status? . . . . . . . *NO *NO, *YES
Bottom
F3=Exit F4=Prompt F5=Refresh F10=Additional parameters F12=Cancel
F13=How to use this display F24=More keys

How to use the GIFSGATE command Gentran IFS Gateway
15 - 6 Gentran:Server for iSeries Communications Module Release 3.5 User Guide
3. Enter a value in each field, as shown in Figure 15.5. Refer to the Field Definitions on
page 15-7 for details.
Figure 15.5 The GIFSGATE command panel with field values entered
4. Once you have entered the appropriate field values, press Page Down to display
Additional Parameters (Figure 15.6).
Figure 15.6 The GIFSGATE command panel with additional parameters displayed
Gentran IFS Gateway (GIFSGATE)
Type choices, press Enter.
Communication profile id . . . . > IDXGATE Name
Data direction . . . . . . . . . *BOTH *IN, *OUT, *BOTH
Inbound IFS directory . . . . . /HOME/ECENGINE/DATA/MYCO/EDIIN
Inbound IFS file . . . . . . . . *
Inbound End of Line . . . . . . *FIXED *CRLF, *CR, *LF, *LFCR...
Remove Hex Characters . . . . . *NO *NO, *YES
Outbound IFS directory . . . . . /HOME/ECENGINE/DATA/MYCO/EDIOUT
Outbound IFS file . . . . . . . MYFILE1
Outbound End of Line . . . . . . *FIXED *CRLF, *CR, *LF, *LFCR...
Append Data? . . . . . . . . . . *NO *NO, *YES
Include SA Status? . . . . . . . *NO *NO, *YES
More...
F3=Exit F4=Prompt F5=Refresh F10=Additional parameters F12=Cancel
F13=How to use this display F24=More keys
Gentran IFS Gateway (GIFSGATE)
Type choices, press Enter.
Periodic polling . . . . . . . . *NO, *YES
Additional Parameters
Process Name . . . . . . . . . . GIFSGATE
Start Profile Sequence Number . 0 Number
End Profile Sequence Number . . 999999 Number
Record Entries in Comm Hist? . . *YES *YES, NO
Run interactively . . . . . . . *NO *YES, *NO
Schedule job . . . . . . . . . . *YES *YES, *NO
Bottom
F3=Exit F4=Prompt F5=Refresh F12=Cancel F13=How to use this display
F24=More keys

Gentran IFS Gateway How to use the GIFSGATE command
Gentran:Server for iSeries Communications Module Release 3.5 User Guide 15 - 7
5. Enter a value in each field. Refer to the Field Definitions below for details. When
complete, press Enter.
System Response: The job will be submitted. If you chose to run the job interactively,
gateway processing will begin immediately in your interactive session and the screen will
display status messages.
Field Descriptions for the GIFSGATE command
Communication profile id (COMPRF)
The name of the Gentran:Server communication profile that is to be accessed through the
Gentran IFS gateway. For outbound processing, the data will be extracted from the
communication profile entered and placed in the IFS file system. For inbound processing,
the data coming from the IFS file system will be placed on the queue entered.
A communication profile named IDXGATE is included with the Gentran:Server for this
purpose. If you wish, you may use this profile or create one of your own. If you create a
profile, you may use any protocol. This profile is only used to identify data on the queues
and not for actual communications. The protocol and other protocol specific fields are not
important.
+ For More Values
Used to enter either additional communication profile IDs or the + symbol to access the
Specify More Values parameter COMPRF panel, where you can enter up to 25
communication profile IDs.
Data direction (DIRECTION)
You can control whether this invocation of the gateway will process inbound data,
outbound data, or both. You may also run multiple invocations of the gateway, giving you
flexibility.
Inbound IFS directory (INDIR)
This is the directory where the IFS gateway will look for files. If it finds the files, it will
copy them to the inbound queue under the specified profile ID.
Inbound IFS file (INFILE)
Specify a single asterisk (*) to check for any and all files in the Inbound IFS Directory.
Specify a fully qualified filename (path and file) if you only want to check for one specific
file.
Inbound End of Line (INEOL)
Specify the end-of-line characters which are recognized in the stream file during copying
of records.
All records are transformed to a fixed-length format as they are copied to the database file.
The fixed-length is equal to the length of the database file records to which they are
copied. If one of the end-of-line character options is selected (ENDLINFMT(*FIXED) is
not specified) the stream file is read up to the first occurrence of that character. The
end-of-line character is stripped from the record. The remainder of the record is padded
with blanks. The data is converted to the destination data format (if specified) and copied
to the database file member. If a record is too long to fit in the fixed-length format, it is
truncated, then copied.

How to use the GIFSGATE command Gentran IFS Gateway
15 - 8 Gentran:Server for iSeries Communications Module Release 3.5 User Guide
The possible values are:
Remove Hex Characters (RMCHAR)
This parameter is only valid when *IN or *BOTH is specified on the Data Direction
(DIRECTION). It allows the user to specify up to 2 hex characters to be removed from
the data before adding to the queue. *FIXED should be specified on the Inbound End of
Line (OUTEOL) parmameter.
If you enter *YES for the Remove Hex Characters field, 1st Hex Character and 2nd Hex
Character fields are displayed for you to enter in hex to be removed from the data.
Outbound IFS directory (OUTDIR)
This is the directory where data from the outbound queue will be placed.
Outbound IFS file (OUTFILE)
This controls the file name to be used when files are created in the Outbound IFS
Directory. Specify any name you want. You can also use the special character sequences
%PROFILE%, %BATSEQ%, and %DATETIME% to include the communication profile ID,
profile batch sequence number, and/or date and time stamp in the file name.
Outbound End of Line (OUTEOL)
Specifies the end-of-line characters which are recognized in the steam file during copying
of records.
*ALL Any single or double character combination of carriage-return and
line-feed is appended to the end of each line.
*CRLF Carriage-return followed by line-feed is appended to the end of each
line.
*LF Line-feed is appended to the end of each line
*CR Carriage-return is appended to the end of each line.
*LFCR Line-feed followed by carriage-return is appended to the end of each
line.
*FIXED Text lines in the stream file are considered fixed-length records of the
same length as the database file records to which they are being copied.
Any encountered CR, LF, or EOF characters are not stripped from the
stream file. Tab expansion is not allowed and the TABEXPN
parameter is not valid. If the last record in the stream file does not fill
the database file record, that record is padded with blanks.
Only stream files and database files with compatible encoding
schemes, which do not result in the expansion of data record lengths,
are valid with this option. If an incompatible encoding scheme
combination is detected, the operation will fail. The following
encoding scheme combinations are supported:
Single-byte to single-byte
Double-byte to double-byte
Mixed ASCII to mixed ASCII
Mixed EBCDIC to mixed EBCDIC

Gentran IFS Gateway How to use the GIFSGATE command
Gentran:Server for iSeries Communications Module Release 3.5 User Guide 15 - 9
If one of the end-of-line character options is selected (ENDLINFMT(*FIXED) is not
specified) the database file records are transformed to variable-length stream file text lines
as they are copied. Each database file record is trimmed of any trailing blanks. The data is
converted to the destination data format (if specified) and the end-of-line character is
appended to the end of the text line. The text line is copied to the stream file.
The possible values are:
Append Data? (APPEND)
If *YES, data extracted is appended to the existing data within the file.
If *NO, existing data with the file is overwritten.
Include SA Status? (SA)
If *YES, batches that have SA or Q status are picked up for file transfer.
If *NO, only batches with a Q status are picked up for file transfer.
Periodic polling (POLL)
This field enables you to continuously run the command or execute it only once. Enter
*YES if the command is to run on a periodic basis. Enter *NO if it is to run only once.
Polling interval (INTERVAL)
If polling, how many seconds to wait before the next check.
*ALL Any single or double character combination of carriage-return and
line-feed is appended to the end of each line.
*CRLF Carriage-return followed by line-feed is appended to the end of each
line.
*LF Line-feed is appended to the end of each line
*CR Carriage-return is appended to the end of each line.
*LFCR Line-feed followed by carriage-return is appended to the end of each
line.
*FIXED Text lines in the stream file are considered fixed-length records. CR
and LF characters are not added at the end of each line, trailing blanks
are not removed from the end of each record. The length of the stream
file records equals the length of the database file records.
Only stream files and database files with compatible encoding
schemes, which do not result in the expansion of data record lengths,
are valid with this option. If an incompatible encoding scheme
combination is detected, the operation will fail. The following
encoding scheme combinations are supported:
Single-byte to single-byte
Double-byte to double-byte
Mixed ASCII to mixed ASCII
Mixed EBCDIC to mixed EBCDIC

Stopping the IFS Gateway Gentran IFS Gateway
15 - 10 Gentran:Server for iSeries Communications Module Release 3.5 User Guide
Process Name (PRCNAM)
This is not used in the Communications Module.
Start Profile Sequence Number (STRSEQ)
This field is used to type the profile sequence number that extract processing will begin
with. The parameter is valid only if option 32 (GIFSGATE) is entered on the Work with
Outbound Queue Control panel (EDIX-CTL01). Otherwise, the system ignores it.
End Profile Sequence Number (ENDSEQ)
This field is used to type the profile sequence number that extract processing will end
with. The parameter is valid only if option 32 (GIFSGATE) is entered on the Work with
Outbound Queue Control panel (EDIX404-CTL01). Otherwise, the system ignores it.
Run interactively (INT)
This parameter allows you to perform the process interactively (immediately). If you
select to run the command in an interactive mode (*YES), you can monitor system
messages that occur during processing. However, you are locked out of the system from
the terminal the job was submitted on until the process is complete.
Schedule job (SCHED)
This alphanumeric field is used to designate if you want to run this option by scheduling it
as a job. Use *NO as the default for this field.
You can also access the Gentran IFS Gateway from the Work with Outbound Queue
Control panel (EDIX404-CTL01). (SEE the topic “Operations and Management of
Communications” in Chapter 1 of this guide for more information.)
Stopping the IFS Gateway
If you are running the IFS gateway in polling mode, stop the gateway by cancelling the gateway
jobs using the *IMMED option. If you are not using polling, the gateway will end on its own after
making one check of the inbound and/or outbound data sources.

Gentran IFS Gateway How to Use the GENIBQIFS Command
Gentran:Server for iSeries Communications Module Release 3.5 User Guide 15 - 11
How to Use the GENIBQIFS Command
The GENIBQIFS command enables you to copy batches from the inbound communication queue
to the IFS file system.
The following procedure includes the steps necessary to use the GENIBQIFS command. A table of
field definitions for the GIFSGATE command follows the procedure.
1. Type the command GENIBQIFS at the command line and press F4 (Prompt), as shown in
Figure 15.7.
Figure 15.7 The Gentran:Server Communications Module GENMAIN Menu
GENMAIN Gentran:Server for iSeries Communications 3.5
System: ISDDEV01
Select one of the following:
1. Communications Menu (GENCOM)
2. Work with Job Scheduler
3. Work with Environment Control
4. System Configuration Menu (GENSYSCFG)
10. Gentran:Server Search Index
13. Gentran File Tracking Menu (GENFILETRK)
90. Sign off
Bottom
Selection or command
===> GENIBQIFS
F3=Exit F4=Prompt F9=Retrieve F12=Cancel F13=User Support
(C) COPYRIGHT Sterling Commerce Inc., 2008, ALL RIGHTS RESERVED.

How to Use the GENIBQIFS Command Gentran IFS Gateway
15 - 12 Gentran:Server for iSeries Communications Module Release 3.5 User Guide
System Response: The GENIBQIFS command displays (Figure 15.8).
Figure 15.8 The Gentran IBQ to IFS Gateway (GENIBQIFS) command panel
2. Type a value in each field, as shown in Figure 15.9. Refer to the Field Definitions
page 15-13 for details. Press F10 to display additional parameters. When complete, press
Enter.
System Response: The job will be submitted. If you chose to run the job interactively,
gateway processing begins immediately in your interactive session and the screen displays
status messages.
Figure 15.9 The Gentran IBQ to IFS Gateway (GENIBQIFS) command panel with
additional parameters displayed
Gentran IBQ to IFS Gateway (GENIBQIFS)
Type choices, press Enter.
Communication profile id . . . . Name
Outbound IFS directory . . . . .
Outbound IFS file . . . . . . .
Outbound End of Line . . . . . . *FIXED *CRLF, *CR, *LF, *LFCR...
Periodic polling . . . . . . . . *NO, *YES
Bottom
F3=Exit F4=Prompt F5=Refresh F10=Additional parameters F12=Cancel
F13=How to use this display F24=More keys
Gentran IBQ to IFS Gateway (GENIBQIFS)
Type choices, press Enter.
Communication profile id . . . . IDXGATE Name
Outbound IFS directory . . . . . '/HOME/ECENGINE/DATA/MYCO/EDIOUT'
Outbound IFS file . . . . . . . MYFILE1
Outbound End of Line . . . . . . *FIXED *CRLF, *CR, *LF, *LFCR...
Periodic polling . . . . . . . . *NO, *YES
Additional Parameters
Process Name . . . . . . . . . . GENIBQIFS
Append Data? . . . . . . . . . . *NO *YES, *NO
Start Profile Sequence Number . 0 Number
End Profile Sequence Number . . 999999 Number
Record Entries in Comm Hist? . . *YES *YES, NO
Include RA Status? . . . . . . . *NO *NO, *YES
Run interactively . . . . . . . *NO *YES, *NO
Schedule job . . . . . . . . . . *NO *YES, *NO
Bottom
F3=Exit F4=Prompt F5=Refresh F12=Cancel F13=How to use this display
F24=More keys

Gentran IFS Gateway How to Use the GENIBQIFS Command
Gentran:Server for iSeries Communications Module Release 3.5 User Guide 15 - 13
Field Descriptions for the GENIBQIFS Command
Communication Profile ID (COMPRF)
The name of the Gentran:Server communication profile that contains the data that you
want to extract the data from and that is placed in the integrated file system (IFS).
Outbound IFS Directory (OUTDIR)
This is the directory where data from the inbound queue will be placed.
Outbound IFS File (OUTFILE)
This controls the file name to be used when files are created in the Outbound IFS
Directory. Specify any name you want. You can also use the special character sequences
%PROFILE%, %BATSEQ%, and %DATETIME% to include the communication profile ID,
profile batch sequence number, and/or date/time stamp in the file name.
Outbound End of Line (OUTEOL)
Specifies the end-of-line characters recognized in the steam file during copying of records.
If one of the end-of-line character options is selected (ENDLINFMT(*FIXED) is not
specified), the database file records are transformed to variable-length stream file text
lines as they are copied. Each database file record is trimmed of any trailing blanks. The
data is converted to the destination data format (if specified) and the end-of-line character
is appended to the end of the text line. The text line is copied to the stream file.
The possible values are:
*ALL Any single or double character combination of carriage-return and
line-feed is appended to the end of each line.
*CRLF Carriage-return followed by line-feed is appended to the end of each
line.
*LF Line-feed is appended to the end of each line
*CR Carriage-return is appended to the end of each line.
*LFCR Line-feed followed by carriage-return is appended to the end of each
line.
*FIXED Text lines in the stream file are considered fixed-length records. CR
and LF characters are not added at the end of each line, trailing blanks
are not removed from the end of each record. The length of the stream
file records equals the length of the database file records.
Only stream files and database files with compatible encoding
schemes, which do not result in the expansion of data record lengths,
are valid with this option. If an incompatible encoding scheme
combination is detected, the operation will fail. The following
encoding scheme combinations are supported:
Single-byte to single-byte
Double-byte to double-byte
Mixed ASCII to mixed ASCII
Mixed EBCDIC to mixed EBCDIC

How to Use the GENIBQIFS Command Gentran IFS Gateway
15 - 14 Gentran:Server for iSeries Communications Module Release 3.5 User Guide
Periodic polling (POLL)
This field enables you to continuously run the command or execute it only once. Type
*YES if the command is to run on a periodic basis. Type *NO if it is to run only once.
Process Name (PRCNAM)
This area is used to label the command for the Message Center. The default for this prompt
is the command name, but can be changed to any 15-byte field to help further identify this
process. The process name displays on the first panel of the Work with Message Center
screen (EDIX600) and will always track under this name.
Append (APPEND)
This field lets you specify whether the records in the files being copied are to be appended
(*YES) to the target file, or are to create a file for each batch copied.
Start Profile Sequence Number (STRSEQ)
This field is used to type the profile sequence number that extract processing will begin
with. The parameter is valid only if you enter option 32 (GENIBQIFS) on the Work with
Inbound Queue Control panel (EDIX407-CTL01). Otherwise, the system ignores it.
End Profile Sequence Number (ENDSEQ)
This field is used to type the profile sequence number that extract processing will end
with. The parameter is valid only if you enter option 32 (GENIBQIFS) on the Work with
Inbound Queue Control panel (EDIX-407-CTL01). Otherwise, the system ignores it.
Record entries in Comm Hist? (COMMLOG)
Enter *YES to record the information in the Communications History File and to assign a
Comm stamp number to the batch of data and in the Communication file. Enter *NO to
not record information in the Communications History file.
Include RA Status? (RA)
If *YES, batches that have RA or RN status are picked up for file transfer.
If *NO, only batches with an RN status are picked up for file transfer.
Run Interactively (INT)
This parameter enables you to perform the process interactively (immediately). If you
select to run the command in an interactive mode (*YES), you can monitor system
messages that occur during processing. However, you are locked out of the system from
the terminal the job was submitted on until the process is complete.
Schedule Job (SCHED)
This alphanumeric field is used to designate if you want to run this option by scheduling it
as a job. Use *NO as the default for this field.
You can also access the Gentran IBQ to IFS Gateway from the Work with Inbound Queue
Control panel (EDIX407-CTL01). (SEE the topic “Operations and Management of
Communications” in Chapter 1 of this guide for more information.)

Chapter
Gentran:Server for iSeries Communications Module Release 3.5 User Guide 16 - 1
16 Job Scheduler
In this Chapter
The “Job Scheduler” chapter explains the processes for creating and maintaining entries in the Job
Scheduler Master and Occurrence files.
This chapter covers the following topics:
¾What is the Job Scheduler? ............................................................................................ 16-1
¾What does the Job Scheduler Function Do? .................................................................. 16-2
¾Take a Closer Look at the Job Scheduler ....................................................................... 16-2
¾Start the Subsystem Used by the Job Scheduler ............................................................ 16-3
¾Panel Quick Reference................................................................................................... 16-3
¾Use the Job Scheduler Panels......................................................................................... 16-5
¾Common Questions...................................................................................................... 16-31
What is the Job Scheduler?
The Job Scheduler function gives you the ability to define run-time parameters for any job you
wish to run on a routine basis. By establishing a schedule, you can automate your processing
instead of manually initiating each job every time you wish to run it. You may use the Job
Scheduler to run Gentran:Server jobs such as communication sessions and purges. You may also
schedule any non-Gentran:Server jobs (your own applications) you need to run on a routine basis.

What does the Job Scheduler Function Do? Job Scheduler
16 - 2 Gentran:Server for iSeries Communications Module Release 3.5 User Guide
What does the Job Scheduler Function Do?
Using the Gentran:Server Job Scheduler feature, you can perform the following functions:
Set parameters to schedule jobs to run automatically
Maintain the Job Schedule parameters
Change the status of a job schedule to temporarily de-activate it from running
View and maintain current job schedule occurrence records
Change the status of a job schedule occurrence record on the Job Scheduler to place it
“on-hold” or delete it
Purge or Retrieve Job Schedule records
Take a Closer Look at the Job Scheduler
The Job Scheduler function makes the automation of your system processing a manageable task.
The Job Scheduler function enables you to schedule jobs to run automatically at a specified date
and time without your intervention after the initial setup. Each time you set up a new set of
scheduling parameters, you add an entry to the Job Scheduler Master file. This entry in the Job
Scheduler Master file is like a “system reminder notice”; it reminds the system to automatically
run a job on the date and time that you have specified and to continue to run it at regular intervals.
You are now relieved of the duty of scheduling the job each time you want it to run.
The Job Scheduler helps you automate daily processing tasks by providing access to a common
Job Scheduler function which can be accessed from any Gentran:Server command where a job can
be run. This includes commands which support activities such as running reports and purges,
setting up processing and communications jobs as well as any number of other user and
administrative functions.
# NOTE
Use of the Job Scheduler feature is not required. Jobs can still be executed interactively or
submitted to batch. Using the Job Scheduler function, however, can greatly increase your
processing efficiency by automating routine procedures.

Job Scheduler Start the Subsystem Used by the Job Scheduler
Gentran:Server for iSeries Communications Module Release 3.5 User Guide 16 - 3
Start the Subsystem Used by the Job
Scheduler
When you are ready to begin using the Job Scheduler, you must start the subsystem
GENTRAN350 in the data library. To start the subsystem, type the command:
STRSBS SBSD(GENTRAN350)
Once you have your scheduler set up to run jobs on a regular basis, you will want to have this
subsystem active whenever your iSeries is up. Your iSeries Security Officer (QSECOFR) can
automate this process by including the start of the subsystem in your iSeries Start Up Job
(QSTRUP in QSYS or the program specified in the system value QSTRUPJOB).
Panel Quick Reference
The following table gives the purpose and access methods for the panels in the Job Scheduler
function.
Panel Name Purpose Access Methods
EDIX412-FMT01
Work with Job Scheduler
Add, change, copy,
delete and view job
schedule master
records
Select option 2 on the GENMAIN menu
Enter EXCPGM EDIX412 on the
command line
EDIX411-FMT01
Job Schedule Master
Define the job
schedule master
record
Select an option (1 – 5) on the Work
with Job Scheduler panel
(EDIX412-FMT01)
Enter EXCPGM EDIX411 on the
command line
EDIX409-FMT01
Work with Scheduled
Entries
Add, change, copy,
delete and view job
schedule occurrence
records
Select option 11 on the Work with Job
Scheduler panel (EDIX412-FMT01)
Enter EXCPGM EDIX409 on the
command line
EDIX413-FMT01
Job Schedule
Define the job
schedule occurrence
record
Select an option (1 – 5) on the Work
with Scheduled Entries panel
(EDIX409-FMT01)
Enter EXCPGM EDIX413 on the
command line
PRGSCH
Purge Job Schedule
Purge records from
the Job Scheduler
Select option 40 on the Work with Job
Scheduler panel (EDIX412-FMT01)
Prompt PRGSCH on the command line

Panel Quick Reference Job Scheduler
16 - 4 Gentran:Server for iSeries Communications Module Release 3.5 User Guide
RTVSCH
Retrieve Job Schedule
Retrieve Job
Schedule records
from tape or save
file
Select option 41 on the Work with Job
Scheduler panel (EDIX412-FMT01)
Prompt RTVSCH on the command line
SCHJOB
Schedule Job
Add records to the
Job Scheduler
Master File
Respond with *YES to the ‘Schedule
Job?’ parameter on any Gentran:Server
command
Prompt SCHJOB on the command line
Panel Name Purpose Access Methods

Job Scheduler Use the Job Scheduler Panels
Gentran:Server for iSeries Communications Module Release 3.5 User Guide 16 - 5
Use the Job Scheduler Panels
Job Scheduler functions are accessed from two general locations in the Gentran:Server Job
Scheduler system. The panels used to create records on the Job Scheduler Master File are accessed
from the individual commands located in each subsystem, such as the start communications
(STRCOMSSN) command. The panels associated with maintaining the entries in the Job
Scheduler Master File and with maintaining the job schedule occurrence records are accessed
through the System Administration subsystem. Both access methods are described in this chapter.
The following tasks are included in the Job Scheduler. These tasks are documented in the next
sections:
Create a new entry in the Job Scheduler
Manage entries in the Job Scheduler
Manage Job Occurrence records
Purge the Job Schedule (PRGSCH)
Retrieve the Job Schedule (RTVSCH)
Create a New Entry in the Job Scheduler
After identifying a particular task to be scheduled and run on a routine basis you must define the
schedule parameters that designate exactly when and how the Job Scheduler is to run the job. By
entering this information, you add a master “schedule” record to the Job Scheduler Master file. You
only need to set up a schedule one time. The system will then run the job automatically, using your
parameters, as frequently as you specify. This master schedule allows you to set up several
parameters including a meaningful job name, job description, run start and stop dates, run
frequency, the unit of frequency (hours, days, quarters, etc.), a run time, a message queue, and any
additional programs that you want executed after the normal or abnormal completion of the job.
A common method for adding master schedule records is from the Schedule Job (SCHJOB) panel.
The Gentran:Server Job Scheduler provides access to this panel from any other command in the
system where a job can be scheduled to run. For instance, if you prompt the Purge All Comm files
(PRGALL) command and specify *YES to the Schedule Job option, the Schedule Job (SCHJOB)
panel is displayed.
In the following example, you will add records to the Job Scheduler Master file from the
Communications subsystem. The job will automatically initiate a communications session at
2:00 p.m. every day.

Use the Job Scheduler Panels Job Scheduler
16 - 6 Gentran:Server for iSeries Communications Module Release 3.5 User Guide
Start Communications Session (STRCOMSSN) Command
Figure 16.1 Schedule the STRCOMSSN command
via the Schedule Job (SCHJOB) panel – Part 1
To schedule the Start Communications Session command from the Work with Communications
panel (EDIX400-FMT01), type 30 (Start Session) in the Option field next to the desired
communication Profile ID and press Enter. Specify the desired parameters and type *YES in the
Schedule Job? parameter and press Enter. This automatically displays the Schedule Job
(SCHJOB) panel, as shown in Figure 16.1.
The parameters entered on the submitted command are pre-loaded into the data fields on the
SCHJOB panel. You may accept these default values or you may selectively override them. Press
Page Down to specify additional Job Schedule parameters. Press Enter to add the job Schedule
Master record.
Start Communications Session (STRCOMSSN)
Type choices, press Enter.
Communications Profile ID . . . > 'CN3BSC' Comm Profile Id
Session Type . . . . . . . . . . SO Name
Delete Previous Jobs? . . . . . *YES *YES, *NO
Schedule Job? . . . . . . . . . *YES *YES, *NO
Run Continually? . . . . . . . . *NO *YES, *NO
Schedule Job (SCHJOB)
Type choices, press Enter.
Command to Exec . . . . . . . . > STRCOMSSN PROFIL('CN3BSC') SSN(SO) DELETE('*
YES') SCHED(*NO) CONT('*NO') TRACE('*NO') INT(*YES) DOCONNECT('*YES') RESETQ('*N
O') RERUNCT('00') COMPRS('*NO') PROCNAME('STRCOMSSN') SESSLOG('*NO')
Job Name . . . . . . . . . . . . > CN3BSC Name, *JOBD
Date of First Run . . . . . . . *CURRENT Date, *CURRENT
Date of Last Run . . . . . . . . *FSTRUN Date, *NONE, *FSTRUN
Time of Day to Start Run . . . . *CURRENT Time, *CURRENT
Run Frequency . . . . . . . . . 1 1-99, *NONE
Run Occurrence . . . . . . . . . *DAILY *MINUTE, *HOURLY, *DAILY...
Job Description . . . . . . . . > GENTRAN Name, *USRPRF
User profile . . . . . . . . . . *CURRENT Name, *CURRENT
MSGQ for completion message . . > EDI Name, *USRPRF
More...
F3=Exit F4=Prompt F5=Refresh F12=Cancel F13=How to use this display
F24=More keys

Job Scheduler Use the Job Scheduler Panels
Gentran:Server for iSeries Communications Module Release 3.5 User Guide 16 - 7
Figure 16.2 illustrates the additional parameters shown when you Page Down on the SCHJOB
panel.
Figure 16.2 The Schedule Job (SCHJOB) panel – Part 2
Field Descriptions for the SCHJOB command
Command to Exec
The value in this field is the exact command string which will be executed by the
Gentran:Server Job Scheduler. This string is built by the system from the data entered on
the command panel which executed the ‘Schedule Job?’ request. In this example, the field
shows you the command string that the system created from data you previously entered
on the STRCOMSSN panel.
Job Name
The value in this field is pre-loaded from the previous panel. In this case, the Job Name
field displays the value STRCOMSSN, which is the name of the command being scheduled.
Date of First Run
This field defines the first date from which the job can be automatically scheduled to run.
The date is in the format specified in the System Configuration file (SYSCFG). To find
out what that format is, use the SETGENFMT command on the GENSYSCFG menu.The
default value is *CURRENT, which accepts the current system date.
Schedule Job (SCHJOB)
Type choices, press Enter.
Exec Upon Normal Completion . .
Exec Upon Abnormal Completion . SNDMSG MSG('COMM PROCESSING FAILED') TO MSGQ
(*SYSOPR)
Description . . . . . . . . . . COMM-SENDING PAYROLL INFORMATION
Bottom
F3=Exit F4=Prompt F5=Refresh F12=Cancel F13=How to use this display
F24=More keys

Use the Job Scheduler Panels Job Scheduler
16 - 8 Gentran:Server for iSeries Communications Module Release 3.5 User Guide
Date of Last Run
This field defines the date after which the job will no longer be scheduled to run. The date
is in the format specified in the System Configuration file. To find out what that format is,
use the SETGENFMT command on the GENSYSCFG menu.
*NONE No end date is specified. Enter this value if you want the scheduled job to run
indefinitely according to the schedule you establish. The job will run
perpetually until deactivated (Status = I). The system loads 9999999 into
this field when the Job Schedule Master record is added. When viewing the
job master for a perpetual job, the end date will appear as *PERPETUAL.
*FSTRUN The end date is equal to the value entered into the Date of First Run field.
Time of Day to Start Run
This field defines the time of day that the job will run the first time it is executed. The time
is in HHMMSS format using a military 24-hour clock (i.e., 2:00 p.m. is entered as
140000). The default value is *CURRENT for the current time.
# NOTE
This value is valid for the first scheduled run only. After the first scheduled run of
the job, the next scheduled run time for the job will depend on the values entered in
the Run Frequency field and the Run Occurrence field.
Run Frequency
This is the number of times that the job is to be run, relative to the Run Occurrence field.
Valid values are 01 – 99. For example, if this field displays a value of 02, and the Run
Occurrence field displays a value of HOURLY, the job is run every two hours.
Run Occurrence
This is the job run unit, relative to the Run Frequency field. For example, if this field
displays a value of QUARTERLY, and the Run Frequency field displays a value of 02, the
run occurrence is “every two quarters” or twice each year. Valid values are:
If this value is used… the job will run…
*MINUTE every ‘n’ minutes
*HOURLY every ‘n’ hours
*DAILY every ‘n’ days
*WEEKLY every ‘n’ weeks
*MONTHLY every ‘n’ months
*QUARTERLY every ‘n’ quarters
*YEARLY every ‘n’ years
Note: Run Frequency should be 1 when using the values below:
*WEEKDAY each weekday: Mon, Tues, Wed, Thurs, Fri

Job Scheduler Use the Job Scheduler Panels
Gentran:Server for iSeries Communications Module Release 3.5 User Guide 16 - 9
Job Description
This field is used to designate the job description under which the job runs. The system
defaults the job description from your Gentran:Server user profile in the Environment
Control subsystem.
User Profile
This field is used to designate the iSeries user profile under which the job will run. The
default value *CURRENT is the user who is currently maintaining or adding the job
schedule record.
MSGQ for Completion Message
This field is used to define a secondary message queue for any messages that are generated
from this job run. The system operator will always receive messages from job runs;
however you may also designate another user, work station, or device to also receive
messages. The system defaults the message queue from your Gentran:Server user profile
in the Environment Control subsystem.
Exec Upon Normal Completion
This field can be used to enter a command that will be executed after a successful job run
(normal completion). For example, you may enter a command to send a message to a user
if the job ends normally. In addition to the Gentran:Server Job Scheduler executable
programs, any iSeries command or user defined commands may be entered.
Exec Upon Abnormal Completion
This field can be used to enter a command that will be executed after an unsuccessful job
run (abnormal completion). For example, you may enter a command to send a message to
a user if the job abnormally ends, or, to initiate a second job if the original job abends. In
addition to the Gentran:Server Job Scheduler executable programs, any iSeries command
or user defined commands may also be entered.
Description
This field is used to provide additional information to describe the job being scheduled.
The description can be used as an identification tool to help you differentiate between
identical job name entries.
) RECOMMENDATION
It is extremely helpful to specify the description to further explain the job that is
being scheduled. This description is displayed with the job name on the Work with
Job Scheduler panel (EDIX412-FMT01).
*WEEKEND each weekend: Sat, Sun
*MWF every Mon, Wed, Fri
*TR each Tues, Thurs
If this value is used… the job will run…

Use the Job Scheduler Panels Job Scheduler
16 - 10 Gentran:Server for iSeries Communications Module Release 3.5 User Guide
Manage Entries in the Job Scheduler
The Job Schedule Master file records which can be created from multiple panels in the
Gentran:Server system can all be viewed and maintained together from a set of panels located
within the System Administration subsystem. This allows you to view in a single place all the Job
Schedule Master records which you have created, both those related to Gentran:Server tasks and
those related to other iSeries tasks.
Gentran:Server provides a maintenance panel, Work with Job Scheduler (EDIX412-FMT01),
which you can use to manage existing records in the Job Scheduler.
The following example illustrates how to view and interpret the entries in the Job Schedule Master
file and continues the STRCOMSSN scenario from the previous section.
Access the Job Scheduler Function
All maintenance tasks for the Job Scheduler are accessed from the Work with Job Scheduler panel
(EDIX412-FMT01).
Figure 16.3 Accessing the Work with Job Scheduler function from the GENMAIN menu
To access the Work with Job Scheduler panel (EDIX412-FMT01), select 2 (Work with Job
Scheduler) from the Gentran main menu and press Enter, as shown in Figure 16.3.
GENMAIN Gentran:Server for iSeries Communications 3.5
System: ISDDEV01
Select one of the following:
1. Communications Menu (GENCOM)
2. Work with Job Scheduler
3. Work with Environment Control
4. System Configuration Menu (GENSYSCFG)
10. Gentran:Server Search Index
13. Gentran File Tracking Menu (GENFILETRK)
90. Sign off
Bottom
Selection or command
===> 2
F3=Exit F4=Prompt F9=Retrieve F12=Cancel F13=User Support
(C) COPYRIGHT Sterling Commerce Inc., 2008, ALL RIGHTS RESERVED.

Job Scheduler Use the Job Scheduler Panels
Gentran:Server for iSeries Communications Module Release 3.5 User Guide 16 - 11
Work with Job Scheduler
The Work with Job Scheduler panel (EDIX412-FMT01) is shown in Figure 16.4. This panel lists
all the Job Scheduler Master records that you have previously created and added to the Job
Scheduler Master file. These job schedules may be for Gentran:Server Job Scheduler jobs or for
your own internal jobs that will automatically run on the date and time you have designated in the
Scheduler.
Figure 16.4 The Work with Job Scheduler panel (EDIX412-FMT01)
In the previous section, we set up the master schedule to perpetually schedule job schedule
occurrence records from outside the Job Scheduler itself.
From this panel, you can create, revise, copy, delete, and view a job schedule. Use option 11 (Sch.
Entries) to access the job schedule occurrence records for a specific job name. Or, you can access
all occurrence records by typing option 11 (Sch. Entries) on the key entry line. You can also
access the Purge Schedule and Retrieve Schedule commands by using options 40 and 41,
respectively.
EDIX412 Work with Job Scheduler EDI 04/30/08
FMT01 pgmlib: G3X5PGM dtalib: G3X5DTA 12:00:00
Position to Job Name . . . . . . . Seq
Type option (and Information), press Enter.
1=Create 2=Revise 3=Copy 4=Delete 5=View 11=Sch. Entries
Opt Job Name Seq St Start Time End Freq Occurrence
CN3BSC 1 04/30/08 17:08:30 04/30/08 1 DAY
CN3BSC 2 04/30/08 17:10:14 *PERPETUAL 1 DAY
CN3BSC 3 04/30/08 15:30:00 *PERPETUAL 1 DAY
PRCTRNOUT 1 I 04/30/08 11:54:01 *PERPETUAL 1 DAY
PRCTRNOUT 2 04/30/08 10:15:00 04/30/08 1 DAY
PRGAUD 1 C 04/30/08 09:08:38 04/30/08 1 DAY
Bottom
Parameters or command
===>
F1=Help F3=Exit F12=Cancel F15=Sort F23=More Options F24=More Keys
Use the Job Scheduler Panels Job Scheduler
16 - 12 Gentran:Server for iSeries Communications Module Release 3.5 User Guide
Finding entries on the Work with Job Scheduler panel (EDIX412-FMT01), particularly when there
are numerous entries, is further facilitated by using both the “Sort By” option and the “Position
To” option. The default sort order, as shown in the previous figure, is alphabetical by Job Name
and Sequence. The following “Sort By” options are available:
Job Name (Job Name); Sequence Number
Start (Start Date); Job Name; Sequence Number
Status (Select Status); Start Date; Job Name; Sequence Number
Figure 16.5 illustrates the selection of the sort option and the results of sorting the Job Scheduler
Master file by Start Date, Job Name and Sequence.
Figure 16.5 Select a sort order using the F15 (Sort)
from the Work with Job Scheduler panel (EDIX412-FMT01)
EDIX412 Work with Job Scheduler EDI 04/30/08
FMT01 pgmlib: G3X5PGM dtalib: G3X5DTA 12:00:00
Position to Job Name . . . . . . . Seq
Type option (and Information), press Enter.
1=Create 2=Revise 3=Copy 4=Delete 5=View 11=Sch. Entries
Opt Job Name Seq St Start Time End Freq Occurrence
04/30/08 17:08:30 04/30/08 1 DAY
Position/Sort By 04/30/08 17:10:14 *PERPETUAL 1 DAY
04/30/08 15:30:00 *PERPETUAL 1 DAY
1=Select 04/30/08 11:54:01 *PERPETUAL 1 DAY
04/30/08 10:15:00 04/30/08 1 DAY
Job Name 04/30/08 09:08:38 04/30/08 1 DAY
1 Start
Status
F3=Exit F12=Cancel Bottom
F1=Help F3=Exit F12=Cancel F15=Sort F23=More Options F24=More Keys

Job Scheduler Use the Job Scheduler Panels
Gentran:Server for iSeries Communications Module Release 3.5 User Guide 16 - 13
Access a Scheduled Job
Gentran:Server provides an additional panel, Job Schedule Master panel (EDIX411-FMT01),
which allows you to see a detailed view of the command(s) to execute for a specific Job Schedule
entry.
To continue with our example, we want to view the Job Schedule Master file record for the
CN3BSC communications session (STRCOMSSN) which we created earlier. Figure 16.6 shows
the Job Schedule Master panel (EDIX411-FMT01) with the CN3BSC record displayed:
Figure 16.6 The Job Schedule Master panel (EDIX411-FMT01)
To access the Job Schedule Master panel (EDIX411-FMT01) from the Work with Job Scheduler
panel (EDIX412-FMT01), type 5 in the Option field and press Enter. After viewing the Job
Schedule Master panel, return to the Work with Job Scheduler panel by pressing F12 (Cancel).
EDIX412 Work with Job Scheduler EDI 04/30/08
FMT01 pgmlib: G3X5PGM dtalib: G3X5DTA 12:00:00
Position to Job Name . . . . . . . Seq
Type option (and Information), press Enter.
1=Create 2=Revise 3=Copy 4=Delete 5=View 11=Sch. Entries
Opt Job Name Seq St Start Time End Freq Occurrence
CN3BSC 1 04/30/08 17:08:30 04/30/08 1 DAY
5 CN3BSC 2 04/30/08 17:10:14 *PERPETUAL 1 DAY
EDIX411 Job Schedule Master EDI 04/30/08
FMT01 12:00:00
Job Name . . . . . . . . . . . . . CN3BSC
Sequence . . . . . . . . . . . . . 2
Job Description. . . . . . . . . . GENTRAN
User . . . . . . . . . . . . . . . EDI
Run Frequency. . . . . . . . . . . 1
Run Occurrence . . . . . . . . . . D
Status . . . . . . . . . . . . . . A
Message Queue. . . . . . . . . . . EDI
Run Start Date/Time/Stop Date. . . 04/30/08 12:00:00 *PERPETUAL
Command
STRCOMSSN PROFIL('CN3BSC') SSN(SO) DELETE('*YES') SCHED(*NO) CONT('*NO') TR
Normal Completion Cmd to Execute
Abnormal Completion Cmd to Execute
F1=Help F12=Cancel F24=More Keys

Use the Job Scheduler Panels Job Scheduler
16 - 14 Gentran:Server for iSeries Communications Module Release 3.5 User Guide
Field Descriptions
The following fields are present on the Job Schedule Master panel (EDIX411-FMT01):
Job Name
This field specifies the Job Name you previously assigned to the job. The name must be a
valid iSeries job name.
Sequence
This field displays the run sequence number for those jobs having the same job name, but
varying start dates and times, as previously assigned by the system.
Job Description
This field is used to designate the job description under which the job runs. The system
defaults the job description from your Gentran:Server user profile in the Environment
Control subsystem.
User
This field is used to designate the system user profile under which the job will run.
Run Frequency
This field displays the number of times that the job is run, relative to the Run Occurrence
field. Valid values are 01 – 99. For example, if this field displays a value of 02, and the
Unit field displays a value of H (Hours), the run frequency is every two hours.
Run Occurrence
This field displays a code which is an equivalent to the Run Occurrence field. Valid values
for this field are:
If the value used
is… Description then the job is run...
AEach Weekday Mon, Tues, Wed, Thurs, Fri
DDays every ‘n’ days
EEach Weekend Sat, Sun
FMon, Wed, Fri every Mon, Wed, Fri
HHours every ‘n’ hours
MMonths every ‘n’ months
QQuarters every ‘n’ quarters
TTues, Thurs every Tue, Thurs
UMinutes every ‘n’ minutes
WWeeks every ‘n’ weeks
YYears every ‘n’ years

Job Scheduler Use the Job Scheduler Panels
Gentran:Server for iSeries Communications Module Release 3.5 User Guide 16 - 15
Status
This field specifies the master job schedule “activity” status code. Valid values are:
CThe system has completed scheduling all job schedule occurrence records for
the run date and time indicated by the user.
AThe system is active and in the process of scheduling job schedule occurrence
records. For those jobs scheduled to run perpetually (no run end date), an “A”
status will always appear after scheduling has started.
IInactive is a user-entered value used to temporarily prevent the system from
scheduling job schedule occurrence records on the Job Scheduler queue.
BLANK The system has not initiated the process of scheduling job schedule
occurrence records because the defined start date is greater than the
scheduler’s ‘generate through’ date, which is stored in the data area
SCHEDULER.
Message Queue
This field designates the secondary message queue for any messages that are generated
from this job run. The operator will always receive all messages from job runs; however,
you may also designate another user, work station, or device to also receive messages. The
system defaults the message queue from your Gentran:Server user profile in the
Environment Control subsystem.
Run Start Date/Time/Stop Date
The first two fields specify the specific Job Schedule start date and time (which will be the
first time the job will be executed). The third field identifies the stop date of the scheduled
job. Press Tab between each field.
You must enter the dates based on the format in your Gentran:Server user profile in the
Environment Control subsystem. The time must be entered in HHMMSS format using a
military 24-hour clock (i.e., 2:00 p.m. is entered as 140000). To schedule a perpetual job,
specify *PERPETUAL in the Stop Date field.
# NOTE
This value is valid for the first scheduled run only. After the first scheduled run of
the job, the next scheduled run time for the job will depend on the values entered in
the Run Frequency field and the Run Occurrence field.
Command
The value in this field is the command string which will be executed by the
Gentran:Server Job Scheduler. In this example, the field shows you the command string
that the system created from data you previously entered on the STRCOMSSN command.

Use the Job Scheduler Panels Job Scheduler
16 - 16 Gentran:Server for iSeries Communications Module Release 3.5 User Guide
Normal Completion Cmd to Execute
This field can be used to enter a command that will be executed after a successful job run
(normal completion). For example, you may enter a command to send a message to a user
if the job ends normally. In addition to the Gentran:Server Job Scheduler executable
programs, any iSeries command or user defined commands may be entered.
Abnormal Completion Cmd to Execute
This field can be used to enter a command that will be executed after an unsuccessful job
run (abnormal completion). For example, you may enter a command to send a message to
a user if the job abnormally ends, or, to initiate a second job if the original job abends. In
addition to the Gentran:Server Job Scheduler executable programs, any iSeries command
or user defined commands may also be entered.

Job Scheduler Use the Job Scheduler Panels
Gentran:Server for iSeries Communications Module Release 3.5 User Guide 16 - 17
Copying a Job Schedule
You may copy any record in the Job Schedule master file. After you copy the record you may view
it by following the steps illustrated in the last section.
For our example, we are creating a new Job Scheduler Master file record called CN3BSCTST.
Figure 16.7 Copy a Job schedule Master file record
To copy a record in the Job Master file:
1. From the Work with Job Scheduler panel (EDIX412-FMT01), type 3 (Copy) in the
Option field next to the Job Scheduler record you want to copy and press Enter.
2. The Copy To will display as shown in Figure 16.7. Type the job name of the new record
and press Enter.
EDIX412 Work with Job Scheduler EDI 04/30/08
FMT01 pgmlib: G3X5PGM dtalib: G3X5DTA 12:00:00
Position to Job Name . . . . . . . Seq
Type option (and Information), press Enter.
1=Create 2=Revise 3=Copy 4=Delete 5=View 11=Sch. Entries
Opt Job Name Seq St Start Time End Freq Occurrence
3 CN3BSC 1 04/30/08 17:08:30 04/30/08 1 DAY
Copy To
CN3BSCTST
F3=Exit F12=Cancel
Bottom
Parameters or command
===>
F1=Help F3=Exit F12=Cancel F15=Sort F23=More Options F24=More Keys

Use the Job Scheduler Panels Job Scheduler
16 - 18 Gentran:Server for iSeries Communications Module Release 3.5 User Guide
The Job Schedule Master panel (EDIX411-FMT01) displays as shown in Figure 16.8. At this point
you may modify any of the fields on the new record.
# NOTE
When the copy occurs, the Start Date and Start Time fields default to the current system date
and time.
Figure 16.8 The Job Schedule Master panel (EDIX411-FMT01) after a record is copied
Press F10 (Update) when you are finished making modifications. This will add the record to the
Job Schedule Master file.
EDIX411 Job Schedule Master EDI 04/30/08
FMT01 12:00:00
Job Name . . . . . . . . . . . . . CN3BSCTST
Sequence . . . . . . . . . . . . . 1
Job Description. . . . . . . . . . GENTRAN
User . . . . . . . . . . . . . . . EDI
Run Frequency. . . . . . . . . . . 1
Run Occurrence . . . . . . . . . . D
Status . . . . . . . . . . . . . .
Message Queue. . . . . . . . . . . EDI
Run Start Date/Time/Stop Date. . . 04/30/08 12:00:00 04/30/08
Command
STRCOMSSN PROFIL('CN3BSC') SSN(SO) DELETE('*YES') SCHED(*NO) CONT('*NO') TR
Normal Completion Cmd to Execute
Abnormal Completion Cmd to Execute
F1=Help F4=Prompt F10=Update F12=Cancel F24=More Keys

Job Scheduler Use the Job Scheduler Panels
Gentran:Server for iSeries Communications Module Release 3.5 User Guide 16 - 19
Delete a Job Schedule
Entries remain in the Job Schedule Master file until they are deleted. From time to time it is a good
idea to review the contents of the file and delete jobs which are no longer in use.
Figure 16.9 Delete a Job schedule Master file record
Type 4 (Delete) in the Option field next to the Job Scheduler Master record you want to delete and
press Enter. The Job Schedule Master panel (EDIX411-FMT01) will be displayed, as shown in
Figure 16.9. Press F11 (Delete).
EDIX412 Work with Job Scheduler EDI 04/30/08
FMT01 pgmlib: G3X5PGM dtalib: G3X5DTA 12:00:00
Position to Job Name . . . . . . . CN3BSCTST Seq 1
Type option (and Information), press Enter.
1=Create 2=Revise 3=Copy 4=Delete 5=View 11=Sch. Entries
Opt Job Name Seq St Start Time End Freq Occurrence
4 CN3BSC 1 04/30/08 17:08:30 04/30/08 1 DAY
CN3BSC 2 04/30/08 17:10:14 *PERPETUAL 1 DAY
EDIX411 Job Schedule Master EDI 04/30/08
FMT01 12:00:00
Job Name . . . . . . . . . . . . . CN3BSCTST
Sequence . . . . . . . . . . . . . 1
Job Description. . . . . . . . . . GENTRAN
User . . . . . . . . . . . . . . . EDI
Run Frequency. . . . . . . . . . . 1
Run Occurrence . . . . . . . . . . D
Status . . . . . . . . . . . . . .
Message Queue. . . . . . . . . . . EDI
Run Start Date/Time/Stop Date. . . 04/30/08 12:00:00 04/30/08
Command
STRCOMSSN PROFIL('CN3BSC') SSN(SO) DELETE('*YES') SCHED(*NO) CONT('*NO') TR
Normal Completion Cmd to Execute
Abnormal Completion Cmd to Execute
F1=Help F4=Prompt F11=Delete F12=Cancel F24=More Keys
Cursor in protected area of display.

Use the Job Scheduler Panels Job Scheduler
16 - 20 Gentran:Server for iSeries Communications Module Release 3.5 User Guide
Manage Job Occurrence Records
Up until now, we have been working solely with the records in the Job Schedule Master file. The
Job Scheduler uses these “master” records to automatically create “Job Occurrence Records” in
the Job Scheduler. For example, in our scenario we set up parameters to schedule a CN3BSC job to
run one time each day at 2:00 p.m., starting from the current date, 04/30/08, (for the purpose of
defining a date for this example). As a result the Job Scheduler will create job occurrence records
for every scheduled run time for the CN3BSC job – one record for every day at 2:00 p.m. (See
“How are job occurrence records generated?” in the “Common Questions” section in this chapter
for more information.)
Gentran:Server Job Scheduler provides several features for working with the job occurrence
records. These features allow you to work not only with the occurrence records automatically
created by the Job Scheduler, but also lets you work with any occurrence record in the Job
Scheduler.
Tasks which can be performed include:
Access the Job Schedule Occurrence records
Update Job Schedule Occurrence records
Add Job Schedule Occurrence records
Delete Job Schedule Occurrence records
# NOTE
All additions, changes, and deletions of job schedule occurrence records on the Scheduler do
not affect the job master records on the Job Scheduler Master file. For example, if you
change a job record's execution commands on the Work with Scheduled Jobs panel
(EDIX409-FMT01), these parameter changes are for this occurrence only and are not
updated to the Job’s master parameters as they exist on the Job Scheduler Master file.

Job Scheduler Use the Job Scheduler Panels
Gentran:Server for iSeries Communications Module Release 3.5 User Guide 16 - 21
Access the Job Schedule Occurrence Records
The job schedule occurrence records may be viewed from the Work with Job Scheduler panel
(EDIX412-FMT01). Depending on how the option is selected, you may choose to view all the job
schedule occurrence records or only those occurrence records associated with a single Job
Schedule Master file record.
The Work with Scheduled Entries panel (EDIX409-FMT01) will appear as shown in the following
figure. The features pertaining to working with the Job Schedule occurrence records are accessed
by using the options available on the Work with Job Scheduler panel (EDIX412-FMT01) as
illustrated in Figure 16.10.
Figure 16.10 The Work with Scheduled Entries panel (EDIX409-FMT01)
To view all Job Schedule Occurrence records for a particular job, type 11 on the Work with Job
Scheduler panel (EDIX412-FMT01) next to the Job Scheduler Master record you want to view and
press Enter. The Work with Scheduled Entries panel (EDIX409-FMT01) will be displayed with
the occurrences of the selected job.
EDIX412 Work with Job Scheduler EDI 04/30/08
FMT01 pgmlib: G3X5PGM dtalib: G3X5DTA 12:00:00
Position to Job Name . . . . . . . CN3BSC Seq
Type option (and Information), press Enter.
1=Create 2=Revise 3=Copy 4=Delete 5=View 11=Sch. Entries
Opt Job Name Seq St Start Time End Freq Occurrence
11 CN3BSC 1 04/30/08 17:08:30 04/30/08 1 DAY
CN3BSC 2 04/30/08 17:10:14 *PERPETUAL 1 DAY
CN3BSC 3 04/30/08 15:30:00 *PERPETUAL 1 DAY
EDIX409 Work with Scheduled Entries EDI 04/30/08
FMT01 pgmlib: G3X5PGM dtalib: G3X5DTA 12:00:00
Position to Date . . . . . . . . . Time For CN3BSC 001
Type option (and Information), press Enter.
1=Create 2=Revise 3=Copy 4=Delete 5=View
Opt Date Time St Job Desc Msg User Job Numb Day of Week
04/30/08 12:00:00 GENTRAN EDI EDI 0 WEDNESDAY
04/30/08 09:00:00 GENTRAN EDI EDI 0 WEDNESDAY
04/30/08 12:00:00 GENTRAN EDI EDI 0 THURSDAY
04/30/08 12:00:00 GENTRAN EDI EDI 0 FRIDAY
04/30/08 12:00:00 GENTRAN EDI EDI 0 FRIDAY
Bottom
Parameters or command
===>
F1=Help F3=Exit F12=Cancel F15=Sort F24=More Keys

Use the Job Scheduler Panels Job Scheduler
16 - 22 Gentran:Server for iSeries Communications Module Release 3.5 User Guide
You can use the Job Status field to determine the exact processing status of each job. The status
code value will indicate that the job has completed running or was just submitted for execution. If
it completed normally or abnormally, the completion instructions used by the system in either
event would be displayed, whether it was manually placed on “hold” to temporarily prevent it
from running, or manually added to the Job Scheduler queue (and does not exist on the Master
File).
If you chose to see job occurrences for all jobs (by typing 11 on the key entry line on
EDIX412-FMT01), you can access the Date/Time alternate sort option by pressing F15 (Sort).
You can use this option to see the next job to be run, regardless of job name; or use it to view all
job occurrences for a particular day.
Keep in mind that the Work with Scheduled Entries panel (EDIX409-FMT01) allows you to take
an interactive “snapshot” of the job schedule occurrence records as they exist on the Job
Scheduler. As jobs are initiated, the Scheduler assigns them a Job Number. The Job Status field
will remain blank until after the job has been executed.
Field Descriptions
Date
This field defines the job run start date. You must enter the date based on the format in
your Gentran:Server user profile in the Environment Control subsystem.
Time
This field defines the job run start time. Format is HHMMSS in 24-hour military time.
St (Job Status)
This field displays the current processing status of the job. You may change the status of
an unprocessed job (blank status) to temporarily suspend it by entering a value of H in this
field. Processing status code values are:
NN The job has been executed and the first command ended normally and a
normal completion command existed which is also executed normally.
NA The job has been executed and the first command ended normally and a
normal completion command existed which terminated abnormally.
NX The job has been executed and the first command ended normally and no
normal completion or abnormal completion commands existed.
AA The job has been executed and the first command ended abnormally and an
abnormal completion existed command which also terminated abnormally.
AN The job has been executed and the first command ended abnormally and an
abnormal completion command existed which terminated normally.
AX The job has been executed and the first command ended abnormally and no
normal completion or abnormal completion commands existed.
SThe job is in the process of being submitted.

Job Scheduler Use the Job Scheduler Panels
Gentran:Server for iSeries Communications Module Release 3.5 User Guide 16 - 23
SB The job has been submitted for processing and is currently running or the job
was abruptly terminated while executing with no recovery possible.
HA user can place the job on hold which temporarily suspends processing. This
will also prevent completed jobs from being purged.
ER An error has occurred. Either the user profile, message queue, or job
description was not previously defined to the system.
ES Error on Submit Job. The Scheduler encountered an error on the submit job
command for this job. The job could not be submitted.
BLANK The job has not started.
Job Desc
This field defines the job description under which the job will run. You may change this
job description if you choose to add more libraries to the library list, or you may change
the subsystem in which the jobs are run by changing the job queue. This field defaults to
the job description defined by the Gentran:Server user profile in the Environment Control
subsystem.
Msg (Queue)
This field defines the secondary message queue to which any messages generated by this
occurrence of the job run will be (have been) sent.
User
This field defines the iSeries user profile of the person who created the job processing
record, either by creating a job schedule, or by manually placing the specified job on the
scheduling queue.
Job Numb
This field displays the job number assigned by the system when it began processing the
job.
Day of Week
Shows the day of the week the job is scheduled to run. This field is only displayed if this
panel was accessed for a specific job (that is, not from the key entry line), as shown in
Figure 16.10.
Update a Job Occurrence Record
You may update a job schedule occurrence record on the Job Scheduler using the Work with
Scheduled Entries panel (EDIX409-FMT01). For example, you may need to change an execution
command parameters for a particular job or you may need to change the status of an occurrence
record to place it on hold.
# NOTE
Changes you make to the job schedule occurrence records on the Job Scheduler do not update
the master parameter information for the job on the Job Scheduler Master file.

Use the Job Scheduler Panels Job Scheduler
16 - 24 Gentran:Server for iSeries Communications Module Release 3.5 User Guide
By placing a job schedule occurrence record on hold, you may temporarily suspend its future
processing. You may also use the hold status to prevent an initiated job schedule occurrence record
(a job that has already been run) from being removed from the Job Scheduler queue during a
purge.
The Job Schedule panel (EDIX413-FMT01) displays as shown in the next figure.
Figure 16.11 The Job Schedule panel (EDIX413-FMT01)
Type 2 (Revise) next to the Occurrence record you want to update and press Enter, as shown in
Figure 16.11.
Make any necessary changes (you cannot change the Date or Time) and press F10 (Update).
# NOTE
Remember, when updating the record, you must remove the current status code (if a code
exists) so that the system recognizes that the record still needs to be executed.
EDIX409 Work with Scheduled Entries EDI 04/30/08
FMT01 pgmlib: G3X5PGM dtalib: G3X5DTA 12:00:00
Position to Date . . . . . . . . . Time For CN3BSC 001
Type option (and Information), press Enter.
1=Create 2=Revise 3=Copy 4=Delete 5=View
Opt Date Time St Job Desc Msg User Job Numb Day of Week
04/30/08 12:00:00 GENTRAN EDI EDI 0 TUESDAY
04/30/08 09:00:00 GENTRAN EDI EDI 0 WEDNESDAY
2 04/30/08 12:00:00 GENTRAN EDI EDI 0 WEDNESDAY
04/30/08 12:00:00 GENTRAN EDI EDI 0 THURSDAY
04/30/08 12:00:00 GENTRAN EDI EDI 0 FRIDAY
Bottom
Parameters or command
===>
EDIX413 Job Schedule EDI 04/30/08
FMT01 12:00:00
Job Name . . . . . . . . . . . . . CN3BSC
Date . . . . . . . . . . . . . . . 04/30/08
Time . . . . . . . . . . . . . . . 12:00:00
Status . . . . . . . . . . . . . . H
Job Description. . . . . . . . . . GENTRAN
Message Queue. . . . . . . . . . . EDI
User . . . . . . . . . . . . . . . EDI
Job Number . . . . . . . . . . . .
Day of Week WEDNESDAY
Command
STRCOMSSN PROFIL (‘CN3BSC’) SSN(SP) DELETE(‘*YES’) SCHED (*NO) CONT(‘*NO’) TRA
Normal Completion Cmd to Execute
Abnormal Completion Cmd to Execute
F1=Help F4=Prompt F10=Update F12=Cancel F24=More Keys

Job Scheduler Use the Job Scheduler Panels
Gentran:Server for iSeries Communications Module Release 3.5 User Guide 16 - 25
Add a Job Occurrence Record
You may create or add by copying a job schedule occurrence record to the Job Scheduler using the
Work with Scheduled Entries panel (EDIX409-FMT01). This situation may occur if you need to
run a job that is not currently scheduled, or has a scheduled date/time that is different than the
date/time you currently need to run the job. Adding jobs to the Job Scheduler is typically reserved
for special one-time job runs where scheduled run routines are impossible to predict and cannot be
established.
Figure 16.12 Add an entry to the Job Schedule
To add a job schedule occurrence record to the Job Scheduler:
Type 3 (Copy) next to any existing entry on the Work with Scheduled Entries panel
(EDIX409-FMT01) and press Enter.
On the Copy To, type the date and time for the new occurrence record you want to add and
press Enter, as shown in Figure 16.12. The date can be entered with or without date separators
but must be in the user’s date format.
EDIX409 Work with Scheduled Entries EDI 04/30/08
FMT01 pgmlib: G3X5PGM dtalib: G3X5DTA 12:00:00
Position to Date . . . . . . . . . Time For CN3BSC 001
Type option (and Information), press Enter.
1=Create 2=Revise 3=Copy 4=Delete 5=View
Opt Date Time St Job Desc Msg User Job Numb Day of Week
04/30/08 12:00:00 NX GENTRAN EDI EDI 0 TUESDAY
04/30/08 09:00:00 NX GENTRAN EDI EDI 0 WEDNESDAY
3 04/30/08 12:00:00 H GENTRAN EDI EDI 0 WEDNESDAY
Copy To
040102 180000
F3=Exit F12=Cancel
Parameters or command
===>
F1=Help F3=Exit F12=Cancel F15=Sort F24=More Keys
Cancel request complete. No data updated.

Use the Job Scheduler Panels Job Scheduler
16 - 26 Gentran:Server for iSeries Communications Module Release 3.5 User Guide
The Job Schedule panel (EDIX413-FMT01) will display as shown in Figure 16.13.
Figure 16.13 New Occurrence Record
Create the command to execute, and if necessary, the command to execute upon a normal or
abnormal completion and press F10 (Update).
EDIX413 Job Schedule EDI 04/30/08
FMT01 12:00:00
Job Name . . . . . . . . . . . . . CN3BSC
Date . . . . . . . . . . . . . . . 04/30/08
Time . . . . . . . . . . . . . . . 18:00:00
Status . . . . . . . . . . . . . .
Job Description. . . . . . . . . . GENTRAN
Message Queue. . . . . . . . . . . EDI
User . . . . . . . . . . . . . . . EDI
Job Number . . . . . . . . . . . .
Day of Week. . . . . . . . . . . . MONDAY
Command
STRCOMSSN PROFIL('CN3BSC') SSN(SO) DELETE('*YES') SCHED(*NO) CONT('*NO') TR
Normal Completion Cmd to Execute
Abnormal Completion Cmd to Execute
F1=Help F4=Prompt F10=Update F12=Cancel F24=More Keys

Job Scheduler Use the Job Scheduler Panels
Gentran:Server for iSeries Communications Module Release 3.5 User Guide 16 - 27
Delete a Job Occurrence Record
You may also delete a job schedule occurrence record that currently exists on the Job Scheduler
using the Work with Scheduled Entries panel (EDIX409-FMT01). Remember, when you delete a
job schedule occurrence record on the Job Scheduler, you are not deleting its master record on the
Job Scheduler Master file.
The Job Schedule panel (EDIX413-FMT01) displays as shown in Figure 16.14.
Figure 16.14 Delete an entry in the Job Scheduler
To delete a job schedule occurrence record from the Job Scheduler, type 4 (Delete) next to the
occurrence record you wish to delete and press Enter. The Job Schedule panel (EDIX413-FMT01)
will be displayed. Press F11 (Delete).
EDIX409 Work with Scheduled Entries EDI 04/30/08
FMT01 pgmlib: G3X5PGM dtalib: G3X5DTA 12:00:00
Position to Date . . . . . . . . . Time For CN3BSC 001
Type option (and Information), press Enter.
1=Create 2=Revise 3=Copy 4=Delete 5=View
Opt Date Time St Job Desc Msg User Job Numb Day of Week
4 04/30/08 12:00:00 GENTRAN EDI EDI 0 TUESDAY
04/30/08 09:00:00 GENTRAN EDI EDI 0 WEDNESDAY
04/30/08 12:00:00 GENTRAN EDI EDI 0 WEDNESDAY
04/30/08 12:00:00 GENTRAN EDI EDI 0 THURSDAY
EDIX413 Job Schedule EDI 04/30/08
FMT01 12:00:00
Job Name . . . . . . . . . . . . . CN3BSC
Date . . . . . . . . . . . . . . . 04/30/08
Time . . . . . . . . . . . . . . . 12:00:00
Status . . . . . . . . . . . . . .
Job Description. . . . . . . . . . GENTRAN
Message Queue. . . . . . . . . . . EDI
User . . . . . . . . . . . . . . . EDI
Job Number . . . . . . . . . . . .
Day of Week TUESDAY
Command
STRCOMSSN PROFIL (‘CN3BSC’) SSN (SO) DELETE(‘*YES’) SCHED(*NO) CONT(‘*NO’) TR
Normal Completion Cmd to Execute
Abnormal Completion Cmd to Execute
F1=Help F4=Prompt F11=Delete F12=Cancel F24=More Keys

Use the Job Scheduler Panels Job Scheduler
16 - 28 Gentran:Server for iSeries Communications Module Release 3.5 User Guide
Purge the Job Schedule (PRGSCH)
Job schedule occurrence records are not deleted from the Job Scheduler queue after they are run.
They remain there until you purge them. Gentran:Server provides a feature for purging the Job
Scheduler of old occurrence records. This feature allows you to selectively purge groups of
occurrence records with a start date prior to a date you specified.
CAUTION
STOP
The Job Schedules subsystem (GENTRAN350) must be ended prior to executing the
PRGSCH command. Records cannot be purged while the schedule is still actively processing
scheduled jobs.
The Purge Job Schedule (PRGSCH) command appears as shown in Figure 16.15.
Figure 16.15 The Purge Job Schedule panel (PRGSCH)
To purge the Job Schedule, type 40 (Purge Schedule) on the key entry line or next to any job name
on the Work with Job Scheduler panel (EDIX412-FMT01) and press Enter.
Type the desired parameters in each field on the PRGSCH command. Press F1 (Help) for detailed
information about the parameters.
EDIX412 Work with Job Scheduler EDI 04/30/08
FMT01 pgmlib: G3X5PGM dtalib: G3X5DTA 12:00:00
Position to Job Name . . . . . . . Seq
Type option (and Information), press Enter.
40=Purge Schedule 41=Retv. Schedule
Opt Job Name Seq St Start Time End Freq Occurrence
40
CN3BSC 1 04/30/08 17:08:30 04/30/08 1 DAY
CN3BSC 2 04/30/08 17:10:14 *PERPETUAL 1 DAY
CN3BSC 3 04/30/08 15:30:00 *PERPETUAL 1 DAY
Purge Job Schedule (PRGSCH)
Type choices, press Enter.
Selection Criteria for Purge . . *DAYS *DATE, *DAYS, *ALL
Schedule Job ? . . . . . . . . . *NO *YES, *NO
Purge Method? . . . . . . . . . *NONE *TAPE, *SAVF, *NONE, *CL
Days to Retain on File . . . . . 0 Number
Additional Parameters
Run Interactively? . . . . . . . *NO *YES, *NO
Reorganize Files? . . . . . . . *YES *YES, *NO
Process Name . . . . . . . . . . PRGSCH
Bottom
F3=Exit F4=Prompt F5=Refresh F12=Cancel F13=How to use this display
F24=More keys

Job Scheduler Use the Job Scheduler Panels
Gentran:Server for iSeries Communications Module Release 3.5 User Guide 16 - 29
You can execute the purge job one of three ways: Type *Yes to use the Job Scheduler feature;
press Enter to immediately submit the job to your queue to run; or press F10 (Additional
parameters) and type *Yes for Run Interactively to run the purge job on your screen.
# NOTE
For more information about using the PRGSCH command, see the online help.

Use the Job Scheduler Panels Job Scheduler
16 - 30 Gentran:Server for iSeries Communications Module Release 3.5 User Guide
Retrieve the Job Schedule (RTVSCH)
The Retrieve Job Schedule (RTVSCH) command allows you to restore Job Schedule records from
tape or save file that have been previously purged to tape or save file with the PRGSCH command.
Figure 16.16 The Retrieve Job Schedule panel (RTVSCH)
To retrieve the Job Schedule, type 41 (Retv. Schedule) on the key entry line or next to any job
name on the Work with Job Scheduler panel (EDIX412-FMT01) and press Enter. Type the desired
parameters in each field on the RTVSCH command, as shown in Figure 16.16
You can execute the retrieve job one of three ways:
Type *Yes to use the Job Scheduler feature.
Press Enter to immediately submit the job to your queue to run.
Press F10 (Additional parameters) and type *YES for Run Interactively to run the retrieve job
on your screen.
# NOTE
For more information about using the RTVSCH command, see the online help.
EDIX412 Work with Job Scheduler EDI 04/30/08
FMT01 pgmlib: G3X5PGM dtalib: G3X5DTA 12:00:00
Position to Job Name . . . . . . . Seq
Type option (and Information), press Enter.
40=Purge Schedule 41=Retv. Schedule
Opt Job Name Seq St Start Time End Freq Occurrence
41
CN3BSC 1 04/30/08 17:08:30 04/30/08 1 DAY
CN3BSC 2 04/30/08 17:10:14 *PERPETUAL 1 DAY
CN3BSC 3 04/30/08 15:30:00 *PERPETUAL 1 DAY
PRCTRN
PRCTRN
PRGAUD
Paramete
===>
F1=Help
Retrieve Job Schedule (RTVSCH)
Type choices, press Enter.
Schedule Job File . . . . . . . SCHJOB Character value
Schedule Master File . . . . . . SCHMST Character value
Library . . . . . . . . . . . . G3X5DTA Character value
Retrieve Method . . . . . . . . *TAPE, *SAVF
Additional Parameters
Run Interactively? . . . . . . . *NO *YES, *NO
Bottom
F3=Exit F4=Prompt F5=Refresh F12=Cancel F13=How to use this display
F24=More keys

Job Scheduler Common Questions
Gentran:Server for iSeries Communications Module Release 3.5 User Guide 16 - 31
Common Questions
How are job occurrence records generated?
When you schedule a job, Gentran:Server creates job occurrence records through the Stop Date or
the schedule-thru date in the SCHEDULER data area, whichever comes first. The data area is
located in the Gentran:Server data library (G35DTA). When the iSeries system date is equal to the
schedule-thru date in the SCHEDULER data area, Gentran:Server automatically generates a new
schedule-thru date by adding to this date the number of days in the first three positions of the data
area. Then for all active schedules, Gentran:Server creates job occurrence records through the new
schedule thru date for all schedules with an active status, including those with a stop date of
*PERPETUAL. If the Stop Date is less than the new schedule-thru date, Gentran:Server only
generates occurrence records through the Stop Date.
# NOTE
The Gentran:Server subsystem GENTRAN350 must be active and the autostart job
SCHEDULER must be running to generate new job occurrence records.
My jobs are scheduled – why don’t they run?
Figure 16.17 can be used as a quick reference for determining why jobs are not scheduling.
Following the flow chart, there are four examples that will assist you in reading and resolving the
most common problems found in the joblogs, and provide detailed instructions for verifying the
setup of the GENTRAN350 system. Throughout these examples it is assumed the Gentran data
library is G35DTA. If your Gentran data library has a different name, substitute that name
everywhere G35DTA is specified.
Common Questions Job Scheduler
16 - 32 Gentran:Server for iSeries Communications Module Release 3.5 User Guide
Figure 16.17 Find out why scheduled jobs are not running
Example 1: Why am I getting the error “QPGMR not authorized to object XXX”
(where XXX is an iSeries user ID)?
The Scheduler job runs under the user profile QPGMR. Therefore, when the Scheduler job tries to
submit a job that was scheduled using another user profile, QPGMR has to have authority to that
user profile. When you schedule a job from the Job Schedule Master panel, the default user ID is
the user ID of the current user. The iSeries user profile of the current user, or whatever user ID is
specified, must be set up with QPGMR having *USE authority to that user profile. To resolve the
above error, specify a user ID of QPGMR when scheduling jobs on the Job Schedule Master panel
or change the object authority for the user ID specified to allow QPGMR authority. To change
object authority, use the iSeries command:
EDTOBJAUT OBJ(*LIBL/<user id) OBJTYPE(*USRPRF).
WRKACTJOB
Is the GENTRAN350
subsystem running?
Yes
No
Is scheduler job
running under
GENTRAN350?
5. Work with Scheduler Job
10. Display joblog
F10 Expanded Info
F18 Go to bottom, any errors?
STRSBS GENTRAN350
WRKSPLF QPGMR
Look for Scheduler
joblog
Display last joblog for
Job Scheduler.
Look for error that caused
job to end.
Found
Yes
No
WRKACTJOB
Not
Found
5. Work with GENTRAN350
subsystem
10. Display joblog
F10 Expanded Info

Job Scheduler Common Questions
Gentran:Server for iSeries Communications Module Release 3.5 User Guide 16 - 33
Example 2: Why do I get the error “WAKEUP data queue not found”?
The WAKEUP data queue is used by the Scheduler job to wake it up when it is time to submit a
scheduled job. If the WAKEUP data queue is not in the G35DTA library, create it. To do this, use
the iSeries command CRTDTAQ as follows:
CRTDTAQ DTAQ(G35DTA/WAKEUP) MAXLEN(64512) SEQ(*FIFO)
Example 3: Why do I get the error “Program ROUTERCL not found in current
library list”?
This error may show up in the Scheduler joblog, the GENTRAN350 subsystem joblog, or in the
joblog of a job that was submitted by the Scheduler. Ensure that the G35DTA and G35PGM
libraries are in the initial library list for all job descriptions that are being used. The Scheduler job
uses the job description SCHEDULER. Use the DSPJOBD command for the job description
SCHEDULER. Make sure that G35DTA and G35PGM are in the library list. The job being
scheduled uses the job description specified on the Work with Scheduled Entries panel
(EDIX409-FMT01) and the Work with Job Scheduler panel (EDIX412-FMT01). The default is the
job description in environment control, but the users may have specified their own job description.
Use the DSPJOBD command on the job description specified for the scheduled entry, and make
sure G35DTA and G35PGM are in the initial library list. If the library list needs to be changed, you
can do so by prompting the iSeries command CHGJOBD and modifying the INLLIBL (Initial
Library List).
Example 4: Why can’t I start an autostart job?
This error or something similar may show up in the joblog for the GENTRAN350 subsystem. This
is most likely a problem with library names within the subsystem. You will need to go through the
GENTRAN350 subsystem description and verify library names in the autostart entry, job queue
entries, and routing entries. If one is wrong, you will most likely have to change them all.

Common Questions Job Scheduler
16 - 34 Gentran:Server for iSeries Communications Module Release 3.5 User Guide

Chapter
Gentran:Server for iSeries Communications Module Release 3.5 User Guide 17 - 1
17 System Configuration
File
In this Chapter
This chapter is intended for the System Administrator, and covers the following topics:
¾What is the System Configuration File? ........................................................................ 17-2
¾Use the System Configuration Menu............................................................................. 17-4

What is the System Configuration File? System Configuration File
17 - 2 Gentran:Server for iSeries Communications Module Release 3.5 User Guide
What is the System Configuration File?
The System Configuration file (SYSCFG) contains system configuration information used by
Gentran:Server to determine how online information should be displayed and/or configured. The
SYSCFG file resides in the Gentran data library. You can use the iSeries command DSPFFD
FILE(SYSCFG) to see a complete list of the fields. The parameters included in the file that relate
to the Communications Module and their functions are shown in this table.
Parameter
(Field Name) Function
Set Gentran Break
Year
(SCY2K)
When no century is provided in data, break year is used to determine
century. The system default is 40.
Set Gentran Date
Format for
Commands
(SCDTFMT)
The format to be used for dates displayed and entered on command panels.
The system default is *ENVCTL.
Set Inbound
Queue Sort
Option
(SETINBQSRT)
This command enables you to define the default sort option for the Work
with Inbound Queue Control screen (EDIX407).
Set Outbound
Queue Sort
Option
(SETOUTQSRT)
This command enables you to define the default sort option for the Work
with Outbound Queue Control screen (EDIX404).
Set Comm History
Log Sort Option
(SETCOMHSRT)
This command enables you to define the default sort option for the Work
with Comm History screen (EDIX406).
Set Job Scheduler
Sort Option
(SETJOBSSRT)
This command enables you to define the default sort option for the Work
with Job Scheduler screen (EDIX412).
Set Gentran File
Tracking Sort
(SETFTRKSRT)
This command enables you to define the default sort option for the Gentran
File Tracking System screen (EDIX650).
Set W/W
Communications
(SETCOMMSRT)
This command enables you to define the default sort option for the Work
with Communications screen (EDIX400).

System Configuration File What is the System Configuration File?
Gentran:Server for iSeries Communications Module Release 3.5 User Guide 17 - 3
)RECOMMENDATION
The System Configuration file should be regarded as a high security file. Modifications to it
should be made with care and access to it should probably be limited to your EDI System
Administrator.
The parameters can be accessed through the System Configuration menu in the Gentran:Server for
iSeries Communications menu. The System Configuration menu is discussed in the next section.

Use the System Configuration Menu System Configuration File
17 - 4 Gentran:Server for iSeries Communications Module Release 3.5 User Guide
Use the System Configuration Menu
The System Configuration menu enables you to set options on the System Configuration file
(SYSCFG). The System Configuration file is located in the Gentran data library (G35DTA) and
contains information about how your EDI system is set up. The fields being used in this release are
detailed in this section. Other fields are reserved for future use.
Figure 17.1 Select the System Configuration Menu from GENMAIN
Select option 4 from the GENMAIN menu, as shown in Figure 17.1, and press Enter.
GENMAIN Gentran:Server for iSeries Communications 3.5
System: ISDDEV01
Select one of the following:
1. Communications Menu (GENCOM)
2. Work with Job Scheduler
3. Work with Environment Control
4. System Configuration Menu (GENSYSCFG)
10. Gentran:Server Search Index
13. Gentran File Tracking Menu (GENFILETRK)
90. Sign off
Bottom
Selection or command
===>4
F3=Exit F4=Prompt F9=Retrieve F12=Cancel F13=User Support

System Configuration File Use the System Configuration Menu
Gentran:Server for iSeries Communications Module Release 3.5 User Guide 17 - 5
The Gentran:Server System Configuration (Comm) menu is displayed, as shown in Figure 17.2.
Figure 17.2 Gentran:Server System Configuration (Comm) menu (GENSYSCFG)
# NOTE
The System Configuration menu can also be accessed by using the command GO
GENSYSCFG.
To select one of the options on the System Configuration menu, type the option number on the
command line and press Enter. The command panel for the option chosen will be displayed next.
Each of the options on the System Configuration menu is described in this section.
)RECOMMENDATION
When selecting the options from the System Configuration menu, driver programs are used
to retrieve the current value for the option and are then displayed on the command. If you
update the option using the command from the command line instead of this menu, the
current value will not be displayed.
GENSYSCFG Gentran:Server System Configuration (Comm) 3.5
System: ISDDEV01
Select one of the following:
1. Set Gentran Break Year (SETGENYR)
2. Set Gentran Date Format for Commands (SETGENFMT)
10. Set Inbound Queue Sort Option (SETINBQSRT)
11. Set Outbound Queue Sort Option (SETOUTQSRT)
12. Set Comm History Log Sort Option (SETCOMHSRT)
13. Set Job Scheduler Sort Option (SETJOBSSRT)
14. Set File Tracking Sort Option (SETFTRKSRT)
15. Set W/W Communications Sort Option (SETCOMMSRT)
90. Sign off
Selection or command
===>
F3=Exit F4=Prompt F9=Retrieve F12=Cancel F13=User Support
(C) COPYRIGHT Sterling Commerce Inc., 2008, ALL RIGHTS RESERVED.

Use the System Configuration Menu System Configuration File
17 - 6 Gentran:Server for iSeries Communications Module Release 3.5 User Guide
Set Gentran Break Year
What is the “Break Year?”
The break year is the year that determines to which century the year belongs. If the input date is
less than the break year, it is determined to be in the 2000s and is assigned a century of 20 or 1.
Otherwise, it is determined to be in the 1900s and is assigned a century of 19 or 0.
The default break year is consistent with the IBM cut off year of 40.
All internal processing of dates in Gentran:Server must include the century to ensure the integrity
of processing. The dates are handled internally in one of two ways:
In the format YYYYMMDD (uses a 2-digit century)
In the format CYYMMDD (uses a 1-digit century)
Break Year Examples
The following are examples of various input dates and the resulting date determined by
Gentran:Server. Examples are shown in *YMD format with and without the century and assume the
default break year of 40.
Input date Input Date Format Gentran date
(yyyymmdd)
980301 yymmdd 199880301
199990412 yyyymmdd 19990412
1000101 cyymmdd 20000101
301215 yymmdd 20301215
800828 yymmdd 19800828
20151101 yyyymmdd 20151101

System Configuration File Use the System Configuration Menu
Gentran:Server for iSeries Communications Module Release 3.5 User Guide 17 - 7
Figure 17.3 Set Gentran Break Year Command
Field Description
Set Gentran Break Year
Select this option to set the break year for Year 2000 processing.
If Gentran:Server encounters a 2-digit date during online or batch processing, the break
year determines which century to use.
If a date has a year that is lower than that of the break year, Gentran:Server will use 20 as
the 2-digit century and 1 as the 1-digit century. For example, if the break year is 40 and
the date being evaluated has a year of 17, the values 20’ and 1 would be used as the
century, resulting in 2017 or 117.
If a date has a year that is greater than or equal to that of the break year, Gentran:Server
will use 19 as the 2-digit century and 0 as the 1-digit century. For example, if the break
year is 40 and the date being evaluated has a year of 52, the values 19 and 0 would be
used as the century, resulting in 1952 or 052.
Set Gentran Break Year (SETGENYR)
Type choices, press Enter.
Gentran Break Year . . . . . . . > 40 Break Year
Bottom
F3=Exit F4=Prompt F5=Refresh F12=Cancel F13=How to use this display
F24=More keys

Use the System Configuration Menu System Configuration File
17 - 8 Gentran:Server for iSeries Communications Module Release 3.5 User Guide
Set Gentran Date Format
What is the Gentran Date Format?
The Gentran system can be configured to allow dates to be entered on commands in any format
desired.
Default Format
For new users, the system default is *ENVCTL, which indicates that the format from the
Environment Control user profile is used.
Sample Panel
Figure 17.4 shows the Set Gentran Date Format command panel.
Figure 17.4 Set Gentran Date Format Command
Valid Values
The valid values for Date Format field are described in this table.
Date Format
Value Description
*JOB The date has the format specified by the job attribute, DATFMT.
*SYSVAL The date has the format specified by the system value, QDATFMT.
*ENVCTL The date has the format specified by the date format specified in the
Environment Control for the user.
*MDY The date has the month, day, year format: mmddyy.
Set Gentran Date Format (SETGENFMT)
Type choices, press Enter.
Gentran Date Format . . . . . . > *ENVCTL *JOB, *SYSVAL, *ENVCTL...
Bottom
F3=Exit F4=Prompt F5=Refresh F12=Cancel F13=How to use this display
F24=More keys

System Configuration File Use the System Configuration Menu
Gentran:Server for iSeries Communications Module Release 3.5 User Guide 17 - 9
To see these values on the command panel, press F4 (Prompt) with the cursor positioned in the
Date Format field.
*MDYY The date has the month, day, year format: mmddyyyy.
*DMY The date has the day, month, year format: ddmmyy.
*DMYY The date has the day, month, year format: ddmmyyyy.
*YMD The date has the year, month, day format: yymmdd.
*YYMD The date has the year, month, day format: yyymmdd.
*JUL The date has the julian format: yyddd.
*LONGJUL The date has the long julian format: yyyyddd.
*USA The date has the United States date format: mm/dd/yyyy.
*EUR The date has the European date format, dd.mm.yyyy.
*ISO The date has the International Organization for Standardization (ISO)
date format: yyyy-mm-dd.
*JIS The date has the Japanese Industrial Standard (JIS) date format:
yyy-mm-dd.
*CYMD The date has the century, year, month, day format: cyymmdd, where c is
0 for years in the 1900’s and is 1 for years in the 2000’s.
Date Format
Value Description

Use the System Configuration Menu System Configuration File
17 - 10 Gentran:Server for iSeries Communications Module Release 3.5 User Guide
Set the Gentran File Tracking Sort Option
Use the option to set the default sort option for the Work with gentran File Tracking panel
(EDIX650).
Who is impacted by this option?
Changing the default sort option impacts all users in the same Gentran:Server environment.
Sample Panel
Figure 17.5 illustrates the Set Gentran File Tracking Sort command panel. The system default is
Date, Time.
Figure 17.5 Set Gentran File Tracking Sort Order (SETFTRKSRT)
Set Gentran File Tracking Sort (SETFTRKSRT)
Type choices, press Enter.
Date/Time . . . . . . . . . . . > *YES *NO, *YES
Program/Date/Time . . . . . . . > *NO_ *NO, *YES
Subsystem/Date/Time . . . . . . > *NO_ *NO, *YES
User/Date/Time . . . . . . . . . > *NO_ *NO, *YES
Bottom
F3=Exit F4=Prompt F5=Refresh F12=Cancel F13=How to use this display
F24=More keys

Chapter
Gentran:Server for iSeries Communications Module Release 3.5 User Guide 18 - 1
18 Gentran File Tracking
In this Chapter
This chapter describes setting up, viewing, and using the Audit File tracking system for
Gentran:Server. The chapter covers the following topics:
¾What is Gentran File Tracking? ..................................................................................... 18-1
¾Panel Quick Reference................................................................................................... 18-2
¾Access the Gentran File Tracking Subsystem................................................................ 18-3
¾Configure Gentran File Tracking ................................................................................... 18-5
¾Work with Gentran File Tracking .................................................................................. 18-8
¾Print the Gentran File Tracking Report........................................................................ 18-18
¾Purge the File Tracking Entries (PRGFILETRK)........................................................ 18-23
¾Retrieve the Gentran File Tracking Entries (RTVFILETRK)...................................... 18-27
¾Reports ......................................................................................................................... 18-30
What is Gentran File Tracking?
Gentran:Server File Tracking is a method to monitor all changes that are made to the Gentran File
System. Any time a Gentran field or file is modified, an entry is recorded in the Gentran File
Tracking system. These entries can be viewed or printed for audit purposes. The user can
configure this system to capture all, none, or selected subsystems for file tracking.

Panel Quick Reference Gentran File Tracking
18 - 2 Gentran:Server for iSeries Communications Module Release 3.5 User Guide
Panel Quick Reference
The following table gives the purpose and access methods for the panels in the File Tracking
system.
Panel Name Purpose Access Methods
GENFILETRK
Gentran:Server File
Tracking Menu
Select an option to work with
the File Tracking Subsystem.
Select option ‘13’ on the GENMAIN menu.
Type ‘GO GENFILETRK’ on the
command line.
EDIX650-FMT01
Work with Gentran
File Tracking
Display the Work with
Gentran File Tracking entries.
Select option ‘1’ from the GENFILETRK
menu.
Type ‘EXCPGM EDIX650’ on the
command line.
EDIX651-FMT01
File Tracking Detail
View detailed information
about the item that was
modified in the Gentran file.
Select option ‘5’ on panel
EDIX650-FMT01.
EDIX660-FMT01
Gentran File
Tracking
Configuration
Display the configuration
panel for Gentran File
Tracking.
Select option ‘2’ on the GENFILETRK
menu.
Type ‘EXCPGM EDIX660’ on the
command line.
PRTFILETRK
Print Gentran File
Tracking entries
Print selected list of File
Tracking entries.
Select option ‘3’ on the GENFILETRK
menu.
Select option ‘30’ on panel
EDIX650-FMT01.
Type ‘PRTFILETRK’ on the command
line.
PRGFILETRK
Purge Gentran File
Tracking entries
Perform routine
housekeeping purges on the
File Tracking entries.
Select option ‘4’ on the GENFILETRK
menu.
Select option ‘40’ on panel
EDIX650-FMT01.
Type ‘PRGFILETRK’ on the command
line.
RTVFILETRK
Retrieve Gentran File
Tracking entries
Retrieve the Gentran File
Tracking entries from tape or
save file.
Select option ‘5’ on the GENFILETRK
menu.
Select option ‘41’ on panel
EDIX650-FMT01.
Type ‘RTVFILETRK’ on the command
line.

Gentran File Tracking Access the Gentran File Tracking Subsystem
Gentran:Server for iSeries Communications Module Release 3.5 User Guide 18 - 3
Access the Gentran File Tracking Subsystem
The Gentran File Tracking Menu (GENFILETRK) is the starting point for all the tasks associated
with configuring, viewing, and monitoring the File Tracking utility. From this panel, you can go to
the Work with Gentran File Tracking entries, Configure the Gentran File Tracking, Print, Purge,
and Retrieve the File tracking entries
To access the Gentran File Tracking menu, select option '13' (Gentran File Tracking Menu) on the
Gentran:Server for iSeries menu (GENMAIN).
Figure 18.1 Access the Gentran File Tracking Menu from GENMAIN
GENMAIN Gentran:Server for iSeries Communications 3.5
System: ISDDEV01
Select one of the following:
1. Communications Menu (GENCOM)
2. Work with Job Scheduler
3. Work with Environment Control
4. System Configuration Menu (GENSYSCFG)
10. Gentran:Server Search Index
13. Gentran File Tracking Menu (GENFILETRK)
90. Sign off
Bottom
Selection or command
===>13
F3=Exit F4=Prompt F9=Retrieve F12=Cancel F13=User Support

Access the Gentran File Tracking Subsystem Gentran File Tracking
18 - 4 Gentran:Server for iSeries Communications Module Release 3.5 User Guide
The Gentran File Tracking Menu (GENFILETRK) is displayed.
Figure 18.2 Gentran:Server File Tracking (GENFILETRK) panel
GENFILETRK Gentran:Server File Tracking 3.5
System: IV5R2
Select one of the following:
1. Work with Gentran File Tracking
2. Gentran File Tracking Configuration
3. Print File Tracking Entry Report (PRTFILETRK)
4. Purge Gentran File Tracking Files (PRGFILETRK)
5. Retrieve Gentran File Tracking Files (RTVFILETRK)
90. Sign off
Selection or command
===>
F3=Exit F4=Prompt F9=Retrieve F12=Cancel F13=User Support

Gentran File Tracking Configure Gentran File Tracking
Gentran:Server for iSeries Communications Module Release 3.5 User Guide 18 - 5
Configure Gentran File Tracking
Use of the File Tracking is controlled through the Gentran File Tracking Configuration panel. You
can globally turn on or off the File Tracking and select the specific subsystems that you wish to
monitor from this screen.
To access the Configuration screen, select option '2' (Gentran File Tracking Configuration) from
the Gentran:Server File Tracking Menu (GENFILETRK) as shown in the following figure:
Figure 18.3 Access the Gentran File Tracking Configuration panel from GENFILETRK
GENFILETRK Gentran:Server File Tracking 3.5
System: IV5R2
Select one of the following:
1. Work with Gentran File Tracking
2. Gentran File Tracking Configuration
3. Print File Tracking Entry Report (PRTFILETRK)
4. Purge Gentran File Tracking Files (PRGFILETRK)
5. Retrieve Gentran File Tracking Files (RTVFILETRK)
90. Sign off
Selection or command
===> 2_______________________________________________________________________
_____________________________________________________________________________
F3=Exit F4=Prompt F9=Retrieve F12=Cancel F13=User Support

Configure Gentran File Tracking Gentran File Tracking
18 - 6 Gentran:Server for iSeries Communications Module Release 3.5 User Guide
Modify the Gentran File Tracking Configuration
The Gentran File Tracking Configuration panel (EDIX660-FMT01) displays with the default
values. This panel and the default values are illustrated below:
Figure 18.4 Gentran File Tracking Configuration panel (EDIX660-FMT01)
Field Descriptions
Activate Gentran File Tracking
This parameter is used to turn on or off the entire File Tracking. To use the File Tracking
utility, type 'Y' in this field. This activates File Tracking and allows you to select the
desired subsystems you wish to monitor. If you wish to stop all File Tracking, type 'N' in
this field and File Tracking will be disabled.
By using this field to turn the File Tracking on and off, you do not have to turn off each
individual subsystem to disable the File Tracking Utility.
EDIX660 Gentran File Tracking Configuration XXX 2008/04/30
FMT01 12:00:00
Activate Gentran File Tracking . . N (Y/N)
Subsystem Select (Y/N)
Partner. . . . . . . . . . . . . N
Application. . . . . . . . . . . N
Transaction Mapping. . . . . . . N
Communication. . . . . . . . . . N
Standards. . . . . . . . . . . . N
Environmental Control. . . . . . N
Message Center . . . . . . . . . N
Processing . . . . . . . . . . . N
System Administration. . . . . . N
Viewpoint. . . . . . . . . . . . N
Gentran File Tracking. . . . . . N
Update Allowed . . . . . . . . . Y
F1=Help F5=Refresh F10=Update F12=Cancel

Gentran File Tracking Configure Gentran File Tracking
Gentran:Server for iSeries Communications Module Release 3.5 User Guide 18 - 7
Partner
Application
Transaction Mapping
Communication
Standards
Environmental Control
Message Center
Processing
System administration
Viewpoint
Gentran File Tracking
These fields represent each Subsystem that can be monitored in the File Tracking utility.
Valid values are:
Y‘Yes’ activates the subsystem for File Tracking. Each time a
Gentran field is modified in that subsystem, an entry will be
recorded in the File Tracking system, giving detail information
about the before and after information.
N‘No’ disables File Tracking for that subsystem. ‘No’ is the
default.
Update Allowed
Determines whether or not you can update this panel.
Y‘Yes’ allows the user to modify this panel. ‘Yes’ is the default.
N ‘No’ does not allow any modifications to this panel.

Work with Gentran File Tracking Gentran File Tracking
18 - 8 Gentran:Server for iSeries Communications Module Release 3.5 User Guide
Work with Gentran File Tracking
To access the Work with Gentran File Tracking panel, select option '1' (Work with Gentran File
Tracking) on the Gentran:Server File Tracking (GENFILETRK) menu.
Figure 18.5 Access Work with Gentran File Tracking from GENFILETRK
All tracked changes that have occurred to Gentran files are available from the Work with Gentran
File Tracking panel.
Figure 18.6 The Work with Gentran File Tracking panel (EDIX650-FMT01) display
GENFILETRK Gentran:Server File Tracking 3.5
System: IV5R2
Select one of the following:
1. Work with Gentran File Tracking
2. Gentran File Tracking Configuration
3. Print File Tracking Entry Report (PRTFILETRK)
4. Purge Gentran File Tracking Files (PRGFILETRK)
5. Retrieve Gentran File Tracking Files (RTVFILETRK)
90. Sign off
Selection or command
===> 1______________________________________________________________________
____________________________________________________________________________
F3=Exit F4=Prompt F9=Retrieve F12=Cancel F13=User Support
EDIX650 Work with Gentran File Tracking XXX 2008/04/30
FMT01 pgmlib: G3X5PGM dtalib: G3X5TSTDTA 12:00:00
Position to Date Time 00:00:00.00
Type option (and Information), press Enter.
4=Delete 5=View 6=Print 30=Prt FileTrk 40=Purge FileTrk 41=Rtv FileTrk
Opt Date Time User Program Subsystem Description
__ 2008/04/30 15:49:07 IH EDIX407A COMM Status of Batch cha
__ 2008/04/30 15:48:59 IH EDIX050 PARTNER Deleted Data Separa
__ 2008/04/30 15:48:37 IH EDIX050 PARTNER Added Data Separati
__ 2008/04/30 15:48:27 IH EDIX407A COMM Status of Batch cha
__ 2008/04/30 15:47:56 IH EDIX050 PARTNER Added Data Separati
__ 2008/04/30 15:47:33 IH EDIX407A COMM Status of Batch cha
__ 2008/04/30 15:46:49 IH EDIX055 PARTNER Reject Inbound Flag
__ 2008/04/30 15:46:49 IH EDIX055 PARTNER Reject Outbound Fla
__ 2008/04/30 15:46:46 IH EDIX055 PARTNER Reject Inbound Flag
More...
Parameters or command
===>
F1=Help F3=Exit F9=Retrieve F12=Cancel F15=Sort

Gentran File Tracking Work with Gentran File Tracking
Gentran:Server for iSeries Communications Module Release 3.5 User Guide 18 - 9
View the File Tracking Records
The Work with Gentran File Tracking panel (EDIX650-FMT01) is the starting point to view all
messages logged in the File Tracking Subsystem. This panel displays the primary information
associated with each entry in the File Tracking system.
Field Definitions
Date and Time
The date and time that the file/field was modified
User
The user who made the change
Program
The program through which the change was made
Subsystem
The subsystem in which the change was made
Description
A description of the change that was made
Sort Options
The default sort order for the Gentran File Tracking is Date/Time. You can override the default sort
order using the 'Set File Tracking Sort Option' (SETFTRKSRT) on the System Configuration
menu. (SEE the "System Considerations" chapter in this guide for more information about
working with system configuration options.)
To access the data in a different order, use the following sort options:
Date Time
Program, Date, Time
Subsystem, Date, Time
User, Date, Time
# NOTE
The Date/time sorts are in descending order.
The Position To fields can be used to quickly access the information being searched. These fields
will change according to the selected sort option.

Work with Gentran File Tracking Gentran File Tracking
18 - 10 Gentran:Server for iSeries Communications Module Release 3.5 User Guide
The following figure illustrates the sort feature. Press F15 to display the Sort window.
Figure 18.7 Work with Gentran File Tracking panel (EDIX650-FMT01) - Sort Window
To select a sort option for the Gentran File Tracking, type '1' in the Option field next to the sort
option you want to use and press Enter.
EDIX650 Work with Gentran File Tracking XXX 2008/04/30
FMT01 pgmlib: G3X5PGM dtalib: G3X5TSTDTA 12:00:00
Position to Date Time 00:00:00.00
Type option (and Information), press Enter.
4=Delete 5=View 6=Print 30=Prt FileTrk 40=Purge FileTrk 41=Rtv FileTrk
Opt Date Time User Program Subsystem Description
__ 2008/04/30 15:49:07 IH EDIX407A COMM Status of Batch cha
__ 2008/04/30 15:48:59 IH EDIX050 PARTNER Deleted Data Separa
__ 2008/04/30 15:48:37 IH EDIX050 PARTNER Added Data Separati
__ 2008/04/30 15:48:27 IH EDIX407A COMM Status of Batch cha
__ 2008/04/30 15:47:56 IH EDIX050 PARTNER Added Data Separati
__ 2008/04/30 15:47:33 IH EDIX407A COMM Status of Batch cha
__ 2008/04/30 15:46:49 IH EDIX055 PARTNER Reject Inbound Flag
__ 2008/04/30 15:46:49 IH EDIX055 PARTNER Reject Outbound Fla
__ 2008/04/30 15:46:46 IH EDIX055 PARTNER Reject Inbound Flag
More...
Parameters or command
===>
F1=Help F3=Exit F9=Retrieve F12=Cancel F15=Sort
Position/Sort By
1=Select
_Date Time
_ Program Date Time
_ Subsystem Date Time
_ User Date Time

Gentran File Tracking Work with Gentran File Tracking
Gentran:Server for iSeries Communications Module Release 3.5 User Guide 18 - 11
Gentran File Tracking Work with options
You can run the following options from the Work with Gentran File Tracking panel
(EDIX650-FMT01):
Delete File Tracking Entries
View File Tracking Details
Print a File Tracking Entry
Print File Tracking Entries based upon Selection Criteria
Purge File Tracking Entries
Retrieve File Tracking Entries

Work with Gentran File Tracking Gentran File Tracking
18 - 12 Gentran:Server for iSeries Communications Module Release 3.5 User Guide
Delete Records from the Gentran File Tracking
You can delete entries from the Gentran File Tracking if you have the proper authority. Prior to
deleting records, it is important to have a clear understanding of your organization's procedures for
managing the File Tracking files.
CAUTION
STOP
Deletions cannot be reversed. Exercise caution when using the Delete option.
To delete an entry in the Gentran File Tracking, type '4' in the Option field next to the entries that
you want to delete and press Enter. The item that you are deleting will be displayed on the
Gentran File Tracking Control (EDIX651-FMT01) panel. You must press F11 to confirm the
deletion of the record. This confirmation panel will be displayed for each entry that has been
selected for deletion.
The following figure shows the selection of a File Tracking entry to be deleted:
Figure 18.8 Work with Gentran File Tracking panel (EDIX650-FMT01) - Delete option
EDIX650 Work with Gentran File Tracking XXX 2008/04/30
FMT01 pgmlib: G3X5PGM dtalib: G3X5TSTDTA 12:00:00
Position to Date Time 00:00:00.00
Type option (and Information), press Enter.
4=Delete 5=View 6=Print 30=Prt FileTrk 40=Purge FileTrk 41=Rtv FileTrk
Opt Date Time User Program Subsystem Description
__ 2008/04/30 15:49:07 IH EDIX407A COMM Status of Batch cha
__ 2008/04/30 15:48:59 IH EDIX050 PARTNER Deleted Data Separa
__ 2008/04/30 15:48:37 IH EDIX050 PARTNER Added Data Separati
4_ 2008/04/30 15:48:27 IH EDIX407A COMM Status of Batch cha
__ 2008/04/30 15:47:56 IH EDIX050 PARTNER Added Data Separati
__ 2008/04/30 15:47:33 IH EDIX407A COMM Status of Batch cha
__ 2008/04/30 15:46:49 IH EDIX055 PARTNER Reject Inbound Flag
__ 2008/04/30 15:46:49 IH EDIX055 PARTNER Reject Outbound Fla
__ 2008/04/30 15:46:46 IH EDIX055 PARTNER Reject Inbound Flag
More...
Parameters or command
===>
F1=Help F3=Exit F9=Retrieve F12=Cancel F15=Sort

Gentran File Tracking Work with Gentran File Tracking
Gentran:Server for iSeries Communications Module Release 3.5 User Guide 18 - 13
The confirmation displays as follows:
Figure 18.9 Gentran File Tracking Control panel (EDIX651-FMT01)
Press F11 to confirm the deletion process or F12 to cancel the delete action.
EDIX651 Gentran File Tracking Control XXX 2008/04/30
FMT01 12:00:00
Last Update Date/Time. . . . . . . 2008/04/30 15:48:27.20
User . . . . . . . . . . . . . . . IH
Subsystem. . . . . . . . . . . . . COMM
Program Name/Description . . . . . EDIX407A
File/Field Name. . . . . . . . . . INBCTL IQCSTS
Comm Profile ID. . . . . . . . . . IHCOMM
Description of Change. . . . . . . Status of Batch changed
Item . . . . . . . . . . . . . . . Profile Seq. No: 0000537
Old Value
PI
New Value
RN
F1=Help F11=Delete F12=Cancel

Work with Gentran File Tracking Gentran File Tracking
18 - 14 Gentran:Server for iSeries Communications Module Release 3.5 User Guide
Display the File Tracking Details
Select option '5' (View) to display all details for a particular File Tracking record. To view the File
Tracking details from the Work with Gentran File Tracking panel, type '5' in the Option field next
to the entry that you want to display and press Enter.
Figure 18.10 Work with Gentran File Tracking panel (EDIX650-FMT01) View Detail
The Gentran File Tracking Control panel displays showing the entry that was selected.
Figure 18.11 Gentran File Tracking Control panel (EDIX651-FMT01)
EDIX650 Work with Gentran File Tracking XXX 2008/04/30
FMT01 pgmlib: G3X5PGM dtalib: G3X5TSTDTA 12:00:00
Position to Date Time 00:00:00.00
Type option (and Information), press Enter.
4=Delete 5=View 6=Print 30=Prt FileTrk 40=Purge FileTrk 41=Rtv FileTrk
Opt Date Time User Program Subsystem Description
__ 2008/04/30 15:01:32 XXX EBDI588 TRNMAP 27 TRNSEG records
__ 2008/04/30 15:01:32 XXX EBDI588 TRNMAP 166 TRNELE records
__ 2008/04/30 15:01:32 XXX EBDI588 TRNMAP 1 TRNHDR records a
_5 2008/04/30 11:29:58 XXX EDIX504 TRNMAP Max Use changed
__ 2008/04/30 11:29:54 XXX EDIX504 TRNMAP Max Use changed
__ 2008/04/30 16:15:49 XXX EDIX513 TRNMAP Deleted TRNELE reco
__ 2008/04/30 16:15:42 XXX EDIX506 TRNMAP Added TRNELE record
__ 2008/04/30 16:06:37 XXX EDIX502 TRNMAP 1 TRNSEG records ad
__ 2008/04/30 16:06:37 XXX EDIX502 TRNMAP 2 TRNELE records
More...
Parameters or command
===>
F1=Help F3=Exit F9=Retrieve F12=Cancel F15=Sort
EDIX651 Gentran File Tracking Control XXX 2008/04/30
FMT01 12:00:00
Last Update Date/Time. . . . . . . 2008/04/30 11:29:58.45
User . . . . . . . . . . . . . . . XXX
Subsystem. . . . . . . . . . . . . TRNMAP
Program Name/Description . . . . . EDIX504 Transaction Map Segments
File/Field Name. . . . . . . . . . TRNSEG TSDMUC
Transaction ID . . . . . . . . . . P485041I
S/R. . . . . . . . . . . . . . . . R
Description of Change. . . . . . . Max Use changed
Item . . . . . . . . . . . . . . . Seq: 100 Seg: BEG A: H
Old Value
0000000
New Value
0000001
F1=Help F12=Cancel

Gentran File Tracking Work with Gentran File Tracking
Gentran:Server for iSeries Communications Module Release 3.5 User Guide 18 - 15
View File Tracking Detail
The Gentran File Tracking Control (EDIX651-FMT01) panel displays the detailed information for
the selected File Tracking entry.
Field Definitions
Last Update Date/Time
The date and time when the selected item was modified
User
The user who modified the entry
Subsystem
The subsystem in which the change was made
Program Name/Description
The program and a description of the program through which the change was made
File/Field Name
The file and field name that was modified
Transaction ID
This label varies depending on which subsystem was modified.
The following table lists the label and definition that could be displayed for each subsystem.
Subsystem Label Description
PARTNER Partner ID Displays the Partner ID that was modified.
APPDEF Application ID Displays the Application ID that was modified.
TRNMAP Transaction ID Displays the Transaction ID that was modified.
TRNMAP Split Displays the Split file that was modified.
TRNMAP Table ID Displays the Table ID that was modified.
COMM Comm Profile ID Displays the Communications Profile ID that was
modified.
COMM MQ Link Name Displays the MQ Link Name that was modified.
STANDARD Standard Displays the Standard that was modified.
ENVIRNMNT User ID Displays the User ID that was modified.
SYSTEM Job Name Displays the Job Name in the Scheduler that was
modified.
SYSTEM Error Message
Number
Displays the Error Message Number that was
modified.

Work with Gentran File Tracking Gentran File Tracking
18 - 16 Gentran:Server for iSeries Communications Module Release 3.5 User Guide
S/R
This label varies depending on which subsystem was modified.
The following table lists the label and definition that could be displayed for each subsystem.
SYSTEM Function Displays the system configuration value that was
modified.
GENFILETRK Function Displays Gentran File Tracking Configuration.
VIEWPOINT Document Name
/ S or R
Displays the Document name and direction for the
viewpoint document that was modified.
VIEWPOINT Return Code Displays the return code of the automatic notification
entry that was modified.
VIEWPOINT Network ID Displays the network ID that was modified in the
viewpoint system.
Subsystem Label Description
PARTNER Partner Qualifier Displays the Partner Qualifier that was modified.
APPDEF S/R Displays the direction of the Application (S=Send,
R=Receive).
TRNMAP S/R Displays the direction of the Application (S=Send,
R=Receive).
TRNMAP Sub-Split Displays the sub-split that was cleared.
TRNMAP Type of Table Displays the type of table that was modified.
COMM Session Name Displays the session name that was modified.
COMM MQ Queue Name Displays the MQ Queue name that was modified.
STANDARD Transaction Displays the Transaction that was modified.
STANDARD Transaction/
Segment
Displays the Transaction/Segment combination that
was modified.
STANDARD Segment/
Element ID
Displays the Segment/Element that was modified.
STANDARD Trans/Seg/
Element
Displays the Transaction/Segment/Element
combination that was modified.
STANDARD Element ID Displays the Element ID that was modified.
Subsystem Label Description

Gentran File Tracking Work with Gentran File Tracking
Gentran:Server for iSeries Communications Module Release 3.5 User Guide 18 - 17
Description of Change
A brief description of what was modified
Item
Additional information about the item that was modified when the other description lines
cannot fully describe the item
Old Value
The old value of the item prior to the modification
New Value
The new value of the item after the modification has been made
ENVIRNMNT Name Displays the name of the user whose environment was
modified.
SYSTEM Sequence Displays the sequence number of the job that was
modified in the Job Scheduler.
SYSTEM Date/Time Displays the date and time of the instance that was
modified in the Job Scheduler.
VIEWPOINT Partner Id Displays the Partner ID that is associated with the
document ID that was modified.
VIEWPOINT Process /
Command Name
Displays the Process and Command name that was
modified for the Automatic Notification .
Subsystem Label Description

Print the Gentran File Tracking Report Gentran File Tracking
18 - 18 Gentran:Server for iSeries Communications Module Release 3.5 User Guide
Print the Gentran File Tracking Report
The Gentran:Server system provides you with the ability to print a report containing information
about File Tracking entries. There are two methods of printing the File Tracking information. You
can either print one particular item or you can print multiple items based upon selection criteria.
To print a single entry, select option '6' (Print) from EDIX650 (FMT01), and the PRTFILETRK
command is executed. It will produce report EBDI663, providing a printout of the particular item
selected.
Figure 18.12 Printing one entry from the Gentran File Tracking System
The PRTFILETRK command will print multiple entries based on the selection criteria. This print
option can be accessed from the Gentran:Server File Tracking menu (GENFILETRK) or the Work
with Gentran File Tracking panel (EDIX650) using option '30'.
EDIX650 Work with Gentran File Tracking XXX 2008/04/30
FMT01 pgmlib: G3X5PGM dtalib: G3X5TSTDTA 14:09:28
Position to Date 2008/04/30 Time 11:33:14.13
Type option (and Information), press Enter.
4=Delete 5=View 6=Print 30=Prt FileTrk 40=Purge FileTrk 41=Rtv FileTrk
Opt Date Time User Program Subsystem Description
2008/04/30 11:33:14 IH EDIX407A COMM Status of Batch cha
6 2008/04/30 11:31:59 IH EDIX407A COMM Status of Batch cha
2008/04/30 11:31:53 IH EDIX031 PARTNER Expect an AK1, B5 o
2008/04/30 11:31:53 IH EDIX031 PARTNER Acknowledge Specifi
2008/04/30 11:31:53 IH EDIX031 PARTNER Group Acknowledgmen
2008/04/30 11:31:53 IH EDIX031 PARTNER GS02 Applications S
2008/04/30 11:30:51 IH EDIX031 PARTNER Send Group Outbound
2008/04/30 11:28:14 IH EDIX407A COMM Status of Batch cha
2008/04/30 11:22:43 IH EDIX407A COMM Status of Batch cha
More...
Parameters or command
===>
F1=Help F3=Exit F9=Retrieve F12=Cancel F15=Sort

Gentran File Tracking Print the Gentran File Tracking Report
Gentran:Server for iSeries Communications Module Release 3.5 User Guide 18 - 19
From the GENFILETRK menu, select option '3' (Print File Tracking Entry Report).
GENFILETRK Gentran:Server File Tracking 3.5
System: IV5R2
Select one of the following:
1. Work with Gentran File Tracking
2. Gentran File Tracking Configuration
3. Print File Tracking Entry Report (PRTFILETRK)
4. Purge Gentran File Tracking Files (PRGFILETRK)
5. Retrieve Gentran File Tracking Files (RTVFILETRK)
90. Sign off
Selection or command
===> 3
F3=Exit F4=Prompt F9=Retrieve F12=Cancel F13=User Support

Print the Gentran File Tracking Report Gentran File Tracking
18 - 20 Gentran:Server for iSeries Communications Module Release 3.5 User Guide
Enter the Print Options
Gentran:Server provides several selection options that allow you to selectively print all of some of
the entries in the File Tracking system. The system builds the selection criteria based on the
combined values entered in the fields on the Print File Tracking Entries (PRTFILETRK) panel.
The selection criteria available are:
Age Selection Type
User Id to Print
Subsystem to Print
Program to Print
You can combine the print selection criteria with an "age" parameter. The "age" parameter reduces
the selection of file tracking entries that are printed. You may select to search for records using:
Current Date
Date Range
Number of Hours from the current hour
Days Old Range
# NOTE
SEE the File Tracking Entries Report (EBDI663) in “Reports” on page 30 for more
information about the report.

Gentran File Tracking Print the Gentran File Tracking Report
Gentran:Server for iSeries Communications Module Release 3.5 User Guide 18 - 21
To run the Print File Tracking Entries Report (GENFILETRK) command, specify the selection
criteria and press Enter.
Figure 18.13 Print File Tracking Entries (PRTFILETRK) Command
Parameter Definitions
Age Selection Type
A 6-position alphabetic field used to define an "age" record selection criteria for which
you want to print File Tracking entries. After selecting one of the following valid values,
the system displays a prompt line with an 8-position entry field enabling you to further
define your selection. Valid values for this field are:
*DATE Enables you to specify File Tracking records for a specific date,
date range, or the current date. Only records within the specified
date range are printed.
*DAYS You can specify the number of days before the current date or any
given day. Only records within the specified number of days are
printed. Values are 0–999. Enter a "from" number and a "to"
number. For example, if you entered '0' to '3', records 0–3 days
old would be printed.
*HOURS You can specify the number of hours to be included, starting from
the current hour. Records between the current hour and the
number of hours you specified are printed. Values are 0–24. For
example, if you only want to include data for items that were
changed in the last 2 hours, specify 2. File Tracking entries 0–2
hours old are printed.
*ALL All records are included.
Print File Tracking Entries (PRTFILETRK)
Type choices, press Enter.
Age Selection Type . . . . . . . *DATE, *DAYS, *HOURS, *ALL
User Id to Print . . . . . . . . *ALL *ALL, Name
Subsystem to Print . . . . . . . *ALL *ALL, Name
Program to Print . . . . . . . . *ALL *ALL, Name
Bottom
F3=Exit F4=Prompt F5=Refresh F10=Additional parameters F12=Cancel
F13=How to use this display F24=More keys

Print the Gentran File Tracking Report Gentran File Tracking
18 - 22 Gentran:Server for iSeries Communications Module Release 3.5 User Guide
If you type a value of '*DATE' or '*DAYS' in the Age Selection Type field and press
Enter, the system displays the following prompt lines:
From #, *CURRENT, or Date..____
To #, *CURRENT, or Date..____
If you type a value of '*HOURS' in the Age Selection Type field and press Enter, the
system displays the following prompt line:
Hours to Include…____
User Id to Print
This is a 10-position alphanumeric field used to enter a specific Gentran user. By entering
a specific user, only items modified by that user will print. Type *ALL to select all users.
Subsystem to Print
This is a 10-position alphabetic field used to enter a specific Gentran subsystem. By
entering a specific subsystem, only items in that subsystem will print. Type *ALL to select
all subsystems.
Program to Print
This is a 10-position alphanumeric field used to enter a specific Gentran program. By
entering a specific program, only items that were changed using that program will print.
Type *ALL to select all programs.
Run Interactively
This field is accessed by pressing F10 to display additional parameters. It allows you to
perform the process interactively. If you elect to run the command in interactive mode,
you can monitor system messages that occur during processing. However, if you choose
this option, your terminal is locked until the process is complete.
Schedule Job
This field is accessed by pressing F10 to display additional parameters. It allows you to
schedule the job to be run at a later time using the Gentran job scheduler.

Gentran File Tracking Purge the File Tracking Entries (PRGFILETRK)
Gentran:Server for iSeries Communications Module Release 3.5 User Guide 18 - 23
Purge the File Tracking Entries
(PRGFILETRK)
Each time a field is changed in a Gentran file that is marked to be tracked, a record is written in the
Gentran File Tracking system. These records remain until you purge them. Gentran:Server
provides a feature for purging the Gentran File Tracking system of old occurrences. This feature
allows you to purge groups of records by using the selection criteria.
To purge the Gentran File Tracking files, select option '4' (Purge Gentran File Tracking Files) from
the GENFILETRK menu and press Enter. The PRGFILETRK command can also be invoked
from the Work with Gentran File Tracking panel (EDIX650) using option '40' (Purge FileTrk).
Figure 18.14 Access the Purge Gentran File Tracking Files (PRGFILETRK) panel
GENFILETRK Gentran:Server File Tracking 3.5
System: IV5R2
Select one of the following:
1. Work with Gentran File Tracking
2. Gentran File Tracking Configuration
3. Print File Tracking Entry Report (PRTFILETRK)
4. Purge Gentran File Tracking Files (PRGFILETRK)
5. Retrieve Gentran File Tracking Files (RTVFILETRK)
90. Sign off
Selection or command
===> 4
F3=Exit F4=Prompt F9=Retrieve F12=Cancel F13=User Support

Purge the File Tracking Entries (PRGFILETRK) Gentran File Tracking
18 - 24 Gentran:Server for iSeries Communications Module Release 3.5 User Guide
Type your selection criteria on the PRGFILETRK panel and press Enter to run. Press F1 (Help)
for detailed information about any of the parameters.
Figure 18.15 Purge Gentran File Tracking (PRGFILETRK) panel
You can execute the Purge Gentran File Tracking command in one of three modes:
Press Enter to immediately submit the job to batch to run (this is the default).
Press F10 (Additional Parameters) and type '*YES' in the Run Interactively field to run the job
interactively (your terminal will be locked until the job completes).
Press F10 (Additional Parameters) and type '*YES' in the Job Scheduler field to run the job at
a later time.
Purge Gentran File Tracking (PRGFILETRK)
Type choices, press Enter.
Selection Criteria for Purge . . *DATE, *DAYS, *ALL
User . . . . . . . . . . . . . . *ALL *ALL, User Name
+ for more values
Subsystem Name . . . . . . . . . *ALL *ALL, subsystem name
Schedule Job? . . . . . . . . . *NO *YES, *NO
Purge Method? . . . . . . . . . *NONE *TAPE, *SAVF, *NONE, *CL
Days to Retain on File . . . 0 Number
Additional Parameters
Run Interactively? . . . . . . . *NO *YES, *NO
Reorganize Files? . . . . . . . *YES *YES, *NO
Process Name . . . . . . . . . . PRGFILETRK
Bottom
F3=Exit F4=Prompt F5=Refresh F12=Cancel F13=How to use this display
F24=More keys

Gentran File Tracking Purge the File Tracking Entries (PRGFILETRK)
Gentran:Server for iSeries Communications Module Release 3.5 User Guide 18 - 25
Parameter Definitions
Selection Criteria for Purge
This is a 10-position alphanumeric field used to define a purge date. Valid values are:
*Date Purge records that are in between and equal to the From and To dates entered.
Date entered must be in the format defined in the System Configuration file.
Use the SETGENFMT command found on the System Configuration menu to
determine the format.
*DAYS The Days to Retain on File parameter displays when you press Enter. This
allows you to specify the number of days to retain on file.
*ALL All records including the current date are deleted.
User
This is a 10-position alphanumeric field used to enter a specific Gentran user. By entering
a specific user, only entries modified by that user will be purged. Type *ALL to select all
users.
Subsystem
This is a 10-position alphabetic field used to enter a specific Gentran subsystem. By
entering a specific subsystem, only those entries in that subsystem will be purged. Type
*ALL to select all subsystems.
Schedule Job?
This alphanumeric field is used to designate whether you want to run this option by
scheduling it as a job. *NO is the default for this field.
Purge Method?
An alphanumeric field used to indicate whether the data should be saved to tape or to a
save file. If you want the data to be saved to tape, specify '*TAPE' or '*CL'. Specify '*CL'
when using this command within a CL. If you want to save the data to a save file, specify
'*SAVF'. If you want the data purged without saving it, specify '*NONE'.

Purge the File Tracking Entries (PRGFILETRK) Gentran File Tracking
18 - 26 Gentran:Server for iSeries Communications Module Release 3.5 User Guide
Additional Parameters
Run Interactively?
This parameter allows you to perform the purge process interactively. If you select to run
the command in interactive mode (*YES), you can monitor system messages that occur
during processing. However, you are locked out of the system from the terminal where the
job was submitted until the process is complete.
Reorganize Files?
An alphanumeric field used to indicate whether the physical file(s) should be reorganized
using the RGZPFM command. Valid values are:
*YES Reorganize files immediately after the purge has completed.
*NO Reorganize files at a later time.
Process Name
This is used to label the command from the Message Center. The default for this prompt is
the command name, but can be changed to any 15-byte field to help further identify this
process. The process name displays on the first panel of the Work with Message Center
(EDIX600) panel and always tracks under this name.

Gentran File Tracking Retrieve the Gentran File Tracking Entries (RTVFILETRK)
Gentran:Server for iSeries Communications Module Release 3.5 User Guide 18 - 27
Retrieve the Gentran File Tracking Entries
(RTVFILETRK)
The Retrieve Gentran File Tracking Files (RTVFILETRK) command allows you to restore File
Tracking entries that have been previously purged to tape or save file using the PRGFILETRK
command.
To retrieve File Tracking files, select option '5' (Retrieve Gentran File Tracking Files) from the
GENFILETRK menu and press Enter. The RTRFILETRK command can also be invoked from the
Work with Gentran File Tracking (EDIX650) panel using option '41' (Rtv FileTrk).
Figure 18.16 Accessing the Retrieve Gentran File Tracking Files (TRVFILETRK)
command
GENFILETRK Gentran:Server File Tracking 3.5
System: IV5R2
Select one of the following:
1. Work with Gentran File Tracking
2. Gentran File Tracking Configuration
3. Print File Tracking Entry Report (PRTFILETRK)
4. Purge Gentran File Tracking Files (PRGFILETRK)
5. Retrieve Gentran File Tracking Files (RTVFILETRK)
90. Sign off
Selection or command
===> 5
F3=Exit F4=Prompt F9=Retrieve F12=Cancel F13=User Support

Retrieve the Gentran File Tracking Entries (RTVFILETRK) Gentran File Tracking
18 - 28 Gentran:Server for iSeries Communications Module Release 3.5 User Guide
Type your selection criteria on the RTVFILETRK command and press Enter to run. Press F1
(Help) for detailed information about any of the parameters.
Figure 18.17 Retrieve File Tracking Files (RTVFILETRK) panel
You can execute the Retrieve Gentran File Tracking command in one of three modes:
Press Enter to immediately submit the job to batch to run (this is the default).
Press F10 (Additional Parameters) and type '*YES' in the Run Interactively field to run the job
interactively (your terminal will be locked until the job completes).
Press F10 (Additional Parameters) and type '*YES' in the Job Scheduler field to run the job at
a later time.
Retrieve File Tracking Files (RTVFILETRK)
Type choices, press Enter.
File Tracking Main File . . . . GENAUD Character value
File Tracking Large Chgs File . GENAUD2 Character value
Library . . . . . . . . . . . . G3X5DTA Character value
Retrieve Method . . . . . . . . *TAPE, *SAVF
Bottom
F3=Exit F4=Prompt F5=Refresh F10=Additional parameters F12=Cancel
F13=How to use this display F24=More keys

Gentran File Tracking Retrieve the Gentran File Tracking Entries (RTVFILETRK)
Gentran:Server for iSeries Communications Module Release 3.5 User Guide 18 - 29
Parameter Definitions
File Tracking Main File
This file contains all data that is stored for the File Tracking system (GENAUD).
File Tracking Large Chgs File
This file contains all data where the old and/or new value is larger than 50 bytes. It is used
in conjunction with the main tracking file (GENAUD2).
Library
A 10-position alphanumeric field used to indicate the library name on your system where
your Gentran Data files reside.
Retrieve Method
An alphanumeric field used to indicate whether the data should be retrieved from tape or
save file. If you want the data to be retrieved from tape, specify '*TAPE.' To retrieve the
data from save file, specify '*SAVF'.

Reports Gentran File Tracking
18 - 30 Gentran:Server for iSeries Communications Module Release 3.5 User Guide
Reports
EBDI663 - Gentran File Tracking Entries Report
Contents of the Report
The Gentran File Tracking Entries Report contains information about File Tracking entries that
have been recorded.
How to Identify the Report
The identifier 'EBDI663' is printed in the upper left corner of the report. The report title, "Gentran
File Tracking Entries Report" is printed in the center at the top of the report. The identifier
'EBDI663' is also printed in the User Data field associated with the spooled report in the Output
Queue.
How to Generate the Report
This is a user-generated report. It is submitted in one of three ways:
From the GENFILETRK menu, by selecting option '3'.
From the Work with Gentran File Tracking panel (EDIX650-FMT01), by selecting option '30'
(PRTFILETRK)
From the Command Line, by entering the 'PRTFILETRK' command.
In all cases, you can use selection criteria to limit the information on the report by selecting any of
the following combinations:
Age Selection Type
User Id
Subsystem
Program
Special Considerations
Like all other Gentran:Server reports, the Gentran File Tracking Entries Report automatically goes
to the iSeries Output Queue defined for the user running the job. (SEE the "Environment Control"
chapter in the User Guide for instructions to set up a user's Output Queue.)

Gentran File Tracking Reports
Gentran:Server for iSeries Communications Module Release 3.5 User Guide 18 - 31
Sample Report
EBDI663 RUN DATE 2008/04/30 GENTRAN FILE TRACKING ENTRIES REPORT RUN TIME 17:20:56 PAGE 1
SELECTION CRITERIA
------------------
USER: *ALL SUBSYSTEM: *ALL PROGRAM: *ALL
AGE SELECTION: *DATE FROM 2008/04/30 TO 2008/04/30
DATE TIME USER SUBSYSTEM PROGRAM DESCRIPTION FILE FIELD
------------------------------------------------------------------------------------------------------------------------------------
2008/04/30 10:49:32 MKK TRNMAP EBDI589 Map re-synch performed TRNELE TRNELE
Transaction ID . . . . . . . . A003070 S/R. . . . . . . . . . . . . .R
2008/04/30 10:49:32 MKK TRNMAP EBDI589 Map re-synch performed TRNELE TRNELE
Transaction ID . . . . . . . . A004010 S/R. . . . . . . . . . . . . .R
2008/04/30 10:49:32 MKK TRNMAP EBDI589 Map re-synch performed TRNELE TRNELE
Transaction ID . . . . . . . . A004020 S/R. . . . . . . . . . . . . .R
2008/04/30 10:49:32 MKK TRNMAP EBDI589 Map re-synch performed TRNELE TRNELE
Transaction ID . . . . . . . . DATEIN S/R. . . . . . . . . . . . . .R
2008/04/30 10:49:32 MKK TRNMAP EBDI589 Map re-synch performed TRNELE TRNELE
Transaction ID . . . . . . . . MKKDATEIN S/R. . . . . . . . . . . . . .R
2008/04/30 10:49:32 MKK TRNMAP EBDI589 Map re-synch performed TRNELE TRNELE
Transaction ID . . . . . . . . MKKIB12.14 S/R. . . . . . . . . . . . . .R
2008/04/30 10:49:32 MKK TRNMAP EBDI589 Map re-synch performed TRNELE TRNELE
Transaction ID . . . . . . . . MKKDATEOUT S/R. . . . . . . . . . . . . .S
2008/04/30 10:49:32 MKK TRNMAP EBDI589 Map re-synch performed TRNELE TRNELE
Transaction ID . . . . . . . . MMMM S/R. . . . . . . . . . . . . .S
2008/04/30 10:49:32 MKK TRNMAP EBDI589 Map re-synch performed TRNELE TRNELE
Transaction ID . . . . . . . . TEST S/R. . . . . . . . . . . . . .S
2008/04/30 10:49:33 MKK TRNMAP EBDI589 Map re-synch performed TRNELE TRNELE
Transaction ID . . . . . . . . TESTTEST S/R. . . . . . . . . . . . . .S
2008/04/30 10:52:08 MKK STANDARD EDIX110 Version Update Allowed Changed STDVER VTRLOC
Standard . . . . . . . . . . . 004010
OLD VALUE: Y NEW VALUE: N
EBDI663 RUN DATE 2008/04/30 GENTRAN FILE TRACKING ENTRIES REPORT RUN TIME 17:20:56 PAGE 1
SELECTION CRITERIA
------------------
USER: *ALL SUBSYSTEMSterling Commerce PROGRAM: *ALL
AGE SELECTION: *DATE FROM 2008/04/30 TO 2008/04/30
DATE TIME USER SUBSYSTEM PROGRAM DESCRIPTION FILE FIELD
------------------------------------------------------------------------------------------------------------------------------------
2008/04/30 13:33:34 XXX COMM EDIX403 Added new Session Control COMCTL COMCTL
Comm Profile ID. . . . . . . . MAZFTP Session Name . . . . . . . . .RG
2008/04/30 13:34:32 XXX COMM EDIX403 Deleted Session Control COMCTL COMCTL
Comm Profile ID. . . . . . . . MAZFTP Session Name . . . . . . . . .RG
OLD VALUE: 015 C debug debug
NEW VALUE:
2008/04/30 13:34:38 XXX COMM EDIX403 Added new Session Control COMCTL COMCTL
Comm Profile ID. . . . . . . . MAZFTP Session Name . . . . . . . . .RG
2008/04/30 13:34:44 XXX COMM EDIX403 Deleted Session Control COMCTL COMCTL
Comm Profile ID. . . . . . . . MAZFTP Session Name . . . . . . . . .RG
OLD VALUE: 025 C cd cd mazdir

Reports Gentran File Tracking
18 - 32 Gentran:Server for iSeries Communications Module Release 3.5 User Guide

Appendix
Gentran:Server for iSeries Communications Module Release 3.5 User Guide A - 1
AModems: Configuration
and Troubleshooting
Overview
The following is a list of recommended modems for use with Gentran:Server for iSeries
Communications Module. These modems have been tested by Sterling Commerce support and
were known to work successfully at the time of testing. However, due to rapid changes in
technology and customer requests, the revision levels of these modems change frequently. Due to
these constant revisions in the modem firmware, it is difficult for Sterling Commerce support to
note these variations. Use the information that follows as a guideline for the Communications
Module modem requirements.

Overview Modems: Configuration and Troubleshooting
A - 2 Gentran:Server for iSeries Communications Module Release 3.5 User Guide
The following chart lists modems according to speed, dialing method, and supported protocol.
Speed Modem Dialing Method Bisync
Protocols
SNA
Protocols
Async
Protocols
Async
Protocols
via X.25
2400 bps UDS 201 C Manual X X X
UDS 201 C UDS 801 ACU X X
UDS 201 C/D Manual X X X
UDS 201 C/D UDS Bisync(2) X
UDS 2140 Manual X X X
UDS 2140 UDS 801 ACU X X
UDS 2140 UDS Bisync(2) X
IBM 5853 Manual X X X X
IBM 5853 V.25bis SDLC X X X
IBM 5853 AT Commands X
4800 bps UDS 208 B Manual X X X
UDS 208 B UDS 801 ACU X X
UDS 208 B/D Manual X X X
UDS 208 B/D UDS Bisync(2) X
UDS 2860 Manual X X X
UDS 2860 UDS 801 ACU X X
UDS 2860 UDS Bisync(2) X
UDS 9648T(1) Manual X X X
UDS 9648T(1) V.25bis SDLC X X X

Modems: Configuration and Troubleshooting Overview
Gentran:Server for iSeries Communications Module Release 3.5 User Guide A - 3
9600 bps UDS V.3225 Manual X X X X
UDS V.3225 V.25bis SDLC X X X
UDS V.3225 AT Commands X
UDS V.3227 Manual X X X X
UDS V.3227 V.25bis SDLC X X X
UDS V.3227 AT Commands X
UDS V.3229 Manual X X X X
UDS V.3229 V.25bis SDLC X X X
UDS V.3229 AT Commands X
UDS V.34 Manual X X X X
UDS V.34 V.25bis SDLC X X X
UDS V.34 AT Commands X
IBM 7855-10 Manual X X X X
IBM 7855-10 V.25bis SDLC X X X
IBM 7855-10 V.25bis Async X
IBM 7855-10 AT Commands X
IBM 7857 Manual X X X X
IBM 7857 V.25bis SDLC X X X
IBM 7857 V.25bis Async X
IBM 7857 AT Commands X
(1) The UDS 9648T modem can be configured to operate in Bell 208 mode. Bell 208 mode
works with Gentran:Server; however, the modem is not proven to work in any other mode.
(2) The UDS Bisync dial method will work and can be used, but it is not recommended
because it can create undesirable results.
Speed Modem Dialing Method Bisync
Protocols
SNA
Protocols
Async
Protocols
Async
Protocols
via X.25

Configuration Requirements Modems: Configuration and Troubleshooting
A - 4 Gentran:Server for iSeries Communications Module Release 3.5 User Guide
Configuration Requirements
The Communications Module requirements for modem settings will vary depending on the
protocol being used (SYNC, ASYNC) and the requirements of the remote.
Autodialing will be performed by either the iSeries communications support or by Gentran,
depending on the protocol and profile you are using.
For synchronous V.25bis dialing modems, the following modem configuration settings are
necessary:
V.25bis dialing using SDLC, HDLC, or bit-oriented option
V.25bis dialing using the ASCII character set
NRZ data encoding
Troubleshooting Problems
There are many simple things that can cause your connection to a remote system to fail. The ideas
and figure that follow provide some simple troubleshooting items to look for if you have problems
with a modem.
Is the modem connected to a working telephone line (e.g. do you hear a dial tone if you plug
the line into a phone)?
Is the telephone line plugged into the proper outlet on the back of the modem?
Do you need to use an access code (9, 8, etc.) to dial out of a PBX switch?
Is the modem connected to the correct communications line on the iSeries? When you start a
communication session or manually vary on the line, you should see the “Terminal Ready”
(DTR or TR) light illuminate.
Once you have checked the above items and established that they are all set up and working
properly, check the following items:
Is your modem dialing? Check by having the modem dial a number you can monitor (e.g. a
desk phone).
If the modem is dialing the line, determine if it is getting to the remote system’s modem by
turning your modem’s speaker on and listening as it attempts to connect.
If the modem does not connect once it has accessed a remote modem, it is probably not configured
correctly, or is not compatible with the remote modem. Check the following item:
Speak to the remote system’s support personnel to determine if your modem is compatible
with their modem, or if there are any special configuration changes to be made to your
modem. If you are not sure how to make the changes to your modem, contact the modem’s
manufacturer for assistance.

Modems: Configuration and Troubleshooting Troubleshooting Problems
Gentran:Server for iSeries Communications Module Release 3.5 User Guide A - 5
The following figure summarizes these troubleshooting ideas.
Figure A.1 Problem Solving Checklist
# NOTE
Product support will give you all of the above suggestions for correcting modem connectivity
problems, but they cannot help you configure your modem over the telephone.
Problem: Check for:
Modem is not dialing Dial tone?
Access code required?
Telephone cable plugged into
correct port?
Modem connected to correct line
on iSeries?
Modem is dialing but not connecting Dialing the correct number?
Compatible with remote
modem?
Special configuration
requirements for the remote
system?

Troubleshooting Problems Modems: Configuration and Troubleshooting
A - 6 Gentran:Server for iSeries Communications Module Release 3.5 User Guide

Appendix
Gentran:Server for iSeries Communications Module Release 3.5 User Guide B - 1
BTranslating between
ASCII and EBCDIC
The tables in this appendix illustrate the EBCDIC-to-ASCII translation that is applied to all
outbound data transmitted via the iSeries’ asynchronous ICF support, and the ASCII-to-EBCDIC
translation that is applied to all inbound data received via the iSeries asynchronous ICF support.

Outbound Translation Table (EBCDIC-to-ASCII) Translating between ASCII and EBCDIC
B - 2 Gentran:Server for iSeries Communications Module Release 3.5 User Guide
Outbound Translation Table
(EBCDIC-to-ASCII)
The following table illustrates the EBCDIC-to-ASCII translation that is applied to all outbound
data transmitted via the iSeries’ asynchronous ICF support. When using this table, the outer axes
of the chart refer to the hexadecimal values of the EBCDIC representations of the characters being
transmitted. The inner portion of the chart shows the hexadecimal values of the ASCII characters
that are transmitted on the communication line.
For example, an outbound EBCDIC hex 3F is translated to an ASCII hex 1A.
# NOTE
Blank squares that appear in the table, such as hex 9C, represent characters that are translated
to hex FF.
High-Order Hex Digit
Low-Order Hex Digit
0123456789ABCDEF
0 0010 20262D 7B7D5C30
1 0111 2F 616A7E 414A 31
2 0212 16 626B73 424B5332
3 0313 636C74 434C5433
4 646D75 444D5534
5 090A0A 656E76 454E 5635
6 0817 666F77 464F5736
7 7F 1B04 677078 47505837
8 18 687179 48515938
9 19 6069727A 49525A39
A5B5D7C3A
B0B 2E242C23
C 0C1C 14 3C2A25 40
D 0D1D051528295F27
E 0E1E06 2B3B3E3D
F 0F1F071A215E3F22

Translating between ASCII and EBCDIC Inbound Translation Table (ASCII-to-EBCDIC)
Gentran:Server for iSeries Communications Module Release 3.5 User Guide B - 3
Inbound Translation Table
(ASCII-to-EBCDIC)
The following table illustrates the ASCII-to-EBCDIC translation that is applied to all inbound data
received via the iSeries asynchronous ICF support. When using this table, the outer axes of the
chart refer to the hexadecimal values of the ASCII representations of the characters being received
on the communication line. The inner portion of the chart shows the hexadecimal values of the
EBCDIC characters that are presented to the communication application.
For example, an inbound ASCII hex 1A would be translated to an EBCDIC hex 3F.
High-Order Hex Digit
Low-Order Hex Digit
0123456789ABCDEF
0 001040F07CD77997001040F07CD77997
1 01114FF1C1D8819801114FF1C1D88198
2 02127FF2C2D9829902127FF2C2D98299
3 03137BF3C3E283A203137BF3C3E283A2
4 37 3C5BF4 C4E384 A337 3C5BF4 C4E384 A3
5 2D3D6CF5 C5E485 A42D3D6CF5 C5E485 A4
6 2E3250F6C6E586A52E3250F6C6E586A5
7 2F267DF7C7E687A62F267DF7C7E687A6
8 16184DF8C8E788A716184DF8C8E788A7
9 05195DF9C9E889A805195DF9C9E889A8
A 153F5C7AD1E991A9153F5C7AD1E991A9
B 0B274E5ED24A92 C00B27 4E5ED24A92 C0
C 0C1C6B4CD3E093 6A0C1C6B4CD3E093 6A
D 0D1D60 7E D45A94 D00D1D60 7E D45A94 D0
E 0E1E4B6ED55F95 A10E1E4B6ED55F95 A1
F 0F1F616FD66D96070F1F616FD66D9607

Inbound Translation Table (ASCII-to-EBCDIC) Translating between ASCII and EBCDIC
B - 4 Gentran:Server for iSeries Communications Module Release 3.5 User Guide

Glossary
Gentran:Server for iSeries Communications Module Release 3.5 User Guide G - 1
Glossary
Introduction
This glossary includes terms and definitions from the IBM Vocabulary for Data Processing,
Telecommunication, and Office Systems, GC20-1699. Definitions from the American National
Dictionary for Information Processing are identified by an asterisk (*). Definitions from draft
proposals and working papers under development by the International Standards Organization,
Technical Committee 97, Subcommittee 1, are identified by the symbol (TC97).
Definition of Terms
ACB
Access method control block.
ACB Name
(1) The name of an ACB macro instruction. (2) A name specified in the ACBNAME parameter of
an APPL statement. Contrast with network name.
Note: This name allows an ACF/VTAM application program that is used in more than one domain
to specify the same application program identification (pointed to by the APPLID parameter of the
program’s ACB statement) in each copy.
ACF/VTAM knows the program by both its ACB name and its network name (the name of the
APPL statement). Program users within the domain can request a session using the ACB name or
the network name; program users in other domains must use the network name (which must be
unique in the network).
ACF
Advanced Communication Function.
ACF/NCP
Advanced Communication Function for the Network Control Program.
ACF/VTAM
Advanced Communication Function for the Virtual Telecommunication Access Method.
ACF/VTAM application program
A program that has opened an ACB to identify itself to ACF/VTAM and can now issue
ACF/VTAM macro instructions.

Definition of Terms Glossary
G - 2 Gentran:Server for iSeries Communications Module Release 3.5 User Guide
ACF/VTAM definition
The process of defining the user application network to ACF/VTAM and modifying IBM-defined
characteristics to suit the needs of the user.
ACF/VTAM definition library
The operation system files that contain the definition statements and start options filed during
ACF/VTAM definition.
ACF/VTAM operator
A person or program authorized to issue ACF/VTAM operator commands. See domain operator,
program operator, and network operator (2).
ACF/VTAM operator command
A command used to monitor or control an ACF/VTAM domain.
Active
In ACF/VTAM, pertaining to a major or minor node for which a VARY ACT command has been
issued. Also, a major or minor node in a list of major nodes to be activated when ACF/VTAM is
started. Contrast with inactive.
Adjacent NCPs
Network control programs (NCPs) that are connected by sub-area links with no intervening NCPs.
Adjacent Nodes
Two nodes that are connected by one or more data links with no intervening nodes.
Advanced Communication Function for the Network Control Program (ACF/NCP)
A program product that provides communication controller support for single-domain and
multiple-domain networks, and, optionally, multiple-network capability.
Application
An in-house program designed to process specific jobs. This program is formatted by the customer
for their business needs. (Example, payroll.)
Application Program
(1) A program written for or by a user that applies to the user’s work. (2) A program used to
connect and communicate with stations in a network, enabling users to perform
application-oriented activities.
Application Program Identification
The symbolic name by which an application program is identified to ACF/VTAM.
Note: It is specified in the APPLID parameter of the ACB macro instruction. It corresponds to the
ACBNAME parameter in the APPL statement or, if ACBNAME is defaulted, to the name of the
APPL statement.

Glossary Definition of Terms
Gentran:Server for iSeries Communications Module Release 3.5 User Guide G - 3
Application Program Major Node
In ACF/VTAM, a member of the ACF/VTAM definition library that contains one or more APPL
statements, each representing an application program.
Automatic Logon
A process by which ACF/VTAM creates a session-initiation request (logon) for a session between
a secondary logical unit (other than a secondary application program) and a designated primary
logical unit whenever the secondary logical unit is not in session with, or queued for a session
with, another primary logical unit. See also controlling application program and controlling logical
unit.
Autoanswer
Autoanswer refers to the computer’s capability in conjunction with Gentran:Server for iSeries to
wait and automatically answer in-coming calls when remote sites dial in.
Autodial
Autodial refers to the computer’s capability in conjunction with Gentran:Server for iSeries to
automatically dial a remote site on a switched line in order to establish a connection.
Auto Call Unit
This term refers to an 801C Bell auto call unit or compatible unit. The auto call unit attaches to a
communication port and a synchronous modem to provide dial out capabilities over a public
telephone network. Gentran:Server for iSeries will support the use of an auto call unit in the profile
definition.
Basic Information Unit (BIU)
In SNA, the unit of data and control information that is passed between half-sessions. It consists of
a request/response header (RH) followed by a request/response unit (RU).
Basic Transmission Unit (BTU)
In SNA, the unit of data and control information passed between path control components. A BTU
can consist of one or more path information units (PIUs).
Batch
A set of related data collected by, or added to Gentran:Server for iSeries. This is typically an
application file that has been added to the outbound queue or extracted from the inbound queue.
Batch Processing
A type of data processing operation and data communication transmission where related
transactions are grouped together and transmitted for processing. Usually by the same computer
and under the same application; generally regarded as non–real time data traffic consisting of large
files; type of data traffic where network response time is not critical; compare with interactive
(processing).
Begin Bracket
In SNA, the value (binary 1) of the begin-bracket indicator in the request header (RH) of the first
request in the first chain of a bracket; the value denotes the start of a bracket. Contrast with end
bracket. See also bracket.

Definition of Terms Glossary
G - 4 Gentran:Server for iSeries Communications Module Release 3.5 User Guide
Bidder
In SNA, the LU-LU half-session defined at session activation as having to request and receive
permission from the other LU-LU half-session to begin a bracket. Contrast with first speaker. See
also bracket protocol.
Binary Synchronous Communication (BSC)
(1) Communication using binary synchronous line discipline. (2) A uniform procedure, using a
standardized set of control characters and control character sequences, for synchronous
transmission of binary-coded data between stations.
Binary Synchronous Transmission
Data transmission in which synchronization of characters is controlled by timing signals generated
at the sending and receiving stations.
Bind
In SNA, a request to activate a session between two logical units.
Blank Compression
A method of replacing long strings of contiguous blanks with control characters indicating the
number of blanks removed. Commonly used to shorten the amount of data sent over
telecommunication lines.
Blank Truncation
A method of dropping trailing blanks from fixed length data records before sending data over
telecommunication lines. Optionally used to shorten the amount of data sent over
telecommunication lines.
BTAM
Basic Telecommunication Access Method. A standard IBM access method that provides
high-level tools for the creation of bisync applications.
BTAM ID Verification
An optional BTAM feature which allows for the exchange and verification of host site and/or
remote site IDs. Available for switched lines only, the feature provides for added security. Both the
host site and the remote site must be capable of implementing the option.
Bracket
In SNA, one or more chains of request units (RUs) and their responses that are exchanged between
the two LU-LU half-sessions and that represent a transaction between them. A bracket must be
completed before another bracket can be started. Examples of brackets are data base
inquiries/replies, update transactions, and remote job entry output sequences to work stations. See
also begin bracket and end bracket.
Bracket Protocol
In SNA, a data flow control protocol in which exchanges between the two LU-LU half-sessions
are achieved through the use of brackets, with one LU designated at session activation as the first
speaker and the other as the bidder. The bracket protocol involves bracket initiation and
termination rules. See also bidder and first speaker.

Glossary Definition of Terms
Gentran:Server for iSeries Communications Module Release 3.5 User Guide G - 5
BSC
Binary synchronous communication.
Buffer
A portion of storage for temporarily holding input or output data.
Channel Adapter
A communication controller hardware unit used to attach the controller to a System/360 or a
System/370 channel.
Channel-attached
(1) Pertaining to the attachment of devices directly by data channels (I/O channels) to a computer.
Contrast with link-attached. (2) Pertaining to devices that are attached to a controlling unit by
cables, rather than by telecommunication lines.
Channel-attached 3705
An IBM 3705 Communication Controller that is attached to a host processor by means of a data
channel. Contrast with link-attached 3705.
Character-coded
In ACF/VTAM, pertaining to commands (such as LOGON or LOGOFF) entered by an end user
and sent by a logical unit in character form. The character-coded command must be in the syntax
defined in the user’s unformatted system services definition table. Synonym for unformatted.
Contrast with field-formatted.
Cluster Controller
A device that can control the input/output operations of more than one device connected to it. A
cluster controller may be controlled by a program stored and executed in the unit; for example, the
IBM 3601 Finance Communication Controller. Or it may be controlled entirely by hardware; for
example, the IBM 3272 Control Unit.
Command
(1) A request from a terminal for the performance of an operation or the execution of a particular
program. (2) In SNA, any field set in the transmission header (TH), request header (RH), and
sometimes portions of a request unit, that initiates an action or that begins a protocol; for example:
(a) Bind Session (session-control request unit), a command that activates an LU-LU session, (b)
the change-direction indicator in the RH of the last RU of a chain, (c) the virtual route reset
window indicator in a FID4 transmission header. See also ACF/VTAM operator command.
Communication Common Carrier
In the USA and Canada, a public data transmission service that provides the general public with
transmission service facilities; for example, a telephone or telegraph company.
Communication Control Unit
A communication device that controls the transmission of data over lines in a network.
Communication control units include transmission control units (such as the 2702 Transmission
Control Unit) and communication controllers (such as the 3705 Communication controller).

Definition of Terms Glossary
G - 6 Gentran:Server for iSeries Communications Module Release 3.5 User Guide
Communication Controller
A type of communication control unit whose operations are controlled by one or more programs
stored and executed in the unit. For example, the IBM 3705 Communication Controller. It
manages the details of line control and the routing of data through a network.
Communication Line
Term for telecommunication line and transmission line.
Communication Stamp
A number that uniquely identifies each session occurrence of those batches on the Gentran:Server
for iSeries inbound and outbound queues.
Compression
See blank compression.
Connect:Supertracs (BSC)
An online telecommunication program that runs under a IBM 370 machine architecture and
manages data collection and data transmission between the host and remote terminals and
computers using BSC 3780/2780 protocol.
Connect:Supertracs (SNA)
An online telecommunication program that runs under a 370 machine architecture and manages
data collection and data transmission between the host and remote terminals and computers using
SNA protocols.
Controlling Application Program
In ACF/VTAM, an application program with which a secondary logical unit (other than an
application program) is automatically put in session whenever the secondary logical unit is
available. See also automatic logon and controlling logical unit.
Controlling Logical Unit
In ACF/VTAM, a logical unit with which a secondary logical unit (other than an application
program) is automatically put in session whenever the secondary logical unit is available. A
controlling logical unit can be either an application program or a device-type logical unit. See also
automatic logon and controlling application program.
Data Channel
A device that connects a processor and main storage with I/O storage units. Synonymous with
input/output channel and I/O channel.
Data Flow Control (DFC) Layer
In SNA, the layer within a half-session that (1) controls whether the half-session can send, receive,
or concurrently send and receive request units (RUs); (2) groups related RUs into RU chains; (3)
delimits transactions via the bracket protocol; (4) controls the interlocking of requests and
responses in accordance with control modes specified at session activation; (5) generates sequence
numbers; and (6) correlates requests and responses.

Glossary Definition of Terms
Gentran:Server for iSeries Communications Module Release 3.5 User Guide G - 7
Data Link Control (DLC) Layer
In SNA, the layer that consists of the link stations that schedule data transfer over a link between
two nodes and perform error control for the link. Examples of data link control are SDLC for
serial-by-bit link connection and data link control for the System/370 channel.
Data Link Control Protocol
In SNA, a set of rules used by two nodes on a data link to accomplish an orderly exchange of
information. Synonymous with line control.
Data Terminal Equipment (DTE)
(TC97) That part of a data station that serves as a data source, data sink, or both, and provides for
the data communication control function according to protocols.
Definite Response
In SNA, a value in the form-of-response-requested field of the request header. The value directs
the receiver of the request to return a response unconditionally, whether positive or negative, to
that request. Contrast with exception response and no response.
Delayed-request Mode
In SNA, an operational mode in which the sender may continue sending request units on the
normal flow after sending a definite-response request chain on that flow, without waiting to
receive the response to that chain. Contrast with immediate-request mode.
DISCINTV
Disconnect Interval.
Delayed-response Mode
In SNA, an operational mode in which the receiver of normal-flow request units can return
responses to the sender in a sequence different from that in which the corresponding request units
were sent. Contrast with immediate-response mode.
Domain
In SNA, a system services control point (SSCP) and the physical units (PUs), logical units (LUs),
links, link stations, and all the associated resources that the SSCP has the ability to control by
means of activation requests and deactivation requests. Synonymous with single-domain network.
Domain Operator
In a multiple-domain network, the person or program that controls the operation of the resources
controlled by one system services control point. Contrast with network operator (2).
Duplex
* In data communication, pertaining to a simultaneous two-way independent transmission in both
directions. Synonymous with full duplex. Contrast with half-duplex.
Echo Check
A check to determine the correctness of the transmission of data in which the received data are
returned to the source for comparison with the originally transmitted data.

Definition of Terms Glossary
G - 8 Gentran:Server for iSeries Communications Module Release 3.5 User Guide
Element Address
In SNA, a value in the element address field of the network address identifying a specific resource
within a sub-area. See sub-area address.
Emulation Mode
The function of a network control program that enables it to perform activities equivalent to those
performed by a transmission control unit. Contrast with network control mode.
Enabled
In ACF/VTAM, pertaining to an LU that has indicated to its SSCP that it is now ready to establish
LU-LU sessions. The LU can separately indicate whether this prevents it from acting as a primary
logical unit (PLU) or as a secondary logical unit (SLU).
End Bracket
In SNA, the value (binary 1) of the end bracket indicator in the request header (RH) of the first
request of the last chain of a bracket; the value denotes the end of the bracket. Contrast with begin
bracket. See also bracket.
End User
In communication, the ultimate source or destination of application data flowing through a
communication network. An end user may be an application program or a terminal operator.
EOT
End of Transmission
EP
Emulation Program. A program, or more nearly correct, an operating system which runs on a
communication controller (“front end”) such as a 3704 or 3705, emulating a 270x BSC
communication controller. See also, PEP and NCP.
Exception Response
In SNA, a value in the form-of-response-requested field of a request header: the receiver is
requested to return a response only if the request is unacceptable as received or cannot be
processed; that is, a negative response, but not a positive one, may be returned. Contrast with
definite response and no response. See also negative response.
Expedited Flow
In SNA, a data flow designated in the transmission header (TH) that is used to carry network
control, session control, and various data flow control request/response units (RUs); the expedited
flow is separate from the normal flow (which carries primarily end-user data) and can be used for
commands that affect the normal flow. Contrast with normal flow.
Note: The normal and expedited flows move in both the primary-to-secondary and
secondary-to-primary directions. Requests and responses on a given flow (normal or expedited)
usually are processed sequentially within the path, but the expedited flow traffic may be moved
ahead of the normal-flow traffic within the path at queuing points in the half-sessions and for
half-session support in boundary functions.

Glossary Definition of Terms
Gentran:Server for iSeries Communications Module Release 3.5 User Guide G - 9
Field-formatted
Pertaining to a request or response that is encoded into fields, each having a specified format such
as binary codes, bit-significant flags, and symbolic names. Contrast with character-coded.
Field-formatted Request
In SNA, a request that is encoded into fields, each having a specified format such as binary codes,
binary counts, bit-significant flags, and symbolic names; a format indicator in the request/response
header (RH) for the request is set to zero. Contrast with character-coded.
First Speaker
In SNA, the LU-LU half-session defined at session activation as: (1) able to begin a bracket
without requesting permission from the other LU-LU half-session to do so, and (2) winning
contention if both half-sessions attempt to begin a bracket simultaneously. Contrast with bidder.
See also bracket protocol.
First-in-chain (FIC)
A request unit whose request header (RH) begin chain indicator is on and whose RH end chain
indicator is off. See also RU chain.
Flow Control
In SNA, the process of managing the rate at which data traffic passes between components of the
network. The purpose of flow control is to optimize the rate of flow of message units, with
minimum congestion in the network; that is, to neither overflow the buffers at the receiver or at
intermediate routing nodes, nor leave the receiver waiting for more message units.
FMH
Function management header.
Function Management (FM) Header
In SNA, one or more headers, optionally present in the leading request units (RUs) of an RU chain,
that allow one half-session in an LU-LU session to: (1) select a destination at the session partner
and control the way in which the end-user data it sends is handled at the destination, (2) change the
destination or the characteristics of the data during the session, and (3) transmit between session
partners status or user information about the destination (for example, a program or device).
Note: FM headers can be used on LU-LU session types 0, 1, 4, and 6.
Generalized Path Information Unit Trace (GPT)
A record of the flow of path information units (PIUs) exchanged between the network control
program and its attached resources. PIU trace records consist of up to 44 bytes of transmission
header, request/response header, and request/response unit data.
Half-duplex
* In data communication, pertaining to an alternate, one way at a time, independent transmission.
Contrast with duplex.

Definition of Terms Glossary
G - 10 Gentran:Server for iSeries Communications Module Release 3.5 User Guide
Half-session
In SNA, a component that provides FMD services, data flow control, and transmission control for
one of the sessions of a network addressable unit (NAU).
Houston Automatic Spooling Program (HASP)
A computer program that provides supplementary job management, data management, and task
management functions, such as control of job flow, ordering tasks, and spooling. (See also JES2).
Host
The main processing computer at your central site. Also referred to as the “host site”, “host
computer”, or “local site”.
Immediate-request Mode
In SNA, an operational mode in which the sender stops sending request units (RUs) on a given
flow (normal or expedited) after sending a definite-response request chain on that flow until that
chain has been responded to. Contrast with delayed-request mode. See also immediate-response
mode.
Immediate-response Mode
In SNA, an operational mode in which the receiver responds to request units (RUs) on a given
normal flow in the order it receives them in a first-in, first-out sequence. Contrast with
delayed-response mode. See also immediate-request mode.
Inactive
In ACF/VTAM, pertaining to a major or minor node that has not been activated or for which the
VARY INACT command has been issued. Contrast with active.
Inbound Queue
The inbound queue may contain multiple batches of data for multiple profile IDs. The batches of
data are placed on the inbound queue when data is received from a remote and may be copied to an
application file using the EXTRACT command.
Inter-record Separator
A special character used to separate multiple records in a block of data being transmitted over a
telecommunication line. Gentran:Server for iSeries BSC allows either X“1E” or X“1F” as the
inter-record separator. Also referred to as “IRS” or simply “record separator”.
IRS
See Inter-Record Separator, above.
JES2
Job Entry Subsystem 2. The spooler for IBM’s OS/VS2/MVS operating system. In addition to
spooling unit record input and output, JES2 performs certain operator console and job control
functions. JES3, another MVS spooler, is similar in function to JES2.
Job Entry Subsystem (JES)
JES is a system facility that is responsible for handling all input and output, such as spooling, job
queuing, operator commands, and managing the scheduler work area. (See also JES2).

Glossary Definition of Terms
Gentran:Server for iSeries Communications Module Release 3.5 User Guide G - 11
Last-in-chain (LIC)
A request unit whose request header (RH) end chain indicator is on and whose RH begin chain
indicator is off. See also RU chain.
Leased Line
A dedicated telecommunication line for which no dialing is required to establish a connection with
the remote end. Also, Nonswitched Line.
Line Control
Synonym for data link control protocol.
Line Group
One or more telecommunication lines of the same type that can be activated and deactivated as a
unit.
Link
In SNA, the combination of the link connection and the link stations joining network nodes; for
example: (1) a System/370 channel and its associated protocols, (2) a serial-by-bit connection
under the control of Synchronous Data Link Control (SDLC). Synonymous with data link.
Note: A link connection is the physical medium of transmission; for example, a telephone wire or
a microwave beam. A link includes the physical medium of transmission, the protocol, and
associated communication devices and programming; it is both logical and physical.
Link Connection
In SNA, the physical equipment providing two-way communication between one link station and
one or more other link stations; for example, a telecommunication line and data circuit-terminating
equipment (DCE).
Link-attached
In ACF/VTAM, pertaining to devices that are physically connected by a telecommunication line.
Synonymous with remote. Contrast with channel-attached.
Link-attached Communication Controller
An IBM communication controller that is attached to another communication controller by means
of a link.
Local
Synonymous with channel-attached. Pertaining to a device that is attached to a controlling unit by
cables, rather than by a telecommunication line.
Local Address
In SNA, an address used in a peripheral node in place of an SNA network address and transformed
to or from an SNA network address by the boundary function in a sub-area node.
Local Non-SNA Major Node
In ACF/VTAM, a major node whose minor nodes are channel-attached non-SNA terminals.

Definition of Terms Glossary
G - 12 Gentran:Server for iSeries Communications Module Release 3.5 User Guide
Local SNA Major Node
In ACF/VTAM, a major node whose minor nodes are channel-attached peripheral nodes.
Log Off
To request that a session be terminated.
Log On
(1) To initiate a session. (2) In SNA products, to initiate a session between an application program
and a logical unit.
Logic Error
In ACF/VTAM, an error condition that results from an invalid request; a program logic error.
Logical Unit (LU)
In SNA, a port through which an end user accesses the SNA network in order to communicate with
another end user and through which the end user accesses the functions provided by system
services control points (SSCPs). An LU can support at least two sessions - one with an SSCP and
one with another LU - and may be capable of supporting many sessions with other logical units.
See also network addressable unit (NAU), peripheral LU, physical unit, system services control
point, primary logical unit, and secondary logical unit. Contrast with physical unit (PU).
Logical Unit (LU) Services
In SNA, capabilities in a logical unit to: (1) receive requests from an end user and, in turn, issue
requests to the system services control point (SSCP) in order to perform the requested functions,
typically for session initiation; (2) receive requests from the SSCP, for example to activate LU-LU
sessions via Bind Session requests; and (3) provide session presentation and other services for
LU-LU sessions. See also physical unit (PU) services.
Logoff
In ACF/VTAM, an unformatted session-termination request.
Logon
In ACF/VTAM, an unformatted session-initiation request for a session between two logical units.
See automatic logon and session-initiation request.
Logon Data
In ACF/VTAM: (1) The user data portion of a field-formatted or unformatted session-initiation
request. (2) The entire logon sequence or message from an LU. Synonymous with logon message.
Logon Message
Synonym for logon data.
Logon Mode
In ACF/VTAM, a subset of session parameters specified in a logon mode table for communication
with a logical unit. See also session parameters.

Glossary Definition of Terms
Gentran:Server for iSeries Communications Module Release 3.5 User Guide G - 13
Logon Mode Table
In ACF/VTAM, a set of entries for one or more logon modes. Each logon mode is identified by a
logon mode name.
LU
See “Logical Unit”.
LU1RJE
See “LU Type 1 RJE”.
LU Type 1 RJE
A device such as a 3770, a PC running Connect:Tracs, or a similar device or software package
which uses Logical Unit Type 1 protocols and is used primarily for data transfer or RJE (Remote
Job Entry) purposes. The devices typically have multiple I/O devices, such as printers, card
readers, and storage devices. An operator console for messages or interactive use is often present.
LU-LU session
In SNA, a session between two logical units in an SNA network. It provides communication
between two end users, or between an end user and an LU services component.
Major Node
In ACF/VTAM, a set of minor nodes that can be activated and deactivated as a group. (See node
and minor node.)
Manual Dial
The method of establishing contact over switched telecommunication lines wherein human
intervention is required. The operator at the host site must manually dial the telephone number of
the remote site if the connection is initiated by the host site. The opposite of auto dial.
Middle-in-chain (MIC)
A request unit whose request header (RH) begin chain indicator and RH end chain indicator are
both off. See also RU chain.
Minor Node
In ACF/VTAM, a uniquely-defined resource within a major node. See node and major node.
Modem
(modulator-demodulator) A device that modulates and demodulates signals transmitted over data
communication facilities.
Multiple-domain Network
In SNA, a network with more than one system services control point (SSCP). Contrast with
single-domain network.
Multipoint Link
A link or circuit interconnecting several link stations. Synonymous with multidrop line. Contrast
with point-to-point link.

Definition of Terms Glossary
G - 14 Gentran:Server for iSeries Communications Module Release 3.5 User Guide
Multithread Application Program
An ACF/VTAM application program that processes requests for more than one session
concurrently. Contrast with single-thread application program.
NCP
Network Control Program. The SNA software for IBM’s intelligent 37xx communication
controllers. NCP supports BSC (EP) functions through a subprogram called PEP (q.v.).
NCP major node
In ACF/VTAM, a set of minor nodes representing resources, such as lines and peripheral nodes,
controlled by a network control program. See major node.
Negative Response
In SNA, a response indicating that a request did not arrive successfully or was not processed
successfully by the receiver. Contrast with positive response. See exception response.
Network
A network is a Third Party Network. Networks are defined to Gentran:Server for iSeries for the
purposes of collecting and routing data.
Network Address
In SNA, an address, consisting of sub-area and element fields, that identifies a link, a link station,
or a network addressable unit. Sub-area nodes use network addresses; peripheral nodes use local
addresses. The boundary function in the sub-area node to which a peripheral node is attached
transforms local addresses to network addresses and vice versa. See local address and network
name.
Network Addressable Unit (NAU)
In SNA, a logical unit, a physical unit, or a system services control point. It is the origin or the
destination of information transmitted by the path control network. See also network name, and
network address.
Network Communication Control Facility (NCCF)
An IBM program product consisting of a base for command processors that can monitor, control,
and improve the operation of a network.
Network Control Mode
The functions of a network control program that enable it to direct a communication controller to
perform activities such as polling, device addressing, dialing, and answering. Contrast with
emulation mode.
Network Control Program (NCP)
A program, generated by the user from a library of IBM-supplied modules, that controls the
operations of a communication controller.
Network Control Program Generation
The process, performed in a host system, of assembling and link-editing a macro instruction
program to produce a network control program.

Glossary Definition of Terms
Gentran:Server for iSeries Communications Module Release 3.5 User Guide G - 15
Network Name
(1) In SNA, the symbolic identifier by which end users refer to a network addressable unit (NAU),
a link, or a link station. See also network address. (2) In a multiple-domain network, the name of
the APPL statement defining an ACF/VTAM application program is its network name and it must
be unique across domains. Contrast with ACB name.
Network Operator
(1) A person or program responsible for controlling the operation of all or part of a network. (2)
The person or program that controls all the domains in a multiple-domain network. Contrast with
domain operator.
Networking
In a multiple-domain network, communication among domains.
No Response
In SNA, a value in the form-of-response-requested field of the request header (RH) indicating that
no response is to be returned to the request, whether or not the request is received and processed
successfully. Contrast with definite response and exception response.
Node
(1) In SNA, an endpoint of a link or junction common to two or more links in a network. Nodes
can be distributed to host processors, communication controllers, cluster controllers or terminals.
Nodes can vary in routing and other functional capabilities. (2) In ACF/VTAM, a point in a
network defined by a symbolic name. Synonymous with network node. See major node and minor
node.
Non-switched Line
A dedicated telecommunication line on which connection is not established through a switched
network. The opposite of a switched (dial-up) line. A nonswitched line is often called a leased line.
Only-in-chain (OIC)
A request unit whose request header (RH) begin chain indicator and RH end chain indicator are
both on. See also RU chain.
Outbound Queue
The outbound queue may contain multiple batches of data for multiple profile IDs. The batches of
data are placed on the outbound queue by the ADD command before they are sent to a remote.
Parallel Sessions
In SNA, two or more concurrently active sessions between the same two logical units (LUs) using
different pairs of network addresses. Each session can have independent session parameters.
Partitioned Emulation Programming (PEP) Extension
A function of a network control program that enables a communication controller to operate some
telecommunication lines in network control mode while simultaneously operating others in
emulation mode.

Definition of Terms Glossary
G - 16 Gentran:Server for iSeries Communications Module Release 3.5 User Guide
Path Information Unit (PIU)
In SNA, a message unit consisting of a transmission header (TH) alone, or of a TH followed by a
basic information unit (BIU) or a BIU segment. See also transmission header.
Pending Active Session
In ACF/VTAM, the state of an LU-LU session recorded by the SSCP when it finds both LUs
available and has sent a CINIT request to the primary logical unit (PLU) of the requested session.
PEP
Partitioned Emulation Program. This communication controller subprogram provides BSC (EP)
functions to NCP running on 37xx controllers. See EP and NCP, above.
Peripheral LU
In SNA, a logical unit representing a peripheral node.
Physical Unit (PU)
In SNA, one of three types of network addressable units (NAUs); each node of an SNA network
contains a physical unit (PU) that manages and monitors the resources (such as attached links) of a
node, as requested by an SSCP via an SSCP-PU session.
Note: An SSCP activates a session with the physical unit in order to indirectly manage, through
the PU, resources of the node such as attached links.
Physical Unit (PU) Services
In SNA, the components within a physical unit (PU) that provide configuration services and
maintenance services for SSCP-PU sessions. See also logical unit (LU) services.
Point-to-point Line
A telecommunication line connection which allows data exchange between two points on the
connection, usually the host site and a remote site. Once a dialed connection is established on a
switched network, the connection is considered point-to-point. Leased lines where the remote site
is a single station are also considered point-to-point.polling
(1) * Interrogation of devices for purposes such as to avoid contention, to determine operational
status, or to determine readiness to send or receive data. (2) (TC97) The process whereby stations
are invited, one at a time, to transmit.
Port
The iSeries physical address associated with a communication line.
Positive Response
A response indicating that a request was received and processed. Contrast with negative response.
POWER
The spooling subsystem of the DOS and VSE operating systems.

Glossary Definition of Terms
Gentran:Server for iSeries Communications Module Release 3.5 User Guide G - 17
Primary Logical Unit (PLU)
In SNA, the logical unit (LU) that contains the primary half-session for a particular LU-LU
session. Contrast with secondary logical unit.
Note: A particular logical unit may contain both primary and secondary half-sessions for different
active LU-LU sessions.
Problem Determination
The process of identifying the source of a problem; for example, a program component, a machine
failure, telecommunication facilities, user or contractor-installed programs or equipment, an
environment failure such as a power loss, or a user error.
Profile
The set of communication parameters that is associated with a given company or application in
Gentran:Server for iSeries. The profile will contain information specific to the communication
details like phone numbers, protocol, and contact names.
Profile ID
A 1 to 8 alphanumeric identifier associated with the profile in Gentran:Server for iSeries. A profile
ID is typically associated with a company or an application.
Profile Sequence Number
The sequence number is a number that uniquely identifies a batch of data residing on the inbound
or outbound queues. It may be used by the EXTRACT command to differentiate a batch of data
when multiple batches with the same profile id reside on the inbound queue. It is analogous to the
Connect:Supertracs (SNA) and Connect:Supertracs (BSC) batch number.
PU
Physical Unit.
Public Network
A network established and operated by communication common carriers or telecommunication
administrations for the specific purpose of providing circuit-switched, packet-switched, and
leased-circuit services to the public. Contrast with user-application network.
Remote Job Entry (RJE)
The submission of job control statements and data from a remote terminal that causes the
described jobs to be scheduled and executed as though encountered in the input stream.
Remote Site
Any data terminal equipment for communicating with a data processing system from a location
that is distanced from the data processing system by time, space, or electronics.
Request Unit (RU)
In SNA, a message unit that contains control information such as a request code or FM headers,
end-user data, or both.

Definition of Terms Glossary
G - 18 Gentran:Server for iSeries Communications Module Release 3.5 User Guide
Request/response Unit (RU)
In SNA, a generic term for a request unit or a response unit.
RU chain
In SNA, a set of related request/response units (RUs) that are consecutively transmitted on a
particular normal or expedited data flow. The request RU chain is the unit of recovery: if one of the
RUs in the chain cannot be processed, the entire chain is discarded.
Note: Each RU belongs to only one chain, which has a beginning and an end indicated via control
bits in request/response headers within the RU chain. Each RU can be designated as first-in-chain
(FIC), last-in-chain (LIC), middle-in-chain (MIC), or only-in-chain (OIC). Response units and
expedited-flow request units are always sent as only-in-chain.
Script
A script is the name given to the set of transaction codes used to instruct Gentran:Server for iSeries
to send and receive data. The Session Control Maintenance panel EDIM403 is used to define the
session script.
Secondary Logical Unit (SLU)
In SNA, the logical unit (LU) that contains the secondary half-session for a particular LU-LU
session. Contrast with primary logical unit.
Session
In SNA, a logical connection between two network addressable units (NAUs) that can be
activated, tailored to provide various protocols, and deactivated, as requested. The session
activation request and response can determine options relating to such things as the rate and
concurrence of data exchange, the control of contention and error recovery, and the characteristics
of the data stream. Sessions compete for network resources such as the links within the path
control network. For routing purposes, each session is identified by the network or local addresses
of the session partners.
Note: Each session is uniquely identified in a transmission header (TH) by a pair of network
addresses, identifying the origin and destination NAUs of any transmissions exchanged during the
session.
Session-initiation Request
In SNA, an initiate or logon request from a logical unit (LU) to a system services control point
(SSCP) that an LU-LU session be activated.
Session Limit
In SNA, the maximum number of concurrently active LU-LU sessions a particular logical unit can
support.
Session Parameters
In SNA, the parameters that specify or constrain the protocols (such as bracket protocol and
pacing) for a session between two network addressable units. See also logon mode.

Glossary Definition of Terms
Gentran:Server for iSeries Communications Module Release 3.5 User Guide G - 19
Session Partner
In SNA, one of the two network addressable units (NAUs) having an active session.
SIGNON
A special format data record sent by some remote BSC terminals designed to communicate with
RJE software (such as JES or DOS POWER). The SIGNON record is not required by
Gentran:Server for iSeries, but can be processed if sent by a remote terminal, provided the
Gentran:Server for iSeries script has been configured to do so.
Single Domain Network
In SNA, a network with one system services control point (SSCP). Contrast with multiple-domain
network.
Single-thread Application Program
An ACF/VTAM application program that processes requests for multiple sessions one at a time.
Such a program usually requests synchronous operations from ACF/VTAM, waiting until each
operation is completed before proceeding. Contrast with multithread application program.
SNA Character String (SCS)
A character string composed of EBCDIC controls, optionally intermixed with end-user-data, that
is carried within a request/response unit.
SNA Terminal
A terminal that supports Systems Network Architecture protocols.
Spool
A file used to hold print data before it is printed. Gentran:Server for iSeries may receive data from
the communication line directly into the Gentran:Server for iSeries spool file.
Start-stop Transmission
(1) (TC97) Asynchronous transmission such that a group of signals representing a character is
preceded by a start element and is followed by a stop element. (2) Asynchronous transmission in
which a group of bits is preceded by a start bit that prepares the receiving mechanism for the
reception and registration of a character and is followed by at least one stop bit that enables the
receiving mechanism to come to an idle condition pending the reception of the next character. See
also binary synchronous transmission and synchronous data link control.
Sub-area
A portion of the SNA network consisting of a sub-area node, any attached peripheral nodes, and
their associated resources. Within a sub-area node, all network addressable units, links, and
adjacent link stations (in attached peripheral or sub-area nodes) that are addressable within the
sub-area share a common sub-area address and have distinct element addresses.
Sub-area Address
In SNA, a value in the sub-area field of the network address that identifies a particular sub-area.
See also element address.

Definition of Terms Glossary
G - 20 Gentran:Server for iSeries Communications Module Release 3.5 User Guide
Switched Line
A communication line in which the connection between the communication controller and a
remote link station is established by dialing.
Switched Major Node
In ACF/VTAM, a major node whose minor nodes are physical units and logical units attached by
switched SDLC links.
Synchronous Data Link Control (SDLC)
A discipline for managing synchronous, code-transparent, serial-by-bit information transfer over a
link connection. Transmission exchanges may be duplex or half-duplex over switched or
nonswitched links. The configuration of the link connection may be point-to-point or multipoint.
SDLC conforms to subsets of the Advanced Data Communication Control Procedures (ADCCP)
of the American National Standards Institute and High-Level Data Link Control (HDLC) of the
International Standards Organization.
System Services Control Point (SSCP)
In SNA, a focal point within an SNA network for managing the configuration, coordinating
network operator and problem determination requests, and providing directory support and other
session services for end users of the network. Multiple SSCPs cooperating as peers, can divide the
network into domains of control, with each SSCP having a hierarchical control relationship to the
physical units and logical units within its domain.
Systems Network Architecture (SNA)
The description of the logical structure, formats, protocols, and operational sequences for
transmitting information units through and controlling the configuration and operation of
networks.
Note: The purpose of the layered structure of SNA is to allow the ultimate origins and destinations
of information (that is, the end users) to be independent of, and unaffected by, the way in which the
specific SNA network services and facilities used for information exchange are provided.
Telecommunication Line
Any physical medium such as a wire or microwave beam, that is used to transmit data.
Synonymous with transmission line.
Terminal
A device, usually equipped with a keyboard and some kind of display, capable of sending and
receiving information over a link.
Transaction Code
The Gentran:Server for iSeries script code that indicates the action to be taken during a
communication session. Example transaction codes are “S” to send, “R” to receive, “C” to send an
80 character literal, and “D” to trap data when received.
Transmission Control Unit
A device which usually resides at the host site and which manages data over the
telecommunication lines to and from many remote sites. It is also known as a “TCU”.

Glossary Definition of Terms
Gentran:Server for iSeries Communications Module Release 3.5 User Guide G - 21
Transmission Header (TH)
In SNA, control information, optionally followed by a basic information unit (BIU) or a BIU
segment, that is created and used by path control to route message units and to control their flow
within the network. See also path information unit.
Transmission Line
Synonym for telecommunication line.
Transparency
A mode of transmitting data over telecommunication lines wherein special line control characters
embedded in the data are “transparent”, that is, they do not function in their normal capacity as line
control characters. Transparency mode is used when non-text data (binary data such as object
modules) must be sent over telecommunication lines.
Truncation
See Blank Truncation, above.
Unformatted
In ACF/VTAM, pertaining to commands (such as LOGON or LOGOFF) entered by an end user
and sent by a logical unit in character form. The character-coded command must be in the syntax
defined in the user’s unformatted system services definition table. Synonymous with
character-coded. Contrast with field-formatted.
Unformatted System Services (USS)
In SNA products, a system services control point (SSCP) facility that translates a character-coded
request, such as a logon or logoff request into a field-formatted request for processing by formatted
system services and translates field-formatted replies and responses into character-coded requests
for processing by a logical unit. Contrast with formatted system services.
User-application Network
A configuration of data processing products, such as processors, controllers, and terminals,
established and operated by users for the purpose of data processing or information exchange,
which may use services offered by communication common carriers or telecommunication
Administrations. Contrast with public network.
User Batch ID
A 1- to 24-character free form batch identifier which may be used to describe the contents of a
batch of data. The batchid is recognized by the Connect:Supertracs (SNA) and Connect:Supertracs
(BSC) products.
USS Table
A table defined to VTAM which provides conversion of character-coded LOGON or LOGOFF to
field-formatted LOGON or LOGOFF. This table must be provided in an MVS system to allow
Gentran:Server for iSeries to establish sessions with SNA products on MVS systems.

Definition of Terms Glossary
G - 22 Gentran:Server for iSeries Communications Module Release 3.5 User Guide

Gentran:Server for iSeries Communications Module Release 3.5 User Guide IX - 1
Index
Symbols
$$ADD 4-104, 5-31
Command examples 5-35
Conditions for using 5-31
Keyword parameters 5-31
Keyword values and definitions 5-31
Protocol Specific Considerations 5-34, 5-39
Uses for 5-33
$$CMD END 5-30, 5-31, 5-40
$$DIR 5-31
$$LOGOFF 5-30, 5-31, 5-40
$$REQUEST 5-31, 5-37
Command examples 5-39
Keyword parameters 5-37
Keyword values and definitions 5-38
Multiple command transmission 5-37
Options for using 5-37
Single command transmission 5-37
A
ADD command 4-104
Additional Parameters 4-106
Add Communication Entry panel (ADDCMNE)
7-17
Add Data to Queues command, see ADD
Advantis BSC 4-39
Advantis LU0 4-40
ASC 9-40
Application Level Translation 9-12
Clear to Send 9-4
Indicator values 5-21, 9-21
PC script example 9-49
Profile LOCDAA, example 9-46
Profile LOCDDA, example 9-41
Profile RMTDAA, example 9-44
Remote command support 9-36
Session Script LOCDAA, example 9-47
Session Script LOCDDA, example 9-43
Session Script RMTDAA, example 9-45
Transaction codes 5-21, 9-21
Transparent data 9-37
ASC via X.25 (XAS)
Evoke record LXADDVN, example 9-62
Evoke record LXADDVX, example 9-58
Evoke record LXALDNN, example 9-67
Evoke record LXALDNX, example 9-53
Profile LXADDVN, example 9-61
Profile LXADDVX, example 9-56
Profile LXALDNN, example 9-66
Profile LXALDNX, example 9-52
Profile RXADANN, example 9-63
Profile RXALANN, example 9-68
Profile RXALANX, example 9-54, 9-59
Session Script LXADDVN, example 9-62
Session Script LXADDVX, example 9-57
Session Script LXALDNN, example 9-67
Session Script LXALDNX, example 9-53
Session Script RXADANN, example 9-65
Session Script RXALANN, example 9-70
Session Script RXALANX, example 9-55, 9-60
ASC, see Async Communications
ASCII-to-EBCDIC inbound translation B-3
Async Communications
ASC via X.25 (XAS) 9-50
AT or V.25bis command set 9-5
Basic scripting concepts 9-14
Command field, transaction type 9-20
Command field, using 9-20
Communication examples 9-40
Creating your own protocol 9-33
Default modem strings in profile 9-6
Dynamic scripting 9-35
Error detection and correction 9-3
Evoke considerations 9-38
Extended script logic 9-25
Extended Script Logic Keywords 9-25
Extended script logic, example 9-30
Flow control 9-10
Modem considerations 9-2
Modem dialing commands 9-8
Modem Initialization commands 9-7
Overview 9-1
Print control 9-34
Protocols ASC, ASX, OFA, OFX, XAS 9-1
Receive calls 9-9
Receive indicator table 9-23
Scripting considerations 9-14
Send /receive indicators 9-21
Send indicator table 9-23
Supported script transaction types and actions 9-16
System Level Translation 9-11
Transaction code/action table 9-21
Translation 9-11

Index
IX - 2 Gentran:Server for iSeries Communications Module Release 3.5 User Guide
Translation examples 9-13
Using ETX, EOT, and End-of-Cmd characters 9-19
Asynchronous Communication Support, see Async
Communications
AT&T Easy 4-136
AT&T EASYLINK SERVICES 4-41
AT&T in the U.K. 4-42, 4-136
Authority Codes 3-8
Code combinations and their meanings 3-13
Data Level 3-12
Define 3-10
Function Level 3-11
Quick Reference 3-13
Reference Table 3-13
Subsystem Level 3-11
Auto Answer 4-65
Auto Call field
Table 4-23
Auto Dial 4-65
Table 4-23
B
Batch status
Revising on outbound queue 4-85
Batch status, revise on inbound queue 4-97
BCS
see Bisync
Bisync 6-1
Communication Session Control Scripts 6-7
Configuration 6-2
Create a Bisync (BSC) Profile 6-3
Data-Trap("D") command, using with 5-14, 6-15
Print Carriage Control Conversion 6-16
Remotes Requirements checklist 6-17
Script Example 6-11
Transaction codes/actions,Send/Receive Indicators
5-12, 6-13
Zero (0) indicator, using with 5-14, 6-15
Break Year 17-7
BSC
Inactivity timer 4-131
BT EDI*NET in the UK ASC 4-43
BT EDI*NET in the UK BSC 4-44
BT EDI*NET in the UK XAS 4-45
BTASC 4-137
BTXAS 4-138, 4-143
C
Comm Profile ID 4-16
Comm Profile ID panel (EDIX407-FMT01) 4-59
Comm Profiles
Copy 4-58
Comm Script
see Scripts
Comm Session Control
Extended Parameters 4-34, 5-6
Command Line
Access panels from 2-18
Commerce:Network - Release 2 BSC 4-46
Commerce:Network - Release 3 BSC 4-47
Commerce:Network - Release 3 SNA 4-48
Commerce:Network Release 2 4-139
Commerce:Network Release 3 4-140, 4-141
Common Questions
How can I control the inactivity timer used during
communications sessions? 4-131
How can I create a uniform running environment for
multiple users? 3-17
How can I implement security in auto answer
sessions to guard against unauthorized access?
4-129
How can I initiate inbound processing immediately at
the end of a communication session? 4-130
How can the network scripts be converted to use the
automatic network update feature? 4-132
How do job occurrence records get generated? 16-31
What if I want two User IDs? 3-17
Communication Line/Controller/Device panel
(EDIX819-FMT01) 4-26
Communication Profile
Access the Communication Profile panel
(EDIX401-FMT04) 7-16
Communication Profile ID, see Comm Profile ID
Communication Profile panel (EDIX401-FMT01)
4-17
Communication Protocols
Asynchronous Communication Support
Bisync 6-1
SNA 7-1
SNA LU6.2 8-1
Communication Session Control panel
(EDIX403-CTL01) 4-30, 5-1
Communication Session Control panel
(EDIX43B-FMT01) 4-34, 5-6

Index
Gentran:Server for iSeries Communications Module Release 3.5 User Guide IX - 3
Communications
Access Communications 4-12
Comm Profile ID panel (EDIX407-FMT01) 4-59
Communication Line/Controller/Device panel
(EDIX819-FMT01) 4-26
Communication Profile panel (EDIX401-FMT01)
4-17
Communication Session Control panel
(EDIX403-CTL01) 4-30, 5-1
Communication Session Control panel
(EDIX43B-FMT01) 4-34, 5-6
Controlling the inactivity timer 4-131
ezCOMM 4-123
Flowchart 4-4
Gentran EDI Queue Standards Report (EBDI019)
4-126
How to initiate processing 4-130
Initiate Communication Sessions 4-65
Line/Controller/Device Descriptions 4-26
Manage the Inbound Queue 4-92
Manage the Outbound Queue 4-79
Management 4-64
Monitor Active Communication Sessions 4-71
Network Profile panel (EDIX821-FMT01) 4-57
Network Scripts 4-38
Network Scripts, updating automatically 4-55
Operations 4-64
Operations and Management 4-3
Outbound Queue Inquiry panel (EDIX405) 4-82
Panel Quick Reference 4-5
Purge All Communication Files command, see
PRGALLA
Purge All Communications Files, see PRGALL
Purge the Communications Files 4-114
Purge the Communications History Log, see
PRGCHF
Purge the Inbound Queue, see PRGIBQ
Purge the Outbound Queue, see PRGOBQ
Retrieve All Communications Files, see RTVALL
command
Retrieve the Communications History Log
(RTVCHF) 4-119
Retrieve the Inbound Queue (RTVIBQ), see
RTVIBQ
Retrieve the Inbound Queue, see RTVIBQ command
Retrieve the Outbound Queue, see RTVOBQ
command
Revise the batch status on the outbound queue 4-85
Session Control Scripts 4-28
Session Control Scripts, work with 4-30, 5-1
Setup 4-15
Start Communications Session command, see
STRCOMSSN
view additional fields on Work with Inbound Queue
Control panel 4-96
view additional fields on Work with Outbound
Queue Control panel 4-84
View the Communications History Log 4-73
What Does Communications do? 4-2
What Is Communications? 4-2
Work with Communication Jobs panel
(EDIX817-FMT01) 4-72
Work with Communications History Log panel
(EDIX406-FMT01) 4-74
Work with Communications panel
(EDIX400-FMT01) 4-14
Work with Communications Session panel
(EDIX402-FMT01) 4-62
Work with Inbound Queue Control panel
(EDIX407-CTL01) 4-93
Work with Network Profile panel
(EDIX820-FMT01) 4-56
Work with Outbound Queue Control panel
(EDIX404-CTL01) 4-81
Communications History log
Purge 4-114
Communications History Log, view it 4-73
Communications sessions
Security 4-129
Concepts in Gentran:Server 2-10
Configuration, Bisync 6-2
Configuring File Tracking 18-5
Connect:Mailbox/Supertracs 7-21
Connect:Mailbox/Supertracs (SNA) 7-21
VTAM Session parameters 7-22
VTAM USS Session parameters 7-23
Connect:Mailbox/Supertracs (SNA) (Leased) 7-25
Line/Controller/Device, customize 7-28
Remote definition 7-27
Requirements checklist 7-25
Sample NCP LU definition 7-27
VTAM mode table entry 7-26
Connect:Supertracs (SNA)
BLKSIZE 7-22
Option definition file entries 7-19
Remote definition 7-23
Requirements checklist 7-21
RUSIZE 7-22
Sample NCP LU definition 7-23
Connect:Supertracs (SNA) (Leased)
BLKSIZE 7-26
RUSIZE 7-26
VTAM USS table entry 7-26

Index
IX - 4 Gentran:Server for iSeries Communications Module Release 3.5 User Guide
Connect:Supertracs for MVS (SNA)
Dedicated Lines, requirements 7-18
Example 7-20
Host initiated comm, requirements 7-18
Prepare 7-20
Control file (INBCTL) 4-93
Control file (OUTCTL) 4-81
Copy
Comm Profiles 4-58
Scripts 4-58, 4-61
Scripts between Profiles 4-61
Scripts within a Profile 4-61
Create a Bisync (BSC) Profile 6-3
D
Data file (INBDTA) 4-93
Data file (OUTDTA) 4-81
Dedicated Lines 7-18
Dynamic Scripting
Remote Program Start Request 7-14
E
EBCDIC-to-ASCII outbound translation B-2
EDIX404 4-84
EDIX407 4-96
Enter Key defined 2-13
Entering Information on a panel
Prompt Key 2-15
Entry Fields 2-9
Entry Line 2-9
Environment 3-5
Environment Control
Access the Subsystem 3-3
Authority code table 3-13
Authority Codes, see also Authority Codes 3-8
Copy an Existing User Profile 3-6
Create a User Profile 3-5
Creating two User IDs for one user 3-17
Define Authority Codes 3-10
Define the Environment Profile 3-7
Define the Security Profile 3-8
Delete a User Profile 3-6
Environment Control panel (EDIX200-FMT01) 3-5
Environment Control panel (EDIX201-CTL02) 3-5
Environment Control panel (EDIX201-FMT01) 3-5
Environment profile 3-1
Manage User Profiles 3-3
Panel Quick Reference 3-2
Revise a User Profile 3-6
Security profile 3-1
Select an Option 3-4
Specify a User ID 3-5
Uniform Environment for Multiple Users 3-17
Use the panels 3-3
User Profile 3-1
User’s Initials, defining 2-9
View an Existing User Profile 3-6
What does Environment Control do? 3-2
What is Environment Control? 3-1
Work with Environment Control panel
(EDIX200-FMT01) 3-3
Environment Control panel (EDIX200-FMT01) 3-5
Environment Control panel (EDIX201-CTL02) 3-5,
3-7, 3-8, 3-10
Environment Control panel (EDIX201-FMT01) 3-5,
3-7
EXTRACT command 4-108
Additional Parameters 4-110
EXTRACT Data from Queues function 4-108
EXTRACT Data from Queues, see EXTRACT
ezCOMM 4-123
F
F1 (Help) 2-10, 2-24, 2-25, 2-26
F10 (Update) 2-11, 2-12
F11 (Delete) 2-11
F12 (Cancel) 2-11
F13 (Services) 2-11, 2-20
F15 (Sort) 2-11
F16 (Record-1(Rolling Update)) 2-12
F17 (Record+1 (Rolling Update)) 2-12
F2 (Hex On/Off) 4-35, 5-8
F21 (Print) 2-12
F22 (Resequence) 2-12
F23 (More Options) 2-12
F24 (More Keys) 2-12
F3 (Exit) 2-10
F4 (Prompt) 2-10, 2-16, 2-17
F5 (Refresh) 2-11
F7 (Back) 2-11
F8 (Next) 2-11
F9 (Retrieve) 2-11, 2-12

Index
Gentran:Server for iSeries Communications Module Release 3.5 User Guide IX - 5
Field Definitions 2-25
Fields 2-9
File Tracking 18-1
configuration 18-5
menu 18-3
printing 18-18
purge 18-23
quick reference 18-2
retrieve 18-27
Work with panel 18-8
File Tracking Report 18-30
FTP
Start an FTP Client Communication Session 12-32
Use the FTP Server Interface 12-33
FTP Communication Session Control Scripts 12-12
FTP Communication Support 12-1
FTP Configuration 12-7
function keys 2-9
definitions 2-10
Functions in Gentran:Server 2-4
G
gateway
IFS 4-91
GE Information Services 4-49, 4-142
GENFILETRK menu 18-3
GENIBQIFS command, how to use 15-11
Gentran EDI Queue Standards Report (EBDI019)
4-126
Gentran File Tracking 18-1
Gentran:Server
Command Line, use 2-21
Components of a panel 2-8
function keys 2-9
using 2-10
Functions 2-4
find 2-4
Help 2-23
How is Gentran:Server organized? 2-3
Hypertext 2-27
Key Entry Line 2-9
Message Line 2-9
Online Help 2-23
for a whole panel 2-26
for field definitions 2-25
Option Codes 2-8, 2-14
Option Fields 2-8
Panel Description 2-8
Panel Fields 2-9
Panel Structure 2-6
Panels
access from Command line 2-18
access from service (F13) 2-20
Printing Reports 2-29
Product Support and Remote Maintenance 2-31
Program and Data Libraries 2-8
Program Names 2-8
Prompt Key 2-15
Remote Maintenance 2-31
Reports, printing 2-29
Search Index 2-28
Shortcuts for using the system 2-18
Subsystems 2-4
System Essentials 2-1
Taking a Closer Look 2-3
Terms and Concepts 2-10
User’s Initials 2-9
What is Gentran:Server? 2-3
Work With concept 2-6
Getting Help 2-23
Sterling Software Support (SSS) 2-31
Getting Help within Gentran:Server system 2-23
GIFSGATE 15-2
How to use 15-4
H
Help Function in Gentran:Server 2-23
Help Key defined 2-13
Home Key defined 2-13
How Gentran:Server is organized 2-6
How Gentran:Server panels are structured 2-6
Hypertext 2-27
I
IFS Gateway 4-91
INBCTL (Control file) 4-93
INBDTA (Data file) 4-93
Inbound Processing
Initiating following communications 4-130
Inbound Queue
Access the inbound queue 4-92
Accessing the inbound queue 4-75
Control 4-93
control, additional fields 4-96
Extract data from inbound queue 4-108
Files 4-93
Inquiry (Character Display) 4-94

Index
IX - 6 Gentran:Server for iSeries Communications Module Release 3.5 User Guide
Inquiry (Hexadecimal Display) 4-95
Manage the inbound queue 4-92
Revise Batch Status 4-97
J
JES2 SNA
Definition requirements 7-31
NCP LU definition 7-31
Profile sample 7-32
Requirements checklist 7-29
Script sample 7-33
Use to communicate with Gentran:Server 7-29
VTAM mode table entry 7-30
VTAM USS table entry 7-30
VTAM/NCP definition requirements 7-30
Job Occurrence records generation 16-31
Job Schedule Master panel (EDIX411-FMT01)
16-13, 16-18, 16-19
Job Schedule Master panel Field Descriptions 16-14
Abnormal Completion Cmd to Execute 16-16
Command 16-15
Job Description 16-14
Job Name 16-14
Message Queue 16-15
Normal Completion Cmd to Execute 16-16
Run Denomination 16-14
Run Frequency 16-14
Run Start Date 16-15
Run Stop Date 16-15
Run Time 16-15
Sequence 16-14
Status 16-15
User 16-14
Job Schedule panel (EDIX413-FMT01) 16-24, 16-27
Job Scheduler 16-1
Access a Job Schedule 16-13
Access the Job Schedule Occurrence Records 16-21
Access the Job Scheduler Function 16-10
Add a Job Occurrence Record 16-25
Copying a Job Schedule 16-17
Create a New Entry 16-5
Delete a Job Occurrence Record 16-27
Delete a Job Schedule 16-19
Job occurrence records, generating 16-31
Job Schedule Master panel (EDIX411-FMT01)
16-13
Manage Entries in the Job Scheduler 16-10
Manage Job Occurrence Records 16-20
Panel Quick Reference 16-3
Purge the Job Schedule command, see PRGSCH
Retrieve the Job Schedule command, see RTVSCH
Schedule Job command, see SCHJOB
SCHEDULER data area 16-31
Scheduling the Process Transactions Outbound 16-6
Start the subsystem 16-3
Taking a Closer Look 16-2
Update a Job Occurrence Record 16-23
Use the Panels 16-5
What does it do? 16-2
What is it? 16-1
Work with Job Scheduler 16-11
Work with Job Scheduler panel (EDIX412-FMT01)
16-10
Work with Scheduled Entries panel
(EDIX409-FMT01) 16-23
K
Key Entry Line 2-9
Kleinschmidt Network 4-50, 4-142
L
Learning about the Gentran:Server system 2-1
Line Pools
Creating 13-3
How Line Pools Work 13-1
Requirements for Using Line Pools 13-1
Set Up a Line Pool with a Comm Profile 13-4
Using 13-1
When Line Pools Can Be Used 13-2
Line/Controller/Device Descriptions 4-26
Lines, dedicated 7-18
M
Maintenance, Remote 2-31
Manual Dial 4-65
MCI Bisync 4-51
Message Line 2-9
Messages 2-9
Modems, recommended for use with Gentran:Server
A-1
Monitor Active Communication Sessions 4-71
Mouse usage defined 2-13
N
Network Profile panel (EDIX821-FMT01) 4-57
Network Profile Worksheets 4-134
Network Scripts, see Scripts

Index
Gentran:Server for iSeries Communications Module Release 3.5 User Guide IX - 7
O
Occurrence Records generation 16-31
OFTP
Create an OFTP Profile 11-4
Create an OFTP Script 11-13
OFTP Asynchronous (OFA) Scripting Example
11-19
OFTP Communication Support 11-1
OFTP X.25 Scripting Example 11-21
Online Help 2-23, 2-26
Field Definitions 2-25
Option Codes 2-8
1=Create 2-14
2=Revise 2-14
3=Copy 2-14
4=Delete 2-15
5=View 2-15
6=Print 2-15
Option fields 2-8
Outbound Queue
Access the outbound queue 4-80
Accessing the outbound queue 4-75
control, additional fields 4-84
Extract data from outbound queue 4-108
Inquiry 4-82, 4-83
Manage the outbound queue 4-79
Revise batch status 4-85
Work with Outbound Queue Control panel
(EDIX404-FMT01) 4-81
Outbound Queue Inquiry panel (EDIX405) 4-82
OUTCTL (Control file) 4-81
OUTDTA (Data file) 4-81
P
Page Down (Roll Up) Key, defined 2-13
Page Up (Roll Down) Key, defined 2-13
Panel Descriptions 2-8
Panel Fields 2-9
Panel Structure 2-6
PRGALL command 4-118
PRGALLA command 4-19, 4-115
PRGCHF command 4-115
PRGIBQ command 4-117
PRGOBQ command 4-116
PRGSCH command 16-28
Print Key defined 2-13
Printing File Tracking Report 18-18
Printing reports 2-29
Processing
Add Data to Queues command, see ADD
EXTRACT Data from Queues, see EXTRACT
Product Support 2-31
Use Sterling Software Support 2-32
Program and Data Libraries 2-8
Program Names 2-8
Prompt Key 2-15
Purge
Communication files 4-114
Days to Purge field 4-115
Table 4-114
Purge All Communication Files command, see
PRGALLA
Purge All Communications Files, see PRGALL
Purge the Communications History Log, see
PRGCHF
Purge the Inbound Queue, see PRGIBQ
Purge the Job Schedule command, see PRGSCH
Purge the Outbound Queue, see PRGOBQ
Purging File Tracking entries 18-23
Q
Queue
Extract data from inbound or outbound queue 4-108
Queue, Inbound
Access the inbound queue 4-92
Accessing the inbound queue 4-75
Control 4-93
Files 4-93
Inquiry (Character Display) 4-94
Inquiry (Hexadecimal Display) 4-95
Manage the Inbound Queue 4-92
Revising Batch Status 4-97
Queue, Outbound
Access the outbound queue 4-80
Accessing the outbound queue 4-75
Inquiry 4-82, 4-83
Manage the outbound queue 4-79
Revise batch status 4-85
Work with Outbound Queue Control panel
(EDIX404-FMT01) 4-81
Quick reference
File Tracking 18-2

Index
IX - 8 Gentran:Server for iSeries Communications Module Release 3.5 User Guide
R
Remote commands 5-29
$$ADD 5-31
$$CMD END 5-30, 5-31
$$DIR 5-31
$$LOGOFF 5-30, 5-31
$$REQUEST 5-31
Session Control Script values 5-29
Remote Maintenance
Using Sterling Software Support 2-32
Remote Program Start Request 7-14
Configuration Information 7-14
Configure a host system 7-15
Enable a remote device 7-15
Profile ID and Session Information 7-14
Reports
File Tracking 18-18, 18-30
General information about printing 2-29
Gentran EDI Queue Standards Report (EBDI019)
4-126
Retrieve All Communications Files, see RTVALL
command
Retrieve the Inbound Queue (RTVIBQ)
Retrieve the Inbound Queue, see RTVIBQ
command
Retrieve the Job Schedule command, see RTVSCH
Retrieve the Outbound Queue, see RTVOBQ
command
Retrieving File Tracking entries 18-27
Revise batch status on inbound queue 4-97
Revising batch status on outbound queue 4-85
RTVALL command 4-122
RTVCHF command 4-119
RTVIBQ
RTVIBQ command 4-121
RTVOBQ command 4-120
RTVSCH command 16-30
S
Schedule Job Command Field Descriptions 16-7
Date of First Run 16-7
Date of Last Run 16-8
Description 16-9
Exec Upon Abnormal Completion 16-9
Exec Upon Normal Completion 16-9
Job Name 16-7
MSGQ for Completion Message 16-9
Time of Day to Start Run 16-8
User Profile 16-9
Schedule Job command, see SCHJOB
SCHJOB command 4-70, 16-5
Script Decision Tables 5-11
ASC 5-21
SNA/LU0/LU1 5-15
X62/L62 5-18
Scripts
Advantis BSC (Comm Profile ID: ADVBSC) 4-39
Advantis LU0 (Comm Profile ID: ADVLU0) 4-40
AT&T EASYLINK SERVICES (Comm Profile ID:
ATTEASY) 4-41
AT&T in the U.K. (Comm Profile ID: ATTUK) 4-42
BT EDI*NET in the UK ASC (Comm Profile ID:
BTASC) 4-43
BT EDI*NET in the UK BSC (Comm Profile ID:
BTUK) 4-44
BT EDI*NET in the UK XAS (Comm Profile ID:
BTXAS) 4-45
Commerce:Network - Release 2 BSC (Comm Profile
ID: CN2BSC) 4-46
Commerce:Network - Release 3 BSC (Comm Profile
ID: CN3BSC) 4-47
Commerce:Network - Release 3 SNA (Comm Profile
ID: CN3SNA) 4-48
Copy between Profiles 4-61
Copy scripts 4-58
Copy within a Profile 4-61
Copying scripts 4-61
EDI networks, table 4-38
GE Information Services (Comm Profile ID: GEIS)
4-49
How to convert automatically 4-132
Kleinschmidt (Comm Profile ID: KLEIN) 4-50
MCI Bisync (Comm Profile ID: MCIBSC) 4-51
Modify a Session Control Script 4-15
Sears Communication Network (Comm Profile ID:
SEARS) 4-52
Transettlements (Comm Profile ID:TRANS) 4-53
Update automatically 4-55
Update manually 4-38
Western Union (Comm Profile ID: WSUN) 4-54
Search Index 2-28
Selecting topics 2-28
Use the Search Index 2-28
Sears Communication Network 4-52, 4-143
Security
Auto answer sessions 4-129
Select a Value (F4) 2-16
Service (F13)

Index
Gentran:Server for iSeries Communications Module Release 3.5 User Guide IX - 9
Access panels from 2-20
Session Control
Extended Parameters 4-34, 5-6
Session Control Scripts 4-28
Work with them 4-30, 5-1
Setting up communications
line pools 13-1
SNA
Communications Support 7-1
Inactivity timer 4-131
SNA LU1
Remote Program Start Request 7-14
SNA LU6.2
Communications Support 8-1
Configuration 8-2
Create an L62/X62 profile 8-2
L62/X62 Communication Session Control Scripts
8-6
L62/X62 Script Transactions 8-7
LU6.2 via SDLC configuration examples 8-15
LU6.2 via SDLC Examples 8-14
LU6.2 via SDLC naming conventions overview 8-14
LU6.2 via SDLC, Example 1 8-16
LU6.2 via SDLC, Example 2 8-24
LU6.2 via SDLC, naming convention parameters
8-14
LU6.2 via X.25 configuration examples 8-35
LU6.2 via X.25 examples 8-34
LU6.2 via X.25 naming convention parameters 8-34
LU6.2 via X.25 naming conventions 8-34
LU6.2 via X.25, Example 1 8-36
LU6.2 via X.25, Example 2 8-47
LU6.2 via X.25, Example 3 8-58
Start an L62/X62 Communication Session 8-10
X62/L62 Script Decision Tables 8-11
X62/L62 Transaction codes 8-11
SNA/LU0
Communication Session Control Scripts 7-5
Configuration 7-2
Create an SNA/LU0 Script 7-5
Creating an SNA/LU0 profile 7-3
Script Decision Tables 7-11
Script Example 7-9
Script Transactions 7-6
Start a Communication Session 7-10
Transaction Codes/Actions, Send/Receive Indicators
7-11
SNA/LU0/LU1
Data-Trap (“D”) command, using with 5-17, 7-13
Indicator values 5-15, 7-11
Line/Controller/Device 4-26
Transaction codes 5-15
Zero (0) indicator, using with 5-17, 7-13
SSSCONFIG command 2-31, 2-33
SSSOFF command 2-35
SSSON command 2-35
SSSREMOVE command 2-35
Start Communications Session command, see
STRCOMSSN
Sterling Software Support (SSS) 2-31, 2-32
STRCOMSSN command 4-67, 4-69
Subsystems in Gentran:Server 2-4
Support
for Gentran:Server 2-31
remote 2-31
Using Sterling Software Support 2-32
Switched Line field
Table 4-23
System Administration subsystem
Job Scheduler 16-5
System Basics 2-1
System Configuration file
break year, setting 17-7
System Date and Time 2-9
System Essentials 2-1
T
Tab Key defined 2-13
Terms used in Gentran:Server 2-10
Transettlements Network 4-53, 4-144
U
User Profile 3-1, 3-9
Authority Codes, see Authority Codes
Copy Existing Profile 3-6
Create 3-5
Define the Environment Profile 3-7
Define the Security Profile 3-8
Delete 3-6
Environment profile 3-1
Manage 3-3
Revise 3-6
Security profile 3-1
View an Existing Profile 3-6
User’s Initials
Defining 2-9

Index
IX - 10 Gentran:Server for iSeries Communications Module Release 3.5 User Guide
V
View the Communications History Log 4-73
W
Western Union 4-54, 4-144
Work with Communication Jobs panel
(EDIX817-FMT01) 4-72
Work with Communications History Log panel
(EDIX406-FMT01) 4-74
Work with Communications panel
(EDIX400-FMT01) 4-14
Work with Communications Session panel
(EDIX402-FMT01) 4-62
Work With Concept 2-6
Work with Environment Control panel
(EDIX200-FMT01) 3-3
Work with Gentran File Tracking panel 18-8
Work with Inbound Queue Control panel
(EDIX407) 4-96
Work with Inbound Queue Control panel
(EDIX407-CTL01) 4-93
Work with Job Scheduler panel (EDIX412-FMT01)
16-10, 16-11, 16-21
Work with Network Profile panel
(EDIX820-FMT01) 4-56
Work with Outbound Queue Control panel
(EDIX404) 4-84
Work with Outbound Queue Control panel
(EDIX404-CTL01) 4-81
Work with Scheduled Entries panel
(EDIX409-FMT01) 16-21, 16-23, 16-25,
16-27
Work with Scheduled Entries panel Field
Descriptions 16-22
Date 16-22
Job Desc 16-23
Job Numb 16-23
Job Status 16-22
Msg Queue 16-23
Time 16-22
User 16-23
X
X62/L62
Data-Trap (“D”) command, using with 5-20, 8-13
Indicator values 5-18, 8-11
Transaction codes 5-18
Zero (0) indicator, using with 5-20, 8-13
Y
Year 2000 processing 17-7
