Geomax Zenith DGPS Instructions
User Manual:
Open the PDF directly: View PDF ![]() .
.
Page Count: 10
Geomax Zenith Differential GPS
A guide for basic surveying
(Compiled by Nicholaus Huchzermeyer, 2015)
The differential system uses two GPS receivers that record at the same time. The first is the static
base station and the second the rover. The latter is used for the actual surveying. The data coming
from both GPS receivers is fed into the Controller which aligns the data so that data being collected
by the rover receiver is automatically corrected to the position of the base.
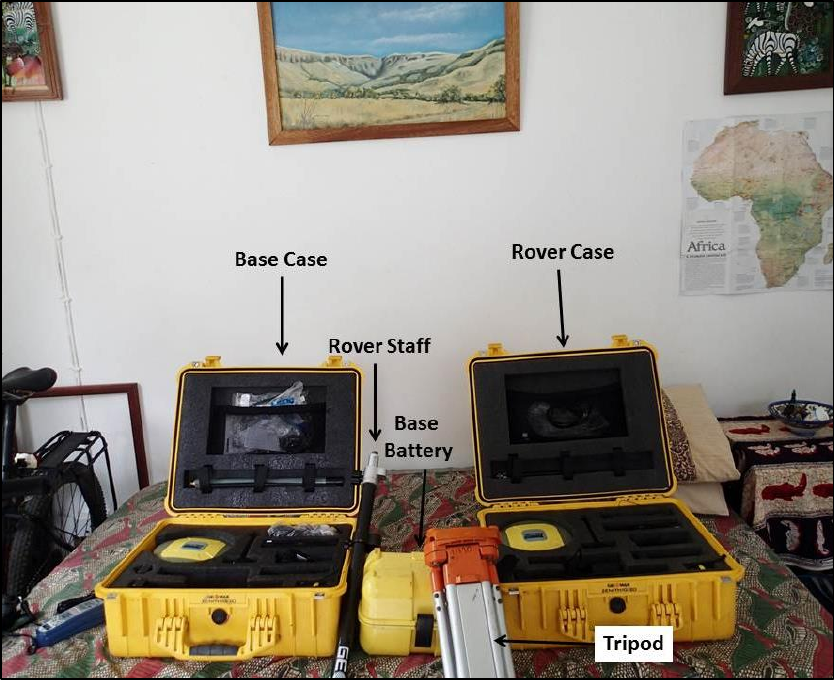
The Equipment:
Do you have five pieces of Equipment?
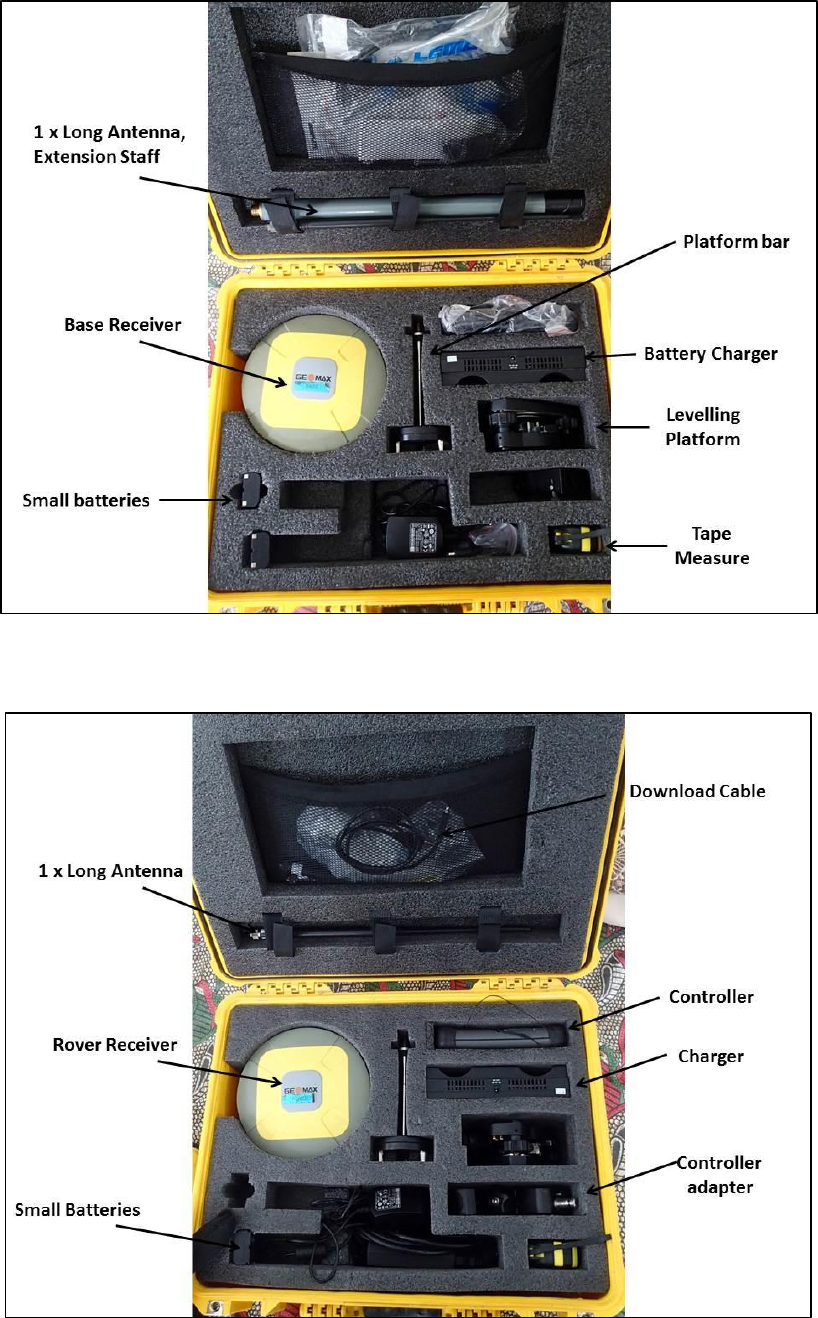
Essential Base Equipment
Essential Rover Equipment
On arrival in the field, identify an area in your survey site that you can safely setup the base station.
Note that it should not be in any of your survey lines. Make sure you have a clear/open view of the
sky to ensure good satellite communication (avoid trees, vehicles, cliffs, buildings etc.). This can
increase the accuracy of your data significantly.
Don’t leave the base unattended. People as well as livestock are commonly curious and can knock
over your base while you are surveying. Hire a field assistant to watch over the base for you.
Insert a peg where you are going to put up the base station. This acts as a reference point and is very
important to have if you wish to return the next day to continue surveying or if you plan to do repeat
monitoring surveys.
Setting up the Base Station:
1. Set up the tripod over the peg.
2. Attach the levelling platform onto the tripod.
3. Toggle between levelling the tripod and keeping it over the peg.
4. I.e. use the eye piece/camera on the levelling platform to position yourself over the peg
whilst also ensuring to keep the platform balanced using the waterpass/level indicator.
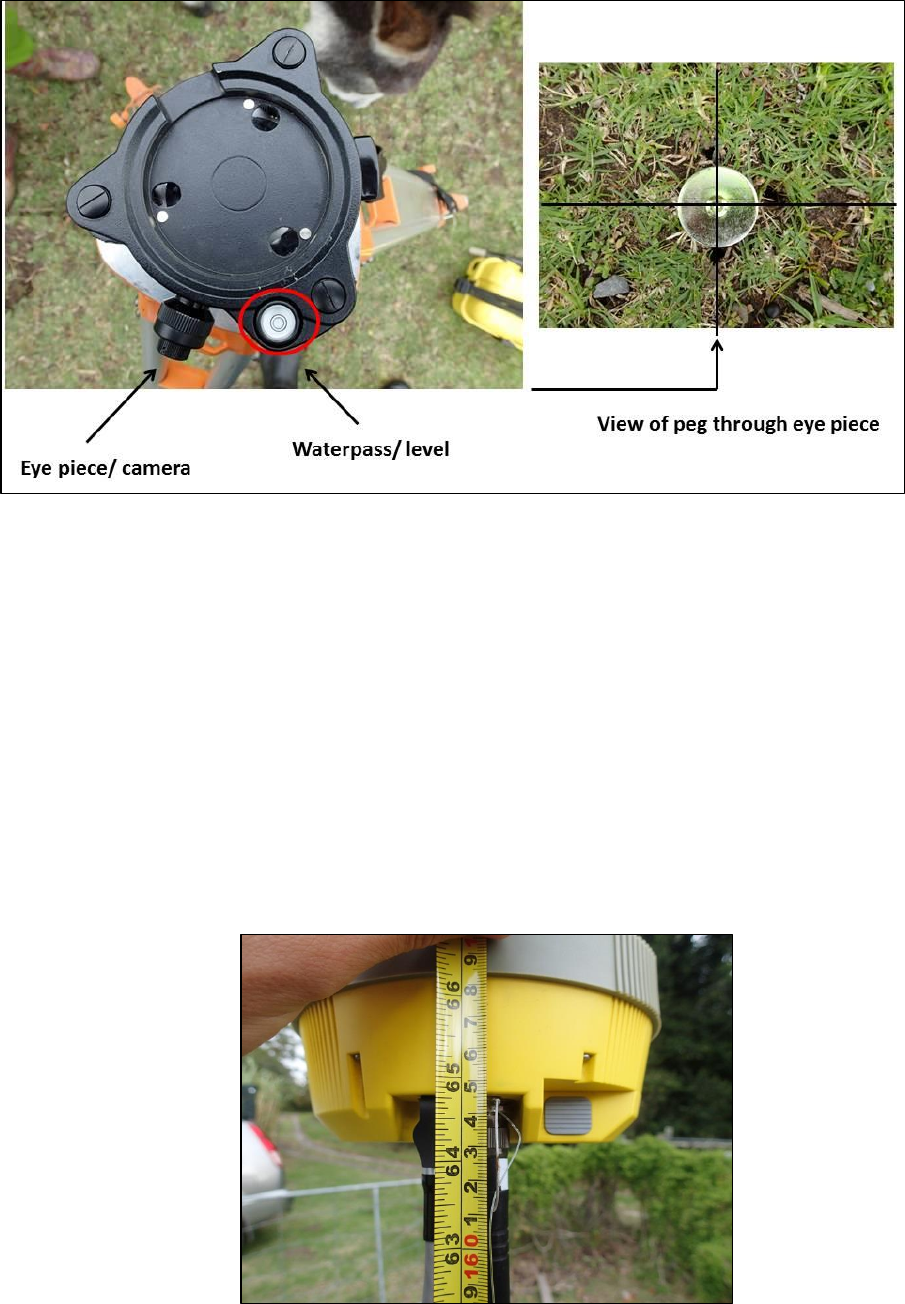
5. Once level inspect the tripod and ensure that it is securely placed on the ground and that a
sudden gust of wind will not knock it over.
6. Assemble the base station (4 parts). This can be safely done from the box. Start by flipping
the receiver upside down, screw in the extension staff, followed by the platform bar. Screw
one long antenna into the UHF port.
7. Take the assemblage and slot the platform bar into the levelling platform and tighten with
the screw on the side of the platform. Make sure it is secure and double check the level on
the platform.
8. Use the tape measure to Measure the distance from the peg (ground) to the base of the
antenna mounting. Note the value as you need to programme it into the controller.
Height from ground to base of antenna (In this case 1.646 m)
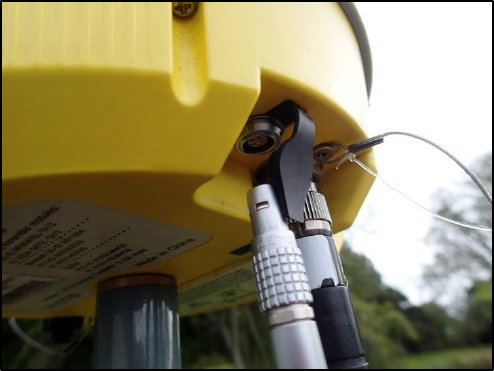
9. Connect the battery cable to the big base battery. Connect the battery to the base receiver
by plugging the cable into the port next to the UHF antenna, by lining up the two red dots.
Note that if you want to use a small battery you need to put it into the base receiver during
step 6. The small battery only lasts a couple of hours whereas the large battery can go all
day. Also please note that the large battery should not be left uncharged for any amount of
time as it will lose its ability to hold a charge i.e. charge asap after every use.
Connecting the big battery into the base receiver
Setting up the Rover:
10. Flip the rover receiver over in the box, add a small battery into the battery compartment,
screw one long antenna into the UHF port and finally, extend the staff slightly and screw it
into the rover receiver.
11. Attach the adapter onto the handheld Controller in order to clip it onto the rover staff.
12. Clip the Controller onto the staff and extend the staff to your desired height (generally 2
meters is accepted).
13. Ensure the rover is screwed on securely and the staff is tightened so that it won’t retract
while you are surveying.
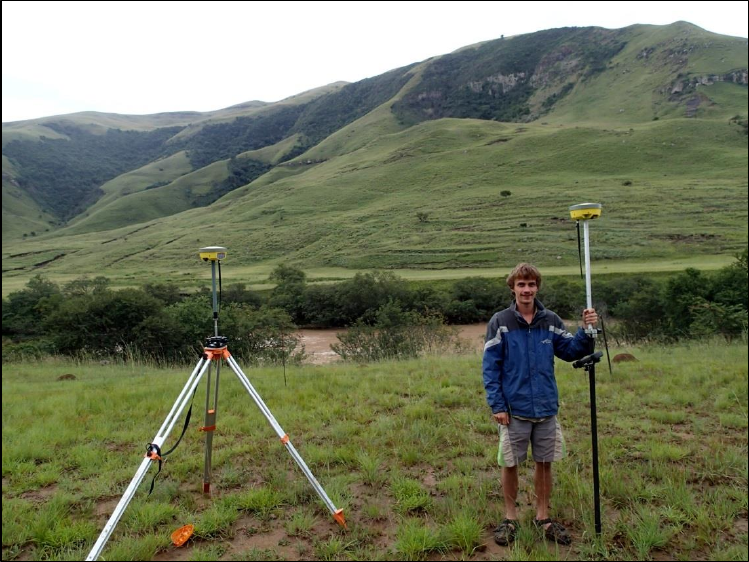
Ready for work. The correct setup (note that in this picture a small battery was used for the base).
Setting up your Project for the first time:
14. Turn on the Controller by holding in the on button (bottom left)
15. You will reach a Windows home page. Tap on the start button using the touch screen.
16. Tap on “FieldGenius”.
17. Start a New Project and enter your project name (or select a current project if you already
have one). Tap on the box and a key pad comes up. Once done tap ‘Ok’.
18. Leave Project Review page as defaults by tapping ‘Continue’.
19. Unit Settings page should stay as default- Tap ‘Ok’ (Just check to make sure it makes sense).
20. Define a coordinate system? – Tap ‘Yes’.
21. Set Coordinate System to your field site (eg. Hartebeesthoek Lo 27 for Grahamstown, Lo 29
for the Tsitsa River or Lo 25 for the Kromme River). Remember this for when you import
your work into ArcMap- Tap ‘Ok’.
22. Tap on and select GNSS Reference (Reference stands for the Base)
23. Tap on ‘Edit’
24. Tap on ‘Antenna Height’. Under ‘Measured Height’ enter the value you measured from the
ground to the base of the antenna mount on the base (e.g. 1.646 m) - Tap ‘Ok’.
25. Turn on the base by holding in the on button (bottom left on the base receiver). The receiver
should beep three times.
26. Tap on ‘Model and Communication’- Keep defaults and tap ‘Connect’. This will connect the
Bluetooth (blue light will appear on base receiver). If you are prompted to enter a code,
enter: 1234.
27. Initialize raw data logging of GNSS raw data- Tap ‘No’.
28. You will now be in Map View. Tap on ‘Known Position’.
29. Tap on ‘Averaged Geodic Position’.
30. Back in Map View tap on ‘Start Reference’- Use this to measure and average an Autonomous
Geodetic position. It is up to you to determine how many observations or the duration of
time you want to wait before accepting the averaged position. It is advised to wait at least
10 minutes depending on accuracy needed. At any time you can restart the process by
tapping the ‘Reset Average’ button. If you tap ‘Set Position’, your receiver will be
programmed with the new position and you will have the option of storing a point's position
in the database.
31. Store the point to the database- ‘Yes’- name it e.g. base_1
32. Keep defaults: Linked Device (UHF radio Model) .GNSS: Internal. Data Format: CMR+
33. Tap- ‘Connect’
34. Once connected base_1 should show in Map View and a red light should show by ‘base’ on
the receiver.
35. Turn on the Rover (same as base).
36. Tap on Blue dot (bottom left of screen).
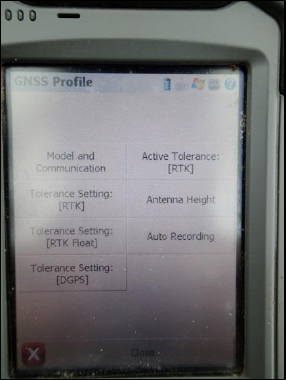
37. Tap on ‘Settings’- ‘Instrument Selection’- tap on and select ‘GNSS Rover’- Edit Antenna
height (2 meters advised) Tap ‘Ok’- Tap ‘Model and Communication’- ‘Connect’.
Note that you can set Tolerances and the distance for Auto Points on this page too.
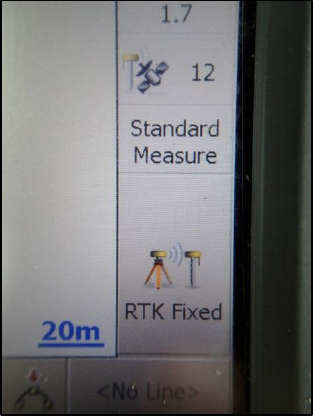
38. Once connected tap on ‘Map View’. Map View must show RTK fixed (bottom right corner). If
not (e.g. Auton, GPRS or RTK Float) then wait for a bit. If RTK fixed still doesn’t appear
batteries might be flat or a process during the setup was done wrong (check you are setup in
clear view of the sky). Try setting up from point 22 again.
Starting a Survey:
39. Start your survey by tapping RTK fixed. Standard Measure above RTK fixed means you are
taking single points. Hold the rover staff still while observations are being taken. Below 0.01
horizontal and vertical errors are acceptable. Tap ‘Store Point’ to save or ‘Cancel’ to redo
measurement. A quick way to take points is by clicking the enter button.
40. Give your point an appropriate name e.g. T1_1 rather than just T1. This will mean your next
point is T1_2 rather than T2 etc.
41. By tapping on ‘Standard Measure’ above RTK Fixed, you can select ‘Auto Point’ (Takes points
every few meters as pre-set). If RTK fixed is highlighted green, points will be taken at
intervals while walking. You can manually take a point by tapping on RTK fixed (becomes un-
highlighted i.e. won’t take any points) and tap on it again (highlights green) and it will take a
point. You can switch between Standard Measure and Auto Point anytime during a survey.
42. If the battery dies on the Base (unlikely with big battery), you have to setup from point 14.
43. If the battery dies on the Rover, simply replace the battery and reconnect the Rover from
point 36.
44. Field Genius automatically saves your surveys as you work. Once you are done Tap on Blue
dot (bottom left of screen). Tap on ‘Settings’- ‘Instrument Selection’- ‘Disconnect’
45. You can then either export data (see below) or Exit Field Genius, shut down the Controller,
Rover and Base and pack- up. Hold in the power buttons on the rover and base, wait for
three beeps and then release the button. All the lights should terminate.
Export data:
46. Select project on controller if you exited field genius.
47. Under Main Menu tap ‘Import/Export’.
48. Tap on ASCII Coordinate File Export. This will allow you to get a .txt that can be imported
into excel. Give it a suitable name.
49. Tap on Shapefile Export. This exports a shapefile for GIS (ArcMap).
50. Exit Field Genius.
51. Plug the Controller into a PC (Field laptop + certain GIS lab computers) using the USB cable.
52. The Controller now acts as an external hard drive.
53. Browse to Computer-> Extended Storage->Program Files -> MicroSurvey FieldGenius -> FG
Projects -> Find your project and copy it onto a flashstick for you own use. Make sure the
files copy across with the folder.
54. Shut down Controller
Returning to a site using the same project:
55. If you are returning the next day or doing repeat monitoring, set up the base over the same
peg you used previously (step 1 to 13).
56. Start the Controller and open your project. Follow steps 22 to 27.
57. In Map View check that it says ‘Known Position’ above ‘Start Reference’
58. Use this when you know the geodetic position of the point the base is setup on. Tap ‘Start
Reference’. The known point in this case would be base_1, which you measured before
(make sure you have updated the antenna height!). Field Genius automatically selects the
original base for you but double check it.
59. Once connected follow the rest of the steps as before (step 34 onwards).
60. Good luck…
Problems:
- It has happened before that the radio signals between the base and rover have been
scrambled. We were advised to not use two way radios alongside the DGPS as they both use
UHF signal.
- In this case the rover will show DGPS instead of RTK fixed. If you cannot get RTK fixed after
several attempts at setting up then contact Abe.
