Getting Started Adobe Campaignv7 Student Guide
User Manual:
Open the PDF directly: View PDF ![]() .
.
Page Count: 110 [warning: Documents this large are best viewed by clicking the View PDF Link!]
- Chapter Six
- Chapter Five
- Chapter Four
- Chapter Three
- Segmenting Recipients
- Accessing the Recipient Data
- Managing Recipient Data
- Filtering Data
- Targeting and Segmentation
- Editing a Query
- Selecting a Filter
- Specifying a Filtering Condition
- Adding Multiple Values from a Distribution
- Configuring the Preview List
- Applying Standard Exclusions
- Exercise 4 – Segment Recipients in a Target by Creating an Email Campaign Workflow
- Accessing the Recipient Data
- Segmenting Recipients
- Chapter Two
- Chapter One

Getting Started with Adobe
Campaign v7
student guide
ADOBE DIGITAL LEARNING SERVICES

Getting Started with Adobe Campaign v7 2
©2017 Adobe Systems Incorporated. All rights reserved.
Getting Started with Adobe Campaign v7
If this guide is distributed with software that includes an end user agreement, this guide, as well as the software
described in it, is furnished under license and may be used or copied only in accordance with the terms of such
license. Except as permitted by any such license, no part of this guide may be reproduced, stored in a retrieval
system, or transmitted, in any form or by any means, electronic, mechanical, recording, or otherwise, without the
prior written permission of Adobe Systems Incorporated. Please note that the content in this guide is protected
under copyright law even if it is not distributed with software that includes an end user license agreement.
The content of this guide is furnished for informational use only, is subject to change without notice, and should
not be construed as a commitment by Adobe Systems Incorporated. Adobe Systems Incorporated assumes no
responsibility or liability for any errors or inaccuracies that may appear in the informational content contained in
this guide.
Please remember that existing artwork or images that you may want to include in your project may be protected
under copyright law. The unauthorized incorporation of such material into your new work could be a violation of
the rights of the copyright owner. Please be sure to obtain any permission required from the copyright owner.
Any references to company names in sample templates are for demonstration purposes only and are not intended
to refer to any actual organization.
Adobe, the Adobe logo, Acrobat, the Creative Cloud logo, and the Adobe Marketing Cloud logo are either
registered trademarks or trademarks of Adobe Systems Incorporated in the United States and/or other countries.
All other trademarks are the property of their respective owners.
Adobe Systems Incorporated, 345 Park Avenue, San Jose, California 95110, USA.
Notice to U.S. Government End Users. The Software and Documentation are “Commercial Items,” as that term is
defined at 48 C.F.R. §2.101, consisting of “Commercial Computer Software” and “Commercial Computer Software
Documentation,” as such terms are used in 48 C.F.R. §12.212 or 48 C.F.R. §227.7202, as applicable. Consistent
with 48 C.F.R. §12.212 or 48 C.F.R. §§227.7202-1 through 227.7202-4, as applicable, the Commercial Computer
Software and Commercial Computer Software Documentation are being licensed to U.S. Government end users
(a) only as Commercial Items and (b) with only those rights as are granted to all other end users pursuant to the
terms and conditions herein. Unpublished-rights reserved under the copyright laws of the United States. Adobe
agrees to comply with all applicable equal opportunity laws including, if appropriate, the provisions of Executive
Order 11246, as amended, Section 402 of the Vietnam Era Veterans Readjustment Assistance Act of 1974 (38
USC 4212), and Section 503 of the Rehabilitation Act of 1973, as amended, and the regulations at 41 CFR Parts
60-1 through 60-60, 60-250, and 60-741. The affirmative action clause and regulations contained in the preceding
sentence shall be incorporated by reference.
21AUG2017
Geing Started with Adobe Campaign v7
ADOBE COPYRIGHT PROTECTED

Table of ContentsGetting Started with Adobe Campaign v7 3
Table of Contents
Chapter One : Introduction to Adobe Campaign v7 5
Adobe Campaign v7 Architecture 6
Exercise 1 – Log on to Adobe Campaign v7 client 7
Navigating rough the Adobe Campaign v7 UI 10
Features of Adobe Campaign v7 12
Chapter Two: Designing a Campaign 15
Adobe Campaign: Key Concepts 16
Managing Marketing Activities 17
Creating a Campaign 17
Editing the Campaign 19
Exercise 2 – Add a recipient and send a delivery 20
Exercise 3 – Create a plan, program and campaign hierarchy 28
Chapter Three : Segmenting Recipients 33
Accessing the Recipient Data 34
Managing Recipient Data 35
Filtering Data 35
Targeting and Segmentation 35
Editing a Query 36
Selecting a Filter 37
Specifying a Filtering Condition 37
Adding Multiple Values from a Distribution 38
Conguring the Preview List 39
Applying Standard Exclusions 39
Exercise 4 – Segment Recipients in a Target by Creating an Email Campaign Workow 40
ADOBE COPYRIGHT PROTECTED

Table of ContentsGetting Started with Adobe Campaign v7 4
Chapter Four : Preparing Deliveries 60
Dynamic Content and Personalization 61
Integration with Adobe Experience Manager 61
Editing Deliveries 61
Delivery Workow Activities 62
Reducing Spam Score and Improving Deliverability 62
Exercise 5 – Prepare deliveries 63
Chapter Five: Executing Campaigns 76
Sending a Delivery: Process 77
Creating Reports 77
Types of Reports 77
Exercise 6 – Execute campaigns 78
Chapter Six : Direct Mail, SMS, and Multichannel Delivery 97
Direct Mail Delivery 98
SMS Delivery 99
Multichannel Campaigns 100
Event-triggered Campaigns 101
Exercise 7 - Send a direct mail delivery 101
ADOBE COPYRIGHT PROTECTED

Chapter One Introduction to Adobe Campaign v7
Getting Started with Adobe Campaign v7 5
Chapter One
Introduction to Adobe Campaign v
Objectives
By the end of this chapter, you will be able to:
• Explain the Adobe Campaign v7 architecture
• Log on to the Adobe Campaign v7 client
• Explain the elements in the Adobe Campaign v7 UI
• Explain the features of Adobe Campaign v7
ADOBE COPYRIGHT PROTECTED
Chapter One Introduction to Adobe Campaign v7
Getting Started with Adobe Campaign v7 6
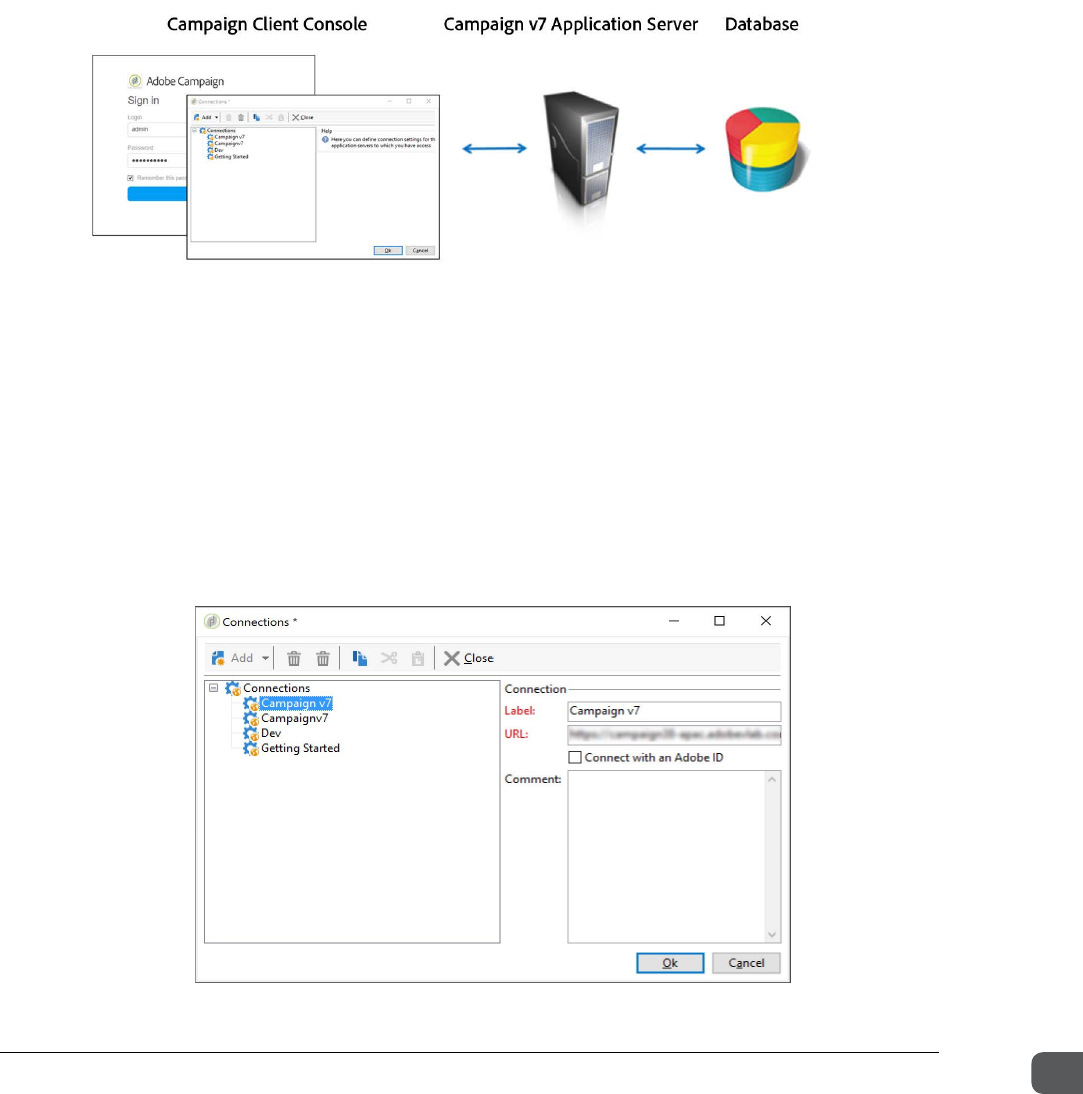
Adobe Campaign v7 Architecture
Adobe Campaign v7 is a multi-tier application that consists of:
• Lightweight client
• Application server
• Database
To access Adobe Campaign, you must use the Adobe Campaign Client Console.
When you access Adobe Campaign through the Adobe Campaign Client Console, you use
Application Programming Interfaces (APIs) to connect to the Application Server. The Application
Server executes the workflows, and renders the dynamic content of your delivery. The Application
Server communicates to the database, which contains your data mart, Adobe Campaign
configurations, and system tables. Within Adobe Campaign, the data and resources are configured
with schemas, which drive the database structure.
Within your Adobe Campaign Client Console, you can create and manage your connections to
multiple environments, such as training, development, and production. You can connect to multiple
environments by opening multiple sessions of the client.
ADOBE COPYRIGHT PROTECTED
Chapter One Introduction to Adobe Campaign v7
Getting Started with Adobe Campaign v7 7
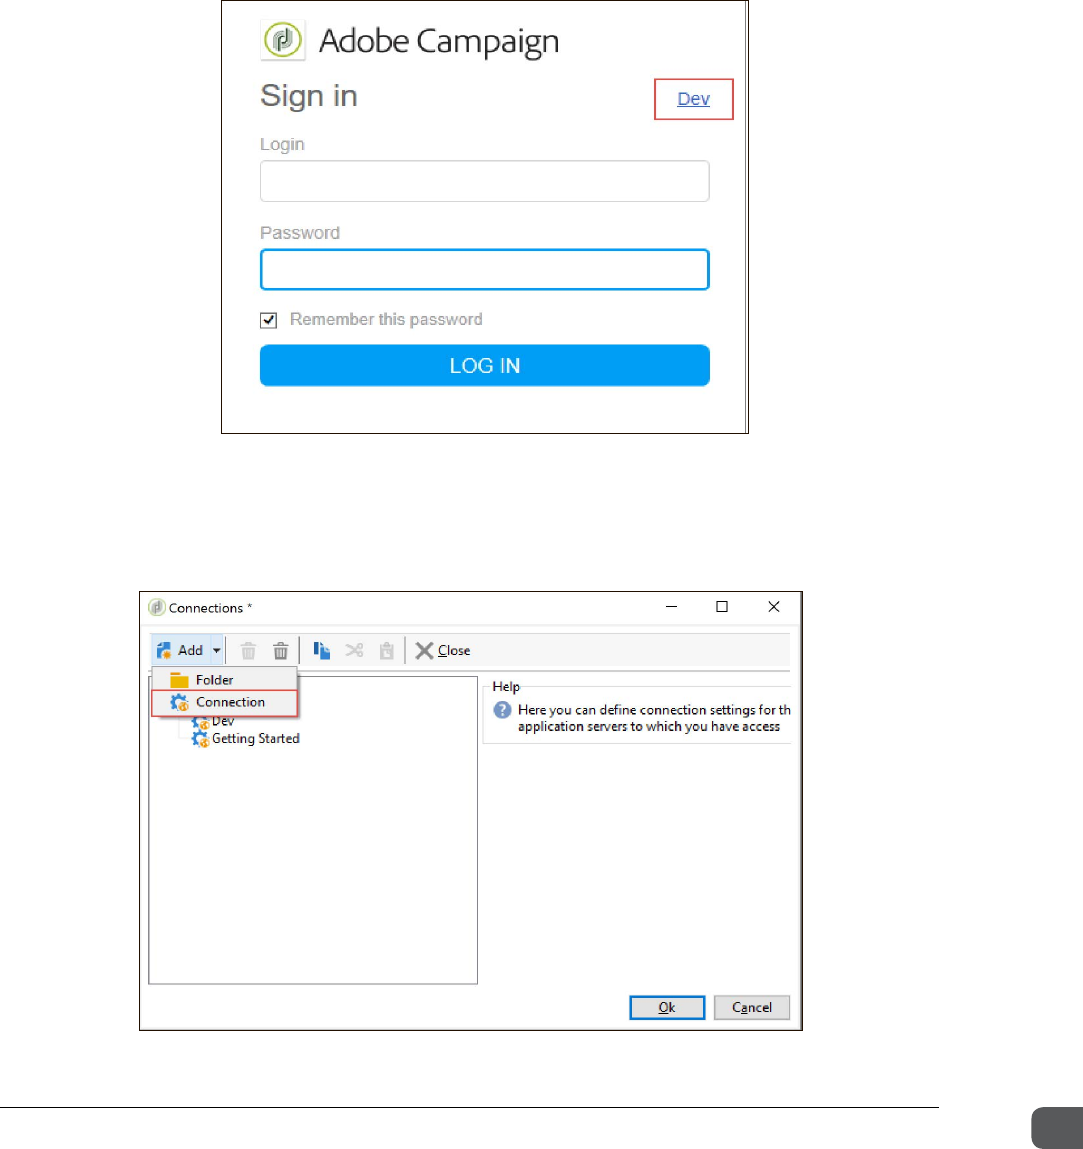
Exercise 1 – Log on to Adobe Campaign v7 client
1. On the Start menu, go to Adobe Campaign v7 and click Adobe Campaign Client Console. Do
not click LOG IN.
2. Click the link in the upper-right corner of the console as shown. The Connections dialog
box opens.
3. In the Connections dialog box, click Add and select Connection from the drop-down menu
as shown:
ADOBE COPYRIGHT PROTECTED

Chapter One Introduction to Adobe Campaign v7
Getting Started with Adobe Campaign v7 8
4. A New connection is added to Connections.
5. In the Connections dialog box:
a. In the Label field, enter a connection name of your choice. In this exercise, we will enter
Getting Started.
b. In the URL field, enter the server URL. Use the exact server address your instructor provided
prior to the training.
The server URL must follow this format: https://campaign###-region.adobevlab.com.
Your connection settings should look similar to the one shown:
6. Click Ok. The connection you just defined should be selected.
7. Enter your credentials.
You can select the Remember this password checkbox. However, when this option is
selected, ensure no one else has access to your computer.
TIP: Log on using the credentials your instructor provided. The credentials are case-sensitive.
ADOBE COPYRIGHT PROTECTED
Chapter One Introduction to Adobe Campaign v7
Getting Started with Adobe Campaign v7 9
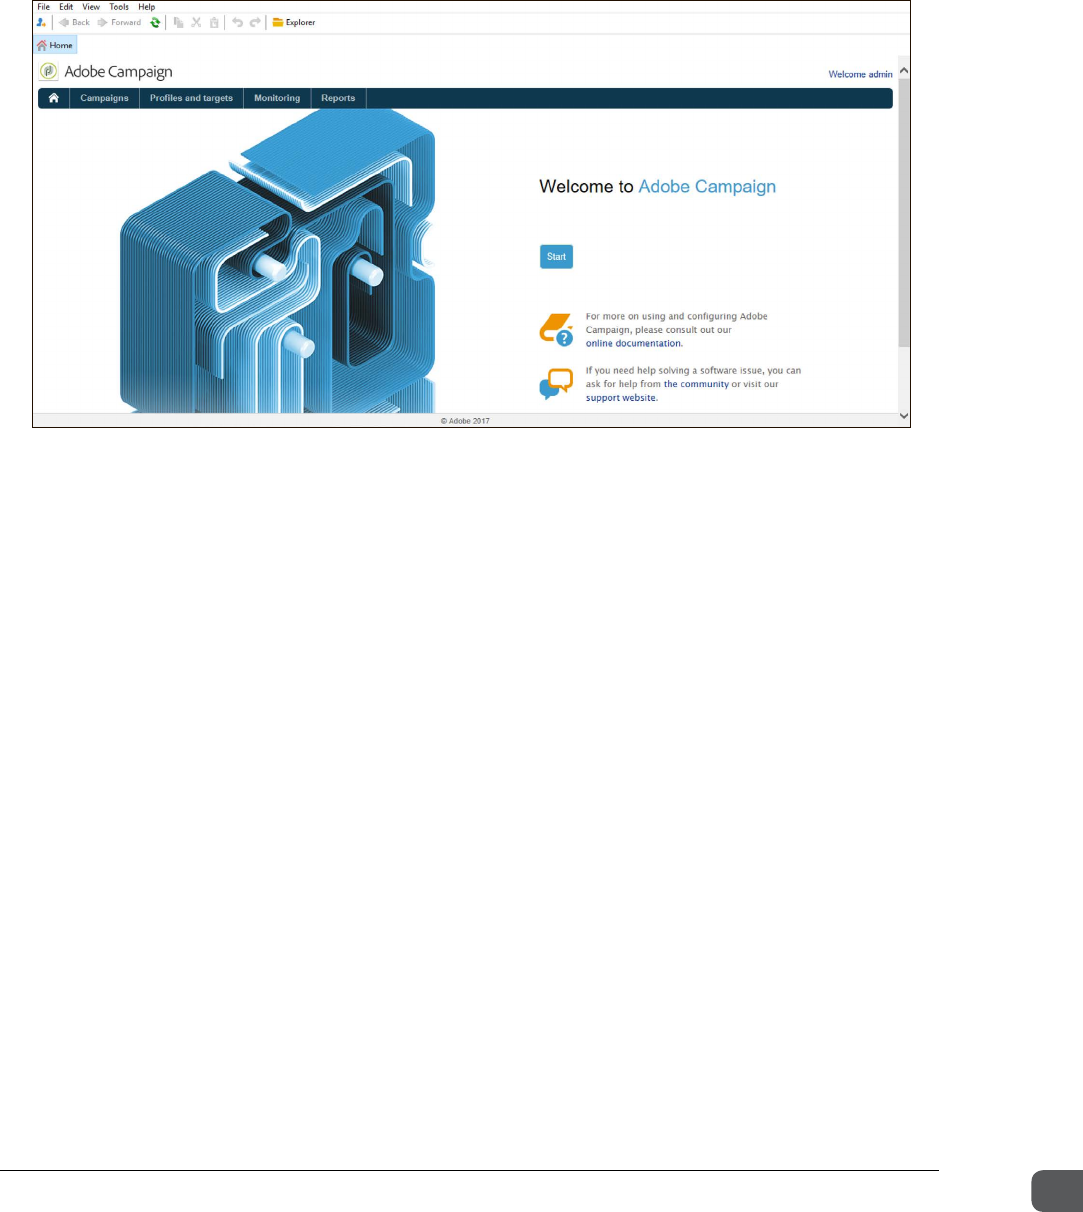
8. Click LOG IN. A confirmation dialog box is displayed.
9. Click No.
10. You have logged on to Adobe Campaign successfully.
ADOBE COPYRIGHT PROTECTED
Chapter One Introduction to Adobe Campaign v7
Getting Started with Adobe Campaign v7 10
Navigating rough the Adobe Campaign v7 UI
You can access the Adobe Campaign platform by using a console or a browser. The platform accessed
using the browser has a reduced set of functionalities compared to the platform accessed through the
console.
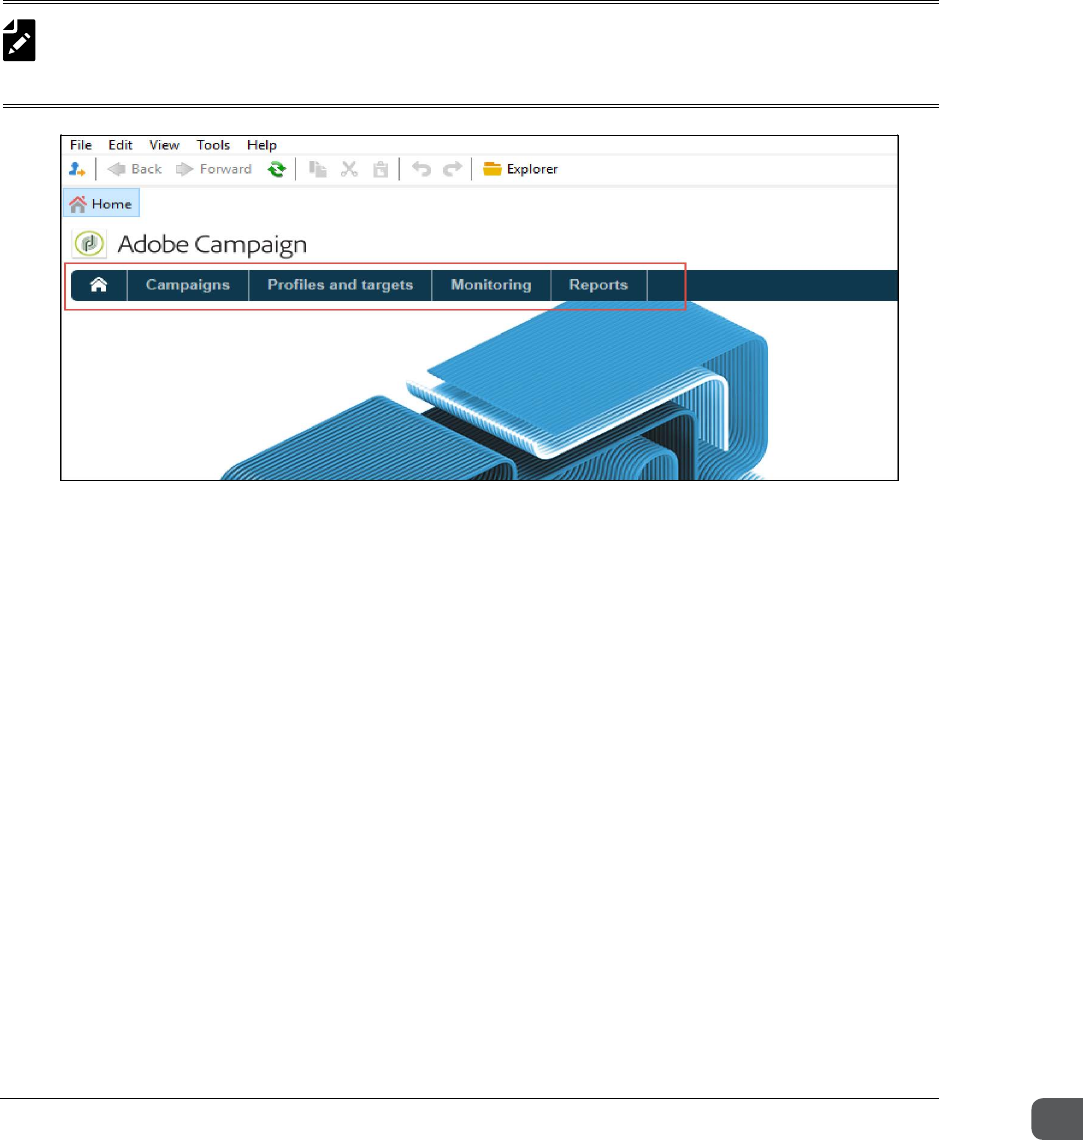
After you connect to the database, you can access the Adobe Campaign Home page, which is a
dashboard. The functionalities of the dashboard are grouped as various universes such as
Campaigns, Profiles and targets, Monitoring, and Reports.
The universes consist of links and shortcuts that help you access applications, such as Delivery,
Campaign, and Marketing Resource Management (MRM), and general platform configurations.
Each universe includes a set of functionalities based on task-related needs and contexts.
Campaigns
The Campaigns universe is the dashboard that displays all campaigns you are working on, profiles
and targets, social network information, environment monitoring information, and the reports for
past or current campaigns.
You can customize your view of the dashboards/panels. A campaign calendar displays plans and
programs, but most other campaign components display in a dashboard view.
Proles and targets
The Profiles and targets universe enables you to access the database of recipient profiles stored in
Adobe Campaign. In the Profiles and targets window, you can access recipients, lists, subscription
services, and the existing targeting workflows and shortcuts to create workflows. The Recipients
page enables you to perform frequent operations on profiles, such as edits, updates, adds, deletions,
and sorts.
NOTE: The elements on the Home page vary depending on the installed applications and operator
rights. It is likely the Home page for an admin (shown below), which may look different from your
Home page.
ADOBE COPYRIGHT PROTECTED
Chapter One Introduction to Adobe Campaign v7
Getting Started with Adobe Campaign v7 11
Monitoring
The Monitoring universe enables you to monitor the Application Server and the redirection server
(tracking) manually or automatically. You must have admin access to have monitoring rights.
Reports
The standard platform reports are grouped in the Reports universe. You can export, print, archive, or
display the report in a web browser by using the options on the toolbar.
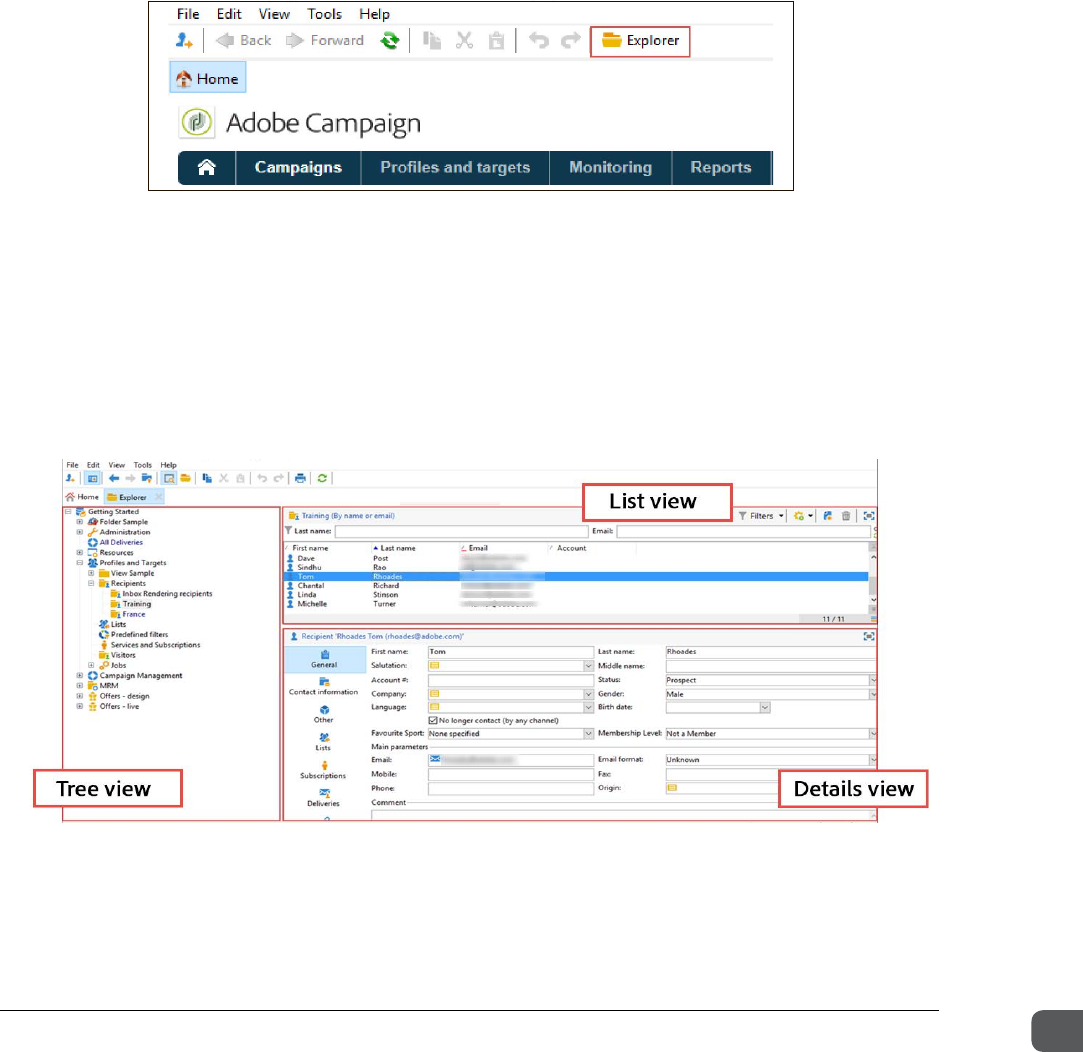
The Explorer option provides the explorer view and consists full set of folders and configuration
options.
You can click the Explorer option on the Adobe Campaign v7 dashboard to access the Explorer
view. It is divided into three zones:
• Tree view: Helps you personalize the content of the Adobe Campaign tree (add, move, or delete
nodes).
• List view: Helps you filter a list, run searches, add information, or sort data.
• Details view: Helps you display the details of the selected element.
ADOBE COPYRIGHT PROTECTED

Chapter One Introduction to Adobe Campaign v7
Getting Started with Adobe Campaign v7 12
Features of Adobe Campaign v7
Adobe Campaign v7 enables you to create, manage, and track digital marketing campaigns. Adobe
Campaign v7 has innovative features to model, streamline, and automate marketing and customer
communication processes.
The main features of Adobe Campaign v7 include:
• Email delivery
• SMS delivery
• Push notification
• Marketing cloud integration
• Social marketing
• Interactions
• Direct mail delivery
• ACS connectors
• Web API for Microsoft connectors
• Email archiving BCC method
• Amazon Simple Storage Service (S3) connector
Email Delivery
Adobe Campaign v7 enables you to mass deliver personalized electronic messages (email) as part
of your marketing campaigns. The recipient profiles are stored in the database and must contain at
least one email address. You can also send a delivery to recipients whose details are not saved in
the database, but stored in an external file.
SMS Delivery
Adobe Campaign v7 enables you to send mass personalized deliveries of Short Message Service
(SMS) messages as part of your marketing campaign. To perform this, the recipient profiles must
contain at least one mobile telephone number.
Push Notication
Push notifications are the messages sent by mobile app publishers to mobile app users. These
messages pop up on a mobile device with the app. Users receive them even if the app is not open.
The Mobile App Channel in Adobe Campaign enables you to send personalized push notifications
to iOS and Android devices.
Marketing Cloud Integration
Adobe Campaign v7 enables you to combine the delivery functionalities and advanced campaign
management functionalities with a set of other solutions in Adobe Marketing Cloud. Depending on
your environment, you can link several solutions as tenants to Adobe Marketing Cloud.
ADOBE COPYRIGHT PROTECTED

Chapter One Introduction to Adobe Campaign v7
Getting Started with Adobe Campaign v7 13
Social Marketing
Adobe Campaign v7 enables you to manage social networks. You can interact with the customers
through Facebook and Twitter. On Facebook, the delivery content is in the form of publications on
page walls and through news feeds. On Twitter, the delivery content is in the form of tweets.
Interactions
The Interactions feature in Adobe Campaign v7 enables you to send and manage marketing offers
to customers or target them at a specific point of time. These marketing offers can be a basic
communication or a promotion for a service or one or more products. Offers are sent to contacts
through an inbound channel, such as a website or a call center or through outbound channels, such
as email delivery, direct mail, or SMS. You can create an offer catalog that will interface with inbound
and outbound channels to select the best offer to send to a contact in a context. Interaction helps
you create and manage a catalog of offers and configure the eligibility rules and application themes
linked to them. It also helps you personalize the offer content based on the channel chosen.
Direct Mail Delivery
Adobe Campaign v7 enables you to produce files to deliver personalized mails, such as catalogs,
coupons, and flyers. Direct mail is a marketing collateral sent through postal mail to a customer’s
home or place of business. The target recipients can be the profiles stored in the database, and for
profiles that are not available in the database, direct mails can be sent using external delivery. The
recipient profiles must contain at least their names and postal addresses. The goal of the direct mail
delivery in Adobe Campaign is to generate an extraction file that includes contact details of
recipients. You will then route your extraction file to the agency or department that sends out the
delivery.
ACS Connectors
The ACS Connector bridges Adobe Campaign v7 and Adobe Campaign Standard. It is available in
the Adobe Campaign Prime and automatically replicates the profile data to Campaign Standard,
enabling marketers to create, personalize and execute campaigns through the intuitive web UI of
Adobe Campaign Standard (ACS). With the ACS Connector, digital marketers can use Adobe
Campaign Standard to design, target, and execute campaigns. Adobe Campaign v7 is tailor-made
for data-oriented users, such as database marketers.
Web API for Microso Connectors
Adobe Campaign V7 provides various CRM connectors for linking your Adobe Campaign platform
to your third-party systems, such as Salesforce.com, Oracle On Demand, Microsoft Dynamics CRM,
and Microsoft Dynamics Online. These CRM connectors allow you to synchronize contacts,
accounts, and purchases. You can select the Web API connector as a deployment type when
creating a Microsoft Dynamics external account.
ADOBE COPYRIGHT PROTECTED

Chapter One Introduction to Adobe Campaign v7
Getting Started with Adobe Campaign v7 14
Email Archiving BCC Method
Adobe Campaign v7 enables you to archive emails using a BCC (blind carbon copy) address -
invisible to the message recipients - to transfer an exact copy of the sent emails to a remote server.
When activated in the delivery or delivery template, this feature allows you to send an exact copy
of the corresponding sent messages to a BCC email address.
Amazon Simple Storage Service (S3) Connector
The file transfer activity in Adobe Campaign v7 enables you to receive or send files, test for file
presence, or list files on a server. The protocol used is either Amazon Simple Storage Service (S3),
File Transfer Protocol (FTP), or Secure File Transfer Protocol (SFTP). The Amazon Simple Storage
Service (S3) connector enables you to import or export data to Adobe Campaign. You can set up
this activity in a workflow and configure this feature in an external account.
ADOBE COPYRIGHT PROTECTED

Chapter Two Designing a Campaign
Getting Started with Adobe Campaign v7 15
Chapter Two
Designing a Campaign
Objectives
By the end of this chapter, you will be able to:
• Explain the process involved in designing a marketing campaign
• Explain how to create and edit a campaign
• Send an email delivery
• Plan a marketing program
• Create a marketing campaign
ADOBE COPYRIGHT PROTECTED

Chapter Two Designing a Campaign
Getting Started with Adobe Campaign v7 16
Adobe Campaign: Key Concepts
Adobe Campaign v7 enables you to configure, execute, and analyze marketing campaigns. You can
manage all marketing campaigns from a unified control center.
Some key concepts related to Adobe Campaign are:
• Campaign: A campaign centralizes all elements related to a marketing campaign, such as
deliveries, targeting rules, costs, export files, and related documents. Each campaign is
attached to a program.
• Program: A program helps you define the marketing actions, such as launching and
canvassing, for a calendar period. Each program contains the campaigns linked to a calendar,
which provides an overall view.
• Plan: The marketing plan can contain multiple programs. It is linked to a calendar period and
has an allocated budget. You can also link the marketing plan to documents and objectives.
• Objectives: Objectives are quantified values to be achieved. Within the campaign, program,
or plan, you can state a list of objectives. At the end of the campaign, program, or plan,
Marketing Resource Management (MRM) helps you compare the objectives and results in
dedicated reports. It enables you to measure the success and profitability of marketing
campaigns or offer propositions for all communication channels such as email, mobile,
telephone, direct mail, fax, and agency.
• Delivery outline: A delivery outline is a structured description of a delivery. Every delivery
can refer to a delivery outline, which contains, for example, related offers, documents to be
attached, or a link to stores. An offer can be referenced in the delivery according to the
delivery outline selected.
• Workflows: A workflow enables task automation. You can execute deliveries, manipulate
files, approve campaigns, and notify operators by using workflows.
Adobe Campaign v7 uses workflows to:
› Define the logic of marketing campaigns. You can build the target and create the
deliveries for each campaign.
› Generate targets and segments.
› Perform technical processes in Adobe Campaign such as cleaning up and collecting
tracking information.
ADOBE COPYRIGHT PROTECTED

Chapter Two Designing a Campaign
Getting Started with Adobe Campaign v7 17
Managing Marketing Activities
Adobe Campaign enables marketers to plan and execute their marketing campaigns. In Adobe
Campaign, a marketing campaign process involves actions (deliveries), procedures (importing or
extracting files), and resources (marketing documents, delivery outlines).
You can create your marketing campaigns to support the programs, develop the deliveries, execute
the campaign, and measure the results all within Adobe Campaign. You can also execute marketing
campaigns automatically, whenever required. You can have built-in approval cycles, time
dependencies, and multiple touch points within your campaign in Adobe Campaign.
To plan marketing efforts in Adobe Campaign:
• Create one or more marketing plans
• Create one or more marketing programs as part of the marketing plan
• Create one or more marketing campaigns as part of the marketing program
Creating a Campaign
Here are the steps you need to follow when creating a marketing campaign:
1. Create a campaign: Involves adding a campaign description and its characteristics such as
label, type, start and end dates, budget, associated resources, manager(s), and participants.
2. Define target population(s): Involves creating a workflow with targeting queries.
3. Create deliveries: Involves selecting channel(s) and defining the content to be sent.
4. Approve deliveries: Involves verifying and confirming deliveries.
5. Associate costs and plan deliveries: Involves defining cost categories and associating a service
with a campaign.
After you create the campaign, you can start the deliveries, check the data, processes, and
information relating to the deliveries, and, if necessary, manage the associated documents. You can
also track the execution of the processing phases of campaigns and deliveries.
ADOBE COPYRIGHT PROTECTED
Chapter Two Designing a Campaign
Getting Started with Adobe Campaign v7 18
Campaigns are based on models that group a set of predefined parameters. In a default configuration,
the campaign templates are stored in the Resources > Templates > Campaign templates node of
the Adobe Campaign tree. An empty template is supplied out of the box in order to create a
campaign for which no specific configuration is defined.
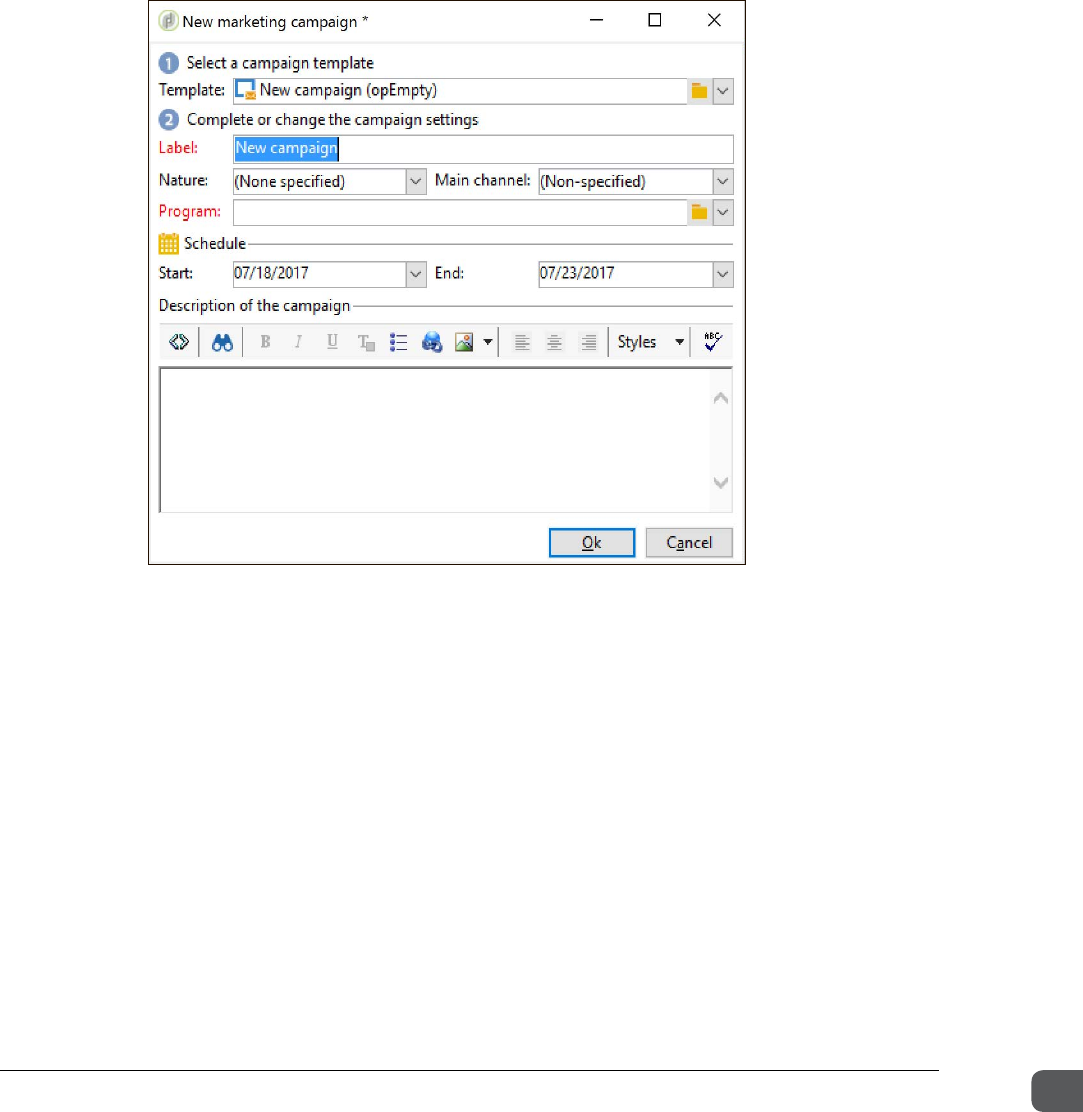
You can create and configure your campaign templates and then create campaigns by using these
templates. You can create a new marketing campaign using the New marketing campaign dialog
box as shown in this screenshot.
The dialog box has these options:
• Template: You can provide a starting definition for the campaign.
• Label: You can provide the front-end name of the campaign, which is the label used in searches.
You should create and use a naming convention for labels.
• Nature: You can specify the type of campaign.
• Program: You can select the program in which the campaign is created.
• Schedule: You can provide the start and end dates for the campaign.
ADOBE COPYRIGHT PROTECTED
Chapter Two Designing a Campaign
Getting Started with Adobe Campaign v7 19
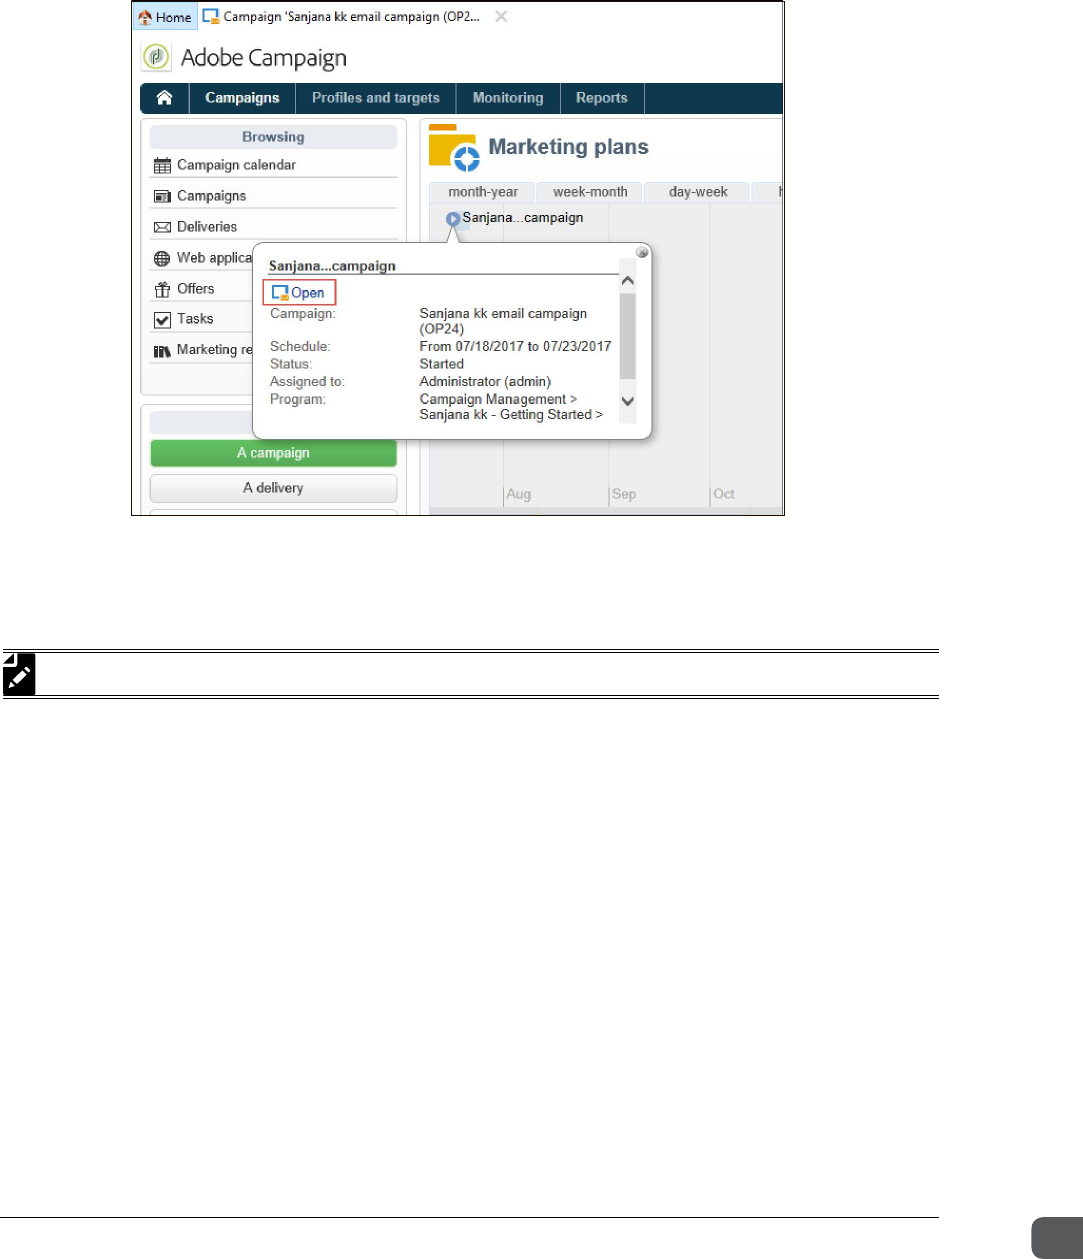
Editing the Campaign
You can open the campaign from the schedule, and then make changes to it from the campaign
dashboard.
The campaign interface enables you to configure campaign approvals, manage your deliveries, set
proof targets, schedule contact dates, and design and execute campaign workflows. When editing
or setting up the campaign, you can modify the start and end dates.
Based on these dates, the UI will display the following status:
• Being edited: The status before the start date is reached.
• In Progress: The status when the start date is reached.
• Finished: The status when the end date is reached.
NOTE: It is still possible to send out deliveries after the end date.
ADOBE COPYRIGHT PROTECTED
Chapter Two Designing a Campaign
Getting Started with Adobe Campaign v7 20
Exercise 2 – Add a recipient and send a delivery
In this exercise, you will add yourself as a recipient and send an email delivery to your assigned
email ID.
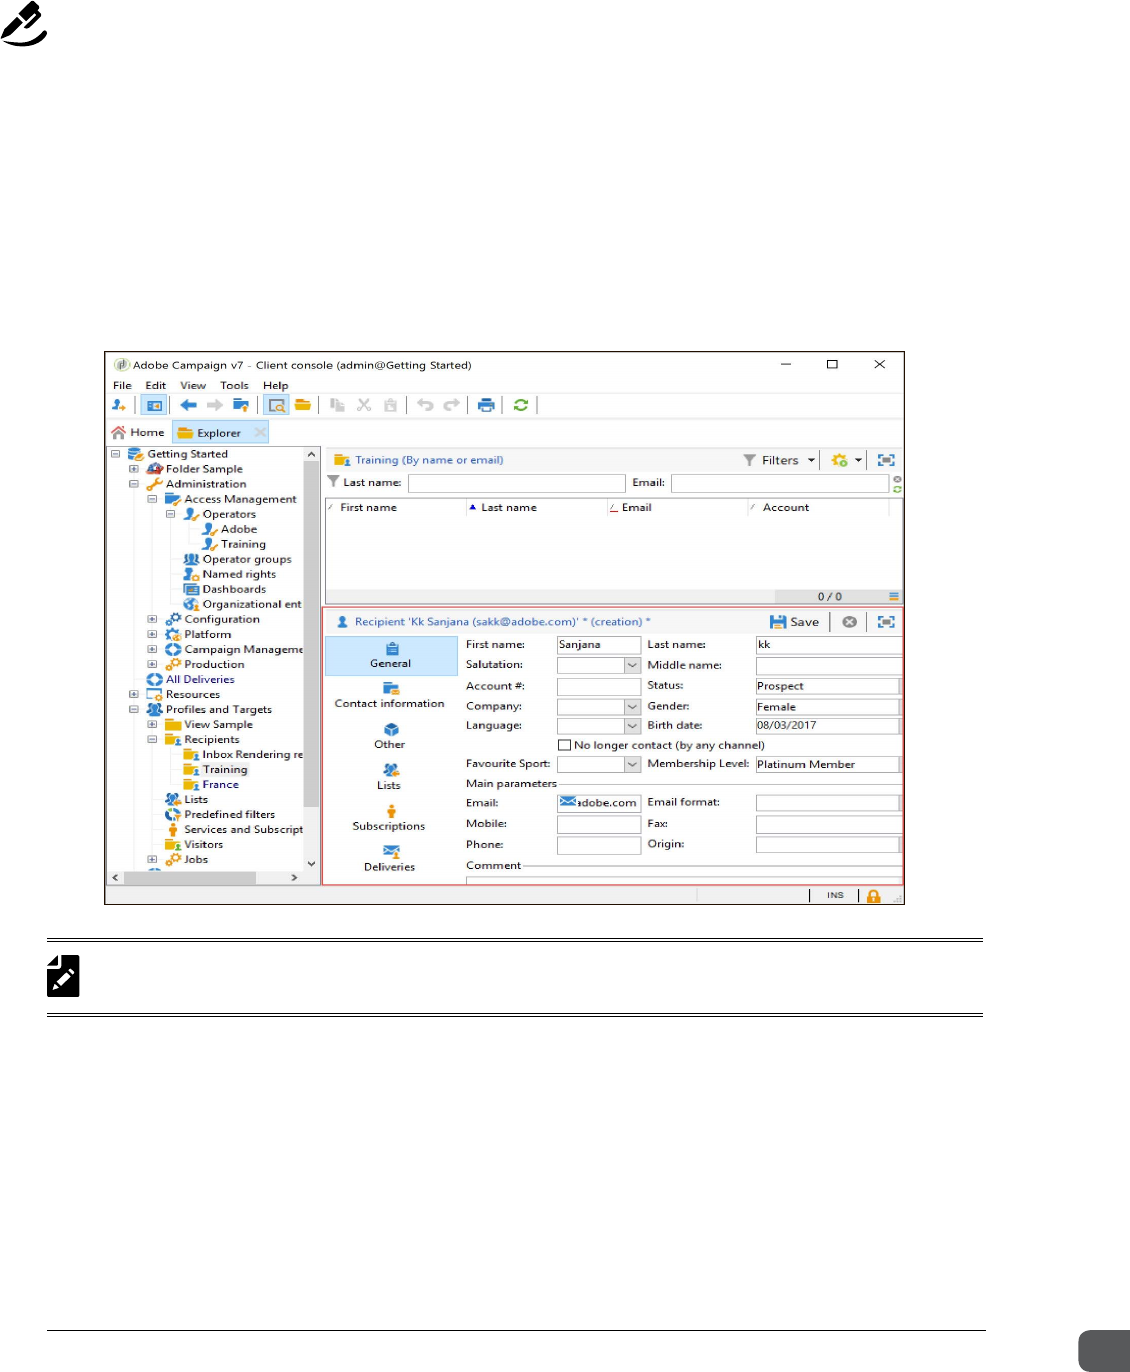
Task 1: Add yourself to the recipient list
1. Click the Explorer button on the toolbar.
2. In the tree view, expand the Profiles and Targets folder and then expand the Recipients folder.
3. Select the Training subfolder.
4. Click the New icon above the list view. Enter your details in the detail view as shown:
5. Click Contact information to enter your other details such as address, zip/postcode, city, and
state.
NOTE: Use an email address you can access easily during the training class. You may use your per-
sonal email or your work email(s).
ADOBE COPYRIGHT PROTECTED
Chapter Two Designing a Campaign
Getting Started with Adobe Campaign v7 21
6. Click Save. Adobe Campaign saves your recipient details.
Task 2: Create a Platform Delivery
1. Click the Explorer button on the toolbar again to open the Explorer view.
2. On the tree view, expand the Campaign Management folder, and select the Deliveries
subfolder.
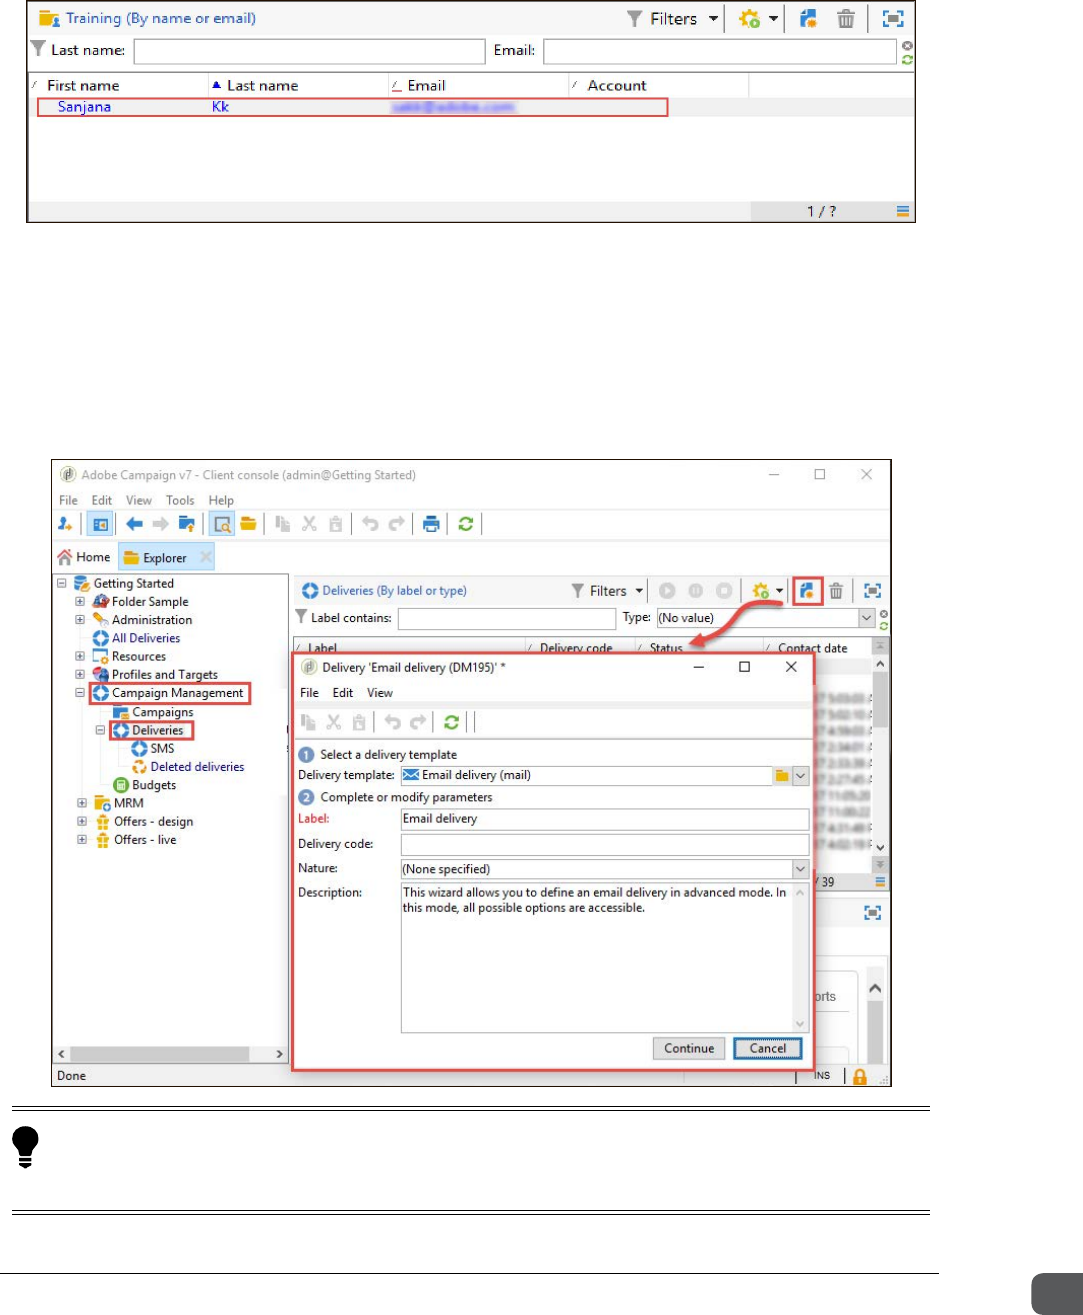
3. On the list view, click the New icon. The Delivery Email delivery dialog box opens.
TIP: You can also access the Delivery Email delivery dialog box using the Dashboard. To access the
Delivery Email delivery dialog box, from the Home page, click Campaigns universe> Create section > A
delivery.
ADOBE COPYRIGHT PROTECTED
Chapter Two Designing a Campaign
Getting Started with Adobe Campaign v7 22
4. In the Delivery dialog box, complete these steps:
a. In the Delivery template field, click the folder icon. The Please select a Deliveries
document dialog box opens.
In the Please select a Deliveries document dialog box, in the Folder field, click the drop-
down arrow and expand Resources > Templates and select Delivery Templates. The
available delivery templates are displayed, as shown below:
ADOBE COPYRIGHT PROTECTED
Chapter Two Designing a Campaign
Getting Started with Adobe Campaign v7 23
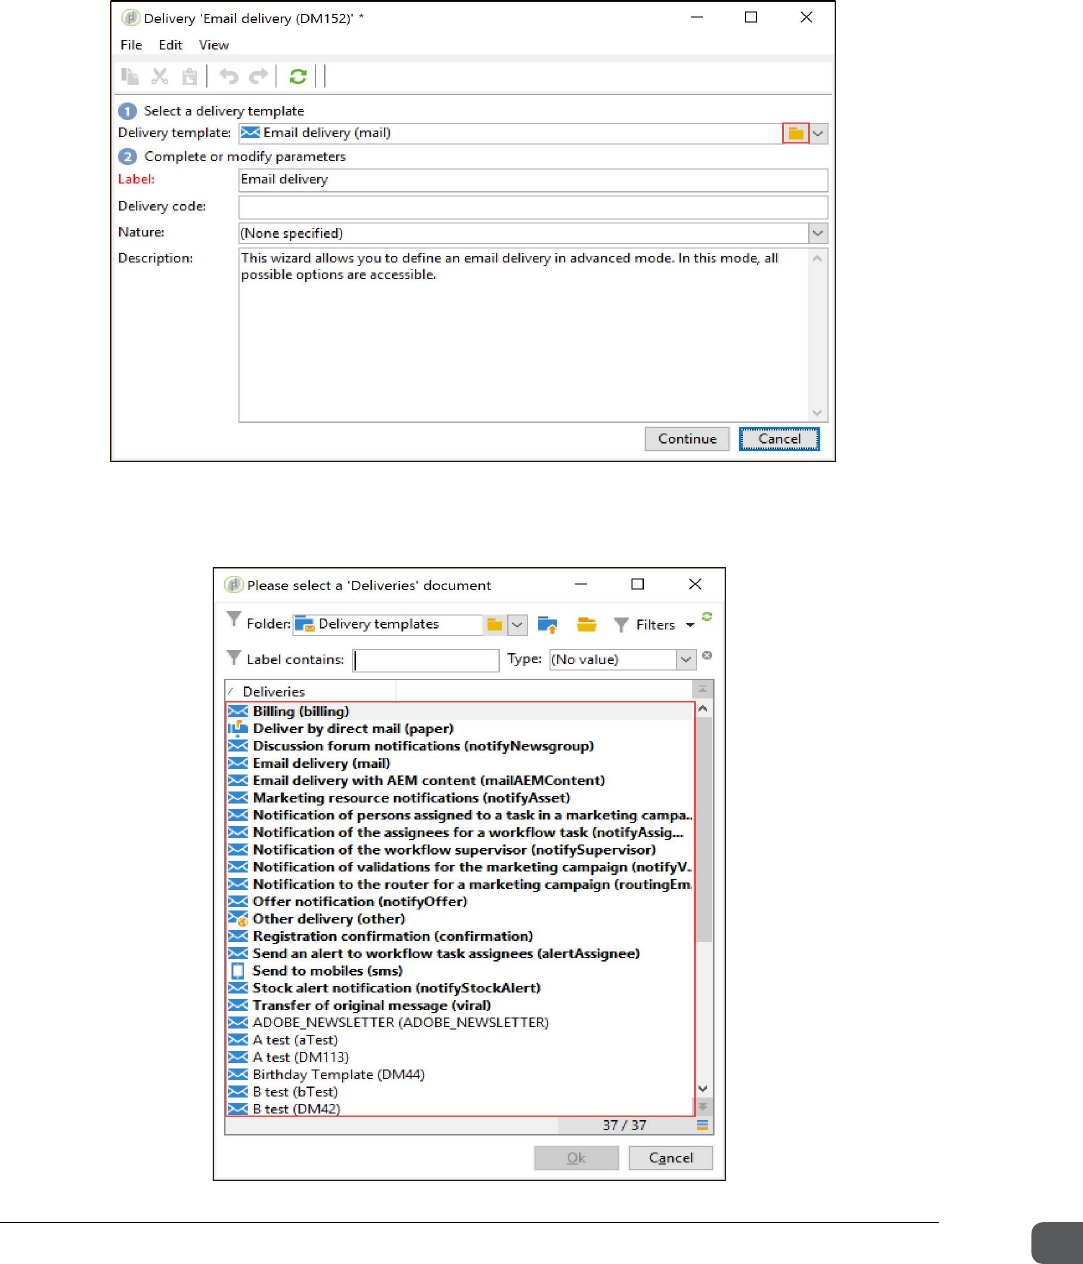
b. Double-click a delivery template. In this exercise, Birthday Template (DM44) is selected
for demonstration purposes. The template is selected in the Delivery dialog box.
c. In the Label field, enter <Your first name> <Your last name> first email. For example, if
your name is John Doe, the label would be: John Doe first email.
d. Click Continue. The Delivery <Your first name> <Your last name> first email dialog box
displays.
5. In the <Your first name> <Your last name> first email dialog box, click Save. The email
delivery is saved.
Task 3: Preview the Delivery
1. On the Explorer view, expand the Campaign Management folder, and select the Deliveries
subfolder.
2. In the list view, the delivery is displayed. Double-click the delivery you created in task 2. The
Delivery <Your first name> <Your last name> first email dialog box opens.
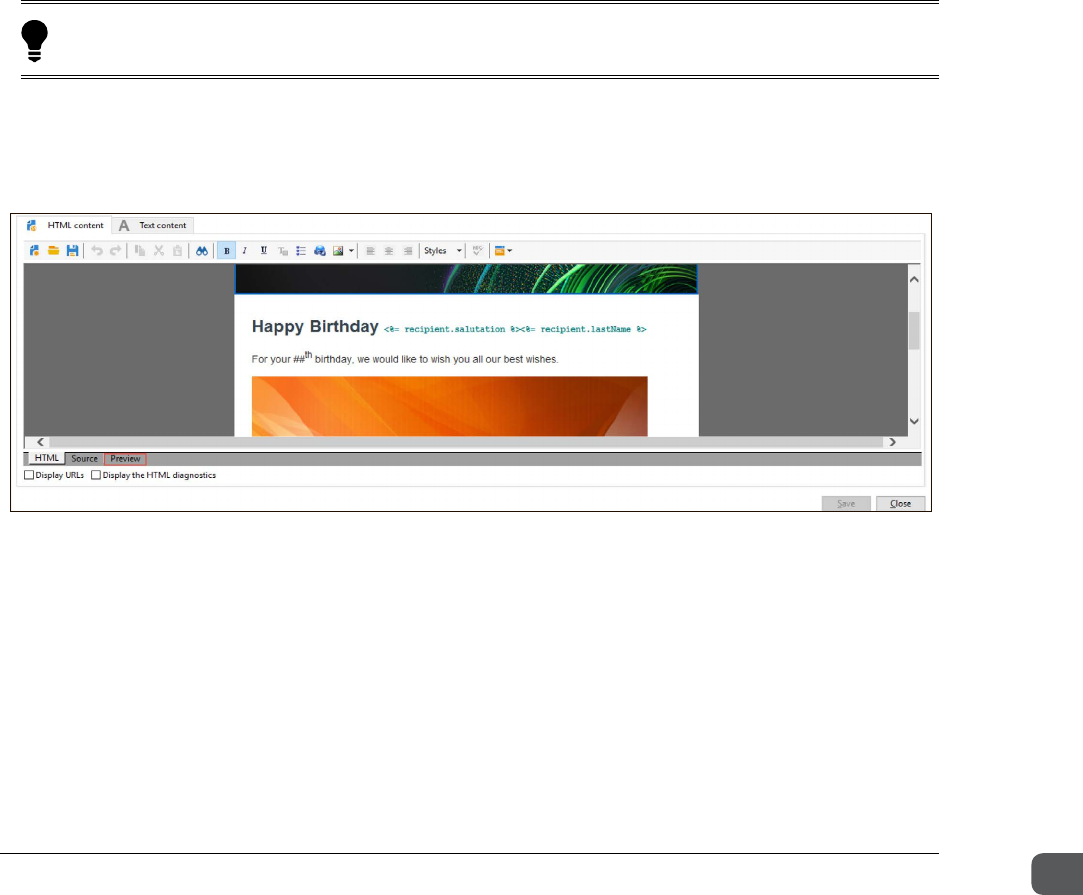
3. In the Delivery <Your first name> <Your last name> first email dialog box, click the Preview
tab.
You can preview the email on both HTML content and Text content tabs.
4. Click Preview in the HTML content tab.
5. Click Test personalization > Recipient. The Select a recipient dialog box opens.
In the Select a recipient dialog box, in the Folder field, click the folder icon and expand the
Recipients folder, select the Training subfolder, and click Ok. The recipients in the Training
subfolder are displayed.
6. Select your profile and click Ok. The preview is generated.
TIP: You can access the delivery using the Dashboard. To access the delivery, from the Home page,
click Campaigns universe> Browsing section> Deliveries.
ADOBE COPYRIGHT PROTECTED
Chapter Two Designing a Campaign
Getting Started with Adobe Campaign v7 24
7. Click Save. The delivery is saved.
Task 4: Send a Proof of the Delivery
1. On the Explorer view, expand the Campaign Management folder, and select the Deliveries
subfolder.
2. In the list view, the delivery is displayed. Double-click the delivery you created in task 2. The
Delivery <Your first name> <Your last name> first email dialog box opens.
IMPORTANT! Make sure your email also has a subject in the Subject line in the email. Without it, Adobe
Campaign cannot send the proof.
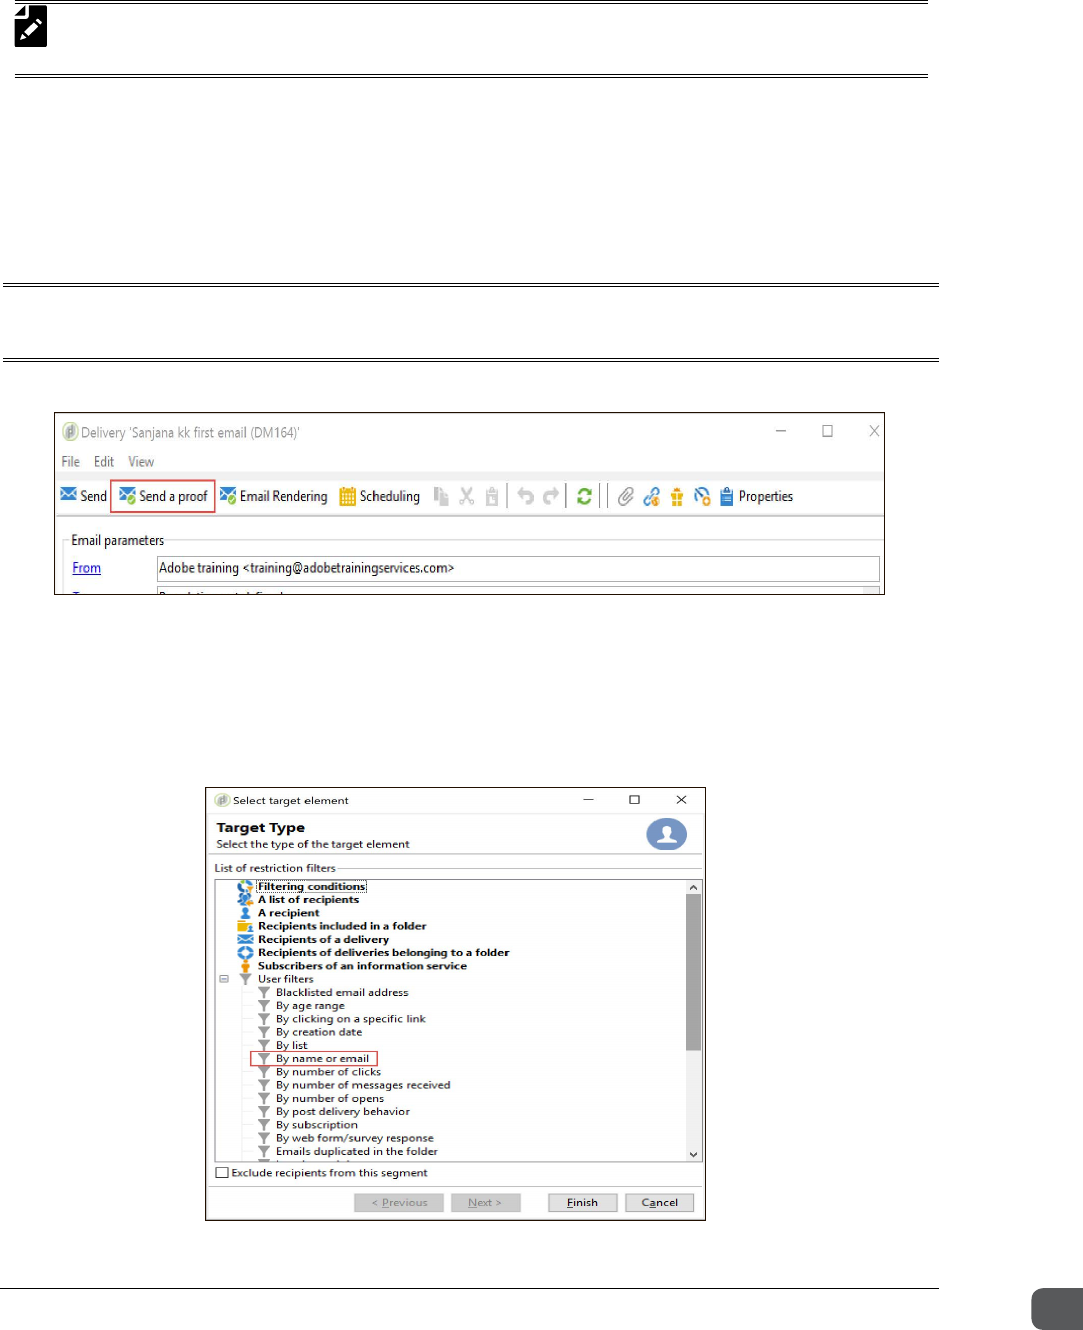
3. Click Send a proof. The Send a proof dialog box opens.
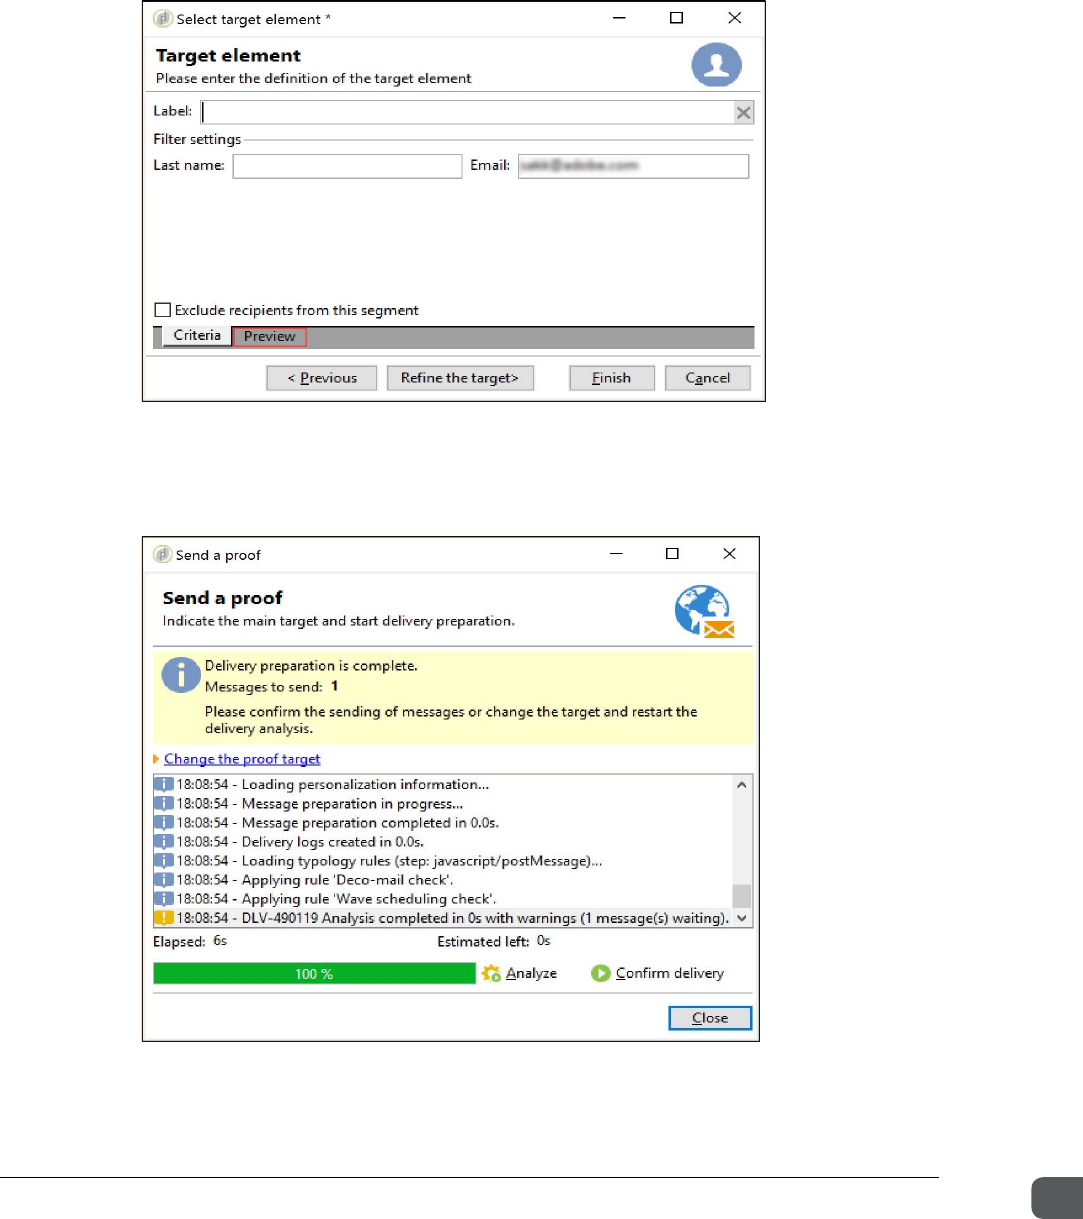
4. In the Send a proof dialog box, click Add. The Select target element dialog box to enter a
target type opens.
5. In the Select target element dialog box, expand User filters and double-click By name or
email. The Select target element dialog box, which enables you to enter the definition of the
target element, opens.
NOTE: You will learn more about the steps involved in previewing a delivery later in the
course.
ADOBE COPYRIGHT PROTECTED
Chapter Two Designing a Campaign
Getting Started with Adobe Campaign v7 25
6. In the Select target element dialog box, in the Email field, enter your email ID - making sure it
is the one you used to create your recipient profile earlier.
7. Click Preview. The recipient profile displays, showing all the information you entered (for
yourself) when you created your profile.
8. Click Finish. The email is added in the Send a Proof dialog box.
9. Click Analyze and wait until the dialog box displays Message to send: 1 and the progress bar is
completely green, labeled 100%.
10. Click Confirm delivery. A confirmation dialog box opens.
ADOBE COPYRIGHT PROTECTED

Chapter Two Designing a Campaign
Getting Started with Adobe Campaign v7 26
11. Click Yes. The delivery starts and the Send a proof dialog box indicates you can close the
window.
12. Click Close. You will receive an email in your inbox.
13. Click Save in the Delivery <Your first name> <Your last name> first email dialog box. The
proof is sent successfully to your email account.
14. In the Explorer tree view, click Campaign Management and select Deliveries.
15. Select the delivery you created, and you will see the status of the proof displays in the detail
view.
Task 5: Send the Delivery
1. On the Explorer view, expand the Campaign Management folder, and select the Deliveries
subfolder.
2. In the list view, the delivery is displayed. Double-click the delivery you created in the task 2 (Do
Not select [Proof 1] delivery). The Delivery <Your first name> <Your last name> first email
dialog box opens.
3. Click your <Your first name> <Your last name> first email delivery. The Delivery <Your first
name> <Your last name> first email dialog box opens.
IMPORTANT! Make sure your email also has a subject in the Subject line in the email. Without it, Adobe
Campaign cannot send the proof.
4. Click Send. The Send to the main delivery target dialog box opens.
5. Click Add. The Select target element dialog box to enter a target type opens.
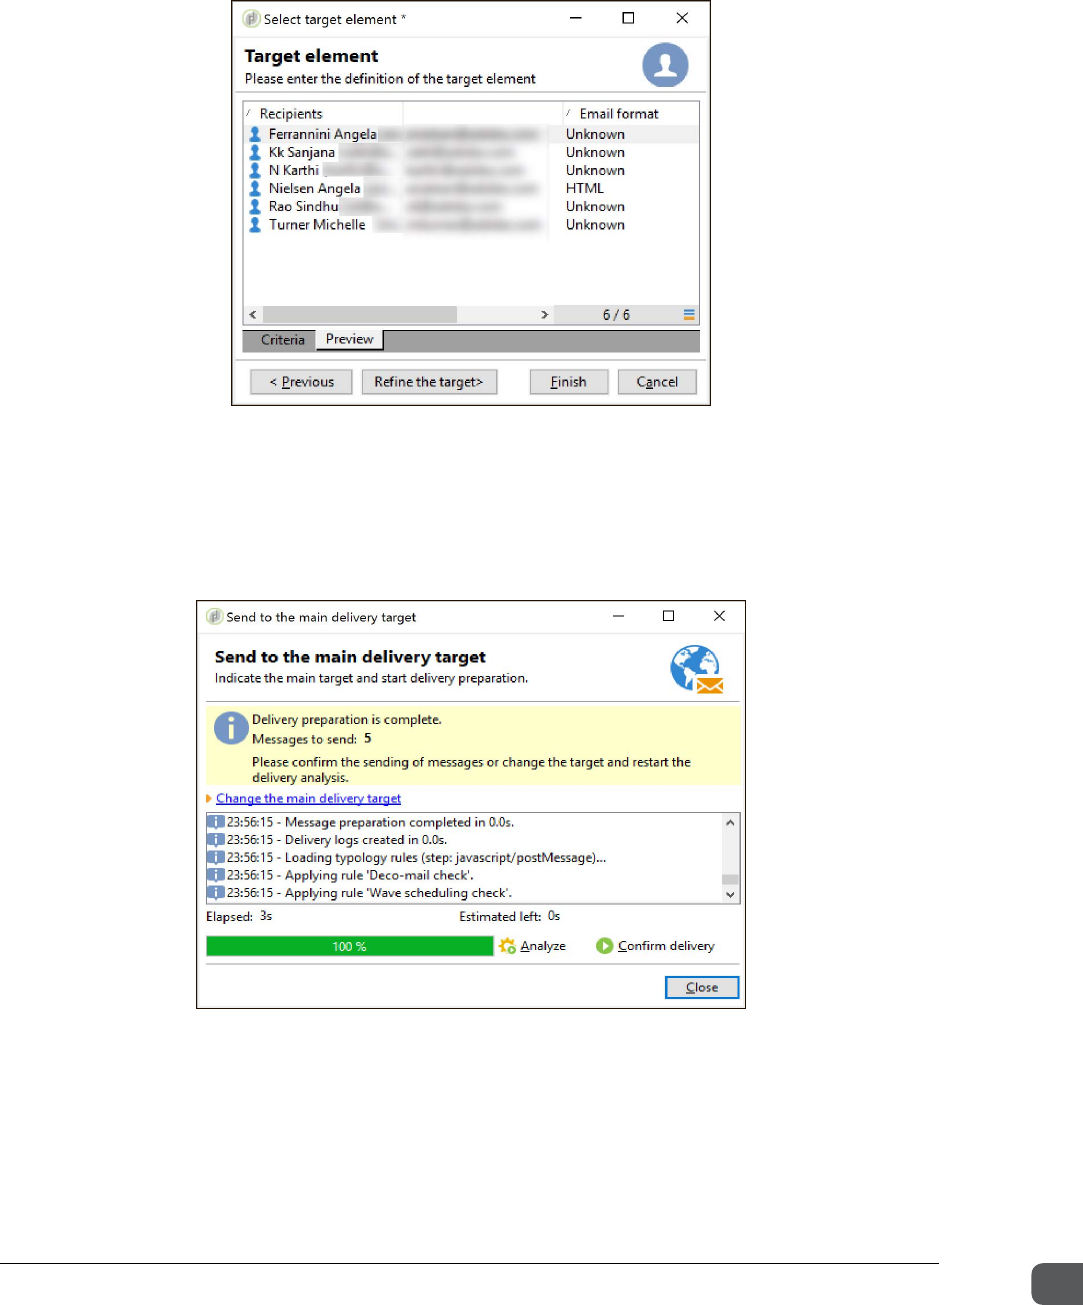
6. Double-click Recipients included in a folder. The Select target element dialog box to enter the
definition of the target element opens.
ADOBE COPYRIGHT PROTECTED
Chapter Two Designing a Campaign
Getting Started with Adobe Campaign v7 27
7. In the Label section, expand the Recipients folder and select the Training subfolder and click
the Preview tab. The list of recipients is displayed, as shown:
8. Click Finish.
9. In the Send to the main delivery target dialog box, select Deliver as soon as possible.
10. Click Analyze and wait until the dialog box displays Messages to send: x. Here, x refers to the
number of recipients. The number may differ based on the number of recipients.
11. Click Confirm delivery. A confirmation dialog is displayed. Click Yes. The delivery starts.
12. Click Close.
13. Click Save in the Delivery <Your first name> <Your last name> first email dialog box. The
delivery is sent successfully.
ADOBE COPYRIGHT PROTECTED
Chapter Two Designing a Campaign
Getting Started with Adobe Campaign v7 28
14. In the Explorer tree view, click Campaign Management and select Deliveries. Select the
delivery, the status of the delivery is displayed in the detail view.
15. Notice the status of the delivery.
Exercise 3 – Create a plan, program and campaign hierarchy
In this exercise, you will plan the following marketing programs and create a campaign for one of the
programs:
• Acquisition
• Cross-sell
• Retention
Task 1: Plan marketing programs
Create a plan containing a set of programs for cross-sell, retention, and acquisition.
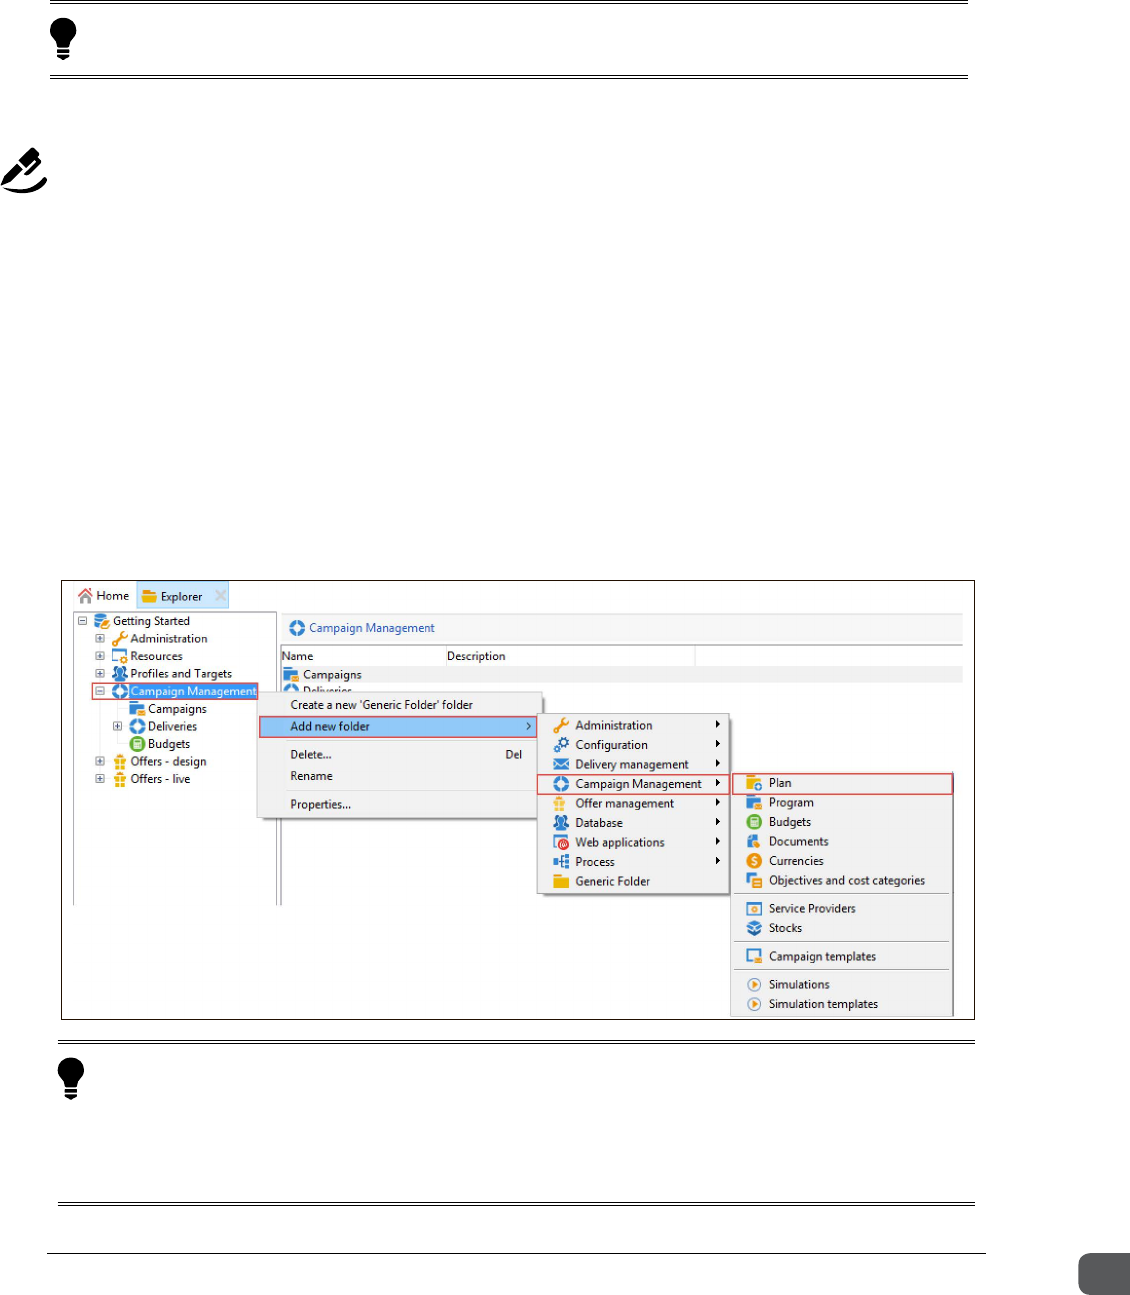
1. On the Explorer view, right-click Campaign management root folder> Add new folder>
Campaign Management> Plan. The Plan folder is created in the Campaign Management root
folder.
TIP: You can also access the Deliveries using the dashboard. To access the deliveries using the dash-
board, from the Home page, click the Campaigns universe> Browsing> Deliveries.
TIP: You can also create a Plan using the Dashboard. On the Home page, click the Campaigns uni-
verse> Create> More> Plan. The Plan New dialog box opens. In the Label field, enter <Your First
Name> < Your Last Name> – Getting Started. For example: Jane Smith - Getting Started
In the Parent field, click the drop-down arrow and select the root Campaign Management folder, then
click Save.
ADOBE COPYRIGHT PROTECTED
Chapter Two Designing a Campaign
Getting Started with Adobe Campaign v7 29
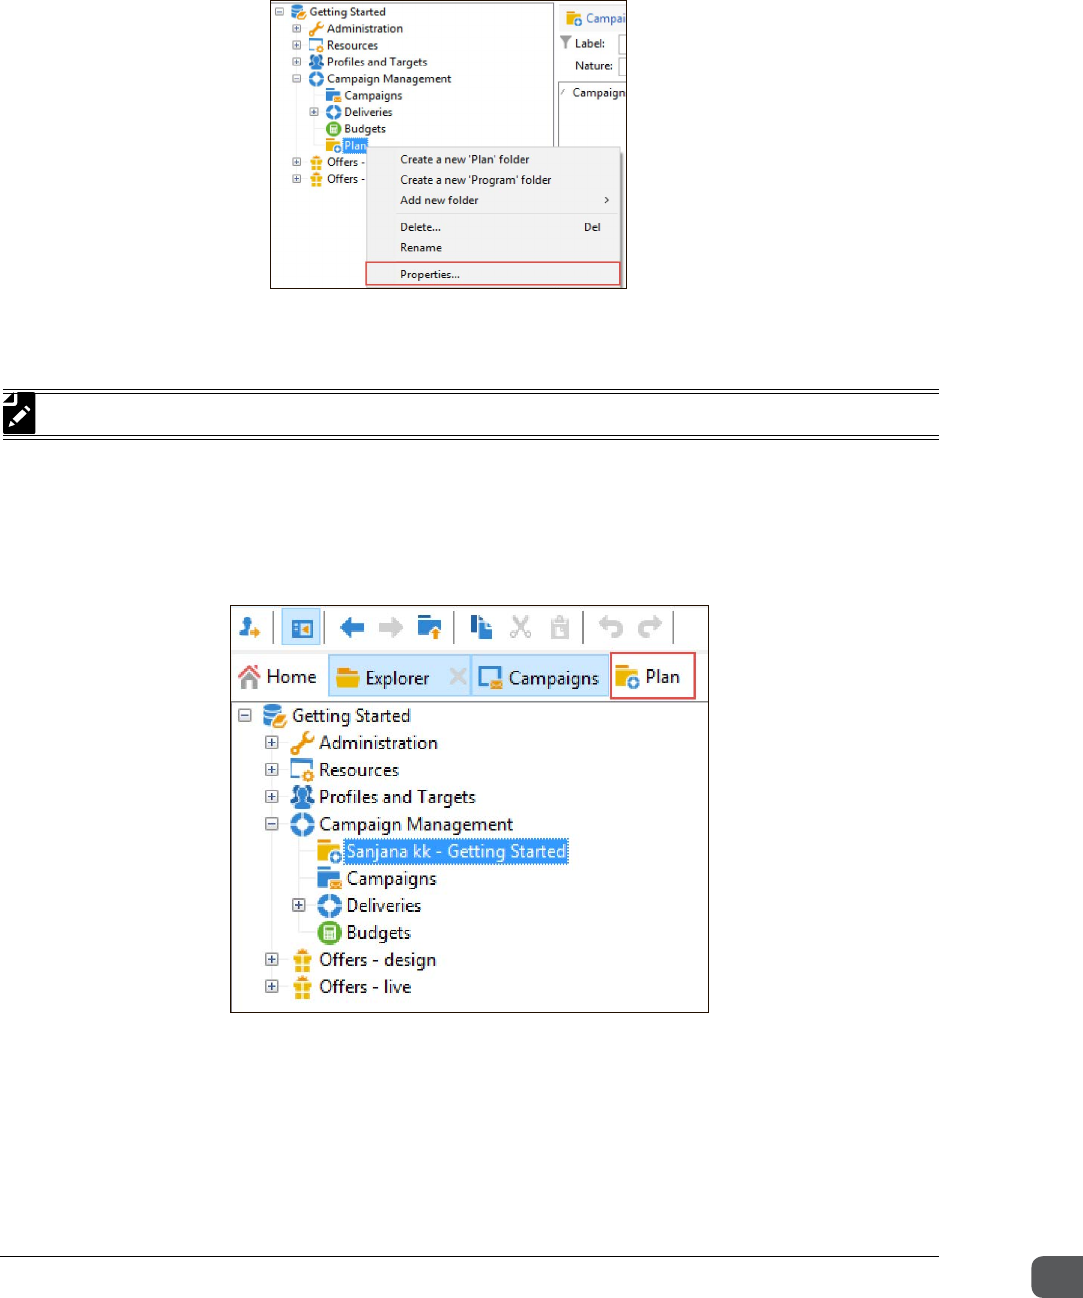
2. Right-click the Plan folder and select Properties. The Folder properties Plan dialog box
displays.
3. In the Label field, enter <Your First Name> <Last Name> – Getting Started. For example: Jane
Smith - Getting Started
NOTE: You do not need to change the value in the Internal name field.
4. Click Save.
5. On the tree view, select <Your First Name> <Last Name> – Getting Started and click the Plan
tab as shown. The Plan <Your First Name> <Last Name> – Getting Started view opens in the
list view.
6. Click the Edit tab and set the Start and End dates to correspond to the current calendar year.
7. Click Save in the upper right of the list view.
ADOBE COPYRIGHT PROTECTED
Chapter Two Designing a Campaign
Getting Started with Adobe Campaign v7 30
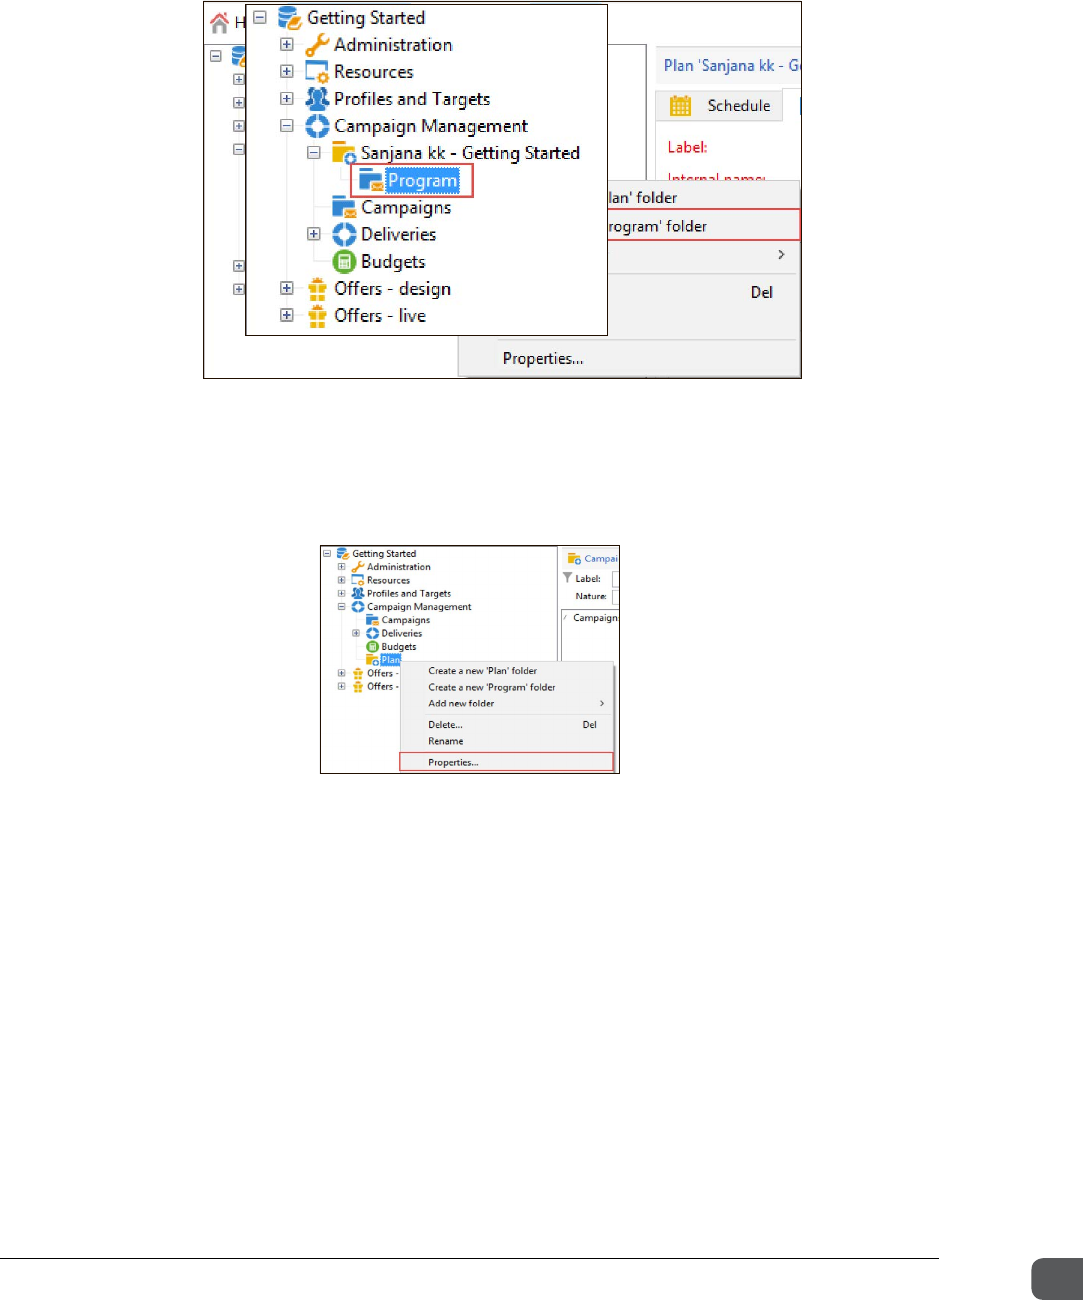
8. On the Explorer tree view, right-click the <Your First Name> <Your Last Name> – Getting
Started program you created and select Create a new Program folder.
9. Verify the Program folder is created in the <Your First Name> <Your Last Name> – Getting
Started plan folder.
10. Right-click the Program folder and click Properties. The Folder properties Program dialog box
displays.
11. In the Label field, enter Acquisition.
12. Click Save. The program name is updated in the tree view.
13. In the tree view, select <Your First Name> <Your Last Name> – Getting Started and click
Acquisition.
ADOBE COPYRIGHT PROTECTED
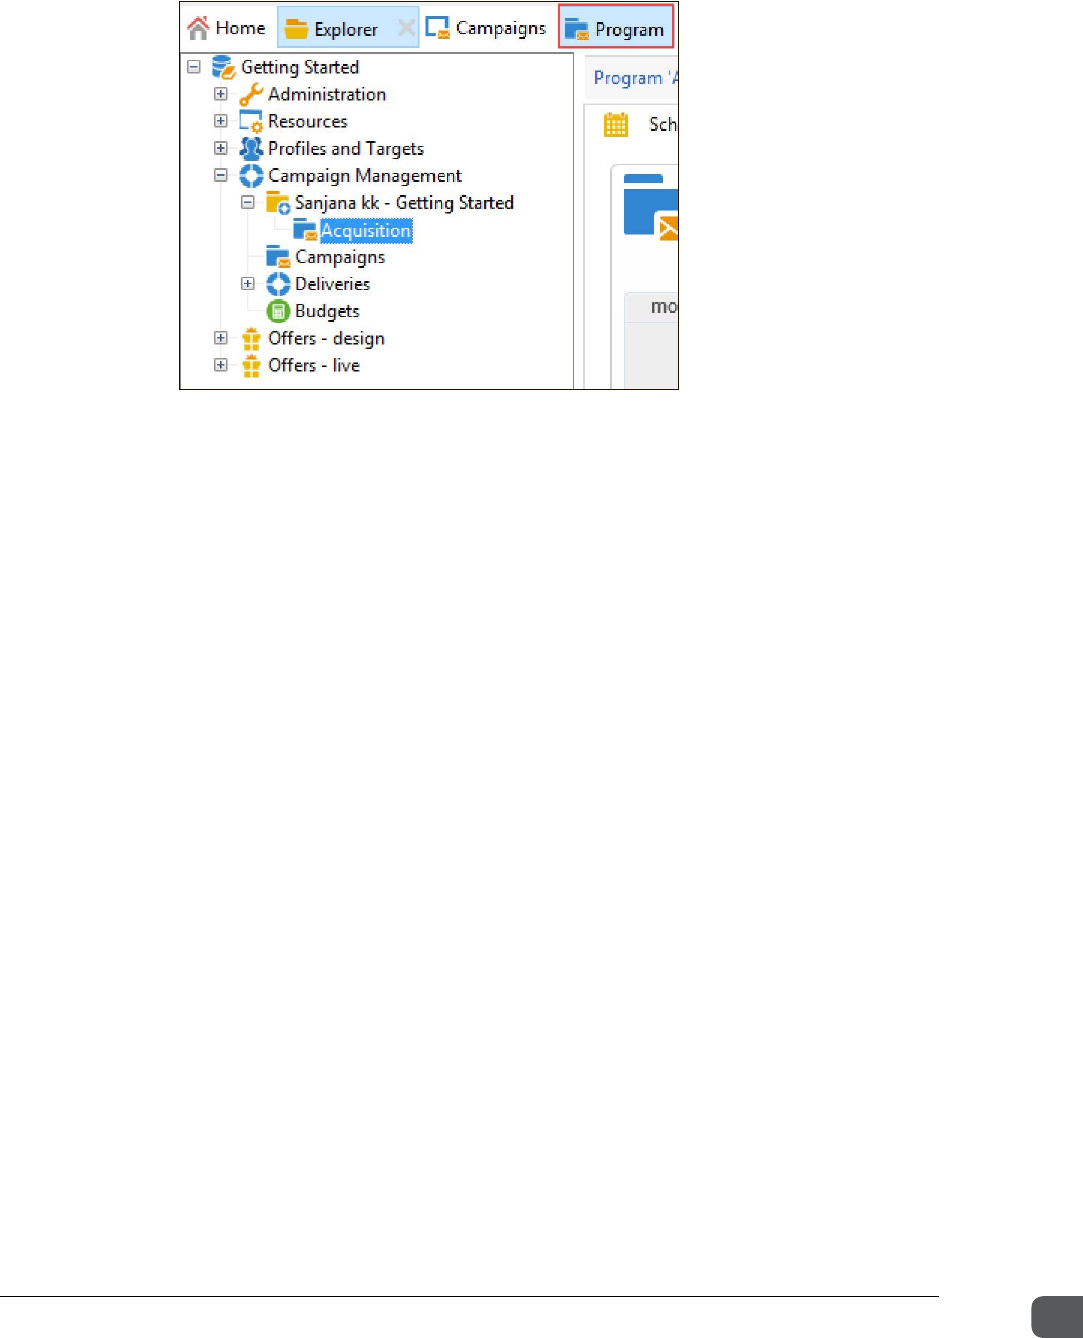
Chapter Two Designing a Campaign
Getting Started with Adobe Campaign v7 31
14. Click the Program tab. The Program Acquisition view opens in the list view.
15. Click the Edit tab and set the Start and End dates to correspond to the current calendar year.
16. Click Save in the upper right of the list view.
17. Create another new program under your marketing plan following the same instructions as
described in the previous steps, except for the following:
a. In the Label field, enter Cross-sell.
b. For Start date, select the first day of the current quarter.
c. For End date, select the last day of the current quarter.
18. Click Save. The program is saved.
19. Create a third program under your marketing plan following the same instructions as
described in the previous step, except for the following:
a. In the Label field, enter Retention.
b. For Start date and End date, select the start and end dates of the current month.
20. Click Save. The program is saved.
Task 2: Create a campaign
Create a campaign to support one of your segmentation marketing programs.
1. In the Explorer tree view, click Campaign Management and select the Acquisition program you
created in Task 1.
2. In the list view, click the New icon. The New marketing campaign dialog box displays.
3. In the New marketing campaign dialog box:
a. In the Template field, click the drop-down arrow and select the template. For this exercise,
keep the default template, New campaign (opEmpty).
b. In the Label field, enter <Your first name> <Your last name> email campaign. For example:
John Smith email campaign
ADOBE COPYRIGHT PROTECTED
Chapter Two Designing a Campaign
Getting Started with Adobe Campaign v7 32
c. In the Main channel field, select Email.
d. Keep the default start date and end date.
4. Click Ok. The newly created campaign is added to the list view.
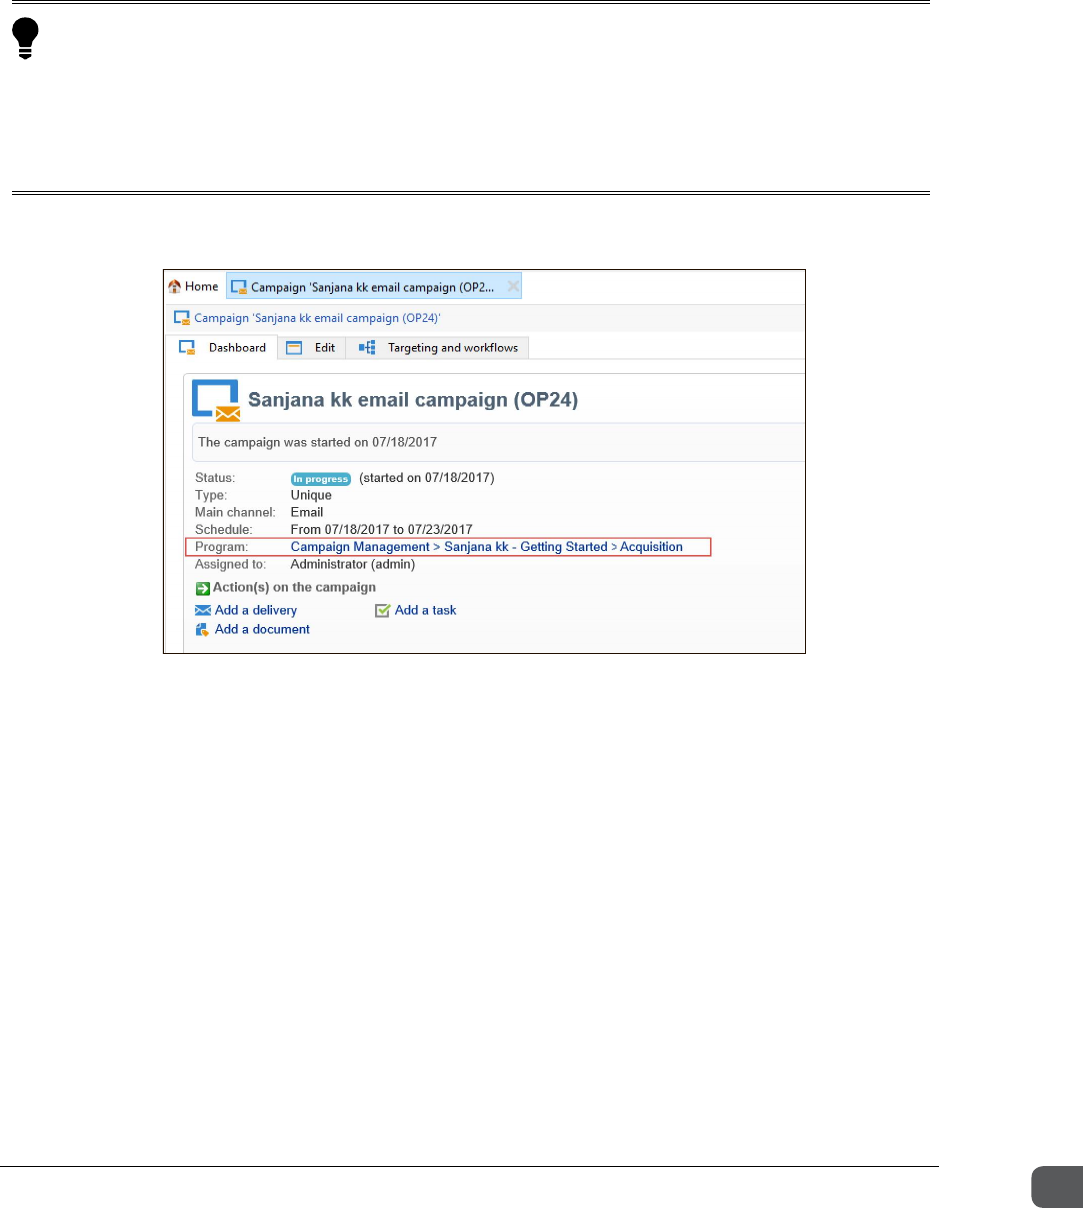
5. Double-click the campaign. Your newly created campaign opens in its own workspace.
6. Confirm the program location path is correct.
TIP: You can also create a campaign using the Dashboard. On the Home page, click the Campaigns
universe> Create > A campaign . The New marketing campaign dialog box opens. In the Template
field, click the drop-down arrow and select the template. For this exercise, keep the default template, New
campaign (opEmpty).In the Label field, enter <Your first name> <Your last name> email campaign. In
the Program field, click the drop-down arrow and select Acquisition. In the Main channel field, select
Email and keep the default start date and end date and click Ok.
ADOBE COPYRIGHT PROTECTED

Chapter Three Segmenting Recipients
Getting Started with Adobe Campaign v7 33
Chapter ree
Segmenting Recipients
Objectives
By the end of this chapter, you will be able to:
• Manage recipient data
• Create and run a target workflow
• Apply standard exclusions
ADOBE COPYRIGHT PROTECTED
Chapter Three Segmenting Recipients
Getting Started with Adobe Campaign v7 34
Accessing the Recipient Data
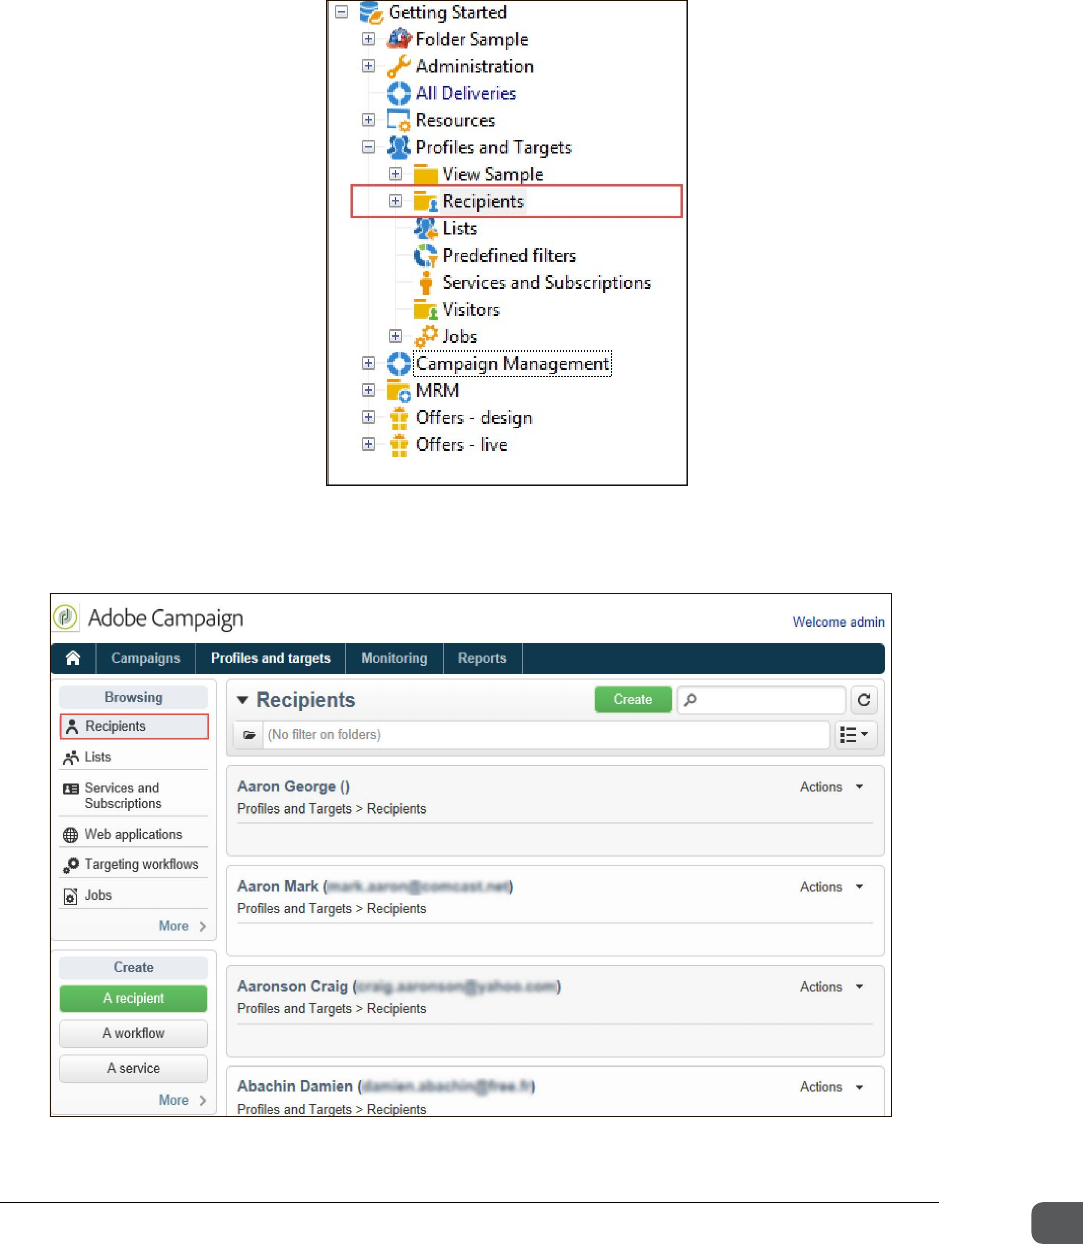
The Explorer view of the Adobe Campaign enables you to go into the Recipient folder and browse
through the customer database.
You can also access the Recipients option under the Profiles and targets universe to browse
through the recipient data. Click the recipient name to edit the data.
ADOBE COPYRIGHT PROTECTED

Chapter Three Segmenting Recipients
Getting Started with Adobe Campaign v7 35
Managing Recipient Data
Adobe Campaign enables you to manage recipient profiles throughout their entire lifecycle of a
marketing campaign. Delivery recipients are stored in the database as profiles containing the
information linked to them such as last name, first name, address, subscriptions, and deliveries.
Each profile matches a database entry. They contain all information required for targeting, qualifying,
and tracking individuals. When you create campaigns, you can define the target of the deliveries to
the selected profiles in the database, based on simple or advanced criteria.
Filtering Data
Adobe Campaign enables you to apply filters to data lists. You can also save filters for future use. In
addition, you can apply several filters at the same time. The following filter types are available in
Adobe Campaign:
• Default filters: Default filters enable you to filter predefined fields such as name and email ID.
You can access the default filter by using the fields located above the lists.
• Simple filters: Simple filters are defined with one or more simple search criteria on the
columns. You can combine several simple filters on the same data list to refine your search.
The filter fields are displayed one below the other.
• Advanced filters: Advanced filters help you filter recipient data using complex criteria to
optimize your search. You can create advanced filter using a query or a combination of
queries on the data.
• User filters: User filters are advanced filters that were saved to use and share their
configuration with other operators. You can use a set of application filters that you can
combine to refine the filtering.
• Predefined filters: Predefined filters allow you to filter the profiles of recipients contained in
the database. You can set up a standard filter for others to reuse.
You can apply filters to the recipient data to identify a target population. For example, you can
obtain a target with customers who bought a certain product during a given period. Filtering criteria
can include:
• Gender and age
• Shared geography
• Spending or delivery history
Any information you have in the data mart, including custom and standard attributes, can be used
to determine the campaign target. You can apply filters to the recipient table and identify the target
population. You can filter on any criteria known about the recipients.
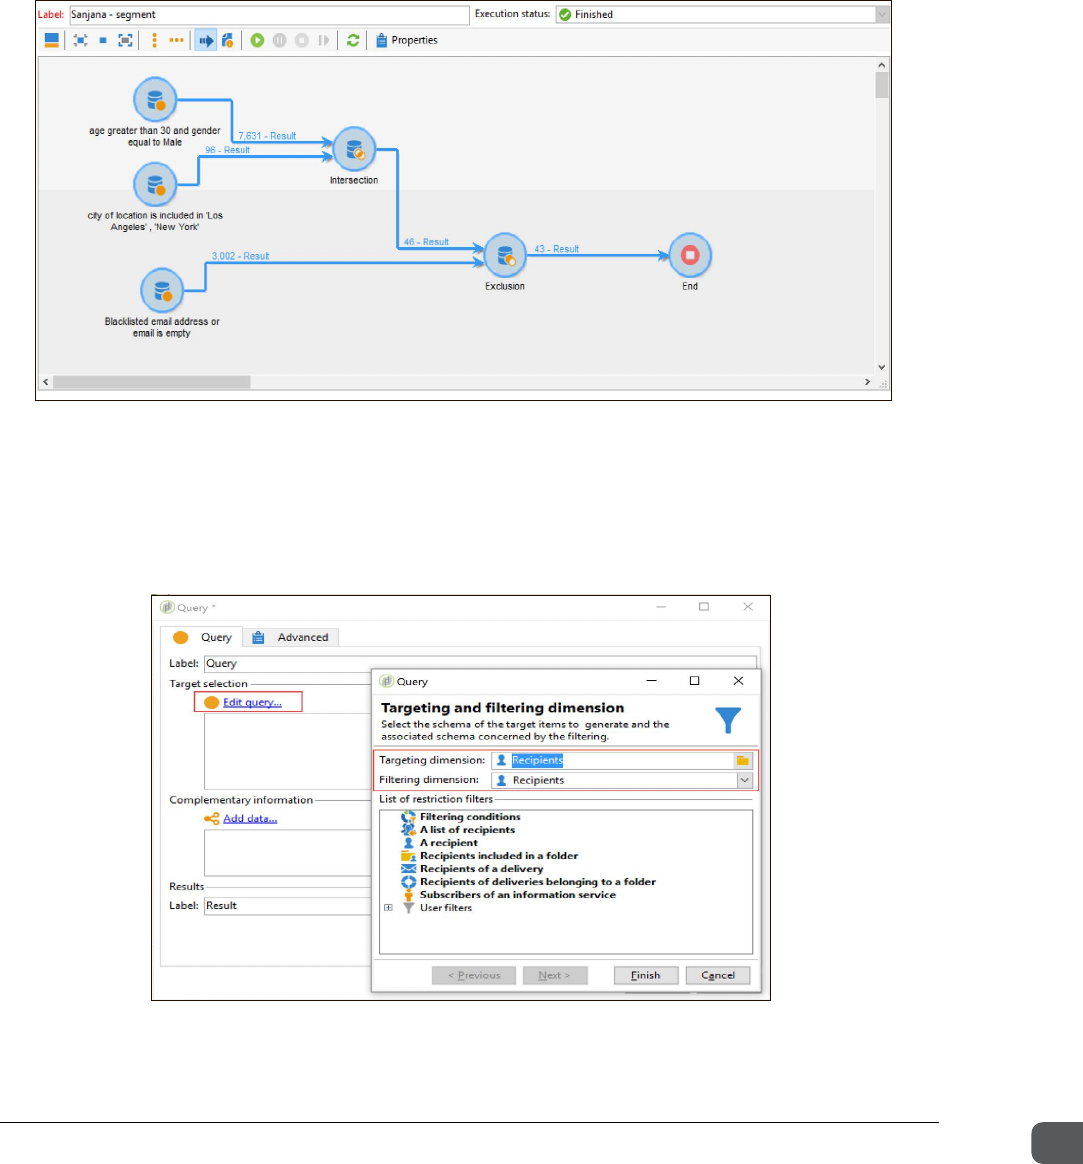
Targeting and Segmentation
Adobe Campaign enables you to create workflows that can help marketers define multiple
segments and offers. The workflow enables you to automate business processes. For example, a
ADOBE COPYRIGHT PROTECTED
Chapter Three Segmenting Recipients
Getting Started with Adobe Campaign v7 36
campaign workflow executes the campaign. The segmentation workflows help personalize your
campaigns and offers. These segments are created by using queries in workflows. You can create
audience segments by filtering data available in the data mart. However, these segments are static
and may not include the latest customer attributes. You can include segmentation in the campaign
workflow to make the segments dynamic. The following screenshot displays a segmentation
workflow.
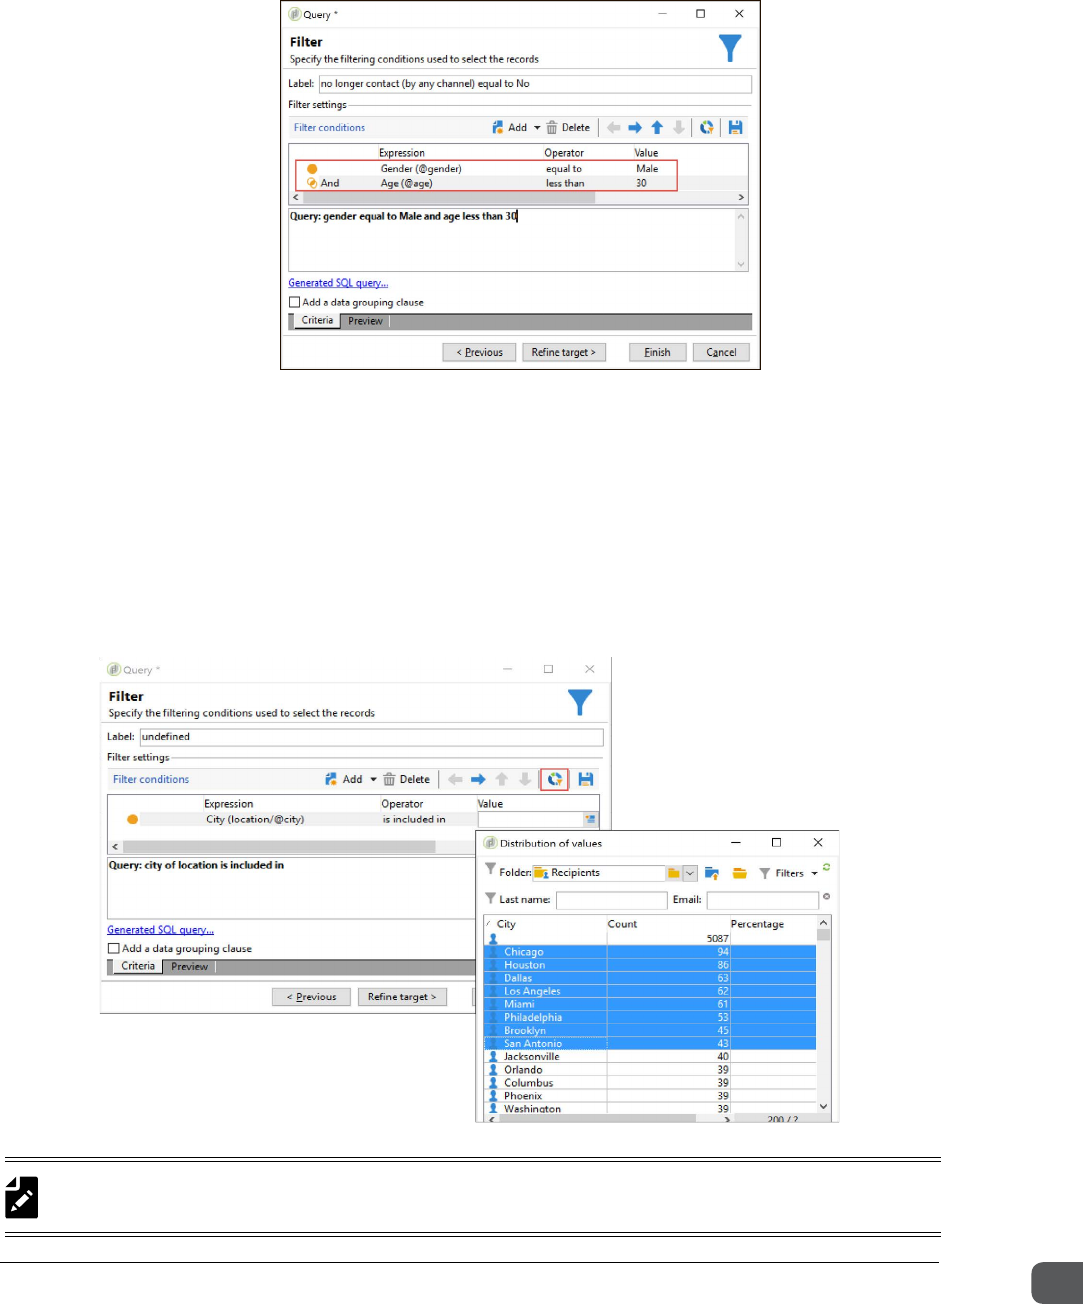
Editing a Query
A query activity enables you to select basic data to build the target population. You can select a target
according to some criteria. You can also associate a segment code to the query result and insert
additional data into the query result. You can edit a query to define the targeting type, restrictions,
and the selection criteria for the population by using the targeting and filtering dimensions.
The targeting dimension enables you to define the population targeted by the operation such as
recipients, contract beneficiaries, operator, and subscribers. The filtering dimension enables you to
ADOBE COPYRIGHT PROTECTED

Chapter Three Segmenting Recipients
Getting Started with Adobe Campaign v7 37
select the population based on certain criteria such as contract holders and newsletter subscribers.
For example, to select clients who have had a life insurance policy for over five years, you can select
clients as the targeting dimension and contract holder as the filtering dimension. The two dimensions
are related and the content of the filtering dimension depends on the targeting dimension.
Selecting a Filter
Adobe Campaign enables you to select the type of filter to apply. The filter must work with the
filtering dimension.
If you select recipients as the filtering dimension, you can use the following filters:
• Filtering conditions: Construct a logical expression to select profiles based on attributes.
• A list of recipients: Target a pre-populated list.
• A recipient: Target a recipient.
• Recipients included in a folder: Target profiles residing in a folder in the hierarchy.
• Recipients of a delivery: Reuse the target of an existing delivery.
• Recipients of deliveries belonging to a folder: Target all recipients of deliveries in a specific
folder.
• Subscribers of an information service: Publish content to service subscribers.
• User filters: Target based on a predefined query.
Specifying a Filtering Condition
Filters are based on a logical expression. A query returns the recipients for whom the expression is
true.
To define filtering conditions:
1. Add an expression line to the filter.
2. Find an attribute of recipient or related data.
3. Select an operator.
4. Enter or select a value the attribute will be compared with.
5. Optionally combine multiple expressions.
When you specify the filtering conditions, you are creating a logical expression. The first part of the
expression is an attribute of a recipient or an attribute from a linked table to a recipient such as
status. If the attribute has a set of values, these values will appear in the drop-down list.
For example, for status, the values are client, prospect, or not specified; for gender, the values are
male, female, or not specified. After you specify an attribute, you can enter an operator such as
equal to and a value to match against the targeting dimension client.
For, example, if you want to target men under the age of 30, you can use the Filter dialog box:
1. For the Expression field, select the attribute Gender.
2. Select equal to for the Operator, and select Male from the Value.
ADOBE COPYRIGHT PROTECTED
Chapter Three Segmenting Recipients
Getting Started with Adobe Campaign v7 38
3. Add an additional Expression with Age as the attribute, less than as the Operator, and 30
as the Value. The following screenshot is the result.
By default, all expressions are combined with AND. You can change it to OR or EXCEPT, depending
on what you want to accomplish.
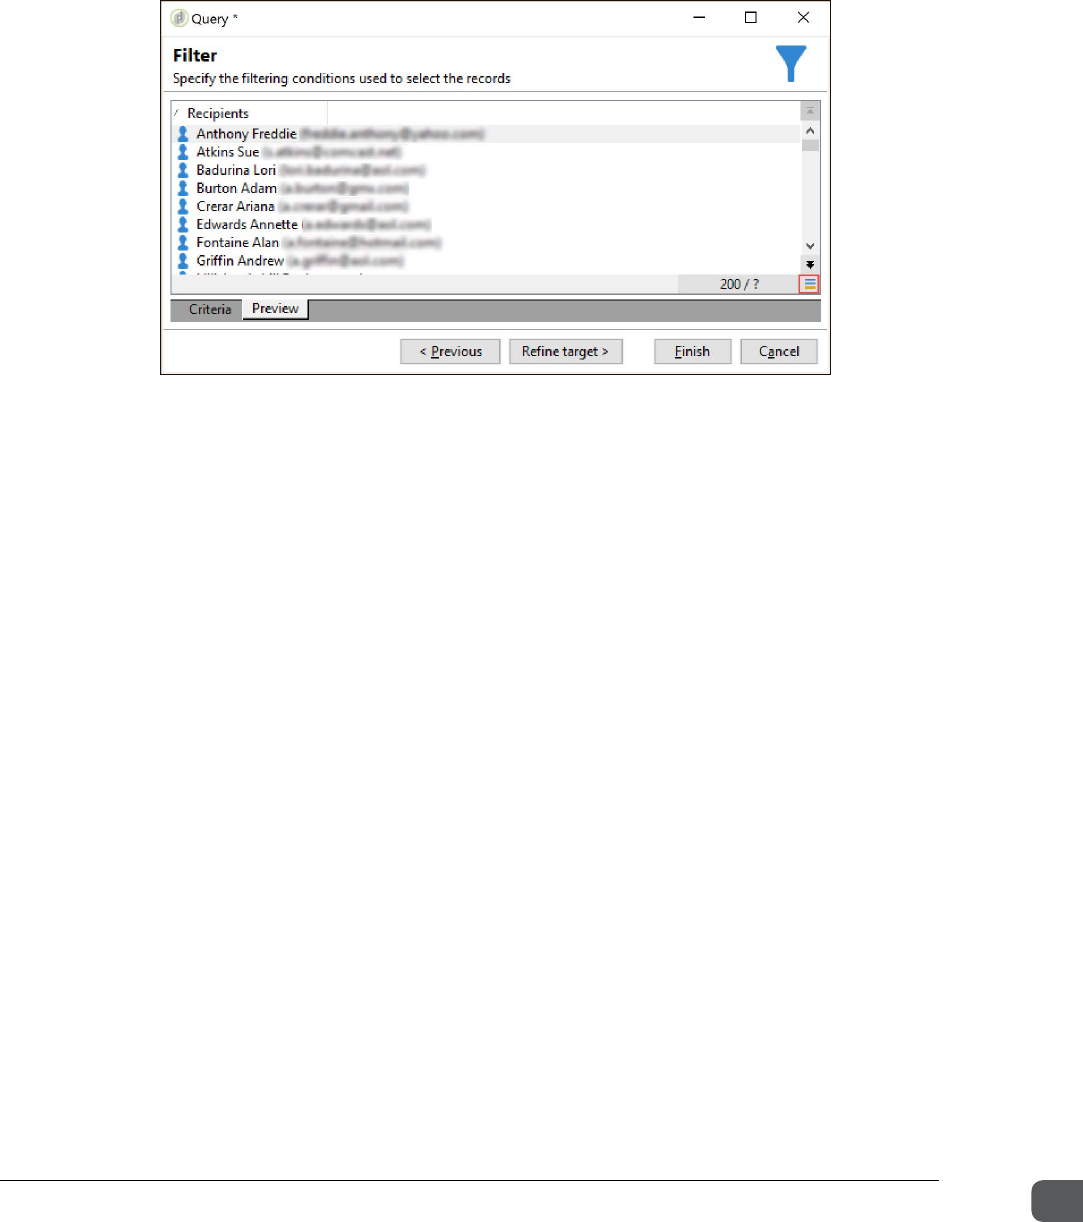
Adding Multiple Values from a Distribution
You can add multiple values to an expression. To do this, add an attribute, select the operator is
included in, and then click the Distribution of values icon. All values currently in the data mart for
the selected attribute are displayed. This can help you find valid values, such as cities and product
categories.
NOTE: If you select equal to in the Operator field, you can select only one value. The values are
listed in order of prevalence, so you will find the most common value first.
ADOBE COPYRIGHT PROTECTED
Chapter Three Segmenting Recipients
Getting Started with Adobe Campaign v7 39
Conguring the Preview List
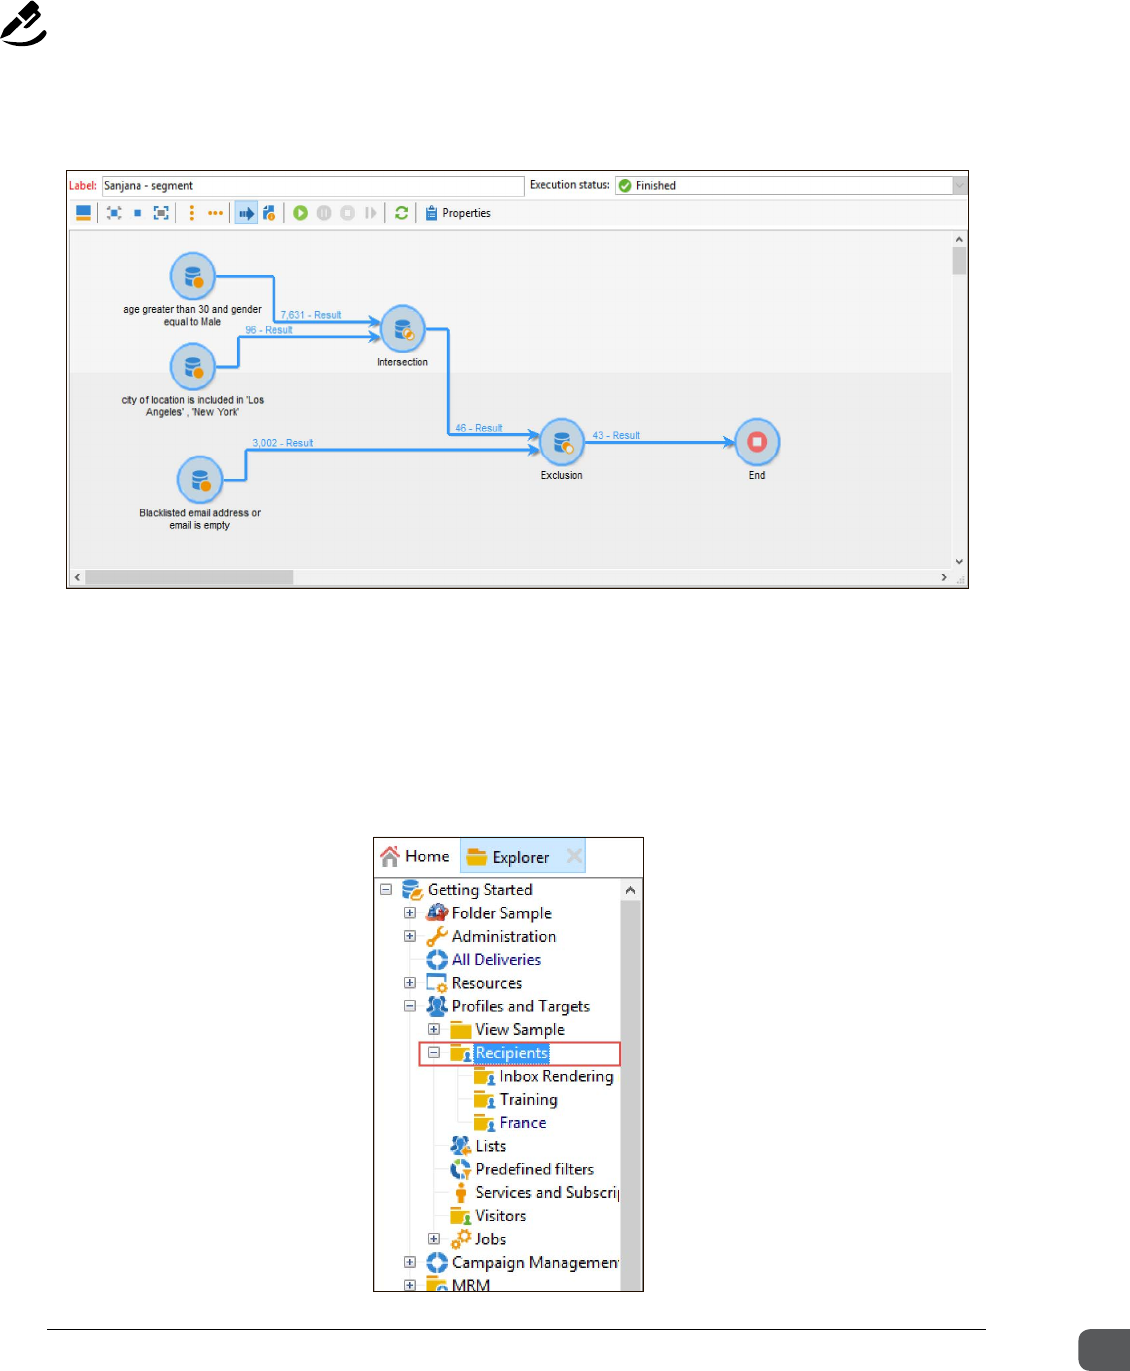
When creating a query, it is important to preview the results. By previewing the results, you can verify
the logic used in the filter. When previewing the results of the query to verify your expression logic,
you can configure the list to add or remove columns by using the Configure List icon.
Applying Standard Exclusions
Each business typically has a standard definition of who they want to exclude from their target. You
can add a typology rule that is applied during the analysis to exclude contacts. You can also exclude
them up front by creating a predefined filter to get a more accurate count.
To apply a standard exclusion, you can start with your target population, define one or more
additional queries to choose the recipients you want to exclude, and then use an exclusion activity
to exclude them from the main target.
There are predefined user filters for excluding recipients. They are:
• Blacklisted email: Recipients who opted out either globally or by channel.
• Email in quarantine: If the mailbox is full or if the address does not exist, an email address can be
quarantined.
You can also define your own filters to exclude recipients and save them for reuse.
ADOBE COPYRIGHT PROTECTED
Chapter Three Segmenting Recipients
Getting Started with Adobe Campaign v7 40
Exercise 4 – Segment Recipients in a Target by Creating an Email Campaign
Workow
In this exercise, you will create a segmentation workflow by filtering males over the age of 30 in Los
Angeles or New York and remove the recipients without email addresses and are blacklisted. By the
end of this exercise, you will create a workflow similar to the following workflow.
Task 1: Manage recipient lists
Manage your own recipient lists by sorting, adding columns, and adding a recipient manually.
1. On the Home page, click Explorer from the toolbar. The Explorer window workspace is
displayed.
2. On the tree view, expand the Profiles and Targets folder and click Recipients. The list of
recipients is displayed in the list view.
ADOBE COPYRIGHT PROTECTED
Chapter Three Segmenting Recipients
Getting Started with Adobe Campaign v7 41
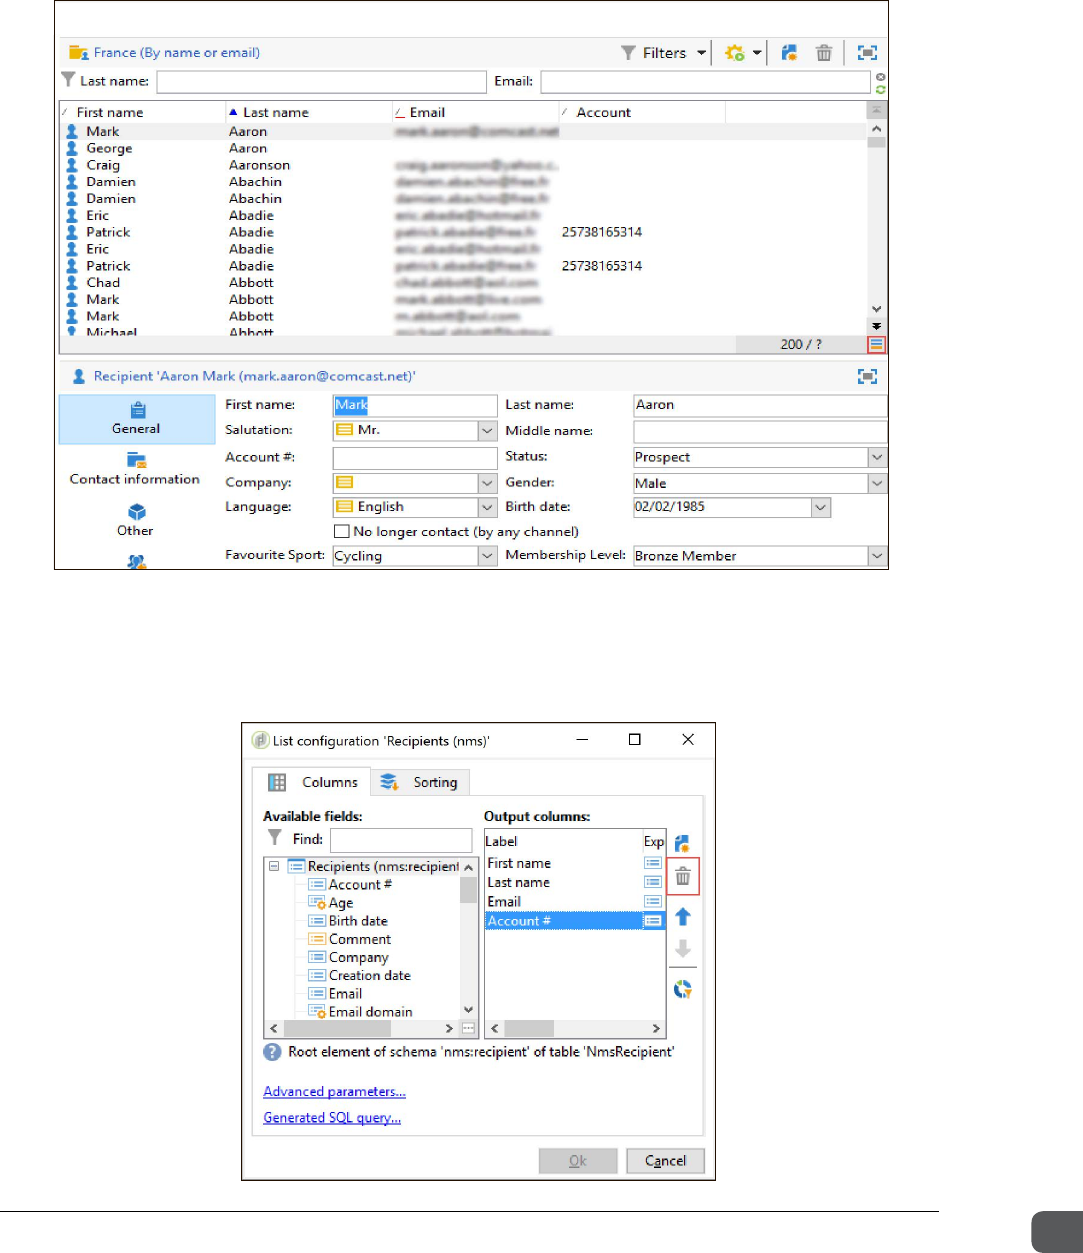
3. Click the Configure list icon in the list view (in the lower right, as shown in the screenshot)
or right-click and select Configure list. The List configuration Recipients (nms) dialog box
opens.
4. To configure the list view:
a. In the Output columns, select Account #.
b. Click the Delete icon to remove Account # from the Output columns. The Account #
column is deleted from the list.
ADOBE COPYRIGHT PROTECTED
Chapter Three Segmenting Recipients
Getting Started with Adobe Campaign v7 42
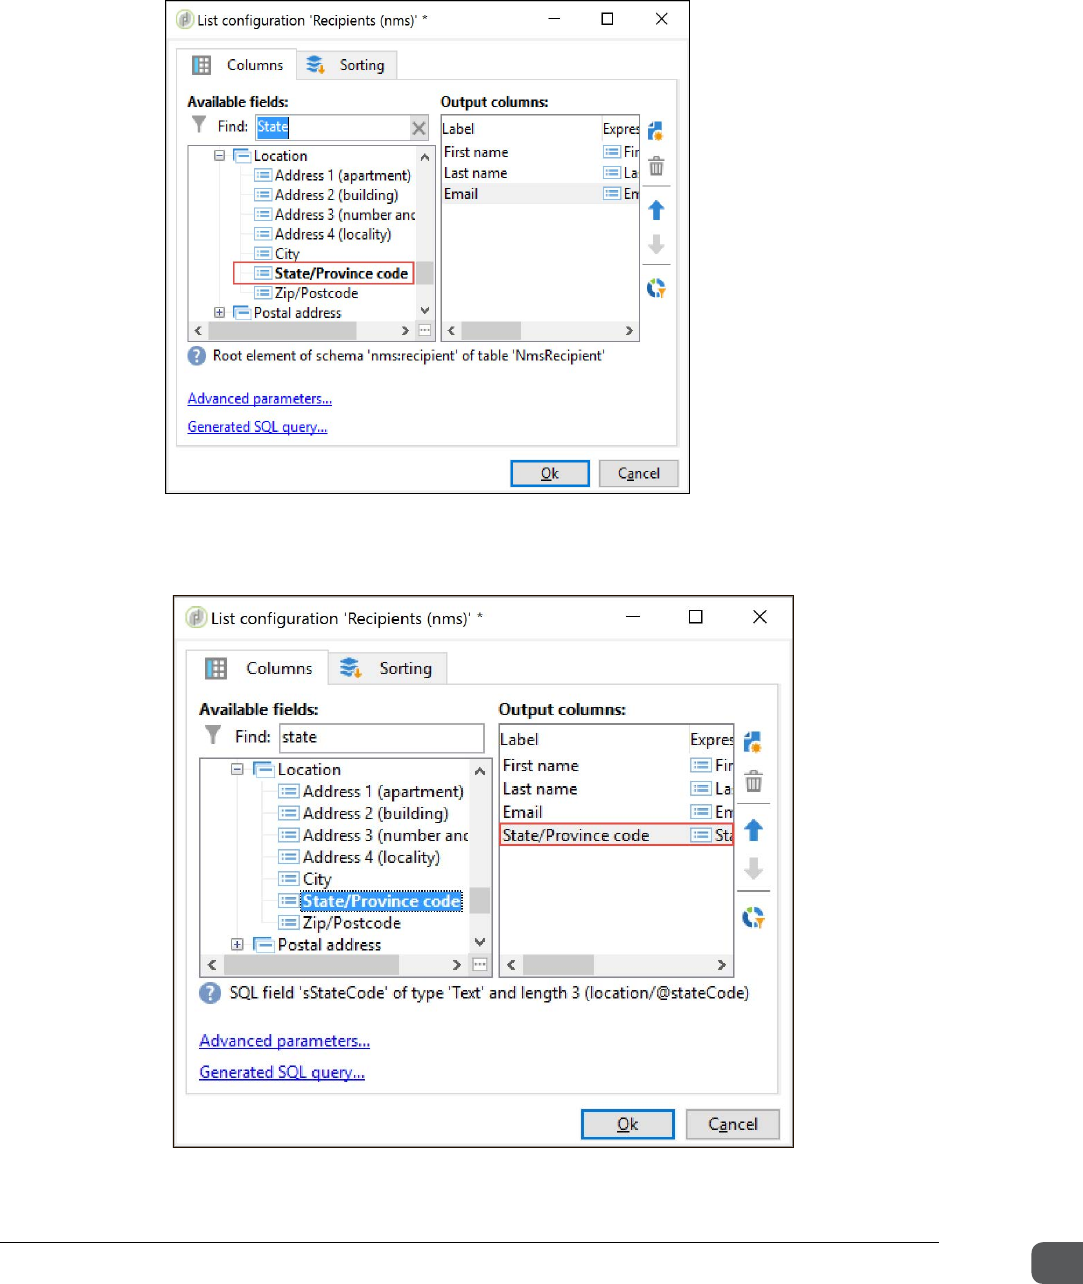
c. In the Available fields, enter State in the Find field and press Enter. The State/Province
code column is selected in the available field and displayed in bold (font).
d. Double-click the State/Province code in the Available fields to add it to the Output
columns.
ADOBE COPYRIGHT PROTECTED
Chapter Three Segmenting Recipients
Getting Started with Adobe Campaign v7 43
e. Click Ok. A new column State/Province code is added to the list view.
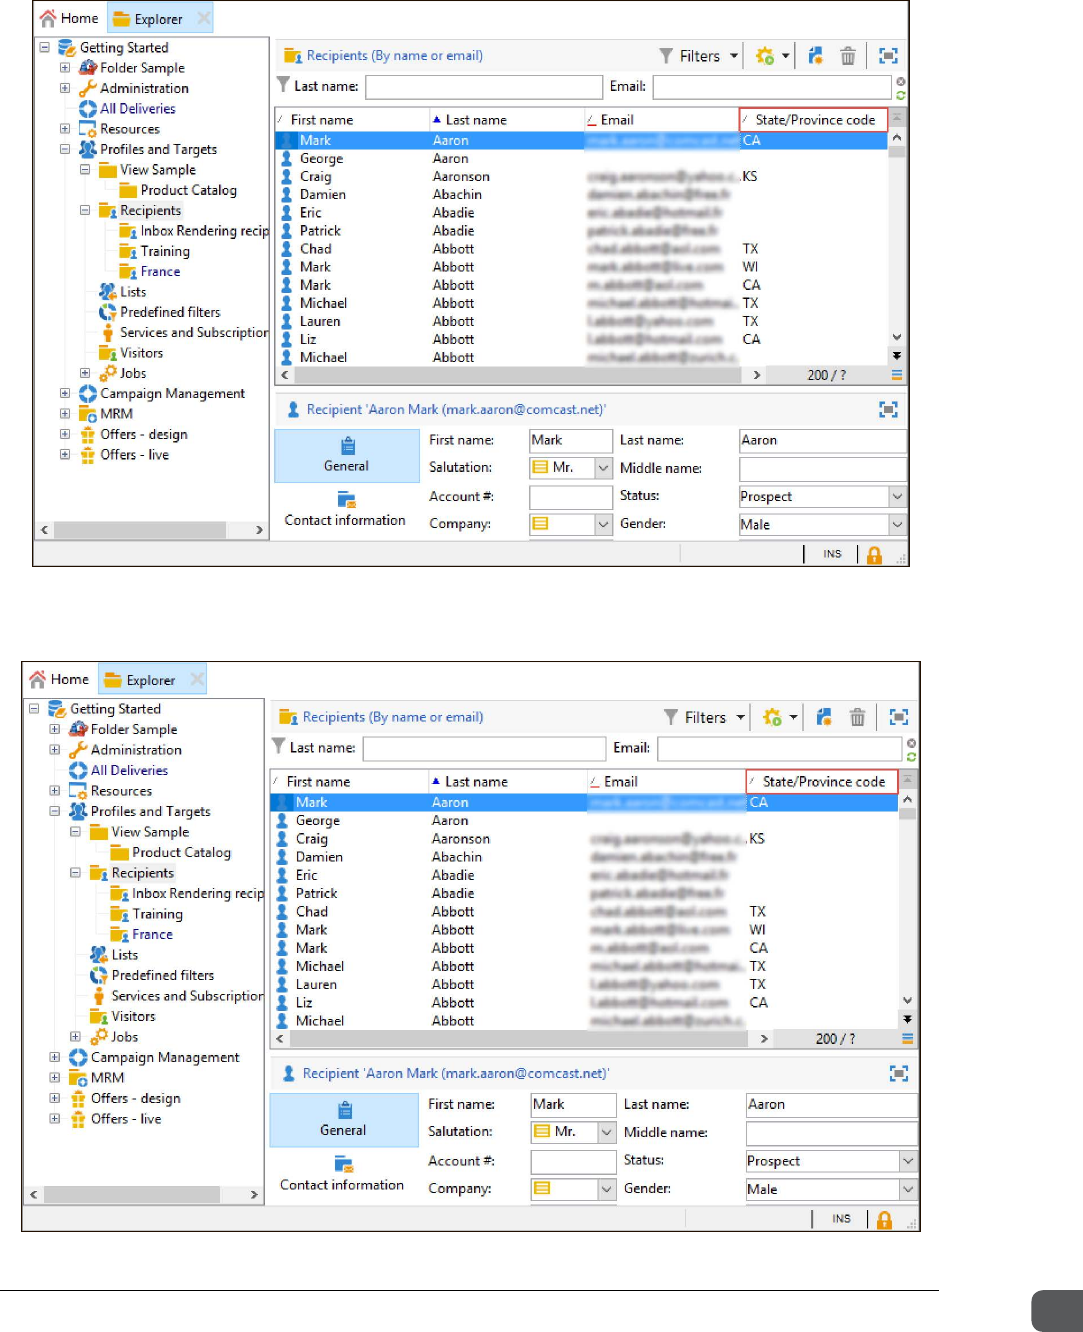
5. In the list view, click the State/Province code header to sort the list. The data in the State/
Province code is sorted alphabetically, beginning with AK (Alaska).
ADOBE COPYRIGHT PROTECTED
Chapter Three Segmenting Recipients
Getting Started with Adobe Campaign v7 44
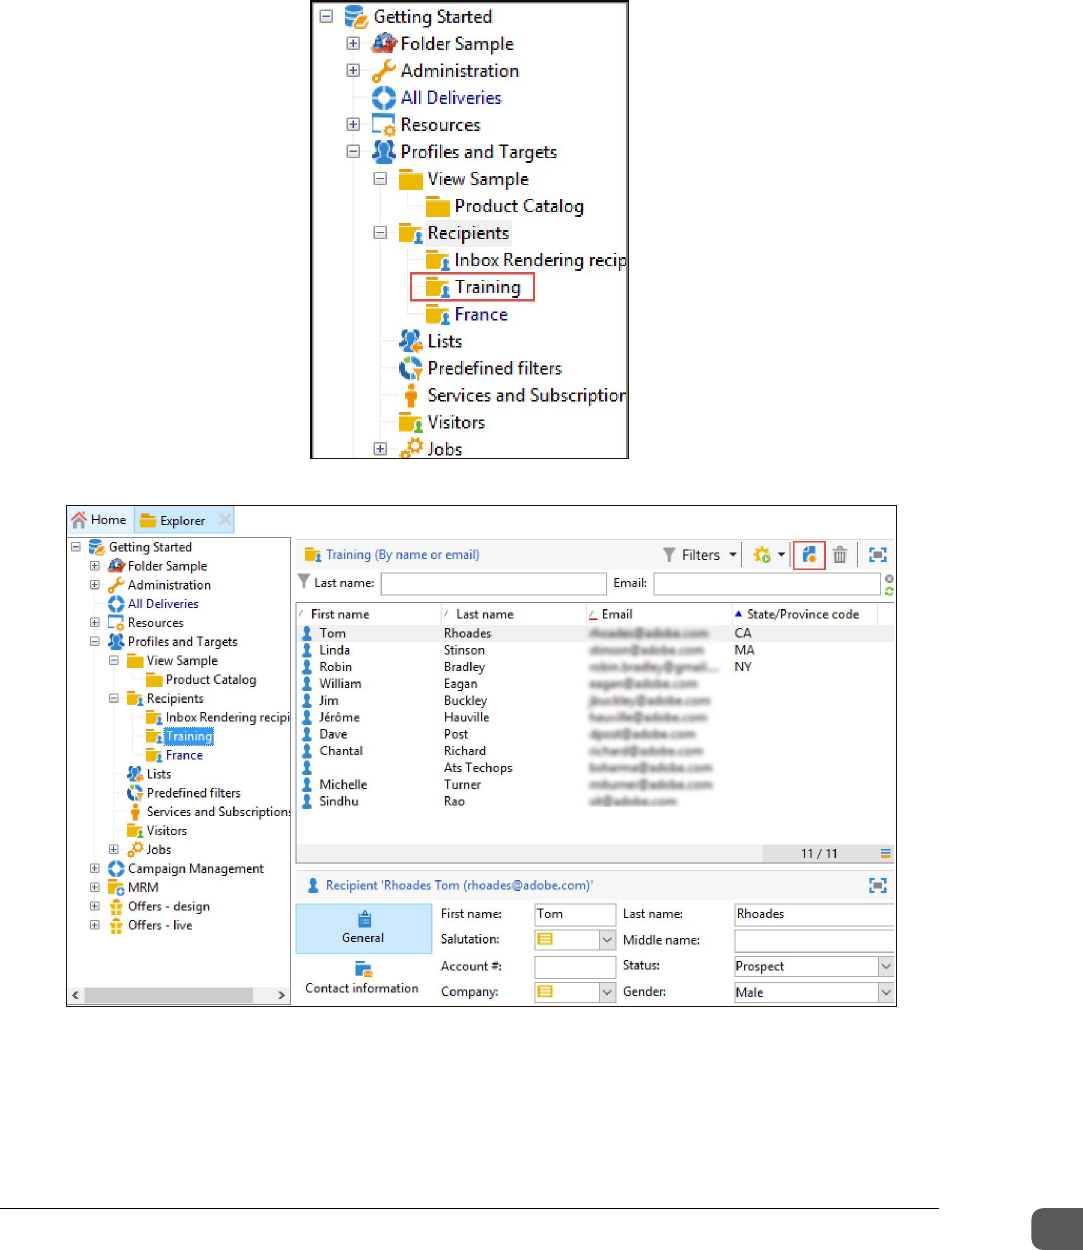
6. On the tree view, expand the Profiles and Targets folder and then expand the Recipients
folder.
7. Select the Training subfolder.
8. Click the New icon on top of the list view, as shown below:
9. Enter a first name, last name, gender, birth date and email in the respective fields.
10. Click Save. The details are saved successfully. Your entry will appear in the Training subfolder.
ADOBE COPYRIGHT PROTECTED
Chapter Three Segmenting Recipients
Getting Started with Adobe Campaign v7 45
Task 2: Create and run a targeting workow
a. Create and run a targeting workflow in the workflow editor by using your recipient list.
b. Use filtering conditions in your workflow to segment your recipient list to include only males
over 30 years of age.
1. In the Explorer tree view, click Campaign Management and select the Acquisition program you
created earlier. The campaign you created is displayed in the list view.
2. Double-click the campaign you created in Exercise 3.
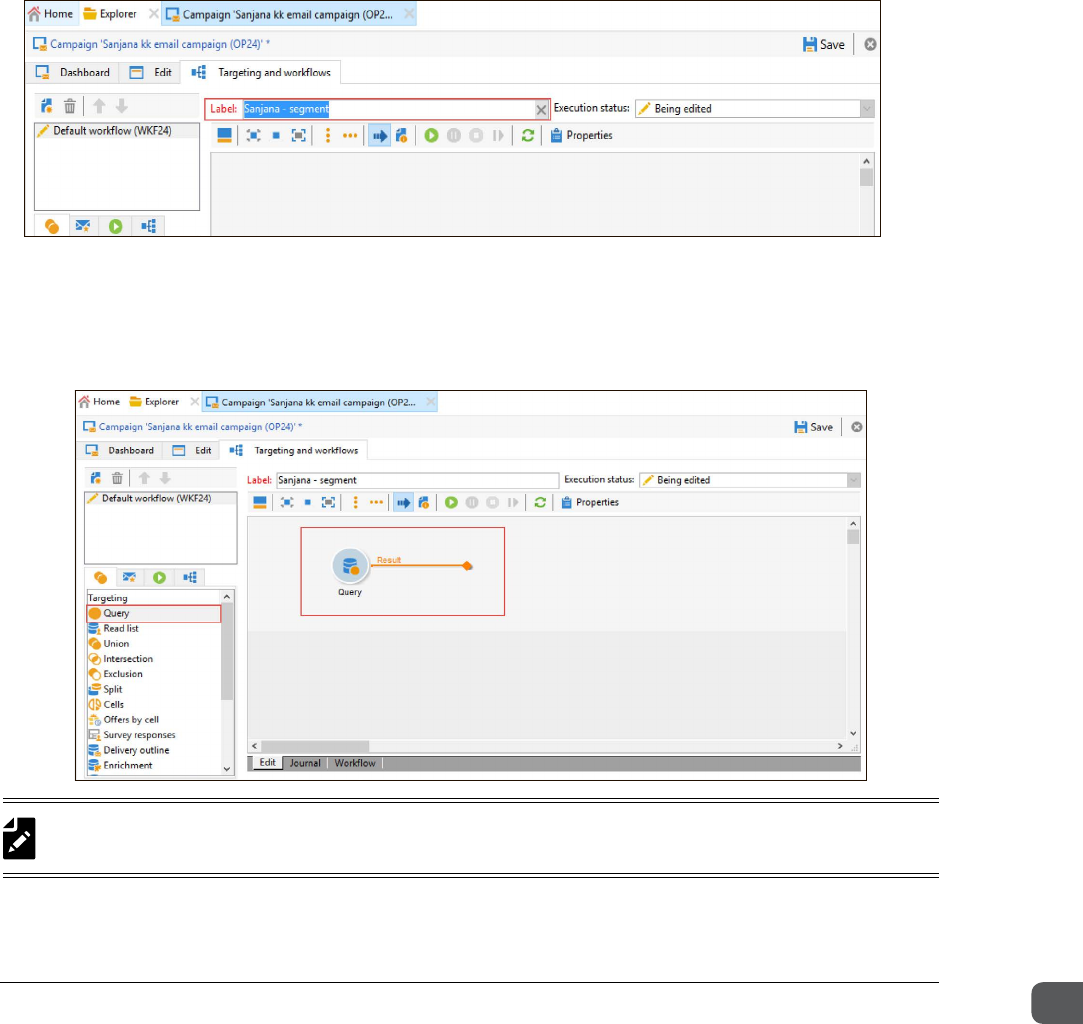
3. Click the Targeting and workflows tab.
4. In the Label field, enter <Your name> - segment.
5. Click Save. The workflow is saved.
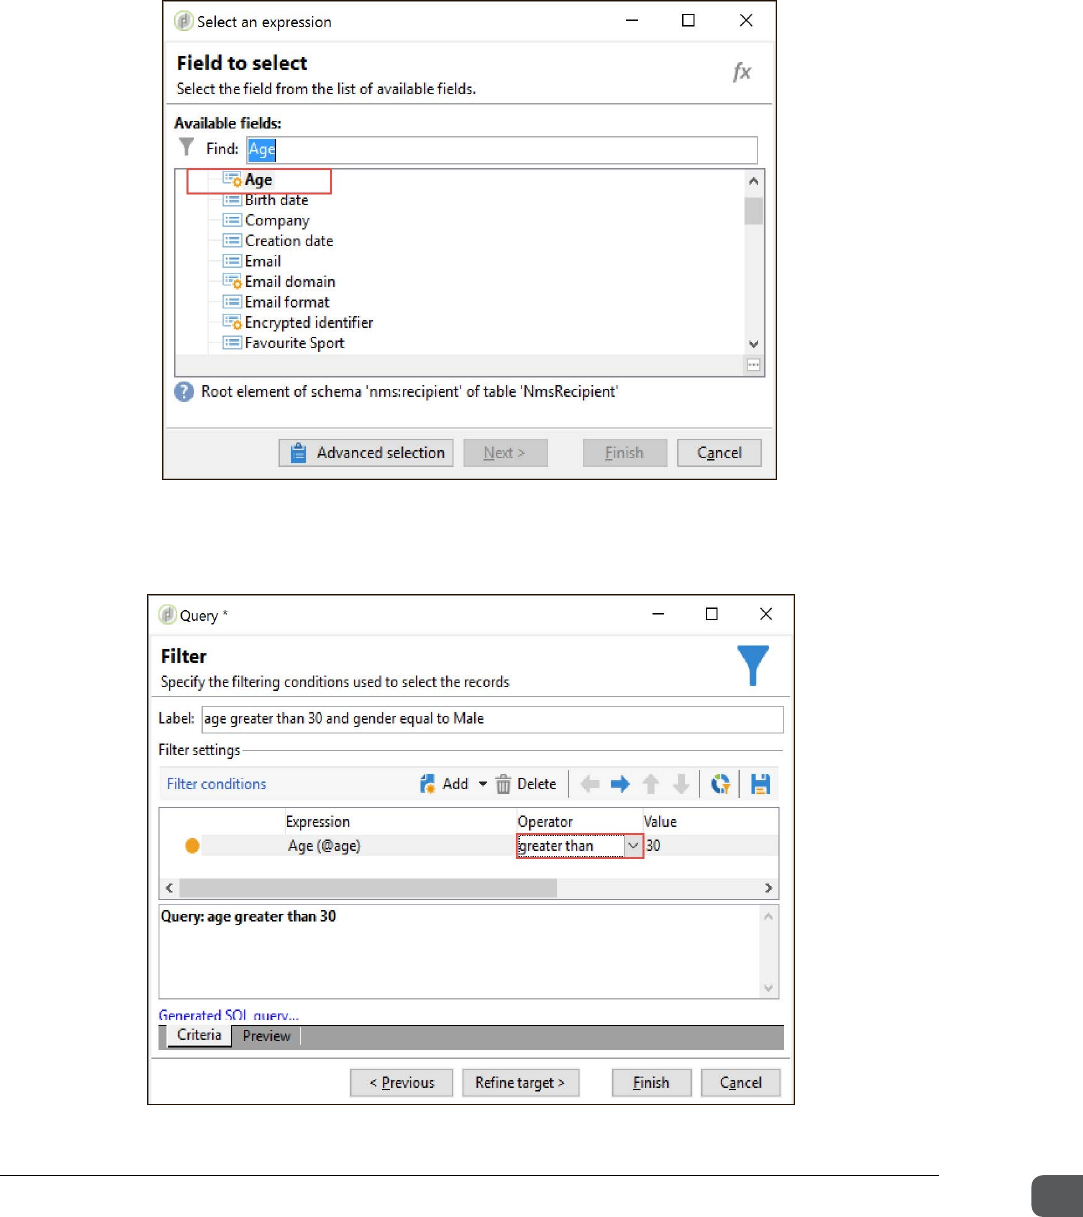
6. Drag a Query from the Targeting section onto the diagram.
7. Double-click the Query activity on the diagram. The Query dialog box opens.
NOTE: If you are using two monitors, the dialog box may appear in the second monitor. If you do not see
the dialog box in the first monitor, check the other monitor.
ADOBE COPYRIGHT PROTECTED

Chapter Three Segmenting Recipients
Getting Started with Adobe Campaign v7 46
8. In the Target selection area, click the Edit query link. The Query dialog box opens, and
displays the fields to select the schema of the target items of the schema and the associated
schemas filters related to the filtering.
9. Double-click Filtering conditions. The Query dialog box displays the fields to specify the
filtering conditions used to select records.
ADOBE COPYRIGHT PROTECTED
Chapter Three Segmenting Recipients
Getting Started with Adobe Campaign v7 47
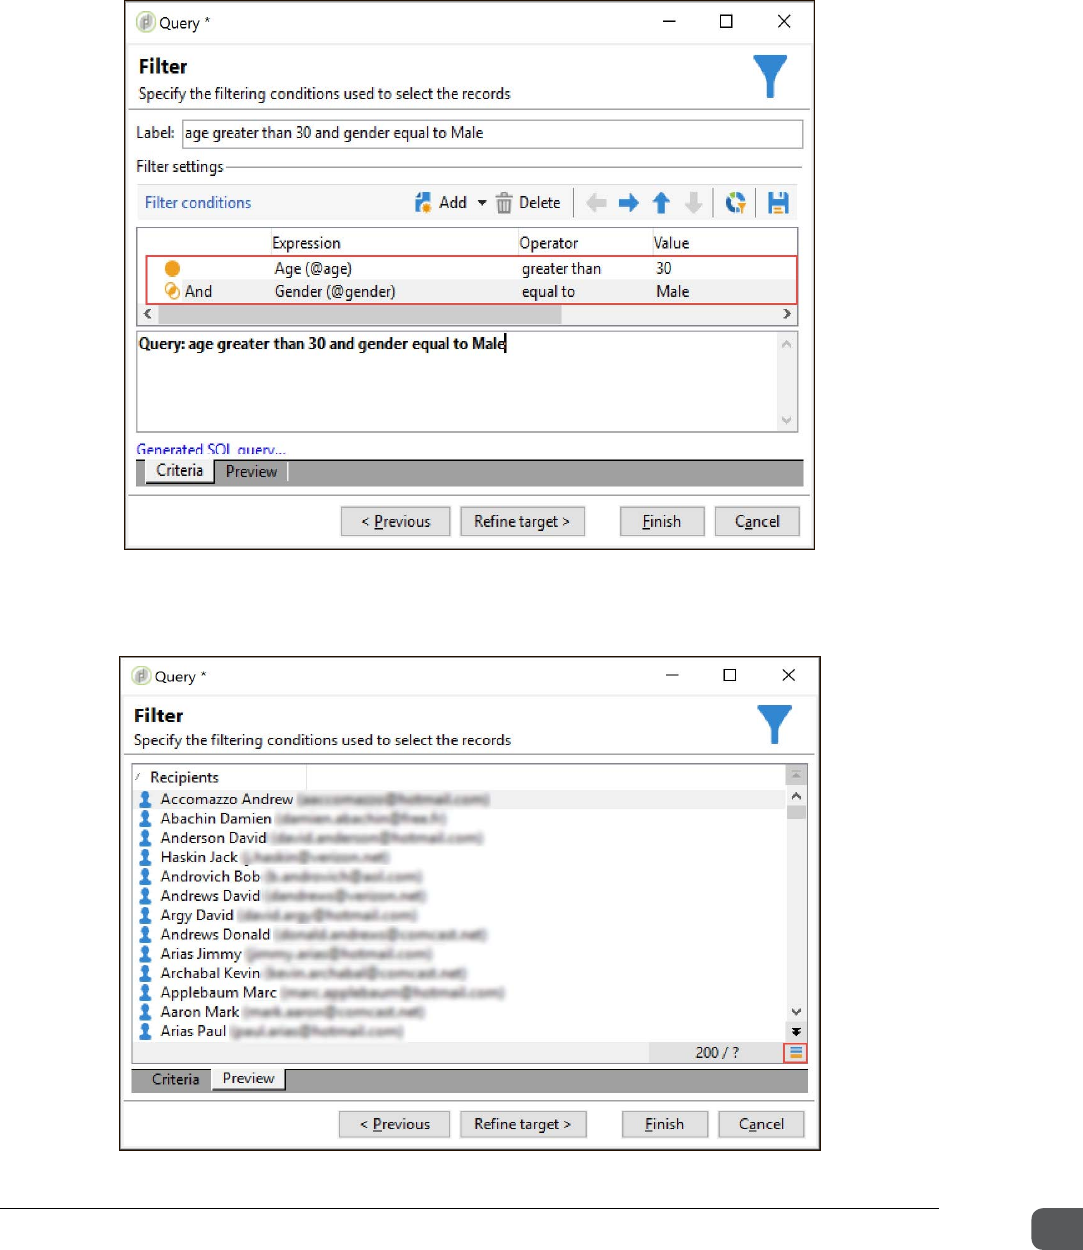
10. In the Expression field, click the Edit expression icon. The Select an expression dialog box
opens.
11. In the Find field, enter Age and double-click Age (@age) from the Available fields. The
expression is added to the field.
12. On the Query dialog box where the expression was added, click the Operator field and
select greater than from the drop-down list.
ADOBE COPYRIGHT PROTECTED
Chapter Three Segmenting Recipients
Getting Started with Adobe Campaign v7 48
13. Click the Value field, and enter 30.
14. Add another expression for Gender (@gender) equal to male. By default, the two
expressions are combined with an And.
15. Click the Preview tab. The query results are displayed.
16. Right-click the preview and select Configure list or click the Configure list icon.
ADOBE COPYRIGHT PROTECTED
Chapter Three Segmenting Recipients
Getting Started with Adobe Campaign v7 49
17. Double-click the Age and Gender columns to add them to Output columns.
18. Click Ok. The Preview tab displays the name, age, and gender of the recipients.
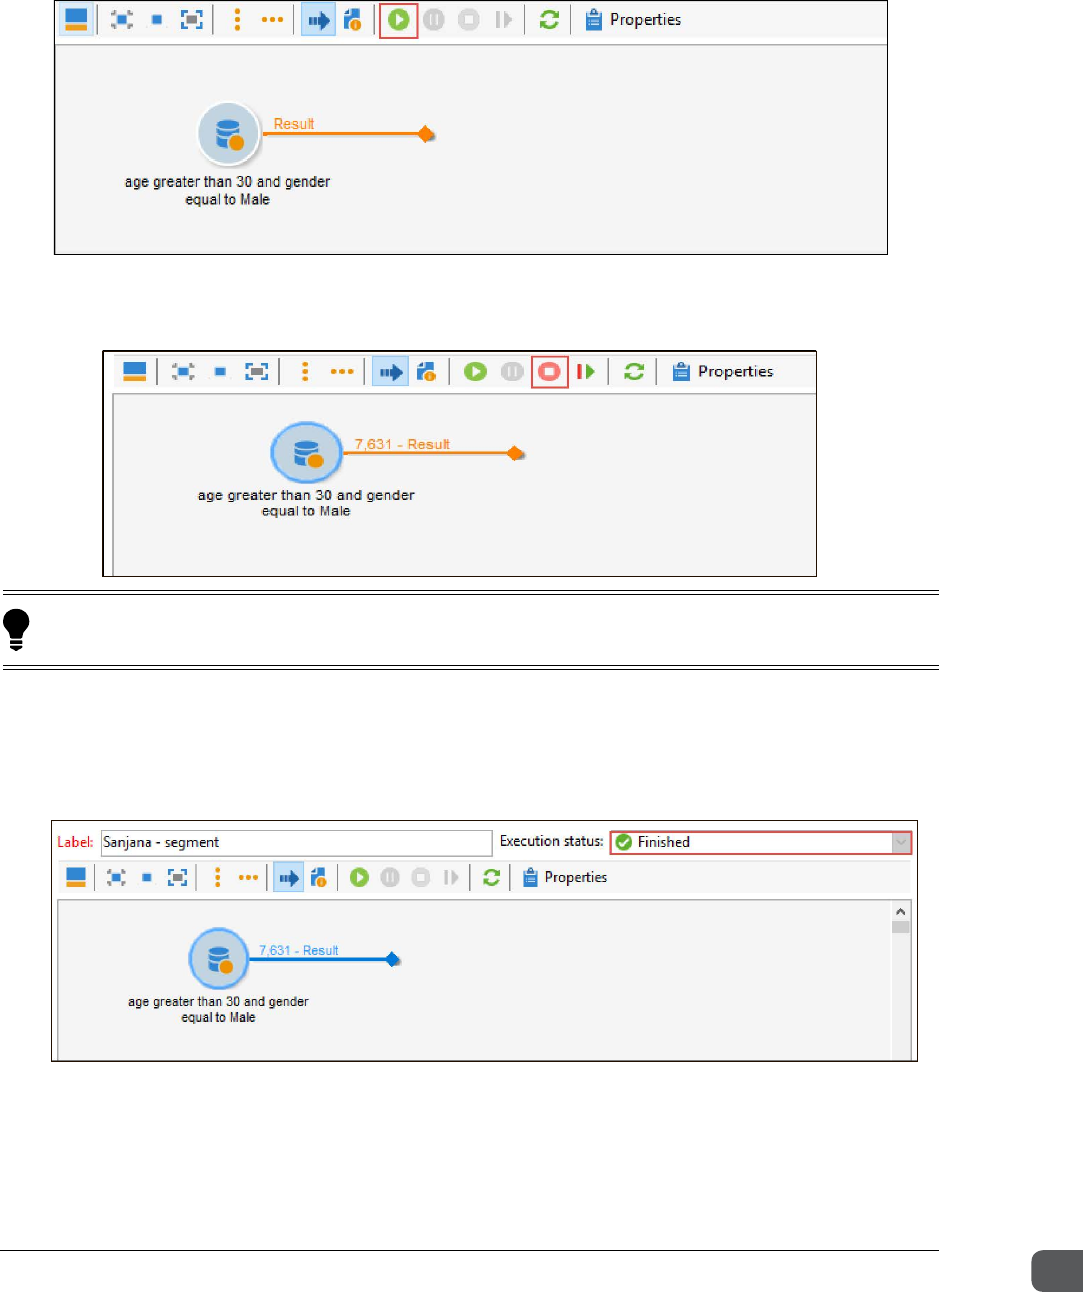
19. Validate your query logic by verifying your list now contains only males over 30.
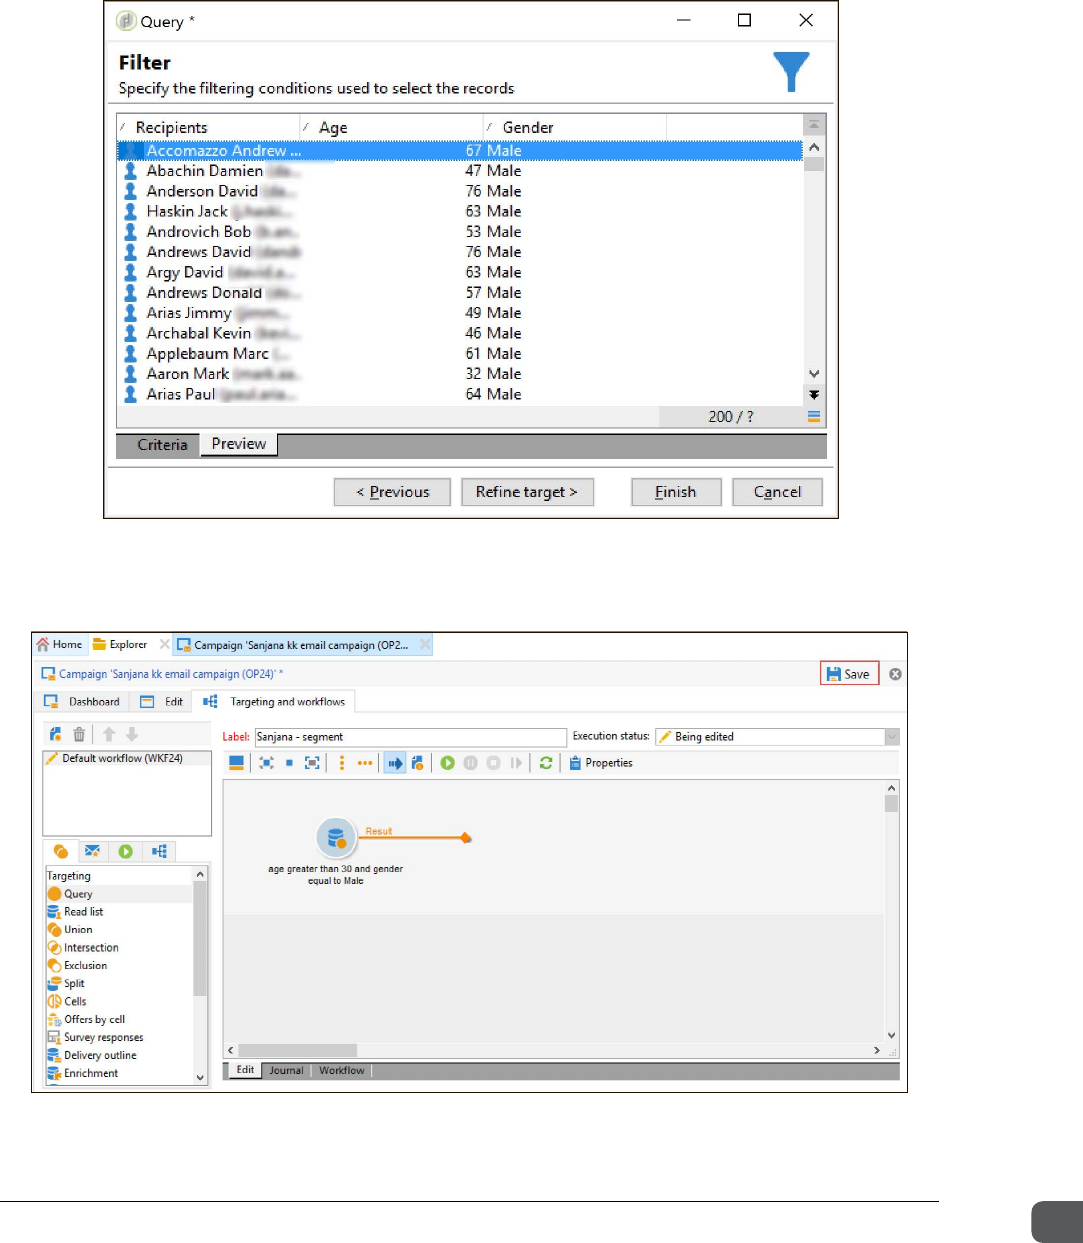
20. Click Finish, and click Ok to return to the Targeting and Workflows tab.
21. Click Save. Your workflow is saved.
ADOBE COPYRIGHT PROTECTED
Chapter Three Segmenting Recipients
Getting Started with Adobe Campaign v7 50
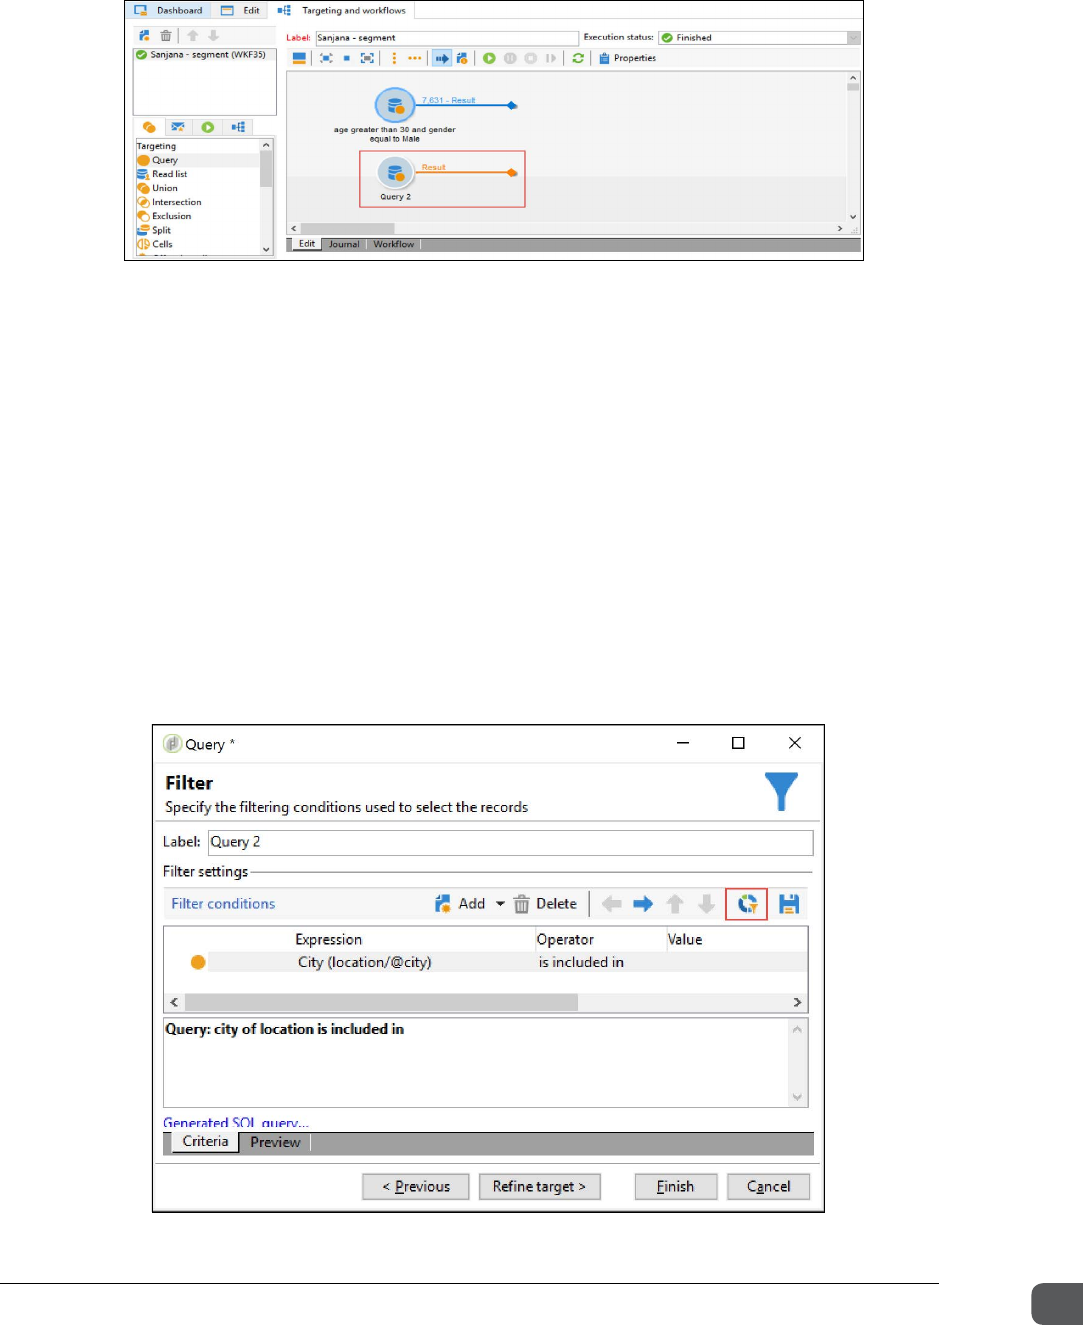
22. Click the Start button to start the workflow. The Result will start flashing and show a
number indicating the number of recipients.
23. Click the Stop button. The Adobe Campaign v7 - Client console confirmation dialog box is
displayed.
24. Click Yes to confirm the dialog box.
25. Wait for the workflow to go to the finished state. The workflow then moves to the Finished
state - which is indicated by the non-blinking blue line and resulting number.
Task 3: Segment the recipient list by using ltering conditions
Use filtering conditions in your workflow to further segment your recipient list to include individuals
from certain cities.
TIP: Click the Age column to sort the ages of the recipients from youngest to oldest. That way, when you
look at the youngest person, you can verify the age is greater than 30 years.
ADOBE COPYRIGHT PROTECTED
Chapter Three Segmenting Recipients
Getting Started with Adobe Campaign v7 51
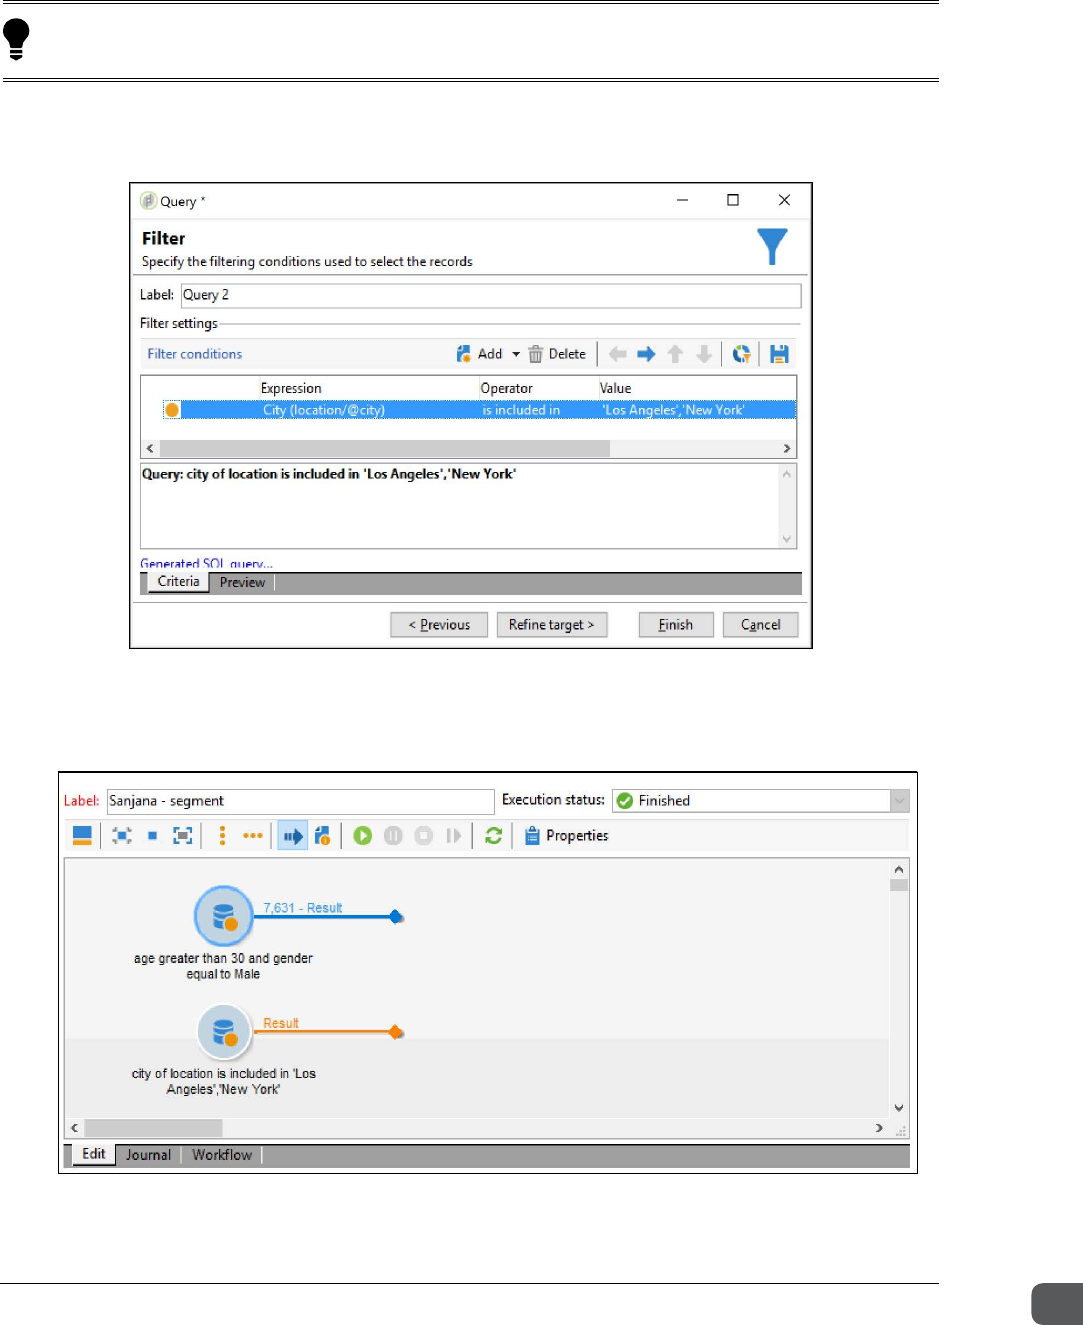
1. Drag another Query activity to the workflow created in the previous task (Query 2).
2. Double-click Query 2. The Query dialog box is displayed.
3. Click Edit query to edit the query. The Query dialog box displays the fields to select the schema
of the target items and the associated schemas' filters.
4. Double-click Filtering conditions. The Query dialog box displays the fields to specify the
filtering conditions used to select records.
5. In the Expression field, click the Edit expression icon. The Select an expression dialog box
opens.
6. In the Find field, type City and press Enter, then double-click City (@city) from Available fields.
The expression is added to the field.
7. Click the Operator filed and select is included in from the drop-down list.
8. Click the Distribution of values icon in the upper right.
ADOBE COPYRIGHT PROTECTED
Chapter Three Segmenting Recipients
Getting Started with Adobe Campaign v7 52
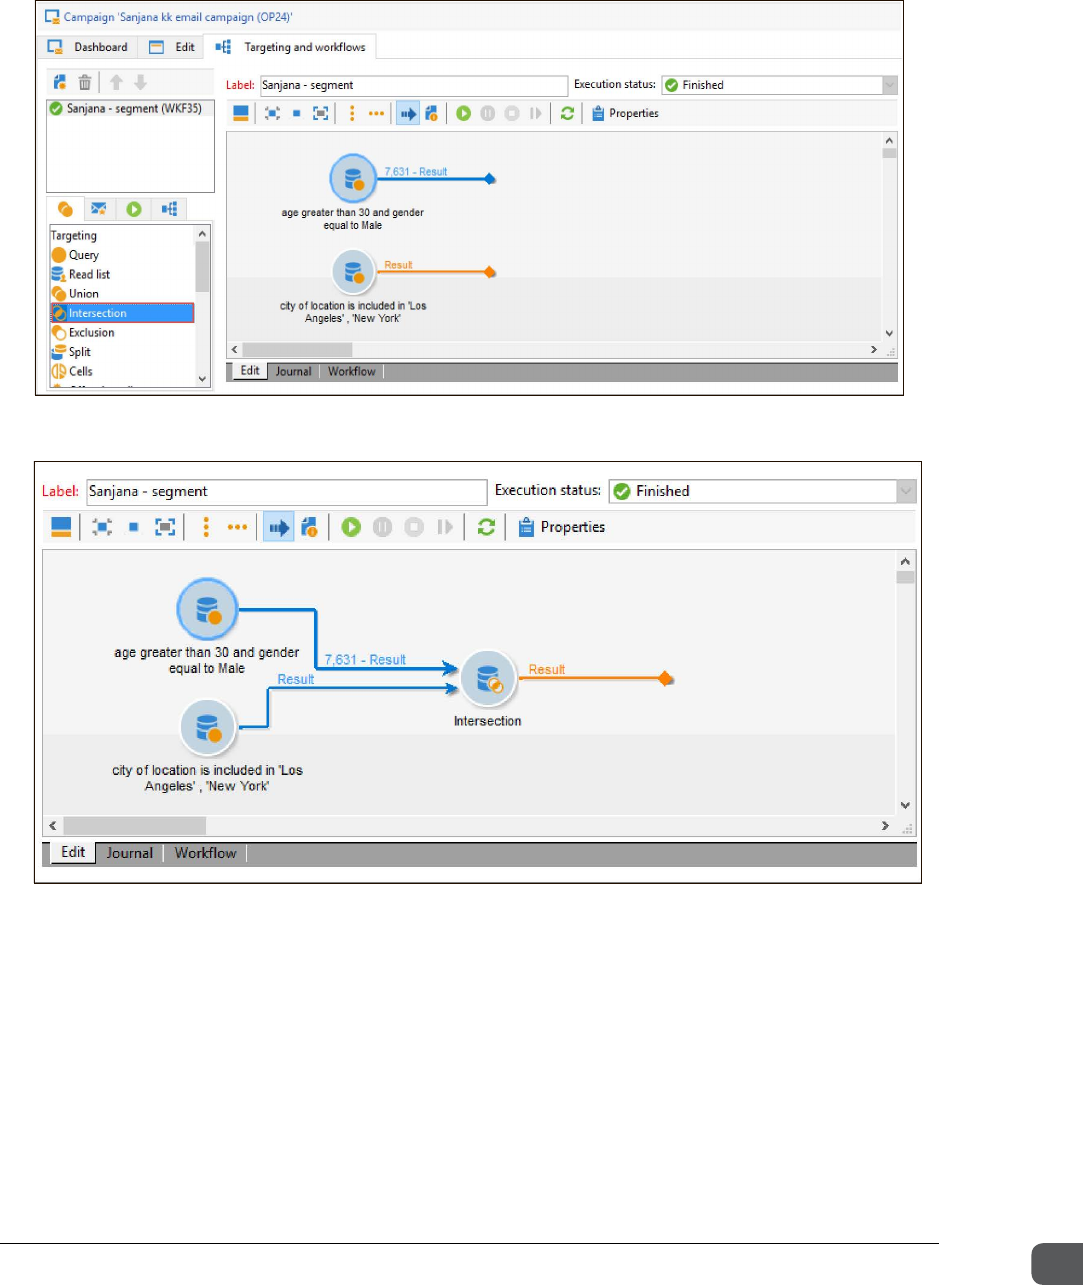
9. In the Distribution of values dialog box, press CTRL and select New York and Los Angeles.
10. Click Ok. The values are added to the Value field.
11. Click Preview to view the records.
12. Click Finish and click Ok to go back to the Targeting and Workflows tab.
TIP: If you are using a VM client on a Mac, you may need to use SHIFT + CTRL to select mul-
tiple values.
ADOBE COPYRIGHT PROTECTED
Chapter Three Segmenting Recipients
Getting Started with Adobe Campaign v7 53
13. Click Save. The workflow is saved.
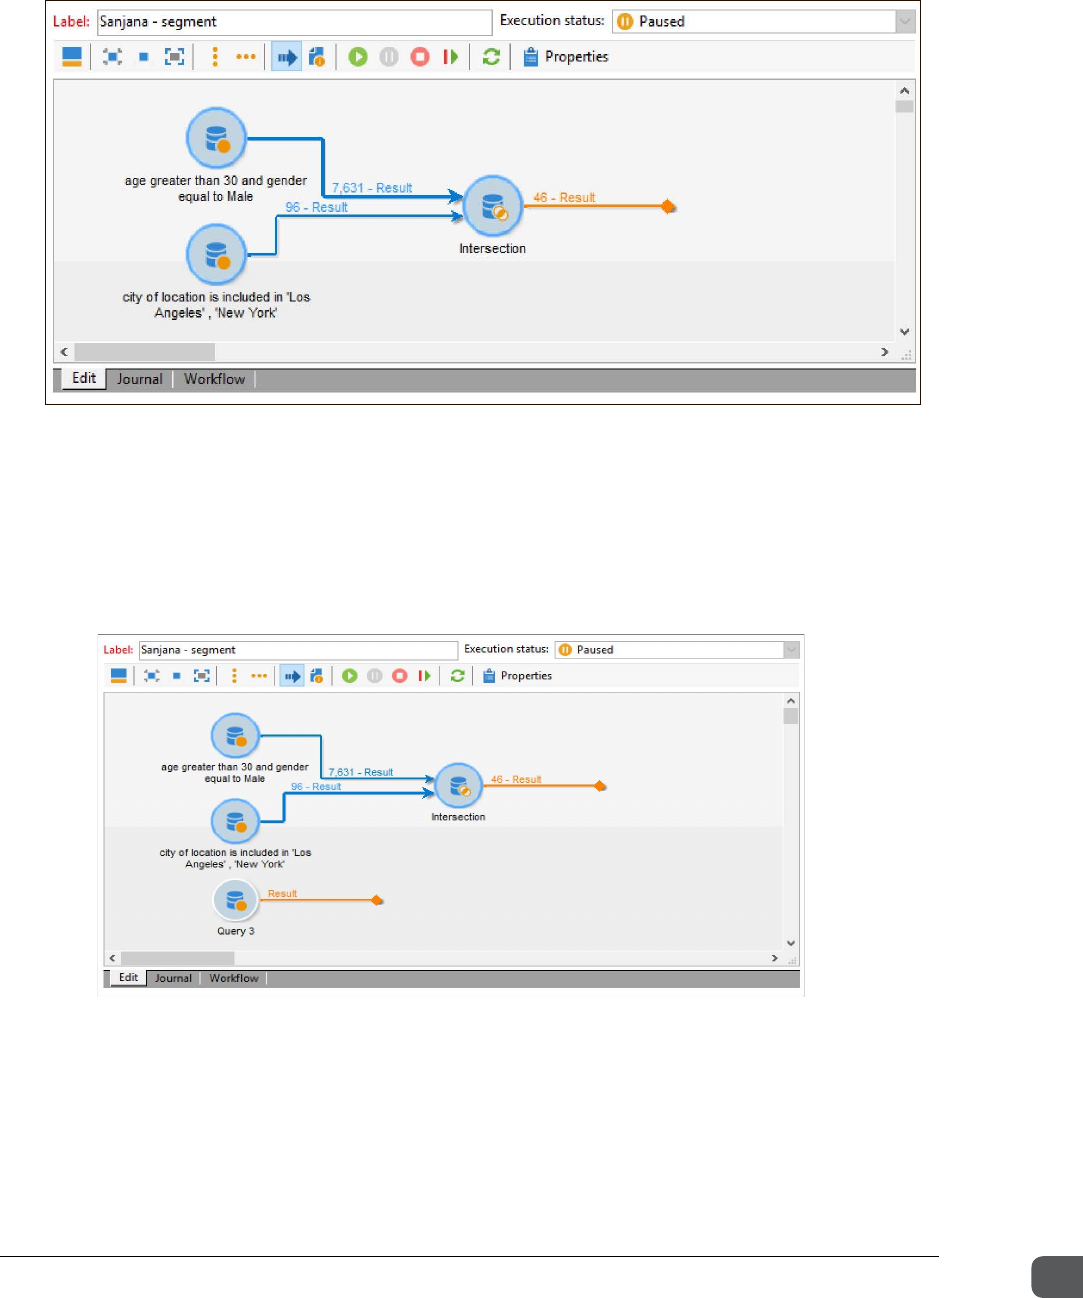
14. Drag an Intersection activity onto the workflow diagram.
15. Connect each of the query activities to the Intersection activity.
ADOBE COPYRIGHT PROTECTED
Chapter Three Segmenting Recipients
Getting Started with Adobe Campaign v7 54
16. Start the workflow by clicking the Start button. If your workflow is already running, click the
Restart button to run the workflow from the beginning. The workflow displays the results.
Task 4: Apply standard exclusions
To comply with legal and corporate requirements, and best practices, you must exclude blacklisted
recipients and recipients without email addresses.
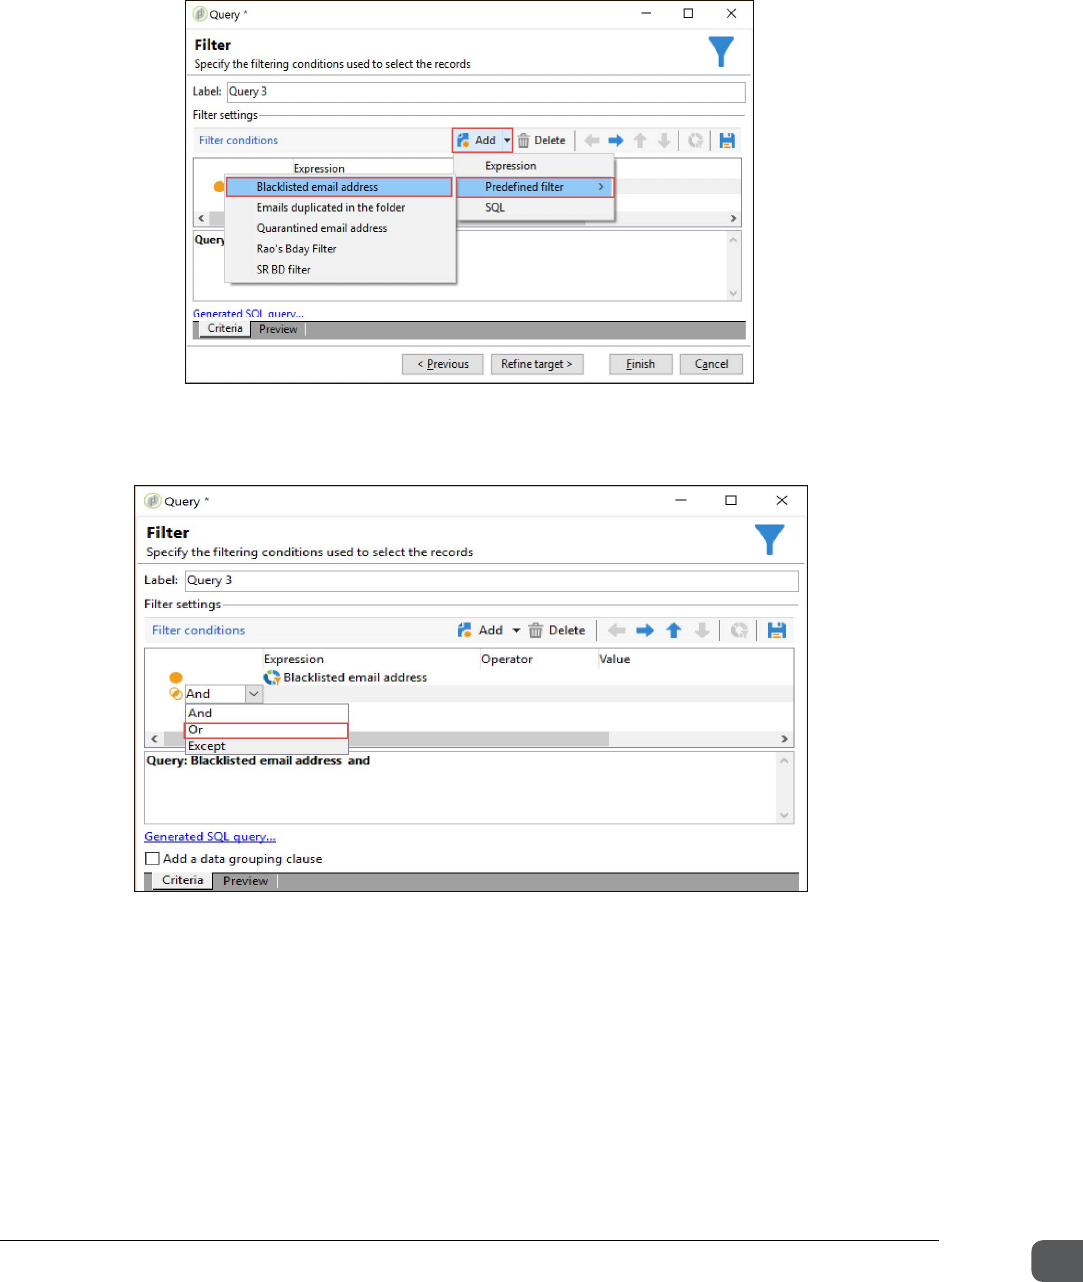
1. Drag another Query activity to the workflow created in the previous task (Query 3).
2. Double-click Query 3. The Query dialog box opens.
3. Click the Edit query link to edit the query. The Query dialog box displays the fields to select the
schema of the target items and the associated schemas' filters.
4. Double-click Filtering conditions. The Query dialog box displays the fields to specify the
filtering conditions used to select the records.
ADOBE COPYRIGHT PROTECTED
Chapter Three Segmenting Recipients
Getting Started with Adobe Campaign v7 55
5. Select Add > Predefined filter > Blacklisted email address. The expression Blacklisted email
address is added as an attribute.
6. Click Add to add another expression.
7. Click And and select Or from the drop-down list.
8. In the Expression field, click the Edit expression icon. The Select an expression dialog box
opens.
9. In the Find field, enter Email and press Enter. Double-click Email (@email) from the Available
fields. The expression is added to the field.
ADOBE COPYRIGHT PROTECTED
Chapter Three Segmenting Recipients
Getting Started with Adobe Campaign v7 56
10. Click the Operator field and select is empty. Your Query dialog box should look like this:
11. Click Finish and click Ok to go back to the Targeting and Workflows tab.
12. Click Save to save the query.
ADOBE COPYRIGHT PROTECTED
Chapter Three Segmenting Recipients
Getting Started with Adobe Campaign v7 57
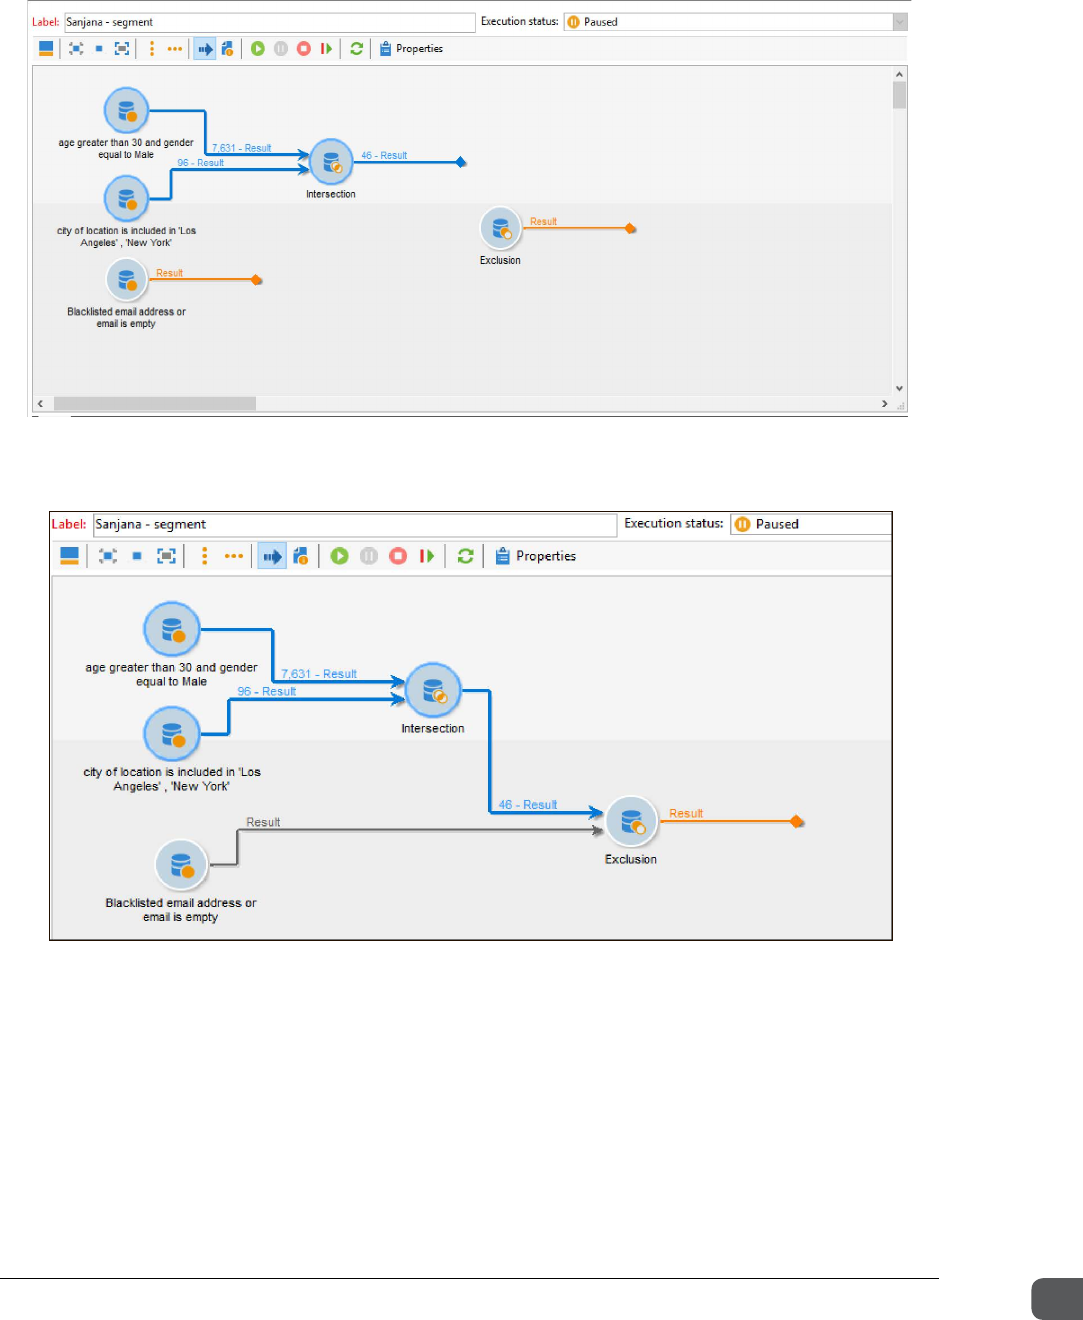
13. Drag an Exclusion activity onto the transition leaving the Intersection activity.
14. Connect the Blacklisted email address or email is empty query activity and Intersection
activity to the Exclusion activity.
15. Double-click the Exclusion activity. The Exclusion dialog box displays.
ADOBE COPYRIGHT PROTECTED
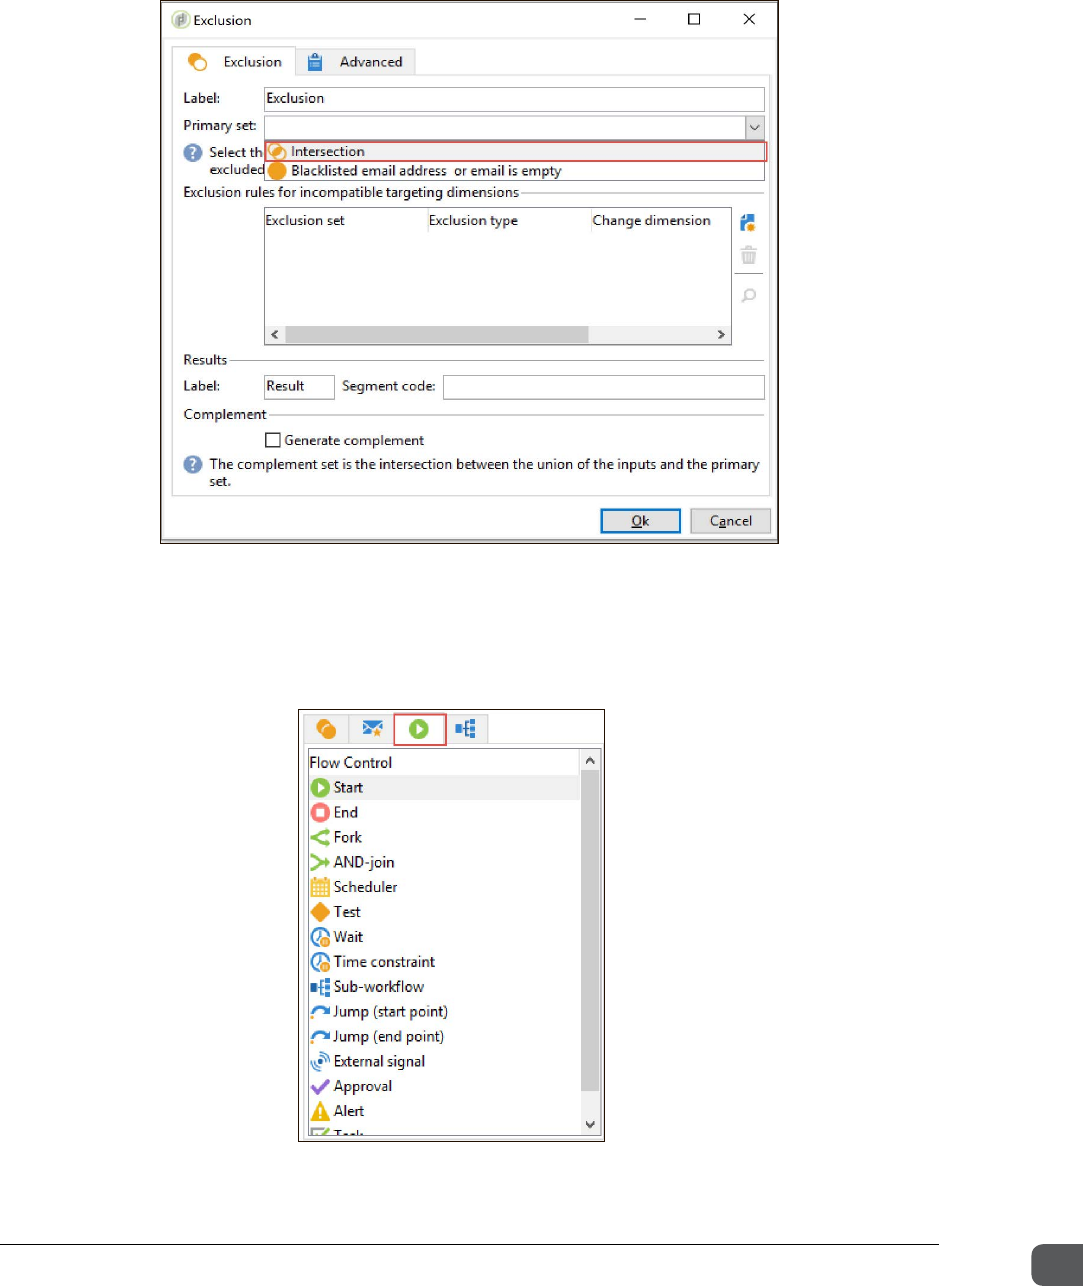
Chapter Three Segmenting Recipients
Getting Started with Adobe Campaign v7 58
16. In the Exclusion dialog box, in the Primary set field, select Intersection from the drop-
down list.
17. Click Ok to go back to the Targeting and Workflows tab.
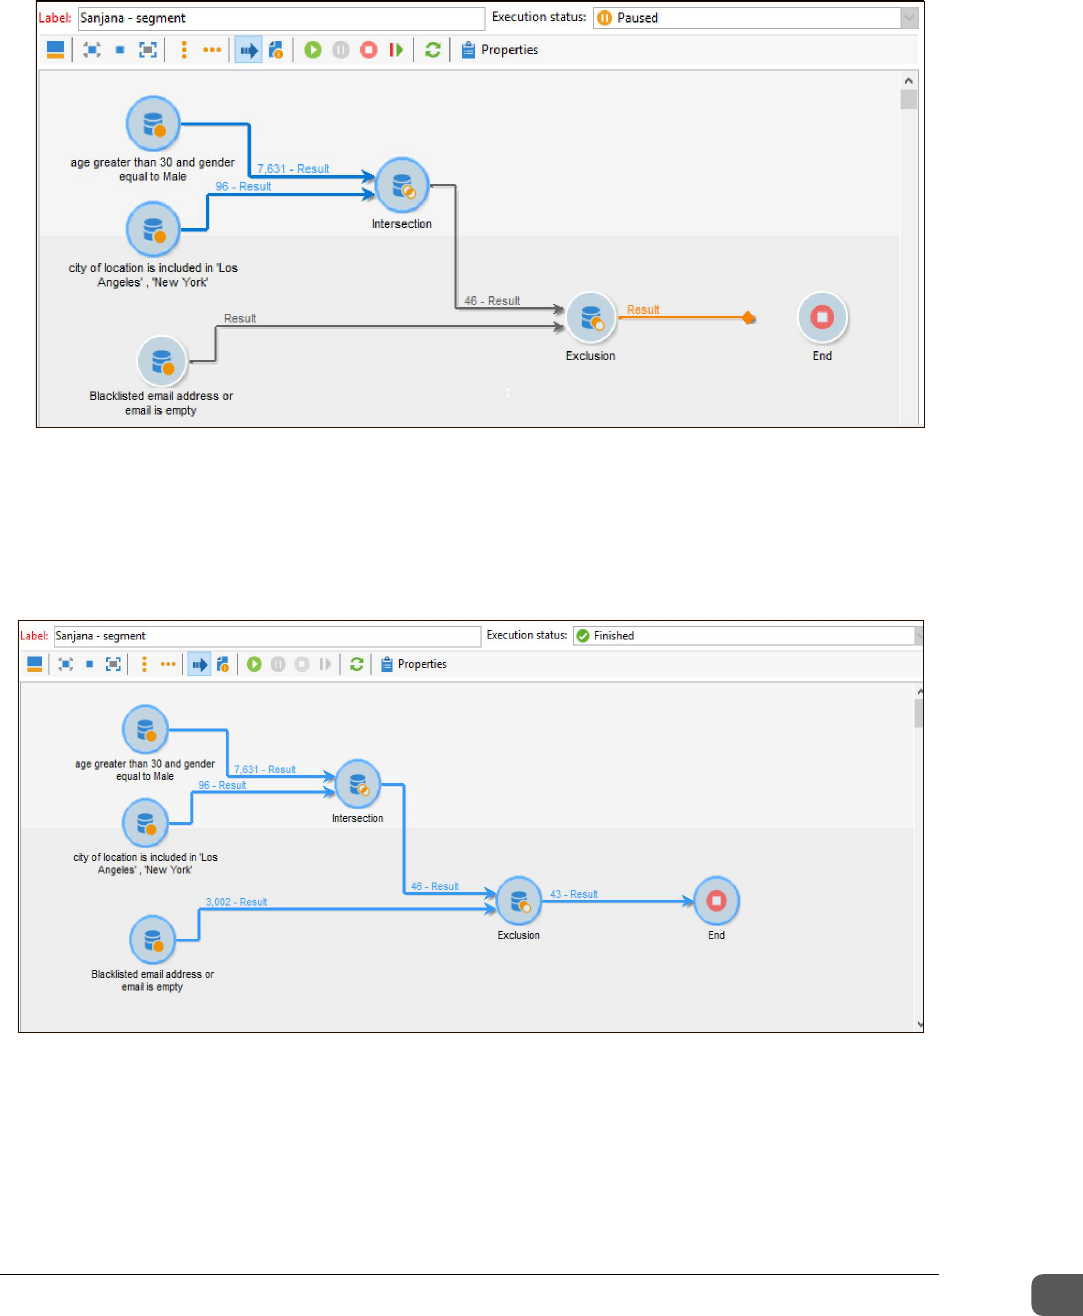
18. On the left-side navigation, click the Flow Control icon. A list of activities under the Flow
Control option is displayed, as shown:
ADOBE COPYRIGHT PROTECTED
Chapter Three Segmenting Recipients
Getting Started with Adobe Campaign v7 59
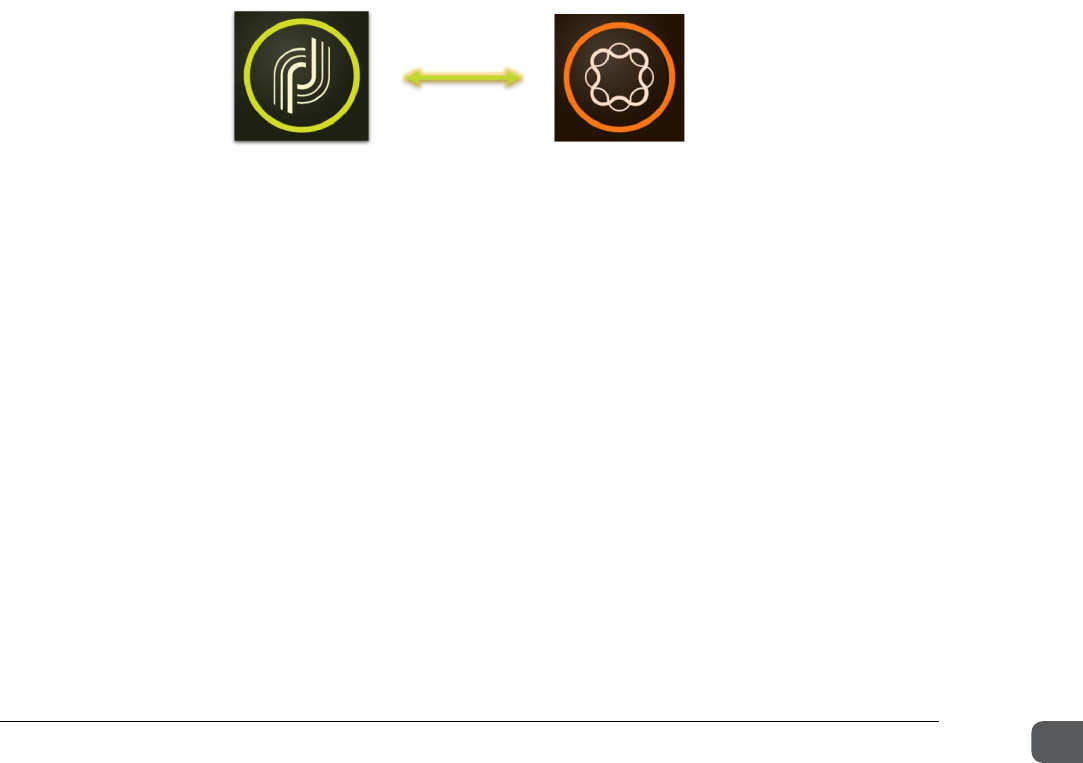
19. Drag an End activity from the Flow control options to the workflow diagram, as shown below:
20. Connect the Exclusion activity with the End activity.
21. Click Save to save the workflow.
22. Click the Restart button. A confirmation dialog box is displayed.
23. Click Yes. The workflow displays the result of the queries.
ADOBE COPYRIGHT PROTECTED

Chapter Four Preparing Deliveries
Getting Started with Adobe Campaign v7 60
Chapter Four
Preparing Deliveries
Objectives
By the end of this chapter, you will be able to:
• Explain dynamic and personalized campaign content
• Explain the Adobe Campaign integration with Adobe Experience Manager
• Explain the delivery workflow activities
• Explain strategies to improve the deliverability
• Compose and manage email delivery content
• Verify and reduce the spam score
ADOBE COPYRIGHT PROTECTED
Chapter Four Preparing Deliveries
Getting Started with Adobe Campaign v7 61
Dynamic Content and Personalization
Adobe Campaign v7 enables you to create a campaign and create deliveries within the campaign.
Email and direct mail are the most common format for deliveries. The other formats include SMS
and social. In Adobe Campaign, you can make your communication with your customers more
effective by having dynamic and personalized content.
Dynamic content makes marketing messages up-to-date, and personalized content makes it more
appealing to a prospects and customers. The content should be relevant for the recipient which can
lead to more engagement. You should make it conditional based on what you know about your
customer’s interests. You can gather information about your recipients, and then use that information
to create dynamic and personalized content that is interesting and relevant to your customer.
In Adobe Campaign, you can personalize marketing messages in many ways based on the criteria
derived from recipient profiles. For email deliveries, you can define the elements and personalization
conditions of a delivery directly in JavaScript.
Integration with Adobe Experience Manager
You can integrate Adobe Campaign with Adobe Experience Manager to manage the content of
your email deliveries. You can create and design the delivery content in Adobe Experience Manager
and export it toAdobe Campaign. In this way, you can use Adobe Experience Mangers authoring
features to enhance the design of your delivery content.
In Adobe Experience Manager, you can create online forms. You can map the fields in these forms
to fields in Adobe Campaign. You can also create and manage new contacts and subscriptions in
Adobe Experience Manager and export them to Adobe Campaign. You can also directly insert
assets from your Adobe Experience Manager Assets library while editing an email or a landing page
in Adobe Campaign. Adobe Campaign is compatible with Adobe Experience Manager 6.1, 6.2, and
6.3.
Editing Deliveries
Adobe Campaign enables you to either create or upload your delivery content, edit your deliveries,
add links, and preview the email content. You can preview the content and see how it renders. In
the delivery process, there is an iterative development cycle that includes steps such as create the
content, preview the content, edit the content, and preview it again to ensure sure it is rendering
properly.
You can generate HTML content and the text content to show how the delivery will appear to the
recipient. It is necessary to provide both HTML and text formats of your marketing message to
reach different customers.
ADOBE COPYRIGHT PROTECTED
Chapter Four Preparing Deliveries
Getting Started with Adobe Campaign v7 62
Delivery Workow Activities
A campaign delivery workflow can have multiple activities. The following table describes these
activities:
Workflow Activity Description
Delivery Helps you create a delivery action. It can be
constructed using input elements.
Delivery control Helps you start, pause, or stop a delivery. This
activity can be the delivery specified in the
transition, a delivery selected explicitly, or a
delivery calculated by a script.
Continuous delivery Helps you add new recipients to an existing
delivery. This activity helps eliminate the need to
create a new delivery each time.
Recurring delivery Helps you configure a delivery template
occurrence specific to a campaign.
Cross-channel delivery Helps you create a delivery specific to a channel,
such as email, mobile, and direct mail. You can
specify the template on which you want to base
your delivery and its content.
Reducing Spam Score and Improving Deliverability
Email deliverability refers to the set of characteristics that determine a message's ability to reach its
destination through a personal e-mail address, within a short time, and with the expected quality
in terms of content and format. The deliverability rate is the number of sent emails that were
successfully delivered to recipients.
In Adobe Campaign, there are four checkpoints to ensure the content/message passes the spam
filters. They are:
• Data quality management: You need to ensure the quality of recipient lists and ensure it is
valid and relevant for the message.
• Content quality management: You need to ensure the quality of the content in terms of
relevance.
• Sending infrastructure: You need to use built-in features in Adobe Campaign to manage
deliverability.
• Reputation monitoring: You need to monitor your reputation on an ongoing basis by getting
in touch with the deliverability team.
ADOBE COPYRIGHT PROTECTED
Chapter Four Preparing Deliveries
Getting Started with Adobe Campaign v7 63
Exercise 5 – Prepare deliveries
In this exercise, you will create an email campaign using the opEmail template and send a proof.
Your email content must include:
• Personalization fields
• Compelling subject line
• Content in the body
• Unsubscribe and mirror page links
• Spam score of 2.0 or less
Task 1: Create a campaign to support the email delivery
Create a campaign to support your email delivery based on a template that includes a basic delivery
workflow.
1. In the Explorer tree view, click Campaign Management and select the Acquisition program
you created.
2. In the list view, click the New icon. The New marketing campaign dialog box opens.
3. In the New marketing campaign dialog box:
a. In the Template field, click the drop-down arrow and select the New email campaign
(opEmail).
b. In the Label field, enter <Your first name> <Your last name> email campaign. For
example: John Smith email campaign
c. In the Main channel field, select Email.
d. Keep the default start date and end date, and leave the description as is.
4. Double-click the campaign. Your newly created campaign opens in its own workspace.
NOTE: If you cannot find the New email campaign (opEmail) template in the Template field,
click the folder icon in the Template field. The Please select a Campaigns document dialog box
opens. In the dialog box, go to the Campaigns section and select the New Email Campaign (opEmail)
template. If the template is not displayed in the Campaigns section, click the folder icon in the folder
field, click Resources > Templates > Campaigns templates, and click Ok. The template will be dis-
played in the Campaigns section of the Please select a Campaigns document dialog box.
TIP: You can also create a campaign by using the Dashboard. On the Home page, by clicking the
Campaigns universe> Create > A campaign. The New marketing campaign dialog box opens. In the
Template field, select the New Email Campaign (opEmail) template. In the Label field, enter <Your first
name> <Your last name> email campaign. In the Program field, click the drop-down arrow and select
Acquisition. In the Main channel field, select Email and keep the default start date and end date and click
Ok.
ADOBE COPYRIGHT PROTECTED
Chapter Four Preparing Deliveries
Getting Started with Adobe Campaign v7 64
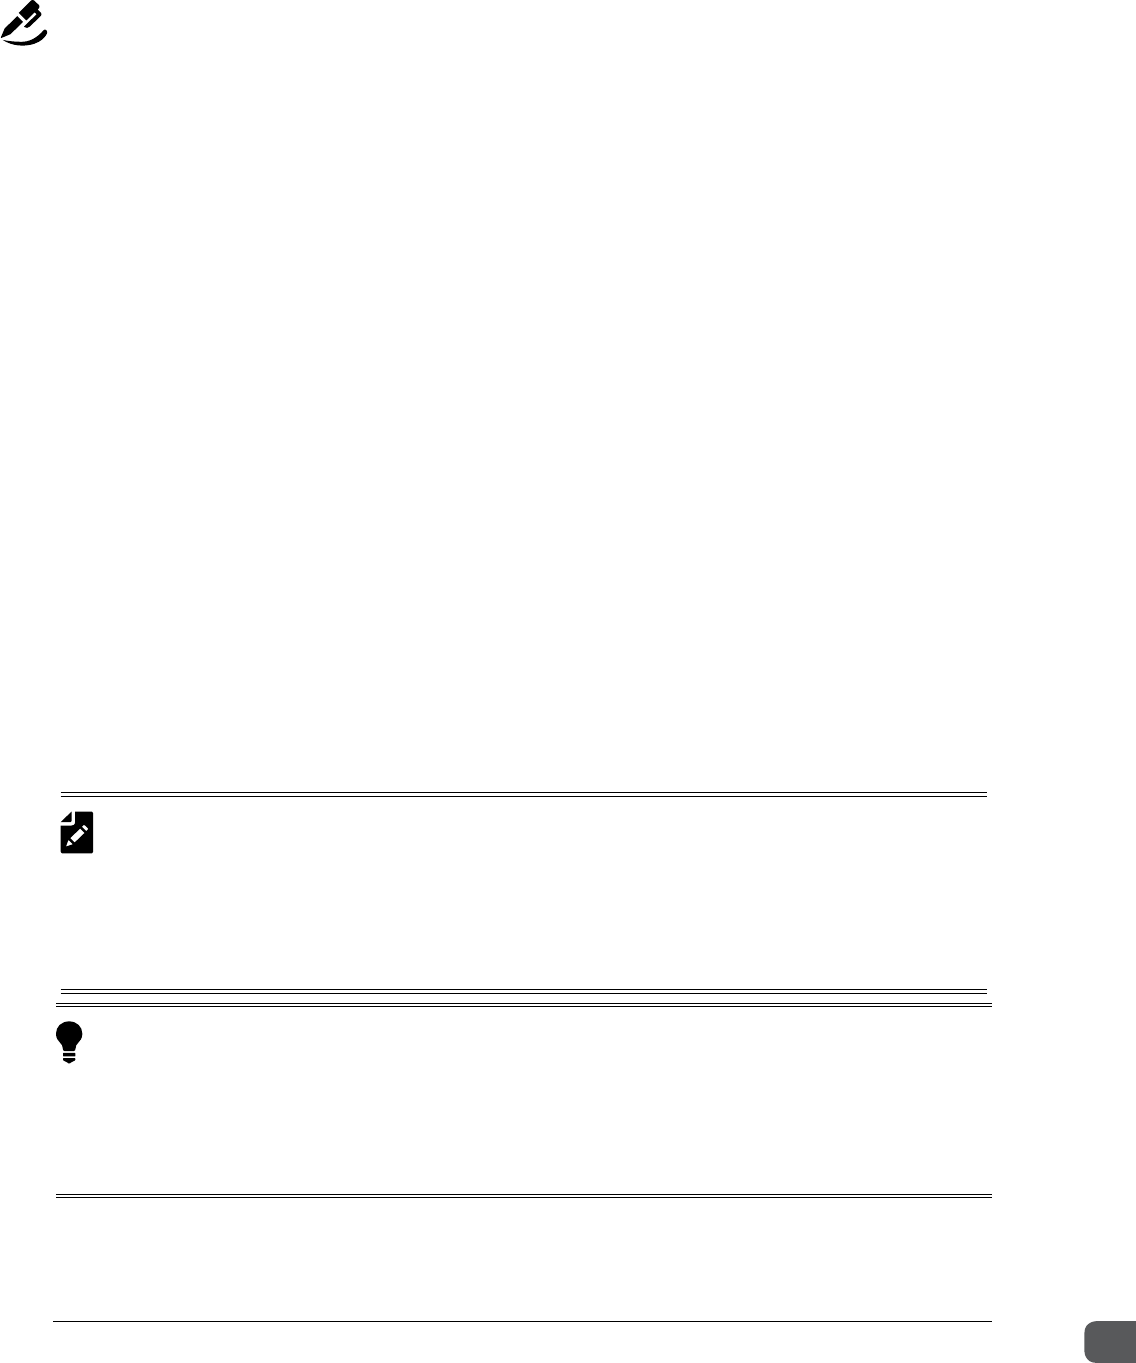
5. Ensure the path of the plan and program mentioned in the newly created campaign is correct.
Task 2: Compose delivery content
Compose personalized email content by including personalization fields.
1. Open the campaign you created in the Task 1 of this exercise.
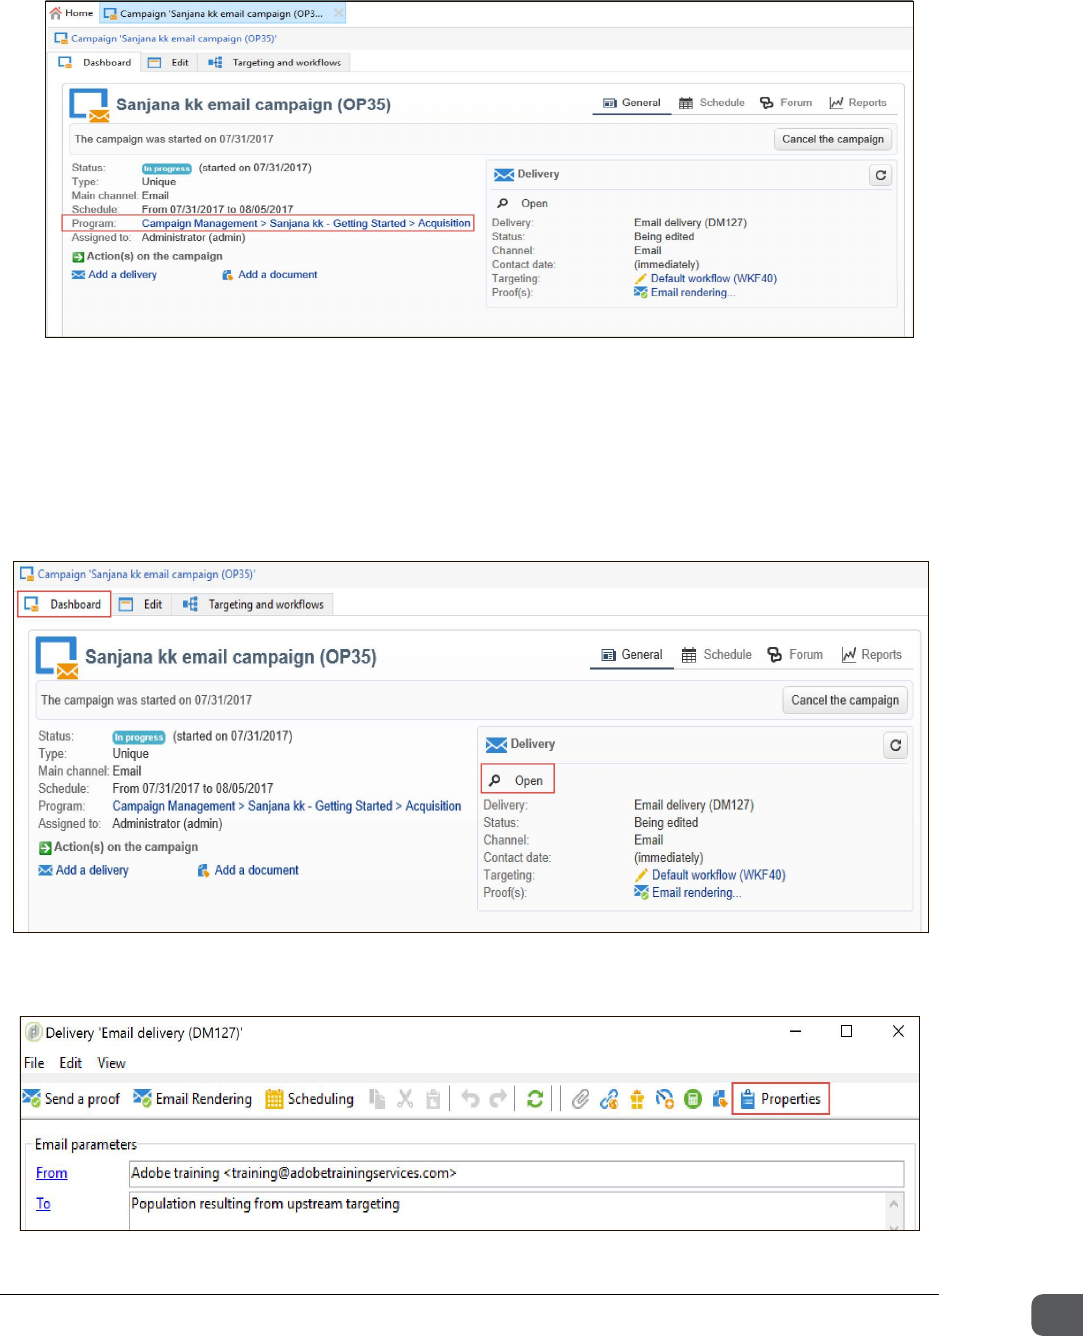
2. Click the Dashboard tab, go to the Delivery section and click Open. The Delivery Email
delivery dialog box opens.
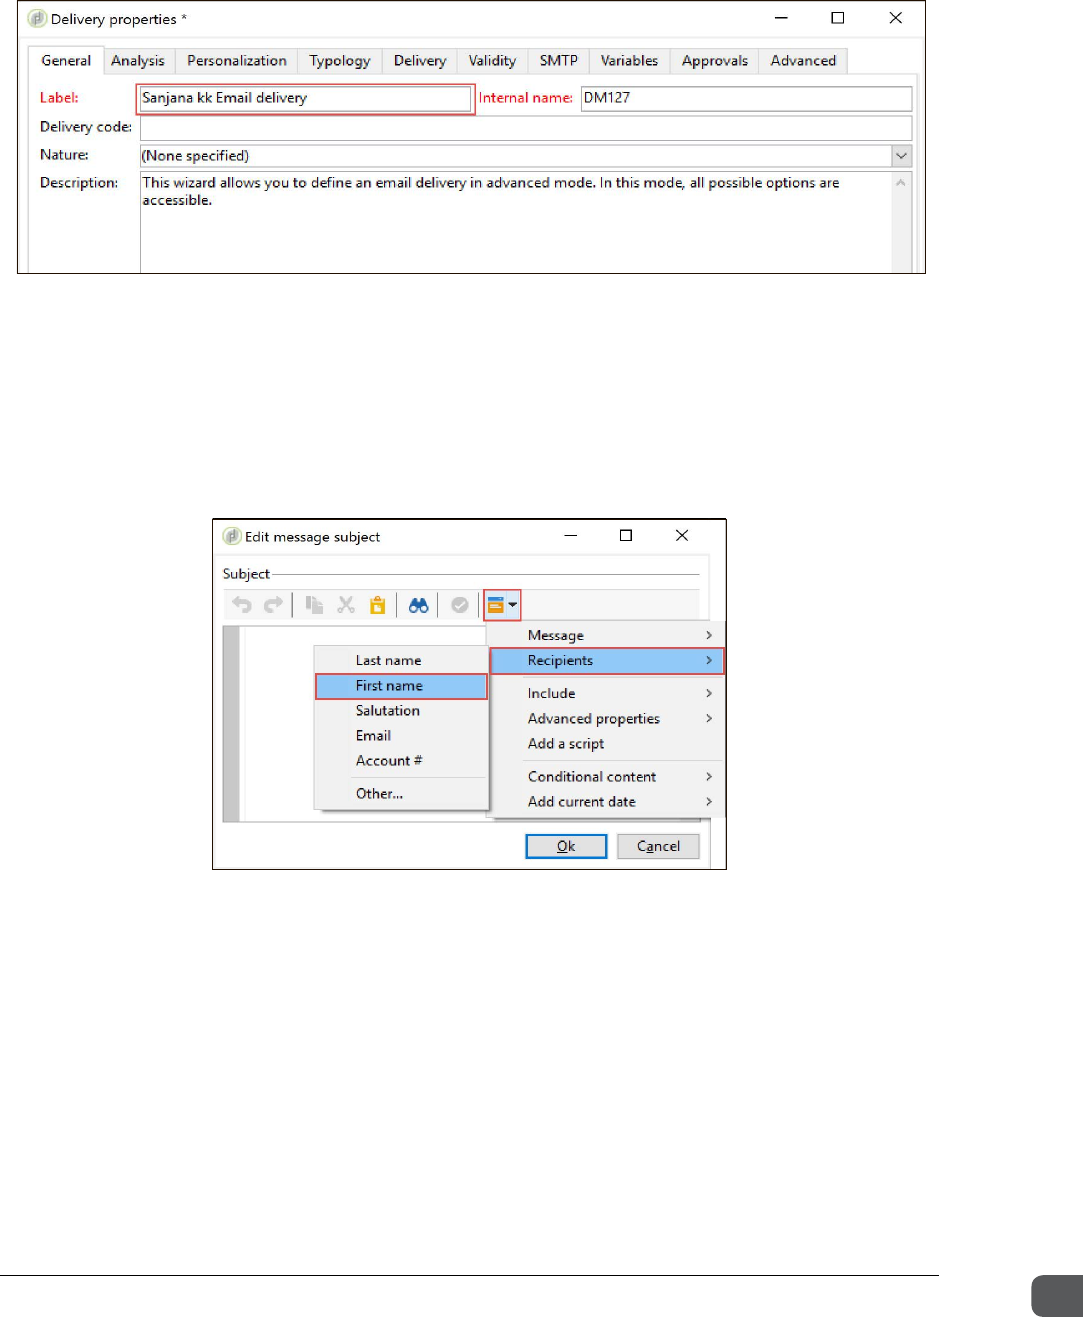
3. In the Delivery Email delivery dialog box, click Properties.
ADOBE COPYRIGHT PROTECTED
Chapter Four Preparing Deliveries
Getting Started with Adobe Campaign v7 65
4. In the Label field, enter your <first name and last name> Email delivery.
5. Click Ok to go back to Delivery Email delivery dialog box.
6. In the Delivery Email delivery dialog box, click the Subject link to include a personalized
subject line. The Edit message subject dialog box opens.
7. In the Edit message subject dialog box, click the Insert content drop-down arrow and select
Recipients > First name.
8. Click Ok.
ADOBE COPYRIGHT PROTECTED
Chapter Four Preparing Deliveries
Getting Started with Adobe Campaign v7 66
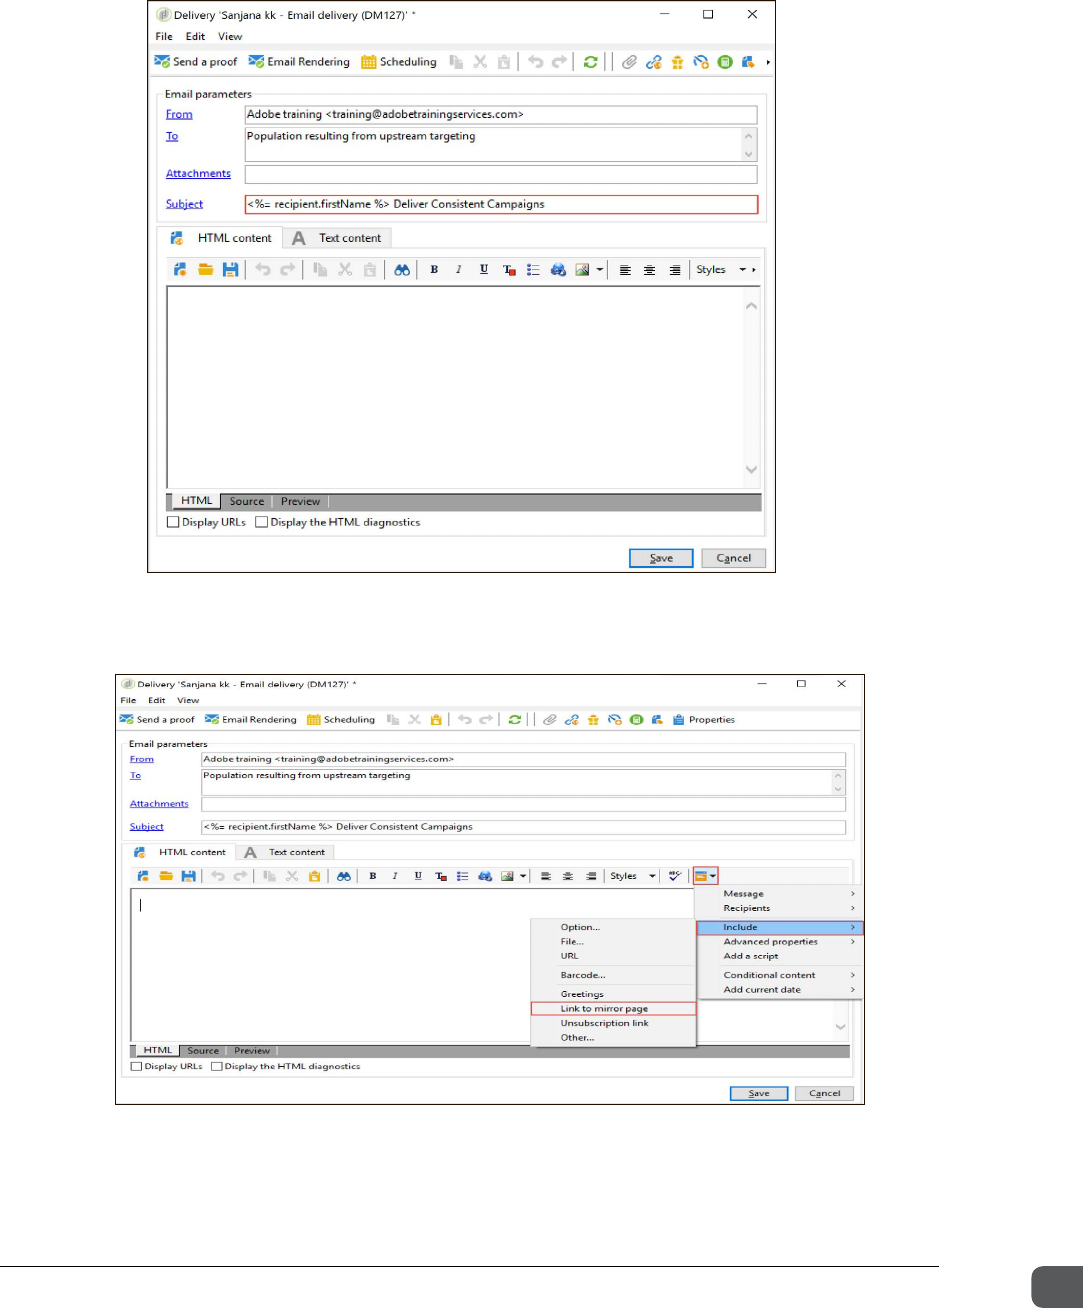
9. Enter the rest of the subject line after the <% … %> in the Subject field.
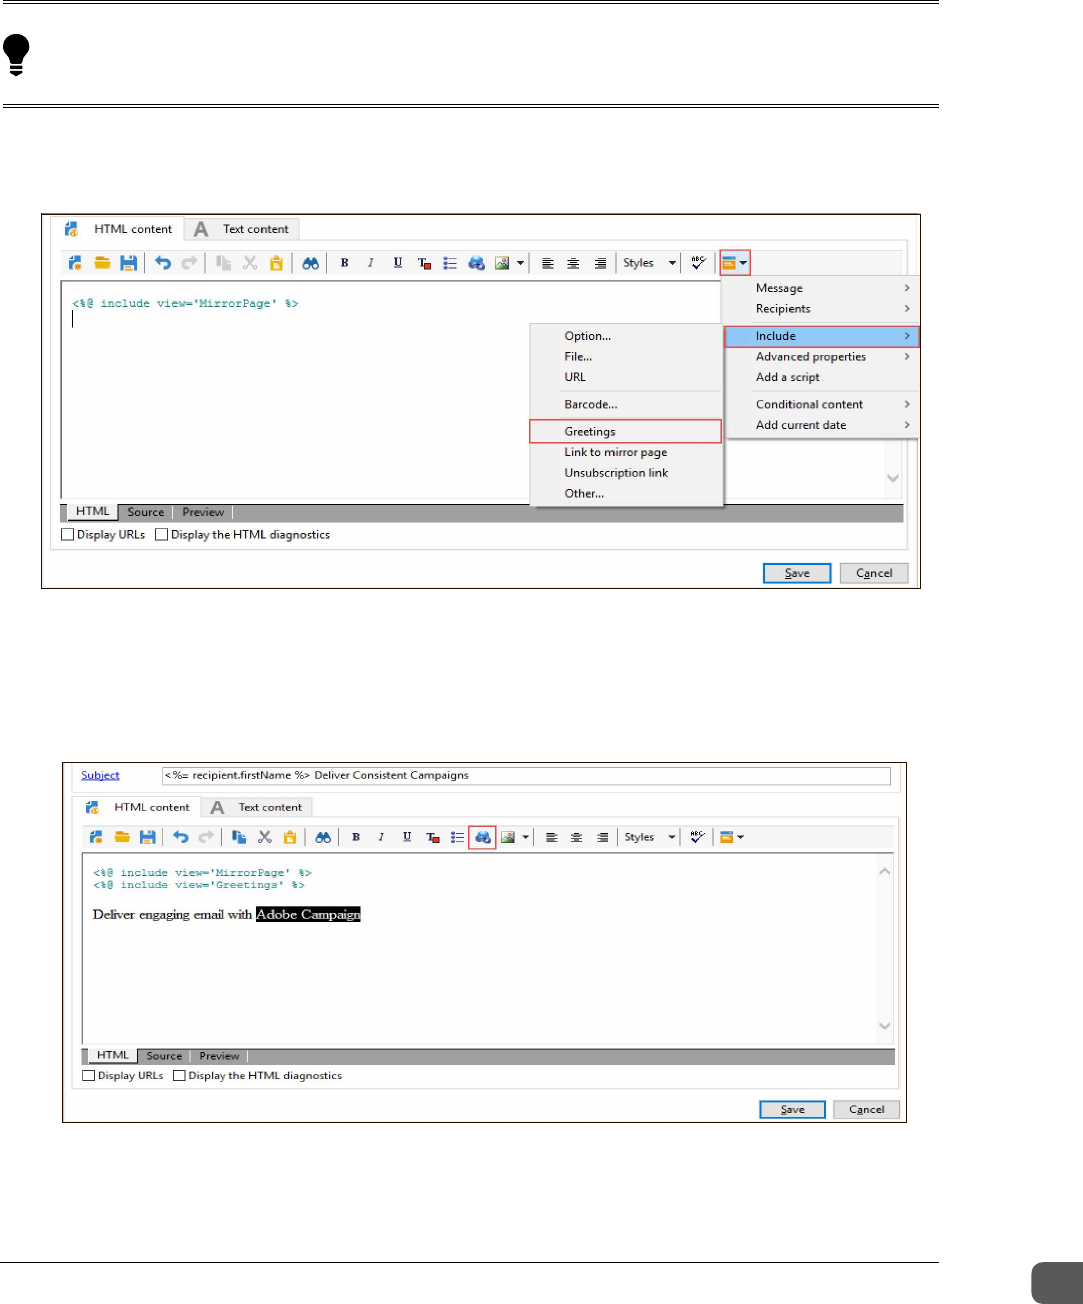
10. Inside the HTML content section, click the Insert content drop-down arrow and select Include
> Link to mirror image. The link is added to the mail body in the HTML content section.
ADOBE COPYRIGHT PROTECTED
Chapter Four Preparing Deliveries
Getting Started with Adobe Campaign v7 67
11. Place the cursor at the end of the line containing the link to the mirror page and press
Shift+Enter.
12. Insert another personalization field to include greetings. Inside the HTML content section, click
the Insert content drop-down arrow and select Include > Greetings.
13. Place the cursor at the end of the line containing the greetings and press Enter.
14. Enter the message body of your choice and include a compelling text for a link.
15. Select the link text and click the Insert hypertext link button. The Add hypertext link dialog
box opens.
TIP: You use Shift+Enter to ensure line breaks are not inserted into the email content. Often, render-
ing in certain email programs will add additional unwanted “spaces” in between lines if you just press
Enter. If you are using a VM client on a Mac, you may need to use Shift+Ctrl to select multiple values.
ADOBE COPYRIGHT PROTECTED

Chapter Four Preparing Deliveries
Getting Started with Adobe Campaign v7 68
16. In the Add hypertext link dialog box, in the URL field, enter a URL. In the Target field, click
the drop-down arrow and select New Window.
17. Place the cursor at the end of the message body and press Enter.
18. To include an unsubscription link at the bottom of the email, click the Insert content drop-
down arrow and select Include > Unsubscription link.
19. Notice how the unsubscription link is added to the email body.
20. Click Preview.
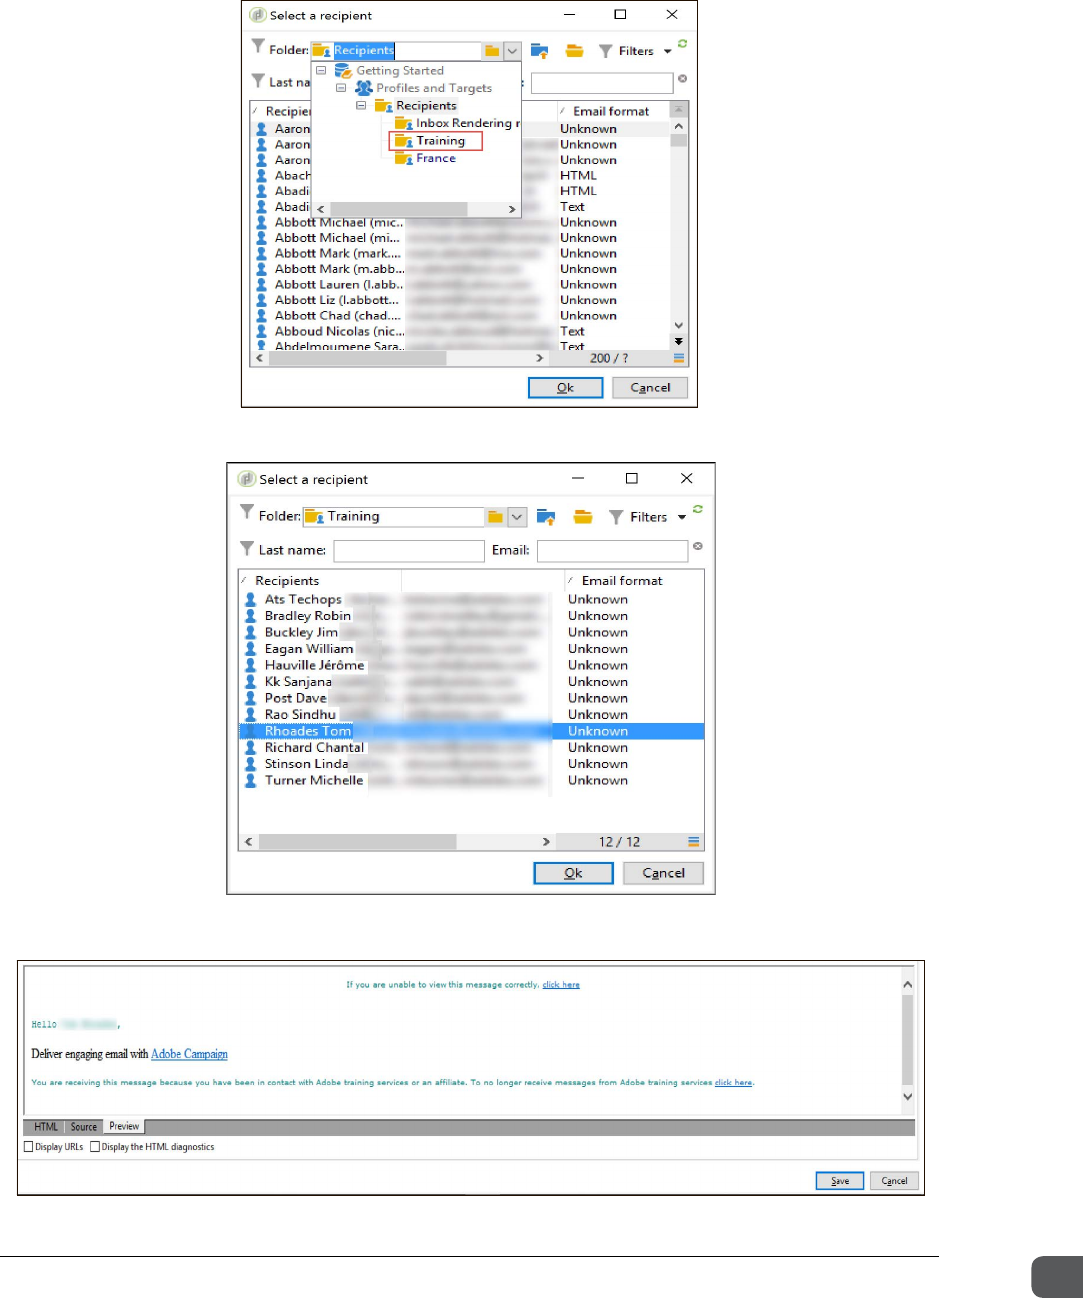
21. Click Test personalization > Recipients. The Select a recipient dialog box opens.
ADOBE COPYRIGHT PROTECTED
Chapter Four Preparing Deliveries
Getting Started with Adobe Campaign v7 69
22. In the Select a recipient dialog box, in the Folder field, click the drop-down arrow and
select Recipients > Training.
23. Double-click any recipient from the list of recipient details.
24. Verify the preview displays the name of the recipient you selected.
ADOBE COPYRIGHT PROTECTED
Chapter Four Preparing Deliveries
Getting Started with Adobe Campaign v7 70
25. Click Save. The email content is saved.
Task 3: Reduce the spam score
Add an image to your email content and improve deliverability by reducing its spam score.
1. Open the email campaign you saved in the previous task.
2. Click the HTML content tab.
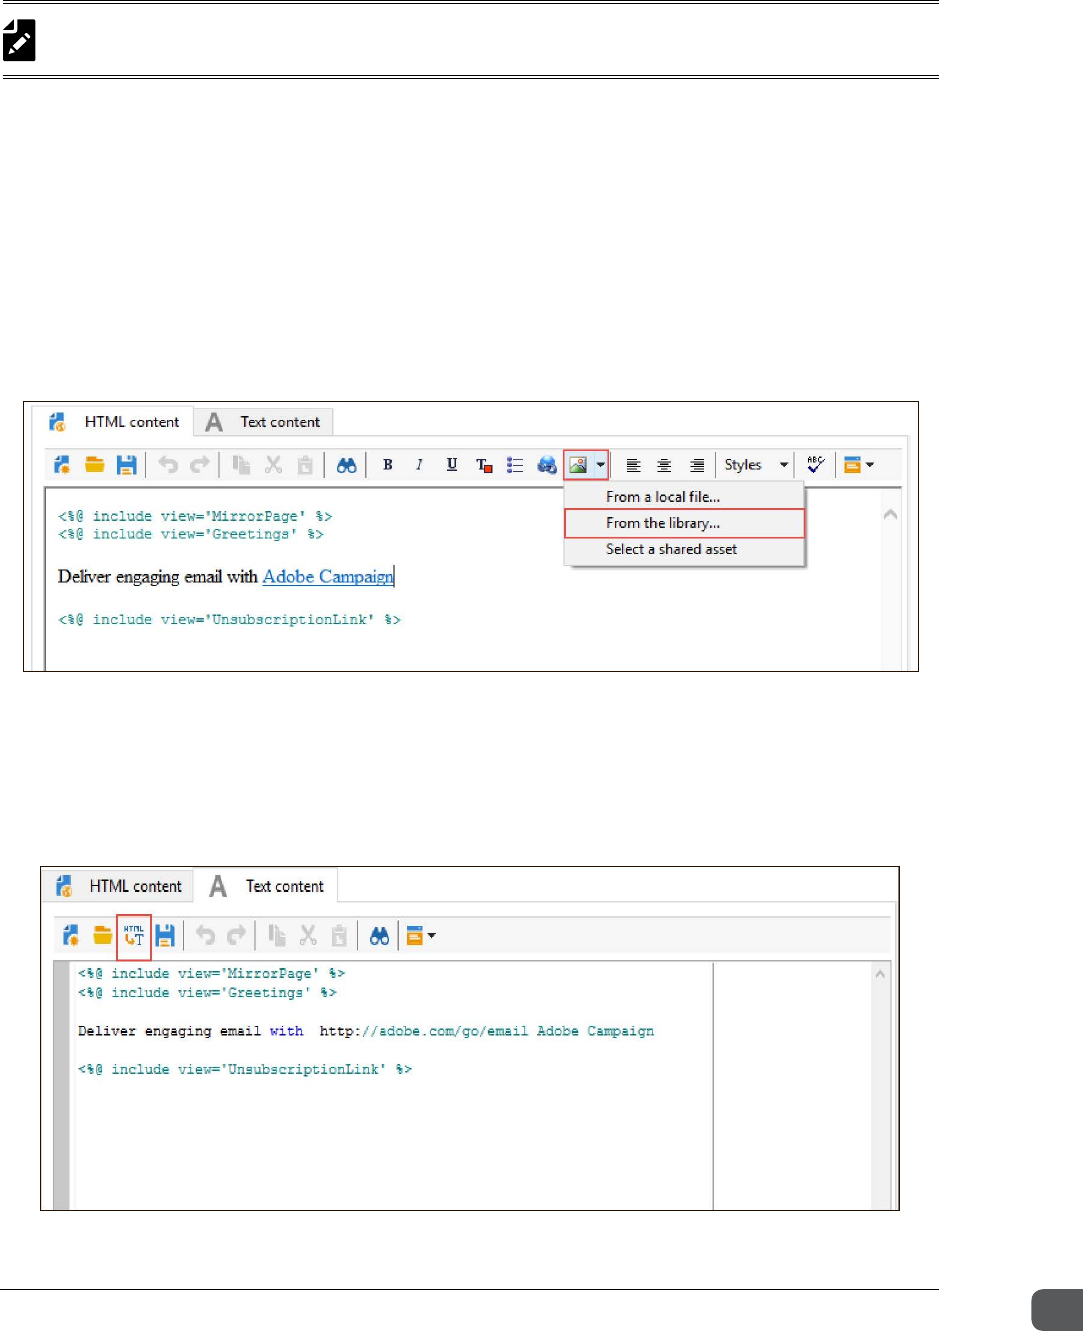
3. To insert and image to the email content:
a. Place the cursor after the web link and press Shift+Enter.
b. Click the Insert image button and select From the library, as shown below. The Select an
image from the library dialog box opens.
c. In the Select an image from the library dialog box, select an image. The image is added in
the mail body.
4. To generate a text version of the mail:
a. Click the Text content tab.
b. Click the Import HTML button to import the existing content from the HTML to text format.
NOTE: To save your content without closing the dialog box, on the toolbar, select File > Save. This allows
you to save your changes and keep working.
ADOBE COPYRIGHT PROTECTED
Chapter Four Preparing Deliveries
Getting Started with Adobe Campaign v7 71
c. Clean up your message content as necessary, mostly by editing the line containing your
message body. You can rearrange the text and link.
5. Preview the content on the HTML content tab and Text content tab to ensure the content is
correct.
6. Click the Test personalization drop-down arrow and select a recipient.
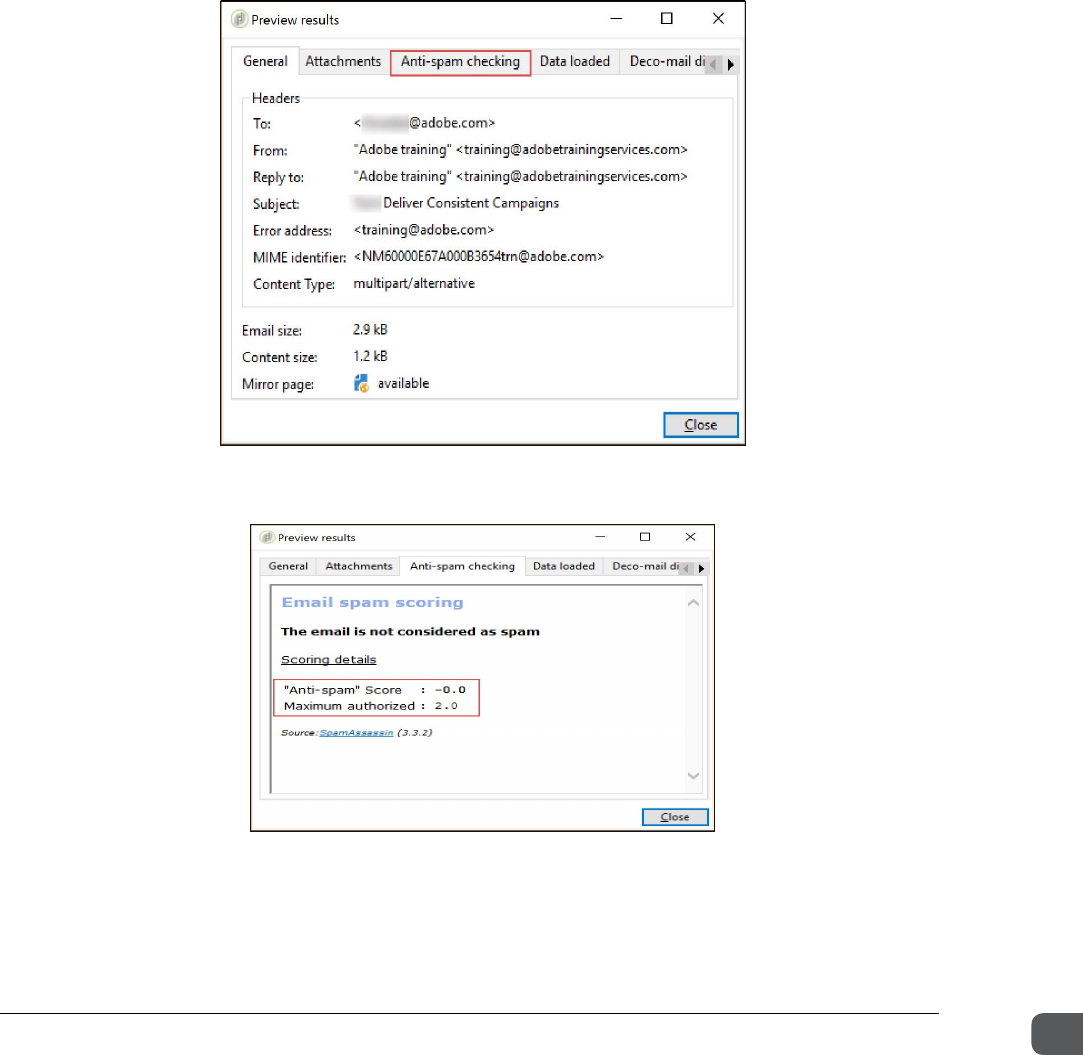
7. Click the More link on the HTML content tab or the Text content tab. The Preview results
dialog box opens.
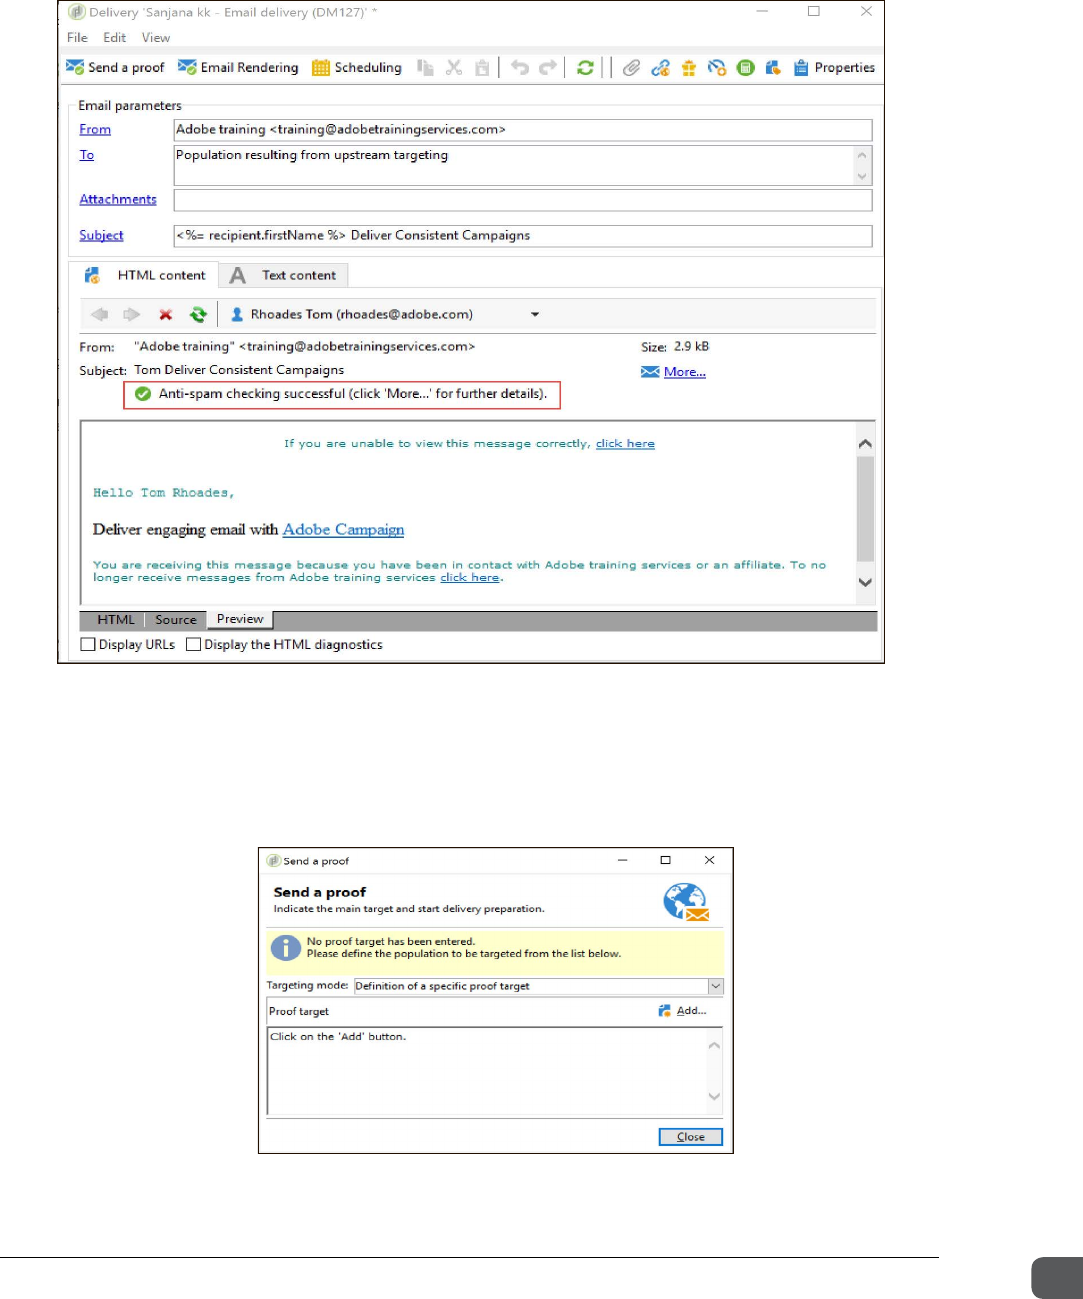
8. In the Preview results dialog box, click the Anti-spam checking tab.
9. Examine the anti-spam score.
An anti-spam score above 2.0 indicates that either the HTML_IMAGE_ONLY rule or the
HTML_IMAGE_RATIO rule is violated. If this score is less than 2.0, no rules are violated. You
can add text to the HTML content to reduce the score.
ADOBE COPYRIGHT PROTECTED
Chapter Four Preparing Deliveries
Getting Started with Adobe Campaign v7 72
10. Click Close to go back to the Delivery Email delivery dialog box. This dialog box displays a
message indicating the anti-spam checking is successful:
Task 4: Send a proof
Send a proof of the email campaign by adding a recipient.
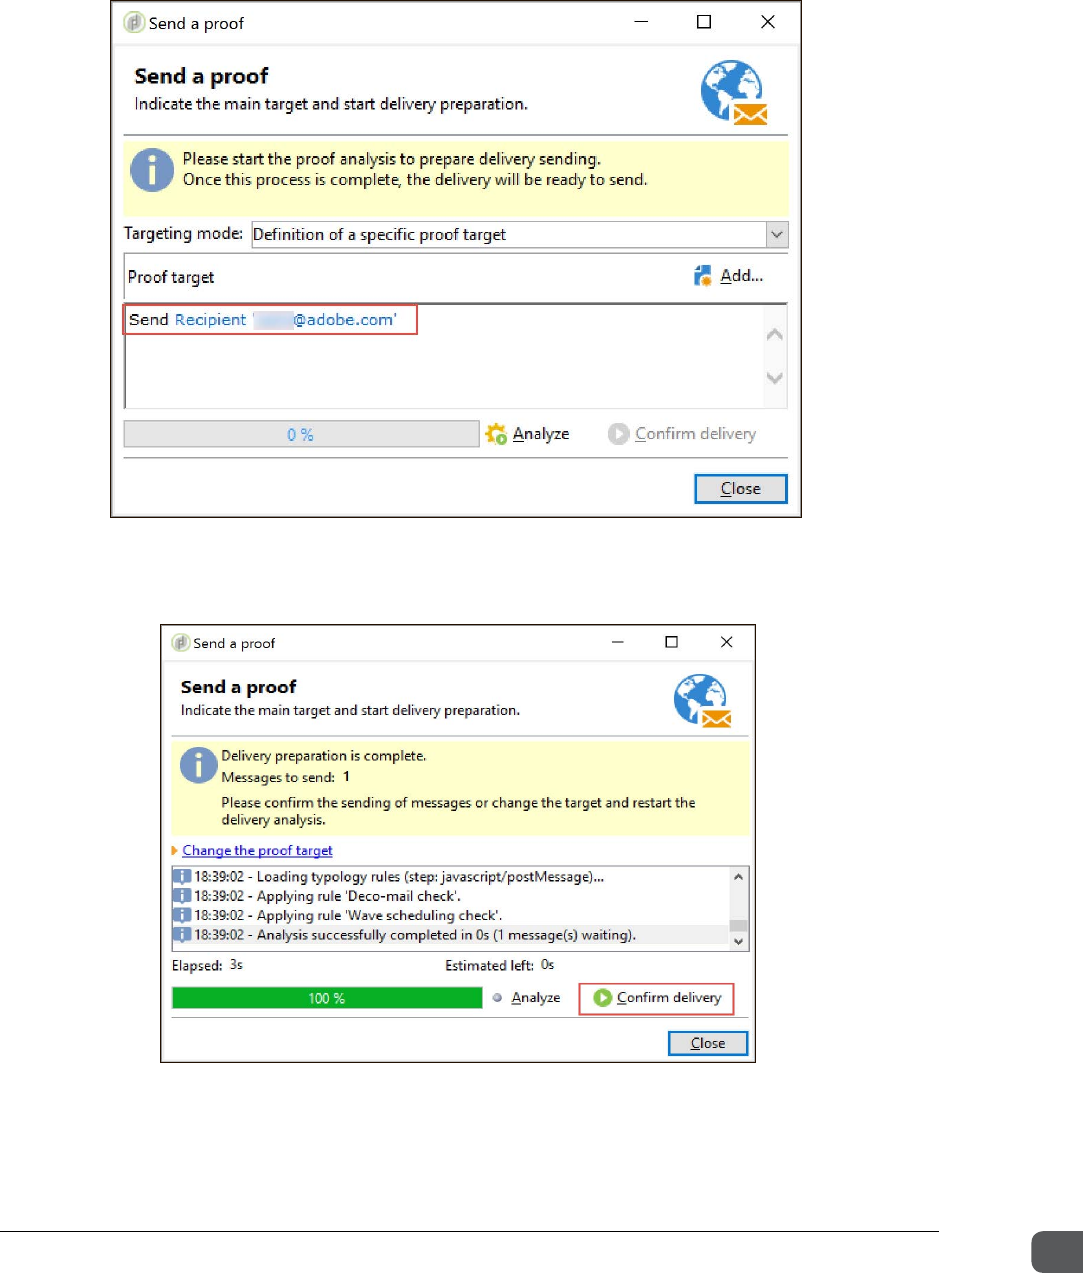
1. In the Delivery Email delivery dialog box, click Send a Proof. The Send a Proof dialog box is
displayed, as shown below:
ADOBE COPYRIGHT PROTECTED

Chapter Four Preparing Deliveries
Getting Started with Adobe Campaign v7 73
2. In the Send a Proof dialog box, click Add to add the proof target. The Select target element
dialog box opens.
3. In the Select target element dialog box, select A recipient for the target and then click Next.
4. In the Select target element dialog box, you need to enter the definition of the target element.
In the Folder field, click the drop-down arrow and select the Training folder you created.
NOTE: If you do not select a recipient in the Training subfolder under the Recipients folder, your proof
will not be sent because there is a typology rule that prevents sending to recipients in the Recipients
folder.
ADOBE COPYRIGHT PROTECTED
Chapter Four Preparing Deliveries
Getting Started with Adobe Campaign v7 74
5. In the recipient details, select your own record.
6. Click Finish. Your records are updated in the Send a Proof dialog box.
7. Click Analyze. The proof analysis starts and prepares the delivery.
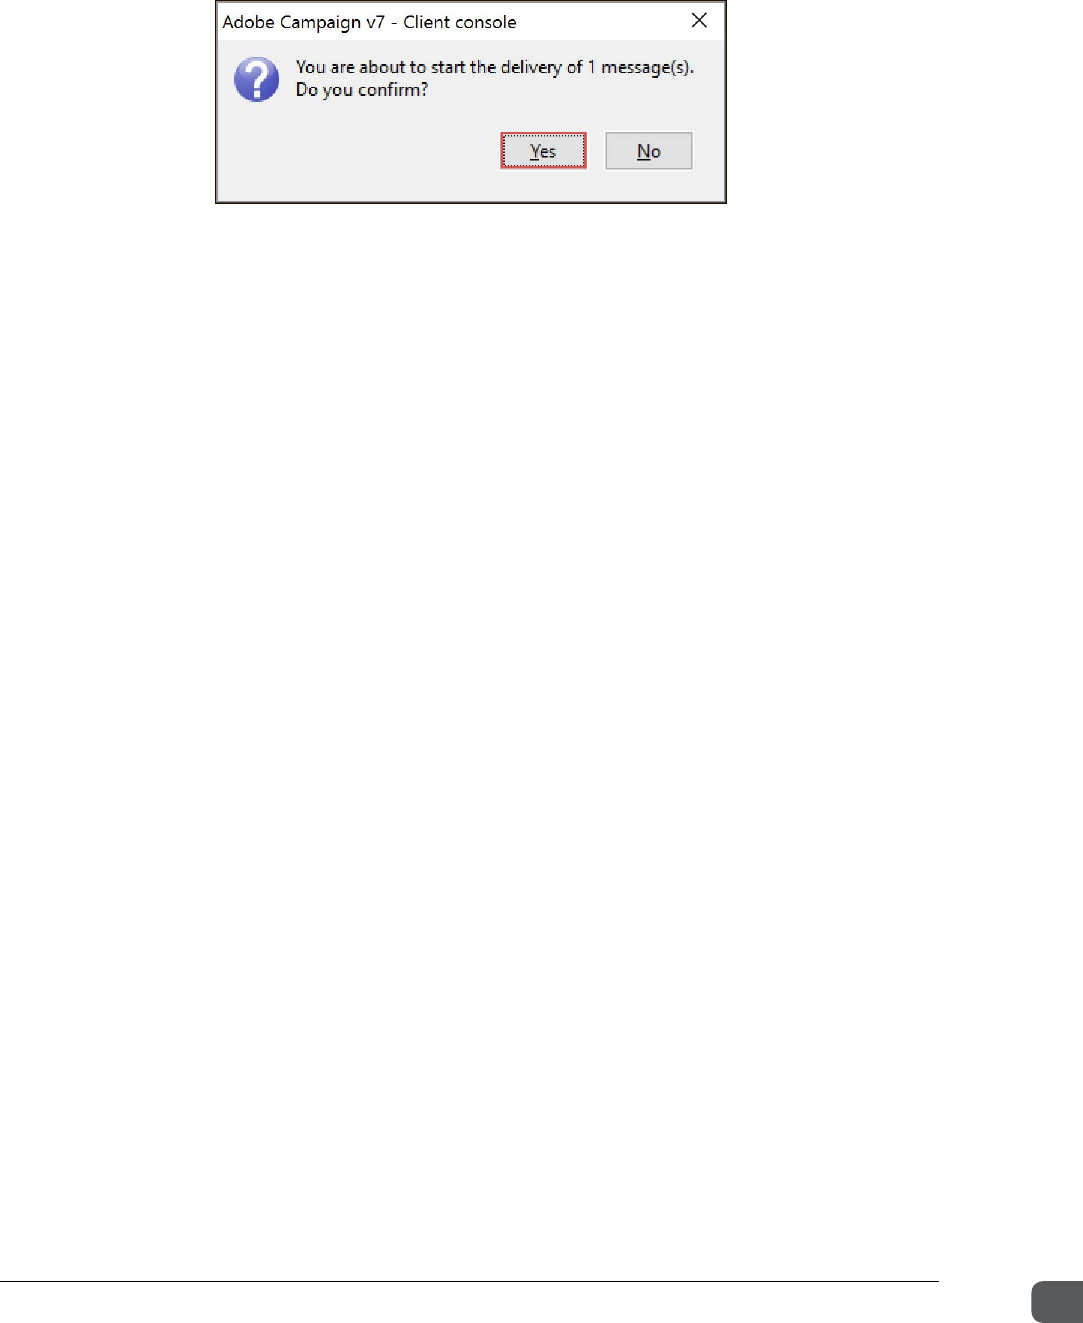
8. Click Confirm delivery. A confirmation dialog box is displayed:
ADOBE COPYRIGHT PROTECTED
Chapter Four Preparing Deliveries
Getting Started with Adobe Campaign v7 75
9. Click Yes to confirm the delivery.
The Send a proof dialog box indicates the delivery has started. The recipient you added will
receive your proof email shortly.
10. Click Close.
ADOBE COPYRIGHT PROTECTED

Chapter Five Executing Campaigns
Getting Started with Adobe Campaign v7 76
Chapter Five
Executing Campaigns
Objectives
By the end of this chapter, you will be able to:
• Explain the processes involved in sending an email delivery
• Send a delivery
• Track a delivery
• Execute a recurring campaign
• Execute a retargeting campaign
ADOBE COPYRIGHT PROTECTED

Chapter Five Executing Campaigns
Getting Started with Adobe Campaign v7 77
Sending a Delivery: Process
The process of sending a delivery involves starting the workflow, analyzing and confirming the
delivery, and monitoring the progress.
If approvals were set up for the campaign, the workflow will go through those steps. Each time the
workflow reaches an approval step, it will stop until that step is approved.
The final checkpoint before sending the delivery is to view the analysis results and confirm the
delivery. If you are satisfied with the analysis results, confirm the delivery. Otherwise, fix the errors,
and rerun the workflow.
You can cancel or stop the delivery prior to confirming analysis or after confirming. After the analysis
phase is completed, you will see the option to cancel.
You can also pause and restart an in-progress delivery. The option to stop the delivery is available
only after you confirm the delivery. If you know you do not want to send the delivery, you should
not confirm the delivery. The stop option is more of a “panic button”. If there is no delayed delivery
date set up, emails will start going out immediately. Therefore, even if you click stop, the execution
of the emails will already be under way. If you accidently cancel or stop the delivery, an administrator
or a power user can duplicate the campaign workflow.
You can track the delivery after you execute it. You can check the delivery logs and exclusions. The
tracking logs are updated by the Mail Transfer Agent (MTA) on an hourly basis.
Creating Reports
You can generate reports in Adobe Campaign to evaluate the effectiveness of a campaign and to
identify how to improve future campaigns. You can improve future campaigns by modifying the
target based on the delivery reports and modifying your subject line, or link text based on the
response reports. You can share, export, and print reports.
There are over 20 out-of-the-box or default reports in Adobe Campaign. You can create your own
ad hoc reports using the descriptive analysis tool. If there is a report you want to use repeatedly and
it is not covered in the default reports, you can use the report builder in Adobe Campaign to create
a custom report.
Types of Reports
Adobe Campaign offers several types of reports, accessible via the customer console or an Internet
browser. They are:
• Global reports: Display the activity of the data in the entire database.
• Delivery reports: Display the execution of deliveries via various reports accessible from the
delivery overview.
• Cumulative reports: Display the cumulated reports on deliveries. You can generate the cumulative
reports by selecting the deliveries to be compared.
WARNING: You should cancel the delivery only when you decide not to send the campaign.
This is an irreversible action, and you will not be able to execute this campaign again.
ADOBE COPYRIGHT PROTECTED
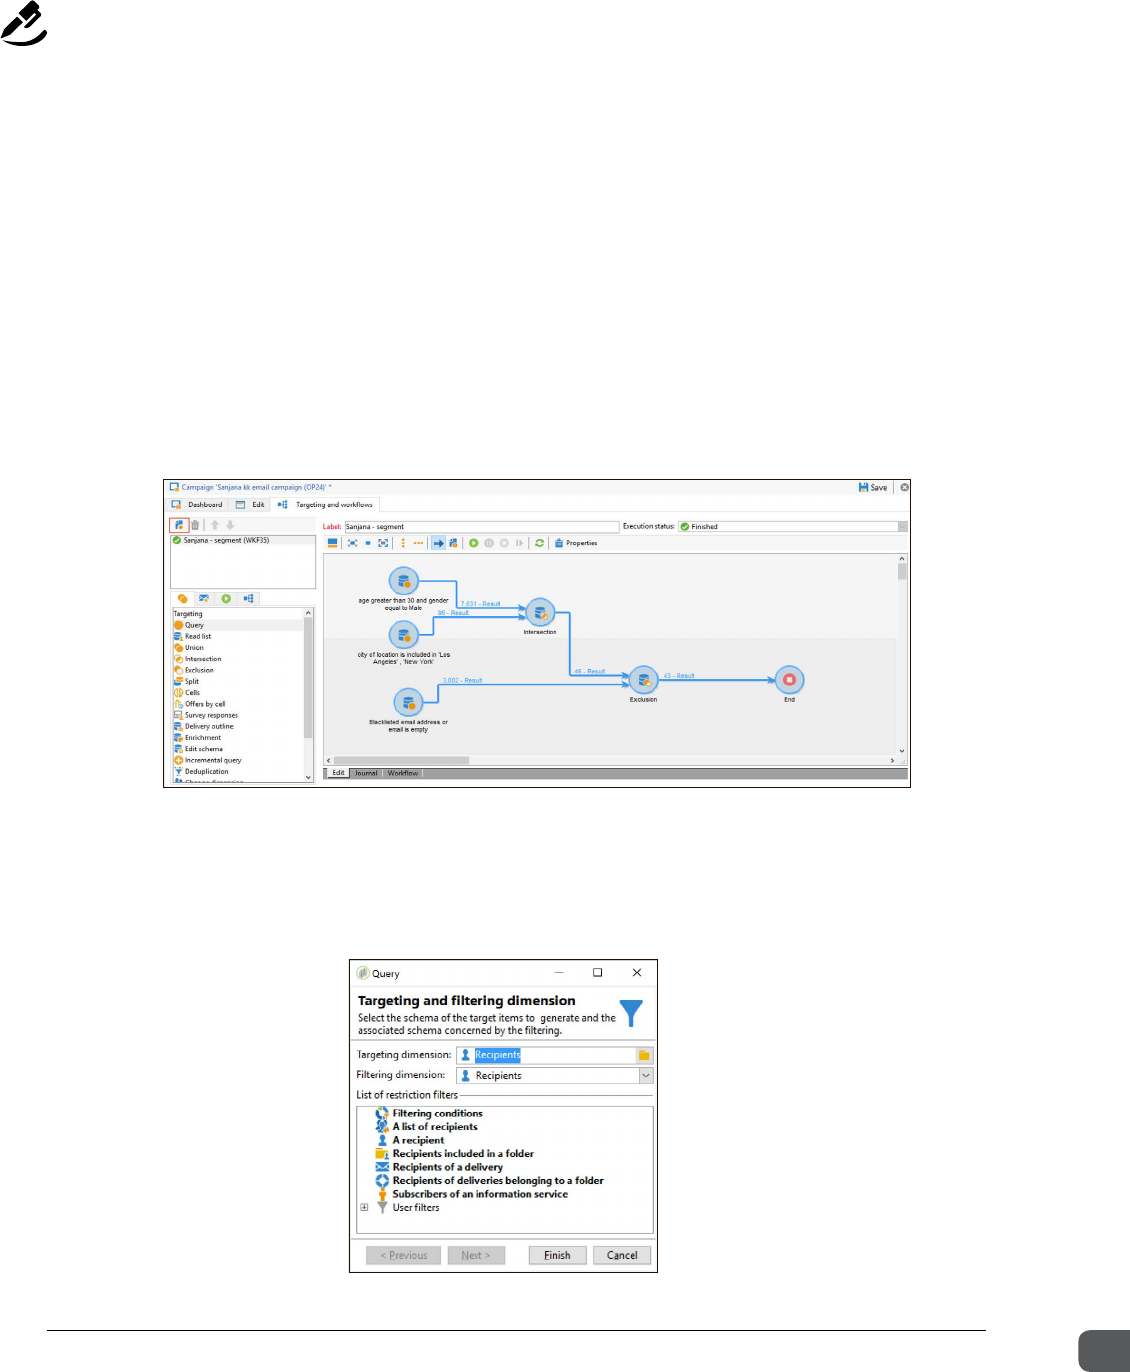
Chapter Five Executing Campaigns
Getting Started with Adobe Campaign v7 78
Exercise 6 – Execute campaigns
In this exercise, you will set up a campaign and a delivery. You should set the delivery properties so the
approver is your own recipient record you created earlier. You can submit the delivery content for
approval to send and validate a proof. You will also approve the content and then approve the
delivery, and run reports on your recipient data’s email domains. You will also execute a recurring
campaign, and a retargeting campaign in this exercise.
Task 1: Design a campaign workow with targeting and delivery activities.
Create an email delivery
1. Open the campaign you created in Exercise 3.
2. Click the Targeting and workflows tab. The Default workflow workspace is displayed.
3. Click Add. The New targeting workflow dialog box is displayed.
4. In the Label field, enter <student-name>‘s workflow where student name is your name.
5. Click Ok. The new name is reflected in the Label field of the Targeting and workflow tab.
6. From the Targeting section, drag a Query activity onto the diagram.
7. Double-click Query on the workflow diagram. The Query dialog box opens.
8. Click the Edit query link. The Query dialog box to select the schema of the target opens.
ADOBE COPYRIGHT PROTECTED
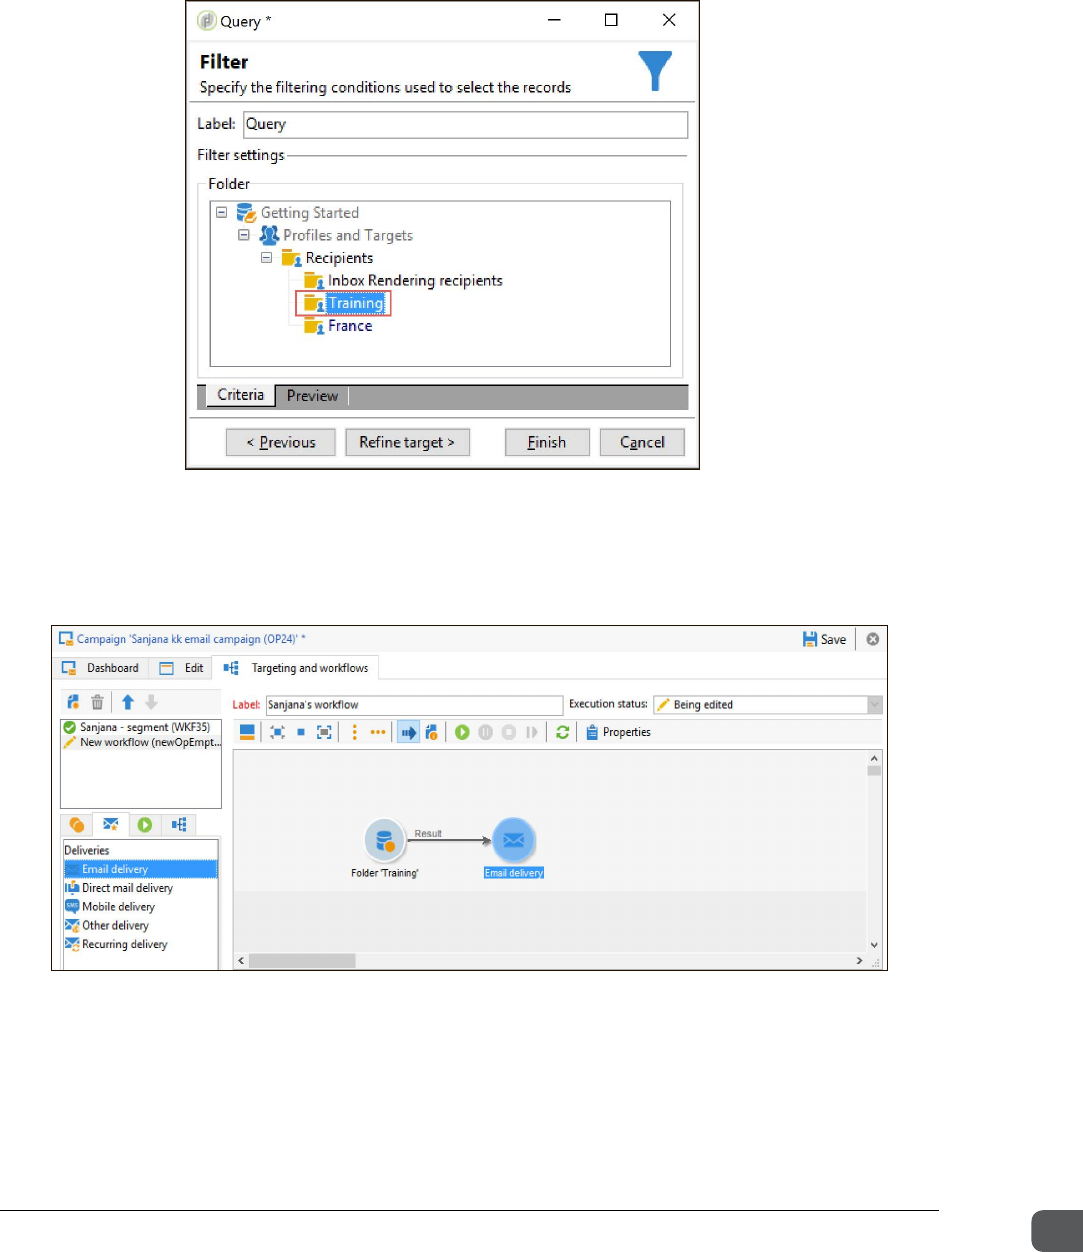
Chapter Five Executing Campaigns
Getting Started with Adobe Campaign v7 79
9. Double-click Recipients included in a folder. The Query dialog box to select the folder
opens.
10. Expand the Recipients folder and select the Training folder.
11. Click Finish and then click Ok. The Targeting and workflow tab is displayed.
12. Click the Deliveries icon to open the options in the Deliveries section.
13. Drag an Email delivery activity from the Deliveries section onto the workflow diagram.
14. Double-click Email delivery in the workflow diagram. The Delivery dialog box opens.
15. In the Delivery dialog box, in the Label field, enter <student name>'s delivery where your
name is the student name.
16. Click Continue.
ADOBE COPYRIGHT PROTECTED
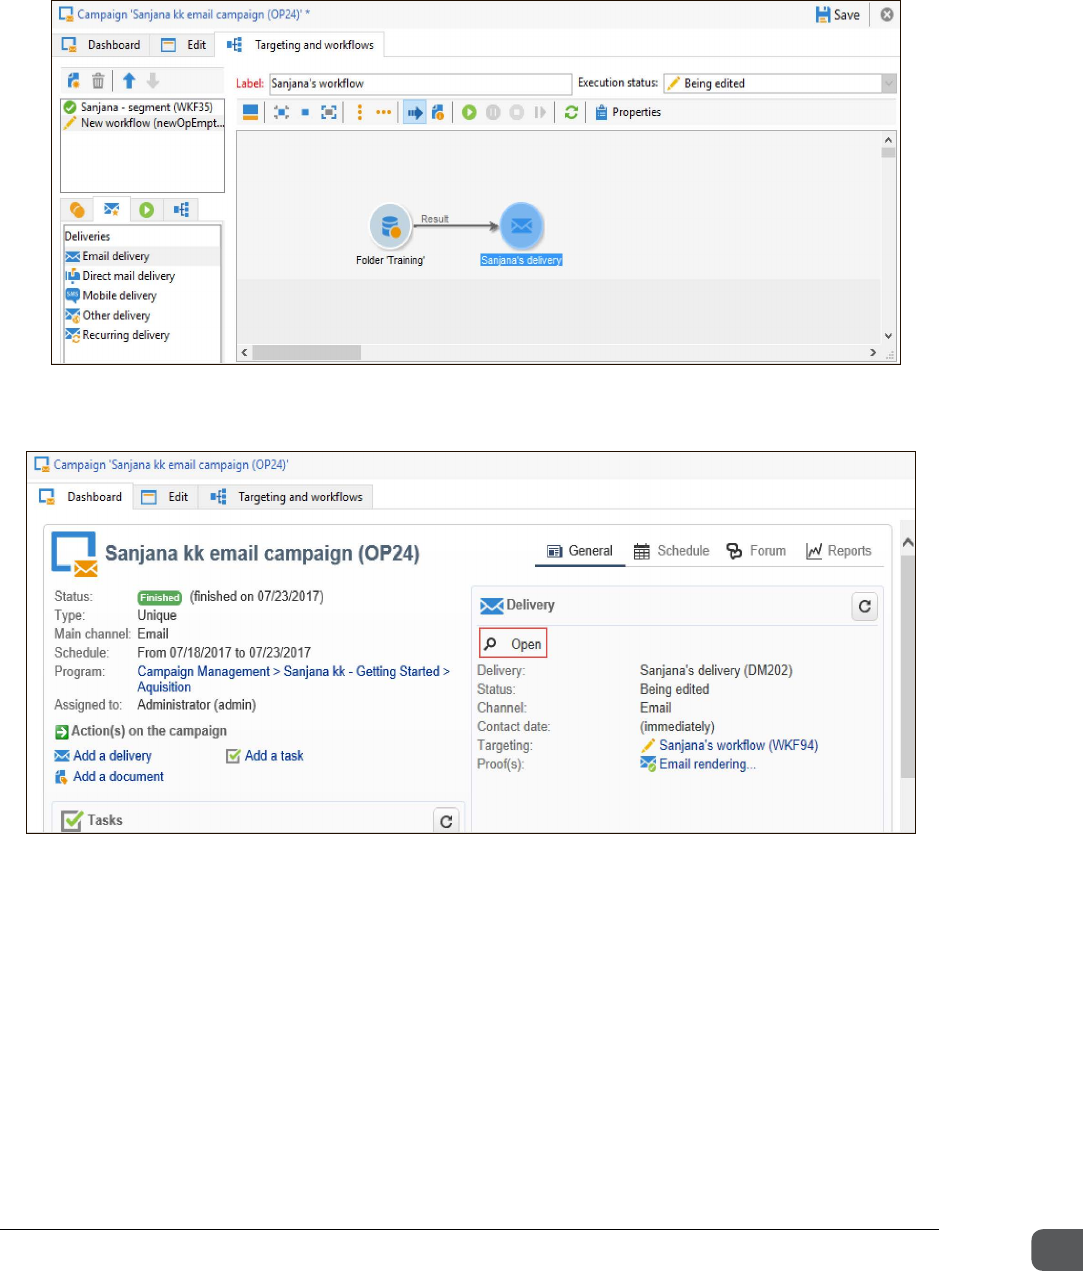
Chapter Five Executing Campaigns
Getting Started with Adobe Campaign v7 80
17. Click Save to close the Delivery dialog box. The name of the Email delivery is updated.
18. Click Save to save the workflow.
19. Click the Dashboard tab.
20. Click Open as shown in the screenshot.
21. Enter a subject line and create the body of the mail, remembering to generate the text version
of the HTML body. Include both personalization fields of your choice. (If necessary, refer to
Exercise 5.)
22. Click Properties at the top of the Delivery window. The Delivery properties dialog box opens.
23. Click the Approvals tab, and select the Enable content approval checkbox. Three checkboxes
are displayed under the Enable content approval option.
24. Select the Enable proof sending option.
25. Select the Enable target approval.
ADOBE COPYRIGHT PROTECTED
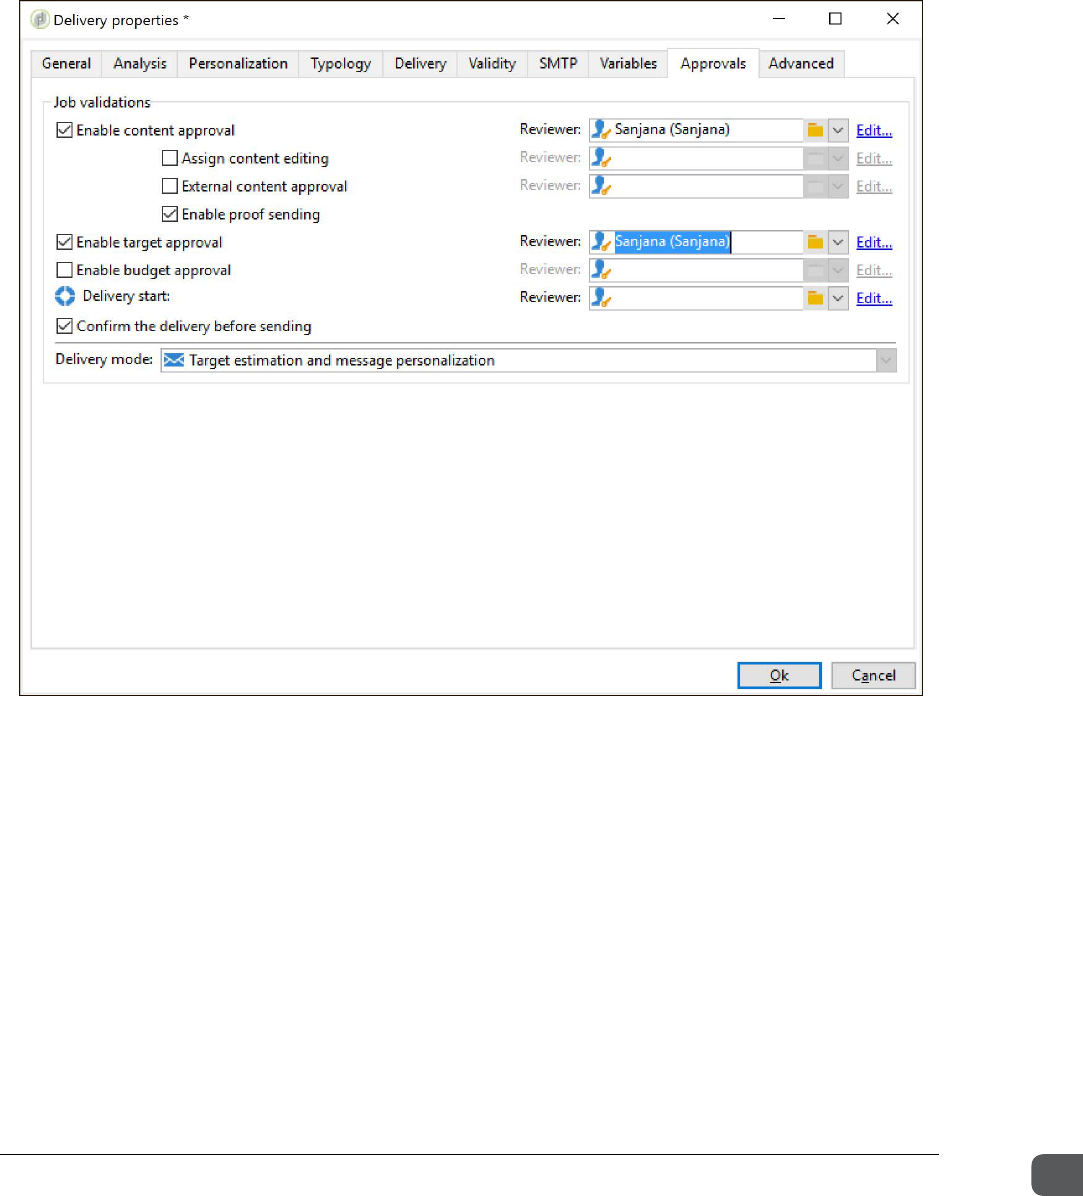
Chapter Five Executing Campaigns
Getting Started with Adobe Campaign v7 81
26. In the Reviewer field, click the folder icon. The Please Select a Reviewer document dialog
box opens. In the Folder field, click the drop-down arrow and select Administration>
Access Management> Operators > Training and select your details from the Operators or
groups section. Your name is added in the Reviewer field.
27. Add a Reviewer for target approval.
28. Click Ok.
29. Preview the delivery, and make changes if necessary.
30. In the Delivery <student name>'s delivery dialog box, click Save. The delivery is saved.
Task 2: Submit the delivery content for approval and send a proof
Submit the delivery content for approval in order to send and validate a proof.
1. On the Dashboard tab, click Open. The Delivery <student name>'s delivery dialog box
displays.
ADOBE COPYRIGHT PROTECTED
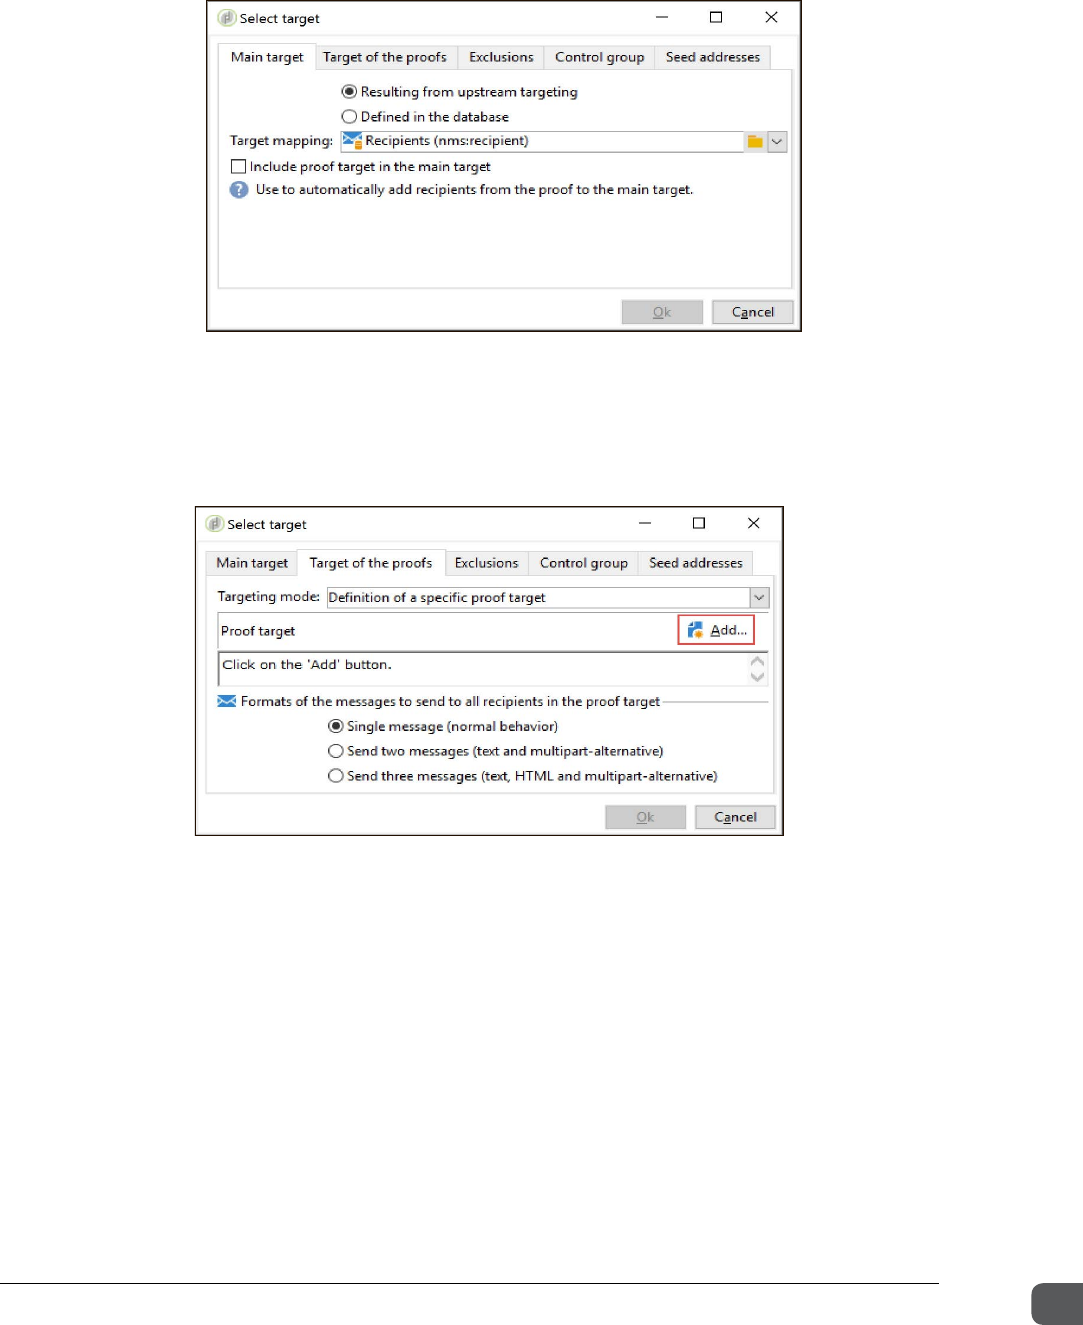
Chapter Five Executing Campaigns
Getting Started with Adobe Campaign v7 82
2. Click the To link. The Select target dialog box is displayed.
3. In the Select target dialog box, click Target of the proofs.
4. Ensure that in the Targeting mode field, Definition of a specific proof target is selected.
5. Click Add. The Select target element dialog box opens.
6. In the Select target element dialog box, double-click A recipient and select the recipient from
the Training folder you added in Exercise 2.
7. Click Finish. The Select Target dialog opens.
ADOBE COPYRIGHT PROTECTED
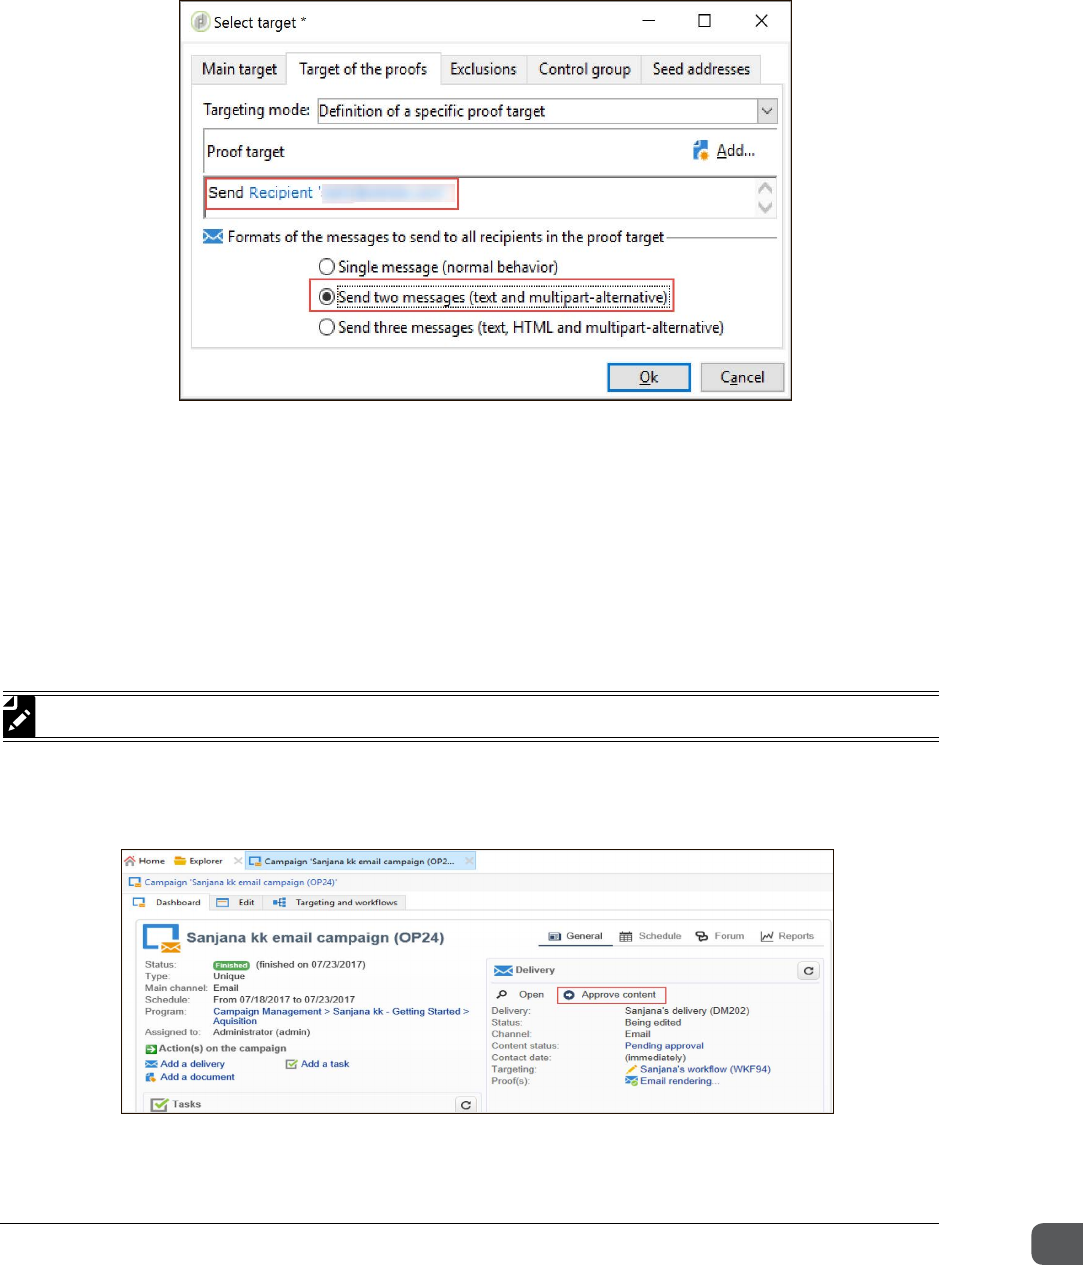
Chapter Five Executing Campaigns
Getting Started with Adobe Campaign v7 83
8. In the Select target dialog box, the selected mail ID is reflected in the Proof target section.
In the Formats of the messages to send to all recipients in the proof target section, select
Send two messages (text and multipart-alternative).
9. Click Ok to close the Select target dialog box and go back to the Delivery <student name>'s
delivery dialog box.
10. Click Save to save the delivery.
11. Click the Dashboard tab.
12. On the Dashboard tab, click Submit Content. The Submit content confirmation dialog box
opens.
13. Click OK to confirm the submission.
14. Click the Dashboard tab and click Approve Content. The Action on delivery dialog box
opens.
NOTE: You will receive two emails in the recipient mail ID.
ADOBE COPYRIGHT PROTECTED
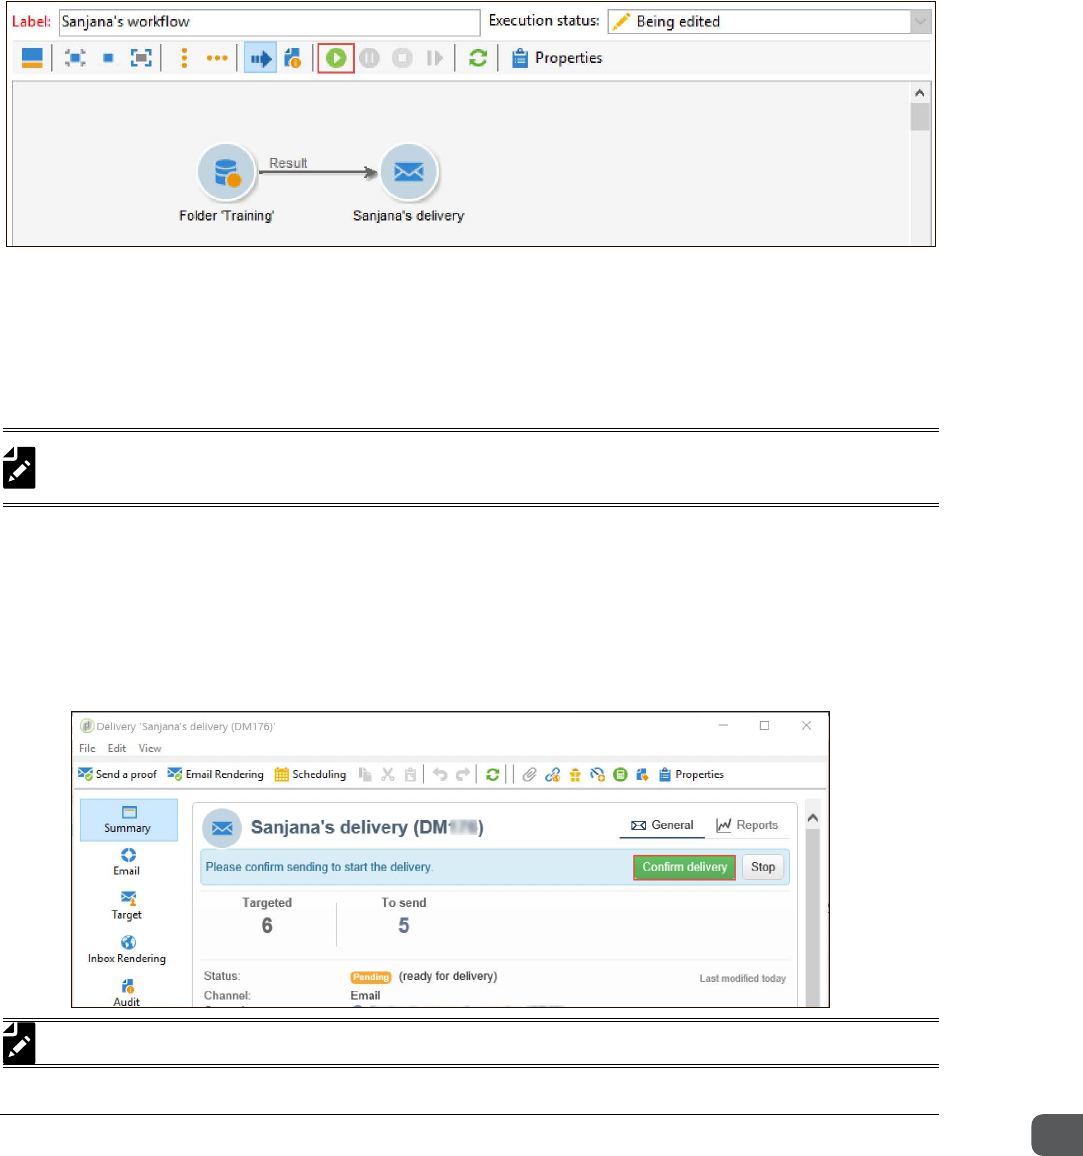
Chapter Five Executing Campaigns
Getting Started with Adobe Campaign v7 84
15. In the Action on delivery dialog box, select Accept and click Content approval.
Task 3: Approve targeting and Conrm delivery
Approve targeting and confirm delivery to execute the campaign.
1. Click the Targeting and workflows tab.
2. Click the Start button to start the workflow.
3. Click the Dashboard tab, go to the Delivery section, and click Open. The Delivery <student
name>'s delivery dialog box opens.
4. In the Delivery <student name>'s delivery dialog box, click Audit.
5. Click Summary and click Approve targeting. The Action on delivery dialog box opens.
6. Click Accept and click the Target approval button to approve the target.
Verify all tabs/pages - Email, Delivery and Audit to ensure your delivery looks OK/acceptable.
This is the final step to stop the delivery.
7. If everything looks good, go to Summary and click Confirm delivery, as shown below. The
Start delivery confirmation dialog box opens.
NOTE: In your target approval email, there should be a “code” after the name of the delivery such as
DM176. This code should match the code that appears in the Summary page at the top.
NOTE: Notify your instructor if there are any errors or warnings on the Log tab.
ADOBE COPYRIGHT PROTECTED
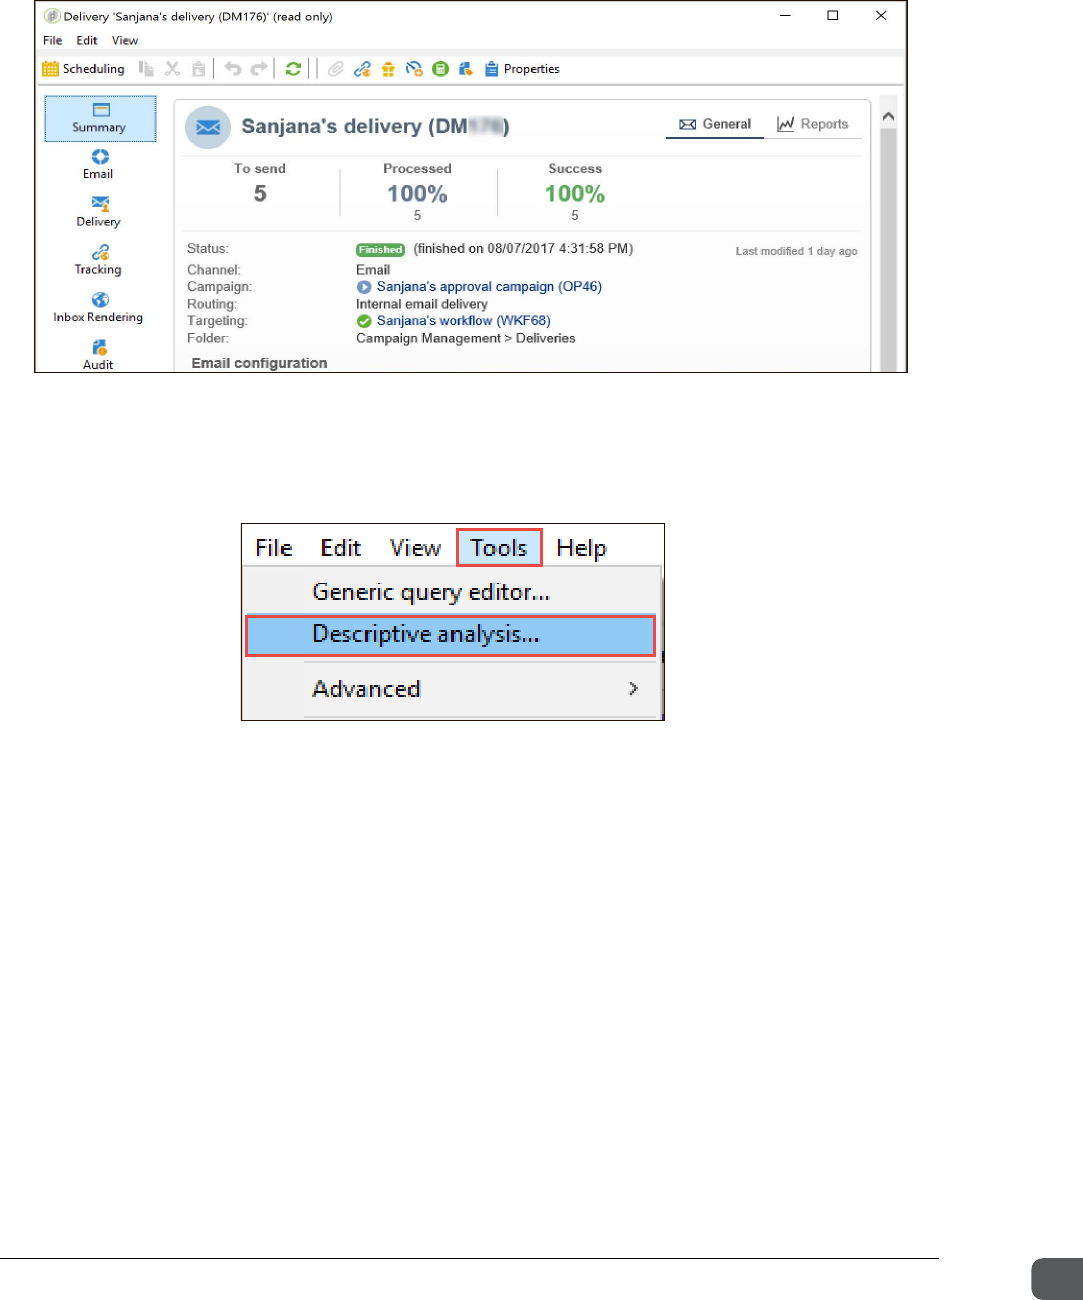
Chapter Five Executing Campaigns
Getting Started with Adobe Campaign v7 85
8. In the Start delivery confirmation dialog box, click Ok. You will receive an email. This
screenshot shows the Summary page after the delivery.
Task 4: Analyze a population
Analyze a population to determine the most popular email domains.
1. On the menu bar, click Tools and select Descriptive analysis. The Descriptive analysis wizard
opens.
In the Descriptive analysis wizard, the Descriptive analysis configuration page enables you to
select the descriptive analysis template.
2. In the Descriptive analysis configuration page of the Descriptive analysis wizard:
a. In the Select a descriptive analysis template section, select New descriptive analysis from
a template.
b. In the Template field, select Qualitative distribution (qualitative).
c. In the Display mode section, select Chart.
3. Click Next. The Chart configuration page of the Descriptive analysis wizard is displayed.
4. In the Chart configuration page:
a. In the Data section, select 1 variable.
b. In the First variable (X axis) field, click the Edit expression icon. The Select an expression
dialog box opens. In the Available fields section, double-click Email domain (@domain).
c. Click the Label field and Email domain is automatically added to the field.
d. In the Chart type section, select Histogram or Pie. For this exercise, select Histogram.
ADOBE COPYRIGHT PROTECTED
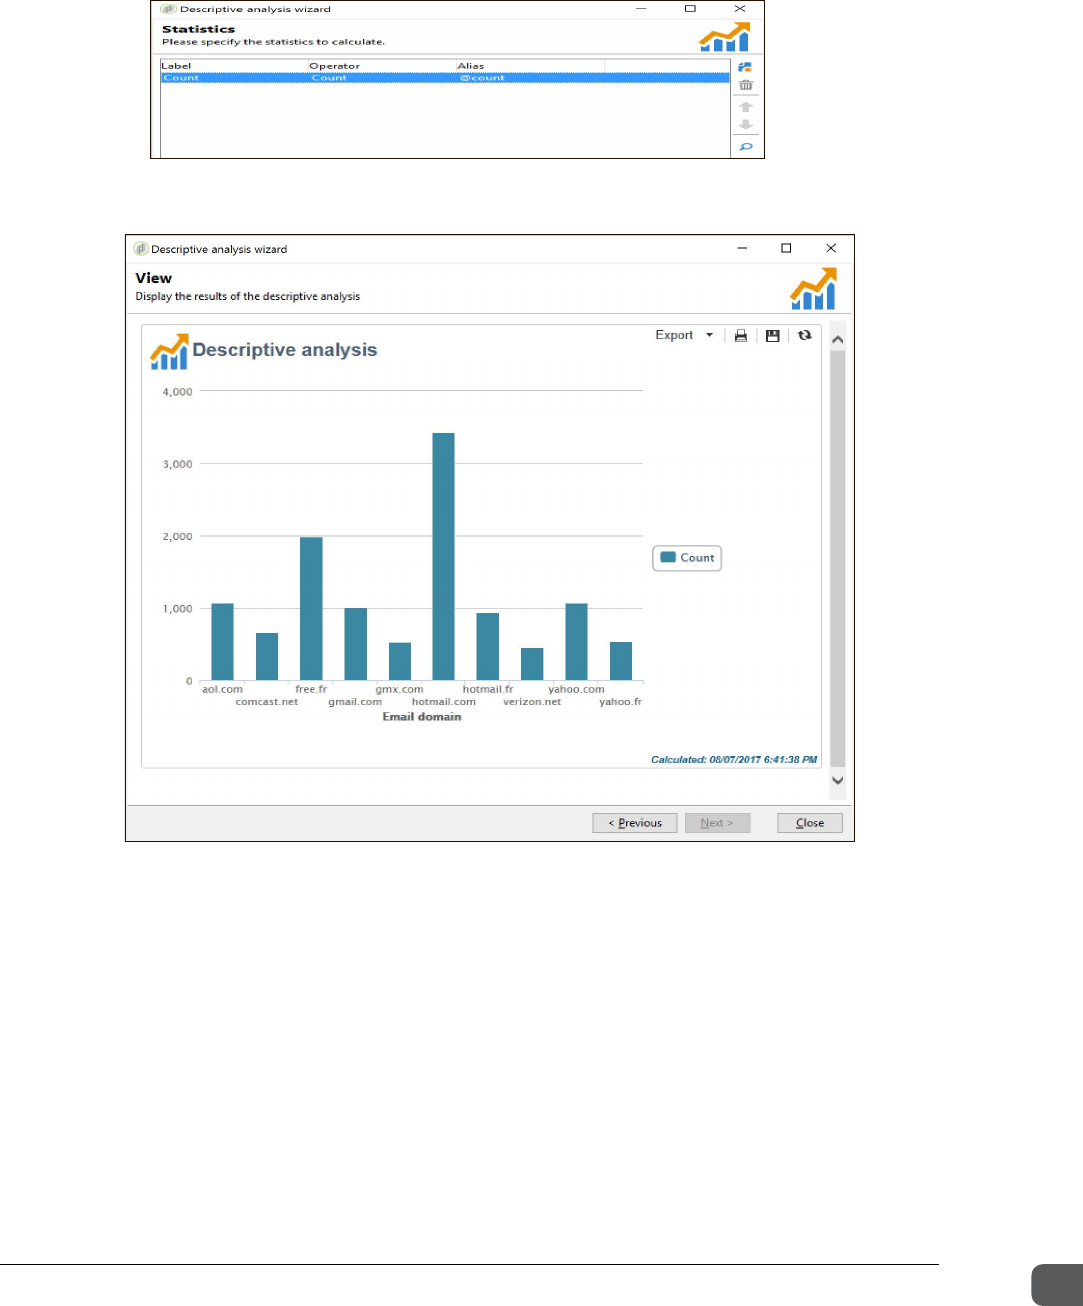
Chapter Five Executing Campaigns
Getting Started with Adobe Campaign v7 86
5. Click Next. The Statistics page of the Descriptive analysis wizard displays where the count
is listed.
6. Click Next. The View page of the Descriptive analysis wizard displays where you can view
the result of the descriptive analysis.
Task 5: Execute a recurring birthday campaign
Create a workflow to execute a recurring birthday campaign.
1. Open the campaign you created in Exercise 3.
2. On the Targeting and workflows tab, create a new campaign workflow:
3. Click Add. The New targeting workflow dialog box opens.
4. In the New targeting workflow dialog box, in the Label field, rename your workflow as
YourInitials_Birthday_Recurring.
5. Click Ok.
6. Drag a Query activity on the canvas.
ADOBE COPYRIGHT PROTECTED
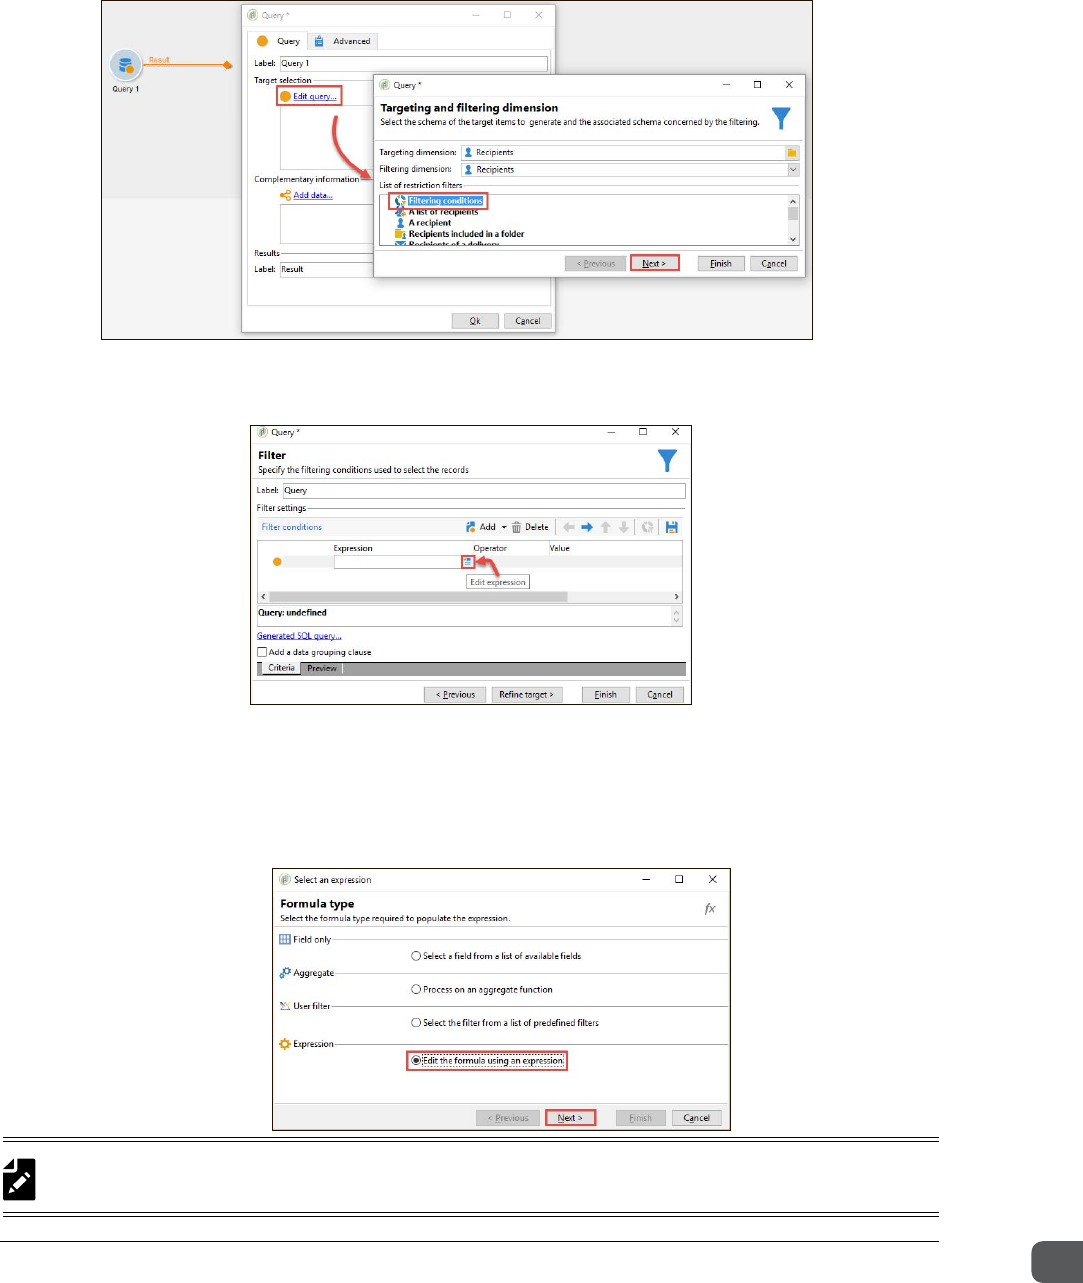
Chapter Five Executing Campaigns
Getting Started with Adobe Campaign v7 87
7. Double-click the Query activity.
8. Click Edit query, select Filtering conditions, and then click Next.
9. Build the expression to extract the Day of the birth date:
a. In the Expression column, click Edit expression.
b. Click Advanced selection to build your own expression. The Select an expression dialog
box opens.
c. In the Expression area, select Edit the formula using an expression, and click Next. The
Edit the expression page of Select an expression dialog box opens.
NOTE: You are now in the Function editor. Functions are listed on the right side of the screen and
fields of the recipients’ table are on the left side.
ADOBE COPYRIGHT PROTECTED
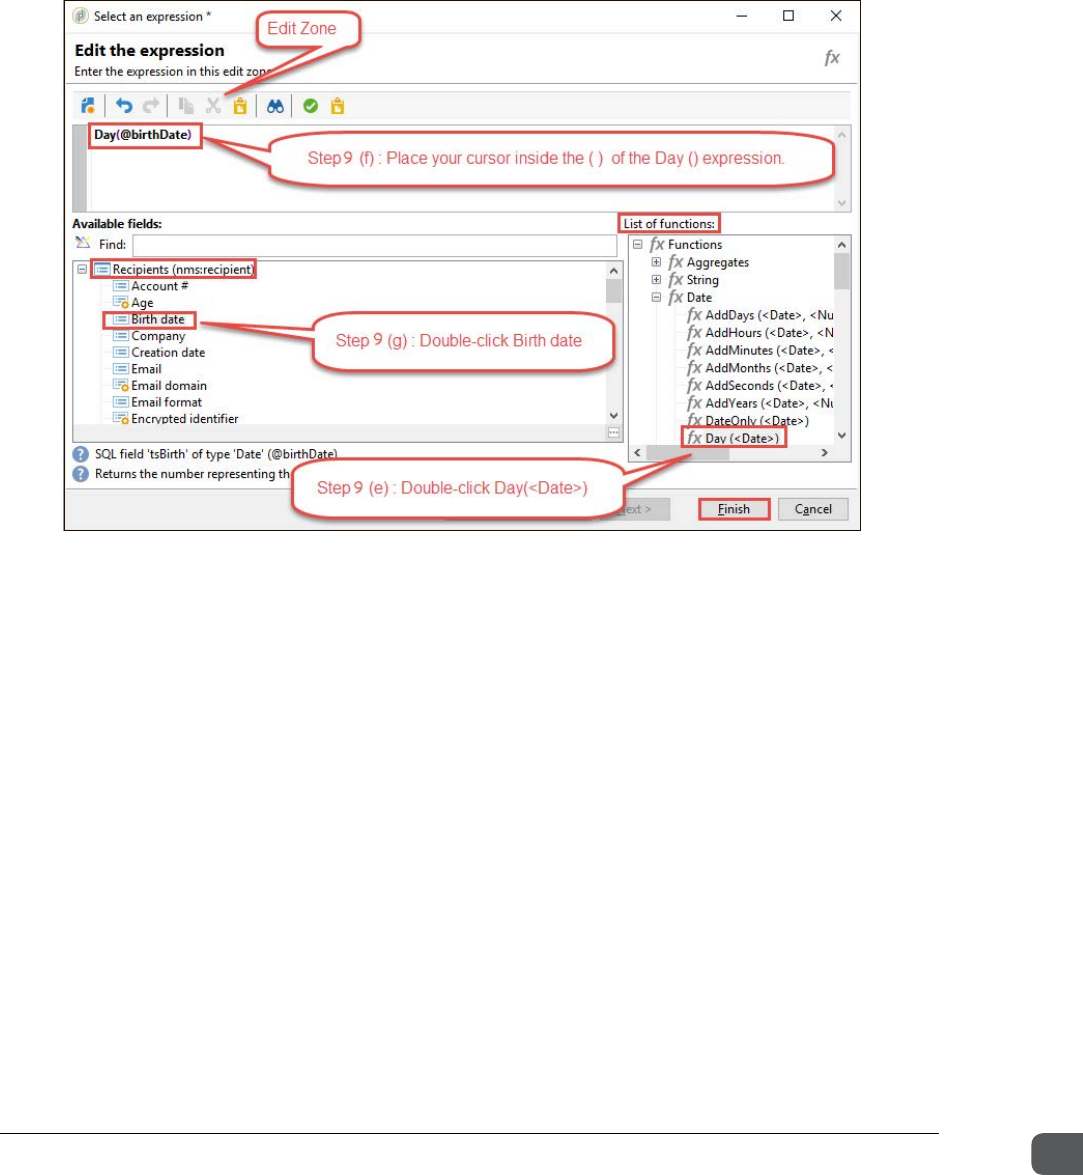
Chapter Five Executing Campaigns
Getting Started with Adobe Campaign v7 88
d. In the List of Functions area, expand the Date node, and double-click Day (<Date>) to
place the selected function in the edit zone.
e. In the edit zone, place your cursor inside the () of the Day() expression.
f. Go the Recipients (nms:recipient) column, and double-click Birth date.
g. Ensure the expression in the Edit zone is Day(@birthDate).
h. Click Finish. The Filter page of the Query dialog box opens.
10. In the Filter page of the Query dialog box, select equal to as the operator.
11. Build the expression to extract Today’s day for the value. To do so:
a. Click inside the Value field, and click Edit expression. The Edit the expression window
opens.
b. In the List of functions section, expand the Date node, and double-click the function
Day (<Date>) to add it in the Edit zone.
c. In the Edit zone, place your cursor inside the () in the Day() expression.
d. From the List of functions section, double-click GetDate () to create it in the expression
already in the Edit zone.
ADOBE COPYRIGHT PROTECTED
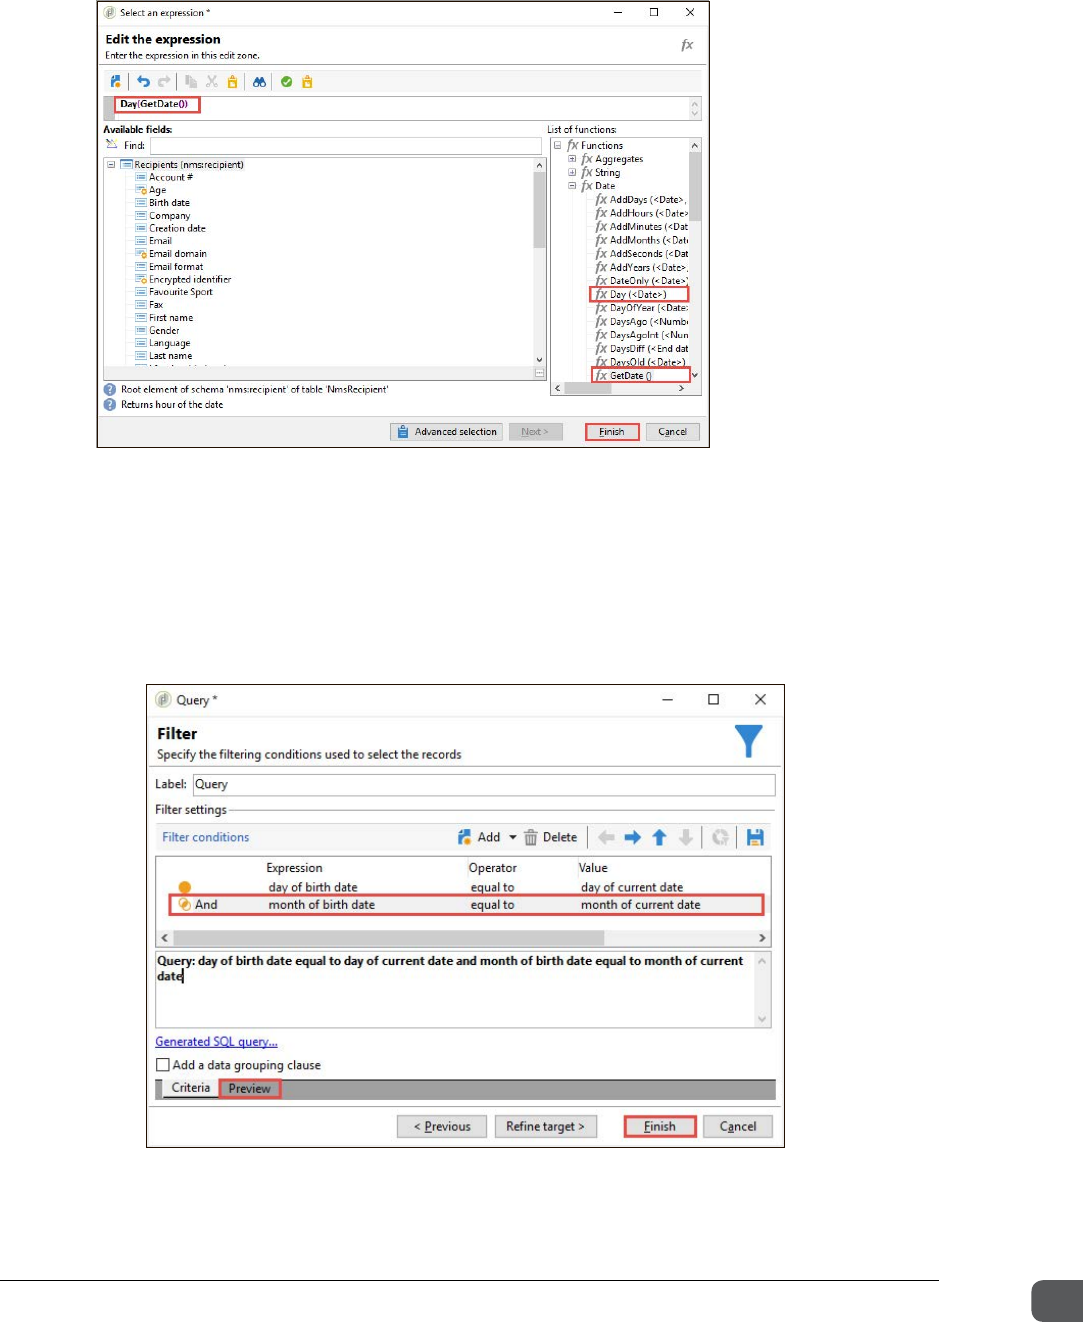
Chapter Five Executing Campaigns
Getting Started with Adobe Campaign v7 89
e. Ensure the expression in the Edit zone is Day(GetDate()).
f. Click Finish.
12. In the Filter page of the Query dialog box, click Add to create a new line.
13. Repeat the steps to extract the month of the birth date. For example: Month(@birthDate)
14. Keep equal to as the operator.
15. Repeat the steps to extract today's month - using Month(GetDate()).
ADOBE COPYRIGHT PROTECTED
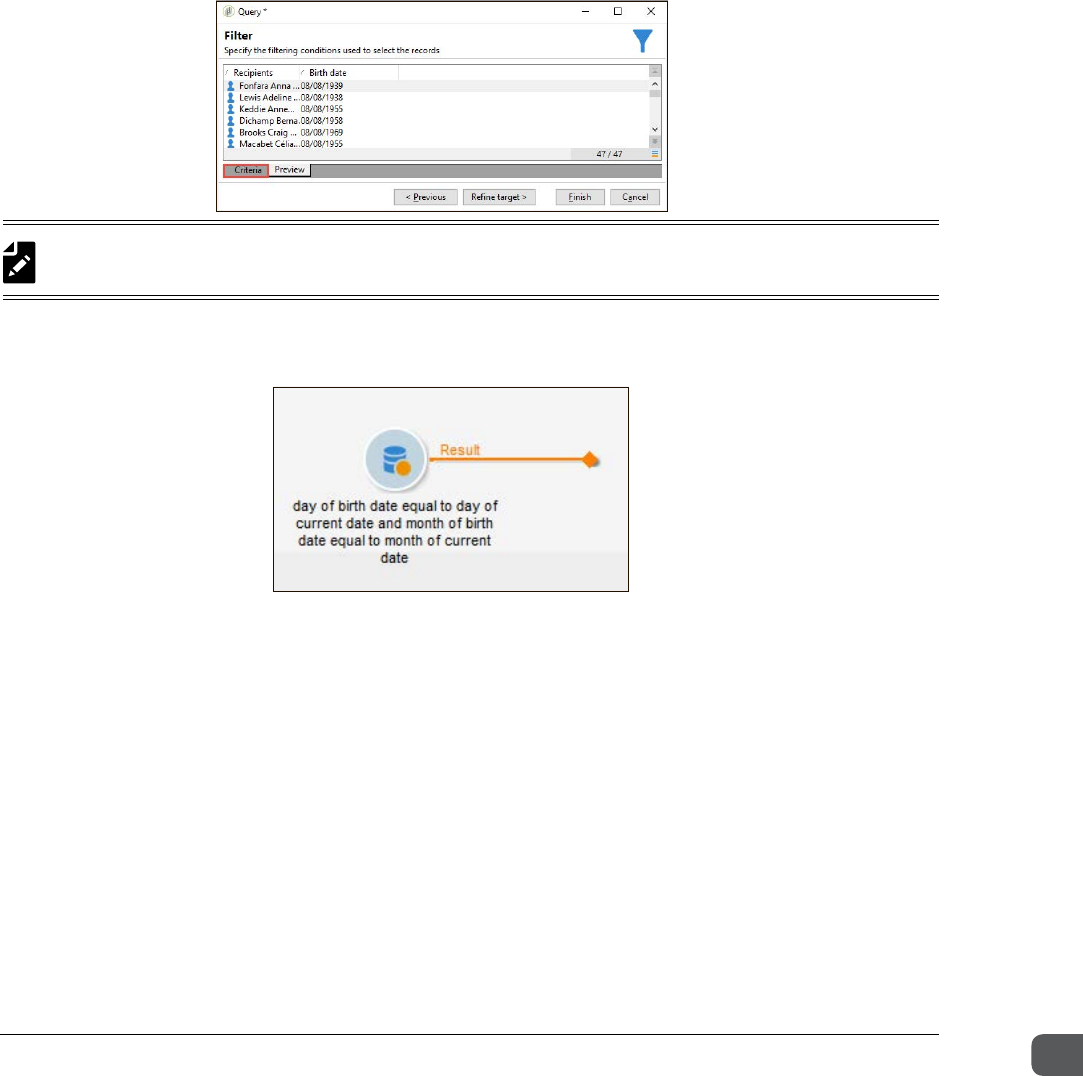
Chapter Five Executing Campaigns
Getting Started with Adobe Campaign v7 90
16. In the Filter page of the Query dialog box, verify the expression to see if it is month of birth
date equal to month of current date.
17. In the Filter page of the Query dialog box, click the Preview tab. The preview of the
recipients who meet the filtering conditions' criteria is displayed.
18. In the preview, right-click the list of names and select Configure List.
19. Using the Configure list dialog box, double-click Birth date on the left side in the Available
fields column to move it to the Output columns. The Birth date column is added to the
preview.
20. Click Finish and then click Ok to close the Query. The query is displayed in the workflow as
shown:
NOTE: Ensure that the your birthday in the recipient data matches the current date to generate your
data in the Preview.
ADOBE COPYRIGHT PROTECTED
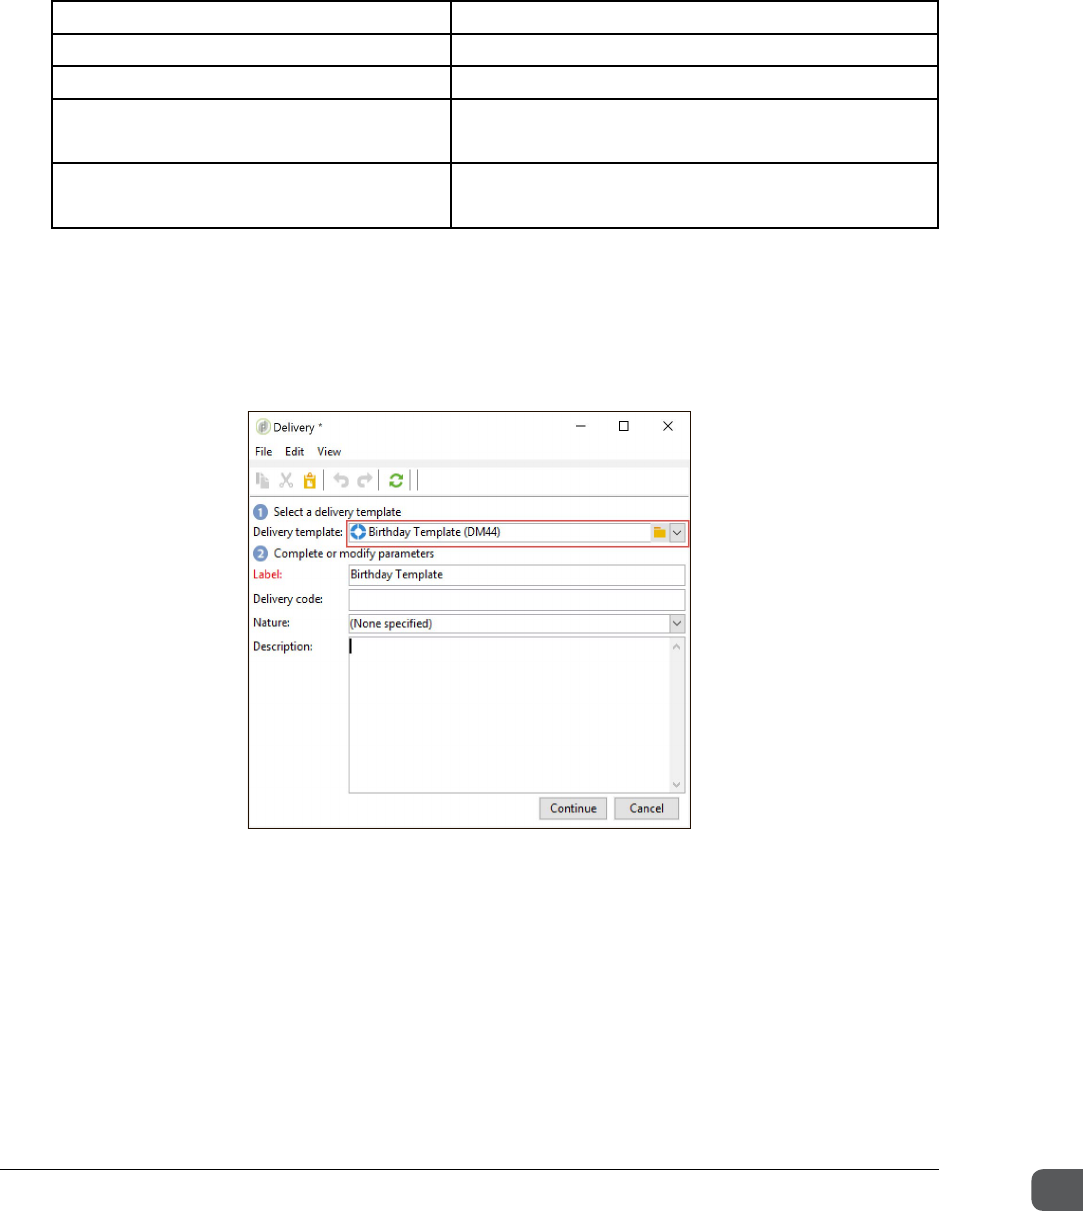
Chapter Five Executing Campaigns
Getting Started with Adobe Campaign v7 91
21. Click the Actions icon and drag Recurring delivery onto the workflow diagram and link it to
the query you created.
You cannot use a standard delivery template because it cannot be sent several times.
Instead, use a recurring delivery or a continuous delivery. The following table lists the
differences between a recurring delivery and a continuous delivery:
Recurring Continuous
Can select an existing template Can select an existing template
Can edit or insert/upload content Cannot edit content
Can create new delivery object each
time the workflow runs
Resends the same delivery
Reports for each delivery + Campaign
reports
No Delivery + Campaign Reports; however,
information is still available in logs.
22. Double-click the Recurring delivery.
23. Click the folder icon. The Please select a Template document dialog box is displayed.
24. Click the folder icon and select Resources> Templates> Delivery Templates.
25. Select the Birthday Template(DM44) and click Continue. The Delivery dialog box opens.
26. Enter a subject line in the Subject field and generate the preview of the content on the
HTML content tab and the Text content tab.
27. Click Ok.
28. Click Save in the Delivery dialog box. The name of the Recurring delivery is changed to
Birthday Template in the workflow diagram.
29. Click the Flow Control icon and drag Scheduer onto the beginning of the workflow.
30. Link the Scheduler to the Query.
ADOBE COPYRIGHT PROTECTED
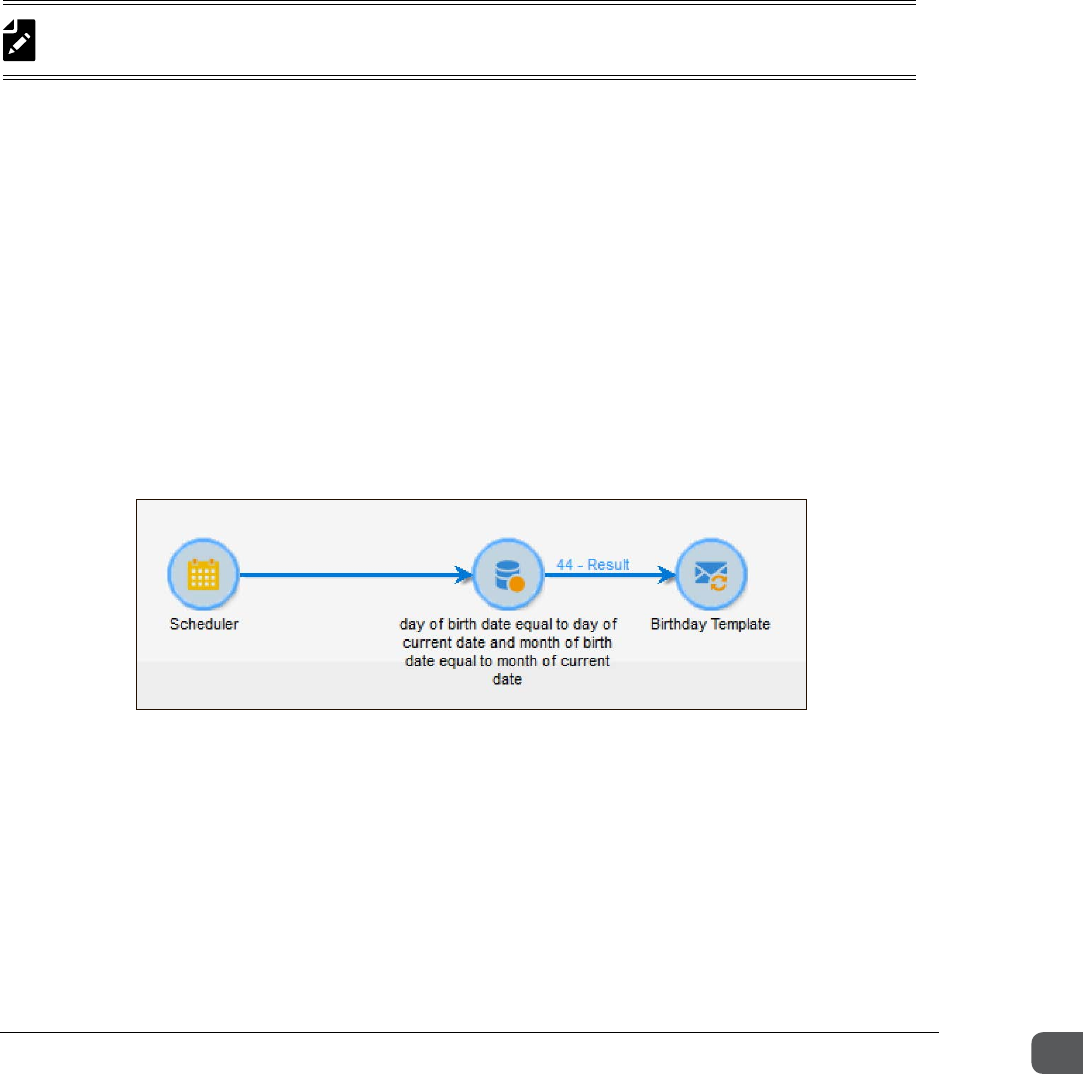
Chapter Five Executing Campaigns
Getting Started with Adobe Campaign v7 92
31. To configure the Scheduler:
a. Double-click the Scheduler activity to open it.
b. In the lower-right corner, click Change.
c. Select Daily as frequency and click Next.
d. Configure the start time as 09:00 AM.
e. Retain the day selection to Every day and click Next.
f. Retain the validity period as Permanent validity.
g. Click Next, and review the summary of next launches.
h. Click Finish and click Ok to close the Scheduler.
32. Run the campaign by clicking Start. A confirmation dialog box opens.
33. Click Yes.
34. Click the Dashboard tab, on the Deliveries section, open the delivery and click Confirm
delivery.
35. The Scheduler starts processing but remains paused based on the starting hour you
configured.
36. Right-click the Scheduler and select Execute pending task(s) now in the menu. The
workflow is processed and the birthday delivery is sent.
37. Check if the Scheduler is blinking - this means the scheduler is waiting for the next launch.
38. Go to your delivery folder and review your the delivery.
Task 6: Execute a retargeting campaign
Create a workflow to execute a retargeting campaign to target the recipients of a previous delivery.
1. Open the campaign you created in Exercise 3.
2. Click the Targeting and workflow tab.
3. Click the Add icon to add a new workflow. The New targeting workflow dialog box opens.
4. In the New targeting workflow dialog box, in the Label field, enter Retargeting workflow and
click Ok.
NOTE: Before running the workflow, ensure you have a participant recipient data with a birthday
matching the current date and a valid email ID.
ADOBE COPYRIGHT PROTECTED
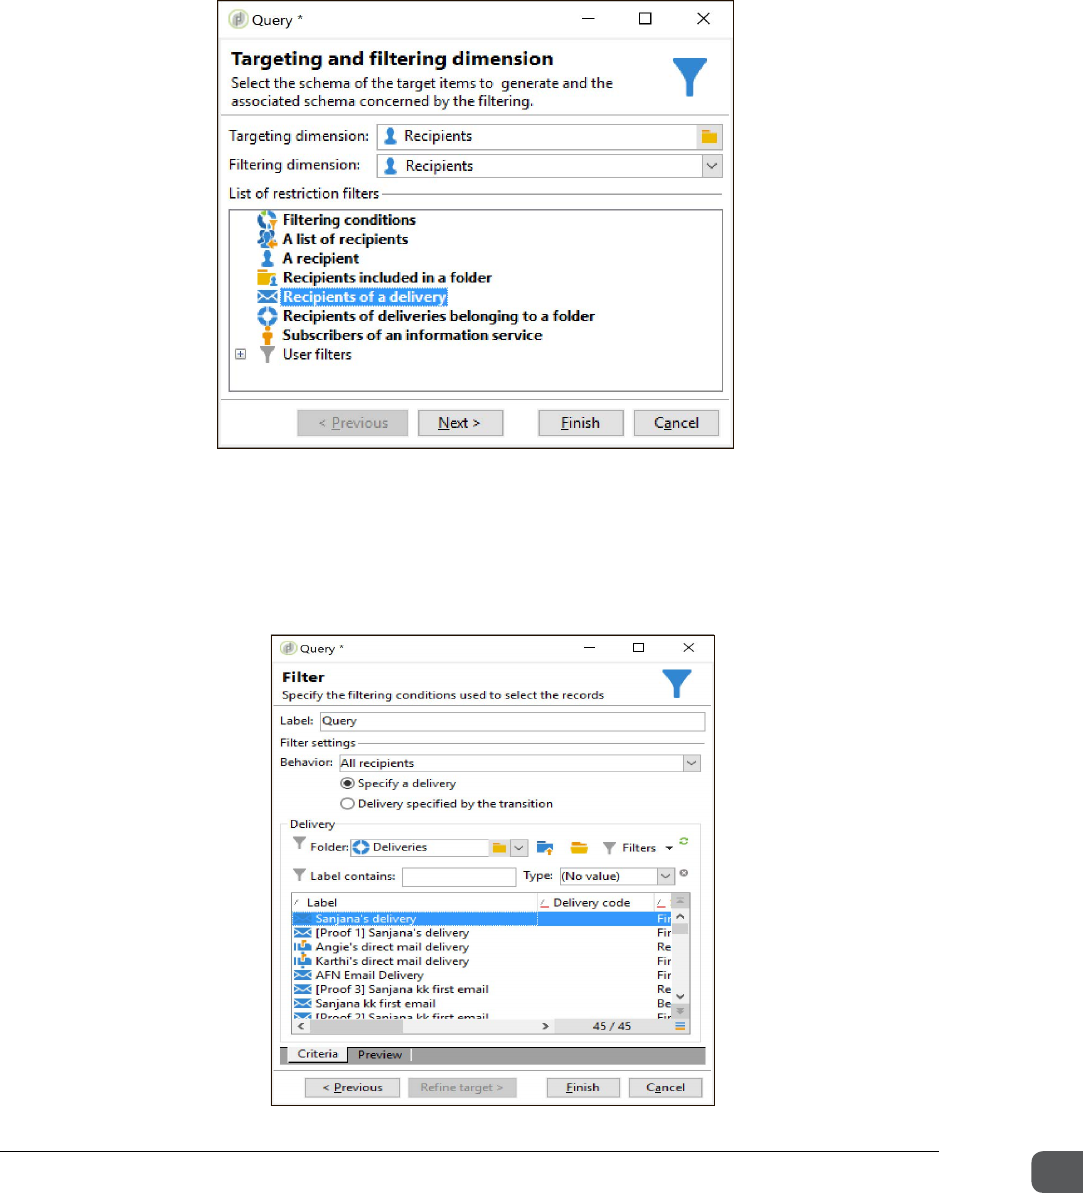
Chapter Five Executing Campaigns
Getting Started with Adobe Campaign v7 93
5. Drag a query to the workflow diagram and double-click the query.
6. In the Query dialog box, click Edit query link. The Targeting and filtering dimensions page of
the Query dialog box is displayed.
7. From the List of restrictions filter section, select Recipients of a delivery.
8. Click Next. The Filter page of the Query dialog box is displayed.
9. In the Folder field, click the folder icon, expand Campaign Management and select Deliveries.
10. In the Label section, the deliveries that were targeted earlier are displayed. Select a delivery
to retarget. In this exercise, Sanjana's delivery is selected for demonstration purpose.
ADOBE COPYRIGHT PROTECTED
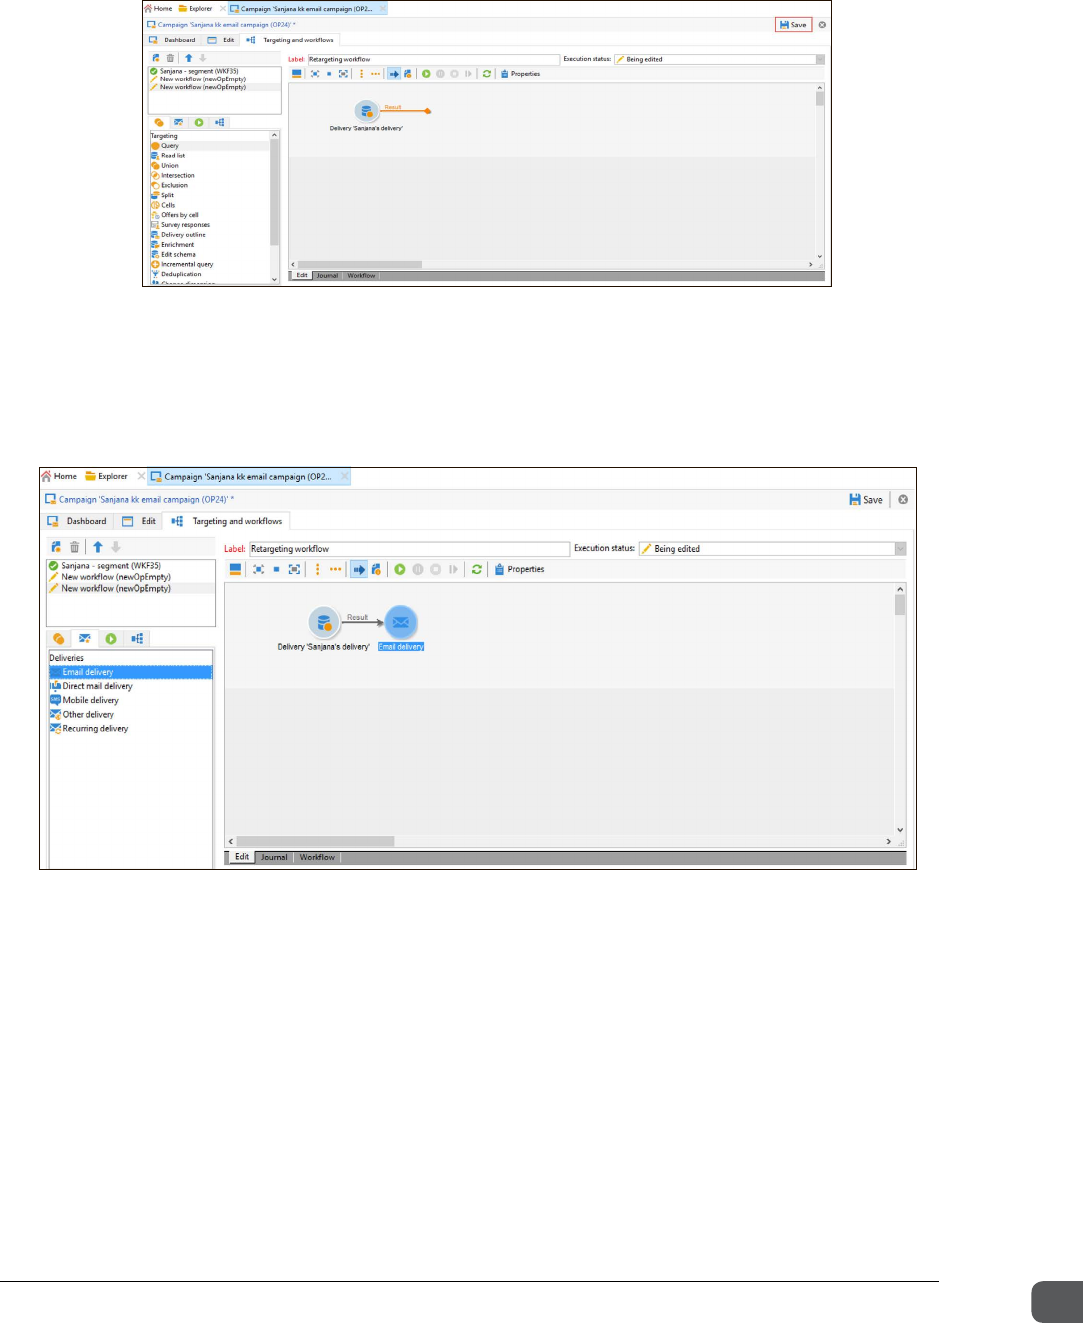
Chapter Five Executing Campaigns
Getting Started with Adobe Campaign v7 94
11. Click Preview to preview the recipients in the delivery and click Finish.
12. Click Ok to close the Query dialog box.
13. Click Save to save the workflow.
14. Click the Deliveries icon and drag an Email delivery activity to the workflow diagram.
15. Double-click the Email delivery activity on the workflow diagram. The Delivery dialog box
is displayed.
16. In the Delivery dialog box:
a. In the Delivery template field, click the folder icon. The Please select a Deliveries
document is displayed. In the Folder field, click the drop-down icon and select
Resources> Templates> Delivery Templates and click OK.
b. Select a delivery template. In this exercise, you will select Event - Invite to new event
(Event - Invite to new event) template and click Ok. You are back on the Delivery dialog
box.
c. In the Label field, verify the name of the delivery is updated.
ADOBE COPYRIGHT PROTECTED
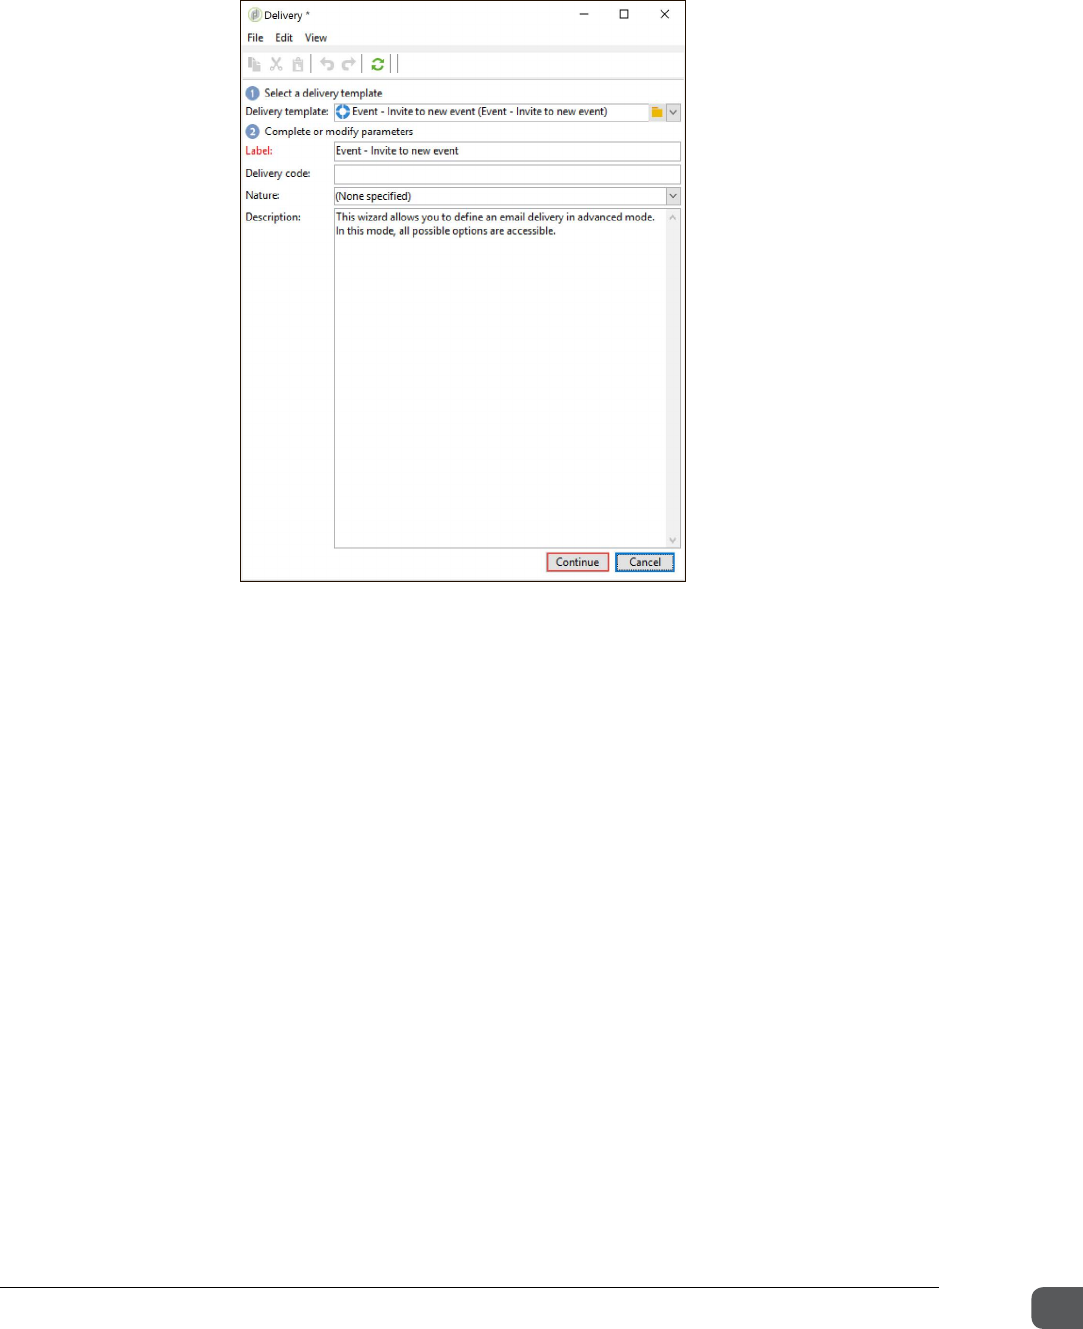
Chapter Five Executing Campaigns
Getting Started with Adobe Campaign v7 95
d. Click Continue.
17. Notice how the Delivery dialog box displays fields to update the delivery such as Subject,
Attachments, HTML content, Text content and Preview.
18. Generate the preview in the HTML content and Text content by adding a recipient in the Test
personalization drop-down list accessible via the Preview tab.
19. Click Properties at the top of the Delivery dialog box. The Delivery properties dialog box
opens.
20. Click the Approvals tab, and select the Enable content approval checkbox. Three
checkboxes are displayed under the Enable content approval checkbox.
21. Select the Enable proof sending checkbox.
22. Select the Enable target approval.
23. In the Reviewer field, click the folder icon. The Please Select a Reviewer document dialog box
is displayed. In the Folder field, click the drop-down and select Administration> Access
Management> Operators > Training and select your details from the Operators or groups
section.
24. Add a reviewer for target approval and click Ok.
ADOBE COPYRIGHT PROTECTED
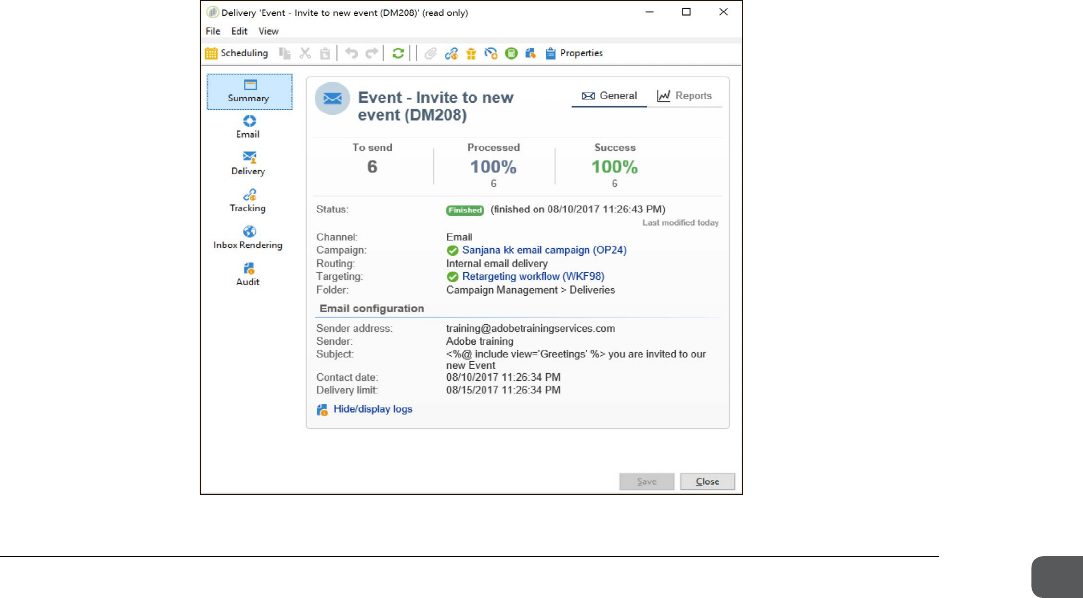
Chapter Five Executing Campaigns
Getting Started with Adobe Campaign v7 96
25. Click Save on the Delivery dialog box.
26. Click Save to save the workflow.
27. Click the Dashboard tab, in the Delivery section, select Submit content.
28. The Submit content confirmation dialog box is displayed.
29. Click OK to confirm the submission.
30. Click the Dashboard tab and click Approve Content. The Action on delivery dialog box opens.
31. In the Action on delivery dialog box, click Accept and select the Content approval button.
32. Click the Targeting and workflows tab.
33. Click the Start button to start the workflow.
34. Click the Dashboard tab, go to the Delivery section, and click Open.
35. Click Summary and click Approve targeting. The Action on delivery dialog box is
displayed.
36. Click Accept and click the Target approval button to approve the target.
Verify all tabs/pages - Email, Delivery and Audit to ensure your delivery looks OK/good. This is the
final step to stop the delivery.
37. If everything looks good, go to Summary and click Confirm delivery. The Start delivery
confirmation dialog box opens.
38. In the Start delivery confirmation dialog box, click Ok. You will receive an email. The
following screenshot shows the Summary page after the delivery.
ADOBE COPYRIGHT PROTECTED

Chapter Six Direct Mail, SMS, and Multichannel Delivery
Getting Started with Adobe Campaign v7 97
Chapter Six
Direct Mail, SMS, and Multichannel Delivery
Objectives
By the end of this chapter, you will be able to:
• Explain direct mail delivery
• Explain SMS delivery
• Explain multichannel campaigns
• Explain event-triggered campaigns
• Send a direct mail delivery
ADOBE COPYRIGHT PROTECTED
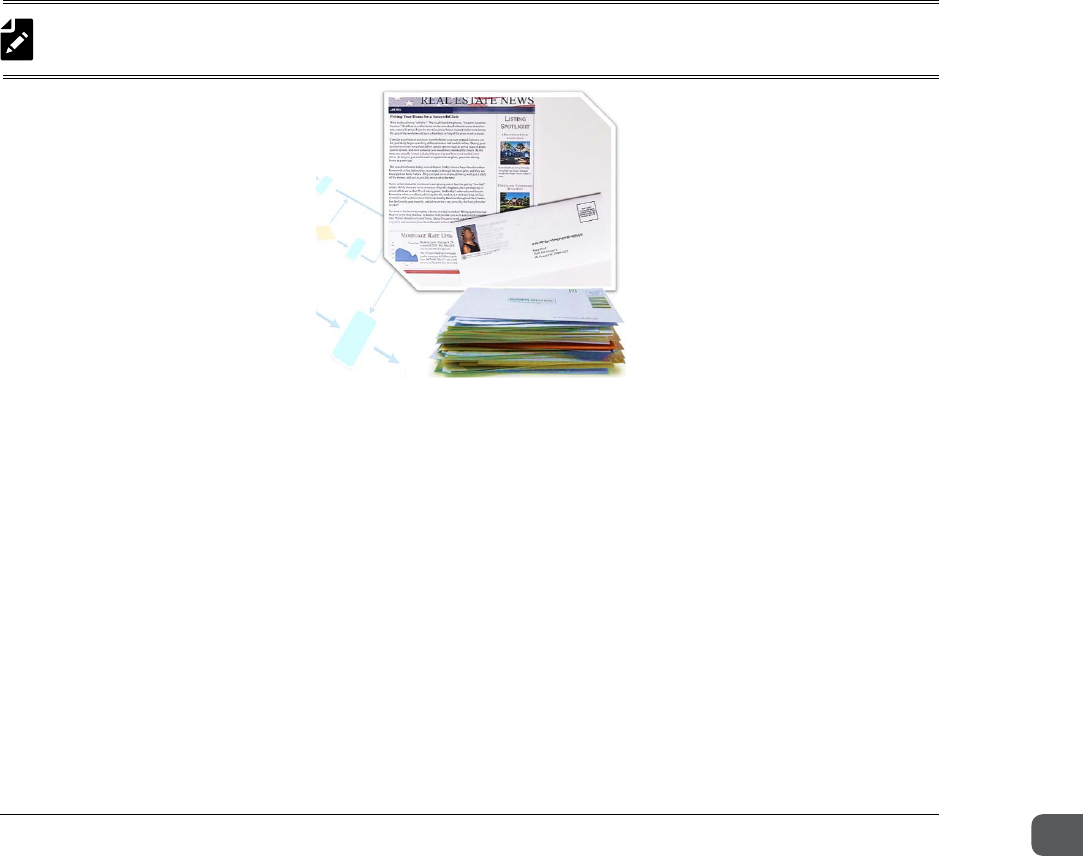
Chapter Six Direct Mail, SMS, and Multichannel Delivery
Getting Started with Adobe Campaign v7 98
Direct Mail Delivery
Direct mail is a marketing collateral sent through postal mail to the customer’s home or place of
business. Typically, direct mail consists of catalogs, coupons, and flyers.
In Adobe Campaign, you can generate an extraction file that includes the contact details of
recipients, such as first name, last name, street address, town/city, state, and zip/postal code. You
can also include other useful information, such as who is getting which version of the print.
You will then route your extraction file to the agency or department that sends out the delivery.
Generating Extraction Files
The process of generating the extraction file involves:
1. Creating the delivery
2. Defining the content – extraction
3. Confirming the delivery
a. Analyze the delivery
b. Send the delivery
NOTE: Depending on the template or content used, level of personalization required, and level of tar-
geting complexity, these steps may vary.
Managing Extraction Files
Within the direct mail delivery activity, you can:
• Schedule when the extraction file is to be generated. If you have a service provider modeled
in Adobe Campaign, the routing workflow is triggered when the extraction takes place.
• Configure to download the extraction file to your computer after the file is generated on the
server.
• Incorporate the date the file is extracted into the extraction file name.
• Format the extraction file by specifying the columns you want included, order of the columns,
and file format (.csv or text file).
ADOBE COPYRIGHT PROTECTED
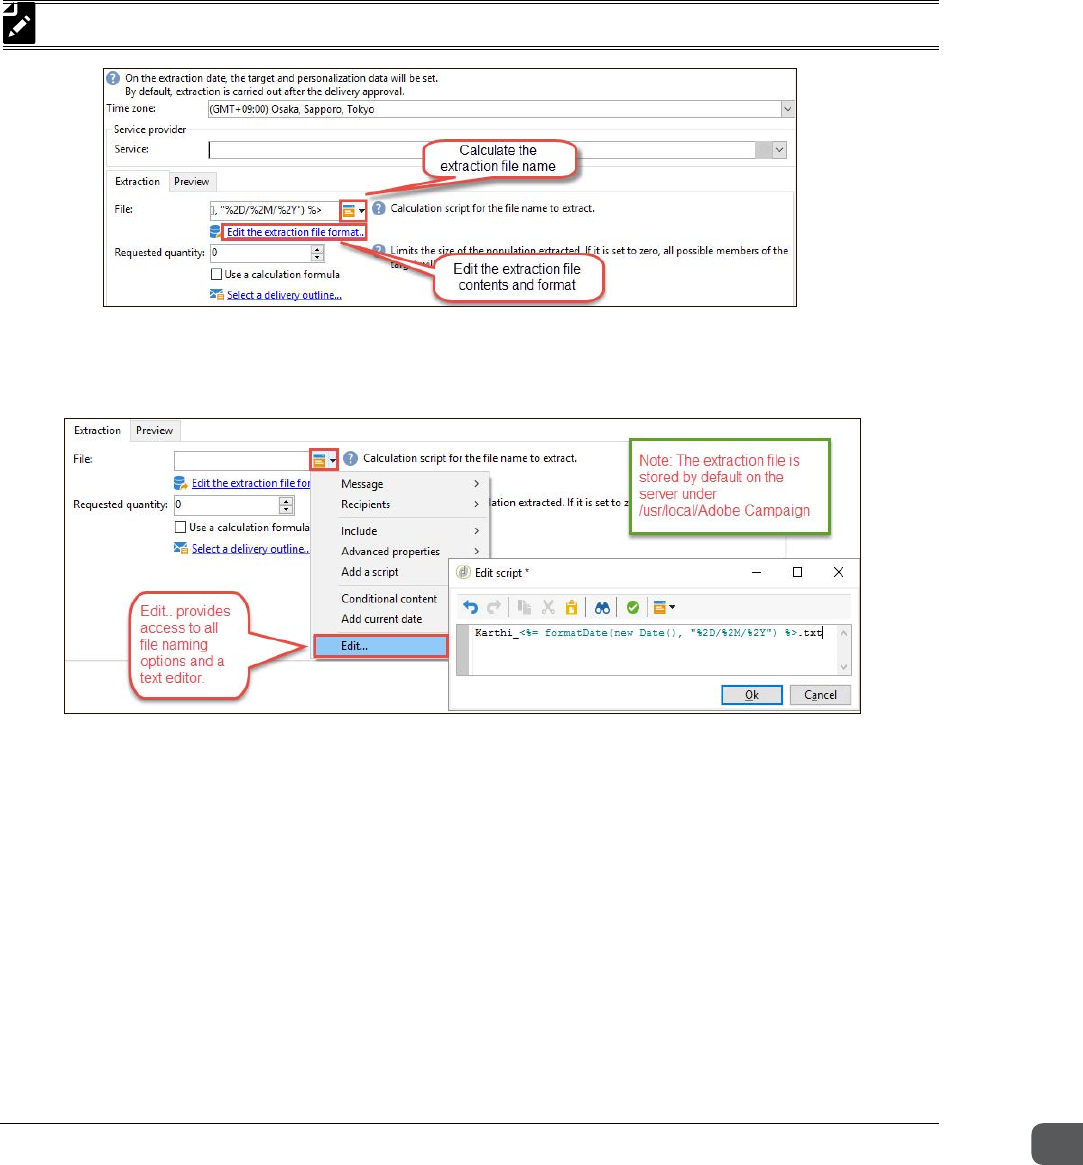
Chapter Six Direct Mail, SMS, and Multichannel Delivery
Getting Started with Adobe Campaign v7 99
Extraction File Format
Typically, the file format is part of the template, so you do not need to configure the file format each
time you execute a direct mail campaign. The template is set up based on how your fulfillment
provider wants the information provided to them. For example, there might be one template for
each direct mail provider. You could also name the extraction file and include the date on the direct
mail activity as shown in the following screenshot.
The extraction file is stored on the server, and if you want to download it, you can specify the location.
You will, however, need to ensure the directory is writable.
SMS Delivery
Adobe Campaign helps you perform mass, personalized delivery of Short Message Service (SMS)
messages. The recipient profiles must contain at least a mobile telephone number to execute this
delivery.
For SMS campaigning, you need:
• An external account specifying a connector and type of message. The available connectors
are NetSize, SMPP Generic (SMPP version 3.4 supporting binary mode), Sybase365 (SAP SMS
365), mBlox and Tele2, and O2.
• A delivery template that references the external account.
NOTE: If you already named the extraction file on the Advanced tab, this information will carry over.
ADOBE COPYRIGHT PROTECTED
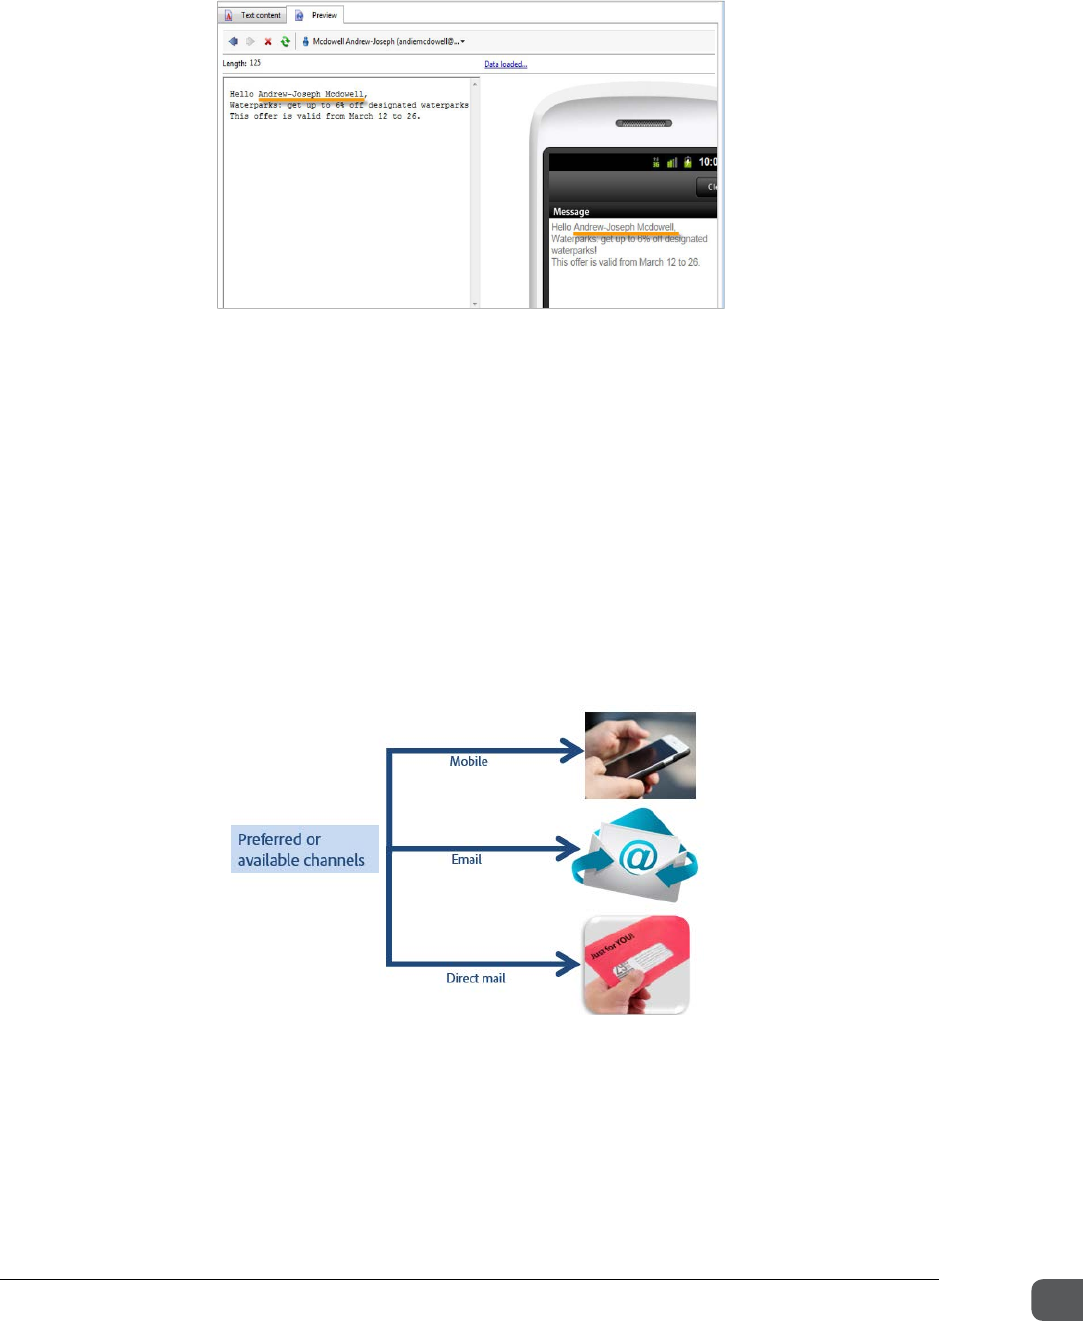
Chapter Six Direct Mail, SMS, and Multichannel Delivery
Getting Started with Adobe Campaign v7 100
The following screenshot depicts the SMS delivery preview mode:
The length of SMS messages is limited to 160 characters if the Latin-1 (ISO-8859-1) code page is
used. If the message is written in Unicode, it must not exceed 70 characters. When personalization
fields or conditional content fields are present, the size of the message varies from one recipient to
another. You must evaluate the length of the message after personalization is carried out.
When you launch the analysis, the length of messages is checked, and a warning is displayed in the
event of character overflow.
Multichannel Campaigns
In a multichannel campaign, a single marketing communication utilizes multiple channels based
on, for example, the customer’s preferred channel or on an available channel that might have a
wider audience reach.
After initial segmentation, you can segment by channel to:
• Reach a wider audience by using available channels
• Target customers through their preferred channel
ADOBE COPYRIGHT PROTECTED
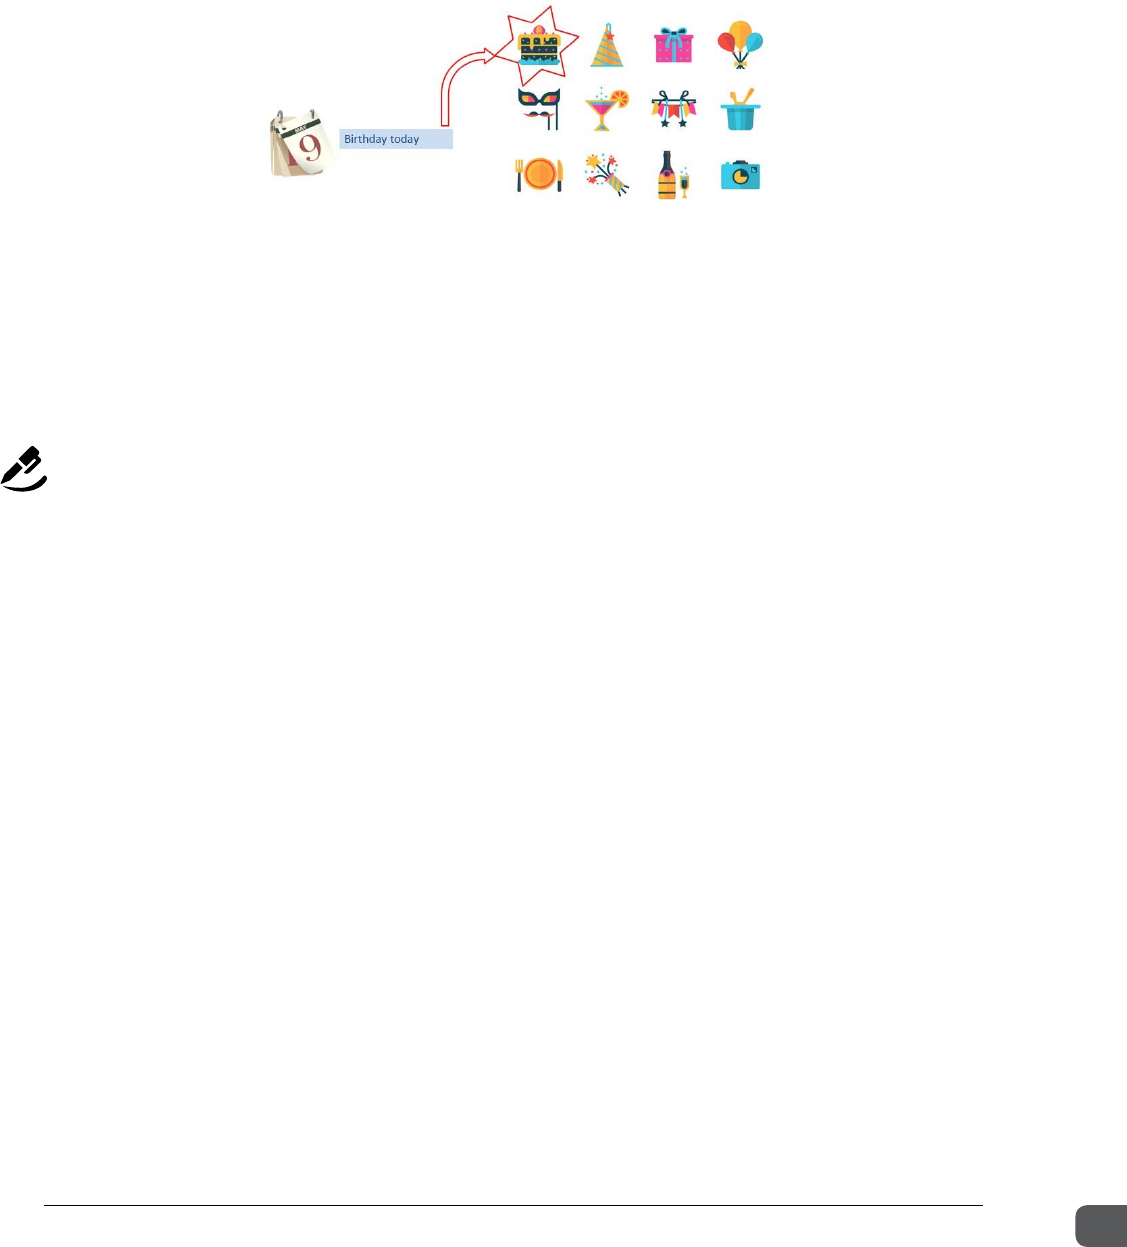
Chapter Six Direct Mail, SMS, and Multichannel Delivery
Getting Started with Adobe Campaign v7 101
Event-triggered Campaigns
Adobe Campaign enables you to design event-triggered campaigns for discrete one-time events,
such as birthdays or a purchase. A birthday is a discrete event because it occurs on a specific day.
Another concept for a trigger campaign could be a transition. For example, you could target
prospects after they convert to a client/member or reach a certain level of their membership. After
they become a client, they are hopefully still a client the next day, and you would want to ensure to
only target them one time – when you transition or qualify prospects. You should not repeatedly
target them because customers may become annoyed when they receive a welcome email every
day.
Exercise 7 - Send a direct mail delivery
In this exercise, you will create a direct mail delivery, edit the delivery, format the extraction files, and
execute the delivery.
Task 1: Create a direct mail delivery
Configure approvals and control group, seed addresses for a direct mail delivery, and design the
campaign workflow.
1. In the Explorer view, click Campaign Management. Select the plan you created and select
Acquisition.
2. In the list view, click the New icon. The New marketing campaign dialog box displays.
3. In the New marketing campaign dialog box:
a. In the Template field, click the drop-down arrow and select the template. For this
exercise, keep the default template, New campaign (opEmpty).
b. In the Label field, enter <Your name> direct mail campaign. For example: Angie direct
mail campaign
c. In the Main channel field, select Direct Mail.
ADOBE COPYRIGHT PROTECTED
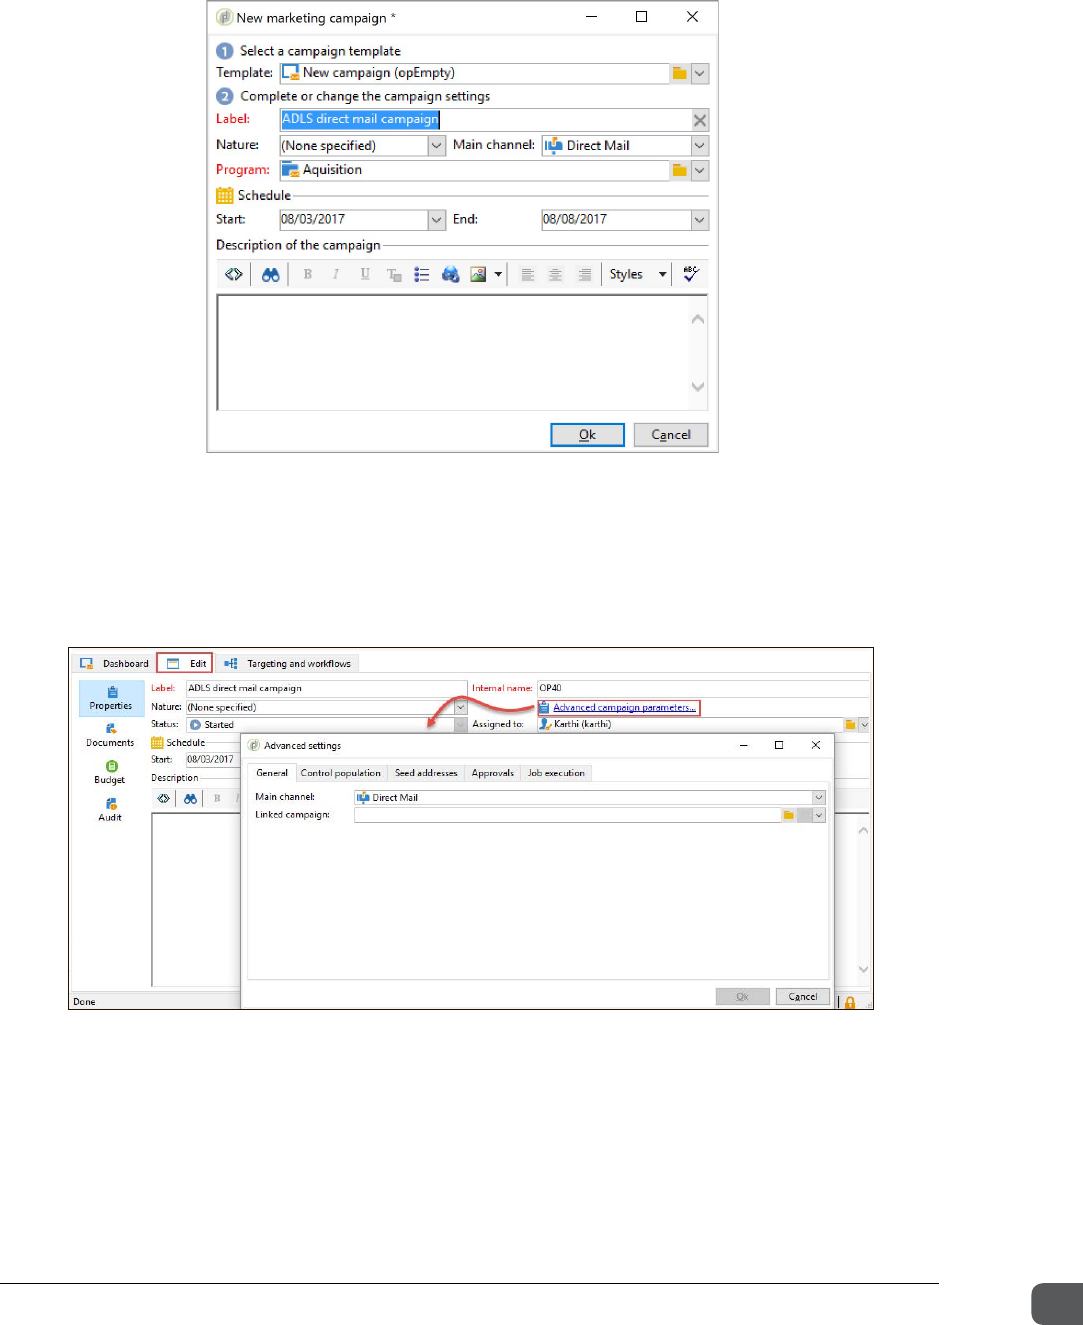
Chapter Six Direct Mail, SMS, and Multichannel Delivery
Getting Started with Adobe Campaign v7 102
d. Keep the default start and end dates.
4. Click Ok. The newly created campaign is added to the list view.
5. Double-click the campaign. Your newly created campaign opens in its own workspace.
6. Click the Edit tab, and then click Advanced campaign parameters. The Advanced settings
dialog box opens.
ADOBE COPYRIGHT PROTECTED
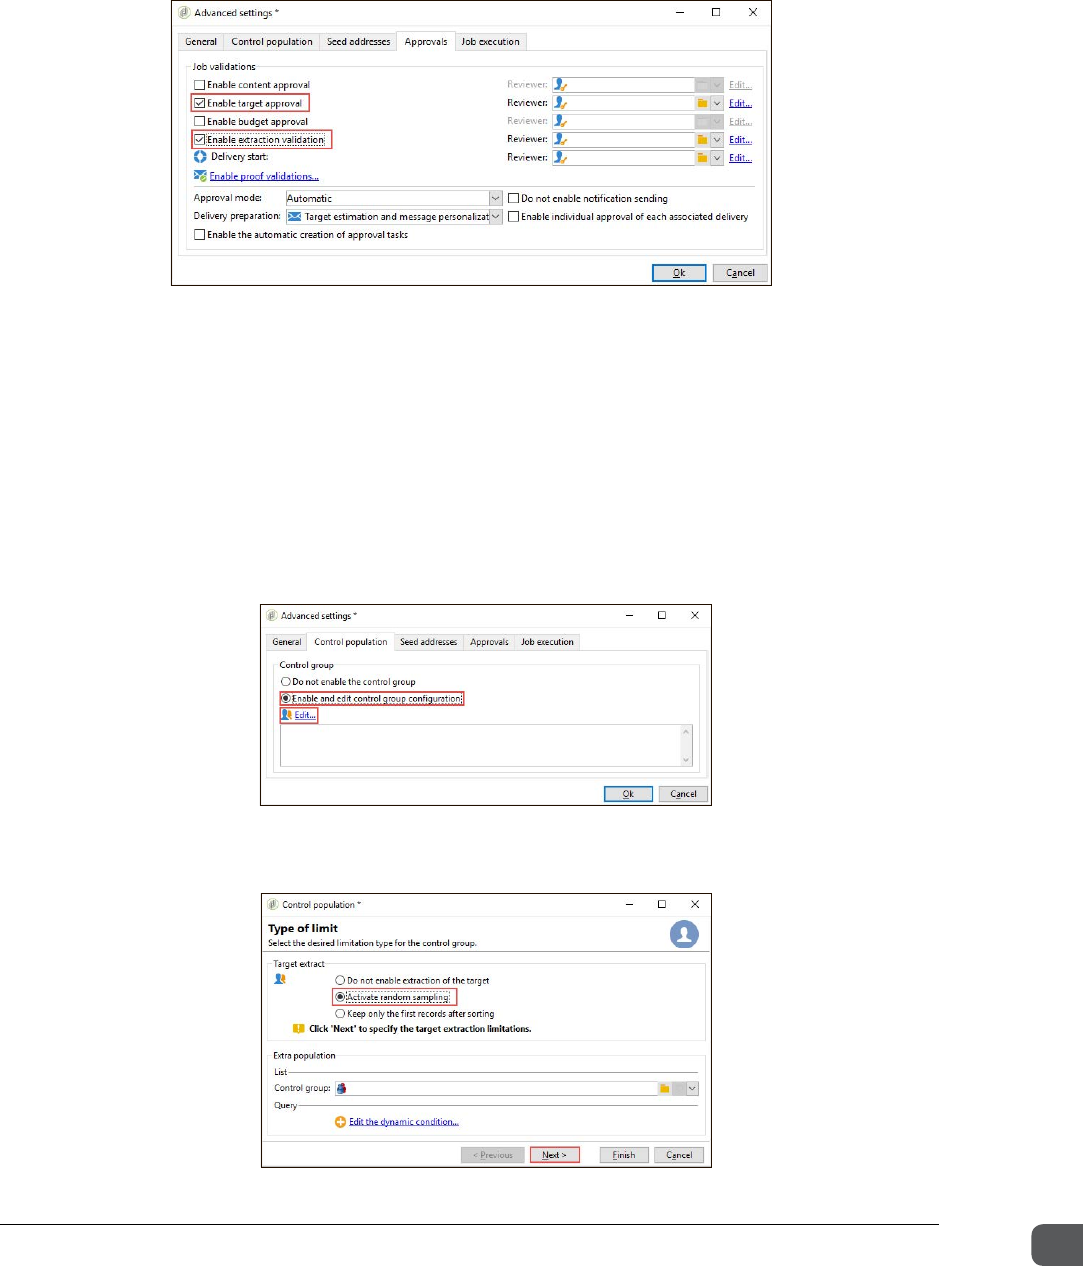
Chapter Six Direct Mail, SMS, and Multichannel Delivery
Getting Started with Adobe Campaign v7 103
7. In the Advanced settings dialog box, click the Approvals tab and verify all checkboxes in
the Job validations section are cleared except for Enable target approval and Enable
extraction validation.
8. Click the folder icon parallel to the Enable target approval checkbox to open the Please
select a 'Reviewer' document dialog box and select your name as the reviewer. You may have
to explore different operators or groups to find your name.
9. Keep the Advanced Settings dialog box open.
10. Click the folder icon parallel to the Enable extraction validation checkbox to open the Please
select a 'Reviewer' document dialog box and select your name as the reviewer.
11. Click Ok.
12. Click the Control population tab and select Enable and edit control group configuration.
13. Click Edit. The Control population dialog box opens.
14. In the Target extract section, select Activate random sampling.
15. Click Next.
ADOBE COPYRIGHT PROTECTED
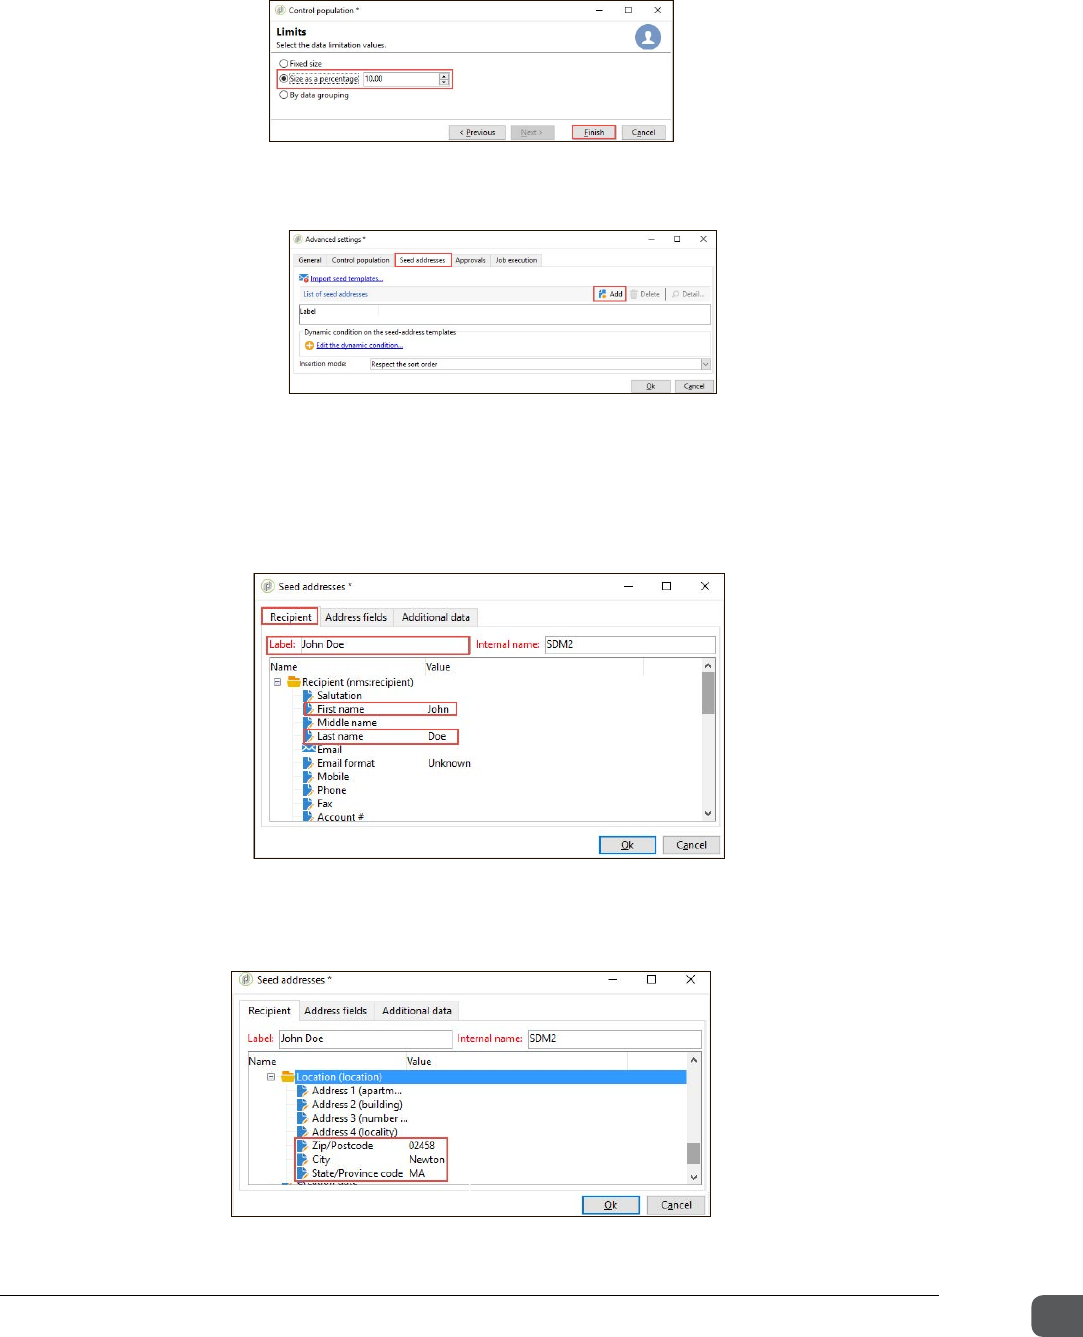
Chapter Six Direct Mail, SMS, and Multichannel Delivery
Getting Started with Adobe Campaign v7 104
16. Select Size as a percentage, and enter 10, as shown below:
17. Click Finish.
18. Click the Seed addresses tab, and click Add.
19. On the Recipients tab, enter John Doe in the Label field. Refer to the screenshot in the next
step.
20. Click the Value column to enter values for the lines that correspond to First name and Last
name. For example, click the Value column for First name and enter John.
21. Scroll down and enter the values (in the screenshot) for the Location: Zip/Postcode, City, and
State/Province code.
ADOBE COPYRIGHT PROTECTED
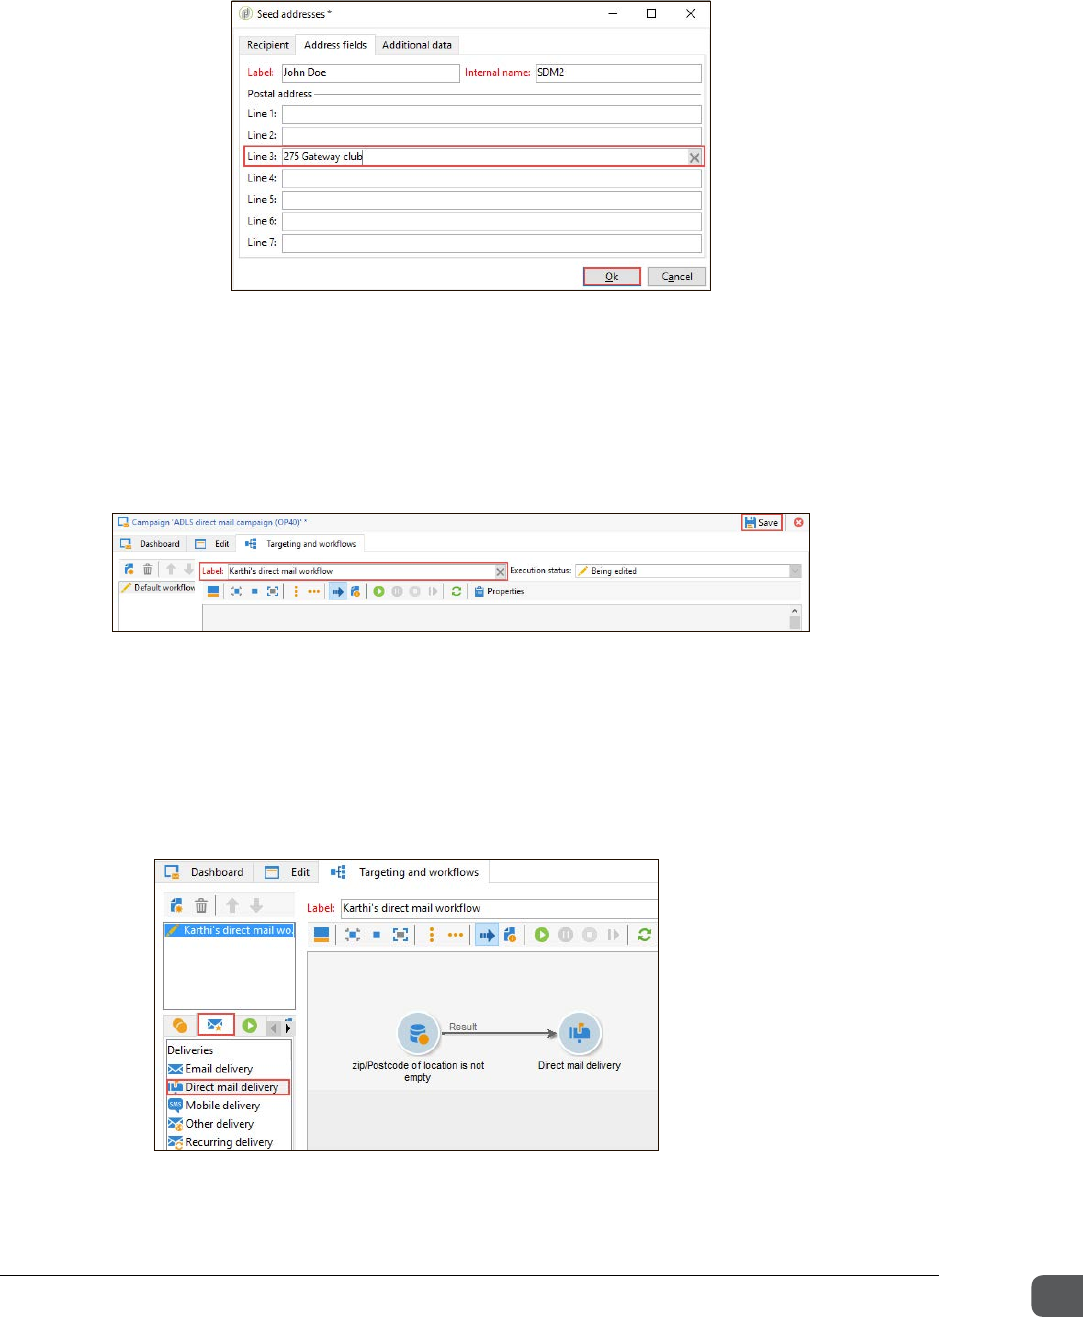
Chapter Six Direct Mail, SMS, and Multichannel Delivery
Getting Started with Adobe Campaign v7 105
22. Click the Address fields tab and enter the street address on Line 3.
23. Click OK on the Seed addresses dialog box and then click Ok to close the Advanced
settings dialog box.
24. Click Save in the upper right to save your campaign.
25. Click the Targeting and workflows tab of the campaign.
26. In the Label field, rename the default workflow to <your name>'s direct mail workflow.
27. Click Save.
28. Add a Query activity to target recipients whose Zip/Postcode (location/@zipCode) is not
empty.
29. Click Finish and click Ok.
30. Click the Deliveries icon, drag a Direct mail delivery activity onto the workflow diagram, and
place it in sequence after the query activity.
ADOBE COPYRIGHT PROTECTED
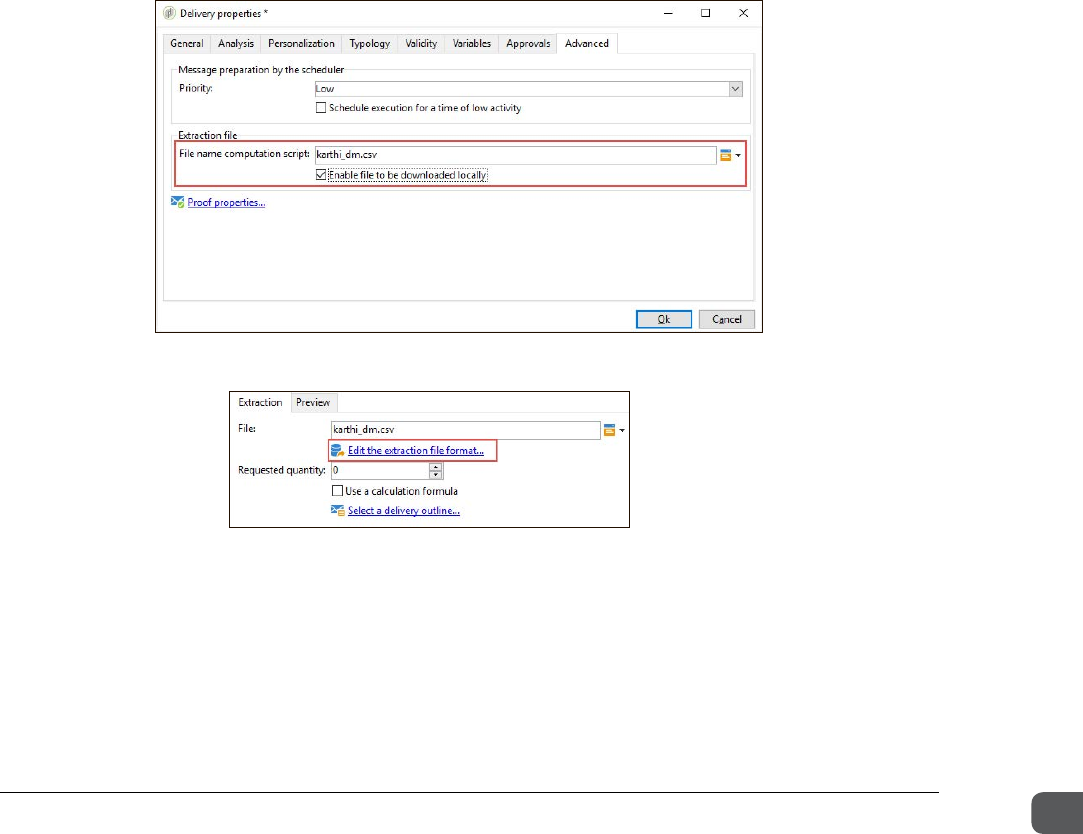
Chapter Six Direct Mail, SMS, and Multichannel Delivery
Getting Started with Adobe Campaign v7 106
31. Double-click the Direct mail delivery activity. In the Label field, enter <Your name>'s direct
mail delivery.
32. Click Continue.
33. Click Save to save the workflow.
Task 2: Edit the delivery and format the extraction le
Edit a direct mail delivery. This exercise shows you how to configure the extraction filename and
format the extraction file. You will also enable an extraction file download.
1. Go to the Campaigns dashboard, and open the delivery activity you just created (<your
name>'s direct mail delivery) by double-clicking it.
2. Click Properties, and then click the Advanced tab.
3. In the Extraction File area, for the File name computation script field, enter: <your
name>_dm.csv
For example: joe_dm.csv
4. Select Enable file to be downloaded locally, and then click Ok.
5. Back on the delivery window, click Edit the extraction file format.
6. In the Data to extract dialog box, scroll down in the Recipient delivery log attribute
column and click "+" to expand the Recipient node.
7. Double-click First name and Last name to add them to the Output columns.
ADOBE COPYRIGHT PROTECTED
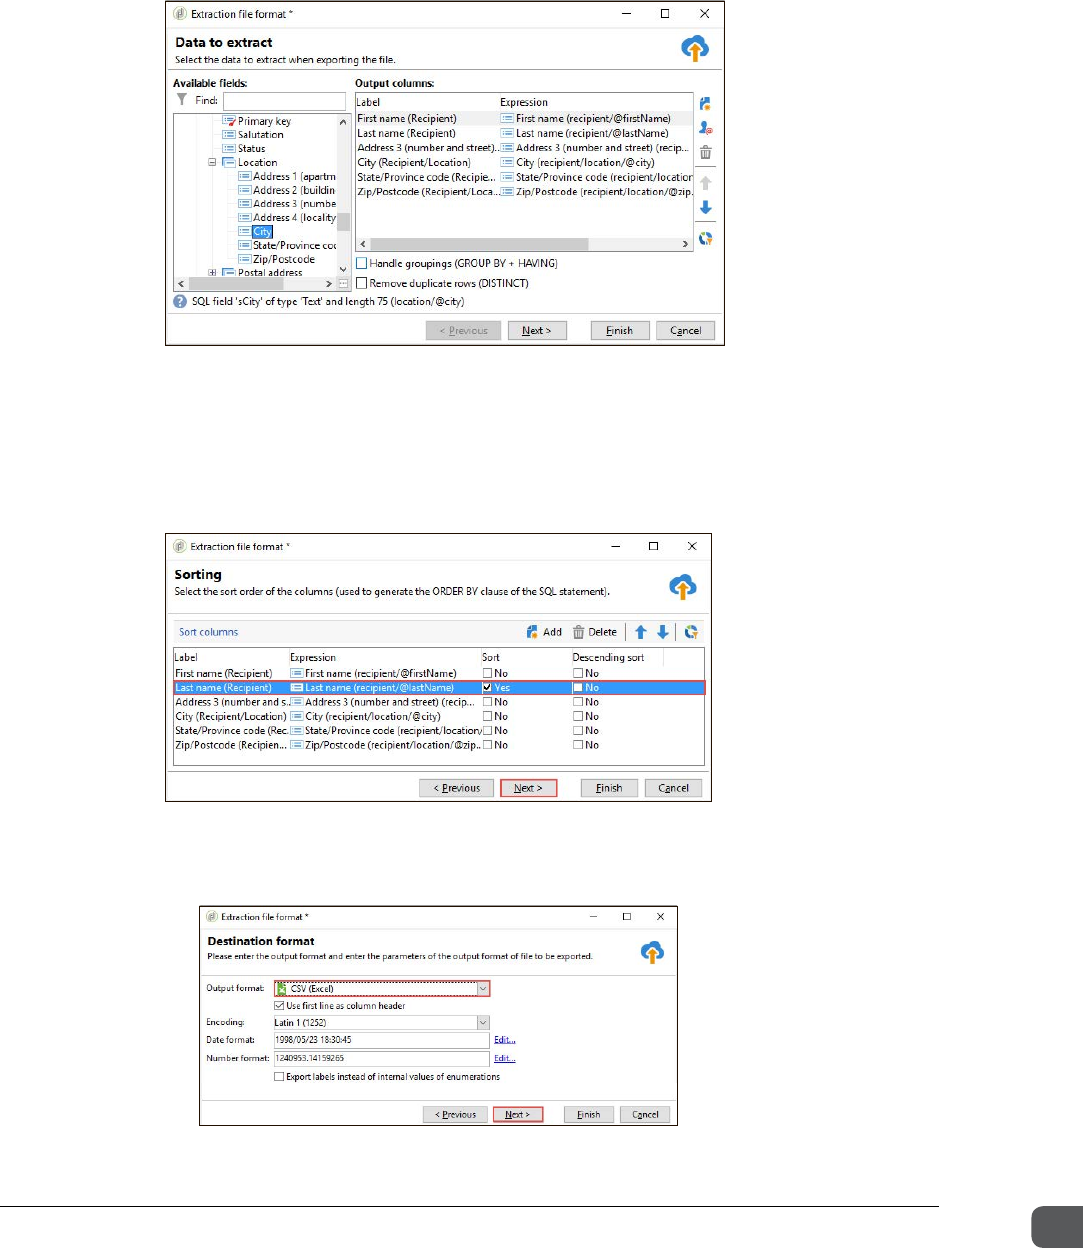
Chapter Six Direct Mail, SMS, and Multichannel Delivery
Getting Started with Adobe Campaign v7 107
8. In the Recipient node, click "+" to expand the Location subnode.
9. Double-click Address3 (number and street), City, State/Province code and Zip/Postcode
to move to Output columns. The final set of output columns should look like:
10. Click Next.
11. On the Sorting screen, select the Sort checkbox in the Last name(Recipient) row. The sort
changes from No to Yes. This is required if the seed address is based on the sort order.
Optionally, reorder output columns.
12. Click Next.
13. In the Destination format dialog box, change the Output format to CSV (Excel).
ADOBE COPYRIGHT PROTECTED
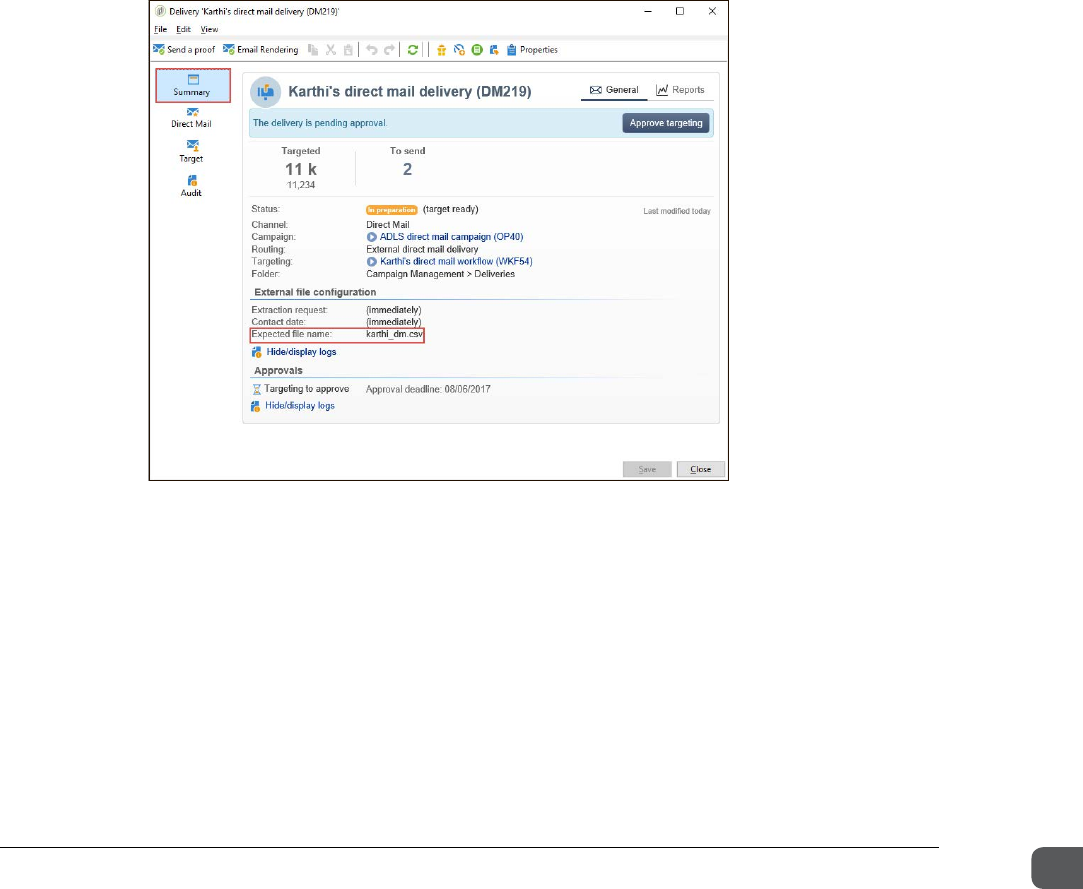
Chapter Six Direct Mail, SMS, and Multichannel Delivery
Getting Started with Adobe Campaign v7 108
14. Click Next.
15. In the Data formatting dialog box, click Finish.
16. Click Ok, then click Save.
Task 3: Execute the direct mail delivery
Execute a direct mail delivery and download the extraction file.
1. Start the workflow by clicking the green Start button..
2. Go to the campaign dashboard.
3. Open the direct mail delivery (<Your name>'s Direct Mail Delivery).
4. View the analysis results by clicking Audit in the left navigation pane.
5. Click the Causes of exclusions tab and examine the causes of exclusions.
6. View the output file name by clicking the Summary tab in the left navigation pane.
ADOBE COPYRIGHT PROTECTED
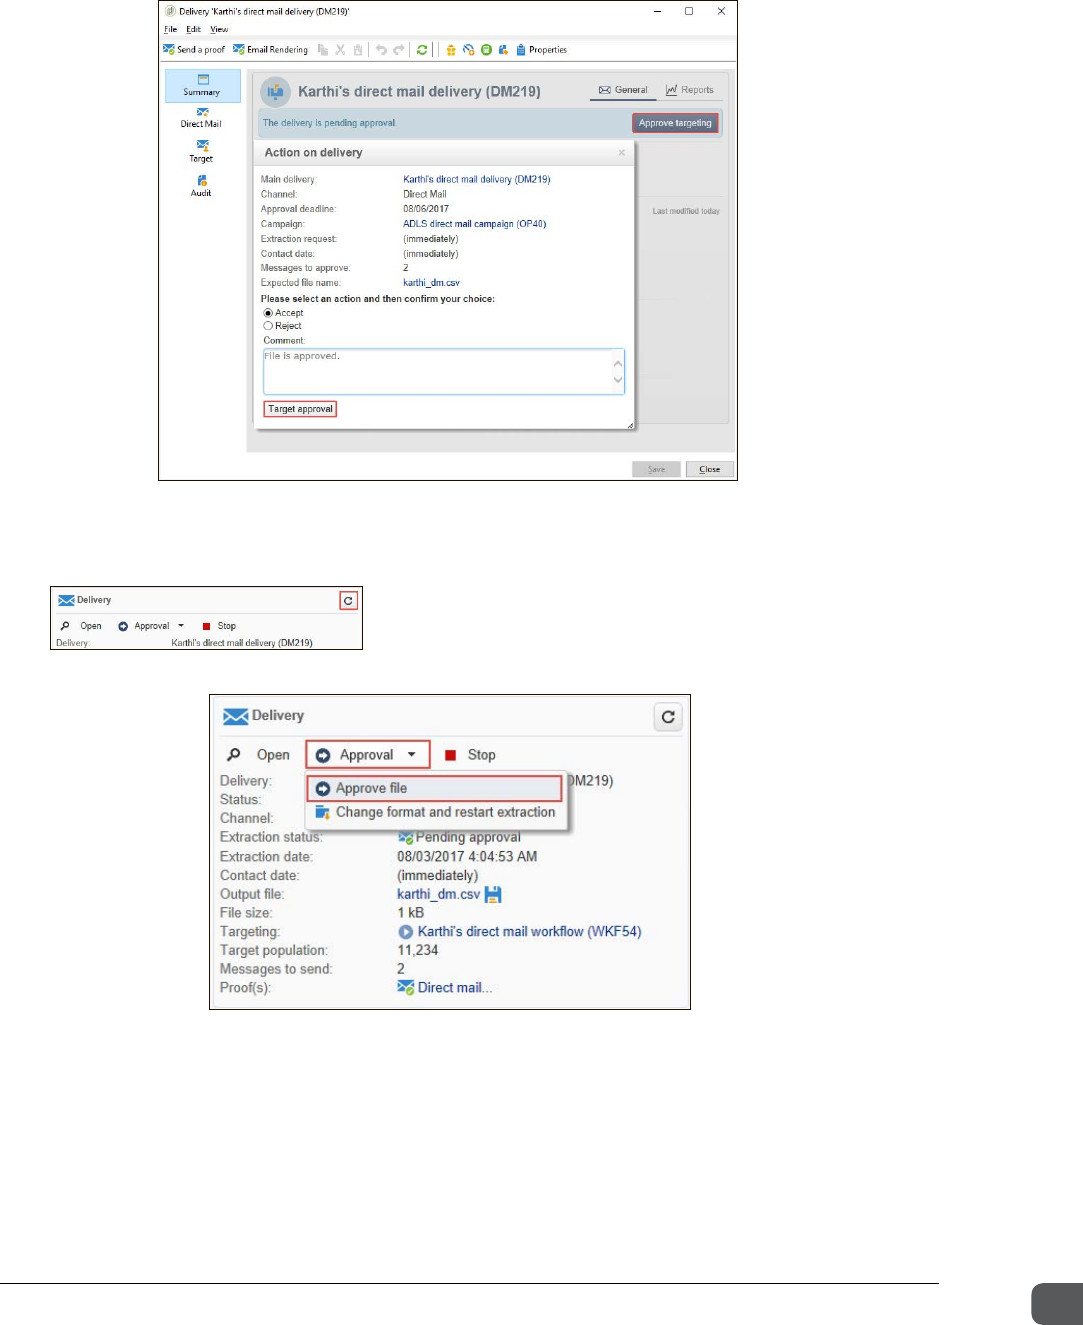
Chapter Six Direct Mail, SMS, and Multichannel Delivery
Getting Started with Adobe Campaign v7 109
7. Click Approve targeting in the upper right.
8. When the Action on delivery dialog opens, click Target approval, and close the delivery.
9. Refresh the dashboard.
10. Click Approve file.
11. In the Action on delivery dialog box, select File Approval to approve the extraction file.
12. Refresh the dashboard.
ADOBE COPYRIGHT PROTECTED
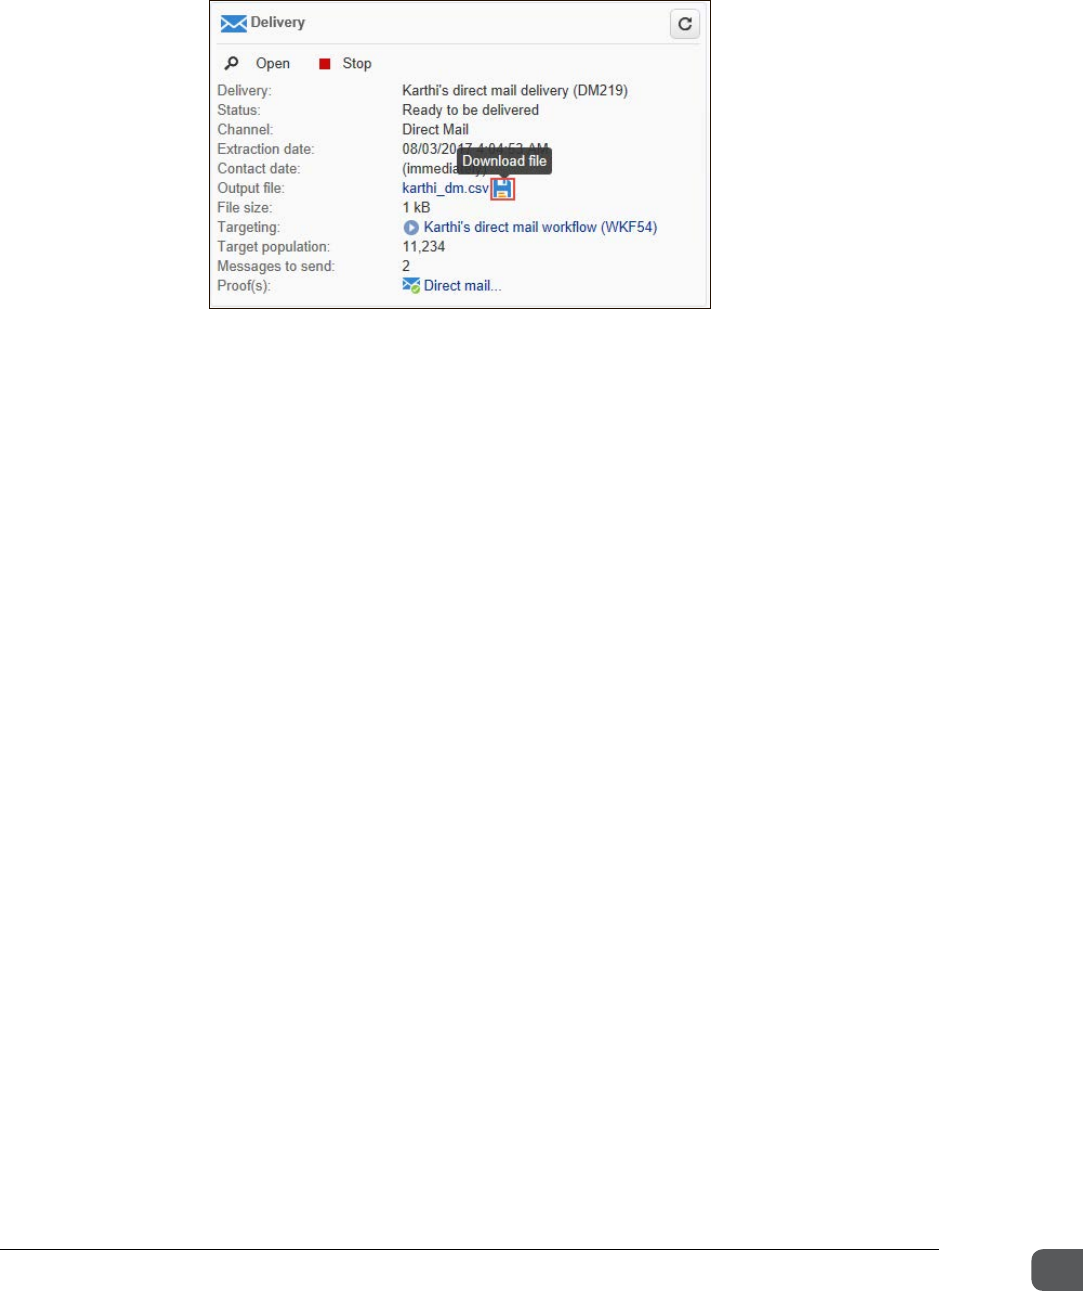
Chapter Six Direct Mail, SMS, and Multichannel Delivery
Getting Started with Adobe Campaign v7 110
13. In the Delivery area, click the Download file icon to download the extraction file. The
Download files of the delivery dialog box opens.
14. In the Download files of the delivery dialog box, in the Local name field, click the folder icon
and select a location, then click Save. The location is added to the Download files of the
delivery dialog box.
15. In the Download files of the delivery dialog box, click Download.
16. After downloading the file successfully, close the window and view the local file.
17. Look for the seed address you provided.
ADOBE COPYRIGHT PROTECTED
