HERO5Black UM ENG REVA Web
User Manual: Rent a GoPro Hero 5 Black - Kit at LensProToGo.com
Open the PDF directly: View PDF  .
.
Page Count: 47

1
USER MANUAL

JOIN THE GOPRO MOVEMENT
twitter.com/GoPro
facebook.com/GoPro youtube.com/GoPro
instagram.com/GoPro
To download this user manual
in a different language, visit
gopro.com/help.
Pour télécharger ce manuel de
l’utilisateur dans une autre langue,
rendez-vous sur gopro.com/help.
Wenn Sie dieses Benutzerhandbuch
in einer anderen Sprache
herunterladen möchten, besuchen
Sie gopro.com/help.
Per scaricare questo manuale
utente in un’altra lingua, visita
gopro.com/help.
Para descargar este manual de
usuario en otro idioma, visite
gopro.com/help
Para descargar este manual de
usuario en un idioma diferente,
gopro.com/help.
Para baixar este manual do
usuário em outro idioma, acesse
gopro.com/help.
Om deze gebruikershandleiding
in een andere taal te downloaden,
ga naar gopro.com/help.
Aby pobrać ten podręcznik
użytkownika w innym języku,
odwiedź stronę gopro.com/help.
Ladda ner den här
användarhandboken på ett annat
språk på gopro.com/help.
Чтобы загрузить это руководство
пользователя на другом
языке, посетите страницу
gopro.com/help.
このユー ザーマニュアル の 他 言
語 版 をダ ウン ロ ード する には 、
gopro.com/helpに アクセ スしてく
ださい。
若要下載其他語言版本的使用說明
書,請 前 往: gopro.com/help。
如需下载本用户手册的其他语言版
本,请访问 gopro.com/help。
이 사용자 설명서의 다른 언어
버전은 gopro.com/support에서
다운로드하십시오.

Your HERO5 Black 6
Getting Started 8
Navigating Your GoPro 16
Map of Modes and Settings 20
QuikCapture 22
Capturing Video and Photos 24
Controlling Your GoPro with Your Voice 27
Playing Back Your Content 30
Using Your Camera with an HDTV 33
Connecting to the Capture App 35
Offloading Your Content 36
Video Mode: Capture Modes 39
Video Mode: Settings 41
Video Mode: Advanced Settings 48
Photo Mode: Capture Modes 50
Photo Mode: Settings 52
Photo Mode: Advanced Settings 54
Time Lapse Mode: Capture Modes 56
Time Lapse Mode: Settings 58
TABLE OF CONTENTS
Time Lapse Mode: Advanced Settings 62
Advanced Controls 63
Connecting to an Audio Accessory 73
Customizing Your GoPro 74
Important Messages 78
Resetting Your Camera 79
Mounting 80
Removing the Side Door 85
Maintenance 87
Battery Information 88
Troubleshooting 91
Customer Support 93
Trademarks 93
Regulatory Information 93
TABLE OF CONTENTS
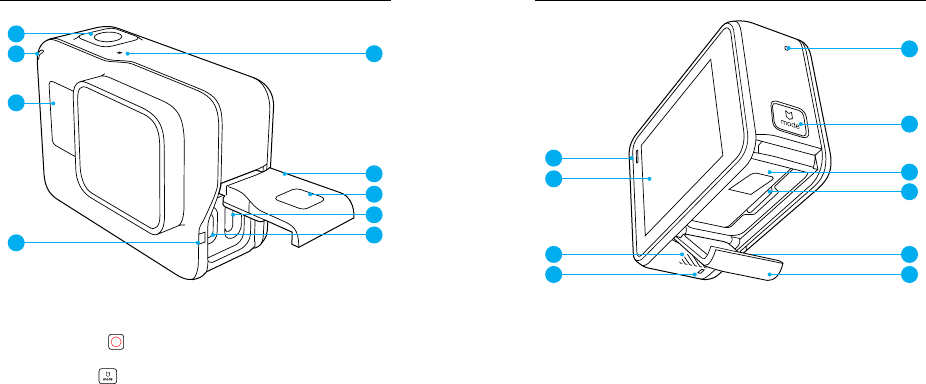
6 7
1. Shutter Button [ ]
2. Camera Status Screen
3. Mode Button [ ]
4. Side Door
5. USB-C Port
6. Micro HDMI Port
(cable not included)
7. Speaker
8. Battery Door
9. Latch Release Button
YOUR HERO5 BLACK
10. Battery
11. microSD Card Slot
12. Camera Status Light
13. Touch Display
14. Microphone
YOUR HERO5 BLACK
6
5
4
9
14
1
12
14
12
13
12
7
2
3
14
8
9
10
11
8 9
Welcome to your new HERO5 Black. To capture video and photos, you need
a microSD card (sold separately).
MICROSD CARDS
Use brand name memory cards that meet these requirements:
• microSD, microSDHC, or microSDXC
• Class 10 or UHS-I rating
• Capacity up to 128GB
For a list of the recommended microSD cards, visit
gopro.com/workswithgopro.
If the memory card becomes full during recording, your camera stops
recording and displays FULL on the touch display.
NOTICE: Use care when handling memory cards. Avoid liquids, dust and
debris. As a precaution, power off the camera before inserting or removing
the card. Check manufacturer guidelines regarding use in acceptable
temperature ranges.
REFORMATTING YOUR MICROSD CARD
To keep your microSD card in good condition, reformat it on a regular basis.
Reformatting erases all of your content, so be sure to offload your photos
and videos first.
To reformat your card, swipe down, then tap Preferences > Format SD
Card > Delete.
GETTING STARTED
CHARGING THE BATTERY
For the best experience with your new camera, we recommend fully
charging the battery before first use.
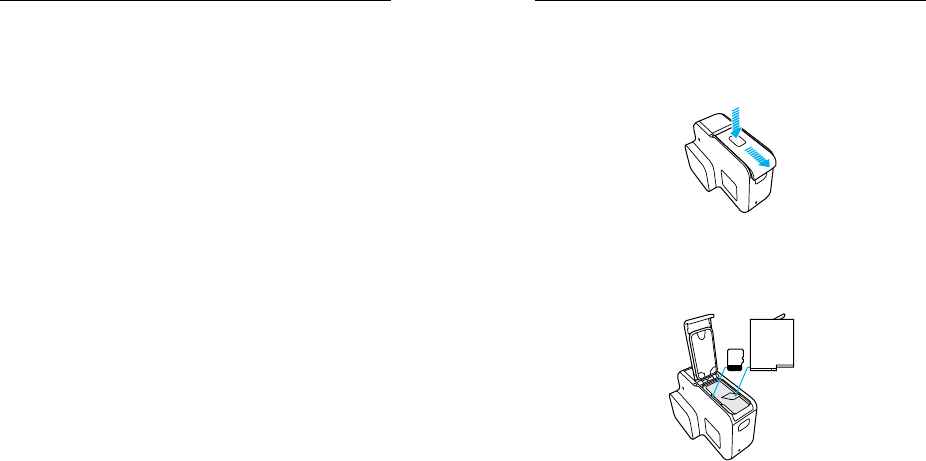
1. Hold down the Latch Release button on the battery door, then slide
the door open.
2. Insert a microSD card with the label facing the battery (microSD card is
not required for charging).
Note: To remove the card, press it into the slot with your fingernail and it will
pop out.
3. Insert the battery, then close the door.
GETTING STARTED
10 11
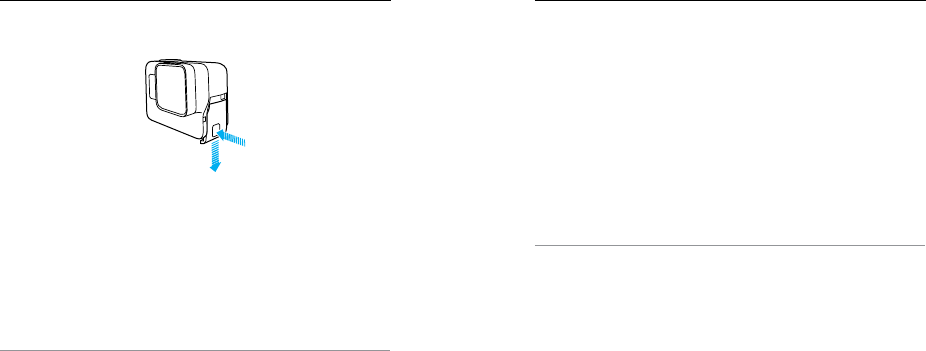
4. Hold down the Latch Release button on the side door, then slide the
door open.
5. Connect the camera to a computer or other USB charging adapter
using the included USB-C cable.
6. Power off the camera. The camera status light turns on during charging
and turns off when charging is complete.
When charging with a computer, be sure that the computer is
connected to a power source. If the camera status light does not turn
on, use a different USB port.
The battery charges to 100% in about 3 hours. For more information, see
Battery Information (page 88).
PRO TIP: For fastest charging, use GoPro’s Supercharger (sold
separately). You can charge your camera with a USB-compatible wall
charger or auto charger.
GETTING STARTED GETTING STARTED
UPDATING YOUR CAMERA SOFTWARE
To get the latest features and best performance from your GoPro, make
sure your camera is always using the most current software. When you
connect to the Capture app or Quik for desktop, you are automatically
notified if an update is available.
1. Download these apps:
• Capture app from the Apple© App Store© or Google Play™
• Quik for desktop from gopro.com/apps
2. Connect your camera to your smartphone/tablet or computer. If an
update is available, the app provides instructions for installing it.
You can also update your camera manually using the microSD card and a
card reader/adapter (sold separately). For details and information about
the latest software version, visit gopro.com/update.
PRO TIP: To see your current software version, swipe down from the main
screen, then tap Preferences > About This GoPro.
12 13
GETTING STARTED
POWERING ON + OFF
To Power On:
Press the Mode button [ ]. The camera beeps several times while the
camera status lights flash. When information appears on the touch display
or the camera status screen, your camera is on.
To Power Off:
Press and hold the Mode button for two seconds. The camera beeps
several times while the camera status lights flash.
WARNING: Use caution when using your GoPro as part of
your active lifestyle. Always be aware of your surroundings to
avoid injury to yourself and others.
Abide by all local laws when using your GoPro and related
mounts and accessories, including all privacy laws, which may
restrict recording in certain areas.
GETTING STARTED
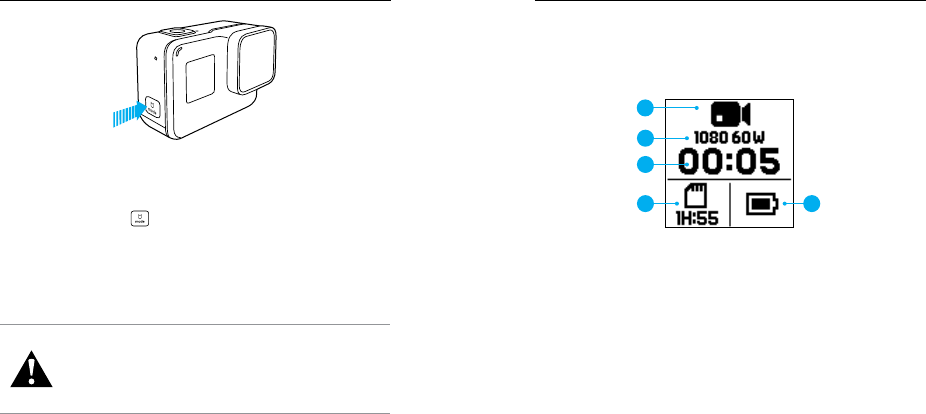
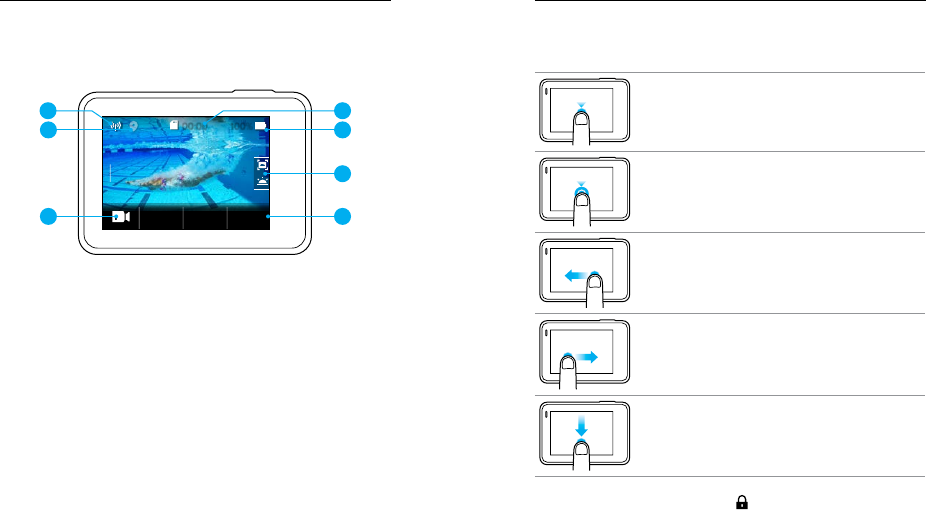
CAMERA STATUS SCREEN
The camera status screen on the front of the camera contains the following
information about modes and settings so you can see the basics for your
current setting at a glance:
1. Camera Mode
2. Settings
3. Number of Files Captured
4. Remaining microSD Card Storage
5. Battery Status
Note: The icons and settings that appear on the camera status screen vary by mode.
Those shown above are for Video mode.
1
2
3
4 5
14 15
GETTING STARTED
TOUCH DISPLAY
The touch display on the back of the camera contains the following
information about modes and settings on the main screen. The settings that
appear vary by mode.
100%00:00
1080
1080
60
60
RES
RES
FPS
FPS
WIDE
WIDE
FOV
FOV
1 3
4
6
7
5
2
1. Wireless Status
2. GPS Status
3. Time Remaining/Photos Taken
4. Battery Status
5. Camera Mode
6. Settings
7. Advanced Settings (icons)
Note: The touch display does not work under water.
GETTING STARTED
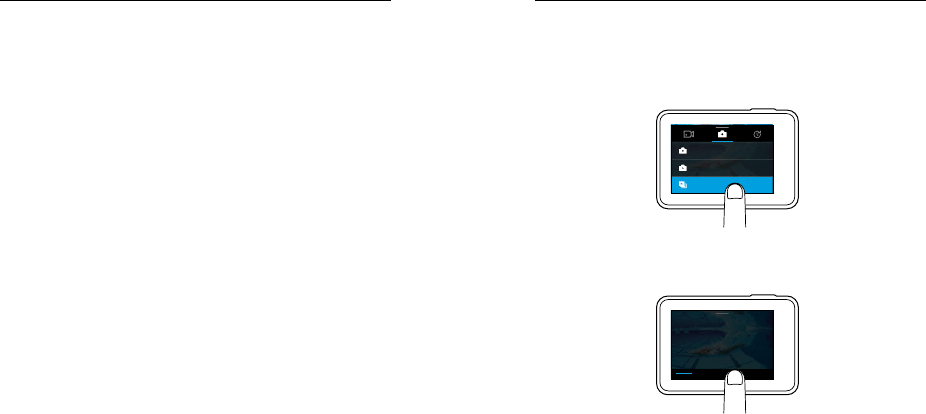
TOUCH DISPLAY GESTURES
Use these gestures to navigate the touch display. When swiping, swipe
from the edge of the screen.
Tap
Selects an item, turns a setting on/off.
Press and Hold
Accesses Exposure Control setting.
Swipe Left
Accesses advanced settings (if available) for the
current mode.
Swipe Right
Displays your media.
Swipe Down
From the main screen, opens the Connect and
Preferences menus. Otherwise, returns to the main
screen.
PRO TIP: To lock the touch display to prevent accidental input, swipe
down from the main screen, then tap [ ]. Tap this icon again to unlock it.
16 17
MODES
Your HERO5 Black contains three camera modes: Video, Photo, and Time
Lapse.
Video
Video mode contains three capture modes: Video, Video + Photo, and
Looping. For descriptions of each capture mode, see Video Mode: Capture
Modes (page 39).
Photo
Photo mode contains three capture modes: Photo, Burst, and Night.
For descriptions of each capture mode, see Photo Mode: Capture Modes
(page 50).
Time Lapse
Time Lapse mode contains three capture modes: Time Lapse Video, Time
Lapse Photo, Night Lapse Photo. For descriptions of each capture mode,
see Time Lapse Mode: Capture Modes (page 56).
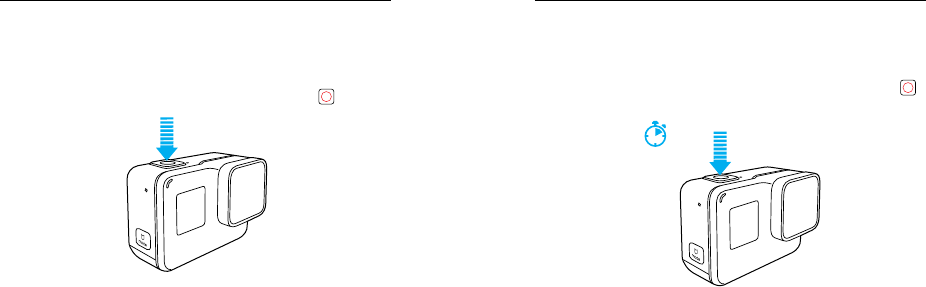
For a visual map of your GoPro's modes and settings, see Map of Modes
and Settings (page 20).
NAVIGATING YOUR GOPRO
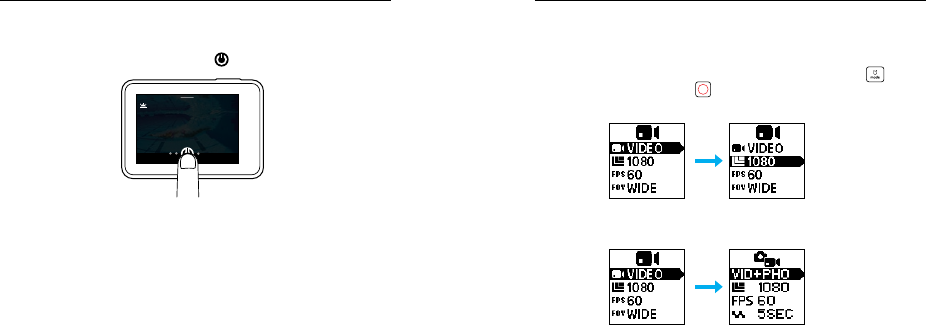
NAVIGATING WITH THE TOUCH DISPLAY
1. From the main screen, tap the icon in the lower left corner.
2. Tap one of the mode icons at the top of the screen (Video, Photo, or
Time Lapse).
3. Tap a capture mode in the list below it.
NIGHT
PHOTO
BURST
4. On the main screen, tap the setting that you want to change.
5. Tap a new option (available options are white). The camera returns you
to the main screen.
1080
RESOLUTION
RESOLUTION
1080
960
720
480
4k 2.7k 2.7k/4:3 1440
@ 60fps
If you select a video resolution (RES) that does not support the frames
per second (FPS) setting that is selected, a message appears that
instructs you to tap the touch display to automatically move to the FPS
setting and select a different value. A similar message appears if you
select an FPS that is not supported by the selected resolution.
NAVIGATING YOUR GOPRO
18 19
6. To change an advanced setting, swipe left.
Note: Not all capture modes have advanced settings.
7. To turn on an advanced setting, tap [ ].
AUTO LOW LIGHT
When needed, automatically lowers the frame
rate in dim lighting for better video quality
8. To return to the main screen, swipe down.
CHANGING MODES WITH THE MODE BUTTON
The Mode button lets you quickly cycle through the capture modes that
you set. For example, if you previously selected Video in Video mode, Night
Photo in Photo mode, and Time Lapse Video in Time Lapse mode, pressing
the Mode button cycles through those capture modes.
Note that Burst photo always appears in this cycle. You can capture fast-
moving action like kids jumping into a pool or a mountain bike jump without
having to change your Photo capture mode ahead of time.
NAVIGATING YOUR GOPRO
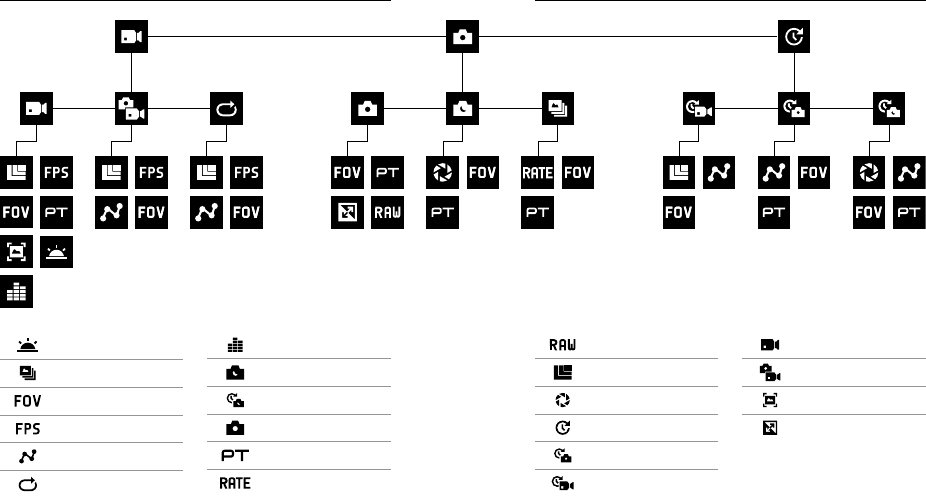
NAVIGATING WITH THE BUTTONS
If you use the camera under water, use the buttons and the camera status
screen to change modes and settings.
1. With the camera powered on, hold down the Mode button [ ] and
press the Shutter button [ ].
2. Use the Mode button to cycle through the settings.
3. Press the Shutter button to cycle through the options within a setting.
To select an option, leave the option highlighted.
4. To exit, press and hold the Shutter button, or cycle to Done in the menu.
NAVIGATING YOUR GOPRO
20 21
MAP OF MODES AND SETTINGS MAP OF MODES AND SETTINGS
Auto Low Light
Burst
FOV
FPS
Interval
Looping
Manual Audio Control
Night Photo
Night Lapse Photo
Photo Mode / Photo
Protune
Rate
RAW
Resolution (RES)
Shutter
Time Lapse Mode
Time Lapse Photo
Time Lapse Video
Video Mode / Video
Video + Photo
Video Stabilization
WDR
22 23
QuikCapture is the fastest way to capture video or time lapse photos with
HERO5 Black. Because the camera is powered on only when it is capturing,
you also conserve battery power.
CAPTURING VIDEO WITH QUIKCAPTURE
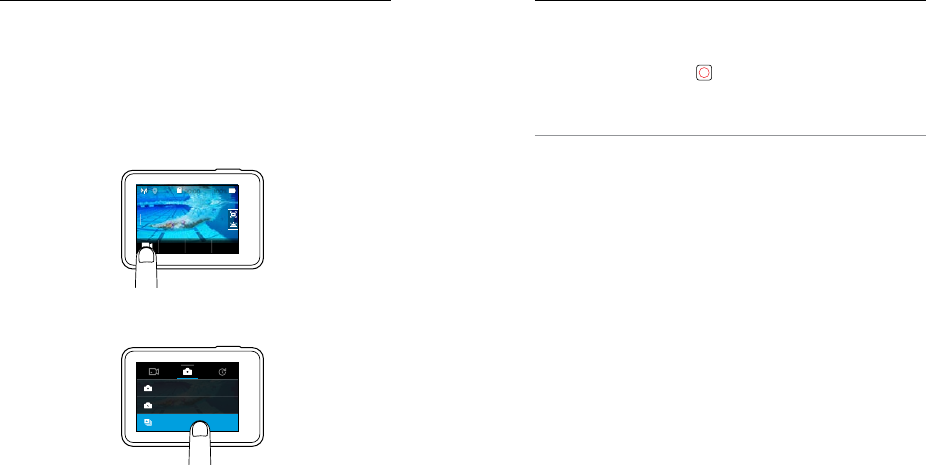
1. With the camera powered off, press the Shutter button [ ].
Your camera powers on, beeps several times, and automatically begins
capturing video. The camera status lights blink while the camera is
recording.
2. To stop recording, press the Shutter button again.
The camera stops recording, beeps several times, and automatically
powers off.
To capture other types of video, see Capturing Video and Photos (page 24).
QUIKCAPTURE
CAPTURING TIME LAPSE PHOTOS WITH QUIKCAPTURE
In addition to showing how a scene changes over time, time lapse photos
are also useful for capturing a series of photos to be sure you get the shot
you want.
1. With the camera powered off, press and hold the Shutter button [ ]
until capture begins.
3 sec
Your camera powers on, beeps several times, and automatically
begins capturing time lapse photos. The camera status lights blink once
for each photo captured.
2. To stop capturing, press the Shutter button again.
The camera stops recording, beeps several times, and automatically
powers off to maximize battery life.
To capture other types of photos or time lapse content, see Capturing Video
and Photos (page 24).
TURNING QUIKCAPTURE OFF
QuikCapture is on by default, but you can turn it off, if needed.
1. From the main screen, swipe down.
2. Tap Preferences > QuikCapture.
3. Tap Off.
QUIKCAPTURE
24 25
CAPTURING VIDEO AND PHOTOS
You can also use a more traditional method to capture video and photos—
including time lapse video and photos—in which you leave the camera
powered on and capture, as needed. With this method, you can use the
touch display to preview your shots and change modes and settings before
capturing. However, unlike QuikCapture, the camera remains on when you
are not capturing, so you must manually power it off to save battery life.
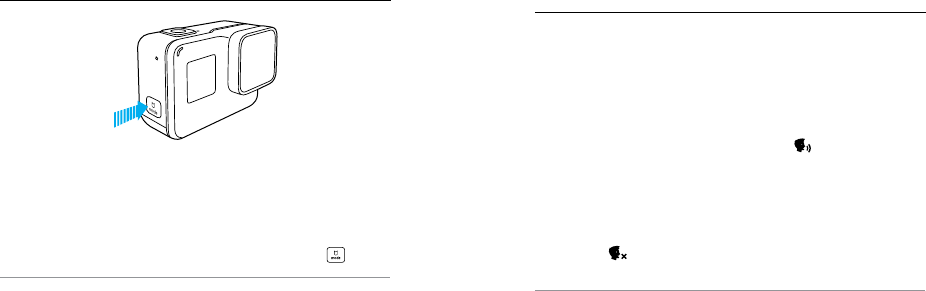
1. If needed, select a different mode:
a. Tap the icon in the lower left corner of the touch display.
100%00:00
1080
1080
60
60
RES
RES
FPS
FPS
WIDE
WIDE
FOV
FOV
b. Tap one of the mode icons at the top of the screen.
c. Tap a capture mode in the list below it.
NIGHT
PHOTO
BURST
CAPTURING VIDEO AND PHOTOS CAPTURING VIDEO AND PHOTOS
2. If needed, select different settings. For details about settings, see Video
Mode: Capture Modes (page 39), Photo Mode: Capture Modes
(page 50), or Time Lapse Mode: Capture Modes (page 56).
3. Press the Shutter button [ ]. The camera beeps and the camera
status lights flash while the camera is capturing.
4. To stop capturing video or time lapse, press the Shutter button. The
camera beeps and the camera status lights flash quickly.
PRO TIP: You can also capture video and photos using voice commands.
For details, see Controlling Your GoPro with Your Voice (page 27).
26 27
ADDING HILIGHT TAGS
You can mark specific moments in your video during recording or playback
with HiLight Tags. HiLight Tags make it easy to find the best highlights
to share.
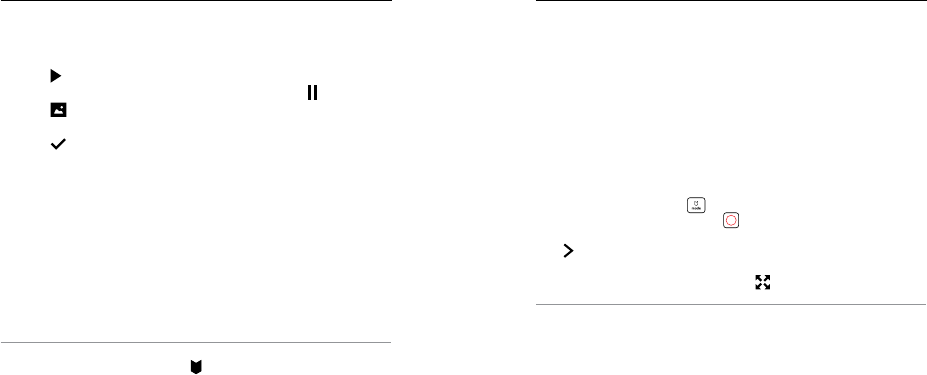
While recording or playing back video, press the Mode button [ ].
PRO TIP: You can also add HiLight Tags during recording with the Capture
app, Voice Control, or the Smart Remote.
CAPTURING VIDEO AND PHOTOS
You can control your HERO5 Black with your voice using a set of specific
commands (see list below).
Note: Voice Control performance may be impacted by distance, wind, and noisy
conditions. Keep the product clean and clear of debris.
USING VOICE CONTROL
Voice Control works best when you and your GoPro are in close proximity.
1. From the main screen, swipe down, then tap [ ].
Note: You can also turn Voice Control on or off from the Preferences menu. Tap
Preferences > On Camera Voice Control, then select an option.
2. If this is the first time you turned on voice control, confirm or change
the voice control language.
3. Say a command from List of Voice Commands (page 28).
4. To turn off Voice Control manually, swipe down on the main screen,
then tap [ ]. Voice Control also turns off when your camera powers
off. For details, see Auto Off (page 75).
PRO TIP: To extend the voice control of your camera in windy and noisy
environments, use Remo (Waterproof Voice Activated Remote). For details,
visit gopro.com.
CONTROLLING YOUR GOPRO WITH
YOUR VOICE

28 29
LIST OF VOICE COMMANDS
Two types of commands are available with Voice Control:
• Action commands let you immediately capture video or photos. For
example, if you just stopped recording video, you can say the command
to take a photo or begin capturing time lapse—without having to first
change the mode.
• Mode commands are useful if you want to quickly select a mode and
then use the Shutter button to capture.
Your camera does not need to be in a specific mode to capture video or
photos. You can use the action commands from any mode. Your camera
captures video or photos based on the settings you previously selected.
Action Command Description
GoPro start recording Starts capturing video
GoPro HiLight Adds a HiLight Tag to video during
recording
That was sick Adds a HiLight Tag to video during
recording
GoPro stop recording Stops capturing video
GoPro take a photo Captures a single photo
GoPro shoot burst Captures burst photos
GoPro start time lapse Starts capturing time lapse
GoPro stop time lapse Stops capturing time lapse
GoPro turn off Powers off the camera
CONTROLLING YOUR GOPRO WITH
YOUR VOICE
Mode Command Description
GoPro Video mode Changes the camera mode to Video
(does not capture video)
GoPro Photo mode Changes the camera mode to Photo
mode (does not capture photos)
GoPro Burst mode Changes the camera mode to Burst
mode (does not capture burst photos)
GoPro Time Lapse mode Changes the camera mode to Time
Lapse (does not capture time lapse
photos)
For the most updated list of commands, visit gopro.com/yourhero5.
PRO TIP: If you are recording video or time lapse, you must stop recording
before issuing a new command.
CHANGING YOUR VOICE CONTROL LANGUAGE
1. From the main screen, swipe down.
2. Tap Preferences > Language (in the Voice Control section).
3. Tap a language.
CONTROLLING YOUR GOPRO WITH
YOUR VOICE

30 31
You can play back your content on the camera’s touch display, your
computer, TV, or smartphone/tablet.
You can also play back content by inserting the microSD card directly into
a device, such as a computer or compatible TV. With this method, playback
resolution depends on the resolution of the device and its ability to play
back that resolution.
VIEWING VIDEOS AND PHOTOS ON YOUR HERO5 BLACK
1. Swipe right to open the gallery. If your microSD card contains a lot of
content, it might take a minute for it to load.
2. Scroll through the thumbnails.
Note: For photo series (Burst, Time Lapse, Night Lapse and Continuous photos), the
thumbnail displays the first photo in the series.
3. Tap a video or photo to open it in full-screen view.
4. To add a HiLight Tag, tap [ ]. HiLight Tags make it easy to find the
best video and photos to share.
5. To return to the thumbnails screen, tap [ ].
6. To exit the gallery, swipe down.
PLAYING BACK YOUR CONTENT
CREATING SHORT CLIPS FROM A VIDEO
Video trimming lets you create short clips of your favorite shots from your
video files. Clips are saved as new files that can be shared and used during
editing in the Capture app or Quik for desktop.
1. Swipe right to open the gallery, then tap the video that contains the clip
that you want to save.
2. Tap [ ] to begin playing the video.
3. When you reach the point where you want to start clipping,
tap [ ].
4. Tap [ ]. By default, the duration of the clip is 5 seconds.
5. To save a longer clip, tap 5 SEC, then tap the length of the clip that
you want (15 or 30 seconds).
6. Tap the screen, then tap PREVIEW to review the clip before saving it.
7. To adjust the starting point of the clip, tap -1. To adjust the ending
point, tap +1.
Note: If you adjust the starting or ending points, the duration of the clip remains
the same.
8. Tap [ ]. The clip is saved as a separate video file and your original
video file is unchanged.
PRO TIP: After you create clips from a video, you can delete the original
file to save space on your microSD card.
PLAYING BACK YOUR CONTENT
32 33
SAVING A VIDEO FRAME AS A STILL PHOTO
1. Swipe right to open the gallery, then tap the video that contains the clip
that you want to save.
2. Tap [ ] to begin playing the video.
3. When you reach the frame that you want to save, tap [ ].
4. Tap [ ].
5. If needed, slide the bar at the bottom of the screen to select the frame.
6. Tap [ ]. The frame is saved as a photo and your original video file is
unchanged.
VIEWING VIDEOS AND PHOTOS ON A COMPUTER
To play back your video and photos on a computer, you must first
transfer these files to a computer. For details, see Offloading Your Content
(page 36).
VIEWING CONTENT ON A MOBILE DEVICE
1. Connect your camera to Capture. For details, see Connecting to the
Capture App (page 35).
2. Use the controls on the app to play back your footage on your
smartphone/tablet.
PRO TIP: While playing back your video with the Capture app, you can
mark the best moments by tapping [ ] to add a HiLight Tag.
PLAYING BACK YOUR CONTENT
VIEWING VIDEOS AND PHOTOS ON AN HDTV
Playing back videos and photos on your HDTV lets you view your content
directly from your camera on a large screen. This playback requires a micro
HDMI cable (sold separately).
Note: HDMI playback depends on the resolution of the device, and is certified up
to 1080p.
1. Power on the camera.
2. Tap Preferences > HDMI Output > Media.
3. Use a micro HDMI cable to connect the HDMI port on the camera to
an HDTV.
4. Select the HDMI input on your TV.
5. Press the Mode button [ ]
to move through the controls,
then press the Shutter button [ ] to select the control. For example,
to move through each thumbnail, press the
Mode
button to move to
[ ], then press the Shutter button repeatedly to move through the
files.
6. To open a file in full-screen view, tap [ ].
PRO TIP: When viewing your videos and photos on an HDTV, you can also
navigate using gestures on the touch display.
USING YOUR CAMERA WITH AN HDTV

34 35
CONNECTING TO THE APP FOR THE FIRST TIME
The Capture app lets you control your camera remotely using a smartphone
or tablet. Features include full camera control, live preview, playback and
sharing of content, and camera software updates.
1. Download Capture to your mobile device from the Apple© App Store©
or Google Play™.
2. Follow the app's on-screen instructions to connect your camera.
CONNECTING TO THE APP IN THE FUTURE
After connecting to the Capture app for the first time, you can connect in
the future through the Connect menu on the camera.
1. If your camera’s wireless is not already turned on, swipe down, then tap
Connect > Wireless Connections.
2. In the Capture app, follow the on-screen instructions to connect
your camera.
CONNECTING TO THE CAPTURE APP
CAPTURING VIDEO AND PHOTOS WHILE CONNECTED TO AN HDTV
This option lets you see the live preview from your camera when it is
connected to an HDTV or monitor.
1. Power on the camera.
2. Tap Preferences > HDMI Output, then select one of these options:
• To display your camera’s live preview with the icons from the touch
display, tap Monitor.
• To display your camera’s live preview on the HDTV without the icons
or overlays that you see during recording on the camera’s touch
display, tap Live.
3. Use a micro HDMI cable to connect the HDMI port on the camera to
an HDTV.
4. Select the HDMI input on your TV.
5. Use the Shutter button [ ] on the camera to start and
stop recording.
USING YOUR CAMERA WITH AN HDTV

36 37
OFFLOADING YOUR CONTENT TO A COMPUTER
To play back your video and photos on a computer, you must first transfer
these files to a computer. Transferring also frees up space on your microSD
card for new content.
1. Download and install Quik for desktop from gopro.com/apps.
2. Connect the camera to your computer using the included
USB-C cable.
3. Power on the camera and follow the on-screen instructions in Quik.
PRO TIP: To offload files to a computer using a card reader (sold
separately) and your computer’s file explorer, connect the card reader to
the computer, then insert the microSD card. You can then transfer files to
your computer or delete selected files on your card. Note that you must use
a card reader to offload RAW photos or RAW audio files.
UPLOADING YOUR CONTENT TO THE CLOUD
With a subscription to GoPro Plus, you can upload your content to the
cloud and then view, edit, and share it from any of your devices. From your
mobile device, use the Quik™ app to edit content from the cloud and share
it with your friends.
Note: When you upload your content to the cloud, your original files remain on your camera.
1. Subscribe to GoPro Plus:
a. Download the Capture app to your mobile device from the Apple©
App Store© or Google Play™.
b. Follow the app’s on-screen instructions to connect your camera.
c. If this is the first time you are connecting to the app, follow the
on-screen instructions to subscribe to GoPro Plus. Otherwise,
tap [ ] next to the image of your camera and follow the
instructions.
OFFLOADING YOUR CONTENT OFFLOADING YOUR CONTENT
2. Connect your camera to a power outlet. When the battery is charged,
automatic upload to the cloud begins.
Note: Once you set up Auto Upload, you do not need to connect your camera to the
Capture app to use this feature.
The files in the cloud are optimized for the web, so might not be full
resolution. To offload files in their full resolution, connect your camera to the
Quik app for desktop and offload the files to your computer.
3. To access content in the cloud from your mobile device, connect to the
Capture app and tap [ ] next to the image of your camera.
4. Download the desired content to your phone, then use the Quik app to
edit and share.
PRO TIP: After you subscribe to GoPro Plus, you can use Quik for desktop
to offload your files to your computer. Quik then uploads the files to your
GoPro Plus account.
TURNING OFF AUTO UPLOAD
You can temporarily turn off Auto Upload on the camera to prevent
automatic upload to GoPro Plus when you connect your camera to a
power outlet.
1. Swipe down, then tap Connect > Auto Upload > Upload.
2. Tap Off.

38 39
OFFLOADING YOUR CONTENT
CONNECTING TO A DIFFERENT WIRELESS NETWORK
If you want to connect to a different wireless network for your camera to
use for Auto Upload, you can change that network on the camera.
1. Swipe down, then tap Connect > Auto Upload > Networks.
2. Tap the name of a network. The network must not be hidden or require
an end user license agreement (such as the network in a hotel).
3. If needed, enter the password.
4. Tap [ ] to save the new network.
Video mode contains three capture modes: Video, Video + Photo, and
Looping. Each capture mode has its own settings.
VIDEO
This capture mode is for traditional video capture. The default settings are
1080p60 Wide, with Video Stabilization and Auto Low Light both turned on.
For more information, see these topics:
HERO5 Black Video Resolutions (page 45)
Video Stabilization (page 48)
Interval (Video) (page 68)
Auto Low Light (page 48)
Manual Audio Control (page 49)
Protune (page 66)
VIDEO + PHOTO
Video + Photo captures photos at set intervals while you record video. The
default settings are 1080p30 Wide, with the interval set at 5 photos per
second. Photos are captured at 12MP with a 16:9 aspect ratio. For more
information, see these topics:
HERO5 Black Video Resolutions (page 45)
Interval (Video) (page 68)
VIDEO MODE: CAPTURE MODES

40 41
LOOPING VIDEO
Use Looping to you continuously record video, but save only the moments
that you want. For example, if you select a 5-minute interval, only the
previous 5 minutes are saved when you press the Shutter button to stop
recording. If you record for 5 minutes and do not press the Shutter button
to stop recording and save, the camera records a new 5-minute interval by
recording over your previous 5 minutes of footage.
This capture mode is useful when you are recording events that contain
long periods of inactivity that you don’t want to save, such as fishing or
recording from a car dashboard.
The default settings for Looping are 1080p60 Wide, with the interval set
at 5 minutes. Looping is not available in 4K, 2.7K 4:3, and 480p. For more
information, see these topics:
HERO5 Black Video Resolutions (page 45)
Interval (Video) (page 68)
VIDEO MODE: CAPTURE MODES
VIDEO RESOLUTION
Video resolution (RES) refers to the number of horizontal lines in the video.
For example, 720p means that the video has 720 horizontal lines, each with
a width of 1280 pixels. Higher numbers of lines and pixels result in greater
detail and clarity. So, a video with resolution of 4K is considered higher
quality than 720p because it consists of 3840 lines, each with a width of
2160 pixels.
VIDEO MODE: SETTINGS
4K 2.7K 4:3
2.7K 1440p
1480p 960p
720p
480p

42 43
Use this table to help you determine the best resolution for your activity.
Also consider the capabilities of your computer or TV to be sure your
hardware can support the selected resolution.
Video Resolution Best Use
4K
Stunning high-resolution video with professional
low-light performance. 8MP stills available
from video. Recommended for tripod or fixed
position shots.
2.7K
16:9 resolution video downscales to provide
stunning, cinema-quality results for professional
productions.
2.7K 4:3
Recommended for body-mounted, ski-mounted
or surfboard-mounted shots. Provides large
viewing area.
1440p
Recommended for body-mounted shots. Aspect
ratio of 4:3 captures a larger vertical viewing
area, compared to 1080p. High frame rate yield
the smoothest, most immersive results for high-
action capture. Great for sharing to social media.
1080p
Great for all shots and for sharing to social
media. High resolution and frame rate yield
stunning results. This resolution is available in all
FOVs and its high FPS option (120fps) enables
slow motion during editing.
VIDEO MODE: SETTINGS
Video Resolution Best Use
960p
Use for body-mounted shots and when
slow motion is desired. Aspect ratio of 4:3
provides large viewing area and smooth results
for high action capture.
720p
Good for handheld shots and when slow motion
is desired. The high frame rate of 240fps is great
for super slow motion, but is available only in
Narrow FOV.
480p Good when super slow motion and Wide FOV are
desired and standard definition is acceptable.
FRAMES PER SECOND (FPS)
Frames per second (FPS) refers to the number of video frames that are
captured in each second.
When selecting a resolution and FPS, consider the activity that you want
to capture. Higher resolutions result in greater detail and clarity, but are
generally available at lower fps values. Lower resolutions result in less
detail and clarity, but support higher FPS values, which are important for
capturing motion. Higher FPS values can also be used to create slow-
motion videos.
ASPECT RATIO
GoPro video resolutions use two aspect ratios: either 16:9 or 4:3. Standard
televisions and editing programs use 16:9. Footage shot in 4:3 is 33%
taller, but must be cropped to 16:9 for playback on a TV. (If footage is not
cropped, it appears with black bars on the sides of the image.)
VIDEO MODE: SETTINGS

44 45
FIELD OF VIEW (FOV)
The field of view (FOV) refers to how much of the scene (measured in
degrees) can be captured through the camera lens. Wide FOV captures the
largest amount of the scene, while Narrow FOV captures the least.
The FOV options that appear are based on the selected resolution and fps.
FOV Best Use
SuperView
SuperView delivers the world’s most immersive
field of view. Good for body-or gear-mounted
shots. More vertical 4:3 content is automatically
stretched to full-screen 16:9 for stunning
widescreen playback on your computer or TV.
Wide
Large field of view that is good for action shots
where you want to capture as much as possible
within the frame. This FOV results in a fisheye
look, especially around the edge of the scene.
(You can crop that out during editing, if needed.)
Medium Mid-range field of view that has the effect of
zooming in on the center of the shot.
Linear
Mid-range field of view that removes the
fisheye effect found in the Wide FOV. Good for
capturing aerial footage or any other shot where
you want to remove the distortion.
Narrow
Smallest field of view. Good for capturing
content at a distance. Its most significant effect
is that it zooms in on the center of the shot.
VIDEO MODE: SETTINGS
HERO5 BLACK VIDEO RESOLUTIONS
Video
Resolution
(RES)
FPS
(NTSC/
PAL)1
FOV Screen
Resolution
Aspect
Ratio
4K 30/25 Wide 3840x2160 16:9
4K 24/24 Wide, SuperView 3840x2160 16:9
2.7K
60/50
48/48
24/24
Wide, Medium,
Linear 2704x1520 16:9
2.7K 30/25 SuperView, Wide,
Medium, Linear 2704x1520 16:9
2.7K 4:3 30/25 Wide 2704x2028 4:3
1440p
80/80
60/50
48/48
30/25
24/24
Wide 1920x1440 4:3
1080p 120/120 Wide, Narrow 1920x1080 16:9
1080p 90/90 Wide 1920x1080 16:9
1080p 80/80 SuperView 1920x1080 16:9
1080p
60/50
48/48
30/25
24/24
SuperView, Wide,
Medium, Linear,
Narrow
1920x1080 16:9
VIDEO MODE: SETTINGS
46 47
Video
Resolution
(RES)
FPS
(NTSC/
PAL)
FOV Screen
Resolution
Aspect
Ratio
960p 120/120
60/50 Wide 1280x960 4:3
720p 240/240 Narrow21280x720 16:9
720p 120/120
60/50
SuperView,
Wide, Medium,
Narrow
1280x720 16:9
720p 100/100 SuperView 1280x720 16:9
720p 30/25 Wide, Medium,
Narrow 1280x720 16:9
480p 240/240 Wide 848x480 16:9
1 NTSC and PAL refer to the video format, which depends on the region that you are
in. For more information, see Video Format (page 77).2 Narrow FOV for 720p240 is
smaller than Narrow FOV for other resolutions/frame rates.
For more information about resolution, FPS, or FOV, see these topics:
Video Resolution (page 41)
Frames Per Second (FPS) (page 43)
Field of View (FOV) (page 44)
VIDEO MODE: SETTINGS
High Resolutions/High Frame Rates
When capturing video at high resolutions or high frame rates in warm
ambient temperatures, the camera may become warm and use more power.
In addition, lack of airflow around the camera and using the camera with the
Capture app further increase camera temperature and power consumption,
and decrease camera recording time.
If the camera gets too hot, a message appears on the screen indicating
thatthecamerais shutting down. For details, see Important Messages
(page 78).
When recording in high-performance video modes, capture shorter video
clips when in stationary use, and/or limit your use of features that increase
power consumption, such as the GoPro Capture app. To control your
camera remotely at higher temperatures, use a GoPro remote or Remo
(Waterproof Voice Activated Remote) (both sold separately) instead
of Capture.
INTERVAL (VIDEO)
The Interval setting determines the amount of time that passes between each
captured frame.
Video + Photo Intervals
Available photo intervals for Video + Photo range are 5 (default), 10, 30,
and 60 seconds. The quality of the photo depends on the selected video
resolution and FOV.
Looping Video Intervals
Available intervals for Looping are 5 (default), 20, 60, and 120 minutes. You
can also select Max as the interval. With this option, the camera records
until the memory card is full, then overwrites the content.
VIDEO MODE: SETTINGS

48 49
VIDEO STABILIZ ATION
This setting adjusts the footage to offset for motion during capture. The
result is smoother footage, especially in activities with relatively small but
fast motion including cycling, motorcycling, and handheld uses. The options
for this setting are On (default) and Off. To access this advanced setting,
see Navigating with the Touch Display (page 17).
Video Stabilization is not available for 4K or frame rates higher than 60 fps.
For Wide FOV, the image is cropped 10%. This setting is not available for
Video + Photo or Looping video.
PRO TIP: The more narrow the FOV, the greater the effect of Video
Stabilization.
AUTO LOW LIGHT
Auto Low Light allows you to shoot in low-light environments or when
quickly transitioning in and out of low-light conditions. When possible, the
camera automatically adjusts fps to achieve the optimal exposure and best
results.
The options for this setting are On (default) and Off. Auto Low Light is
available for frame rates higher than 30fps.
When Auto Low Light and Video Stabilization are both on and Auto Low
Light activates because of dark lighting conditions, Video Stabilization is
temporarily turned off to deliver optimal image quality in the dark scene.
To access this advanced setting, see Navigating with the Touch Display
(page 17).
VIDEO MODE: ADVANCED SETTINGS
MANUAL AUDIO CONTROL
By default, this setting is off and your camera automatically switches
between recording in stereo and filtering wind noise to achieve the best
audio balance. When this setting is on, you can manually select which of
these two filters to apply.
For example, you might want to turn on this setting and select Wind Only
if you are recording outdoors on a windy day. You might select Stereo Only
if you are recording in a club or theater where consistent stereo audio is a
priority and wind is not a factor.
To access this advanced setting, see Navigating with the Touch Display
(page 17).
PROTUNE
Protune is available only for the Video capture mode. For details about
Protune settings, see Protune (page 66).
PRO TIP: Easily create GoPro-style videos using GoPro Studio (included
in Quik for desktop). Learn more and download this free software to your
computer at gopro.com/apps.
VIDEO MODE: ADVANCED SETTINGS

50 51
Photo mode contains three capture modes: Photo, Night, and Burst. All
photos are captured at 12MP. Each capture mode has its own settings.
PHOTO
Photo captures either single or continuous photos. For continuous photos,
hold down the Shutter button to capture 4 photos/second, up to 30
photos.
The default FOV for Photo is Wide, with all advanced settings turned off.
For more information, see these topics:
Field of View (FOV) (Photos) (page 52)
Wide Dynamic Range (WDR) (page 54)
RAW Format (page 54)
Protune (page 66)
NIGHT
Night captures photos in dim to dark light. The shutter remains open
longer to let in more light in dark environments, so Night photo is not
recommended for handheld shots or mounted shots where the camera
might move during exposure.
The default settings for Night are Wide FOV, with the Shutter set to Auto.
For more information, see these topics:
Field of View (FOV) (Photos) (page 52)
Shutter (Night Photo) (page 53)
Protune (page 66)
PHOTO MODE: CAPTURE MODES
BURST
Burst captures up to 30 photos in 1 second, so it is perfect for capturing
fast-moving activities. The default FOV for Burst is Wide, with the Rate set
to 30 photos in 1 second. For more information, see these topics:
Field of View (FOV) (Photos) (page 52)
Rate (page 53)
Protune (page 66)
PHOTO MODE: CAPTURE MODES
52 53
FIELD OF VIEW (FOV) (PHOTOS)
Your camera includes several FOV options for photos. All photos are
captured at 12MP.
FOV Description
Wide
Largest field of view. Good for action shots to
capture as much as possible within the frame.
This FOV results in a fisheye look, especially
around the edge of the scene. (You can crop
that out during editing, if needed.)
Medium Mid-range field of view. Has the effect of
zooming in on the center of the shot.
Linear
Mid-range field of view that removes the fisheye
distortion. Good for capturing aerial footage or
any other shot where you want a more traditional
perspective.
Narrow
Smallest field of view with reduced fisheye
distortion. Good for capturing content at a
distance. Its most significant effect is that it
zooms in on the center of the shot.
PHOTO MODE: SETTINGS
RATE
This setting applies only to Burst. Available rates:
• 30 photos in 1, 2, 3, or 6 seconds
• 10 photos in 1, 2, or 3 seconds
• 5 photos in 1 second
• 3 photos in 1 second
SHUTTER (NIGHT PHOTO)
Within Photo mode, this setting applies only to Night Photo. Shutter lets
you determine the amount of time that the shutter is open. The default
option is Auto.
Settings Examples
Auto (up to 2 sec) Sunrise, sunset, dawn, dusk, twilight, night
2 sec, 5 sec, 10 sec Dawn, dusk, twilight, traffic at night, Ferris
wheel, fireworks, light painting
20 sec Night sky (with light)
30 sec Night stars, Milky Way (complete darkness)
PRO TIP: To reduce the amount of blur when using Night photo, mount
your camera on a tripod or other surface that is stable and cannot move.
PHOTO MODE: SETTINGS

54 55
WIDE DYNAMIC RANGE (WDR)
Wide Dynamic Range (WDR) retains a greater level of detail in the dark and
bright areas of an image. The result is a photo that is properly exposed for
both of these extremes. This setting is especially useful for scenes that are
backlit or that have large bright regions and a dark foreground.
WDR is available only for the Photo capture mode and only when RAW
Format is turned off. The options for this setting are Off (default) and On.
To access this advanced setting, see Navigating with the Touch Display
(page 17).
RAW FORMAT
When this setting is turned on, all photos are captured with an
accompanying .jpg image for immediate viewing on your camera or sharing
with the Capture app. RAW photos are saved as .gpr files, which are based
on the Adobe .dng format. These files can be used in Adobe Camera Raw
(ACR), version 9.7 or later. You can also use Adobe Photoshop Lightroom
CC (2015.7 release or later) and Adobe Photoshop Lightroom 6 (version
6.7 or later).
RAW Format is available only for the Photo capture mode and only when
Wide Dynamic Range is turned off. RAW Format is not available when
capturing Continuous photos (that is, when holding down the Shutter
button in Photo capture mode) or for Linear FOV.
The options for this setting are Off (default) and On. To access this
advanced setting, see Navigating with the Touch Display (page 17).
PRO TIP: Photos in .gpr format are captured in the same location and with
the same file name as .jpg files. To access them, insert your microSD card
into a card reader and locate the files with your computer’s file explorer.
PHOTO MODE: ADVANCED SETTINGS PHOTO MODE: ADVANCED SETTINGS
PROTUNE
Within Photo mode, Protune is available for all capture modes (Photo,
Night, and Burst). For details about Protune settings, see Protune (page 66).

56 57
Time Lapse mode contains three capture modes: Time Lapse Video,
Time Lapse Photo, and Night Lapse Photo. Each capture mode has its
own settings.
TIME LAPSE VIDEO
Time Lapse Video creates video from frames captured at specific intervals.
This option lets you capture a time lapse event and immediately view or
share it as a video. Time Lapse Video is available only in 4K, 2.7K 4:3, and
1080p resolutions and is captured without audio.
The default resolution for Time Lapse Video is 4K, with the default interval
set at 0.5 second. For more information, see these topics:
HERO5 Black Video Resolutions (page 45)
Interval (Time Lapse) (page 59)
TIME LAPSE PHOTO
Time Lapse Photo captures a series of photos at specified intervals. Use
this mode to capture photos of any activity, then choose the best ones
later. You can also capture photos over a long time frame, then convert
them into a video using GoPro Studio (included with Quik for desktop).
The default FOV for Time Lapse Photo is Wide, with the default interval
set at 0.5 second. For more information, see these topics:
Interval (Time Lapse) (page 59)
Field of View for Time Lapse (page 58)
Protune (page 66)
TIME LAPSE MODE: CAPTURE MODES TIME LAPSE MODE: CAPTURE MODES
NIGHT LAPSE PHOTO
Night Lapse Photo captures a series of photos at set intervals when there
is minimal light. The shutter remains open longer to let in more light in
dark environments.
The default settings for Night Lapse Photo are Wide FOV, with the
Interval set at 15 seconds and Shutter set to Auto. For more information,
see these topics:
Shutter (Time Lapse) (page 61)
Field of View for Time Lapse (page 58)
Protune (page 66)

58 59
TIME LAPSE VIDEO RESOLUTION AND FOV
In Time Lapse mode, resolution and FOV apply only to Time Lapse Video.
Video resolution refers to the number of horizontal lines in the video. Higher
resolutions result in greater detail and clarity. So, a video with resolution of
2.7K is considered higher quality than 1080p because it consists of 2704
lines, each with a width of 1520 pixels.
The field of view (FOV) refers to how much of the scene (measured in
degrees) can be captured through the camera lens. Wide FOV captures the
largest amount of the scene.
Available resolutions for Time Lapse Video are 4K, 2.7K 4:3, and 1080p.
FIELD OF VIEW (FOV) FOR TIME LAPSE
Your camera includes several FOV options for time lapse.
FOV Description
Wide
Largest field of view. Good for action shots to
capture as much as possible within the frame.
This FOV results in a fisheye look, especially
around the edge of the scene. (You can crop
that out during editing, if needed.)
Medium Mid-range field of view. Has the effect of
zooming in on the center of the shot.
TIME LAPSE MODE: SETTINGS
FOV Description
Linear
Mid-range field of view that removes the
fisheye distortion. Good for capturing aerial
footage or any other shot where you want a
more traditional perspective.
Narrow
Smallest field of view with reduced fisheye
distortion. Good for capturing content at a
distance. Its most significant effect is that it
zooms in on the center of the shot.
INTERVAL (TIME LAPSE)
The Interval setting determines the amount of time that passes between
each captured frame.
Time Lapse Photo and Time Lapse Video Intervals
Available intervals for Time Lapse Video are 0.5 (default), 1, 2, 5, 10, 30, and
60 seconds.
Interval Examples
0.5-2 seconds Surfing, biking or other sport
2 seconds Busy street corner
5-10 seconds Clouds or outdoor scenes with long durations
10-60 seconds Lengthy activities, such as construction or
artwork
TIME LAPSE MODE: SETTINGS
60 61
Night Lapse Photo Interval
Interval determines the rate at which photos are captured. Night Lapse
intervals are Auto, 4, 5, 10, 15, 20, and 30 seconds, and 1, 2, 5, 30, and
60 minutes.
Auto (default) causes the Interval to match the Shutter setting. For
example, if Shutter is set to 10 seconds and Interval is set to Auto, your
camera captures a photo every 10 seconds. Photos are captured at 12MP.
Interval Examples
Auto Great for all exposures. Captures as quickly as
possible, depending on the Shutter setting.
4-5 seconds Evening city scene, street lighting, or scenes
with movement
10-15 seconds Dim lighting with slow scene changes, like night
clouds with a bright moon
20-30 seconds Very low light or very slow scene changes, like
stars with minimal ambient or street light
TIME LAPSE MODE: SETTINGS TIME LAPSE MODE: SETTINGS
SHUTTER (TIME LAPSE)
Within Time Lapse mode, this setting applies only to Night Lapse Photo.
Shutter lets you determine the amount of time that the shutter is open.
The default option is Auto.
Use this table to help you select the most appropriate setting for
your activity:
Settings Examples
Auto (up to 2 sec) Sunrise, sunset, dawn, dusk, twilight, night
2 sec, 5 sec, 10 sec Dawn, dusk, twilight, traffic at night, Ferris
wheel, fireworks, light painting
20 sec Night sky (with light)
30 sec Night stars, Milky Way (complete darkness)
PRO TIP: To reduce the amount of blur when using Night Lapse Photo,
mount your camera on a tripod or other surface that is stable and
cannot move.
62 63
PROTUNE
Within Time Lapse mode, Protune is available for Time Lapse Photo
and Night Lapse Photo. For details about Protune settings, see Protune
(page 66).
TIME LAPSE MODE: ADVANCED SETTINGS ADVANCED CONTROLS
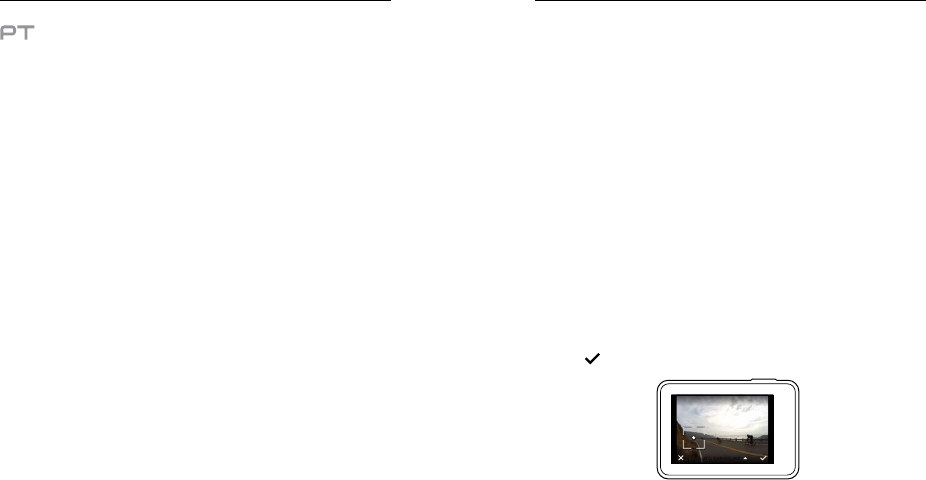
EXPOSURE CONTROL
By default, your camera uses the entire image to determine the appropriate
exposure level. However, Exposure Control lets you select an area that you
want the camera to prioritize when determining exposure. This setting is
particularly useful in shots where an important region might otherwise be
over- or underexposed.
When you change this setting, the touch display immediately shows you the
effect on your image. If you change modes, the camera returns to using the
entire scene to determine the correct level of exposure.
Using Exposure Control with Auto Exposure
With this option, the camera always bases exposure on the area of the
touch display that you select, regardless of what is in that area.
Suppose your camera is mounted on your dashboard. You might want to
select the upper part of the touch display so that the exposure is based on
the scene outside of the windshield and not on the dashboard (which might
cause the scene outside to be overexposed).
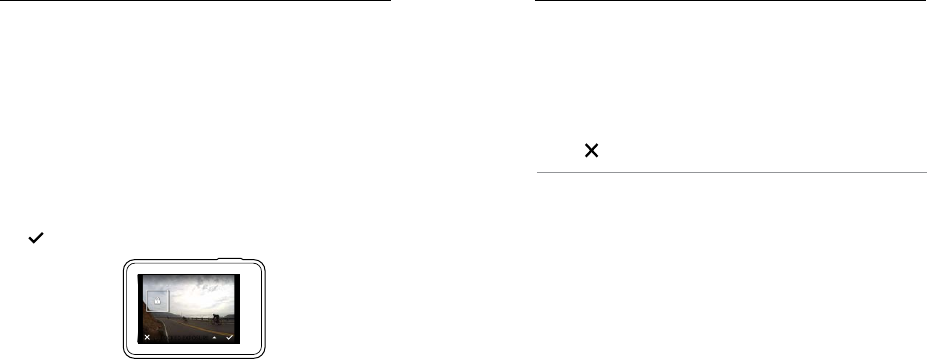
1. Press the touch display until a square outline shrinks to the middle of
the screen.
2. Drag the square to the area that you want to use to set the exposure
level. (You can also tap that area instead of dragging the square.)
3. Tap [ ] in the lower right corner.
AUTO EXPOSURE
64 65
ADVANCED CONTROLS
Using Exposure Control with Locked Exposure
With this option, the camera locks the exposure. That exposure level
remains until you cancel it.
For example, suppose you are snowboarding on a sunny day. By manually
setting the exposure level based on your subject's jacket, the images that
you capture throughout the day are based on the jacket. So, they are less
likely to be underexposed compared to the bright snow.
1. Press the touch display until a square outline shrinks to the middle of
the screen.
2. Drag the square to the area that you want to use to set the exposure
level. (You can also tap that area instead of dragging the square.)
3. Tap Auto Exposure to change it to Locked Exposure.
4. Confirm that the exposure looks the way you want it to, and then tap
[ ] in the lower right corner to lock the exposure.
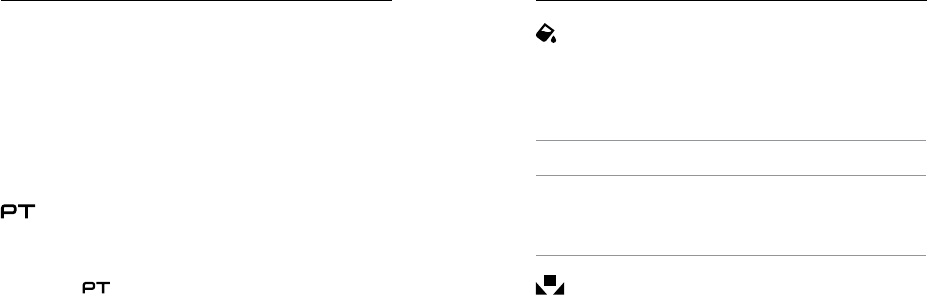
LOCKED EXPOSURE
Canceling Exposure Control
Exposure Control is automatically canceled when you select a different
mode or restart the camera. You can also cancel this setting manually
(below). When you cancel the exposure setting that you previously set,
the camera returns to using the entire scene to determine the correct level
of exposure.
1. Press the touch display until a square outline shrinks to the middle of
the screen.
2. Tap [ ] in the lower left corner.
PRO TIP: For advanced exposure settings, see Exposure Value
Compensation (page 71).
ADVANCED CONTROLS
66 67
ADVANCED CONTROLS
PROTUNE
Protune unlocks the camera’s full potential, yielding stunning image quality
and cinema-caliber video and photos optimized for professional productions.
Protune gives content creators more flexibility and workflow efficiency than
ever before.
Protune is compatible with professional color correction tools, GoPro Studio
(included in Quik for desktop) and other video and photo editing software.
Protune enables manual control of color, white balance, shutter speed,
and more for advanced control and customization of your video footage
and photos.
Protune
Protune is available as an advanced setting for supported capture modes.
To access this advanced setting, see Navigating with the Touch Display
(page 17). The options for this setting are Off (default) and On. When
Protune is on, [ ] appears on the camera screens.
Protune is not available for Video + Photo, Looping, or Time Lapse Video.
Some Protune settings are not available when you use Exposure Control.
Protune is available for all video and photo resolutions.
Changes that you make to Protune settings in one capture mode apply only
to that capture mode. For example, changing the White Balance for Night
Photo does not affect White Balance for Burst photos.
Color
Color allows you to adjust the color profile of your video footage or photos.
When you change this setting, the touch display immediately shows you the
effect on your image.
Color Setting Resulting Color Profile
GoPro Color (default) Provides GoPro color-corrected profile (same
great color as when Protune is turned off).
Flat
Provides neutral color profile that can be color-
corrected to better match footage captured with
other equipment, offering more flexibility in post-
production. Due to its long curve, Flat captures
more details in shadows and highlights.
White Balance
White Balance lets you adjust the color temperature of videos and photos
to optimize for cool or warm lighting conditions. When you change this
setting, the touch display immediately shows you the effect on your image.
Options for this setting are Auto (default), 3000K, 4000K, 4800K, 5500K,
6000K, 6500K, and Native. Lower values result in warmer tones.
You can also select Native to create a minimally color-corrected file
from the image sensor that allows for more precise adjustments in
post-production.
ADVANCED CONTROLS
68 69
ADVANCED CONTROLS
ISO (Video Only)
ISO determines the camera’s sensitivity to light, and creates a tradeoff
between brightness and resulting image noise. Image noise refers to the
degree of graininess in the image.
In low light, higher ISO values result in brighter images, but with greater
image noise. Lower values result in lower image noise, but darker images.
When you change this setting, the touch display immediately shows you the
effect on your image.
ISO behavior depends on the Shutter setting:
• Shutter set to Auto: The ISO that you select is used as the maximum
ISO value. The ISO value that is applied might be lower, depending on
the lighting conditions. Available ISO values are 6400, 3200, 1600, 1200,
800, 400.
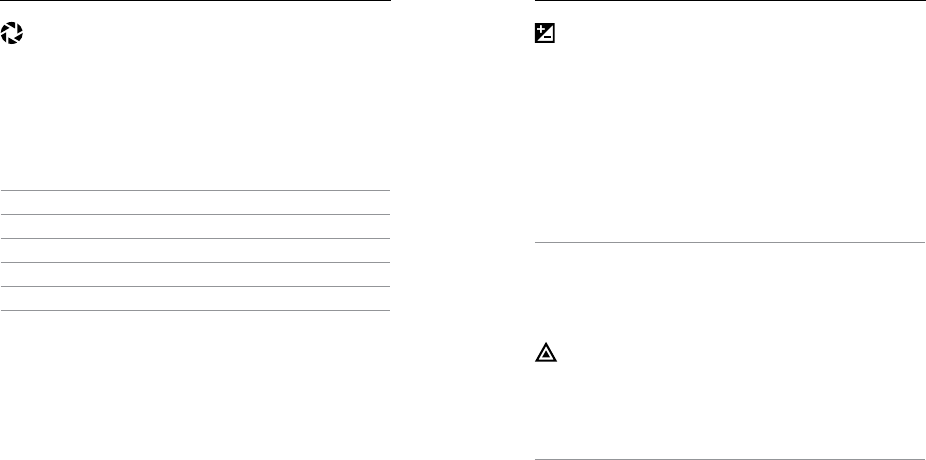
• Shutter not set to Auto: The ISO that you select is used as the
maximum ISO value, unless you tap [ ] at the bottom of the screen
to lock the value. Available ISO values are 6400, 3200, 1600, 1200, 800,
and 400.
Darker image
Lower image noise
Brighter image
Greater image noise
400 800 1200 1600 3200 6400
ADVANCED CONTROLS
ISO Minimum (Photo Only)
ISO Maximum (Photo Only)
ISO Minimum and ISO Maximum let you set a range for the camera’s
sensitivity to light and image noise. ISO settings create a balance between
brightness and resulting image noise. Image noise refers to the degree of
graininess in the image.
Higher values result in brighter images with greater image noise. Lower
values result in darker images with lower image noise.
Note: ISO Minimum is not available for Time Lapse photos when the interval is set to
0.5 or 1 second.
PRO TIP: To lock the ISO at a specific value, set ISO Minimum and ISO
Maximum to the same values.
Darker image
Lower image noise
Brighter image
Greater image noise
100 200 400 800 1600
70 71
ADVANCED CONTROLS
Shutter
The Shutter setting in Protune applies only to Video and determines the
amount of time that the shutter is open. When you change this setting, the
touch display immediately shows you the effect on your image.
The options available for this setting depend on the FPS setting, as noted
below. The default setting is Auto.
Settings Example 1:
1080p30
Example 2:
1080p60
Auto Auto Auto
1/FPS 1/30 sec 1/60 sec
1/(2xFPS) 1/60 sec 1/120 sec
1/(4xFPS) 1/120 sec 1/240 sec
1/(8xFPS) 1/240 sec 1/480 sec
PRO TIP: To reduce the amount of blur in your video and photos when
using the Shutter setting, mount your camera on a tripod or other surface
that is stable and cannot move.
Exposure Value Compensation (EV Comp)
Exposure Value Compensation affects the brightness of your video or
photo. Adjusting this setting can improve image quality when shooting in
environments with contrasting lighting conditions.
Options for this setting range from -2.0 to +2.0. The default setting is 0.
When you change this setting, the touch display immediately shows you the
effect on your image. Higher values result in brighter images.
For Video, this setting is available only if Shutter is set to Auto.
For information about adjusting exposure based on a certain area of your
scene, see Exposure Control (page 63).
PRO TIP: Exposure Value Compensation adjusts brightness within the
existing ISO setting. If brightness has already reached the ISO setting in a
low-light environment, increasing the Exposure Value Compensation does
not have any effect. To continue increasing the brightness, select a higher
ISO value.
Sharpness
Sharpness controls the quality of details captured in your video footage or
photos. Options for this setting are High (default), Medium, and Low.
When you change this setting, the touch display immediately shows you the
effect on your image.
PRO TIP: If you plan to increase sharpness during editing, select Low for
this setting.
ADVANCED CONTROLS
72 73
RAW Audio
This setting applies only to the Video capture mode and creates a
separate .wav file for your video, in addition to the standard .mp4 audio
track. You can select the level of processing to apply to the RAW audio
track. This setting is useful if you want a separate .wav file to share or use
in post-processing.
Option Description
Low Applies minimal processing. Ideal if you apply
audio processing in post-production.
Med
Applies processing based on the Manual
Audio Control setting (wind and/or stereo). If
Manual Audio Control is turned off, the camera
automatically switches between wind filtering
and stereo audio.
High Applies full audio processing (automatic gain and
AAC encoding).
PRO TIP: Audio files in .wav format are captured in the same location
and with the same file name as .mp4 files. To access them, insert your
microSD card into a card reader and locate the files with your computer’s
file explorer.
Reset
This option resets all Protune settings to their default values.
ADVANCED CONTROLS CONNECTING TO AN AUDIO ACCESSORY
An accessory microphone or other component can provide enhanced audio
for your captured video.
1. Connect the audio accessory to your camera's USB-C port using
GoPro’s Pro 3.5mm Mic Adapter (sold separately).
2. From the camera's main screen, swipe down.
3. Tap Preferences > Audio Input.
4. Tap an option:
Option Description
Standard (default) Camera supplies power to the microphone and
no audio boost
Standard+ Camera supplies power to the microphone
and a 20dB boost in audio
Non-Powered Camera supplies no microphone power and no
audio boost
Non-Powered+ Camera provides no microphone power and a
20dB boost in audio
Line In
Use for audio equipment other than
a microphone (mixing board, guitar
preamplifier, karaoke machine, etc.)
Note: If you are not sure which option to select, refer to the information from your
microphone manufacturer.
74 75
CUSTOMIZING YOUR GOPRO
From changing the beep volume to turning off the status lights, you can set
up your camera to work the way that you want.
CHANGING PREFERENCES
1. Swipe down, then tap Preferences.
2. Tap a setting, then tap a new option.
3. To exit, swipe down.
DATE AND TIME
The date and time are automatically updated when you connect your
camera to the Capture app or Quik for desktop. However, you can manually
change these settings, if needed.
Note: If the battery is removed from the camera for an extended period of time, you
must reset the date and time (automatically or manually).
BEEP VOLUME
Sets the volume of your GoPro's alerts. The options are High (default),
Med, Low, and Off.
LED
Sets which status lights blink. The options are All On (default), All Off, and
Front Off.
PRO TIP: Turn the front status light off if you are capturing in an area with
windows or mirrors that might cause reflection in the shot.
CUSTOMIZING YOUR GOPRO
DEFAULT MODE
Sets the capture mode that your GoPro defaults to when powering up. The
options are Video (default), Time Lapse Video, Video + Photo, Looping,
Photo, Night, Burst, Time Lapse Photo, and Night Lapse Photo.
Note: This setting does not affect QuikCapture.
AUTO OFF
Powers off your GoPro after a period of inactivity to save battery life. The
options are 5 minutes, 15 minutes (default), 30 minutes, and Never.
Note: Voice Control is not available when the camera is off. When using Voice Control,
consider selecting a higher time period (or Never) for Auto Off.
SCREENSAVER
Turns off the touch display after a period of inactivity to save battery life.
The options are 1 minute (default), 2 minutes, 3 minutes, and Never.
To turn on the touch display again, tap anywhere on the screen. When
the touch display turns off, you can still use the camera buttons and
Voice Control.
BRIGHTNESS
Adjusts the brightness level of the touch display. The options are 10% to
100% (default).
76 77
AUTO-ROTATION
This setting determines the orientation of your video or photos to help you
prevent upside down footage.
Setting Description
Auto
(Auto Image Rotation) Camera automatically
selects Up or Down, based on the orientation
of the camera when recording begins. Ensures
that your resulting image is always right-side
up.
Up (default) Camera is set to always capture in right-side up
orientation.
Down Camera is set to always capture in upside down
orientation.
GPS
Captures the location where your video and photos were taken. To see this
information, view the video or photos on a compatible desktop or mobile
application. For details, visit gopro.com/help.
LANGUAGE
Sets the language that appears on the camera.
CUSTOMIZING YOUR GOPRO
VIDEO FORMAT
Sets the regional frame rates that your camera uses for recording and
playing back video on a TV/HDTV. Selecting the appropriate option for your
region helps prevent flicker when capturing video indoors.
Setting Description
NTSC
Select this option to play back your
video on an NTSC TV (most televisions
in North America)
PAL
Select this option to play back your video
on a PAL TV (most televisions outside of
North America)
CUSTOMIZING YOUR GOPRO

78 79
TEMPERATURE ICON
The Temperature icon appears on the camera status screen
when the camera becomes too hot and needs to cool
down. Simply let it sit and cool before attempting to use it
again. Your camera was designed to identify conditions of
overheating and shuts down when needed.
FILE REPAIR ICON
If recording stopped abruptly and the video file was not
properly saved, the file might become corrupted. If this
happens, the camera displays the File Repair icon while it
tries to repair the file. When this process is finished, you
receive a message stating whether the repair was successful
or failed. Press any button to continue using the camera.
MICROSD CARD MESSAGES
NO SD
No card present. The camera requires a microSD,
microSDHC or microSDXC card (sold separately)
to capture videos and photos.
FULL The card is full. Delete some files or insert a
different card.
SD ERR The camera is unable to read the card
formatting. Reformat the card in the camera.
IMPORTANT MESSAGES RESETTING YOUR CAMERA
RESETTING THE CONNECTIONS
This option clears your connections list and resets the camera's password.
If you reset the connections, you must reconnect any desired devices to
your GoPro.
1. From the main screen, swipe down.
2. Tap Connect > Reset Connections, and then tap Reset.
RESETTING ALL SETTINGS TO THE DEFAULTS
This option resets all of your camera settings to the defaults, except Date,
Time, and your camera's username and password.
1. From the main screen, swipe down.
2. Tap Preferences > Camera Defaults, and then tap Reset.
RESTARTING YOUR GOPRO
If your camera is not responding, press and hold the Mode button [ ]
for 8 seconds to shut down the camera and then restart it. All settings
are retained.
RESTORING FACTORY SETTINGS
Follow the steps below to reset all settings and the camera’s password, and
unregister the camera from your GoPro Plus account. This option is useful if
you are reselling your camera and want to reset it to its original state.
1. From the main screen, swipe down.
2. Tap Preferences > Factory Reset, and then tap Next.
Restoring factory settings does not erase all content from your microSD
card. To clear your microSD card, see Reformatting Your microSD Card
(page 8).
80 81
ATTACHING YOUR CAMERA TO MOUNTS
To attach your camera to a mount, you need The Frame (for HERO5 Black)
and a mounting buckle and/or thumb screw, depending on the mount you
are using.
THE FRAME
Your camera comes with The Frame (for HERO5 Black).
The HERO5 Black camera is waterproof to 33’ (10m) with the doors
closed—no additional housing is needed when using the camera in or
around water.
The The Frame (for HERO5 Black) provides additional protection for your
camera if you drop it, so you might want to keep it in The Frame during
certain activities, even if the camera is not mounted.
NOTICE: The Frame does not provide additional waterproof protection.
MOUNTING
Securing the Camera in The Frame
1. Open the latch.
2. Slide the camera into the frame. The bottom front of The Frame has a
raised edge. Be sure the front of the camera sits flush against it.
3. Close the door.
4. Lock the latch.
PRO TIP: During water activities, use Camera Tethers for added security
and use a Floaty to keep your camera afloat (both sold separately). For
more information, visit gopro.com.
MOUNTING
82 83
ATTACHING MOUNTING BUCKLES TO MOUNTS
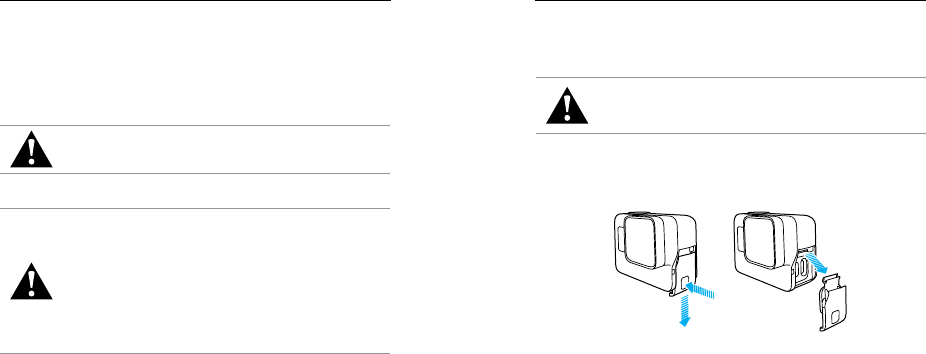
1. Flip up the mounting buckle plug.
2. Slide the buckle into the mount until it clicks into place.
3. Press down on the plug so that it sits flush with the buckle.
PRO TIP: If you mount your HERO5 Black upside down, the camera
automatically changes the orientation of your image to be right-side up. For
more information, see Auto-Rotation (page 76).
MOUNTING
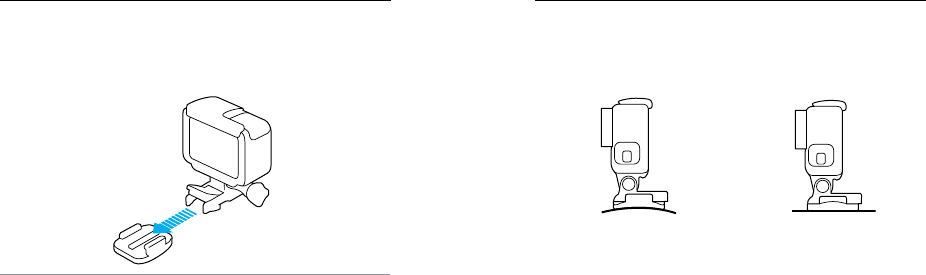
USING CURVED + FLAT ADHESIVE MOUNTS
The Curved + Flat Adhesive Mounts make it easy to attach the camera to
curved and flat surfaces of helmets, vehicles, and gear. With the mounting
buckle, the frame can be clicked on and off the secured adhesive mounts.
Curved Adhesive Mount Flat Adhesive Mount
MOUNTING GUIDELINES
Follow these guidelines when attaching adhesive mounts:
• Attach the adhesive mounts at least 24 hours before use.
• Adhesive mounts must be mounted only on smooth surfaces. Porous
or textured surfaces do not enable a proper bond. When applying
the mount, firmly press it into place and ensure full contact over the
entire surface.
• Apply adhesive mounts to clean surfaces only. Wax, oil, dirt or other
debris reduce adhesion, which can result in a weak bond and risk of
losing the camera should the connection fail.
• Attach adhesive mounts in room temperature conditions. Adhesives do
not bond properly if applied in cold or damp environments to cold or
damp surfaces.
MOUNTING
84 85
MOUNTING
• Check state and local regulations and laws to ensure that attaching a
camera to equipment (such as hunting equipment) is permitted. Always
comply with regulations that restrict the use of consumer electronics
or cameras.
• During water activities, use Camera Tethers for added security and use
a Floaty to keep your camera afloat (both sold separately).
WARNING: To avoid injury, do not use a tether when mounting
the camera on a helmet.
For more information about mounts, visit gopro.com.
WARNING: If using your camera with a GoPro mount or strap
intended for use with a helmet, always select a helmet that
meets the applicable safety standard.
Choose the right helmet for your particular sport or activity
and make sure that it is the right fit and size for you. Inspect
your helmet to ensure that it is in good condition, and follow
the helmet manufacturer’s instructions on safe helmet use.
Any helmet that has sustained a major impact should be
replaced. No helmet can protect against injury in every
accident.
In some situations, such as charging the camera within The Frame or
connecting audio or HDMI accessories or the Karma drone, you must
remove the side door to access the ports.
WARNING: Remove the side door only when you are using the
camera in a dry, dust-free environment. When the door is open
or removed, the camera is not waterproof. Never operate the
camera with the battery door open.
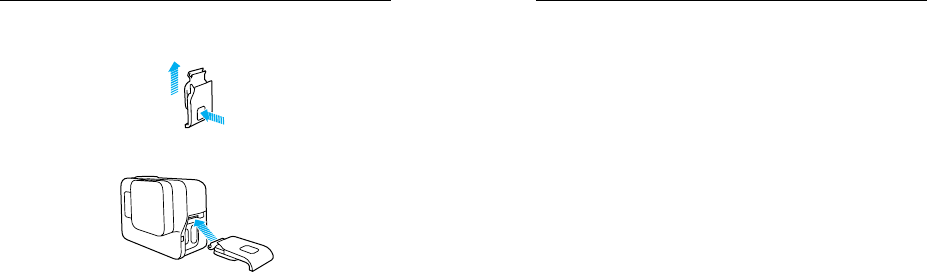
REMOVING THE SIDE DOOR
1. Hold down the Latch Release button and slide the door open.
2. Pull the door off of the camera.
REMOVING THE SIDE DOOR
86 87
Follow these guidelines to get the best performance from your camera:
• The camera is waterproof to 33’ (10m)—no housing needed. Ensure
that the doors are closed before using the camera in or around water,
dirt, or sand.
• Before closing the doors, be sure the seals are free of debris. If needed,
clean with a cloth.
• Before opening the doors, be sure the camera is free of water or debris.
If needed, rinse the camera with fresh water and dry it with a cloth.
• If sand or debris hardens around the doors, soak the camera in warm
tap water for 15 minutes and then rinse thoroughly to remove the
debris before opening the doors.
• In wet environments, dry the touch display with a soft cloth so that it
registers your touch.
• For best audio performance, shake the camera or blow on the mic
to remove water and debris from the microphone holes. To prevent
damage to the internal waterproof membranes, do not use compressed
air to blow into the mic holes.
• After every use in salt water, rinse the camera with fresh water, and
dry with a soft cloth.
• To clean the lens, wipe it with a soft, lint-free cloth. If debris becomes
lodged between the lens and the trim ring, flush it out with water or air.
Do not insert foreign objects around the lens.
MAINTENANCEREMOVING THE SIDE DOOR
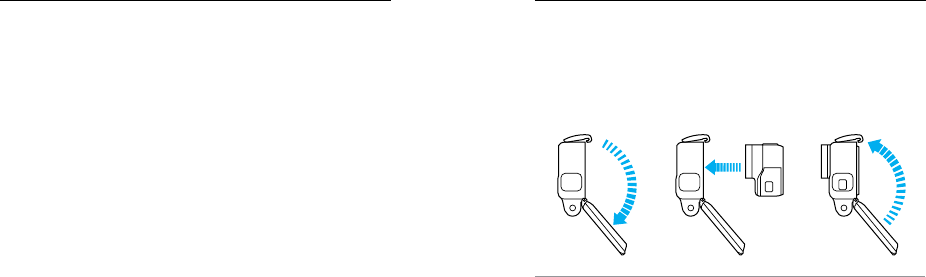
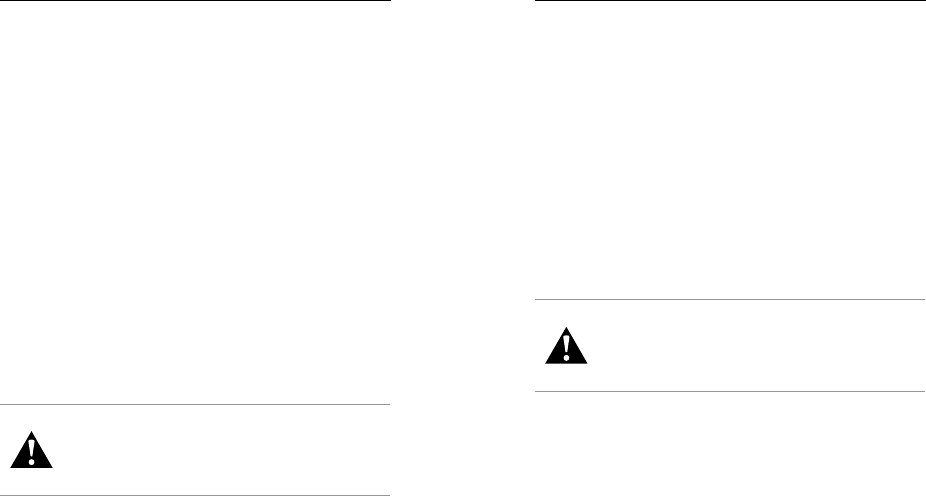
REATTACHING THE SIDE DOOR
1. Hold down the Latch Release button and extend the tab on the door.
2. Press the tab onto the small silver bar.
88 89
BATTERY INFORMATION
MAXIMIZING BATTERY LIFE
A message appears on the touch display if the battery drops below 10%.
If the battery reaches 0% while recording, the camera saves the file and
powers off.
To maximize battery life, follow these guidelines when possible:
• Turn off Wireless Connections
• Capture video at lower frame rates and resolutions
• Turn off Protune
• Use these settings:
• QuikCapture (page 22)
• Screensaver (page 75)
• Brightness (page 75)
RECORDING WHILE CHARGING
Using the USB-C cable that came with your camera, you can capture video
and photos while the camera is plugged in to a USB charging adapter, the
GoPro Supercharger, another GoPro charger, or the GoPro Portable Power
Pack. Although the battery does not charge during recording, you can
use one of the above methods to power the camera and obtain extended
recording time. When you stop recording, charging resumes. (You cannot
record while charging the camera through a computer.)
Note: Because the side door is open, the camera is not waterproof during charging.
WARNING: Using a wall charger other than a GoPro charging
device can damage the GoPro camera battery and could
result in fire or leakage. With the exception of the GoPro
Supercharger (sold separately), only use chargers marked:
Output 5V 1A. If you do not know the voltage and current
of your charger, use the included USB cable to charge the
camera from your computer.
BATTERY INFORMATION
BATTERY STORAGE AND HANDLING
The camera contains sensitive components, including the battery. Avoid
exposing your camera to very cold or very hot temperatures. Low or high
temperature conditions may temporarily shorten the battery life or cause
the camera to temporarily stop working
properly. Avoid dramatic changes in temperature or humidity when using
the camera, as condensation may form on or within the camera.
Do not dry the camera or battery with an external heat source such as a
microwave oven or hair dryer. Damage to the camera or battery caused by
contact with liquid inside the camera is not covered under the warranty.
Do not store your battery with metal objects, such as coins, keys or
necklaces. If the battery terminals come in contact with metal objects, this
may cause a fire.
Do not make any unauthorized alterations to the camera. Doing so may
compromise safety, regulatory compliance, performance, and may void
the warranty.
WARNING: Do not drop, disassemble, open, crush, bend,
deform, puncture, shred, microwave, incinerate or paint the
camera or battery. Do not insert foreign objects into the
battery opening on the camera. Do not use the camera or
the battery if it has been damaged—for example, if cracked,
punctured or harmed by water. Disassembling or puncturing
the battery can cause an explosion or fire.
BATTERY DISPOSAL
Most rechargeable lithium-ion batteries are classified as non-hazardous
waste and are safe for disposal in the normal municipal waste stream. Many
localities have laws in place requiring battery recycling. Check your local
laws to make sure that you can dispose of rechargeable batteries in your
regular trash. To safely dispose of lithium-ion batteries, protect terminals

90 91
BATTERY INFORMATION
from exposure to other metal with packing, masking or electrical tape so
they do not cause a fire while being transported.
Lithium-ion batteries, however, do contain recyclable materials and are
accepted for recycling by the Rechargeable Battery Recycling Corporation’s
(RBRC) Battery Recycling Program. We encourage you to visit Call2Recycle
at call2recycle.org or call 1-800-BATTERY in North America to find a
convenient recycling location.
Never dispose of a battery in a fire because it may explode.
WARNING: Only use manufacturer-recommended
replacement batteries for your camera.
TROUBLESHOOTING
MY GOPRO WON'T POWER ON
Make sure your GoPro is charged. To charge your camera, use the included
USB-C cable and a computer. You can also use GoPro's Supercharger or
USB-compatible Wall Charger or Auto Charger (all sold separately) or any
charging device marked with output 5V 1A. (Supercharger’s output is
5V 2A.)
MY GOPRO WON'T RESPOND WHEN I PRESS A BUTTON
See Restarting Your GoPro (page 79).
PLAYBACK ON MY COMPUTER IS CHOPPY
Choppy playback is typically not a problem with the file. If your footage
skips, one of these situations is likely the cause:
• Using an incompatible video player. Not all video players support
the H.264 codec. For best results, download the latest version of
Quik for desktop for free at gopro.com/apps.
• The computer does not meet the minimum requirements for HD
playback. The higher the resolution and frame rate of your video, the
harder the computer has to work to play it back. Make sure that your
computer meets the minimum requirements for the playback software.
If your computer does not meet the minimum requirements, record
at 1080p60 with Protune off, and make sure that all other programs
on your computer are closed. If that resolution does not improve the
playback, try 720p30.
I FORGOT MY CAMERA’S USERNAME OR PASSWORD
Swipe down, then tap Connect > Name & Password.

92 93
TROUBLESHOOTING
I DON’T KNOW WHAT SOFTWARE VERSION I HAVE
From the main screen, swipe down. Then tap Preferences > About This
GoPro. The Version Number displays the software version that you
are running.
I CAN’T FIND MY CAMERA’S SERIAL NUMBER
The camera’s serial number is listed in several places:
• In Preferences > About This GoPro
• On the inside of the battery bay (remove the battery to see it)
• On your camera’s microSD card (in the version.txt file in the
MSC folder)
For more answers to commonly asked questions, see gopro.com/help.
CUSTOMER SUPPORT
TRADEMARKS
REGULATORY INFORMATION
To see the complete list of country certifications, refer to the Important
Product + Safety Instructions included with your camera or visit
gopro.com/help.
GoPro, HERO, Protune, and SuperView are trademarks or registered
trademarks of GoPro, Inc. in the U.S. and internationally. Other names and
marks are the property of their respective owners.
GoPro is dedicated to providing the best possible service. To reach GoPro
Customer Support, visit gopro.com/help.
REVA
