HOW TO] Dynode Setup Guide
User Manual:
Open the PDF directly: View PDF ![]() .
.
Page Count: 7
Dynode Setup Tutorial
Summary
Setting up a Dynode requires a basic understanding of Linux and blockchain technology, as well
as an ability to follow instructions closely. It also requires regular maintenance and careful
security, especially when it comes to updating the clients.
This tutorial should help set-up a cold Dynode on a remote webserver. ‘‘Cold’’ means that the
server running the Dynode does not need a local wallet containing the Dynode collateral.
Notice that setting up a Dynode requires some basic knowledge of the Linux shell. However,
with this guide you should be fine.
Duality will be offering Dynode hosting services at a later time. There will be an announcement
upon the release of this service so please check back for updates.
Before you start
This guide assumes you are setting up a single Dynode for the first time.
You will need:
• 1000 Dynamic
• A Dynamic client running on your local PC
• A VPS
We also assume you will be working from a Windows computer. However, since most of the
work is done on your Linux VPS, alternative steps for using macOS or Linux will be indicated
where necessary.
Setting up your VPS
A VPS, also known as a cloud server, is fully functional installation of an operating system
(usually Linux) operating within a virtual machine.
We will use Vultr hosting as an example of a VPS, although DigitalOcean, Amazon EC2, Google
Cloud, Choopa and OVH are also popular choices. First create an account and add credit. Then
go to the Servers menu item on the left and click + to add a new server. Select a location for
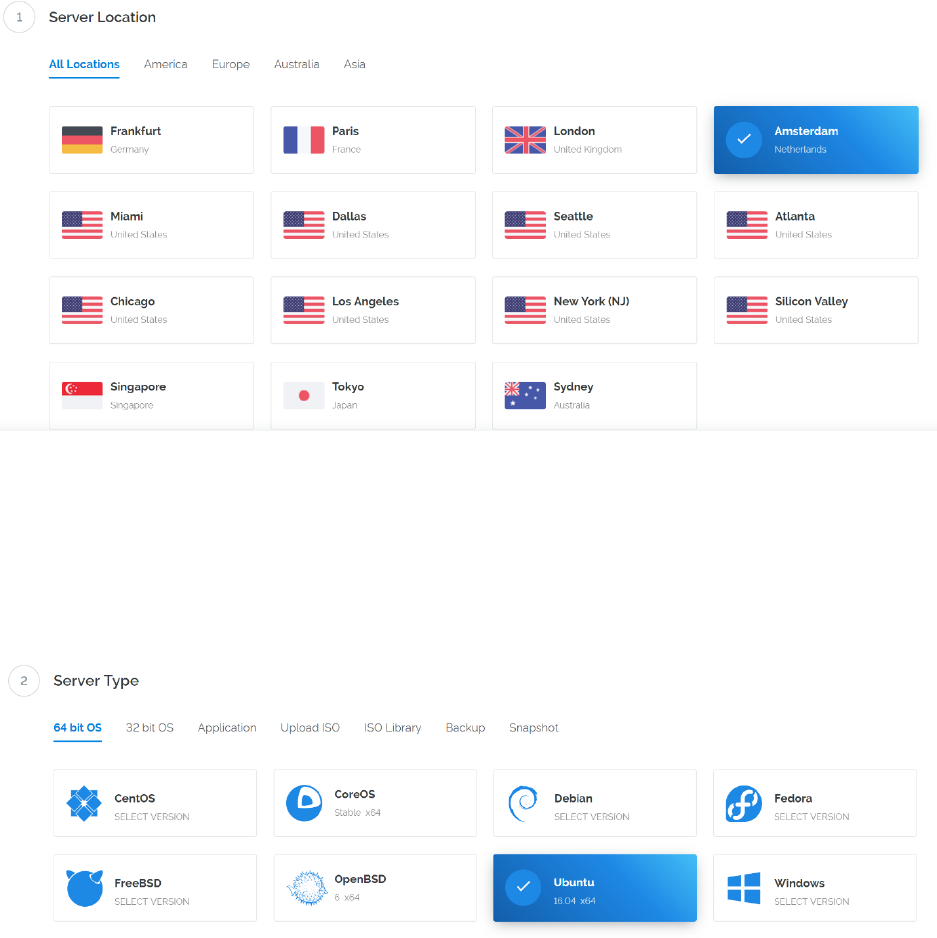
your new server on the following screen:
Vultr server location selection screen
Select Ubuntu 16.04 x64 as the server type. We use 16.04 instead of the latest version because
16.04 is an LTS release of Ubuntu, which will be supported with security updates for 5 years
instead of the usual 9 months.
Vultr server type selection screen
Select a server size offering at least 1GB of memory.

Vultr server size selection screen
Enter a hostname and label for your server. In this example we will use Dynode1 as the
hostname.
Vultr server hostname & label selection screen
Vultr will now install your server. This process may take a few minutes.
Vultr server installation screen
Click Manage when installation is complete and take note of the IP address, username and
password.
Vultr server management screen

Setup your Operating System
We will begin by connecting to your newly provisioned server. On Windows, we will first
download an app called mRemoteNG to connect to the server located at
https://mremoteng.org/. You could also use the “PuTTY” program as well located at
https://www.putty.org/. Go to the mRemoteNG download page and select the appropriate
installer for your system. On Mac or Linux you can ssh directly from the terminal - simply type
“ssh root@<server_ip>” and enter your password when prompted.
Double-click the downloaded file to install mRemoteNG, then run the app from your Start
menu. Right click on the connections button and click “New Connection”. Right click on your
new connection and “Rename” it to what you want. Enter your VPS IP address under the
configuration screen at the bottom left under “Hostname/IP”. Enter your “User name” and
“Password” as well. Change the “Protocol” to “SSH version 2”. Connect to your VPS by double
clicking your new connection. Click on “YES” to the security screen pop up.
You have now successfully connected to your VPS.
For the following commands, please enter everything exactly as it is shown between the
parentheses. Ex. “COMMAND”, you would type: COMMAND
You should immediately change the root password and store it in a safe place for security. You
can do this by typing the following command:
“passwd root”
Enter and confirm a new password (preferably long and randomly generated).
Now, while still as root, we will update the system from the Ubuntu package repository:
“apt update”
“apt upgrade”
The system will show a list of upgradable packages. Press Y and Enter to install the packages.
We will now install a firewall (and some other packages we will use later), add swap memory
and reboot the server to apply any necessary kernel updates, and then login to our newly
secured environment as the new user:
(press Y and Enter to confirm)
“ufw allow ssh/tcp”
“ufw limit ssh/tcp”
“ufw allow 9999/tcp”
“ufw logging on”
“ufw enable”
(press Y and Enter to confirm)

Next, we need to add the swap file:
“apt-get -y install dphys-swapfile”
“echo "CONF_SWAPSIZE=2048" >> /etc/dphys-swapfile”
“echo "CONF_MAXSWAP=2049" >> /etc/dphys-swapfile”
Then reboot the server:
“reboot now”
Setting up your Dynamic Server Client
• Connect to your VPS, get the Dynamic binary archive from GitHub and extract it.
• “wget https://github.com/duality-solutions/dynamic/releases/FILENAME” - Replace
FILENAME with the GitHub file you are downloading.
• To extract the client use this command: “tar -xzf FILENAME”
• Change into the Dynamic binary directory to see the binaries
• cd dynamic-(CURRENT_VERSION)/bin (Example: dynamic-2.2.0/bin)
Configuring your Dynode
• First, start the daemon by typing “dynamicd”. This creates an initial configuration file at
~/ .dynamic/dynamic.conf. Now press <CTRL>+c to stop the daemon again.
• Now start the daemon in background mode by typing “dynamicd --daemon”
• The Dynamic node should now start syncing the blockchain automatically. You can check
the progress using:
“dynamic-cli getblockcount” and comparing to the block explorer located at:
https://dynexplorer.duality.international
• Next, we need to create a private key for the Dynode. The controller wallet on your
main machine will use that key to talk to start the Dynode:
“dynamic-cli dynode genkey”
• Write down the generated key as <Dynodepairingkey>
• After the wallet has synced, stop the daemon:
“dynamic-cli stop”
• Now we edit the configuration file
“nano ~/ .dynamic/dynamic.conf”
• Add the following lines (save with <CTRL>+o, close with <CTRL>+x):
dynode=1
dynodepairingkey=<dynodepairingkey>
• Now, starting the node you will have a Dynode ready to be controlled enter the
following:
“dynamicd --daemon”
• You can check the status of your remote Dynode using the client:
“dynamic-cli dynode status”
Setting up the Controller Wallet
The wallet on your local machine acts as the controller wallet for your Dynodes. It contains the
Dynode collateral and can activate your cold Dynode on your webserver. We will use the
Dynamic QT Wallet.
Setting the Collateral Funds
• In the QT Wallet, go to the tab ‘‘Receive’’, and create a new address. You may use a
label like ‘‘Dynode collateral’’ for that. Copy the address just generated, which we will
call <collateral address>.
• Go to ‘‘Send’’ and send exactly 1000 DYN to the address <collateral address> (You
need to make sure fees are accounted for and it is exactly 1000).
• Now this should have created a Dynode compatible transaction output. You now have 2
options to find the <collateralTXID><TXINDX>
• Option 1 – Go to Tools/Debug Console and type Dynode outputs. You should see
something like "<collateral TXID>" "<TXINDX>"
• Example Output:
• ce334e88a716b8bb7c51d8f817dd4bea3a3665be4b95361a0d486db7e8bf890f, “0”
• Option 2 – Go to Settings then Options and make sure “Enable coin control features” is
checked. Now go to Send tab, click on Inputs. Right click on the input and copy TX id.
You should also see the output index.
Configuring the Dynode Configuration File on the Controller Wallet
• Now go to Tools/Edit Dynode Configuration File and enter the following line:
• <alias> <webserverIP>:33300 <dynodepairingkey> <collateralTXID> <TXINDX>
• <alias>: The name you have given to your Dynode.
• <webserverIP>: The external IP of your webserver, something like 123.45.67.89
• <dynodepairingkey>: The key that you generated earlier and put into the dynode.conf
file on your remote cold Dynode
• <collateralTXID>: The transaction ID you received from the above instructions.
• <TXINDX>: The transaction index will be either a “1” or “0”
• Close the wallet and restart it. (NOTE: Please make sure your wallet is 100% synced.)
• Go to the ‘‘Dynodes’’ Tab. Your Dynode should be listed with its alias as ‘‘Missing’’.
Right-click on it and click Start Alias.
• If you did everything right, the Dynode will successfully start and become ‘‘PRE-
ENABLED’’
• The Dynodes should switch to ‘‘ENABLED’’ and stay like after a max of 20 minutes, as
long as everything is fine on your remote webserver.
• Hint: You might need to restart your QT wallet to see the updated status
• When your Dynode earns a reward, it will be credited to the corresponding
• <collateral address>
Ensure your VPS has connected correctly
• Log back into your webserver.
• Check the status of your Dynode to ensure your webserver has connected:
“dynamic-cli dynode status”
