HPE Security Fortify Plugins For IntelliJ And Android Studio Installation Usage Guide Intelli J Stud 17.10
HPE_IntelliJ_AndStud_Plugins_Guide_17.10
User Manual:
Open the PDF directly: View PDF ![]() .
.
Page Count: 32
- Title Page
- Contents
- Preface
- Change Log
- Chapter 1: Introduction
- Chapter 2: Using the Analysis Plugin
- About Analysis Plugin Installation
- About HPE Security Fortify Security Content
- Analysis Configuration
- Setting Memory for Code Analysis
- Setting the Query Language Type
- Selecting the Security Content to Apply During Analysis
- Selecting Quick Scan Mode for Project Analysis
- Enabling FindBugs During Scans
- Excluding Dependent Modules from Analysis
- Specifying Additional Fortify Static Code Analyzer Options
- Synchronizing with Fortify Software Security Center
- Scanning Projects
- Uploading Analysis Results to Fortify Software Security Center
- Chapter 3: Using the Remediation Plugin
- About the Remediation Plugin Installation
- Opening Fortify Software Security Center Application Versions
- Viewing Audit Results
- Viewing Issue Information
- Assigning Users to Issues
- Assigning Tags to Issues
- Adding Comments to Issues
- Customizing Issue Visibility
- Searching for Issues
- Locating Issues in Your Source Code
- Send Documentation Feedback

HPE Security Fortify Plugins for
IntelliJ and Android Studio
Software Version: 17.10
Installation and Usage Guide
Document Release Date: April 2017
Software Release Date: April 2017
Legal Notices
Warranty
The only warranties for Hewlett Packard Enterprise Development products and services are set forth in the express warranty
statements accompanying such products and services. Nothing herein should be construed as constituting an additional
warranty. HPE shall not be liable for technical or editorial errors or omissions contained herein.
The information contained herein is subject to change without notice.
Restricted Rights Legend
Confidential computer software. Valid license from HPE required for possession, use or copying. Consistent with FAR 12.211
and 12.212, Commercial Computer Software, Computer Software Documentation, and Technical Data for Commercial Items
are licensed to the U.S. Government under vendor's standard commercial license.
The software is restricted to use solely for the purpose of scanning software for security vulnerabilities that is (i) owned by
you; (ii) for which you have a valid license to use; or (iii) with the explicit consent of the owner of the software to be scanned,
and may not be used for any other purpose.
You shall not install or use the software on any third party or shared (hosted) server without explicit consent from the third
party.
Copyright Notice
© Copyright 2012 - 2017 Hewlett Packard Enterprise Development LP
Trademark Notices
Adobe™ is a trademark of Adobe Systems Incorporated.
Microsoft® and Windows® are U.S. registered trademarks of Microsoft Corporation.
Documentation Updates
The title page of this document contains the following identifying information:
lSoftware Version number
lDocument Release Date, which changes each time the document is updated
lSoftware Release Date, which indicates the release date of this version of the software
To check for recent updates or to verify that you are using the most recent edition of a document, go to:
https://www.protect724.hpe.com/community/fortify/fortify-product-documentation
You will receive updated or new editions if you subscribe to the appropriate product support service. Contact your HPE sales
representative for details.
Installation and Usage Guide
HPE Security Fortify Plugins for IntelliJ and Android Studio (17.10) Page 2 of 32

Contents
Preface 5
Contacting HPESecurity Fortify Support 5
For More Information 5
About the Documentation Set 5
Change Log 6
Chapter 1: Introduction 7
About HPE Security Fortify Plugins for IntelliJ and Android Studio 7
Related Documents 7
All Products 8
HPE Security Fortify Software Security Center 8
HPE Security Fortify Static Code Analyzer 10
Chapter 2: Using the Analysis Plugin 11
About Analysis Plugin Installation 11
Installing the Analysis Plugin 11
Uninstalling the Analysis Plugin 12
About HPE Security Fortify Security Content 12
Updating Security Content 12
Updating Security Content on a Network That Uses a Proxy Server 13
Analysis Configuration 13
Setting Memory for Code Analysis 13
Setting the Query Language Type 14
Selecting the Security Content to Apply During Analysis 14
Selecting Quick Scan Mode for Project Analysis 15
Enabling FindBugs During Scans 15
Excluding Dependent Modules from Analysis 15
Specifying Additional Fortify Static Code Analyzer Options 16
Synchronizing with Fortify Software Security Center 16
Scanning Projects 17
Scanning Large and Complex Projects 17
Performing an Advanced Scan 18
Uploading Analysis Results to Fortify Software Security Center 19
Chapter 3: Using the Remediation Plugin 20
About the Remediation Plugin Installation 20
Installing the Remediation Plugin 20
Installation and Usage Guide
HPE Security Fortify Plugins for IntelliJ and Android Studio (17.10) Page 3 of 32

Uninstalling the Remediation Plugin 21
Opening Fortify Software Security Center Application Versions 21
Viewing Audit Results 21
Grouping and Selecting Issues 22
Grouping Issues 23
Viewing Issue Information 24
Issue Details Tab 24
Recommendation Tab 25
Description Tab 25
History Tab 25
Assigning Users to Issues 26
Assigning Tags to Issues 26
Adding Comments to Issues 26
Customizing Issue Visibility 27
Searching for Issues 27
Search Modifiers 28
Locating Issues in Your Source Code 31
Send Documentation Feedback 32
Installation and Usage Guide
HPE Security Fortify Plugins for IntelliJ and Android Studio (17.10) Page 4 of 32
Preface
Contacting HPESecurity Fortify Support
If you have questions or comments about using this product, contact HPESecurityFortify Technical
Support using one of the following options.
To Manage Your Support Cases, Acquire Licenses, and Manage Your Account
https://support.fortify.com
To Email Support
fortifytechsupport@hpe.com
To Call Support
1.844.260.7219
For More Information
For more information about HPE Security software products: http://www.hpe.com/software/fortify
About the Documentation Set
The HPE Security Fortify Software documentation set contains installation, user, and deployment
guides for all HPE Security Fortify Software products and components. In addition, you will find
technical notes and release notes that describe new features, known issues, and last-minute updates.
You can access the latest versions of these documents from the following HPE Security user community
website:
https://www.protect724.hpe.com/community/fortify/fortify-product-documentation
You will need to register for an account.
Installation and Usage Guide
Preface
HPE Security Fortify Plugins for IntelliJ and Android Studio (17.10) Page 5 of 32
Change Log
The following table lists changes made to this guide. Revisions to this document are published between
software releases only if the changes made affect product functionality.
DocumentRelease/
DocumentVersion Change
17.10 Updated: Release date and version number
16.20 Added:"Assigning Tags to Issues" on page26
16.10 This is a new guide created by combining the contents of the HP Fortify
Analysis Plugin for IntelliJ and Android Studio Installation and Usage Guide
and the HP Fortify Remediation Plugin for IntelliJ and Android Studio
Installation and User Guide.
Installation and Usage Guide
Change Log
HPE Security Fortify Plugins for IntelliJ and Android Studio (17.10) Page 6 of 32
Chapter 1: Introduction
This section contains the following topics:
About HPE Security Fortify Plugins for IntelliJ and Android Studio 7
Related Documents 7
About HPE Security Fortify Plugins for IntelliJ and
Android Studio
The Fortify Plugins for IntelliJ and Android Studio work in the IntelliJ IDEAand the Android Studio
integrated development environment (IDEs). Developers use these plugins to:
lScan a codebase for vulnerabilities with HPE SecurityFortify Static Code Analyzer (Fortify Static
Code Analyzer)
lReview the analysis results to eliminate false positives and prioritize the order of remediation
lFix and eliminate security vulnerabilities in your code (remediation)
lIntegrate with HPE Security Fortify Software Security Center (Fortify Software Security Center)
You can install the plugin that best fits your needs, or install both plugins.
To do this Use this plugin
Initiate a scan from the IDE Analysis Plugin
Upload scan results to Fortify Software Security Center Analysis Plugin
Integrate with Fortify Software Security Center Remediation Plugin
Review security issues, add comments, and assign users Remediation Plugin
Related Documents
This topic describes documents that provide information about HPE Security Fortify Plugins for IntelliJ
and Android Studio.
Note: The Protect724 site location is https://www.protect724.hpe.com/community/fortify/fortify-
product-documentation.
HPE Security Fortify Plugins for IntelliJ and Android Studio (17.10) Page 7 of 32

All Products
The following documents provide general information for all products.
Document / File Name Description Location
HPE Security Fortify Software
System Requirements
HPE_Sys_Reqs_<version>.pdf
This document provides the
details about the environments
and products supported for this
version of HPE Security Fortify
Software.
Included with product
download and on the
Protect724 site
HPE Security Fortify Software
Release Notes
HPE_FortifySW_RN_
<version>.txt
This document provides an
overview of the changes made
to HPE Security Fortify
Software for this release and
important information not
included elsewhere in the
product documentation.
Included on the Protect724 site
What’s New in HPE Security
Fortify Software <version>
HPE_Whats_New_
<version>.pdf
This document describes the
new features in HPE Security
Fortify Software products.
Included on the Protect724 site
HPE Security Fortify Open
Source and Third-Party
License Agreements
HPE_OpenSrc_<version>.pdf
This document provides open
source and third-party software
license agreements for software
components used in HPE
Security Fortify Software.
Included with product
download and on the
Protect724 site
HPE Security Fortify Glossary
HPE_Glossary.pdf
This document provides
definitions for HPE Security
Fortify Software terms.
Included with product
download and on the
Protect724 site
HPE Security Fortify Software Security Center
The following documents provide information about HPE Security Fortify Software Security Center.
Document / File Name Description Location
HPE Security Fortify Software
Security Center User Guide
HPE_SSC_Guide_
<version>.pdf
HPE_SSC_Help_<version>
This document provides Fortify
Software Security Center users
with detailed information about
how to deploy and use Fortify
Software Security Center. It
provides all of the information
you need to acquire, install,
Included with product
download and on the
Protect724 site
Installation and Usage Guide
Chapter 1: Introduction
HPE Security Fortify Plugins for IntelliJ and Android Studio (17.10) Page 8 of 32

Document / File Name Description Location
configure, and use Fortify
Software Security Center.
It is intended for use by system
and instance administrators,
database administrators (DBAs),
enterprise security leads,
development team managers,
and developers. Fortify Software
Security Center provides security
team leads with a high-level
overview of the history and
current status of a project.
HP Fortify Software Security
Center User Guide: Legacy
User Interface
HP_Fortify_SSC_User_Guide_
Legacy.pdf
PDFonly; no help file
This document is the user guide
for HP Software Security Center
version 4.30. The legacy (4.30)
user interface is available from
the Fortify Software Security
Center version 16.20 user
interface. Specific areas of
functionality are available only in
the 4.30 interface.
Included with product
download and on the
Protect724 site
HPE Security Fortify Software
Security Center Process
Designer Guide: Legacy User
Interface
HPE_SSC_Proc_Design_
Guide_Legacy_<version>.pdf
HPE_SSC_Proc_Design_Help_
<version>
This document provides
information about how to start
the Process Designer, configure
its connection to your Fortify
Software Security Center
instance, and then use it to work
with Fortify Software Security
Center process templates, which
are used only in the Fortify
Software Security Center legacy
(version 4.30) user interface.
Included with product
download and on the
Protect724 site
HP Fortify Software Security
Center Installation and
Configuration Guide: Legacy
User Interface
HP_Fortify_SSC_Install_and_
Config_Guide_Legacy.pdf
PDFonly; no help file
This document provides system
and database administrators with
complete instructions on how to
configure Fortify Software
Security Center server software
using the legacy (v4.30) user
interface.
Included with product
download and on the
Protect724 site
HPE Security Fortify Software
Security Center Process
Designer Guide: Legacy User
Interface
This legacy document provides
information about how to start
the Process Designer, configure
its connection to your Fortify
Included with product
download and on the
Protect724 site
Installation and Usage Guide
Chapter 1: Introduction
HPE Security Fortify Plugins for IntelliJ and Android Studio (17.10) Page 9 of 32

Document / File Name Description Location
HPE_SSC_Proc_Design_
Guide_Legacy_<version>.pdf
HPE_SSC_Proc_Design_Help_
<version>
Software Security Center
instance, and then use it to work
with Fortify Software Security
Center process templates.
HPE Security Fortify Static Code Analyzer
The following documents provide information about Static Code Analyzer.
Document / File Name Description Location
HPE Security Fortify Static
Code Analyzer User Guide
HPE_SCA_Guide_
<version>.pdf
HPE_SCA_Help_<version>
This document describes how
to use Fortify Static Code
Analyzer to scan code on many
of the major programming
platforms. It is intended for
people responsible for security
audits and secure coding.
Included with product
download and on the
Protect724 site
HPE Security Fortify Static
Code Analyzer Installation
Guide
HPE_SCA_Install_
<version>.pdf
HPE_SCA_Install_Help_
<version>
This document contains
installation instructions for
Fortify Static Code Analyzer
and Applications.
Included with product
download and on the
Protect724 site
HPE Security Fortify Static
Code Analyzer Performance
Guide
HPE_SCA_Perf_Guide_
<version>.pdf
PDF only; no help file
This document provides
guidelines for selecting
hardware to scan different
types of codebases and offers
tips for optimizing memory
usage and performance.
Included with product
download and on the
Protect724 site
HPE Security Fortify Static
Code Analyzer Custom Rules
Guide
HPE_SCA_Cust_Rules_Guide_
<version>.zip
PDF only; no help file
This document provides the
information that you need to
create custom rules for Fortify
Static Code Analyzer. This
guide includes examples that
apply rule-writing concepts to
real-world security issues.
Included with product
download
Installation and Usage Guide
Chapter 1: Introduction
HPE Security Fortify Plugins for IntelliJ and Android Studio (17.10) Page 10 of 32

Chapter 2: Using the Analysis Plugin
The Analysis Plugin focuses on the analysis phase that enables developers to quickly and easily identify
vulnerabilities in their code.
After you install the Analysis Plugin, you can configure your scanning options and connect to Fortify
Software Security Center. Your organization can use the plugin scan results with Fortify Software
Security Center to manage projects and assign issues to the relevant developers.
This chapter describes how to install the Analysis Plugin, use it to uncover vulnerabilities in your source
code, and how to upload the analysis results to Fortify Software Security Center.
This section contains the following topics:
About Analysis Plugin Installation 11
About HPE Security Fortify Security Content 12
Analysis Configuration 13
Scanning Projects 17
Uploading Analysis Results to Fortify Software Security Center 19
About Analysis Plugin Installation
You can install the Analysis Plugin on Windows, Linux, and Mac OS. For Information about which
operating system versions are supported, see the HPE Security Fortify Software System Requirements
document.
Installing the Analysis Plugin
To install the Analysis Plugin:
1. Run the Fortify Static Code Analyzer and Applications installation and select IntelliJ IDEA Analysis
from the list of plugins.
2. Start IntelliJ IDEA or Android Studio.
3. Open the project that you want to scan.
4. Open the Settings dialog box as follows:
lOn Windows or Linux, select File > Settings.
lOn Mac OS, select Preferences > IDE Setting.
5. In the left panel, select Plugins.
HPE Security Fortify Plugins for IntelliJ and Android Studio (17.10) Page 11 of 32
6. Click Install plugin from disk, browse to the <sca_install_dir>/plugins directory and
select one of the following files:
lOn Windows, find HPE_Security_Fortify_IntelliJ_Analysis_Plugin_<version>_
Windows.zip
lOn Linux or Mac OS, find HPE_Security_Fortify_IntelliJ_Analysis_Plugin_
<version>_Non-Windows.zip
7. Click OK.
8. When asked whether you want to restart the program to activate the plugin, click Restart.
Fortify Analysis is added to the list of plugins and the menu bar now includes the Fortify menu.
Uninstalling the Analysis Plugin
To uninstall the Analysis Plugin:
1. Start IntelliJ IDEA or Android Studio.
2. Open the Settings dialog box as follows:
lOn Windows or Linux, select File > Settings.
lOn Mac OS, select Preferences > IDE Setting.
3. In the left panel, select Plugins.
4. From the Plugins list, select Fortify Analysis.
5. In the Fortify Analysis panel on the right, click Uninstall plugin.
6. In the Fortify Analysis panel on the right, click Restart (IntelliJ IDEA or Android Studio).
About HPE Security Fortify Security Content
HPE Security Fortify security content consists of secure coding Rulepacks and external metadata that
includes mappings from the HPE Security Fortify categories to alternative categories (such as OWASP,
PCI, and CWE). You can customize the existing mapping in the external metadata document
(externalmetadata.xml) or create your own files to map HPE Security Fortify issues to different
taxonomies, such as internal application security standards or additional compliance obligations
(recommended). See the HPESecurity Static Code Analyzer CustomRules Guide for instructions on
how to customize mappings.
HPE strongly recommends that you periodically update the security content.
Updating Security Content
If your network uses a proxy server to reach the Rulepack update server, see "Updating Security
Content on a Network That Uses a Proxy Server" on the next page.
Installation and Usage Guide
Chapter 2: Using the Analysis Plugin
HPE Security Fortify Plugins for IntelliJ and Android Studio (17.10) Page 12 of 32
To get the latest security content:
1. Open a command prompt, and then navigate to the <sca_install_dir>/bin directory.
2. At the prompt, type either fortifyupdate.cmd (on a Windows system) or fortifyupdate (on
a non-Windows system).
Updating Security Content on a Network That Uses a Proxy
Server
If your network uses a proxy server to reach the Rulepack update server, you must use the
scapostinstall utility to specify the proxy server.
To specify a proxy for the Rulepack update server and download the latest security content:
1. Open a command window, and then navigate to the <sca_install_dir>/bin directory.
2. At the command prompt, type scapostinstall.
3. Type 2to select Settings.
4. Type 2to select Fortify Update.
5. Type 2to select Proxy Server Host.
6. Type the proxy server name.
7. Type 3to select Proxy Server Port.
8. Type the proxy server port number.
9. To exit the scapostinstall, type q.
10. At the command prompt, type either fortifyupdate.cmd (on a Windows system) or
fortifyupdate (on a non-Windows system).
Analysis Configuration
You can modify Analysis Plugin settings to do the following:
lSpecify the amount of memory to use during scans
lSpecify the procedural language your SQL files use
lDetermine the security content to use in project analysis
This controls what Fortify Static Code Analyzer looks for during a scan.
lConfigure advanced analysis options (for example, enable quick scan mode)
lConfigure a connection to Fortify Software Security Center
Setting Memory for Code Analysis
If you plan to analyze large projects, and you want to make sure you do not run out of memory during
analysis, consider increasing the amount of memory that Fortify Static Code Analyzer uses for scanning.
Installation and Usage Guide
Chapter 2: Using the Analysis Plugin
HPE Security Fortify Plugins for IntelliJ and Android Studio (17.10) Page 13 of 32

To specify the amount of memory that Fortify Static Code Analyzer uses to scan a project:
1. Open your IntelliJ IDEA or Android Studio project.
2. From the menu bar, select Fortify > Analysis Settings.
The Fortify Analysis Settings dialog box opens to the Analysis Configuration tab.
3. Under Scan Configuration, in the Memory (MB) box, type an integer.
Assuming that no other memory-intensive processes are running, HPE recommends that you
allocate no more than two thirds of the available physical memory.
Note: The Analysis Plugin prevents you from specifying more memory than is physically
available on your system.
4. Click OK.
Setting the Query Language Type
By default, the Analysis Plugin treats SQL files as though they use the T-SQL procedural language on
Windows systems and PL/SQL on other platforms. (The SQL type setting is determined by the
com.fortify.sca.SqlLanguage property in the fortify-sca.properties file.)
To set the procedural language for analysis:
1. Open your IntelliJ IDEA or Android Studio project.
2. From the menu bar, select Fortify > Analysis Settings.
The Fortify Analysis Settings dialog box opens to the Analysis Configuration tab.
3. Under Scan Configuration, from the SQL type list, select TSQL or PLSQL.
4. Click OK.
Selecting the Security Content to Apply During Analysis
By default, the Analysis Plugin uses all available security content to analyze projects. You can narrow
the focus of what the Analysis Plugin looks for during a scan by selecting the security content that it
uses to analyze your project.
To specify the security content used to analyze a project:
1. Open your IntelliJ IDEA or Android Studio project.
2. From the menu bar, select Fortify > Analysis Settings.
The Fortify Analysis Settings dialog box opens to the Analysis Configuration tab.
3. Under Security Content, clear the Use all installed security content check box.
4. In the Installed Fortify Security Content list, select the check boxes for the rules to apply during
the scan.
5. If you have custom security content installed, in the Installed Custom Security Content list, select
the check boxes for the custom security content you want to apply during the scan.
6. Click OK.
Installation and Usage Guide
Chapter 2: Using the Analysis Plugin
HPE Security Fortify Plugins for IntelliJ and Android Studio (17.10) Page 14 of 32
Selecting Quick Scan Mode for Project Analysis
You can use quick scan mode to quickly analyze projects for major issues. A quick scan of the WebGoat
sample application uncovers 284 possible issues. By contrast, a full scan of the WebGoat sample
application uncovers 1,150 possible issues.
In quick scan mode, Fortify Static Code Analyzer uses the fortify-sca-quickscan.properties
file (instead of the standard fortify-sca.properties file) to search for high-confidence,
high-severity issues. Quick scans are a great way to get many applications through an assessment so
that you can quickly find issues and begin remediation.
Although the quick scan is significantly faster than a full scan, it does not provide as robust a result set.
Critical and other issues that a quick scan cannot detect might exist in your application. HPE
recommends that you run full scans whenever possible.
To enable quick scan mode:
1. Open your IntelliJ IDEA or Android Studio project.
2. From the menu bar, select Fortify > Analysis Settings.
3. Click the Advanced Options tab.
4. Select the Enable quick scan mode check box.
5. Click OK.
Enabling FindBugs During Scans
FindBugs (http://findbugs.sourceforge.net) is a static analysis tool that detects quality issues in Java
code. You can run FindBugs with the Analysis Plugin. The results are integrated into the analysis results
file.
Unlike Fortify Static Code Analyzer, which analyzes Java source files, FindBugs analyzes Java bytecode.
Therefore, you must successfully compile your project before you run a scan with FindBugs enabled.
Otherwise, FindBugs is not run with the scan and Fortify Static Code Analyzer issues a warning to that
effect.
To enable FindBugs for your scan:
1. Open your IntelliJ IDEA or Android Studio project.
2. From the menu bar, select Fortify > Analysis Settings.
3. Click the Advanced Options tab.
4. Select the Enable FindBugs integration check box.
5. Click OK.
Excluding Dependent Modules from Analysis
By default, the Analysis Plugin includes all source files from dependent modules in scans. Although you
can scan individual modules, scan results are more accurate if you scan an entire project at once.
Installation and Usage Guide
Chapter 2: Using the Analysis Plugin
HPE Security Fortify Plugins for IntelliJ and Android Studio (17.10) Page 15 of 32

To exclude dependent or nested modules from analysis:
1. Open your IntelliJ IDEA or Android Studio project.
2. From the menu bar, select Fortify > Analysis Settings.
3. Click the Advanced Options tab.
4. Clear the Scan resources in dependent modules check box.
5. Click OK.
Specifying Additional Fortify Static Code Analyzer Options
To specify additional Fortify Static Code Analyzer options:
1. Open your IntelliJ IDEA or Android Studio project.
2. From the menu bar, select Fortify > Analysis Settings.
3. Click the Advanced Options tab.
4. Select the Use additional SCA arguments check box.
5. In the Translate and Scan boxes, enter command-line options for the translation and scan phases,
respectively.
For example, if you include the -verbose command-line option, the Analysis Plugin sends detailed
status messages to the console during the analysis. For information on the available command-line
options and syntax, see the HPE SecurityFortify Source Code Analyzer User Guide.
6. To change the output location for your scan results, click the button next to the Output results to
box, and then, in the Select output directory dialog box, specify the directory in which to save the
analysis results.
7. Click OK.
Synchronizing with Fortify Software Security Center
You can automatically upload your changes to an application version on Fortify Software Security
Center each time you scan your local project. This synchronization helps facilitate collaborative auditing,
and enables you to synchronize any source code changes each time you re-scan the project.
Note: Automatic synchronization requires that you specify an application version that already
exists in Fortify Software Security Center. If the application version does not exist in Fortify
Software Security Center, you must first create it. For instructions, see the HPE Security Fortify
Software Security Center User Guide.
To enable synchronization with Fortify Software Security Center:
1. Open your IntelliJ IDEA or Android Studio project.
2. From the menu bar, select Fortify > Analysis Settings.
3. Click the Synchronize Options tab.
4. In the Server URL box, specify the URL for your Fortify Software Security Center server (for
example, http://127.0.0.1:8180/ssc).
Installation and Usage Guide
Chapter 2: Using the Analysis Plugin
HPE Security Fortify Plugins for IntelliJ and Android Studio (17.10) Page 16 of 32

5. If required, specify a proxy server and port number.
6. Click OK.
Scanning Projects
This section provides information about how to use the Analysis Plugin to scan and analyze your Java
source code to uncover security vulnerabilities.
Note: HPE strongly recommends that you periodically update the security content, which contains
Rulepacks and external metadata. For information about how to update security content, see
"Updating Security Content" on page12.
Note: If your project is an Android Gradle project, build the release target for the project so that the
final project artifacts are generated before the scan. Doing this provides more accurate scan results.
You can either build the release target manually, before you start the scan, or later, as described in
the following procedure.
To scan a project:
1. Open your IntelliJ IDEA or Android Studio project.
2. From the menu bar, do one of the following:
lSelect Fortify > Analyze Project.
lRight-click a module, and then select Analyze Module from the context menu.
Note: If your project is an Android Gradle project, the plugin prompts you to build the release
target for the project so that the final project artifacts are generated. In the Rebuild the release
target dialog box, click Yes.
The Fortify Static Code Analyzer scan starts. The progress bar at the bottom of the window
displays the progress of events during the scan. After the scan is completed, the Analysis Plugin
saves the resulting FPR.
If you configured a connection to Fortify Software Security Center, the Analysis Plugin displays the
Select Software Security Center Application Version dialog box. If you have not already set up a
connection to Software Security Center, you can do so later, and then upload the scan results (see
"Uploading Analysis Results to Fortify Software Security Center" on page19).
3. If you want to upload your scan results to Fortify Software Security Center, select the Fortify
Software Security Center application version that corresponds to your project, and then click OK.
Scanning Large and Complex Projects
Exceptionally large code bases might require that you take measures to ensure a complete scan,
including using Fortify Static Code Analyzer to scan the code in smaller sections. By default, your
project modules are translated separately, and the results are combined into a single FPR file during the
analysis phase.
Installation and Usage Guide
Chapter 2: Using the Analysis Plugin
HPE Security Fortify Plugins for IntelliJ and Android Studio (17.10) Page 17 of 32
While you can edit Fortify Static Code Analyzer command options, you can handle large and complex
scans more successfully directly through the command console. You can use the Advanced Scan wizard
to translate and analyze Java projects that have source code in multiple directories, have special
translation or build conditions, or have files that you want to exclude from the project.
Performing an Advanced Scan
To perform an advanced scan:
1. Open your IntelliJ IDEA or Android Studio project.
2. From the menu bar, select Fortify > Advanced Scan.
The Advanced Scan wizard opens. The wizard automatically includes all source files configured in
IntelliJ or Android Studio.
When you scan several modules, the wizard displays several tabs, one for each module. All modules
are translated separately but analyzed together. If you want to exclude a module, close its tab.
3. To exclude files or directories that contain, for example, test source code, right-click the file or
directory, and then select Exclude from the shortcut menu.
4. The Analysis Plugin automatically detects the class path from IntelliJ or Android Studio settings for
the project. To add folders that the plugin has not detected as in the class path, right-click a build
directory, and then select Add to ClassPath from the shortcut menu.
5. From the Java version list, select the Java version for the project.
6. In the Build ID box, type the build ID.
The project name is the default build ID with unacceptable file system symbols escaped.
7. To specify a different output file path than the default, in the Output path box, type the path and
file name for the HPE Fortify Project (FPR) file that Fortify Static Code Analyzer will generate.
8. To perform a quick scan, select the Enable Quick Scan mode check box.
For information about quick scans, see "Selecting Quick Scan Mode for Project Analysis" on
page15.
9. Click Next.
The scan process includes the following phases:
lDuring the clean phase, Fortify Static Code Analyzer removes files from previous translation of
the project.
lDuring the translation phase, you can see one translation section for each of the selected
modules. You can modify the class path and all build parameters for each module separately.
Fortify Static Code Analyzer translates source code identified in the previous screen into an
intermediate format associated with the build ID. (The build ID is typically the project name.)
lDuring the scan phase, Fortify Static Code Analyzer scans source files identified during the
translation phase and generates analysis results in the FPR format.
10. (Optional) To skip a scanning phase, clear the Enable clean,Enable translation, or Enable scan
check box. For example, if the security content has changed but the project has not changed, you
might want to disable the translation phase so that Fortify Static Code Analyzer scans the project
Installation and Usage Guide
Chapter 2: Using the Analysis Plugin
HPE Security Fortify Plugins for IntelliJ and Android Studio (17.10) Page 18 of 32
without retranslating.
11. Click Finish.
Uploading Analysis Results to Fortify Software
Security Center
You can manually upload analysis results to Fortify Software Security Center any time after a scan is
completed. However, before you do, a corresponding application version must already exist in Software
Security Center.
To upload analysis results to Software Security Center:
1. Check to make sure that you have a generated FPR file in the default location or the location
configured in the Fortify Analysis Settings dialog box (see step 6 in "Specifying Additional Fortify
Static Code Analyzer Options" on page16).
The FPR file must already exist.
2. Check to make sure that an application version that corresponds to your IntelliJ IDEA or Android
Studio project already exists in Fortify Software Security Center. If the application version does not
exist on Fortify Software Security Center, create it.
3. From the IntelliJ IDEA or Android Studio menu bar, select Fortify > Upload Results.
The Software Security Center Credentials dialog box opens.
4. Provide the Fortify Software Security Center server URL and your Fortify Software Security Center
credentials, and then click OK.
The Select Software Security Center Application Version dialog box opens.
5. Select the Fortify Software Security Center application version that corresponds to your IntelliJ
IDEA project, and then click OK.
You can now open the project and view the results from Fortify Software Security Center or from the
Remediation Plugin. For information about how to view and work with scan results in Fortify Software
Security Center, see the HPE Security Fortify Software Security Center User Guide. For information
about how to view and work with scan results from IntelliJ or Android Studio, see "Using the
Remediation Plugin" on page20.
Installation and Usage Guide
Chapter 2: Using the Analysis Plugin
HPE Security Fortify Plugins for IntelliJ and Android Studio (17.10) Page 19 of 32

Chapter 3: Using the Remediation Plugin
This chapter describes how to install the Remediation Plugin, use it to uncover vulnerabilities in your
source code, and how to upload the analysis results to HPE Security Fortify Software Security Center.
This section contains the following topics:
About the Remediation Plugin Installation 20
Opening Fortify Software Security Center Application Versions 21
Viewing Audit Results 21
Viewing Issue Information 24
Assigning Users to Issues 26
Assigning Tags to Issues 26
Adding Comments to Issues 26
Customizing Issue Visibility 27
Searching for Issues 27
Locating Issues in Your Source Code 31
About the Remediation Plugin Installation
You can install the Remediation Plugin on systems with Windows, Linux, and Mac OS.
Installing the Remediation Plugin
To install the Remediation Plugin:
1. Open a project in IntelliJ IDEA or Android Studio.
2. Open the Settings dialog box as follows:
lOn Windows or Linux, select File > Settings.
lOn Mac OS, select Preferences > IDE Setting.
3. In the left panel under IDE Settings, select Plugins.
4. Click Install plugin from disk, and then locate and select one of the following files:
lOn a Windows, find HPE_Security_Fortify_IntelliJ_Remediation_Plugin_
<version>_Windows.zip
lOn a Linux or Mac OS, find HPE_Security_Fortify_IntelliJ_Remediation_Plugin_
<version>_Non-Windows.zip
5. Click OK.
6. When asked whether you want to restart the program to activate the plugin, click Restart.
The menu bar now includes the Fortify menu.
HPE Security Fortify Plugins for IntelliJ and Android Studio (17.10) Page 20 of 32

Uninstalling the Remediation Plugin
To uninstall the Remediation Plugin:
1. Start IntelliJ IDEA or Android Studio.
2. Open the Settings dialog box as follows:
lOn Windows or Linux, select File > Settings.
lOn Mac OS, select Preferences > IDE Setting.
3. In the left panel, select Plugins.
4. From the Plugins list, select Fortify Remediation.
5. In the Fortify Remediation panel on the right, click Uninstall plugin.
6. In the Fortify Remediation panel on the right, click Restart (IntelliJ IDEA or Android Studio).
Opening Fortify Software Security Center Application
Versions
To use the Remediation Plugin, you must first connect to Fortify Software Security Center.
To connect to Fortify Software Security Center and open an application version in the Remediation
Plugin:
1. Open a project in IntelliJ IDEA or Android Studio.
2. Select Fortify > Connect to Software Security Center.
3. Enter your Fortify Software Security Center credentials if prompted, and then click OK.
Note: If you are already connected to the Fortify Software Security Center, you do not need to
re-enter your credentials.
The Select Software Security Center Application Version dialog box opens and lists the existing
applications and application versions.
4. Select an application version to work with, and then click OK.
The Remediation Plugin downloads the audit results from the Fortify Software Security Center
application version.
Viewing Audit Results
Audit projects in the Remediation Plugin provide the security-related issues associated with a specific
application. Audit projects organize these issues into folders based on filters.
Folders contain logically defined sets of issues. For example, the Critical folder contains all critical issues
for a project. Similarly, the Low folder contains all low-priority issues.
Installation and Usage Guide
Chapter 3: Using the Remediation Plugin
HPE Security Fortify Plugins for IntelliJ and Android Studio (17.10) Page 21 of 32
Filters determine which issues are visible. Filters are organized into distinct groups called filter sets. An
issue template can contain definitions for multiple filter sets. You can use multiple filter sets in a project
to quickly change issue sorting and visibility.
To remediate issues, the project you have open in the IDE must correspond to the application version
you selected from Fortify Software Security Center when you connected to it from the Remediation
Plugin. See "Opening Fortify Software Security Center Application Versions" on the previous page.
To update the audit results at any time with Fortify Software Security Center, click Refresh .
Grouping and Selecting Issues
When you connect to an application, the Remediation Plugin downloads the issues for that application
version. Fortify Software Security Center provides a number of default folder types. Your view might be
different, depending on whether your organization has created custom folders.
1. Click the Change View Options icon.
2. From Filter Set, select one of the following filter sets to apply to issues:
lSelect Security Auditor View to list all issues relevant to a security auditor.
lSelect Quick View to list only issues in the Critical folder (these have a potentially high impact
and a high likelihood of occurring) and the High folder (these have a potentially high impact and
a low likelihood of occurring).
3. From the Group By list, select a value to use to sort issues in all visible folders into groups.
The default grouping is Category. For more information, see "Grouping Issues" on the next page.
4. From the Issues for list, select one of the following:
l<All Users>
lYour Fortify Software Security Center user name. This is the default.
lPossibly additional Software Security Center user names
5. Click one of the following category tabs.
lThe Critical tab contains issues that have a high impact and a high likelihood of exploitation.
HPE recommends that you remediate critical issues immediately.
lThe High tab contains issues that have a high impact and a low likelihood of exploitation. HPE
recommends that you remediate high issues with the next patch release.
lThe Medium tab contains issues that a have low impact and a high likelihood of exploitation.
HPE recommends that you remediate medium issues as time permits.
lThe Low tab contains issues that have a low impact and a low likelihood of exploitation. HPE
Installation and Usage Guide
Chapter 3: Using the Remediation Plugin
HPE Security Fortify Plugins for IntelliJ and Android Studio (17.10) Page 22 of 32

recommends that you remediate low issues as time permits (your organization can customize
this category).
lThe All tab contains all issues.
6. Select a folder to view the associated issues.
The available folders are based on your Group By,Issues for, and Filter Set selections. After you
select a folder, the plugin retrieves the appropriate issues from Fortify Software Security Center.
7. Select an issue to view.
Grouping Issues
The items visible in the navigation tree vary depending on the selected grouping option. The value you
select from the Group By list sorts issues in all visible folders into subfolders.
To list all issues in a folder without any grouping, select <none>.
You can view issues using any of the Group By options, and you can create and edit customized groups.
The Group By options enable you to group and view the issues in different ways. In practice, you will
probably switch frequently between various groupings. The following table lists descriptions of the
standard Group By options.
Option Description
Analysis Groups issues by the audit analysis, such as suspicious and exploitable.
Analysis Type Groups issues by analyzer product.
Analyzer Groups issues by analyzer group.
AppDefenderProtected Groups issues by whether or not Application Defender can protect the
vulnerability category.
Category Groups issues by vulnerability category. This is the default setting.
File Name Groups issues by file name.
FortifyPriorityOrder Groups issues by the seriousness of the issue which is calculated based on
the impact and likelihood of exploitation.
New Issue Shows which issues are new since the last scan. For example, if you run a
new scan, any issues that are new display in the tree under the New
Issues group and the others are displayed in the Existing Issues group.
Issues not found in the latest scan are displayed in the Removed list.
<metadata_listname> Groups issues using the alternative metadata external list names (for
example, OWASPTop10<year>, CWE, PCI<version>, STIG<version>,
and so on).
Package Groups issues by package or namespace. Does not appear for projects for
which this option is not applicable, such as C projects.
Installation and Usage Guide
Chapter 3: Using the Remediation Plugin
HPE Security Fortify Plugins for IntelliJ and Android Studio (17.10) Page 23 of 32
Option Description
Sink Groups issues that share the same dataflow sink function.
Source Groups issues that share the same dataflow source functions.
Source File Type Groups issues by source file types Fortify SCA recognizes.
Note: Issues in files with different file extensions that are the same
source file type are grouped together(for example, issues in files with
the extensions:html and htm, and xhtml are grouped under html).
Taint Flag Groups issues by the taint flags that they contain.
<none> Displays a flat view without grouping.
Viewing Issue Information
After you select an issue, the Remediation Plugin organizes issue-specific content and displays it on the
Issue Details,Recommendation,Description, and History tabs, which are described in the following
topics.
Issue Details Tab
The Issue Details tab provides a dashboard for selected issues. It includes a User list and an Analysis
list, which you use to assign a user and analysis value to issues. The Issue Details tab also displays any
custom tags defined for the Fortify Software Security Center application version.
This tab also displays an abstract of each issue, any comments that have been added, and an issue tree
(Analysis Evidence). You can click an issue in the Analysis Evidence box to jump to its location in your
code (if you have the same project open in the IDE as you selected from Fortify Software Security
Center with the Remediation Plugin).
Installation and Usage Guide
Chapter 3: Using the Remediation Plugin
HPE Security Fortify Plugins for IntelliJ and Android Studio (17.10) Page 24 of 32

Recommendation Tab
The Recommendation tab contains suggestions and examples on how to secure a vulnerability or
remedy a bad practice. The following table describes the sections on this tab.
Section Information Provided
Recommendations/Custom
Recommendations
Recommendations for the selected issue type, and any custom
recommendations defined by your organization
Tips/Custom Tips Tips for the selected issue type, and any custom tips defined by your
organization
References/Custom
References
Reference information, including any custom reference defined by your
organization
Description Tab
The Description tab provides a short abstract of the selected issue, detailed descriptions and examples
with code samples. The following table describes the sections on this tab.
Section Information Provided
Abstract/Custom
Abstract
Summary description of an issue, including custom abstracts defined by your
organization
Explanation/Custom
Explanation
Conditions in which the selected issue type occurs
Discussion of the vulnerability, the constructs typically associated with it, ways
in which it can be exploited, and the potential ramifications of an attack
Any custom explanations defined by your organization
Instance ID Unique identifier for an issue
Primary Rule ID Primary rule used to uncover the issue
Priority Metadata
Values
Priority metadata values for the issue
Legacy Priority
Metadata Values
Legacy priority metadata values for the issue
History Tab
The History tab displays the history of the selected issue, including changes made by the assigned
user, the Analysis tag, and any custom tags.
Installation and Usage Guide
Chapter 3: Using the Remediation Plugin
HPE Security Fortify Plugins for IntelliJ and Android Studio (17.10) Page 25 of 32

Assigning Users to Issues
To assign a user to the issue:
1. Select an issue from the issues panel.
2. Select the Issue Details tab, and then, from the User list, select a user. (To leave the issue
unassigned, select the blank value.)
The Remediation Plugin communicates with Fortify Software Security Center and updates the project.
Assigning Tags to Issues
To assign tag values to an issue:
1. Select an issue from the issues panel.
2. From the Analysis list on the Issue Details tab, select a value that reflects your assessment of this
issue.
3. If custom tags defined for the project exist, provide values for them.
Note: Text-type custom tags accept up to 500 characters (HTML/XML tags and newlines are
not allowed).
Adding Comments to Issues
You can use the Remediation Plugin to add comments to an issue.
1. Select an issue from the issues panel.
2. From the Issue Details tab, click Add Comment .
The Add Comment for Issue dialog box opens.
3. Type your comment in the Add Comment for Issue box.
4. Click OK.
The Remediation Plugin communicates with Fortify Software Security Center and updates the related
project.
Installation and Usage Guide
Chapter 3: Using the Remediation Plugin
HPE Security Fortify Plugins for IntelliJ and Android Studio (17.10) Page 26 of 32
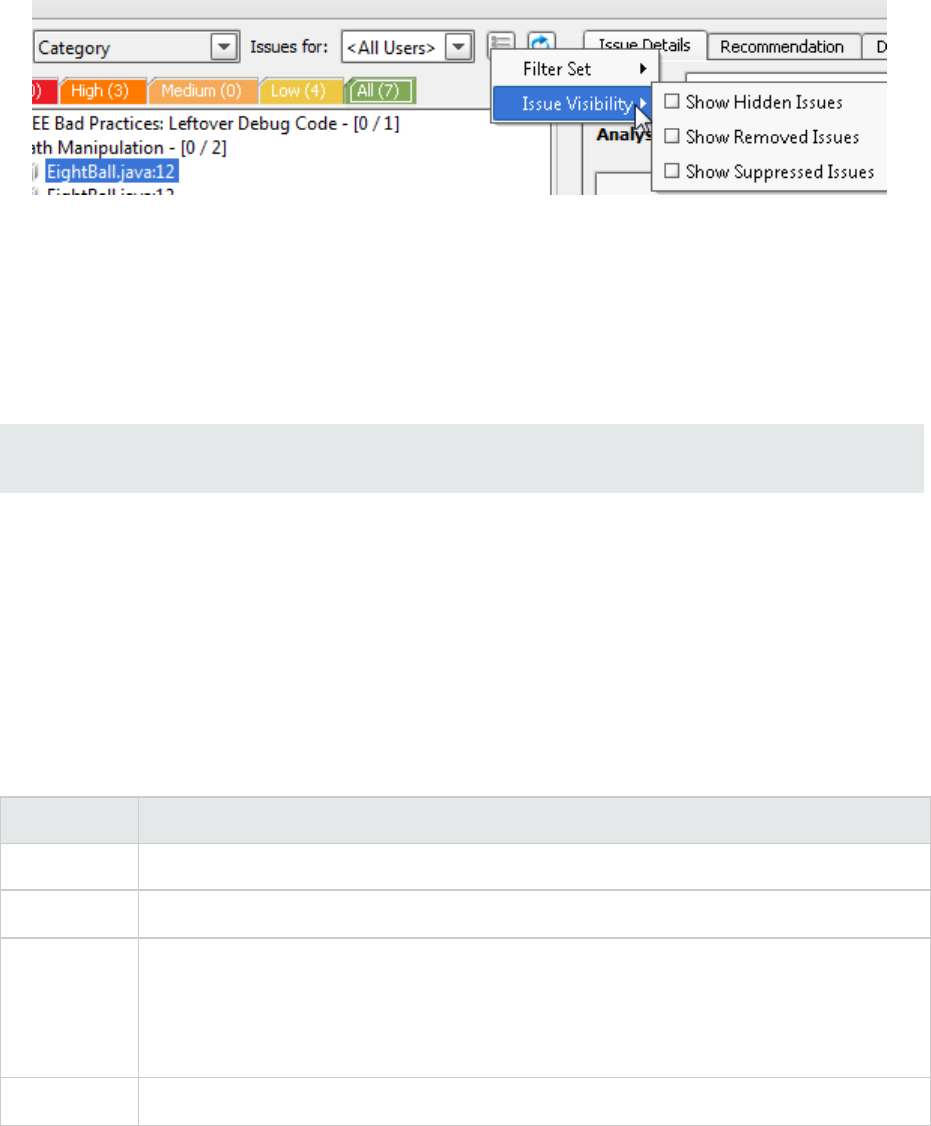
Customizing Issue Visibility
You can customize the issues view to determine which issues are displayed.
1. Click the Change View Options icon.
2. From Issue Visibility, choose from the following options:
lTo display all hidden issues, select Show Hidden Issues.
lTo display all of the issues removed since the previous analysis, select Show Removed Issues.
lTo display all suppressed issues, select Show Suppressed Issues.
The Remediation Plugin displays issues based on your selection.
Note: You can also change the issue visibility settings from the Options dialog box (select Fortify >
Options).
Searching for Issues
You can use the search box below the issues list to search for issues. After you type a search query,
either press Enter or click the magnifying glass icon to start the search and filter the issues in the tree.
After you enter a search term, the label next to the folder name changes to indicate the number of
issues that match the search as a subset of the total. For example, Hot (2 of 5).
You can wrap search terms with delimiters to indicate the type of comparison to be performed. The
following table shows the syntax to use in the search string field.
Comparison Description
contains Searches for a term without any special qualifying delimiters
equals Searches for an exact match when you enclose the term in quotation marks ("")
number
range
Searches for a range of numbers using the standard mathematical interval notation of
parentheses and/or brackets to indicate whether the endpoints are excluded or
included respectively
Example: (2,4] means greater than two and less than or equal to four
not equal Excludes issues specified by the string when you precede the string with the
Installation and Usage Guide
Chapter 3: Using the Remediation Plugin
HPE Security Fortify Plugins for IntelliJ and Android Studio (17.10) Page 27 of 32
Comparison Description
exclamation character (!)
Example: file:!Main.java returns all issues that are not in Main.java
You can further qualify search terms with modifiers. The syntax to use for a modifier is
modifier:<search_term>.
If you specify more than one modifier, the search returns only issues that match all the modified search
terms. For example, file:ApplicationContext.java category:SQL Injection returns only
SQL injection issues found in ApplicationContext.java.
If you use the same modifier more than once in a search string, then the search terms qualified by those
modifiers are treated as an OR comparison. For example, file:ApplicationContext.java
category:SQL Injection category:Cross-Site Scripting returns SQL injection issues and
cross-site scripting issues found in ApplicationContext.java.
For complex searches, you can also insert the AND or the OR keyword between your search queries.
Note that AND and OR operations have the same priority in searches.
Search Modifiers
You can use a search modifier to specify which attribute of an issue the search term should apply to. To
use a modifier that contains a space in the name, such as the name of the custom tag, you must enclose
the modifier in brackets. For example, to search for issues that are new, enter [issue age]:new.
A search that is not qualified by a modifier tries to match the search string on the following issue
attributes: kingdom, primary rule id, analyzer, filename, severity, class name, function name, instance id,
package, confidence, type, subtype, taint flags, category, sink, and source.
lTo apply the search to all modifiers, enter a string such as control flow. This searches all of the
modifiers and returns any result that contains the specified string.
lTo apply the search to a specific modifier, type the modifier name and the string as follows:
analyzer:control flow. This returns all results whose analyzer is control flow.
The following table describes the search modifiers. A few modifiers have a shortened modifier name
indicated in parentheses in the Modifier column. You can use either modifier string.
Modifier Description
analysis Searches for issues that have the specified audit analysis value
(such as exploitable,notanissue, and so on).
analyzer Searches the issues for the specified analyzer.
audience Searches for issues by intended audience. Valid values are
targeted,medium, and broad.
audited Searches the issues to find true if the primary custom tag is set
and false if the primary custom tag is not set. The default
Installation and Usage Guide
Chapter 3: Using the Remediation Plugin
HPE Security Fortify Plugins for IntelliJ and Android Studio (17.10) Page 28 of 32

Modifier Description
primary tag is the Analysis tag.
category (cat) Searches for the given category or category substring.
comments
(comment, com)
Searches for issues that contain the search term in the comments
that have been submitted on the issue.
commentuser Searches for issues with comments from a specified user.
confidence (con) Searches for issues that have the specified confidence value. The
confidence value is based on the number of assumptions made in
the code analysis. The more assumptions made, the lower the
confidence value.
dynamic Searches for issues that have the specified dynamic hot spot
ranking value.
file Searches for issues where the primary location or sink node
function call occurs in the specified file.
[fortifypriorityorder] Searches for issues that have a priority level that matches the
specified priority determined by the analyzers. Valid values are
critical,high,medium, and low, based on the expected impact
and likelihood of exploitation.
The impact value indicates the potential damage that might result
if an issue is successfully exploited. The likelihood value is a
combination of confidence, accuracy of the rule, and probability
that the issue can be exploited.
historyuser Searches for issues that have audit data modified by the specified
user.
[issue age] Searches for the issue age, which is either new,updated,
reintroduced, or removed.
kingdom Searches for all issues in the specified kingdom.
maxconf Searches for all issues that have a confidence value equal to or less
than the number specified as the search term.
minconf Searches for all issues that have a confidence value equal to or
greater than the number specified as the search term.
package Searches for issues where the primary location occurs in the
specified package or namespace. For dataflow issues, the primary
location is the sink function.
[primary context] Searches for issues where the primary location or sink node
function call occurs in the specified code context. Also see sink and
Installation and Usage Guide
Chapter 3: Using the Remediation Plugin
HPE Security Fortify Plugins for IntelliJ and Android Studio (17.10) Page 29 of 32

Modifier Description
[source context].
primaryrule (rule) Searches for all issues related to the specified sink rule.
ruleid Searches for all issues reported by the specified rule IDs used to
generate the issue source, sink and all passthroughs.
sink Searches for issues that have the specified sink function name.
Also see [primary context].
source Searches for dataflow issues that have the specified source
function name. Also see [source context].
[source context] Searches for dataflow issues that have the source function call
contained in the specified code context.
Also see source and [primary context].
sourcefile Searches for dataflow issues with the source function call that the
specified file contains.
Also see file.
status Searches issues that have the status reviewed, not reviewed, or
under review.
suppressed Searches for suppressed issues.
taint Searches for issues that have the specified taint flag.
<custom_tagname>Searches the specified custom tag.
You can search a list-type custom tag using a range of values. The
values of a list-type custom tag are an enumerated list where the
first value is 0, the second is 1, and so on. You can use the search
syntax for a range of numbers to search for ranges of list-type
custom tag values. For example, analysis:[0,2] returns the
issues that have the values of the first three Analysis values, 0, 1,
and 2 (Not an Issue, Reliability Issue, and Bad Practice).
To search a date-type custom tag, specify the date in the format:
yyyy-MM-dd.
<metadata_listname>Searches the specified metadata external list. For example,
[owasptop102013],[sans top252011],[pci3.2],
and others.
Installation and Usage Guide
Chapter 3: Using the Remediation Plugin
HPE Security Fortify Plugins for IntelliJ and Android Studio (17.10) Page 30 of 32
Locating Issues in Your Source Code
Because the Remediation Plugin works as a plugin to IntelliJ IDEA or Android Studio, you can use it to
locate security-related issues in your code. You must have the same project open in the IDE as you
selected from Software Security Center with the Remediation Plugin.
To locate issues in the source code:
1. Select an issue from the issues panel.
The Remediation Plugin communicates with Fortify Software Security Center and updates with the
most recent project data. The focus jumps to the line of code that corresponds to the selected
issue.
2. From the Issue Details tab, select an issue from the Analysis Evidence panel.
IntelliJ IDEA or Android Studio places the focus on the line of code that contains the security-related
issue displayed in the Remediation Plugin.
Installation and Usage Guide
Chapter 3: Using the Remediation Plugin
HPE Security Fortify Plugins for IntelliJ and Android Studio (17.10) Page 31 of 32
Send Documentation Feedback
If you have comments about this document, you can contact the documentation team by email. If an
email client is configured on this computer, click the link above and an email window opens with the
following information in the subject line:
Feedback on Installation and Usage Guide (HPE Security Fortify Plugins for IntelliJ and Android
Studio 17.10)
Just add your feedback to the email and click send.
If no email client is available, copy the information above to a new message in a web mail client, and send
your feedback to HPFortifyTechpubs@hpe.com.
We appreciate your feedback!
HPE Security Fortify Plugins for IntelliJ and Android Studio (17.10) Page 32 of 32
