Reference Architecture HPE Simplivity Citrix User Guide
User Manual:
Open the PDF directly: View PDF ![]() .
.
Page Count: 20
HPE SimpliVity
integration for Citrix
Cloud
User Guide
User guide
Version 1.0
Table of Contents
Introduction ............................................................................................................................................ 1
Release Notes ....................................................................................................................................... 1
Hyper-V/SCVMM ................................................................................................................................ 1
Requirements ........................................................................................................................................ 1
Citrix Cloud Requirements ................................................................................................................. 1
VM Template Requirements .............................................................................................................. 1
Versions: ................................................................................................................................................ 2
Microsoft Hyper V - Citrix Cloud Connector Installation ........................................................................ 2
Registration ........................................................................................................................................ 2
Operations .......................................................................................................................................... 4
Configuration ...................................................................................................................................... 6
Deconfigure/Plug(Out) ....................................................................................................................... 8
Logs .................................................................................................................................................. 10
Proxy ................................................................................................................................................ 10
VMware vSphere - Citrix Cloud Connector plugin ............................................................................... 11
Glossary ........................................................................................................................................... 17
For more information HPE Converged Infrastructure Library .............................................................. 17

1
Introduction
Citrix cloud connector acts as an interface between the Citrix cloud and resource location. This helps
in managing the hosts and virtual desktops from the cloud by removing the need for complex
solutions and networking. Each resource location is recommended to have more than one cloud
connector to provide high availability (HA). However, it is laborious to configure or de-configure cloud
connector whenever a resource location is created or deleted.
This document is a step by step guide to automate the installation of cloud connectors using HPE
SimpliVity Citrix Plugin by deploying virtual machines (VMs), adding them to Active Directory (AD),
downloading Citrix cloud connector and installing it.
Target audience: Software architects, solution engineers and end users using Hyper Converged
infrastructure for virtual desktops. It is recommended to have a brief understanding on HPE
SimpliVity and Citrix cloud.
Document purpose: The purpose of this document is to provide a step by step process to use HPE
SimpliVity Citrix cloud connector for Microsoft Hyper-V and VMware vSphere.
Release Notes
This is the first version of HPE SimpliVity plugin for Citrix cloud which installs and configures Citrix
cloud connector. Major aspects of this plugin that are covered in this release are:
Proxy implementation is a preview feature (beta) in version 1.0
Secure SSL/HTTPS enabled on SimpliVity OmniCube controller (OVC) IP address to connect
using REST APIs
VM template with Windows 2016 Operating System.
Hyper-V/SCVMM
Few caveats that are specific to SCVMM/Hyper-V plugin
SCVMM templates are not stored in SimpliVity and base VM satisfying the template
requirements are used to perform SimpliVity clone
Hosts in SimpliVity clone are automatically selected during deployment. Live migration should be
working in the SCVMM setup to migrate VM to the user specified host. If live migration is not
supported, VM placement is not guaranteed to reside on the specified host
SCVMM should run on default port 8100)
Requirements
In order to use this plugin, there are a few pre requisites that need to be configured prior to running
this.
Citrix Cloud Requirements
In order to access and manage Citrix cloud remotely, client id and key should be created. The key is
used along with the organization to deploy cloud connector in a resource location.
Refer the following link on how to create client id and key.
https://docs.citrix.com/en-us/citrix-cloud/citrix-cloud-management/identity-access-management.html
If the given resource location is not present, this application creates a new resource location in the
Citrix Customer (Organization) and tags cloud connector to the new resource location. For existing
resource location, cloud connector is automatically tagged to it
VM Template Requirements
Following requirements should be taken care while generating VM template for cloud connector
installation.

2
1. It is recommended to use Windows Server 2016 to create a template that is used for connecting
Citrix cloud and resource location.
2. Windows remote management feature should be enabled to access the virtual machines from
SCVMM plugin.
3. The template should not join the AD domain. The plugin creates the VM and joins to AD.
4. Since the IP address of VM(s) created by the plugin is assigned from the DHCP server, user has
no option to assign static IP.
Versions:
Microsoft Hyper-V
Citrix cloud connector installation on HPE SimpliVity storage using Microsoft SCVMM plugin is tested
on the following versions:
Product
Component
Version
HPE SimpliVity
OmniCube Controller
3.7.0.46
API Version
1.8
Microsoft SCVMM
Client
Windows 2016
Build
4.0.2314.0
VMware vSphere:
Citrix cloud connector installation on HPE SimpliVity storage using VMware vSphere plugin is tested
on the following versions:
Product
Component
Version
HPE SimpliVity
OmniCube Controller
3.7.0.260
API Version
1.8
VMware vSphere
Client
Windows 2016
Build
Version 6.5.0 Build 4944578
Microsoft Hyper V - Citrix Cloud Connector Installation
Registration
Download the HPE SimpliVity Citrix Cloud Connector plugin (connector plugin) and import the Add-
In to System Center Virtual Machine Manager (SCVMM)
a. Extract the plugin to C:\Users\Public
b. Login to SCVMM Manager and upload the ‘CitrixSimplivity.zip’ Add-in from the path
C:\Users\Public\HpeCitrixPlugin
c. Close and reopen the SCVMM Management console to reflect to access the new plugin

3
Figure 1: Add-in import
4
Operations
The plugin can perform different operations to configure and de-configure cloud connector virtual
machines. If the plugin is successfully installed ‘SimpliVity-Citrix Connector’ application is visible in
the VMs and Services of SCVMM as shown in the following figure:
Figure 2: HPE SimpliVity-Citrix Connector
The list of supported operations using this plugin are
a. Plug(in): Deploy Citrix Cloud Connector
b. Plug(out): Remove Citrix Cloud Connector
c. Proxy: Proxy information to access internet
d. Log: Logging output of the installation and uninstallation process
e. Exit: Exit the Citrix Connector app
5
Figure 3: HPE SimpliVity Citrix Cloud Connector Plugin
The details of OmniCube controller and SCVMM are requested when the Plug(in) or Plug(out) is
selected for the first time.
Figure 4: Plugin node information
Note
The username and password for the OmniCube controller and SCVMM Management are the same
Basic validation of SCVMM and OVC are implemented to check invalid login access
6
Configuration
Plugin option is used to deploy virtual machines, join the VMs to active directory (AD) domain,
downloads and installs Citrix cloud connector for a resource location. Provide these details of AD
domain, Citrix Identity access, and HPE SimpliVity and Microsoft SCVMM information to deploy the
virtual machines.
Figure 5: HPE SimpliVity Citrix Cloud Connector Plugin Configuration screen
Note
Kindly check the pre-requisites section for more information of Citrix cloud options
There is a check box ‘Include VMs’ to display the SimpliVity virtual machines along with
SimpliVity template
Ideally there will not be any SimpliVity templates because SCVMM uses Library server (non SimpliVity
node) to store templates. Performing SimpliVity clone on templates created on non SimpliVity node will not
work. To overcome this problem, include VM check box is provided to deploy Citrix cloud connector VMs
from the existing virtual machines.
The virtual machine used for image template should support all the pre-requisites required for the template.
7
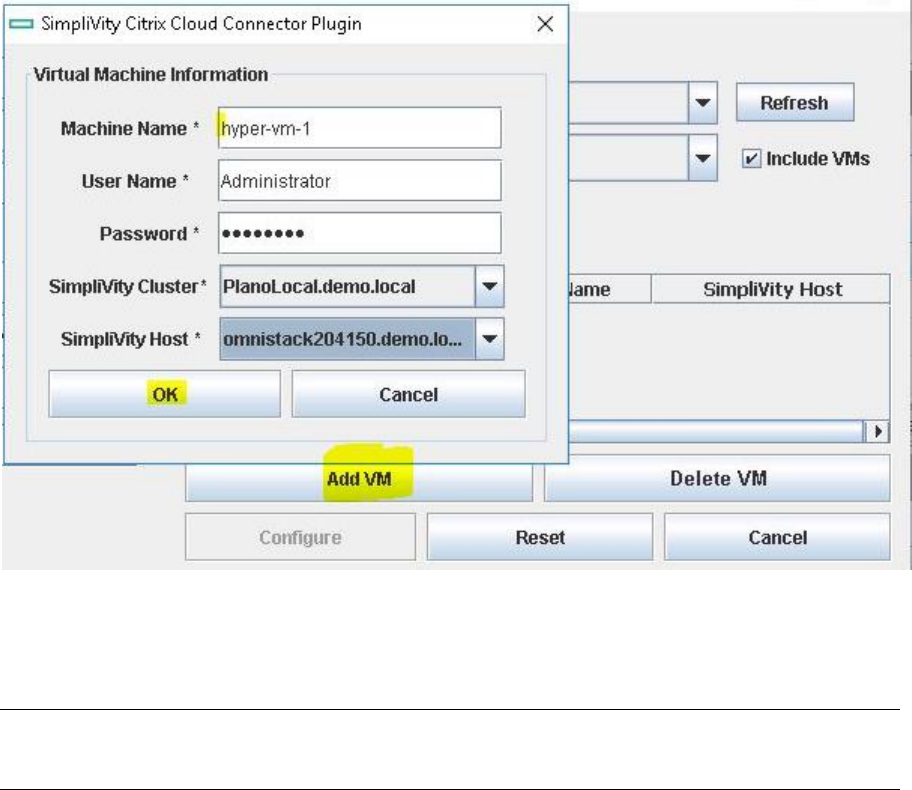
Figure 6: HPE SimpliVity Citrix Cloud Connector Plugin - Virtual Machine Information
Add the details of Virtual Machine such as name, credentials, host and so on to deploy cloud
connector VM.
Use Add VM button to deploy multiple VMs with this plugin. Click on ‘Configure’ button to start the
Citrix cloud connector process.
Note: The username and password of the VM should be exactly the same as the selected image template.
These credentials are used for initial login and VM to AD.
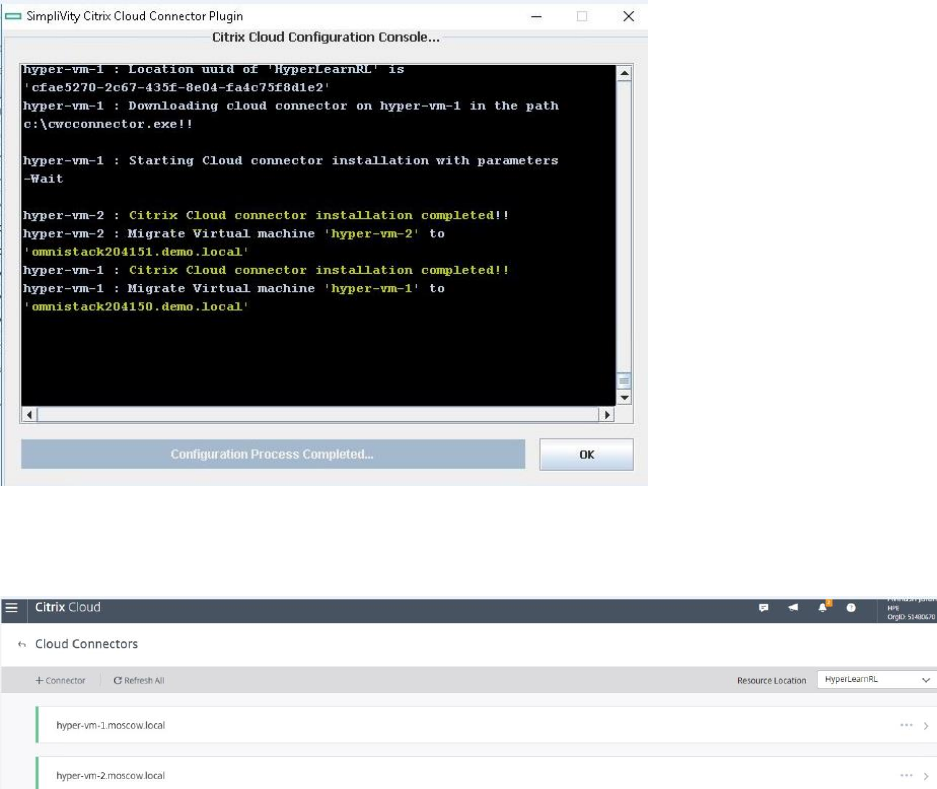
If the installation is successful, all the VMs are deployed and Citrix cloud connector will be installed
successfully.
8
Figure 7: HPE SimpliVity Citrix Cloud Connector Plugin
The cloud connector VMs are also visible in the resource location of Citrix cloud portal.
Figure 8: Citrix cloud portal
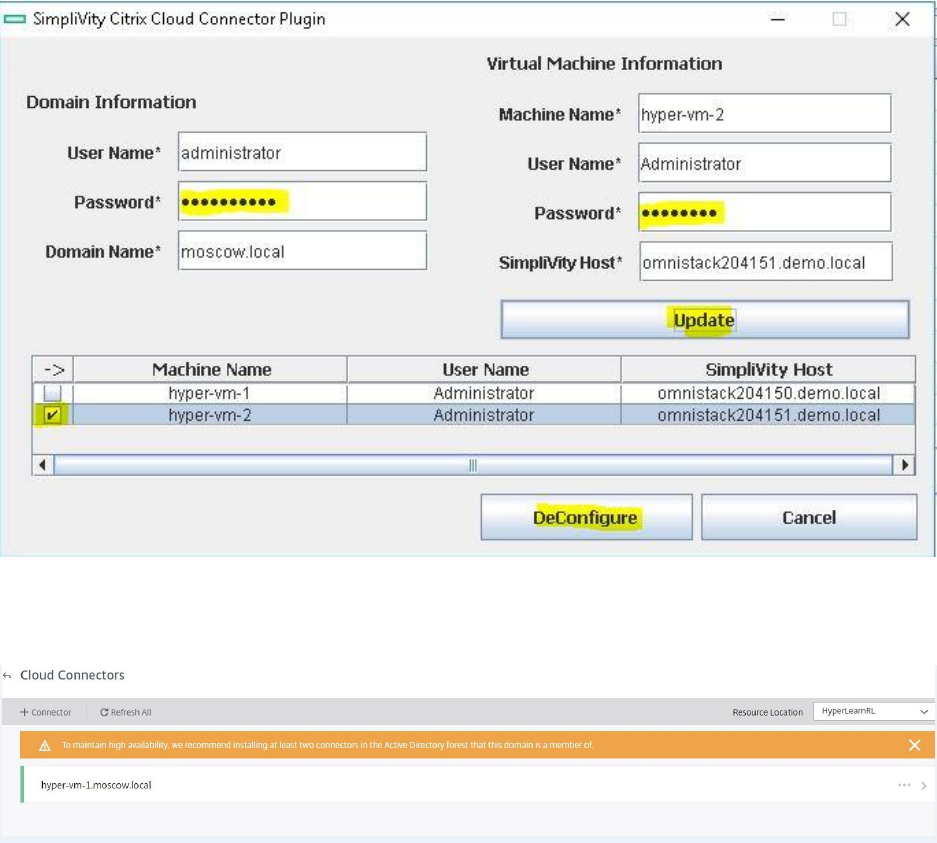
Deconfigure/Plug(Out)
Using this plugin, the cloud connector of a resource location can be removed, unjoin from domain
and delete the virtual machines from SCVMM. To start the de-configure, select the Plug(Out) option
in Actions.
a. Select the cloud connector VM to uninstall
b. Enter the password of AD Domain and Virtual Machine and click on Update (other fields are
pre populated)
c. Select De-configure option to complete the uninstallation
9
Figure 9: HPE SimpliVity Citrix Cloud Connector Plugin - Deconfigure
After successful plug out, the selected VM is removed from the Citrix cloud of a resource location.
Figure 10: Successful plug out screen
10
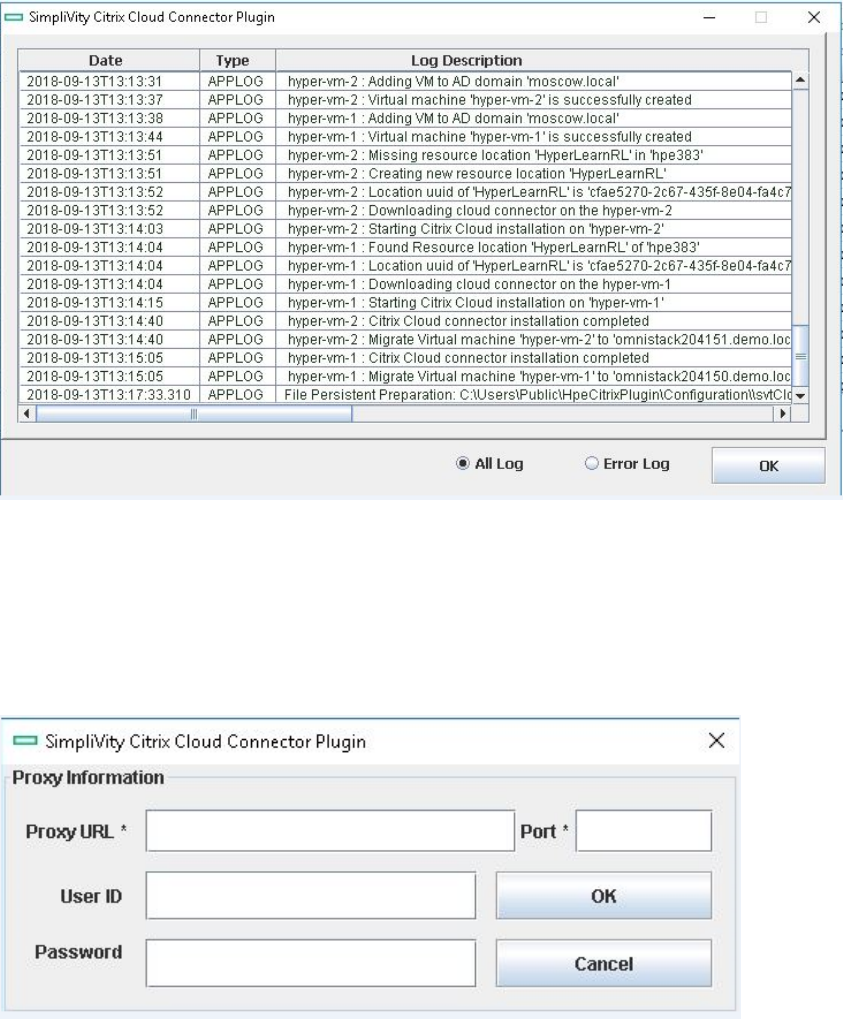
Logs
The execution and failures of this plugin are logged in a file and is visible from the application. Select
Logs in the Action section to display all the information. A filter Error Log can be used to display
only the error logs
Figure 11: HPE SimpliVity Citrix Cloud Connector Plugin - Log screen
Proxy
If the datacenter requires proxy to connect to internet, a proxy option has be enabled to access Citrix
cloud, download and install Citrix cloud connector of a resource location.
Skip this section, if the environment does not require any proxy to connect to internet.
Figure 12: HPE SimpliVity Citrix Cloud Connector Plugin - Proxy information
11
VMware vSphere - Citrix Cloud Connector plugin
Prerequisites:
1. This plugin supports VMware 6.5 flex.
2. Configuration file (input file) need to place under “C:\Users\Public” path.
3. One should create a VM template with external network connectivity.
Installation prerequisites:
1. Java ( >1.6 version) has to be installed.
2. Create new login credentials for VMware portal and download vsphere-client-sdk-6.5.0-
4602587.
3. To register the plugin follow the instruction from
“Getting_Started_with_HTML_Client_SDK” pdf file
How to register/integrate plugin to vCenter Server:
vCenter server plug-in registration tool
The SDK includes a tool to help you register your plug-in as a vCenter server extension. It is
available in
html-client-sdk\tools\vCenter plugin registration. The prebuilt directory contains the main script
extension-registration which lets you register or unregister an extension with the vCenter server of
your choice. In addition the tool allows you to update the registration of an existing extension. It uses
the default implementation from the local .jar file.
The project directory contains the source code and a build script to recompile extension-
registration.jar
You can use this code to extend or customize the existing logic for your own business purpose. Run
extension-registration.[sh,bat] from the command line with the following parameters:
● -action - the action to complete: registerPlugin , unregisterPlugin , isPluginRegistered
● -k <key> - unique extension key which should match your plug-in package id
● -url <vc url> - the URL of vCenter server (ending with /sdk ) where your plug-in will be registered.
● -p <vc password> and -u <vc user> - the vCenter server credentials
And also add these parameters for registerPlugin
● -v <version> - the plugin extension version, which should match the version in plugin-package.xml
● -pu <plugin url> - the URL from which the plug-in package .zip will be downloaded.
● -st <thumbprint> - the thumbprint of the server hosting the plug-in package (required when the URL
is
https)
./extension-registration.sh -url https://<vCenter Server IP>/sdk -username <Username> -password
<Password> -action registerPlugin -key <Plug-in Key> -version <Plug-in Version> -pluginU rl
https://<Host Location>/<Plug-in Package>.zip -serverThumbprint <Thumbprint Data>
12
Note: special characters require quoting the word or escaping the character. For instance instead of
foo!23 you need to use 'foo!23' or foo\!23
Example:
./extension-registration.sh -url https://10.23.222.35/sdk -username administrator@vsphere.local
-password administrator -action registerPlugin -key com.acme.myplugin -version 1.0.0 -pluginU rl
https://150.20.23.254/MyPluginpackage.zip -serverThumbprin t
99:FD:2B:0D:12:85:37:AA:DA:A0:08:E1:F4:3B:4A:E6:08:AC:49:C D
For help with the full list of parameters run the script without any arguments.
Once the plug-in is registered test that the deployment works correctly from that URL by doing a new
login to the HTML client. If the plug-in is not visible check for errors in the Virgo log.
Notes:
● using an http plug-in URL instead of https is ok for development but not recommended for
production. It is not secure and requires including the flag allowHttp=true in vSphere Client’s
webclient.properties .
● You can review all vCenter extensions with the MOB interface at
https://VC_IP/mob/?moid=ExtensionManager
● To update your plug-in extension info you must first unregister it. If you try to register the same
plugin twice you will get the error: A specified parameter was not correct: extension Key
13
How to Use:
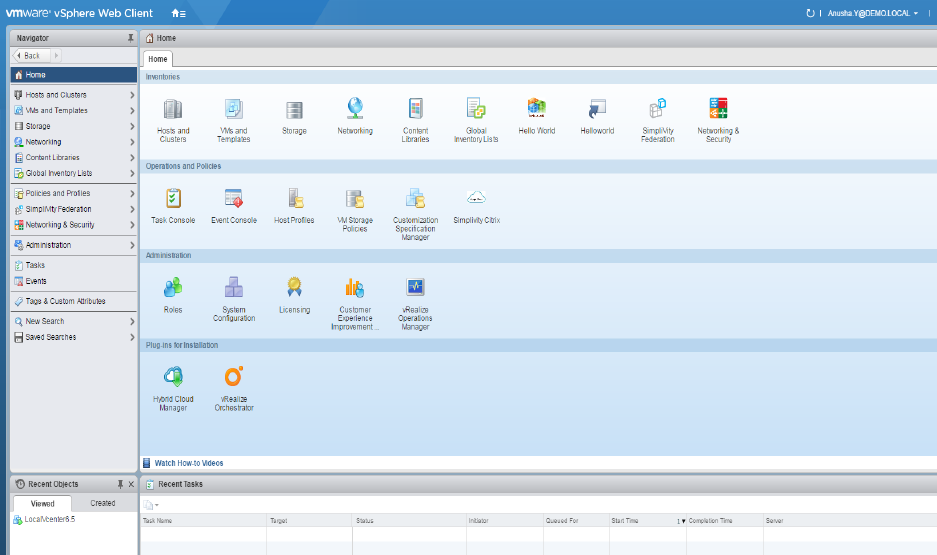
Go to Home page click on “SimpliVity Citrix” plugin icon.
Figure 13: HPE SimpliVity Citrix Plugin
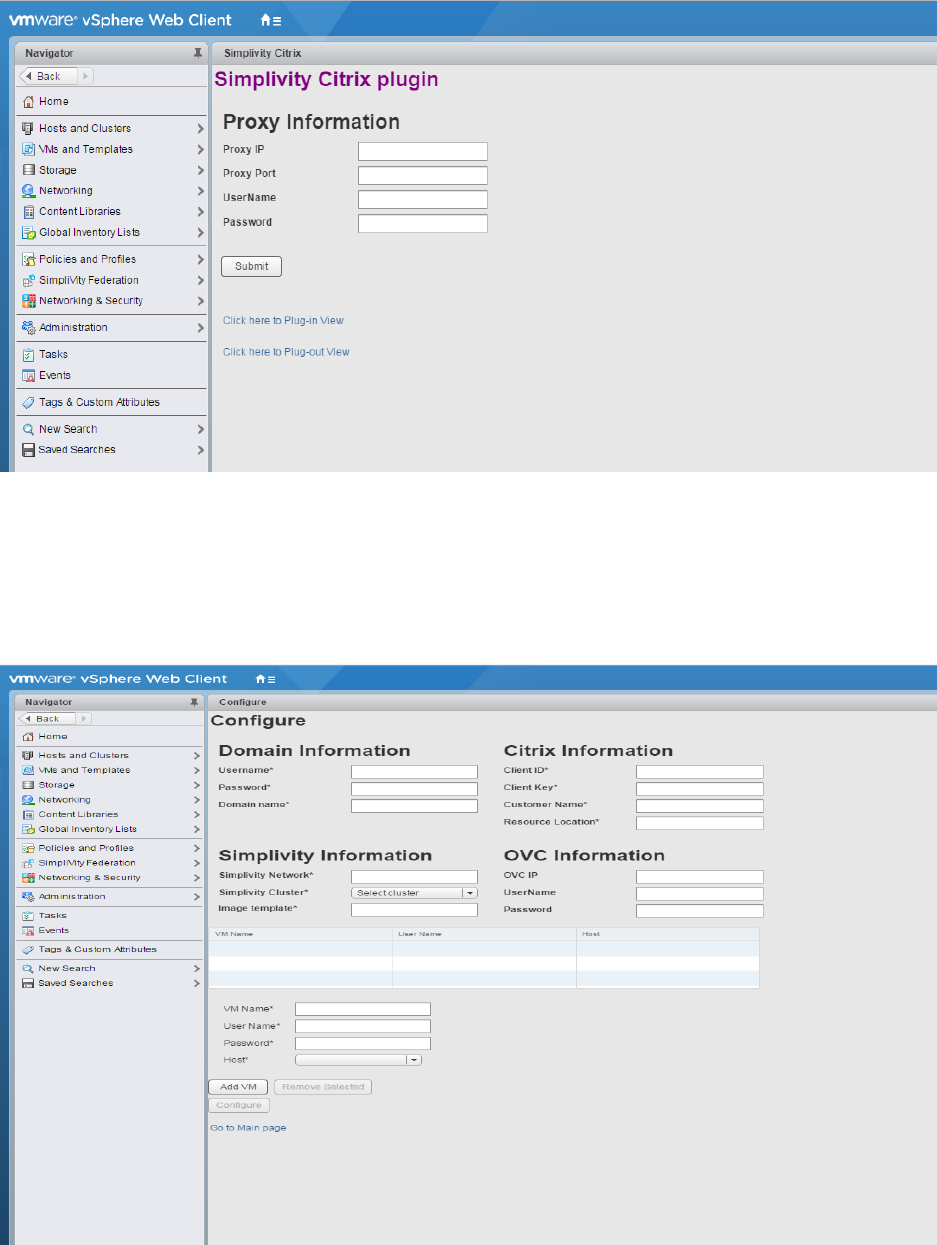
Proxy information page,
If the datacenter requires proxy to connect to internet, a proxy option has be enabled to access Citrix
cloud, download and install Citrix cloud connector of a resource location.
Skip this section, if the environment does not require any proxy to connect to internet.
Note: Proxy information is a beta feature in v1.0.
14
Figure 14: HPE SimpliVity Citrix plugin - Proxy Information
Click on “Click here to plug-in View” page.
Configure /Plug –in:
Figure 15: HPE SimpliVity Citrix Plugin Configuration information screen
15
1. Provide the necessary details such as Domain information Citrix information, SimpliVity
Information, OVC information.
2. Add the VM details which needs to created (Note : template UserName and Password and
VM’s UserName and Password has to be same )
3. Select the host where you want to create the VM.
4. Once you provide all the information click on “Configure” button.
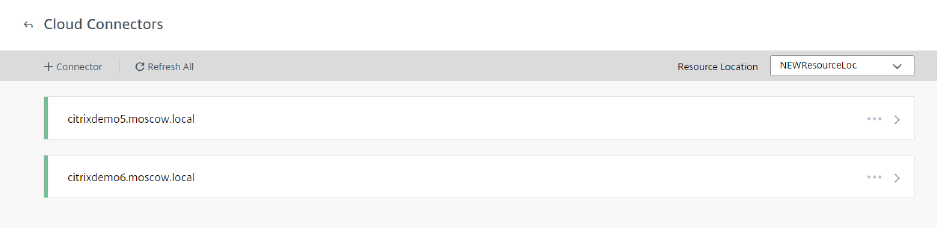
The Cloud connector VMs are visible under resource location of the Citrix cloud portal once the
configuration is complete.
Figure 16: HPE SimpliVity Citrix Cloud Connectors
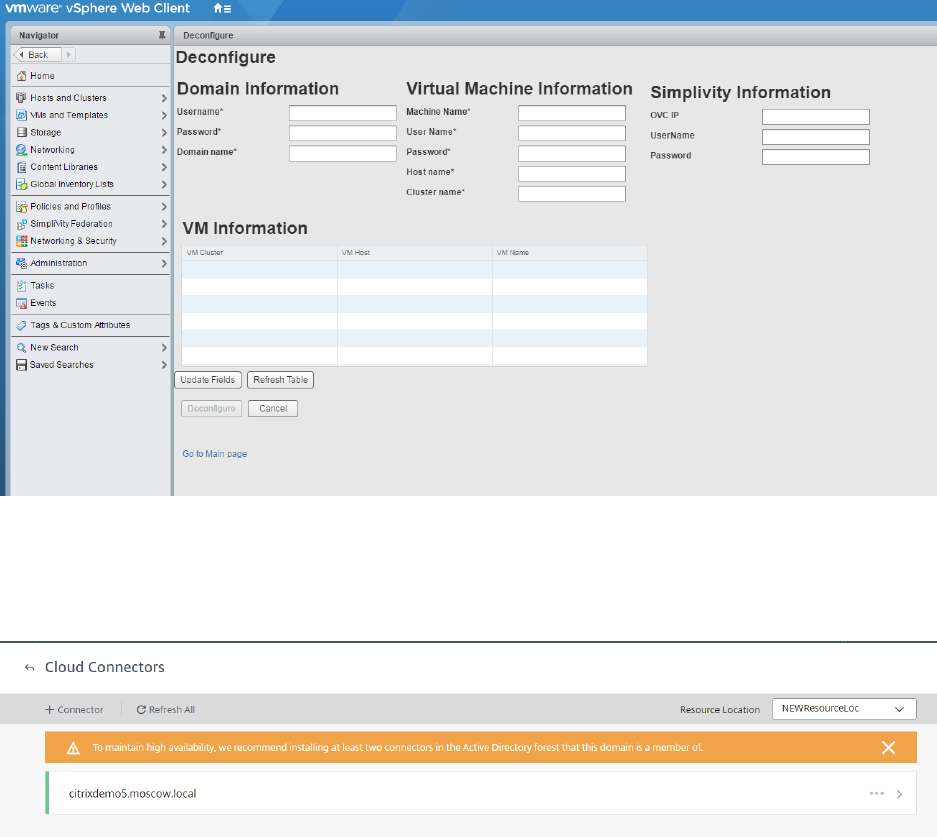
Deconfigure /Plug –out: from the main page click on the “Click here to plug-out View” link to
navigate to Deconfigure page.
1. Table will list the all the VM’s which were created using this plugin .select the VM which you
wanted to deconfigure
2. Provide user name and password for the VM which you wanted to deconfigure.
3. Provide password for the domain under the Domain Information.
4. Once the VM is selected click on Deconfigure button.
16
Figure 17: HPE SimpliVity Citrix Deconfiguration
After successful Deconfiguration, the selected VM is removed from the Citrix cloud of a resource
location.
Figure 18: HPE SimpliVity Citrix successful deconfiguration
Log file path:
C:\\ProgramData\\VMware\\vCenterServer\\logs\\vsphere-client\\logs\\CitrixPluginLog.log

17
Glossary
HPE – Hewlett Packard Enterprise
SCVMM - System Center Virtual Machine Manager
OVC – SimpliVity OmniCube Controller
AD – Windows Active Directory
VM – Virtual Machines
For more information HPE Converged Infrastructure Library
hpe.com/info/convergedinfrastructure
HPE Servers
hpe.com/servers
HPE Storage
hpe.com/storage
HPE Networking
hpe.com/networking
HPE Technology Consulting Services
hpe.com/us/en/services/consulting.html
To help us improve our documents, please provide feedback at hpe.com/contact/feedback.

© Copyright 2018 Hewlett Packard Enterprise Development LP. The information contained herein is subject to change without notice.
The only warranties for Hewlett Packard Enterprise products and services are set forth in the express warranty statements accompanying
such products and services. Nothing herein should be construed as constituting an additional warranty. Hewlett Packard Enterprise shall
not be liable for technical or editorial errors or omissions contained herein.
This document contains confidential and/or legally privileged information. It is intended for Hewlett Packard Enterprise and
Channel Partner Internal Use only. If you are not an intended recipient as identified on the front cover of this document, you are strictly prohibited
from reviewing, redistributing, disseminating, or in any other way using or relying on the contents of this document.
4AA4-xxxxENW, October 2018
