HandsOn_WebIDE_CF_Instructionsx Hands On Web IDE CF Instructions
User Manual:
Open the PDF directly: View PDF ![]() .
.
Page Count: 40
Develop SAP Business One extensions on the
SAP Cloud Platform

2
TABLE OF CONTENTS
PREREQUISITES .............................................................................................................................................. 4
i. Download and Install Development Tools .................................................................................... 4
ii. Create a SAP Cloud platform Neo trial account ........................................................................... 5
iii. Activate Web IDE Full Stack service .............................................................................................. 6
iv. Activate a Cloud Foundry trial account ......................................................................................... 9
STEP 1: CREATE A BUILD HIGH FIDELITY PROTOTYPE ......................................................................... 10
STEP 2: IMPORT YOUR BUILD PROTOTYPE INTO WEBIDE .................................................................... 10
i. Create the Project .......................................................................................................................... 10
ii. Test the project with mock data ................................................................................................... 13
iii. Create a destination pointing to your backend server .............................................................. 14
iv. Connect to your real B1 backend server ..................................................................................... 14
v. Extra SAP Business One backend configuration steps ............................................................ 16
STEP 3: CLONE A NODEJS APP .................................................................................................................. 21
STEP 4: DEPLOY THE NODEJS APP INTO SAP CLOUD FOUNDRY ........................................................ 22
i. SAP Cloud Platform Cloud Foundry Environment ..................................................................... 22
ii. Create the backing services ......................................................................................................... 23
iii. Deploy the smbmkt app ................................................................................................................ 24
iv. Configure the SMB Mktplace backend ........................................................................................ 25
v. Initialize the SMB Mktplace backend ........................................................................................... 26
vi. Test the SMB Mktplace backend /SimilarItems API ................................................................... 26
STEP 5: CONSUME THE NODEJS APP FROM THE SAP FIORI APP ........................................................ 27
i. Create a destination pointing to your smbmkt backend ........................................................... 27
ii. Create a new JSON model ............................................................................................................ 28
iii. Change the Image control in the Page1.view.xml file. ............................................................... 28
iv. Create a FileUploader control....................................................................................................... 29
v. Bind the Matching Items Table to our backend properties ....................................................... 29
vi. Implement the Page1.controller.js. .............................................................................................. 32
STEP 6: ADD A NEW SERVICE TO THE NODEJS APPLICATION ............................................................. 35
STEP 7: CALL THE NEW NODEJS SERVICE FROM YOUR SAP FIORI APP ........................................... 38

3
The objective of this hands on is to put in practice how to develop SAP Business One extensions on SAP
Cloud Platform.
The exercise will be composed by
- Step 1: Create a Build prototype connecting to B1
- Step 2: Import the Build prototype into a SCP WebIDE Fiori application and connect to your real B1
backend
- Step 3: Clone an existing NodeJS application
- Step 4: Deploy the server side NodeJS application to SAP Cloud Foundry
- Step 5: Modify the SAP Fiori app to consume the server side NodeJS application
- Step 6: Add a new service to the NodeJS application and consume it from SAP Fiori
- Step 7: Call the new NodeJS service from the SAP Fiori app
This hands-on exercise will require several steps, please follow them in the proposed order as each step is
counting on the precedent steps.
4
PREREQUISITES
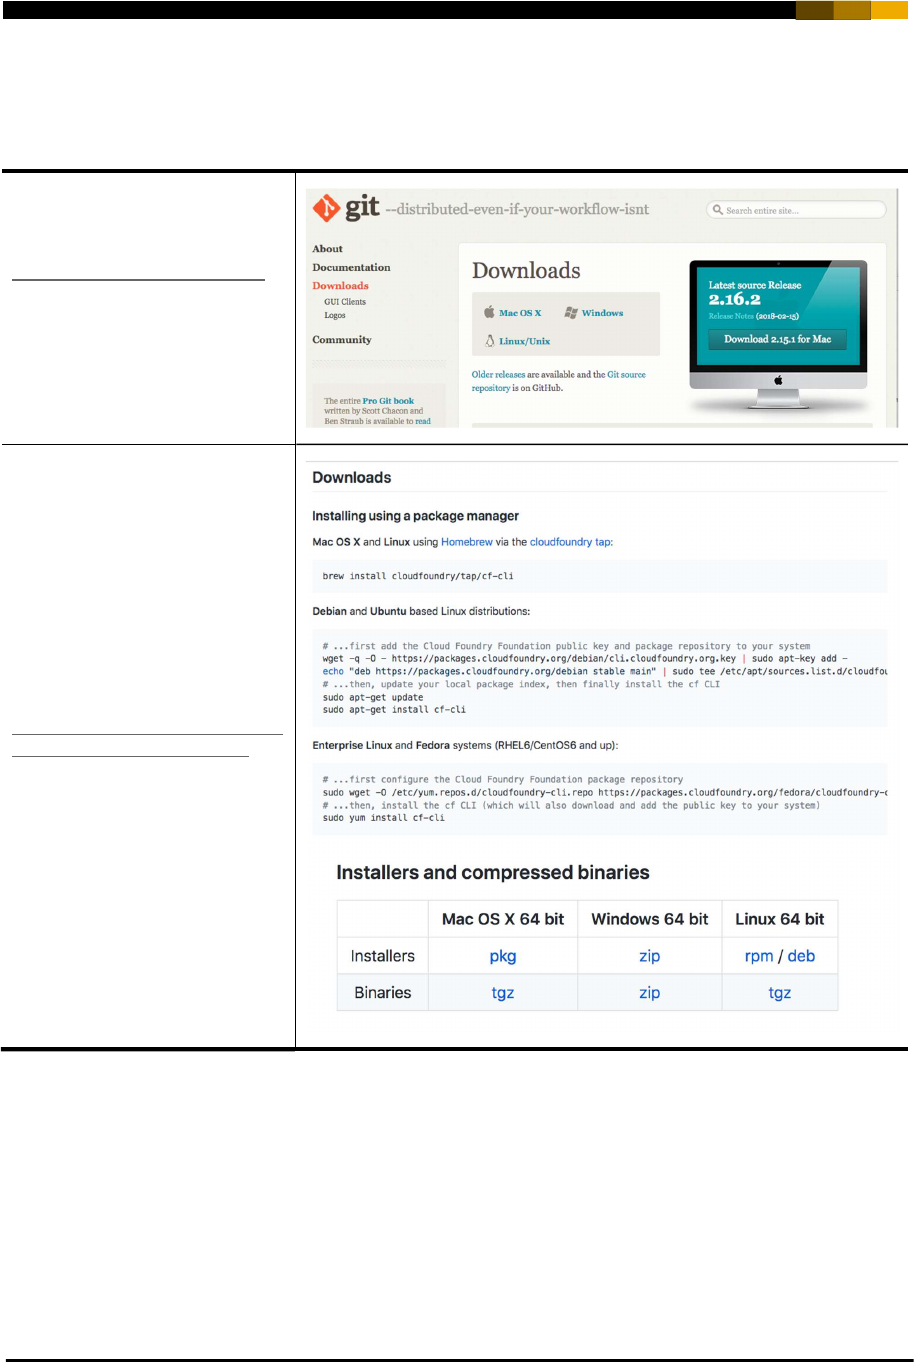
i. Download and Install Development Tools
Download and install git version
control on your system from the
following link
https://git-scm.com/downloads
We will also make use of SAP
Cloud Platform Cloud Foundry
Environment.
To do so, we need the Cloud
Foundry command line interface
(CLI)
You can download it and install
if the CF CLI for your operating
system on.
https://github.com/cloud
foundry/cli#downloads
5
ii. Create a SAP Cloud platform Neo trial account
The exercises proposed in this hands on are implemented on top of the SAP Cloud Platform.
If you have already a trial SAP Cloud Platform account, you can skip this step.
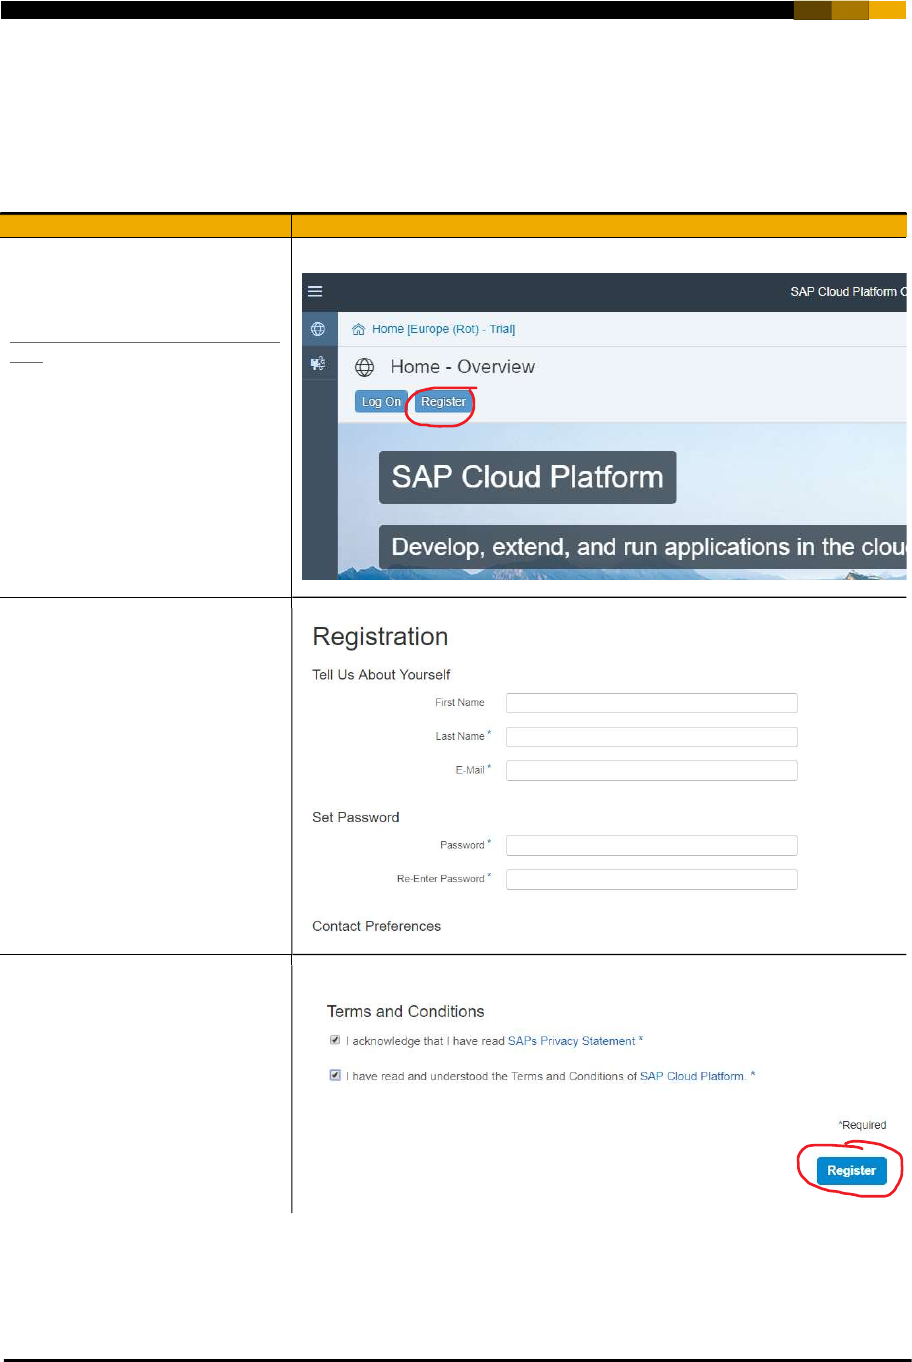
To create a trial SAP Cloud Platform account, go to the following link:
Explanation Screenshot
To create a trial SAP Cloud
Platform account, go to the
following link:
https://account.hanatrial.ondemand.
com
Press the Register button
Enter all your details
Accept the terms and conditions by
checking both check boxes and
press “Register”.
6
iii. Activate Web IDE Full Stack service
We will use Web IDE Full Stack for the creation and implementation of our application.
Web IDE is offered as a service on the SAP Cloud Platform.
To activate Web IDE Full Stack service please follow the steps here below, if you already have Web IDE Full
Stack service active in your account please skip this step.
Explanation Screenshot
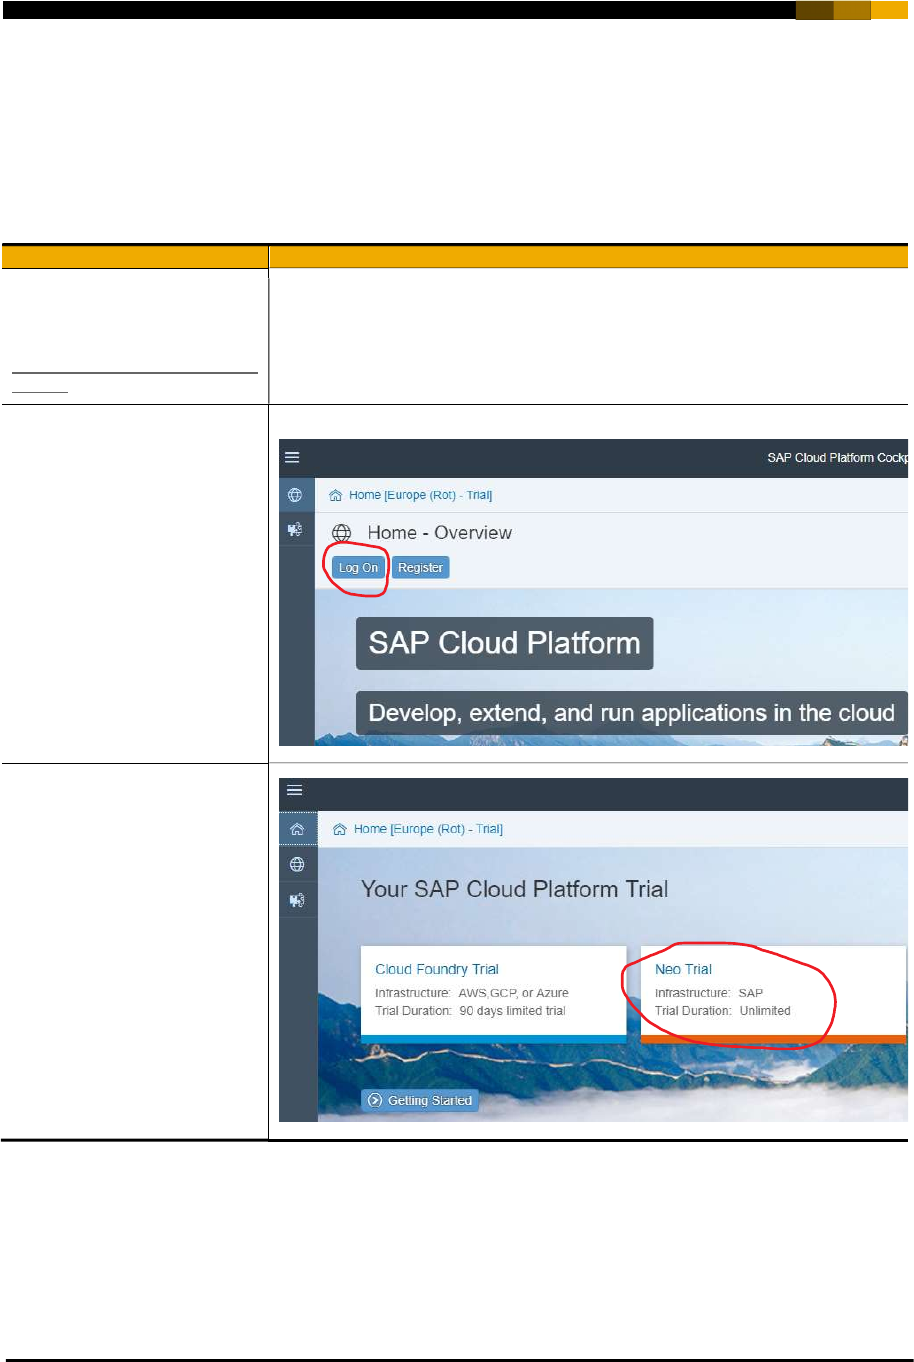
Open your trial SAP Cloud
Platform account from the
following link:
https://account.hanatrial.ondema
nd.com
Press the Log On button if you
are not automatically logged in
After login if you are proposed
between Cloud Foundry Trial
and Neo Trial please choose
Neo Trial.
7
Explanation Screenshot
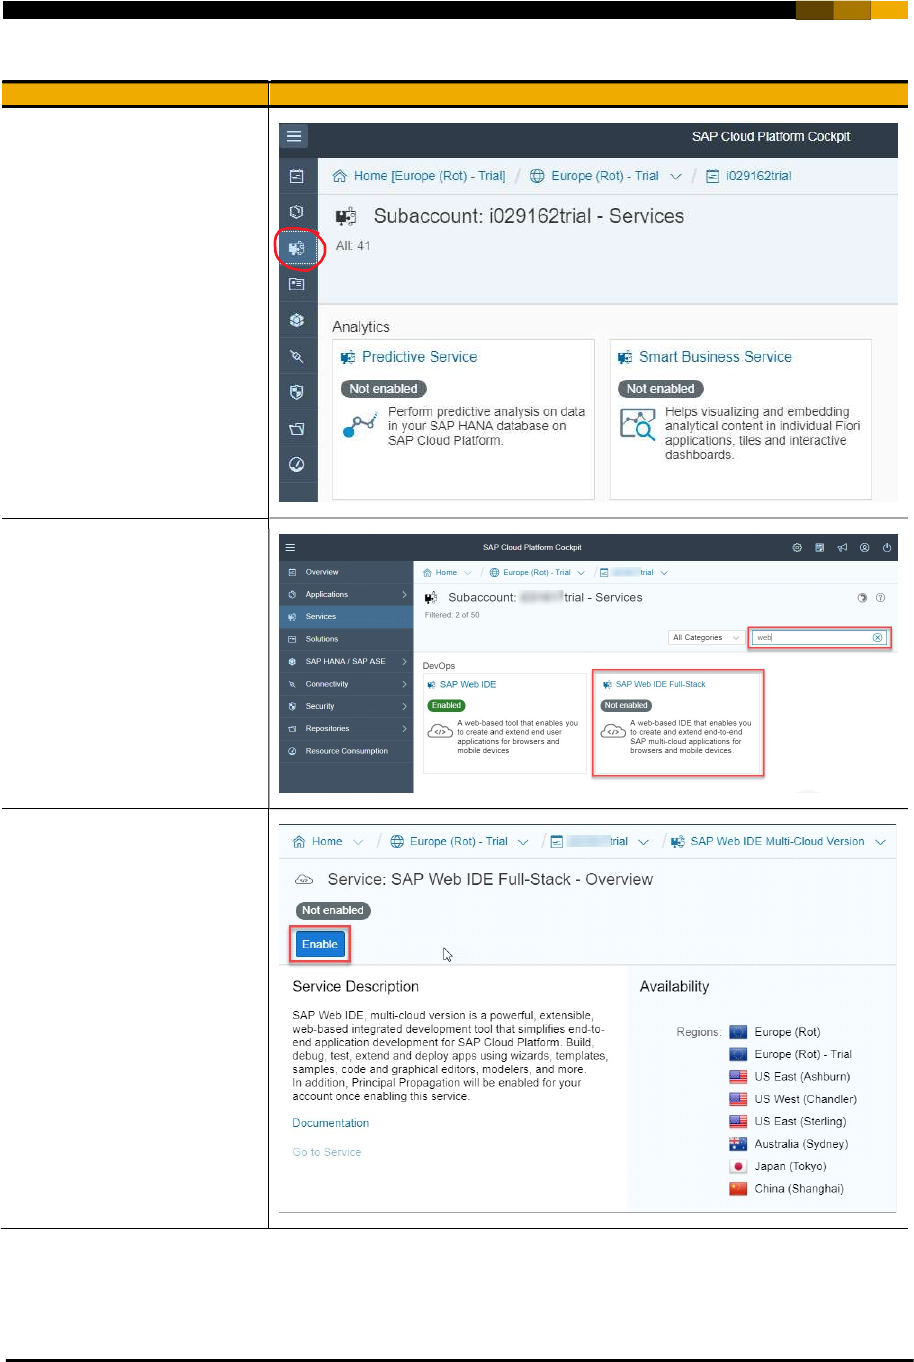
Select the Services icon on the
left side bar.
Enter Web in the search edit
text.
Click on the SAP Web IDE Full
Stack box.
Click Enable.
This may take a few
minutes.
8
Explanation Screenshot
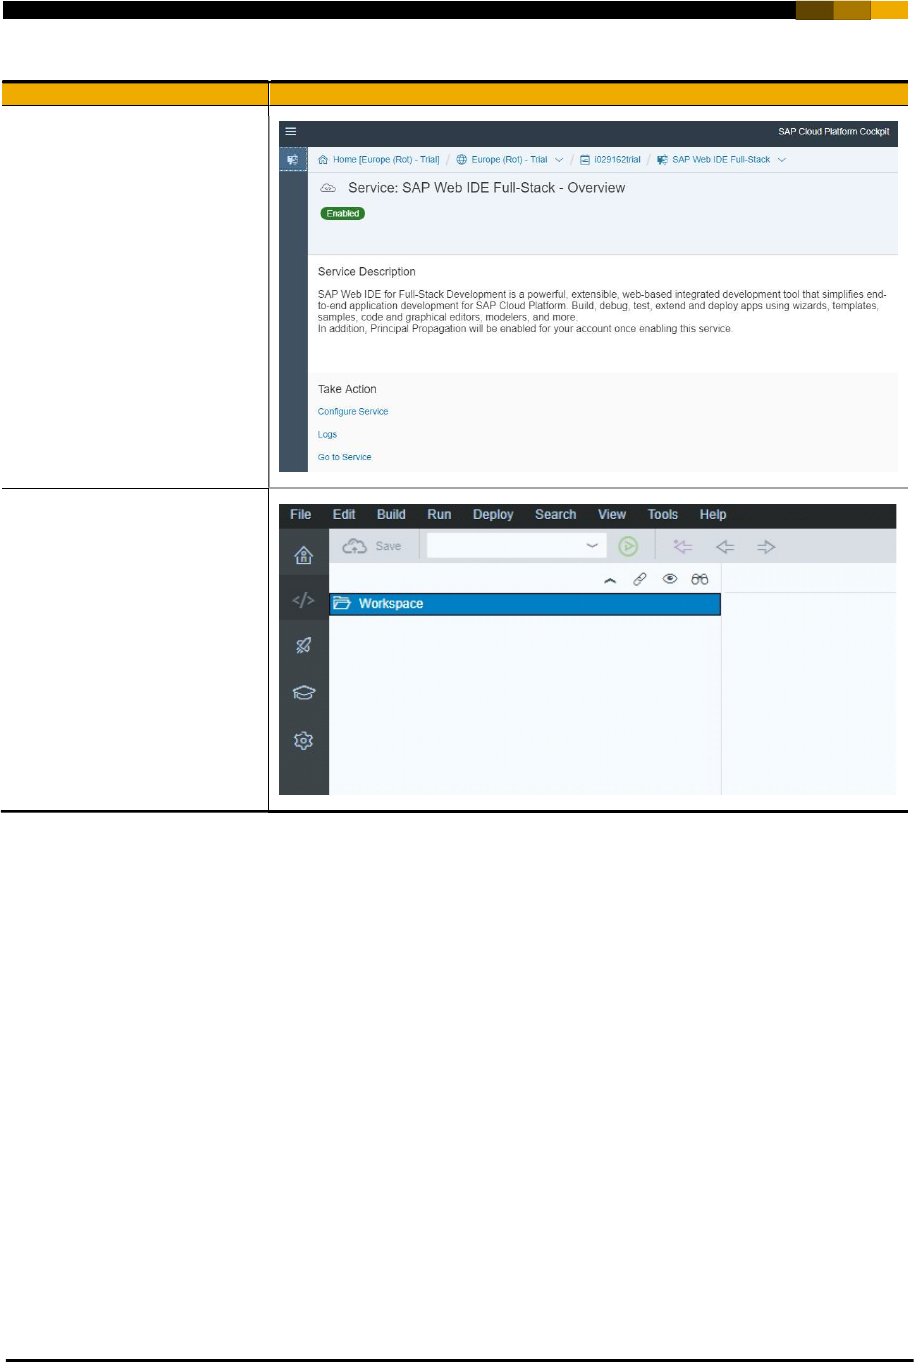
Once Enabled select the
link Go to Service to open
Web IDE Full Stack.
Web IDE opens with an
empty Workspace unless
you already developed
applications with Web IDE
in the past.
9
iv. Activate a Cloud Foundry trial account
Explanation Screenshot
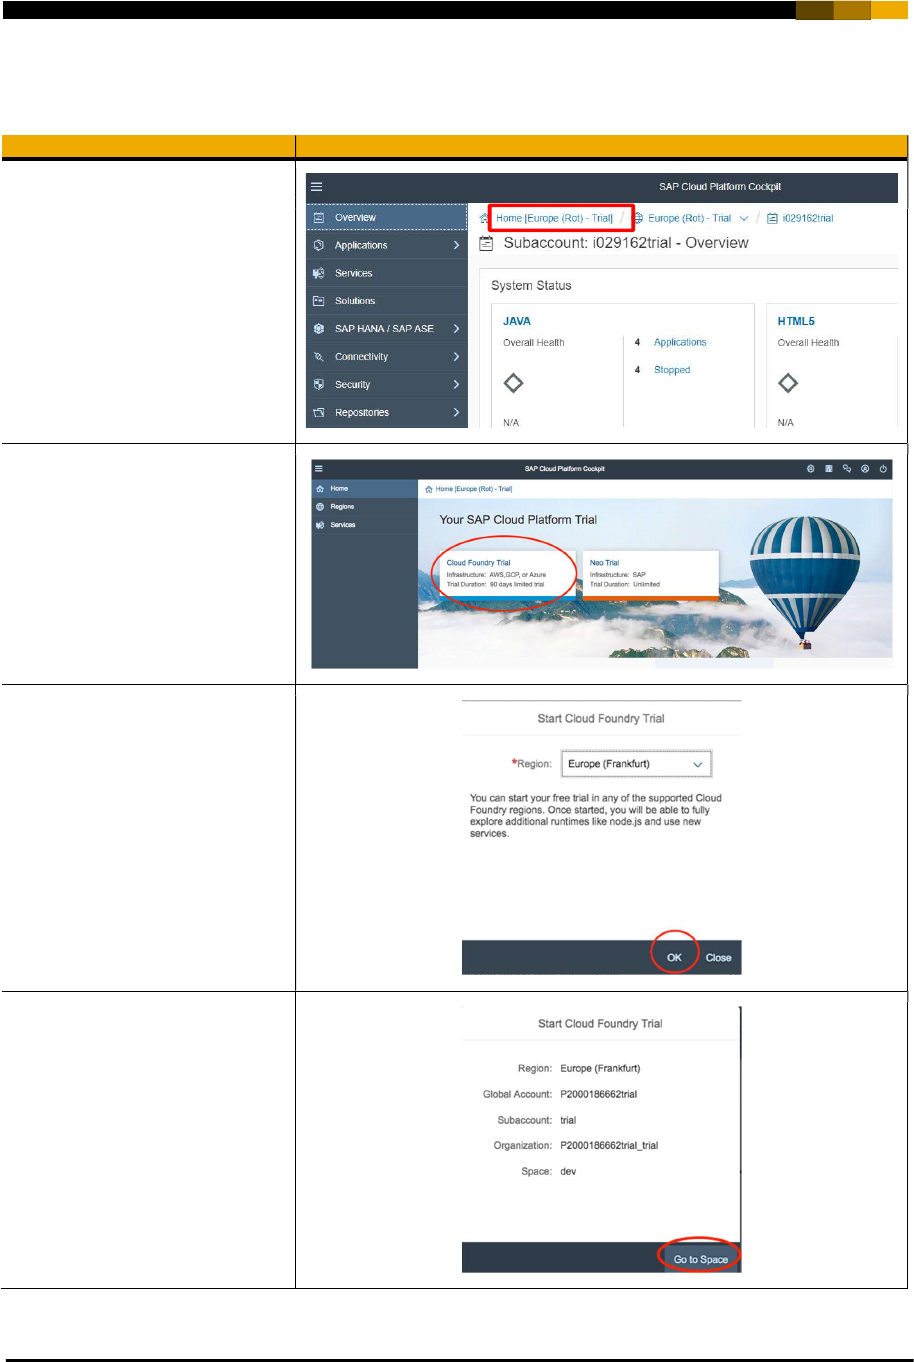
We need to activate the SAP
Cloud Platform Cloud Foundry
Environment.
On the SAP Cloud Platform
Dashboard click on the HOME
option.
First, we need to activate the
SAP Cloud Platform Cloud
Foundry Environment.
From the SAP CP Home Screen,
click on Cloud Foundry Trial.
Select the Trial Region that most
suits you. And Click on OK
This will initialize your Cloud
Foundry Trial and create a DEV
space (where the solutions will be
deployed).
10
STEP 1: CREATE A BUILD HIGH FIDELITY PROTOTYPE
Follow the steps of the HandsOn_Build_B1_Instructions.pdf document.
STEP 2: IMPORT YOUR BUILD PROTOTYPE INTO WEBIDE
The objective of this first exercise is to create a SAP Fiori app from your Build prototype.
i. Create the Project
Explanation Screenshot
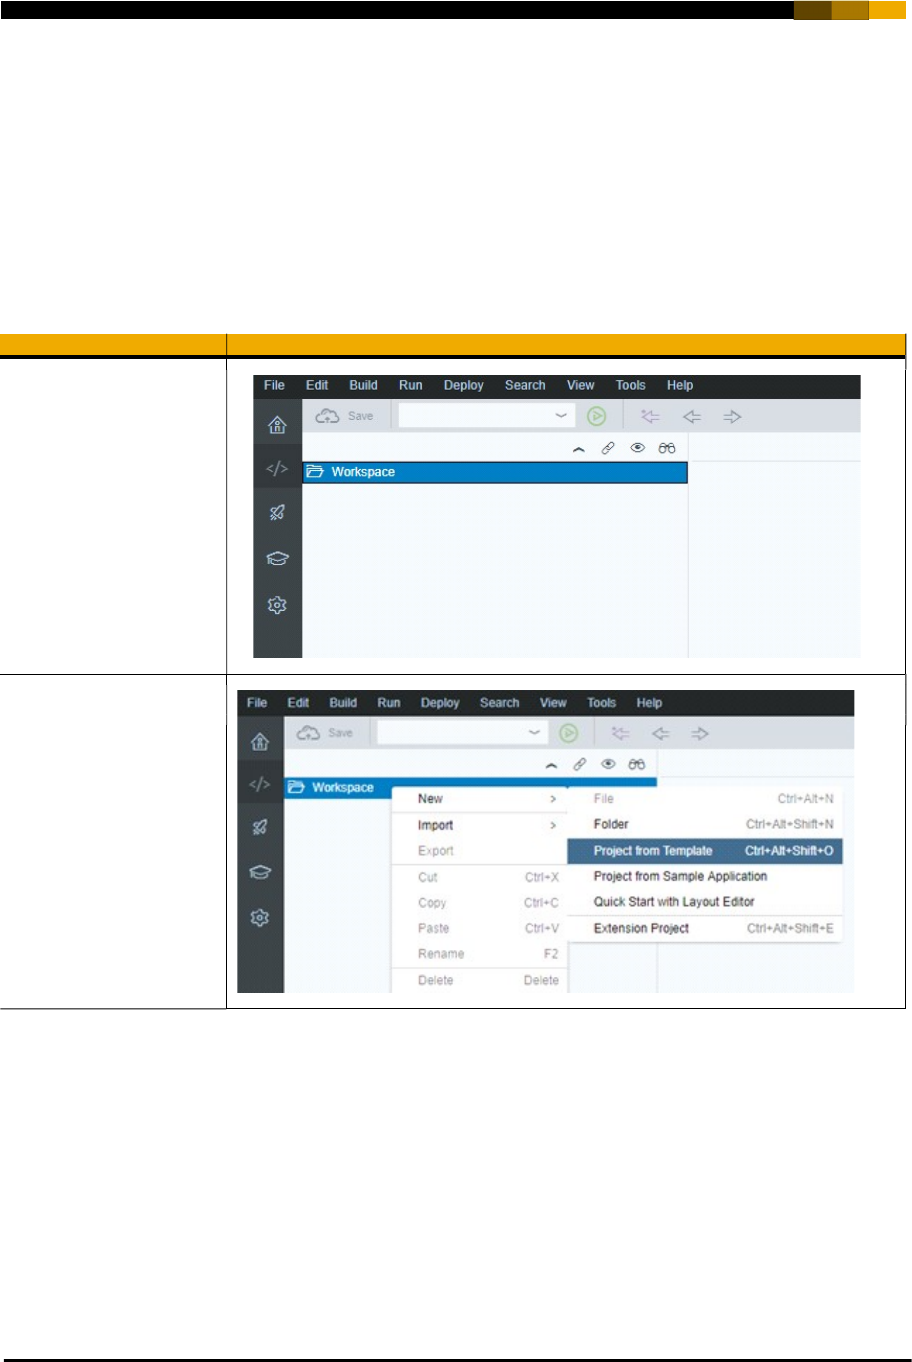
Open SAP Web IDE Full
Stack.
Check the prerequisites
sections “Create a SAP
Cloud platform trial
account” and “Activate
Web IDE Full Stack
service” if you don’t
know how to open
WebIDE Full Stack.
Right click on your
Workspace and select New
-> Project from Template.
11
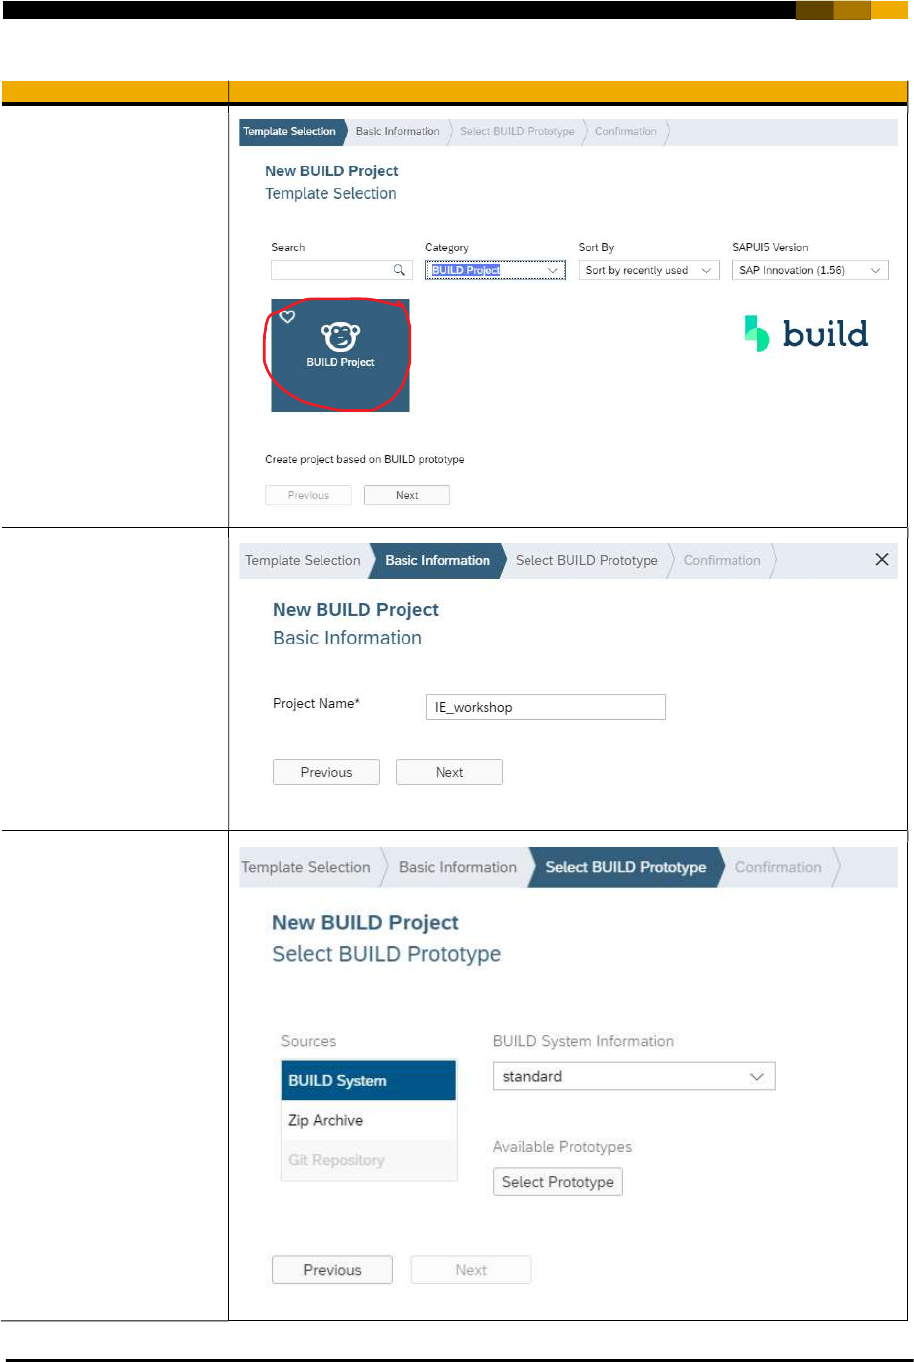
Explanation Screenshot
Select the BUILD Project
template.
Press Next.
If you don’t see this
template, change the
Category to BUILD Project
or All categories.
Enter a Project Name.
Press Next.
Select BUILD System
source.
Select standard BUILD
System Information.
Press Select Prototype to
get the list of available
BUILD prototypes.
You might be prompted to
enter your SAP Community
User Name and Password.
Enter your credentials and
press Log In.
12
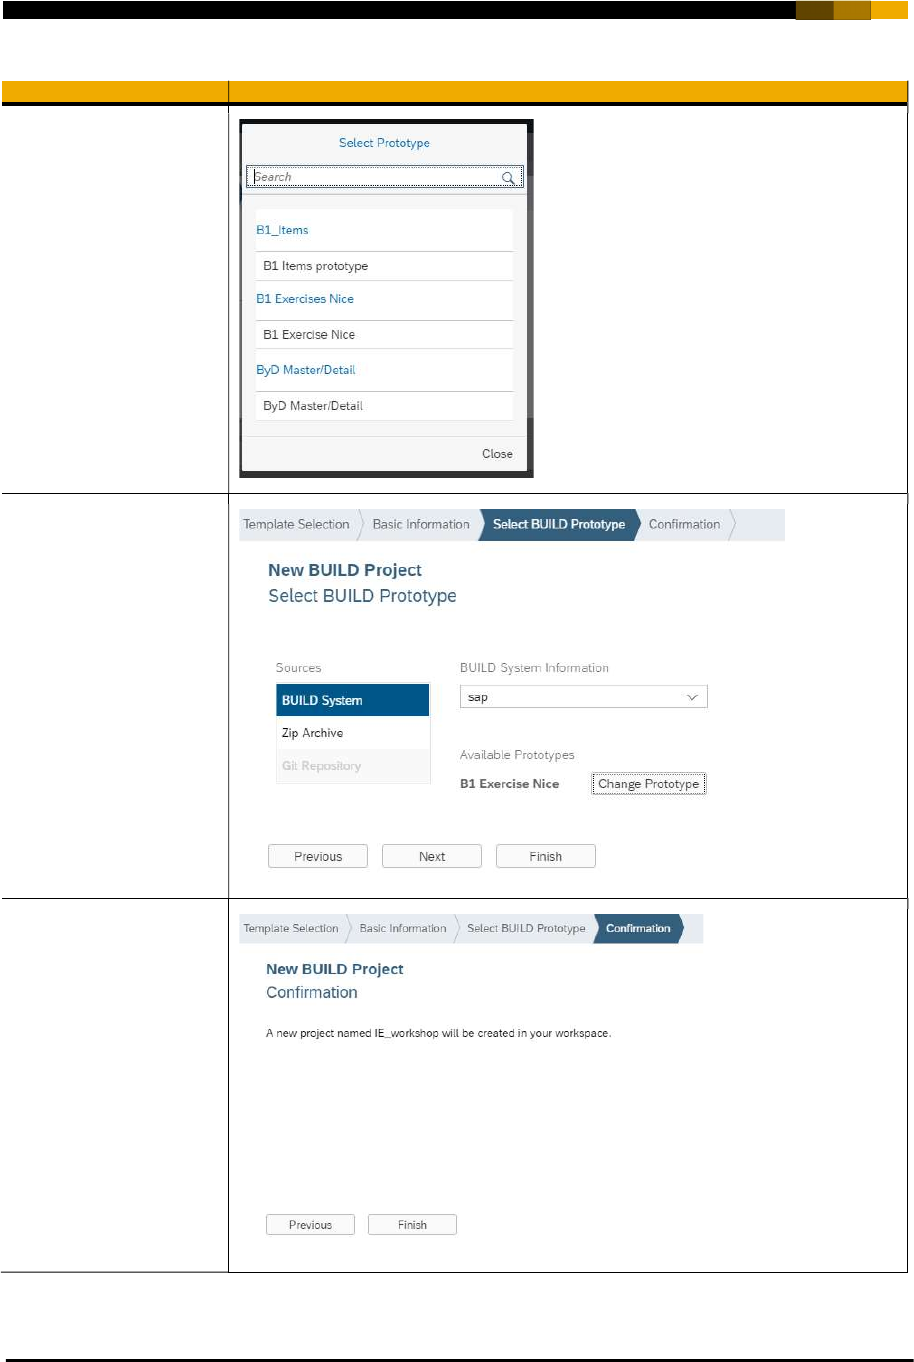
Explanation Screenshot
Select the prototype you
shared previously in
BUILD.
Press Close.
Press Next.
Press Finish.
13
ii. Test the project with mock data
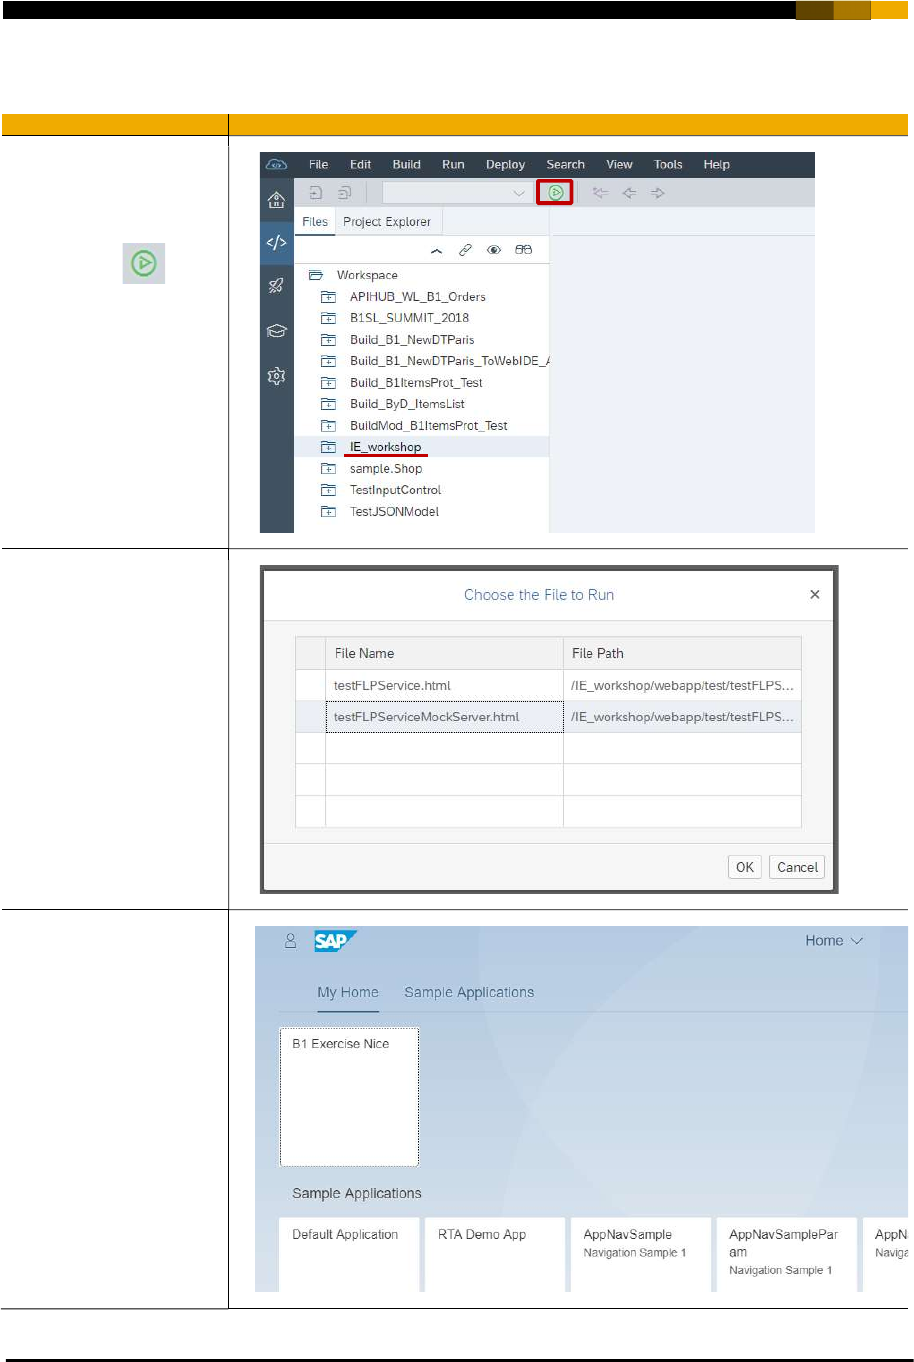
Explanation Screenshot
Go to your workspace, the
new project should be
listed.
Select your project and
press the Run
button.
Select the
testFLPServiceMockServ
er.html to run the
application with the mock
data we prepared in
BUILD.
Press OK.
A new tab will be open and
show an SAP Fiori
launchpad.
Select the tile on the
launchpad that
corresponds to the name
your BUILD prototype
application.
14
Explanation Screenshot
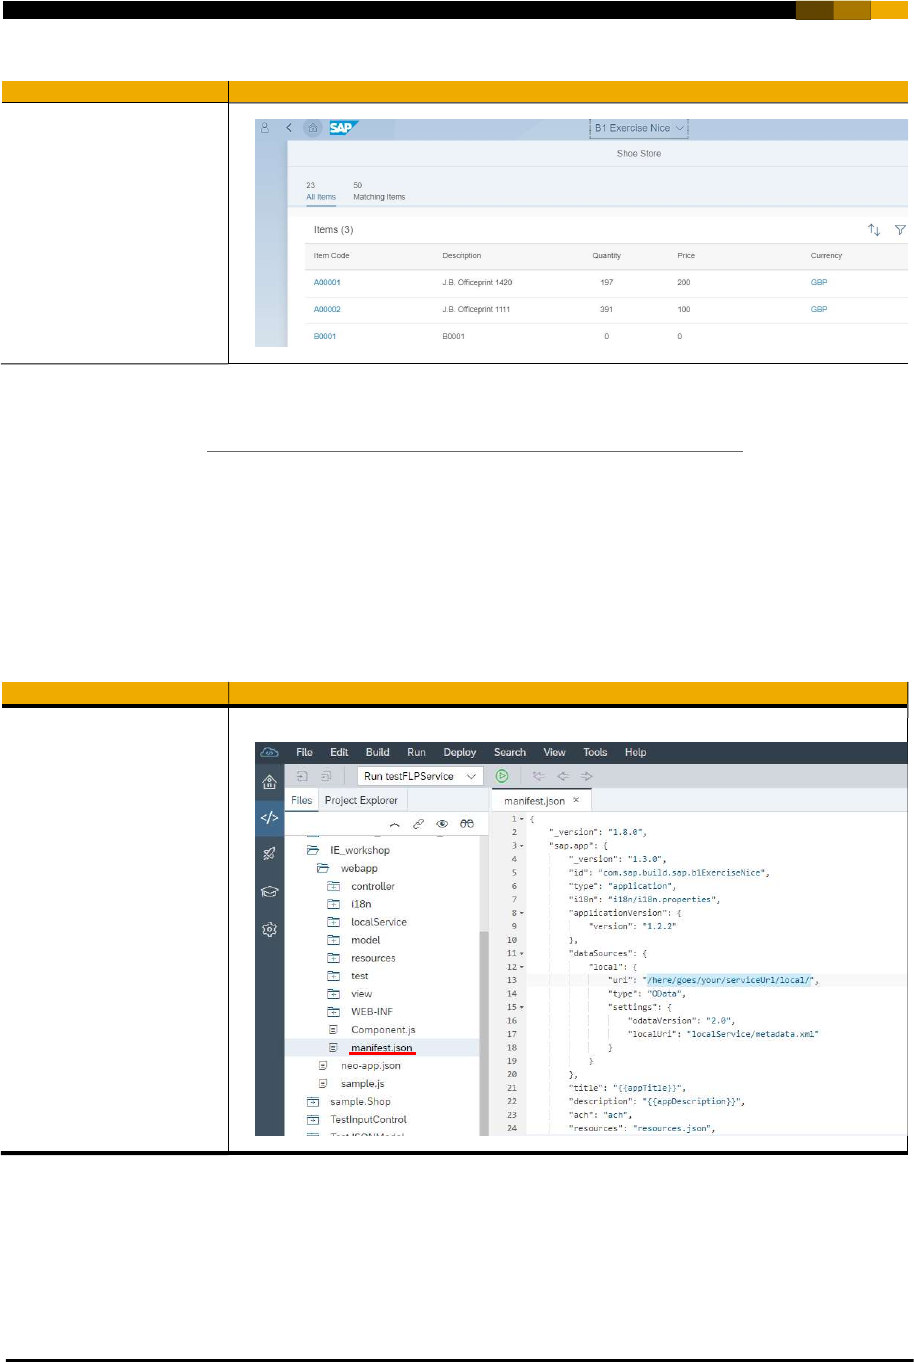
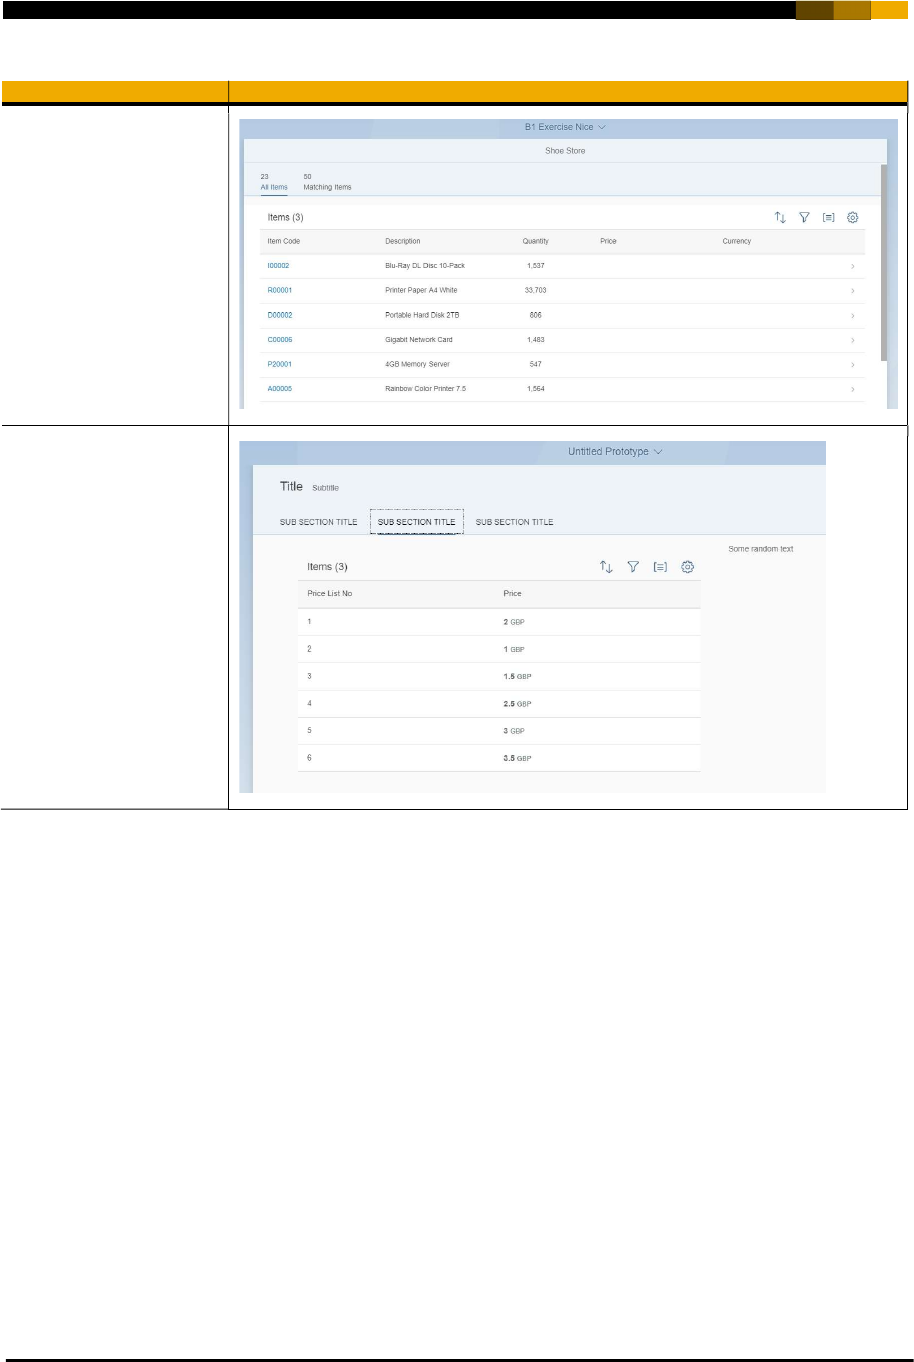
Your application will now
open and show the views
you designed with BUILD.
iii. Create a destination pointing to your backend server
On the SAP Community From SAP API Business Hub to your SAP Business One system blog dedicated to
SAP API Business Hub it is explained how to create a destination in SAP Cloud Platform pointing to your
SAP Business One backed server. Please check step number 1 of this blog to learn how to create a
destination.
iv. Connect to your real B1 backend server
We have imported the BUILD prototype into a WebIDE SAP Fiori project but we are still not connected to a
real backend server. This section will show you how to modify the SAP Fiori project to connect to your real
B1 backend server.
Explanation Screenshot
In SAP Web IDE
workspace, expand your
project.
In the webapp folder,
open the manifest.json
file with the code editor.

15
Explanation Screenshot
In the
manifest.json
file.
Replace the uri property
value under
dataSources section
with your backend
OData service path.
The uri is built from your
destination name (in my
case
/B1SL_Summit2018)
plus the root Service
Layer path for OData v4
(/b1s/v2/ available from
SAP Business One 9.3
PL04).
Press Save button.
Open neo-app.json file.
Add your backend
destination entry to
fetch data.
,{
"path": "/yourdest",
"target": {
"type": "destination",
"name": "yourdest"
},
"description":"yourdesc"
}
Press Save button.
16
v. Extra SAP Business One backend configuration steps
As at the time we have created this document SAP BUILD doesn’t support yet OData v4 and SAP Business
One Service Layer APIs are based on OData v4, to design our SAP Business One Build prototype we had to
use a custom OData model in SAP Build to design our prototype. Therefore, the WebIDE project will not
directly run after the changes done in previous steps but some extra steps will be required.
As SAP WebIDE supports OData v4 we can now replace the custom OData model we designed in SAP
Build by the real SAP Business One Service Layer OData model to get SAP Business One data from our
backend.
Explanation Screenshot
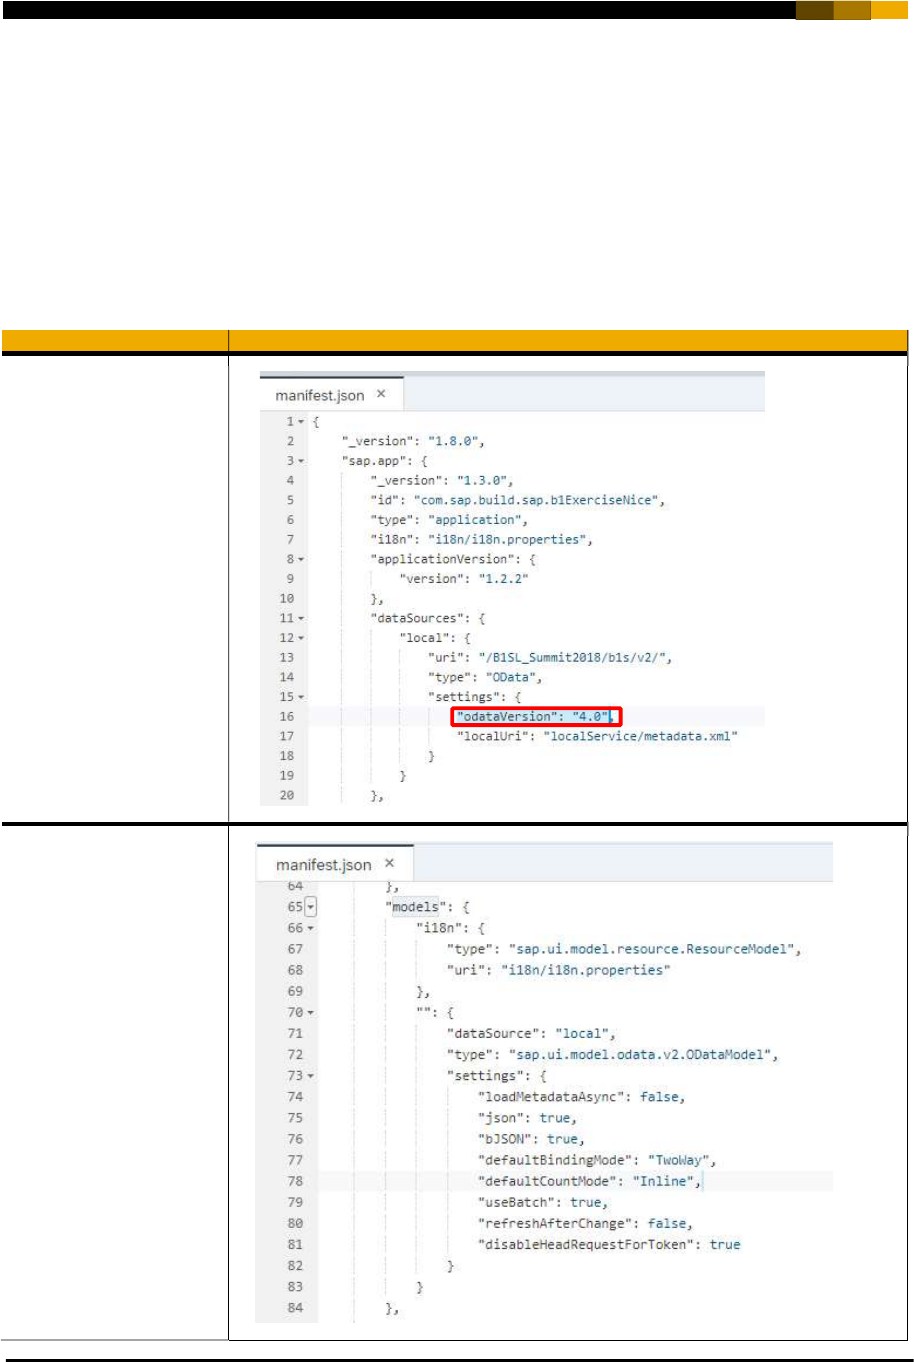
Open the manifest.json
file.
Change the “settings”
“odataVersion” to 4.0.
Search models element
inside sap.ui5
17
Explanation Screenshot
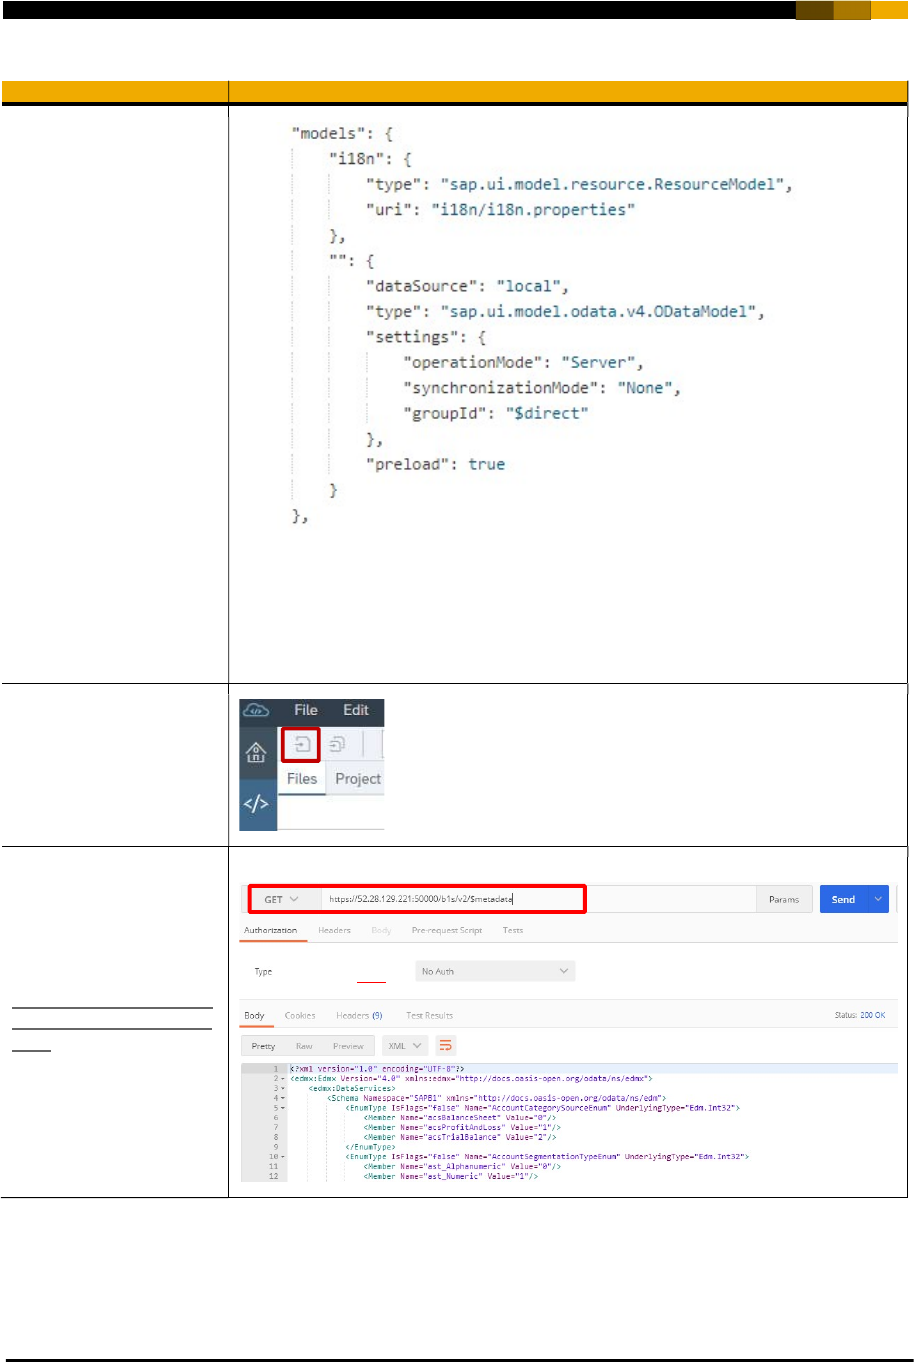
Replace the
type
of the
model with empty name
by
sap.ui.model.odata.v4.
ODataModel.
Change the settings
and add preload
property true.
Pay attention you keep
the dataSource value
unchanged as it
matches the dataSource
value defined at the
beginning of the file.
"settings": {
"operationMode":
"Server",
"synchronizationMode":
"None",
"groupId": "$direct"
},
"preload": true
Press the Save button.
Retrieve the metadata
file from SAP Business
One Service Layer via
Postman with the GET
request
https://your_b1sl_serv
er:50000/b1s/v2/$meta
data.
Save the response as a file
named metadata.xml.
18
Explanation Screenshot
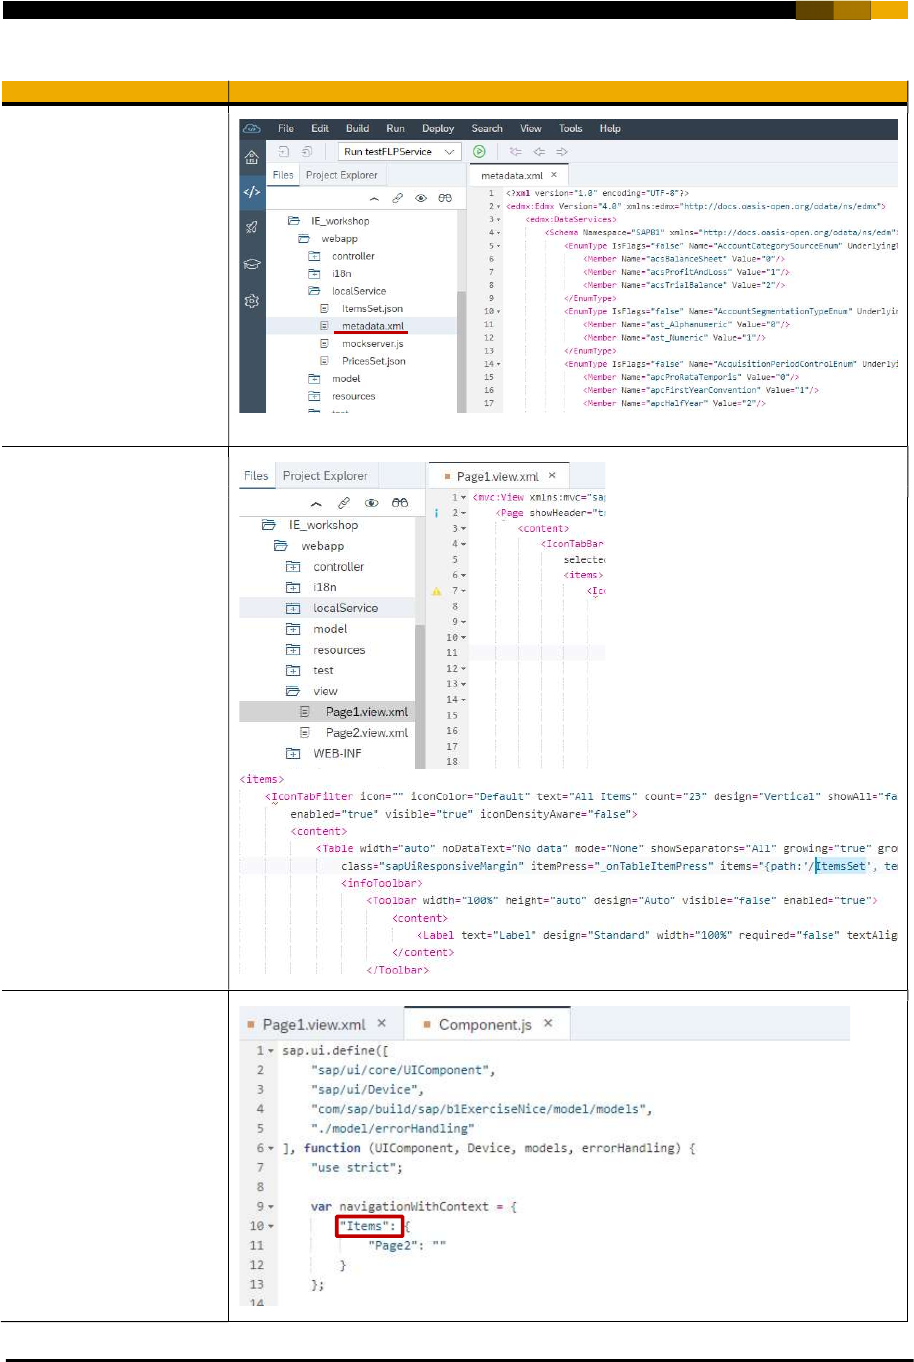
Replace the
localService/metadata.
xml file imported from
BUILD by the SAP
Business One Service
Layer metadata file
saved in the previous
step.
To avoid conflicts as the
Build metadata.xml file
is already there you can
rename the existing file
as build_metadata.xml.
Open the Page1.view.xml
file, search for ItemsSet
and replace it by Items.
In the model we created
in BUILD entities have
the suffix Set, while in
SAP Business One
Service Layer we don’t
have it, we need to fix it
to be able to directly
connect to Service
Layer.
Open Component.js file.
Replace ItemsSet by
Items in the
navigationWithContext
definition.
19
Explanation Screenshot
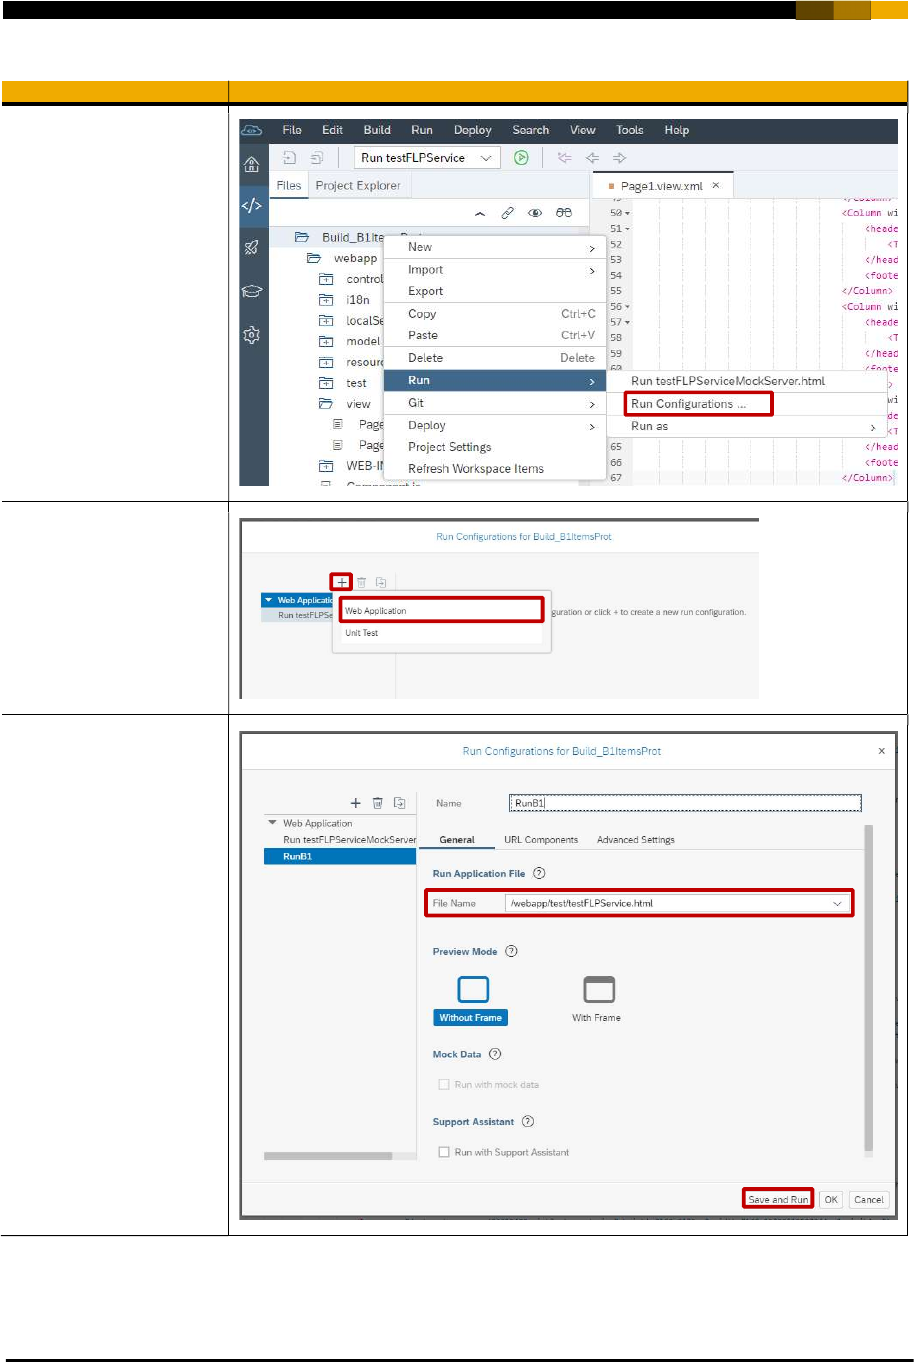
To run the application this
time connecting to your
real B1 backend right click
on your project and choose
Run -> Run
Configurations…
Press +.
Select Web Application.
Give a Name to the new
configuration.
Select
testFLPService.html as
File Name.
Press Save and Run.
20
Explanation Screenshot
Now the data shown
comes from B1 and not
anymore from the Build
sample data.
You can also check the
details page containing the
different prices depending
on their price list for a
specific Item by clicking on
one of the rows.
Congratulations! You have imported a Build prototype to your WebIDE development environment and
connected to your real SAP Business One backend server.
21
STEP 3: CLONE A NODEJS APP
In this step we are going to deploy the backend of our application.
The application we are going to deploy is based on the SMB Marketplace proof of concept we shared in the
Digital Transformation for SMBs – the Intelligent Enterprise blog.
It will contain the business logic required to call SAP Leonardo services and get Item details from SAP
Business One and SAP Business ByDesign erps.
The application is written in NodeJS and the source code is available on GitHub.
Explanation Screenshot
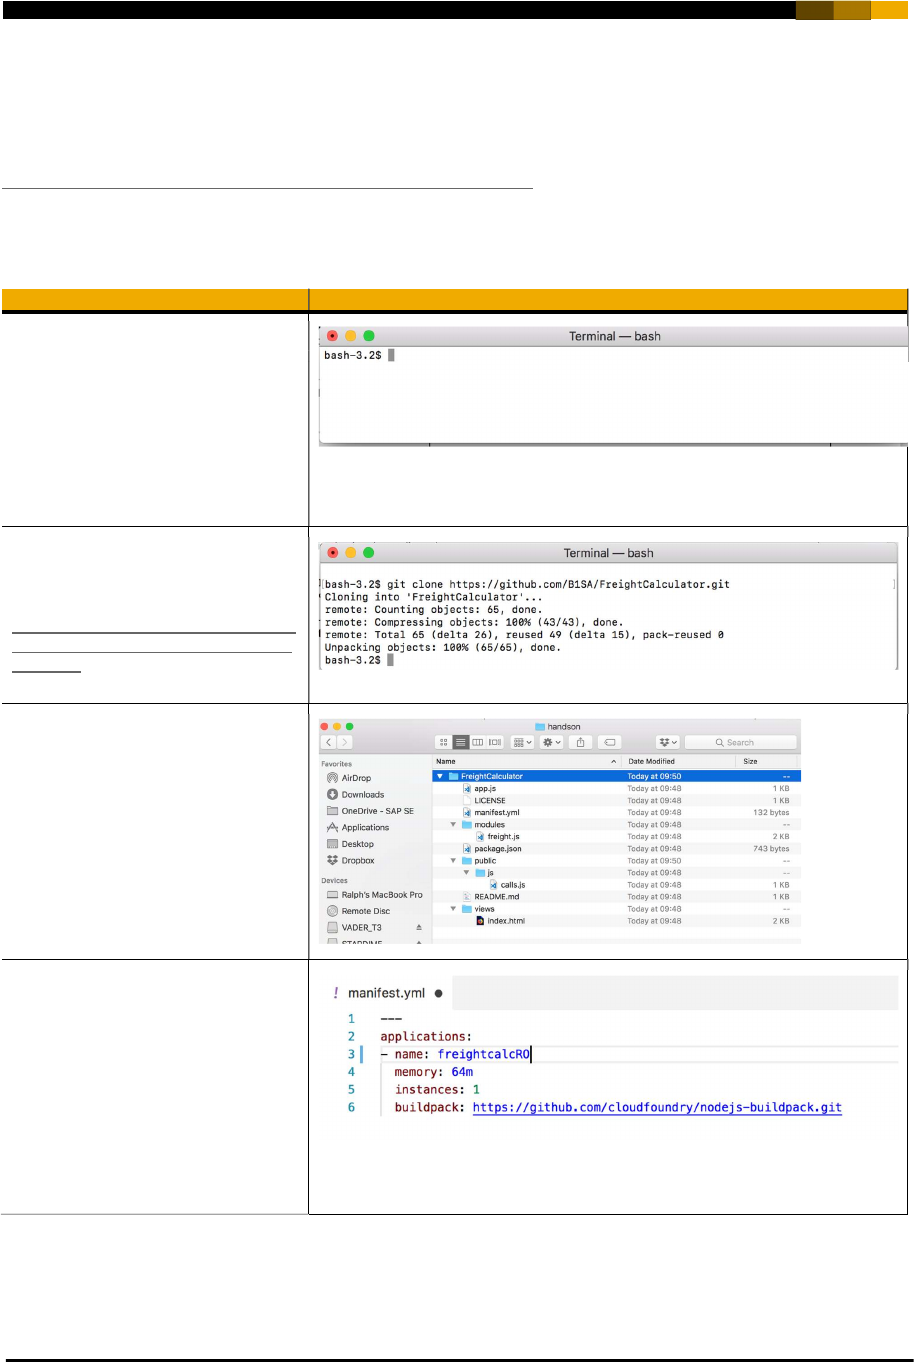
Once git is installed (according to the
pre requisites), open your system
terminal (cmd, bash..)
Navigate to a specific folder where
you will download the sample
application.
Pay attention what folder is it, we will
access it later
.
Execute the following command to
clone our solution backend repository:
$ git clone
https://github.com/B1SA/exercise_Bui
ldToWebIDECF/tree/master/Backend
_smbmkt
You can see the app code on your file
explorer:
You can change the name of the app
in manifest.yml file and set a unique
name for your application.
It is not a mandatory operation as we
can generate a random url for our
application to avoid conflicts with
other accounts running the same app
name, it will be shown in the next
step.
E.eg
smbmkt
<Your Initials>
22
STEP 4: DEPLOY THE NODEJS APP INTO SAP CLOUD FOUNDRY
In this step, we are going to deploy our SMB Marketplace app to SAP Cloud Platform Cloud Foundry.
i. SAP Cloud Platform Cloud Foundry Environment
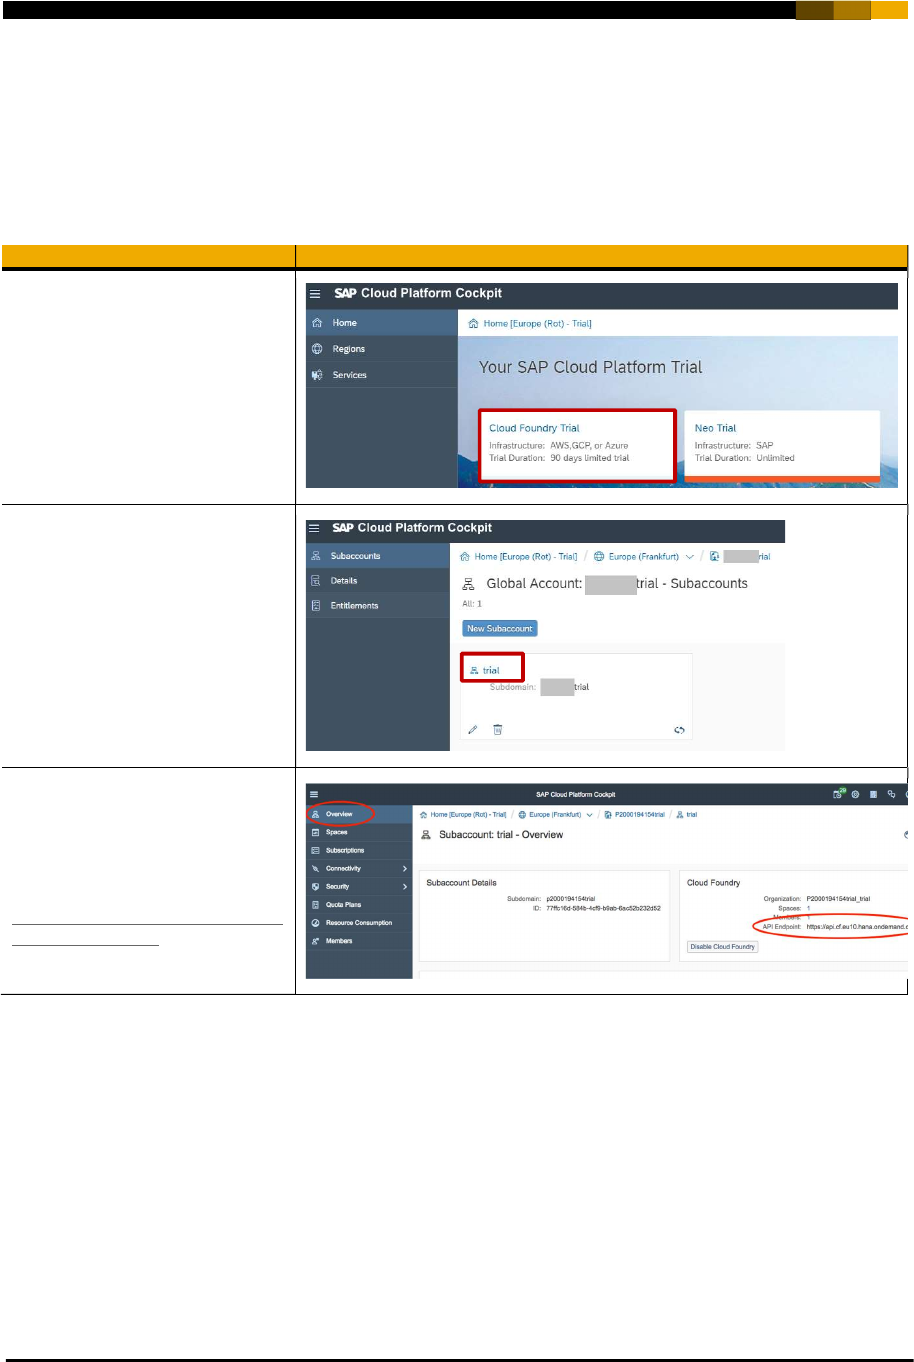
Go to your Cloud Foundry account.
Select your trial subaccount.
Click on the trial link.
Open the Overview option in the
menu
Select and copy your API
Endpoint. E.g.
https://api.cf.eu10.hana
.ondemand.com
23
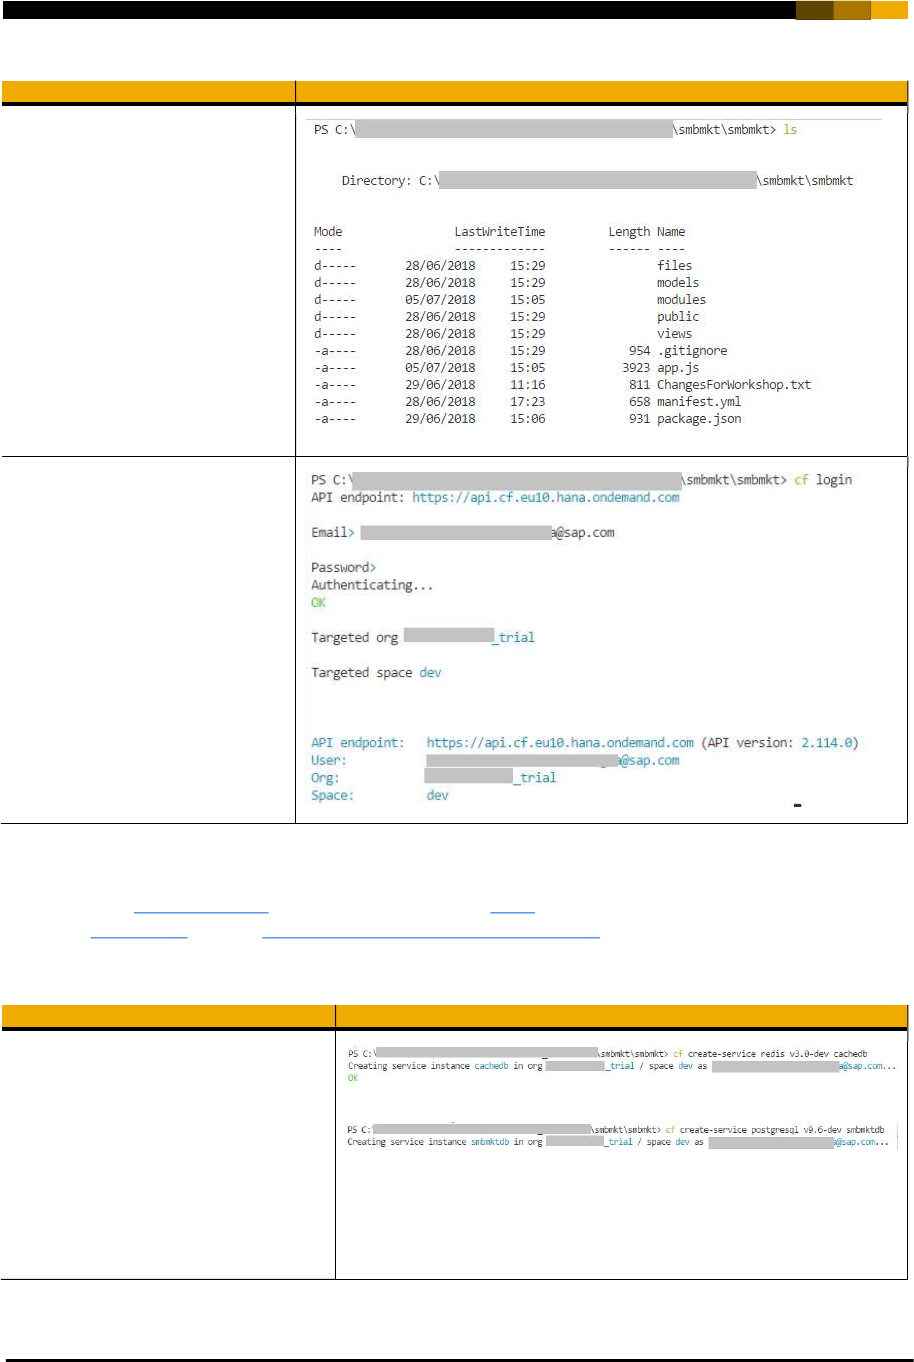
With the CLI installed
(according to the pre-
requisites), open your system
terminal and navigate to the
folder of the backend app
cloned on STEP 3 of this guide
From that folder, login to Cloud
foundry using the command
cf login -a <API
ENDPOINT>
e g.
$ cf login -a
api.cf.eu10.hana.ondeman
d.com
When prompted provide your
SAP Cloud Platform email and
password
ii. Create the backing services
This app uses 2 backing services from SAP Cloud Platform. Redis for storing B1 Service Layer Sessions ID in
cache and PostgreSQL to store SAP Leonardo Feature Extraction Vectors.
Here are the steps to create them:
Explanation Screenshot
Using the command terminal,
navigate to the smbmkt root
directory, which you downloaded or
cloned previously.
Execute the following commands to
create the Redis and PostgreSQL
services:
cf create-service redis
v3.0-dev cachedb
24
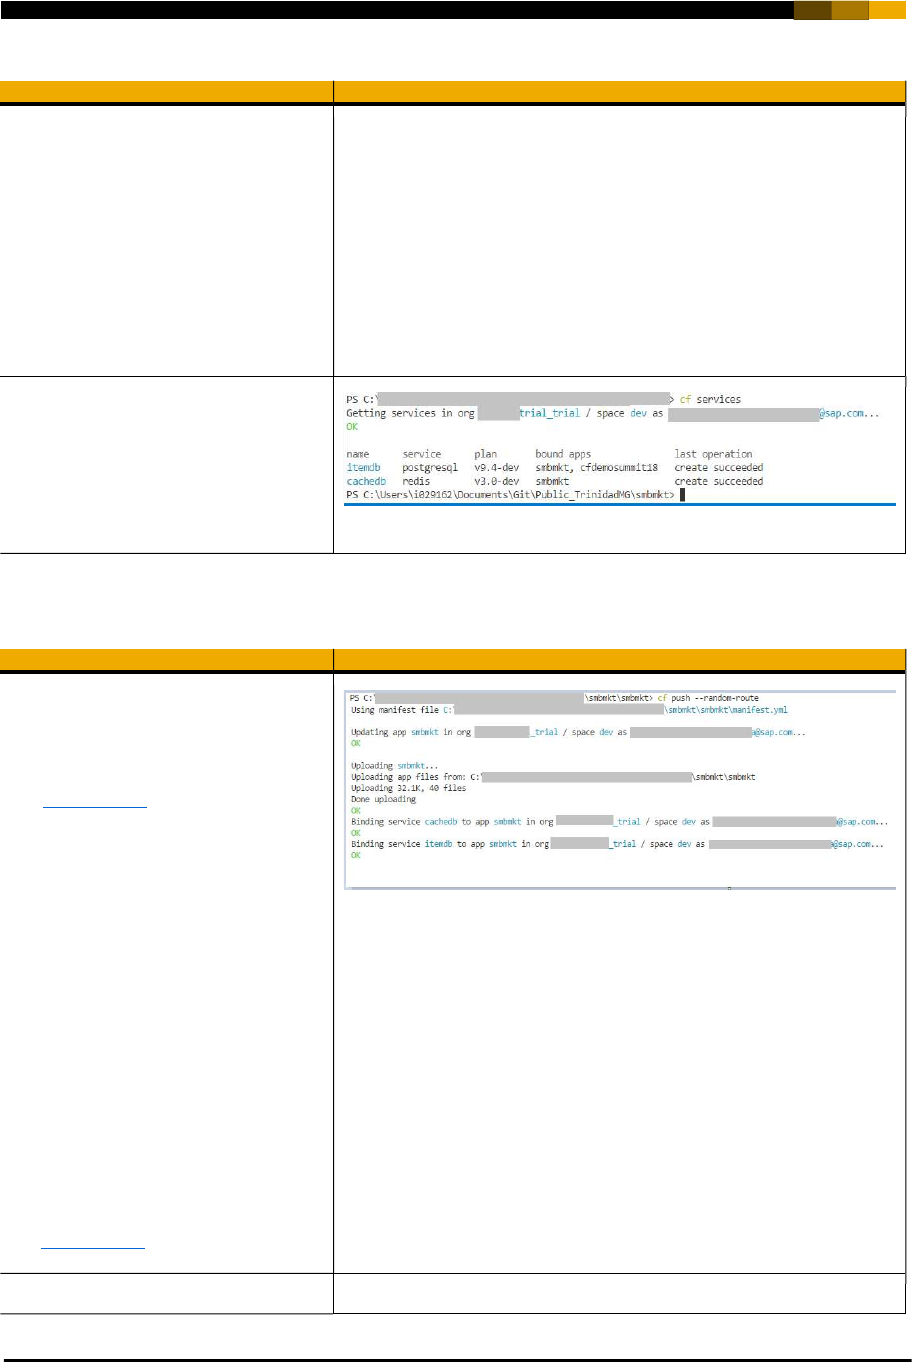
Explanation Screenshot
cf create-service
postgresql v9.6-dev
smbmktdb
PS: When using a trial account some
limitations apply. If you already had a
postgresql or redis service you will
not be able to create a second one,
just reuse the one you have or delete
your old one.
You can check which services are active
and the bound apps with the command:
cf services
(your services might not be bound to any
app if just created now)
iii. Deploy the smbmkt app
Explanation Screenshot
This app has 2 microservices (bot and
smbmkt) that can be deployed at
once or separately. Their
specifications are detailed in
the manifest.yml.
In this exercise we will only work with
the smbmkt microservice as the other
service is the one related to
Facebook Messenger that is not used
in this exercise.
From the same terminal of the
previous step go to your
smbmkt/smbmkt app folder and
execute:
cf push --random-route
--random-route avoids name
collisions with other accounts that
might deploy the same app on SCP.
You can choose your own app name
by changing the application names in
the manifest.yml.
25
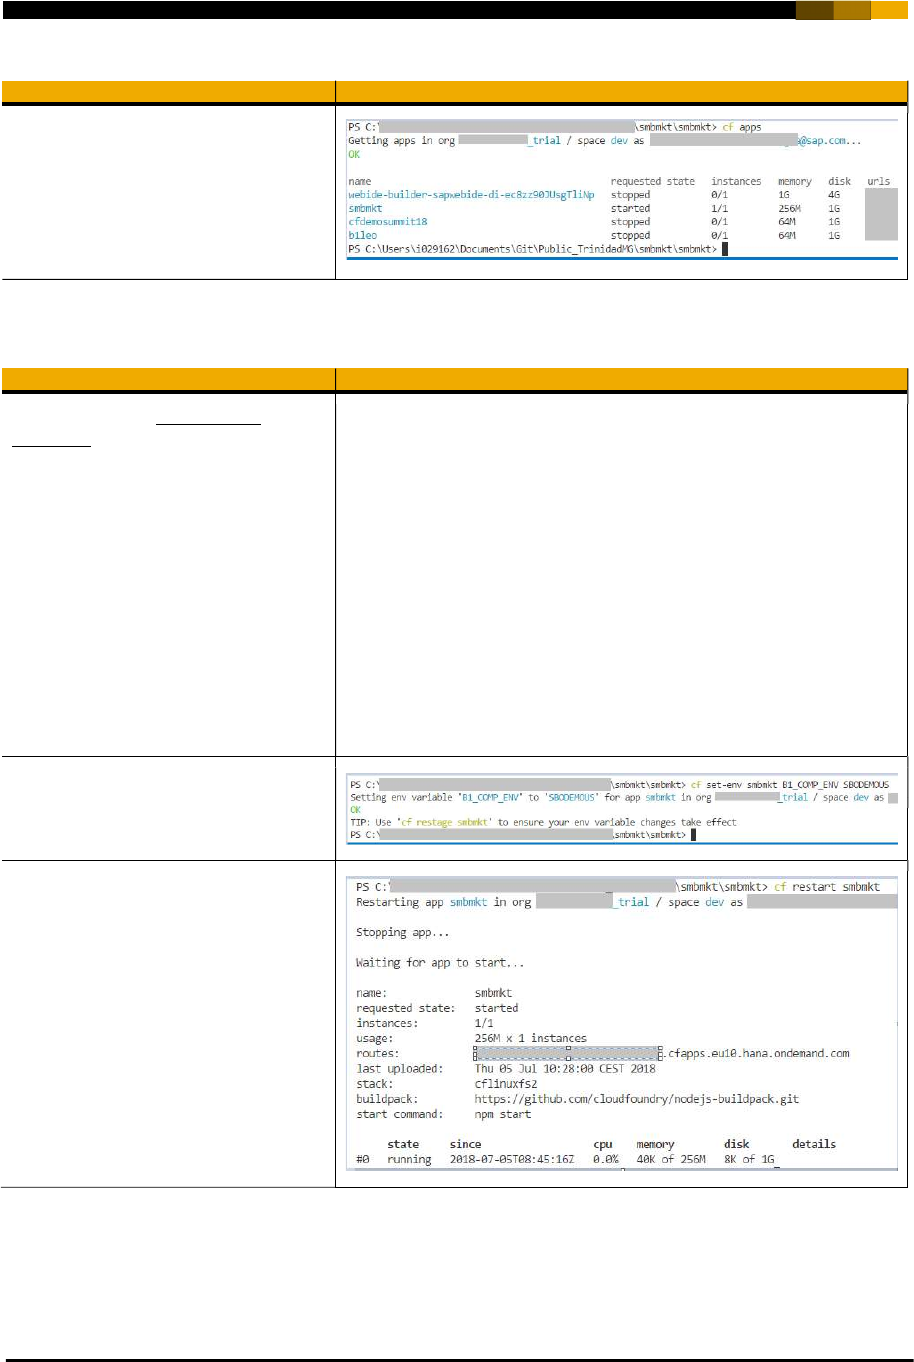
Explanation Screenshot
At the end of the process your smb app
must be running.
You can check your apps with the
command:
cf apps
iv. Configure the SMB Mktplace backend
Explanation Screenshot
Set the following Environment
Variables so the app can work
properly.
If you don’t have a B1 or ByD system
available you can then skip their
corresponding environment variables
set. Please note that you need at
least one ERP system from both to
be able to retrieve items data.
B1_COMP_ENV: <SAP Business One Company Name>
B1_DEFAULT_BP: <A Business Partner Code for the B1 Sales Order>
B1_USER_ENV: <B1 User to login the Service Layer>
B1_PASS_ENV: <Password for the B1 User>
B1_SERVER_ENV: <SAP Business One server URL>
B1_SLPATH_ENV: /b1s/v1
B1_SLPORT_ENV: <SAP Business One Service Layer Server Port>
BYD_AUTH: <[Base64 Encoded] user:password>
BYD_DEFAULT_BP: <A Business Partner Code for the ByD Sales
Order>
BYD_PATH: /sap/byd/odata/cust/v1
BYD_PORT: ""
BYD_SERVER: <SAP Business ByDesign server URL>
FILE_SEP: -_-_
LEO_API_KEY: <SAP Leonardo API Key>
TEMP_DIR: files/tmp
VECTOR_DIR: files/vectors
Set one by one the environment variables
with the command:
cf set-env smbmkt B1_COMP_ENV
SBODEMOUS
Restart your application so it can get the
new environment variables with the
following command:
cf restart smbmkt
26
v. Initialize the SMB Mktplace backend
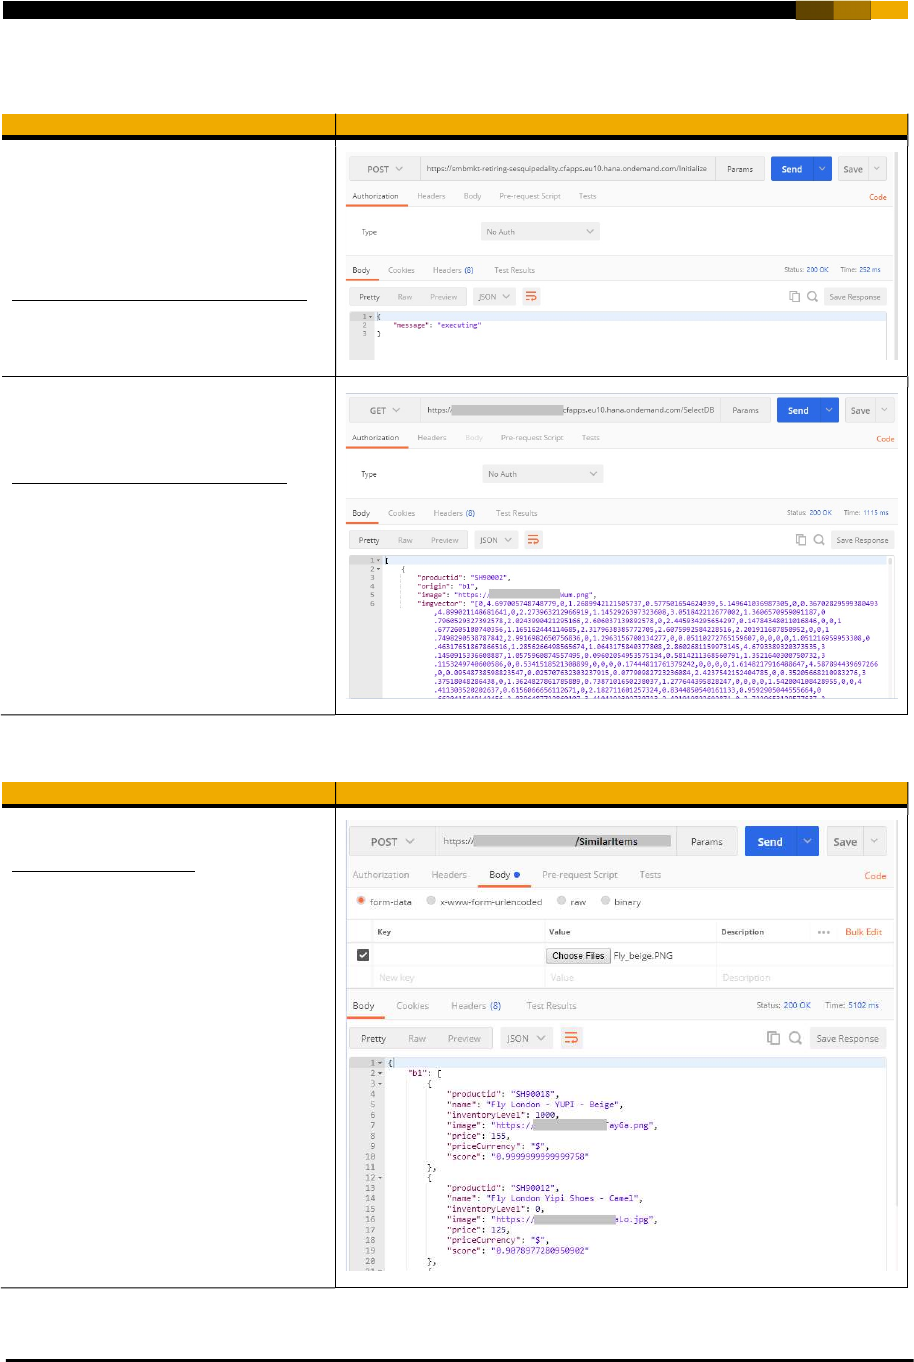
Explanation Screenshot
To initialize the Postgresql database with
the existing items from B1 and ByDesign
as well as the vectors for each item
please call the following API with
Postman for example:
POST
<your_backend_url>/Initialize
After initialization you can check the
Postgresql items table content with the
following API:
GET
<your_backend_url>/SelectDB
If the Initialize command runs
successfully an entry should be available
for each one of your items containing the
productid, origin, image and imgVector
properties.
vi. Test the SMB Mktplace backend /SimilarItems API
Explanation Screenshot
With Postman call the /SimilarItems API:
POST
<your_backend_url>/SimilarItem
s
In the body select “form-data” and
choose a file containing the image of a
shoe.
Congratulations! You have implemented and deployed your first Cloud Foundry application on SAP Cloud
Platform!
27
STEP 5: CONSUME THE NODEJS APP FROM THE SAP FIORI APP
Until now our SAP Fiori application hasn’t been modified and reflects exactly what was designed in BUILD.
In this step we are going to modify the tab “Matching Items” in order to consume the services provided by our
NodeJS backend.
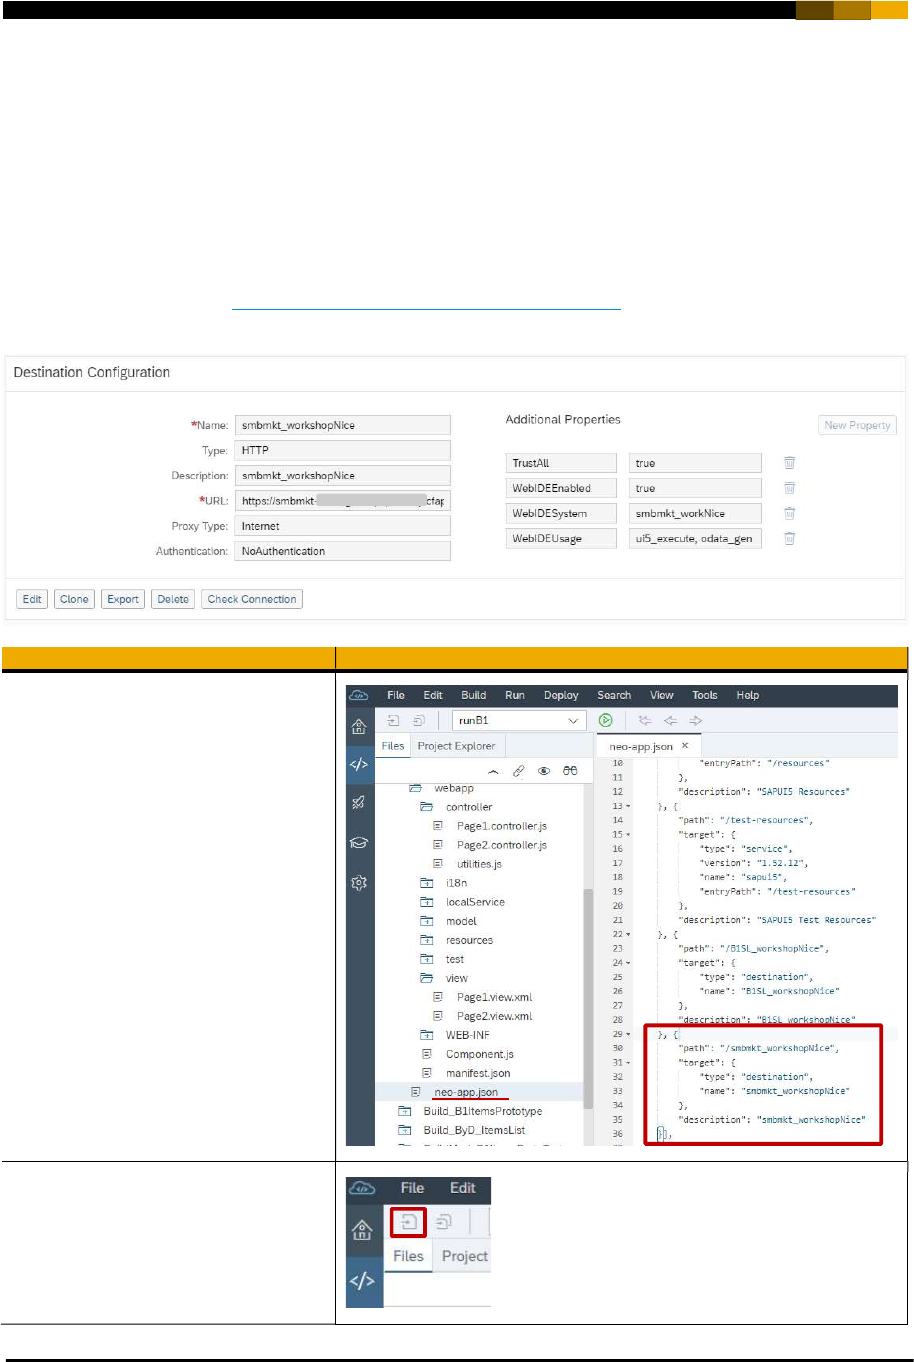
i. Create a destination pointing to your smbmkt backend
Your destination in your SAP Cloud Platform cockpit -> Connectivity -> Destinations should look like the one
here, just replace the URL with your smbmkt url.
Check the following tutorial Create a Destination on SAP Cloud Platform to learn more details about
destinations.
Explanation Screenshot
Open neo-app.json file.
Add your backend destination entry
to fetch data.
,{
"path": "/yourdest",
"target": {
"type": "destination",
"name": "yourdest"
},
"description":"yourdesc"
}
Press Save button.
28
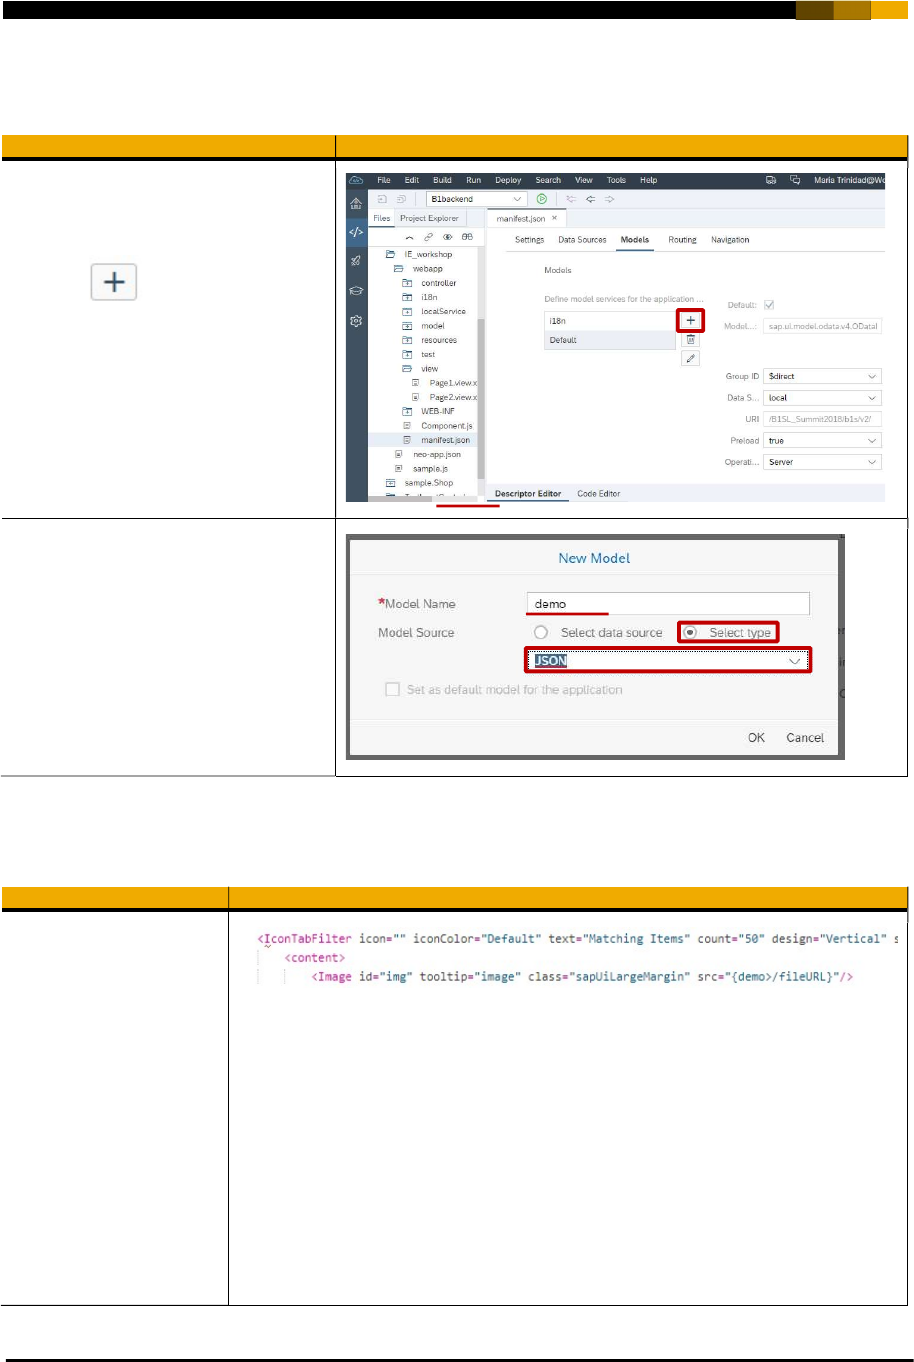
ii. Create a new JSON model
Explanation Screenshot
Open the manifest.json file with the
Descriptor Editor.
Go to the Models tab.
Press the button to add a new
model.
Enter the Model Name of the model
demo if you want to avoid changing
the references in the following steps.
Choose Select type as Model
Source.
Select JSON as type.
Press OK.
iii. Change the Image control in the Page1.view.xml file.
Explanation Screenshot
Open the
Page1.view.xml file
with the Code Editor.
Search for the Image
control and replace it
with the following code:
<Image id="img"
tooltip="image"
class="sapUiLargeMargi
n"
src="{demo>/fileURL}"/
>
29
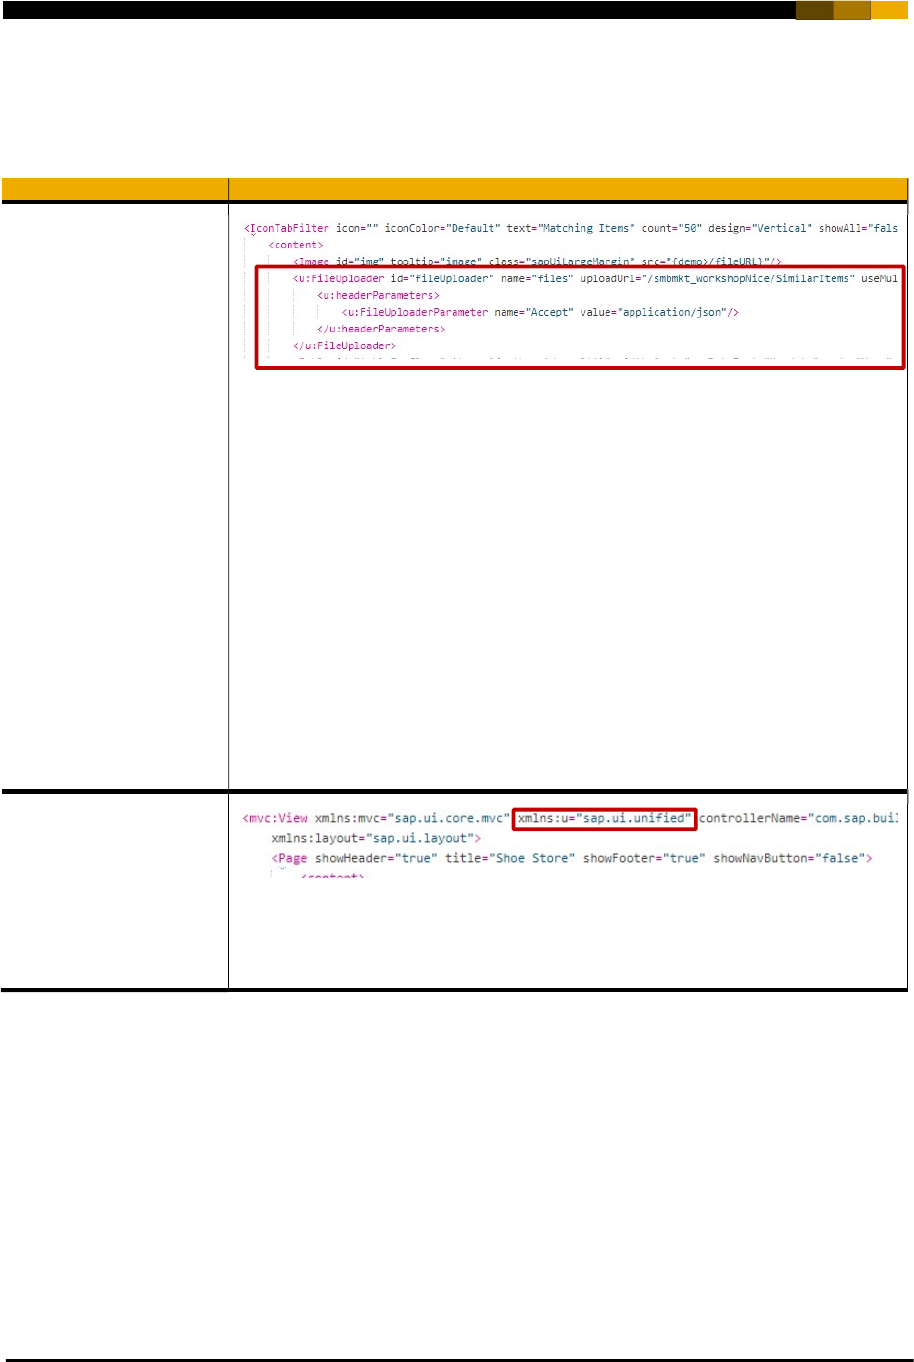
iv. Create a FileUploader control.
In BUILD we added a SearchField control as the FileUploader control was not available. We will now replace
it with a FileUploader.
Explanation Screenshot
Open the
Page1.view.xml file
with the Code Editor.
Search the SearchField
control and replace it by
the following code.
We use the smbmkt
destination created in a
previous step to get the
SimilarItems url.
Replace
smbmkt_destination
with your smbmkt
destination name.
<u:FileUploader id="fileUploader" name="files"
uploadUrl="/smbmkt_destination/SimilarItems" useMultipart="true"
sendXHR="true" uploadOnChange="true" tooltip="Upload your file to the
local server" fileType="jpg,png,gif" mimeType="application/x-zip-
compressed,application/zip,application/octet-
stream,image/png,image/jpg,image/jpeg,image/bmp,image/tiff"
change="fileUploadChange" uploadStart="fileUploadStart"
uploadComplete="fileUploadComplete">
<u:headerParameters>
<u:FileUploaderParameter
name="Accept" value="application/json"/>
</u:headerParameters>
</u:FileUploader>
Add the prefix
xmlns:u="sap.ui.unifie
d", required by the
FileUploader control, at
the beginning of the
Page1.view.xml file.
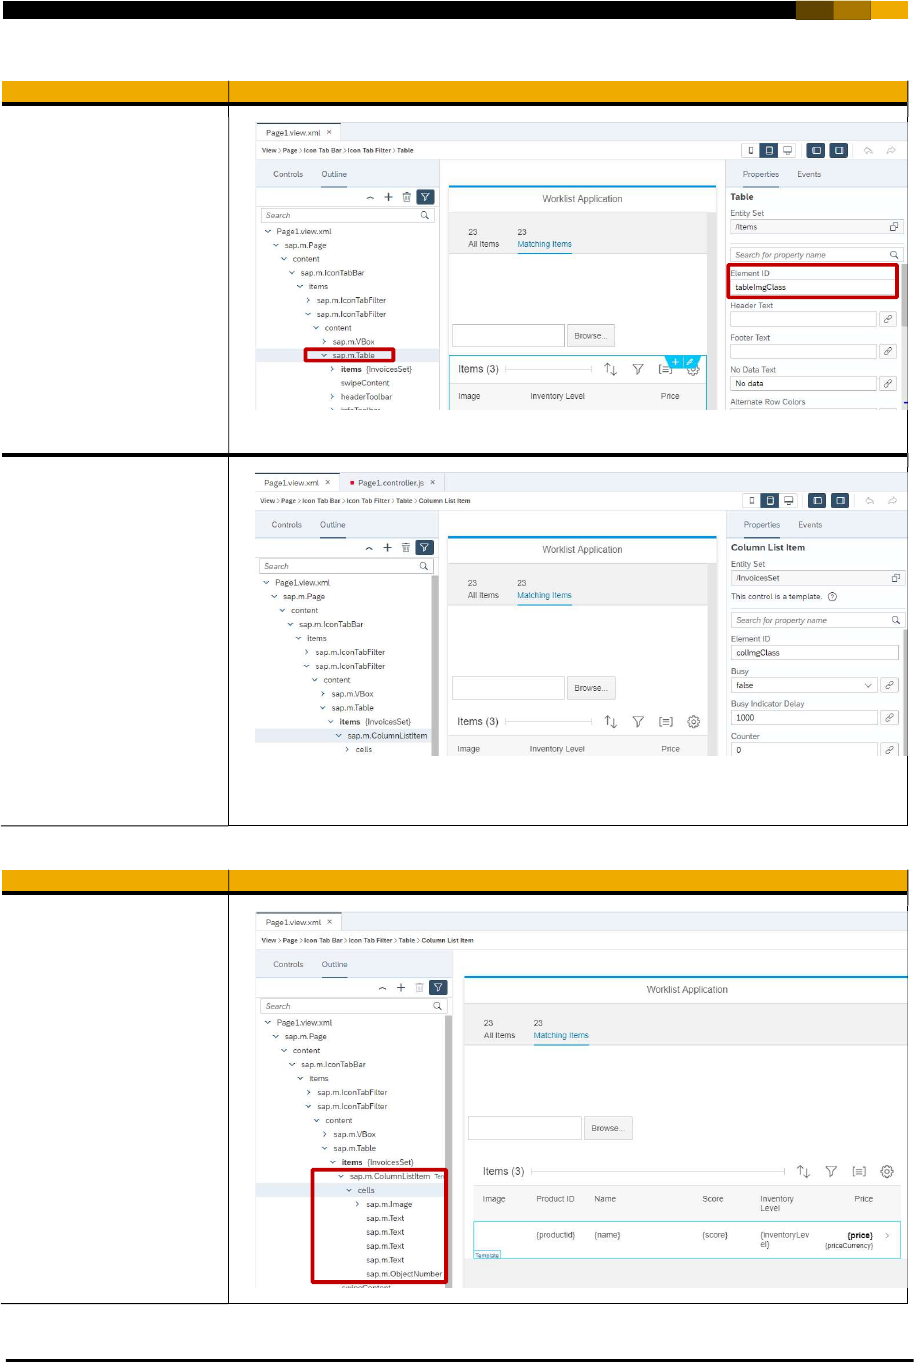
v. Bind the Matching Items Table to our backend properties
Let’s define first the IDs of our Table and ColumnListItem controls, we will need them to further bind them to
our backend response.
30
Explanation Screenshot
Open the
Page1.view.xml file
with the Layout Editor.
In the Outline tab (left of
the screen) open the
second IconTabFilter
content and select the
sap.m.Table.
In the Properties tab
(right of the screen)
enter tableImgClass as
Element ID.
In the Outline tab (left of
the screen), inside the
sap.m.Table we
selected in previous
step now select the
Items ->
sap.m.ColumnListItem
element.
In the Properties tab
(right of the screen)
enter colImgClass as
Element ID.
Now let’s map each column in the Table to our backend response properties.
Explanation Screenshot
Open the
Page1.view.xml file
with the Layout Editor.
Open the Outline tab
(left of the screen) and
select the
sap.m.ColumnListItem
-> cells element.
Make sure you get 6
cells defined with the
types as marked in the
screen capture.
Maybe the easier is to
delete them and
recreate them in the
right order.

31
Explanation Screenshot
For the sap.m.Image open
the detailBox and enter
{image} in the Src
property.
For the cells of type
sap.m.Text go over them
and set the Text property
to the different properties
names returned by the
smbmkt backend:
{productid}
{name}
{score}
{inventoryLevel}
For the last cell of type
sap.m.ObjectNumber set
the property Number to
{price} and Unit to
{priceCurrency}.
Open the
Page1.view.xml file
with the Code Editor.
Search for the Table
with id “tableImgClass”
we updated in previous
steps.
Add the following
property to indicate the
32
Explanation Screenshot
path to the results from
SimilarItems:
items="{path :
'/result'}"
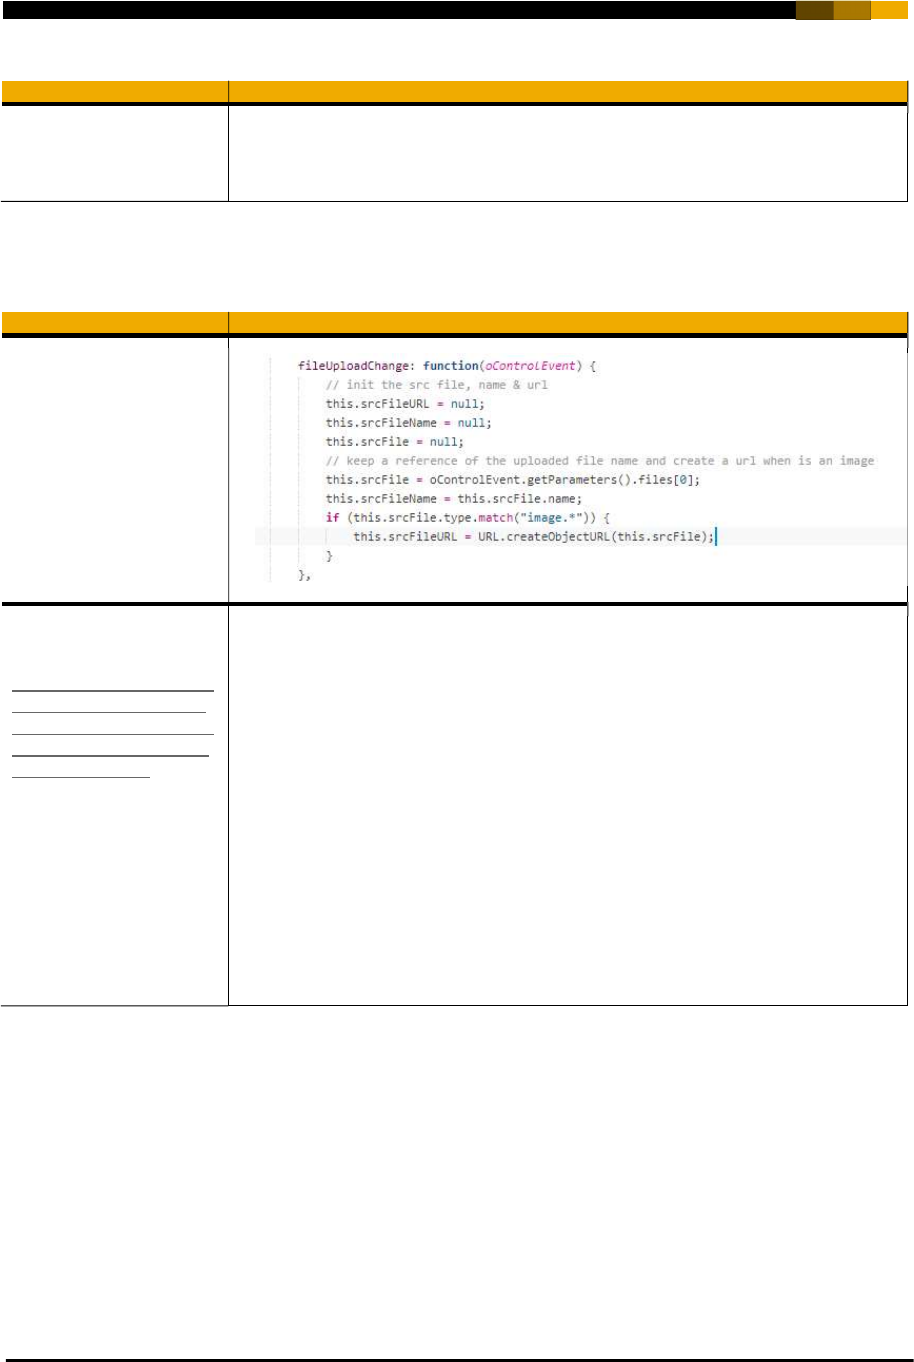
vi. Implement the Page1.controller.js.
Explanation Screenshot
Open the
Page1.controller.js file.
Implement the
fileUploadChange
function.
This function will be
called when a file has
been selected.
You can get the code
from the following link:
https://github.com/B1SA
/exercise_BuildToWebI
DECF/blob/master/extra
s/STEP%205/Page1.co
ntroller.js_ext.txt
fileUploadChange: function (oControlEvent) {
// init the src file, name & url
this.srcFileURL = null;
this.srcFileName = null;
this.srcFile = null;
// keep a reference of the uploaded file name and create a url out
of that when this is an image
this.srcFile = oControlEvent.getParameters().files[0];
this.srcFileName = this.srcFile.name;
if (this.srcFile.type.match("image.*")) {
this.srcFileURL = URL.createObjectURL(this.srcFile);
}
},
33
Explanation Screenshot
Now let’s implement the
fileUploadComplete
function.
This function will be called
after the fileUploader
uploadUrl ({demo>/url})
has been called and a
response returned.
You can get the code
from the following link:
https://github.com/B1SA/ex
ercise_BuildToWebIDECF/
blob/master/extras/STEP%
205/Page1.controller.js_ext
.txt
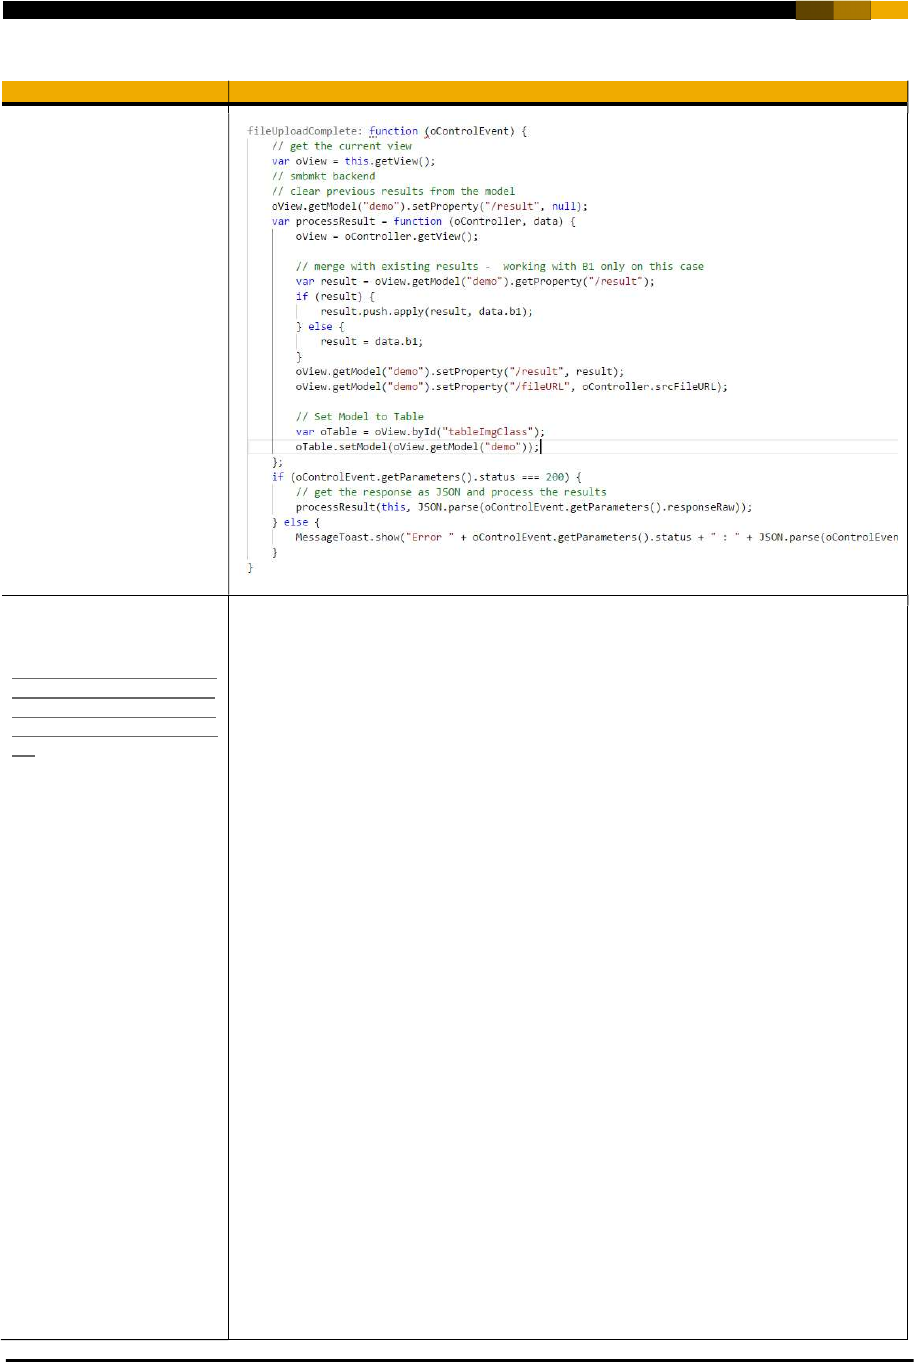
fileUploadComplete: function (oControlEvent) {
// get the current view
var oView = this.getView();
// smbmkt backend
// clear previous results from the model
oView.getModel("demo").setProperty("/result", null);
var processResult = function (oController, data) {
oView = oController.getView();
// merge with existing results - working with B1 only on this case
var result = oView.getModel("demo").getProperty("/result");
if (result) {
result.push.apply(result, data.b1);
} else {
result = data.b1;
}
oView.getModel("demo").setProperty("/result", result);
oView.getModel("demo").setProperty("/fileURL", oController.srcFileURL);
// Set Model to Table
var oTable = oView.byId("tableImgClass");
oTable.setModel(oView.getModel("demo"));
};
if (oControlEvent.getParameters().status === 200) {
// get the response as JSON and process the results
processResult(this, JSON.parse(oControlEvent.getParameters().responseRaw));
} else {
34
Explanation Screenshot
MessageToast.show("Error " + oControlEvent.getParameters().status + " : " +
JSON.parse(oControlEvent.getParameters().responseRaw).error_description);
}
}
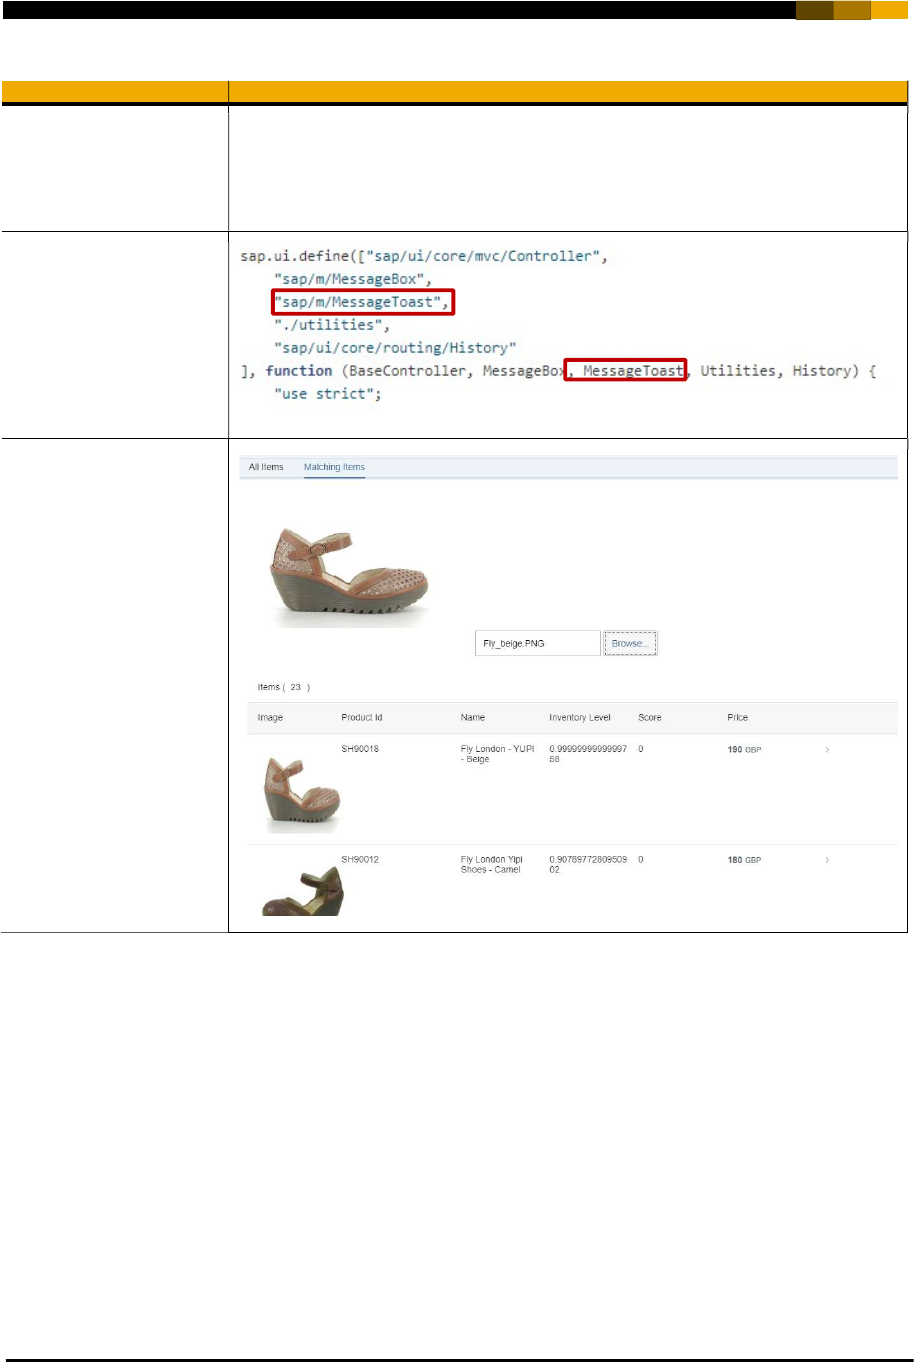
Add the MessageToast
definition at the beginning
of the file.
"sap/m/MessageToast",
, MessageToast
Now the code should be
complete.
Run your SAP Fiori
application to check all the
new features.
Press Browse and choose
an image containing a
shoe.
The SimilarItems backed
API is called and similar
items result shown in the
table.
35
STEP 6: ADD A NEW SERVICE TO THE NODEJS APPLICATION
Let’s add a new service to the NodeJS app that will create Sales Orders in the ERP system.
Explanation Screenshot
Go to the smbmkt folder
you deployed before in
Cloud Foundry.
Open the app.js file with
a Java Script editor
(Visual Studio Code is
an option).
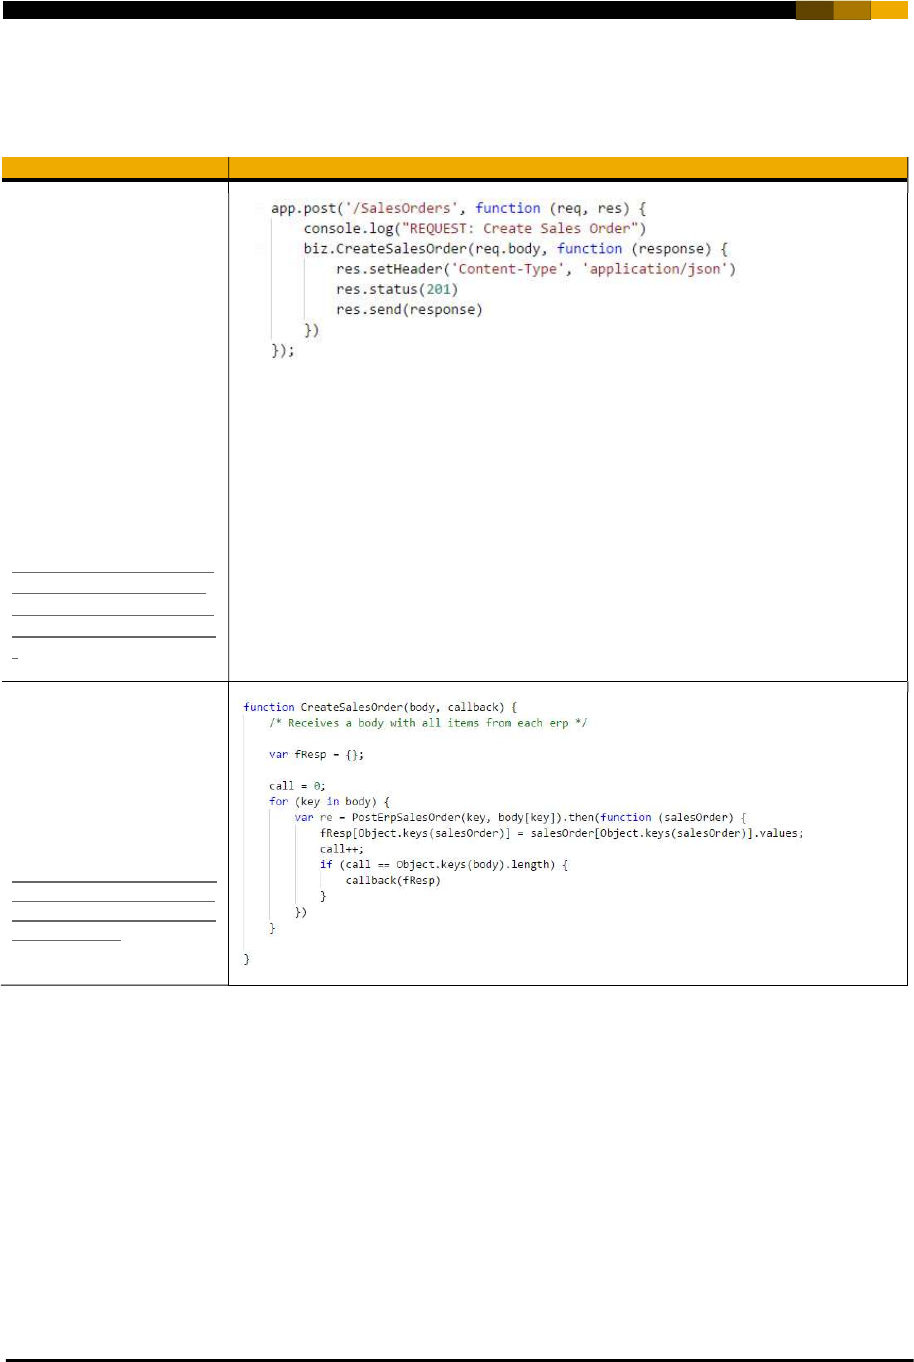
Add a post service
called /SalesOrders.
This service will call a
function in the biz
module.
You can get the code
from the following link:
https://github.com/B1SA
/exercise_BuildToWebI
DECF/blob/master/extra
s/STEP%206/app_ext.tx
t
Open the modules/biz.js
file.
Add a function called
CreateSalesOrder.
You can get the code
from the following link:
https://github.com/B1SA/ex
ercise_BuildToWebIDECF/
blob/master/extras/STEP%
206/biz_ext.txt
36
Explanation Screenshot
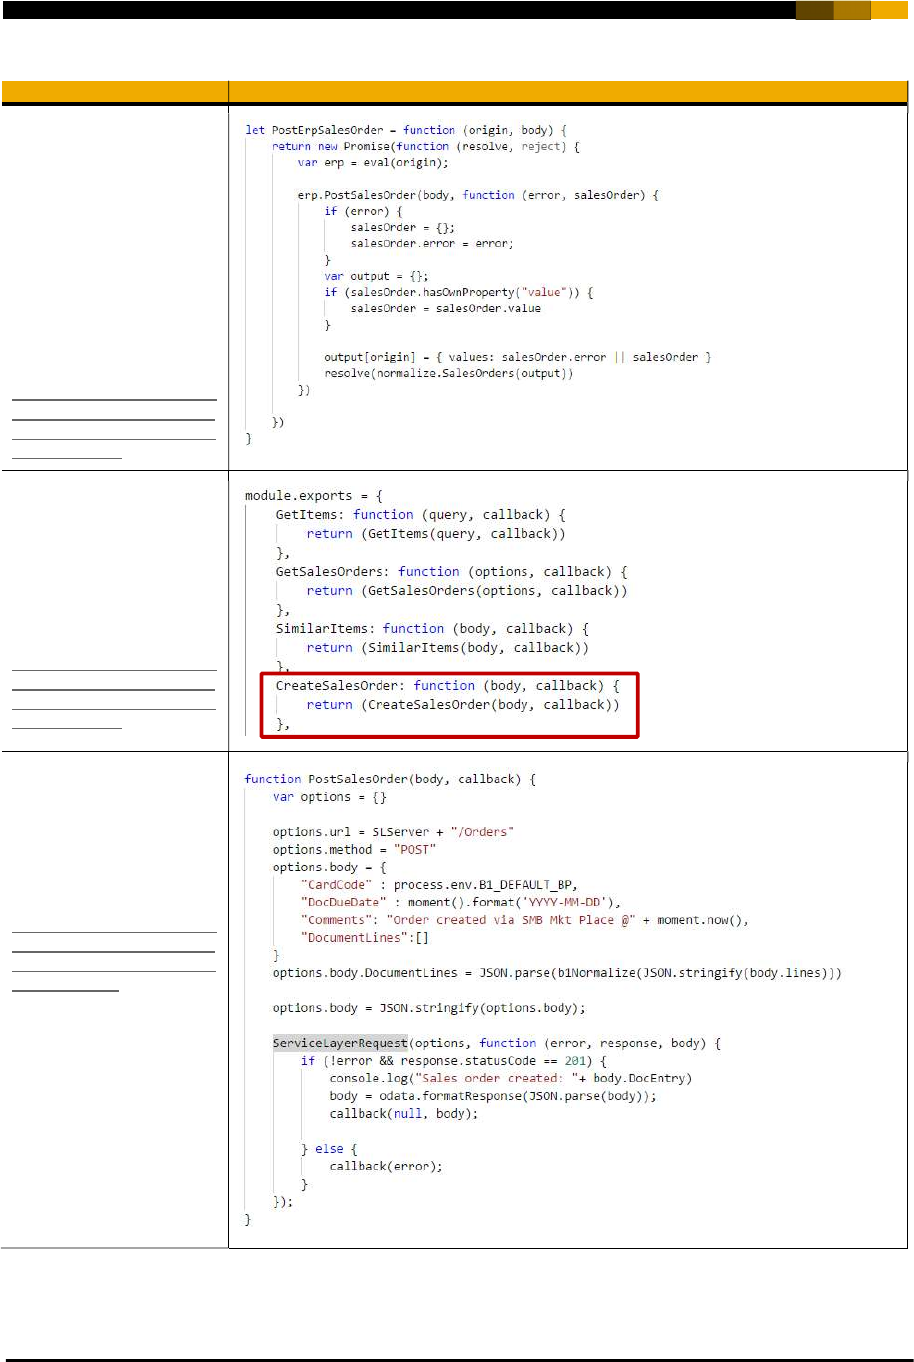
In the modules/biz.js file.
Add a function called
PostErpSalesOrder.
This function will create a
new sales order in the
corresponding erp module
(B1 or ByD) for each item
ordered.
You can get the code
from the following link:
https://github.com/B1SA/ex
ercise_BuildToWebIDECF/
blob/master/extras/STEP%
206/biz_ext.txt
In the modules/biz.js file.
Declare in module.exports
the CreateSalesOrder
function.
You can get the code
from the following link:
https://github.com/B1SA/ex
ercise_BuildToWebIDECF/
blob/master/extras/STEP%
206/biz_ext.txt
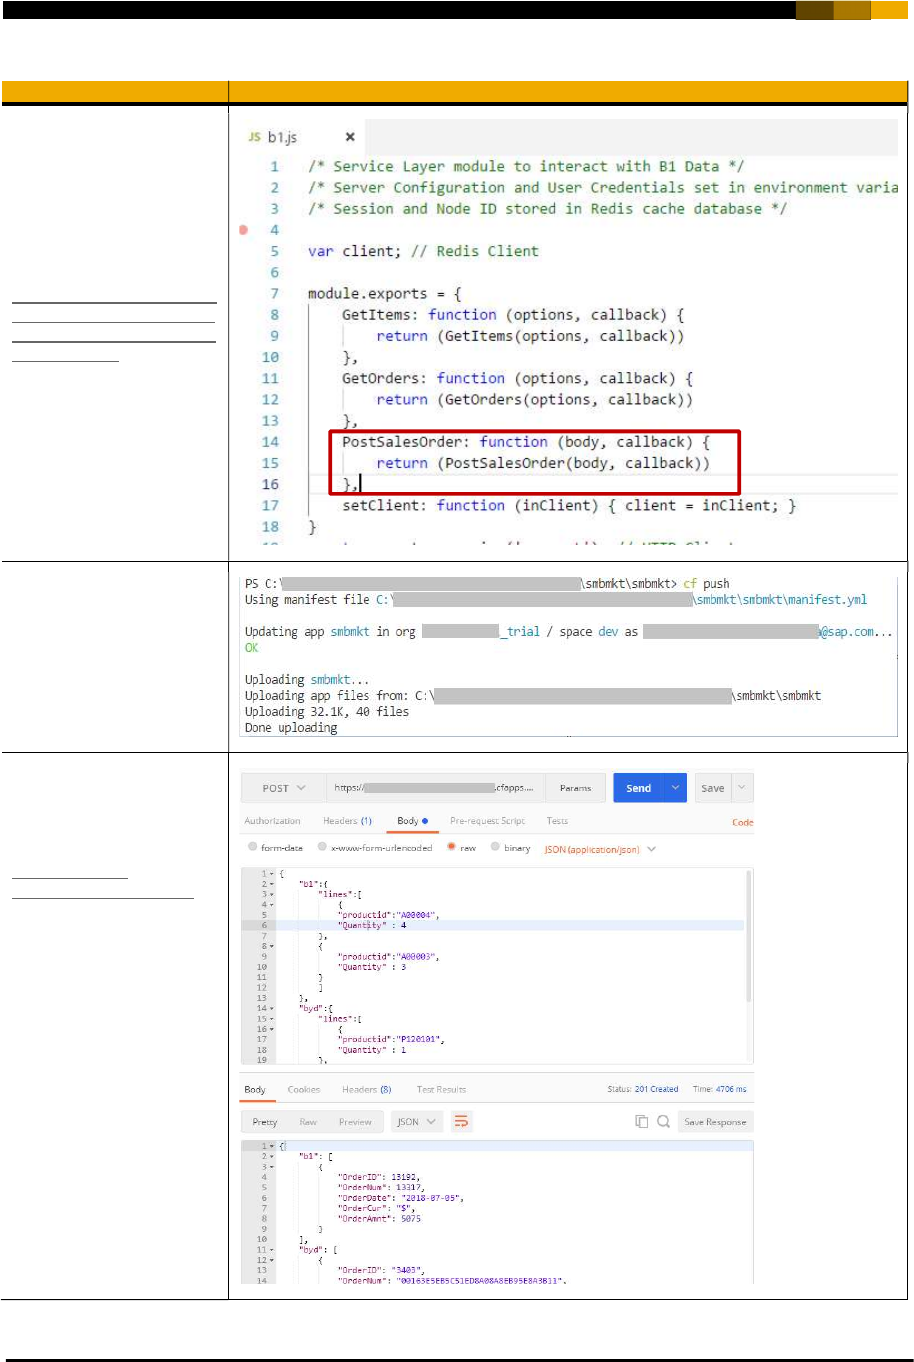
Open the erp/b1.js file.
Add a new function
PostSalesOrder.
You can get the code
from the following link:
https://github.com/B1SA/ex
ercise_BuildToWebIDECF/
blob/master/extras/STEP%
206/b1_ext.txt
37
Explanation Screenshot
In the erp/b1.js file.
Declare in module.exports
the PostSalesOrder
function.
You can get the code
from the following link:
https://github.com/B1SA/ex
ercise_BuildToWebIDECF/
blob/master/extras/STEP%
206/b1_ext.txt
Go to you cmd line
window.
Run the cf command
cf push
To upload the changes you
did to your app to Cloud
Foundry.
You can test now your new
service with Postman with
the url of your app as
follows:
https://smbmkt-
YOURAPP/SalesOrders
38
STEP 7: CALL THE NEW NODEJS SERVICE FROM YOUR SAP FIORI APP
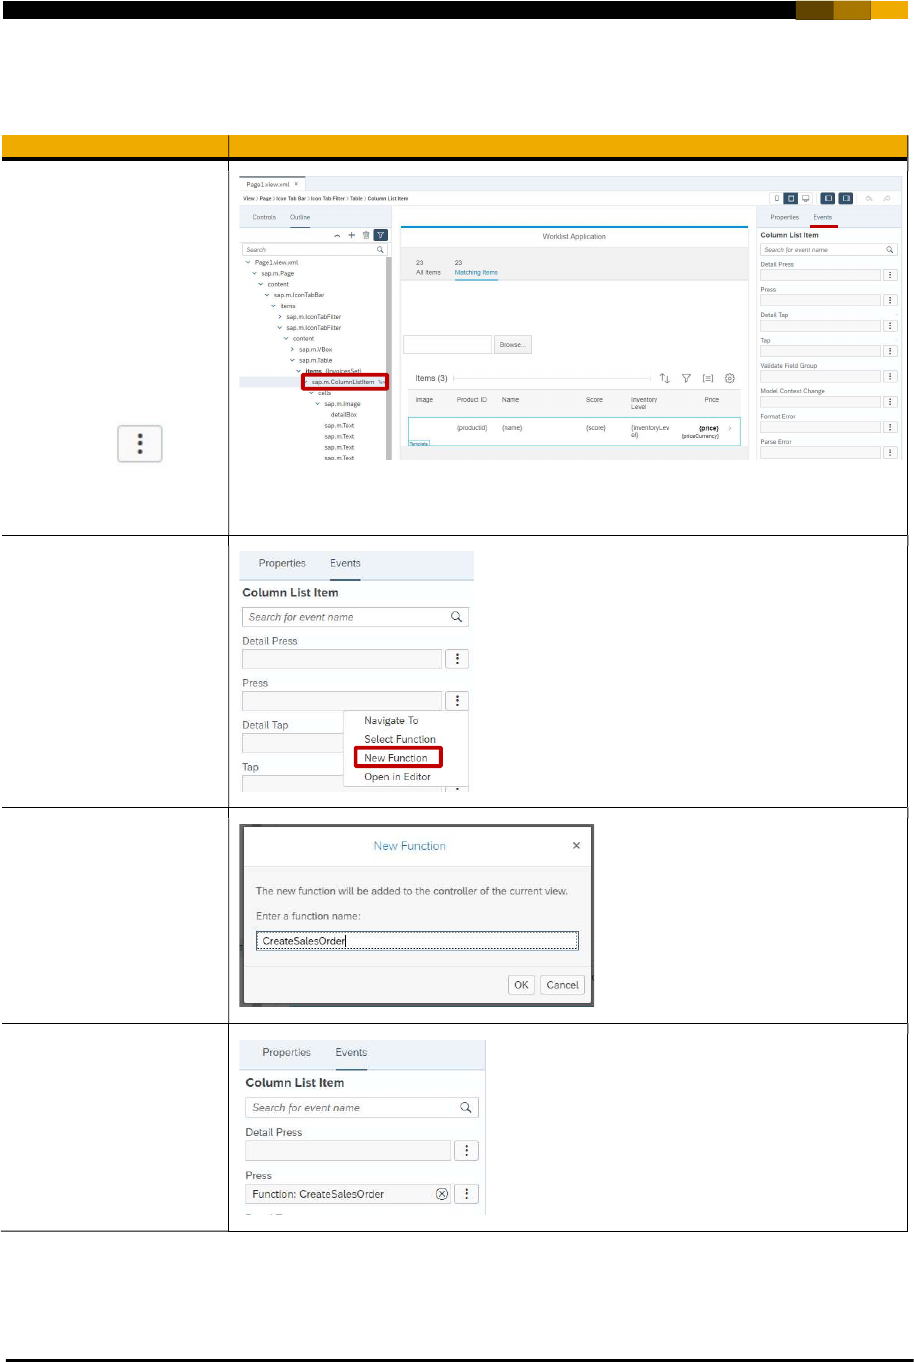
Explanation Screenshot
Open the
Page1.view.xml file
with the Layout Editor.
Open the Outline tab
and select
sap.m.ColumnsListIte
m control we worked on
previously.
Select the Events tab
(right side).
Click on the
button corresponding to
the Press event.
Choose the New Function
option.
Enter CreateSalesOrder
as function name.
Press OK.
The new function will be
indicated inside the Press
event.
39
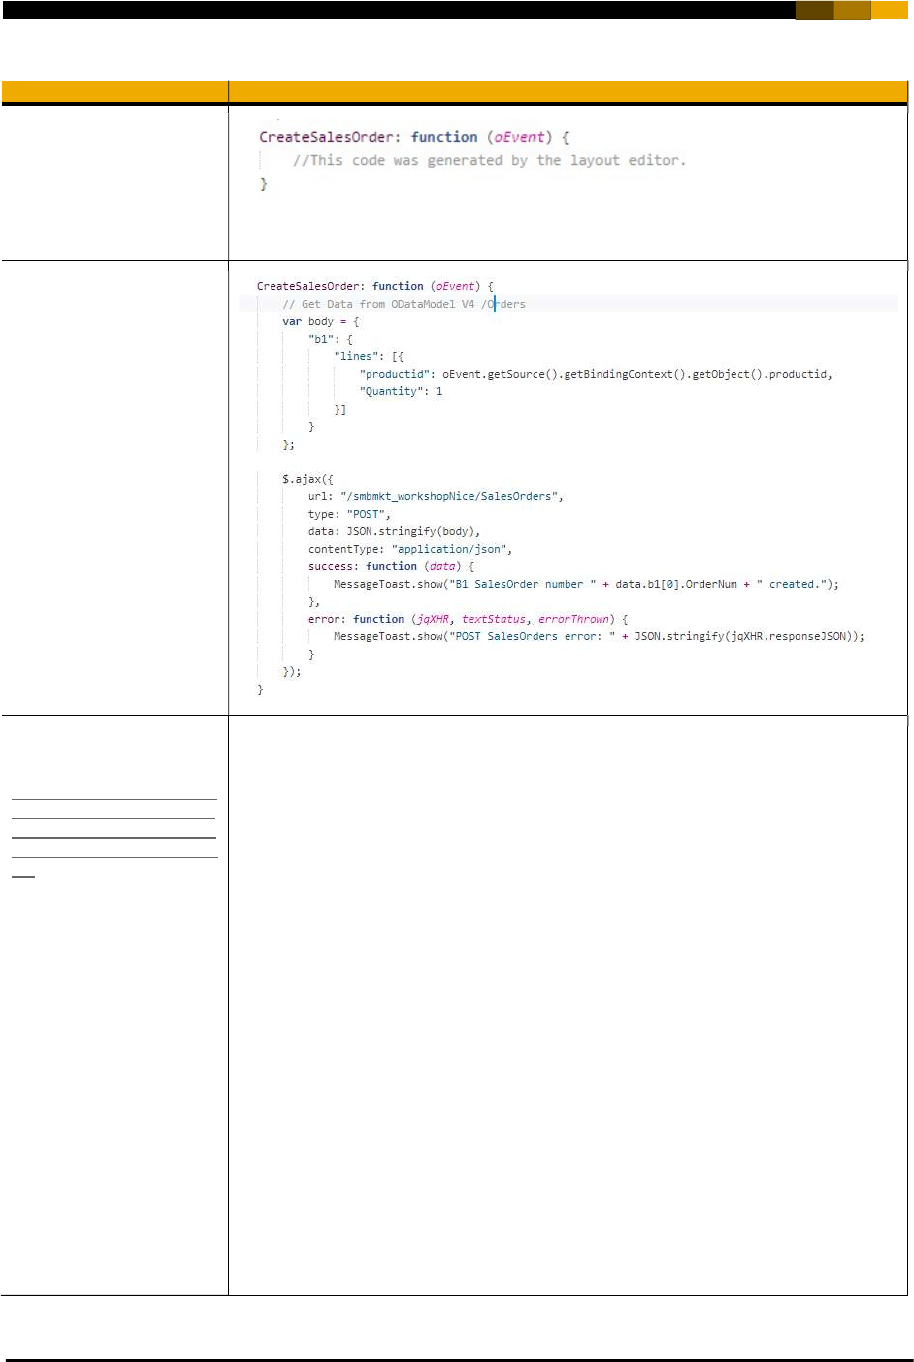
Explanation Screenshot
Open the
Page1.controller.js file.
A new empty function has
been automatically created
based on our last step.
Let’s implement this
function to call our smbmkt
backend nodejs
/SalesOrder service.
We use here the
destination pointing to our
smbmkt backend.
You can get the code
from the following link:
https://github.com/B1SA/ex
ercise_BuildToWebIDECF/
blob/master/extras/STEP%
207/Page1.controller.js_ext
.txt
Replace
smbmkt_destination with
your smbmkt destination
name.
CreateSalesOrder: function (oEvent) {
// Get Data from ODataModel V4 /Orders
var body = {
"b1": {
"lines": [{
"productid":
oEvent.getSource().getBindingContext().getObject().productid,
"Quantity": 1
}]
}
};
$.ajax({
url: "/smbmkt_destination/SalesOrders",
type: "POST",
data: JSON.stringify(body),
contentType: "application/json",
success: function (data) {
MessageToast.show("B1 SalesOrder number " +
data.b1[0].OrderNum + " created.");
},
error: function (jqXHR, textStatus, errorThrown) {
MessageToast.show("POST SalesOrders error: " +
JSON.stringify(jqXHR.responseJSON));
}
});
}
Congratulations! You have just implemented your first full stack loosely coupled extension!
www.sap.com/contactsap
© 2018 SAP SE or an SAP affiliate company. All rights reserved.
No part of this publication may be reproduced or transmitted in any form or for any purpose without the express permission of SAP SE or an SAP affiliate company.
The information contained herein may be changed without prior notice. Some software products marketed by SAP SE and its distributors contain proprietary software components of other software vendors.
National product specifications may vary.
These materials are provided by SAP SE or an SAP affiliate company for informational purposes only, without representation or warranty of any kind, and SAP or its affiliated companies shall not be liable
for errors or omissions with respect to the materials. The only warranties for SAP or SAP affiliate company products and services are those that are set forth in the express warranty statements
accompanying such products and services, if any. Nothing herein should be construed as constituting an additional warranty.
In particular, SAP SE or its affiliated companies have no obligation to pursue any course of business outlined in this document or any related presentation, or to develop or release any functionality
mentioned therein. This document, or any related presentation, and SAP SE’s or its affiliated companies’ strategy and possible future developments, products, and/or platform directions and functionality are
all subject to change and may be changed by SAP SE or its affiliated companies at any time for any reason without notice. The information in this document is not a commitment, promise, or legal obligation
to deliver any material, code, or functionality. All forward-looking statements are subject to various risks and uncertainties that could cause actual results to differ materially from expectations. Readers are
cautioned not to place undue reliance on these forward-looking statements, and they should not be relied upon in making purchasing decisions.
SAP and other SAP products and services mentioned herein as well as their respective logos are trademarks or registered trademarks of SAP SE (or an SAP affiliate company) in Germany and other
countries. All other product and service names mentioned are the trademarks of their respective companies. See http://www.sap.com/corporate-en/legal/copyright/index.epx for additional trademark
information and notices.
