AppleScript Hart Davis Beginners Guide
User Manual:
Open the PDF directly: View PDF ![]() .
.
Page Count: 449 [warning: Documents this large are best viewed by clicking the View PDF Link!]
- Contents
- Acknowledgement
- Introduction
- Part I: Getting Started with AppleScript
- 1 Grasping the Essentials of AppleScript
- 2 Up to Speed with AppleScript Editor
- 3 Creating Your First Script
- Opening AppleScript Editor
- Creating tell Statements
- Try This: Opening a Finder Window Showing the Documents Folder
- Saving a Script
- Try This: Saving Your Script
- Creating tell Blocks
- Try This: Using a tell Block
- Adding Comments to Your Code
- Try This: Commenting Out a Line
- Try This: Creating a Comment Block
- Recording Actions into a Script
- Try This: Recording Actions: Repositioning and Resizing the Finder Window
- Examining the Recorded Code
- Try This: Editing the Script
- Dealing with Errors
- Try This: Resolving an Error in Your Code
- Wrapping a Line of Code
- Try This: Breaking Lines of Code Manually
- Opening a Dictionary File
- Try This: Opening the Dictionary File for TextEdit
- Finding the Terms You Need
- Try This: Using the Dictionary File
- Turning a Script into an Application
- Try This: Making an Application from Your Script and Adding It to the Dock
- Part II: Learning Essential AppleScript Programming Techniques
- 4 Working with Variables, Classes, Operators, and Coercions
- 5 Working with Text, Numbers, and Dates
- 6 Working with the Finder, Files, and Folders
- Working with Finder Windows
- Try This: Using Special Folders
- Try This: Using Nested References, Path References, and Alias References
- Try This: Opening, Configuring, and Closing Finder Windows
- Working with Folders
- Try This: Creating, Renaming, and Moving a Folder
- Working with Files
- Renaming a File
- Try This: Creating a File and Opening It
- Mounting and Unmounting Volumes
- 7 Making Decisions in Your Scripts
- Checking a Single Condition with an if… then Statement
- Try This: Using an if… then Statement to Launch an Application If It’s Not Running
- Deciding Between Two Courses of Action with an if… then… else Statement
- Try This: Using an if… then… else Statement
- Choose Among Multiple Courses of Action with an if… then… else if… else Statement
- Try This: Using an if… then… else if… else Statement
- 8 Using Dialog Boxes to Get User Input
- Using Dialog Boxes
- Try This: Adding a Custom Dialog Box to the Set Up Finder and TextEdit Script
- Try This: Returning Text from a Text-Entry Field
- Using Alerts
- Try This: Creating an Alert
- Choosing the Name Under Which to Save a File
- Letting the User Choose from a List of Items
- Try This: Creating a Choose From List Dialog Box
- Letting the User Choose Files, Folders, Applications, and URLs
- Try This: Letting the User Choose a File
- Try This: Using the Choose Application Dialog Box to Open a Document in a Particular Application
- 9 Repeating Actions in Your Scripts
- Getting an Overview of the Types of Loops That AppleScript Provides
- Understanding What Hard-Coding Is and When to Use It
- Repeating Actions Until a Termination Condition Becomes True
- Try This: Using a repeat Loop to Close All Open Finder Windows Except One
- Repeating Actions a Set Number of Times
- Try This: Using a repeat… times Loop Controlled by a Dialog Box
- Repeating Actions Using a Loop Controlled by a Loop Variable
- Try This: Using a Loop Controlled by a Loop Variable
- Repeating Actions for Each Item in a List
- Try This: Using a repeat with list Command to Close Some Finder Windows
- Repeating Actions as Long as a Condition Remains True
- Try This: Using a repeat while Loop
- Repeating Actions Until a Condition Becomes True
- Try This: Using a repeat until Loop
- 10 Debugging and Handling Errors
- Understanding What Happens When an Error Occurs
- Try This: Causing Errors Deliberately
- Suppressing an Error with a Try Block
- Try This: Adding a Try Block to a Script
- Creating an Error Handler
- Try This: Building an Error Handler
- Finding Out Which Errors You Need
- Making Your Scripts Resistant to Errors
- Try This: Creating a Subroutine
- 11 Running Scripts Automatically
- Running a Script Automatically Using a Droplet
- Try This: Creating and Running a Droplet
- Running a Script Automatically with a Folder Action
- Try This: Creating and Using a Folder Action Script
- Running a Script at Login
- Running a Script Repeatedly at Intervals
- Try This: Creating an Application That Uses an Idle Handler
- Running a Script Automatically at Specific Times
- Part III: Automating Major Applications with AppleScript
- 12 Automating iTunes and iPhoto
- 13 Automating Apple Mail
- 14 Automating Microsoft Word
- Launching Word—and Quitting Word
- Understanding the Key Word Objects for AppleScript
- Working with Documents
- Try This: Creating, Saving, and Closing a Document
- Working with Windows and Views
- Working with Text
- Try This: Entering and Formatting Text in a Document
- Using Sections, Page Setup, and Headers and Footers
- Displaying Word’s Built-in Dialog Boxes
- Try This: Adding a Header, Adjusting Margins, and Displaying a Dialog Box
- Running Your Scripts from Word
- 15 Automating Microsoft Excel
- Understanding Excel’s Main Objects
- Launching and Quitting Excel
- Working with Workbooks
- Protecting a Workbook Against Changes
- Try This: Creating, Saving, and Closing a Workbook
- Working with Worksheets and Other Sheets
- Try This: Opening a Workbook and Adding a Worksheet to It
- Creating and Using Ranges of Cells
- Try This: Adding Data to a Workbook
- Using Charts in Your Workbooks
- Try This: Creating a Chart
- Using Find and Replace in Your Scripts
- 16 Automating Microsoft Entourage
- Index
AppleScript:
A Beginner’s Guide
About the Author
Guy Hart-Davis is the author of Mac OS X Leopard
QuickSteps, How to Do Everything: iPod, iPhone, & iTunes,
HTML, XHTML & CSS QuickSteps, and several other equally
fine computer books.
About the Technical Editor
Greg Kettell is a Windows programmer by day, but by night
loves his Mac. Greg has served as an author, contributing
author, and/or technical editor for an ever-increasing number
of technical books.

AppleScript:
A Beginner’s Guide
Guy Hart-Davis
New York Chicago San Francisco
Lisbon London Madrid Mexico City
Milan New Delhi San Juan
Seoul Singapore Sydney Toronto

Copyright © 2010 by The McGraw-Hill Companies. All rights reserved. Except as permitted under the United States Copyright Act of 1976, no
part of this publication may be reproduced or distributed in any form or by any means, or stored in a database or retrieval system, without the prior
written permission of the publisher.
ISBN: 978-0-07-163955-2
MHID: 0-07-163955-1
The material in this eBook also appears in the print version of this title: ISBN: 978-0-07-163954-5, MHID: 0-07-163954-3.
All trademarks are trademarks of their respective owners. Rather than put a trademark symbol after every occurrence of a trademarked name, we
use names in an editorial fashion only, and to the benefit of the trademark owner, with no intention of infringement of the trademark. Where such
designations appear in this book, they have been printed with initial caps.
McGraw-Hill eBooks are available at special quantity discounts to use as premiums and sales promotions, or for use in corporate training
programs. To contact a representative please e-mail us at bulksales@mcgraw-hill.com.
Information has been obtained by McGraw-Hill from sources believed to be reliable. However, because of the possibility of human or
mechanical error by our sources, McGraw-Hill, or others, McGraw-Hill does not guarantee the accuracy, adequacy, or completeness of any
information and is not responsible for any errors or omissions or the results obtained from the use of such information.
TERMS OF USE
This is a copyrighted work and The McGraw-Hill Companies, Inc. (“McGraw-Hill”) and its licensors reserve all rights in and to the work. Use of
this work is subject to these terms. Except as permitted under the Copyright Act of 1976 and the right to store and retrieve one copy of the work,
you may not decompile, disassemble, reverse engineer, reproduce, modify, create derivative works based upon, transmit, distribute, disseminate,
sell, publish or sublicense the work or any part of it without McGraw-Hill’s prior consent. You may use the work for your own noncommercial
and personal use; any other use of the work is strictly prohibited. Your right to use the work may be terminated if you fail to comply with these
terms.
THE WORK IS PROVIDED “AS IS.” McGRAW-HILL AND ITS LICENSORS MAKE NO GUARANTEES OR WARRANTIES AS TO THE
ACCURACY, ADEQUACY OR COMPLETENESS OF OR RESULTS TO BE OBTAINED FROM USING THE WORK, INCLUDING ANY
INFORMATION THAT CAN BE ACCESSED THROUGH THE WORK VIA HYPERLINK OR OTHERWISE, AND EXPRESSLY DISCLAIM
ANY WARRANTY, EXPRESS OR IMPLIED, INCLUDING BUT NOT LIMITED TO IMPLIED WARRANTIES OF MERCHANTABILITY
OR FITNESS FOR A PARTICULAR PURPOSE. McGraw-Hill and its licensors do not warrant or guarantee that the functions contained in the
work will meet your requirements or that its operation will be uninterrupted or error free. Neither McGraw-Hill nor its licensors shall be liable to
you or anyone else for any inaccuracy, error or omission, regardless of cause, in the work or for any damages resulting therefrom. McGraw-Hill
has no responsibility for the content of any information accessed through the work. Under no circumstances shall McGraw-Hill and/or its
licensors be liable for any indirect, incidental, special, punitive, consequential or similar damages that result from the use of or inability to use the
work, even if any of them has been advised of the possibility of such damages. This limitation of liability shall apply to any claim or cause
whatsoever whether such claim or cause arises in contract, tort or otherwise.
This book is dedicated to Teddy,
who helped develop some of the sample scripts.
This page intentionally left blank
vii
Contents at a Glance
1 Grasping the Essentials of AppleScript . . . . . . . . . . . . . . . . . . . . . . . . . . . . . . . . . . . 3
2 Up to Speed with AppleScript Editor . . . . . . . . . . . . . . . . . . . . . . . . . . . . . . . . . . . . . 11
3 Creating Your First Script ................................................ 27
4 Working with Variables, Classes, Operators, and Coercions . . . . . . . . . . . . . 61
5 Working with Text, Numbers, and Dates . . . . . . . . . . . . . . . . . . . . . . . . . . . . . . . . . . 81
6 Working with the Finder, Files, and Folders . . . . . . . . . . . . . . . . . . . . . . . . . . . . . . 101
7 Making Decisions in Your Scripts ......................................... 129
8 Using Dialog Boxes to Get User Input . . . . . . . . . . . . . . . . . . . . . . . . . . . . . . . . . . . . . 137
9 Repeating Actions in Your Scripts . . . . . . . . . . . . . . . . . . . . . . . . . . . . . . . . . . . . . . . . . 179
10 Debugging and Handling Errors .......................................... 195

viii AppleScript: A Beginner’s Guide
11 Running Scripts Automatically ............................................ 219
12 Automating iTunes and iPhoto ............................................ 249
13 Automating Apple Mail ................................................... 271
14 Automating Microsoft Word .............................................. 291
15 Automating Microsoft Excel .............................................. 337
16 Automating Microsoft Entourage ......................................... 377
Index ...................................................................... 411
ix
Contents
ACKNOWLEDGMENTS ........................................................... xix
INTRODUCTION .................................................................. xxi
PART I Getting Started with AppleScript
1 Grasping the Essentials of AppleScript . . . . . . . . . . . . . . . . . . . . . . . . . . . . . . . . . . . 3
Knowing What AppleScript Is and What You Can Do with It . . . . . . . . . . . . . . . . . . . . . . . . 4
What You Can Do with Scripts ................................................ 4
Why AppleScript Is Easy to Learn ............................................. 5
Understanding What Scripts Are .................................................... 5
What a Script Is ............................................................... 5
Where Scripts Are Stored ..................................................... 5
How You Create Scripts ....................................................... 6
How You Run Scripts ......................................................... 6
Understanding Objects, Keywords, Commands, and Properties . . . . . . . . . . . . . . . . . . . . . . 7
What Objects Are ............................................................. 7
What Keywords Are .......................................................... 7
What Commands Are ......................................................... 8
What Properties and Values Are ............................................... 9

x AppleScript: A Beginner’s Guide
2 Up to Speed with AppleScript Editor . . . . . . . . . . . . . . . . . . . . . . . . . . . . . . . . . . . . . 11
Launching AppleScript Editor ...................................................... 12
Meeting the AppleScript Editor Window ............................................ 13
Setting Up AppleScript Editor for Working Comfortably . . . . . . . . . . . . . . . . . . . . . . . . . . . . . 16
Choosing General Preferences ................................................. 16
Choosing Editing Preferences ................................................. 18
Choosing Formatting Preferences ............................................. 20
Choosing History Preferences ................................................. 22
Choosing Plug-ins Preferences ................................................ 23
Putting the Script Menu on the Menu Bar in Leopard . . . . . . . . . . . . . . . . . . . . . . . . . . . . . . . . 23
Running a Script from the Script Menu .............................................. 25
3 Creating Your First Script ................................................ 27
Opening AppleScript Editor ......................................................... 28
Creating tell Statements ............................................................ 29
Try This: Opening a Finder Window Showing the Documents Folder . . . . . . . . . . . . . . . . 30
Saving a Script ..................................................................... 31
Try This: Saving Your Script ........................................................ 31
Creating tell Blocks ................................................................. 32
Creating a tell Block Manually ................................................ 32
Try This: Using a tell Block ......................................................... 32
Using the Tell Application Pop-Up Menu . . . . . . . . . . . . . . . . . . . . . . . . . . . . . . . . . . . . . 33
Adding Comments to Your Code .................................................... 34
Creating End-of-Line Comments .............................................. 35
Try This: Commenting Out a Line .................................................. 36
Creating Block Comments .................................................... 36
Try This: Creating a Comment Block ............................................... 37
Recording Actions into a Script ..................................................... 37
Try This: Recording Actions: Repositioning and Resizing the Finder Window . . . . . . . 38
Examining the Recorded Code ..................................................... 39
Activating an Application ..................................................... 39
Selecting the Finder Window ................................................. 39
Setting the Position of the Window ............................................ 39
Resizing the Window ......................................................... 40
Changing the View ........................................................... 41
Try This: Editing the Script ......................................................... 41
Dealing with Errors ................................................................. 43
Try This: Resolving an Error in Your Code . . . . . . . . . . . . . . . . . . . . . . . . . . . . . . . . . . . . . . . . . . 43
Wrapping a Line of Code ........................................................... 44
Try This: Breaking Lines of Code Manually . . . . . . . . . . . . . . . . . . . . . . . . . . . . . . . . . . . . . . . . . 45
Opening a Dictionary File .......................................................... 46
Try This: Opening the Dictionary File for TextEdit . . . . . . . . . . . . . . . . . . . . . . . . . . . . . . . . . . 46

Contents xi
Finding the Terms You Need ........................................................ 48
Try This: Using the Dictionary File ................................................. 48
Turning a Script into an Application ................................................ 55
Try This: Making an Application from Your Script and Adding It to the Dock . . . . . . . . 56
PART II Learning Essential AppleScript Programming Techniques
4 Working with Variables, Classes, Operators, and Coercions . . . . . . . . . . . . . 61
Working with Variables ............................................................. 62
Understanding the Seven Data Types ......................................... 62
Creating a Variable ........................................................... 63
Understanding the Scope and Persistence of Variables . . . . . . . . . . . . . . . . . . . . . . . . . 67
Try This: Using a Global Variable ................................................... 69
Using Script Properties to Store Data Permanently in the Script . . . . . . . . . . . . . . . . . . . . . 71
Try This: Using a Script Property ................................................... 73
Performing Operations with Operators .............................................. 74
Understanding Classes .............................................................. 77
Converting Data with Coercions .................................................... 78
Try This: Creating a Variable and Applying a Coercion . . . . . . . . . . . . . . . . . . . . . . . . . . . . . . 80
5 Working with Text, Numbers, and Dates . . . . . . . . . . . . . . . . . . . . . . . . . . . . . . . . . . 81
Working with Text .................................................................. 82
Entering Normal Text in a Text Object . . . . . . . . . . . . . . . . . . . . . . . . . . . . . . . . . . . . . . . . 82
Joining Two or More Strings of Text .......................................... 83
Adding Spaces, Tabs, Line Feeds, and Returns . . . . . . . . . . . . . . . . . . . . . . . . . . . . . . . . 83
Using Backslash and Double-Quote Characters . . . . . . . . . . . . . . . . . . . . . . . . . . . . . . . 85
Returning Parts of a Text Object .............................................. 86
Trimming a String ............................................................ 88
Finding a String Within Another String . . . . . . . . . . . . . . . . . . . . . . . . . . . . . . . . . . . . . . . . 88
Finding Out Whether One Text Object Contains Another Text Object . . . . . . . . . . 89
Choosing What to Ignore When Comparing Text . . . . . . . . . . . . . . . . . . . . . . . . . . . . . . 90
Transferring Text from One Application to Another . . . . . . . . . . . . . . . . . . . . . . . . . . . 91
Try This: Using the Clipboard ...................................................... 92
Working with Numbers ............................................................. 93
Performing Arithmetic with Numbers ......................................... 93
Coercing Numbers to Other Data Types . . . . . . . . . . . . . . . . . . . . . . . . . . . . . . . . . . . . . . . 93
Coercing Other Data Types to Numbers . . . . . . . . . . . . . . . . . . . . . . . . . . . . . . . . . . . . . . . 94
Working with Dates ................................................................. 94
Understanding How AppleScript Handles Dates . . . . . . . . . . . . . . . . . . . . . . . . . . . . . . . 94
Working with the month Property of the Date Object . . . . . . . . . . . . . . . . . . . . . . . . . . 96
Working with the weekday Property of the Date Object . . . . . . . . . . . . . . . . . . . . . . . 97
Coercing a Date Object to a String ............................................ 97
Changing a Date .............................................................. 97

xii AppleScript: A Beginner’s Guide
Calculating Hours, Minutes, Days, and Weeks . . . . . . . . . . . . . . . . . . . . . . . . . . . . . . . . 98
Finding Out How Far Off GMT Your Mac Is . . . . . . . . . . . . . . . . . . . . . . . . . . . . . . . . . . 98
Comparing Dates and Times .................................................. 98
Try This: Working with Dates and Times ............................................ 99
6 Working with the Finder, Files, and Folders . . . . . . . . . . . . . . . . . . . . . . . . . . . . . . 101
Working with Finder Windows ...................................................... 102
Referring to the Objects You Need ............................................ 102
Try This: Using Special Folders ..................................................... 107
Opening a Finder Window ................................................... 110
Try This: Using Nested References, Path References, and Alias References . . . . . . . . . . 110
Changing the View in a Finder Window . . . . . . . . . . . . . . . . . . . . . . . . . . . . . . . . . . . . . . . 111
Changing the Position of a Finder Window . . . . . . . . . . . . . . . . . . . . . . . . . . . . . . . . . . . . 112
Changing the Size of a Finder Window . . . . . . . . . . . . . . . . . . . . . . . . . . . . . . . . . . . . . . . . 113
Minimizing and Restoring a Finder Window . . . . . . . . . . . . . . . . . . . . . . . . . . . . . . . . . . 113
Changing the Width of the Sidebar ............................................ 113
Showing and Hiding the Toolbar .............................................. 114
Hiding All Finder Windows ................................................... 115
Closing Finder Windows ...................................................... 115
Try This: Opening, Configuring, and Closing Finder Windows . . . . . . . . . . . . . . . . . . . . . . 116
Working with Folders ............................................................... 117
Creating a Folder ............................................................. 118
Copying a Folder ............................................................. 119
Duplicating a Folder .......................................................... 119
Renaming a Folder ........................................................... 119
Moving a Folder .............................................................. 119
Deleting a Folder ............................................................. 120
Try This: Creating, Renaming, and Moving a Folder . . . . . . . . . . . . . . . . . . . . . . . . . . . . . . . . 120
Working with Files ................................................................. 121
Creating Files from the Finder ................................................ 121
Copying a File ................................................................ 123
Duplicating a File ............................................................. 123
Deleting a File ............................................................... 124
Renaming a File ................................................................... 124
Moving a File ................................................................ 124
Try This: Creating a File and Opening It . . . . . . . . . . . . . . . . . . . . . . . . . . . . . . . . . . . . . . . . . . . . 125
Mounting and Unmounting Volumes ................................................ 125
Mounting a Volume ........................................................... 126
Unmounting a Volume ........................................................ 128
7 Making Decisions in Your Scripts ......................................... 129
Checking a Single Condition with an if… then Statement . . . . . . . . . . . . . . . . . . . . . . . . . . . 131
Try This: Using an if… then Statement to Launch
an Application If It’s Not Running ............................................... 131

Contents xiii
Deciding Between Two Courses of Action with an if… then… else Statement . . . . . . . 132
Try This: Using an if… then… else Statement . . . . . . . . . . . . . . . . . . . . . . . . . . . . . . . . . . . . . . . 133
Choose Among Multiple Courses of Action with
an if… then… else if… else Statement ........................................... 134
Try This: Using an if… then… else if… else Statement . . . . . . . . . . . . . . . . . . . . . . . . . . . . . 135
8 Using Dialog Boxes to Get User Input . . . . . . . . . . . . . . . . . . . . . . . . . . . . . . . . . . . . . 137
Using Dialog Boxes ................................................................ 138
Displaying Multiple Paragraphs of Text in a Dialog Box . . . . . . . . . . . . . . . . . . . . . . 139
Adding a Title to a Dialog Box ................................................ 140
Choosing the Buttons Displayed in the Dialog Box . . . . . . . . . . . . . . . . . . . . . . . . . . . . 141
Setting a Default Button in a Dialog Box . . . . . . . . . . . . . . . . . . . . . . . . . . . . . . . . . . . . . . 142
Creating a Cancel Button That’s Not Called “Cancel” . . . . . . . . . . . . . . . . . . . . . . . . . 143
Seeing Which Button the User Clicked in a Dialog Box . . . . . . . . . . . . . . . . . . . . . . . 144
Adding an Icon to a Dialog Box ............................................... 145
Try This: Adding a Custom Dialog Box to the Set Up Finder and TextEdit Script . . . . 147
Creating a Dialog Box That Closes Itself . . . . . . . . . . . . . . . . . . . . . . . . . . . . . . . . . . . . . . 149
Getting Text Input from the User .............................................. 149
Try This: Returning Text from a Text-Entry Field . . . . . . . . . . . . . . . . . . . . . . . . . . . . . . . . . . . 150
Using Alerts ........................................................................ 151
Understanding How Alerts Differ from Standard Dialog Boxes . . . . . . . . . . . . . . . . 151
Choosing the Icon for an Alert ................................................ 152
Try This: Creating an Alert .......................................................... 153
Choosing the Name Under Which to Save a File . . . . . . . . . . . . . . . . . . . . . . . . . . . . . . . . . . . . 154
Adding a Custom Prompt to the Choose File Name Dialog Box . . . . . . . . . . . . . . . 154
Setting a Default Location and Filename . . . . . . . . . . . . . . . . . . . . . . . . . . . . . . . . . . . . . 155
Letting the User Choose from a List of Items . . . . . . . . . . . . . . . . . . . . . . . . . . . . . . . . . . . . . . . . 156
Creating the List of Items ..................................................... 156
Seeing Which Item the User Chose ........................................... 156
Adding a Title and Custom Prompt to the Choose From List Dialog Box . . . . . . 157
Changing the Buttons on the Choose From List Dialog Box . . . . . . . . . . . . . . . . . . . 158
Choosing One or More Default Items ......................................... 158
Letting the User Select Multiple Items or No Items . . . . . . . . . . . . . . . . . . . . . . . . . . . . 159
Try This: Creating a Choose From List Dialog Box . . . . . . . . . . . . . . . . . . . . . . . . . . . . . . . . . . 160
Letting the User Choose Files, Folders, Applications, and URLs . . . . . . . . . . . . . . . . . . . . . 161
Letting the User Choose a File ................................................ 162
Try This: Letting the User Choose a File . . . . . . . . . . . . . . . . . . . . . . . . . . . . . . . . . . . . . . . . . . . . 169
Letting the User Choose a Folder ............................................. 170
Letting the User Choose an Application . . . . . . . . . . . . . . . . . . . . . . . . . . . . . . . . . . . . . . . 172
Try This: Using the Choose Application Dialog Box
to Open a Document in a Particular Application . . . . . . . . . . . . . . . . . . . . . . . . . . . . . . . . . . 174
Letting the User Choose a URL ............................................... 175

xiv AppleScript: A Beginner’s Guide
9 Repeating Actions in Your Scripts . . . . . . . . . . . . . . . . . . . . . . . . . . . . . . . . . . . . . . . . . 179
Getting an Overview of the Types of Loops That AppleScript Provides . . . . . . . . . . . . . . 180
Understanding What Hard-Coding Is and When to Use It . . . . . . . . . . . . . . . . . . . . . . . . . . . . 181
Repeating Actions Until a Termination Condition Becomes True . . . . . . . . . . . . . . . . . . . . 181
Try This: Using a repeat Loop to Close All Open Finder Windows Except One . . . . . . 183
Repeating Actions a Set Number of Times . . . . . . . . . . . . . . . . . . . . . . . . . . . . . . . . . . . . . . . . . . 184
Try This: Using a repeat… times Loop Controlled by a Dialog Box . . . . . . . . . . . . . . . . . 185
Repeating Actions Using a Loop Controlled by a Loop Variable . . . . . . . . . . . . . . . . . . . . . 186
Try This: Using a Loop Controlled by a Loop Variable . . . . . . . . . . . . . . . . . . . . . . . . . . . . . . 188
Repeating Actions for Each Item in a List . . . . . . . . . . . . . . . . . . . . . . . . . . . . . . . . . . . . . . . . . . . 189
Try This: Using a repeat with list Command to Close Some Finder Windows . . . . . . . . 189
Repeating Actions as Long as a Condition Remains True . . . . . . . . . . . . . . . . . . . . . . . . . . . . 190
Try This: Using a repeat while Loop ................................................ 191
Repeating Actions Until a Condition Becomes True . . . . . . . . . . . . . . . . . . . . . . . . . . . . . . . . . 192
Try This: Using a repeat until Loop ................................................. 193
10 Debugging and Handling Errors .......................................... 195
Understanding What Happens When an Error Occurs . . . . . . . . . . . . . . . . . . . . . . . . . . . . . . . 196
Try This: Causing Errors Deliberately ............................................... 197
Suppressing an Error with a Try Block .............................................. 198
Try This: Adding a Try Block to a Script . . . . . . . . . . . . . . . . . . . . . . . . . . . . . . . . . . . . . . . . . . . . 199
Creating an Error Handler .......................................................... 201
Understanding the Basics of Error Handlers . . . . . . . . . . . . . . . . . . . . . . . . . . . . . . . . . . . 201
Returning the Error Number and Error Message . . . . . . . . . . . . . . . . . . . . . . . . . . . . . . . 201
Dealing with the Error ........................................................ 202
Try This: Building an Error Handler ................................................ 204
Finding Out Which Errors You Need ................................................ 204
Handling a Cancel Button in a Dialog Box . . . . . . . . . . . . . . . . . . . . . . . . . . . . . . . . . . . . 205
Identifying Errors by Running a Script . . . . . . . . . . . . . . . . . . . . . . . . . . . . . . . . . . . . . . . . 205
Looking Up Errors in the Application’s Documentation . . . . . . . . . . . . . . . . . . . . . . . 206
Creating Your Own Errors .................................................... 206
Making Your Scripts Resistant to Errors . . . . . . . . . . . . . . . . . . . . . . . . . . . . . . . . . . . . . . . . . . . . . 209
Verifying That an Item Exists Before You Use It . . . . . . . . . . . . . . . . . . . . . . . . . . . . . . 209
Referring to an Application by Its Formal Name . . . . . . . . . . . . . . . . . . . . . . . . . . . . . . . 210
Breaking Up a Script into Subroutines . . . . . . . . . . . . . . . . . . . . . . . . . . . . . . . . . . . . . . . . 213
Try This: Creating a Subroutine ..................................................... 214
11 Running Scripts Automatically ............................................ 219
Running a Script Automatically Using a Droplet . . . . . . . . . . . . . . . . . . . . . . . . . . . . . . . . . . . . 220
Turning a Script into a Droplet ................................................ 221
Saving the Droplet as an Application . . . . . . . . . . . . . . . . . . . . . . . . . . . . . . . . . . . . . . . . . . 223
Try This: Creating and Running a Droplet . . . . . . . . . . . . . . . . . . . . . . . . . . . . . . . . . . . . . . . . . . . 224

Contents xv
Running a Script Automatically with a Folder Action . . . . . . . . . . . . . . . . . . . . . . . . . . . . . . . . 225
Turning On Folder Actions .................................................... 226
Writing a Folder Action Script ................................................ 227
Attaching a Folder Action Script to a Folder . . . . . . . . . . . . . . . . . . . . . . . . . . . . . . . . . . . 233
Try This: Creating and Using a Folder Action Script . . . . . . . . . . . . . . . . . . . . . . . . . . . . . . . . . 240
Running a Script at Login ........................................................... 243
Running a Script Repeatedly at Intervals . . . . . . . . . . . . . . . . . . . . . . . . . . . . . . . . . . . . . . . . . . . . 243
Try This: Creating an Application That Uses an Idle Handler . . . . . . . . . . . . . . . . . . . . . . . . 244
Running a Script Automatically at Specific Times . . . . . . . . . . . . . . . . . . . . . . . . . . . . . . . . . . . 245
PART III Automating Major Applications with AppleScript
12 Automating iTunes and iPhoto ............................................ 249
Working with iTunes ................................................................ 250
Working with Tracks .......................................................... 250
Working with Playlists ........................................................ 256
Try This: Dealing with All the Songs That Have an Intermediate Rating . . . . . . . . . . . . . 258
Working with iPhoto ............................................................... 263
Working with Albums and Photos ............................................. 263
Working with Photos ......................................................... 265
Working with Keywords ..................................................... 267
Try This: Creating an Album and Adding Photos to It . . . . . . . . . . . . . . . . . . . . . . . . . . . . . . . 269
13 Automating Apple Mail ................................................... 271
Working with Mail Accounts ........................................................ 272
Understanding the Four Types of Accounts . . . . . . . . . . . . . . . . . . . . . . . . . . . . . . . . . . . . 273
Checking and Changing the Settings for an E-mail Account . . . . . . . . . . . . . . . . . . . 275
Working with Mailboxes ............................................................ 278
Creating a New Mailbox ...................................................... 278
Renaming a Mailbox .......................................................... 278
Deleting a Mailbox ........................................................... 279
Try This: Finding the Number of New Messages for Only Some Accounts . . . . . . . . . . . 279
Creating and Sending Messages ..................................................... 281
Creating an Outgoing Message ................................................ 281
Attaching a File to an Outgoing Message . . . . . . . . . . . . . . . . . . . . . . . . . . . . . . . . . . . . . . 283
Sending the Message ......................................................... 284
Dealing with Incoming Messages ................................................... 284
Opening a Message in a Separate Window . . . . . . . . . . . . . . . . . . . . . . . . . . . . . . . . . . . . 285
Deleting a Message ........................................................... 285
Moving a Message to a Folder ................................................ 285
Dealing with Incoming Attachments .......................................... 286
Working with Tasks ................................................................. 287

xvi AppleScript: A Beginner’s Guide
14 Automating Microsoft Word .............................................. 291
Launching Word—and Quitting Word ............................................... 292
Understanding the Key Word Objects for AppleScript . . . . . . . . . . . . . . . . . . . . . . . . . . . . . . . 293
Working with Documents ........................................................... 294
Creating a New Document .................................................... 294
Working with the Template Attached to a Document . . . . . . . . . . . . . . . . . . . . . . . . . . 295
Opening an Existing Document ............................................... 298
Saving a Document ........................................................... 298
Making a Document the Active Document . . . . . . . . . . . . . . . . . . . . . . . . . . . . . . . . . . . . 300
Closing a Document .......................................................... 301
Identifying the Document You Want to Work With . . . . . . . . . . . . . . . . . . . . . . . . . . . . 302
Printing a Document .......................................................... 303
Try This: Creating, Saving, and Closing a Document . . . . . . . . . . . . . . . . . . . . . . . . . . . . . . . . 304
Working with Windows and Views .................................................. 306
Working with Windows ....................................................... 306
Working with Views .......................................................... 308
Working with Text .................................................................. 310
Returning a Text Object and Reaching Its Contents . . . . . . . . . . . . . . . . . . . . . . . . . . . . 310
Working with the Selection Object ............................................ 311
Creating a Text Range ........................................................ 317
Extending, Shortening, or Moving a Range . . . . . . . . . . . . . . . . . . . . . . . . . . . . . . . . . . . . 319
Entering Text in a Document .................................................. 319
Formatting Text ............................................................... 320
Try This: Entering and Formatting Text in a Document . . . . . . . . . . . . . . . . . . . . . . . . . . . . . . 322
Using Sections, Page Setup, and Headers and Footers . . . . . . . . . . . . . . . . . . . . . . . . . . . . . . . 325
Breaking a Document into Sections ........................................... 325
Choosing Page Setup ......................................................... 326
Adding Headers, Footers, and Page Numbers . . . . . . . . . . . . . . . . . . . . . . . . . . . . . . . . . 326
Displaying Word’s Built-in Dialog Boxes . . . . . . . . . . . . . . . . . . . . . . . . . . . . . . . . . . . . . . . . . . . 329
Try This: Adding a Header, Adjusting Margins, and Displaying a Dialog Box . . . . . . . . 331
Running Your Scripts from Word ................................................... 333
Adding a Script to Word’s Script Menu . . . . . . . . . . . . . . . . . . . . . . . . . . . . . . . . . . . . . . . 333
Creating a Keyboard Shortcut to Run a Script . . . . . . . . . . . . . . . . . . . . . . . . . . . . . . . . . 334
15 Automating Microsoft Excel .............................................. 337
Understanding Excel’s Main Objects ................................................ 338
Launching and Quitting Excel ...................................................... 339
Working with Workbooks ........................................................... 340
Creating a New Blank Workbook ............................................. 340
Creating a New Workbook Based on a Template . . . . . . . . . . . . . . . . . . . . . . . . . . . . . . 341
Saving a Workbook ........................................................... 341
Opening an Existing Workbook ............................................... 344
Closing a Workbook .......................................................... 344
Sharing a Workbook with Others .............................................. 345

Contents xvii
Protecting a Workbook Against Changes ............................................ 346
Using the active workbook Class .............................................. 347
Try This: Creating, Saving, and Closing a Workbook . . . . . . . . . . . . . . . . . . . . . . . . . . . . . . . . 348
Working with Worksheets and Other Sheets . . . . . . . . . . . . . . . . . . . . . . . . . . . . . . . . . . . . . . . . . 349
Inserting a Worksheet in a Workbook . . . . . . . . . . . . . . . . . . . . . . . . . . . . . . . . . . . . . . . . . 350
Renaming a Worksheet ....................................................... 351
Deleting a Worksheet ......................................................... 351
Moving or Copying a Worksheet .............................................. 352
Finding Out Which Kind of Sheet You’re Dealing With . . . . . . . . . . . . . . . . . . . . . . . 353
Protecting a Worksheet ....................................................... 354
Using the active worksheet Class ............................................. 355
Printing a Worksheet .......................................................... 355
Try This: Opening a Workbook and Adding a Worksheet to It . . . . . . . . . . . . . . . . . . . . . . . 356
Creating and Using Ranges of Cells ................................................. 357
Working with the Active Cell or the Selection . . . . . . . . . . . . . . . . . . . . . . . . . . . . . . . . . 358
Referring to a Range of Cells ................................................. 359
Using Named Ranges for Easy Reference . . . . . . . . . . . . . . . . . . . . . . . . . . . . . . . . . . . . . 359
Working with a Worksheet’s Used Range . . . . . . . . . . . . . . . . . . . . . . . . . . . . . . . . . . . . . 359
Using Excel’s Special Cells ................................................... 360
Inserting a Formula in a Cell .................................................. 361
Try This: Adding Data to a Workbook ............................................... 361
Using Charts in Your Workbooks ................................................... 363
Understanding How to Create a Chart from AppleScript . . . . . . . . . . . . . . . . . . . . . . . 363
Adding a Chart Sheet to a Workbook .......................................... 363
Adding a Chart Object to a Worksheet . . . . . . . . . . . . . . . . . . . . . . . . . . . . . . . . . . . . . . . . 364
Setting the Chart Type ........................................................ 365
Add a Series to the Chart ..................................................... 366
Adding a Caption to an Axis ................................................. 366
Adding a Chart Title ......................................................... 367
Adding a Legend ............................................................. 367
Try This: Creating a Chart .......................................................... 368
Working with Excel Windows and Views . . . . . . . . . . . . . . . . . . . . . . . . . . . . . . . . . . . . . 371
Opening a New Window ...................................................... 371
Activating a Window ......................................................... 371
Closing a Window ............................................................ 372
Repositioning and Resizing Windows ......................................... 372
Rearranging Excel Windows .................................................. 373
Changing the View ........................................................... 374
Zooming a Window ........................................................... 374
Using Find and Replace in Your Scripts ............................................. 374
Using find to Search for Data ................................................. 374
Continuing a Search .......................................................... 375
Using replace to Replace Data ................................................ 376

xviii AppleScript: A Beginner’s Guide
16 Automating Microsoft Entourage ......................................... 377
Creating Entourage Accounts ....................................................... 378
Creating an Exchange Account ................................................ 380
Creating an IMAP Account ................................................... 382
Creating a POP Account ...................................................... 384
Creating a Hotmail Account ................................................... 386
Creating and Sending E-mail Messages ............................................. 387
Understanding the message Object ............................................ 387
Creating and Sending an E-mail Message . . . . . . . . . . . . . . . . . . . . . . . . . . . . . . . . . . . . . 388
Creating an E-mail Message for the User to Work With . . . . . . . . . . . . . . . . . . . . . . . . 391
Setting a Signature for an E-mail Message . . . . . . . . . . . . . . . . . . . . . . . . . . . . . . . . . . . . 393
Attaching a File to a Message ................................................. 394
Dealing with Incoming E-mail Messages ............................................ 395
Forwarding a Message ........................................................ 395
Moving a Message to a Folder ................................................ 396
Deleting a Message ........................................................... 396
Receiving an Attachment ..................................................... 397
Working with Contacts ............................................................. 398
Creating a New Contact ....................................................... 401
Adding E-mail Addresses to a Contact . . . . . . . . . . . . . . . . . . . . . . . . . . . . . . . . . . . . . . . . 401
Getting a vCard of Contact Data .............................................. 404
Deleting a Contact ............................................................ 404
Working with Events ............................................................... 405
Working with Tasks ................................................................. 407
Working with Notes ................................................................ 408
Index ...................................................................... 411
xix
Acknowledgments
My thanks go to the following people for their help with this book:
● Roger Stewart for getting the book approved and pulling strings.
● Joya Anthony for managing the acquisitions end of the process.
● Greg Kettell for reviewing the book for technical accuracy and contributing many
helpful suggestions.
● Lisa McCoy for editing the book with a light touch and a good sense of proportion.
● Vipra Fauzdar for coordinating the production of the book.
● Glyph International’s skillful typesetters for laying out the book.
● Jack Lewis for creating the index.
This page intentionally left blank
xxi
Introduction
This book shows you how to harness the power of AppleScript to make your Mac do
your work for you.
AppleScript not only comes for free, built into every copy of Mac OS X, but it works
across all Mac OS X applications, so you can automate almost any operation you can
think of.
Is This Book for You?
Yes.
If you want to get more done on your Mac—at work, at home, on the road, or all
three—then this book is for you.
This book takes you from knowing nothing about AppleScript to using it confidently
to manipulate all the applications you use.
The book is clear and easy to read, and it moves along at a rapid pace. As you
progress, the Try This sections give you step-by-step practice in the essential skills for
using AppleScript effectively.

xxii AppleScript: A Beginner’s Guide
What Does This Book Cover?
This book shows you how to get started with AppleScript and how to achieve impressive
results in minimal time.
Here is a chapter-by-chapter breakdown of what you will learn:
● Chapter 1, “Grasping the Essentials of AppleScript,” makes sure you know what
AppleScript is and what you can do with it. You learn about the key terms for working
with AppleScript: objects, keywords, commands, and properties.
● Chapter 2, “Up to Speed with AppleScript Editor,” teaches you to use AppleScript
Editor, the tool that Mac OS X includes for creating and editing scripts. You learn how
to launch AppleScript Editor, understand its user interface, and customize AppleScript
Editor to suit your needs. You also learn how to put the Mac OS X Script menu on
your Mac’s menu bar and run scripts instantly from it.
● Chapter 3, “Creating Your First Script,” walks you through creating a script in
AppleScript Editor. You create and save a script, build tell statements and tell blocks,
and compile and run the script. Along the way, you learn how to open and arrange
Finder windows, and how to launch, manipulate, and close other applications.
● Chapter 4, “Working with Variables, Classes, Operators, and Coercions,” explains
how to store data temporarily in your scripts for later use. You learn how to create
variables, assign data to them, and retrieve the data; how to use AppleScript’s
operators to perform operations (such as addition or division) or to make comparisons;
and how to use different classes of objects and change data from one type to another.
● Chapter 5, “Working with Text, Numbers, and Dates,” teaches you how to work with
three essential types of content: text (such as words and paragraphs), AppleScript’s
two different types of numbers, and dates.
● Chapter 6, “Working with the Finder, Files, and Folders,” shows you how to use
AppleScript to control the Finder and to manipulate files and folders. For example,
you learn how to create folders, rename them, move them, and delete them.
● Chapter 7, “Making Decisions in Your Scripts,” explains how to make decisions
by using the three If structures that AppleScript provides. Making decisions is vital
to creating powerful and flexible scripts—and AppleScript makes the language of
decisions as easy and natural as it can be.

Introduction xxiii
● Chapter 8, “Using Dialog Boxes to Get User Input,” covers using dialog boxes to let
the user control your scripts and provide input to them. You learn about AppleScript’s
dialog box, its alerts, and the special commands it provides for displaying dialog
boxes that enable the user to choose files, folders, or other items.
● Chapter 9, “Repeating Actions in Your Scripts,” teaches you how to repeat actions in
your code—either once, or a fixed number of times, or exactly however many times
turns out to be necessary. AppleScript provides a handful of different kinds of loops
for repeating actions, but you will find it easy to get the hang of them.
● Chapter 10, “Debugging Scripts and Handling Errors,” shows you how to write code
that either suppresses errors or handles them neatly. Even if you keep your scripts
simple, errors can easily occur, so handling them is a vital skill.
● Chapter 11, “Running Scripts Automatically,” explains the different options that
AppleScript offers for running scripts automatically rather than running them
manually. For example, you can create a “droplet” application that runs when you drop
a file on it, attach a script to a folder as a Folder Action, or set it to run automatically
when you log in. Then there are other possibilities… .
● Chapter 12, “Automating iTunes and iPhoto,” shows you how to let AppleScript loose
on the Mac’s multimedia marvels. You learn how to work with tracks and playlists in
iTunes, and how to work with albums, photos, and keywords in iPhoto.
● Chapter 13, “Automating Apple Mail,” teaches you how to script Apple’s Mail
application. Coverage includes creating and configuring mail accounts, creating and
sending messages, dealing with incoming messages, and working with tasks.
● Chapter 14, “Automating Microsoft Word,” explains how to manipulate Microsoft
Word 2008 via AppleScript. Word is a big application, and this is a big chapter,
teaching you how to work with documents, windows, and views; insert and
manipulate text; and set up your documents using sections and headers and footers.
You even learn how to corral Word’s built-in dialog boxes and use them in your
scripts.
● Chapter 15, “Automating Microsoft Excel,” digs into using AppleScript with
Microsoft Excel 2008. You learn to launch and quit Excel; create, save, open, and
close workbooks; work with worksheets, ranges, and charts; and much more.
● Chapter 16, “Automating Microsoft Entourage,” teaches you to use AppleScript to
automate essential tasks in Microsoft Entourage. Among other things, this chapter
shows you how to create and send e-mail messages and attachments, deal with
incoming e-mail messages (with or without attachments), and work with contacts.

xxiv AppleScript: A Beginner’s Guide
What Are Those Lines, and
What Are the Funny Fonts For?
To make its meaning clear but concise, this book uses a number of conventions, four of
which are worth mentioning here:
● The pipe character, or vertical bar, indicates choosing an item from the menus. For
example, “choose File | Open Dictionary” means that you should click the File menu
on the Mac OS X menu bar to open the menu, and then click the Open Dictionary
command on it.
● Terms in boldface in regular text are AppleScript terms. The boldface is just there to
make the terms stand out and help the sentences make sense.
● The code lines show examples of AppleScript code. Here is how such a code snippet
looks:
display dialog "Keep playing this version, or play the next?" ¬
buttons {"Keep Playing This Version", "Play the Next Version", ¬
"Cancel"} with title "Gimme Shelter"
if the button returned of the result is "Play the Next Version" then
next track
else
return
end if
● The ¬ characters at the end of the code lines are continuation characters that indicate
the same line of code continues on the same line of text.
Turn the page, and we will get started.

Part I
Getting Started
with AppleScript
This page intentionally left blank

3
Chapter 1
Grasping the Essentials
of AppleScript

4 AppleScript: A Beginner’s Guide
Key Skills & Concepts
● Knowing what AppleScript is and what you can do with it
● Understanding what scripts are
● Understanding objects, keywords, commands, and properties
Welcome to automating your Mac with AppleScript! This short chapter brings you
up to speed on what AppleScript is and what you can do with it. The chapter then
covers the essentials you need to know about scripts before you start working with them,
and then explains key terms—objects, keywords, commands, and properties—for working
in AppleScript.
Knowing What AppleScript Is
and What You Can Do with It
AppleScript is a power-packed programming language that comes with Mac OS X. You
can use AppleScript to automate almost any repetitive task on your Mac, saving you time
and effort.
AppleScript works both with Mac OS X and its built-in components (such as the
Finder and Spotlight) and with most applications that run on Mac OS X. For example,
you can automate tasks in Apple applications such as TextEdit, Apple Mail, iPhoto,
iTunes, and the iWork applications—not to mention essential third-party applications such
as the Microsoft Office applications (Word, Excel, PowerPoint, and Entourage), Adobe
Photoshop, and FileMaker Pro.
What You Can Do with Scripts
A script can do anything from a single action (such as automatically emptying the Trash
securely) to running as a complete application—for example, opening Microsoft Excel,
using it to create a spreadsheet file, drawing in data from existing files and inserting it in
the worksheets, saving the file, and generating a Portable Document Format (PDF) file
from it for distribution.

Chapter 1: Grasping the Essentials of AppleScript 5
Why AppleScript Is Easy to Learn
Many programming languages are hard to learn because they use not only complicated
concepts, but also abstruse syntax that looks like an explosion in a punctuation factory.
By contrast, AppleScript is easy to read and understand, so you can get moving with
it immediately. For example, if you read the following AppleScript command, you can
immediately understand what it does:
tell the application "Microsoft Excel" to make new document
When you run that command, Microsoft Excel creates a new workbook. (If Excel isn’t
running, Mac OS X launches it automatically.)
Yes, AppleScript is that English-like and straightforward. That doesn’t mean AppleScript
isn’t powerful, just that its power is delivered in a friendly and easy-to-use way.
Understanding What Scripts Are
This section runs you quickly through essential concepts you need to grasp before you get
started with AppleScript.
What a Script Is
A script is a document that contains a sequence of commands. For example, a script can
contain commands to do the following:
1. Open the TextEdit application and create a new document.
2. Type some text in the document.
3. Save the document.
4. Quit TextEdit.
Normally, Mac OS X executes the script’s commands in order from first to last, but
you can build control structures to repeat or skip sections of code. For example, you can
create a loop that runs for a certain number of repetitions or until a condition is met.
Where Scripts Are Stored
Mac OS X comes with various scripts that are installed in the /Library/Scripts/ folder and
its subfolders. These scripts are available to all the users of your Mac.
Your own scripts are stored in the ~/Library/Scripts/ folder (where ~ represents your
home folder) and are available only to you. You can move them to other folders as needed.

6 AppleScript: A Beginner’s Guide
How You Create Scripts
To create scripts, you open the AppleScript Editor application (as described in Chapter 2)
and type commands into it. You save a script as you would most any other document, giving
it a name of your choice and using one of the Scripts folders explained in the previous
section. You can also save a script to a different folder if you prefer.
How You Run Scripts
You can run a script in any of these ways:
● From AppleScript Editor When you’re creating a script, you can run it by clicking
the Run button on the toolbar in AppleScript Editor, by pressing z-R, or by choosing
Script | Run. If the script works, great; if not, you’re in the right place to change it.
NOTE
You can run any script at any time by opening it in AppleScript Editor and using one
of the Run commands described in the main text, but usually, other ways of running
a finished script are more convenient unless you need to open a script for another
reason—for example, to change it.
● From the Script menu If you add the Script menu to the Mac OS X menu bar, you
can instantly run any script stored in your Mac’s /Library/Scripts/ folder or in your
~/Library/Scripts/ folder. See Chapter 2 for details.
● From the Finder If you save a script to a different folder than your Mac’s /Library/
Scripts/ folder or in your ~/Library/Scripts/ folder, you can run the script by opening
the folder and double-clicking the script file.
● From the Dock If you save a script as an application, you can add it to the left side
of the Dock and run it as you would any other application.
Q: Can I record scripts the way I can record macros in Microsoft Office?
A: AppleScript Editor lets you record actions in some applications, such as the Finder and
iChat—but very few applications have this capability.
You open the script to which you want to add the actions, turn on recording, and
then perform the actions in the application (for example, the Finder). AppleScript Editor
records what you do and writes down the commands for the actions. When you’ve
finished, you turn off recording and polish up the recorded code in AppleScript Editor.
Ask the Expert

Chapter 1: Grasping the Essentials of AppleScript 7
Understanding Objects, Keywords,
Commands, and Properties
This section introduces four essential terms for working with AppleScript: objects,
keywords, commands, and properties.
What Objects Are
To take actions in AppleScript, you work with objects. An object is simply an identifiable
item on your Mac—for example:
● Your Mac itself is an object.
● Each disk on the Mac is an object.
● Each folder on the Mac’s disks is an object.
● Each file in each folder is an object.
● The items in each file are objects—for instance, an image object on a slide in a
presentation or a paragraph object in a word-processing document.
● Each application is an object.
The objects are arranged in an organizational structure called an object hierarchy. That
term sounds complex, but the object hierarchy is simply a map that shows you how to
reach the objects you need.
At the top of the hierarchy are objects that are directly accessible to AppleScript—
objects you can get at directly, such as the computer and your home folder. Those objects
contain other objects that you can reach by going through the directly accessible objects.
For example, you can get to your Documents folder by going through your home folder
(because the home folder contains the Documents folder).
What Keywords Are
In AppleScript, a keyword is a predefined term with a special meaning. For example:
● before and after are keywords used to describe the position of an item in a range of
items—for instance, in a range of open Finder windows, you may need to work with
the window after the front window or the window before the last window.
● first, second, third, and so on through tenth are keywords used to describe the position
of an object in a container object—for instance, the second item in the Documents folder.
● me is a keyword that refers to the current script.

8 AppleScript: A Beginner’s Guide
When you use a keyword in a script, it’s important to use it only in its AppleScript
sense. Avoid creating variable names that conflict with AppleScript’s keywords, because
this is a recipe for errors and confusion.
What Commands Are
A command is an action that you can take with an object. Here are three examples:
● activate This command brings the specified application to the front. If the
application isn’t running, Mac OS X launches it and then brings it to the front.
Q: Can you give an example to help me understand the object hierarchy?
A: The object hierarchy can be difficult to picture, but it works in much the same way as
when you’re working interactively with your Mac.
For example, the Desktop is right there, so you can access it directly with your
mouse. By contrast, if you want to apply boldface to a character in a paragraph in a
Word document, you normally proceed like this:
1. Open Word.
2. Open the document in Word.
3. Go to the paragraph in the document.
4. Find the character.
5. Apply the boldface.
In the same way, AppleScript can access your Desktop directly. But if you want to
make a change to that character using AppleScript, you need to work like this:
1. Tell AppleScript to open Word.
2. Tell Word to open the document.
3. Tell Word which paragraph contains the character and which character it is (for
example, the fifth character in the third paragraph).
4. Tell Word to apply the boldface.
Ask the Expert
Chapter 1: Grasping the Essentials of AppleScript 9
● mount volume This command mounts an AppleShare volume in the Mac’s file system.
● choose file This command displays the Choose A File dialog box so that the user can
choose a file.
What Properties and Values Are
Each object has properties—attributes—that describe what the object is and control how it
behaves. Each property is set to a value; the type of value depends on the type of property.
Some properties are read-only, which means that you can get (return) the value but not
change it. But most properties are read-write, which means that you can set their values as
well as get them.
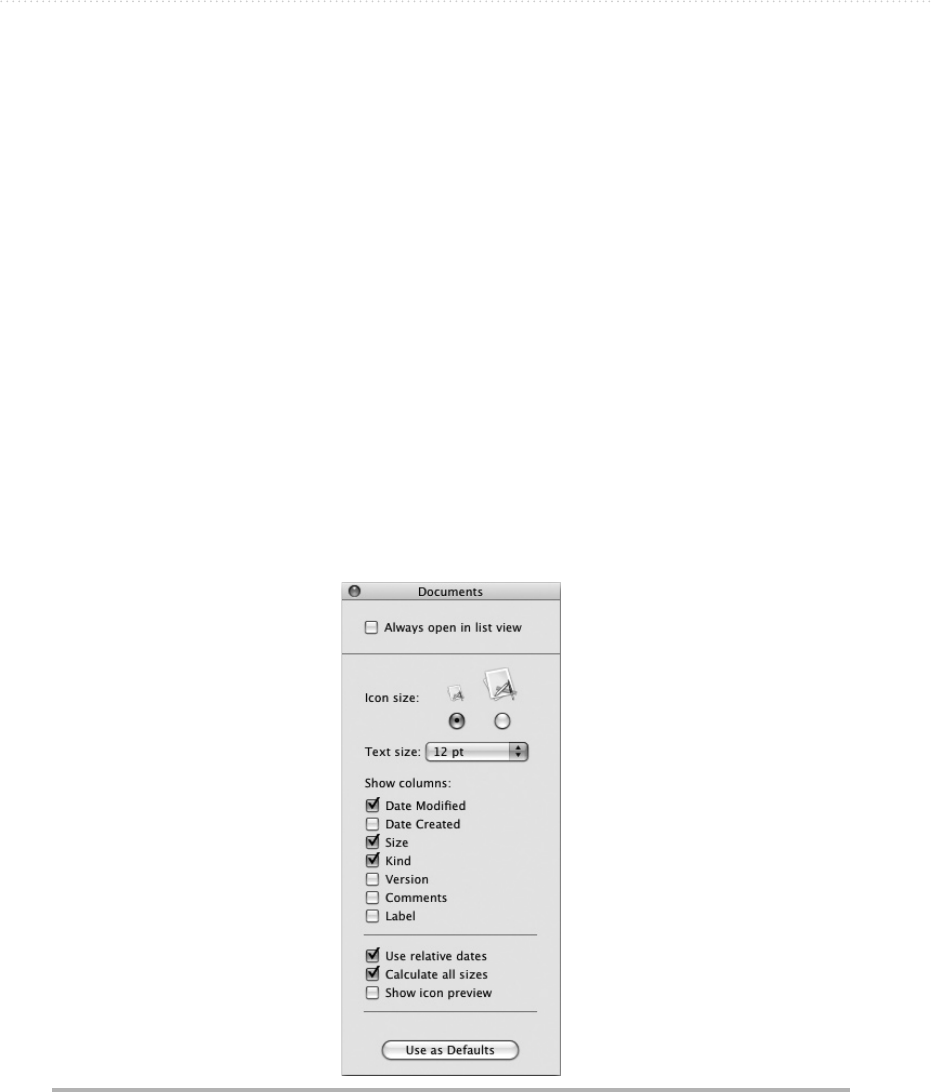
For example, you’re probably familiar with the View Options window for Finder
windows in List view (see Figure 1-1). The Text Size pop-up menu is the interactive
means of setting the text size to use in List view; the AppleScript way is to change the
value of the text size property. Similarly, you can set the icon size property to large icon
or small icon—this is the AppleScript equivalent of choosing the small option button or
the large option button in the Icon Size area of the window.
Figure 1-1 AppleScript provides properties for the List view options settings you can choose
in this window.
This page intentionally left blank

11
Chapter 2
Up to Speed with
AppleScript Editor

12 AppleScript: A Beginner’s Guide
Key Skills & Concepts
● Launching AppleScript Editor
● Meeting the AppleScript Editor window
● Setting up AppleScript Editor for working comfortably
● Putting the Script menu on the menu bar in Leopard
● Running a script from the Script menu
Your tool for creating AppleScript is AppleScript Editor, which is included with Mac
OS X. This chapter shows you how to launch AppleScript Editor, understand its user
interface, and customize AppleScript Editor to suit your needs. You’ll also learn how to
put the Mac OS X Script menu on your Mac’s menu bar and run scripts instantly from it.
Launching AppleScript Editor
AppleScript Editor lives in the Utilities folder in your Applications folder, so you can
launch it like this:
1. Activate the Finder by clicking the Finder icon on the Dock or clicking open space on
your Desktop.
2. Choose Go | Utilities to open a Finder window showing the Utilities folder. Alternatively,
press z-SHIFT-U.
3. Double-click the AppleScript Editor icon.
NOTE
In Mac OS X version 10.5 (Leopard) and earlier versions, Script Editor is in the
Applications/AppleScript/ folder rather than in the Utilities folder. Activate the Finder,
choose Go | Applications to open a Finder window showing the Applications folder,
double-click the AppleScript folder, and then double-click the Script Editor icon.
Once you’ve launched AppleScript Editor, make its icon stay in the Dock so that you
can launch it instantly. CTRL-click or right-click the AppleScript Editor icon in the Dock,
click or highlight Options, and then choose Keep In Dock from the shortcut menu.

Chapter 2: Up to Speed with AppleScript Editor 13
Q: Why is my editor named Script Editor rather than AppleScript Editor?
A: In Snow Leopard, Apple changed the editor’s name from Script Editor to AppleScript
Editor. So if you’re using Leopard or an earlier version of Mac OS X, your editor is
named Script Editor.
You’ll find that Script Editor behaves in almost exactly the same way as AppleScript
Editor described in this book but that the interface is different—in particular, that the
lower pane is laid out differently, and that AppleScript Editor’s preferences contain
settings that used to be in AppleScript Utility in earlier versions of Mac OS X. You’ll
see the main differences later in this chapter.
Ask the Expert
Meeting the AppleScript Editor Window
Figure 2-1 shows AppleScript Editor window with its key components labeled.
As you can see, AppleScript Editor has a straightforward interface.
● Toolbar The toolbar contains buttons for recording, running, and compiling scripts,
and for bundling their contents into an application bundle or script bundle (a package
that contains not only the script, but also any other items it needs, such as documents
and images).
TIP
You can toggle the display of the toolbar by clicking the jellybean button at the right end
of the AppleScript Editor title bar or by choosing View | Hide Toolbar or View | Show
Toolbar. If you want to change the selection of buttons on the toolbar, choose View |
Customize Toolbar and then work in the dialog box that appears.
● Navigation bar The navigation bar is the thin horizontal strip under the toolbar. At
its left end, the language pop-up menu lets you switch between AppleScript and other
scripting languages that AppleScript Editor supports; normally, you’ll want to leave
this menu set to AppleScript. To the right of the language pop-up menu is the elements
pop-up menu, which you can use to select elements (such as variables or properties)
that you’ve defined in the script. Until you select an element, the elements pop-up
menu shows “<No selected element>,” as shown in the figure.
14 AppleScript: A Beginner’s Guide
● Script text pane This pane is where you create and edit each script.
● Lower pane This pane displays two main different types of information, depending
on which of the tabs at the bottom of the window is selected. When the Description tab
is selected, the pane displays the description of the script—text you write to explain
what the script is and what it does. When the Event Log tab is selected, the pane
displays the event log. The event log contains three different categories of information,
which you can switch among by clicking the three visibility buttons.
● Events Click this visibility button to see the events the script has sent. This helps
you keep track of exactly what’s happening in the script.
● Replies Click this visibility button to see the values the script has returned for
the events. This information helps you see the information the script is getting.
● Result Click this visibility button to see the result of running the script—for
example, which button in a dialog box the user clicked.
Figure 2-1 AppleScript Editor has a streamlined interface that enables you to create code
quickly and easily.
Display
control
Toolbar
Script text
pane
Lower
pane
Navigation
bar Elements
pop-up menu
Language
pop-up menu
Chapter 2: Up to Speed with AppleScript Editor 15
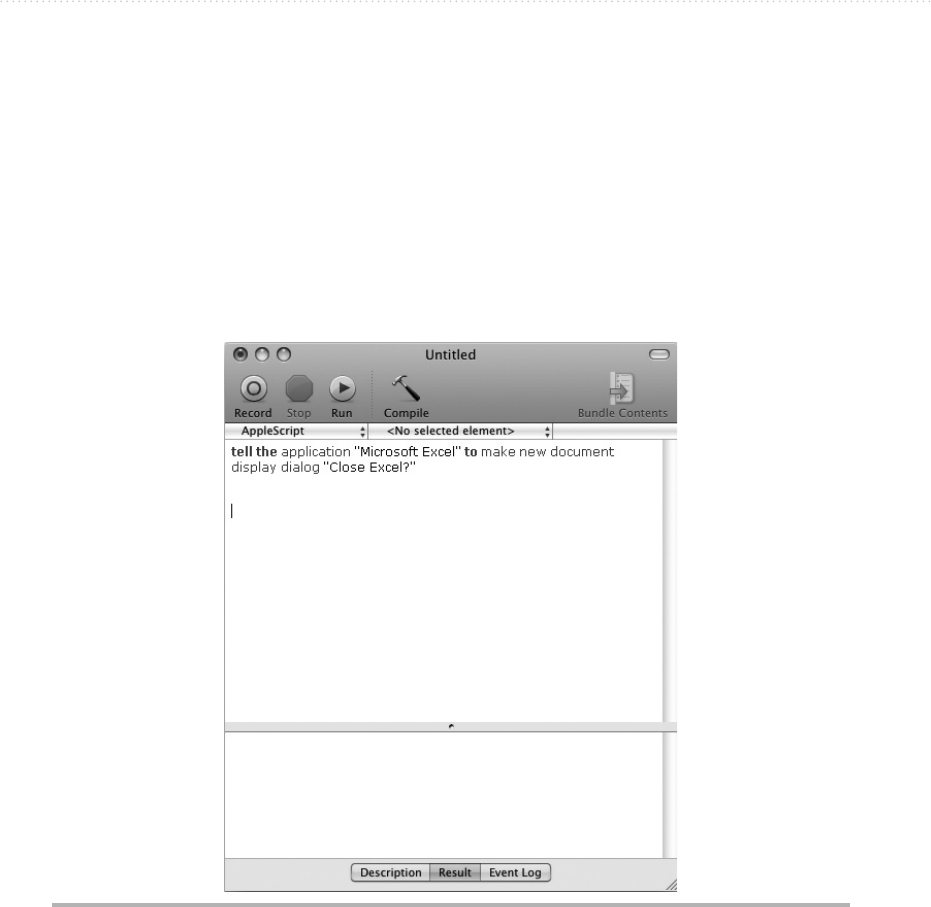
If you’re using Mac OS X Leopard (10.5) or an earlier version, your AppleScript tool
is named Script Editor rather than AppleScript Editor. As you can see in Figure 2-2, the
Script Editor window has three tabs at the bottom—Description, Result, and Event Log—
instead of the two that AppleScript Editor has, and it does not have the three visibility
buttons.
Figure 2-2 In Leopard or earlier versions of Mac OS X, you use Script Editor rather than
AppleScript Editor to create your code. The differences are minor.
16 AppleScript: A Beginner’s Guide
Setting Up AppleScript Editor
for Working Comfortably
To make sure you can work swiftly and comfortably in AppleScript Editor, spend a few
minutes setting its preferences.
With AppleScript Editor open, press z-, (z and the COMMA key) or choose AppleScript
Editor | Preferences to open the Preferences window. This window’s title bar shows the
category of preferences you’re setting—General, Editing, Formatting, History, or Plug-
ins—rather than the word “Preferences.” If the title bar doesn’t show General at first, click
the General button to open the General preferences pane.
Choosing General Preferences
The General preferences pane (see Figure 2-3) enables you to choose your default script
editor and default language for scripting, decide whether to show inherited items in the
dictionary viewer, and choose whether (and if so, how) to display the Script menu in the
menu bar.
NOTE
In Script Editor in Leopard and earlier versions of Mac OS X, the General preferences
pane contains only the Default Language pop-up menu and the Show inherited items in
dictionary viewer check box. The other controls appear in AppleScript Utility, discussed in
the section “Putting the Script Menu on the Menu Bar in Leopard,” later in this chapter.
Figure 2-3 In the General preferences pane, make sure AppleScript Editor is set to use
AppleScript.

Chapter 2: Up to Speed with AppleScript Editor 17
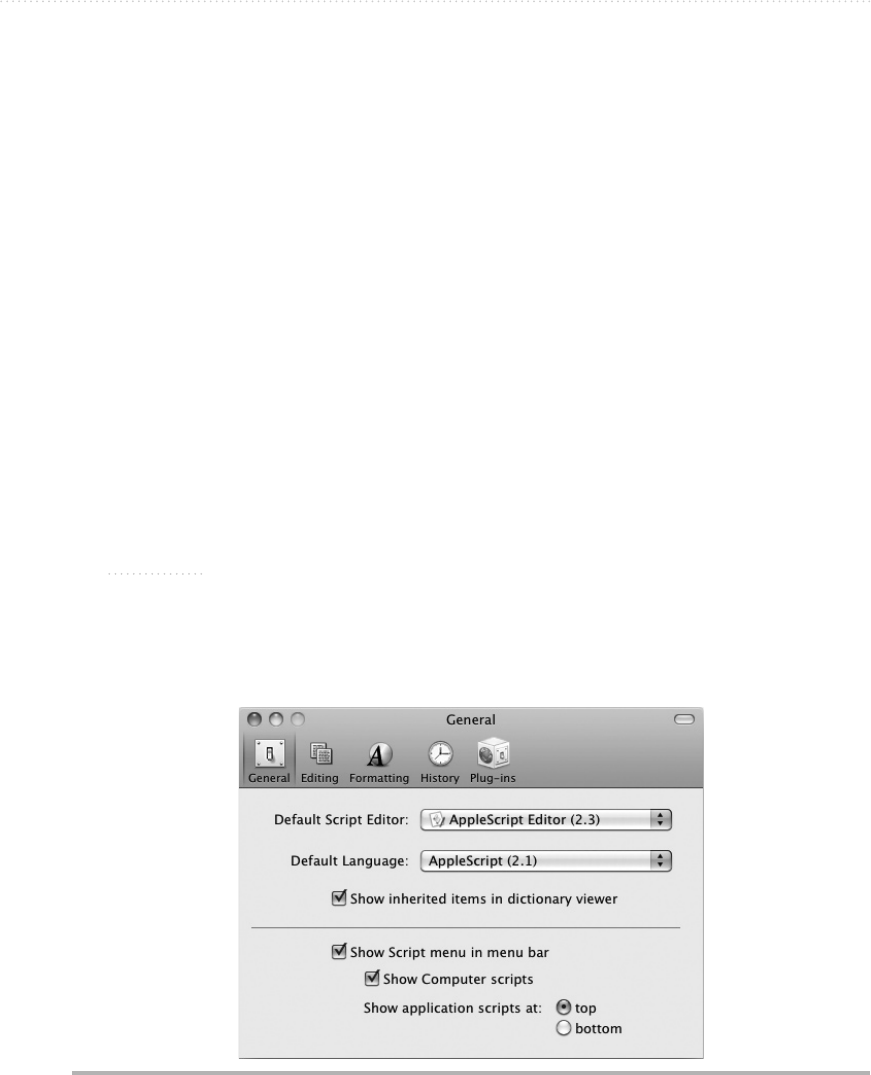
Here’s what you need to know:
● Default Script Editor In this pop-up menu, pick the script editor you want to use
for AppleScript. Make sure AppleScript Editor is selected, unless you’ve installed
another AppleScript-capable script editor, such as Smile, Script Debugger, or Xcode.
● Default Language In this pop-up menu, choose the language you’ll use in
AppleScript Editor. For this book, you’ll want AppleScript. Depending on how your
Mac is set up, this may be your only choice.
NOTE
AppleScript Editor supports the Open Scripting Architecture (OSA for short), which
enables AppleScript Editor to handle other scripting languages, such as UserTalk,
JavaScript, or QuicKeys (http://startly.com).
● Show Inherited Items In Dictionary Viewer This check box lets you decide,
when viewing a dictionary file, whether to view only the items that belong to the
object itself or to also view the objects it inherits from the class above it in the object
hierarchy. Turn this setting on for now, because it’s usually helpful. You’ll work with
inherited items extensively throughout the course of this book.
NOTE
In the AppleScript sense, a dictionary is a file that contains all the AppleScript terms
associated with an application. For example, to browse the list of objects, commands,
and properties available for scripting Safari, you open the Safari dictionary.
● Show Script Menu In Menu Bar Select this check box to make the Script menu
appear on the menu bar. It appears as a stylized S that looks like a scroll, as shown on
the left here.
● Show Computer Scripts Select this check box if you want the scripts stored in
your Mac’s /Library/Scripts/ folder to appear in the Script menu. Having these scripts
appear is usually helpful at first, especially when you’re learning to use AppleScript,
so select this check box. Later, when you’ve stuffed the Script menu with essential
scripts you’ve created, you may want to suppress the display of the computer scripts
so that the Script menu is easy to use.
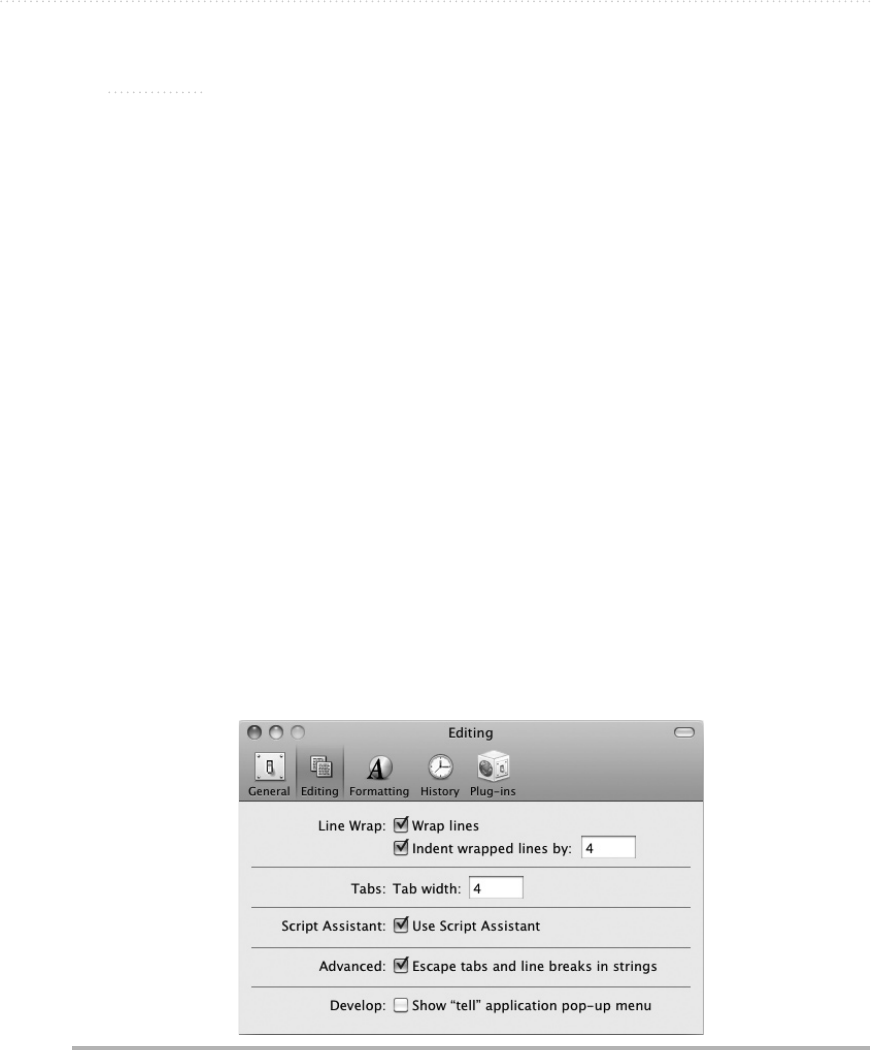
18 AppleScript: A Beginner’s Guide
NOTE
The /Library/Scripts/ folder is referred to either as the “computer scripts folder” or the
“local scripts folder.” Your own scripts folder is the “user scripts folder.”
● Show Application Scripts At In this area, select the Top option button or the
Bottom option button to choose where to display application scripts on the Script
menu. These are scripts that you place in a folder named Applications in your
~/Library/Scripts/ folder. Usually, you’ll want to select the Top option button, as it
makes the scripts easier to access.
Choosing Editing Preferences
The Editing preferences (see Figure 2-4) can help you work more quickly and accurately
in AppleScript Editor, so it’s important to set them to suit your needs. This section
explains the preferences and offers suggestions on how to set them.
Choosing Wrapping and Tabs Preferences
Lines of code can become much longer than the width of AppleScript Editor, so normally
it’s a good idea to select the Wrap Lines check box. When this setting is on, AppleScript
Editor automatically wraps lines of code to fit in the window so you can see each entire line.
The alternative is to clear the Wrap Lines check box and then scroll to the right as
needed to see the hidden part of the line and then scroll back to see the beginning of the
next line. Some people prefer working this way.
Figure 2-4 Editing preferences let you control line wrap, tabs, and whether the Script
Assistant offers you its help.
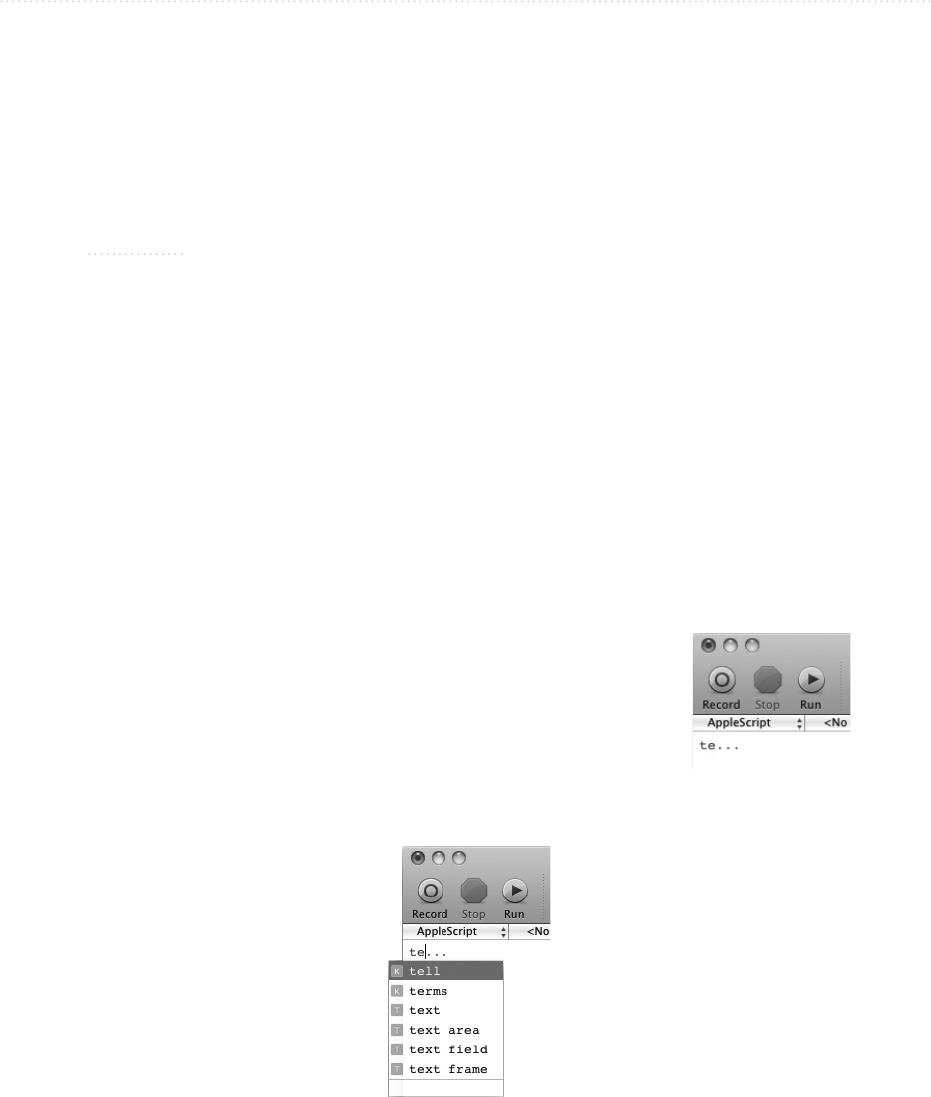
Chapter 2: Up to Speed with AppleScript Editor 19
When you wrap a line of code, normal practice is to indent each line after the first
so that you can easily see what’s a starting line and what’s a wrapped line. Usually, it’s
helpful to have AppleScript Editor indent the lines for you, so you’ll probably want to
select the Indent Wrapped Lines By check box. The normal indentation is 4 spaces, but
you can change this number if you want more indentation or less.
NOTE
You can also break your lines of code manually so that they don’t become too long. See
Chapter 3 for details.
You can indent code manually by typing spaces, but it’s quicker to press TAB and have
AppleScript Editor automatically enter a group of spaces for you. Use the Tab Width box
to set the number of spaces AppleScript Editor enters for a tab. Normally, you’ll want the
tab width to match your Indent Wrapped Lines By setting so that you can press TAB to
indent lines to the same level; the default setting is again 4 spaces.
Choosing Whether to Use the Script Assistant
The Script Assistant feature watches as you type in AppleScript Editor and tries to
save you time by either completing code items for you or displaying suggestions for
completing your code. Here are the details:
● When Script Assistant identifies enough of a word to be able to
suggest ways to complete the word, it displays an ellipsis (…)
to let you know, as shown here.
● To see the suggestions, press F5. In the pop-up list that appears
(as shown here), you can enter it in your code. Either double-
click the item you want, or press DOWN ARROW or UP ARROW to
reach the term, and then press RETURN.

20 AppleScript: A Beginner’s Guide
● When Script Assistant has uniquely identified the term you’re typing, or has identified
the most likely term, it enters the term in your code without asking you. The part that
Script Assistant has entered appears in gray, and the insertion point remains after the
last character you typed. You can accept the suggestion by pressing ESC or F5, or reject
the suggestion by typing through it.
Choosing Whether to Escape Tabs and Line Breaks
Near the bottom of the Editing preferences, the Escape Tabs And Line Breaks Strings
check box sounds bewildering, but it’s straightforward enough.
A string is a sequence of text characters, such as your name. Normally, when you enter
a string, AppleScript Editor shows it as text, and any tabs, line breaks, or carriage returns
appear in the normal way they do on screen—for example, a tab appears as a chunk of
white space in AppleScript Editor, and a carriage return makes the text wrap down to a
new line.
To make your code more compact, AppleScript Editor can automatically replace tabs
with the \t code and line breaks and carriage returns with the \n code. AppleScript Editor
replaces these items when you compile or run your code rather than when you type it in.
Your code appears more compact as a result, but it’s harder to read because of the escaped
characters—for example, documents.\nChoose indicates the word “documents.” followed
by a carriage return and the word “Choose.”
NOTE
A line-feed is the character created when you press SHIFT-RETURN. A carriage return is
the character created when you press RETURN.
Choosing Whether to Show the Tell Application Pop-up Menu
Right at the bottom of the Editing preferences is the Show “Tell” Application Pop-up
Menu check box. This appears only in AppleScript Editor (in Snow Leopard), not in
Script Editor in Leopard or earlier versions of Mac OS X.
Select this check box to add to the navigation bar a pop-up menu that lets you direct a
tell block to the current application or a particular application. Briefly, a tell block is what
you use to direct a command to an application rather than to AppleScript itself; you’ll start
using tell blocks in the next chapter, after which you’ll never stop.
Choosing Formatting Preferences
The Formatting preferences (see Figure 2-5) let you control how code looks in
AppleScript Editor. AppleScript Editor by default uses the typewriter-like Courier font for
uncompiled new text, so you can easily distinguish what’s new from the compiled items,
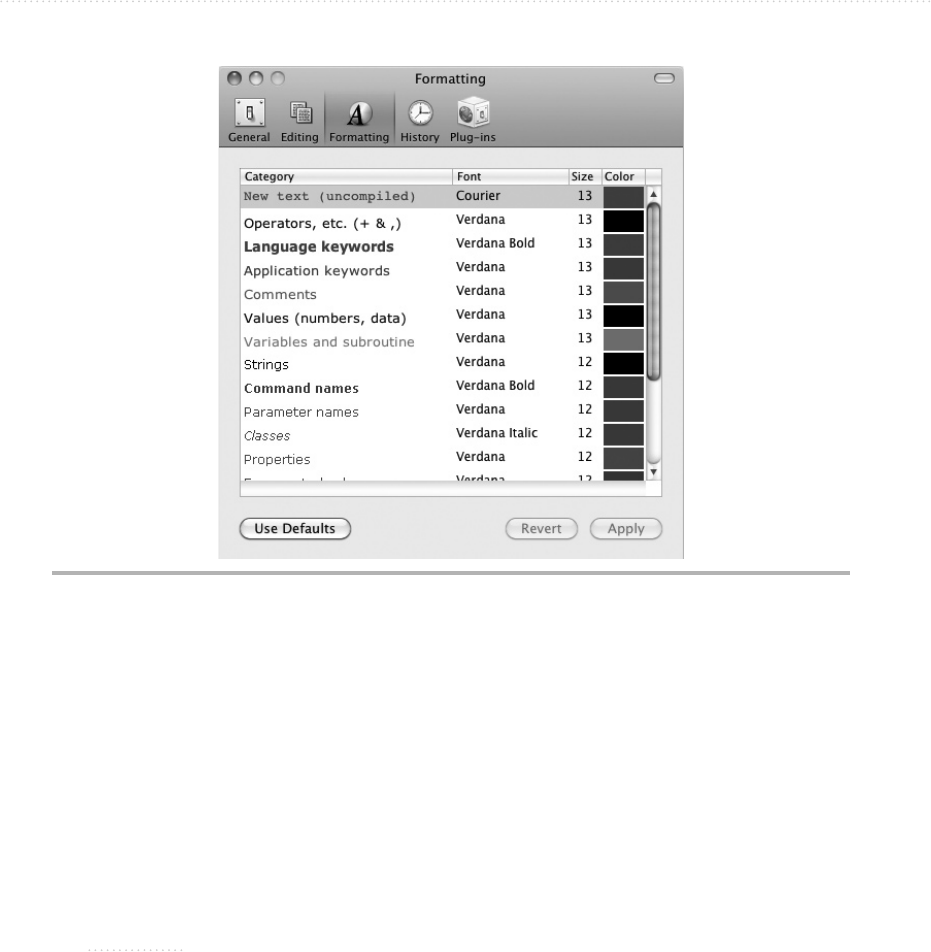
Chapter 2: Up to Speed with AppleScript Editor 21
which appear in the Verdana font in different colors according to their type. For example,
operators (such as + and ,) appear in black and regular weight, while language keywords
appear in bold blue, making them stand out.
To change a category’s font, size, or color, double-click the category, and then work
in the Font panel that AppleScript Editor opens. Click the Apply button in the Formatting
preferences when you want to apply the font formatting; click the Revert button if you
find yourself regretting the change. And if you want to restore AppleScript Editor’s
standard fonts and colors, click the Use Defaults button.
TIP
If you want to change several categories at once, select them by clicking the first
category and then z-clicking each of the others. You can also select a range of
categories by clicking the first and then SHIFT-clicking the last. Then double-click
anywhere in the selection to open the Fonts panel. This trick is useful when you want
to change the font family or size of several different categories at once—for example,
when you grow tired of the Verdana font.
Figure 2-5 In the Formatting preferences, choose fonts and colors for different types of text in
AppleScript Editor.
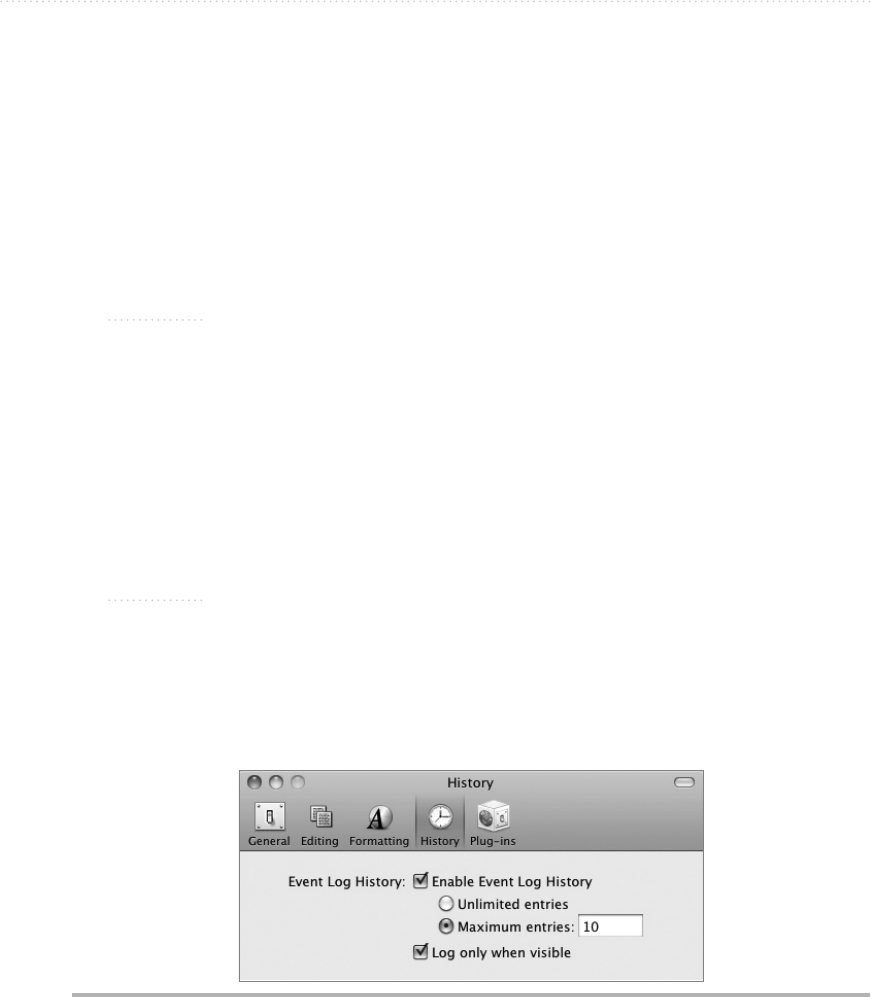
22 AppleScript: A Beginner’s Guide
Choosing History Preferences
The History preferences (see Figure 2-6) let you choose how many items of the results and
the Event Log to keep to hand.
To keep Event Log items, select the Enable Event Log History check box, and then
choose between the Unlimited Entries option button and the Maximum Entries option
button; again, if you choose Maximum Entries, type the number you want in the text box
(the default number is 10).
NOTE
In Script Editor in Leopard and earlier versions of Mac OS X, the History preferences
pane also includes an Enable Result History check box. If you select this check box,
you can choose between the Unlimited Entries option button and the Maximum Entries
option button; if you choose the latter, type the number you want in the text box (the
default number is again 10).
For Event Log items, you can also select or clear the Log Only When Visible check
box. When selected, this check box makes AppleScript Editor log only the Event Log
items that occur when the Event Log pane is displayed. When this check box is cleared,
AppleScript Editor logs the items whether or not the Event Log pane is displayed.
NOTE
Usually, you’ll do best to select the Enable Event Log History check box, because you
can save time and effort by having this information available. Whether to log all entries
or just the last few depends on the types of scripts you create and how you create them,
so experiment with the different settings and find out what suits you best.
Figure 2-6 In the History preferences, choose how many Result History items and Event Log
items to keep.
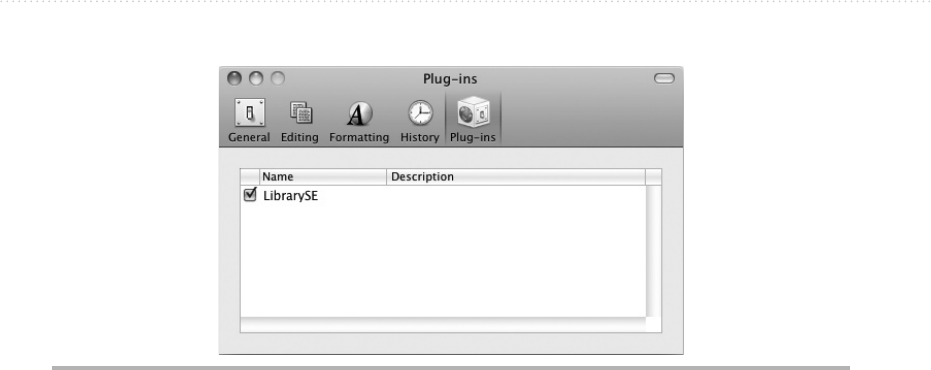
Chapter 2: Up to Speed with AppleScript Editor 23
Choosing Plug-ins Preferences
The Plug-ins preferences pane (see Figure 2-7) shows the plug-ins (add-on software items)
installed for AppleScript Editor on your Mac.
If you (or whoever administers your Mac) haven’t installed any plug-ins yet, the Plug-ins
preferences pane will be empty. That’s just fine—you don’t need to install any plug-ins to
start harnessing the power of AppleScript.
Putting the Script Menu on the Menu Bar in Leopard
As you’ve seen earlier in this chapter, AppleScript Editor in Snow Leopard lets you put
the Script menu on the menu bar directly from General Preferences. In Leopard, you have
to use AppleScript Utility to put the Script menu there (if it’s not there already). Follow
these steps:
1. Activate the Finder by clicking the Finder icon on the Dock or clicking open space on
your Desktop.
2. Choose Go | Applications to open a Finder window showing the Applications folder.
Alternatively, press z-SHIFT-A.
3. Display the contents of the AppleScript folder by clicking its icon (in Columns view)
or double-clicking its icon (in any of the other three views).
4. Double-click the AppleScript Utility icon to launch AppleScript Utility (see Figure 2-8).
Figure 2-7 The Plug-ins preferences pane lets you turn off plug-ins when you don’t want to
use them.
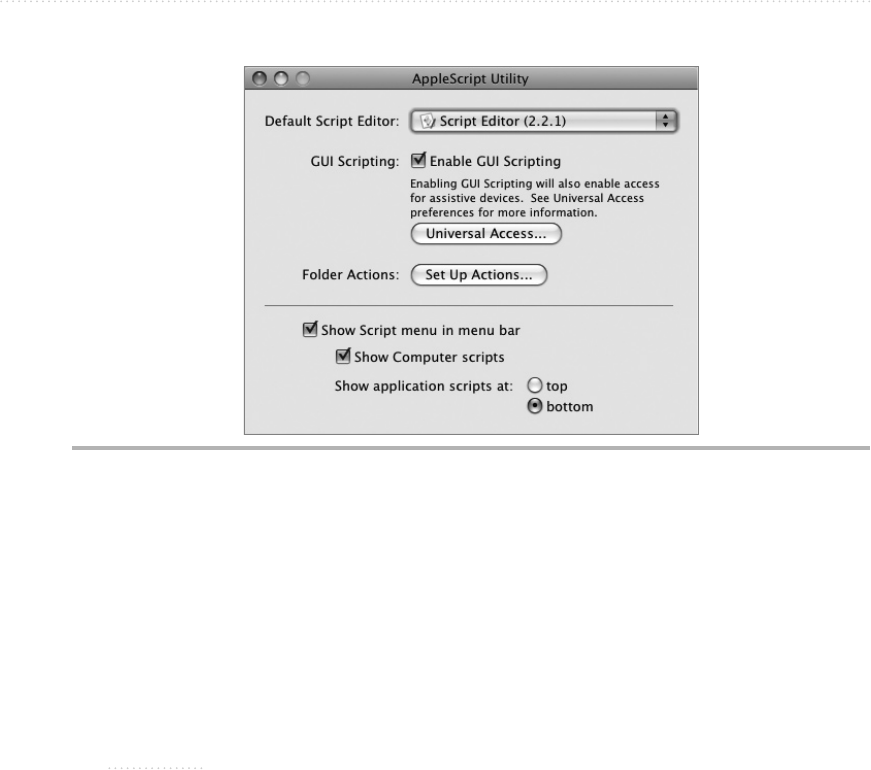
24 AppleScript: A Beginner’s Guide
5. Select the Show Script Menu In Menu Bar check box. The Script menu icon appears on
the menu bar.
6. Select the Show Computer Scripts check box if you want the scripts stored in your
Mac’s /Library/Scripts/ folder to appear in the Script menu. This is usually helpful until
you pack the Script menu with scripts of your own.
NOTE
The /Library/Scripts/ folder is referred to either as the “computer scripts folder” or the
“local scripts folder.” Your own scripts folder is the “user scripts folder.”
7. In the Show Application Scripts At area, select the Top option button or the Bottom
option button to choose where to display application scripts on the Script menu. Most
people find placing these scripts at the top makes them easier to access, but you may be
the exception.
8. Press z-Q or choose AppleScript Utility | Quit AppleScript Utility to quit AppleScript
Utility.
Figure 2-8 AppleScript Utility lets you control whether the Script menu appears on the menu
bar in Leopard and earlier versions of Mac OS X.

Chapter 2: Up to Speed with AppleScript Editor 25
Running a Script from the Script Menu
Now that you’ve put the Script menu on the menu bar, try running one of Mac OS X’s
sample scripts from it. Follow these steps:
1. Click the Script Menu icon on the menu
bar to display the Script menu.
2. Highlight the Info Scripts item, and then
click the Font Sampler item (see Figure 2-9).
3. Mac OS X runs the Font Sampler script,
which displays the informational dialog
box shown here.
Q: What are the other settings in AppleScript Utility in Leopard for?
A: Apart from the Script menu–related settings discussed in the main text, AppleScript
Utility in Leopard also provides the following settings:
● Default Script Editor In this pop-up menu, pick the script editor you want to use
for AppleScript. Make sure Script Editor is selected, unless you’ve installed another
AppleScript-capable script editor, such as Smile, Script Debugger, or Xcode. As
you’ve seen, the General preferences of AppleScript Editor now include this pop-up
menu.
● Enable GUI Scripting Select this check box if you want to be able to use
AppleScript to control applications that aren’t directly accessible to AppleScript.
Instead of controlling such an application by reaching into its objects, you control
it by using its graphical user interface (GUI)—for example, by making AppleScript
click a button in the GUI just as you would click it with your mouse. The Enable GUI
Scripting check box is cleared by default unless you’ve selected the Enable Access
For Assistive Devices check box at the bottom of the Universal Access pane in System
Preferences. Unless you’ve turned on assistive devices, leave the Enable GUI Scripting
check box cleared for the moment.
● Set Up Actions Click this button to display the Folder Actions Setup window, which
you use to create folder actions by attaching a script to a particular folder. The script
can then run when you add an item to that folder (or when you remove an item).
Ask the Expert

26 AppleScript: A Beginner’s Guide
4. Click the Continue button. The script launches TextEdit (or activates TextEdit, if it is
already open), creates a new document, inserts sample paragraphs, and then formats
them with different fonts.
5. Close the document without saving changes, and then quit TextEdit, unless you were
using it.
You’re now read to start creating scripts with AppleScript. Turn the page.
Figure 2-9 You can quickly run a script from the Script menu on the Mac OS X menu bar.

27
Chapter 3
Creating Your
First Script

28 AppleScript: A Beginner’s Guide
Key Skills & Concepts
● Creating, editing, and saving a script
● Creating tell statements and tell blocks
● Adding comment lines and comment blocks
● Recording actions into a script
● Dealing with errors
● Wrapping lines of code
● Using a dictionary file to find the AppleScript terms you need
● Creating an application from a script
In this chapter, you’ll create your first script. You’ll learn how to work in AppleScript
Editor, create and save a script, build tell statements and tell blocks, and compile and run
the script. In creating the script, you’ll also learn how to open and arrange Finder windows
and how to launch, manipulate, and close other applications, using the TextEdit text editor
that comes with Mac OS X as the example.
The script you create opens a Finder window, resizes and repositions the window, and
changes it to show your preferred view and the contents of the Applications folder. The
script then launches TextEdit, makes it create a document, enters some standard text in it,
and displays the Save As dialog box so that you can name and save the document.
The chances that this script performs exactly the actions you want are slim and none
(and Slim’s out of the country just now), but you can use the techniques you learn in this
chapter to create a script that opens the folders and applications you want and positions
the windows where you prefer to have them on your Mac’s Desktop. So treat this script as
just a start, and modify it to meet your needs.
Opening AppleScript Editor
To get started creating the script, open AppleScript Editor. If you’ve added the AppleScript
Editor icon to the Dock, click the icon; otherwise, open the Applications folder, expand
the contents of the AppleScript folder, and then double-click the AppleScript Editor icon.

Chapter 3: Creating Your First Script 29
Creating tell Statements
To take an action in AppleScript, you use tell statements. A tell statement starts with the
verb tell, identifies the application or object, and then tells it what to do.
For example, the following statement tells the application Microsoft PowerPoint to
create a new document (a new presentation):
tell the application "Microsoft PowerPoint" to make new presentation
TIP
One peculiarity of AppleScript is that it allows you to use the word “the” freely in your
scripts. For example, the tell statement tell the application “Finder” to open the desktop has the
same effect as tell application “Finder” to open desktop. AppleScript ignores the word “the,”
so you can add it wherever you want if you find it helps you structure the commands.
(You can even go wild—the statement tell the application the “Finder” the to the open the
desktop has the same effect.) Technically, AppleScript uses “the” as a syntactic no-op
keyword—in other words, a keyword that does nothing except make the syntax more
natural.
You can also tell the application or object you’re addressing first to tell another
application or object to do something. For example, the following statement makes the
Finder apply column view in the front (foremost) Finder window:
tell application "Finder" to tell the front Finder window to set the
current view to column view
NOTE
The “front” Finder window is the one that’s foremost. If you click the Finder icon on
the Dock, Mac OS X displays all the open Finder windows that aren’t minimized. The
window that has the focus is the front window. If the windows overlap one another, you
can see that the front window is at the front.
TIP
AppleScript isn’t case-sensitive, so it doesn’t matter if you capitalize the commands and
names correctly. Generally, though, most people find scripts easier to read and edit if
they use standard capitalization or something close to it.

30 AppleScript: A Beginner’s Guide
Try This Opening a Finder Window
Showing the Documents Folder
In AppleScript Editor, enter a tell statement that opens the Documents folder. Follow these steps:
1. Type the following and then pause:
tell the ap
2. When Script Assistant suggests “application” for “ap,” press ESC or F5 (whichever you
find easier) to accept the suggestion.
3. Continue typing the following statement:
tell the application "Finder" to open home
4. Click the Compile button on the toolbar or press z-K to compile the script. (You can
also choose Script | Compile if you prefer to use the menus.) You’ll see the text of the
statement change from the New Text (Uncompiled) font and color (which by default
is magenta Courier) to the fonts and colors for compiled text. By default, the language
keywords (“tell,” “the,” and “to”) appear in blue Verdana Bold, the application
keywords (“application,” “open,” and “home”) appear in blue Verdana, and the value
(“Finder”) appears in black Verdana.
5. Click the Run button or press z-R to run the script. AppleScript Editor opens a Finder
window displaying the contents of your home folder. Admire the window briefly, and
then close it.
6. Edit the tell statement by adding the text shown in bold here so that it opens the
Documents folder in your home folder:
tell the application "Finder" to open folder "Documents" of home
7. Click the Run button on the toolbar or press z-R to run the script. This time, the script
opens a Finder window showing the contents of your Documents folder. When you run
an uncompiled script like this, AppleScript Editor automatically compiles it.
8. Run the script again. Notice that AppleScript Editor doesn’t open another window to the
Documents folder because the window you opened before is already showing this folder.
9. Now add another tell statement that closes all the open Finder windows. Press RETURN
to create a new line in AppleScript Editor, and then type this statement:
tell the application "Finder" to close every window
10. Click the Run button or press z-R to run the script. AppleScript Editor closes all the
Finder windows that are open.
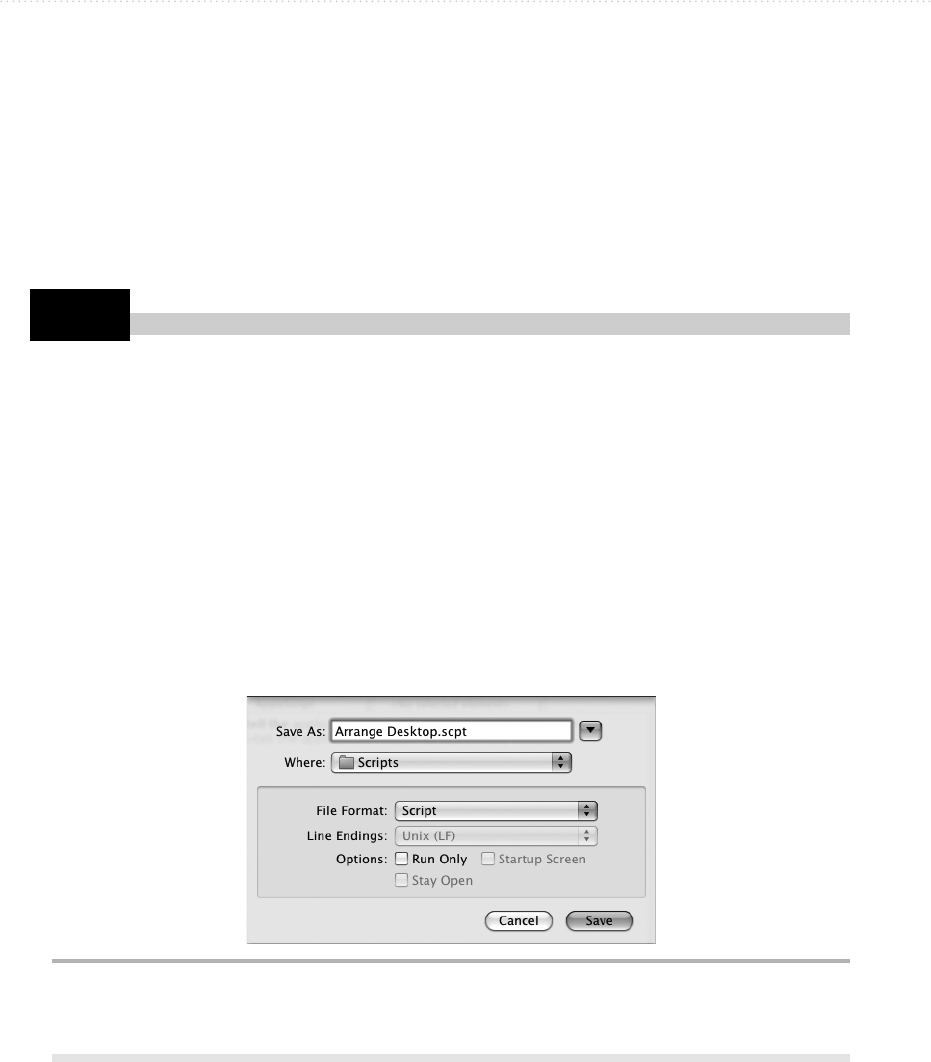
Chapter 3: Creating Your First Script 31
Try This
Saving a Script
As with most applications, you need to save your work in AppleScript Editor. The first
time you save a script, you choose the folder in which to save it, give the script a name,
and choose the file format and other options.
We’ll look at the file formats later in this chapter, but for now, save your script as
described in the Try This section.
Saving Your Script
Follow these steps to save your script:
1. Choose File | Save or press z-S to display the Save As dialog box (see Figure 3-1).
2. In the Save As text box, type the name for the script: Arrange Desktop.
3. Make sure the Where pop-up menu is set to your Scripts folder. If you need to check,
you may have to expand the dialog box by clicking the button to the right of the Save
As text box.
4. Choose Script in the File Format pop-up menu.
5. Make sure the Run Only check box is cleared. (It should be cleared by default.)
6. Click the Save button to save the script.
Figure 3-1 AppleScript Editor’s Save As dialog box lets you choose from among different file
formats. You can also choose to save a script as run-only (discussed later in this
chapter).

32 AppleScript: A Beginner’s Guide
Try This
Creating tell Blocks
When you need to tell the same application or object to take two or more actions, as your
script does with the Finder, you can use a tell block rather than a series of tell statements.
A tell block is simply an easier way of giving a sequence of commands to the same
application or object.
Creating a tell Block Manually
A tell block starts with the tell verb and the application or object to which you’re giving
the instructions, and ends with the statement end tell:
tell application "Finder"
end tell
Between the tell statement and the end tell statement, you enter each command on
its own line. You’ve already told AppleScript which application or object you’re working
with, so you don’t need to tell it again. You also don’t need to include the “to” part of the
instruction. For example, this tell block tells the Finder to open a window showing the
contents of your Documents folder and then tells it to close every Finder window:
tell the application "Finder"
open folder "Documents" of home
close every window
end tell
NOTE
Often, it’s handy to turn a tell statement into a tell block by pressing RETURN after the
name of the application or object and then adding the end tell statement at the end. If
AppleScript Editor gives the message “Syntax Error: Expected end of line but found end
of script” when you try to compile or run a script, it usually means you’ve missed out an
end tell statement.
Using a tell Block
Change the two tell statements in your script into a tell block. You can edit the statements
however you prefer, but here’s an example:
1. To start with, the statements look like this:
tell the application "Finder" to open folder "Documents" of home
tell the application "Finder" to close every window

Chapter 3: Creating Your First Script 33
2. Double-click the word to in the first statement to select it.
3. Press RETURN to replace the selected word with a carriage return so that the
statements look like this:
tell the application "Finder"
open folder "Documents" of home
tell the application "Finder" to close every window
4. In the second statement, select tell the application “Finder” to, and then press
DELETE.
tell the application "Finder"
open folder "Documents" of home
close every window
5. On a new line after the second statement, type end tell.
tell the application "Finder"
open folder "Documents" of home
close every window
end tell
6. Press z-K to compile the script. AppleScript Editor automatically indents the
statements in the tell block to make it easily readable:
tell the application "Finder"
open folder "Documents" of home
close every window
end tell
NOTE
You can place one tell block inside another tell block as needed. This is called
nesting tell blocks, and is useful for structuring your scripts clearly. AppleScript
Editor automatically indents each nested block farther so that you can distinguish
the blocks easily.
Using the Tell Application Pop-Up Menu
In AppleScript Editor in Snow Leopard, Apple introduced a new feature for creating tell
blocks, the Tell Application pop-up menu.
Once you have enabled this pop-up menu by selecting the Show “Tell” Application
Pop-Up Menu in Editing preferences, the Tell Application pop-up menu appears in the
navigation bar (see Figure 3-2).
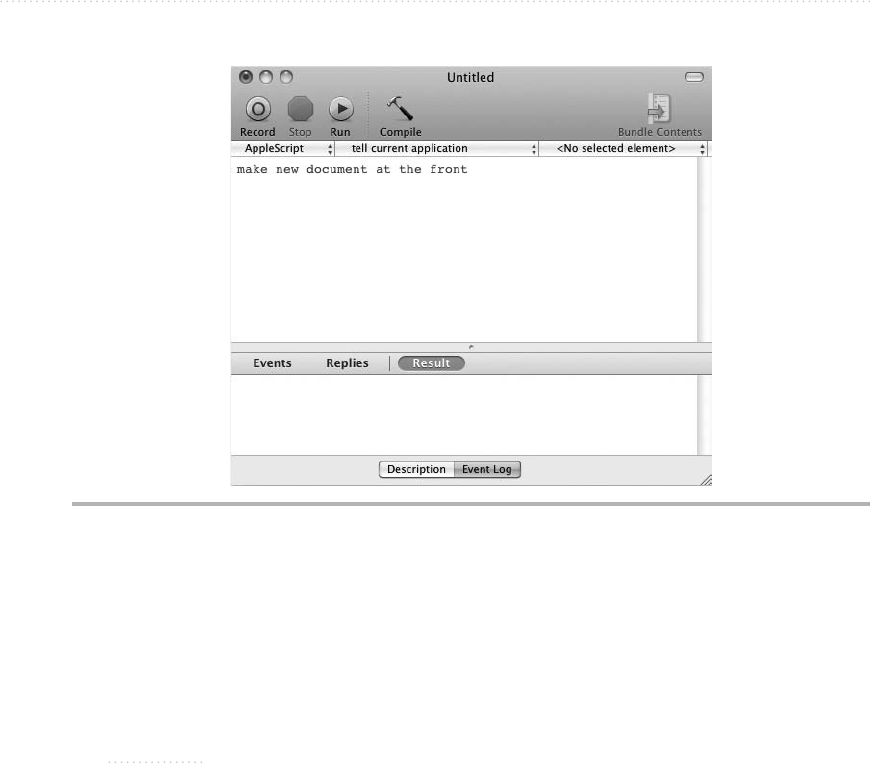
34 AppleScript: A Beginner’s Guide
You can then click this pop-up menu and choose the application to which you want to
direct the script (see Figure 3-3). This saves you from having to write a tell block around
your whole script while you’re working in AppleScript Editor.
NOTE
The Tell Application pop-up menu shows the applications you have added to
the Library window.
Adding Comments to Your Code
Often, it’s helpful to add notes to your code as you write a script—for example, noting
what works and what doesn’t, what you need to do next, and other approaches you’re
considering to getting the job done. When a script is complete, it’s a good idea to write
notes that make the script easy to understand for someone who’s never seen it before.
AppleScript calls such notes comments and lets you add them to your scripts in two
ways: as end-of-line comments and block comments.
Figure 3-2 You can place the Tell Application pop-up menu in the navigation bar by selecting
the Show “Tell” Application Pop-Up Menu in Editing preferences.
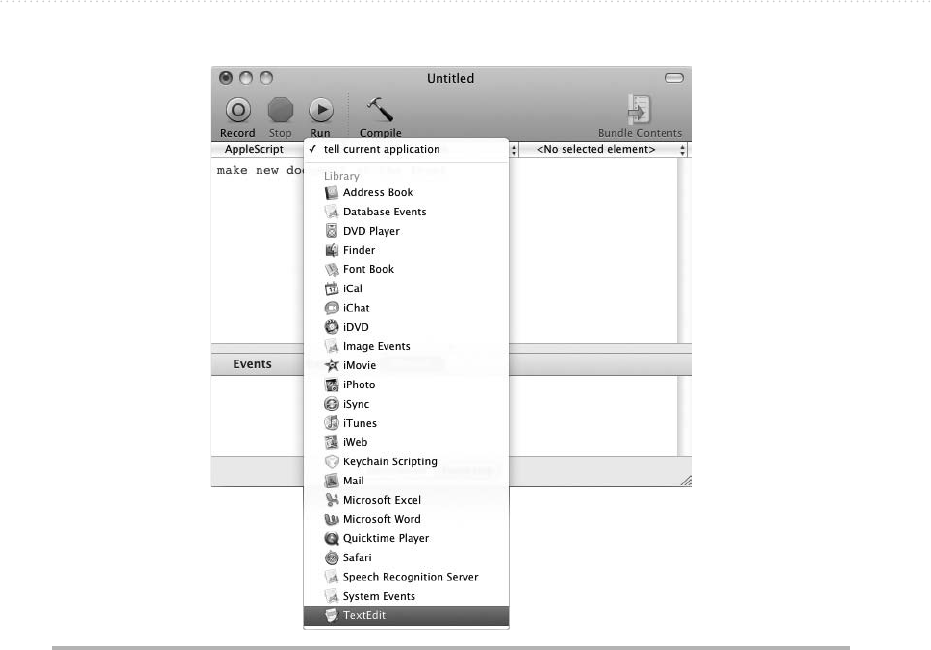
Chapter 3: Creating Your First Script 35
Creating End-of-Line Comments
The first way of creating a comment is to tell AppleScript that it has reached the end of the
line of code. This type of comment is called an end-of-line comment.
To create an end-of-line comment, type two hyphens at the beginning of a comment
line; add a space, if you like, to keep your code easy to read. For example:
-- this line is a comment
You can also use two hyphens to “comment out” a statement that you don’t want
AppleScript to execute. This is useful when you’re experimenting with code and need to
be able to prevent a command from running without actually deleting it from your code.
In the following example, everything after “Finder” is commented out because you’ve told
AppleScript that the end of the line occurs there.
tell application "Finder" -- to open folder "Documents" of home
Figure 3-3 Choose the application to which you want the script to apply.

36 AppleScript: A Beginner’s Guide
Try This Commenting Out a Line
Comment out the close every window statement in your script.
1. Click to place the insertion point at the beginning of the second line inside the tell block.
2. Type two hyphens and a space:
-- close every window
3. Press z-K or click the Compile button to compile the script. AppleScript Editor changes
the line to the comments color set in the Formatting preferences; by default, this color
is gray.
4. Press z-R or click the Run button to run the script. The script opens a Finder window
showing the Documents folder. Because the close every window statement is commented
out, it does not run.
Creating Block Comments
Instead of an end-of-line comment, you can create a block comment. A block comment is
a comment that appears as its own block—normally on multiple lines rather than a single
line, although you can create single-line block comments if you want. Block comments
are good for presenting chunks of information without the distraction of having the two
hyphens at the beginning of each line.
To create a block comment, type an opening parenthesis and an asterisk, the text of the
comment, and another asterisk and a closing parenthesis. For example:
(* Start a tell block to the Finder.
Open a window to the Documents folder.
Set the view to Cover Flow. *)
Q: Is it okay to use several end-of-line comments instead of a block comment?
A: Yes, it’s fine—although purists may look down at you.
If you prefer to use several end-of-line comments in sequence rather than create a
block comment, by all means do so. Generally, though, a block comment is easier to read.
One other thing while we’re talking about comments—you can start a block comment
after a statement of code on the same line if you like, but usually it’s much clearer if you
start the block comment on its own line.
Ask the Expert

Chapter 3: Creating Your First Script 37
Try This Creating a Comment Block
In your sample script, create a comment block at the beginning of the script.
1. Click before the beginning of the tell block and type this comment:
(* Start a tell block to the Finder.
Open a window to the Documents folder.
Set the view to Column view. *)
2. Press z-K or click the Compile button to compile the script. AppleScript Editor
changes the line to the comments color set in the Formatting preferences.
3. Press z-R or click the Run button to run the script. AppleScript Editor ignores the
comment and executes only the open folder "Documents" of home statement.
Recording Actions into a Script
To quickly create parts of a script, you can record actions into AppleScript Editor. You
open the script to which you want to add the actions, turn on recording, and then perform
the actions in the relevant application. AppleScript Editor writes down the AppleScript
commands for the actions.
Recording sounds like the perfect way to create scripts quickly, as it enables you to
perform the actions the usual way—interactively in the application—and either simply use
the resulting commands in AppleScript Editor or learn them easily and adapt them to your
needs. The problem is that only a few applications generate the necessary Apple Events
for recording to work.
Finder is one application that is recordable, and you’ll use it in a moment. Another
recordable application is BBEdit, the powerful text editor from Bare Bones software
(www.barebones.com).
Q: How can I find out whether an application is recordable by AppleScript Editor?
A: If you suspect an application may be recordable but don’t know for sure, you can find
out quickly enough: Just turn on recording in AppleScript Editor, and then perform a few
actions in the application—for example, clicking buttons on the toolbar or choosing menu
commands. If AppleScript Editor doesn’t notice that you’re performing actions in the other
application, you’ll know that you can’t record the actions.
Ask the Expert

38 AppleScript: A Beginner’s Guide
Try This Recording Actions: Repositioning and
Resizing the Finder Window
Record actions into AppleScript Editor by turning on recording and then resizing and
repositioning the Finder window. Follow these steps:
1. In AppleScript Editor, click on a new line after the end tell statement.
2. Click the Record button on the toolbar to start recording. You can also press z-SHIFT-R
or choose Script | Record.
3. Click the Finder window to activate it. You’ll see AppleScript Editor begin a tell block
and register commands for activating Finder, selecting the window, and establishing
where the Finder window is:
tell application "Finder"
activate
select Finder window 1
set position of Finder window 1 to {899, 152}
4. Drag the Finder window so that its upper-left corner is positioned where you want it.
This example uses the upper-left corner of the Mac’s screen, just below the menu bar.
5. Drag the resize handle in the lower-right corner of the Finder window to make the
window the size and shape you prefer.
6. Click the View button on the toolbar for whichever view you want to apply. This
example uses Column view. (Click the button even if the Finder window is already
showing the view you want.)
7. Click the Applications folder in the sidebar (or choose Go | Applications) to display the
Applications folder.
8. In the AppleScript Editor window, click the Stop button on the toolbar to stop
recording. You can also press z-. (z and the PERIOD key) or choose Script | Stop. When
you issue the Stop command, AppleScript Editor adds the end tell statement to close
the tell block.
9. The tell block you’ve recorded should look something like this:
tell application "Finder"
activate
select Finder window 1
set position of Finder window 1 to {899, 152}
set position of Finder window 1 to {1, 44}

Chapter 3: Creating Your First Script 39
set bounds of Finder window 1 to {1, 44, 800, 605}
set current view of Finder window 1 to column view
set target of Finder window 1 to folder "Applications" of
startup disk
end tell
10. Delete any extra statements that you’ve recorded accidentally. AppleScript Editor tries
to follow everything you do, so any extra click shows up as a command.
Examining the Recorded Code
Let’s look quickly at what happens in the code you recorded so that we know which parts
to keep and which parts to delete.
Activating an Application
The activate statement activates the Finder in AppleScript. This is the AppleScript
equivalent of you clicking the Finder button on the toolbar.
Because the Finder will already be activated by this point in the script, you can get rid
of this statement. (You’ll make this change in the next Try This section.)
Selecting the Finder Window
The select Finder window 1 statement selects the first Finder window. AppleScript
considers the open Finder windows to be arranged in a stack from front to back, numbered
by their index position. That means the frontmost Finder window is the first window, the
one behind it is the second, the next the third, and so on.
When you select a Finder window, you bring it to the front of the stack, making it the
first window; the previously first window is now second, and so forth. Similarly, if you
open a new Finder window, the Finder automatically puts that window at the front. So it’s
easy for things to get complicated when selecting Finder windows in scripts.
Because your script opens a Finder window, that window will already be at the top of
the stack, so you can delete this statement too.
Setting the Position of the Window
The set position of Finder window 1 to {899,152} statement positions the Finder window
by defining where its upper-left corner appears: 899 pixels from the left edge of the screen
and 152 pixels from the top edge (but see the nearby Caution for a complication).

40 AppleScript: A Beginner’s Guide
CAUTION
There are two complications when positioning Finder windows. First, the vertical
measurement is not from the top edge of the Finder window itself, as you’d expect,
but from the bottom edge of the Finder window’s title bar. This means you must add
22 pixels (the depth of the title bar) to the top measurement to place the Finder window
correctly. Second, if you’re placing the Finder window on the Mac’s primary screen, you
must also allow another 22 pixels at the top of the screen for the Mac OS X menu bar.
So normally you need to add 44 pixels (22 + 22) to the vertical offset measurement to
place a Finder window at the top of the screen.
In fact, that first set position statement is the Finder registering the window’s initial
position in case you want to be able to duplicate it; you can delete this statement. The
second set position statement (set position of Finder window 1 to {1, 44}) is the one that
positions the Finder window where you want it.
Q: What happens to the positioning if my Mac has a second monitor attached?
A: The coordinates start from the upper-left corner of your Mac’s primary monitor—the
monitor on which the menu bar and the Dock appear. You can change which monitor
is the primary monitor by dragging the menu bar from one monitor to the other on the
Arrangement tab of Displays preferences.
If you have a secondary monitor positioned to the left of the primary monitor, use
negative horizontal values to position windows on it (for example, –800 is 800 pixels to
the left of the 0 position). If you have a secondary monitor positioned above the primary
monitor, use negative vertical values to position windows on it.
Ask the Expert
Resizing the Window
To resize a window, you tell the Finder to set its bounds. So the set bounds of Finder
window 1 to {1, 44, 800, 605} statement positions the window like this:
● The window’s left border appears 1 pixel from the left edge of the screen.
● The window’s top border appears just below the bottom edge of the Mac OS
X menu bar (allowing 22 pixels for the menu bar and 22 pixels for the Finder
window’s title bar).
● The window’s right border appears 800 pixels across the screen from the left edge.
● The window’s bottom border appears 605 pixels down the screen from the top edge.

Chapter 3: Creating Your First Script 41
Try This
Changing the View
Each Finder window can be in any of four views: Icon view, List view, Column view,
or Cover Flow view. To set the view, you use a set current view to statement and the
appropriate view term from Table 3-1. For example, a set current view to column view
statement sets the view to Column view.
NOTE
Setting a window’s bounds lets you both resize and reposition the window. Just position
the borders in the appropriate places.
Editing the Script
Now edit your script to integrate the recorded statements from the second tell block
into the first tell block and to create a nested tell block that works with the front Finder
window. Follow these steps:
1. To start with, your script should look like this, with minor variations for the window
positions and the view you chose:
(*Start a tell block to the Finder.
Open a window to the Documents folder.
Set the view to Column view. *)
tell the application "Finder"
open folder "Documents" of home
--close every window
end tell
tell application "Finder"
activate
select Finder window 1
set position of Finder window 1 to {899, 152}
set position of Finder window 1 to {1, 44}
Table 3-1 AppleScript Terms for the Finder’s Four Views
View Finder Command Finder Shortcut Term
Icon view View | As Icons z-1icon view
List view View | As List z-2list view
Column view View | As Columns z-3column view
Cover Flow view View | As Cover Flow z-4flow view
(continued)

42 AppleScript: A Beginner’s Guide
set bounds of Finder window 1 to {1, 44, 800, 605}
set current view of Finder window 1 to column view
set target of Finder window 1 to folder "Applications" of
startup disk
end tell
2. Delete the lines shown in boldface (from the --close every window comment to the
first set position of Finder window 1 statement) to collapse the script to a single tell
block:
(*Start a tell block to the Finder.
Open a window to the Documents folder.
Set the view to Column view. *)
tell the application "Finder"
open folder "Documents" of home
set position of Finder window 1 to {1, 44}
set bounds of Finder window 1 to {1, 44, 800, 605}
set current view of Finder window 1 to column view
set target of Finder window 1 to folder "Applications" of
startup disk
end tell
3. Delete the set position of Finder window 1 statement as well. You don’t need this
statement because the set bounds of Finder window 1 statement both resizes and
positions the window.
4. Create a nested tell block to deal more neatly with all the statements that manipulate
Finder window 1. The boldfaced statements are the ones that have changed:
(*Start a tell block to the Finder.
Open a window to the Documents folder.
Set the view to Column view. *)
tell the application "Finder"
open folder "Documents" of home
tell the front Finder window
set bounds to {1, 44, 800, 605}
set current view to column view
set target to folder "Applications" of startup disk
end tell
end tell
5. Press z-K or click the Compile button on the toolbar to compile the script. AppleScript
Editor automatically indents the nested tell block so that it is easy to read:
(*Start a tell block to the Finder.
Open a window to the Documents folder.
Set the view to Column view. *)
tell the application "Finder"

Chapter 3: Creating Your First Script 43
Try This
open folder "Documents" of home
tell the front Finder window
set bounds to {1, 44, 800, 605}
set current view to column view
set target to folder "Applications" of startup disk
end tell
end tell
6. Save the script (press z-S), but don’t run it just yet.
Dealing with Errors
When you tell AppleScript exactly what to do, and it is able to interpret each of your
commands correctly, your script runs perfectly. But all too often, you’ll run into a problem
that causes an error. When you do, AppleScript displays an error message telling you
that a problem has occurred. You’ll then need to correct the code to make the script run
correctly.
Resolving an Error in Your Code
Try dealing with an error that occurs in a script. Follow these steps:
1. Click the Run button or press z-R to run your script. The Finder window opens, moves
to the specified position, and changes to your chosen view—but then an error occurs
(see Figure 3-4).
Figure 3-4 AppleScript warns you when an error occurs in a script you’re running.
(continued)

44 AppleScript: A Beginner’s Guide
2. Read the error message—for example: Can’t set startup disk of Finder window id 7429
to folder “Applications” of startup disk of Finder window 1. Note its contents and
where it occurs. The problem is that the tell statement needs to go to the Finder rather
than to the front window.
3. Click the OK button to dismiss the dialog box.
4. Edit the problem statement. You will often need to look up the solution to errors;
Chapter 10 offers suggestions on where to look. For now, move the set target to
folder "Applications" of startup disk statement out of the nested tell block, put it
in the outer tell block, and spell out the window that it is to affect. The moved and
revised statement is shown in boldface in the next listing.
(*Start a tell block to the Finder.
Open a window to the Documents folder.
Set the view to Column view. *)
tell the application "Finder"
open folder "Documents" of home
tell the front Finder window
set position to {1, 44}
set bounds to {1, 44, 800, 605}
set current view to column view
end tell
set target of the front Finder window to folder "Applications"
of startup disk
end tell
5. Compile the script, run it, and make sure it works without raising an error.
6. Save the changes to the script (for example, press z-S).
Wrapping a Line of Code
Lines of code can easily grow longer than the width of the AppleScript Editor window—
but AppleScript Editor gives you an easy way to avoid scrolling left and right to see your
statements in their entirety.
If you’ve selected the Wrap Lines check box in Editing preferences, AppleScript
Editor automatically wraps lines of code to fit within the window. And if you selected
the Indent Wrapped Lines By check box, AppleScript Editor automatically indents the
wrapped lines by however many spaces you chose. This enables you to see instantly
which lines of code are wrapped.

Chapter 3: Creating Your First Script 45
Try This
If you’ve cleared the Wrap Lines check box, you can break a line of code manually
by placing the insertion point where you want to break the line and then pressing OPTION-
RETURN. AppleScript Editor inserts the continuation character to show that the line has
been broken visually but continues logically. The continuation character appears as a “not
sign” symbol, a horizontal line with a downward hook at the right end: the ¬ character. If
you want to insert this character without breaking the line, press OPTION-L instead.
TIP
Even if you’ve turned wrapping on, you can break lines of code manually as needed.
For example, you may find it better to break a line of code at the most logical point
rather than have AppleScript Editor break it at the point dictated by the window width.
Breaking Lines of Code Manually
Try breaking the long set target statement near the end of the script onto two lines.
Position the insertion point at a handy place, such as after the front Finder window,
and then press OPTION-RETURN. AppleScript Editor inserts the continuation character and
breaks the line, indenting it to the same level:
end tell
set target of the front Finder window ¬
to folder "applications" of startup disk
end tell
Press z-K or click the Compile button to compile the script, and AppleScript Editor
indents the continued line to the next level so that you can more easily see that it is
continued:
end tell
set target of the front Finder window ¬
to folder "applications" of startup disk
end tell
So far, the script opens a Finder window, resizes and repositions it, changes the view,
and then displays the contents of another folder. Now let’s make the script open TextEdit,
create a new document, add some text to it, and save it automatically. To find the commands
needed, we’ll open the AppleScript dictionary file for TextEdit.
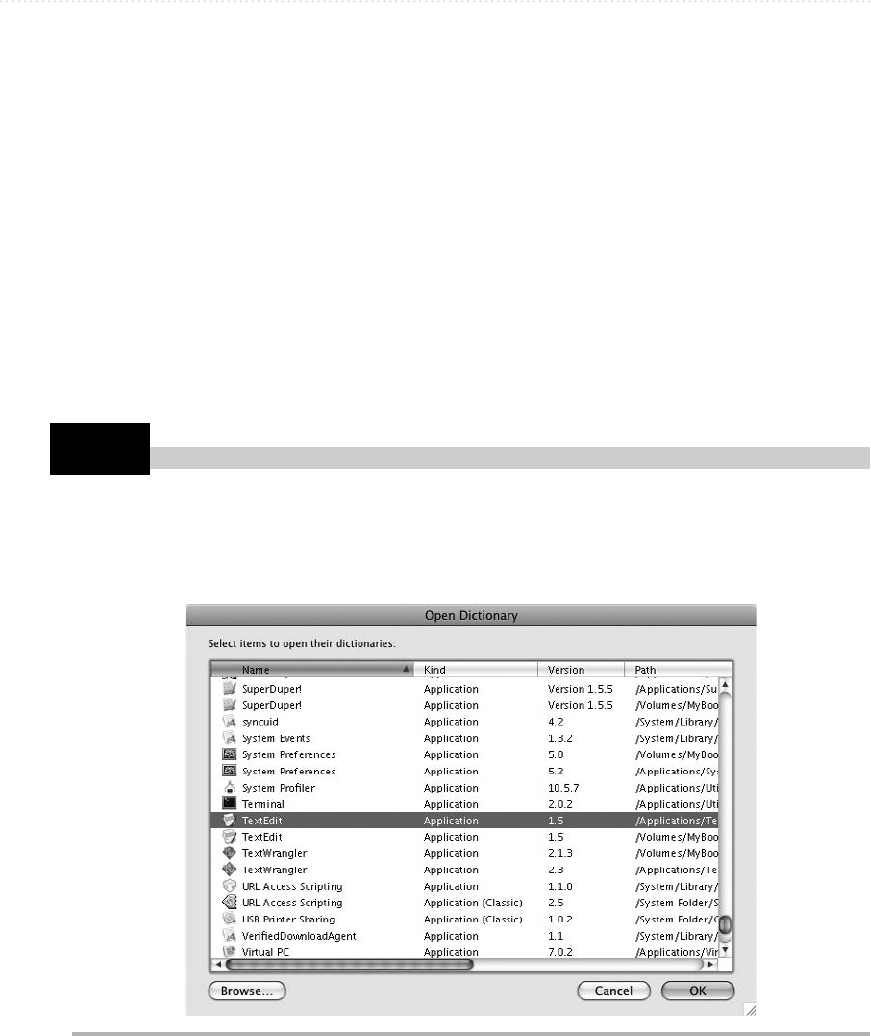
46 AppleScript: A Beginner’s Guide
Try This
Opening a Dictionary File
To find out the AppleScript verbs, classes, and properties you need to control an
application, you open the application’s AppleScript dictionary. The dictionary explains the
AppleScript structure of the application and how to use it.
You can open an application’s dictionary file in either of two ways:
● Use the File | Open Dictionary command from AppleScript Editor. This is the
normal and more formal way. You’ll probably want to use this way most of the time.
● Drag the application’s icon and drop it on the AppleScript Editor icon. This way works
well when the AppleScript Editor icon appears on the Dock (as it does when AppleScript
Editor is open) and you’ve got a Finder window open to the Applications folder.
Opening the Dictionary File for TextEdit
To open the dictionary file for TextEdit, follow these steps:
1. In AppleScript Editor, choose File | Open Dictionary or press z-SHIFT-O to display the
Open Dictionary dialog box (see Figure 3-5).
Figure 3-5 In the Open Dictionary dialog box, either pick the application from the list or click
the Browse button to locate it elsewhere.
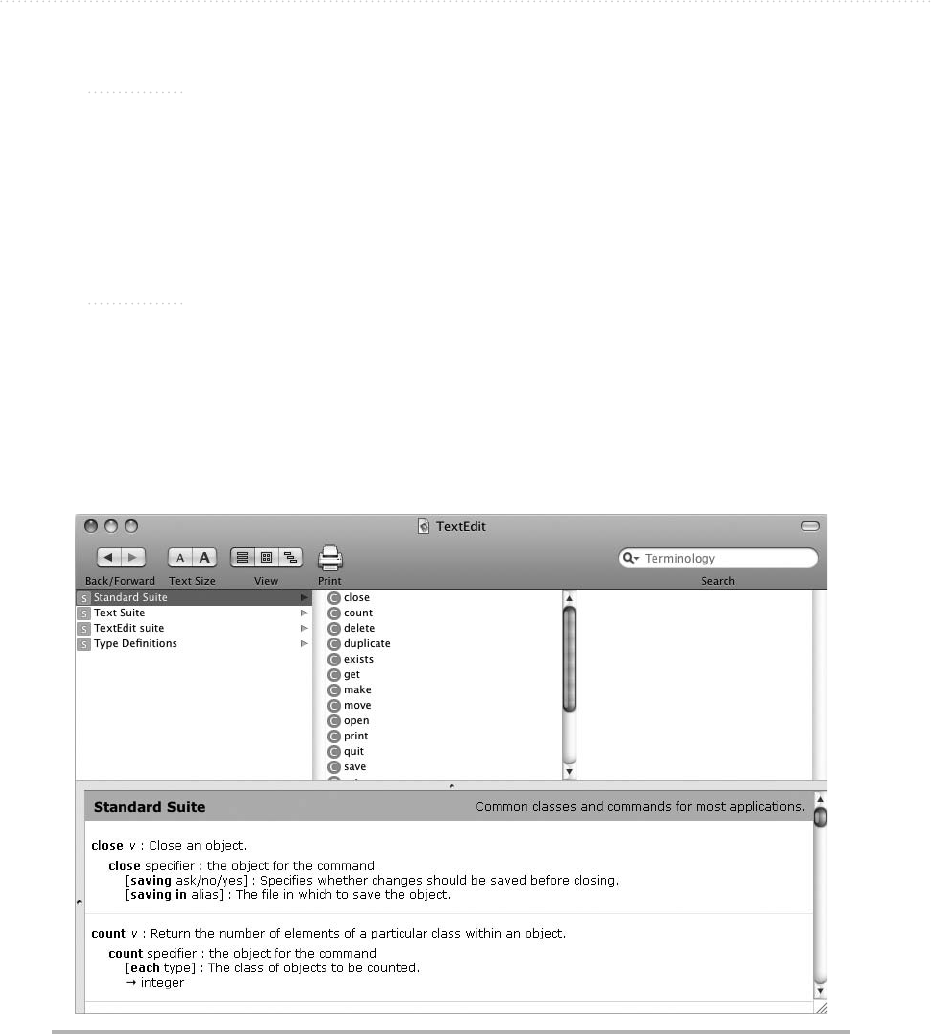
Chapter 3: Creating Your First Script 47
NOTE
If you find two or more listings for the application, choose the one with the highest
version number (in the Version column). If two or more versions have the same number,
pick the one in your Applications folder over any others.
2. Select the entry for TextEdit, and then click the OK button. The TextEdit dictionary
file opens in a AppleScript Editor window that bears the application’s name, so you
can easily see which dictionary it is (see Figure 3-6).
TIP
You can open multiple dictionary files at once from the Open Dictionary dialog box.
Click the first dictionary file, and then z-click each of the others you want; click the OK
button when you’ve finished choosing. Alternatively, click the first dictionary file and
then SHIFT-click the last to select a range of files.
Like iTunes, the Dictionary Viewer window has three columns in the upper part of
the window for browsing through its contents. The main section of the window is the
dictionary pane, which shows the definition for the selected term.
Figure 3-6 Once you’ve opened the TextEdit dictionary file, you can look up the commands,
classes, and properties you need. (continued)

48 AppleScript: A Beginner’s Guide
Try This
If AppleScript Editor opens the dictionary file in a small window, expand it to a decent
size so that you can see what you’re doing. Zoom it to fill the screen if you prefer.
You can resize the different areas of the window by dragging the divider bars that
separate them. For example, if you want to have more space in the browsing area, click
the separator bar above the dictionary pane and drag it downward.
Finding the Terms You Need
As you’ll probably remember from the PowerPoint example near the beginning of this
chapter, all you need to do to launch an application and create a new document is give the
command to make a new document—for example:
tell application "TextEdit" to make new document
Sure enough, when you run this command in a script, AppleScript activates TextEdit,
if it’s already running; if TextEdit isn’t running, AppleScript launches TextEdit and then
activates it.
But to get beyond this, we’ll use the dictionary. Let’s start by looking up the make
command.
Using the Dictionary File
We’ll look at dictionary files in more detail in the upcoming chapters. For now, follow
these steps to find the commands needed and to enter them in the script:
1. Make sure Standard Suite is selected in the left column of the three and that the
leftmost of the three View buttons on the toolbar is selected.
2. In the second column, click the make command to display its information in the
dictionary pane (see Figure 3-7), which tells us this:
● The new parameter is what we need to make a new object, such as the new
document we want to create. This parameter has no brackets around it, which
means that it’s required.
● The at parameter lets you choose where to insert the new object—for example, at
the front or at the back of the TextEdit stack of windows. This parameter appears
in brackets, which means it’s not required; we’ll just let TextEdit place the new
document in a window at the front.
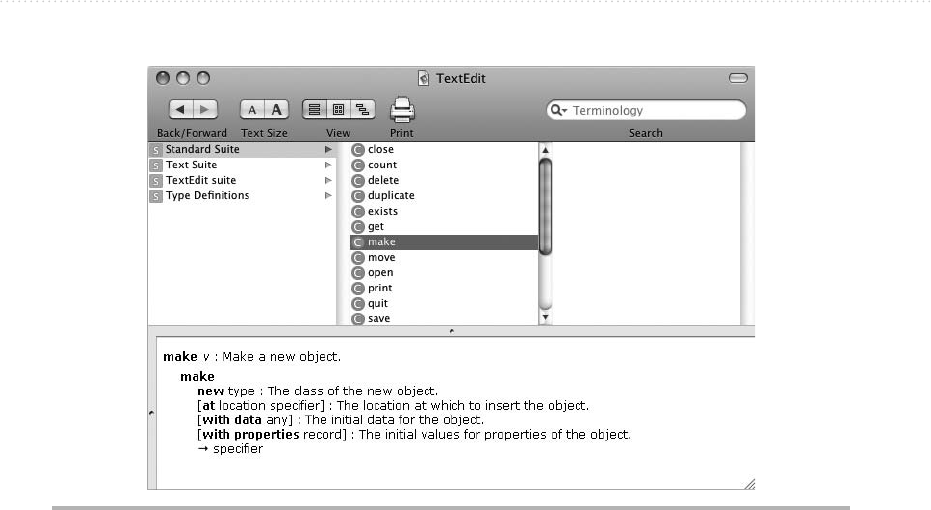
Chapter 3: Creating Your First Script 49
● The with data parameter lets you place initial data in the object. This parameter is
optional, too, and we won’t use it either.
● The with properties parameter lets you set properties for the new object. This
parameter is also optional and one we won’t use right now.
3. Click in the main AppleScript Editor window and comment out all the Finder
commands by entering (* (an opening parenthesis and an asterisk) before the first
tell statement and *) (an asterisk and a closing parenthesis) after the last end tell
statement. You’re commenting out these statements so that they don’t run while you’re
creating and testing the TextEdit part of the script.
4. Now create a tell block for TextEdit at the end of your script:
tell the application "TextEdit"
end tell
5. Inside the tell block, add a make new document statement, as shown in boldface here:
tell the application "TextEdit"
make new document
end tell
Figure 3-7 The dictionary viewer shows the selected item’s information in the dictionary pane.
(continued)
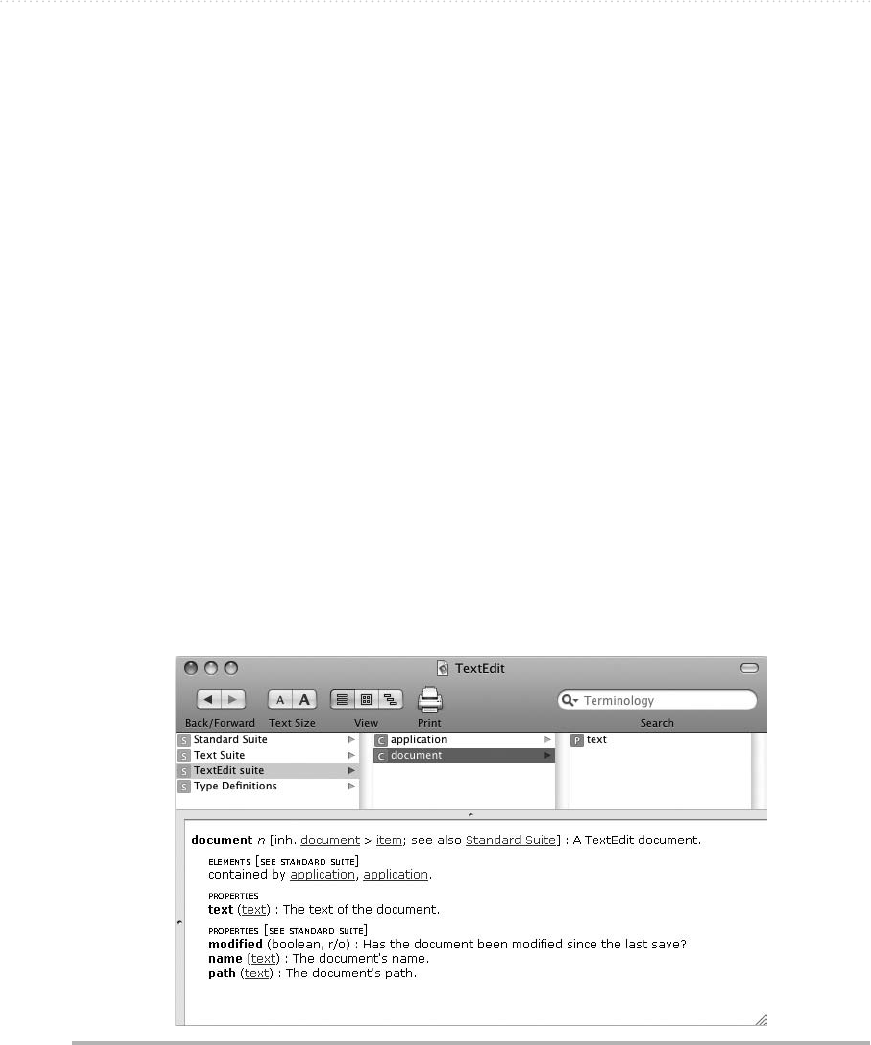
50 AppleScript: A Beginner’s Guide
6. Now click the TextEdit Suite item in the left column of the dictionary viewer, and
then click the document item in the second column to display information about the
document class. Figure 3-8 shows the information you’ll see.
7. The property we’re interested in here is the text property, which contains the text of
the document. Set the text property to assign text to the front document. The text you
assign is a string that includes two return characters, which break the text into three
paragraphs.
set the text of the front document to "Latest Report" & return ¬
& "Here is the latest news from the front." & return & "Sales
have doubled!"
8. Next we need to look up the properties for the paragraph class to see how TextEdit
lets us manipulate it. Click in the Search box in the upper-left corner of the dictionary
viewer window and type parag. The dictionary viewer window displays results as you
type.
9. In the list of results, click the paragraph class—the one with the white C in a purple box
to its left. The dictionary pane displays the information on the class (see Figure 3-9). As
you can see, there’s a color property that sets the font’s color, a font property that sets
the font’s name (for example, Arial or Times New Roman), and a size property that sets
the font size in points.
Figure 3-8 The document class includes a text property that contains the text of the document.
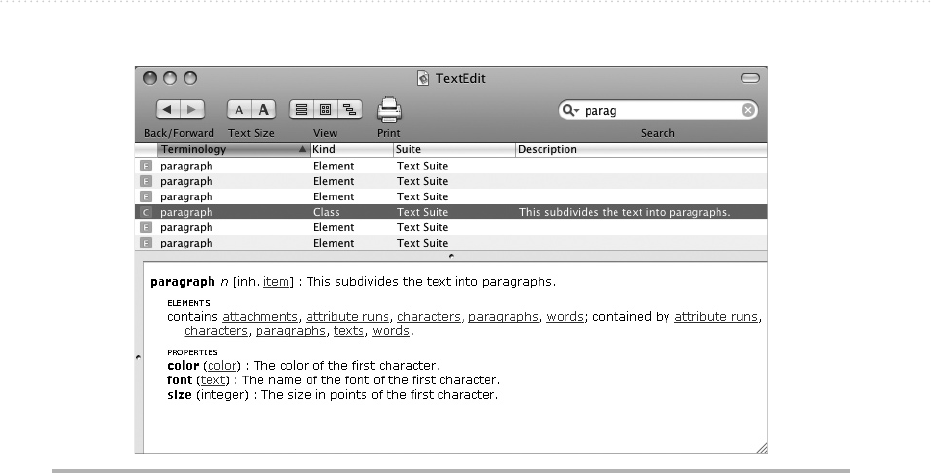
Chapter 3: Creating Your First Script 51
10. Start a tell block to the front document like this:
tell application "TextEdit"
make new document
set the text of the front document to "Latest Report" & return ¬
& "Here is the latest news from the front." & return ¬
& "Sales have doubled!"
tell the front document
end tell
11. Within the tell block to the front document, insert a nested tell block to the first
paragraph that sets the font property and the size property, as shown in boldface here:
tell application "TextEdit"
make new document
set the text of the front document to "Latest Report" & return ¬
& "Here is the latest news from the front." & return ¬
& "Sales have doubled!"
tell the front document
tell the first paragraph
set the font to "Arial Bold"
set the size to 18
end tell
end tell
end tell
Figure 3-9 The paragraph class contains information on the properties of the paragraph in
TextEdit.
(continued)

52 AppleScript: A Beginner’s Guide
12. After the end tell statement for the first paragraph, insert another nested tell block
to the second paragraph that sets the font property and the size property, as shown in
boldface here:
tell application "TextEdit"
make new document
set the text of the front document to "Latest Report" & return ¬
& "Here is the latest news from the front." & return ¬
& "Sales have doubled!"
tell the front document
tell the first paragraph
set the font to "Arial Bold"
set the size to 18
end tell
tell the second paragraph
set the font to "Arial"
set the size to 12
end tell
end tell
end tell
13. Set the bounds of the front TextEdit window by using the same technique you learned
earlier in this chapter for the Finder window, as shown in boldface here:
tell application "TextEdit"
make new document
set the text of the front document to "Latest Report" & return ¬
& "Here is the latest news from the front." & return ¬
& "Sales have doubled!"
tell the front document
tell the first paragraph
set the font to "Arial Bold"
set the size to 18
end tell
tell the second paragraph
set the font to "Arial"
set the size to 12
end tell
end tell
set the bounds of the front window to {800, 22, 1400, 822}
end tell
14. Now all that remains is to save the document. Type save into the Search box in the
dictionary viewer window to find the information about the save verb. As you can see
in Figure 3-10, save takes an optional as parameter to specify which file type to use
and an optional in parameter to specify the filename (and the folder path).
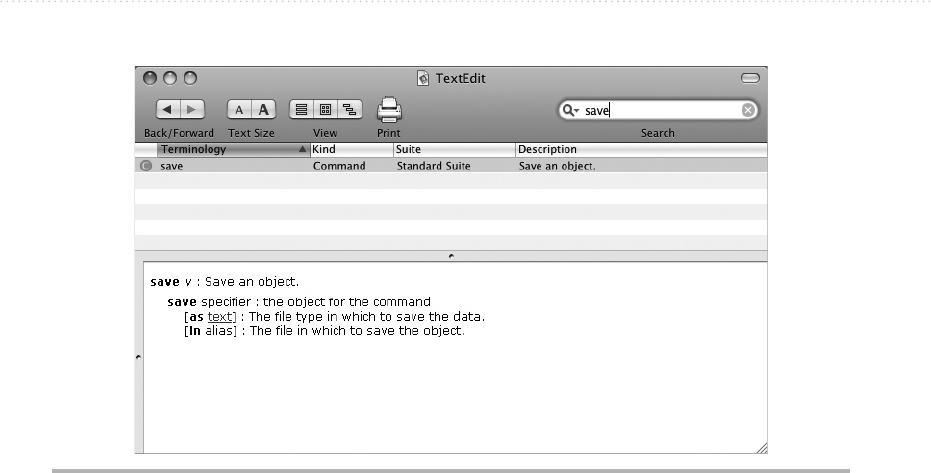
Chapter 3: Creating Your First Script 53
15. Both of these parameters are optional, so you can use the save verb without either,
in which case TextEdit prompts the user to enter the filename and choose the folder
path if the document has never been saved. That’s the behavior we’ll use here, so add
a save the front document statement before the final end tell statement in the script,
as shown in boldface here:
tell application "TextEdit"
make new document
set the text of the front document to "Latest Report" & return ¬
& "Here is the latest news from the front." & return ¬
& "Sales have doubled!"
tell the front document
tell the first paragraph
set the font to "Arial Bold"
set the size to 18
end tell
tell the second paragraph
set the font to "Arial"
set the size to 12
end tell
end tell
set the bounds of the front window to {800, 22, 1400, 822}
save the front document
end tell
Figure 3-10 The TextEdit dictionary shows that the save verb takes two parameters, both of
which are optional.
(continued)

54 AppleScript: A Beginner’s Guide
16. Uncomment the Finder part of the script by removing the (* from before the first tell
statement and the *) from after the last Finder-related end tell statement. Your script
should now look like this (with minor variations in the bounds of the windows and the
view used in the Finder):
tell the application "Finder"
open folder "Documents" of home
tell the front Finder window
set bounds to {1, 44, 836, 605}
set current view to column view
end tell
set target of the front Finder window to ¬
folder "Applications" of startup disk
end tell
tell application "TextEdit"
make new document
set the text of the front document to "Latest Report" & return ¬
& "Here is the latest news from the front." & return ¬
& "Sales have doubled!"
tell the front document
tell the first paragraph
set the font to "Arial Bold"
set the size to 18
end tell
tell the second paragraph
set the font to "Arial"
set the size to 12
end tell
end tell
set the bounds of the front window to {800, 22, 1400, 822}
save the front document
end tell
17. Press z-S to save your changes to the script.
18. Press z-R to run the script. When TextEdit displays the Save As dialog box, type a
name for the document and choose the folder in which to save it.
NOTE
If you click the Cancel button in the Save As dialog box, AppleScript displays an error
message. We’ll look at how to handle errors in Chapter 10.

Chapter 3: Creating Your First Script 55
Turning a Script into an Application
To make your script easy to run, you can turn it into a usable application and put an icon
for it somewhere handy—for example, on the Dock.
AppleScript Editor enables you to save a script in the five different formats explained
in Table 3-2.
Table 3-2 File Formats in Which AppleScript Editor Can Save Scripts
Script Format Explanation Use This Format When
Script This is the basic format for scripts
you run in AppleScript Editor or
from the Scripts menu.
You’re creating a script, or you
have a finished script that you want
to run from the Scripts menu.
Application This creates an executable
application that you can run
on any Mac. You can include a
startup screen showing the script’s
description, make the script read-
only, and choose to leave it open
after it finishes running.
You’ve created a script that doesn’t
use any external components (such
as documents or graphics) and are
ready to distribute it.
Script Bundle This creates a script that includes
any external components needed,
such as graphics, sounds, or movies.
You’ve created a script that needs
external components but that you
want to run from the Script menu
rather than as an executable
application.
Application Bundle This creates an executable
application that you can run on any
Mac. The application includes any
external components needed, such
as graphics, movies, or sounds.
You’ve created a script that uses
external components, and you’re
ready to distribute it.
Text This contains the uncompiled text of
the script.
You need to create a text-only
version of the script so that you can
edit it in a word processor or text
editor.

56 AppleScript: A Beginner’s Guide
Try This Making an Application from Your Script
and Adding It to the Dock
Follow these steps to add a description to your script, make an application from it, and add
the application to the Dock so that you can run it easily:
1. In AppleScript Editor, click the Description button at the bottom (unless it’s selected
already) to display the Description pane.
2. Type a description of what the script does, such as this:
This application opens, positions, and resizes a Finder window, and
then creates a document in TextEdit.
3. Press z-S or choose File | Save to save the script with the description.
4. Press z-SHIFT-S or choose File | Save As to display the Save As dialog box.
5. Open the File Format pop-up menu and choose Application.
6. Select the Startup Screen check box.
7. Make sure that the Run Only check box and the Stay Open check box are both cleared.
(These check boxes will normally be cleared by default.)
8. If you want, choose the folder in which to save your scripts. AppleScript Editor
automatically suggests the current folder, which will normally be your ~/Library/
Scripts/ folder, but you may prefer to use another folder.
Q: When I’m saving a script in the Script format, what happens if I select the Run Only
check box?
A: The code vanishes into thin air…
More seriously: When you save a script in the Script format, select the Run Only
check box if you want to prevent the commands in the script from being visible.
This sounds odd, but it’s useful when you need to distribute a script but you don’t
want anybody to be able to see how it works. Use this run-only option only for versions of
scripts that are ready for distribution, not for working versions or reference versions that
you need to be able to read and edit.
Ask the Expert
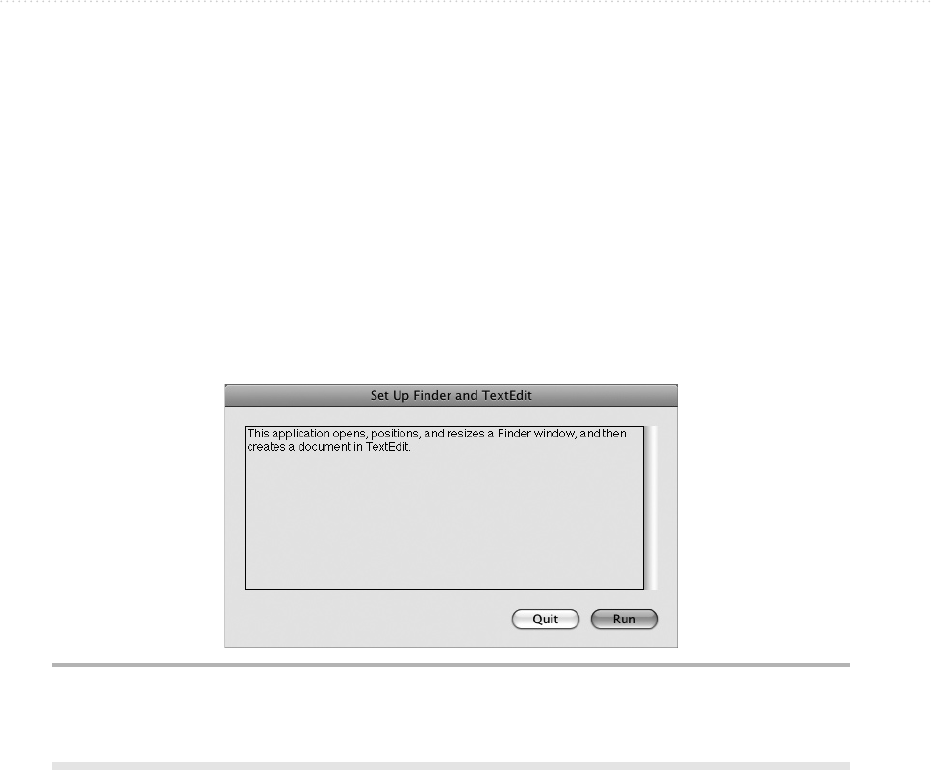
Chapter 3: Creating Your First Script 57
9. Click the Save button. AppleScript Editor closes the Save As dialog box and creates
the application.
10. Open a Finder window to the folder in which you saved the script.
11. Drag the icon for the script to the applications area of the Dock (the area to the left of
the divider bar, or above the divider bar if you’ve positioned the Dock on the left side
or right side of the screen).
12. Click the new Dock icon to run the application. The application displays its startup
screen (see Figure 3-11).
13. Click the Run button to run the application.
Figure 3-11 The startup screen for a script application lets the user choose whether to run the
script or quit it.
This page intentionally left blank

Part II
Learning Essential
AppleScript Programming
Techniques
This page intentionally left blank

61
Chapter 4
Working with Variables,
Classes, Operators,
and Coercions

62 AppleScript: A Beginner’s Guide
Key Skills & Concepts
● Working with variables
● Understanding AppleScript’s data types
● Using operators to perform operations and comparisons
● Understanding AppleScript’s classes
● Changing data from one type to another
Often, you’ll need to store data temporarily in your scripts so that you can use it later.
To do so, you use variables. For example, instead of asking the user to input his or her
name at each point you need it in the script, you can ask for the user’s name one time via an
input box, store the result in a variable, and then insert that variable throughout the script.
In this chapter, you’ll learn how to declare variables, assign data to them, and use them
in your code. You’ll also learn how to use AppleScript’s operators to perform operations
(such as addition or division) or to make comparisons (such as checking whether one
value is greater than or equal to another value). Finally, I’ll explain about the different
classes of objects that AppleScript provides and teach you to change data from one type to
another.
Working with Variables
A variable is a named area in memory in which you can store an item of data—for example,
your company’s name, the date two months ago, or the hundreds of thousands of dollars
your company has lost since that date.
When you need to store data during a script, use a variable. You can then retrieve
the contents of the variable whenever you need to use the information, or overwrite the
contents of the variable with new information if needed.
Understanding the Seven Data Types
When you create a variable, you can assign to it any of seven types of data. Table 4-1
explains these data types with examples.
Chapter 4: Working with Variables, Classes, Operators, and Coercions 63
When you’re working with AppleScript, you don’t normally need to specify the data
type of a variable explicitly. Instead, AppleScript automatically works out the data type
from the data you assign to the variable and assigns the appropriate data type.
For example, say you create a variable like this:
set IsUserSane to true
From the true value that you assign to the variable, AppleScript infers that the variable
should be Boolean—either true or false—and so gives the variable the Boolean type.
NOTE
If you want to assign the literal string “True” or “False” to a variable, put the string in
quotes. AppleScript then infers that the variable should be a string variable.
Similarly, if you assign a string of text to a variable, AppleScript automatically makes
it a string variable:
set myUsername to "Bill"
Creating a Variable
All you have to do to create a variable is to use a set command to specify a name for it
and assign the data to it. For example, the following statement creates the variable named
myGreeting and assigns the string "Good morning!" to it:
set myGreeting to "Good morning!"
Data Type Data in the Variable Example or Explanation
Boolean Only true or false true
Integer A whole number (with no decimal places) 10
Real A double-precision number (with decimal
places)
39282.87270
Date A floating-point number that has the date
before the decimal point and the time
after it
AppleScript lets you retrieve various parts
of the date—for example, the year, the
month, the day, or the time.
List Any quantities that you enter between
braces and separate with commas
{"San Francisco", "Oakland", "Hayward",
"San Jose"}
Record A list of pairs of keys and values set client to {name:"Industrial Amalgams",
city:"City of Industry"}
String Text enclosed within double quotation
marks ("")
set prompt to "Save the document?"
Table 4-1 AppleScript Data Types for Variables

64 AppleScript: A Beginner’s Guide
After you create a variable in a script, the variable retains its contents—the data you
assign it—unless you change the contents by assigning other data. You can do this in
several ways, as you’ll see later in this chapter.
Understanding the Difference Between
the set Command and the copy Command
The examples shown so far in this chapter have used the set command to create a variable
and assign data to it. But there’s also another command you can use to create a variable
and shovel data into it—the copy command.
For most purposes, the copy command has the same effect as the set command, but it
has a different syntax—in effect, it’s the set command’s syntax in reverse. For example,
instead of using set myGreeting to "Hello", you can use the copy command, like this:
copy "Hello" to myGreeting
The result of this copy command is to create a variable named myGreeting whose
contents are the string "Hello". For general instances like these, you can use the set
command and the copy command more or less interchangeably.
But the difference between the two commands becomes important when you’re creating
a variable that contains a date, a list, a record, or a script object. Here’s the difference:
● If you use a set command, AppleScript assigns to the variable a reference to the object.
The reference is a pointer that means the variable contains whatever the object contains.
● If you use a copy command, AppleScript assigns to the variable a separate copy of the
object. This copy is independent of the original—so if the original object changes after
you use the copy command, the variable contains an object with different values than
the original object.
This can lead to confusion if you set two or more variables to point to the same object.
For example, the following code snippet creates a variable named CompanyOffices and
assigns a list of three cities to it: Little Rock, Paris, and Albuquerque. It then creates a
variable named Destinations and uses a set command to assign to it the CompanyOffices
object. It then changes the first item in the Destinations variable and displays a dialog box
showing the first item in the CompanyOffices variable. You’ll learn about dialog boxes in
detail in Chapter 8.
set CompanyOffices to {"Little Rock", "Paris", "Albuquerque"}
set Destinations to CompanyOffices
tell Destinations to set {item 1} to {"Cincinnati"}
display dialog item 1 of CompanyOffices

Chapter 4: Working with Variables, Classes, Operators, and Coercions 65
When you run this code, the dialog box shows Cincinnati rather than Little Rock.
Changing the Destinations variable also changes the CompanyOffices variable, because
both variables point to the same object as a result of the set command.
To prevent the Destinations variable from trampling the CompanyOffices variable
like this, use a copy command to create a separate copy of the CompanyOffices variable
rather than a set command. The code (shown here with the change in boldface) then
displays Little Rock in the dialog box, as you would expect.
set CompanyOffices to {"Little Rock", "Paris", "Albuquerque"}
copy CompanyOffices to Destinations
tell Destinations to set {item 1} to {"Cincinnati"}
display dialog item 1 of CompanyOffices
Understanding the Rules for Naming Variables
AppleScript has several rules for creating the names for variables. These rules aren’t very
restrictive, so you can create a wide variety of variable names without running afoul of
them. Here are the details:
● Start with a letter Each variable name must start with a letter.
● Use letters, numbers, and underscores only After the first letter, you can use
any combination of letters, numbers, and underscores. Many people use underscores
to separate different words in variable names, as you can’t use spaces or other
punctuation. For example, the variable name first_name is easier to read than the
variable name firstname. You can also use capital letters to separate the parts (for
example, FirstName) or both (for example, First_Name)—it’s your choice.
● Don’t worry about capitalization Names are not case-sensitive, but AppleScript
enforces the first capitalization you use. The first time you enter a variable name,
AppleScript takes that to be the way you want to capitalize the variable. So if you
create a variable with the name myCompany, you can enter the name thereafter as
mycompany (or any other variation of capitalization—for example, MYCOmpaNY),
and AppleScript will apply the original capitalization when you compile the script.
TIP
AppleScript’s trick of enforcing the first capitalization you use for variables is usually
helpful, but it can be awkward when you realize you want to improve on that initial
capitalization after you’ve compiled the code. In these cases, you need to quit and
restart AppleScript Editor before you can persuade it to accept your new capitalization.

66 AppleScript: A Beginner’s Guide
● Avoid reserved words Don’t use any of AppleScript’s reserved words—any of
the words defined as terms in AppleScript. For example, don’t call a variable result
or error, because AppleScript uses those words. This is one of those things that’s
apparently forehead-slapping obvious but in practice easy enough to trip up on,
because most people can’t reel off every single AppleScript keyword. If AppleScript
gives you an unexpected syntax error, see whether you’ve inadvertently stepped on a
reserved word.
NOTE
If you truly must, you can use a reserved word as a variable name by putting it between
vertical bar characters (| characters). For example, if you feel compelled to name a
variable error, use |error| to do so. There’s normally no good reason to do this. You can
also use this syntax to create a variable name that contains characters you otherwise
can’t use, such as spaces or symbols. There’s no good reason to do this either unless
you take joy in doing so.
Creating a Variable That Refers to Another Object
Instead of assigning to a variable the contents of an object, you can assign a reference to
the object. Doing this lets you get the current contents of the object whenever you use the
variable rather than what the contents were when you created the variable. This is useful
when the object you’re referring to may change value during the course of a script.
To create a reference, create the variable using the a reference to operator. For
example, the following tell block makes the Finder create a variable named myWin as
a reference to the front Finder window. It then sets the position property of myWin to
position the front Finder window.
tell the application "Finder"
set myWin to a reference to the front window
set the position of myWin to {800, 44}
end tell
That’s all straightforward. But where using the reference makes a difference is when
the object changes. The following expanded tell block (with changes in boldface) opens
another Finder window, this one to the startup disk. Because this new window is now
the front window, the myWin variable now refers to it, so the second set the position of
myWin command repositions the new window rather than the first window.
tell the application "Finder"
set myWin to a reference to the front window
set the position of myWin to {800, 44}
open startup disk
set the position of myWin to {0, 44}
end tell

Chapter 4: Working with Variables, Classes, Operators, and Coercions 67
Understanding the Scope and Persistence of Variables
AppleScript lets you use two different types of variables: local variables and global variables.
The normal way of using variables is to simply create them as you need them in your
scripts, as the examples so far in this chapter have done. When you create a variable like
this, you get a local variable, one that is available only in the part of the script that creates
the variable and that retains its value only as long as the script is executing.
When you create scripts that consist of only a single part, local variables are all
you need to store data. But when you create scripts that contain multiple subroutines
(a subroutine is a separate section of code that performs a specific function), you may also
need global variables. A global variable is one that is available to all the subroutines in the
script and to the main body of the script. By contrast, a local variable that you create in
one subroutine is available only in that subroutine, not in any of the other subroutines or
in the main body of the script.
The area within which a variable is available is called its scope, so global variables
have global scope and local variables have local scope.
To create a global variable, you need to declare it ahead of time so that your script
knows about it. You declare it by using the term global and the name you want to give the
variable. For example, the following statement declares the global variable myCity:
global myCity
Normally, you declare each global variable at the top level of a script rather than in
one of the subroutines, as in the following example, where the declaration of the global
variable myUserName appears in boldface. This makes the global variable available to
the main body of the script and to each subroutine, which is what you normally want. The
script first calls the get_user_name subroutine, which displays a dialog box prompting
the user to enter his or her name and stores it in myUserName, and then calls the show_
user_name subroutine, which displays the contents of myUserName in a dialog box.
global myUserName
get_user_name()
show_user_name()
on get_user_name()
display dialog "Please type your name:" default answer ""
set myUserName to text returned of the result
end get_user_name
on show_user_name()
display dialog myUserName
end show_user_name

68 AppleScript: A Beginner’s Guide
An approach you may need to use sometimes is to declare a global variable in only the
subroutines that need it. The following script declares the global variable myUserName in
the get_user_name subroutine (again, in boldface), making it available to that subroutine
and to the main body of the script but not to the show_user_name subroutine:
get_user_name()
show_user_name()
on get_user_name()
global myUserName
display dialog "Please type your name:" default answer ""
set myUserName to text returned of the result
end get_user_name
on show_user_name()
display dialog myUserName
end show_user_name
In this case, moving the declaration to the get_user_name subroutine isn’t a good
idea, as it causes the show_user_name subroutine to fail with an error. This is because
the show_user_name subroutine doesn’t know about the variable myUserName whose
contents the display dialog command tells it to display.
To fix this problem, you need to declare the global variable myUserName in the
show_user_name subroutine as well, as shown here in boldface:
get_user_name()
show_user_name()
on get_user_name()
global myUserName
display dialog "Please type your name:" default answer ""
set myUserName to text returned of the result
end get_user_name
on show_user_name()
global myUserName
display dialog myUserName
end show_user_name
NOTE
Within a script, each global variable name must be unique. Each local variable name
must be unique within its scope, but you can use the same local variable names in
different scopes if you want. Generally speaking, it’s best not to reuse local variable
names in the same script because having multiple variables with the same name tends
to be confusing.

Chapter 4: Working with Variables, Classes, Operators, and Coercions 69
Try This
You can also declare local variables ahead of time by using the term local and the
name you want to give the variable. For example, the following statement declares the
local variable Boss:
local Boss
Each local declaration must appear in the part of the script in which you will use it—in
the main body of the script (if it’s not in a subroutine) or in the subroutine that uses it.
Q: Do I need to declare local variables ahead of time using the local term?
A: In a word: No.
Even when you start declaring global variables, you don’t need to declare local
variables ahead of time by using the local term: You can continue to create your local
variables by using set statements at any point in your code.
But—you sensed a “but” coming, didn’t you?—when you use global variables, you
may find it helpful to use local declarations so that your code is absolutely clear about the
scope of each variable.
You may also benefit from declaring local variables ahead of time so that you can
place all the local variable declarations for a subroutine together in the same place, where
you can easily see all the variables the subroutine uses. This is helpful both when you
revisit your code after a while and when someone else is trying to come to grips with
your code.
Using a Global Variable
In this example, you use a global variable to make information available to different
subroutines in a script. This example uses a script shown earlier in the chapter. The script
includes several features you haven’t learned about in detail, including creating and
calling subroutines and displaying dialog boxes, but you’ll find it easy to work through.
To create the script, follow these steps:
1. In AppleScript Editor, press z-N or choose File | New to create a new script.
2. Create the global variable myUserName at the beginning of the script by typing the
global term and the variable’s name:
global myUserName
Ask the Expert
(continued)

70 AppleScript: A Beginner’s Guide
3. Call the get_user_name subroutine by typing its name and putting empty parentheses
after it, as shown in boldface here. This makes AppleScript run the get_user_name
subroutine.
global myUserName
get_user_name()
4. On the next line, call the show_user_name subroutine in the same way, as shown in
boldface here:
global myUserName
get_user_name()
show_user_name()
5. Create the get_user_name subroutine by typing an on command, the subroutine’s
name, and a pair of parentheses. Then, on a new line, type the end keyword to end the
subroutine. These changes appear in boldface here:
global myUserName
get_user_name()
show_user_name()
on get_user_name()
end
6. Press z-K or click the Compile button on the toolbar to compile the script. You’ll
notice that AppleScript automatically adds the get_user_name subroutine’s name to
the end statement, as shown in boldface here:
global myUserName
get_user_name()
show_user_name()
on get_user_name()
end get_user_name
7. Inside the get_user_name subroutine, add a display dialog command that prompts
the user to type his or her name in a text-entry field that is empty at first (the default
answer " " parameter). Set the myUserName global variable to the text returned by
the text-entry field. The changes appear in boldface here:
global myUserName
get_user_name()
show_user_name()
on get_user_name()

Chapter 4: Working with Variables, Classes, Operators, and Coercions 71
display dialog "Please type your name:" default answer ""
set myUserName to text returned of the result
end get_user_name
8. Create the show_user_name subroutine and give it a display dialog command that
displays the contents of the myUserName variable. The changes appear in boldface
here:
global myUserName
get_user_name()
show_user_name()
on get_user_name()
display dialog "Please type your name:" default answer ""
set myUserName to text returned of the result
end get_user_name
on show_user_name()
display dialog myUserName
end show_user_name
9. Press z-R or click the Run button on the toolbar to run the script. When the first dialog
box appears, type a name in the text-entry field, and then click the OK button. Verify
that the text you typed appears in the second dialog box.
10. Save the script under a name of your choice.
Using Script Properties to Store Data
Permanently in the Script
When you need to store data from one time you run a script to the next time, use a script
property rather than a variable. A script property is a piece of data stored in the script that
you can get and set as needed.
Script properties largely follow the same naming rules you learned for variables earlier
in this chapter:
● Each name must be unique within the script. (Script properties are global to the script;
you can’t restrict them to certain areas of it.)
● Each name must start with a letter.
● After that first letter, you can use letters, numbers, and underscores as you wish, but
no spaces or symbols.

72 AppleScript: A Beginner’s Guide
● You should avoid stepping on AppleScript’s reserved words. But if you really want,
you can use a reserved word by cordoning it off with vertical bar characters (for
example, |dialog| if you want to name a property “dialog”). You can also use vertical
bars to create property names featuring spaces and symbols.
To declare a script property, you use the term property, the name you want to assign
the property, a space, a colon, another space, and then the property’s initial value. You
can’t declare a property without assigning an initial value—a notable difference from
variables. But that initial value can be empty—for example, an empty string (" ") or an
empty list ({}).
NOTE
You can initialize a property with any AppleScript data type or object. For example,
you can initialize a property with a list, a window, or a document.
For example, the following statement declares the script property committee_name
and assigns the string "Management Steering Committee" to it.
property committee_name : "Management Steering Committee"
The best place to declare your script properties is right at the beginning of a script,
where anyone reading your code will notice the declarations immediately. There’s no
obligation to put property declarations here, though—you can place them anywhere in the
top level of the script. You can’t put them in a tell block or in a subroutine handler.
If you like, you can use script properties for storing information that doesn’t change,
but in many cases, you’re better off simply hard-coding the information into the script.
What you’ll usually find more useful is using script properties to store information that
does change. For example, you can store the folder in which the user last ran the script,
and then use that folder as the default folder the next time, as shown here. This example
uses the choose folder command, which you’ll meet in detail in Chapter 8.
property starting_folder : "/"
set starting_folder to choose folder default location starting_folder
CAUTION
Here’s one thing you need to be careful about with script properties—once you’ve set
a property correctly in a script and compiled the script, don’t run the script so that you
change the value before distributing the script—otherwise, the script will start with the
data you left in it. Instead, compile the script, and check to make sure it’s fine. Then
make a trivial change (for example, edit a comment) and compile the script again so
that it remains as you wrote it.
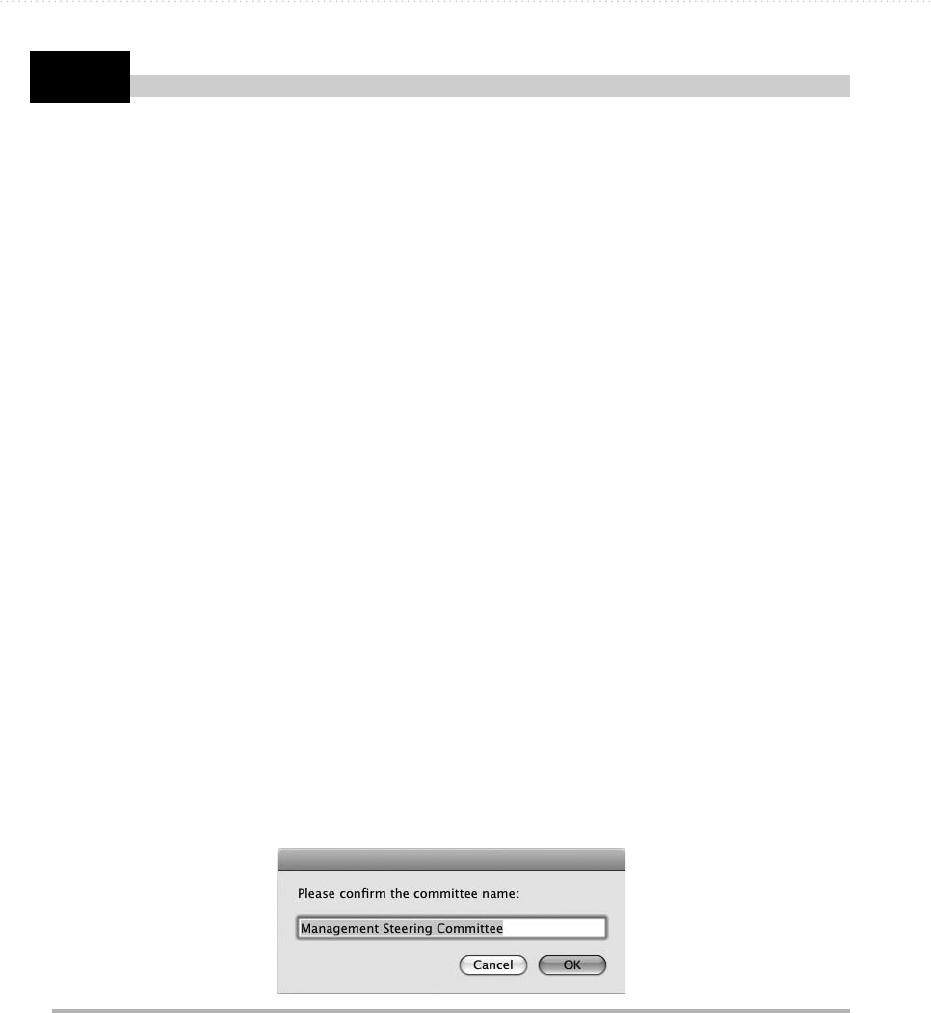
Chapter 4: Working with Variables, Classes, Operators, and Coercions 73
Try This Using a Script Property
In this example, you declare a script property that contains a committee name, display a
dialog box that prompts the user to confirm the name, and then set the property to the result
of the dialog box. You’ll learn all the details of how to use dialog boxes in Chapter 8,
but you’ll find this preview straightforward.
Follow these steps to create the script:
1. In AppleScript Editor, press z-N or choose File | New to create a new script.
2. Declare a property named committee_name and set its initial value to "Management
Steering Committee":
property committee_name : "Management Steering Committee"
3. Add the display dialog statement shown in boldface here, which displays the value of
the committee_name property as its default value and prompts the user to change or
accept it:
property committee_name : "Management Steering Committee"
display dialog "Please confirm the committee name:" default answer
committee_name
4. Add a set statement that sets the committee_name property to the text returned from
the dialog box’s text-entry field, as shown in boldface here:
property committee_name : "Management Steering Committee"
display dialog "Please confirm the committee name:" default answer
committee_name
set committee_name to text returned of the result
5. Press z-s or click the Run button on the toolbar to run the script. The dialog box shown
in Figure 4-1 appears.
Figure 4-1 Change the committee name displayed in the dialog box to change the property’s
value in the script.
(continued)
74 AppleScript: A Beginner’s Guide
6. Type a different name in the text entry field, and then click the OK button to close the
dialog box. AppleScript stores the name you entered in the script.
7. Run the script again. This time, the name you entered appears in the dialog box.
8. Save the script under a name of your choice.
Performing Operations with Operators
An operator in AppleScript is an expression or a character that performs an operation on
specified data. Some operators are peculiar to AppleScript, but you’ll already be familiar
with others that have more general usage. For example, in the expression 100–50, the –
sign is a subtraction operator that tells you (or AppleScript) to subtract the second value
(50) from the first value (100).
Like that subtraction operator, most operators work on two values, or operands. These
operators are known as binary operators. The other kind of operator is a unitary operator,
one that works on a single operand.
Table 4-2 explains AppleScript operators by category and gives examples of them in use.
Table 4-2 AppleScript’s Operators
Operator Explanation or Details Example
Arithmetic Operators
+ Addition 5 + 3 = 8
– Subtraction 5 – 3 = 2
– Unary negation (making a number negative) –3
* Multiplication 5 * 3 = 15
/ Division 6 / 3 = 2
Div Integral division (returning the integer value
from division and ignoring any remainder)
27 div 7 returns 3
28 div 7 returns 4
Mod Modulus (returning the remainder from
dividing the first number by the second
number)
9 mod 2 returns 1
10 mod 2 returns 0
24 mod 7 returns 3
^ Exponentiation (raising to the power) 2^3 returns 8
2^4 returns 16
2^5 returns 32
Chapter 4: Working with Variables, Classes, Operators, and Coercions 75
Operator Explanation or Details Example
Logical Operators
And Inclusion (this one and that one) name begins with "T" and size is
greater than 10000000
Or Alternation (this one or that one) name begins with "T" or name
begins with "W"
Not Exclusion (this one but not that one) name begins with "T" not name
begins with "W"
Concatenation Operator
& Concatenation (joining two strings of data
together into a single string)
"Good morning, " & "Universe!"
creates the string Good morning,
Universe!
Containment Operators
begin[s] with/start[s]
with
Finds the specified item at the beginning
of the target
name begins with "A"
end[s] with Finds the specified item at the end of the target name ends with "tion"
contains Finds the specified item in the target name contains "test"
does not contain/
doesn’t contain
Finds a target without the specified item name does not contain "Project"
is in Finds a target that matches one of the
specified items
name extension is in {"doc",
"docx"
is not in Finds a target that doesn’t match any of the
specified items
name extension is not in {"doc",
"docx"
is contained by Checks whether an item is contained by
another item
{"Tokyo", "Paris"} contains
{"Paris"} returns true
is not contained by/
isn’t contained by
Checks whether an item is not contained by
another item
{"Tokyo", "Paris"} does not contain
{"Seoul"} returns true
Comparison Operators for Equality
is equal to You can also use =, equal, equals, or equal to.
AppleScript automatically changes any of the
text variations to is equal to when you compile
the script.
1 is equal to 2 returns false
is not equal to You can also use /=, does not equal, doesn’t
equal, or is not equal (without "to"). AppleScript
automatically changes /= to ≠ (the not-equal
sign) and the text variations to is not equal to
when you compile the script.
"cheese" is not equal to "burger"
returns true
is Returns true if the first item is the same as
or equal to the second item; otherwise,
returns false
object1 is object2
Table 4-2 AppleScript’s Operators (continued)

76 AppleScript: A Beginner’s Guide
Operator Explanation or Details Example
is not Returns true if the first item is not the same as or
equal to the second item; otherwise, returns false
object1 is not object2
Comparison Operators for Precedence
is less than You can also use < or less than. AppleScript
automatically changes less than to is less than
when you compile the script. Returns true if the
first item is less than the second item.
1 is less than 2
is greater than You can also use > or greater than. AppleScript
automatically changes greater than to is greater
than when you compile the script.
"bun"is greater than "burger"
returns false
is greater than or
equal to
You can also use ≥ or is greater than or equal.
AppleScript automatically changes the text
version to is greater than or equal to when you
compile the script.
4 is greater than or equal to 5
returns false
is not greater than or
equal to
You can also use is not greater than or equal, isn’t
greater than or equal, or isn’t greater than or equal
to. AppleScript automatically changes the text
versions to is not greater than or equal to when
you compile the script.
4 is not greater than or equal to 5
returns true
is less than or equal
to
You can also use ≤ or is less than or equal.
AppleScript automatically changes is less
than or equal to is less than or equal to when you
compile the script.
10 is less than or equal to 10
returns true
is not less than or
equal to
You can also use is not less than or equal, isn’t
less than or equal, or isn’t less than or equal to.
AppleScript automatically changes the text
versions to is not less than or equal to when you
compile the script.
10 is not less than or equal to 10
returns false
comes before Tests whether a number or a string comes
before another number or string
1 comes before 2 returns true
does not come before Tests whether a number or string doesn’t
come before another number or string. You
can also use doesn’t come before. AppleScript
automatically changes this to does not come
before when you compile the script.
1 does not come before 2 returns
false
comes after Tests whether a number or string comes after
another number or string
"steak" comes after "fries"
returns true
does not come after Tests whether a number or string does not
come after another number or string
You can also use doesn’t come after. AppleScript
automatically changes this to does not come after
when you compile the script.
"fries" does not come after "ice
cream" returns true
Table 4-2 AppleScript’s Operators (continued)

Chapter 4: Working with Variables, Classes, Operators, and Coercions 77
NOTE
To enter the ≥ symbol, type >=; AppleScript substitutes the symbol when you compile the
script. Similarly, type <= to enter the ≤ symbol, and type /= to produce the ≠ symbol.
Understanding Classes
In AppleScript, a class is a category for objects that have similar characteristics. For
example, the file class consists of a reference to an object in the file system—a file, a
folder, or a volume. Each object of the file class is typically different because it points to
a different file (or folder, or volume), but each object is the same kind of thing.
Table 4-3 explains the classes built into AppleScript. Each scriptable application
also has its own classes. For example, as you saw in the previous chapter, the TextEdit
application has a document class that represents document objects and a paragraph class
that represents paragraph objects.
Class Explanation Example or Details
alias A reference to an existing file, folder, or
volume in the Mac’s file system. You can’t
create an alias to an object that doesn’t exist.
set myAlias to "Macintosh HD:Users:" as alias
application An application on the Mac or on a server to
which the Mac is connected
tell application "TextEdit" to quit
boolean A Boolean value, either true or false set docExists to true
class The class of an object or a value class of 123.45 returns real
constant A term with a value predefined by
AppleScript or by an application. You can’t
create your own constants in scripts.
AppleScript includes text constants, such
as tab, space, return, linefeed, and quote,
for working with text.
date The day of the week, the date (month, day,
year), and the time (hours, minutes, seconds)
current date returns the current date—for
example, date "Thursday, April 1, 2010
9:48:16 AM"
file A reference to a file, folder, or volume in the
Mac’s file system. You can create a file object
that refers to an object that doesn’t exist.
set myFile to choose file name uses the choose
file name command (see Chapter 8) to let
the user specify a filename
integer A whole number (a number without any
fraction)
set myInteger to 7
list A collection of items in order set myList to {"bacon", "eggs", "kidneys"}
number Either an integer number or a real number This is an abstract class; any number’s
actual class must always be either integer
or real.
Table 4-3 AppleScript’s Built-in Classes

78 AppleScript: A Beginner’s Guide
Class Explanation Example or Details
POSIX file A pseudo-class that returns a file object.
This is not a class; rather, it enables you to
evaluate a POSIX file specifier.
set fileName to POSIX file "/System" returns
a file object such as file "Macintosh HD:
System"
real A number that can include a fractional part set myReal to 1.43
record A collection of labeled properties that you
access by label rather than by position
set myDog to {name:"Roofer", animal:"Dog",
breed:"Terrier"}
reference An object that refers to another object set docWin to a reference to the front window
of the application "TextEdit"
RGB A three-item list of integer values in the
range 0–65535 giving the red, green, and
blue components of a color
{65535, 0, 0} produces a full-intensity red
script An AppleScript script This script shows the current date:
script DateScript display dialog (current date)
as string end script
text A string of Unicode characters set headline to "Special Offers"
unit types A collection of unit type classes for working
with measurements—for example, the feet
class and the miles class
set distance to 200 as miles
Converting Data with Coercions
In most of life, coercion is such a bad thing it’s often illegal, but it’s not only a positive
thing, but also a highly welcome one in AppleScript, where a coercion is an expression
that changes one type of data to another type. For example, when you need to change a
real number or an integer number to a string, you use a coercion to make the change.
In many cases, AppleScript performs any necessary coercion for you automatically,
drawing your attention to it only if an error occurs—for example, because your code needs
to coerce data into a data type in which it will not fit.
You can also coerce data manually to a particular data type whenever you need to. To
apply a coercion, you use the as operator and the data type you want. For example, the
following commands create an integer variable named myInteger with the value 100,
and then use as string to coerce the value of myInteger to a string. The result is "100"
(including the double quotation marks that indicate a string).
set myInteger to 100
myInteger as string
Table 4-4 shows the full list of coercions you can perform, with explanations and examples.
Table 4-3 AppleScript’s Built-in Classes (continued)
Chapter 4: Working with Variables, Classes, Operators, and Coercions 79
Original Class Coerce to Class Explanation or Notes
alias List Returns a single-item list
alias Text Returns a text string
boolean Integer Returns 1 for true and 0 for false
boolean List Returns a single-item list, either {true} or {false}
boolean Text Returns a string, either "true" or "false"
class List Returns a single-item list
class Text Returns a string
constant List Returns a single-item list
constant Text Returns a string
date List Returns a single-item list using the format shown in International
preferences—for example, {date "Thursday, April 1, 2010 6:44:03 AM"}
date Text Returns a string using the format shown in International
preferences—for example, "Thursday, April 1, 2010 6:44:03 AM"
file List Returns a single-item list
file Text Returns a text string
integer List Returns a single item list—for example, {150}
integer Real Returns a real number—for example, 150.0
integer Text Returns a string containing the integer’s value—for example, "150"
item from list [various] You can coerce the list item to any class to which you can
coerce an individual item of that class. For example, if you have
a list of aliases, you can coerce them to text.
list Text {"Morning", "Afternoon", "Night"} as string returns
MorningAfternoonNight
number Integer Returns the integer portion of the number
number List Returns a single-item list containing the number—for example,
{178.24}
number Real Returns a real number—for example, 178.24
number Text Returns a string containing the number—for example, "178.24"
POSIX file List Returns a single-item list
POSIX file Text Returns a string
real Integer Returns the integer part of the number—for example, 178.24 as
integer returns 179
real List Returns a single-item list—for example, {178.24}
record List Returns a list with the labels removed. For example,
{name:"Roofer", animal:"Dog", breed:"Terrier"} as list returns
{"Roofer", "Dog", "Terrier"}.
Table 4-4 AppleScript Coercions

80 AppleScript: A Beginner’s Guide
Try This
Original Class Coerce to Class Explanation or Notes
reference [various] You can coerce the reference to any class to which you can
coerce the object referenced.
script List Returns a single-item list
text Integer Returns an integer from a string that contains a number. For
example, "150.5" as integer returns 150.
text List Returns a single-item list containing a string—for example,
"Yellowstone" as list returns {"Yellowstone"}
text Real Returns a real number from a string that contains a number. For
example, "150.5" as real returns 150.5.
unit types Integer Returns an integer containing the integer part of the number of
the specified item (for example, liters)
unit types List Returns a single-item list containing the number of the specified
item (for example, miles)
unit types Real Returns a real number containing the number of the specified
item (for example, centimeters)
unit types Text Returns a string containing the number of the specified item (for
example, degrees Celsius)
Table 4-4 AppleScript Coercions (continued)
Creating a Variable and Applying
a Coercion
In this example, you create a variable using one of AppleScript’s classes and assign data to
it. You then apply a coercion to return the data in a different format.
1. In AppleScript Editor, press z-N or choose File | New to create a new script.
2. Use a set command to create a variable named ThisDay and assign the current date to it:
set ThisDay to current date
3. Add a display dialog command to display the contents of the ThisDay variable in a
dialog box, coercing it to a string so that the dialog box can display it:
display dialog ThisDay as string
4. Press z-R or click the Run button on the toolbar to run the script. AppleScript displays
a dialog box showing the current date.
5. Save the script under a name of your choice.

81
Chapter 5
Working with Text,
Numbers, and Dates

82 AppleScript: A Beginner’s Guide
Key Skills & Concepts
● Working with Text
● Working with Numbers
● Working with Dates
In this chapter, you learn a core set of skills for working with three essential types of
content: text, numbers, and dates.
Text is the most complicated of the three. We’ll start by entering normal text in a text
object, and then move along to joining two text strings together, adding white space, and
adding special characters. We’ll then look at how to return different parts of a text object
(for example, a word or a paragraph), how to trim white space off a text string, and how
to find a text string within a text object. Finally, for text, I’ll show you how to move text
from one application to another.
Compared to text, numbers are straightforward—but you still need to know the
difference between AppleScript’s real numbers and integer numbers, when to use each,
and how to convert data to and from numeric data types.
Dates are vital to many procedures, and AppleScript deals with them in a smart way
that enables you to enter dates easily, return exactly the parts of them you need (for
example, the year or the month), and perform arithmetic with them.
Working with Text
For dealing with text, AppleScript provides the text object, which contains a series of
Unicode characters in a particular order. This series of characters is often referred to as a
string of text.
Entering Normal Text in a Text Object
To enter a string of text in a text object, you put it between double-quote characters. For
example, the following statement creates the variable myCity and assigns the text San
Francisco to it:
set myCity to "San Francisco"

Chapter 5: Working with Text, Numbers, and Dates 83
You can also create a text object by passing to it a text object from a document. For
example, the following code tells TextEdit to create the variable myString and assign to it
the text from the front document:
tell the application "TextEdit"
set myString to text of front document
end tell
You can then return different parts of the text object as needed—for example, you can
return the first character, the second word, or the third paragraph. We’ll look at how to do
this later in this chapter.
Joining Two or More Strings of Text
To join two or more strings of text together, you use &, the concatenation operator.
For example, the following statements declare two string variables, myopically named
String1 and String2, and then join them together into a third string variable logically
named String3:
set String1 to "Five boxing wizards"
set String2 to " jump quickly"
set String3 to String1 & String2
As a result, String3 contains Five boxing wizards jump quickly, one of the all-
alphabet phrases for testing keyboards whose fidelity you doubt.
Notice that the second string variable includes a leading space to produce a readable
result. Without the leading space, AppleScript smashes the two strings together, because
that’s what you’ve told it to do.
Adding Spaces, Tabs, Line Feeds, and Returns
When you’re entering a string of text, you can include any spaces, tabs, or returns it needs
to make sense. Just press SPACEBAR, TAB, or RETURN as you would in a text document.
When you press RETURN, AppleScript Editor actually enters a linefeed character rather
than a carriage return.
For example, the following statement creates the variable strTC and assigns four lines
of text to it, the second line being blank space:
set strTC to "New terms and conditions:
1. The bank now owns all your money.
2. The country owns all the banks."

84 AppleScript: A Beginner’s Guide
If you’ve selected the Escape Tabs And Line Breaks In Strings check box in Editing
Preferences, AppleScript Editor automatically changes a tab from a chunk of white
space to the \t value and a line feed to the \n value when you compile the script. So after
compilation, the preceding example looks like this:
set strTC to "New terms and conditions:\n\n\t1.\tThe bank now owns all
your money.\n\t2.\tThe country owns all the banks."
With the tab and line feed values, the statements are harder to read, but they still work
just the same. For example, if you display the strTC variable in a dialog box, you see the
four lines (see Figure 5-1).
If you prefer, you can type the values directly into a string in AppleScript Editor.
You can also use the constants shown in Table 5-1. These are useful when you’re putting
together a string from different components.
For example, the following statements declare string variables for the different
components of an address, build from them a string containing the full address, and then
display the string in a dialog box:
set FirstName to "Megg"
set MiddleInitial to "A"
set LastName to "Byte"
set strAddress1 to "8192 Giggs St."
set strAddress2 to "Apt. AF"
set strCity to "City of Industry"
set Zip to "CA 91745"
set FullAddress to FirstName & space & MiddleInitial & space & ¬
LastName & linefeed & strAddress1 & linefeed & strAddress2 & ¬
linefeed & strCity & tab & Zip
display dialog FullAddress
Figure 5-1 You can use spaces, tabs, and carriage returns in strings.
Chapter 5: Working with Text, Numbers, and Dates 85
White Space Character Constant Value
Space Space " "
Tab Tab "\t"
Carriage return return "\r"
Linefeed linefeed "\n"
Table 5-1 AppleScript Constants for White Space Characters
Q: Okay, I’ll bite: What is the “carriage return” character that Table 5-1 mentions?
A: Quick warning: You may regret that you asked this…
When you press RETURN in AppleScript Editor, you get a linefeed character—so what’s
a carriage return character?
In ASCII, a linefeed character has the value 10, and a carriage-return character has the
value 13. In many applications, these two characters have the same effect, and you can use
the two interchangeably—which is handy but continues the confusion.
But you’ll find that other applications treat a carriage return differently from a
linefeed—so if your code isn’t able to identify the end of a paragraph, you may need to
use the other character. Some Windows programs even use both a carriage return and a
linefeed at the end of paragraphs.
Ask the Expert
Using Backslash and Double-Quote Characters
Because AppleScript uses the backslash character (\) to denote the tab character (\t),
linefeed character (\l), and carriage-return character (\r), you can’t use a backslash on its
own in text. Instead, use \\ to represent a single backslash.
Similarly, AppleScript uses the double-quote character (") to mark the beginning
or end of a string, so you can’t use a double-quote character as itself. Instead, use the
constant quote or the two-character sequence \" to represent a double-quote character. For
example, each of the following statements displays a dialog box showing the sentence He
said “How do you pronounce the \ symbol?”:
display dialog "He said " & quote & "How do you pronounce the \\
symbol?" & quote
display dialog "He said \"How do you pronounce the \\ symbol?\""
Both work; neither is pretty.

86 AppleScript: A Beginner’s Guide
Returning Parts of a Text Object
What’s often useful is getting just part of a text object. For example, if you store the
contents of a TextEdit document in a variable, as shown earlier in this chapter, you may
need to pull out parts of it.
To do so, you can use the different elements of the text object—text itself, paragraph,
character, and word. Table 5-2 explains these elements.
Before we get into examples of how to pull the different elements out of a text object,
we need to go over the reference forms shown in Table 5-2. The next table, Table 5-3,
explains the five reference forms shown there (Arbitrary, Every, Index, Middle, and
Range), together with the other five reference forms AppleScript supports.
Element Reference Forms Explanation
Text Every, Name All of the text in the text object, including characters such
as spaces, tabs, and returns. You can use this item when
you need to return a range of contiguous characters in the
text object.
paragraph Arbitrary, Every, Index,
Middle, Range
A paragraph of text as most of us understand it: All the
text from the beginning of the document to the character
that ends the first paragraph, from the character after
the end of a paragraph to the character that ends the
next paragraph, or from the character after the end of a
paragraph to the end of the document.
character Arbitrary, Every, Index,
Middle, Range
A character in the text. AppleScript uses Unicode
characters, which means that even combining characters
(such as à) count as one character. This is unremarkable,
but in some encodings, combining characters count as
two characters (the base character—here, a —and the
combining mark).
Word Arbitrary, Every, Index,
Middle, Range
A word in the text. This seems straightforward, but you
need to be careful with words because the setting in
the Word Break pop-up menu on the Language tab of
International Preferences can trip you up. For example, if
Word Break is set to Standard, word 1 of "Steak:Fries" returns
"Steak:Fries" because the separator between the words isn’t
a space. But if Word Break is set to English (United States,
Computer), word 1 of "Steak:Fries" returns only "Steak"the
Atkins version of the classic meal.
Table 5-2 Elements of AppleScript Text Objects

Chapter 5: Working with Text, Numbers, and Dates 87
Reference
Form
Keywords or
Usage Explanation
Arbitrary some Returns a random object from whatever you’re referring to—for
example, some word or other in the document. This is seldom
useful for working with text, but can be useful for other objects (for
example, numbers).
Every every Returns a list containing every object from the collection. For example,
every word of "How are you?" returns the list {"How", "are", "you"}.
Filter whose, where, that Returns a list of items that match the specified condition. For
example, tell the application "Finder" folders of home whose name starts with
"D" returns a list of folders with names that start with D.
ID [the ID property] Returns the object specified by the id property. This works only with
application objects that have an id property.
Index A cardinal integer
(1, 2), an ordinal
integer (1st, 2nd), an
ordinal word (first,
second, up to tenth),
or a positional word
(last, front, back)
Returns the object specified by the index position. For example,
the first character of the 2nd word of paragraph 3 of the front document
of application "TextEdit". Cardinal integers are usually easiest to
understand, but AppleScript Editor automatically corrects any bogus
ordinal integers you produce—for example, it changes 25st to 25th.
Middle middle Returns the middle item in the object. This is sometimes useful with
lists that contain an odd number of objects. (If the object contains an
even number of objects, middle returns the object before the middle—
for example, the fourth object out of eight objects.)
If you use middle with a string, specify the item you want (for
example, middle word of "one two three"); otherwise, AppleScript gives
you the middle character, which is seldom helpful.
Name named Returns the item specified by name. Use this reference form with
objects that have names. For example, tell the application "Finder" folder
named "Documents" of home returns the Documents folder. You can
usually refer to an object more simply by its name (for example,
folder "Documents" of home).
Property A property of the
object
Returns the property or properties you specify of the object. For
example, tell the application "TextEdit" properties of the front window
returns a list of the properties for the front window.
Range from start to finish,
start through finish
Returns a list containing the specified range of objects contained by
the target object. For example, words 1 through 3 of "The quick brown fox
jumped over the lazy dog" returns {"The", "quick", "brown"}. You can use
thru instead of through.
Relative before, in front of,
after, behind, in
back of
Returns the object you specify in relation to another object (the base
object) in the same container. For example, tell the application "TextEdit"
to set doc_process to text of the document behind the front document assigns
the text of the second document in the stack (the document behind
the front document) to the variable doc_process.
Table 5-3 AppleScript’s Reference Forms

88 AppleScript: A Beginner’s Guide
NOTE
You can also use the plural of the class instead of using the every keyword. For example,
you can use tell application "Finder"every folder of home or tell application "Finder" folders of home
to return a list of the folders in the current user’s home folder.
With that in mind, here are examples of using the text, paragraph, character, and
word elements of the text object. Each example uses the text object doc_process:
● To get the whole of the text, use the text element:
set allText to text of doc_process
● To get the first paragraph, use the first paragraph or a similar formulation (for
example, paragraph 1):
set firstPara to the first paragraph of doc_process
● To get a list containing the first five characters, use characters 1 through 5:
set fiveChars to characters 1 through 5 of doc_process
● To get the second word, use the second word:
set secondWord to the second word of doc_process
To find out how many of an item a text object contains, get the count of the item. For
example, use count of paragraphs in doc_process to return the number of paragraphs in
doc_process.
Trimming a String
Sometimes, a string may have leading spaces or trailing spaces that you need to get rid
of, especially if you receive the string from another application (for example, a database
application). For example, if you get the string " Minneapolis " (with several spaces
before it and several more after it), you may need to trim it down to "Minneapolis" so
that you can use it without inserting extra spaces in text.
AppleScript doesn’t provide a command for trimming off leading spaces or trailing
spaces (as some other programming languages do), so you need to create a subroutine
to remove them. Chapter 10 gives an example of using a subroutine to remove leading
spaces and trailing spaces from a string.
Finding a String Within Another String
When you need to find where one string is within another string, use the offset command.
This command takes two parameters, as you’d expect: the string you’re looking for,

Chapter 5: Working with Text, Numbers, and Dates 89
preceded by the of keyword, and the string in which you’re looking for it, preceded by the
in keyword.
The offset command returns the position of the first character in the search string
within the target string. For example, the following statement return the offset position of
the string "back" in the string "I’ll be back":
offset of "back" in "I'll be back"
This statement returns 9, because the word back starts at the ninth character in the
string I’ll be back—in lay terms, the b of back is the ninth letter. (If AppleScript doesn’t
find the search string in the target string, it returns 0.)
CAUTION
In Mac OS X 10.3 (Panther) and later versions, the offset command ignores case when
searching for one string inside another string. Usually, this is what you want—but
it’s as well to know what you’re getting rather than to be surprised. If you need your
comparisons to be case-sensitive, add considering case, as discussed later in this chapter.
Often, finding out whether the search string is within the target string (and, if so,
where it starts) is enough. But what if the search string occurs two or more times in the
target string? In this case, AppleScript returns only the first instance. To find the next
instance, you need to search again from after the end of the first string found.
Finding Out Whether One Text Object
Contains Another Text Object
AppleScript makes it easy to find whether one text object contains another text object. To
find out whether the text string "quick" is in the text object myString, just check like this:
"quick" is in myString
If the text string is in the text object, AppleScript returns true; if it’s not, AppleScript
returns false.
If you want to make the comparison the other way around, check whether the text
object contains the text string. For example, to find out whether "quicksilver" contains
"silver", use the contains operator like this:
"quicksilver" contains "silver"
This example returns true; if the first string doesn’t contain the second, the
comparison returns false.

90 AppleScript: A Beginner’s Guide
Choosing What to Ignore When Comparing Text
When you’re comparing text objects, you may need to tell AppleScript to ignore some
attributes of the text to perform the comparison—or to consider some attributes that it
automatically ignores.
To control which attributes AppleScript uses, you add an ignoring statement, a
considering statement, or both to the comparison.
Table 5-4 explains the attributes you can use.
To use a considering statement, set up a considering block like this:
considering case
-- make the comparison here
end considering
Similarly, to use an ignoring statement, create an ignoring block like this:
ignoring diacriticals
-- make the comparison here
end ignoring
Attribute Explanation Default Setting
Considering
Example Ignoring Example
Case Uppercase and
lowercase letters
ignoring A is different from a T is the same as t
diacriticals The accent marks
over letters
considering õ is different from o ë is the same as e
hyphens – characters considering dog-food is different
from dogfood
play-pen is the same
as playpen
numeric
strings
Whether text
strings (such
as "1.4.3") are
evaluated as
text or by their
character values
ignoring "2.20.3" is greater than
"2.8.4" returns true
"2.20.3" is greater than
"2.8.4" returns false
punctuation Punctuation marks
such as , . ; : +
" ‘ ?
considering won’t is different from
wont
can’t is the same as
cant
White
space
Spaces, tabs,
linefeeds, and
carriage returns
considering stand alone is
different from
standalone
no one is the same as
noone
Table 5-4 AppleScript Attributes for Considering Statements and Ignoring Statements

Chapter 5: Working with Text, Numbers, and Dates 91
To use two considering items or two ignoring items together, use and like this:
considering case and numeric strings
-- make the comparison here
end considering
To combine considering and ignoring statements, put the considering statement first,
then but, and then the ignoring statement. End the block with end considering, as shown
here:
considering case and diacriticals but ignoring hyphens
--make the comparison here
end considering
NOTE
You can also nest considering and ignoring statements.
Transferring Text from One Application to Another
The easiest way to transfer text from one application to another in a script is to store the
data in a variable from the first application and then use the data from the variable in the
other application.
The following example grabs the text from a TextEdit document, stores it in a variable,
chops it down to the first paragraph, and then slaps that paragraph into a new Microsoft
Word document:
tell the application "TextEdit"
set myText to the text of the front document
end tell
set myText to the first paragraph of myText
tell the application "Microsoft Word"
make new document at the front
set the content of the text object of the first paragraph ¬
of the front document to myText
end tell
You can also place text on the clipboard from one application and then insert it from
the clipboard in the other application.
To place text on the clipboard, use the set the clipboard to command. This command
takes a single required parameter, anything, which is the data you’re placing on the
clipboard.

92 AppleScript: A Beginner’s Guide
Try This
For example, the following statement places the text Vital Mac Software on the clipboard:
set the clipboard to "Vital Mac Software"
To return text from the clipboard, use the command the clipboard. The following
statement assigns the contents of the clipboard to myClip:
set myClip to the clipboard
Using the Clipboard
In this example, you place a string of text on the clipboard, and then insert it in a TextEdit
document. Follow these steps:
1. In AppleScript Editor, press z-N or choose File | New to create a new script.
2. Create a tell block to the TextEdit application:
tell the application "TextEdit"
end tell
3. Inside the tell block, add text to the clipboard, as shown in boldface here:
tell the application "TextEdit"
set the clipboard to "Essential Mac Software"
end tell
4. Tell TextEdit to make a new document at the front, as shown in boldface here:
tell the application "TextEdit"
set the clipboard to "Essential Mac Software"
make new document at the front
end tell
5. Assign the contents of the clipboard to the text property of the front document, as
shown in boldface here:
tell the application "TextEdit"
set the clipboard to "Essential Mac Software"
make new document at the front
set the text of the front document to the clipboard
end tell
6. Press z-R or click the Run button on the toolbar to run the script. You’ll see TextEdit
create a new document and add the text to it.
7. Close the document without saving it (unless you happen to need a list of essential
Mac software—in which case, start typing).
8. Save the script under a name of your choice.

Chapter 5: Working with Text, Numbers, and Dates 93
Working with Numbers
As you saw in the previous chapter, AppleScript uses two types of numbers: integer
numbers (with no fractional part) and real numbers (with fractional parts as needed).
Both integer numbers and real numbers belong to the abstract number class, though in
practice the class of every number is either the integer class or the real class.
Performing Arithmetic with Numbers
You can perform arithmetic by using the arithmetic operators discussed in Chapter 3. Here
is a brief summary:
● Use + for addition and – for subtraction.
● Use * for multiplication and / for straightforward division.
● Use div for integral division (ignoring the remainder).
● Use mod for modulus (returning the remainder).
● Use ^ for exponentiation.
You can use these operators with either integer numbers or real numbers. The type
of result depends on the numbers you use. For example, if you multiply two integers, you
get an integer; but if you multiply an integer by a real number, or a real number by another
real number, you get a real number.
If necessary, you can coerce the result of a calculation to another data type, as
discussed next.
Coercing Numbers to Other Data Types
You can easily coerce a number to the other type—real number to integer number, or vice
versa—or to a list or a string.
● To coerce a real number to an integer number—in effect, rounding it to the nearest
number—use as integer. For example, 1.5 as integer returns 2.
● To coerce an integer number to a real number, use as real. AppleScript adds a
decimal point and a 0 to the end of the integer number to create the real number. For
example, 100 as real returns 100.0.
● To coerce an integer number or real number to a string, use as string. The string
contains the same number as the integer number or real number used. For example,
254 as string returns "254"; 255.693 as string returns "255.693".
● To coerce an integer number or real number to a list, use as list. The result is a single-
item list. For example, 189 as list returns the list {189}.

94 AppleScript: A Beginner’s Guide
Coercing Other Data Types to Numbers
You can coerce two data types to numbers.
● boolean You can coerce a boolean value to an integer number by using as integer.
The result is 1 for true or 0 for false.
NOTE
AppleScript doesn’t let you coerce a boolean value directly to a real value, but there’s
nothing to stop you from coercing the boolean value to an integer value and then coercing
the result to a real value (for example, myBool as integer as real). You’ll end up with 1.0 for
a true value and 0.0 for a false value.
● string If you have a string that contains a number, you can coerce it to either
an integer number or a real number. Unless you know that the string contains no
fractional part, or you want the result to be an integer number, coercing the string to a
real number is usually the safer choice.
If you try to coerce a string that contains non-numeric data to a number, AppleScript
returns an error.
Working with Dates
In your scripts, you’ll often need to work with dates, doing everything from returning the
current date and time to calculating the number of days or weeks between two dates.
In this section, you’ll come to grips with the powerful set of tools that AppleScript
provides for working with dates.
Understanding How AppleScript Handles Dates
To work with dates, AppleScript uses the date object. The date object is a floating-
point number with the integer portion representing the date and the fractional portion
representing the time within the day.
NOTE
The date object puts the Pope firmly above Caesar, using the Gregorian calendar and
ignoring the Julian calendar.
Treating dates as numbers enables AppleScript (and computers in general) to calculate
them easily. But AppleScript lets you return any of the components of the date—the year,
the month, the hour, and so on—simply enough.

Chapter 5: Working with Text, Numbers, and Dates 95
The date object returns the date in a standard format such as this:
date "Thursday, April 1, 2010 6:14:47 AM"
What you’ll normally want to do is get at one or more of the separate parts of the date.
To do so, use the properties of the date object. Table 5-5 explains these properties.
As you can see in the table, the properties return three types of data: text strings,
integer numbers, and weird things (weekday and month).
The text strings are great for when you need to insert a date as text (for example, in a
document) or display it in a dialog box. For example, the following statement returns the
day and date from a date object:
date string of date "1 December 2010"
When you compile a script, AppleScript changes a date entered like this into its
standard format, including the time, which it sets to midnight if you haven’t specified any
other time. Here’s what the compiled statement looks like:
date string of date "Wednesday, December 01, 2010 12:00:00 AM"
Property Data Type Explanation
Example Using 4/15/2010
2:23:45 PM
date string text The day and date as a string “Thursday, April 15, 2010”
short date string text The date as a string “4/15/2010”
time string text The time as a string “2:23:45 PM”
Day integer The day of the month as a
number
15
weekday weekday The name of the day of the week Thursday
Month month The month April
Year integer The year as a four-digit number 2010
Time integer The number of seconds elapsed
since midnight
51825
Hours integer The hour of the date’s time 14
minutes integer The minutes of the date’s time 23
seconds integer The seconds of the date’s time 45
Table 5-5 Properties of the AppleScript Date Object

96 AppleScript: A Beginner’s Guide
NOTE
AppleScript lets you enter dates in a variety of formats as strings after the date keyword.
For example, date "2/2/11", date "2 feb 11", date "February 02 11", and date "2-feb-2011" all
compile to "Wednesday, February 02, 2011 12:00:00 AM". This friendly flexibility means you
don’t need to worry about how you enter dates—you can simply hammer in dates using
whichever format you find most natural.
When you need to perform date and time arithmetic, the strings are about as much use as
a cheerful grin in an earthquake. Instead, use the integer numbers provided by the day, year,
time, hours, minutes, and seconds properties of the date object. For example, the following
statements use the year of (current date) integer to calculate an item’s age in years:
set YearNow to year of (current date)
set YearThen to 2000
set AgeInYears to YearNow - YearThen
TIP
When you enter a time in a script, always enter the date as well. If you don’t,
AppleScript automatically adds the current date for you when you compile the script.
This can be useful, but for clarity, you should enter the dates explicitly.
Working with the month Property of the Date Object
Calculating with integers is easy enough, but you’ll have noticed that the month property
doesn’t return an integer between 1 and 12: Instead, it returns a month class that contains
a month constant, such as June for the month of June.
Each month constant has a corresponding integer value, so you can perform
arithmetic with the month constants. For example, if you subtract a date that returns the
month constant February from a date that returns the month constant June, as in the
following example, you get 4, the number of months between February and June.
set month1 to month of date "Monday, February 22, 2010 12:00:00 AM"
set month2 to month of date "Thursday, June 24, 2010 12:00:00 AM"
set monthDiff to month2 - month1
But what you’ll often want to do is coerce a month constant to an integer so that you
can see what you’re working with. For example, the following statement returns 6, the
integer value for June:
set intMonth to month of date "Tuesday, June 22, 2010 12:00:00 AM" as
integer

Chapter 5: Working with Text, Numbers, and Dates 97
Working with the weekday Property of the Date Object
Just as the month property of the date object returns a month constant, so the weekday
property of the date object returns a weekday constant containing the name of the day of
the week—Saturday, Sunday, or one of the five less friendly days.
You can use the weekday constants to perform calculations if you want. For example,
(Saturday) – (Wednesday) returns 3, the number you get if you subtract 4 (Wednesday’s
integer value) from 7 (Saturday’s integer value).
You can also coerce the weekday constants to their corresponding integers. For
example, Sunday as integer returns 1, Monday as integer returns 2, and Tuesday as
integer returns 3.
Coercing a Date Object to a String
If you need the full date and time, you can coerce a date object to a string. For example,
the following statement displays a dialog box showing the full current date and time, as
shown in Figure 5-2:
display dialog (current date) as string
Changing a Date
Once you’ve stored a date in a date object, you can alter the date by setting its properties.
For example, the following statements declare the variable myDate and assign to it the
current date, but then move the date out to 14 November 2025:
set myDate to current date
set month of myDate to November
set year of myDate to 2025
set day of myDate to 14
CAUTION
You can’t set the weekday property of a date object, because that would involve damage
to the space-time continuum.
Figure 5-2 On the rare occasions you need the full date and time, you can coerce a date
object to a string.

98 AppleScript: A Beginner’s Guide
Calculating Hours, Minutes, Days, and Weeks
As you saw earlier in this chapter, the time property of the date object returns the number
of seconds since midnight. This is nice and precise, but most of us fuzzy-brained humans
find hours and minutes easier units to deal in.
To break down a time in seconds into hours, minutes, or larger units, use the date
constants shown in Table 5-6. For example, the following statement returns the number of
hours that have passed so far in the day:
(time of (current date)) div hours
Finding Out How Far Off GMT Your Mac Is
Finding the current date and time is useful, but in many cases, you also need to know
where your Mac’s clock is set in relation to Greenwich Mean Time (GMT). To do so, use
the time to GMT command, which returns the time in seconds between your Mac’s time
zone and GMT.
For example, if you’re stuck outside of Memphis with a mobile Mac, time to GMT
typically returns –18000, which is five hours behind GMT, whereas if you’re in New
Zealand, time to GMT typically returns 43200, or twelve hours ahead of GMT.
To get the number of hours, divide the result of time to GMT by the hours constant:
set ZuluHours to time to GMT / hours
Comparing Dates and Times
You can use the standard operators discussed in Chapter 4 to compare dates and times.
For example, each of the following comparisons works for finding out whether the current
date lies before Independence Day 2012:
(current date) comes before date "Wednesday, July 04, 2012 12:00:00 AM"
(current date) < date "Wednesday, July 04, 2012 12:00:00 AM"
(current date) is less than date "Wednesday, July 04, 2012 12:00:00 AM"
Date Constant Returns Number of Seconds
Minutes The number of minutes 60
Hours The number of hours 3600
Days The number of days 86,400
Weeks The number of weeks 604,800
Table 5-6 Date Constants for Converting Seconds to Larger Units of Time

Chapter 5: Working with Text, Numbers, and Dates 99
Try This
AppleScript’s natural-language formulations (comes before, does not come before, comes
after, and does not come after) are usually the easiest way of making date comparisons, but
you can use the regular operators instead if you prefer. For example, the does not come before
operator gives the same result as the is not less than or equal to operator.
Working with Dates and Times
In this example, you create a short script that calculates the number of hours and minutes
that have passed so far in the day and displays the results in a dialog box.
1. In AppleScript Editor, press z-N or choose File | New to create a new script.
2. Type a statement that creates a variable named mySeconds and assigns to it the
number of seconds in the time property of the current date object:
set mySeconds to time of (current date)
3. On the next line, type a statement that creates a variable named myHours and assigns
to it the value of mySeconds divided by the hours constant (using div, which ignores
the remainder). The new statement appears in boldface here:
set mySeconds to time of (current date)
set myHours to mySeconds div hours
4. On the next line, type a statement that creates a variable named myMinutes and
assigns to it the value of the remainder from dividing mySeconds by the hours
constant (mySeconds mod hours) and then converting the result to minutes
(mySeconds mod hours div minutes). The new statement appears in boldface here:
set mySeconds to time of (current date)
set myHours to mySeconds div hours
set myMinutes to mySeconds mod hours div minutes
display dialog "Hour:" & tab & myHours & return & Minutes:" ¬
& tab & myMinutes
5. On the next line, type a statement (shown in boldface here) that displays a dialog box
showing the hours and minutes stored in the variables:
set mySeconds to time of (current date)
set myHours to mySeconds div hours
set myMinutes to mySeconds mod hours div minutes
display dialog "Hour:" & tab & myHours & return & Minutes:" ¬
& tab & myMinutes buttons {"OK"}
(continued)
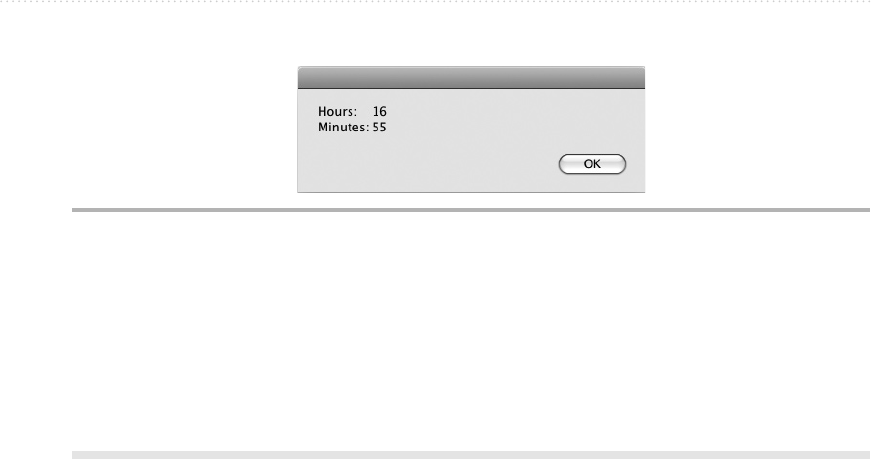
100 AppleScript: A Beginner’s Guide
6. Press z-R or click the Run button on the toolbar to run the script. A dialog box such as
that shown in Figure 5-3 appears.
7. Click the OK button to close the dialog box.
8. Save the script under a name of your choice.
Figure 5-3 This dialog box shows the number of hours and minutes that have elapsed since
midnight.

101
Chapter 6
Working with the
Finder, Files, and
Folders

102 AppleScript: A Beginner’s Guide
Key Skills & Concepts
● Referring to files and folders
● Opening and manipulating Finder windows
● Working with folders
● Working with files
● Mounting and unmounting volumes
Pretty much everything you do on your Mac involves files and folders, so the chances
are that you’ll need to work with both of them in your scripts. As when working
interactively, your main tool for manipulating files and folders in AppleScript is the Finder.
This chapter starts by explaining how to refer to the files and folders you need by using
AppleScript’s various types of references. You will then learn how to open, configure, and
close Finder windows; create, rename, move, and delete folders; and perform essential
actions with files, such as creating aliases, copying and duplicating files, and renaming them.
You will also learn how to mount a network volume on a Mac’s file system via
AppleScript—and how to unmount the volume when you no longer need it.
Working with Finder Windows
You saw some basic maneuvers for Finder windows in Chapter 3, when you created your
first script. In this section, we’ll dig more deeply into how to control Finder windows. First,
though, we need to go over how to refer to the objects you want in your Mac’s file system.
Referring to the Objects You Need
To reach files and folders in your Mac’s file system, you need to describe where they are.
AppleScript gives you several ways to reach the objects you need, starting with directly
accessible objects (such as your home folder) and special folders whose location Mac OS
X tracks for you.
Using Directly Accessible Objects
The easiest way to get into your Mac’s file system is to use one of the handy reference
points that AppleScript provides. Table 6-1 provides a list of the reference points that are
most widely useful in scripts.

Chapter 6: Working with the Finder, Files, and Folders 103
Using the path to Command to Reach Special Folders
Each Mac has various special folders, many of which you’ll be familiar with from using
the operating system (OS) interactively—the System folder, the various Library folders,
the Applications folder, your Documents folder, and so on. Mac OS X keeps track of
where these folders are, even if the operating system is customized, and you can get the
path to these folders by using the path to command.
These special folders fall into four different domains, or areas of the operating system.
● user This domain contains folders that belong in the user account—for example, the
user’s own Documents folder or Movies folder.
● local This domain contains files and preferences that are available to all users—for
example, the Applications folder is in the local domain.
● system This domain contains operating system components.
● network This domain contains items Mac OS X uses over networks.
NOTE
Older versions of Mac OS X also recognize a fifth domain, the classic domain. Leopard
and Snow Leopard no longer use this domain. Follow their lead.
Folder or Item AppleScript Name Notes
Your Mac computer container This reaches the contents of your Mac as you
see them if you click your Mac’s entry in the
Devices list in the sidebar of a Finder window. The
computer container contains your Mac’s internal
hard disk or disks, any external hard disks, your
iDisk (if you have one), the Network item, and
any mounted network drives.
Your Mac’s current
startup disk
startup disk The disk from which your Mac has started on this
boot. You can change startup disk from Startup
Disk preferences in System Preferences.
Your home folder home The folder represented by ~ (a tilde)—for
example, if your short user name is joan,
the /Users/joan/ folder.
Your Desktop folder desktop Your Desktop folder is the ~/Desktop folder (the
Desktop folder in your home folder).
Trash trash The Trash folder
Table 6-1 Useful Mac OS X Locations You Can Open Directly from AppleScript

104 AppleScript: A Beginner’s Guide
Some folders belong to only a single domain, but most of them belong to two or three
domains; some folders even belong to all four domains.
When a folder belongs to more than one domain, one of the domains is almost always
the default domain—the domain that AppleScript gives you if you don’t specify one of
the other domains. For example, the Library folder belongs to the user domain, the local
domain, and the system domain. The system domain is the default domain, so if you give
the path to library folder command without specifying the user domain or the local
domain, you get the system domain. To get the Library folder from the user domain (the
~/Library folder), add from user domain to the command like this:
path to library folder from user domain
Each special folder has a name, which is usually the name under which it appears in
the operating system (for example, Applications). Each folder also has a four-character
code that you can use to identify the folder uniquely—for example, apps for the
Applications folder. Some of the more widely used folders also have constants that you
can use instead of the codes to refer to them in more natural language—for example, you
can refer to the Applications folder as applications folder.
Table 6-2 lists the special folders that are normally most useful in scripts. The table
breaks down the folders by default domain for the user domain, local domain, and system
domain, but also shows which other domains they belong to. No special folders belong to
the network domain by default, so the table has no section for the network domain.
For example, the following command tells the Finder to open a window showing the
contents of the Applications folder:
tell the application "Finder" to open (path to Applications folder)
TIP
To type the mu (µ) character used in paths such as the Music path (µdoc), press OPTION-M.
To type the ƒ character used in paths such as the Desktop Pictures path (dtpƒ),
press OPTION-F.
You can also use the path to command to return the path to the reference points
explained in Table 6-2. For example, the following command tells the Finder to open a
window showing the contents of the computer container object:
tell the application "Finder" to open (path to computer container)

Chapter 6: Working with the Finder, Files, and Folders 105
Folder Name
Folder
Constant
Folder
Code Explanation Sample Location
Other
Domains
Special Folders That Default to the User Domain
Desktop Desktop desk The Desktop folder
in the current user’s
account
~/Desktop/ —
Documents documents
folder
docs The Documents
folder in the current
user’s account
~/Documents/ —
Downloads downloads
folder
down The Downloads
folder in the current
user’s account
~/Downloads/ local
Favorites favorites
folder
favs The Favorites folder
in the Library folder
in the current user’s
account
~/Library/Favorites/ local
Home Home folder cusr The home folder in
the current user’s
account
~ local,
system,
network
Movies Movies folder mdoc The Movies folder
in the current user’s
account
~/Movies/ —
Music Music folder µdoc The Music folder in
the current user’s
account
~/Music/ —
Pictures pictures
folder
pdoc The Pictures folder
in the current user’s
account
~/Pictures/ —
Preferences preferences
folder
pref The Preferences
folder in the current
user account’s
library
~/Library/Preferences/ local
Public public folder pubb The Public folder
in the current user
account
~/ —
Sites sites folder site The Sites folder in
the current user’s
account
~/Sites/ —
Users users folder usrs The Users folder on
the Mac
/Users/ local,
system,
network
Table 6-2 Mac OS X Special Folders You Can Reach with the path to Command

106 AppleScript: A Beginner’s Guide
Folder Name
Folder
Constant
Folder
Code Explanation Sample Location
Other
Domains
Special Folders That Default to the Local Domain
Applications applications
folder
apps The Applications
folder on the Mac
/Applications/ user,
system
Desktop Pictures desktop
pictures
folder
dtpƒ The Desktop
Pictures folder on
the Mac
/Library/Desktop
Pictures/
user
Startup Items startup items empz The Mac’s
StartupItems folder
/Library/StartupItems/ user,
system
Utilities utilities folder utiƒ The Utilities folder
on the Mac
/Applications/Utilities/ user,
system
Special Folders That Default to the System Domain
Fonts fonts font The Fonts folder on
the Mac
/System/Library/
Fonts/
user, local
Library library folder dlib The Library folder
on the Mac
/Library/ user, local
Printers — impr The Printers folder
in the System
library
/System/Library/
Printers/
user, local
Root — root The System folder
(the root folder)
/System/ user, local
System system folder dtop The System folder
on the Mac’s
startup disk
/System user,
network
System
Preference
panes
system
preferences
sprf The
PreferencePanes
folder in the System
library
/System/Library/
PreferencePanes/
user, local
Table 6-2 Mac OS X Special Folders You Can Reach with the path to Command (continued)
TIP
To identify the foreground application, use the path to foremost application command.
To refer to the application running the script or to the script itself, use the path to me
command.
From these special folders, you can easily reach other folders by using nested
references, as described in the next section.

Chapter 6: Working with the Finder, Files, and Folders 107
Try This Using Special Folders
In this example, you open Finder windows to two special folders. Follow these steps:
1. In AppleScript Editor, press z-N or choose File | New to create a new script.
2. Create a tell block to the Finder application:
tell the application "Finder"
end tell
3. In the tell block, add a statement to open the Public folder in your user account by
using its constant, as shown in boldface here:
tell the application "Finder"
open (path to public folder)
end tell
4. Add a statement to open the Utilities folder in the local domain (the default domain) by
using its folder code, as shown in boldface here:
tell the application "Finder"
open (path to public folder)
open (path to "utiƒ")
end tell
5. Press z-R or click the Run button on the toolbar to run the script.
6. Save the script under a name of your choice.
Referring to Objects with Nested References and Path References
In AppleScript, you reach the objects you need by using references to them. This works
the same for all scriptable objects, so you can use it in the Finder. For example, to refer
to the /Library/Audio/Apple Loops/Apple/Apple Loops for GarageBand/ folder on your
Mac’s hard disk, you can use a reference such as this:
folder "Apple Loops for GarageBand" of folder "Apple" ¬
of folder "Apple Loops"
of folder "Audio" ¬
of folder "Library" of startup disk
If you can stand the relentless repetition of the word “of,” the reference is completely
clear, as it goes all the way from the startup disk to the folder. This type of reference is
called a nested reference, because each folder specified is within the next: The Apple

108 AppleScript: A Beginner’s Guide
Loops for GarageBand folder is inside the Apple folder, which is inside the Apple Loops
folder, and… I’ll spare you the rest. The nested reference starts at the end of the chain of
references—in this case, with the Apple Loops for GarageBand folder.
In the Finder, you can also use path references to access objects more concisely.
A path reference is one that starts at the beginning of the chain of objects to the object
you want to reach. For example, to refer to that same Apple Loops for GarageBand
folder with a path reference:
folder "Macintosh HD:Library:Audio:Apple Loops:Apple:Apple Loops for
GarageBand:"
You place the path reference within double quotation marks to indicate that it’s not a
command, and identify the class of object before it (in this case, folder). A path reference
to a folder ends with a colon, like the previous example, whereas a path reference to a file
ends with the file’s extension, like this:
document file "Macintosh HD:Library:Audio:Apple Loops:Apple:
Apple Loops for GarageBand:70s Ballad Drums 01.caf"
NOTE
When you’re referring to an object in AppleScript like this, include its class—for example,
folder or document file. If you don’t know the class, use the generic class name item
instead.
Referring to Objects with Alias References
Nested references and path references work great in the Finder, but not in most other
applications, which simply don’t understand them. You also can’t pass a nested reference
from one application to another.
So to refer to files and folders in most applications, or to pass references from
one application to another, you need to use a different type of reference. This is the
alias reference, and all applications understand it. An alias reference is nothing more
complicated than a path reference with the word alias before it, like this:
alias "Macintosh HD:Users:angela:Music:"
You can create an alias reference by putting the path together yourself or by reading it
from the path bar at the bottom of a Finder window, but what’s easier is to use AppleScript
Editor to make the Finder create an alias reference for you. To do so, add the as alias
coercion to a command that returns the object like this:
tell application "Finder" to get folder "Mail" of folder "Library" of
startup disk as alias

Chapter 6: Working with the Finder, Files, and Folders 109
This command returns this alias:
alias "Macintosh HD:Library:Mail:"
CAUTION
In Tiger (Mac OS X 10.4) and earlier versions of AppleScript, each alias reference must
refer to an existing item; a script won’t compile if it refers to an object that doesn’t exist.
In Leopard, an alias reference can refer to an object that doesn’t yet exist (for example,
one that you’re about to create) until the point at which you run the code, when you will
get an error if the object doesn’t exist.
Understanding and Using POSIX References
With AppleScript, you can also use POSIX references, ones that are constructed as
POSIX paths delimited with forward slash (/) characters rather than colons. (POSIX is
the contraction for Portable Operating System for Unix.) In POSIX, the first forward
slash refers to the startup disk. For example, the following POSIX path refers to the
Users:jane:Documents:Reference:BeatingSpyware.pdf file:
"/Users/jane/Documents/Reference/BeatingSpyware.pdf"
To get a POSIX path from an alias reference, use the get POSIX path command
like this:
tell application "Finder"
get POSIX path of (folder "Mail" of folder "Library" of startup
disk as alias)
end tell
This command returns the following POSIX path:
"/Library/Mail/"
To get an alias reference from a POSIX path, add as POSIX file after the path
reference like this:
"/Library/Audio" as POSIX file as alias
This command returns the following alias:
alias "Macintosh HD:Library:Audio:"

110 AppleScript: A Beginner’s Guide
Try This
Opening a Finder Window
To open a Finder window, you use the open command and a reference to the folder you
want the Finder window to show. Here are four examples:
● To open the startup disk in the simplest way possible:
tell the application "Finder"
open the startup disk
end tell
● To open the /Library/Fonts/ folder by using a nested reference:
tell the application "Finder"
open the folder "Fonts" of the folder "Library" of the
startup disk
end tell
● To open the /Library/Fonts/ folder by using a path reference:
tell the application "Finder"
open folder "Macintosh HD:Library:Fonts:"
end tell
● To open the /Library/Fonts/ folder by using an alias reference:
tell the application "Finder" to open alias "Macintosh HD:Library:
Fonts:"
Using Nested References, Path References,
and Alias References
In this example, you use a nested reference, a path reference, and an alias reference to
open folders and files. Follow these steps:
1. With the previous script you created still open, press z-SHIFT-s or choose File | Save As
to open the Save As dialog box. Specify a different name for the new script, and then
click the Save button.
2. Delete the two open commands from the script.
3. Add an open command that uses a nested reference to open the /Library/Desktop
Pictures/Nature/ folder, as shown in boldface here:
tell the application "Finder"
open folder "Nature" of folder "Desktop Pictures" ¬
of folder "Library" of startup disk
end tell

Chapter 6: Working with the Finder, Files, and Folders 111
4. Add an open command that uses a path reference to open the document file named
Aurora.jpg in the /Library/Desktop Pictures/Nature/ folder, as shown in boldface here:
tell the application "Finder"
open folder "Nature" of folder "Desktop Pictures" ¬
of folder "Library" of startup disk
open document file ¬
"Macintosh HD:Library:Desktop Pictures:Nature:Aurora.jpg"
end tell
5. Add an open command that uses an alias reference to open the document file named
Mojave.jpg in the /Library/Desktop Pictures/Black & White/ folder, as shown in
boldface here:
tell the application "Finder"
open folder "Nature" of folder "Desktop Pictures" ¬
of folder "Library" of startup disk
open document file ¬
"Macintosh HD:Library:Desktop Pictures:Nature:Aurora.jpg"
open document file alias ¬
"Macintosh HD:Library:Desktop Pictures:Black & White:
Mojave.jpg"
end tell
6. Press z-R or click the Run button on the toolbar to run the script. The Finder opens
a Finder window showing the Desktop Pictures folder and then opens the Aurora.
jpg desktop picture and the Mojave.jpg desktop picture in your default JPG viewer
application (for example, Preview).
7. Close the windows the script has opened.
8. Save the script under a name of your choice.
Changing the View in a Finder Window
When you open a Finder window, you’ll often want to make sure it’s in the best view for
whoever is using it.
To find out which view a Finder window is in, check the current view property of the
window. As you’ll remember from Chapter 3, there are four views (see Table 6-3).
For example, the following tell block tests whether the current view is Column view.
If it is, the code changes the view to Cover Flow view.
tell the application "Finder"
tell the front window
if the current view is column view then
112 AppleScript: A Beginner’s Guide
set the current view to flow view
end if
end tell
end tell
Changing the Position of a Finder Window
To find out where a Finder window is positioned, get its position property. AppleScript
returns a list showing the horizontal and vertical coordinates from the upper-left corner of
the primary monitor (the monitor on which the menu bar appears)—for example:
{800, 44}
NOTE
As discussed in Chapter 3, the reference point isn’t actually the upper-left corner of the
Finder window—it’s the leftmost point below the title bar. Ideally, you should allow
22 pixels for the depth of the Finder window’s title bar. You should also allow 22 pixels
for the depth of the menu bar if you’re positioning the Finder window near the top of a
Mac’s primary monitor. However, if you try to position a Finder window on top of the
menu bar (for example, by using a vertical position of 0), Mac OS X forces the Finder
window below the title bar without comment.
To change the position of a Finder window, set its position property and provide a
list of the coordinates of where you want to put the upper-left corner. For example, the
following statement positions the front Finder window in the upper-left corner of the
primary monitor:
tell the application "Finder"
set the position of the front Finder window to {0, 44}
end tell
You can also change the position of a Finder window by setting its bounds, as
described next.
View Finder Command Finder Shortcut Term
Icon view View | As Icons z-1 icon view
List view View | As List z-2 list view
Column view View | As Columns z-3 column view
Cover Flow view View | As Cover Flow z-4 flow view
Table 6-3 AppleScript Terms for the Finder’s Four Views

Chapter 6: Working with the Finder, Files, and Folders 113
Changing the Size of a Finder Window
To discover how big a Finder window is, get its bounds property. AppleScript returns a
list showing the positions of the left edge, top edge (below the title bar), right edge, and
bottom edge of the window—for example:
{0, 44, 752, 870}
To change the size of a Finder window, set its bounds to the appropriate positions. For
example, the following tell block positions the Finder window named Documents in the
upper-left corner of the primary monitor and makes it 800 pixels high by 800 pixels wide:
tell the application "Finder"
set the bounds of the Finder window "Documents" to {0, 44, 800, 822}
end tell
Minimizing and Restoring a Finder Window
To minimize a Finder window to an icon on the Dock, you set its collapsed property to
true. For example, the following statement minimizes the front Finder window:
tell application "Finder" to set collapsed of front Finder window to
true
NOTE
The property for minimizing a Finder window is called "collapsed" because Mac System 9
used to allow you to collapse a window to just its title bar. Most other applications use the
miniaturized property for minimizing windows. For example, the statement tell application
"iPhoto" to set miniaturized of window 1 to true minimizes the first iPhoto window.
To restore a minimized Finder window to its previous position, set the collapsed
property to false like this:
tell application "Finder" to set collapsed of front Finder window to
false
Changing the Width of the Sidebar
To find out how wide the sidebar is in a Finder window, get the sidebar width property of
the window. AppleScript returns an integer showing the number of pixels. The minimum
width is 135 pixels; AppleScript ignores any smaller value you care to suggest.

114 AppleScript: A Beginner’s Guide
To change the width of the sidebar, set the sidebar width property of the window.
For example, the following tell block makes the sidebar in the front Finder window
160 pixels wide:
tell the application "Finder"
set the sidebar width of the front Finder window to 160
end tell
NOTE
Two quick things here. First, if you need to hide the sidebar, hide the toolbar as
described next; the sidebar disappears at the same time. Second, after you set the
sidebar width, Mac OS X uses that width for each new Finder window you open—so
don’t set the sidebar as wide as the flares you’re hiding in your closet.
Showing and Hiding the Toolbar
To find out whether the toolbar is visible in a Finder window, get the toolbar visible property
of the window. This is a Boolean property, so AppleScript returns true if the toolbar and the
sidebar are displayed and false if they’re hidden.
Hiding the Front Application
or All Background Applications
You can use the System Events application to hide either the front application or all
other applications apart from the front application. To do so, you tell System Events to
issue the keystrokes you use for hiding when working interactively.
● Hide the front application z-H
tell application "System Events" to keystroke ¬
"h" using command down
● Hide all other applications z-OPTION-H
tell application "System Events" to keystroke ¬
"h" using {command down, option down}

Chapter 6: Working with the Finder, Files, and Folders 115
To hide the toolbar and the sidebar, set the toolbar visible property to false, as in this
example:
tell the application "Finder"
set toolbar visible of the front Finder window to false
end tell
To show the toolbar and the sidebar again, set the toolbar visible property to true.
Hiding All Finder Windows
You can’t hide a single Finder window, but you can hide the entire application. You need
to use the System Events application to hide the application in question rather than simply
telling the application straight to its face.
For example, the following statement hides all open Finder windows:
tell application "System Events" to tell ¬
process "Finder" to set visible to false
To display the Finder windows again, set the visible property to true like this:
tell application "System Events" to tell ¬
process "Finder" to set visible to true
NOTE
This technique of hiding an application works for other applications as well as the
Finder. For example, to hide all the open Microsoft Word windows, you can use tell
application “System Events” to tell process “Microsoft Word” to set visible to false.
Closing Finder Windows
To close a Finder window, use a close command and identify the window. For example,
the following tell block closes the Finder window at the back of the stack:
tell the application "Finder"
close the back Finder window
end tell
If you want to close every open Finder window, you need only specify every window:
tell the application "Finder"
close every Finder window
end tell

116 AppleScript: A Beginner’s Guide
Try This Opening, Configuring,
and Closing Finder Windows
In this example, you open a Finder window, reposition and resize it, make sure the toolbar
is visible, and then close the window after a pause.
To create this script, follow these steps:
1. In AppleScript Editor, press z-N or choose File | New to create a new script.
2. Create a tell block to the Finder application:
tell the application "Finder"
end tell
3. Add an open command to open the Documents folder in the current user’s account, as
shown in boldface here:
tell the application "Finder"
open folder "documents" of home
end tell
4. Create a nested tell block that works with the front Finder window (the window the
open command opens), as shown in boldface here:
tell the application "Finder"
open folder "documents" of home
tell the front Finder window
end tell
end tell
5. Inside the nested tell block, set the current view property to column view, the position
property to {0, 44}, and the bounds property to {0, 44, 800, 844}, as shown in boldface
here:
tell the application "Finder"
open folder "documents" of home
tell the front Finder window
set the current view to column view
set the position to {0, 44}
set the bounds to {0, 44, 800, 844}
end tell
end tell
6. Still inside the nested tell block, set the sidebar width property to 150 pixels and the
toolbar visible property to true, as shown in boldface here:
tell the application "Finder"
open folder "documents" of home

Chapter 6: Working with the Finder, Files, and Folders 117
tell the front Finder window
set the current view to column view
set the position to {0, 44}
set the bounds to {0, 44, 800, 844}
set the sidebar width to 140
set toolbar visible to true
end tell
end tell
7. After the nested tell block, but still within the outer tell block, add a delay 5 statement
to insert a five-second pause when the script runs, and then add a close command to
close the front Finder window. The additions are shown in boldface here:
tell the application "Finder"
open folder "documents" of home
tell the front Finder window
set the current view to column view
set the position to {0, 44}
set the bounds to {0, 44, 800, 844}
set the sidebar width to 150
set toolbar visible to true
end tell
delay 5
close the front Finder window
end tell
8. Press z-R or click the Run button on the toolbar to run the script. You’ll see a Finder
window open; change to the position, size, and configuration you specified; pause to
take a curtain call; and then close.
9. Save the script under a name of your choice.
Working with Folders
Mac OS X’s Spotlight feature is a wonderful technology for hunting down lost files and
folders, but it’s still no excuse for not keeping tight organization of the file system of your
Mac—or whoever’s Mac your script is running on.
To keep the file system in apple-pie order, your scripts will often need to create,
modify, or delete folders. In this section, we’ll look at the essential maneuvers you’ll need
to be able to perform with folders—creating them, renaming them, moving them, lobbing
them in the Trash, and so on.

118 AppleScript: A Beginner’s Guide
Creating a Folder
To create a folder using AppleScript, use a make command. The make command is a
widely used command that takes two required parameters.
● new type You use the new parameter to tell AppleScript which class of object you
want to create. So to create a new folder, you use a make new folder command.
● at location You use the at parameter to tell AppleScript where you want to create the
new object. For example, when you use a make new folder command, you can use the
parameter at desktop to tell Mac OS X to create the new folder on the Desktop. If you
need to reach a folder within the Mac’s file system, use one of the means discussed
earlier in this chapter. For example, use the alias keyword and provide the path to the
folder—such as “Macintosh HD:Users:ben:Documents” or a similar path.
When you’re using the make command to create a folder, you also use the with properties
parameter to provide essential information for the folder you’re creating. The essential nugget
of information you need to give AppleScript is the name item. If you don’t provide a name for
the new folder, Mac OS X obligingly gives it the default name of untitled folder for you. (If
that name is already taken—which does happen, especially if you mess around with scripts—
Mac OS X uses untitled folder 2, untitled folder 3, or the next available name.)
The following example creates a folder named Test Folder on the Desktop:
tell application "Finder"
make new folder at desktop with properties {name:"Test Folder"}
end tell
This example creates a folder named Sample Files within the Temp subfolder of the
user’s Documents folder. The Documents folder is a standard Mac OS X system folder,
but you will need to create the Temp subfolder (or verify that it already exists) if you want
to make this example work on your Mac.
tell application "Finder"
make new folder at folder "Temp" ¬
of folder "Documents" of home ¬
with properties {name:"Sample Files"}
end tell
If you want to open the folder you’ve just created, all you need do is add an open the
result command to the tell block like this:
tell application "Finder"
make new folder at folder "Temp" ¬
of folder "Documents" of home ¬

Chapter 6: Working with the Finder, Files, and Folders 119
with properties {name:"Sample Files"} ¬
open the result
end tell
Copying a Folder
To copy a folder, use the copy command, identify the folder to copy, and tell AppleScript
where to place the copy. For example, the following tell block copies the ~/Documents/
Shift/ folder to the Loading Zone folder on the Desktop:
tell application "Finder"
copy folder "Shift" of folder "Documents" of home ¬
to folder "Loading Zone" of desktop
end tell
Duplicating a Folder
Instead of copying a folder, you can duplicate it by using the duplicate command. As when you
use the command interactively, duplicate is like a single-minded version of the copy command:
It creates a copy of the folder in the same containing folder and gives the copy the same name
as the original but with copy added (or copy 2 if copy is already taken). For example, when you
duplicate a folder named Samples, Finder names the duplicate Samples copy.
The following statement duplicates the folder named Loading Zone on the desktop:
tell application "Finder" to duplicate folder "Loading Zone" of desktop
Renaming a Folder
To rename a folder, use the set command to change the name property of the folder. The
following tell block changes the name of the folder named Current, which is located on
the Desktop, to Old:
tell application "Finder"
set name of folder "Current" of desktop to "Old"
end tell
Moving a Folder
To move a folder, use the move command, identify the folder you’re moving, and tell
AppleScript where to move it. For example, the following tell block moves the ~/Desktop/
Video/ folder to the ~/Movies/Files/ folder:
tell application "Finder"
move folder "Video" of desktop to folder "Files" ¬
of (path to movies folder)
end tell

120 AppleScript: A Beginner’s Guide
Try This
Deleting a Folder
To delete a folder, use the delete command and specify the victim folder. For example, the
following statement deletes the ~/Documents/Temp/Sample Files/ folder:
tell application "Finder"
delete folder "Sample Files" of folder "Temp" ¬
of folder "Documents" of home
end tell
Creating, Renaming, and Moving a Folder
In this example, you create a folder, rename it, and then move it to a different location.
The script opens a Finder window so that you can see the folder has been created and then
changes the window’s target so that you can verify that the folder has been moved. You
get to delete the folder manually, unless it happens to be just what you need.
Follow these steps to create the script:
1. In AppleScript Editor, press z-N or choose File | New to create a new script.
2. Create a tell block to the Finder application:
tell the application "Finder"
end tell
3. Inside the tell block, add a make new folder command to create a folder named Temp1 in
the current user account’s Documents folder. Follow up with an open the result command
to open the new folder in a Finder window. The commands appear in boldface here:
tell application "Finder"
make new folder at folder "Documents" of home ¬
with properties {name:"Temp1"}
open the result
end tell
4. Next, add a two-second delay to give you a breath to see the new folder in place, and
then follow with a set name command to change the new folder’s name to Temp2.
Then add another two-second delay for you to see the change. The new commands
appear in boldface here:
tell application "Finder"
make new folder at folder "Documents" of home ¬
with properties {name:"Temp1"}
open the result
delay 2

Chapter 6: Working with the Finder, Files, and Folders 121
set name of folder "Temp1" of folder "Documents" ¬
of home to "Temp2"
delay 2
end tell
5. Now add a move command to move the Temp2 folder from the Documents folder to
the Desktop, and then set the front Finder window’s target to show the Desktop so that
you can see the moved folder. Again, the new commands appear in boldface:
tell application "Finder"
make new folder at folder "Documents" of home ¬
with properties {name:"Temp1"}
open the result
delay 2
set name of folder "Temp1" of folder "Documents" ¬
of home to "Temp2"
delay 2
move folder "Temp2" of folder "Documents" of home to desktop
set the target of the front Finder window to folder "Desktop"
of home
end tell
6. Press z-R or click the Run button on the toolbar to run the script. When the Finder
window opens, look for the Temp 1 folder, marvel as its name changes to Temp2, and
then sigh with satisfaction as it migrates to the desktop.
7. Save the script under a name of your choice.
8. Delete the Temp2 folder from your Desktop.
Working with Files
To work with files, you can use techniques similar to those for working with folders.
This section shows you how to create files from the Finder; copy, duplicate, and move files;
and rename and delete files.
Creating Files from the Finder
To create a file via AppleScript, you use a make new command, as you did when creating
a new folder earlier in this chapter. The make new command works in most scriptable
applications, and normally you’ll want to create a file by using the application with which
you’ll manipulate it. For example, to create a Microsoft Excel workbook, you use Excel,
which handles the details of the file format for you. You don’t tell the Finder to “make a new
file of the Excel workbook type” or something like that.

122 AppleScript: A Beginner’s Guide
From the Finder, you can create folders (as you’ve seen) and three different types of
files: aliases, Internet link files, and text files. Aliases tend to be the most useful of these
file types, so we’ll start with them.
Creating an Alias File
Another type of file you may want to create using Finder is an alias file—a file that the
user can double-click to open an object that’s located elsewhere in the Mac’s file system.
For example, you can create an alias to a file or folder that’s hard to reach, or place an
alias for an obscure application within easy view.
To create an alias file, use the make new command like this:
1. Specify the alias file type and provide the path to the file or folder.
2. Use the at folder parameter to tell the Finder which folder to create the alias in.
3. Set the name property to the name you want the alias file to have.
Here’s an example of creating an alias file to the Public folder on the volume named
Server:
tell application "Finder"
make new alias file to folder "Server:Public:" ¬
at folder "Test Folder" of desktop ¬
with properties {name:"Public Folder on Server"}
end tell
Creating an Internet Link File
Often, it’s useful to create an Internet link file—a file that the user can double-click to
open a website using his or her default browser. To create an Internet link file, use the
make new command like this:
1. Specify the internet location file type and supply the URL.
2. Use the at folder parameter to tell the Finder where to create the link.
3. Set the name property to the name you want the link file to bear.
Here’s an example of creating an Internet link file to the www.mhprofessional.com
website:
tell application "Finder"
make new internet location file to "http://www.mhprofessional.com" ¬

Chapter 6: Working with the Finder, Files, and Folders 123
at folder "Key Links" of desktop ¬
with properties {name:"McGraw-Hill Professional website"}
end tell
Creating a Plain-Text File
The third type of file you can create from the Finder is a plain-text file—one that contains
only text, with no formatting and no objects (such as graphics). This capability is
occasionally useful, but you may prefer to create your text files from TextEdit or another
application, or to create rich-text format documents rather than plain-text ones.
To create a plain-text file, use the make new command like this:
1. Specify the document file type.
2. Use the at folder parameter to tell the Finder the folder in which to create the text file.
3. Set the name property to the name you want to give the text file.
For example, the following tell block creates a text file named Log File.txt in the ~/
Desktop/Loading Zone/ folder:
tell application "Finder"
make new document file at folder "Loading Zone" of desktop ¬
with properties {name:"Log File.txt"}
end tell
Copying a File
To copy a file, use the copy command, identify the target file by name and folder, and tell
AppleScript where to place the copy. For example, the following tell block copies the ~/
Desktop/Stuff/Sample.tiff file to the user’s Pictures folder:
tell application "Finder"
copy file "Picture 1" of folder "Stuff" of desktop ¬
to folder (path to pictures folder)
end tell
Duplicating a File
As with a folder, you can duplicate a file by using the duplicate command. The Finder
creates a copy of the original file in the same folder and gives the copy the original’s name
with copy added (or copy 2 if copy is already in use).

124 AppleScript: A Beginner’s Guide
The following example duplicates the file named Picture 1 on the Desktop, creating a
file named Picture 1 copy:
tell application "Finder"
duplicate file "Picture 1" of desktop
end tell
Deleting a File
To delete a file, use the delete command and specify your target file (by using document
file and the file’s name) and the folder that contains it. For example, the following
statement deletes the file named Red Bull.doc stored in the ~/Documents/Temp/ folder:
tell application "Finder"
delete document file "Red Bull.doc" of folder "Temp" ¬
of folder "Documents" of home
end tell
Renaming a File
You can rename a file in the same way as you rename a folder, by using a set name command,
telling the Finder which folder the file is in, and specifying the new name. For example,
the following tell block renames the file named Bills in the ~/Documents/Money/ folder
to Invoices:
tell application "Finder"
set name of file "Bills" of folder "Money" ¬
of folder "Documents" of home to "Invoices"
end tell
Moving a File
To move a file, use the move command, identify the file you’re moving by its name and
folder, and tell AppleScript where you want to put it. For example, the following tell block
moves the file named Invoices from the ~/Documents/Money/ folder to the ~/Desktop/
Sort/ folder:
tell application "Finder"
move file "Invoices" of folder "Money" of folder "Documents" ¬
of home to folder "Sort" of desktop
end tell

Chapter 6: Working with the Finder, Files, and Folders 125
Try This Creating a File and Opening It
In this short example, you create a new Internet location file and then tell Safari to open it.
Follow these steps:
1. In AppleScript Editor, press z-N or choose File | New to create a new script.
2. Create a tell block to the Finder:
tell the application "Finder"
end tell
3. Declare a variable named myWebLoc and assign to it the result of a make new
internet location file command. This example (shown in boldface) uses Amazon.com,
since the site seems likely to survive the Credit Crunch, but substitute your preferred
URL if you like:
tell application "Finder"
set myWebLoc to make new internet location file ¬
to "http://www.amazon.com" ¬
at desktop ¬
with properties {name:"Amazon.com"}
end tell
4. Add a tell statement that tells Safari to open myWebLoc, as shown in boldface here:
tell application "Finder"
set myWebLoc to make new internet location file ¬
to "http://www.amazon.com" ¬
at desktop ¬
with properties {name:"Amazon.com"}
end tell
tell the application "Safari" to open myWebLoc
5. Press z-R or click the Run button on the toolbar to run the script. You’ll see Safari
launch (or become active) and open the Internet location file.
6. Save the script under a name of your choice.
7. Delete the Internet location file from your Desktop.
Mounting and Unmounting Volumes
To give users of your scripts access to all the files they need, you may have to mount
volumes located in servers. When the users have finished using files on a volume, you can
eject the volume to unmount it from the Mac’s file system.
126 AppleScript: A Beginner’s Guide
Mounting a Volume
To mount a network volume in a script, use the mount volume command. This command
takes the following parameters:
● volume_name This required parameter gives the name or URL of the volume—for
example, smb://10.0.0.7/ or afp://server/public/.
● on server This optional parameter gives details of the server that contains the
volume. If volume_name contains the full network path or URL to the server, you can
omit the on server parameter.
● in AppleTalk zone This optional parameter specifies the AppleTalk zone in which to
find the server. As with on server, if volume_name contains the full network path, you
can omit in AppleTalk zone.
● as user name This optional parameter specifies the user name under which to log on
to the server. If you omit this parameter, Mac OS X tries to log on as a guest user; if
the server doesn’t allow guest access, Mac OS X will be unable to mount the volume.
● with password This parameter specifies the password to use for authenticating the
user name. This parameter is optional in the sense that when you use the as user name
parameter, you use this parameter with it to supply the password; if you don’t supply
the password, the server prompts the user for it, as shown in Figure 6-1.
If you specify a server but not which volume on it to mount, Mac OS X prompts the
user to choose from among the available volumes (see Figure 6-2).
Figure 6-1 If you don’t include the password when mounting a volume, the user has the
choice of entering the password or trying to connect as a guest user.
Chapter 6: Working with the Finder, Files, and Folders 127
Q: I’m using the with password parameter, but the server is still bugging the user for the
password. What can I do to get around this?
A: When you’re mounting a server with the mount volume command, you may find that the
server demands a password even if you use the with password parameter to supply the
correct password.
To avoid being prompted for the password, place the name and password in the URL
like this: smb://username:password@server.domain.com/volume, where each of the italic
items is a placeholder for the details you’ll supply.
For example, the following command mounts the volume named Shared on the server
with the IP address 10.0.0.7 using the Server Message Block (SMB) protocol:
mount volume "smb://10.0.0.7/Shared"
The following command mounts the volume named Spreads on the server with the IP
address 10.0.0.20, authenticating with the user name dfinkel and the password drowssap:
mount volume "afp://10.0.0.20/spreads" as user name "dfinkel" with
password "drowssap"
Ask the Expert
Figure 6-2 If necessary, Mac OS X prompts the user to choose from among the available
volumes on the server.

128 AppleScript: A Beginner’s Guide
Unmounting a Volume
When you no longer need to have a volume mounted on the Mac’s file system, unmount
it by telling the Finder to eject it. For example, the following statement ejects the volume
named “spreads”:
tell application "Finder" to eject alias "spreads"

129
Chapter 7
Making Decisions
in Your Scripts

130 AppleScript: A Beginner’s Guide
Key Skills & Concepts
● Making a decision with an if… then statement
● Using if… then… else statements
● Using if… then… else if… else statements
In some scripts, you’ll always need to take the same actions—for example, running
the same application, creating the same document, or manipulating the same files in a
particular way. But more often, you’ll need to make decisions in your scripts and take
action accordingly.
This short chapter shows you how to make decisions by using the three If structures
that AppleScript provides.
● if… then This structure lets you test whether a condition is true and take actions if
it is. If the condition is false, the script takes no actions.
● if… then… else This structure lets you test whether a condition is true, take actions
if it is, and take other actions if it is not.
● if… then… else if… else This structure lets you test whether multiple conditions
are true, taking actions for whichever of the conditions turns out to be true. If all the
conditions return false, the else code runs.
The various kinds of if statements are so vital to programming in AppleScript that
you’ve already seen some of them in action earlier in this book.
NOTE
The if statements are great for taking decisions in your scripts, but AppleScript also
provides other ways of taking decisions. For example, the next chapter shows you how
to display dialog boxes that enable the user to choose from among different courses of
action or to pick one or more choices from a list that you present to them.

Chapter 7: Making Decisions in Your Scripts 131
Try This
Checking a Single Condition
with an if… then Statement
To check a single condition, use an if… then statement. You normally write it as a block
of code like this, starting with the if statement and its condition, and ending with the end
if statement:
if condition then
statements
end if
NOTE
You can also use a single-line if statement that reads if condition then statement—for
example, if myNumber = 10 then display dialog "The value of myNumber is 10.".
This type of if statement is more compact and has no end if line. But laying your code
out in block if statements makes it easier to read and to debug, so it’s usually a better
idea.
Here’s an example of an if… then statement:
tell application "Finder"
if (count of Finder windows) = 0 then
open folder "Documents" of home
end if
end tell
Inside the tell block that addresses the Finder, the if statement compares the count of
Finder windows to 0 to see if no Finder windows are open. If that’s the case, the open
folder "Documents" of home statement runs, opening a Finder window showing the
contents of the Documents folder.
Using an if… then Statement to Launch
an Application If It’s Not Running
In this example, you write a script that checks whether TextEdit is running, and launches
and activates it if it is not. Follow these steps:
1. If TextEdit is open, quit it. Save any unsaved changes that you want to keep.
2. In AppleScript Editor, press z-N or choose File | New to create a new script.
(continued)

132 AppleScript: A Beginner’s Guide
3. Type in the following if… then block:
if (get running of application "TextEdit") is false then
activate application "TextEdit"
end if
4. Press z-R or click the Run button on the toolbar to run the script. The script launches
and activates TextEdit so that TextEdit is the frontmost window.
5. Run the script again with TextEdit still open. Verify that the script doesn’t open another
TextEdit document window.
Deciding Between Two Courses of Action
with an if… then… else Statement
Often, you’ll need to decide between two paths in your code: If a condition is true, do
this; if it’s not true (in other words, if it’s false), do something else instead.
In AppleScript, you use an if… then… else statement to make this kind of decision:
if condition then
statements1
else
statements2
end if
If the condition is true, AppleScript runs statements1, the statements before the else
keyword. If the condition is false, AppleScript runs statements2, the statements after the
else keyword. Both these sets of statements are optional, though you’ll always want to
have one or the other (with neither, the if statement does nothing), and usually you’ll want
to have both (if you have only one, you might as well use an if… then statement instead).
Here’s a brief example of an if… then… else statement. If the number stored in the
variable myHour is less than 12, the script sets the text in the myGreeting variable to
Good morning!; otherwise (if the number is 12 or greater), the script sets the text in
myGreeting to Good afternoon!.
if myHour is less than 12 then
set myGreeting to "Good morning!"
else
set myGreeting to "Good afternoon!"
end if

Chapter 7: Making Decisions in Your Scripts 133
Try This Using an if… then… else Statement
In this example, you write a script that checks the hour of the day, assigns an appropriate
greeting (“Good morning!”, “Good afternoon!”, or “Good evening!”, depending on the
time) to the variable myGreeting, and then displays myGreeting in a dialog box. You’ll
meet dialog boxes in detail in the next chapter, but in this example, you’ll use the display
dialog command in its simplest form.
Follow these steps to create the script:
1. In AppleScript Editor, press z-N or choose File | New to create a new script.
2. Type the following statement that assigns the hours property of the current date class
to the variable myHour:
set myHour to hours of (current date)
3. Create the if… then… else statement from the previous example, as shown in boldface
here:
set myHour to hours of (current date)
if myHour is less than 12 then
set myGreeting to "Good morning!"
else
set myGreeting to "Good afternoon!"
end if
4. Adapt the else section by adding another if… then… else statement to make it
distinguish between the afternoon and the evening, as shown in boldface here:
set myHour to hours of (current date)
if myHour is less than 12 then
set myGreeting to "Good morning!"
else
if myHour is less than 18 then
set myGreeting to "Good afternoon!"
else
set myGreeting to "Good evening!"
end if
end if
5. Add a display dialog statement at the end to display a dialog box containing the text in
myGreeting, as shown in boldface here:
set myHour to hours of (current date)
if myHour is less than 12 then
set myGreeting to "Good morning!"
(continued)

134 AppleScript: A Beginner’s Guide
else
if myHour is less than 18 then
set myGreeting to "Good afternoon!"
else
set myGreeting to "Good evening!"
end if
end if
display dialog myGreeting
6. Press z-R or click the Run button on the toolbar to run the script. Make sure the dialog
box that appears shows the appropriate greeting for the time.
7. Save the script under a name of your choice so that you can work with it again later in
this chapter.
Choose Among Multiple Courses of Action
with an if… then… else if… else Statement
When you need to choose among three or more courses of action in a script, you can use
an if… then… else if… else statement. Here’s how this statement looks logically:
if condition1 then
statements1
else if condition2 then
statements2
[other else if statements here as needed]
else
statements3
end if
As you can see, this works in the same way as the if… then… else statement except
that it also has one or more else if statements between the if line and the else line.
Here’s an example of an if… then… else if… else statement that assigns to the
variable myGreeting the text Good morning!, Good afternoon!, Good evening!, or
Goodnight! as appropriate to the hour in many western civilizations:
set myHour to hours of (current date)
if myHour is less than 12 then
set myGreeting to "Good morning!"
else if myHour is greater than or equal to 12
and myHour is less than 18 then
set myGreeting to "Good afternoon!"

Chapter 7: Making Decisions in Your Scripts 135
Try This
else if myHour is greater than or equal to 12
and myHour is less than 22 then
set myGreeting to "Good evening!"
else
set myGreeting to "Goodnight!"
end if
display dialog myGreeting
Using an if… then… else if… else Statement
In this example, you adapt the script you created in the last Try This example so that it
uses an if… then… else if… else statement as shown previously. Follow these steps:
1. In AppleScript Editor, open the script you created in the previous section if it’s not still
open.
2. Press z-SHIFT-S or choose File | Save As, and then save the script under a name of your
choice.
3. Edit the script so that it reads as follows:
set myHour to hours of (current date)
if myHour is less than 12 then
set myGreeting to "Good morning!"
else if myHour is greater than or equal to 12 ¬
and myHour is less than 18 then
set myGreeting to "Good afternoon!"
else if myHour is greater than or equal to 12 ¬
and myHour is less than 22 then
set myGreeting to "Good evening!"
else
set myGreeting to "Goodnight!"
end if
display dialog myGreeting
4. Press z-R or click the Run button on the toolbar to run the script.
5. Press z-S or choose File | Save to save the changes to the script.
This page intentionally left blank

137
Chapter 8
Using Dialog Boxes
to Get User Input

138 AppleScript: A Beginner’s Guide
Key Skills & Concepts
● Getting user input with dialog boxes
● Communicating with the user via alerts
● Asking the user to choose a filename and location
● Letting the user choose from a list of items
● Letting the user choose files, folders, applications, and URLs
In this chapter, you’ll learn how to use dialog boxes to let the user control your scripts and
provide input to them.
AppleScript provides a display dialog command that lets you display custom dialog
boxes containing a prompt, one to three action buttons, and an icon. You can also add
a text-entry box to get input from the user for use in your scripts or the documents they
create.
For more emphasis, you can use the display alert command to display an informative
message and an icon. You can give alerts different buttons to allow the user to choose
from among different actions.
In many scripts, you’ll need to present the user with a list of items from which they
can make one or more selections. To do so, you use the choose from list command. You
may also need to have the user choose the name and folder in which to save a file you
create. You can do this by using the choose file name command.
AppleScript also gives you commands for letting the user choose files, folders,
applications, and URLs via built-in dialog boxes while a script is running. These commands
make it easy to perform actions such as manipulating files and folders using the Mac OS X
interface items with which the user is already familiar.
Using Dialog Boxes
When you need to communicate information with the user of a script, or enable them to
make a choice between two or three alternatives, use a dialog box.
In AppleScript, you use the display dialog command to display a dialog box. This
command requires only one parameter: the text that appears in the dialog box as the prompt.
When you give the display dialog command like this, as in the next example, you get

Chapter 8: Using Dialog Boxes to Get User Input 139
a dialog box with an empty title bar, the prompt in the body of the dialog box, and an OK
button and a Cancel button (see Figure 8-1).
display dialog "This script will set up your Desktop for fast work."
Displaying Multiple Paragraphs of Text in a Dialog Box
When you need to put a large amount of text in the prompt, you can make the dialog box easier
to digest by breaking it up into multiple paragraphs. To do so, create the prompt as separate
strings joined with the & concatenation operator. Place a return character where you want to
start a new line; place two return characters where you want to start a new paragraph.
For example, the following command creates the dialog box shown in Figure 8-2:
set myPrompt to "This script helps you open a text file in the
TextEdit application." & return & return
set myPrompt to myPrompt & "First, you will see the Choose a File
dialog box. Click the text file you want and click Choose." & return &
return
set myPrompt to myPrompt & "Second, you will see the Choose an
Application dialog box. Click the TextEdit application, and then click
Choose." & return & return
set myPrompt to myPrompt & "OK to proceed?"
display dialog myPrompt
Figure 8-1 A basic dialog box contains a prompt and one or more buttons.
Figure 8-2 You can break up a dialog box’s prompt into multiple paragraphs to make it
easier to read.
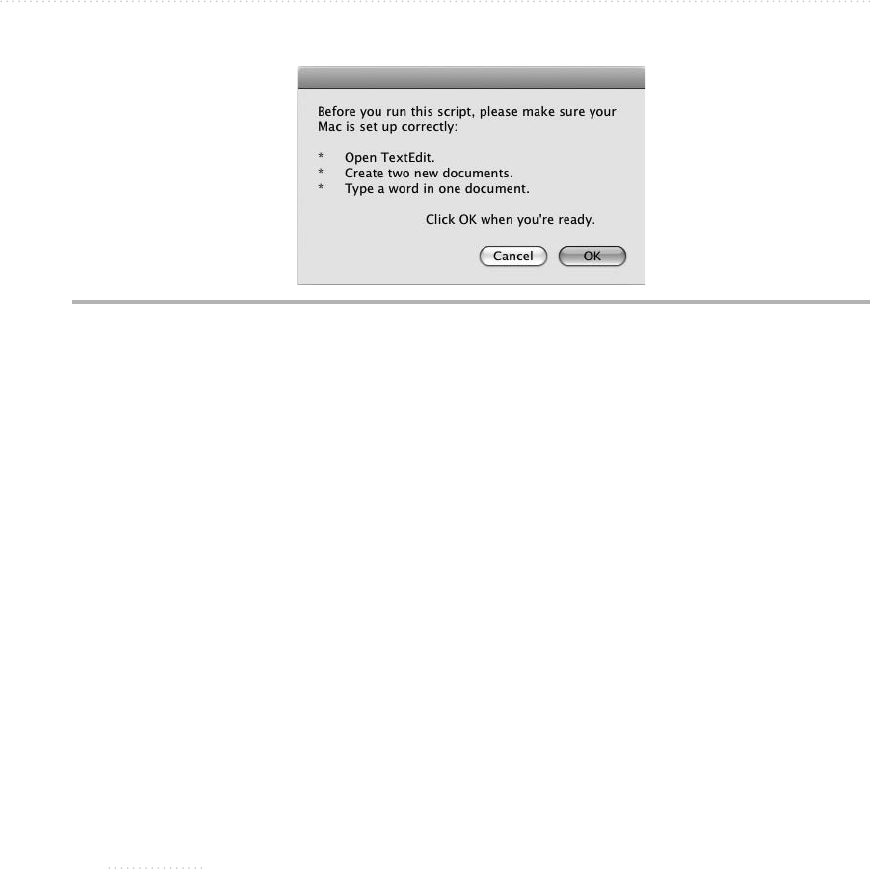
140 AppleScript: A Beginner’s Guide
You can also use tab characters, spaces, or other characters to improve the layout of
the prompt and to convey your message more clearly. The following command produces
the dialog box shown in Figure 8-3:
set myText to ¬
"Before you run this script, please make sure your Mac is set up
correctly:" ¬
& return & return
set myText to myText & ¬
"*" & tab & ¬
"Open TextEdit." & return
set myText to myText & ¬
"*" & tab & ¬
"Create two new documents." & return
set myText to myText & ¬
"*" & tab & ¬
"Type a word in one document." & return & return
set myText to myText & tab & tab & tab & tab & ¬
"Click OK when you're ready."
display dialog myText
TIP
If you need to display a short paragraph of heading-like text before your prompt,
consider using an alert rather than a dialog box. See the discussion of alerts later in
this chapter.
Adding a Title to a Dialog Box
To make your dialog boxes easier to understand, you’ll usually want to use the add title
parameter to put custom text in the title bar. The following statement displays the dialog
box shown in Figure 8-4:
display dialog "This script will set up your Desktop for fast work." ¬
with title "Desktop Setup: Continue?"
Figure 8-3 You can also create bulleted-style lists or lay out text with tabs in your dialog boxes.
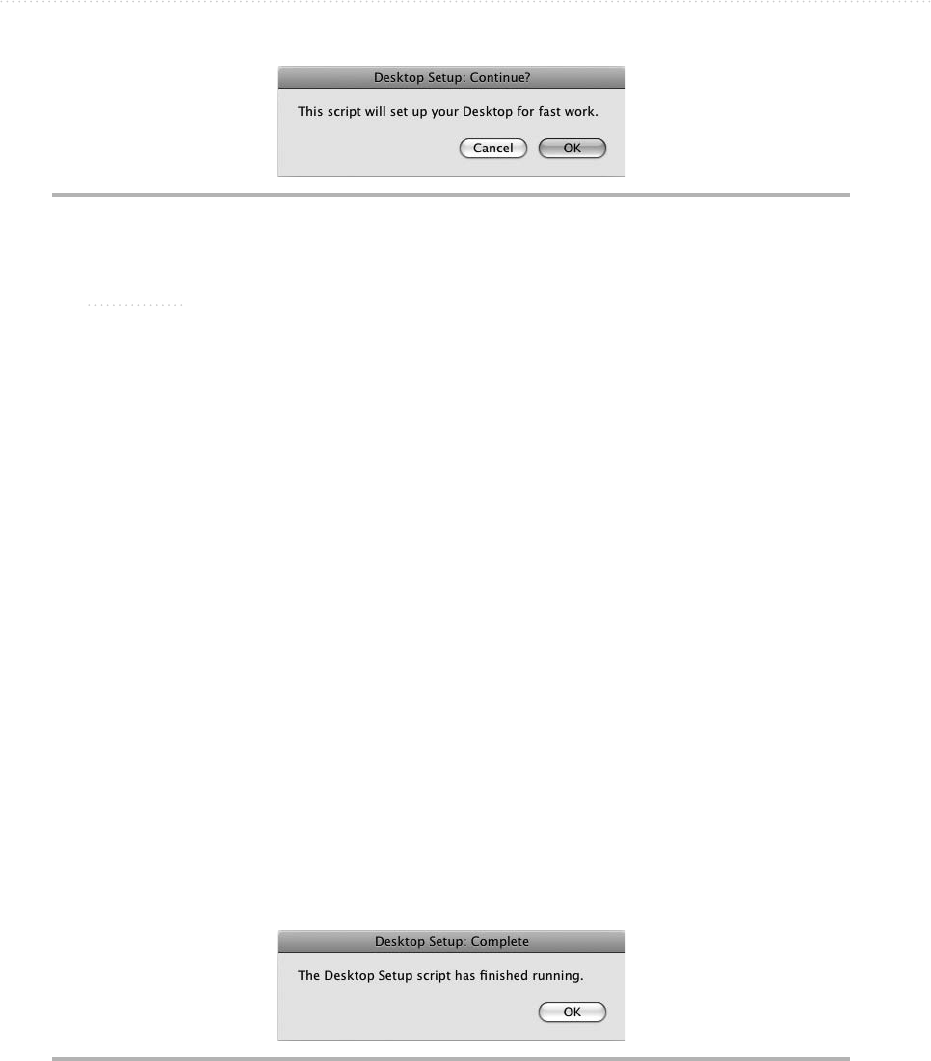
Chapter 8: Using Dialog Boxes to Get User Input 141
TIP
Name your dialog boxes consistently to make them easy to recognize. For example,
if a script displays several dialog boxes at different times, put the script’s name first,
followed by a short name for the dialog box—for example, “Desktop Setup: Continue?,”
“Desktop Setup: Choose Number of Windows,” and so on. Given how many
applications most people run these days, it’s easy to lose track of which application a
particular dialog box belongs to.
Choosing the Buttons Displayed in the Dialog Box
The display dialog command’s default set of buttons—OK and Cancel—are fine for
many dialog boxes, but you’ll often do better to customize the buttons. With AppleScript,
you can have one, two, or three buttons in a dialog, and you can set their names to
whatever you need.
To control which buttons the display dialog command displays, add the buttons
parameter, and then provide the list of button names as strings within a pair of braces. Put
a comma between each string. The buttons appear from left to right in the order in which
you list them.
For example, sometimes you may need a single-button dialog box to present
information, such as the fact that a script has finished running. The following statement
displays the dialog box shown in Figure 8-5:
display dialog "The Desktop Setup script has finished running." ¬
with title "Desktop Setup: Complete" buttons {"OK"}
Figure 8-4 Add a descriptive title to make your dialog boxes easier to recognize and
understand.
Figure 8-5 When presenting information without a choice, all you need is an OK button.
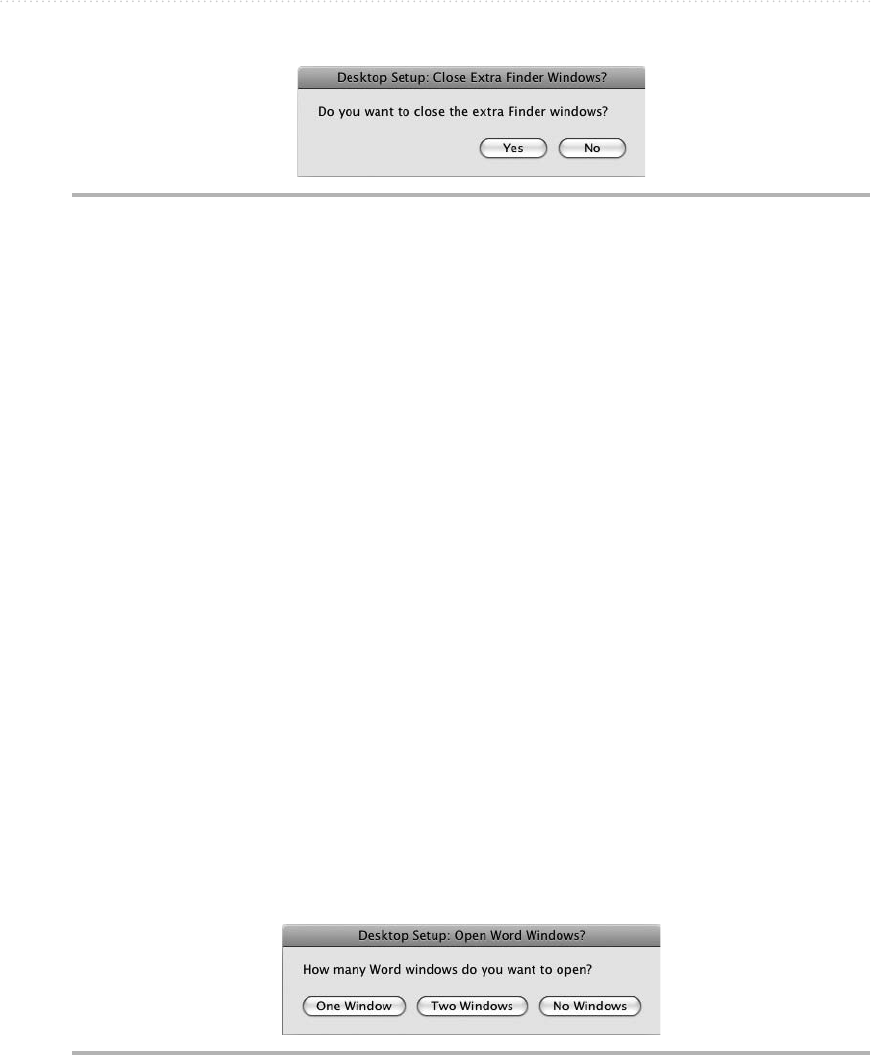
142 AppleScript: A Beginner’s Guide
Two buttons are great for giving the user a binary choice. This example uses a Yes
button and a No button (see Figure 8-6) instead of the default OK button and Cancel
button:
display dialog "Do you want to close the extra Finder windows?" ¬
with title "Desktop Setup: Close Extra Finder Windows?" ¬
buttons {"Yes", "No"}
When the user needs to choose among three paths of action (or inaction), add three
buttons to the dialog box, as in this example (see Figure 8-7):
display dialog "How many Word windows do you want to open?" ¬
with title "Desktop Setup: Open Word Windows?" ¬
buttons {"One Window", "Two Windows", "No Windows"}
Setting a Default Button in a Dialog Box
As you’ll probably have noticed in the last few figures, none of the dialog boxes has a
default button—the one that appears with the blue highlight (or gray highlight if the Mac
is using the Graphite look in Appearance preferences) and that receives the press of the
RETURN key. Usually, you’ll want to make one of the buttons in any dialog box the default
button to shepherd the user toward the choice that’s appropriate more often than the other
choices. Omit a default button only when the choice between the buttons is too close to
recommend one over the other.
Figure 8-6 In a two-button dialog box, Yes and No are often clearer than OK and Cancel.
Figure 8-7 A three-button dialog box lets you make more complex choices in your scripts.

Chapter 8: Using Dialog Boxes to Get User Input 143
To set the default button, add to the display dialog command the default button
parameter followed by the button’s name. The following statement makes the One
Window button the default, as you can see in Figure 8-8:
display dialog "How many Word windows do you want to open?" ¬
with title "Desktop Setup: Open Word Windows?" ¬
buttons {"One Window", "Two Windows", "No Windows"} ¬
default button "One Window"
You can also set the default button by number, counting from left to right. For example, the
following statement makes the second button (the Two Windows button) the default button:
display dialog "How many Word windows do you want to open?" ¬
with title "Desktop Setup: Open Word Windows?" ¬
buttons {"One Window", "Two Windows", "No Windows"} ¬
default button 2
TIP
In many cases, you’ll want the “action” button for the dialog box to be the default
button. For example, when you display an OK/Cancel dialog box, you’ll often want to
make the OK button the default button so that the user can proceed by simply pressing
RETURN. But if the dialog box asks for confirmation of a wide-ranging or destructive
action (such as deleting files or folders), it’s better to make the “cancel” button the
default. (The button may have a name other than “Cancel”—for example, “No,” “Keep
Files,” or “Keep My Current Settings.”)
Creating a Cancel Button That’s Not Called “Cancel”
In any dialog box with two or three buttons, it’s usually a good idea to have one button be a
cancel button—a button that lets the user stop running the script or refuse the action the dialog
box suggests. The button isn’t necessarily called “Cancel,” but that’s the function it fulfills.
NOTE
The cancel button captures a press of the ESC key, so you’ll usually want to set it to
allow the user to dismiss the dialog box using the keyboard. If you don’t set a cancel
button, the user must press TAB (or SHIFT-TAB) to put the selection ring around the
appropriate button, and then press SPACEBAR to “click” it (when using only the keyboard).
Figure 8-8 You’ll normally want to set a default button in each dialog box to help the user
make the best choice.

144 AppleScript: A Beginner’s Guide
You can create a cancel button in three ways:
● Use the default buttons If you don’t set the buttons parameter, AppleScript
automatically gives you a cancel button named Cancel, which is nice and clear. You
also get an OK button, which is clear, too, if not inspiring.
● Create a button named “Cancel” If you do set the buttons parameter, you can
name a button “Cancel.” AppleScript then treats it as a cancel button, which is handy.
● Tell AppleScript which button is the cancel button If you don’t want to give the
cancel button a different name, use the cancel button parameter to tell AppleScript
which button to treat as the cancel button. As with the default button parameter, you
can use either the button’s name or the button’s number to identify the cancel button.
The following example uses the button’s name:
display dialog "Do you want to set up your desktop?" ¬
buttons {"Yes", "No"} ¬
default button "Yes" ¬
cancel button "No"
NOTE
The cancel button is special in AppleScript because it returns an error that you can use
to tell the user wants to cancel the action. You’ll learn how to use this error (error -128)
in Chapter 10.
Seeing Which Button the User Clicked in a Dialog Box
If you use a single-button dialog box, you don’t need to check which button the user
clicked, because you’re not giving them any choice. But when you use a two- or three-
button dialog box, you must check which button the user clicked so that you can direct the
flow of the script in the corresponding way.
When the user clicks a button in a dialog box, AppleScript stores the details in the
dialog record. To find out the button, you check the button returned property of the
result, where result is a predefined variable that automatically grabs the details of what
the user chose in the dialog box. For example, the following if block checks the result of
the Desktop Setup: Open Word Windows? dialog box shown in Figure 8-7 earlier in this
chapter. The comments indicate where the script would take the appropriate action based
on the button the user chose.
if the button returned of the result is "Two Windows" then
-- open two Word windows here
else if the button returned of the result is "One Window" then
-- open one Word window here
end if
Chapter 8: Using Dialog Boxes to Get User Input 145
Adding an Icon to a Dialog Box
To pack more meaning into a dialog box, you can add an icon to it. AppleScript lets you
use any of three built-in icons or a custom icon of your own.
Adding a Built-in Icon to a Dialog Box
To add a built-in icon to a dialog box, add the with icon parameter and specify the
appropriate icon. Table 8-1 shows the three built-in icons and suggests when to use them.
For example, the following statement causes the Finder to display a two-button dialog
box that includes a Caution icon (see Figure 8-9):
tell the application "Finder" to display dialog ¬
"Do you want to delete this document?" ¬
& return & return & tab & docName ¬
with title "Workflow Streamliner: Delete Document" ¬
buttons {"Delete File", "Keep File"} ¬
default button 2 ¬
cancel button 2 ¬
with icon caution
Creating and Using Custom Icons
To give your scripts a custom look or to convey exactly the information required, you
can make your dialog boxes display custom icons. This is great when you need to use a
company logo or other standard icon in your dialog boxes.
Icon Picture Icon Name Icon Number When to Use This Icon
Stop 0 When a major problem has arisen with the script.
Don’t waste this icon on trivial problems, as doing so
reduces the icon’s effect when you genuinely need it.
Note 1 For general dialog boxes where nothing unexpected
or dangerous is happening. The icon shown is
the default icon for the application you’re using.
For example, if your script makes Microsoft Word
display a dialog box, the Word icon appears; if
you’re using Finder, the Finder icon appears.
Caution 2 When the user needs to pay extra attention to a
decision—for example, because the script is about to
delete a file or folder.
Table 8-1 Built-in Icons for Dialog Boxes
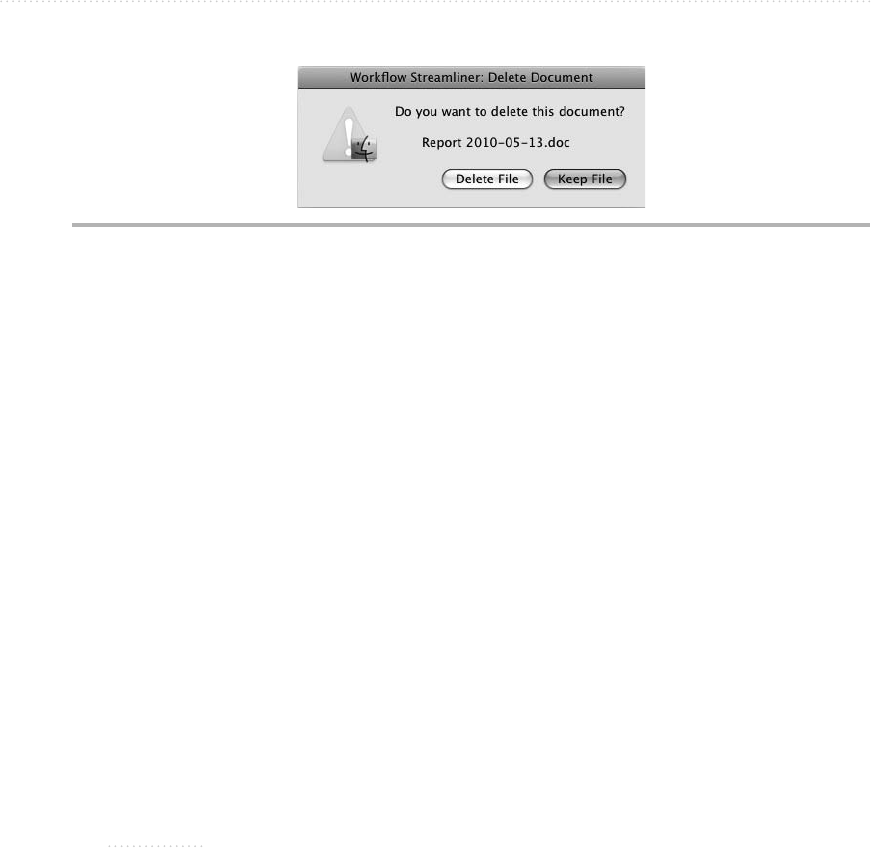
146 AppleScript: A Beginner’s Guide
First, create an icon file using the Apple icon image format and the .icns file extension.
Follow these guidelines:
● Use either an icon editor such as the Icon Composer tool included in the Apple Developer
Tools or the IconBuilder plug-in for Adobe Photoshop, Adobe Photoshop Elements, or
Macromedia Fireworks. Some other applications can also create Apple icon image files.
● Make the file 512 pixels high by 512 pixels wide and 72 dpi resolution.
● Use RGB color rather than CMYK color.
● If the icon occupies only part of the square (as most icons do), apply alpha to make the
empty parts see-through so that the dialog box’s background can appear through them.
Now save your script as a script bundle and add the icon file to it. Follow these steps:
1. In AppleScript Editor, press z-SHIFT-S or choose File | Save As to display the Save As
dialog box.
2. In the File Format pop-up menu, choose Script Bundle.
NOTE
You can also add custom icons to a script you save as an application bundle.
3. Change the filename and folder as needed, and then click the Save button to save the
script bundle.
4. Click the Bundle Contents button on the toolbar. AppleScript Editor displays the
Bundle Contents drawer at the side of the window (usually on the right, unless
AppleScript Editor is too near the right edge of your Mac’s screen).
5. Open a Finder window to the folder that contains the icon file, and then drag it to the
Bundle Contents drawer (see Figure 8-10).
Figure 8-9 Add an icon to a dialog box to make its impact clearer.
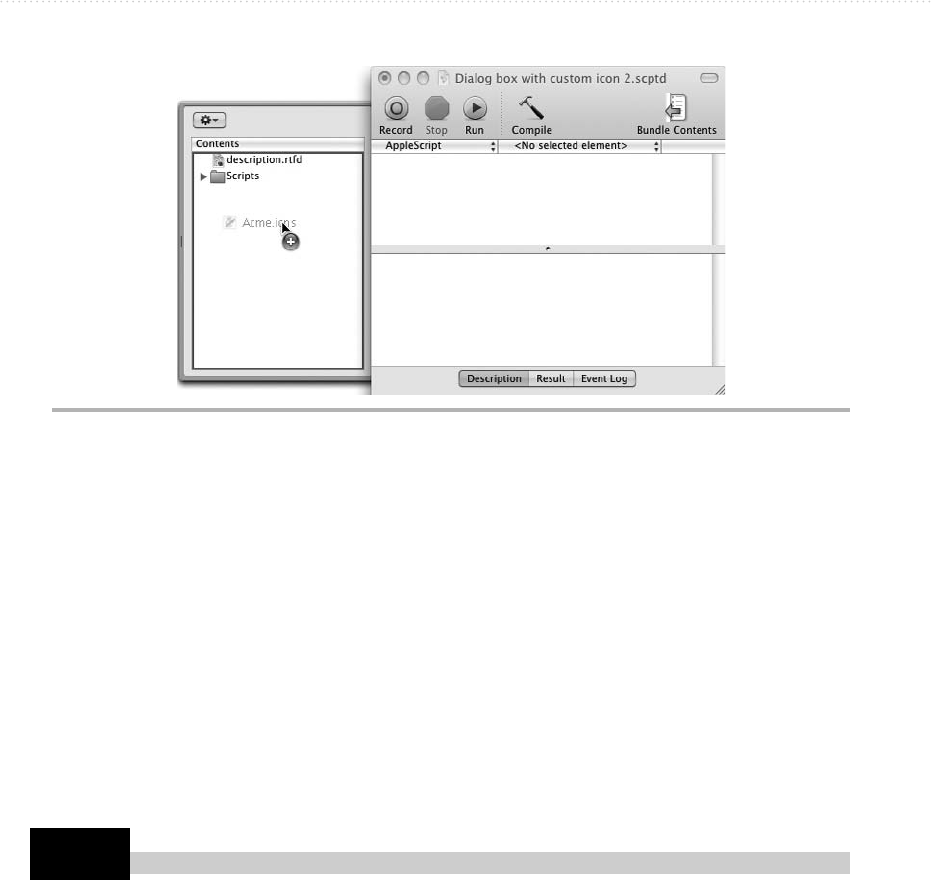
Chapter 8: Using Dialog Boxes to Get User Input 147
Try This
Now that the icon file is in place, use the path to command to specify the icon’s alias
in the display dialog command, as in the last line of the statement here:
display dialog "This script will set up your Desktop for fast work." ¬
with title "Desktop Setup: Continue?" ¬
buttons {"Yes", "No"} ¬
default button 1 ¬
cancel button 2 ¬
with icon file ((path to me) & "Contents:Resources:Acme.icns" ¬
as string)
The path to me part returns the path to the script itself, and the Contents:Resources:
Acme.icns part specifies the file named Acme.icns in the Resources folder in the
Contents folder of the script.
Adding a Custom Dialog Box to the Set Up
Finder and TextEdit Script
In this example, you’ll add a custom dialog box to the Set Up Finder and TextEdit script
you created in Chapter 3. The dialog box tells the user what the script will do and lets the
user choose between running the script and stopping it in its tracks. Follow these steps:
1. In AppleScript Editor, press z-O or choose File | Open to display the Open dialog box.
2. Choose the Set Up Finder and TextEdit script you created in Chapter 3, and then click
the Open button.
Figure 8-10 Drag your icon to the Bundle Contents drawer at the side of the AppleScript
Editor window.
(continued)

148 AppleScript: A Beginner’s Guide
3. Press z-SHIFT-S or choose File | Save As to display the Save As dialog box.
4. Change the name to “Set Up Finder and TextEdit with Opening Dialog” and then click
the Save button to save the script.
5. Click at the beginning of the script (before the tell the application "Finder"
statement), and press RETURN to create a new paragraph.
6. Add the display dialog command shown here and its prompt:
display dialog ¬
"This script will set up your Desktop for fast work." ¬
& return & return & ¬
"Do you want to continue?"
7. Add a custom title to the dialog box, as shown in boldface here:
display dialog ¬
"This script will set up your Desktop for fast work." ¬
& return & return & ¬
"Do you want to continue?" ¬
with title "Desktop Setup"
8. Add the note icon to the dialog box, as shown in boldface here:
display dialog ¬
"This script will set up your Desktop for fast work." ¬
& return & return & ¬
"Do you want to continue?" ¬
with title "Desktop Setup" ¬
with icon note
9. Specify Yes and No buttons for the dialog box, with the Yes button the default button
and the No button the cancel button, as shown in boldface here:
display dialog ¬
"This script will set up your Desktop for fast work." ¬
& return & return & ¬
"Do you want to continue?" ¬
with title "Desktop Setup" ¬
with icon note ¬
buttons {"Yes", "No"} ¬
default button "Yes" ¬
cancel button "No"
10. Press z-S to save the script.
11. Press z-R or click the Run button to run the script. On the first run, click the No button
to make sure that canceling the dialog box stops the script from running further.
12. Run the script again. This time, click the Yes button so that the script continues running
and sets up the Finder window and the TextEdit window.

Chapter 8: Using Dialog Boxes to Get User Input 149
Creating a Dialog Box That Closes Itself
By using the giving up after parameter with the display dialog command, you can create
a dialog box that closes itself after a number of seconds. This is great for displaying
progress information or for occasions when the user’s input is optional rather than
essential: If the user has left the script running, you can make the dialog box dismiss itself
automatically after an interval, allowing the script to continue running rather than waiting
for the user to return.
The giving up after parameter takes an integer number that specifies the number of
seconds to wait. For example, the following dialog box closes itself after 2 seconds:
display dialog "10 files created... 10 files to go!" ¬
with title "File Creator Script: Status" giving up after 2
When you use the giving up after parameter, the dialog reply record includes the
button returned property as usual and the gave up parameter. The gave up parameter
is Boolean, so it is true if the dialog box dismissed itself and false if the user clicked a
button. When gave up is true, button returned is blank, because the user didn’t click a
button.
Getting Text Input from the User
Dialog boxes are great for asking the user what to do, as you’ve seen so far in this chapter.
But often, you’ll need to get a piece of information from the user—for example, their
name or the quantity of widgets their company wants to order.
To add a text-entry field to a dialog, add the optional default answer parameter to the
display dialog command. If you want to provide a default answer in the text-entry field,
add the appropriate string after the default answer parameter; if you want to leave the
text-entry field blank, just place "" (two pairs of double quotation marks indicating an
empty string) after the parameter instead.
For example, the following statement produces the dialog box shown in Figure 8-11:
display dialog "Please enter your employee code:" ¬
default answer "CZ 1234" ¬
with title "Employee Code"
When you add the default answer parameter, the dialog reply record includes a
text returned property containing the text in the text-entry field as well as the button
returned property containing the button clicked. For example, the dialog box shown in
Figure 8-11 returns a dialog reply record like this:
{text returned:"CZ 9288", button returned:"OK"}
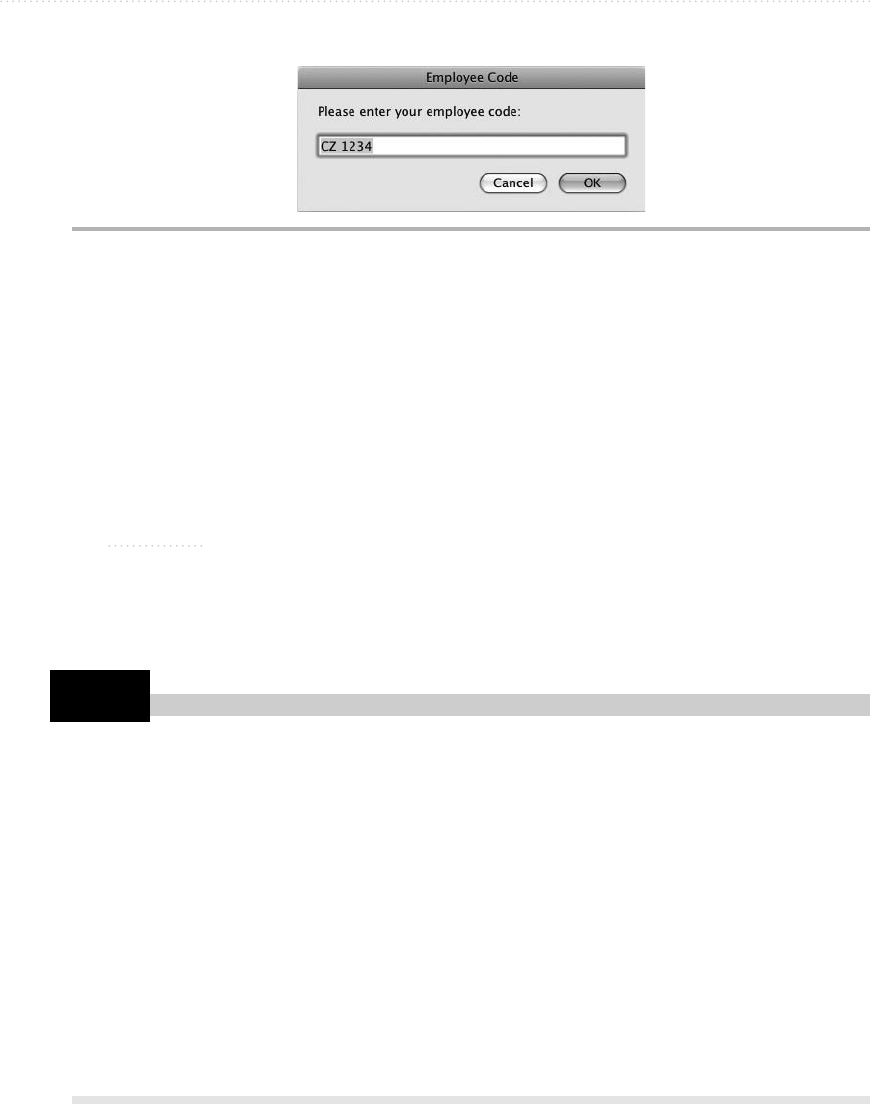
150 AppleScript: A Beginner’s Guide
Try This
To store the user’s input, you can assign it to a variable, like this:
set the employee_code to the text returned of the result
Even if you assign an empty string to the default answer parameter, the OK button
(or its equivalent) is still available for the user to click without entering text in the text-entry
field. So if you need the user to enter text, you’ll need to check that the field isn’t blank.
We’ll look at an example of how to do this in the next chapter.
TIP
If the information the user is typing in the text-entry field needs to be protected from
casual snooping, add the with hidden answer parameter to the display dialog statement. This
parameter makes Mac OS X display the user’s input as bullet characters rather than
actual characters for security.
Returning Text from a Text-Entry Field
Try this example of adding a text-entry field to a dialog box and returning the user’s input.
1. In AppleScript Editor, press z-N to create a new script.
2. Create a display dialog statement that includes the default answer parameter with
sample text as shown here:
display dialog "How old are you?" default answer "25"
3. Add a set statement that assigns the text returned property of the result to a variable:
set userAge to the text returned of the result
4. Display a dialog that shows a string including the variable:
display dialog "Your age is " & userAge & "."
5. Run the script and verify that it works as expected.
Figure 8-11 You can add a text-entry field to any dialog box. This dialog box includes a
default value to show the user a sample response.

Chapter 8: Using Dialog Boxes to Get User Input 151
Using Alerts
Instead of displaying a dialog box, you can display an alert—a window that notifies the
user that there’s a problem and offers information or different buttons for solving the
problem.
There’s a wide overlap between dialog boxes and alerts, so it can sometimes be hard
to choose which to use. That means our first order of business is to sort out what the
differences are between alerts and standard dialog boxes.
TIP
The difference between alerts and dialog boxes may be clear to Apple’s human
interface design experts, but most users treat alerts in the same way as dialog boxes—
as something to deal with and dismiss as quickly as possible. This means it’s not worth
agonizing over whether to use a dialog box or an alert in cases where either will work;
just make sure your code works, and all will be well.
Understanding How Alerts Differ
from Standard Dialog Boxes
Like a standard dialog box, an alert contains one, two, or three buttons, which you can set
using the buttons parameter. As with a standard dialog box, you use the default button
parameter to set the default button for an alert and the cancel button parameter to set the
cancel button. You can also use the giving up after parameter to automatically dismiss an
alert after the number of seconds you choose.
So far, so similar. But an alert differs from a standard dialog box in five important
ways:
● An alert contains bold alert text at the top The alert text appears in boldface at
the top of the alert window. You use this line to present a summary of the problem—
preferably using few enough words that the user can grasp it at a glance. This bold text
works as a kind of headline for the alert.
● An alert’s title bar is blank It’s tempting to try to add text to the title bar of an alert
window by using the with title parameter, but this doesn’t work.
● An alert always contains an icon As you’ll see shortly, you can put either of two
different icons in an alert. But even if you don’t specify an icon, the alert window
contains an icon—so your choice is limited.
● An alert has no text-entry field You can’t add a text-entry field to an alert.

152 AppleScript: A Beginner’s Guide
● An alert doesn’t register a custom button named “Cancel” As you saw earlier in
this chapter, if you create custom buttons in a dialog box, you can make one a cancel
button by simply naming it “Cancel.” In an alert, this doesn’t work; instead, you need
to use the cancel button parameter explicitly to turn a button into a cancel button.
Figure 8-12 shows an alert for the OmniFocus organizer application.
Choosing the Icon for an Alert
In theory, AppleScript lets you use three different icons for alerts: You can set the optional
as parameter to as critical, to as informational, or to as warning. But because critical
and informational both display the application’s own icon (for example, the OmniFocus
icon shown in Figure 8-12 if you’re scripting OmniFocus), there’s little point in using
them, because this icon is what you get anyway if you omit the as parameter.
When you use the as warning parameter, you get the yellow-triangle-with-white-
exclamation-point icon shown in Figure 8-13, with a smaller version of the application’s icon
superimposed on it so that you can see immediately which application is raising the alert.
Figure 8-12 An alert has a blank title bar, a paragraph of bold text, a prompt, and your
choice of buttons. The application’s icon appears on an alert to identify the
perpetrator.
Figure 8-13 The as warning parameter displays an exclamation-point icon that’s good for
getting the user’s attention. The application’s icon (here, AppleScript Editor’s own
icon) appears in miniature to identify the perpetrator.

Chapter 8: Using Dialog Boxes to Get User Input 153
Try This Creating an Alert
In this example, you write a script that creates a folder on the Desktop, displays an alert
warning (see Figure 8-14) that the script is about to delete that folder, and then deletes it.
Follow these steps:
1. In AppleScript Editor, press z-N to create a new script.
2. Create a tell statement that tells the Finder to create a new folder named “Test Folder”
on the desktop:
tell the application "Finder" to ¬
make new folder at desktop with properties {name:"Test Folder"}
3. Start a display alert statement and add the prompt:
display alert ¬
"Delete the Test Folder?"
4. Add the as warning parameter, as shown in boldface here:
display alert ¬
"Delete the Test Folder?" as warning
5. Add the message parameter and a string giving more detail, as shown in boldface here:
display alert ¬
"Delete the Test Folder?" as warning ¬
message "The script will delete the folder named Test Folder on
your Desktop.
6. Add the buttons parameter with a confirmation button and a cancel button called Cancel.
Make the cancel button the default button for the alert, as shown in boldface here:
display alert ¬
"Delete the Test Folder?" as warning ¬
message "The script will delete the folder named Test Folder on
your Desktop." ¬
buttons {"Delete the Test Folder", "Cancel"} ¬
cancel button "Cancel" ¬
default button "Cancel"
Figure 8-14 The sample alert warns that the script will delete a folder. (continued)

154 AppleScript: A Beginner’s Guide
7. Create another tell statement that makes the Finder delete the Test Folder:
tell the application "Finder" to delete folder "Test Folder" of
desktop
8. Run the script and click the Delete The Test Folder button in the alert. The Finder
deletes the folder that it has just created.
Choosing the Name Under
Which to Save a File
Chances are you’ll often need to create documents in your scripts. Most scriptable
applications let you manipulate their save commands via AppleScript, just as you did
with TextEdit in Chapter 3. But with some other applications, you may need to save a
document in different ways. For these cases, AppleScript provides the choose file name
command, which you’ll learn to use in this section.
The choose file name command does what it says on the tin: It lets the user choose
the name for a file, but it doesn’t actually save the file. So you normally use the choose
file name command to create a file reference that you pass to a variable, and then use the
contents of the variable when you need to save the file.
set myDocName to choose file name
NOTE
The file reference isn’t a string, but you can coerce it to a string if you need to display it
in a dialog box or alert.
Adding a Custom Prompt to the
Choose File Name Dialog Box
The choose file name dialog box always shows Choose File Name in the title bar. By
default, the dialog box shows the prompt Choose new file name and location, but you can
customize this by adding the with prompt parameter and a suitable text string. Here’s an
example:
choose file name with prompt ¬
"Choose the folder and name for the document the script will
create:"
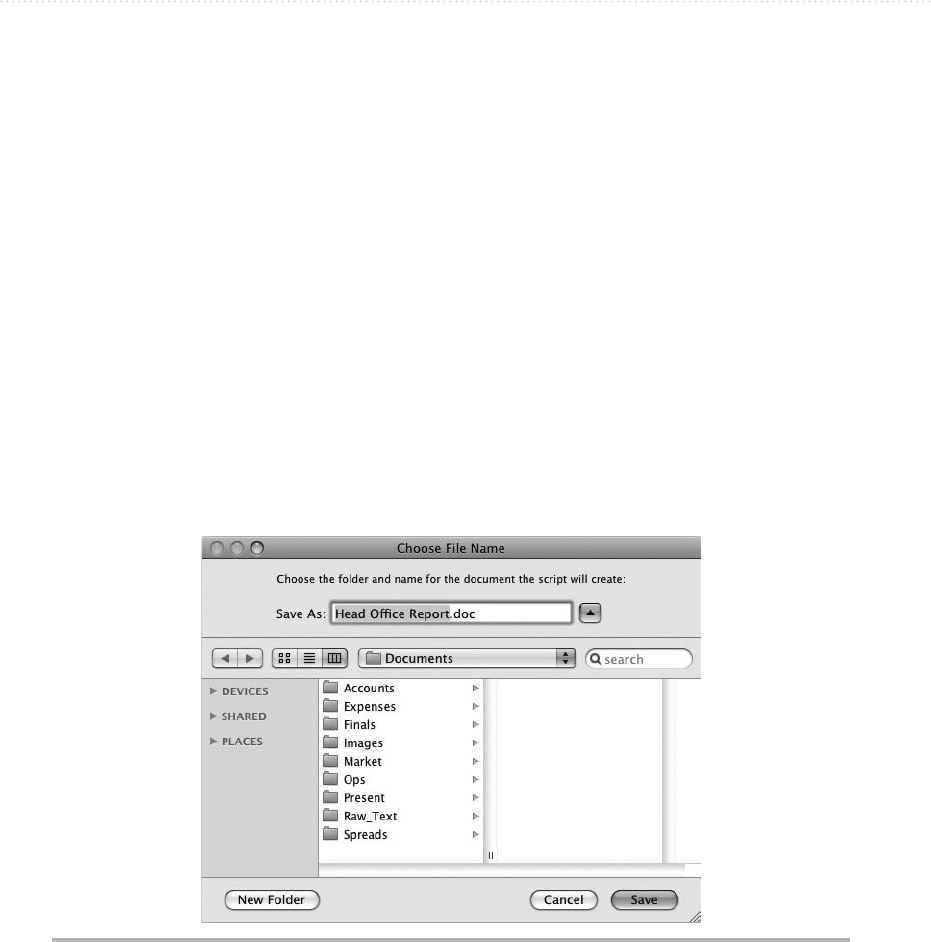
Chapter 8: Using Dialog Boxes to Get User Input 155
Setting a Default Location and Filename
To encourage the user to create a file reference in a suitable location, you can set
the default location by setting the default location parameter. This makes the choose
file name dialog box show that folder first. The user can choose another folder if
they wish.
Often, it’s a good idea to provide a default filename for the file reference so that the
files have a good chance of getting standard names. To do so, add the default name
parameter to the choose file name command and supply a text string for the name.
Here’s an example of setting a default location and name (see Figure 8-15):
choose file name with prompt ¬
"Choose the folder and name for the document the script will
create:" ¬
default location (path to documents folder) ¬
default name "Head Office Report.doc"
Figure 8-15 You can customize the Choose File Name dialog box by adding a prompt and
specifying the default location and filename.

156 AppleScript: A Beginner’s Guide
Letting the User Choose from a List of Items
AppleScript’s dialog boxes are great for making choices from among two or three courses
of action, but often, you’ll need to present the user with a list of choices so that they can
choose one or more items. To do so, you use the choose from list command.
Creating the List of Items
The only essential part of the choose from list command is the list of items. To create the
list, you type an opening brace, each item within double quotation marks and separated
by commas, and then the closing brace. For example, the following choose from list
command displays a list containing the cities Madrid, Paris, and San Francisco:
choose from list {"Madrid", "Paris", "San Francisco"}
When you run this command, the basic form of the choose from list dialog box
appears. As you can see in Figure 8-16, the dialog box has no title bar, a bland “Please
make your selection” prompt, and an OK button and a Cancel button. You can change the
prompt and the buttons, and add a title bar, as you’ll see shortly.
Seeing Which Item the User Chose
After the user picks an item in the list, the choose from list command returns a list of
the items they chose. Returning a list of items seems weird, but the command does this
because you can set up the list so that the user can select multiple items. Unless you
specifically allow multiple selections, AppleScript gives you a single-selection list, which
means that the command returns a “list” containing a single item.
So if the user chooses the Paris item and clicks the OK button in the example dialog
box, the command returns a list containing the item "Paris", like this:
{"Paris"}
To get an item from the list, you can specify it by its item position—for example:
item 1 of result
Figure 8-16 The Choose From List dialog box enables you to let the user choose from among
several predefined options.

Chapter 8: Using Dialog Boxes to Get User Input 157
But when you’re dealing with a single-item list, you can simply coerce the list into a
string by putting the choose from list command and list into parentheses and adding as
string after the list, like this:
(choose from list {"Madrid", "Paris", "San Francisco"}) as string
Coercing the list into a string makes the command return a string that you can
manipulate without further ado.
If the user clicks the Cancel button in the choose from list dialog box, the dialog
box returns the value false rather than returning the standard AppleScript cancel error
(error number –128). Because clicking the Cancel button means that the user didn’t make
a choice in the choose from list dialog box, it’s best to check for a false return before
seeing which item (or items) the user chose. The following example displays a dialog box
containing the first item in the result list, as long as the result is not false:
choose from list {"Madrid", "Paris", "San Francisco"}
if result is not false then
display dialog item 1 of result
end if
Adding a Title and Custom Prompt
to the Choose From List Dialog Box
To make a choose from list dialog box easier to grasp immediately, you can add a title
and customize the prompt. It’s usually a good idea to do both of these.
To add a title, use the with title parameter and provide the text string for the title.
Similarly, to customize the prompt from the default (“Please make your selection”), use
the with prompt parameter and a text string.
For example, the following choose from list statement produces the dialog box shown
in Figure 8-17:
choose from list {"Madrid", "Paris", "San Francisco"} ¬
with title "Choose Your Destination" ¬
with prompt "Click the office you will visit:"
Figure 8-17 Adding a title and customizing the prompt makes the Choose From List dialog
box clearer to users.

158 AppleScript: A Beginner’s Guide
Changing the Buttons on the
Choose From List Dialog Box
The choose from list dialog box comes with a Cancel button on the left and an OK button
on the right. You can’t change the behavior or position of these buttons, but you can change
their names to make their function more obvious (though OK and Cancel are pretty clear)
or to make the dialog box conform to your company’s or organization’s house style.
To change the button names, use the OK button name parameter and the Cancel
button name parameter, as in this example and Figure 8-18:
choose from list ¬
{"FREE! Deluxe airline bag", ¬
"FREE! Return train ticket", ¬
"FREE! Manicure and root canal voucher"} ¬
OK button name "Send Me My Choice" ¬
cancel button name "No, Thanks"
Choosing One or More Default Items
In many choose from list dialog boxes, you’ll want to allow the user free rein to select
the item that suits him or her. But in others, it will make more sense to select a default
item—or, for a choose from list dialog box that allows multiple selections, multiple items.
To set a default item in a choose from list dialog box, add the default items parameter
with the list of default items. This parameter has the same name whether the dialog
box lets the user select one item or multiple items—there’s no singular version such as
“default item” without an s. As with the result of a single-item choose from list dialog
box, you simply supply a single-item list if you want to use a single default item.
Here’s an example of setting a single default item:
choose from list {"Madrid", "Paris", "San Francisco"} ¬
default items {"Paris"}
Figure 8-18 You can change the names of the buttons on the Choose From List dialog box.

Chapter 8: Using Dialog Boxes to Get User Input 159
Here’s an example of setting two default items:
(choose from list {"Madrid", "Paris", "San Francisco", "Wasilla"} ¬
default items {"Paris", "Wasilla"} ¬
with multiple selections allowed
NOTE
When you set one or more default items, the user can select one of the other items but
can’t deselect all items. So there’s no point in allowing no selection (as discussed next) if
you set one or more default items.
Letting the User Select Multiple Items or No Items
To allow the user to select multiple items in a choose from list dialog box, add the with
multiple selections allowed parameter. You don’t need to set this to true or false; if you
add this parameter to your code, it’s true, and if you omit the parameter, it’s false. Here’s
an example:
choose from list {"Madrid", "Paris", "San Francisco"} ¬
with multiple selections allowed
Normally, the OK button in the choose from list dialog box is disabled until the user
selects an item. This prevents the user from clicking the OK button without making a
selection; if they want to dismiss the dialog box without making a selection, they must
click the Cancel button (and generate a false value).
When you allow multiple selections like this, the choose from list command returns
a list of items as usual. You can retrieve the items by specifying their position in the
list (item 1 of result, item 2 of result, and so on). Don’t coerce them to a string, or
AppleScript simply smashes them together (for example, MadridSan Francisco).
You may sometimes need to allow the user to select no items and click the OK button
anyway, as in the choose from list dialog box shown in Figure 8-19. To do so, add the
with empty selection allowed parameter like this:
choose from list {"Fruitarian", "Vegetarian", "Ovo-Vegetarian", ¬
"Ovo-Lacto Vegetarian", "Pesco-Ovo-Lacto Vegetarian", ¬
"Pullo-Pesco-Ovo-Lacto-Vegetarian", "Vegan", "Kosher"} ¬
with prompt "Choose a dietary preference (leave blank for none):" ¬
with title "Menu Selection" ¬
with empty selection allowed
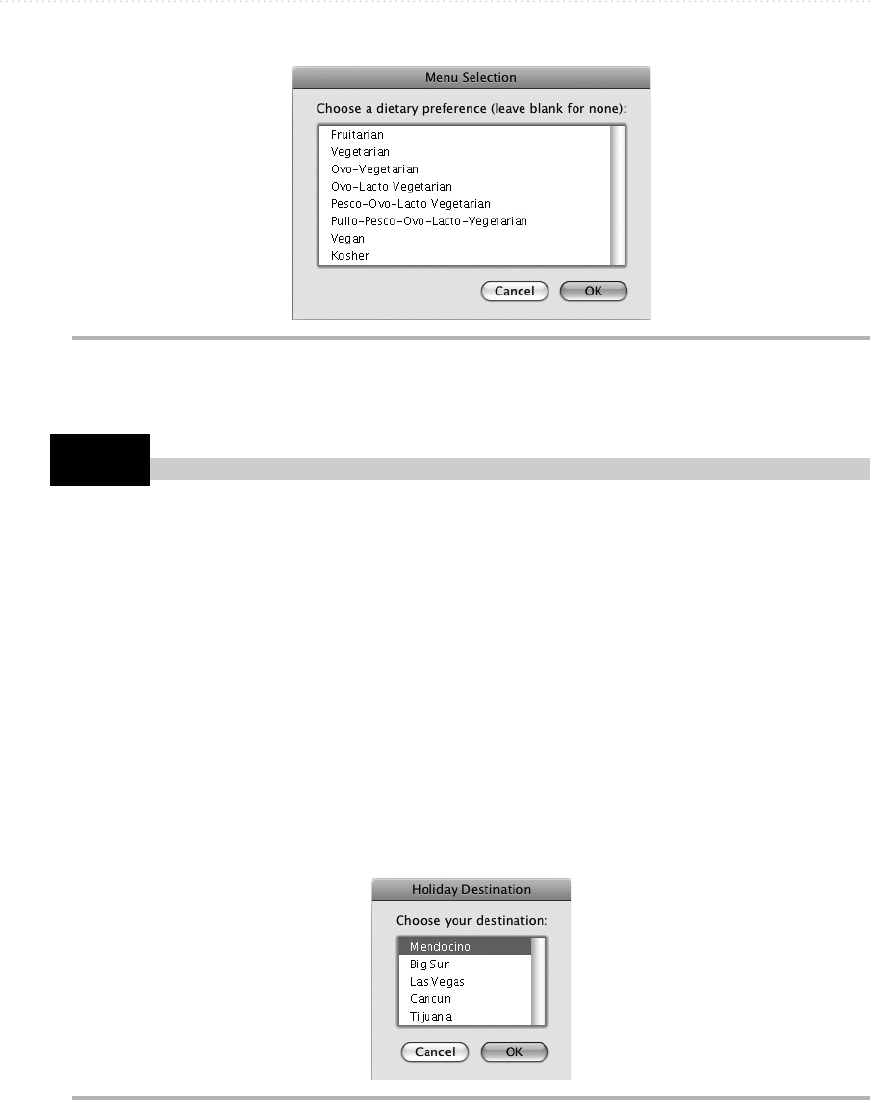
160 AppleScript: A Beginner’s Guide
Try This Creating a Choose From List Dialog Box
In this example, you will create the Choose From List dialog box shown in Figure 8-20
and display the user’s choice in a dialog box.
1. Start a choose from list command:
choose from list
2. Add the list of items, as shown in boldface here:
choose from list ¬
{"Mendocino", "Big Sur", "Las Vegas", "Cancun", "Tijuana"}
3. Set a default item in the list, as shown in boldface here:
choose from list ¬
{"Mendocino", "Big Sur", "Las Vegas", "Cancun", "Tijuana"} ¬
default items {"Mendocino"}
Figure 8-19 Sometimes you may need to allow the user to click the OK button in a choose from
list dialog box without making a selection.
Figure 8-20 The Choose From List dialog box you create in this example.

Chapter 8: Using Dialog Boxes to Get User Input 161
4. Add a title and a prompt, as shown in boldface here:
choose from list ¬
{"Mendocino", "Big Sur", "Las Vegas", "Cancun", "Tijuana"} ¬
default items {"Mendocino"} ¬
with title "Holiday Destination" ¬
with prompt "Choose your destination:"
5. Now put the whole command in parentheses and add as string to coerce the result to a
string, as shown in boldface here:
(choose from list ¬
{"Mendocino", "Big Sur", "Las Vegas", "Cancun", "Tijuana"} ¬
default items {"Mendocino"} ¬
with title "Holiday Destination" ¬
with prompt "Choose your destination:") as string
6. Add a display dialog command at the beginning with the first part of a prompt, add
the result of the choose from list command, and then a period at the end, as shown in
boldface here:
display dialog ("You chose " & (choose from list ¬
{"Mendocino", "Big Sur", "Las Vegas", "Cancun", "Tijuana"} ¬
default items {"Mendocino"} ¬
with title "Holiday Destination" ¬
with prompt "Choose your destination:") as string) ¬
& "."
7. Press z-R or click the Run button on the toolbar to run the script. When the Holiday
Destination dialog box appears, click one of the items, and then click the OK button.
The script then displays your choice in a dialog box.
8. Save the script under a name of your choice.
Letting the User Choose Files, Folders,
Applications, and URLs
AppleScript includes commands for displaying a dialog box so that the user can quickly
choose a file, a folder, an application, or a URL. This section shows you how to use these
commands in your scripts.
NOTE
You can use the choose file command, choose folder command, choose application command,
and choose URL command either inside a tell block or outside one. These commands are
part of AppleScript’s Standard Additions.
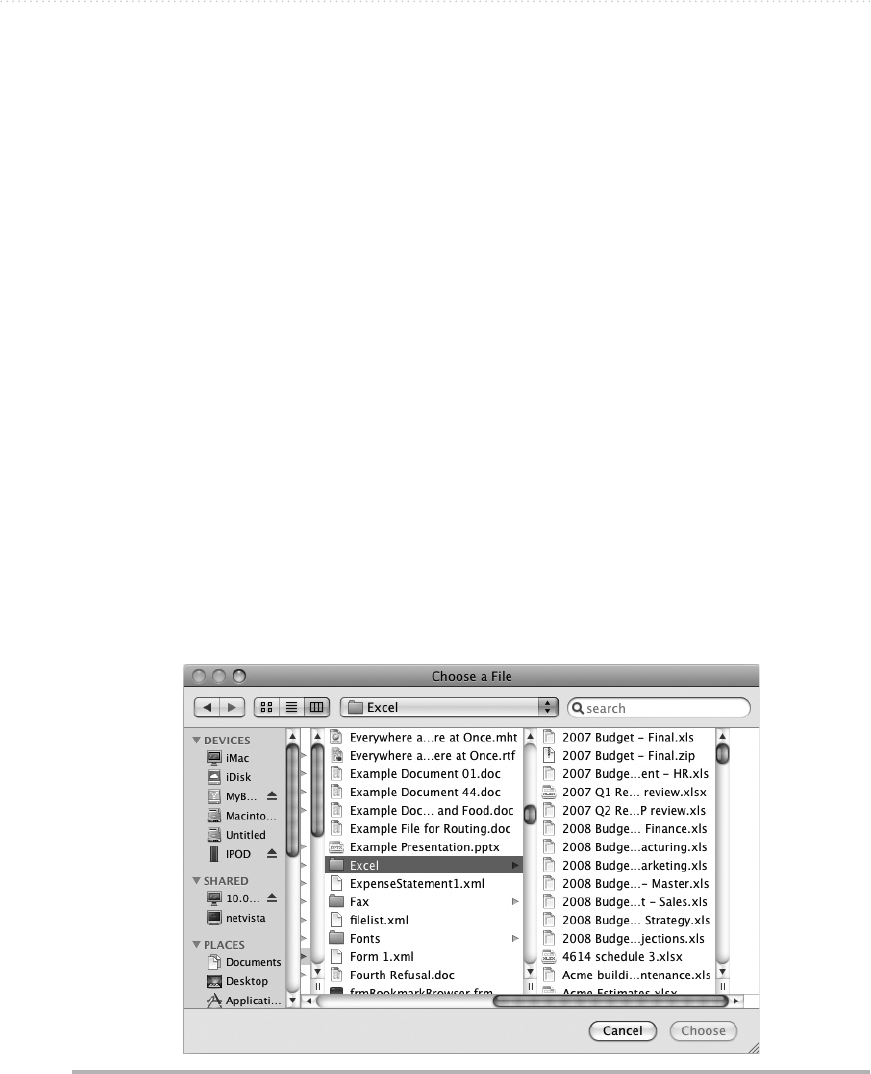
162 AppleScript: A Beginner’s Guide
Letting the User Choose a File
Often, you’ll need to let the user choose a file—for example, to tell your script exactly
which document to slice, dice, or spice. To do so, use the choose file command.
On its own, the choose file command displays the Choose A File dialog box shown in
Figure 8-21. The dialog box opens to the current working directory (which may be helpful
or otherwise) and shows every single file in it, including invisible ones. The user can
navigate to any other folder in the file system, pick any file they want, and then click the
Choose button to tell the script that this is the file he or she wants to open.
Adding a Prompt to the Choose A File Dialog Box
In most cases, it’s a good idea to display a prompt in the Choose A File dialog box to make
clear to the user what type of file you’re expecting them to choose. This may be blindingly
obvious to you as you write the script, and indeed may be clear to the user when he or she
runs it, but the Choose A File dialog box can look supremely uninformative if the user
comes back to their Mac after a break and finds the dialog box still patiently waiting for
their attention.
To display a prompt, add the with prompt parameter to the Choose A File dialog box,
followed by the string of text. Here’s an example:
choose file with prompt ¬
"Choose the source document for the Latest News report."
Figure 8-21 Without any parameters, the Choose A File dialog box shows every file in the
current working directory.

Chapter 8: Using Dialog Boxes to Get User Input 163
Setting the Default Location for the Choose A File Dialog Box
In many scripts, it’s helpful to make the Choose A File dialog box show the folder that
contains the files the user will likely need rather than let him flounder through his Mac’s
plethora of folders. To do so, add the default location parameter to the choose file command
followed by an alias to the folder. Normally, you’ll want to use the path to command to
return a standard path within the Mac OS X file system rather than hard-coding the path to a
particular folder, as that folder may be in a different place on other Macs.
Here’s an example of using the choose file command with the default location
parameter. The command uses the Documents folder.
choose file with prompt ¬
"Choose the source document for the Latest News report." ¬
default location (path to the documents folder)
Choosing Whether to Display Invisible Files
By default, the choose file command displays every file in the folder to which it opens.
This includes any files (and folders) set to be invisible to the user, such as the .DS_Store
file that Mac OS X creates in every folder you open to store details such as the position of
icons, the size of the Finder window you’re using, and other view options.
Only seldom will you need the user to be able to choose an invisible file, so normally,
you’ll want to keep them invisible. To do so, add the parameter without invisibles to the
choose file command. (To display invisible files, you can either add the parameter with
invisibles or omit the invisibles parameter altogether.)
Here’s an example of using the choose file command and hiding invisible files:
choose file with prompt ¬
"Choose the source document for the Latest News report." ¬
default location (path to the documents folder) ¬
without invisibles
Displaying Only the Right Type of Files
Even if you hide invisible files, it’s likely that the folder shown in the Choose A File
dialog box will contain files of different types. When you need the user to be able to select
only files of a particular type suitable for whatever the script is doing—for example, only
rich-text documents for opening in TextEdit, or only Excel workbooks for processing in
Microsoft Excel—add the of type parameter to specify which kinds of files to display. The
files that match the parameter appear listed in black as usual in the Choose A File dialog
box, while other files are listed in the dimmed gray that indicates they’re not available.

BeginNew / AppleScript: A Beginner’s Guide / Guy Hart-Davis / 954-3 / Chapter 8
164 AppleScript: A Beginner’s Guide
To display only files of a particular type, use Uniform Type Identifiers (UTIs) to identify
the file type or types. A Uniform Type Identifier is a Mac OS X means of identifying the file
type by its contents rather than just by its file type code (for example, TIFF).
Table 8-2 provides a short list of the UTIs that are normally most useful in scripts.
To see a full list of UTIs together with enough detail to numb your brain, steer your web
browser to the Apple Developer Connection website (http://developer.apple.com) and
search for the document named “Uniform Type Identifiers Overview.”
For example, the first of the following two commands displays the Choose A File
dialog box showing Keynote presentations without invisibles in the //Server/Presentations/
folder. The second command tells Keynote to open the chosen presentation.
set myKey to choose file ¬
default location (alias "Server:Presentations:") ¬
of type "com.apple.iwork.keynote.sffkey" ¬
with prompt "Choose the presentation you want to open:" ¬
without invisibles
tell the application "Keynote" to open myKey
CAUTION
UTIs work only with Mac OS X 10.4 (Tiger) and later versions. If you need to make
sure your scripts work with Panther (10.3) or earlier versions of Mac OS X, use file type
codes to identify the file types instead of UTIs.
When you need to display two or more file types, use the of type parameter with
a list of the types inside braces. The following statement displays Microsoft Word
documents (with the .doc file extension) and Microsoft Excel workbooks (with the .xls
file extension):
choose file ¬
default location (path to the documents folder) ¬
of type {"com.microsoft.word.doc", "com.microsoft.excel.xls"} ¬
without invisibles
NOTE
The of type parameter always takes a list. But when you provide a single type,
AppleScript automatically coerces it to a list for you, so you don’t need to enter it
within braces.
NOTE
The old-style means of choosing which files to display in the Choose A File dialog box
is to use their file type codes. This means is no longer recommended for Mac OS X 10.4
or later versions—so if you find this means used in legacy code you’re maintaining,
update the code to use UTIs instead.
ch08.indd 164 11/10/09 4:00:25 PM
Chapter 8: Using Dialog Boxes to Get User Input 165
UTI UTI Constant Conforms to Type Tags Explanation
Text Files
public.plain-text kUTTypePlainText public.text .txt, text/plain Text with no specific
encoding (such as UTF-
8) and with no markup
public.rtf kUTTypeRTF public.text 'RTF ', .rtf, text/rtf, NeXT Rich
Text Format 1.0 pasteboard type,
NSRTFPBoardType
Rich text (text with
formatting)
public.html kUTTypeHTML public.text 'HTML', .html, .htm, text/html,
Apple HTML pasteboard type
HTML file
Image Files
public.jpeg kUTTypeJPEG public.image 'JPEG', .jpg, .jpeg, image/jpeg JPEG image (not JPEG
2000) file
public.jpeg-2000 kUTTypeJPEG2000 public.image 'jp2', .jp2, image/jp2 JPEG 2000 image file
public.tiff kUTTTypeTIFF public.image 'TIFF', .tif, .tiff, image/tiff, NeXT
TIFF v4.0 pasteboard type,
NSTIFFPBoardType
TIFF image file
public.camera-raw-
image
N/A public.image N/A RAW digital camera
image (base type)
public.png kUTTypePNG public.image 'PNGf', .png, image/png PNG image file
com.apple
.quicktime-image
kUTTypeQuickTimeImage public.image 'qtif', .quf, qtif, image/
x-QuickTime
QuickTime image file
com.adobe.pdf kUTTypePDF public.data, public
.composite-content
'PDF ', .pdf, application/pdf,
Apple PDF pasteboard type
PDF file
com.compuserve.gif kUTTypeGIF public.image 'GIFf', .gif, image/gif GIF image file
com.microsoft.bmp kUTTypeBMP public.image 'BMP', 'BMPf', .bmp Windows bitmap image
file
Table 8-2 Uniform Type Identifiers (UTIs) for Widely Useful File Types

166 AppleScript: A Beginner’s Guide
UTI UTI Constant Conforms to Type Tags Explanation
Movie Files
com.apple
.quicktime-movie
kUTTypeQuickTimeMovie public.movie 'MooV', .mov, .qt, video/
quicktime
QuickTime movie
public.avi N/A public.movie .avi, .vfw, 'Vfw', video/avi,
video/msvideo, video/x-msvideo
AVI file
public.mpeg kUTTypeMPEG public.movie 'MPG', 'MPEG', .mpg, .mpeg,
.m75, .m15, video/mpg, video/
mpeg, video/x-mpg, video/
x-mpeg
MPEG-1 or MPEG-2 file
public-mpeg4 kUTTypeMPEG4 public.movie 'mpg4', .mp4, video/mp4,
video/mp4v
MPEG-4 file
Audio Files
public.mp3 kUTtypeMP3 public.audio 'MPG3', 'mpg3', 'Mp3', 'MP3',
'mp3!', 'MP3!', .mp3, audio/
mpeg, audio/mpeg3, audio/
mpg, audio/mp3, audio/x-mpeg,
audio/x-mpeg3, audio/x-mpg,
audio/x-mp3
MPEG-3 audio file or
MP3 audio file
public-mpeg-4-
audio
kUTTypeMPEG4Audio public.audio, public
.mpeg4
'M4A', .m4a MPEG-4 audio file
public-aiff-audio N/A public.audio .aiff, .aif, 'AIFF', audio/aiff,
audio/x-AIFF
AIFF audio file
com.microsoft
.waveform-audio
N/A public.audio .wav, .wave, '.WAV', 'WAVE',
audio/wav, audio/wave
WAV audio file
Table 8-2 Uniform Type Identifiers (UTIs) for Widely Useful File Types (continued)

Chapter 8: Using Dialog Boxes to Get User Input 167
UTI UTI Constant Conforms to Type Tags Explanation
Microsoft Office
Documents
com.microsoft
.word.doc
N/A public.data 'W8BN', .doc, application/
msword
Microsoft Word
document (.doc file
extension)
com.microsoft
.excel.xls
N/A public.data 'XLS8', .xls, application/
vnd.ms-excel
Microsoft Excel
document (.xls file
extension)
com.microsoft
.powerpoint.ppt
N/A public.data, public
.presentation
.ppt, 'SLD8', application/
mspowerpoint
Microsoft PowerPoint
presentation (.ppt file
extension)
com.microsoft.word
.openxml.document
N/A public.data N/A Microsoft Word
document (.docx file
extension)
com.microsoft.excel
.openxml.workbook
N/A public.data N/A Microsoft Excel
workbook (.xlsx file
extension).
com.microsoft
.powerpoint
.openxml
.presentation
N/A public.data N/A Microsoft PowerPoint
presentation (.pptx file
extension)
iWork Documents
com.apple.iwork
.pages.sffpages
N/A N/A .pages Pages document flies
com.apple.iwork
.numbers.sffnumbers
N/A N/A .numbers Numbers spreadsheet
files
com.apple.iwork
.numbers.sffkey
N/A N/A .key Keynote presentation
files
Table 8-2 Uniform Type Identifiers (UTIs) for Widely Useful File Types (continued)

168 AppleScript: A Beginner’s Guide
Letting the User Choose Two or More Files
In many scripts, you’ll need to let the user choose only a single file each time you display
the Choose A File dialog box. But in others, you’ll need to let the user choose multiple
files for the script to work on—for example, when the user is identifying a group of files
for batch processing by your script.
To let the user choose multiple files, add the with multiple selections allowed parameter
to the choose file command, like this:
choose file with prompt ¬
"Choose the photos you want to crop to 4 x 3:" ¬
default location (path to the pictures folder) ¬
with multiple selections allowed ¬
without invisibles
NOTE
There’s one other parameter for the choose file command: the showing package contents
parameter. Add this parameter when you need the user to be able to poke inside
package files and pick out files they contain. The contents of package files are normally
hidden, but you can display them in the Finder by CTRL-clicking or right-clicking a
package file and choosing Show Package Contents from the shortcut menu.
Seeing Which File the User Chose
After the user picks a file in the Choose A File dialog box and clicks the Choose button,
the choose file command returns an alias to the file—for example:
alias "Server:Docs:2010 Business Plan - rough.doc"
When you’re dealing with a single file, often the easiest way of dealing with it is to
assign the file to a variable, as in the Keynote example you saw earlier in this chapter:
set myKey to choose file ¬
default location (alias "Server:Presentations:") ¬
of type "com.apple.iwork.keynote.sffkey" ¬
with prompt "Choose the presentation you want to duplicate:" ¬
without invisibles
If you use the with multiple selections allowed parameter, AppleScript returns a list
of the files selected, even if the user chose only a single file. Here’s an example of a two-
item list:
{alias "Server:Excel:2010 Budget - Final.xls", ¬
alias "Server:Excel:2010 Budget by Department - HR.xls"}
To return one of the files, identify it by item—for example:
set myFile1 to item 1 of result

Chapter 8: Using Dialog Boxes to Get User Input 169
Try This Letting the User Choose a File
In this example, you display the Choose A File dialog box and prompt the user to choose a
text file. This example works with the Try This example in the section “Using the Choose
Application Dialog Box to Open a Document in a Particular Application” later in this
chapter, in which the user picks an application; the script then opens the text file using the
application. Follow these steps:
1. Press z-N or choose File | New to create a new script.
2. Start a set statement that assigns the result of the choose file command to a variable
named userFile:
set userFile to choose file
3. Add the of type parameter to specify the file type you want the Choose A File dialog
box to display, as shown in boldface here:
set userFile to choose file ¬
of type "public.text"
4. Add the with prompt parameter and the text of the prompt, as shown in boldface here:
set userFile to choose file ¬
of type "public.text" ¬
with prompt "Choose the text file you want to open:"
5. Add the default location parameter and specify the path to the Documents folder, as
shown in boldface here:
set userFile to choose file ¬
of type "public.text" ¬
with prompt "Choose the text file you want to open:" ¬
default location (path to the Documents folder)
6. Add the without invisibles parameter to suppress the display of invisible files, as
shown in boldface here:
set userFile to choose file ¬
of type "public.text" ¬
with prompt "Choose the text file you want to open:" ¬
default location (path to the Documents folder) ¬
without invisibles
7. Press z-R or click the Run button on the toolbar to run the script. The Choose A File
dialog box opens, as shown in Figure 8-22.
(continued)
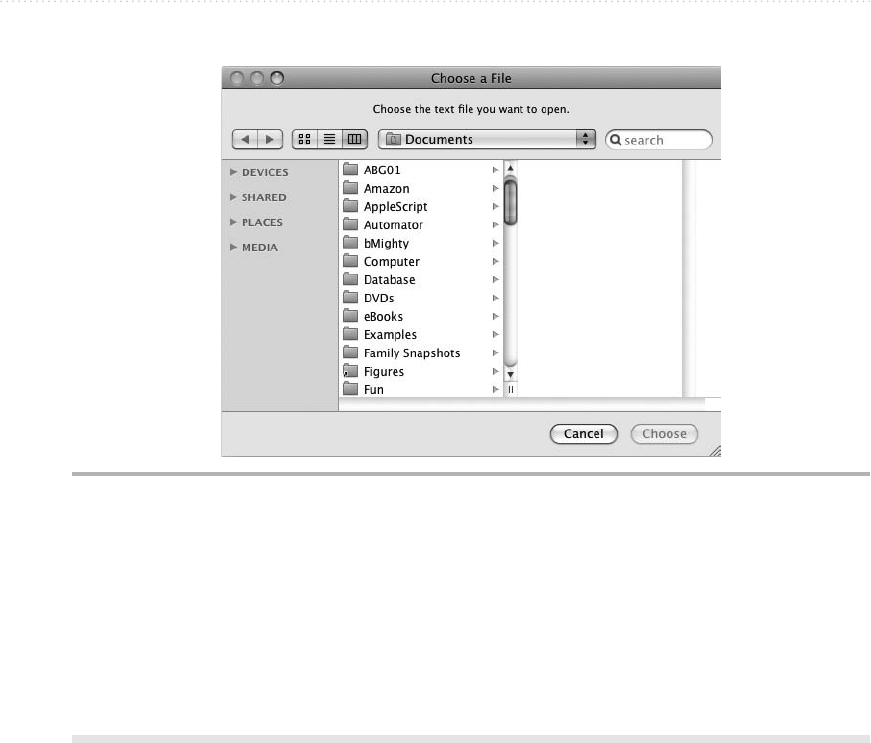
170 AppleScript: A Beginner’s Guide
8. Navigate to a text file (go on, you must have one lurking somewhere), select it, and
then click the Choose button.
9. Verify that the document’s name and path appears in the Result pane.
10. Press z-S and save this script under a name of your choice. Keep the script open so that
you can add to it in the chapter’s final Try This section.
Letting the User Choose a Folder
To let the user choose a folder, use the choose folder command. This works in much the
same way as the choose file command, so we’ll just go over the parameters quickly here.
On its own, the choose folder command displays the Choose A Folder dialog box
shown in Figure 8-23.
You can use the following parameters with the choose folder command:
● with prompt Add this parameter and a text string to make the Choose A Folder
dialog box display a prompt at the top. Adding a prompt is usually a good idea for
clarity.
Figure 8-22 The Choose A File dialog box appears with your custom prompt and showing
the contents of the Documents folder.
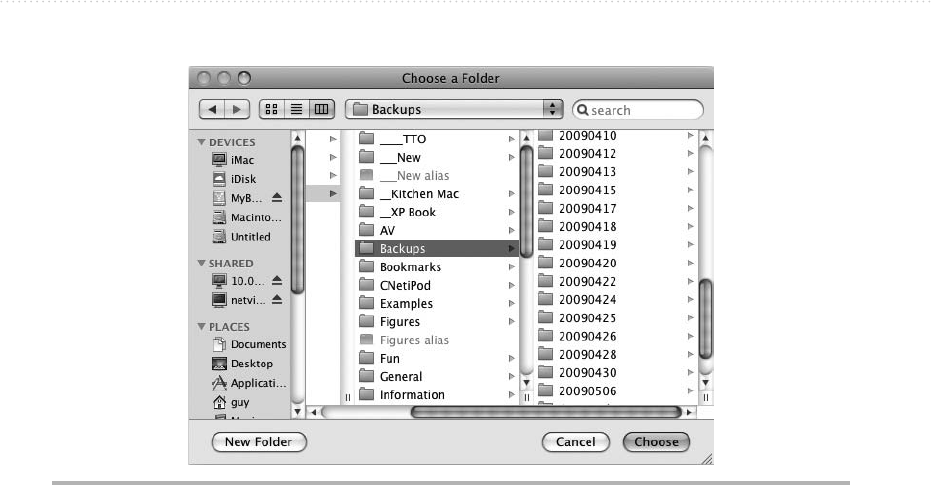
Chapter 8: Using Dialog Boxes to Get User Input 171
● default location Add this parameter and an alias to control which folder the Choose
A Folder dialog box displays at first. In most cases, it’s helpful to direct the user to the
right place to start choosing a folder.
● with invisibles/without invisibles Add the with invisibles parameter to make
the Choose A Folder dialog box display invisible folders. Either omit the invisibles
parameter or add without invisibles to make the dialog box hide invisible folders.
● with multiple selections allowed Add this parameter if you want the user to be able
to select multiple folders. Omit this parameter to allow the user to select only a single
folder.
● showing package contents Add this parameter if you want the Choose A Folder dialog
box to show the contents of package files instead of hiding them (as it normally does).
For example, the following command displays the Choose A Folder dialog box with a
custom prompt and showing the contents of a folder named Photos on a server:
choose folder ¬
with prompt "Choose the folder to store the processed images in:" ¬
default location alias "Server:Examples:Photos:"
Figure 8-23 Without any parameters, the Choose A Folder dialog box displays no prompt
and hides invisible folders.
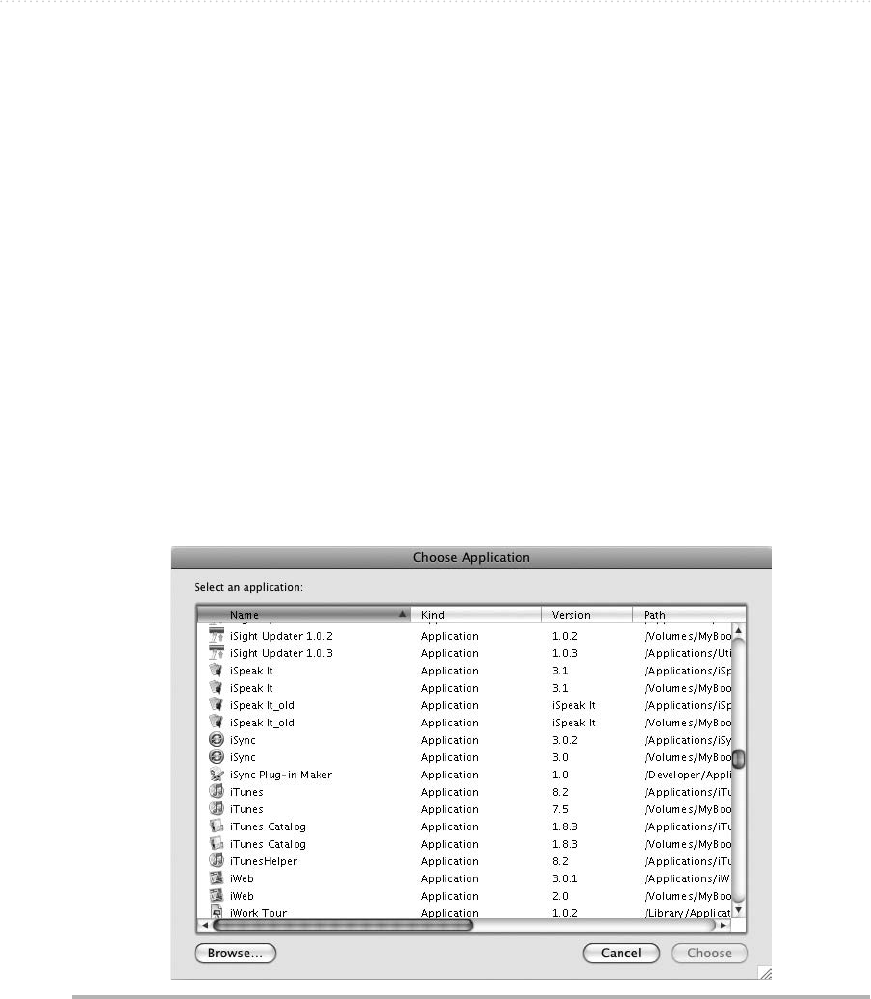
172 AppleScript: A Beginner’s Guide
When you use the choose folder command without the with multiple selections
allowed parameter, it returns the alias to the folder chosen—for example:
alias "Server:Examples:Photos:Processed:"
When you use the choose folder command with the with multiple selections allowed
parameter, it returns a list containing the alias to each folder chosen—for example:
{alias "Transfer:Examples:Photos:Processed:", ¬
alias "Transfer:Examples:Photos:Second Generation:"}
Letting the User Choose an Application
To let the user choose an application, use the choose application command.
When you use the command on its own, as in the following example, Mac OS X
displays the Choose Application dialog box with the terse prompt “Select an application”
(see Figure 8-24).
Figure 8-24 Display the Choose Application dialog box to let the user pick the application
with which to perform a task.

Chapter 8: Using Dialog Boxes to Get User Input 173
CAUTION
The first time you issue the choose application command, Mac OS X hunts for all the
applications on the Mac’s startup disk and other connected disks so that it can show
them all in the dialog box. This may take a while, so be prepared to watch the “wait”
cursor for a minute or two.
Changing the Title and Prompt of the Choose Application Dialog Box
You can also customize the Choose Application dialog box by giving it your own title and
prompt. These are the parameters to use:
● with title Add this optional parameter and a string with the text you want to show in
the title bar of the dialog box.
● with prompt Add this optional parameter and a string with the text with which you
want to replace the default prompt (“Select an application”).
Letting the User Choose Multiple Applications
AppleScript also lets you decide whether to let the user select multiple applications
instead of just one. Usually, you’ll want just a single application, and this is the default
setting. To let the user choose multiple applications, add the with multiple selections
allowed parameter:
choose application with multiple selections allowed
If you omit the multiple selections allowed parameter, AppleScript limits the user to a
single selection.
Getting an Alias to the Application Rather Than Launching It
Normally, when the user chooses an application in the Choose Application dialog box,
Mac OS X launches the application. Sometimes this is handy, but other times, it may not
be what you want.
Instead of letting the application launch, you can set the Choose Application dialog
box up to return an alias to the application. You can then use this information as needed—
for example, to run the application later rather than now. To return the alias, add the as
alias parameter to the choose application command:
choose application as alias

174 AppleScript: A Beginner’s Guide
Try This Using the Choose Application Dialog
Box to Open a Document in a Particular
Application
In this example, you’ll add to the script you created in the previous Try This section.
So far, the script displays the Choose A File dialog box, prompts the user to select a
text file, and stores the file’s details in a variable named userFile. Here, you will display
the Choose Application dialog box, give it a custom title bar and prompt to make sure the
user understands what to do with it, and then use the application returned to open the
text file.
Follow these steps:
1. In AppleScript Editor, activate the script window containing the script you created in
the previous Try This section.
2. At the end of the script, type a set statement to assign the result of the choose
application command to the variable named userApp:
set userApp to choose application
3. Add the with title parameter and a string to the statement, as shown in boldface here:
set userApp to choose application ¬
with title "Select Document Application"
4. Add the with prompt parameter and a suitable string, as shown in boldface here:
set userApp to choose application ¬
with title "Select Document Application" ¬
with prompt "Select the TextEdit application and click the
Choose button."
5. Add the as alias parameter:
set userApp to choose application ¬
with title "Select Document Application" ¬
with prompt "Select the TextEdit application and click the
Choose button." ¬
as alias
6. Add a tell statement telling Finder to open userFile using userApp:
tell application "Finder" to open userFile using userApp
7. Press z-S to save the script.
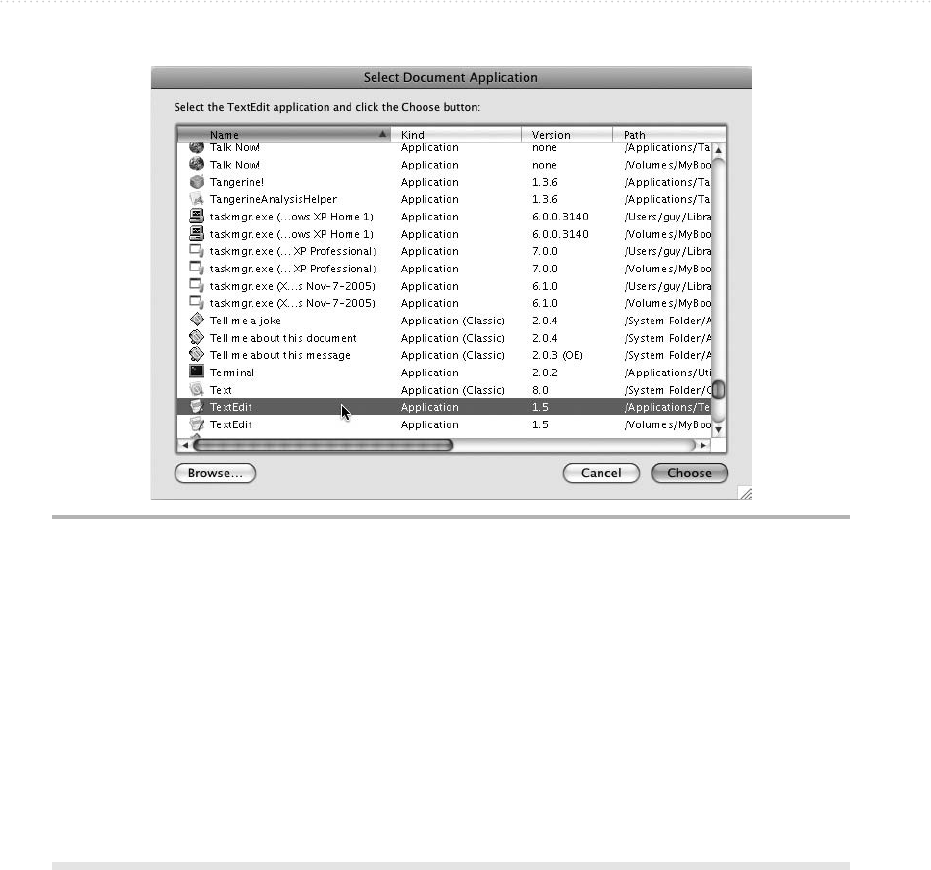
Chapter 8: Using Dialog Boxes to Get User Input 175
8. Press z-R or click the Run button on the toolbar to run the script. The Choose A File
dialog box appears as before. After you choose the text file and click the Choose
button, the Select Document Application dialog box appears (see Figure 8-25).
9. Select the TextEdit application (if there’s more than one, select the latest one on your
Mac’s hard disk), and then click the Choose button. AppleScript causes Finder to open
the text file in TextEdit.
10. Quit TextEdit (for example, press z-Q or choose TextEdit | Quit TextEdit).
Letting the User Choose a URL
As you probably know, a URL is a uniform resource locator—in other words, the address
of a file, website, or other resource on the Internet or another TCP/IP network.
Figure 8-25 The Choose An Application dialog box appears with the custom title and prompt
you set.
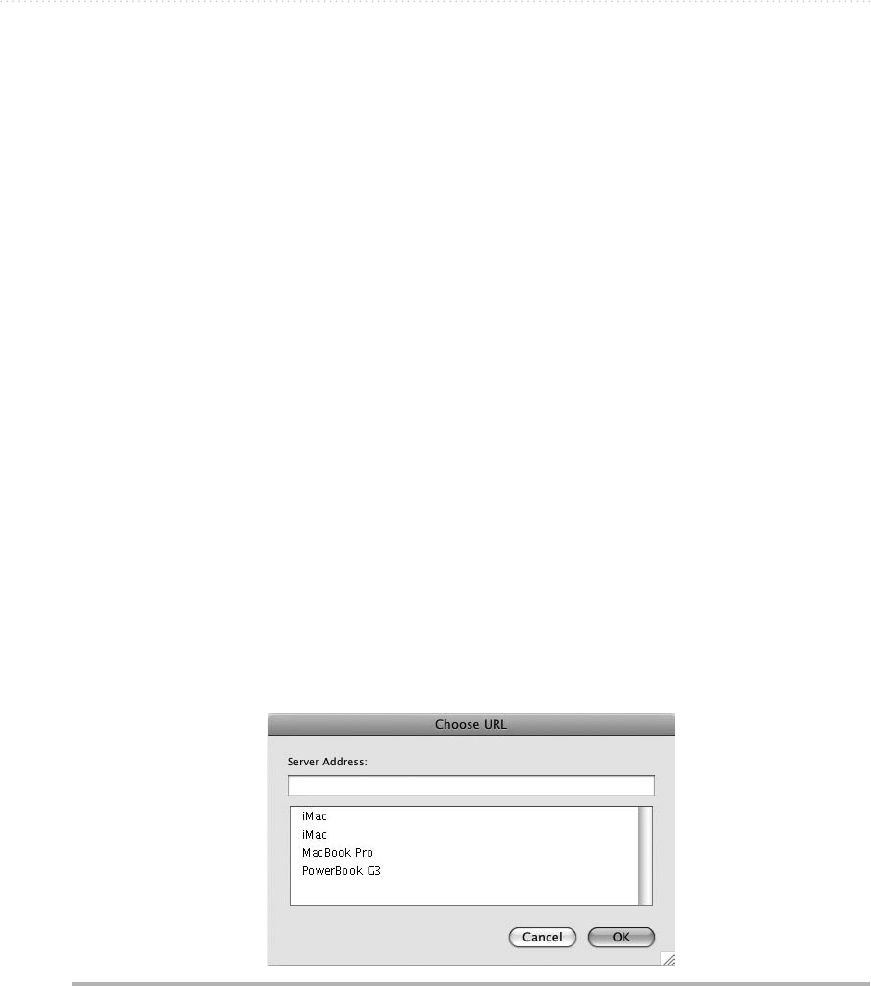
176 AppleScript: A Beginner’s Guide
When your script requires the user to choose a URL to which to connect, use the
choose URL command. This command displays a dialog box that enables the user to
either select a URL from a list you present to them or type a URL of his or her choosing.
Your script can then use this URL as necessary—Mac OS X doesn’t open a browser
window to the URL automatically when the user dismisses the Choose URL dialog box.
If you use the choose URL command on its own, without any parameters, it displays
a dialog box showing available file servers on the network to which your Mac is attached
(see Figure 8-26). These are any Macs or other computers configured to offer file services
on the network.
In most cases, you’ll want to add the showing parameter with one of the items
explained in Table 8-3.
Normally, the Server Address box at the top of the Choose URL dialog box is
enabled so the user can type in a URL that doesn’t appear in the list box. (Or, if the user
is feeling ornery, he or she user can type in one of the listed URLs.) You can disable the
Server Address box by adding the parameter without editable URL to the choose URL
command. The box then appears without a black outline around it—a visual distinction
subtle enough to be lost on many users, who will try to click in the box anyway.
The following example displays the Choose URL dialog box showing file servers and
then mounts the chosen server using the open location command:
open location (choose URL showing File servers)
Figure 8-26 Without any parameters, the choose URL command displays available file servers
on your network.

Chapter 8: Using Dialog Boxes to Get User Input 177
Table 8-3 URL Items for the showing Parameter of the choose URL command
URL Item Shows a List of
Web servers http (unsecured) and https (secured) services
FTP servers FTP (File Transfer Protocol) servers
Telnet hosts telnet hosts (which are little used these days, largely because telnet has
minimal security
File servers File servers offering AFP (Apple File Protocol), NFS (Network File
System), and SMB (Server Message Block) services. Each protocol
appears as a different server, so if a computer is running both AFP and
SMB, for example, it appears as two servers.
News servers NNTP (Network News Transfer Protocol) servers
Directory services LDAP (Lightweight Directory Access Protocol) services
Media servers RTSP (Real Time Streaming Protocol) servers
Remote applications Applications available for running on remote computers
This page intentionally left blank

179
Chapter 9
Repeating Actions
in Your Scripts

180 AppleScript: A Beginner’s Guide
Key Skills & Concepts
● Understanding AppleScript’s various kinds of loops
● Understanding what hard-coding is and when to use it
● Repeating actions with a repeat loop
● Repeating actions a set number of times with a repeat… times loop
● Repeating actions using a loop variable
● Repeating actions for each item in a list
● Repeating actions as long as a condition remains true
● Repeating actions as long as a condition remains false
To work swiftly and efficiently with multiple files, windows, or other objects, you’ll
often need to repeat one or more actions in your scripts. For example, you may need to
process several files in Preview, or take the same action in a Microsoft Word document
for every paragraph that’s formatted with the Normal style. This chapter shows you
how to repeat actions however many times you need using the various mechanisms that
AppleScript provides.
Getting an Overview of the Types
of Loops That AppleScript Provides
AppleScript provides six different kinds of repeat loops.
● repeat with a termination condition Lets you repeat a set of actions forever. You
must set a condition to terminate the loop; otherwise, it won’t stop running.
● repeat a number of times Lets you repeat a set of actions the number of times
specified by the number.
● repeat with a counter variable Lets you repeat a set of actions using a counter
variable. The counter variable starts at a start value, increases or decreases on each
repetition, and ends the loop when it reaches the end value.

Chapter 9: Repeating Actions in Your Scripts 181
● repeat for each item in a list Lets you repeat a set of actions for each item in a list.
For example, if you create a list of documents, you can repeat the actions for each item
in turn.
● repeat as long as a condition is true Lets you run a set of actions if a condition is
true and keep repeating the actions as long as the condition remains true.
● repeat until a condition becomes true Lets you run a set of actions if a condition is
false and keep repeating the actions until the condition becomes true.
Understanding What Hard-Coding
Is and When to Use It
The simplest way to repeat an action in AppleScript is to repeat the command for the
action. This is called hard-coding; it’s considered simplistic by most programmers, but it
works well for simple tasks, and there’s no reason why you shouldn’t use it when it meets
your needs.
For example, if you need to create two new documents in TextEdit, you can use a tell
block such as this:
tell the application "TextEdit"
make new document
make new document
end tell
If your script always needs TextEdit to create two new documents, this code works fine.
But if you need to make your code flexible—for example, so that it can tell TextEdit to
create different numbers of new documents as necessary, or to work through each of the open
documents before creating a new document—you can use loops to repeat actions instead.
NOTE
A loop is a section of code that AppleScript can go around and repeat rather than
simply going through. If the conditions are right, AppleScript repeats the loop; if not, it
goes on to the code that appears after the end of the loop in the script.
Repeating Actions Until
a Termination Condition Becomes True
In many scripts, you’ll need to repeat a set of actions until a condition becomes true. This
condition is known as a termination condition because it causes the loop to terminate. For
example, you could set a termination condition that stopped the loop after it had created

182 AppleScript: A Beginner’s Guide
a certain number of documents, or a condition that checked the time and stopped the loop
from running at a particular moment.
CAUTION
It’s vital to use a termination condition with a plain repeat loop; otherwise, the loop
will run forever (or until it encounters an error). If you forget to include a termination
condition, or if your termination condition doesn’t work the way you planned, press z-.
(z and the period key) to end execution of the script. You’ll then see an AppleScript
Error alert telling you that “User canceled out of wait loop for reply or receipt,” which is
pretty good gobbledygook for your having sandbagged the script.
To repeat actions until a condition becomes true, you use a repeat loop. The loop’s
structure looks like this:
repeat
actions
[check the termination condition] exit repeat
end repeat
The exit repeat statement ends the execution of the repeat loop. The script continues
running at the statement after the loop.
NOTE
The exit repeat statement works for all kinds of repeat loops.
For example, the following script closes every Finder window except the front one:
tell the application "Finder"
repeat
if (count of Finder windows) is not greater than 1 then ¬
exit repeat
close the back Finder window
end repeat
end tell
Here’s how this works:
● The if (count of Finder windows) is not greater than 1 then exit repeat statement
makes the script end when only one Finder window is left open or if no Finder
window is open in the first place.
● If the script is still running, the close the back Finder window statement closes the
Finder window at the back of the stack.

Chapter 9: Repeating Actions in Your Scripts 183
Try This
NOTE
Instead of using exit repeat to exit the repeat loop, you can use a return statement
to exit the repeat loop and end execution of the script. This statement is useful when
you want to stop the script at the point where it exits the repeat loop rather than
continuing with whichever statements follow the loop.
Using a repeat Loop to Close All Open
Finder Windows Except One
In this example, you create a script that closes all open Finder windows except one.
This script uses a repeat loop to close the windows.
To create the script, follow these steps:
1. In AppleScript Editor, press z-N or choose File | New to create a new script.
2. Create a tell block to the Finder:
tell the application "Finder"
end tell
3. Inside the tell block, create a repeat block, as shown in boldface here:
tell the application "Finder"
repeat
end repeat
end tell
4. Inside the repeat block, add an if statement that gives the exit repeat command if the
count of Finder windows is not greater than 1, as shown in boldface here:
tell the application "Finder"
repeat
if (count of Finder windows) is not greater than 1 ¬
then exit repeat
end repeat
end tell
5. Add the command for closing the back Finder window, as shown in boldface here:
tell the application "Finder"
repeat
if (count of Finder windows) is not greater than 1 ¬
then exit repeat
close the back Finder window
end repeat
end tell

184 AppleScript: A Beginner’s Guide
6. Open plenty of Finder windows for the script to close. The easiest way to do so is to
click the Desktop or the Finder icon on the Dock and then keep pressing z-N until
doing so ceases to amuse you.
7. Press z-R or click the Run button on the toolbar to run the script. Verify that it closes all
but the frontmost Finder window.
8. Press z-S and save the script under a name of your choice.
Repeating Actions a Set Number of Times
To repeat a group of actions a set number of times, use a repeat… times loop.
A repeat… times loop looks like this:
repeat number times
actions
end repeat
As you can see, this is very straightforward: You specify the number of times you
want the loop to repeat, and AppleScript automatically counts that number of times. You
don’t need to use a counter variable or other means of tracking how many times the loop
has run.
For example, the following script uses a repeat 5 times command to make TextEdit
create five new documents and resize and reposition the window of each:
tell the application "TextEdit"
repeat 5 times
make new document at the front
set the bounds of the front window to {1, 22, 400, 422}
end repeat
end tell
How useful this type of hard-coded repetition is depends on the kinds of tasks you
need to automate with AppleScript. In general, loops that have greater flexibility are more
useful—but you can build some flexibility into a straightforward repeat… times loop by
using a dialog box, as in the next Try This example.
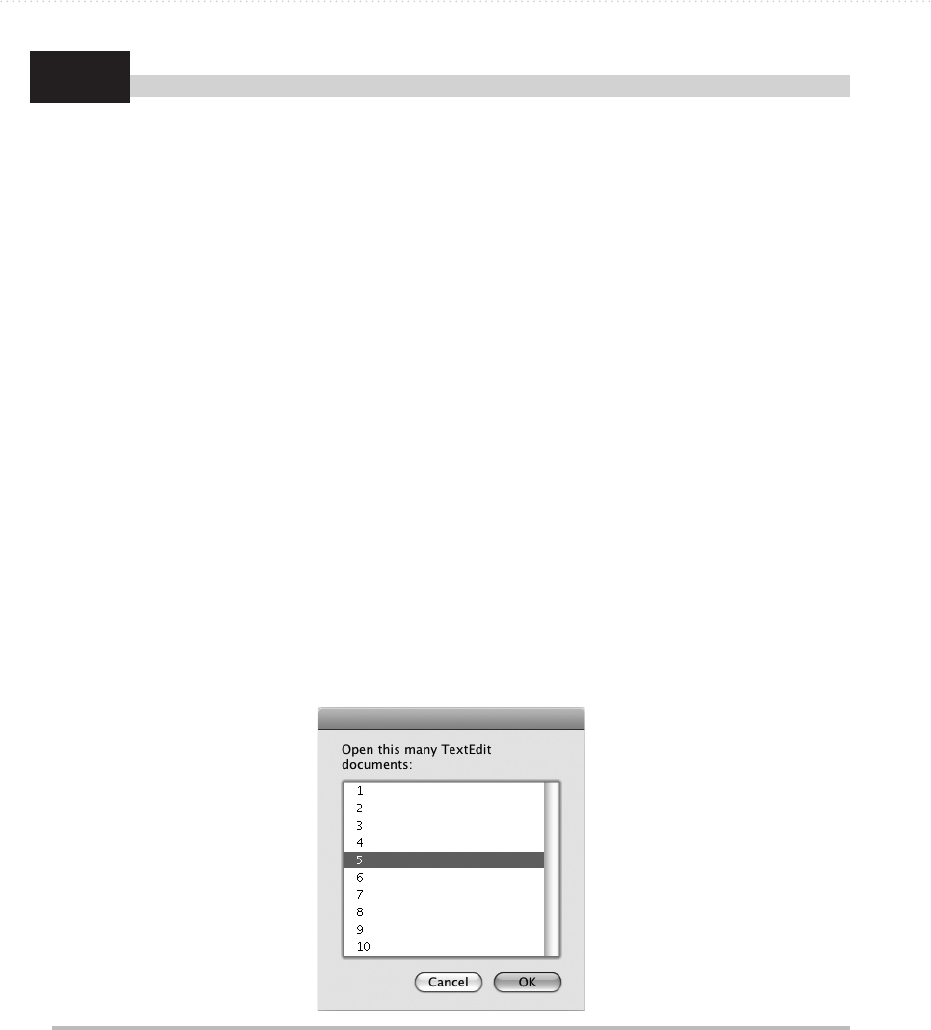
Chapter 9: Repeating Actions in Your Scripts 185
Try This Using a repeat… times Loop Controlled
by a Dialog Box
In this example, you create a repeat… times loop whose number of repetitions is
controlled by a choose from list dialog box rather than being hard-coded in. The choose
from list command (discussed in detail in Chapter 8) displays a list of choices (from
which the user can pick only one) in a dialog box with a prompt and standard buttons (an
OK button and a Cancel button), as shown in Figure 9-1.
Follow these steps to create the script:
1. In AppleScript Editor, press z-N or choose File | New to create a new script.
2. Create the choose from list statement like this:
choose from list ¬
{"1", "2", "3", "4", "5", "6", "7", "8", "9", "10"} ¬
with prompt "Open this many TextEdit documents:"
3. Press z-R or click the Run button on the toolbar to run the script. You’ll see the choose
from list dialog box. Click a number and click the OK button to dismiss the dialog box.
Beyond returning your choice, the dialog box doesn’t take any action because it’s not
hooked up to code.
Figure 9-1 This choose from list dialog box lets the user pick how many times the repeat…
times loop runs.
(continued)

186 AppleScript: A Beginner’s Guide
4. Assign the result of the choose from list dialog box to a variable named loopTimes, as
shown in boldface here:
set loopTimes to choose from list ¬
{"1", "2", "3", "4", "5", "6", "7", "8", "9", "10"} ¬
with prompt "Open this many TextEdit documents:"
5. Create a tell block for TextEdit, as shown in boldface here:
set loopTimes to choose from list ¬
{"1", "2", "3", "4", "5", "6", "7", "8", "9", "10"} ¬
with prompt "Open this many TextEdit documents:"
tell the application "TextEdit"
end tell
6. Add the repeat… times loop within the tell block, as shown in boldface here:
set loopTimes to choose from list ¬
{"1", "2", "3", "4", "5", "6", "7", "8", "9", "10"} ¬
with prompt "Open this many TextEdit documents:"
tell the application "TextEdit"
repeat loopTimes times
make new document at the front
end repeat
end tell
7. Press z-R or click the Run button on the toolbar to run the script. Choose a number in
the choose from list dialog box, click the OK button, and verify that TextEdit creates
the number of documents you chose.
8. Save the script under a name of your choice.
Repeating Actions Using a Loop
Controlled by a Loop Variable
Another way of controlling the number of times a loop repeats is to use a loop variable,
a variable that AppleScript automatically changes on each iteration through the loop. You
tell AppleScript the start value and end value for the loop variable; AppleScript starts the
loop at the start value and runs it until it reaches the end value.

Chapter 9: Repeating Actions in Your Scripts 187
A loop controlled by a loop variable looks like this:
repeat with loop_variable from start_value to end_value [by increment]
actions
end repeat
As you can see, this is pretty straightforward. You supply a name for the loop variable,
such as myCounter, the start value (for example, 1), and the end value (for example, 10).
Optionally, you can supply the increment, the number by which to increase or decrease the
value of the loop variable. If you don’t provide the increment, AppleScript increments the
value by 1 on each iteration through the loop. This is nice, logical, and effective for many
scripts.
Here’s an example of a loop controlled by a loop variable using the default increment
of 1. The code sets the startvalue variable to 1, prompts the user to choose the value of
the endvalue variable from a choose from list dialog box, and then runs from the value
of startvalue to the value of endvalue. On each iteration, AppleScript automatically
increments the numWindows counter variable by 1:
set startvalue to 1
set endvalue to choose from list {"3", "4", "5", "6", "7"}
repeat with numWindows from startvalue to endvalue
tell application "Finder" to make new Finder window
end repeat
Q: Can I make a loop run backward?
A: Yes, if you need to.
The easiest way to make a loop run backward is to use a negative increment. To do this,
just specify an increment with a negative number rather than a positive number.
For example, if you specify an increment of –1, each loop counts down by one: 10, 9,
8, 7, and so on. If you specify –2, each loop counts down by two: 10, 8, 6, and so on.
When you use a negative increment, you must make sure that the end value is lower
than the start value. This is easy enough to do when you’re paying attention, but it’s
easy enough to get wrong if you’re working under pressure. So if you find your negative
increments are sending your scripts into a terminal tailspin, double-check the end value
against the start value.
Ask the Expert

188 AppleScript: A Beginner’s Guide
Try This
Here’s the example loop using the by parameter (shown in boldface) to increment the
counter variable by 2 instead of the default 1:
set startvalue to 1
set endvalue to choose from list {"3", "4", "5", "6", "7"}
repeat with numWindows from startvalue to endvalue by 2
tell application "Finder" to make new Finder window
end repeat
Here’s the same loop back for a second encore using the by parameter with a negative
value to decrement the counter variable by 1 instead of incrementing it. This example sets
startvalue to 10 to ensure it is larger than endvalue. The changes appear in boldface:
set startvalue to 10
set endvalue to choose from list {"3", "4", "5", "6", "7"}
repeat with numWindows from startvalue to endvalue by –1
tell application "Finder" to make new Finder window
end repeat
Using a Loop Controlled by a Loop Variable
In this example, you create a loop controlled by a loop variable. The loop simply displays
a dialog box showing the current value of the loop variable, allowing you to watch as it
changes.
To create and run the script, follow these steps:
1. In AppleScript Editor, press z-N or choose File | New to create a new script.
2. Type the following repeat with loop:
repeat with myCounter from 1 to 5
display dialog myCounter
end repeat
3. Press z-R or click the Run button on the toolbar to run the script. You’ll see a dialog
box showing the value assigned to the myCounter variable—1 on the first iteration.
4. Click the OK button to dismiss the dialog box. Back it comes in a moment, showing
the next value of the myCounter variable: 2.
5. Continue until myCounter reaches 5; the script ends after you close the dialog box.

Chapter 9: Repeating Actions in Your Scripts 189
Try This
Repeating Actions for Each Item in a List
AppleScript also gives you an easy way to repeat an action for each item in a list. This is
great when you need to take the same action for each of the items because AppleScript
automatically tracks its progress through the list so that you don’t have to.
A loop controlled by a list looks like this:
repeat with list_item in list_items
actions
end repeat
AppleScript performs one iteration of the repeat block for each individual item (list_
item) in the list (list_items). The following example creates a list named offices with four
entries (Ashland, Cupertino, Mendocino, and Sebastopol). The loop then repeats for each
of the office items in the offices list—first Ashland, then Cupertino, and so on.
set offices to {"Ashland", "Cupertino", "Mendocino", "Sebastopol"}
repeat with office in offices
set officename to contents of office
tell application "TextEdit"
make new document
set the text of the front document to "Report for " ¬
& officename & " office"
end tell
end repeat
Inside the loop, the script sets the officename variable to the contents of the office
item. This is because the office item contains a reference to the item rather than to the
item’s actual value. The script then tells TextEdit to make a new document and insert text
in it (“Report for Ashland office,” “Report for Cupertino office,” and so on).
Using a repeat with list Command
to Close Some Finder Windows
In this example, you create a script that uses a repeat with list loop to close every Finder
window that’s open to your Documents folder (or any other folder named Documents) but
leave all other Finder windows open.
Follow these steps to create the script:
1. In AppleScript Editor, press z-N or choose File | New to create a new script.
2. Create a tell block to the Finder:
tell the application "Finder"
end tell (continued)

190 AppleScript: A Beginner’s Guide
3. Within the tell block, create a list named windowNames that gets the name of every
open Finder window, as shown in boldface here:
tell the application "Finder"
set windowNames to get the name of every window
end tell
4. Add a repeat with list loop that works with each windowName item in the
windowNames list, as shown in boldface here:
tell the application "Finder"
set windowNames to get the name of every window
repeat with windowName in windowNames
end repeat
end tell
5. Inside the repeat loop, add an if statement that compares the contents of windowName
to "Documents" and closes the window identified by windowName if it matches. The
if statement appears in boldface here:
tell the application "Finder"
set windowNames to get the name of every window
repeat with windowName in windowNames
if contents of windowName is "Documents" then
close window (windowName)
end if
end repeat
end tell
6. Open some Finder windows to various folders, including your Documents folder.
7. Press z-R or click the Run button on the toolbar to run the script. Verify that the script
closes all windows open to the Documents folder or other folders named Documents.
8. Save the script under a name of your choice.
Repeating Actions as Long
as a Condition Remains True
You can also control a loop by tying it to a condition evaluating to true. This kind of loop
is called repeat while, and it stops as soon as the condition becomes false.
The repeat while loop looks like this:
repeat while condition
actions
end repeat
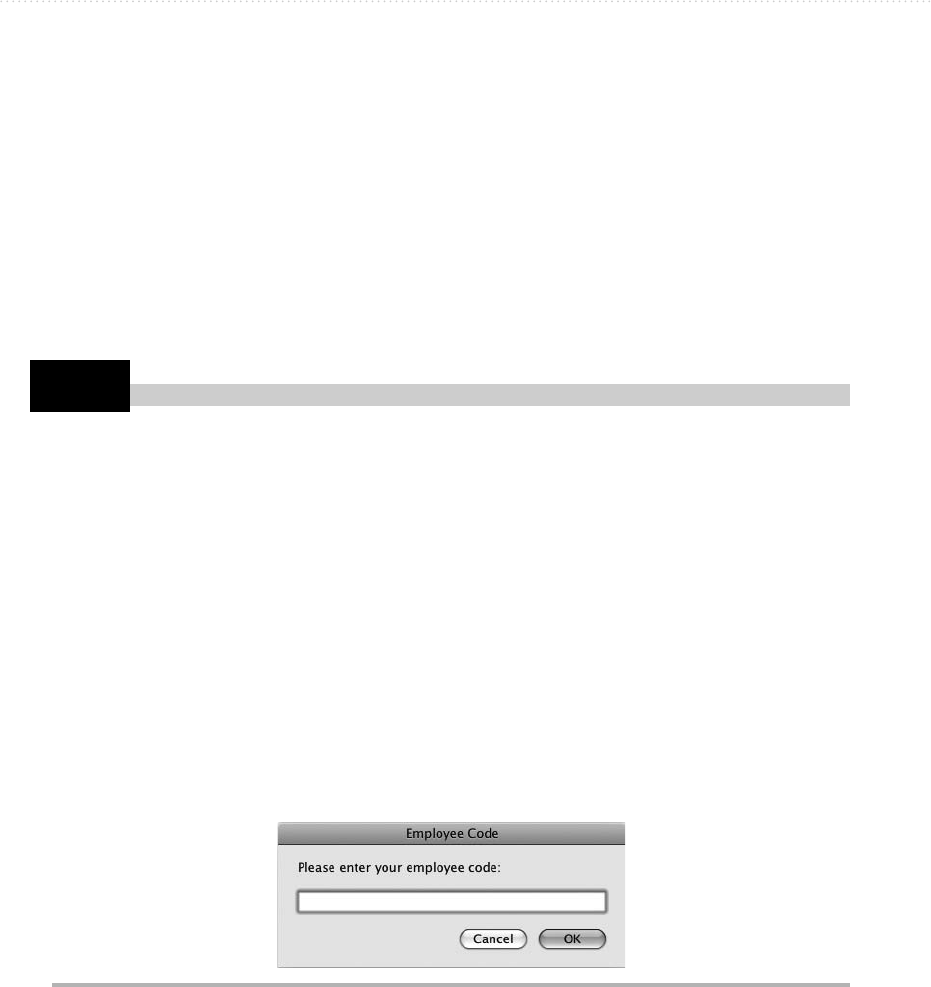
Chapter 9: Repeating Actions in Your Scripts 191
Try This
The following example uses a repeat while loop to make sure five documents
are open in TextEdit. If the count of documents is less than 5, the repeat loop makes
TextEdit create a new document at the front.
tell the application "TextEdit"
repeat while (count of documents) is less than 5
make new document at the front
end repeat
end tell
If the number of documents is already 5 or more, the condition evaluates as false and
the code inside the loop doesn’t run at all.
Using a repeat while Loop
In this example, you create a script that uses a repeat while loop to make sure the user
enters a code in the dialog box (see Figure 9-2) that prompts him or her for it. This
example is simplistic, in that you would normally check the code further (for example, to
make sure that it’s valid, or at least that it’s the right length), but it lets you put the repeat
while loop into action.
Follow these steps to create the script:
1. In AppleScript Editor, press z-N or choose File | New to create a new script.
2. Type a set statement that declares a variable named employee_code and sets its value
to an empty string (" "):
set employee_code to ""
Figure 9-2 If the user clicks the OK button in the Employee Code dialog box without entering
any text, the repeat while loop makes the dialog box appear again.
(continued)

192 AppleScript: A Beginner’s Guide
3. Add a repeat while loop that runs as long as the value of the employee_code variable
is an empty string, as shown in boldface here:
set employee_code to ""
repeat while employee_code is ""
end repeat
4. Inside the repeat while loop, add the statement for displaying the dialog box and
assigning the text property of its result to the employee_code variable, as shown in
boldface here:
set employee_code to ""
repeat while employee_code is ""
display dialog ¬
"Please enter your employee code:" default answer "" ¬
with title "Employee Code"
set employee_code to the text returned of the result
end repeat
5. Press z-R or click the Run button on the toolbar to run the script. When the Employee
Code dialog box appears, click the OK button without entering text. AppleScript
immediately displays the dialog box again.
6. This time, type one or more characters in the text-entry box, and then click the OK
button. The dialog box closes and doesn’t reappear.
7. Save the script under a name of your choice.
Repeating Actions Until a Condition Becomes True
The last way of controlling loops in AppleScript is by repeating the loop as long as a
specified condition is false and stopping when the condition becomes true. This type
of loop is called repeat until, and it’s similar to the repeat while loop; often, you can
achieve the same effect with both types of loops by structuring the condition differently.
The repeat until loop looks like this:
repeat until condition
actions
end repeat

Chapter 9: Repeating Actions in Your Scripts 193
Try This
The following example uses a repeat until loop to close Finder windows until only
one is left open:
tell the application "Finder"
repeat until (count of Finder windows) is not greater than 1
close the back Finder window
end repeat
end tell
As with the repeat while loop, if the condition evaluates as true on the first check, the
code inside the loop doesn’t run at all.
Using a repeat until Loop
In this example, you change the repeat while loop you created in the previous Try This
example into a repeat until loop. Follow these steps:
1. Open the script you created in the previous Try This example.
2. Press z-SHIFT-S or choose File | Save As to display the Save As dialog box. Save the
script under a different name. The script looks like this:
set employee_code to ""
repeat while employee_code is ""
display dialog ¬
"Please enter your employee code:" default answer "" ¬
with title "Employee Code"
set employee_code to the text returned of the result
end repeat
3. Edit the repeat while employee_code is " " statement to make it a repeat until
statement. The changes appear in boldface here; the rest of the script remains the same.
repeat until employee_code is not ""
4. Press z-R or click the Run button on the toolbar to run the script. You’ll find it behaves
in the same way as before.
5. Save the changes to the script.
This page intentionally left blank

195
Chapter 10
Debugging and
Handling Errors

196 AppleScript: A Beginner’s Guide
Key Skills & Concepts
● Understanding AppleScript errors
● Suppressing an error with a try block
● Creating an error handler
● Finding out which errors you need
● Making your scripts resistant to errors
In the best of all possible worlds, you’ll write perfect code that always runs smoothly
under ideal conditions. But in the real world, your code will run into pitfalls and speed
bumps as it executes, so it needs to be able to handle errors that occur.
The easiest way to handle an error is to suppress it by using a try block, but what
you’ll usually want to do is add error-handling code to your scripts. An error handler
enables a script to handle errors gracefully, no matter whether they’re built-in AppleScript
errors or custom errors that you cook up yourself.
First, though, you need to know what happens when an error occurs. Let’s start there.
Understanding What Happens
When an Error Occurs
When an error occurs, the script crashes. For example, if you tell an application to do
something impossible, such as to open a file that doesn’t exist, it returns an error.
Figure 10-1 shows an example of a typical error message. The message—TextEdit got
an error: Can’t get document 1. Invalid index—is intelligible enough if you know what
the script is trying to do, which is to perform an action on the front document. TextEdit
can’t get (return) document 1 because the index number is invalid—in other words, there’s
no front document in TextEdit at the moment. But when a user of the script runs into the
error, the message will probably mean little to him or her (“an index of invalids?”), and
will be about as welcome as a fly in the soup.
AppleScript makes an exception to a script crashing when an error occurs. When the
user clicks the Cancel button in a dialog box, AppleScript returns a special error, error –128,
which doesn’t raise an error dialog box. Instead, when error –128 occurs, AppleScript
quietly stops running the script.
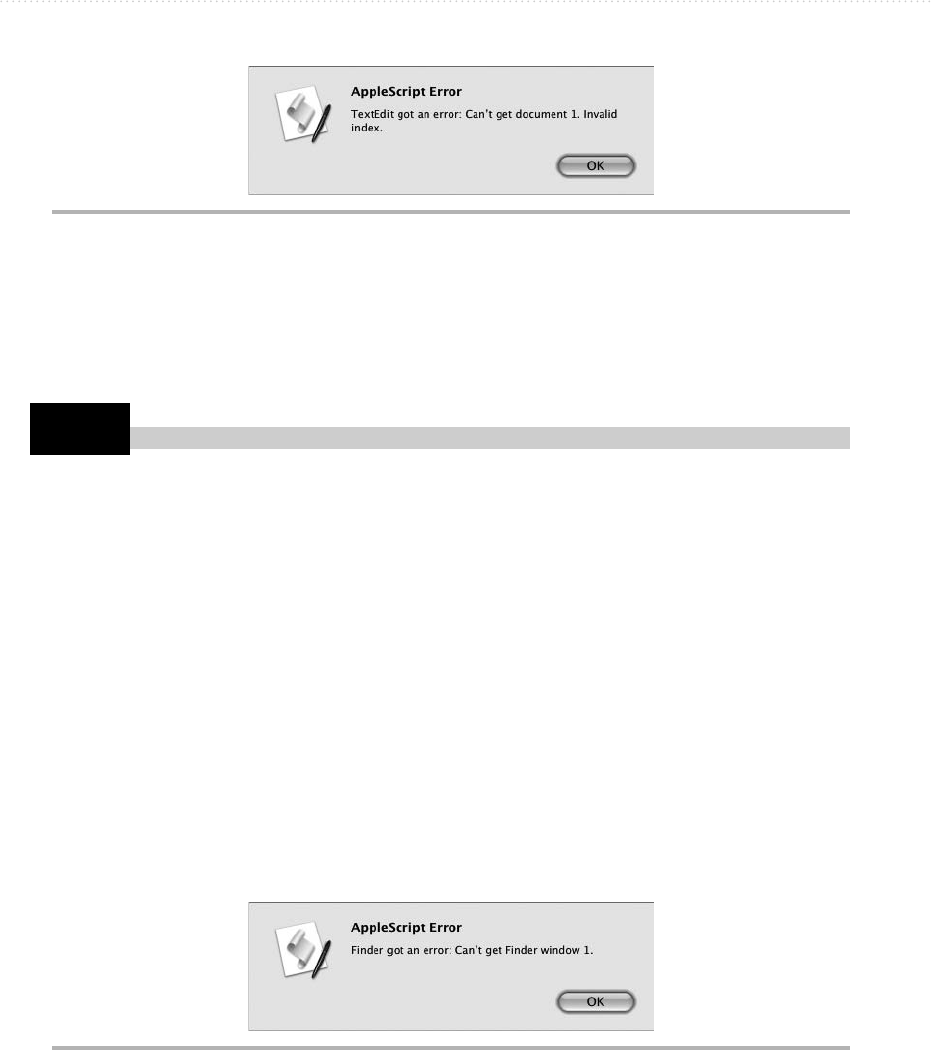
Chapter 10: Debugging and Handling Errors 197
Try This
You’ve seen this behavior already in this book, where you used an OK/Cancel dialog
box to let the user choose whether to run a script or cancel out of it. As you’ll see later in
this chapter, you can check for this special error and take advantage of it in your scripts.
Causing Errors Deliberately
In this example, you cause two errors deliberately in a script and watch how AppleScript
handles them. Follow these steps:
1. In AppleScript Editor, press z-N or choose File | New to create a new script.
2. Type the following short script, which tells the Finder to close every Finder window
and then return the position of the front window. This is guaranteed to cause an error
every time.
tell application "Finder"
close every Finder window
get the position of the front Finder window
end tell
3. Press z-R or click the Run button on the toolbar to run the script. You’ll get an AppleScript
Error message, as shown in Figure 10-2.
4. Click the OK button to dismiss the error message.
Figure 10-1 When a script runs into an error, it displays an error message.
Figure 10-2 The sample script produces an error message because it tries to return the
position of the front Finder window when no Finder window is open.
(continued)
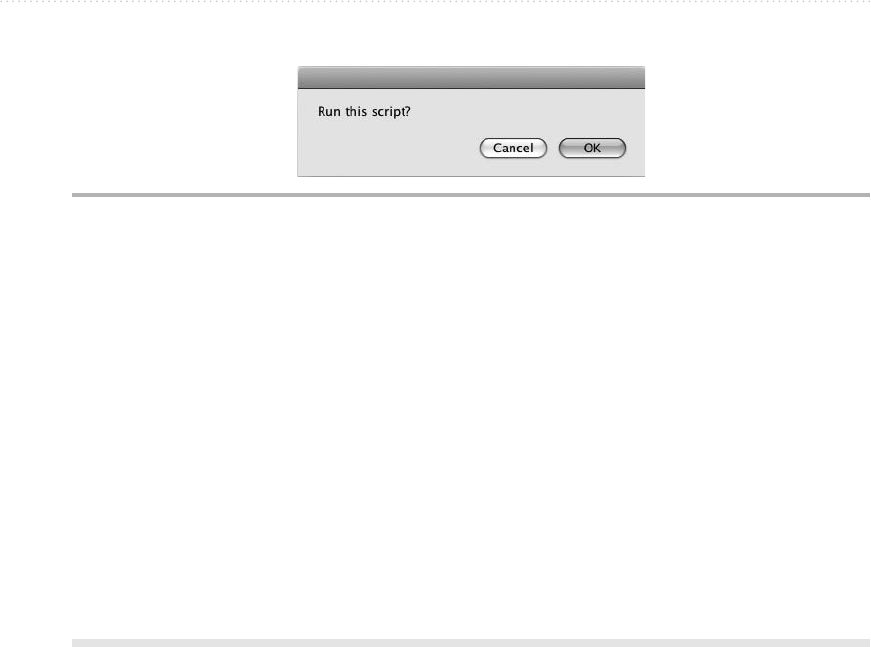
198 AppleScript: A Beginner’s Guide
5. At the beginning of the script, add a display dialog statement that prompts the user to
run this script, as shown in boldface here:
display dialog "Run this script?"
tell application "Finder"
close every Finder window
get the position of the front Finder window
end tell
6. Run the script. The dialog box appears, as shown in Figure 10-3.
7. Click the Cancel button. Notice that the script simply stops running and doesn’t execute
the tell block to the Finder.
8. Save the script under a name of your choice.
9. Leave the script open so that you can work with it in the next Try This example.
Suppressing an Error with a Try Block
The first stage of handling errors in your scripts is to prevent the user from seeing them.
To do this, you use a try block. When an error occurs in a try block, AppleScript ignores
the error, goes to the end of the try block, and keeps on running the script.
A try block starts with the try statement and ends with the end try statement, like this:
try
end try
Inside the block goes the statement or statements that may cause the error, like this:
try
tell application "Finder"
get the position of the front Finder window
end tell
end try
Figure 10-3 Click the Cancel button in the dialog box to produce an error that stops the
script from running.

Chapter 10: Debugging and Handling Errors 199
Try This
The key thing to remember about try blocks is that as soon as an error occurs,
AppleScript stops executing the statements in the try block and continues with the
statement after the end try statement. This means that you need to arrange your try blocks
carefully to make sure that an error doesn’t cause AppleScript to skip any vital statements:
Simply placing the whole of a script inside a try block doesn’t usually do much good
unless the script contains only a single command that you care about.
You can put try blocks in sequence, as you’ll see in the next example. You can also
nest one try block inside another try block, as shown in boldface here:
try
tell application "Finder"
get the position of the front Finder window
try
set the target of the front Finder window ¬
to folder "Sludge" of folder "Documents" of home
end try
set the bounds of the front Finder window to {0, 44, 800, 844}
end tell
end try
If the current user’s Documents folder doesn’t contain a folder named Sludge (and no,
mine doesn’t either), the inner try block captures the error, so the set the bounds of the
front Finder window statement still runs.
Adding a Try Block to a Script
In this example, you add a try block to the script you created in the previous example.
Follow these steps:
1. Activate the window that contains the script you created in the previous example.
2. Type two hyphens to comment out the display dialog statement at the beginning, as
shown in boldface here:
-- display dialog "Run this script?"
tell application "Finder"
close every Finder window
get the position of the front Finder window
end tell
3. Place a try block around the tell block, as shown in boldface here:
-- display dialog "Run this script?"
try
tell application "Finder"
(continued)

200 AppleScript: A Beginner’s Guide
close every Finder window
get the position of the front Finder window
end tell
end try
4. Click the Compile button on the toolbar or press z-K to compile the script. AppleScript
Editor indents the tell block to make the script’s hierarchy clear:
-- display dialog "Run this script?"
try
tell application "Finder"
close every Finder window
get the position of the front Finder window
end tell
end try
5. Press z-R or click the Run button on the toolbar to run the script. Notice that AppleScript
displays no error message, even though the script tries to return the position of a Finder
window that isn’t open.
6. Open a few Finder windows. For example, click the Finder button on the Dock, and
then press z-N a few times.
7. Delete the two hyphens to uncomment the display dialog statement, and then put it in
its own try block. The changes appear in boldface here:
try
display dialog "Run this script?"
end try
try
tell application "Finder"
close every Finder window
get the position of the front Finder window
end tell
end try
8. Press z-R or click the Run button on the toolbar to run the script. When the dialog box
appears, click the Cancel button.
9. Notice that even though you canceled the dialog box, the script continues to run and
closes all the Finder windows you opened. This is because the try block around the
display dialog statement captures the error from the Cancel button.
10. Press z-S to save the changes you’ve made to the script.

Chapter 10: Debugging and Handling Errors 201
Creating an Error Handler
As you’ve seen earlier in this chapter, a try block is a handy tool for trapping an error that
occurs in a script and preventing it from troubling the user. But what you’ll often want
to do is create an error handler that lets you deal with the error in a smart way. The error
handler grabs the details of the error; you can then check which number the error has,
which tells you what has gone wrong and enables you to decide what to do about it.
Understanding the Basics of Error Handlers
To create an error handler, you add an on error statement within a try block. Normally,
you want to put the on error statement and the commands it executes directly before the
end try statement for the try block, without any other commands that aren’t related to the
error handler after them. Here’s the basic layout for an error handler:
try
-- commands that may produce errors
on error
-- commands for dealing with the errors
end try
NOTE
You can use the on error statement only within a try block.
Returning the Error Number and Error Message
The form of the on error statement shown in the previous section is stripped down to
its essentials—only the keywords on error. What you’ll usually want to do is return the
number of the error that has occurred and the message that explains what the error is.
To return the error number, add the number parameter and the name of the variable
in which you want to store the error. The following example uses the variable name
myErrorNumber:
on error number myErrorNumber
To return the error message as well, you add not another parameter called something
like “message” (as you might expect), but just another variable to contain the message—
and you put it before the number parameter rather than after it. The following example
uses the variable name myErrorMessage:
on error myErrorMessage number myErrorNumber

202 AppleScript: A Beginner’s Guide
This looks odd, but it works just fine. This type of parameter without a name is called
the direct parameter.
Dealing with the Error
When you know which errors your error handler needs to trap, you can write statements
that deal with them.
Depending on what the script is doing, you may need to deal with only a single error
or with handfuls of different errors. If you’ve established that the script can easily produce
a wide variety of errors, you may choose to handle only those that are most likely to occur
and alert the user to a problem if they contrive to produce one of the unusual errors.
The following example is for a script that tries to delete a specific file. Various errors
can occur when you try to delete a file, but here are the two errors with which the script is
designed to deal:
● Error –1728 This error has the message “Finder got an error. Can’t get file”
followed by the name of the file that’s presumably cavorting around somewhere else.
The error occurs when Finder can’t find the file you’ve told it to manipulate. This can
mean that the file isn’t in the folder, or that the folder name is wrong.
● Error –45 This error has the message “The operation could not be completed
because the file filename is locked.” The error occurs when the script tries to perform
an action that doesn’t work with a locked file, such as deleting it or moving it.
Once you’ve grabbed the error number (and the error message, if you care to get
that too), you can check the error number and take action accordingly. Here’s what
happens in the following script:
● The try block starts at the beginning and ends at the end.
● The tell block tells the Finder to delete a file—the file named Picture 5 and stored on
the Desktop. If the Finder finds the file and deletes it, all is well. Otherwise, the error
handler runs.
● The on error myErrorMessage number myErrorNumber statement begins
the error handler. This statement assigns the error message to the variable
myErrorMessage and the error number to the variable myErrorNumber.
● The if statement checks to see whether myErrorNumber is equal to 1728, the error
that means the Finder couldn’t find the file. If so, the script displays an alert (see
Figure 10-4) explaining the problem and asking the user to check the filename, and
then the error handler ends.
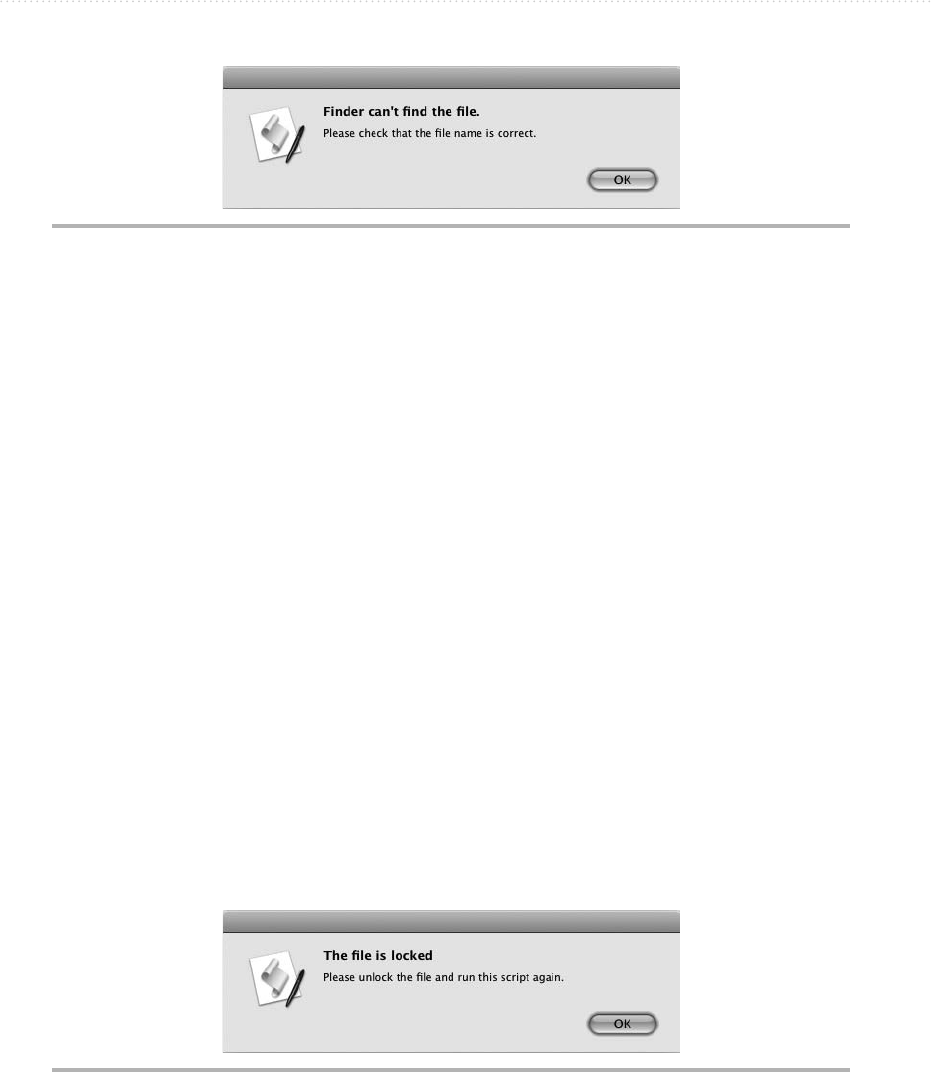
Chapter 10: Debugging and Handling Errors 203
● If the if statement isn’t true, the else if statement runs. This statement checks to see
whether myErrorNumber is equal to –45, the error that means the Finder couldn’t
delete the file because it was locked. If this is the error number, the script displays an
alert (see Figure 10-5) telling the user what is amiss and asking them to unlock the file.
● If the else if statement isn’t true either, the else statement displays an alert saying that the
script cannot delete the file and showing the error message for the error that has occurred.
try
tell the application "Finder"
delete file "Picture 5" of desktop
end tell
on error myErrorMessage number myErrorNumber
if myErrorNumber is equal to -1728 then
display alert "Finder can’t find the file." ¬
message "Please check that the file name is correct."
else if myErrorNumber is equal to -45 then
display alert "The file is locked" message ¬
"Please unlock the file and run this script again."
else
display alert "Cannot delete the file" ¬
message "The following error occurred:" ¬
& return & return & myErrorMessage
end if
end try
Figure 10-4 The script displays this alert if the Finder can’t find the file it’s supposed to delete.
Figure 10-5 The script displays this alert if the file is locked.

204 AppleScript: A Beginner’s Guide
Try This Building an Error Handler
In this example, you create the error handler shown in the previous section but adapt it to
work with a file on your Mac. Follow these steps:
1. In AppleScript Editor, press z-N or choose File | New to create a new script.
2. Type the code shown in the previous section.
3. Edit the delete file statement near the beginning so that it works with a file in your file
system that you’re prepared to delete.
● Unless you’ve recently emptied the Trash, the easiest way to pick a victim is to
open the Trash and then drag a file from it to your Desktop.
● If the Trash is empty, open a Finder window to a folder that contains a blameless
file. Press z-D to duplicate the file, and then drag the duplicate to your Desktop so
that you’ll remember to get rid of it later if the script doesn’t trash it for you.
4. Lock the file on your Desktop. Click the file, press z-I to display the Info window, and
then select the Locked check box. Leave the Info window open for the time being.
5. Press z-R or click the Run button on the toolbar to run the script. Because the file is
locked, AppleScript cannot delete it, so error –45 occurs, and the alert warning that the
file is locked appears.
6. In the Info window, clear the Locked check box to unlock the file, and then close the
Info window.
7. Press z-R or click the Run button on the toolbar to run the script again. This time, the
script deletes the file, and you will see it disappear from your Desktop.
8. Press z-R or click the Run button on the toolbar to run the script a third time. Because
the file is no longer there, error –1728 occurs, and AppleScript displays the alert
warning you that Finder cannot find the file.
9. Save the script under a name of your choice.
Finding Out Which Errors You Need
To deal effectively with errors in your scripts, you need to find out which errors are likely
to occur, and then build handlers for them.

Chapter 10: Debugging and Handling Errors 205
Handling a Cancel Button in a Dialog Box
The error that’s most likely to occur in any script that uses a dialog box is error –128.
As you saw earlier in this chapter, this is the error that occurs when the user clicks the
Cancel button, and it has special status: AppleScript doesn’t display an error dialog box,
the way it does for other errors, but simply stops running the code. So the user gets to
see neither the error number nor its message, User canceled, which is laconic but mostly
unambiguous.
To prevent the click of a Cancel button from stopping a script in its tracks, put the
command for the dialog box (the display dialog command, the display alert command,
the choose from list command, or whatever) inside a try block. Include an on error
number –128 statement to test whether the user has clicked the Cancel button, and then
take action accordingly.
The following example shows a try block set up this way. The display dialog
statement craftily includes only a Cancel button, so that’s all the user has to click. When
error –128 occurs, the on error number –128 error handler catches it. You can then take
whatever action is necessary; in the example, the script simply displays a dialog box with
the information that the user clicked the Cancel button.
try
display dialog "Cancel me!" buttons {"Cancel"}
on error number -128
-- take other actions here instead of display dialog
display dialog "User clicked the Cancel button." buttons {"OK"}
end try
Identifying Errors by Running a Script
Often, the best way to find out which errors are likely to occur is to run a script under the
wrong conditions and see what happens. For example, in a script that creates a document
and saves it to a folder, you may need to trap errors such as these:
● The folder doesn’t exist in the file system.
● A document of the same name is already lurking in the folder.
Besides producing as many errors as you can while developing and testing your script,
you may also need to update your scripts when users produce new errors. Many hands
make light work, but many users whaling on your scripts in creative ways will likely
produce errors you had never considered.

206 AppleScript: A Beginner’s Guide
Looking Up Errors in the Application’s Documentation
Another approach is to look up the errors in the application’s documentation. This should
give you a clear picture of the hundreds of different errors that can (but usually don’t)
occur, but it may make it harder to zero in on those errors that users are actually likely to
produce when they run your scripts.
Creating Your Own Errors
When you’re starting to build scripts in AppleScript, chances are you’ll cause plenty of
errors—some by accident, as you figure out what works and what doesn’t, and others
deliberately, as you explore the errors that can crop up as a particular script runs.
These errors you run into will be ones built into AppleScript and the applications
you’re using. But you can also define your own errors using AppleScript’s error
command. This lets you produce a custom error suited to your script. (You can also
produce custom errors to confuse users of your scripts, but the entertainment will probably
pall when they come to you for help.)
NOTE
Generating an error is sometimes called throwing an error.
The error command works in much the same way as the on error command.
● Start the error statement with the error keyword.
error
● Add a string containing the message for the error. As with the error command,
the message is a direct parameter and doesn’t have a parameter keyword, such as
“message,” as parameters usually do.
error "Your Mac does not have an Intel processor."
● Add the number parameter and the number you want to give the error. You can
choose your own error number freely—you don’t have to apply in triplicate to a
bureaucracy for it—but it’s best to stay out of the ranges that most applications use:
negative numbers, and 0 to 500 on the positive side.
error "Your Mac does not have an Intel processor." number 501

Chapter 10: Debugging and Handling Errors 207
NOTE
AppleScript gives your error the generic error number, –2700, if you don’t assign an
error number—so you should always assign one. Likewise, you should always assign
an error message; if you don’t, AppleScript gives your error a blank string, which is no
help to man, beast, or Mac.
Here’s a code snippet that checks two properties of the system info command and
throws an error if the system isn’t deemed rugged, windswept, and handsome enough to
run a putative demanding application. These are the two system info properties used:
● CPU type This property returns a string describing the CPU type—for example,
Intel 80486 for a Core 2 Duo CPU (not one of the 486-numbered chips that preceded
the first Pentiums) or PowerPC 7450 for an ageing PowerBook’s overwhelmed G4
processor.
● CPU speed This property returns an integer giving the CPU speed in megahertz—
for example, 2000 for a 2GHz chip, or 999 for a 1GHz chip.
Here’s what the code does:
● First, it assigns the CPU type to the variable thisCPU and the CPU speed to the
variable thisMHz.
● The outer if statement then checks to see if thisCPU starts with PowerPC; if so, the
first error statement runs, throwing an error with a message about this not being an
Intel processor (see Figure 10-6).
● If the processor passes the PowerPC test, the nested if statement checks to see
whether thisMHz is less than 2000. If the CPU is slower than 2GHz, the second error
Figure 10-6 You can assign any string to a custom error message.

208 AppleScript: A Beginner’s Guide
statement runs, causing an error with a message about the Mac not being fast enough
(see Figure 10-7).
set thisCPU to the CPU type of (system info)
set thisMHz to the CPU speed of (system info)
if thisCPU starts with "PowerPC" then
error "Your Mac does not have an Intel processor" number 501
else
if thisMHz < 2000 then
error "Your Mac is not fast enough to run this
application." number 555
end if
end if
Errors you produce may be custom, but they’re not fake: AppleScript treats a custom
error in exactly the same way as a built-in error, bringing the script to a screeching halt
and putting up a dialog box on screen to warn the user what has happened. This means
you need to handle your custom errors in the same way as built-in errors—by putting
them inside try blocks, and by building error handlers to catch and process them.
Here is an example of trapping the two custom errors and displaying an alert (see
Figure 10-8) that covers them both. The lines in boldface are the ones added to the
previous code snippet to create the error handler:
try
set thisCPU to the CPU type of (system info)
set thisMHz to the CPU speed of (system info)
if thisCPU starts with "PowerPC" then
error "Your Mac does not have an Intel processor" number 501
else
if thisMHz < 2000 then
error "Your Mac is not fast enough to run this
application." number 555
end if
end if
on error myErrorMessage number myErrorNumber
Figure 10-7 A custom error message appears as a genuine AppleScript error, just like built-in
errors your scripts encounter.

Chapter 10: Debugging and Handling Errors 209
if myErrorNumber is equal to 501 or ¬
myErrorNumber is equal to 555 then
display alert "This Mac cannot run UltraMegaApp." ¬
message "This Mac is not fast enough to run the
application."
end if
end try
Making Your Scripts Resistant to Errors
Just as it’s a good idea to boost your immune system with sleep, sunlight, and vitamins and
to vaccinate yourself (or preferably your children) against standard diseases, so should you
try to make your scripts resistant to errors. This section shows you three ways of doing so:
● Making sure an item exists before you try to use it.
● Referring to an application by its formal name rather than its common name.
● Breaking up a script into subroutines.
These methods of resisting errors are a solid start, not a panacea. Even if you use them
religiously, you may run into unexpected errors, just as swine flu or avian flu may turn up
and brush aside all your health precautions.
Verifying That an Item Exists Before You Use It
Because your scripts will often run under conditions you don’t control, you can save
yourself a great deal of grief by verifying that an item exists before you try to use it. For
example, instead of producing an error by trying to close a window that isn’t open, you
can check to see if the window is open, and then close it only if it is.
To see whether an item exists, use the exists command. This returns true if the item
exists and false if it doesn’t. For example, the following tell block uses exists to find out
Figure 10-8 With an error handler added, the script displays an alert that encompasses both
custom error messages.

210 AppleScript: A Beginner’s Guide
whether the current user’s ~/Documents/ folder contains a folder named Temp. If the
folder doesn’t exist, AppleScript creates it:
tell the application "Finder"
if not (exists folder "Temp" of folder "Documents" of home) then
make new folder of folder "Documents" of home ¬
with properties {name:"Temp"}
end if
end tell
Similarly, the following tell block makes TextEdit check whether there’s a front
document before attempting to assign text to it:
tell the application "TextEdit"
if exists front document then
set the text of the front document to ¬
"Bankers' Remuneration Policy"
end if
end tell
The exists command works widely in AppleScript, and you can spare yourself plenty
of errors by using it to look before you leap.
Referring to an Application by Its Formal Name
So far in this book, we’ve used the names of applications to refer to them. For example, to
make the application TextEdit take an action, we’ve used a tell block to the application
“TextEdit”:
tell the application "TextEdit"
-- do something or other here
end tell
This means of referring to an application is straightforward and works fine as long
as there’s an application with the name you use. If there’s no application with that name,
AppleScript displays the Choose Application dialog box to let you pick the application,
which is much neater than displaying an error dialog box that merely chastises you for
using the wrong name. (If you cancel the Choose Application dialog box, AppleScript
does give you that error.)
To make sure you get the application you intend, you can use the application’s
id property. This property returns what’s known as its bundle identifier for recent
applications; if the application doesn’t have a bundle identifier, the id property returns
the creator code instead, an older means of identifying an application. A bundle identifier
takes the form com.apple.iTunes (for iTunes), while a creator code is a four-letter
string—for example, XCEL for Microsoft Office Excel 2004 for Mac.

BeginNew / AppleScript: A Beginner’s Guide / Guy Hart-Davis / 954-3 / Chapter 10
Chapter 10: Debugging and Handling Errors 211
To communicate with the application, use a tell statement with application id and the
application’s bundle identifier or creator code as a string. For example, to tell iTunes to do
something:
tell the application id "com.apple.iTunes"
end tell
Here’s an example using the creator code, which works in just the same way:
tell the application id "XCEL"
end tell
To find out the bundle identifier or creator code for an application, return its id
property. For example, the following statement returns the bundle identifier of iTunes:
get id of application "iTunes"
For quick reference, Table 10-1 lists the bundle identifier or creator code that the id
property returns for a slew of the most widely used applications.
Application Name Bundle Identifier Creator Code
Activity Monitor com.apple.ActivityMonitor —
Address Book com.apple.AddressBook —
AppleScript Editor com.apple.ScriptEditor2 —
Automator com.apple.Automator —
Backup com.apple.Backup —
Calculator com.apple.calculator —
Camino org.mozilla.camino —
Dashboard com.apple.dashboardlauncher —
Dictionary com.apple.Dictionary —
Exposé com.apple.exposelauncher —
Firefox org.mozilla.firefox —
Front Row com.apple.frontrow —
GarageBand com.apple.garageband —
iCal com.apple.ical —
iChat com.apple.ichat —
iDVD com.apple.iDVD —
Image Capture com.apple.ImageCaptureApp —
iMovie ’09 com.apple.iMovie8 —
Table 10-1 Bundle Identifiers and Creator Codes for Widely Used Applications
ch10.indd 211 11/13/09 12:04:06 PM
212 AppleScript: A Beginner’s Guide
CAUTION
Even the bundle identifiers and creator codes don’t work entirely as they should. For
example, Microsoft Office Excel 2004 has the creator code XCEL, while Microsoft
Office Excel 2008 has the bundle identifier com.microsoft.Excel. If you have both
of these versions of Office on the same Mac, telling the application with the
id "com.microsoft.Excel" to activate normally launches Excel 2008—but so does
telling the application with the id "XCEL" to activate.
Application Name Bundle Identifier Creator Code
iPhoto com.apple.iPhoto —
iTunes com.apple.iTunes —
iWeb com.apple.iWeb —
Keynote com.apple.iWork.Keynote —
Mail com.apple.mail —
Microsoft Entourage 2004 — OPIM
Microsoft Entourage 2008 com.microsoft.Entourage —
Microsoft Excel 2004 — XCEL
Microsoft Excel 2008 com.microsoft.Excel —
Microsoft PowerPoint 2004 — PPT3
Microsoft PowerPoint 2008 com.microsoft.PowerPoint —
Microsoft Word 2004 — MSWD
Microsoft Word 2008 com.microsoft.Word —
Numbers com.apple.iWork.Numbers —
OpenOffice.org org.openoffice.script —
Pages com.apple.iWork.Pages —
Preview com.apple.Preview —
QuickTime Player com.apple.quicktimeplayer —
Remote Desktop Connection com.microsoft.rdc —
Safari com.apple.safari —
Screen Sharing com.apple.ScreenSharing —
Spaces com.apple.spaceslauncher —
System Preferences com.apple.systempreferences —
Terminal com.apple.Terminal —
TextEdit com.apple.TextEdit —
Time Machine com.apple.backup.launcher —
Table 10-1 Bundle Identifiers and Creator Codes for Widely Used Applications (continued)

BeginNew / AppleScript: A Beginner’s Guide / Guy Hart-Davis / 954-3 / Chapter 10
Chapter 10: Debugging and Handling Errors 213
Breaking Up a Script into Subroutines
The third technique for making your code more resilient is to make it modular, dividing it up
into separate parts that perform different tasks. Each part is called a subroutine, performs a
specific function when you call it, and returns a result. After breaking up your code, you run
whichever of the subroutines you need in order to get a single larger task done.
Making your code modular makes each section easier to debug—because there’s less
in any part of it to go wrong, you should be able to iron out any problems more quickly.
And it enables you to repeat actions wherever needed by simply calling the relevant
subroutine rather than having to add the same code to your script again.
To create a subroutine, you make the relevant code into its own block, starting with
an on keyword, the name you want to give the subroutine, and a pair of parentheses. The
subroutine ends with the end keyword and the subroutine’s name again to make clear
what’s ending. For example, here’s the shell of a subroutine named get_user_name,
which returns the short user name from the System Info:
on get_user_name()
end get_user_name
NOTE
You can use the to keyword instead of the on keyword to start a subroutine. In general,
the on keyword is more widely used, and this book follows that practice.
Within the shell, you enter the statements that the subroutine executes. For example,
if you just want the get_user_name subroutine to display a dialog box showing the “short
user name” of the current user (this is the name used for the user account, not the full
name, which is usually longer), you can create a subroutine like this:
on get_user_name()
display dialog short user name of (system info)
end get_user_name
If you just create a subroutine like this in AppleScript Editor and click the Run button,
the code won’t run. To make the subroutine run, you need to call the subroutine from the
main part of the script. To call the subroutine, you just enter its name in the main part of
the script, followed by parentheses, as shown in boldface here:
get_user_name()
on get_user_name()
display dialog short user name of (system info)
end get_user_name
ch10.indd 213 11/13/09 12:04:06 PM

214 AppleScript: A Beginner’s Guide
Try This
When the script reaches the call to the subroutine, it hops to the on statement,
then runs the statements inside the subroutine. When it hits the end statement for the
subroutine, it picks up at the next command after the one that called the subroutine.
(There’s no next command here, but you get the idea.)
The parentheses after the subroutine’s name have a certain grotesque elegance, but
aren’t merely decorative: You use them to pass any parameters to the subroutine. For
example, the following code creates a variable named mySpeed and sets its value to 99,
then passes mySpeed to the howfast() subroutine, which expects a Speed parameter.
The subroutine evaluates the value passed to it and then returns the result (in this case,
"Medium").
set mySpeed to 99
howfast(mySpeed)
on howfast(Speed)
if Speed < 50 then
return "Slow"
else if Speed < 100 then
return "Medium"
else
return "Dangerous"
end if
end howfast
When you pass parameters like this, you must pass the same number of parameters
and pass them in the same order as the subroutine is expecting them. Separate the
parameters with commas.
Creating a Subroutine
In this example, you create a subroutine for trimming any leading spaces or trailing spaces
off a string of text. As mentioned in Chapter 5, trimming off spaces is useful when you
need to make sure that a string of text you use doesn’t start or end with a space—for
example, to avoid layout problems in documents or errors in sorting.
To create the subroutine, follow these steps:
1. In AppleScript Editor, press z-N or choose File | New to create a new script.
2. Create the variable myString and assign to it the word agriculture with several leading
spaces and several trailing spaces.
set myString to " agriculture "

Chapter 10: Debugging and Handling Errors 215
3. Add a display dialog statement to a dialog box that contains the trimmed version of
the myString variable between two pairs of asterisks, as shown in boldface here. The
dialog box shows you the effect of the trimming, with the asterisks making it easier to
see that there are no spaces. To call the subroutine, this statement uses the subroutine’s
name (trim) and passes the variable to it as the string to trim.
set myString to " agriculture "
display dialog "**" & trim(myString) & "**"
4. Type the on trim(myString) statement to begin the subroutine and the end statement to
end it, as shown in boldface here:
set myString to " agriculture "
display dialog "**" & trim(myString) & "**"
on trim(myString)
end
5. Press z-K or click the Compile button on the toolbar to compile the script. AppleScript
Editor automatically adds trim to the end statement to make clear what’s ending, as
shown in boldface here:
set myString to " agriculture "
display dialog "**" & trim(myString) & "**"
on trim(myString)
end trim
6. Inside the trim subroutine, type a repeat loop that runs until myString doesn’t end
with a space. As long as this condition isn’t met, the statement inside the loop sets
myString to text 1 through –2 of myString, thus shortening it by one character each
time. The repeat loop appears in boldface here:
set myString to " agriculture "
display dialog "**" & trim(myString) & "**"
on trim(myString)
repeat until myString does not end with " "
set myString to text 1 through -2 of myString
end repeat
end trim
7. Below the first repeat loop, type a second repeat loop. This one works in a similar
way, but with the beginning of the string: Until the first character of myString is not
" " (a space), the set myString to text 2 through –1 of myString lops off the first
character of the string. The second repeat loop appears in boldface here:
set myString to " agriculture "
display dialog "**" & trim(myString) & "**"
(continued)

216 AppleScript: A Beginner’s Guide
on trim(myString)
repeat until myString does not end with " "
set myString to text 1 through -2 of myString
end repeat
repeat until first character of myString is not " "
set myString to text 2 through -1 of myString
end repeat
end trim
8. Finally, add a return statement (as shown in boldface here) telling the subroutine to
return the contents of myString:
set myString to " agriculture "
display dialog "**" & trim(myString) & "**"
on trim(myString)
repeat until myString does not end with " "
set myString to text 1 through -2 of myString
end repeat
repeat until first character of myString is not " "
set myString to text 2 through -1 of myString
end repeat
return myString
end trim
9. Press z-R or click the Run button on the toolbar to run the script. You’ll see a dialog
box containing the string with all spaces trimmed off (see Figure 10-9).
10. Click the OK button to close the dialog box.
11. Save the script under a name of your choice.
12. Now try using the subroutine from a tell block. Make the changes shown in boldface
here to tell TextEdit to do the trimming:
tell the application "TextEdit"
set myString to " agriculture "
display dialog "**" & trim(myString) & "**"
Figure 10-9 The example code displays the string with the leading and trailing spaces
trimmed off.

Chapter 10: Debugging and Handling Errors 217
end tell
on trim(myString)
repeat until myString does not end with " "
set myString to text 1 through -2 of myString
end repeat
repeat until first character of myString is not " "
set myString to text 2 through -1 of myString
end repeat
return myString
end trim
13. Press z-R or click the Run button on the toolbar to run the script. This time, you’ll get
an error message (see Figure 10-10): “TextEdit got an error: Can’t continue trim.” This
error occurs because TextEdit assumes you’re trying to use a TextEdit command.
14. To fix this error, add the my keyword before the call to the trim subroutine to tell
TextEdit that the subroutine is in the script, as shown in boldface here:
tell the application "TextEdit"
set myString to " agriculture "
display dialog "**" & my trim(myString) & "**"
end tell
on trim(myString)
repeat until myString does not end with " "
set myString to text 1 through -2 of myString
end repeat
repeat until first character of myString is not " "
set myString to text 2 through -1 of myString
end repeat
return myString
end trim
15. Press z-R or click the Run button on the toolbar to run the script. This time, it works as
it should.
16. Close the script without saving the changes.
Figure 10-10 Trying to run your subroutine from a tell block to TextEdit results in this error
unless you use the my keyword.
(continued)

218 AppleScript: A Beginner’s Guide
TIP
You may also want to create a trimming subroutine that removes tabs, linefeed
characters, and carriage-return characters from strings. To do so, create a list of the
characters that you need to remove from the strings—for example, {" ", tab, return,
linefeed} and then check that the beginning and ending characters do not appear in
the list.

219
Chapter 11
Running Scripts
Automatically

220 AppleScript: A Beginner’s Guide
Key Skills & Concepts
● Running a script automatically using a droplet
● Running a script automatically with a folder action
● Running a script automatically at login
● Running a script repeatedly at intervals
● Running a script automatically at a specific time
As you’ve seen earlier in this book, you can run scripts in several ways—directly from
AppleScript Editor, from the Script menu, or by turning a script into an application
and running it as you would any other Mac OS X application. But what’s often handy is to
set up scripts that run themselves automatically.
This chapter shows you the five main ways of running scripts automatically. You’ll
learn to:
● Create a “droplet” application that runs when you drop one or more files or folders on it.
● Assign a script to a folder action so that it monitors the contents of a folder and runs
when they change—for example, when someone adds a file to the folder.
● Set a script to run automatically when you log in.
● Run a script repeatedly at intervals by using an idle handler.
● Schedule a script to run automatically at a specific time.
Running a Script Automatically Using a Droplet
A droplet is an AppleScript application that runs automatically when you drag items from
a Finder window (or the Desktop) and drop them on the droplet’s icon. To recognize this
drop action, the droplet has an open handler that accepts the input and runs the script.
NOTE
The open handler is what distinguishes a droplet from a regular script application.

Chapter 11: Running Scripts Automatically 221
Turning a Script into a Droplet
To turn a script into a droplet, you add an open handler to it. Start the open handler with the on
open command followed by the name of the parameter to which the droplet passes the list of
files dropped on it. You can call this parameter by any name you choose. This example uses
the name myFiles:
on open myFiles
End the open handler with the end open statement. You can simply type the end
keyword and have AppleScript Editor automatically add open when you compile the
script.
on open myFiles
end open
Between the on open command and the end open command, place the statements you
want the open handler to run. Here’s an example of a droplet for sorting incoming files
automatically into the right folders:
property ImageTypes : {"public.jpeg", "public.tiff", "public.png", ¬
"com.adobe.pdf", "com.compuserve.gif"}
property DocTypes : {"com.apple.iwork.pages.sffpages", ¬
"com.microsoft.word.doc"}
property SpreadTypes : {"com.apple.iwork.numbers.sffnumbers", ¬
"com.microsoft.excel.xls"}
property PresTypes : {"com.apple.iwork.keynote.sffkey", ¬
"com.microsoft.powerpoint.ppt"}
property TextTypes : {"public.plain-text", "public.rtf", "public.html"}
on open myFiles
repeat with myCounter from 1 to count of myFiles
set myFile to item myCounter of myFiles
set myFileInfo to info for myFile
if (folder of myFileInfo is false) then
tell the application "Finder"
if (type identifier of myFileInfo is in ImageTypes) then
move myFile to path to pictures folder
else if (type identifier of myFileInfo is in DocTypes) ¬
then
move myFile to folder "Documents" of home
else if (type identifier of myFileInfo is in ¬
SpreadTypes) then
move myFile to folder "Spreads" of folder ¬

222 AppleScript: A Beginner’s Guide
"Documents" of home
else if (type identifier of myFileInfo is in PresTypes)
then
move myFile to folder "Present" of folder
"Documents" of home
else if (type identifier of myFileInfo is in TextTypes)
then
move myFile to folder "Raw_Text" of folder
"Documents" of home
else
move myFile to ¬
choose folder with prompt "Choose where to ¬
store the file "
& name of myFileInfo
end if
end tell
end if
end repeat
end open
Here’s how this script works:
● The first property statement at the beginning defines the script property ImageTypes
and assigns to it the Uniform Type Identifiers (UTIs) for five types of image files:
JPEG files, TIFF files, PNG files, PDF files, and GIF files. (See Chapter 8 for a list of
the UTIs for widely useful file types.)
● Similarly, the next four property statements define four further script properties:
DocTypes (Pages documents and Microsoft Word documents with the .doc file
extension), SpreadTypes (Numbers documents and Microsoft Excel workbooks with
the .xls file extension), PresTypes (Keynote documents and Microsoft PowerPoint
presentations with the .ppt file extension), and TextTypes (plain-text files, RTF files,
and HTML files).
● The on open myFiles command starts the open event handler, assigning to myFiles the
list of items dropped on the droplet. (If you drop only one item, you get a one-item list.)
● The repeat loop uses a counter variable named myCounter to run from 1 to count of
myFiles—in other words, once for each item dropped.
● The first set statement assigns to the variable myFile the item in the myFiles list
identified by the value of the myCounter counter. So myFile refers to the first item on
the first iteration through the loop, the second item on the second iteration, and so on.

Chapter 11: Running Scripts Automatically 223
● The second set statement assigns to the variable myFileInfo the info for myFile.
This variable gives us a handy way to access the information for the item currently
identified by the myFile variable.
● The outer if statement verifies that the item is not a folder by checking that folder
of myFileInfo is false. This script is designed to handle only files, so if the item is a
folder, the script ignores it. (You could improve on this behavior—for example, by
displaying the Choose A Folder dialog box so that the user can select the destination
folder.)
● As long as the item isn’t a folder, the tell block inside the outer if statement tells
the Finder what to do with the file. The nested if statement checks whether the type
identifier of myFileInfo is in ImageTypes; if it is, the move command moves myFile
to the Pictures folder.
● If the file isn’t a picture, the first else if statement see if it’s one of the file types in
DocTypes. If so, the move command moves myFile to the Documents folder.
● Similarly, the next three else if statements check to see if myFile is one of the file
types in SpreadTypes, PresTypes, or TextTypes. If there’s a match, the move
command moves the file to the appropriate folder.
● If the file isn’t any of those types, the else statement displays the Choose Folder dialog
box and moves the file to the folder the user selects.
Saving the Droplet as an Application
When you’ve created the script for your droplet, save the script as an application—it
won’t work as a script.
Open the Save As dialog box by pressing z-S, if you haven’t already saved the script,
or z-SHIFT-S, if you have already saved it. Choose Application in the File Format pop-up
menu, and then choose suitable options in the Options area.
● Clear the Startup Screen check box If you want the droplet to run smoothly,
clear the Startup Screen check box. Otherwise, the user will have to click through the
startup information each time he or she launches the droplet.
● Select the Stay Open check box If you expect the user to use the droplet more
than once, select the Stay Open check box to make the droplet stay open after it has
finished running. Keeping the droplet open makes it run faster the next time the user
drops a file on it.

224 AppleScript: A Beginner’s Guide
Try This
If you want to be able to reach the droplet at a moment’s notice (which is often half
the point), drag the droplet to the Dock after saving it. You can then drag files to the
droplet easily. Or, if you prefer, put the droplet on a part of your Desktop that you keep
uncovered.
One other thing—you may well need to edit the droplet after you’ve saved and run it.
When you save the droplet from AppleScript Editor, you may see the dialog box shown
in Figure 11-1 warning you that “This document’s file has been changed by another
application since you opened or saved it. The changes made by the other application will
be lost if you save.” This is confusing because no application has actually changed the
droplet—rather, you’ve made changes to the droplet’s code. So what you’ll normally want
to do is click the Save button to save those changes. (Don’t press RETURN—the default
button on the dialog box is the Don’t Save button.)
Creating and Running a Droplet
In this example, you create the droplet shown in the previous section and adapt the folders
it uses so that it will run on your Mac. Follow these steps:
1. In AppleScript Editor, press z-N or choose File | New to create a new script.
2. Type the five property statements that define the different file types the script works
with. Add extra property statements if you want the script to deal with other files as
well. For example, create a property named MusicTypes and give it file types such as
public.mp3 and public-mpeg-4-audio.
3. Type the on open event handler as shown in the previous section.
Figure 11-1 You may see this dialog box when you edit a droplet that you have already run.
Normally, you will want to click the Save button to save the changes you’ve just
made in AppleScript Editor.

Chapter 11: Running Scripts Automatically 225
4. If you added another property statement, add an else if statement to handle it. For
example, if you added a MusicTypes property, add a statement such as this:
else if (type identifier of myFileInfo is in MusicTypes) then
move myFile to path to music folder
5. Edit the folders involved so that they match your file system. For example, if your Mac
doesn’t have the folder ~/Documents/Spreads/ (as most Macs don’t), change the move
myFile to folder "Spreads" of folder "Documents" of home to a folder you do have.
(The alternative is to create the missing folders.)
6. Press z-S or choose File | Save, and then save the script as an application under a name
such as File Sorter. Clear the Startup Screen check box, and select the Stay Open
check box.
7. Open a Finder window to the folder in which you saved the droplet, and then drag the
droplet to the Dock. You’ll need to place it on the left side of the Dock divider bar
(or in the upper part of the Dock if you’ve placed the Dock at the side of the screen).
8. Drag one or more files to the droplet’s icon on the Dock. The script works through
each file in turn. If the file matches one of the types, the script puts it in the appropriate
folder; if not, the script displays the Choose Folder dialog box to let you pick the folder
in which to put it.
9. Drag one or more files to the droplet’s icon on the Dock again. Because the droplet has
stayed open, it will execute faster this time.
Running a Script Automatically
with a Folder Action
Droplets are great when you’re handling files automatically, but you’ll probably want to make
the most of Mac OS X’s features for monitoring folders automatically for you. To do so,
you use folder actions.
A folder action is a means of running a script automatically when the contents of a
folder change. You set up a folder action like this:
● Turn on folder actions Mac OS X has a master switch for turning on folder actions.
You need to turn them on only once, but if they’re turned off, you can’t get a folder
action script to run at all.

226 AppleScript: A Beginner’s Guide
● Write a folder action script As you’d imagine, you need to create a suitable script
for the folder. A folder action script includes an event handler that runs when there’s
a change in the folder. For example, you can write an event handler that makes your
script run when someone adds a file to the folder. You store your folder action scripts
in a special folder named Folder Action Scripts so that Mac OS X can distinguish
them from your other scripts.
NOTE
Folder Actions Setup actually checks two Folder Action Scripts folders—the /Library/
Scripts/Folder Action Scripts/ folder (which contains the Mac’s scripts) and the
~/Library/Scripts/Folder Action Scripts/ folder, which contains the user’s own scripts.
Mac OS X creates the /Library/Scripts/Folder Action Scripts/ folder automatically; you
may need to create the ~/Library/Scripts/Folder Action Scripts/ folder manually if you
want to store scripts in your own user account, where other users can’t access them.
● Attach the folder action script to the folder Once you’ve made a suitable script,
you attach the script to the folder on which you want it to work.
Those are the broad strokes of folder actions. Let’s look at the details.
Turning On Folder Actions
Your first move is to turn on folder actions within Mac OS X so that you can use folder
actions. You can do this either manually or by using AppleScript.
Turning On Folder Actions Manually
To turn on folder actions manually, follow these steps:
1. Click the Desktop or the Finder button on the Dock.
2. Press z-SHIFT-A to open a Finder window showing your Applications folder.
3. Expand the AppleScript folder to display its contents. For example, click the
AppleScript folder in Column view, or double-click it in Icon view, List view, or Cover
Flow view.
4. Double-click the Folder Actions Setup icon to run the application. Mac OS X displays
the Folder Actions Setup window (see Figure 11-2).
5. Select the Enable Folder Actions check box.
6. Either quit the Folder Actions Setup application (press z-Q or choose Folder Actions
Setup | Quit Folder Actions Setup as usual) or leave the application open so that you
can attach a folder action script to a folder, as discussed later in this chapter.
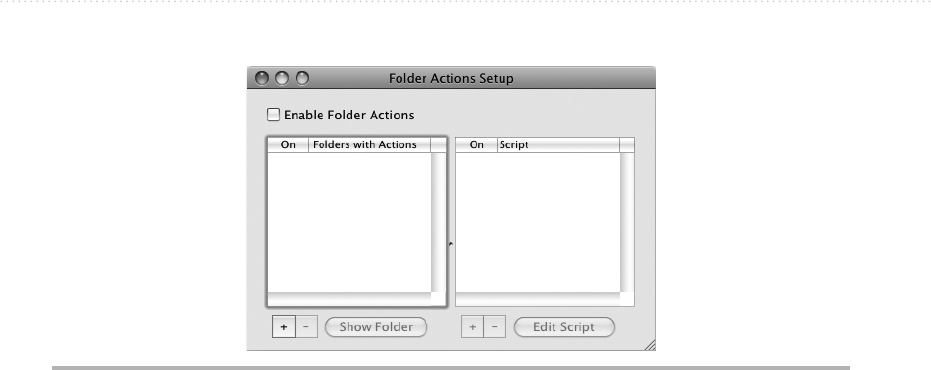
Chapter 11: Running Scripts Automatically 227
Turning On Folder Actions via AppleScript
You can also turn on folder actions using AppleScript by telling the Folder Actions Setup
application to set the folder actions enabled property to true, like this:
tell the application "Folder Actions Setup"
set folder actions enabled to true
end tell
To turn off folder actions via AppleScript, set the folder actions enabled property to
false.
Writing a Folder Action Script
To write a folder action script, you create a script in AppleScript Editor as usual—but you
also include one or more folder action event handlers to tell the script what you want it to
do. What’s often most useful is to take actions when a new file arrives in a folder, so we’ll
start there.
Taking Actions When an Item Is Added to the Folder
To take actions when an item is added to the folder, use the adding folder items event
handler. To create an event handler for this event, set it up like this:
● Start with an on adding folder items statement:
on adding folder items
Figure 11-2 To turn on folder actions, select the Enable Folder Actions check box in the
Folder Actions Setup window.
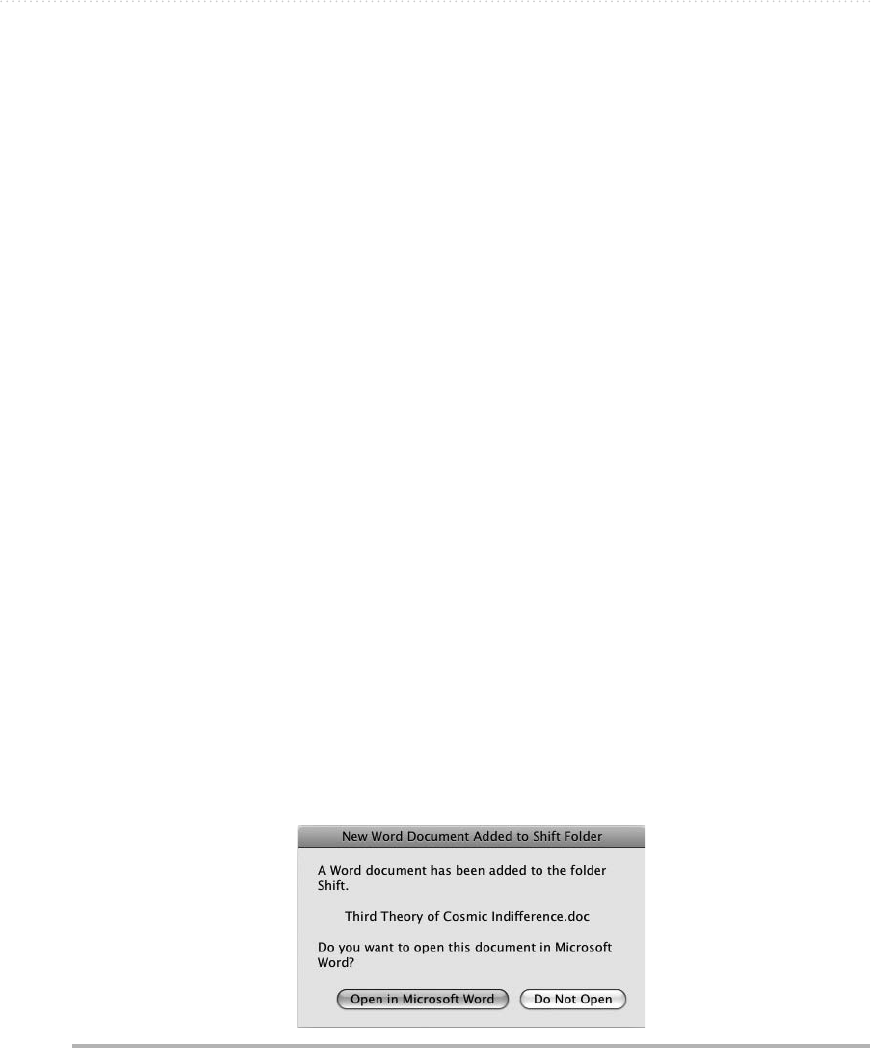
228 AppleScript: A Beginner’s Guide
● Assign a variable name to the folder with which the script will work. This folder is the
direct parameter for the event handler. The variable name is the name you use to refer
to the folder in the script, so it can be pretty much anything you want. The following
example uses the uninspired but serviceable name myFolder:
on adding folder items to myFolder
● Add the after receiving parameter and assign a variable name to the list of items that
have been added. Again, this name is for your use—to enable you to reach the files
or folders that were added—so you can call it what you want. The following example
uses the straightforward but unimaginative name new_files:
on adding folder items to myFolder after receiving new_files
● Add the end statement for the on block. When you compile the script, AppleScript
Editor automatically adds adding folder items to after end, but you can also add it
manually:
on adding folder items to myFolder after receiving new_files
end adding folder items to
● Between the on statement and the end statement, add the commands you want the
script to execute.
Here is an example of a folder action script that checks to see whether each new file
has the file extension ".doc" or ".docx"; if the file has either of these extensions, the script
displays a dialog box (see Figure 11-3) prompting the user to open the file in Microsoft
Word. If the user chooses to open one or more documents in Word, the script stores this
fact by setting a Boolean variable named activateWord to true. If activateWord is true
Figure 11-3 A script that uses the adding folder items folder action to prompt the user to
open a file that has arrived in the target folder.

Chapter 11: Running Scripts Automatically 229
after looping through all the new files, the script activates Word so that the user can see
the open document or documents.
on adding folder items to myFolder after receiving new_files
tell the application "Finder" to set myFolderName to name of myFolder
try
repeat with myCounter from 1 to number of items in new_files
set myNewFile to item myCounter of new_files
set myNewFileInfo to the info for myNewFile
if the name extension of myNewFileInfo is "doc" or ¬
the name extension of myNewFileInfo is "docx" then
display dialog "A Word document has been added to the
folder " ¬
& myFolderName & "." ¬
& return & return & tab & name of myNewFileInfo ¬
& return & return & ¬
"Do you want to open this document in Microsoft
Word?" ¬
with title "New Word Document Added to "
& myFolderName & ¬
" Folder" buttons {"Open in Microsoft Word",
"Do Not Open"} ¬
default button 1
if the button returned of the result is "Open in
Microsoft Word" then
tell application "Microsoft Word"
open myNewFile
set activateWord to true
end tell
end if
end if
end repeat
if activateWord is true then
tell application "Microsoft Word" to activate
end if
end try
end adding folder items to
Taking Actions When an Item Is Removed from the Folder
To take actions when an item is removed from the folder, use the removing folder items
event handler. This works in a similar way to the adding folder items event handler
described in the previous section.
● Start with an on removing folder items statement:
on removing folder items

230 AppleScript: A Beginner’s Guide
● Assign a variable name to the folder with which the script will work. This is the direct
parameter for the event handler. You can use any name that suits you—for example,
ScriptFolder:
on removing folder items from ScriptFolder
● Add the after losing parameter and assign a variable name to the items that were
removed. For example, the following statement uses the name Removed_Files:
on removing folder items from ScriptFolder after losing Removed_Files
● Add the end statement for the on block. When you compile the script, AppleScript
Editor automatically adds removing folder items from after end, but you can also
add it manually:
on removing folder items from ScriptFolder after losing Removed_files
end removing folder items from
● Between the on statement and the end statement, add the commands you want the
script to execute.
The following example monitors a folder named Protected Files and warns the user
when items are removed from the folder. Figure 11-4 shows an example of the warning.
on removing folder items from ScriptFolder after losing Removed_files
tell application "Finder"
set myFolderName to name of ScriptFolder
end tell
set GoneFiles to ""
repeat with myCounter from 1 to number of items in Removed_files
set RemovedFile to item myCounter of Removed_files
set RemovedFileInfo to the info for RemovedFile
set GoneFiles to GoneFiles & name of RemovedFileInfo & return
end repeat
display alert "Files removed from " & ScriptFolder as warning ¬
message GoneFiles
end removing folder items from
Figure 11-4 Using a removing folder items folder action to warn the user when files or
folders are removed from a key folder.

Chapter 11: Running Scripts Automatically 231
Taking Actions When the User Moves or Resizes the Folder’s Window
To take actions when the user moves or resizes the folder’s window, use the moving
folder window for event handler.
CAUTION
The moving folder window for event handler does not work consistently; because of
this, you’ll do best to avoid it. First, the event handler tends to run only when the toolbar
on the target window is hidden, even though this should make no difference. Second, if
you use the folder action script to resize or reposition the window, the script runs again,
repositions the window, and runs again—and so on until you crash it.
To create an event handler for this event, set it up like this:
● Start with an on moving folder window statement:
on moving folder window
● Assign a variable name to the folder with which the script will work. For example, the
following statement refers to the window as myFolder:
on moving folder window for myFolder
● Assign a variable name to the from parameter to store the coordinates of the window’s
starting position. Again, you can use any name of your choice; this example uses
starting_position:
on moving folder window for myFolder from starting_position
● Add the end statement for the on block. When you compile the script, AppleScript
Editor automatically adds moving folder window for after end, but you can also add
it manually if you prefer:
on moving folder window for myFolder from starting_position
end moving folder window for
● Between the on statement and the end statement, add the commands you want the
script to run.
The following example closes the myFolder window if it is resized or moved. This
behavior is seldom helpful, but it avoids having the script resize or move the window
because this will make the folder action run again:
on moving folder window for myFolder from starting_position
tell the application "Finder"
close the window of myFolder
end tell
end moving folder window for

232 AppleScript: A Beginner’s Guide
Taking Actions When the User Opens a Finder Window to the Folder
To take actions when the user opens a Finder window to the folder, use the opening folder
event handler. This event handler takes a single direct parameter that refers to the folder
on which the script is operating. As usual, you can give the variable for this parameter any
name you like—for example, myFolder:
on opening folder myFolder
end opening folder
The following example displays a dialog box that requests the user not to create any
subfolders within the current folder:
on opening folder myFolder
display dialog ¬
"Please do not create any subfolders within this folder." ¬
with title "Folder Alert" with icon caution
end opening folder
Taking Actions When the User Closes the Folder’s Finder Window
To take actions when the user closes a Finder window that was open showing the folder,
use the closing folder window event handler. This event handler works in the same way
as the opening folder event handler discussed in the previous section. It takes a single
direct parameter that refers to the folder on which the script is operating:
on closing folder window for myClosingFolder
end closing folder window for
The following example checks whether the Finder window you’re closing is the last
one open. If it is, the script opens a new Finder window to the home folder, resizes the
window, and positions it in the upper-left corner of the primary monitor.
on closing folder window for myFolder
tell the application "Finder"
if (count of (Finder windows)) = 0 then
open home
set the bounds of the front Finder window to ¬
{0, 44, 600, 644}
end if
end tell
end closing folder window for

Chapter 11: Running Scripts Automatically 233
Attaching a Folder Action Script to a Folder
You can attach a folder action script to a folder in four different ways:
● Manually, by using the Folder Actions Setup application
● Manually, by working directly from the Finder
● Manually, by using the Script menu
● Automatically, by using AppleScript
Let’s look at each of these methods in turn.
Attaching a Folder Action Script to a Folder Using Folder Actions Setup
The more formal way of attaching a folder action script to a folder is to use the Folder
Actions Setup application, which you met earlier in this chapter. Folder Actions Setup is
good when you’re attaching one or more scripts or you want to get an overview of all the
folder actions set up on your Mac.
Here’s how to attach a folder action script to a folder using Folder Actions Setup:
1. Open the Folder Actions Setup application in one of these ways:
● Press z-SPACEBAR to open Spotlight, start typing folder actions, and then open
Folder Actions Setup from the hit list. It’s usually the top hit, so this is normally a
quick way of opening the application.
● Open your Applications folder, expand the AppleScript folder, and then double-
click the Folder Actions Setup icon.
2. Click the + button under the left pane in the Folder Actions Setup window to open the
dialog box for choosing a folder.
3. Click the folder, and then click the Open button. Folder Actions Setup adds the folder
to the list, and then opens the Choose A Script To Attach dialog box (see Figure 11-5).
4. Click the script, and then click the Attach button. The script then appears in the right
pane in the Folder Actions Setup window, as shown in Figure 11-6. From here, you can
quickly open the script by clicking it and then clicking the Edit Script button, which is
handy when you need to change the script (or simply check what it does).
5. Add more scripts to folders as needed.
6. Press z-Q or choose Folder Actions Setup | Quit Folder Actions Setup to quit Folder
Actions Setup.

234 AppleScript: A Beginner’s Guide
Figure 11-5 Select the script you want to attach to the folder.
Figure 11-6 The script appears in the right pane of the Folder Actions Setup window.

Chapter 11: Running Scripts Automatically 235
When you no longer need a folder action to run on a folder, you can stop it in any of
these ways in Folder Actions Setup:
● Turn the action off Clear the check box for the script in the right pane of the Folder
Actions Setup window.
● Remove the action from the folder Click the script’s entry in the right pane of
the Folder Actions Setup window, and then click the – button below the pane. Click
the OK button in the Detach Script From Folder Action dialog box that appears (see
Figure 11-7).
● Turn off all actions for the folder Clear the check box for the folder in the left pane
of the Folder Actions Setup window.
● Remove all actions from the folder Click the folder’s entry in the left pane of the
Folder Actions Setup window, and then click the – button below the pane. Click the
OK button in the Delete Folder Action dialog box that appears (see Figure 11-8).
Figure 11-7 Folder Actions Setup asks you to confirm the removal of a script from a folder.
Figure 11-8 Folder Actions Setup also makes you confirm the removal of all scripts from a
folder.
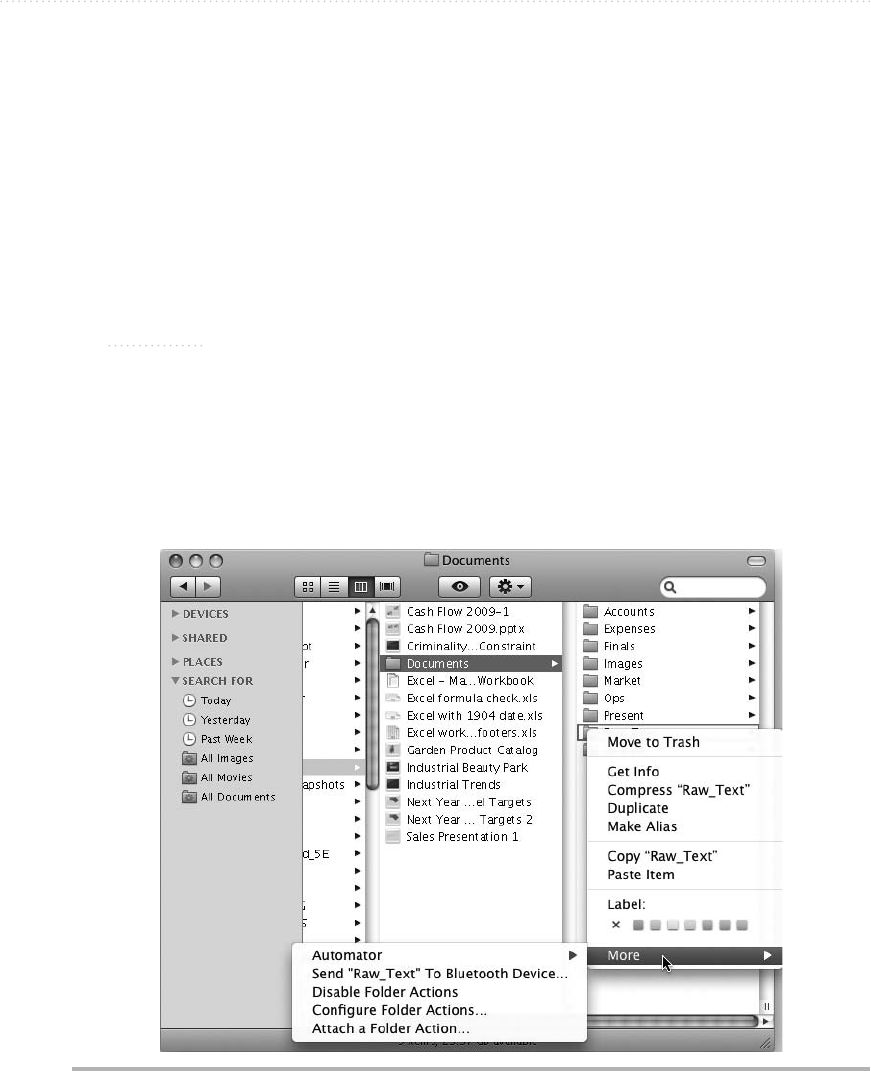
236 AppleScript: A Beginner’s Guide
Attaching a Folder Action Script to a Folder Using the Finder
The second way of attaching a folder action script to a folder is by using the Finder like this
in Leopard:
1. Open a Finder window to the folder that contains your victim folder.
2. CTRL-click or right-click the victim folder, click or highlight More on the shortcut menu,
and then choose Attach A Folder Action, as shown in Figure 11-9. Mac OS X displays
the Choose A File dialog box.
TIP
In Leopard, you can use the shortcut menu’s Enable Folder Actions command, and its
Disable Folder Actions counterpart that appears when folder actions are turned on, to
quickly turn folder actions on and off for your Mac.
3. Navigate to the Folder Action Scripts folder that contains the script, select the script,
and then click the Choose button.
Figure 11-9 In Leopard, you can quickly attach a folder action script to a folder by using the
shortcut menu in the Finder.
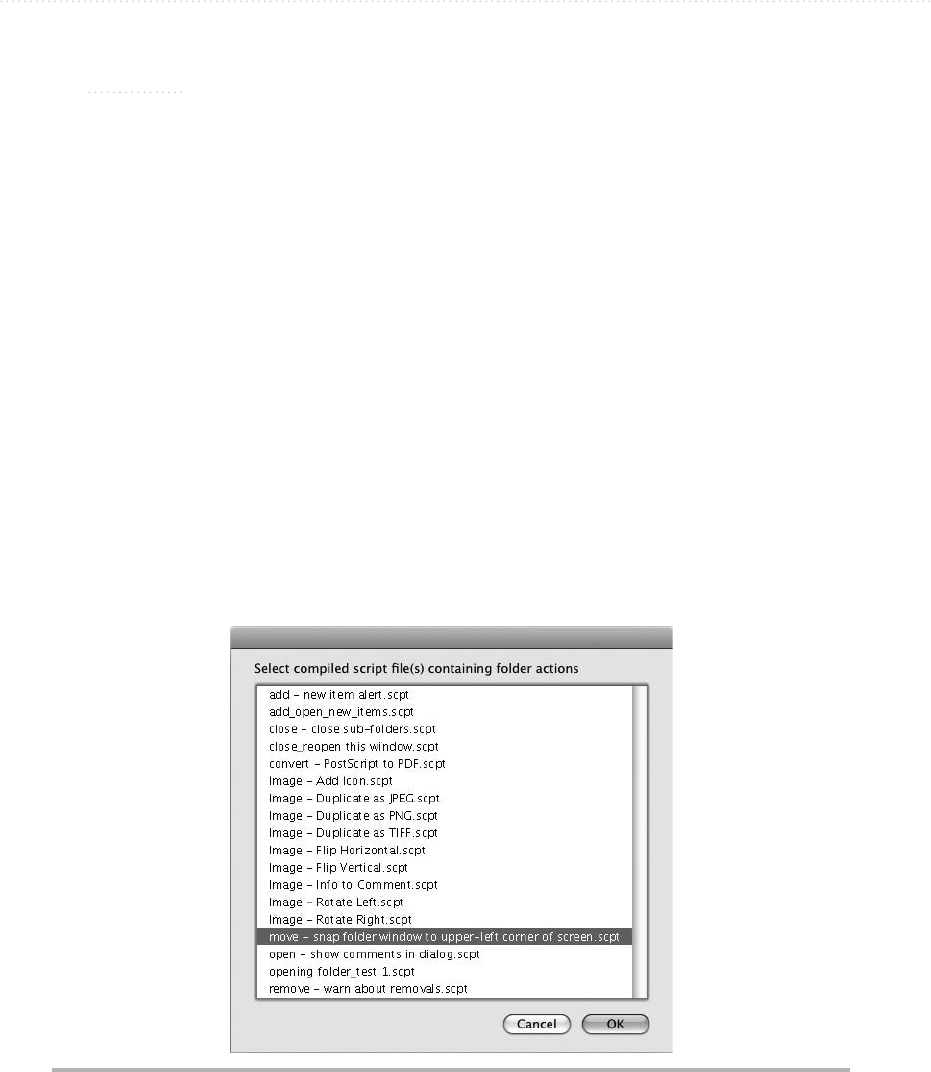
Chapter 11: Running Scripts Automatically 237
CAUTION
You can use the Choose A File dialog box to select a script stored in a folder other than
one of the Folder Action Scripts folders, but it won’t run. Because of this restriction, it’s
usually best to use the shortcut menu’s Configure Folder Actions command as a handy
way to open Folder Actions Setup, and then set up your folder action scripts from there,
as discussed in the previous section.
You can remove a folder action script by opening a Finder window, CTRL-clicking or
right-clicking the appropriate folder, highlighting More on the shortcut menu, highlighting
Remove A Folder Action on the submenu, and then clicking the script you want to
remove. You can also use the Edit A Folder Action command on the submenu to open one
of the attached scripts in AppleScript Editor.
Attaching a Folder Action Script to a Folder Using the Script Menu
The third way of attaching a folder action script to a folder is by using the Script menu.
The Folder Actions submenu on the Script menu provides the following commands:
● Attach Script To Folder Click this item to display the snappily named Select
Compiled Script File(s) Containing Folder Actions dialog box (see Figure 11-10).
Select the script and click the OK button; then choose the folder in the Choose A
Folder dialog box, and click the Choose button.
Figure 11-10 The Attach Script To Folder command on the Script menu displays this dialog
box for picking a script to attach to a folder.
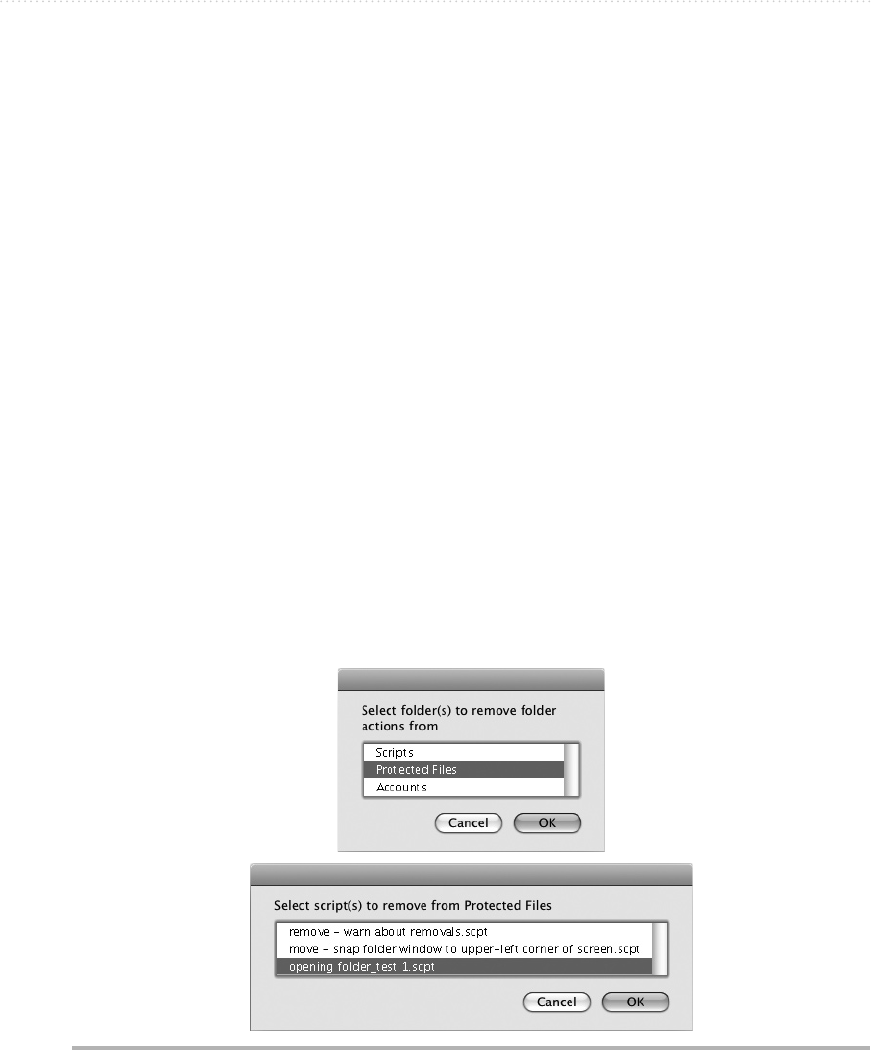
238 AppleScript: A Beginner’s Guide
● Configure Folder Actions Click this item to open the Folder Actions Setup
application.
● Disable Folder Actions Click this item to turn folder actions off.
● Enable Folder Actions Click this item to turn folder actions on.
● Remove Folder Actions Click this item to remove a folder action script using the
two dialog boxes shown in Figure 11-11. First, you select the folder from a dialog box
that lists each folder that has folder actions applied; then you select the folder action
script from a dialog box that lists the scripts applied to that folder.
Attaching a Folder Action Script to a Folder via AppleScript
The three manual methods of attaching a folder action script to a folder all work fine, but
often it’s much more convenient to have AppleScript do the grunt work for you.
To attach a folder action script to a folder, use the attach action to command with
the System Events application. Use to folder and the folder name to specify the folder,
followed by using and the name of the script you want. Here’s an example:
tell application "System Events"
attach action to folder "Macintosh HD:Users:kim:Documents" ¬
using "add - new item alert.scpt"
end tell
Figure 11-11 The Remove Folder Actions command on the Script menu lets you remove
folder actions from a script by using these two dialog boxes.

Chapter 11: Running Scripts Automatically 239
To remove a folder action script from a folder, use the remove action command.
Use from folder and the folder name to tell System Events which folder has the action,
followed by using action name and the name of the folder action you want to remove.
Here’s an example:
tell application "System Events"
remove action from folder "Macintosh HD:Users:kim:Documents" ¬
using action name "add - new item alert.scpt"
end tell
To enable folder actions via AppleScript, tell the application Folder Actions Setup to
set the folder actions enabled property to true:
tell the application "Folder Actions Setup"
set folder actions enabled to true
end tell
To disable folder actions via AppleScript, set folder actions enabled to false:
tell the application "Folder Actions Setup" ¬
to set folder action enabled to false
Q: I’ve got a problem—the Folder Actions submenu doesn’t appear on the Script menu.
A: You can take care of this problem easily.
If the Folder Actions submenu doesn’t appear on the Script menu:
● Snow Leopard In AppleScript Editor, press z-, to display the Preferences window.
Click the General button, then select the Show Script Menu In Menu Bar text box.
● Leopard or earlier Run AppleScript Utility (in the /Applications/AppleScript/
folder), select the Show Computer Scripts check box, and then quit AppleScript Utility.
The easiest way to run AppleScript Utility is to open the Script menu and choose Open
AppleScript Utility from it.
You may also run into this problem one degree worse—if you like expressing your
suffering in mathematical terms: The Script menu doesn’t appear on the menu bar either.
You can fix this quickly, too. Wherever you found the Show Computer Scripts check
box, select the Show Script Menu In Menu Bar check box too.
Ask the Expert

240 AppleScript: A Beginner’s Guide
Try This Creating and Using a Folder Action Script
In this example, you create a short folder action script using the adding folder items
event handler, attach the script to a folder, and make sure folder actions are turned on so
that you can run the script. Follow these steps:
1. In AppleScript Editor, press z-N or choose File | New to create a new script.
2. Press z-S or choose File | Save to display the Save As dialog box. Navigate to the
/Library/Scripts/Folder Action Scripts/ folder, and then save the script under a name of
your choice.
3. Start an on adding folder items to event handler, identifying the folder as myFolder
and using the variable name added_items with the after receiving parameter:
on adding folder items to myFolder after receiving added_items
4. Add the end statement to end the event handler, as shown in boldface here:
on adding folder items to myFolder after receiving added_items
end
5. Press z-K or click the Compile button on the toolbar to compile the script. AppleScript
Editor automatically adds adding folder items to after the end statement, as shown in
boldface here:
on adding folder items to myFolder after receiving added_items
end adding folder items to
6. Inside the event handler, add a tell statement to tell the Finder to assign the name property
of the myFolder item to the variable fName. The changes appear in boldface here:
on adding folder items to myFolder after receiving added_items
tell application "Finder" to set fName to name of myFolder
end adding folder items to
7. Add a try block after the tell statement, as shown in boldface here:
on adding folder items to myFolder after receiving added_items
tell application "Finder" to set fName to name of myFolder
try
end try
end adding folder items to
8. Within the try block, create a blank string variable named myMessage, as shown in
boldface here:
on adding folder items to myFolder after receiving added_items
tell application "Finder" to set fName to name of myFolder

Chapter 11: Running Scripts Automatically 241
try
set myMessage to ""
end try
end adding folder items to
9. After the set myMessage statement, add a repeat block that uses a variable named
myCounter to run from 1 to the number of items in added_items. The new
statements appear in boldface here:
on adding folder items to myFolder after receiving added_items
tell application "Finder" to set fName to name of myFolder
try
set myMessage to ""
repeat with myCounter from 1 to ¬
number of items in added_items
end repeat
end try
end adding folder items to
10. Within the repeat block, set the variable myNewFile to the item in added_items
represented by myCounter, and set myNewFileInfo to the info property for
myNewFile. Then set myMessage to its existing contents, the name property of
myNewFileInfo, and a return, so as to build a list of the files dropped on the droplet.
The added statements appear in boldface here:
on adding folder items to myFolder after receiving added_items
tell application "Finder" to set fName to name of myFolder
try
set myMessage to ""
repeat with myCounter from 1 to ¬
number of items in added_items
set myNewFile to item myCounter of added_items
set myNewFileInfo to the info for myNewFile
set myMessage to myMessage & ¬
name of myNewFileInfo & return
end repeat
end try
end adding folder items to
11. Finally, add a display dialog statement that displays the myMessage string (showing
the list of files dropped on the droplet), together with an explanatory title bar and a
solitary OK button. The new statement appears in boldface here:
on adding folder items to myFolder after receiving added_items
tell application "Finder" to set fName to name of myFolder
try
set myMessage to ""
repeat with myCounter from 1 to number of items in added_items
(continued)

242 AppleScript: A Beginner’s Guide
set myNewFile to item myCounter of added_items
set myNewFileInfo to the info for myNewFile
set myMessage to myMessage ¬
& name of myNewFileInfo & return
end repeat
display dialog myMessage with title "Files Added to " ¬
& fName buttons {"OK"}
end try
end adding folder items to
12. Save the changes you’ve made to the script.
13. Press z-SPACEBAR to open Spotlight, start typing folder actions, and then open Folder
Actions Setup from the hit list.
14. Select the Enable Folder Actions check box if it’s not already selected.
15. Click the + button under the left pane in the Folder Actions Setup window to open the
dialog box for choosing a folder.
16. Click the folder you want to use, and then click the Open button. Folder Actions Setup
adds the folder to the list and then opens the Choose A Script To Attach dialog box
(shown in Figure 11-5, earlier in this chapter).
17. Click the script you’ve just created, and then click the Attach button.
18. Press z-Q or choose Folder Actions Setup | Quit Folder Actions Setup to quit Folder
Actions Setup.
19. Open a Finder window to the folder you chose.
20. Add several files to the folder—for example, by copying them from another folder and
then pasting them in—and verify that the resulting dialog box lists the files. Figure 11-12
shows an example of the dialog box.
Figure 11-12 The folder action script’s dialog box lists the files you added to the folder.

Chapter 11: Running Scripts Automatically 243
Running a Script at Login
Another time it’s often useful to run a script application is when you log in to your
Mac. You can run a script that sets up the Mac the way you want it—for example,
opening and arranging the applications you find essential.
Create the script, save it as an application, and then follow these steps to set it to
run at login:
1. Choose Apple | System Preferences to open System Preferences.
2. In the System category, click the Accounts item to display Accounts preferences.
3. If necessary, click the lock icon and authenticate yourself so that you can make
changes.
4. In the list of user accounts, click the account you want to change.
5. Click the Login Items button to display the list of login items.
6. Click the + button, select the script in the dialog box that appears, and then click the
Add button.
7. Lock System Preferences again if necessary, and then quit System Preferences.
Now the script application will run automatically each time you log in.
Running a Script Repeatedly at Intervals
Sometimes you may need to have a script perform the same actions at regular
intervals—for example, to empty the Trash or to prompt you to take a break from
thrashing your keyboard.
To make a script run repeatedly, use an idle handler and set the script to stay open.
When you do this, the script runs and performs its task; it then lurks in the background
for however long you’ve told it to be idle before springing into action again.
To create an idle handler, you use an on idle command like this, with a return
statement specifying how many seconds to wait before performing the actions again (in
this example, 3600 seconds, which is one hour):
on idle
--take actions here
return 3600
end idle
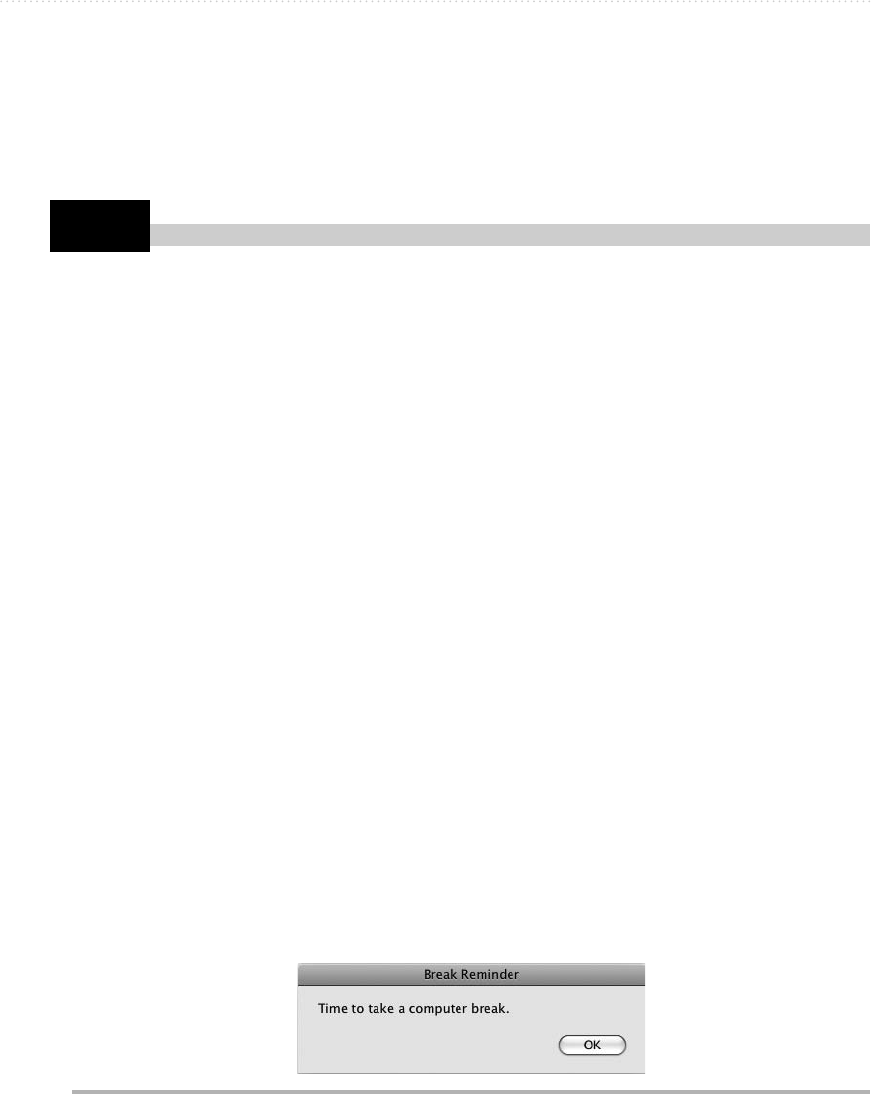
244 AppleScript: A Beginner’s Guide
Try This
Idle handlers don’t work in AppleScript Editor, so you need to save the script as an
application to make it work. When you save the script, select the Stay Open check box
in the Save As dialog box to make the application stay open after you run it rather than
closing as normal. You can then run the application, and the idle handler works.
Creating an Application
That Uses an Idle Handler
In this example, you create an AppleScript application that uses an idle handler to run in
the background and perform the same action at intervals. The application simply displays
a dialog box suggesting you take a break from your computer.
To create the application, follow these steps:
1. In AppleScript Editor, press z-N or choose File | New to create a new script.
2. Enter the code shown here:
on idle
display dialog "Time to take a computer break." ¬
buttons {"OK"} with title "Break Reminder"
return 10
end idle
3. Press z-S or choose File | Save to display the Save As dialog box.
4. Give the application a name, and choose the folder in which to store it.
5. Choose Application in the File Format pop-up menu.
6. Select the Stay Open check box, and make sure the Run Only check box and Startup
Screen check box are cleared.
7. Click the Save button. AppleScript Editor closes the Save As dialog box and saves the
application.
8. Run the application from the folder in which you stored it. You’ll see the Break
Reminder dialog box shown in Figure 11-13.
Figure 11-13 The Break Reminder application uses an idle handler to keep running in the
background and display this dialog box at regular intervals.

Chapter 11: Running Scripts Automatically 245
9. Click the OK button. Ten seconds after you do so, the Break Reminder dialog box
appears again.
10. To quit the application, click the OK button in the Break Reminder dialog box, and
then press z-Q or choose the Quit command from the application’s menu. Alternatively,
click the application’s icon on the Dock, keep holding down the mouse button until the
pop-up menu appears, and then choose Quit.
Running a Script Automatically at Specific Times
Mac OS X also makes it easy to create scripts that run at specific times. For example, if
you decide the still watches of the night are the time for your Mac to perform vital tasks,
you can set a script to run at 2 A.M. or whenever you’re visiting the Land of Nod.
There are two main ways of running a script at a specific time like this.
First, you can create a script that keeps checking to see whether the time condition
you’ve set has been met. For example, if you want to perform an action on the hour and
on the half-hour, you can test whether the current minute of the hour matches 0 or 30.
The problem with this approach is that you need to keep the script running in the
background and checking every minute to see if the current minute is one of the action
minutes. Mac OS X manages processor time smartly enough that this won’t slow your
Mac down much, but it’s still another task that the Mac needs to run.
As a result, a better approach is to schedule the task as an appointment in iCal. One
of the things iCal is great at is checking the time constantly to see if it needs to nag you
about something, so you can use this checking to run a script. What’s especially handy is
that iCal doesn’t even have to be running when the event’s time rolls around, though your
Mac must be running and awake rather than off or dead to the world.
Here’s how to set iCal to run a script at a particular time:
1. Write the script and save it. You can make it either a script or an applet—it doesn’t
matter which. (Make it an applet if you want to be able to run it separately as well.)
2. Open iCal and create a new event by double-clicking the appropriate day. iCal pops up
the window for the new event.
3. Type the name you want to give the event in place of New Event.
4. Use the From date and time controls to set the time at which you want the script to run.
If you want to run the script repeatedly, use the Repeat controls to set up the repetition.
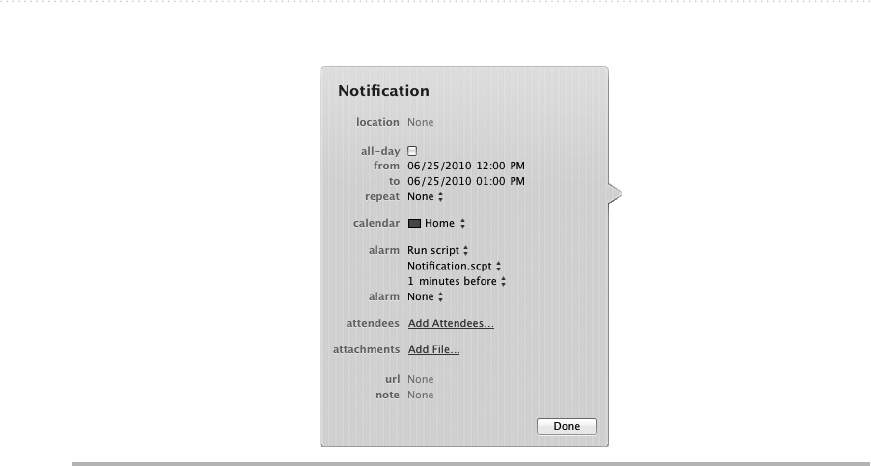
246 AppleScript: A Beginner’s Guide
5. Open the Alarm pop-up menu, and choose Run Script.
6. Open the pop-up menu that appears below the Alarm pop-up menu (see Figure 11-14),
and then click Other. In the iCal: Script To Run As Alarm dialog box, click the script,
and then click the Select button.
7. In the timing menu below the script’s name, set up when you want the script to
run—for example, 1 Minutes Before.
8. Click the Done button to close the window for the event.
The script will now run at the time you chose, even if iCal is closed.
Figure 11-14 You can use iCal to run a script for you at a particular time—even if iCal itself
isn’t running at the time.

Part III
Automating Major
Applications
with AppleScript
This page intentionally left blank

249
Chapter 12
Automating iTunes
and iPhoto

250 AppleScript: A Beginner’s Guide
Key Skills & Concepts
● Working with iTunes
● Working with iPhoto
This chapter shows you how to bring AppleScript to bear on iTunes, Apple’s widely used
audio- and video-management application, and iPhoto, the graphics application in the
iLife suite. You’ll learn how to work with tracks and playlists in iTunes, and how to work
with albums, photos, and keywords in iPhoto.
NOTE
Both iTunes and iPhoto are powerful applications that perform relatively few tasks but
do them well. They have friendly, easy-to-use interfaces that give users most of the
functionality they need. As a result, you may not need to perform a wide variety of tasks
in iTunes and iPhoto using AppleScript.
Working with iTunes
As you know, iTunes helps you organize and enjoy your library of songs, videos, podcasts,
and other multimedia items. You can add items from a CD, from the iTunes Store, or by
dragging in existing media files.
You’ll find various objects in iTunes’ dictionary, but this chapter focuses on the two
objects you’ll probably find the most useful:
● track The track object represents one of the files in your iTunes library—for
example, a song or a TV show.
● playlist The playlist object represents a list of songs.
Working with Tracks
To represent a song, podcast, video file, or other type of file in iTunes, AppleScript uses
the track object. Table 12-1 explains the properties of the track object.

Chapter 12: Automating iTunes and iPhoto 251
track Object Property Explanation
album The name of the album from which the track comes
album artist The album artist assigned for the track
album rating An integer giving the album’s overall rating, from 0 (no stars) to 100 (five
stars)
artist The artist assigned for the track
bit rate An integer giving the track’s bitrate in Kbps. This property is read-only.
bookmark A real number giving the position at which the track is bookmarked for
resuming play
bookmarkable true if the track’s playback position will be remembered for resuming
play, false if it will not be
bpm An integer giving the track’s tempo in beats per minute
category The category assigned to the track
comment Any comments you’ve added to the track’s Comments field
compilation true to have iTunes handle this track as being part of a compilation, false
to handle it as being part of a “normal” album (supposing such a thing
exists)
composer The composer credited with the track
container The playlist that contains the track—for example, user playlist id 28947
of source id 49 of application “iTunes”
database ID An integer giving the track’s unique ID within iTunes. This property is
read-only.
date added The date and time the track was added to iTunes. This property is read-
only.
description The text from the Description field (on the Video tab of the Item
Information dialog box)
disc count An integer giving the number of discs in the album
disc number An integer giving the number of this track’s disc within the album (for
example, 1 for disc 1 of 2)
duration A real number giving the track’s duration in seconds—for example,
146.703002929688. This property is read-only.
enabled true if the track’s check box is selected for playback, false if the check
box is cleared
episode ID The episode ID for the track (for video shows)
episode number The episode number of the track (for video shows)
EQ The name of the equalizer preset to use when playing the track
finish A real number giving the stop time of the track in seconds—for example,
287.476989746094
Table 12-1 Properties of the track Object

252 AppleScript: A Beginner’s Guide
track Object Property Explanation
gapless true if the track is from a gapless album (one set to play without gaps
between songs), false if it is from a regular album
genre The music genre of the track
grouping The grouping for the track. Grouping is a text tag you can enter in the
Grouping field of the Info tab of the Item Information dialog box to create
subgenres.
id An integer giving the track’s unique ID within iTunes on your Mac—for
example, 30394
index The track’s index number in its current context—for example, 19 when it’s
the 19th track in a playlist
kind The file type of the track—for example, AAC Audio File. This property is
read-only.
long description The long description of the track, if any is applied
lyrics The lyrics of the track, if they are in the file
modification date The date and time you last modified the track. This property is read-only.
name The name of the track
persistent id The hexadecimal string that uniquely identifies this track within iTunes—
for example, “6CC5C362D387BB32”
played count An integer indicating how many times the track has been played from
start to end
podcast true if this track is a podcast episode, false if it is not
rating An integer giving the rating of the track, from 0 (no stars) to 100 (five
stars)
rating kind The rating kind used for the track: user for a rating you’ve applied,
computer for a rating your Mac has applied. This property is read-only.
release date The release date for the track, if available. This property is read-only.
sample rate An integer giving the track’s sample rate in hertz (Hz)—for example,
44100 for the CD-standard 44.1 kHz sample rate
season number An integer giving the season number of the track (for TV shows)
shufflable true if the track is marked for inclusion in shuffling, false if it is not.
(In the user interface, select the Skip When Shuffling check box on the
Options tab of the Item Information dialog box to exclude a track from
shuffling.)
skipped count An integer indicating how many times you’ve skipped this track
skipped date The date and time you last skipped the track
show The name of the show from which the track comes
Table 12-1 Properties of the track Object (continued)
Chapter 12: Automating iTunes and iPhoto 253
Most of these properties are pretty straightforward, but these three things aren’t
immediately obvious:
● Ratings In the user interface, you rate a track by assigning it a number of stars, from
one star (irredeemably wretched) to five stars (the best thing since vacuum-packed
coffee). Until you assign a rating, the track has no stars. Internally, iTunes uses an
integer from 0 to 100 to represent the stars: 0 is no stars, 20 is one star, 40 is two stars,
60 is three stars, 80 is four stars, and 100 is five stars.
track Object Property Explanation
sort album The album name to use when sorting the track. If present, this property
overrides the album property.
sort artist The artist name to use when sorting the track. If present, this property
overrides the artist property.
sort album artist The album artist name to use when sorting the track. If present, this
property overrides the album artist property.
sort name The name to use when sorting the track. If present, this property overrides
the name property.
sort composer The composer name to use when sorting the track. If present, this
property overrides the composer property.
sort show The show name to use when sorting the track. If present, this property
overrides the show property.
size An integer giving the track’s size on disk in bytes—for example,
3408348 for a 3.3MB file
start A real number giving the start time of the track in seconds—0.0 until you
change it
time The track’s time in MM:SS format—for example, “4:03”
track count An integer giving the number of tracks on the album this track came from
track number This track’s number on the album it came from
unplayed true if you’ve never played this track at all, false if you’ve played even
part of it
video kind The kind of video track: none, movie, music video, or TV show
volume adjustment An integer giving the volume adjustment you’ve applied to the track. You
can use from –100 to 100.
year The year the track or its album was released
Table 12-1 Properties of the track Object (continued)

254 AppleScript: A Beginner’s Guide
● Overlapping properties As you can see from Table 12-1, several properties overlap.
For example, the basic way of telling iTunes which artist is responsible for a track is
to set the artist property. So far, so easy. Normally, that artist is the artist for the album
as well. But if the album is by a different artist than the track, you can use the album
artist property to specify who’s guilty. And if you want to sort the track by a different
artist than you’ve assigned it to, you can set the sort artist property to tell iTunes how
to handle the sorting. Similarly, you can set the sort album artist property to override
the sorting specified by the album artist property (if you’ve set it) or the artist
property.
● The meaning of “unplayed” The unplayed property tells you whether you’ve ever
played the track at all (false) or never played it (true). If you play the track all the way
to the end (or skip to near the end and then let it finish playing), iTunes adds 1 to the
played count property. So it’s possible to have a track with a played count of 0 but an
unplayed value of false.
Playing a Track
To play a track, you simply need to finger your victim and then give iTunes the play
command.
Usually, the easiest way to identify the track you want is to use the track’s name and
the playlist it’s in. For example, to play the track called Almost Summer in the playlist
named Latest Additions, you can use this statement:
play the track "Almost Summer" of playlist "Latest Additions"
If the track is in your library rather than in a particular playlist, no problem—just tell
iTunes the track is the Library “playlist” like this:
play the track "Treat Me Like Your Mother" of the playlist "Library"
To pause playback, use the playpause command:
playpause
To restart playback, use the playpause command again—just like clicking the Play/
Pause button in the iTunes window (or pressing SPACEBAR).
Looping Through Multiple Tracks
The only problem with identifying a song in the Library by name comes when the Library
contains two or more tracks with the same name. When this happens, iTunes plays the first
track it finds, which may not be the one you want.

Chapter 12: Automating iTunes and iPhoto 255
Following is a short script that works through the different versions of the same track,
allowing you to pick the one you want. Here’s what happens in the script:
● The script uses a try block so that it can catch the error generated by the Cancel button
in its dialog box.
● The script assigns to the variable MyGimmes all the versions of the track Gimme
Shelter that iTunes can dig out of the music library.
● The script then uses a repeat loop with a counter (myCounter) running from 1 to the
count of MyGimmes—in other words, once for each song.
● The script uses the play command to start the first of the tracks playing. The delay 15
command pauses the script for 15 seconds so that you hear that amount of the song.
● The script then displays a three-button dialog (see Figure 12-1) that lets you choose
whether to keep playing this version, go on to the next version, or cancel in disgust.
● If the user clicks the Play The Next Version button, the next track command starts the
next version playing, and the loop continues. If the user clicks the Keep Playing This
Version button, the else statement runs the return command, which ends the loop. If
the user clicks the Cancel button, the error handler gives a playpause command to
pause playback.
tell the application id "com.apple.itunes"
try
set MyGimmes to every track whose name is "Gimme Shelter"
repeat with myCounter from 1 to count of MyGimmes
play the item myCounter of MyGimmes
delay 5
display dialog ¬
"Keep playing this version, or play the next?" ¬
buttons {"Keep Playing This Version", ¬
"Play the Next Version", ¬
"Cancel"} with title "Gimme Shelter"
Figure 12-1 Using a custom dialog box to choose whether to keep playing the current
version of a song or start playing the next version.

256 AppleScript: A Beginner’s Guide
if the button returned of the result is ¬
"Play the Next Version" then
next track
else
return
end if
end repeat
on error number -128
playpause
end try
end tell
Changing the Tags for a Track
To keep your library in order and to make iTunes’ Smart Playlists work effectively, you’ll
need to make sure that all the tracks in your library are properly tagged with accurate
information. To change the tag information for a track, set the relevant property. For
example, the following snippet assigns the tracks from the album Among My Swan to the
variable trax and then uses a repeat loop to set the genre property, the year property, and
the EQ property of each track:
set trax to every track of playlist "Library" ¬
whose album is "Among My Swan"
repeat with mytrack in trax
set the genre of mytrack to "Alternative & Punk"
set the year of mytrack to "1996"
set EQ of mytrack to "Vocal Booster"
end repeat
Working with Playlists
iTunes uses the playlist object to represent a list of tracks or audio streams. Table 12-2
explains the properties of the playlist object.
Creating a New Playlist
To create a new playlist, use a make new playlist command, providing the name by
adding the with properties parameter with the name property. For example, the following
statement creates a new playlist named High Desert Rock:
make new playlist with properties {name:"High Desert Rock"}
iTunes puts the new playlist at the top level of playlists so that it appears in the
Playlists section of the Source list.
Chapter 12: Automating iTunes and iPhoto 257
To get a handle on the new playlist so that you can work with it, assign it to a
variable when you create it. You can then add songs to the playlist by using the duplicate
command, as in the following example:
set Listen to make new playlist with properties ¬
{name:"High Desert Rock", shuffle:true}
duplicate (every track of playlist "Library" ¬
whose genre is "Stoner Rock") to Listen
Deleting a Playlist
To delete a playlist, use a delete command and specify the playlist. For example, the
following statement deletes the playlist named High Desert Rock:
delete playlist "High Desert Rock"
playlist Object Property Explanation
name The playlist’s name
duration An integer giving the total length of the playlist (including all tracks)
in seconds. This property is read-only.
parent If the playlist is stored in a folder, the folder’s name. This property
is read-only. If the playlist is stored at the top level rather than in a
folder, checking this property returns error –1728 (“Can’t get parent
of playlist”).
shuffle true to play the songs in random order, false to play them in the
order in which they’re currently sorted.
size A double integer giving the size of the playlist (including all tracks) in
bytes—for example, 4.346414914E+9. This property is read-only.
song repeat Whether the songs are set to repeat all (all), repeat one song (one),
or not repeat (off)
special kind A read-only property that indicates whether the playlist is a special
one: none for a normal playlist; Audiobooks, folder for a playlist
folder; Movies, Music, Party Shuffle (for the iPod DJ feature, which
used to be called Party Shuffle); Podcasts; Purchased Music; TV
Shows; or Videos
time The playlist’s length (including all songs) in MM:SS format—for
example, “15:13:29” for a chunky playlist
visible true if the playlist appears in the Source list, false if it is hidden. This
property is read-only.
Table 12-2 Properties of the playlist Object

258 AppleScript: A Beginner’s Guide
Try This
NOTE
iTunes doesn’t confirm the deletion when you take out a playlist using AppleScript.
Dealing with All the Songs
That Have an Intermediate Rating
I don’t know about you, but I find iTunes’ rating system to be a great way for slimming
down my music library by identifying songs I don’t actually listen to. If a song is great,
I give it five stars; if it’s a keeper, four stars; if I’m undecided, three stars; if I doubt I want
to keep it, two stars; and if it’s irredeemably wretched, one star. Zero stars indicates a
blank slate, a song that hasn’t been judged yet.
Every now and then I clear out the one-star and two-star songs—but that leaves the
three-star songs in limbo. In this example, you build a script that loops through the three-
star songs, playing each in turn and displaying a dialog box (see Figure 12-2) that prompts
you to upgrade the rating to four stars or downgrade it to two stars. When you rate the
current song, iTunes starts the next playing, and so on until you’ve waded through all the
three-star songs or reached your limit, at which point you click the Cancel button.
NOTE
If you use the star rating system differently, change the script to match your needs. For
example, if two stars marks your Zone of Terminal Uncertainty, use every song whose
rating is 40, and then change the rating values of the buttons in the dialog box. If you
want to apply a wider range of ratings, use a choose from list command rather than
the display dialog command.
To create the script, follow these steps:
1. In AppleScript Editor, press z-N or choose File | New to create a new script.
2. Start a tell block to iTunes, identifying it formally:
tell the application id "com.apple.itunes"
end tell
Figure 12-2 The sample script displays a dialog box with buttons for changing the star rating
on three-star songs.

Chapter 12: Automating iTunes and iPhoto 259
3. Inside the tell block, add a with timeout block to increase the time AppleScript waits
before timing out. The default time is two minutes (120 seconds), which is fine for
many scripts, but this script needs to be able to wait for the user to listen to almost
the whole of a song, which may well be longer than that. The new block appears in
boldface here:
tell the application id "com.apple.itunes"
with timeout of 1200 seconds
end timeout
end tell
4. Inside the timeout block, add a try block, as shown in boldface here. This will let you
trap the error that results from clicking the Cancel button in the dialog the script uses.
tell the application id "com.apple.itunes"
with timeout of 1200 seconds
try
end try
end timeout
end tell
5. Within the try block, create a variable named three_star_songs and assign to it every
track in the Library whose rating is 60—that is, three stars. The new statement appears
in boldface here:
tell the application id "com.apple.itunes"
with timeout of 1200 seconds
try
set three_star_songs to every track of ¬
playlist "Library" whose rating is 60
end try
end timeout
end tell
6. After that, add a repeat loop that uses a with structure to run for each song in the
three_star_songs list, as shown in boldface here:
tell the application id "com.apple.itunes"
with timeout of 1200 seconds
try
set three_star_songs to every track of ¬
playlist "Library" whose rating is 60
repeat with this_song in three_star_songs
end repeat
end timeout
end tell
(continued)

260 AppleScript: A Beginner’s Guide
7. Inside the repeat loop, create a variable named song_details and add to it the essential
details of the current song, which is represented by the this_song variable. The new
statement appears in boldface here:
tell the application id "com.apple.itunes"
with timeout of 1200 seconds
try
set three_star_songs to every track of ¬
playlist "Library" whose rating is 60
repeat with this_song in three_star_songs
set song_details to "Song:" & tab & ¬
name of this_song & return & ¬
"Artist:" & tab & artist of this_song & return & ¬
"Album:" & tab & album of this_song & return & ¬
"Played:" & tab & played count of this_song & return & ¬
"Added:" & tab & date added of this_song
end repeat
end try
end timeout
end tell
8. Next, add a statement creating the variable song_length and setting it to two seconds
less than the duration of the song, as shown in boldface here:
tell the application id "com.apple.itunes"
with timeout of 1200 seconds
try
set three_star_songs to every track of ¬
playlist "Library" whose rating is 60
repeat with this_song in three_star_songs
set song_details to "Song:" & tab & ¬
name of this_song & return & ¬
"Artist:" & tab & artist of this_song & return & ¬
"Album:" & tab & album of this_song & return & ¬
"Played:" & tab & played count of this_song & return & ¬
"Added:" & tab & date added of this_song
set song_length to (duration of this_song) - 2
end repeat
end try
end timeout
end tell
9. Use a play command to set this_song playing, and then display a dialog box that
displays the song’s information stored in the song_details variable and provides
buttons for rating the song with two stars, rating it with four stars, and canceling. Set
the dialog box to give up after the length of time specified by the song_length variable,

Chapter 12: Automating iTunes and iPhoto 261
so that the dialog box remains displayed until two seconds before the end of the song if
the user doesn’t click any of the buttons. The new statements appear in boldface here:
tell the application id "com.apple.itunes"
with timeout of 1200 seconds
try
set three_star_songs to every track of ¬
playlist "Library" whose rating is 60
repeat with this_song in three_star_songs
set song_details to "Song:" & tab & ¬
name of this_song & return & ¬
"Artist:" & tab & artist of this_song & return & ¬
"Album:" & tab & album of this_song & return & ¬
"Played:" & tab & played count of this_song & return & ¬
"Added:" & tab & date added of this_song
set song_length to (duration of this_song) - 2
play this_song
display dialog song_details ¬
with title "Change Rating of Three-Star Songs" ¬
buttons {"Rate As Two Stars **", ¬
"Rate As Four Stars ****", ¬
"Cancel"} giving up after song_length
end repeat
end try
end timeout
end tell
10. Use an outer if structure to see if the gave up property of the dialog box’s result is false
to check whether the user clicked a button in the dialog box. Inside this if structure,
place a nested if… then… else if structure that checks the button returned of the
dialog box’s result and applies a two-star rating for a click of the Rate As Two Stars
button or a four-star rating for a click of the Rate As Four Stars button. The outer and
nested if structures appear in boldface here:
tell the application id "com.apple.itunes"
with timeout of 1200 seconds
try
set three_star_songs to every track of ¬
playlist "Library" whose rating is 60
repeat with this_song in three_star_songs
set song_details to "Song:" & tab & ¬
name of this_song & return & ¬
"Artist:" & tab & artist of this_song & return & ¬
"Album:" & tab & album of this_song & return & ¬
"Played:" & tab & played count of this_song & return & ¬
"Added:" & tab & date added of this_song
set song_length to (duration of this_song) - 2
play this_song
display dialog song_details ¬
(continued)

262 AppleScript: A Beginner’s Guide
with title "Change Rating of Three-Star Songs" ¬
buttons {"Rate As Two Stars **", ¬
"Rate As Four Stars ****", ¬
"Cancel"} giving up after song_length
if gave up of the result is false then
if the button returned of the result is ¬
"Rate As Two Stars **" then
set the rating of this_song to 40
else if the button returned of the result is ¬
"Rate As Four Stars ****" then
set the rating of this_song to 80
end if
end if
end repeat
end try
end timeout
end tell
11. Between the end repeat line and the end try line, add an on error statement that runs
with error number –128 to catch the error generated by clicking the Cancel button in
the dialog box. All the error handler needs is a playpause command to pause playback
in iTunes. The added statements appear in boldface here:
tell the application id "com.apple.itunes"
with timeout of 1200 seconds
try
set three_star_songs to every track of ¬
playlist "Library" whose rating is 60
repeat with this_song in three_star_songs
set song_details to "Song:" & tab ¬
& name of this_song & return & ¬
"Artist:" & tab & artist of this_song & return & ¬
"Album:" & tab & album of this_song & return & ¬
"Played:" & tab & played count of this_song & return & ¬
"Added:" & tab & date added of this_song
set song_length to (duration of this_song) - 2
play this_song
display dialog song_details ¬
with title "Change Rating of Three-Star Songs" ¬
buttons {"Rate As Two Stars **", ¬
"Rate As Four Stars ****", ¬
"Cancel"} giving up after song_length
if gave up of the result is false then
if the button returned of the result is ¬
"Rate As Two Stars **" then
set the rating of this_song to 40
else if the button returned of the result is ¬
"Rate As Four Stars ****" then
set the rating of this_song to 80
end if
end if

Chapter 12: Automating iTunes and iPhoto 263
end repeat
on error number -128
playpause
end try
end timeout
end tell
12. Save the script under a name of your choice.
13. Press z-R or click the Run button on the toolbar to run the script.
Working with iPhoto
iPhoto is a terrific application for manipulating and managing your photos manually on
your Mac, and you can use much of its functionality via AppleScript too.
Apart from the application object, which—like other applications—iPhoto uses to
represent the application as a whole, the three main objects you need to know about when
working with iPhoto from AppleScript are these:
● album The album object represents an album in an iPhoto library.
● photo The photo object represents a photo.
● keyword The keyword class represents a keyword you can associate with photos.
Working with Albums and Photos
iPhoto uses the album object to represent an album—any kind of album. Table 12-3
explains the properties of the album object.
album Object Property Explanation
name The album’s name
id An integer giving the album’s unique ID within iPhoto. This property is
read-only.
children A list of the albums that this album contains
parent The name of the parent album that contains this album
type The album type (see Table 12-4). This property is read-only.
URL If you’ve published the album, or if you’ve subscribed to it, the URL on
which the album is shared
Table 12-3 Properties of the album Object
264 AppleScript: A Beginner’s Guide
As you can see, the properties are pretty straightforward, except for the type property,
which Table 12-4 explains.
Creating a New Album
To create a new album in iPhoto, use a new album command and specify the name
parameter with a string for the name. For example, the following statement creates a new
album named Vacation Photos:
new album name "Vacation Photos"
When you create a new album like this, iPhoto automatically puts it at the top level of
the Albums list, just as it does when you create a new album when working interactively.
Album Type Constant Explanation
book album A photo book
events album An Event
faces album An album in Faces
flagged album The “album” containing the photos you’ve flagged
folder album A folder (for putting other albums in)
last import album The Last Import album in the Recent category
last months album The Last 12 Months album (or however many months you’ve chosen in
General preferences)
last rolls album The Last Roll album used in previous versions of iPhoto
photo library album The Photo Library
places album An album in Places
published album An album you’ve published
regular album A regular, honest-to-god album
shared album An album you’ve shared with other iPhoto users on your network
shared library Someone else’s shared library to which you’ve connected
slideshow album A slideshow
smart album A Smart Album
subscribed album Someone else’s published album to which you’ve subscribed
trash album The Trash
unknown album type An album that iPhoto can’t recognize
Table 12-4 iPhoto’s Different Types of Albums

Chapter 12: Automating iTunes and iPhoto 265
Seeing Whether an Album Exists
To see whether an album already exists, use an exists command. For example, the
following snippet checks to see whether an album called Industrial Seascapes already
exists; if not, the code creates the album. Either way, the code assigns the Industrial
Seascapes album to the variable myAlbum so that you can then work with it.
if exists album "Industrial Seascapes" then
set myAlbum to album "Industrial Seascapes"
else
set myAlbum to new album name "Industrial Seascapes"
end if
Deleting an Album
To delete an album, use the remove command. This gets rid of the album but leaves the
photos it contains in iPhoto, just as when you delete an album when working interactively.
For example, the following statement deletes the album named Lombard Stunts:
remove the album "Lombard Stunts"
Working with Photos
Normally, much of what you’ll want to do with iPhoto involves photos. To manipulate photos,
you work with the photo object. Table 12-5 explains the properties of the photo object.
Setting Properties for a Photo
As you can see in Table 12-5, many of the properties for a photo—for example, the
dimensions property and the height and width properties—are read-only. But you can
change properties such as the title and rating easily enough, as in this example, which uses
the photo assigned to the variable my_pic:
tell my_pic
set the rating to 4
set the title to "Oregon Cliffs"
set the date to current date
end tell
You can identify photos within albums or within the photo library as a whole, but
what’s often most convenient is to work with a selection of photos you’ve made manually.
To do so, get the selection object and assign it to a variable, and then use the item object
to pick out the object you want. Here’s an example:
set my_pix to the selection
set my_pic to item 1 of my_pix
266 AppleScript: A Beginner’s Guide
photo Object Property Explanation
altitude An integer giving the GPS altitude in meters. The value
1.79769313486232E+308 means that the altitude isn’t available rather
than that the camera was orbiting the Horsehead Nebula.
comment The comment attached to the photo
date The date and time the photo was taken
dimensions The photo’s width and height in pixels, returned as a list—for example,
{1600.0, 1200.0}. This property is read-only.
height An integer giving the photo’s height in pixels. This property is read-only.
id An integer giving the photo’s unique ID. This property is read-only.
image filename The name of the file containing the photo. This property is read-only.
image path The path to the file containing the photo, including the filename. This
property is read-only.
latitude An integer giving the GPS latitude of the photo, using the range –90.0
to 90.0. The value 3.40282346638529E+38 means that the latitude
isn’t available.
longitude An integer giving the GPS longitude of the photo, using the range
–180.0 to 180.0. The value 3.40282346638529E+38 means that the
longitude isn’t available.
name The text assigned to the photo’s title. This property returns the same text
as the title property.
original path The path to the original photo file you imported, including the filename.
If you haven’t edited the original file, this property may return the same
file path as the image path property. This property is read-only.
rating An integer giving the star rating, from 0 (no stars) through 5 (five stars)
thumbnail filename The path to the thumbnail file for the photo, including the filename. This
property is read-only.
thumbnail path The name of the thumbnail file for the photo, including the filename. This
property is read-only.
title The title assigned to the photo. This property returns the same text as the
name property.
width The photo’s width in pixels. This property is read-only.
Table 12-5 Properties of the photo Object
NOTE
You can’t pick items out of the selection directly—for example, by using set myPic to
item 1 of the selection. That fails with the error “Can’t make item 1 of selection into type
reference.” But if you assign the selection to a variable, you can pick out the items just fine.

Chapter 12: Automating iTunes and iPhoto 267
Adding Photos to an Album
To add photos to an album, use the add command and provide properties that identify the
photos you want. Here are three examples of ways of identifying photos:
● By keyword To identify photos by keyword, set a variable to the first keyword item
that has the name you want. Then use whose keywords contains and that keyword to
identify the photos. Here’s an example:
set FamilyKey to item 1 of (every keyword whose name is "Family")
add (every photo in album "Photos" ¬
whose keywords contains FamilyKey) ¬
to album "Family Snaps"
● By dimensions To identify photos by dimensions, use a statement such as whose
dimensions is equal to followed by a list of the dimensions—for example, {320, 480}
for portrait-orientation photos taken on an iPhone:
add (every photo whose dimensions is equal to {320, 480}) ¬
to album "iPhone Photos"
● By rating To identify photos by rating, use a statement such as whose rating is and
the rating you want. For example, the following script adds all the five-star photos to a
variable named all_the_best and then uses a repeat loop to assign 20 of the photos to
the album Best Photos:
tell application "iPhoto"
set all_the_best to every photo whose rating is 5
repeat with myCounter from 1 to 20
add item myCounter of all_the_best ¬
to the album "Best Photos"
end repeat
end tell
Removing a Photo from an Album
To remove a photo from an album, use the remove command and specify the photo.
For example, the following statement removes the first photo from the album named
Best Photos:
remove the first photo of album "Best Photos"
Working with Keywords
The only property of the keyword object that’s not inherited from the standard item class
is the name property, which is the string assigned to the keyword.

268 AppleScript: A Beginner’s Guide
Finding Out Which Keywords Are Assigned to a Photo
To find out which keywords are assigned to a photo, use a get every keyword command
for the appropriate photo object. For example, the following statement returns every
keyword assigned to the first photo:
get every keyword of photo 1
This statement returns a list such as {keyword "Europe" of application "iPhoto",
keyword "Vacations" of application "iPhoto"}.
Applying a Keyword to a Photo
To apply a keyword to a photo, use the assign keyword command. This command requires
you to select the photo or photos first, which you can do by using the select method.
For example, the following statements select the first photo in the album Industrial
Decay and assign the existing keyword Urban to it:
select the first photo in album "Industrial Decay"
assign keyword string "Countryside"
CAUTION
If you try to assign a keyword that you haven’t yet created, iPhoto pretends to apply it
but doesn’t. iPhoto doesn’t throw an error, but the photo doesn’t receive the keyword.
Finding Out Which Keywords Are Available
To find out which keywords exist in iPhoto, return every keyword. For example, the
following statement assigns every keyword to the variable all_keywords:
set all_keywords to every keyword
The first keyword in iPhoto’s default list is _Favorite_, which is the special term for
the favorite keyword designated by the check mark. To get all the keywords except this
one, exclude it by name, like this:
set all_keywords to every keyword whose name is not "_Favorite_"
Creating a New Keyword
At this writing, you need to create your keywords manually in iPhoto rather than creating
them in AppleScript. A statement such as make new keyword at end of keywords with
properties {name:"Insolvency"} should work, but it flops with an “AppleEvent handler
failed” message.

Chapter 12: Automating iTunes and iPhoto 269
Try This Creating an Album and Adding Photos to It
In this example, you create a new album in iPhoto and add photos to it. You then choose
whether to delete the album.
To create the sample script, follow these steps:
1. Open iPhoto if it’s not already running.
2. Select the photos that you want to use. While AppleScript lets you select photos
programmatically, it makes more sense to select them manually for many scripts.
3. In AppleScript Editor, press z-N or choose File | New to create a new script.
4. Start a tell block to iPhoto, addressing it by its formal name:
tell the application id "com.apple.iphoto"
end tell
5. Create the variable named my_pix and assign the selected photos to it, as shown in
boldface here:
tell the application id "com.apple.iphoto"
set my_pix to the selection
end tell
6. Create a new album named ABG Test, as shown in boldface here:
tell the application id "com.apple.iphoto"
set my_pix to the selection
new album name "ABG Test"
end tell
7. Use a repeat loop to add each picture (identified by the my_pic variable) in my_pix to
the album, as shown in boldface here:
tell the application id "com.apple.iphoto"
set my_pix to the selection
new album name "ABG Test"
repeat with my_pic in my_pix
add my_pic to album "ABG Test"
end repeat
end tell
8. Add a display dialog statement to display a dialog box offering to delete the album,
and use an if statement to delete the album if the user clicks the Yes button. The code
appears in boldface here:
tell the application id "com.apple.iphoto"
set my_pix to the selection
(continued)
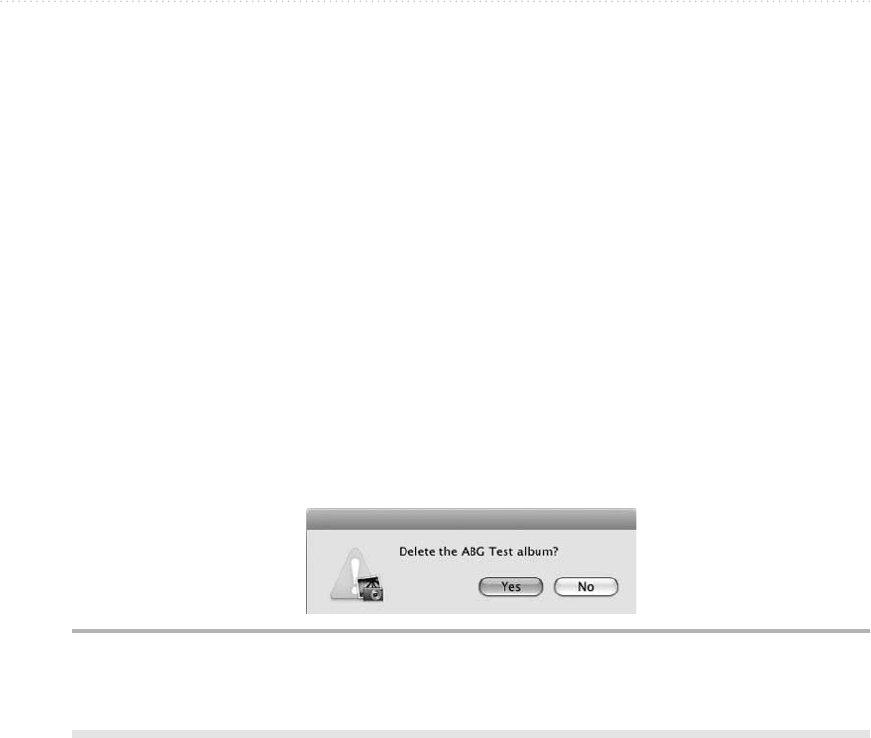
270 AppleScript: A Beginner’s Guide
new album name "ABG Test"
repeat with my_pic in my_pix
add my_pic to album "ABG Test"
end repeat
display dialog "Delete the ABG Test album?" ¬
buttons {"Yes", "No"} ¬
default button "Yes" with icon caution
if the button returned of the result is "Yes" then
remove the album "ABG Test"
end if
end tell
9. Save the script under a name of your choice.
10. Press z-R or click the Run button on the toolbar to run the script. When the dialog box
appears (see Figure 12-3), click the Yes button if you want to delete the album. Click
the No button if you want to check the album’s contents and then delete it manually.
Figure 12-3 Choose whether to delete the sample album the script creates.

271
Chapter 13
Automating Apple Mail

272 AppleScript: A Beginner’s Guide
Key Skills & Concepts
● Working with Mail accounts
● Working with mailboxes
● Creating and sending messages
● Dealing with incoming messages
● Working with tasks
Apple’s Mail application may come as part of the operating system, but it’s a powerful
enough e-mail client for anyone who doesn’t need the organization power—and
cost—of high-end solutions such as Microsoft Entourage. And because you can script
Mail using AppleScript, you can automate everything from setting up mail accounts to
creating mail messages and dealing with incoming messages.
NOTE
Chapter 16 discusses how to bring AppleScript to bear on Microsoft Entourage.
First, you need to know the essentials of how Mail handles messages. This may be
obvious once you’ve thought about it—but if you’ve just used Mail casually, you may
have had no reason to ponder its structure.
Working with Mail Accounts
To work with Mail, the first object you need to understand is the account object. Mail uses
this object to represent an e-mail account, and it’s the key to getting anything done in Mail.
As you know, before you can start sending or receiving messages with Mail, you need
to set up an account in Accounts preferences. The account includes the e-mail address,
password, incoming mail server, outgoing mail server, and details of how you want
to use the account—for example, whether you want to include this account when you
automatically check for new mail.
Similarly, whenever you script Mail to take an action, you need to tell it which account
to use. To get to a message, you have to go through the appropriate account to the mailbox
in it that contains the message.

Chapter 13: Automating Apple Mail 273
Understanding the Four Types of Accounts
Mail provides four different types of accounts for connecting to different types of mail servers.
Table 13-1 gives the details.
Table 13-2 explains the properties of the account object. These properties are largely
shared by the four account types, but each account type also has some extra settings of
its own.
Account Type Explanation
mac An account on Apple’s MobileMe service (which used to be called the .Mac
service—hence the name). A MobileMe e-mail address uses the @me.com
domain name (or the @mac.com domain name for backward compatibility—both
@me.com and @mac.com resolve to the same address). A MobileMe account
uses an IMAP mail server.
imap An account that uses the Internet Mail Access Protocol (IMAP). IMAP’s big
advantage over POP3 is that you can keep your messages on the server rather
than downloading them to your Mac. This lets you check your mail from any
computer without getting confused about which message is where.
pop An account that uses the Post Office Protocol version 3 (POP3)
smtp An account that uses the Simple Mail Transfer Protocol (SMTP). This account is for
sending e-mail only and works alongside the other three types of accounts.
Table 13-1 AppleScript’s account type Constants for Mail Accounts
Q: What is Mail’s smtp account type for?
A: At first sight, the smtp account type is enough to raise your eyebrows. As you probably
know from setting up e-mail accounts or arguing with mail servers, the Simple Mail
Transfer Protocol (SMTP) is used only for sending messages, not for receiving them.
Mail has the smtp account type to dissociate the outgoing mail from the incoming mail.
While most ISPs give you a pair of mail servers—an incoming mail server (POP3, IMAP,
or HTTP) and an outgoing mail server (SMTP)—many ISPs prevent you from sending
mail via that SMTP server unless your computer is logged in to your Internet account with
that ISP. This measure, which is intended to cut down on the amount of spam being sent, is
only a partial success, but it means that you may need to send mail using a different SMTP
server.
Ask the Expert

274 AppleScript: A Beginner’s Guide
account Property Explanation
account directory The folder in which the account stores its messages and other items
account type The account type: mac, imap, pop, or smtp
authentication The account type used for the account. The basic type is password. The other
options are apop, kerberos 5, ntlm, md5, and none.
delivery account The e-mail account used for sending mail from this account. This property
returns an smtp server object.
email addresses The e-mail address or addresses set up for the account
empty junk messages
frequency
–1 for never deleting, 0 for deleting when you quit Mail, or a positive integer
giving the number of days to wait before deleting junk mail (for example, 3 to
wait three days)
empty junk messages
on quit
true to delete messages in the Junk Mail folders (there’s a folder for each account)
when you quit Mail; false to keep the messages until you delete them manually
empty sent messages
frequency
–1 for never deleting sent messages, 0 for deleting when you quit Mail, or a
positive integer giving the number of days to wait before deleting sent messages
empty sent messages
on quit
true to delete sent messages when you quit Mail; false to keep the messages
until you deal with them manually
empty trash frequency –1 for never emptying the Trash, 0 for emptying it when you quit Mail, or a
positive integer specifying how many days to wait before deleting items in the
Trash
empty trash on quit true to empty the Trash when you quit Mail; false to leave the Trash for you to
empty manually
enabled true if the account is enabled for sending and receiving mail; false if it is disabled
full name The full name of the user for the account
include when getting
new mail
true if the account is set for inclusion when you check for new mail; false if it
is not
move deleted
messages to trash
true if the account is set to move deleted messages to the Trash; false if it is not.
name The account’s name (for example, billg@me.com)
password The account’s password. This property is write-only: You can set it using a
script, but you can’t get it.
port The port on the mail server to which the account connects. Standard ports are
110 (POP3), 143 (IMAP without SSL), and 993 (IMAP with SSL), but an ISP
can set any port it chooses.
server name The name of the server to which the account connects—for example,
mail.mac.com
user name The user name for the account (the name used to connect to the server)
uses ssl true if the account is set to use Secure Sockets Layer (SSL) when connecting to
the mail server; false if it is not
Table 13-2 Properties of the account Object

Chapter 13: Automating Apple Mail 275
pop account Property Explanation
big message warning size Set this property to an integer size to specify the size limit in bytes
above which Mail should prompt the user before downloading a large
message. For example, set 2048000 to prompt for any message 2MB
or larger. Set this property to –1 to turn off prompting.
delayed message deletion
interval
Set this property to an integer to specify the number of days to wait
before deleting downloaded messages from the server. Set this property
to 0 to delete messages as soon as you download them.
delete mail on server Set this property to true to tell Mail to delete messages from the server
when you download them (this is normally the most useful setting). Set
this property to false to keep messages on the server—useful when
you’re accessing your mail from another computer and still want to be
able to download it to your main Mac afterward.
delete messages when
moved from inbox
Set this property to true to delete messages from the server when you
move them from your inbox—either deleting them or moving them to
another folder. This setting lets you keep the messages in your inbox
available to multiple computers until you deal with them. Set this
property to false if you want to keep the messages on the server even
when they leave your inbox.
Table 13-3 Extra Properties of the pop account Object
The pop account object also has the properties shown in Table 13-3.
The imap account object also has the properties shown in Table 13-4. The mac
account object is an IMAP account, so it also has these properties. (Technically, the mac
account object inherits these properties from the imap account object.)
The smtp server object has only these properties: name, password, account type,
authentication, enabled, user name, port, server name, and uses ssl.
The following sections provide examples of working with accounts in Mail via
AppleScript.
Checking and Changing the Settings
for an E-mail Account
By manipulating the properties of an e-mail account, you can quickly change its settings.
Here are some examples of checks and changes you may want to make.
NOTE
Because you probably don’t want to mess with the settings on a live mail account, this
section of the chapter does not have a Try This example. But do try any of the following
examples that you’re comfortable running on your mail accounts.
276 AppleScript: A Beginner’s Guide
Finding Out Where an Account Stores Its Mail
To find out the folder in which an account stores its mail, return the account directory
property of the account object. For example, the following statement returns the account
directory of the first account in Mail:
get the account directory of the first account
This returns a result such as file "Macintosh HD:Users:pete:Library:Mail:Mac-
pete_wright:".
Finding Out the E-mail Address for an Account
To find out the e-mail address associated with an account, get the e-mail addresses
property of the account object. For example, the following statement returns the e-mail
addresses for the account named billg@me.com:
get email addresses of account "billg@me.com"
This returns a list of e-mail addresses such as {"billg@mac.com", "billg@me.com"}.
Most accounts will return a single e-mail address (as a single-item list).
imap account Property Explanation
compact mailboxes when
closing
Set this property to true to make Mail automatically compact the mailbox
when you either switch to another mailbox or quit Mail. Set this property
to false if you prefer to compact manually.
message caching Choose how to cache messages for the account. You can choose all
messages and their attachments, all messages but omit attachments, do
not keep copies of any messages, or only messages I have read.
store drafts on server Set this property to true if you want to store draft messages on the IMAP
server so that you can access them from any computer. Set this property
to false to keep the drafts on your Mac.
store junk mail on server Set this property to true if you want to store junk mail on the IMAP server.
Set it to false if you want to store junk mail on your Mac.
store sent messages on
server
Set this property to true if you want to store messages you’ve sent on the
IMAP server. Set it to false if you want to store sent messages on your
Mac for easy access.
store deleted messages
on server
Set this property to true if you want to store deleted messages on the server.
Set it to false if you want to store deleted messages on your Mac.
Table 13-4 Extra Properties of the imap account Object and the mac account Object

Chapter 13: Automating Apple Mail 277
Setting Mail Not to Check for New Messages on an Account
To prevent Mail from checking for new messages on a particular account, set the include
when getting new mail property to false:
set include when getting new mail of the account ".Mac account" to false
Set this property back to true when you want to start checking for new mail again.
Setting a Size Limit for Large-Attachment Warnings on a POP3 Account
To set the size limit for warnings about large incoming attachments on a POP3 account, set
the big message size warning property for the account object to the appropriate number of
bytes. For example, the following statement sets the trigger level to 2048000 bytes (2MB):
tell the account "myEarth"
set the big message warning size to 2048000
end tell
Setting Up a New SMTP Server for an E-mail Account
To set up a new SMTP server, use a make new smtp server command as shown in the
next example. This command is ticklish and may require some juggling to make it work
correctly. The example assigns the server address (smtp.acmevirtualindustries.com) to
the variable smtpserver and the user name (w_acme) to the variable smtpuser, and then
uses the make new smtp server command with the smtpserver variable to create the new
smtp server object. It then uses a tell block to set the authentication, the user name, and
the password.
tell application "Mail"
set smtpserver to "smtp.acmevirtualindustries.com"
set smtpuser to "w_acme"
set mysmtp to make new smtp server with properties ¬
{server name:smtpserver, uses ssl:false}
tell mysmtp
set authentication to password
set user name to smtpuser
set password to "beepbeep"
end tell
end tell
Setting a User Account to Use a Different SMTP Server
When you connect to the Internet via a different connection than your regular ISP, you
may need to use a different SMTP server in order to send mail. To change the SMTP
server, set the smtp server property of the account. Here’s an example that retrieves

278 AppleScript: A Beginner’s Guide
the smtp server object from the account named Roving, stores it in a variable named
TravelServ, and then applies the contents of that variable as the smtp server for the
account named Main Mail:
set TravelServ to the smtp server of account "Roving"
tell the account "Main Mail"
set the smtp server to TravelServ
end tell
Working with Mailboxes
Within each account lurk the mailbox objects that represent the mailboxes. Though vital,
mailboxes are simple objects, with just four properties each, as Table 13-5 explains.
Of these four properties, the ones you’ll use the most are the name property (which
you use to identify the mailbox you want to get a hold of) and the unread count property,
which lets you see how many new messages the mailbox contains.
Creating a New Mailbox
To create a new mailbox, use a make new mailbox command and use the with properties
parameter to specify the name property. For example, the following statement creates a
new mailbox named Read Later:
make new mailbox with properties {name:"Read Later"}
Renaming a Mailbox
To rename a mailbox, identify it by its current name and set the name property to the
new name. For example, the following statement renames the mailbox Odd Messages to
Holding Zone:
set the name of mailbox "Odd Messages" to "Holding Zone"
mailbox Property Explanation
name The mailbox’s name
unread count An integer giving the number of unread messages in a mailbox
account The account to which the mailbox belongs
container The account to which the mailbox belongs
Table 13-5 Properties of the mailbox Object

Chapter 13: Automating Apple Mail 279
Try This
Deleting a Mailbox
To delete a mailbox, use a delete command and identify the mailbox by name. For
example, the following statement deletes the mailbox named Holding Zone:
delete the mailbox "Holding Zone"
CAUTION
When you delete a mailbox from AppleScript, Mail deletes the mailbox and the
messages it contains without confirmation.
Finding the Number of New Messages
for Only Some Accounts
The tell-tale number on the Mail icon on the Dock shows the total number of new messages
without separating them out into what’s hot and what’s not. To find out the number of new
messages in only one account, or in only some accounts, create a script that returns the
unread count property of the appropriate mailbox object.
Follow these steps to create this script:
1. In AppleScript Editor, press z-N or choose File | New to create a new script.
2. Start a tell block to Mail, addressing it by its application id:
tell the application id "com.apple.mail"
end tell
3. Create a variable named NewCount and assign to it the unread count property of the
mailbox "INBOX" of the account you want to use. The sample account here is named
Main, but you’ll need to substitute the name of one of your accounts to make the code
work. The new statement appears in boldface here:
tell the application id "com.apple.mail"
set NewCount to the unread count of mailbox "INBOX" ¬
of account "Main"
end tell
4. Add an if… then… else if… else block that checks the value of NewCount and
assigns suitable text to the variable myMess, as shown in boldface here:
tell the application id "com.apple.mail"
set NewCount to the unread count of mailbox "INBOX" ¬
of account "Main"
if NewCount is 0 then
(continued)
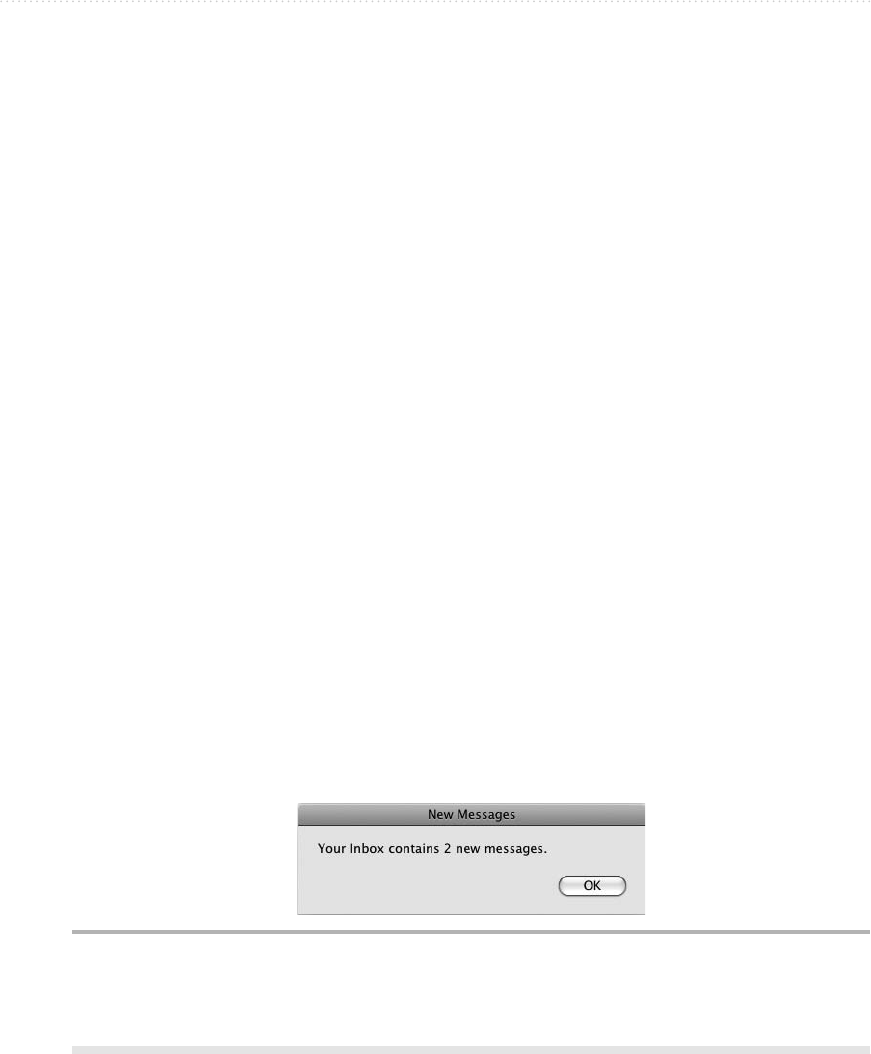
280 AppleScript: A Beginner’s Guide
set myMess to "Your Inbox contains no new messages."
else if NewCount is 1 then
set myMess to "Your Inbox contains 1 new message."
else
set myMess to "Your Inbox contains " & NewCount ¬
& " new messages."
end if
end tell
5. Add a display dialog statement to display the myMess message in an OK-only dialog
box with the title New Messages. The new statement appears in boldface here:
tell the application id "com.apple.mail"
set NewCount to the unread count of mailbox "INBOX" ¬
of account "Main"
if NewCount is 0 then
set myMess to "Your Inbox contains no new messages."
else if NewCount is 1 then
set myMess to "Your Inbox contains 1 new message."
else
set myMess to "Your Inbox contains " & NewCount ¬
& " new messages."
end if
display dialog myMess with title "New Messages" buttons {"OK"}
end tell
6. Save the script under a name of your choice.
7. Press z-R or click the Run button on the toolbar to run the script. You’ll see a dialog
box such as the one shown in Figure 13-1.
8. Click the OK button in the dialog box, and then close the script.
Figure 13-1 A dialog box that displays the number of unread messages in only one of Mail’s
accounts.

Chapter 13: Automating Apple Mail 281
Creating and Sending Messages
Mail distinguishes between messages you send, which it calls outgoing messages, and
messages you receive, which it calls simply messages. This section shows you how to
work first with outgoing messages and then with incoming messages.
Creating an Outgoing Message
Mail uses the outgoing message object to represent each outgoing message. Table 13-6
explains the properties of the outgoing message object.
To create a new outgoing message, you use the make new outgoing message
command. Normally, you’ll want to set the essential properties of the message—the
sender property, the subject property, and the content property—in the same command.
Here’s an example that first assigns the text for the content property to a variable to
shorten the make new outgoing message statement:
tell the application id "com.apple.Mail"
set cust_mess to ¬
"Thank you for your recent query about our products." ¬
& return & return & ¬
"We will send you a full information pack today."
make new outgoing message with properties ¬
{sender:"eduardo_sempio@mac.com", ¬
subject:"Thank You for Your Product Query", ¬
content:cust_mess, visible:true}
end tell
outgoing message Property Explanation
sender The sender to use for the outgoing message. Identify the
account by name—for example, steveb@mac.com.
subject The subject line of the message
content The content of the message’s body
visible true if the message is displayed on screen; false if it is hidden
from view. The default setting is false.
message signature The signature (if any) applied to the message
Id A unique identifier for this message
Table 13-6 Properties of the outgoing message Object

282 AppleScript: A Beginner’s Guide
recipient Object Recipients List Explanation
to recipient to recipients A recipient in the message’s To field
cc recipient cc recipients A recipient in the message’s Cc field
bcc recipient bcc recipients A recipient in the message’s Bcc field
Table 13-7 Mail’s Three Types of Recipients
Q: When I use the make new outgoing message command, nothing happens—but
AppleScript doesn’t return an error. What’s wrong?
A: Most likely, you just need to set the visible property of the outgoing message object to
true so that you can see what’s happening.
If you don’t set the visible property to true, leaving it at its default setting of false, Mail
creates a hidden message that you can’t check visually. You can kick this message into
visibility by trying to quit Mail, at which point the application will prompt you to save the
changes to the message.
Ask the Expert
You’ll have noticed that the outgoing message object doesn’t have a property for the
recipient or recipients, let alone recipients of carbon-free copies or blind-carbon copies.
Instead, you need to add the recipients separately using a make new command and the
appropriate ones from the three types of recipient objects explained in Table 13-7.
Each of the recipient objects has two properties:
● address The e-mail address for the recipient
● name The display name used for the recipient
Without the address property, the message can’t be sent. But normally, you’ll want to
use the name property as well to make clear who the message is being sent to.
The following example creates a new message, assigns it to the variable my_mess,
and then uses that variable to add a recipient:
tell the application id "com.apple.Mail"
set my_mess to make new outgoing message with properties ¬
{sender:"eduardo_sempio@mac.com", subject:"Latest News", ¬

Chapter 13: Automating Apple Mail 283
content:"Here is the latest news about our company.", ¬
visible:true}
tell my_mess
make new to recipient at end of to recipients with properties ¬
{name:"Chris Smith", address:"chris__smith@mac.com"}
end tell
end tell
The following example, which assumes the my_mess message has already been
created, adds a to recipient, a cc recipient, and a bcc recipient:
tell my_mess
make new to recipient at end of to recipients with properties ¬
{name:"Chris Smith", address:"chris__smith@mac.com"}
make new cc recipient at end of cc recipients with properties ¬
{name:"Jan Ramirez", address:"jan.ramirez44@gmail.com"}
make new bcc recipient at end of bcc recipients with properties ¬
{name:"Dan Philps", address:"dan_philps@hotmail.com"}
end tell
NOTE
To add multiple recipients of the same type, use a make new statement for each recipient.
You can also use a repeat loop.
Attaching a File to an Outgoing Message
When you need to send a file as an attachment, use a make new attachment command
to tell the content object of the message object to add the attachment and where to put it.
The attachment class has only one property, file name, which you use to specify the path
and name of the file you want to attach.
For example, the following statement assigns an alias to the file Macintosh HD:
Users:dan:Documents:User Guide.pdf to a variable named myFile, which it then uses
to attach the file to the message referenced by the variable my_mess:
set myFile to alias "Macintosh HD:Users:guy:Documents:User Guide.pdf"
tell my_mess
tell the content
make new attachment with properties {file name:myFile} at
after last paragraph
end tell
end tell
To attach multiple files to the same message, use a separate make new attachment
statement for each file. Alternatively, use a repeat loop to add the files.
284 AppleScript: A Beginner’s Guide
Sending the Message
When you’ve finished creating the message, all you need to do to send it is use the send
command. For example, the following command sends the message referenced by the
variable my_mess:
send my_mess
Dealing with Incoming Messages
Mail uses the message object to represent an incoming message (as opposed to the
outgoing message object that represents an outgoing message). Table 13-8 explains the
properties of the message object.
message Property Explanation
id A unique integer that identifies the message. Mail assigns this integer, which is
read-only.
all headers A read-only property that contains all the headers of the message (including
the headers that are normally hidden)
background color The background color for the message. You can use none (the best choice),
blue, gray, green, orange, purple, red, or yellow. In theory, you can also use
other and specify an RGB color, but this doesn’t work properly at this writing.
mailbox The mailbox that contains the message
content The message’s text content
date received The date that Mail received the message
date sent The date the message was sent
deleted status true if the message is marked as deleted; false if it is not
flagged status true if the message has a flag set on it; false if it does not
Junk mail status true if the message is marked as being junk mail; false if it is not
read status true if the message is marked as having been read; false if it is marked as unread
message id A text ID that uniquely identifies the message—for example, “BAY113-DAT84
E653D459B1FDEC4D92DB1200@phx.gbl”
sender The sender of the message—for example, “Helen Hochwasser
<h_wasser@hotmail.com>”
subject The subject line of the message
was forwarded true if the message is marked as having been forwarded; false if it is not
was redirected true if the message is marked as having been redirected; false if it is not
was replied to true if the message is marked as having had a reply sent for it; false if it is not
Table 13-8 Properties of the Mail message Object

Chapter 13: Automating Apple Mail 285
Mail puts messages you receive into the inbox for the account to which they’re
sent, so this is where you’ll usually want to check for them. For example, the following
statement returns the name of the sender of the first message in the inbox of the account
named Main Mail:
get the sender of the first message in the mailbox "INBOX" ¬
of the account "Main Mail"
NOTE
You must refer to the inbox in capitals—INBOX—to make Mail understand which
mailbox you’re referring to.
Opening a Message in a Separate Window
You can read a message easily enough in the message area of Mail’s Message Viewer
window, but you may want to open a message in a separate window so that you can give it
your undivided attention or scrutinize it alongside another open message.
To open a message, use the open command, identifying the message, the mailbox that
contains it, and the account that contains the mailbox. For example, the following tell
block opens the first message in the inbox of the account named Main Mail:
tell the mailbox "INBOX" of the account "Main Mail" ¬
open the first message
end tell
Deleting a Message
To delete a message, use the delete command. As usual, you need to identify the message,
the mailbox that contains it, and the account that contains the mailbox. For example, the
following statement deletes the first message in the inbox of the account named Main Mail:
tell the mailbox "INBOX" of the account "Main Mail" ¬
to delete the first message
NOTE
Deleting a message puts it in Mail’s Trash, from which you can recover it until you empty
the Trash.
Moving a Message to a Folder
To move a message to a folder, you set the mailbox property of the appropriate message
object to the target mailbox. For example:
set the mailbox of the first message ¬
in the mailbox "INBOX" in the account ".Mac account" ¬
to mailbox "GMSV" of mailbox "Newsletters"

286 AppleScript: A Beginner’s Guide
NOTE
To refer to one mailbox stored inside another, use the name of the nested mailbox, “of,” and
the name of the mailbox that contains it. For example, use mailbox “Shauna” of mailbox
“Friends” to refer to the mailbox named Shauna stored in the mailbox named Friends.
Dealing with Incoming Attachments
When you receive a file attached to a message, Mail treats the file as a mail attachment
object. This object has the properties explained in Table 13-9.
To save an attachment to a folder, you can use the standard save command with the
name property of the appropriate item in the mail attachment object. For example, the
following statement saves the first attached file of the second message in the Inbox folder
of the account named Main Mail to the folder Macintosh HD:Users:pik:Downloads:
tell the mailbox "INBOX" of the account "Main Mail"
save the first item of the mail attachment of the second message ¬
in "Macintosh HD:Users:pik:Downloads:" & ¬
name of the first item of the mail attachment ¬
of the second message
end tell
mail attachment Property Explanation
name The file name or names of the attached files, returned as a
list—for example, {"Literary Trauma.docx","Sheep Design in
the Rockies.jpg"}
MIME type The MIME type of the attachment—for example, text/plain for
a text file, image/jpeg for a JPEG file, application/msword for
a Microsoft Word document, application/pdf for a PDF file, or
application/zip for a zip file. This property returns a list—for
example, {"application/pdf", "application/zip", "text/plain"}
for three attachments.
file size The approximate size of the attached file, measured in bytes,
as a list—for example, {228777, 896834, 482525} for three
attachments. Because sending a file as an attachment adds
overhead, the attachment’s file size is larger than the size of the
file you end up removing from the message.
downloaded true if Mail has downloaded the file from the server; false if it
has not. Again, you get a list—for example, {false,false} for a
brace of attachments that are still on the server.
Id A text ID that uniquely identifies the attached file within the
message (rather than globally)—for example, 1 or 1.2. Once
more, you get a list—for example, {"1"} for a single attachment.
Table 13-9 Properties of the mail attachment Object

Chapter 13: Automating Apple Mail 287
This is fine if you know that the message has an attachment. If not, you need to test.
The following code shows one way of finding messages with attachments—using a repeat
loop to walk through the messages in a mailbox one by one, checking each to see if the
name property of the first item of the mail attachment is not equal to a blank string (" "),
and then saving it with a similar technique to that described previously.
tell the application "Mail"
set myFolder to "Macintosh HD:Users:guy:Incoming:"
try
tell the mailbox "INBOX" of the account "Demon"
repeat with myCounter from 1 to count of messages
if the name of item 1 of the mail attachment ¬
of the message myCounter as string ¬
is not equal to "" then
set myAttachments to every mail attachment ¬
of message myCounter
repeat with Counter2 from 1 ¬
to count of items in myAttachments
set filename to the name of item Counter2 ¬
of myAttachments
save item Counter2 of myAttachments ¬
in myFolder & filename
end repeat
end if
end repeat
end tell
on error myErrorMessage number myErrorNumber
if myErrorNumber is -1728 then
-- the message has no attachment; continue to next message
end if
end try
end tell
If the message being checked has no attachment, trying to get the name of the first item
of the attachment returns an error. The error handler checks for this error (number –1728)
to allow the script to continue past messages that have no attachments.
Working with Tasks
To create a new task that appears in your To Do list in Mail’s Reminders category, you
need to use iCal rather than Mail. iCal uses the todo class to represent a task. Table 13-10
explains the properties of the todo object.
To create a new task, use a make new todo command in iCal. Tell iCal where to place
the new item—for example, at the end of todos of a particular calendar—and use a with
properties parameter to set essential properties such as the summary and the due date.
288 AppleScript: A Beginner’s Guide
todo Property Explanation
completion date The date on which the task was marked as completed
due date The date on which the task is set to be due
priority The task’s priority: no priority, low priority, medium priority, or high priority
sequence A read-only integer that gives the version number of the task
stamp date The date on which the task was modified
summary The name of the task
description The notes added to the task
Uid A unique text identifier that identifies the task
url The URL (if any) associated with the task
Table 13-10 Properties of the iCal todo Object
For example, the following snippet creates a new task in the Work calendar with the
summary (name) Mow the Roses and a due date in July 2010:
tell the application "iCal"
make new todo at the end of todos of the calendar "Work" ¬
with properties {summary:"Mow the Roses", ¬
due date:date "Wednesday, July 14, 2010 12:00:00 PM"}
end tell
The ideal way to work with a task via AppleScript is to identify it by its uid property
because this property’s uniqueness means you can be sure you’ve got exactly the item you
want. But unless you’ve just created the task, you’re not likely to be able to grab its uid
property quickly unless you can easily identify it in another way—for example, by virtue
of its being the first item in a particular calendar.
The following example shows a way of using the summary property of a todo object
to identify it and then delete it, though you could use the same technique to perform
other operations on it—for example, shoving its due date out into the middle distance or
ratcheting up its priority to the subpoena level. Here’s what the code does:
● First, it declares the myToDos variable as containing every todo item in the calendar
called Work.
● Next, it starts a repeat loop with a counter variable (myCounter) to run from 1 to
the count of myToDos—in other words, once for each of the todo items found in the
calendar.

Chapter 13: Automating Apple Mail 289
● The third line assigns to a variable named myToDo the item myCounter of
myToDos—the first todo on the first iteration of the loop, the second todo on the
second iteration, and so on.
● If the summary of myToDo matches the test string, the delete myToDo statement
deletes the todo item, and the return statement kicks AppleScript out of the loop so
that it doesn’t run again.
● If the summary of myToDo doesn’t match the test string, the loop keeps running until
either it finds a match or it reaches the last item in myToDos:
tell the application id "com.apple.ical"
set myToDos to every todo of the calendar "Work"
repeat with myCounter from 1 to count of myToDos
set myToDo to item myCounter of myToDos
if summary of myToDo as string is "Mow the Park" then
delete myToDo
return
end if
end repeat
end tell
This page intentionally left blank

291
Chapter 14
Automating
Microsoft Word

292 AppleScript: A Beginner’s Guide
Key Skills & Concepts
● Launching and quitting Word
● Understanding the key Word objects for AppleScript
● Working with documents
● Working with windows and views
● Working with text
● Using sections, page setup, and headers and footers
● Displaying Word’s built-in dialog boxes
● Running your scripts from Word
In this chapter, you’ll learn the essentials of manipulating Microsoft Word 2008 via
AppleScript. We’ll start by looking at how to launch Word and quit it, and then move
on to examine the key objects that you use for scripting Word. Most likely, your first
action will be to choose a document to work on, so I’ll show you how to create, save,
open, and close documents—and how to print them. We’ll then peer at how to work with
windows and views, how to add text to a document and format it, and how to set up a
document using sections, page setup, and headers and footers. Finally, I’ll teach you how
to commandeer Word’s built-in dialog boxes for use in your scripts, and how to run the
scripts directly from Word rather than using the Script menu on the Mac OS X menu bar.
Launching Word—and Quitting Word
To launch Word, use the launch command—for example:
tell the application id "com.microsoft.Word" to launch
If you want to bring Word to the front, use an activate statement as well:
tell the application id "com.microsoft.Word"
launch
activate
end tell

Chapter 14: Automating Microsoft Word 293
NOTE
You can also launch and activate Word by using the activate command without the
launch command. But usually it’s better to make explicit what your code does.
You can also launch Word implicitly by telling it to open a document or to create
a new document. For example, the first of the following statements tells Word to create a
new document, and the second statement activates Word. If Word is not open, the make
new document command launches Word, because it can’t create a document unless
it’s open.
tell the application id "com.microsoft.Word"
make new document
activate
end tell
To quit Word, use the quit command as usual:
tell the application id "com.microsoft.com" to quit
Before complying with the quit command, Word prompts you to save any unsaved
changes to documents. We’ll look at how to deal with unsaved changes a little later in this
chapter.
Understanding the Key Word
Objects for AppleScript
To make Word do your bidding via AppleScript, you work with the objects from which
Word is built and the objects it creates. In this chapter, you will work with the most widely
useful objects, which include the following:
● The application class returns the Word application. You use the application class to
manipulate Word as a whole—for example, to launch Word or to quit it.
● The document class represents an open document. Word organizes the document
objects into the documents list, which you can use to reach any open document.
● The active document class returns the active document—the one that currently has
the focus. This class is great for scripts that need to manipulate the document that the
user is working with.
● The window class represents a window that a Word document appears in. Word collects
the window objects into the windows list, which enables you to grab hold of any window.

294 AppleScript: A Beginner’s Guide
● The active window class returns the active window in the Word application. This class
gives you direct access to the window with which the user is working.
● The selection class represents the user’s current selection in the active document. You
use this class to access the text or other object with which the user is working.
Working with Documents
Chances are that you’ll spend most of your Word time working with documents—creating
and saving them, opening and closing them, and printing them out on dead trees. This
section shows you how to perform these operations with documents. Later sections dig
into the details of operations you’ll want to perform with documents open, such as adding
text to them and formatting them.
Creating a New Document
To create a new document based on the Normal template, use a make new document
statement. This statement adds a new document to the documents list, where you can
work with it.
tell the application id "com.microsoft.Word"
make new document
end tell
Sometimes all you’ll want to do is create a new document like this and leave it for the
user to work with, but what’s usually more useful is to assign the new document you create
to an object variable so that you can keep tabs on it. For example, the following statement
assigns the new document created by the make new command to the variable myDoc:
tell the application id "com.microsoft.Word"
set myDoc to make new document
end tell
You can then use the myDoc variable to manipulate the document—for example, to
add text or other items to it, to save it, or to close it.
As you’ll know if you’ve worked with Word, the Normal template is a catch-all
template used for documents that don’t need a specific template. Because each document
must have a template attached to it, Word automatically attaches the Normal template
unless you tell it to use another template. Word automatically loads the Normal template
when you launch the application; it loads any other template when you create or open a
document with that template attached, or when you open the template itself.

Chapter 14: Automating Microsoft Word 295
Working with the Template Attached to a Document
The first step toward making a document look the way you want is to attach the right
template to it. Because a template can contain custom settings from margins to styles, not
to mention default content, you can save time by making sure that a document has the
appropriate template attached.
Seeing Which Template Is Currently Attached
To find out which template is attached to a document, check the attached template
property of the relevant document object. For example, the following statement uses the
name property of the attached template object to return the filename of the document
object referenced by the myDocument variable:
get name of attached template of myDocument
This returns just the filename—for example, "Post-Modern Report.dotx". If you
want the full path and filename of the template attached to a document, return the full
name property of the attached template object like this:
get full name of attached template of myDocument
This returns all the information you need to reach the template—for example,
"Macintosh HD:Users:kat:Templates:Indecipherable Newsletter.dotx".
Attaching a Template to a Document in Word 2008
To change the template attached to a document, set the attached template property of
the appropriate document object to the template you want. For example, the following
statement attaches the template named Over-Arty Flyer.dot to the front document:
set the attached template of the front document to "Macintosh HD:
Users:kat:Templates:Over-Arty Flyer.dot"
When you’re creating a new document, you can attach a template to it by setting the
template item in the document’s properties to the appropriate template. For example, the
following statement assigns to the variable myDoc a new document based on the template
named Sudoku Designer.dotx:
set myDoc to make new document with properties {attached template: ¬
"Macintosh HD:Users:kat:Templates:Sudoku Designer.dotx"}
Attaching a Template to a Document in Word 2004
In Word 2004, the attached template property doesn’t work consistently. If you find it
doesn’t work on your copy of Word, try using a do Visual Basic statement instead.

296 AppleScript: A Beginner’s Guide
Q: Can I use the do Visual Basic statement in Word 2008?
A: Sadly not.
The do Visual Basic statement executes the Visual Basic for Applications (VBA)
command that you specify, so it’s a great tool to have up your sleeve if you know VBA.
But Office 2008 for Mac doesn’t include VBA, so you can’t use the do Visual Basic
command with Word 2008. Supposedly Microsoft will graft VBA back on to the next
version of Office for Mac, so do Visual Basic may return too.
Ask the Expert
For example, the following statement attaches the template named Industrial.dot to
the active document:
do Visual Basic "ActiveDocument.AttachedTemplate = \"Macintosh HD:
Users:kat:Templates:Industrial.dot\""
One thing to notice there—because AppleScript passes the command to VBA as a
string inside double quotes, you have to escape the double-quote characters around the
template path and name with backslashes to prevent them from ending the command. This
is why the path begins and ends with \" rather than a plain double-quote character.
Finding Out Where the Templates Are
The examples so far have used hard-coded paths, which work fine—as long as you know
them. But because the Word templates will likely be stored in different folders on different
Macs, you’ll normally need to use the paths to the template folders to reach the templates
reliably.
Word stores template files in two different folders:
● User Templates This is the folder in which the user stores his or her own templates.
The default location is the user’s ~/Library/Application Support/Microsoft/Office/User
Templates/ folder (where ~ represents the user’s home folder). Word sets this folder
automatically on installation, but you can change it as needed.
● Workgroup Templates This is the folder an administrator can use to make other
templates available to the user. Word doesn’t set this folder, so unless someone sets
it manually, it may remain blank in the File Locations Preferences. For a networked
Mac, it’s usually best to locate this folder on a network drive so that the administrator
can easily update the templates centrally.
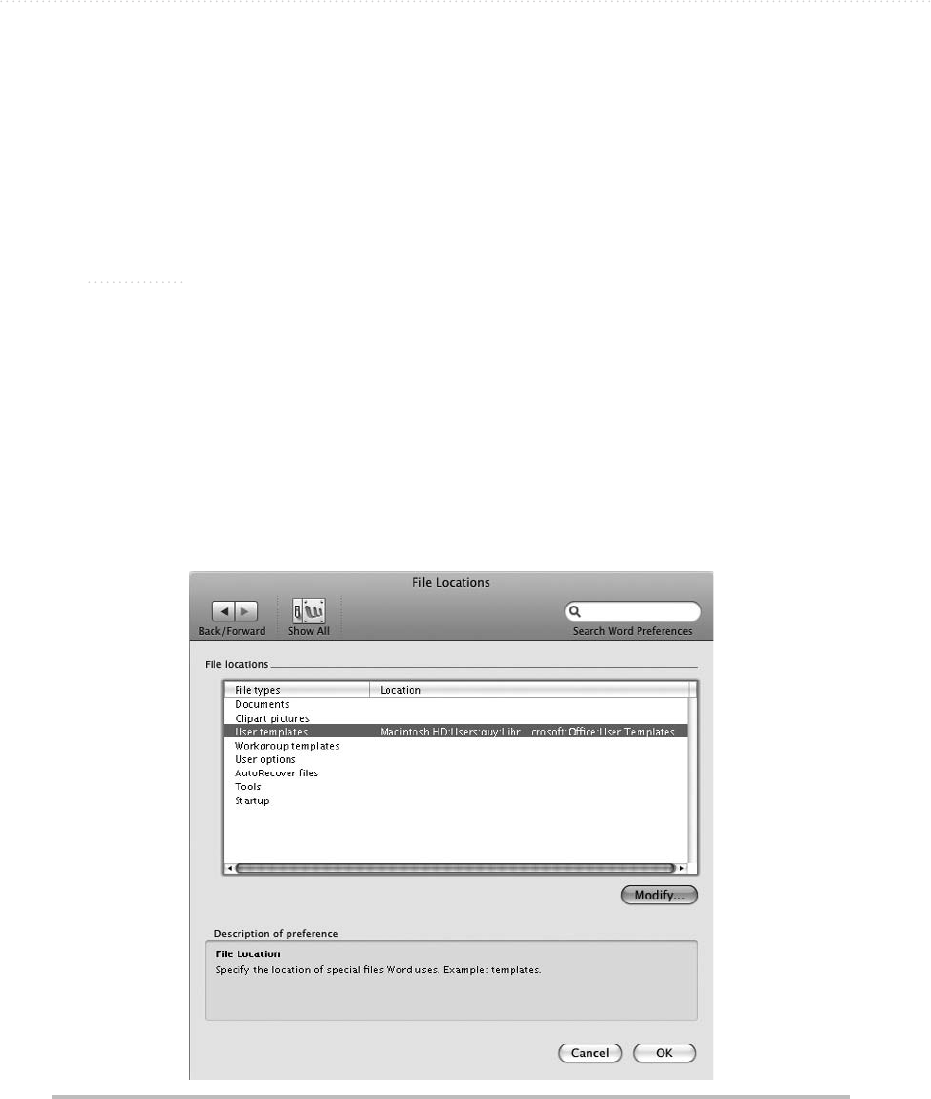
Chapter 14: Automating Microsoft Word 297
When working interactively, you can set the User Templates location and the Workgroup
Templates location by choosing Word | Preferences, clicking the File Locations icon, and
then working in the File Locations Preferences window (see Figure 14-1). Click the User
Templates item in the File Locations list box, click the Modify button, select the folder you
want in the Choose A Folder dialog box, and then click the Choose button. Lather, rinse, and
repeat for the Workgroup Templates item, and then click the OK button to close the window.
NOTE
Even if the File Locations Preferences window shows the Workgroup Templates location
to be blank, AppleScript returns a default location, such as /Applications/Microsoft
Office 2008/Office/Media/Templates/.
Using AppleScript, you can get or set the template folders by using the default file
path command and specifying the user templates path constant or the workgroup
templates path constant for the file path type parameter. For example, the following
statement returns the User Templates path:
get default file path file path type user templates path
Figure 14-1 You can set the User Templates location and Workgroup Templates location
manually from the File Locations Preferences.

298 AppleScript: A Beginner’s Guide
And the following “path”-heavy statement sets the User Templates path to a
networked drive:
set default file path file path type workgroup templates path ¬
path "Server:Templates:Word"
Creating a New Template
To create a new template from AppleScript, create a new document as described earlier in
this chapter. Base the document on an existing template if you wish. When you save the
document, as discussed later in this chapter, use the format template constant for the file
format parameter, as in this example:
save as active document file name ¬
(get default file path file path type user templates path) & ¬
":Example template.dotx" ¬
file format format template
Opening an Existing Document
You open an existing document by using the open command and the filename, including
the path to it. For example, the following statement opens the document named Sample
Document.docx in the Macintosh HD:Users:Shared:Documents: folder:
open "Macintosh HD:Users:Shared:Documents:Sample Document.docx"
TIP
If you want to prevent the document you’re opening from appearing on the Recent
Documents list in Word, add the parameter without add to recent files. This is useful when
you prefer your script not to change the user’s Recent Documents list. Omit this parameter
or use with add to recent files to add the document to the Recent Documents list.
Saving a Document
To save a document for the first time, use the save as command with the appropriate
document object. As when you’re saving a document using the Save As dialog box, Word
offers various options, including password-protecting the document. These are the three
parameters you’re most likely to use:
● file name This parameter is optional, but you’ll almost always want to provide
it—if you don’t, Word blandly uses whatever name the document window has, such as
Document42. (Arguably, this is marginally better than the alternatives—throwing an error
or displaying the Save As dialog box so that the user can choose a more creative name.)
Include the folder path in the filename, or else you’ll get whichever folder was last used.

Chapter 14: Automating Microsoft Word 299
● file format This parameter is optional, too, but you should always use it to make
sure you get the format you want—if you omit file format, Word uses the format
selected in the Save Word Files As pop-up menu in the Save Preferences window.
Table 14-1 explains the 10 most useful file formats you can use.
● without add to recent files Add this optional parameter if you want to prevent
the document from appearing on the Recent Documents list. This lets you create
documents without changing the user’s Recent Documents list. Omit this parameter (or
use with add to recent files for clarity) to add the document to the Recent Documents
list—for example, if you want the user to be able to reopen the document easily.
file format Constant Format Extension Comments
format document Word 2007/2008 document .docx The most stable document
format, but users with Word
2004, Word 2003, or Word
XP will need to install file
converters before they can
open these documents.
format document97 Word 97–2004 document .doc The most widely used format.
Good for general use.
format documentAuto (The format set in Save
Preferences)
— Use this setting when you want
to follow the user’s preferred
file format.
format template Word 2007/2008 template .dotx Use this format for templates
you create for Word 2008 or
Word 2007.
format template97 Word 97–2004 template .dot The most widely used template
format. Good for general use.
format templateAuto (The template format matching
the document format set in
Save Preferences)
— Use this setting when you want
to follow the user’s preferred
file format for templates.
format Unicode text Unicode text .txt Use this setting to produce
a universally readable text
document without formatting.
format rtf Rich-text format .rtf Use this setting to produce a
widely readable RTF document
(including formatting and
objects such as pictures).
format pdf Portable Document Format .pdf Use this setting when you need
to create a PDF.
format xml Extensible Markup Language .xml Use this setting to save the
Word document in XML format.
Table 14-1 Word’s 10 Most Useful File Formats

300 AppleScript: A Beginner’s Guide
For example, the following statement saves the active document in Word 2007/2008
format in the folder Transfer:Documents:Word with the filename Sad Penguins.docx:
save as active document ¬
file name "Transfer:Documents:Word:Sad Penguins.docx" ¬
file format format document
The following statement saves the front document in the current working folder in
Word 97–2004 format with the filename Primate Language.doc, preventing the document
from appearing on the Recent Documents list:
save as front document file name "Primate Language.doc" ¬
file format format document97 without add to recent files
After you’ve saved a document with a filename and folder location, you can save it
again by using the save command with the document but without any further parameters.
For example, the following command saves any unsaved changes in the active document:
save the active document
Making a Document the Active Document
When you’re working via AppleScript, you don’t need to activate a document in the way
that you need to when you’re working interactively. All you need to do is identify the
document you want to affect, and then tell AppleScript what to do to the document.
When your scripts need to show a document to the user, however, you can activate
the document by using the activate object command, the document keyword, and the
name of the open document you want. Before you do this, you need to use the activate
command to make sure that Word is the active application—otherwise, the activate object
command simply doesn’t work, instead failing without raising an error.
For example, the following snippet activates the document named Sample Document.doc:
tell the application id "com.microsoft.word"
activate
activate object document "Sample Document.doc"
end tell
When you’ve made a document active, either by using the activate object command
as described in the previous section or by another means (for example, by creating a new
document), that document is the active document. You can then access it by using the
active document class in Word.

Chapter 14: Automating Microsoft Word 301
NOTE
There’s only one active document at a time in Word. The active document class makes it
easy to manipulate the document the user was working with, but you need to be careful
because the active document can change during the course of a script. Obviously, if you
deliberately activate another document, that document becomes the active document—
but so does a new document you create or a document you open. Similarly, if you close
the active document, the next document behind it becomes active.
Closing a Document
To close a document, use the close command with the document’s name or a variable or
object identifying it. For example, the following statement closes the document named
New Document.doc:
tell the application id "com.microsoft.word"
close the document "New document 1.doc"
end tell
If the document contains unsaved changes, Word prompts the user to save them.
Sometimes this behavior is convenient, but more often you’ll want to take care of any
unsaved changes before giving the command to close the document. If you want to save
the changes, you can either save the document using the save command (as described
earlier in this chapter) or set the saving parameter of the close command to yes:
close the document "New document 1.doc" saving yes
If you need to close the document and lose any unsaved changes without Word
prompting the user about them, set the saving parameter of the close command to no:
close the document "New document 1.doc" saving no
NOTE
If you try to close a document that has never been saved, Word displays the Save As
dialog box unless you’ve set the saving parameter to no. For this reason, it’s usually
best to use the save command to explicitly save each new document you create rather
than rely on the saving yes parameter of the close command to save any documents
you’ve neglected to save.
If you want Word to prompt the user to decide whether to save changes, set the saving
parameter to ask:
close the document "New document 1.doc" saving ask
Setting saving ask makes Word display the familiar “Do you want to save the changes
you made?” dialog box (see Figure 14-2).
302 AppleScript: A Beginner’s Guide
CAUTION
Prompting the user to decide whether to save changes works best when the user
knows which changes have been made—for example, if your script needs to close the
documents the user has left open so that it can run safely. If the script has changed the
document involved, whether to save the changes can be a tricky decision for the user.
To close all open documents, use the close command with the documents list. As
with a single document, you can choose whether to save changes by setting the saving
parameter to yes, no, or ask, as appropriate. For example, the following statement closes
all open documents, saving changes without consulting the user:
tell the application id "com.microsoft.word"
close documents saving yes
end tell
NOTE
Word itself stays open when you close all open documents. To close Word itself, quit it
by using the quit command.
Identifying the Document You Want to Work With
When you’re working with Word interactively, you always use the active document—the
document to which you’ve given the focus by selecting its window with the keyboard or
the mouse.
When you’re working with Word from AppleScript, you can work either in the active
document or in any other document that’s open.
For example, if you want to close the back document without saving changes, use a
statement such as this:
close the back document saving no
Figure 14-2 When closing a document that contains unsaved changes, Word asks the user
to save them if your code doesn’t specify whether to keep the changes or dump
them.

Chapter 14: Automating Microsoft Word 303
Unlike when you’re working interactively, you don’t need to activate one of the open
documents before you can work with it via AppleScript. All you need to do is identify the
document to Word.
Printing a Document
To print a document, use the print out command.
The only required parameter for the print out command is the direct parameter, which
specifies the document or window you want to print. When you print like this, it’s pretty
much like clicking the Print button on the toolbar in Word: You get the whole document
(and nothing but the document), one copy of it, in page order, printed to either the default
printer (if you haven’t yet printed in this Word session) or the last printer you used (if you
have). For example, the following statement prints the active document in this way:
print out active document
Often, you’ll want to use some of the optional parameters the print out command
offers. These are the most useful parameters:
● print out range Use this parameter when you need to print out a range of pages.
Use the constant print all document to print all pages, print current page to print
the page the selection is on, print from to to print a simple range of pages by page
numbers or section numbers, print range of pages to print a complex range of pages
(for example, pages 1, 4, 9–16, 20), or print selection to print the current selection.
● page from Use this parameter to set the starting page when you use print out range
print from to.
● page to Use this parameter to specify the ending page when you use print out
range print from to.
● print copies Use this parameter to specify the number of copies when you need
more than one—for example, print copies 5 to print five copies.
● print out page type Use this parameter when you need to print out only odd pages
(print odd pages only) or only even pages (print even pages only). You can also
use print out page type print all pages to print all pages, but there’s not much point,
because Word does this anyway unless you tell it not to.
For example, the following statement prints the selection in the active document:
print out active document print out range print selection

304 AppleScript: A Beginner’s Guide
Try This
NOTE
To find out which printer is active, get the active printer property of the application
class. Set the active printer property to change the printer.
The following statement prints the even pages from the document referenced by the
variable pDoc:
print out pDoc print out page type print even pages only
NOTE
Another option is to display the Print dialog box so that the user can print the
document as needed. See the end of the chapter for details on displaying Word’s
built-in dialog boxes.
Creating, Saving, and Closing a Document
In this example, you create a script that launches Word by creating a new document based
on the Normal template. The script then saves the document and closes it, leaving a blank
document that you will use again in examples later in this chapter.
Follow these steps to create the script:
1. Quit Word if it’s currently running. (Go on—you can do without it for a couple of
minutes. Trust me.)
2. In AppleScript Editor, press z-N or choose File | New to create a new script.
3. Start a tell block to Word, identifying it by its application id string, com.microsoft.Word:
tell the application id "com.microsoft.Word"
end tell
4. Inside the tell block, add a make new document statement and assign it to the variable
new_doc, as shown in boldface here:
tell the application id "com.microsoft.Word"
set new_doc to make new document
end tell
5. Add an activate statement, as shown in boldface here, to make Word reveal itself and
the new document to you. If you don’t do this, you won’t see what’s happening.
tell the application id "com.microsoft.Word"
set new_doc to make new document
activate
end tell

Chapter 14: Automating Microsoft Word 305
6. Use a save as command to save the new_doc document under the filename Sample
Document.docx using the Word 2007/8 document format (file format format
document). Adapt the file path to suit your file system. The new command appears in
boldface here:
tell the application id "com.microsoft.Word"
set new_doc to make new document
activate
save as new_doc file name ¬
"Macintosh HD:Users:kev:Documents:Sample Document.docx" ¬
file format format document
end tell
7. Add a three-second delay to prevent AppleScript from trying to execute the commands
more quickly than Word can handle; then close the document and quit Word. The new
statements appear in boldface here:
tell the application id "com.microsoft.Word"
set new_doc to make new document
activate
save as new_doc file name ¬
"Macintosh HD:Users:kev:Documents:Sample Document.docx" ¬
file format format document
delay 3
close the document "Sample Document.docx"
quit
end tell
8. Save the script under a name of your choice.
9. Press z-R or click the Run button on the toolbar to run the script. You’ll see Word open,
create a new document and then display Sample Document in the title bar, and then
close the document and quit.
Q: What happens if my code tries to save a document in a folder that doesn’t exist?
A: This depends on the version of Word—but it’s worth avoiding in any case.
● Word 2008 falls back to the default Documents folder set in File Locations preferences
or (if none is set) your ~/Documents folder. This is sane and helpful, but even so, it can
cause some surprises.
● Word 2004 throws an error.
Ask the Expert

306 AppleScript: A Beginner’s Guide
Working with Windows and Views
To present documents helpfully on screen, you’ll often need to open, close, and resize
windows. You will also need to change the view and zoom it to a suitable degree.
Working with Windows
To work with windows, you use the windows list, which contains a window object for
each open window. Word treats the windows as being in a stack, with the active window at
the front, so you can access the windows in various ways.
● By the window’s position in the stack For example, use the front window or
window 1 to return the front window.
● By the window’s caption The caption property of a window object returns the text
that’s displayed in the window’s title bar. You can use this property to identify the
window you want. For example, the following if block checks to see if the caption of
the window identified by the myWindow variable is Papal Bull.docx; if the caption
matches, the code activates Word and then activates the window.
if the caption of myWindow is "Papal Bull.docx" then
activate
activate object myWindow
end if
● By using the active window class The active window class lets you grab the active
window—the window the user is actually using.
Zooming a Window
To zoom a window up, set the window state property of the window object to window
state maximize; to zoom it back down, set the window state property to window state
normal. For example, the following tell block toggles the front window between zoomed
up and zoomed down, assuming it is in one of those states to start with:
tell the application id "com.microsoft.Word"
tell the front window
if the window state is window state maximize then
set the window state to window state normal
else if the window state is window state normal then
set the window state to window state maximize
end if
end tell
end tell

Chapter 14: Automating Microsoft Word 307
The third state, which the previous example doesn’t use, is window state minimize.
Set the window state property to window state minimize to minimize a window down to
an icon on the Dock.
CAUTION
The word “zoom” here has the Mac meaning of making the window the size that Mac
OS X thinks best fits its contents, or of returning the window from that size to its previous
size—the same as clicking the green button in the upper-left corner of the window or
choosing Window | Zoom. This is not the same as maximizing the window on Windows.
Minimizing and Restoring a Window
To minimize a window, set its collapsed property to true. For example, the following
statement minimizes the first window of the document referenced by the variable myDoc:
set collapsed of window 1 of myDoc to true
To restore a window, set the collapsed property to false. For example, the following
statement restores the same window:
set collapsed of window 1 of myDoc to false
Resizing, Repositioning, and Arranging Windows
To resize a window, set the left position, top, width, and height properties of the
appropriate window object. Each of these properties takes an integer value of pixels. For
example, the following tell blocks position the front window in the upper-left corner of
the primary monitor and make it 1024 wide by 800 pixels high:
tell the application "Microsoft Word"
tell the front window
set left position to 0
set top to 0
set height to 800
set width to 1024
end tell
end tell
To reposition a window without resizing it, set the left position property and the
top property to suitable pixel values. For example, the following tell block makes Word
position the upper-left corner of the front window 400 pixels from the left edge of the
screen and 200 pixels from the top edge:
tell the application "Microsoft Word"
set left position of front window to 400
set top of front window to 200
end tell

308 AppleScript: A Beginner’s Guide
NOTE
Word includes an arrange windows command with an arrange style parameter that
you can set to tiled or icons. At this writing, this command doesn’t work as it should. For
example, arrange windows arrange style tiled should tile all the open windows across
the screen, giving each as equal a share of the space as possible. In practice, the tiling
is amusingly random but not much practical use.
Working with Views
To set up a document so that it’s right for reading or for working with, you can set the
view type and the zoom. AppleScript uses the view object to represent the view, and the
zoom object to represent the zoom.
Setting the View in the Window
To work with the view in the window, you use the view object of the appropriate window.
What you’ll probably want to do first is learn which view the window is currently using.
To find out the view, check the view type property of the view object of the appropriate
window object.
get view type of view of active window
This returns one of the view types explained in Table 14-2.
To change the view, set the view type property of the view object of the window
object. For example, the following statement applies Print Layout view to the first window
of the active document:
set view type of view of the first window of the active document ¬
to page view
AppleScript Term Word View Type Notes
page view Print Layout view —
outline view Outline view —
master view Master Document view This is Outline view with Master Document
view turned on.
online view Web Layout view —
draft view Draft view This was Normal view in Word 2004 and
earlier versions.
publishing view Publishing Layout view This view is not available in Word 2004.
wordnote view Notebook Layout view —
Table 14-2 AppleScript Terms for Word’s Views

Chapter 14: Automating Microsoft Word 309
Finding Out the Current Zoom of the Window
To find out the current zoom of the window, return the percentage property of the zoom
object of the view object of the appropriate window. For example, the following statement
returns the zoom percentage of the active window:
get percentage of zoom of view of active window
Zooming the Contents of a Window In or Out
To zoom the contents of a window in so that the user can see every pore of the fonts or
zoom them out until the letters are just flyspecks on the screen, you use the zoom property
of the view object.
To zoom to a percentage, use a set command with the percentage property of the
zoom object. For example, the following statement zooms the first window of the front
document to 150 percent:
set percentage of zoom of view of the first window ¬
of the front document to 150
If the document is in Page Layout view, you can use the page fit full page constant to
display the whole page in the window. For example, the following statements switch the
active window to Page Layout view and then display the whole page in the window:
set the view type of the view of the active window to page view
set page fit of zoom of view of active window to page fit full page
Zooming to the Full Page or the Page Width
To zoom so that the full page appears in the Word window, set the page fit property of the
zoom object to page fit full page. To zoom so that the page appears at its full width in the
Word window, set the page fit property of the zoom object to page fit best fit. To remove
fitting the full page or the page width, set the page fit property of the zoom object to page
fit none.
For example, the following statement zooms the active window to the page width:
set page fit of zoom of view of active window to page fit best fit
Zooming to Display Multiple Pages at the Same Time
One of Word’s neatest tricks is to zoom in or out so that you can see two or more full
pages at the same time. This is especially handy when you need to see two full pages at
once for layout purposes or see a whole slew of pages—eight pages, say, or 16 pages—to
get an overview of a larger document.

310 AppleScript: A Beginner’s Guide
To zoom the display to show multiple pages at the same time, use the page columns
property of the zoom object to set the number of columns of pages and the page rows
property of the zoom object to set the number of rows of pages. For example, the
following statements set the active window to display two rows of four columns each:
set view type of view of the active window to page view
set page rows of zoom of view of active window to 2
set page columns of zoom of view of active window to 4
As in the example, you’ll need to make sure that the window is in Print Layout view
first—otherwise, you’ll get an error when you try to set the page rows property or the
page columns property.
Working with Text
Most Word documents contain text—usually, plenty of it. That means it’s important to
know how to work with text in your scripts. This section shows you how to come to grips
with the text in Word’s documents and smaller objects, how to work with the selection
object, how to work with ranges, and how to enter text in a document.
Returning a Text Object and Reaching Its Contents
To work with text, you use the text object property of an object to return the text in that
object. The text object property returns a text range object—an object that represents a
range of text.
A document object has a text object, as do the bookmark object (which represents a
bookmark) and the cell object (which represents a cell in a table). But usually the most useful
way to get at the text in a document is to return the text object of a paragraph object.
For example, to return a text range object referring to the first paragraph of the active
document, you can use the text object property of the first paragraph object in the active
document object. The following statement returns this text range object and assigns it to
the variable para1:
set para1 to the text object of the first paragraph ¬
of the active document
To reach the text in the text range, you use the content property of the text object
class. For example, the following statement returns the text in the first paragraph of the
active document:
get the content of the text object of the first paragraph ¬
of the active document

Chapter 14: Automating Microsoft Word 311
To change the text in the text range, use a set statement with the content property
of the text object class. For example, the first of the following statements assigns to the
variable para1 the text range object of the first paragraph of the active document. The
second statement sets the content of para1 to New Industrial Policy, a carriage return, and
its existing contents, thus creating a new paragraph before the existing first paragraph:
set para1 to the text object of the first paragraph of the active
document
set the content of para1 to "New Industrial Policy" & return & the
content of para1
Apart from the content property, the text range object has many other properties that
you can use to work with different aspects of the text range. Here are three of the most
useful properties:
● The font object property returns or sets the font object class for the text range, which
you can use to set the font, font size, and other font options. (More on this later in the
chapter.)
● The paragraph format property returns or sets the paragraph format class for the
text range, which you can use to set paragraph formatting, such as the alignment and
line spacing. (More on this, too, later.)
● The style property returns or sets the Word style applied to the text range. (Likewise.)
Working with the Selection Object
If your script needs to work with an object the user has selected in the active document,
use the selection object. For example, if you have the user select some text and then run a
script to manipulate it, the script will need to work with the selection object. You can also
create your own selection by using the select command—for example, your script may
need to highlight text or another object so that the user can gaze on it with fascination or
(more usefully) do something with it.
The selection object represents the selection or insertion point in the active document.
If something—one or more characters, for example—is selected, the selection object
returns that selection; if nothing is selected, the selection is considered to be collapsed to
an insertion point, and the selection object returns that instead.
Finding Out What Type of Selection You Have
Before you do anything to the selection, it’s a good idea to check which kind of selection
it is. This helps you avoid awkward surprises, such as inserting text over priceless content
that the user has selected, or trying to check the spelling of a non-text object.
Table 14-3 explains Word’s different types of selections.
312 AppleScript: A Beginner’s Guide
For example, the following code checks to see if the selection is collapsed to an
insertion point. If it’s not, the code checks further. If the selection is a block selection, the
nested if statement collapses the selection to its start; if it’s a normal selection, the else if
statement collapses it to its end. If it’s a different kind of selection, the script displays an
alert saying it’s the wrong kind of selection and prompting the user to make the right kind
(see Figure 14-3).
tell the application id "com.microsoft.word"
if selection type of selection is not selection ip then
if selection type of selection is selection block then
collapse range text object of selection ¬
direction collapse start
else if selection type of selection is selection normal then
collapse range text object of selection ¬
direction collapse end
else
display alert "Wrong type of selection" ¬
message "Please click in text where you want ¬
to insert the address." buttons {"OK"}
end if
end if
end tell
selection type Explanation
no selection This is a mystery value that is hard to generate. What you might expect it
to mean—that there’s no selection because the selection is collapsed to an
insertion point—actually has another name.
selection ip No object is selected, and the selection is collapsed to an insertion point.
selection block This is a “block” selection—part of one or more paragraphs is selected. This
is the type of selection you get by OPTION-dragging through part of several
paragraphs (for example, to remove leading spaces from several one-line
paragraphs).
selection normal This is a “normal” selection—for example, a word, a paragraph, or several
paragraphs.
selection column Part or all of one or more columns in a table is selected.
selection row One or more full rows in a table is selected.
selection frame A frame is selected.
selection shape A floating shape or text box is selected.
selection inline shape An inline shape is selected.
Table 14-3 Word’s Different Types of Selections

Chapter 14: Automating Microsoft Word 313
As you can see from the previous example, you can collapse a selection to either its
start or its end by using the collapse range command and using either direction collapse
start or direction collapse end.
● Collapsing a selection to its start is like pressing the LEFT ARROW key when working
interactively:
collapse range text object of selection direction collapse start
● Similarly, collapsing a selection to its end is like pressing RIGHT ARROW:
collapse range text object of selection direction collapse end:
Finding Out Which Part of the Document the Selection Is In
Each Word document consists of 11 different parts, which Word calls stories—for
example, the main text part of the document is called the main text story. To find out
which part of the document the selection is in, you get the story type property. Table 14-4
explains the constants used for the stories.
For example, the following snippet checks to see whether the selection is in the main
text story. If the selection is in another story, the code displays a dialog box asking the
user to select a paragraph in the main text and then run the script again.
if story type of selection is not main text story then
display dialog "Please select a paragraph in the
main text of the document and run this script again."
end if
Getting Information About the Current Selection
When you’re working with the selection in a document, it’s usually a good idea to check
that the selection is what your script expects it to be. For example, if your script is trying to
manipulate a text object but the user has selected a picture, you’ll get unexpected results.
Figure 14-3 For safety, check what the user has selected before taking action with a script.
314 AppleScript: A Beginner’s Guide
To return information about the selection, use the get information selection
command. Table 14-5 explains the different information you can return.
For example, the following snippet turns off the Track Changes feature if it is
currently on. The if statement checks the selection information type revision marking; if
this returns true, the set track revisions of active document to false statement turns off
Track Changes for the active document.
if (get selection information selection information type ¬
revision marking) is "true" then
set track revisions of active document to false
end if
The following example checks to make sure the selection is within a table. If it’s not,
the code displays an alert message (see Figure 14-4) explaining the problem.
if (get selection information ¬
selection information type with in table) is "false" then
display alert "This script requires a table" ¬
message "Please click in the table you want to process, ¬
and then run this script again." ¬
buttons {"OK"}
end if
Word story type Part of the Document
main text story The main text
text frame story The text in text boxes
comments story The comments
endnotes story The endnotes
footnotes story The footnotes
primary header story The primary header or the odd-page header (for a document with
different even-page headers)
even pages header story The even-page header
first page header story The first-page header
primary footer story The primary footer or the odd-page footer (for a document with
different even-page footers)
even pages footer story The even-page footer
first page footer story The first-page footer
Table 14-4 Word’s 11 Story Types

Chapter 14: Automating Microsoft Word 315
information type Item Explanation of What the Item Returns
General Information
info caps lock true if Caps Lock is on; false if it is off
info num lock true if Num Lock is on; false if it is off
over type true if Overtype mode is on; false if it is off
revision marking true if Track Changes is on; false if it is off
selection mode 0 for the normal selection mode (what you use most of the
time); 1 for Extend mode (selecting by pressing the F8 key);
2 for Column-selection mode (selecting columns of multiple
lines by OPTION-dragging)
Zoom percentage The zoom percentage used for the document
Information About the Selection
and the Insertion Point
active end adjusted page number The page number of the page on which the active end of the
selection falls. If you change the starting page number, Word
adjusts this number, but not the active end page number item.
active end page number The page number of the page on which the active end of the
selection falls
active end section number The section number of the section in which the active end of the
selection falls
first character column number The number of characters between the left margin and the first
character in the selection or the character to the right of the
insertion point
first character line number In layout views, the line number of the first character in the
selection. In Draft mode, this item returns –1.
frame is selected true if the selection or range is a whole frame or whole text
box; false otherwise (including if the selection or range is in a
frame or text box)
header footer type A number indicating which type of header or footer the
selection or range is in: –1 means the selection or range is
not in a header or footer; 0 means the even-page header
or footer; 1 means the primary header (in a document that
doesn’t have different odd- and even-page headers) or an
odd-page header; 4 means the first-page header; 2 means the
even-page footer; 3 means the primary footer (in a document
that doesn’t have different odd- and even-page footers) or an
odd-page footer; and 5 means the first-page footer
horizontal position relative to page The distance from the left edge of the selection or range to the
left edge of the page, measured in twips. (A twip is 1/
20 of a
point, or 1/
1440 of an inch.) Returns –1 if the selection or range
isn’t in the screen area.
Table 14-5 Information About the selection Object

316 AppleScript: A Beginner’s Guide
information type Item Explanation of What the Item Returns
horizontal position relative to text
boundary
The distance from the left edge of the selection or range to
the left edge of the text boundary it is within. This, too, is
measured in twips and returns –1 if the selection or range isn’t
in the screen area.
in clipboard true if the selection or range is on the Clipboard
in comment pane true if the selection or range is in the document’s comment
pane
in endnote true if the selection or range is in an endnote. This works in
both the endnote pane (in Draft view) and the endnote area
(in layout views).
in footnote true if the selection or range is in a footnote. This works both in
the footnote pane (in Draft view) and the footnote area at the
bottom of the page in Print view.
in footnote endnote pane true if the selection or range is in either a footnote or an
endnote, either in the footnote pane or endnote pane (in Draft
view), or in the footnote area or endnote area in a layout view
in header footer true if the selection or range is in a header or a footer
in master document true if the selection or range is in a master document (the
master document must contain one or more subdocuments)
in word mail (Applies only on the PC.) Whether the selection or range is in
a WordMail send note (1), in a WordMail read note (2), or not
in a WordMail message (0).
number of pages in document The number of pages in the document that contains the
selection or range
reference of type A value indicating whether the selection or range is in or near
a reference to a footnote, endnote, or comment. –1 means the
selection includes a reference but also includes other material;
0 indicates that the selection or range is not before a reference;
1 indicates that the selection or range is before a footnote
reference; 2 indicates it’s before an endnote reference; and 3
indicates it’s before a comment reference.
vertical position relative to page The distance from the top edge of the selection or range to
the top edge of the page, measured in twips. Returns –1 if the
selection or range isn’t in the screen area.
vertical position relative to page
boundary
The distance from the top edge of the selection or range to
the top edge of the text boundary it is within. This, too, is
measured in twips and returns –1 if the selection or range isn’t
in the screen area.
Table 14-5 Information About the selection Object (continued)
Chapter 14: Automating Microsoft Word 317
information type Item Explanation of What the Item Returns
Information About Tables
is in table The selection or insertion point is in a table.
maximum number of columns The maximum number of columns in the table
maximum number of rows The maximum number of rows in the table
start_of_range column number The number of the column that contains the start of the
selection or range
start_of_range row number The number of the row that contains the start of the selection or
range
end_of range column number The number of the column that contains the end of the selection
or range
end_of range row number The number of the row that contains the end of the selection or
range
at end of row marker true if the selection is at the end-of-row marker in a table (the
marker after the border of the last cell in the row)
Table 14-5 Information About the selection Object (continued)
Creating a Text Range
The selection object is great for scripts that start from an item the user has selected. But when
your script itself chooses the parts of the document to work with, you don’t need to create
your own selection by selecting objects with the select command. Instead, you can create one
or more text range objects that refer to the part of the document you want to affect.
Figure 14-4 If checking reveals the selection to be of the wrong type, you can tell the user
which type of selection is needed.

318 AppleScript: A Beginner’s Guide
Using text range objects has four main advantages over using the selection object:
● First, you can create as many text range objects as you need.
● Second, you can create and use text range objects in any open document—you’re not
confined to using the active document.
● Third, you can redefine a text range object as needed, extending it to contain more or
reducing it to contain less, or simply moving it to a different location.
● Fourth, text range objects are entirely separate from the selection. This means you
can use text ranges to change a document without affecting the user’s selection. Or
you can assign the selection to a text range object, work with the selection object, and
then select that text range object, giving the user back the original selection at the end
of the script.
To create a text range, you use a set statement, the variable name to which you want to
assign the range, and the details of the range to which you want to set it. For example, the
following statement assigns the text object of the first paragraph of the active document to
the variable first_paragraph:
set first_paragraph to the text object of the first paragraph ¬
of the active document
That example uses the active document, but you can use any open document. For
example, the following statement assigns the last word object in the rearmost document to
the variable last_word:
set last_word to the last word of the back document
You can also assign the current contents of a text range to another text range. For
example, the following statement assigns the contents of the range referenced by the
first_paragraph variable to the doc_opening variable, and then uses a select statement to
select the range referenced by doc_opening. This is useful when you need to change the
text range or manipulate part of it.
set doc_opening to first_paragraph
select doc_opening
NOTE
You can also create a text range by using the create range command, as you’ll see
in the next section. This command isn’t entirely reliable, so the method of creating text
ranges described previously is preferable.

Chapter 14: Automating Microsoft Word 319
By selecting a text range or other object, you can also present the user with a selection
to work with.
Extending, Shortening, or Moving a Range
After creating a range, you can extend it, shorten it, or move it as needed. For example:
● The following statement extends the doc_opening range to the end of the fourth
paragraph by moving the end of the range by three paragraphs:
set doc_opening to move end of range doc_opening ¬
by a paragraph item count 3
● The following statement shortens the doc_opening range to the end of the second
paragraph by moving the end of the range back by two paragraphs (by a paragraph
item count –2):
set doc_opening to move end of range doc_opening ¬
by a paragraph item count -2
● The following statement uses the create range command to redefine the doc_opening
range to the position before the first character of the document. Here, the create
range command takes a direct parameter (active document) specifying the document,
a start parameter specifying the start position (character position 0), and an end
parameter specifying the end position (also character position 0, making the range a
single point right at the beginning of the document).
set doc_opening to create range active document start 0 end 0
Entering Text in a Document
To insert text, use the insert text command and specify where to insert the text. For
example, the following statement inserts text and a carriage return (to create a new
paragraph) at the beginning of the selection object:
insert text "New Caledonian Tour Plans" & return at the beginning ¬
of the text object of the selection
The following statement inserts a new paragraph after the third paragraph of the active
document:
insert text return & "Industrial Policy" & return at the end of the ¬
text object of the third paragraph of the active document

320 AppleScript: A Beginner’s Guide
You can insert a new paragraph by using the return constant with the insert text
command, as in the last two examples, but you can also use the insert paragraph
command. For example:
insert paragraph at the beginning of the text object ¬
of the fifth paragraph of the active document
Formatting Text
You can use AppleScript to apply any of Word’s many types of formatting. Just as
when you’re working interactively, the most efficient way of formatting a document
via AppleScript is to use styles, but you can also apply direct font formatting (such as
boldface or italic) or direct paragraph formatting as needed.
Applying a Style
To apply a style, set the style property of the paragraph object or the text range object
you want to affect, putting the style name inside double quotation marks. For example, the
following statement applies the Heading 1 style to the first paragraph of the active document:
set the style of the first paragraph of the active document ¬
to "Heading 1"
Applying Font Formatting
As you know, Word provides enough font formatting to stun a charging rhinoceros,
including little-used options such as Emboss, Engrave, and Kerning. AppleScript gives
you access to all these options through the font object; here are the types of formatting
that are generally most useful:
● To change the font, set the name property of the font object to the font you want. For
example, to use the Times New Roman font on the selection:
set name of font object of the text object of the selection ¬
to "Times New Roman"
● To change the font size, set the font size property of the font object to the size you
need. For example, to use 36-point font:
set the font size of the font object of the text object ¬
of the selection to "36"
Applying Paragraph Formatting
As with font formatting, Word provides more paragraph-formatting options than most
people need or want. Some items use the paragraph object itself, while others use the
paragraph format object, which contains all the formatting for the paragraph.

Chapter 14: Automating Microsoft Word 321
Here are examples of the most widely useful types of paragraph formatting:
● To align a paragraph, set the alignment property of the paragraph format object of the
selection or range to the appropriate value (see Table 14-6). For example, the following
statement aligns the paragraphs in the range named range1 with the right margin:
set alignment of paragraph format of range1 ¬
to align paragraph right
● To check or change the amount of space before a paragraph, get or set the space
before property of the paragraph object, as in the following statement. To change
the amount of space after a paragraph, set the space after property of the paragraph
object.
set space before of paragraph 1 of active document ¬
to (inches to points inches 1.0)
● To check or change the first-line indent for a paragraph, get or set the first line indent
property of the paragraph format object. Using a positive value creates an indent,
while using a negative value creates a hanging indent (or “outdent” if you can stand
the word). For example, the following statement returns the first-line indent for the
second paragraph of the active document:
get the first line indent of the second paragraph ¬
of the active document
● To check or change the line spacing for a paragraph, you work with the line spacing
rule property and the line spacing property of the paragraph format object. Set the
line spacing rule property to the appropriate constant from Table 14-7, and then set
the line spacing property if you’ve chosen line space at least, line space exactly, or
line spacing multiple. For example, the following statement sets the third paragraph
of the active document to use double spacing:
set the line spacing rule of the third paragraph ¬
of the active document to line space double
alignment Type alignment Constant
Left alignment align paragraph left
Center align paragraph center
Right alignment align paragraph right
Justified align paragraph justify
Table 14-6 Constants for the alignment Property of the paragraph format Object
322 AppleScript: A Beginner’s Guide
Try This Entering and Formatting Text in a Document
In this example, you open the document you created in the first example, add text to it,
apply some formatting, and then save it. Follow these steps:
1. In AppleScript Editor, press z-N or choose File | New to create a new script.
2. Start a tell block to Word, identifying it by its name this time for variety, and tell it to
activate:
tell the application "Microsoft Word"
activate
end tell
3. Open the document as shown in boldface here. Change the file path as needed for your
Mac’s file system.
tell the application "Microsoft Word"
activate
open "Macintosh HD:Users:kev:Documents:Sample Document.docx"
end tell
4. Insert two paragraphs at the beginning of the active document, as shown in boldface
here. It’s easier to repeat the command than to use a repeat loop here, even if it’s not
especially pretty.
tell the application "Microsoft Word"
activate
open "Macintosh HD:Users:guy:Documents:Sample Document.docx"
insert paragraph at the beginning of the text object ¬
line spacing rule Constant Sets This Line Spacing line spacing Setting
line space single Single spacing —
line space1 pt5 Line-and-a-half (1.5-line) spacing —
line space double Double spacing —
line space at least Minimum line spacing The minimum number of
points you want
line space exactly Exact line spacing The exact number of points
you want
line spacing multiple Multiple-line spacing The line spacing in points.
To set it in lines, use lines
to points lines and the
number—for example, lines
to points lines 3.
Table 14-7 Details for Setting Line Spacing via AppleScript

Chapter 14: Automating Microsoft Word 323
of the active document
insert paragraph at the beginning of the text object ¬
of the active document
end tell
5. Assign the first paragraph to a variable named para1, and the second paragraph to a
variable named para2, as shown in boldface here:
tell the application "Microsoft Word"
activate
open "Macintosh HD:Users:guy:Documents:Sample Document.docx"
insert paragraph at the beginning of the text object ¬
of the active document
insert paragraph at the beginning of the text object ¬
of the active document
set para1 to the first paragraph of the active document
set para2 to the second paragraph of the active document
end tell
6. Create a tell block to para1 that assigns text to it and sets the style to Heading 1, as
shown in boldface here:
tell the application "Microsoft Word"
activate
open "Macintosh HD:Users:guy:Documents:Sample Document.docx"
insert paragraph at the beginning of the text object ¬
of the active document
insert paragraph at the beginning of the text object ¬
of the active document
set para1 to the first paragraph of the active document
set para2 to the second paragraph of the active document
tell para1
set the content of the text object to "Canine Forensics"
set the style to "Heading 1"
end tell
end tell
7. Create a tell block to para2 that assigns text to it and sets its font size, as shown in
boldface here:
tell the application "Microsoft Word"
activate
open "Macintosh HD:Users:guy:Documents:Sample Document.docx"
insert paragraph at the beginning of the text object ¬
of the active document
insert paragraph at the beginning of the text object ¬
of the active document
set para1 to the first paragraph of the active document
set para2 to the second paragraph of the active document
(continued)

324 AppleScript: A Beginner’s Guide
tell para1
set the content of the text object to "Canine Forensics"
set the style to "Heading 1"
end tell
tell para2
set the content of the text object to ¬
"We show you how to begin a power-packed career" ¬
& "in this rapidly developing area."
set the font size of the font object of the text object ¬
to "12"
end tell
8. Add a save the active document statement to save the document, as shown in boldface
here:
tell the application "Microsoft Word"
activate
open "Macintosh HD:Users:guy:Documents:Sample Document.docx"
insert paragraph at the beginning of the text object ¬
of the active document
insert paragraph at the beginning of the text object ¬
of the active document
set para1 to the first paragraph of the active document
set para2 to the second paragraph of the active document
tell para1
set the content of the text object to "Canine Forensics"
set the style to "Heading 1"
end tell
tell para2
set the content of the text object to ¬
"We show you how to begin a power-packed career " ¬
& "in this rapidly developing area."
set the font size of the font object of the text object ¬
to "12"
end tell
save the active document
end tell
9. Save the script under a name of your choice.
10. Press z-R or click the Run button on the toolbar to run the script. Word opens the
sample document, adds the text and formatting, and then saves the document.
Leave the document open for the next Try This section.

Chapter 14: Automating Microsoft Word 325
Using Sections, Page Setup,
and Headers and Footers
To make your documents look right, you’ll probably need to set the margins and
orientation, and add headers and footers, as discussed in this section.
To use different margins or different headers or footers in different parts of the same
document, you need to break the document into sections—so we’ll start there.
Breaking a Document into Sections
To break the documents into logical parts, you’ll need to use Word’s sections. Each
section can have its own layout (for example, different margins or a different number of
columns) and its own headers and footers.
Each document starts off as a single section, but you can add other sections as needed
by using the insert break command. Table 14-8 explains the break type constants you
can use, including the non-section break types.
For example, the following statement collapses the current selection to its start and
then inserts a next-page section break before it:
set myText to text object of selection
set myIP to collapse range myText direction collapse start
insert break at myIP break type section break next page
To work with a section, identify the section of the document—for example, section 3
of active document.
break type Constant Type of Break
line break Line break (forcing a new line without starting a new paragraph)
page break Page break (for forcing a new page)
column break Column break (for forcing a new column)
section break next page Section break with the new section starting on the next page
section break continuous Section break with the new section starting immediately after the
end of the previous section
section break even page Section break with the new section starting on the next even-
numbered page
section break odd page Section break with the new section starting on the next odd-
numbered page
Table 14-8 AppleScript’s break type Constants

326 AppleScript: A Beginner’s Guide
Choosing Page Setup
To control the page setup, use the page setup object of either the document object (if you
want to affect the whole of the document) or the section object (if you want to affect just
a section).
To set the margins, set the top margin property, bottom margin property, left margin
property, and right margin property to the appropriate numbers of points. For example,
the following snippet sets each of the margins in the first section of the active document to
100 points:
tell the active document to tell the page setup of section 1
set the top margin to 100
set the bottom margin to 100
set the left margin to 100
set the right margin to 100
end tell
NOTE
To create mirrored margins, where the margins on facing pages look like reflections of
each other, first set the mirror margins property of the section object to true. Then set
the left margin property to the number of points you want for the inside margins (where
the pages meet) and the right margin property to the number of points for the outside
margins.
To set the orientation for the document or section, set the orientation property
to orient portrait for portrait orientation (taller than wide) or orient landscape for
landscape orientation (wider than tall). For example, the following statement sets the
second section of the active document to landscape orientation:
set the orientation of the page setup of section 2 ¬
of the active document to orient landscape
Adding Headers, Footers, and Page Numbers
Most printed documents need information in header sections at the top of each page and
footer sections at the bottom of each page to make their identity clear. You’ll also usually
want to add page numbers so that the reader knows how many pages the document
contains and can keep the pages in the right order.
Understanding How Word Handles Headers and Footers
You can simply create the same header (or footer, or both) on every page of the
document—but most documents need different headers and footers on different pages.

Chapter 14: Automating Microsoft Word 327
If you’ve created documents interactively in Word, you’re probably familiar with its
confusing way of handling headers and footers. But in case you’re not, here’s what you
need to know:
● Headers and footers are part of section formatting.
● Word gives you three basic types of headers and footers: a header and footer for the
first page of the section, a header and footer for the even-numbered pages, and a
header and footer for the odd-numbered pages. So if you need your two-page spreads
to have different headers and footers (as this book does), you can set those up within
the same section.
● Headers and footers are always present in your document, but they don’t appear until
you activate them. For example, a blank document doesn’t show a header or footer
area until you activate the area (working interactively) or add text or other objects to
it (working via AppleScript). When you do that, you get the primary header or footer;
the first-page, even-numbered, and odd-numbered headers and footers lurk in the
background until you summon them.
● When you create different headers for even-numbered pages and odd-numbered pages, the
primary header becomes the odd-numbered page header Fsooters work in the same way.
● Any section in the document can have a different set of headers and footers than
each other section. So you must start a new section whenever you need to give the
document a new set of headers and footers. See the previous section for instructions
for creating sections using AppleScript. Working manually, you choose Insert | Break,
and then choose one of the Section Break commands—for example, Insert | Break |
Section Break (Continuous).
● Word links a section’s headers and footers to the previous section’s headers and
footers until you unlink them. So when you create a new section, it picks up the
headers and footers from the previous section until you break the link and change the
headers and footers.
Returning the Header or Footer You Want
To work with a header or a footer, you use the appropriate header footer object for the
section of the document you want to affect. Word organizes the header footer objects into
the header footers list, and you return a header footer object by using the get header
command (for a header) or the get footer command (for a footer), together with the
keyword index and the constant for the type of header or footer.

328 AppleScript: A Beginner’s Guide
Calling every header and footer a “header footer” makes you want to rap your forehead
against the wall, but it must have made sense to somebody at Microsoft. Use the commands
and constants shown in Table 14-9 to tell Word which header or footer you want.
For example, the next statement creates the variable myHeader and assigns the
primary header of the first section of the active document to it:
set myHeader to (get header section 1 of active document ¬
index header footer primary)
Adding Text to Headers and Footers
Once you’ve grabbed hold of the header footer object, you can manipulate it using the
techniques described earlier in this chapter. For example, the text object contains the text
in the header or footer, so you can add text to the header or footer by using the content
property of the text object.
For example, the following statement works with the myHeader variable created in
the previous section to assign text to the header:
set content of text object of myHeader to ¬
"AppleScript: A Beginner's Guide" & tab & tab & "Chapter 14"
Setting Up Different Headers or Footers in a Section
To set up a different first-page header or footer, or different even-numbered page and
odd-numbered page headers or footers, you work with the page setup object of the
document object.
To turn on different first-page headers and footers for a section, you set the different
first page header footer property of the page setup object to true. For example, the
following statement turns on different first-page headers and footers for the first section of
the active document:
set different first page header footer of page setup ¬
of section 1 of active document to true
Header or Footer Command Constant
Primary header get header header footer primary
First-page header get header header footer first page
Even-numbered page header get header header footer even pages
Primary footer get footer header footer primary
First-page footer get footer header footer first page
Even-numbered page footer get footer header footer even pages
Table 14-9 Commands and Constants for Returning header footer Objects

Chapter 14: Automating Microsoft Word 329
To turn on different headers and footers for the odd-numbered pages and even-
numbered pages, set the odd and even pages header footer property of the page setup
object to true. For example, the following statement turns on different odd- and even-
numbered page headers for the second section of the document referenced by the variable
myDoc:
set odd and even pages header footer of page setup ¬
of section 2 of myDoc to true
Adding Page Numbers to a Document
To add page numbers to a document, you normally place them in either the header or the
footer so that they repeat automatically on the relevant pages of the document.
Use the make new page number command to add a new page number object to the
page numbers list. For example, the following statement adds page numbers to the footer
of the even-numbered pages in the first section of the document referenced by the variable
myDoc:
make new page number at ¬
(get footer section 1 of myDoc index header footer even pages)
Displaying Word’s Built-in Dialog Boxes
Often it’s useful to be able to display one of Word’s built-in dialog boxes in a script. For
example, you can display the Open dialog box to let the user choose a document for the
script to work on, the Save As dialog box to let the user save a document under a name
and location of the user’s choice, or the Page Setup dialog box to let the user pick a
suitable fix for a formatting problem.
NOTE
You can also use AppleScript’s built-in dialog boxes as usual. For example, use the
choose from list dialog box when you need to let the user select one item from a list, the
choose file dialog box to have the user choose a file, or the choose folder dialog box
when you need the user to pick a folder.
To display one of Word’s built-in dialog boxes, you use the dialog command and
specify the appropriate dialog type constant for the dialog box you want. Table 14-10 lists
the most useful couple of dozen of Word’s built-in dialog boxes.
CAUTION
At this writing, the dialog edit replace constant displays the Find tab of the Find And
Replace dialog box rather than the Replace tab—and the Replace tab button is grayed
out so that you can’t access it.

330 AppleScript: A Beginner’s Guide
For example, the following statement displays the Open dialog box by using the file
open constant:
show (get dialog dialog file open)
Dialog Box Menu Command AppleScript dialog type Constant
Open File | Open file open
Project Gallery File | Project Gallery file new
Print File | Print file print
Save File | Save or File | Save As file save as
Document File | Page Setup file page setup
Paste Edit | Paste Special edit paste special
Find And Replace,
Find tab
Edit | Find edit find
Find And Replace,
Replace tab
Edit | Replace edit replace
Find And Replace,
Go To tab
Edit | Go To edit go to
Zoom View | Zoom view zoom
Font Format | Font format font
Paragraph Format | Paragraph format paragraph
Bullets And Numbering Format | Bullets And Numbering format bullets and numbering
Borders And Shading Format | Borders And Shading format borders and shading
Tabs Format | Tabs format tabs
Style Format | Style format style
Spelling And Grammar Tools | Spelling And Grammar tools spelling and grammar
Word Count Tools | Word Count tools word count
Highlight Changes Tools | Track Changes |
Highlight Changes
tools revisions
Word Preferences Word | Preferences tools options
Templates And Add-ins Tools | Templates And Add-ins tools templates
Language Tools | Language tools language
AutoCorrect Tools | AutoCorrect tools auto manager
Table 14-10 AppleScript dialog type Constants for Built-in Dialog Boxes

Chapter 14: Automating Microsoft Word 331
Try This
TIP
To change the folder that Word displays in the Open dialog box, use the change file
open directory command with the path parameter and the folder path. For example,
to set the folder to the Server:Documents:Word folder, use change file open directory
path “Server:Documents:Word”.
If the dialog box contains different tabs, you can display the tab you want by assigning
the dialog box to a variable and then using the default dialog tab property to specify
the tab you want. For example, the following snippet displays the AutoText tab of the
AutoCorrect dialog box:
set autoDB to get dialog dialog tools auto manager
set default dialog tab of autoDB to ¬
dialog tools auto manager tab auto text
show autoDB
NOTE
Open the Word dictionary in AppleScript Editor and look at the dialog object to find a
list of Word’s dialogs and their default dialog tab constants.
Adding a Header, Adjusting Margins,
and Displaying a Dialog Box
In this example, you finish off the document you created in the previous Try This sections.
Here, you add a header to the document, adjust its margins, and then display the Save As
dialog box so that the user—okay, you—can save the document under a different name.
Follow these steps to create the script:
1. In Word, make the Sample Document.docx document the active window. If you closed
the document earlier, open it again.
2. In AppleScript Editor, press z-N or choose File | New to create a new script.
3. Start a tell block to Word:
tell the application id "com.microsoft.Word"
end tell
(continued)

332 AppleScript: A Beginner’s Guide
4. Activate Word and switch the first window of the active document to Print Layout
view, as shown in boldface here:
tell the application id "com.microsoft.word"
activate
set view type of the first window of the active document ¬
to page view
end tell
5. Add text to the primary header—the only header in the document, because you haven’t
set the document to have any others. The new command appears in boldface here:
tell the application id "com.microsoft.word"
activate
set view type of the first window of the active document
to page view
set content of text object of ¬
(get header section 1 of active document ¬
index header footer primary) to ¬
"Canine Forensics" & tab & ¬
"Expert Guidance for the Gullible" & tab & "Chapter 1"
end tell
6. Add a tell block to the page setup object of section 1 of the active document; then set
each margin to 72 points inside it, as shown in boldface here:
tell the application id "com.microsoft.word"
activate
set view type of the first window of the active document ¬
to page view
set content of text object of ¬
(get header section 1 of active document ¬
index header footer primary) to ¬
"Canine Forensics" & tab & ¬
"Expert Guidance for the Gullible" & tab & "Chapter 1"
tell page setup of section 1 of the active document
set top margin to 72
set bottom margin to 72
set left margin to 72
set right margin to 72
end tell
end tell
7. Finally, add the show command for displaying the Save As dialog (dialog file save as),
as shown in boldface here:
tell the application id "com.microsoft.word"
activate
set view type of the first window of the active document ¬

Chapter 14: Automating Microsoft Word 333
to page view
set content of text object of ¬
(get header section 1 of active document ¬
index header footer primary) to ¬
"Canine Forensics" & tab & ¬
"Expert Guidance for the Gullible" & tab & "Chapter 1"
tell page setup of section 1 of the active document
set top margin to 72
set bottom margin to 72
set left margin to 72
set right margin to 72
end tell
show (get dialog dialog file save as)
end tell
8. Save the script under a name of your choice.
9. Press z-R or click the Run button on the toolbar to run the script. Word adds the header,
changes the margins, and then displays the Save As dialog box.
10. Save the document under a name of your choice, and then close it.
Running Your Scripts from Word
Rather than running your scripts from the Script menu on the Mac OS X menu bar (or from
AppleScript Editor), you’ll probably want to run them directly from Word. You can do this
by using Word’s own Script menu or by assigning a keyboard shortcut to each script.
Adding a Script to Word’s Script Menu
Word’s Script menu appears to the right of the Help menu on the menu bar. To add your
scripts to the Script menu, you simply move or copy them to the right folder (or, if you
prefer, save them there in the first place). That folder is the ~/Documents/Microsoft User
Data/Word Script Menu Items/ folder.
Follow these steps to add scripts to the Word Script Menu Items folder:
1. Click the Scripts menu, and then click About This Menu. Word displays the information
dialog box shown in Figure 14-5.
2. Click the Open Folder button. Word opens a Finder window to the Word Script Menu
Items folder.
3. Copy or move your Word-related scripts to this window, and then close it.

334 AppleScript: A Beginner’s Guide
TIP
You can create folders in the Word Script Menu Items folder to make the Script
menu display submenus. This is a great way of organizing your scripts into different
categories and keeping the Script menu manageable. Put your most-used scripts directly
on the Script menu so you don’t have to go to a subfolder to open them.
Now, when you open the Scripts menu, your scripts appear on it. Click the script you
want to run.
Creating a Keyboard Shortcut to Run a Script
If you like to use the keyboard, the easiest way to run a script is to create a keyboard
shortcut for it. You can either assign a keyboard shortcut in System Preferences (as
discussed in Chapter 11) or change the script’s name to include a keyboard shortcut.
The simple way of creating a keyboard shortcut is to tack the shortcut onto the script’s
name. The best time to do this is when you add the script to the Word Script Menu Items
folder.
At the end of the script’s name, add a backslash character (\) followed by the keypress
you want. Use the letters shown here for the z, OPTION, and CONTROL modifier keys,
followed by the letter or number you want to use. If you want to include the SHIFT key,
type the shifted character—for example, type P instead of p to include SHIFT.
Modifier Key Character to Use
zm
OPTION o
CONTROL c
Figure 14-5 The easiest way to open the Word Scripts folder is by choosing About This Menu
from the Scripts menu and then clicking the Open Folder button.

Chapter 14: Automating Microsoft Word 335
Here are two examples:
● Add \mcc to the end of the script’s name to use z-CONTROL-C as the keyboard shortcut.
● Add \moP to the end of the script’s name to use z-OPTION-SHIFT-P as the keyboard shortcut.
TIP
When creating custom keyboard shortcuts, avoid stepping on any of Word’s existing
keyboard shortcuts that you value. If you don’t remember them, you can create a list
easily. Chose File | Print to open the Print dialog box. Open the pop-up menu in the
middle and choose Microsoft Word to display the Word options. In the Print What pop-
up menu, choose Key Assignments, and then print the document—or save the forests by
clicking the PDF button and making a virtual printout instead.
This page intentionally left blank

337
Chapter 15
Automating
Microsoft Excel

338 AppleScript: A Beginner’s Guide
Key Skills & Concepts
● Understanding Excel’s main objects
● Launching and quitting Excel
● Creating, saving, opening, and closing workbooks
● Working with worksheets and other sheets
● Creating and using ranges of cells
● Using charts in your workbooks
● Working with Excel windows and views
● Using Find and Replace in your scripts
This chapter shows you how to bring the power of AppleScript to bear on Microsoft
Excel, the widely used spreadsheet application. You’ll learn how to launch Excel (and
quit it when you’re done), create workbooks, and manipulate the worksheets and other
sheets inside them. After that, I’ll show you how to create ranges of cells and work with
them and build charts automatically in your workbooks. Finally, we’ll look at how to work
with windows and views in Excel, and how to use the Find and Replace features in scripts.
First, let’s take a quick look at the main objects you will work with when you
automate Excel.
Understanding Excel’s Main Objects
These are the main objects you will work with to automate Excel using AppleScript:
● The application class represents the Excel application as a whole. You use the
application class for launching Excel, quitting it, setting options, and performing
other tasks that involve the whole application rather than a workbook or a smaller
component.
● The workbook class represents an open workbook. As usual, Excel marshals the
workbook objects into the workbooks list, which you can use to work with all the
open workbooks together. For example, you can save all the open workbooks that

Chapter 15: Automating Microsoft Excel 339
contain unsaved changes, or you can close all the open workbooks, saving changes or
not (more on this shortly).
● Within a workbook, the worksheet class represents a worksheet. Excel groups the
worksheet objects together into the worksheets list. This collection works as usual, but
you have to bear in mind that Excel also has chart sheets (discussed next), list sheets,
macro sheets, and dialog sheets—and all these appear in another collection, sheets.
● The chart sheet object represents a chart sheet (a chart on its own sheet—not a chart
on a worksheet). Excel groups the chart sheet objects with the worksheet objects in
the sheets list.
● The active sheet object represents the active sheet in the active workbook.
● As in most applications, the window object represents an open window. All the
window objects together make up the windows list.
Launching and Quitting Excel
To launch Excel, use the launch command, followed by the activate command if you
want to bring Excel to the front so that you can see what’s happening—often useful when
you’re developing your scripts or when you want the user to see what the script does. For
example:
tell the application id "com.microsoft.Excel"
launch
activate
end tell
NOTE
If you prefer, you can omit the launch command—the activate command on its own
will launch Excel if it’s not already running. But your code will be clearer if you include
launch if you’re intending to launch the application. If the application is running
already, using launch doesn’t return an error.
You can also launch Excel if it’s not running by telling it to open a workbook or to
create a new workbook. For example, the following snippet launches Excel if it’s not
running, as the make new workbook command requires Excel to be open:
tell the application id "com.microsoft.excel"
make new workbook
end tell

340 AppleScript: A Beginner’s Guide
To quit Excel, use the quit command:
tell the application id "com.microsoft.Excel"
quit
end tell
Before agreeing to quit, Excel prompts you to save any unsaved changes to
workbooks. You’ll see how to handle unsaved changes later in this chapter.
Working with Workbooks
To get things done in Excel—either via AppleScript or when working interactively—
you’ll need to use workbooks. So our next move here is to see how you create and save
workbooks, open and close them, share them with others, and protect them against
unwanted interference.
Creating a New Blank Workbook
To create a new workbook based on the Blank Document workbook, like you get when
you press z-N when working interactively, use the make new workbook command. Excel
adds a new workbook to the workbooks list, where you can work with it.
tell the application id "com.microsoft.Excel"
make new workbook
end tell
NOTE
When you create a new workbook using AppleScript, Excel names the new workbook
Sheet1 (or the next unused number—Sheet2, Sheet3, or whatever) rather than using the
Workbook1 name (or the next unused number) it uses when you give a New Workbook
command interactively (for example, choosing File | New Workbook). Excel also marks
the new workbook as dirty, meaning that it contains unsaved changes—even though
you haven’t changed anything in it yet.
To give yourself a direct handle on the new workbook, use a set statement to assign
it to a variable, as in the next example, which uses the x_book variable. You can then use
the variable to refer to the workbook rather than finding it through the workbooks list.
tell the application id "com.microsoft.Excel"
set x_book to make new workbook
end tell

Chapter 15: Automating Microsoft Excel 341
A blank workbook can be good when you’re starting from scratch, but often you’ll
want to give your workbook a head start by basing it on either a template or on an existing
workbook. Let’s look at how to do that next.
Creating a New Workbook Based on a Template
To create a new workbook based on a template, you don’t use a make new workbook
command with a template parameter or property as you might expect. Instead, all you
need to do is to tell Excel to open the template. This makes Excel create a new workbook
based on the template.
For example, the following statement creates a new workbook based on the Event
Budget.xlxs spreadsheet template:
open "Macintosh HD:Applications:Microsoft Office 2008:Office:Media:
Templates:Ledger Sheets:Budgets:Event Budget.xlsx"
The new workbook’s title bar shows the template’s name, so this command is confusing.
But when you try to save the new workbook, Excel prompts you to choose a new name, just
as when you’re saving a workbook that appears new in the conventional way.
The open command you’re using here is in AppleScript’s Standard Suite—commands
available to every application under the sun. This command doesn’t return a result, so
you can’t assign the new workbook you create to a variable that will let you access it
easily. To assign the workbook to a variable, you need to use Excel’s open workbook
command instead. This command takes the parameter workbook file name followed by
the filename. Here’s an example of an open workbook command that assigns the new
document created to a variable:
set myBudget to open workbook workbook file name ¬
"Macintosh HD:Applications:Microsoft Office 2008:Office:Media:
Templates:Ledger Sheets:Budgets:Event Budget.xlsx"
Saving a Workbook
To save a workbook, use the save workbook as command. Put the workbook, or a
variable referring to it, as the direct parameter, followed by the filename parameter and
the path and filename you want to use. For example, the following statements declare a
variable called myfilename, assign a path and filename to it, and then save the workbook
referenced by the variable WB to that location:
set myfilename to (path to desktop as string) & "2012 Budget.xlsx"
save workbook as WB filename myfilename

342 AppleScript: A Beginner’s Guide
Apart from the filename parameter, which you’ll want to use every time you save a
new workbook or save an existing workbook under a different name, the save workbook
as command offers various parameters that correspond to choices you can make in the
Save As dialog box. The following parameters are the most useful:
● file format Add this parameter if you want to control the file format Excel uses for
the workbook—usually a good idea. If you omit the file format parameter, Excel uses
the format selected in the Save Files In This Format pop-up menu in the Compatibility
Preferences. Table 15-1 explains the most useful of Excel’s many file formats.
● add to most recently used list Add this optional parameter and set it to true if you
want the workbook to appear on the Recent Documents list—for example, so that
the user can reopen the workbook quickly from the File menu. If you don’t want the
workbook to appear on the Recent Documents list, either set this parameter to false or
simply omit it—the default value is false.
● create backup Add this optional parameter set to with create backup to make
Excel create a backup copy of the file.
For example, the following statement saves the active workbook in Excel 2007/2008
format in the folder Shared:Spreads:Excel with the filename Production Statistics.xlsx,
setting Excel to create a backup:
save workbook as active workbook filename ¬
"Shared:Spreads:Excel:Production Statistics.xlsx" ¬
file format Excel XML file format with create backup
The following statement saves the workbook referenced by the variable this_book
in Excel 97–2004 format in the folder Shared:Spreads:Excel with the filename
Recruitment Tactics.xls, explicitly preventing the workbook from being added to the
Recent Documents list:
save workbook as this_book ¬
filename "Shared:Spreads:Excel:Recruitment Tactics.xls" ¬
file format Excel98to2004 file format ¬
without add to most recently used list
After you’ve saved a workbook with a filename and folder location, you can save
it again by using the save command with the workbook object (so Excel knows which
workbook you’re referring to) but without any further parameters. For example, the
following command saves any unsaved changes in the active workbook:
save the active workbook

Chapter 15: Automating Microsoft Excel 343
file format Constant Format Extension Comments
Excel XML file format Excel Workbook .xlsx This is Excel 2007/Excel 2008’s default
workbook format (unless someone changes
it in the Compatibility Preferences). Users
with earlier versions of Excel will need to
install file converters to read this format.
Files in this format cannot contain macros.
template file format Excel Template .xltx This is Excel 2007/2008’s default template
format. Users with earlier versions of Excel
will need to install file converters to read
this format. Templates in this format cannot
contain macros.
Excel binary
file format
Excel Binary
Workbook
.xlsb This is Excel 2007/2008’s new binary file
format. It’s good for use with Excel 2007
and 2008, but not with earlier versions of
other applications.
Excel98to2004 file
format
Excel 97–2004
Workbook
.xls This is the default format for versions of
Excel from Excel 97 (for Windows) and
Excel 98 (for Mac) through Excel 2003
(for Windows) and Excel 2004 (for Mac).
This is the best choice for workbook
compatibility.
Excel98to2004
template file format
Excel 97-2004
Template
.xlt This is the default template format for
versions of Excel from Excel 97 (for
Windows) and Excel 98 (for Mac) through
Excel 2003 (for Windows) and Excel
2004 (for Mac). This is the best choice for
template compatibility.
macro enabled XML
file format
Excel
Macro-Enabled
Workbook
.xlsm The version of the Excel 2007/Excel 2008
file format that can contain macros. Users
with earlier versions of Excel will need to
install file converters to read this format.
macro enabled
template file format
Excel
Macro-Enabled
Template
.xltm The version of the Excel 2007/Excel 2008
template format that can contain macros.
Users with earlier versions of Excel will need
to install file converters to read this format.
CSV file format Comma
Separated
Values
.csv This is the standard format that contains
only the text of a spreadsheet and uses
commas to separate the cell contents.
Universally compatible with spreadsheet
applications and text editors.
PDF file format PDF .pdf This creates a Portable Document Format
file, which is good for sharing a spreadsheet
for reading rather than for use.
Table 15-1 Excel’s Most Useful File Formats

344 AppleScript: A Beginner’s Guide
Opening an Existing Workbook
The standard way of opening a workbook is to use the open command in AppleScript’s
Standard Suite of commands. For example, the following statement opens the workbook
named Amortization.xlsx in the Server:Shared:Sheets folder:
open "Server:Shared:Sheets:Amortization.xlsx"
As mentioned earlier in this chapter, the open command in AppleScript’s Standard
Suite doesn’t return a result, so you can’t assign the workbook you’re opening to a
variable. If you need to assign the workbook you’re opening to a variable, use Excel’s
open workbook command, which returns a result that you can assign to a variable. This
command takes the parameter workbook file name followed by the filename.
For example, the following statement opens the workbook named Amortization.xlsx
in the Server:Shared:Sheets folder and assigns it to the variable amort:
set amort to open workbook ¬
workbook file name "Transfer:Examples:Excel:Amortization.xlsx"
Closing a Workbook
To close a workbook, use the close command with the workbook keyword and the
workbook’s name or a variable or object identifying the workbook. For example, the
following statement closes the workbook named Product Goal-Seeking.xlsb:
close workbook "Product Goal-Seeking.xlsb"
If the workbook contains unsaved changes, Excel prompts the user to save them.
Sometimes you’ll want the user to decide whether to keep the changes (for example, if
it’s a workbook they’ve been editing), but often you’ll want to take care of any unsaved
changes automatically in the script. You can either use the save command (discussed
earlier in this chapter) before using the close command, or set the saving parameter of the
close command to yes:
close workbook "Product Goal-Seeking.xlsb" saving yes
If you need to close the workbook and lose any unsaved changes without Excel
prompting the user about them, set the saving parameter of the close command to no:
close workbook "Product Goal-Seeking.xlsb" saving no

Chapter 15: Automating Microsoft Excel 345
NOTE
If you try to close a workbook that has never been saved, Excel displays the Save As
dialog box unless you’ve set the saving parameter to no. Unless you can be sure that
the workbook has already been saved, use the save command to explicitly save each
new workbook you create rather than rely on the saving yes parameter of the close
command.
If you want Excel to prompt the user to save changes, set the saving parameter to ask
so that the user sees the “Do you want to save the changes you made?” dialog box (see
Figure 15-1).
close workbook "Product Goal-Seeking.xlsb" saving ask
To close all open workbooks, use the close command with the workbooks list. As
with a single workbook, you can set the saving parameter to yes, no, or ask to control
what happens to unsaved changes. For example, the following statement closes all open
workbooks, saving any unsaved changes automatically:
tell the application id "com.microsoft.Excel"
close the workbooks saving yes
end tell
After you close all the open workbooks, Excel stays open until you explicitly quit it.
Sharing a Workbook with Others
When you need to share a workbook with other people so that two or more people can
edit the workbook at the same time without tripping over one another’s changes, save the
workbook as a shared workbook. To do so, use the save workbook as command and set
the access mode property to shared.
Figure 15-1 Setting the saving parameter to ask—or omitting it—makes Excel prompt the
user to decide whether to save any unsaved changes in the workbook your script
is closing.

346 AppleScript: A Beginner’s Guide
For example, the following statement saves the open workbook named Amortization
.xlsx as a shared workbook under the same filename:
save workbook as workbook ("Amortization.xlsx") ¬
filename "Transfer:Examples:Excel:Amortization.xlsx" ¬
access mode shared
NOTE
To remove sharing from a shared workbook, use the save workbook as command but
set the access mode property to exclusive.
To check whether a workbook is shared, get the multi user editing property of the
workbook object. If this property returns true, the workbook is shared; if it returns false,
the workbook is single-user.
Protecting a Workbook Against Changes
To protect a workbook against changes, run the protect workbook command on the
appropriate workbook object. This command has three parameters; each is optional, but
you’ll normally want to set at least the first of them.
● password Use this parameter to lock down the protection with a password. If you don’t
apply a password, the protection is worthless, as anyone can remove it without effort.
CAUTION
Even with a password, Excel’s protection is relatively easy to break, especially as there
are plenty of password crackers just a search away on the Internet. The best way to
prevent anyone untrustworthy from changing your workbooks is to keep the workbooks
away from them—for example, on a secure area of your network.
● structure Add the parameter with structure to protect the workbook’s structure,
preventing your colleagues (or yourself) from moving the sheets around. Applying
structure protection to a shared workbook is usually a good idea. The default value is
without structure, which you can specify if you want to make your code explicit.
● windows Add the parameter with windows if you want to protect the workbook’s
windows so that they remain fixed in place. How helpful this is depends on what
you and your colleagues are trying to do with the workbook; locking the window
immovably to the screen tends to make people think Excel has crashed, so it’s a good
idea to warn the user that you’re locking the windows. The default value is without
windows; again, you can specify this for full disclosure.

Chapter 15: Automating Microsoft Excel 347
For example, the following statement protects the workbook named Budget Strategy
.xlsx with a password you should never use, protecting the structure but not the windows:
protect workbook workbook ("Budget Strategy.xlsx") password "lockdown" ¬
with structure without windows
NOTE
You can also protect a worksheet, as discussed later in this chapter.
To unprotect a workbook, use the unprotect command, specify the workbook object,
and give the password if you used one. For example, the following statement unprotects
the active workbook:
unprotect active workbook password "lockdown"
Using the active workbook Class
When you’re working from AppleScript, you don’t need to activate a workbook as you
do when you’re working manually in Excel. Instead, you can tell AppleScript which
workbook you want to manipulate and which actions to take with it. For example, you can
work with a workbook that the user cannot see without disturbing the active workbook,
the workbook they’ve been using.
Other times, you’ll want to work with the active workbook so that you can interact
with the user’s data and the user can see what’s happening. To access the active workbook
via AppleScript, use the active workbook class.
Q: Can I safely use the active workbook class in just about any script?
A: Yes—up to a point. Only one workbook is active at a time in Excel—the workbook that has
the focus, accepting the mouse clicks and the keystrokes.
This is all very straightforward when you’re using Excel interactively. But when
you’re using the active workbook class in a script, it’s a good idea to assign the result
to a variable so that you can manipulate it easily.
This is because the active workbook can change during the course of a script—for
example, if you open a workbook or create a new workbook, that workbook becomes
the active workbook. And if you close the active workbook, the next workbook behind
it becomes active. It’s easy to miss these switches of focus when you’re creating code,
and they can give your workbooks some uncomfortable surprises.
Ask the Expert

348 AppleScript: A Beginner’s Guide
Try This
To make a workbook the active workbook, give the activate command to Excel
itself, and then give the activate object command followed by the workbook object. For
example, the following statements activate the workbook named Widget Output.xls:
activate
activate object workbook "Widget Output.xls"
Creating, Saving, and Closing a Workbook
In this example, you create a script that launches Excel by creating a new workbook
based on the Blank Document template. The script then saves the workbook and closes it,
leaving a workbook that you will use again in examples later in this chapter.
To create the script, follow these steps:
1. If Excel is running at the moment, quit it in your preferred way. For example, press z-Q.
2. In AppleScript Editor, press z-N or choose File | New to create a new script.
3. Start a tell block to Excel, addressing it by its application id string, com.microsoft.Excel:
tell the application id "com.microsoft.Excel"
end tell
4. Inside the tell block, type a make new workbook statement and assign it to the
variable xbook, as shown in boldface here:
tell the application id "com.microsoft.Excel"
set xbook to make new workbook
end tell
5. Add an activate statement, as shown in boldface here, so that you will see Excel and
the new workbook you create. (Otherwise, they remain hidden.)
tell the application id "com.microsoft.Excel"
set xbook to make new workbook
activate
end tell
6. Add a save workbook as command to save the xbook workbook under the filename
ABG Book.xlsx using the Excel 2007/8 workbook format (file format Excel XML file
format). This example saves the workbook to the Desktop, but you can change it to any
path that works for your Mac’s file system. The new command appears in boldface here:
tell the application id "com.microsoft.Excel"
set xbook to make new workbook
activate

Chapter 15: Automating Microsoft Excel 349
save workbook as xbook ¬
filename (path to desktop as string) & "ABG Book.xlsx" ¬
file format Excel XML file format
end tell
7. Add a delay 3 command to insert a pause in the script to give the file system a chance
to handle the save operation. Then close the workbook and quit Excel. The new
statements appear in boldface here:
tell the application id "com.microsoft.Excel"
set xbook to make new workbook
activate
save workbook as xbook ¬
filename (path to desktop as string) & "ABG Book.xlsx" ¬
file format Excel XML file format
delay 3
close the workbook "ABG Book.xlsx"
quit
end tell
8. Save the script under a name of your choice.
9. Press z-R or click the Run button on the toolbar to run the script. You’ll see Excel
open, create the new workbook, display the name “ABG Book” in the title bar after it
saves the workbook, and then close the workbook and quit.
Working with Worksheets and Other Sheets
You can’t do much in Excel without using sheets, be they worksheets, list sheets, chart
sheets, or dialog or macro sheets. As mentioned earlier in this chapter, Excel uses a sheet
object to represent each sheet in an open workbook and gathers the sheets together into
the sheets list.
As usual, you can refer to a sheet by its name or by its index number, with the
leftmost sheet in the workbook being the first sheet. Each type of sheet has its own index
numbering, so the first worksheet (worksheet 1) is different from the first chart sheet
(chart sheet 1), and so on.
This section shows you how to insert and delete worksheets, rename them, move and
copy them, protect them, and print them. You’ll also learn to find out which kind of sheet
you grabbed hold of and how to use the active worksheet class to work with the active
worksheet.

350 AppleScript: A Beginner’s Guide
Inserting a Worksheet in a Workbook
To insert a worksheet in a workbook, use the make new worksheet command, either the
at keyword or (more naturally) the in keyword, and the workbook to which you want to
add it. For example, the following statement adds a new worksheet at the beginning of the
open workbook named Budget Strategy.xlsx:
make new worksheet in workbook "Budget Strategy.xlsx"
If you use the command on its own like that, you get a new worksheet named Sheet1
(or the next unused name—Sheet42 or whatever) at the beginning of the workbook.
Sometimes this naming and placement is convenient, but usually you’ll want to set at least
the worksheet’s name property and specify where to put it.
To set the name for the new worksheet, add a with properties statement and put the
name property and its values within braces, as in this example:
make new worksheet in workbook "Budget Strategy.xlsx" ¬
with properties {name:"2014 Planning"}
NOTE
If the name you try to set is already in use, Excel uses the next available Sheetn name
without comment—it doesn’t return an error.
Your choices on this are somewhat constrained, because the commands for specifying
where to put the worksheet don’t always work as they should. The parameters at
beginning of and at end of work, but the parameters at before and at after don’t work
reliably. Because the default placement is at the beginning of the workbook, there’s
little point in adding at beginning of unless you need to be explicit—so at end of is the
parameter you’re most likely to need. For example, the following statement adds a new
worksheet named 2015 Planning to the end of the Budget Strategy.xlsx workbook:
make new worksheet at end of workbook "Budget Strategy.xlsx" ¬
with properties {name:"2015 Planning"}
If you need to place a new worksheet in a particular position, your best bet is to place
it at the beginning or the end (your choice) and then use the move command to move
the worksheet to the required position. With the move command, the before and after
parameters work as they should. For example, the following statements add the same new

Chapter 15: Automating Microsoft Excel 351
worksheet (2015 Planning) to the same workbook (Budget Strategy.xlsx), but then move
the new worksheet to the position after the second worksheet:
tell the workbook "Budget Strategy.xlsx"
make new worksheet at end with properties {name:"2015 Planning"}
move the last sheet to before sheet 2
end tell
CAUTION
AppleScript’s commands for inserting and moving worksheets are delicate, and many
operations that should logically work (such as assigning a new worksheet you add to a
variable and then moving the sheet referenced by that variable) fail with errors. To save
time, stick with a simple approach, such as the previous one, if you find a more elegant
approach throws unexpected errors.
Renaming a Worksheet
To rename a worksheet, use a set statement to change the name property of the sheet
object. For example, the following statement changes the name of the sheet called Sheet1
to 2013 Planning:
tell the active workbook
set name of sheet "Sheet1" to "2017 Planning"
end tell
Each sheet name must be unique within a workbook, so if there’s already a sheet with
the name you try to use, the rename operation fails, but with no error message. To avoid
this giving you awkward surprises, use exists to test whether a sheet already has the name
you’re planning to use, as in this example:
tell the active workbook
if not (exists sheet ("2014 Planning")) then
set name of sheet "Sheet4" to "2014 Planning"
end if
end tell
Deleting a Worksheet
To delete a worksheet, use the delete command and specify the sheet in the workbook. For
example, the following statement deletes the first sheet in the active workbook:
delete the first sheet in the active workbook

352 AppleScript: A Beginner’s Guide
When a script deletes a worksheet (or chart sheet, or other type of sheet) like this,
Excel prompts the user for confirmation of the deletion (see Figure 15-2).
If you don’t want the user to be able to prevent the script from deleting the sheet, set
the display alerts property of the Excel application object to false before issuing the
delete command, and then set display alerts back to true. Here’s an example:
set display alerts to false
delete the first sheet in the active workbook
set display alerts to true
This way, Excel deletes the sheet without displaying the confirmation dialog box.
Moving or Copying a Worksheet
To move a worksheet, use the move command, identify the sheet object, and tell Excel
where to put it by using at beginning of, at end of, at before, or at after, as appropriate.
For example, the following statement moves the sheet named Chart5 in the active
workbook to after the sheet named 2015 Planning:
tell the active workbook
move sheet "Chart5" to after sheet "2015 Planning"
end tell
To copy a worksheet, use the copy worksheet command, identify the sheet object,
and tell Excel the destination by using the before parameter or the after parameter and
the name of the target sheet. For example, the following statement copies the worksheet
named Personnel in the active workbook to after the worksheet named 2014 Planning:
tell the active workbook
copy worksheet sheet "2016 Planning" after sheet "2017 planning"
end tell
NOTE
The copy worksheet command uses either the after parameter or the before parameter,
not at after or at before. Don’t ask; I won’t tell.
Figure 15-2 To avoid Excel confirming the deletion of a sheet with the user like this, you have
to suppress alerts before deleting a sheet.

Chapter 15: Automating Microsoft Excel 353
Excel gives the copied sheet the same name as the original sheet, followed by a space
and the number 2 or the next unused number in parentheses. For example, the first copy
of the sheet 2016 Planning is named 2016 Planning (2), the second copy is named 2016
Planning (3), and so on. You can then rename the copied sheet by using this name to
identify it—for example:
set name of sheet "2016 Planning (2)" to "2018 Planning"
To copy a worksheet to a new workbook, use a copy worksheet command with the
worksheet name but without either the before parameter or the after parameter. For
example, the following statement copies the worksheet named Materials from the active
workbook to a new workbook:
tell the active workbook to copy worksheet sheet "Materials"
This gives you a new workbook that’s the active workbook. You can then either work
with it directly as the active workbook (for example, you’ll probably want to save it) or
assign it to a variable so that you can keep track of it.
Finding Out Which Kind of Sheet You’re Dealing With
To find out which type of sheet you’re dealing with, check the worksheet type property of
the sheet object. Table 15-2 explains the five kinds of worksheet type that this property
returns.
For example, the following snippet checks the worksheet type property of the active
sheet and displays an alert (see Figure 15-3) if it is not a worksheet:
if worksheet type of active sheet is not sheet type worksheet then
display alert "Please select a worksheet" ¬
message "This script works only on worksheets, ¬
not on other types of sheets."
end if
worksheet type Constant Type of Worksheet
sheet type worksheet Worksheet
sheet type chart Chart sheet
sheet type dialog sheet (but returns missing value) Dialog sheet
sheet type excel 4 macro sheet Excel 4 macro sheet
sheet type excel 4 intl macro sheet Excel 4 International macro sheet
Table 15-2 AppleScript worksheet type Constants

354 AppleScript: A Beginner’s Guide
Protecting a Worksheet
To protect a worksheet, use the protect worksheet command, specify the sheet, and
add the parameters for the type of protection you want. The following list explains the
parameters; each is optional, but you’ll normally want to at least set a password to make
the protection effective.
● password Use this parameter to secure the protection with a password. If you don’t
apply a password, anybody can remove the protection with two clicks of the mouse.
● drawing objects Set this parameter to with drawing objects to protect the shapes
in the worksheet. Set this parameter to without drawing objects, or omit it, to leave
shapes unprotected.
● worksheet contents Set this parameter to with worksheet contents, or simply omit it
to get the default value of true, to protect the worksheet contents. Set this parameter to
without worksheet contents if you want to leave the worksheet contents unprotected.
● scenarios Set this parameter to with scenarios, or omit the parameter to get the
default value of true, to protect the scenarios in the worksheet. Set this parameter to
without scenarios if you need to let users change the scenarios.
● user interface only Set this parameter to with user interface only if you want to
protect the drawing objects, worksheet contents, and scenarios (using the parameters
chosen previously) while leaving macros unprotected. Omit this argument if you want
the protection to apply to macros as well as to the user interface items.
For example, the following statement protects everything in sight (and the macros) on
the active worksheet and applies a token password:
protect worksheet active sheet password "abcd1234" ¬
with drawing objects, worksheet contents and scenarios
Figure 15-3 It’s a good idea to check the worksheet type before trying to perform actions on
the worksheet.

Chapter 15: Automating Microsoft Excel 355
To remove protection from a worksheet, use the unprotect command, identify
the worksheet, and provide the password if the protection uses one. For example, the
following statement unprotects the active sheet:
unprotect active sheet password "abcd1234"
Using the active worksheet Class
The active worksheet class represents the active worksheet in the active workbook. This
class lets you work directly with the worksheet the user has selected.
You can set a worksheet to be the active worksheet by using an activate command on
Excel (unless it’s already activated) and then using an activate object command on the
worksheet. For example, the following statements activate Excel, the workbook named
Budget Strategy.xlsb, and then the worksheet named 2013 Planning:
activate
activate object workbook "Budget Strategy.xlsb"
activate object worksheet "2013 Planning"
You can also activate a worksheet by adding a new worksheet—the new worksheet
becomes the active worksheet.
TIP
When creating a script that uses the active worksheet, assign the active worksheet to
a variable so that you can easily restore it. Once you’ve done this, you can add new
worksheets or activate other worksheets as needed, and then still restore the user’s
original active worksheet at the end of the script.
Printing a Worksheet
To print a worksheet, use the print out command with the appropriate sheet object. You
can set the following parameters, all of which are optional:
● from Use this parameter with the page number at which you want to start printing. If
you omit this parameter, Excel starts printing from the beginning of the sheet or object.
NOTE
You can also use the print out command to print out a workbook object or the contents
of a window object, but usually a worksheet is the most useful item to print.
● to Use this parameter with the page number at which you want to stop printing.
If you omit this parameter, Excel prints to the end of the sheet or other object.
● copies Use this parameter with an integer number (for example, copies 3) when you
need more than the single copy that Excel prints by default.

356 AppleScript: A Beginner’s Guide
Try This
● preview Set this parameter to true to display the sheet or other object in Print
Preview before printing it.
● collate When you’re printing multiple copies of the same item, set this parameter to
true to make Excel collate the copies.
NOTE
The print out command has two parameters that Excel 2008 doesn’t yet support: active
printer (for changing the printer) and print to file (for printing to a file that you can then
print on a different printer).
For example, the following statement prints the sheet named 2011 Budget from the
workbook named Budget Strategy.xlsx:
print out sheet "2011 Budget" of workbook "Budget Strategy.xlsx"
Opening a Workbook and Adding
a Worksheet to It
In this example, you open the workbook you created in the first example (earlier in this
chapter), rename its existing worksheet, and add a worksheet to it before saving the
workbook.
To create the script, follow these steps:
1. In AppleScript Editor, press z-N or choose File | New to create a new script.
2. Start a tell block to Excel, addressing it by its name for variety:
tell the application "Microsoft Excel"
end tell
3. Inside the tell block, type an open workbook command that opens the workbook
ABG Book.xlsx and assigns it to the variable abook. The new statement appears in
boldface here; if you changed the path in the previous example, you’ll need to change
it here as well:
tell the application "Microsoft Excel"
set abook to open workbook workbook ¬
file name (path to desktop as string) & "ABG Book.xlsx"
end tell
4. Use a set statement to change the name property of Sheet1 to Sales. The new
statement appears in boldface here:
tell the application "Microsoft Excel"
set abook to open workbook workbook ¬

Chapter 15: Automating Microsoft Excel 357
file name (path to desktop as string) & "ABG Book.xlsx"
set the name of sheet "Sheet1" of abook to "Sales"
make new worksheet at end of active workbook ¬
with properties {name:"Results"}
end tell
5. Use a make new worksheet to insert a new worksheet at the end of the active
workbook (the workbook is active because you just opened it), giving it the name
Results, as shown in boldface here:
tell the application "Microsoft Excel"
set abook to open workbook workbook ¬
file name (path to desktop as string) & "ABG Book.xlsx"
set the name of sheet "Sheet1" of abook to "Sales"
make new worksheet at end of active workbook ¬
with properties {name:"Results"}
end tell
6. Add a save command to save abook, as shown in boldface here:
tell the application "Microsoft Excel"
set abook to open workbook workbook ¬
file name (path to desktop as string) & "ABG Book.xlsx"
set the name of sheet "Sheet1" of abook to "Sales"
make new worksheet at end of active workbook ¬
with properties {name:"Profits"}
save abook
end tell
7. Save the script under a name of your choice.
8. Press z-R or click the Run button on the toolbar to run the script. You’ll see the ABG
Book.xlsx workbook open, change the name of the first worksheet, and then add
another worksheet with the name Profits.
9. Leave the workbook open so that you can use it in the next example.
Creating and Using Ranges of Cells
When you’re working on a worksheet, you can work directly with the active cell or
the cells that the user has selected, but you can also choose your own ranges of cells to
manipulate. This section shows you how to do both and how to use Excel’s special cells in
your scripts.

358 AppleScript: A Beginner’s Guide
Working with the Active Cell or the Selection
To work with the cell the user has selected in the active worksheet in the active workbook,
use the active cell class. For example, to return the contents of the active cell, get its value
property:
get the value of the active cell
To change the contents of the active cell, set its value property:
set the value of the active cell to "Albuquerque"
To change the active cell, use an activate object command to activate the worksheet
object, and then use another activate object command to activate the range object for
the cell. For example, the following statements make cell C5 on the worksheet named
Materials the active cell:
activate object worksheet "Materials"
activate object range "C5"
To select the area around the active cell, use a select command with the current
region property of the active cell object like this:
select current region of active cell
Excel uses the selection object to represent the current selection—all the cells that are
selected. The selection can be a single cell (in which case it is the same as the active cell) or
one or more blocks of cells (in which case the active cell is the first cell in the first block).
NOTE
To find out how many cells the current selection contains, return the count property of
the cells collection in the selection object: get count of cells in selection.
Q: What is the current region in Excel?
A: The current region is the block of cells that contains data around the cell you’re referring
to (for example, the active cell). The current region begins after the previous blank column
and row, and ends before the next blank column and row.
For example, if cell E5 is the active cell, columns B and K are blank, and rows 2
and 8 are blank, the current region is C3:J7.
Ask the Expert

Chapter 15: Automating Microsoft Excel 359
Referring to a Range of Cells
To refer to a range of cells, use the range class and provide the reference for the cells as a
string. For example, the following statement selects the range C1:F25:
select range "C1:F25"
To refer to a complex range, use Excel’s normal syntax—for example:
select range "A4,B5,C8:E12,F15"
Often, you’ll want to assign a range of cells to a variable so that you can refer to it
easily throughout a script. For example, the following statement assigns the range B2:E9
to the variable range1:
set range1 to range "B2:E9"
Using Named Ranges for Easy Reference
When you need to work with several ranges, define names for the ranges. To define a
name, set the name property of the range object to a string containing the name you want.
For example, the following statement applies the name Essential_Info to the range B2:C4
in the active worksheet in the active workbook:
set the name of the range "B2:C4" ¬
of active sheet of active workbook to "Essential_Info"
After creating the name, you can refer to the range by the name. For example, the
following statement selects the Essential_Info range:
select range "Essential_Info"
To remove a name from a range, delete the named item for the name. For example,
the following statement deletes the Essential_Info name:
delete named item "Essential_Info" of active workbook
Working with a Worksheet’s Used Range
To work with all a worksheet’s cells that contain data, use the used range property of
the sheet object. The used range is the smallest rectangle that includes all the cells that
contain data.
For example, the following statement selects the used range on the active worksheet:
select the used range of the active sheet

360 AppleScript: A Beginner’s Guide
Using Excel’s Special Cells
In your scripts, you may need to work with only certain types of cells in a range or on a
worksheet—for example, only the cells that contain formulas, or only the cells that are blank.
To save you having to round up these cells manually (or programmatically), Excel
provides the special cells command, which gives you direct access to the various types of
special cells.
When using the special cells command, you need to provide two or three pieces of
information. The first is the range on which you want the command to work—for example,
cells of active sheet to find the special cells on the active worksheet.
The second piece of information is the type of special cells you want. To tell Excel this,
you use one of the type constants explained in Table 15-3.
If you’re using the cell type constants type or the cell type formulas type, you can also
use the value parameter to tell Excel which constants or formulas to return. Table 15-4 shows
the values you can use.
For example, the following statement selects all the cells containing formulas in the
used range of the active worksheet:
select (special cells of used range of active sheet ¬
type cell type formulas)
cell type Constant for Special Cells Returns These Cells
cell type all format conditions Cells that have formatting conditions applied
cell type all validation Cells that have data validation applied
cell type blanks Blank cells
cell type comments Cells with comments attached to them
cell type constants Cells that contain constants
cell type formulas Cells that contain formulas
cell type last cell The last cell in the used range of the sheet
cell type same format conditions Cells that have the same format conditions applied
cell type same validation Cells that have the same data validation applied
cell type visible All visible cells
Table 15-3 AppleScript’s cell type Constants for Accessing Special Cells
Chapter 15: Automating Microsoft Excel 361
Try This
Inserting a Formula in a Cell
To insert a formula in a cell, set the formula property of the range object that represents
the cell. For example, the following statement inserts the formula =AVERAGE(C2:C22)
in cell C23 of the worksheet named 2011 Budget:
set the formula of range "C23" of worksheet "2011 Budget" ¬
to "=AVERAGE(C2:C22)"
Adding Data to a Workbook
In this example, you add some data to the workbook you created earlier in this chapter.
Follow these steps to create the script:
1. In AppleScript Editor, press z-N or choose File | New to create a new script.
2. Start a tell block to Excel, addressing it by its application id string, com.microsoft.Excel:
tell the application id "com.microsoft.Excel"
end tell
3. Inside the tell block, start a nested tell block to the Sales sheet, as shown in boldface
here:
tell the application id "com.microsoft.excel"
tell sheet "Sales"
end tell
end tell
4. Inside the nested tell block, set the value property of the range object A1 to the string
"California", as shown in boldface here:
tell the application id "com.microsoft.excel"
tell sheet "Sales"
value Constant Returns These Cells
errors Cells containing errors
logical Cells containing logical values
numbers Cells containing numbers
text values Cells containing text values
Table 15-4 AppleScript’s value Constants for Accessing Special Cells
(continued)

362 AppleScript: A Beginner’s Guide
set the value of range "A1" to "California"
end tell
end tell
5. Similarly, add three other states to cells A2, A3, and A4, and add a corresponding value
to the cells B1, B2, B3, and B4. The new statements appear in boldface here:
tell the application id "com.microsoft.excel"
tell sheet "Sales"
set the value of range "A1" to "California"
set the value of range "A2" to "Oregon"
set the value of range "A3" to "Nebraska"
set the value of range "A4" to "Wyoming"
set the value of range "B1" to 453
set the value of range "B2" to 861
set the value of range "B3" to 102
set the value of range "B4" to 649
end tell
end tell
6. After the nested tell block but inside the outer tell block, add a save the workbook
statement, as shown in boldface here:
tell the application id "com.microsoft.excel"
tell sheet "Sales"
set the value of range "A1" to "California"
set the value of range "A2" to "Oregon"
set the value of range "A3" to "Nebraska"
set the value of range "A4" to "Wyoming"
set the value of range "B1" to 453
set the value of range "B2" to 861
set the value of range "B3" to 102
set the value of range "B4" to 649
end tell
save the workbook
end tell
7. Save the script under a name of your choice.
8. Display the Sales sheet of the ABG Book.xlsx workbook so that you can watch what
happens. (If you closed this workbook earlier, open it now.)
9. Press z-R or click the Run button on the toolbar to run the script. You’ll see the range
A1:B4 take on values.
Leave the workbook open so that you can use it in the next example, in which you
create charts using the data you just entered.

Chapter 15: Automating Microsoft Excel 363
Using Charts in Your Workbooks
Excel’s great for crunching numbers, but when you need to make your data snap, crackle,
and pop, turn it into a chart.
As you’ll know if you’ve used them when working manually, Excel offers a full range of
chart types and chart options. You can also create charts automatically from AppleScript, as
described in this section. You have total control over the charts you create this way, but for
the greatest effect, you may need to tweak them manually afterward to enhance the points
you wish to make.
Understanding How to Create
a Chart from AppleScript
Excel lets you create a chart either on its own chart sheet or as a chart object on a worksheet.
Using a separate chart sheet is often the better choice, as it gives you more space for creating
and editing the chart, but placing a chart object on a worksheet can be useful when you
need to see the chart together with its source data.
The first step in creating a chart from AppleScript is to either choose data and then add
a chart sheet to the workbook, or identify a chart object to a worksheet and then tell it which
source data to use. You can then set the chart type, format the axes, and add other items such
as a chart title and a legend.
Adding a Chart Sheet to a Workbook
The easiest way to create a new chart sheet and add a chart to it is to select the source data
for the chart first. Just as when you’re working interactively, Excel then grabs that data
and uses it for the chart, automatically linking the two. (If you prefer, you can build the
chart by adding data series, as described later in this chapter.)
To create a new chart sheet, use a make new command to create a new object of
the chart sheet class. As when creating a worksheet, use either at or in and the name or
identity of the workbook in which you want to create the chart.
For example, the following statement adds a chart sheet to the active workbook:
make new chart sheet in active workbook
By default, Excel places the chart sheet before the current worksheet in the workbook.
To choose a different position, you can use one of these designations:
● at beginning of and the workbook object
● at end of and the workbook object

364 AppleScript: A Beginner’s Guide
● at before and a sheet object
● at after and a sheet object
NOTE
Unlike with worksheet objects, the at before and at after parameters work correctly for
chart sheet objects at this writing.
The following example adds a chart sheet after the sheet named 2013 Planning in the
active workbook:
make new chart sheet at before sheet "2013 Planning" of active workbook
Adding a Chart Object to a Worksheet
To add a chart object to a worksheet, you create a new object of the chart object class on the
worksheet. Use a make new chart object command to create the new chart object. Usually,
you’ll want to assign the chart object to a variable so that you can easily manipulate it. The
following example shows code for creating a new chart object in the active worksheet,
assigning it to a variable, setting its position (using the top property and the left position
property) and size (using the height property and the width property), and selecting it:
set myChart to make new chart object at active sheet
set top of myChart to 100
set left position of myChart to 200
set height of myChart to 500
set width of myChart to 800
select myChart
When you create a chart like this, Excel creates a blank chart, even if you selected the
data beforehand. So your next move is to specify its source data. To do so, you use the set
source data command, which takes one required parameter and one optional parameter.
● range This required argument tells Excel which range to draw the chart’s data from.
● plot by This optional argument lets you tell Excel how to plot the chart’s data—by
columns (use plot by columns) or by rows (use plot by rows).
For example, the following statement sets the source data of the active chart to the
range A1:C13 on the worksheet named Temperatures. Note that the range is in double
quotation marks and that the reference starts with an equal sign:
set source data active chart source range "=Temperatures!A1:C13"
Chapter 15: Automating Microsoft Excel 365
Setting the Chart Type
To set the chart type, set the chart type property of the chart object to the appropriate
constant. Table 15-5 shows the constants you can use, broken down by the category of the
charts they create.
For example, the following statement sets the chart type of the active chart to a
stacked bar chart:
set chart type of active chart to bar stacked
Chart Category AppleScript chart type Constants
Area chart area chart, area stacked, area stacked 100, ThreeD area, ThreeD area stacked,
ThreeD area stacked 100
Bar chart bar clustered, bar stacked, bar stacked 100, ThreeD bar clustered, ThreeD
bar stacked, ThreeD back stacked 100, cylinder bar clustered, cylinder bar
stacked, cylinder bar stacked 100, cone bar clustered, cone bar stacked, cone
bar stacked 100, pyramid bar clustered, pyramid bar stacked, pyramid bar
stacked 100
Bubble chart bubble, bubble ThreeD effectstock HLC
Column chart column clustered, column stacked, column stacked 100, ThreeD column,
ThreeD column clustered, ThreeD column stacked, ThreeD column stacked 100,
cylinder column, cylinder column clustered, cylinder column stacked, cylinder
column stacked 100, cone column, cone column clustered, cone column
stacked, cone column stacked 100, pyramid column, pyramid column
clustered, pyramid column stacked, pyramid column stacked 100
Doughnut chart doughnut, doughnut exploded
Line chart line chart, line stacked, line stacked 100, line markers, line markers stacked,
line markers stacked100, ThreeD line
Pie chart pie chart, pie of pie, pie exploded, ThreeD pie, ThreeD pie exploded, bar of pie
Radar chart radar, radar markers, radar filled
Scatter chart xyscatter, xy scatter smooth, xy scatter smooth no markers, xy scatter lines, xy
scatter lines no markers
Stock chart stock OHLC, stock VHLC, stock VOHLC
Surface chart surface, surface wireframe, surface top view, surface top view wireframe
Table 15-5 Excel’s chart type Constants by Chart Category

366 AppleScript: A Beginner’s Guide
Add a Series to the Chart
If you’ve set up the data for the chart as described earlier in this chapter, you’re probably
all set with the chart’s contents. But if necessary, you can add a data series to the chart by
using the make new series command. You specify where to add the series—for example,
at beginning or at end—and use the properties to provide the series values, the xvalues,
and name. Here’s an example:
set mySeries to make new series at end ¬
with properties {series values:"E4:E20", xvalues:"A4:A20", ¬
name:"Bay Area"}
Adding a Caption to an Axis
To add a caption to a chart axis, first use the get axis command to return the axis you
want. The get axis command takes two parameters.
● axis type This required parameter tells Excel which axis you want. Use category
axis to return the category axis, series axis to return the series axis (only on 3-D
charts), or value axis to return the value axis.
● which axis This optional parameter lets you specify which axis group you want:
primary axis or secondary axis. Excel uses the primary axis if you omit this parameter.
For example, the following statement returns the category axis of the chart referenced
by the myChart variable and assigns it to the catax variable:
set catax to get axis axis type category axis which axis primary axis
Once you’ve grabbed hold of the axis, set its has title property to true. You can then
tell the axis title object to set its caption property to the text you want, or tell the font
object to change the font name (the name property), the font size (the font size property),
or other properties such as bold and italic.
For example, the following snippet adds a title to the axis identified by the catax
variable and applies font formatting to it:
tell catax
set has title to true
tell its axis title
set caption to "Cities"
tell the font object

Chapter 15: Automating Microsoft Excel 367
set the font size to 14
set the name to "Trebuchet"
end tell
end tell
end tell
Adding a Chart Title
To add a chart title, set the has title property to true, and then set the caption property of
the chart title object to the text you want the title to have. You can also use the font object
of the chart title object to apply font formatting to the chart title.
The following example adds a title (Latest Sales Figures) to the chart referenced by
the variable myChart and then sets the font size of the chart title to 22 points:
tell myChart
set has title to true
tell its chart title
set caption to "Latest Sales Figures"
tell the font object to set the font size to 22
end tell
end tell
NOTE
When you’re referring to the chart title property, you need to use its chart title to make
the chart notice the changes. Don’t ask.
Adding a Legend
To add a chart legend, set the has legend property to true:
tell myChart
set has legend to true
end tell
To control the position of the legend, set the position property of the legend object
item to the position you want: legend position top, legend position bottom, legend
position left, or legend position right. For example, the following boldface statement
positions the legend on the left:
tell myChart
set has legend to true
set the position of the legend object to legend position left
end tell

368 AppleScript: A Beginner’s Guide
Try This Creating a Chart
In this example, you create a small chart using the data entered by the script you wrote in
the previous example.
To create the script, follow these steps:
1. In AppleScript Editor, press z-N or choose File | New to create a new script.
2. Start a tell block to Excel, addressing it by its application id string, com.microsoft.Excel:
tell the application id "com.microsoft.Excel"
end tell
3. Inside the tell block, add a select statement that selects the range A1:B4 on the sheet
named Sales, the range that contains the data for the chart. The new statement appears
in boldface here:
tell the application id "com.microsoft.excel"
select (range "A1:B4")
end tell
4. Add a make new chart sheet command to insert a new chart sheet at the beginning
of the active workbook, giving the sheet the name Sales Chart. The new statement
appears in boldface here:
tell the application id "com.microsoft.excel"
select (range "A1:B4")
make new chart sheet at beginning of active workbook ¬
with properties {name:"Sales Chart"}
end tell
5. Add a tell block to the chart object on the chart sheet you just created, setting its type
to cylinder column, setting its has title property to true, and then setting the caption
property of the chart title object to Sales Results and making it 36-point font. The new
statement appears in boldface here:
tell the application id "com.microsoft.excel"
select (range "A1:B4")
make new chart sheet at beginning of active workbook ¬
with properties {name:"Sales Chart"}
tell the chart of sheet "Sales Chart"
set the chart type to cylinder column
set has title to true
tell its chart title
set the caption to "Sales Results"
tell the font object
set the font size to 36

Chapter 15: Automating Microsoft Excel 369
end tell
end tell
end tell
end tell
6. Turn off the display of the legend by setting the has legend property to false, as shown
in boldface here:
tell the application id "com.microsoft.excel"
select (range "A1:B4")
make new chart sheet at beginning of active workbook ¬
with properties {name:"Sales Chart"}
tell the chart of sheet "Sales Chart"
set the chart type to cylinder column
set has title to true
tell its chart title
set the caption to "Sales Results"
tell the font object
set the font size to 36
end tell
end tell
set has legend to false
end tell
end tell
7. Use a get axis command with axis type category axis, and assign the result to the
variable myaxis. Then use a nested tell block to myaxis to set its has title property
to true and a further nested tell block to set the caption property of the axis title
object to States. Right inside the Russian doll, use a tell statement to set the font size
property to 20 points. The new statements appear in boldface here:
tell the application id "com.microsoft.excel"
select (range "A1:B4")
make new chart sheet at beginning of active workbook ¬
with properties {name:"Sales Chart"}
tell the chart of sheet "Sales Chart"
set the chart type to cylinder column
set has title to true
tell its chart title
set the caption to "Sales Results"
tell the font object
set the font size to 36
end tell
end tell
set has legend to false
set myaxis to get axis axis type category axis ¬
which axis primary axis
tell myaxis
(continued)

370 AppleScript: A Beginner’s Guide
set has title to true
tell its axis title
set caption to "States"
tell the font object to set the font size to 20
end tell
end tell
end tell
end tell
8. Finally, set the name property of the first series object to Sales by State, as shown in
boldface here:
tell the application id "com.microsoft.excel"
select (range "A1:B4")
make new chart sheet at beginning of active workbook ¬
with properties {name:"Sales Chart"}
tell the chart of sheet "Sales Chart"
set the chart type to cylinder column
set has title to true
tell its chart title
set the caption to "Sales Results"
tell the font object
set the font size to 36
end tell
end tell
set has legend to false
set myaxis to get axis axis type category axis ¬
which axis primary axis
tell myaxis
set has title to true
tell its axis title
set caption to "States"
tell the font object to set the font size to 20
end tell
end tell
set the name of the first series to "Sales by State"
end tell
end tell
9. Save the script under a name of your choice.
10. Press z-R or click the Run button on the toolbar to run the script. You’ll see Excel add a
new chart sheet, name it, and build the chart on it.
11. Save the workbook and close it.

Chapter 15: Automating Microsoft Excel 371
Working with Excel Windows and Views
When your scripts open or create workbooks for the user, you’ll need to open, close, and
resize windows. You will also need to switch views as needed and zoom in or out to show
the appropriate amount of a sheet.
To work with windows, you use the windows list, which contains all window objects
for each open window. As usual, Excel treats the windows as being in a stack, with the
active window at the front, so you can access the windows in various ways.
● By the window’s position in the stack For example, use the front window or
window 1 to return the front window.
● By the window’s caption The caption property of a window object returns the text
that’s displayed in the window’s title bar. You can use this property to identify the
window you want. You’ll see an example of this in just a moment.
● By using the active window class The active window class lets you grab the active
window—the window the user is actually using.
Opening a New Window
To open a new window on a workbook, use the new window on workbook command.
This command takes the workbook parameter with the workbook for which you want the
new window. For example, the following statement opens a new window on the workbook
named Migration Patterns.xlsx:
new window on workbook workbook "Migration Patterns.xlsx"
What you’ll normally want to do is assign the new window to a variable so that
you can easily resize or reposition it, as discussed later in this section. For example, the
following statement assigns the new window created by the new window on workbook
command to the variable myWindow:
set myWindow to new window on workbook workbook "Migration Patterns.xlsx"
Activating a Window
To activate a window, use an activate command first on the Excel application object and
then on the window object. For example, the following repeat block activates the window

372 AppleScript: A Beginner’s Guide
with the caption Amortization.xlsx by going through the open windows until it finds the
one with the right caption:
repeat with i from 1 to count of windows
if the caption of window i is "Amortization.xlsx" then
activate
activate object window i
return
end if
end repeat
Closing a Window
To close a window, use a close command and identify the window by its caption, its position
in the stack, or by another means. For example, the following statement closes the window
with the caption Migration Patterns.xlsx:1:
close the window "Migration Patterns.xlsx:1"
Repositioning and Resizing Windows
To resize a window, set the left position, top, width, and height properties of the appropriate
window object. Each of these properties takes an integer value of pixels. For example,
the following tell blocks position the front window in the upper-left corner of the primary
monitor and make it 800 wide by 600 pixels high:
tell the application id "com.microsoft.Excel"
tell the front window
set left position to 0
set top to 0
set width to 800
set height to 600
end tell
end tell
To reposition a window without resizing it, set the left position property and the top
property to suitable pixel values. For example, the following tell block makes Excel position
the upper-left corner of the front window 600 pixels from the left edge of the screen and
300 pixels from the top edge:
tell the application id "com.microsoft.Excel"
set left position of front window to 600
set top of front window to 300
end tell

Chapter 15: Automating Microsoft Excel 373
Rearranging Excel Windows
To rearrange the open Excel windows, use the arrange_windows command. Without any
parameters, this command tiles all visible windows, giving each as equal a share of the screen
space as possible. But you can also use the following parameters, all of which are optional:
● arrange style Use this parameter to tell Excel how to arrange the windows. Table 15-6
explains your options.
● active workbook Set this parameter to with active workbook to arrange only
the windows of the active workbook. This parameter is most useful when you’re
synchronizing the scrolling of the workbook’s windows, as described next, but you
can also use it when you want to affect only the active workbook. Set this parameter
to without active workbook, or simply omit it, to arrange the windows of all the
open workbooks.
● sync horizontal This parameter applies only when you’re using with active
workbook. Then you can set this parameter to with sync horizontal (giving you with
active workbook and sync horizontal) to synchronize horizontal scrolling in the
windows, allowing you to scroll two or more windows in tandem.
● sync vertical This parameter applies only when you’re using with active workbook.
Then you can set this parameter to with sync vertical (giving you with active workbook
and sync vertical or with active workbook, sync horizontal and sync vertical) to
synchronize vertical scrolling in the windows.
Table 15-6 AppleScript arrange style Constants for Arranging Windows
arrange style Constant Explanation
arrange style cascade Arranges the windows in an overlapping cascade so that you can see
part of each window. This command doesn’t work at this writing.
arrange style horizontal Arranges the windows horizontally—for example, one at the top of
the screen and one at the bottom.
arrange style tiled Tiles the windows, sharing the screen space as equally as possible
among them. This is the default arrangement if you don’t use the
arrange style parameter.
arrange style vertical Arranges the windows vertically—for example, one on the left of the
screen and one on the right.

374 AppleScript: A Beginner’s Guide
For example, the following statement tiles all open windows:
arrange_windows
The following statement arranges the windows of the active workbook horizontally,
setting up synchronized scrolling both horizontally and vertically:
arrange_windows arrange style horizontal ¬
with active workbook, sync horizontal and sync vertical
Changing the View
To change the view in a window, set the view property of the appropriate window object
to page layout view (for Page Layout view) or normal view (three guesses). For example,
the following statement makes sure the active window is in Page Layout view:
set the view of the active window to page layout view
NOTE
The active window in the last example may already be using Page Layout view—the
code doesn’t check, because there’s no point in doing so.
Zooming a Window
To zoom a window in or out, set its zoom property to the percentage you want. Excel
supports zoom percentages from 10 percent to 400 percent. For example, the following
statement zooms the active window to 200 percent:
set zoom of active window to 200
Using Find and Replace in Your Scripts
When you need to find data in a workbook, you can harness Excel’s built-in Find capabilities.
Similarly, you can use Excel’s Replace tools to replace data, formatting, or both.
Using find to Search for Data
To search for data, you use the find command. This command takes two required
parameters and can take up to seven optional parameters.
The two required parameters are straightforward enough.
● range This parameter gives the range in which to search for the data—for example,
the active worksheet.
● what This parameter specifies what you’re searching for—a particular word or value,
for example.

Chapter 15: Automating Microsoft Excel 375
These are the optional parameters you can use:
● after Use this parameter to specify the cell after which you want to begin the search.
This must be a single cell rather than a range of cells.
● look in Set this parameter to formulas if you want to search only formulas, values
to search only values, or comments to search only in comments. Omit this parameter
to search everything.
● look at Set this parameter to whole if you want to find entire cells only. Set it to
part if you’ll take a partial match.
● search order Set this parameter to by rows if you want to search down and then
across. Set it to by columns if you want to search across and then down.
● match case Set this parameter to with match case if you want to use case-sensitive
matching. If case doesn’t matter, omit this parameter or set it to without match case.
● match byte (Japanese versions of Excel only.) Set this parameter to with match
byte if you want to accept only matches of double-byte characters to double-byte
characters rather than double-byte characters matching their single-byte equivalents.
For example, the following statement searches for the word density in the range A1:Z26
of the worksheet named Sheet1, ignoring case:
find (range "A1:Z26" of worksheet "Sheet1") ¬
what "density" without match case
CAUTION
The look in parameter, look at parameter, search order parameter, match case
parameter, and match byte parameter (if you use it) remain in effect from one search
to the next. This means it’s a good idea to set these settings explicitly to avoid getting
surprised by the settings used by whoever searched before you.
Continuing a Search
To continue a search, you can use the find next command to find the next instance of the
search item or the find previous command to find the previous instance. Each of these
commands takes the following two parameters:
● range This required parameter specifies the range through which you want to search.
● after This optional parameter specifies the cell after which you want the search to
start. This works in the same way as the after parameter for the find command itself,
except that for the find previous command, “after” actually means “before,” because
the search is going backward.

376 AppleScript: A Beginner’s Guide
For example, the following statement continues questing forward for the next instance
of the search target:
find next (range "A1:Z26" of worksheet "Sheet1")
Using replace to Replace Data
To perform replace operations using AppleScript, use the replace command. This command
uses the same parameters as the find command (discussed previously) except that it also has
the replacement parameter, which specifies the replacement text you want to use.
For example, the following statement replaces the first instance of the word industry
in the range A1:Z26 of the worksheet named Sheet1 with the word company:
replace (range "A1:Z26" of worksheet "Sheet1") ¬
what "industry" replacement "company"
The replace command returns true if it replaces an item. There’s no command for
replacing all instances via AppleScript the way there is in the user interface, so if you need
to make multiple replacements, create a repeat loop that runs through the region until it
finds no more instances.

377
Chapter 16
Automating Microsoft
Entourage

378 AppleScript: A Beginner’s Guide
Key Skills & Concepts
● Creating Entourage accounts
● Creating and sending e-mail messages
● Dealing with incoming e-mail messages
● Working with contacts
● Working with events
● Working with tasks
● Working with notes
In this chapter, you’ll learn how to use AppleScript to automate essential tasks in Microsoft
Entourage, the Mac equivalent of the Windows-based Microsoft Outlook desktop
information manager application. I’ll show you how to create and send e-mail messages
and attachments; deal with incoming e-mail messages (with or without attachments);
and work with contacts, events, tasks, and notes.
Before you can get anything done in Entourage, you need to set up one or more
accounts—so that’s where we’ll start with AppleScript as well.
NOTE
To help you avoid messing up your Entourage setup, this chapter doesn’t provide any
Try This examples—but do feel free to try any of the sample scripts presented, adapting
them to your needs. If you practice setting up or configuring e-mail accounts, work on a
test Mac rather than on your production machine.
Creating Entourage Accounts
Entourage supports four different types of messaging accounts:
● Exchange account An account for accessing a server running Microsoft Exchange
● IMAP account An account for accessing an Internet Mail Access Protocol (IMAP)
server for incoming mail. Many ISPs use IMAP servers. Apple’s MobileMe service
uses IMAP servers.

Chapter 16: Automating Microsoft Entourage 379
● POP account An account for accessing a Post Office Protocol (POP) server for
incoming mail. Most ISPs who don’t use IMAP servers use POP servers.
● Hotmail account An account for accessing Microsoft’s Windows Live Hotmail
service. Entourage works only with the Hotmail Plus account type—the type you have
to pay for. It doesn’t work with free Hotmail accounts.
Because of the different mail servers involved, the different account types have
different properties—but the Exchange account, IMAP account, and POP account share
a central core of properties. Table 16-1 explains these properties, showing which account
type has which of them.
Each of these three account types also has properties that it doesn’t share, as explained
in the next three sections.
account Object
Property Explanation POP IMAP Exchange
name The account name ¸ ¸ ¸
ID An integer containing the unique ID for
the account. This property is read-only.
¸ ¸ ¸
full name The user’s full name ¸ ¸ ¸
email address The account’s e-mail address ¸ ¸ ¸
additional headers Text giving any extra headers to add to
messages you’re sending
¸ ¸ ¸
default signature type none to use no signature, random to
use a random signature, other to use
a signature specified by the default
signature choice property
¸ ¸ ¸
default signature
choice
The signature to use when the default
signature type property is set to other
¸ ¸ ¸
SMTP server The SMTP server the account uses for
sending mail
¸ ¸
password The password the account uses for the
incoming mail server
¸ ¸
include in send and
receive all
true to include this account when sending
and receiving all mail; false to exclude it
¸ ¸
send secure password true to send the password securely;
false to send the password in the clear if
requested
¸ ¸
Table 16-1 Properties Shared Among the Exchange account, IMAP account, and POP
account Objects

BeginNew / AppleScript: A Beginner’s Guide / Guy Hart-Davis / 954-3 / Chapter 16
380 AppleScript: A Beginner’s Guide
Creating an Exchange Account
Apart from the shared properties shown in Table 16-1, the Exchange account object also
has the properties explained in Table 16-2.
To set up an Exchange account, use a make new Exchange account command.
The easiest way to set the key properties for the account is to specify them in the with
properties parameter, as in the following script:
tell the application id "com.microsoft.Entourage"
set XAcc to make new Exchange account with properties ¬
{name:"jsmith", Exchange server: ¬
"server1.acmevirtualindustries.com", ¬
account Object
Property Explanation POP IMAP Exchange
SMTP requires SSL true if the SMTP server requires an SSL
connection; false if it does not.
¸ ¸
SMTP port An integer showing the port on which to
connect to the SMTP server
¸ ¸
SMTP requires
authentication
true if the SMTP server requires
authentication; false if it does not
¸ ¸
SMTP uses account
settings
true if the SMTP server uses the same
account ID and password as the incoming
mail server; false if the SMTP server
requires different credentials
¸ ¸
SMTP account id The account ID for the SMTP server when
this server requires authentication and
uses different settings from the incoming
mail server
¸ ¸
SMTP password The password for the SMTP server when
this server requires authentication and
uses different settings from the incoming
mail server
¸ ¸
last SMTP
authentication method
The last authentication method Entourage
used when connecting to the SMTP server
¸ ¸
last authentication
method
The last authentication method Entourage
used when connecting to the incoming
mail server
¸ ¸
Table 16-1 Properties Shared Among the Exchange account, IMAP account, and POP
account Objects (continued)
ch16.indd 380 11/13/09 12:26:30 PM
Chapter 16: Automating Microsoft Entourage 381
Exchange account Property Explanation
Exchange ID The user’s Exchange ID
domain The Exchange domain name
Exchange server settings A server settings object containing the settings for accessing the
Exchange server via DAV (Digital Authoring and Versioning)
inbox folder The folder that contains the inbox. This property is read-only.
sent items folder The folder that contains the Sent Items folder. This property is
read-only.
deleted items folder The folder that contains the Deleted Items folder. This property is
read-only.
drafts folder The folder that contains the Drafts folder. This property is read-only.
junk mail folder The folder that contains the Junk Mail folder. This property is
read-only.
favorites folder The folder that contains the Favorites folder. This property is
read-only.
primary calendar The calendar for the Exchange mailbox. This property is read-only.
primary address book The primary address book for the Exchange mailbox. This property
is read-only.
total size The amount of space the account is occupying on the Exchange
server. This property is read-only.
Exchange subfolders A record containing the account’s subfolders and the amount of
storage they consume
LDAP server settings A server settings object containing the settings for the LDAP server
LDAP requires authentication true if the account provides a user name and password to the LDAP
server
partially retrieve messages true to download only the first part of large messages; false to
download entire messages no matter how lardy they are
partially retrieve messages size An integer giving the maximum size in KB for message downloads
partially retrieve messages
on dialup only
true to download only the first part of large messages when using
a dial-up connection; false to download the full messages even on
dial-up
requires Kerberos true if the Exchange account requires Kerberos; false if it does not
principal Text giving the GSSAPI (Generic Security Services Application
Program Interface) principal name for Kerberos v5
search base The search base used for LDAP queries
maximum entries An integer specifying the maximum number of entries an LDAP
query should return
Table 16-2 Properties Peculiar to the Exchange account Object
382 AppleScript: A Beginner’s Guide
Exchange ID:"jsmith", domain:"acmevirtualindustries.com", ¬
free busy server:"server1.acmevirtualindustries.co/public/", ¬
full name:"Jean Smith", ¬
email address:"jsmith@acmevirtualindustries.com", ¬
LDAP server:"ldap.acmevirtualindustries.com", LDAP port:3628, ¬
search base:"", maximum entries:100, ¬
partially retrieve messages:true, ¬
partially retrieve messages size:40000}
end tell
NOTE
If you have Office 2008 Home & Student edition, your version of Entourage doesn’t
support Exchange accounts.
Creating an IMAP Account
Apart from the shared properties shown in Table 16-1, the IMAP account object also has
the properties explained in Table 16-3.
Table 16-2 Properties Peculiar to the Exchange account Object (continued)
Exchange account Property Explanation
public folder server settings A server settings object containing the Public Folder server’s settings
GAL A folder object that represents either the Exchange global address
list (GAL) or LDAP search
out of office true if the out-of-office auto-reply is turned on; false if it is not
out of office auto reply The text used for the out-of-office auto-reply message
free busy server The Exchange free/busy server
Exchange server The Exchange server’s address
DAV requires SSL true if DAV access requires SSL; false if it does not
DAV port The port number on which to connect to the Exchange server via DAV
LDAP server The address of the LDAP server used
requires authentication true if the account provides a user name and password when
logging into the LDAP server; false if not
LDAP requires SSL true if the LDAP server requires an SSL connection; false if it does not
LDAP port The number of the port to connect to on the LDAP server
Chapter 16: Automating Microsoft Entourage 383
IMAP account Property Explanation
IMAP server The IMAP server the account uses for receiving mail
IMAP ID The account’s ID for the IMAP server
IMAP requires SSL true if the IMAP server requires an SSL connection; false if
it does not
IMAP port An integer showing the port on which to connect to the
IMAP server
root folder path The path to the root folder on the IMAP server
send commands to IMAP server
simultaneously
true for standard sending; false to send commands
individually to avoid confusing unreliable IMAP servers
download complete messages in IMAP
Inbox
true to download entire messages in the inbox; false to
download only the headers
partially retrieve messages true to retrieve parts of messages up to the maximum size
allowed; false otherwise
partially retrieve messages size An integer giving the maximum size in KB for downloading
messages
IMAP live sync true to turn on the IMAP Live Sync feature; false to turn it off
IMAP live sync only connect to inbox true to use IMAP Live Sync only for the inbox; false not to
IMAP live sync connect on launch true to run IMAP Live Sync immediately on launching
Entourage; false not to
enable IMAP live sync timeout true to make Live Sync quit after the period of inactivity
specified by the IMAP live sync timeout property
IMAP inbox folder The path to the IMAP inbox. This property is read-only.
store messages in IMAP sent items
folder
true to store the messages you’ve sent in the Sent Items
folder; false not to store them
IMAP sent items folder The folder in which to store sent items (if the store messages
in IMAP sent items folder property is set to true)
store messages in IMAP drafts folder true to store incomplete messages in the Drafts folder so that
you can work on them from any computer; false not to
IMAP drafts folder The folder in which to store draft messages
move messages to the IMAP deleted
items folder
true to move deleted messages to the Deleted Items folder;
false not to
IMAP deleted items folder The folder in which to store deleted messages
empty IMAP deleted items folder
on quit
true to empty the Deleted Items folder when you quit
Entourage; false not to empty the folder
Table 16-3 Properties Peculiar to the IMAP account Object
384 AppleScript: A Beginner’s Guide
For example, the following script creates a new IMAP account for the MobileMe
service. The script assigns the new account to the new_account variable, which it then
uses to set five properties one by one (as opposed to using a tell block to new_account).
tell the application id "com.microsoft.Entourage"
set new_account to make new IMAP account with properties ¬
{name:"MobileMe", full name:"Chris P. Smith", ¬
email address:"chris_p_smith@mac.com", ¬
SMTP server:"smtp.mac.com", ¬
IMAP server:"mail.mac.com", IMAP ID:"chris__smith", ¬
password:"dontreadthis", include in send and receive all:true, ¬
send secure password:false, default signature type:none}
set send commands to IMAP server simultaneously of new_account ¬
to true
set store messages in IMAP sent items folder of new_account to true
set store messages in IMAP drafts folder of new_account to true
set move messages to the IMAP deleted items folder of new_account ¬
to true
set empty IMAP deleted items folder on quit of new_account to true
end tell
Creating a POP Account
Apart from the shared properties shown in Table 16-1, the POP account object also has
the properties explained in Table 16-4.
For example, the following script creates a new POP account, assigns it to the
variable PopAcc, and sets the most important properties for the account by using the
IMAP account Property Explanation
delete expired IMAP messages on quit true to delete messages older than the number of days
specified by the delete expired IMAP messages on quit
after property when you quit Entourage; false to keep the
messages that have passed their best-before date
delete expired IMAP messages on quit
after
An integer giving the number of days after which to delete
IMAP messages
delete all expired IMAP messages on
quit
true to delete all expired messages from the Deleted Items
folder when you quit Entourage
Table 16-3 Properties Peculiar to the IMAP account Object (continued)
Chapter 16: Automating Microsoft Entourage 385
with properties parameter in the make new POP account statement. It then uses a tell
block to PopAcc to set five properties that are peculiar to the POP account object.
tell the application id "com.microsoft.Entourage"
set PopAcc to make new POP account with properties ¬
{name:"Main Mail", full name:"Wilson Collins", ¬
email address:"wcollins@acmevirtualindustries.com", ¬
SMTP server:"smtp.acmevirtualindustries.com", ¬
POP server:"pop.acmevirtualindustries.com", ¬
POP ID:"wcollins", password:"abcd0987", ¬
include in send and receive all:true, ¬
send secure password:false, default signature type:none}
tell PopAcc
set allow online access to true
set leave on server to false
set maximum message size to 3072
set delete messages from server when deleted from computer ¬
to true
set delete messages from server after to 7
end tell
end tell
POP account Property Explanation
POP server The POP3 server the account uses for receiving mail
POP ID The account’s ID for the POP3 server
allow online access true to allow Entourage to access this account and display it in the folder
list; false to prevent Entourage from accessing and displaying the account
leave on server true to leave a copy of each read message on the server (useful if
you’re checking the same mailbox from multiple computers); false to
remove messages from the server when you read them
POP requires SSL true if the POP server requires an SSL connection; false if it does not
POP port An integer showing the port on which to connect to the POP server
maximum message size An integer giving the maximum message size for incoming messages
(measured in KB)
delete messages from
server after
An integer giving the number of days after which to delete messages
from the mail server
delete messages from server
when deleted from computer
true to delete messages from the mail server when you delete them in
Entourage; false to keep them on the server
Table 16-4 Properties Peculiar to the POP account Object

386 AppleScript: A Beginner’s Guide
Creating a Hotmail Account
The Hotmail account object shares several properties with the other account types, but it
has many fewer properties overall, Table 16-5 explains all of them.
The following example uses the make new Hotmail account command to create a
new Hotmail account:
tell the application id "com.microsoft.entourage"
set myAcc to make new Hotmail account with properties ¬
{name:"Hotmail Plus", full name:"John Brown", ¬
email address:"the_real_john_brown@hotmail.com", ¬
Hotmail ID:"the_real_john_brown@hotmail.com", ¬
password:"donttrythis@home", ¬
include in send and receive all:true, ¬
save in server sent items:true, ¬
default signature type:none}
end tell
NOTE
The make new Hotmail account command doesn’t always work as it should—even
if the code contains nothing wrong, it may fail with an error. If this happens, check
everything and try again, putting the command together again from scratch. You may
find it works the next time—even if you haven’t changed anything.
Table 16-5 Properties of the Hotmail account Object
Hotmail account
Object Property Explanation
name The name you want to give the account—for example, Hotmail Plus
ID An integer giving the unique ID number for the account within
Entourage. This property is read-only.
full name The name you’re using as your full name on Hotmail
email address Your Hotmail address
Hotmail ID Your Windows Live Hotmail ID
password Your Windows Live Hotmail password
include in send and receive all true to include this account when sending and receiving all mail;
false to exclude it
save in server sent items true to save sent items on the server; false to save them on your Mac
additional headers Text giving any extra headers you want to add to messages you send
default signature type none to use no signature; random to use a random signature; other
to use a signature specified by the default signature choice property
default signature choice The signature to use when the default signature type property is set
to other

Chapter 16: Automating Microsoft Entourage 387
Creating and Sending E-mail Messages
As you no doubt well know, e-mail is probably Entourage’s most widely used feature—
even people who shirk tasks and appointments tend to send and receive messages. This
section explains the message object that forms the basis of both outgoing messages and
incoming messages, and then shows you how to use AppleScript to make Entourage send
and receive messages.
Understanding the message Object
Table 16-6 explains the many properties of the message object.
message Property Explanation
ID An ID number that uniquely identifies the message—for example, 2023
subject The subject line of the message
content The content of the message’s body
time received The time when the message was received
time sent The time when the message was sent
storage The folder that currently contains the message
sender The address of the sender of the message
priority The message’s priority: lowest, low, normal, high, or highest. The default
priority is normal.
Exchange post true if the message is an Exchange post message; false if it is not
account The account that contains the message
headers The full headers of the message
source The message’s raw source text (including formatting codes)
character set The character set the message uses
color The color Entourage uses for the message when displaying it in lists.
This is an RGB color—for example, {5250, 47184, 5244}.
has html true if the message contains HTML text; false if it does not
online status Whether the message has been downloaded from the server: not on
server, headers only, partially downloaded, or fully downloaded
connection action What Entourage is set to do about the message at the next connection.
The options are keep on server, download on next connection, or
remove at next connection.
read status untouched if the message has not been read; read if it has been read
replied to true if you have replied to the message; false if you have not
Table 16-6 Properties of the message Object
388 AppleScript: A Beginner’s Guide
Creating and Sending an E-mail Message
Entourage uses the outgoing message object to represent a message you’re sending.
The outgoing message object has all the properties of the message object, plus the extra
properties explained in Table 16-7.
message Property Explanation
forwarded true if you have forwarded the message; false if you have not
redirected true if the message has been redirected; false if it has not
flagged true if the message has been flagged for follow-up; false if it has not.
This is an old property; use the flag state property instead, as it offers
three options rather than two.
flag state flag if the message has been flagged; complete if it has been completed;
unflag if it has no flag
edited true if the message has been edited since you received it; false if it has not
modification date The date on which the message was last modified
category The list of categories to which the message belongs
project list The list of projects to which the message belongs
project sharing list The list of projects that share this message
links The list of items that are linked to this message
properties A property that enables you to set a list of properties
has start date true if the incoming message is a To Do item that has a start date;
otherwise false
start date The start date and time for a To Do item. If you set the start date
property, Entourage automatically sets the flag state property to flag.
completed date The completed date and time of a To Do item
has reminder true for a To Do item that contains a reminder; otherwise false
has due date true for a To Do item that contains a due date; otherwise false
remind date and time The date and time to display a reminder for a To Do item. If you set this
property, Entourage automatically sets the flag state property to flag.
SMIME signed true if the message is signed with SMIME (Secure Multipurpose Internet
Mail Extensions); false if it is not
SMIME encrypted true if the message is encrypted with SMIME; false if it is not
Table 16-6 Properties of the message Object (continued)
Chapter 16: Automating Microsoft Entourage 389
Creating an Outgoing Message
To create an e-mail message, you use a make new outgoing message command. You can
either use the with properties parameter to set the properties for the message when you
create it—which is usually easiest—or set them afterward as needed.
For example, the following statement creates a new outgoing message, adds text to
its subject property and to its content property, and assigns the message to the variable
myMessage:
set myMessage to make new outgoing message with properties ¬
{subject:"New Documentation for HR Trials", ¬
content:"Here is the new documentation for the HR trials next week."}
Adding Recipients to an Outgoing Message
To add recipients to a message you’re sending, you create a recipient object for each
recipient. The recipient object has two properties:
● recipient type A recipient in the To field is a to recipient, a recipient in the Cc field
is a cc recipient, and a recipient in the Bcc field is a bcc recipient. Entourage also
supports a fourth type, the newsgroup recipient, which you don’t use with messages.
● address This property returns an address object that contains the name and e-mail
address for the recipient. Each of these has a straightforward property name: display
name for the name, and address for the e-mail address.
outgoing message Property Explanation
delivery status sent if the message has been sent; unsent if it has not
resent true if the message has been resent; false if it has not
encoding The means of encoding used for any attachments: binhex,
base64, uuencode, or AppleDouble
compression type ZIP compression if the attachments have compression applied;
no compression if they are uncompressed
send attachments to cc recipients true if the message’s attachments are to be sent to Carbon Copy
and Blind Carbon Copy recipients; false if the attachments are
to go only to the To recipients
use Windows file names true to send the attachments with Windows file extensions on
the filenames so that Windows PCs can identify the files more
accurately; false to omit the Windows file extensions
Table 16-7 Additional Properties of the outgoing message Object

390 AppleScript: A Beginner’s Guide
For example, the first of the following statements creates a To recipient and assigns
it to the variable recipient1. The second statement creates a Cc recipient and assigns it to
the variable recipient2.
set recipient1 to {recipient type:to recipient, ¬
address:{display name:"Chris Smith", ¬
address:"csmith@acmevirtualindustries.com"}}
set recipient2 to {recipient type:cc recipient, ¬
address:{display name:"Ed Sempio", ¬
address:"esempio@acmevirtualindustries.com"}}
Once you’ve got your recipients, you can easily assign them to the recipient property
of the outgoing message object. Here’s an example using the recipient1 variable and the
recipient2 variable:
set myRecipients to {recipient1, recipient2}
set myMessage to make new outgoing message with properties ¬
{recipient:myRecipients, subject:"New Documentation for HR Trials", ¬
content:"Here is the new documentation for the HR trials next week."}
NOTE
There’s no need to assign recipients to variables—you can put them directly in
the make new outgoing message command if you don’t mind nesting several
levels of braces. For example, make new outgoing message with properties
{recipient:{recipient type:cc recipient, address:{display name:"Ed Sempio",
address:"esempio@acmevirtualindustries.com"}}} works fine, but most people find it
harder to read.
Sending a Message
To send the message, use a send command and specify the message. For example, the
following statement uses the variable myMessage to refer to the message:
send myMessage
To cut down on spam, Entourage warns the user when a script is trying to send a
message (see Figure 16-1) and makes the user click the Send button before the message
goes on its way. It’s a good idea to warn users that they will see this dialog box ahead
of time so that they know the message is above-board and don’t click the Cancel button
instead. You may choose to warn them by displaying an information dialog box at the
beginning of the script or just before the warning appears, or by educating them in general
about the scripts you provide.
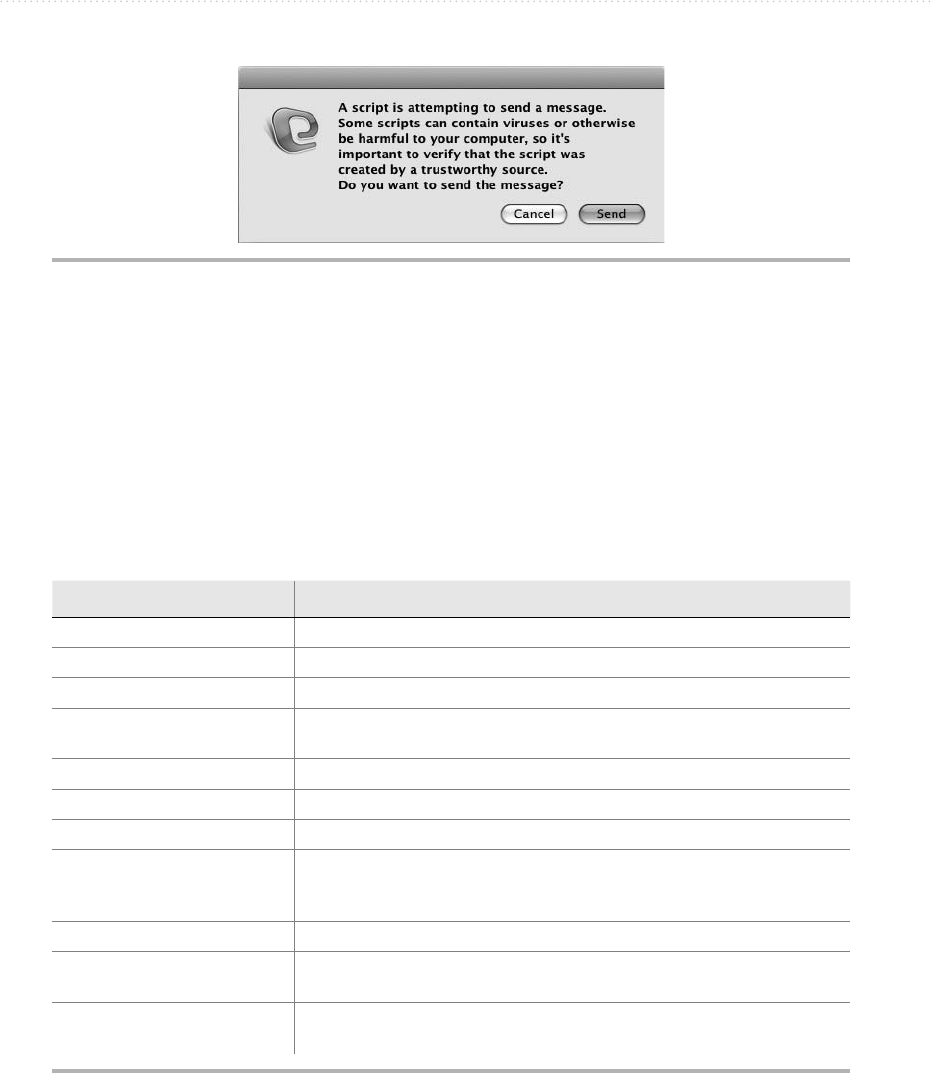
Chapter 16: Automating Microsoft Entourage 391
Creating an E-mail Message for the User to Work With
When you want to begin an e-mail message so that the user can review it, complete it as
necessary, and then send it, use a draft window object rather than an outgoing message
object. The draft window object has the properties explained in Table 16-8. Roughly half the
properties come from the message object and the outgoing message object, while the rest
come from the window object that controls the window in which the draft message appears.
Figure 16-1 When a script is trying to send a message, Entourage warns the user and lets
them decide whether to send it.
draft window Property Explanation
subject The subject line of the message
content The content of the message’s body
account The account that contains the message
priority The message’s priority: lowest, low, normal, high, or highest. The
default priority is normal.
to recipients The To recipients of the message
CC recipients The Cc recipients of the message
BCC recipients The Bcc recipients of the message
signature type The type of signature applied to the message: none for no signature,
random for a random signature (seldom wise), or other for a signature
specified by the other signature choice property
other signature choice The signature to apply if the signature type property is set to other
encoding The means of encoding used for any attachments: binhex, base64,
uuencode, or AppleDouble
compression type ZIP compression if the attachments have compression applied; no
compression if they are uncompressed
Table 16-8 Properties of the draft window Object

392 AppleScript: A Beginner’s Guide
draft window Property Explanation
send attachments to cc
recipients
true if the message’s attachments are to be sent to Carbon Copy and
Blind Carbon Copy recipients; false if the attachments are to go only to
the To recipients
use Windows file names true to send the attachments with Windows file extensions on the
filenames so that Windows PCs can identify the files more accurately;
false to omit the Windows file extensions
class A read-only property that returns the class of the window (cDfW for a
draft message window)
bounds The boundary coordinates of the four edges of the window
closeable true if the window has a close box; false if it does not
titled true if the window has a title bar; false if it does not. This property is
read-only.
index An integer giving the index position of the window. For example, the
index of the front window is 1 and the index of the window behind it
is 2.
floating true if the window is floating; false if it is not. This property is read-only.
modal true if the window is modal, blocking other windows until the user
deals with it; false if it is a normal window. This property is read-only.
resizable true if the user can resize the window, false if they cannot. This
property is read-only.
zoomable true if the user can zoom the window; false if they cannot. This
property is read-only.
zoomed true if the window is zoomed; false if it is not.
name The text that appears in the title bar of the window (if the title bar is
displayed). This property is read-only; for a draft message, it shows the
subject property (if it has been set) or untitled.
visible true if the window is visible, as a draft message window is. This
property is read-only.
position The coordinates of the upper-left corner of the window. This property is
read-only, but you can change it by setting the bounds property.
displayed message A pointer to the message being displayed in the window. This property
is not relevant to draft messages.
displayed feature A pointer to the folder or server being displayed in the window. This
property is not relevant to draft messages.
content The body text of the message in the window
Table 16-8 Properties of the draft window Object (continued)
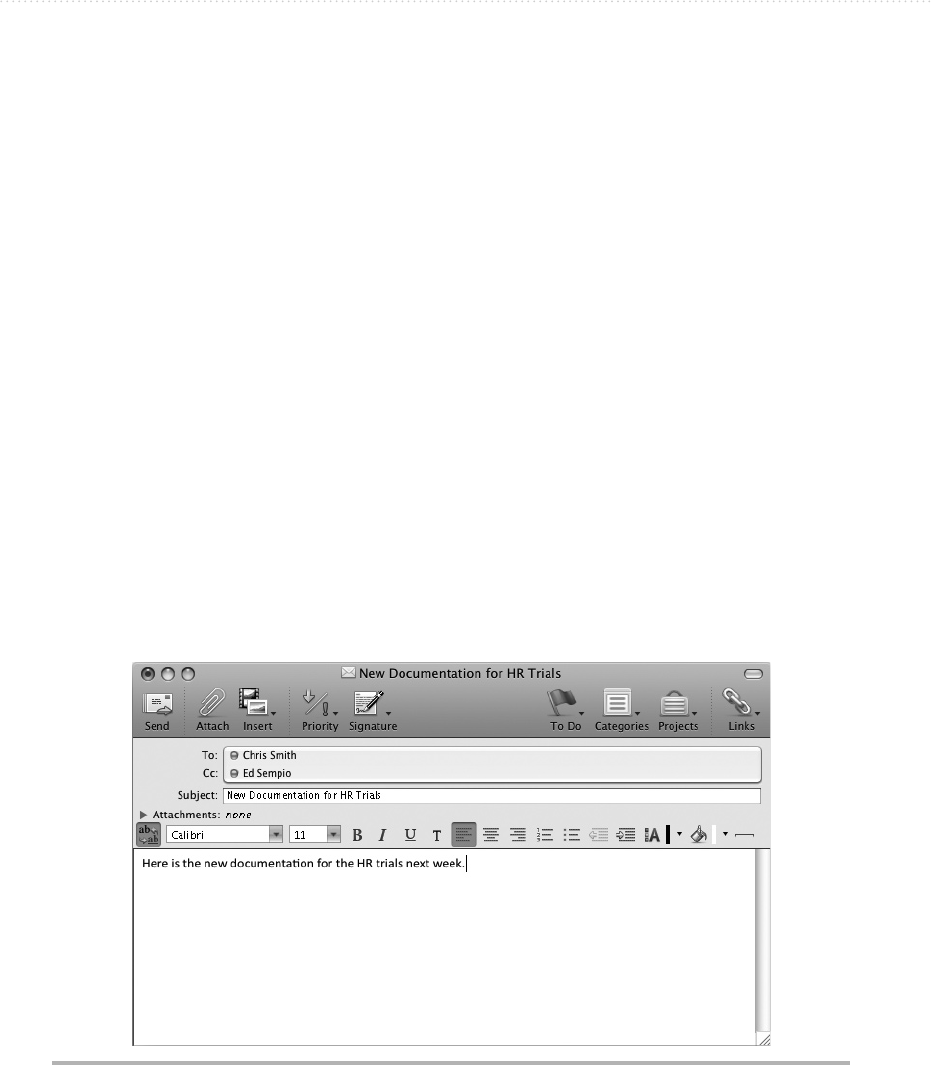
Chapter 16: Automating Microsoft Entourage 393
For example, the following snippet uses the draft window object to create a draft
message, which it assigns to the variable myDraft:
set myMessage to make new draft window with properties ¬
{subject:"New Documentation for HR Trials", ¬
content:"Here is the new documentation for the HR trials next week."}
Figure 16-2 shows an example of the draft window this creates. The user can then add
recipients, edit the content, attach files, and make any other changes the message needs.
After creating a draft message like this, you’ll normally want to let the user review it
and send it in their own good time. But if your script does need to send it, you can simply
use the send command and a reference to the message (for example, send myMessage).
Setting a Signature for an E-mail Message
To give the reader essential information about the sender of the message (and perhaps
about the sender’s company as well), you can add a signature to it. As you’d expect, this
works with both an outgoing message object and a draft window object.
Creating a Signature
Normally, you’ll want to create a signature manually to make sure it contains exactly the
information you want and that (if you include formatting) it looks precisely right. But you
Figure 16-2 To create a message that the user can finish, use the draft window object.

394 AppleScript: A Beginner’s Guide
can also create a signature via AppleScript by using a make new signature command and
setting three properties:
● name The name you want to give the signature
● content The text to use for the signature
● include in random true if you want to include the signature in your random pool;
false if you don’t
When you create a new signature like this, Entourage automatically sets the fourth
property of the signature object, the read-only ID property, to the next unused integer in
the signature-numbering sequence.
Adding a Signature to a Message
To add a signature to a message, set the signature type property to other and then set the
other signature choice to the signature you want to apply. Here’s an example of using
these properties to add the signature named Business Signature (referred to as signature
"Business Signature") to a message in a draft window:
set myDraft to make new draft window with properties ¬
{content:"New Documentation for HR Trials", ¬
signature type:other, ¬
other signature choice:signature "Business Signature"}
NOTE
Normally, you’ll want to give each message you send a specific signature—preferably
one suited to its recipient and contents—or no signature at all. But Entourage also lets
you include a signature picked at random from the signatures you’ve lumped into a
random pool. This can be amusing for personal mail or occasionally useful for business
purposes (for example, adding a random marketing signature). To add a random
signature via AppleScript, set the signature type to random. To control whether a
signature goes swimming in the random pool, set the include in random property of the
appropriate signature object to true (to include it) or false (to exclude it). When you’re
working interactively, select or clear the Random check box opposite the signature in the
Signatures window.
Attaching a File to a Message
You can attach a file to either a draft message or to an outgoing message that your script
sends without displaying it. To attach a file, set the attachments property of the draft
window object or the outgoing message object to refer to the file you want to attach.

Chapter 16: Automating Microsoft Entourage 395
For example, the following statement attaches the file named HR Info.pdf from the
Server:Information folder to the draft message referred to by the variable myMessage:
set myMessage to make new draft window with properties ¬
{recipient:myRecipients, ¬
subject:"New Documentation for HR Trials", content: ¬
"Here is the new documentation for the HR trials next week.", ¬
attachment:"Server:Information:HR Info.pdf"}
Dealing with Incoming E-mail Messages
Entourage uses the incoming message object to represent an incoming message. The
incoming message object has all the same properties as the basic message object (see
Table 16-6, earlier in this chapter), plus the three properties explained in Table 16-9.
TIP
Entourage contains powerful rules for processing incoming messages (and for taking
actions with outgoing messages as well, if you like). To work with rules, choose the
euphonious Tools | Rules command, and then work from the Rules dialog box.
Forwarding a Message
To forward a message that you’ve received, use the forward command. This command
takes one required parameter and three optional parameters:
● message The required parameter—a direct parameter—is a message object. For
example, you can tell Entourage to forward the first message in the folder “Inbox”
or forward myMessage, where the variable myMessage refers to a message.
incoming message Property Explanation
SMIME signature If the message has an SMIME signature, whether it matches the
content (valid) or doesn’t match (invalid). Returns none if the
message doesn’t have an SMIME signature.
SMIME signer If the message has an SMIME signature, whether it matches the
content (valid) or doesn’t match (invalid). Returns none if the
message doesn’t have an SMIME signature.
SMIME signer info Returns an SMIME signer info object, which contains details of
whether the signer’s certificate is trusted, what its e-mail address
is and whether it matches that of the sender, and whether the
certificate has expired or been revoked
Table 16-9 Additional Properties of the incoming message Object

396 AppleScript: A Beginner’s Guide
● to Use this optional parameter to provide the recipients of the forwarded message.
When you’re creating a script to forward a message without user intervention, you’ll
need to use this parameter.
● html This optional parameter controls whether Entourage forwards the message as
HTML (with html) or as plain text (without html). Choose the setting you need.
● opening window This optional parameter controls whether Entourage opens a
window showing the message you’re forwarding. When you’re scripting the operation,
you will probably want to use without opening window to prevent Entourage opening
a window. If you want to open a window, use with open window.
For example, the following snippet forwards the first message in the inbox as HTML,
sending the forwarded message without opening a window:
set myForward to forward the first message in the folder "inbox" ¬
to "jramirez@acmevirtualindustries.com" with html ¬
without opening window
send myForward
Moving a Message to a Folder
To move a message to a folder, use the move command. This command takes a direct
parameter, which specifies the message you want to move, and a to parameter that gives
the folder to which you want to move the message.
For example, the following command moves the message identified by the variable
myMessage to the folder named Business:
move myMessage to folder "Business"
TIP
If you want to work with a message the user has selected, use the selection object.
Usually, the best way to use it is to assign it to a variable (for example, set my_selection
to selection) and then assign the first item from that variable to another variable (for
example, set mess1 to the first item in my_selection). This gives you a direct handle on
the first message in the user’s selection (even if there’s only one message in the selection).
Deleting a Message
To delete a message, use the delete command and provide your victim’s ID as the direct
parameter. For example, the following command deletes the message identified by the
variable myMessage:
delete myMessage

Chapter 16: Automating Microsoft Entourage 397
Receiving an Attachment
When you receive a message with one or more files attached, the message has an
attachments list containing an attachment object for each file. Table 16-10 explains the
properties of the attachment object.
To save an attachment to a folder, you can use the standard save command with
the name property of the appropriate item in the attachments object. For example, the
following statement saves the first attached file of the selected message (the first message
of the selection) to the folder Server:Process:
set current_selection to selection
set this_mess to item 1 of current_selection
set incoming_files to the attachments of this_mess
set my_file_name to the name of the first item in incoming_files
save the first item of incoming_files in "Server:Process:" ¬
& my_file_name
If the message has multiple attachments, use a repeat loop to save each attachment in
turn. Here’s an example that again uses the selection object:
set current_selection to selection
set this_mess to item 1 of current_selection
set incoming_files to the attachments of this_mess
repeat with myCounter from 1 to count of items in incoming_files
set my_file_name to the name of item myCounter in incoming_files
save item myCounter of incoming_files ¬
in "Server:Process:" & my_file_name
end repeat
Table 16-10 Properties of the attachment Object
attachment Object Property Explanation
name The attachment’s name. This property is read-only.
file type The file type of the attachment. This property is read-only.
encoding The MIME encoding used for the attachment’s data. This can be
no encoding, 7bit encoding, 8bit encoding, binhex, base64,
uuencode, AppleSingle, AppleDouble, quoted printable, or (if
you’re out of luck) unknown encoding. This property is read-only.
file The alias to the file
content The encoded content of the file (assuming it has been encoded)
properties A property that lets you set a list of properties
398 AppleScript: A Beginner’s Guide
Working with Contacts
Almost as essential in Entourage as e-mail messages are contacts, which Entourage
represents with contact objects.
As you’ll know from creating contacts manually, Entourage lets you stuff a huge
number of different pieces of information into a contact record. Some of these pieces
of information are essential, such as the contact’s name; most of them are optional; but
almost all of them can be useful and so are worth knowing about.
This translates to a fearful list of properties for the contact object. Take a deep breath,
and then take a look at Table 16-11, which explains the properties of the contact object.
contact Object Property Explanation
id An integer that contains a unique ID number for the contact within
Entourage—for example, 3. This property is read-only; Entourage
assigns the number when you create a new contact.
GUID A text string that contains the item’s global unique identifier—for
example, "8280E8CF-44A4-11D9-9080-000A95A27796"
category The list of categories to which the contact belongs
project list The list of projects to which the contact belongs
project sharing list The list of projects set to share the contact
links The list of items linked to this contact
vcard data The contact’s information assembled in vCard (a virtual address card)
format
first name The first name of the contact
last name The last name of the contact
first name furigana (Japanese-format contacts only.) The contact’s first name in furigana
(Japanese phonetic characters placed above or alongside ideograms
to indicate the pronunciation).
last name furigana (Japanese-format contacts only.) The contact’s last name in furigana.
title The title for the contact—for example, Mr., Mrs., Ms., or Dr.
phone The default phone number for the contact
office The office for the contact
domain alias The alias for the contact
suffix The name suffix for the contact—for example, II, Jr.
nickname The nickname for the contact
company The contact’s company name
Table 16-11 Properties of the contact Object
Chapter 16: Automating Microsoft Entourage 399
contact Object Property Explanation
company furigana The contact’s company name in furigana
job title The job title for the contact
department The department for the contact
default email address Which of the contact’s e-mail addresses to use as the default—for
example, email address 1
default instant message
address
Which of the contact’s IM addresses to use as the default—for
example, instant message address 2
description A text note added to the contact. (In the Entourage UI, this is the Note
field that appears on the Other tab of the Contact window.)
default postal address Which of the contact’s postal addresses to use as the default
home address The contact’s home address. This is a postal address object.
business address The contact’s business address. This is a postal address object.
home web page The URL for the contact’s home web page
business web page The URL for the contact’s business web page
home phone number The contact’s home phone number
other home phone number The contact’s other home phone number—handy for contacts with
other homes
home fax phone number The contact’s home fax number
business phone number The contact’s business phone number
other business phone number The contact’s other business phone number
business fax phone number The contact’s business fax number
pager phone number The contact’s pager number
mobile phone number The contact’s mobile phone number
main phone number The contact’s main phone number
assistant phone number The phone number for the contact’s assistant
custom phone number one
[through four]
Properties for adding up to four custom phone numbers for the contact
custom field one
[through eight]
Properties for adding up to eight custom fields of information to the
contact
age The contact’s age
astrology sign The contact’s astrology sign. This is stored as text, so you don’t need to
confine yourself to the widely recognized signs.
spouse The name of the contact’s husband object or wife object
spouse furigana (Japanese-format contacts only.) The spouse’s name in furigana.
interests The contact’s interests (leave blank for none)
Table 16-11 Properties of the contact Object (continued)

400 AppleScript: A Beginner’s Guide
contact Object Property Explanation
blood type (Japanese-format contacts only.) The contact’s blood type. (This is
considered significant for business—it’s not a medical courtesy or an
indication of imminent danger.)
children A list containing the names of the contact’s children
custom date field one
[through two]
Properties for adding one or two custom dates associated with the
contact—for example, a date other than a birthday or anniversary
that needs commemoration
birthday The contact’s birthday
anniversary The contact’s anniversary
flagged true if a flag is set for this contact; false if no flag is set. This is an old
property; use the flag state property instead, as it offers three options
rather than two.
flag state flag if the message has been flagged, complete if it has been
completed, or unflag if it has no flag. (If you have to ask how to
“complete” a contact, don’t use the complete setting.)
Japanese format true if the contact uses the Japanese format (which gives you access to
the furigana and blood type); false if it does not
modification date The date this contact record was last modified. This property is read-only.
last sent date The date you last sent an e-mail to this contact using Entourage. This
property is read-only.
last received date The date you last received an e-mail from this contact, again using
Entourage
properties A property that enables you to set a list of properties
address book Which address book contains the contact—for example, address
book id 14
has start date true if the incoming message is a To Do item that has a start date;
otherwise false
start date The start date and time for a To Do item. If you set the start date
property, Entourage automatically sets the flag state property to flag.
Not usually relevant for a contact.
completed date The completed date and time of a To Do item. Not usually relevant for
a contact.
has reminder true for a To Do item that contains a reminder; otherwise false. Not
usually relevant for a contact.
has due date true for a To Do item that contains a due date; otherwise false
remind date and time The date and time to display a reminder for a To Do item. If you set
this property, Entourage automatically sets the flag state property to
flag. Not usually relevant for a contact.
image The image associated with the contact record
Table 16-11 Properties of the contact Object (continued)

Chapter 16: Automating Microsoft Entourage 401
With the possible exception of the Japanese-format properties, most of the properties
of the contact object are useful in everyday situations.
Now that you’ve memorized that little list, here are examples of working with contacts.
Creating a New Contact
To create a new contact, use a make new contact command. The easiest way to set most
of the properties for the contact is by using the with properties parameter and specifying
each property for which you want to set a value, like this:
make new contact with properties ¬
{first name:"Estelle", ¬
last name:"Kalamand", ¬
nickname:"Stella", ¬
title:"Dr.", ¬
business phone number:"510-555-8280"}
You can also assign the new contact to a variable and then use that variable to set
properties, as in this example:
set myContact to make new contact with properties ¬
{first name:"Estelle", ¬
last name:"Kalamand", ¬
nickname:"Stella", ¬
title:"Dr.", ¬
business phone number:"510-555-8280"}
tell myContact
set the business web page to "http://www.acmevirtualindustries.com"
set the mobile phone number to "707-555-1083"
set the job title to "Executive Director"
set the age to 35
set the children to {"Max (2005)", "Anne (2008)"}
set the astrology sign to "Sagitto-Gemini Dragon"
end tell
Adding E-mail Addresses to a Contact
These days, most of your contacts will have multiple e-mail addresses, so you’ll want to
load those addresses into the contact records in Entourage and tell the application which
e-mail address to use as the default.
As you may have noticed in Table 16-11, the contact object has a property called
default email address, but it doesn’t have different e-mail address properties like it
has properties for phone numbers—the home phone number property, the other home
phone number property, the mobile phone number property, and so on. This is because
Entourage stores the e-mail addresses in email address objects and then makes the default
one available through the contact’s default email address property.

402 AppleScript: A Beginner’s Guide
If you’ve added various e-mail addresses manually to a contact record in Entourage,
you’ll see how this works. On the Name & E-mail tab of the Contact Properties window
(see Figure 16-3), you add addresses to the E-mail list box. Entourage gives the first
address you add the label Work, but you can change it to Home or Other as needed. Once
you’ve added two or more addresses, you can click one of them and then click the Make
Default button to make it the default e-mail address for the contact. The default e-mail
address appears in boldface so that you can easily pick it out.
From AppleScript, you add e-mail addresses to Entourage contacts in the same way.
● First, add the e-mail addresses to the contact as email address objects, using the label
property to specify the label (work, home, or other) and the contents property to give
the e-mail address.
● Then set the default email address property to the appropriate email address object.
For example, the following snippet sets the variable myContact to the long-suffering
Estelle Kalamand, adds three e-mail addresses (Work, Home, and Other) for her, and then
sets the Work e-mail address as the default:
set myContact to contact "Estelle Kalamand"
set WorkEmail to make new email address at myContact ¬
with properties {label:work, ¬
Figure 16-3 When adding an e-mail address to the list on the Name & E-mail tab of the
Contact Properties window, you give the address a label (for example, Work)
and decide whether to make it the default e-mail address for the contact.

Chapter 16: Automating Microsoft Entourage 403
contents:"e_kalamand@acmevirtualindustries.com"}
set HomeEmail to make new email address at myContact ¬
with properties {label:home, ¬
contents:"e_k_dr@aol.com"}
set OtherEmail to make new email address at myContact ¬
with properties {label:other, ¬
contents:"personal.medical.guru@gmail.com"}
set default email address of myContact to WorkEmail
Adding Instant Messaging Addresses to a Contact
Entourage treats instant messaging addresses in the same way as e-mail addresses: You
can add several IM addresses to a contact, labeling them Work, Home, and Other; and you
can then designate one of the addresses as the default IM address.
This means you set up instant messaging addresses for a contact using the same
technique as for e-mail addresses.
● First, create an instant message address object for each IM address the contact has,
setting the label property to home, work, or other and the contents property to the
IM address.
● Then set the default instant message address property of the contact object to the
IM address you want to make the default.
Here’s an example of adding two IM addresses to a contact:
set myContact to contact "Estelle Kalamand"
set workIM to make new instant message address at myContact ¬
with properties {label:work, contents:"kalamand@aim.com"}
set HomeIM to make new instant message address at myContact ¬
with properties {label:home, contents:"ewk_med@hotmail.com"}
set default instant message address of myContact to workIM
Working with a Contact’s Postal Addresses
Entourage uses the postal address object to represent a complete postal address. The
postal address object contains five text properties with self-explanatory names: street
address, city, state, zip, and country.
Entourage keeps two different postal address objects: a business one for the business
address and a home one for the home address. You can choose which of these objects is
the default address for the contact.
To change the business addresses, use the business address property of the contact
object to return the postal address object for the business address, and then set the five
properties of the address. Similarly, use the home address property of the contact object
to return the postal address object for the home address so that you can set its properties.

404 AppleScript: A Beginner’s Guide
For example, the following snippet sets the properties of the home address for the
contact identified by the variable myContact and then sets the home address as the
default postal address for the contact:
set myContact to contact "Estelle Kalamand"
tell the home address of myContact
set the street address to "1234 Pacific Ave."
set the city to "Emeryville"
set the state to "CA"
set the zip to "94608"
set the country to "USA"
end tell
set the default postal address of myContact to home
Getting a vCard of Contact Data
To get a virtual address card containing the contact’s data, get the vcard data property of
the contact object. For example, the following statement returns the vCard for the contact
named Wilson Collins:
get vcard data of contact "Wilson Collins"
Deleting a Contact
To delete a contact, use the delete method with the appropriate contact object. For
example, the following statement deletes the contact named John Sample:
delete contact "John Sample"
If you’re using an Exchange account, you may find that this method of deleting a
contact doesn’t work. If so, try telling AppleScript to delete the first contact with that
name in the address book—for example:
delete (first contact in address book 1 whose name is "John Sample")
NOTE
Ideally, you’ll use the GUID property to uniquely identify the contact you’re planning
to nail, as this helps you avoid getting a different contact with a similar name. But
unless you can examine the Entourage installation on which your script will run, it’s not
likely that you’ll know the GUID for a particular contact. (And if you can examine the
Entourage installation, you will probably find it easier to take out the victim manually
rather than using AppleScript.)

Chapter 16: Automating Microsoft Entourage 405
The Number One reason for a script to access your address book is to blitz your
contacts with spam offering mail-order brides and pills that will help the recipients retain
them, so Entourage displays the alert shown in Figure 16-4. The user must click the OK
button to let the script continue.
Working with Events
Entourage’s Calendar feature can be a great help in keeping your schedule organized. To
make the most of Calendar, you’ll probably want to create and use events.
AppleScript uses the event object to represent an event. Table 16-12 explains the
properties of the event object.
To create a new event, use a make new event command. As usual, the easiest way to
set the details of the event is to use the with properties parameter and then specify each
property needed. The following example creates a new event named Fly to San Jose
and sets essential properties for it. The script assigns the new event to a variable named
new_event, uses the variable to set the has reminder property to true, and then sets the
remind time property to provide two hours of warning:
tell the application id "com.microsoft.Entourage"
set new_event to make new event with properties ¬
{subject:"Fly to San Jose", location:"LAX", content:"SW 3025", ¬
start time:date ("20 October 2010 6:45 AM"), ¬
end time:date ("20 October 2010 8:00 AM")}
set has reminder of new_event to true
set remind time of new_event to 120
end tell
Figure 16-4 You will probably need to reassure Entourage that your scripts that try to access
the address book are genuine, honest, and friendly.

406 AppleScript: A Beginner’s Guide
In most cases, the easiest way to delete an event is to identify it by its subject
property, as in the following example. The disadvantage to doing so is that Entourage
deletes the first event it finds with this subject—so if you have multiple events with the
same name, you may get the wrong one.
delete event "Fly to San Jose"
event Object Property Explanation
ID An integer giving the unique ID number of the event within Entourage.
This property is read-only.
GUID The global unique identifier for the event
iCal data Text from iCal that you can use to start creating the Entourage event.
This property is read-only.
subject The subject (the name) of the event
location The event’s location
content The description of the event
start time The date and time at which the event starts
end time The date and time at which the event ends
all day event true if the event is all-day; false if it is not
recurring true if the event recurs; false if it does not
recurrence The iCal recurrence rule used for the event’s recurrence
modification date The date you last modified the event. This property is read-only.
category The list of categories assigned to this event
project list The list of projects assigned to this event
project sharing list The list of projects that will share this event
links The list of items linked to this event. This property is read-only.
properties A property that enables you to set a list of properties for the event
remind time An integer giving the number of minutes before the start time to sound
the reminder
has reminder true if the event has a reminder; false if it does not
to recipient The recipients for an invitation for the event
account The account associated with the invitation for the event
time zone The ID of the time zone in which the event is set
free busy status The status for the event: busy, free, tentative, or out of office
calendar The calendar that contains the event. This property is read-only.
Table 16-12 Properties of the event Object

Chapter 16: Automating Microsoft Entourage 407
TIP
If you know the id property or the GUID property of the event you want to delete, use
one of those properties to identify the event without any ambiguity.
Working with Tasks
To keep track of the things you need to get done, you’ll probably want to use Entourage’s
To Do list—even if you dislike its tyrannical style of micromanagement. Entourage uses
the task object to represent a To Do item, and you can use AppleScript to create and
manipulate To Do items automatically.
Table 16-13 explains the properties of the task object.
task Object Property Explanation
name The task’s name
ID An integer giving the unique ID number of the task within Entourage. This
property is read-only.
GUID The global unique identifier for the task. This property is read-only.
iCal data Text from iCal that you can use to start creating the Entourage task. This
property is read-only.
completed true if the task is marked as having been completed; false if it has not
content The text note in the task
recurring true if the task is marked as recurring; false if it is not. This property is
read-only.
has due date true if the task has a due date; false if it does not
due date The date and time the task is due
remind date and time The date and time to display a reminder of the due date
has reminder true if the task has a reminder set to it; false if it does not
priority The priority assigned to the task: lowest, low, normal, high, or highest
modification date The date and time you last modified the task. This property is read-only.
category The list of categories assigned to this task
project list The list of projects assigned to this task
project sharing list The list of projects that will share this task
links The list of items linked to this task. This property is read-only.
has start date true if the task has a start date; false if it does not
start date The date and time the task is due to begin
Table 16-13 Properties of the task Object

408 AppleScript: A Beginner’s Guide
For example, the following snippet creates a new task named Clear out the filing
cabinet and gives it a due date. It assigns the new task to a variable named myTask and
then uses this variable to set the priority property and the category property of the task.
tell the application id "com.microsoft.entourage"
set myTask to make new task with properties ¬
{name:"Clear out the filing cabinet", ¬
has due date:true, due date:date ("20 July 2010")}
set priority of myTask to high
set category of myTask to category "work"
end tell
To delete a task, identify it by its name property—or, if you know the id property or the
GUID property, use one of those for greater certainty. For example, the following statement
deletes the task named Clear out the filing cabinet, identifying it by the name property:
delete the task "Clear out the filing cabinet"
Working with Notes
Entourage’s notes are handy for keeping your information straight, particularly when
you’re working in Entourage and need to jot something down.
As you’d expect, Entourage uses a note object to represent a note. Table 16-14 explains
the properties of the note object. Most of these will probably seem familiar by now.
Table 16-14 Properties of the note Object
note Object Property Explanation
name The name of the note
ID An integer giving the unique ID number of the note within Entourage.
This property is read-only.
GUID The global unique identifier for the note. This property is read-only.
iCal data Text from iCal that you can use to start creating the Entourage note. This
property is read-only.
content The note’s text content
modification date The date and time you last modified the note. This property is read-only.
category The list of categories assigned to this note
project list The list of projects assigned to this note
project sharing list The list of projects that will share this note
links The list of items linked to this note. This property is read-only.
creation date The date and time the note was created. This property is read-only.

Chapter 16: Automating Microsoft Entourage 409
As you can see from the table, more than half of the properties are read-only—and
in fact, for most notes, you’ll need to set only two properties: the note’s name property,
which provides its title, and the content property, which holds its contents.
The following short script creates a note and then opens it in a window (see Figure 16-5):
tell the application id "com.microsoft.entourage"
set note_content to "Attendees: same as last meeting" & return & ¬
"add Bill P., M. Sykes, ?director of HR" & return & return & ¬
"Refreshments: Water, sp. water, fruit" & return & return & ¬
"Book main conf. room, Pacific Room otherwise" & return & ¬
return & "Run agenda past Bill P."
set new_note to make new note with properties ¬
{name:"Planning Meeting Notes", content:note_content}
open new_note
end tell
To delete a note, identify it by its name property—or, if you know the id property
or the GUID property, use one of those for laser-guided targeting. For example, the
following statement deletes the note named Planning Meeting Notes:
delete the note "Planning Meeting Notes"
Figure 16-5 The new note created by the sample script
This page intentionally left blank

411
Index
A
a reference to operator, 66
access mode property, 345–346
account directory property
explained, 274
for locating stored mail, 276
account mailbox property, 278
account object properties, 274
account type property
explained, 274
for smtp server object, 275
accounts. See Mail accounts
activate command
to Excel, 339, 348, 355
explained, 8
on window object, 371–372
to Word, 293, 300
activate object command
with document keyword,
300–301
with workbooks, 348
with worksheets, 355, 358
activateWord variable, 228–229
active cell class, 358
active end page/section number
information, 315
active printer property, 304
active sheet object, 339
active window class, 306, 371
active workbook parameter, 373
active worksheet class, 355
add title parameter, 140–141
add to most recently used list parameter,
341–342
adding folder items event handler
creating folder action
scripts, 240
writing folder action scripts,
227–229
additional headers account object
property, 379
address property
for mail recipients, 282
for outgoing messages, 389–390
after losing parameter, 230
after parameter
for copying worksheets, 352–353
for inserting worksheets, 350
to search for data, 375
after receiving parameter, 228–229
album object properties, 263
album(s)
artist, rating, and track
properties, 251
creating new, 264
locate existing and deleting, 265
types, 264
alerts
choosing icons for, 152
creating, 153–154
for custom error messages,
208–209
differing from dialog boxes,
151–152
suppressing, 352
alias class, 77, 79
alias file, 122
alias references
reaching objects with, 108–109
using, 110–111
alignment property constants, 321
all headers message property, 284
altitude photo object property, 266
AppleScript
attaching folder action scripts,
238–239
cell type constants, 360
chart type constants, 365
constants for white space
characters, 85
creating charts from, 363
defined, 4
dialog type constants, 330
learning, 5

412 AppleScript: A Beginner’s Guide
AppleScript (contd.)
Mac OS X folders accessible
from, 103
turning on folder actions via, 227
use of dates, 94–96
value constants, 361
AppleScript attributes, 90–91
AppleScript coercions, 79–80
AppleScript data types, 62–63
AppleScript Editor
Editing preferences for, 18–20
error warning, 43–44
formats for saving scripts, 55–56
Formatting preferences for, 20–21
General preferences for, 16–18
History preferences for, 22
launching, 12
opening, 28
Plug-in preferences for, 23
recording actions into, 37–39
running scripts from, 6
vs. Script Editor, 13, 15
window, 13–14
AppleScript terms
for Finder’s views, 112
for Word’s views, 308
AppleScript Utility, in Leopard, 23–25
AppleScript’s built-in classes, 77–78
AppleScript’s operators, 74–77
AppleScript’s reference forms, for
text, 87
Application Bundle format, 55–56
application class, 77
active printer property of, 304
for launching Excel, 338
Application format, 55–56
application scripts, 18
applications
adding to the Dock, 55–56
bundle identifiers/creator codes
for, 210–212
documentation errors, 206
droplets saved as, 223–224
launching with if...then
statements, 131–132
that use idle handlers, 244–245
transferring text to another, 91–92
turning scripts into, 55–56
Arbitrary reference form, 87
area chart category, 365
arithmetic operators, 74
arithmetic, with numbers, 93
arrange style constants, 373
arrange style parameter, 308, 373
arrange_windows command, 373–374
as alias parameter, 173, 174
as critical parameter, 152
as informational parameter, 152
as parameter, 52–53
as user name parameter, 126
as warning parameter, 152
assign keyword command, 268
at end of row marker information
type item, 317
at folder parameter, 122, 123
at parameter
for creating a folder, 118
in the dictionary file, 48
attach action to command, 238–239
attach script to folder command, 237
attached template property, 295
attachment objects, 397
attachments, incoming, 286–287
attachments property, 394–395
authentication account property, 274
AutoCorrect dialog box, 330
axis type parameter, 366
B
background color message property, 284
backslash, 85
bar chart category, chart type
constants, 365
BBEdit, 37
big message warning size pop account
property
explained, 275
for setting size limits, 277
binary operators, 74
bit rate track object property, 251
blank title bars, 151–152
block comments, 36–37
block selection type, 312
boldface, in alert text, 151–152
book album, 264
bookmark track object property, 251
bookmarkable track object property, 251
Boolean class
coercion, 79
explained, 77
Boolean data type
coercing to numbers, 94
for variables, 63
Borders and Shading dialog box, 330
bounds property, of Finder window, 113
bpm track object property, 251
break page type constants, 325
Break Reminder application, 244–245
breaking lines of code, 45
bubble chart category, chart type
constants, 365
built-in icons, 145
Bullets and Numbering dialog box, 330
Bundle Contents drawer, 146–147
bundle identifiers, 210–212
business address property, 403–404
button returned property, 144
buttons parameter, 141–142
by parameter, 188
C
cancel button
in alerts, 152
for dialog boxes, 143–144
error-128 and, 205
when errors occur, 196–198
cancel button name parameter, 158
cancel button parameter, 143–144
capitalization, with variables, 65
caption property, 306, 371
carriage returns
defined, 20
in strings of text, 83–85
case attribute, 90
category track object property, 251
cells
active cells and the selection, 358
Excel special, 360–361
inserting formulas in, 361
range of, 359
center alignment property type, 321
changing view, 111–112
character element, 86
chart sheet object, 339
chart sheet worksheet type, 353
charts
adding a series to, 366
adding a title/legend, 367
adding captions to an axis,
366–367
adding to workbooks, 363–364
adding to worksheets, 364
creating, 368–370
creating from AppleScript, 363
setting chart type, 365
children album object property, 263
Choose A File dialog boxes
adding a prompt to, 162
choosing multiple files in, 168
displaying invisible files, 163

Index 413
displaying right type of files,
163–167
letting the user choose, 169–170
seeing user choice, 168
setting the default location, 163
Choose A Folder dialog boxes, 170–172
choose application command,
172–173, 174
Choose Application dialog boxes
letting the user choose, 172–173
to open a document, 174–175
choose file command
in Choose A File dialog box, 162,
168, 169
with default location
parameter, 163
explained, 9
choose file name command, 77,
154–155
choose file name dialog box, 154–155
choose folder command
in letting the user choose, 170–172
using script properties, 72
choose from list command, 154–157
choose from list dialog boxes
adding title and custom
prompt, 157
changing the buttons, 157
choosing default items in,
158–159
controlling repeat...times loop,
185–186
creating, 160–161
creating item list, 156
loop variables from, 187
seeing user choice, 156–157
selecting multiple or no items in,
159–160
choose URL command, 176–177
classes
coercions of, 78–80
understanding AppleScript,
77–78
clipboard, 92
close command
to close documents, 301–302
to close windows, 372
to close workbooks, 344
closing folder window event
handler, 232
code
examining recorded, 39–41
wrapping lines of, 44–45
coercions
converting data with, 78–80
creating variables and
applying, 80
defined, 78
collapse range command, 313
collapsed property
of Finder window, 113
for windows, 307
collate parameter, 356
color property, 50
column break type constant, 325
column chart category, 365
column selection type, 312
Column view, 41, 111–112
commands, defined, 8–9
comment photo object property, 266
comment track object property, 251
commenting out, a statement, 35–36
comments, defined, 34–37
comments story, 314
compact mailboxes, 276
comparison operators
for equality, 75–76
for precedence, 76
compilation track object
property, 251
completion date todo properties, 288
composer track object property, 251
computer scripts folder, 17–18, 24
concatenation operator, 75
configure folder actions command,
237, 238
considering statements, 90–91
constant class, 77, 79
contact object properties, 398–401
contacts
creating new, 401
deleting, 404–405
e-mail addresses for, 401–403
instant messaging addresses
for, 403
postal addresses of, 403–404
vCard of data for, 404
container mailbox property, 278
container track object property, 251
containment operators, 75
content message property, 284
content outgoing message property, 281
content property
for e-mail addresses, 402
for instant messaging
addresses, 403
making new signature
commands, 394
of text range object, 310–311
copies parameter, 355
copy command
for creating variables, 64–65
for files, 123
for folders, 119
copy worksheet command, 352
Cover flow view, 41, 111–112
CPU (central processing unit), speed/
type properties, 207
create backup parameter, 341–342
create range command
for creating text range objects, 318
for moving text range objects, 319
creator codes, 210–212
current region, in Excel, 358
current view property, 111
custom dialog box
adding to Set Up Finder and
TextEdit script, 147–148
in iTunes, 255
custom error messages, 207–209
custom icons, 145–147
custom prompts
in Choose A File dialog box, 170
in Choose Application dialog
box, 175
in choose file name dialog
box, 155
for choose from list dialog
box, 157
custom title, 175
D
data
converting with coercions, 78–80
storage, as script properties,
71–74
data types
coercing numbers to, 93
coercing to numbers, 94
for variables, 62–63
database ID track object property, 251
date added track object property, 251
date class, 77, 79
date constants, 98
date data type, 63
date object
coercing to a string, 97
defined, 94
month property of, 96
properties of AppleScript, 95
weekday property of, 97
date photo object property, 266
date received/sent message property, 284
date string property, 95

414 AppleScript: A Beginner’s Guide
date(s)
AppleScript handling of, 94–96
calculating hours, minutes, days
and weeks, 98
changing, 97
time comparisons and, 98–100
day property, 95
days, calculating, 98
default answer parameter, 149–150
default button parameter, 142–143
default dialog tab property, 331
default e-mail address property,
401–402
default file path command, 297
default instant messaging address
property, 403
default items parameter, 158–159
Default Language pop-up menu, 17
default location parameter
in Choose A File dialog box,
163, 169
in Choose A Folder dialog
box, 171
in choose file name dialog
box, 154
default name parameter, 155
Default Script Editor pop-up menu, 17
default signature account object
property, 379
delayed message deletion interval pop
account property, 275
delete command
for files, 124
for folders, 120
for incoming messages, 285, 396
for mailboxes, 279
for playlists, 257
for worksheets, 351–352
delete mail on server pop account
property, 275
deleted status message property, 284
delivery account property, 274
description todo properties, 288
description track object property, 251
diacriticals attribute, 90
dialog boxes
adding a title to, 140–141
adding an icon to, 145–147
alert differences, 151–152
Break Reminder, 244–245
Bullets and Numbering, 330
for changing song ratings, 258
Choose A Folder, 170–172
Choose Application, 172–175
choose file name, 154–155
choose from list. See choose
from list dialog boxes
choosing a file. See Choose A
File dialog boxes
choosing buttons displayed in,
141–142
creating a self-closing, 149
creating cancel buttons for,
143–144
custom, 147–148, 255
displaying, 331–333
displaying multiple paragraphs
of text in, 139–140
for folder action scripts, 242
handling cancel button in, 205
overview, 138–139
repeat...times loop controlled by,
185–186
for saving changes, 301–302
seeing which button was clicked
in, 144
setting a default button in,
142–143
text-entry field in, 149–150
for unread messages in only one
Mail account, 280
Word’s built-in, 329–331
dialog reply record, 149–150
dialog sheet worksheet type, 353
dictionary, defined, 17
dictionary file
opening, 46–48
using, 48–54
Dictionary Viewer window, 47, 49
different first page header footer
property, 328
dimensions, for identifying photos, 267
dimensions photo object property, 266
direct parameter, 201–202
direction collapse start/end, 313
directory services, 177
disable folder actions command,
236, 238
disc count track object property, 251
disc number track object property, 251
display alerts property, 352
display dialog command
for adding custom icons, 147
to display dialog box, 138
global variables and, 70–71
script properties and, 73
display dialog statement, 199–200
do Visual Basic statement, 295–296
Dock
adding applications to, 12
launching AppleScript Editor
and, 12
running scripts from, 6
doc_process, 88
document class
in the dictionary file, 50
in Word, 293
Document dialog box, 330
document item, 50
document keyword, 300–301
documents
breaking into sections, 325
closing, 301–302
creating new, 294
creating, saving and closing,
304–305
entering text in, 319–320,
322–324
formatting text in, 320–324
identifying, 302–303
making active, 300–301
opening existing, 298
printing, 303–304
saving, 298–300
templates attached to, 295–298
Documents folder, 30
double-quote, 85
doughnut chart category, 365
downloaded mail attachment
property, 286
draft messages
attaching files to, 394–395
creating, 391–393
draft view, 308
draft window object
setting signatures for, 393–394
use and properties of, 391–393
drawing objects parameter, 354
droplets
creating and running, 224–225
defined, 220
saving as applications, 223–224
turning scripts into, 221–223
due date todo properties, 288
duplicate command
for files, 123–124
for folders, 119
duration playlist object property, 257
duration track object property, 251

Index 415
E
e-mail addresses property
of account object, 276
default, 401–402
e-mail messages
attaching files to, 394–395
creating for user, 391–393
setting signatures for, 393–394
e-mail messages, incoming
with attachments, 397
deleting/moving to folders, 396
forwarding, 395–396
e-mail messages, outgoing
adding recipients to, 389–390
creating, 389
properties of, 387–389
sending, 390–391
Editing preferences, 18–20
editing scripts, 41–43
elements, of AppleScript text objects, 86
email address account object
property, 379
email address account property, 274
email address objects, 401–402
enable folder actions command,
236, 238
enabled account property, 274
enabled track object property, 251
end considering, 91
end-of-line comments, 35–36
end tell statement
defined, 32
in the dictionary file, 49, 52–54
endnotes story, 314
end_of_range number information type
item, 317
endvalue variable, 187–188
Entourage
contacts in. See contacts
creating accounts, 378–380
e-mail messages in. See e-mail
messages
events in, 405–407
Exchange account, 380–382
Hotmail account, 386
IMAP account, 382–384
incoming messages in. See e-mail
messages, incoming
notes in, 408–409
outgoing messages in. See e-mail
messages, outgoing
POP account, 384–385
tasks in, 407–408
understanding message objects,
387–388
episode ID track object property, 251
episode number track object
property, 251
EQ track object property, 251
equality, comparison operators for,
75–76
error-128, 196, 205, 262
error-1728, 202
error -2700, 207
error-45, 202
error command, 206–209
error handlers
building, 204
dealing with errors, 201–202
overview, 201
returning error number and
message, 201–202
error keyword, 206
error resistant scripts
creating subroutines, 213–218
using applications’ formal names,
210–212
verifying item exists before using,
209–210
error(s)
in application’s
documentation, 206
creating handlers. See error
handlers
custom made, 206–209
error-128, handling, 205
finding expected, 204
handling, 196–198
identifying by running scripts, 205
resistant scripts. See error
resistant scripts
resolving code, 43–44
suppressing with try blocks,
196–198
Escape Tabs and Line Breaks Strings, 20
even pages header/footer story
document part, 314
Event Log items, 22
event objects, 405–407
events album, 264
Every, reference form, 87
Excel
changing views in, 374
charts in. See charts
creating and using ranges of cells
in. See cells
launching and quitting, 339–340
main objects of, 338–339
most useful file formats, 343
replacing data, 376
using find to search for data,
374–376
windows in. See windows, Excel
workbooks in. See workbook(s)
worksheets in. See worksheet(s)
Excel 4 worksheet types, 353
Exchange account
creation and properties, 380–382
overview, 378–379
exists command
seeing if an album exists, 265
verifying item exists with,
209–210
exit repeat statement, 182–183
F
faces album, 264
file class, 77, 79
file format constants, 299
file format parameter
to create a template, 297–298
for saving documents, 299
saving workbooks and, 341–342
file formats, 55–56
File Locations Preferences, 297–298
file name, 154–155
file name parameter, 298
file name property, 283
file path type parameter, 297
file servers, 177
file size mail attachment property, 286
filename parameter, 341–342
files
attaching to messages, 283,
394–395
copying and duplicating, 123–124
creating and opening, 125
creating from the Finder,
121–123
deleting, renaming and
moving, 124
files and folders
directly accessible from
AppleScript, 102–103
path to command to reach special,
103–106
referring to with alias references,
108–109
referring to with nested and path
references, 107–108

416 AppleScript: A Beginner’s Guide
Filter reference form, 87
Find And Replace dialog boxes, 330
find command, 374–375
find next command, 375
find previous command, 375–376
Finder window(s). See also windows;
windows, Excel
attaching folder action script to
folder with, 236–237
closing, 115
creating files from, 121–123
folder actions, opening and
closing, 232
four views, 41
front, 29
hiding all, 115
minimizing and restoring, 113
opening, 110
opening, configuring and closing,
116–117
opening, showing Documents
folder, 30
position, changing, 112
repeat loop to close all except one,
183–184
repeat with list loop to close,
189–190
repositioning and resizing,
38–39, 40
running scripts from, 6
selecting and positioning of,
39–40
set target of front, 45
showing/hiding the toolbar,
114–115
sidebar width, changing,
113–114
size, changing, 113
using nested, path and alias
references, 110–111
view, changing, 111–112
finish track object property, 251
first character number information
types, 315
first line indent property, 321
first page header/footer stories, 314
flagged album, 264
flagged status message property, 284
folder action scripts
attaching to folder using Finder,
236–237
attaching to folder using Folder
Actions Setup, 233–235
attaching to folder using the
Script menu, 237–238
attaching to folder via AppleScript,
238–239
creating and using, 240–242
folder actions
adding folder items, 227–229
attaching script to folder. See
folder action scripts
closing Finder window, 232
manually turning on, 226–227
moving or resizing window, 231
opening Finder window, 232
removing items, 229–230
turning on via AppleScript, 227
folder actions enabled property, 227
Folder Actions Setup application,
233–235
folder album, 264
folders. See also files and folders
attaching folder action scripts to.
See folder action scripts
copying/duplicating/renaming/
moving, 119
creating, 118–119
creating, renaming and moving,
120–121
deleting, 120
letting the user choose, 170–172
moving incoming messages to,
285–286, 396
special, 103–107
Font dialog box, 330
font object property
formatting of, 320
of text range object, 311
font property, 50, 51–52
fonts, 20–21
footnotes story, 314
Formatting preferences, for
AppleScript Editor, 20–21
formula, into a cell, 361
forward command, 395–396
frame is selected information type
item, 315
frame selection type, 312
from parameter
for moving folder’s window, 231
printing worksheets and, 355
front window
Finder, 29
working with Excel windows,
371–372
working with windows, 306–307
FTP servers, 177
full name account object property, 379
full name account property, 274
G
gapless track object property, 252
gave up parameter, 149
general information type item, 315
General preferences, 16–18
generic error number, 207
genre track object property, 252
get axis command, 366
get every keyword command, 268
get header/footer commands, 327–328
get information selection command, 314
get_user_name(), subroutine, 70–71
giving up after parameter, 149
global myUserName, global variable,
69–71
global variables
subroutines and, 67–69
using, 69–71
GMT (Greenwich Mean Time), and
Mac clocks, 98
grouping track object property, 252
GUI (graphical user interface),
scripting, 25
GUID property, 404, 407, 408, 409
H
hard-coding, 181
has title property, 367
header footer objects, 327–329
header footer type information type
item, 315
headers and footers
adding in Word, 331–333
in Word, handling of, 326–328
height photo object property, 266
Highlight Changes dialog box, 330
History preferences, 22
home address property, 403–404
horizontal position relative to page
information type item, 315
horizontal position relative to text
boundary information type
item, 316
Hotmail account
creation and properties, 386
overview, 379
hours, calculating, 98
hours property, 95
html parameter, 396
hyphens attribute, 90

Index 417
I
iCal
to run scripts at specific times,
245–246
todo object properties, 288
working with tasks in, 287–289
icon size property, 9
Icon view, of Finder window, 41,
111–112
icons
adding to dialog boxes,
145–147
for alerts, 152
ID account object property, 379
id album object property, 263
id mail attachment property, 286
id message property, 284
id outgoing message property, 281
id photo object property, 266
id property, 210–212
ID reference form, 87
id track object property, 252
idle handler
creating an application that uses,
244–245
to run scripts repeatedly,
243–244
if...then statements, 131–132
if...then...else if...else statements
for choosing among multiple
courses of action, 134–135
creating error handlers and,
202–203
if...then...else statements, 132–134
ignoring statements, 90–91
image filename photo object
property, 266
image path photo object property, 266
imap account type, 273, 276
IMAP (Internet Mail Access Protocol)
account
creation and properties, 382–384
overview, 378–379
in AppleTalk zone parameter, 126
in parameter, 52–53
“INBOX”, for incoming messages,
285–287
include in random property, 394
include in send and receive all account
object property, 379
include when getting new mail
account property, 274, 277
incoming attachments, 286–287
incoming message object, 395–396
incoming message(s). See also e-mail
messages, incoming
moving to a folder, 285–286
object properties, 284
opening and deleting, 285
Indent Wrapped Lines By preferences,
44–45
Index reference form, 87
index track object property, 252
info caps/num lock information type
item, 315
information about the selection and the
insertion point, 315
inherited items, 17
inline shape selection type, 312
insert break command, 325
insert text command, 319–320
instant messaging addresses, 403
integer class, 77, 79, 93
Integer data type, 63
integer numbers, 93
Internet link files, 122–123
ip selection type, 312
iPhoto
albums and, 263–265
creating an album in, 269–270
keywords and, 267–268
photos and, 265–267
types of albums, 264
is in table information type item, 317
iTunes
creating playlists for, 256–257
deleting playlists, 257–258
handling intermediate rating
songs, 258–263
tracks. See track(s)
J
junk mail status message property, 284
justified alignment property type, 321
K
keyboard shortcut, 334–335
keyword(s)
defined, 7–8, 263
identifying photos by, 267
in iPhoto, 267–268
kind track object property, 252
L
label property
for e-mail addresses, 402
for instant messaging
addresses, 403
Language dialog box, 330
last import album, 264
last months album, 264
last rolls album, 264
latitude photo object property, 266
launch command
in Excel, 339
for Word, 292–293
left alignment property type, 321
left position property, 307
Leopard
Folder Actions item in, 239
Script menu on the menu bar in,
23–24
Tell Application pop-up menu
in, 33–34
line break type constant, 325
line chart category, 365
line spacing rule constants, 321–322
line wrap preferences, 18–19
linefeeds
defined, 20
in strings of text, 83–85
lines of code
manually breaking, 45
wrapping, 44–45
list class, 77
List data type, 63
List view, of Finder window, 41,
111–112
local domain, 103
local variables, 67–69
logical operators, 75
long description track object
property, 252
longitude photo object property, 266
look at parameter, 375
look in parameter, 375
loop variable, 186–188
loop(s)
to close all open Finder windows
except one, 183–184
controlled by a list, 189–190
controlled by a loop variable,
186–188
definition and overview, 181
repeat until condition is true,
192–193

418 AppleScript: A Beginner’s Guide
loop(s) (contd.)
repeat while condition is true,
190–192
repeating until termination
condition becomes true,
181–183
running backward, 187
for set number of times repetition,
184–186
understanding and using hard-
coding, 181
lyrics track object property, 252
M
mac account type, 273, 276
Mac clock, and GMT, 98
Mac OS X
folders directly accessible from
AppleScript, 103
mounting volumes with, 127
special folders, 105–106
Mail accounts
checking/changing e-mail
settings, 275–278
overview, 272
properties, 274
types, 273
mail attachments
incoming, 286–287
object properties, 286
mailbox message property, 284
mailboxes
creating and renaming, 278
deleting, 279
finding new messages for
specific accounts, 279–280
object properties, 278
main text story, 314
make command, 48–49, 118
make new attachment command, 283
make new chart object command, 364
make new command
to add chart sheets to
workbooks, 363–364
creating documents, 294
creating files, 121
creating folders, 118
creating outgoing messages, 282
make new contact command, 401
make new document statement
in the dictionary file, 49
in Word, 294
make new event command, 405
make new Hotmail account
command, 386
make new mailbox command, 278
make new outgoing message command,
281, 389
make new page number command, 329
make new playlist command, 256
make new series command, 366
make new signature command, 394
make new smtp server command, 277
make new todo command, 287
make new workbook command
in Excel, 340
with template parameter, 341
make new worksheet command, 350
margins, in Word, 331–333
master view, 308
match byte parameter, 375
match case parameter, 375
maximum number of columns
information
type item, 317
maximum number of rows information
type item, 317
media servers, 177
menu bar, 23–24
message caching imap account
property, 276
message id property, 284
message object(s)
message parameter as, 395
properties, 387–388
message signature outgoing
message property, 281
messages. See also e-mail messages
attaching files to, 283
creating outgoing, 281–283
incoming. See incoming
message(s)
outgoing. See outgoing
message(s)
sending, 284
Microsoft Entourage. See Entourage
Microsoft Excel. See Excel
Microsoft Word 2008. See Word
Middle, reference form, 87
MIME type mail attachment
property, 286
miniaturized property, 113
minutes, calculating, 98
minutes property, 95
mirror margins property, 326
modification date track object
property, 252
modular scripts
creating, 214–218
overview, 213–214
month property, 95–96
mount volume command, 9, 126–127
move command
inserting worksheets, 350
to move messages, 396
to move worksheets, 352
for moving a file, 124
for moving a folder, 119, 121
turning scripts into
droplets, 223
move deleted messages to trash
account property, 274
moving folder window for event
handler, 231
multi user editing property, 346
multiple courses of action, 134–135
multiple pages, 309–310
multiple paragraphs of text,
139–140
N
name account object property, 379
name account property, 274
name album object property, 263
name mail attachment property, 286
name mailbox property, 278
name photo object property, 266
name playlist object property, 257
name property
for creating files, 122, 123
for creating playlists, 256
for deleting notes, 409
for deleting tasks, 408
for mail recipients, 282
making new signature
commands, 394
for ranges, 359
for renaming a folder, 119
for renaming worksheets, 351
Name reference form, 87
name track object property, 252
nested considering and ignoring
statements, 91
nested mailboxes, 286
nested references
reaching objects with, 107–108
using, 110–111
nested tell blocks, 33, 51
network domain, 103
new album command, 264

Index 419
new parameter
for creating a folder, 118
in the dictionary file, 48
new window on workbook
command, 371
new_account variable, 384
NewCount variable, 279–280
new_event variable, 405
news servers, 177
normal selection type, 312
Normal templates, 294
notes objects, 408–409
number class, 77, 79
number parameter
for creating errors, 206
for returning error number,
201–202
numbers
coercing other data types to, 94
coercing to other data types, 93
performing arithmetic with, 93
numeric strings attribute, 90
O
object hierarchy
defined, 7
example of, 8
objects
defined, 7
referring to with alias references,
108–109
referring to with nested and path
references, 107–108
odd and even pages header footer
property, 329
of type parameter, 163–164
in Choose A File dialog
box, 169
offset command, 89
OK button name parameter, 158
on error number -128 statement, 205
on error number my ErrorNumber
statement, 201–204
on error statement, 201
on get_user_name() subroutine, 213
on idle command, 243–245
on server parameter, 126
one course of action, 131–132
online view, 308
open command
for incoming messages, 285
to open existing workbooks, 344
Open dialog box, 330
Open Dictionary dialog box, 46–47
open handler, 220–222
open location command, 176
open the result command, 118–119
opening folder event handler, 232
opening window parameter, 396
operands, 74
operators, 74
orientation property, 326
original path photo object property, 266
other signature choice property, 394
outgoing message(s). See also e-mail
messages, outgoing
attaching files to, 283, 394–395
creating, 281–283
object properties, 281
sending, 284
setting signatures for, 393–394
outline view, 308
over type information, 315
overlapping properties, 254
P
page break type constant, 325
page fit property, 309
page from parameter, 303
page numbers, 329
page setup object, 326
page to parameter, 303
page view, 308
paragraph class, 50–51
Paragraph dialog box, 330
paragraph element, 86
paragraph format object, 320–322
paragraph format property, 311
paragraph object
formatting of, 320–322
style property of, 320
text object of, 310–311
parent album object property, 263
parent playlist object property, 257
password account object property, 379
password account property, 274
password parameter
of protect workbook
command, 346
protect worksheet command
and, 354
Paste dialog box, 330
path references
reaching objects with, 107–108
using, 110–111
path to command
for adding custom icons, 147
to reach special folders, 103–106
percentage property, 309
persistence, of variables, 67–69
persistent id track object property, 252
photo library album, 264
photo(s)
adding to/removing from an
album, 267
object defined, 263
object properties, 266
setting properties for, 265
pie chart category, 365
places album, 264
plain-text files, 123
play command, 254
played count track object
property, 252
playlist(s)
creating, 256–257
defined, 250
deleting, 257–258
object properties, 257
playpause command, 254
plot by parameter, 364
Plug-in preferences, 23
podcast track object property, 252
pop account type
explained, 273
extra properties of, 275
POP (Post Office Protocol) account
creation and properties, 384–385
Entourage, 379
pop-up menus
default, 17
Tell Application, 33–34
PopAcc variable, 384–385
port account property, 274
position property, 112
POSIX file class, 79
POSIX (Portable Operating System
for Unix) file class, 78
POSIX (Portable Operating System
for Unix) references, 109
postal addresses, 403
precedence, comparison operators
for, 76
Preferences window, 16
preview parameter, 356
primary footer story, 314
primary header story, 314
print copies parameter, 303
Print dialog box, 330

420 AppleScript: A Beginner’s Guide
print out command
for documents, 303–304
printing worksheets with,
355–356
print out page type parameter, 303
print out range parameter, 303
priority todo properties, 288
Project Gallery dialog box, 330
prompt(s)
in Choose A File dialog box, 162
in Choose Application dialog
box, 173
in choose file name dialog
box, 155
in choose from list dialog box, 157
display text in dialog box using,
139–140
properties
assigning initial value to, 72
defined, 9
property committee_name, 72–73
Property reference form, 87
property starting_folder, 72
protect workbook command, 346–347
protect worksheet command, 354–355
published album, 264
publishing view, 308
punctuation attribute, 90
Q
quit command
to close Word, 302
to Excel, 340
to Word, 293
R
radar chart category, 365
range class, 359
range objects, 359
range parameter, 375
to search for data, 374
set source data command and, 364
Range reference form, 87
rating, for identifying photos, 267
rating kind track object property, 252
rating photo object property, 266
rating track object property, 252, 253
read status message property, 284
real class, 78, 79, 93
real numbers, 93
recipient object types, 282
recipient type property, 389–390
record class, 78, 79
Record data type, 63
recording actions
examining, 39–41
into scripts, 37–39
reference class, 78, 80
reference forms, 87
regular album, 264
Relative reference form, 87
release date track object property, 252
remote applications, 177
remove action from command, 239
remove command
to delete an album, 265
removing photos from
albums, 267
remove folder actions command, 238
removing folder items event handler,
229–230
repeat a number of times loop, 180
repeat for each item in a list loop, 181
repeat loops
to close all open Finder windows
except one, 183–184
controlled by a list, 189–190
for creating a subroutine,
215–218
for creating an album in iPhoto,
269–270
for handling intermediate rating
songs, 259–263
for incoming attachments, 287
for multiple iTunes tracks, 255
for set number of times repetition,
184–186
termination condition and,
181–183
types, 180–181
until condition is true, 192–193
while condition is true, 190–192
for working with tasks in iCal,
288–289
repeat until loop, 181, 192–193
repeat while loop, 181, 190–192
repeat with a counter variable loop, 180
repeat with a termination condition
loop, 180
repeat with list loop, 189–190
repeat...times loop
controlled by a dialog box,
185–186
overview, 184
replace command, 376
replacement parameter, 376
reserved words, 66
return character, 139–140
return statements
repeat loops and, 183
to run scripts repeatedly,
243–245
revision marking information type
item, 315
RGB class, 78
right alignment property type, 321
row selection type, 312
rules, for naming variables, 65–66
Run Only check box, 56
running a script automatically. See
scripts, running automatically
S
sample rate track object property, 252
save command
for attachments, 397
for documents, 300–301
for incoming attachments, 286
for naming files, 154
for workbooks, 342, 344–345, 357
Save dialog box, 330
save the front document statement, 53
save verb, 52–53
save workbook as command
in Excel, 341–342
to share a workbook, 345–346
saving parameter
when closing documents,
301–302
when closing workbooks, 345
scatter chart category, 365
scenarios parameter, 354
scope, of variables, 67–69
Script Assistant, 19–20
Script Bundle format, 55–56
script class, 78, 80
Script Editor
vs. AppleScript Editor, 13
General preferences pane for, 16
History preferences for, 22
window, 15
Script formats, 55–56
Script menu
adding script to, 333–334
for attaching folder action scripts,
237–238
in menu bar, 17

Index 421
in menu bar, in Leopard, 23–24
running scripts from, 6, 25–26
script properties
definition and function of, 71–72
using, 73–74
scripts
adding a try block to, 199–200
adding application to the Dock,
56–57
adding block comments, 36–37
adding end-of-line comments,
34–36
creating error handlers and,
201–203
creating keyboard shortcuts,
334–335
dealing with errors in, 43–44
editing of, 41–43
essential concepts of, 5–6
folder action. See folder action
scripts
identifying errors by running, 205
making error resistant. See error
resistant scripts
modular. See modular scripts
recording actions into, 37–39
saving, 31
turning into applications, 55–56
uses of, 4
scripts, running automatically
with folder actions. See folder
actions
at Login, 243
repeatedly at intervals, 243–245
at specific times, 245–246
using a droplet. See droplets
search order parameter, 375
season number track object
property, 252
seconds property, 95
sections, breaking documents into, 325
selection mode information
type item, 315
selection objects
cells and, 358
finding document location of,
313, 314
information about, 313
moving messages to folders
and, 396
types of, 311–313
send command
for draft messages, 393
to IMAP server, 383
for outgoing messages, 284, 390
send secure password account object
property, 379
sender message property, 284
sender outgoing message property, 281
sequence todo properties, 288
series, adding to charts, 366
server name account property, 274
set bounds of Finder window
editing scripts using, 41–42
examining recorded code and, 40
set bounds of TextEdit window, 52
set command, 64–65
set name command
for renaming a file, 124
for renaming a folder, 119
set position of Finder window 1
editing scripts using, 41–42
examining recorded code and,
39–40
set source data command, 364
set statement
for creating text range objects, 318
for renaming worksheets, 351
set target, of front Finder window, 45
set the bounds of the front Finder
window statement, 199
set the clipboard to command, 91–92
shape selection type, 312
shared album, 264
shared library, 264
short date string property, 95
shortcut menu, 236–237
show track object property, 252
showing package contents parameter
in Choose A Folder dialog
box, 171
with choose file command, 168
showing parameter
in choosing a URL command, 176
URL items for, 177
show_user_name()subroutine, 70–71
shufflable track object property, 252
shuffle playlist object property, 257
sidebar width property, 113–114
signature type property, 394
signatures
adding to messages, 394
creating, 393–394
size playlist object property, 257
size property, 50, 51–52
size track object property, 253
slideshow album, 264
smart album, 264
SMTP account object property, 379
smtp account type, 273
setting a user account to a
different server, 277–278
setting up a new, 277
smtp server property, 277–278
Snow Leopard
AppleScript Editor and, 13, 20
Folder Actions item in, 239
Tell Application pop-up menu
in, 33–34
song ratings
explained, 253
intermediate, dealing with,
258–263
song repeat playlist object
property, 257
space before property, 321
spaces, in strings of text, 83–85
special cells, 360–361
special folders. See also folders
path to command to reach,
103–106
using, 107
special kind playlist object property, 257
Spelling and Grammar dialog box, 330
stamp date todo properties, 288
start track object property, 253
start_of_range column number
information type item, 317
start_of_range row number
information type item, 317
startvalue variable, 187–188
stock chart category, 365
storage, of scripts, 5
store drafts on server imap account
property, 276
story types, in Word, 313, 314
string data type
coercing to numbers, 94
for variables, 63
string(s)
coercing date object to, 97
date as, 95
defined, 20
strings of text
creating a subroutine for, 214–218
entering in text object, 82–83
finding one within another,
88–89
joining two or more, 83
trimming, 88
structure parameter, 346

422 AppleScript: A Beginner’s Guide
Style dialog box, 330
style property
for formatting text, 320
of text range object, 311
subject message property, 284
subject outgoing message
property, 281
subroutines
creating, 214–218
global variables and, 67–69
scripts broken up into, 213–214
subscribed album, 264
summary todo properties, 288
surface chart category, 365
sync horizontal parameter, 373
sync vertical parameter, 373
system domain, 103
System Events application
to hide all Finder windows, 115
to hide front/background
applications, 114
system info properties, 207
T
tab preferences, 18–19
Tabs dialog box, 330
tabs, in strings of text, 83–85
task objects, 407–408
tasks, in iCal, 287–289
Tell Application pop-up menu, 33–34
tell block(s)
adding a try block to a script
and, 199–200
for creating variables, 66
defined, 20
in the dictionary file, 49
editing scripts with, 41–43
hard-coding and, 181
manually creating, 32
nesting, 33
repeat with list loop and,
189–190
TextEdit dictionary and, 51
using, 32–33
tell statements
in Choose Application dialog
box, 174
definition and creation of, 29
in the dictionary file, 49
into tell blocks, 32
TextEdit dictionary and, 54
tell verb, 32
template parameter, 341
templates
attaching to documents, 295–296
creating, 298
locating, 296–298
workbooks based on, 341
Templates And Add-ins dialog
box, 330
termination condition, 181–183
text
adding spaces, tabs, line feeds
and returns, 83–85
backslash and double-quote
character use in, 85
finding a string within another,
88–89
joining two or more strings, 83
paragraphs displayed in dialog
box, 139–140
from text-entry field, 149–150
transferring from one application
to another, 91–92
trimming a string, 88
text class, 78, 80
text element, 86
text-entry field
adding to dialog boxes,
149–150
in alerts, 151–152
Text format, 55–56
text frame story, 314
text, in Word
adding a header, adjusting
margins and displaying a
dialog box, 331–333
adding headers, footers and page
numbers, 326–329
adding script to Word Script
menu, 333–334
breaking into sections, 325
choosing page setup, 326
creating a text range, 317–319
creating keyboard shortcuts for
scripts, 334–335
displaying built-in dialog boxes,
329–331
entering in a document, 319–320,
322–324
extending, shortening, or moving
ranges, 319
formatting text, 320–324
returning text object/reaching
contents, 310–311
selection object in. See selection
objects
text object property, 310–311
text objects
choosing what to ignore when
comparing, 90
containing other text objects, 89
elements of AppleScript, 86
entering normal text in, 82–83
returning and reaching contents,
310–311
returning parts of, 86–88
text property, 50
text range objects
applying a style to, 320
creating, 317–319
extending, shortening, or
moving, 319
of text object property, 310–311
text returned property, 149–150
text size property, 9
TextEdit dictionary file
opening, 46–48
using, 48–54
thumbnail filename photo object
property, 266
thumbnail path photo object
property, 266
time/date comparisons, 98–100
time playlist object property, 257
time property, 95
time string property, 95
time to GMT, 98
time track object property, 253
title bars, 151–152
title photo object property, 266
title(s)
adding to dialog boxes, 140–141
in Choose Application dialog box,
173–175
for choose from list dialog
box, 157
to parameter
forward command and, 396
moving messages, 396
printing worksheets and, 355
todo object properties, 288
toolbar visible property, 114–115
track count track object property, 253
track number track object property, 253
track object properties, 251–253
track(s)
changing tags for, 257
defined, 250
looping through multiple,
254–256
playing, 254
trash album, 264

Index 423
try block
creating error handlers and,
201, 202
suppressing errors with, 198–200
two courses of action, 132–134
type album object property, 263
U
uid todo properties, 288
“Uniform Type Identifiers
Overview”, 164
Uniform Type Identifiers (UTIs)
in Choose A File dialog box,
163–164
for widely useful file types,
165–167
unit types class, 78, 80
unitary operators, 74
unknown album type, 264
unplayed track object property, 253, 254
unprotect command, 347
unread count mailbox property
explained, 278
for finding new messages for
specific accounts, 279–280
URL (uniform resource locator)
album object property, 263
letting user choose, 175–177
todo properties, 288
used range property, 359
user domain, 103
user input, 149–150
user interface only parameter, 354
user name account property, 274
user ssl account property, 274
User Templates folder, 296–298
users
choosing a file, 169–170
choosing a folder, 170–172
choosing a URL command,
175–177
choosing an application,
172–173
creating e-mail messages for,
391–393
V
variables
creating with set command/copy
command, 64–65
defined, 62
referencing other objects, 66
rules for naming, 65–66
scope and persistence of, 67–69
seven data types for, 62–63
VBA (Visual Basic for Applications)
command, 295–296
vcard (virtual address card) data
property, 404
video kind track object property, 253
view, in Finder window, 111–112
view property, 374
view type property, 308
view(s)
AppleScript terms for, 308
setting in the window, 308
zooming and, 309–310
visible outgoing message property, 281
visible playlist object property, 257
volume adjustment track object
property, 253
volume_name parameter, 126
volumes
mounting, 126–127
unmounting, 128
W
web servers, 177
weekday property
explained, 95
working with, 97
weeks, calculating, 98
what parameter, 374
which axis parameter, 366
white space attribute, 90
white space characters, 85
width photo object property, 266
window 1, 306, 371
window object, 339
window state maximize, 306–307
window state normal, 306–307
window state property, 306–307
windows. See also Finder window(s)
accessing, 306, 371
minimizing and restoring, 307
resizing, repositioning and
arranging, 307–308
setting views in, 308
zooming, 306–307
windows, Excel
accessing/opening new, 371
activating, 371–372
closing, repositioning and
resizing, 372
rearranging, 373–374
zooming, 374
windows parameter, 346
with data parameter, 49
with empty selections allowed
parameter, 159–160
with hidden answer parameter,
149–150
with icon parameter, 145–147
with invisibles parameter
in Choose A Folder dialog
box, 171
with choose file command, 163
with multiple selections allowed
parameter
in Choose A File dialog box, 168
in Choose A Folder dialog box,
171–172
in Choose Application dialog
box, 173
in choose from list dialog box,
159–160
with password parameter, 126–127
with prompt parameter
in Choose A File dialog box,
162, 169
in Choose A Folder dialog box,
170–171
in Choose Application dialog box,
173, 174
in choose file name dialog
box, 154
in choose from list dialog box, 157
with properties parameter
to create a new mailbox, 278
for creating a folder, 118
for creating playlists, 256
in the dictionary file, 49
make new contact command
and, 401
make new outgoing message
command and, 389
with title parameter
in Choose Application dialog box,
173, 174
in choose from list dialog box, 157
without add to recent files parameter,
298, 299
without editable URL, 176
without invisibles parameter
in Choose A File dialog box,
163, 169
in Choose A Folder dialog
box, 171

424 AppleScript: A Beginner’s Guide
Word
attaching a template to a
document in, 295
built-in dialog boxes in, 329–331
documents. See documents
launching and quitting, 292–293
most useful file formats in, 299
story types, 313, 314
templates. See templates
text. See text, in Word
Word 2004, 295–296
Word Count dialog box, 330
word element, 86
Word Preferences dialog box, 330
Word Script Menu Items folder,
333–334
wordnote view, 308
workbook class, 338–339
workbook(s)
active workbook class for,
347–348
adding chart sheets to, 363–364
adding data, 361–362
based on a template, 341
charts in. See charts
closing, 344–345
creating, saving and closing,
348–349
inserting worksheets in, 350–351
new blank, 340–341
opening and adding worksheets,
356–357
opening existing, 344
protecting against changes,
346–347
saving, 341–343
sharing, 345–346
Workgroup Templates folder, 296–298
worksheet class, 339
worksheet contents parameter, 354
worksheet(s)
adding chart objects to, 364
checking types of, 353–354
deleting, 351–352
inserting in workbooks, 350–351
moving or copying, 352–353
named ranges in, 359
opening workbooks and adding,
356–357
overview, 349
printing, 355–356
protecting, 354–355
renaming, 351
used ranges, 359
using active worksheet class, 355
wrapping lines of code, 44–45
Y
year property, 95
year track object property, 253
Z
Zoom dialog box, 330
zoom percentage information type
item, 315
zooming
view objects and, 309–310
windows, 306–307, 374
