HiTi USB Photo Printer FAQ V3.2 630PL Hi Ti V.3.2
User Manual: 630PL
Open the PDF directly: View PDF ![]() .
.
Page Count: 94

2005/12
1
HiTi USB Photo Printer
FAQ
Hi-Touch Imaging Technologies Co., Ltd.
Web Site:
http://www.hi-ti.com
TEL: +886-2-8258-3060
Fax: +886-2-8258-3106
Email:
service@hi-ti.com
Manual revision 3.2, Sep. 2005

2005/12
2
Index
Chap 1. About HiTi
Chap 2. What To Know Before Using
Safety
Consumables
Accessories
System Requirements
USB Connection
Printers
Calibration
LED Indicator
Cleaning Kit
After-Sale Services
Chap 3. Product Information
HiTi USB Photo Printers
HiTi USB Card Printers
Symbol
Chap 4. Setup And Installation
MasterCD Description
Driver Installation- Windows
Driver Installation- Mac
Driver Installation- Linux
Application Installation
Downloads
Chap 5. Operation
Software Operation
PhotoDésirée 1
PhotoDésirée 2
Mr. Photo
Adjustor
IDésirée
MugDésirée
GalaDésirée
Image Templates
Mac iPhoto and iView

2005/12
3
CleanKit
CardDésirée
GoldDésirée
Sign Marker
Printer Operation
Consumables
LCD Controller
HiTi USB Photo Printers
HiTi USB Card Printers
Driver Tool
Chap 6. Printing Problems
HiTi USB Photo Printers
HiTi USB Card Printers
Mug Press Kit
Consumables
LCD Controller
Chap 7. Printout Quality Issues

2005/12
4
Chap 1. About HiTi
Q1: How to Pronounce our Name?
A1: Hi-Touch Imaging Technologies is also known as HiTi. The company is pronounced Hi (as in ‘high’) and
Ti (as in ‘Tee’).
Q2: Who is HiTi?
A2: Hi-Touch Imaging Technologies, Inc. is a market leader in the production and development of dye
sublimation photo-printers.
Chap 2 . What To Know Before Using
Safety
Q1: Do I need to power off the printer after I complete my printing job?
A:
Yes, please power off the printer.
Q2: Is there any model of HiTi’s printer can work on the car?
A:
Yes, HiTi Transphotable can work on the car; however, others are not.
Q3: Why I got the slight electric shock?
A:
Please make sure the power supply is safe in your location. If necessary, please adopt the power cord that has
ground wire to conduct the electricity.
Q4: Can I disassemble the printer by myself?
A:
No, you cannot. Please contact HiTi authorized distributors or dealers for help.
Consumables
Q1: What kind of consumables may I use with this printer?
A:
You may use HiTi YMCO, HiTi YMCYMCO or HiTi KO ribbon cartridges, HiTi photo paper or HiTi sticker
sheets.
Q2: May I use the consumables of other brands other than HiTi?
A:
No. Please do NOT use similar consumables of other brands because these are made differently and use
different dimensions, thicknesses, detachable border sizes and have another printable side viscosity, which will
not work with HiTi printers and may seriously damage our printers. Problems like this will not be covered
within the warranty and will result in a service repair charge.

2005/12
5
Q3: Are the consumables re-usable?
A:
No. If you re-use the consumables, ribbon or paper jams are likely. The printer may be damaged permanently.
Problems caused by this are NOT covered by warranty, and HiTi will charge for repair services to the printer.
Please remember: Papers or stickers are sold with the ribbon. The numbers are matched to give you a print out
for each sheet. If you re-use stickers, you will have unused sheets remaining.
Q4: What is the best way to store consumables?
A:
To maintain the quality of your consumables it is necessary to protect them from heat, humidity, sunlight and
dust. Please store unused papers in its original package, place the ribbon cartrige in a re-sealable plastic bag or
any other airtight covering as soon as you finish printing.
Q5: Where can I purchase consumables (ribbon, paper or sticker sheets)?
A:
You can purchase consumables, such as ribbon, paper and sticker packs, from HiTi authorized distributors or
dealers. For more information about local dealers, please visit: http://www.hi-ti.com
Q6: How come the ribbon has run out while there is still paper remaining?
A:
Below are some cases why a ribbon may run out without any printing due to errors or improper operation:
1. If a “ribbon out” problem occurs due to ribbon-searching device errors, the printer will eject HiTi-paper
without printing (white paper), and also wind the ribbon when HiTi-papers are being fed.
2. If a “paper out” problem occurs due to no HiTi-paper in the HiTi-paper cassette, the ribbon will wind up a
little bit to lower down the HiTi-paper lifter. If the starting line of the ribbon passes the functional area of the
ribbon-searching device, the printer will search for the next starting line of the ribbon in order to print, thus
the ribbon could pass frame by frame to proceed printing. Please take out the ribbon cartridge and wind back
the ribbon until the starting line of ribbon is hidden (This operation excludes our professional printer the
HiTi 640DL.).
3. If paper is being loaded while the current print job is being CANCELLED, the printer will eject the HiTi-
paper without printing, and also wind the ribbon when paper is being fed. If the starting line of the ribbon
passes the functional area of the ribbon-searching device, the printer will search for the next starting line of
the ribbon for printing, thus the ribbon could pass frame by frame to proceed printing. If the paper is ejected
without printing, please take out the ribbon cartridge and wind back the ribbon a little bit until the starting
line of ribbon is hidden.
4. If problems like “printer no response” and “write file/port error” occur before printing, the printer will eject
the HiTi-paper automatically, and also wind the ribbon when it feeds paper. If the starting line of the ribbon
passes the functional area of the ribbon-searching device, the printer will search for the next starting line of
the ribbon. Hence one ribbon frame could be passed. If HiTi-paper is ejected without printing, please take the
ribbon cartridges out and wind the ribbon back until the starting line of the ribbon is no longer visible.
5. If printed HiTi-papers are re-used, more HiTi-papers will remain with insufficient ribbon.
6. If the ribbon is wind up into the wrong direction, the starting line may pass the functional area of ribbon-
searching devices, the printer will search for the next starting line of the ribbon for printing, thus the ribbon
could pass frame by frame to proceed printing. Please contact the HiTi’s Service Department for technical
support.
Q7: How can I store the ribbon and paper?
A:
1. Photo paper and ribbon cartridge:

2005/12
6
To achieve optimal performance and quality, please store it under temperature 25 degree centigrade with
relative humidity between 40~60%.
2. Printout:
Printout should be placed in an album or ventilated location at room temperature and away from external
contaminants such as dust.
Q8: Do G2's consumables differ to other models?
A:
Yes, both the ribbon and papers are different. To ensure best color performance, please don’t mix-use them.
NOTE:
G1 means “63x, 64x and PhotoShuttle” series. G2 means “S” and “L” series, i.e. S400, S400, L300... etc.
Accessories
Q1: What accessories come with the HiTi USB Photo Printer?
A:
Accessories such as a power cord, USB cable, warning sheet, quick guide, Master CD (driver, application and
user’s manual), 10 images ribbon+ HiTi-paper kit (in 630PL, 630PS, 630ID, PhotoShuttle, Transphotable,
640PS, 640ID and 640Gala), 1 cleaning kit (only in 640DL) are included in the package of HiTi USB photo
printers.
Q2: What should I do if I received the printer but some accessories are missing?
A:
Please contact the dealer from whom you purchased the printer.
Q3: Where can I find the user manual guide?
A:
1. The Master CD (included with the printer) contains an Electronic User Manual on it. This manual is saved
as a PDF file (Portable Document Format), thus you need to open it with the Adobe Acrobat Reader. (Adobe
Acrobat Reader v 5.0 is included on the Master CD, or you can download the latest Adobe Acrobate Reader at
http://www.adobe.com/products/acrobat/readstep2.html)
2. User manual is available to download from HiTi’s webiste: www.hi-ti.com
System Requirements
Q1: What are the system requirements for the HiTi USB Photo Printer?
A:
Before using HiTi USB Photo Printers, please note the following requirements:
1. A Microsoft Windows compatible PC with a Pentium class processor (500 MHz or faster recommended).
HiTi printers also work on Apple Computers.
2. Supported OS: Window s 98, 98SE, ME, 2000, XP or 2003, Mac OS 10.2 or 10.3 (Excluding 640Amphi
and 630PL), Linux (Excluding 630PL)
3. At least 64MB of RAM (128MB or more recommended).
4. 100MB of free hard disk space.
5. CD-ROM or DVD-ROM Drive for printer software installation.
6. SVGA or better display adapter and monitor.

2005/12
7
7. A Windows/Apple-compliant USB port.
USB Connection
Q1: What versions of USB cables are compatible for use with the HiTi USB Photo Printer?
A:
USB 1.0, 1.1 and 2.0.
Q2: What is the recommended length of the USB printer cable?
A:
The USB cable included in the printer package or other USB cables less then 1.5 meters in length. .
Q3:What is the limitation using the USB interface on Hi-Ti Photo Printer?
A:
1. At the moment, the HiTi 630PL does not function well when your PC has a screen saver enabled. Please
make sure your system will not enter the screen saver, suspend or hibernate modes while you are printing.
2. If you are using a USB Hub to connect the printer to, please connect the printer to the first port of the USB
hub. (Keep in mind that some low quality USB Hubs may affect data transmission.)
3. If you are using an extended USB port to connect the printer to, please install the drivers for the port.
(However, some poor USB cards may affect data transmission.)
4. Compatibility problems caused by unstable or non-existent USB signal. There are some compatibility issues
with motherboards that have a VIA VT82C598B or SiS 7001 USB Host Controller.
Q4: What should I do if the USB device connection between my PC and the printer does not appear to work
properly?
A:
1. Make sure the printer supports the OS. For example: Windows 98, 98SE, ME, 2000, XP, 2003, Mac OS
10.2, 10.3 or Linux are all supported. (exclude 630PL)
2. Make sure the printer is powered on.
3. Make sure the USB cable meets the proper specifications required and is shorter than 1.5 meter.
4. Make sure the USB card or USB Hub is plugged in and connected properly.
5. Make sure the drivers for the USB card or USB Hub are installed properly.
6. Try to connect the printer via another USB port.
7. Make sure the printer is properly connected to the computer.
8. Make sure the printer can be detected by the computer. (Found New Hardware message will pop up under
Windows 2000 and XP when you connect the printer to the computer.)
Printers
Q1: Can I use the ID photos from my HiTi photo printer to apply for a VISA or other official identifications or
licenses?
A:
Yes.
Q2: What is the proper working temperature for HiTi printers?
A:
15~32

2005/12
8
Q3: What is the proper working voltage?
A:
100~240V.
Q4: How to maintain your HiTi photo printer and HiTi card printer?
A:
1. To achieve a prefect printout quality, the printer moves the paper back and forth four times, processing
YMCO per printing cycle. Please wait until the printing process finishes and all paper is completely used up.
While printing is in process, please do NOT interrupt its operation or remove the paper with your hand. This
will damage the printer. (Processing will be different based on ribbon types.)
2. Please do NOT re-use ribbons and HiTi-paper and do ONLY use ribbons and/or paper from HiTi. Failure to
follow these rules may cause paper jam or printing error, and cause damage to the printer. In such a case,
manufacturer warranty is limited and a service charge will apply.
3. If your printing demand is heavy, it is suggested you purchase our HiTi 640DL, a commercial model.
4. For a better printout quality, we suggest that you use HiTi Photo Printer indoors or in an air-conditioned
area. If you do not use the printer for a long time, please pack it into a HiTi portable bag or cover it to avoid
dust damages.
Q5: Can I print in black & white from my HiTi Photo Printer?
A:
Yes. HiTi PhotoShuttle, 640ID, 640PS, 640Gala and 640DL support HiTi black and white ribbons.
Q6: What is the proper way to insert the Compact Flash card?
A:
First, make sure that your insert-direction is correct. Second, insert the Card slowly and softly. Roughness
may cause the CF card slot to bend or brake and a service charge will apply in such a case.
Q7: Can I keep HiTi USB Photo Printer switched on?
A:
No. Because the pre-heat function will shorten the life of the print head, we suggest turning off the
printer after printing.
Calibration
Q1: How do I calibrate the position of sticker?
A:
Please note that you may do the position calibration in both PC and stand-alone modes for printouts. Please
refer to the following instructions:
PC mode:
(1) Go to "Start Menu/ Settings/ Printers/ HiTi USB Photo Printer MODEL NAME/ Properties/ Printing
Preferences/ Tools".
(2) Print a test chart onto a 4x4 sticker.
(3) Confirm the number of both vertical and horizontal cutting lines and fill in the correct ones.
Stand-alone mode: (Models with LCD controller support)
(1) Go to “Setup/ Printer Calibration/ OK”.
(2) Print a test chart onto a 4x4 sticker.

2005/12
9
(3) Confirm the number of both vertical and horizontal cutting lines and fill in the correct ones.
Q2: How do I calibrate or adjust the colors on my photo images?
A:
To further calibrate colors on your photo images, you may refer to the following for more details:
PC mode:
1. Use the “Adjustor” to adjust all colors on photo images, and you may download the program and user
manual at: http://www.hi-ti.com/
(For more instructions on how to use the Adjustor, please refer to the user manual guide.)
2. For “skin color” adjustment, you may run “Position Adjustment” to test printing and its setting:
1. This tool can only be used for sticker adjustments.
2. While in windows mode, follow the path: “Start Menu/ Settings/ Printers/ HiTi USB Photo Printer
MODEL NAME/ Propertie/ Printing Preference/ Tools”.
3. In “color preference setting”, check “skin tone effects”, select “white skin tone optimization”.
4. After printing the test chart, pick the number of the vertical bar that matches the horizontal margin
between stickers. Then, fill the number in the open box of A section, and pick the number of the horizontal
bar that matches the vertical margin between the stickers. Then, fill the number in B section 4 box.
5. To modify settings to “best color performance”, use the tool we offer for skin tone optimization
adjustment:
(1) Follow the path: “Start Menu/ Settings/ Printers/ HiTi USB Photo Printer MODEL NAME/
Propertie/ Printing Preference/ Tools”.
(2) In “Color preference setting”, check “skin tone effects”, select “white skin tone optimization”, then
printing test chart.
(3) Check the C zone for printout. Pick the number of your favorite frame and enter its number in the
box of C zone.
Stand-alone mode:
Please note that only the HiTi 640PS supports color calibration in the stand-alone mode.
(1) Go to “Setup/ Printer setting”.
(2) Pick an image, then adjust the image in the color of your favor, and then press “OK”.
(3) Press “OK”.
Indicator LED
Q1: What is Status LED? How does it work?
A:
Normally, the Status LED will stay in stable green when the printer is ready and blink in green when the printer
is processing a print job. In addition, the amount of times the LED blinks in orange may indicate a different
error situation. Please refer to below for more details.
1 time or 2 times: Cover Open.
3 times: Ribbon Out.
4 times: Paper Out.
5 times: Paper Jam.
6 times: Paper Mismatch.
7 times: Buffer Under Run.
8 times: Cam Error.
9 times: SRAM Error.
10 times: ASIC Error.
11 times: ADC Error.
12 times: NVRAM Error.

2005/12
1
13 times: FW Checksum Error.
15 times: ADF CAM Error.
16 times: Video Error/ Write Flash Error.
Q2: Why is there no light from the Status LED when the printer is powered on?
A:
Please make sure the printer’s power switch is turned on.
If you use extension cords or power surge protectors, please make sure they are properly plugged in and turned
on. If the Status LED or other components has failed, please contact our local distributors or dealers to receive
further assistance.
Q3: Why the Status LED keeps blinking in Green?
A:
At this moment, printer’s firmware is mixed. (The printer is trying to recover firmware.) You may try to
upgrade firmware via PC or Mac. If the printer has no connection to the computer, please contact our local
distributors or dealers to receive further assistance.
Cleaning Kit
Q1: How often should I use the HiTi Cleaning Kit?
A:
We suggest that you may use the HiTi Cleaning Kit after every 100 prints or once a month to well maintain the
HiTi USB Photo Printer. A message box will pop up 3 times to remind you to perform the cleaning maintenance
whenever your printer has printed 100 prints.
Q2: What can I do if I see a “To achieve optimal printing quality, HiTi recommends you to clean the printer
with HiTi Cleaning Kit after every 100 prints” message?
A:
It is suggested to purchase and use the HiTi Cleaning Kit and clean your printer.
Q3: How can I use the HiTi Cleaning Kit?
A:
Please follow the instructions enclosed with the HiTi Cleaning Kit. Use the sponge-cleaning stick to swab the
printer first. If the problem remains, then run the clean paper for further action. You may also visit our website
to download the clean kit program: www.hi-ti.com
Q4: Where can I buy the HiTi Cleaning Kit?
A:
1. You can purchase the HiTi Cleaning kid as well as HiTi ribbon, paper and sticker sheets from HiTi
authorized dealers. Please visit the HiTi’s web site for more purchasing information (dealer locations, sites, etc.):
www.hi-ti.com
Q5: How much cost will be increased if I use cleaning kit periodically?
A:
HiTi suggests, clean the printer by HiTi’s cleaning paper after per 100 prints. Totally, 5 sheets of cleaning paper
are included inside HiTi Cleaning Kit, so per pack of cleaning kit will at least help user to maintain printing
quality of 600 prints. Averagely, it is less than USD 0.02 cents for per print; however, it can effectively resolve
some problems and prolong printer’s lifetime.

2005/12
1
After-Sale Services
Q1: What is covered by the printer warranty?
A:
1. In order to ensure warranty service for your printer, you have to request that the vendor fills in the printer
model, serial number and purchase date on the warranty card and then provides a stamp on the card (seal/stamp
of purchase). Please preserve this warranty card or related proofs of purchase (i.e. invoice or receipt). If the
warranty card has not been filled in completely or is modified, HiTi will charge you for printer repairs.
2. The warranty period is one year from the date of purchase (Limited warranty in HiTi Taiwan, HiTi China,
HiTi United Kingdom and HiTi America, expendable is excluded.). Please keep the warranty card for proof of
purchase when the printer needs to be repaired or serviced. If you cannot provide the warranty card, the
warranty period will expire 14 months past the printer’s manufactured date (the manufacturing date is located
on the printer).
3. HiTi doesn’t offer global warranty.
4. HiTi will charge for repair services in case the following happens during the warranty period:
a. The product is repaired and disassembled by unauthorized persons.
b. The Printer is damaged by abnormal usage.
c. The Printer is damaged by an (external) accident.
d. The Printer is damaged due to improper troubleshooting without consulting the manual, HiTi, or the
Online FAQ.
e. The printer’s back-label or warranty seals are modified, damaged or missing.
f. The S/N of the printer is not clear or modified.
g. Any damage caused during the delivery/logistics by the customer.
h. Damages caused by ’Act of God’, natural or unnatural disasters (i.e. lightning, fire, flood, etc.)
i. Any other factors that are not related to a defect on the printer.
j. Use of ribbon or paper not manufactured by HiTi.
k. Using already used consumables.
5. The warranty does not include any of the bundled accessories or consumables.
Q2: Where can I receive help with the printer or software?
A:
1. Your printer software CD includes an Electronic Manual on it. You can get instant help from its FAQ. The
manual is a PDF file, so you will need Adobe Acrobat Reader to view it. (Adobe Acrobat Reader v 5.0 is
included on the printer software CD-ROM or you can download it from
http://www.adobe.com/products/acrobat/readstep2.html )
2. You can contact the dealer from whom you purchased the printer.
Q3: Where can I buy consumables (ribbon, paper or sticker sheets)
A:
1. You can purchase ribbon, paper and sticker sheets from HiTi’s dealers or the HiTi’s website.
2. Visit the HiTi website for purchasing information (dealer locations, sites, etc.):
http://www.hitishop.com.tw (HiTi Taiwan)
http://www.hitishop.com.cn (HiTi China)
http://www.hitishop.com (HiTi United States)
http://www.hi-ti.com/uk/ (HiTi United Kingdom)
http://www.hi-ti.nl/english (HiTi Europe)
http://www.hi-ti.ru/ (HiTi Russia)
http://www.hi-ti.com/english (HiTi Worldwide)

2005/12
1
Q4: What parts are not completely covered by the printer warranty?
A:
Expendable, such as Thermal Print Head, CF/MicroDrive card reader, SM/SD/MS/MMC card reader, LCD
screen, Line of LCD Controller and power board.
1. Thermal Print Head, CF/MicroDrive card reader, SM/SD/MS/MMC card reader, LCD screen, Line of LCD
Controller:
The warranty is 6 months. (Limited warranty in Taiwan, Europe and America.)
2. Power board:
The warranty is not covered if it is the fuse broken problem. Mainly, it happens when the power supply
is unstable. User has applied AC Line Voltage Regulator to avoid this problem.
3. LCD Controller:
The warranty is not covered if the problem was caused by dropping.
Chap 3. Product Information
HiTi USB Photo Printers
Q1: Why are HiTi printers different from traditional Ink-jet printers?
A:
HiTi printers use a dye-sublimation printing technique, which is a process of creating photographs by a printing
technique that diffuses dye onto paper. This dye comes in the form of a ribbon and is converted into a diffused
gas when heat is applied. Dye-sublimation differs greatly from inkjet in many ways, most significantly in
quality. Dye-sub is known for its high quality and continuous tone output. Continuous tone means that all
gradations of color are used when creating an image, while a half-toning device such as an ink-jet printer will
use a dithering technique of placing dots close together in order to trick the eye. In other words, ink jet printers
use a series of black dots placed closly to white dots in order to trick the eye into blending the pixels when
viewed. With magnification the difference can be seen, where the dye-sub output is clear and sharp dots can be
seen on ink-jet prints.
Q2: May I print without connecting to a PC using HiTi photo printers?
A:
Yes, you may. The HiTi 630PS, 630ID, 631PS, 631ID, 640PS, 640ID, 640Gala, 641PS, Transphotable, 730PS
and 730Gala Photo Printers are equipped with handy view-screens which enable users to preview images,
perform editing functions, and print out digital images without a computer. However, you may also connect the
printer to a PC using the USB cable and further edit photo images for printing using the Photo Désirée software
packaged with HiTi printers.
Q3: What is the difference between the HiTi 630PL and the HiTi 630PS?
A:
The HiTi 630PL model needs to work with an USB connection to the PC for printing, while the HiTi 630PS is a
stand-alone model which comes with an LCD controller and 2 memory card insertion slots (Compact Flash &
Smart Media), to enable printing without connecting to a PC.
Q4: What is the difference between the HiTi 630PS and the HiTi 631PS?
A:
1. 630PS: Supports image reading from 2 different media types, such as Compact Flash, Smart Media.
2. 631PS: Supports image reading from 6 different media types, such as Compact Flash, Smart Media, Secure

2005/12
1
Digital, Memory Stick, Multi-Media Card, and Micro-Drive.
Note: xD card requires the purchase of an optional adapter. (HiTi suggests using CF xD adapter.))
Q5: What is the difference between the HiTi 630PS and the HiTi 630ID?
A:
1. 630ID: For professionals who need more ID formats to print ID photos in standalone.
2. 630PS: The standard printer, a true all-rounder.
Q6: What are the main features of the HiTi 640PS model?
A:
The HiTi 640PS is also a stand-alone model which will process printing with or without a PC connection. It is
equipped with a LCD screen controller to enable photo editing and printing without connecting to a PC and also
supports image reading from 6 different media types, such as Compact Flash, Smart Media, Secure Digital,
Memory Stick, Multi-Media Card, and Micro-Drive. The HiTi 640PS is capable of printing images with a matte
surface and glossy effects without changing the media. Additionally, a unique "watermark" can be added using
HiTi's Magic Coating Technology which also waterproofs the printouts and protects them from aging. Another
nice feature is its capability to adjust individual color preferences for all prints. The HiTi 640PS produces true
photo-lab quality prints in only 75 seconds.
Q7: What kind of photo printer is the HiTi 640DL model?
A:
Hi-Ti 640DL is a computer-based commercial unit with a 403dpi high resolution. It is ideal for mini-lab and
business applications, and is designed for heavy-duty continuous printing and batch printing, making it faster,
more durable and reliable.
Q8: What should I do if I want to use media types other than CF and SM with the HiTi 630PS model?
A:
You may purchase a memory card adapter in case you want to use other media types than CF and SM with the
HiTi 630PS. For more information, please visit the following sites for further details: www.hi-ti.com
Q9: When will HiTi lower the printing cost?
A:
HiTi photo printers emphasize on characteristics such as personalization, privacy and convenience. All these
points have gives a user greater convenience then relying on photo developing shops. Although the photo-
printer market is growing, we are not yet able to lower the printing cost at this moment. However, HiTi’s cost
per print average continues to be significantly less than the costs of inkjet printing and even more affordable
than other dye-sublimation printing solutions.
Q10: HiTi 640Gala, HiTi 640PS, HiTi 640ID, and HiTi 640DL what is the difference?
A:
In principle all 640 printers are similar (except the 640DL)
3. 640Gala: For professionals who need the flexibility of the printer and need to print templates in the
standalone mode.
4. 640ID: For professionals who need more ID formats to print ID photos in standalone.
5. 640PS: The standard printer, a true all-rounder.
6. 640DL: Has no standalone function. This printer is for heavy usage and is mainly intended to stay in a place
permanently.
Q11: What memory cards does the HiTi 640Gala support?
A:

2005/12
1
The following cards are fully supported: CF/MS/MS Pro/SD/MMC/SM/Micro Drive.
The following card requires the purchase of an optional adapter: xD Cards. (HiTi suggests using CF xD
adapter.)
Q12: What is the difference between “PS” and “Gala”?
A:
The big difference between “PS” and “Gala” is the template function. The “Gala” series come with software
called GalaDésirée. Basically, you create a template (according to our instructions) in Photoshop (example) then
run them through GalaDésirée to set up image placement and convert the file. This file can be placed onto your
memory card for storage and when you take the printer to an event, simply load the template/frame from the
card then print your photos with custom logos, frames, or event descriptions without having the printer tethered
to a computer.
Q13: Will HiTi launch an A4 model at 400dpi?
A:
A high resolution version of the large format dye-subs will likely start to spring up if the standard MP of the
market's digital technology has reached around 8MP ~ 12MP. Here is an idea of optimal resolution for each
given size at 400dpi:
1. 4x6 at 400dpi: 3.8MP.
2. 5x7 at 400dpi: 5.6MP.
3. 6x8 at 400dpi: 7.6MP.
4. 8x10 at 400dpi: 12.8MP.
In the end, if image size is not large enough, users will notice little or no improvement to the printout quality as
the printer will have to stretch and interpolate pixels to get it fitting properly. People will end up going to the
cheaper 300dpi units blaming the poor "resolution" on the printer. A poorly timed release, when the market is
not fully capable of utilizing the product’s potential, could mean the quick and untimely death of a product
ahead of it’s time. Give the digital photo taking market a little more time to grow and you’ll see the printing
market grow with it.
HiTi USB Card Printers
Q1: What is the difference between HiTi 640DL and HiTi 640Amphi?
A:
1. 640DL: This printer is for heavy 4x6 photo papers usage and is mainly intended to stay in a place
permanently.
2. 640Amphi: This printer is for both heavy 4x6 photo papers and PVC cards usage and is mainly intended to
stay in a place permanently.
Q2: How long can I keep the printout of printed PVC card?
A:
Under normal situation, printout of printed PVC card can be kept for 6-months at least.
Q3: How to keep the printed PVC card?
A:
1. Laminate a cold laminating film to printed PVC card as a protection.
2. Put PET or OPP slim and transparent cards to card holder to isolate printed PVC card and card holder.
3. Put printed PVC card into the holder which is made by PET or OPP, but PVC.
Q4: What should I know for keeping printed PVC card?

2005/12
1
A:
1. Please don’t put printed PVC card into the holder which is made by PVC, or the color of printed PVC card
will be stuck or transferred to PVC holder.
2. Please don’t use printed PVC card under the surrounding of high temperature or high humidity.
3. Please don’t store printed PVC card with abrasive surface. (i.e. wallet.)
Symbol
Q1: What “T1” means on LCD remote controller of 640Gala and 730Gala?
A:
It means you have uploaded templates of “HiTi 4x6 Photo”.
Q2: What “T2” means on LCD remote controller of 640Gala and 730Gala?
A:
It means you have uploaded templates of “HiTi Mug Photo”.
Q3: What “T3” means on LCD remote controller of 640Gala and 730Gala?
A:
It means you have uploaded templates of “HiTi 4x6 Sticker 4/2/4”.
Q4: What “T4” means on LCD remote controller of 640Gala and 730Gala?
A:
It means you have uploaded templates of “HiTi 4x6 Sticker 4x4”.
Q5: What “T5” means on LCD remote controller of 640Gala and 730Gala?
A:
It means you have uploaded templates of “HiTi 4x6 Sticker 1x1”.
Q6What “LinkPrint” means
A:
It is used to indicate a USB direct link function that HiTi 641PS supports.
Q7What “PictBridge” means
A:
PictBridge is a latest standard for connecting digital camera to printers. It allows easy direct printing regardless
of brands. You can refer to http://www.cipa.jp/pictbridge/index_e.html for more details.
HiTi’s 641PS supports such standard.
Q8: What “PTP” means?
A:
PTP is the acronym for the Picture Transfer Protocol. The protocol has a strong standards basis, in ISO and in
terms of the USB Still Imaging class specification. Most of upcoming digital cameras support it. PTP allows
product-specific device commands, properties, and events as layers over standard transport frameworks such as
USB, IEEE 1394 or even IP.
HiTi’s 641PS supports such standard.

2005/12
1
Chap 4. Setup And Installation
Master CD Description
Q1: What’s included in the Master CD enclosed with the printer?
A:
With your purchase of a HiTi photo printer, you will find a Master CD, which will include a version of our
Photo Désirée image editing application (please note: The 640DL will have a version of our Minilab imaging
editing application software), printer drivers, a version of Adobe Acrobat Reader and a manual and user guide.
Q2: What is the best way to start with the Master CD installation?
A:
1. First of all, install the drivers for the printer (See “Driver installation” for complete details)
2. Next, install the Photo Désirée application for image editing (or Minilab)
3. If necessary, install the freeware “Adobe Acrobat reader” for pdf file support (The HiTi’s user manual
guide is saved in the pdf file format, thus make sure you have Adobe Acrobat reader installed)
4. Download the user manual guide for more details and further reference on printer and software operations.
Driver Installation- Windows
Q1: How do I install the driver?
A:
You may follow the instructions below to install the driver for your HiTi printer:
Before the driver is installed, please DO NOT connect the printer to the PC.
Windows 2000/ XP users should please log in as administrator.
Insert the Master CD into the DVD/CD drive. The software should start automatically and come up with an
installation menu. In case the Master CD did not run automatically (no menu shows up), please double click
“My Computer/ DVD/CD drive/ autorun” to start the installation menu.
Then, select to install the driver for your printer.
If you are using Windows 2000/ XP, a "Digital Signature Not Found-Unknown Software Package"
warning message will pop up. Please click "Yes" to continue.
If you are using Windows 2000/XP, select “No” when you see “Found New Hardware” dialog box which
indicates you to update from “Windows Update” page.
At the end of installation, a message window will appear prompting you to connect the printer
with the PC to complete the installation. Then, please connect the USB cable between the printer
and PC to complete the installation.
Q2: What can I do if a "New Hardware Found" message window pops up before I install the driver?
A:
1. First, cancel the message window.
2. Then, disconnect the printer from your PC.
3. Last, start the driver installation.
If you keep getting the same error message, please contact HiTi’s Customer Service Department for further
assistance.
Q3: May I uninstall the driver? How may I proceed?
2005/12
1
A:
Yes, you may uninstall the printer driver as well. Please follow the instuctions stated below:
1. Disconnect the printer first.
2. Go to “Start Menu/ Settings/ Control Panel/ Add/Remove Programs”, and select to remove the driver for
your printer model.
3. Reboot the computer.
Q4: How do I reinstall the driver?
A:
1. Uninstall the driver first.
2. Reboot the computer.
3. Install the driver again.
Q5: How may I update the driver?
A:
1. You may download the latest driver on HiTi web site: www.hi-ti.com
2. Uninstall the old driver first. (See Q3 for un-installation instructions)
3. Reboot the computer.
4. Execute the downloaded driver to install.
Q6: What can I do if I see the error message “The decompression of %s failed. There may not be enough free
disk space available in the TEMP directory” during installation?
A:
1. Please delete all files in the “Windows/ Temp folder”.
2. If you are using Windows 2000, please delete all files in the “WinNT/ Temp folder”.
3. Reinstall the driver.
If you continue to have problems with this, please contact HiTi’s Customer Service Department for further
assistance.
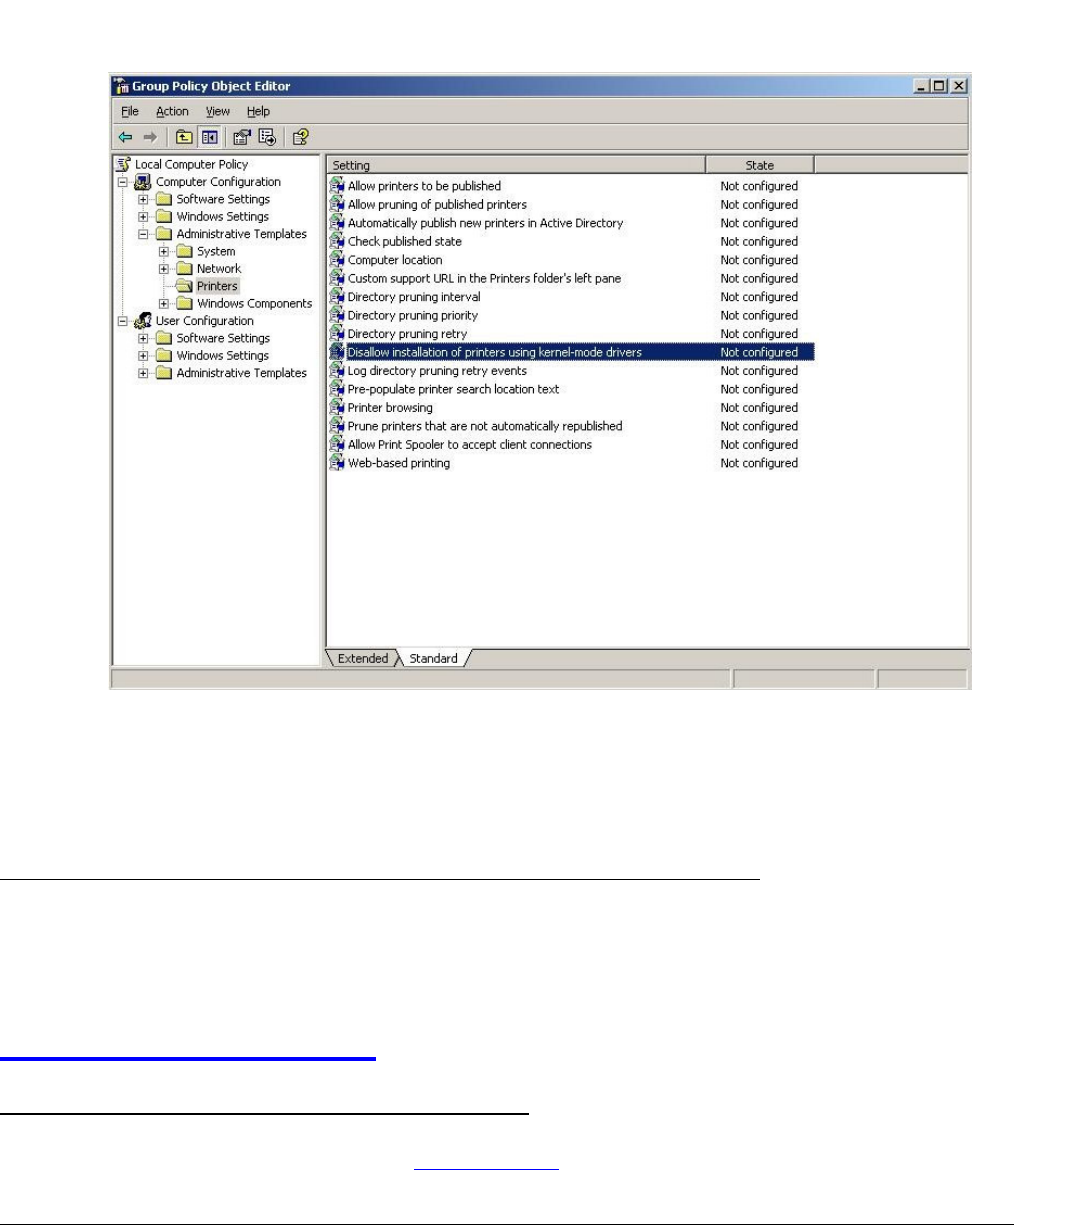
Q7: How do I install the HiTi printer driver on Windows 2003 Server if my driver version is released before
2004/3/3?
A:
Please follow the steps below to install the driver:
While in Windows 2003 Server environment, please go to “Start Menu/ Run/ key in “gpedit.msc”, then
click “ok” to proceed.
While in the window of “Group Policy Object Editor”, please follow the path “Local Computer Policy/
Computer Configuration/ Administrator Templates/ Printers”, then double click on “Disallow installation of
printers using kernel-mode drivers”, and then change its setting to “disable”. (See the image below for reference)
2005/12
1
Finally, follow the recommended procedures to install the driver for your HiTi printer.
Note:
HiTi's printer driver supports Windows 2003 Server since the version released after 2004/3/3.
Q8: Can I install or update driver from Windows Update in Windows XP SP2?
A:
No. HiTi doesn’t offer driver to Windows, so you cannot update or install driver from “Windows Update” page.
Please select “No” when you see “Found New Hardware” dialog box to precede the printer installation.
Driver Installation- Mac
Q1: Where can I find the driver for my Mac computer?
A:
You may download it from HiTi websites: www.hi-ti.com
Q2: What are the procedures that I need to know before installing the printer driver on a MAC computer?
A:
Please note:
1. The driver can only be installed on the system hard drive, instead of any other partition drive.
2. A Mac computer will not detect new hardware like a PC does.
3. Drivers installed on the Mac system cannot be uninstalled, but only to be upgraded.
4. The printer will not be ready for use yet after the driver installation. You need to add the selected
printer in the “print center”.

2005/12
1
5. The printer name shown in “print center” is upon the default name of that printer, not according to the
driver.
6. When installing the driver, please make sure you log into the system as “administrator” or as any
regular user with administrator authorities. A message window will appear prompting for an
administrator id and password.
Q3: Does your Mac driver support the color match function?
A:
So far our Mac driver does not yet support color match by using the profile with Color sync.
There is no problem with this profile, and *.icc & *.icm are both color profile names. You are able to use color
profiles by using Photoshop in Mac:
1. Copy the HiTi Profile in: ...\Adobe\Color\Profiles
2. Open Photoshop and load an image
3. Manu: Image ->Mode->Convert to Profile->Destination Space (select HiTechpa.icm)
Q4: Does your Mac driver support the 630PL?
A:
A: No. HiTi does not offer Mac driver for the 630PL. If you want to print using Linux, please purchase any of
the other outstanding HiTi printers.
Q5: Does your Mac driver support the 640Amphi?
A:
A: No. HiTi does not offer Mac driver for the 640Amphi. If you want to print using Linux, please purchase any
of the other outstanding HiTi printers.
Q6: What OS versions HiTi’s Mac driver supports?
A:
Mac OS 10.2 and 10.3.
Driver Installation- Linux
Q1: Where can I find the driver for my Linux computer?
A: You may download it from the following HiTi website: www.hi-ti.com
Q2: Does the 630PL print under Linux?
A: No. HiTi does not offer Linux driver for the 630PL. If you want to print using Linux, please purchase any of
the other outstanding HiTi printers.
Application Installation
Q1: What application can I use for image editing?
A:
You may install HiTi PhotoDésirée program for image editing:
1. Insert the Master CD, and select “Photo Désirée” to install.
2. Upon installation, select the language you wish to install the program and proceed.
3. The installation will guide you through the rest of the process step by step, when finished, you may click on
the icon shown on the desktop to start using the program for image editing.
2005/12
2
Q2: May I un-install PhotoDésirée as well?
A:
Yes, you may also un-install the program. Just follow the instructions below:
“Start Menu/ Programs/ HiTi/ Photo Désirée/ Uninstall PhotDésirée”.
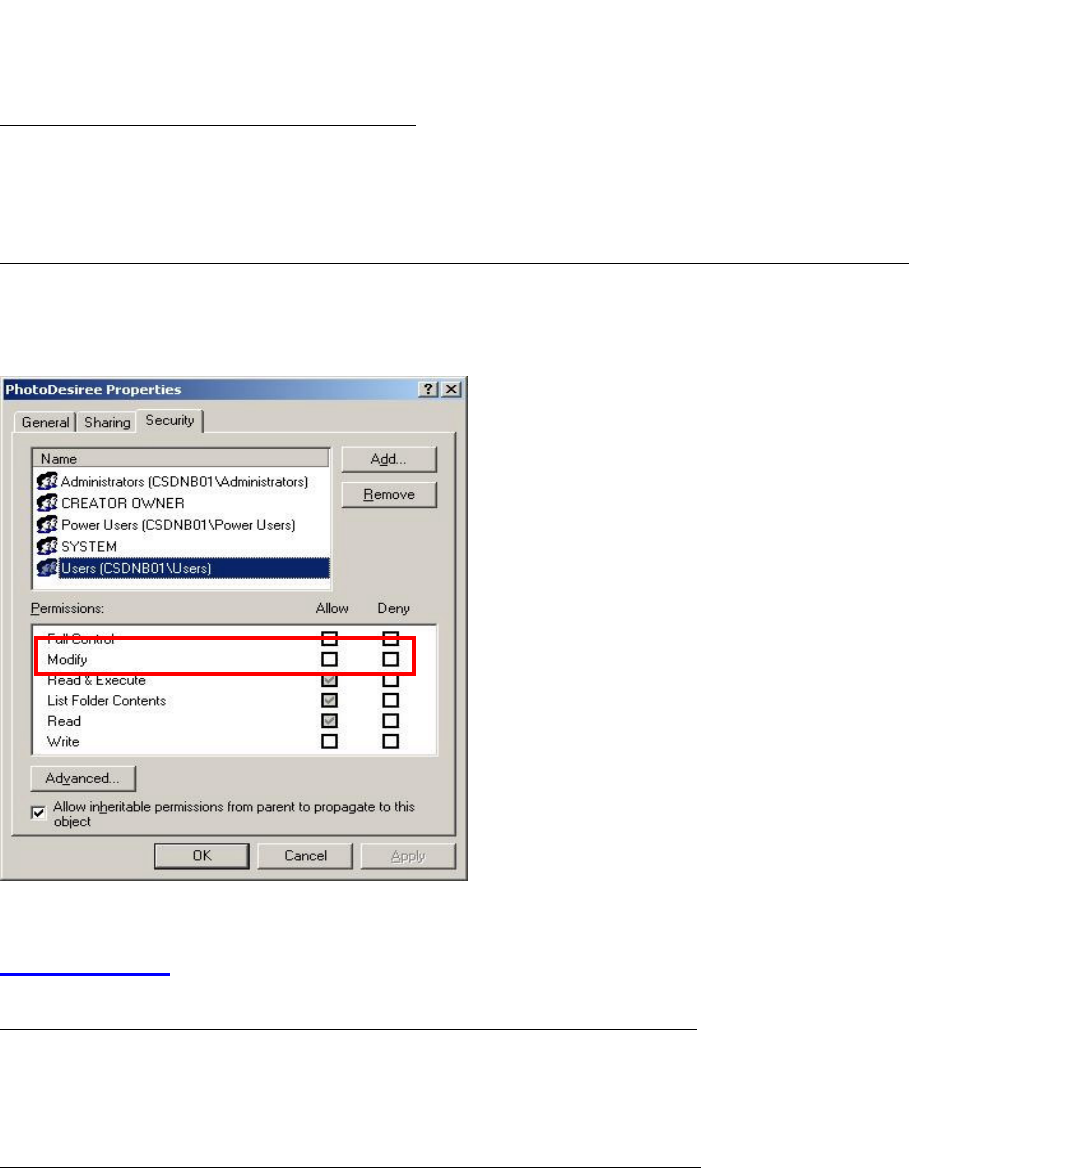
Q3: How can I use PhotoDésirée if not logged in as an “administrator” in Windows 2000/XP ?
A:
Because some files will be written in the folder “Photo Désirée” during the process, please login as a local
administrator, and go to the folder “Photo Désirée” (C:\Program Files\hiti or the location you installed Photo
Désirée into ) to check the permission “Modify” for whom you would like to share with:
Downloads
Q1: What can I do if I want to update the firmware on my photo printer?
A:
Please download the firmware from the HiTi web site and follow the instructions in the ReadMe.txt. (Note: The
firmware of 630PL is embedded inside the driver. Thus, you may simply just update the driver to renew it.)
Q2: How can I update printer’s firmware if my computer OS is Mac 9.x?
A:
HiTi’s Mac driver doesn’t support Mac 9.x so you will need to update printer’s firmware via your memory card.
Simply follow instructions below to update your printer.
1. Format your memory card (Remember to save all files to your Mac from the memory card.).
2. Create a new folder to the memory card, and name it as hiti_psl.
3. Save downloaded file- flash.rom into hiti_psl folder.
4. Insert the memory card into the printer. (Don't connect the printer to Mac.)
5. Execute "Firmware Update" function from LCD remote controller "Setup" page.
Please contact HiTi Service Department for further assistance.

2005/12
2
Q3: How come the Help file is not able to read after downloading and reinstallatiing driver?
A: The downloadable driver has no Help file included. You may download User Manual file from our website
for operation description.
Q4: Are there any extra image templates for my PhotoDésirée image editing?
A:
Yes, you may download extra templates at the HiTi websites below: www.hi-ti.com
(See FAQ: “Software Operation/Image Templates” for more details on installation procedures)
Q5: Does HiTi provide any special utilities for image editing?
A:
Yes, you may download special utility tools at the HiTi websites below: www.hi-ti.com
1. Calendar Désirée: It is a professional calendar creating application developed by HiTi to make a
personalized and wonderful calendar in a few minutes. It can only be used with HiTi photo printers.
2. Adjustor: It is a software tool, which will adjust parameters of printing effects and save the settings as a
driver default, only for HiTi Photo Printer Series. It is developed with a user-friendly interface for image editing,
where users can modify color, brightness, contrast and sharpness very easily by moving the control bar or
entering a number for adjusting. Additionally, the modification can be directly shown and previewed in the
window.
Q6: Where can I download MugDésirée?
A:
Simply go to http://www.hi-ti.com/english/support/index.asp.
Software:
Step 1: Personality Products (Windows).
Step 2: Mug Heat Press Kit.
Q7: Where can I download Silhouette?
A:
Simply go to http://www.hi-ti.com/english/support/index.asp.
Software:
Step 1: Personality Products (Windows).
Step 2: Cutting Machine.
Q8: I tried to download more templates into my PhotoDésirée. But when I go to the template folder, I found the
download item is an application file, when I click to open it, a message box appears with the followings: 16 bit
windows subsystem: C/Windows/system32/AUTOEXEC.NT. The system file is not suitable for running MS-
DOS and Microsoft windows application. Choose "close" to terminate the application. How can I do?
A:
The error you are getting is not necessarily related to the shell.dll error, although they both have the same root
cause. Something deleted a file on your computer. As was true of the shell.dll error, all you need to do to fix it
is replace that file. In this case, the error complained about a missing autoexec.nt, which it wanted to find in
c:''windows''system32. One quick fix is to copy that file from the i386 directory on your computer to the
c:''windows''system32 directory (or for Windows 2000, it is c:''winnt''system32). Sometimes, we see that
someone does not have the i386 directory. It is for those people that we created the XP_FIX.EXE that appears
on our download page. The fix is not really for our software. It is based entirely on the error message and how
Microsoft tells people how to fix it. Here is Microsoft’s memo.
http://support.microsoft.com/default.aspx?scid=kb;en-us;305521 You can follow the steps they outline if you do
not have the i386 directory on your hard drive (although it would be easier to just copy the file you need from
2005/12
2
another computer onto a disk or CD then from that disk or CD to c:''windows''system32 or c:''winnt''system32)
or use our fix.
There is another type of 16 bit subsystem error that requires registry editing. It is not the error you are getting,
but I will mention it here in case someone does a search on our forum for "16 bit subsystem." Be careful if you
are not familiar with registry editing. A mistake can cause your computer not to start. Here is Microsoft’s memo
on that type of 16 bit subsystem error. http://support.microsoft.com/default.aspx?scid=kb;en-us;314452
Chap 5. Operation
Software Operation
PhotoDésirée 1
Q1: What are the display configurations required for PhotoDésirée?
A:
The screen resolution must be over 800x600 pixels and the color setting should be set to high-color or above
(16-bit or higher).
Q2: Where can I add images from?
A:
1. Click ”Add images” to add images from your computer.
2. From a scanner or a digital camera, use the “Twain” interface by clicking on the “Twain” button.
3. From a memory card.
4. From DPOF.
5. From the HiTi album.
Q3: What type of paper or sheets are available for the HiTi Photo Printer?
A: Standard HiTi photo paper (size 4x6), HiTi 4x4 sticker sheets and HiTi 4/2/4 sticker sheets.
Q4: What combination of photo sizes can I print on the standard photo paper?
A:
1. Picture1x1, 1x2 and 2x1.
2. Credit Card Photo1x2 and 2x1.
3. ID 1 Inch1x12, 2x6, 3x4, 4x3, 6x2 and12x1.
4. ID 2 Inch1x8, 2x4, 4x2 and 8x1.
5. Business card1x2, 2x1, 1x3 and 3x1.
6. Bookmarker1x2, 2x1, 1x4, 2x2 and 4x1.
7. Cute Square1x6, 2x3, 3x2 and 6x1.
8. 50mm x 70mm1x2 and 2x1.
9. 35mm x 45mm1x8, 2x4, 4x2 and 8x1.
10. 40mm x 50mm1x4, 2x2 and 4x1.
11. 30mm x 40mm1x9, 3x3 and 9x1.
12. 25mm x 30mm1x15, 3x5, 5x3 and 15x1.
13. 35mm x 50mm1x8, 2x4, 4x2 and 8x1.
14. 25mm x 35mm1x12, 2x6, 3x4, 4x3, 6x2 and 12x1.
2005/12
2
15. 35mm x 35mm1x8, 2x4, 4x2 and 8x1.
16. ID 2 Inch(USA)1x2 and 2x1.
17. Mobile Phone P-GD681x2 and 2x1.
Q5: What combination of photo sizes can I print on a 4x4 sticker sheet?
A:
1x16, 2x8, 4x4, 8x2 and 16x1.
A6: What combination of photo sizes can I print on a 4/2/4 sticker sheet?
A:
2x4+1x2, 4x2+1x2 and 8x1+2x1.
Q7: What can I do if my picture is smaller than the blank montage?
A:
You can adjust your picture by using “Fit to Height”, “Fit to Width” or go into ImagEnhancer and use Manual
Scaling.
Q8: How do I edit the image?
A:
1. Use ”ImagEnhancer” to adjust the image (you can right-click the image to choose it or click the
ImagEnhancer button on the right menu).
2. You can also use ”Edit with External Editor” to edit your image. After clicking it, an option screen will pop
up and show you the external photo editors you have installed on your system which will be available for use.
(Note: only image editors compatible with Photo Désirée will be displayed)
Q9: Can I save an image after editing?
A:
You can click ”Export Collage” to save the edited image. You can save it as an *.htf file, *.jpg file, *.bmp file,
*.tif file, *.pcx file, *.png file and *.tga file.
Q10: Can I add text to the image?
A:
Yes. Click ”ImagEnhancer/ Add text” to edit and add text to your picture.
Q11: Why does the text on the picture have a shadow?
A:
The shadow is the background of the text. Click ”ImagEnhancer/Add text”. Drag the slider to adjust the
brightness of the background. You can adjust the brightness between 0% to 100%. If you set it to 0%, it will
become completely black. If you set it to 100%, there will be no color. The color of the background can also be
adjusted by clicking ”ImagEnhancer/ Add text/ Background”.
Q12: How do I adjust the size of the text
A:
Clicking on the text will cause a box to appear around it. By dragging the surrounding box, you can adjust the
size of the text.
Q13: What is the purpose of the paper type buttons in the queue area?
A:
It is more convenient to batch print jobs of the same paper type together so that you will not need to switch back
and forth between prints, but only once after one paper type is done printing.

2005/12
2
Q14: What file format is used to store my photo album in Photo Désirée?
A:
It is an *.htf file. This is a specific format designed by Hi-Touch Imaging Technologies. It is currently
compliant with Photo Désirée only.
Q15: How do I print a specific image from the printing queue?
A:
Click on the picture you wish to print (the image will then be surrounded by a thin colored box). Then click the
print button. If you want to print some images but not all the images in the queue, hold the Ctrl key on your
keyboard while clicking on the images you want to print (each image should be highlighted by the same colored
box as you click on them). You can now click the print button to print your selected images.
Q16: How to update PhotoDésirée?
A:
You can update Photo Désirée by downloading the latest version.
Please visit HiTi’s website: www.hi-ti.com
Q17: What is MiraBella?
A:
By selecting MiraBella, you are given 9 separate versions of your image to choose from. Each of these 9 images
has different settings for various attributes including contrast, brightness, color, etc.
Q18: What is Magic Coating?
A:
”Overcoat” is the name we give the protective overcoat layer that is placed on the final printout of the photo. It
protects the image from fading, UV rays, water damage and other harmful exposures. This provides a longevity
that cannot be found in many other photo printing solutions. “Magic Coating” is a kind of overcoat. (It can let
overcoat have various textures when you execute “Magic Coating”.) Except for those coating templates, you
also can make your images to be the textures for your printouts.
Q19: What can I do if I encounter "??? e:\Test2.RAW" problem?
A:
This problem happens upon PhotoDésirée version 1.2 when you try to edit text inside ImagEnhancer function.
Please download and update to the latest version to overcome this problem.
Q20: What combination of photo sizes can I print on a 1x1 sticker sheet?
A: 1x1.
Q21: Can I print a photo with a date on it, and how?
A:
Yes. PhotoDésirée supports this function of printing the date in EXIF since version 1.14. To verify whether the
Digital Still Camera supports EXIF or not, please contact the DSC manufacturer. To print a date on the photo,
please kindly refer to the instructions below:
1. Stand-alone mode: (HiTi 640PS only)
On the LCD controller, select "Setup/ Printer Settings" and turn on "Date Print". After this, you have to
select OK and press OK to save your setting.
2. PC mode: (all models)
Use the latest version of PhotoDésirée, which can be downloaded at: www.hi-ti.com
In PhotoDésirée, please refer to the graph below for more details:

2005/12
2
(1) Add the image file in zone 1.
(2) Click on the check box above the "Add Exif Information" button (E-i). Click on the E-i button to change the
color of date content. (Zone 2)
(3) Click on the button (marked with 3) under E-i button to add the image into zone 4.
(4) Follow the normal printing flow to print, then you can get a dated printout.
No matter which mode you choose to print a dated photo, the essential prerequisite to get a date printed on the
photo is that the image must be taken with EXIF.
Q22: Why can’t I adjust the sharpness to the left in ImagEnhancer?
A:
Basically, sharpness is quite different from either brightness or contrast. Sharpness cannot be adjusted to the left
(negative) because it is set at zero by default. Due to the fact that sharpness might damage some details in the
images, it is defaulted at less than 50% intensity for adjustments.
Q23: Can I transfer albums from PhotoDésirée1 to PhotoDésirée2?
A:
Yes. You may adapt HiTi’s Format Converter to implement it.
PhotoDésirée 2
Q1: What is Magic Coating
A:
"Overcoat" is the name we give the protective overcoat layer that is placed on the final printout of the photo. It
protects the image from fading by UV rays, water damage, and other harmful exposures. This provides a

2005/12
2
longevity that cannot be matched by many other photo printing solutions. "Magic Coating" is a kind of overcoat.
It allows you to make the overcoat have versatile textures when you enable the "Magic Coating" function.
Except coating templates already provided by us, you can also make your images become the textures for your
printouts.
Q2: Am I able to print a picture with a date
A:
Yes. PhotoDésirée 2 supports this function of printing the date in EXIF. If you want to know whether or not
your Digital Still Camera supports EXIF, please contact the manufacturer of your camera.
Q3: What is 9 Grid
A:
When selecting 9 Grid, you are given 9 separate versions of your image. Each of these 9 images has different
settings for various attributes including contrast, brightness, color, etc. You can now choose the version you like
most and print it accordingly. Please note, in case you used an older version of PhotoDésirée before, this
function was called MiraBella.
Q4: How to update PhotoDésirée 2
A:
You can update PhotoDésirée 2 from the web. Simply visit our web site at www.hi-ti.com, choose your location
or enter the HiTi global site and then go to the download section. That way you can be assured that you always
have the latest version on your computer.
Q5: Can I save an image after editing
A:
Yes, you can save them into a HiTi album by clicking on “Save Album”.
Q6What combinations of photo sizes can I print on the standard photo paper if using PhotoDésirée 2
A:
6x4inch (10cm x 15cm)
1. Photo Picture: 1x1, 1x2 and 2x1.
2. Credit Card Photo: 1x2 and 2x1.
3. ID 1 Inch: 1x12, 2x6, 3x4, 4x3, 6x2 and 12x1.
4. ID 2 Inch: 1x8, 2x4, 4x2 and 8x1.
5. Business card: 1x2, 2x1, 1x3 and 3x1.
6. Bookmarker: 1x2, 2x1, 1x4, 2x2 and 4x1.
7. Cute Square: 1x6, 2x3, 3x2 and 6x1.
8. 50mm x 70mm: 1x2 and 2x1.
9. 35mm x 45mm: 1x8, 2x4, 4x2 and 8x1.
10. 40mm x 50mm: 1x4, 2x2 and 4x1.
11. 30mm x 40mm: 1x9, 3x3 and 9x1.
12. 25mm x 30mm: 1x15, 3x5, 5x3 and 15x1.
13. 35mm x 50mm: 1x8, 2x4, 4x2 and 8x1.
14. 25mm x 35mm: 1x12, 2x6, 3x4, 4x3, 6x2 and 12x1.
15. 35mm x 35mm: 1x8, 2x4, 4x2 and 8x1.
5x7inch (13cm x 18cm)
1. Photo Picture: 1x1

2005/12
2
6x8inch (15cm x 20cm)
1. Photo Picture: 1X1
2. Bookmarker: 1x2, 2x1, 1x4, 2x2 and 4x1.
HiTi CD
1. S4x4: 2x1+1x1
In addition:
1. 4x6inch Stickers: 1x1
2. 5x7inch Stickers: 1x1
3. 6x8inch Stickers: 1x1
4. 4x6inch Stickers: 1 unit, 4 units, 9 units, 16 units
Q7: What types of paper or sheets are available for HiTi Photo Printers if using PhotoDésirée 2
A:
Photo paper kit (size: 4x6inch), 4x4 sticker sheets and 4/2/4 sticker sheets.
Photo paper kit (size: 5x7inch)
Photo paper kit (size: 6x8inch)
Q8: Where and how can I add images
A:
1. Click "Add images" to add images from your computer.
2. From scanner or digital camera, use the "Twain" interface by clicking on the "Twain" button.
3. From memory card.
4. From the HiTi album.
Q9: Can I add text to an image
A:
Click the “T” Icon from Icon bar. Now you can add text to your picture.
Q10: I cannot find the Text field in my PhotoDésirée 2 Why not
A:
In order to get the text field, you need to click on the “T” icon from above and keep your left mouse button
pressed on the icon if you are using PhotoDésirée 2.0. An extra icon bar will appear which will let you choose
from different functions. At this point you can choose the Text Icon and proceed with your intentions. (Since
version 2.2.5.6, HiTi modified the user interface of PhotoDésirée 2. The new version is more friendly and easier
to use.)
Q11: I have a 630PS and now a 730PS. Why can I not use PhotoDésirée 2 with my 630PS
A:
PhotoDésirée 2.0 only supports the 730 Series printers. PhotoDésirée 2.1 is already to support other printers.
Please download the new version from our web page (i.e.: www.hi-ti.com).
Q12: I cannot find the icons you talk about. Why not and where are they
A:
To get the icons you need to click on any icon on the icon bar located on the right hand side if you are using
PhotoDésirée 2.0. In order to view the icons you need to keep your left mouse button pressed on the main icon.
Now an extra icon bar will appear, which will give you access to more functions. At this point you can choose
the Icon you need. (Since version 2.2.5.6, HiTi modified the user interface of PhotoDésirée 2. The new version
is more friendly and easier to use.)

2005/12
2
Q13: How to use Icon bar
A:
Place your mouse cursor on an Icon if you are using PhotoDésirée 2.0. In this example the mouse button is
placed on the T for Text Icon. Keep the left button pressed. An extra task bar will appear that will give you
access to more functions. (Since version 2.2.5.6, HiTi modified the user interface of PhotoDésirée 2. The new
version is more friendly and easier to use.)
Q14: What is the minimum display configurations required for PhotoDésirée 2
A:
The screen resolution must be over 800x600 pixels and the color setting should be set to high-color or above
(16-bit or higher). (Note: in Windows XP the pre-set minimum resolution is already 800X600.)
Q15: How do I close PhotoDésirée 2
A:
The 3 ways to close PhotoDesiree 2 are listed below:
1. Left click on the X located on the right hand corner of the Graphical User Interface.
2. Left click on the top left hand corner and close the window by left clicking on Close
3. Use keys: ALT + F4 to close PhotoDesiree.
Q16: What combination of photo sizes can I print on a 4x4 sticker sheet
A:
1x16, 2x8, 4x4, 8x2 and 16x1
Q17: PhotoDésirée 2 is too big. I cannot use my desktop any more. How can I get to my desktop and use other
programs
A:
The 3 ways are listed below:
1. You can switch between applications by simultaneously pressing TAB+ALT on your keyboard.
2. You can minimize the PhotoDesiree application by clicking on the minimize button on the top right corner
of the User Interface.
3. You can minimize PhotoDesiree 2 by quickly double clicking the top bar frame.
Q18: How do I print a specific image from the printing queue
A:
Click on the picture you wish to print (the image will be then surrounded by a blue background). Then click the
print button. If you want to print some images but not all the images in the queue, hold the Ctrl key on your
keyboard while clicking on the images you want to print (each image should be highlighted by the same blue
background as you click on them). You can now click the print button to print your selected images.
Q19: What can I do if my picture is smaller than the blank montage
A:
You can adjust your picture by using "Fit to Height", "Fit to Width"
Click on the second Icon from above and remain on the icon until the following task bar appears.
Now you can adjust the size of you image.
Q20: How to use PhotoDésirée 2 in Windows 2000/ XP without administrator privilege to login system
A:

2005/12
2
Because some files will be written in the folder "PhotoDesiree", please login as a administrator, and go to the
folder "PhotoDesiree" (C:\Program Files\hiti or any your indicated location). Now you can give permissions
(open option: "Modify") to users who share the desktop.
Q21: What file format is used to store my photo album in PhotoDésirée 2
A:
I is a *.hta file. This is a specific format designed by HiTi. It is currently compliant with PhotoDésirée 2 only.
Q22: What is the purpose of the paper type buttons in the queue area
A:
It is more convenient to batch print jobs of the same paper type together so that you will not need to switch back
and forth between prints, but only once after one paper type is done printing
Q23: What combinations of photo sizes can I print on a 4/2/4 sticker sheet if using PhotoDésirée 2
A:
2x4'1x2, 4x2'1x2 and 8x1'2x1.
Q24: I have PhotoDésirée 2. Is there a PhotoDésirée 1
A:
Yes, but the 730 Series of printers requires PhotoDésirée 2. If you own one of the 630 or 640 Series printer,
PhotoDesiree 1, will be part of the package for these printers. And it is also available to download at our
website.
Q25: How come the user interface of my PhotoDésirée 2 is totally different as what you mentioned above
A:
Since version 2.2.5.6, HiTi modified the user interface of PhotoDésirée 2. The new version is more friendly and
easier to use.
Mr. Photo
Q1: What can I do if I encounter some problems in the bundled software- “PrestoMr. Photo 3.1”
A:
1. NewSoft announces that Mr. Photo 3.1 does not support Windows XP. If you encounter this problem, please
contact HiTi Customer Service Department for help.
2. If you have other problems about operation or installation, please contact NewSoft Technology for technical
support. NewSoft Customer Service Department: support@newsoft.com.tw or tech@newsoft.eu.com
Q2: Where can I find the User’s Manual for the software “Presto! Mr.Photo 3” that comes with
the printer ?
A:
Under the path, "Start/ Program/ Presto! Mr.Photo3", you can find the user’s manual as a PDF file.
Q3: Why don’t I have the bundled software- “PrestoMr. Photo 3.1 or 3.2”?
A:
Since the release of Master CD version 2.7, “Presto! Mr. Photo 3.1 or 3.2” will not be bundled with HiTi
Printers.

2005/12
3
Adjustor
Q1: Where can I get the Adjustor’s “Help” file?
A:
Please download it from the HiTi website:
http://www.hi-ti.com/english
Q2: My trial version of adjustor has expired, what should I do?
A:
Adjustor has been released for free download now, so please visit the HiTi website to download the full version:
http://www.hi-ti.com/english
Q3: I’m using Mac. Does HiTi offer such tool on Mac?
A:
Yes. HiTi offered such tool since Mac driver version 2.4 released.
Q4: Where can I get such tool?
A:
1. You can download it from HiTi’s web site: www.hi-ti.com
2. It is located inside driver’s tool of some HiTi printers. You may execute it from “Start Menu/ Settings/
Printers/ HiTi USB Photo Printer/ Properties/ Printing Preference/ Advanced Tool/ Advanced Color Setting”.
IDésirée
Q1: Where can I get the IDésirée’s “Help” file?
A:
Please download it from the HiTi website: http://www.hi-ti.com/english
Q2: My trial version of IDésirée
has expired, what should I do?
A:

2005/12
3
You will need to purchase the official version. Please contact our authorized distributor for further information.
Q3: Can I create self-designed photo sizes or blocks via IDésirée?
A:
Yes. User’s Define function can let you decide photo sizes and blocks by yourself.
MugDésirée
Q1: Why the printout for mug transfer still has overcoat?
A:
1. If you are using 630PL, please make sure the driver version you are using is v2.6 or above.
2. If you are using 630PS, please make sure the driver version you are using is v2.6 or above.
3. If you are using 640DL, please make sure the driver version you are using is v2.2 or above.
4. If you are using 640PS, please make sure the driver version you are using is v2.0 or above.
5. If you are using PhotoShuttle, please make sure the driver version you are using is v2.0 or above.
6. If you are using Transphotable, please make sure the driver version you are using is v2.0 or above.
HiTi web site: www.hi-ti.com
Q2: Why cannot I use the
MugDésirée program downloaded from HiTi Website?
A:
The program on the HiTi Website is a kind of service pack. It is for upgrade only. The main program is not
included in it, and the main program is bundled with the mug machine only.
Q3: My MugDésirée has expired, where can I get an official version?
A:
You can get it from HiTi’s web site: www.hi-ti.com
GalaDésirée
Q1: What is GalaDésirée?
A:
GalaDésirée is an Application. GalaDésirée allows you to create template files, save them on a memory card
and then use the HiTi 640Gala to print these templates in the standalone mode. (Before creating template files,
you will need to develop an e-frame image and an e-frame mask with another AP, for instance, PhotoShop or
PhotoImpact.)
Q2: I have a HiTi Mug Machine. Can I use GalaDésirée and the 640Gala or 730Gala with the Mug Machine?
A:
640Gala and 730Gala support mug photo prints with template. That means you can apply the 640Gala or
730Gala to print photos with template for mug transfer. Simply Select HiTi 4x6 Mug Photo and print with your
640Gala or 730Gala. These print outs can now be transferred onto the mug machine.
Q3: What does standalone mean?
A:
Standalone means without a pc. Many HiTi printers are able to print with or without a pc. GalaDésirée is
designed to create templates for the 640Gala or 730Gala. It enables user to print photo with template in the
standalone mode.
2005/12
3
Q4: What is the minimum display configurations required for GalaDésirée?
A: The screen resolution must be over 800x600 pixels and the color setting should be set to high-color or above
(16-bit or higher). (Note: in Windows XP the pre-set minimum resolution is already 800X600.)
Q5: Can I add text to an image?
A:
Since version 1.1.3.11, GalaDésirée starts giving you this function. If your GalaDésirée doesn’t offer this
function, please download it from our website. www.hi-ti.com
Q6: How to use GalaDésirée in Windows 2000/ XP without administrator privilege?
A:
Because some files will be written into the folder "GalaDesiree", please login as an administrator, and go to the
folder "GalaDesiree" (C:\Program Files\hiti or any of your indicated locations). Now you can give permissions
(open option: "Modify") to users who share the desktop.
Q7: Do I need a memory card to print the templates I created from GalaDésirée?
A:
Yes. Created templates need to be saved on your hard disk or onto a memory card. If you want to print
templates from your 640Gala or 730Gala, you need a memory card.
Q8: What file format is used to store my photo album in GalaDésirée?
A:
(1) It is an *.H4A, *.H4B, *.H4C, *.H4D or *.H4E file. These are specific formats designed by HiTi. It is
currently compliant with GalaDésirée and the 640Gala.
(2) It is an *.H3A, *.H3B, *.H3C, *.H3D or *.H3E file. These are specific formats designed by HiTi. It is
currently compliant with GalaDésirée and the 730Gala.
Q9: What are templates?
A:
Templates are pre-made images you can combine with your pictures. HiTi provides templates free for download
from the HiTi web page. For example: you can download templates for birthdays, weddings etc. or seasonal
templates that will allow you to make Christmas Cards, Halloween Cards or New Year Cards.
Q10: How do I set up a GalaDésirée Template?
A:
1. To open the e-frame image. Select the picture you have created before hand.
2. Open the e-frame mask. Select the picture you have created before hand.
3. In case you intend to have a watermark image on your template, click on ‘open watermark image’ and insert
a watermark image. (It is the picture you have created before hand.)
4. Now you can preview the layout of your template. (Please note that photos are added later).
5. The picture would look like that: (The smiley face indicates the area your picture would be located in).
Q11: Can I move the position of where my template is located?
A:
Yes you can. Just click with the mouse on the template area, keep the left mouse button pressed and drag the
template around.
Q12: What can I do with the options located above the picture?
A:

2005/12
3
These are extra options you can use.
1. Landscape: Turns the template to landscape.
2. Portrait: Turns the template to portrait.
3. The e-frame image: Previews e-frame image.
4. The e-frame mask layer: Previews e-frame mask.
5. The e-frame preview layer: Combines e-frame image and e-frame mask to preview.
Q13: What are the options at the right of the GalaDésirée Graphical User Interface for?
A:
1. View image location: When clicked this feature allows you to view the location of the image. You can still
change the size and location of the image itself.
2. Lock image location: When clicked this feature locks the location of the image. You are now not able to
change the size and location of the image itself.
3. If you click on add image location (both: view image location and lock image location needs to be clicked)
you can adjust the location of where the image needs to be printed.
Q14: What are the commands/options at the bottom for?
A:
Check out the location of the commands/options.
1. Fit to width: makes the image the entire width of the paper.
2. Fit to height: makes the image the entire height of the paper.
3. Original Size: Returns to the original size (in case the size was changed).
4. Resize: Allows you to resize the picture.
5. Shape Location of Sticker: Allows you to apply customized picture to create sticker templates.
Q15: Will there be new versions of GalaDésirée?
A:
We recommend that you keep visiting our web page (www.hi-ti.com) and check for software updates. By this
chance you can also see what is new in the HiTi world.
Q16: What *.H4A means?
A:
It is template file of HiTi 4x6 Photo for 640Gala.
Q17: What *.H4B means?
A:
It is template file of HiTi 4x6 Sticker 4/2/4 for 640Gala.
Q18: What *.H4C means?
A:
It is the template file of HiTi 4x6 Sticker 4x4 for 640Gala.
Q19: What *.H4D means?
A:
It is the template file of HiTi Mug Photo for 640Gala.
Q20: What *.H4E means?
A:
It is the template file of HiTi 4x6 Sticker 1x1 for 640Gala.

2005/12
3
Q21: What models GalaDésirée supports?
A:
640Gala and 730Gala.
Q22: What is the standard size of an e-frame image for 640Gala?
A:
1. HiTi 4x6 Photo: 2448 x 1632 pixels.
2. HiTi 4x6 Sticker 4/2/4: 2324 x 1632 pixels.
3. HiTi 4x6 Sticker 4x4: 2324 x 1632 pixels.
4. HiTi Mug Photo: 2316 x 1174 pixels.
5. Hiti 4x6 Sticker 1x1: 2324 x 1632 pixels.
Q23: What is the standard size of an e-frame mask for 640Gala?
A:
1. HiTi 4x6 Photo: 2448 x 1632 pixels.
2. HiTi 4x6 Sticker 4/2/4: 2324 x 1632 pixels.
3. HiTi 4x6 Sticker 4x4: 2324 x 1632 pixels.
4. HiTi Mug Photo: 2316 x 1174 pixels.
5. Hiti 4x6 Sticker 1x1: 2324 x 1632 pixels.
Q24: What is the stand size of watermark for 640Gala?
A:
2448 x 1664 pixels.
Q25: What is the standard size of an e-frame image for 730Gala?
A:
1. HiTi 4x6 Photo: 1224 x 1844 pixels.
2. HiTi 4x6 Sticker 4/2/4: 1224 x 1844 pixels.
3. HiTi 4x6 Sticker 4x4: 1224 x 1844 pixels.
4. HiTi 4x6 Mug Photo: 880 x 1746 pixels.
5. HiTi 4x6 Sticker 1x1: 1224 x 1844 pixels.
6. HiTi 5x7 Photo: 1544 x 2128 pixels.
7. HiTi 5x7 Sticker 1x1: 1544 x 2128 pixels.
8. HiTi 5x7 Sticker CD: 1544 x 21128 pixels.
9. HiTi 5x7 Mug Photo: 880 x 2044 pixels.
10. HiTi 6x8 Photo: 1844 x 2434 pixels.
11. HiTi 6x8 Sticker 1x1: 1844 x 2434 pixels.
Q26: What is the standard size of an e-frame mask for 730Gala?
A:
1. HiTi 4x6 Photo: 1224 x 1844 pixels.
2. HiTi 4x6 Sticker 4/2/4: 1224 x 1844 pixels.
3. HiTi 4x6 Sticker 4x4: 1224 x 1844 pixels.
4. HiTi 4x6 Mug Photo: 880 x 1746 pixels.
5. HiTi 4x6 Sticker 1x1: 1224 x 1844 pixels.
6. HiTi 5x7 Photo: 1544 x 2128 pixels.
7. HiTi 5x7 Sticker 1x1: 1544 x 2128 pixels.
8. HiTi 5x7 Sticker CD: 1544 x 21128 pixels.
9. HiTi 5x7 Mug Photo: 880 x 2044 pixels.
10. HiTi 6x8 Photo: 1844 x 2434 pixels.

2005/12
3
11. HiTi 6x8 Sticker 1x1: 1844 x 2434 pixels.
Q27: What is the stand size of watermark for 730Gala?
A:
1. HiTi 4x6 Photo: 1224 x 1844 pixels.
2. HiTi 4x6 Sticker 4/2/4: 1224 x 1844 pixels.
3. HiTi 4x6 Sticker 4x4: 1224 x 1844 pixels.
4. HiTi 4x6 Mug Photo: 880 x 1746 pixels.
5. HiTi 4x6 Sticker 1x1: 1224 x 1844 pixels.
6. HiTi 5x7 Photo: 1544 x 2128 pixels.
7. HiTi 5x7 Sticker 1x1: 1544 x 2128 pixels.
8. HiTi 5x7 Sticker CD: 1544 x 21128 pixels.
9. HiTi 5x7 Mug Photo: 880 x 2044 pixels.
10. HiTi 6x8 Photo: 1844 x 2434 pixels.
11. HiTi 6x8 Sticker 1x1: 1844 x 2434 pixels.
Q28: Can I create a multi-source e-frame for 640Gala?
A:
Yes. The printer firmware version 1.03 and GalaDésirée version 1.2.5.14 support “2 images in 1 e-frame”
feature.
Q29: Can I create a multi-source e-frame for 730Gala?
A:
Yes. The printer firmware version 1.03 and GalaDésirée version 1.2.6.15 support “2 images in 1 e-frame”
feature.
Q30: What *.H3A means?
A:
It is template file of HiTi 4x6 Photo for 730Gala.
Q31: What *.H3B means?
A:
It is template file of HiTi 4x6 Sticker 4/2/4 for 730Gala.
Q32: What *.H3C means?
A:
It is the template file of HiTi 4x6 Sticker 4x4 for 730Gala.
Q33: What *.H3D means?
A:
It is the template file of HiTi Mug Photo for 730Gala.
Q34: What *.H3E means?
A:
It is the template file of HiTi 4x6 Sticker 1x1 for 730Gala.
Q35: What *.H3F means?
A:
It is the template file of HiTi 5x7 Photo Paper 1x1 for 730Gala.
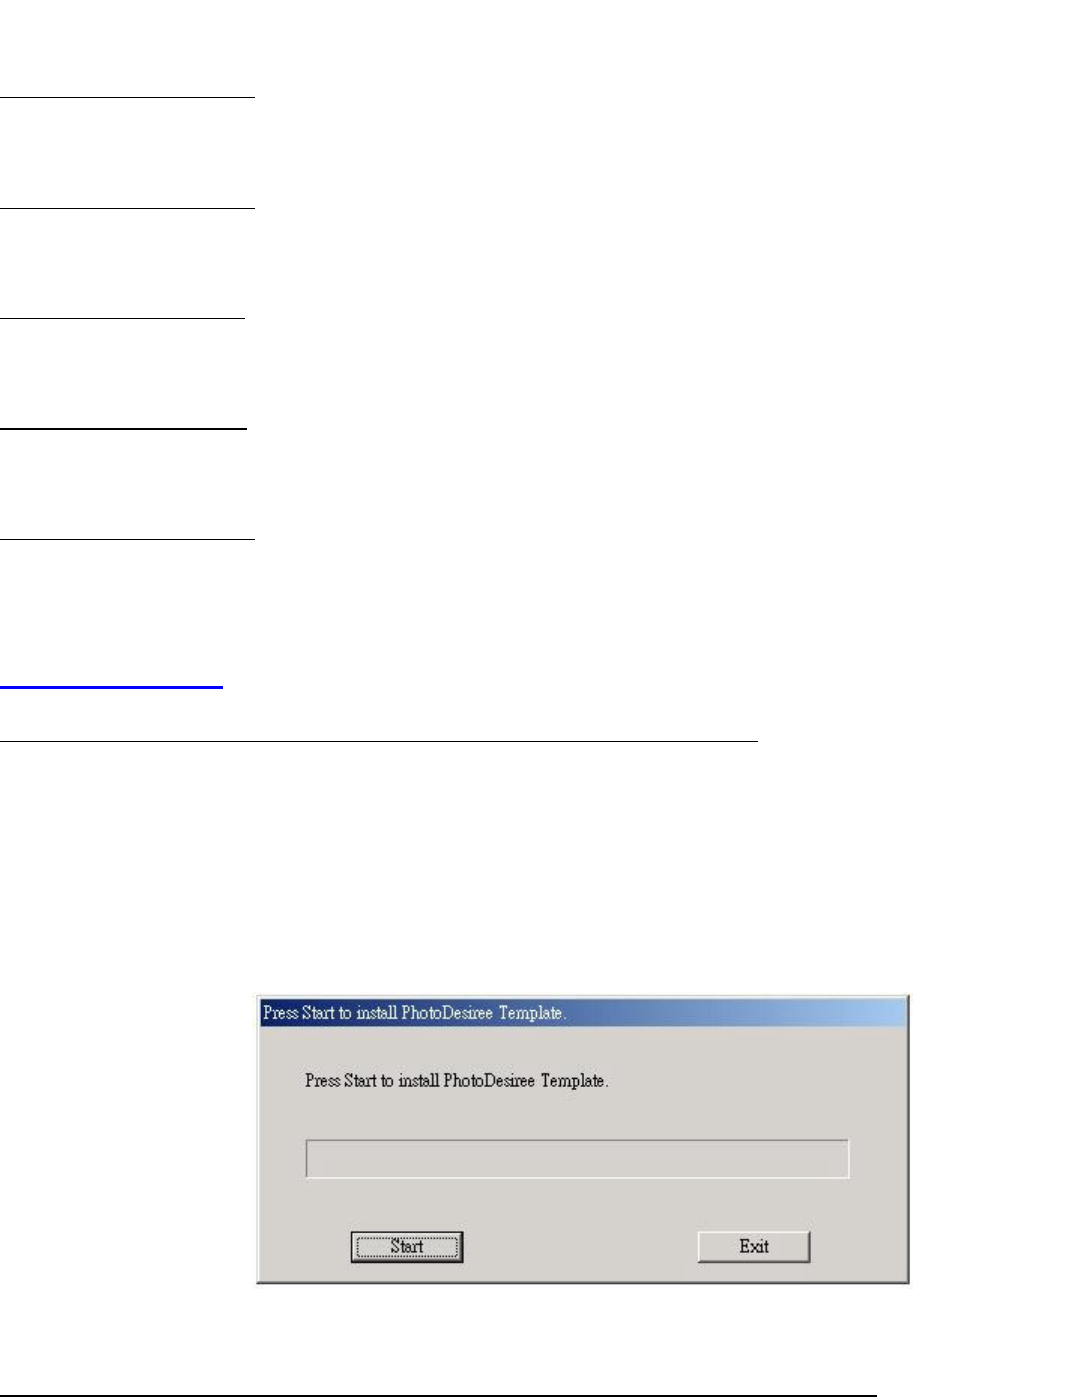
2005/12
3
Q36: What *.H3G means?
A:
It is the template file of HiTi 5x7 Sticker 1x1 for 730Gala.
Q37: What *.H3H means?
A:
It is the template file of HiTi 5x7 Sticker CD for 730Gala.
Q38: What *.H3I means?
A:
It is the template file of HiTi 5x7 Mug Photo for 730Gala.
Q39: What *.H3J means?
A:
It is the template file of HiTi 6x8 Photo Paper for 730Gala.
Q40: What *.H3K means?
A:
It is the template file of HiTi 6x8 Sticker 1x1 for 730Gala.
Image Template
Q1: How do I install the image templates I downloaded from the HiTi website:
A:
1. First, please make sure you have PhotoDésirée installed before you download the templates.
2. Please note that PhotoDésirée consists of three main parts. These parts are: The main program, template and
help. If you only have the main program on your computer, you will still need to install the templates.
3. Before you decide to download the templates, you may click verify the content of the template by clicking
on “preview”. Simply click “go” on the web page to start the template downloading process.
4. After you download the template, double click the “.exe” file to install it. A message window will appear
prompting for permission to install the template.
5. Click on “Yes” if you wish to proceed. Then another window will appear:
6. Just click on “Start” to complete the installation. Open PhotoDésirée, and find the downloaded templates in
“ImagEnhancer” for further image editing.
Q2: I’m using Mac. Can I install the image templates I downloaded from the HiTi website?
A:
No. PhotoDésirée 1 and PhotoDésirée 2 don’t support Mac now, so template files are useless to Mac.
2005/12
3
Mac iPhoto and iView
Q1: Why do I only get a portion of the picture on the printout with my Mac?
A:
Correcting the AP settings can solve this problem:
Take iPhoto 2.0 as example,
1. Go to: “File/ Page Setup" to select printer and "Paper Size" with "4x6".
2. See if preview is ok for printing.
If you haven't done step 1, iPhoto will use its own default paper size, so the preview of iPhoto still looks ok. But
when it starts to print, the printer driver will not receive the correct image data.
Q2: Why do I get an additional 1/8
th
to 1/4-inch border on 6” side of the photo when I print from iPhoto?
A:
It could be the problem caused by the printing settings of you Mac computer. For example, when using
iPhoto, before printing you need to set the settings as shown below:
1. Use "Constrain" to select 4x6 output size
2. Select the area to fit the 4x6
3. Click "Crop" button to get result image
4. Use “File/ Page Setup” to select printer and paper size
5. Use “File/ Print” to see the preview and print out
Q3: How can I use the Color Sync profile with my HiTi printer on my Mac?
A:
HiTi’s profile is based on sRGB style, and you can apply all kinds of sRGB Color Sync profiles to HiTi printers.
Because we don't apply this profile to translate color in the driver, you can select profile of input and output
device from photo editor applications.
Q4: Does HiTi provide CMS Color Sync profile for MAC?
A:
The CMS colorsync profile from MAC is similar to the ICC profile from PC, both of which can be provided by
HiTi. If necessary, please kindly contact HiTi Customer Service Department or your HiTi distributor for further
assistance.
Q5: Can I print stickers with HiTi printers on my Mac?
A:
HiTi printers support sticker printing with the latest driver. It supports 4x4 stickers, 4/2/4 stickers and 1x1
stickers. Please download the latest Mac driver from our website and update it to your Mac.
Q6: Why can’t I print a 5x7 or 6x8 with a 730PS on my Mac? It may show me the following error message:
"Ribbon type mismatch! If you select to ignore this warning you will get black and white output".
A:
Please make sure the following settings in Page Setup are enabled.
1. Settings: Page Attributes is selected. (HiTi does not support “Custom Paper Size”)
2. Format From: The correct printer model is selected.
3. Paper Size: The correct paper size and type is selected.
Q7: Why is the image not clear in the preview window of iView?
A:
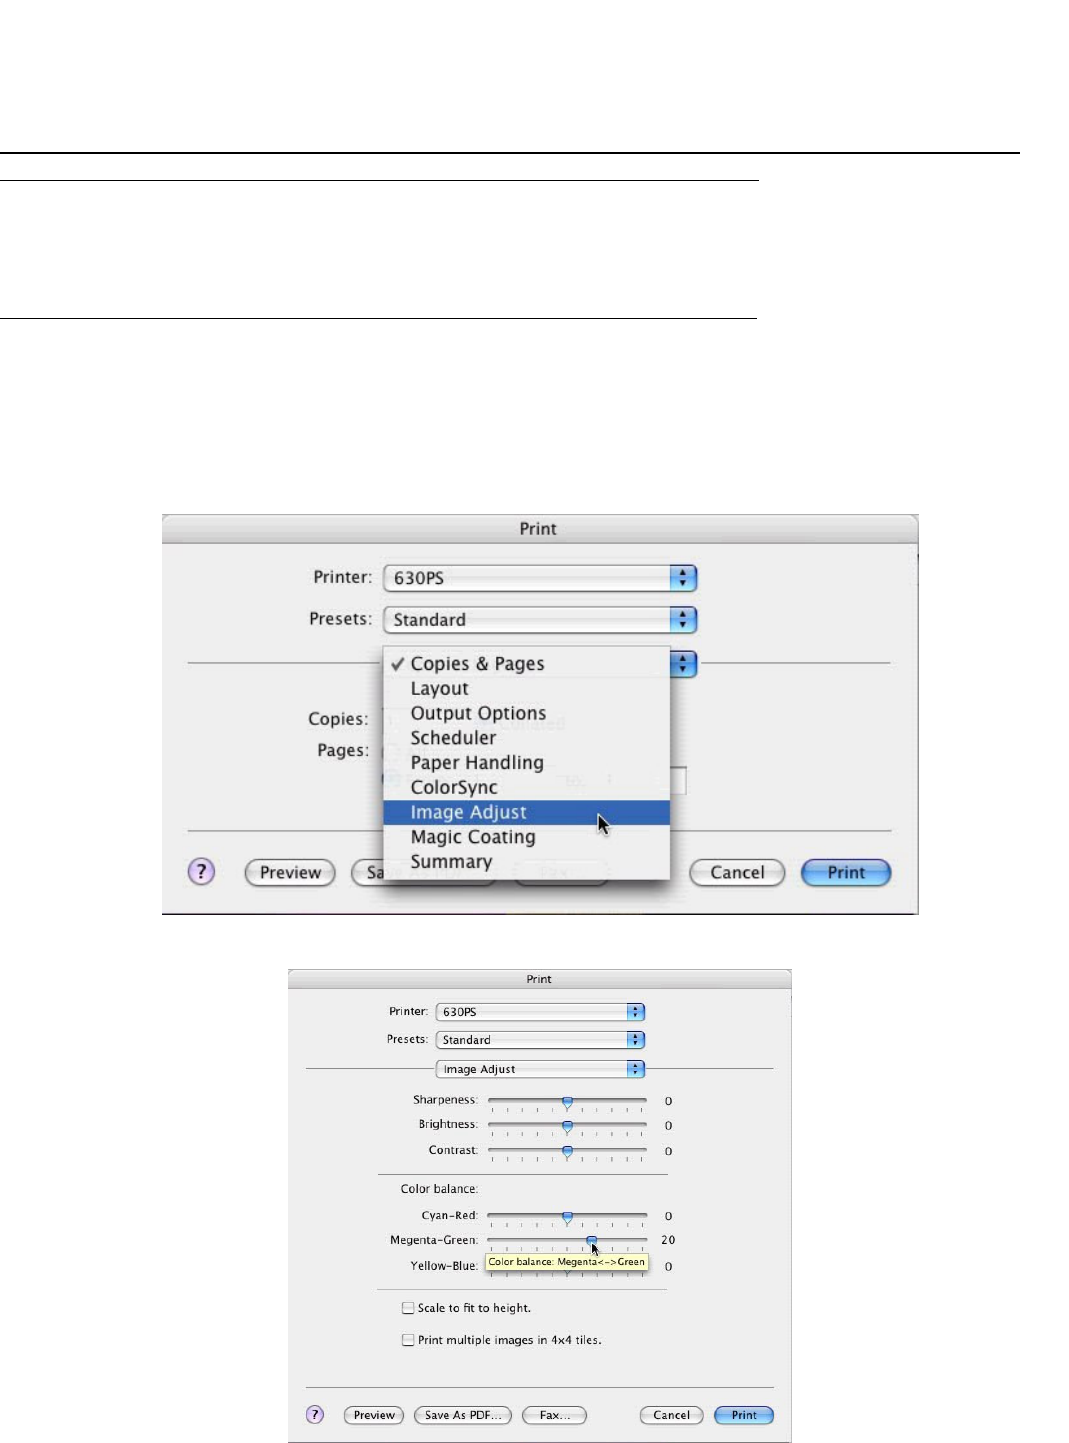
2005/12
3
That is an iView's feature. Mac iView uses a thumbnail to show the preview, not the original picture.
Q8: In iView, if I don't like to have so much white border around my pictures and don’t want to go in and
change the settings with each printing job. How can I make it a default setting?
A:
In order to get a borderless picture without adjusting the settings every time, you can set all margin values to
zero first. And then change the Scaling method to "Scale to fit" or "Fit Width" or "Fit Height".
Q9. What should I do if I have a yellowish cast or other type of cast problems?
A:
You can adjust the colors through Image Adjust: Image Adjust is provided in the driver UI and helps to improve
the quality of yellowish printouts. But it may be required that you try different settings until the most
satisfactory result is reached. The current Mac driver has 6 values for users’ adjustments: brightness, contrast,
sharpness, and 3 sets of color balance. The values can be saved as a preset.
Step 1: When showing the print dialog, select the Image Adjust panel.
Step 2: Drag the slider to do the adjustments.
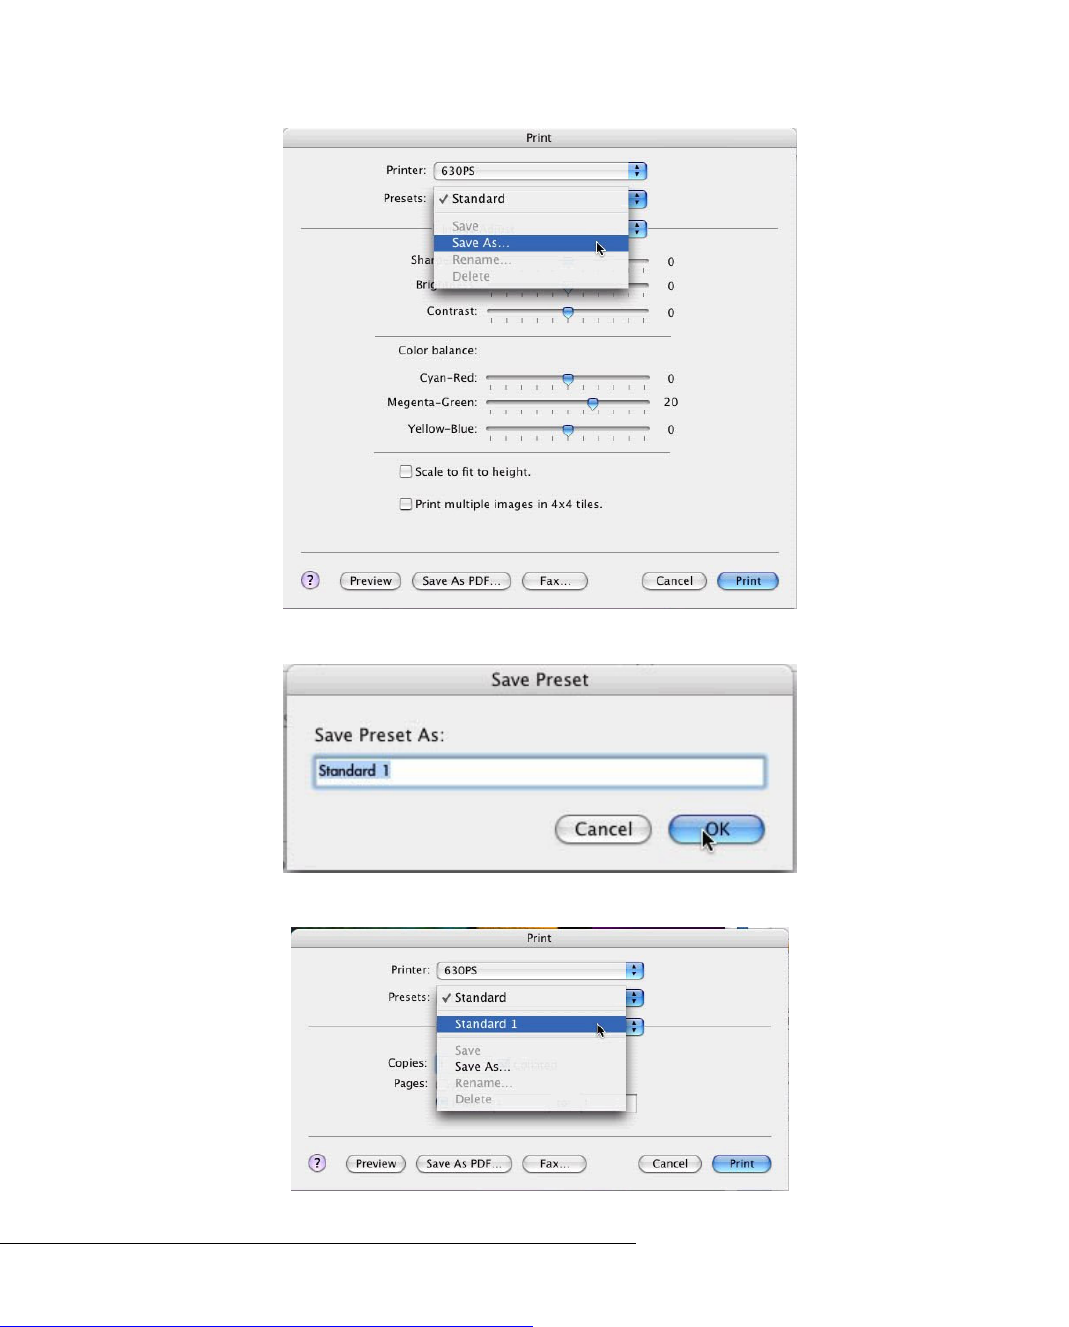
2005/12
3
Step 3: Press the Preset menu bar; select Save As to save the current values as a preset.
Step 4: create a name or use the name Presets suggests for these settings
Step 5: If you print after saving the preset, Photoshop will remember it as a default.
Q10: How to print a 4x4 sticker with 16 different images on Mac?
A:
1. You are able to find some imaging software at Apple’s website as
http://www.apple.com/downloads/macosx/imaging_3d/ to try with.
2. For iPhoto: Open up “Page Setup” page and select Paper Size to "4x6 Sticker 4X4".
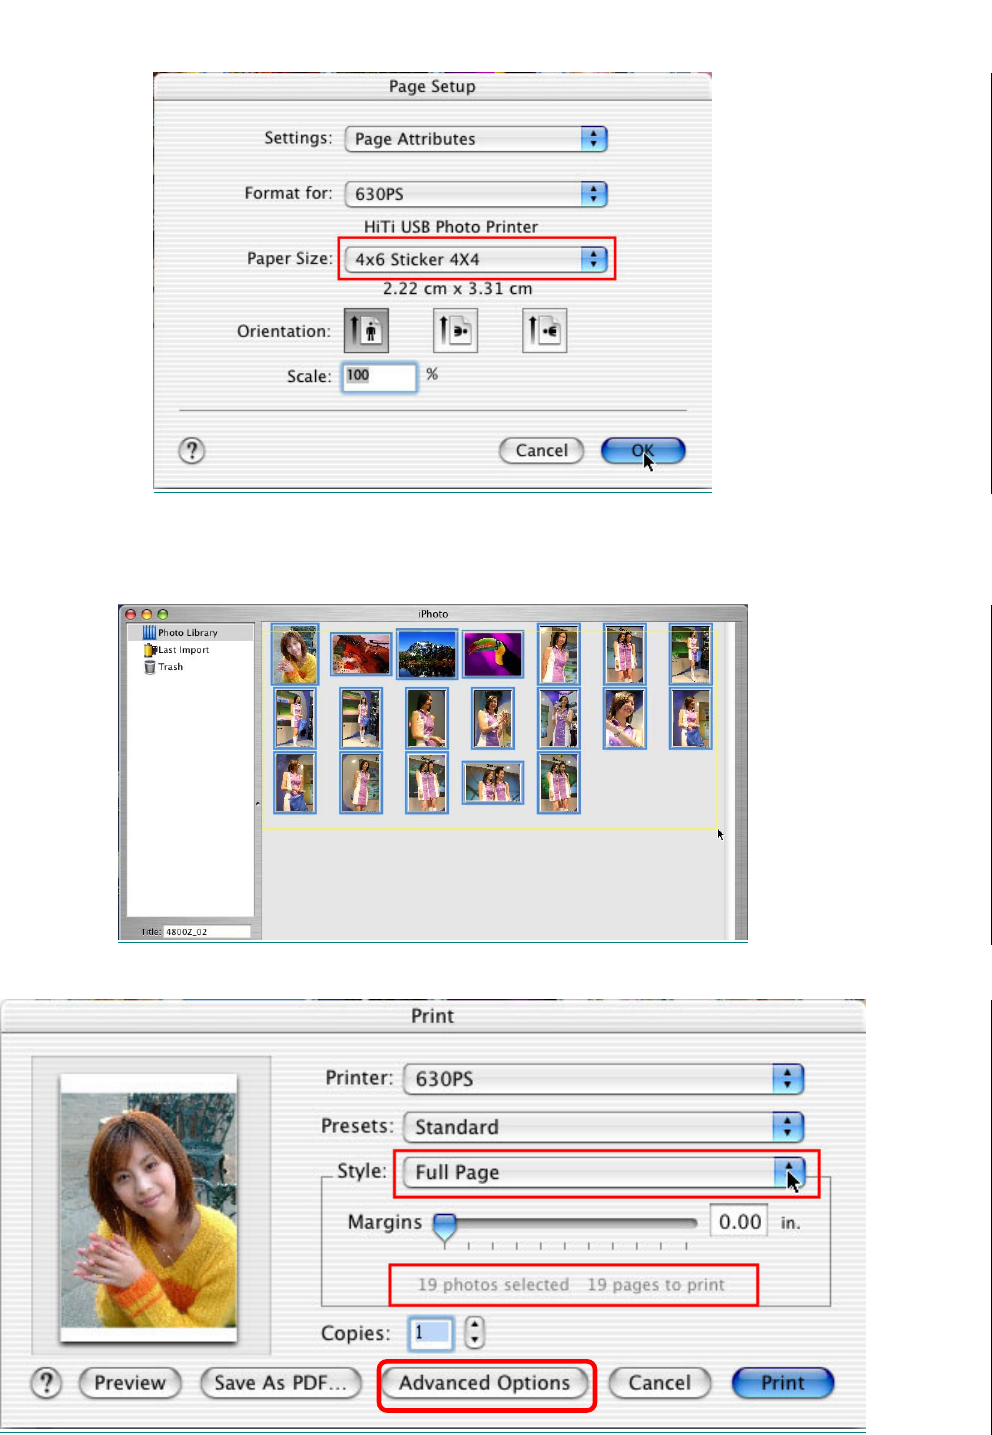
2005/12
4
3. Select your images to print. The first 16 images will be printed on the first page. The 17-19 photos will be
printed on the second page and repeated until the second page is full. On the analogy of the layout, if the
quantity of selected images is less than 16, the selected images will be duplicated until 16.
4. Select "Full Page" in "Standard Options", you will see how many photos you selected and pages to print.
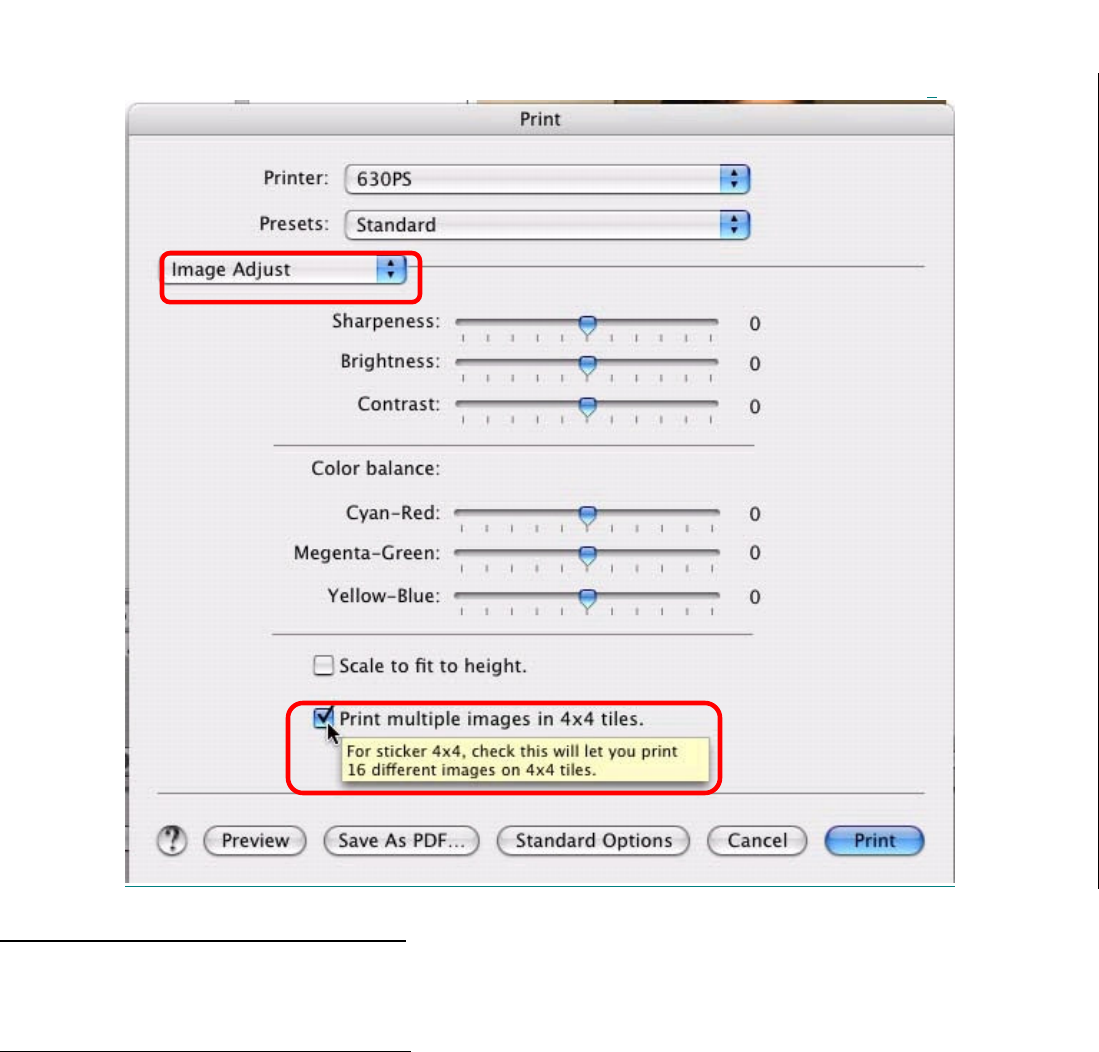
2005/12
4
5. Check the "Print multiple images in 4x4 tiles" at "Advanced Options" in "Image Adjust" pane.
Q11. Does HiTi’s Adjustor work on Mac?
A:
Yes. Please upgrade your Mac driver to version 2.4.
Q12. How to use HiTi’s Adjustor on Mac?
A:
Please make sure your Mac driver is version 2.4 or above.
1. On 10.2, simply go to "Print Center" from Finder -> Go to -> Applications -> Utilities -> Print Center.
On 10.3, simply go to "Printer Setup Utility".
2. Click “Configure” button. (for instance, OS 10.2)
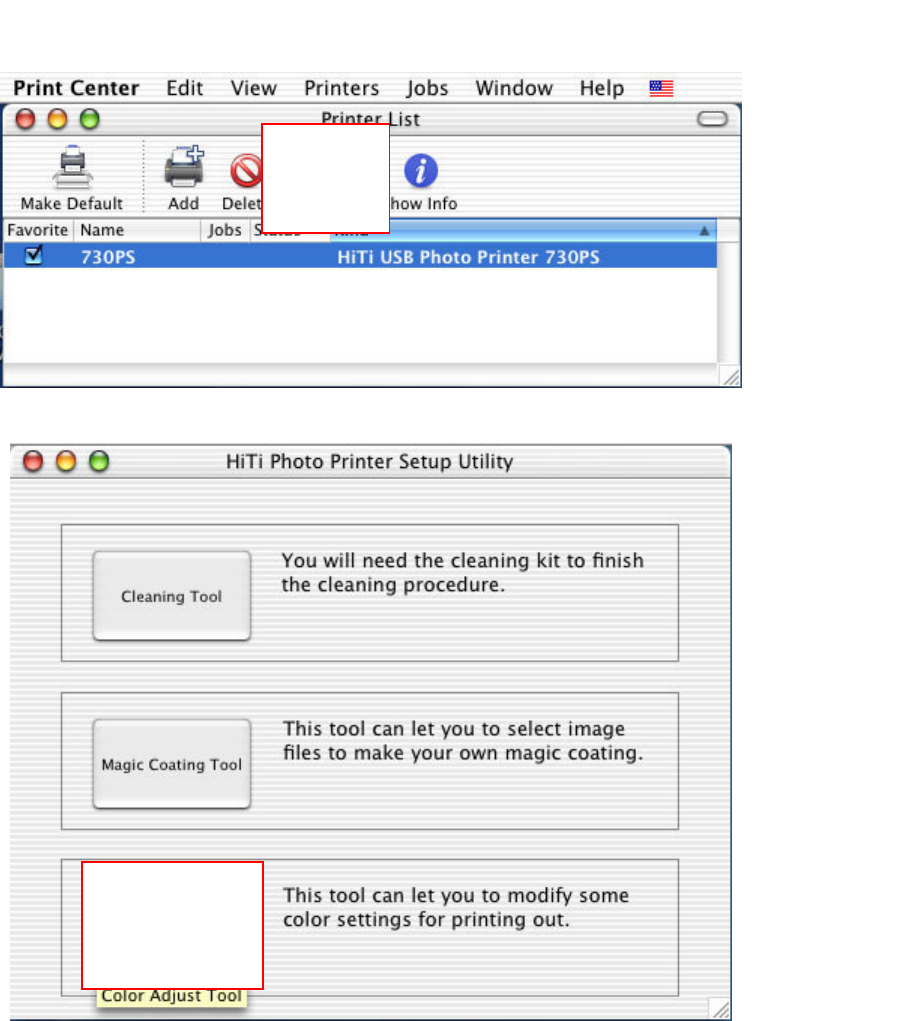
2005/12
4
3. Click "Color Adjust Tool" button.
4. Open an image file by HiTi’s Adjustor then set your favorite color by dragging the “Color Balance” sliders.
When then settings are OK for the image, select "Save As" to save the slider values from drop-down button.
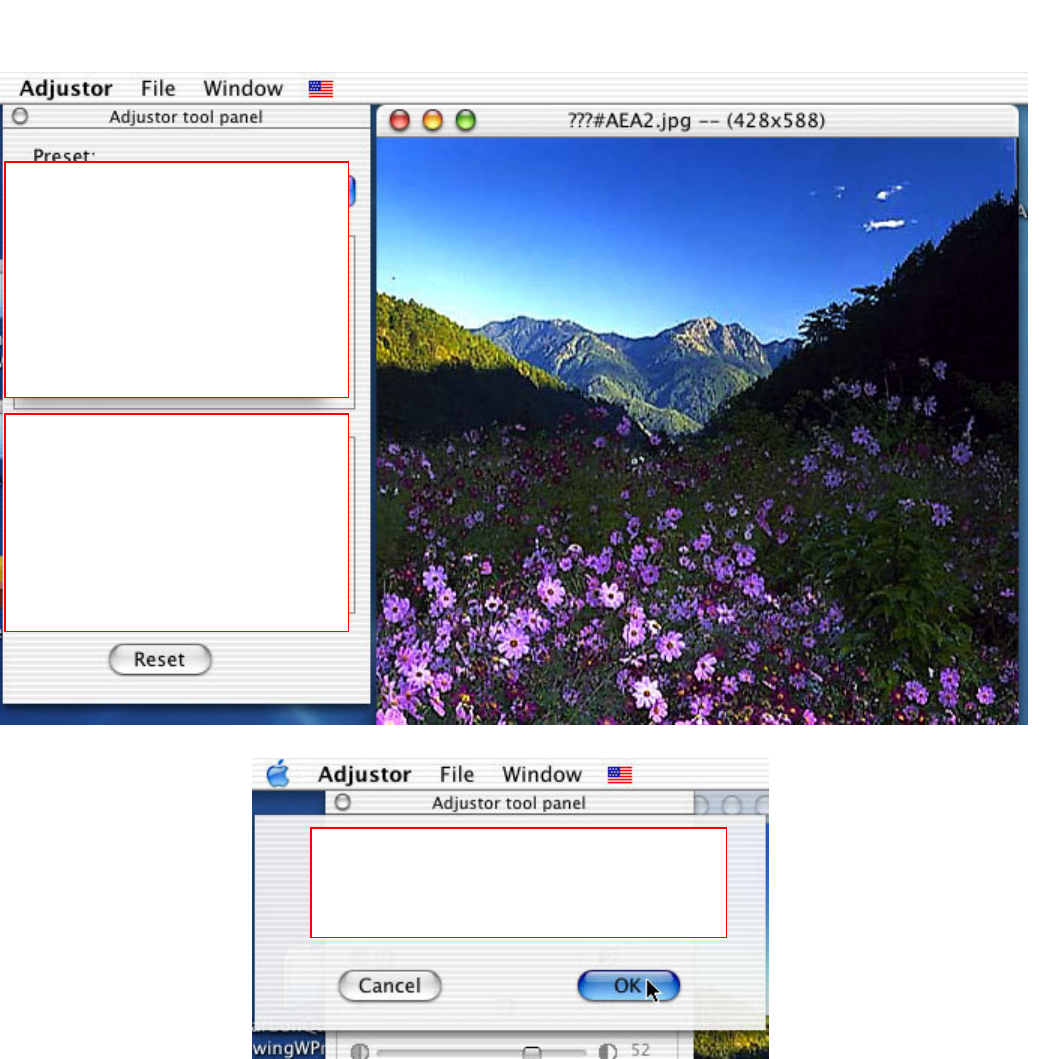
2005/12
4
5. Execute a print job. Click the “Presets” and select the name you save on Adjustor tool panel- “New preset
name”.

2005/12
4
Q13. Can I use 2 printers of same models to execute printing jobs at the same time on Mac?
A:
No, HiTi’s Mac driver doesn’t support this. On your Mac, you can only see one printer of each model in
“Printer Center”. However, if you have 2 or more models, you can operate each one to execute printing jobs by
sequence.
Q14. How to set printed size when I print by PhotoShop?
A:
1. Choose "Print with Preview".
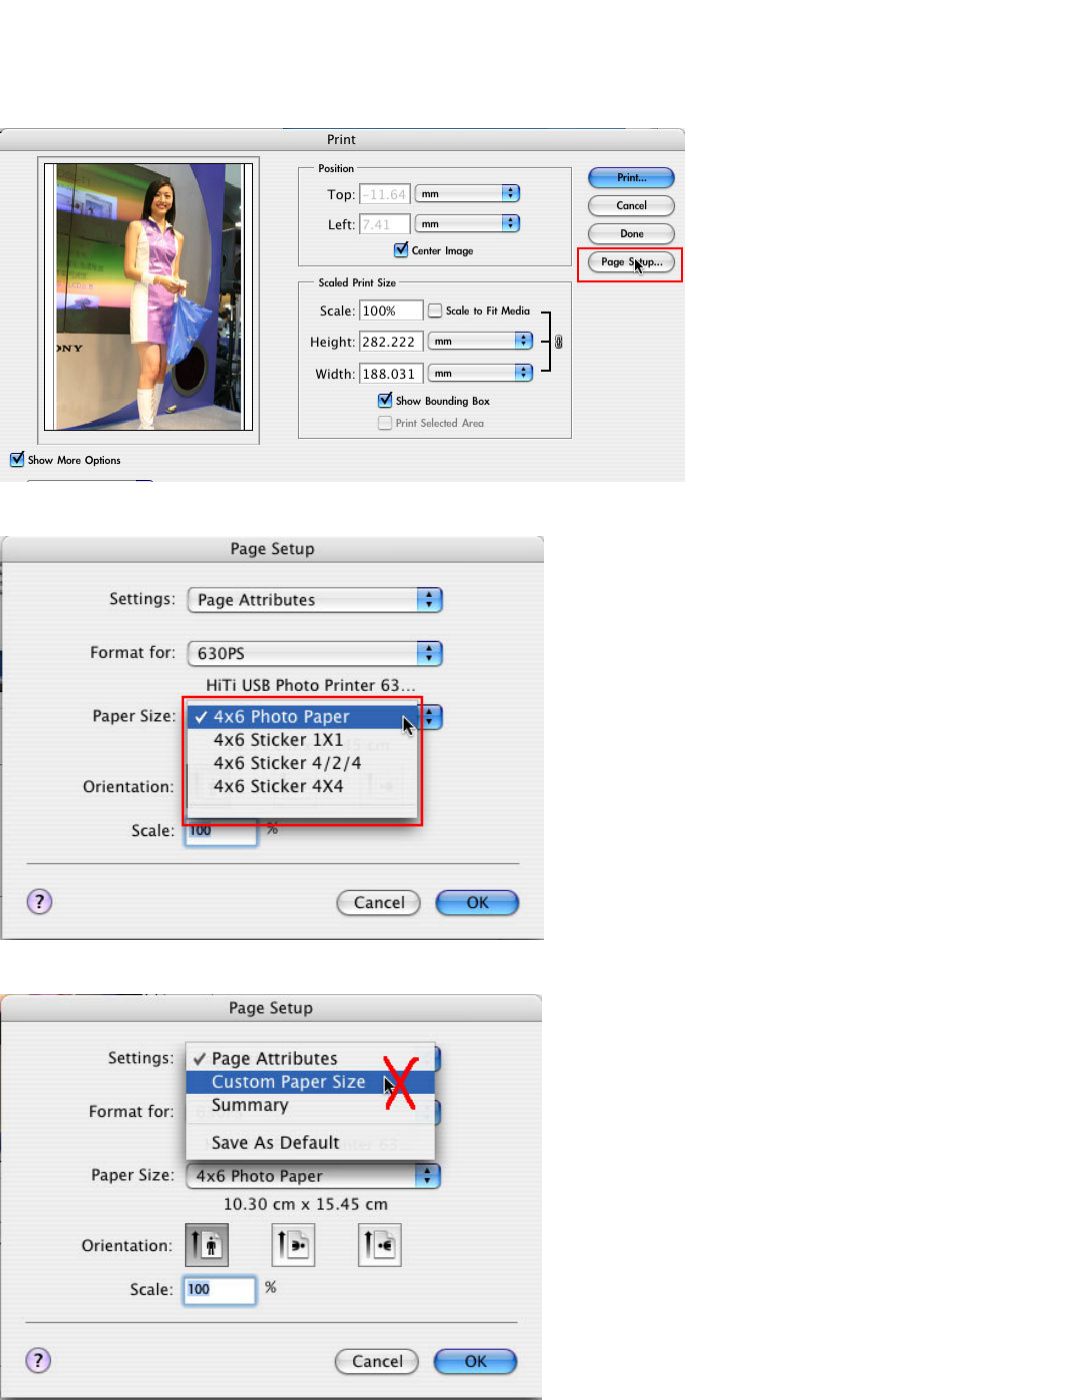
2005/12
4
2. Click "Page Setup".
3. Select target printer and target paper.
4. Don't select "Custom Paper Size" because it will make the result incorrect.
5. Check "Scale to Fit Media" to fit the image to paper size.
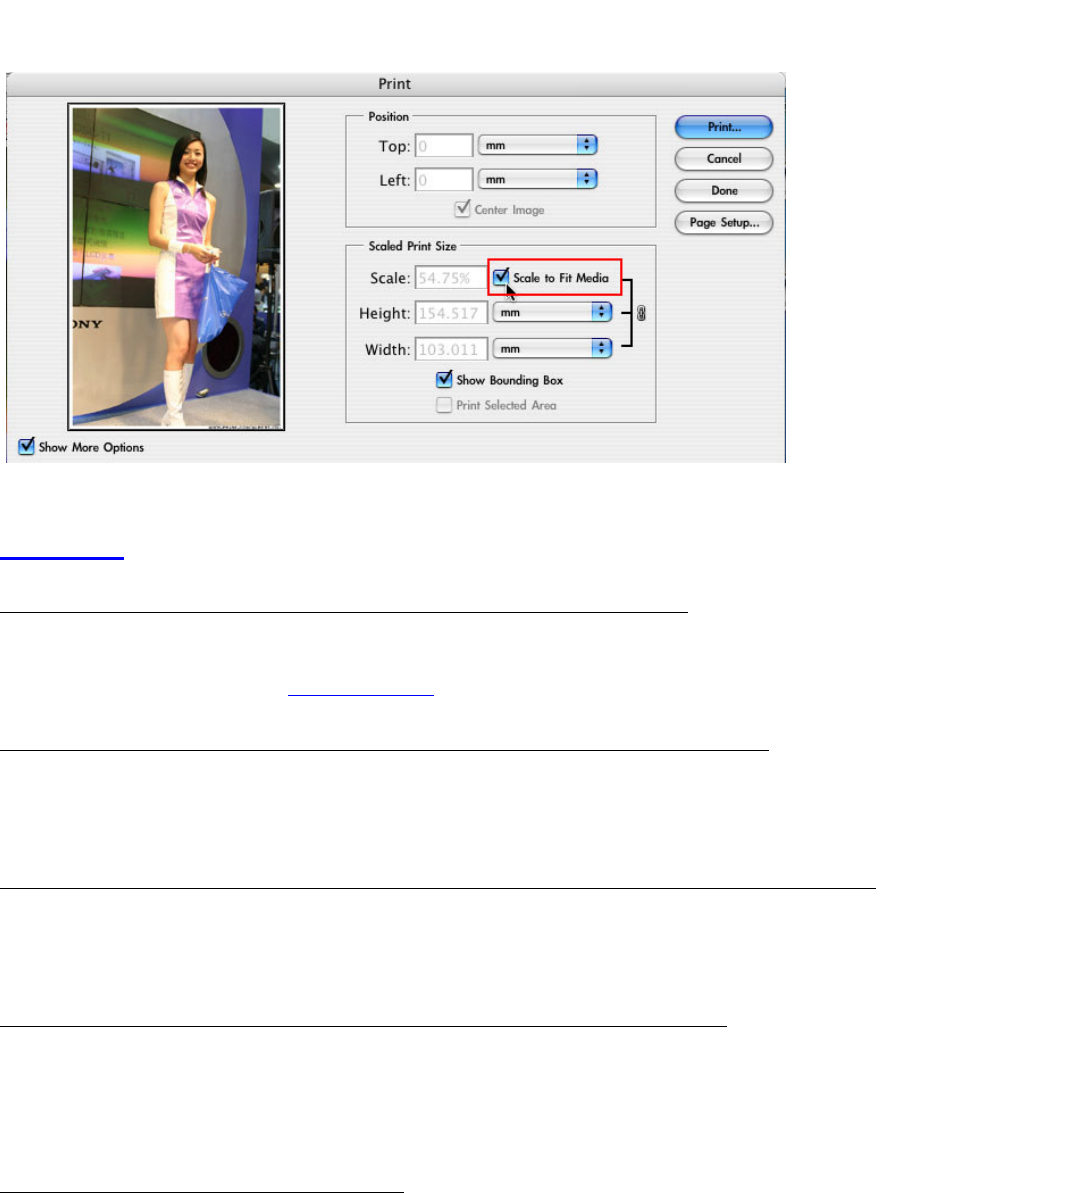
2005/12
4
CleanKit
Q1: What can I do if a “WRITE PIPE IS INVALIDE” message occurs?
A:
This problem is caused by the old version of “cleankit.exe”. Please kindly refer to the site below and download
the latest version of program: www.hi-ti.com .
Q2: I just bought a HiTi Cleaning Kit. Why the cartridge has no ribbon inside?
A:
The cartridge is used to force the printer go into the cleaning mode. Vacant cartridge can avoid jam problem
when you use the cleaning paper.
Q3: I just bought a HiTi Cleaning Kit for my 640DL. Why there is no any cartridge inside?
A:
640DL doesn’t need a vacant cartridge to drive the cleaning paper. The printer will go into the cleaning mode
automatically.
Q4: I just bought a HiTi Cleaning Kit. Why there is no any program inside?
A:
The latest version of driver includes a cleaning tool. You can run the cleaning paper from “Start Menu/ Settings/
Printers/ HiTi Photo Printer 63xPL/PS/ Properties/ Printing Preference/ Advanced Tool/ Cleaning Tool”.
(Model name will be different if you installed other models.)
Q5: Why I need to clean my HiTi printer?
A:
HiTi suggests cleaning the printer after every 100 prints. It can help you to obtain better quality of prints.
1. Followings are the main parts that cleaning paper can clean.
(1) Rollers: Feeding Roller, Exit Roller, Platen Roller, Pinch Roller and Capstan Roller.
(2) Tray: Tray-Front and Tray-Back.
2. Followings are the main parts that cleaning swab can clean.
(1) Thermal print head.
(2) Cover of thermal print head.
(3) Ribbon LED.

2005/12
4
(4) Ribbon Sensor.
(5) Tray-Front.
(6) Tray-Back.
3. Followings are the main problem that HiTi Cleaning Kit can avoid.
(1) Scratch/dust problem.
(2) Paper feeding problem. (Paper Out)
(3) Ribbon searching problem. (Ribbon Out)
(4) Intermittent dots problem.
(5) Grease problem.
Q6: Where can I get the cleaning program?
A:
1. You can download it from HiTi web site: www.hi-ti.com
2. You can execute it from “Start Menu/ Settings/ Printers/ HiTi USB Photo Printer/ Properties/ Printing
Preference/ Advanced Tool/ Cleaning Tool”. (Please update printer’s driver to the latest one.)
Q7: What cleaning swab and cloth are used for?
A:
The cleaning swab and cloth can be used for general wiping of reachable areas. Dust accumulation may be
heavy for some people, so using the cloth first will allow more effective use of the swabs as those can be
focused on areas that are more difficult to reach. (If you have any alcoholic cleaning fluid, this can help when
using the cleaning swabs.)
CardDésirée
Q1: What is CardDésirée for?
A:
CardDésirée is a professionally designed application for printing ID PVC cards.
Q2: How can I import image files from CardDésirée?
A:
Go to “File/ Import”. You can import image files via Image Brower, TWAIN and HiTi Printer.
Q3: How can I import image files from Digital Still Camera on CardDésirée?
A:
If one of following Canon DSC models is connected with PC, photos shot on that Canon DSC will be directly
presented in the “Take Photo Dialog” (Go to “View/ Take Photo”) window on CardDésirée.
Below are Canon DSC models which are applicable on CardDésirée:
1. PowerShot A10/ A20/ A30/ A40/ A60/ A70/ A75/ A80/ A100/ A200/ A300.
2. PowerShot S10/ S20/ S30/ S40/ S45/ S50/ S100/ S110/ S200/ S230/ S300/ S330/ S400.
3. PowerShot SD100/ Pro90 IS.
4. PowerShot G1/ G2/ G3/ G5.
5. IXY DIGITAL 30/ 200/ 200a/ 300/ 300a/ 320/ 400.
6. DIGITAL IXUS v/ v2 /v3 /300 /300a /330 /400 /II.
7. EOS 1D /1Ds /D30 /D60 /10D
Q4: How can I apply cachet on CardDésirée?
A:

2005/12
4
The option of cachet is the access to put in a cachet image on template. This image is archived a *.hgf file.
(HiTi’s file format)
Q5: What combinations of PVC card sizes I can print on the standard HiTi PVC card if I am using CardDésirée?
A:
1. Full page.
2. CR-80 Horizontal.
3. CR-80 Vertical.
4. CR-90 Horizontal.
5. CR-90 Vertical.
6. CR-100 Horizontal.
7. CR-100 Vertical.
8. User Defined.
Q6: What combinations of PVC card layouts I can print on the standard HiTi PVC card if I am using “Full
page”, “CR-80 Horizontal”, “CR-80 Vertical”, “CR-90 Horizontal”, “CR-90 Vertical”, “CR-100 Horizontal” or
“CR-100 Vertical” card size on CardDésirée?
A:
You have no selections here.
Q7: What combinations of photo sizes I can print on the standard HiTi 4x6 photo paper if I am using
CardDésirée?
A:
1. One_Inch.
2. Two-Inch.
3. Ver_Full. (Portrait)
4. Hor_Full. (Landscape)
5. User Defined.
Q8: What combinations of photo layouts I can print on the standard HiTi 4x6 photo paper if I am using
“One_Inch” paper size on CardDésirée?
A:
1. 16x1.
2. 8x2.
3. 4x4.
4. 2x8.
Q9: What combinations of photo layouts I can print on the standard HiTi 4x6 photo paper if I am using
“Two_Inch” paper size on CardDésirée?
A:
1. 8x1.
2. 4x2.
3. 2x4.
4. 1x8.
Q10: What combinations of photo layouts I can print on the standard HiTi 4x6 photo paper if I am using
“Ver_Full” or “Hor_Full” paper size on CardDésirée?
A:
You have no selections here.
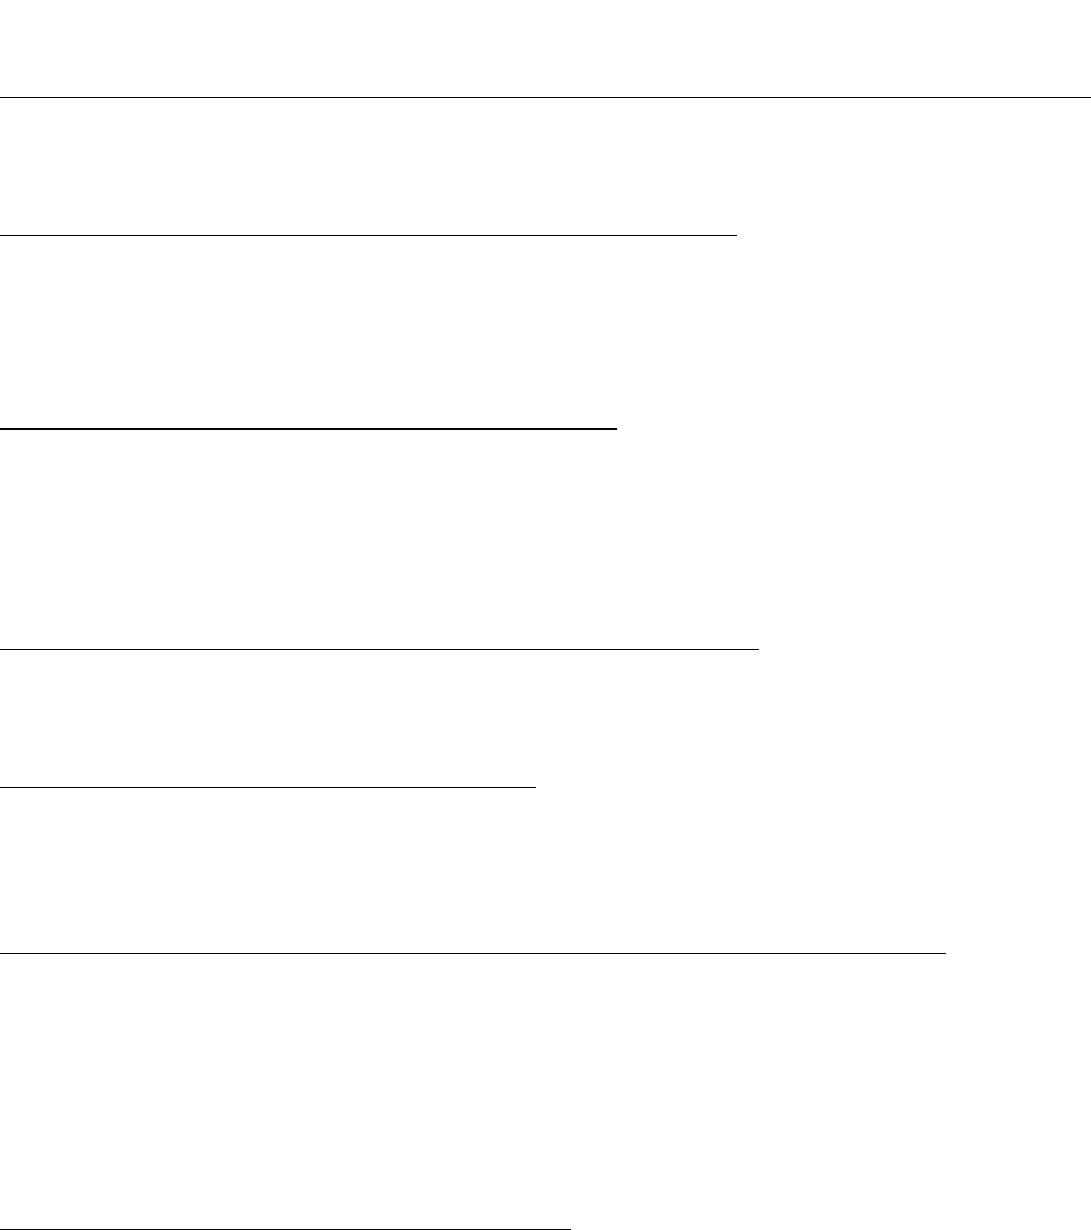
2005/12
4
Q11: Will CardDésirée show a print dialog to let me change copies when my Canon DSC is connected with PC?
A:
No. If the photo image is directly caught from Canon DSC and the work mode on CardDésirée is set as Exhibit,
CardDesiree will automatically print out the photo image without print dialog.
Q12: What “IfPrint” means on “Browse Database” function of CardDésirée?
A:
When you mark any blanks of “IfPrint”, those printing jobs will be processed after you click “Batch Print”
button on the main page. However, if you select them by dragging mouse then execute “Print” function from the
tool of mouse right-click, CardDésirée will still process entire printing jobs that exist in your database even
though blanks of “IfPrint” are unmarked at this moment.
Q13: How come there are no any templates inside CardDésirée?
A:
CardDésirée is an application designed for developing ID PVC cards. Users need to create their own-designed
templates to print. Beside of developing ID PVC cards, users are still available to print standard 4x6 photo
papers via this application; however, CardDésirée here is not so powerful, and it has not offered any of
templates for such kind of printing jobs. In order to implement versatile demands, you may try PhotoDésirée1
or PhotoDésirée2 if you would like to print standard 4x6 photo papers.
Q14: How come I see a “Template Brower” window after I open CardDésirée?
A:
This window is for you to maintain your self-designed templates based on different PVC card layouts. It will
show nothing if you have not create your own templates.
Q15: What is the purpose of templates on CardDésirée?
A:
Templates here are not simply some decorations for PVC cards or 4x6 Photo Papers. Templates here are able to
save some information in, such as photo, barcodes, names… etc. Users can maintain and record some
differential information based on each template for now and future’s printing demands.
Q16: What is the difference between “Print”, “Batch Print” and “Print The Page” on CardDésirée?
A:
1. Print: It is located at the database (Go to “Browse Database/ Select Template” then mouse right-click on any
records there.), and it is used to print all records that you have maintained on the database. (No matter whether
you mark “IfPrint” or not.)
2. Batch Print: It is located at the main page, and it is used to print all records that you have maintained and
marked “IfPrint” on the database.
3. Print The Page: It is located at the main page, and it is used to print the image you have edited on the edit
queue.
Q17: How do I use “Batch Print” function on CardDésirée?
A:
Please see the instructions below:
Step 1. Select type of PVC card.
Step 2. Create a template:
(1) Press on the “Edit the current template” button to create a template as shown below. (i.e. PVC card, CR-80
Horizontal)
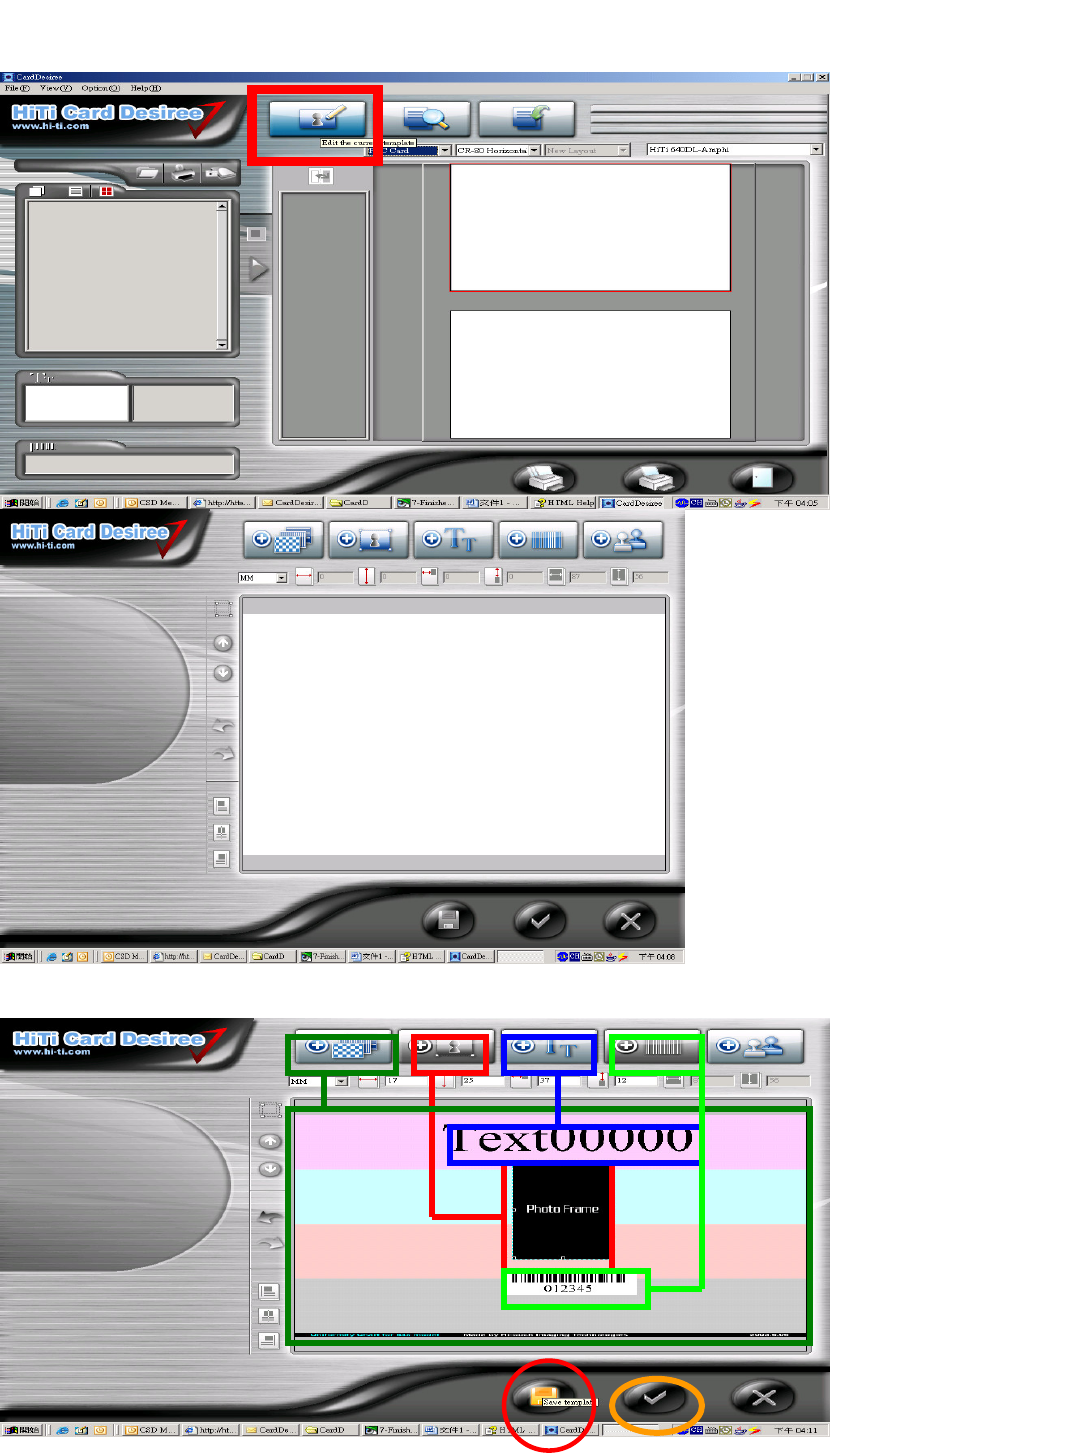
2005/12
5
(2) Start creating your template with your designs.
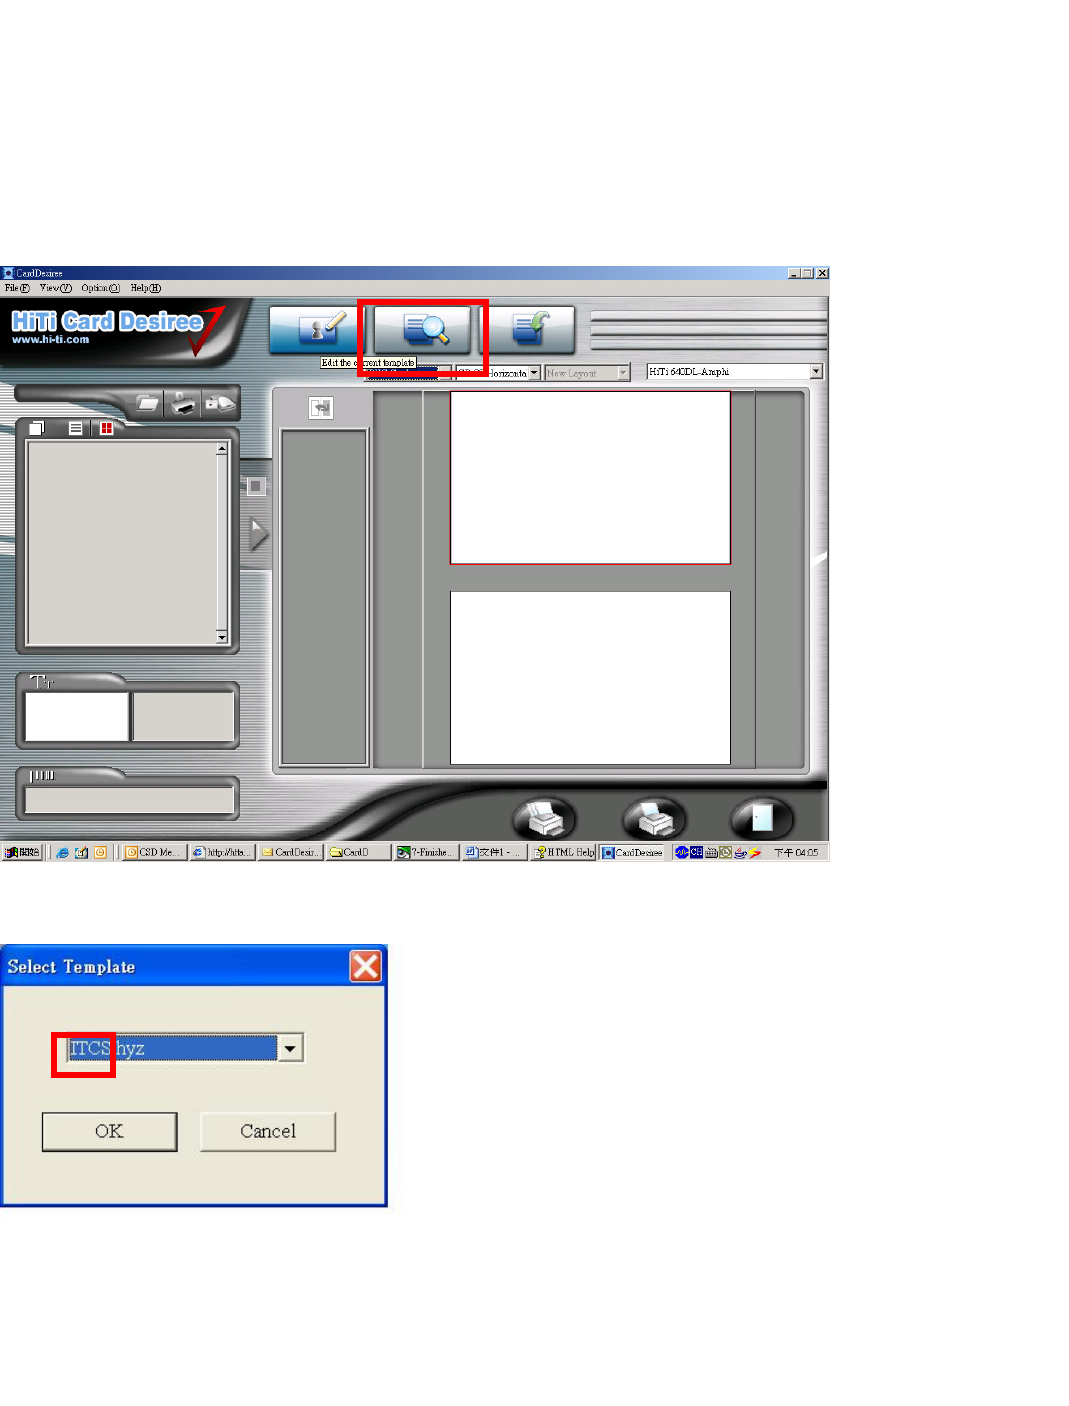
2005/12
5
(3) After creating a template you’ll have to “Save” template in order to browse the database later. The batch
printing requires database to work.
(4) After the template has been saved, press “OK” to exit template editing window.
Step 3. Browse database:
(1) Press the button that is squared in red to browse database.
(2) Select Template: Select the one you just saved or others that you made and apply the data in. The (*).hyz
would be the file you named. (“*.hyz” file is the HiTi’s format and it is not readable or editable by other AP.)
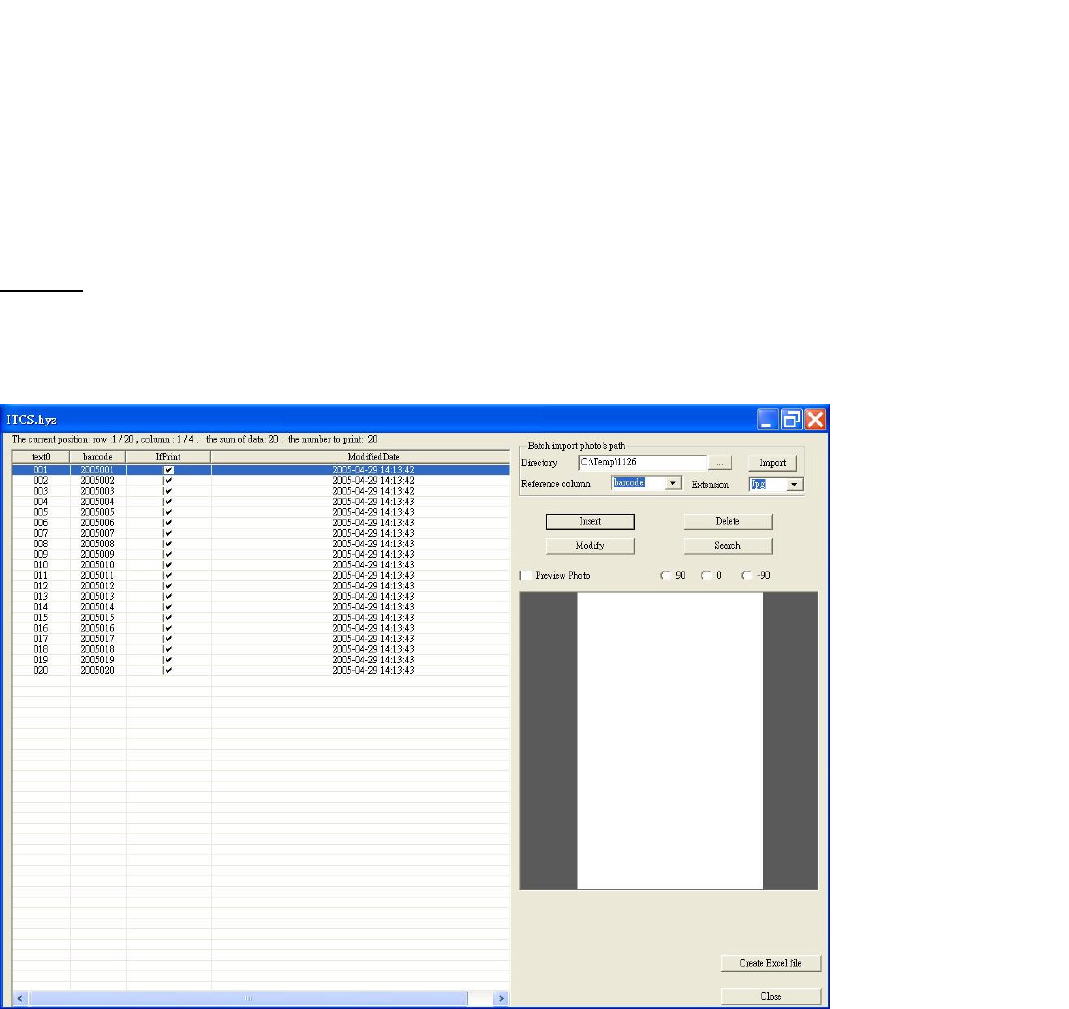
2005/12
5
(3) Create database: Creating the database, you’ll need to insert the images you want to the template. (input
necessary information here, i.e. barcode, text... etc)
a. Press “Insert” button to put an image into database.
b. “Delete” is to delete the column you don’t want.
c. “Modify” is to change the one you add in.
d. Click on the “Ifprint” to make a check on the square to choose the items you want to print.
NOTE:
1. In order to import multiple files from directory, the name inside the photo column has to be the same as the
name of particular image file.
2. From “Create Excel File” function, you can easily maintain your database in Excel. Simply click on “Create
Excel File” button, maintain the data in Excel then copy and paste the data to CardDésirée. Close it at the end.
Step 4. Click on the “Batch Print” button to print.
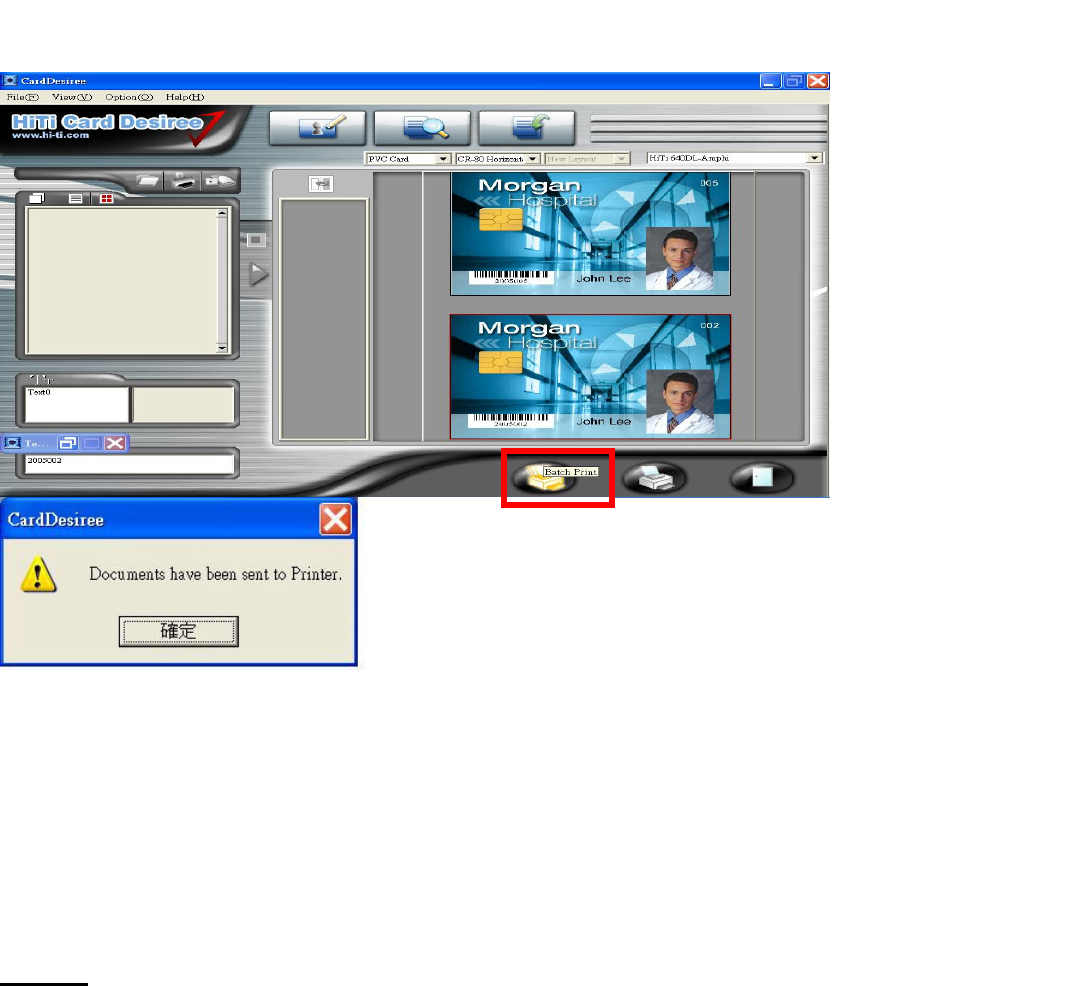
2005/12
5
NOTE:
1. If you’ve already created the database for one template, you can directly click on “Batch Print” button to
print.
2. If you haven’t selected a template, there will be a window popup to let you select the template you want to
print.
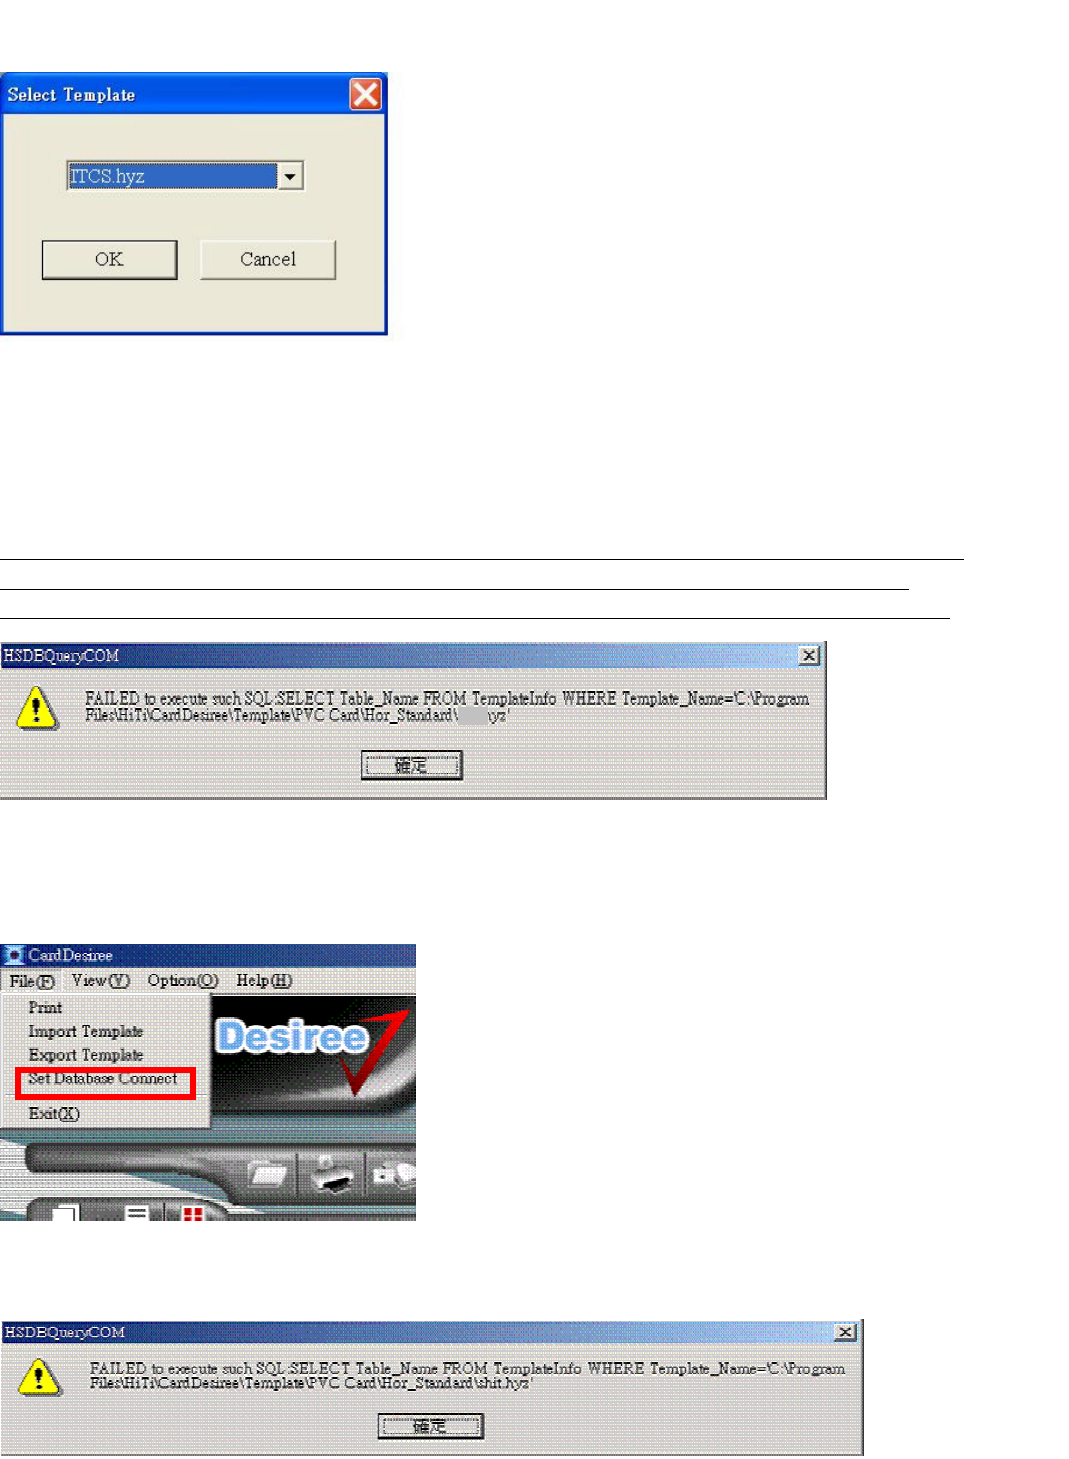
2005/12
5
Q18: Why is there an error messageFAILED to execute such SQL:SELECT Table_Name FROM
TemplateInfo WHERE Template_Name=’C:\Program Files\HiTi\CardDesiree\Template\PVC
Card\Hor_Standard\****.hyz” when I try load a template from CardDésirée (or save template)?
A:
Please note that the CardDésirée cannot load database from excel files.
1. Most user might want to load the excel file from the Card Desiree by choosing the Set Database Connection.
2. If user selects any other selection besides the MYDATASOURCE, the error message will appear when you
try to browse the template.
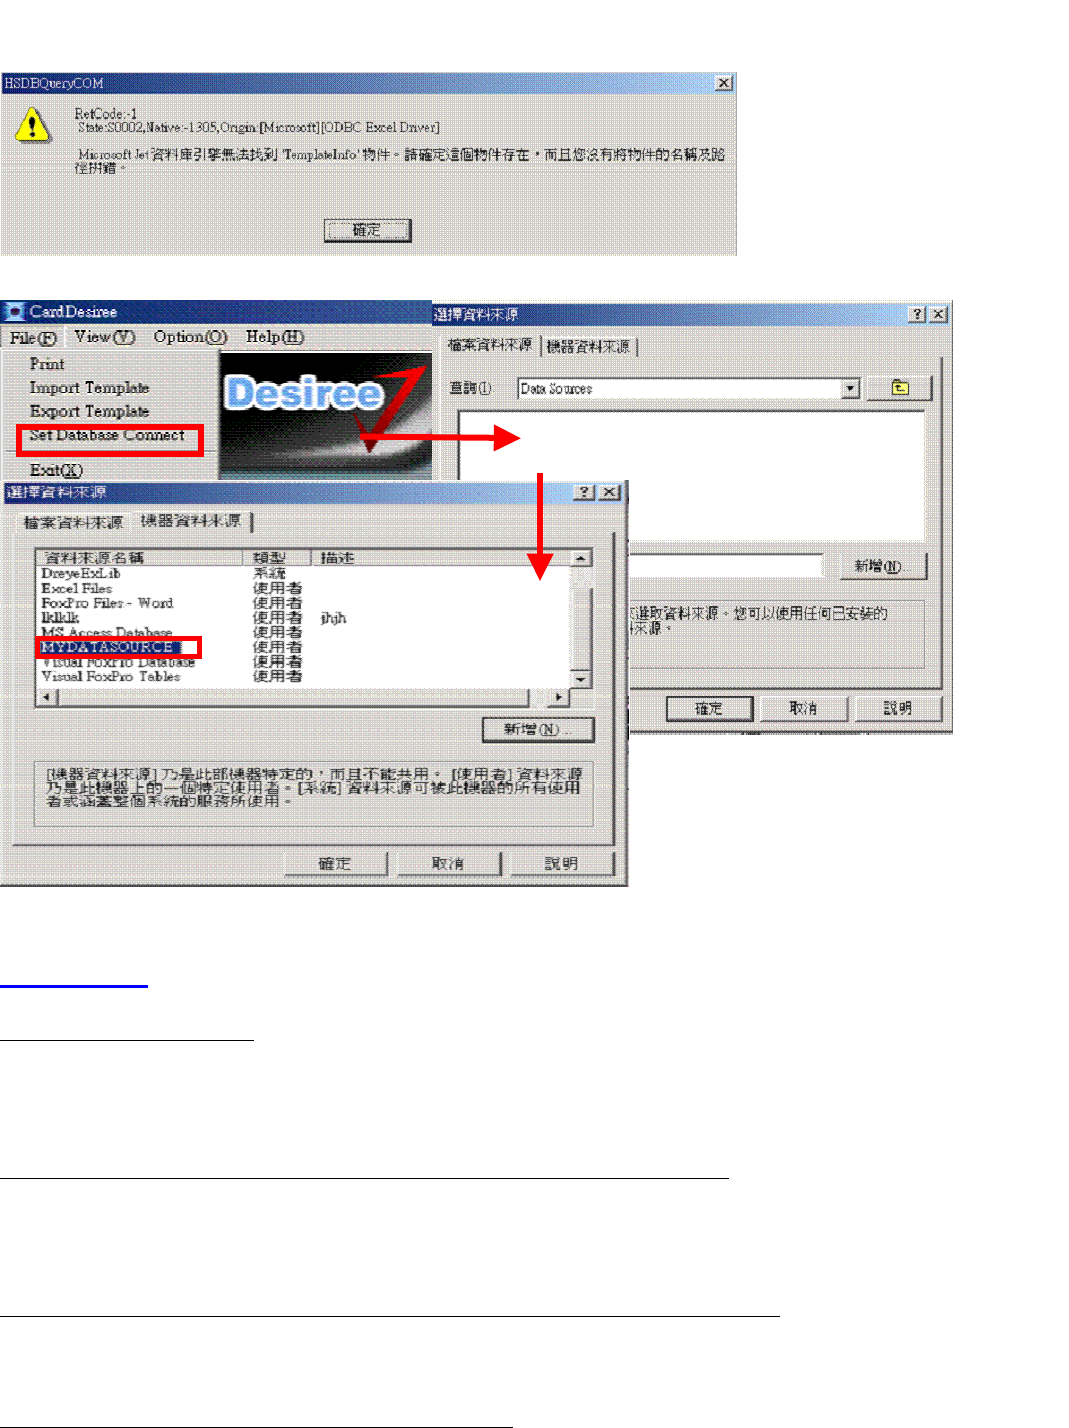
2005/12
5
3. In order to set things correctly, please select the MYDATASOURCE.
GoldDésirée
Q1: What is GoldDésirée?
A:
Gold Desiree is an Application. GoldDésirée allows you to create the image file for 640Gold in either PC mode
or standalone mode.
Q2: What is the minimum display configurations required for GoldDésirée?
A:
The screen resolution must be over 800x600 pixels and the color setting should be set to high-color or above
(16-bit or higher). (Note: in Windows XP the pre-set minimum resolution is already 800X600.)
Q3: Do I need a memory card to print the image file I created from GoldDésirée?
A:
Not really. You can use 640Gold in either PC mode or stand alone mode.
Q4: What file format can be created by GoldDésirée?
A:
2005/12
5
1. It is *.htj file, specific formats designed by HiTi. It is currently compliant with Gold Desiree and the 640Gold
in PC mode.
2. It is *.gpg or *.gsg file, specific formats designed by HiTi. They are currently compliant with Gold Desiree
and the 640Gold in standalone mode.
Q5: Will there be new versions of GoldDésirée?
A:
We recommend that you keep visiting our web page (www.hi-ti.com) and check for software updates. By this
chance you can also see what is new in the HiTi world.
Q6: What *.gpg means?
A:
It is the file format from GoldDésirée and only for HiTi 4x6 Photo paper on 640Gold in stand alone mode.
Q7: What *.gsg means?
A:
It is the file format from GoldDésirée and only for all HiTi stickers on 640Gold in stand alone mode.
Q8: What models GoldDésirée supports?
A:
Only 640Gold so far.
Sign Maker
Q1: How could I make my own signature?
A:
You can design personalized signature by the "Sign Maker" provided in our master CD. You can save 2 sets of
your personalized signature to the printer.
Easy mode:
(1) Add text and Garnish to the upper blank area, and move them to the proper position.
(2) Save file and drag the signature you like to the right-lower side for updating.
(3) Press button to upload the signature then you will see a message shows “Burning Signatures”.
Enhance mode:
(1) Please use other AP (like Photo Shop) to convert your image file to the standard format that “Sign Maker”
needs (600x200 resolution).
(2) Open both your image and mask file.
(3) Save file and drag the signature to the right-lower side for uploading. You will see a ”Burning Signature”
message after pressing button.
Q2: How come there is a “Can't Link to Printer” message showed on the screen while pressing ”Download
signature file from printer” button?
A:
Please choose the correct printer (copy1 or copy2) from the scroll bar right below the “Upload signature to
printer” button.
Q3: What file format is used to store the signature file?
A:
2005/12
5
The signature file will be stored in *.sig.
Printer Operation
Consumables
Q1: Where can I set the correct media type (4×6 or sticker sheet) for printing?
A:
1. You should set the type of paper you have loaded in PhotoDésirée. Notify the printer of the type of paper
that is loaded, so that the printer will adjust and arrange the pictures properly.
2. If you are using other applications to print, you can select the media type in the settings of driver. If you
have any question about the settings of those applications, please refer to their operation manual or visit their
website for technical support.
Q2: When should I replace the ribbon cartridge?
A:
HiTi USB Photo Printer will detect the ribbon status automatically. When the ribbon is used up, an “Out of
Ribbon” error message will pop up. When this happens, you should replace the ribbon cartridge.
Q3: How do I install the ribbon cartridge?
A:
1. Use your right hand to hold the ear of the ribbon cartridge and make sure the arrow marks are facing up.
2. Place the ribbon cardtridge into the printer by following the printer's inner arrow marks.
3. Close ribbon door.
4. Power the printer on and make sure the green light is on.
Q4: How do I remove ribbon cartridge?
A:
Use your right hand to take and remove the ear of the ribbon cartridge.Then move the ribbon cartridge up and
take it out.
Q5: What can I do if the printer will not feed paper?
A:
1. Turn off the printer.
2. Take out of the paper cassette.
3. Make sure the paper is not curled or wrinkled.
4. Make sure the paper is not worn.
5. Turn on the printer. After the LED goes into a stable green, insert the paper cassette and try to print. If the
above steps do not help you in fixing the problem, please contact the HiTi Customer Service Department or
your HiTi distributor for assistance.
Q6: Where can I buy additional consumables for my printer?
A:
Go to the dealer from whom you purchased the printer from or visit the HiTi website for purchasing information.
Q7: Is there anything I should do if I don’t plan on using the printer for a long time?
A:
2005/12
5
We recommend that you store your ribbon cartridge in a re-sealable bag to prevent damage caused
by long periods of exposure to dust and humidity.
Q8: What combinations of photo sizes can I use with the 640Gala to print on a 4/2/4 sticker sheet?
A:
2x4'1x2, 4x2'1x2 and 8x1'2x1.
Q9: Can I use 6x8 ribbon cartridges to print 5x7 or 4x6 papers?
A:
No. You will get an error message telling you that paper type is mismatched.
Q10: Can I use 5x7 ribbon cartridges to print 4x6 or 6x8 papers?
A:
No. You will get an error message telling you that paper type is mismatched.
Q11: Can I use 4x6 ribbon cartridges to print 5x7 or 6x8 papers?
A:
No. You will get an error message telling you that paper type is mismatched.
LCD Controller
Q1: Why can’t I operate the 630PS’s LCD controller?
A:
The 630PS LCD controller may not be operable while or when:
1. The printer is connected to a PC through an USB cable. (“PC Mode” will be shown on the LCD screen.)
2. The printer is processing a job.
3. The LCD Controller or printer might have been damaged. Please contact the HiTi Customer Service
Department or your HiTi distributor for assistance.
Q2: Can I remove or install the 630PS’s LCD controller while the printer is on?
A:
No. To avoid any possible damage to the printer, we strongly advise that you do not remove the LCD controller
while the printer is on. Please ensure that the printer is off before you connect the LCD controller to the
printer.
Q3: Which card will be active if I insert 2 cards into a HiTi USB Photo Printer card slots at the same time?
A:
If 2 memory cards are inserted into the printer, only the card inserted first will be actively read. If you wish to
read the other card that was plugged in, please “Pull out the other card” or “Enter the Setup page and run the
card selection switch.
Q4: Where can I check printer’s firmware version?
A:
In the standalone mode, you can check it on “Setup/ About/ Firmware Version”.
Q5: What functions that HiTi’s 640PS, 630PS, 631PS, and 730PS have in the standalone mode?
A:
1. Photo.
2. ID Photo.
2005/12
5
3. Index.
4. Sticker.
5. Quick Photo.
6. DPOF.
7. Print All.
8. Setup.
Q6: What functions that HiTi’s 640ID, 630ID, and 631ID have in the standalone mode?
A:
1. Photo.
2. ID Photo.
3. Sticker.
4. Setup.
Q7: What functions that HiTi’s 640Gala and 730Gala have in the standalone mode?
A:
1. Photo.
2. Mug.
3. Sticker.
4. Print All.
5. Template.
6. Setup.
Q8: Does HiTi’s printers support color adjustment function in the standalone mode?
A:
Yes, 640ID, 640PS, 640Gala, 730PS, and 730Gala can let you change the output color in the standalone mode.
(Simply go to “Setup/ Color Table Setting” to set your favorite color.)
Q9: Does HiTi’s printers support “Auto Optimization” function in the standalone mode?
A:
No.
Q10: Can I create my self-defined ID layouts in the standalone mode?
A:
Yes, only HiTi 640PS offers a “New Formats” function to let users define 5 ID formats by themselves. (Simply
go to “ID Photo/ New Formats” to set your favorite ID formats.)
Q11: How should I create my own wallpaper in the S400 LCD controller?
A:
The software "Screen Maker" included in the Master CD provides user to make wallpapers.
(1) Execute Screen Maker and select your printer.
(2) Open your favorite image file.
(3) Choose "download wallpaper file from the printer".
(4) Drag the wallpaper image you wish to have from your PC to replace the wallpaper image which you
downloaded from the printer.
(5) Choose "upload wallpaper file to printer" to save new wallpapers into the printer.
(6) "Burning wallpaper" message will show up, and you will have unique wallpaper after updating.
Q12: There are 4 hot keys on the LCD remote controller. What are they use for?
A:

2005/12
6
The 4 hot keys are (left to right):
1. Auto-Color.
2. Matte.
3. Date Print.
4. Signature.
When these functions are activated, the indicators will light up.
HiTi USB Photo Printers
Q1: What is the proper way to turn off the printer?
A:
There is a power switch located on the back of the printer that can be used to shut the printer off properly. DO
NOT unplug the power cord or cut power to the printer while it is printing.
Q2: What can I do if the printing speed is too slow?
A:
1. Make sure your system meets the minimun requirements. If you are printing a high-resolution image, you
will likely need more than the minimun requirements. See "System Requirements” for more details.
2. Open up more space on your hard disk or run a defragmentation utility.
3. Close applications you are not using.
4. Expand your System Memory (RAM).
5. Re-install the printer driver.
Q3: Why is the Status LED not lighten up when I turn the printer on?
A:
1. If you use extension cords or surge protectors, please make sure they are properly plugged in and turned on.
2. The Status LED or other components may have failed. Please contact the HiTi Customer Service
Department for further assistance.
Q4: Should I disable the screen saver while I am printing?
A:
Yes. The HiTi 630PL currently has difficulty functioning while a screen saver is activated.
Q5: Can I use 2 or more printers with one PC?
A:
So far, HiTi 640DL and 640Amphi support parallel printing. When the second printer is connected, you need to
install the driver again, and you will find “HiTi USB Photo Printer MODEL NAME (copy 2)” in the printer
folder.
Q6: Can I use any HiTi USB Photo Printer PS series as a card reader?
A:
Yes. You can use PhotoDésirée to save the jpeg files from the memory card into your PC.

2005/12
6
Q7: What kinds of memory cards does the HiTi 630PS support?
A:
1. CompactFlash (CF) card type 1 and type 2.
2. SmartMedia (SM) card.
3. CF adapter.
Please contact HiTi Sales Department for more purchasing information on the CF adapter.
Q8: Does 630PS support IBM MicroDrive?
A:
No. This is because the IBM MicroDrive's high current consumption design may damage your 630PS. But
640PS or future models will support this type of media.
Q9: Is xD card compatible to the HiTi USB Photo Printer PS series?
A:
No. HiTi has not announced that HiTi PS series support xD card so far. The only way to use xD card with the
HiTi PS series is to use an "xD to CF adaptor". Furthermore, the specifications of the xD card has not been
made public thus far. Most companies cannot decide on its specifications to develop this new controller system.
Q10: Can I cancel the printing job after clicking the print button?
A:
If you click ‘Cancel’ before the printer begins to print, it may cancel properly, depending on how far the
processing has gotten. If the printer has already begun printing, hitting ‘Cancel’ will cancel print jobs queued to
print after the current photo is done.
Q11: Can I use a Memory Stick PRO or Memory Stick Duo / PRO Duo memory card with my HiTi printer?
A:
Yes, you can, but you need a particular adapter. Please refer to the following table for details. Warning: Insert a
Memory Stick Duo or Memory Stick PRO Duo memory card into HiTi printers directly is prohibited; it will
damage your printer. HiTi will charge for this kind of service.
630PS / Transphotable 640PS / 640Gala 631PS 730PS / 730Gala
Memory Stick
PRO Via an MS PRO supported
adapter for CF slot Ready Ready Ready
Via an MS Duo adapter and an
MS PRO supported adapter for
CF slot
Via an MS Duo
adapter Via an MS Duo
adapter Via an MS Duo
adapter
Memory Stick
Duo / PRO
Duo
Via a Sony Memory Stick Duo Adapter for Compact Flash Slot
Q12: Can I use a Mini SD memory card with my HiTi printer?
A:
Yes, you can, but you need a particular adapter. Please refer to the following table for details. Warning: Insert a
Mini SD card into HiTi printers directly is prohibited; it will damage your printer. HiTi will charge for this kind
of service.
Model Adapter needed
630PS /
Transphotable Via a Mini SD (to SD) adapter and an SD adapter
for CF slot
640PS / 640Gala
631PS
Via a Mini SD (to SD) adapter
2005/12
6
730PS / 730Gala
Q13: Can HiTi’s 641PS work with my DSC?
A:
HiTi is a member of Camera & Imaging Products Association (CIPA). HiTi’s 641PS has owned CIPA’s
PictBridge Certificate, and it is completely compatible to those devices which have owned CIPA’s PictBridge
Certificate. You may refer to CIPA’s official web site for all supporting devices.
http://www.cipa.jp/pictbridge/CertifiedModels/PictBridgeCertifiedModels_E.html#DSC_CANON
Q14: What certificate that HiTi 641PS support?
A:
1. PTP Certificate. (It is “Printer mode” on LCD controller.)
2. PictBridge Certificate. (It is “DSC mode” on LCD controller.)
Q15. How come I got problem on the connection via PictBridge function?
A:
1. Make sure your DSC supports PictBridge function. (Please refer to
http://www.cipa.jp/pictbridge/CertifiedModels/PictBridgeCertifiedModels_E.html#DSC_CANON for the
supporting devices.)
2. Make sure your 641PS’s firmware version is 1.0 or above.
3. Make sure you have enabled PictBridge function on both DSC and printer.
(1) DSC: Please refer to your camera’s user manual for operation instruction.)
(2) HiTi 641PS: Go to “Setup/ Card Select/ USB” then select “DSC mode” from LCD controller.
4. Please contact HiTi’s Customer Service Department or your HiTi’s distributor for further assistance.
Q16: Can I connect portable hard disk to HiTi’s 641PS?
A:
Yes. HiTi 641PS supports PTP Certificate, so HiTi 641PS can connect to versatile portable hard disks and other
storage devices which support PTP Certificate. (Operation: Go to “Setup/ Card Select/ USB” then select
“Printer mode” from LCD controller.)
Q17: Can HiTi’s 641PS work with my iPod or iPod Photo?
A:
Yes.
1. Make sure your 641PS’s firmware version is 1.01.
2. Make sure your iPod or iPod Photo is compatible to Windows.
3. Do not edit any of your image files under Mac’s application.
(Operation: Go to “Setup/ Card Select/ USB” then select “Printer mode” from LCD controller.)
Q18: How to print images from Digital Still Camera if I am using a HiTi 641PS?
A:
1. Disconnect your digital still camera with HiTi 641PS.
2. Simply go to “Setup/ Card Select/ USB” then select “DSC mode” from LCD controller.
3. Execute printing jobs from your digital still camera. (Please refer to your digital camera’s user manual for
the operation instruction.)
Q19: How to disconnect my Digital Still Camera and HiTi 641PS?
A:
Simply remove the USB cable between your digital still camera and HiTi 641PS then HiTi 641PS will be able
to be operated by LCD controller.

2005/12
6
Q20: How to print images from portable storage device if I am using a HiTi 641PS?
A:
1. Disconnect your portable storage device with HiTi 641PS.
2. Simply go to “Setup/ Card Select/ USB” then select “Printer mode” from LCD controller.
3. Execute printing jobs from 641PS.
Q21: How come I can’t insert the memory card?
A:
1. Please make sure the card inserting direction is correct.
2. Please don’t paste any of sticker or tape onto your memory card.
3. Please make sure the appearance of your memory card is OK.
4. Please make sure the card reader slot of HiTi Photo Printer is OK.
5. HiTi’s printer doesn’t support MS Duo or xD card. Both cards require an adapter to work with printer.
Q22: How comes that my printer cannot read MS Duo?
A:
1. The MS Duo card requires an adapter to work with Hi-Ti printer.
2. Please do not insert the MS Duo into printer without the adapter.
Q23: Why does my SD card sometimes get stuck inside the printer or cannot be inserted?
A:
1. This problem occurs when the joint of SD card has been damaged.
2. If user over-pushed the SD card into the printer, it may damage the joint of SD card or printer’s card reader.
We suggest users to check if the card is damaged before inserting, for Example:
(1) The picture of “Other Brand” shown below is the kind of SD which can be damaged during usage. (This
kind of SD card has a joint in the front which can be damaged if user over-pushes it, and this is the reason SD
card is stuck inside)
(2) The picture of “Panasonic” is a sample of the kind of SD card that can prevent damage during plug-in. (This
kind of SD card has the joint at the top, which can prevent gap open if user over-pushes it)
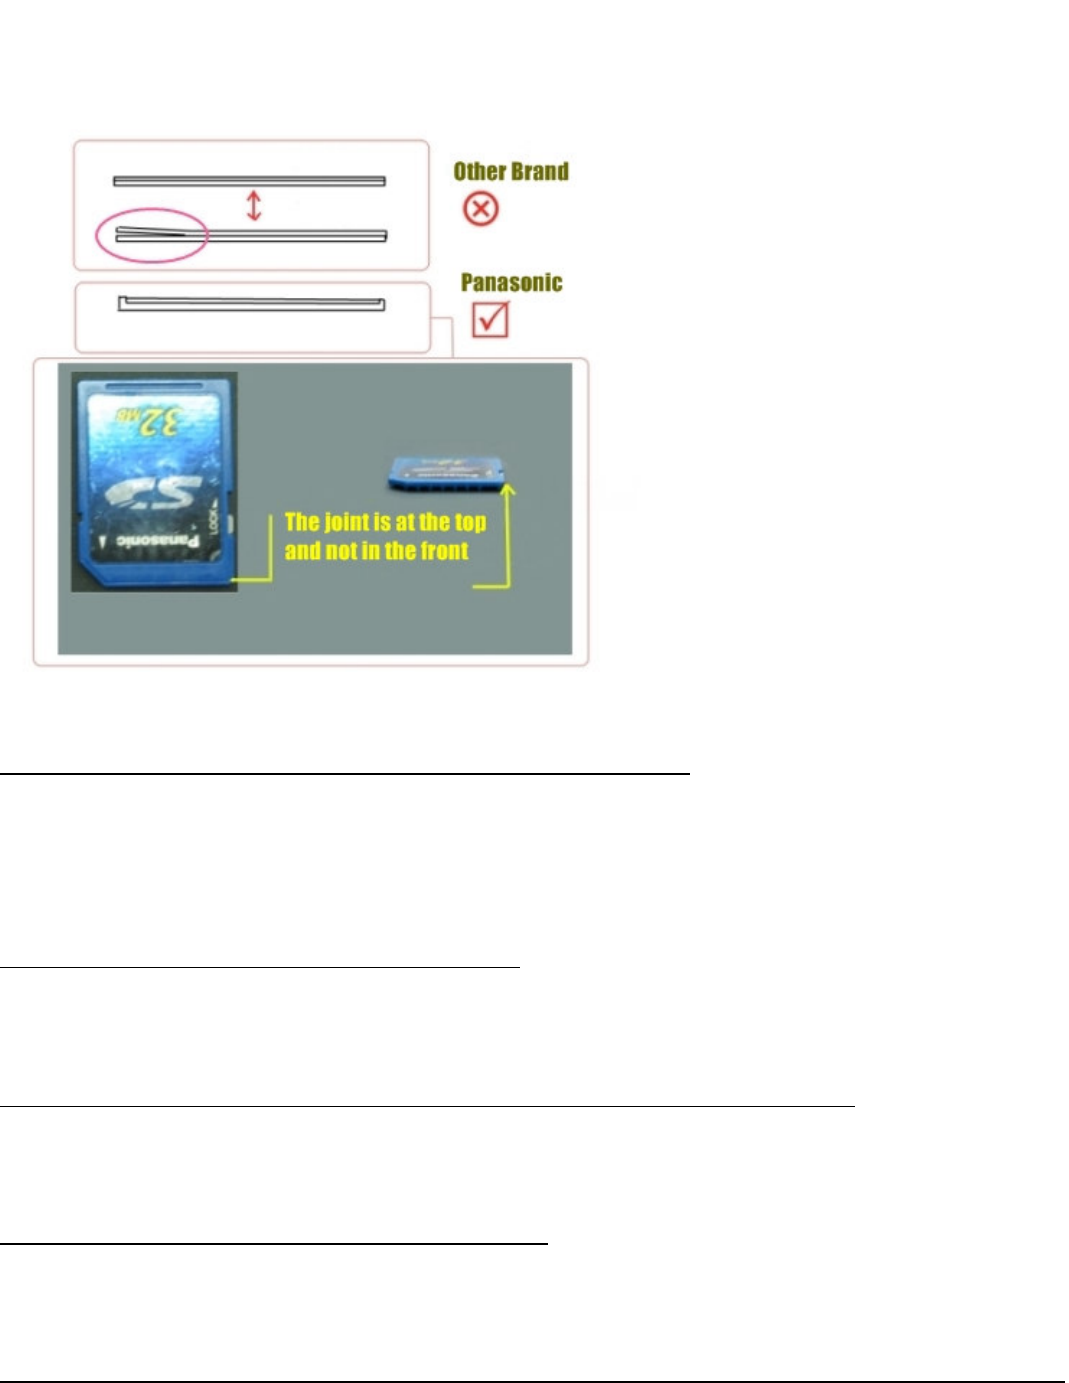
2005/12
6
Q24Does HiTi software supports uncompressed (RAW) image file
A:
There are variable of raw image files taken from different brands of digital camera or other input devices. These
files can be opened by the software provided by the manufactures. Please transform the raw files to TIFF or
JPEG before using HiTi software to process or you may use the manufacture’s software to print through HiTi’s
printer.
Q25: How do I use the function of collage with S400?
A:
The S400 allows users to print several images on one photo paper, but the collage function is applicable on
photo paper or 1X1 sticker only. Simply choose collage from menu, and start to enjoy this function.
Q26: How come some image files disappear while reading in the S400 compare to DSC?
A:
In normal cases, the file will not disappear unless you format the memory card!! The reason you couldn't find
the photo may because the files sequence we see in S400 is different to what we see in the DSC.
Q27: What does the function- "Sepia" in the S400 mean?
A:
The “Sepia” will make the photo look like historical. When the Sepia function is on, you can see the preview
image by pressing "Edit" button on the photo and decide whether you like it or not.
Q28: What is the difference between Landscape, Portrait and their enhanced mode in “Color Wizard” of S400?
A:
The sharpness and saturation are different. Enhanced mode makes the prints look more vivid (much sharpness
and saturation).
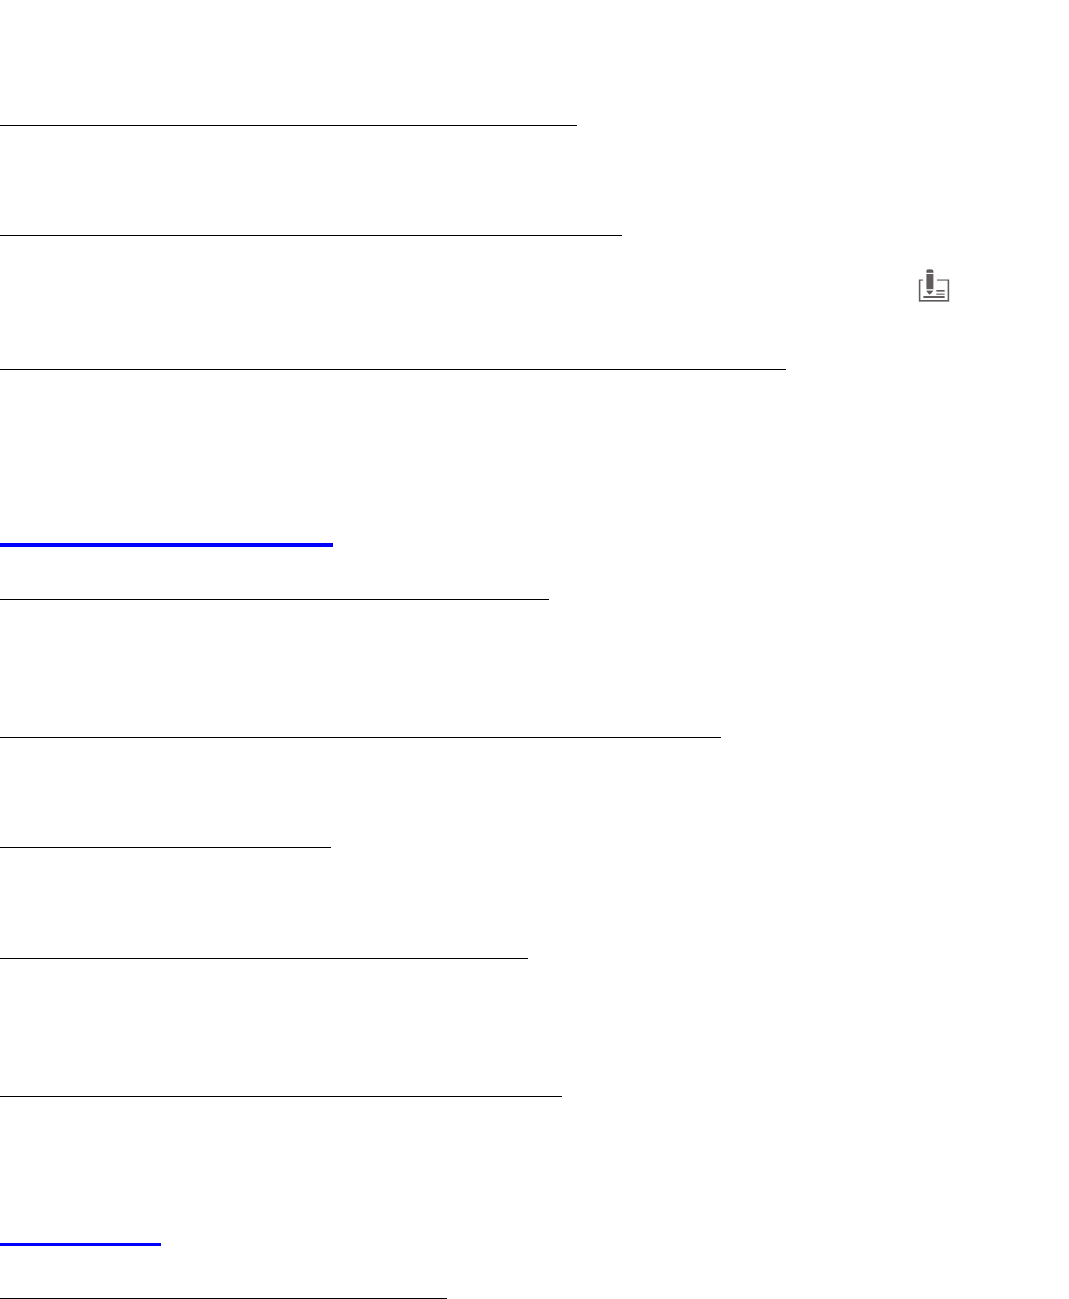
2005/12
6
Q29: What is the dust proof case of S400 mainly design for ?
A:
It is used to avoid that dust or alien object may fall onto the paper during printing.
Q30: How can I apply the signature to my printouts in the S400?
A:
In the standalone mode, you can simply add signature onto your prints by light up the hot key .
Q31: I would like to adjust the position of my signature in S400. How could I do?
A:
Select “Setup” then chose “Signature”. Press “Edit” in the signature you want to modify then start to rotate the
sign or adjust the position anywhere you want.
HiTi USB Card Printers
Q1: Can I print PVC cards from HiTi’s dye-sub printers?
A:
Yes. HiTi 640Amphi is a model designed for printing ID PVC cards. Users can print ID PVC cards and 4x6
photo papers via 640Amphi.
Q2: What is the standard thickness of PVC cards that 640Amphi can print?
A:
0.25mm.
Q3: Can I use 640Amphi on Mac?
A:
No, 640Amphi can’t work on Mac; however, it can work on Windows and Linux OS.
Q4: Can I use 2 or more HiTi 640Amphi with one PC?
A:
Yes, HiTi 640Amphi supports parallel printing. When the second printer is connected, you need to install the
driver again, and you will find “HiTi USB Photo Printer MODEL NAME (copy 2)” in the printer folder.
Q5: Why there’s a loud noise when I reset my 640Amphi?
A:
Please DO NOT power on and off suddenly, this action is fatal to the printer.
Driver Tool
Q1: Can I change the printout color of 730PS?
A:
Yes, you can.
(1) Download the HiTi’s color-adjusting tool- “Adjustor” to change the color default.
(2) Update the driver of the printer to obtain a new color default. You can change color modes from the tool of
drivers.

2005/12
6
(3) Update the firmware of the printer to obtain a new color default. You can execute “BurnFW.exe” to change
color modes.
Q2: What color modes will I have after installing the 730PS driver version 2.0 or above?
A:
You will be able to choose from 3 color modes.
(1) Gentle style.
(2) Classical style.
(3) Glamorous style.
Q3: What is the color default mode for the 730PS driver version 2.0?
A:
Glamorous style.
Q4: What color modes will I have after updating 730PS firmware to version 1.02 or above?
A:
You will have “Glamorous style” only; however, you can execute “BurnFW.exe” to change the color mode.
Before that, you must make sure you have installed driver version 2.0 or above to enable the new functions of
“BurnFW.exe”.
Q5: How can I change the color default of 730PS in the PC mode?
A:
(1) Install the latest driver version. (Version 2.0 or above)
(2) Go to “Start Menu/ Printers/ HiTi Photo Printers 730 series/ Properties/ Printing Preference/ Advanced
Tool/ Advanced Color Setting”, select “Change Color Mode” to change the color default.
Step1 Step2
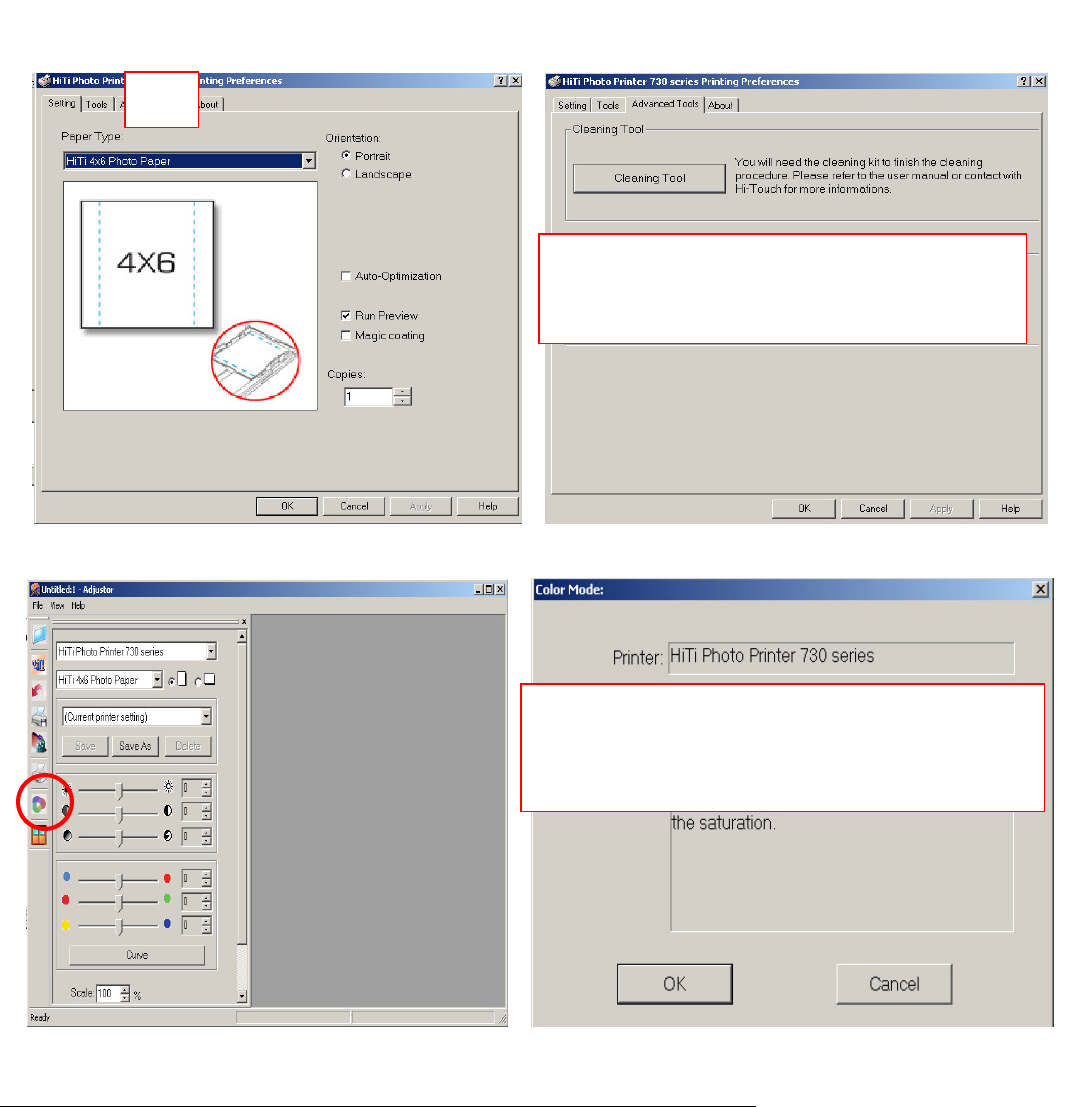
2005/12
6
Step3 Step4
Step5 Step6
Q6: How can I change the color default for the 730PS in the standalone mode?
A:
(1) Install the latest driver version. (Version 2.0 or above)
(2) Update firmware to version 1.02 or above.
(3) Execute “BurnFW.exe” to change the color mode.
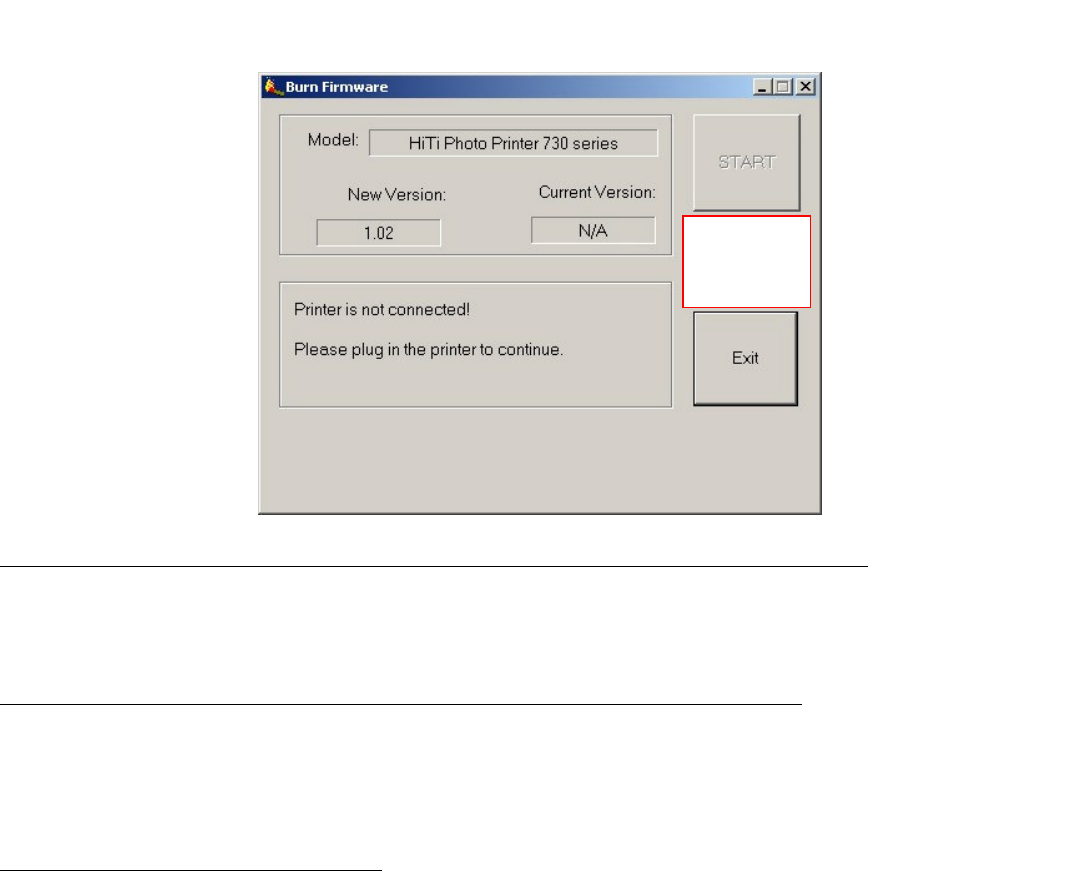
2005/12
6
Q7: Why can’t I see the “Change Color Mode” button when I execute the “BurnFW.exe”?
A:
(1) You didn’t install the latest driver version. You must install version 2.0 or above.
(2) You didn’t update the firmware of the printer. You must update firmware to version 1.02 or above.
Q8: Why can’t I change the color mode after installing driver version 2.0 or above?
A:
The color-adjusting tool- “Adjustor” may not have been updated. Please uninstall the “Adjustor” and “driver”
from “Start Menu/ Control Panel/ Add/Remove Programs/ HiTi USB Photo Printer 730 series”; after the reboot,
install the driver of the printer again.
Q9: What are color preference settings?
A:
1. Skin tone best quality effects:
The output color (skin color) will be changed by printer's driver based on the skin tone you select no matter
which AP you use to print.
2. Use Windows color management profiles:
The output color will be changed based on Windows color profile. ICC profile is located at:
Window 98 & ME: c:\WINDOWS\System\color
Window 2000: c:\WINNT\system32\spool\drivers\color
Window XP: c:\WINDOWS\system32\spool\drivers\color
You may apply it from “Start Menu/ Printers/ HiTi Photo Printers 730 series/ Properties/ Color Management”.
If you would like to print from PhotoShop, you should check the settings on it as well.
(1) Select "File" -> "Print with Preview".
(2) Enable "Show More Option". Select "Color Management".
Select Profile: "Printer color management".
3. Do not use color preference setting:
The output color will be changed based on color profiles of the AP you are using to print. (The output color will
not be changed by printer's driver.)
If you would like to use PhotoShop, you should check below.
(1) Select "Edit" -> "Color Setting".
(2) Select Settings: "U.S. Prepress Defaults".
(3) Open image file.
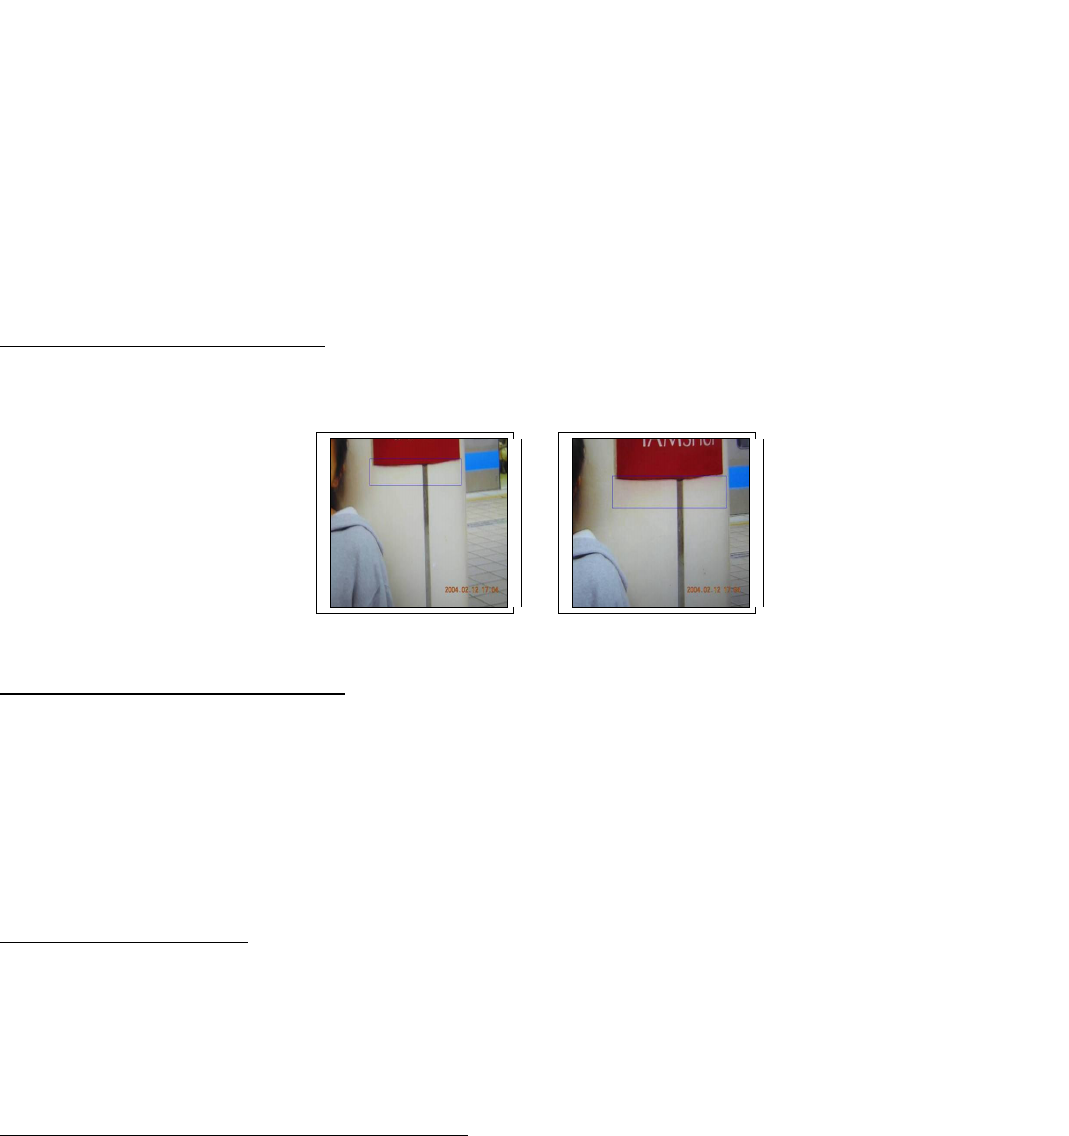
2005/12
6
If the embedded profile of image does not match the current RGB working space:
=> Select "Use the embedded profile (instead of the working space)".
If the image does not have any embedded color profile:
=> Select "Assign working RGB: Adobe RGB (1998)".
(4) Select "File" -> "Print with Preview".
(5) Enable "Show More Option". Select "Color Management".
Select Profile: "printer's profile (for instance, Hi-Ti 730 D50.icc)". Select Intent: "Relative Colorimetric".
Disable "Use Black Point Compensation".
Q10: What is Auto Optimization?
A:
Auto Optimization is a function to improve heat-accumulation problem on printing, but it has nothing to do with
colour, brightness, contrast, etc. It is unavailable in the standalone mode.
Q11: Where is HiTi’s color profile?
A:
HiTi’s color profile is located at “Master-CD\640PS\3.5\64xPS\Common” (It depends on model.). It will be
installed into following folder when you install printer’s driver. (It depends on OS.)
Window 98 & ME: c:\WINDOWS\System\color.
Window 2000: c:\WINNT\system32\spool\drivers\color.
Window XP: c:\WINDOWS\system32\spool\drivers\color.
For the latest version of color profile, please directly contact HiTi Customer Service Department for assistance.
Q12: What is color chart?
A:
Color chart is a tool to let you print out some color bars with Y, M, C values as your color settings reference.
Simply print those out then you can produce your favorite color based on those color bars by advanced imaging
editor, i.e. PhotoShop, Illustrator, CorelDraw and …etc.
(Please make sure your driver version is latest one, or you will not have such tool.)
Q13: How do I calibrate the position of stickers?
A:
Please selectstart/ setup/ printer & fax / driver / File / Preferences / Toolsto start calibrating the sticker.
Print a test chart first to check for the position, usually we recommend user to set default and save position
values before any stickers are printed. This tool is for printout that is out of position, by selecting the
coordinates A and B to adjust the position of the sticker paper.
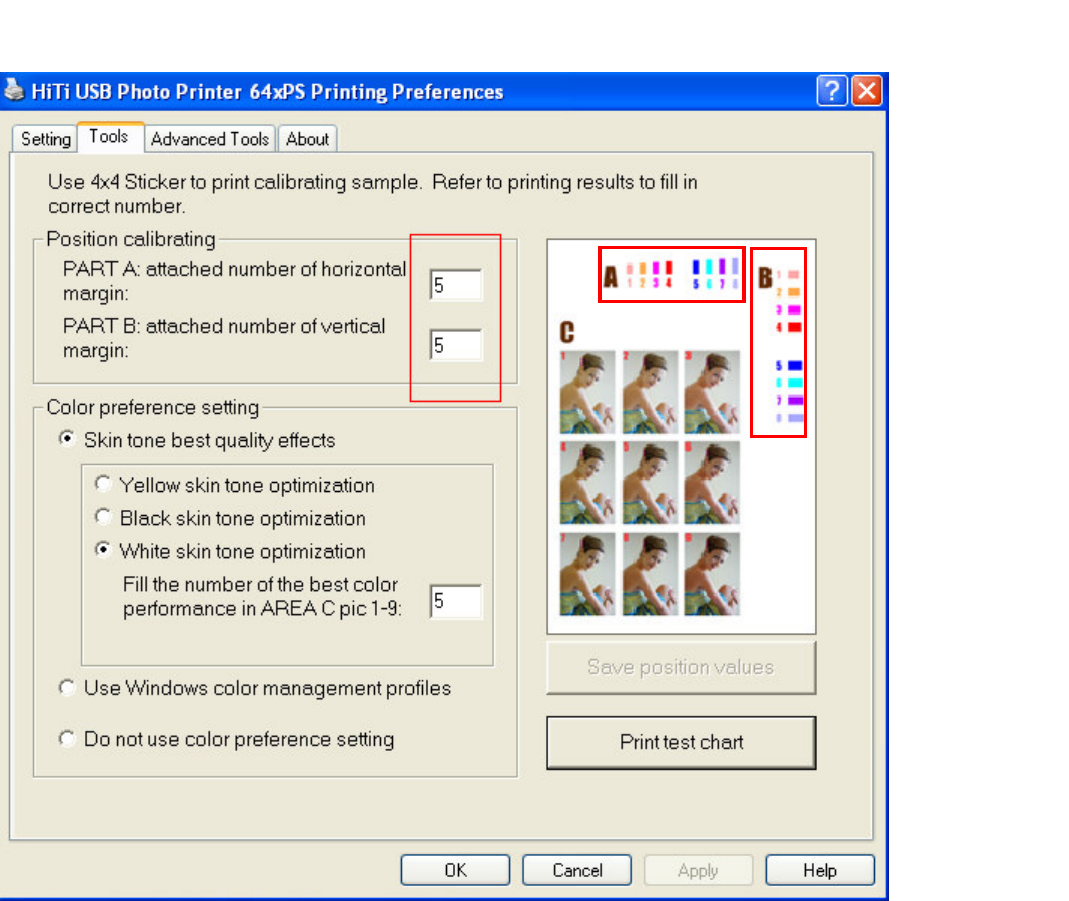
2005/12
7
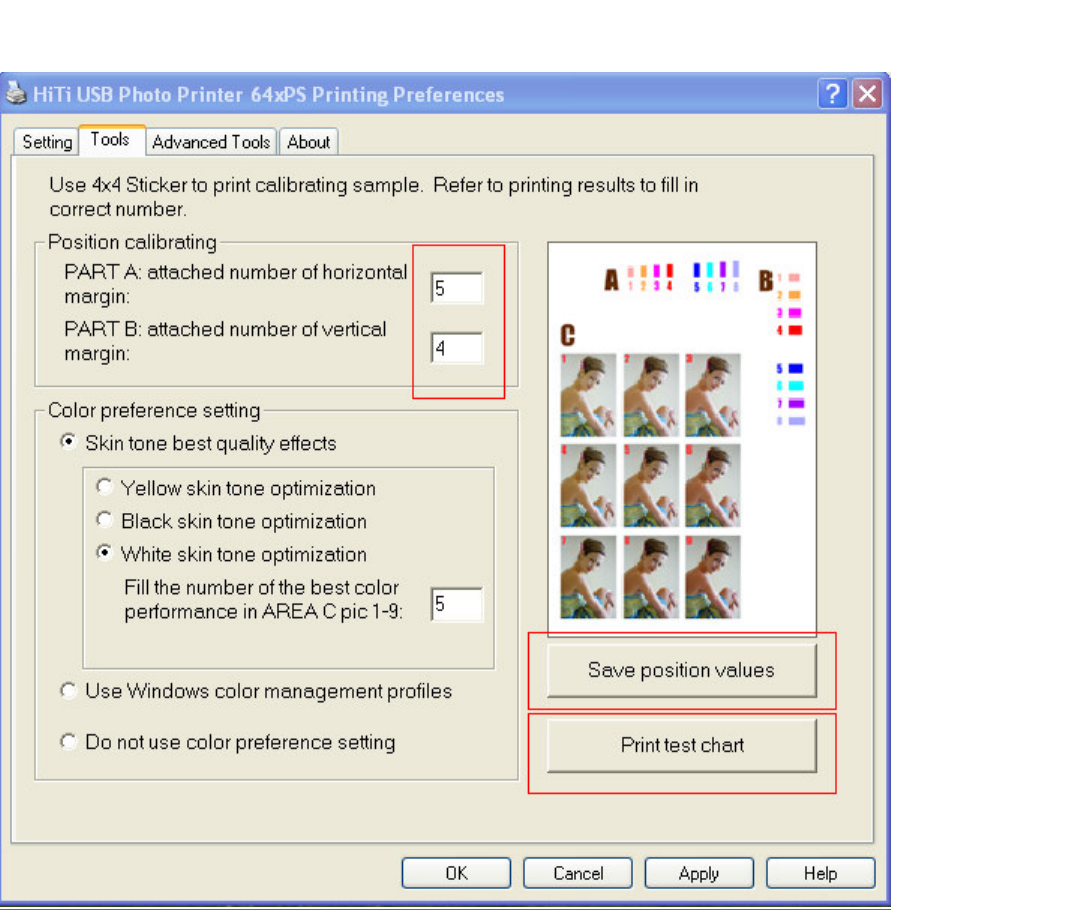
2005/12
7
Example:
At first, the coordinates are A=5 B=5 and the picture is slanted to upper left
By setting the coordinates to A=2 B=7, the image will move to lower right
After the calibration is completed, please select “Save position values”
2005/12
7
Q14: Can I keep the position setting when I reinstall my driver?
A:
When your settings are saved, the values will not change unless you modify it.
After you have reinstalled the driver, the values will return to default (A: 5, B: 5) but the true values will stay
the same in the printer (i.e. A: 5, B: 4).
Q15: What color modes will I have after installing the 730PS or 730Gala driver version 2.3 or above?
A:
You will be able to choose from 5 color modes.
(1) Gentle style.
(2) Classical style.
(3) Glamorous style.
(4) Portrait.
(5) Landscape.
Q16: What should I know before using the color chart?
A:
1. This function is not for adjusting the printout color. It is used to be a reference when you produce color on
images, i.e. ID background.
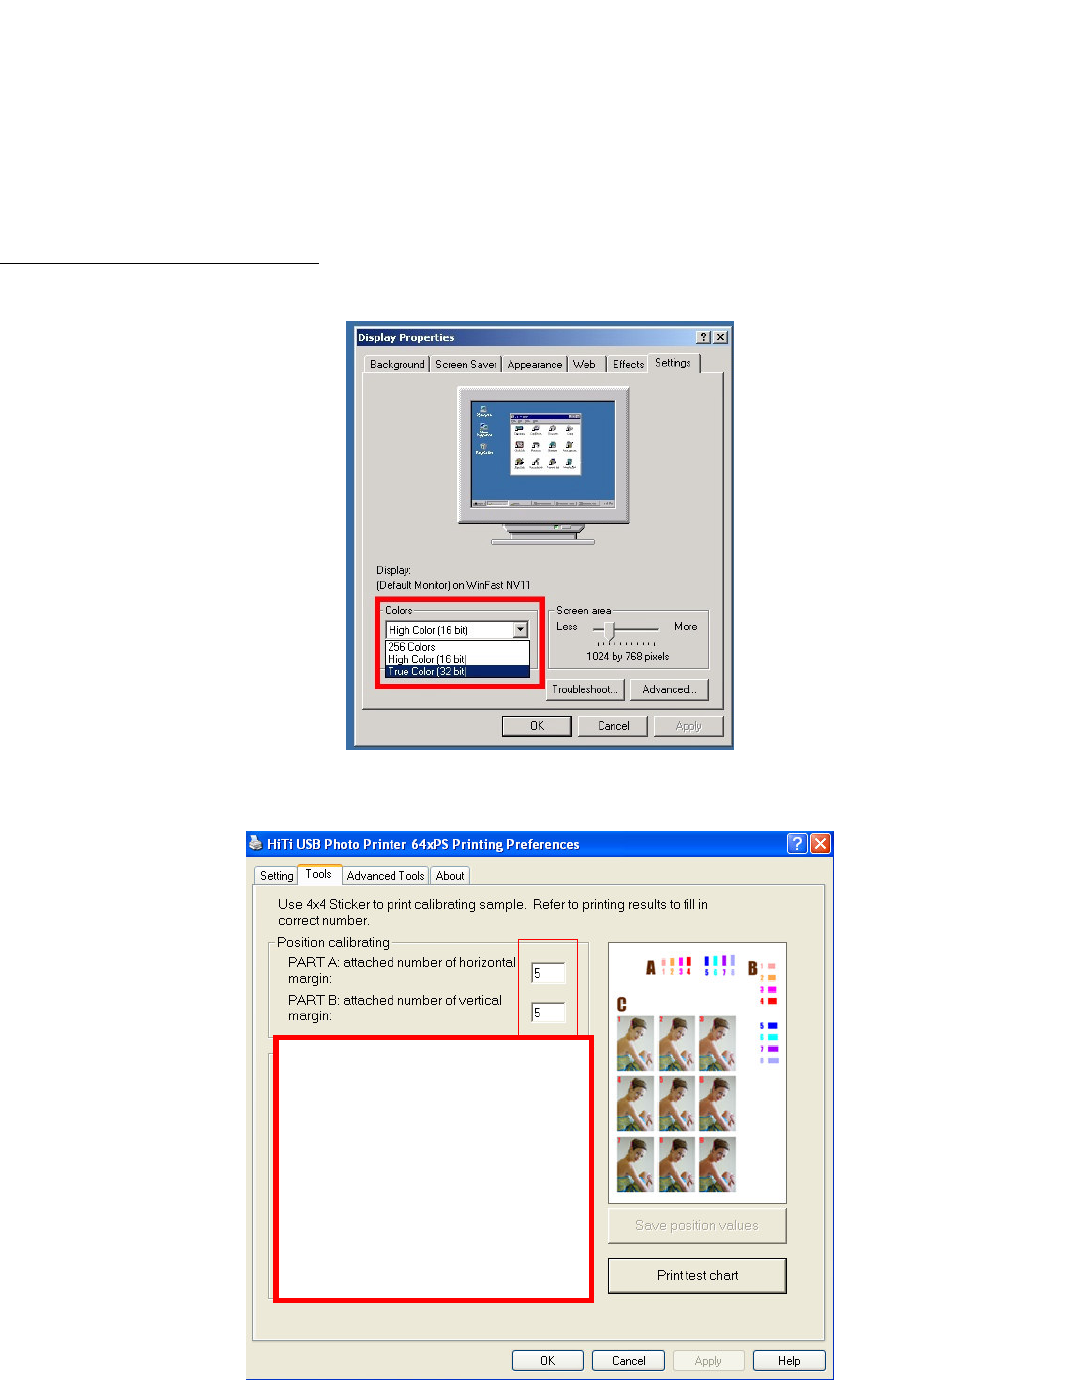
2005/12
7
2. User must print color charts out to get correct output RGB values as a reference if he would like to create
color with correct output by advanced image editing software.
3. PhotoDésirée 1or PhotoDésirée 2 does not support the function of creating image and setting RGB values.
Please use advanced image editing software (e.g. Photoshop, Illustrator, CorelDraw) if you would like to apply
RGB values to your works.
Q17: How to use the color chart?
A:
1. Please make sure that you had already set the Windows Color Display Mode to 24 bits or above.
2. Confirm printer’s “Color Preference Setting” from “Start/ Settings/ Printers/ HiTi USB Photo Printer xxxxx/
Printing Preferences/ Tools”. (Mind the change here will affect the color output now and future.)
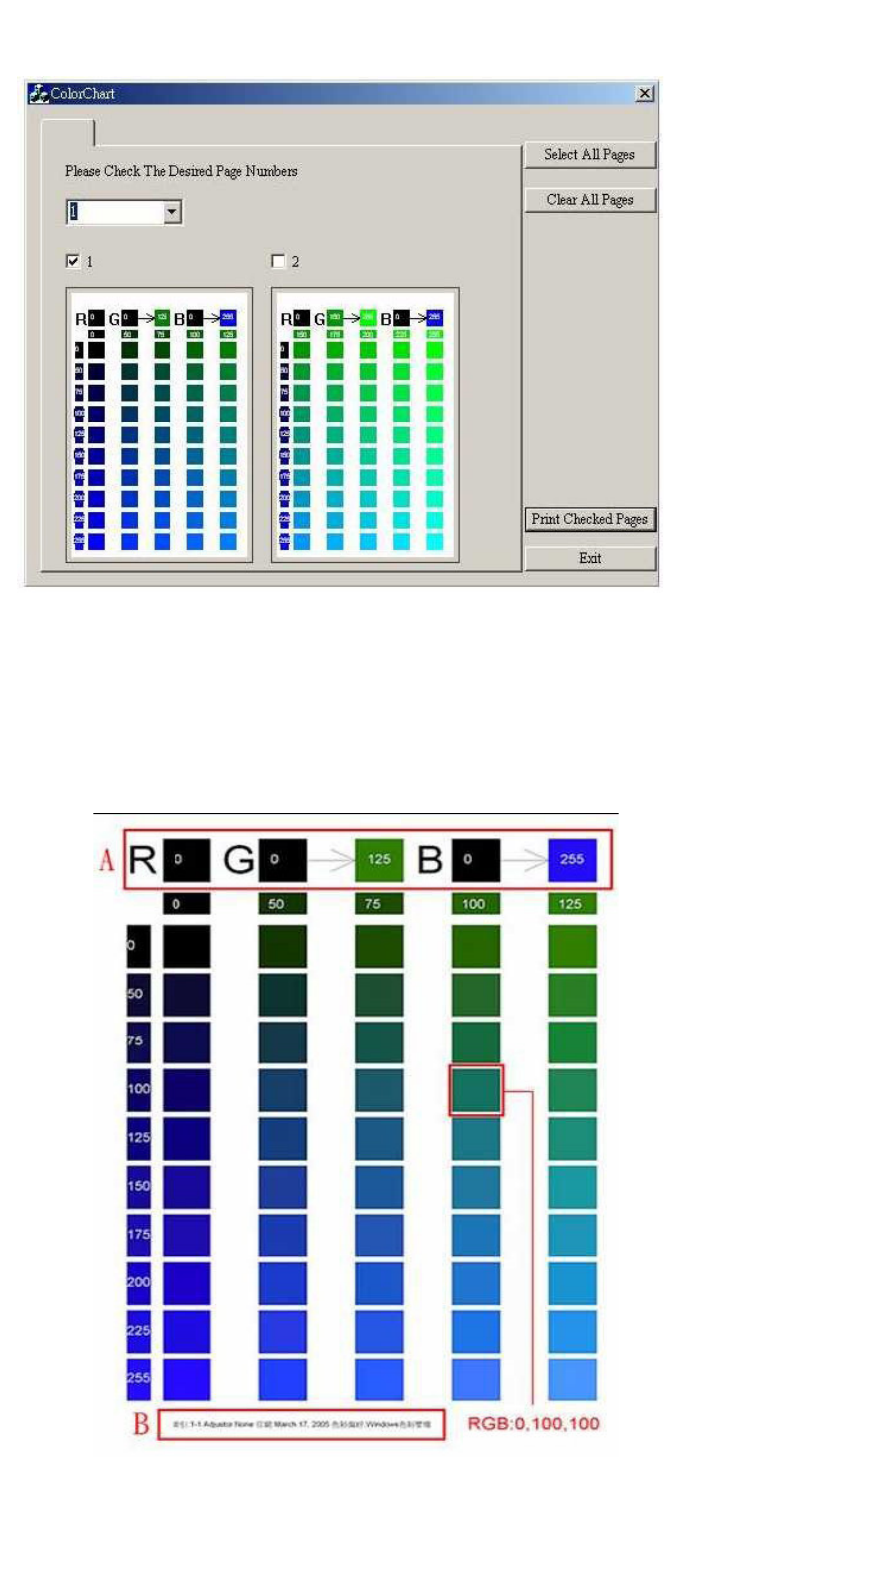
2005/12
7
3. Click “Start/ Settings/ Printers” and select the printer you had installed then select “Advanced Tool/ Color
Chart”.
4. Print selected color charts to obtain your favorite color and RGB values that HiTi printer will produce.
5. Identify the RGB axis. In the sample print below, “R” is fixed and equal to 0. “G” is horizontal, from “0
125”. “B” is vertical, from “0 255”. Assume that you would like to produce a deep green (color of red
square), RGB will be the one “0, 100, 100” showed below.

2005/12
7
Chap 6. Printing Problems
HiTi USB Photo Printers
Q1What can I do if I have scratches on my printout
A:
1. Please buy a HiTi cleaning kit. Clean the dust on the paper path through the printer by using cleaning paper
and a sponge-cleaning swab. (Paper path: Thermal Print Head, Tray-Front and Tray-Back.)
2. Please contact the HiTi Customer Service Department for further assistance..
Q2What can I do if a “Printer No Response” message occurs
A:
Possible reasons:
1. Compatibility problems caused by unstable or non-existent USB signal. There are some compatibility issues
with motherboards that have a VIA VT82C598B or SiS 7001 USB Host Controller.
2. The static electricity issues in your PC (There is a lack of prevention from static electricity in DIY PCs).
Please do some static electricity preventions(grounding) for motherboard or other boards.
3. Multitasking will affect the USB data transmission when printing. Please close all other programs while
printing.
4. Interference from other USB interfaced devices. Ex.: scanner, touch pad, other printers, etc.
Resolutions:
1. Please download and install the latest drivers. HiTi’s website: www.hi-ti.com
2. Please try a USB Hub (w/ power adapter) for stable data transmission. Recommended: Ergotech USB HUB
4 ports.
Q3What should I do if I see a “Print Error” error message
A:
1. This could happen due to lower temperature. Please retry printing.
2. It could be the problem of the “Analog Digital Converter”, please contact HiTi Customer Service
Department or your HiTi’s distributor for assistance.
Q4What should I do if I see a “Print Fail” error message
A:
It could be the problem that the printer cannot search for the correct color of ribbon during the printing, please
contact HiTi for help.
Q5What can I do if a “Ribbon Jam” error message occurs?
A:
1. Please download and install the latest drivers. HiTi’s website: www.hi-ti.com
2. Please do NOT pull the ribbon or scratch the roller by yourself. If you do troubleshooting in a wrong way, it
will be out of warranty. Please contact HiTi Customer Service Department or your HiTi’s distributor for
assistance. (HiTi’s staff will guide you how to resolve the problem step by step.)
3. Please do NOT reuse paper or stickers. The damage caused by reusing paper or sticker will be outside of
warranty coverage and HiTi will charge for services for this case.
Q6What can I do if a “Ribbon Out” error message occurs?
A:
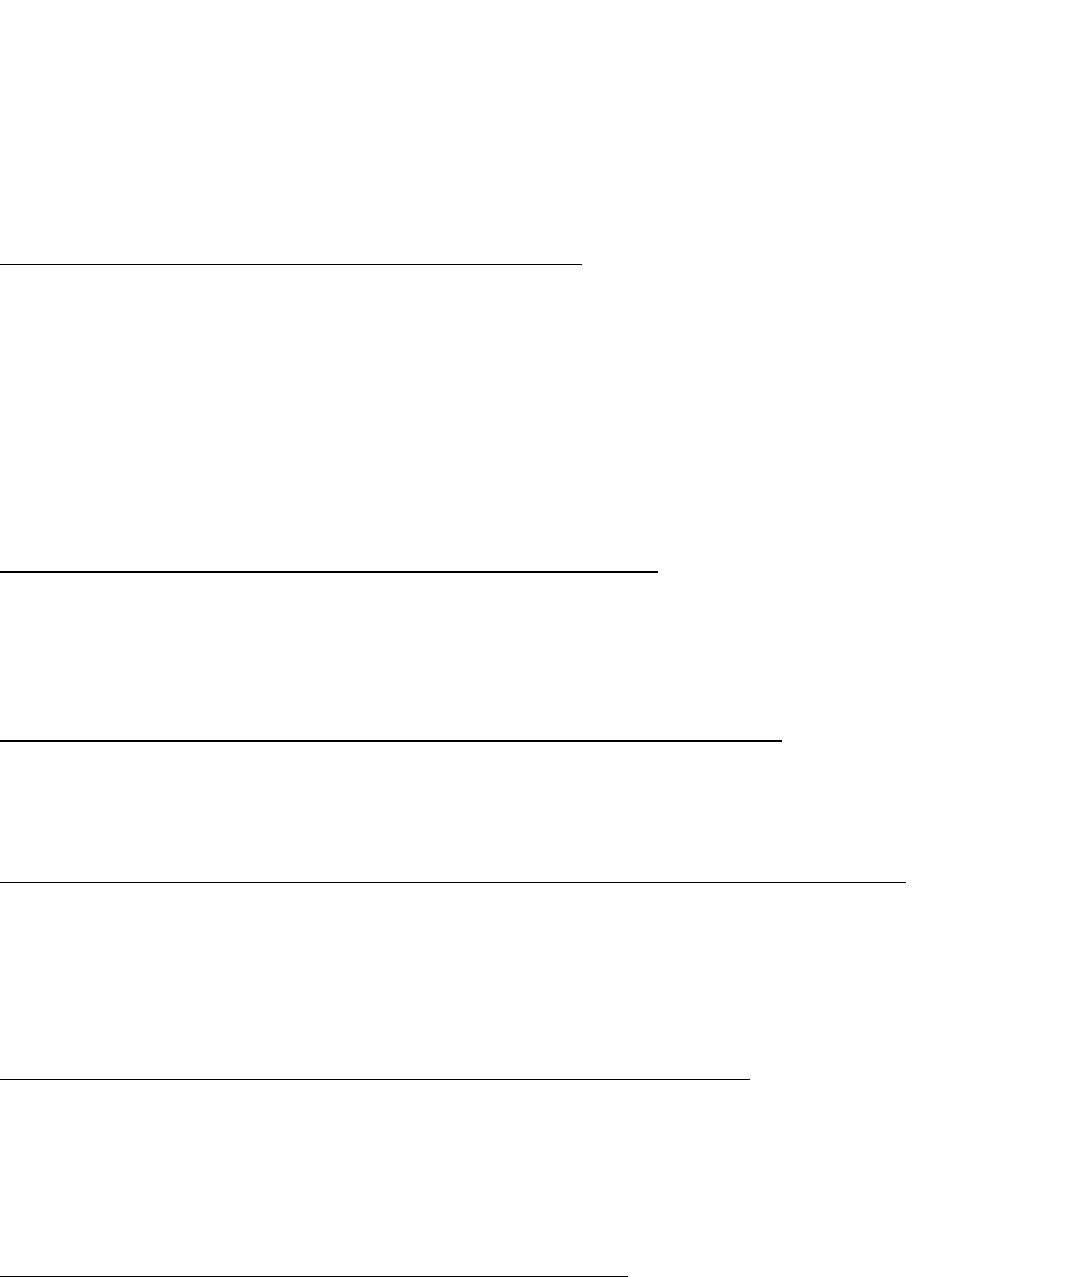
2005/12
7
1. Please make sure that the ribbon has run out (there shouldn’t be any ribbon left in the spool w/ the tab on the
side) If there is ribbon beyond yellow in the unused spool, then it was a pre-mature message and you should still
able to print.
2. Please contact HiTi Customer Service Department for further assistance. (HiTi’s staff will guide you how to
resolve the problem step by step.)
Q7What can I do if a “Paper Out” error message occurs
A:
1. Please turn the printer off and remove the paper cassette. Turn on the printer first, and then insert the paper
cassette. (To make sure the paper-feeding device is completely on the correct position.)
2. Please remove the paper cassette. Try to execute a printing job first, and then insert the paper cassette after
you see a “Paper Out” error message. (To make sure the paper-feeding device is completely on the correct
position.)
3. Please buy a HiTi cleaning kit. Use cleaning paper to clean the paper take-up roller.
4. To ensure paper or sticker is loaded well, please shake paper cassette after loading paper or sticker.
5. Please contact HiTi’s Customer Service Department or your HiTi’s distributor for further assistance.
Q8What can I do if a “Ribbon Mmissing” error message occurs
A:
1. Please reinstall the ribbon cartridge.
2. It may the problem of ribbon cartridge sensor; please contact HiTi Customer Service Department or your
HiTi’s distributor for further assistance.
Q9What should I do if a “Cover Open” error message occurs before printing
A:
1. Make sure the ribbon door has been closed tightly and correctly.
2. Make sure the ribbon cartridge has been installed properly.
Q10What should I do if a “Ribbon Type Mismatch” error message occurs before printing
A:
1. Open the ribbon door to make sure the ribbon was installed correctly.
2. Please make sure you are using a correct HiTi ribbon. (HiTi offers 4 types of ribbon: YMCO, YMCYMCO,
KO and Gold ribbons.)
3. Please make sure you are using HiTi’s ribbon, and it has no physical damage.
Q11What should I do if a “Paper Type Mismatch” error message occurs
A:
1. Make sure the paper was placed properly in the paper cassette.
2. Make sure the ribbon was placed properly in the printer.
3. Make sure you have placed the correct type of paper in accordance to your settings in the program that you
are using.
Q12What should I do if a “Paper Jam” error message occurs
A:
1. If ribbon and paper jam on the roller, please directly contact HiTi Customer Service Department or your
HiTi’s distributor for assistance.
2. If paper jams on the roller only, DO NOT pull the paper out immediately. Firstly, power off the printer.
After 5 seconds, power on the printer. The printer will reset and the paper will be released. You should then be
able to pull it out easily (Regardless of whether it is sticking out the front or the back end).

2005/12
7
Q13What should I do if I see an “Insufficient Memory” message when I try printing
A:
1. Please stop or close other applications that you are running.
2. Please make sure your computer system meets the printer’s minimum system requirements.
5. Expand your memory size.
Q14What should I do if I see “System resources insufficient”
A:
Restart your computer.
Q15What should I do if I see a “Printing data underrun” error message?
A:
Possible reasons:
1. Compatibility problems caused by unstable or non-existent USB signal. There are some compatibility issues
with motherboards that have a VIA VT82C598B or SiS 7001 USB Host Controller.
2. The static electricity issues in your PC (There is a lack of prevention from static electricity in DIY PCs).
Please do some static electricity preventions(grounding) for motherboard or other boards.
3. Multitasking will affect the USB data transmission when printing. Please close all other programs while
printing.
4. Interference from other USB interfaced devices. Ex.: scanner, touch pad, other printers, etc.
Resolutions:
1. Please download and install the latest drivers. HiTi’s website: www.hi-ti.com
2. Please try a USB Hub (w/ power adapter) for stable data transmission. Recommended: Ergotech USB HUB
4 ports.
Q16What should I do if I see a “Printer disconnected or suspended” or “Printer Off-Line” error message
A:
1. Make sure the printer is securely connected to the computer.
2. Make sure the printer is power on.
3. Make sure you have properly installed the printer drivers. Click “Start Menu/ Settings/ Control Panel/
System/ Device Manager/ Universal Serial Bus (USB) Controllers” [be sure to click the little ‘+’ sign to drop
down the list of USB controllers]. If you are using Windows 98, 98SE or ME, you will see “HiTi USB
PhotoPrinter 63xPL/63xPS”. If you are using Windows 2000 or XP, you will see “USB Printing Support”.
4. Make sure your computer system meets the printer’s minimum system requirements.
5. Make sure the Hi-Touch Photo Printer is installed, selected and its status is “Ready”. (Start Menu/ Settings/
Printers/ HiTi USB Photo Printer 63xPL). (It depends on model)
Q17What should I do if I see an “Allocate Memory Failed “ error message?
A:
1. Make sure the HiTi Photo Printer is installed properly. (Start Menu/ Settings/ Control Panel/ System/
Hardware/ Device Manager/ Universal Serial Bus Controller). If you are using Windows 98, 98SE or ME, you
will see something like “HiTi USB Photo Printer 63xPL/63xPS” listed. If you are using Windows 2000 or XP,
you will see “USB Printing Support” listed.
2. Make sure the USB devices you are set up properly. (USB port, USB Hub or USB cable)
3. This kind of problem will be minimized in using Photo Désirée. Please try printing with Photo Désirée.
4. If you have too many applications opened, please close them. Rebooting your PC may work as well.
5. Don’t print with 2 printers simultaneously. (multi-task)
6. Don’t connect to networks when printing if your network is not good enough.

2005/12
7
7. Check your USB conditions. (especially Intel 815 or VIA 694x chipsets) You must have the correct
Intel/VIA INF updated files, and you must install them under Windows 98. Otherwise, the USB port will not
detect a USB printer or you may have a low speed of data transmission.
Intel chipset INF download:
http://support.intel.com/support/chipsets/
VIA chipset driver download:
http://www.via.com.tw/jsp/en/dr/driver.jsp
8. Turn off the printer, wait 5 seconds then turn it on again.
9. Reboot your PC.
10. If the problem still exists, please contact the HiTi Customer Service Department or HiTi’s distributors for
help.
Q18What should I do if I see an “Output data CRC error” error message?
A:
Possible reasons:
1. Compatibility problems caused by unstable or non-existent USB signal. There are some compatibility issues
with motherboards that have a VIA VT82C598B or SiS 7001 USB Host Controller.
2. The static electricity issues in your PC (There is a lack of prevention from static electricity in DIY PCs).
Please do some static electricity preventions(grounding) for motherboard or other boards.
3. Multitasking will affect the USB data transmission when printing. Please close all other programs while
printing.
4. Interference from other USB interfaced devices. Ex.: scanner, touch pad, other printers, etc.
Resolutions:
1. Please download and install the latest drivers. HiTi’s website: www.hi-ti.com
2. Please try a USB Hub (w/ power adapter) for stable data transmission. Recommended: Ergotech USB HUB
4 ports.
Q19: What should I do if I see a “Printer response data CRC error” error message
A:
Possible reasons:
1. Compatibility problems caused by unstable or non-existent USB signal. There are some compatibility issues
with motherboards that have a VIA VT82C598B or SiS 7001 USB Host Controller.
2. The static electricity issues in your PC (There is a lack of prevention from static electricity in DIY PCs).
Please do some static electricity preventions(grounding) for motherboard or other boards.
3. Multitasking will affect the USB data transmission when printing. Please close all other programs while
printing.
4. Interference from other USB interfaced devices. Ex.: scanner, touch pad, other printers, etc.
Resolutions:
1. Please download and install the latest drivers. HiTi’s website: www.hi-ti.com
2. Please try a USB Hub (w/ power adapter) for stable data transmission. Recommended: Ergotech USB HUB
4 ports.
Q20: What should I do if I see “Read file error” error message
A:
Possible reasons:
1. Compatibility problems caused by unstable or non-existent USB signal. There are some compatibility issues
with motherboards that have a VIA VT82C598B or SiS 7001 USB Host Controller.
2. The static electricity issues in your PC (There is a lack of prevention from static electricity in DIY PCs).
Please do some static electricity preventions(grounding) for motherboard or other boards.
3. Multitasking will affect the USB data transmission when printing. Please close all other programs while
printing.
4. Interference from other USB interfaced devices. Ex.: scanner, touch pad, other printers, etc.

2005/12
7
Resolutions:
1. Please download and install the latest drivers. HiTi’s website: www.hi-ti.com
2. Please try a USB Hub (w/ power adapter) for stable data transmission. Recommended: Ergotech USB HUB
4 ports.
Q21: What should I do if I see a “Write File time out”, “Write File Error” or “Write Port Error” error message
A:
Possible reasons:
1. Compatibility problems caused by unstable or non-existent USB signal. There are some compatibility issues
with motherboards that have a VIA VT82C598B or SiS 7001 USB Host Controller.
2. The static electricity issues in your PC (There is a lack of prevention from static electricity in DIY PCs).
Please do some static electricity preventions(grounding) for motherboard or other boards.
3. Multitasking will affect the USB data transmission when printing. Please close all other programs while
printing.
4. Interference from other USB interfaced devices. Ex.: scanner, touch pad, other printers, etc.
Resolutions:
1. Please download and install the latest drivers. HiTi’s website: www.hi-ti.com
2. Please try a USB Hub (w/ power adapter) for stable data transmission. Recommended: Ergotech USB HUB
4 ports.
Q22: What should I do if the printer won’t work
A:
1. Turn off and disconnect the printer. Make sure the printer is securely connected to the computer. Restart the
computer and the printer. Print again.
2. Make sure you are using HiTi Photo Printer drivers and that the driver is installed correctly. Click “Start
Menu/ Settings/ Control Panel/ System/ Device Manager/ Universal Serial Bus Controller” to check. If you are
using Windows 98, 98SE or ME, you will see something like “HiTi USB Photo Printer 63xPL/63xPS” listed. If
you are using Windows 2000 or XP, you will see “USB Printing Support” listed.
3. A poor USB card or Hub will also contribute to link problems between the printer and the PC.
1.
Q23: What should I do if the printing speed has gotten slower
A:
1. When you first begin printing (this must be the first time after the printer has cooled off) a “System
Processing” window will pop up and a vertical bar will rise on the right side from orange to red. This is
actually preheating the printer heads to a working temperature. If the printer continues to preheat after each
consecutive print, the TPH thermostat or its related cables may have failed. Please contact HiTi’s Customer
Service Department or your HiTi’s distributor for assistance.
2. If you have another PC, please try to operate this printer on it to make sure that the problem is related to the
printer and not the PC.
3. If you have another HiTi photo printer, please try printing from it to check if the speed is slow for that
printer as well. If so, try reinstalling the driver.
Q24: What should I do if What should I do if “Matte” or “Magic Coating” effect is not smooth and even when I
use 641PS to print?
A:
1. This kind of problem only occurs when you print “Matte” or “Magic Coating” effect by 641PS in the PC
mode. It won’t happen in stand alone mode.
2. This problem only occurs when the firmware version is 1.00, 1.01 or 1.02. Please download and upgrade
the latest firmware to resolve this problem.
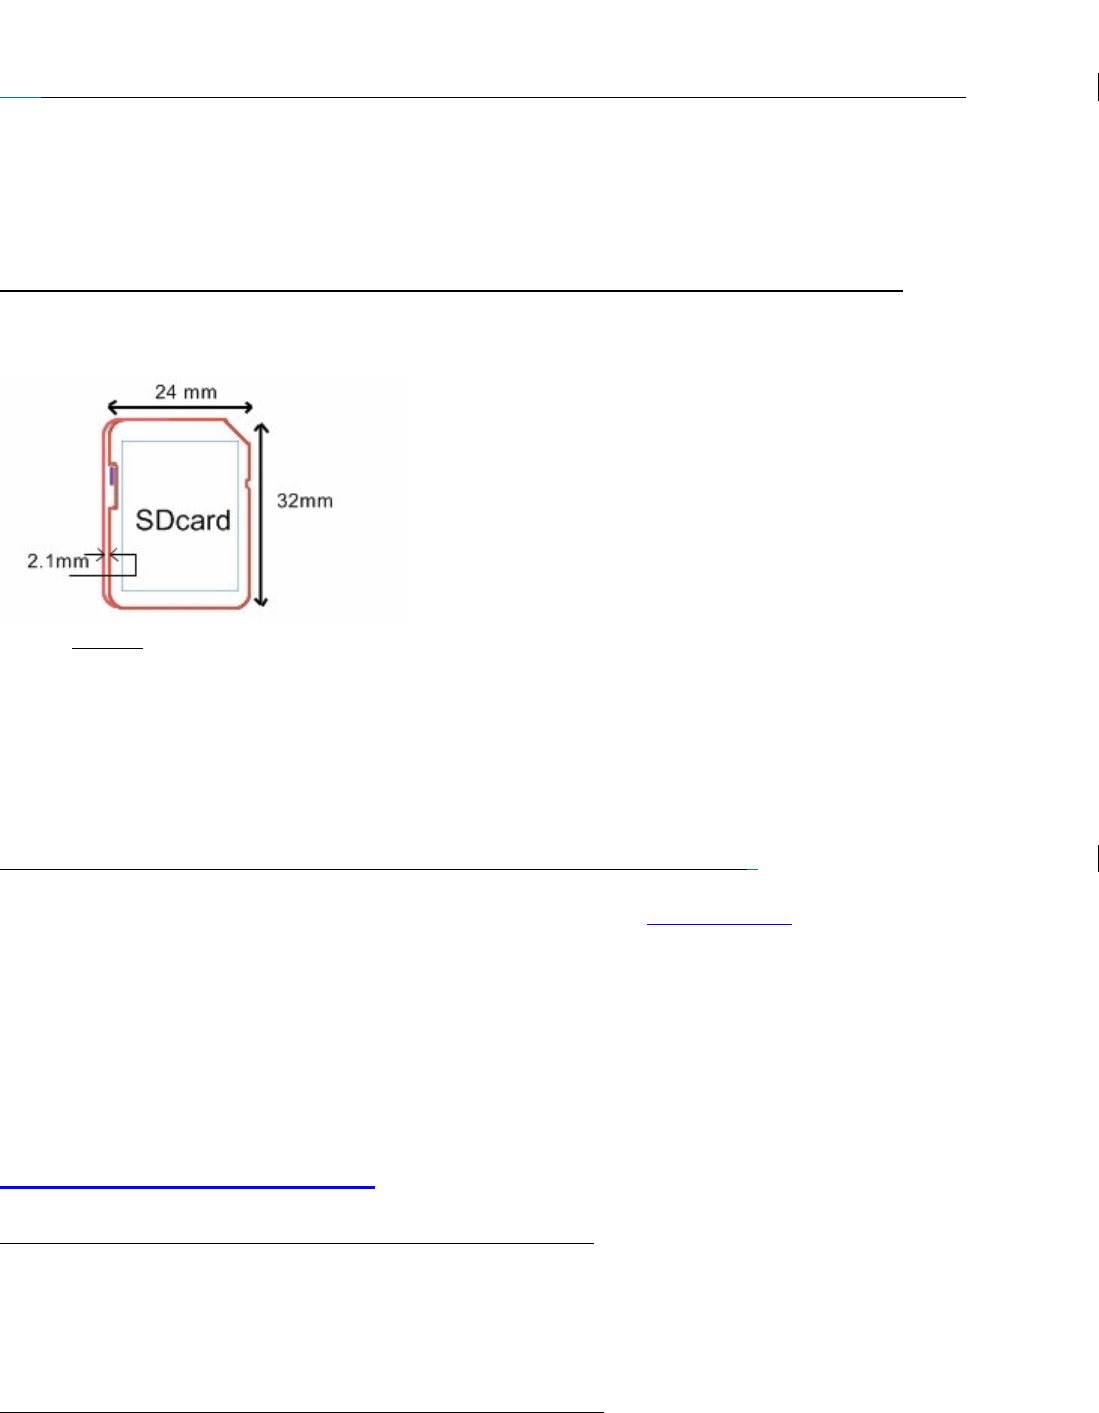
2005/12
8
Q25: What should I do if I see“Paper Jam” error message when printing job is completed by 641PS?
A:
1. This kind of problem occurs when user enters setup, back to menu and switches the standalone mode to the
PC mode without resetting the HiTi 641PS.
2. Please pull the paper out gently and reset the printer.
3. Before switching the standalone mode to the PC mode, please power off the printer first.
Q26: Why does my printer sometimes show “Card Error” message when I insert my SD card?
A:
1. Here is the standard size of SD Memory Card: 24mm x 32mm x 2.1mm. Over thin SD card may bring card
error message sometimes because the contact between card reader and SD card may be incomplete.
NOTE:
Some manufacturers have slight differences of size and specification.
2. To avoid problems during usage of SD cards, we recommend our customers to use qualified SD card
manufacturers such as Panasonic, SanDisk.
3. Sometimes this might occur when user did not insert the SD card in its right position or insert the SD card
with a very slow speed; please reinsert it.
Q27: What should I do if the paper and ribbon both jammed inside my printer?
A:
1. Please download and install the latest drivers. HiTi’s website: www.hi-ti.com
2. Please do NOT pull the ribbon and paper or scratch the roller by yourself. If you do the troubleshooting in
the wrong way, it will be out of warranty. Please contact HiTi Customer Service Department or your HiTi’s
distributor for assistance. (HiTi’s staff will guide you how to resolve the problem step by step.)
3. Please do NOT reuse paper or stickers. The damage caused by reusing paper or sticker will be out of
warranty coverage and HiTi will charge for services for this case.
HiTi USB Card Printers
Q1: What should I do if my PVC cards have color shadows
A:
1. Please make sure the PVC cards you are using are HiTi’s standard PVC cards.
2. Do NOT scratch roller if you meet jam problem.
3. Please contact HiTi’s Customer Service Department or your HiTi’s distributor for assistance.
Q2: What should I do if a “Paper Jam” error message occurs
A:

2005/12
8
1. Please make sure the PVC cards you are using are HiTi’s standard PVC cards.
2. Please make sure the PVC cards are separated before you install them into paper cassette. (HiTi suggest
unfolding PVC cards by your hands before installation.)
3. If jam problem happens, please switch off the printer. 5 seconds later, switch on the printer then pull
jammed PVC card out from the front or back exit slot.
4. Please contact HiTi’s Customer Service Department or your HiTi’s distributor for assistance.
Q3: What should I do if my PVC cards have a white line
A:
1. Please make sure there is nothing stuck on the surface of thermal print head. HiTi suggests using HiTi
Cleaning Kit to maintain your printer after per 100 printings.
2. If you have cleaned thermal print head but the line still exists, please contact HiTi’s Customer Service
Department or your HiTi’s distributor for further assistance.
Q4: What should I do if my PVC cards have some horizontal lines
A:
1. Please make sure the PVC cards you are using are HiTi’s standard PVC cards.
2. Please contact HiTi’s Customer Service Department or your HiTi’s distributor for assistance.
Q5: What can I do if a “Ribbon Out” error message occurs?
A:
1. Please make sure that the ribbon has run out (there shouldn’t be any ribbon left in the spool w/ the tab on the
side) If there is ribbon beyond yellow in the unused spool, then it was a pre-mature message and you should still
able to print.
2. Please contact HiTi Customer Service Department for further assistance. (HiTi’s staff will guide you how to
resolve the problem step-by-step.)
Q6: What can I do if a “Paper Out” error message occurs
A:
1. Please turn the printer off and remove the paper cassette. Turn on the printer first, and then insert the paper
cassette. (To make sure the paper feeding device is completely on the correct position.)
2. Please remove the paper cassette. Try to execute a printing job first, and then insert the paper cassette after
you see a “Paper Out” error message. (To make sure the paper feeding device is completely on the correct
position.)
3. Do NOT remove paper cassette under processing..
4. Do NOT install paper cassette under processing.
5. Please buy a HiTi cleaning kit. Use cleaning paper to clean the paper take-up roller.
6. To ensure PVC cards are loaded well, please unfold PVC cards before loading PVC cards and shake paper
cassette after loading PVC cards.
7. Please contact HiTi’s Customer Service Department or your HiTi’s distributor for further assistance.
Q7: What can I do if a “Ribbon Mmissing” error message occurs
A:
1. Please reinstall the ribbon cartridge.
2. It may the problem of ribbon cartridge sensor; please contact HiTi’s Customer Service Department or your
HiTi’s distributor for further assistance.
Q8: What should I do if a “Cover Open” error message occurs before printing
A:

2005/12
8
1. Make sure the ribbon door has been closed tightly and correctly.
2. Make sure the ribbon cartridge has been installed properly.
Q9: What should I do if a “Ribbon Type Mismatch” error message occurs before printing
A:
1. Open the ribbon door to make sure the ribbon was installed correctly.
2. Please make sure you are using a correct HiTi ribbon. (HiTi offers 4 types of ribbon: YMCO, YMCYMCO,
KO and Gold ribbons.)
3. Please make sure you are using HiTi’s ribbon, and it has no physical damage.
Q10: What should I do if a “Paper Type Mismatch” error message occurs
A:
1. Make sure the media was placed properly in the paper cassette.
2. Make sure the ribbon was placed properly in the printer.
3. Make sure you have placed the correct type of media in accordance to your settings in the program that you
are using.
Q11: How come printed PVC card gets fading
A:
1. Please don’t put printed PVC card into the holder which is made by PVC, or the color of printed PVC card
will be stuck or transferred to PVC holder. HiTi suggests:
(1) Laminate a cold lamination film to printed PVC card as a protection.
(2) Put PET or OPP slim and transparent cards to card holder to isolate printed PVC card and card holder.
(3) Put printed PVC card into the holder which is made by PET or OPP, but PVC.
2. Please don’t use printed PVC card under the surrounding of high temperature or high humidity.
3. Please don’t store printed PVC card with abrasive surface. (i.e. wallet.)
Mug Press Kit
Q1: How do I maintain the mug?
A:
1. Please do not wash it by dishwasher.
2. Please do not wash it by warm or hot water.
3. Please do not wash it by coarse fabric.
4. Please do not wash it by organic solvent, for instance, ethanol, decolorant and alkali... etc.
5. Please do not place it directly under the sunlight.
6. Use water to wash only.
Q2: How do I make good quality mug?
A:
1. Make sure the temperature settings are correct.
2. Slow down the speed of the action of bubble elimination.
3. Make sure there is no any bubble between the paper and the mug.
4. Make sure the size of image printout is under 74mm.
5. Make sure the printout is printed by MugDésirée.
6. Make sure you have trimmed the paper to fit the size of mug.
Q3: How do I do if I see a “No Mug” error message?
2005/12
8
A:
Please follow following steps to fix up the problem.
1. Press “OK” button to stop music.
2. Make sure the opening of mug is upward.
3. Press “OK” button to continue.
4. If you still got the same problem, please contact HiTi Customer Service Department or your HiTi’s
distributor for assistance.
Q4: How do I do if I see a “Cover Open” error message?
A:
Please follow following steps to fix up the problem.
1. Press “OK” button to stop music.
2. Make sure the cover of mug machine is completely close.
3. Press “OK” button to continue.
4. If you still got the same problem, please contact HiTi Customer Service Department or your HiTi’s
distributor for assistance.
Q5: How do I do if I see an “ADC Fail”, ”TCX Fail”, ”Time Out” or ”Over Heat” error message?
A:
Please follow following steps to fix up the problem.
5. Press “OK” button to stop music.
6. Switch off the power. After 2 minutes, switch on the printer and make sure the cover of mug machine is
completely close.
7. Press “OK” button to continue.
8. If you still got the same problem, please contact HiTi Customer Service Department or your HiTi’s
distributor for assistance.
Q6: When should I change the heater plate?
A:
1. When you keep seeing an ”ADC Fail” or ”Time Out” error message.
2. Please contact HiTi Customer Service Department or your HiTi’s distributor for assistance.
Q7: How do I change the heater plate?
A:
Please follow following steps to change the heater plate.
1. Switch off the mug machine until the temperature is low.
2. Pull the heater plate out slowly and slightly, then disconnect the connector wire.
3. Have a new heater plate and connect the connector wire.
4. Put the wire back to its original location, and then install the heater plate.
5. If you got any problem on it, please contact HiTi Customer Service Department or your HiTi’s distributor
for assistance.
Q8: Where can I buy the heater plate?
A:
The heater plate is sold with 2 pieces of Teflon.
1. Please contact your local distributor or dealer for purchase information.
2. Purchase it from HiTi Website.
Taiwan: www.hitishop.com.tw
USA: www.hitishop.com
Worldwide Distributors: www.hi-ti.com/english

2005/12
8
Q9: Why can I buy the Teflon?
A:
The heater plate is sold with 2 pieces of Teflon.
1. Please contact your local distributor or dealer for purchase information.
2. Purchase it from HiTi Website.
Taiwan: www.hitishop.com.tw
USA: www.hitishop.com
Worldwide Distributors: www.hi-ti.com/english
Consumables
Q1Can I re-use sticker sheets that have already been printed on?
A: No.
1. If you re-use the stickers, it will likely cause a ribbon jam or paper jam, and possibly further damage the
printer. This is NOT covered in the warranty. HiTi will charge for service for these cases.
2. Paper and sticker are sold with ribbon and the numbers are matched to give you a print for each sheet. If you
reuse stickers, you will have unused sheets remaining.
Q2Can I re-use paper that has been printed on?
A: No.
1. If you re-use the paper, it will likely cause a ribbon jam or paper jam, and possibly further damage the
printer. This is NOT covered in the warranty. HiTi will charge for service for these cases.
2. Paper and sticker are sold with a ribbon and the numbers are matched to give you a print for each sheet. If
you re-use paper, you will have unused sheets remaining.
Q3Can I re-use Ribbon’s?
A: No.
Because paper and sticker are sold with ribbon and the numbers are matched to give you a print for each sheet.
If you re-use ribbon, you will have unused ribbon when the paper or sticker has run out.
Q4Can I use Ribbon of other brands?
A: No.
Please do NOT use other brands of ribbon. The dimension, thickness, detachable border size and printable side
viscosity of other brands are different from HiTi photo paper and sticker. If you use them, they may cause
serious damage to the printer. The damage caused by using other brands of ribbon will not be covered by the
warranty and HiTi will charge for service of this case.
Q5Can I use paper or sticker of other brands?
A: No.
Please do NOT use other brands of paper and sticker. The dimension, thickness, detachable border size and
printable side viscosity of other brands are different from HiTi photo paper and sticker. If you use them, they
may cause serious damage to the printer. The damage caused by using other brands of paper or stickers will be
outside warranty coverage and HiTi will charge for service in these cases.
Q6How can I do if the paper hasn’t been ejected completely, or has been released with some wrinkles
A:
1. Make sure you are using HiTi photo paper or sticker sheets.

2005/12
8
2. Make sure you have loaded the papers properly into the paper cassette.
3. Make sure the printer has enough space to eject the paper from both front and back slots of the printer.
4. Make sure the paper is placed on a flat surface such as a table before you start printing.
5. Don’t drop the ribbon cartridge due to negligence.
Q7How do I prevent the printer from feeding multiple pages at the same time
A:
1. Make sure the paper you are using is HiTi photo paper or sticker sheets.
2. Make sure the paper you are using is not used paper.
3. Make sure the printable side is face up.
4. Flip PVC cards before installation. (Please make sure PVC cards are not adherent each other.)
5. If the foregoing steps still cannot fix your problem, please contact the HiTiCustomer Service Department or
your HiTi distributors for help.
Q8Can I re-use PVC card that has been printed on?
A: No.
1. If you re-use the PVC card, it will likely cause a ribbon jam or paper jam, and possibly further damage the
printer. This is NOT covered in the warranty. HiTi will charge for service for these cases.
2. Paper and sticker are sold with a ribbon and the numbers are matched to give you a print for each sheet. If
you re-use paper, you will have unused sheets remaining.
LCD Controller
Q1Why does the 630PS’s LCD display "Please insert the card" while my memory card is already inserted
A:
1. Possible memory card issue:
(1) Holes on the CF card are too big (does not meet the standard specification set by the CompactFlash
Association).
(2) The memory card is defective.
2. Possible printer issue:
(1) The pins in the CF card slot are bent or skewed.
(2) The memory card slot is warped or misaligned so that your memory card does not plug in
properly.
(3) The embedded memory card reader may be defective.
Q2: Why do some images display “Edit” on the LCD controller preview page?
A:
HiTi Photo Printer reads thumbnails of images to produce a preview of the image on the LCD Preview Page.
Thus, if the images saved in your memory card do not have thumbnails or they are not standard EXIF images,
you cannot preview them on the LCD Preview Page. You can still, however, click the “Edit” button to preview
and print them.
Q3Why won’t some images show up on the 630PS’s LCD Preview Page
A:
When you insert your memory card, the HiTi 630PS will search for JPEG format images first. Most of the
images should be EXIF files (supported by most digital cameras in the market) which come along with
2005/12
8
thumbnail files. These thumbnails will be what you view on the LCD’s preview pages. [The thumbnail is
created along with actual image in the camera itself when shots are taken]
1. If the image file does not include a thumbnail, the "EDIT" icon will appear instead of the thumbnail.
2. A "Broken flower" icon will appear due to the following:
a. Below Firmware V1.42 (included):
(1) The image file in the memory card is damaged or not in a standard JPEG format.
(2) The total number pixels in the image files are more than 6MP (megapixels).
(3) The maximum length of the image is more than 2,950 pixels.
(4) The size of the image file is larger than 3MB (megabytes).
b. Firmware V1.43~V1.49 (included):
(1) The image file in the memory card is damaged or not in a standard JPEG format.
(2) The total number pixels in the image files are more than 8MP (megapixels)
(3) The maximum length of the image is more than 3,470 pixels.
(4) The size of the image file is larger than 8MB (megabytes).
c. Above Firmware V1.50 (included):
(1) The image file in the memory card is damaged or not in a standard JPEG format.
(2) The total number pixels in the image files are more than 32MP (megapixels)
(3) The maximum length of the image is more than 6,000 pixels.
(4) The size of the image file is larger than 8MB (megabytes).
Q4What is the specification of file allocation table(FAT) that HiTi’s printers support?
A: FAT
Model FAT 12 FAT 16 FAT 32 NTFS
730PS/Gala X X
630PS/ID X X
Transphotable
X X
640ID X X
640PS X X
640Gala X
641PS X
Q5What is the specification of file allocation table(FAT) that memory cards support?
A:
2005/12
8
FAT
Size FAT 12 FAT 16 FAT 32 NTFS
16 MB X
32 MB X
64 MB X
128 MB X
256 MB X X
512 MB X X
1 GB X X
2 GB X X
4 GB X X X
Q6What is the specification of file size and image size that HiTi 730PS and 730Gala support?
A:
730PS/Gala Firmware
(version)
Max. File Size
(Byte) Max. Image Size
(Pixel)
File Format
Media Type JPEG TIFF JPEG TIFF
Photo 8M 23M 34M 7.8M
ID 8M 23M 33M 7.8M
Sticker
All
8M 23M 31M 7.8M
Note:
1. For JPEG format, either width or height of one image is restricted to 6,000 pixels.
Q7What is the specification of file size and image size that HiTi 630PS and 630ID support?
A:
630PS/630ID Firmware
(version)
Max. JPEG File
Size (Byte) Max. Image Size
(Pixel)
Photo 8M 32M
ID 8M 32M
Sticker
From
v1.50 8M 32M
Note:
1. 630PS/ID supports JPEG file only.
2. Either width or height of one image is restricted to 6,000 pixels.
630PS/630ID Firmware
(version)
Max. JPEG File
Size (Byte) Max. Image Size
(Pixel)
Photo 8M 8M
ID 8M 8M
Sticker
From
v1.41 to
v1.49 8M 8M
Note:
1. 630PS/ID supports JPEG file only.
2. Either width or height of one image is restricted to 3,470 pixels.
630PS/630ID Firmware
(version)
Max. JPEG File
Size (Byte) Max. Image Size
(Pixel)
Photo 3M 6M
ID
Before
v1.41 3M 6M
2005/12
8
Sticker 3M 6M
Note:
1. 630PS/ID supports JPEG file only.
2. Either width or height of one image is restricted to 2,950 pixels.
Q8What is the specification of file size and image size that HiTi Transphotable supports?
A:
Transphotable Firmware
(version)
Max. JPEG File
Size (Byte) Max. Image Size
(Pixel)
Photo 8M 8M
ID 8M 8M
Sticker
All
8M 8M
Note:
1. Transphotable supports JPEG file only.
2. Either width or height of one image is restricted to 3,470 pixels.
Q9What is the specification of file size and image size that HiTi 640ID supports?
A:
640ID Firmware
(version)
Max. JPEG File
Size (Byte) Max. Image Size
(Pixel)
Photo 8M 32M
ID 8M 32M
Sticker
From
v1.06 8M 32M
Note:
1. 640ID supports JPEG file only.
2. Either width or height of one image is restricted to 6,000 pixels.
640ID Firmware
(version)
Max. JPEG File
Size (Byte) Max. Image Size
(Pixel)
Photo 8M 8M
ID 8M 8M
Sticker
Before
v1.06 8M 8M
Note:
1. 640ID supports JPEG file only.
2. Either width or height of one image is restricted to 3,470 pixels.
Q10What is the specification of file size and image size that HiTi 640PS supports?
A:
640PS Firmware
(version)
Max. JPEG File
Size (Byte) Max. Image Size
(Pixel)
Photo 8M 32M
ID 8M 32M
Sticker
From
v1.10 8M 32M
Note:
1. 640PS supports JPEG file only.
2. Either width or height of one image is restricted to 6,000 pixels.
640PS Firmware
(version)
Max. JPEG File
Size (Byte) Max. Image Size
(Pixel)
Photo
Before
8M 8M
2005/12
8
ID 8M 8M
Sticker
8M 8M
Note:
1. 640PS supports JPEG file only.
2. Either width or height of one image is restricted to 3,470 pixels.
Q11What is the specification of file size and image size that HiTi 640Gala supports?
A:
640Gala Firmware
(version)
Max. JPEG File
Size (Byte) Max. Image Size
(Pixel)
Photo 8M 32M
ID 8M 32M
Sticker
From
v1.00 8M 32M
Note:
1. 640Gala supports JPEG file only.
2. Either width or height of one image is restricted to 6,000 pixels.
Q12How come I got a “Card Error” message when I remove my xD card from card adapter on the printer?
A:
The xD card adapter will check the xD card automatically. If you would like to remove the xD card from the
printer, please remove the xD card adapter at the same time to avoid “Card Error” problem. (xD card adapter is
NOT one of HiTi’s accessories.)
Q13How come I got a “Card Error” message when I plug in the memory card?
A:
1. 63xPS/ID and 640PS/ID/Gala:
(1) If “Card Error” text is in WHITE, it means that it is the memory card format problem. Please make
sure your memory card is formatted by FAT 12 or FAT16.
(2) If “Card Error” text is in RED, it means that it is the electronic problem. Please contact HiTi Customer
Service Department or your HiTi’s distributor for assistance.
2. 641PS:
(1) If “Card Error” text is in WHITE, it means that it is the memory card format problem. Please make
sure your memory card is formatted by FAT 12, FAT16 or FAT 32.
(2) If “Card Error” text is in RED, it means that it is the electronic problem. Please contact HiTi Customer
Service Department or your HiTi’ distributor for assistance.
3. 73xPS/Gala:
(1) If “Card Error” text is in WHITE, it means that it is the memory card format problem. Please make
sure your memory card is formatted by FAT 12 or FAT16.
(2) If “Card Error” text is in RED, it means that it is the electronic problem. You need to check the pins of
CF adapter first. If any pins of CF adapter are bent or broken, you need to purchase a new CF adapter to
change it by yourself. If it is not CF adapter pin bent or broken problem, please contact HiTi for help. (CF
adapter is a kind of consumables. HiTi’s warranty doesn’t cover it unless it has broken before using.)
Q14Why some images can not be seen on the LCD controller?
A:
Please make sure the file format you are using is correct.
In the standalone model, HiTi’s printer supports reading JPEG file only, but doesn’t support reading other file
formats, for instance, Tiff, BMP, and ….etc. Besides, HiTi’s printer supports reading JPEG- Progressive
Coding, but doesn’t support reading JPEG Baseline Coding.
2005/12
9
Q15What is JPEG- Progressive Coding?
A:
”Progressive Coding” means that when you load the image, it will have you a faint image in the beginning stage,
and then after the data transmission, the image will become clear.
Q16What is the file format that HiTi 640Gold supports in stand alone mode?
A:
640Gold in stand alone mode only supports the file format, *.gpg or *.gsg, created by Gold Desiree.
Chap 7. Printout Quality Issues
Q1The colors of my image on my monitor do not match the output from my printer. What is wrong
A:
1. First, you should have an understanding of how the color is produced. A monitor displays color by
transmitting Red, Green and Blue (RGB) light into your eyes. The HiTi printer uses thermal diffusion to
transfer Yellow, Magenta, Cyan (CYM) color into papers. It is virtually impossible to have these two different
color types (transmissive and reflective) match perfectly. Also, due to its transmissive nature, the monitor is
able to display a much wider range of colors than a reflective product (photograph or any paper with ink or dye
on it).
2. Most monitors are not calibrated for correct color display out of the box. They have to be calibrated to
produce accurate colors. Adobe Photoshop includes a basic monitor calibrator to do this; it is called the Adobe
Gamma utility. This utility is contained in the Control Panel in Windows and on the Macintosh. Some of the
higher-end monitor calibrators use a suction cup device that sticks on the monitor and reads a range of colors
displayed on the monitor. These hardware/software combination devices create much more accurate color
profiles than the strictly software solutions.
3. What type of color matching system (CMS) are you using when printing your image? The color matching
system can greatly affect the output color of your image. For information on how to use the various color
management systems available, please check your CMS user documentation or the website of your CMS
manufacturer.
4. To ensure that the images that your HiTi printer produces are as close as possible to the images displayed on
your monitor you should do the following:
(1) Calibrate your monitor.
(2) Experiment with various Color Management Systems.
(3) Try using the ICM (Windows98 or 2000).
(4) Try using HiTi’s color preference settings.
5. The settings on DSC will cause great effects on the quality of printouts. On the other hand, the PC monitor
presents wider color than color reflective transfer printing products. The overexposure or underexposure will
not be obvious in PC monitor, but it will be obvious in printouts. If you encounter this kind of problem, please
refer to the digital product tips in our member newsletters or you may be able to inquiry the manufacturers
about notices for printouts of the best quality.
Q2The quality of my printout is unacceptable. How can I improve this
A:
1. Make sure you are printing the image at its actual size. If you try to enlarge the print size of a low resolution
image, it will be very pixelated.
2. Make sure the paper setting matches the paper loaded. Let the printer driver automatically select the settings
for the best quality.

2005/12
9
3. Make sure your source images having good resolution and gradation. (You may enlarge your images on the
computer to view gradations initially.)
4. Verify that the printable side of the paper is face up, and check the type of paper you are going to use. Hi-
Touch brand paper, which is specifically designed for the series of Hi-Touch Photo Printers, delivers the best-
printed output.
5. Try testing the printer on another computer. This will test the possibility of a defective printer cable, USB
port, or software issue. If you're still experiencing a problem, try replacing the ribbon or paper and make sure
you are using HiTi brand ribbon and paper.
Q3What is the recommended resolution that my images should be, for printouts of the best quality?
A:
HiTi suggests that you use images with resolutions of below or above to print:
1. Priners with 300dpi thermal print head: (ex: 63xPL, 63xPS, 730PS… etc.)
(1) 4x6 papers: 1200 x 1800 pixels (4 x 300, 6 x 300).
(2) 5x7 papers: 1500 x 2100 pixels (5 x 300, 7 x 300).
(3) 6x8 papers: 1800 x 2400 pixels (6 x 300, 8 x 300).
2. Printer with 310dpi thermal print head: (ex: PhotoShuttle)
(2) 4x6 papers: 1240 x 1860 pixels (4 x 310, 6 x 310).
(3) 5x7 papers: 1550 x 2170 pixels (5 x 310, 7 x 310).
(4) 6x8 papers: 1860 x 2480 pixels (6 x 310, 8 x 310).
3. Printers with 403dpi thermal print head: (ex: 640PS, 640DL… etc.)
(1) 4x6 papers: 1612 x 2418 pixels (4x403, 6x403).
Q4What should I do if the printed image is misaligned with the paper?
A:
1. Make sure you have the latest drivers installed.
2. Make sure the position of the detachable borders on the paper are correct.
3. Make sure the “Position Setting” of HiTi Photo Printer is correct. Please set it from “Start Menu/ Settings/
Printers/ HiTi USB Photo Printer MODEL/ Printers/ Printing Preferences/ Tool”.
4. Make sure you are using HiTi photo paper or sticker sheets.
Q5Why am I getting faint printouts?
A:
1. Make sure you have the latest drivers installed.
2. Make sure the printable side of the paper is not damaged, old, dirty or loaded face down.
3. Make sure the thermal print head is clean.
4. Make sure you are using HiTi photo paper or sticker sheets.
5. Try replacing ribbon or paper.
6. Do NOT disassemble thermal print head unauthorizedly.
7. If it’s still the same, please contact the HiTi Customer Service Department or your HiTi’s distributor for
assistance.
Q6Why does my printout have Yellow, Meganta or Cyan shadows?
A:
1. Make sure you have the latest drivers installed.
2. Make sure the paper was loaded in the correct direction.
3. Make sure you are using HiTi photo paper or sticker sheets.
4. Do NOT scratch roller due to ribbon jam problem. The damaged roller will bring such problem to you.
5. Make sure there is no physical damage to the unit that might have happened before you received your
printer. If there is, please contact the HiTi Customer Service Department or your HiTi’s distributor for

2005/12
9
assistance.
Q7What should I do if the image size or position is incorrect?
A:
1. Make sure the paper and layout options are set correctly in your application.
2. Make sure the paper in the paper cassette was placed in the correct direction.
3. Make sure the HiTi Photo Printer driver is installed correctly.
4. Make sure resolution of your image files is qualified.
5. If the foregoing steps still cannot fix your problem, please contact HiTi Customer Service Department or
HiTi’s distributors for help.
Q8Why do all my printouts have a blur or scratch
A:
1. Dust may attach itself on the thermal print head, thermal print head cover, ribbon tray, auto document
feeding roller or exit roller. Clean them by using the HTi Cleaning Kit.
2. Dust may attach itself on the ribbon or paper. If it is not necessary, do not open the ribbon door or the paper
cassette too often.
3. Try not to use the printer outdoors or in dusty surroundings.
4. Buy a HiTi Cleaning Kit for clean:
www.hitishop.com.tw
(Taiwan),
www.hitishop.com
(USA), or
www.hi-ti.com
(HiTi’s Global distributors).
5. If the foregoing steps still cannot fix your problem, please contact HiTi’s Customer Service Department or
HiTi’s distributors for help.
Q9: What can I do if I have scratches on my printout
A:
1. There may be dust on the printer’s TPH( Thermal Print Head), please use the HiTi’s Cleaning Kit to clean
the printer.
2. There may be dust on the paper moving paths, please use HiTi Cleaning Kit to clean it.
3. There may be dust on the tribbon cartridge tray back or tray front, please use HiTi Cleaning Kit to clean it.
4. Make sure that your printer has never been misused.
5. If the foregoing steps still cannot fix your problem, please contact HiTi’s Customer Service Department or
your HiTi distributors for help.
Q10Why does the printout have fingerprints on it
A:
1. You might have touched the printable side of the paper with your fingers before (leaving a finger print on
the surface).
2. You might have touched the ribbon with you fingers before and left fingerprints on it.
3. You might have touched the auto document feeding roller or exit roller and left a fingerprint on it.
4. Buy a HiTi Cleaning Kit and clean the printer:
http://www.hitishop.com
(Taiwan) or
http://www.hitishop.com/
(USA), or
www.hi-ti.com
(HiTi’s Global distributors).
Q11Why does the printout have vertical banding
A:
1. The driver installation may have been incomplete.
2. The old drivers you uninstalled may still be used (due to incomplete installation of new drivers).
3. Make sure that your printer has never been misused.
4. The paper-feeding Motor or ribbon-winding device may have failed. (cannot work smoothly), please contact
the HiTi Customer Service Department or HiTi’s distributors for repair.

2005/12
9
5. The printer’s memory IC may be failed, please contact HiTi’s Customer Service Department or HiTi’s
distributors for repair.
Q12Why are the printouts of my HiTi’s photo printer lighter than the printouts of
other brands
A:
1. You may have loaded the paper with the backside facing up. Please see the Manual for instruction on
loading paper
2. You may need to adjust printout settings of your images before printing.
3. The settings on a DSC will cause greatly effect the quality of printouts. Overexposure will also cause lighter
color translation onto printouts.
Q13Why is the printout size different from the original image when using Photoshop,
PhotoImpact or ACDsee
A:
1. Photoshop, PhotoImpact or ACDsee do not provide an autofit function; thus,you have to adjust the printout
size by yourself before printing.
2. PhotoDésirée supports an autofit function. HiTi suggests using this application for printing images that
require quick fitting.
Q14Why does the printout have a wrinkle on it
A:
1. The ribbon may not be completely flat due to uncertain pressures.
2. Don’t re-use ribbons that have already been used up.
3. The ribbon may be in poor condition. Please contact HiTi Customer Service Department or your local
distributor for further assistance.
Q15Why does the printout have oil on it
A:
The paper path or roller may have oil on it. The oil should be cleared out after 1 or 2 more printings.
Please buy a HiTi Cleaning Kit and follow the cleaning procedure:
www.hitishop.com.tw
(Taiwan),
http://www.hitishop.com/
(USA), or
www.hi-ti.com
(Worldwide Distributors).
Q16How can I peel stickers off correctly?
A:
To avoid a wrinkle which might appear while tearing off the sticker, please place the sticker upside down and
use fingernail to fix the piece of sticker you want to detach, then tear off sticker’s PE sheet slowly.
Q17What is the major difference of printout qualities using 300dpi and 400dpi printers?
A:
The quality of photos printed from a 300dpi HiTi photo printer is fairly the same as those printed from a
traditional 4800dpi inkjet printer. Printout results from HiTi printers have satisfied or exceeded the demand of
consumers’ worldwide. However, we do recommend our 400dpi printer models for professional photographers
or power users who specialize in photography. The difference between 300dpi and 400dpi is marginal for
common users and hobby photographers, power users who need to use their printer for special applications may
enjoy the benefits of a 400dpi. (A quality of a 300dpi HiTi printer is higher then a 4800dpi ink jet. The quality
of a 400dpi HiTi printer is higher then a 6400dpi ink jet printer.)
Q18 What is the major difference of printout qualities using Dye-sub and laser printers?

2005/12
9
A:
Although laser color printers are getting cheaper these days, basically both laser color printer and inkjet printer
share the same printing theory, which is half-tone printing, while Dye-sub (HiTi) is known for its high quality
and continuous tone output. Continuous tone means that all gradations of color are used when creating an image.
For example, when creating a gray scale, from black to white, a continuous tone printer will show all shades of
gray in between the black and the white by actually printing them.
A half-toning device such as an ink-jet printer will use a dithering technique of placing dots close together in
order to trick the eye. In other words, ink jet and laser printers use a series of black dots placed close to white
dots in order to trick the eye into blending the pixels when viewed. With magnification the difference can be
seen: where the dye-sub (HiTi) output is clear and sharp, ink jets prints show dots and are not so clear.
Q19: What kind of digital camera do I need to print good quality pictures/templates with my 640Gala?
A:
Digital Cameras vary widely in quality and price, but as a standard rule we recommend the following
specifications: If you want to print 4x6 inch pictures (10X15cm), you should take pictures in (minimum) 2
mega pixels.
Q20What kind of digital camera do I need to print good quality pictures with my 730PL/PS
A:
The qualities and prices of Digital Cameras around the world are variable, but as a standard rule we recommend
the following specifications:
If you want to print 6x4 inch pictures (10X15cm), you should take pictures in (minimum) 2 mega pixels. For
5x7 inch (13x18cm) pictures your digital camera should at least be 3 mega pixels. For 6x8 inch (15x20cm)
pictures your digital camera should at least be 5 mega pixels. (Please note: the above specifications is for the
730PL/PS printer only, in case you own one of our other printer, the above specifications may not apply.)
