Hive Fabric 7.0 Administration Guide
User Manual:
Open the PDF directly: View PDF ![]() .
.
Page Count: 89
- Hive Fabric Administration Guide

1. Hive Fabric Administration Guide . . . . . . . . . . . . . . . . . . . . . . . . . . . . . . . . . . . . . . . . . . . . . . . . . . . . . . . . . . . . . . . . 3
1.1 Release Notes . . . . . . . . . . . . . . . . . . . . . . . . . . . . . . . . . . . . . . . . . . . . . . . . . . . . . . . . . . . . . . . . . . . . . . . . . . . . . . 4
1.2 Patching and Upgrading Fabric . . . . . . . . . . . . . . . . . . . . . . . . . . . . . . . . . . . . . . . . . . . . . . . . . . . . . . . . . . . . 5
1.3 Requirements, Dependencies and Sizing . . . . . . . . . . . . . . . . . . . . . . . . . . . . . . . . . . . . . . . . . . . . . . . . . . 6
1.4 Glossary . . . . . . . . . . . . . . . . . . . . . . . . . . . . . . . . . . . . . . . . . . . . . . . . . . . . . . . . . . . . . . . . . . . . . . . . . . . . . . . . . . . 8
1.5 Appliance Installation . . . . . . . . . . . . . . . . . . . . . . . . . . . . . . . . . . . . . . . . . . . . . . . . . . . . . . . . . . . . . . . . . . . . . . 9
1.5.1 USB Drive . . . . . . . . . . . . . . . . . . . . . . . . . . . . . . . . . . . . . . . . . . . . . . . . . . . . . . . . . . . . . . . . . . . . . . . . . . . . . 10
1.5.2 Intelligent Platform Management Interface (IPMI) . . . . . . . . . . . . . . . . . . . . . . . . . . . . . . . . . . . . 11
1.5.2.1 Dell Remote Access Control . . . . . . . . . . . . . . . . . . . . . . . . . . . . . . . . . . . . . . . . . . . . . . . . . . . . . . 12
1.5.2.2 Cisco Integrated Management Controller . . . . . . . . . . . . . . . . . . . . . . . . . . . . . . . . . . . . . . . . 13
1.5.2.3 HP Integrated Lights-Out . . . . . . . . . . . . . . . . . . . . . . . . . . . . . . . . . . . . . . . . . . . . . . . . . . . . . . . . 14
1.5.2.4 Lenovo Integrated Management Module . . . . . . . . . . . . . . . . . . . . . . . . . . . . . . . . . . . . . . . . 15
1.5.2.5 Supermicro Intelligent Management . . . . . . . . . . . . . . . . . . . . . . . . . . . . . . . . . . . . . . . . . . . . 16
1.5.3 PXE Installation . . . . . . . . . . . . . . . . . . . . . . . . . . . . . . . . . . . . . . . . . . . . . . . . . . . . . . . . . . . . . . . . . . . . . . . 17
1.5.4 First Boot Wizard . . . . . . . . . . . . . . . . . . . . . . . . . . . . . . . . . . . . . . . . . . . . . . . . . . . . . . . . . . . . . . . . . . . . . 18
1.5.5 Initial Deployment . . . . . . . . . . . . . . . . . . . . . . . . . . . . . . . . . . . . . . . . . . . . . . . . . . . . . . . . . . . . . . . . . . . . 20
1.6 Appliance Administration . . . . . . . . . . . . . . . . . . . . . . . . . . . . . . . . . . . . . . . . . . . . . . . . . . . . . . . . . . . . . . . . . . 21
1.6.1 Console Management . . . . . . . . . . . . . . . . . . . . . . . . . . . . . . . . . . . . . . . . . . . . . . . . . . . . . . . . . . . . . . . . . 22
1.6.1.1 Status . . . . . . . . . . . . . . . . . . . . . . . . . . . . . . . . . . . . . . . . . . . . . . . . . . . . . . . . . . . . . . . . . . . . . . . . . . . . 23
1.6.1.2 Networking . . . . . . . . . . . . . . . . . . . . . . . . . . . . . . . . . . . . . . . . . . . . . . . . . . . . . . . . . . . . . . . . . . . . . . 24
1.6.1.3 Management . . . . . . . . . . . . . . . . . . . . . . . . . . . . . . . . . . . . . . . . . . . . . . . . . . . . . . . . . . . . . . . . . . . . 25
1.6.2 Navigating the User Interface . . . . . . . . . . . . . . . . . . . . . . . . . . . . . . . . . . . . . . . . . . . . . . . . . . . . . . . . . 26
1.6.3 Inventory . . . . . . . . . . . . . . . . . . . . . . . . . . . . . . . . . . . . . . . . . . . . . . . . . . . . . . . . . . . . . . . . . . . . . . . . . . . . . 27
1.6.3.1 Overview . . . . . . . . . . . . . . . . . . . . . . . . . . . . . . . . . . . . . . . . . . . . . . . . . . . . . . . . . . . . . . . . . . . . . . . . . 28
1.6.3.2 System Graphs . . . . . . . . . . . . . . . . . . . . . . . . . . . . . . . . . . . . . . . . . . . . . . . . . . . . . . . . . . . . . . . . . . 30
1.6.3.3 Network Graphs . . . . . . . . . . . . . . . . . . . . . . . . . . . . . . . . . . . . . . . . . . . . . . . . . . . . . . . . . . . . . . . . . 31
1.6.3.4 Guest Management . . . . . . . . . . . . . . . . . . . . . . . . . . . . . . . . . . . . . . . . . . . . . . . . . . . . . . . . . . . . . 32
1.6.4 Publishing . . . . . . . . . . . . . . . . . . . . . . . . . . . . . . . . . . . . . . . . . . . . . . . . . . . . . . . . . . . . . . . . . . . . . . . . . . . . 33
1.6.4.1 Storage Pools . . . . . . . . . . . . . . . . . . . . . . . . . . . . . . . . . . . . . . . . . . . . . . . . . . . . . . . . . . . . . . . . . . . . 34
1.6.4.1.1 Local Storage . . . . . . . . . . . . . . . . . . . . . . . . . . . . . . . . . . . . . . . . . . . . . . . . . . . . . . . . . . . . . . . . 36
1.6.4.1.2 Shared Storage . . . . . . . . . . . . . . . . . . . . . . . . . . . . . . . . . . . . . . . . . . . . . . . . . . . . . . . . . . . . . 37
1.6.4.2 Templates . . . . . . . . . . . . . . . . . . . . . . . . . . . . . . . . . . . . . . . . . . . . . . . . . . . . . . . . . . . . . . . . . . . . . . . 38
1.6.4.2.1 Add an Existing Template . . . . . . . . . . . . . . . . . . . . . . . . . . . . . . . . . . . . . . . . . . . . . . . . . . . 39
1.6.4.2.2 Create a New Template . . . . . . . . . . . . . . . . . . . . . . . . . . . . . . . . . . . . . . . . . . . . . . . . . . . . . 40
1.6.4.2.3 Template Management . . . . . . . . . . . . . . . . . . . . . . . . . . . . . . . . . . . . . . . . . . . . . . . . . . . . . 43
1.6.4.3 Realms . . . . . . . . . . . . . . . . . . . . . . . . . . . . . . . . . . . . . . . . . . . . . . . . . . . . . . . . . . . . . . . . . . . . . . . . . . 52
1.6.4.4 Profiles . . . . . . . . . . . . . . . . . . . . . . . . . . . . . . . . . . . . . . . . . . . . . . . . . . . . . . . . . . . . . . . . . . . . . . . . . . 53
1.6.4.5 Guest Pools . . . . . . . . . . . . . . . . . . . . . . . . . . . . . . . . . . . . . . . . . . . . . . . . . . . . . . . . . . . . . . . . . . . . . . 55
1.6.4.6 Standalone Guest . . . . . . . . . . . . . . . . . . . . . . . . . . . . . . . . . . . . . . . . . . . . . . . . . . . . . . . . . . . . . . . 57
1.6.5 Tools . . . . . . . . . . . . . . . . . . . . . . . . . . . . . . . . . . . . . . . . . . . . . . . . . . . . . . . . . . . . . . . . . . . . . . . . . . . . . . . . . . 59
1.6.5.1 Convert an Image . . . . . . . . . . . . . . . . . . . . . . . . . . . . . . . . . . . . . . . . . . . . . . . . . . . . . . . . . . . . . . . . 60
1.6.6 Settings . . . . . . . . . . . . . . . . . . . . . . . . . . . . . . . . . . . . . . . . . . . . . . . . . . . . . . . . . . . . . . . . . . . . . . . . . . . . . . 61
1.6.6.1 Appliance . . . . . . . . . . . . . . . . . . . . . . . . . . . . . . . . . . . . . . . . . . . . . . . . . . . . . . . . . . . . . . . . . . . . . . . . 62
1.6.6.2 Network Settings . . . . . . . . . . . . . . . . . . . . . . . . . . . . . . . . . . . . . . . . . . . . . . . . . . . . . . . . . . . . . . . . 63
1.6.6.3 Administration . . . . . . . . . . . . . . . . . . . . . . . . . . . . . . . . . . . . . . . . . . . . . . . . . . . . . . . . . . . . . . . . . . 65
1.6.6.4 Users . . . . . . . . . . . . . . . . . . . . . . . . . . . . . . . . . . . . . . . . . . . . . . . . . . . . . . . . . . . . . . . . . . . . . . . . . . . . 67
1.7 Template Administration . . . . . . . . . . . . . . . . . . . . . . . . . . . . . . . . . . . . . . . . . . . . . . . . . . . . . . . . . . . . . . . . . . 68
1.7.1 VirtIO Device Drivers Installation . . . . . . . . . . . . . . . . . . . . . . . . . . . . . . . . . . . . . . . . . . . . . . . . . . . . . . 69
1.7.2 Desktop Image Management . . . . . . . . . . . . . . . . . . . . . . . . . . . . . . . . . . . . . . . . . . . . . . . . . . . . . . . . . 70
1.7.3 Guest Session Scripts . . . . . . . . . . . . . . . . . . . . . . . . . . . . . . . . . . . . . . . . . . . . . . . . . . . . . . . . . . . . . . . . . 71
1.8 Cluster Administration . . . . . . . . . . . . . . . . . . . . . . . . . . . . . . . . . . . . . . . . . . . . . . . . . . . . . . . . . . . . . . . . . . . . . 72
1.8.1 Join a Cluster . . . . . . . . . . . . . . . . . . . . . . . . . . . . . . . . . . . . . . . . . . . . . . . . . . . . . . . . . . . . . . . . . . . . . . . . . 73
1.8.2 Remove Appliance from a Cluster . . . . . . . . . . . . . . . . . . . . . . . . . . . . . . . . . . . . . . . . . . . . . . . . . . . . 74
1.8.3 Cluster Dashboard . . . . . . . . . . . . . . . . . . . . . . . . . . . . . . . . . . . . . . . . . . . . . . . . . . . . . . . . . . . . . . . . . . . . 75
1.8.4 Cluster Best Practice . . . . . . . . . . . . . . . . . . . . . . . . . . . . . . . . . . . . . . . . . . . . . . . . . . . . . . . . . . . . . . . . . 76
1.9 VM Broker . . . . . . . . . . . . . . . . . . . . . . . . . . . . . . . . . . . . . . . . . . . . . . . . . . . . . . . . . . . . . . . . . . . . . . . . . . . . . . . . . 77
1.9.1 Broker . . . . . . . . . . . . . . . . . . . . . . . . . . . . . . . . . . . . . . . . . . . . . . . . . . . . . . . . . . . . . . . . . . . . . . . . . . . . . . . . 78
1.9.2 Gateway . . . . . . . . . . . . . . . . . . . . . . . . . . . . . . . . . . . . . . . . . . . . . . . . . . . . . . . . . . . . . . . . . . . . . . . . . . . . . . 79
1.10 Advanced Admininstration . . . . . . . . . . . . . . . . . . . . . . . . . . . . . . . . . . . . . . . . . . . . . . . . . . . . . . . . . . . . . . . 80
1.10.1 Migration . . . . . . . . . . . . . . . . . . . . . . . . . . . . . . . . . . . . . . . . . . . . . . . . . . . . . . . . . . . . . . . . . . . . . . . . . . . . . 82
1.10.1.1 Migrate Citrix XenServer to Fabric . . . . . . . . . . . . . . . . . . . . . . . . . . . . . . . . . . . . . . . . . . . . . . . 83
1.10.1.2 Migrate Nutanix Acropolis to Fabric . . . . . . . . . . . . . . . . . . . . . . . . . . . . . . . . . . . . . . . . . . . . . 86
1.10.1.3 Migrate VMware to Fabric . . . . . . . . . . . . . . . . . . . . . . . . . . . . . . . . . . . . . . . . . . . . . . . . . . . . . . . 88
Hive Fabric 7.0 Administration Guide
3 | © 2018 HiveIO
Hive Fabric Administration Guide
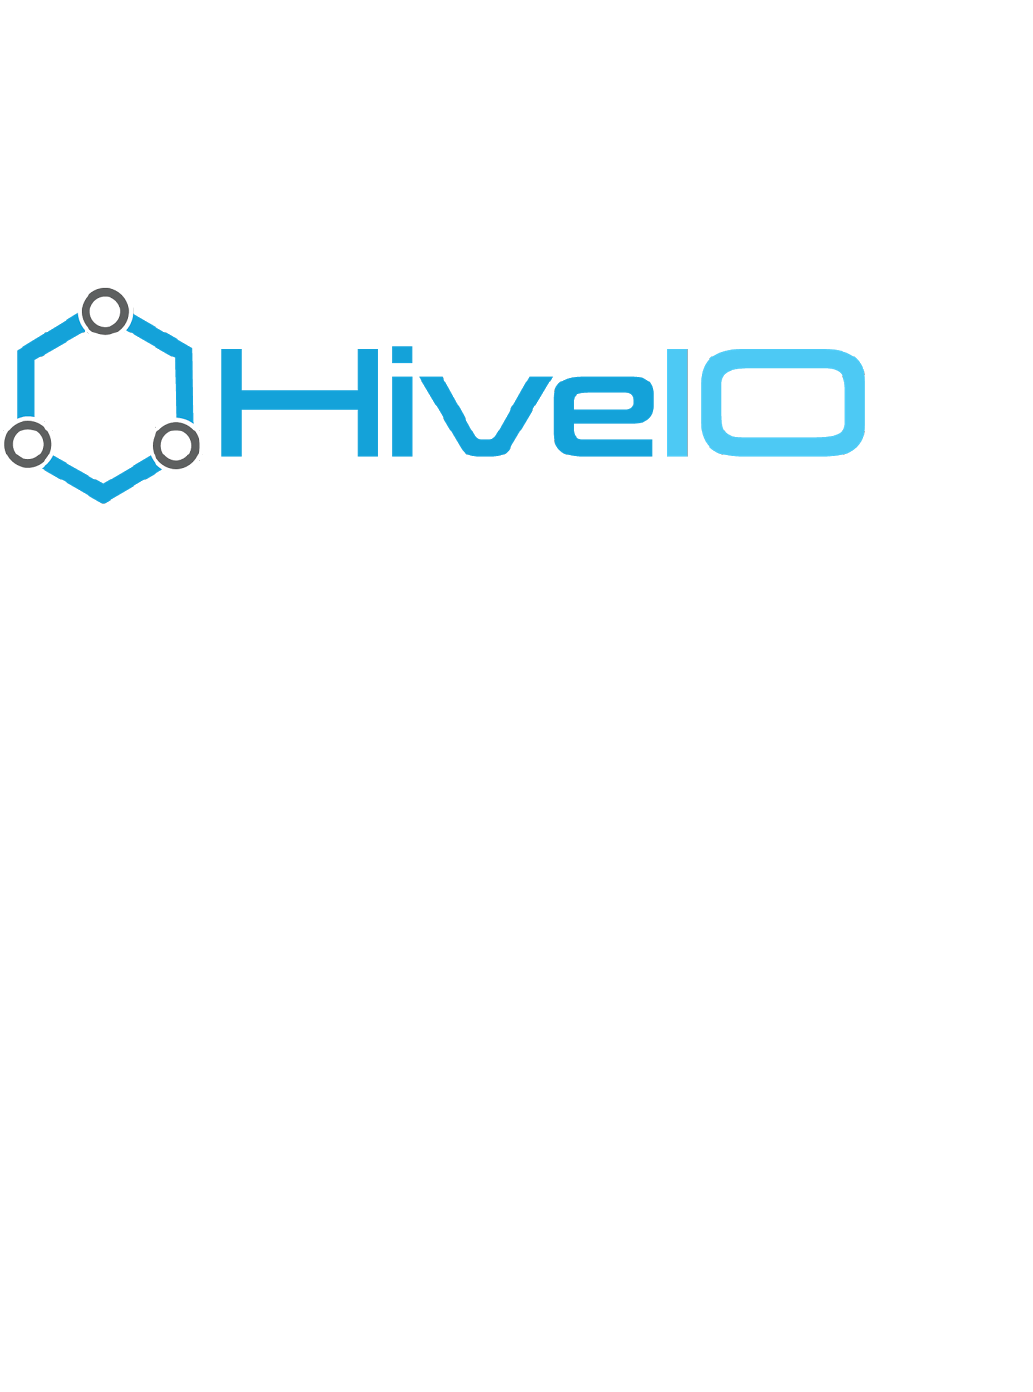
This guide outlines how to install, setup, and run Hive Fabric 7.0. Hive Fabric is a cloud compute platform that
delivers end-to-end functionality for the private and hybrid cloud. The product can integrate seamlessly into any
existing private cloud stack.
Some of the functionality included in Hive Fabric includes:
Hypervisor
Storage (Hyperconverged, Shared, Local and in RAM)
Message Bus and RESTful API
Reporting and Alerting
Virtual Server support
Cluster Resource Scheduling
High Availability
Virtual Desktop (Persistent and Stateless desktops)
Desktop Brokering
User Volumes

Hive Fabric 7.0 Administration Guide
4 | © 2018 HiveIO
Release Notes
What's New for 7.0?
Appliance Installation - Hive Fabric employs a new installer, further simplifying the appliance installation
process.
Shared Storage - (Customer Preview) A Hive Fabric shared storage pool may now be established among
members of a cluster. Clusters require a minimum of three members to be able to take advantage of this
feature.
Virtual Server Support - Run any mix of workloads - Linux, Windows, Desktop or Server. Hive Fabric now
supports a broader range of Standalone Guest VM requirements such as multi-disk support, dynamic
CD-ROM support, and modifying guest resources.
Cluster Resource Scheduler (CRS) - Provides intelligent resource management to ensure efficient use of
the infrastructure. This maximizes the resources and performance available to an application. The
algorithms used to calculate max. appliance density have been updated. These algorithms will look at the
actual resources in terms of CPU and memory assigned to a Guest. From there, the appliance makes
adjustments to the outstanding the number of Guest VMs that can be provisioned based on resource
consumption and Guest Pool settings.
First Boot Wizard - New-installed appliances are now introduced with a EULA. This EULA must be
accepted before administrators can proceed to the First Boot Wizard.
Hardware Support- Hive Fabric's base operating system has been updated to Ubuntu 18.04 with Linux
kernel 4.15.
Known Issues
APP-1554: Users cannot adjust hardocde network settings from the WebUI.
APP-1549: Guest pools fail to create when the template has a space in the filename
Workaround: Do not name template files with a space in them.
APP-1497: Users cannot build shared storage with an offline appliance.
Workaround: Ensure all appliances in the cluster are on-line.
APP-1415: When using multiple CD-ROM disk types for a Standalone Guest, the action only applies toEject
the primary CD-ROM.
APP-814: UEFI Support. Hive Fabric does not support UEFI boot for either the install or Appliance boot.
Workaround: Use BIOS boot mode.
Resolved Issues
APP-1146: First Boot Wizard: Networks may not be visible when attempting to create a bond. If this
happens use the Web-UI to create the network bond.
APP-765: UEFI Support for Guests. UEFI is now supported for Guest VMs.
Updating to 7.0
Current Hive Fabric customers who are looking to update their current deployment of Hive Fabric to
version 7.0 must perform a clean install and migrate workload.

Hive Fabric 7.0 Administration Guide
5 | © 2018 HiveIO
1.
2.
3.
4.
5.
1.
2.
3.
4.
5.
6.
7.
Patching and Upgrading Fabric
Occasionally, a patch or upgrade may need to be issued for the existing version of Fabric. Upgrading the
environment is a simple process, and can be done even if guest pools cannot be shut down. The following
instructions given assume that guests are non-persistent and have user volumes attached. Make sure the
correct package files are on hand before proceeding.
If the guest pools are in a position to be shut down:
From the left-hand navigation menu, click on This displays the current inventory of GuestGuest Pools.
Pools.
Delete each Guest Pool from the inventory.
Navigate to the . Under , click on the buttonAdministration Settings Software Firmware Upload Software
and upload the patch file. Click on to stage the package for deployment. Once the package is.pkg Stage
staged, click on to deploy the package. The staging and deployment process may take a fewDeploy
moments to complete.
When package deployment completes, Fabric typically restarts Hive Services automatically and runs the
new deployment. If that does not occur, however, then click on to restart Fabric.Restart Hive Services
Return to the Guest Pools inventory. Create new Guest Pools using the updated Template.
If guest pools cannot be shut down:
From the left-hand navigation menu, click on This displays the current inventory of GuestGuest Pools.
Pools.
For each Guest Pool, set the to .Available Guests 0
For each applicable Guest Pool, the GUID for user volumes must be deleted.
Access the Templates page. Any templates that are being applied to Guest Pools must be toauthored
inject a VSS registry.
Navigate to the . Under , click on the buttonAdministration Settings Software Firmware Upload Software
and upload the patch file. Click on to stage the package for deployment. Once the package is.pkg Stage
staged, click on to deploy the package. The staging and deployment process may take a fewDeploy
moments to complete.
When package deployment completes, Fabric typically restarts Hive Services automatically and runs the
new deployment. If that does not occur, however, then click on to restart Fabric.Restart Hive Services
Return to the Guest Pools inventory and restore the size of available guests in the Guest Pool.

Hive Fabric 7.0 Administration Guide
6 | © 2018 HiveIO
Requirements, Dependencies and Sizing
Supported Hardware
Hive Fabric is a bare metal install and, as a result, has certain requirements. It has a broad range of hardware
support, supporting most x86 hardware. Currently Hive Fabric mirrors the wUbuntu 18.04 hardware certification
ith Linux kernel 4.15. Hive Fabric is capable of running on other hardware. However, this is only supported on a
best-effort basis or customer by customer basis.
Sizing Hive Fabric
The key components to consider for Hive Fabric are CPU, Memory, Storage and Network. The hardware
requirements will vary based on the number of guests intended to be served and their own resource
requirements.
The following hardware specs are for illustrative purposes only and can be used to size an initial PoC or Pilot.
Sizing per server based on a Guest VM with 4GB RAM:
Option Hardware Specifications Guests Served
Small 16 core/dual socket
128GB RAM
2 x 256GB local disk
1 Gb Ethernet
up to 30
Medium 24 core/dual socket
384 GB RAM
2 x 256GB local disk
1 Gb Ethernet (shared storage or high throughput may require aggregated
links or 10GB)
up to 100
Large 40 core/dual socket
1 TB RAM
2 x 512GB local disk
1 Gb Ethernet (shared storage or high throughput may require aggregated
links or 10GB)
up to 225
Additionally, the following specs are recommended to use local shared storage among appliances:
A cluster containing three or more appliances
Recommended: 256GB (or more) local disk per appliance
An established storage network
Recommended: 10GB Ethernet
The medium size spec depicts the typical server specifications for a Hive Fabric appliance in production.
Storage
Have Fabric will consume all the storage available within the hardware during installation. Create any
necessary backups before committing hardware for appliance use.

Hive Fabric 7.0 Administration Guide
7 | © 2018 HiveIO
Production Requirements
The minimum number of appliances in a cluster is two. Three appliances are required to implement shared
storage. The recommendation for production is three. This provides further resilience and always provides a
quorum to handle a "split-brain" scenario. For more information on cluster management, review the Cluster
process.Administration

Hive Fabric 7.0 Administration Guide
8 | © 2018 HiveIO
Glossary
This guide uses a series of terminology to describe certain actions and events that are consistent throughout the
use of the Hive Fabric. The following terms are referenced throughout the guide:
Authoring: The act of modifying and configuring a Guest Template so that it is ready for deployment.
Compression: Reducing the number of bits needed to store or transmit data.
Cluster esource cheduling, or , manages Guest Pool resource consumption on an appliance. IfR S CRS
system metrics hit a maximum limit within a certain period based on resources assigned to guests,
guests may be nominated as migration candidates and moved to reduce system duress.
Console A user interface that provides a direct view of the VM as if the administrator were sat in front of a:
screen directly attached to the guest. This is where administrators will be able to modify a template's
guest OS.
Deduplication: A data reduction technique for eliminating duplicate copies of repeating blocks of data.
Disaster ecovery, or , refers to the event in which a physical location is suddenly unavailable, takingR DR
the resources that were provisioned in that location offline. The remediation of this event can also fall
under the same generalization and allows for typically temporary resource to be made available in a new
or secondary location allowing users to access their guest.
High vailability, or , refers to the availability of resources in the wake of component failure such as aA HA
server within a Hive Fabric Cluster. Typically other servers in the cluster will have sufficient spare resource
to pick up the load imposed on the cluster in the event of failure.
Non-Persistent Guest: Typically none of the changes to a guest are saved upon logout or reboot of the
guest. At the end of a session, the desktop gets destroyed and the user receives a fresh image the next
time they log in. If User Volumes are enabled, it will track and save the basic user's settings, such a
Printers, Bookmarks, Internet Explorer, History, Map Drives.
Persistent Guest: Each guest runs in its own right. Any changes to the desktop persist across a reboot or
logout of the user. These types of desktops allow for more personalization, but they require more storage
and backup.
Shared Storage: A repository of shared files among clusters containing at least three members. Storage
sizing is based upon the smallest disk per group of three appliances, and expands as the cluster gains
members in multiples of three.
Virtual erver upport, or , is the support offered for various workloads and Guest VMs.S S VSS
Hive Fabric 7.0 Administration Guide
9 | © 2018 HiveIO
Appliance Installation
Once an image has been acquired from the HiveIO website through a team member, there are multiple
methods supported for installing Hive Fabric to a server. The most common method is done though the use of
the (IPMI). Users with physical access to the server may also chooseIntelligent Platform Management Interface
to create a installer to plug in. Users with advanced Linux knowledge may also opt to perform a bootable USB PX
on their server.E Install
Once the installation of Hive Fabric has been completed, the will run and prepare theFirst Boot Wizard
appliance for .deployment

Hive Fabric 7.0 Administration Guide
10 | © 2018 HiveIO
1.
2.
3.
4.
5.
6.
7.
8.
9.
USB Drive
Hive supports multiple ways of installing the system. These steps cover installation via USB drive.
Requirements for USB Installation
There are several methods of turning a blank USB drive into a bootable drive for the server. Any method is
acceptable. Among the recommended USB tools is , a free and effective bootable drive creatorUnetbootin
available for Windows, Mac, and Linux.
Users who wish to install via USB drive will need the following:
Blank USB Drive (5GB or greater)
HiveIO Fabric ISO file
Server capable of running HiveIO Fabric
Instructions for Creating a Bootable USB Drive
Insert a blank USB drive into the workstation that contains the latest Hive Fabric ISO file.
Open the bootable USB drive creator.
Follow the USB drive tool's instructions for creating a bootable USB drive. These steps vary based on the
tool used. Make sure to select the correct ISO file. Verify that the drive that corresponds to the blank USB
drive is correct before proceeding.
Confirm and allow the USB drive creator to build the bootable USB drive.
Plug the USB drive containing the latest Hive ISO into the server that will run Hive Fabric. Depending on
the server's boot options, select the option to boot from USB.
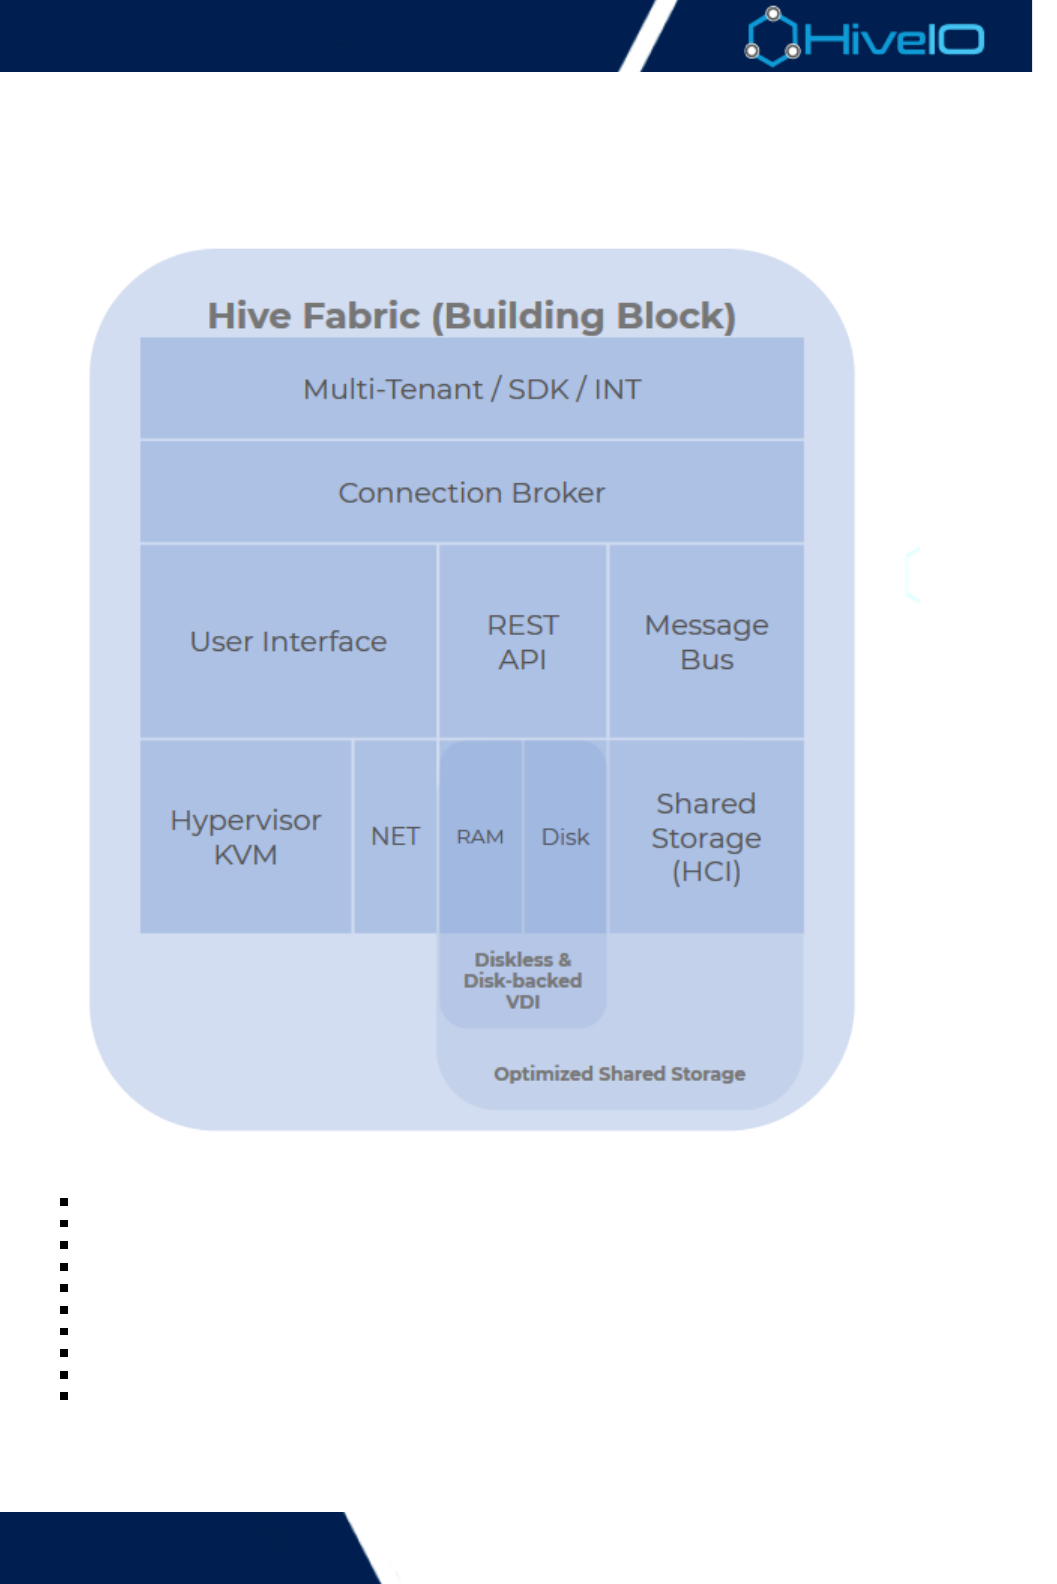
Once the boot from the USB begins, the HiveIO screen will display. Choose the optionHiveIO Installer
to run the Hive Fabric Installer.
Select the appropriate drive to install the Hive software on. Once selected, hit the key to begin theEnter
installation.
When the installation completes, the server will prompt for a reboot. Select the option to progress.Reboot
When the server reboots, the server will boot the disk image and display the EULA, designating the
beginning of the .First Boot Wizard
Bootable USB Tools
Many tools are available for use, and some tools may work better than others for certain OS distributions.
For best results on effectively using any preferred bootable USB tool, consult the appropriate product
documentation.

Hive Fabric 7.0 Administration Guide
11 | © 2018 HiveIO
1.
2.
3.
4.
Intelligent Platform Management Interface (IPMI)
Hive supports multiple ways of installing the system. These steps cover installation via IPMI.
Requirements for IPMI Installation
Access to the IPMI of the server is required. Various web interfaces are available and are dependent on
hardware. For assistance with gaining access to the IPMI, consult the hardware manual.
Users who wish to install via IPMI will need the following:
Hive Fabric installation ISO file
Server capable of running HiveIO Fabric
Access to the IPMI of that server
The instructions given here cover some of the common management platforms used to install the Hive software
to a server. Steps may vary based on the platform and version used. For unlisted platforms, consult the IPMI's
documentation for specified instructions on installing the ISO file.
Cisco Integrated Management Controller
Dell Remote Access Control
HP Integrated Lights-Out
Lenovo Integrated Management Module
Supermicro Intelligent Management
Instructions for Installing the Hive Fabric Software
Once the boot from the CD/DVD Drive begins, the HiveIO screen will display. Choose the HiveIO
option to run the Hive Fabric Installer.Installer
Select the appropriate drive to install the Hive software on. This is the drive that was designated as the
Boot Drive in the previous steps. Once selected, hit the key to run the installation.Enter
When the installation completes, the server will prompt for a reboot. Select the option to progress.Reboot
When the server reboots, the server will boot the disk image and display the EULA, designating the
beginning of the .First Boot Wizard
Many of these platforms require that the Java plug-in is installed on the workstation. Verify that Java is
correctly installed before continuing with the system deployment.
If installation was done through the Cisco Integrated Management Controller, the Activate
option may need to be disabled again once the installation process hasVirtual Devices
completed.

Hive Fabric 7.0 Administration Guide
12 | © 2018 HiveIO
1.
2.
3.
4.
5.
6.
7.
8.
Dell Remote Access Control
The following steps are for installing through the iDRAC platform. Be aware that instructions may vary based on
the version used.
Mount the latest HiveIO ISO to the workstation as a virtual drive.
Access the web interface for the IPMI and sign in.
Click on tab and select the option. Click on the Console/Media Virtual Consoles and Virtual Media Launc
button. Leave the console open for now.h Virtual Console
While remaining on the page, select the option. Under , openConsole/Media Configuration Virtual Media
the tab and select . Press to advance.Status Attach Apply
Click on . Select the option. Click on the button andVirtual Media Launch Virtual Media Add Image...
select the mounted HiveIO ISO file. Enable the checkbox next to the image.Mapped
After loading the ISO file, power on the system. At the server's POST screen, press to access the bootF11
menu. This may take a few moments to load.
When the menu is present, select the appropriate virtual CD/DVD Drive. The drive may vary based on
server hardware and drivers.
The server will boot from the CD/DVD Drive and load the Hive Fabric Installer.

Hive Fabric 7.0 Administration Guide
13 | © 2018 HiveIO
1.
2.
3.
4.
5.
6.
7.
Cisco Integrated Management Controller
The following steps are for installing through the Cisco IMC platform. Be aware that instructions may vary based
on the version used.
Access the web interface for the IPMI and sign in.
Click on the option.Launch KVM Console
Click on and select the option. After a brief moment, the Virtual Media Activate Virtual Devices Virtual
menu will display a few new options. Select the option.Media Map CD/DVD...
When prompted to browse for a file, locate the latest HiveIO installation ISO file.
After loading the ISO file, power on the system. At the server's POST screen, press to access the bootF6
menu. This may take a few moments to load.
When the menu is present, select the appropriate CD/DVD Drive. The drive may vary based on server
hardware and drivers.
The server will boot from the CD/DVD Drive and load the Hive Fabric Installer.

Hive Fabric 7.0 Administration Guide
14 | © 2018 HiveIO
1.
2.
3.
4.
5.
6.
7.
8.
HP Integrated Lights-Out
The following steps are for installing through the HP iLO platform. Be aware that instructions may vary based on
the version used.
Access the web interface for the IPMI and sign in.
From the option on the left side navigation menu, open a console for the server.Remote Console
Click on or a similar options and access the virtual CD/DVD drive option. Do not close theVirtual Drives
console yet.
Once prompted for a file, choose the latest HiveIO installation ISO file.
After loading the ISO file, the boot order needs to be selected. Click on the option on theVirtual Media
left side navigation menu to reveal the option.Boot Order
Under , select . Click on to save the change.One-Time Boot Status CD/DVD Drive Apply
Once the boot drive has been applied, click on the button below to restart the server.Server Reset
Once the reboot has finished, the server will boot from the CD/DVD Drive and load the Hive Fabric
Installer.

Hive Fabric 7.0 Administration Guide
15 | © 2018 HiveIO
1.
2.
3.
4.
5.
6.
Lenovo Integrated Management Module
The following steps are for installing through the Lenovo IMM platform. Be aware that instructions may vary
based on the version used.
Access the web interface for the IPMI and sign in. If necessary, disable the timeout value to prevent the
session from timing out before deployment completes.
From the task menu, click on and select the option.Remote Control Start Remote Control
Access the window. From the Client View list, select as theVirtual Media Sessions Add image...
deployment option.
When prompted to browse for a file, locate the latest HiveIO installation ISO file. The option willRead Only
need to be enabled for this process.
After loading the ISO file, reboot the system. The Lenovo platform will detect the deployment method and
boot appropriately.
Follow the on-screen prompts to load the Hive Fabric Installer.

Hive Fabric 7.0 Administration Guide
16 | © 2018 HiveIO
1.
2.
3.
4.
5.
6.
7.
Supermicro Intelligent Management
The following steps are for installing through the Supermicro Intelligent Management platform. Be aware that
instructions may vary based on the version used.
Access the web interface for the IPMI and sign in.
Click on tab and select the option. Click on .Remote Control Console Redirection Launch Console
Click on and select the option. After a brief moment, the wiVirtual Media Virtual Storage Virtual Storage
ndow will launch. Access the tab.From the dropdown menu, select CDROM&ISO Logical Drive Type ISO
.File
When prompted to browse for a file, locate the latest HiveIO installation ISO file. Click to mountPlug In
the image.
After loading the ISO file, reboot on the system. At the server's POST screen, press to access the bootF11
menu. This may take a few moments to load.
When the menu is present, select the appropriate CD/DVD Drive. The drive may vary based on server
hardware and drivers.
The server will boot from the CD/DVD Drive and load the Hive Fabric Installer.

Hive Fabric 7.0 Administration Guide
17 | © 2018 HiveIO
1.
2.
3.
4.
5.
6.
7.
PXE Installation
Requirements
Install and configure PXE on the server that is intended to be used as the install server. This guide uses
PXEInstallServer on an Ubuntu server. For instructions on installing and configuring PXE, consult the following: h
.ttps://help.ubuntu.com/community/PXEInstallServer
Additionally, a fairly advanced working knowledge of Linux and networking in general is recommended for
using this solution.
Users who wish to install via PXE will need the following:
Hive Fabric ISO image
Server capable of running Hive Fabric
Access to an appropriately configured PXE Server on the same network
Loading the ISO File onto the PXE Install Server
Complete the installation and configuration so that the PXE server is available to the HiveIO Fabric server.
There will be a repository for installation ISO files. Copy the Hive Fabric ISO files into the repository. Doing
so will make the files available to the server booting from the network.
When starting the server that Hive Fabric is intended to be installed on, select .boot from network
After loading the appropriate data over the network, the HiveIO installation screen will appear. Choose
the option to run the Hive Fabric Installer.HiveIO Installer
Select the appropriate boot drive to install the Hive software on. Once selected, hit the key to beginEnter
the installation.
When the installation completes, the server will prompt for a reboot. Select the option to progress.Reboot
When the server reboots, the server will boot the disk image and display the EULA, designating the
beginning of the .First Boot Wizard
Hive Fabric 7.0 Administration Guide
18 | © 2018 HiveIO
1.
2.
3.
First Boot Wizard
When the Hive Fabric boots up for the first time, the first boot wizard will run for the initial setup process. This
wizard helps to configure a variety of initial settings during the installation and setup of Hive Fabric. Users are
advised to become familiar with these settings to best implement the first boot wizard.
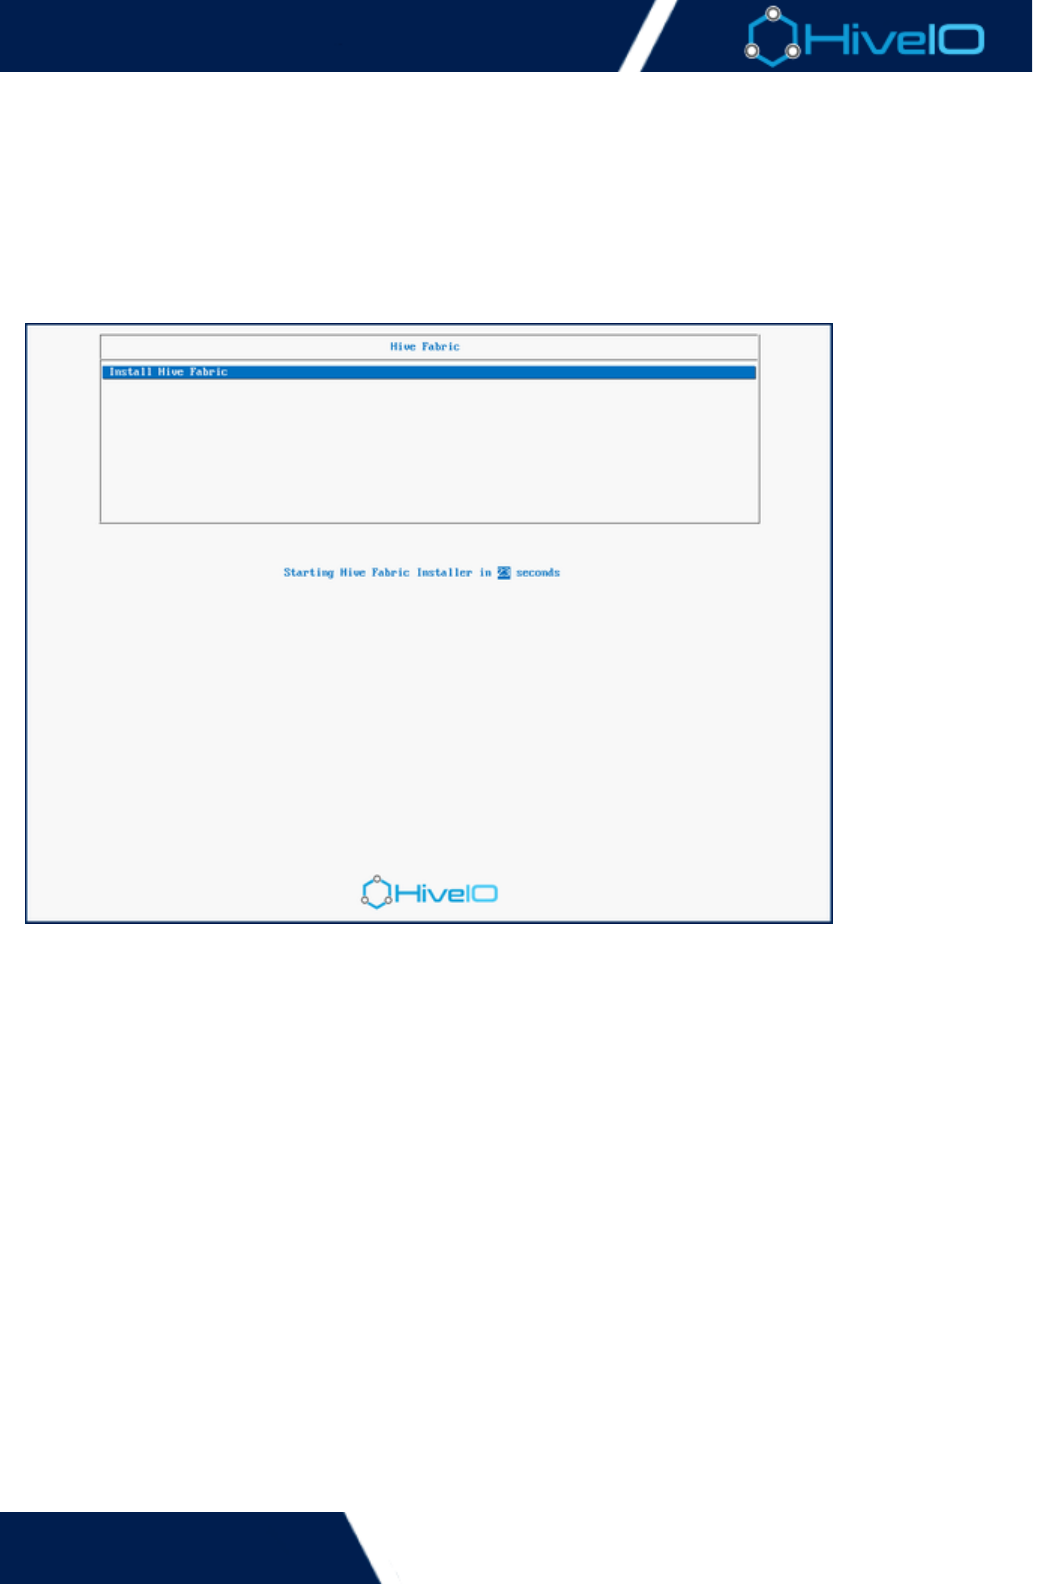
Before progressing, the EULA must be accepted. Once accepted, the first boot wizard begins guiding through
initial configuration. Use the and keys to read the entire EULA before proceeding. ToPage Up Page Down
navigate the first boot wizard, use the and arrow keys and the key. To configure the first runUp Down Enter
options:
On the page, enter the unique hostname for the local appliance, typically entered as Hostname Setup loc
. Press to advance to the next page.al.yourdomain.com Enter
The page is where a new password will be established for the default "admin"Admin Password Setup
Administrator account. Enter a secure new password in the appropriate field, then re-enter the password
in the following confirmation field. Use the arrow keys to select the button and press toNext Enter
advance to the next page.
Enter the HiveIO Fabric network settings in the page. The following optionsConfigure Network Settings
must be set:
Enable DHCP: When enabled, an IP address is automatically assigned to the device. Disabling this
option will allow entry of an IP Address, Netmask, and Gateway.
IP Address: Enter the IP Address to assign to this device. Verify that this IP Address is not
After installation and on the initial first boot, it may sometimes take a moment for the configuration
screen to appear on the console, indicating that the First Boot Wizard is starting. If the console asks for a
login before the EULA appears, ignore the prompt until the First Boot Wizard starts and the EULA
appears.
Admin Passwords
This also sets the password for the account, a separate administrator account foradmin1
navigating the Fabric console through a shell.
Hive Fabric 7.0 Administration Guide
19 | © 2018 HiveIO
3.
4.
IP Address: Enter the IP Address to assign to this device. Verify that this IP Address is not
currently in use before assignment.
Netmask: Enter the netmask for the network’s host.
Gateway: Enter the default gateway for the network.
VLAN: Enter the VLAN ID. if the device will be joining one. Otherwise, this can be left at the default
value.
DNS Server: Enter the DNS server address. For common setups, this will be the same as the
hostname.
DNS Search Path: Enter the DNS search path. This will typically resemble .yourdomain.com
Once the Hive services have been configured, the following pages are optional to complete. The Join
enables the Hive Fabric to gain membership to a database cluster. Cluster Setup If a cluster has already
. Otherwise, this step can bebeen established, enter the IP address of the Central Management Appliance
performed at a later time. Use the arrow keys to select the button and press to advance andNext Enter
complete the First Boot Wizard.
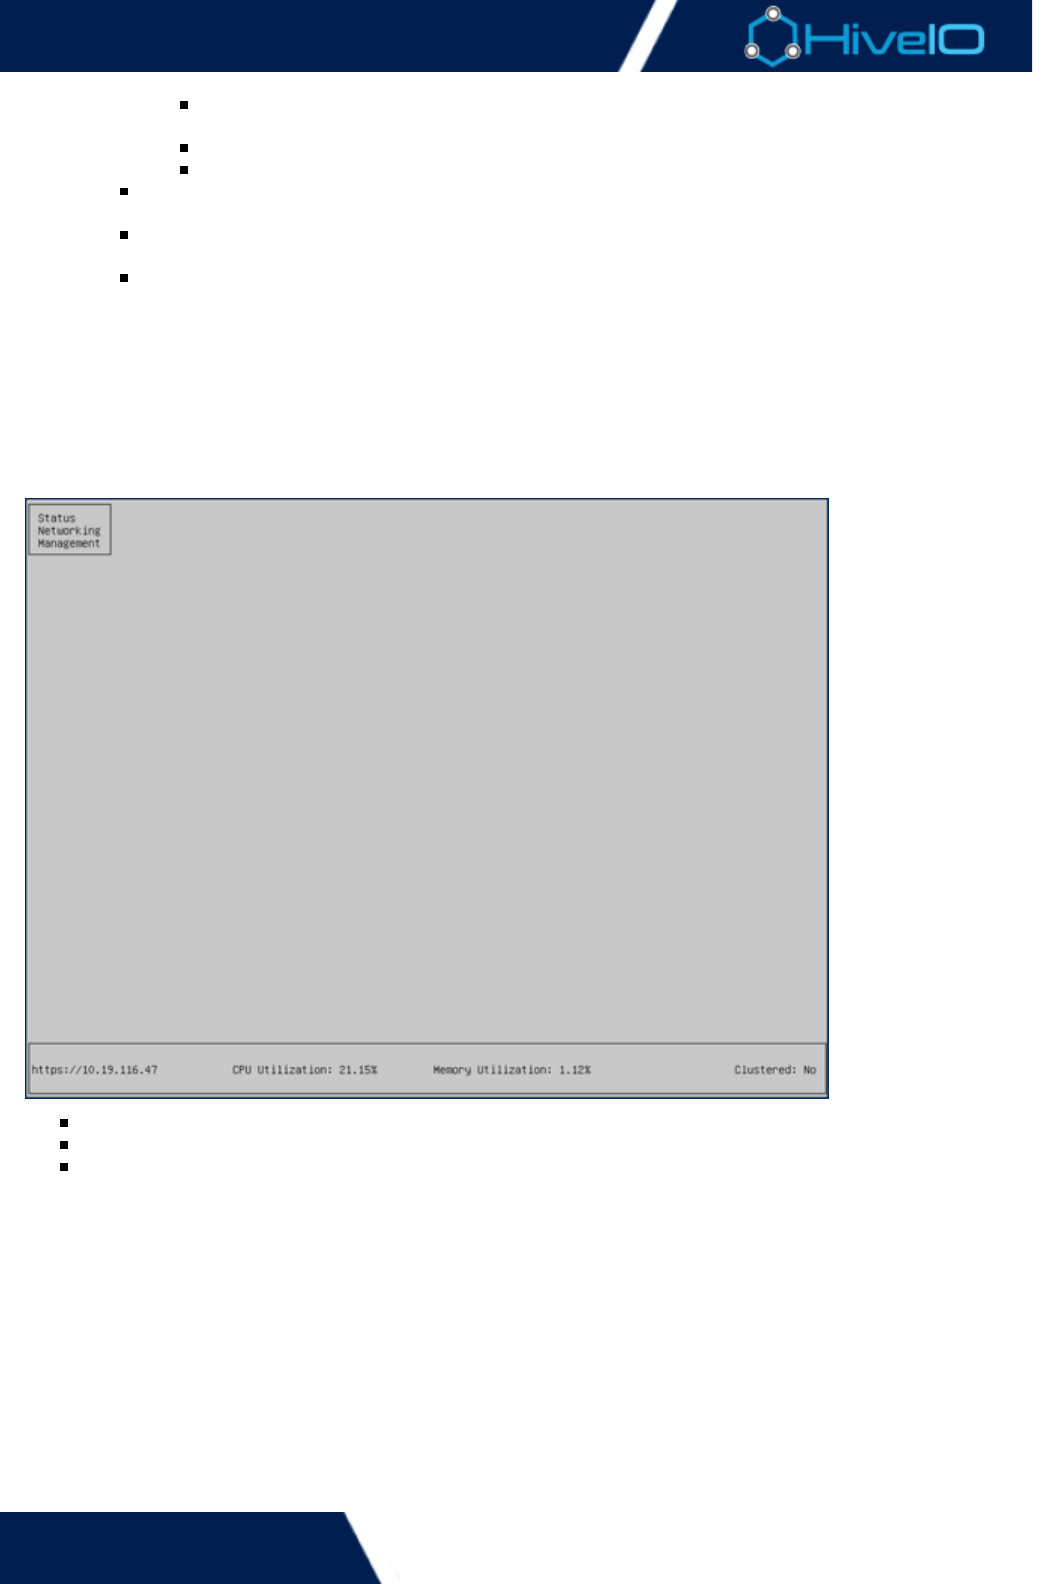
Once the First Boot Wizard has been completed, users will need to log in as the Administrator, using the
password set from the first boot wizard. When that has been verified, the is available toManagement Console
navigate with three options:
Status
Networking
Management
The status page also displays the server's IP address, CPU Utilization, Memory Utilization, and Clustered status.
Enter the assigned IP address into a web browser to begin using the appliance.

Hive Fabric 7.0 Administration Guide
20 | © 2018 HiveIO
1.
2.
3.
4.
5.
6.
Initial Deployment
With installation process completed and the First Boot Wizard run, Hive Fabric is ready for deployment. Hive
Fabric is accessible through any HTML5-compliant web browser. Further configurations that could not be
performed within the First Boot Wizard are available within the appliance's Web user interface.
Instructions for Deploying the Hive Fabric Software
Ensure the appropriate media is connected to the server. Turn it on and boot from the connected boot
device.
When starting up, the GNU GRUB screen may appear with a series of options. Select the option toUbuntu
advance. Otherwise, the system will simply start without any further prompting.
Hive will indicate a successful install when the screen displays the . The bottom of theConsole Application
menu page displays the IP address of the host appliance.
Using the IP obtained on the console after installation, open a web browser and insert the IP in the format
off .https://<hiveIO-Host-IP>
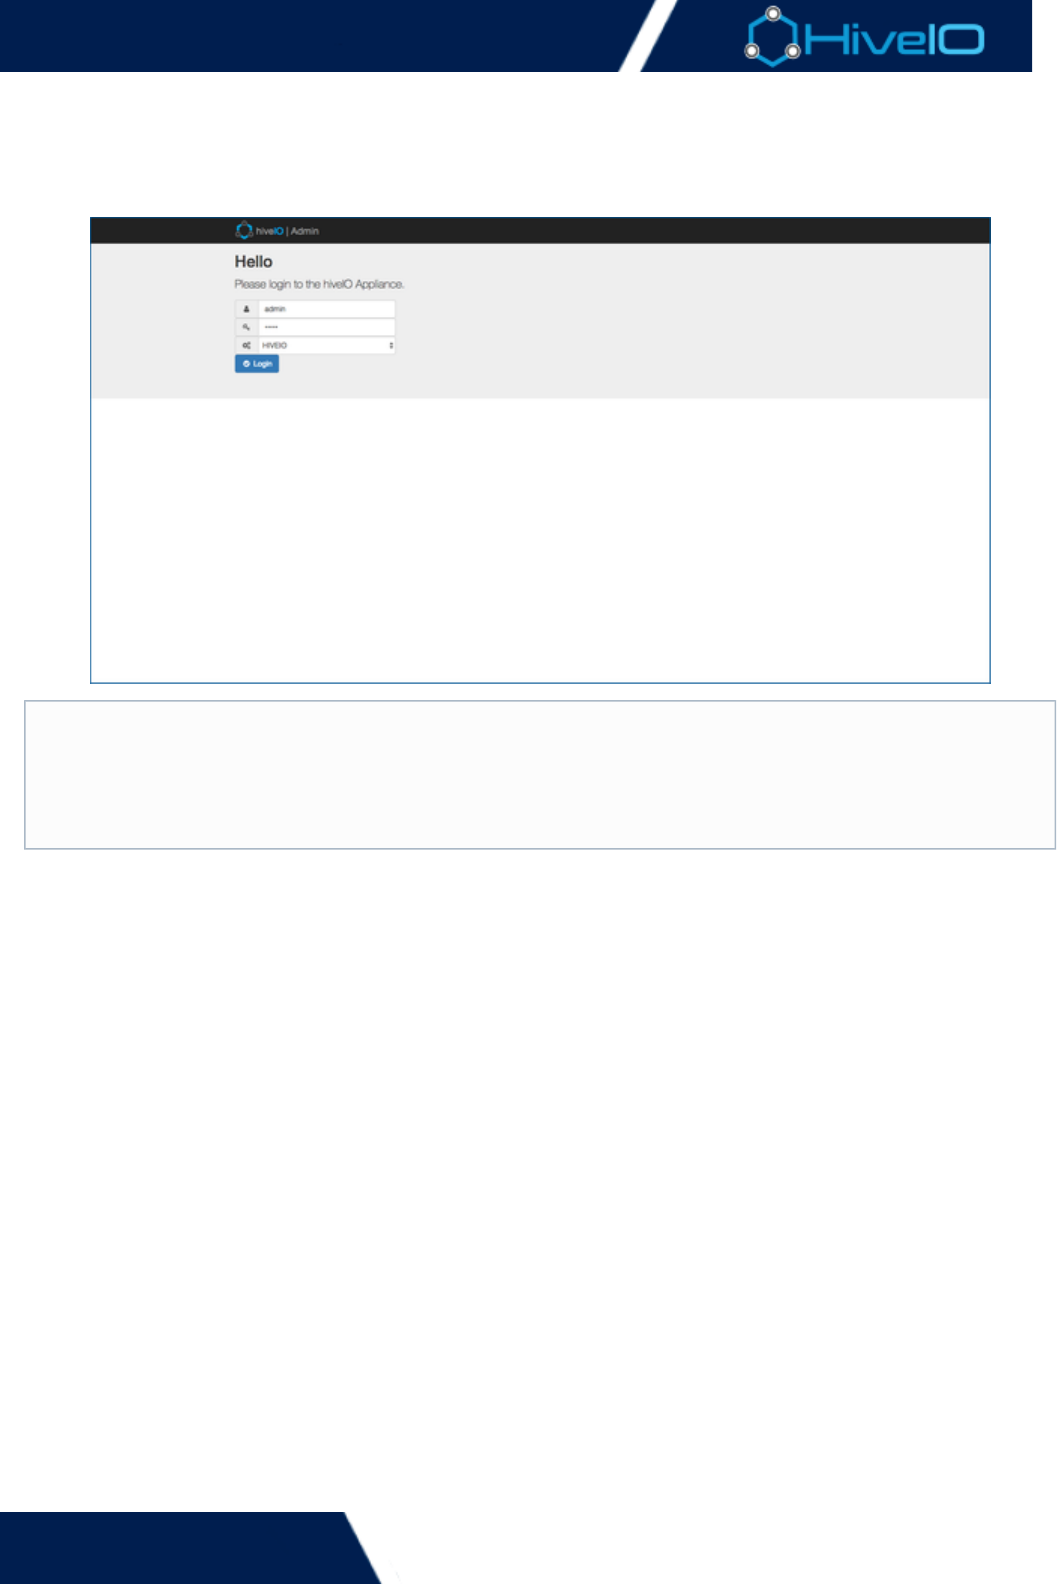
The following is the default Administrator ID:
User: admin
Password: This varies based on the password entered during the First Boot Wizard
When the login is successful, configuration may begin.
Note
There may be a warning for the SSL connection. This can be safely ignored as this is a self-signed
certificate. It can be replaced later to the correct certificate for the environment.

Hive Fabric 7.0 Administration Guide
21 | © 2018 HiveIO
Appliance Administration
When the appliance has been deployed, it is ready for use. To begin access and prepare configurations to guests,
review the process of .navigating the user interface
There are several sections used when navigating the appliance interface. Each one is integral to the
configuration and maintenance of both guests and the appliance itself:
Inventory
Publishing
Tools
Settings
Hive Fabric 7.0 Administration Guide
22 | © 2018 HiveIO
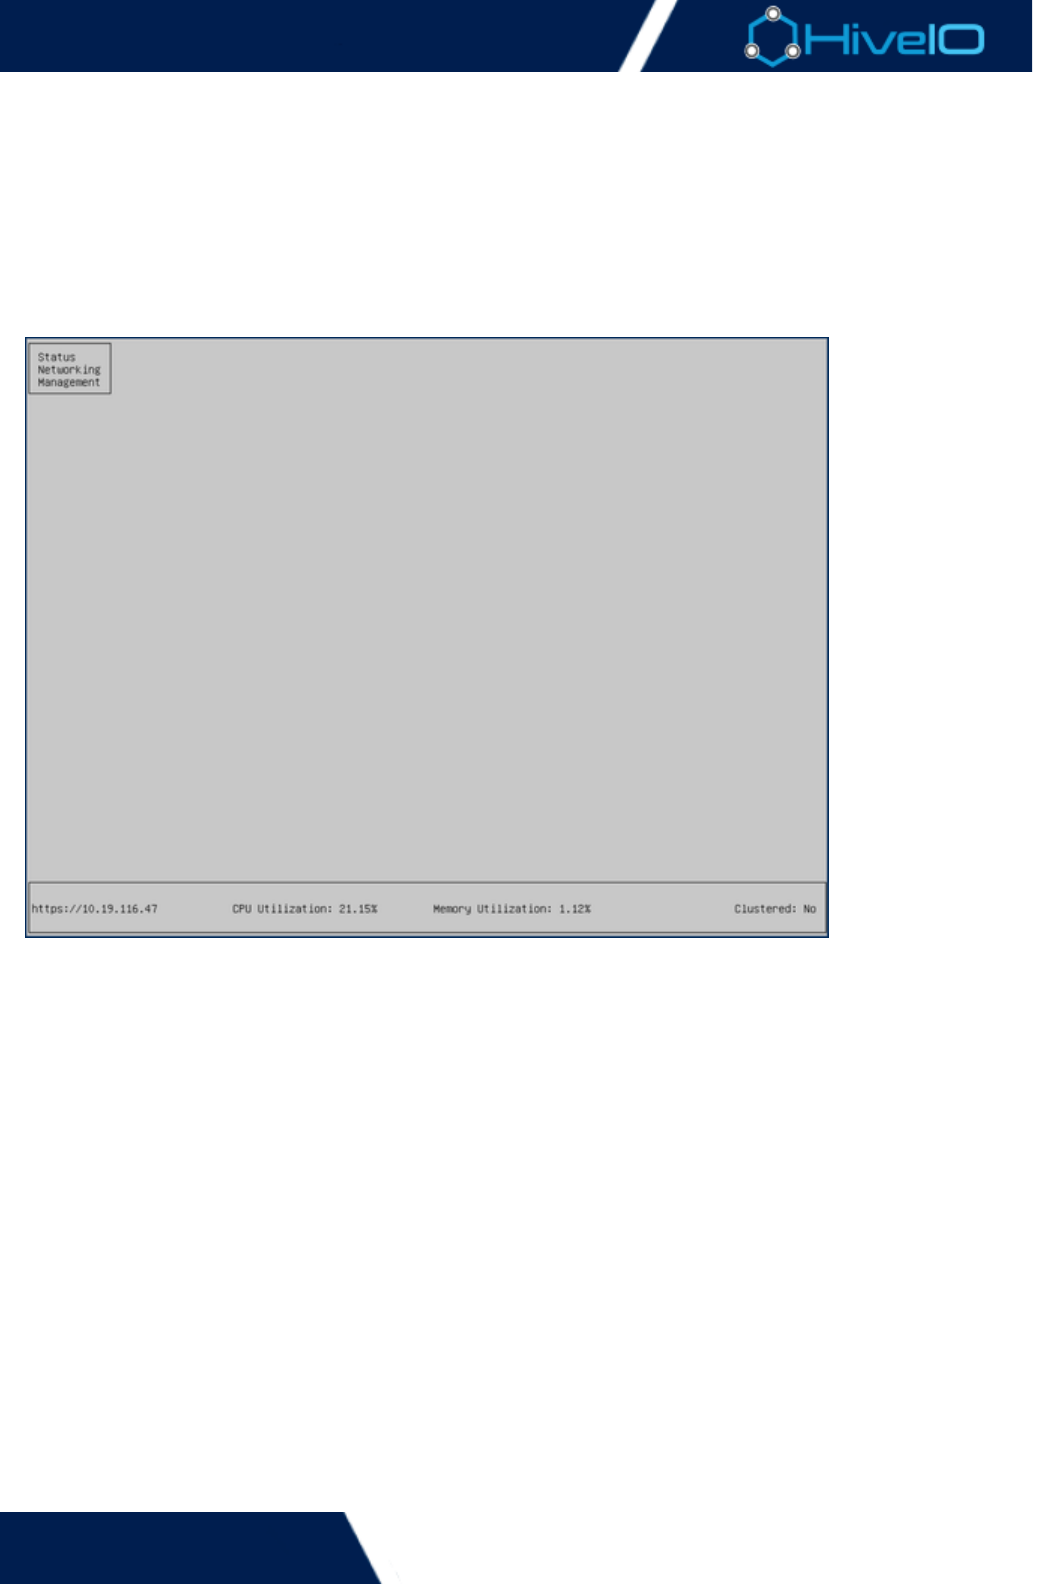
Console Management
An individual Hive Fabric Appliance can be managed locally through the console. This is not intended to be the
primary point of management for Hive Fabric but does allow for configuration of certain appliance operations
from the console. For example, if a machine isn't available to run the Web UI then the Management Console will
still permit access to any necessary appliance configuration. The menu will show when the console is not in
direct use and is ready for user-interaction. All commands in this tool are also available through the Web UI.
For security purposes, the Management Console automatically locks itself after a few moments of inactivity. It
can be unlocked using the current password.admin
There are three main areas to this tool:
Status: This displays the status of the Hive Fabric services and the appliance in general.
Networking: See the current configuration and update any of the production network settings. This is
particularly useful in instances where connectivity to the appliance is lost while a network settings needs
adjustment.
Management: Manage the appliance such as Cluster membership, maintenance mode and power operations on
the appliance itself.
Hive Fabric 7.0 Administration Guide
23 | © 2018 HiveIO
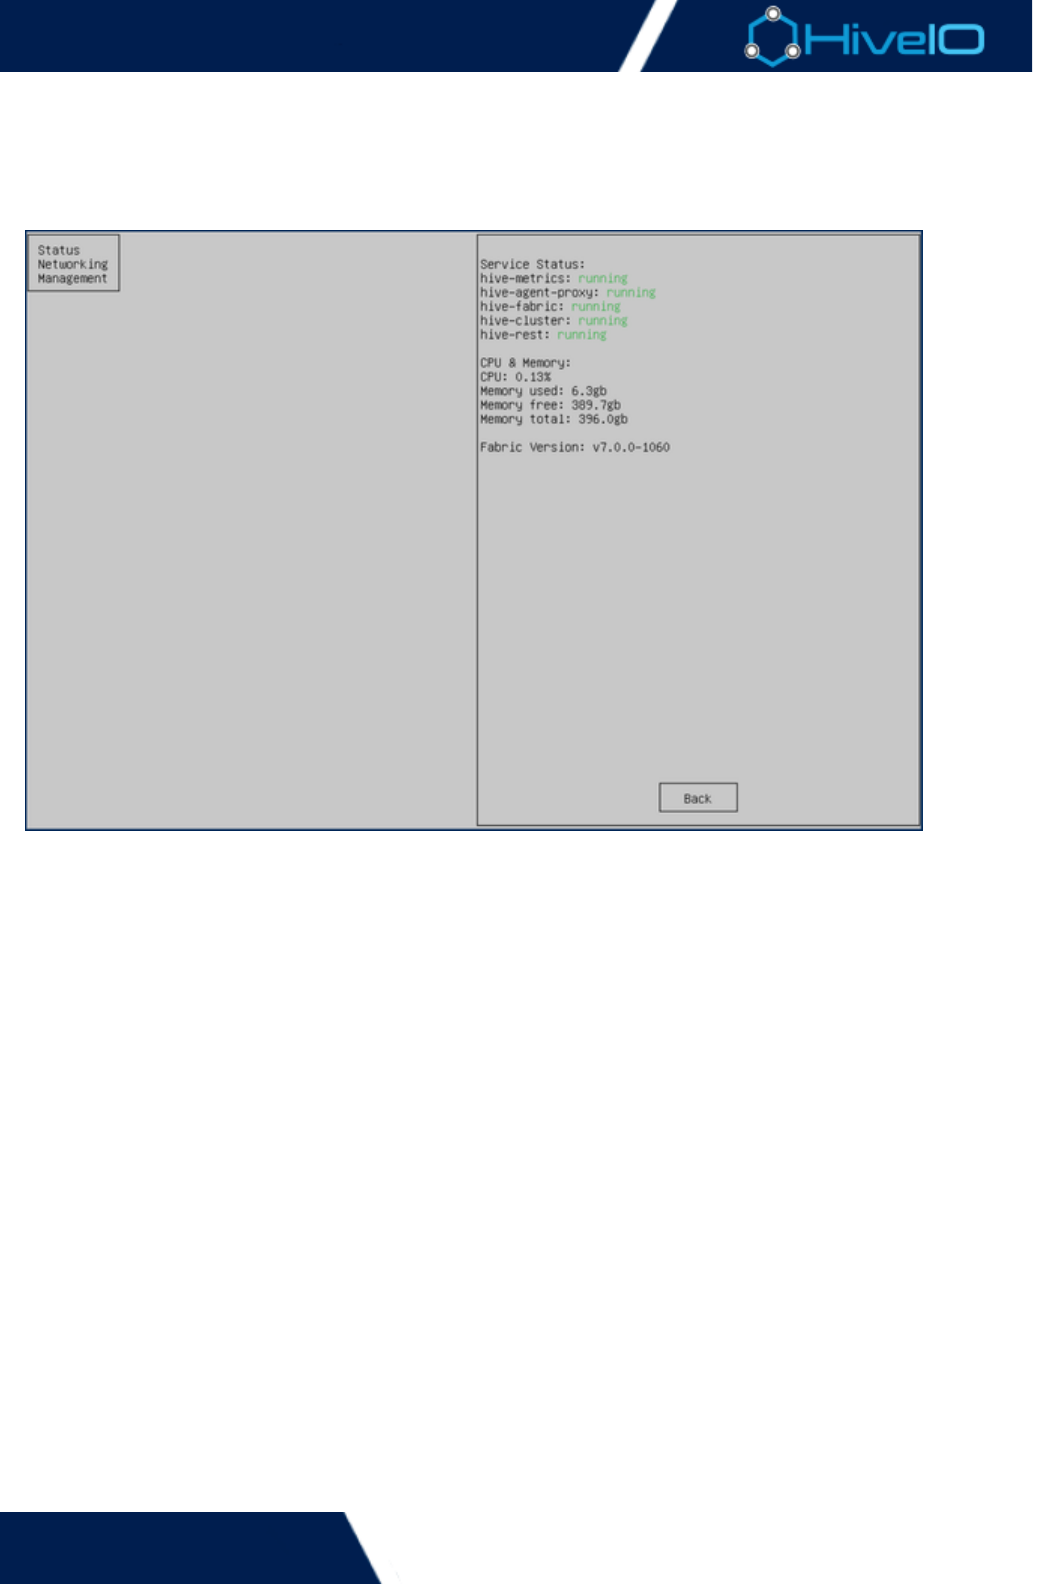
Status
The menu displays the current health of the server and the Hive services. A Service Status list displays theStatus
current Hive services and their running state. A status indicates that the service is running withoutrunning
issues.
CPU and Memory stats are displayed beneath the Service Status. These display the current metrics of the
system. Here, the CPU usage can be monitored, as well as the current memory statistics. The status also displays
the current version of Fabric running on the server.

Hive Fabric 7.0 Administration Guide
24 | © 2018 HiveIO
Networking
The menu lets users reconfigure or even reset network configurations. Many of these options mayNetworking
also be set within the appliance's web interface.
View Network Settings display the current network configuration for the Hive Fabric. The appliance's IP
address, Subnet Mask, Default Gateway, and Network Interface are displayed here.
Configure Production Network allows users to change the network interface configurations that were
set during the initial run of the First Boot Wizard. DHCP and VLAN can both be enabled or disabled from
this menu. For more information on configuring the production network, see .Network Settings
Configure Network Bonding lets users set a Network Bond for the appliance. For more information on
configuring a Network Bond, see .Network Settings
After any network settings has been edited, the applied changes must be saved via the Restart
option. A prompt will appear, confirming the server to proceed with the restart.Networking
Hive Fabric 7.0 Administration Guide
25 | © 2018 HiveIO
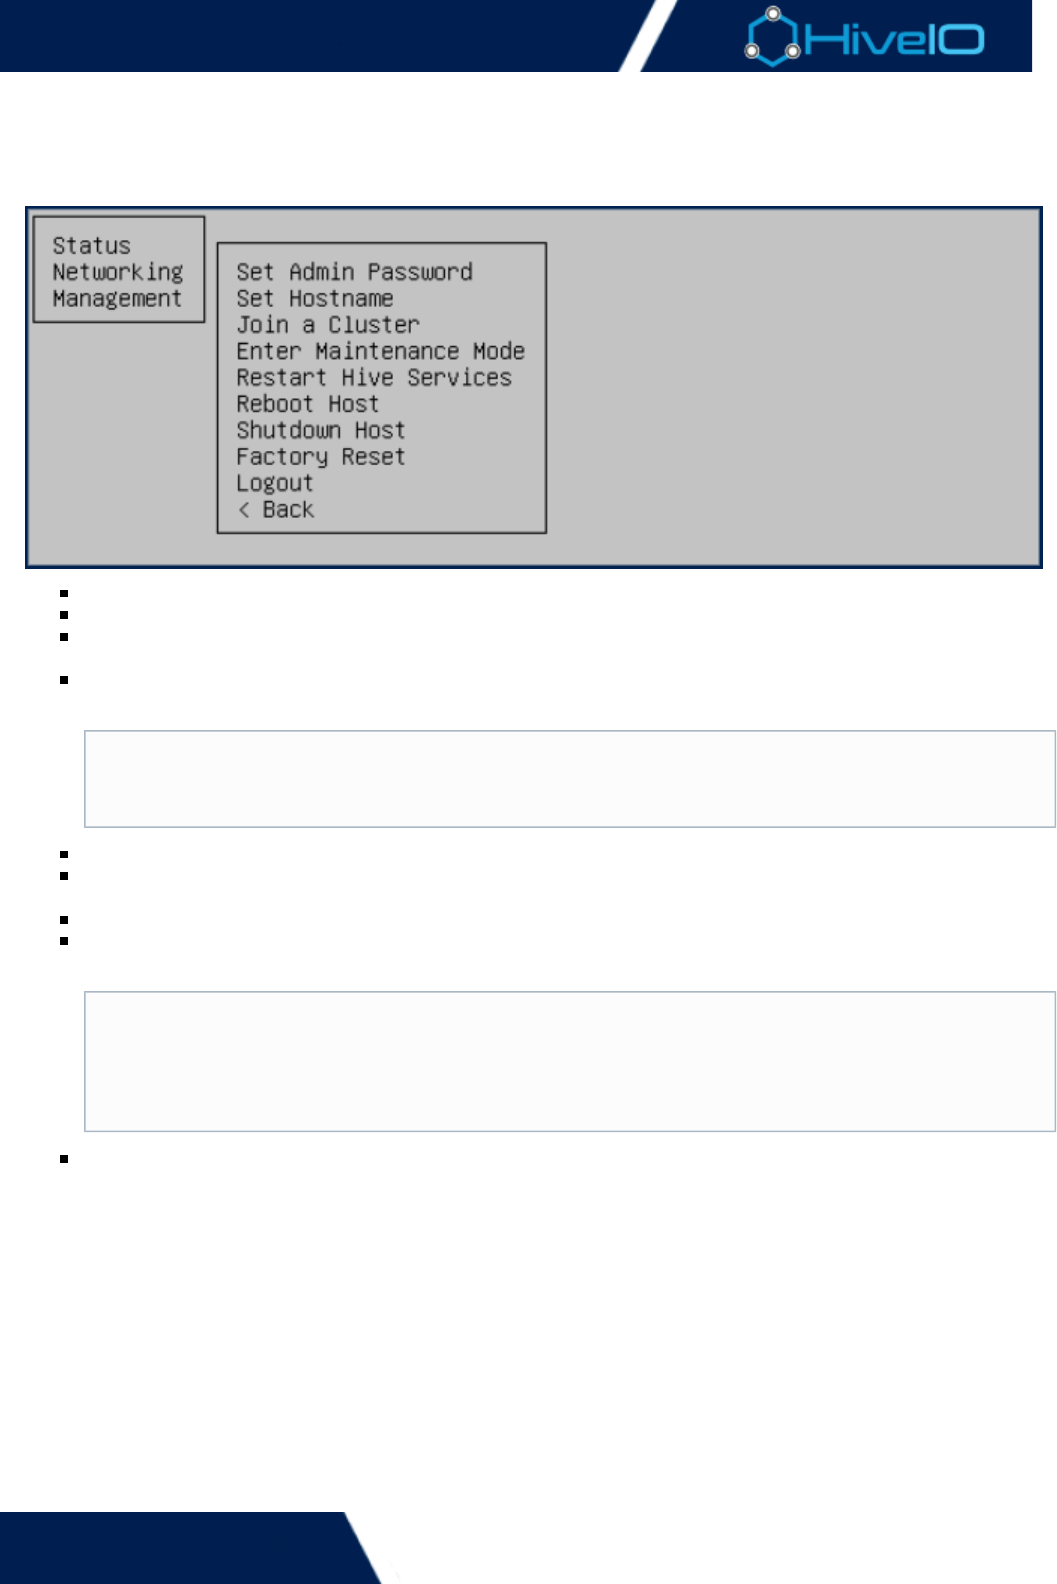
Management
The menu has a variety of options that are imperative to configuring and maintaining Hive Fabric.Management
Many of these options may also be set within the appliance's web interface.
Set Admin Password to enter a new Administrator password.
Set Hostname sets a new hostname for the appliance.
Join a Cluster joins the appliance to a cluster if it does not already have a membership. This option cannot
be used to change cluster membership. The appliance must first detach itself from the cluster.
Enter/Exit Maintenance Mode toggles the appliance to a maintenance state. It is necessary to enter
Maintenance Mode in order to leave the host's cluster membership.
Restart Hive Services restarts the Hive services after certain settings have been changed.
Reboot Host restarts the host appliance. This action may be necessary to save applied settings or for
troubleshooting purposes.
Shutdown Host shuts down the host appliance.
Factory Reset reboots the appliance to factory-default settings. Once this option is deployed, the First
Boot Wizard must be run again.
Logout logs the current user out of the console. The console will automatically log out users after a brief
period of idle time for security purposes. This option is recommended for anytime an administrator must
step away from the station.
Clustering
This option only works while the appliance is a member of a cluster. Otherwise, an error will
appear.
Factory Resetting
Performing a Factory Reset will clear out all changes made to the server and restore the appliance
to its initial settings. Any changes that were made to the server prior to factory resetting will be
lost. This includes any software packages used to update Hive Fabric. To perform a factory reset
while retaining the latest version of Hive Fabric, perform a fresh install with the most current files.
Hive Fabric 7.0 Administration Guide
26 | © 2018 HiveIO
1.
2.
3.
4.
5.
Navigating the User Interface
The Hive Fabric user interface can be accessed by entering either the URL in the format of https://<hive_fabr
ic host IP> or DNS name, if configured.
A warning for the SSL connection may appear in the browser, a result of the self-signed certificate that is
installed by default. This certificate can be replaced later with your own certificate. Refer to the pAdministration
age for certificate configuration.
A series of options are available to the user on the left navigation bar once they login to administer the
appliance. These options allow Users with the appropriate privileges to setup, configure and manage all aspects
of Hive Fabric which consists of 6 main sections. Once configuration of each section is completed the appliance
will be capable of hosting guests and securely brokering these to users. The configuration consists of:
Appliance
Network Settings
Templates
Realms
Guest Pools
Default Credentials
The default credentials to login to the UI are:
admin Username:
This varies based on the password entered during the First Boot WizardPassword:

Hive Fabric 7.0 Administration Guide
27 | © 2018 HiveIO
Inventory
This section provides insight into the performance of the appliance and the management for Guests. The admin
is able to view the basic health of the system including storage and networking for troubleshooting purposes.
Administrators are able to monitor Guest Pools here, managing each individual guest.
Hive Fabric 7.0 Administration Guide
28 | © 2018 HiveIO
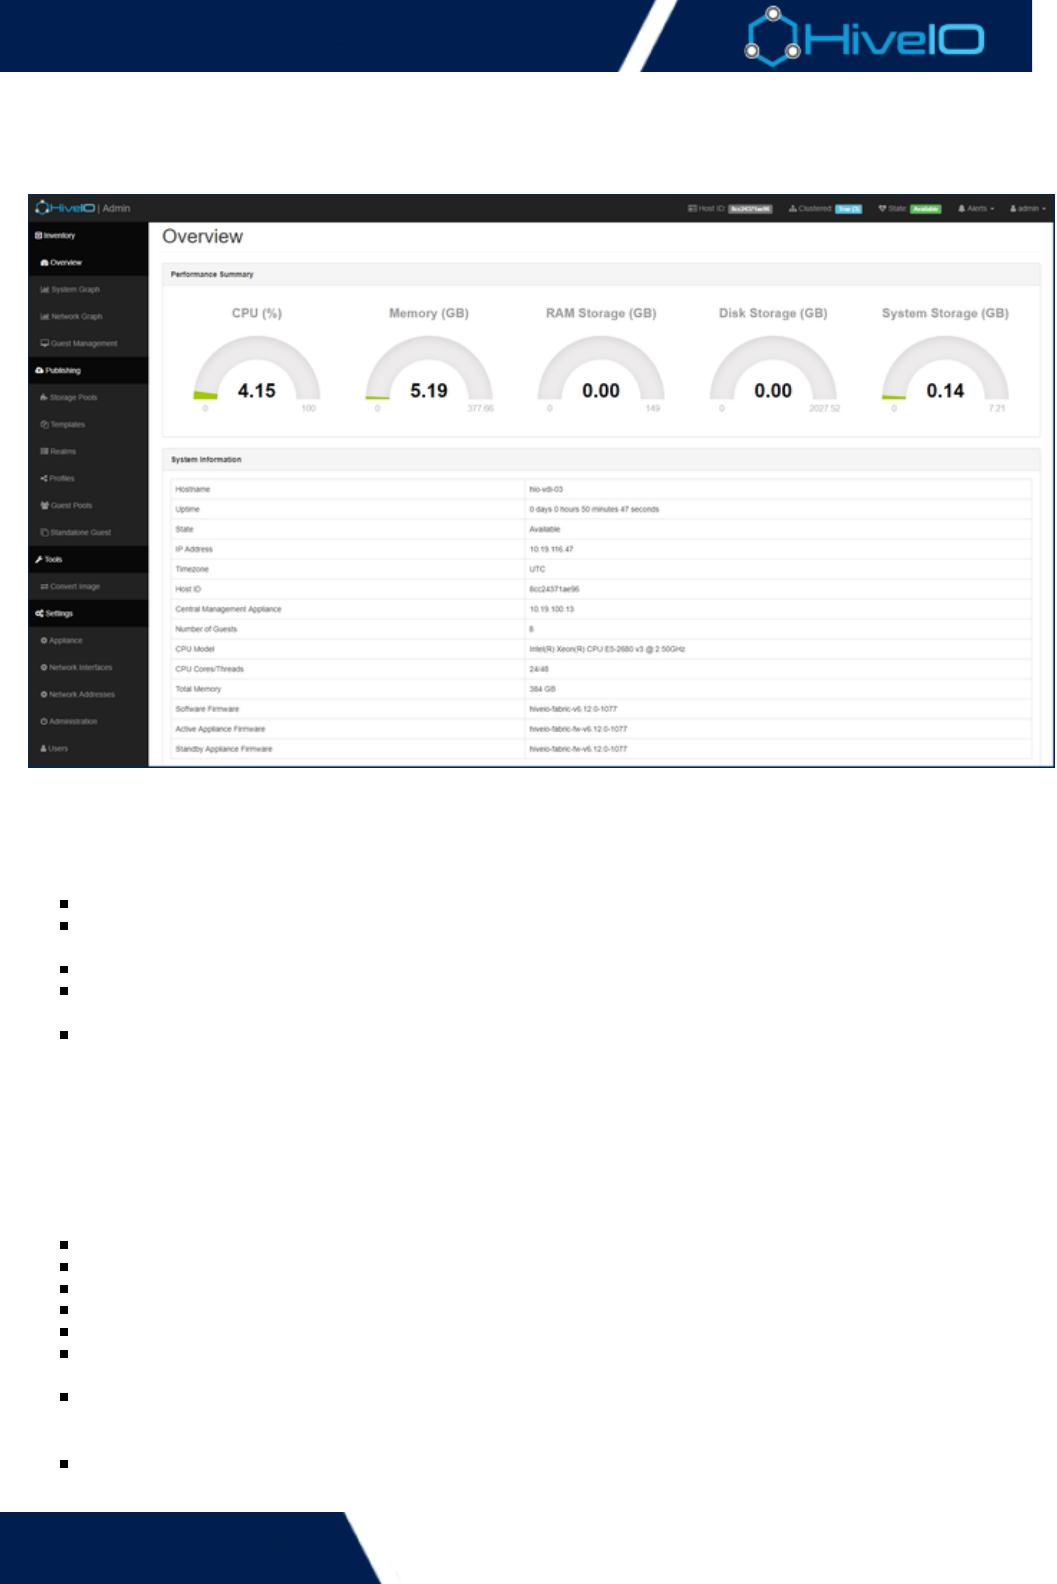
Overview
This page provides key resource consumption metrics and detailed system information about the appliance.
Performance Summary
This panel provides a high level overview of the resource utilization across the appliance. The amount of CPU,
memory and storage that is currently in use by the appliance is monitored and reported.
CPU (%): Display the percentage of CPU resource currently in use across the appliance.
Memory (GB): The memory installed in the appliance along with the current utilization. This is a
summation of all system and guest utilization and includes RAM allocation to storage.
RAM Storage (GB): The memory currently reserved for storage and the amount currently utilized.
Disk Storage (GB): The available storage in the appliance and the amount currently being consumed by
Guests.
System Storage (GB): The storage reserved for the Hive Fabric OS. This needs to be monitored and should
not be allowed to fill to 100%.
System Information
This page also displays key information about the appliance that may be useful for administration purposes. It
also shows key information about the state of clustering, as well as the number of guests running hardware and
software versions. Many of these settings are established during the and can be adjusted inFirst Boot Wizard
the page.Appliance Settings
Hostname: The current hostname of the appliance.
Uptime: The amount of time that the appliance has been booted up and running.
State: The current status of the appliance in the cluster.
IP Address: The IP address of the appliance.
Timezone: The timezone of the appliance.
Host ID: The unique identifier assigned to the host. This is system generated and can't be changed by the
admin.
Central Management Appliance: The IP of the current Central Management Appliance in the cluster; The
CMA is the appliance in the cluster responsible for join and union orchestration. If a cluster isn't
configured this will be set to .localhost
Number of Guests: The current number of active Guests on this appliance.
CPU Model: The processor model and clock speed that the server is running on.

Hive Fabric 7.0 Administration Guide
29 | © 2018 HiveIO
CPU Model: The processor model and clock speed that the server is running on.
CPU Cores/Threads: The total number of cores that the appliance has available to use across all CPUs.
Threads will usually differ if hyper-threading is turned on in the BIOS and will usually be double the
number of Cores.
Total Memory: The total amount of memory available to the appliance.
Software Firmware: The current version of the Hive Fabric firmware that is running.
Active Appliance Firmware: The version of the active Hive Fabric firmware.
Standby Appliance Firmware: The version of the standby Hive Fabric firmware.
Firmware
The appliance has active and standby firmware to allow for easy application of updates. In this
architecture if an update adversely affects the appliance then it can be rolled out and replaced by the
standby version.
Hive Fabric 7.0 Administration Guide
30 | © 2018 HiveIO
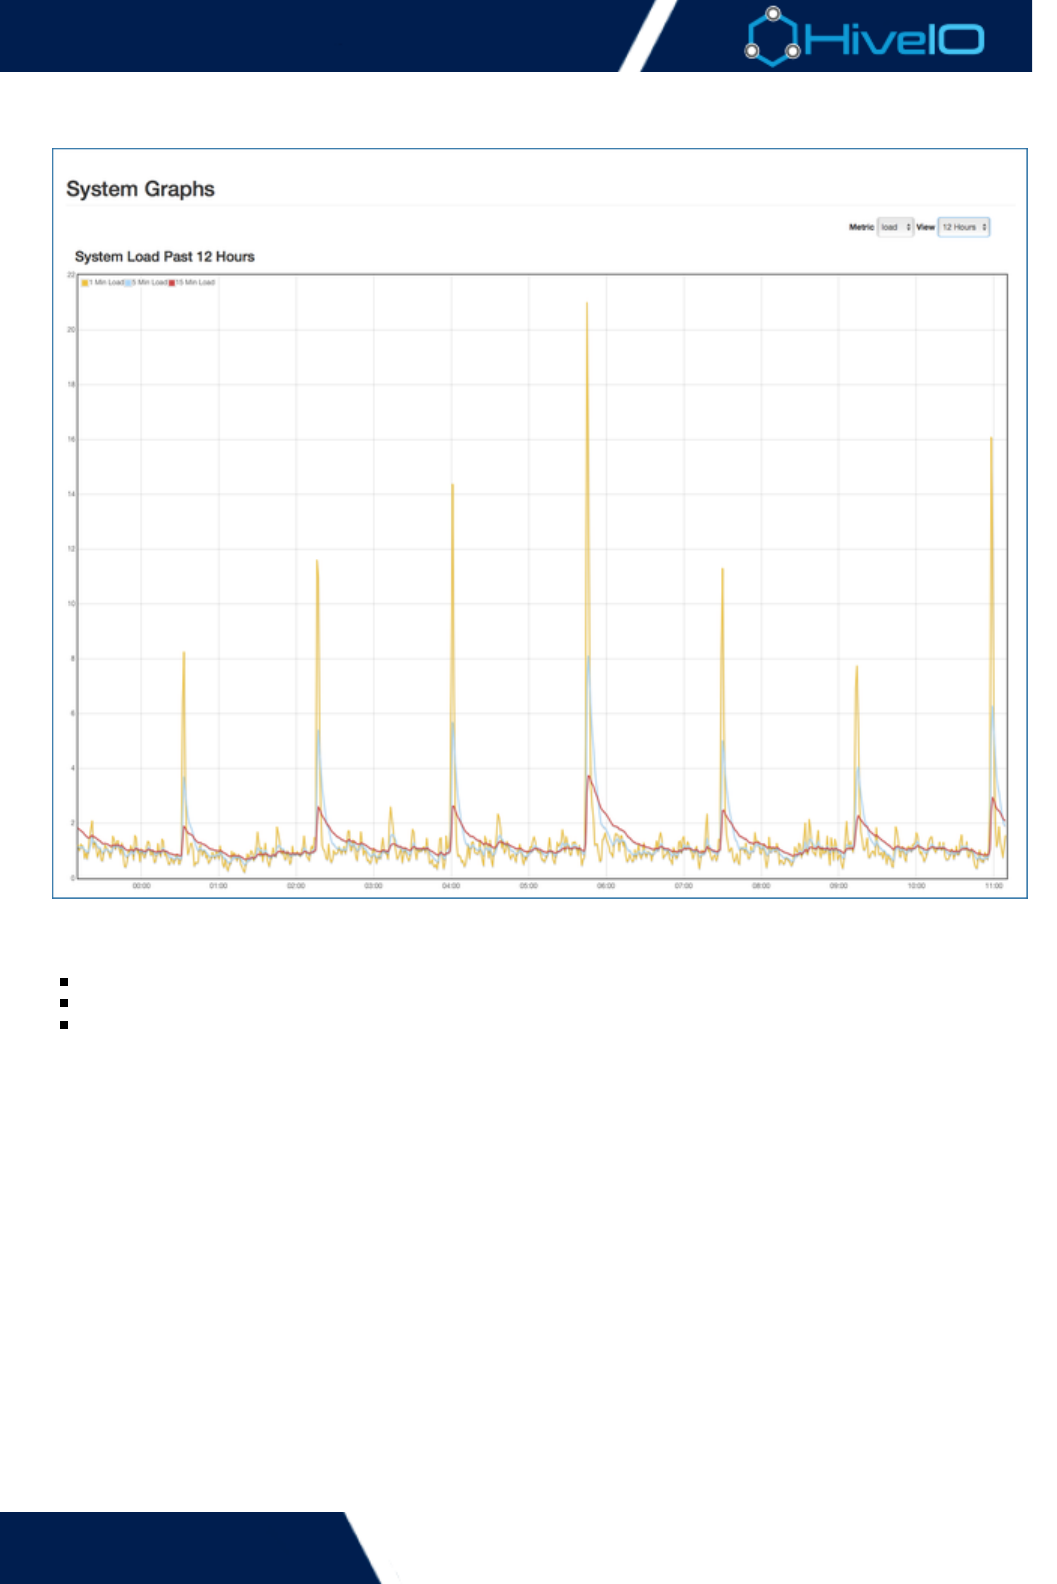
System Graphs
The health of the appliance can be monitored from this page. The System Graphs display graphs for various
metrics within the appliance and can assist troubleshooting. The following metrics can be viewed:
CPU
System load
System memory
The View dropdown menu can be used to select a specific period to review metrics for. The appliance tracks
data occurring within the last 1 hour, 2 hours, 6 hours, 12 hours, 1 day, 1 week, or 1 month.
Hive Fabric 7.0 Administration Guide
31 | © 2018 HiveIO
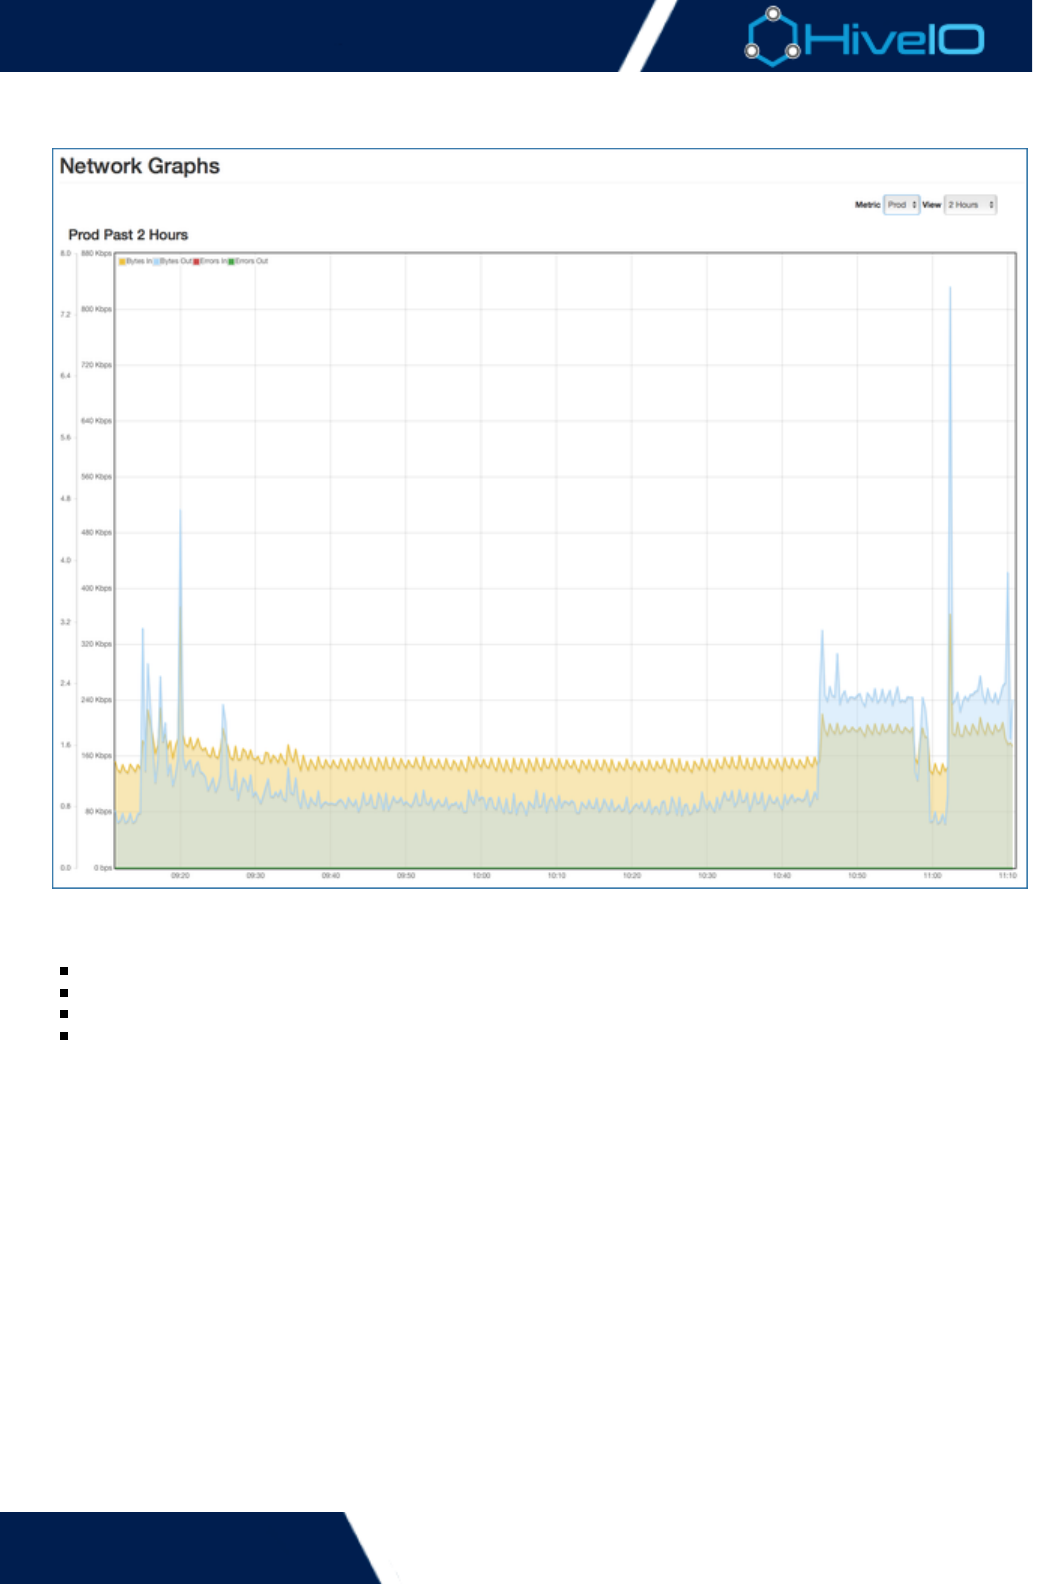
Network Graphs
The network utilization across each physical network can be monitored from this page. The Network Graphs
displays graphs for the following metrics:
Bytes In
Bytes Out
Errors In
Errors Out
The Metrics dropdown will allow users to view the health of any configured physical interface as well as the
additional prod network that is automatically created for the management of the appliance. The View dropdown
menu can be used to select a specific period to review metrics for. The appliance tracks data occurring within
the last 1 hour, 2 hours, 6 hours, 12 hours, 1 day, 1 week, or 1 month.

Hive Fabric 7.0 Administration Guide
32 | © 2018 HiveIO
Guest Management
This page displays the guests that are deployed on this appliance and allows the administrator to manage them.
The guest table can be sorted by any of the columns, the default is Name. Users with administrative privileges
have access to a series of actions that can be performed on the Guest.
Below are the available actions that can be performed on the guest VM, accessible through the Action
dropdown to the left of a guest entry in the table:
Power On: Power on the Guest.
Shutdown: Attempt to cleanly shutdown the Guest.
Reboot: Reboot the Guest.
Power Off: Force shutdown the Guest.
Reset: Hard reset the Guest, equivalent to momentarily pressing the power button on a physical system.
Delete: Deletes the Guest from the Guest pool inventory. The Guest Pool or Standalone Guest will remain
in its corresponding inventories until relaunched or deleted.
Migrate: Move this Guest to a different host in the cluster, when this option is selected a dialog box will
appear giving a list of servers that are capable of running the selected guest.
Mount/Eject CD: Mounts a CD-ROM to the Guest or ejects the CD-ROM from the Guest. This is necessary
for some driver installs.
Open Console: Opens a console to the Guest, typically used for troubleshooting.

Hive Fabric 7.0 Administration Guide
33 | © 2018 HiveIO
Publishing
These options focus on publishing options. Administrators can configure all the tools needed to run the guest
pools for all users.
Hive Fabric 7.0 Administration Guide
34 | © 2018 HiveIO
1.
2.
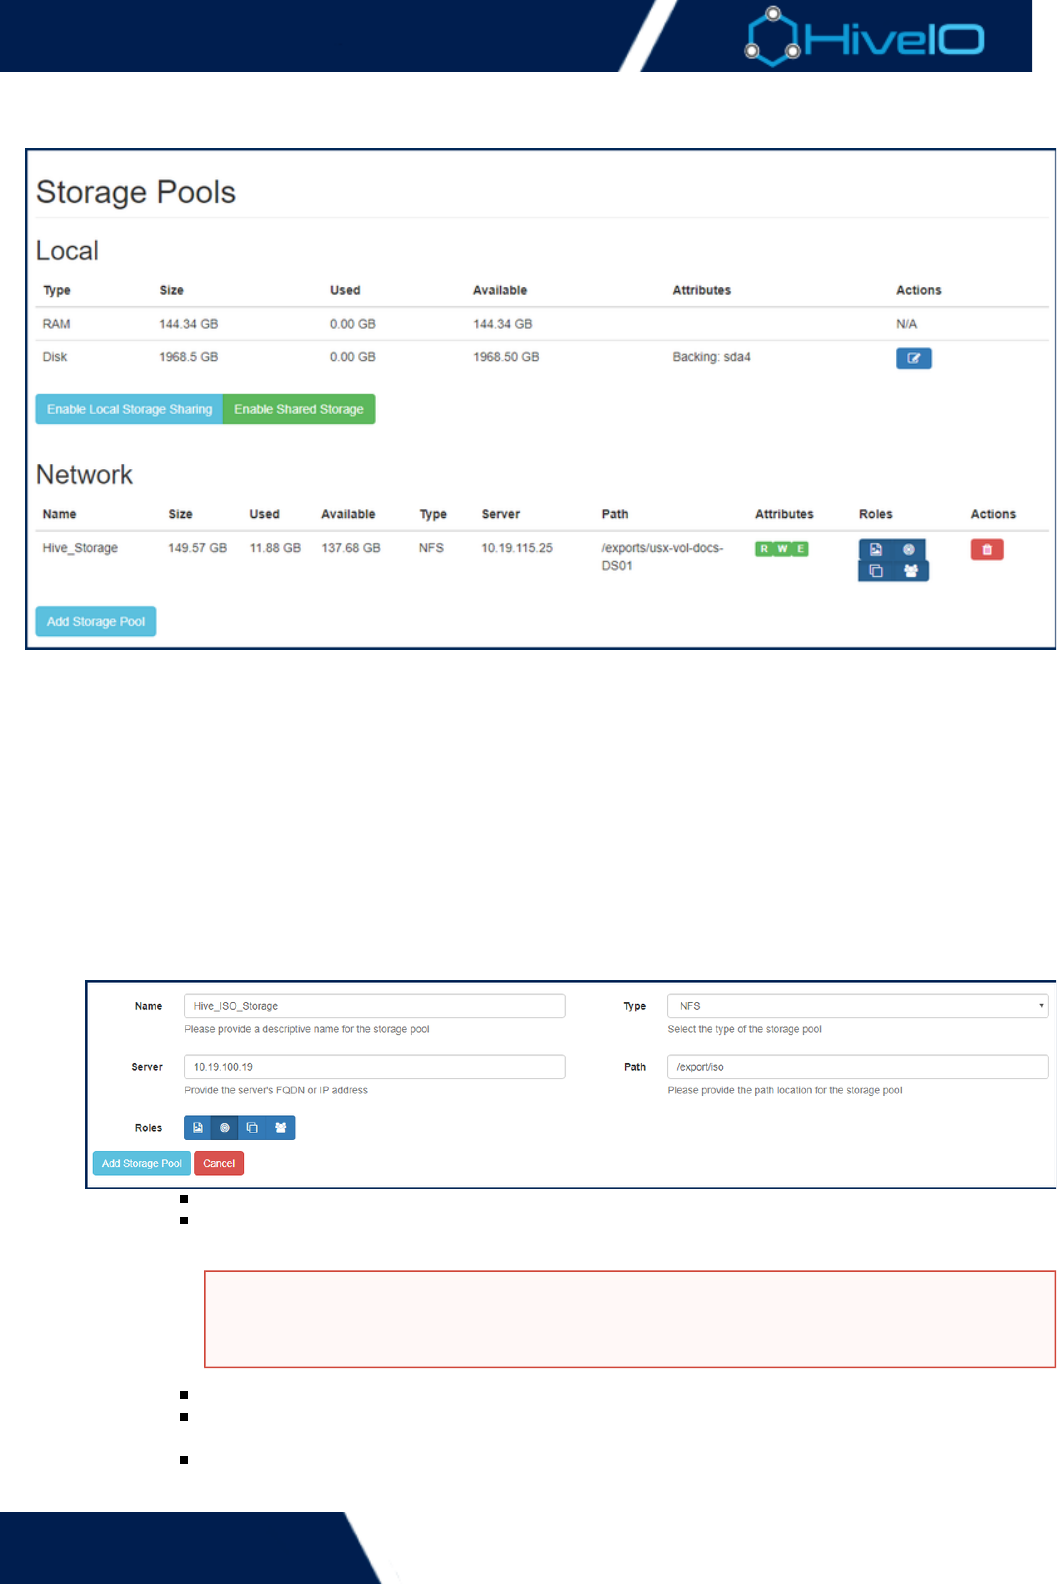
Storage Pools
Storage Pools are used throughout Hive Fabric for the setup and maintenance of virtual machines. The server's
local storage, RAM storage, and any additional shared storage pools will be displayed here. Adding a Storage
Pool to the appliance is the first step to creating or adding templates and Guest Pools. Adding the appropriate
files to a Storage Pool varies based on the storage and server type.
The host server's local RAM and disk space may be used as to store certain files and settings.Local Storage
Storage networks may be set as a shared storage among cluster memberships containing three or more
appliances. Follow the steps provided under to ensure that all the requirements are met to shareShared Storage
storage within a cluster.
To add a network server as an available Storage Pool within the appliance:
Click on on the left side Navigation Bar.Storage Pools
Click on the button and fill in the required field:Add Storage Pool
Name: The unique name used to identify the storage pool.
Type: The type of storage that will be used for the Storage Pool, supported systems are , NFS
, and .CIFS Ceph (RBD)
Server: Provide the server IP or FQDN of the external storage server.
Path: Enter the path of the export or share that will be mounted and used for the Storage
Pool.
Roles: By default, a storage pool can fulfill a multiple of intended storage rolls. Selecting one
of these options will disable that store's role within the appliance. That storage pool cannot
Known Issues
There is a known issue where CIFS shares will be restricted to read-only permissions,
regardless of permissions set on the system itself.

Hive Fabric 7.0 Administration Guide
35 | © 2018 HiveIO
2.
3.
of these options will disable that store's role within the appliance. That storage pool cannot
be used for that purpose unless it is re-enabled. Storage roles can be adjusted at any time by
clicking on the designated icon within the storage pool inventory. The available storage roles
are:
Template Storage
ISO Storage
Guest Storage
User Volume Storage
Click to complete the process. If everything is correct, the storage pool will be added toAdd Storage Pool
the inventory. The appliance will display a list of that are applicable to the storage pool: ead, Attributes R
rite, and xecute.W E
A storage pool with read-only permissions will not have access to template creation and authoring. If
there are any issues regarding storage attributes, verify that the server permissions are set correctly.
NFS Permissions
Server Administrators using an NFS share must consider the current user permissions of the server. The
Storage Pool requires both the user and the user to have read and execute access.root libvert-qemu
Aside from permissions, the following settings must also be enabled for the NFSRead-Write-Execute
share: , , and .insecure no_subtree_check no_root_squash

Hive Fabric 7.0 Administration Guide
36 | © 2018 HiveIO
1.
2.
3.
Local Storage
Hive Fabric has access to the host server's local disk space and RAM, and may use these spaces as Storage Pools.
By default, these Local Storage options can only be used as a target storage for Guest Pools. If desired, however,
administrators have the option to use and share a Local Storage Pool. This makes the server's local disk or RAM
available to share as an NFS storage pool.
To deploy a Local Storage as a Network Storage Pool:
Click on the button beneath the local storage pools.Enable Local Storage Sharing
Set the local storage settings and apply them using the button. MuchConfigure Local Storage Sharing
like network storage pools, the required NFS permissions and settings still apply, and are set by default.
Once established, a share link will be provided. The server provided and the path (either or /zdata/share
) may now be entered when adding a new ./zram/share Network Storage Pool
The local store settings may be adjusted at any time by clicking on the option. CurrentlyEdit Sharing Settings
active shared stores may also be disabled at any time by clicking on the option.Disable Local Storage Sharing
The appliance will ask for confirmation before stopping the share.
Local Disk storage may be further configured by clicking on the button under the Edit Disk Storage Settings Ac
menu. Under this menu, the available drives on the server may be enabled or disabled as a tions Backing Device
. This uses up the drive's space, so it is best to use a drive that is not currently serving another purpose within the
server. Any devices that are marked as cannot be employed as a Backing Device.Used by Hive
Shared Local Storage
Local storage should not be shared and used in production. If the server fails then any appliance using
this storage will be affected by the outage.

Hive Fabric 7.0 Administration Guide
37 | © 2018 HiveIO
1.
2.
3.
Shared Storage
Clusters containing three or more appliance have the option to share local storage among its members. Shared
storage offers self-contained and secure high availability within cluster, making it ideal for user volume
maintenance.
Before enabling shared storage, establish the same on each appliance that will gain clusterstorage network
membership. This must be done even before any of the initial three appliances become members of the cluster.
To get local shared storage set up within a cluster:
From , enter the correct information for the Storage Network. If needed, make anyNetwork Addresses
necessary changes to the Production Network. Click on to confirm the changes. A prompt willSubmit
appear to restart network services. This must be done to apply network changes. Repeat this step for
every appliance that will become a member of the cluster, including the appliance that will be assigned
as the Central Management Appliance.
Once every appliance has the network correctly set up, access the page and enter theAppliance Settings
Central Management Appliance's IP for each cluster member. Shared Storage requires a cluster with at
least three members, including the CMA.
The next step only needs to be done on one appliance, rather than on every member of the cluster.
In the page, a new option is now available. Click on the button. For Storage Pools Enable Shared Storage
, select the maximum amount of disk space that will be allocated forShared Storage Disk Utilization
storage. This sizing is based upon the smallest disk among the three initial appliances. When everything is
set, click on to establish the share pool.Configure Local Storage Sharing
When done correctly, the shared storage will be set on every appliance within the cluster. Afterwards, any new
members of the cluster automatically access the shared storage pool upon gaining membership.
As the cluster gains more members, the size of the shared storage gradually grows. This growth occurs in
multiples of three, adding a new volume. Any appliances with membership numbers that do not fall on the
multiple rule may still use the shared storage without an issue. Disk utilization is based upon the smallest disk
size among appliances per group of three. In a failure case among three members of the cluster's local shared
storage, a fourth member may take over duties. However, this cannot occur if its local disk is smaller than the
smallest disk that utilization is already based upon.
Under the menu, the button is available for instances in which connectivity to theActions Retry Shared Storage
storage network or any of the cluster stores may need a refresh.

Hive Fabric 7.0 Administration Guide
38 | © 2018 HiveIO
Template Management becomes available once a template has been created. Its life cycle is managed
through a number of actions:
Create a New Template in preparation for deploying a Guest Pool.
Add an Existing Template to the cluster in preparation for deploying a Guest Pool.
Templates
Templates are the foundation for deploying pools of virtual machines. A template is used to define the operating
system, application set, and default settings that a virtual machine will initially build with, before being used to
create a . Templates can be created from scratch through the wizard. ExistingGuest Pool Create a new Template
templates can be added to the cluster through the process.Add an Existing Template
There is a balance between the number of templates that are created and the level of customization a template
receives. Consider the ongoing template management and ensuring that users get all the applications they
need to do their day to day job. The more generic a template is, the more guest pools can use the same
template. However, this can complicate application delivery through the use of application virtualization to layer
the applications a user requires into the guest.
This section guides through a number of key steps regarding templates:
Authoring a Template
plicate a Template
Staging a Template
Removing a Template
Prepare a template with the Template Console
Validate a Template for Guest Pool deployment
Unload a Template
Consider
If a large number of templates are being managed for a small user group a persistent desktop maybe a
better solution to deliver VDI to end-users.
Hive Fabric 7.0 Administration Guide
39 | © 2018 HiveIO
1.
2.
3.
Add an Existing Template
Hive Fabric can make use of an existing template. This template could have been previously utilized by Hive
Fabric, copied over from another cluster, or been used with another virtualization platform. Hive Fabric is
capable of using any QEMU/KVM-supported disk emulation, but the preferred emulation is either RAW or
QCOW2. If an image has not been previously the Hive Fabric will convert the file upon upload, but it isconverted
faster and more ideal to perform the conversion beforehand. Supported disk images include:
raw
qcow2 (KVM, Xen)
vmdk (VMware)
vpc (Hyper-V)
vhdx (Hyper-V)
vdi (Virtual Box)
This template should have any 3rd party hypervisor agents (such as VMware tools) removed. The template
should have the latest version of the VirtIO drivers installed. The template file must exist on a Storage Pool in the
cluster and be in a supported format.
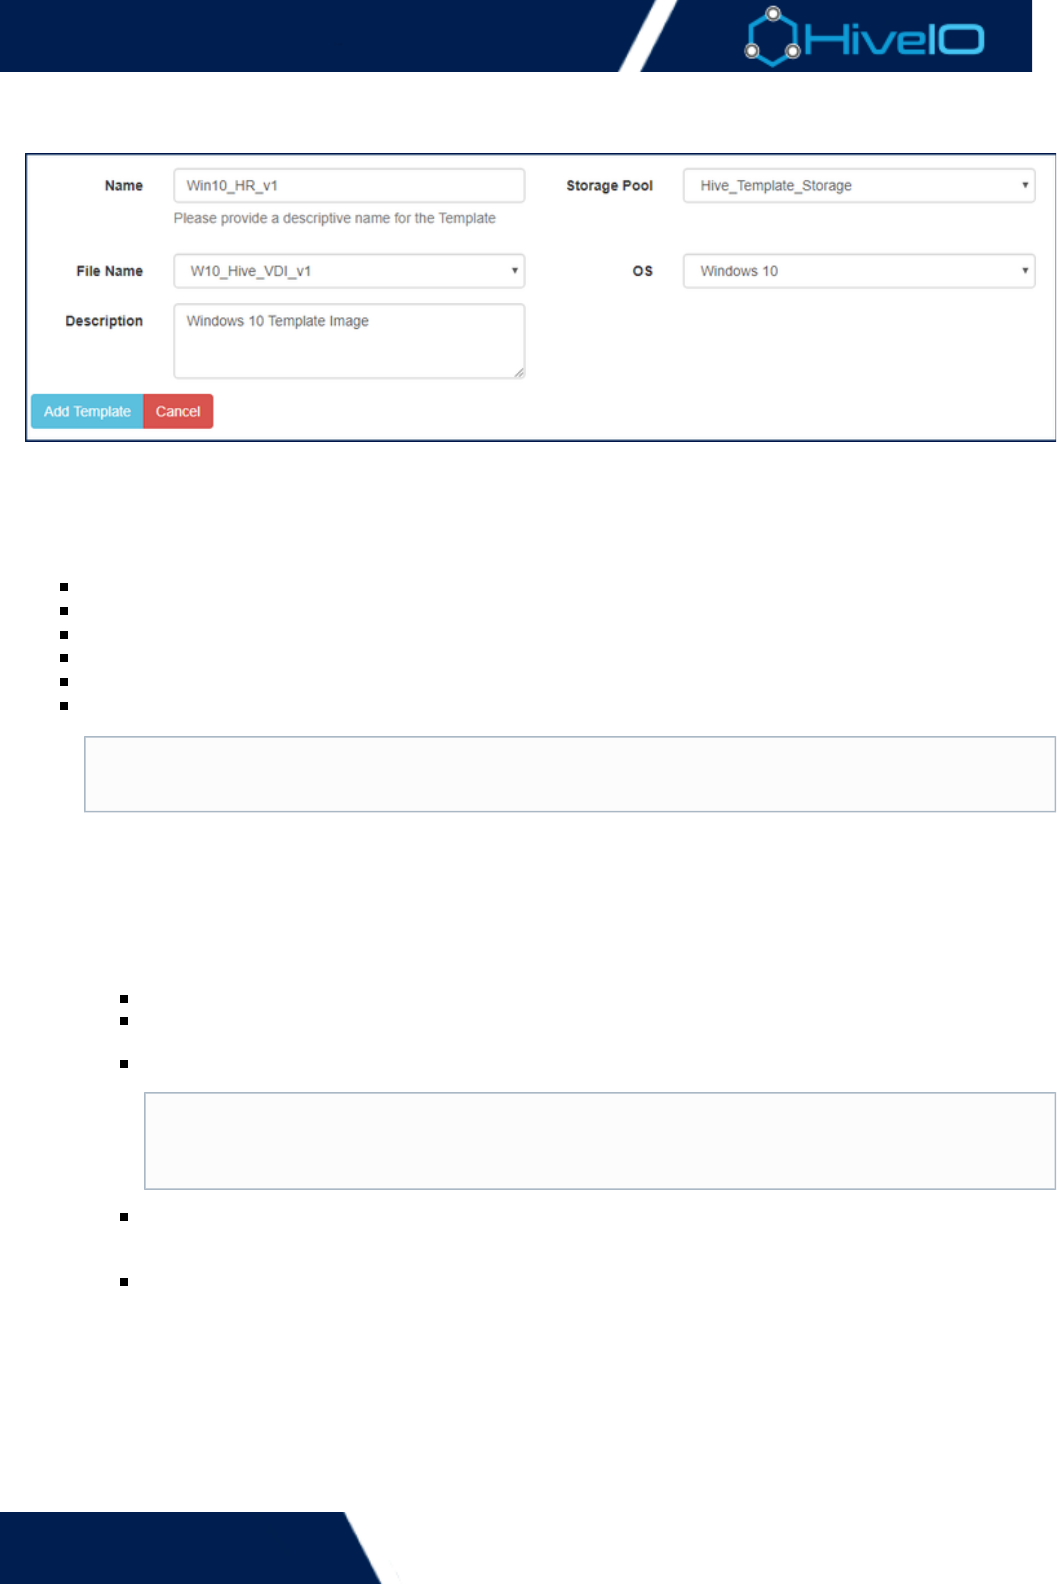
To add an existing template from a Storage Pool to Hive Fabric carry out the following steps:
Click on on the left Navigation Bar.Templates
Click on the button. Complete the following information:Add Template
Name: Assign a unique name to identify the template.
Storage Pool: Select the storage pool that the template resides on. Only stores that are meant to
fulfill template storage roles will display here.
File Name: Select the template from the drop down list of files on the Storage Pool.
OS: Select the OS version of the template, this is used by the broker to display the appropriate
version to the user. Select from Windows 7, Windows 8, Windows 10, Windows 2012, Windows
2016, or Linux.
: Enter a brief description for the template. This is optional, but may be preferred forDescription
organizational purposes.
Click to complete the process. The template will be validated and several actions becomeAdd Template
available depending on the current status of the template, see for moreTemplate Management
information.
The system will automatically convert the template to RAW when the template is staged, if the
template is stored on NFS shared storage RAW is the recommended format.
Template Re-Use
A template can only be added once to Hive Fabric. To re-use or add a template more than
once, follow the steps on how to .duplicate a template
Hive Fabric 7.0 Administration Guide
40 | © 2018 HiveIO
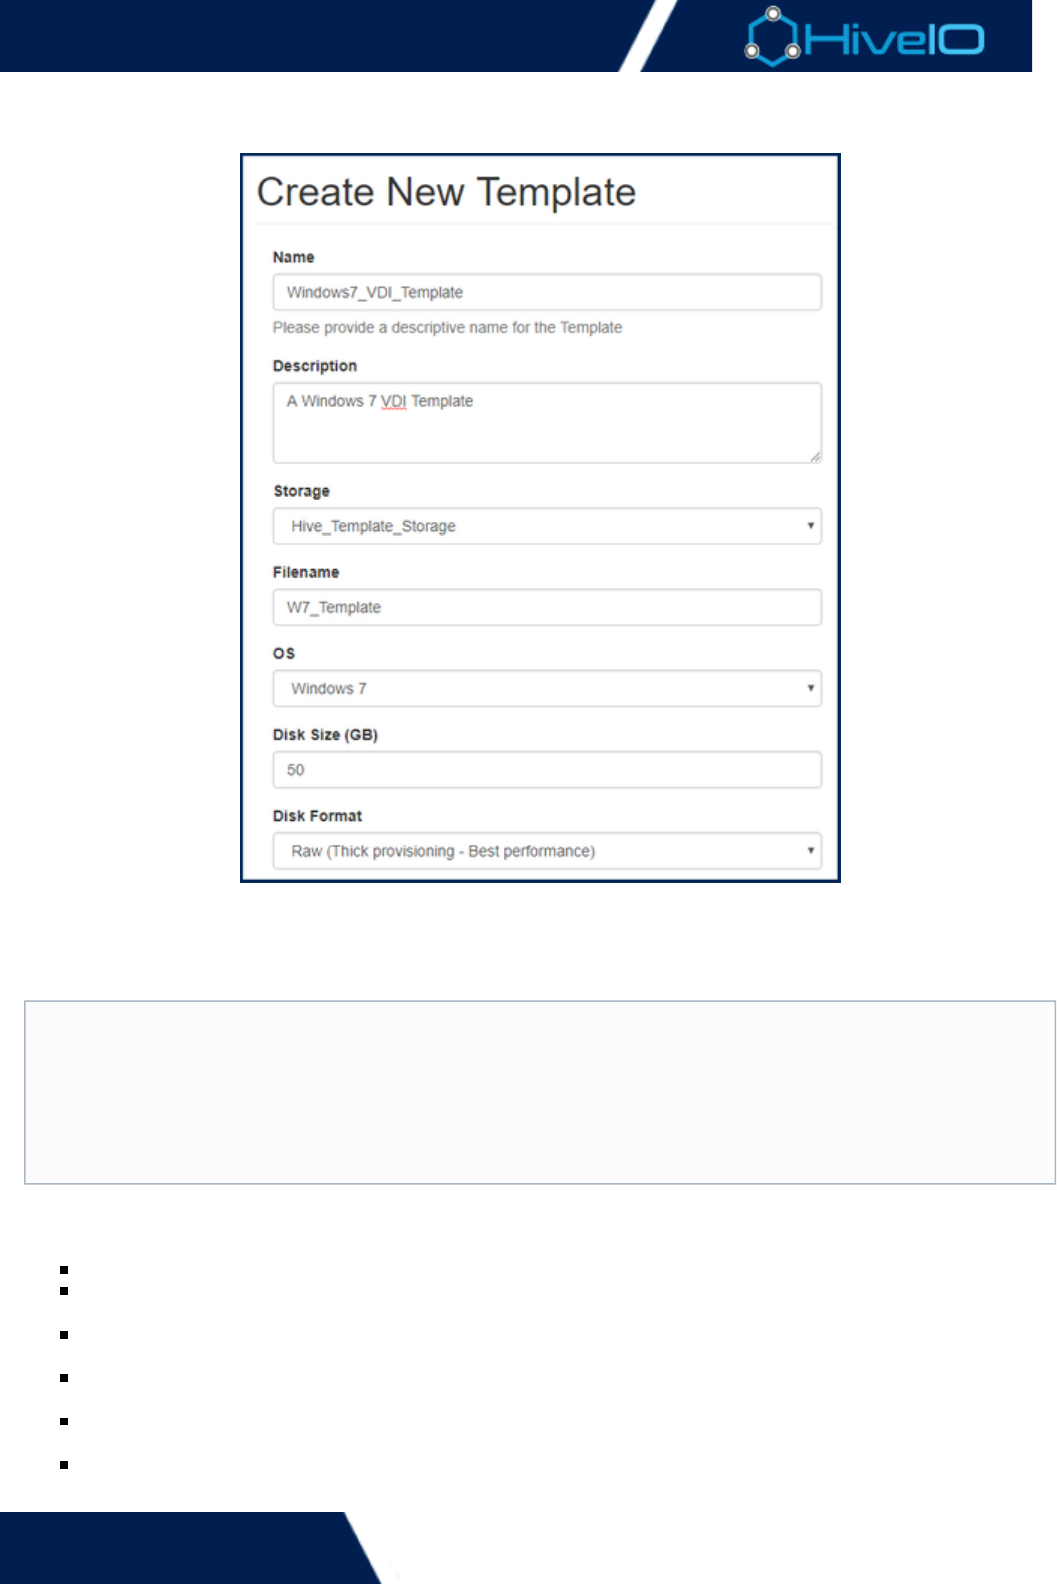
Create a New Template
A new template is created through the Create Template wizard and is used to build a template from scratch,
starting with the OS installation using an ISO file. The ISO file must first be uploaded to a Storage Pool. For more
details, see . Creating a new template will provide the best performance and aUploading files to a Storage Pool
clean base to install applications and apply best practice configuration.
To create a new template select the button and complete the following information on theNew Template
screen that appears:
Name: Assign a unique name to identify the template.
: Enter a brief description for the template. This is optional, but may be preferred forDescription
organizational purposes.
Storage: The storage pool that will store the new template. Only stores that are meant to fulfill template
storage roles will display here.
Filename: Enter the name of the new file that will be created. A file extension does not need to be
included.
OS: The OS version that the broker will display when a user logs in. Select from Windows 7, Windows 8,
Windows 10, Windows 2012, Windows 2016, or Linux.
Disk Size (GB): The disk capacity of the template. This size specified will be the same for the Guest
machine.
Golden Image
Templates are stored in a space efficient manner. When building a template from scratch it's a good
idea to have a base install of the Operating System and some key optimizations (e.g. Drivers,
performance optimization) and save this as a master template to create other templates from in the
future. This is easily carried out by which gives a new standalone version thatduplicating the template
can then be further customize with applications and any settings specific to the Guest Pool intended to
get delivered from the template.
Hive Fabric 7.0 Administration Guide
41 | © 2018 HiveIO
machine.
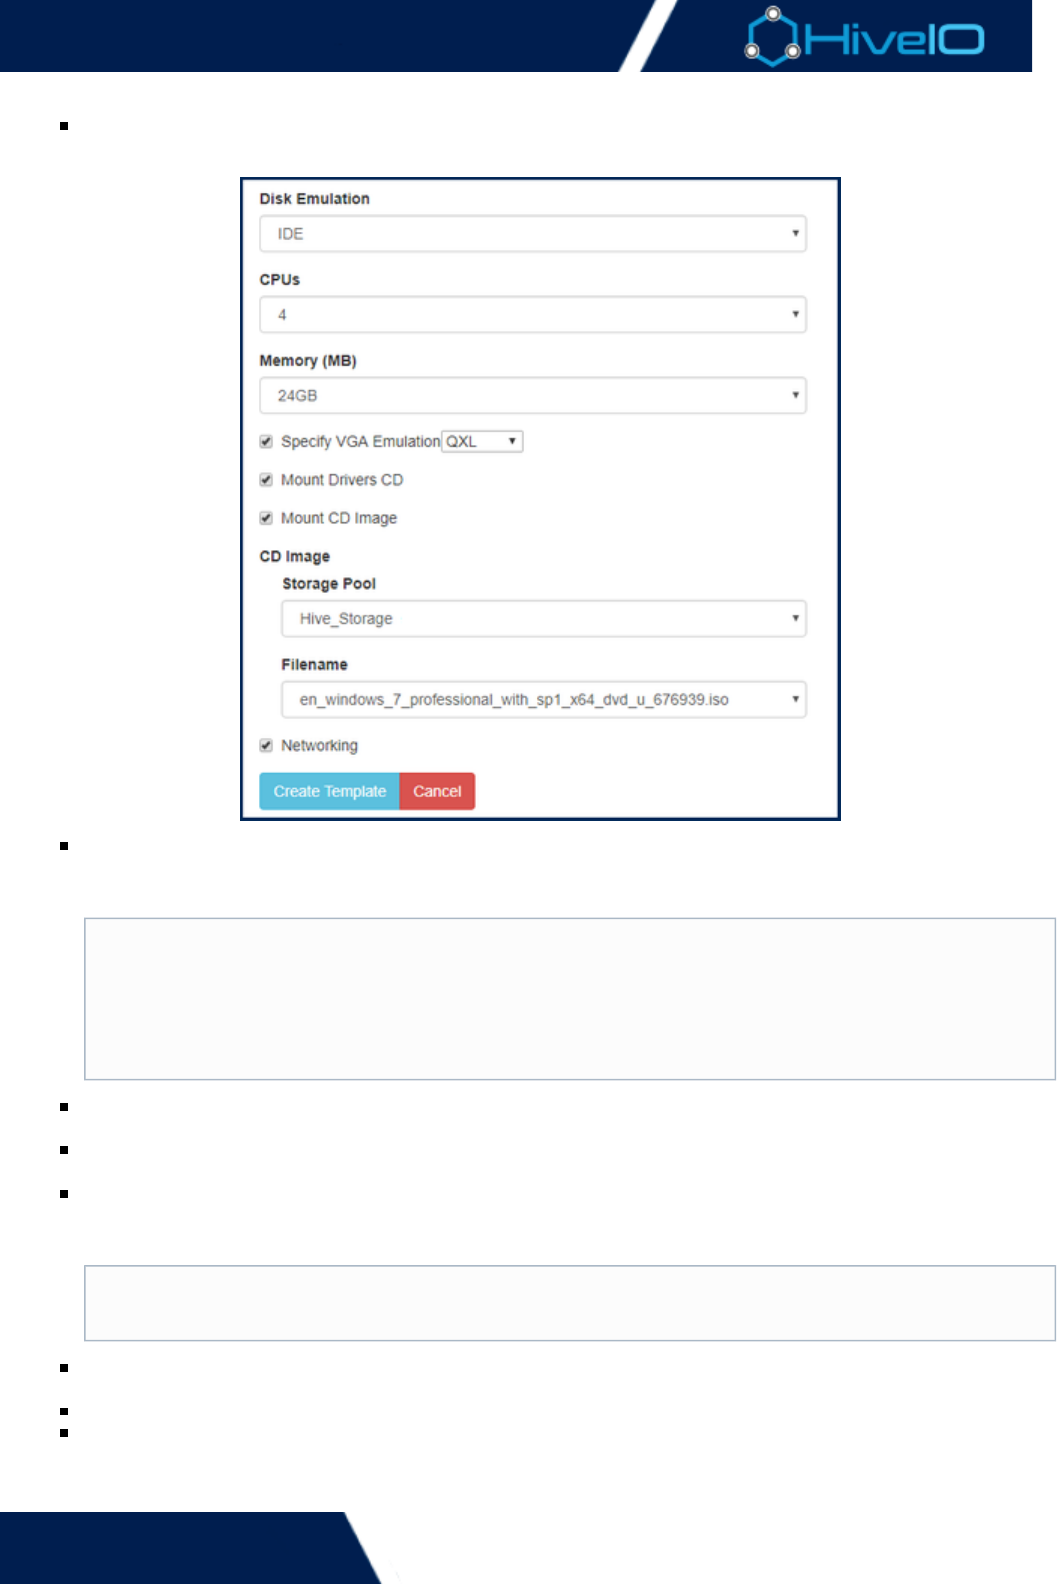
Disk Format: The appliance supports Raw and QCOW2 formats. Raw will give better performance.
QCOW2 will be more space efficient. Where possible use RAW for the additional performance it provides.
Disk Emulation: Specifies the disk emulation that the new template will use. Choose from IDE, SATA, SCSI
Linux option will be selected by default. will be, or Virtio. If a OS is being installed the VirtIO IDE
selected for a Windows OS.
CPUs: The number of CPU cores to assign to the template during authoring. This is not the number of
CPUs that a Guest Pool member will have.
Memory (MB): The amount of memory to assign to the template during authoring. This is not the amount
of memory that a Guest Pool member will have.
Specify VGA Emulation: Enabling this option sets the display emulation used in console mode. Choose
from VGA (Standard), QXL, Cirrus, Xen, or VMVGA. If left unchecked, this will be automatically set to . QXL
This setting will not affect users accessing the virtual desktop.
Mount Drivers CD: Enabling this option will mount the included version of the VirtIO driver CD into the
template to allow installation of optimized drivers for Hive Fabric.
Mount CD Image: Enabling this option defines the ISO location or path of the installation ISO image.
Networking: Select this to connect the template to the production network during authoring.
Click to complete the process.Create Template
Recomendation
The recommended disk emulation is , using it will provide the best performance. VirtIOVirtIO
drivers are available as standard for most Linux OS. For any Microsoft Windows OS, the VirtIO disk
driver will need to be installed by selecting the additional driver option during the install. The
additional drivers and the VirtIO agent should be added once the OS is installed see VirtIO Device
for more information.Driver Installation
The default and recommended VGA emulation is . If VGA emulation is selected for laterQXL
versions of Microsoft Windows the resolution will default to 800 x 600.

Hive Fabric 7.0 Administration Guide
42 | © 2018 HiveIO
This defines the parameters for the template and creates it. The template will automatically power-on. See Auth
and for more information on how to connect to the console andoring a Template Template Administration
setup a template ensuring best practice is followed.

Hive Fabric 7.0 Administration Guide
43 | © 2018 HiveIO
Template Management
Once a template has been created there are a number of different actions that form the lifecycle of a template:
Authoring a template is the most important of the template creation process and would typically include:
Installing the Guest Operating System (OS).
Installing the required applications.
Applying HiveIO best practice configuration to the guest.
Staging a template for the creation of a Guest Pool.
Users may also a staged template.unload
Duplicating a template to version or create a new template from a standard base.
Removing a template once it has been retired or is no longer needed.
Access the to install and configure the template's OS.Console
Revalidate a template for optimization and repairs.
Hive Fabric 7.0 Administration Guide
44 | © 2018 HiveIO
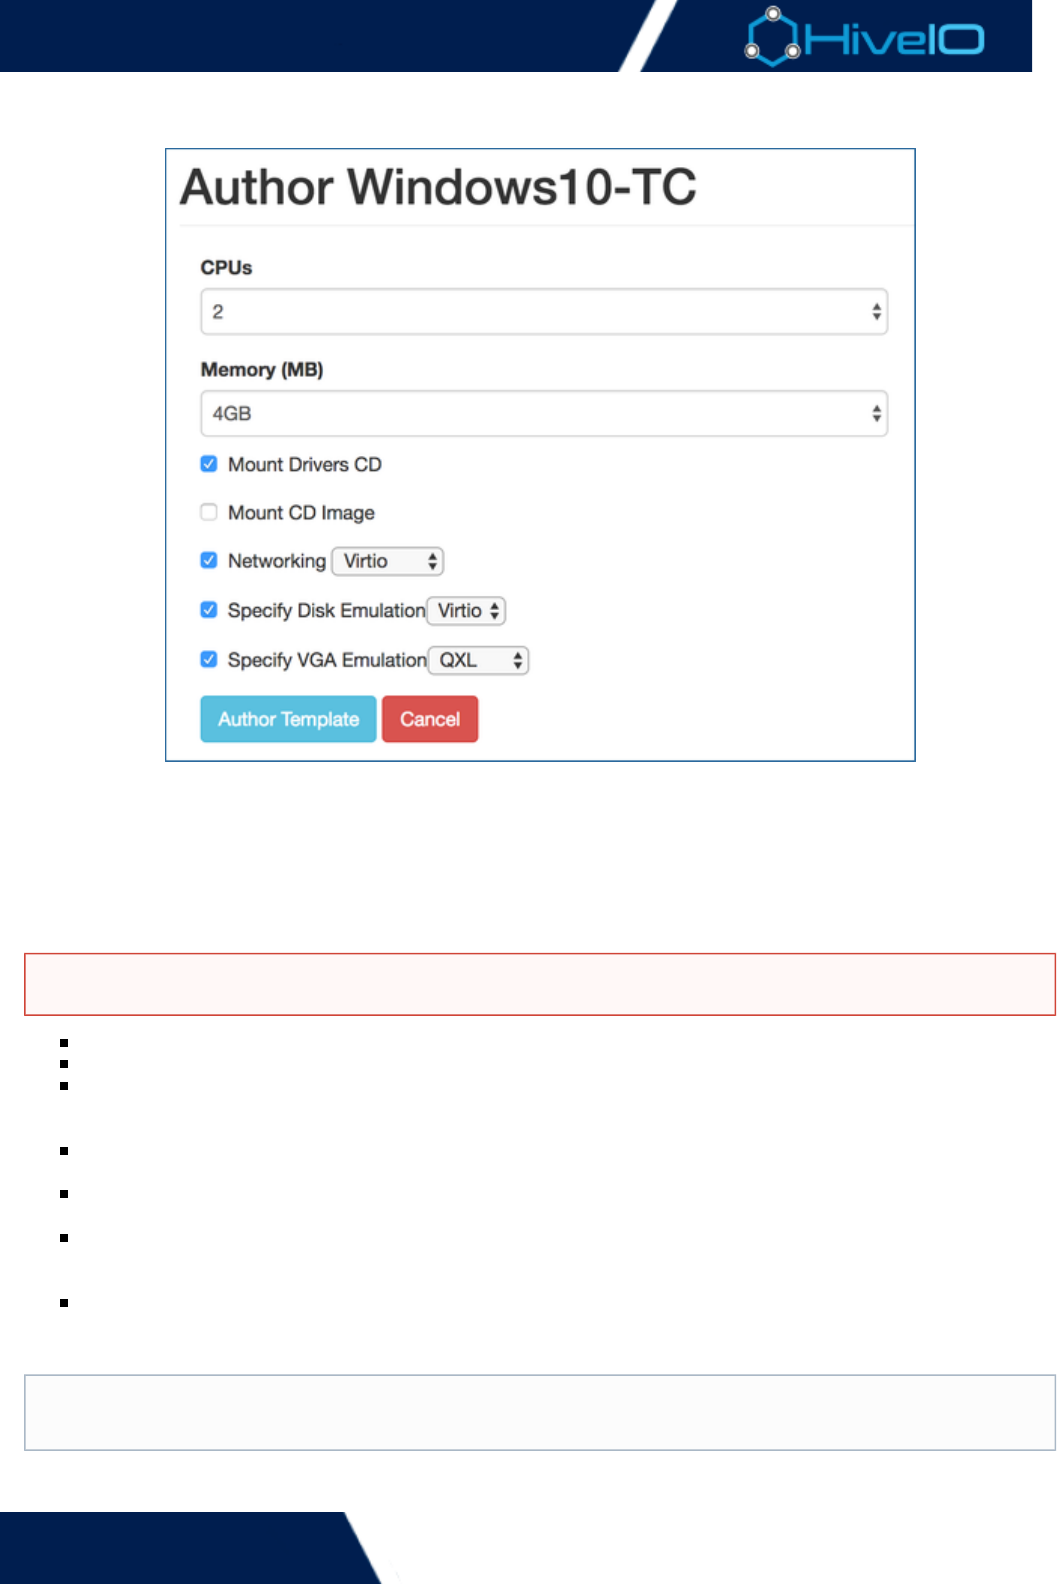
Authoring a Template
Once a template has been added to the appliance or a new template created, it can be authored. Authoring
allows the template to be booted up as if it were a guest VM to modify its install and configuration.
To author a template, click on the option under for the template.Author Actions
To allow the template to start, a number of settings must be specified. Note that these are specific for the
template during authoring and are not used when deploying a Guest Pool. This allows for faster authoring
through various means, such as temporarily assigning more memory. or CPU
CPU: The number of cores to assign to the Template during authoring.
Memory: The amount of memory to assign to the Template during authoring.
Mount Drivers CD: This allows the Hive Fabric driver CD to be mounted inside the Template during
authoring. This is required to install VirtIO version of drivers or update them to the latest version in the
template.
Mount CD Image: This allows for an ISO image to be mounted inside the template during authoring. This
will behave like a standard CD, allowing for installation of update OS components or applications.
Networking: Enables the network inside the template during authoring. Select the appropriate network
driver type from the dropdown menu. The recommended option is .VirtIO
Specify Disk Emulation: Specifies the method of disk emulation to be used during the authoring of a
Template. The default will be automatically selected based on the OS selected. The recommended driver
is VirtIO and this should be installed at the appropriate point.
Specify VGA Emulation: Enabling this option sets the display emulation used in console mode. If left
unchecked, this will be automatically set to QXL. Choose from , , , , or VGA (Standard) QXL Cirrus Xen VMVG
. This will not affect users accessing the virtual desktop.A
Click to set the resources and start the Template ready for interaction.Author Template
Templates kept within read-only Storage Pools will not have the authoring capability enabled.
The default and recommended VGA emulation is . If VGA emulation is selected for later versions ofQXL
Microsoft Windows the resolution will default to 800 x 600.

Hive Fabric 7.0 Administration Guide
45 | © 2018 HiveIO
Click to set the resources and start the Template ready for interaction.Author Template
Under the actions for the Template, click on to begin interacting with the Template through the consoleConsole
session. A new window will open, giving access to the console of the virtual machine so that changes can be
made to the template.
Microsoft Windows Requirements
Windows templates require .Net 4.0 or higher to be installed for the Hive agent to work - https://w
ww.microsoft.com/en-US/Download/confirmation.aspx?id=17718
It is recommended to have the Visual C++ Redistributable package installed - https://www.micros
oft.com/en-us/download/details.aspx?id=48145
The Windows image must be 64-bit

Hive Fabric 7.0 Administration Guide
46 | © 2018 HiveIO
1.
Duplicate a Template
Duplicating a Template can be an efficient way to version a Template or have a base Template to build
additional Templates from. This supports options such as the ability to build departmental templates that start
from the same base OS template that has company-wide applications and settings applied. Each department
template would then have specific applications installed and settings applied for their users.
The Duplicate Template option will copy an existing template creating a new standalone template.
Click on the option under and complete the required fields:Duplicate Actions
Name: The name of the duplicate template.
Storage Pool: Select the storage pool to store the new template.
File Name: The name that duplicate template image will be saved as on the Storage Pool.
Click to complete the process and start the template duplication.Duplicate Template

Hive Fabric 7.0 Administration Guide
47 | © 2018 HiveIO
Pre-Stage a Template
Template pre-staging copies the template to either local storage or the entire cluster, allowing for the template
to be in the correct place ahead of Guest Pool creation. The option to stage cluster is only available once the
appliance has joined a cluster. Once pre-staging has started, it may take a few moments for the load to
complete. This will depend on the size of the template and the type of storage it is being copied to.
To remove a template, refer to the instructions on how to .Unload a Template
Local RAM is typically the fastest pre-staging method, but will result in a template having to be
re-staged in the event of a power-failure or host reboot.

Hive Fabric 7.0 Administration Guide
48 | © 2018 HiveIO
Remove Template
During the typical lifecycle of a deployment, a template may become outdated or no longer serve a purpose. The
Remove Template option will remove an existing template from the template inventory. This will not delete the
file from the Storage Pool. Delete obsolete template files directly off the storage.
Template Removal
A template can not be removed if it is in use or or staged for use across the cluster.


Hive Fabric 7.0 Administration Guide
50 | © 2018 HiveIO
Template Validation
Occasionally, a template may need to be modified to add an application, apply an update or change a setting.
This is carried out through the Authoring process. Following the shutdown of the template it must be
re-validated to confirm that is in the correct state. During this process the re-validation process confirms:
The template disk is partitioned properly.
That the partitions are system readable and mountable.
Checks that the appliance has read and write permissions on the template.
That the filesystem on the template disk matches the OS that has been selected.
Checks and where possible repairs any unclean filesystem (often caused by un-clean shutdowns).
That the template is in the correct power-state (powered off).
That hibernation has been disabled inside the template.
Should any of these fail the appropriate status will show in the UI and brief explanation will appear in the state's
tooltip when the cursor is hovered over it.

Hive Fabric 7.0 Administration Guide
51 | © 2018 HiveIO
Unload Template
During the removal of a template itTemplates must be Unloaded before they can be removed from inventory.
first has to be de-staged or 'unloaded' to ensure it has been removed from the cluster and can no longer be
used. This is carried out by clicking the Unload button.
Hive Fabric 7.0 Administration Guide
52 | © 2018 HiveIO
1.
2.
3.
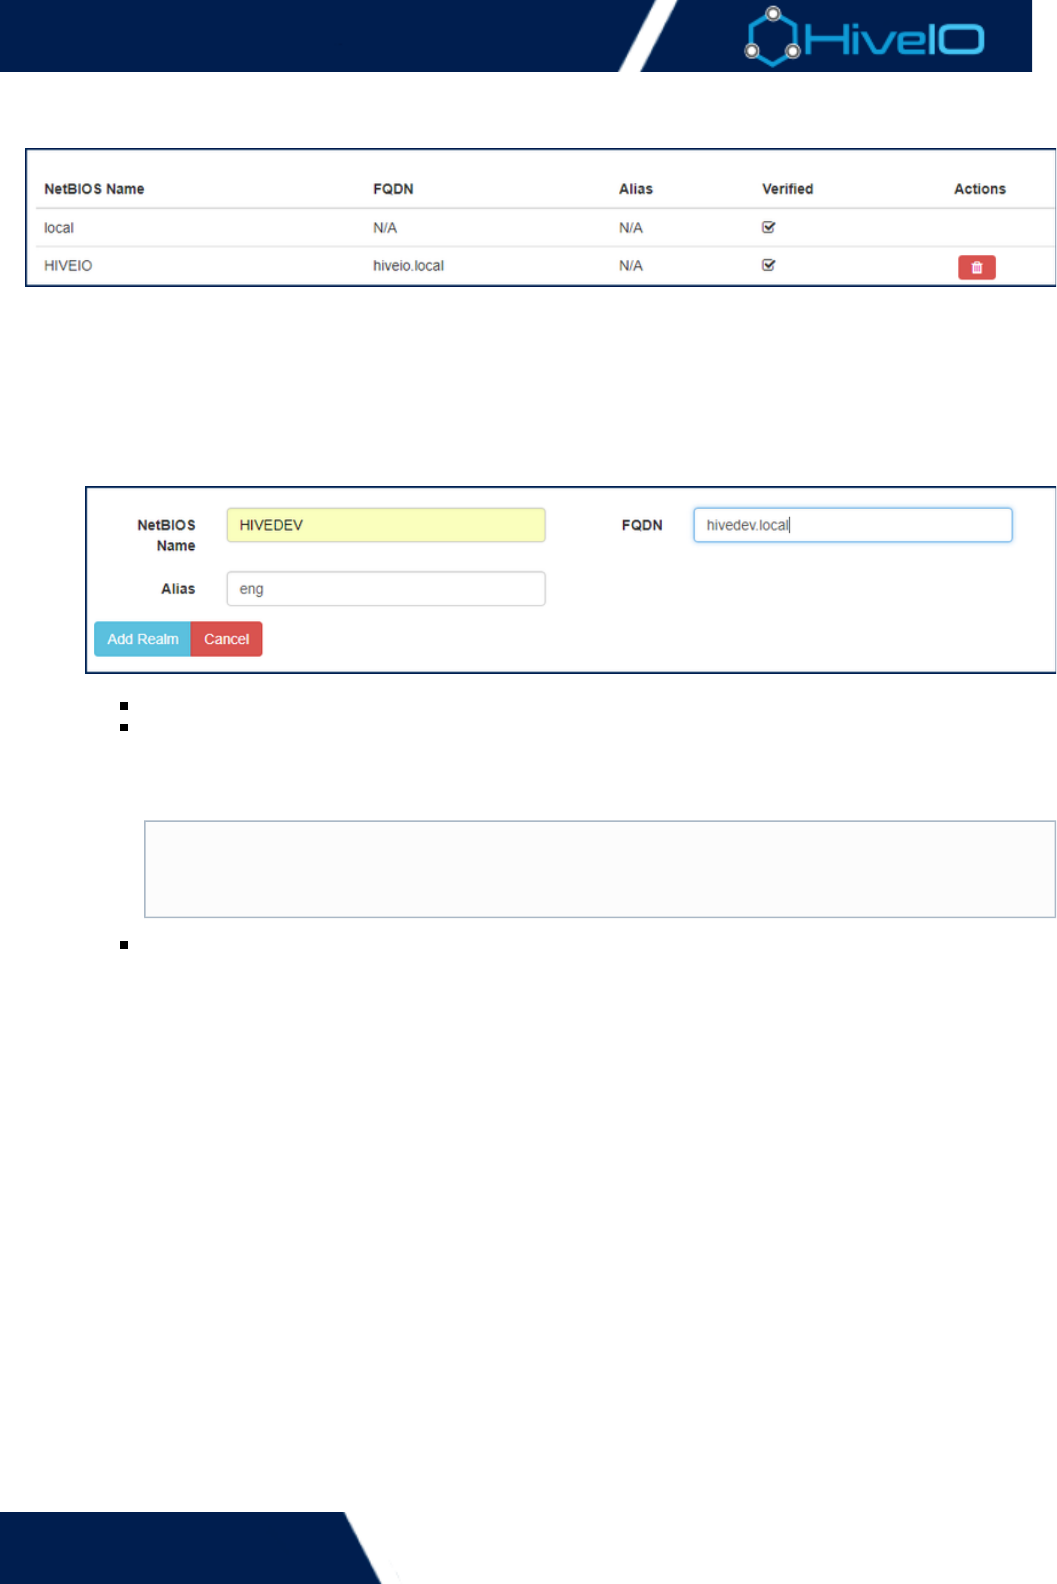
Realms
A Realm defines the link between the Cluster and an LDAP compliant authentication capability, e.g. Microsoft
Active Directory. Authentication will happen under the umbrella of the Realm and will provide the building
blocks to specify the users and groups that are allowed to authenticate against a Guest Pool. Multiple Realms
can be specified to accommodate a wide variety of scenarios.
To define a Realm the following actions and information are required:
Click on on the left side Navigation Bar.Realms
Click on the option. Complete the following information:Add Realm
NetBIOS Name: The NetBIOS name of the domain being defined by the Realm.
FQDN: The Fully Qualified Domain Name of the domain. This field is automatically validated by the
appliance and a success / failure message displayed for the administrator. If verification
fails confirm that the information entered is correct, and that the FQDN can be resolved by the DNS
server specified for the production network.
Alias: An alias can be set on a realm. It may be ideal to deploy this feature so users can login with
their email domain rather than the actual domain name of the realm. could be thehivedev.local
domain but the login uses . This is particularly useful in a multi-tenanted design.hivedev.com
Click to save the Realm specification, once processed the Realm will be added to the list ofAdd Realm
Realms.
.local Domains
.local domains must be included in the DNS Search Path within the Production Network
in order to be correctly used for Realms.settings
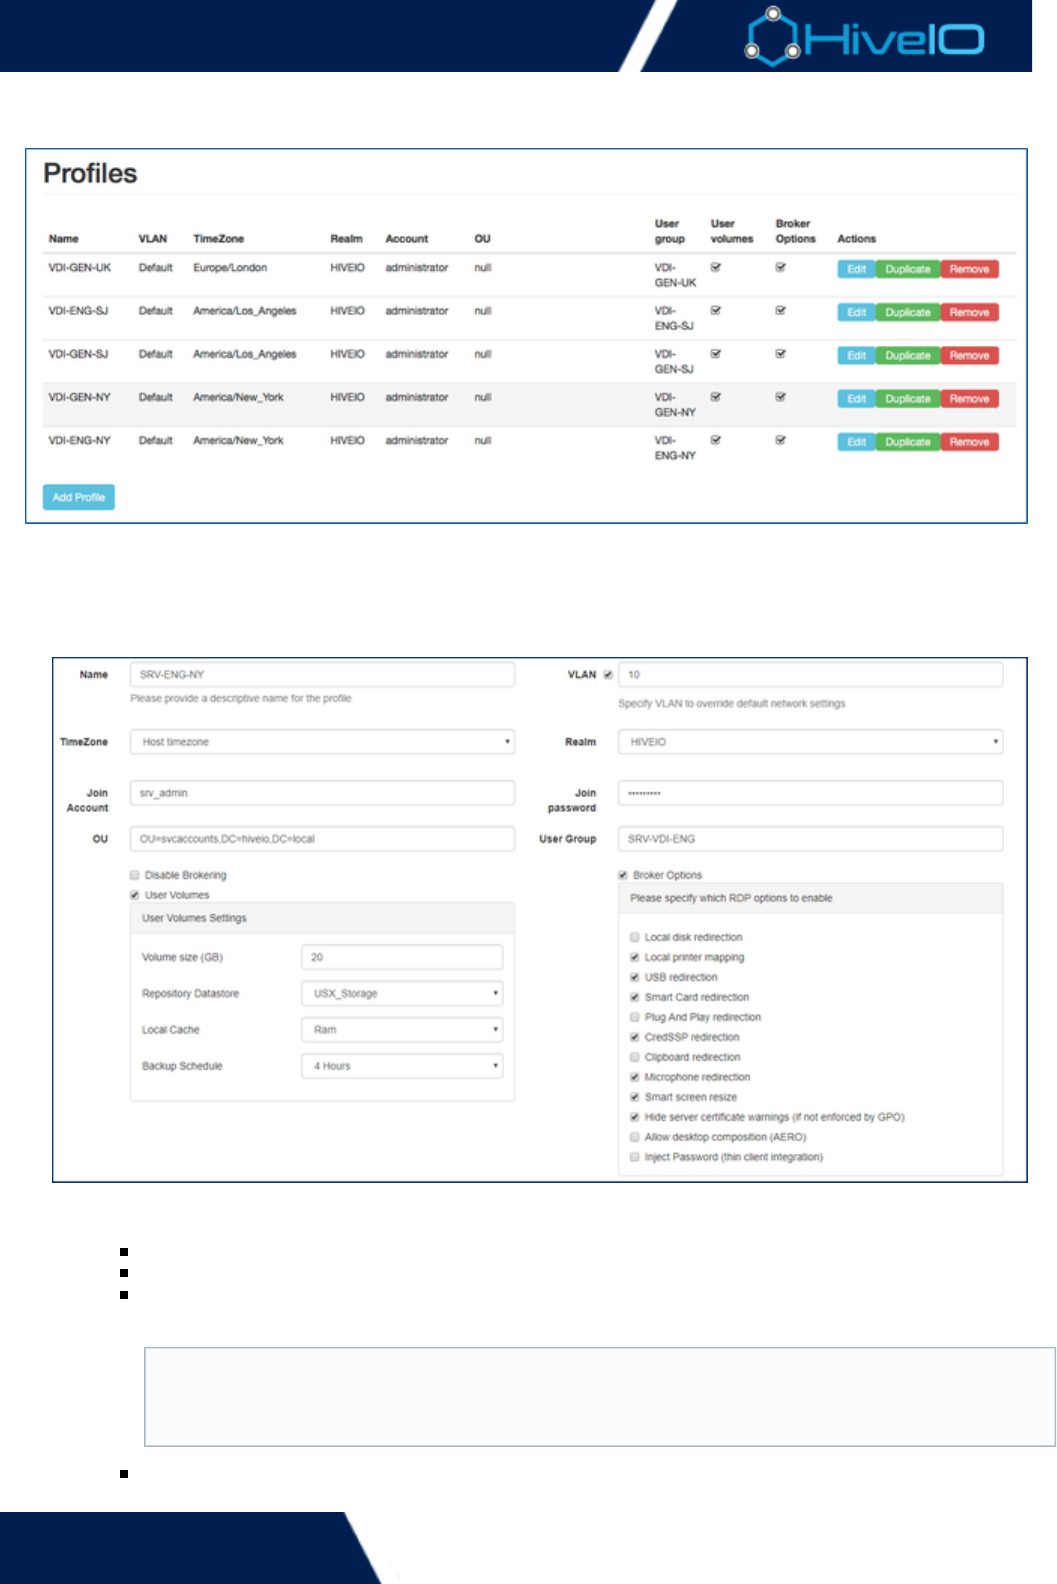
Hive Fabric 7.0 Administration Guide
53 | © 2018 HiveIO
1.
2.
Profiles
Profiles are required to create a Guest Pool and allow Administrators to apply required settings to multiple
guests with ease. The profile will dictate the functionality that the pool will provide to the end-user. These
include access to a specific User Volume or the capability to connect to the user's Guest VM via the broker.
To Create a new Profile:
Click on on the left side Navigation Bar.Profiles
Click on the option. A series of fields need to be completed:Add Profile
Name: The name used to store the profile in Hive Fabric.
VLAN: Enter the VLAN ID if the default network settings will be over-ridden.
TimeZone: Select the time zone to apply to the profile. Leaving this at will inject theHost timezone
current timezone set on the appliance.
Realm: Select the Realm to use for this Profile from the drop-down menu. The Realm specifies
which authentication point will be used but the Guest Pool and should have already been created.
UTC
For guests syncing with an AD, the timezone on the appliance and the AD must be set
correctly. Using as the timezone is recommended for proper timezone injection.UTC

Hive Fabric 7.0 Administration Guide
54 | © 2018 HiveIO
2.
3.
which authentication point will be used but the Guest Pool and should have already been created.
Once the realm is selected, a new series of options will be present:
Join Account: Enter the account name of the user that has the appropriate privileges in AD
to join Guests to the domain.
Join Password: Provide the password for the Join Account.
OU: Enter the Distinguished Name (DN) of the OU that contains the join account. If the
administrator account is used then this does not need to be specified. This should be
specified in the standard directory format, as shown here:
<OU=service_accounts,DC=domain,DC=local>
User Group: The AD Group that contains the users that will log into the Guest Pool that this
Profile is applied to.
Disable Brokering: Stops the Guest Pool from being accessed. This may be used to pre-stage
Guest Pools. To enable access at a later date uncheck this option and set the appropriate
settings for the Guest Pool. When brokering is disabled, , , and User Groups User Volumes Br
can not be set.oker Options
User Volumes: Sets the appropriate settings for the User Volume.
Volume Size (GB): The capacity for the User Volume allocated to each user.
Repository Datastore: The Storage Pool that will store the user volumes within this
Profile. The recommendation is to use a shared storage Storage Pool for User
Volumes.
Local Cache: Sets the cache for the user data, this copies the User Volume to the local
appliance if the shared storage is slow for example this can provide a significant speed
increase for the user. A RAM cache will be faster than a disk cache but consideration
needs to be given for the available resources a good compromise is a local SSD.
Backup Schedule: Sets a schedule that the profile will follow for backing up user data
from the local cache to the Storage Pool location. So long as a backup has been
created, users will not lose data during a guest release. The schedule is typically
dictated by the number of backups the Storage Pool can handle concurrently or the
type of data stored in the profile and how often it is expected to change.
Broker Options: Select which options will be enabled when the user connects through the
broker to their Guest.
Click to complete the process. If all fields are validated correctly, the new profile will be added.Add Profile
Once a profile has been created all of the settings can be modified or duplicated, using either the or Edit Duplic
button, to remove a profile click the Remove button. Duplicating a profile can be useful for creating multipleate
profiles that share similar settings.
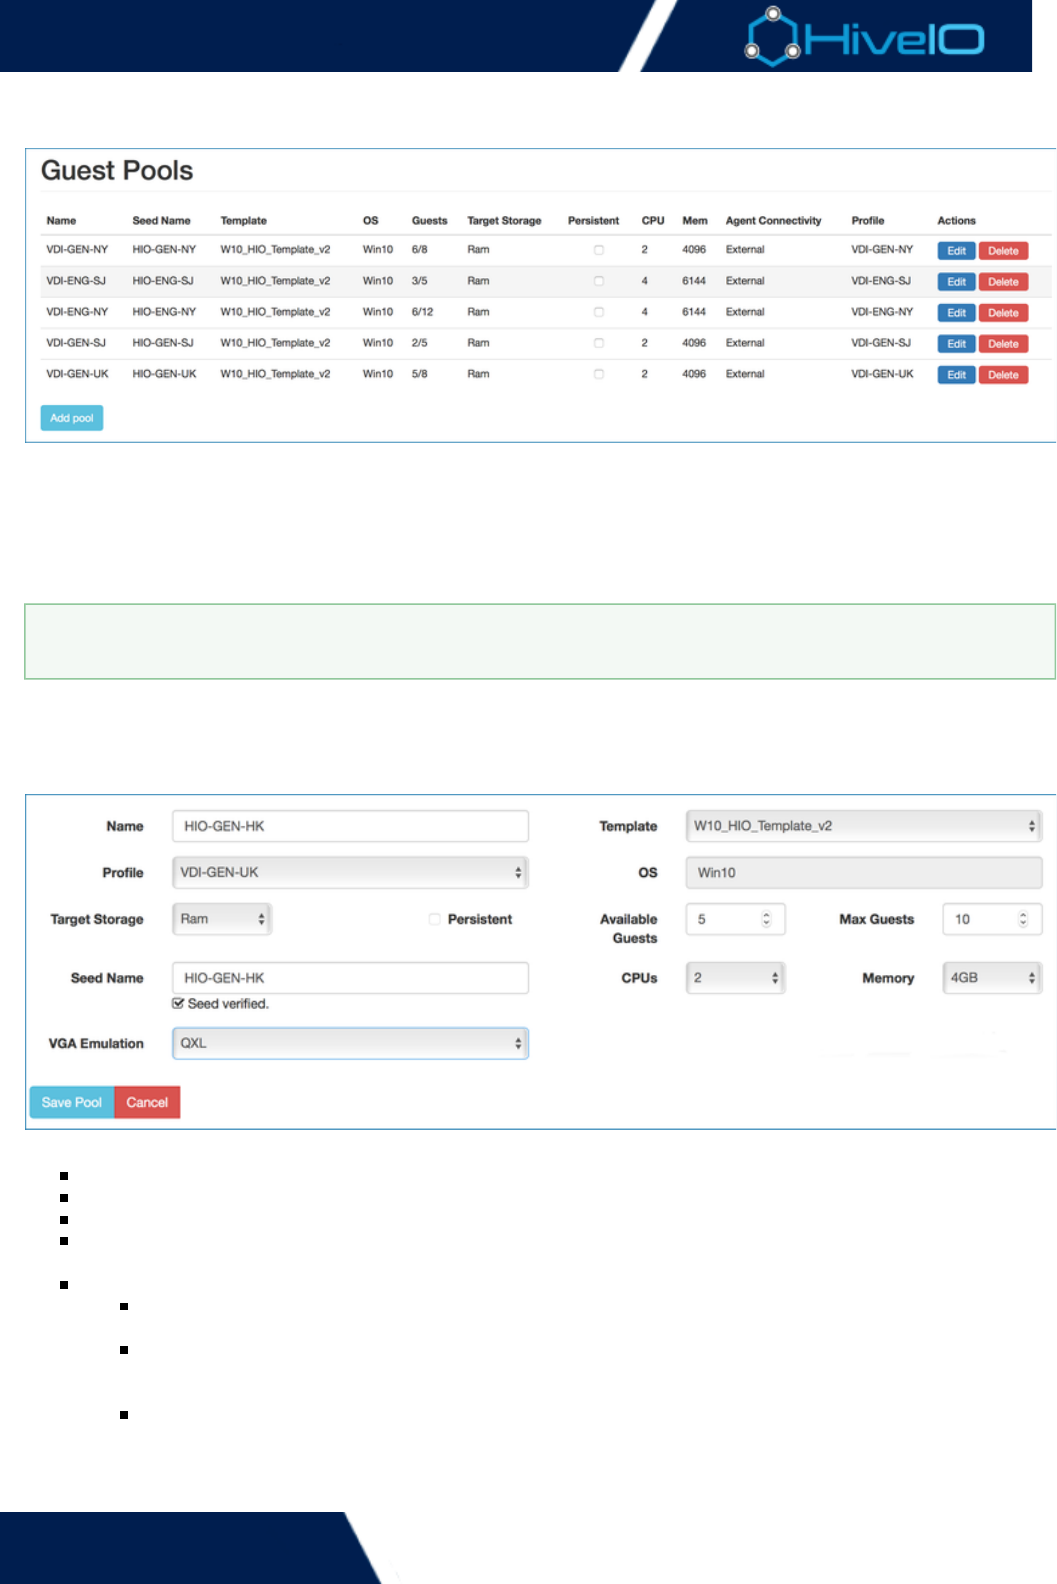
Hive Fabric 7.0 Administration Guide
55 | © 2018 HiveIO
1.
2.
Guest Pools
A Guest Pool is a set of Guest VMs that are grouped together to form a pool of resource that can be brokered to
an end-user. The users that can access a Guest are defined in the Profile that is assigned to the Guest Pool. A
user can login through the broker or gateway and have a single Guest VM assigned to them. A template must
be created before a Guest Pool can be created. Multiple Guest Pools can be created to deliver multiple desktops
to a single user or isolate one set of users from another. For example, if a small set of users need a specific
application then a dedicated Template, Profile and Guest Pool can be created for them.
To Create a Guest Pool carry out the following steps:
Click on on the left side Navigation Bar.Guest Pools
Click on the option. A series of fields will need to be completed:Add Pool
Name: Assign a unique name to identify the Guest Pool.
Template: Use the drop-down menu to select the template that will be used to create the Guest Pool.
Profile: Select a Profile to apply to Guests of the Pool.
OS: Select the OS that is installed in the template. This will ensure the right icon is displayed in the broker
for the end-user.
Target Storage: Select the storage type that best fits the needs for the Guest Pool:
RAM: Memory based storage. This option is suitable for non-persistent or stateless Guests only. This
storage type is deduplicated and compressed.
Disk: Local Disk based storage. This option can provide storage for hosting both persistent and
non-persistent guests. If Persistent Guests are being deployed for production use the
recommendation is to use shared storage. This storage type is deduplicated and compressed.
Shared Storage: Any shared storage pools that have been added to the cluster will be displayed in
this list by their Name and can be used to host persistent guests. This option does not provide
deduplication and compression natively but this may be delivered by the underlying storage for
example when using Hive USX. A Storage Pool has to be used if is required.HA
Before proceeding, ensure that the Guest Template has the latest , optimizations applied,VirtIO drivers
appropriate configuration, and the required set of applications installed.

Hive Fabric 7.0 Administration Guide
56 | © 2018 HiveIO
example when using Hive USX. A Storage Pool has to be used if is required.HA
Persistent: Determines whether the Guests being deployed are persistent. When enabled, VMs will
persist across a reboot. Otherwise, each VM will start on a fresh state upon rebooting. This setting cannot
be adjusted for some storage types.
Available Guests: Sets the minimum number of Guest VMs that will always be available to be brokered
from the pool. Once provisioned, this minimum number of Guests will be available at all times assuming
there is enough resource in the cluster to create the Guests. The minimum number of Guests in a "Ready"
state will be provisioned across the cluster until the maximum amount has been met, or the system runs
out of resource.
Max Guests: Sets the maximum number of Guests that can be created in the Guest Pool. Once the
maximum number of Guests has been achieved the appliance will stop accepting provisioning jobs from
the cluster until a Guest slot frees up in the future.
Seed Name: Assign a string that will be the prefix the the computer names of the Guests This must be a
The Seed Name will be appended with a 3 digit number starting from 000NetBIOS compliant hostname.
and will increment by 1, ensuring Guest VM names are unique.
CPUs: Select the number of cores to provide to each Guest.
Memory: Select the amount of memory available to each Guest. The maximum that can be selected is
32GB as of this release.
VGA Emulation: The VGA Emulation used by the Guest.
Click to complete the process and start creating the Guests for the pool. When loading completes, theSave Pool
Guest Pools will spawn.
Once a Pool has been created then it can be edited or deleted using the appropriate buttons. When editing a
Pool all of the fields mentioned above can be modified except for the Seed Name and the OS type. If the number
of Available Guests or Max Guests is changed then this will only affect Guests that are not in use. For example if
the max size of the pool is reduced but the number of Guests in use exceeds this, then they will remain until the
user logs off. Afterwards, the Guest is destroyed and is not re-provisioned on the system.
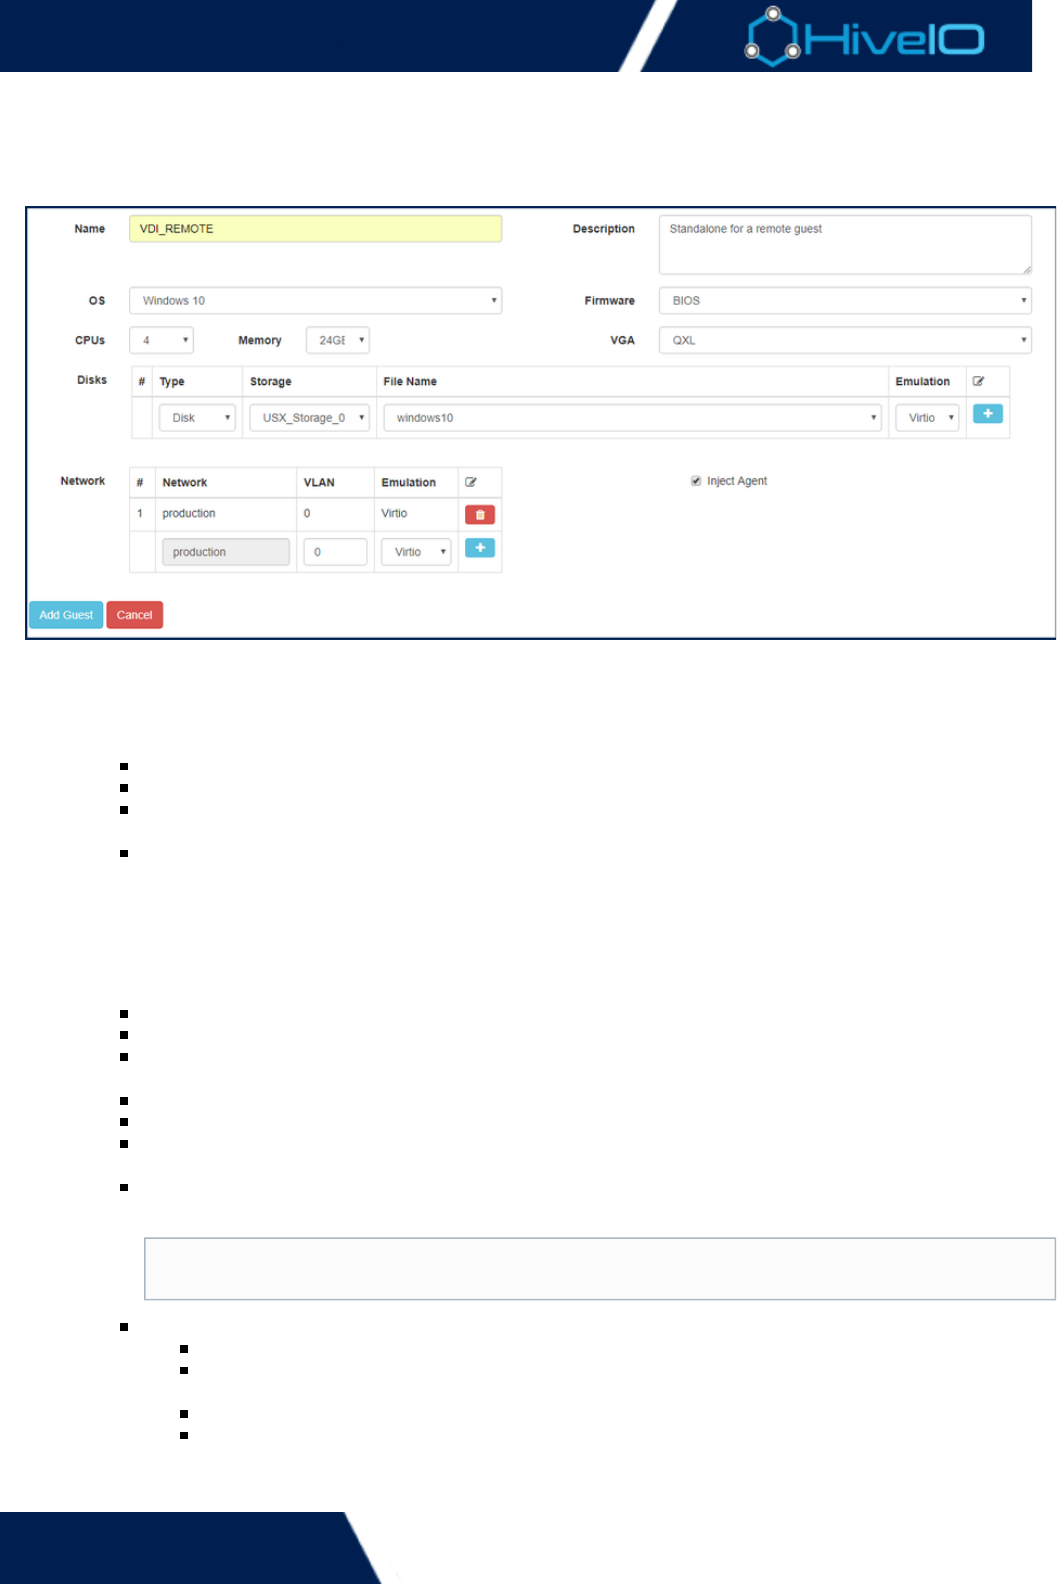
Hive Fabric 7.0 Administration Guide
57 | © 2018 HiveIO
1.
2.
1.
Standalone Guest
A Standalone Guest can be created in lieu of a full Guest Pool. This is ideal for creating single instance servers
with their own dedicated disks.
Before creating a Standalone Guest, a separate Standalone Disk must be setup for the Guest. This process
requires a network or shared storage pool to have already been made available.
Click on on the left side Navigation Bar. To add a new Disk, click on the butStandalone Guest Create Disk
ton. A series of fields will need to be completed:
Storage: Select the storage pool that the disk will be created in.
File name: Enter a file name for the Standalone Disk.
Format: Select the format that the disk will operate under. ensures better performance. Raw Qcow
is ideal for consuming less disk space.2
Disk Size (GB): Enter the amount of disk space needed.
Click to complete the process. The disk may now be selected from the storage pool forAdd Disk
Standalone Guest use.
Now, a new Standalone Guest can be set up.
Click on on the left side Navigation Bar. To add a new Guest, click on the buStandalone Guest Add Guest
tton. A series of fields will need to be completed:
Name: Assign a unique name to identify the Guest.
Description: Enter an optional description to better identify the Guest.
OS: The OS that the broker will display. Select from , , , Windows 7 Windows 8 Windows 10 Windows
, , or .2012 Windows 2016 Linux
Firmware: Select a firmware option. Choose from either or .BIOS UEFI
CPUs: Select the number of cores to allocate to the Guest. Larger images may require more cores.
Memory: Select the amount of memory to allocate to the Guest. Larger images may require more
memory.
VGA: Select the display hardware to allocate to the Guest's console. Choose from , VGA (Standard) Q
, , , or . This will not affect users accessing the virtual desktop.XL Cirrus Xen VMVGA
Disks: Enter the standalone disk information for the Guest.
#: Multiple disks may be supported on one Guest.
Type: The disk type used for the Standalone Guest. A image may also be mountedCDROM
here.
Storage: The storage pool containing the Standalone Disk, Guest template, or CD image.
Filename: Select the filename of the disk, template, drivers, or image that will be.iso
employed for Guest use. This image file must be contained within the selected storage
option.
The VGA (Standard) display displays at a low resolution.

Hive Fabric 7.0 Administration Guide
58 | © 2018 HiveIO
1.
2.
option.
Emulation: Select a storage disk emulation option. Choose from , , , or .IDE SATA SCSI Virtio
The default setting and options available vary based on disk type used. imageCDROM
mounts only use emulation.IDE
Network: Enter the network settings for the Guest. The Guest uses the production network
settings.
#: Multiple networks may be supported on one Guest.
Network: The network that the Guest is employing. This is typically the production network.
VLAN: Specify the VLAN for the network, or leave it at the default setting.
Emulation: Select the specific network device to enable. Choose from , , Virtio e1000 ne2k_pci
, , or .pcnet rtl8139
Inject Agent: Determines whether the Agent will connect within the Guest. The Agent reports key
information, such as the IP address, to Hive Fabric itself. In most cases, this can be left enabled by
default.
Click to complete the process. The Standalone Guest will be ready for use.Add Guest
Known Issue
At the moment, when attempting an Action from Guest Management, onlyEject CD
the primary CD-ROM disk will eject.
If the Agent is not installed, then the Guest is still accessible. However, the Guest's IP
address is not able to display within the WebUI.

Hive Fabric 7.0 Administration Guide
59 | © 2018 HiveIO
Tools
Extra tools are available to further assist with the usage of the Hive Fabric. The appliance offers users the ability
to . With this tool, a disk image can be converted into ready-made template image. When theConvert an Image
conversion is completed, follow the wizard to begin preparing the new templateAdd an Existing Template
image for Guest use.
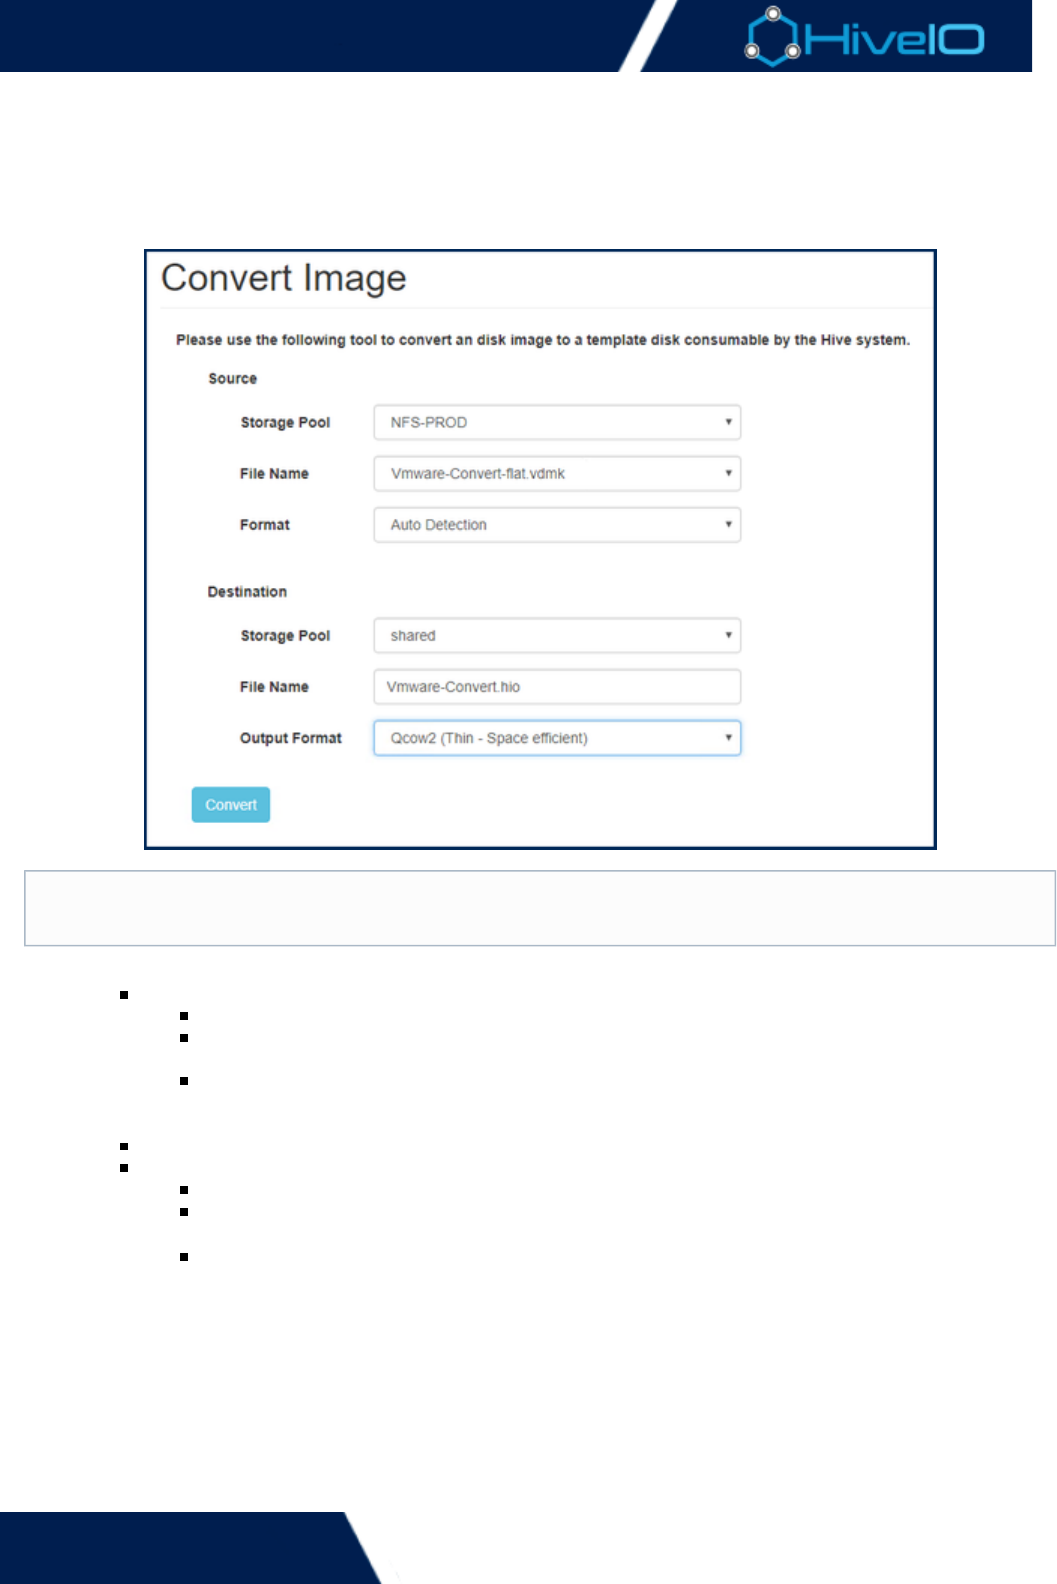
Hive Fabric 7.0 Administration Guide
60 | © 2018 HiveIO
1.
2.
Convert an Image
The Hive Fabric is compatible with any QEMU or KVM-supported disk emulation. Typically, the Hive Fabric will
automatically convert images into a preferred usable format. The conversion tool reduces the need to constantly
. This makes the process of migrating diskconvert a hypervisor image every time it is added to the Hive Fabric
images quick, convenient, and easier to consume.
Click on on the left side Navigation Bar. Complete the following information:Standalone Guest
Source
Storage Pool: Select the storage location containing the disk image.
File Name: Select the image file from the dropdown menu. The image file must be contained
within the selected Storage Pool.
Format: Sets the format of the source image. By default the tool will use toAuto Detection
determine the image format, but this may also be specified based on the image's origin. The
format is also available, if needed.Raw
Format: Select the format that will be used to convert the disk image.
Destination
Storage Pool: Select the storage location that the converted image will save to.
File Name: Enter a new file name for the converted disk image. The filename must end with
the extension..hio
Output Format: Sets the output format of the image. A format will give the bestRaw
performance at the cost of disk space. is a thin format, taking up only the space thatQcow2
is needed. further compresses a thin image, but may affectCompressed Qcow2
performance as a result.
Click the complete the process and begin the image conversion. The conversion may take a fewConvert
moments to complete before the image becomes usable.
VirtIO drivers must be installed and hypervisor tools must be remove first before an image is ready for
conversion.

Hive Fabric 7.0 Administration Guide
61 | © 2018 HiveIO
Settings
This segment contains all the setting and configuration options for the Hive system itself. Many of these settings
may need to be adjusted before properly using the Hive appliance.

Hive Fabric 7.0 Administration Guide
62 | © 2018 HiveIO
1.
2.
Appliance
Appliance configuration sets the general configuration of the host. The initial cluster configuration for an
appliance is also done on this page.
On the left side Navigation Bar, under , click on . The following fields may be set:Settings Appliance
Hostname: Assigns a hostname to the appliance.
Timezone: The time zone of the host location/environment.
NTP Server: The NTP server IP address.
Center Management Appliance: Enter the IP address of the current Central Management
Appliance (CMA) to join the appliance to an existing cluster. To set the current appliance as the
Central Management Appliance, enter the name . For more information on clusterlocalhost
management, refer to the page.Cluster Administration
Max Clone Density: The maximum number of Guest VMs permitted to this host. This will override
all Pool density settings. The default amount shown is based on the server's system specs.
Broker: Enable and configure Guest VM brokering based on Realm and AD Group membership.
Passthrough: When set, authentication is performed a the Guest. Users will only need to
enter a username.
Hide Realms: Disables the realm selection menu from the broker's login screen. Users are
required to login with the UPN format .user@realm-fqdn
Auto Connect: When enabled, users will automatically connect to a Guest. Users that are
members of more than one Guest Pool will connect to the first Pool.
White Labeling: Allows customization of the broker's login website.
Theme: Sets the color theme for the broker website.
Logo: Enter the external address of the logo image for the broker website.
Favicon: Enter the external address of the favicon image for the broker website.
Company Name/Title: Enter a name for the broker website to display in the welcome
message of the login screen.
HTTP Formatted Company Name/Title (Optional): Enter an HTTP-formatted name for
the broker website to display in the welcome message of the login screen.
HTTP Formatted Disclaimer (Optional): Enter an HTTP-formatted message for the
broker to display on the login screen.
Preview: Pressing this button will display a preview of the broker's login page with the
currently entered settings. If everything looks satisfactory, apply these settings by
clicking on the button.Submit
Gateway: Enable and configure the remote connection broker.
External Address (URI): Enter the gateway's URI. This will be used by the remote gateway for
RDP connections.
Start Port and : The range of firewall ports that the gateway will use. End Port
Deployment Type: Determine if the broker will service guests from the appliance or Local Gl
guests from the cluster.obal
Resource Scheduler: When this option is enabled, the Appliance opts in to Cluster Resource
Scheduling (CRS). CRS measures memory load in the system within a period and may migrate
guests based on the results. For more information, review .Cluster Administration
Log Level: Changes made are applied after restarting the Hive Services from the paAdministration
ge.
Click on to complete the process.Submit
This needs to be set or Guests will not join the domain.
This needs to be set or Guests will not join the domain.

Hive Fabric 7.0 Administration Guide
63 | © 2018 HiveIO
1.
2.
3.
1.
2.
1.
2.
3.
Network Settings
This section is for configuring the network settings that are specific to the environment. These settings should
be among the first to be configured to best ensure stable operation across the Fabric. It is also necessary to
configure networking first in order to take advantage of certain features, such as Shared Storage for clusters.
Administrators are able to create a Bond Interface. This allows for teaming multiple NICs to a single bond
interface. This creates a network redundancy when each interface is connected to separate switches.
Click on on the left side Navigation Bar.Network Interfaces
To create a new Bond Interface, click on . A series of options will be available:Configure Bonding
Members: Select the networks that will be included as members of the Bond Interface. A minimum
of two members are required to create a Bond.
Mode: Select the mode that the Bond will act in. Choose between or .Active/Backup 802.3ad LACP
Primary: Select the network connection within the bond that will be set at the primary connection.
Click on to complete the process. The Appliance will need to either or Submit Reboot Restart Network
to apply these changes.Services
Administrators can also configure port options for each network.
Click on , next to the network that will be configured. A series of options will beHardcode Settings
available:
Speed: Sets the speed for the network connection. Set this option to detect, or select one ofAuto
the speed options available.
Duplex: Sets the communication flow for the connection. Set this option to detect, or select Auto fu
or , based on the Ethernet connection.ll half
MTU: Sets the maximum transmission units for the connection. Adjustments to this option are
based on the connection.
Click on to complete the process. The Appliance will need to either or Submit Reboot Restart Network
to apply these changes.Services
It is also possible for Administrators to configure the network interface/VLAN that will be used as the guest VM's
production network. Trunking and VLAN tagging are both supported. If a storage network is available for use,
the appliance may also be enabled to access it. Using a storage network helps to segregate the management
traffic and storage traffic within the network.
Click on on the left side Navigation Bar.Network Addresses
For , the following values may be set. Note that by default, these options are set toProduction Network
the values entered in the :First Boot Wizard
Interface: Select the network interface of the appliance.
VLAN: Specify the VLAN ID, if the server will be joining one.
DHCP: When enabled, an IP address is automatically assigned to the device. Disabling this option
will allow entry of an IP Address, Netmask, and Gateway. If DHCP is to remain enabled, no further
edits need to be made unless the DNS server being used is changing, or a DNS Search Path is
being provided.
IP Address: Enter the static IP Address to assign to the server. This will change the IP
Address used to access the web interface.
Subnet Mask: Enter the netmask for the network's host.
Default Gateway: Enter the default gateway for the network.
DNS Server: Enter an optional DNS server address. When using multiple DNS servers, separate the
list with spaces.
DNS Search Path: Enter an optional DNS search path. When using multiple DNS search paths,
separate the list with spaces.
For , the following values may be set:Storage Network
Enable Storage Network: When enabled, the storage area network becomes accessible after
credentials are entered.
Interface: Enter the network interface of the storage area network.
VLAN: Enter the VLAN ID of the storage area network.
.local Domains
.local domains must be included in the DNS Search Path in order to be correctly used for Re
.alms

Hive Fabric 7.0 Administration Guide
64 | © 2018 HiveIO
3.
4.
VLAN: Enter the VLAN ID of the storage area network.
IP Address: Enter the IP Address of the storage area network.
Subnet Mask: Enter the netmask of the storage area network.
Click on to complete the process. Once complete, the network must be restarted from Submit Administr
on the left side Navigation Bar. If the IP address has changed during this process, enter the new IPation
address into the Web Browser to regain access to the Web Interface.
Hive Fabric 7.0 Administration Guide
65 | © 2018 HiveIO
1.
2.
3.
4.
5.
6.
7.
Administration
Various maintenance and administrative options are available to ensure that the Hive Fabric runs efficiently.
Regular maintenance is critical to the Appliance's health and should be performed regularly. Users must have
administrative privileges in order to apply updates, power manage the appliance, or upload/download files.
Licensing
Users can view the current Appliance license and the amount of time remaining on that license. To add or
extend the license, click on the option. Enter the and click to addUpload License License Key Upload License
the new license.
Power Management
Administrators can manage the power of the Appliance.
Shutdown: Shuts down the appliance. During a shutdown, no guest pools will be accessible.
Restart: Restarts the Appliance. Guest Pools will not be accessible during the restart process. This option
can be run whenever changes to the network or services have been applied.
Restart Network Services: Restarts the Hive Appliance's network. This option is necessary whenever a
change to the network has been applied.
Restart Hive Services: Restarts Hive services without restarting the Appliance itself.
The following options become available once the Appliance has joined a cluster:
Leave Cluster: Releases the appliance from its current cluster membership. This must be done before an
appliance can join a new cluster. Do not use this option on appliances that have been designated as the
CMA.
Enter/Exit Maintenance Mode: Sets the Appliance to enter or exit maintenance mode. The appliance
must be in maintenance mode before it gets released from the cluster.
Software Firmware
This displays all software packages uploaded to the Appliance. Any package check-marked as is theCurrent
version that is currently in use. Here, Administrators can easily upgrade the appliance without having to run
through the installation process a second time. To upgrade the software package:
Download the latest file with the most current version of Hive Fabric..pkg
Click on on the left Navigation Bar.Administration
Click on the button. A Browse prompt will appear, where users can select theUpload Software
appropriate file..pkg
Once the file has successfully uploaded, a few new actions will appear: and . Clicking on the Stage Delete
button prepares the appliance for package deployment. This process may take a few seconds.Stage
When the package is staged and ready, click to install the update, or click to destage theDeploy Cancel
package and cancel the update process.
Once the deployment begins, the package begins installation. This process may take a few moments to
complete. During this time, the web interface and the server console will not be accessible.
When deployment completes, Hive will automatically restart and begin using the newly-deployed version.
Appliance Firmware Images
This displays all appliance firmware uploaded. Any version marked as is the version that is currently Current Acti
. Inactive versions are marked as on . The option allowsve Standby Upload Appliance Firmware/Patch
Administrators to upload a new version of the Appliance. When selected, a Browse prompt will appear, where
users can select the appropriate or file. From there, newly uploaded images can be selected as the .tar .gz Curr
version in use, and the previous version will be sent to .ent Standby
This option should not be executed while there are users logged in to Guest Pools. Make sure that
all users have logged out before performing a restart to network services.
Do not interact with the database while the Appliance is in Maintenance Mode.

Hive Fabric 7.0 Administration Guide
66 | © 2018 HiveIO
version in use, and the previous version will be sent to .ent Standby
Support Files
This displays any files that have been created to give to Support for troubleshooting purposes. Clicking on Creat
creates a compressed file that can be given to a HiveIO Support member. The file will be added toe Support File
the Support Files inventory, along with the creation date and file size. Users may choose to the file forDownload
themselves or the file if it is no longer needed.Delete
Certificates
Displays any security certificates that have been applied to the Appliance. Users can view the of theStatus
certificate, the of the certificate, and the date of the certificate. The optionIssuer Expiration Upload Certificate
allows Administrators to upload a new Certificate to the Appliance. When selected, users can select to upload a
new or . Clicking on either of these options will open a Browse prompt, where users can selectCertificate Key
the appropriate file..cer
Timezones
Support logs print using UTC, regardless of the timezone set within the system.

Hive Fabric 7.0 Administration Guide
67 | © 2018 HiveIO
1.
2.
3.
Users
This section is for Administrators looking to configure user accounts for the Hive Appliance. New users can be
added to the system. These accounts are primarily for navigating the Fabric and cannot be used to access Guest
desktops.
Click on on the left side Navigation Bar. Users
Click on the option. A series of fields need to be completed:Add User
User Name: The name of the user. This name must be unique.
Realm: The realm that the user has access to.
Role: The role of the user. accounts have full privileges within the appliance. accoAdmin Read only
unts only have view privileges and cannot configure any settings or options within the appliance. It
is important to determine which role the new user will fall under before creating the account. Once
the role is set, it cannot be changed.
Password: Sets a password for the user. All accounts must have a password.
Click to complete the process. The user account is immediately available for use.Add User
Administrator accounts have the ability to for any account, or for existingChange Password Delete User
accounts.

Hive Fabric 7.0 Administration Guide
68 | © 2018 HiveIO
1.
2.
3.
Template Administration
Templates will need updates during its life cycle. When the end user is ready to update, the procedure should be
as follows:
First, duplicate the current template. This duplicate makes it easy to retain many of the templates
settings during the update process. This also ensures that the current template does not get corrupted
during the update process, should any errors or issues arise.
Author the duplicate template to apply the updates.
Modify the current guest pool for the new template, if the guest pool is not persistent.
Existing guests are not affected by the template update process, unless the "Available Guest" counter is set to .0
Any new guests spawned will use the new template. Current users will receive the new guest templates upon
logging off of their session.
Before administrating a template, be sure to review:
The best practices for proper .desktop image management
The steps for to a Windows OS image.installing VirtIO device drivers
Recommendation
It is ideal to set the "Available Guest" counter down to . Then, once all unassigned guests have0
been destroyed, restore the available guest value.
Recommendation
When adding or creating a template, the recommended disk emulation is . Use this whenever VirtIO
possible for the best performance. VirtIO drivers are native to most Linux systems. However, for any
Microsoft Windows OS template, use IDE for install. The VirtIO drivers will need to be installed during the
OS install or added to the template after installation for best performance and for network connectivity.
For more information, view the process for .installing VirtIO device drivers

Hive Fabric 7.0 Administration Guide
69 | © 2018 HiveIO
1.
a.
b.
c.
d.
e.
f.
g.
2.
a.
b.
c.
d.
e.
f.
g.
h.
VirtIO Device Drivers Installation
VirtIO is a virtualization standard for network and disk device drivers where the guest's device driver
understands it is running in a virtual environment, and cooperates with the hypervisor. This helps to ensure the
guest gets the best possible performance for network and disk operations. HiveIO best practice also state to use
these drivers for all applicable guests. Most Linux guests will come with VirtIO drivers pre-installed and will
automatically use these.
There are two scenarios to consider:
Using an and switching the current drivers installed in the guest over to VirtIOexisting template
drivers. During the process, .template authoring select the "Mount Drivers CD" option, under Networking
Select the option, but ensure that Specify Disk Emulation matches the disk driver inside the guest.VirtIO
This is likely to be iSCSI on most modern templates. The following process will switch to the VirtIO drivers:
Author the template and login to the guest with administrator privileges.
Open the Start menu and search for Device Manager.
Locate the Ethernet Controller. Right-click on this option and select "Update Driver Software".
Follow the update wizard's prompts when they appear. When asked how to search for driver
software, select "Browse my Computer for Driver Software". Enter the path to the CD drive and
specific folder for the Guest OS. e.g: .d:\NetKVM\w7\amd64
Follow the prompts to complete the driver installation process.
Repeat this process for the SCSI Controller and PCI standard RAM Controller.
Any unknown devices may also have VirtIO device drivers that can be updated by following this
same procedure.
Creating a new Template. S . Enable "Specify Diskelect the "Mount Drivers CD" option, under Networking
Emulation" and select the option.VirtIO
During the installation of Windows use the "Specify Additional Driver" option to navigate to the
appropriate OS folder on the VirtIO driver CD for the SCSI controller. Add this so that Windows can
recognize the disk for installation.
Once the Windows installation has completed, the additional devices can be updated or installed.
Login with a user that has administrative privileges
Open the Start menu and search for Device Manager.
Locate the Ethernet Controller. Right-click on this option and select "Update Driver Software".
Follow the update wizard's prompts when they appear. When asked how to search for driver
software, select "Browse my Computer for Driver Software". Enter the path to the CD drive and
specific folder for the Guest OS. e.g: .d:\NetKVM\w7\amd64
Follow the prompts to complete the driver installation process.
Repeat this process for the SCSI Controller and PCI standard RAM Controller.
Any unknown devices may also have VirtIO device drivers that can be updated by following this
same procedure.

Hive Fabric 7.0 Administration Guide
70 | © 2018 HiveIO
Desktop Image Management
Repository
An external NFS, CIFS, or Ceph volume is required as a desktop image repository. These shares store OS images
and template images for Hive Fabric use.
Delivery
New desktop image deployment is achieved by updating the template used within the Guest Pool
configuration. Once a new desktop image is pushed to the repository, a new template can be created in the
HiveIO Administration portal. After the template is created, it can then be assigned to any existing Guest Pool or
during Guest Pool creation. For more information, review .Templates
Permissions
Any storage with read-only permissions can add existing templates, but will not have access to template
creation and authoring.

Hive Fabric 7.0 Administration Guide
71 | © 2018 HiveIO
1.
2.
3.
Guest Session Scripts
The Hive Fabric supports the use of hook scripts for advanced users who want to automate certain agent
processes within their Windows deployments. These scripts are executable string files that are placed within a
designated folder, typically , of the Guest OS template. Because theseC:\Program Files\HiveIO\Scripts
scripts must run within the template, they will have to be baked into the Windows template before deployment.
This can be done from within the during the process.Console Template Authoring
A script starts running whenever a specific session change event occurs. The supported values are:
Onlogin
Onlogoff
Onremoteconnect
Onremotedisconnect
In the example given below, the script will set a name for the Citrix ICA client to use by forwarding the hostname
of the device to the remote desktop.
$key = (get-itempropertyvalue -Path "HKLM:\SOFTWARE\HiveAgent" -Name
"ClientName")
set-itemproperty -Path "HKLM:\SOFTWARE\Wow6432Node\Citrix\ICA Client" -Name
"ClientName" -Value $key
To run a script from a template:
Author the template and access the template console.
Place the script into the Windows image's folder.C:\Program Files\HiveIO\Scripts
Open the Windows Registry Editor and edit the following registry path
“HKLM\SOFTWARE\HiveAgentActions”. Add an SZ value to reflect one of the supported session event
values above, depending on when the script will run. The contents of that value must be the full filepath
for the script. Based on the sample script above, this would be C:\ s\set_Program Files\HiveIO\Script
.citrix_clientname.ps1
Session scripts are non-interactive, so no further user input will be required upon running. The executable file
executes the strings and starts the process as written in the script. After the script runs, logs are generated.
set_citrix_clientname

Hive Fabric 7.0 Administration Guide
72 | © 2018 HiveIO
Cluster Administration
Hive Fabric supports the grouping of multiple Appliances in a Cluster. This allows for cross-server administration,
resource load balancing and simple administration of a large number of appliance. A cluster requires a minimu
m of two appliances. However, the recommendation is to have at least three appliances. This provides further
resilience and ensures a quorum is available to handle a "split-brain" scenario. The cluster is maintained by the C
entral Management Appliance, or CMA role. This role is assigned to the first server that forms the cluster. The
CMA gets replicated across the other members of the cluster. These members becomes proxies and get cached.
The first three appliances to join the cluster automatically become Cluster Managers. All manager appliances
run the database service within the cluster and replicate changes between each other. Once the Cluster
Manager roles are assigned, appliances that join the cluster after this point become Cluster Members. The
cluster will always attempt to have three managers. If the CMA ever experiences an issue, the cluster can cast a
majority vote and promote a member to a Cluster Manager role.
Hive Fabric further supports clusters with the option to participate in Cluster Resource Scheduling, or CRS, for
Guest Pools. Clusters of any size have the ability to use CRS. This service uses algorithms to measure the current
system load over a 15-minute period, as well as signal and memory usage assigned to all guests within the
cluster. From there, the system nominates guests as migration candidates based on a median of the current
metrics. If any of these metrics hit maximum constraints on an appliance, migration candidates get moved to
allow for stress reduction. The migration candidates move to another appliance within the cluster that is not
hitting maximum resource consumption and has supporting Guest Pool settings. This service may be enabled or
disabled at any time from the .Appliance Settings
Further details on joining and managing the cluster :
Joining an appliance to a Cluster.
Removing an appliance from a Cluster.
The monitors and maintains the entire cluster.Cluster Dashboard
Follow these when building out clusters.Best Practices

Hive Fabric 7.0 Administration Guide
73 | © 2018 HiveIO
1.
2.
3.
4.
Join a Cluster
Joining Hive Fabric to an existing cluster is a simple process. If a cluster does not yet exist, then two appliances
can join together to create a new cluster.
On the left side Navigation Bar, under Settings, click on Appliance.
Enter a hostname for the appliance. This must be set or the appliance will not successfully join the cluster.
For the field, enter an IP address for an appliance within the cluster. ThisCentral Management Appliance
IP does not have to point the the designated Central Management Appliance, as it will be located through
the cluster.
If the cluster does not exist, enter the IP address of the other appliance that will unite to establish a
cluster. The IP entered will promote that appliance to a Central Management Appliance. The
Central Management Appliance will list itself as the on its appliance.localhost
Set the appliance broker and gateway information as needed. Once all the required information has been
completed, click on to join the cluster.Submit
Once the appliance successfully joins the cluster, then the status at the top of the window will be Clustered True
. The number of members within the cluster will display in parenthesis.
Local Shared Storage
If there are plans to implement a within a new cluster, then a needs toshared storage storage network
be established before joining appliances to a cluster.
This process can not be replicated to join an appliance to another cluster while it is already a member of
a cluster. The appliance must first be from its current cluster before it can establish aremoved
membership with new one.

Hive Fabric 7.0 Administration Guide
74 | © 2018 HiveIO
1.
2.
3.
Remove Appliance from a Cluster
During the typical life cycle, an appliance may become an unwanted member of the cluster and necessitate
removal. It is also possible that an appliance needs to switch its cluster membership. However, appliances must
first be removed from its current cluster membership before it can join a new cluster. This is integral to
advanced cluster management, such as partitioning for multiple clusters.
Data migration is automatic, but the handling may vary based on the status of workload persistence. For
non-persistent servers, other appliances will pick up the data. Persistent workloads perform a live migration
from the existing cluster.
The following steps remove the appliance from the cluster:
On the left side Navigation Bar, under Settings, click on Administration.
Set the appliance to . This must be done before removing the Appliance fromEnter Maintenance Mode
the cluster.
Click on the button. A confirmation prompt will appear, stating that this action cannot beLeave Cluster
undone. Click on to advance and begin the release.OK
The removal process erases the local database. It also erases local entries from the Central Management
Appliance. The removal process may take a few moments, depending on the size of the server. The appliance
will automatically reboot when everything is complete. For appliances that will be joining a new cluster, return
to the process.Join a Cluster
Do not decouple the Central Management Appliance from the cluster.

Hive Fabric 7.0 Administration Guide
75 | © 2018 HiveIO
Cluster Dashboard
The dashboard portal will provide monitoring functions to the entire HiveIO cluster. To access the Dashboard
portal, enter the URL as: .https://<HiveIO-Host-IP>/dashboard
Overview
The tab provides an overall monitoring view of the entire cluster. It displays Key PerformanceOverview
Indicator graphs for each fabric in the cluster. KPI status includes:
Guest Density
Active user Count
CPU Usage
Memory Usage
Storage Usage
In addition, a side bar will display the KPI summary index of the entire cluster.
Hardware
Hardware view provides the general information and specifications of the hardware of each of the fabric hosts.
Information includes:
Manufacturer and Model
BIOS Version
System Board Model
Processor Type and Speed
Memory Size and Type
Core Temperature
Guests
The section provides guest orchestration functions for the cluster. This is similar to guest management inGuest
the Administration portal. However, the view will cover the entire cluster instead of just an individual fabric. For
more information on guest management, please review .Guest Management
Service Bus: Broker
The tab displays the configuration and overall statistics of the HiveIO internal message bus.Broker
Service Bus: Exchanges
The tab provides the list of topics available within the HiveIO internal message bus. In addition, theExchanges
user can select any item listed in exchanges and enable the feature. This will allow the user to create aListen
hook to the item and monitor the messages that are being transmitted on the bus.
Service Bus: Queues
The tab provides a list of available queues in the HiveIO message bus.Queues

Hive Fabric 7.0 Administration Guide
76 | © 2018 HiveIO
Cluster Best Practice
The guidelines presented here help to provide scalability, reliability, and high performance within the cluster
setup.
A cluster requires a minimum of two appliances, but it is recommended to use three or more appliances when
establishing a cluster. The reasoning behind this is threefold.
A minimum of three appliances in the cluster provides more resilience for disaster recovery. As the cluster
grows, the first three members of the cluster become Cluster Managers, along with the first of these appliances
taking on the role as Central Management Appliance. In cases where the CMA may go down, one of the other
Cluster Managers has the ability to step up and take over the role as the new CMA.
A three member minimum provides mediation in potential "split-brain" scenarios. As an example and as
previously mentioned, a Cluster Manager takes over the role of CMA in case the preceding CMA experiences a
failure. For this to occur, the cluster must cast a majority vote.
Finally, a minimum of three appliances are required to utilize shared storage within the cluster. To further
expand on the cluster rule of three, this shared storage expands with every third member added to the cluster.
This rule does not restrict, say, a fourth or fifth-assigned member of the cluster from taking advantage of the
shared storage available. Be mindful, however, that before shared storage can be established within the cluster,
a storage network must be set up. See for more information on setting up a storage networkNetwork Settings
within the Fabric.
If a cluster is making use of Shared Storage, it is recommended to reboot one node at a time. This is the best way
to reduce downtime. Wait a few moments before rebooting the next node to ensure that the Shared Storage
remains intact. Shared Storage automatically returns itself to a Ready state when the reboot processes
completes. (expand as we get more info)

Hive Fabric 7.0 Administration Guide
77 | © 2018 HiveIO
VM Broker
Once a guest is successfully deployed, users are ready to log in. The Hive Fabric provides access to the guest OS
through either the broker or the gateway. Before users can begin to login and use their desktops, these
brokering services must be established first. The Guest Connection Broker and Port Accessible Gateway portals
are configured from the settings.Appliance
Any workstation that is on the same network as the guest pool will access guest desktops through the .Broker
Remote users will access virtual desktops through the .Gateway
User Logins
Users may only log in to one Guest at a time. Make sure to completely log the user out of the desktop
before attempting to access another Guest. This allows the system to correctly back up User Volumes.

Hive Fabric 7.0 Administration Guide
78 | © 2018 HiveIO
1.
2.
3.
Broker
HiveIO includes a built-in guest brokering function. This feature can be enabled via the sectiAppliance Settings
on of the Administration portal. Once enabled, the Guest Connection Broker can be accessed by entering the
URL as .https://<HiveIO-Host-IP>/broker
To login, simply enter the and . Access role is based on the user's AD Group membershipUserName Password
and the AD Group defined in the Guest Pool definition of the specified realm.
Once logged in, a list of available desktop resources will be presented to the user for each Guest Pool.
Accessing the Guest
In a web browser, type the server IP/broker address. Typically, this will resemble https://<address
.here>/broker
Login with the user's AD username and password. Once access is granted, the user's guest assignments
will display.
Select a guest and click on . An RDP file will begin downloading. When the downloadAssign & Connect
finishes, the file is ready to launch. This will connect the user to the Guest Image.

Hive Fabric 7.0 Administration Guide
79 | © 2018 HiveIO
1.
2.
3.
Gateway
An RDP access gateway function is available in the HiveIO appliance. This feature can be enabled via the Applia
section of the Administration portal. Once enabled, users will be able to access the guest VMnce Settings
through the internal port addressable gateway instead of connecting via the IP address guest. Brokering for the
gateway will be accessed via the URL .https://<HioveIO-Host-IP>/remote
Accessing the Guest
In a web browser, type the server IP/broker address. Typically, this will resemble https://<address
.here>/remote
Login with the user's AD username and password. Once access is granted, the user's guest assignments
will display.
Select a guest and click on . An RDP file will begin downloading. When the downloadAssign & Connect
finishes, the file is ready to launch. This will connect the user to the Guest Image.
Connectivity
Users who lose connectivity during VDI access through the gateway must log back in to the gateway to
regain access to their desktop.
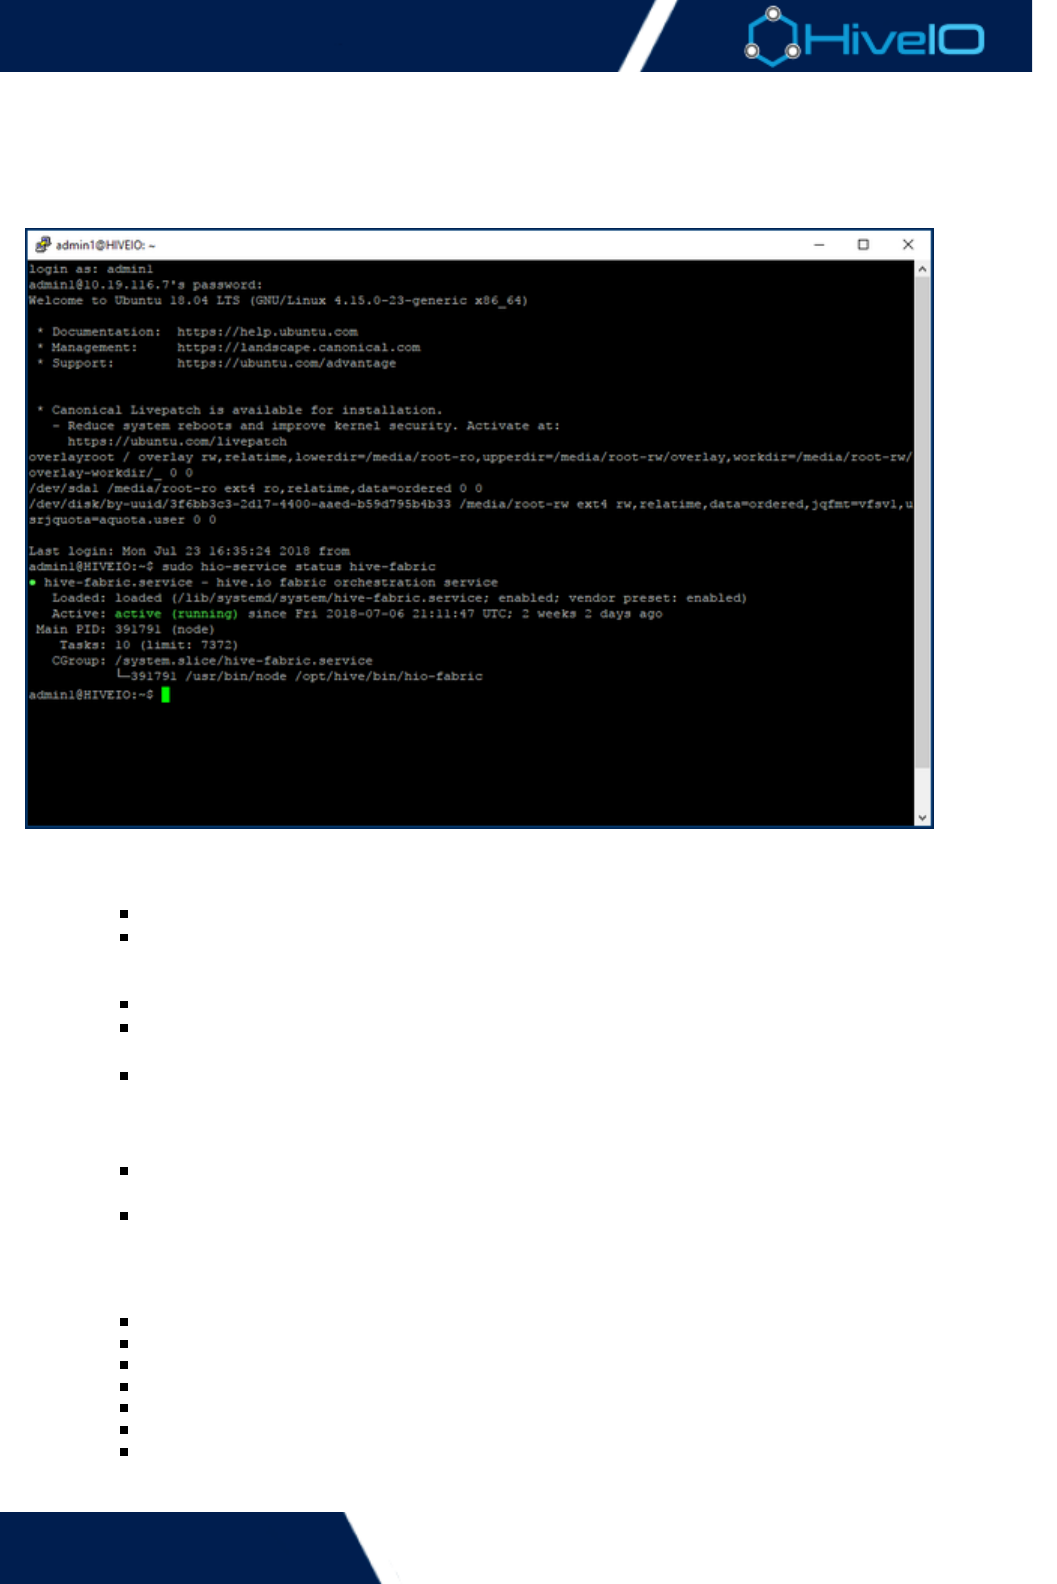
Hive Fabric 7.0 Administration Guide
80 | © 2018 HiveIO
1.
2.
Advanced Admininstration
Advanced users have the option to execute command line tools through a remote shell. This option is available
for any administrators who require remote access to issue scripts through to the Appliance. Some of these
commands also access any pertinent information regarding the Appliance.
To employ these scripts as part of Fabric operations:
Open a terminal and access the Fabric appliance via . When prompted, the credentials to use are:ssh
User: admin1
Password: This varies based on the current admin account password
The following Hive Fabric-specific commands may be issued. All commands listed must be executed with
:sudo
hio-guest-list: Displays the current guests on the Appliance.
hio-log <service name>: Generates log files from the Appliance, based on the service requested.
For example, the command generates full logs from the Fabric service.sudo hio-log hive-fabric
hio-service <operation> <service name>: Performs a specified operation with the service
requested. For example, the command displays thesudo hio-service status hive-fabric
current status of the Fabric service. Users may , , , or check the of astart stop restart status
supported .hio-service
hio-shared-storage-status: Displays the current status for Shared Storage. Appliances must be
part of a cluster to have Shared Storage established.
hio-start-appliance-console: Starts the for the Appliance within the shellManagement Console
session. Navigating the console remains the same.
Additionally, the following services names are accepted where applicable. Be aware that only specifihive-
c services, , , and may be used with the command:nginx qpidd rethinkdb hio-service
dmesg
fail2ban
guest/[guestname]
hive
hive-agent-proxy
hive-appliance-console
hive-boot

Hive Fabric 7.0 Administration Guide
81 | © 2018 HiveIO
2.
3.
hive-cluster
hive-fabric
hive-image-service
hive-metrics
hive-rest
hive-storage
kern
libvert/qemu/[guestname]
nginx
nginx/access
nginx/error
qpidd
rethinkdb
user
When the command has been entered, the script executes.
Wildcards
These shell commands support wildcards, with the term contained within quotation marks. For
example, will pull the logs for all services, rather than a specificsudo hio-log "hive-*" hive-
service.

Hive Fabric 7.0 Administration Guide
82 | © 2018 HiveIO
Migration
It is possible to take pre-existing virtual machines from another hypervisor and migrate them to Hive Fabric. The
steps to do so may vary based on the hypervisor and version that was used before migrating to Fabric. Here,
some of the more common setups are discussed. If the previous hypervisor is not shown here, either consult the
appropriate documentation or contact a member of support for further assistance.
The instructions given here cover some of the common hypervisors used for managing virtual machines. Steps
may vary based on the platform and version used.
Migrate Citrix XenServer to Fabric
Migrate Nutanix Acropolis to Fabric
Migrate VMware to Fabric
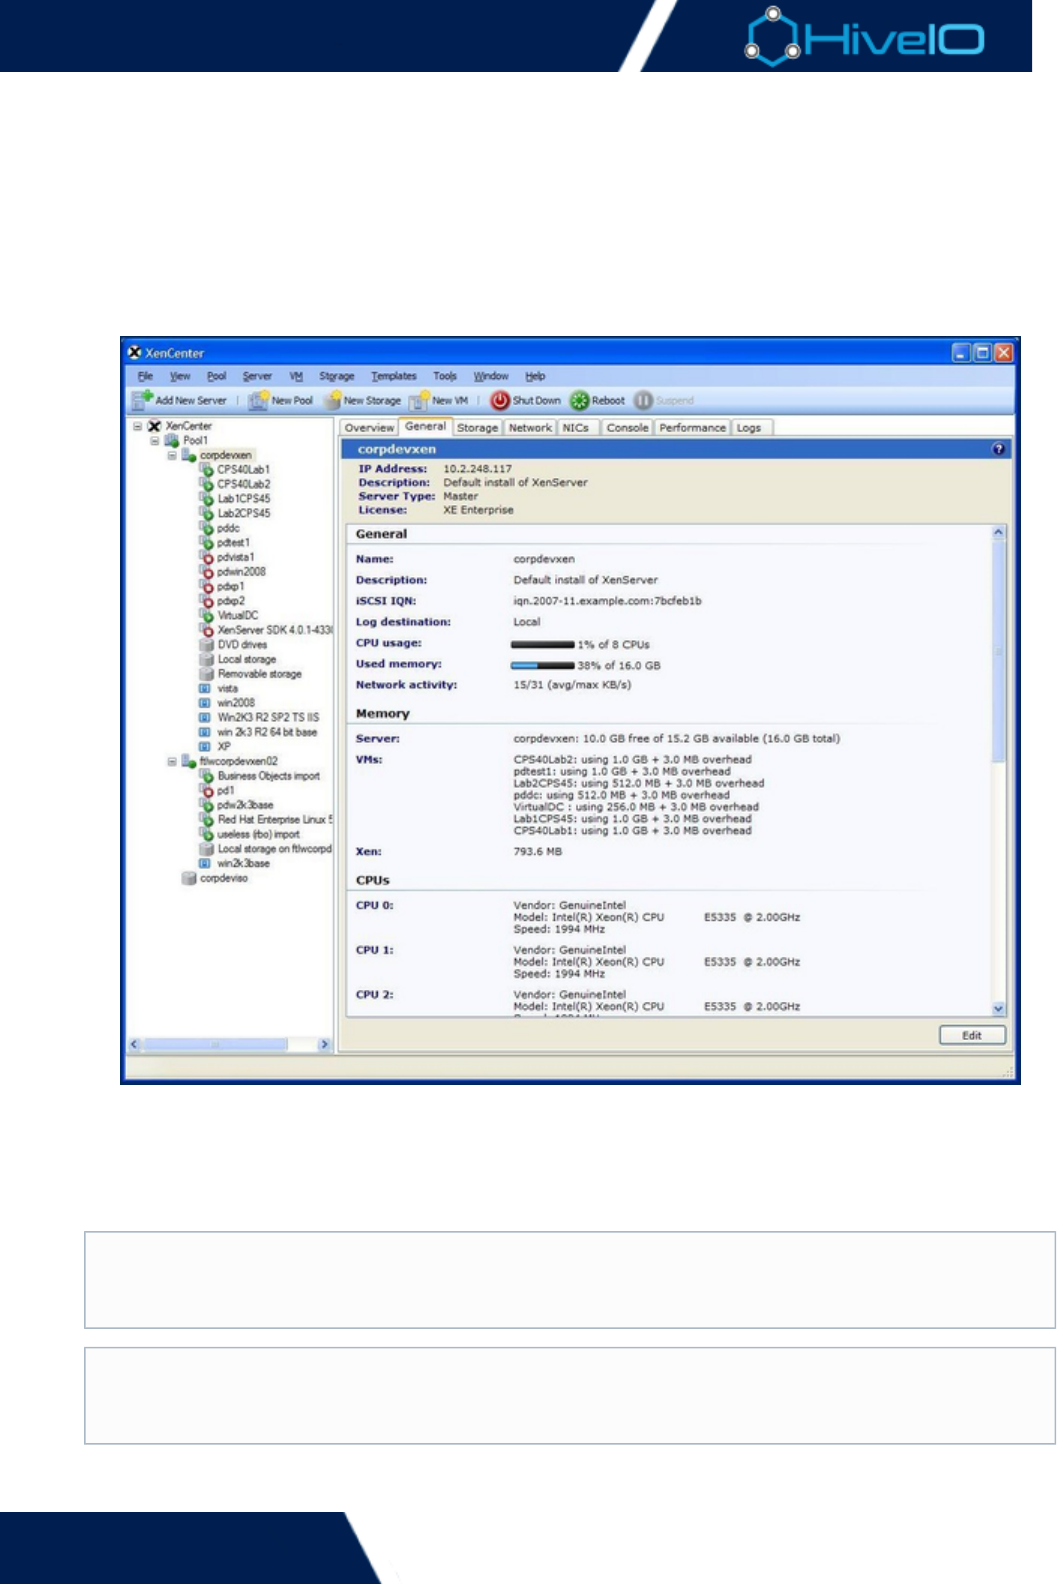
Hive Fabric 7.0 Administration Guide
83 | © 2018 HiveIO
1.
2.
3.
Migrate Citrix XenServer to Fabric
The following steps show how to migrate virtual machines from Citrix XenServer to Hive Fabric. Prior Citrix
knowledge is recommended before proceeding. It is recommended to remove all Citrix optimizations from the
virtual machine before proceeding so that the image can be easier authored for Fabric optimization. These
instructions assume that the Citrix infrastructure is running on XenServer.
Before proceeding, it is a good idea to create a backup of the Citrix virutal machine. This ensures that
there is less risk of loss should an issue arise during the migration process.
First, connect to Xenserver or Xencenter. Find and select the virtual machine intended to migrate to
Fabric.
The next step is to copy the virtual machine to a destination storage location. To begin the copy process,
right-click on the virtual machine and select . In the dialogue window"Copy VM..." Copy Virtual Machine
that appears, select the option for . This creates a full copy of the Virtual Machine on the"Full Copy"
selected storage repository. If a Fabric Shared Storage volume is not used as the storage, then confirm
that the file goes to a storage location that is mountable in Fabric. The time to copy varies, based on
image sizing, copy location, and network.
Before continuing to the next step, ready an SSH session into the Fabric internal NFS or open a view of the
storage repositories files.
Fabric Storage Repositories
Fabric internal NFS on version 6 and shared storage on Fabric 7.0 can be created and mounted as
a Storage Repository within XenServer to copy the virtual machines to.
Storage Recommendations
An NFS share is recommended. This is because the storage repository needs to be mounted in
Hive Fabric if it is not originating from Hive Fabric Shared Storage.
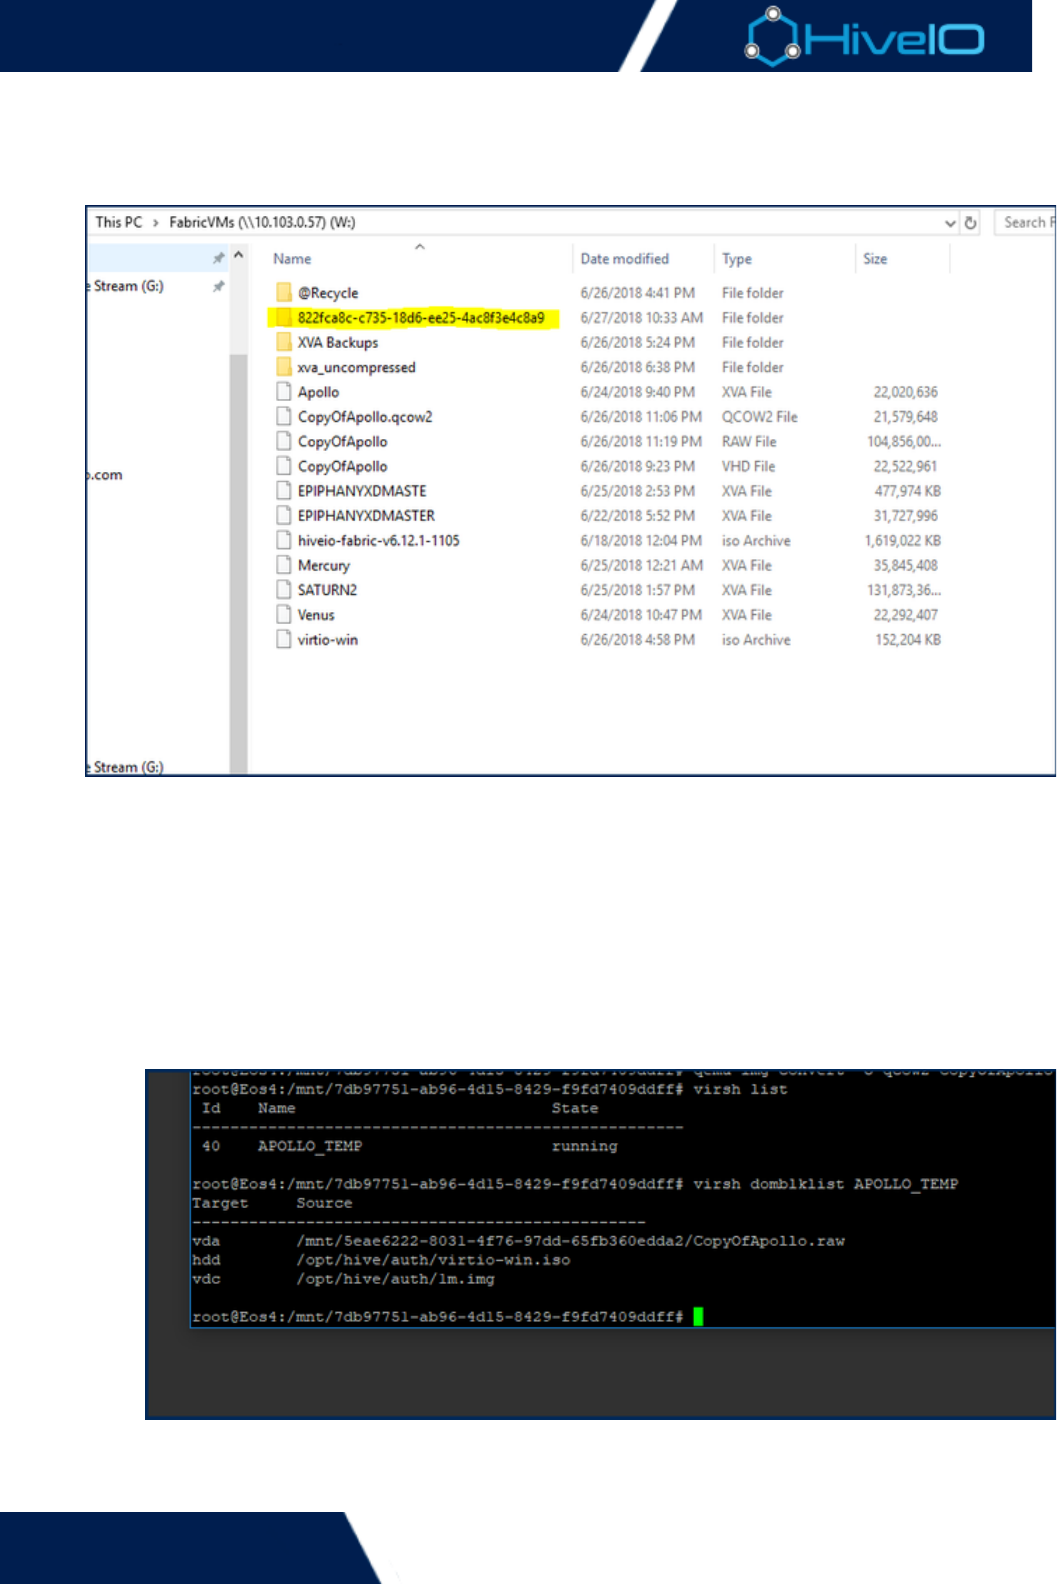
Hive Fabric 7.0 Administration Guide
84 | © 2018 HiveIO
3.
4.
5.
a.
b.
storage repositories files.
Certain migration methods require the UUID of the Virtual Machine as part of the migration process. The
easiest way to do this is first by browse to the storage destination while the VM is copying. When
accessing an NFS store, check for the most recent files modified, preferably sorted by date and time. The
directory containing the Full Copy Virtual Machine disks typically uses the UUID as its name.
The folder contains the .VHD's of each disk from the Virtual Machine. Each disk must be converted from
their original format into either a or for Hive Fabric consumption. There are two ways to.vhd .raw .qcow2
do this, either through Hive Fabric's conversion tool or through a remote shell.
To convert the image via Fabric: Access Fabric's tool. Starting with the ,Image Conversion Source
select the storage containing the cloned VM image, then select the correct image from the .vhd Fil
drop down. The source can remain at for this process. For the e Name Format Auto Detection Dest
, place the converted image into any shared storage or storage pool and give the convertedination
image an appropriate name. Select as the . With the image ready, click on Qcow2 Output Format C
to begin the conversion process. This may take a few moments, depending on network andonvert
image sizing.
To convert the image via remote shell: From the remote shell into the Fabric session, navigate to
the remote storage point the files are located. If the files are not located within the Fabric.vhd
host, this folder will be available at . /mnt/<storageUUID>
From this folder, enter the following command replacing the example file names with the intended
disks and disk names:

Hive Fabric 7.0 Administration Guide
85 | © 2018 HiveIO
5.
b.
6.
7.
8.
disks and disk names:
qemu-img -O qcow2 <filenamein>.vhd <filenameout>.qcow2 -p
It is possible to replace the qcow2 specification with raw or other formats if converting the image
into a qcow2 formatted virtual machine is not desired. An example for raw format is:
qemu-img -O raw <filenamein>.vhd <filenameout>.raw -p
Once the conversion process is completed, the virtual machine is now in the necessary format for Hive
Fabric to consume. Create a using the newly converted image. Add a Disk Type,Standalone Guest Disk
and select the storage containing the converted image. When prompted for a file name, select the
converted VHD image. Include a second , a with the as part of theDisk Local CDROM HiveIO Drivers
Standalone Guest. When finished, click on to create the Guest.Add Guest
The Standalone Guest needs further authoring before it is ready for deployment. Select the Open Console
option under the Standalone Guest's menu. Follow the steps provided to Action Install VirtIO Device
to the image. This is also the time to install any desired optimization tools to the OS, if desired.Drivers
Once everything is set, close the console.
Return to the Standalone Guest and edit it to have the disk removed. Refresh the StandaloneCDROM
Guest to reboot the image and apply the changes. Users may now begin using the Standalone Guest
version of the clone. Decommission the Citrix clone if it is no longer necessary.
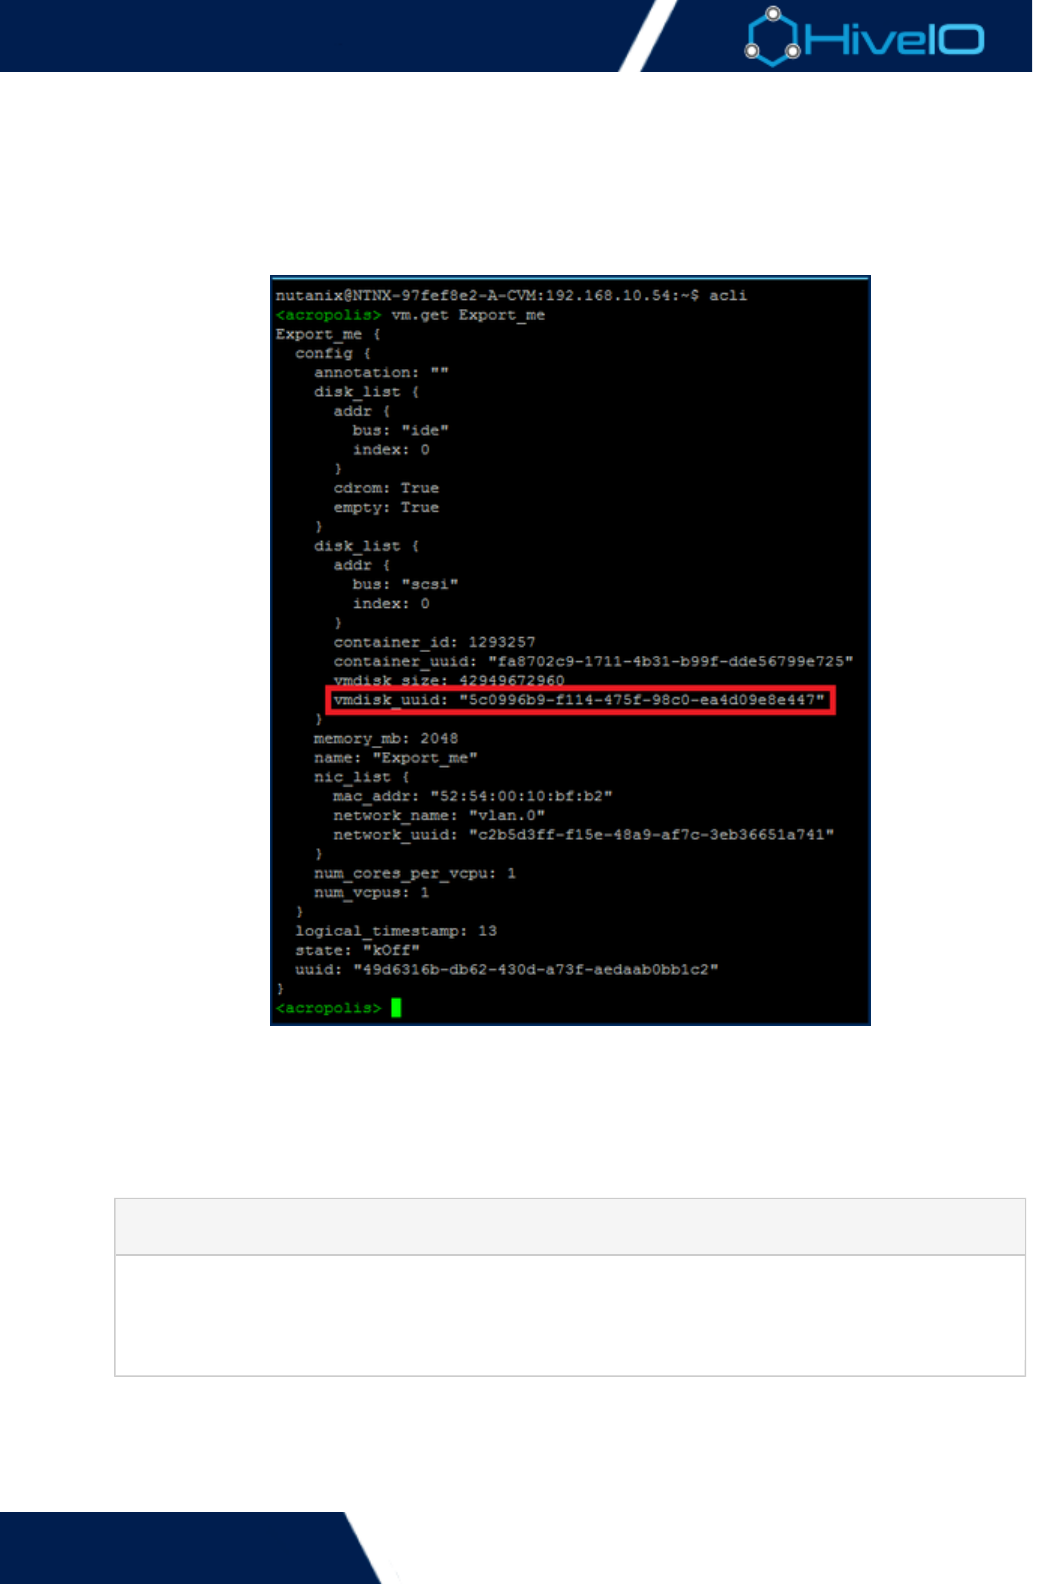
Hive Fabric 7.0 Administration Guide
86 | © 2018 HiveIO
1.
2.
3.
4.
Migrate Nutanix Acropolis to Fabric
The following steps show how to migrate virtual machines from Nutanix Acropolis (AHX) to Hive Fabric. Prior
Nutanix knowledge is recommended before proceeding. It is recommended to remove all Nutanix optimizations
from the virtual machine before proceeding so that the image can be easier authored for Fabric optimization.
First, find the UUID of the vDisk. To do this, connect to a CVM. Enter a CLI and run the command vm.get
. Copy the vmdisk_uuid.[vm name]
Next is to export the applicable vDisks. The vDisks of AHV VMs are located in a hidden folder on the
container named . Use the qemu-img command to export the vDisk. Note that the vDisk.acropolis
exports in a thin format. This means that even if it is provisioned as a 100GB drive, it only exports the
actual size used. To begin the export, first make sure the VM is powered off. Then, run the following
command:
qemu-img convert –c ] –O qcow2 nfs://127.0.0.1/[containter]/.acropolis/vmdisk/[UUID nfs:/
/127.0.0.1/[containter]/[vmdisk].qcow2
qemu-img convert -c
nfs://127.0.0.1/Nutanix/.acropolis/vmdisk/5c0996b9-f114-475f-98c0-ea4d
09e8e447 -O qcow2 nfs://127.0.0.1/Nutanix/export_me.qcow2
Once the export completes, whitelist a Windows 2012 R2 server. Browse to the container and copy the .ac
vDisk to storage. Place the file into an NFS store that is presented to both Nutanix and Hiveropolis
Fabric. It is also possible to upload the image to the internal data store of a Fabric server.
The AHX VM clone must be converted before Fabric can use it. This process uses Fabric's built-in Image
tool. Starting with the , select the storage containing the cloned VM image, then selectConversion Source
Example

Hive Fabric 7.0 Administration Guide
87 | © 2018 HiveIO
4.
5.
6.
7.
tool. Starting with the , select the storage containing the cloned VM image, then selectConversion Source
the correct image from the drop down. The source can remain at .acropolis File Name Format Auto
for this process. For the , place the converted image into any shared storage orDetection Destination
storage pool and give the converted image an appropriate name. Select as the .Qcow2 Output Format
With the image ready, click on to begin the conversion process. This may take a few moments,Convert
depending on network and image sizing.
Create a using the newly converted image. Add a Disk Type, and select the storageStandalone Guest Disk
containing the converted image. When prompted for a file name, select the converted AHX image.
Include a second , a with the as part of the Standalone Guest. WhenDisk Local CDROM HiveIO Drivers
finished, click on to create the Guest.Add Guest
The Standalone Guest needs further authoring before it is ready for deployment. Select the Open Console
option under the Standalone Guest's menu. Follow the steps provided to Action Install VirtIO Device
to the image. This is also the time to install any desired optimization tools to the OS, if desired.Drivers
Once everything is set, close the console.
Return to the Standalone Guest and edit it to have the disk removed. Refresh the StandaloneCDROM
Guest to reboot the image and apply the changes. Users may now begin using the Standalone Guest
version of the clone. Decommission the AHX clone if it is no longer necessary.
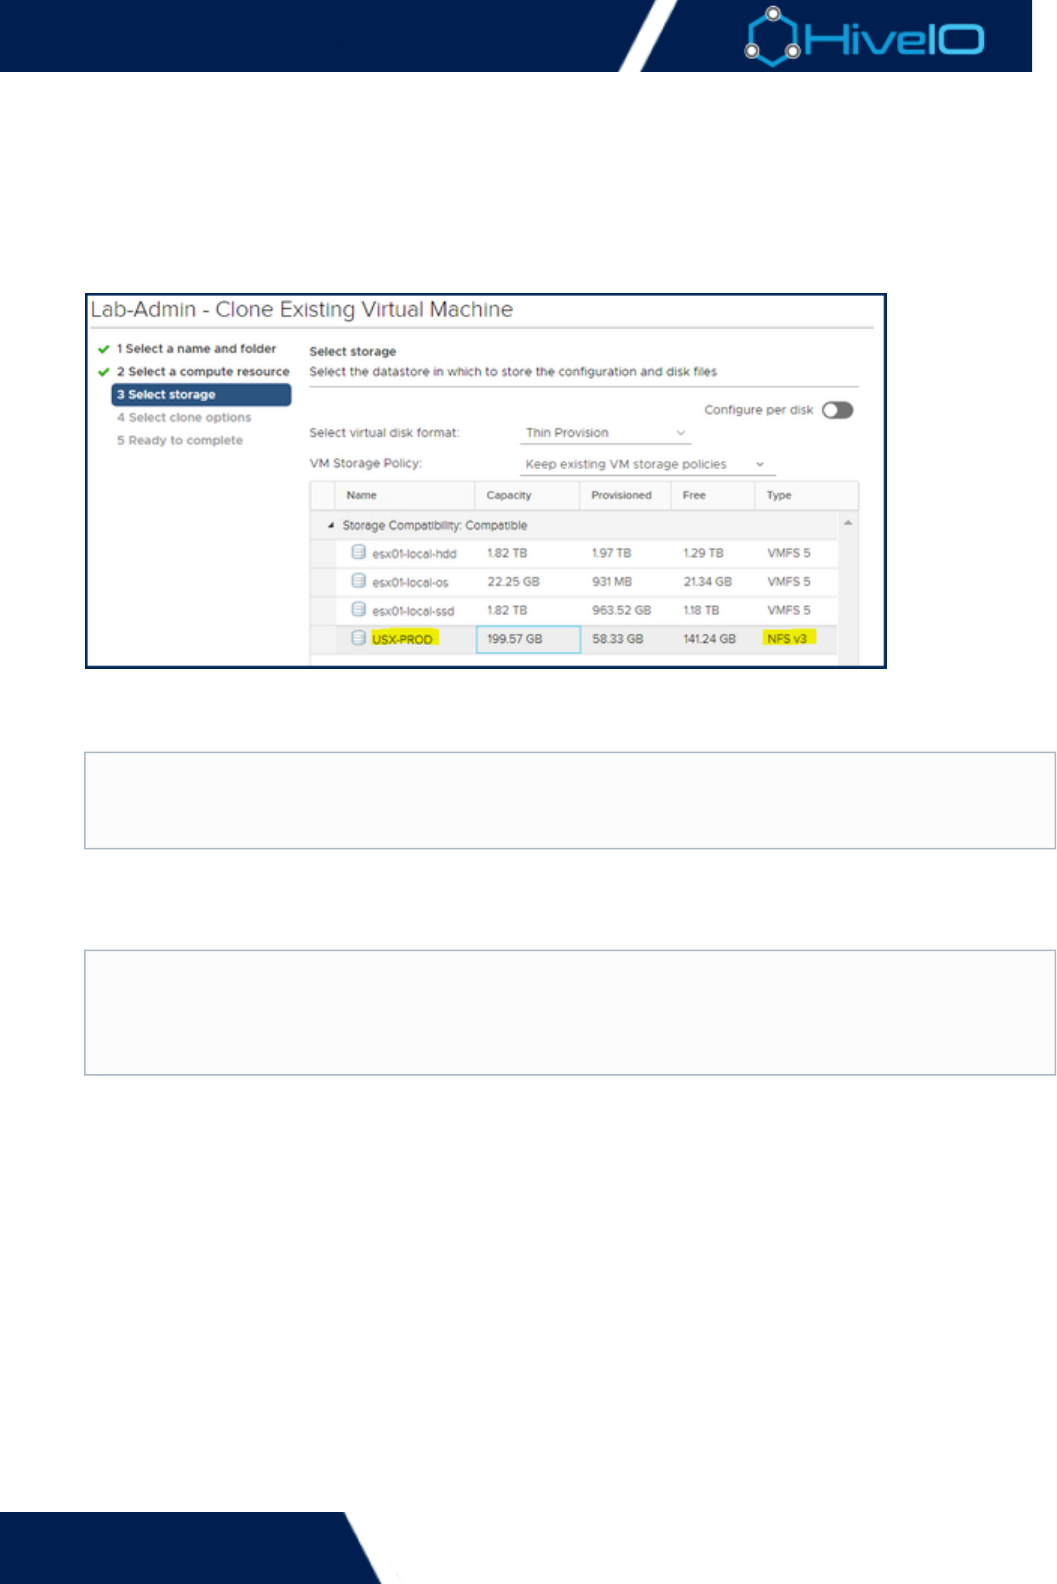
Hive Fabric 7.0 Administration Guide
88 | © 2018 HiveIO
1.
2.
3.
4.
Migrate VMware to Fabric
The following steps show how to migrate virtual machines from VMware to Hive Fabric. Prior VMware
knowledge is recommended before proceeding.
First, it's a good idea to make a note of all the NIC settings from the VMware virtual machine, such as IP
Addresses, DNS settings, Gateways, etc., before proceeding. Create a clone of the VMware virtual machine
and place it into an . Cloning the VM makes aNFS store that is presented to both VMware and Hive Fabric
backup available, so there is less risk in case an issue arises.
Prepare the clone for migration. Power on the VM clone and remove all VMware tools from the image.
Once finished, shut the clone down and remove it from vCenter's VMware inventory. Move the cloned
VM's to the root of the storage volume. It no longer needs to be in the folder that VMware created..vdmk
The VMware VM clone must be converted before Fabric can use it. This process uses Fabric's built-in Imag
tool. Starting with the , select the storage containing the cloned VM image, thene Conversion Source
select the correct image from the drop down..vdmk File Name
The source can remain at for this process. For the , place theFormat Auto Detection Destination
converted image into any shared storage or storage pool and give the converted image an appropriate
name. Select as the . With the image ready, click on to begin theQcow2 Output Format Convert
conversion process. This may take a few moments, depending on network and image sizing. After
successfully converting the VM, the file and VMware VM folder may be removed from the NFS store..vmdk
Create a using the newly converted image. Add a Disk Type, and select the storageStandalone Guest Disk
containing the converted image. When prompted for a file name, select the converted VMware image.
Include a second , a with the as part of the Standalone Guest. WhenDisk Local CDROM HiveIO Drivers
finished, click on to create the Guest.Add Guest
Storage Pools
The storage containing the VM clone must be included as part of Fabric's inventoryStorage Pool
before proceeding to the next step.
Correct Source Image
Current versions of VMware create and files to represent the cloned disk-flat.vdmk *.vdmk
image. The file is the actual disk image and the correct source chosen for conversion.-flat.vdmk
The file is a descriptor file that references the file.*.vdmk -flat.vdmk

Hive Fabric 7.0 Administration Guide
89 | © 2018 HiveIO
4.
5.
6.
The Standalone Guest needs further authoring before it is ready for deployment. Select the Open Console
option under the Standalone Guest's menu. Follow the steps provided to Action Install VirtIO Device
to the image. This is also the time to update the image with the NIC information that wasDrivers
previously noted, so that it matches the source VMware virtual machine. Once everything is set, close the
console.
Return to the Standalone Guest and edit it to have the disk removed. Refresh the StandaloneCDROM
Guest to reboot the image and apply the changes. Users may now begin using the Standalone Guest
.version of the clone. Decommission the VMware clone if it is no longer necessary
