How To Guide Open Stack Zone Preliminary Release 20180913
User Manual:
Open the PDF directly: View PDF ![]() .
.
Page Count: 25

Red Hat Connect for Technology Partners
Getting Started Guide - OpenStack / NFV Zone
Prepared for: Product Managers and Technical Staff
Draft Version: 20180913 (preliminary release)

Table of Contents
Introduction 3
Register for RHC4TP & Request Technology Partnership 4
Request Zone Access 6
Add a Product 7
Add a New User to the RHC4TP Account 9
Request Software Access 10
Access granted software entitlements 10
Creating a Certification Project 10
In Tree vs Out of Tree 12
In Tree Certification Workflow 13
Out of Tree Certification Workflow14
The Container Certification Checklist 14
Certification Checklist Section Descriptions 15
Preparing the Image For Scanning 16
Dockerfile Requirements 16
The Automated Build Service 17
Manually Upload Your Image 20
Downloading Your Unpublished Container 20
Image Scan Results 21
Export Compliance Questionnaire 22
Maintaining Certified Images 23
Top FAQs 24
Online Resources 25
2

Introduction
Welcome to Red Hat Connect for Technology Partners. This guide provides instructions on
how to register for the Red Hat Connect for Technology Partner program.
This document will also guide you through the process of obtaining a “Red Hat Certified”
designation for an OpenStack plugin that you have made deployable via a Linux container using
Red Hat technology.
The process involves preparing your containerized application so that it meets certain criteria
as specified in the Red Hat Certification Policy Guide, submitting it to Red Hat scan utility for
certification, and publishing it so that the containerized application is available for
consumption.
It should be noted that the ability to maintain the certification requires a commitment to
maintaining the trustworthiness of the container, i.e., updating it as needed for security or
other reasons.
NOTE: This document only covers partner registration with Red Hat Connect and the image
certification scanning process for out of tree OpenStack plugins.
Functional testing and Red Hat OpenStack integration are out of scope of this document.
3
Register for RHC4TP & Request Technology Partnership
Go to connect.redhat.com and click LOG IN
at the upper right of the page.
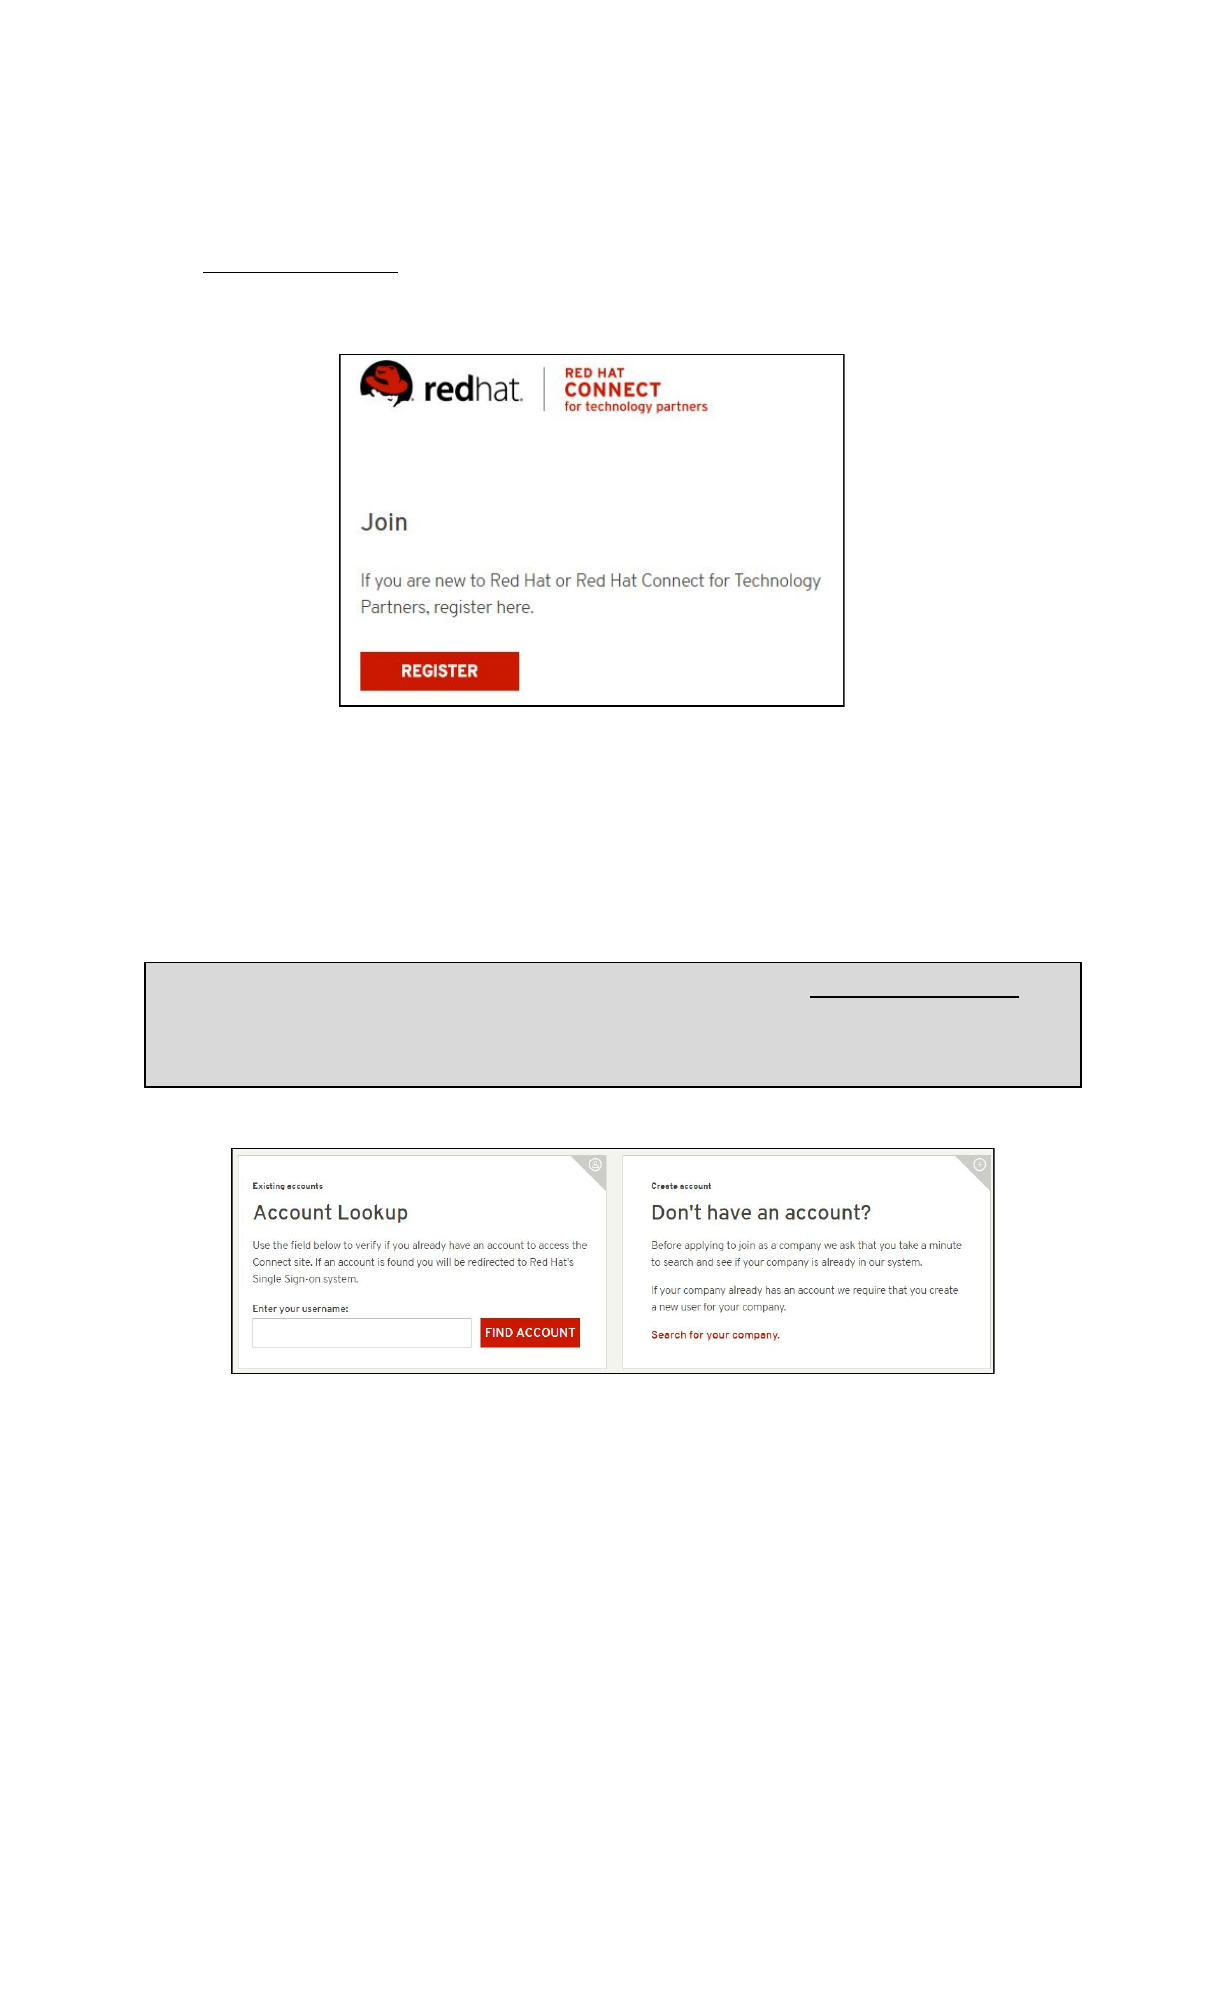
Click REGISTER
.
Check to see if you have an existing account by searching your Red Hat account login
Username.
If you do not have an existing User Account, check if your Company has an existing account by
clicking SEARCH FOR YOUR COMPANY
.
Note: If you find your company in the search field, please email connect@redhat.com to
find out who the Org Admin is for your company, so they can add you to the existing
account.
If your company does not have an existing account, click CAN’T FIND YOUR COMPANY
and then
click REGISTER NEW COMPANY
.
4
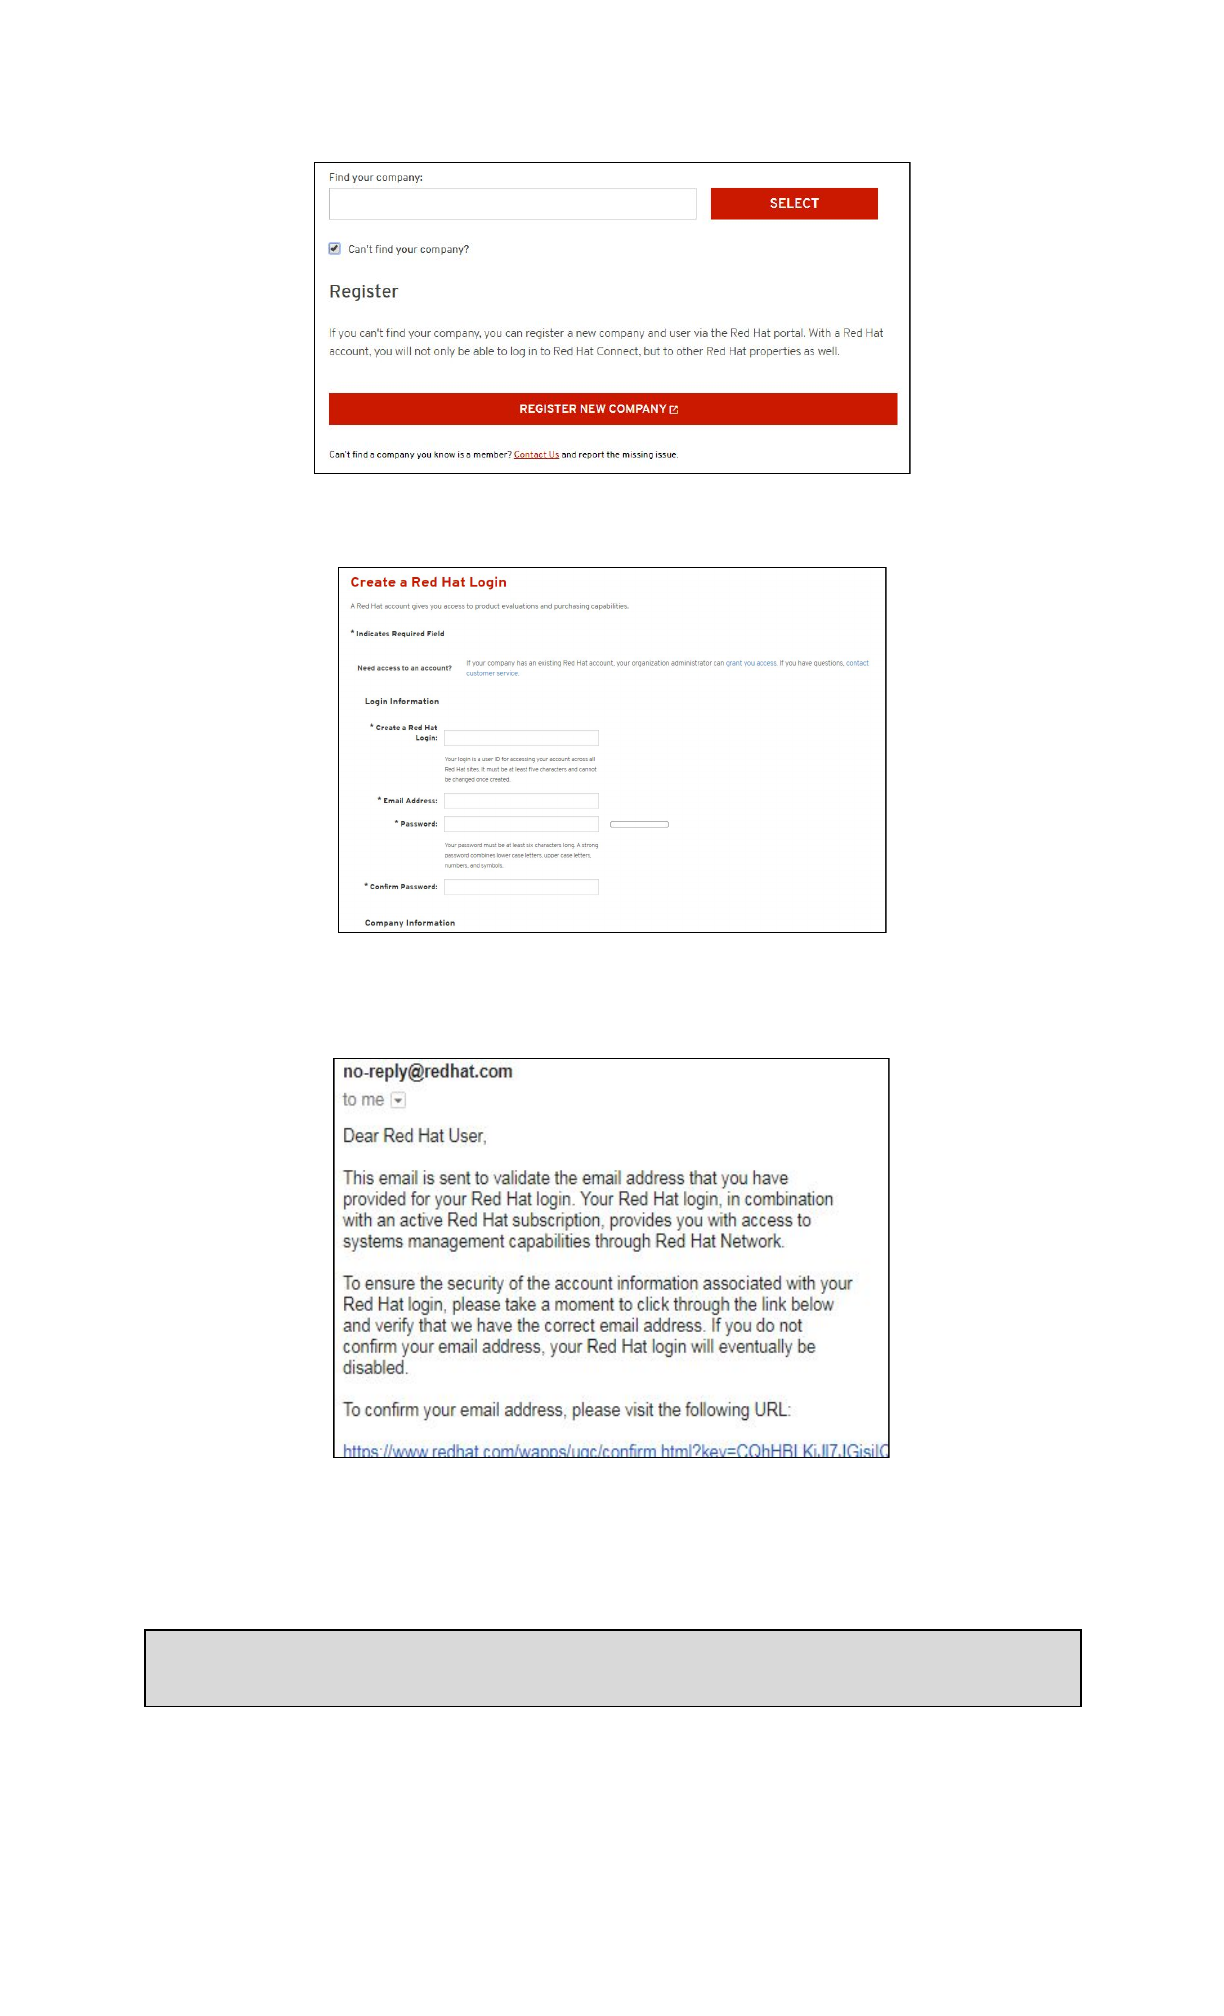
Fill in all required fields and SUBMIT
.
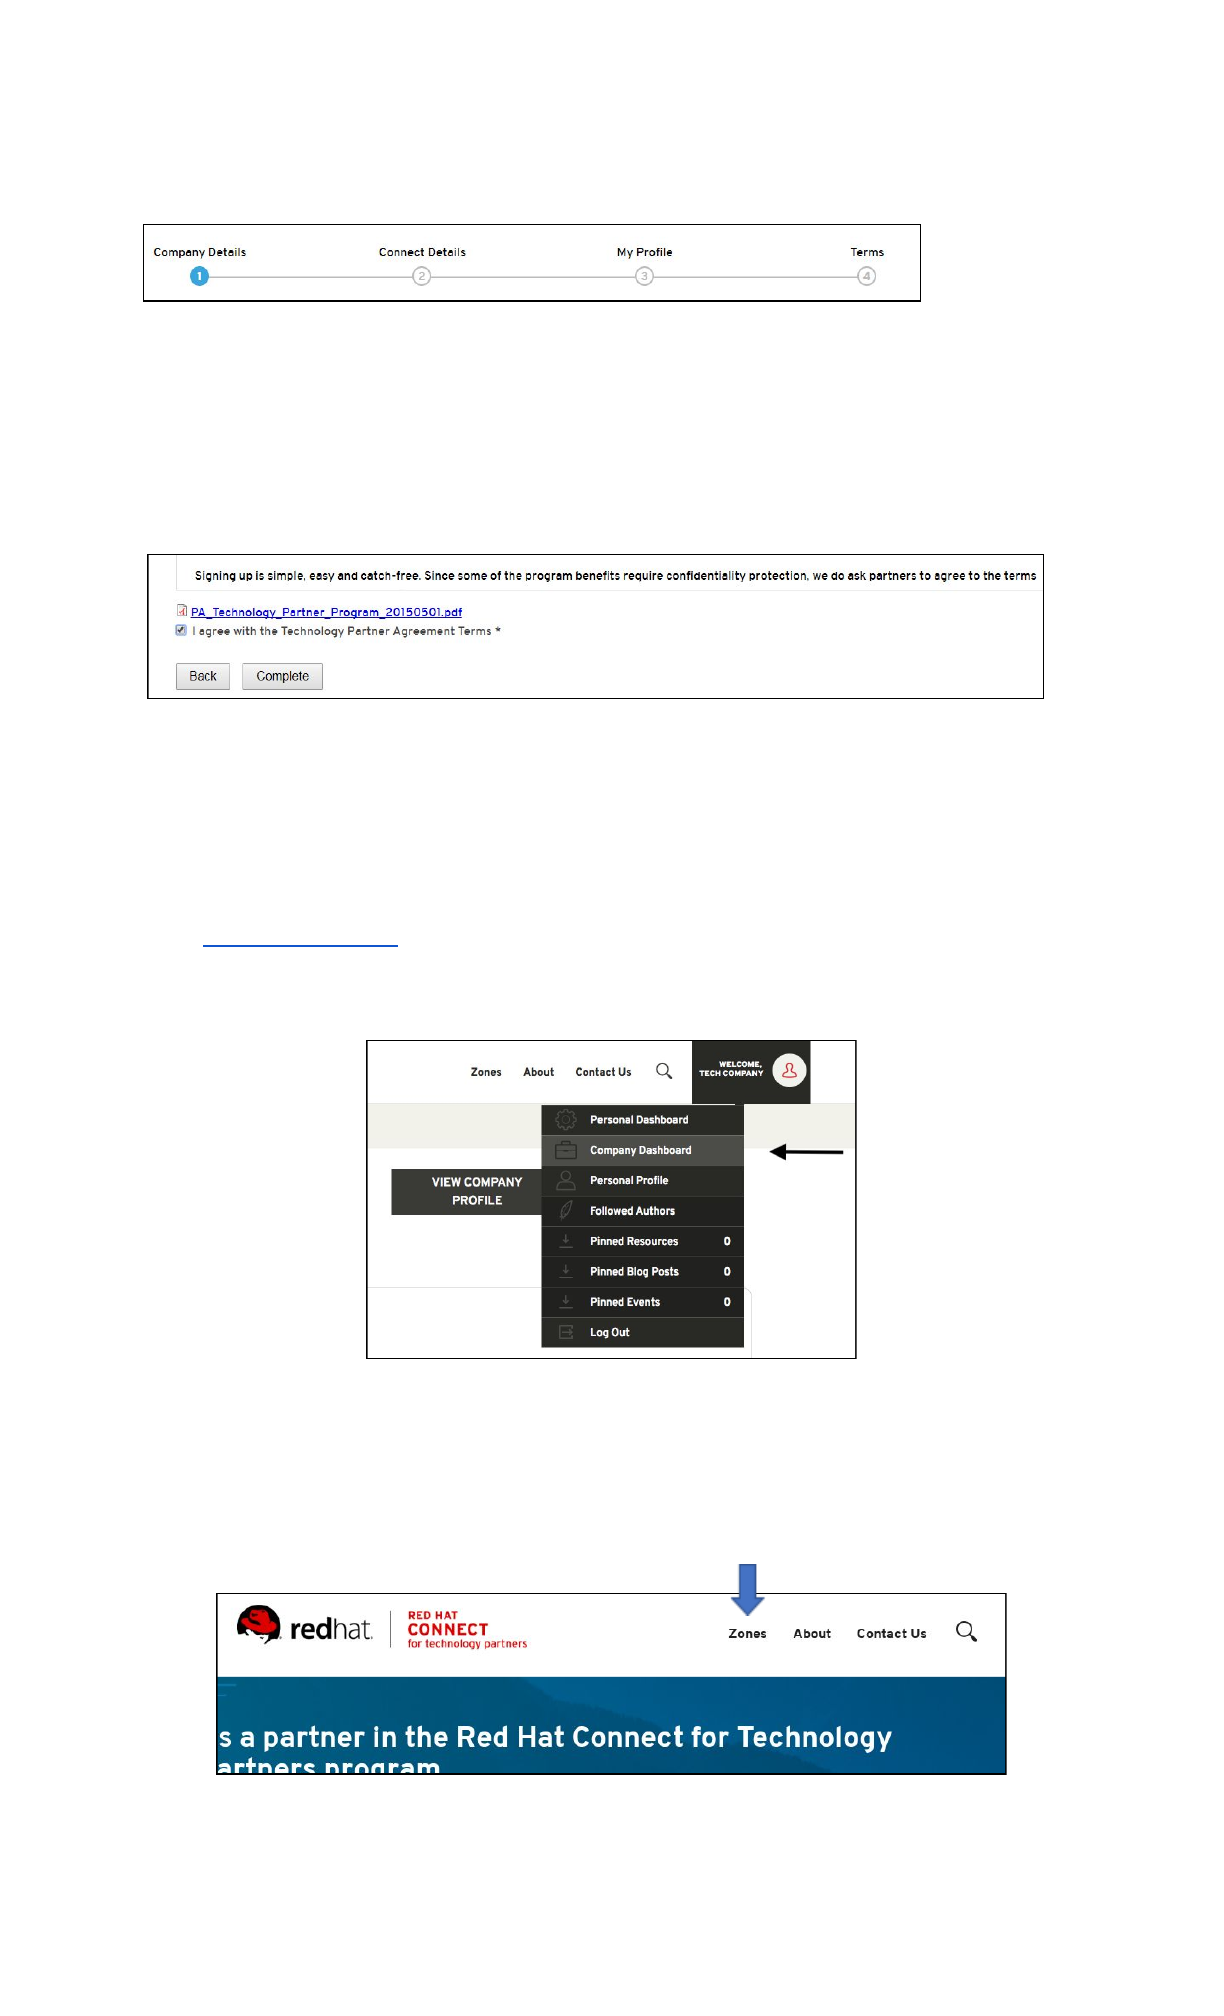
A confirmation Email will be sent (example email)
Once your Email has been confirmed, log in to your RHC4TP account at connect.redhat.com.
You will be redirected to the Getting Started
page.
Note: If you are not redirected, please click MANAGE COMPANY
and then click BECOME A
PARTNER
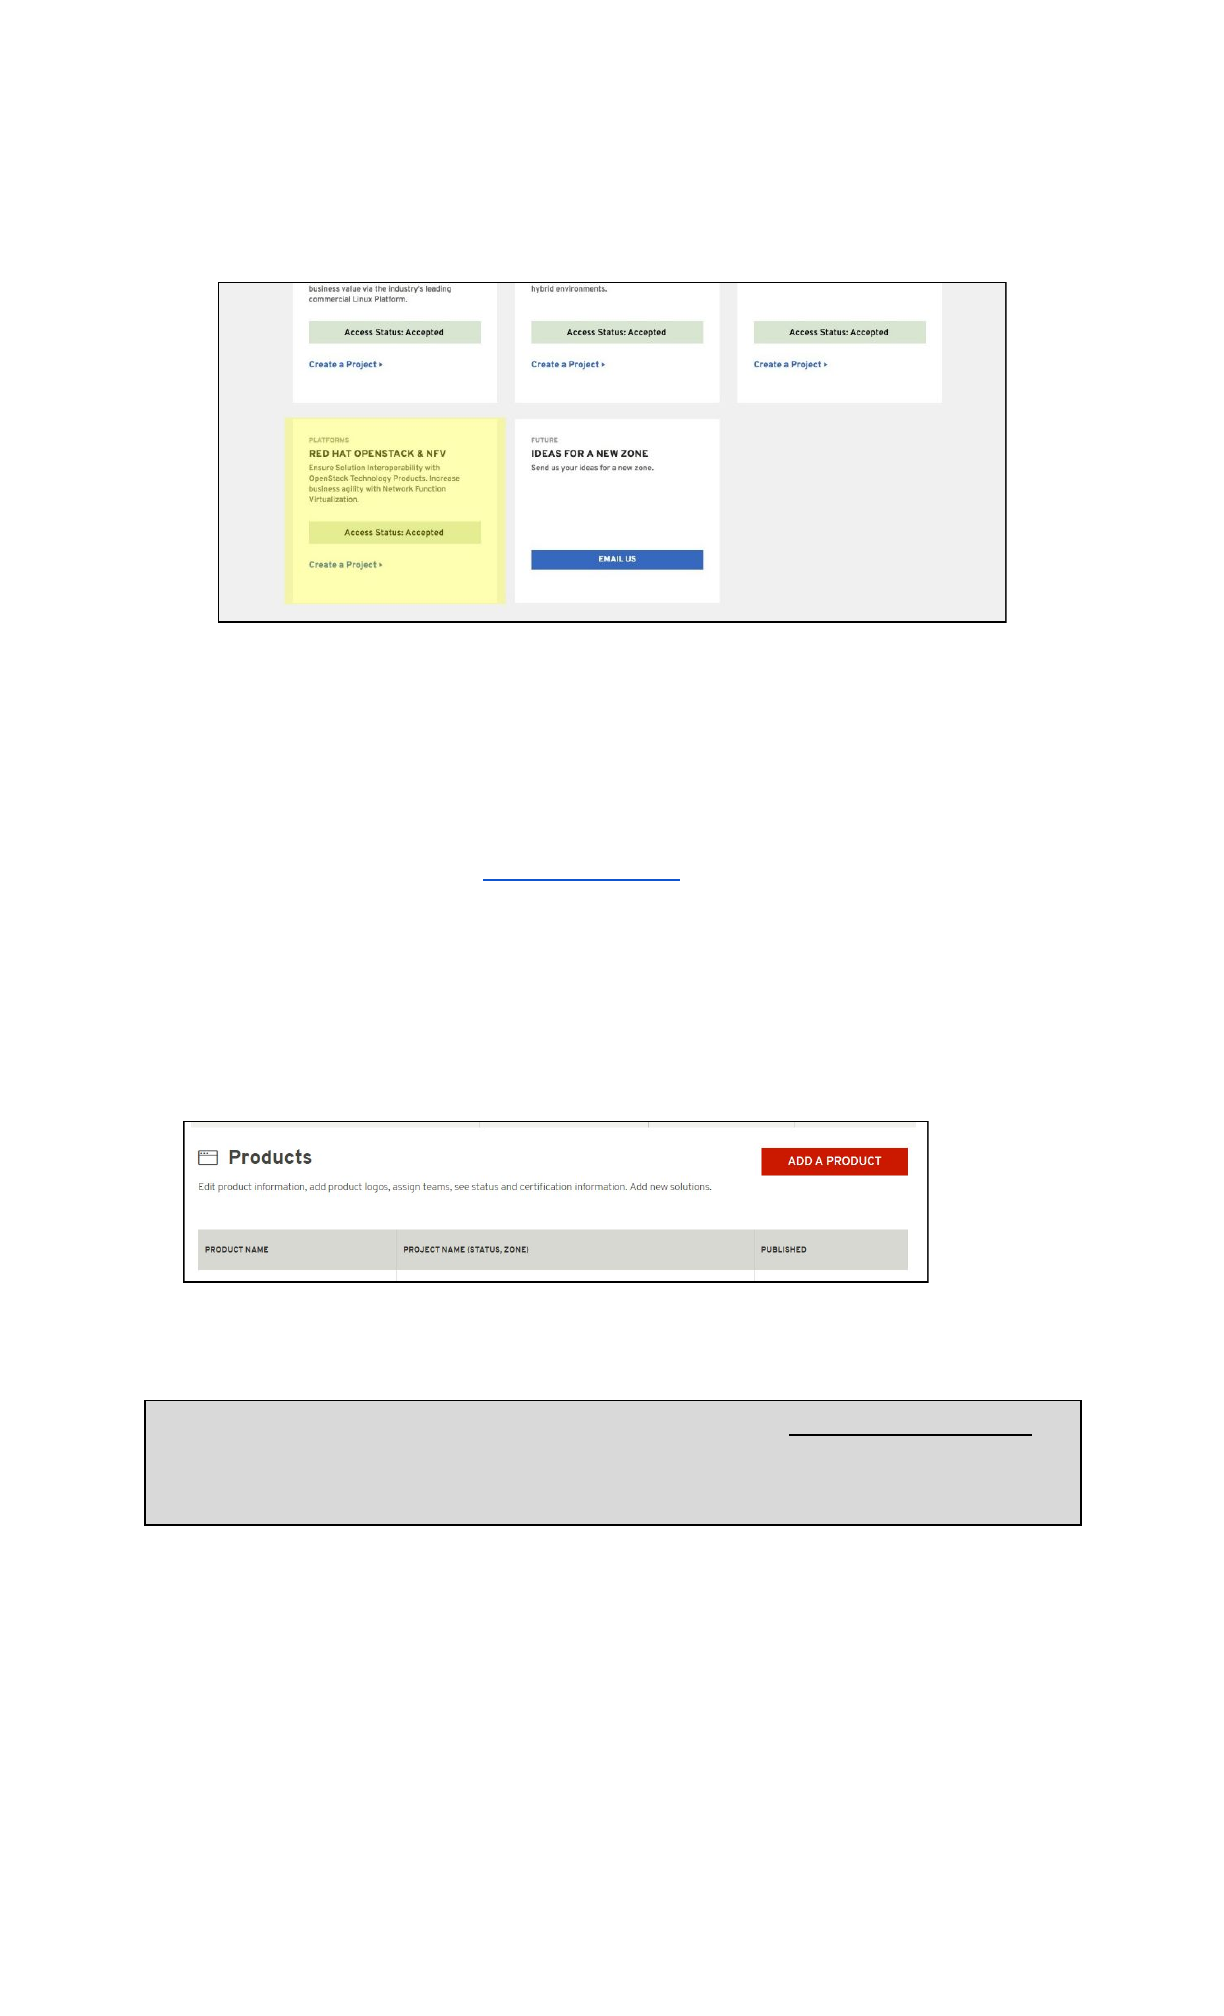
You will now be required to complete the following sections (clicking Next
after filling in the
required information):
Company Details
5
Connect Details
My Profile
Once the Profile section is complete, you will need to review and accept the Technology
Partner Program Agreement.
Request Zone Access
When you’re ready to certify your product on Red Hat Software, you will need to request Zone
access and then create a Certification Project.
Go to connect.redhat.com and click LOG IN
at the upper right of the page.
Click on COMPANY DASHBOARD
Then select EDIT COMPANY PROFILE
Complete all mandatory fields marked with an * and then click SUBMIT
at the end of the page
Click on ZONES
at the top of the page.
Scroll down to Join a Zone section.
6
Under the Zone you wish to join, click APPLY FOR ZONE ACCESS
.
For the OpenStack Plugins, you need to select OpenStack & NFV.
At this point you will via Email upon approval of your Zone Request.
Add a Product
Log in to your RHC4TP account at connect.redhat.com.
Select the Human
icon at the top right of the screen and select Company Dashboard
from the
dropdown menu.
Scroll down to Products
section.
Click ADD A PRODUCT
.
Fill in all required information and click SUBMIT
.
Note: The product information you enter will be used to feed the certified product catalog
after certification is complete and approved by Red Hat, therefore verify all information is
correct.
7
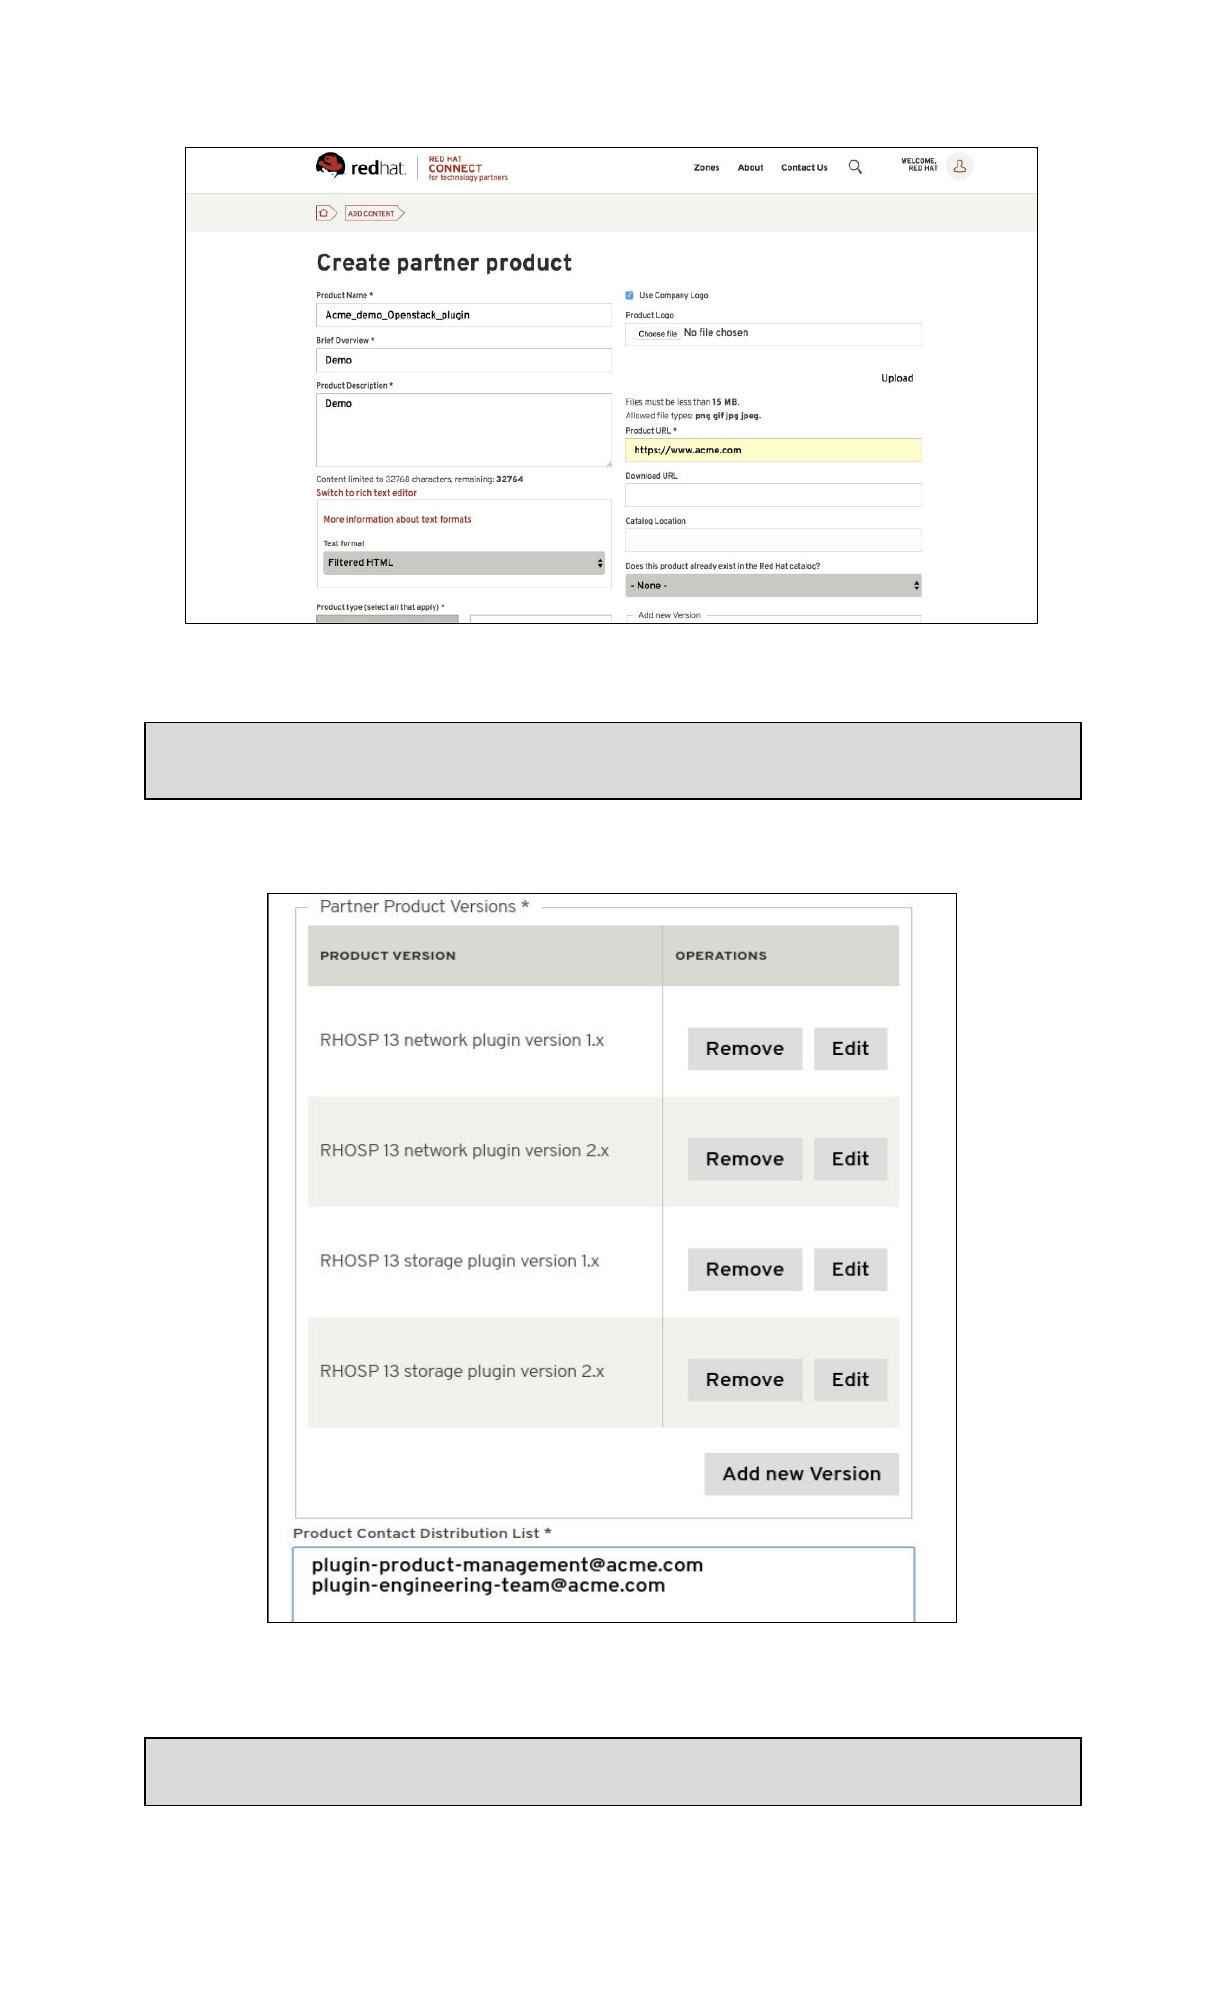
Note: If the plugin comes in multiple versions, you need to specify the different versions in
order to create a Project for each version.
Note: The Product Contact Distribution List must contain at least one email.
8
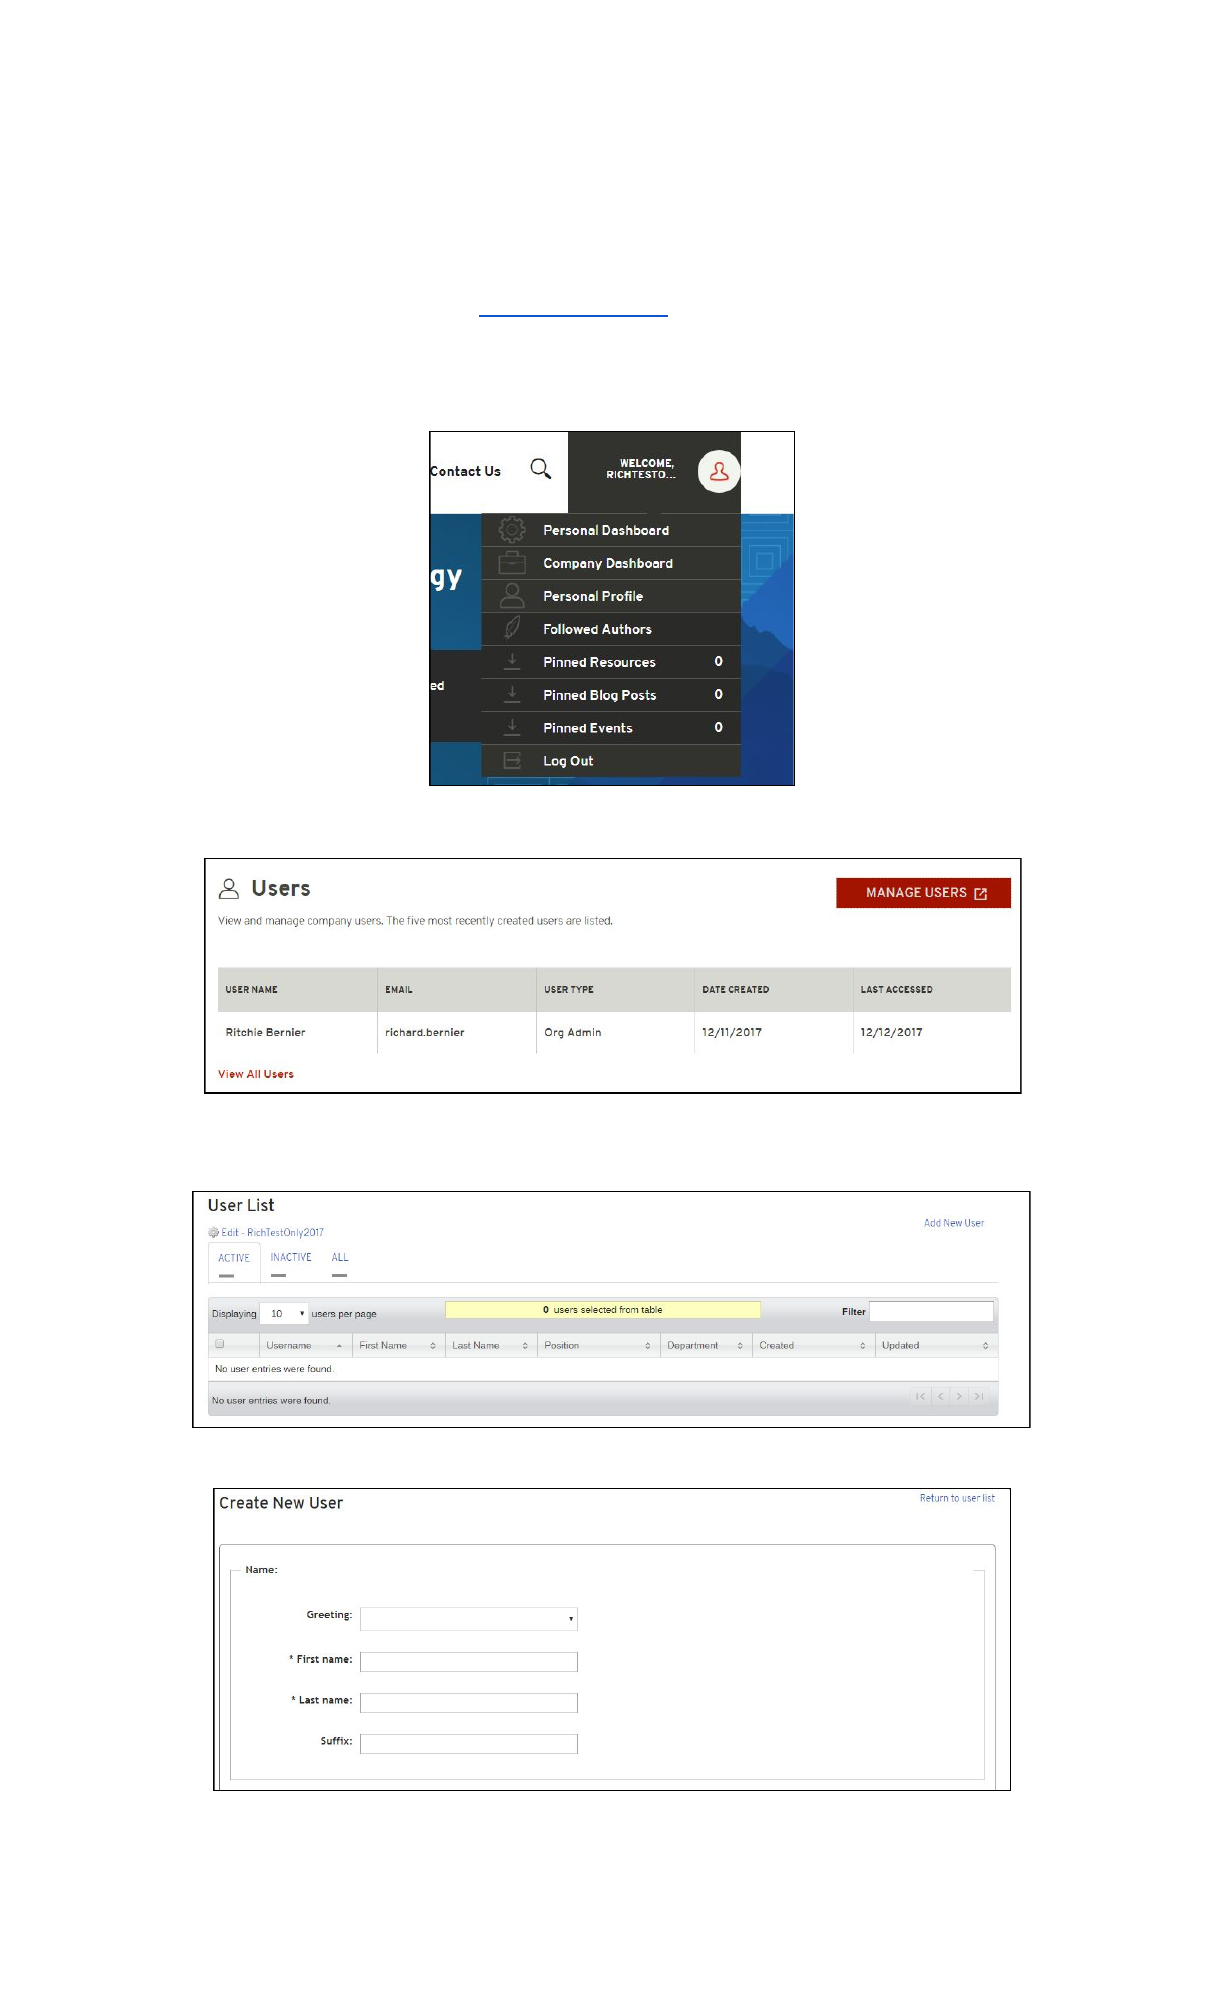
Add a New User to the RHC4TP Account
Login to your RHC4TP account at connect.redhat.com
Click on the Human
icon at the top right of the page and select Company Dashboard
from the
drop-down menu
Scroll down to Users
section
and click MANAGE USERS
.
Click ADD NEW USER
Fill in required information, then click SAVE
.
9
NOTE: For a User to access software and certification tools, you must check the Organization
Administrator (Org Admin) box. Multiple users can be Organization Administrators.
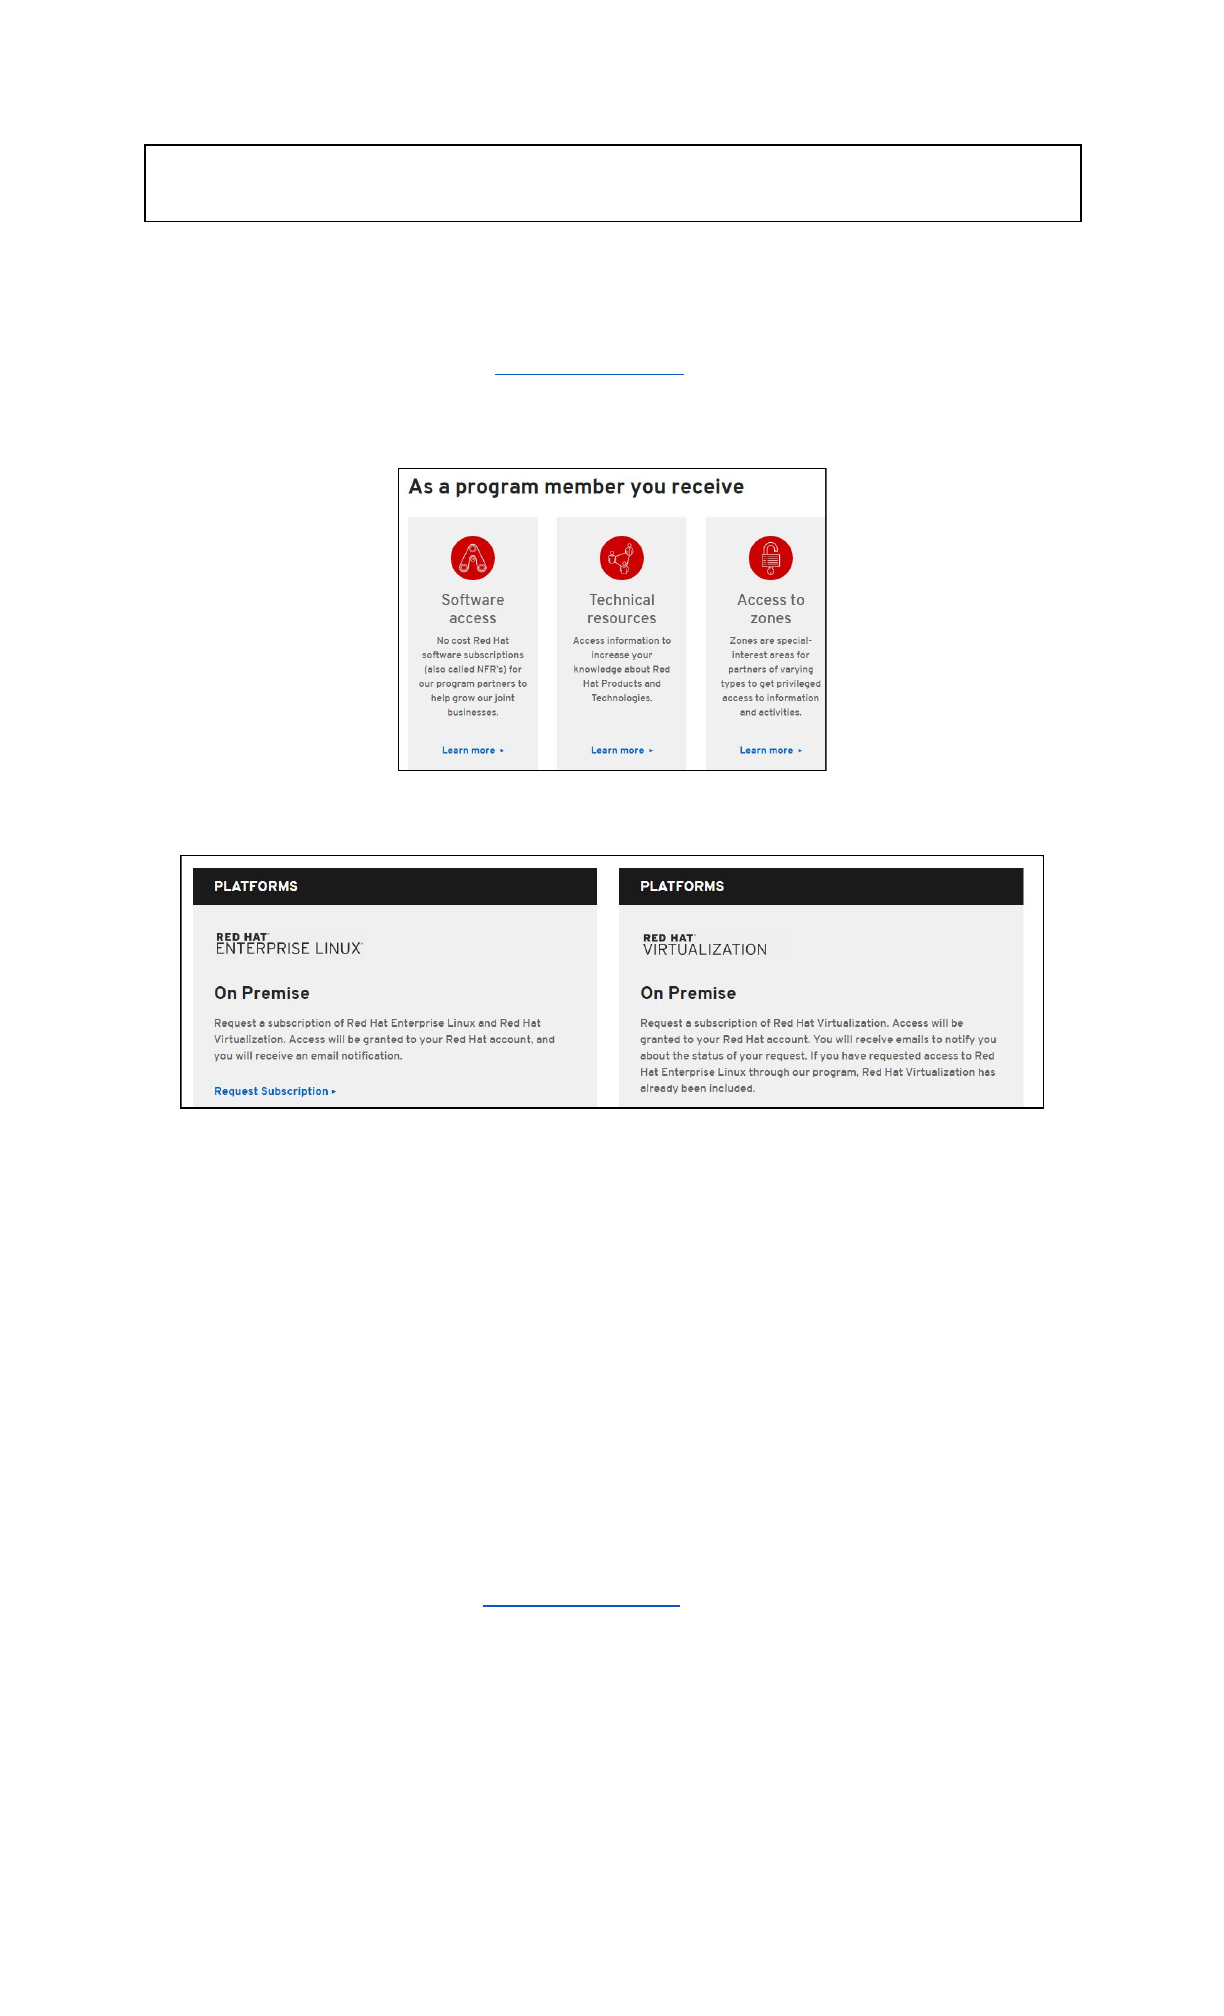
Request Software Access
Log in to your RHC4TP account at connect.redhat.com.
Scroll down to the As a program member you receive section
and click LEARN MORE
under
Software access.
On the Red Hat Software Access Page, scroll down to PLATFORMS
and click REQUEST
SUBSCRIPTION
under the software you need
You will receive an email once software access has been granted.
Access granted software entitlements
Go to access.redhat.com
Click DOWNLOADS
under Quick links at the bottom of the page
Choose the product family
Then follow the instructions to download
Create a Certification Project
Log in to your RHC4TP account at connect.redhat.com.
Select ZONES
at the top of the page.
Scroll down to the OpenStack & NFV Zone and create the Project under and click CREATE A
PROJECT
.
10
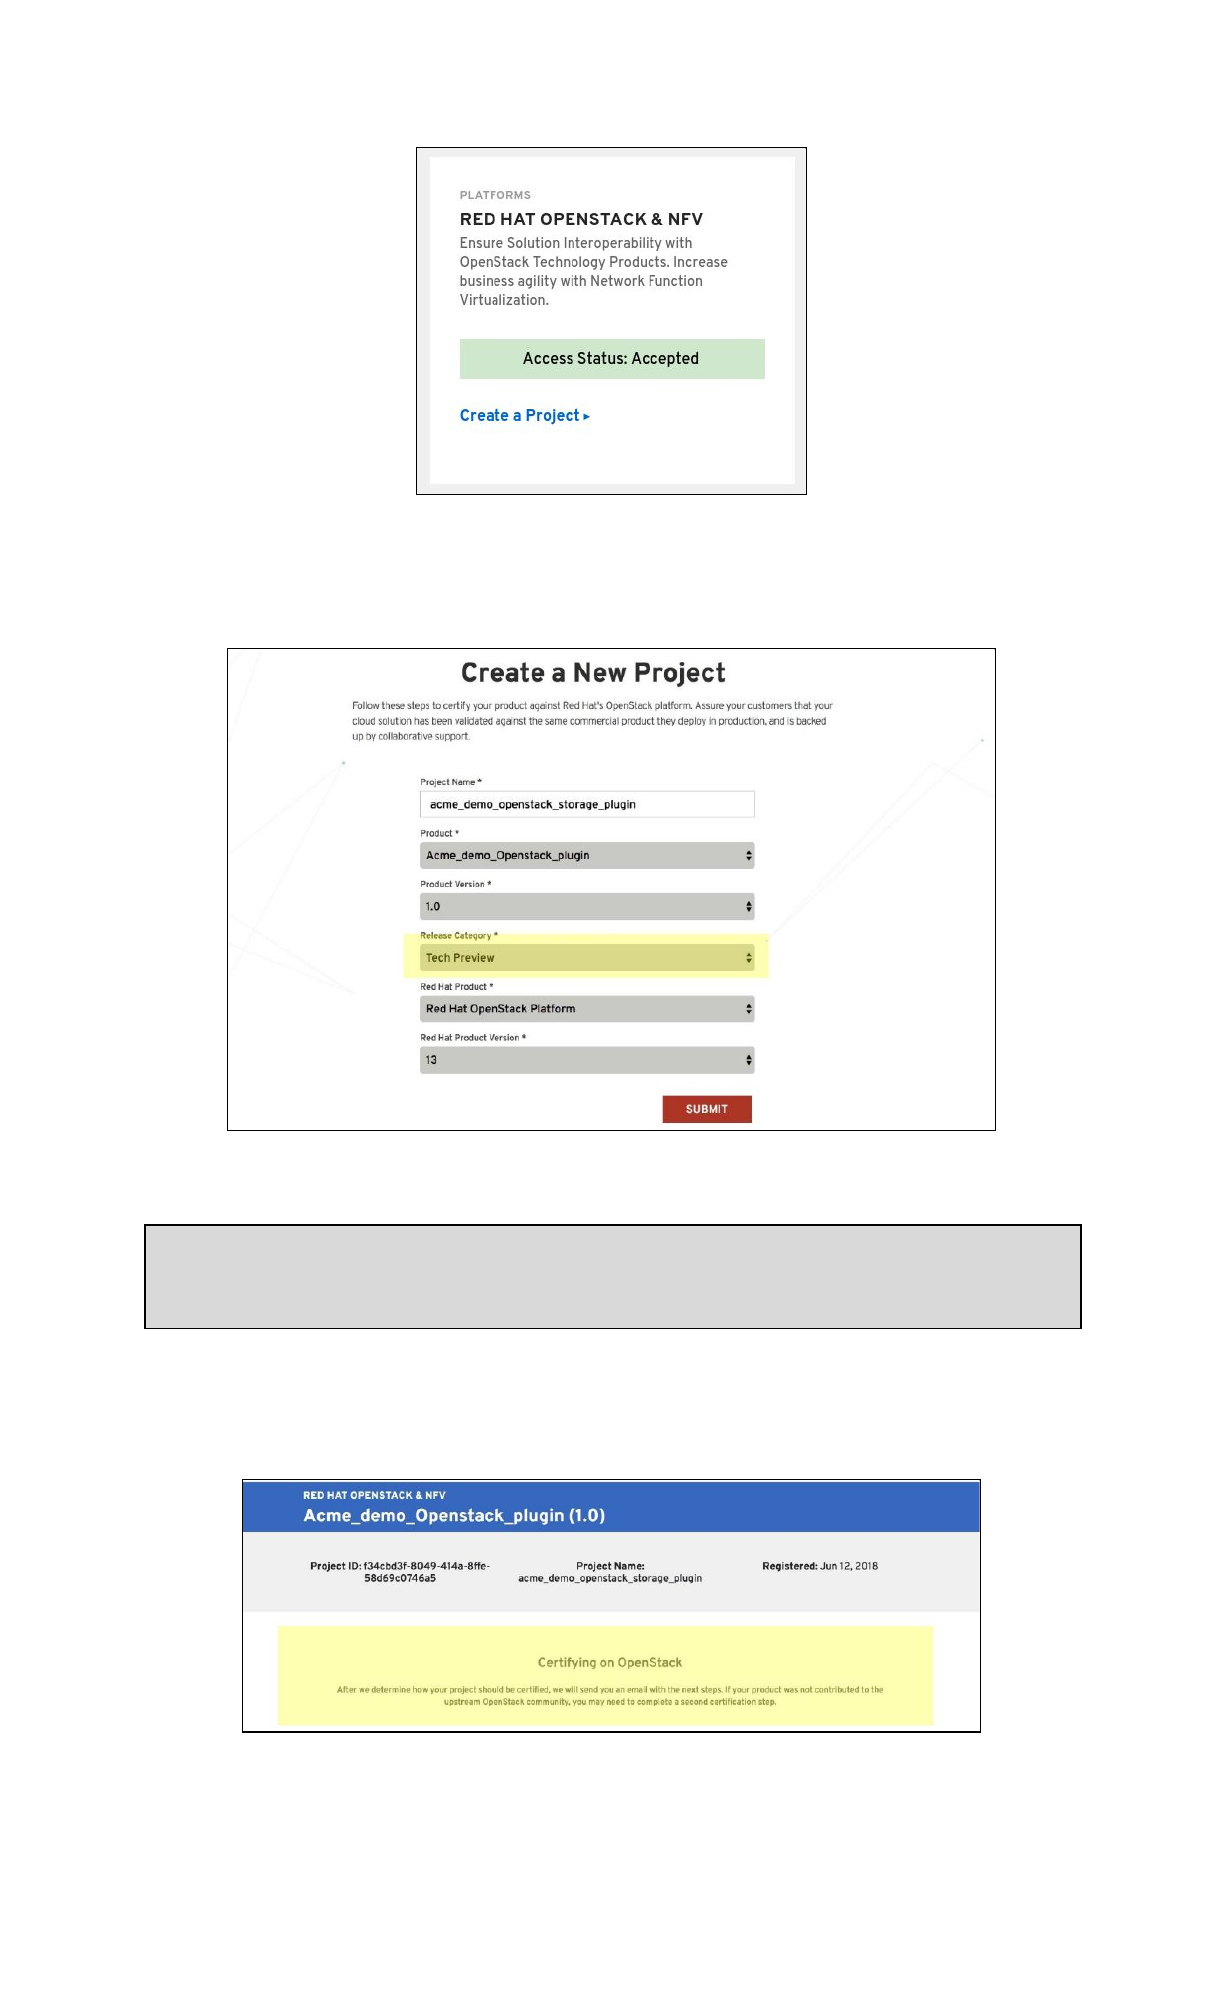
Complete the required fields and click SUBMIT
.
Note: Select Tech Preview for the Release Category.
General Availability is not an option for OpenStack plugins due to the API testing that is
completed using the rhcert portal .
After you have created the Project, you will presented with the page below.
11

A member of the RH4TP will contact you with further questions to determine whether your
project is In Tree or Out of Tree. If you are not contacted, please send an email to
connect@redhat.com.
After the plugin status is confirmed and approved, you will be able to move on the the
Certification Workflows.
In Tree vs Out of Tree
Projects can be contributed to the Red Hat Container platform following two separate processes: In Tree
or Out of Tree. The descriptions below highlight the differences between both.
In Tree
In Tree plugins are included with the OpenStack upstream code base. In this case, Red Hat will build the
plugin and will distribute it with every RHOSP 13 release. In Tree plugins also do not have to go through
a container certification process, since Red Hat will verify that the plugin will work prior to release.
Out of Tree
Out of Tree plugins require an extra step called Container Certification. It is understood that partners
that do not want their codebase to be distributed with RHOSP must take extra measure to ensure that
their plugin adheres to our certification policy.
Another major difference is that out of tree plugins must be built by the partner, scanned for security
(by RH), and must be continuously maintained for security updates. Red Hat Connect has a built-in
scanner that will review your container prior to publishing. Once all checks pass, then the plugin can be
published as tech preview.
Functional Certification
Both processes will still need to go through functional certification to ensure that the plugins are
compatible with RHOSP prior to release. This process involves utilizing a self-hosted OpenStack
environment and collaborating with RHOSP engineers by providing them with system logs.
Once the plugins are confirmed to work with the RHOSP API, the project can then be switched from
“Tech Preview” to “Generally Available”.
The full functional certification guide can be found here:
https://access.redhat.com/documentation/en-us/red_hat_openstack_certification/1.0/html/red_hat_o
penstack_certification_workflow_guide/
In Tree = Plugin is included in the OpenStack upstream code base and the plugin image is
built by Red Hat and distributed with RHOSP 13.
Out of Tree = Plugin image is NOT included of the OpenStack upstream code base and NOT
distributed within RHOSP 13.
12
In Tree Certification Workflow
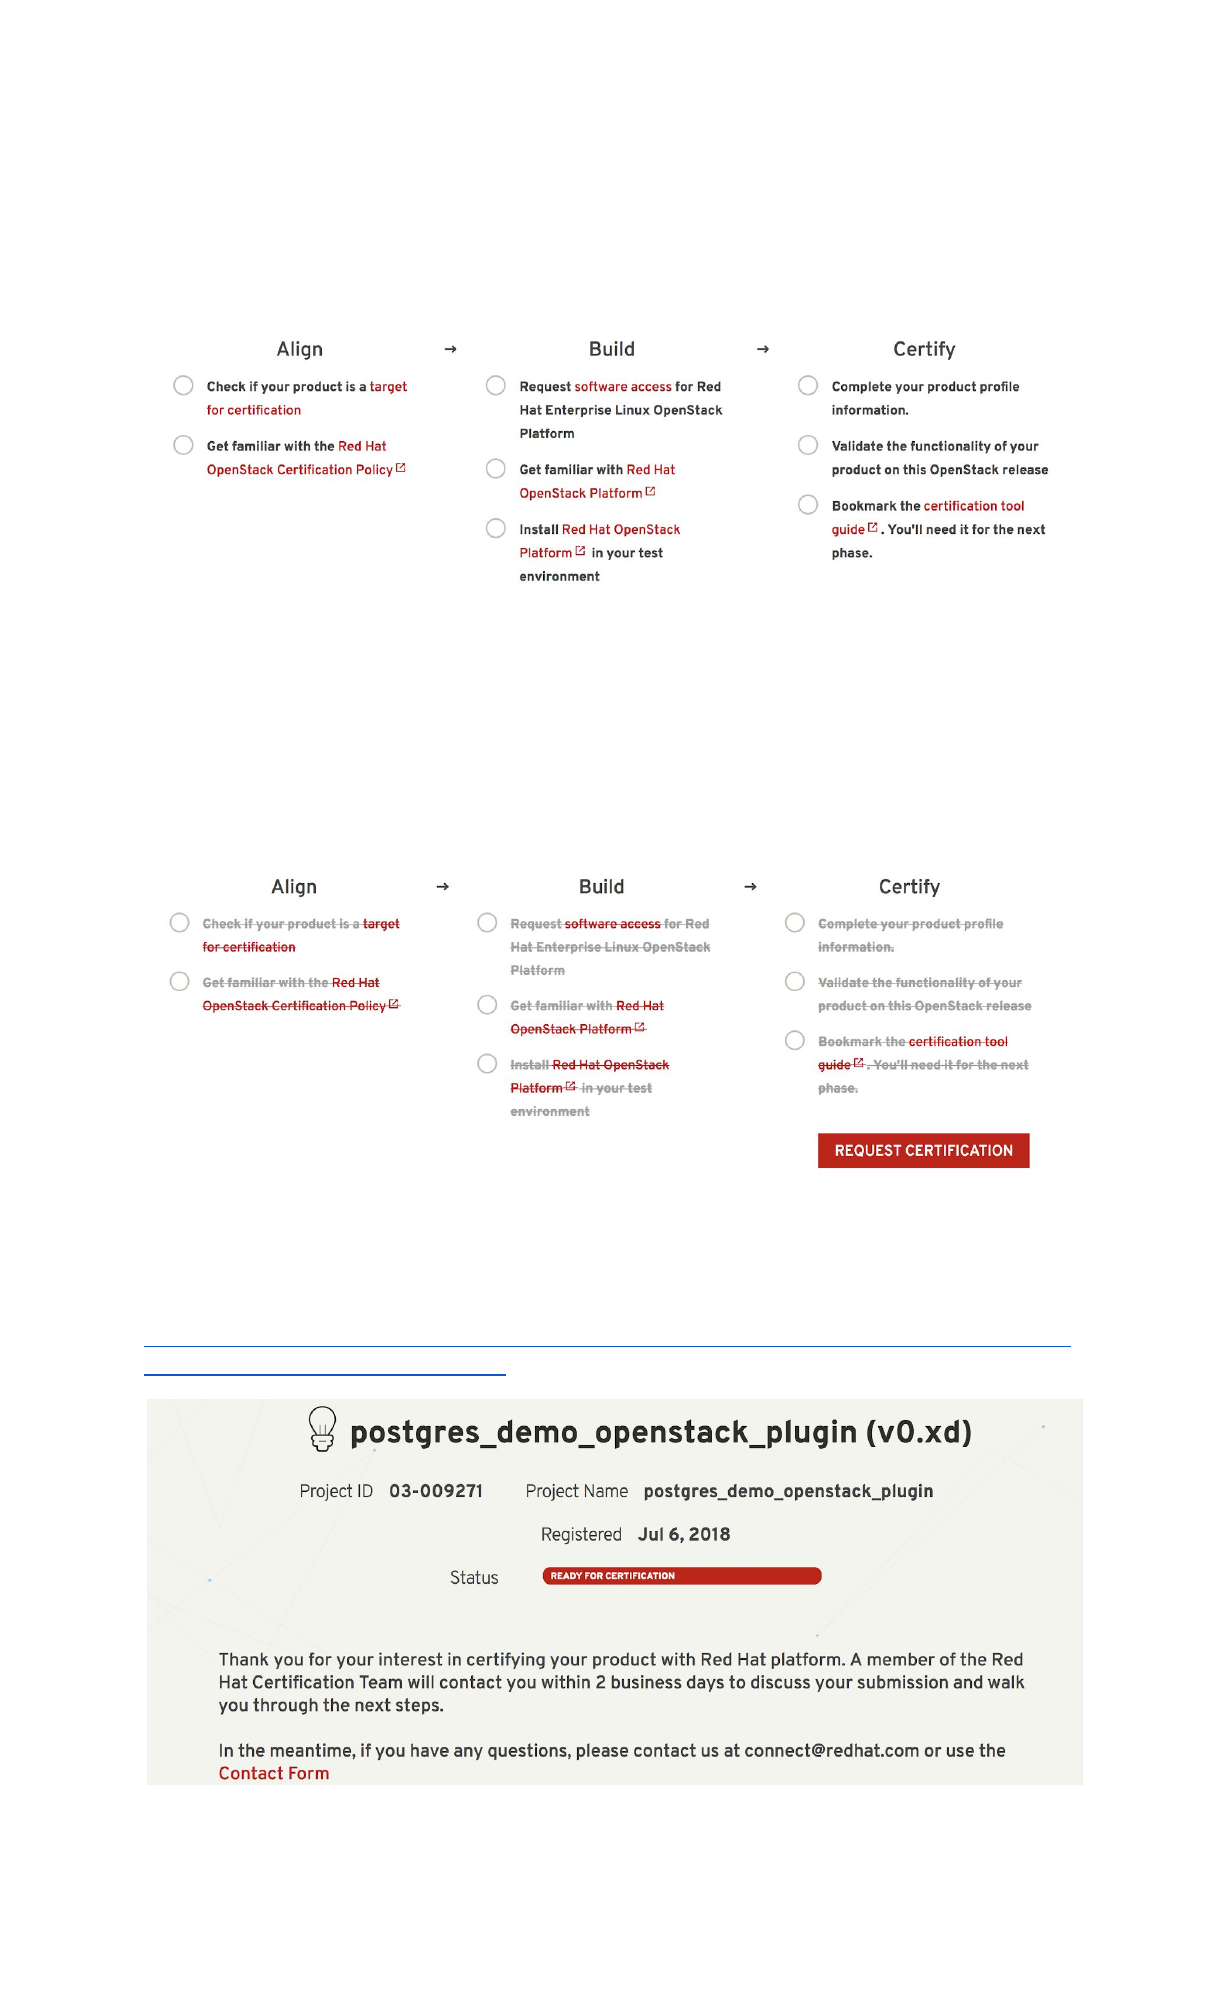
Once your project has been configured as In Tree (by Red Hat), you will be greeted with the ABC guide:
Align, Build, Certify.
This guideline is simply a list of steps to begin your plugin integration with RHOSP. Note that the red text
is a link to official Red Hat documentation and that each step is a different part of the process. Once you
have read through all of the documentation, click on the black text so that the list item has a
strikethrough (see image below). After all list items have been checked off, the “Request Certification”
button will be clickable. Requesting certification will initiate the functional testing portion of the
workflow and will change your project’s status to “Ready For Certification”.
Once you reach this page, you are now ready to start the final step, functional certification. Functional
certification involves creating your own self-hosted OpenStack environment and testing your plugin
using packages created for this specific test. System logs will need to be collected and sent to Red Hat
engineering for review. A detailed guide of this step can be found here:
https://access.redhat.com/documentation/en-us/red_hat_openstack_certification/1.0/html/red_hat_o
penstack_certification_workflow_guide/
13
Once RHOSP engineers have determined that your plugin can integrate with the RHOSP platform, it will
then be included in the upstream and will be released in the next major RHOSP release.
Out of Tree Certification Workflow
If the partner has not contributed the plugin to the OpenStack upstream code base, the image
will need to complete the following checklist and use the Red Hat Automated Build Service
(ABS) to push and scan the image. Once container certification is completed, then functional
testing will be the next step in releasing your container as Generally Available.
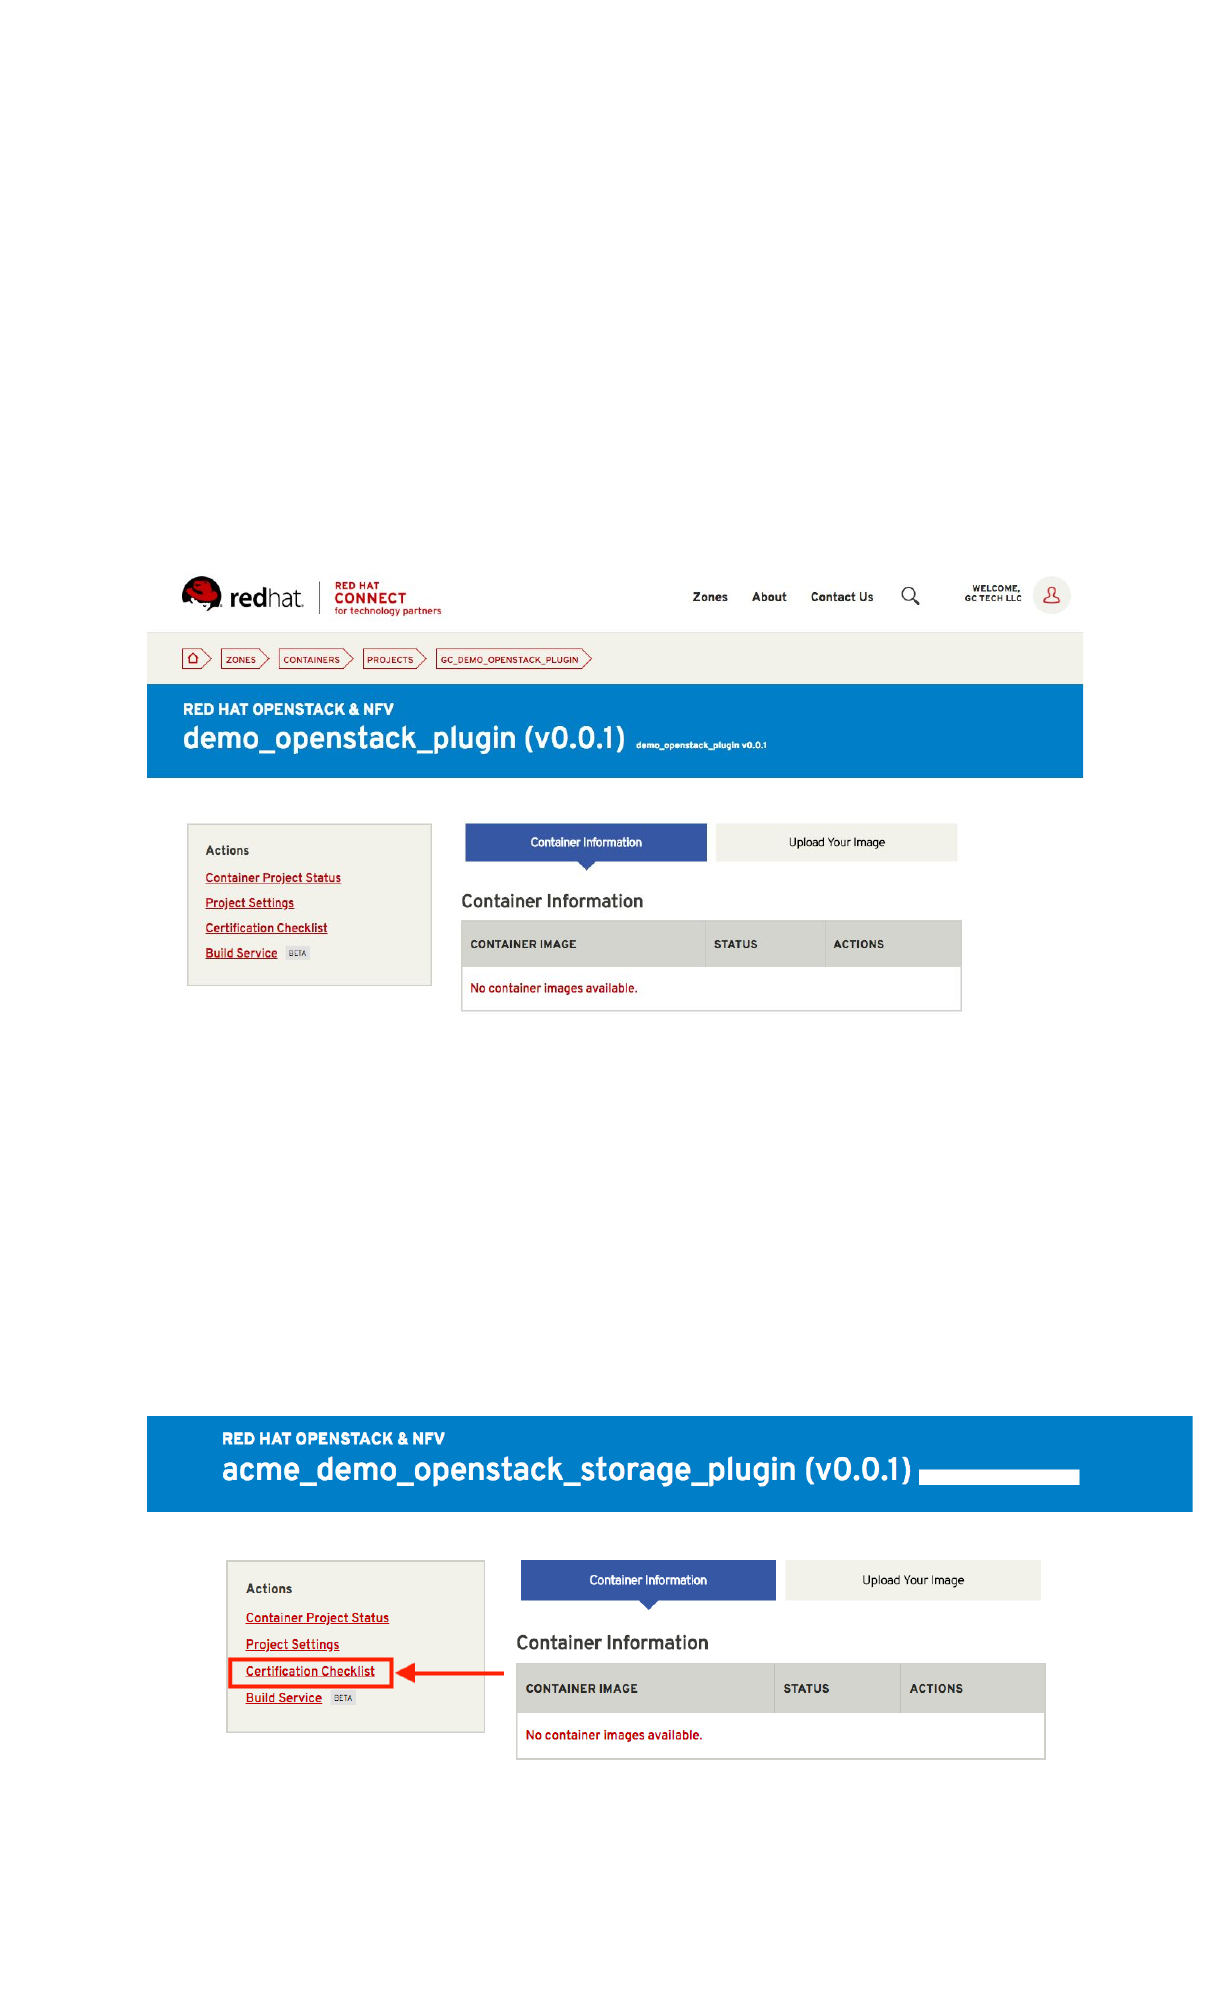
To get started, visit your company dashboard and select the project under the OpenStack &
NFV Zone. Upon clicking on your project, you will be directed to your project detail page. The
next steps will relate to the Container Certification Checklist.
The Container Certification Checklist
Certified containers are applications that meet Red Hat’s best practices for packaging,
distribution, and maintenance. Certified containers imply a commitment from partners to
maintain their images up to date and represent the highest level of trust and supportability for
Red Hat customers container-capable platforms, including Red Hat OpenStack Platform.
To access the Certification Checklist, click on the option in the left hand box:
14
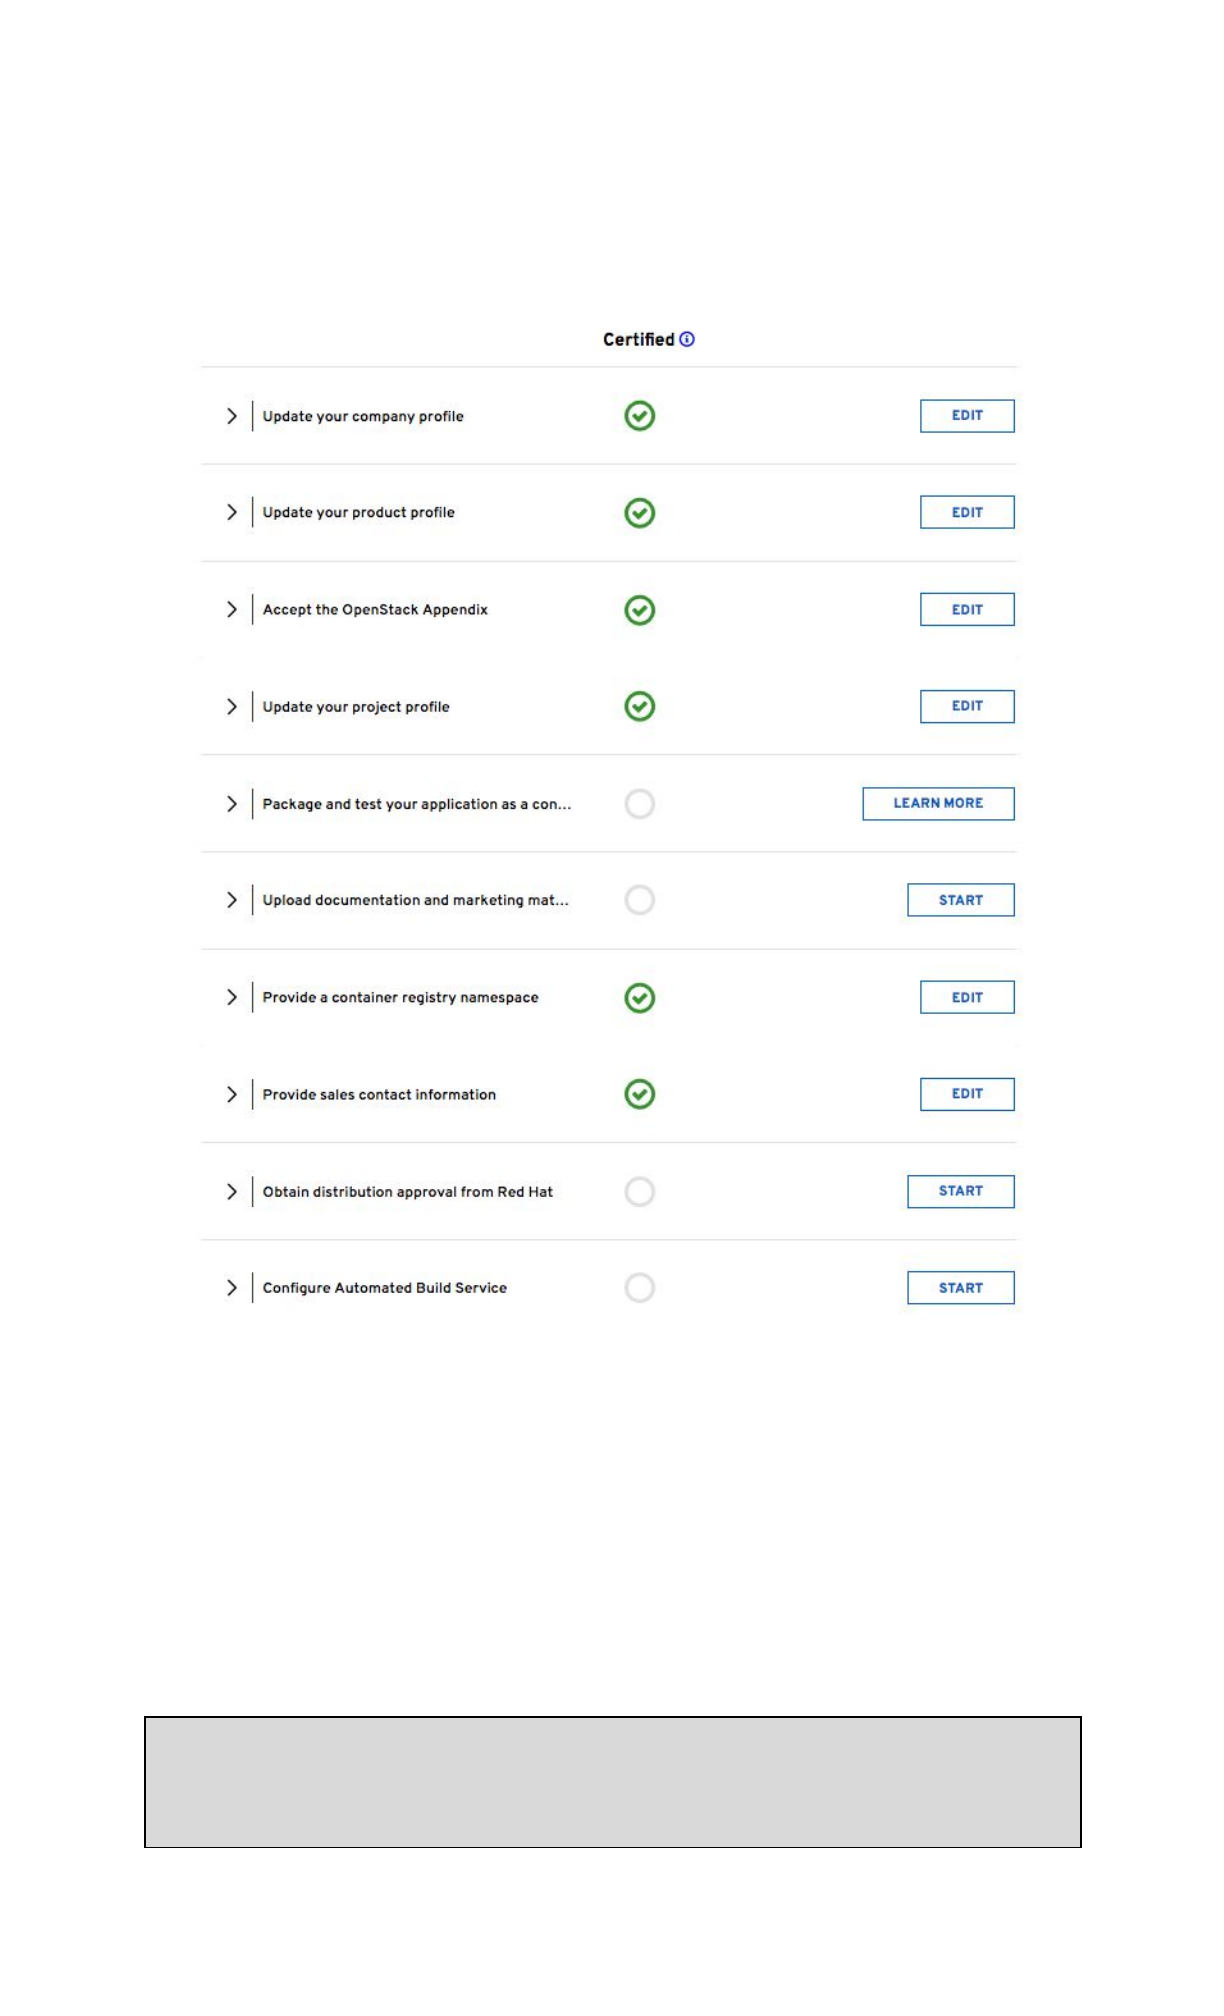
The goal is to complete all sections of the certification checklist. If you need more information,
you can click on the dropdown arrows and it will provide you with relevant links.
Example of a Container Checklist in progress:
Certification Checklist Section Descriptions
●Update your company profile
○ This page is to ensure that your company profile is up to date. Edit if necessary.
●Update your product profile
○This page relates to the product’s profile such as product type, description,
repository URL, version, contact distribution list, etc.
●Accept the OpenStack Appendix
○Site Agreement to the Container Terms.
●Update project profile
○This section relates more to the image/container settings such as Auto Publish
feature, registry namespace, release category, supported platforms.
Note: There is a minor bug on this page. In the “Supported Platforms” section at the bottom,
you must select an option, even regardless of the zone your project is in
(Containers/OpenStack). Select any any option will allow you to save other required fields on
this page.
15

●Package and test your application as a container
○Follow the instructions on this page to configure the build service. The build
service will be dependent on the complete of the previous steps.
●Upload documentation and marketing materials
○This will bring you to the product page. Scroll to the bottom and click on Add
new Collateral
to upload your product information.
Note: A minimum of 3 materials are required, with 1 being a mandatory “document” type. This
is where you add your product information to your product page.
●Provide a container registry namespace
○This is the same as the project page profile page.
●Provide sales contact information
○Again, this information is the same as the company profile.
●Obtain distribution approval from Red Hat
○Red Hat will take care of this step.
●Configure Automated Build Service
○The build service is where Red Hat will automatically build your container/image
by utilizing the Dockerfile provided in your repository. The advantage of setting
up the automated build service is that your image will update whenever the
underlying base image/OS is updated, to ensure up-to-date security. Part of the
agreement of using Red Hat’s services requires that your container meets a high
security standard. See section “Build Service” to get started with this.
Preparing the Image For Scanning
Red Hat requires specific labels and metadata in your Dockerfile for the image to pass the scan.
In addition to labels, the scanner also requires licenses and it must be added to the Dockerfile.
Please see the OpenStack & NFV neutron and cinder examples in this link for guidance:
https://github.com/RHC4TP/starter
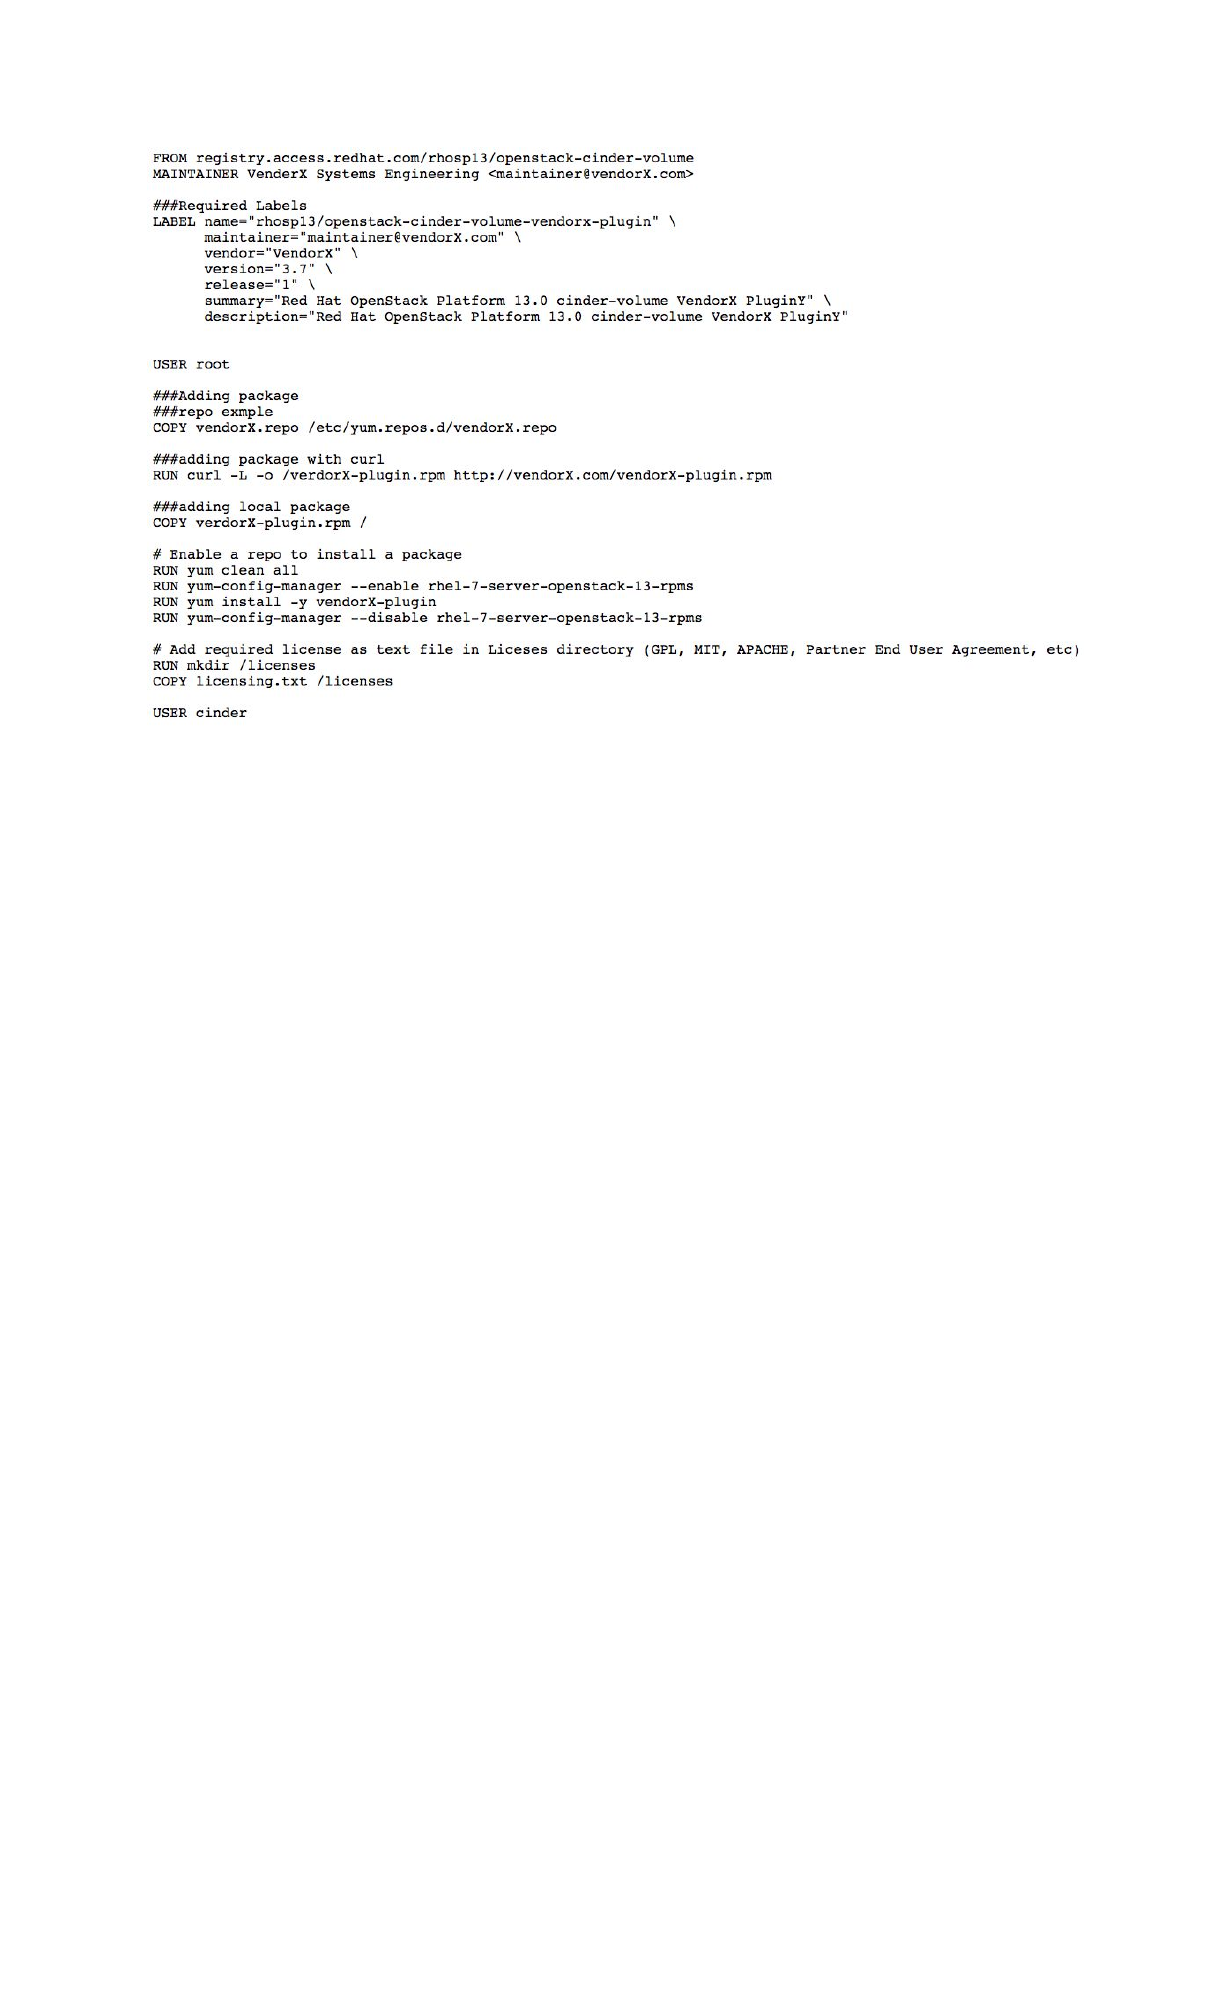
Dockerfile Requirements
1. Base image must be Red Hat. Any images using Ubuntu, Debian, CentOS, etc as a base
will not pass the scanner.
2. You must configure the required labels (name, maintainer, vendor, version, release,
summary)
3. Software license(s) must be included (txt file only) within the image and must be added
in the root of the project.
4. You must configure a user other than root.
Below is a snippet of a Dockerfile which includes the aforementioned requirements:
16
The Build Service
What does it do?
This service automates the rebuilding of your image whenever an updated Red Hat package is
available. It also scans your image (after a successful build) for any security vulnerabilities that
may be present prior to publishing your image to the Container Catalog.
How does it work?
The build service clones your Github/Gitlab repository onto a build server, and uses the
Dockerfile to build your image.
Why is this recommended?
It is a requirement from Red Hat to properly maintain your image by keeping up to date with
the latest security updates. By not using the automated build service, you are opting into
manually maintaining and rebuilding your image every time an update is released.
Red Hat keeps track of your image by giving it a grade. If your image falls too far behind on
security updates, your image grade will drop and will be flagged for removal from the Container
Catalog.
Configuration
Configuration is very easy and straightforward. Follow the steps below:
In the left hand box, click on Build Service:
17
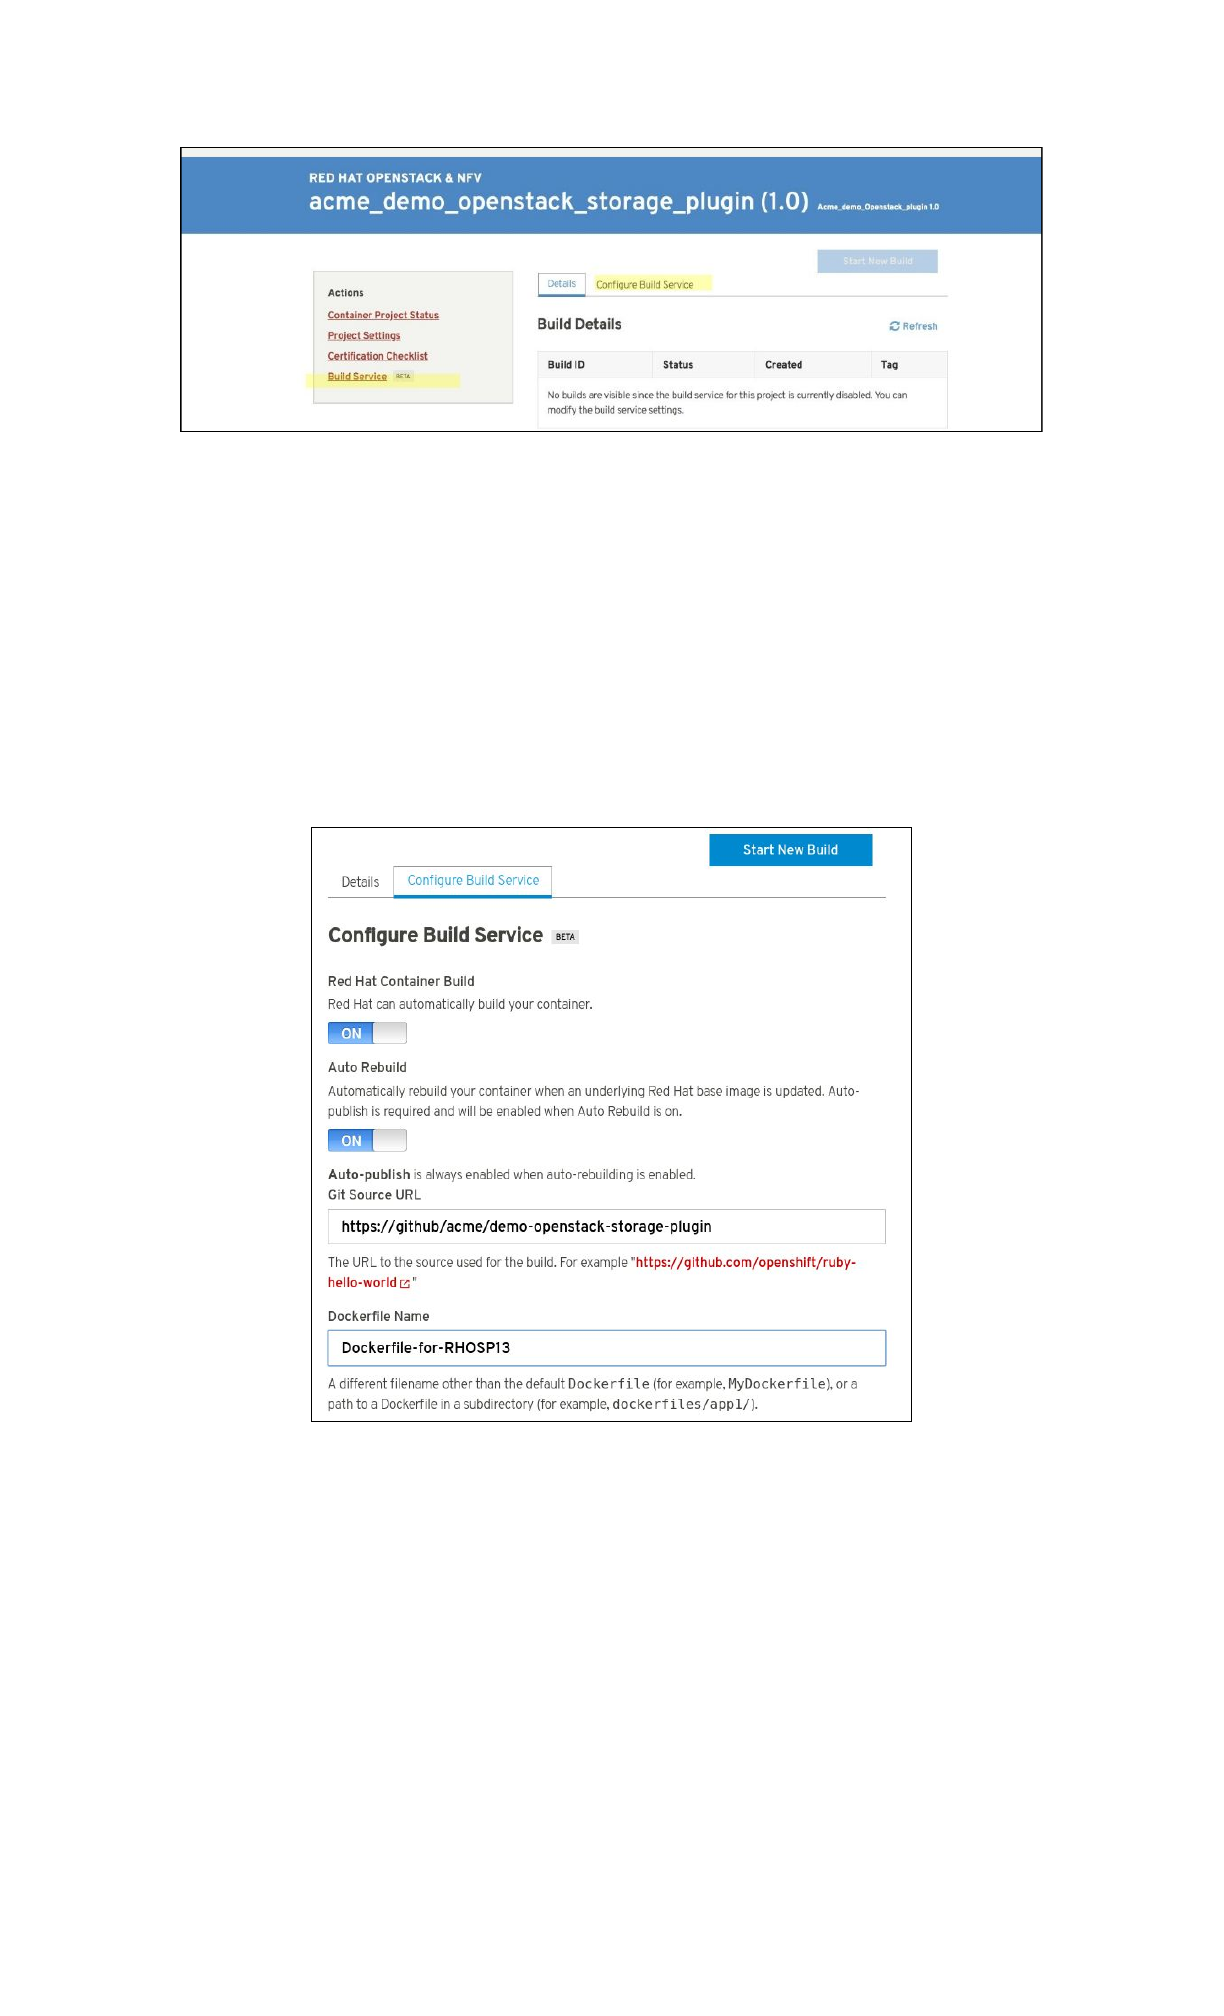
Click on the Configure Automated Build Service tab and fill in the git repo and the Dockerfile
name if it has a name other than “Dockerfile”.
If your repository is public, then all that is needed is the git source URL (HTTPS link). If your
repository is private,
then you must configure the build service with the SSH link and a private
ssh key. The git repository needs the public ssh key associated with the private key in order to
successfully clone. It is recommended to create a new public and private ssh key just for the
project. Never use your own personal private key.
Click “Start New Build” button at the top of the page.
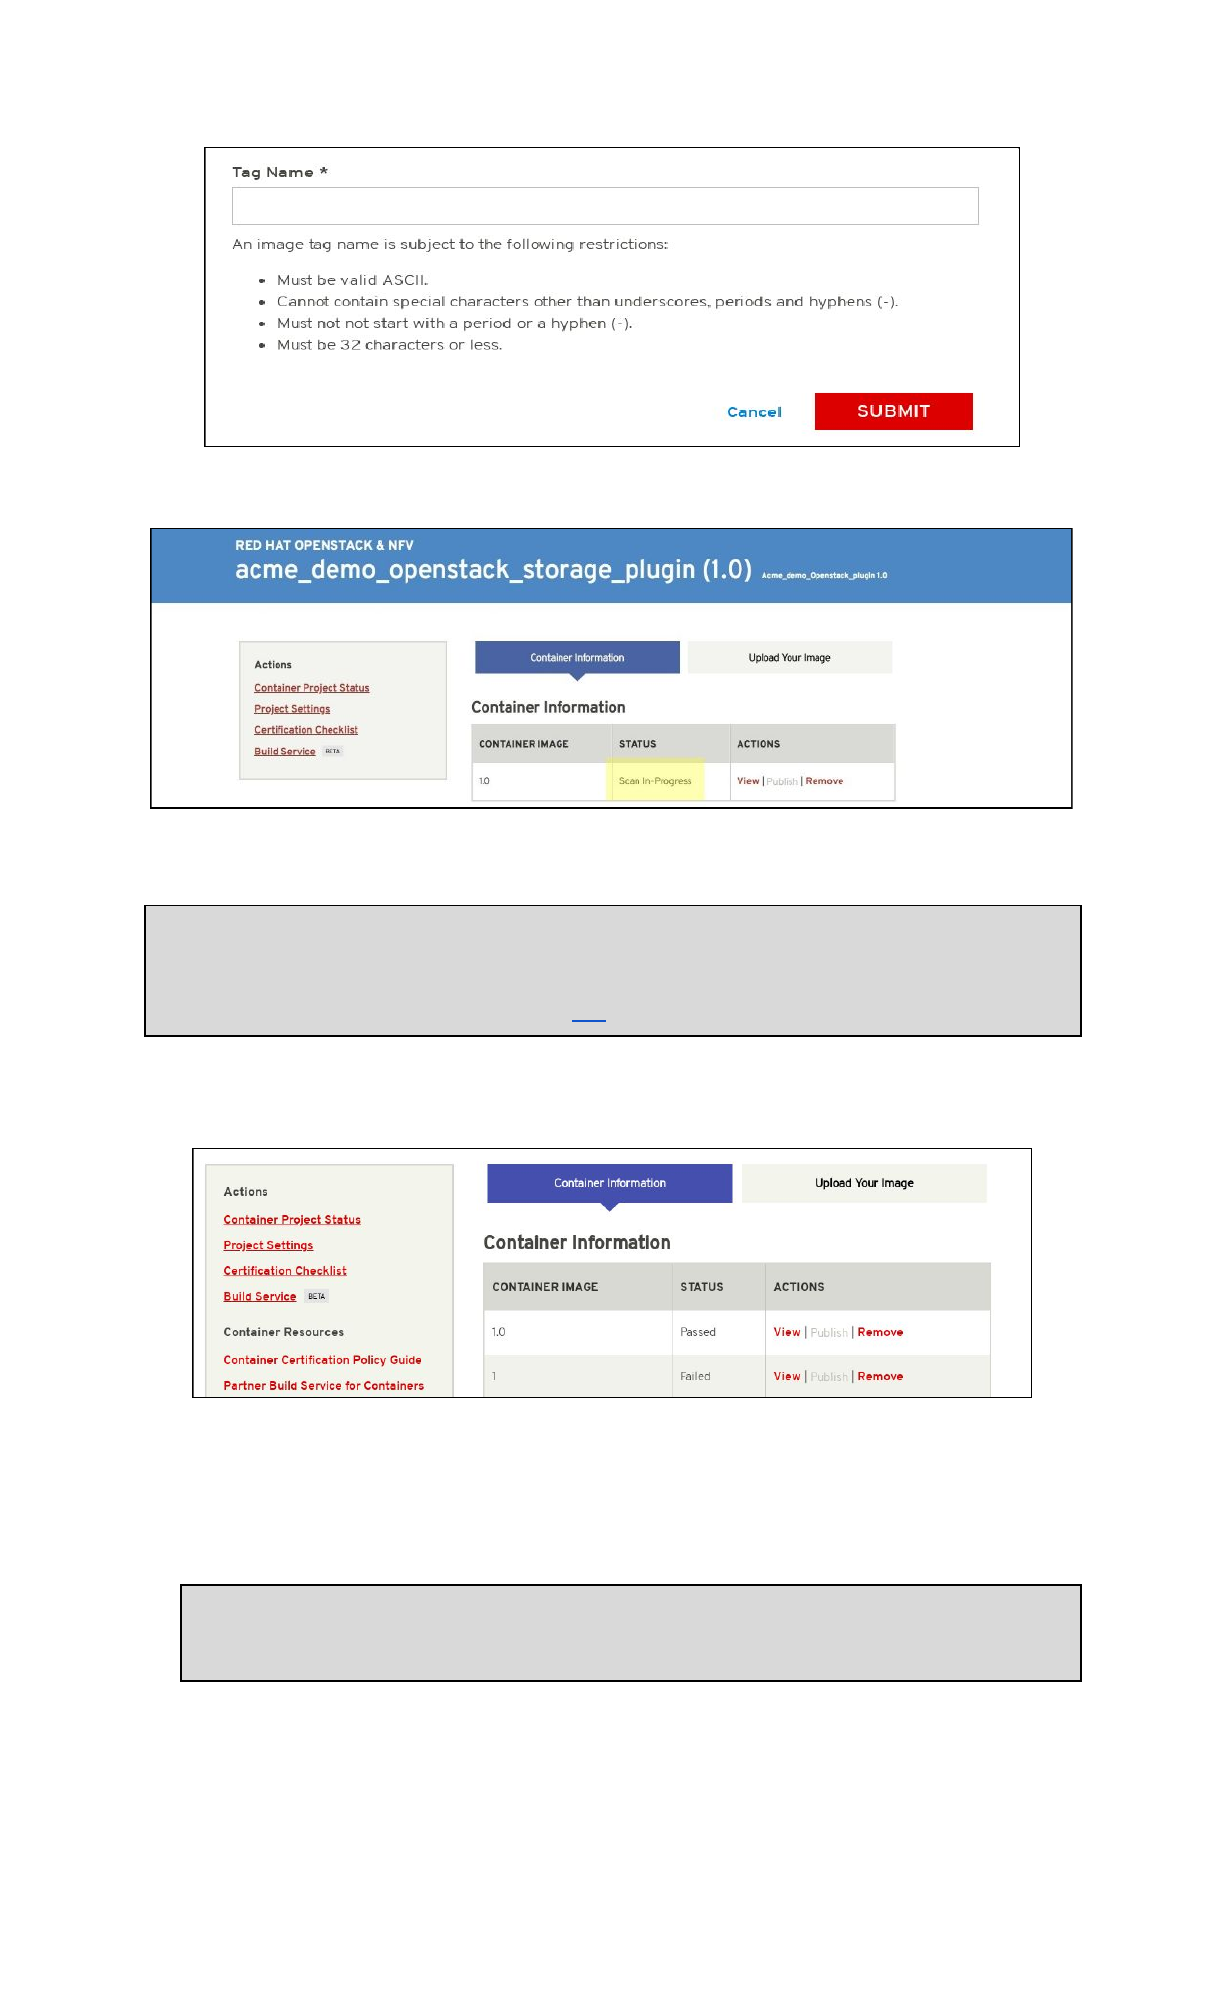
Enter a tag number (the version number of the plugin) and click SUBMIT
to begin the build and
scan process.
18
NOTE: The Build Service must first be completed before it can begin the scanning process for
certification. If your Build Service fails or does not complete, make sure the details you
entered under the Configure Build Service tab is correct and confirm that your Dockerfile
conforms to the examples provided in this link.
Once the image has completed the scan in Red Hat Connect repository, the image will show the
results of the scan. Scans normally take about 10-15 minutes to complete.
The “View” button will expand on the scan results. The “Publish” button will publish the image
to the Red Hat Container Catalog. It will change to “Unpublish” once and image has been
published. The “Remove” button allows you to remove an image that you do not want to use or
need anymore.
Note: If you would like to manually push your images instead of using the Automated
build Service, please see section Manually Upload Your Image
19
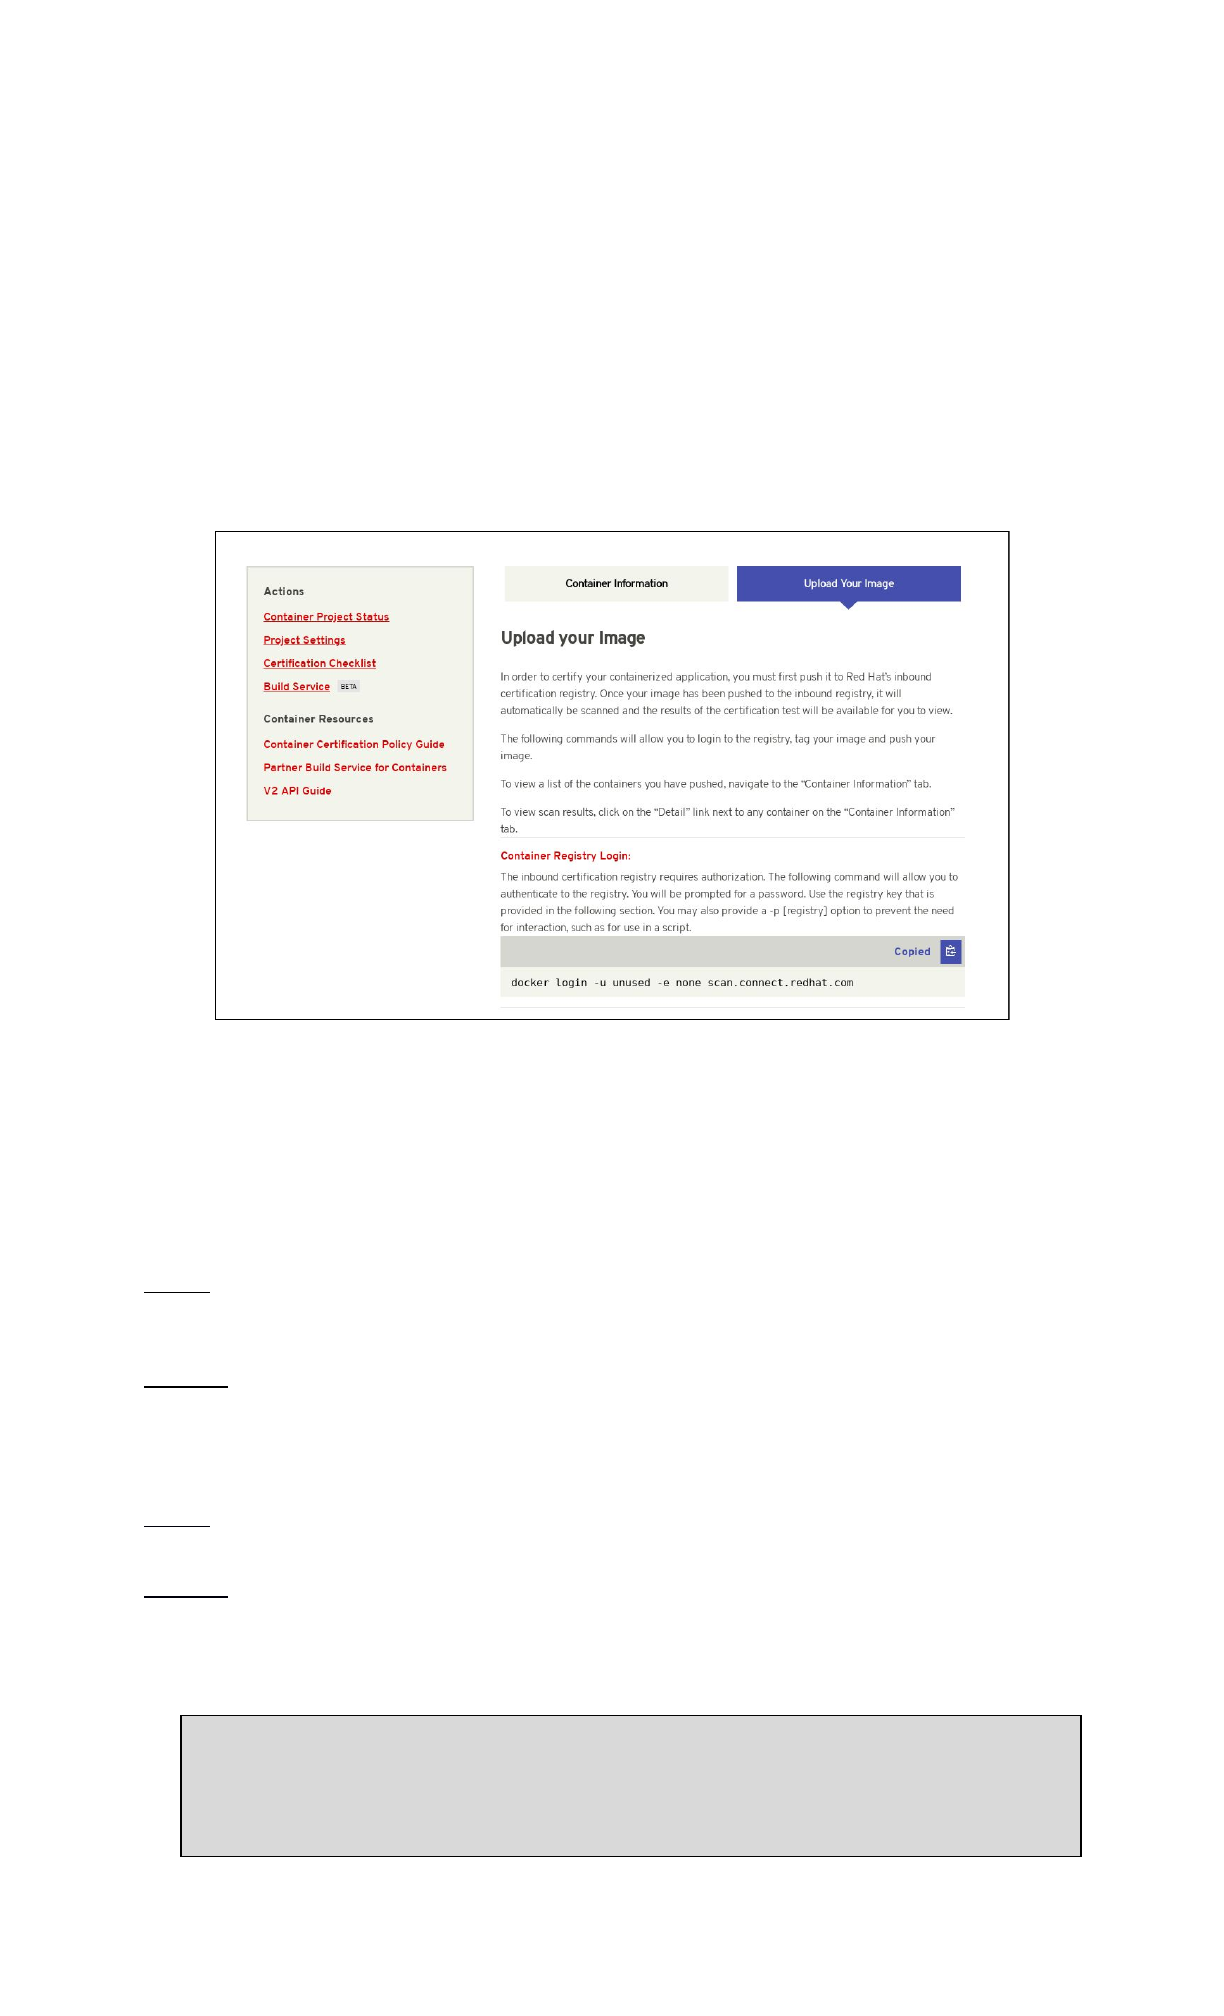
Manually Upload Your Image
This information can be located in the Upload Your Image
tab on the Projects page.
Cut and paste the following line to your terminal.
# docker login -u unused -e none scan.connect.redhat.com
When prompted for the password copy and paste the Registry Key
located on the Upload Your
Image
tab in the project. This Registry Key is unique per project, please make sure you are
using the correct password for the project you are working on.
Downloading Your Unpublished Container
It is possible to download your unpublished container to test it on a local environment. To do so,
visit the Upload Your Image
tab and copy the last command for Push Your Container
. Change
the word “push” to “pull” and replace the data in the brackets with the data appropriate to your
project. Use either one of the command formats below to pull your image from the registry.
If your image was built using the build service:
format: # docker pull
scan.connect.redhat.com/[pid]/partner-build-service:[image-tag]
example: # docker pull
scan.connect.redhat.com/p78693833236cdf211b0b7767fec4f6fe2a25b4e51/partner-bui
ld-service:1.2.0
If your image was built locally and pushed manually:
format: # docker pull scan.connect.redhat.com/[pid]/[image-name]:[image-tag]
example: # docker pull
scan.connect.redhat.com/p78693833236cdf211b0b7767fec4f6fe2a25b4e51/my-awesome-
plugin:1.2.0
Common Error: Error response from daemon: unauthorized:
authentication required
20
If your CLI complains of authorization being required after logging into the registry
and performing a docker pull command, try these steps:
1. Log back into the registry: docker login -u unused -e none
scan.connect.redhat.com
2. Copy the registry key and paste it on your command prompt as the password
when prompted.
3. If you still get this error, after docker pull make sure that you physically type
the commands. The only thing that should be copied and pasted is the registry
key. Copying and pasting commands from PDF files or other programs or between
VMs/hosts has been known to add special characters or trailing spaces that may
alter your commands.
After the image has completed being uploaded, the image will display “Scan In-Progress” in the
“Status” column.
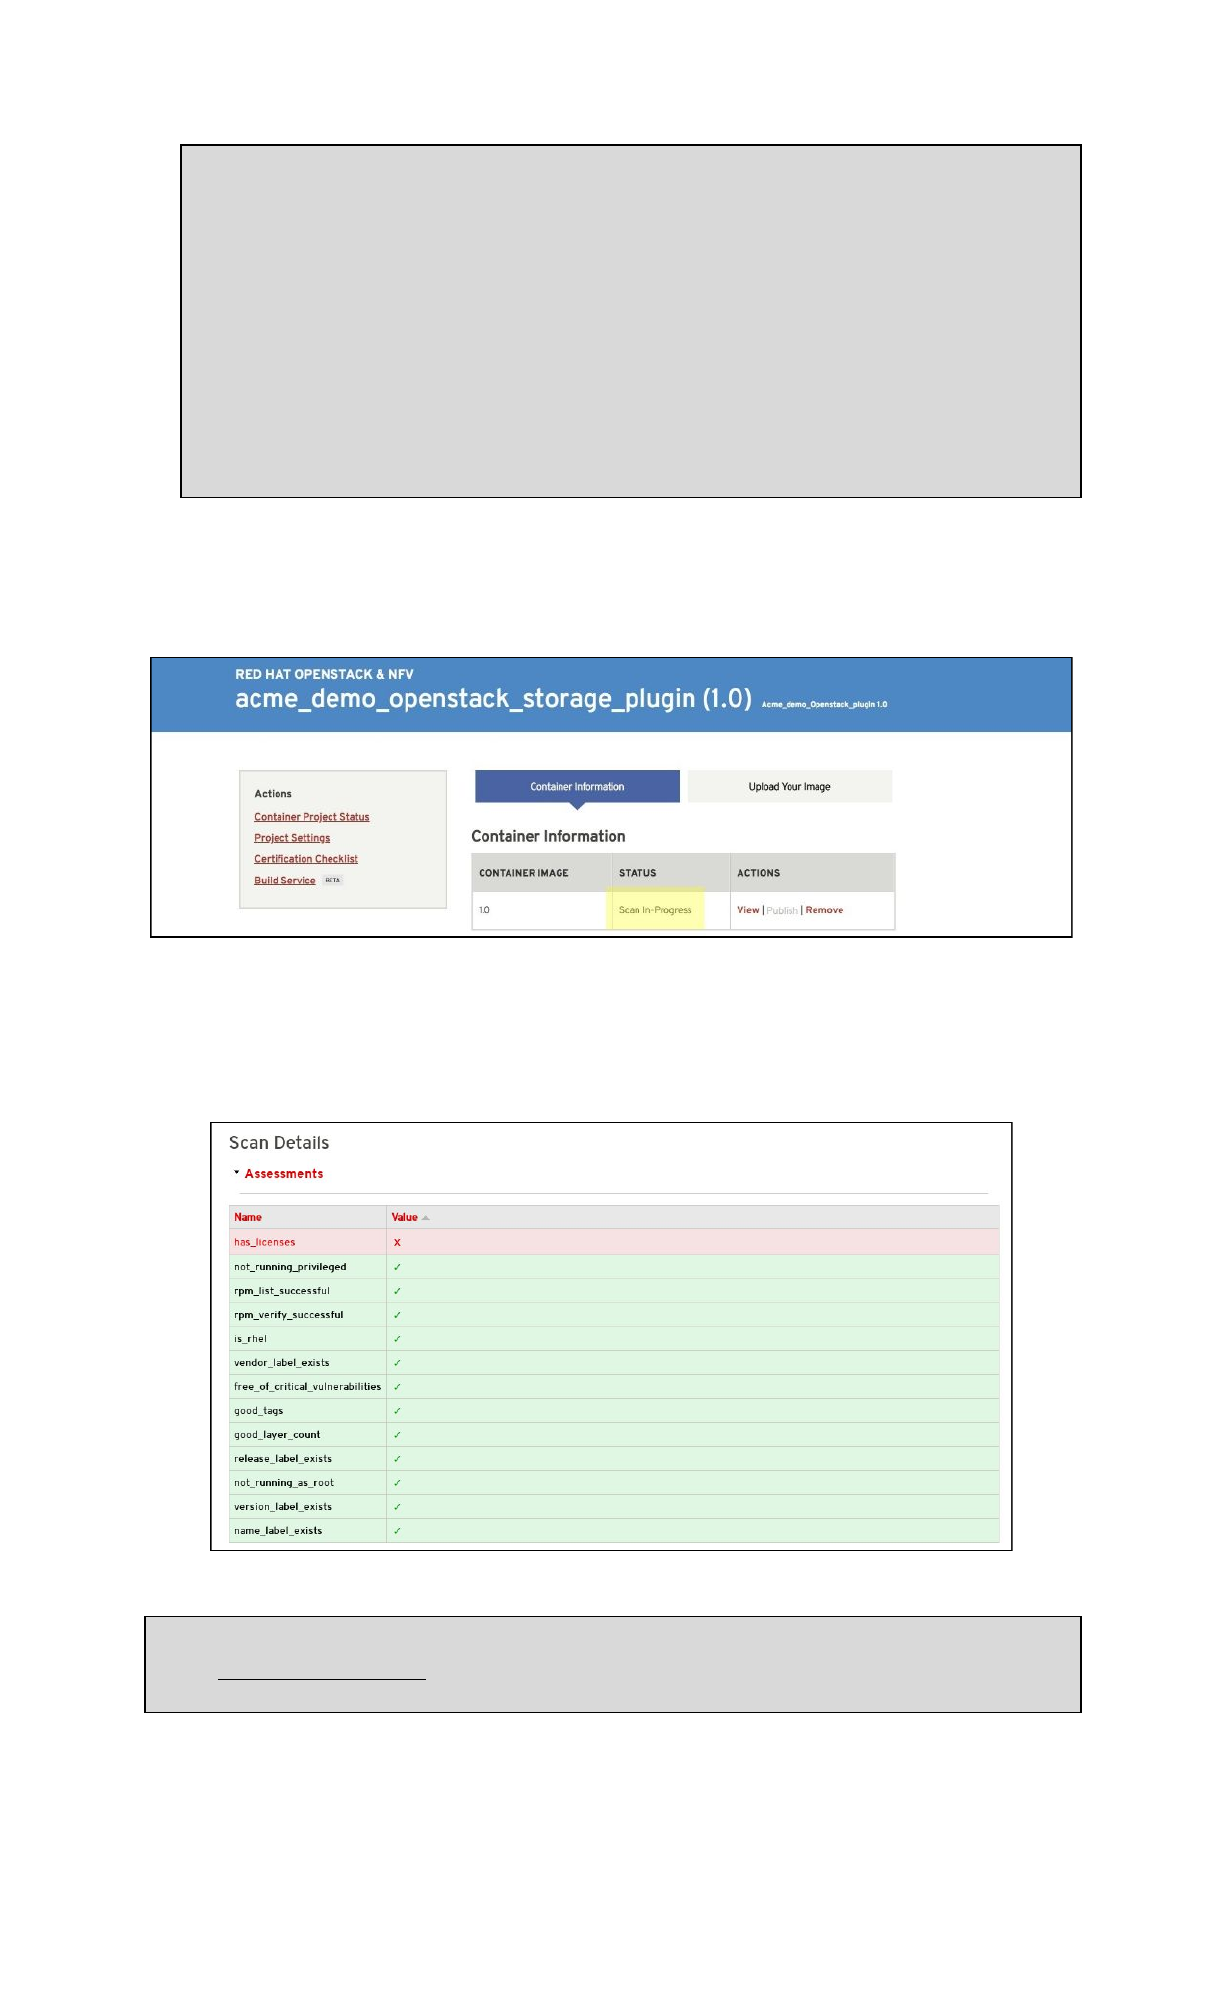
Image Scan Results
If the image returns a “Failed” scan status, the results will automatically be displayed. Click on
the name of the failed item (in this example, “has_licenses”) for reference to the policy guide.
*NOTE: If you receive an “Access Denied” link when accessing the Policy Guide, please reach
out to connect@redhat.com
21

Export Compliance Questionnaire
Red Hat Export Questionnaire and Resource Links
This section references a set of questions provided by the Red Hat legal team for evaluation of
export compliance by third party software vendors.
The resource links and questions should be reviewed and answered by a legal representative of
the partner.
Completion and returning this document does not guarantee export compliance approval, but
begins the evaluation process by Red Hat.
Depending on the answers provided, a set of follow-up questions may be necessary.
In the event that you have insufficient information to complete the questionnaire, some
additional resources are provided in Part 2 below.
The evaluation process is outlined below:
Step 1: Red Hat provides questionnaire to partner to complete
Step 2: Partner engages their legal team to review and respond to questionnaire
Step 3: Partner returns completed questionnaire to Red Hat
Step 4: Within approximately 5 business days, Red Hat legal evaluates responses and
a. Approves partner
b. Defers decision
c. Requests more information
d. Declines partner
Part I: Red Hat Questionnaire
Please access and complete this export questionnaire.
At this time, Red Hat is NOT able to accept applications that are authorized for export as
encryption items under License Exception ENC §740.17(b)(2) and/or License Exception ENC
§740.17(a) of the U.S. Export Administration Regulations.
Part II: Resources
In the event that your company has not previously gone through the process of obtaining an
export classification, or if you have not gone through this process for the product that you
intend to publish in the Red Hat Container Catalog, the U.S. Department of Commerce’s Bureau
of Industry and Security provides these resources.
Unfortunately Red Hat cannot provide any guidance or help with our partners’ export control
compliance.
EAR/Encryption
Overview
https://bis.doc.gov/index.php/1-encrypti
on-items-not-subject-to-the-ear/15-polic
y-guidance/encryption
Guidance for determining
whether your item is
subject to the EAR.
Encryption items not
subject to the EAR
https://bis.doc.gov/index.php/1-encrypti
on-items-not-subject-to-the-ear
Flowchart 1
https://bis.doc.gov/index.php/document
s/new-encryption/1654-flowchart1/file
Item designed to use
encryption NOT controlled
under Category 5, Part 2
Flowchart 2
https://bis.doc.gov/index.php/document
s/new-encryption/1655-flowchart-2-1/fil
Item classified under an
ECCN in Category 5, Part
22
e
2
License Exception
ENC §740.17/ Mass
Market Chart
https://bis.doc.gov/index.php/document
s/new-encryption/1651-740-17-enc-table
/file
Chambers & Global -
US Export Control
Lawyers
http://www.chambersandpartners.com/1
2788/525/editorial/5/1
Red Hat Export
Control Product
Matrix (for example
purposes)
https://www.redhat.com/en/about/expor
t-control-product-matrix
Maintaining Certified Images
Image Maintenance Requirements
As software package vulnerabilities are discovered it is important to rebuild container images
to keep them up-to-date. Without automation this process quickly becomes onerous and
reflects poorly on the catalog listing. Organizations frequently run vulnerable software but few
want to download vulnerable software. It is a requirement of Red Hat Connect Partner Program
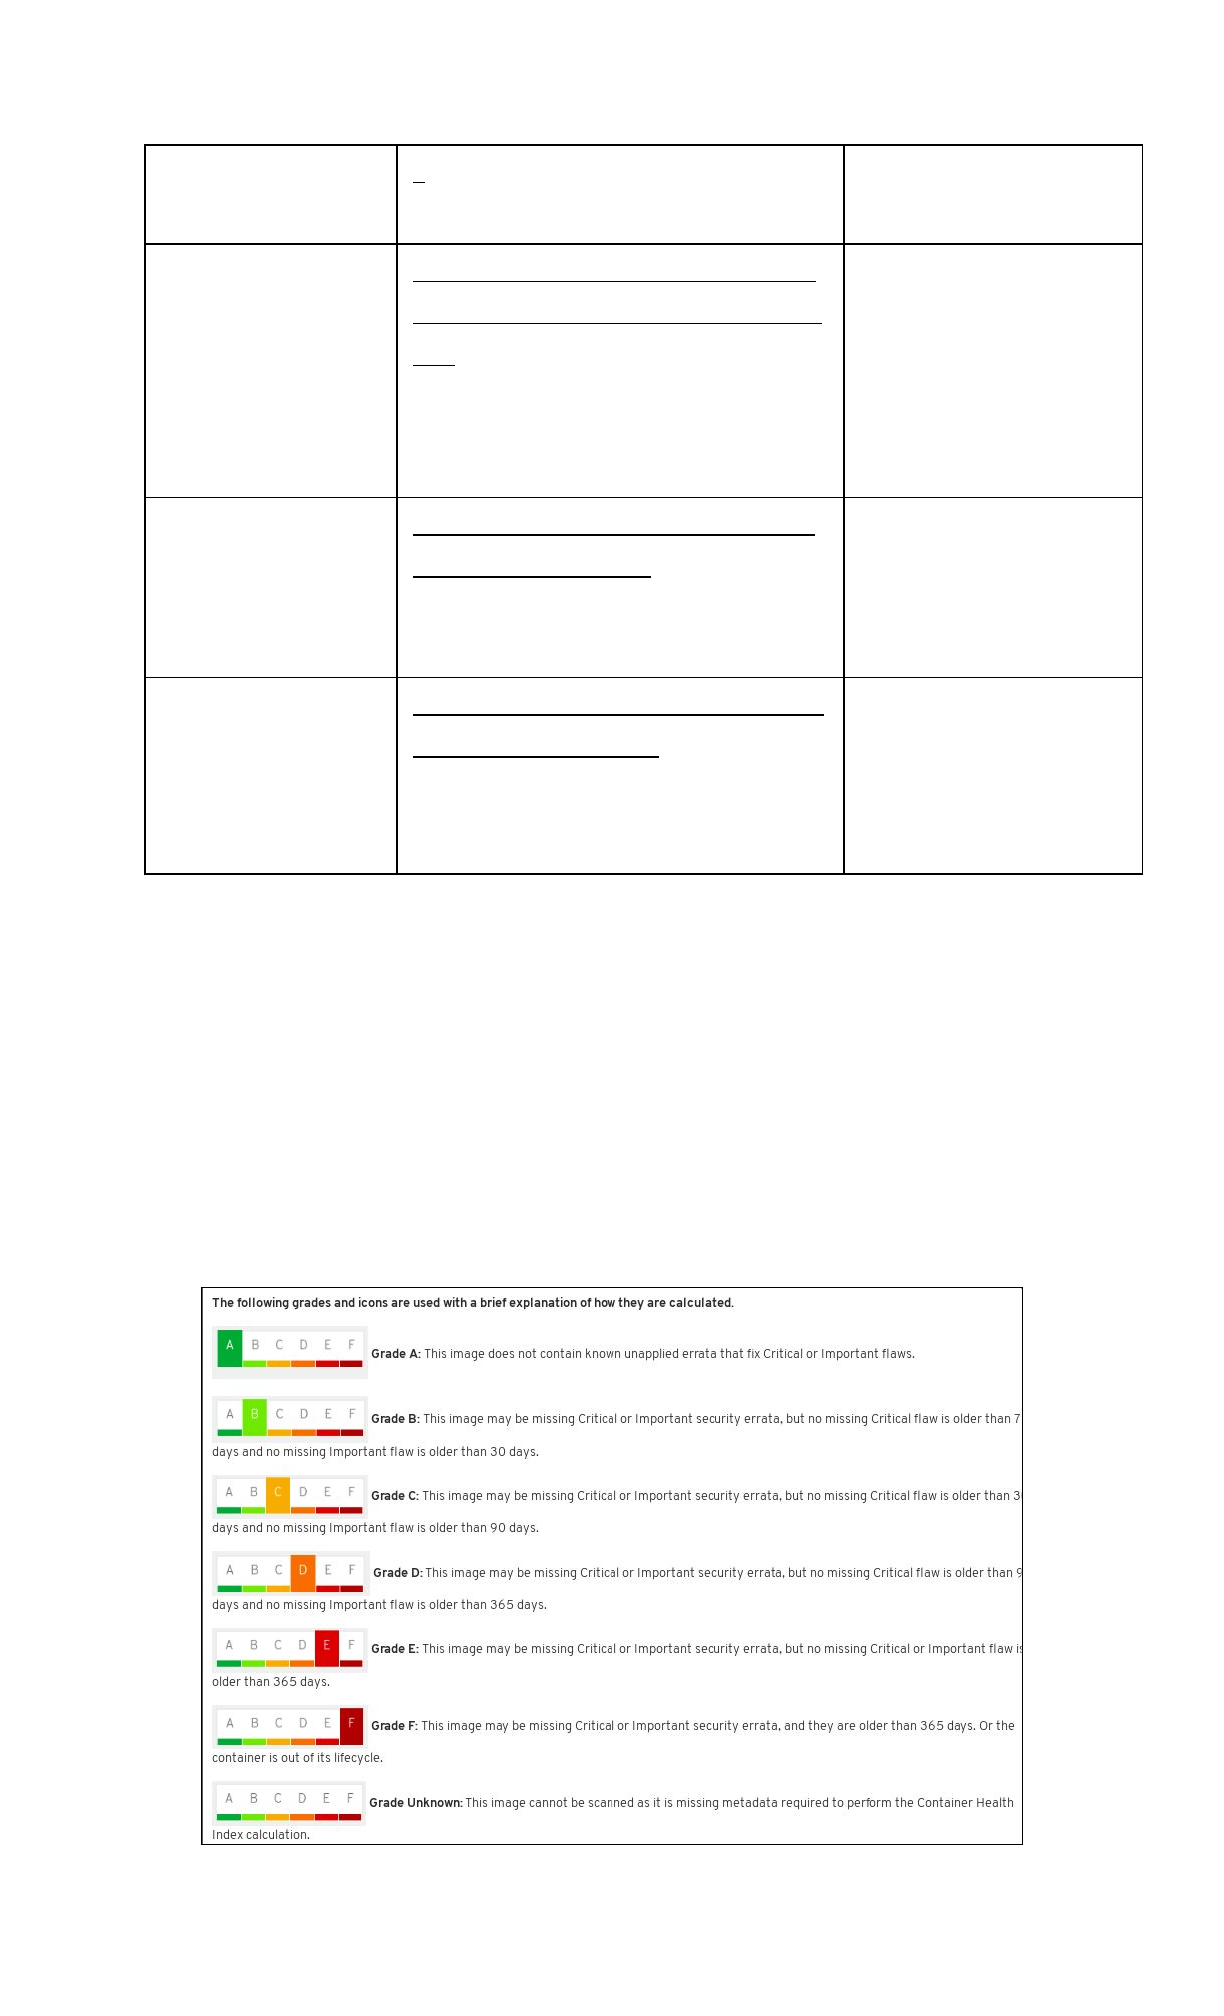
that the partner maintain the image certification. Red Hat publishes a “Container Health Index”
(or CHI) as described here to inform partners about those situations where an image might
need to be updated.
23

Reference: https://access.redhat.com/articles/2803031
If a container image falls below an "A" grade, a periodic email from connect@redhat.com will be
sent out to the partner contact list.
Top FAQs
1. Who can upload images through the Portal?
A. The administrator account created for your organization may upload images.
However, this account may grant permissions to other user accounts so that those
accounts may also upload images.
2. Can I change the Product Version after I created a Project?
A. No you cannot; therefore make sure you set it up correctly before starting any
project with that product version. Keep in mind that the product version should be
considered as the name of the image, the version can be specified later on when you
Tag your image during the project.
3. Can a container be built on another version of Linux other than Red Hat?
A. No, the Red Hat certification is a validation that the container, which is a
combination of application software and Linux, is made of genuine Red Hat parts.
Currently, Red Hat has just a little over one million paying customers today. Our
customers do not use other versions of Linux and pay us for the services and
support we provide to them. Therefore, your container needs to be built on a version
of Red Hat Linux.
4. Will the catalog support an ISO or virtual machine image as the container image?
A. No, this certification process is specifically for containers. Therefore, your image
needs to be in Dockerfile format. You can find an example provided by Red Hat
Engineering: Dockerfile Examples
5. What path should my licenses be on?
A. Should be on / (the root or home directory of where the application resides). They
must be text files, not PDF. You can find an example provided by RH
Engineer:Dockerfile Example
6. How do I change the namespace and repository name of my project?
A. First, unpublish all containers. Then change the namespace/repo in the project
settings. Finally, re-publish your containers.
7. How do I download my unpublished container?
A. First log into the registry (scan.connect.redhat.com) using the appropriate registry
key as the password for the project. Then use this docker pull command if you have
used the build service ( #docker pull
scan.connect.redhat.com/[pid]/partner-build-service:[image-tag]), otherwise, use
(#docker pull scan.connect.redhat.com/[pid]/[image-name]:[image-tag]). Look at
the Downloading Your Unpublished Container
section above for more information.
8. I pushed my image using a script but I do not see my image on the project page. Why
is my project missing?
A. Make sure you pushed your image to the correct endpoint. The correct endpoint
scan.connect.redhat.com. If you push your image to registry.rhc4tp.openshift.com,
your image will not show up on the project page.
24

Online Resources
OpenStack Partner Integration
https://access.redhat.com/documentation/en-us/
red_hat_openstack_platform/13/html/partner_int
egration/index
OpenStack Documentation
https://docs.openshift.com/container-platform/
Red Hat Atomic Recommended Practices for
Container Development
https://access.redhat.com/articles/1483053
Continuous integration Examples
https://rhsyseng.github.io/containerzone-pipeline
-library/#_example_jenkins_pipeline_using_docke
r
Examples of scan ready Dockerfiles
https://github.com/RHC4TP/starter.git
Docker tagging
https://docs.docker.com/engine/reference/com
mandline/tag/
Setting up a test RHEL system for building OpenStack images:
https://access.redhat.com/articles/1127153
25
