Report ICO OPE 02757 TETRA Terminal User Guide V5.5
User Manual:
Open the PDF directly: View PDF ![]() .
.
Page Count: 199 [warning: Documents this large are best viewed by clicking the View PDF Link!]

www.ingenico.com
28/32, boulevard de Grenelle, 75015 Paris - France / (T) +33 (0)1 58 01 80 00 / (F) +33 (0)1 58 01 91 35
Ingenico – S.A. au capital de 53 086 309 € / 317 218 758 RCS PARIS
TETRA Terminal
User's guide
ICO-OPE-02757-V5
Public
Ingenico Smart terminals R&D
Monday 28th August 2017
ICO-QSE-00013-EN-V8
ICO-OPE-02757-V5
TETRA Terminal
User's guide
Public
2/199
Ingenico document - Reproduction or disclosure prohibited without written authorization
Please check document validity before using
Contents
1 Document information ..................................................................... 10
1_1 Evolution follow-up ............................................................................................ 10
1_2 Document validity .............................................................................................. 10
1_3 Objective ........................................................................................................... 11
1_4 Terminology ...................................................................................................... 11
2 TETRA terminals .............................................................................. 12
2_1 With WEB applications running capabilities ...................................................... 12
2_2 Without WEB applications running capabilities ................................................. 13
2_3 TETRA keypads ................................................................................................ 15
2_4 INGENICO graphical chart evolutions ............................................................... 17
3 TETRA terminal human interface principle .................................... 19
3_1 Terminal “Desktop” and “Explorer” principle ...................................................... 19
“Desktop” role ............................................................................................................................. 19
“Explorer” role ............................................................................................................................. 19
Native “Explorer”..................................................................................................................... 20
“WEB Desktop” ....................................................................................................................... 21
3_2 Different screen sub-panels .............................................................................. 21
3_3 The general tree of the “Explorer” sub-panels / menus ..................................... 22
3_4 General rule of keypad usage ........................................................................... 27
3_5 TETRA “Status bar” description ........................................................................ 27
General structure of the “Status bar” .......................................................................................... 27
Date ............................................................................................................................................ 28
Time ............................................................................................................................................ 29
Power or Battery level status ...................................................................................................... 29
Main power connection .............................................................................................................. 31
Ethernet network connection ...................................................................................................... 31
GPRS / 3G / 4G Network connection ........................................................................................ 32
Bluetooth connection .................................................................................................................. 33
Wi-Fi connection ......................................................................................................................... 33
ICO-OPE-02757-V5
TETRA Terminal
User's guide
Public
3/199
Ingenico document - Reproduction or disclosure prohibited without written authorization
Please check document validity before using
Contactless connection ............................................................................................................ 34
4 TETRA terminal Power-UP sequence ............................................. 35
4_1 Step1 = Secured OS initialization ...................................................................... 35
4_2 Step2 = TETRA OS initialization and startup .................................................... 36
4_3 Power-down or reboot sequence ...................................................................... 40
5 “Explorer” “Payment” icon selection ............................................. 41
6 “Control Panel” icon selection ....................................................... 43
7 Applications reports ........................................................................ 44
7_1 Transaction ....................................................................................................... 44
7_2 Calls planning ................................................................................................... 44
7_3 Diagnostics ....................................................................................................... 45
Local ........................................................................................................................................... 45
Diag to USB or MMC .................................................................................................................. 47
Clear ........................................................................................................................................... 48
7_4 Batch Data capture ........................................................................................... 49
8 Software management ..................................................................... 50
8_1 View configuration ............................................................................................. 50
Customer packages.................................................................................................................... 51
Platform packages ...................................................................................................................... 52
8_2 Evolution ........................................................................................................... 53
Local upgrade ............................................................................................................................. 54
Upgrade using External device .................................................................................................. 56
Remote upgrade ......................................................................................................................... 57
Configure remote upgrade ..................................................................................................... 57
TMS ETHERNET or WIFI or PCL link ................................................................................ 58
TMS using MODEM link ..................................................................................................... 58
TMS using MODEM ISP link .............................................................................................. 59
TMS using GPRS/3G link ................................................................................................... 59
Contract Number ................................................................................................................ 60
TMS address ...................................................................................................................... 61
TCP port ............................................................................................................................. 61
SSL profile .......................................................................................................................... 61
APN .................................................................................................................................... 62
Login ................................................................................................................................. 62
Password .......................................................................................................................... 62
Phone number .................................................................................................................. 63
Print parameters ............................................................................................................... 63

ICO-OPE-02757-V5
TETRA Terminal
User's guide
Public
4/199
Ingenico document - Reproduction or disclosure prohibited without written authorization
Please check document validity before using
Start remote upgrade ............................................................................................................. 63
Download specific package .................................................................................................... 64
Automatic Upgrades ............................................................................................................... 65
Cyclic Calls ......................................................................................................................... 66
8_2_3_4_1_1 Reference call................................................................................................................. 66
8_2_3_4_1_2 Cyclic call definitions ...................................................................................................... 66
8_2_3_4_1_3 Manual parameters ........................................................................................................ 68
Maintenance ....................................................................................................................... 68
8_2_3_4_2_1 Consult parameters ........................................................................................................ 69
8_2_3_4_2_2 Deactivate/Activate ......................................................................................................... 71
8_2_3_4_2_3 Reset configuration ........................................................................................................ 71
Consult log .......................................................................................................................... 71
8_3 Software packages removal .............................................................................. 72
9 Terminal settings ............................................................................. 74
9_1 General settings ................................................................................................ 74
Currency ..................................................................................................................................... 75
Date and Time ............................................................................................................................ 76
Set date .................................................................................................................................. 76
Set time .................................................................................................................................. 77
Date format ............................................................................................................................. 77
Time format ............................................................................................................................ 78
Language .................................................................................................................................... 78
PCIV4 time slot ........................................................................................................................... 79
Time slot principle................................................................................................................... 79
Time slot menus ..................................................................................................................... 80
9_2 Human interface ................................................................................................ 81
Beep On PIN code...................................................................................................................... 82
Frequency ............................................................................................................................... 83
Duration .................................................................................................................................. 83
Volume ................................................................................................................................... 84
Buzzer on PINpad 1 ............................................................................................................... 84
Print parameters ..................................................................................................................... 84
Explorer ...................................................................................................................................... 85
Calibrate touch ........................................................................................................................... 85
Camera ....................................................................................................................................... 86
Position ................................................................................................................................... 87
Size ......................................................................................................................................... 88
Rotation .................................................................................................................................. 88
Contrast / Brightness / Saturation .......................................................................................... 88
Print ........................................................................................................................................ 89
9_3 ECO mode ........................................................................................................ 89
Screen saver time out ................................................................................................................ 90
Standby ...................................................................................................................................... 91
Print parameters ......................................................................................................................... 91
Backlight ..................................................................................................................................... 91
Backlight normal level ............................................................................................................ 93
Backlight eco mode ................................................................................................................ 93
Keyboard backlight normal level ............................................................................................ 93
Keyboard backlight low level .................................................................................................. 94

ICO-OPE-02757-V5
TETRA Terminal
User's guide
Public
5/199
Ingenico document - Reproduction or disclosure prohibited without written authorization
Please check document validity before using
Display backlight normal level ................................................................................................ 94
Display backlight low level ...................................................................................................... 95
Backlight time out ................................................................................................................... 95
PINpad1 .................................................................................................................................. 96
Print parameters ..................................................................................................................... 96
Wakeup on tilt management ....................................................................................................... 97
Wakeup on touch management ................................................................................................. 97
9_4 Communication means ..................................................................................... 98
Ethernet ...................................................................................................................................... 99
DHCP activation ................................................................................................................... 100
IP address ............................................................................................................................ 101
Subnet mask ......................................................................................................................... 101
Gateway address.................................................................................................................. 101
DNS1 address ...................................................................................................................... 102
DNS2 address ...................................................................................................................... 102
Print parameters ................................................................................................................... 102
Ping ...................................................................................................................................... 103
Modem PABX ........................................................................................................................... 104
PABX activation .................................................................................................................... 105
PABX header ........................................................................................................................ 105
PABX number ....................................................................................................................... 105
PABX Trailer ......................................................................................................................... 106
PABX Standard .................................................................................................................... 106
Print parameters ................................................................................................................... 107
Mobile Networks ....................................................................................................................... 107
Parameters ........................................................................................................................... 108
APN .................................................................................................................................. 109
Login ................................................................................................................................. 110
Password .......................................................................................................................... 110
Startup mode .................................................................................................................... 110
Set SIM code ........................................................................................................................ 111
Set PUK code ....................................................................................................................... 111
Retrieve status ...................................................................................................................... 112
Select a network ................................................................................................................... 113
Signal Strength ..................................................................................................................... 115
Change SIM slot ................................................................................................................... 115
Set preferred network type ................................................................................................... 116
Wi-Fi configuration.................................................................................................................... 116
Activation menu .................................................................................................................... 118
Scan networks ...................................................................................................................... 118
Selecting an existing network ........................................................................................... 119
Manual network selection ................................................................................................. 120
9_4_4_2_2_1 Home security .............................................................................................................. 121
9_4_4_2_2_2 Enterprise security ........................................................................................................ 121
TLS ........................................................................................................................... 122
TTLS ......................................................................................................................... 124
PEAP ........................................................................................................................ 126
SIM ........................................................................................................................... 128
Advanced options ................................................................................................................. 128
My networks ..................................................................................................................... 128
9_4_4_3_1_1 Management of one registered profile ......................................................................... 129
“Force use” / “Default use” ....................................................................................... 130
“Remove” .................................................................................................................. 130
“Update”.................................................................................................................... 131
ICO-OPE-02757-V5
TETRA Terminal
User's guide
Public
6/199
Ingenico document - Reproduction or disclosure prohibited without written authorization
Please check document validity before using
9_4_4_3_1_2 Delete all ....................................................................................................................... 132
IPv4 Configuration ............................................................................................................ 132
Active roaming .................................................................................................................. 133
BLUETOOTH configuration ...................................................................................................... 133
Phone pairing ....................................................................................................................... 134
Add peripherals .................................................................................................................... 136
Paired devices ...................................................................................................................... 137
BT bases setup..................................................................................................................... 138
Association ....................................................................................................................... 139
9_4_5_4_1_1 New base...................................................................................................................... 140
9_4_5_4_1_2 Select Base .................................................................................................................. 141
9_4_5_4_1_3 Remove Base ............................................................................................................... 142
9_4_5_4_1_4 Print Base ..................................................................................................................... 142
Base advanced functions ................................................................................................. 143
9_4_5_4_2_1 Modem, COM0, COM1, COMU, COMH and COMN ................................................... 143
9_4_5_4_2_2 Set base name ............................................................................................................. 144
9_4_5_4_2_3 Print .............................................................................................................................. 145
9_4_5_4_2_4 Clear Secret.................................................................................................................. 146
Base state ......................................................................................................................... 146
Upgrade software base .................................................................................................... 146
Advanced terminal options ................................................................................................... 147
Rename ............................................................................................................................ 148
Power save mode ............................................................................................................. 148
Modem settings ........................................................................................................................ 149
Output level .......................................................................................................................... 150
Line selection ........................................................................................................................ 150
Limited speed ....................................................................................................................... 151
Line seized ........................................................................................................................... 151
Country selection .................................................................................................................. 152
Print parameters ................................................................................................................... 155
9_5 GPS ................................................................................................................ 155
Mode ......................................................................................................................................... 156
State ......................................................................................................................................... 156
10 Terminal information ................................................................... 157
10_1 Legal information .......................................................................................... 157
10_2 Applications versions .................................................................................... 159
10_3 SDK information ........................................................................................... 159
10_4 Firmware PCI PTS ........................................................................................ 160
10_5 Hardware information ................................................................................... 160
Display .................................................................................................................................... 161
General ............................................................................................................................... 162
Hardware ............................................................................................................................ 163
Wireless .............................................................................................................................. 164
Card readers ....................................................................................................................... 164
PINpad ................................................................................................................................ 165
Print ........................................................................................................................................ 165
ICO-OPE-02757-V5
TETRA Terminal
User's guide
Public
7/199
Ingenico document - Reproduction or disclosure prohibited without written authorization
Please check document validity before using
10_6 Shortcuts ...................................................................................................... 167
11 Advanced configuration ............................................................. 169
11_1 Software TETRA identification rule summary ............................................... 169
11_2 TETRA parameters customization ................................................................ 170
TETRA default parameters provided ...................................................................................... 171
TETRA default parameters customization ......................................................................... 173
Non signed TETRA parameters customization ...................................................................... 178
11_3 TETRA internationalization setting ............................................................... 178
TETRA internationalization principle ...................................................................................... 178
“Dictionaries” type and files organization .............................................................................. 179
Needed tools .......................................................................................................................... 180
Language customization “cooking” process ........................................................................... 181
INGEDEV creation project .................................................................................................. 181
Template dictionary installation and language customization ............................................ 183
Pre-building and building of the project .............................................................................. 185
Taking in account of previous translation ........................................................................... 187
12 Annexes ....................................................................................... 189
12_1 “French domain“ parameters ........................................................................ 189
Main network access point selection ...................................................................................... 190
Gateway for IP/ETH access ............................................................................................... 192
SSL for IP/ETH access ....................................................................................................... 192
IP address .......................................................................................................................... 193
port ..................................................................................................................................... 194
Fall back network access parameters .................................................................................... 194
Cash register activation .......................................................................................................... 195
12_2 Summary of parameters to customize .......................................................... 196

ICO-OPE-02757-V5
TETRA Terminal
User's guide
Public
8/199
Ingenico document - Reproduction or disclosure prohibited without written authorization
Please check document validity before using
Table of figures
Figure 1 – TETRA WEB Desktops different looks according to configuration ...................................... 21
Figure 2 – TETRA “WEB Desktop” parsing “Explorer” tree ................................................................... 27
Figure 3 - The different areas in "Status Bar" ........................................................................................ 28
Figure 4 – Date European format (DD/MM/YYYY) ............................................................................. 29
Figure 5 – Date Anglo-Saxon format (MM/DD/YYYY) ........................................................................ 29
Figure 6 – Date Asian format (YYYY/MM/DD) .................................................................................... 29
Figure 7 – Date ISO8601 format (YYYY-DD-MM)................................................................................ 29
Figure 8 – Time on 12 Hours HH:MM AM or PM mode ..................................................................... 29
Figure 9 – Time on 24 Hours HH:MM mode ....................................................................................... 29
Figure 10 – Power or battery status ...................................................................................................... 30
Figure 11 – Non mobile terminal connected to power supply ............................................................... 31
Figure 12 – Secured OS boot screen .................................................................................................... 35
Figure 13 – Secured OS battery low state screen ................................................................................ 36
Figure 14 – Secured OS battery charging state screen ........................................................................ 36
Figure 15 – TETRA OS boot screen ..................................................................................................... 37
Figure 16 – TETRA OS local loading or wait for debug screen ............................................................ 38
Figure 17 – TETRA applications start-up screen .................................................................................. 39
Figure 18 – TETRA applications in case of WEB applications presence .............................................. 40
Figure 19 - TETRA software packages identification description.......................................................... 52
Figure 20 – LLT connection ................................................................................................................... 55
Figure 21 – PCIV4 Time slot principle ................................................................................................... 79
Figure 22 – Wi-Fi configuration synoptic ............................................................................................. 117
Figure 23 – CUSTOM and LIVE CONFIG taking in account logic ...................................................... 170
Figure 24 – Initial terminal parameters ................................................................................................ 171
Figure 25 – “local.desktopenv.explorer.PBT” parameters file of Explorer .......................................... 172
Figure 26 – Specific “local.desktopenv.inactivity.PBT” for MOVE5000 terminal ................................. 173
Figure 27 – TETRA terminal parameters project creation (step 1) ..................................................... 174
Figure 28 –TETRA terminal parameters project creation (step 2) ...................................................... 175
Figure 29 – Make visible “Resource inside Telium project” ................................................................ 175
Figure 30 – “CFGCUSTOM” folder creation ........................................................................................ 176
Figure 31 – Archives files creation ...................................................................................................... 176
Figure 32 – Data files creation ............................................................................................................ 177
Figure 33 – Ready to build custom configuration ................................................................................ 177
Figure 34 – SDK reference languages delivery................................................................................... 179
Figure 35 – Unpacked Platform language dictionary .......................................................................... 180
Figure 36 – Language customisation thanks to INGEDEV ................................................................. 181
Figure 37 –TETRA language customisation project creation .............................................................. 182
Figure 38 – Archives files creation ...................................................................................................... 183
Figure 39 – Data files creation ............................................................................................................ 183
Figure 40 – Default language insertion in project result ...................................................................... 184
Figure 41 – “es.po” created file example ............................................................................................. 185
Figure 42 – Set a prebuild command step .......................................................................................... 185
Figure 43 – “prebuid.bat” content ........................................................................................................ 186
Figure 44 – Final package to load ....................................................................................................... 187
Figure 45 – “merge_SDK_msg.bat” content........................................................................................ 188

ICO-OPE-02757-V5
TETRA Terminal
User's guide
Public
9/199
Ingenico document - Reproduction or disclosure prohibited without written authorization
Please check document validity before using
Table of tables
Table 1 – TETRA terminals with WEB applications capabilities ........................................................... 12
Table 2 – Retail TETRA terminals with WEB applications capabilities ................................................. 13
Table 3 – TETRA terminals without WEB applications capabilities ...................................................... 14
Table 4 – TETRA terminals without WEB applications capabilities ...................................................... 15
Table 5 – Keypads of TETRA terminals with touchscreen .................................................................... 16
Table 6 – Keypads of TETRA terminals with touchscreen .................................................................... 17
Table 7 - "Explorer" tree pathnames organisation................................................................................. 26
Table 8 - Secured OS startup status ..................................................................................................... 35
Table 9 – PCIV4 resets schedule .......................................................................................................... 80
Table 10 – ITU T.35 code for modem settings .................................................................................... 155
Table 11 – French configuration – Communications means common set of parameters ................... 192
Table 12 – French configuration - List of gateway numbers ............................................................... 192
ICO-OPE-02757-V5
TETRA Terminal
User's guide
Public
10/199
Ingenico document - Reproduction or disclosure prohibited without written authorization
Please check document validity before using
1 Document information
1_1 Evolution follow-up
Revision
Change
Written by
Date
1
User manual build according to SDK 11.0.0.0 release
candidate content.
JLF
08/07/2015
2
User manual build according to SDK 11.2.0.6 release
candidate content:
-hardware settings menu added
-correction in PCI V4 time slot menu
-firmware PCI PTS menu added
JLF
18/09/2015
3
User manual build according to SDK 11.4.0.10 release
candidate content.
-New Ingenico graphical chart
-corrections and evolution according to targeted SDK
release
-annex on parameters *.PBT files
JLF
11/01/2016
4
User manual build according to SDK 11.6.0.06 release
candidate content.
-Adding of “Terminal information” menu + cosmetic
reordering of the other menus.
-BLUETOOTH+WIFI configuration menus adding due to
BEM support on MOVE.
-annex on parameters *.PBT files update
JLF
11/04/2016
5
User manual build according to SDK 11.10.0.06 release
candidate content.
-New Ingenico STONE graphical chart.
-Some menus ordering according to users returns.
-Non signed configuration support
-Shortcuts feature and menu
-Touch screen calibration menu
-Bluetooth final menus
-Modem settings menu
-GPS menu
-PINpad configuration (backlight, beep on PIN code,
hardware information…)
-Camera menu
JLF
03/10/2016
1_2 Document validity
Name
Function
Date
ICO-OPE-02757-V5
TETRA Terminal
User's guide
Public
11/199
Ingenico document - Reproduction or disclosure prohibited without written authorization
Please check document validity before using
Written by
FRIMOUR Jean-Luc
Software PLATFORM architect
24/10/2016
Checked by
CHARPIN Florence
QUALIFICATION PLATFORM
team leader
24/10/2016
Checked by
ROUXEL Alice
PLATFORM Core team leader
24/10/2016
Checked by
GOMES Vincent
PLATFORM Protocol team
leader
24/10/2016
Checked by
PLASSE Pascal
TELIUM SDK and GCL team leader
24/10/2016
Approved
by
MISSUE Eric
Agile SW Factory Manager
24/10/2016
1_3 Objective
The “TETRA User’s manual” is the object of this document. Part of this document can be reused to
build a final user’s manual for end user (= retailers,…).
After a brief description of TETRA Terminals currently existing in the range, the following subjects will
be developed:
General TETRA human interface principle
Detailed description of terminal start-up
Detailed description of each menu provided by the minimal set of software components
delivered in a terminal. (“General settings”, “Software settings”, …)
Advanced TETRA terminal configuration
Annexes describing some optional menus.
1_4 Terminology
The creation of new terminal range is often associated with new branding and new names for
terminals. By extension, all the components of their eco-system are also reviewed and renamed even
if part their main features have not been challenged regarding those provided in the previous
generation.
As users are more familiar with technical features name than with “marketing” features name, in this
document or in TETRA terminal menus, the feature “Terminal Management System” will continue to
be named as “TMS” although the new name of the server solution is “The Estate Manager”.
“PLATFORM” is the generic term to designate initial software of the terminals provided by INGENICO
corp. All additional software added after are named in this document and in terminal as “user” or
“customer” applications or packages.
ICO-OPE-02757-V5
TETRA Terminal
User's guide
Public
12/199
Ingenico document - Reproduction or disclosure prohibited without written authorization
Please check document validity before using
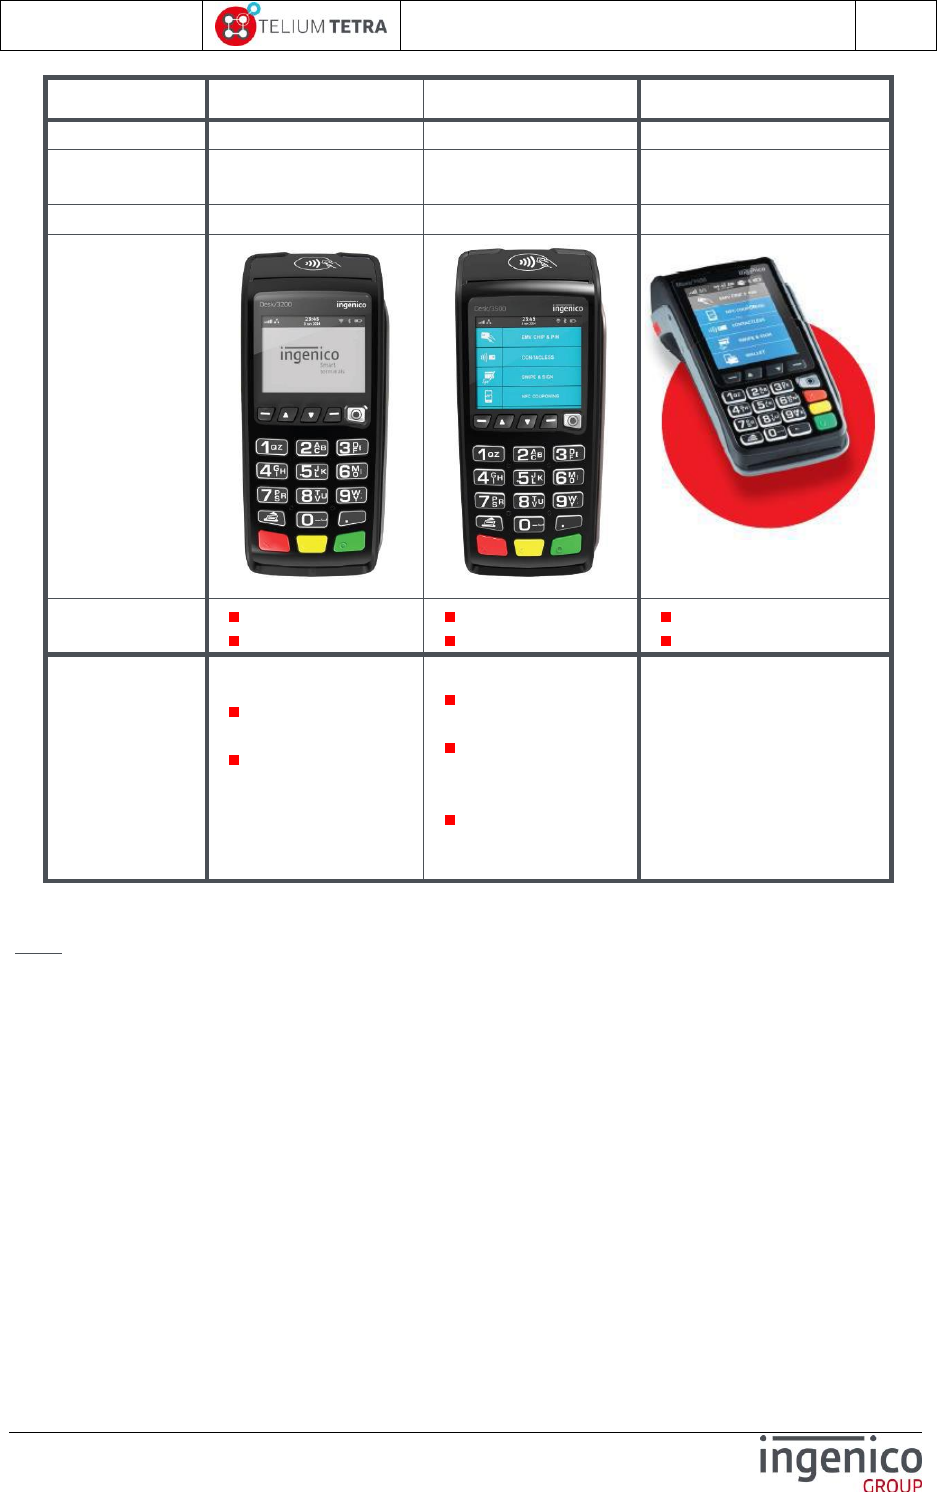
2 TETRA terminals
At the publishing date of this document, the TETRA terminals range is composed of the touch screen
color terminals family.
Note: Memory sizes of the terminals are given in Megabytes in different following tables.
2_1 With WEB applications running capabilities
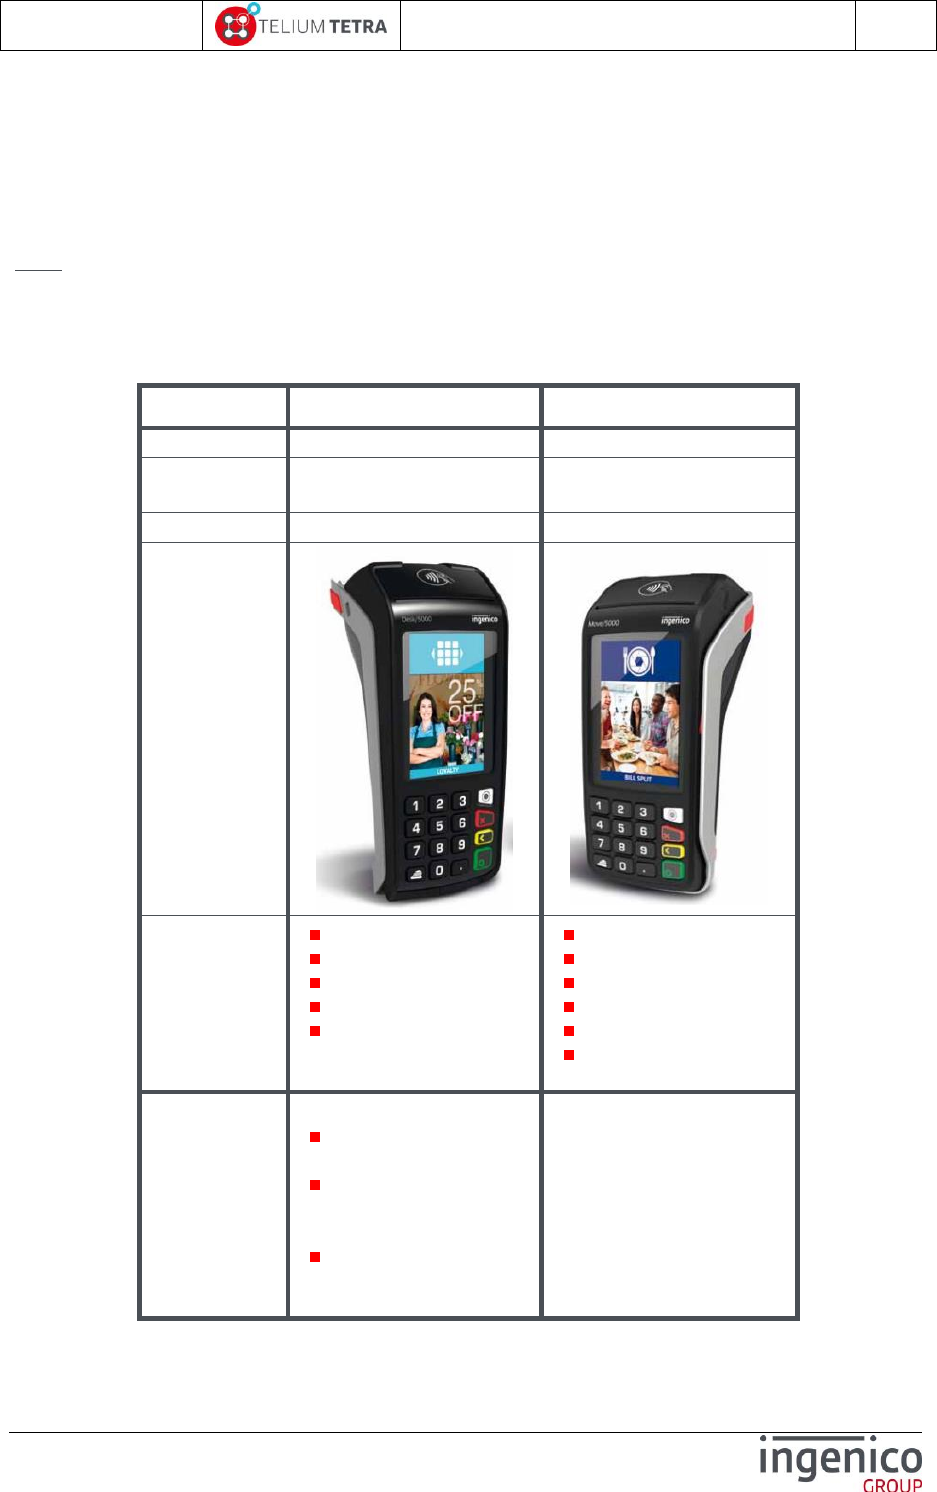
Four terminals exist in this family.
DESK5000
MOVE5000
Type
M70
M71
Display
Colour 3.5” (320x480)
Touch screen
Colour 3.5” (320x480)
Touch screen
Memory (Flash/RAM)
512 Mb /512 Mb
512 Mb /512 Mb
Terminal
Compatibility
Ethernet-Modem
Audio
Audio-3G
Audio–3G-Bluetooth
Audio-Bluetooth-WIFI
3G-Audio
GPS-Barecode
Charging bases supported
Ethernet-Modem bases
Ethernet-Modem-Bluetooth
Ethernet-Modem-
Bluetooth-WIFI bases
Comment
Supported Pinpads:
iPP280 (PIN entry,
contactless)
iPP310 – PCI V3 or V4
(PIN entry, swipe, chip,
contactless)
iPP315 – PCI V4 (PIN
entry, swipe, chip,
contactless)
Table 1 – TETRA terminals with WEB applications capabilities
ICO-OPE-02757-V5
TETRA Terminal
User's guide
Public
13/199
Ingenico document - Reproduction or disclosure prohibited without written authorization
Please check document validity before using
Note: Current major or future options are in italic.
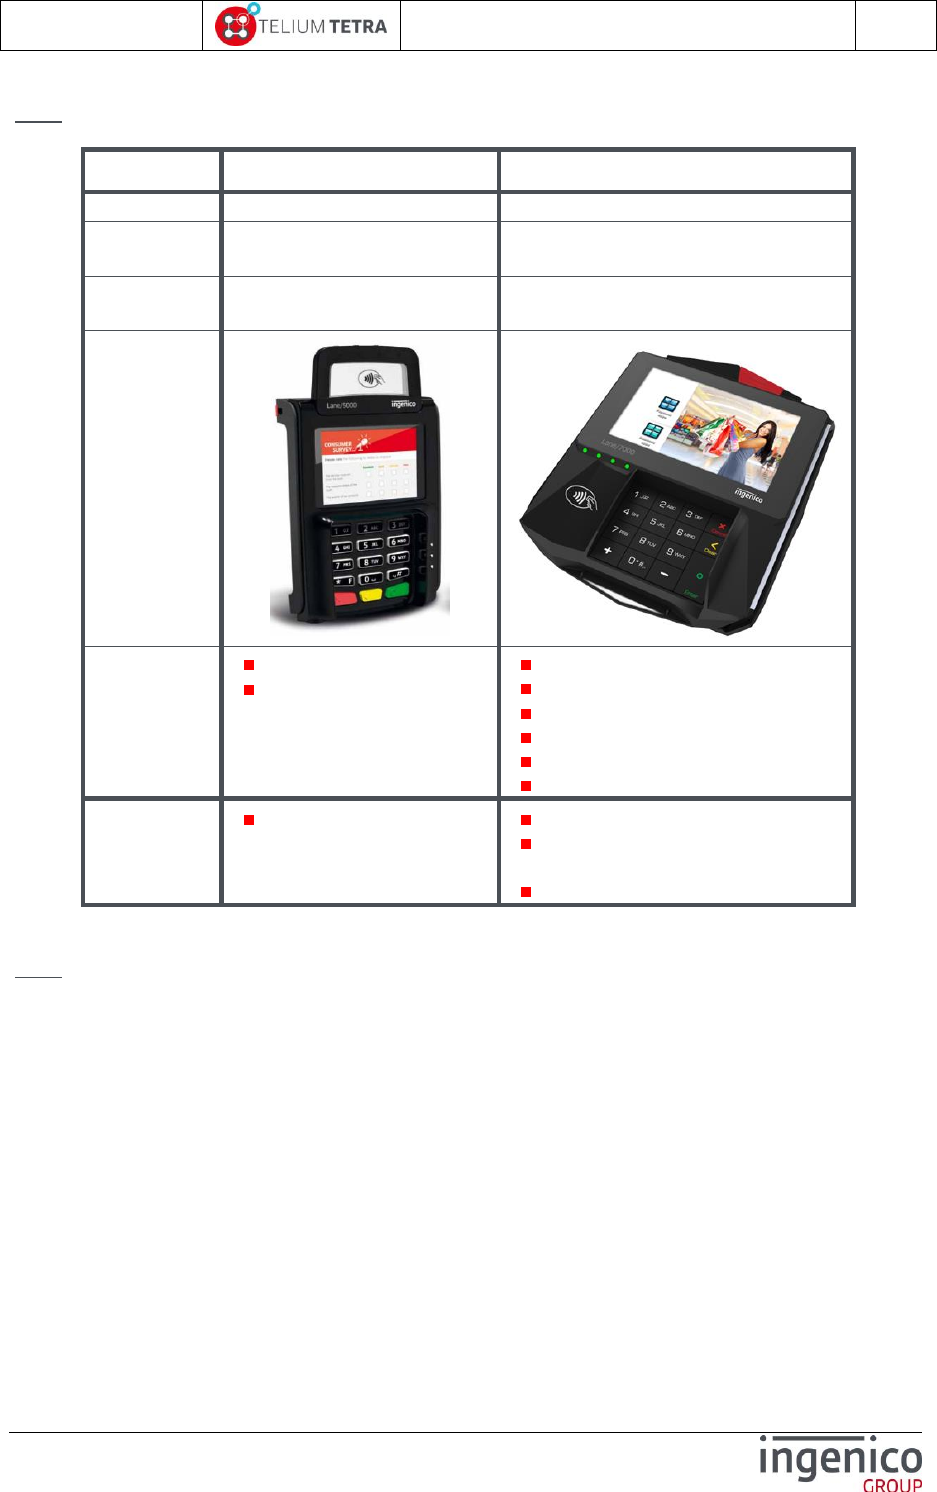
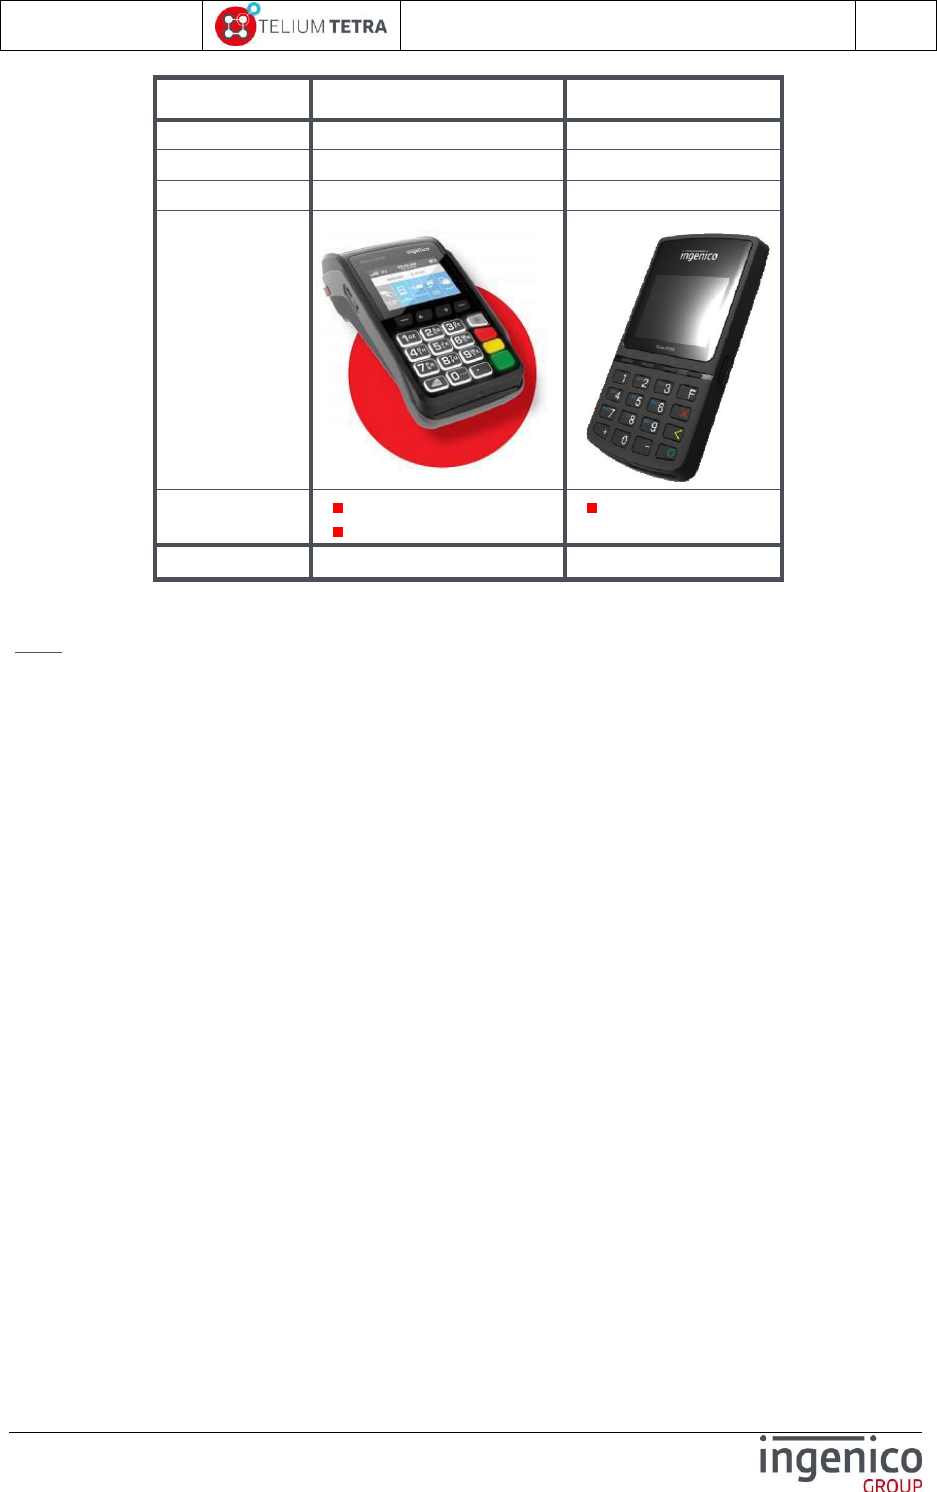
LANE5000
LANE7000
Type
M72
M77
Display
Colour 3.5” (480x320)
Touch screen
Colour 5” (800x480)
Touch screen
Memory
(Flash/RAM)
512 Mb /512 Mb
512 Mb /512 Mb
Terminal
Compatibility
Ethernet
Audio
Audio
Ethernet
RS485 (Tailgate)
Ethernet switch
Bluetooth/BLE - WIFI
Camera
Comment
Double side swipe reader
Communication options managed
thanks to removable modules.
COMBOX support
Table 2 – Retail TETRA terminals with WEB applications capabilities
Note: Current major or future options are in italic.
2_2 Without WEB applications running capabilities
Five terminals exist in this family: no touch screen available in this range.
ICO-OPE-02757-V5
TETRA Terminal
User's guide
Public
14/199
Ingenico document - Reproduction or disclosure prohibited without written authorization
Please check document validity before using
DESK3200
DESK3500
MOVE3500
Type
M73
M74
M75
Display
Black and white 2.7’’
(128x64)
Colour 2.7” (320x240)
Color 3.2” (240x320)
Memory (Flash/RAM)
128 Mb / 128 Mb
128 Mb /128 Mb
128 Mb / 128 Mb
Terminal
Compatibility
Ethernet-Modem
3G
Ethernet-Modem
3G
3G
Charging bases supported
Comment
Supported Pinpads:
iPP280 (PIN entry,
contactless)
iPP310 - PCI V3 or
V4 (PIN entry, swipe,
chip, contactless)
iPP315 - PCI V4 (PIN entry,
swipe, chip, contactless)
Supported Pinpads:
iPP280 (PIN entry,
contactless)
iPP310 - PCI V3 or
V4 (PIN entry, swipe,
chip, contactless)
iPP315 - PCI V4 (PIN
entry, swipe, chip,
contactless)
Table 3 – TETRA terminals without WEB applications capabilities
Note: Current major or future options are in italic.
ICO-OPE-02757-V5
TETRA Terminal
User's guide
Public
15/199
Ingenico document - Reproduction or disclosure prohibited without written authorization
Please check document validity before using
MOVE2500
LINK2500
Type
M76
M78
Display
Colour 2.4” (320x240)
Colour 2.4” (320x240)
Memory (Flash/RAM)
512 Mb / 128 Mb
256 Mb / 128 Mb
Terminal
Compatibility
Ethernet-Modem-3G
Bluetooth - WIFI
Comment
Table 4 – TETRA terminals without WEB applications capabilities
Note: Current major or future options are in italic.
2_3 TETRA keypads
The keypad type is terminal dependant.
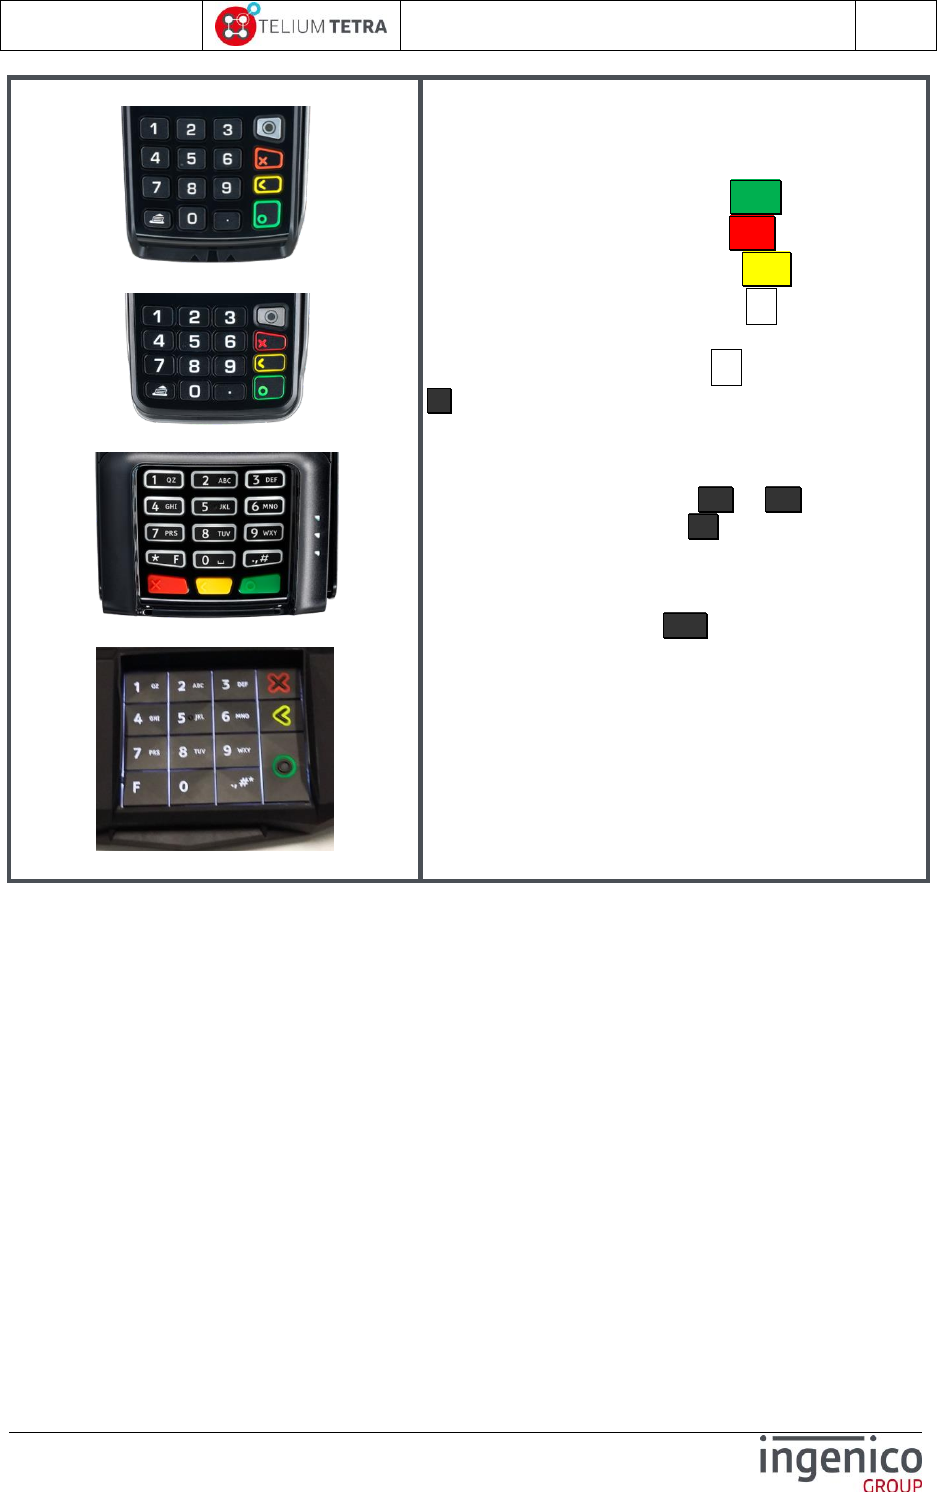
ICO-OPE-02757-V5
TETRA Terminal
User's guide
Public
16/199
Ingenico document - Reproduction or disclosure prohibited without written authorization
Please check document validity before using
DESK5000
MOVE5000
LANE5000
LAN7000
Terminals with touchscreen have limited number of
keys on their keyboard.
The minimal size is 4 keys:
one green validation key O ;
one red cancellation key X ;
one yellow correction key < ;
one Ingenico HOME key ;
Ingenico HOME key Function is replaced by key
F on Retail terminals.
This minimal set can be completed by a numerical
keyboard of 11 keys
ten digital keys (from 0 to 9 );
one decimal dot key . ;
Terminals integrating a printer have a dedicated
key:
one function key ↑ often used as “paper
feed” key
Some terminals have other keys. Refer to the
terminal user manual for more information.
Table 5 – Keypads of TETRA terminals with touchscreen
ICO-OPE-02757-V5
TETRA Terminal
User's guide
Public
17/199
Ingenico document - Reproduction or disclosure prohibited without written authorization
Please check document validity before using
MOVE2500/3500
DESK3200/DESK3500
LINK 2500
Previous description of keypad for TETRA
terminals with touchscreen is also valid for
terminals without touchscreen.
To address the lack of touchscreen, additional keys
are present and allow moving on the screen.
4 function keys ▬ , ▲ , ▼ , ▬ , which
can be screen-printed depending on the
terminal type.
Some terminals have other keys. Refer to the
terminal user manual for more information.
Table 6 – Keypads of TETRA terminals with touchscreen
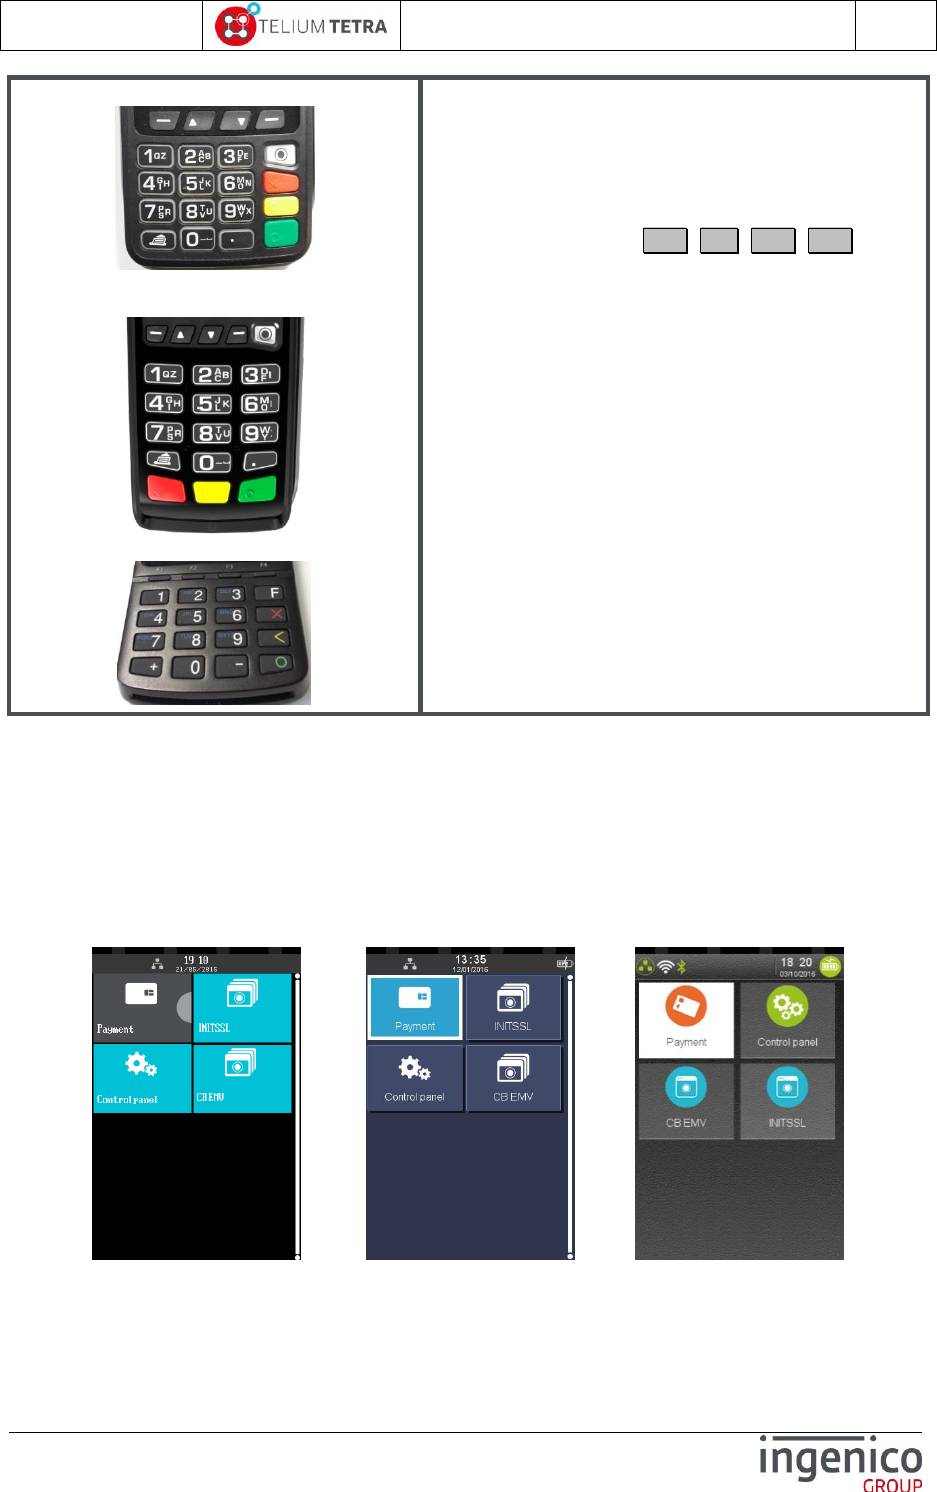
2_4 INGENICO graphical chart evolutions
According to SDK software release versions, different styles of the human interface have been
implemented to respond to customer critics and change requests. The current skin, named STONE, is
supposed to be the final one. The following pictures illustrate the 3 existing styles.
Initial TETRA style CYAN TETRA style STONE TETRA style
With the current style when an icon / icon list element / element list is:
ICO-OPE-02757-V5
TETRA Terminal
User's guide
Public
18/199
Ingenico document - Reproduction or disclosure prohibited without written authorization
Please check document validity before using
Selected => its background is as on the following icon .
Not selected => its background is as on the following icon .
Note: According to the number of captured screenshots present in this document, the updates of some
of them may have been forgotten.
Note: This document does not illustrate specifically black and white screen human interface, a part
“No colour” the main characteristics are:
Same menus logic
Text length adjusted to view size and resolution constraints
All actions done with keyboard
Icon menus replaced by text lists
ICO-OPE-02757-V5
TETRA Terminal
User's guide
Public
19/199
Ingenico document - Reproduction or disclosure prohibited without written authorization
Please check document validity before using
3 TETRA terminal human interface principle
A TETRA terminal is provided with a minimal set of software packages:
PLATFORM software components providing a generic human machine interface based on
screen and keyboard or on screen, touch screen and keyboard according to hardware terminal
capabilities
A set of “applications” managing settings of some category of terminal generic features.
3_1 Terminal “Desktop” and “Explorer” principle
“Desktop” and “Explorer” wording is frequently used in TETRA software domain: documentation,
software components naming, … Sometime these words are misused, (one for the other), it’s useful
to define them.
“Desktop” role
“Desktop” is a TETRA PLATFORM application managing the screen organisation and usage (ex:
windows layers management). The screen management is organised around 5 areas:
A user area
An optional “Cless Leds bar” (= software leds) area
An optional “Status bar” area
An optional “Footer” area
An optional “Virtual keyboard” area
Whatever WEB capabilities activated or not, “Desktop” application is always present.
“Explorer” role
“Explorer” is the first TETRA PLATFORM application that will use the user area of the screen. All the
others software components that will run and used the screen will overlay screens windows of the
“Explorer” screen window. So when every running application has released their graphical context, the
“Explorer” is the default screen that can be seen and be active according to keyboard and touch
screen inputs.
Functionally, the “Explorer” application role is to give access to applications (user or PLATFORM) to
perform treatment thanks to human input actions that are suggested to user with different screen
organisations and renderings:
Associated to a feature, different “icons” (or “Icon list” or “list” according to configuration) are
displayed on the screen.
Thanks to keyboard or to touch screen, action on displayed element (“icon” or “icon list” or
“list”) can
Open a new screen panel on which new icons (or “Icon list” or “list” ) may be selected
Start a treatment.
Chaining the selection of different icons to start a treatment is equivalent of building a
pathname where “Explorer” is root (‘\’) and where each path level corresponds to the
different displayed element name selected to start a treatment.
The “Explorer” role is the same, whatever WEB capabilities are activated or not even if the rendering
and the organisation of applications are different. The common terminology used also differs:
When WEB capabilities are not activated, “Native Explorer” term is used

ICO-OPE-02757-V5
TETRA Terminal
User's guide
Public
20/199
Ingenico document - Reproduction or disclosure prohibited without written authorization
Please check document validity before using
When WEB capabilities are activated, “WEB Desktop” term is used
Native “Explorer”
Native “Explorer” is only present or activated when WEB capabilities are not activated.
By default “Icons” mode is activated on native “Explorer” on all terminals with touch screen. This
default mode may be set by parameters file customisation.
According to configuration, the following pictures illustrate some different native “Explorer” looks.
“Icons” mode “Icon list” mode “List” mode
The icons composing the minimal set present on “Explorer” are:
“Control Panel” = this icon gives access to a new panel corresponding to terminal global
configuration management.
“Payment” or “No transaction” = one of these two icons according to the presence or not of
initialized “user” applications.
“Payment” icon selection allows to start a payment in requesting to enter an “Amount”
“No transaction” icon selection informs the retailer that no applications are registered to
make payment.
Unlike to TELIUM2 behaviour, no prompt informs the operator that the terminal must be initialized or
that no applications are present: only “No transaction” present help him to detect this state.
“Explorer” default configuration mode is “Icons” without access protection (= no password to enter
when selecting treatment).
“Explorer” default configuration mode and access protection can be changed according to parameters
file customisation. (Refer to TETRA parameters customization).
The “Payment” icon is always located in the left upper corner
Other icons are sorted and organized according to their registered properties when they have
been declared by the applications.
When applications have been installed in terminal, they may have registered on “Explorer” some icons
allowing to access to their own subpanels or to start one their specific treatment. On the previous
figure, each application ( “CB EMV” or “INIT SSL”) has added its own icon.
ICO-OPE-02757-V5
TETRA Terminal
User's guide
Public
21/199
Ingenico document - Reproduction or disclosure prohibited without written authorization
Please check document validity before using
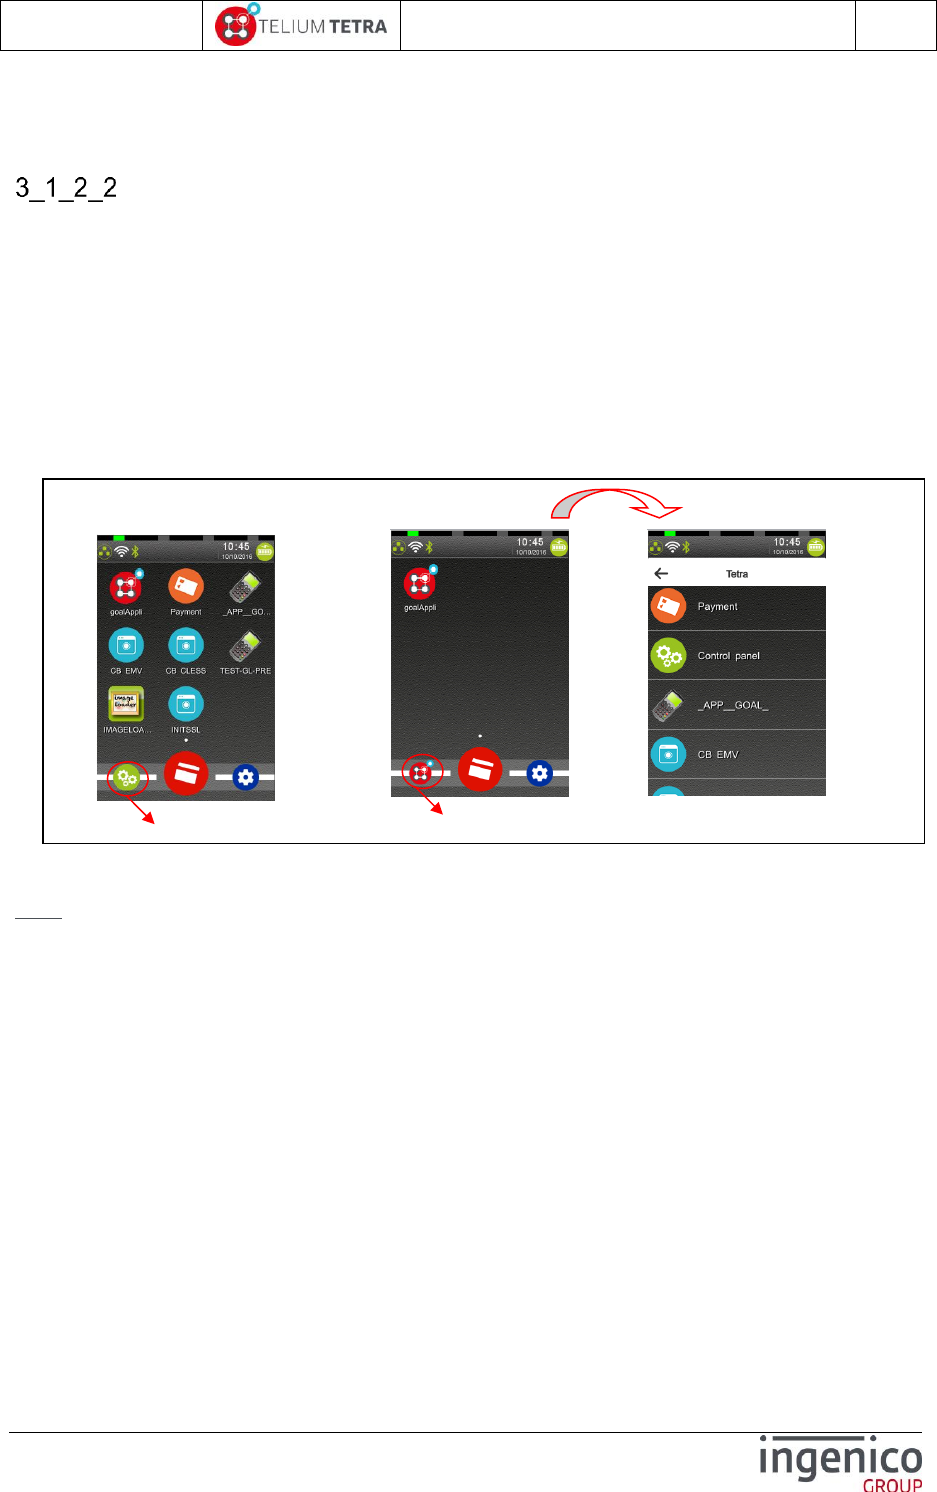
When the number of icons is greater than the user screen area can content, scrolling action is needed:
a vertical slider is displayed. The slider size is proportional to the visible part; so smaller it is, larger is
the non-visible part.
“WEB Desktop”
On terminals with WEB applications running capabilities activated, “WEB Desktop” takes in charge
“Explorer” role whatever the type of the applications. It’s has its ways to organize the menus and the
access to the applications. It can manage it:
Globally => no differentiation between applications based technology or functional perimeter
(Payment, loyalty, etc …)
Sorted => the different type of applications and terminal configuration menus are sorted.
An “Explorer” exposing WEB Applications, it is the initial “Explorer” started.
Different subpanel exposing other applications and terminal configuration menus
The following picture illustrates examples of WEB “Desktop” looks on a terminal with WEB capabilities
set.
Figure 1 – TETRA WEB Desktops different looks according to configuration
Note: Currently “WEB Desktop” configuration allows only rendering “menus” in list with icons.
3_2 Different screen sub-panels
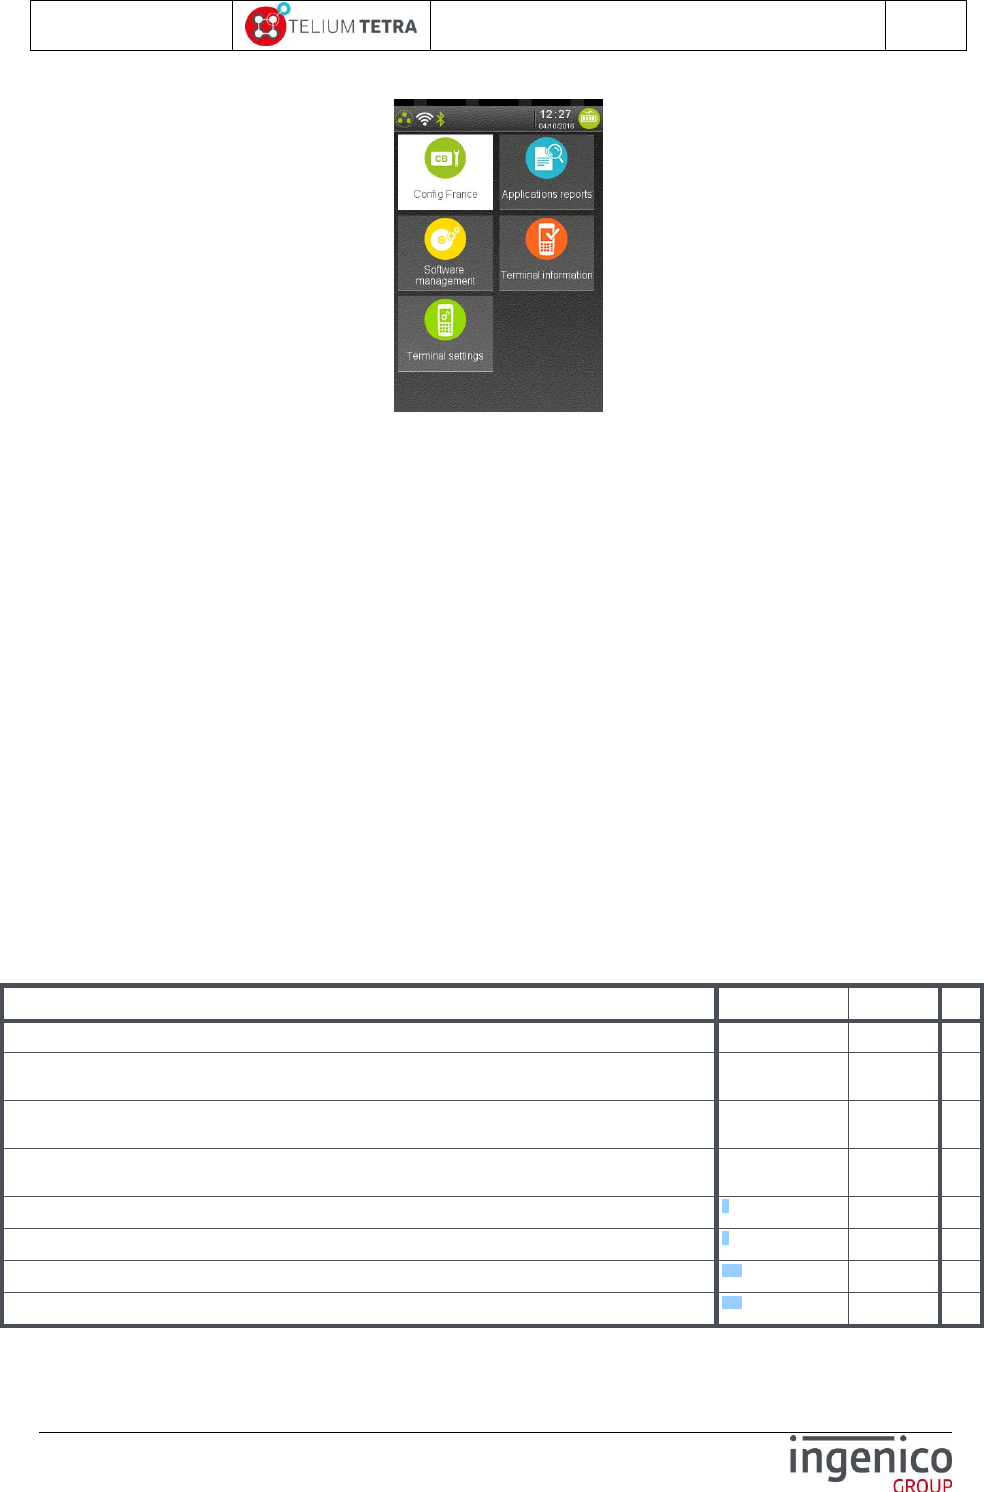
The main available subpanel is “Control Panel”. This icon gives access to the global configuration of
the terminal. The different icons present in this panel allow performing:
functional treatments
simple parameter setting
current global configuration state view
A minimal set of icons are present on “Control Panel”:
“Software Management”
“Terminal Settings” = Icon allowing to select “Terminal Settings” panel in which different icons
give access to terminal configuration. Each icon present covers a set of dependant features as:
General settings
Human interface settings
…
Icon to access to native TETRA control panel
Generic icon to access native TETRA applications
“Show Native Apps on grid “ = ON
“Show Native Apps on grid” = OFF
ICO-OPE-02757-V5
TETRA Terminal
User's guide
Public
22/199
Ingenico document - Reproduction or disclosure prohibited without written authorization
Please check document validity before using
The following picture illustrates the “Control Panel” look.
3_3 The general tree of the “Explorer” sub-panels / menus
As explained previously, each accessible treatment or subpanel can be represented by a pathname.
In the following table, all existing paths are listed. Some complementary information has been added:
Path = pathname to access an icon or a menu line
Green italic = added by applications
Blue italic = optional (hardware terminal dependant)
Orange italic = optional (user/customer dependant)
Normal = default icons
Description link = provides a hypertext link on the description or a brief description if not
detailed in this document.
Type = gives the nature of the element
Subpanel = Icon giving access to a subpanel related to a specific feature
Icon = Icon on which action starts a treatment
Menu = Icon on which action opens a menu organized in a list whatever the configuration
mode of the “explorer”.
Menu line = elementary menu line on which action starts a treatment. (only those having a
dedicated description associated with a paragraph number are present in this table)
Level = indicates the number of selections to perform before accessing to the described
feature, subpanel or menu.
Path
Description link
Type
Level
\Payment
Icon
1
\CB EMV
Example of user
application presence
in screenshots
1
\MONEO
Example of user
application presence
in screenshots
1
\INIT SSL
Example of user
application presence
in screenshots
1
\Control Panel
6
Subpanel
1
\Control Panel\Applications reports
7
Subpanel
2
\Control Panel\Applications reports\Transaction
7_1
Icon
3
\Control Panel\Applications reports\Calls planning
7_2
Icon
3
ICO-OPE-02757-V5
TETRA Terminal
User's guide
Public
23/199
Ingenico document - Reproduction or disclosure prohibited without written authorization
Please check document validity before using
\Control Panel\Applications reports\Diagnostics
7_3
Icon
3
\Control Panel\Applications reports\Diagnostics\Local
7_3_1
Icon
3
\Control Panel\Applications reports\Diagnostics\Diag to USB
7_3_2
Icon
3
\Control Panel\Applications reports\Diagnostics\Diag to MMC
7_3_2
Icon
3
\Control Panel\Applications reports\Diagnostics\Clear
7_3_3
Icon
3
\Control Panel\Applications reports\Batch Data capture
7_4
Icon
3
\Control Panel\Software management
8
Subpanel
2
\Control Panel\Software management\View configuration
8_1
Subpanel
3
\Control Panel\Software management\View configuration\Customer packages
8_1_1
Menu
4
\Control Panel\Software management\View configuration\Platform packages
8_1_2
Menu
4
\Control Panel\Software management\Evolution
8_2
Subpanel
3
\Control Panel\Software management\Evolution\Local upgrade
8_2_1
Icon
4
\Control Panel\Software management\Evolution\External upgrade
8_2_2
Icon
4
\Control Panel\Software management\Evolution\Remote upgrade
8_2_3
Subpanel
4
\Control Panel\Software management\Evolution\Remote upgrade\Start remote upgrade
8_2_3_2
Icon
5
\Control Panel\Software management\Evolution\Remote upgrade\Download specific package
8_2_3_3
Icon
5
\Control Panel\Software management\Evolution\Remote upgrade\Configure remote upgrade
8_2_3_1
Icon
5
\Control Panel\Software management\Evolution\Remote upgrade\Configure remote upgrade\Network type
8_2_3_1_1
Menu line
6
\Control Panel\Software management\Evolution\Remote upgrade\Configure remote upgrade\Contract Number
8_2_3_1_5
Menu line
6
\Control Panel\Software management\Evolution\Remote upgrade\Configure remote upgrade\TMS address
8_2_3_1_6
Menu line
6
\Control Panel\Software management\Evolution\Remote upgrade\Configure remote upgrade\TCP port
8_2_3_1_7
Menu line
6
\Control Panel\Software management\Evolution\Remote upgrade\Configure remote upgrade\SSL profile
8_2_3_1_8
Menu line
6
\Control Panel\Software management\Evolution\Remote upgrade\Configure remote upgrade\APN
8_2_3_1_9
Menu line
6
\Control Panel\Software management\Evolution\Remote upgrade\Configure remote upgrade\Login
8_2_3_1_10
Menu line
6
\Control Panel\Software management\Evolution\Remote upgrade\Configure remote upgrade\Password
8_2_3_1_11
Menu line
6
\Control Panel\Software management\Evolution\Remote upgrade\Configure remote upgrade\Phone number
8_2_3_1_12
Menu line
6
\Control Panel\Software management\Evolution\Remote upgrade\Configure remote upgrade\Print Parameters
8_2_3_1_13
Menu line
6
\Control Panel\Software management\Evolution\Remote upgrade\Automatic Upgrades
8_2_3_4
Subpanel
5
\Control Panel\Software management\ Evolution\Remote upgrade\Automatic Upgrades\Cyclic calls
8_2_3_4_1
Subpanel
6
\Control Panel\Software management\ Evolution\Remote upgrade\Automatic Upgrades\ Cyclic calls\Reference Call
8_2_3_4_1_1
Icon
7
\Control Panel\Software management\ Evolution\Remote upgrade\Automatic Upgrades\ Cyclic calls\Cyclic call definitions
8_2_3_4_1_2
Icon
7
\Control Panel\Software management\ Evolution\Remote upgrade\Automatic Upgrades\ Cyclic calls\Manual parameters
8_2_3_4_1_3
Icon
7
\Control Panel\Software management\ Evolution\Remote upgrade\Automatic Upgrades\Maintenance
8_2_3_4_2
Subpanel
6
\Control Panel\Software management\ Evolution\Remote upgrade\Automatic Upgrades\Maintenance\Consult parameters
8_2_3_4_2_1
Subpanel
7
\Control Panel\Software management\ Evolution\Remote upgrade\Automatic Upgrades\Maintenance\Deactivate
8_2_3_4_2_2
Icon
7
\Control Panel\Software management\ Evolution\Remote upgrade\Automatic Upgrades\Maintenance\RAZ
8_2_3_4_2_3
Icon
5
\Control Panel\Software management\ Evolution\Remote upgrade\Automatic Upgrades\Consult log
8_2_3_4_3
Icon
5
\Control Panel\Software management\Software packages removal
8_3
Icon
3
\Control Panel\Terminal settings
9
Subpanel
2

ICO-OPE-02757-V5
TETRA Terminal
User's guide
Public
24/199
Ingenico document - Reproduction or disclosure prohibited without written authorization
Please check document validity before using
\Control Panel\Terminal settings\General settings
9_1
Subpanel
3
\Control Panel\Terminal settings\General settings\Currency
9_1_1
Icon
4
\Control Panel\Terminal settings\General settings\Date and Time
9_1_2
Subpanel
4
\Control Panel\Terminal settings\General settings\Date and Time\Set date
9_1_2_1
Icon
5
\Control Panel\Terminal settings\General settings\Date and Time\Set time
9_1 9_1_2_2
Icon
5
\Control Panel\Terminal settings\General settings\Date and Time\Date format
9_1_2_3
Icon
5
\Control Panel\Terminal settings\General settings\Date and Time\Time format
9_1_2_4
Icon
5
\Control Panel\Terminal settings\General settings\Language
9_1_3
Icon
4
\Control Panel\Terminal settings\General settings\PCIV4 time setting
9_1_4
Icon
4
\Control Panel\Terminal settings\Human interface
9_2
Subpanel
3
\Control Panel\Terminal settings\Human interface\BeepOnPincode
9_2_1
Subpanel
4
\Control Panel\Terminal settings\Human interface\BeepOnPincode\Frequency
9_2_1_1
Icon
5
\Control Panel\Terminal settings\Human interface\BeepOnPincode\Duration
9_2_1_2
Icon
5
\Control Panel\Terminal settings\Human interface\BeepOnPincode\Volume
9_2_1_3
Icon
5
\Control Panel\Terminal settings\Human interface\BeepOnPincode\Buzzer PINpad 1
9_2_1_4
subpanel
5
\Control Panel\Terminal settings\Human interface\BeepOnPincode\Print parameters
9_2_1_5
Icon
5
\Control Panel\Terminal settings\Human interface\Explorer
9_2_2
Icon
4
\Control Panel\Terminal settings\Human interface\Calibrate touch
9_2_3
Icon
4
\Control Panel\Terminal settings\Human interface\Camera
9_2_4
Subpanel
4
\Control Panel\Terminal settings\Human interface\Camera\Position
9_2_4_1
Icon
5
\Control Panel\Terminal settings\Human interface\Camera\Size
9_2_4_2
Icon
5
\Control Panel\Terminal settings\Human interface\Camera\Rotation
9_2_4_3
Icon
5
\Control Panel\Terminal settings\Human interface\Camera\Contrast
9_2_4_4
Icon
5
\Control Panel\Terminal settings\Human interface\Camera\Brightness
9_2_4_4
Icon
5
\Control Panel\Terminal settings\Human interface\Camera\Saturation
9_2_4_4
Icon
5
\Control Panel\Terminal settings\Human interface\Camera\Print
9_2_4_5
Icon
5
\Control Panel\Terminal settings\ECO mode
9_3
Subpanel
3
\Control Panel\Terminal settings\ECO mode\Screen saver time out
9_3_1
Icon
4
\Control Panel\Terminal settings\ECO mode\Standby
9_3_2
Icon
4
\Control Panel\Terminal settings\ECO mode\Print parameters
9_3_3
Icon
4
\Control Panel\Terminal settings\ECO mode\Backlight
9_3_4
Subpanel
4
\Control Panel\Terminal settings\ECO mode\Backlight \Backlight normal level
9_3_4_1
Icon
5
\Control Panel\Terminal settings\ECO mode\Backlight \Backlight low level
9_3_4_2
Icon
5
\Control Panel\Terminal settings\ECO mode\Backlight \Keyboard normal level
9_3_4_3
Icon
5
\Control Panel\Terminal settings\ECO mode\Backlight \Keyboard low level
9_3_4_4
Icon
5
\Control Panel\Terminal settings\ECO mode\Backlight \Display normal level
9_3_4_5
Icon
5
\Control Panel\Terminal settings\ECO mode\Backlight \ Display low level
9_3_4_6
Icon
5
\Control Panel\Terminal settings\ECO mode\Backlight \ PINPAD1
9_3_4_8
subpanel
5
\Control Panel\Terminal settings\ECO mode\Backlight \Backlight time out
9_3_4_7
Icon
5
ICO-OPE-02757-V5
TETRA Terminal
User's guide
Public
25/199
Ingenico document - Reproduction or disclosure prohibited without written authorization
Please check document validity before using
\Control Panel\Terminal settings\ECO mode\Backlight \Print parameters
9_3_4_9
Icon
5
\Control Panel\Terminal settings\ECO mode\Wakeup on tilt
9_3_5
Subpanel
4
\Control Panel\Terminal settings\ECO mode\ Wakeup on touch
9_3_6
Subpanel
4
\Control Panel\Terminal settings\Communication means
9_4
Subpanel
3
\Control Panel\Terminal settings\Communication means\Ethernet
9_4_1
Icon
4
\Control Panel\Terminal settings\Communication means\Ethernet\DHCP activation
9_4_1_1
Menu line
5
\Control Panel\Terminal settings\Communication means\Ethernet\IP address
9_4_1_2
Menu line
5
\Control Panel\Terminal settings\Communication means\Ethernet\Subnet mask
9_4_1_3
Menu line
5
\Control Panel\Terminal settings\Communication means\Ethernet\Gateway address
9_4_1_4
Menu line
5
\Control Panel\Terminal settings\Communication means\Ethernet\DNS1 address
9_4_1_5
Menu line
5
\Control Panel\Terminal settings\Communication means\Ethernet\DNS2 address
9_4_1_6
Menu line
5
\Control Panel\Terminal settings\Communication means\Ethernet\Print parameters
9_4_1_7
Menu line
5
\Control Panel\Terminal settings\Communication means\Ethernet\Ping
9_4_1_7
Menu line
5
\Control Panel\Terminal settings\Communication means\Modem PABX
9_4_2
Icon
4
\Control Panel\Terminal settings\Communication means\Modem PABX\PABX activation
9_4_2_1
Menu line
5
\Control Panel\Terminal settings\Communication means\Modem PABX\PABX header
9_4_2_2
Menu line
5
\Control Panel\Terminal settings\Communication means\Modem PABX\PABX number
9_4_2_3
Menu line
5
\Control Panel\Terminal settings\Communication means\Modem PABX\PABX Trailer
9_4_2_4
Menu line
5
\Control Panel\Terminal settings\Communication means\Modem PABX\PABX Standard
9_4_2_5
Menu line
5
\Control Panel\Terminal settings\Communication means\Modem PABX\Print parameters
9_4_2_6
Menu line
5
\Control Panel\Terminal settings\Communication means\Mobile Networks
9_4_3
Subpanel
4
\Control Panel\Terminal settings\Communication means\Mobile Networks\Parameters
9_4_3_1
Icon
5
\Control Panel\Terminal settings\Communication means\Mobile Networks\Parameters\APN
9_4_3_1_1
Menu line
6
\Control Panel\Terminal settings\Communication means\Mobile Networks\Parameters\Login
9_4_3_1_2
Menu line
6
\Control Panel\Terminal settings\Communication means\Mobile Networks\Parameters\Password
9_4_3_1_3
Menu line
6
\Control Panel\Terminal settings\Communication means\Mobile Networks\Parameters\Startup mode
9_4_3_1_4
Menu line
6
\Control Panel\Terminal settings\Communication means\Mobile Networks\Set SIM code
9_4_3_2
Icon
5
\Control Panel\Terminal settings\Communication means\Mobile Networks\Set PUK code
9_4_3_3
Icon
5
\Control Panel\Terminal settings\Communication means\Mobile Networks\Retrieve status
9_4_3_4
Icon
5
\Control Panel\Terminal settings\Communication means\Mobile Networks\Select a network
9_4_3_5
Menu
5
\Control Panel\Terminal settings\Communication means\WiFi
9_4_4
Subpanel
4
\Control Panel\Terminal settings\Communication means\WiFi\Diasble or Enable
9_4_4_1
Icon
5
\Control Panel\Terminal settings\Communication means\WiFi\Scan networks
9_4_4_2
Menu
6
\Control Panel\Terminal settings\Communication means\WiFi\Advanced Options
9_4_4_3
Subpanel
6
\Control Panel\Terminal settings\Communication means\WiFi\Advanced Options\My networks
9_4_4_3_1
Menu
6
\Control Panel\Terminal settings\Communication means\WiFi\Advanced Options\IP configuration
9_4_4_3_2
Menu
6
\Control Panel\Terminal settings\Communication means\WiFi\Advanced Options\Active roaming
9_4_4_3_3
Menu
5
\Control Panel\Terminal settings\Communication means\Bluetooth
9_4_5
Subpanel
4
\Control Panel\Terminal settings\Communication means\Bluetooth\Switch on or Switch off
9_4_5
Subpanel
4
ICO-OPE-02757-V5
TETRA Terminal
User's guide
Public
26/199
Ingenico document - Reproduction or disclosure prohibited without written authorization
Please check document validity before using
\Control Panel\Terminal settings\Communication means\Bluetooth\Phone pairing
9_4_5_1
Menu
5
\Control Panel\Terminal settings\Communication means\Bluetooth\Add peripherals
9_4_5_2
Menu
5
\Control Panel\Terminal settings\Communication means\Bluetooth\Paired devices
9_4_5_3
Menu
5
\Control Panel\Terminal settings\Communication means\Bluetooth\Base
9_4_5_4
Subpanel
5
\Control Panel\Terminal settings\Communication means\Bluetooth\Base\Association
9_4_5_4_1
Subpanel
6
\Control Panel\Terminal settings\Communication means\Bluetooth\Base\Association\New base
9_4_5_4_1_1
Menu
7
\Control Panel\Terminal settings\Communication means\Bluetooth\Base\Association\Select base
9_4_5_4_1_2
Menu
7
\Control Panel\Terminal settings\Communication means\Bluetooth\Base\Association\Remove base
9_4_5_4_1_3
Menu
7
\Control Panel\Terminal settings\Communication means\Bluetooth\Base\Association\Print bases
9_4_5_4_1_4
Menu
7
\Control Panel\Terminal settings\Communication means\Bluetooth\Base\Advanced
9_4_5_4_2
Menu
6
\Control Panel\Terminal settings\Communication means\Bluetooth\Base\Base State
9_4_5_4_3
Menu
6
\Control Panel\Terminal settings\Communication means\Bluetooth\Base\Upgrade Base
9_4_5_4_4
Menu
6
\Control Panel\Terminal settings\Communication means\Bluetooth\Advanced options
9_4_5_5
Subpanel
5
\Control Panel\Terminal settings\Communication means\Bluetooth\Advanced options\Rename
9_4_5_5_1
Menu
6
\Control Panel\Terminal settings\Communication means\Bluetooth\Advanced options\Power mode
9_4_5_5_2
Menu
6
\Control Panel\Terminal settings\Communication means\Modem settings
9_4_6
Menu
4
\Control Panel\Terminal settings\GPS
9_5
Subpanel
3
\Control Panel\Terminal settings\GPS\Mode
9_5_1
Icon
4
\Control Panel\Terminal settings\GPS\State
9_5_2
Icon
4
\Control Panel\Terminal information
10
Subpanel
2
\Control Panel\ Terminal information\Legal information
10_1
Icon
3
\Control Panel\Terminal information\Applications versions
10_2
Icon
3
\Control Panel\Terminal information\SDK information
10_3
Icon
3
\Control Panel\Terminal information\Firmware PCI PTS
10_4
Icon
3
\Control Panel\Terminal information\Hardware information
10_5
Subpanel
3
\Control Panel\Terminal information\Hardware information\Display
10_5_1
Subpanel
4
\Control Panel\Terminal information\Hardware information\Display\General
10_5_1_1
Icon
5
\Control Panel\Terminal information\Hardware information\Display\Wireless
10_5_1_2
Icon
5
\Control Panel\Terminal information\Hardware information\Display\Hardware
10_5_1_3
Icon
5
\Control Panel\Terminal information\Hardware information\Display\Readers
10_5_1_4
Icon
5
\Control Panel\Terminal information\Hardware information\Display\PINpad
10_5_1_5
Icon
5
\Control Panel\Terminal information\Hardware information\Print
10_5_2
Subpanel
4
\Control Panel\Terminal information\Shortcuts
10_6
Icon
4
\Control Panel\Config France
12_1
Subpanel
2
\Control Panel\Config France\Network Access
12_1_1
Menu
3
\Control Panel\Config France\Cash connexion
12_1_3
Menu
3
Table 7 - "Explorer" tree pathnames organisation
The following chapters will detail the different default sub-panels.
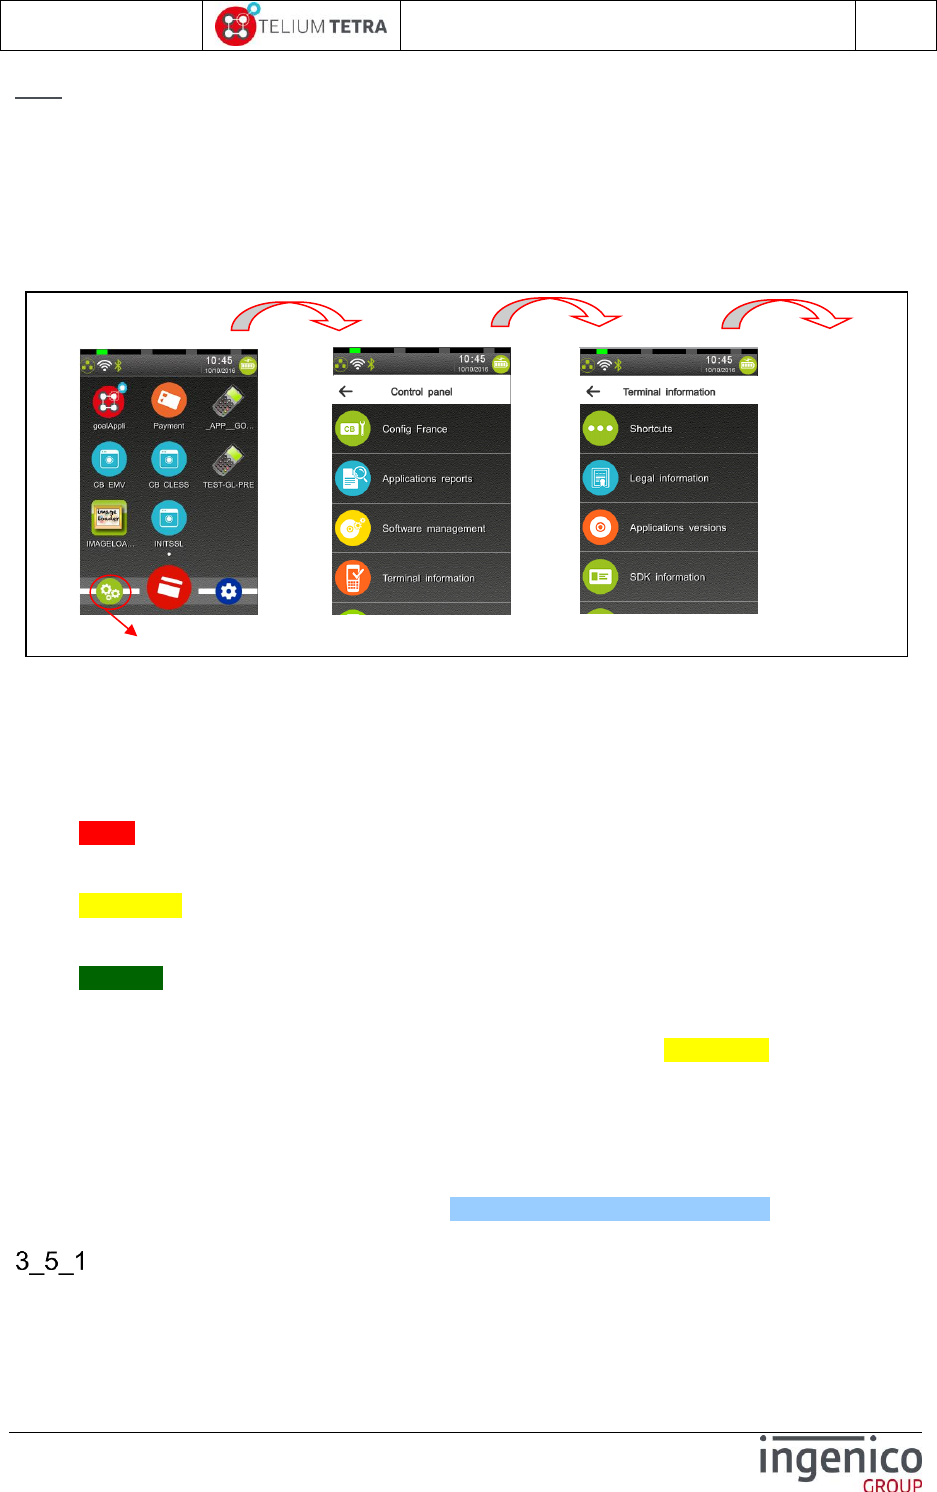
ICO-OPE-02757-V5
TETRA Terminal
User's guide
Public
27/199
Ingenico document - Reproduction or disclosure prohibited without written authorization
Please check document validity before using
Note: Concerning all menus providing printing reports, even they are proposed on all terminal of
TETRA range, their selection on a terminal without printer (ex: LANE5000) triggers nothing: no
warning, no error message is reported to user.
On terminals with WEB applications running capabilities activated, the “WEB Desktop” follows up this
tree pathnames organisation to perform its rendering as illustrated with the following pictures:
On first screen “Control Panel” icon is selected
On second screen “Terminal information” icon is selected.
Figure 2 – TETRA “WEB Desktop” parsing “Explorer” tree
3_4 General rule of keypad usage
The minimal set of applications provided in the terminal used a common rule to manage keyboard
during subpanel or menu management:
“RED” key is used to cancel the operation in progress and to return to main menu or on
“Explorer” according to use cases. This key may be implicitly expected even if it’s not proposed
to selection on screen. (= case of “Explorer” and “sub-panels”)
“YELLOW” key is used in menu, if proposed to selection on screen, to cancel the operation in
progress and to return to the previous menu from where the operation was selected,
highlighting maintained on the menu (= ready to be selected again)
“GREEN” key is used to validate, to confirm a choice, an operation …
As some menus or subpanels may be protected by password, no action during some duration stops
waiting on this menu or subpanel: time-out term has same action as a “YELLOW” key hitting. This
duration is governed by “Screen saver time-out” parameter (by default 60s).
3_5 TETRA “Status bar” description
By default one “Status bar” is displayed on top of the screen. Its location and presence on screen can
be customized thanks to parameters file (refer to TETRA parameters customization).
General structure of the “Status bar”
The “Status bar” is divided in 2 main areas:
Communications means status
Touching this icon select the native TETRA control panel
…
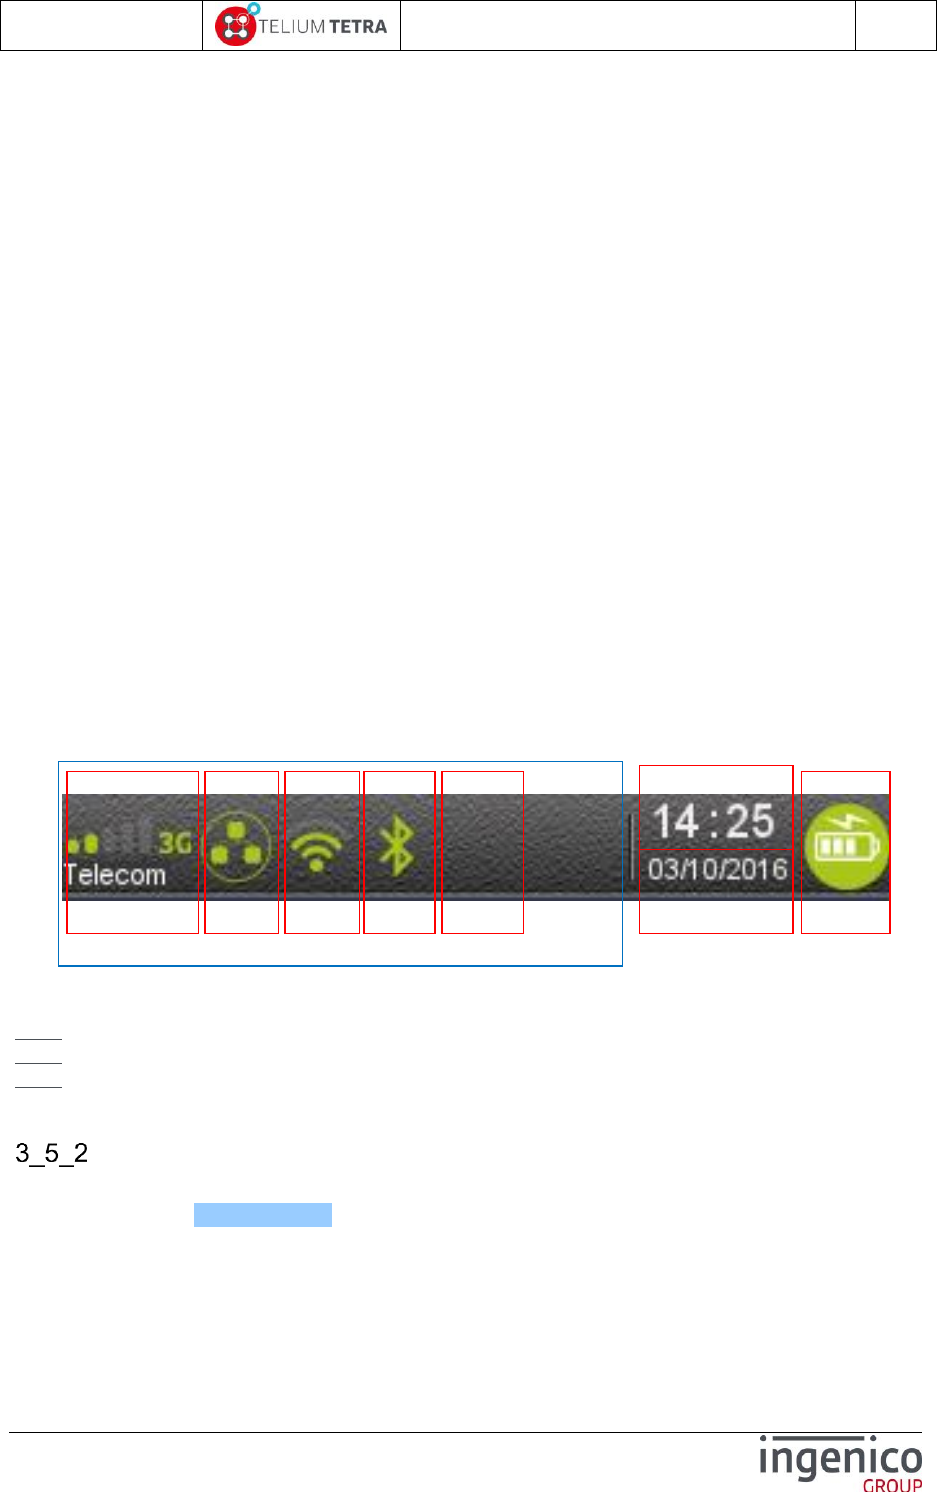
ICO-OPE-02757-V5
TETRA Terminal
User's guide
Public
28/199
Ingenico document - Reproduction or disclosure prohibited without written authorization
Please check document validity before using
Other status
A separator materializes the boundaries of the 2 areas. When a status is not present in one area (ex:
features not managed in the terminal) the reminding statuses are:
left justified in communications means status area
right justified in other status area
Communications means status area is divided in 6 areas: some of them are attached to a feature, the
others reserved for future use:
GPRS / 3G / 4G status
Local network status (= Ethernet Lan)
WIFI status
Bluetooth status
Modem status
Unused areas reserved for future
Other status area is divided in 3 areas:
Current time
Current date
Power status
Each area contents an icon of its associated feature except for date and time information. The look of
the icon depends of the state of the feature. Common looks are:
No icon = feature no presence in the terminal or OFF
Grey icon = active feature but non connected
Orange icon = when used connexion in progress
Green icon = link ready to exchange data.
Figure 3 - The different areas in "Status Bar"
Note: Unlike TELIUM2 range terminals, the PKI information no more appears in the status bar.
Note: RFU area reserved for future use.
Note: This is a theoretical screenshot as all communication options displayed do not currently exist
together on a terminal.
Date
The terminal displays the current date. The date is displayed according to format in “Date & Time
format” menu (refer Date and Time). According to the different date format, to the short and long year
format and to the different separators proposed, different date representations can be composed.
The following pictures illustrate some usual date format that can be displayed.
Current date
Current time
RFU
Bluetooth
Ethernet
WIFI
GPRS/3G/4G
Energy
Communications means status
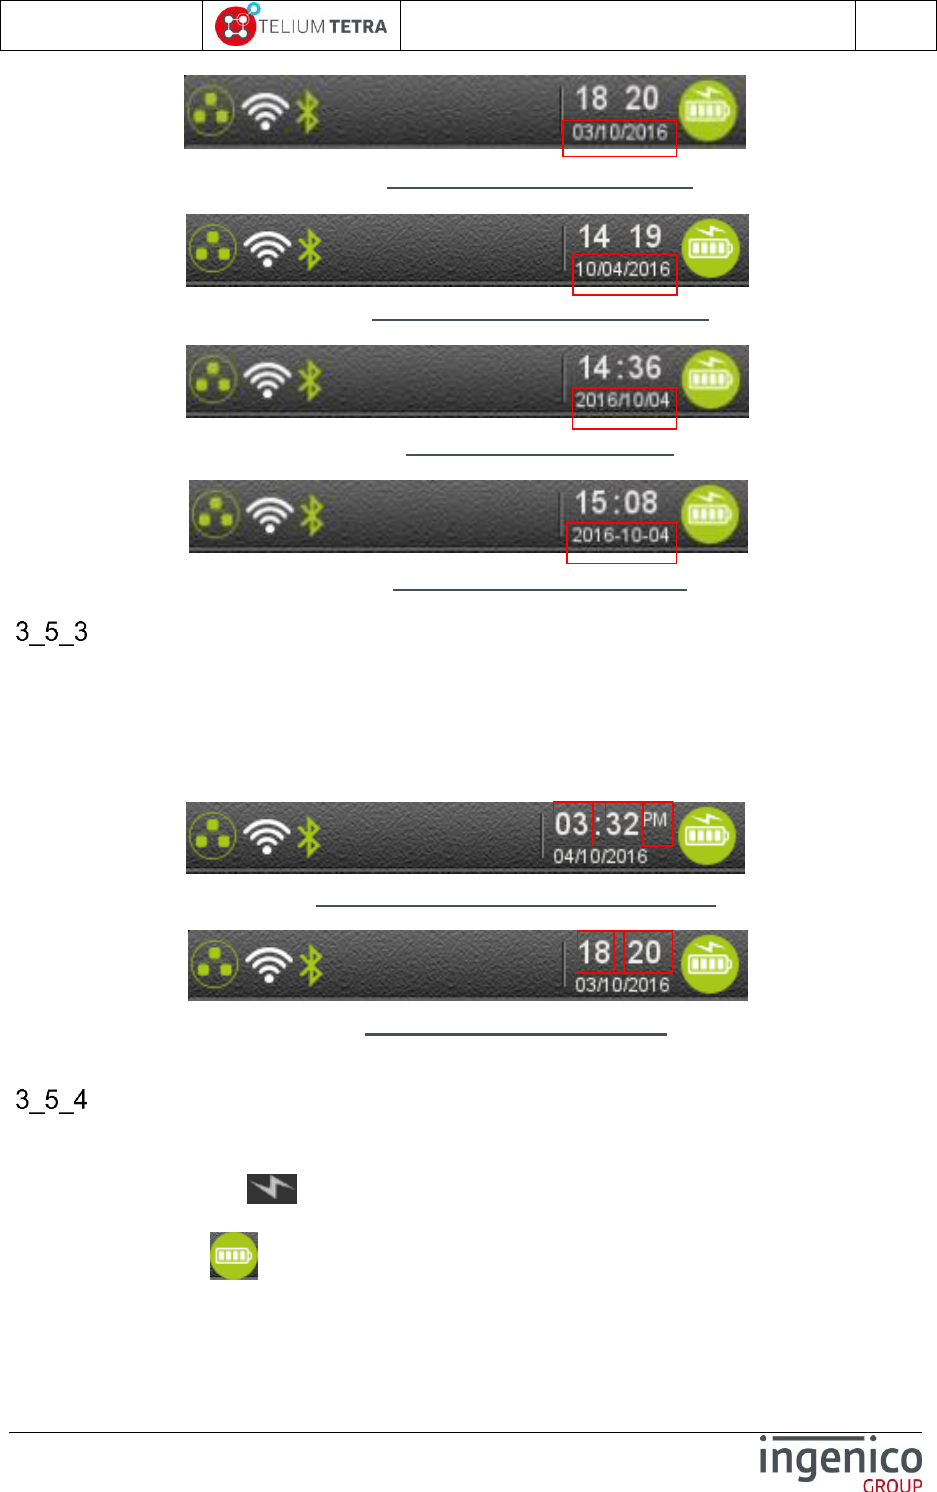
ICO-OPE-02757-V5
TETRA Terminal
User's guide
Public
29/199
Ingenico document - Reproduction or disclosure prohibited without written authorization
Please check document validity before using
Figure 4 – Date European format (DD/MM/YYYY)
Figure 5 – Date Anglo-Saxon format (MM/DD/YYYY)
Figure 6 – Date Asian format (YYYY/MM/DD)
Figure 7 – Date ISO8601 format (YYYY-DD-MM)
Time
The terminal displays its current time with the HH:MM format. The “:” blinks at 1Hz frequency.
The current time is with 2 different modes:
On 12 hours with AM or PM
On 24 hours
Figure 8 – Time on 12 Hours HH:MM AM or PM mode
Figure 9 – Time on 24 Hours HH:MM mode
Power or Battery level status
External power supply present and battery charge level are reported on status bar of mobile terminal
with:
A thunderbolt icon when mobile terminal is connected to a wired power supply. This icon
overprints the icon of the battery.
A battery icon when terminal is only powered by its internal battery. In this case different
icon shape illustrates the battery charge status.
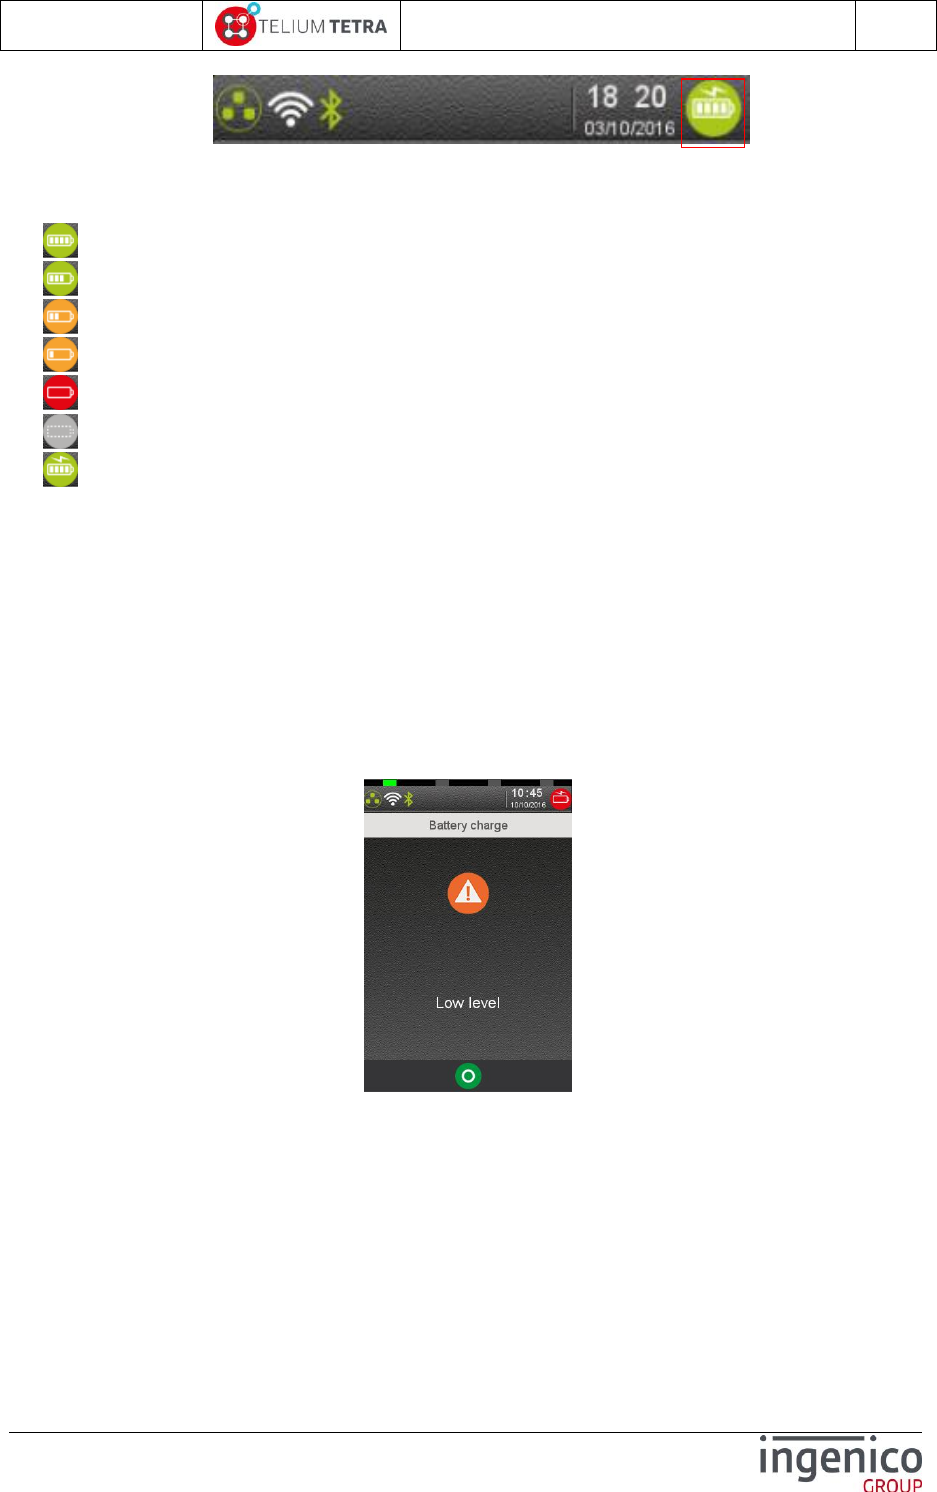
ICO-OPE-02757-V5
TETRA Terminal
User's guide
Public
30/199
Ingenico document - Reproduction or disclosure prohibited without written authorization
Please check document validity before using
Figure 10 – Power or battery status
Depending on the battery charge level, one of the following icons is displayed
Battery charge greater than 80%,
Battery charge greater than 60% and less than 80%,
Battery charge greater than 40% and less than 60%,
Battery charge greater than 20% and less than 40%,
Battery charge less than 20%,
Battery not present and connected to power supply,
Powered by external power supply, battery full charge
When a mobile terminal is charging its battery, external power supply may come from different
sources:
The terminal is on its base which is connected to main power, or
The terminal is connected to a battery charging system via an USB link (PC, HUB…,).
The battery charge status, illustrated by an icon of a battery, evolves according the acquired charge
level until full charge will be obtained.
When the terminal is running on battery power supply and when the charge is less than a certain
percentage, the terminal may display some specific message to warn the User.
Battery charge level between 5% and 10% => LOW CHARGE state.
Battery charge level = 5% => VERY LOW CHARGE state or battery charge level = 4% =>
CRITICAL state
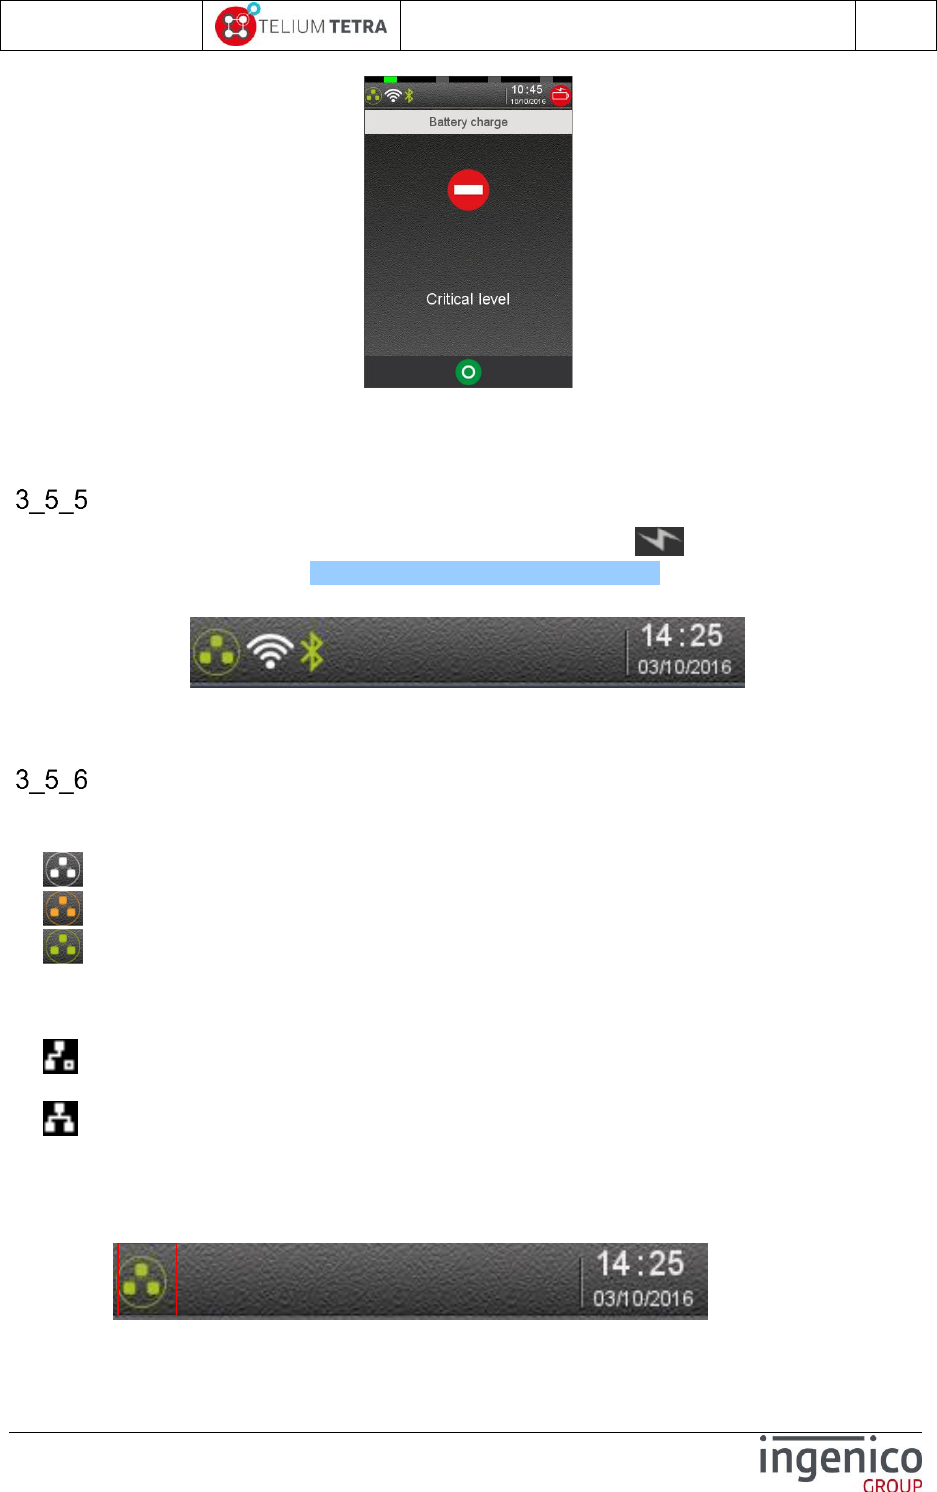
ICO-OPE-02757-V5
TETRA Terminal
User's guide
Public
31/199
Ingenico document - Reproduction or disclosure prohibited without written authorization
Please check document validity before using
Battery charge level <= 1% => terminal hardware automatically initiates a shutdown.
Main power connection
A part mobile terminal (=battery inside) on which a “thunderbolt” icon indicates its connection to
an external power supply (refer Figure 10 – Power or battery status), the status bar of the other
terminals does present power status.
Figure 11 – Non mobile terminal connected to power supply
Ethernet network connection
The following icons indicate the Ethernet link status on a colour screen terminal.
No icon No Ethernet capability
Ethernet capability present and cable not connected;
Ethernet cable connected. When DHCP is selected, means no IP address set
Ethernet connected
The following icons indicate the Ethernet link status on black and white screen terminal.
No icon No Ethernet capability
Ethernet capability present with or without cable connected. When DHCP is selected,
means no IP address set
Ethernet connected
This Ethernet link is established thanks to:
An internal Ethernet interface, or
An external Ethernet interface located in a basic ETHERNET/MODEM cradle or
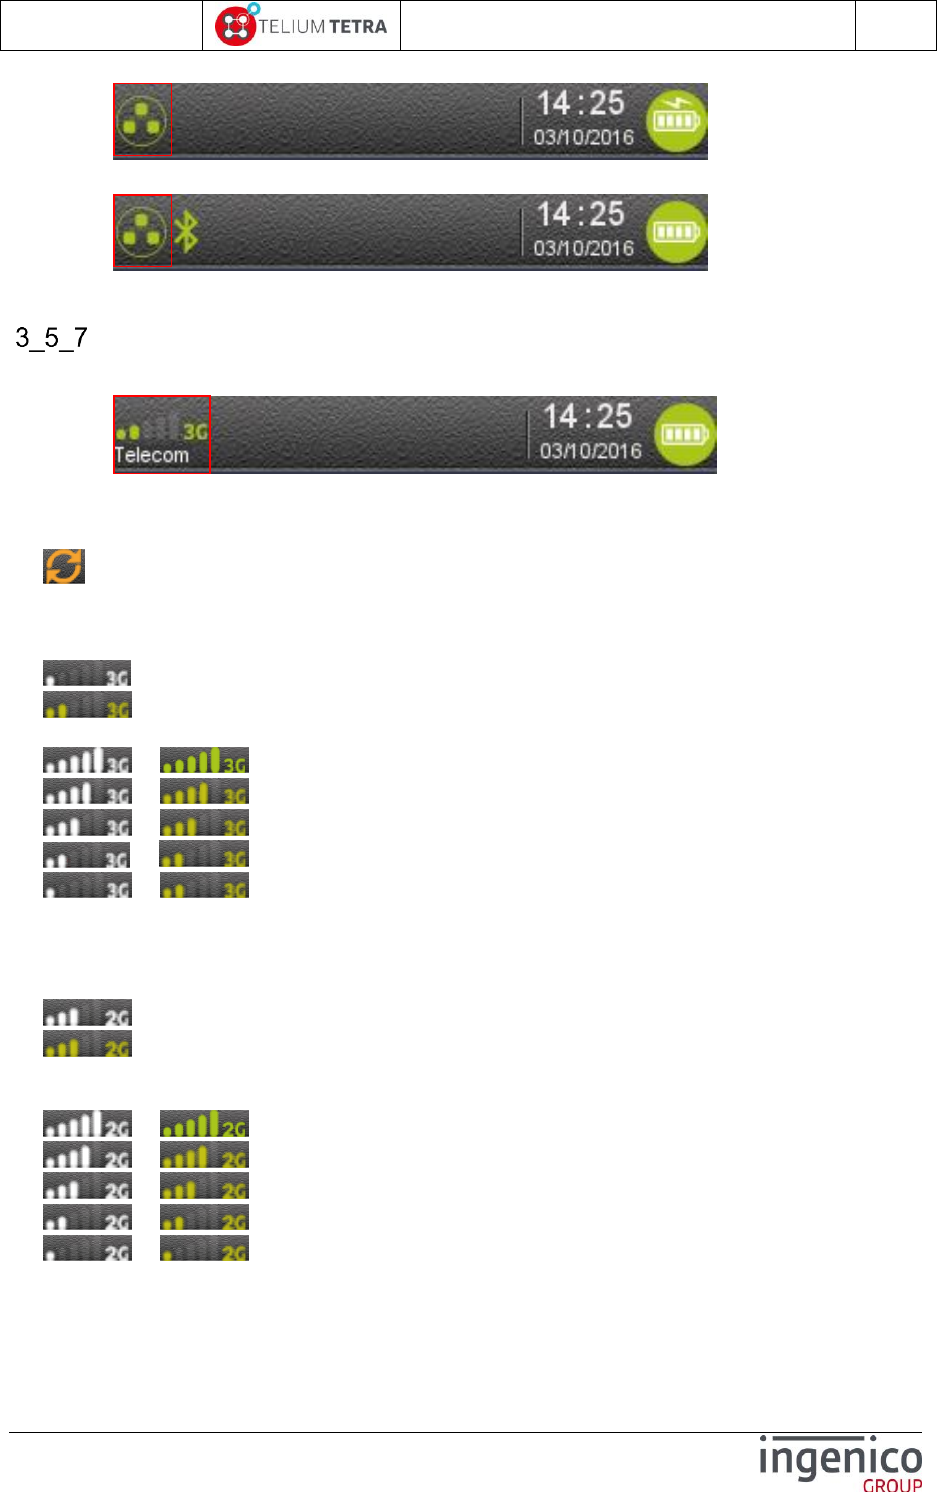
ICO-OPE-02757-V5
TETRA Terminal
User's guide
Public
32/199
Ingenico document - Reproduction or disclosure prohibited without written authorization
Please check document validity before using
An external Ethernet interface located in a BLUETOOTH/ETHERNET/MODEM cradle
GPRS / 3G / 4G Network connection
The terminal displays the status of the 3G connection and the mobile network name.
Before connection, the mobile network status is represented by:
No icon No mobile network module or module not activated;
Mobile network module is activated but not attached to a network.
The 3G network connection is represented by 2 elements:
3G connection status according icon colour: grey or green.
3G module is attached to mobile network but not yet ready for data transfer;
3G module is ready for data transfer to network, signal level is displayed;
3G connection reception signal level: number of highlighted bars.
or Maximum reception level (100%)
or High reception level (75%)
or Medium reception level (50%)
or Low reception level (25%)
or Very low reception level (<5%)
According to network capabilities and operator SIM card configuration, terminal may connect in 2G. In
this case the following icons are displayed:
GPRS connection status:
Radio module is attached to 2G network but not yet ready for data transfer;
Radio module is attached to 2G network and it is ready for data transfer. In this
case the signal level is displayed;
GPRS connection reception signal level:
or Maximum reception level (100%)
or High reception level (75%)
or Medium reception level (50%)
or Low reception level (25%)
or Very low reception level (<5%)
Some high mobile terminals offer 4G network connexion usage. In this case the following icons are
displayed:
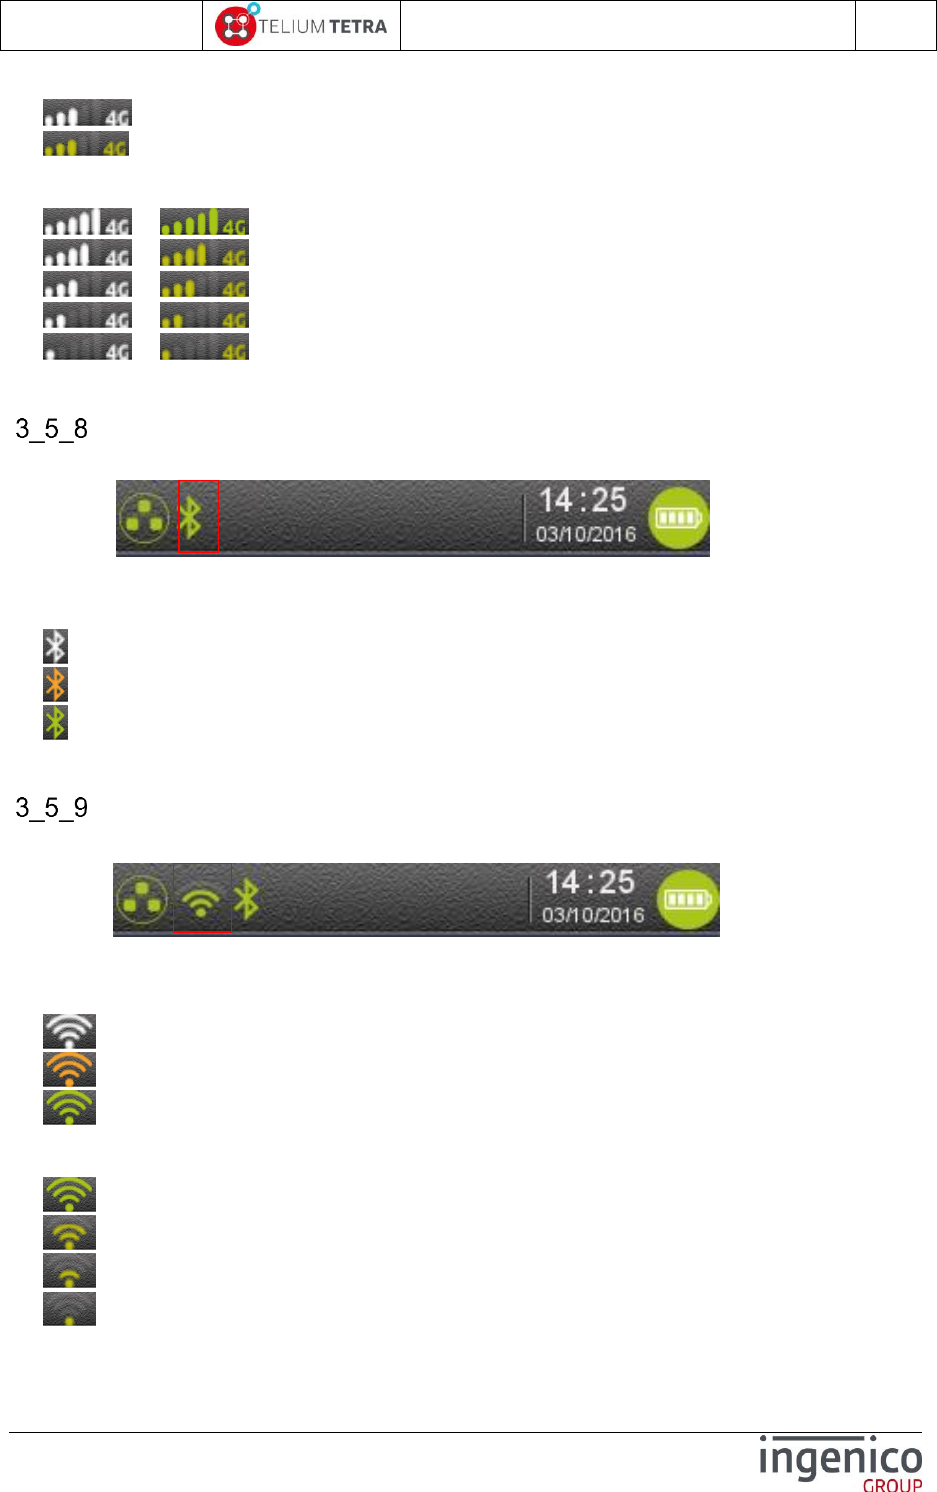
ICO-OPE-02757-V5
TETRA Terminal
User's guide
Public
33/199
Ingenico document - Reproduction or disclosure prohibited without written authorization
Please check document validity before using
4G connection status:
Radio module is attached to 4G network but not yet ready for data transfer;
Radio module is attached to 4G network and it is ready for data transfer. In this
case the signal level is displayed;
4G connection and reception signal level:
or Maximum reception level (100%)
or High reception level (75%)
or Medium reception level (50%)
or Low reception level (25%)
or Very low reception level (<5%)
Bluetooth connection
The terminal displays the status of the Bluetooth connection.
The Bluetooth connection is represented by one element:
The connection status:
No icon no Bluetooth capability or Bluetooth OFF (= in config menu it can be enabled)
Bluetooth present but not activated.
Bluetooth connection is in progress.
Terminal connected to at least one base.
Wi-Fi connection
The terminal displays the Wi-Fi connection status.
The Wi-Fi connection is represented by 2 elements:
Wi-Fi connection status:
No icon No Wi-Fi module present or Wi-Fi OFF (= in config menu it can be enabled)
Wi-Fi capability present and radio on;
Wi-Fi module is attached to an access point but waiting for an IP address;
Wi-Fi module is attached to network
Wi-Fi connection reception signal level:
Maximum reception level (greater than -55 dBm)
High reception level (between -70 dBm and -55 dBm)
Medium reception level (between -85 dBm and -70 dBm)
Low reception level (lower than -85 dBm)

ICO-OPE-02757-V5
TETRA Terminal
User's guide
Public
34/199
Ingenico document - Reproduction or disclosure prohibited without written authorization
Please check document validity before using
Contactless connection
When physical LEDs are not available, the terminal displays the Contactless connection status on
screen (= notion of software LEDs).
The contactless connection status is represented by a LED:
GRAY Contactless HW capable or led off state during blinking
GREEN Blinking Contactless HW & SW capable and READY.
GREEN Static Contactless field turned ON, waiting the contactless card.

ICO-OPE-02757-V5
TETRA Terminal
User's guide
Public
35/199
Ingenico document - Reproduction or disclosure prohibited without written authorization
Please check document validity before using
4 TETRA terminal Power-UP sequence
TETRA terminal start-up is divided in difference steps which durations may depend on operations to
be performed. The number of operations may be different depending of terminal state;
New software to control and to install will impact substantially the duration of start-up
Some operations as Secured OS replacement or primary OS element may need intermediate
hardware reboot to be performed.
4_1 Step1 = Secured OS initialization
The Secured OS is the first software of a TETRA terminal which is initialized and started. During this
step the following screen is displayed.
Figure 12 – Secured OS boot screen
When the terminal stops on this screen without other activity, the terminal must be sent to a repair
center.
SCREEN
MEANING
“ : ( “
The Secured OS of the terminal has not been loaded.
The terminal is not activated (symbol).
“ :-) “
The Secured OS of the terminal has not been loaded.
The terminal is activated (symbol).
Table 8 - Secured OS startup status
On mobile terminals (ex: MOVE5000) some other screens may be optionally displayed according to
battery charging status.
When battery level voltage is too low and the terminal is not connected to an external power supply,
one of the following screens is displayed during 3 seconds and the terminal automatically shutdown.
“Security Activation”
status (refer to
following table)
Additional ‘*’ are
added on screen until
Secured OS
initialization outcome.

ICO-OPE-02757-V5
TETRA Terminal
User's guide
Public
36/199
Ingenico document - Reproduction or disclosure prohibited without written authorization
Please check document validity before using
Figure 13 – Secured OS battery low state screen
When the terminal is connected to an external power supply and until the battery level voltage has not
reached its nominal value to boot, one of the following screens is displayed.
Figure 14 – Secured OS battery charging state screen
This first charging step may take tens of minutes.
4_2 Step2 = TETRA OS initialization and startup
The TETRA OS is the second software of a TETRA terminal which is authenticated, initialized and
started. During this step the following screen is displayed.
Minimal voltage battery
level not reached to
boot.
Terminal not
connected to external
power supply.
Minimal voltage battery
level not reached to
boot.
Terminal connected to
external power supply
= battery is charging
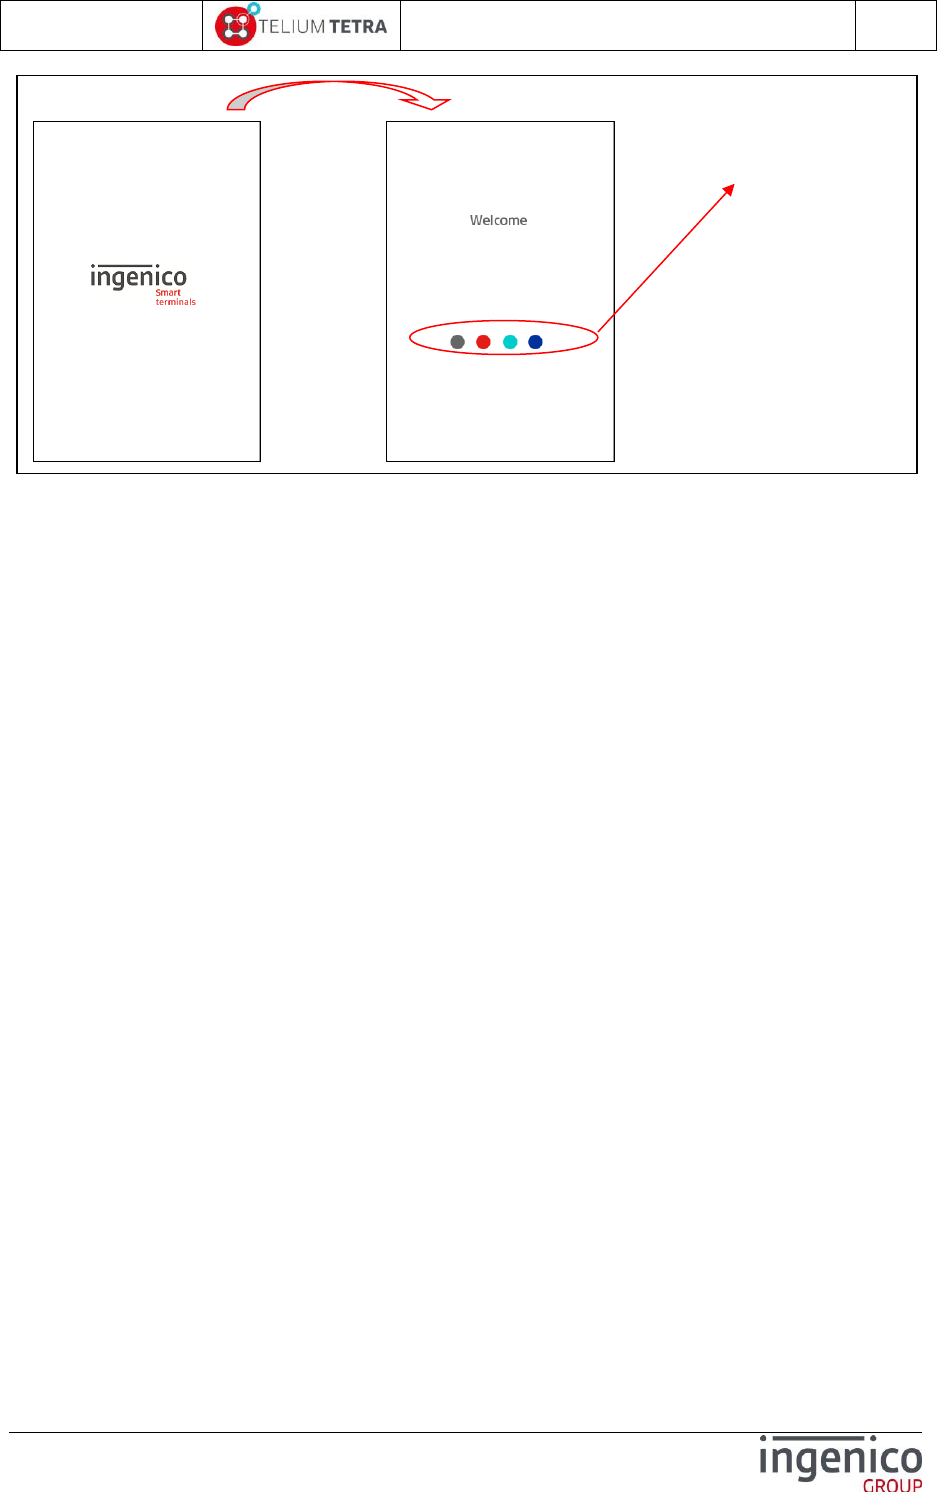
ICO-OPE-02757-V5
TETRA Terminal
User's guide
Public
37/199
Ingenico document - Reproduction or disclosure prohibited without written authorization
Please check document validity before using
Figure 15 – TETRA OS boot screen
During the second part of TETRA OS initialization (= Screen 2 displayed), a beep sounds: during the 2
seconds after it’s possible in pressing key to enter in specific operations:
Key ‘.’ is pressed Local loading mode is activated for local maintenance thanks to “LLT”
PC tool (if no USB key is detected) or thanks to an USB key (if an USB key is detected) .
Key ‘5’ is pressed Remote debug mode is activated for development. This is only
available on terminal which is “development” mode (=> not in production state = Flashing red
banner “Do not use for payment” visible).
When an USB is detected to perform local loading mode (= presence of “\TELIUM3” directory), the
terminal asks the user to confirm the loading. If the user cancels the operation, the terminal expects
LLT connexion. According to the terminal state “development” or “production”, the loading by an USB
key allows performing:
Software update whatever terminal state
Factory reset software loading only for terminal in “development” state.
When the “\TELIUM3” directory, in the USB key, contents sub-directories, it is possible to parse them
thanks to “YELLOW” key and to select a directory contenting the packages to load thanks to “GREEN”
key.
The 2 following screens illustrate these 2 uses cases.
The “dots” are
displayed based on 1
second frequency.
When the 4 dots have
been displayed they
are all erased and the
first one is displayed
and so on.
Screen 1
After 3s a Screen 2 is displayed
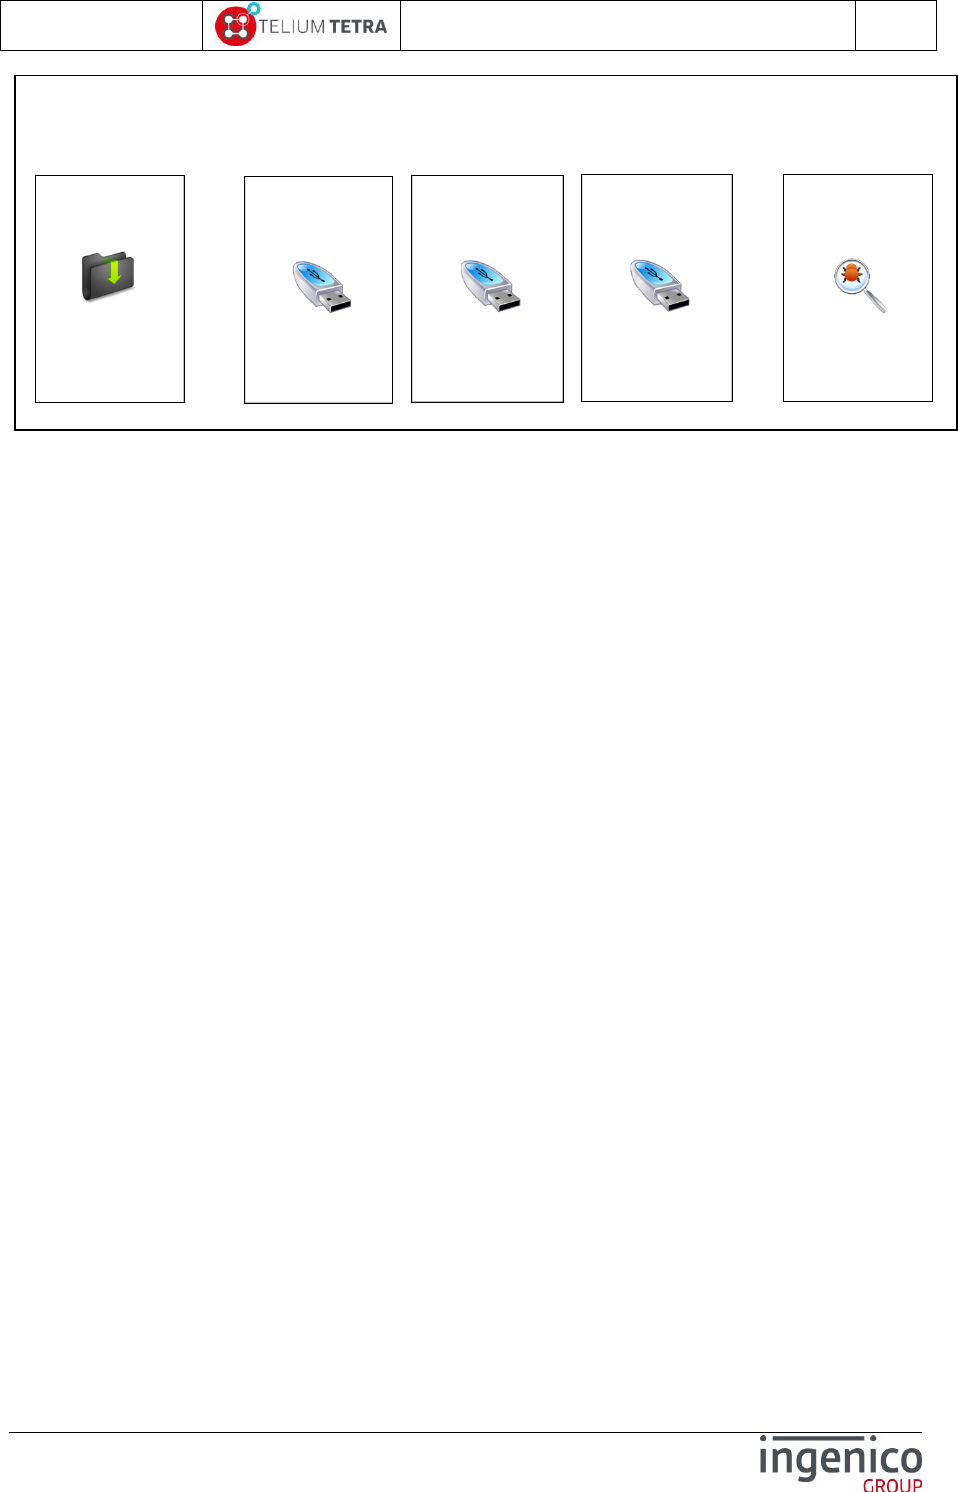
ICO-OPE-02757-V5
TETRA Terminal
User's guide
Public
38/199
Ingenico document - Reproduction or disclosure prohibited without written authorization
Please check document validity before using
Figure 16 – TETRA OS local loading or wait for debug screen
When GDB connexion is expected the terminal displays the following messages:
“Init Ethernet” until connexion to DHCP and IP address set
“LDBG OK: IP 10.23.7.xxx Port 2159” when IP address is set and until connexion
establishment with PC workstation running Ingedev/GDB.
“Accepted IP 10.23.7.yyy” when connection is established with Ingedev/GDB.
During the second part of TETRA OS initialization (= Screen 2 displayed), after the beep, if the
terminal is not ready to start, the Local loading mode is activated. When this appends in field, the
terminal must be returned to a repair center:
The minimal set of software to run is not present
The minimal set of software to run is corrupted.
When there is no software update pending, the duration of this step is around 6s, otherwise this step
take time according to the number of software packages to authenticate, to install, to update and to
remove.
At this step, the applications of the terminal begin to start. During this step in which applications may
wait to other applications availability to perform treatments, no human action is possible, on touch and
on keyboard. This state is highlighted by the following screen:
Remote debug mode:
- GDB connection expected
Local loading mode:
- Expected LLT connection - USB detected to load software
After 4s a second screen is displayed
Init Ethernet
LDBG OK: IP
10.23.7.xxx
Port 2159
Accepted
IP 10.23.7.yyy
Waiting ...
USB factory reset
...
Waiting ...
USB Update ...
Detection => Factory Reset OR Software update
‘VAL’ to confirm

ICO-OPE-02757-V5
TETRA Terminal
User's guide
Public
39/199
Ingenico document - Reproduction or disclosure prohibited without written authorization
Please check document validity before using
Figure 17 – TETRA applications start-up screen
Note: When the terminal has done a specific planned reboot (refer to 9_1_4 PCIV4 time slot) to
control the integrity of the software, screen 4 is replaced by the following screen:
When running WEB applications capabilities have been activated, the starting sequence is slightly
different. After “Screen 4”, other screens are displayed. The following figure illustrates start-up in
presence of WEB PLATFORM:
The “dots” are displayed based on 1 second frequency. When the 4 dots have
been displayed they are all erased and the first one is displayed and so on.
Screen 3
Screen 4
Screen 5
OR Screen 6
After some seconds Screen 5 or 6 is displayed according
to terminal configuration
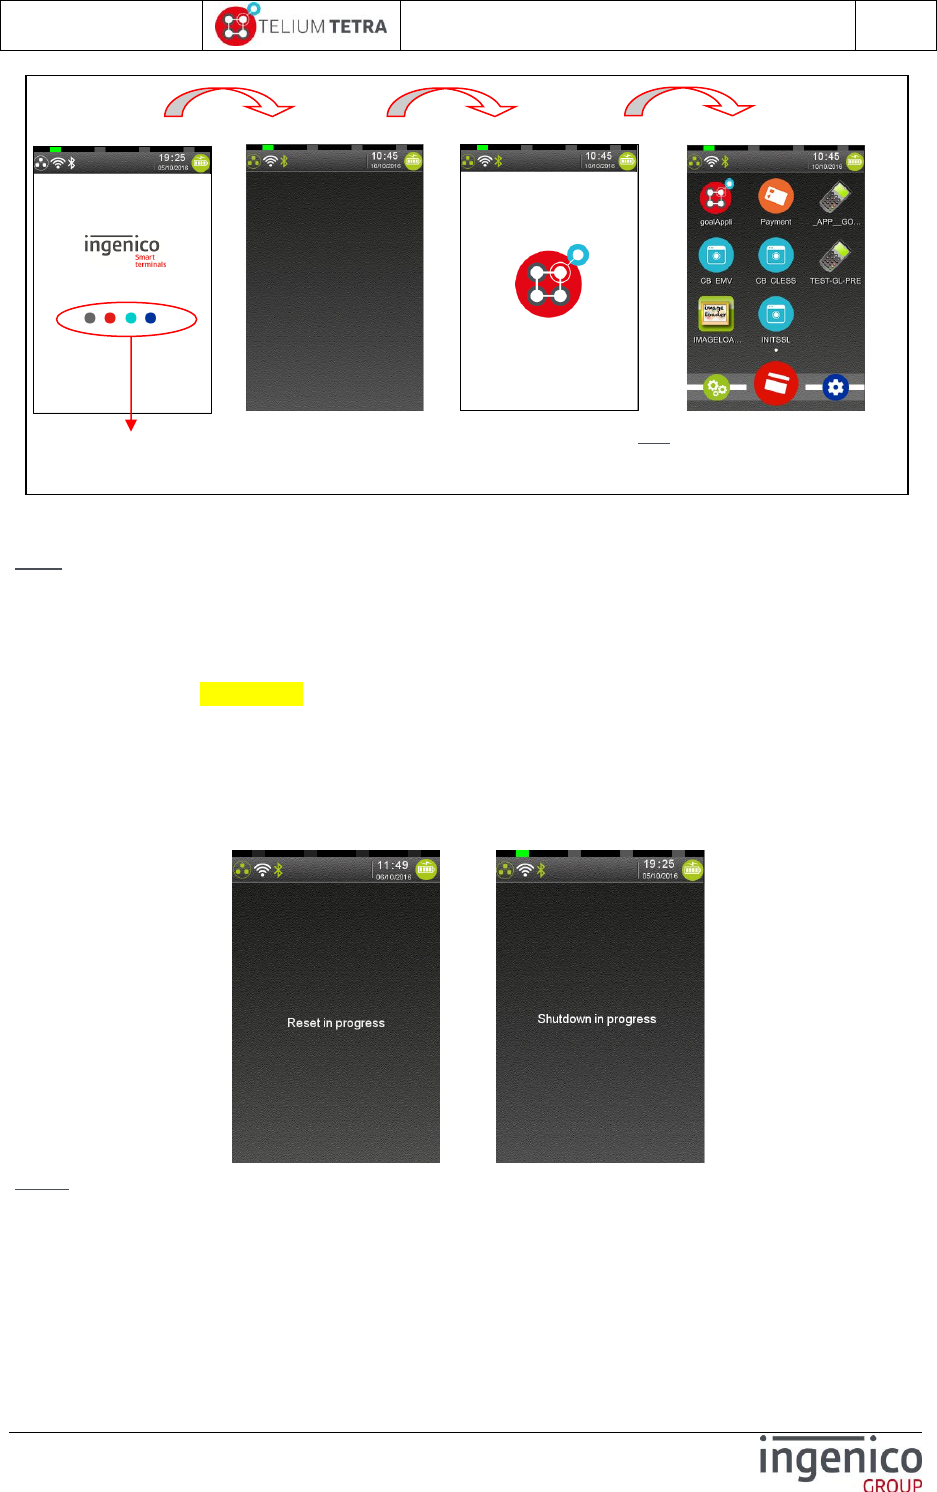
ICO-OPE-02757-V5
TETRA Terminal
User's guide
Public
40/199
Ingenico document - Reproduction or disclosure prohibited without written authorization
Please check document validity before using
Figure 18 – TETRA applications in case of WEB applications presence
Note: According to terminal configuration “Payment” “Amount” screen may also be the issue of start-
up when WEB applications capabilities are activated as in previous figure.
4_3 Power-down or reboot sequence
Keys combination of “YELLOW” key and “.” triggers a reboot of the terminal.
On standalone terminal (ex: DESK5000), the terminal stops software execution and restarts.
On a mobile terminal (ex: MOV5000), the terminal stops software execution and power-down.
The User needs to press “GREEN” key to power-on the terminal again.
In this case the following screens are displayed until all processes in progress stop. According to
resources used by applications this may take some seconds before a black screen appears and the
real reboot starts.
or
Note: It’s safe to use this keys combination than removing the power pack or the power supply when
the terminal seems to be blocked.
The “dots” are displayed based on 1 second frequency. When the 4 dots have
been displayed they are all erased and the first one is displayed and so on.
Screen 4
Screen 5
Screen 6
Screen 7
Note : « WEB Desktop » configured
“Show
Native Apps on grid “ = ON in this view
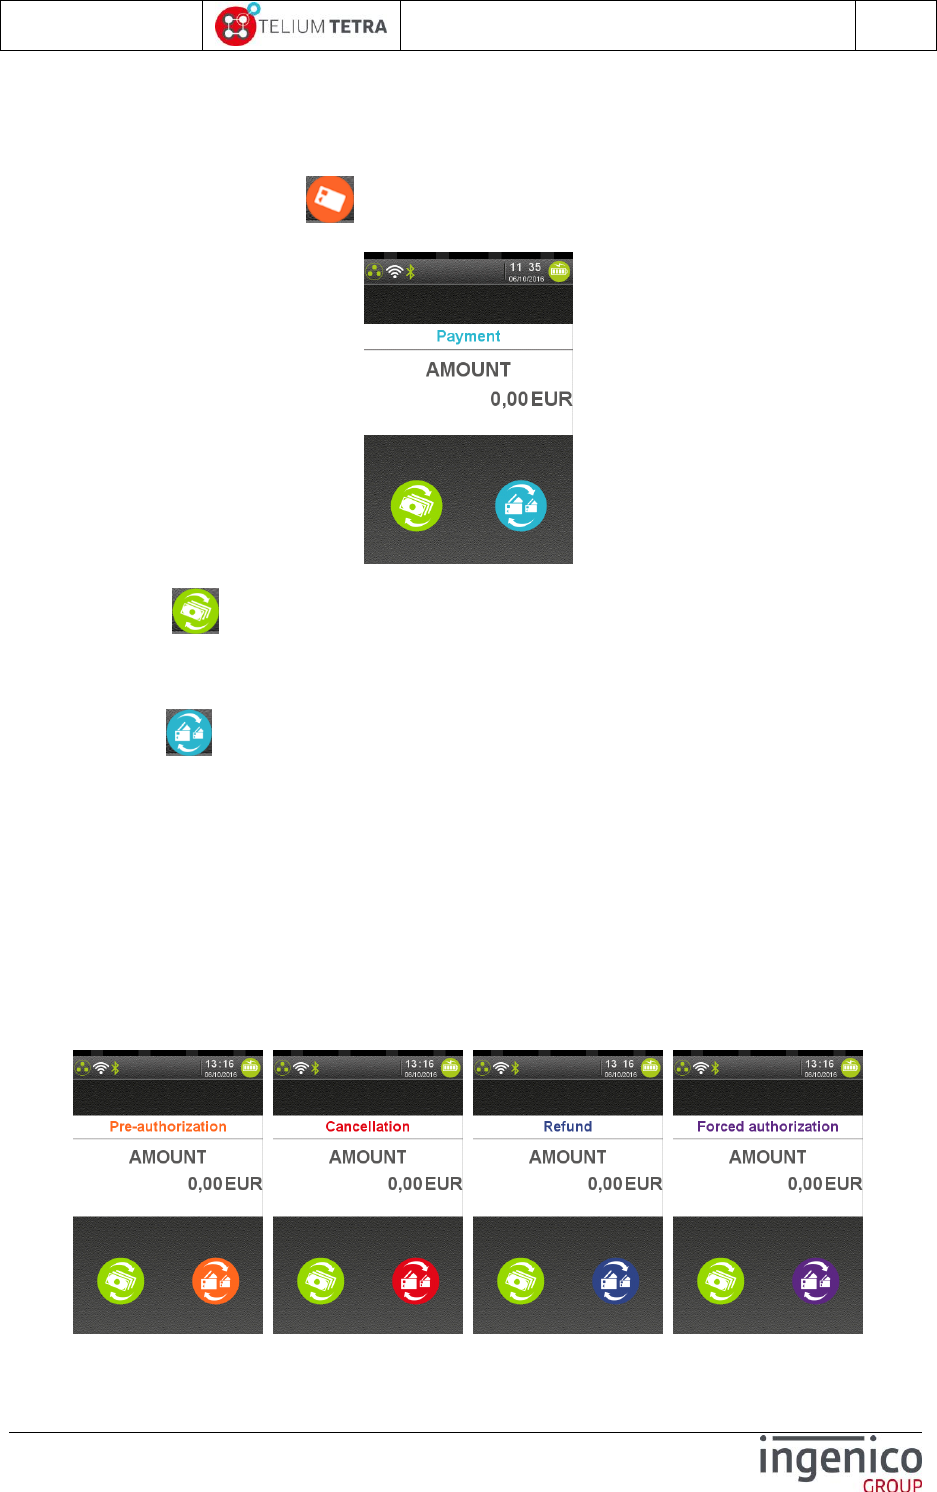
ICO-OPE-02757-V5
TETRA Terminal
User's guide
Public
41/199
Ingenico document - Reproduction or disclosure prohibited without written authorization
Please check document validity before using
5 “Explorer” “Payment” icon selection
When selecting “Payment” icon on “Explorer”, it’s possible to initiate a payment: the terminal
proposes to user to enter an amount.
On bottom on the screen, some icons are present to typify the payment type or the amount:
Currency icon allows selecting another currency according to those registered by
applications. This icon is inactive when only one currency available. Amount entry field is
automatically adjusted to currency specificities. (ex: separator, authorized number after
separator, …)
Payment icon allows selecting another payment type according to those authorized by
applications. This icon is inactive when only one payment type authorized. Each time the
payment icon is touched:
A new payment type is proposed
The background of payment icon is set to a new colour
The payment type is displayed on top of “Amount” text with the colour of the icon .
The different proposed payment types are:
“Payment”
“Auto. forced”
“Cancellation”
“Refund”
“Pre-authorisation”
The corresponding screens are:
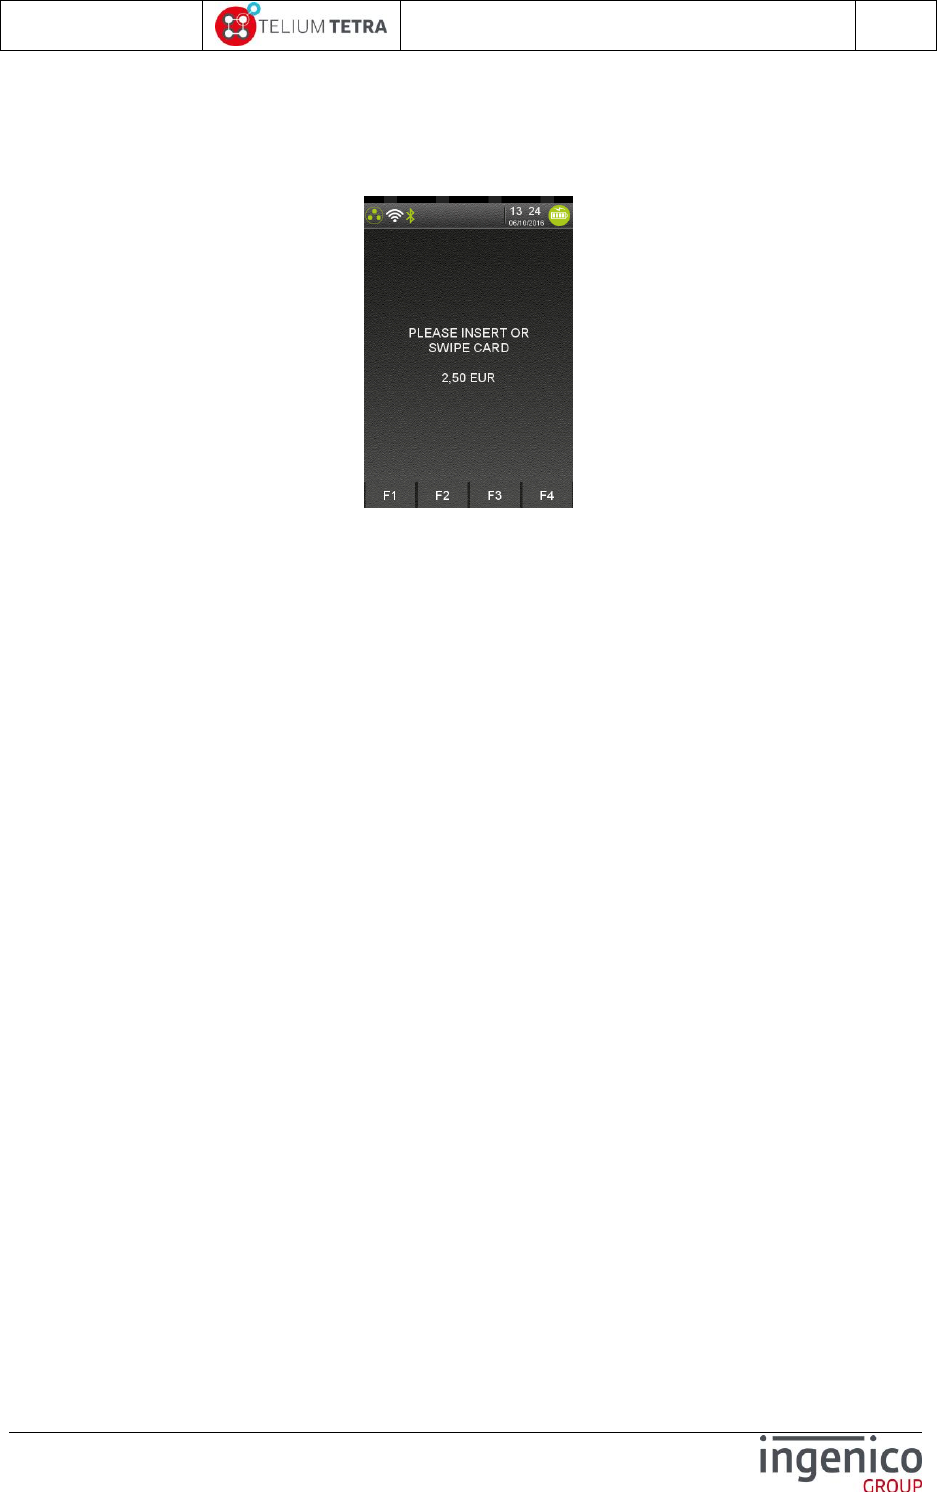
ICO-OPE-02757-V5
TETRA Terminal
User's guide
Public
42/199
Ingenico document - Reproduction or disclosure prohibited without written authorization
Please check document validity before using
The following screen is displayed when an amount has been validated; the terminal starts to wait for
payment means presentation.
The supported payment means depend of terminals settings and customisation done via
applications or parameters files.
The operation can be cancelled thanks to “RED” key.
Enter a chip card or swipe a magnetic card or tap a contact less card to start a payment. This
operation may be cancelled thanks to “RED” key.
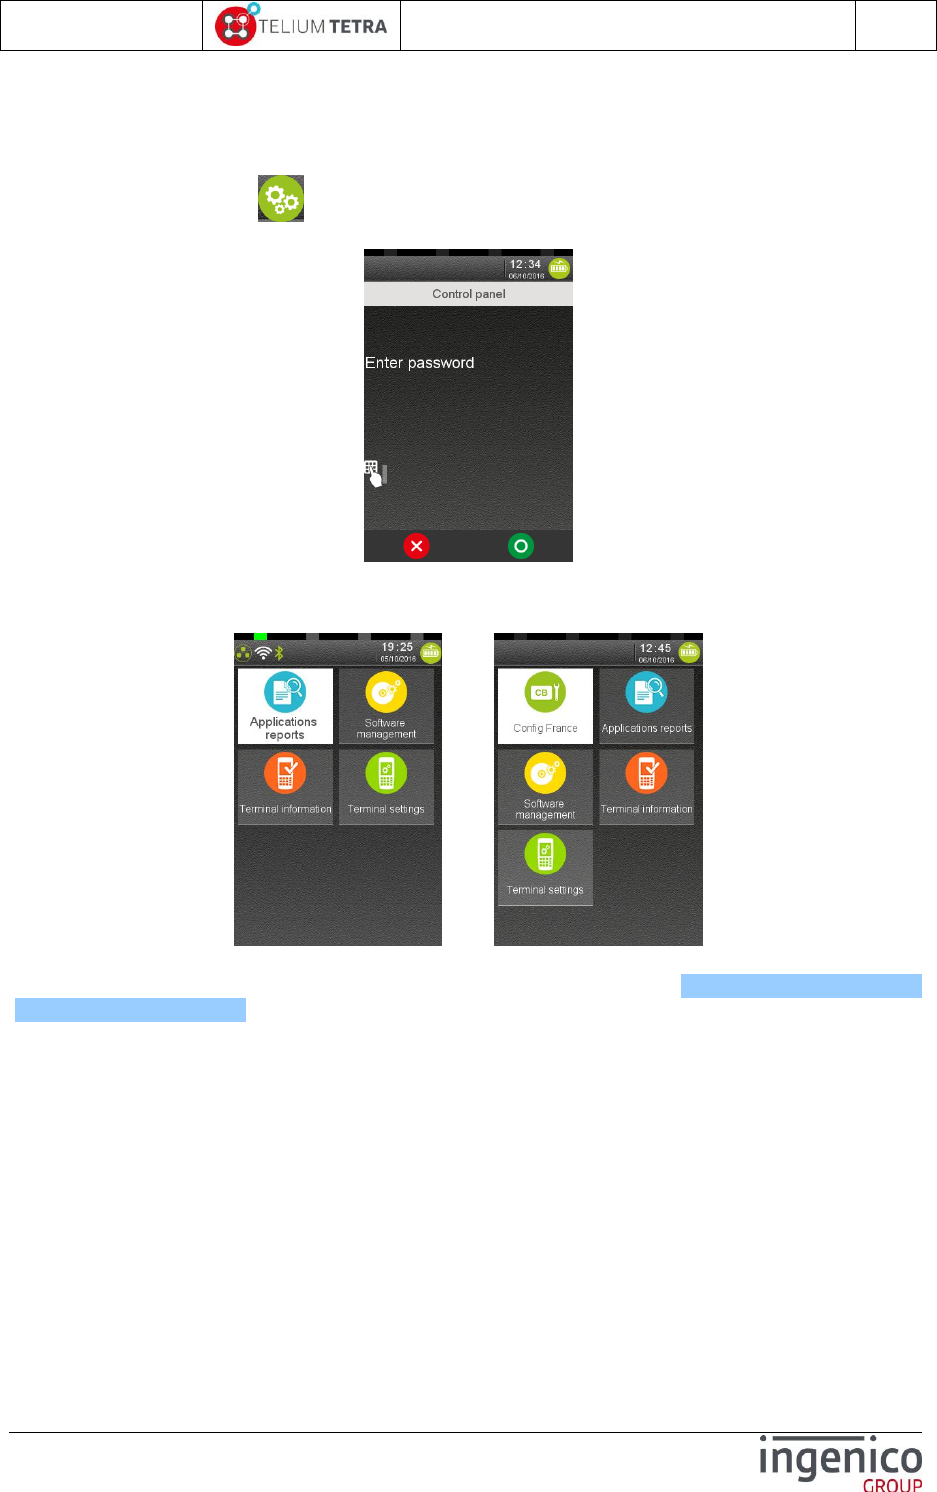
ICO-OPE-02757-V5
TETRA Terminal
User's guide
Public
43/199
Ingenico document - Reproduction or disclosure prohibited without written authorization
Please check document validity before using
6 “Control Panel” icon selection
When “Control panel” icon on “Explorer” is selected and according to terminal configuration, an
access password may be asked to user before opening “Control panel”.
When a valid password is entered the following screens could be displayed according loaded
configuration:
OR
Default Locally customized (ex: FRANCE )
The following chapters will detail the different panels or menus listed in Table 7 - "Explorer" tree
pathnames organisation : One chapter per element of level 2 column.
The “Config France” icon is available only on French configuration. The description of this menu is
provided in the annex chapter of this document.

ICO-OPE-02757-V5
TETRA Terminal
User's guide
Public
44/199
Ingenico document - Reproduction or disclosure prohibited without written authorization
Please check document validity before using
7 Applications reports
This menu gathers all printed reports done by the customers’ applications and a subset of reports
done by software PLATFORM. The other reports of the PLATFORM are provided by different sub-
panels of the “General settings” panel.
This specific menu addresses the following items:
Item
Reference
Transaction State
7_1
Calls planning
7_2
Diagnostics
7_3
Batch Data capture
7_4
When “Application Reports” icon is selected on “Control panel”, the following subpanel is
proposed:
7_1 Transaction
From “Application Reports” screen, select the icon (named “Transaction”): when implemented in
applications, it prints the log of the transactions. This item is functional only on terminals equipped with
a printer.
7_2 Calls planning
From the “Application Reports” screen, select the icon (named “Calls planning”): when
implemented in applications, it prints the schedule of coming automatic calls (as calls for
downloading). This item is functional only on terminals equipped with a printer.

ICO-OPE-02757-V5
TETRA Terminal
User's guide
Public
45/199
Ingenico document - Reproduction or disclosure prohibited without written authorization
Please check document validity before using
7_3 Diagnostics
To retrieve diagnostics information save in terminal, select from the “Application Reports” screen, the
icon (named “Diagnostics”). The following menu is proposed:
Three ways to extract diagnostics information from the terminal:
By creating reports on screen or on printer = “Local” icon
By saving diagnosis files on an USB key = “Diag to USB” icon.
By saving diagnosis files on a MMC/SD card = “Diag to MMC” icon.
The recorded diagnostics may be also erased thanks to “Clear” icon.
This specific menu addresses the following items:
Item
Reference
Local
7_3_1
Diag to USB
7_3_2
Diag to MMC
7_3_2
Clear
7_3_3
Local
When selecting icon (named “Local”), the terminal proposes to extract all recorded diagnosis
files or specific type of diagnostic information: it will possible to choose afterward between screen
rendering or printing.
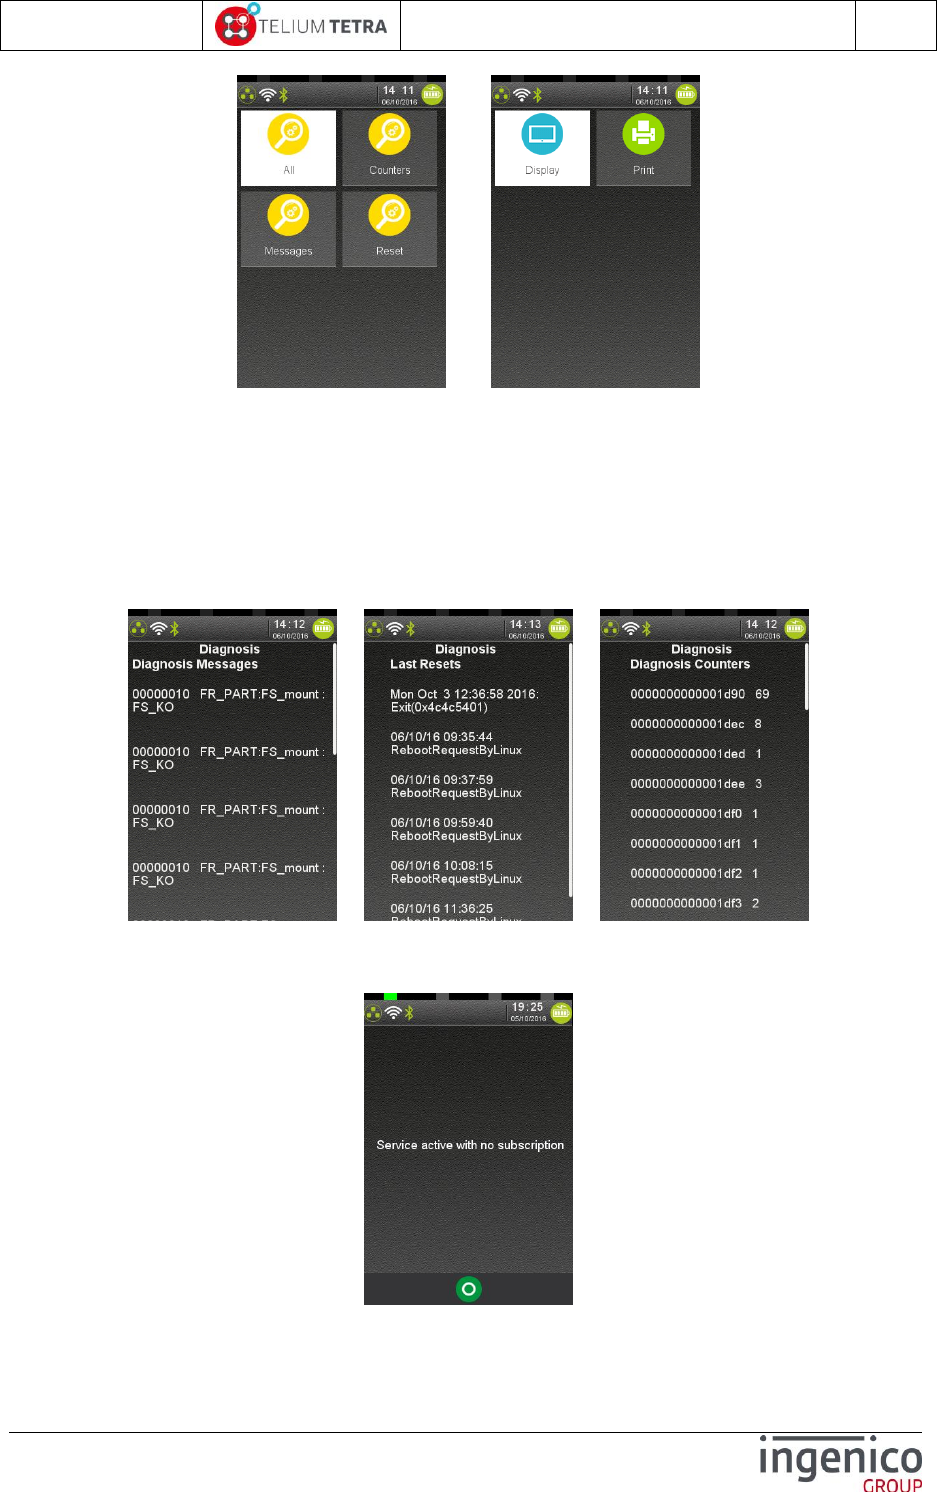
ICO-OPE-02757-V5
TETRA Terminal
User's guide
Public
46/199
Ingenico document - Reproduction or disclosure prohibited without written authorization
Please check document validity before using
=>
Four ways to extract locally diagnostics information from the terminal:
Concatenation of all recorded diagnosis files
Counters diagnosis file = Different counters recorded by applications and PLATFORM/OS
software
Messages diagnosis file = Different errors or warning messages recorded by applications and
PLATFORM/OS software
Reset diagnosis file = Different date / time and cause of the terminal reboot action.
One of the following screens or a combination of these screens may be displayed:
When information exceeds the one screen, it’s possible to scroll thanks touch screen.
When there is no recorded information, the terminal displays the following error message:
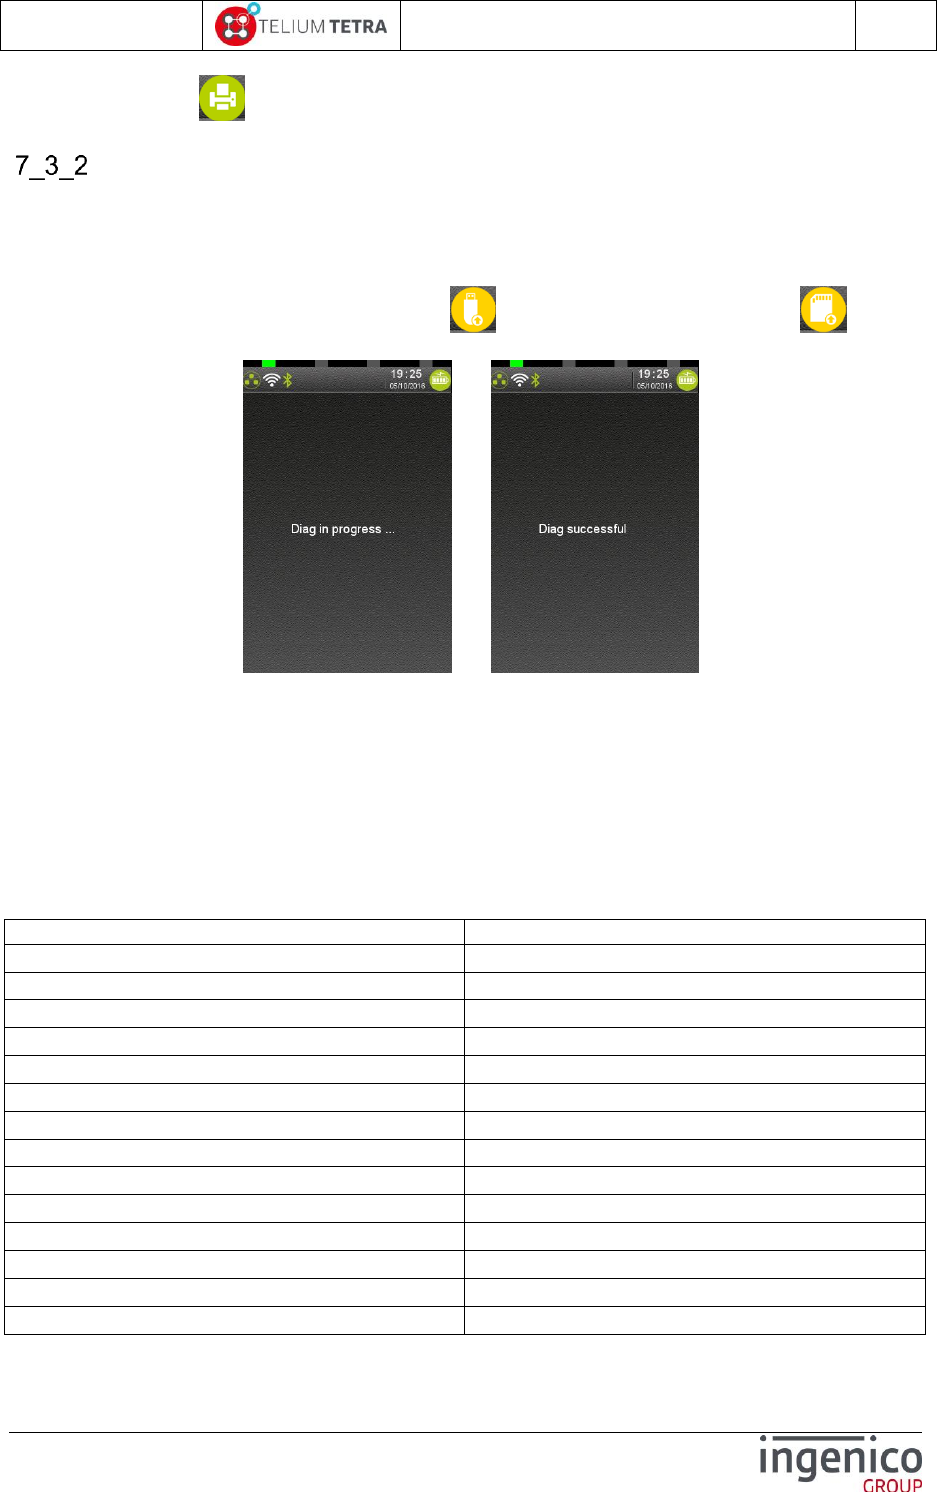
ICO-OPE-02757-V5
TETRA Terminal
User's guide
Public
47/199
Ingenico document - Reproduction or disclosure prohibited without written authorization
Please check document validity before using
When selecting icon (named “Print”, the same information are reported on a ticket.
Diag to USB or MMC
Diagnostics information can be saved on USB key or on a MMC/SD card. Apart different memory
support used; there is no difference between these 2 menus.
Insert an USB key (or a MMC) and select icon (named “Diag to USB”) or icon (named
“Diag to MMC”). During processing the terminal displays the following screens.
=>
At the end of the operation the user can remove the key (or the MMC).
When the operation performs successfully, the terminal has:
Create a directory named with the serial number of the terminal:
Ex = “141423413270000500000333”
Inside this directory it creates a directory with date/time of the extraction:
Ex = “201604251419” corresponding to April 25th, 2016.
It copies in these “date/time” directory all the log/diagnostics files it finds. Here after, the list of
all files that may exist:
Filenames
Description
APPCOUNTER.DIA
Application usage diagnostics file
APPTEXT.DIA
Application usage diagnostics file
BAT.DIA
Battery log = part managed by Secured OS
BAT.LOG
Battery log = part not managed by Secured OS
BOOTLOG.DIA
BOOT sequence log of Secured OS
COUPLE_SSL.CFG
SSL connexion log information
DEBUG.INI
Syslog trace settings
HTERMINAL.INI
Hard configuration description
INITRD.DIA
Linux kernel BOOT sequence log
KPANIC.DIA
Linux kernel log on kernel “panic” event
ldbg.log
LDBG/GDB log file (not in field)
LIFECOUNTER.DIA
Life counter
LOGPROD.DIA
Secured OS software configuration
network.dia
UDP/TCP input output log connexion
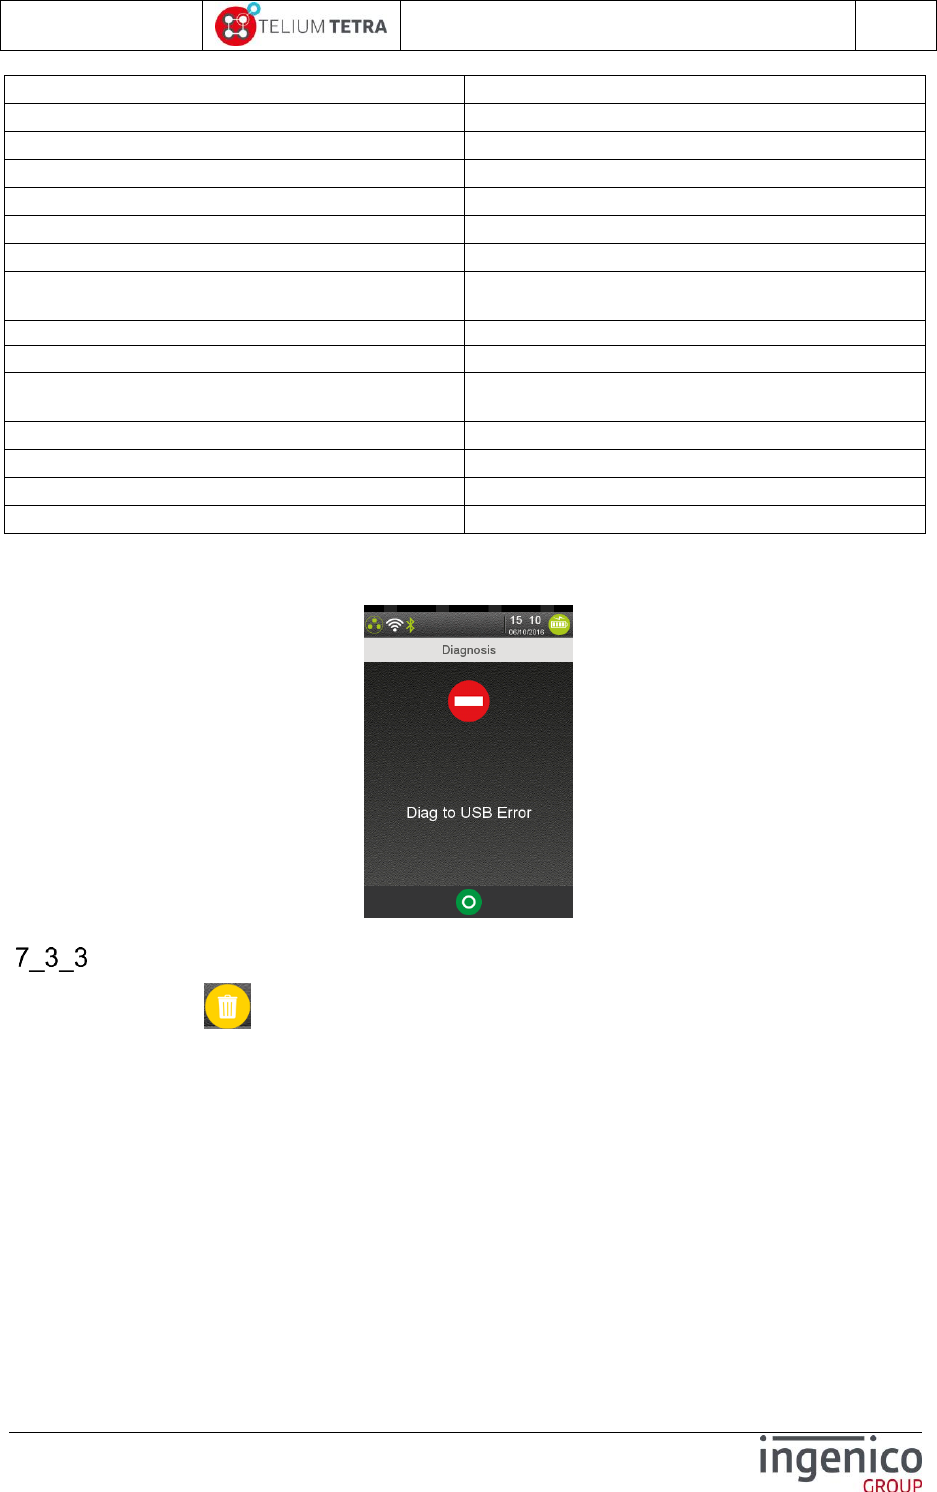
ICO-OPE-02757-V5
TETRA Terminal
User's guide
Public
48/199
Ingenico document - Reproduction or disclosure prohibited without written authorization
Please check document validity before using
network.dia.bak
UDP/TCP input output log connexion backup file
ntpt3.log
Download protocol log information
OSSECURE.DIA
Secured OS usage log file
OSSECURE.LOG
Secured OS usage log file
MOCKUP.INI
Development mode activation state (Not in field)
PACKAGES.CSV
Terminal Software configuration
SECURE_OS.INI
Secured OS firmware information
STERMINAL.INI
Specific terminal configuration description (MAC
address serial number …)
sw_act.log
Software activation log file
syslog.log
General traces of OS/PLATFORM/applications
present if activated
SYSTEM.CFG
TMSCALL.log
TMS call log information
TMSCALL.TMS
TMS call configuration for automatic connexion
TMSCONFIG.TMS
TMS call configuration for manual connexion
When the USB key (or the MMC) has not been inserted before selecting the storing action, the
terminal displays the following error message.
Clear
When selecting icon (named “Clear”), the terminal proposes to user to erase the all diagnosis
files. After confirmation by user, the files are erased. display or to print the content of diagnosis files.
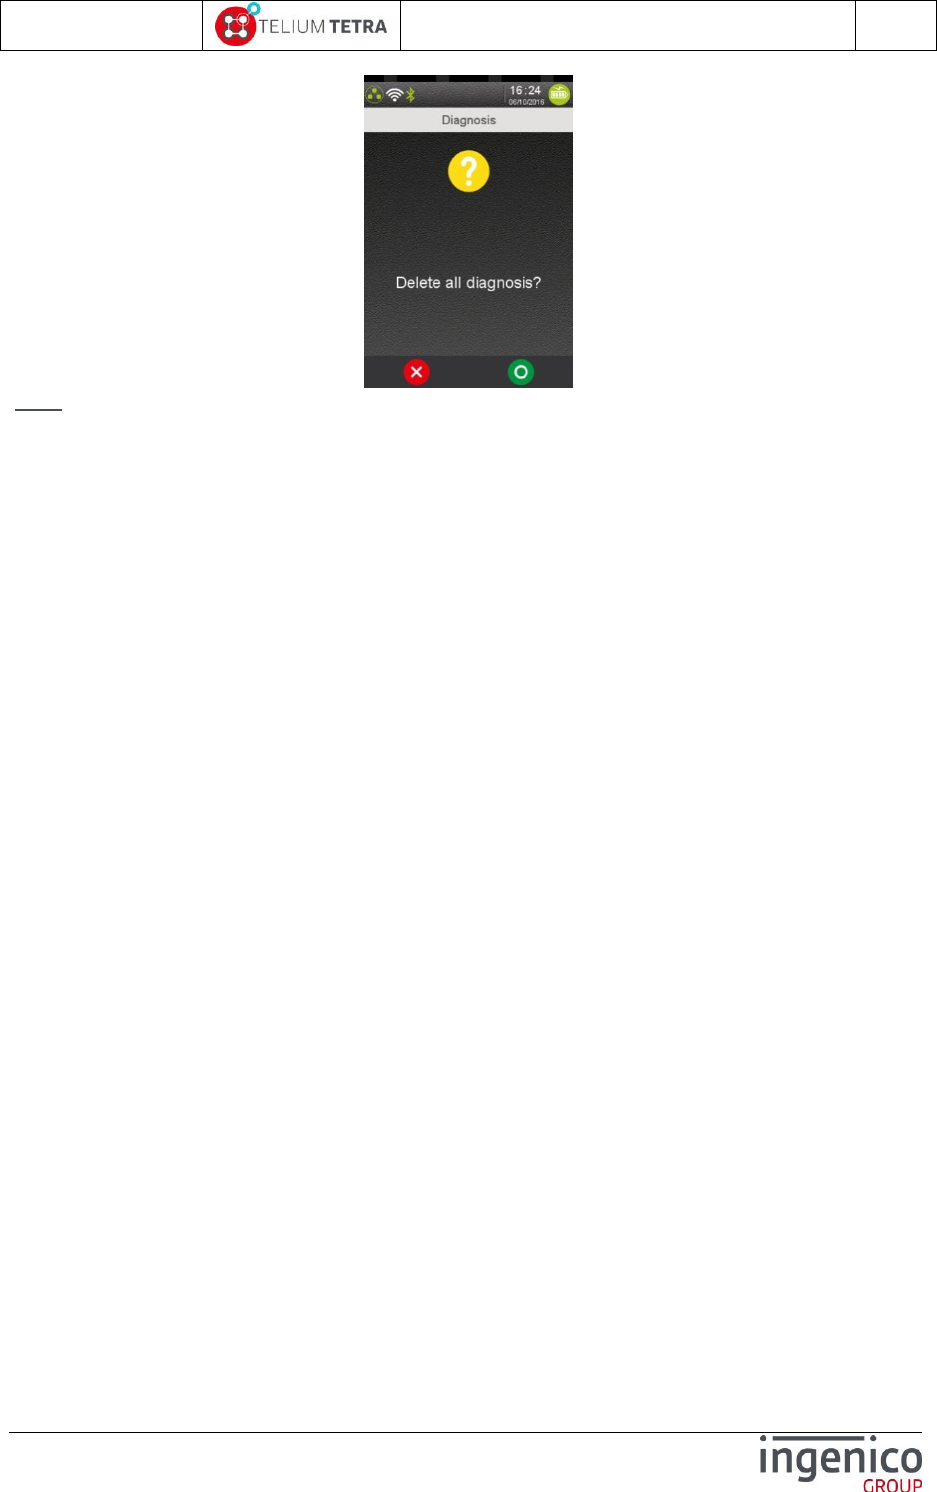
ICO-OPE-02757-V5
TETRA Terminal
User's guide
Public
49/199
Ingenico document - Reproduction or disclosure prohibited without written authorization
Please check document validity before using
Note: Whatever the result of the operation, nothing is reported to the user.
7_4 Batch Data capture
From “Application Reports” screen, select the icon named “Batch Data capture”. When implemented in
applications, it prints the concatenation of the different batch data captures recorded by applications.
This item is functional only on terminals equipped with a printer.
When no application has subscribed to this feature, nothing appends.
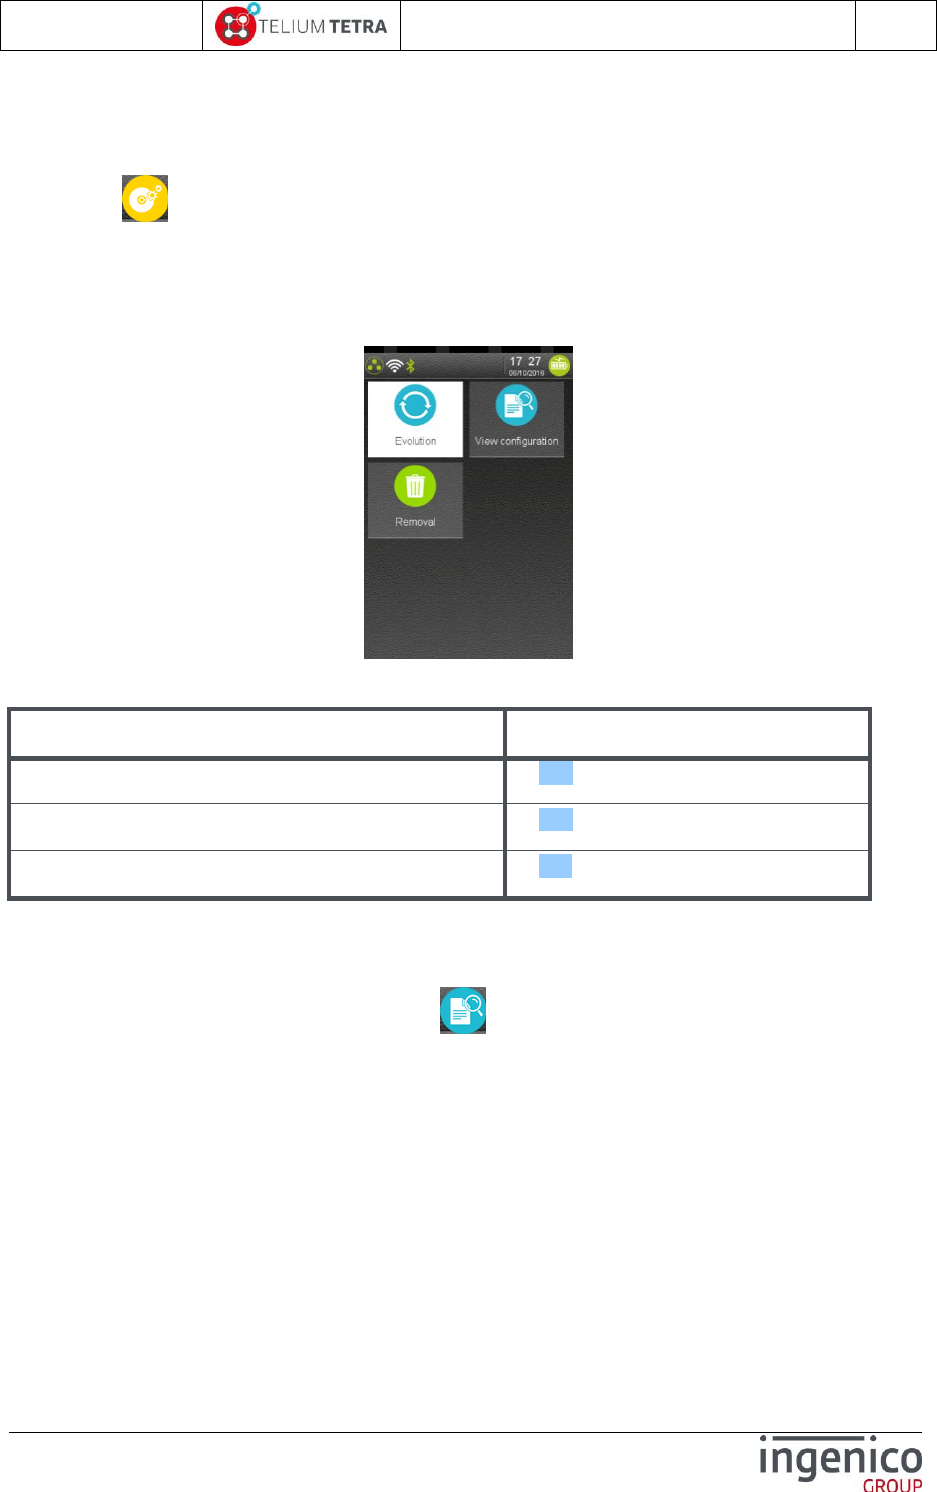
ICO-OPE-02757-V5
TETRA Terminal
User's guide
Public
50/199
Ingenico document - Reproduction or disclosure prohibited without written authorization
Please check document validity before using
8 Software management
“Software” icon selection opens the following screen sub-panel dedicated to software
management:
Software evolution management (Local or automatic terminal supervision and
download/upload)
Local software package removal
Software configuration reports view or print
This specific panel addresses the following items:
Item
Reference
View configuration
8_1
Evolution
8_2
Removal
8_3
8_1 View configuration
From “Software management” panel, select the icon (named “View configuration”). The following
menu is proposed:
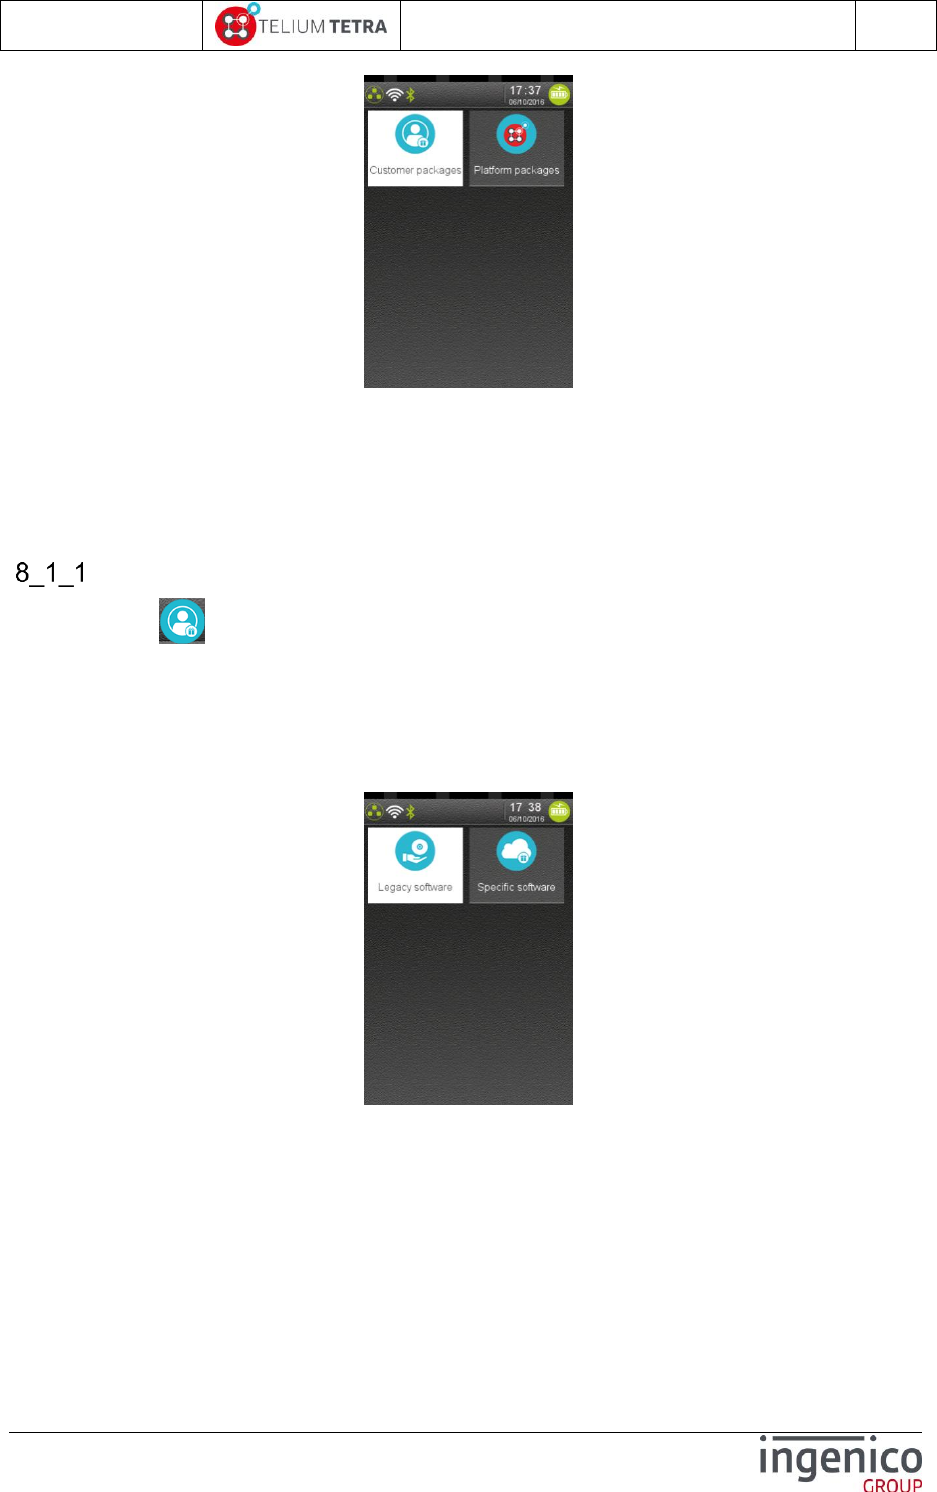
ICO-OPE-02757-V5
TETRA Terminal
User's guide
Public
51/199
Ingenico document - Reproduction or disclosure prohibited without written authorization
Please check document validity before using
The “Software configuration” screen proposes to select the category of software to view:
“Customer packages” menu concentrates all customer applications and their dependencies =
all software developed locally for INGENICO’ customers.
“Platform packages” menu concentrates all generic software developed by INGENICO group
and provided by default to run on TETRA terminal.
Customer packages
When selecting icon (named “Customer Packages”), it’s proposed to select the package nature
on which information are required. Proposed package natures are:
Legacy software = components developed using TELIUM+ framework, which may exist also on
TELIUM2 range. It includes also legacy components provided by TELIUM Platform (INGENICO
corp).
T3 specific software = components developed using TELIUM3 framework, (which do not exist
on TELIUM2 range) and which may use the full capabilities of TETRA terminal range.
Whatever package nature selection, the next menu proposes to choose a type of component on which
information must be reported.
Application (extension .P3A)
DLL (Dynamic Linked Library) (extension .P3L)
Parameters file (extension .P3P)
Keys file (extension .P3T)
When a type of component has been selected, the terminal displays the list of present components
with brief information. Selecting or validating with GREEN key one element of list gives access to
detailed information. This information can be displayed or printed according to a specific selection.
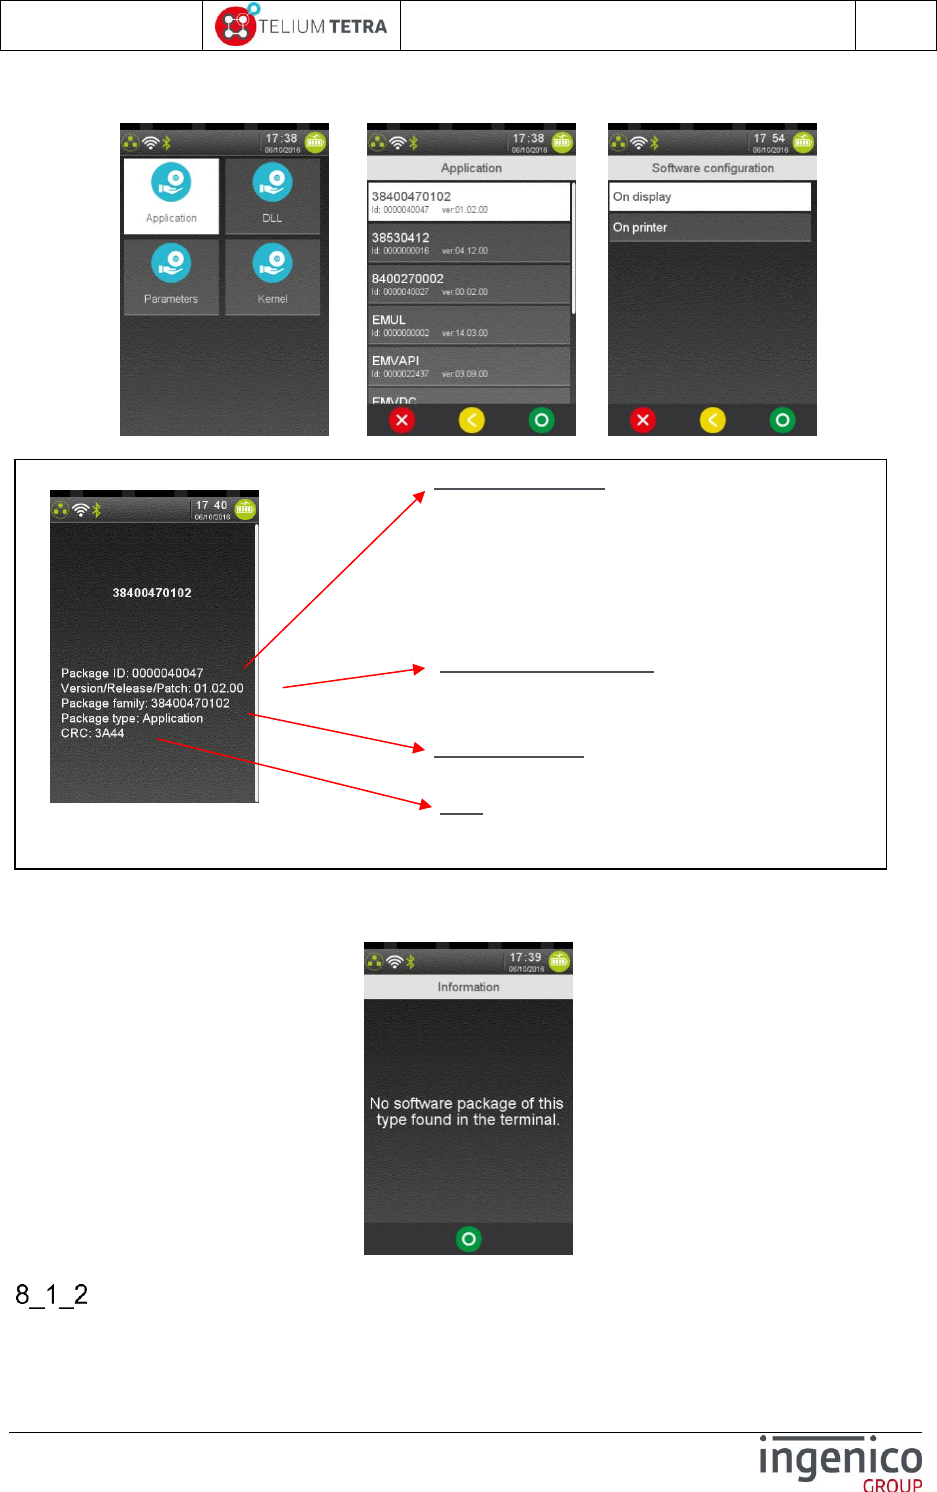
ICO-OPE-02757-V5
TETRA Terminal
User's guide
Public
52/199
Ingenico document - Reproduction or disclosure prohibited without written authorization
Please check document validity before using
Follows here after the chaining of different screens to obtain detailed information of a specific
component:
Figure 19 - TETRA software packages identification description
When some categories of components are not present, the following screen may be displayed:
Platform packages
Package Identifier: 10 characters
- Less than « 100000 », it’s a legacy component.
This component may also exit on TELIUM 2
range with the same identifier.
- Otherwise the 3 first characters are country
code of the software “editor”: “999” means
Ingenico GROUP, (other specific values exist).
Version/Release/Patch: for legacy components
patch may be not managed (fixed to zero or
ignored)
Package family: It’s the friendly part of the
identification of a component.
CRC: value modified at each evolution of the
component
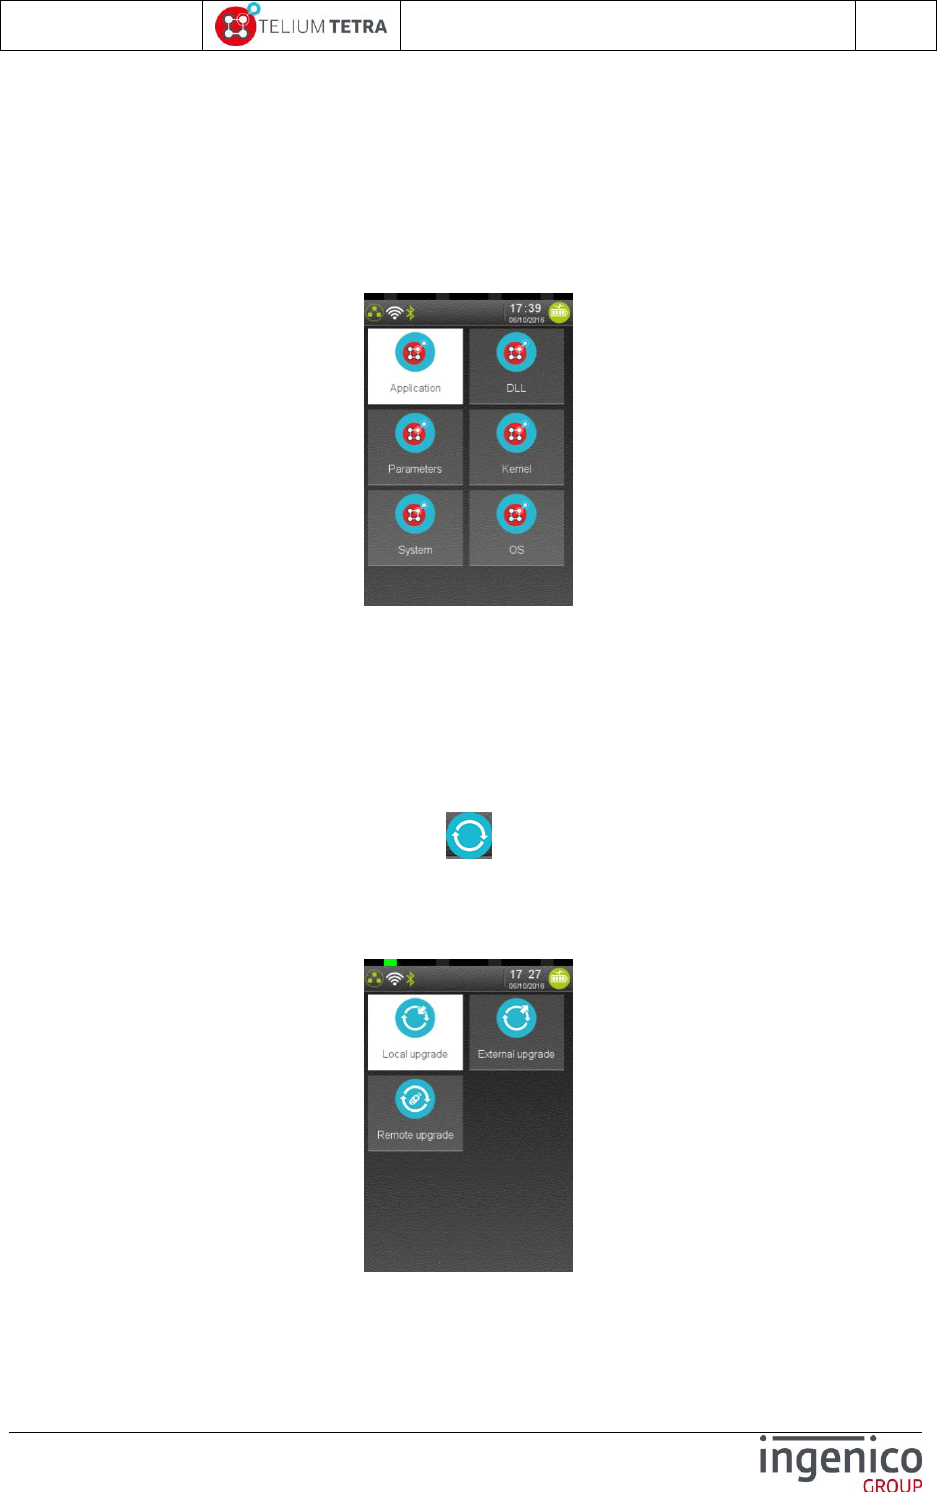
ICO-OPE-02757-V5
TETRA Terminal
User's guide
Public
53/199
Ingenico document - Reproduction or disclosure prohibited without written authorization
Please check document validity before using
When selecting “Platform Packages” menu, the package nature of the different components provided
by TELIUM Platform (INGENICO corp) are listed. This list does not include legacy components (based
on TELIUM+ framework). Proposed package natures are:
Application (extension .P3A)
DLL (Dynamic Linked Library) (extension .P3L)
Parameters file (extension .P3P)
Kernel (Keys or sensible software files, extension .P3T)
SYSTEM file (extension .P3S)
OS file (extension .P3O)
When a type of package has been selected, the terminal displays the list of present components with
brief information. Selecting the focused component in the list gives access to detailed information: it
can be displayed or printed according to a specific choice. Same type of screen capture may be
obtained as in the previous menu.
8_2 Evolution
From “Software management” panel, select the icon (named “Evolution”). The following menu
proposes to user different types of software updates:
via local PC and LLT tool
via an external device as USB key or MMC media
via remote TMS call
Select the way to upgrade the terminal. The list depends on the configuration and items can be:
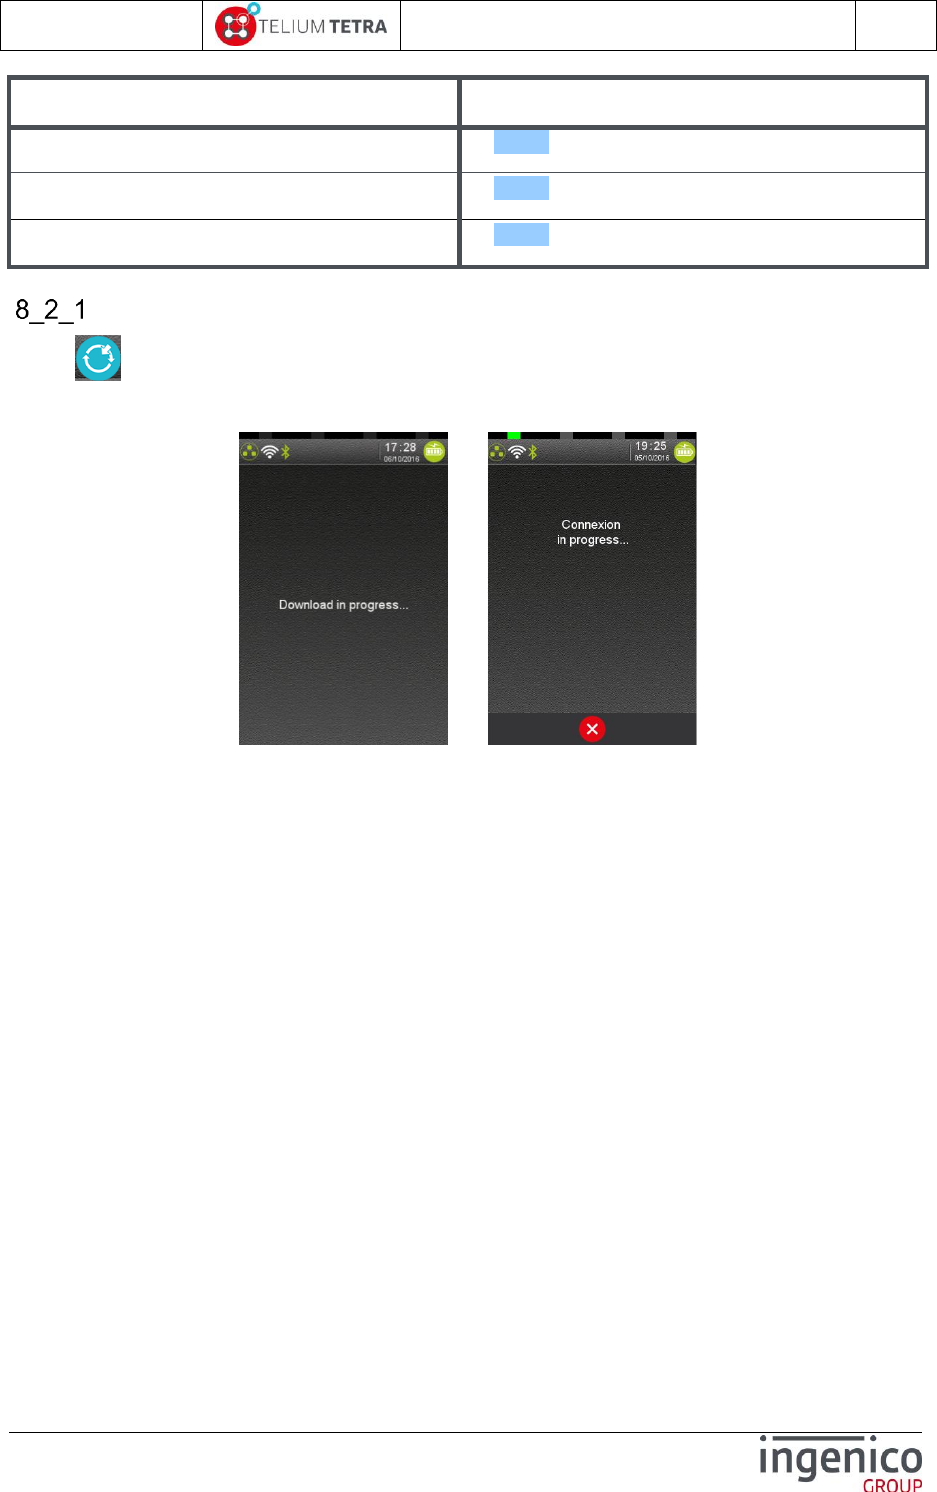
ICO-OPE-02757-V5
TETRA Terminal
User's guide
Public
54/199
Ingenico document - Reproduction or disclosure prohibited without written authorization
Please check document validity before using
Item
Reference
Local upgrade
8_2_1
External upgrade
8_2_2
Remote upgrade
8_2_3
Local upgrade
When “Local upgrade” icon (=via LLT)” has been selected, the terminal displays the following
screen until the user triggers a connection with LLT PC tool. The operation can be cancelled thanks
to touching “RED” button on screen or hitting “RED” key.
=>
When the user clicks on detected terminal in LLT interface, the loading operation begins (Refer to LLT
user manual for more information.)
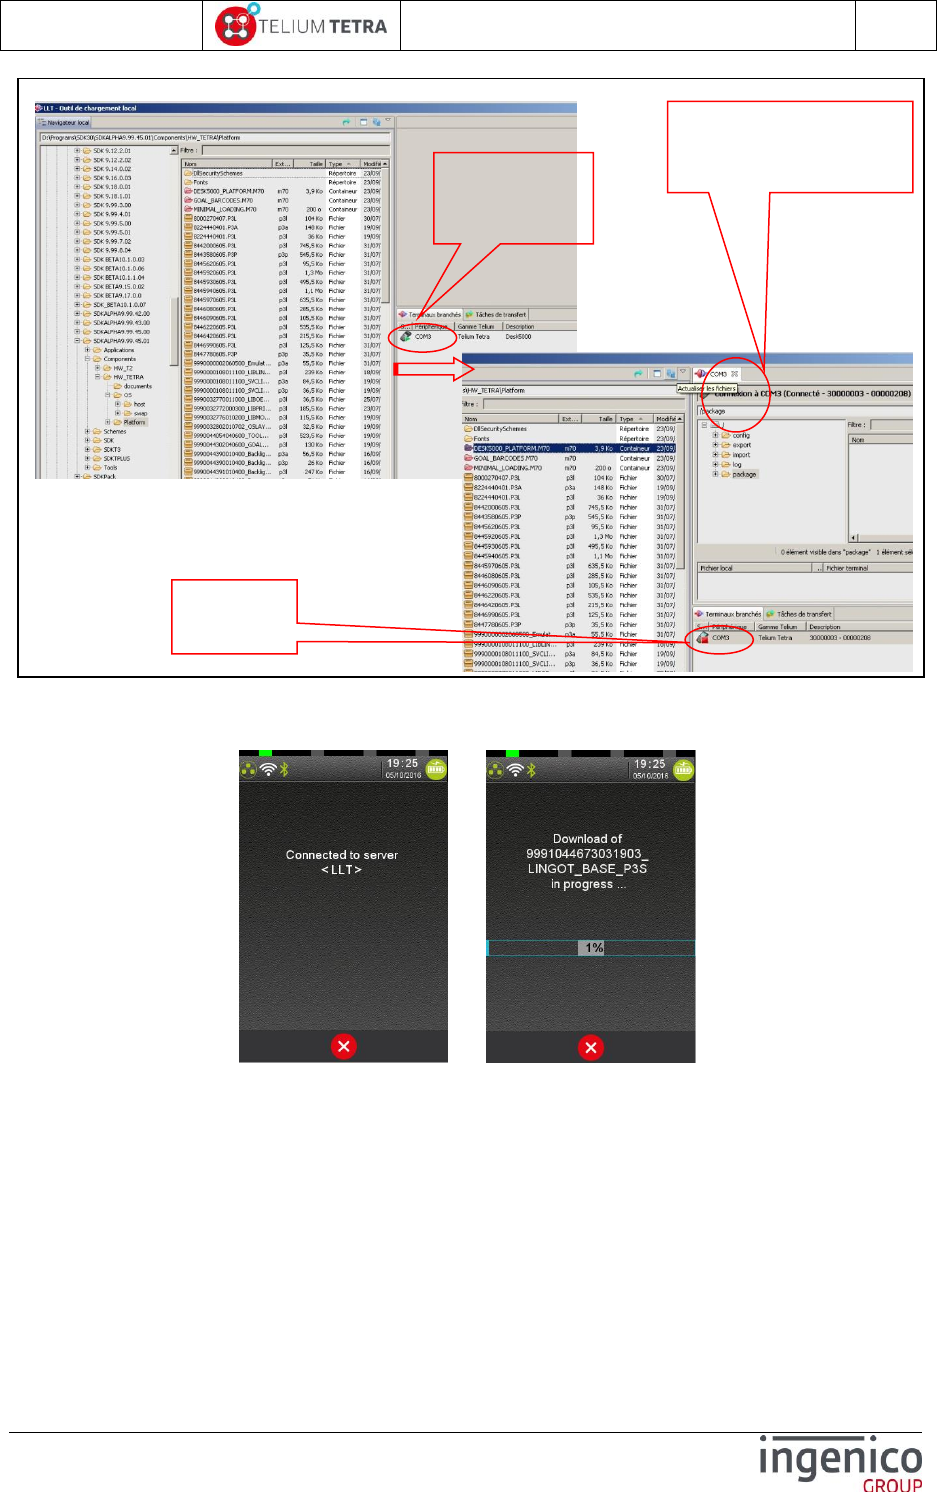
ICO-OPE-02757-V5
TETRA Terminal
User's guide
Public
55/199
Ingenico document - Reproduction or disclosure prohibited without written authorization
Please check document validity before using
Figure 20 – LLT connection
During software transfer, different screens illustrate loading activities.
../..
When the user disconnects “LLT” PC tool, the terminal displays a status of the operations done during
loading:
Number of packages to install
Number of packages to uninstall
Number of files imported in “HOST” directory
When uploading/loading concerns software to install, a reboot of the terminal is required to finalize the
operation.
In the other cases, at disconnection of the terminal, the previous screen is displayed and a new
loading operation can be selected.
Click on one of
listed terminals
to connect
Terminal is
connected
Possible locations in which
elements can be uploaded
or downloaded
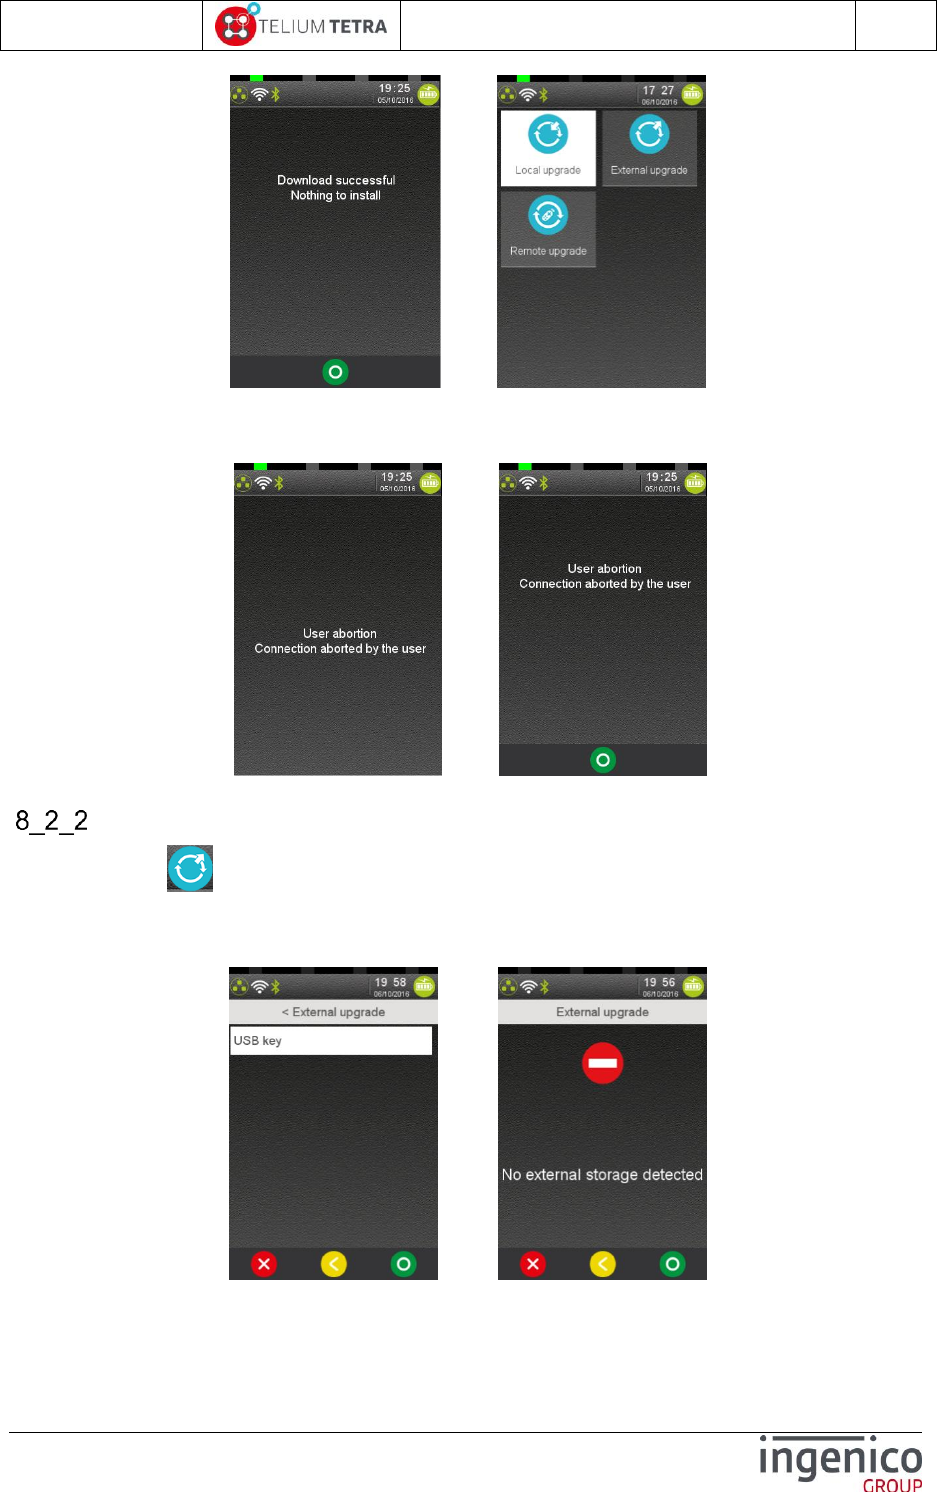
ICO-OPE-02757-V5
TETRA Terminal
User's guide
Public
56/199
Ingenico document - Reproduction or disclosure prohibited without written authorization
Please check document validity before using
=>
The local loading operation may be also aborted by user thanks to “RED” key. The following screen
sequence is displayed:
=>
Upgrade using External device
When selecting “External Upgrade” icon, the terminal displays the list of detected external
connected devices.
Screenshots when an USB key is detected or nothing found:
When selecting a connected device, the terminal parses the content of the media to find a “TELIUM3”
directory: it must content TETRA software packages to install. Currently only software loading is
supported, it‘s not possible to import file in terminal “HOST” directory.

ICO-OPE-02757-V5
TETRA Terminal
User's guide
Public
57/199
Ingenico document - Reproduction or disclosure prohibited without written authorization
Please check document validity before using
The terminal displays the status of the loading operation in progress.
Remote upgrade
This menu is dedicated to software update thanks to TMS solution. When “Remote upgrade”
icon has been selected, the terminal displays the following possible actions:
Manual connexion to TMS server to check if needed updates available.
Manual connexion to TMS for a specific loading operation
TMS parameters selection or modification
Automatic connexion to TMS
Select the way upgrading the terminal. The list depends on the configuration and items can be:
Item
Reference
Start remote upgrade
8_2_3_2
Download specific package
8_2_3_3
Configure remote upgrade
8_2_3_1
Automatic Upgrades
8_2_3_4
Configure remote upgrade
When “Configure remote upgrade” icon has been selected, the terminal displays:
Type of registered communication mean used to reach TMS server. “Network Type” are:
3G/GPRS
ETHERNET
MODEM
MODEM ISP
WIFI
PCL
The list of the different parameters (and their registered values) that can be modified according
to “Network Type”.
An additional menu to print all the recorded parameters corresponding to selected “Network
Type”.
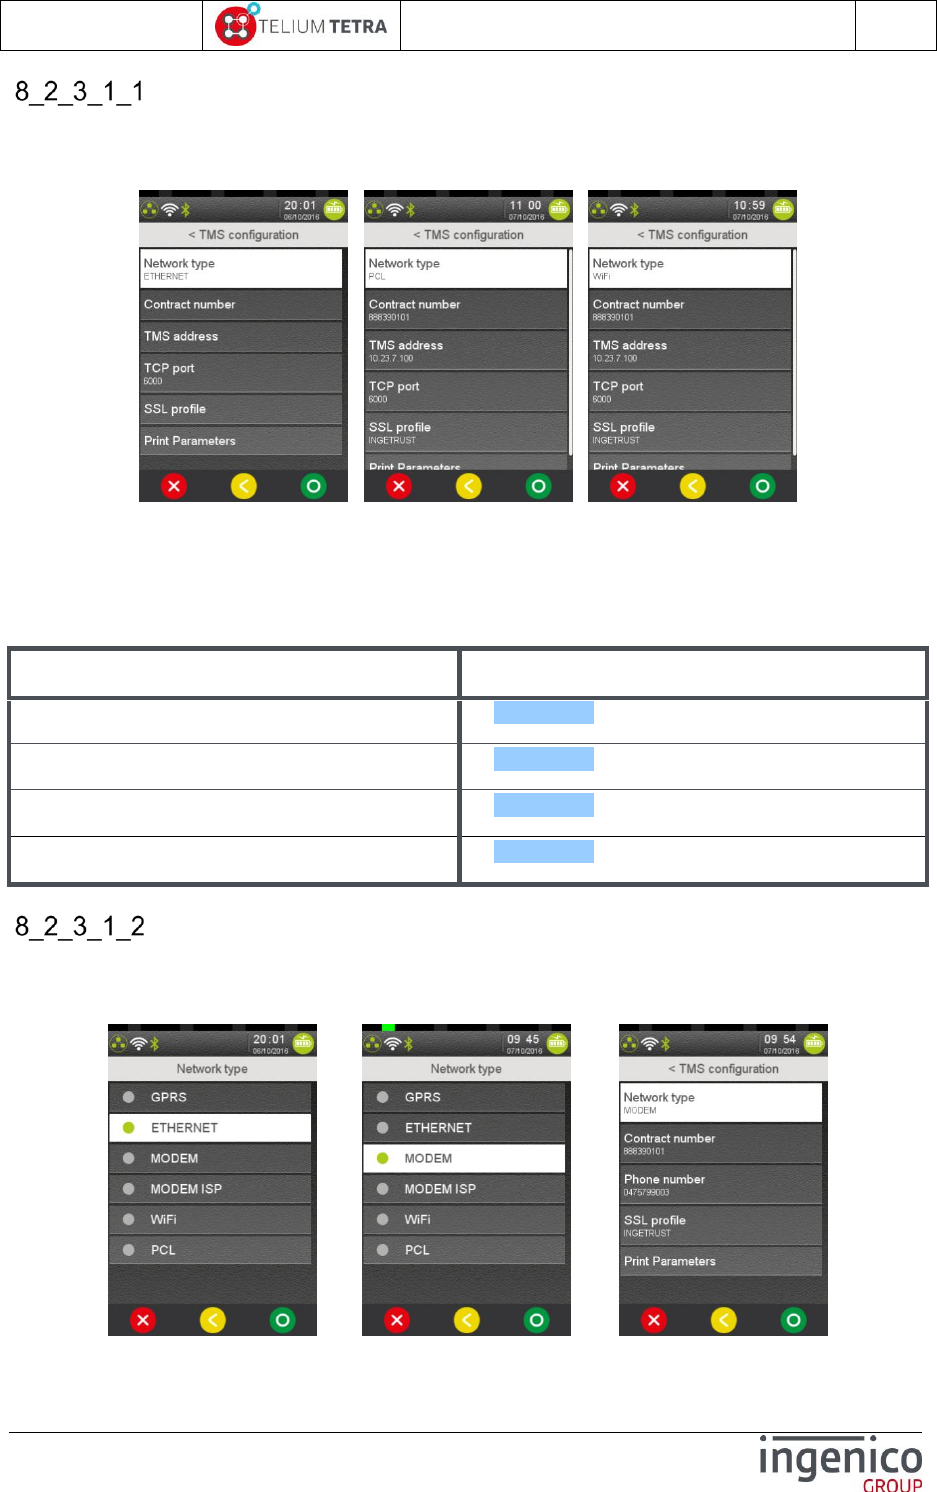
ICO-OPE-02757-V5
TETRA Terminal
User's guide
Public
58/199
Ingenico document - Reproduction or disclosure prohibited without written authorization
Please check document validity before using
TMS ETHERNET or WIFI or PCL link
When “Network Type” is registered to “ETHERNET” ( or to “WIFI” or to “PCL”):
Each presented parameter can be modified.
A status ticket of the registered parameters can be printed in selecting “Print Parameters”.
When selecting item menu “Network type”, the user can select another communication mean used to
reach TMS server.
The following table provides the different parameters to set and to use “ETHERNET” or “WIFI” or
“PCL” to perform remote TMS upgrades:
Item
Reference
Contract Number
8_2_3_1_5
TMS address
8_2_3_1_6
TCP port
8_2_3_1_7
SSL profile
8_2_3_1_8
TMS using MODEM link
Screenshots “Network Type” registering to “MODEM”:
=> =>
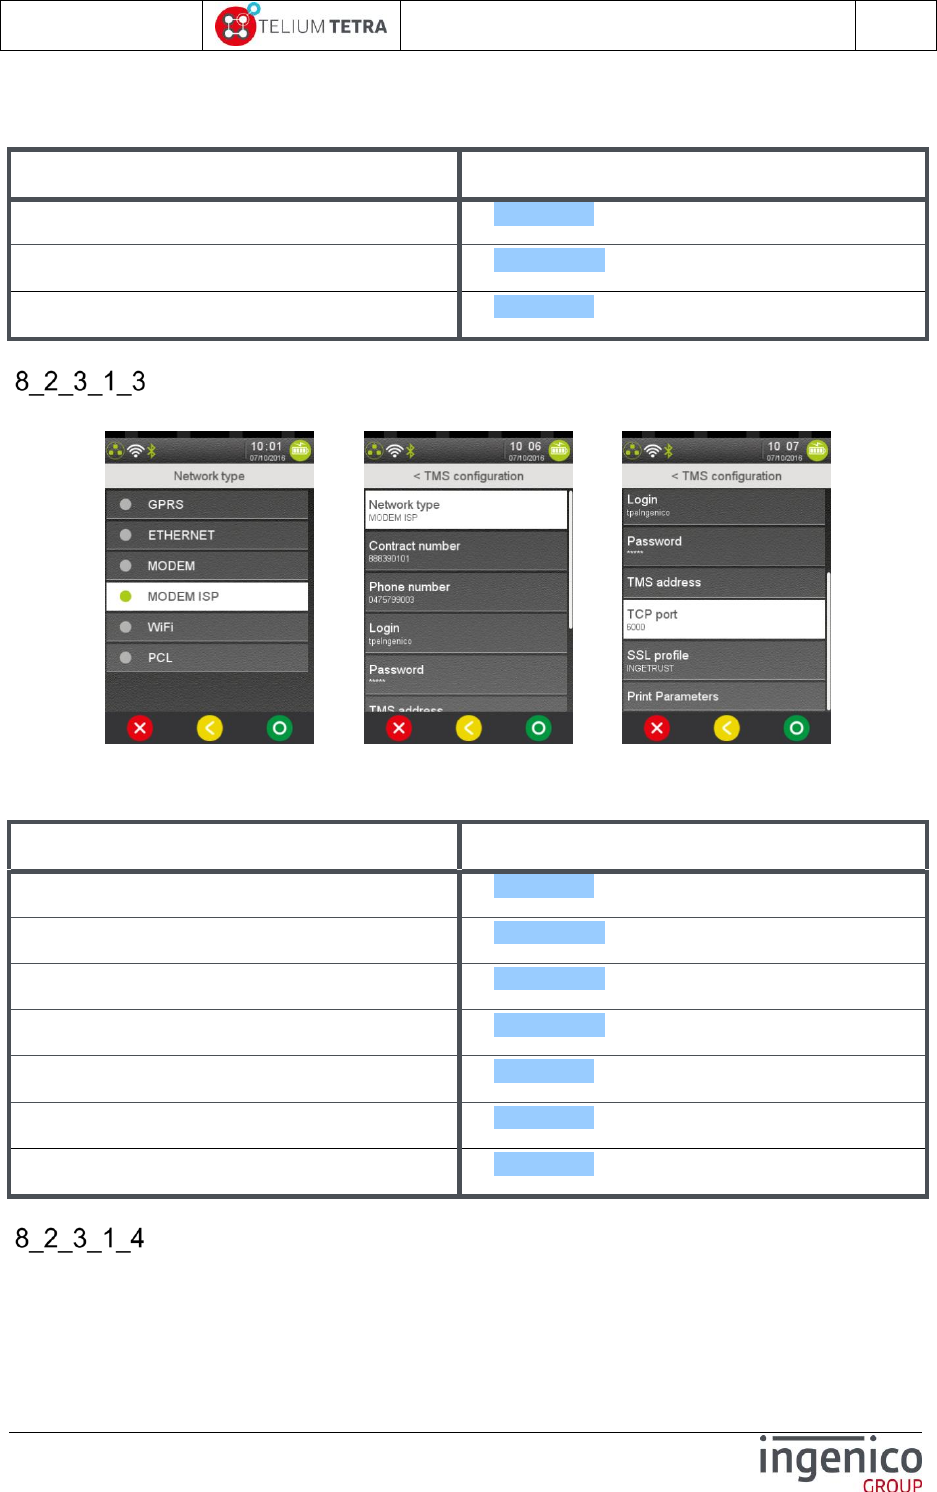
ICO-OPE-02757-V5
TETRA Terminal
User's guide
Public
59/199
Ingenico document - Reproduction or disclosure prohibited without written authorization
Please check document validity before using
The following table provides the different parameters to set and to use “MODEM” to perform remote
TMS upgrades:
Item
Reference
Contract Number
8_2_3_1_5
Phone number
8_2_3_1_12
SSL profile
8_2_3_1_8
TMS using MODEM ISP link
Screenshots “Network Type” registering to “MODEM ISP”:
=> ../..
The following table provides the different parameters to set and to use “MODEM ISP” to perform
remote TMS upgrades:
Item
Reference
Contract Number
8_2_3_1_5
Phone number
8_2_3_1_12
Login
8_2_3_1_10
Password
8_2_3_1_11
TMS address
8_2_3_1_6
TCP port
8_2_3_1_7
SSL profile
8_2_3_1_8
TMS using GPRS/3G link
Screenshots “Network Type” registering to “GPRS”:
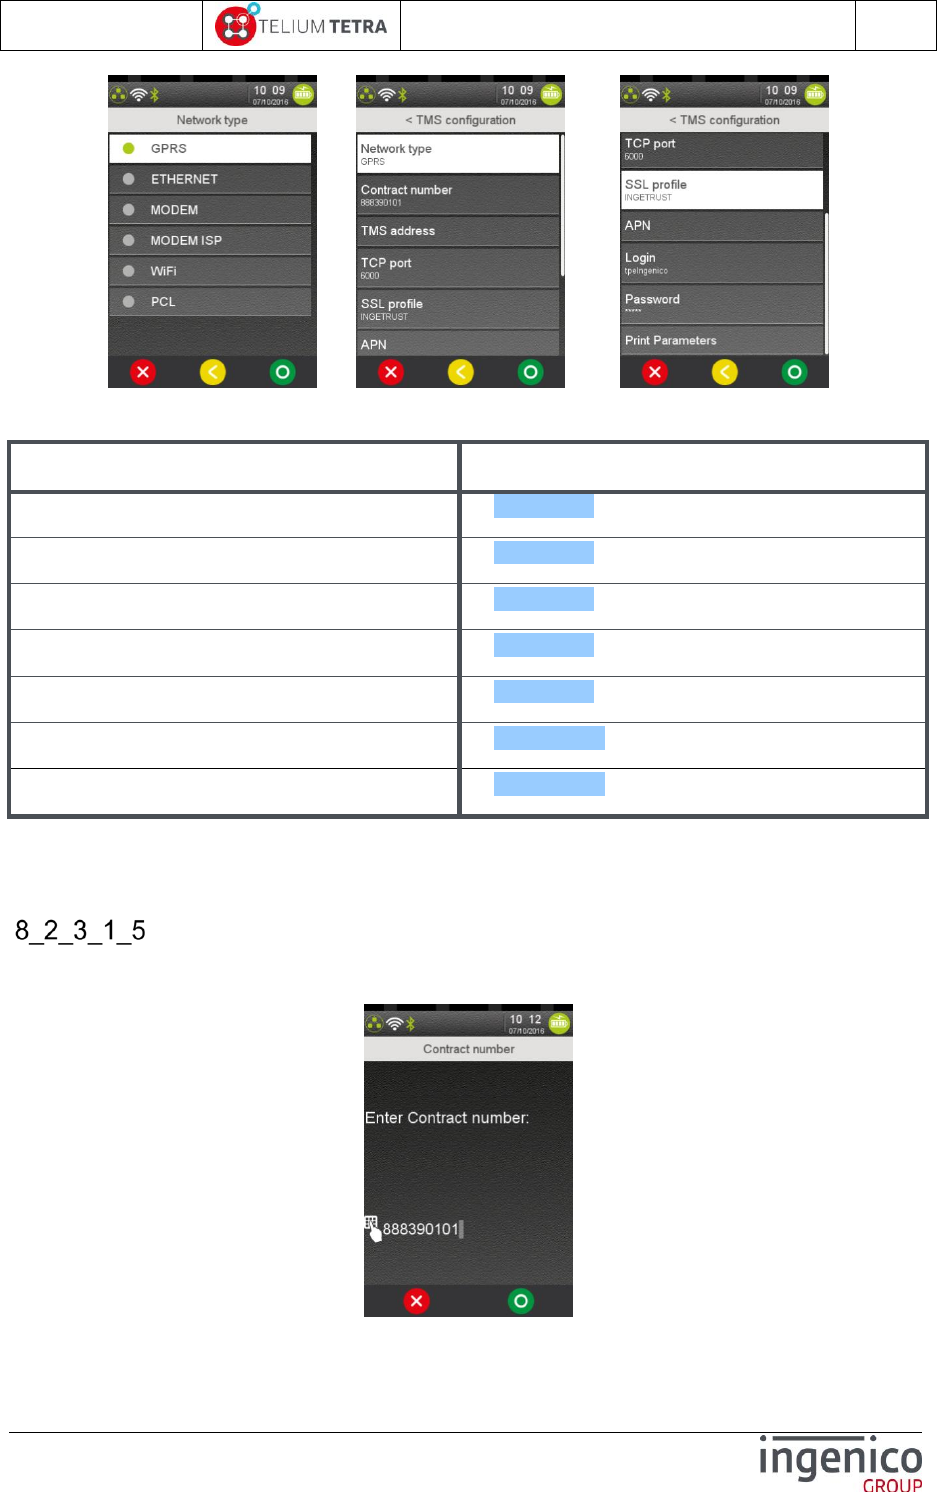
ICO-OPE-02757-V5
TETRA Terminal
User's guide
Public
60/199
Ingenico document - Reproduction or disclosure prohibited without written authorization
Please check document validity before using
=> ../..
The following table provides the different parameters to set and to use “GPRS” to perform remote
TMS upgrades:
Item
Reference
Contract Number
8_2_3_1_5
TMS address
8_2_3_1_6
TCP port
8_2_3_1_7
SSL profile
8_2_3_1_8
APN
8_2_3_1_9
Login
8_2_3_1_10
Password
8_2_3_1_11
The detailed description of each parameter is done in the next paragraphs. Some parameters are
common to different “Network Type”.
Contract Number
The “Contract Number” parameter is needed whatever the “Network type” chosen. Enter the value
corresponding to your terminal contract, thanks the following screen.
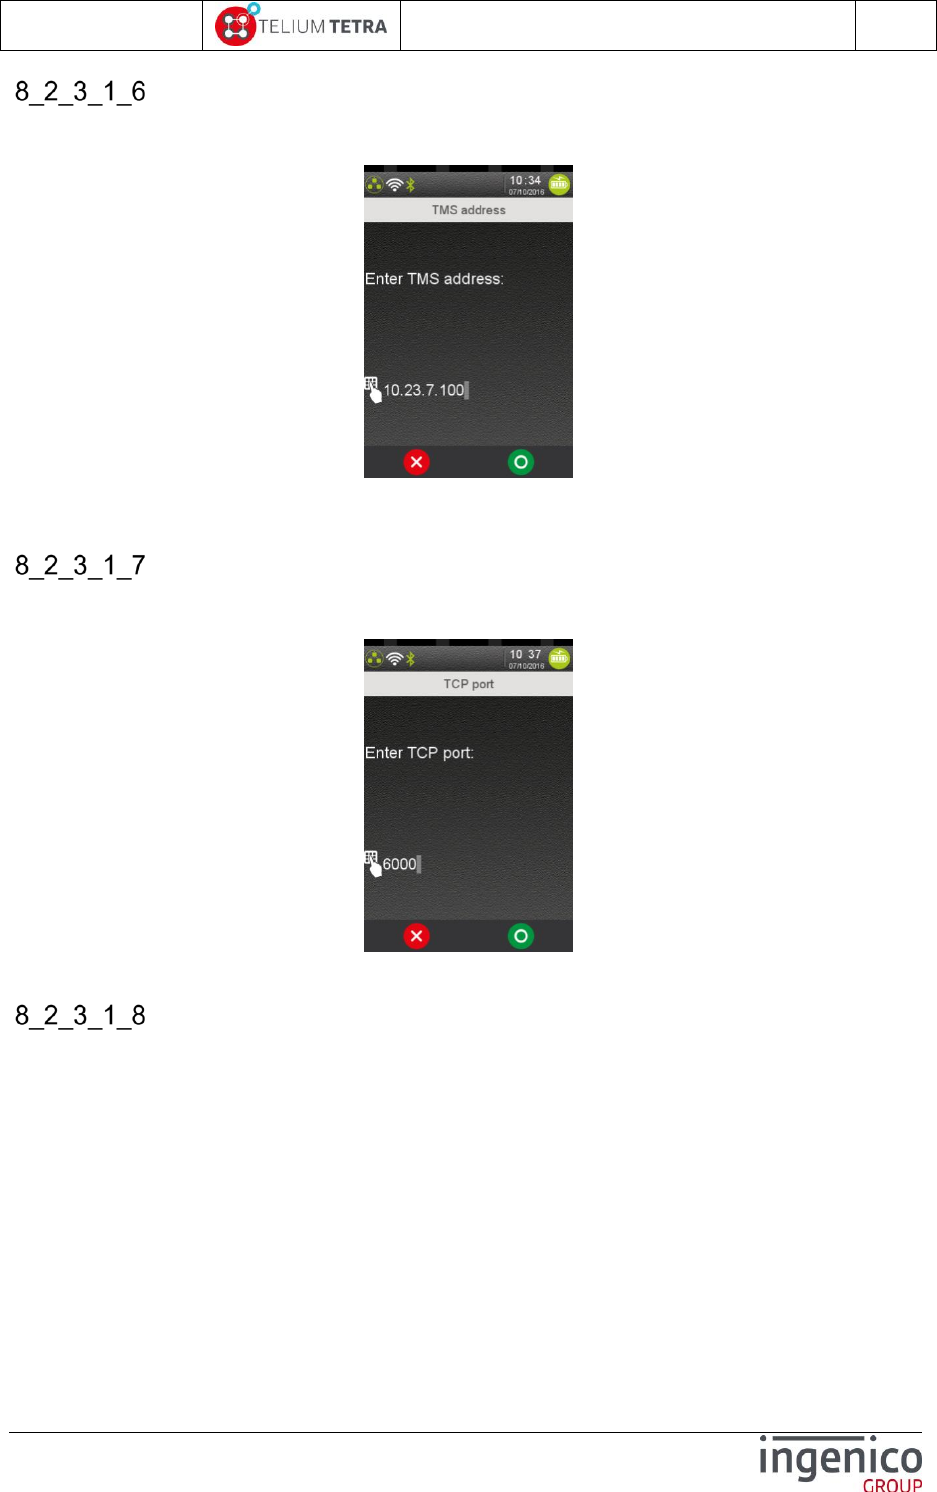
ICO-OPE-02757-V5
TETRA Terminal
User's guide
Public
61/199
Ingenico document - Reproduction or disclosure prohibited without written authorization
Please check document validity before using
TMS address
The “TMS address” parameter is only proposed when “Network type” = “ETHERNET” or “GPRS” is
chosen.
Enter the TMS IP address (four digital fields, each one from “0” to “255”) corresponding to your
download TMS server.
TCP port
The “TCP Port” parameter is only proposed when “Network type” = “ETHERNET” or “GPRS” is
chosen.
Enter the TMS TCP port (up to 10 digits) corresponding to your download TMS server.
SSL profile
The “SSL profile” parameter is only proposed when “Network type” = “ETHERNET” or “GPRS” is
chosen. The user must select one of the proposed SSL profiles:
The list contents all SSL profiles registered in terminal.
By default: “ingetrust” is the only certificate present
In the following illustration, another profile “customcertif” has been registered in the terminal.
To allow connexion without SSL a specific choice “No SSL” has been added
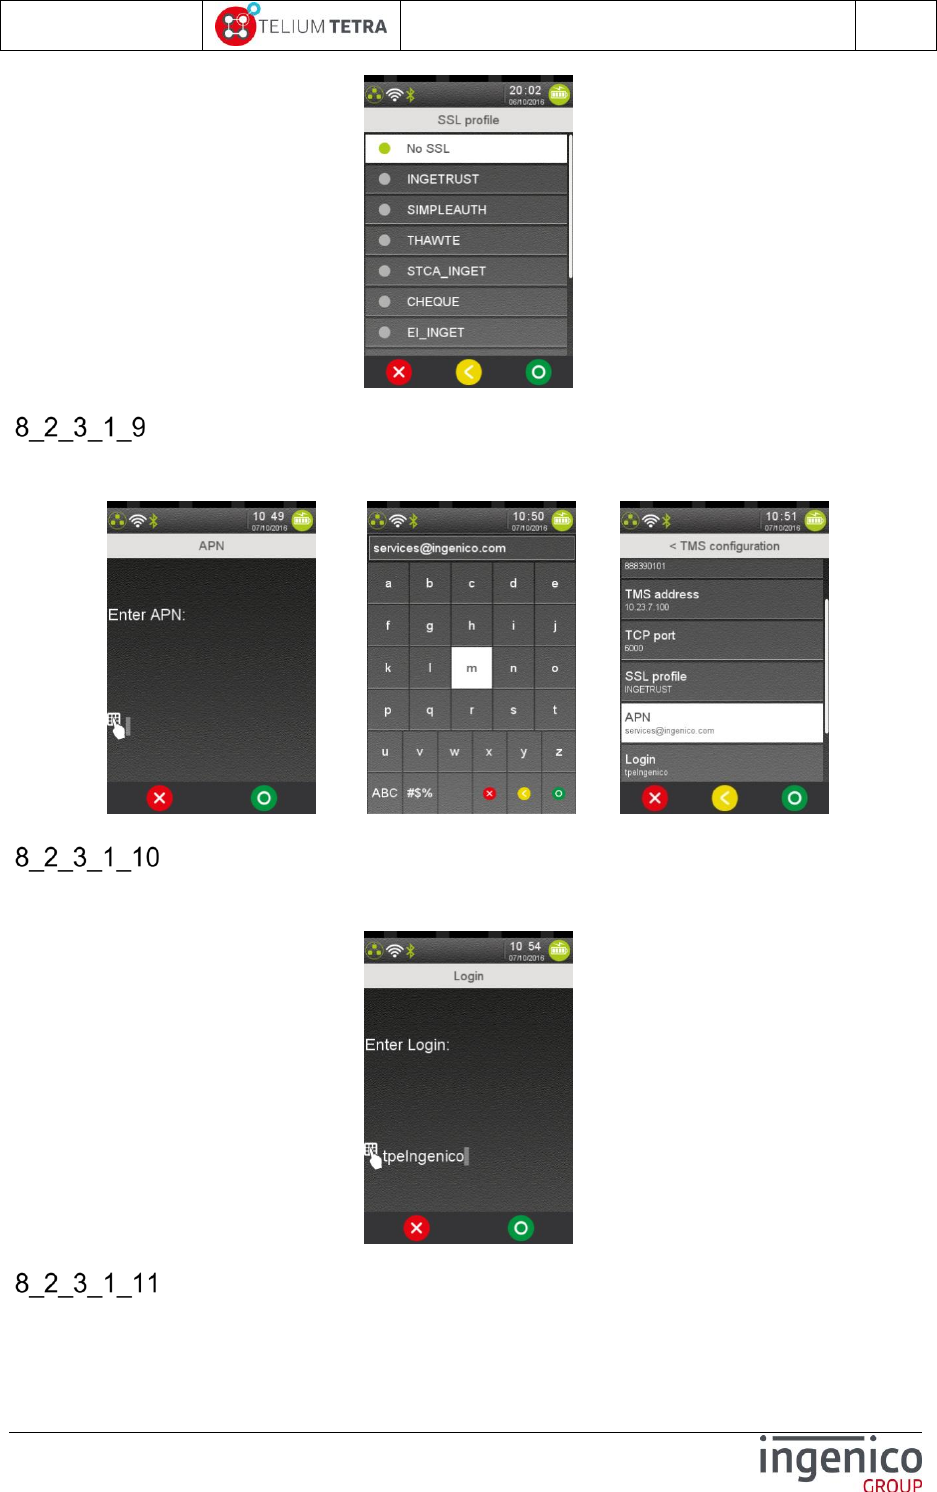
ICO-OPE-02757-V5
TETRA Terminal
User's guide
Public
62/199
Ingenico document - Reproduction or disclosure prohibited without written authorization
Please check document validity before using
APN
The “APN” parameter is only proposed when “Network type” = “GPRS” is chosen. Use virtual
keyboard to enter the APN string and validate.
=> =>
Login
The “Login” parameter is only proposed when “Network type” = “GPRS” is chosen. Use virtual
keyboard to enter the login string and validate.
Password
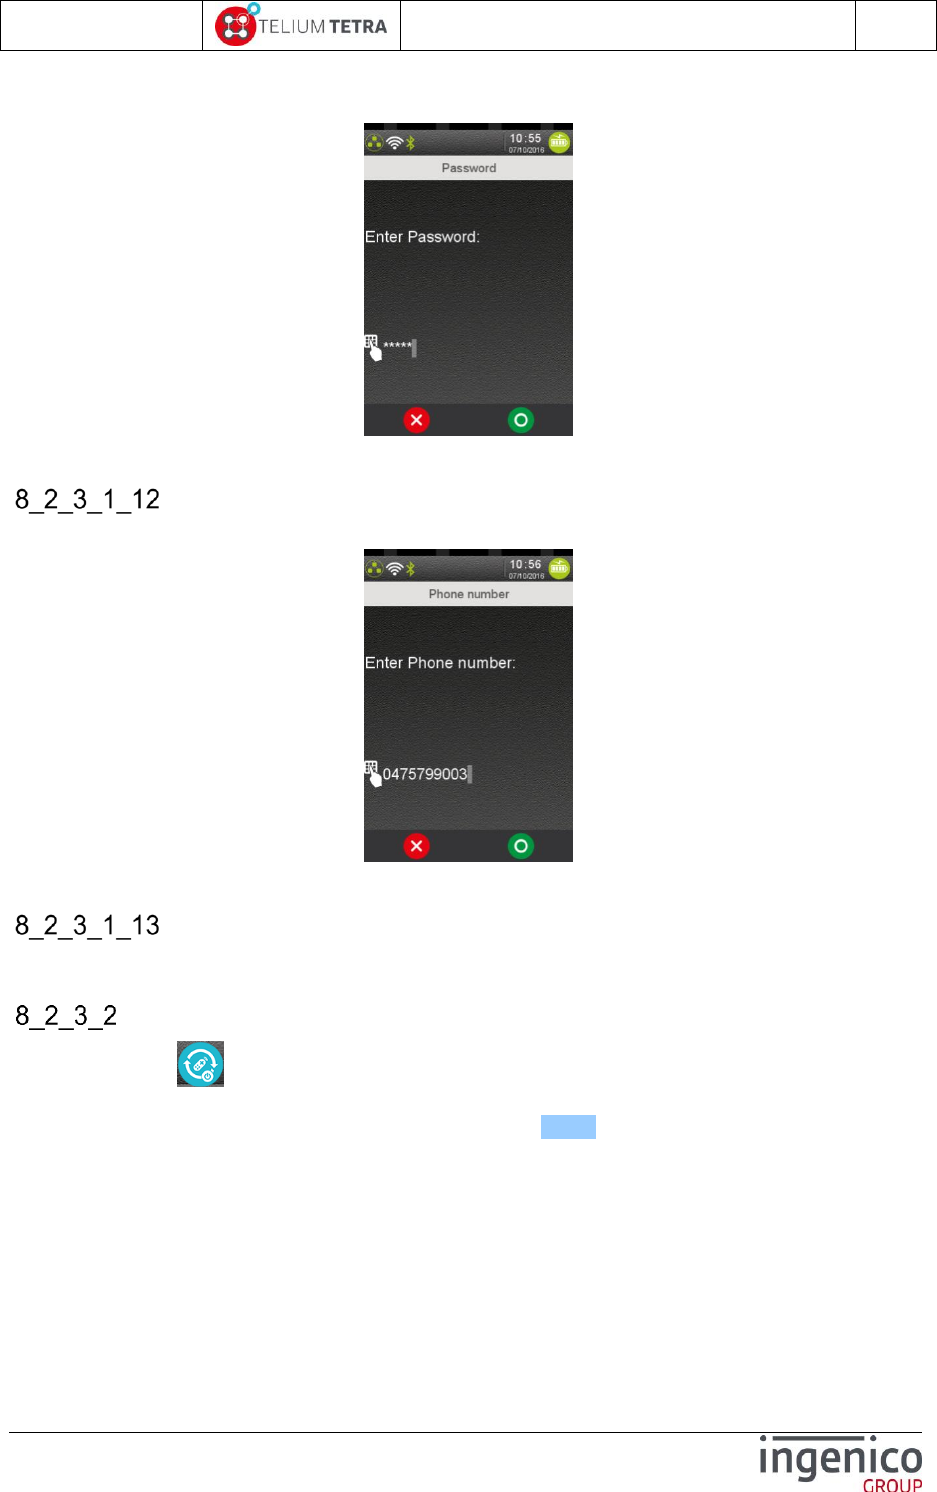
ICO-OPE-02757-V5
TETRA Terminal
User's guide
Public
63/199
Ingenico document - Reproduction or disclosure prohibited without written authorization
Please check document validity before using
The “Password” parameter is only proposed when “Network type” = “GPRS” is chosen. Use virtual
keyboard or terminal physical keyboard to enter the password string and validate.
Phone number
The “Phone number” parameter is only proposed when “Network type” = “MODEM” is chosen.
Enter the TMS phone number (up to 15 digits) corresponding to your download TMS server.
Print parameters
When touching the “Print Parameters” icon, a ticket of parameters summary is printed.
Start remote upgrade
The selection of “Start remote upgrade” icon starts a remote upgrade connexion with the
recorded communication parameters of TMS server. The following screen is displays. To have a look
on screenshots during processing refer to “Local upgrade” (8_2_1): similar screens.
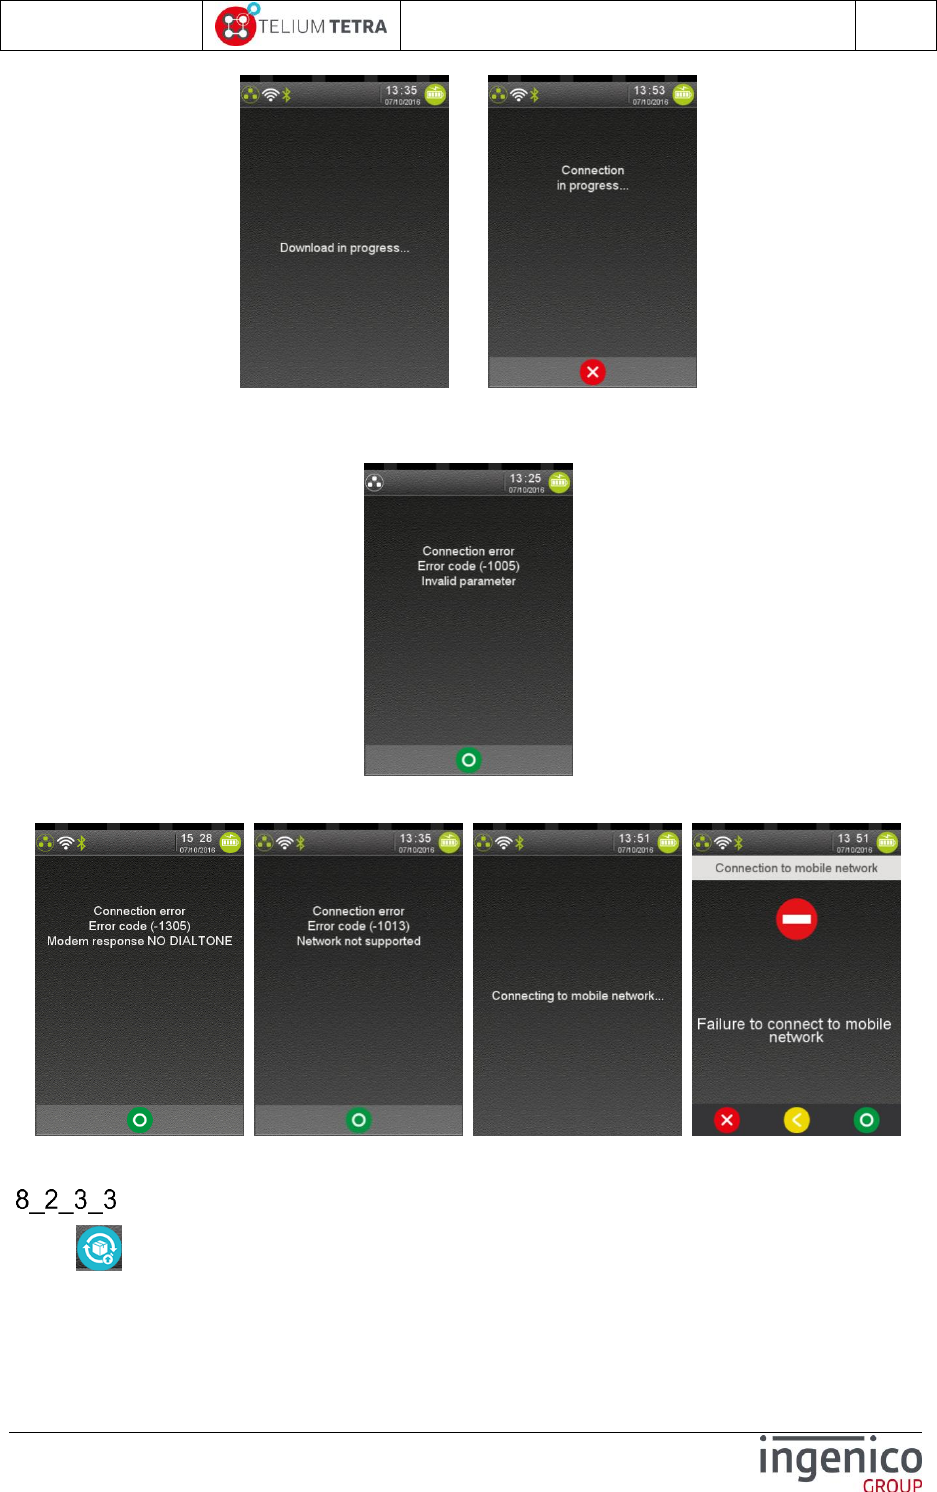
ICO-OPE-02757-V5
TETRA Terminal
User's guide
Public
64/199
Ingenico document - Reproduction or disclosure prohibited without written authorization
Please check document validity before using
=>
When the selected “Network type” communication mean is absent, the terminal reports the following
error.
The following different screens illustrate some specific errors that may be reported to user.
Download specific package
When “Download package” icon has been selected, the terminal asks to enter the package
name to download:
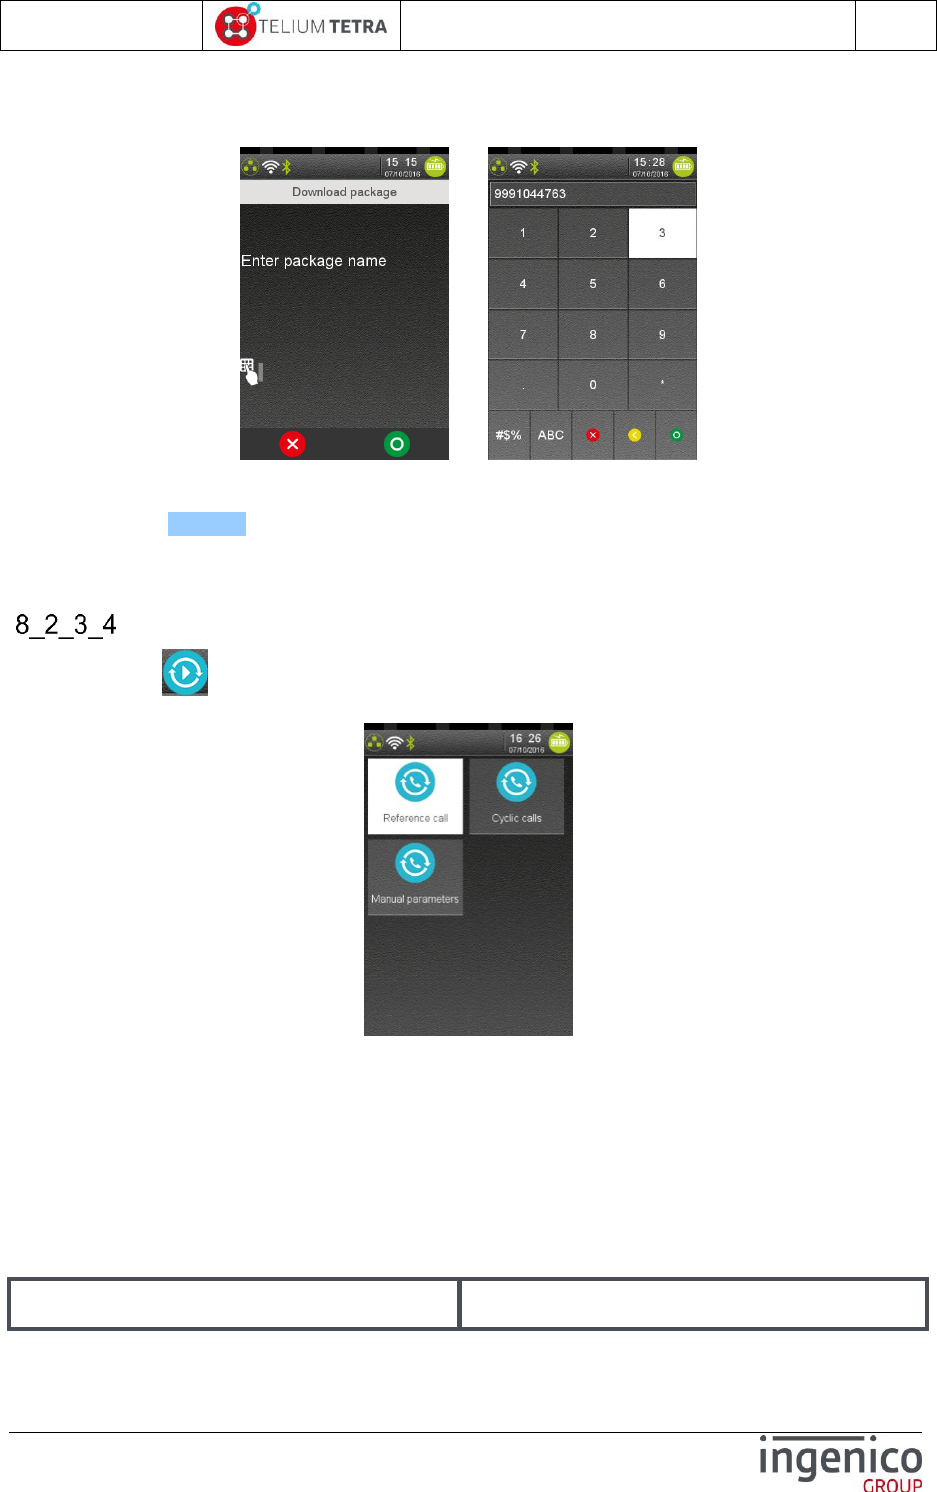
ICO-OPE-02757-V5
TETRA Terminal
User's guide
Public
65/199
Ingenico document - Reproduction or disclosure prohibited without written authorization
Please check document validity before using
Package corresponds to “PackageID” = 10 characters as described Figure 19 - TETRA
software packages identification description in Figure 19 - TETRA software packages
identification description .
=>
After package name validation, the terminal starts connecting to TMS server with the recorded
communications parameters. To have a look on screenshots during processing refer to manual
remote upgrade (8_2_3_2): similar screens.
If the package name is invalid, the terminal returns to “Remote upgrade” menu.
Automatic Upgrades
When selecting “Automatic Upgrades” icon in “Remote upgrade” menu, the following menu is
proposed:
The “Automatic Upgrades” delivers the same features as “TMSCall” application for TELIUM 2. It allows
managing automatic connexions to a TMS server. During these established sessions, the TMS server
can process:
Download of new software package or parameters files
Update existing software package or parameters files
Upload parameters files or information files to perform terminal supervision
Select a type of the operations related to terminal upgrade thanks to TMS. The list depends on the
configuration and items can be:
Item
Reference

ICO-OPE-02757-V5
TETRA Terminal
User's guide
Public
66/199
Ingenico document - Reproduction or disclosure prohibited without written authorization
Please check document validity before using
Cyclic calls
8_2_3_4_1
Maintenance
8_2_3_4_2
Consult call log
8_2_3_4_3
Cyclic Calls
When selecting “Cyclic calls” in “Automatic upgrades” menu, the following screen is displayed.
Select a type of the connection setting related to terminal upgrade thanks to TMS. The list depends on
the configuration and items can be:
Item
Reference
Reference call
8_2_3_4_1_1
Cyclic call definitions
8_2_3_4_1_2
Manual parameters
8_2_3_4_1_3
8_2_3_4_1_1 Reference call
When selecting “Reference Call” icon, the terminal prompts for a contract number and then
triggers a download call using the TMS parameters (“Network type” and access parameters) and the
aforementioned contract number.
It chains screens described in paragraph 8_2_3_1_5 and in paragraph 8_2_3_2 .
8_2_3_4_1_2 Cyclic call definitions
According to parameters registered in terminal (=been injected by “TMSCALL.PAR”), some “Cyclic
calls” profile could have been defined. Using this menu, the user will be able to activate or deactivate
the chosen profile.
When “Cyclic calls” icon is selected in “Cyclic calls” menu, one of the following screens is displayed:

ICO-OPE-02757-V5
TETRA Terminal
User's guide
Public
67/199
Ingenico document - Reproduction or disclosure prohibited without written authorization
Please check document validity before using
Or
When validating an “active” registered cyclic call reference, an access password may be asked to user
according to TMS parameter file configuration loaded the terminal.
=> VAL => =>
Inserting the valid administrator password allows to continue with “deactivate” menu.
When a registered cyclic call reference is in “inactive” state, no password is required to change the
state as illustrated below.
=> VAL =>
When the administrator password is not valid, the following screen is displayed:
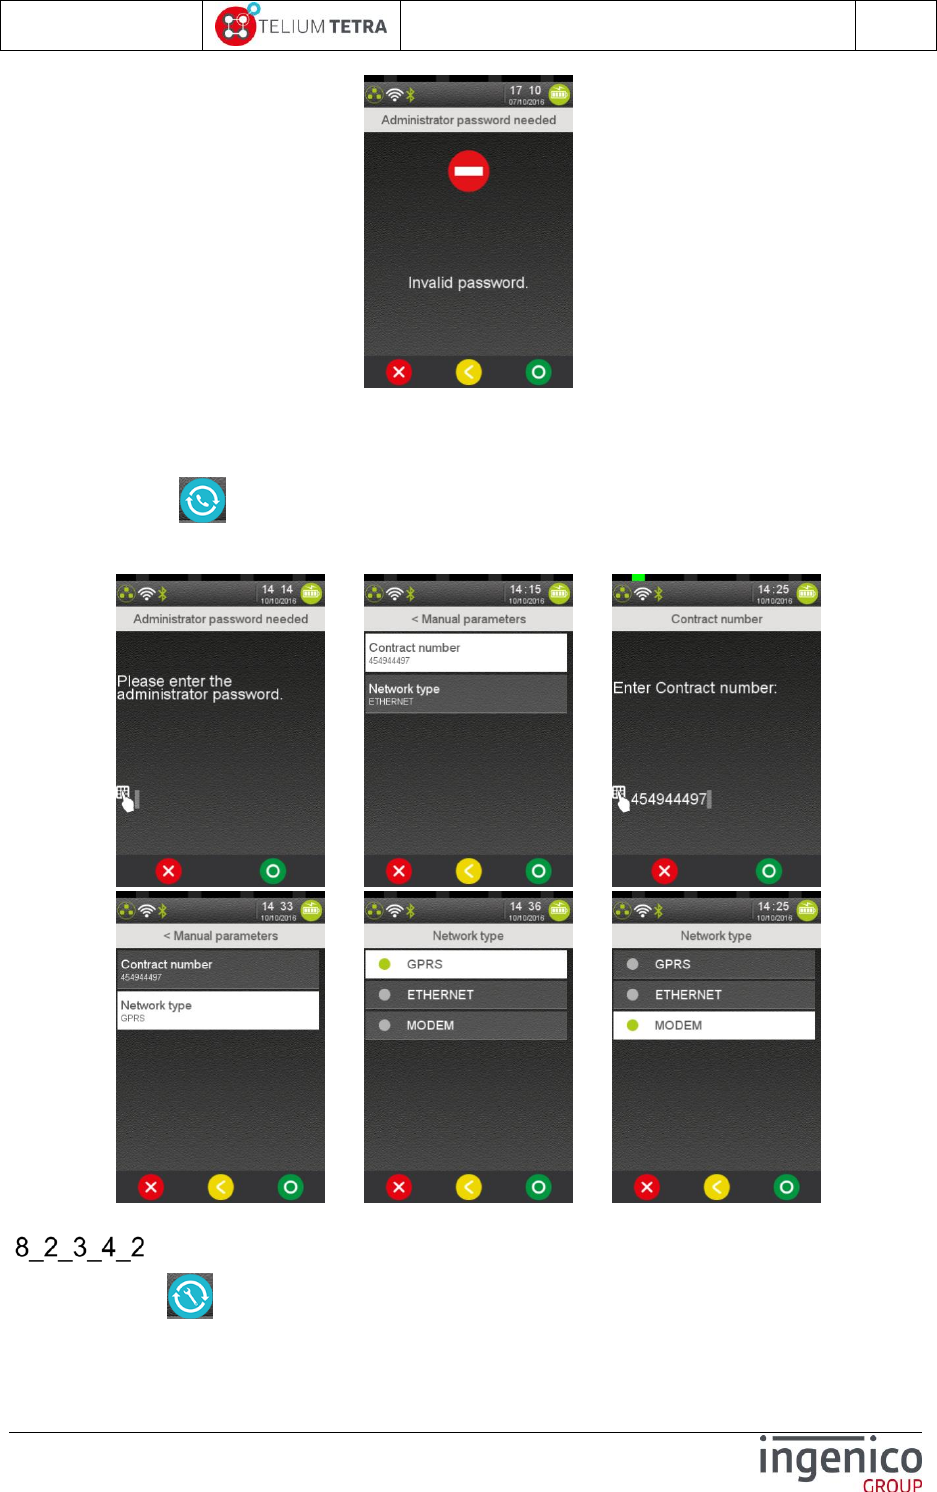
ICO-OPE-02757-V5
TETRA Terminal
User's guide
Public
68/199
Ingenico document - Reproduction or disclosure prohibited without written authorization
Please check document validity before using
Valid the screen to continue
8_2_3_4_1_3 Manual parameters
The selection of “Manual parameters” icon allows modifying stored “Contract Number” or
“Network Type”. According TMS parameter file configuration loaded the terminal, an access password
may be asked to user to continue. The following screens sequence is proposed to user.
=> =>
=> =>
Maintenance
When selecting “Maintenance” icon in “Automatic upgrades” menu, the following screen is
displayed:
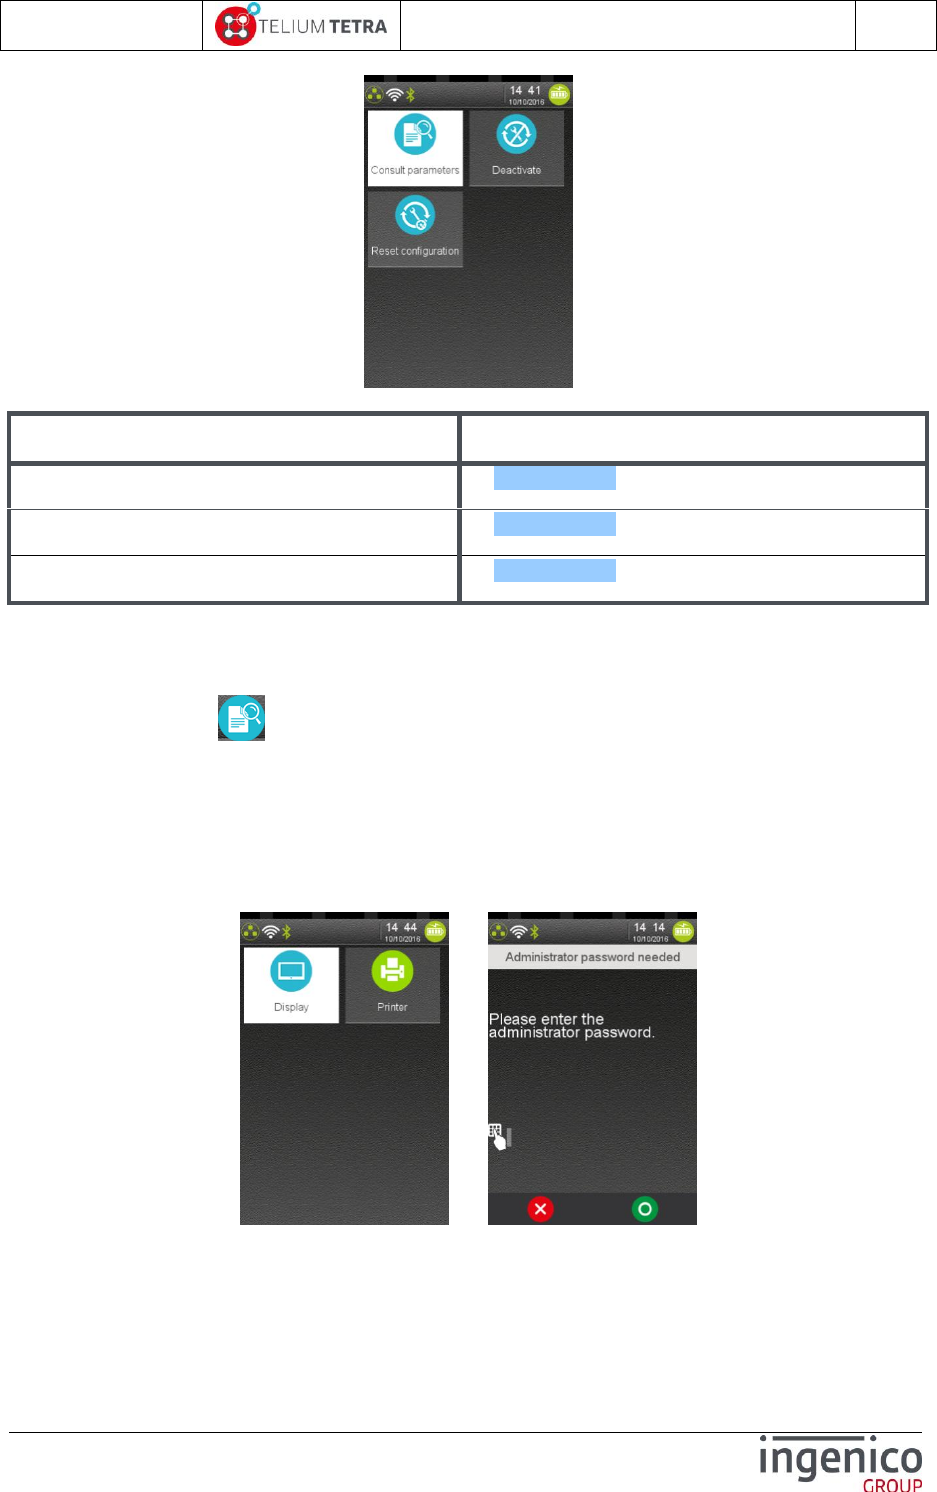
ICO-OPE-02757-V5
TETRA Terminal
User's guide
Public
69/199
Ingenico document - Reproduction or disclosure prohibited without written authorization
Please check document validity before using
Select an operation to perform according to the following list:
Item
Reference
Consult parameters
8_2_3_4_2_1
Deactivate
8_2_3_4_2_2
Reset configuration
8_2_3_4_2_3
8_2_3_4_2_1 Consult parameters
The When selecting “Consult parameters” icon in “Maintenance” menu, two options are
proposed the user:
Consultation on display
Printing of the parameters
When one of the options has been selected and according TMS parameter file configuration loaded
the terminal, an access password may be asked to user to continue. The following screens sequence
happens:
=>
Below is an example of display consultation:
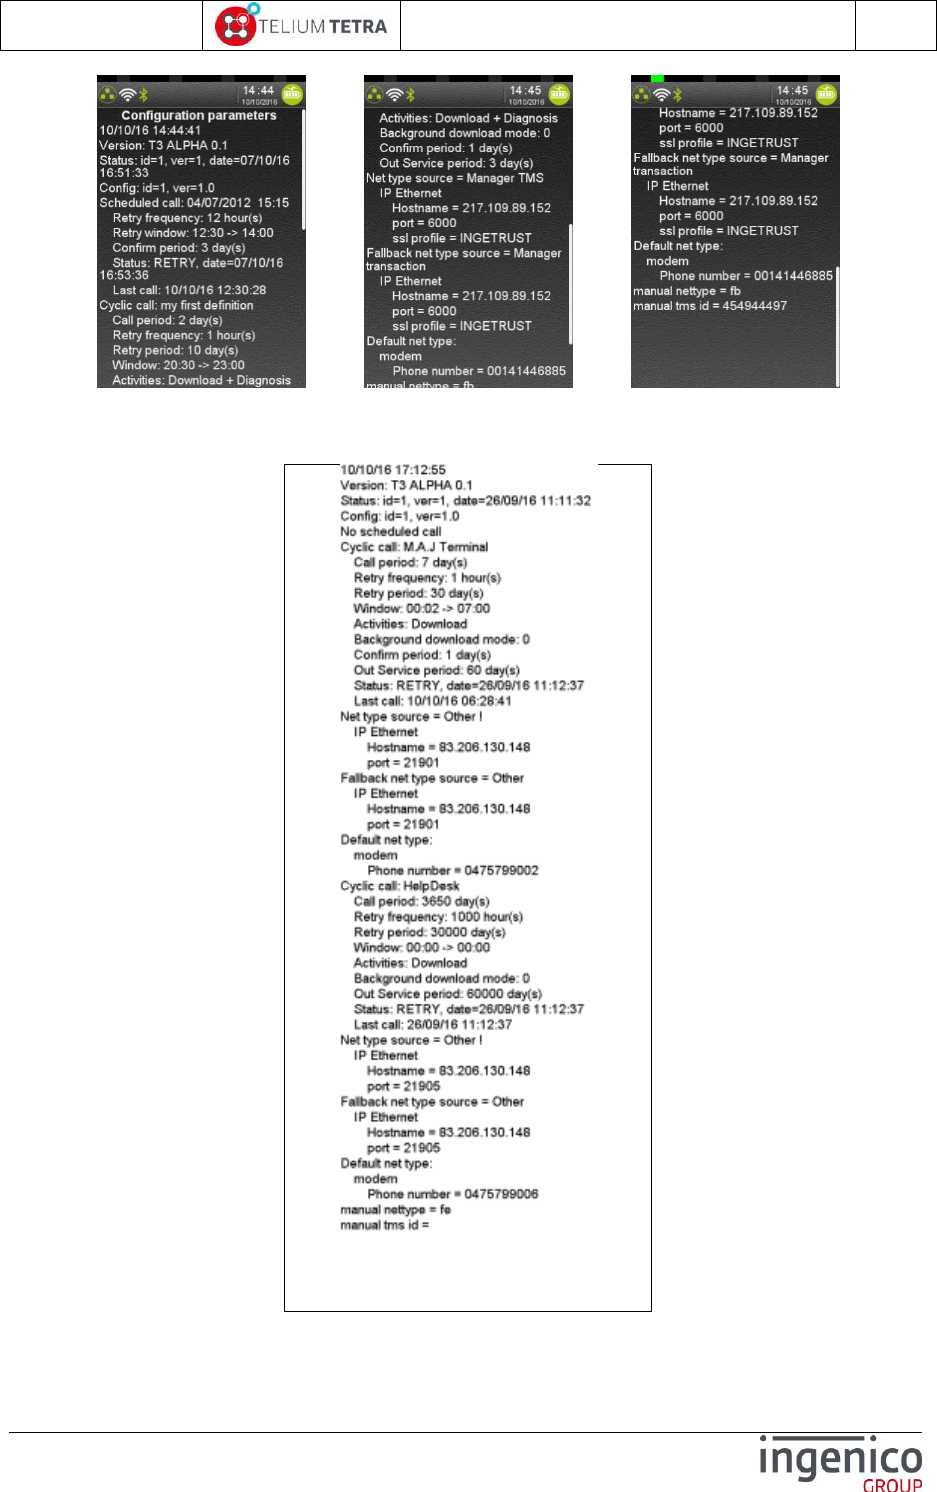

ICO-OPE-02757-V5
TETRA Terminal
User's guide
Public
71/199
Ingenico document - Reproduction or disclosure prohibited without written authorization
Please check document validity before using
8_2_3_4_2_2 Deactivate/Activate
This menu allows deactivating or activating cyclic TMS call maintenance mechanism according to
terminal state. After menu validation and password hitting (only for deactivation if parameter
“TMSCall” is set with password), the terminal reboots.
OR =>
8_2_3_4_2_3 Reset configuration
“RAZ” menu clears all stored information and log files linked with cyclic TMS call maintenance
mechanism. After menu validation and password hitting (if parameter “TMSCall” is set with
password), the terminal reboots.
Consult log
The menu “Consult log” allows consulting the log of all calls performed by the terminal thanks to
printer or display.
=> =>
Below is an example of such a ticket:
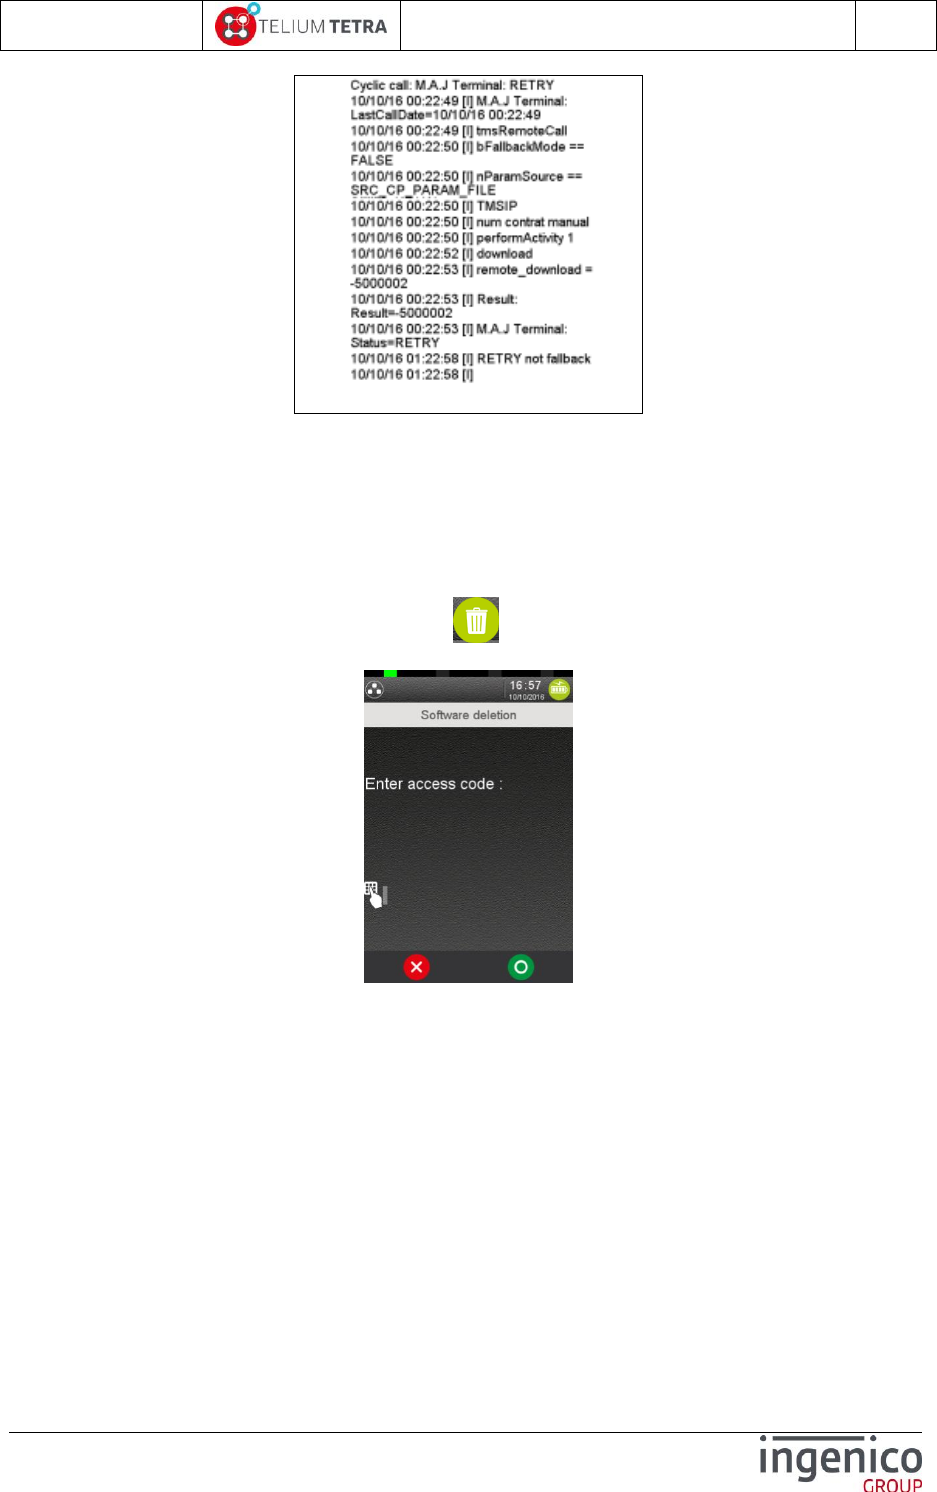
ICO-OPE-02757-V5
TETRA Terminal
User's guide
Public
72/199
Ingenico document - Reproduction or disclosure prohibited without written authorization
Please check document validity before using
“[I]” is used for information. When there some error detected, “[E]” is used.
8_3 Software packages removal
Warning! The feature described in this paragraph is reserved to experienced user: software removal
may block terminal if essential software is removed.
From “Software management” panel, select the icon (named “Removal”). The following screen
is proposed.
Software removal proposes two interfaces to remove software packaging according to access code:
“Access code” = “26” : Software removal by ID package
Software packages are sorted by types: Application, DLL, Parameters, Key, System, OS.
Having selected a type, the user is invited to enter the software package ID: 10 digits
number.
Here after screenshots of the sequence.
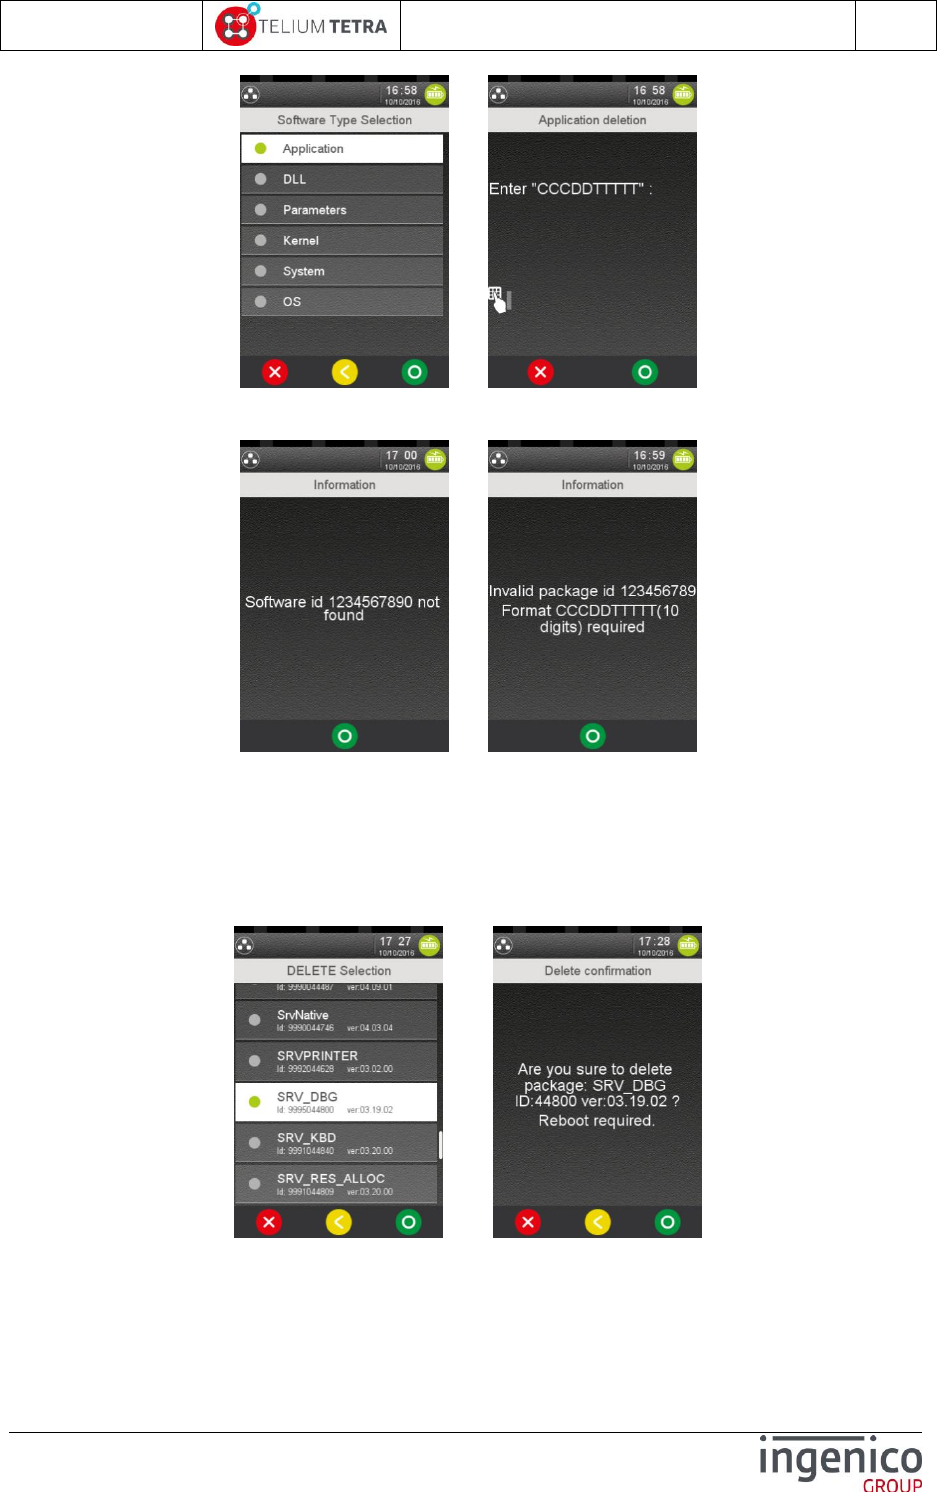
ICO-OPE-02757-V5
TETRA Terminal
User's guide
Public
73/199
Ingenico document - Reproduction or disclosure prohibited without written authorization
Please check document validity before using
=>
When package is not found the following screen or when package name does not fit the
required format, one of the following screen is displayed:
or
“Access code” = “07” : Software removal by “friendly” name
All software packages are listed not sorted (=discovery order)
Each software element contents its “friendly” name , its package ID number and its full
version
Having selected a file, the terminal asks the user to confirm removal.
Here after screenshots of the sequence.
=>

ICO-OPE-02757-V5
TETRA Terminal
User's guide
Public
74/199
Ingenico document - Reproduction or disclosure prohibited without written authorization
Please check document validity before using
9 Terminal settings
The “Terminal Settings” subpanel allows managing the different parameters of the terminal: these
parameters act on configuration of hardware features or of logical functionalities provided by software
programs. The configuration is organized around 4 themes:
General Settings: covering general logical functionalities
Human interface: covering all related points linked with user interface
ECO mode: covering power management and energy monitoring
Communication means: covering all related points linked communications means
Hardware settings
When “Terminal Settings” icon is selected on “Control panel”, the following subpanel appears on
screen:
Select an icon on the screen.
The following table provides the different links to subpanels description.
Item
Reference
General settings
9_1
Human interface
9_2
ECO mode
9_3
Communication means
9_4
GPS
9_4
9_1 General settings
The “General Settings” subpanel gives access to “regional” settings. The configuration is organized
around 3 themes:
Currency
Date and Time
Language

ICO-OPE-02757-V5
TETRA Terminal
User's guide
Public
75/199
Ingenico document - Reproduction or disclosure prohibited without written authorization
Please check document validity before using
Time slot to tune automatic reboot for integrity memory checking.
When “General Settings” icon is selected on “Terminal Settings”, the following subpanel appears
on screen:
Select an icon on the screen.
The following table provides the different links to subpanels description.
Item
Reference
Currrency
9_1_1
Date and Time
9_1_2
Language
9_1_3
PCIV4 time slot
9_1_4
Currency
“Currency” icon allows setting the default currency to be displayed on the amount screen (driven by
“AMOUNT” application) and the currency formatting to use. When “Currency” icon is selected on
“General Settings”, the terminal built the list of currencies managed by applications and displays the
following type of screens:
or
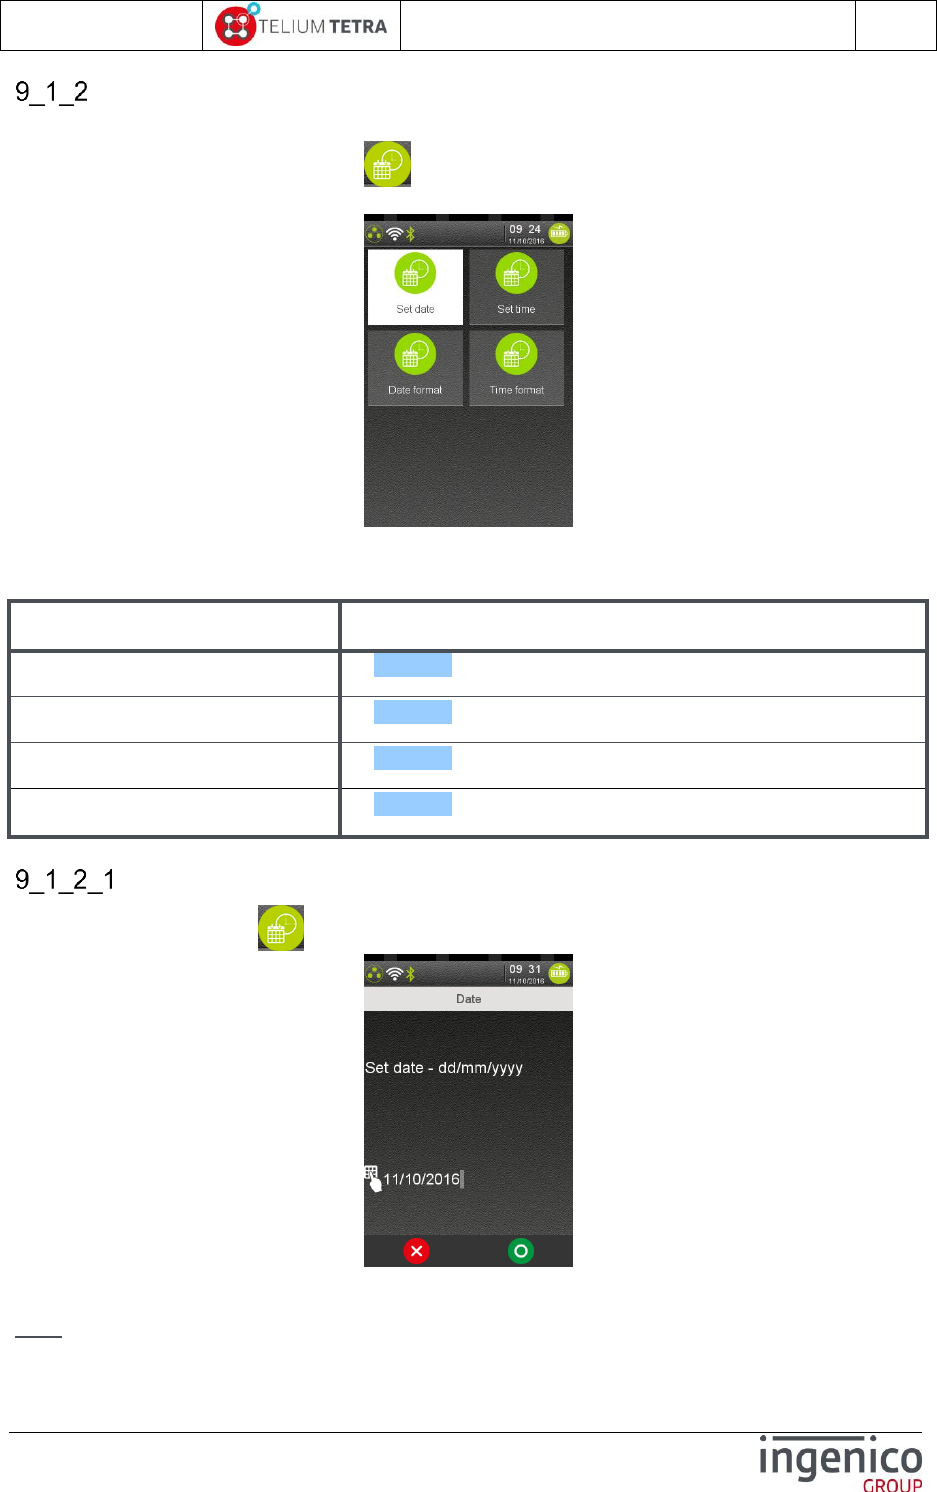
ICO-OPE-02757-V5
TETRA Terminal
User's guide
Public
76/199
Ingenico document - Reproduction or disclosure prohibited without written authorization
Please check document validity before using
Date and Time
“Date and Time” icon allows setting date and time values and the way they will be displayed and
managed. When “Date and Time” icon is selected on “General Settings”, the following subpanel
appears on screen:
Select an icon on the screen.
The following table provides the different links to subpanels description.
Item
Reference
Set date
9_1_2_1
Set time
9_1_2_2
Date format
9_1_2_3
Time format
9_1_2_4
Set date
To modify date, select icon named “Set date”, the following screen is displayed:
According to the date specified format, enter a new date and then validate.
Note: When the entered date is invalid, a “red” flashing screen is displayed when validating.

ICO-OPE-02757-V5
TETRA Terminal
User's guide
Public
77/199
Ingenico document - Reproduction or disclosure prohibited without written authorization
Please check document validity before using
Set time
To modify time, select icon named “”Set time”, the following screen is displayed:
Enter a new time and then validate.
Note: When entered the time is invalid, a “red” flashing screen is displayed when validating.
Date format
The date can be displayed with specific regional format. When icon named “Date format” is
selected the selection of the different formats is proposed thanks to the following sequence of screens:
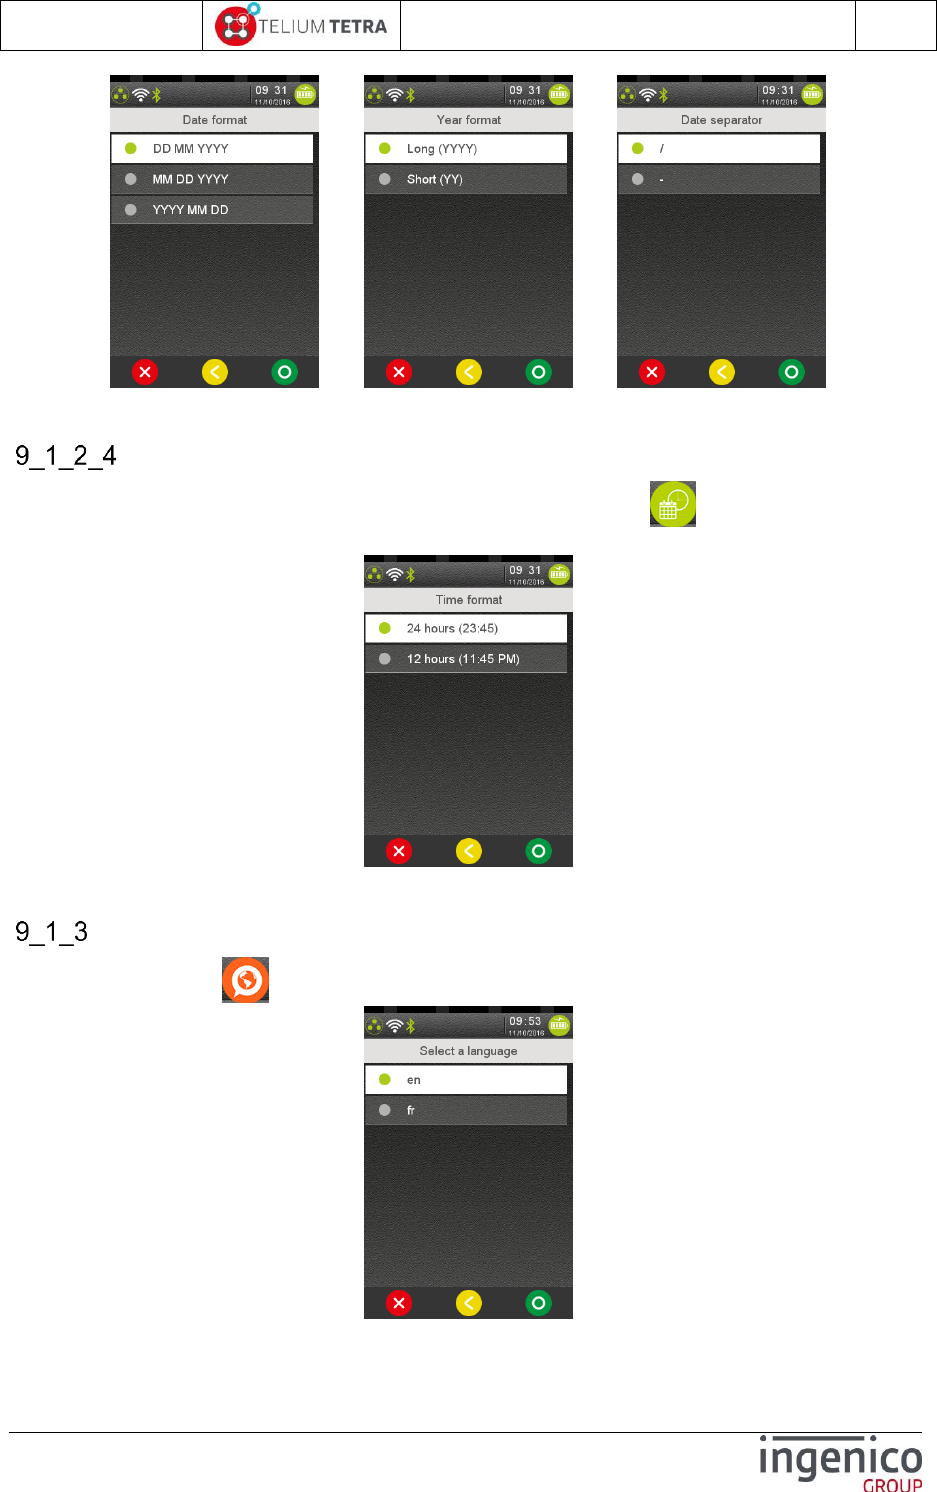
ICO-OPE-02757-V5
TETRA Terminal
User's guide
Public
78/199
Ingenico document - Reproduction or disclosure prohibited without written authorization
Please check document validity before using
=> =>
Select and validate the different proposed setting that can be adjusted.
Time format
The time can be displayed with specific regional format. When icon named “Time format” is
selected the selection of the different formats is proposed thanks to the following screen:
Select and validate one of proposed setting.
Language
When “Language” icon is selected on “General Settings”, the following screen is displayed:
The list of available languages depends on the loaded configuration. Select the desired language.
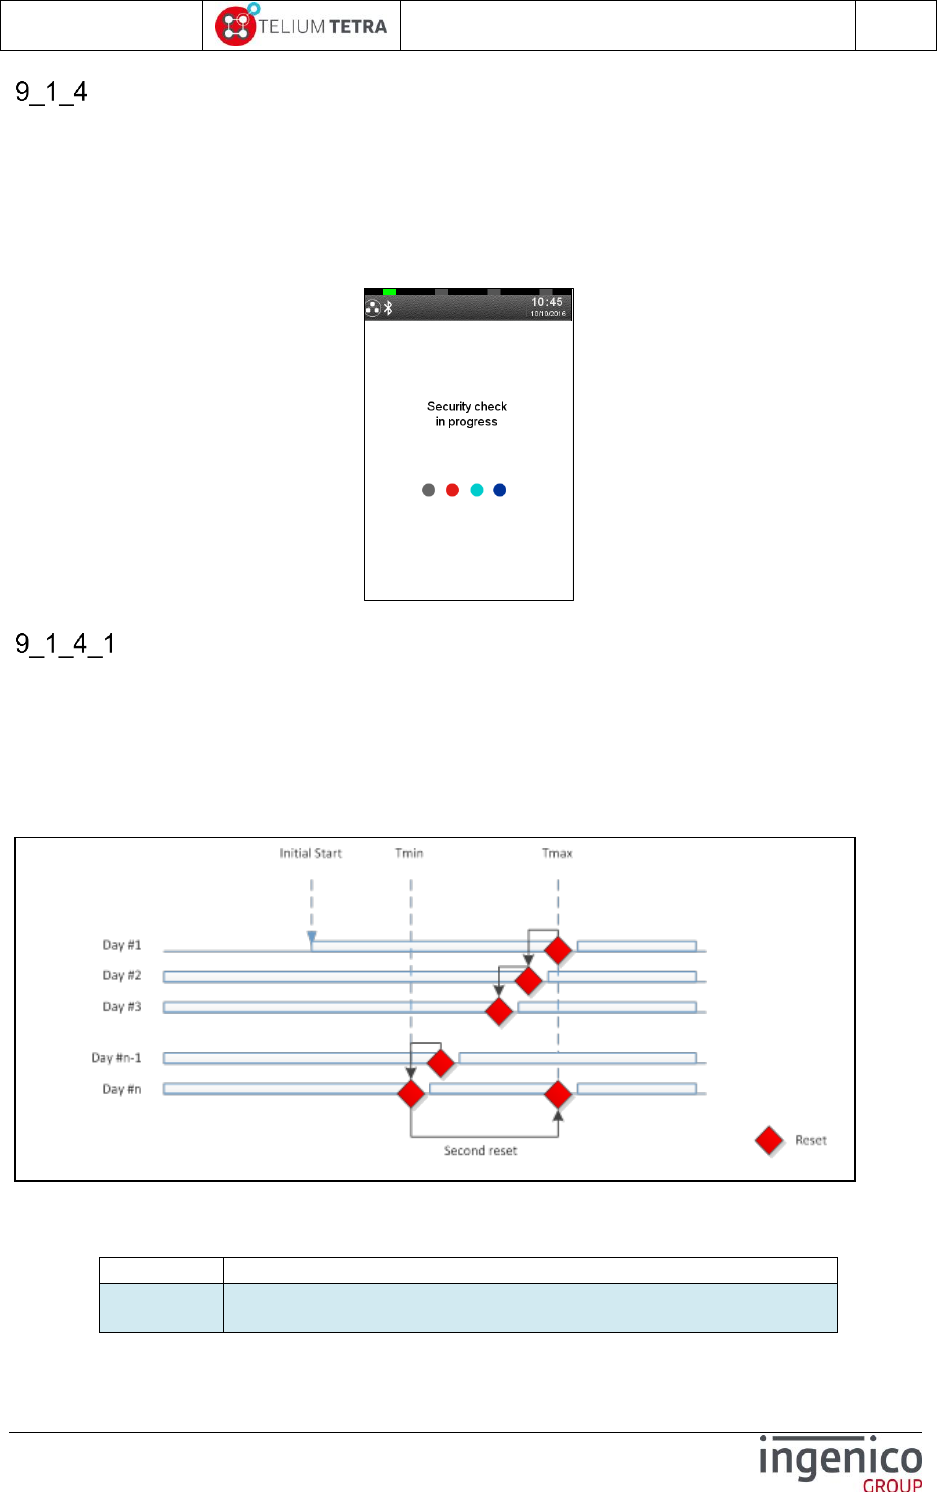
ICO-OPE-02757-V5
TETRA Terminal
User's guide
Public
79/199
Ingenico document - Reproduction or disclosure prohibited without written authorization
Please check document validity before using
PCIV4 time slot
PCI V4 security constraints impose to check integrity of “memory” at least once a day. The mechanism
that was set up to respond to both integrity of executable code and other types of data, is based on a
full reset of the terminal. To no worry the final user, some parameters are available to tune when this
event happens.
In case someone would be present during this reset, a specific message is display during boot to warn
the user.
Time slot principle
The Reset mechanism is designed to ensure a terminal reset at least one time per 24 hours running.
To fulfill this requirement a time slot, called the “reset interval” represented by Tmin and Tmax has
been defined. This period represents the time interval where the reset is allowed. Depending on the
business case, the “reset interval” has to be customized during the terminal installation phase. By
design, this period cannot be shorter than 30 minutes.
During this period, the reset occurs each day 5 minutes earlier as explained by the diagram below:
Figure 21 – PCIV4 Time slot principle
Sequence:
Day
Description
Day #1
The first day, since the terminal start after Tmax, the reset will
occur at Tmax minus 5 minutes which is less than 24Hours.
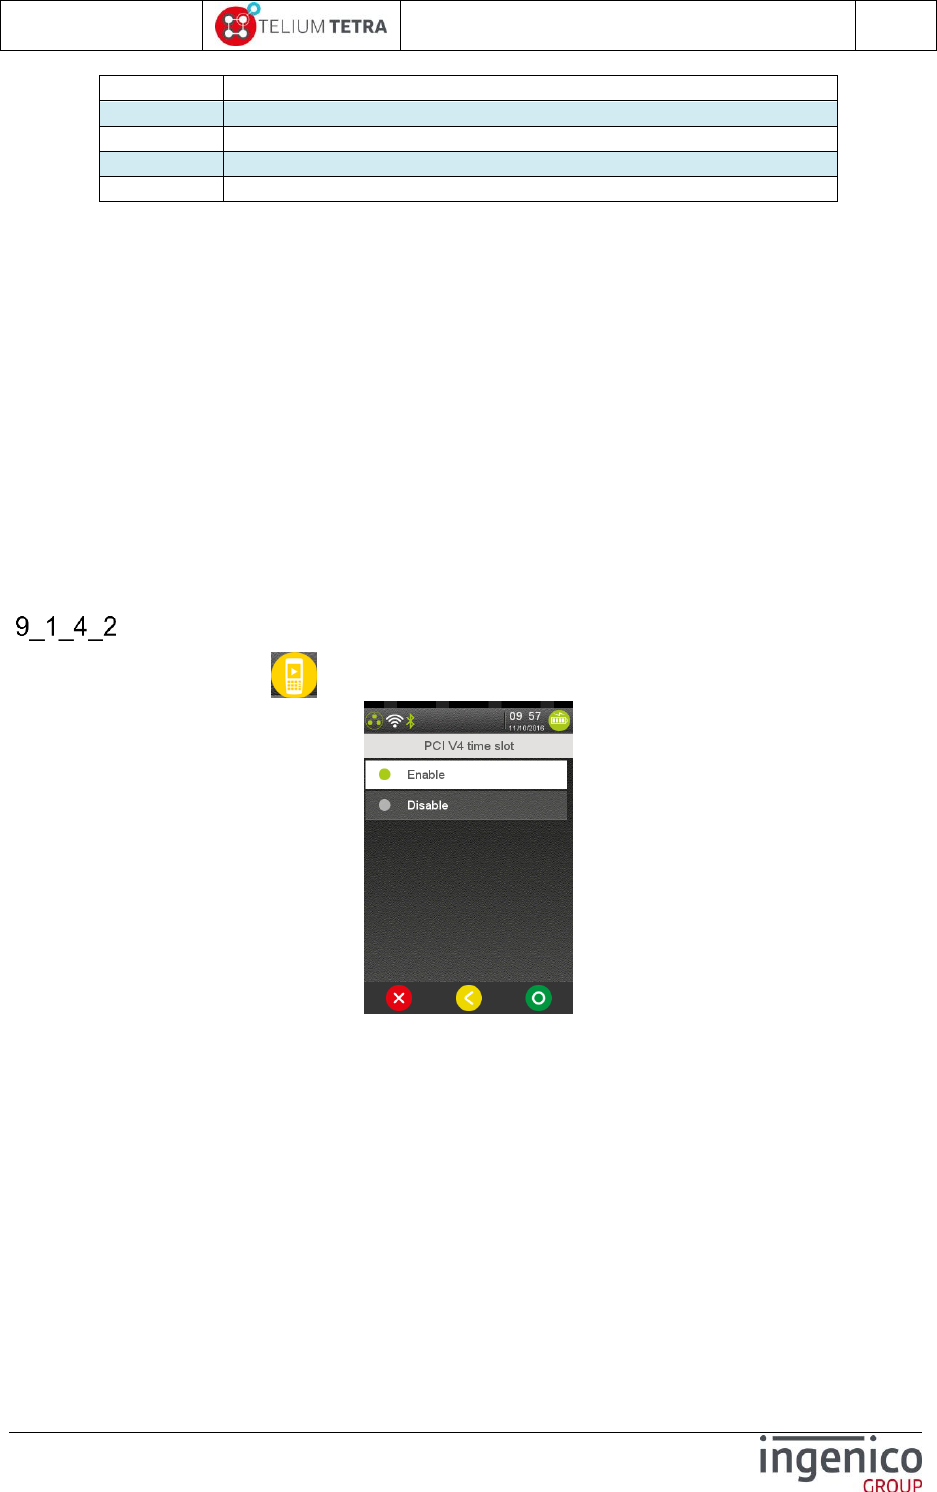
ICO-OPE-02757-V5
TETRA Terminal
User's guide
Public
80/199
Ingenico document - Reproduction or disclosure prohibited without written authorization
Please check document validity before using
Day #2
The second day, the reset occurs at Tmax minus 10 minutes
Day #3
The third day, the reset occurs at Tmax minus 15 minutes
---
---
Day #n-1
The reset occurs at Tmax minus n-5 minutes
Day #n
The reset occurs at Tmin. A second reset is triggered at Tmax.
Table 9 – PCIV4 resets schedule
To ensure to keep the reset in the “reset interval” specified by the customer and to ensure that a reset
will occurs per 24 hours, a water flow mechanism has been introduced. This mechanism shifts earlier
the reset of 5 minutes per day. The consequence of this mechanism is after several days (depending
on the reset interval) the reset will go out of the “reset interval”.
To prevent it a second reset has been introduced. This second reset occurs when the reset time reach
the Tmin value. In this position (Day #n in the table above) a reset occurs at Tmin and a second one at
Tmax.
Depending on the “reset interval”, the second reset can occur more or less frequently. With a 30
minutes time interval between Tmin and Tmax, the double reset will occur each 6 days.
By default the reset period is
3h30 for Tmin
5h00 for Tmax
Time slot menus
When “PCIV4 time slot” icon is selected on “General Settings”, the following screen is displayed:
When selecting “Disable”, the terminal will perform a cyclic reboot only according to its power-on date
and time: 24 hours elapsed duration.
When selecting “Enable”, the terminal will propose to enter a slot of time during which the terminal will
trigger a reboot.

ICO-OPE-02757-V5
TETRA Terminal
User's guide
Public
81/199
Ingenico document - Reproduction or disclosure prohibited without written authorization
Please check document validity before using
=>
Select a slot of time during which the terminal has low activity (no sale, no planned software automatic
upgrade, …).
9_2 Human interface
The “Human interface” subpanel gives access to parameters related to inputs or outputs devices
linked user. This configuration sub-panel is organized around 2 main themes and to 2 options only
present when the hardware is detected:
BeepOnPincode
Explorer
Touch calibration
Internal camera
When “Human Interface” icon is selected on “Terminal Settings”, the following subpanel appears
on screen:
Or
Select an icon on the screen.
The following table provides the different links to subpanels description.
Item
Reference
BeepOnPincode
9_2_1
Explorer
9_2_2
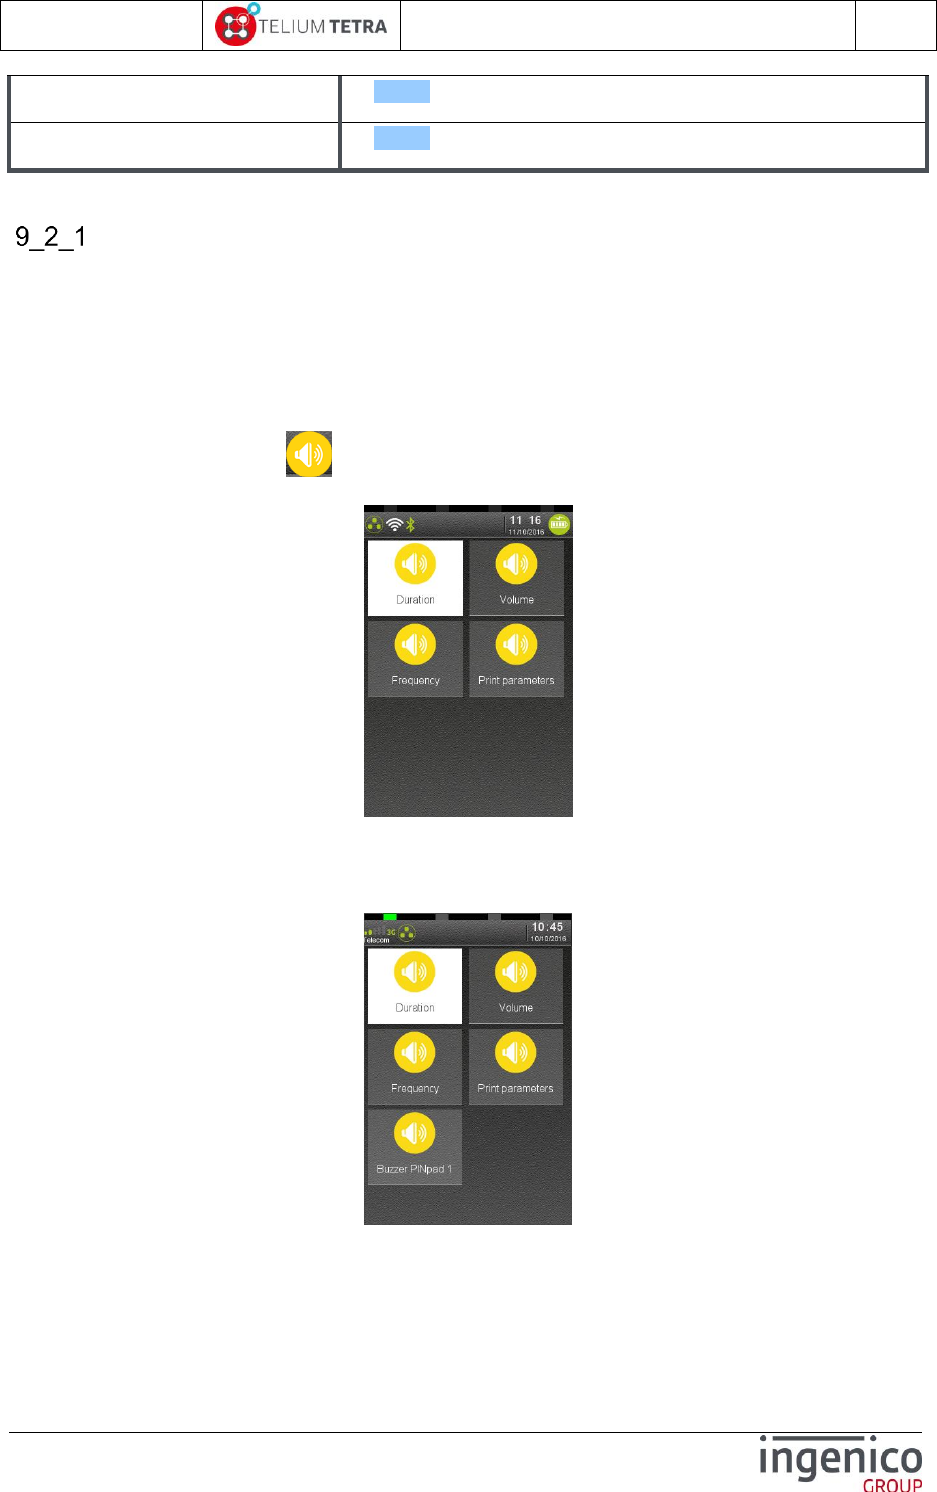
ICO-OPE-02757-V5
TETRA Terminal
User's guide
Public
82/199
Ingenico document - Reproduction or disclosure prohibited without written authorization
Please check document validity before using
Touch calibration
9_2_2
Internal Camera
9_2_4
Beep On PIN code
The “Bip On PIN code” subpanel allows setting the different parameters of the buzzer when used
during pin code sequence. Three parameters can be set:
Frequency
Duration
Volume
An icon is also proposed to summarize on a ticket the different parameters of buzzer configuration.
When “Beep on Pincode” icon is selected on “Human interface” subpanel, the following subpanel
appears on screen:
Select an icon on the screen.
For terminal on which a pinpad is connected, it is possible also to configure the beep during PIN code
when the pinpad is used. Follows a screenshot captured on DESK5000 with a connected pinpad:
Select an icon on the screen.
The following table provides the different links to subpanels description.
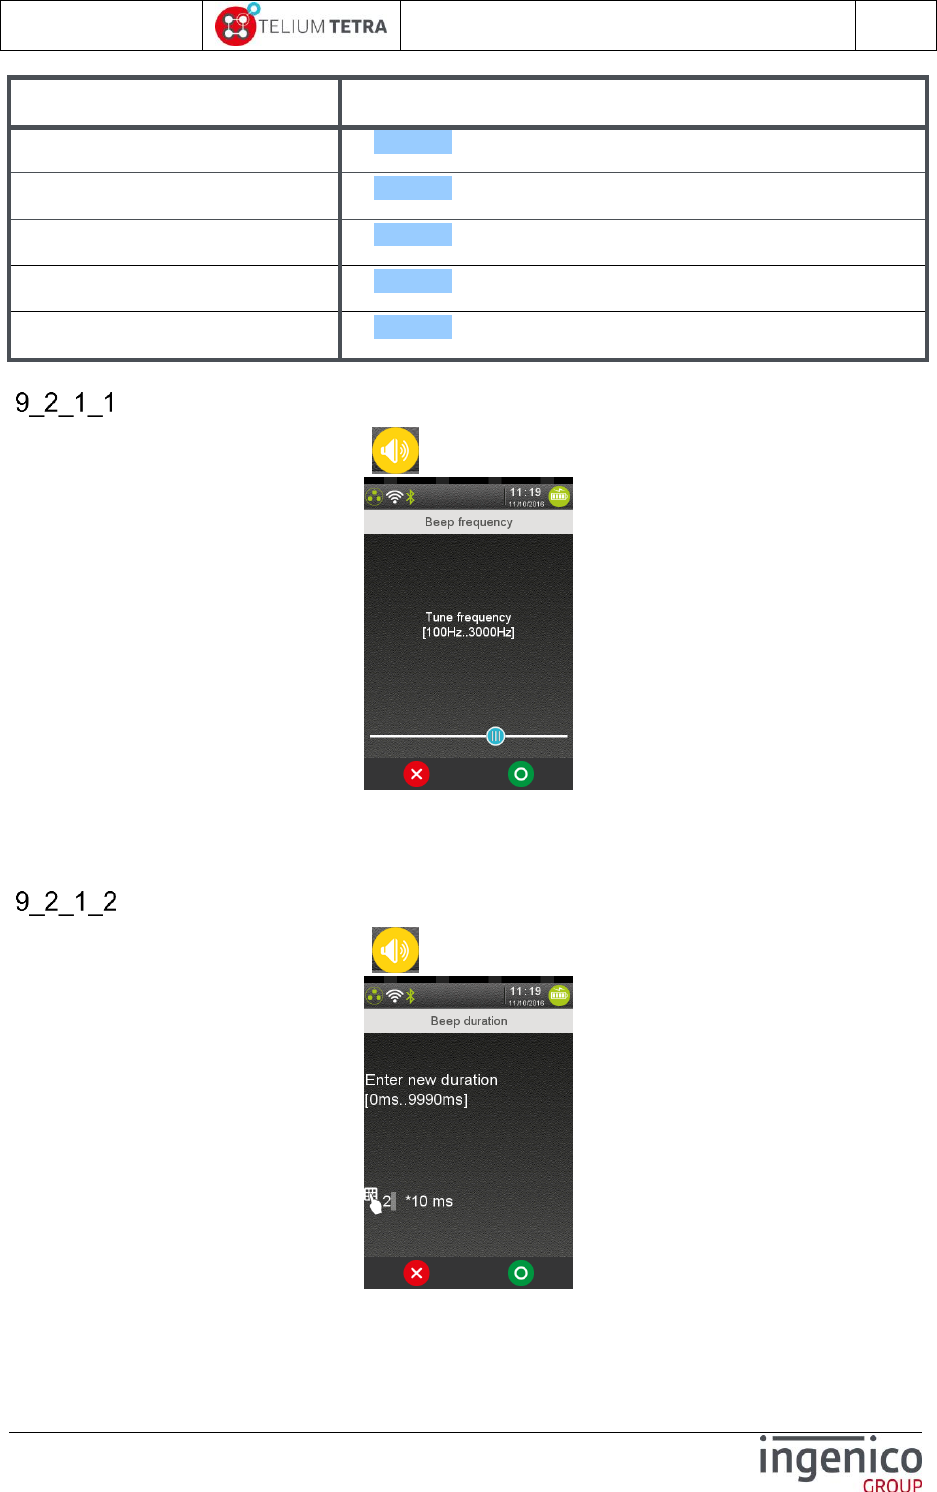
ICO-OPE-02757-V5
TETRA Terminal
User's guide
Public
83/199
Ingenico document - Reproduction or disclosure prohibited without written authorization
Please check document validity before using
Item
Reference
Frequency
9_2_1_1
Duration
9_2_1_2
Volume
9_2_1_3
Buzzer on PINpad 1
9_2_1_5
Print Parameters
9_2_1_5
Frequency
To modify buzzer frequency, select icon named “Frequency”, the following screen is displayed:
To select a frequency, move the slider and validate.
Until the slider is moved and touched, the terminal beeps with a frequency corresponding to slider
position.
Duration
To modify buzzer frequency, select icon named “Duration”, the following screen is displayed:
Enter a value multiple of 10 milliseconds according to min and max on the screen and validate.
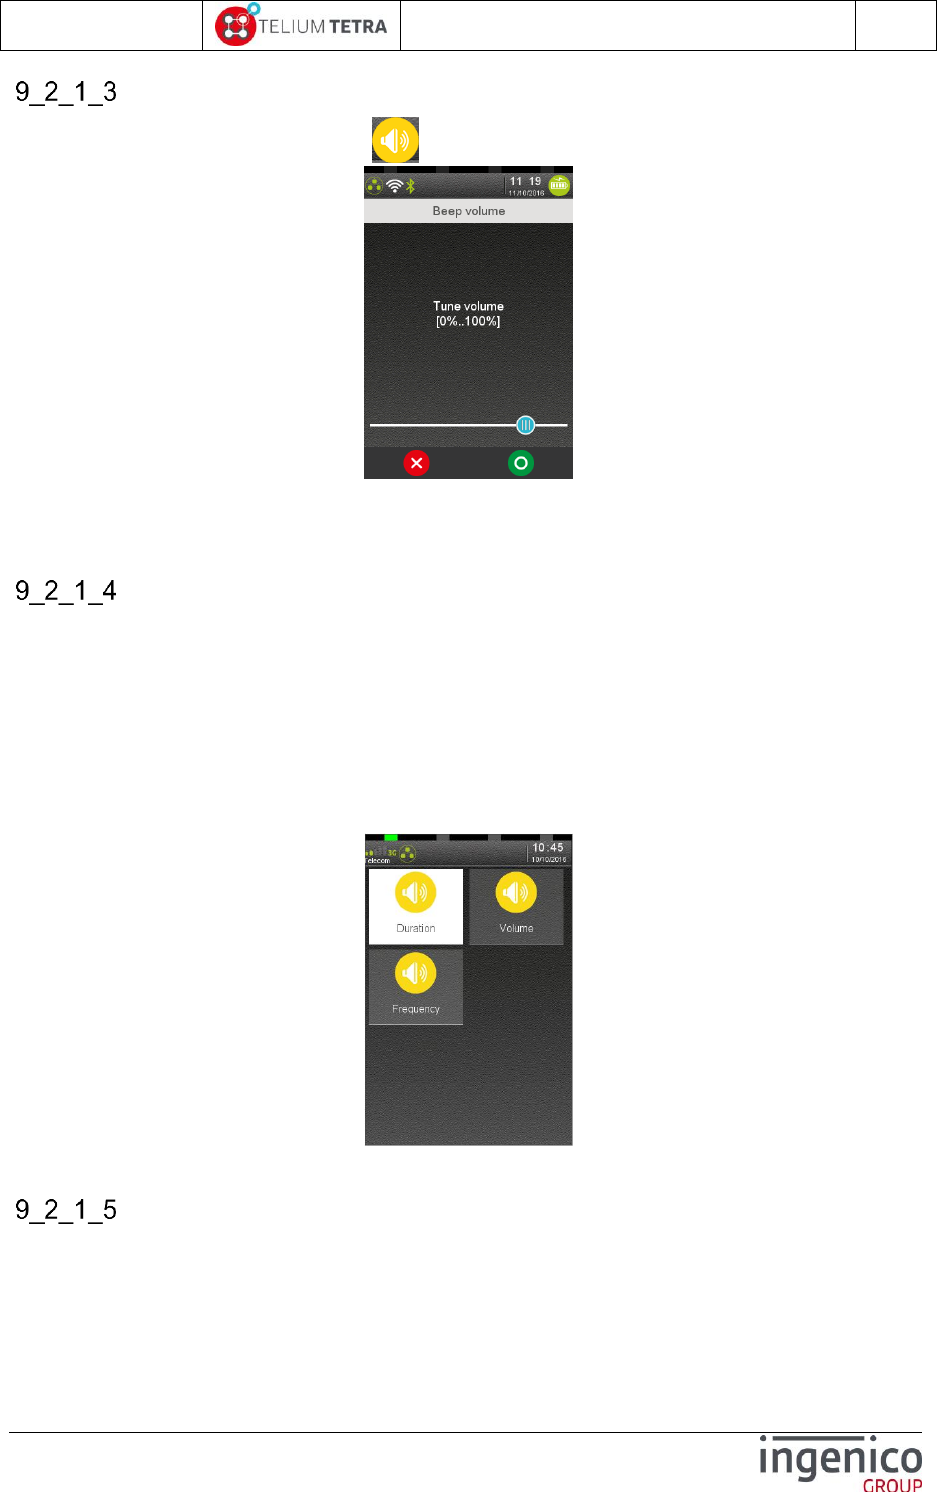
ICO-OPE-02757-V5
TETRA Terminal
User's guide
Public
84/199
Ingenico document - Reproduction or disclosure prohibited without written authorization
Please check document validity before using
Volume
To modify buzzer frequency, select icon named “Volume”, the following screen is displayed:
To select a frequency, move the slider and validate.
Until the slider is moved and touched, the terminal beeps with a frequency corresponding to slider
position.
Buzzer on PINpad 1
The “Buzzer on PIN pad 1” subpanel allows modifying the beep during pin code when the pinpad is
used. The following parameters are proposed:
Duration
Frequency
Volume
The menus for PINpad are not specifically detailed; refer to previous menus described for the terminal
part. Follows a screenshot example of typical “Beep on pincode” pinpad menus for DESK5000
connected to IPP315:
Select an icon and validate.
Print parameters
The following ticket is printed when touching the “Print Parameters” icon.
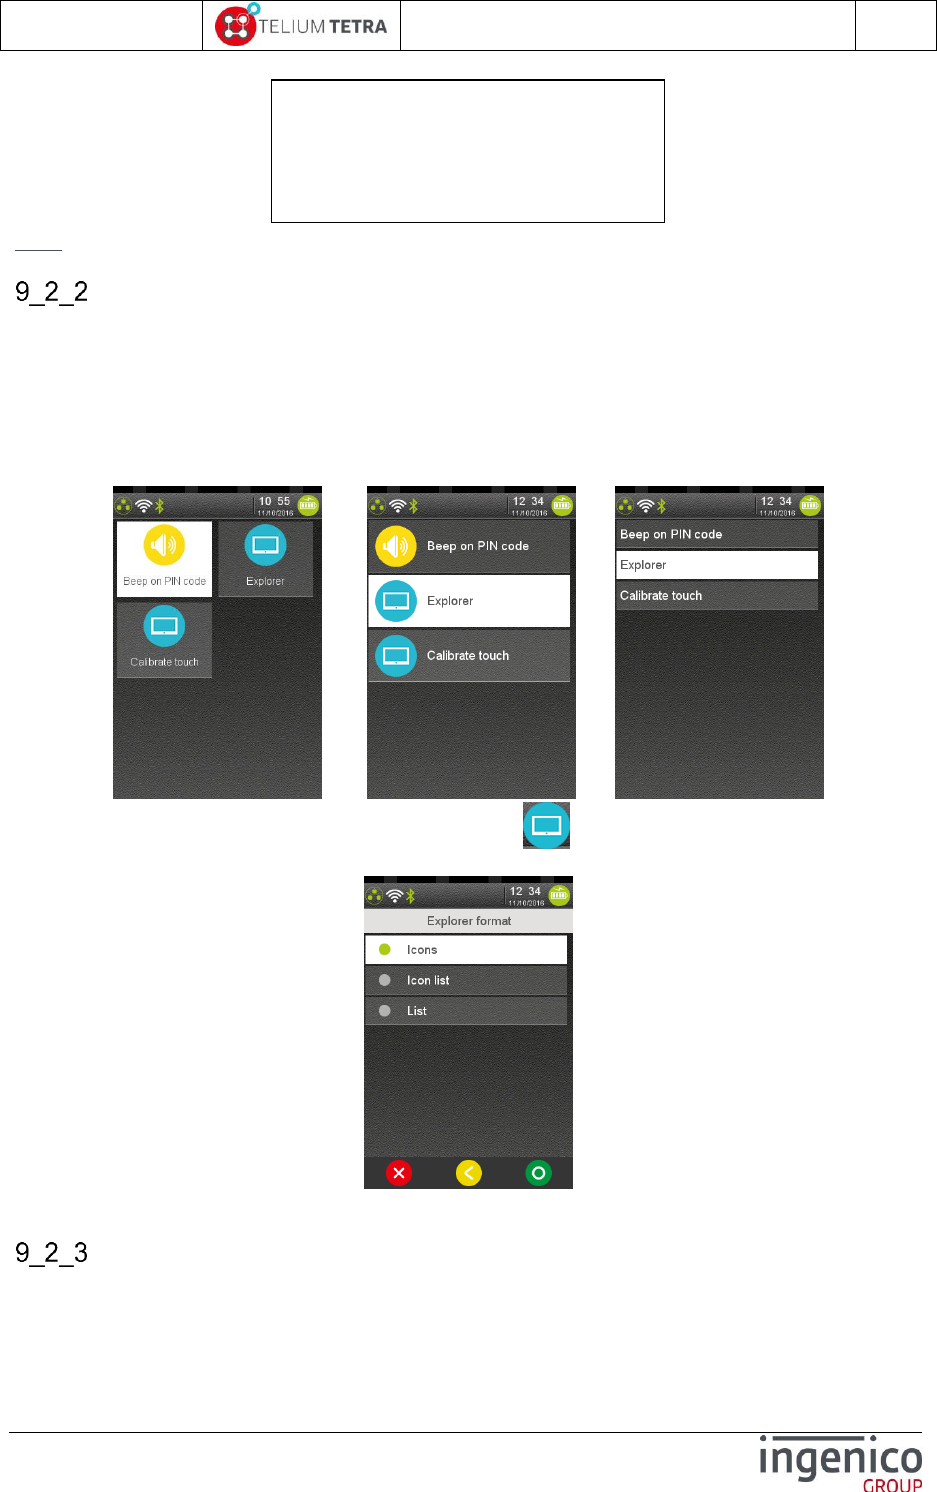
ICO-OPE-02757-V5
TETRA Terminal
User's guide
Public
85/199
Ingenico document - Reproduction or disclosure prohibited without written authorization
Please check document validity before using
Note: When a pinpad is present, a section for pinpad parameters is added to the ticket.
Explorer
The “Explorer” panel manages 3 types of screen rendering according to its configuration:
Big icons with feature name inserted ordered on the screen
List of small icons followed by the feature name
List of feature names. When a “>” is present at the end of the line, the menu gives access to
another menu
The following screenshots illustrates the different possible configuration
or or
To modify “Explorer” rendering configuration, select icon named “Explorer”, the following screen
is displayed:
Select one of the proposed formats and validate.
Calibrate touch
Beep on PIN code
Local buzzer
- Frequency : 738 hz
- Volume: 20%
- Duration: 20ms
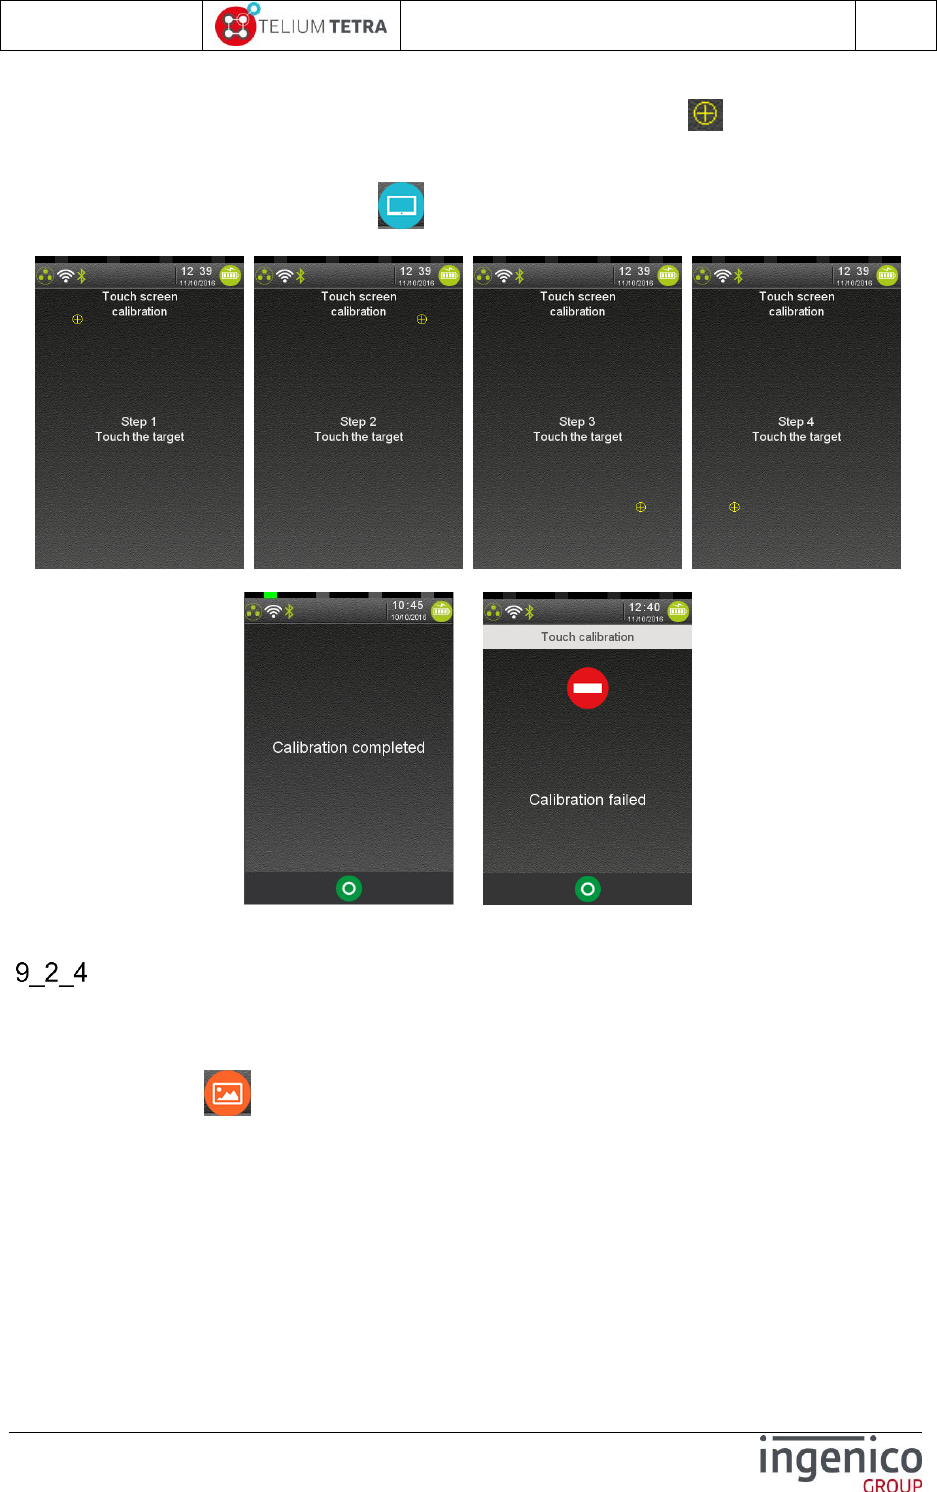
ICO-OPE-02757-V5
TETRA Terminal
User's guide
Public
86/199
Ingenico document - Reproduction or disclosure prohibited without written authorization
Please check document validity before using
The “Calibrate touch” subpanel allows tuning the touchscreen calibration. During this operation
dividing in 4 steps, the user must click on the screen on 4 different areas (circumscribed with a
circle in which a cross in drawn).
To access this operation, select icon named “Calibrate touch”, the following sequence of
screenshots happens:
According to the result of operation, the terminal displayed one of the following messages:
or
Successful Error detected.
Camera
This menu is optional: only present on terminal equipped with a camera. It allows to set the different
parameters of the camera.
When selecting, icon named “Camera”, the following screen is displayed:
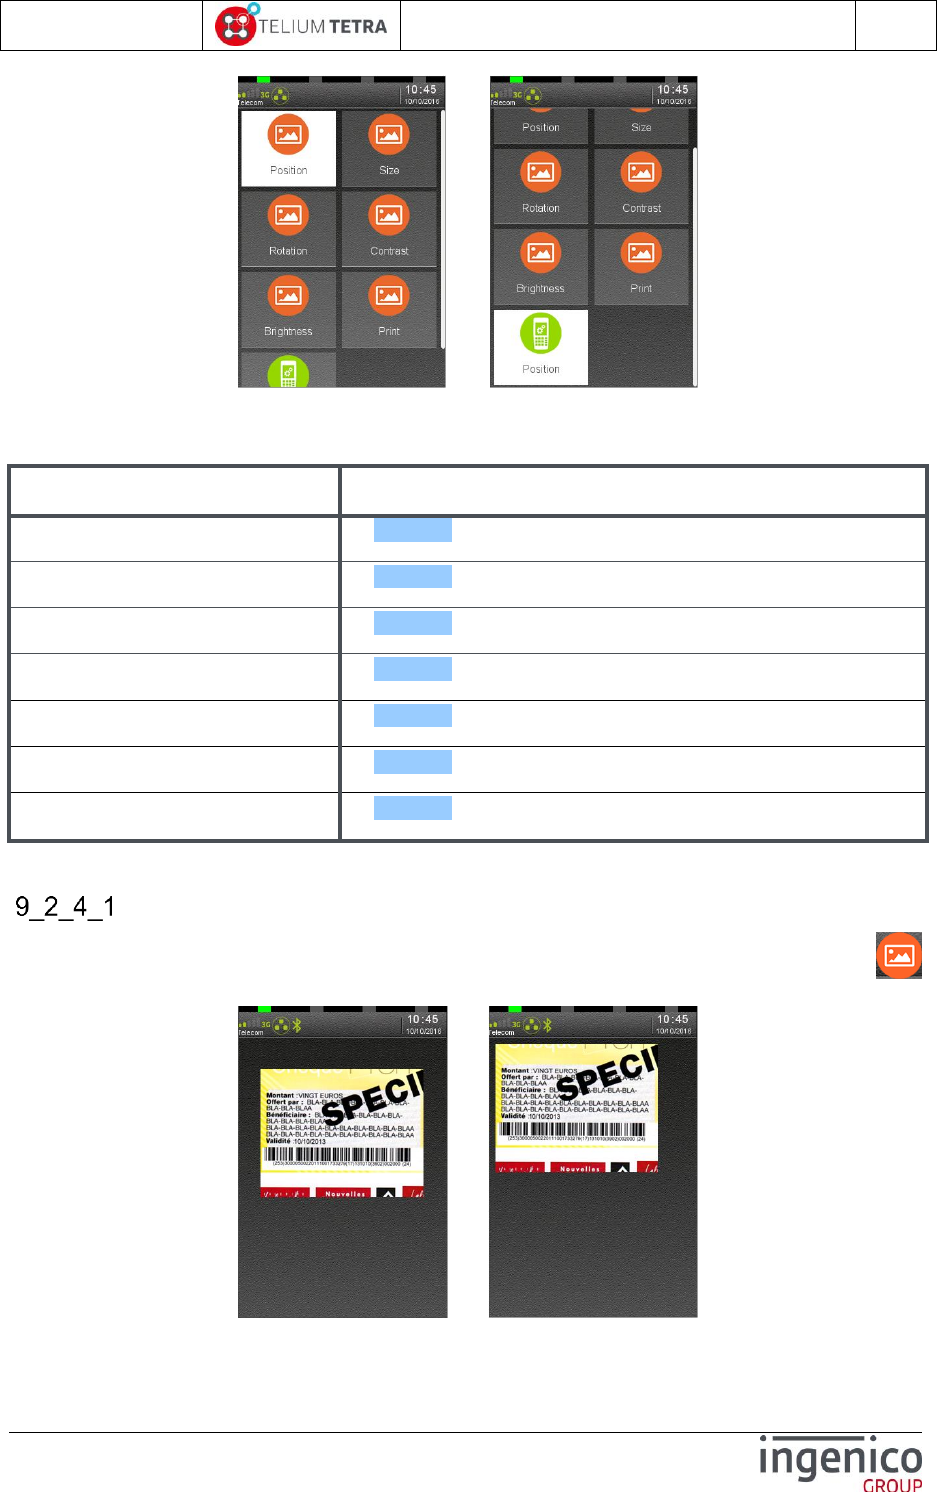
ICO-OPE-02757-V5
TETRA Terminal
User's guide
Public
87/199
Ingenico document - Reproduction or disclosure prohibited without written authorization
Please check document validity before using
../..
Select an icon on the screen.
The following table provides the different links to the different parameters description.
Item
Reference
Position
9_2_4_1
Size
9_2_4_2
Rotation
9_2_4_3
Contrast
9_2_4_4
Brightness
9_2_4_4
Saturation
9_2_4_4
Print
9_2_4_5
Position
To set default position of the rendered capture of the camera on terminal screen, select icon
named “Position”. The following screen with capture in progress is displayed:
=>
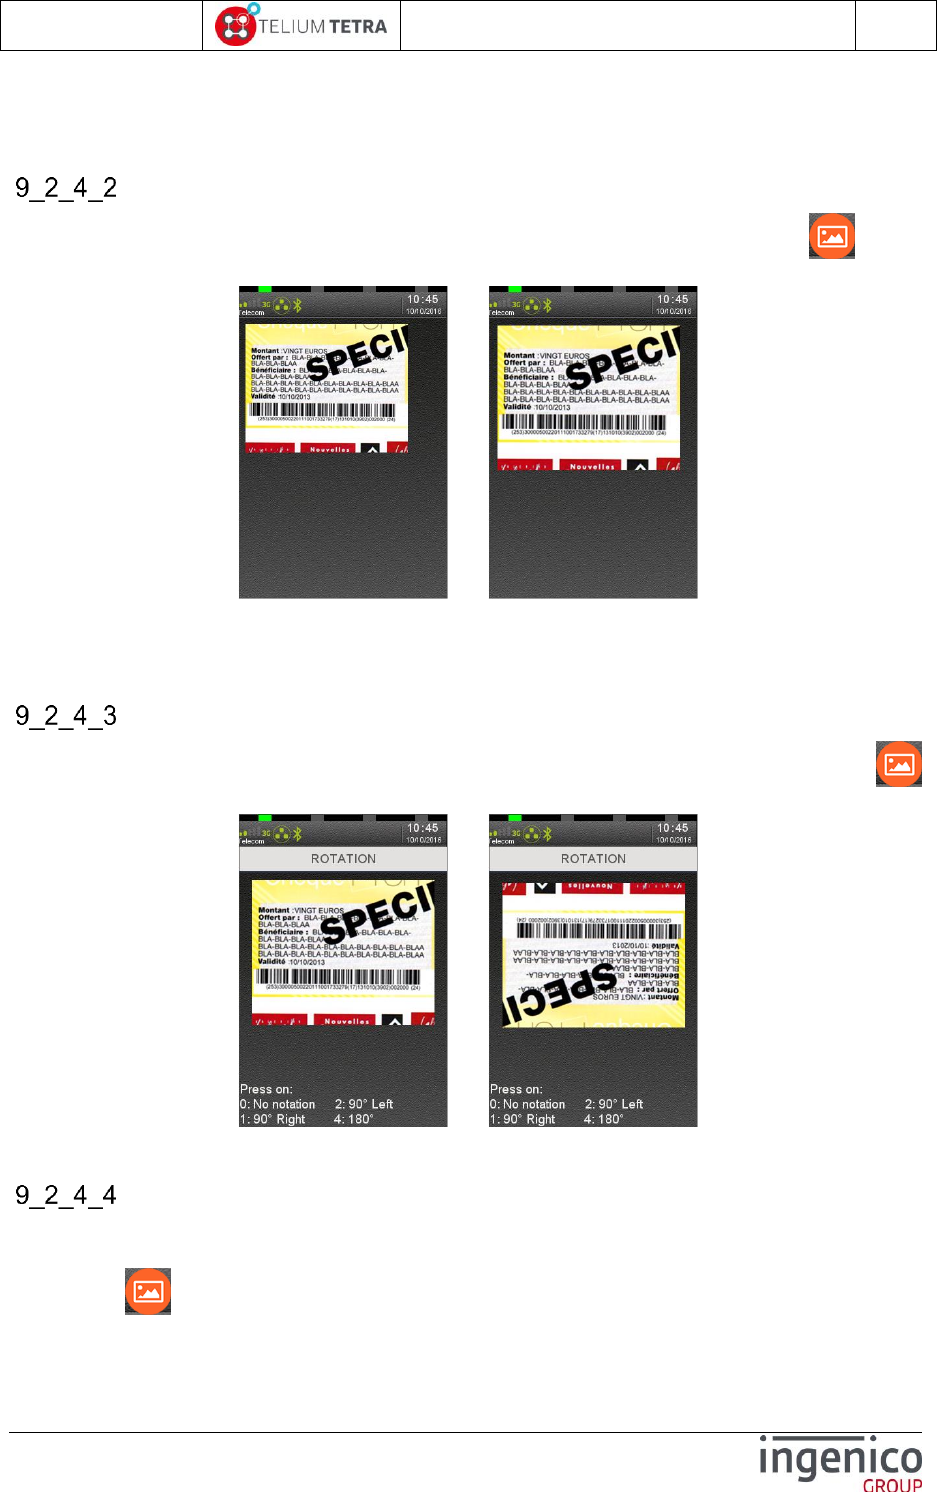
ICO-OPE-02757-V5
TETRA Terminal
User's guide
Public
88/199
Ingenico document - Reproduction or disclosure prohibited without written authorization
Please check document validity before using
With your finger, select the capture and move it on the screen where you want to the capture to be
displayed and validate. You must consider than you fix the x and y coordinates of the left top corner of
the rendering.
Size
To set default size of the rendered capture of the camera on terminal screen, select icon named
“Size”. The following screen with capture in progress is displayed:
=>
With your finger, select the bottom or right border of the rendered capture and move it on the screen to
adjust respectively height or width and validate.
Rotation
To set default orientation of the rendered capture of the camera on terminal screen, select icon
named “Rotation”. The following screen with capture in progress is displayed:
=>
Select the orientation by hitting key 0, 1, 2 or 3 (as explained on the screen) and validate.
Contrast / Brightness / Saturation
The default contrast , brightness or saturation of the rendered capture of the camera on terminal
screen, can be set by a dedicated menu for each of them: each menu has the same look and logic.
Select icon with the name of feature to set, the following screen with capture in progress is
displayed:
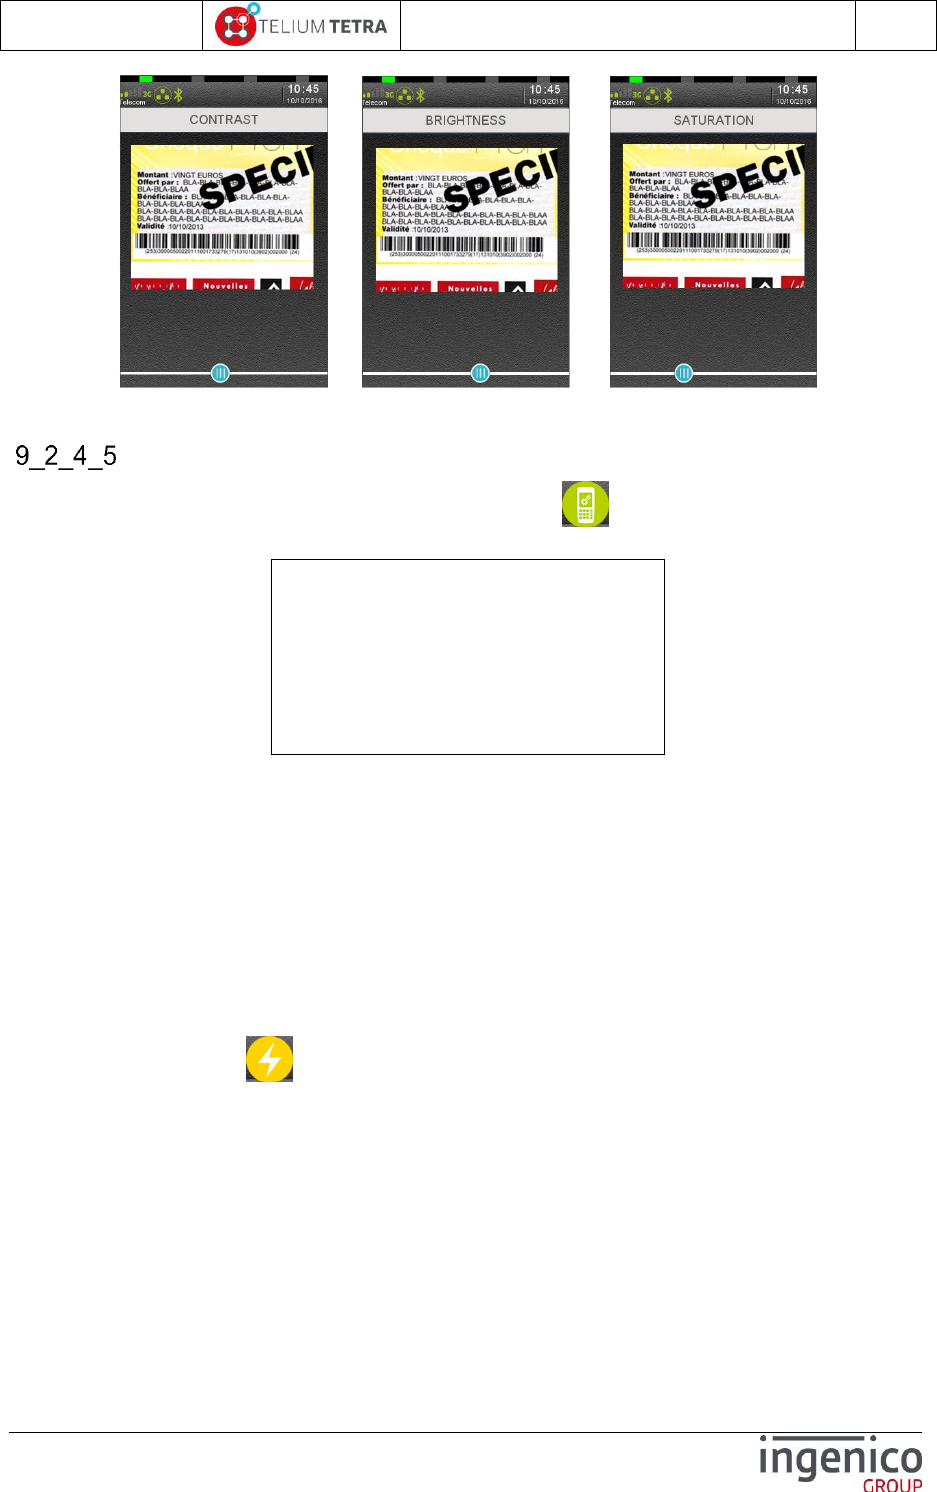
ICO-OPE-02757-V5
TETRA Terminal
User's guide
Public
89/199
Ingenico document - Reproduction or disclosure prohibited without written authorization
Please check document validity before using
or or
In moving the slider, select the default value and validate.
Print
To print the default parameters of the camera, select icon named “Print”. A typical ticket as
follows may be printed.
9_3 ECO mode
The “ECO mode” subpanel gives access to parameters driving power management and energy saving
also called “Inactivity” management. The configuration is organized around up to 4 themes:
Screen saver management
Standby management (only proposed on mobile terminal)
Backlight setting
Wake up condition according to Tilt or Touch events (only proposed on mobile terminal)
An icon is also proposed to summarize on a ticket the different parameters managed by “Inactivity”.
When “ECO mode” icon is selected on “Terminal Settings” subpanel, the following subpanel
appears on screen:
CAMERA
Position (v,y) 1:2
Size (w,h) 280:220
Rotation 180 degrees
Contrast [0..1000] 500
Brightness[0..1000] 500
Saturation[0..1000] 333
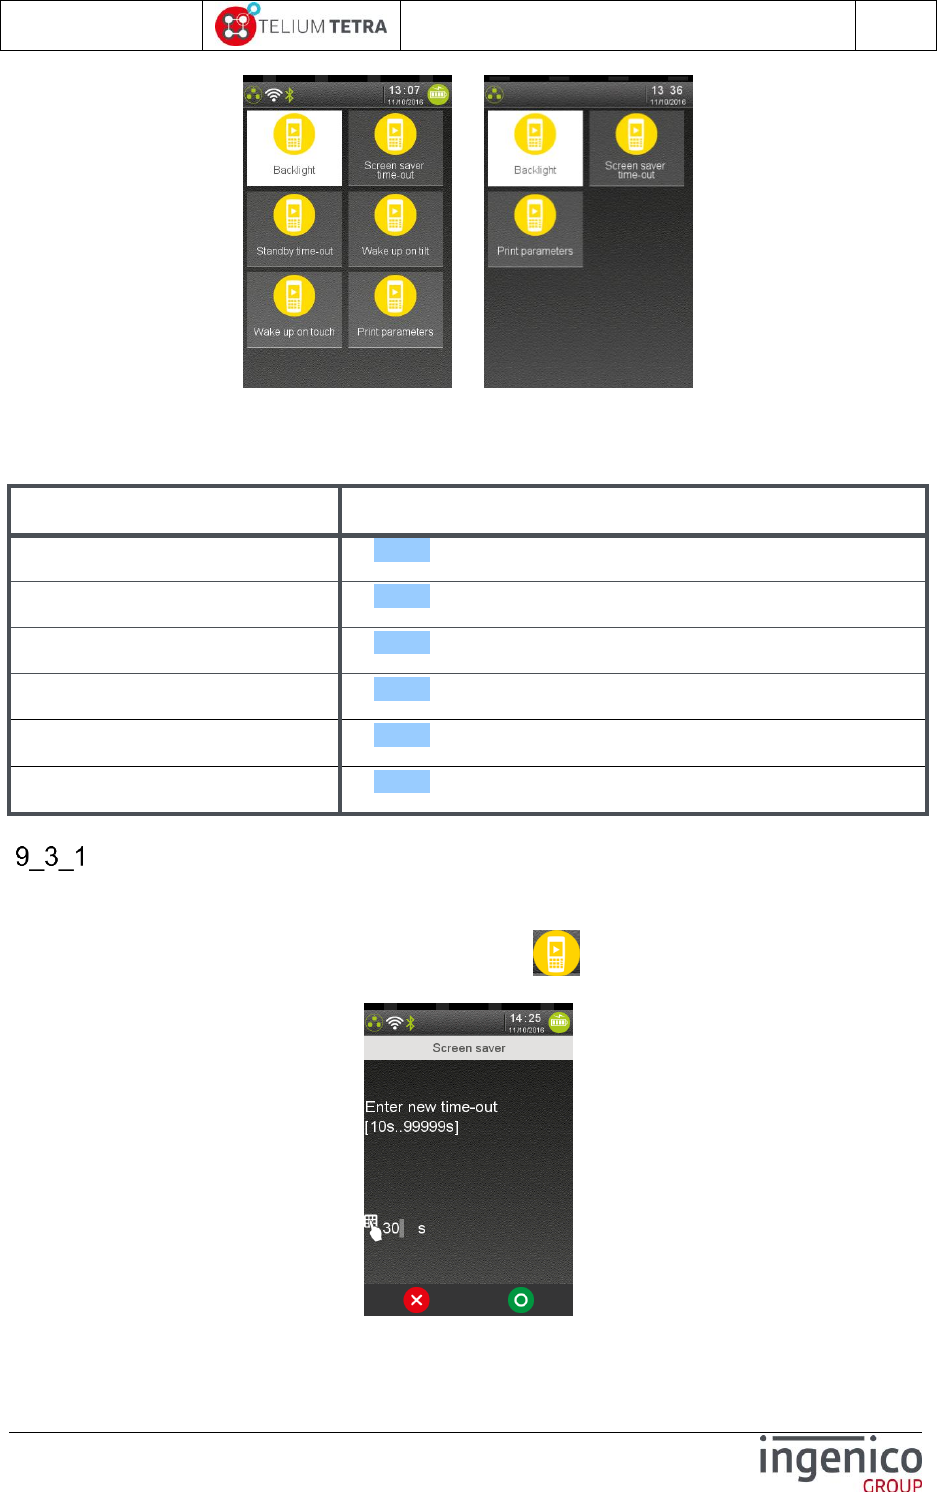
ICO-OPE-02757-V5
TETRA Terminal
User's guide
Public
90/199
Ingenico document - Reproduction or disclosure prohibited without written authorization
Please check document validity before using
MOVE5000 Non mobile terminals
Select an icon on the screen.
The following table provides the different links to subpanels description.
Item
Reference
Screen saver management
9_3_1
Standby management
9_3_2
Print parameters
9_3_3
Backlight setting Explorer
9_3_4
Wakeup on tilt
9_3_5
Wakeup on touch
9_3_6
Screen saver time out
The terminal provides to application some capabilities to display screen saver. This menu allows user
to fix the duration to wait before activating screen saver mechanism.
To modify the screen saver configuration, select icon named “Screensaver time out”, the
following screen is displayed:
Enter a value according to min and max on the screen and validate: 99999s means no screen saver.
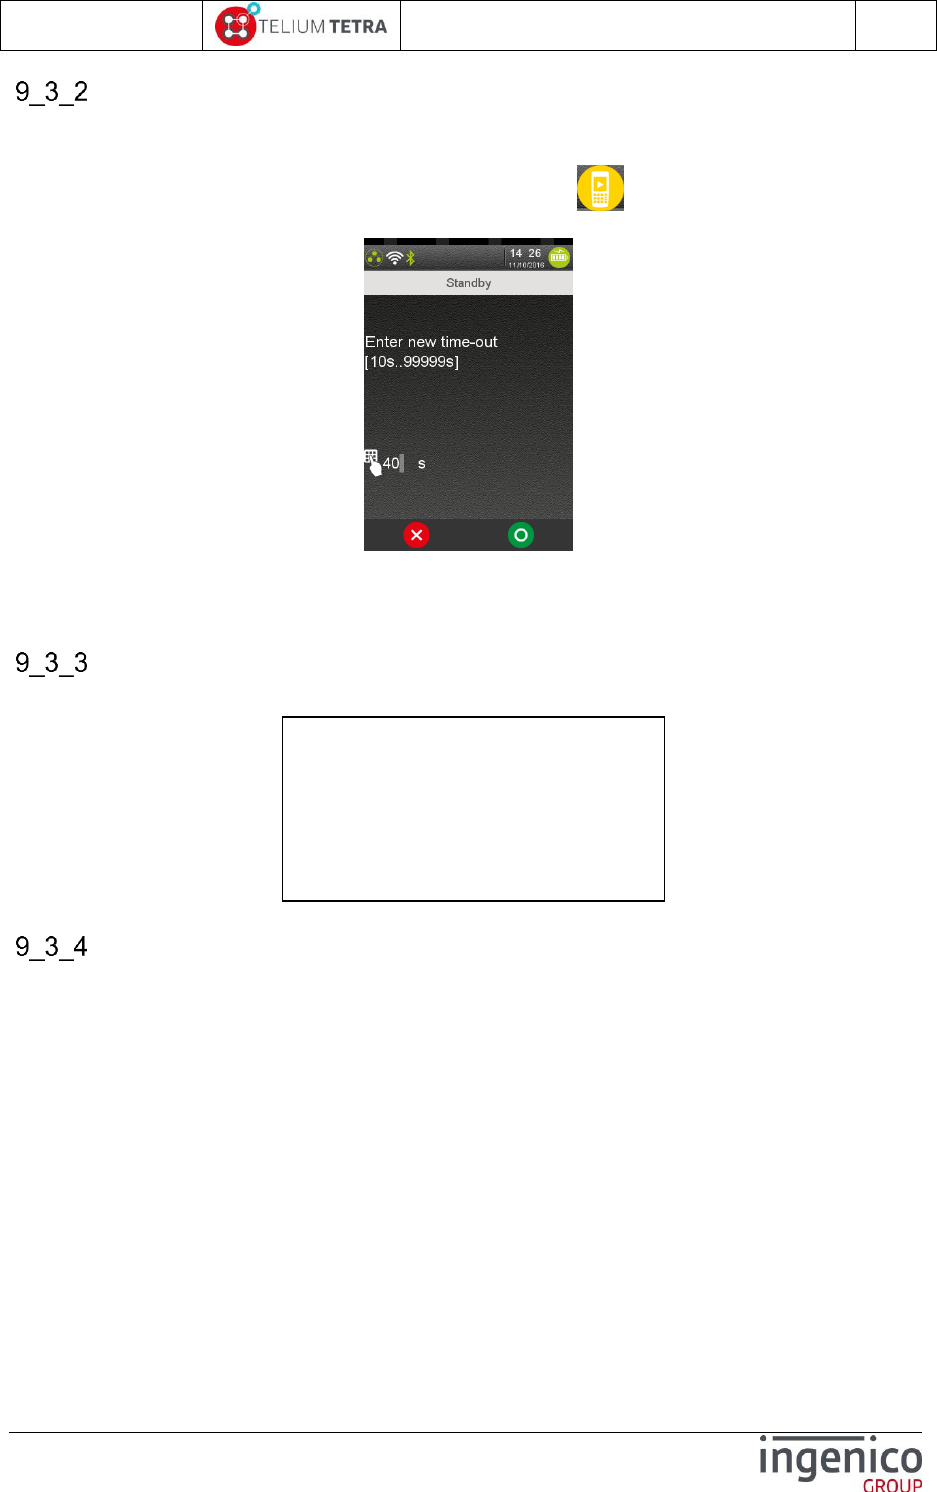
ICO-OPE-02757-V5
TETRA Terminal
User's guide
Public
91/199
Ingenico document - Reproduction or disclosure prohibited without written authorization
Please check document validity before using
Standby
To optimize energy saving especially on “MOVE” range terminals, the user can fix the duration to wait
before terminal enter in low power mode.
To modify the standby configuration parameter, select icon named “Standby time out”, the
following screen is displayed:
Enter a value according to min and max on the screen and validate: 99999s means no standby
management; such choice on “MOVE” terminal range may affect battery sustainability => not
recommended.
Print parameters
The following ticket is printed when touching the “Print Parameters” icon.
Backlight
According to terminal type and its backlight hardware design, the “Backlight setting” will propose
different interfaces to manage:
Couple backlight between display and keyboard (concerned terminals: DESK5000, DESK
3200)
Independent channels to adjust backlight level on keyboard and on display backlight.
(concerned terminal: LAN5000)
Backlight level of the display that can be adjusted and backlight of the keyboard that can be
turned on or off. (concerned terminal: MOVE5000)
The “Backlight setting” subpanel allows modifying the different parameters of the backlight according
to terminal activities:
Level during normal mode
Level during ECO mode (corresponding to low level)
Duration to wait before switching from normal mode to eco mode
An icon is also proposed to summarize on a ticket the different parameters of backlight configuration.
INACTIVITY parameters
Low backlight time out 10s
Screen saver time out 30s
Standby time out 40s
Wake up on tilt Enable
Wake up on touch Enable
PCI V4 time slot [03:30 05:00]
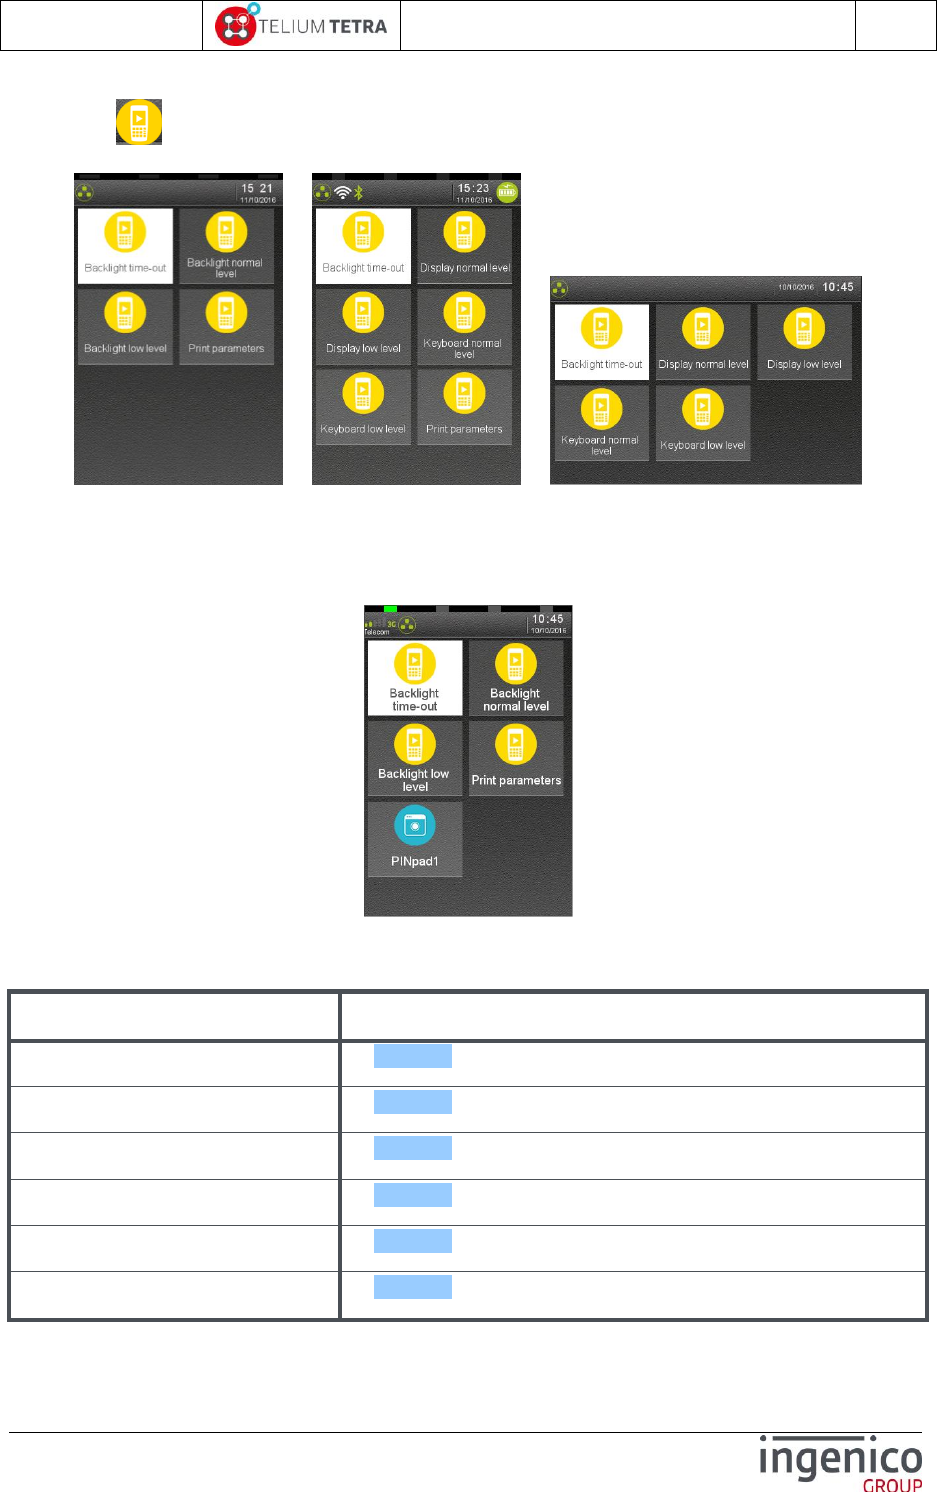
ICO-OPE-02757-V5
TETRA Terminal
User's guide
Public
92/199
Ingenico document - Reproduction or disclosure prohibited without written authorization
Please check document validity before using
When icon named “Backlight” is selected on “ECO mode” subpanel, the following subpanel may
appear on screen:
DESK5000 MOVE5000 LANE5000
Select an icon on the screen.
For terminal on which a pinpad is connected, it is possible also to configure the backlight of the
pinpad. Follows a screenshot capture on DESK5000 with a connected pinpad:
Select an icon on the screen.
The following table provides the different links to subpanels description.
Item
Reference
Backlight normal level
9_3_4_1
Backlight low level
9_3_4_2
Keyboard normal level
9_3_4_3
Keyboard low mode
9_3_4_4
Display normal level
9_3_4_5
Display low mode
9_3_4_6
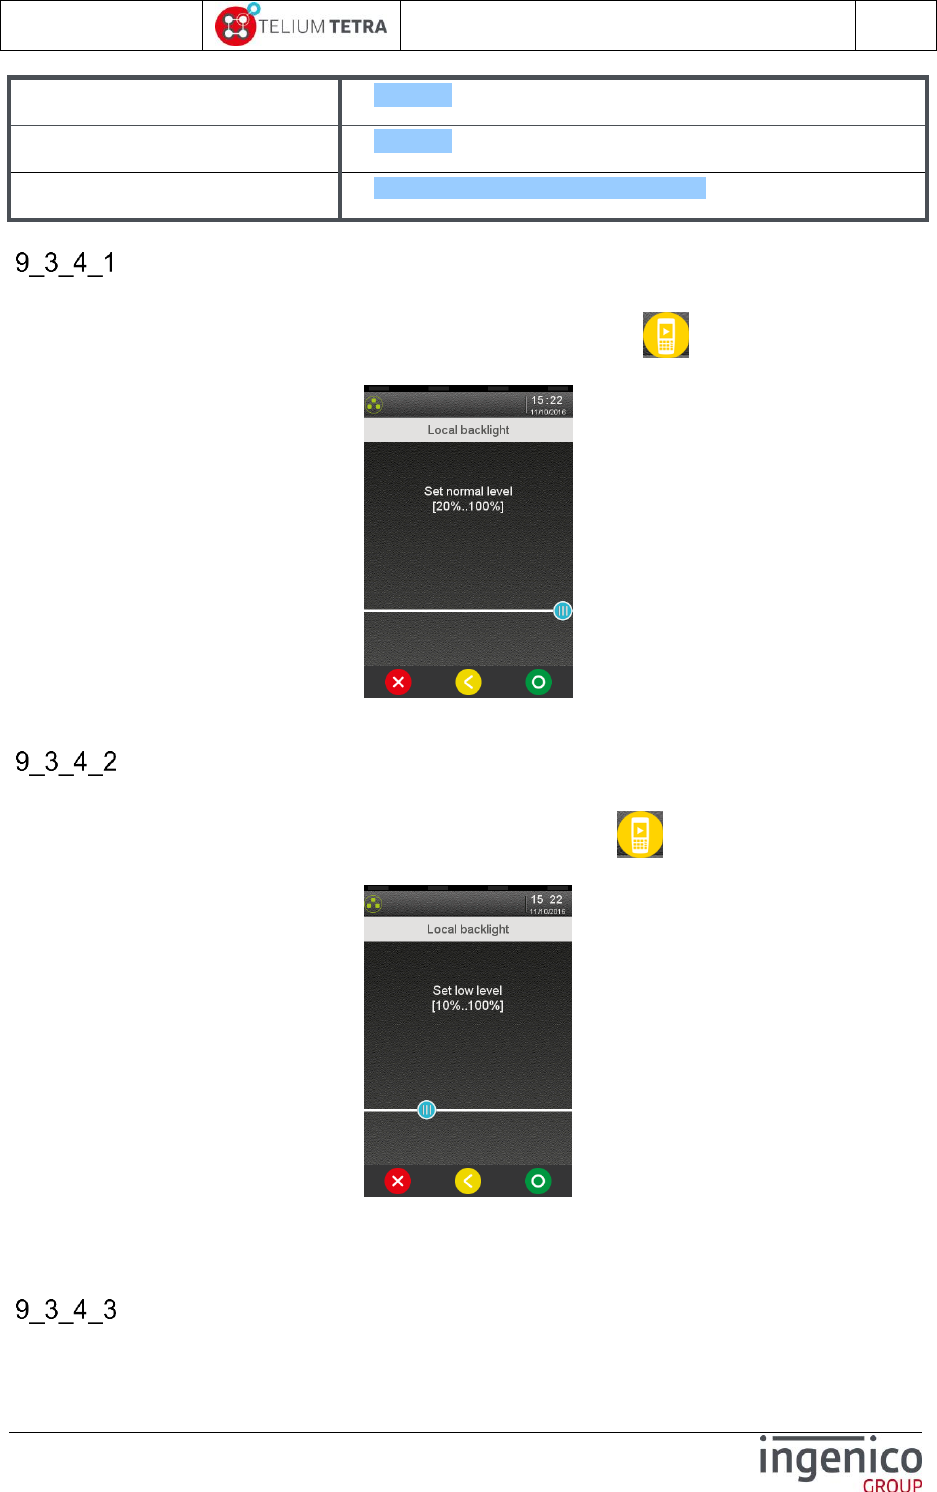
ICO-OPE-02757-V5
TETRA Terminal
User's guide
Public
93/199
Ingenico document - Reproduction or disclosure prohibited without written authorization
Please check document validity before using
Backlight time-out
9_3_4_7
PINpad1
9_3_4_8
Print Parameters
Erreur ! Source du renvoi introuvable.
Backlight normal level
This parameter is proposed when the backlight of the keyboard and of the display are commonly
managed. To modify backlight level during normal mode, select icon named “Backlight normal
level”, the following screen is displayed:
Enter a value according to min and max on the screen and validate.
Backlight eco mode
This parameter is proposed when the backlight of the keyboard and of the display are commonly
managed. To modify backlight level during ECO mode, select icon named “Backlight low level”,
the following screen is displayed:
Enter a value according to min and max on the screen and validate. The eco-mode setting is always
smaller or equal to the normal setting value: after normal setting selection, its value is automatically
adjusted to normal setting value if greater.
Keyboard backlight normal level
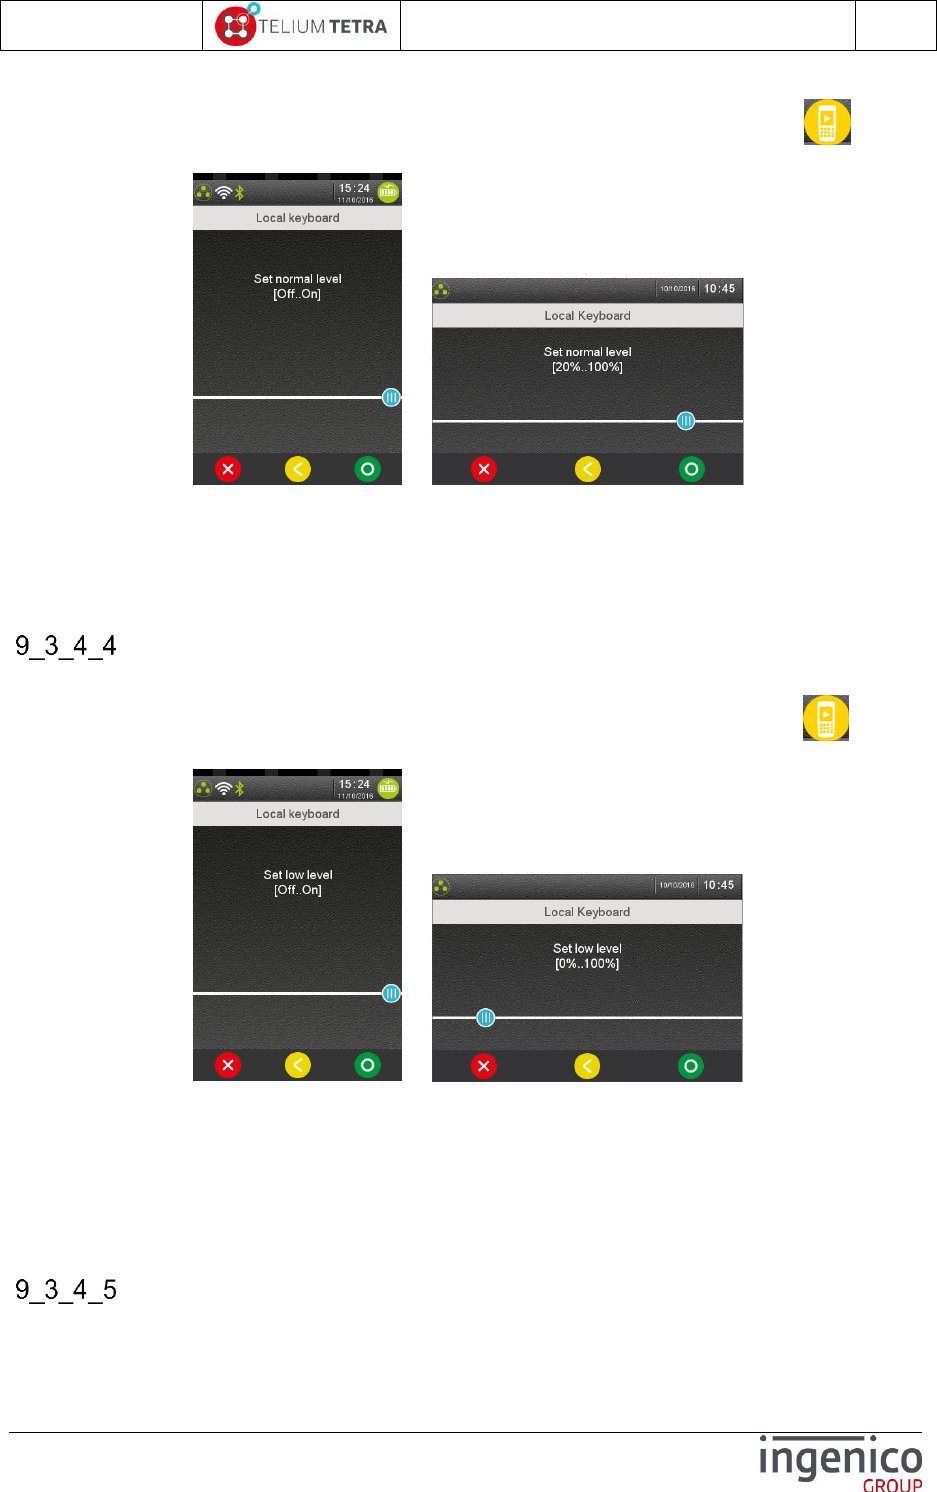
ICO-OPE-02757-V5
TETRA Terminal
User's guide
Public
94/199
Ingenico document - Reproduction or disclosure prohibited without written authorization
Please check document validity before using
This parameter is proposed when the backlight of the keyboard can be managed independently of the
backlight of the display. To modify backlight level during normal mode, select icon named
“Keyboard normal level”, the following screen is displayed:
MOVE5000 LANE5000
Enter a value according to min and max on the screen and validate. When the keyboard backlight only
support turn on or turn off, proposed value are:
OFF
ON
Keyboard backlight low level
This parameter is proposed when the backlight of the keyboard can be managed independently of the
backlight of the display. To modify backlight level during ECO mode, select icon named
“Keyboard low level”, the following screen is displayed:
MOVE5000 LANE5000
Enter a value according to min and max on the screen and validate. The eco-mode setting is always
smaller or equal to the normal setting value: after normal setting selection, its value is automatically
adjusted to normal setting value if greater. When the keyboard backlight only support turn on or turn
off, proposed value are:
OFF
ON
Display backlight normal level
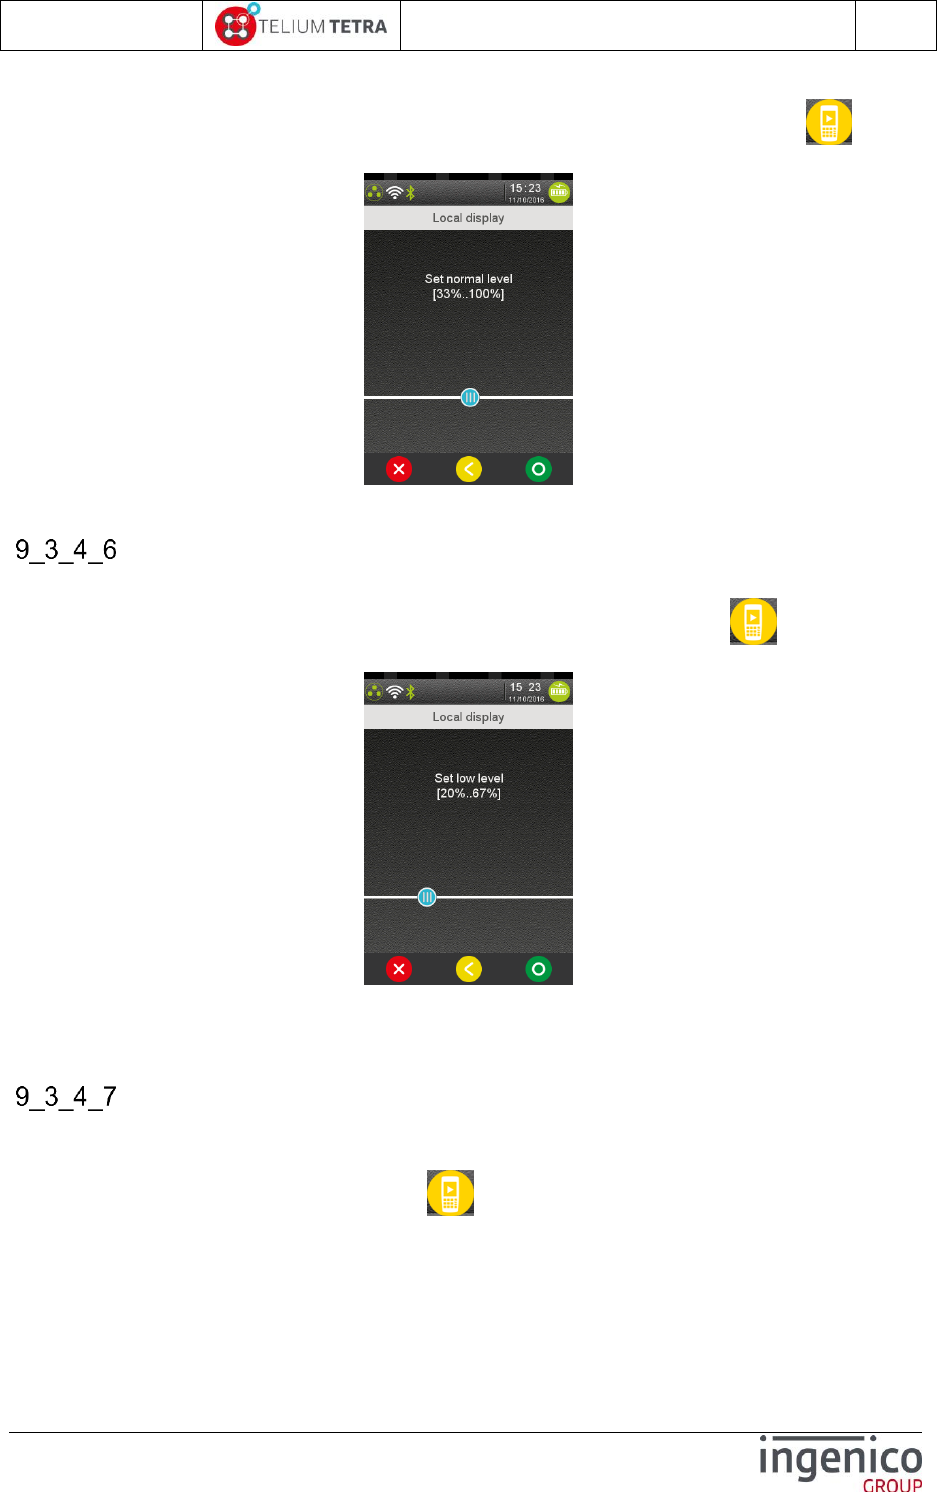
ICO-OPE-02757-V5
TETRA Terminal
User's guide
Public
95/199
Ingenico document - Reproduction or disclosure prohibited without written authorization
Please check document validity before using
This parameter is proposed when the backlight of the display can be managed independently of the
backlight of the keyboard. To modify backlight level during normal mode, select icon named
“Display normal level”, the following screen is displayed:
Enter a value according to min and max on the screen and validate.
Display backlight low level
This parameter is proposed when the backlight of the display can be managed independently of the
backlight of the display. To modify backlight level during ECO mode, select icon named “Display
low level”, the following screen is displayed:
Enter a value according to min and max on the screen and validate. The eco-mode setting is always
smaller or equal to the normal setting value: after normal setting selection, its value is automatically
adjusted to normal setting value if greater.
Backlight time out
To optimize energy saving especially on “MOVE” range terminals, the user can fix the duration to wait
before terminal switch from normal mode to eco mode.
To modify this duration parameter, select icon named “Backlight time out”, the following screen is
displayed:
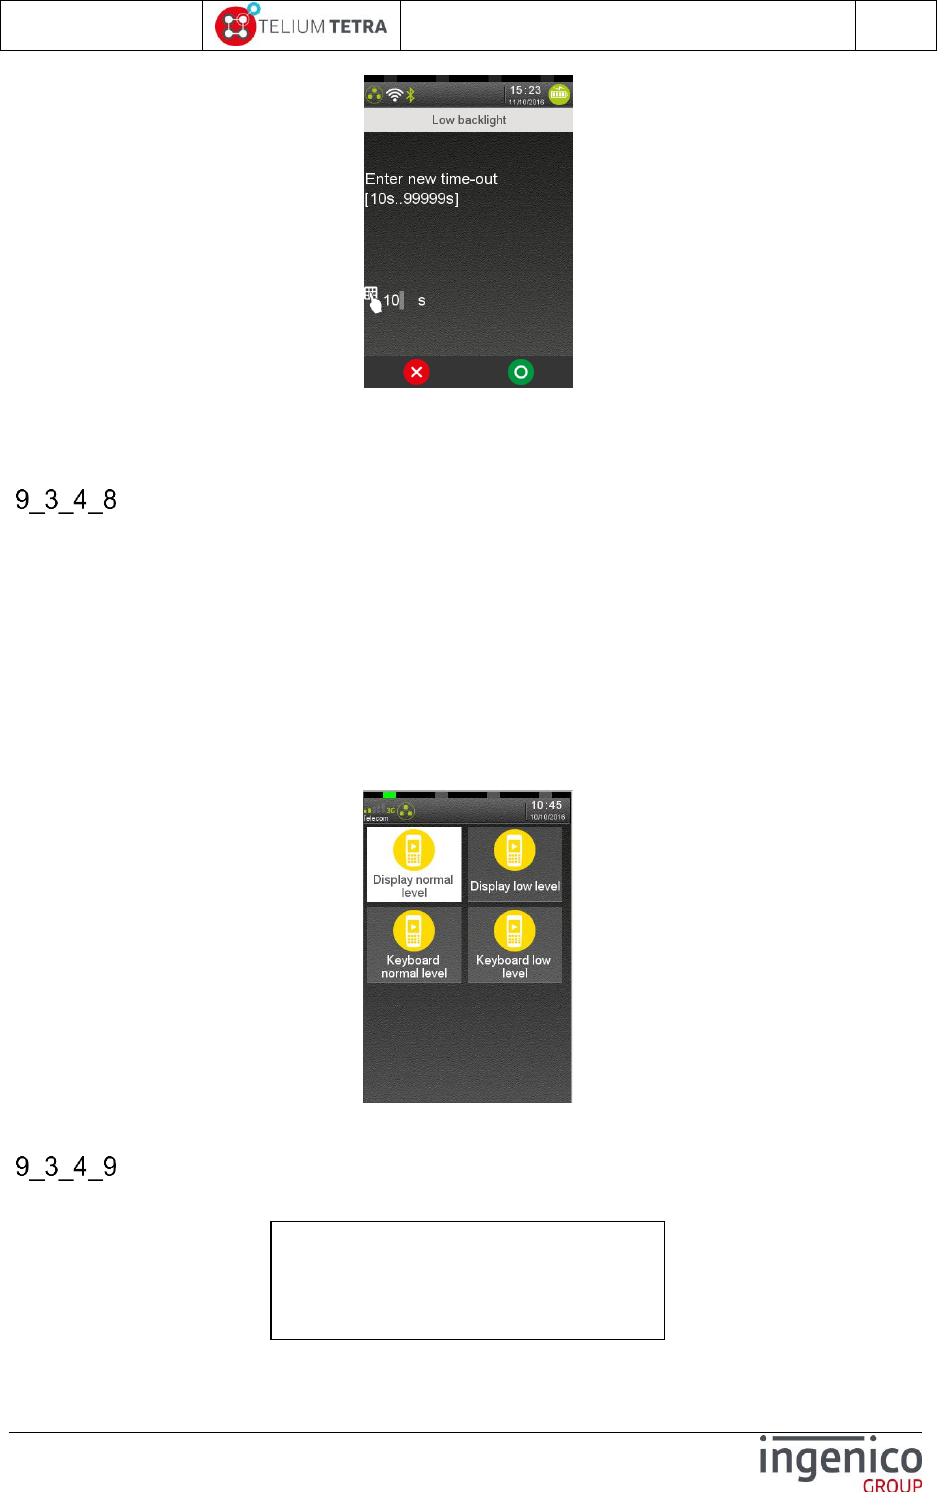
ICO-OPE-02757-V5
TETRA Terminal
User's guide
Public
96/199
Ingenico document - Reproduction or disclosure prohibited without written authorization
Please check document validity before using
Enter a value according to min and max on the screen and validate: 99999s means no standby
management; such choice on “MOVE” terminal range may affect battery sustainability => not
recommended.
PINpad1
The “PINpad1” subpanel allows modifying the different parameters of the backlight of the pinpad
according to terminal activities (based on “Backlight time-out” defined for the terminal):
Level during normal mode
Level during eco mode
The management of the backlight depends of backlight characteristics:
Common backlight for keyboard and display
Independent backlight for keyboard and display
The menus dedicated to PINpad are not specifically detailed, refer to terminal backlight menus.
Follows a screenshot captured on a DESK5000 with connected IPP315 PINpad:
Select an icon on the screen.
Print parameters
One of the following tickets is printed when touching the “Print Parameters” icon.
Backlight
Local backlight
Normal level 100%
Low level 20%
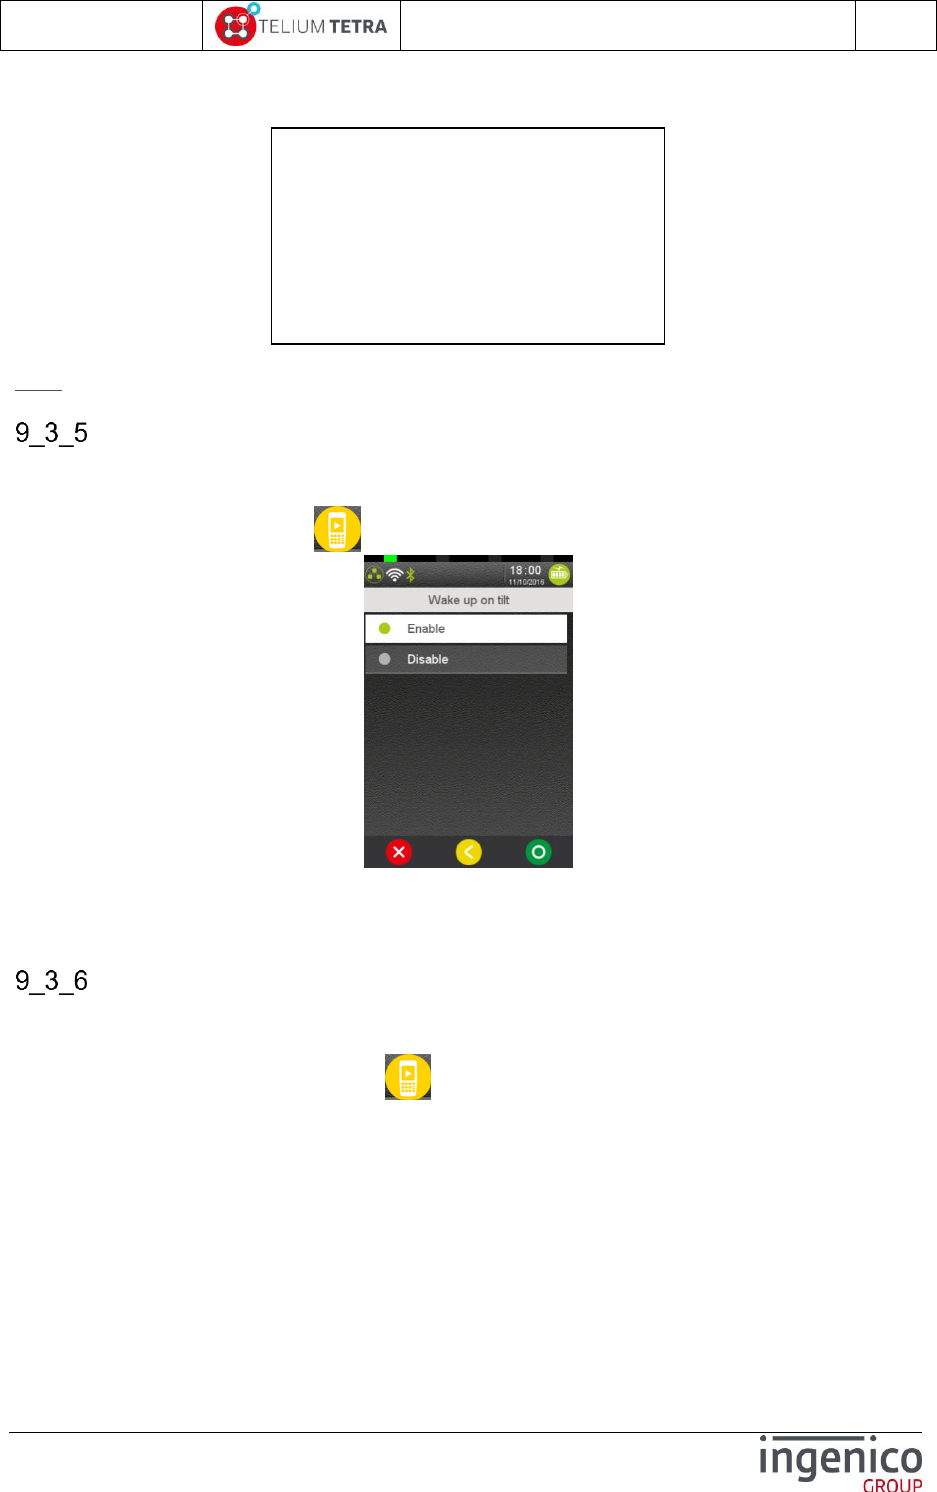
ICO-OPE-02757-V5
TETRA Terminal
User's guide
Public
97/199
Ingenico document - Reproduction or disclosure prohibited without written authorization
Please check document validity before using
On DESK5000
On MOVE5000
Note: When a pinpad is present, a section for pinpad backlight parameters is added to the ticket.
Wakeup on tilt management
The mobile terminals, equipped with a motion sensor may wake up thanks to this mechanism when it
will be picked up. This menu allows user to activate/deactivate this feature.
To set wake up on tilt, select icon named “Wakeup on tilt”, the following screen is displayed:
Select:
“Enable” to automatically wake up the terminal when it is picked up while in standby.
“Disable” to wake up the terminal only by pressing a key.
Wakeup on touch management
For mobile terminals equipped with touch screen, it is also possible to exit from standby mode by
touching the screen panel. This menu allows user to activate/deactivate this feature.
To set wake up on touch, select icon named “Wakeup on touch”, the following screen is
displayed:
Backlight
Local display
Normal level 67%
Low level 20%
Local keyboard
Normal level On
Low level On
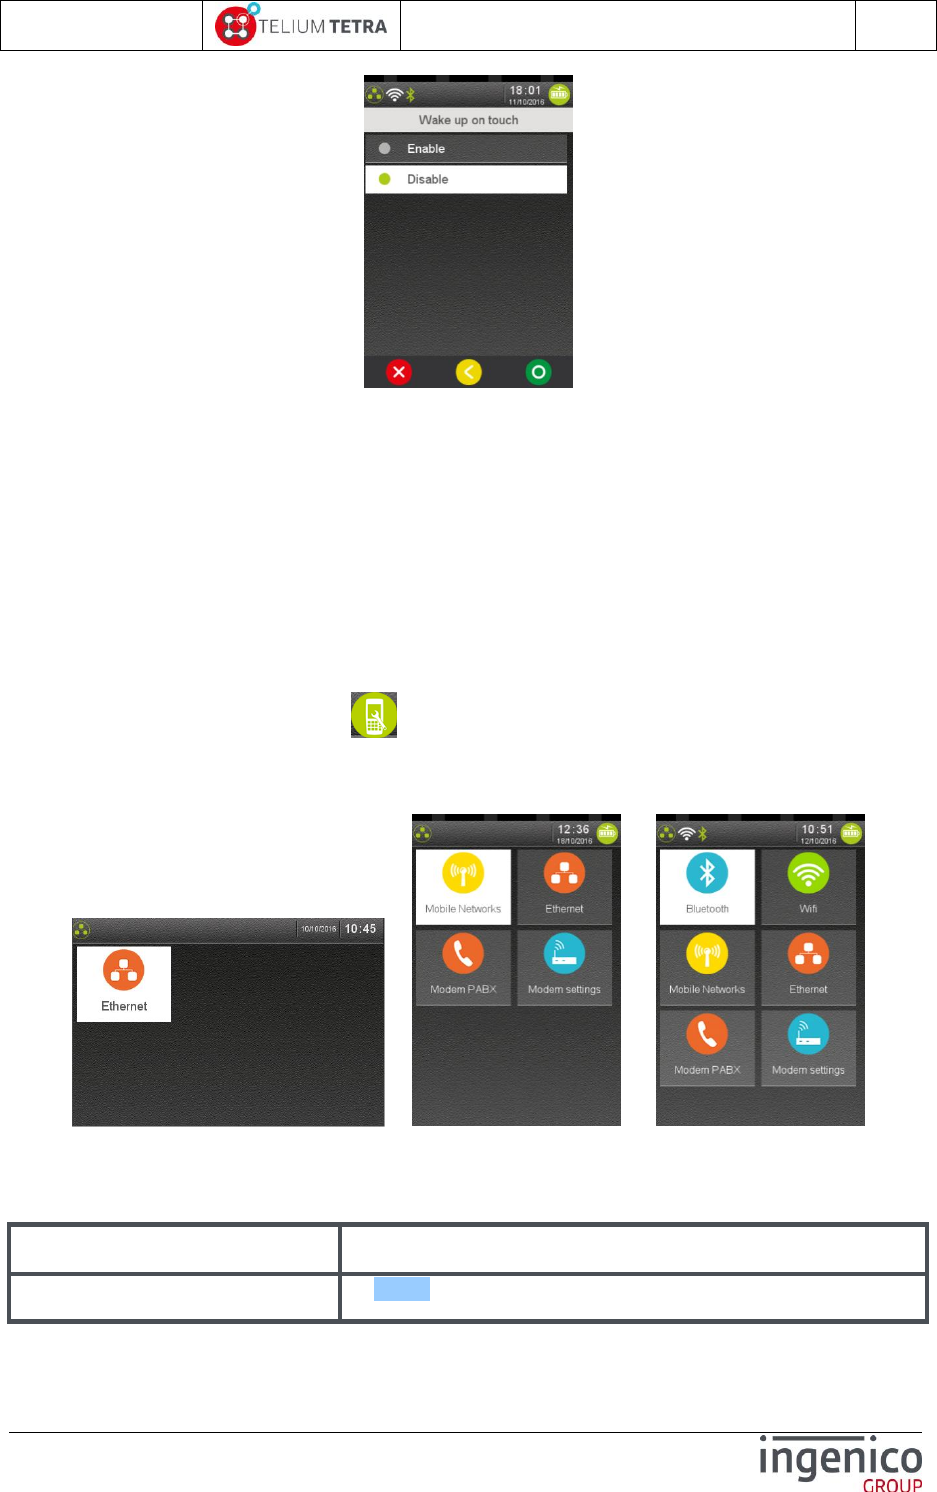
ICO-OPE-02757-V5
TETRA Terminal
User's guide
Public
98/199
Ingenico document - Reproduction or disclosure prohibited without written authorization
Please check document validity before using
Select:
“Enable” to automatically wake up the terminal when it is picked up while in standby.
“Disable” to wake up the terminal only by pressing a key.
9_4 Communication means
Communications means configuration can be modified thanks to “Communications means” subpanel.
This screen is built according to terminal hardware communication capabilities. The current available
communications features are:
Ethernet
Mobile Networks
Modem PABX
When “Communications means” icon is selected on “Terminal Settings” subpanel, a subpanel is
displayed proposing the different communications means available in the terminal. Below some
representative subpanels that can be proposed according to terminal configuration.
LANE 5000 MOVE5000-3G MOVE5000-Full options
Select an icon on the screen.
The following table provides the different links to menus description.
Item
Reference
Ethernet
9_4_1
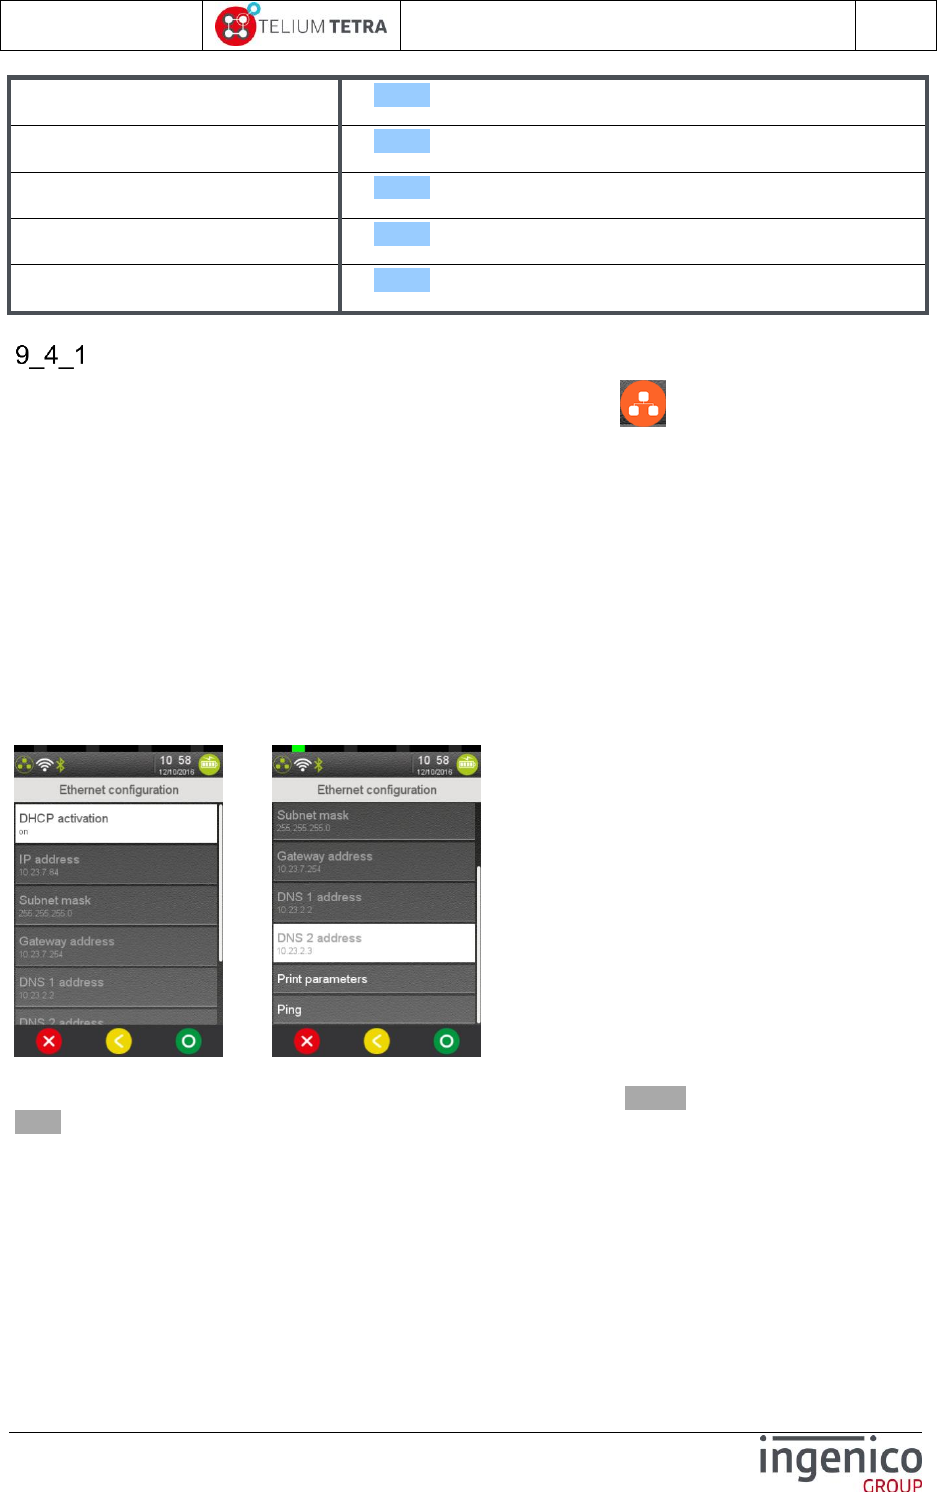
ICO-OPE-02757-V5
TETRA Terminal
User's guide
Public
99/199
Ingenico document - Reproduction or disclosure prohibited without written authorization
Please check document validity before using
Mobile Networks
9_4_3
Modem PABX
9_4_2
Wifi
9_4_4
Bluetooth
9_4_5
Modem Settings
9_4_6
Ethernet
ETHERNET local network configuration can be modified thanks to icon named “Ethernet”. The
following list of parameters can be set or modified.
DHCP activation
IP address
Subnet mask
Gateway address
DNS1 address
DNS2 address
The menu also offers to:
Summarize on a ticket the parameters of Ethernet configuration.
Test connectivity thanks to a “ping” test function
When “Ethernet” icon has been selected, the following screen menu is displayed:
../..
Select active menu line. (According to some parameter settings, some parameters may be useless or
only displayed as automatically obtained: there are displayed with a greyed colour (not with a flashing
white!)).
When parameters have been changed, exit action on this menu will warn the user according
parameters saving, the following screen is displayed:
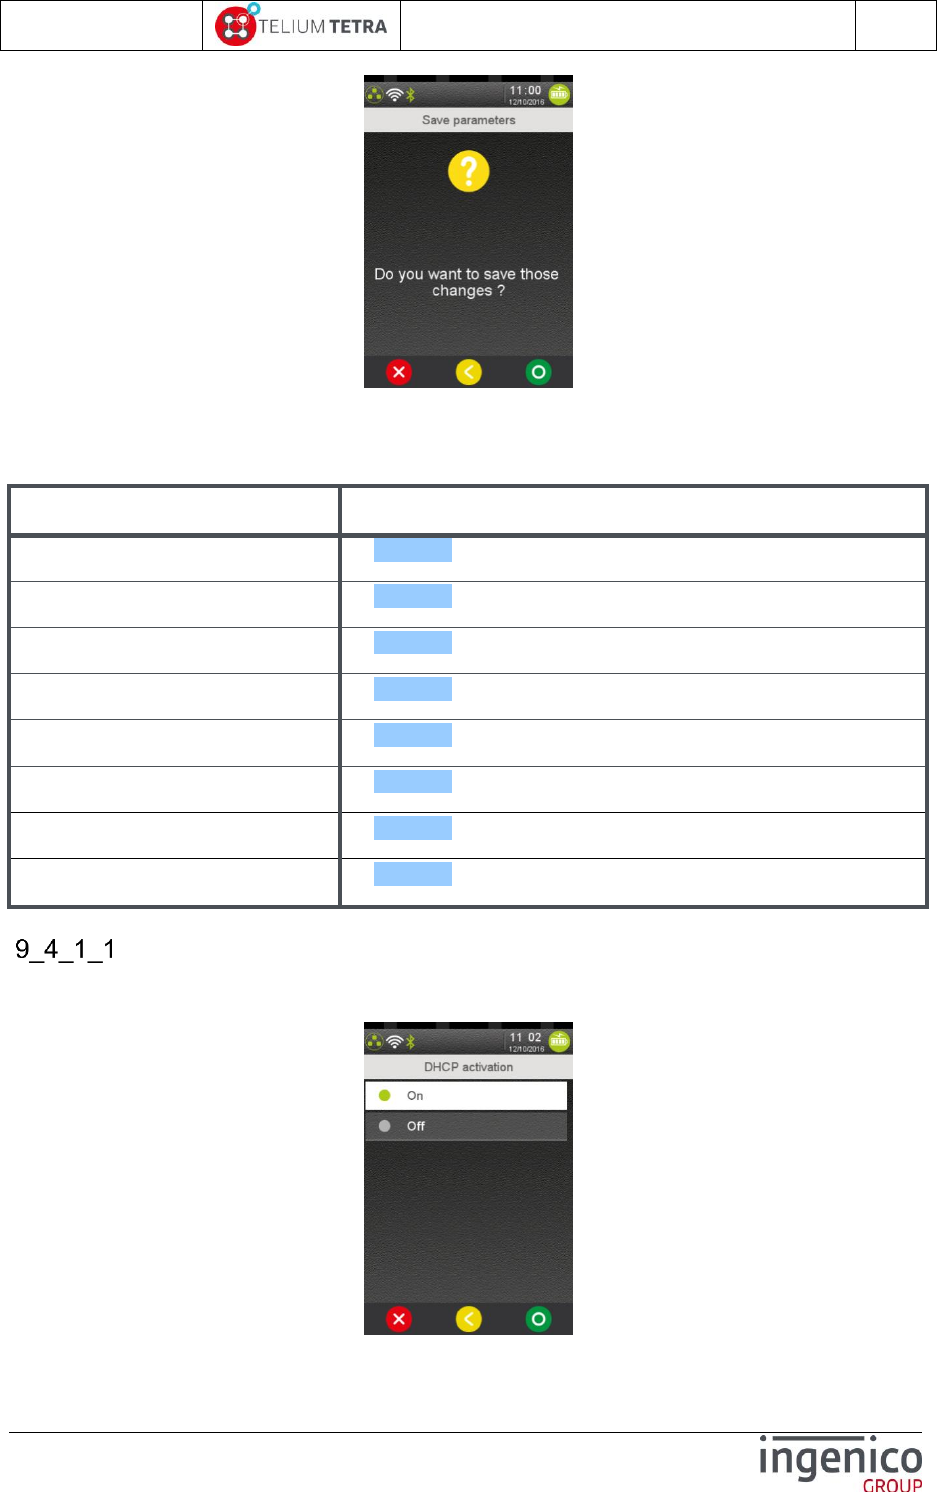
ICO-OPE-02757-V5
TETRA Terminal
User's guide
Public
100/199
Ingenico document - Reproduction or disclosure prohibited without written authorization
Please check document validity before using
After selecting parameters recording, the terminal will take in account parameters and restarts
ETHERNET. Since SDK 11.6, this operation appends without terminal reboot.
The following table provides the different links to menus description.
Item
Reference
DHCP activation
9_4_1_1
IP address
9_4_1_2
Subnet mask
9_4_1_3
Gateway address
9_4_1_4
DNS1 address
9_4_1_5
DNS2 address
9_4_1_6
Print parameters
9_4_1_7
Ping
9_4_1_8
DHCP activation
DHCP is activated by default. Select the “DHCP activation” menu line to change the network
configuration mode, the following screen is displayed:
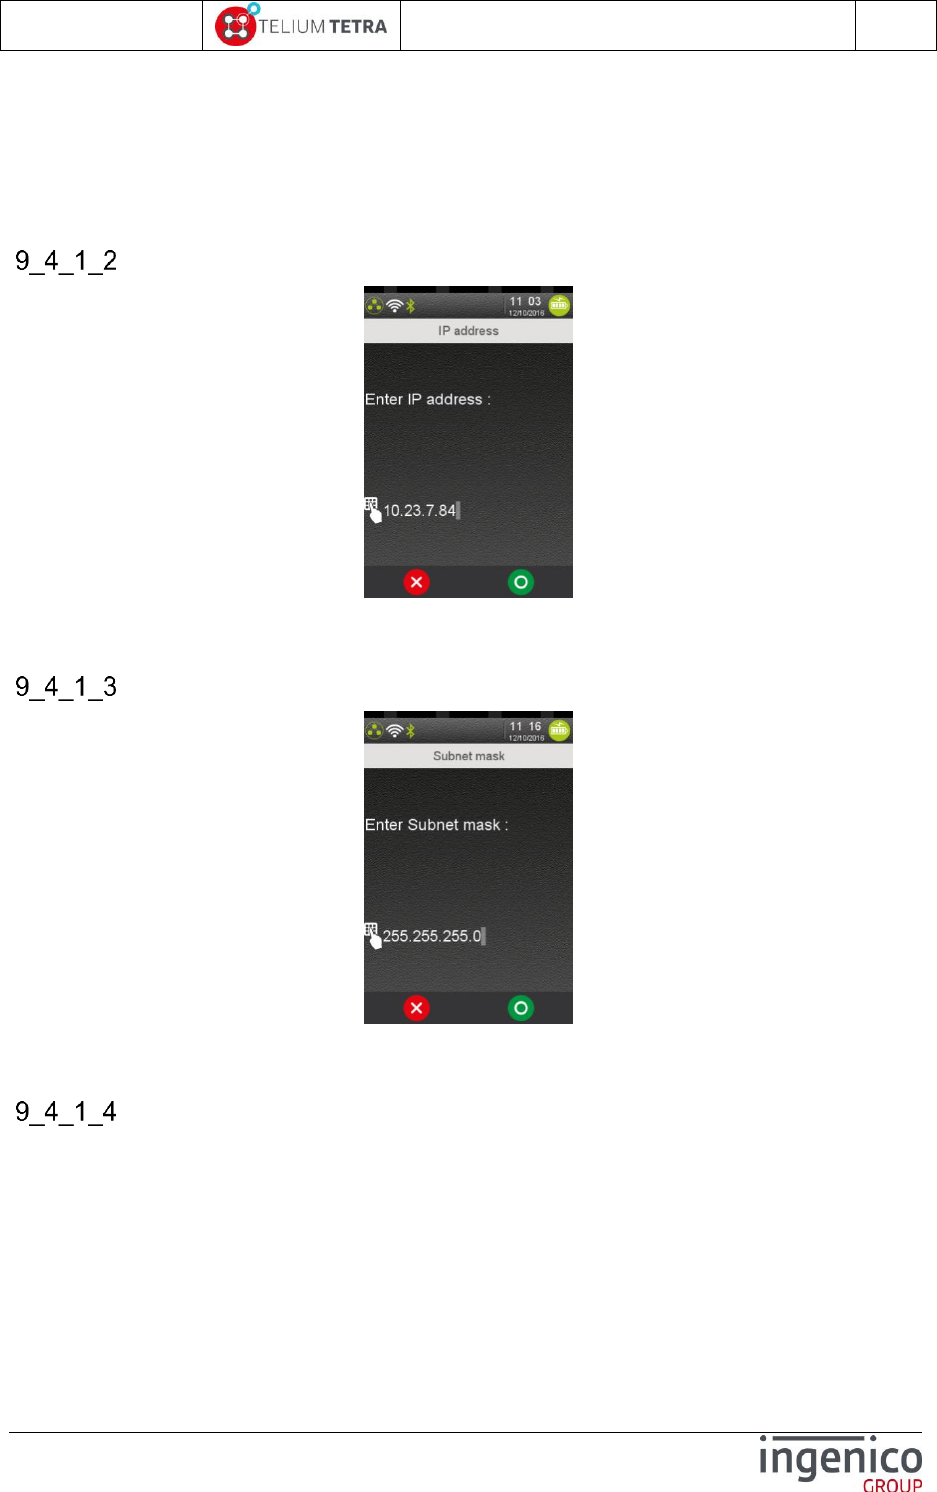
ICO-OPE-02757-V5
TETRA Terminal
User's guide
Public
101/199
Ingenico document - Reproduction or disclosure prohibited without written authorization
Please check document validity before using
When choosing “ON”, Dynamic Host Configuration Protocol will used and parameters are
negotiated during ETHERNET initialisation. The other parameters are not proposed to
modification.
When choosing “OFF”, all the parameters are required and must be set to configure local
network: IP address, Network mask, Gateway, DSN1 and DSN2 parameters. (All menu lines
can be selected).
IP address
Enter the IP address of the terminal (supplied by the administrator of the local network). IP Address is
composed of four digital fields, each one from 0 to 255.
Subnet mask
Enter the sub-network mask of the Ethernet interface (usually 255.255.255.000). As IP Address, the
sub-network mask is composed of four digital fields, each one from 0 to 255.
Gateway address
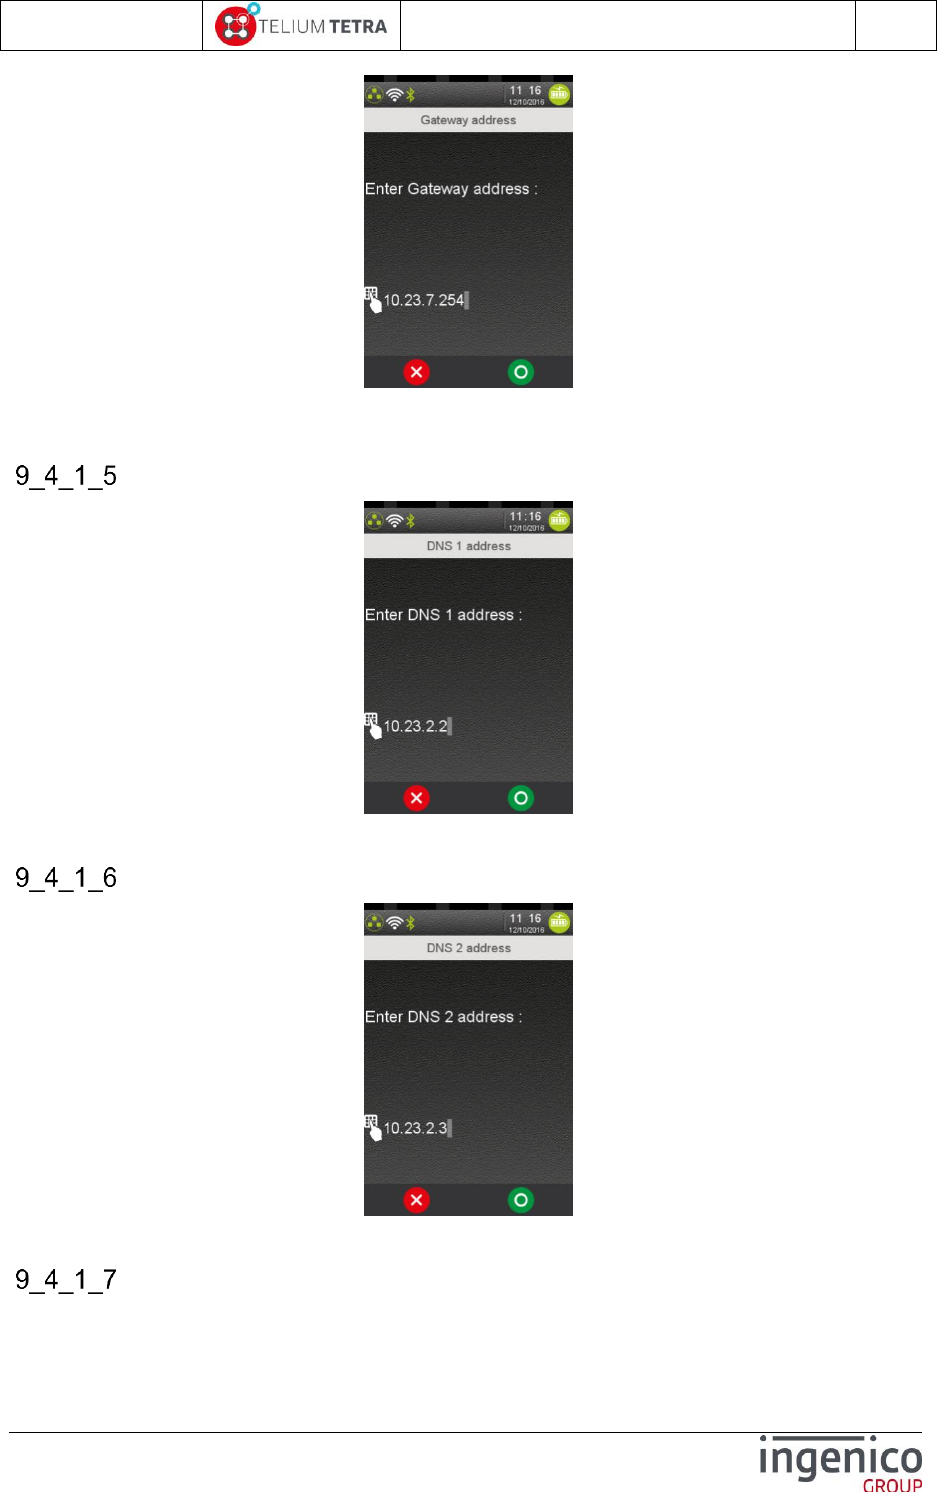
ICO-OPE-02757-V5
TETRA Terminal
User's guide
Public
102/199
Ingenico document - Reproduction or disclosure prohibited without written authorization
Please check document validity before using
Enter Gateway address (supplied by the administrator of the local network) which is the IP address of
the machine used by gateway to join other networks.
DNS1 address
Enter the IP address of Domain Name Servers 1 (supplied by the administrator of the local network).
DNS2 address
Enter the IP address of Domain Name Servers 2 (supplied by the administrator of the local network).
Print parameters
The following ticket is printed when selecting and validating “Print Parameters” menu line
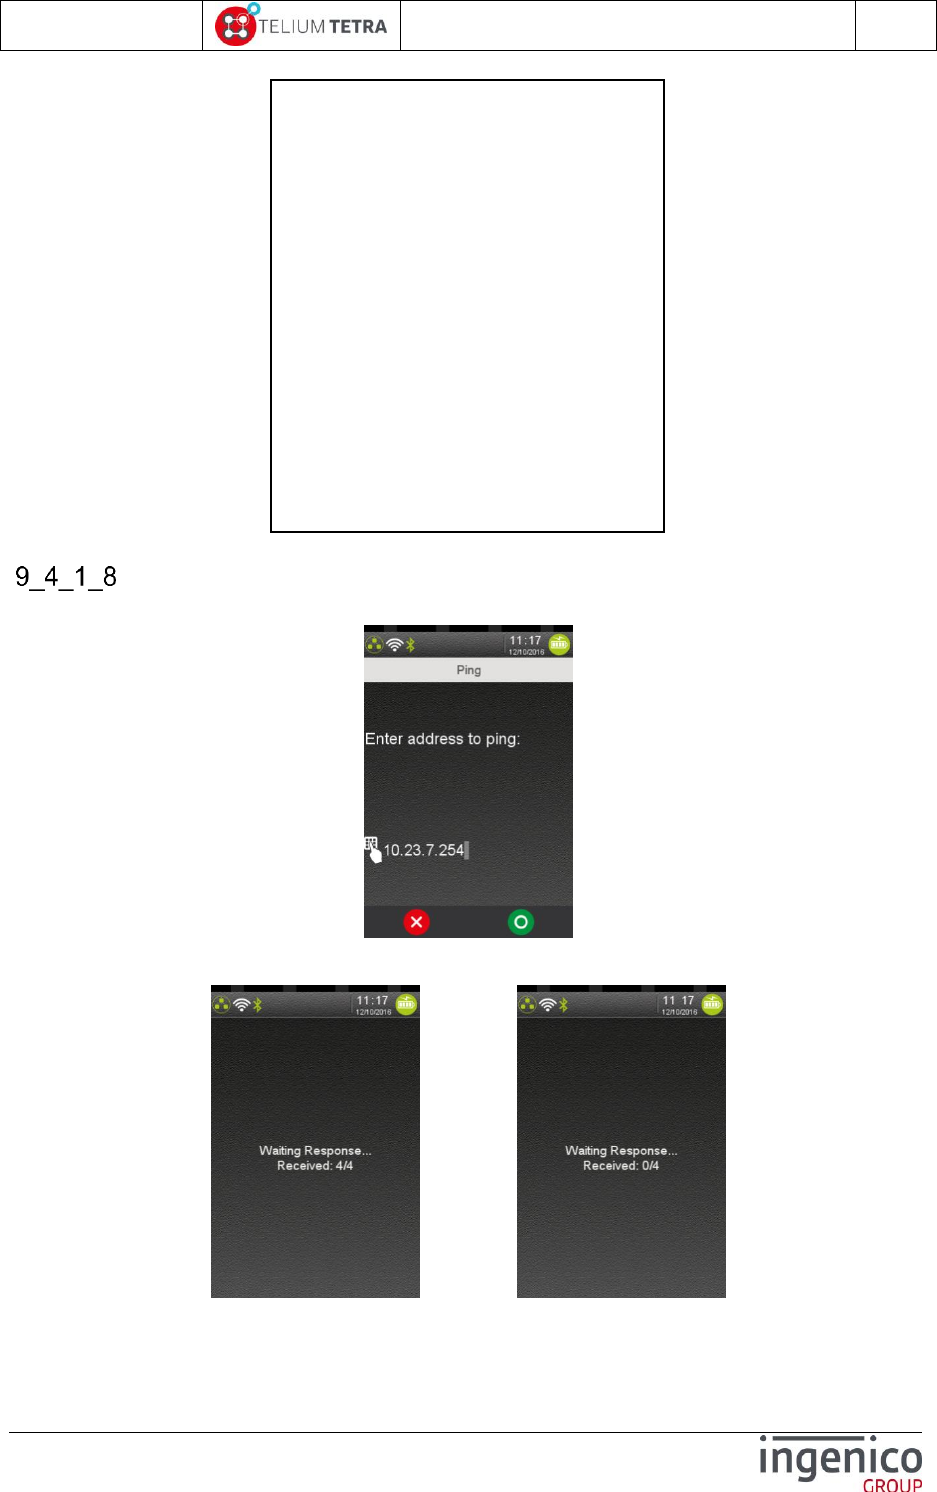
ICO-OPE-02757-V5
TETRA Terminal
User's guide
Public
103/199
Ingenico document - Reproduction or disclosure prohibited without written authorization
Please check document validity before using
Ping
When selecting “Ping”, the following screen is displayed:
Enter the IP address to ping and validate.
The following screenshots may be visible when the ping is OK or KO.
OK KO
Ethernet parameters
DHCP activation
On
IP Address
10.23.7.32
Subnet mask
255.255.25.0
Gateway address
10.23.7.254
DNS1 address
10.23.2.2
DNS2 Address
10.23.2.3
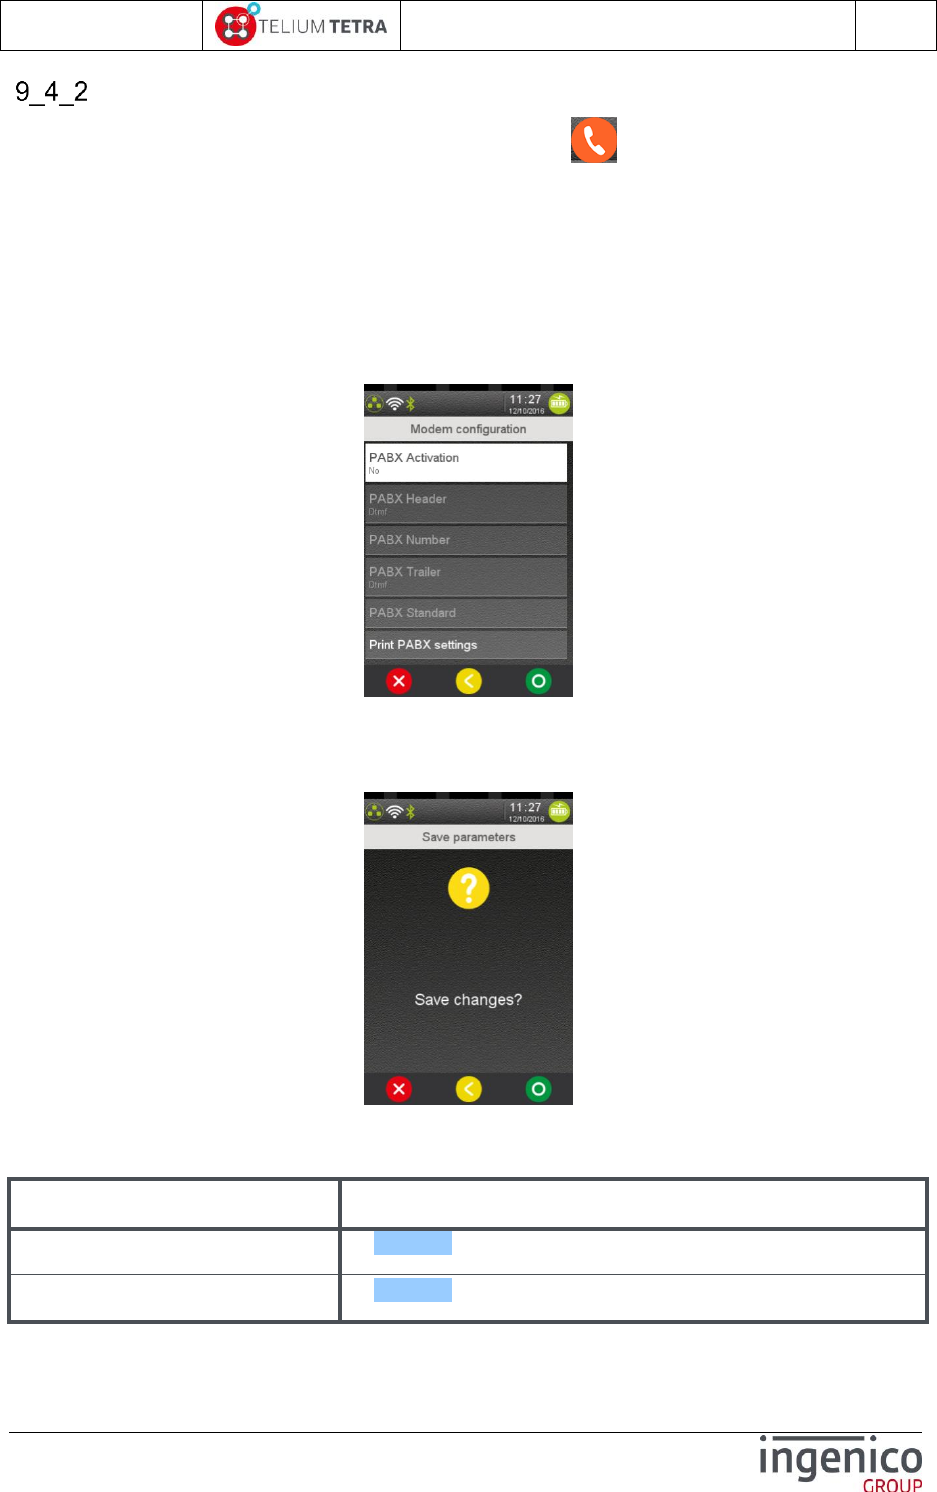
ICO-OPE-02757-V5
TETRA Terminal
User's guide
Public
104/199
Ingenico document - Reproduction or disclosure prohibited without written authorization
Please check document validity before using
Modem PABX
PABX configuration to use modem can be modified thanks to icon named “Modem PABX”. The
following list of parameters can be set or modified.
PABX activation
PABX header
PABX number
PABX Trailer
PABX Standard
The menu also offers to summarize on a ticket the parameters of PABX configuration. When “Modem
PABX” icon has been selected the following screen menu is displayed:
Select active menu line. (According to some parameter settings, some parameters may be useless).
When parameters have been changed, exit action on this menu will warn the user according to
parameters saving, the following screen is displayed:
Validate to save the parameters.
The following table provides the different links to menus description.
Item
Reference
PABX activation
9_4_2_1
PABX header
9_4_2_2
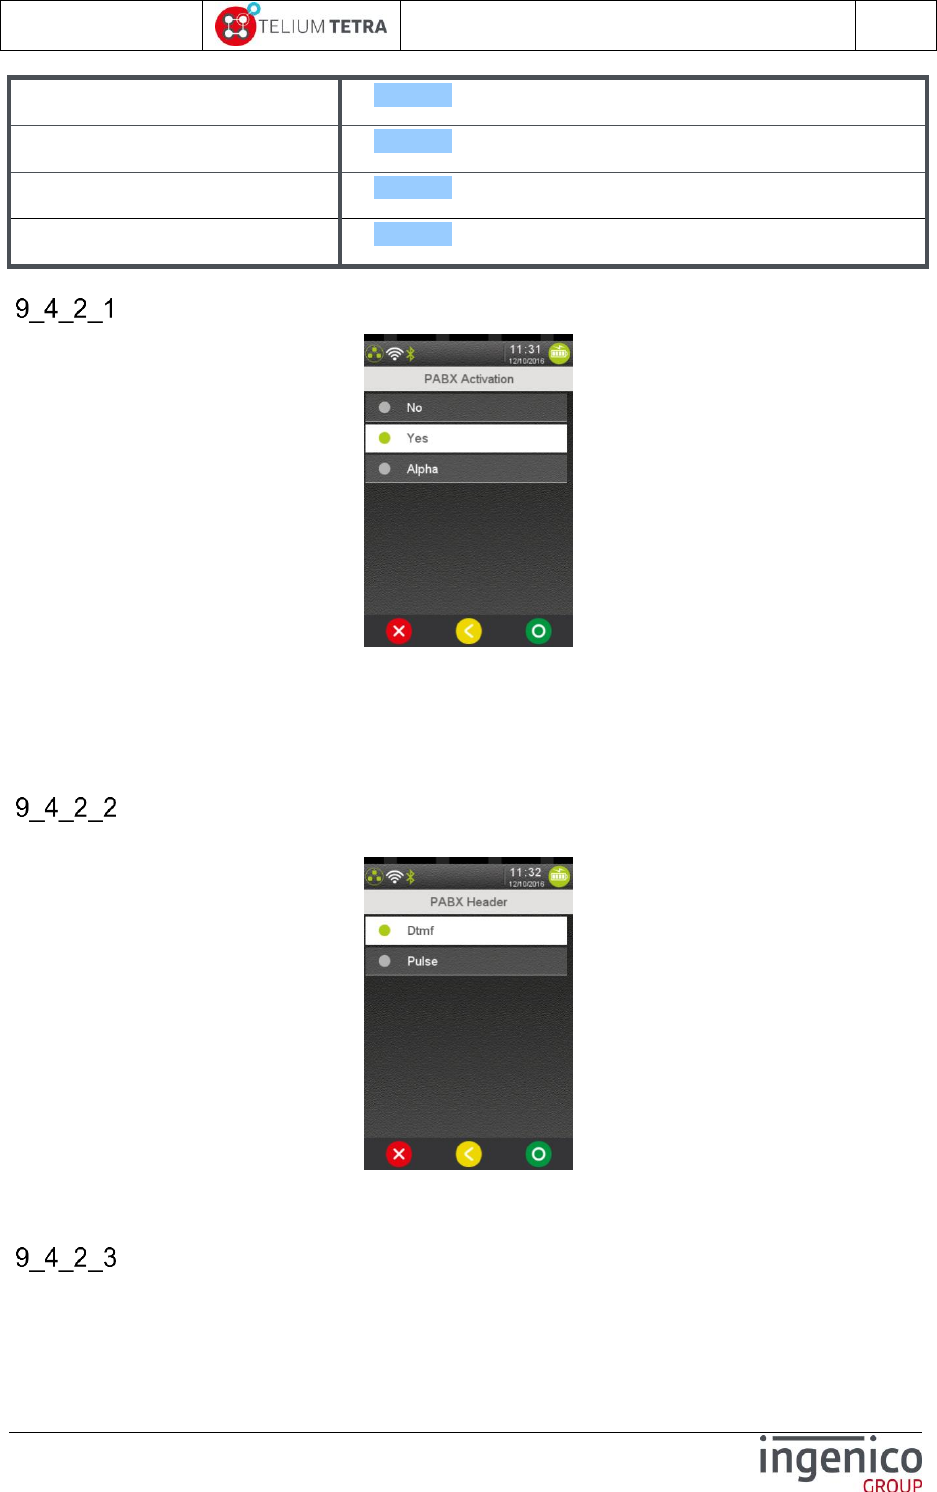
ICO-OPE-02757-V5
TETRA Terminal
User's guide
Public
105/199
Ingenico document - Reproduction or disclosure prohibited without written authorization
Please check document validity before using
PABX Number
9_4_2_3
PABX Trailer
9_4_2_4
PABX Standard
9_4_2_5
Print parameters
9_4_2_6
PABX activation
This menu is used to adapt the terminal to the phone line on which it is connected by defining the
following parameters:
presence (or absence) of private PABX between the terminal and the phone line,
DTMF or pulse dialing,
Other parameters like tone detection, various hold…
PABX header
This parameter can be set when “Yes” has been selected on “PABX activation”.
Choose the dialling mode before the private switchboard: either DTMF (voice frequency dialling) or
pulse (decimal dialling).
PABX number
This parameter can be set when “Yes” has been selected on “PABX activation”.

ICO-OPE-02757-V5
TETRA Terminal
User's guide
Public
106/199
Ingenico document - Reproduction or disclosure prohibited without written authorization
Please check document validity before using
Enter the number (1 to 13 alphanumeric characters) to use to connect the terminal to the public
network through the private switchboard.
PABX Trailer
This parameter can be set when “Yes” has been selected on “PABX activation”.
Choose the dialling mode after the private switchboard: either DTMF (voice frequency dialling) or
pulse (decimal dialling).
PABX Standard
This parameter can be set when “Alpha” has been selected on “PABX activation”.
=> =>
PABX activation selection in “Alpha” followed by PABX Standard selection
Enter up to fifteen characters and validate.
ICO-OPE-02757-V5
TETRA Terminal
User's guide
Public
107/199
Ingenico document - Reproduction or disclosure prohibited without written authorization
Please check document validity before using
Print parameters
The following ticket is printed when selecting and validating “Print PABX settings” menu line
Mobile Networks
Mobile networks configuration can be modified thanks to icon named “Mobile Networks”. Thanks
to a menu, the user can choose to:
Modify main parameters thank to sub-menu
Set SIM pincode
Set PUK code
Retrieve status
Select a network
Retrieve signal Strength
Change SIM slot
Set preferred network type
When “Mobile Networks” icon has been selected the following screen subpanel is displayed:
../..
Select an icon.
Note: According to some parameters settings, some icons may be inactive: their selection will not
imply screen changes.
The concerned icons are:
PABX modem parameters
PABX activation
Yes
PABX Header
Dtmf
PABX number
9
PABX Trailer
Dtmf
PABX Standard infos
ICO-OPE-02757-V5
TETRA Terminal
User's guide
Public
108/199
Ingenico document - Reproduction or disclosure prohibited without written authorization
Please check document validity before using
Sim code (available only when a new SIM has been introduced in the selected SIM slot and
when its pin code has not been registered.)
PUK code (not available until the parameter is not mandatory, remaining “Sim code” possible
attempts)
The following table provides the different links to menus description.
Item
Reference
Parameters
9_4_3_1
Set SIM code
9_4_3_2
Set PUK code
9_4_3_3
Retrieve status
9_4_3_4
Select a network
9_4_3_5
Signal strength
9_4_3_6
Changed SIM slot
9_4_3_7
Set preferred network type
9_4_3_8
Note: When no “Mobile network” is available, the selection of the icon implies the displaying of the
following screen.
Parameters
The main parameters of mobile networks configuration can be modified thanks to menu line
“Parameters”. The parameters are:
APN
Login
Password
Startup mode
When “Mobile Networks” icon has been selected the following screen menu is displayed:
ICO-OPE-02757-V5
TETRA Terminal
User's guide
Public
109/199
Ingenico document - Reproduction or disclosure prohibited without written authorization
Please check document validity before using
Select active menu line. (According to some parameters settings, some parameters may be useless).
After main parameters of mobile networks configuration completion, when the user will exit of this
menu (“RED” key or “YELLOW key), the terminal asks the user to confirm their registration. The
following screen is displayed:
After confirmation, a restart begins to configure the 3G module according to these parameters.
The following table provides the different links to menus description.
Item
Reference
APN
9_4_3_1_1
Login
9_4_3_1_2
Password
9_4_3_1_3
Startup mode
9_4_3_1_4
APN
According to server services planned to be used, an Access Point Name (APN) string must be set.
ICO-OPE-02757-V5
TETRA Terminal
User's guide
Public
110/199
Ingenico document - Reproduction or disclosure prohibited without written authorization
Please check document validity before using
=> =>
Enter “APN” string thanks to virtual keyboard and validate.
Login
According to server services planned to be used, a login/password may be required.
Enter “Login” string thanks to virtual keyboard and validate.
Password
Enter “Password” thanks to virtual keyboard or terminal physical keyboard and validate.
Startup mode

ICO-OPE-02757-V5
TETRA Terminal
User's guide
Public
111/199
Ingenico document - Reproduction or disclosure prohibited without written authorization
Please check document validity before using
This menu allows selecting when and how the 3G communication mean will be initialized at terminal
startup.
Select one mode and validate.
OFF : at startup, the 3G module is not activated, (3G icon will stay crossed with a red line)
ON: the 3G module is activated during startup but does not allow data exchanges
ON (ready for DATA): the 3G module is activated during startup for data exchanges
Set SIM code
This menu is not accessible when:
No Sim card has been detected
A Sim card has been detected but first mobile configuration has not been done
Sim card is blocked and PUK code must be registered
Enter “SIM Code” and validate.
Set PUK code
The Pin Unlock Key (PUK) must be provided to revalidate the SIM card when the SIM card is blocked
(3 invalid Sim pin code have been entered). This menu is accessible only when:
Sim card is blocked
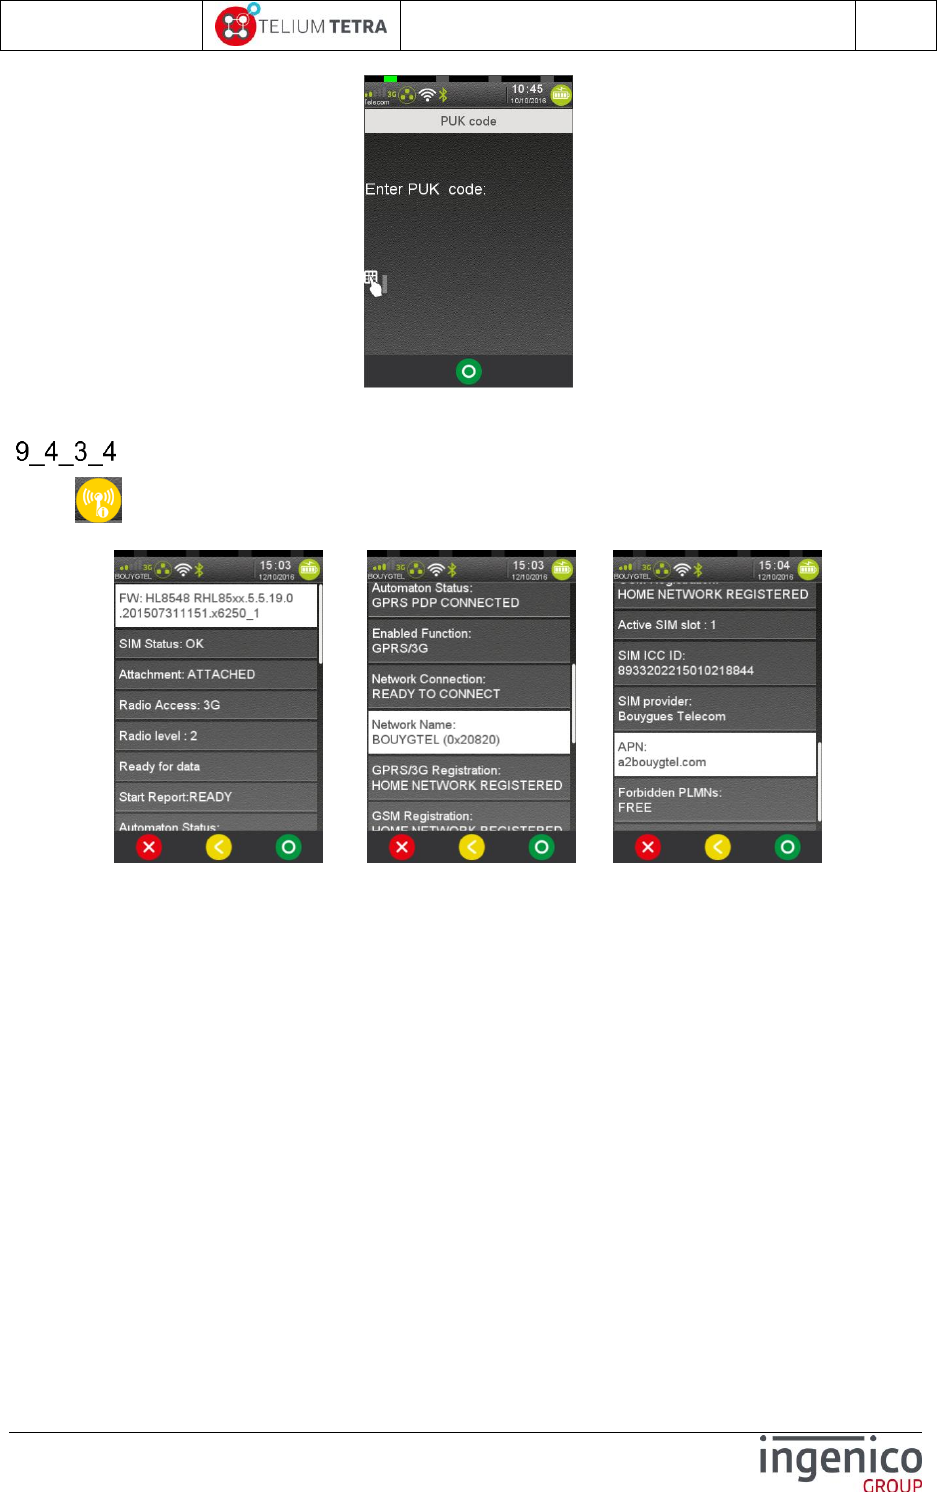
ICO-OPE-02757-V5
TETRA Terminal
User's guide
Public
112/199
Ingenico document - Reproduction or disclosure prohibited without written authorization
Please check document validity before using
Enter “PUK Code.” and validate.
Retrieve status
When “Status” icon is selected in “Mobile Networks” subpanel, the terminal displays different
information linked with established connection. Here after different status screenshots.
../.. ../..
The different available status report items are:
FW: GPRS/3G module version and firmware version
SIM status: GPRS/3G Sim card status
“NOT YET” = Sim card status not yet received
“OK” = Sim card detected and a valid Sim pincode has presented.
"KO" = Sim card error
"PIN?" = Sim card pincode required
"PIN2?" = second Sim card pincode required
"BAD PIN" = invalid sim pincode was presented
"NO SIM" = Sim card not present
"PUK?" = Sim card PUK required
"PUK2?" = second Sim card PUK2 is required
Attachment:
“NOT ATTACHED”
“ATTACHED”
Radio Access: type of radio access
“2G”
“3G”
Radio level: level of radio signal
0 to 4 = corresponding to the number of bars present with 3G icon in status bar.
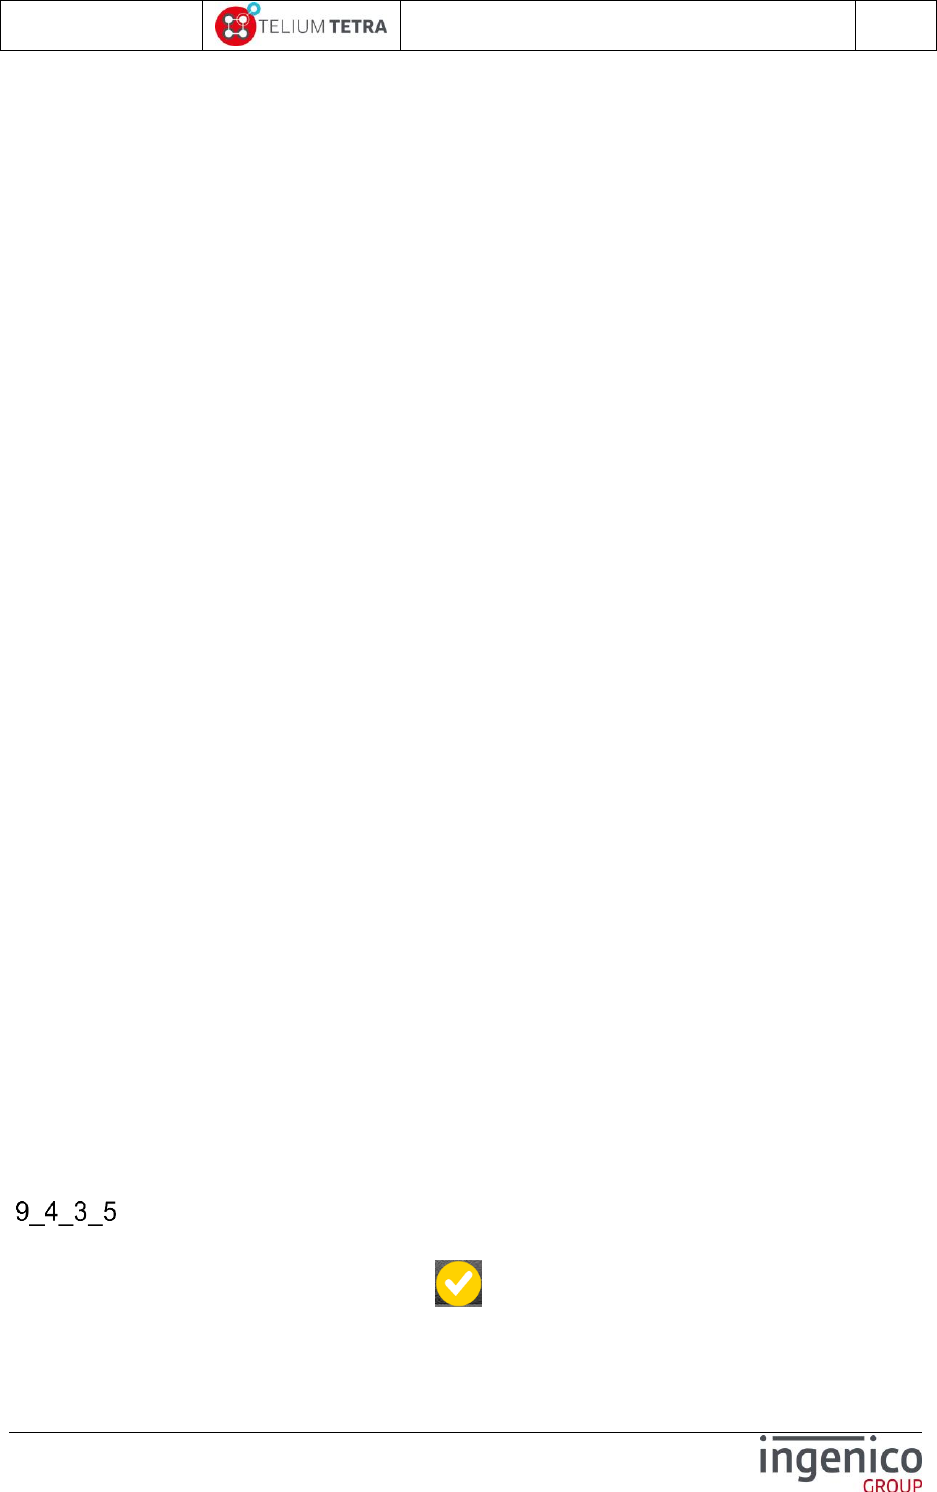
ICO-OPE-02757-V5
TETRA Terminal
User's guide
Public
113/199
Ingenico document - Reproduction or disclosure prohibited without written authorization
Please check document validity before using
Network availability: type of available network
"Netw. Availability: not yet known"
"Netw. Ready for data" = link established for data exchanges
"Netw. Not ready for data" = link not established for data exchanges
Start report:
"NOT RECEIVED YET"
"READY"
"PIN OK" = a valid pincode has been presented to Sim card.
"PIN REQUIRED"
"SIM NOT PRESENT"
"SIM LOCK"
"FATAL ERROR"
"UNKNOWN ERROR”
Automaton Status:
"GPRS DISCONNECTED"
"GPRS PDP READY"
"GPRS PDP CONNECTED"
"GPRS PPP NEGOCIATED"
"GPRS ATTACHEMENT FAILED"
Enabled function:
“None"
"GSM"
"GPRS/3G"
"Global"
Network connection
"DISCONNECTED"
"EMERGENCY ONLY"
"CONNECTED"
"COM IN PROGRESS"
Network name = returns GPRS/3G provider name followed by PLMN mobile network code
GPRS/3G Registration: status reported by specific command “CGREG” on module
"NOT REGISTERED NOT SEARCHING"
"REGISTERED HOME NETWORK"
"NOT REGISTERED SEARCHING"
"REGISTRATION DENIED"
"UNKNOWN"
"REGISTERED ROAMING"
GSM Registration: status reported by specific command “CREG” on module
"NOT REGISTERED NOT SEARCHING"
"REGISTERED HOME NETWORK"
"NOT REGISTERED SEARCHING"
"REGISTRATION DENIED"
"UNKNOWN"
"REGISTERED ROAMING"
Sim slot = slot number in terminal in which sim card has been inserted
Select a network
The network selection can be configured to be done automatically or manually according to all
discovered mobile network provider. When “Select Network” icon is selected in “Mobile
Networks” subpanel, the terminal displays the following screen:
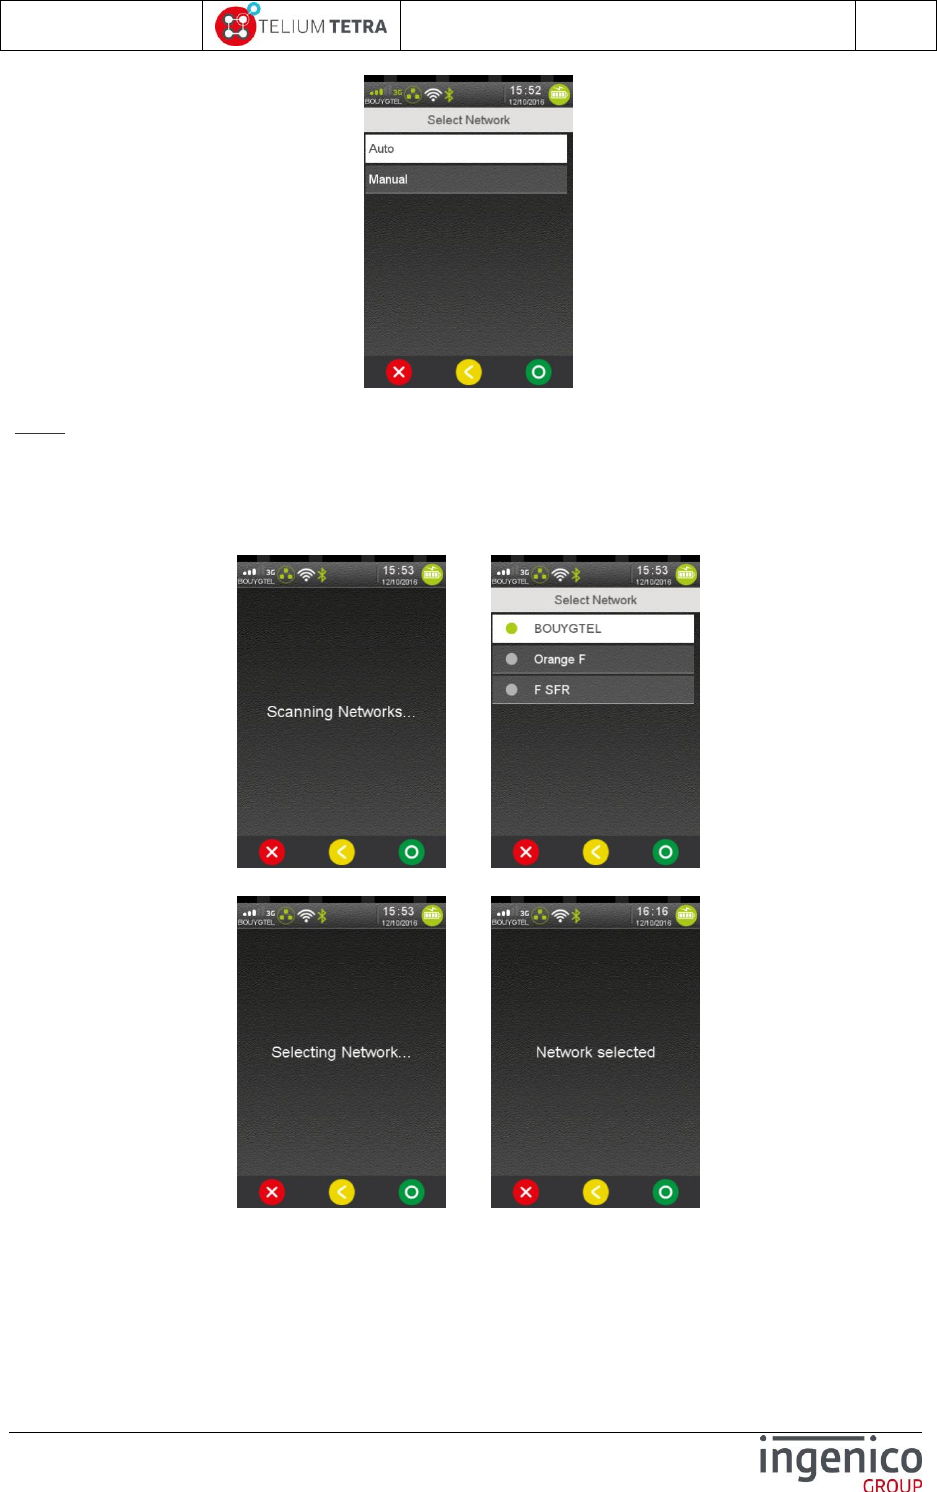
ICO-OPE-02757-V5
TETRA Terminal
User's guide
Public
114/199
Ingenico document - Reproduction or disclosure prohibited without written authorization
Please check document validity before using
Note: Automatic selection must be the default mode to privilege, and manual selection has to
be exceptional. You must consider that manual mode is intended to be used for test purpose.
When selecting “Manual” choice, the networks are scanned. Networks scan operation may be up to
one minute long. The discovered networks are listed and proposed to user for selection. The following
screens are displayed:
=>
The user has to select one of discovered network and validate.
=>
If the selection is valid, the 3G icon state will change to give the level. Otherwise, in case of not
supported network, an error message is displayed.
The following screen illustrates the selection of a not authorized provider.
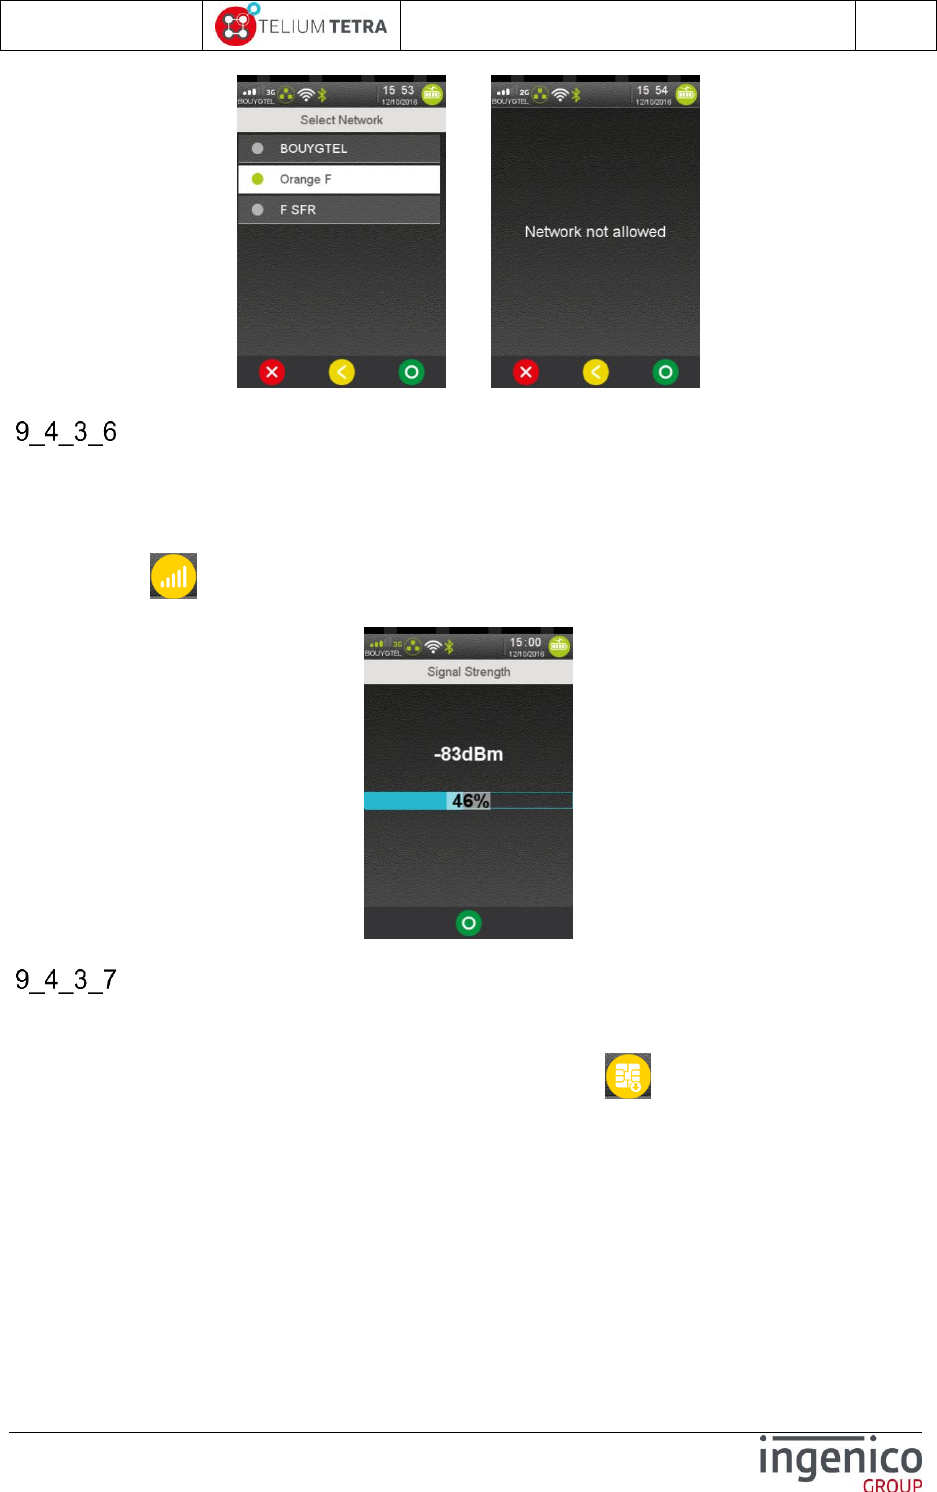
ICO-OPE-02757-V5
TETRA Terminal
User's guide
Public
115/199
Ingenico document - Reproduction or disclosure prohibited without written authorization
Please check document validity before using
=>
Signal Strength
One icon in the status bar of terminal is dedicated to GPRS/3G/4G status, the strength of signal is
given thanks a number of bars corresponding to a range of signal level. The value in dBm of the signal
strength can be obtained thanks to this dedicated menu “Signal Strength”.
When the icon “Signal strength” is selected in “Mobile Networks” subpanel, GPRS/3G/4G signal
strength is displayed as here after:
Change SIM slot
A mobile terminal may be equipped with more than one SIM slot, it is possible to select which SIM slot
will be selected by default. To activate another SIM slot, no active connection must be established
(GPRS icon in status bar must be in GRAY color). When the icon “Change SIM slot” is selected
in “Mobile Networks” subpanel, the following screen is displayed:

ICO-OPE-02757-V5
TETRA Terminal
User's guide
Public
116/199
Ingenico document - Reproduction or disclosure prohibited without written authorization
Please check document validity before using
OR
Select one option and validate.
Note: Do not forget to the change the APN!
Note: The current implementation does not facilitate usage; future improvements are expected to allow
configuring each SIM slot and its SIM card with their own parameters.
Set preferred network type
According mobile terminal equipment and to available mobile network capabilities, it may be possible
to connect in 2G , 3G or 4G and to perform some fallbacks from high to low inputs/outputs data rate.
However according to applications present in the terminal it may be required to fix the network type.
When the icon “Set preferred network type” is selected in “Mobile Networks” subpanel, the
terminal displays the different available choices between specific network types and automatic
management. The following typical screen is displayed:
Select one option and validate.
Wi-Fi configuration
Wi-Fi configuration can be modified thanks to icon. This item is displayed only on Wi-Fi
terminals.
According to registered configuration or to default terminal configuration (=first usage), access to this
menu can produce one of the two following screens:
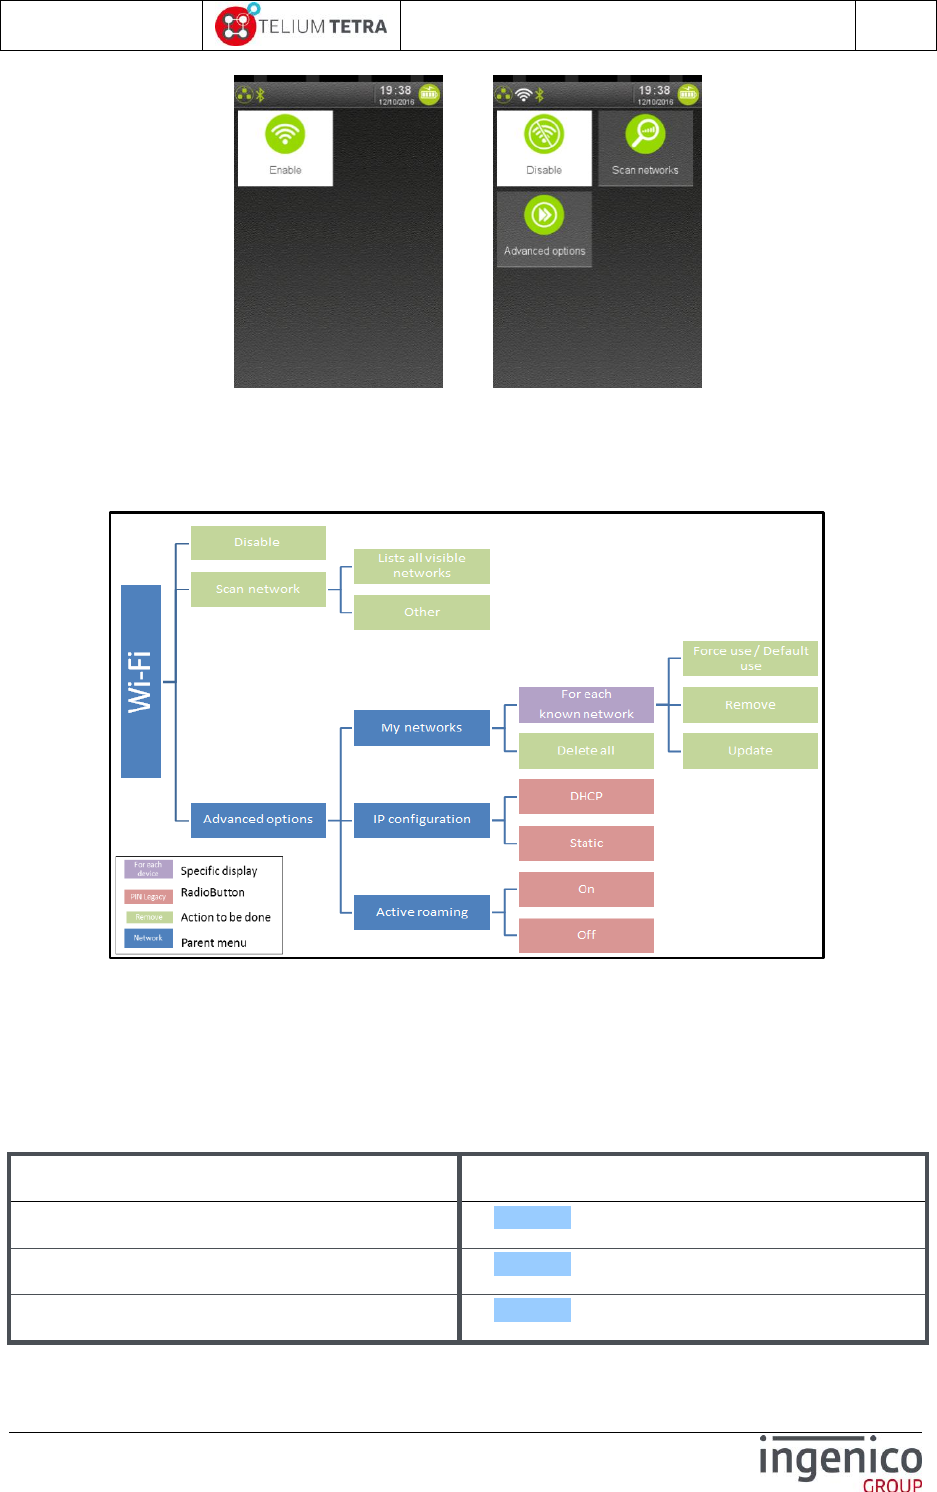
ICO-OPE-02757-V5
TETRA Terminal
User's guide
Public
117/199
Ingenico document - Reproduction or disclosure prohibited without written authorization
Please check document validity before using
or
“Wi-Fi (OFF)”: Wi-Fi connectivity is not activated
“Wi-Fi (ON)” Wi-Fi connectivity is activated and configuration can be modified.
The following scheme illustrates WI-FI configuration general configuration logic:
Figure 22 – Wi-Fi configuration synoptic
WI-FI configuration consists in creating a profile, i.e. the set of parameters required for connection to
an “Access Point”. Several profiles can be created if connection is required to more than one Access
Point. In this case, you can choose the profile which is active or let the terminal connect to the best
available access point amongst all defined profiles.
The following table provides the different links to menus description.
Item
Reference
Disable/ Enable
9_4_4_1
Scan networks
9_4_4_2
Advanced options
9_4_4_3
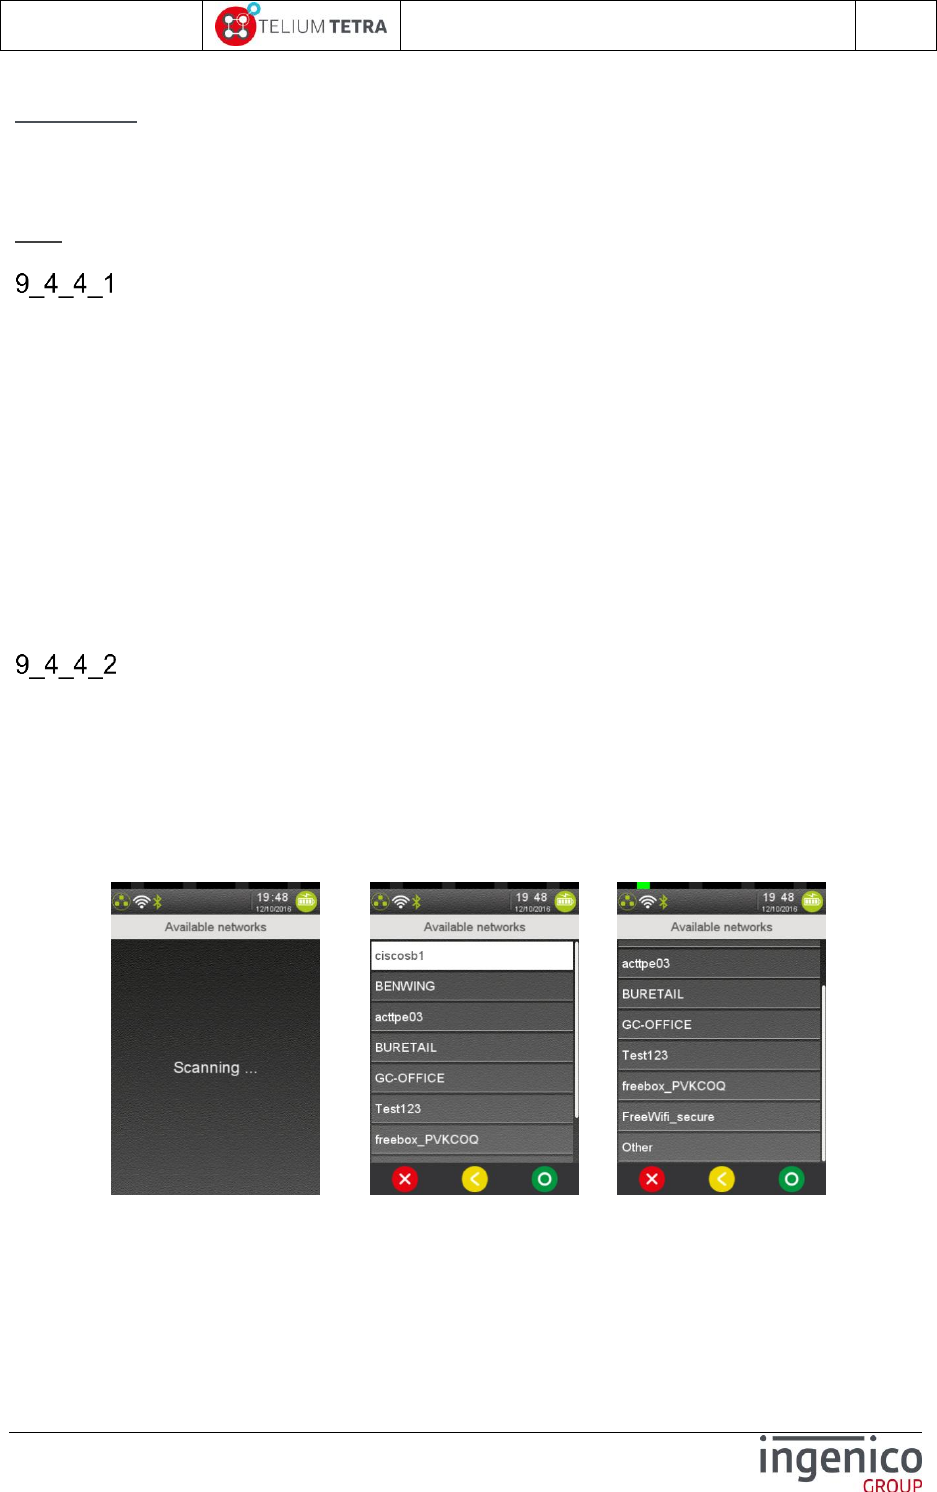
ICO-OPE-02757-V5
TETRA Terminal
User's guide
Public
118/199
Ingenico document - Reproduction or disclosure prohibited without written authorization
Please check document validity before using
Security note:
If the Wi-Fi interface is used to transfer any sensitive authentication data, including but not limited to
the encrypted PIN or account data, the Wi-Fi interface must enforce encryption.
The WIFI configuration profile shall be consistent with the PCI DSS v2 Wireless Guidance.
Note: the Wifi service will refuse to create profiles for unsecure network (open or WEP networks).
Activation menu
According the Wi-Fi connectivity status, the displayed menu line is:
“Disable” = allows disabling Wi-Fi connectivity (up to and including the radio emission). Its
selection implies:
Wi-Fi connectivity is shutdown
Menu line “Disable” is renamed “Enable”
None of the other Wi-Fi menus is visible
“Enable” = allows enabling Wi-Fi connectivity. Its selection implies:
Wi-Fi connectivity is activated
Menu line “Enable” is renamed “Disable”
All Wi-Fi menus are visible
Loaded with the default configuration, the Wi-Fi is proposed enabled on a Wi-Fi connectivity capable
terminal.
Scan networks
When selecting “Scan network”, the terminal performs a full search of the different networks that may
be present around it. At the end of the scan, the terminal displays “Available networks” menu which is
composed of:
The list of available networks that respond to security criteria (network with NONE security or
WEP security are not shown)
A static menu named “Other”.
The following sequence is displayed:
=> ../..
To select an existing network or “Other” menu:
Set the radio-button
Validate with “Green” key ( on screen or on keyboard)
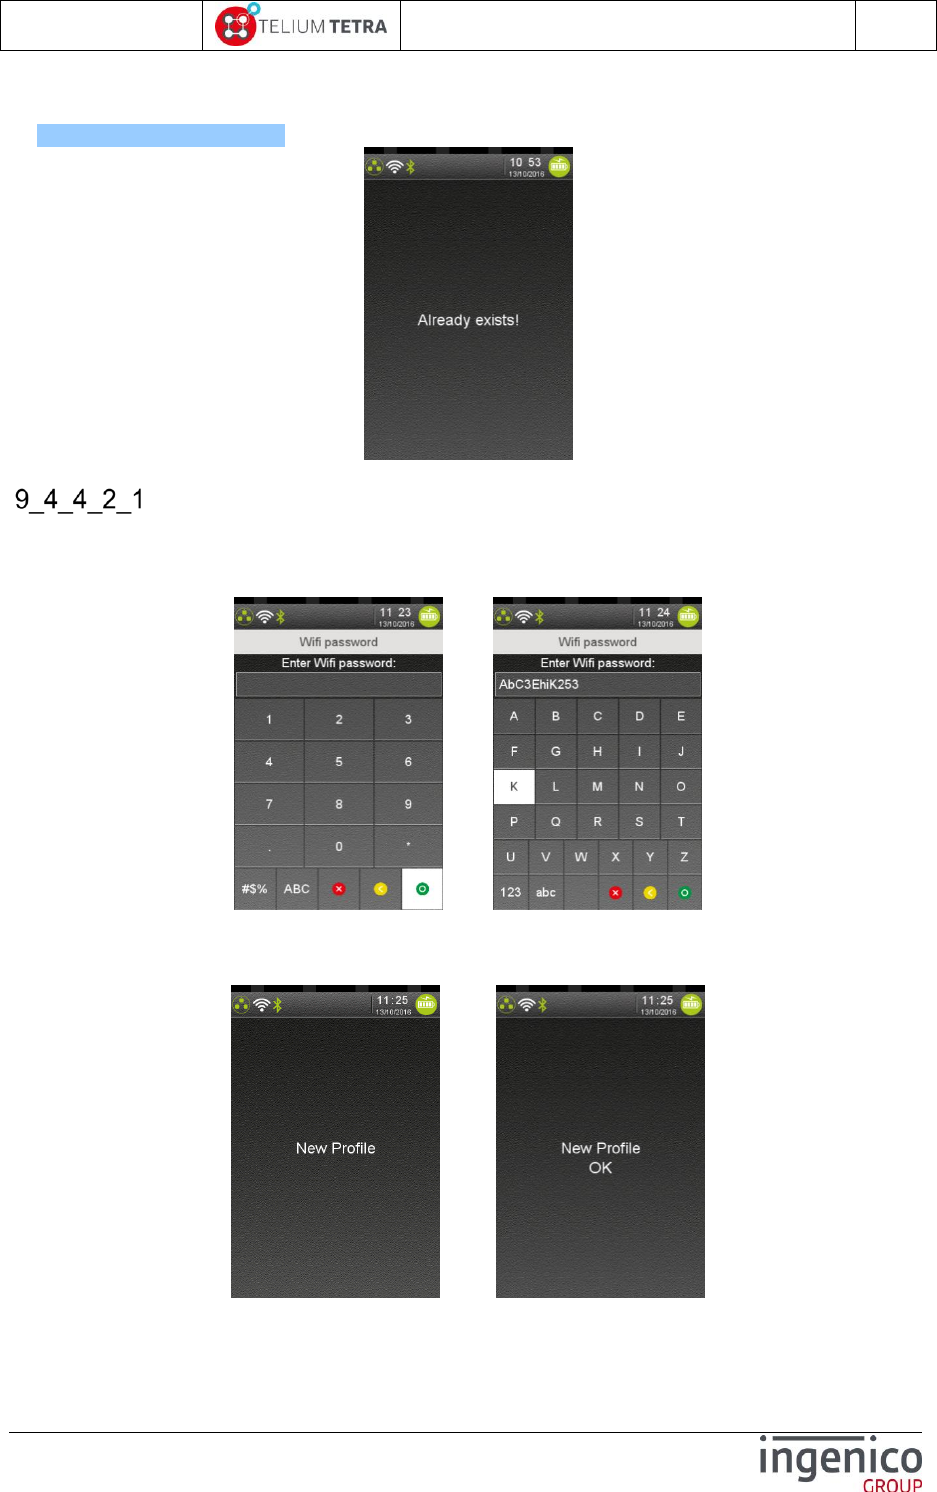
ICO-OPE-02757-V5
TETRA Terminal
User's guide
Public
119/199
Ingenico document - Reproduction or disclosure prohibited without written authorization
Please check document validity before using
When the selected network is already configured, the terminal displayed the following error message.
In this case go in “Advanced options” -> “My networks” to delete the previous registered profile (refer
to 9_4_4_3_1_1_2 “Remove” ).
Selecting an existing network
When an existing network is selected (i.e. any other entry than “Other”), the terminal proposes to
configure a new profile, for example it will ask to enter the Wi-Fi password with following screen for a
Home security network:
=>
After validation, a new profile is created, registered and activated. The following sequence is
displayed.
=>
When the terminal is not able to create the profile some error could be displayed as below.
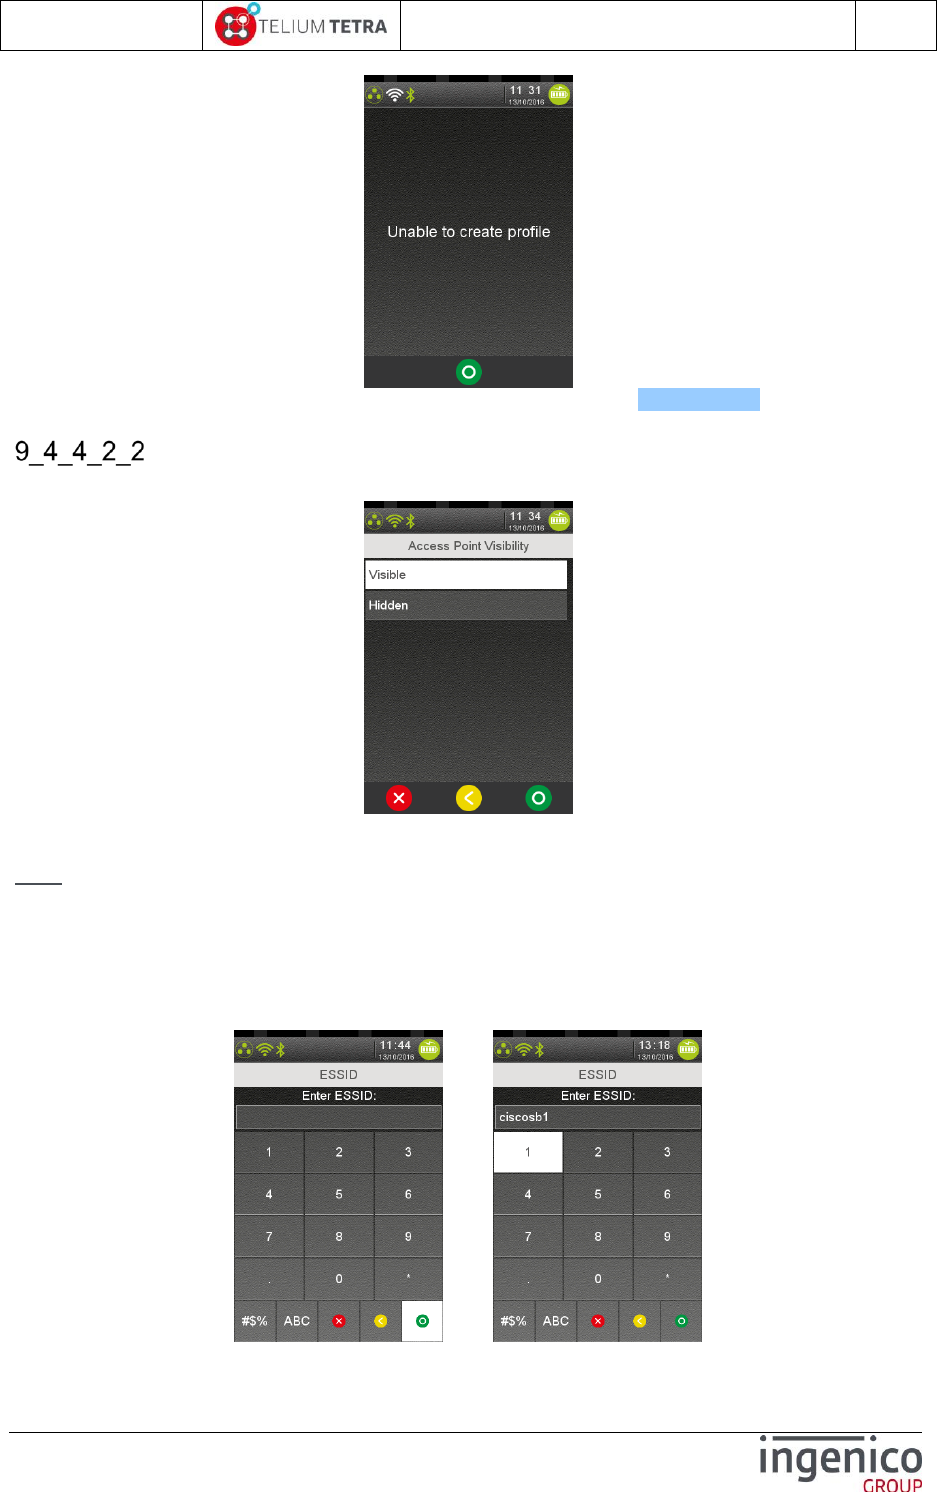
ICO-OPE-02757-V5
TETRA Terminal
User's guide
Public
120/199
Ingenico document - Reproduction or disclosure prohibited without written authorization
Please check document validity before using
For a profile with enterprise security network example, refer to section 9_4_4_2_2_2.
Manual network selection
When “Other” menu is selected, a screen asks whether the Access Point is hidden or not.
Select “Visible” or “Hidden” and then validate with “green” key (on screen or on keyboard).
Note: It is recommended to select “Visible” if the network is really visible.
When “Access Point visibility” has been chosen, the selection of “Network name (SSID)” is proposed
to user:
Enter the Wi-Fi network name (ESSID).
Then validate.
=>

ICO-OPE-02757-V5
TETRA Terminal
User's guide
Public
121/199
Ingenico document - Reproduction or disclosure prohibited without written authorization
Please check document validity before using
Once the SSID is configured, the terminal proposes to select the security type to manage.
According to what is select refer to the following paragraphs:
Item
Reference
Home security
9_4_4_2_2_1
Enterprise security
9_4_4_2_2_2
9_4_4_2_2_1 Home security
When “Home security” is selected, the terminal proposes to enter the Wi-Fi password with the
following screen:
=> =>
After validation, a new profile is created, registered and activated. The configuration is finished, the
terminal return to “Available networks menus”.
9_4_4_2_2_2 Enterprise security
When “Enterprise security” is selected, the terminal proposes to select which type of Extensible
Authentication Protocol (EAP) to use. A screen proposing all the available authentication
capabilities of the terminal is displayed:

ICO-OPE-02757-V5
TETRA Terminal
User's guide
Public
122/199
Ingenico document - Reproduction or disclosure prohibited without written authorization
Please check document validity before using
Select one of the authentication methods and validate.
According authentication methods selected refer to the following paragraphs:
Item
Reference
TLS
9_4_4_2_2_2_1
TTLS
9_4_4_2_2_2_2
PEAP
9_4_4_2_2_2_3
SIM
9_4_4_2_2_2_4
TLS
When this authentication method is used, the following parameter will be asked to the user:
User name identifier.
CA certificate
Client certificate
Private key
Private key password
After validation of “TLS” (Transport Layer Security) choice, the following screen is displayed:
Enter the username and validate.

ICO-OPE-02757-V5
TETRA Terminal
User's guide
Public
123/199
Ingenico document - Reproduction or disclosure prohibited without written authorization
Please check document validity before using
Next, the selection of the root certificate according to the list of certificates previously loaded and
saved in the terminal is proposed.
Select the root certificate corresponding to the targeted network and validate.
Next, the selection of the client certificate according to the list of certificates previously loaded and
saved in the terminal is proposed.
Select the client certificate corresponding to the targeted network and validate.
Next, the selection of the private key according to the list of private key previously loaded and saved in
the terminal is proposed.
Select the private key. Then validate.
Note: WARNING Private key MUST BE PKCS8 format.
ICO-OPE-02757-V5
TETRA Terminal
User's guide
Public
124/199
Ingenico document - Reproduction or disclosure prohibited without written authorization
Please check document validity before using
Next, the password related to selected private key must be entered.
Enter the password and validate.
Note: Validation is only accepted if something has been entered!
The “TLS” configuration sequence is finished and according from initial menu selected, the success of
the profile creation or update is notified to user.
OR
TTLS
When this authentication method is used, the following parameter will be asked to the user:
Phase 2 negotiation method.
Username
Wifi Password
CA certificate
After validation of “TTLS” (Tunneled Transport Layer Security), the user must select the “Phase2”
negotiation method according to a list established by the terminal according to its capabilities. The
following screen is displayed.
ICO-OPE-02757-V5
TETRA Terminal
User's guide
Public
125/199
Ingenico document - Reproduction or disclosure prohibited without written authorization
Please check document validity before using
Select one of the methods and validate.
Next, a username must be entered:
Enter the username and validate.
Next, the Wifi password must be entered:
Enter the password and validate.
Note: Validation is only accepted if something has been entered!
Next, the selection of the root certificate according to the list of certificates previously loaded and
saved in the terminal is proposed.
ICO-OPE-02757-V5
TETRA Terminal
User's guide
Public
126/199
Ingenico document - Reproduction or disclosure prohibited without written authorization
Please check document validity before using
Select the root certificate corresponding to the targeted network and validate.
The “TTLS” configuration sequence is finished and according from initial menu selected, the success
of the profile creation or update is notified to user as exposed in “TLS” configuration sequence.
PEAP
When this authentication method is used, the following parameter will be asked to the user:
Phase 2 negotiation method.
Username
Wifi Password
CA certificate
After validation of “PEAP” (Protected Extensible Authentication Protocol), the user must select the
“Phase2” negotiation method according to a list established by the terminal according to its
capabilities. The following screen is displayed.
Select one of the methods and validate.
Next, a username must be entered:
ICO-OPE-02757-V5
TETRA Terminal
User's guide
Public
127/199
Ingenico document - Reproduction or disclosure prohibited without written authorization
Please check document validity before using
Enter the username and validate.
Next, the Wifi password must be entered:
Enter the password and validate.
Note: Validation is only accepted if something has been entered!
Next, the selection of the root certificate according to the list of certificates previously loaded and
saved in the terminal is proposed.
Select the root certificate corresponding to the targeted network and validate.
The “PEAP” configuration sequence is finished and according from initial menu selected, the success
of the profile creation or update is notified to user as exposed in “TLS” configuration sequence.

ICO-OPE-02757-V5
TETRA Terminal
User's guide
Public
128/199
Ingenico document - Reproduction or disclosure prohibited without written authorization
Please check document validity before using
SIM
When this authentication method is used, needed parameters are present in SIM.
Select “SIM choice and validate. According from initial menu selected, the success of the profile
creation or update is notified to user as exposed in “TLS” configuration sequence.
Advanced options
When “Advanced options” subpanel is selected the following screen is proposed to the user:
To select a menu touch or validate one of displayed icon:
The following table provides the different links to subpanels description.
Item
Reference
My networks
9_4_4_3_1
IPv4 configuration
9_4_4_3_2
Active roaming
9_4_4_3_3
My networks
“My networks” subpanel allows managing all registered profiles in the terminal. When selecting this
menu, as illustrated in following screenshot:
All saved profiles are displayed. Each “Profile name” line can be selected to manage
specifically this profile.
The currently activated profile (ie the Preferred one) is highlighted in the list
A menu allows to delete all registered configuration

ICO-OPE-02757-V5
TETRA Terminal
User's guide
Public
129/199
Ingenico document - Reproduction or disclosure prohibited without written authorization
Please check document validity before using
The following table provides the different links to menus description.
Item
Reference
“ciscosb1” (A named profile)
9_4_4_3_1_1
Delete All
9_4_4_3_1_2
9_4_4_3_1_1 Management of one registered profile
The management of each registered profile can be done in selecting “Profile name” line. Three
operations can be performed:
Selecting usage condition “Force use” or “Default use”: to set the selected profile as the
preferred profile, ie if a profile is “forced”, the Wifi will not connect to any other profiles, even if
the forced network is not available it will be this one that will be used, whatever is the signal
strength or other parameters. When “Force use” has been selected, next access to menu it will
be proposed the reverted possible choice: “Default use”.
Additional information: Selecting “Force use” for a profile automatically put any other profile
previously put in “Force use” into “Default use”
Removing of the selected profile. Once the profile is removed, the user go back to the Network
menu
Updating of the profile. The update process is similar to create profile. Once the update is
done, the user will go back to Network menu
The following table provides the different links to menus description.
Item
Reference
Force use/Default use
9_4_4_3_1_1_1
Remove
9_4_4_3_1_1_2
Update
9_4_4_3_1_1_3
When a “Profile name” line is selected and according previous recorded parameters, three possible
operations are proposed:

ICO-OPE-02757-V5
TETRA Terminal
User's guide
Public
130/199
Ingenico document - Reproduction or disclosure prohibited without written authorization
Please check document validity before using
OR
“Force use” / “Default use”
When “Force use” is proposed and selected, the terminal displays a message to user until the
completion of the operation (duration = some seconds). When the operation is finalized, a result or an
error message is displayed.
=> Short time later
When “Default use” is proposed and selected, the terminal displays a message to user until the
completion of the operation (duration = some seconds). When the operation is finalized, a result or an
error message is displayed.
=> Short time later
“Remove”
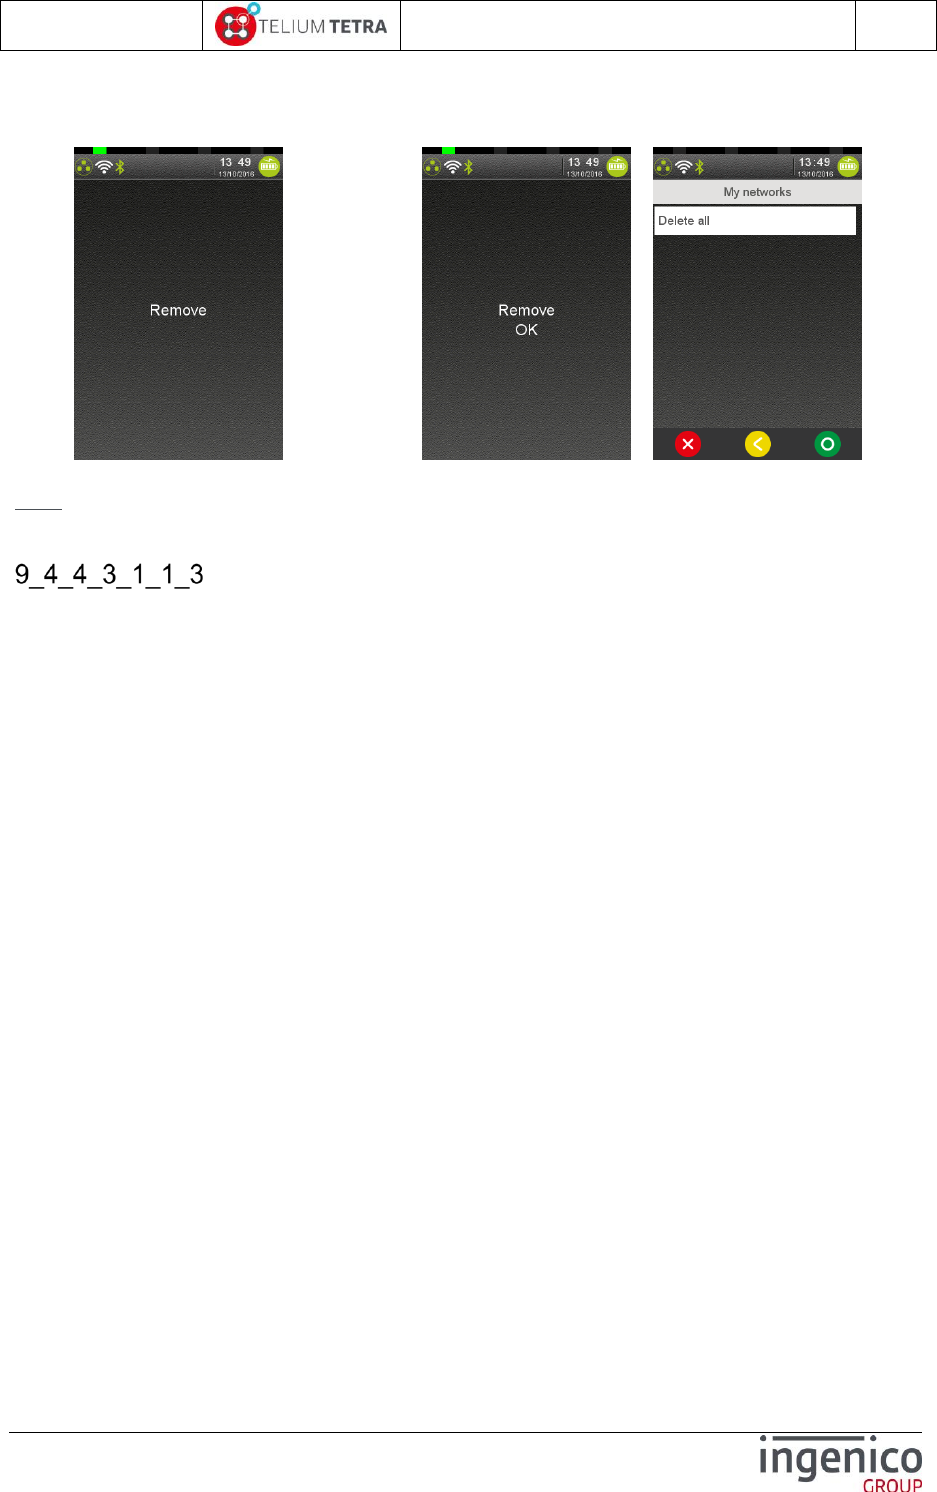
ICO-OPE-02757-V5
TETRA Terminal
User's guide
Public
131/199
Ingenico document - Reproduction or disclosure prohibited without written authorization
Please check document validity before using
When “Remove” is selected, the terminal removes the selected named profile. The terminal displays a
message to user until the completion of the operation (duration = some seconds). At the end of the
operation the named profile no more exist in the menus lines.
=> Short time later =>
Note: During this operation, the WiFi icon color in the status bar has evolved. At the end of the
operation, the icon is gray meaning that only radio activated but not connected to a network.
“Update”
When “Update” is selected, the registered parameters can be changed. The terminal asks to:
Adjust “Hidden” and “Visible”.
Select between “Home” or “Enterprise” security profile
Reenter the “Wi-Fi password”
The terminal displays a message to user until the completion of the operation (duration = some
seconds). When the operation is finalized, a result or an error message is displayed. The following
screenshots illustrates this sequence.
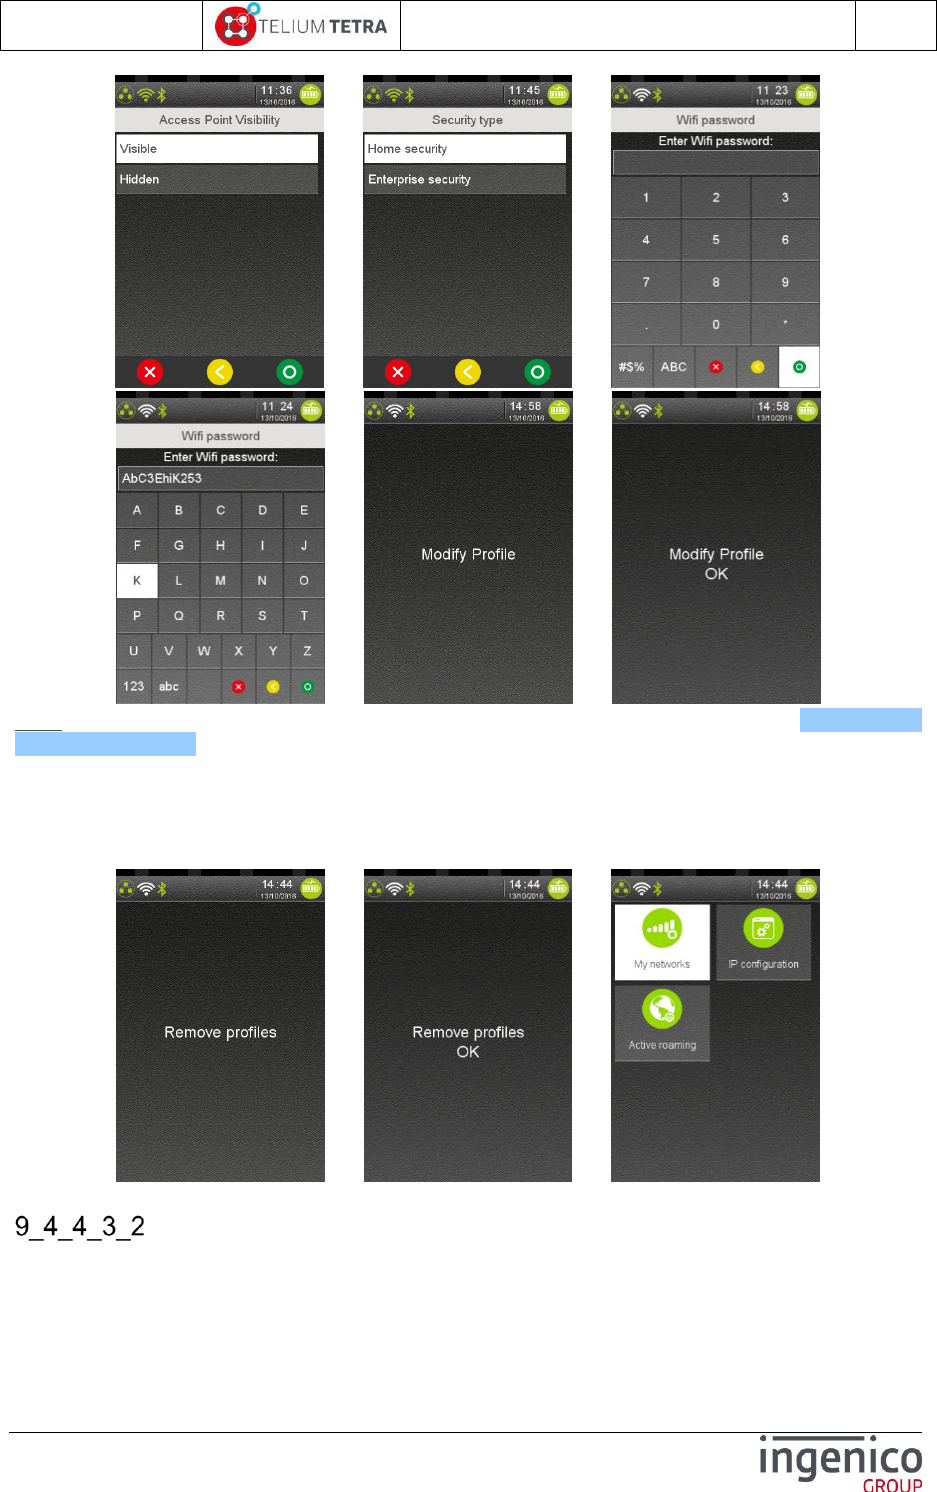
ICO-OPE-02757-V5
TETRA Terminal
User's guide
Public
132/199
Ingenico document - Reproduction or disclosure prohibited without written authorization
Please check document validity before using
=> => =>
=> =>
Note: For detailed description of “Enterprise security” parameters setting refer to 9_4_4_2_2_2
Enterprise security paragraph.
9_4_4_3_1_2 Delete all
This menu is used to delete all the networks registered in the terminal. The following screenshots
illustrates this sequence. When finalized, the terminal returns to “Advanced Options”.
=> =>
IPv4 Configuration
When “IP configuration is selected, the user is able
To configure the IP address thanks to DHCP or in setting all the parameters.
To print current IP Wi-Fi parameters
To ping a specific address.

ICO-OPE-02757-V5
TETRA Terminal
User's guide
Public
133/199
Ingenico document - Reproduction or disclosure prohibited without written authorization
Please check document validity before using
The following screen is displayed.
..\..
This menu is similar to Ethernet configuration. (Refer to 9_4_1).
Active roaming
When selected, this menu displays 2 radio buttons (On / Off) used to specified whether the dynamic
roaming must be enabled or not.
The registered state is displayed:
Change setting and validate or go back to previous menu.
The Active roaming is a feature that allows the terminal to actively perform background Wi-Fi scans,
looking for an Access Point that would provide a stronger signal than the one currently in use. If such
an Access Point is found, the terminal will automatically connect to it, even if it still has a connection to
the current Access point
By default, the option is set to “OFF” because of the possible side effect: if a room with weak access to
2 access points, the terminal might end up switching back and forth to each access point, making the
actual use of the Wi-Fi useless
BLUETOOTH configuration
BLUETOOTH configuration can be modified thanks to icon. This item is displayed only on BT
terminals. According to BLUETOOTH status, two different screens may happen when this icon is
selected:
BLUETOOTH is activated
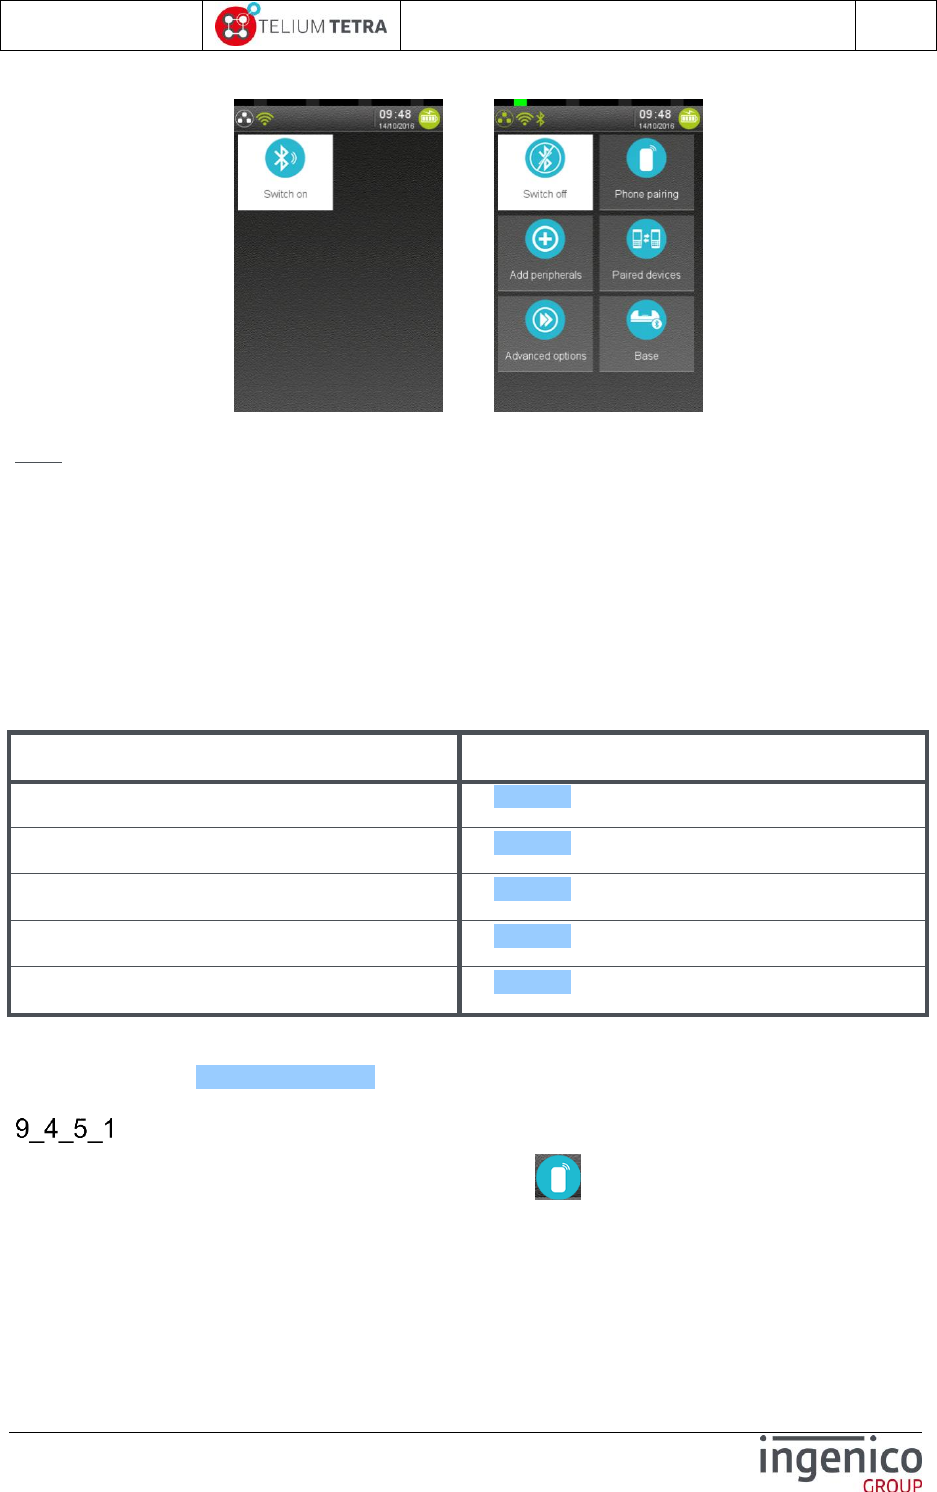
ICO-OPE-02757-V5
TETRA Terminal
User's guide
Public
134/199
Ingenico document - Reproduction or disclosure prohibited without written authorization
Please check document validity before using
BLUETOOTH is not activated
OR
Note: In the following paragraph, BT abbreviation will be use in place of BLUETOOTH.
This menu provides a set of configuration features to manage BT ecosystem around payment
terminal:
Activation/deactivation of BT module
Phone pairing
Attachment of different BT peripherals to the terminal
Management of all BT peripherals currently paired with the terminal
Management of terminal BT bases (BEM)
Management of different terminal BT advanced options.
The following table provides the different links to menus description.
Item
Reference
Phone pairing
9_4_5_1
Add peripherals
9_4_5_2
Paired devices
9_4_5_3
Base
9_4_5_4
Advance options
9_4_5_5
Before processing part of these menus, the general configuration of BT on the terminal must have
been done. (refer to Advanced terminal options menu).
Phone pairing
To pair a mobile phone or a tablet to your terminal, select “Phone pairing” icon. During 1 minute
the terminal will be visible or detectable to be paired with a BT equipment. It displays the following
screens sequence in which the remaining duration of visibility is refreshed until pairing failed or
achieved with success.
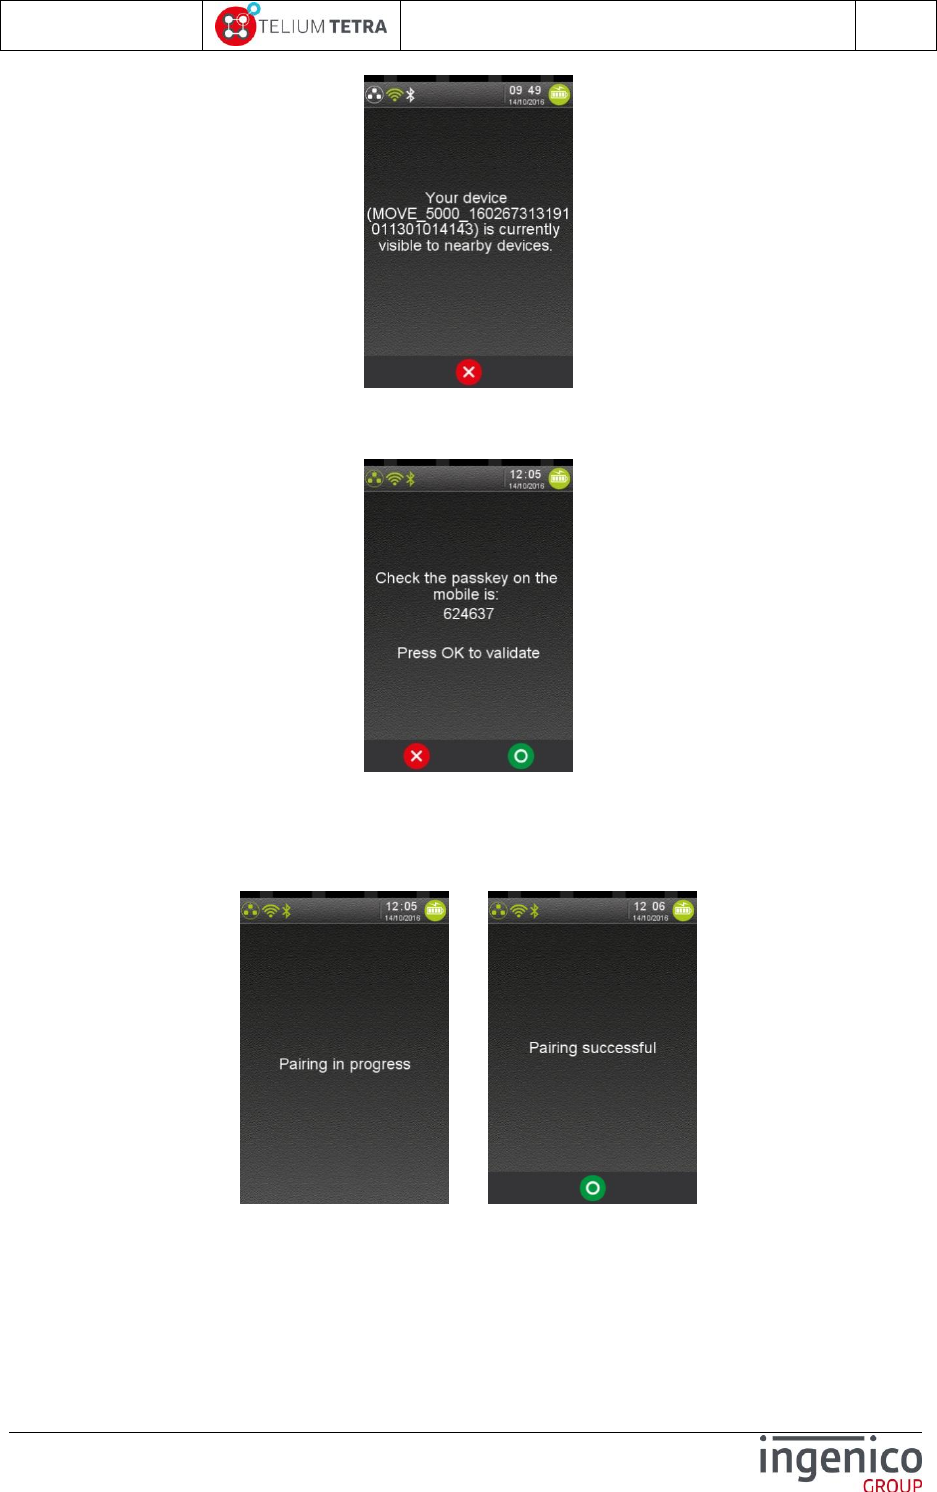
ICO-OPE-02757-V5
TETRA Terminal
User's guide
Public
135/199
Ingenico document - Reproduction or disclosure prohibited without written authorization
Please check document validity before using
On the mobile phone starts a recognition process of BT peripherals in field.
TETRA BT terminals only support « PIN Matching » pairing method. When phone start association
exchanges sequence, the terminal displays the following type of messages:
After having control the pin value on the mobile phone, validate to confirm the association.
If pairing treatment is successful, the terminal and the mobile phone confirm pairing success in
displaying a message. On mobile phone, the paired BT equipment lists content the terminal name or
reference.
=>
In case of pairing failure or when visibility sequence duration expires, the terminal displays the
following message.
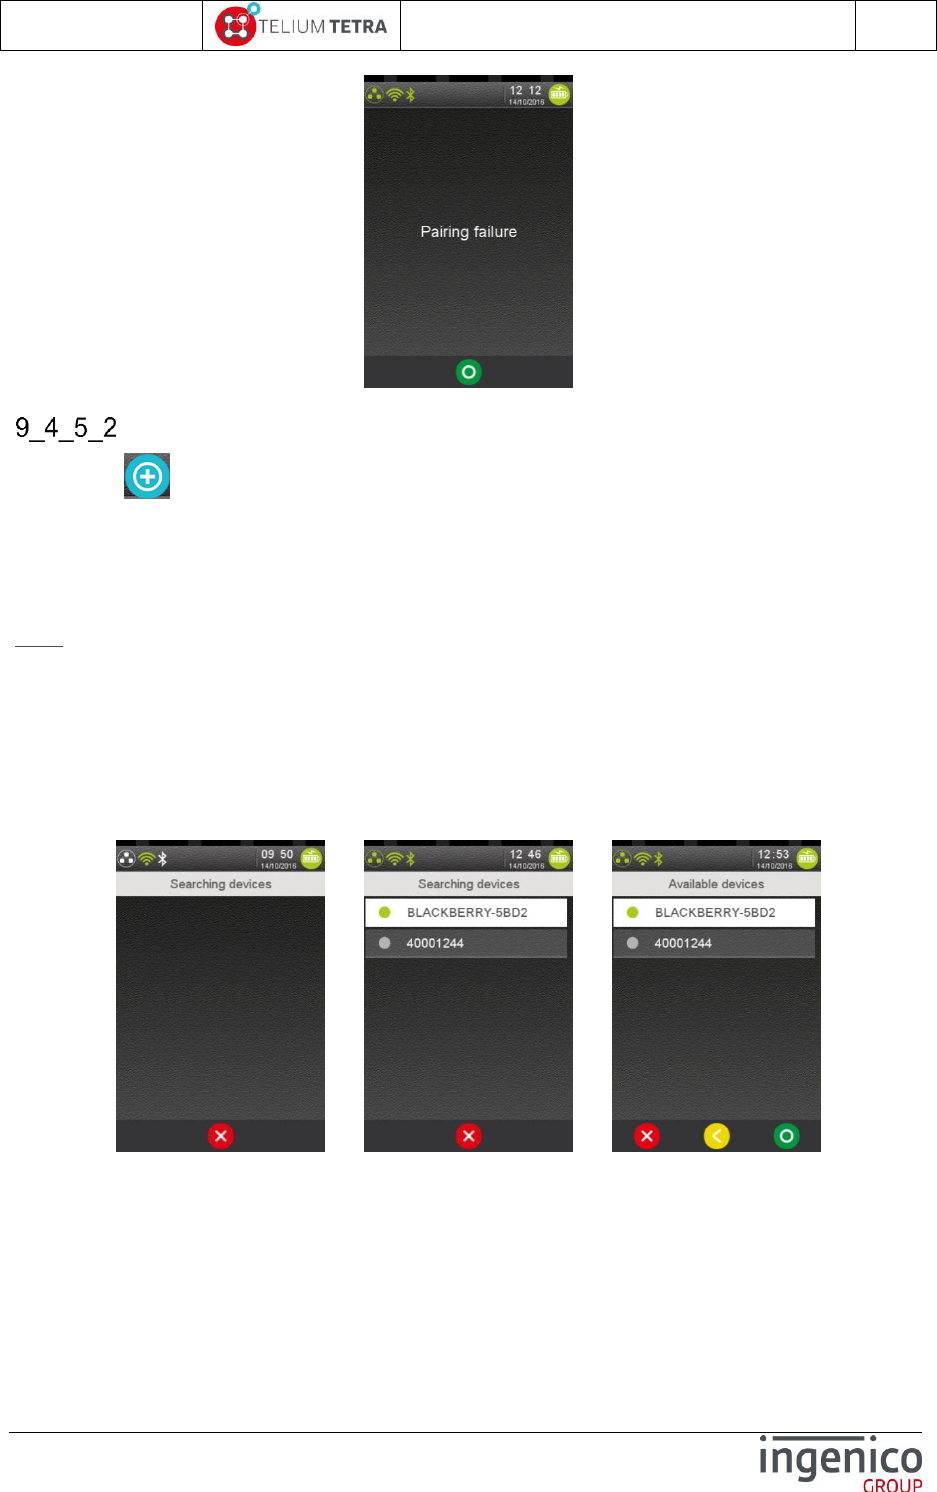
ICO-OPE-02757-V5
TETRA Terminal
User's guide
Public
136/199
Ingenico document - Reproduction or disclosure prohibited without written authorization
Please check document validity before using
Add peripherals
In selecting “Add peripherals” icon, you can pair a device to a TETRA BT terminal. The current
supported types of BT on TETRA are:
Bluetooth printer:
Bluetooth barcode reader:
iOS bridge:
Note: An iOS bridge is a type of BT device that will be physically connected to the TETRA terminal but
will be functionally driven by the iOS application. That’s why this type is only available on device with
the iAP chip. (=not on all BT TETRA terminal)
When “Add peripherals” menu is selected, the terminal starts to search the available devices in its
perimeter. The list of the available Bluetooth devices is displayed and adjusted according to new
device discovering. During this phase, it is possible to cancel operation thanks to “RED” button or key.
When searching phase is finished, the user can select a device to pair with its terminal. The following
screenshots illustrates searching until its completion.
=> =>
When the expected device to pair appears in the list, select it to start pairing.
If the terminal cannot automatically determine whether the device is a printer or a barcode reader, it
will display a specific screen to select the type of device. In the following illustrated use case, “Others”
will be selected.
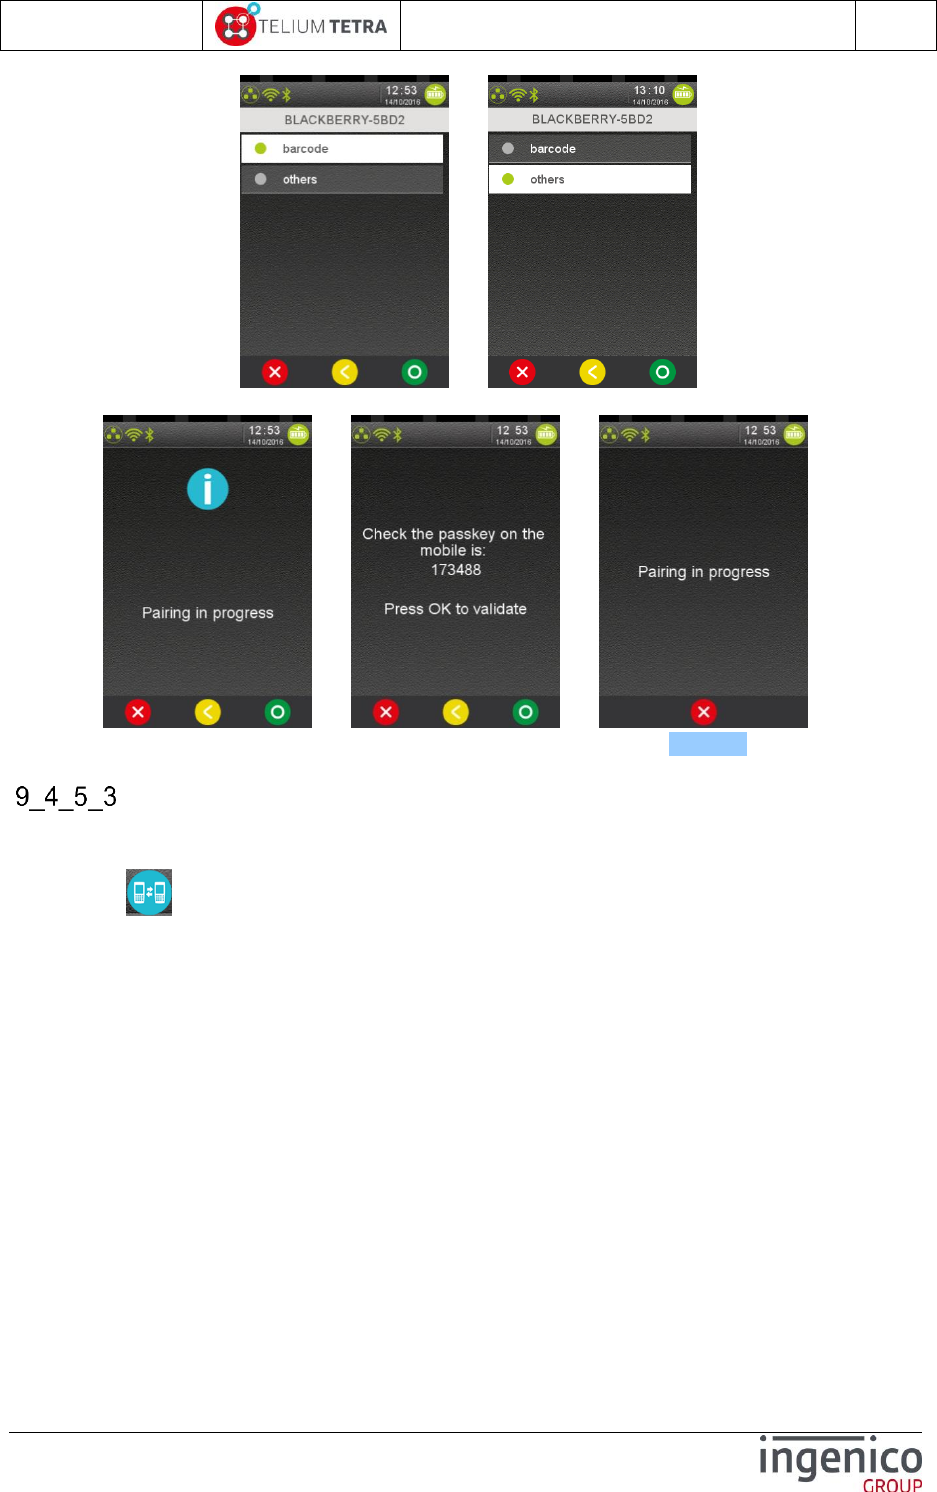
ICO-OPE-02757-V5
TETRA Terminal
User's guide
Public
137/199
Ingenico document - Reproduction or disclosure prohibited without written authorization
Please check document validity before using
=>
The User must validate the adequate type, the pairing operation starts:
=> => ….
The next steps of this operation are similar to « Phone pairing » (refer to 9_4_5_1).
Paired devices
The “Paired devices” menu allows managing paired BT devices registered by the terminal. The
available functions depend on BT device type.
In selecting “Paired devices” icon, you can pair a device to a TETRA BT terminal. The current
supported types of BT on TETRA are:
Bluetooth printer:
Remove: unpair the device
Auto connect: (if this option is supported by the printer)
YES to keep the connection alive. This will increase the power consumption (lower
battery life) but speed up the printing
NO to connect on demand (managed by the Telium application). This will slow the
printing as the Bluetooth connection will have to be established each time
Bluetooth barcode reader:
Remove: unpair the device
iOS bridge:
Remove: unpair the device
Mobile device for other cases (smartphone or tablet):
Remove: unpair the device
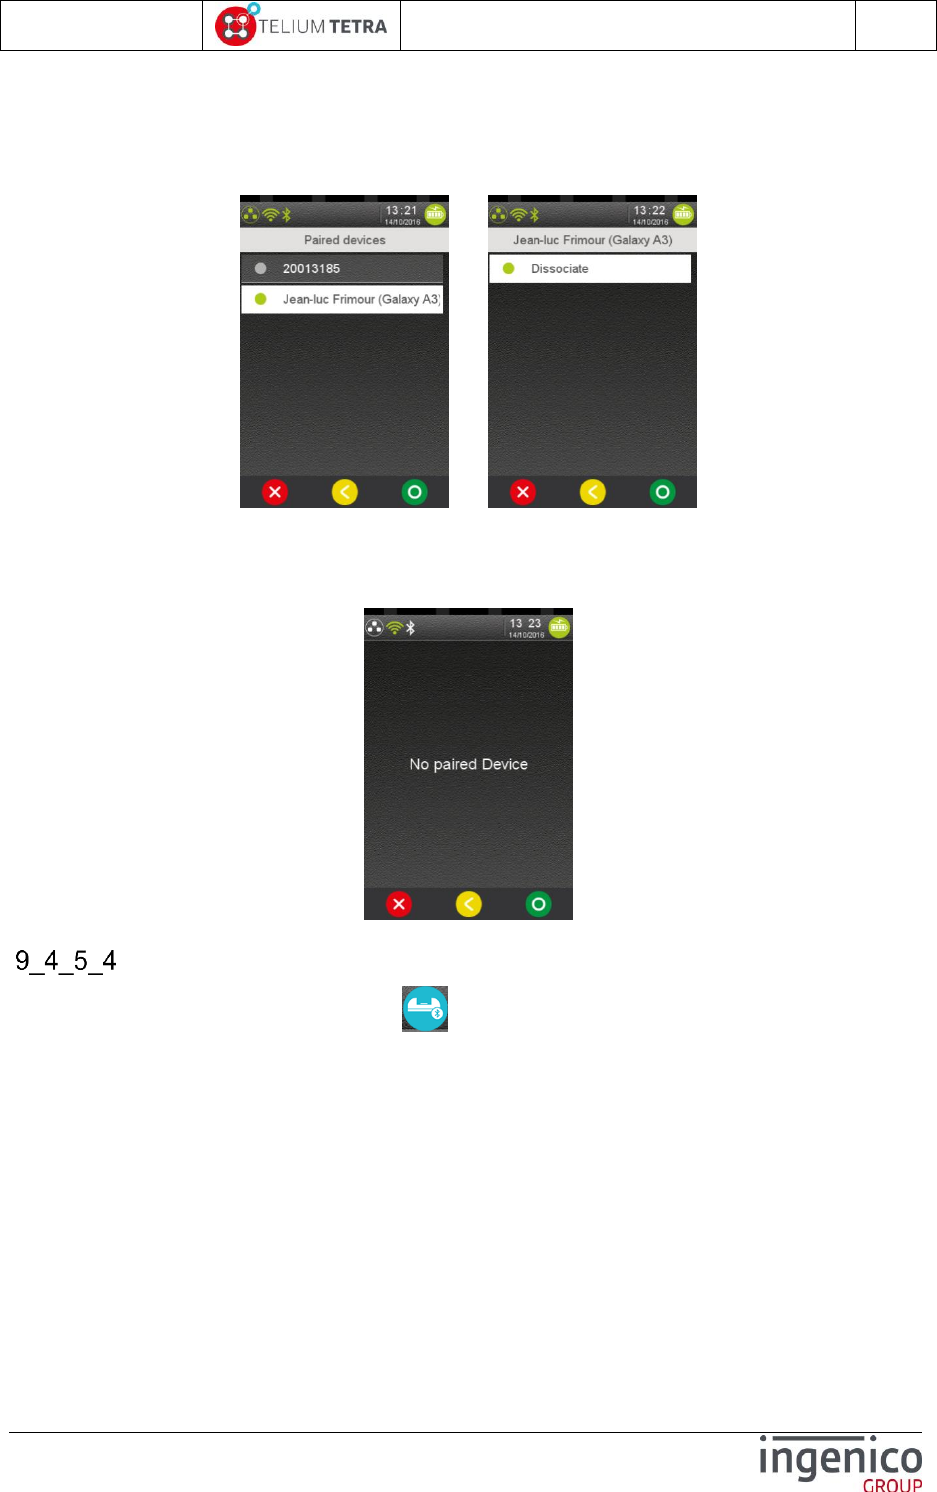
ICO-OPE-02757-V5
TETRA Terminal
User's guide
Public
138/199
Ingenico document - Reproduction or disclosure prohibited without written authorization
Please check document validity before using
Connect : to restart SmartConnection algorithm (item only available on Apple device if
SmartConnection is enabled, device set by default and not connected)
The short following sequence illustrates displays menu when another terminal is paired to the terminal
and when the User chooses to unpair an existing association.
=>
Validate to confirm “dissociation” between the two devices. The operation does not report any error.
The terminal stay after on BT main menu.
When the terminal does not find any paired device, it will display the following error message:
BT bases setup
From the “Bluetooth” subpanel, select the “Base” icon and validate. The terminal displays the
following menu to the User.
ICO-OPE-02757-V5
TETRA Terminal
User's guide
Public
139/199
Ingenico document - Reproduction or disclosure prohibited without written authorization
Please check document validity before using
To be operational, a Bluetooth terminal shall be associated to at least one base (“Association” item).
Once associated, the terminal can use one of the base communication ports (“Advanced” item) like
modem, USB, Ethernet…
The following table provides the different links to menus description.
Item
Reference
Association
9_4_5_4_1
Advanced
9_4_5_4_2
Base State
9_4_5_4_3
Upgrade Base
9_4_5_4_4
Association
When “Association” icon is selected, the following screen is proposed to the user.
Thanks to the “Association” menus the User can:
Create a new base association.
Select between base which base will be used
Remove a registered associated base
Print base associations registered in the terminal.

ICO-OPE-02757-V5
TETRA Terminal
User's guide
Public
140/199
Ingenico document - Reproduction or disclosure prohibited without written authorization
Please check document validity before using
The following table provides the different links to menus description.
Item
Reference
New Base
9_4_5_4_1_1
Select Base
9_4_5_4_1_2
Remove Base
9_4_5_4_1_3
Print Base
9_4_5_4_1_4
9_4_5_4_1_1 New base
Before selecting the “New base” icon, place the terminal on the new base to associate. At
association achievement, the terminal displays the operation result.
If result is successful, the following screen is displayed
=>
Note: the BT icon in status bar will be updated (=BT Green Icon) on first reboot of the terminal out-
size the base.
If the association is not successful, the result screen contains the "Association failure"
message and the text of the error as illustrated below:
The user must put the terminal on the base to associate and validate. Until the terminal is not on the
base “GREEN” button or key is inactive.
The description of “Error text” is given in the following table.

ICO-OPE-02757-V5
TETRA Terminal
User's guide
Public
141/199
Ingenico document - Reproduction or disclosure prohibited without written authorization
Please check document validity before using
Displayed error text
Description of association failure
"IR link not
available"
InfraRed link not available (trace on COM0, MODEM.IS_IR or
COM0.IS_IR selected)
"Connection
timeout"
Base couldn't be connected to (not a smart base ?)
"Cannot send"
The terminal fails to transmit its association request.
"Receive timeout"
The terminal has transmitted its association request but has not
received a reply.
"Base @ = 0"
Base has returned a null address (base not yet started up or out of
order).
"Put on cradle"
Association not possible: portable terminal not on a base.
"Wrong driver
version"
Device driver is too old (either portable or base) => update needed.
" Wrong base
firmware "
Software version of the base is incorrect.
“Wrong portable
firmware”
Software version of the terminal is incorrect.
"Wrong firmware"
Different causes may set this error:
Software version of the base is unknown.
Software version of the terminal is unknown
Software versions of both base and terminal are incorrect.
Then if the association was successful, the terminal may propose updating of base software (refer
Upgrade software base).
9_4_5_4_1_2 Select Base
When “Select base” icon is selected, the terminal lists all the available associated bases.
=> =>
Select in the list of associated bases the one to use as peripheral. The terminal confirms base
selection and returns to “Association” subpanel.
When no base has been associated, the terminal displays the following error message.
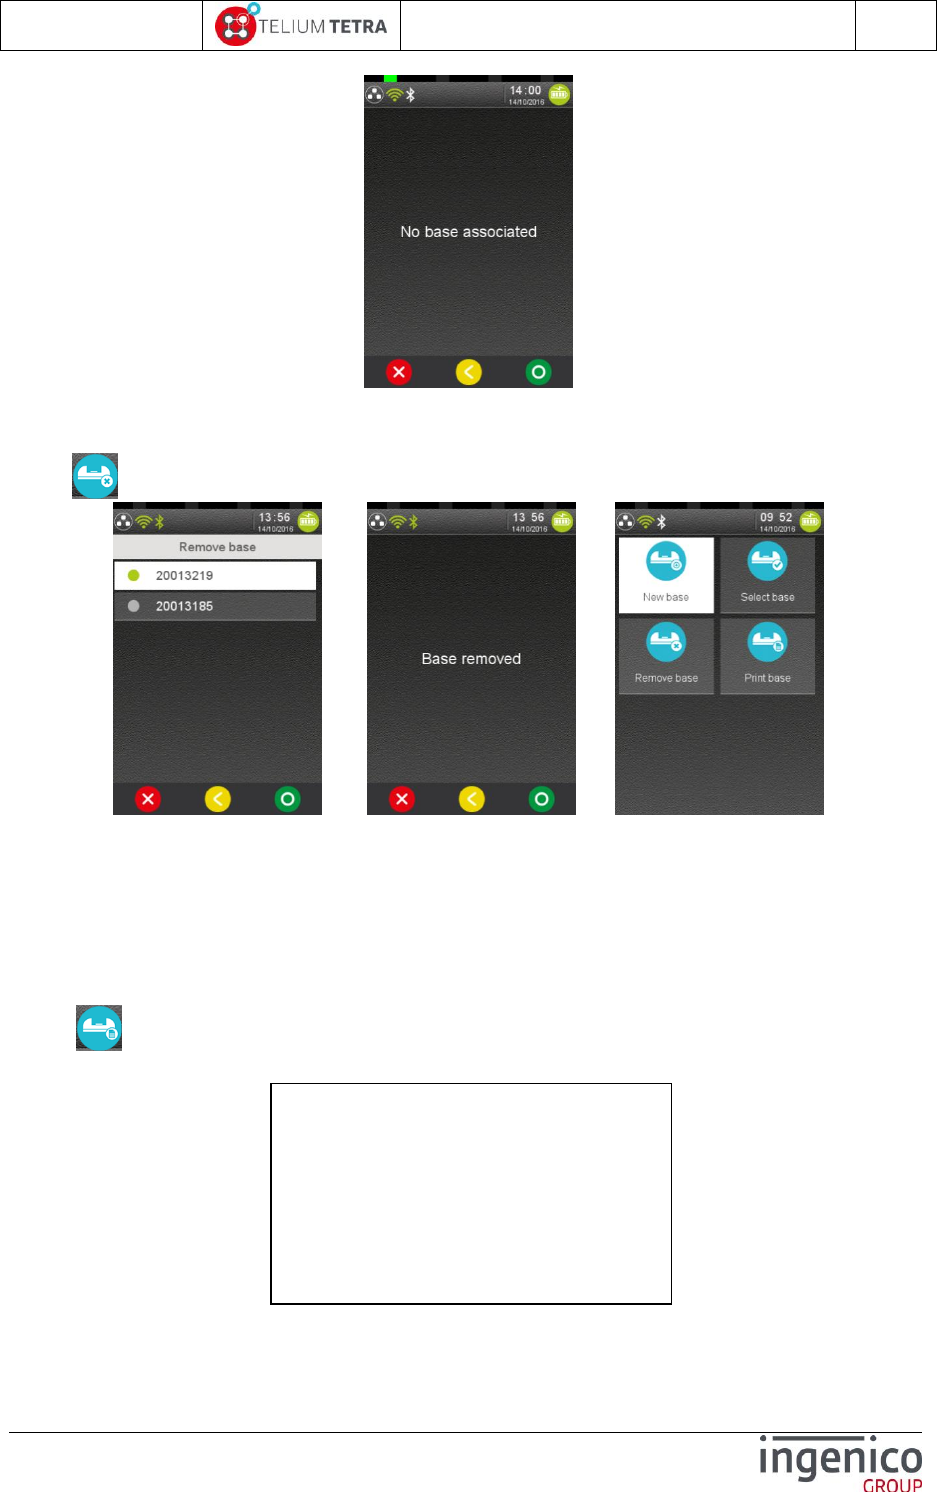
ICO-OPE-02757-V5
TETRA Terminal
User's guide
Public
142/199
Ingenico document - Reproduction or disclosure prohibited without written authorization
Please check document validity before using
9_4_5_4_1_3 Remove Base
When “Remove base” icon is selected, the terminal lists all the available associated bases.
=> =>
Select in the list of associated bases the one to delete. Peripherals are automatically reassigned to the
first known base. The terminal confirms base removal and returns to “Association” menu.
When no base has been associated, the terminal displays the following error message “No base
associated”.
9_4_5_4_1_4 Print Base
When “Print base” icon is selected, the terminal print information of all available associated
bases. (Two associated bases in the example below)
The available information of the base is:
its name
------------ Bases information ---------------
Name | Serial : 20013185 | 20013185 Type |
Bluetooth@ : 127 |7F:54:9C4662
Firmware | Loader :4841 | 4841
--------------------------
Name | Serial : 20013219 | 20013219 Type |
Bluetooth@ : 127 |7F:54:9C45EF
Firmware | Loader :4841 | 4841
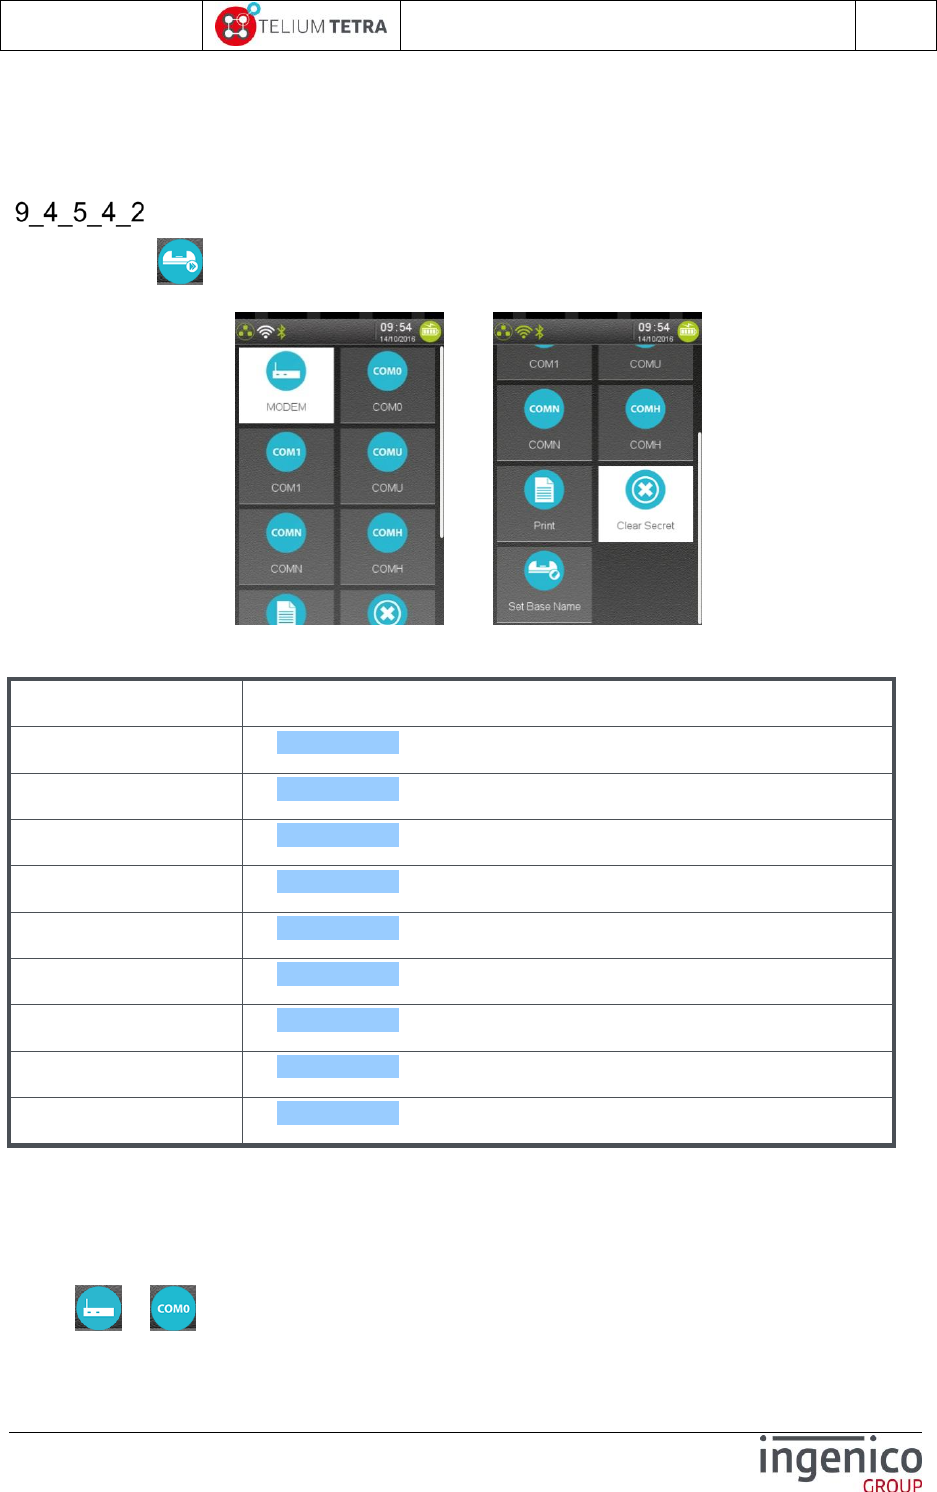
ICO-OPE-02757-V5
TETRA Terminal
User's guide
Public
143/199
Ingenico document - Reproduction or disclosure prohibited without written authorization
Please check document validity before using
its type
its Bluetooth address
its serial number
its firmware versions for loader and loaded software.
Base advanced functions
When selecting “Advanced” icon in “Base” subpanel, the terminal displayed the list of all available
features of the base that can be configured.
../..
The following table provides the different links to menus description.
Item
Reference
Modem
9_4_5_4_2_1
COM0
9_4_5_4_2_1
COMU
9_4_5_4_2_1
COM1
9_4_5_4_2_1
COMN
9_4_5_4_2_1
COMH
9_4_5_4_2_1
Set base name
9_4_5_4_2_2
Print
9_4_5_4_2_3
Clear Secret
9_4_5_4_2_4
9_4_5_4_2_1 Modem, COM0, COM1, COMU, COMH and COMN
The following description illustrates “MODEM” menu. It’s also valid for “COM0”, “COM1”, “COMU”,
“COMH” and “COMN”: “MODEM” text is replaced by the adequate “COMx” text or icon.
Select or or … icon in “Advanced” subpanel and validate.
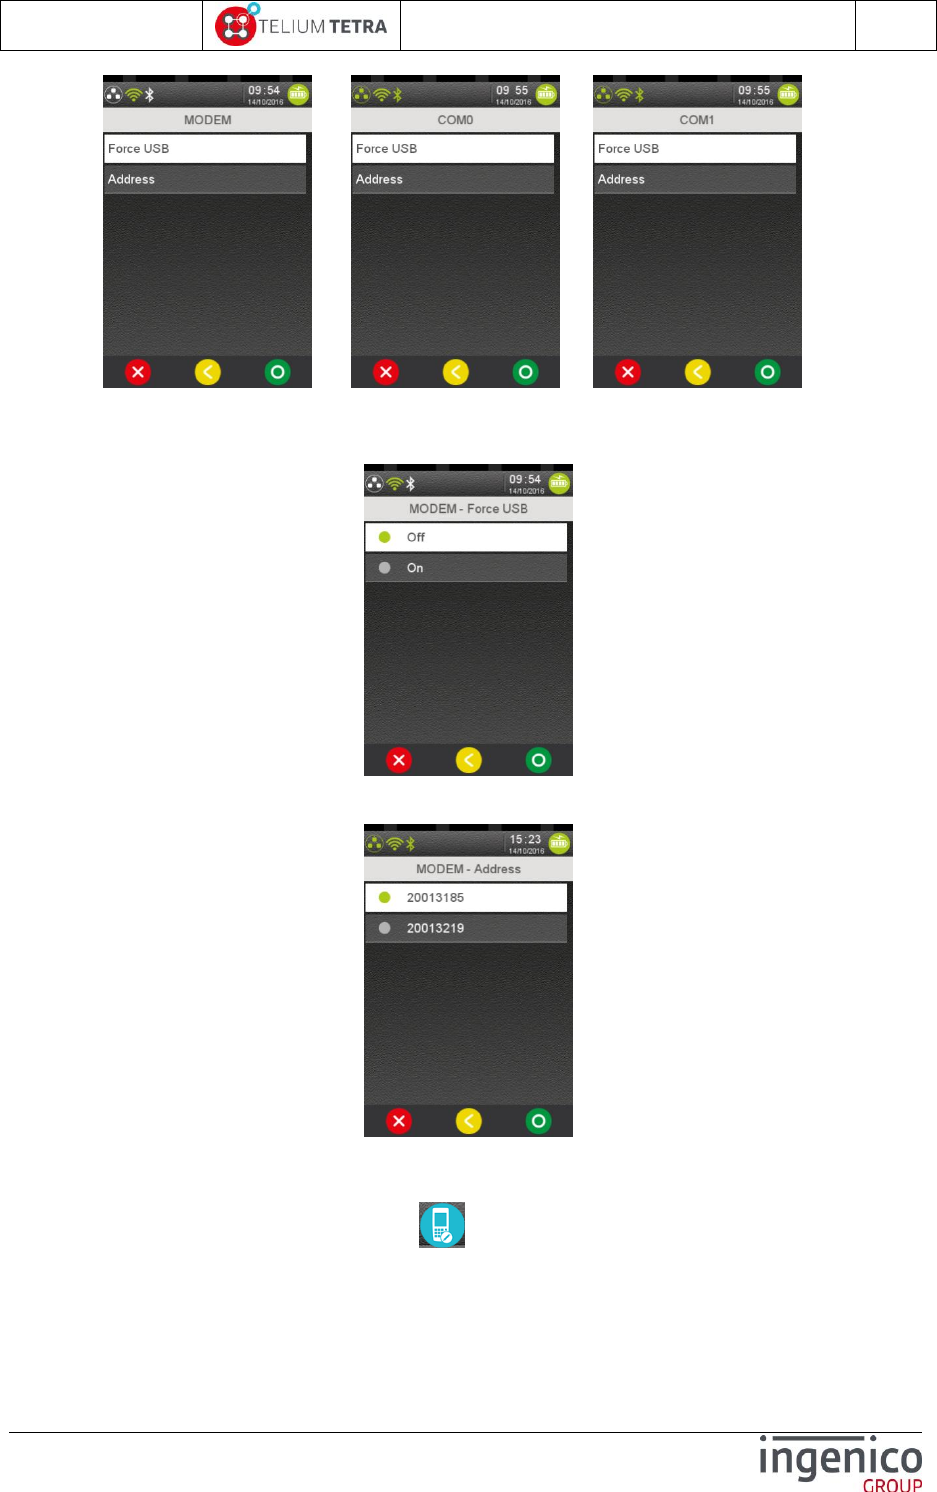
ICO-OPE-02757-V5
TETRA Terminal
User's guide
Public
144/199
Ingenico document - Reproduction or disclosure prohibited without written authorization
Please check document validity before using
or or …
Select the way to communicate via a modem (from highest to lowest priority):
“Force USB”: set “ON” to force the use of the serial link even if the selected base has a
“Bluetooth” interface.
“Address”: force the use of a specific “Bluetooth” base. The terminal displays the addresses of
its associated registered bases, select one of them:
9_4_5_4_2_2 Set base name
To set a name to an associated base, select “Set base name” icon in “Advanced” subpanel. The
terminal displays the following screens:
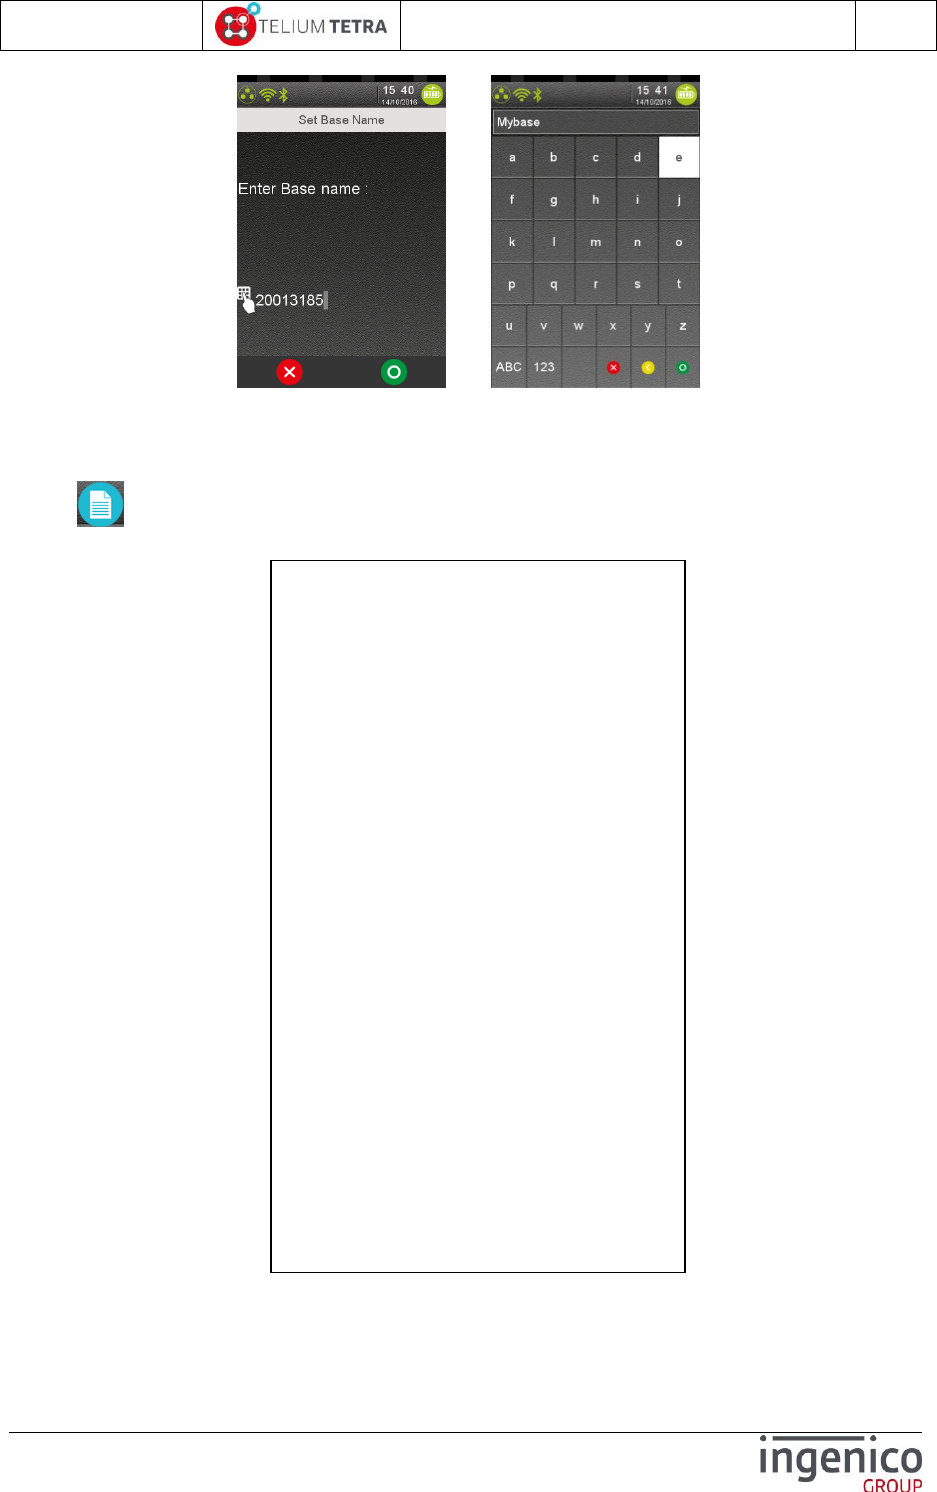
ICO-OPE-02757-V5
TETRA Terminal
User's guide
Public
145/199
Ingenico document - Reproduction or disclosure prohibited without written authorization
Please check document validity before using
=>
Enter the name of the base which will be displayed during configuration management.
9_4_5_4_2_3 Print
When “Print” icon is selected in “Advanced” subpanel, the terminal print configuration and
association of all Bluetooth ports:
The available information of the base is:
Bases information
Local information
------------ Bases information ---------------
Name | Serial : 20013185 | 20013185
Type | Bluetooth@ : 127 |7F:54:9C4662
Firmware | Loader :4841 | 4841
--------------------------
Name | Serial : 20013219 | 20013219
Type | Bluetooth@ : 127 |7F:54:9C45EF
Firmware | Loader :4841 | 4841
------------ Local information ---------------
Local @ 547F:54:9C421A
------------ Local options ---------------
modem_force_usb = OFF
modem_address = 20013185
com0_force_usb = OFF
com0_address = 20013185
com1_force_usb = OFF
com1_address = 20013185
comN_force_usb = OFF
comN_address = 20013185
comU_force_usb = OFF
comU_address = 20013185
comH_force_usb = OFF
comH_address = 20013185
-------- Connection information -----------
address[0]=20013185
address[1]=20013219
--------------------------
SPP[0] base name = 20013185
SPP[0] progress = 1
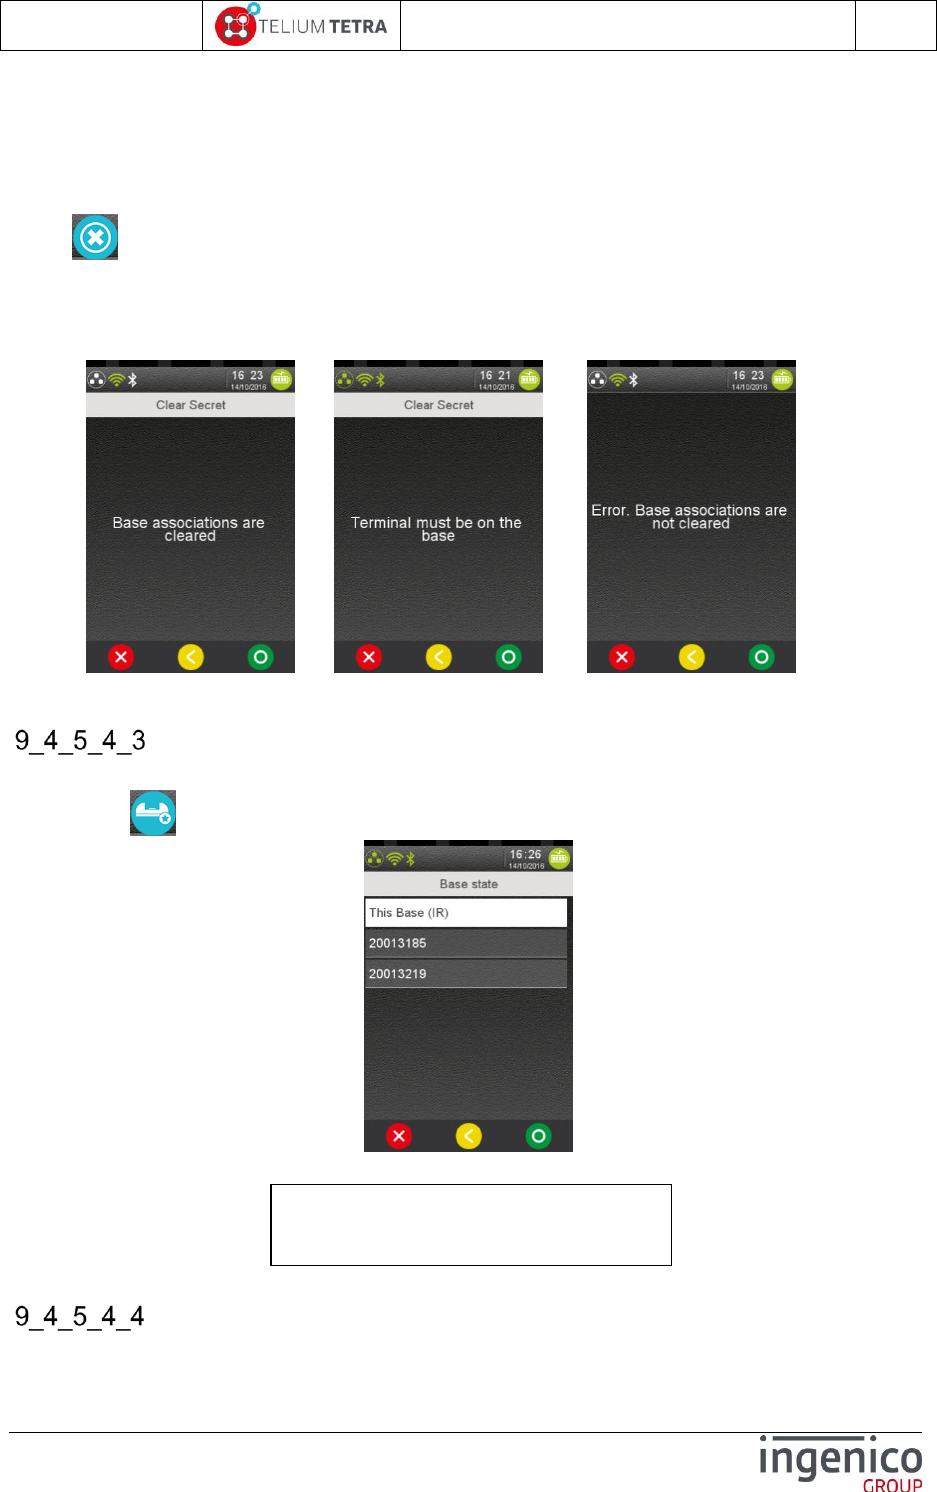
ICO-OPE-02757-V5
TETRA Terminal
User's guide
Public
146/199
Ingenico document - Reproduction or disclosure prohibited without written authorization
Please check document validity before using
Local options
Connection information
9_4_5_4_2_4 Clear Secret
To erase the association between a terminal and its base and to clear the registered information,
select “Clear secret” icon in “Advanced” subpanel:
put the terminal on the base
select “Clear Secret” menu.
When the terminal has performed the operation, it displays one of following result messages:
or or or …
When the operation succeeds, all the terminals have to be associated again to use this base.
Base state
With “Base state” menu, it possible to retrieve the software version present in a given associated
base. Select “Base State” icon in “Base” subpanel
Select in the proposed list a base address or name. After validation, terminal prints out its report.
Upgrade software base
TELIUM BASE SYSTEM
Version : 37775005
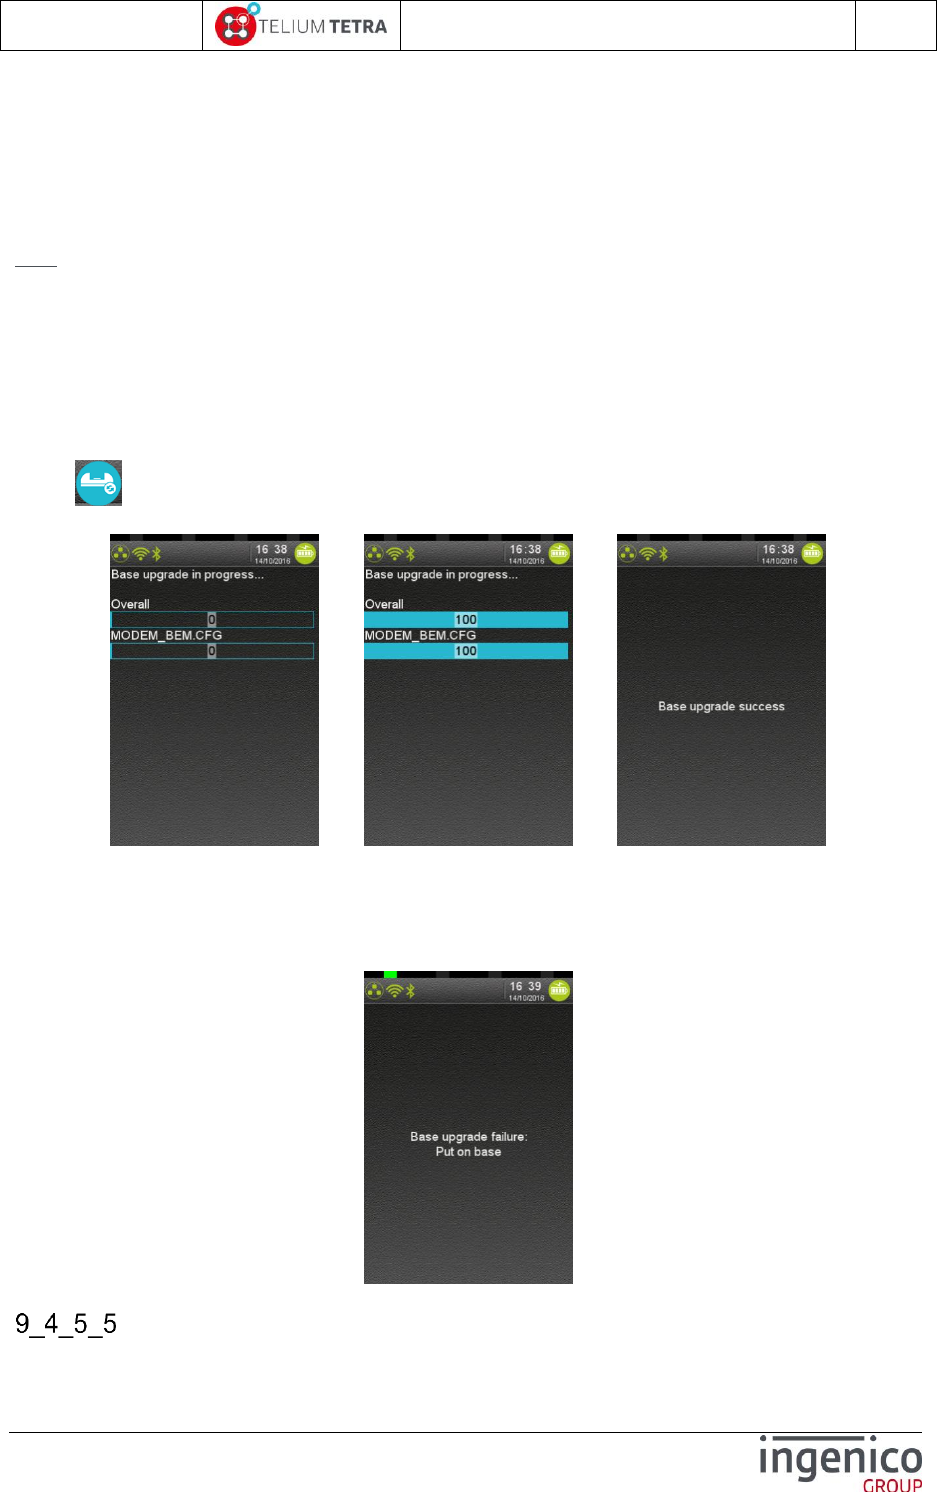
ICO-OPE-02757-V5
TETRA Terminal
User's guide
Public
147/199
Ingenico document - Reproduction or disclosure prohibited without written authorization
Please check document validity before using
The conditions of the base software update are:
Done automatically when the terminal starts on base and if the software version of the base is
different from the base software packages stored in the terminal (so it may the case after a
base association operation as the terminal will reboot to take it in account)
Triggered by user thanks to menu. The loading happens if the software version of the base is
different from the base software packages stored in the terminal
Note: The logic to take in account new software is not identical to TELIUM 2.
If MODEM_BEM.CFG file is present on the terminal, it is also sent to during automatic or manual
upgrade of the software. When the base detects a new version, it will reboot to apply configuration. In
the other case, nothing happens, the base is ready.
With “Upgrade Base” menu, it possible to trigger an update of the software present in a given
associated base. To perform this operation, you must the terminal on the associated base to update.
Select “Upgrade Base” icon in “Base” subpanel and validate.
If the terminal is on the base, the following sequence happens:
=> =>
At the end of the loading, the terminal reports the status of the operation with one of the
following text.
"Base upgrade success"
"Base upgrade failure"
If the terminal is not on the base, the following error message is displayed.
Advanced terminal options
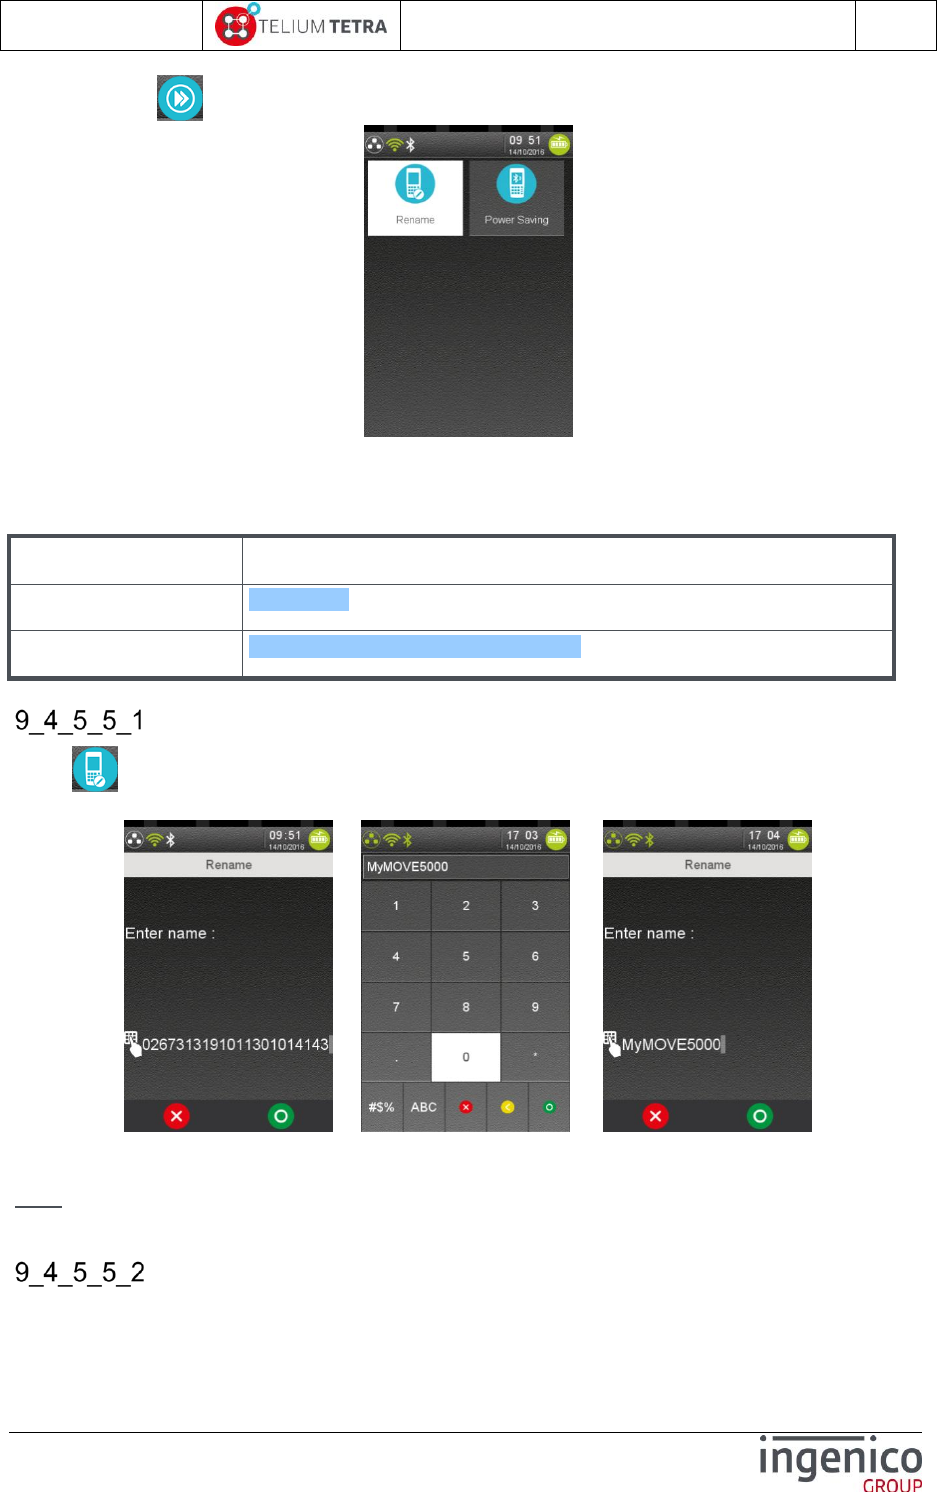
ICO-OPE-02757-V5
TETRA Terminal
User's guide
Public
148/199
Ingenico document - Reproduction or disclosure prohibited without written authorization
Please check document validity before using
When selecting “Advanced options” icon in “Bluetooth” subpanel, the following menu is proposed:
Thanks to the “Advanced options” menus the user can:
Give a name to the terminal or rename it
Select power saving state
Item
Reference
Rename
9_4_5_5_1
Power save
Erreur ! Source du renvoi introuvable.
Rename
When “Rename” icon is selected in “Advanced options” subpanel, a name or a new name can be
given to the terminal.
or =>
Select the alpha numeric keyboard on the screen and enter a name and validate.
Note: As the default name is based on the serial number of the terminal, only the end of name is
visible on the screen.
Power save mode

ICO-OPE-02757-V5
TETRA Terminal
User's guide
Public
149/199
Ingenico document - Reproduction or disclosure prohibited without written authorization
Please check document validity before using
When selecting “Power saving” icon in “Advanced options” subpanel, the terminal displays the
current mode in use.
Select between the 2 proposed modes and validate:
Sleep
Disconnect
The terminal changes power saving mode without reboot and returns to “Advanced options” subpanel.
Modem settings
Modem settings configuration can be modified thanks to icon named “Modem settings”. The
following list of parameters can be set or modified.
Output Level
Type of phone line
Modem speed limitation
Line seized
Country phone norm selection
The menu also offers to:
Summarize on a ticket the parameters of Modem configuration.
When ““Modem settings” icon has been selected, the following screen menu is displayed:
Select active menu line.
When parameters have been changed, exit action on this menu will warn the user according
parameters saving, the following screen is displayed:
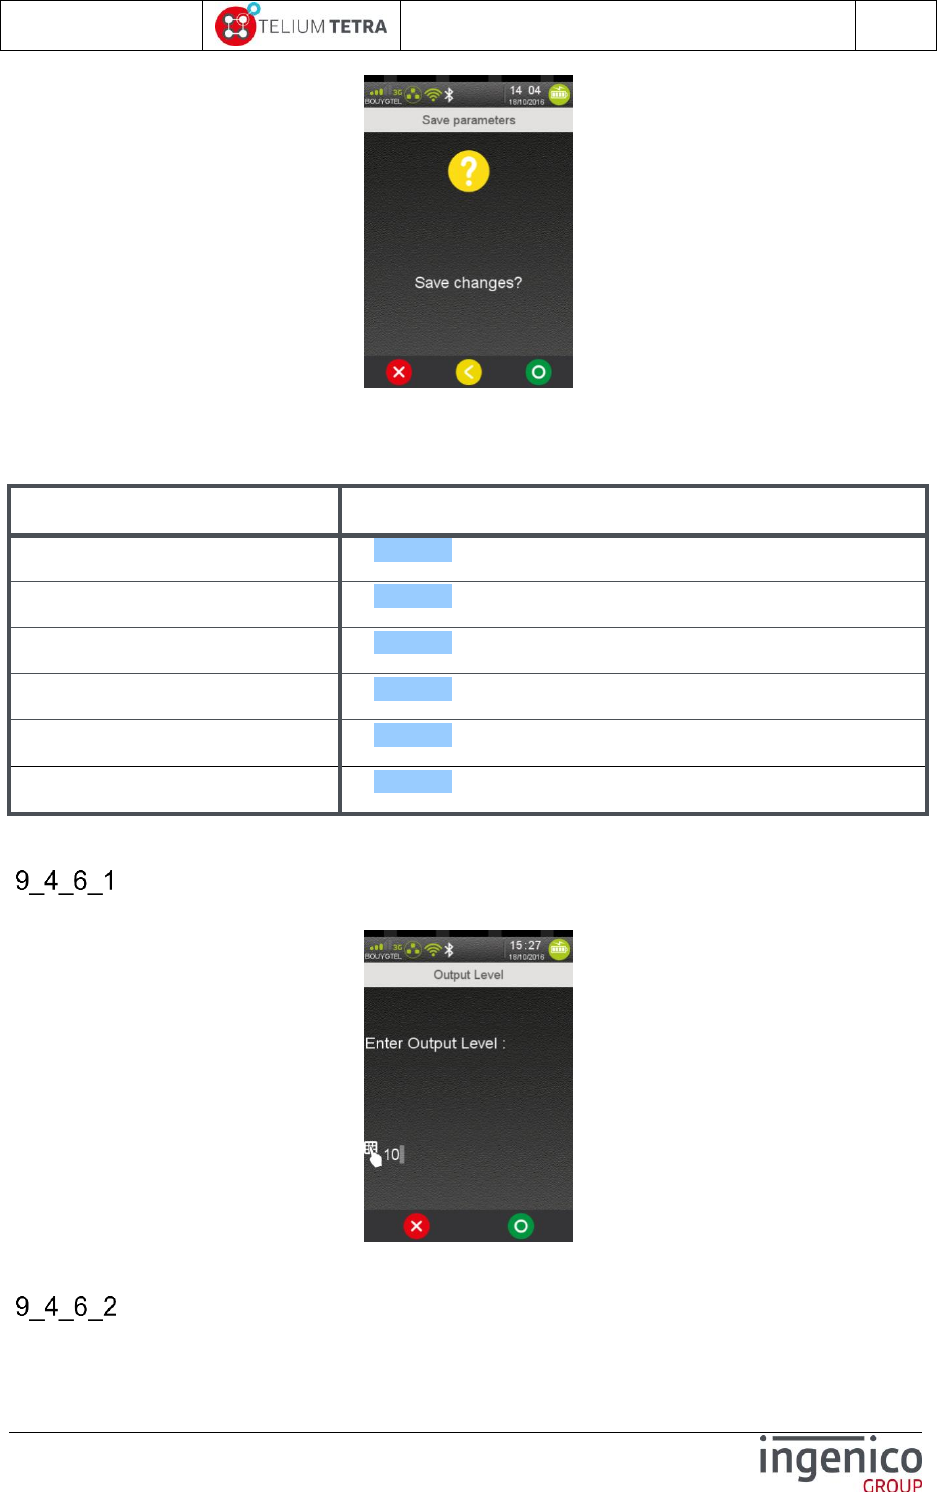
ICO-OPE-02757-V5
TETRA Terminal
User's guide
Public
150/199
Ingenico document - Reproduction or disclosure prohibited without written authorization
Please check document validity before using
After selecting parameters recording, the terminal will take in account parameters and reconfigure
modem.
The following table provides the different links to menus description.
Item
Reference
Output level
9_4_6_1
Line selection
9_4_6_2
Limited speed
9_4_6_3
Line seized
9_4_6_4
Country selection
9_4_6_5
Print parameters
9_4_6_6
Output level
Select “Output level” menu line to configure the modem output level.
Enter a value between 0 and 15 dbm, and validate.
Line selection
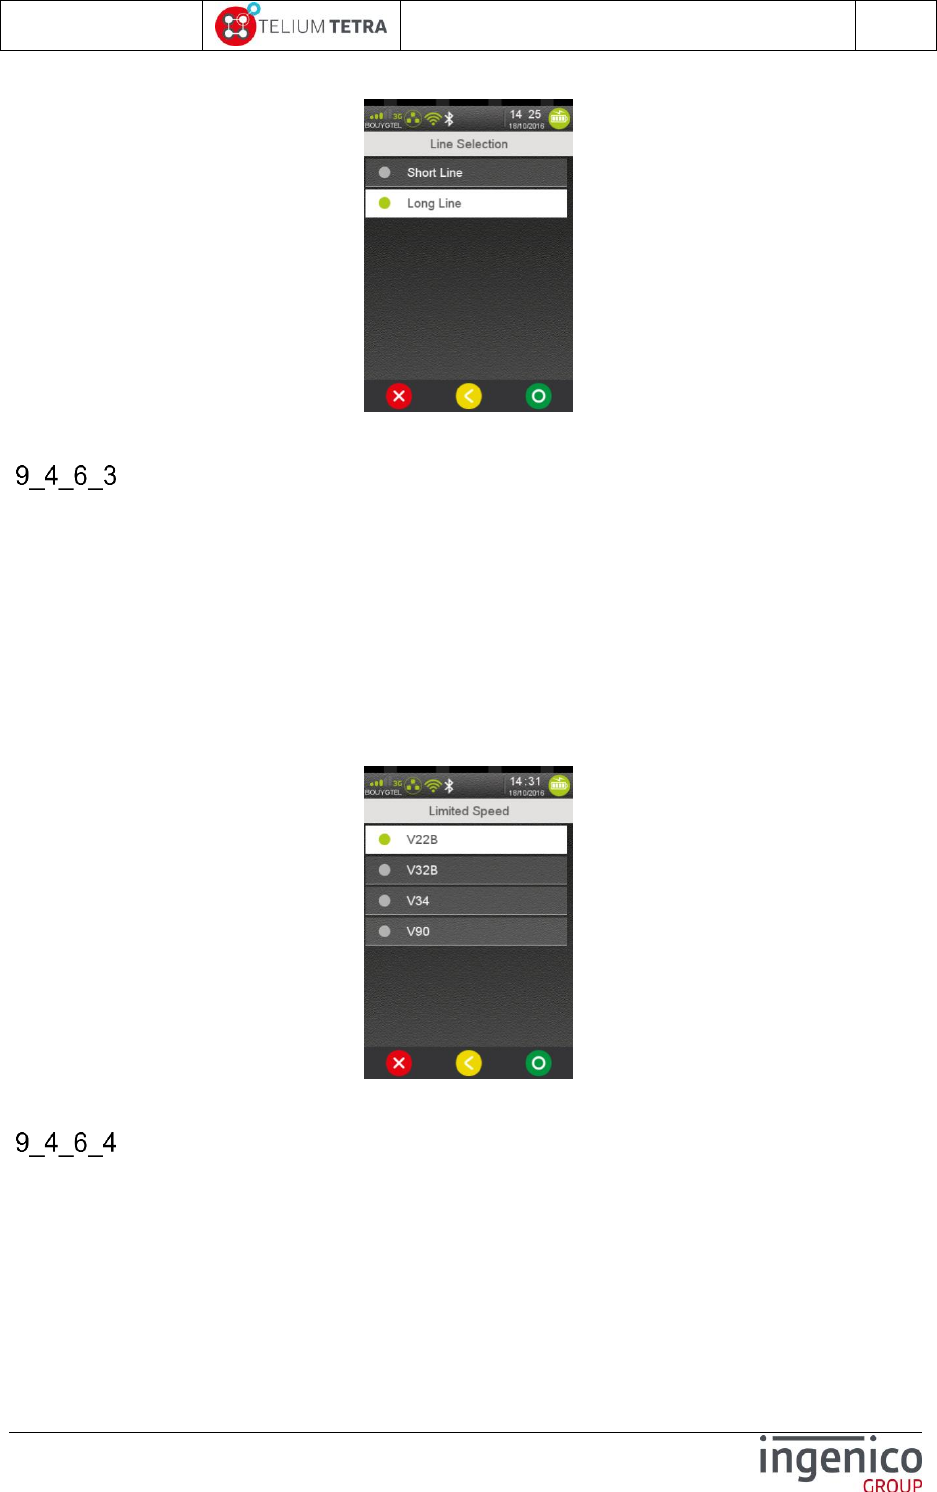
ICO-OPE-02757-V5
TETRA Terminal
User's guide
Public
151/199
Ingenico document - Reproduction or disclosure prohibited without written authorization
Please check document validity before using
Select “Line selection” menu line to select the type of the phone on which the terminal is plugged.
Choose between long or short line and then validate.
Limited speed
Modem present in terminal is able to manage different connection speeds. According to usage
perimeter, it may be required to limit the modem maximum connection speed to a slower speed than it
can perform.
Select “Limited speed” menu line to limit the bitrate of the modem. The terminal displays according to
modem capabilities the different available speeds. Common connection speeds on TETRA modem
are:
V22B : 2,4 kbit/s
V32B : 14,4 kbit/s
V34 : 33,6 kbit/s
V90 : 56 kbit/s / 33,6 kbit/s
Choose between one of the proposed bitrate and then validate.
Line seized
Before dialing it may be required verifying than the phone line is not seized.
Select “Line seized” menu line to activate or deactivate this control.
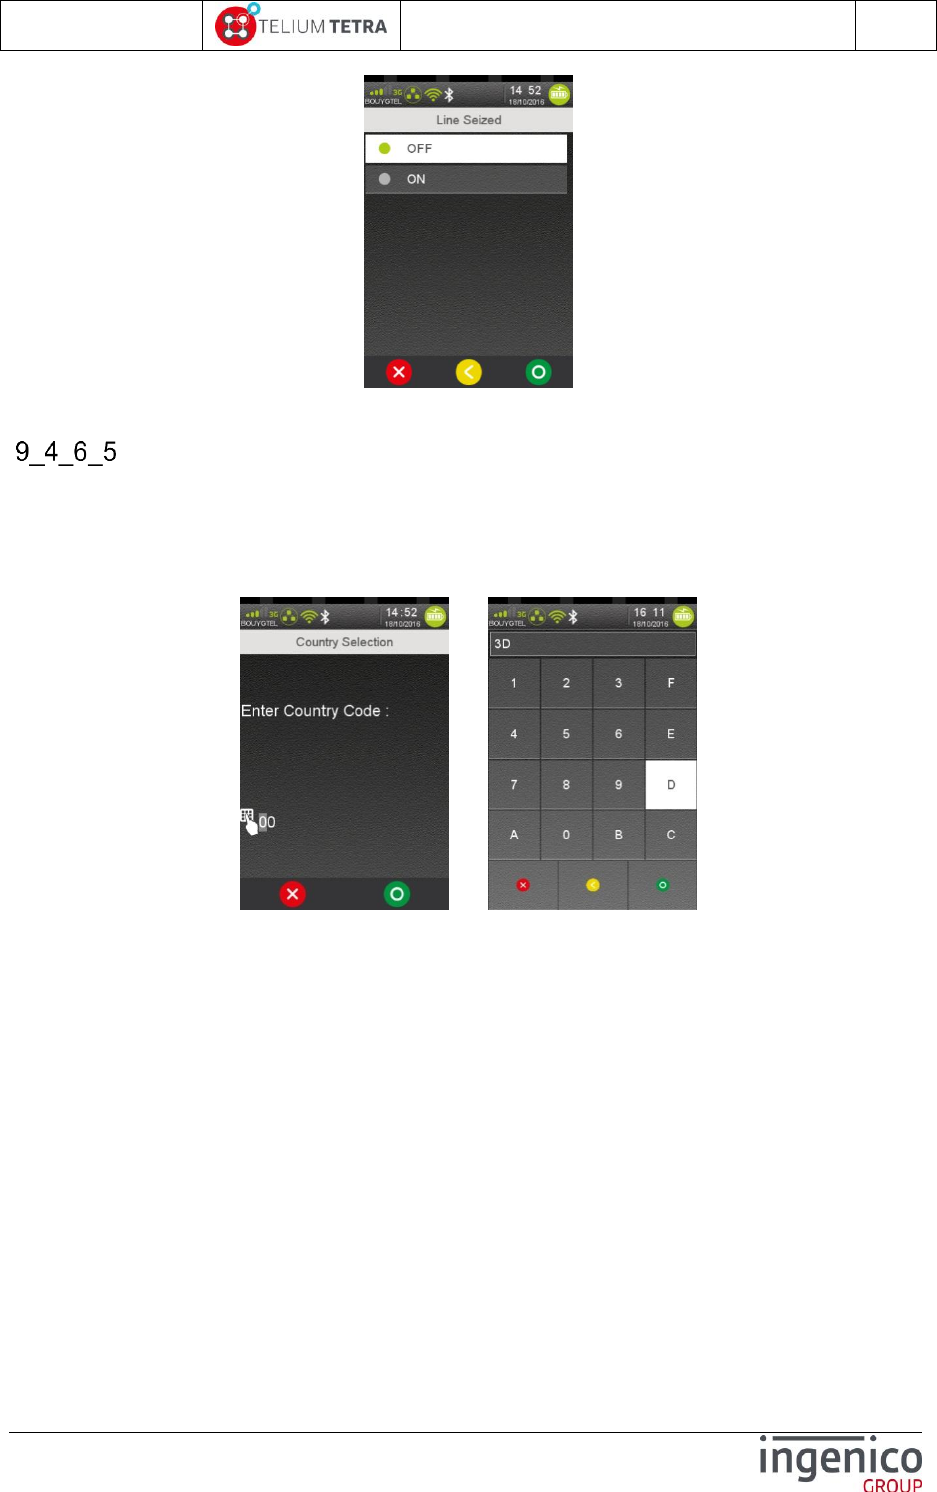
ICO-OPE-02757-V5
TETRA Terminal
User's guide
Public
152/199
Ingenico document - Reproduction or disclosure prohibited without written authorization
Please check document validity before using
Choose between one of the choices and then validate.
Country selection
According to country regulation where the modem is used, some of its specific parameters must be
adjusted. In selecting, the country parameter, the terminal will automatically configure the modem
behaviour.
Select “Country selection” menu line to configure local parameters of the modem.
=>
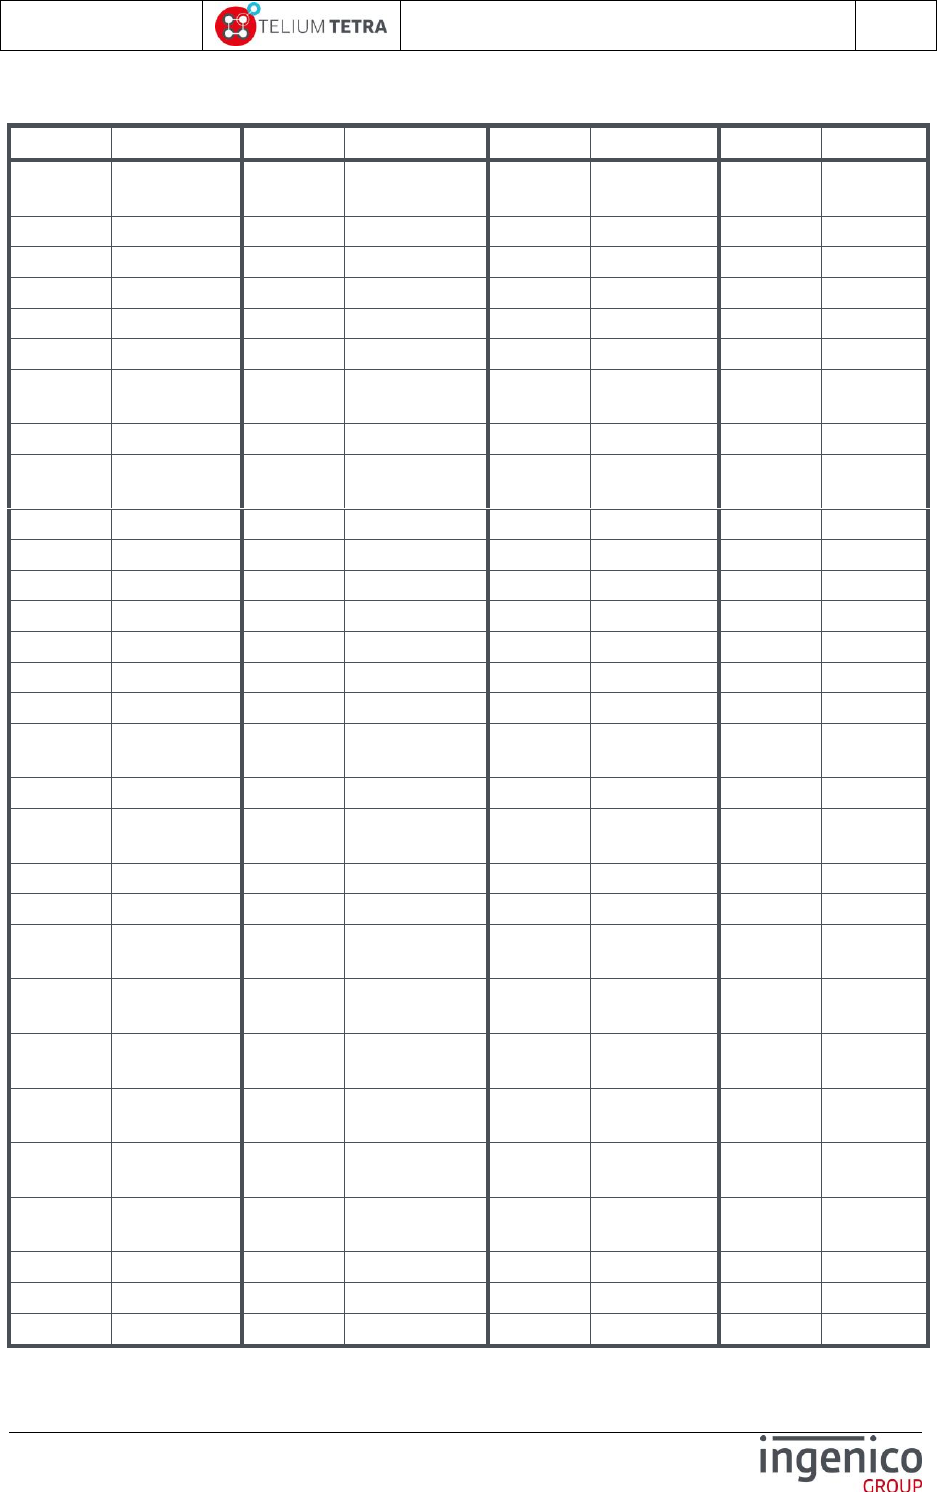
ICO-OPE-02757-V5
TETRA Terminal
User's guide
Public
153/199
Ingenico document - Reproduction or disclosure prohibited without written authorization
Please check document validity before using
Enter a (hexadecimal) value according to the joined table and virtual keyboard and then validate.
T.35 code
Country
T.35 code
Country
T.35 code
Country
T.35 code
Country
0
Japan
40
Gabon
80
Niger
C0
Yemen
(Republic of)
1
Albania
41
Gambia
81
Nigeria
C1
Yugoslavia
2
Algeria
42
Germany
82
Norway
C2
Zaire
3
American Samoa
43
Angola
83
Oman
C3
Zambia
4
Germany
44
Ghana
84
Pakistan
C4
Zimbabwe
5
Anguilla
45
Gibraltar
85
Panama
C5
Slovakia
6
Antigua and
Barbuda
46
Greece
86
Papua New
Guinea
C6
Slovenia
7
Argentina
47
Grenada
87
Paraguay
C7
(available)
8
Ascension (see
Saint Helena)
48
Guam
88
Peru
C8
(available)
9
Australia
49
Guatemala
89
Philippines
C9
(available)
0A
Austria
4A
Guernsey
8A
Poland
CA
(available)
0B
Bahamas
4B
Guinea
8B
Portugal
CB
(available)
0C
Bahrain
4C
Guinea-Bissau
8C
Puerto Rico
CC
(available)
0D
Bangladesh
4D
Guayana
8D
Qatar
CD
(available)
0E
Barbados
4E
Haiti
8E
Romania
CE
(available)
0F
Belgium
4F
Honduras
8F
Rwanda
CF
(available)
10
Belize
50
Hongkong
90
Saint Kitts and
Nevis
D0
(available)
11
Benin
51
Hungary
91
Saint Croix
D1
(available)
12
Bermudas
52
Iceland
92
Saint Helena and
Ascension
D2
(available)
13
Bhutan
53
India
93
Saint Lucia
D3
(available)
14
Bolivia
54
Indonesia
94
San Marino
D4
(available)
15
Botswana
55
Iran (Islamic
Republic of)
95
Saint Thomas
D5
(available)
16
Brazil
56
Iraq
96
Sao Tomé and
Principe
D6
(available)
17
British Antarctic
Territory
57
Ireland
97
Saint Vicent and
the Grenadines
D7
(available)
18
British Indian
Ocean Territory
58
Israel
98
Saudi Arabia
D8
(available)
19
British Virgin
Islands
59
Italy
99
Senegal
D9
(available)
1A
Brunei
Darussalam
5A
Côte d'Ivoire
9A
Seychelles
DA
(available)
1B
Bulgaria
5B
Jamaica
9B
Sierra Leone
DB
(available)
1C
Myanmar
5C
Afghanistan
9C
Singapore
DC
(available)
1D
Burundi
5D
Jersey
9D
Solomon Islands
DD
(available)

ICO-OPE-02757-V5
TETRA Terminal
User's guide
Public
154/199
Ingenico document - Reproduction or disclosure prohibited without written authorization
Please check document validity before using
1E
Belarus
5E
Jordan
9E
Somalia
DE
(available)
1F
Cameroon
5F
Kenya
9F
South Africa
DF
(available)
20
Canada
60
Kiribati
A0
Spain
E0
(available)
21
Cape Verde
61
Korea (Republic of)
A1
Sri Lanka
E1
(available)
22
Cayman Islands
62
Kuwait
A2
Sudan
E2
(available)
23
Central African
Republic
63
Lao (People's
Democratic
Republic)
A3
Suriname
E3
(available)
24
Chad
64
Lebanon
A4
Swaziland
E4
(available)
25
Chile
65
Lesotho
A5
Sweden
E5
(available)
26
China
66
Liberia
A6
Switzerland
E6
(available)
27
Colombia
67
Libya
A7
Syria
E7
(available)
28
Comoros
68
Liechtenstein
A8
Tanzania
E8
(available)
29
Congo
69
Luxembourg
A9
Thailand
E9
(available)
2A
Cook Islands
6A
Macao
AA
Togo
EA
(available)
2B
Costa Rica
6B
Madagascar
AB
Tonga
EB
(available)
2C
Cuba
6C
Malaysia
AC
Trinidad and
Tobago
EC
(available)
2D
Cyprus
6D
Malawi
AD
Tunisia
ED
(available)
2E
Czech Republic
6E
Maldives
AE
Turkey
EE
(available)
2F
Cambodia
6F
Mali
AF
Turks and Caicos
Islands
EF
(available)
30
Democratic
People's Republic
of Korea
70
Malta
B0
Tuvalu
F0
(available)
31
Denmark
71
Mauritania
B1
Uganda
F1
(available)
32
Djibouti
72
Mauritius
B2
Ukraine
F2
(available)
33
Dominican
Republic
73
Mexico
B3
United Arab
Emirates
F3
(available)
34
Dominica
74
Monaco
B4
United Kingdom
F4
(available)
35
Ecuador
75
Mongolia
B5
United States
F5
(available)
36
Egypt
76
Montserrat
B6
Burkina Faso
F6
(available)
37
El Salvador
77
Morocco
B7
Uruguay
F7
Lithuania
38
Equatorial Guinea
78
Mozambique
B8
Russia
F8
Latvia
39
Ethiopia
79
Nauru
B9
Vanuatu
F9
Estonia
3A
Falkland Islands
7A
Nepal
BA
Vatican City State
FA
US Virgin
Islands
3B
Fiji
7B
Netherlands
BB
Venezuela
FB
(available)
3C
Finland
7C
Netherlands Antilles
BC
Vietnam
FC
(available)
3D
France
7D
New Caledonia
BD
Wallis and Futuna
FD
(Universal)
3E
French Polynesia
7E
New Zealand
BE
Western Samoa
FE
Taiwan
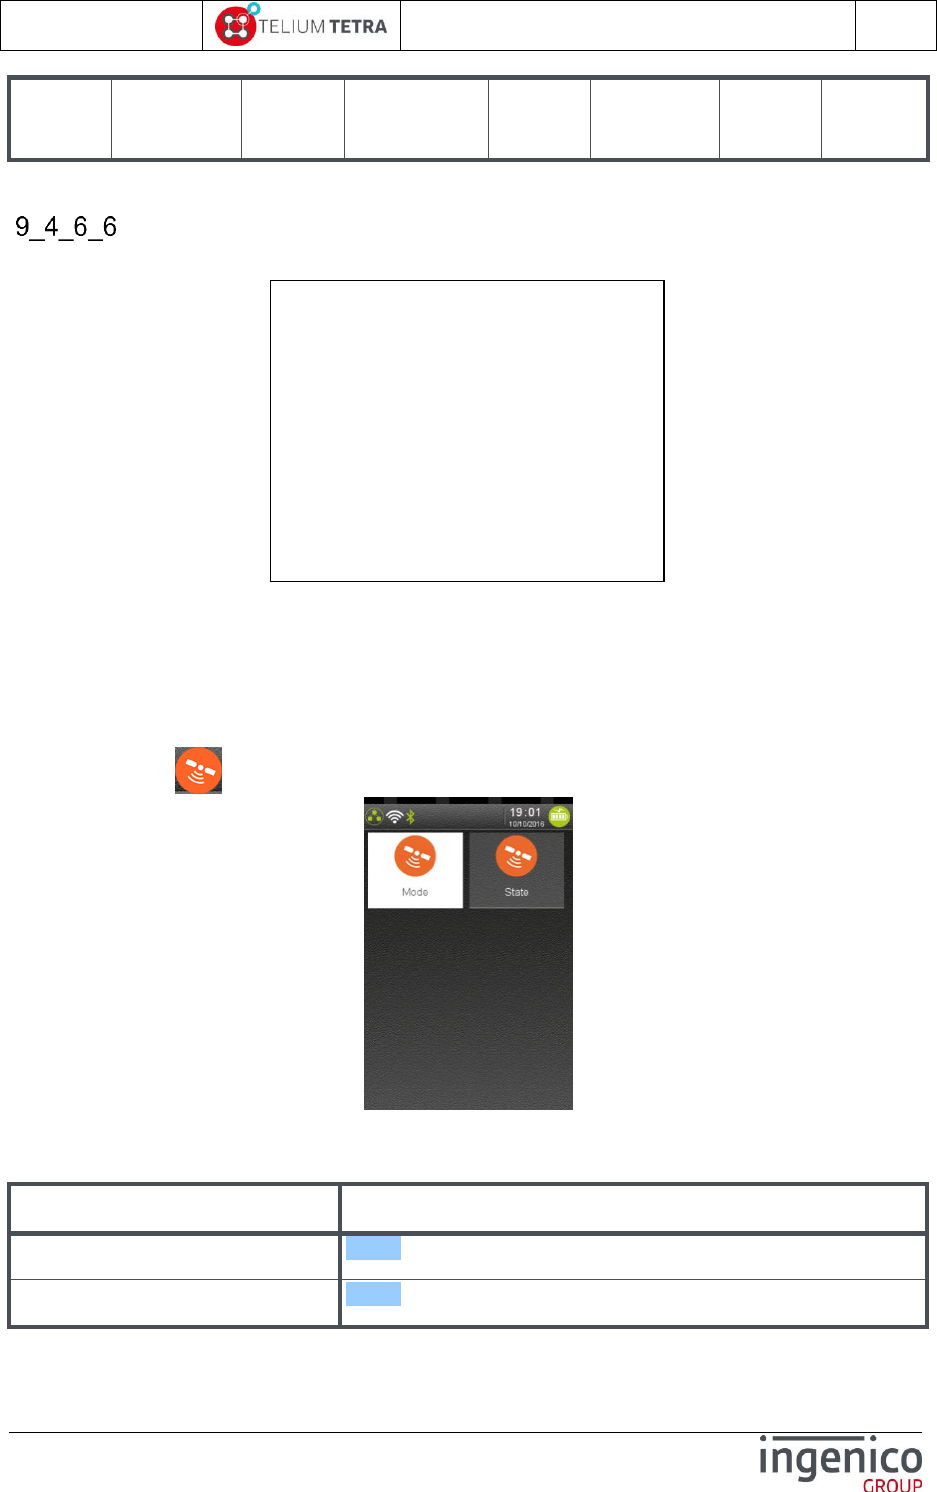
ICO-OPE-02757-V5
TETRA Terminal
User's guide
Public
155/199
Ingenico document - Reproduction or disclosure prohibited without written authorization
Please check document validity before using
3F
(available)
7F
Nicaragua
BF
Yemen (Republic
of)
FF
escape code
to extension
List
Table 10 – ITU T.35 code for modem settings
Print parameters
The following ticket is printed when selecting and validating “Print Parameters” menu line
9_5 GPS
Mobile terminal can be equipped with GPS hardware feature. A dedicated subpanel “GPS” allows
configuring and looking about its running state.
When “GPS” icon is selected on “Terminal Settings”, the following subpanel appears on screen:
Select an icon on the screen.
The following table provides the different links to subpanels description.
Item
Reference
Mode
9_5_1
State
9_5_2
Modem settings
Output level
15
Line Selection
Short Line
Limited Speed
V22B
Country Selection
3D
ICO-OPE-02757-V5
TETRA Terminal
User's guide
Public
156/199
Ingenico document - Reproduction or disclosure prohibited without written authorization
Please check document validity before using
Mode
By default the GPS feature is not activated. The selection “Mode” icon in “GPS” subpanel allows
enabling or disabling the “GPS”:
Select one of proposed choice and then validate.
State
The selection “State” icon in “GPS” subpanel allows knowing the current state and position of the
terminal. The different screenshots illustrate the position searching and the obtained position:
.../… =>
ICO-OPE-02757-V5
TETRA Terminal
User's guide
Public
157/199
Ingenico document - Reproduction or disclosure prohibited without written authorization
Please check document validity before using
10 Terminal information
The “Terminal information” subpanel centralizes all reporting of information related to the terminal
identification, its characteristics and its contents. The reporting is organized around 5 themes of
information:
Legal = provides the different licenses of software components.
Applications versions = reports user application software identification
SDK = reports elementary software identification
Firmware PCI PTS = reports information related to PCIPTS certification
Hardware = terminal hardware characteristics
When “Terminal information” icon is selected on “Control panel”, the following subpanel appears
on screen:
Select an icon on the screen.
The following table provides the different links to subpanels description.
Item
Reference
Legal information
10_1
Applications versions
10_2
SDK information
10_3
Firmware PCIPTS
10_4
Hardware information
10_5
Shortcuts
10_6
10_1 Legal information
The software of the terminal consists of different packages/components, each with its own license. A
specific menu is dedicated to consult this information on the screen of the terminal: the generic
ICO-OPE-02757-V5
TETRA Terminal
User's guide
Public
158/199
Ingenico document - Reproduction or disclosure prohibited without written authorization
Please check document validity before using
software and each application of the terminal are able to feed this menu by their own licences. This
menu is intended to respond to legal requirements in particular related to Open Sources licences
usage.
To access to this menu, select the icon (named “Legal information”) in “Terminal information”
panel. The following screenshots illustrate the basic use case of terminal loaded with its generic
software and some INGENICO Group applications.
:
After having select the package/component, the legal information is displayed, the user can read it
with scrolling action. The displayed legal information screens of TETRA PLATFORM software are here
after:
../.. ../..
../.. ../..
ICO-OPE-02757-V5
TETRA Terminal
User's guide
Public
159/199
Ingenico document - Reproduction or disclosure prohibited without written authorization
Please check document validity before using
../.. ../..
10_2 Applications versions
From the “Applications Reports” screen, select the icon (named “Applications versions”): when
implemented in applications, it prints the different information related to applications executables as:
Application name and associated INGENICO identification (=application type value)
Dependant DLLS and parameters files and resources.
Version number, CRC (or hashes) which were declared as references for certification
Legal licences information implied by Open sources usage (= compatible licences with the
application developer contract).
Application status.
…
These reports does not content information related to software management: installation packages
and their version: these information are available in View configuration section.
10_3 SDK information
When selecting “SDK information” menu, a synthetic summary on software and hardware status is
done on display or on printer.
Displayed information are:
SDK Version: Version of SDK used by the terminal (Release/version/patch), with its CRC
value in parenthesis.
SDK Build: Delivery build number of the SDK Version.
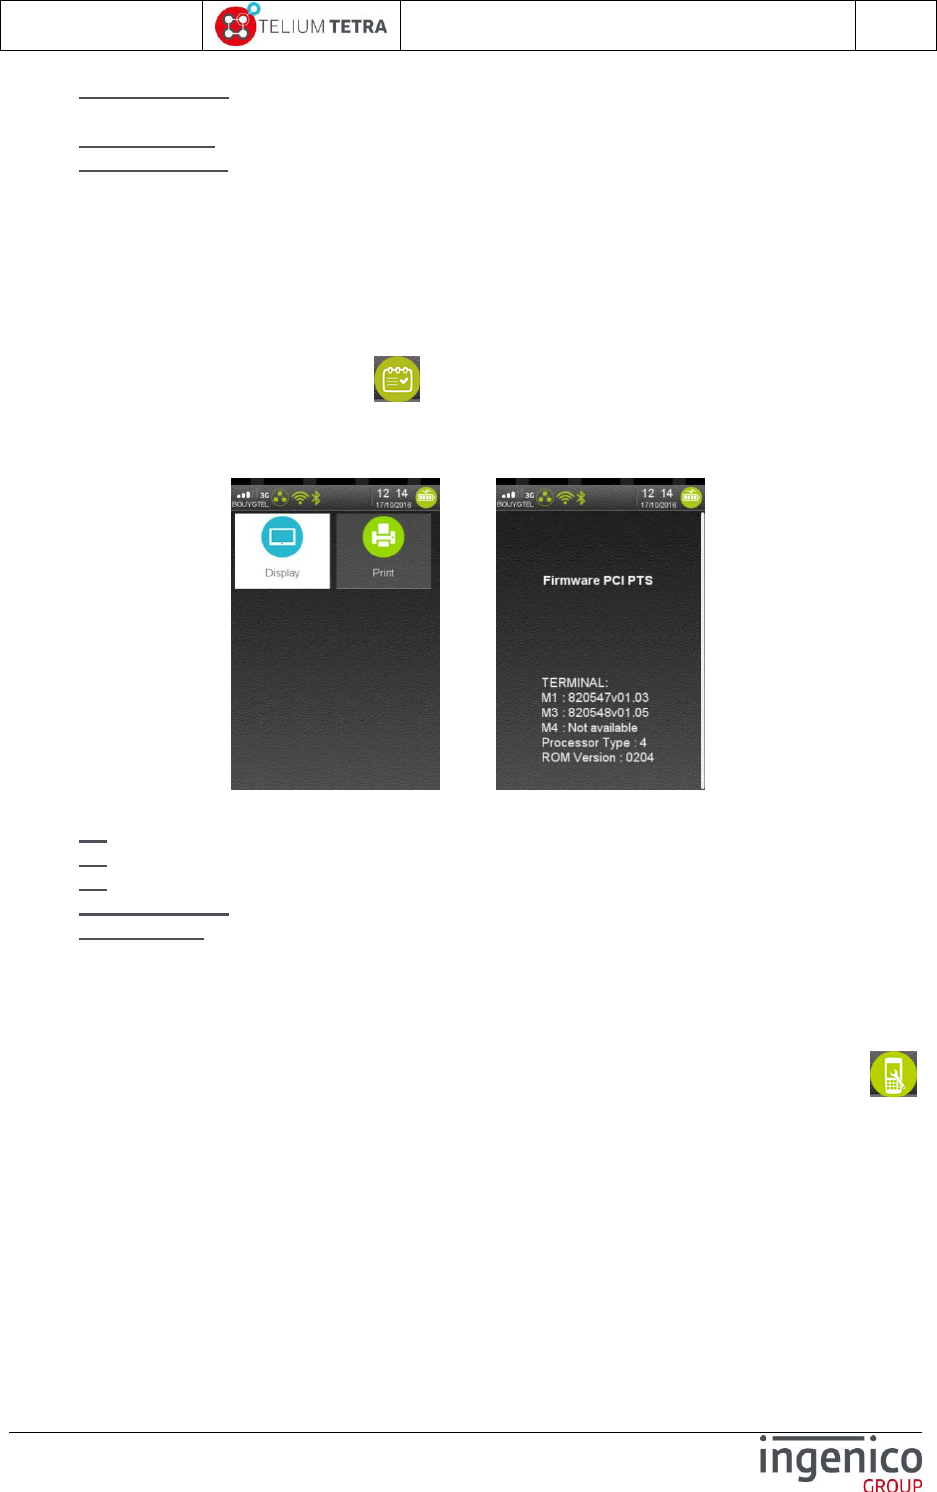
ICO-OPE-02757-V5
TETRA Terminal
User's guide
Public
160/199
Ingenico document - Reproduction or disclosure prohibited without written authorization
Please check document validity before using
System Version: Current version of System used by the terminal (Release/version/patch), with
its CRC value in parenthesis.
Terminal Type: Terminal range identifier.
Catalogue Type: Service TRANSACTION loaded
“T+” = legacy implementation
“T3” = new implementation supporting legacy T+ features and improvements dedicated to
Telium3 framework based application features.
10_4 Firmware PCI PTS
When selecting “Firmware PCI PTS” icon in “Terminal information” subpanel, a synthetic
summary of the firmware information required for PCI standard approval is done on display or on
printer.
=>
Displayed information are:
M1: Firmware PCI version.
M3: Open Protocol version.
M4: SRED version.
Processor Type: TELIUM hardware secured unit version. ‘4’ = TELIUM TETRA processor
ROM Version: Current version of TELIUM TETRA processor ROM.
10_5 Hardware information
The terminal hardware characteristics can be obtained thanks to “Hardware information” icon :
the following subpanel appears on screen:
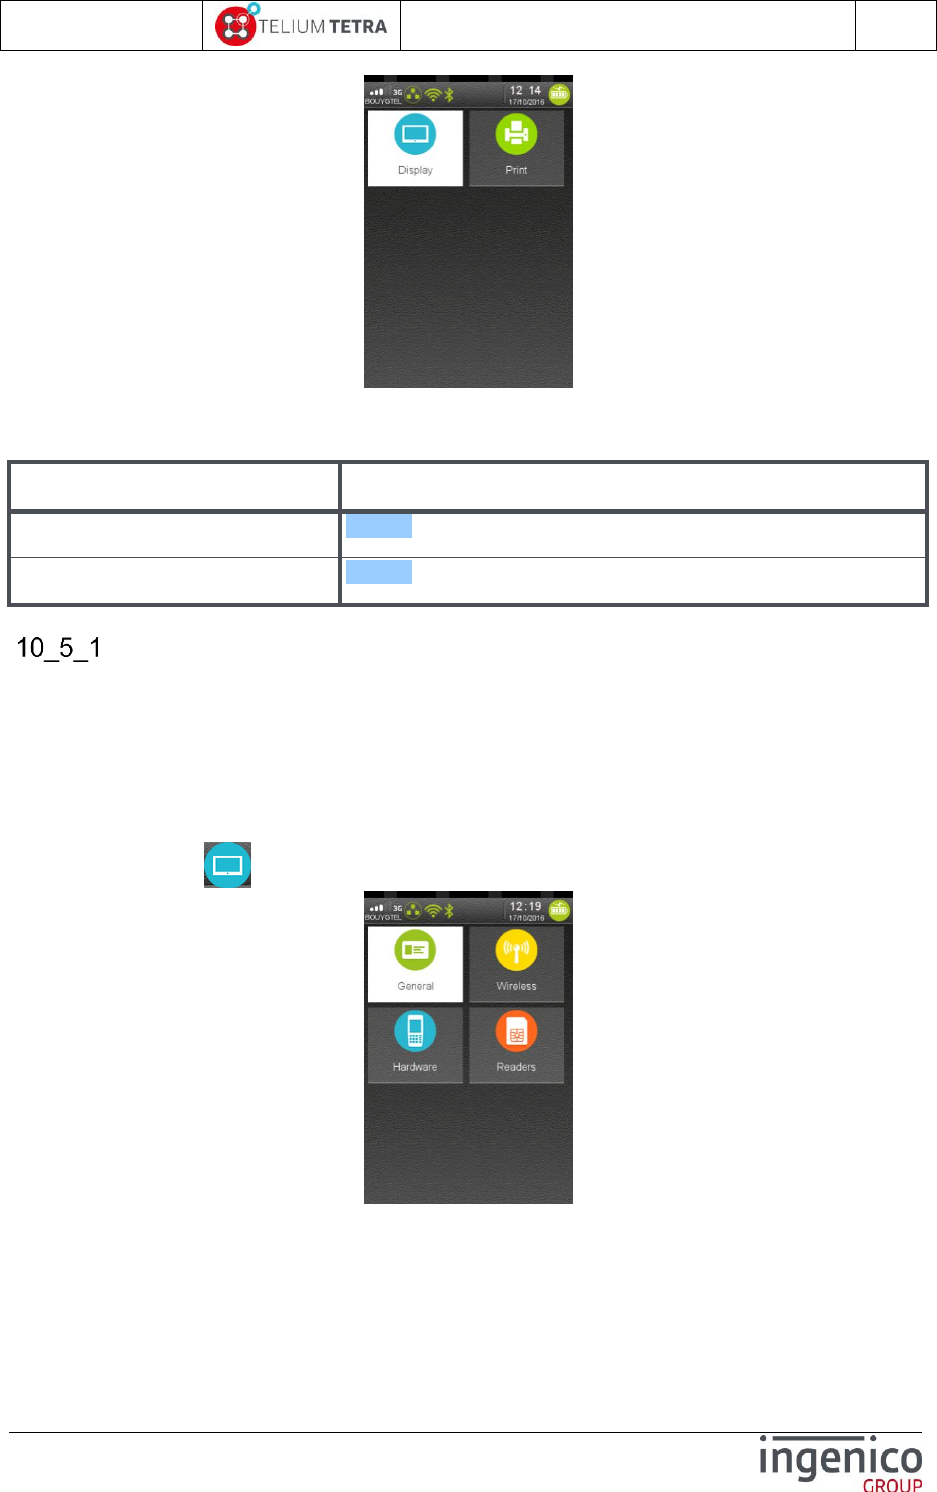
ICO-OPE-02757-V5
TETRA Terminal
User's guide
Public
161/199
Ingenico document - Reproduction or disclosure prohibited without written authorization
Please check document validity before using
Select an icon on the screen.
The following table provides the different links to menus description.
Item
Reference
Display
10_5_1
Print
10_5_2
Display
The terminal hardware characteristics have been organized in 4 screens according to specific themes:
General = product identification (Product name, serial number …)
Hardware = list availability of each possible hardware sub-module (except wireless and card
readers)
Wireless = list availability of each possible wireless sub-module
Readers = list availability of each possible card reader sub-module
When “Display” icon is selected, the following subpanel appears on screen:
Select an icon on the screen.
When a PINpad is connected to the terminal, it is possible to access to its information.
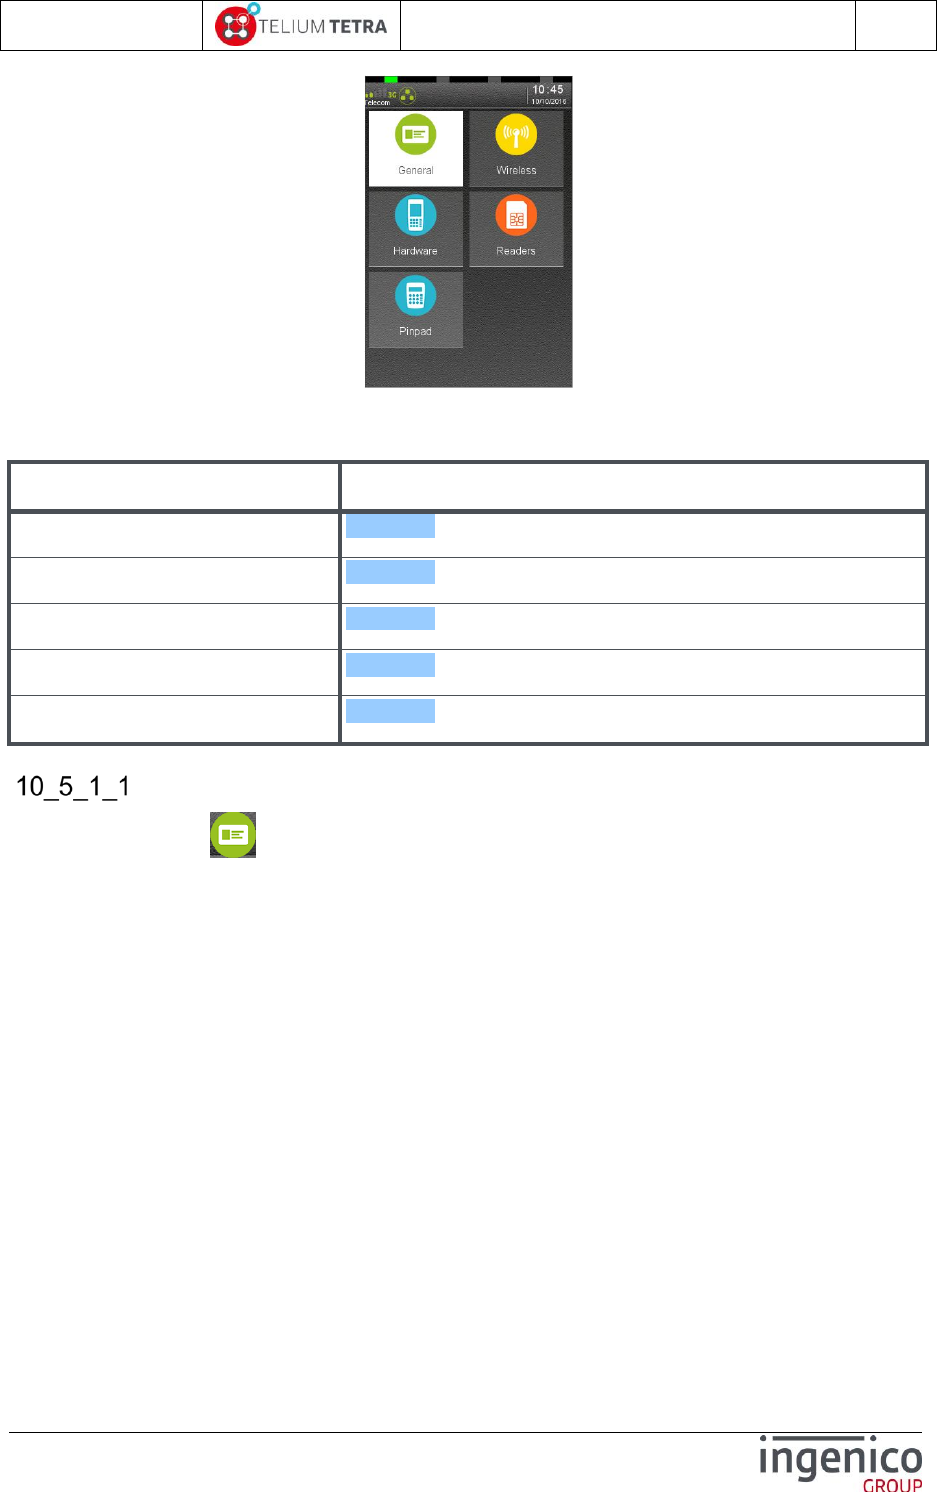
ICO-OPE-02757-V5
TETRA Terminal
User's guide
Public
162/199
Ingenico document - Reproduction or disclosure prohibited without written authorization
Please check document validity before using
Select “Pinpad” icon to access pinpad information.
The following table provides the different links to menus description.
Item
Reference
General
10_5_1_1
Hardware
10_5_1_2
Wireless
10_5_1_3
Readers
10_5_1_4
PINpad
10_5_1_5
General
When “General” icon is selected, the terminal displays its general information:
Product name
Product reference
Manufacturer name
Serial number
Manufacturing date
PCI and PCI PTS version
Memory flash & RAM used and total size
Screen resolution in pixels
The following picture illustrates the obtained result.

ICO-OPE-02757-V5
TETRA Terminal
User's guide
Public
163/199
Ingenico document - Reproduction or disclosure prohibited without written authorization
Please check document validity before using
../..
Any action on keyboard allows returning to previous menu.
Hardware
When “Hardware” icon is selected, the terminal displays the list of each possible hardware sub-
module (except wireless and card readers) and a status on their presence:
Modem
Printer
Buzzer
Serial link = Com0 , Com1 and Com2
USB = host and slave
Ethernet
SD card
Audio = Presence and audio jack
Touch screen
Mobile = or not
Tilt sensor
Light sensor
Video capacity
Barcode capacity
Camera presence
Hardware or software leds
The following screenshots illustrate the obtained result.
../.. ../..
Any action on keyboard allows returning to previous menu.
ICO-OPE-02757-V5
TETRA Terminal
User's guide
Public
164/199
Ingenico document - Reproduction or disclosure prohibited without written authorization
Please check document validity before using
Wireless
When “Wireless” icon is selected, the terminal displays the list of each possible wireless sub-
module and a status on their presence:
GPRS
BLUETOOTH
WIFI
CDMA
Dual SIM
3G
GPS
The following picture illustrates the obtained result.
Any action on keyboard allows returning to previous menu.
Card readers
When “Cards readers” icon is selected, the terminal displays the list of each possible card
readers sub-modules and a status on their presence:
Magnetic tracks reader (Iso1 track, Iso2 track and Iso3 track )
Contact card reader (CAM1)
Small contact card reader (SAM1, SAM2, SAM3 and SAM4)
Contact Less card reader
The following snapshots illustrate the obtained result.
ICO-OPE-02757-V5
TETRA Terminal
User's guide
Public
165/199
Ingenico document - Reproduction or disclosure prohibited without written authorization
Please check document validity before using
Any action on keyboard allows returning to previous menu.
PINpad
When “PINPAD” icon is selected, the terminal displays all the information of the pinpad in a
unique list: scroll to access to all details.
The major parameters are:
Serial Number
Product name and reference
INGETRUST Security version
PCI version
PCI PTS firmware version
Screen characteristics (width, height,color type)
Readers information ( Chip reader, SAM , Cless)
Print
When “Print” icon is selected, the terminal prints a ticket summarizing terminal hardware
settings.
The following ticket illustrates MOVE5000 hardware settings.
ICO-OPE-02757-V5
TETRA Terminal
User's guide
Public
166/199
Ingenico document - Reproduction or disclosure prohibited without written authorization
Please check document validity before using
…/…
Note: When a pinpad is connected to a terminal, a specific section is added to the ticket concerning
pinpad information. Follows an example for an IPP315 connected to a DESK5000.
Terminal Configuration
17/10/2016 17:53
-----Terminal -----
Serial Number 160267313191011301014143
Product Name MOVE5000
Product reference 000031910113
Product Code M71
Constructor Code INGENICO
Manufacturing Date 26012016
IFM HW 0101
IFM SW 0101
INGETRUST Security PKI v3
PCI version PCI v4
PCI PTS firmware 820547v01.03
Flash memory 282/512 Mbytes
RAM Memory 382/512 Mbytes
Screen width 320
Screen height 480
Screen Color 8
-----Wireless options -----
GPRS YES
BLUETOOTH YES
WIFI YES
CDMA NO
3G YES
Dual SIM YES
GPS YES
-----Hardware options -----
MODEM YES
PRINTER YES
BUZZER YES
COM0 YES
COM1 YES
COM2 NO
USB HOST YES
USB SLAVE YES
ETHERNET NO
SD CARD YES
AUDIO YES
AUDIO JACK YES
TOUCH SCREEN YES
RESISTIVE YES
PORTABLE YES
SENNSOR ACCEL YES
SENSOR LIGHT NO
VIDEO YES
BARCODE YES
CAMERA NO
HW LED NO
-----Readers -----
ISO1 YES
ISO2 YES
ISO3 YES
CAM1 YES
SAM1 YES
SAM2 YES
SAM3 NO
SAM4 YES
CLESS YES
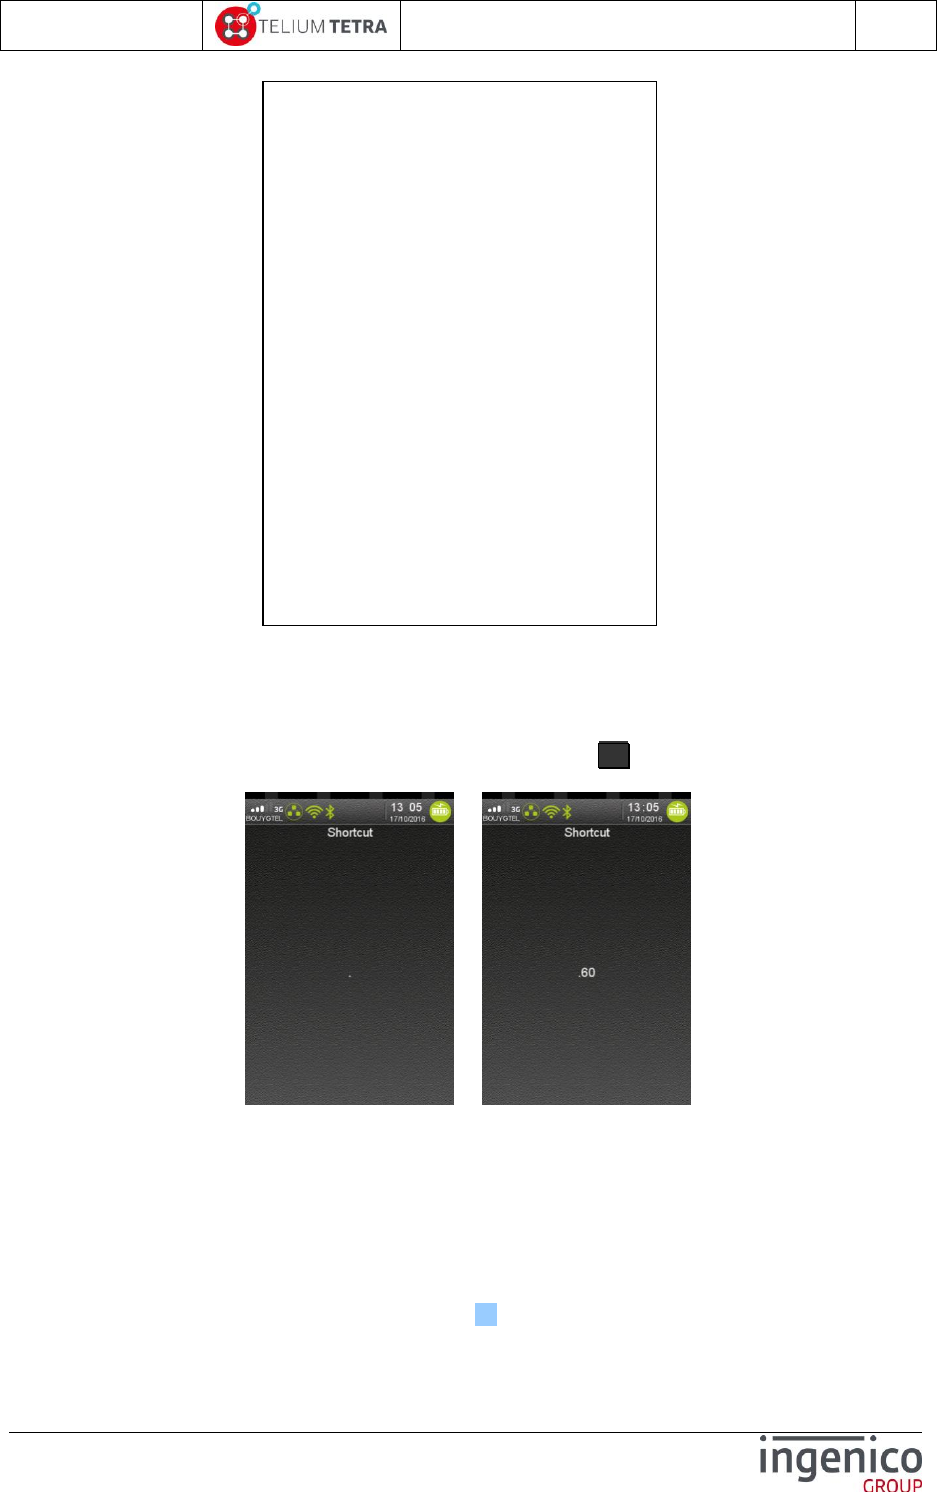
ICO-OPE-02757-V5
TETRA Terminal
User's guide
Public
167/199
Ingenico document - Reproduction or disclosure prohibited without written authorization
Please check document validity before using
10_6 Shortcuts
“Shortcuts” is a feature allowing quick access to widely used parameters setting and/or full feature
menus. When the terminal displays the “Explorer” panel, dot key “ . ” must be pressed to activate the
mechanism.
=>
Enter a numerical value and validate.
If the mechanism is not activated nothing happen when dot key is pressed.
If no shortcuts definition corresponds to first entered numerical value, nothing happens.
When a valid value corresponding to a shortcut definition is entered, the next displayed screen
is in the selected menu or dedicated parameter setting screen.
To be active, the loaded configuration in the terminal must content a shortcuts table definition.
Thanks to “Advanced customisation” (refer chapter 11), it is possible to customize the shortcuts list or
to remove the usage of this mechanism.
PINpad Configuration
Serial Number 16035PP82060158
Product Name IPP315
Product reference IPP315-31T3409A
INGETRUST Security PKI v3
PCI version PCI v4
Firmware PCI PTS 82018v01.02
Screen width 320
Screen height 240
Screen Color 4
BUZZER YES
-----Readers -----
ISO1 YES
ISO2 YES
ISO3 YES
CAM1 YES
SAM1 NO
SAM2 NO
SAM3 NO
SAM4 NO
CLESS YES
ICO-OPE-02757-V5
TETRA Terminal
User's guide
Public
168/199
Ingenico document - Reproduction or disclosure prohibited without written authorization
Please check document validity before using
A menu is provided to display or print the shortcuts table definition loaded. To access this menu select
the icon (named “Shortcuts”) in “Terminal information” subpanel. The following screen is
displayed.
When the “Display” is selected, the following screenshots illustrates an example of a basic shortcuts
table definition.
../..
When “Print” is selected, the same information is reported on a ticket.

ICO-OPE-02757-V5
TETRA Terminal
User's guide
Public
169/199
Ingenico document - Reproduction or disclosure prohibited without written authorization
Please check document validity before using
11 Advanced configuration
Advanced configuration concerns terminal configuration part that cannot be directly managed by the
final user thanks the provided menus of the terminal. The two main subjects regarding this point
concern:
Customization of different default values of the parameters that can be set by user or
eventually not proposed to final user for modification
Customization of internationalization parameters as language
The advanced configuration can be considered as development:
INGEDEV development tools chain needs to be acquired and used
Produced files to be installed in a terminal must be signed
Sign Kit + signature card must be obtained
A contractual commitment with INGENICO have to been signed
11_1 Software TETRA identification rule summary
To understand the customization principle, the main keys of TETRA software identification rules must
be described.
According to TETRA constraints, all executable files or parameters are injected in terminal through a
software container called “Package”. According to its content, indicated by the extension of its
filename, it may content one or more files. The “Package” is the elementary part that can be managed
by “The Estate Manager” (TMS solution).
To guaranty the uniqueness of the package files, a naming convention has been established. The
package name has the following structure “CCCDDTTTTTVVRRPP_suffix.P3x” where
“CCC”= Package country code based on ISO3166-1 numeric norm with the range “990” to
“999”restricted to INGENICO Co uses. It guaranties, by default, uniqueness of TETRA software
wherever and by whom it is produced.
“DD”= Package range, from “00” to “63”, used to discriminate current Package number. It is
used to create derivate software: identical “CCC” and “TTTTT” with different “DD” between on 2
packages allows during TMS operation to replace one by the other.
“TTTTT”= Package number from “00000” to “65536”,
“00000” to “32768” = allocation in this range is managed locally to maintain uniqueness of
TETRA software packages.
“47900” to “47999” = “transversal” reserved range used to customization package from
INGENICO corp by overlay or addition for specific features.
Other ranges = reserved for future usage
“VVRRPP”= Major Version, Minor release & Maintenance Patch number
“_suffix”: friendly part of the name up to 15 chars
“X” : package type ’A’,’L’,’P’,’C’ …
Ex: “9992047901020200_PltfParam.P3P” one of the delivered software packages (part of SDK
TETRA components)
“999” = INGENICO Co
“20” = one of range internally reserved for PLATFORM packages
“47901” = specific package number identifying “TETRA parameter configuration”
“020200” = version 2.2.0
“_ PltfParam” = acronym for “Platform Parameters”

ICO-OPE-02757-V5
TETRA Terminal
User's guide
Public
170/199
Ingenico document - Reproduction or disclosure prohibited without written authorization
Please check document validity before using
“P” = package contenting parameters information
Refer to Figure 19 - TETRA software packages identification description, to make link with printed
or displayed information in TETRA “Software view”
All packages identified by a number in the “Transversal” (“47900” to “47999”) will content components
of same nature whatever “CCC” and “DD” value:
“999” package provided by the INGENICO co is present as reference or default,
Currently 2 package numbers have to be considered:
“47900” = PLATFORM dictionary, contenting the default languages of terminal
“47901” = PLATFORM parameters, contenting the default values of the parameters of the
terminal.
11_2 TETRA parameters customization
Behind each menu or alterable element to modify in menus corresponds to a “backup” parameter
(stored in files system). Two ways of parameters customisation exist:
One, customizing/replacing the default startup initial values. This customization overloads initial
configuration provided by INGENICO Group thanks to SDK components. It is valid for all
parameters as the injected files are signed. (Named CUSTOM CONFIG)
One, setting parameters case by case and eventually targeting differently each customer. This
customization is not signed and can be also set remotely but as data (loaded in legacy “HOST”
directory of the terminal files system). (Named LIVE CONFIG)
Parameters present in menus can be set.
Non sensible (=related to security) parameters non present in menus can be set,
Others are ignored by the terminal.
Here after a drawing illustrating how and the priority of taking in account these different types of
configuration.
Figure 23 – CUSTOM and LIVE CONFIG taking in account logic
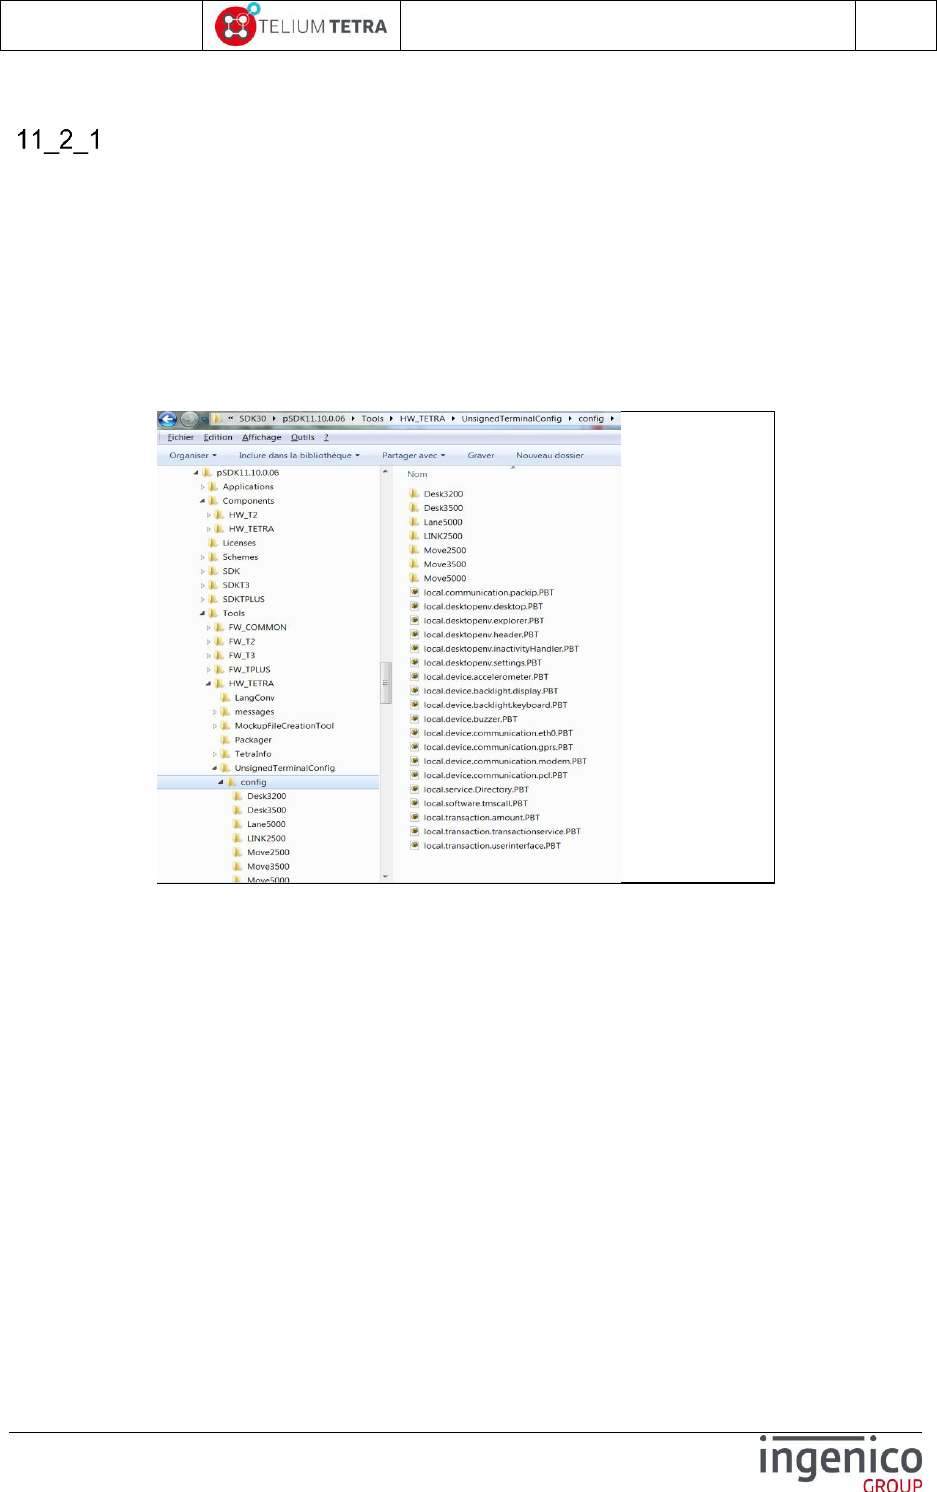
ICO-OPE-02757-V5
TETRA Terminal
User's guide
Public
171/199
Ingenico document - Reproduction or disclosure prohibited without written authorization
Please check document validity before using
TETRA default parameters provided
To allow pre-initialization of the terminal with a targeted configuration, specific signed parameters files
are provided to set these default values. Whatever the configuration to build, the content of these
initial files are the bases of the construction.
Theses initial signed package file is provided in the SDK installation directory:
“\Components\HW_TETRA\Platform\package”.
Its name is:
“9992047901040402_PltfParam.P3P”.
Its internal unpacked content is also provided in the SDK installation directory:
“\Tools\HW_TETRA\UnsignedTerminalConfig”
Figure 24 – Initial terminal parameters
At illustrated in the previous figure, the unpacked default parameters is constituted of:
A set of parameter files (“.PBT” extension ) corresponding to common configuration
whatever the supported TETRA terminals
One file per provided feature
Filename is related to the service class name managing the feature.
Each file is provided with comments (thanks to # character) illustrating all capabilities and
active line corresponding to the default setting as illustrates in the following figure.

ICO-OPE-02757-V5
TETRA Terminal
User's guide
Public
172/199
Ingenico document - Reproduction or disclosure prohibited without written authorization
Please check document validity before using
Figure 25 – “local.desktopenv.explorer.PBT” parameters file of Explorer
For complex parameters, on which basic comments may not be sufficient to understand
their usage, a description is provided in the SKD CHM file.
A set of directories corresponding to specific configuration for each supported TETRA terminal
One directory per provided terminal type
Contenting also parameter files (“.PBT” extension ), with the same name that at root
directory of the unpacked configuration
Each duplicated and modified parameter files overlays the values of the common
parameters. See the following figure illustrating the difference on common parameters
managing power and standby (named “inactivity”) between MOVE5000 and other terminals.
# Way to display Explorer's items. Either ICON_LIST, ICONBUTTON_LIST, or BUTTON_LIST
listFormat: ICON_LIST
# Url of the icon to be launched automatically at start-up
#autostartUrl: "Payment"
# List of icons url to be masked (currently empty)
#blackListedUrls: "first black listed url"
#blackListedUrls: "second black listed url"
# List of url protected by password (no password on "Control panel")
protectedUrls {
url: "Control panel"
password: ""
}
#protectedUrls {
# url: "Second protected url"
# password: "second password"
#}
# Hereafter a sample of shortcut registration
#shortcuts {
# shortcut: ".123"
# entryUrl: "Payment"
# description: "Sample shortcut to payment menu"
#}
shortcuts {
shortcut: ".0"
entryUrl: "Control panel/Terminal information/Shortcuts/Print?ExpId=2"
description: "Print shortcuts"
}
shortcuts {
shortcut: ".2"
entryUrl: "Control panel/Applications reports/Transaction?cmdId=4"
description: "Transactions"
}
shortcuts {
shortcut: ".3"
entryUrl: "Control panel/Applications reports/Calls planning?cmdId=6"
description: "Call planning"
}
shortcuts {
shortcut: ".4"
entryUrl: "Control panel/Terminal information/Hardware information"
description: "Hardware configuration"
}
shortcuts {
shortcut: ".5"
entryUrl: "Control panel/Terminal information/Hardware information/Display"
description: "Hardware configuration on display"
}
shortcuts {
shortcut: ".6"
entryUrl: "Control panel/Terminal information/Hardware information/Print?cmdId=12"
description: "Hardware configuration on printer"
}
ICO-OPE-02757-V5
TETRA Terminal
User's guide
Public
173/199
Ingenico document - Reproduction or disclosure prohibited without written authorization
Please check document validity before using
Figure 26 – Specific “local.desktopenv.inactivity.PBT” for MOVE5000 terminal
TETRA default parameters customization
The “CUSTOM CONFIG” building consisted in:
Modifying the provided default configuration
Packaging in TETRA format
In practice:
Under INGEDEV create a new project.
Select TELIUM 3 framework project
Select T3 Resource project without GOAL resource + click on “Next”
Select a SDK + click on “Next”
# Service class of the screen saver to be used
#serviceClass: "local.myPackage.myScreenSaver"
# Time-out before starting screen saver ([10..99999], in
seconds)
screenSaverTimeout: 60
# Time-out before switching backlight level ([10..99999],
in seconds)
backlightTimeout: 1800
# Time-out before switching in standby mode
([10..99999], in seconds)
standbyTimeout: 99999
# Wake-up authorized on movement detection
wakeUpOnTilt: true
# Service class of the screen saver to be used
#serviceClass: "local.myPackage.myScreenSaver"
# Time-out before starting screen saver ([10..99999], in
seconds)
screenSaverTimeout: 60
# Time-out before switching backlight level ([10..99999],
in seconds)
backlightTimeout: 110
# Time-out before switching in standby mode
([10..99999], in seconds)
standbyTimeout: 120
# Wake-up authorized on movement detection
wakeUpOnTilt: true
MOVE5000
Other TETRA terminals
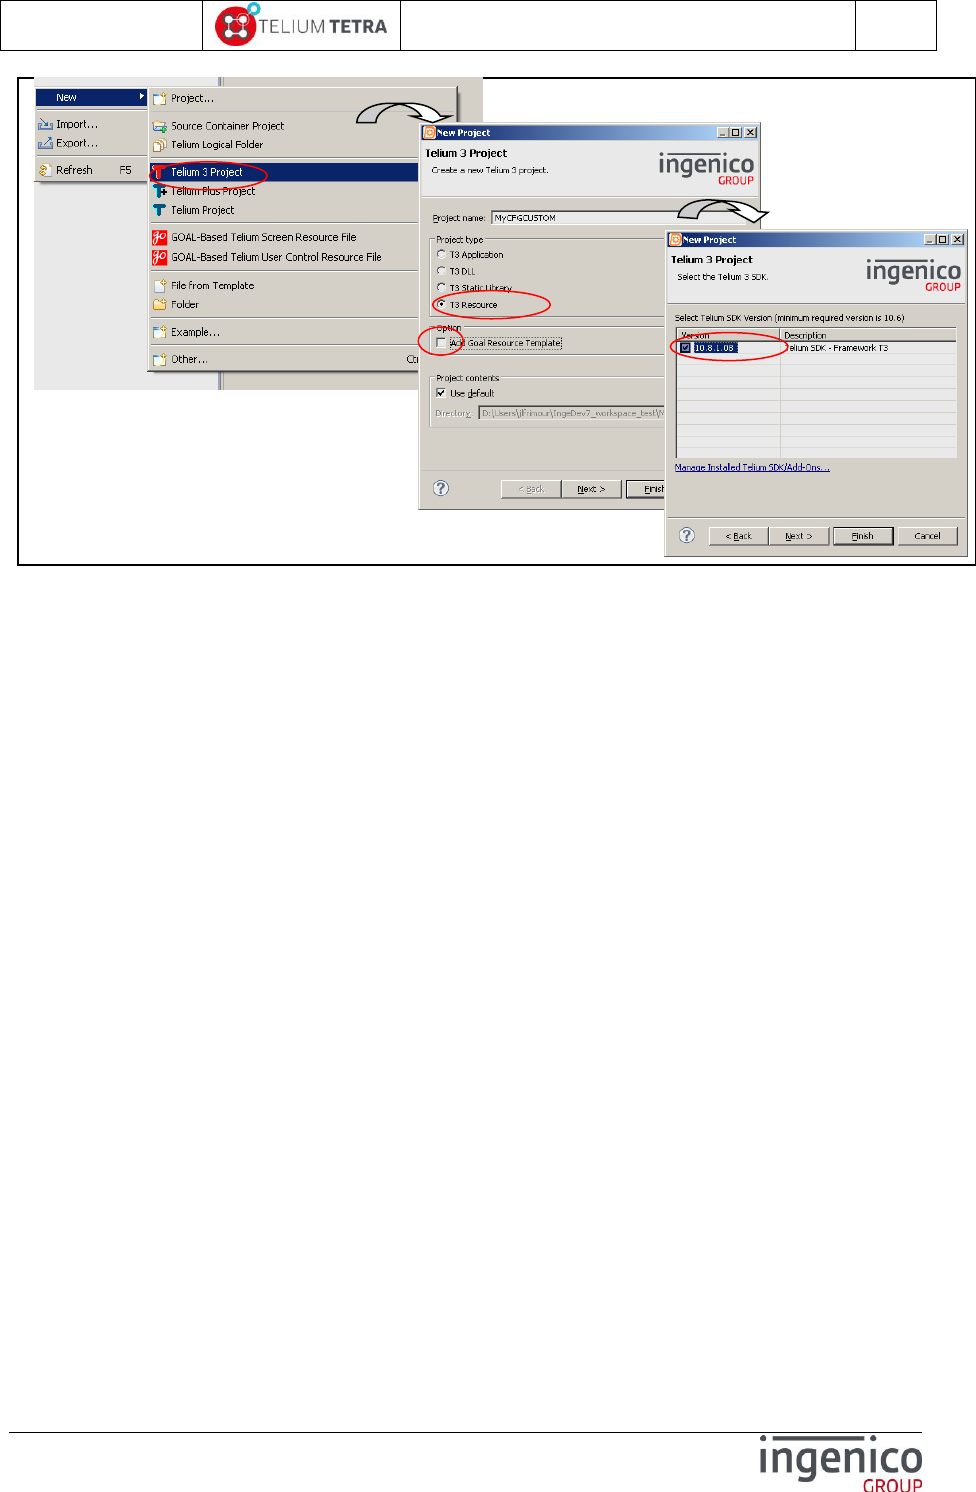
ICO-OPE-02757-V5
TETRA Terminal
User's guide
Public
174/199
Ingenico document - Reproduction or disclosure prohibited without written authorization
Please check document validity before using
Figure 27 – TETRA terminal parameters project creation (step 1)
Give a description to your project
Adjust eventually “Family name”
Set “Application type” to “47901” in decimal or “0xBB1D” en hexadecimal. Indegev will warn
you with the following message “The entered value for ‘Package Identifier’ is for
specific use !”
Set the “Data Binary File base name in selecting “Use specific data binary base name”. The
chosen data binary name must be set to: “CFGCUSTOM”.
Click on “Next”
Set package properties
Set signature certificate according to your signature card right
Select a “Domain/Country code” according to your country/region
Eventually set a “Package Range”
Verify “Package Identifier” is set to “47901”. Indegev will warn you with the following
message “The entered value for ‘Package Identifier’ is for specific use !”
Set “Package Version” according to your needs.
Set “Package Family” according to your needs.
Click on “Finish”
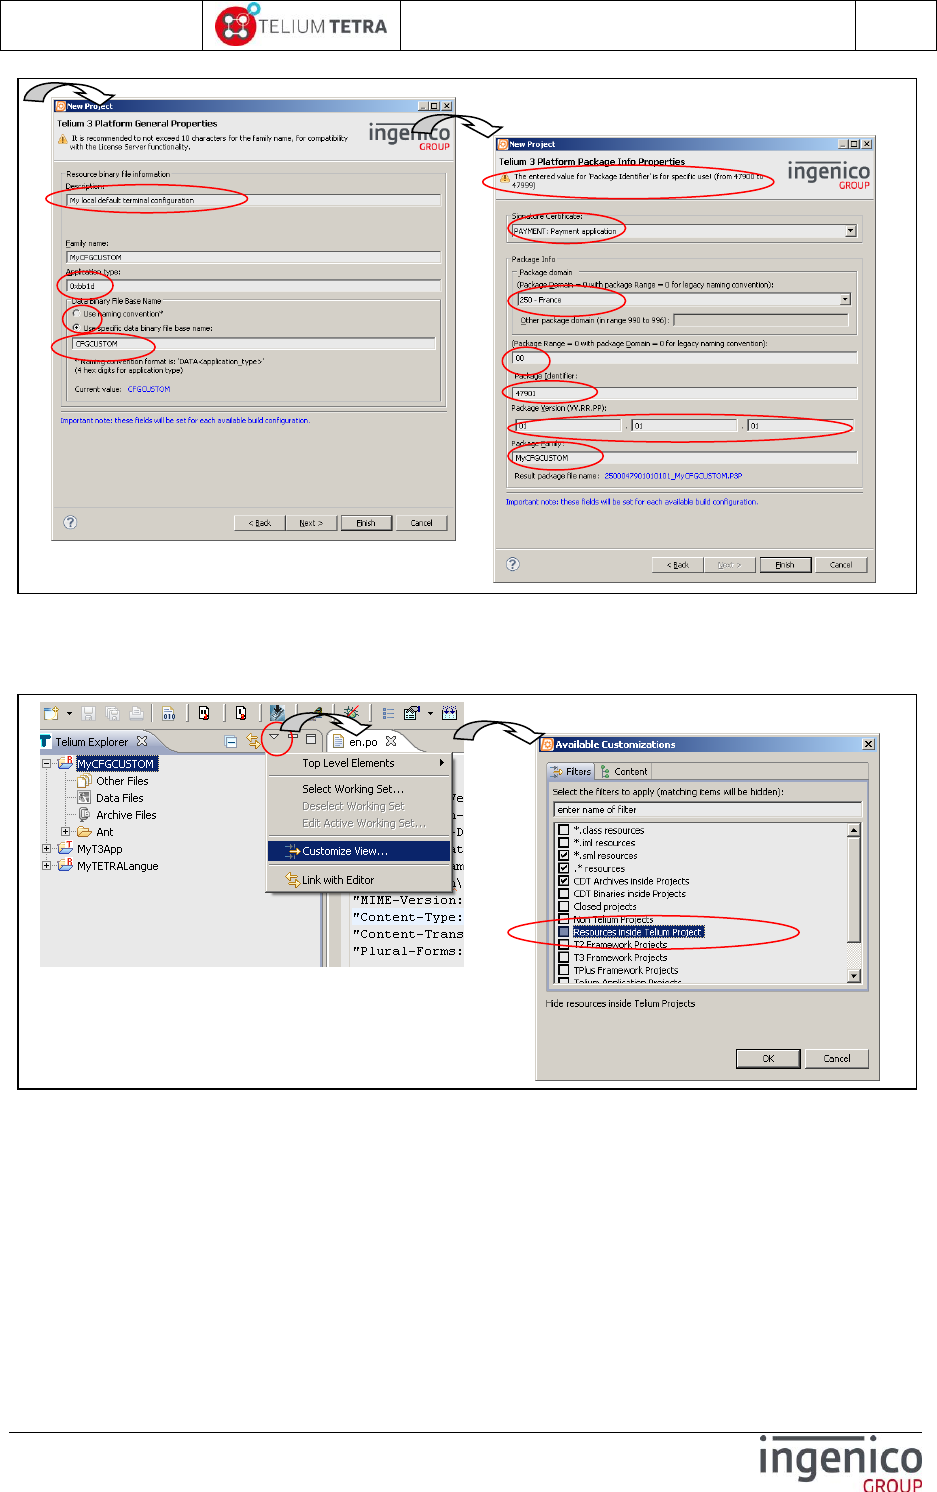
ICO-OPE-02757-V5
TETRA Terminal
User's guide
Public
175/199
Ingenico document - Reproduction or disclosure prohibited without written authorization
Please check document validity before using
Figure 28 –TETRA terminal parameters project creation (step 2)
Set your project view with visible “Resource inside Telium project: right click on icon
surrounded with a red circle. Select “Customize view..”, unselect “Resources inside Telium
project” and click on “OK”.
Figure 29 – Make visible “Resource inside Telium project”
In Telium Explorer view, right click on “MyCFGCUSTOM” + select “New” + select “Folder” +
name the new folder “CFGCUSTOM” + click on finish
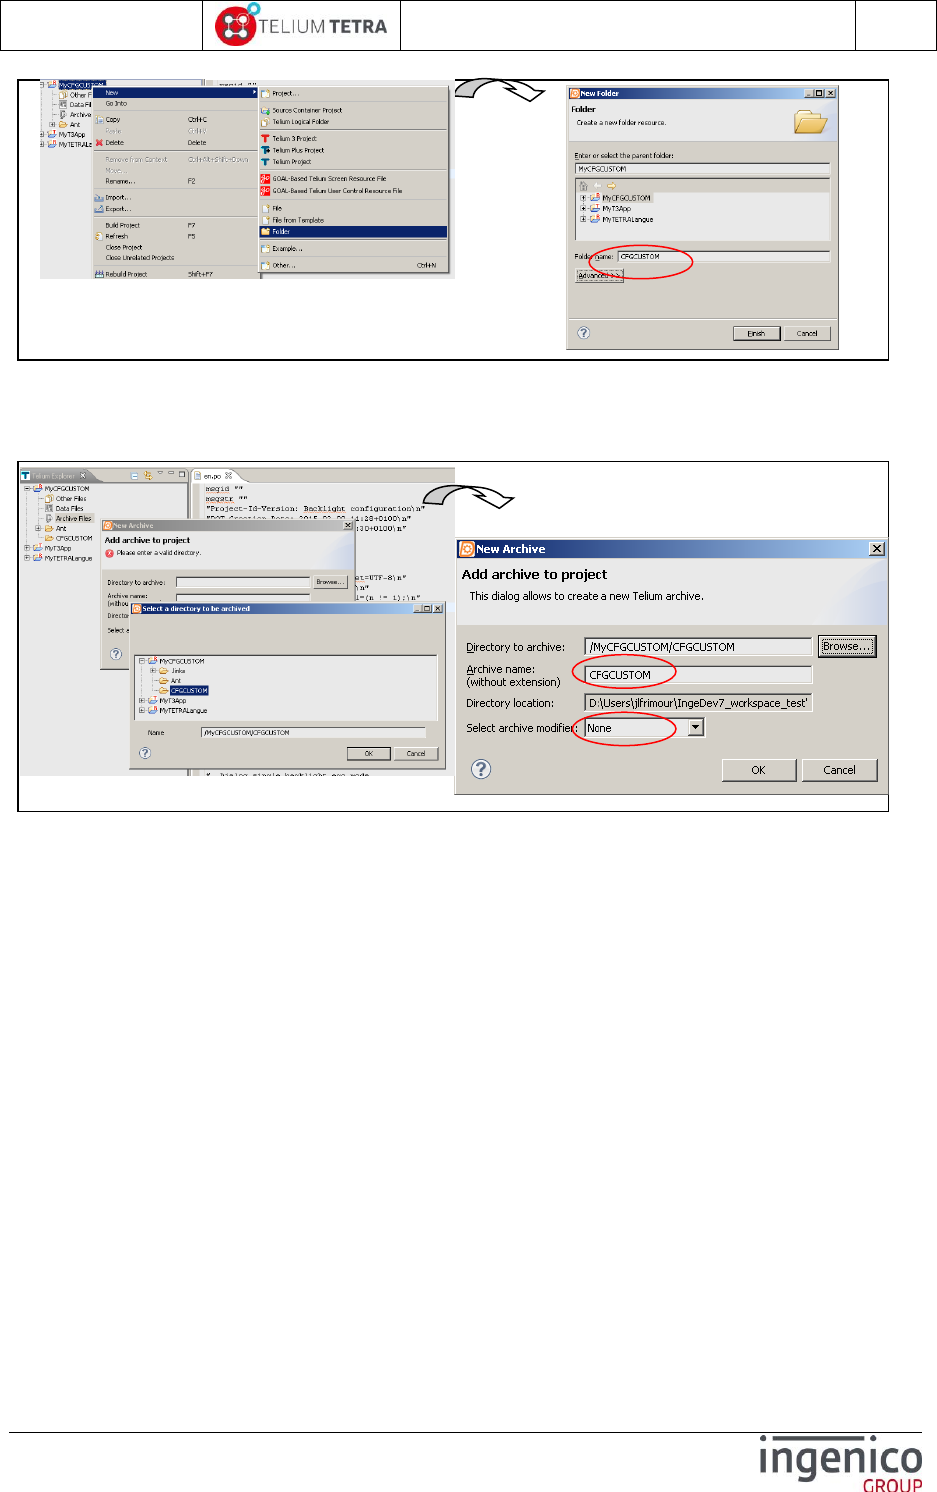
ICO-OPE-02757-V5
TETRA Terminal
User's guide
Public
176/199
Ingenico document - Reproduction or disclosure prohibited without written authorization
Please check document validity before using
Figure 30 – “CFGCUSTOM” folder creation
Right click on “archive files” virtual folder to create new archive with “CFGCUSTOM” folder as
root folder
Figure 31 – Archives files creation
Creation of a new data file with “CFGCUSTOM” archive as DATA file.
Right click on “Data files” virtual folder to create new data with “CFGCUSTOM” archive as
DATA file.
“User Data files” properties open , select “+ “ to add a data file
On “New data file” screen set “Set as default data file” and select “Archive file”
On “Select Archive” screen select the archive “CFGCUSTOM” previously defined
Confirm all the operations by clicking on “OK”.

ICO-OPE-02757-V5
TETRA Terminal
User's guide
Public
177/199
Ingenico document - Reproduction or disclosure prohibited without written authorization
Please check document validity before using
Figure 32 – Data files creation
Final step:
Outside Ingedev, with Windows file explorer copy the content of the unpacked configuration
delivered in SDK installation directory “\Tools\HW_TETRA\UnsignedTerminalConfig”.
Modify each PBT file according to your need
Make Ingedev “Build”
In “Bin\DEFAULT_RESOURCE\CFGCUSTOM” can be found the binary to load in terminal
Figure 33 – Ready to build custom configuration

ICO-OPE-02757-V5
TETRA Terminal
User's guide
Public
178/199
Ingenico document - Reproduction or disclosure prohibited without written authorization
Please check document validity before using
Note: “Signature” steps are not described as there is not specificity compared to other software
TETRA package generation. Refer to INGEDEV CHM or “TRAINING” documentation.
Non signed TETRA parameters customization
The “LIVE CONFIG” building consisted in:
Modifying one of the provided “*.PBT” provided file in the default configuration
Loading it in terminal
Note: When the parameters file is not common to all terminals, take care to get the default in the
directory with a name corresponding to the type of your terminal:
Example: For mobile terminals, modification of some parameters related to standby conditions
may affect on battery operating time.
Note: It may be possible to overload only one parameter: their absence in the provided configuration
involves the persistence of the previous recorded value.
Note: As the parameters files are recognized according their filenames, they must not be changed and
must fit to the corresponding name supported the initial software installed in the terminal.
11_3 TETRA internationalization setting
The terminal is provided with 2 default languages:
English
French
Customizing language means giving a translation of each text of each default components of a TETRA
terminal. All these new created texts, associated to a language, are stored in files called language
“dictionaries”.
Follow here after:
A brief description of internationalization principle in TETRA terminal
The “cooking” operation to create and to modify language “dictionaries”.
TETRA internationalization principle
The language customization is based on “gettext” principle:
The source code is tooled up to allow strings extraction on those requiring translation
The extracted strings are stored in files reusing standard “gettext” file format and naming as:
“.pot” format = Portable Object Template
“.po” format = Portable Object
File naming is made of “[LANGUAGE]” or “[LANGUAGE]_[COUNTRY]” according to
ISO 639-1 two-letter language code values and to ISO-3166 two-letter country code
The extracted strings are used as identifier reference to search translation.
All created language files can be manipulated using GNU tools as “xgettext”, “msginit”
and “msgfmt”.
Their produced file, as “.mo” file (Machine Object file), will be reused to create language files
to load in TETRA terminals.
TETRA “Dictionaries” file structure container is specific to INGENICO TETRA terminals
range.
A proprietary implementation has been developed by INGENICO, to manage TETRA
“Dictionaries” and language translation rendering in terminal: this implementation does not
called or reused GNU source code in terminal.
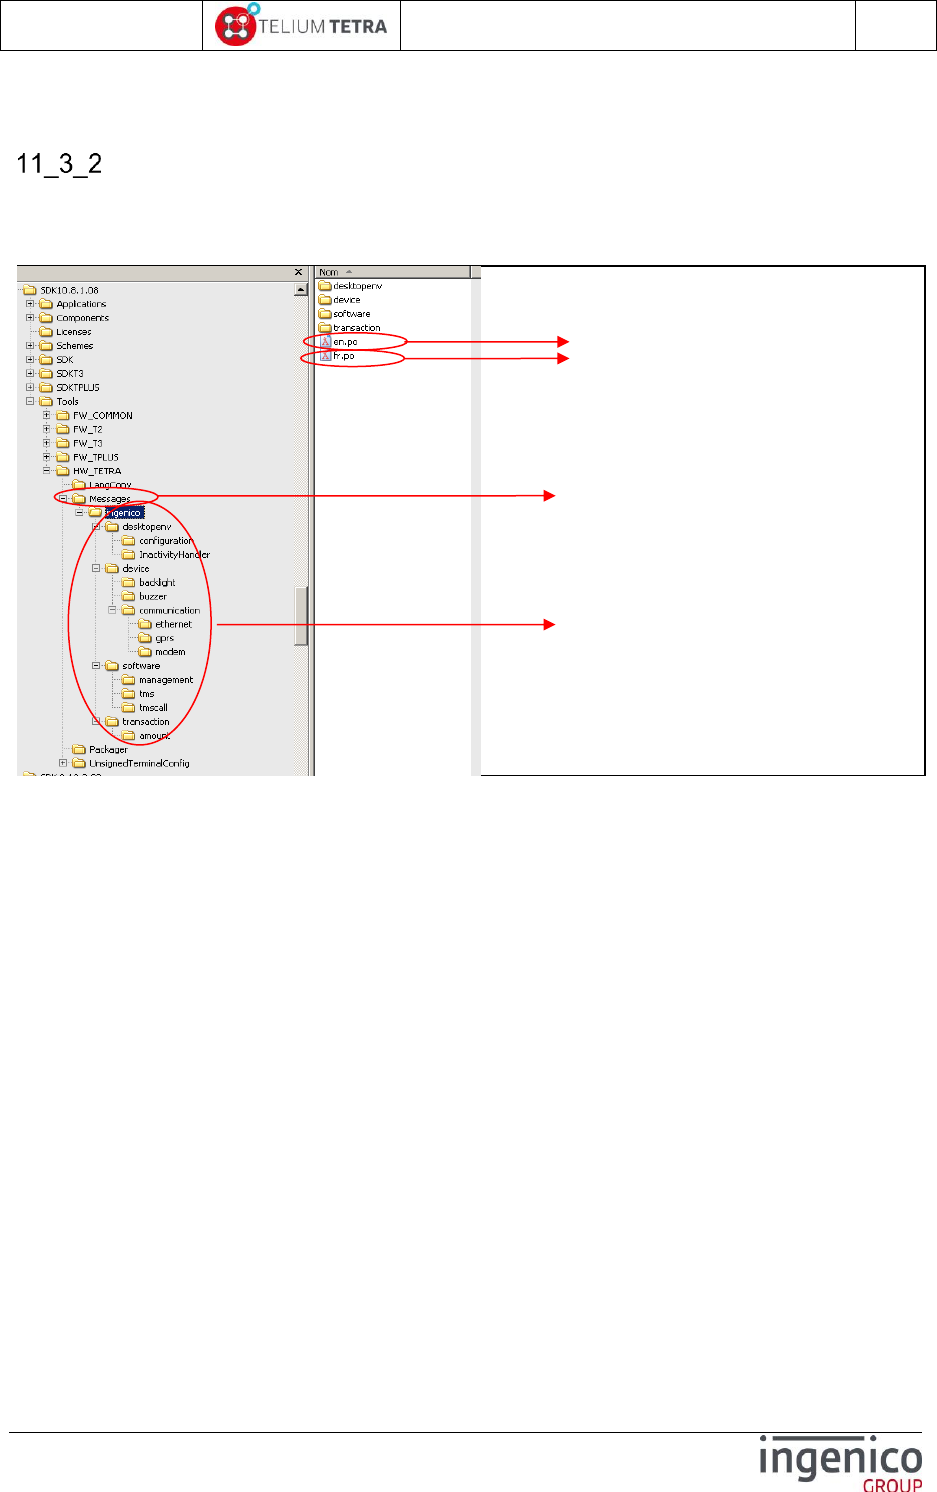
ICO-OPE-02757-V5
TETRA Terminal
User's guide
Public
179/199
Ingenico document - Reproduction or disclosure prohibited without written authorization
Please check document validity before using
Plurals management is supported. (detailed later)
“Dictionaries” type and files organization
To allow customization, the SDK delivery provides a directories structure filled with initial “en.po”
and “fr.po” files. It is located in the installation directory of the SDK in
“\Tools\HW_TETRA\Messages”:
Figure 34 – SDK reference languages delivery
Taking as model, the default provided PLATFORM language files,
“9992047900020200_PltfLang.P3P”, its unpacked content in the following view illustrates the
elements to rename and to customize:
Directory to reuse during language
customisation.
Language identifier references
French translation provided as sample
Tree files organisation giving a link
between reference string and its context
of usage.
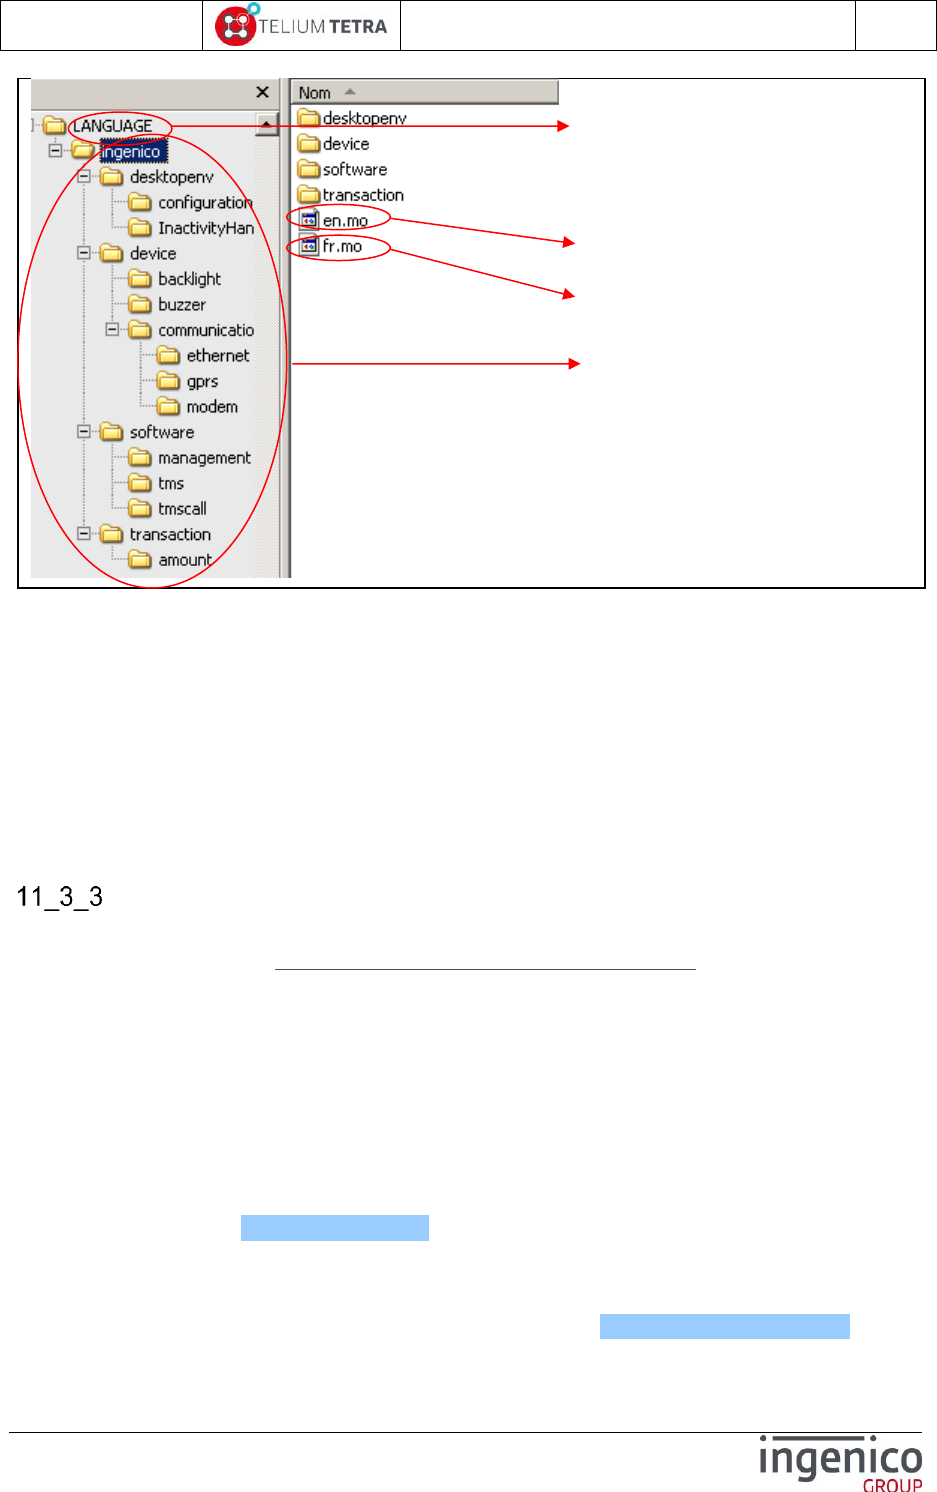
ICO-OPE-02757-V5
TETRA Terminal
User's guide
Public
180/199
Ingenico document - Reproduction or disclosure prohibited without written authorization
Please check document validity before using
Figure 35 – Unpacked Platform language dictionary
A customised language dictionary is a PLATFORM language files in which:
“LANGUAGE” file name is replace by a filename with the following structure: “CCCDD47900”
“CCC”= country code, same value as the package country code
“DD”= range, same value as the package range.
“47900”= predefined application type for dictionary
Each “fr.mo“ file have been replaced by a new “[LANGUAGE].mo” resulting from a computing
of an “[LANGUAGE].po” in which all translations have been inserted: [LANGUAGE] is based on
ISO-639-1 two-letter language code.
All “en.mo“ files have been removed.
Needed tools
To extract, to merge and to produce “Machin Object” file (“.mo”), “gettext” GNU Tools for Windows
can be downloaded from https://github.com/vslavik/gettext-tools-windows and installed on your
development PC.
Current version tested and used to verify the proposed “cooking” process is:
“gettext-tools-windows-0.19.4”.
Note: The installation of this tool in a directory of your INGEDEV workspace may facilitate the use by
script used during project building. It’s the choice done in the presented example.
Note: Other open sources off-self tools can be installed to edit “.po” file or to create “.mo” file.
“gted” (“GetText EDitor”) : an Eclipse plug-in to create/edit “.po” file and to build “.mo” file .
It’s available at http://www.gted.org. Tests usage of “.po” file edition in INGEDEV
ecosystem is successful. “gted” manages “.po” or “.mo” file creation, but according to
TETRA dictionary directories organisation, it requires some extra works to set the INGEDEV
project directory organisation as expected by “gted” and “gettext” tools for windows .
“Poedit”: a dedicated editor for “.po” file. It’s available at http://poedit.net/download.
Internal component name of PLATFORM
dictionary and its un-tarred content => Tetra
parameters filename to adjust according
your targeted “country code” and package
“range”
English reference language result of “en.po”
computing
French translation result of « fr.po »
computing
Same tree files organisation as in
previous figure contenting the
computing results of all “en.po” and
“fr.po”
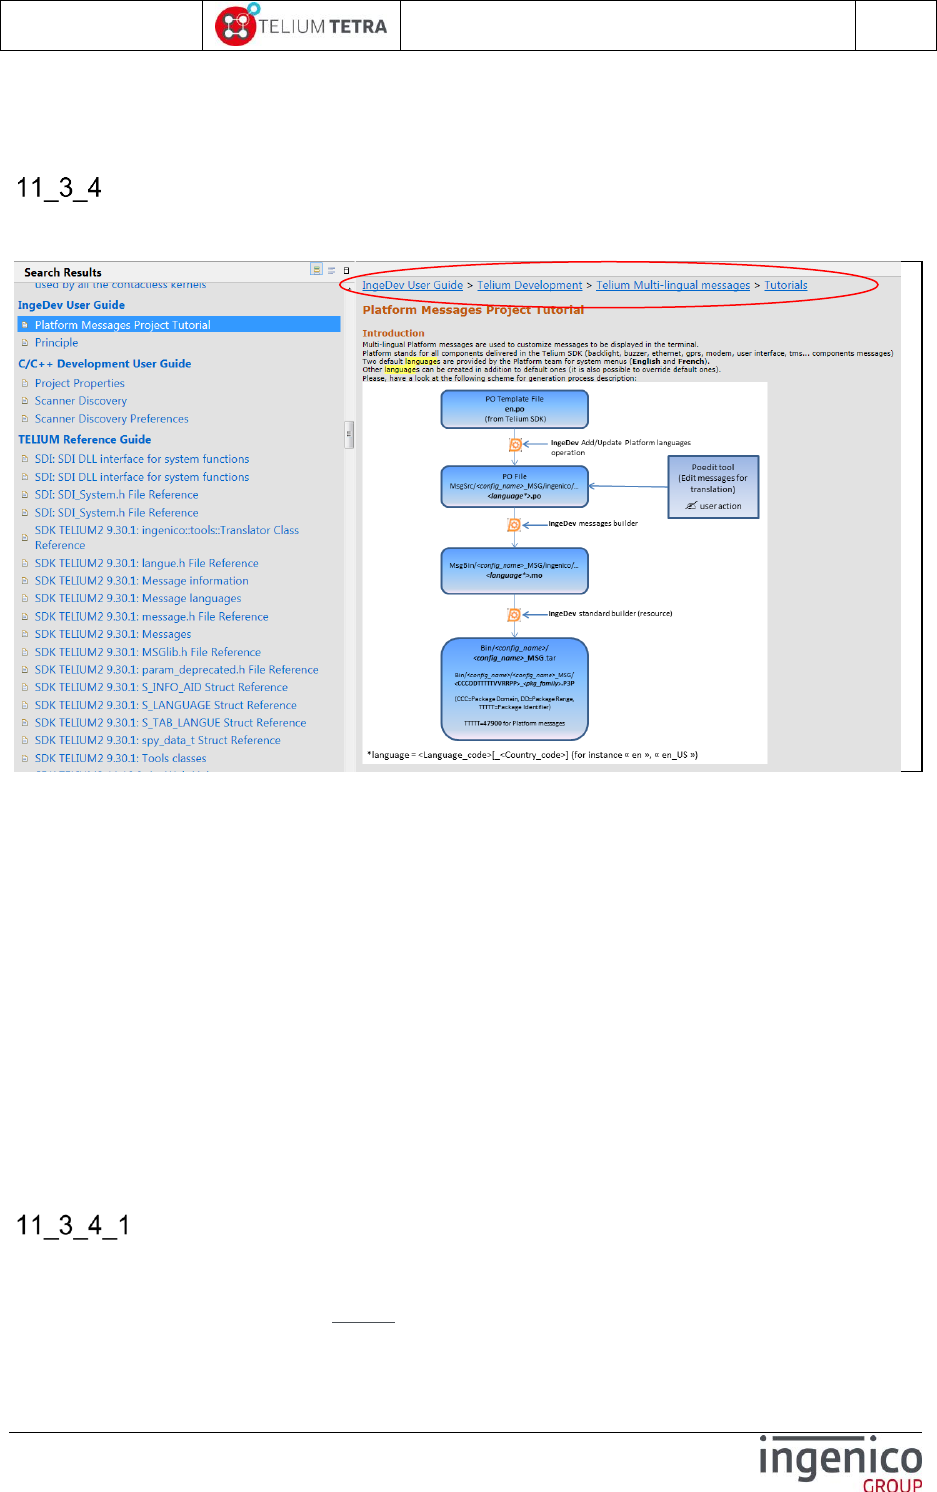
ICO-OPE-02757-V5
TETRA Terminal
User's guide
Public
181/199
Ingenico document - Reproduction or disclosure prohibited without written authorization
Please check document validity before using
Note: An INGEDEV plug-in to support TETRA dictionaries, based on open sources with a compliant
licence with the INGEDEV software distribution licence, is underdevelopment.
Language customization “cooking” process
To process this operation, it possible to:
Benefit of help from some INGEDEV Tools (refer to INGEDEV HELP: see following picture)
Figure 36 – Language customisation thanks to INGEDEV
Do it yourself as when INGEDEV Tools did not exist: the next part of the paragraph will
illustrates this way, it also help to understand what it’s behind INGEDEV tools.
The customization consisted in:
Using the “Messages” directory to build a new language dictionary to complete default
languages of the terminal.
Packaging of the created dictionary in TETRA format
To simplify illustration, the building of a spanish customization for Spain will be described with the
following selected elements:
“CCC”= country code = ‘724’
“DD”= ‘00’
Language =’es’
INGEDEV project name =”LANG_es”
Follow here after the different steps.
INGEDEV creation project
Under INGEDEV create a new project: ”LANG_es”.
Select TELIUM 3 framework project
Select T3 Resource project without GOAL resource + click on “Next”
Select a SDK + click on “Next”
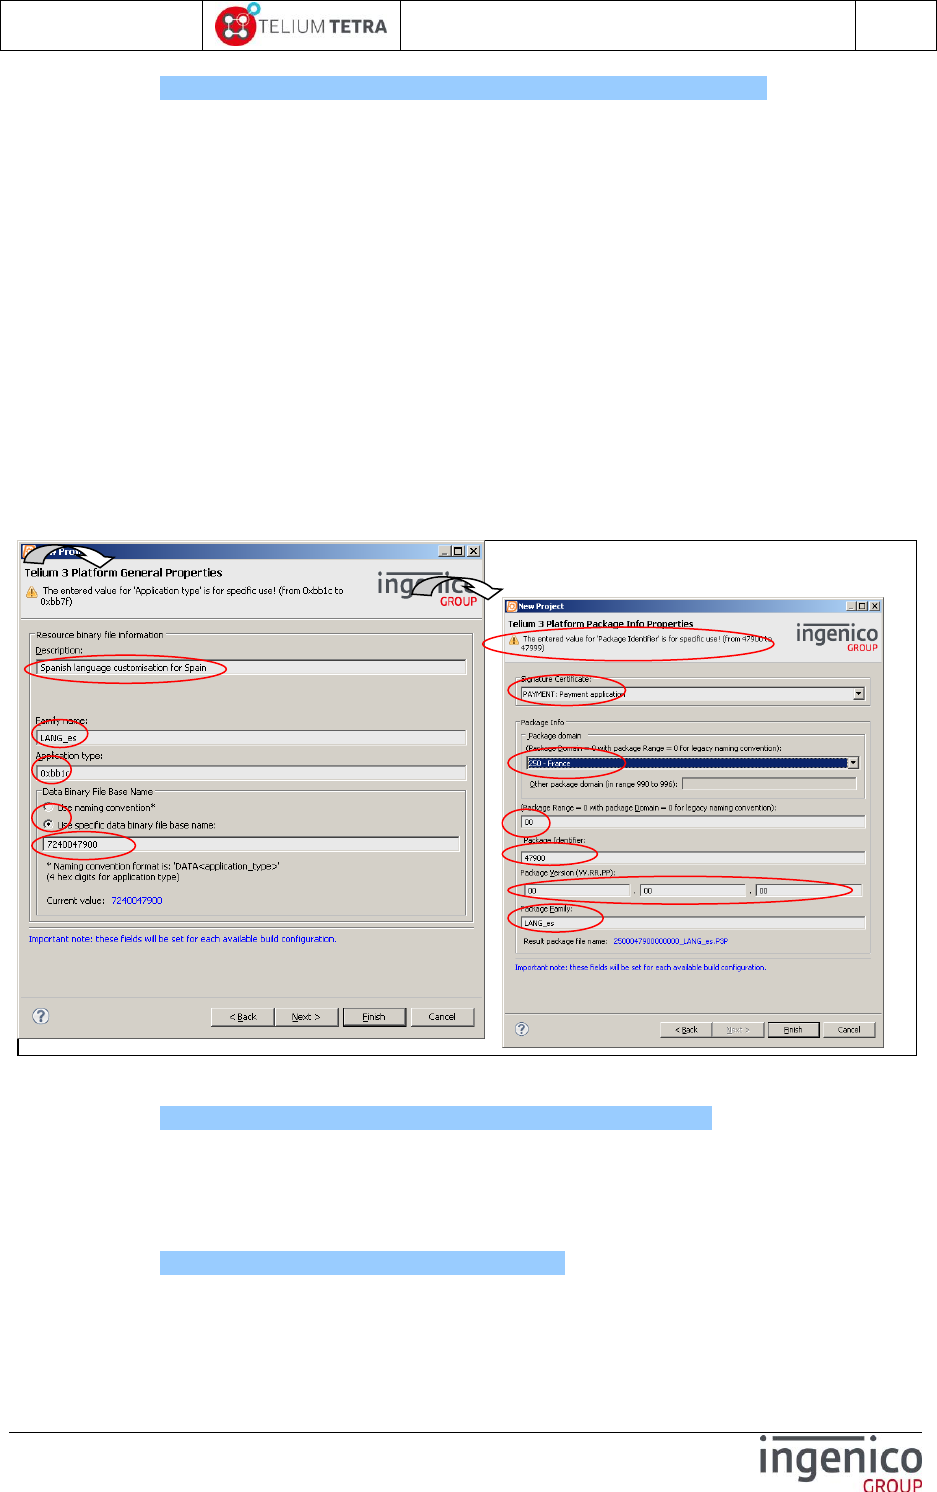
ICO-OPE-02757-V5
TETRA Terminal
User's guide
Public
182/199
Ingenico document - Reproduction or disclosure prohibited without written authorization
Please check document validity before using
(refer on Figure 27 – TETRA terminal parameters project creation (step 1))
Give a description to your project
Adjust eventually “Family name”
Set “Application type” to “47900” in decimal or “0xBB1C” en hexadecimal. Indegev will warn
you with the following message “The entered value for ‘Package Identifier’ is for
specific use !”
Set the “Data Binary File base name in selecting “Use specific data binary base name”. The
chosen data binary name must be set according to your targeted package domain and range:
ex “7240047900”.
Click on “Next”
Set package properties
Set signature certificate according to your signature card right
Select a “Domain/Country code” according to your country/region
Eventually set a “Package Range”
Verify “Package Identifier” is set to “47900”. INGEDEV will warn you with the following
message “The entered value for ‘Package Identifier’ is for specific use !”
Set “Package Version” according to your needs.
Set “Package Family” according to your needs.
Click on “Finish”
Figure 37 –TETRA language customisation project creation
Set your project view with visible “Resource inside Telium project
(refer on Figure 29 – Make visible “Resource inside Telium project”)
In Telium Explorer view, right click on “LANG_es” + select “New” + select “Folder” + name
the new folder “MESSAGES” + click on finish
In Telium Explorer view, right click on “LANG_es” + select “New” + select “Folder” + name
the new folder “CUSTOM_MSG” + click on finish
(refer on Figure 30 – “CFGCUSTOM” folder creation)
Right click again on “LANG_es” + select “New” + select “Folder” + name the new folder
“RESULT” + click on finish
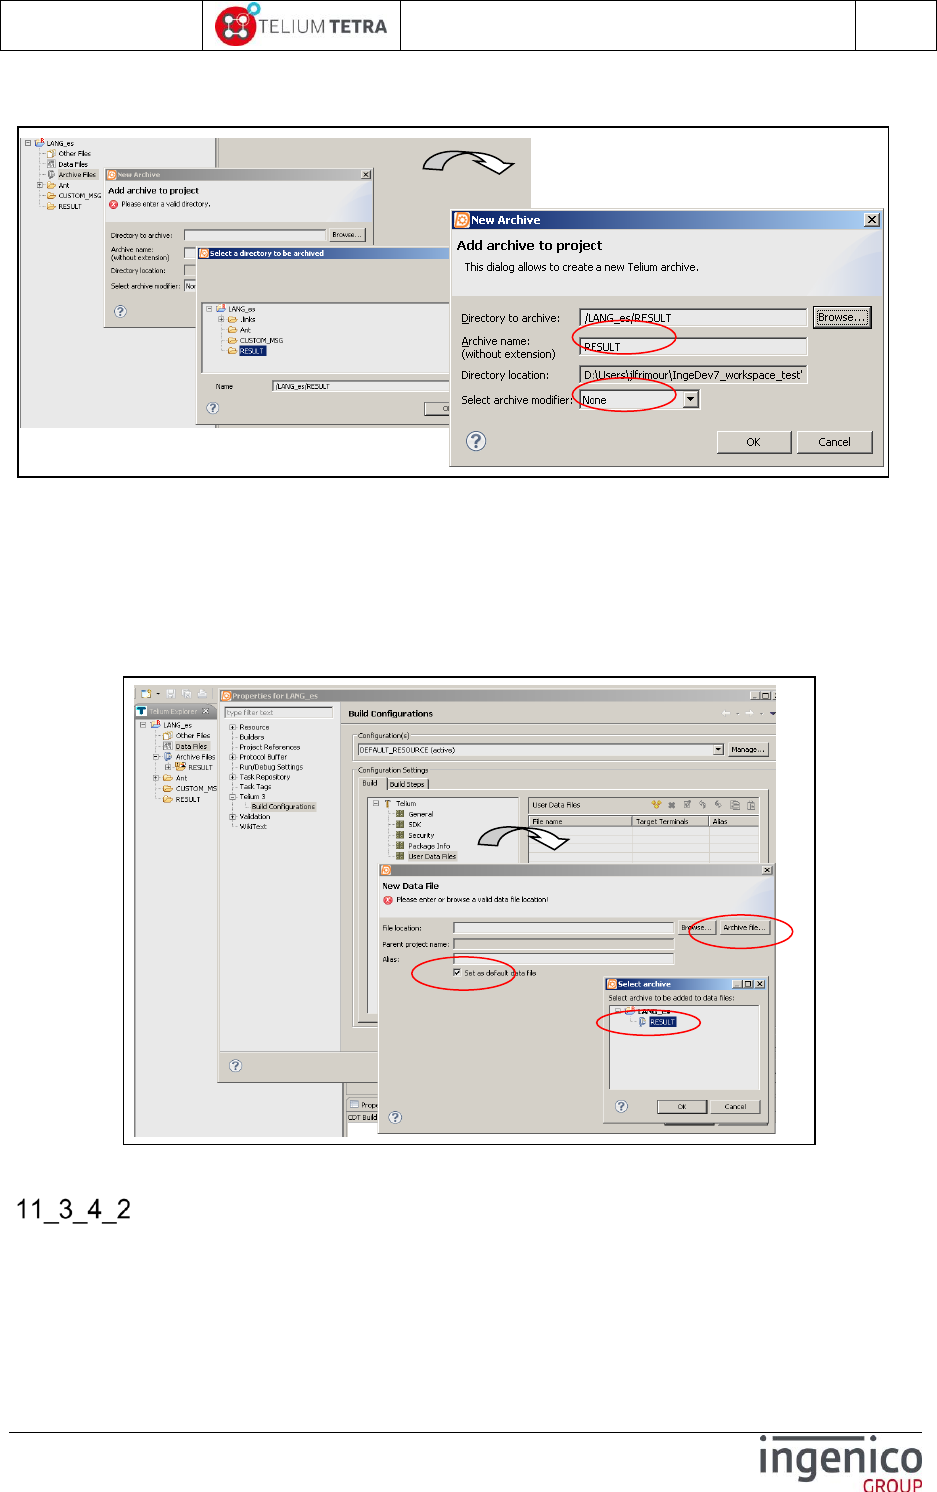
ICO-OPE-02757-V5
TETRA Terminal
User's guide
Public
183/199
Ingenico document - Reproduction or disclosure prohibited without written authorization
Please check document validity before using
Right click on “archive files” virtual folder to create new archive with “RESULT” folder as root
folder.
Figure 38 – Archives files creation
Creation of a new data file with “RESULT” archive as DATA file.
Right click on “Data files” virtual folder to create new data with “RESULT” archive as DATA
file.
“User Data files” properties open , select “+ “ to add a data file
On “New data file” screen set “Set as default data file” and select “Archive file”
On “Select Archive” screen select the archive “RESULT” previously defined
Confirm all the operations by clicking on “OK”.
Figure 39 – Data files creation
Template dictionary installation and language customization
At this step, the default language provided in the SDK can be copied in the TELIUM project and the
language customization can start:
Outside Ingedev, with Windows file explorer copy “ingenico” directory, delivered in SDK
installation directory “\Tools\HW_TETRA\Messages” to “LANG_es” project
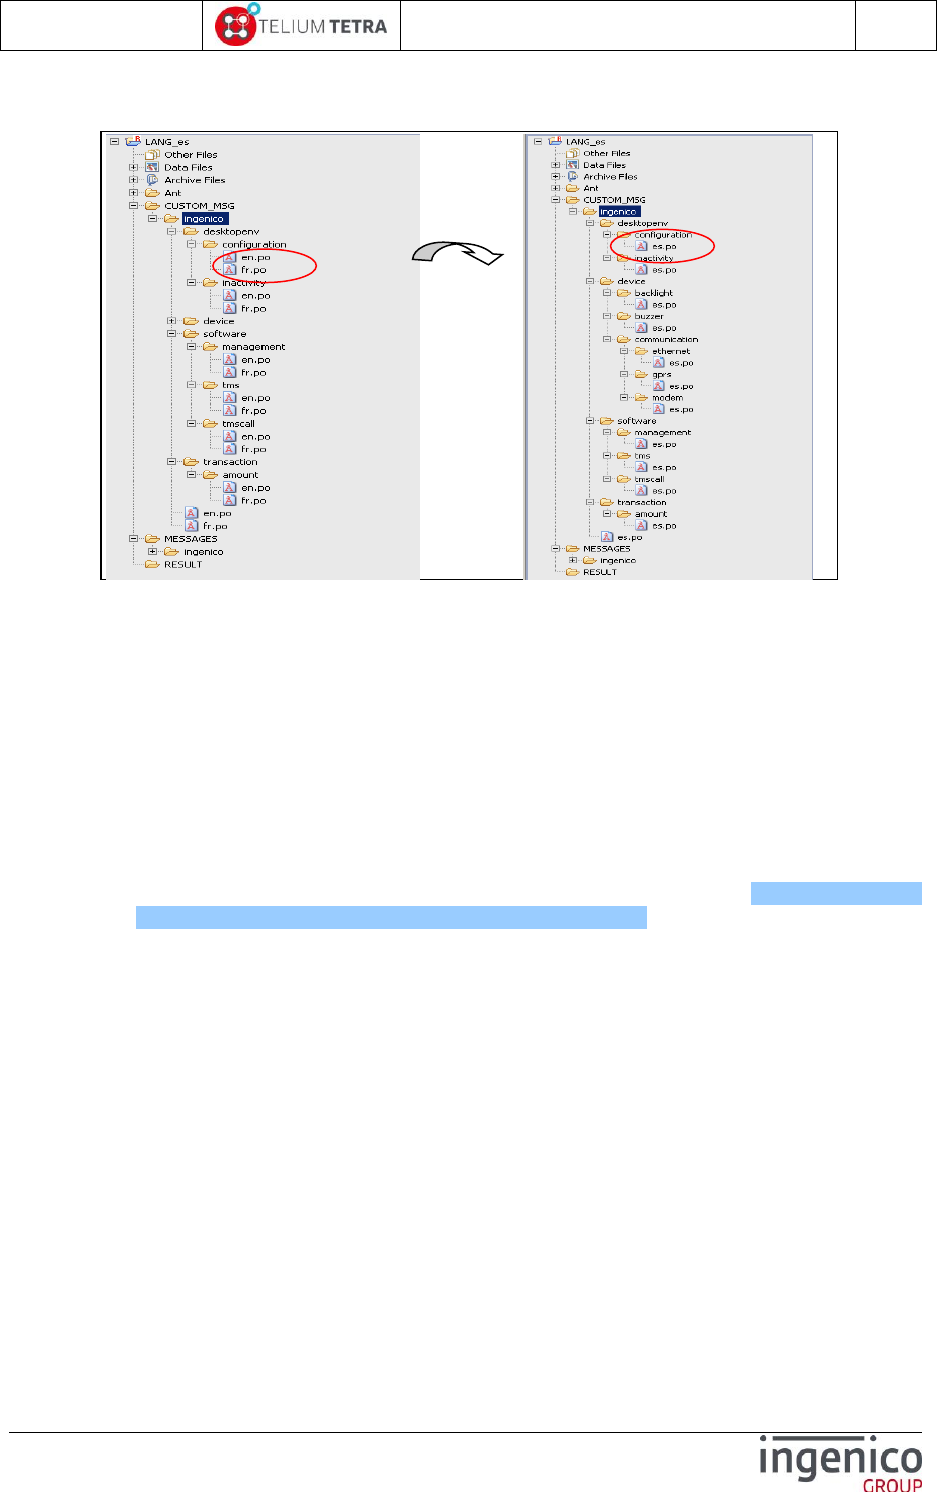
ICO-OPE-02757-V5
TETRA Terminal
User's guide
Public
184/199
Ingenico document - Reproduction or disclosure prohibited without written authorization
Please check document validity before using
in “MESSAGES” folder used as reference directory.
in “CUSTOM_MSG” folder dedicated to create or update translation.
Figure 40 – Default language insertion in project result
in “CUSTOM_MSG” folder, remove all the “fr.po”.(these files are present to illustrate an
example of translated texts)
According your targeted language, rename all “en.po” in “[LANGUAGE].po” (in our
example: “es.po”).
Open each “[LANGUAGE code].po” (ex: ‘es.po”) file with text editor of Eclipse.
On “Language:” line, replace “en” by “[LANGUAGE code]” (ex:”es”) or “[LANGUAGE
code]_[COUNTRY code]” according to your need (ex:”es_ES” Spanish language for
Spain country ).
On “Plural-Forms:” line set the values of “nplurals” and the rule on plurals setting
according to your targeted language.
Plurals setting information can be found at http://localization-
guide.readthedocs.org/en/latest/l10n/pluralforms.html.
Note that currently only « nplurals=2; plural=(n != 1);\n » and
« nplurals=1; plural=0;\n » are managed by TETRA terminal whatever
setting.
On each “msgstr” line, introduce the corresponding translation of text present on previous
line with “msgid” text.
Note that it’s recommended to use INGEDEV (Eclipse CDT part) to make edition and file
manipulation: inappropriate editor may corrupt UTF8 initial file format that consequently will
imply errors reported by “getttext” formatting tools.
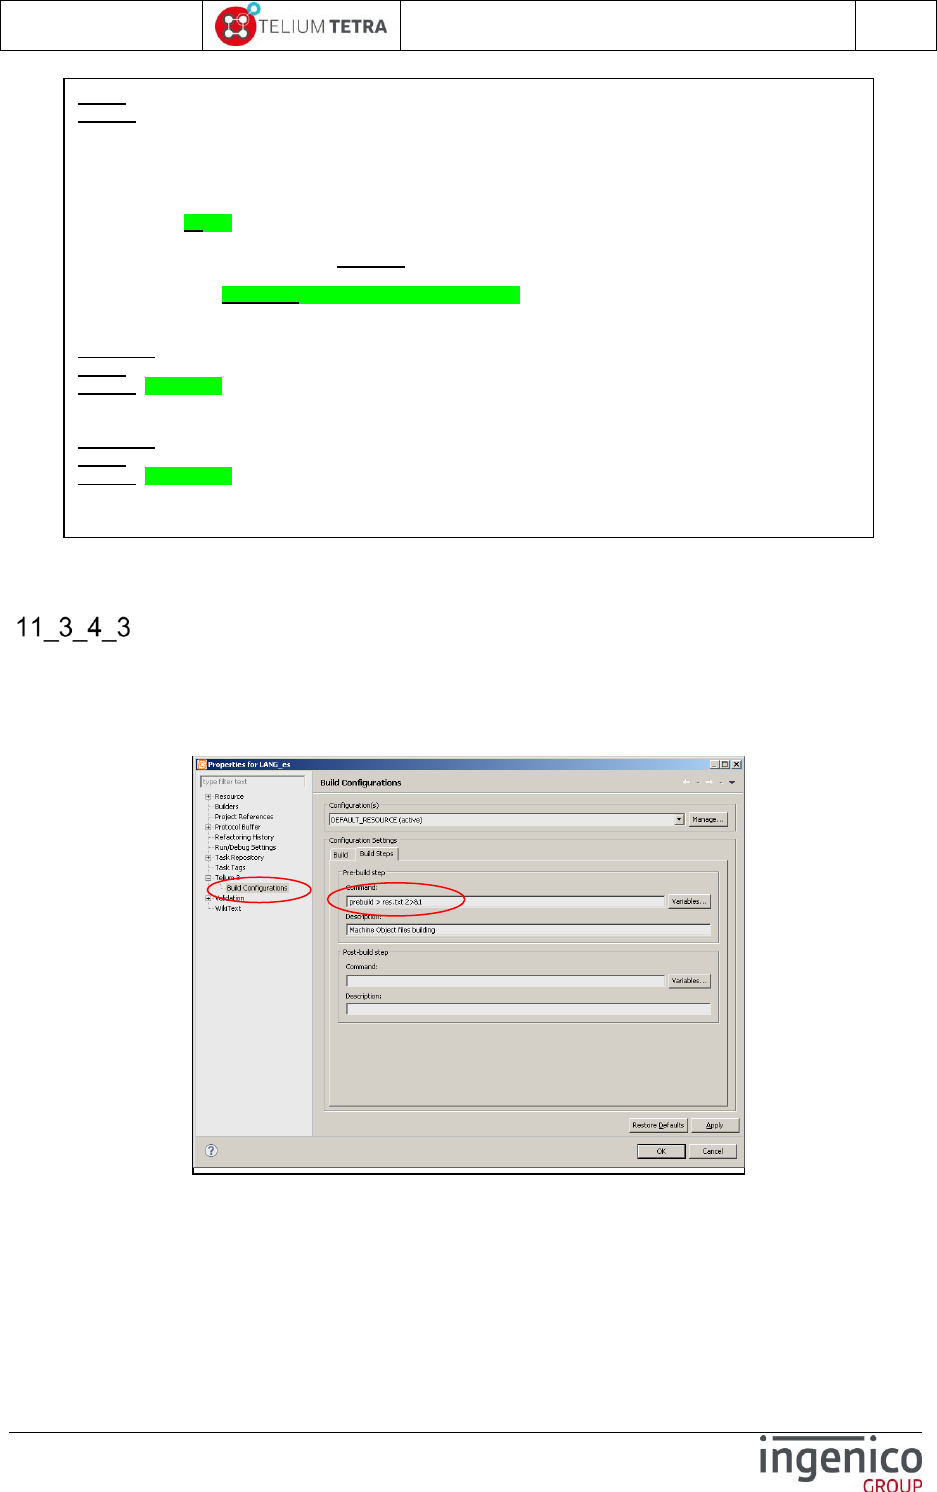
ICO-OPE-02757-V5
TETRA Terminal
User's guide
Public
185/199
Ingenico document - Reproduction or disclosure prohibited without written authorization
Please check document validity before using
Figure 41 – “es.po” created file example
Pre-building and building of the project
The new language is now in place in the project, building step can begin.
Create prebuilt command file that will call “msgfmt” gettext tool to create the “.mo” files.
Note that to optimize time computing usage of “.mk” file (makefile) may be used to condition
messages formatting to “.po” dependency and evolution.
Figure 42 – Set a prebuild command step
The following figure illustrates the content of “prebuild.bat” file.
msgid ""
msgstr ""
"Project-Id-Version: Platform\n"
"POT-Creation-Date: 2015-02-20 14:40+0100\n"
"PO-Revision-Date: 2015-02-20 14:40+0100\n"
"Last-Translator: \n"
"Language-Team: \n"
"Language: es\n"
"MIME-Version: 1.0\n"
"Content-Type: text/plain; charset=UTF-8\n"
"Content-Transfer-Encoding: 8bit\n"
"Plural-Forms: nplurals=2; plural=(n != 1);\n"
#. TRANSLATORS: Exported transaction type
ingenico::transaction::Application::PAYMENT
msgid "Payment"
msgstr "Débito"
#. TRANSLATORS: Exported transaction type
ingenico::transaction::Application::REFUND
msgid "Refund"
msgstr "Crédito"
ICO-OPE-02757-V5
TETRA Terminal
User's guide
Public
186/199
Ingenico document - Reproduction or disclosure prohibited without written authorization
Please check document validity before using
Figure 43 – “prebuid.bat” content
Build your Ingedev project
Make Ingedev “Build”
In case of errors, take care on those reported by “prebuild.bat” command: errors are
reported in console and in “res.txt”. Refer to “gettext” tools documentation to correct errors.
The final dictionary is now available (signed for production or for development according the
selection done in INGEDEV project) and can be loaded in the terminal.
rem declare language variable
set LANG=es
rem declare variables on different existing dir in Ingedev project and on tools location
set MESSAGES=.\CUSTOM_MSG\ingenico
set RESULT=.\RESULT\ingenico
set GETTEXTTOOLS=..\gettext-tools-windows-0.19.4\bin
set MSGFMT="%GETTEXTTOOLS%\msgfmt.exe"
rem CLEAN-UP
rmdir /S /Q %RESULT%
rem Dir creation to store result ".mo"
mkdir %RESULT%
mkdir %RESULT%\desktopenv\configuration
mkdir %RESULT%\desktopenv\inactivity
mkdir %RESULT%\device\backlight
mkdir %RESULT%\device\buzzer
mkdir %RESULT%\device\communication\ethernet
mkdir %RESULT%\device\communication\gprs
mkdir %RESULT%\device\communication\modem
mkdir %RESULT%\software\management
mkdir %RESULT%\software\tms
mkdir %RESULT%\software\tmscall
mkdir %RESULT%\transaction\amount
rem creation of .mo files
%MSGFMT% %MESSAGES%\%LANG%.po -o %RESULT%\%LANG%.mo
%MSGFMT% %MESSAGES%\desktopenv\configuration\%LANG%.po -o %RESULT%\desktopenv\configuration\%LANG%.mo
%MSGFMT% %MESSAGES%\desktopenv\inactivity\%LANG%.po -o %RESULT%\desktopenv\inactivity\%LANG%.mo
%MSGFMT% %MESSAGES%\device\backlight\%LANG%.po -o %RESULT%\device\backlight\%LANG%.mo
%MSGFMT% %MESSAGES%\device\buzzer\%LANG%.po -o %RESULT%\device\buzzer\%LANG%.mo
%MSGFMT% %MESSAGES%\device\communication\ethernet\%LANG%.po -o %RESULT%\device\communication\ethernet\%LANG%.mo
%MSGFMT% %MESSAGES%\device\communication\gprs\%LANG%.po -o %RESULT%\device\communication\gprs\%LANG%.mo
%MSGFMT% %MESSAGES%\device\communication\modem\%LANG%.po -o %RESULT%\device\communication\modem\%LANG%.mo
%MSGFMT% %MESSAGES%\software\management\%LANG%.po -o %RESULT%\software\management\%LANG%.mo
%MSGFMT% %MESSAGES%\software\tms\%LANG%.po -o %RESULT%\software\tms\%LANG%.mo
%MSGFMT% %MESSAGES%\software\tmscall\%LANG%.po -o %RESULT%\software\tmscall\%LANG%.mo
%MSGFMT% %MESSAGES%\transaction\amount\%LANG%.po -o %RESULT%\transaction\amount\%LANG%.mo

ICO-OPE-02757-V5
TETRA Terminal
User's guide
Public
187/199
Ingenico document - Reproduction or disclosure prohibited without written authorization
Please check document validity before using
Figure 44 – Final package to load
When your customized dictionary has been loaded in terminal, you can select a new language in
“\Control Panel\Terminal settings\General settings\Language” subpanel. In our example what is
displayed on the terminal:
Taking in account of previous translation
The evolution of the default dictionary is linked to human interface modifications:
new menus creation
menus removal
modifications
These evolutions must be reported in the different customized dictionaries.
The previous exposed procedure is valid but is not efficient: “gettext” tool allows taking advantage
of previous translations. They creates “.po” file merging result of inserted new released messages to
translate and those unchanged already translated.
Follow here after, how to take in account your previous translation when receiving a new SDK.
.mo file created by prebuid command
.TETRA final generated package ready to be
loaded in terminal
Initial .po file created by user based on
default language provide in SDK

ICO-OPE-02757-V5
TETRA Terminal
User's guide
Public
188/199
Ingenico document - Reproduction or disclosure prohibited without written authorization
Please check document validity before using
In the project used to create the initial language customization in “MESSAGES” reference directory
Remove “ingenico” directory
Outside Ingedev, with Windows file explorer copy “ingenico” directory, delivered in the new
SDK installation directory “\Tools\HW_TETRA\Messages” to “MESSAGES” folder of
“LANG_es” project (= messages references are updates).
Create and run a batch command “merge_SDK_msg.bat” that will merge in your previous
created customisation language the new “msgid” line to translate.
Return on INGEDEV tool, and complete the translation in each “[LANGUAGE].po” (in our
example: “es.po”).
Figure 45 – “merge_SDK_msg.bat” content
Build your Ingedev project
Make Ingedev “Build”
In case of errors, take care on those reported by “prebuild.bat” command: errors are
reported in console and in “res.txt”. Refer to “gettext” tools documentation to correct errors.
The final dictionary is now available (signed for production or for development according the
selection done in INGEDEV project) and can be loaded in the terminal.
rem declare language variable
set LANG=es
rem declare language variable
set LANG=es
rem declare variables on different existing dir in Ingedev project and on tools location
set MESSAGES=.\CUSTOM_MSG\ingenico
set SDKMSG=.\MESSAGES\ingenico
set GETTEXTTOOLS=..\gettext-tools-windows-0.19.4\bin
set MSGMERGE="%GETTEXTTOOLS%\msgmerge.exe" --backup=none --no-location --update --no-fuzzy-matching
rem merge in previous created %LANG%.po files
%MSGMERGE% %MESSAGES%\%LANG%.po %SDKMSG%\en.po
%MSGMERGE% %MESSAGES%\desktopenv\configuration\%LANG%.po %SDKMSG%\desktopenv\configuration\en.po
%MSGMERGE% %MESSAGES%\desktopenv\inactivity\%LANG%.po %SDKMSG%\desktopenv\inactivity\en.po
%MSGMERGE% %MESSAGES%\device\backlight\%LANG%.po %SDKMSG%\device\backlight\en.po
%MSGMERGE% %MESSAGES%\device\buzzer\%LANG%.po %SDKMSG%\device\buzzer\en.po
%MSGMERGE% %MESSAGES%\device\communication\ethernet\%LANG%.po %SDKMSG%\device\communication\ethernet\en.po
%MSGMERGE% %MESSAGES%\device\communication\gprs\%LANG%.po %SDKMSG%\device\communication\gprs\en.po
%MSGMERGE% %MESSAGES%\device\communication\modem\%LANG%.po %SDKMSG%\device\communication\modem\en.po
%MSGMERGE% %MESSAGES%\software\management\%LANG%.po %SDKMSG%\software\management\en.po
%MSGMERGE% %MESSAGES%\software\tms\%LANG%.po %SDKMSG%\software\tms\en.po
%MSGMERGE% %MESSAGES%\software\tmscall\%LANG%.po %SDKMSG%\software\tmscall\en.po
%MSGMERGE% %MESSAGES%\transaction\amount\%LANG%.po %SDKMSG%\transaction\amount\en.po
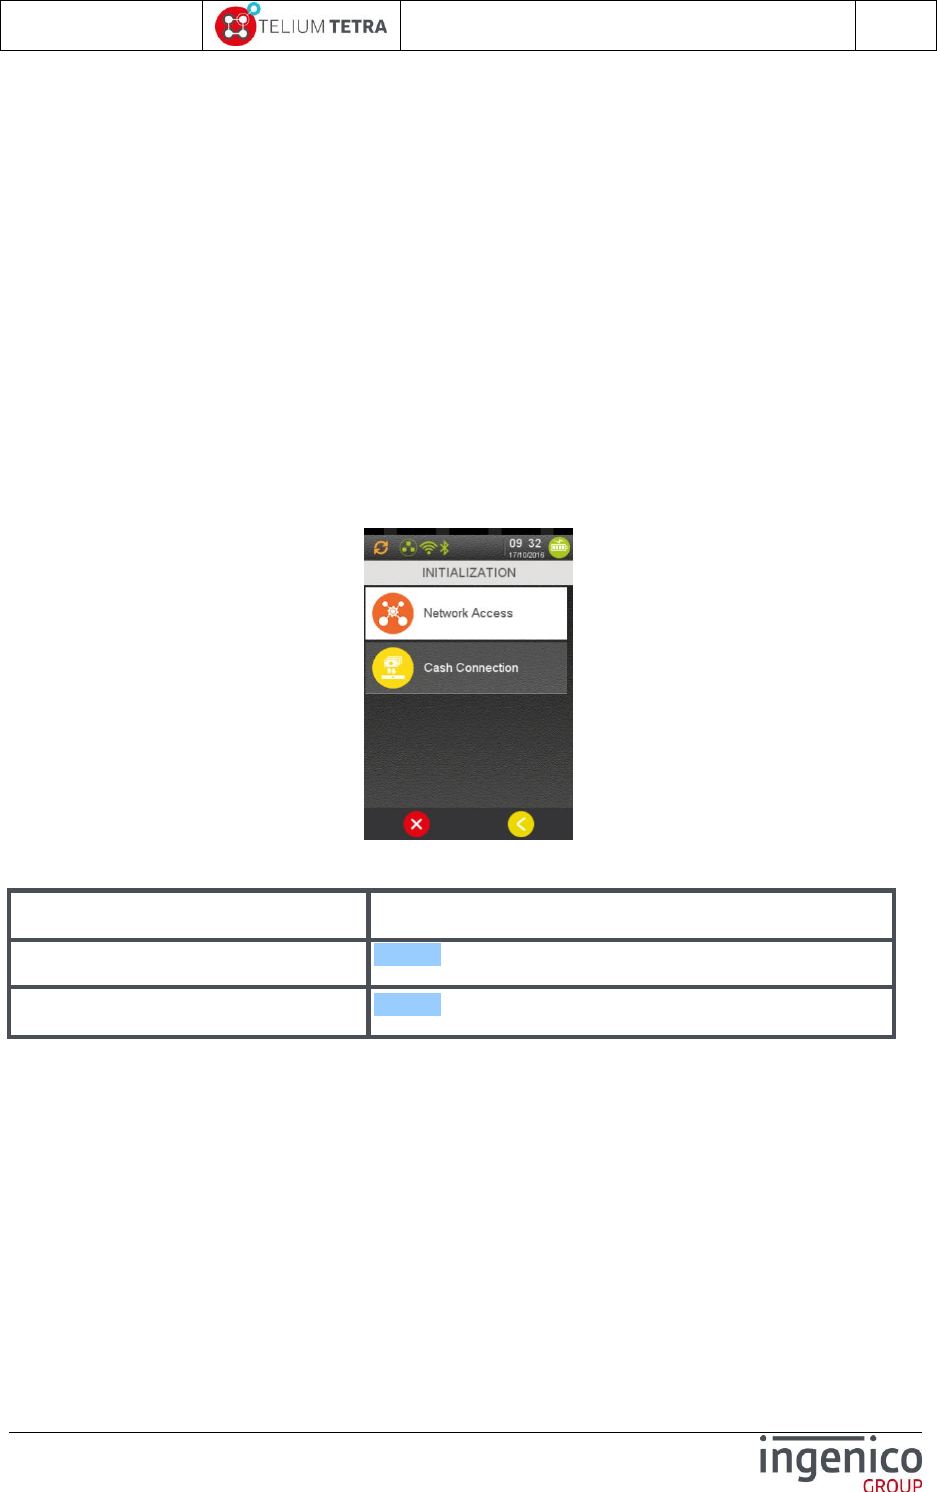
ICO-OPE-02757-V5
TETRA Terminal
User's guide
Public
189/199
Ingenico document - Reproduction or disclosure prohibited without written authorization
Please check document validity before using
12 Annexes
Two topics in this annexes chapter:
Additional menu in FRANCE configuration
Summary of parameters to customize
According to TETRA terminal usage, some regional parameters may be managed: a dedicated icon
can be added in “Control panel” to perform these treatments.
The following paragraphs give an example how “Default network” parameters are managed and
initialized in FRENCH TETRA terminals.
12_1 “French domain“ parameters
These parameters are provided thanks to “Config France” icon on “Explorer” panel. The following
menu is displayed.
The following table provides the different links to menus description.
Item
Reference
Network Access
12_1_1
Cash register connexion
12_1_3
When exiting from this menu (after parameters selection or on cancelling operation in progress or on
keying time-out achievement), the user can select to print the current registered configuration. The
terminal displays:
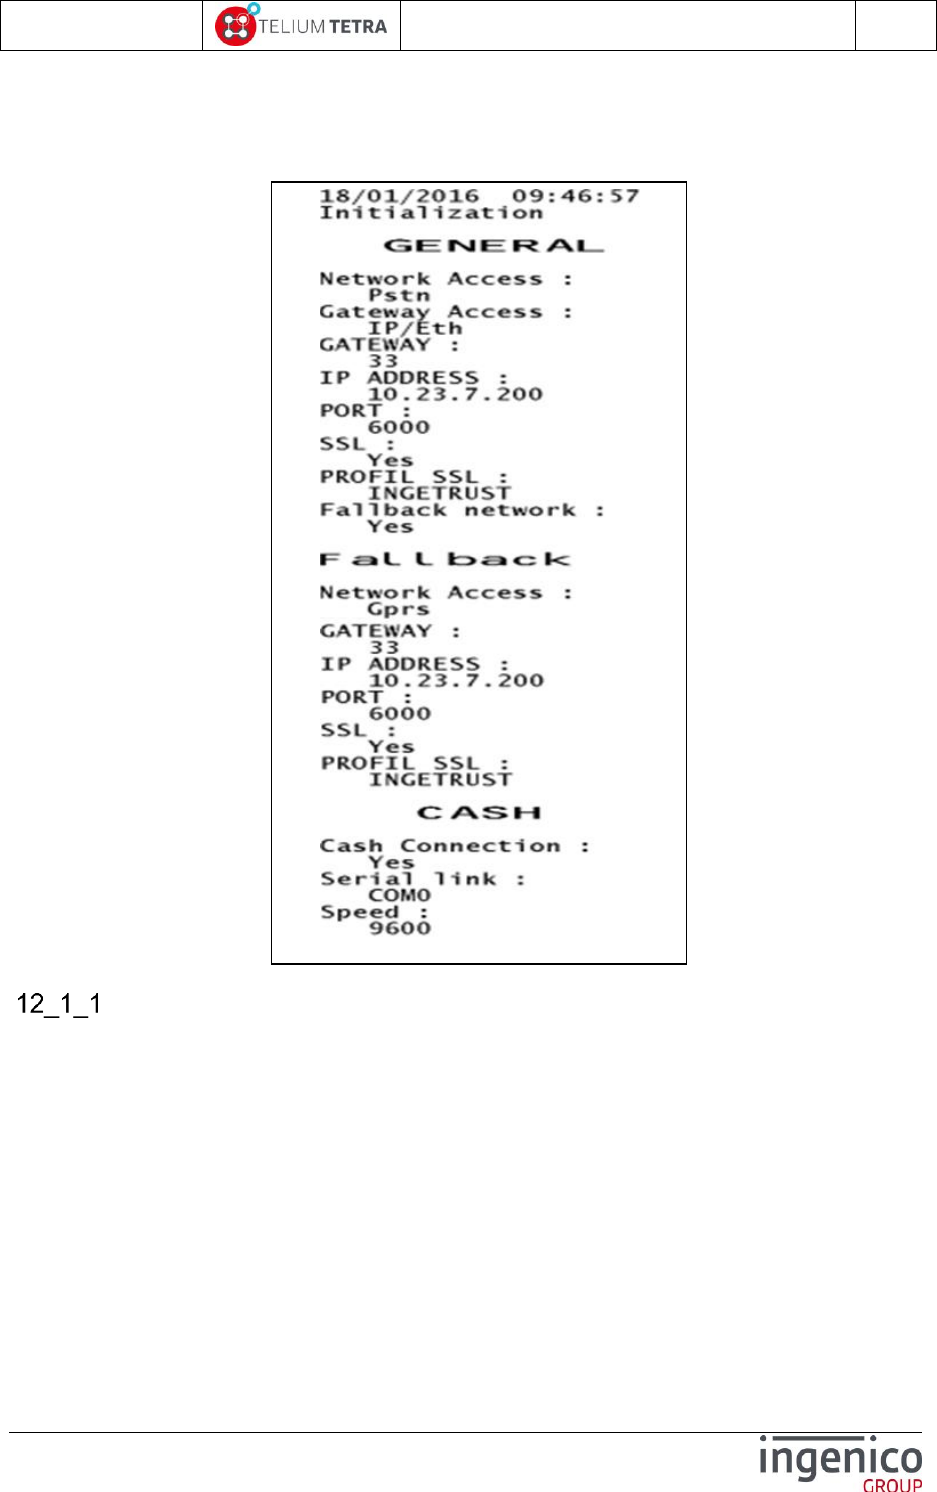
ICO-OPE-02757-V5
TETRA Terminal
User's guide
Public
190/199
Ingenico document - Reproduction or disclosure prohibited without written authorization
Please check document validity before using
If validated, the terminal prints the following ticket.
Main network access point selection
When selecting “Network Access” menu line, the following options can be currently proposed to user
according to communication means discovered in terminal:
“PSTN” = Public Switched Telephone Network
“GPRS” = Mobile phone network
“IP EXT” = External communications means provided thanks to PCL via a connected
peripherals (cash register, tablet …).
The user will select between choices what will be used to perform application configuration and funds
transfer. Follow screenshots corresponding to existing terminal configuration:
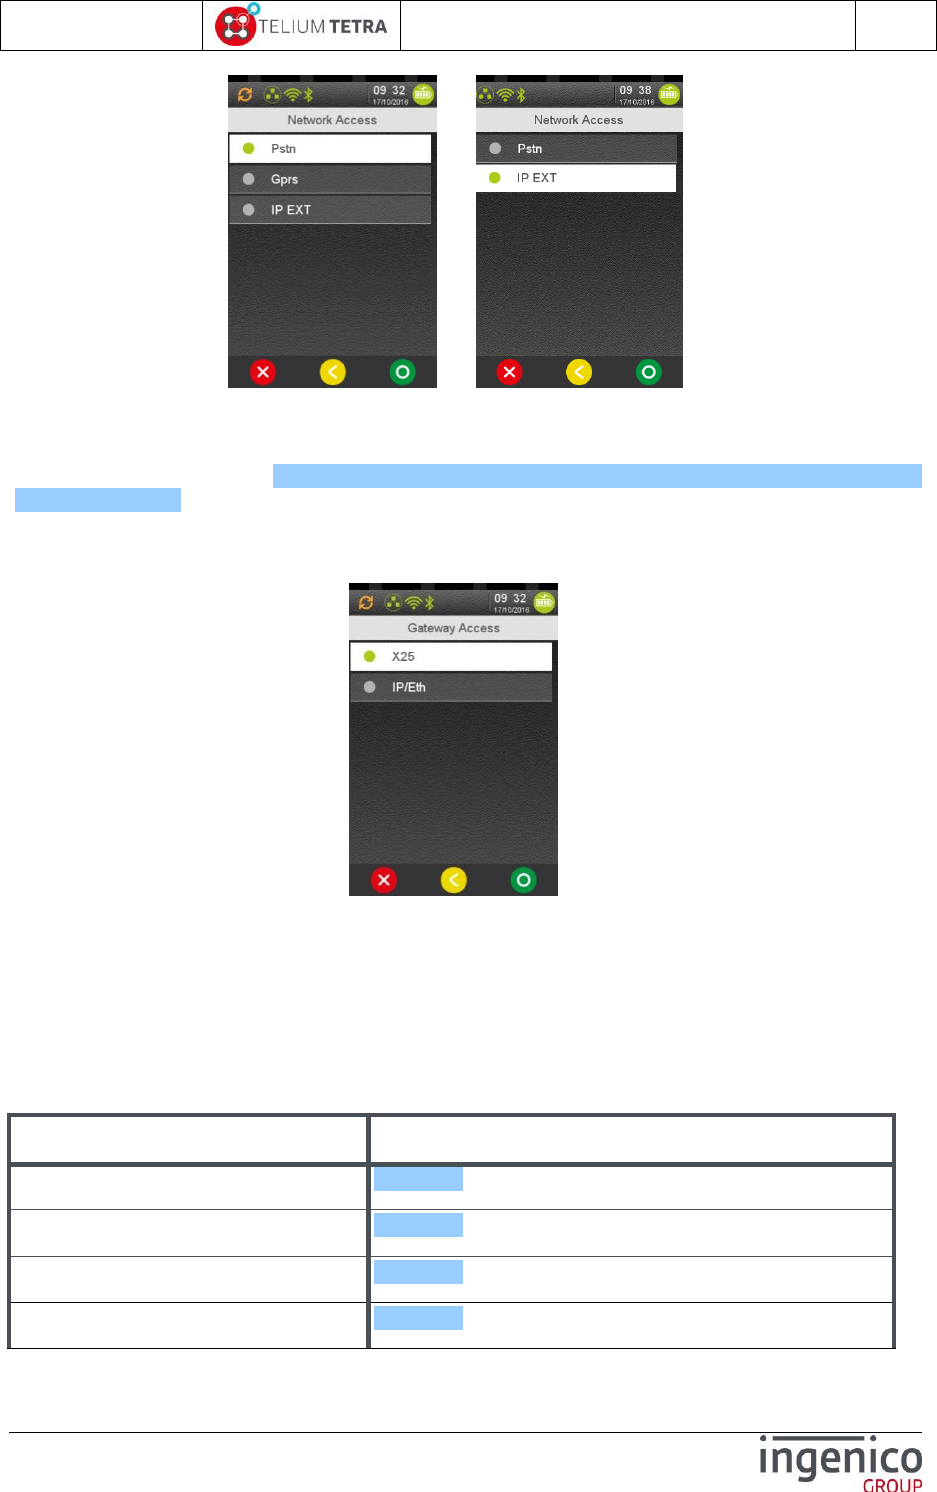
ICO-OPE-02757-V5
TETRA Terminal
User's guide
Public
191/199
Ingenico document - Reproduction or disclosure prohibited without written authorization
Please check document validity before using
or …
Except for “X25” via “PSTN”, a common set of parameters are needed for each communications
mean. There are proposed to user after specific parameters setting. Common set of parameter are
listed in table below: refer to Table 11 – French configuration – Communications means common
set of parameters.
When “PSTN” is selected, before proposing common parameters, the terminal requires the gateway
access mode selection.
Select one of the two possibilities:
X25 – access to Transpac servers via internal modem and PAD. If selected, the configuration
of the network is finished.
IP/Eth – access to Transpac servers via IP/X25 gateway.
When “GPRS” or “IP EXT” is selected, only the common set of parameters is proposed to the user.
The following table lists the different parameters that will be proposed in next step and the links on
their description.
Item
Reference
Gateway for IP/ETH access
12_1_1_1
SSL for IP/ETH access
12_1_1_2
IP address
12_1_1_3
Port
12_1_1_4

ICO-OPE-02757-V5
TETRA Terminal
User's guide
Public
192/199
Ingenico document - Reproduction or disclosure prohibited without written authorization
Please check document validity before using
Fallback network access
12_1_2
Table 11 – French configuration – Communications means common set of parameters
Gateway for IP/ETH access
When “IP/ETH” has been selected the type of gateway or its absence must be selected, as illustrates
below:
Enter the gateway number according to predefined values listed in the table below.
Item
Reference
0
NO GATEWAY
32
NO X28
33
PAD X28 SSL
40
RFC1086
41
RFC1086 SSL
42
RFC1086+
43
RFC1086+ SSL
64
GIPX25 V2
65
GIPX25 V2 SSL
66
GIPX25 V1
67
GIPX25 V1 SSL
Table 12 – French configuration - List of gateway numbers
Note: Configuration without SSL must not be used anymore.
SSL for IP/ETH access
When a gateway has been selected, according to its constraints:
ICO-OPE-02757-V5
TETRA Terminal
User's guide
Public
193/199
Ingenico document - Reproduction or disclosure prohibited without written authorization
Please check document validity before using
No SSL required
SSL required
SSL is an option
The terminal proposes respectively to:
select SSL profile according to all profiles present in terminal (predefined gateway with odd
number, SSL is required => SSL choice not proposed)
select optional activation of SSL followed with profile selection
continue to next parameters. (predefined gateway with even number, SSL is not required)
The following screenshots illustrate the 2 use cases:
=> or
=> =>
If SSL is activated, select a SSL profile in the list.
Next parameters to select are IP address and port number.
IP address
ICO-OPE-02757-V5
TETRA Terminal
User's guide
Public
194/199
Ingenico document - Reproduction or disclosure prohibited without written authorization
Please check document validity before using
Enter the IP address. IP Address is composed of four digital fields, each one from 0 to 255.
port
Enter the port number (up to ten digits).
Fall back network access parameters
At the end of the network access parameters selection, the terminal proposes to select a second
network access to use when the first one is busy or unavailable.
When a fall back network access is selected, the same sequence than exposed in the previous
paragraphs related to PSTN or GPRS is proposed to select parameters.
ICO-OPE-02757-V5
TETRA Terminal
User's guide
Public
195/199
Ingenico document - Reproduction or disclosure prohibited without written authorization
Please check document validity before using
Cash register activation
This menu is used to activate the cash register connection according to French standard protocol.
When selecting “On”, the communication link used must be specified. The following screen is
displayed.
Declare (or not) the connection to a computer system. Activate only if there is an effective connection
to a computer system.
If a connection to a cash register is selected, the different available serial links are proposed to user:
or or …
If a no USB link is selected, the serial port speed is proposed to selection.
Select the dialog speed on the serial link.
ICO-OPE-02757-V5
TETRA Terminal
User's guide
Public
196/199
Ingenico document - Reproduction or disclosure prohibited without written authorization
Please check document validity before using
12_2 Summary of parameters to customize
The terminal configuration is divided in 19 files reflecting TETRA services recorded in terminal: it also
eases default parameters overlaying according to hardware and software differences between
terminals.
Filenames
Description
local.desktopenv.explorer.PBT
Default parameters of Explorer
Explorer style
Default idle state
Blacklisting of Explorer panel / subpanel /
Icon / menu
Default shortcuts table definition
local.desktopenv.header.PBT
Default parameters of Header
Position
Set or not
local.desktopenv.inactivityHandler.PBT
Default idle state parameters
screen saver management
eco-mode management (wake-up and
standby conditions)
PCI V4 cyclic reboot
Note: The name of file has been changed since
SDK11.10.0. Custom configuration including this
file to compatible must be updated accordingly.
local.desktopenv.settings.PBT
Default general settings parameters
Language
Time and date formats
Internationalization parameters (Currency,
separator …)
local.communication.packip.PBT
Default IP stack parameters
ICMP echo mode
local.device.backlight.display.PBT
Default parameters of display backlight
Low power level
Normal level
Inactivity duration before low power
local.device.backlight.keyboard.PBT
Default parameters of keyboard backlight
Low power level
Normal level
Inactivity duration before low power
local.device.buzzer.PBT
Default parameters of buzzer
Frequency
Volume
Beep duration
local.device.communication.eth0.PBT
Default parameters of Ethernet (ETH0)
DHCP activation
IPv4 address
Netmask
Gateway address
local.device.communication.gprs.PBT
Default parameters of GPRS
APN
Login

ICO-OPE-02757-V5
TETRA Terminal
User's guide
Public
197/199
Ingenico document - Reproduction or disclosure prohibited without written authorization
Please check document validity before using
Password
Data mode to activate during startup
local.device.communication.modem.PBT
Default parameters of modem
PABX configuration
PABX default parameters (type, number,…)
local.service.directory.PBT
Default parameters of terminal startup
sequences.
Initial PLATFORM software components list
to start . (cannot be customized by USER)
Mandatory CORPORATE software
components list to start first. (cannot be
customized by USER)
User software components list to start first.
List of software components that can be
postponed and started later when the
processor is less overloaded.
Parameters to consider processor not
overloaded condition.
local.software.tmscall.PBT
Default parameters of automatic download
Network type
TCP address
TCP port
SSL profile
Phone number
APN
Login
Password
Contract number
local.transaction.amount.PBT
Default parameters of amount entry
Amount entry as default or not
Loop mode activation
Time-out to clear entry
Default payment type
local.transaction.transactionservice.PBT
Default parameters of Transaction service
Time-out of card insertion detection
Time-out of card removal waiting
Number of magnetic card swipe retries
Number of contact card retries
Chip to swipe fallback activation
Contactless interface activation
Generic payment type definition (string and
value)
local.transaction.userinterface.PBT
Default parameters of Transaction service
human interface
Beep on card removal activation
Frequency of the removal beep
local.desktopenv.desktop.PBT
Default parameters of desktop service (in
particular screen windows and layer
management)
Screen rotation activation
local.desktopenv.accelerometer.PBT
Default parameters of accelerometer

ICO-OPE-02757-V5
TETRA Terminal
User's guide
Public
198/199
Ingenico document - Reproduction or disclosure prohibited without written authorization
Please check document validity before using
Wake up condition activation
local.device.communication.pcl.PBT
Default parameters of PCL interface
Used communication link
Start condition
SSL activation
Targethost
Note: When possible values to set are not documented in *.PBT file, refer to framework TELIUM3
CHM file and search current set value or parameter to obtain other possible values.

ICO-OPE-02757-V5
TETRA Terminal
User's guide
Public
199/199
Ingenico document - Reproduction or disclosure prohibited without written authorization
Please check document validity before using
This Document is Copyright © 2015-2016 by INGENICO Group. INGENICO
retains full copyright ownership, rights and protection in all material contained in
this document. The recipient can receive this document on the condition that he
will keep the document confidential and will not use its contents in any form or by
any means, except as agree beforehand, without the prior written permission of
INGENICO. Moreover, nobody is authorized to place this document at the
disposal of any third party without the prior written permission of INGENICO. If
such permission is granted, it will be subject to the condition that the recipient
ensures that any other recipient of this document, or information contained
therein, is held responsible to INGENICO for the confidentiality of that information.
Care has been taken to ensure that the content of this document is as accurate
as possible. INGENICO however declines any responsibility for inaccurate,
incomplete or outdated information. The contents of this document may change
from time to time without prior notice, and do not create, specify, modify or
replace any new or prior contractual obligations agreed upon in writing
between INGENICO and the user.
INGENICO is not responsible for any use of this device, which would be non
consistent with the present document.
All trademarks used in this document remain the property of their rightful owners.
