Identity Implementation Guide
User Manual:
Open the PDF directly: View PDF ![]() .
.
Page Count: 46
- What Is Salesforce Identity?
- How to use Salesforce Identity
- Quick Start: Set up your own domain, add a Connected App and use the App Launcher
- My Domain
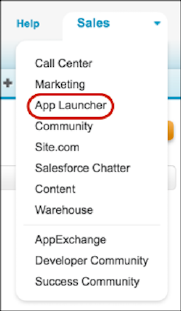
- Configure and Use the App Launcher
- Set Up Single Sign-On to Google Apps
- Set Two-Factor Authentication Login Requirements
- Customize Your Login Page with Your Own Branding
- Synchronize your Salesforce and Active Directory Users with Identity Connect
- Tutorial: Test Single Sign-On from an External Identity Provider
- Monitor Applications and Run Reports
- Use External Identities to Extend Your Organization to New Users
- Get More Information about Salesforce Identity, Single Sign-On and Security
- Index
© Copyright 2000–2017 salesforce.com, inc. All rights reserved. Salesforce is a registered trademark of salesforce.com, inc.,
as are other names and marks. Other marks appearing herein may be trademarks of their respective owners.

CONTENTS
Chapter 1: What Is Salesforce Identity? .....................................1
Chapter 2: How to use Salesforce Identity ..................................4
Chapter 3: Quick Start: Set up your own domain, add a Connected App and use the
App Launcher .......................................................5
Use My Domain to Create Your Own Subdomain Name ............................6
Launch Your Connected App from the Salesforce App Launcher ......................7
Chapter 4: My Domain ................................................9
Set Up a My Domain Name ..............................................11
Define Your Domain Name ...........................................11
Customize Your Login Page with Your Brand ...............................12
Add Identity Providers on a Login Page ...................................13
Set the My Domain Login Policy ........................................13
My Domain URL Changes ...............................................14
Test and Deploy Your New My Domain Subdomain ..............................14
Guidelines and Best Practices for Implementing My Domain ........................15
Get System Performance and Maintenance Information with My Domain ...............16
Chapter 5: Configure and Use the App Launcher ............................17
Enable the App Launcher with a Profile in Salesforce Classic ........................18
Enable the App Launcher with a Permission Set in Salesforce Classic ..................19
Set the Default Sort Order for Apps .........................................20
Reorder the App Menu and App Launcher in Salesforce Classic ..................20
Reorder the App Launcher Apps in Lightning Experience .......................21
Make the App Launcher the Default Landing Page ...............................21
Chapter 6: Set Up Single Sign-On to Google Apps ...........................22
Get a Salesforce Identity Provider Certificate ...................................23
Set Google Administrator Single Sign-On Options ...............................23
Create a Connected App for GMail .........................................24
Chapter 7: Set Two-Factor Authentication Login Requirements ..................26
Verify Your Identity with a One-Time Password Generator App or Device ................27
Chapter 8: Customize Your Login Page with Your Own Branding ................28
Chapter 9: Synchronize your Salesforce and Active Directory Users with Identity
Connect ..........................................................29
Identity Connect ......................................................30
Installing Identity Connect ...............................................30
Chapter 10: Tutorial: Test Single Sign-On from an External Identity Provider .........31
Establish a Federation ID ................................................32
Set up your identity provider ..............................................32
Generate SAML ......................................................33
Troubleshoot SAML assertions ............................................34
Chapter 11: Monitor Applications and Run Reports ...........................35
Monitor Usage for Connected Apps ........................................36
Create an Identity Users Report ...........................................37
Chapter 12: Use External Identities to Extend Your Organization to New Users ......39
Chapter 13: Get More Information about Salesforce Identity, Single Sign-On and
Security ...........................................................41
Index ............................................................42
Contents
CHAPTER 1 What Is Salesforce Identity?
EDITIONS
Available in: Salesforce
Classic
Available in: Enterprise,
Performance, Unlimited,
Developer, and
Database.com Editions
Salesforce Identity connects your Salesforce org users with external applications and services while
providing administrative tools for monitoring, maintaining, and reporting user apps and authorization.
Note: Salesforce Identity Demo (12:16 minutes)
Take a quick tour of Salesforce Identity features.
Salesforce Identity is an identity and access management (IAM) service with the following features.
•Cloud-based user directories, so user accounts and information are stored and maintained in
one place, while available to other services or applications.
•Authentication services to verify users and keep granular control over user access. You can
select which apps specific users can use, require two-factor authentication, and set how often individual users must log in to maintain
their session.
•Access management and authorization for third-party apps, including UI integration, so a user’s apps and services are readily available.
•App user provisioning that streamlines the process for providing and removing access to apps to multiple users simultaneously.
•An API for viewing and managing your deployment of Identity features.
•Identity event logs for creating reports and dashboards on single sign-on and connected app usage.
•Salesforce Identity Connect, a connector that integrates Microsoft Active Directory (AD) with Salesforce. You can manage AD users
and Salesforce users simultaneously. You can configure Identity Connect to give AD users access to their Salesforce orgs without
having to log in again.
To implement Salesforce Identity, use any of the following.
Security Assertion Markup Language (SAML)
Security Assertion Markup Language (SAML) is an XML-based protocol that allows you to transfer user information between services,
for example, from Salesforce to Microsoft 365. Apps use this information to authorize users and enable single sign-on. Salesforce
supports SAML for single sign-on into Salesforce from a corporate portal or identity provider.
OAuth 2.0
OAuth 2.0 is an open protocol used for single sign-on to allow secure authorization between applications. OAuth authorization flows
describe the options for implementing OAuth in Salesforce orgs. For more information on specific flows, see Force.com REST API
Developer Guide.
OpenID Connect
Open ID Connect is an authentication protocol based on OAuth 2.0 that sends identity information between services. With OpenID
Connect, users can log in to another service, like Gmail, and then access their Salesforce org without logging in again.
My Domain
My Domain allows you to define your own domain name within the Salesforce domain (for example,
https://companyname.my.salesforce.com). My Domain makes it easier to manage login and authentication and
allows you to customize your login page. Salesforce requires My Domain if you want to use Lightning components in Lightning tabs,
Lightning Pages, or as a standalone app.
Connected Apps
A connected app integrates an application with Salesforce using APIs. Connected apps use standard SAML and OAuth protocols to
authenticate, provide single sign-on, and provide tokens for use with Salesforce APIs. In addition to standard OAuth capabilities,
1
connected apps allow Salesforce admins to set various security policies and have explicit control over who can use the corresponding
apps.
App Launcher
The App Launcher allows you to give your users easy access to apps that they use most often. Users go to the App Launcher to
launch Salesforce and third-party apps without having to log in again (referred to as single sign-on). The App Launcher presents
tiles that link to your connected apps and standard apps, all from one location in Salesforce. All Lightning Experience users have
access to the App Launcher. Salesforce Classic users must have the “Use Identity Features” permission and the App Launcher option
in their profile set to Visible. In Salesforce Classic, the App Launcher appears as an app in the Force.com App menu.
Identity License
The Identity license grants users access to Identity features. Salesforce Classic users must have the “Use Identity Features” permission
to get the App Launcher. All Lightning Experienceusers have the App Launcher.
Identity licenses are included with Enterprise, Performance, and Unlimited Editions. Ten free Identity user licenses are included
with each new Developer Edition org.
External Identity License
An External Identity license grants Identity features such as the App Launcher and single sign-on to external users. With External
Identity, you can give your customers and partners access to your org through an external identity community.
The license is included with all user licenses in Enterprise, Performance, and Unlimited Editions. Five free External Identity user
licenses are included with each new Developer Edition org.
Identity Provider and Service Provider integration
An identity provider is a trusted provider that lets you use single sign-on to access other websites. A service provider is a website that
hosts applications. You can enable Salesforce as an identity provider and define one or more service providers. Your users can then
access other applications directly from Salesforce using single sign-on. Single sign-on can be a great help to your users: instead of
having to remember many passwords, they only have to remember one. Plus, the applications can be added as tabs to your Salesforce
organization, which means users don’t have to switch between programs.
Salesforce Identity Connect
Identity Connect integrates Microsoft Active Directory with Salesforce via a service that runs on either Windows or Linux platforms.
It gives AD users single sign-on access to Salesforce. When syncing AD users, the identity service provider can be either Salesforce
or Identity Connect.
Two-Factor Authentication
With two-factor authentication enabled, users are required to log in with two pieces of information, such as a username and a
one-time password (OTP). Salesforce supports user-defined OTPs and OTPs generated from software or hardware devices.
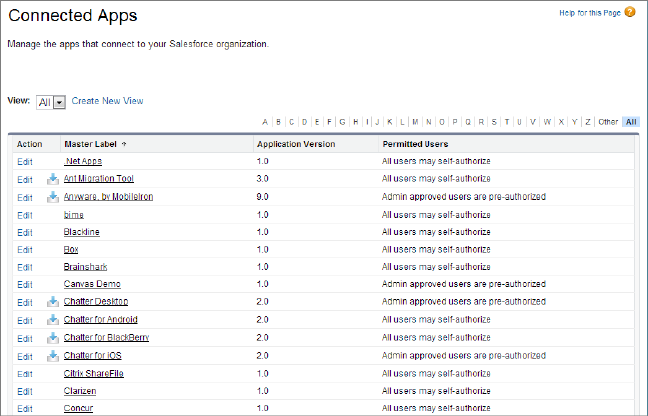
Here’s the Salesforce admin’s connected apps page where you manage user access to apps based on user profiles and permission sets.
2
What Is Salesforce Identity?

CHAPTER 2 How to use Salesforce Identity
This is a quick narrative showing how a company can combine some of the Salesforce Identity features to improve the experience of
their employees while providing administrative control over the use of various applications.
Salesforce Identity provides single sign-on (SSO) for employees to sign in to multiple applications to get their job done. Some of those
applications are integrated into their Salesforce organization, and some might be third-party, external applications.
Here’s an example of how a single company, Universal Containers, might use several Salesforce Identity features to meet their needs.
Example: Universal Containers has employees that need to sign-in to multiple applications to get their job done. It needs a single
sign-on (SSO) solution, and decides to use Salesforce to do it. In order to set-up Salesforce as an SSO provider (also called the
“identity provider”), Universal Containers must set up a custom domain using “My Domain” in their Salesforce organization. With
their own domain, Universal Containers creates and manages their own authorization settings as employees log in to that domain.
Then, Universal Containers leverages Security Assertion Markup Language (SAML) to pass authentication and authorization
information between their domain and other providers. Users logged into the Universal Containers custom domain are able to
use external applications without having to log in again. And conversely, these users can also access the Universal Containers
domain while using approved external applications, without having to log in again (in this case, the external application is the
“identity provider”). Users can have single sign-on access between any application that supports SAML standards, such as Google
Apps.
Next, Universal Containers decides they also want to enhance their own security while enabling single sign-on. They implement
two-factor authentication to require users to enter a unique one-time code while logging in. Universal Containers also customizes
the login page, making the page more consistent with their corporate identity and easier for users logging in to see where they
are before entering authentication information.
Using the App Launcher, Universal Containers controls the apps that are available to individual users, and how frequently the user
needs to log in. They also use the App Launcher to extend single sign-on to their mobile users through a mobile browser or the
Chatter native mobile app.
For login and user management, they decide to integrate Active Directory with Salesforce using Identity Connect, so users in their
corporate database are added to their Salesforce organization. Users with corporate accounts can easily log in to their Salesforce
organization using their Active Directory credentials, or they can use single sign-on from their desktop.. Furthermore, changes to
users in either Active Directory or Salesforce are integrated between the two environments.
After the system is up and running, Universal Containers builds reports and dashboards to track users’ login history and application
usage. With these reports, administrators can keep track of authorized usage, then adjust authorization as needed.
4

CHAPTER 3 Quick Start: Set up your own domain, add
a Connected App and use the App
Launcher
This quick start provides a hands-on tutorial to familiarize yourself with combining several Salesforce
Identity features.
In this chapter ...
•Use My Domain to
Create Your Own
Subdomain Name
Important: Use a new Developer Edition (DE) organization, Winter 14 or newer. Upgraded, legacy
DE organizations may not have all the required features for this quick start.
•Launch Your
Connected App from
All you need to start using Identity features is: a custom Salesforce domain created using My Domain, a
connected app to launch from your Salesforce organization, and the App Launcher configured for the
appropriate users of the allowed connected apps.
the Salesforce App
Launcher
5

Use My Domain to Create Your Own Subdomain Name
Create your own subdomain to better manage login and authentication for your Salesforce org. A subdomain is also a way to brand
your org with your company name, for example, https://yourcompanyname.my.salesforce.com.
While you’re learning to use My Domain, don’t perform these steps in your production org. For a good introduction, see the Trailhead
module, User Authentication. After you deploy your new domain name, you can’t reverse it without contacting Salesforce Support.
Note: Setting Up My Domain (5:11 minutes)
See how to use My Domain to customize your Salesforce org URL and login.
A subdomain name helps you better manage login and authentication for your org in several key ways. You can:
•Highlight your business identity with your unique domain URL
•Brand your login screen and customize right-frame content
•Block or redirect page requests that don’t use the new domain name
•Work in multiple Salesforce orgs at the same time
•Set custom login policy to determine how users are authenticated
•Let users log in using a social account, like Google and Facebook, from the login page
•Allow users to log in once to access external services
The following steps use the company name “universal containers” as an example. However, each My Domain must be unique, so pick
a name of your own.
1. From Setup, enter My Domain in the Quick Find box, then select My Domain.
2. Enter the subdomain name you want to use within the sample URL. For example, if a company called Universal Containers uses the
subdomain universalcontainers, the company’s login URL is
https://universalcontainers.my.salesforce.com/. Your name can include up to 40 letters, numbers, and
hyphens.
You can’t use these reserved words for subdomains:
•www
•salesforce
•heroku
You can’t start the domain name with:
•root
•status
•a hyphen (-)
3. Click Check Availability. If your name is already taken, choose a different one.
4. Click Register Domain.
5. You receive an email when your domain name is ready for testing. It can take a few minutes.
Test your domain.
1. In the Salesforce email, click the link to log in to your new subdomain. Or you can return to My Domain from Setup: Enter My
Domain in the Quick Find box, then select My Domain. Now you’re at Step 3 of the wizard.
2. Notice that the URL in the browser address bar shows your new subdomain.
6
Use My Domain to Create Your Own Subdomain NameQuick Start: Set up your own domain, add a Connected App
and use the App Launcher
At this point, you’re the only one in your org that has the subdomain URL. As you click through the UI, check that all the pages use
the new subdomain.
Note: If you’ve customized your org, such as modified buttons or added Visualforce pages, look for links that don’t redirect
to the subdomain. Broken links can occur when URLs reference your instance name (such as na1.salesforce.com). For more
information, enter “hard-coded references” in Salesforce Help.
Deploy your domain.
After you’re sure that all links redirect to your subdomain, you can make the subdomain available to users.
1. From Setup, enter My Domain in the Quick Find box, then select My Domain.
2. Click Deploy to Users.
Next, edit your login policies for the subdomain in My Domain Settings, and customize your login page.
Launch Your Connected App from the Salesforce App Launcher
Configure the connected app for single sign-on from your Salesforce org and add it to the App Launcher.
The App Launcher presents tiles that link to your connected apps and standard apps, all from one location in Salesforce. All Lightning
Experience users have access to the App Launcher. Salesforce Classic users must have the “Use Identity Features” permission and the
App Launcher option in their profile set to Visible. In Salesforce Classic, the App Launcher appears as an app in the Force.com App
menu. As the Salesforce admin of your DE org, you already have access to the App Launcher.
1. To launch your connected app from your Salesforce org, you need to give it a start URL.
2. In your Salesforce org, from Setup, enter “Connected Apps” in the Quick Find box, then select the option for managing connected
apps.
You see your new connected app listed.
3. Click Edit next to your connected app name.
4. In the Basic Information section, give your app a Start URL.
For example, if your app is “glacial-temple-2472,” the URL is https://glacial-temple-2472.herokuapp.com/.
Note: Include the https:// prefix.
5. Click Save.
6. In Lightning Experience, click to open the App Launcher. In Salesforce Classic, select the App Launcher from the drop-down app
menu.
7
Launch Your Connected App from the Salesforce App
Launcher
Quick Start: Set up your own domain, add a Connected App
and use the App Launcher
You see your connected app on the App Launcher tab. You can click it to launch the app.
You can give your connected app a custom logo, and customize the App Launcher appearance. Then, monitor connected app usage
for all your users with reports and adjust your security settings as needed.
8
Launch Your Connected App from the Salesforce App
Launcher
Quick Start: Set up your own domain, add a Connected App
and use the App Launcher
CHAPTER 4 My Domain
EDITIONS
Available in: both Salesforce
Classic and Lightning
Experience
Available in: Performance,
Unlimited, Enterprise,
Developer, Professional,
and Group Editions.
Add a subdomain to your Salesforce org URL with the My Domain
Salesforce feature. Having a subdomain lets you highlight your
brand and makes your org more secure. A subdomain is convenient
and allows you to personalize your login page.
Using My Domain, you define a subdomain that's part of your
Salesforce domain. For example, developer is a subdomain of
the salesforce.com domain. With a subdomain, you replace
the URL that Salesforce assigned you, like
https://na30.salesforce.com, with your chosen name,
like https://somethingcool.my.salesforce.com.
A subdomain is also referred to as a custom domain. However, a
custom domain has a specific meaning for Salesforce Communities.
In this chapter ...
•Set Up a My Domain
Name
•My Domain URL
Changes
•Test and Deploy Your
New My Domain
Subdomain
•Guidelines and Best
Practices for
Implementing My
Domain
A subdomain name helps you better manage login and authentication for your org in several key ways.
You can:
•Get System
Performance and
Maintenance •Highlight your business identity with your unique domain URL
Information with My
Domain •Brand your login screen and customize right-frame content
•Block or redirect page requests that don’t use the new domain name
•Work in multiple Salesforce orgs at the same time
•Set custom login policy to determine how users are authenticated
•Let users log in using a social account, like Google and Facebook, from the login page
•Allow users to log in once to access external services
My Domain is required before you can use these Salesforce features:
•Single sign-on (SSO) with external identity providers
•Social sign-on with authentication providers, such as Google and Facebook
•Lightning components in Lightning component tabs, Lightning Pages, the Lightning App Builder,
or standalone apps
Watch a Demo (5:11 minutes)
My Domain is also available for sandbox environments.
Note: My Domain is subject to additional Terms of Use.
Your domain name uses standard URL format, including:
•Protocol: https://
•Subdomain prefix: your brand or term
•Domain: my.salesforce.com
Your name can include up to 40 letters, numbers, and hyphens. You can’t start the subdomain name
with root, status, or a hyphen.
You have the chance to try out names and check availability before you commit to your domain name.
9

Salesforce is enabled as an identity provider when a domain is created. After your domain is deployed,
you can add or change identity providers and increase security for your org by customizing your domain’s
login policy.
Important: After you deploy your domain, it’s activated immediately, and requests with the
original URL are redirected to your new domain. Only Salesforce Customer Support can disable or
change your domain name after it’s deployed.
10
My Domain

Set Up a My Domain Name
EDITIONS
Available in: both Salesforce
Classic and Lightning
Experience
Available in: Performance,
Unlimited, Enterprise,
Developer, Professional,
and Group Editions.
USER PERMISSIONS
To set up a domain name:
•“Customize Application”
Implementing your subdomain name with My Domain is quick and easy.
1. Find a domain name that’s available and sign up for it.
2. Customize the logo, background color, and right-frame content on your login page.
3. Add or change the identity providers available on your login page.
4. Test your domain name and deploy it to your entire org.
5. Set the login policy for users accessing your pages.
Define Your Domain Name
EDITIONS
Available in: both Salesforce
Classic and Lightning
Experience
Available in: Performance,
Unlimited, Enterprise,
Developer, Professional,
and Group Editions.
USER PERMISSIONS
To define a domain name:
•“Customize Application”
Register your org’s custom domain name with My Domain. You can try out names and check
availability before registering the name.
Start setting up your My Domain subdomain by finding a domain name unique to your org and
registering it. Choose your name carefully. When you register, Salesforce updates its domain name
registries with your domain name. After the name is registered, only Salesforce Customer Support
can disable or change your domain name.
1. From Setup, enter My Domain in the Quick Find box, then select My Domain.
2. Enter the subdomain name you want to use within the sample URL. For example, if a company
called Universal Containers uses the subdomain universalcontainers, the company’s
login URL is https://universalcontainers.my.salesforce.com/. Your
name can include up to 40 letters, numbers, and hyphens.
You can’t use these reserved words for subdomains:
•www
•salesforce
•heroku
You can’t start the domain name with:
•root
•status
•a hyphen (-)
3. Click Check Availability. If your name is already taken, choose a different one.
4. Click Register Domain.
5. You receive an email when your domain name is ready for testing. It can take a few minutes.
The new subdomain is available to your users after you test and deploy it.
11
Set Up a My Domain NameMy Domain

Customize Your Login Page with Your Brand
EDITIONS
Available in: both Salesforce
Classic and Lightning
Experience
Available in: Performance,
Unlimited, Enterprise,
Developer, Professional,
and Group Editions.
USER PERMISSIONS
To customize a login page:
•“Customize Application”
Customize the look and feel of your login page by adding a background color, logo, and right-side
content. Customizing your login page with your company’s branding helps users recognize your
page.
Setting Up a My Domain (Salesforce Classic) (5:10 minutes. Login page branding starts at 2:43.)
1. From Setup, enter My Domain in the Quick Find box, then select My Domain.
2. Under Authentication Configuration, click Edit.
3. To customize your logo, upload an image.
Images can be .jpg, .gif, or .png files up to 100 KB. Maximum image size is 250px by 125px.
4. To customize your login page background, click the or enter a valid hexadecimal color
code.
5. To support advanced authentication methods for iOS users, select Use the native browser
for user authentication on iOS.
This iOS user authentication option is for users of Salesforce1 and Mobile SDK applications on
iOS devices. It enables support of authentication methods, such as Kerberos, Windows NT LAN Manager (NTLM), or certificate-based
authentication. When you select this option, users on iOS devices are redirected to their native browser when using single sign-on
authentication into your custom domain. For other operating systems, Salesforce1 and applications using Mobile SDK version 3.1
or later can support certificate-based authentication when the applications are integrated with Mobile Device Management (MDM)
software.
6. Enter the URL of the file to be included in the right-side iFrame on the login page.
The content in the right-side iFrame can resize to fill about 50% of the page. Your content must be hosted at a URL that uses SSL
encryption and the https:// prefix. To build your own custom right-side iFrame content page using responsive web design, use the
My Domain Sample template.
Example: https://c.salesforce.com/login-messages/promos.html
7. Optionally, select authentication services as identity providers on the login page, such as social sign-on providers like Google and
Facebook. Users can then log in with their social account credentials. Configure authentication services as Auth. Providers in Setup.
8. Click Save.
12
Customize Your Login Page with Your BrandMy Domain
Add Identity Providers on a Login Page
EDITIONS
Available in: both Salesforce
Classic and Lightning
Experience
Available in: Performance,
Unlimited, Enterprise,
Developer, Professional,
and Group Editions.
USER PERMISSIONS
To add identity providers on
a login page:
•“Customize Application”
Allow users to authenticate using alternate identity provider options right from your login page. If
you’ve enabled single sign-on and configured SAML, or set up external authentication providers
as Auth. Providers in Setup, you can provide links to these identity providers on your domain’s login
page. Users are sent to the identity provider’s login screen to authenticate and then redirected back
to Salesforce.
Note: Available authentication services include all providers configured as SAML single
sign-on identify providers or external authentication providers, except Janrain. You can’t use
Janrain for authentication from the login page.
1. From Setup, enter My Domain in the Quick Find box, then select My Domain.
2. Under Authentication Configuration, click Edit.
3. Select one or more already configured authentication services as an identity provider.
4. Click Save.
Set the My Domain Login Policy
EDITIONS
Available in: both Salesforce
Classic and Lightning
Experience
Available in: Performance,
Unlimited, Enterprise,
Developer, Professional,
and Group Editions.
USER PERMISSIONS
To set login policy for a
domain:
•“Customize Application”
Manage your user logins by customizing the login policy for your domain. By default, users log in
from a generic Salesforce login page, bypassing the login page specific to your domain. If you don’t
set a login policy, users can make page requests without your domain name, such as when using
old bookmarks.
1. From Setup, enter My Domain in the Quick Find box, then select My Domain.
2. Under My Domain Settings, click Edit.
3. To disable authentication for users who don’t use your domain-specific login page, set a login
policy. Selecting the login policy prevents users from logging in on the generic
https://<instance>.salesforce.com/ login page and then being redirected
to your pages after login.
4. Choose a redirect policy.
a. To allow users to continue using URLs that don’t include your domain name, select Redirect
to the same page within the domain.
Note: Bookmarks don’t work when the Redirect to the same page within the
domain option is selected for partner portals. Manually change the existing bookmarks
to point to the new domain URL by replacing the Salesforce instance name with your
custom domain name. For example, replace
https://na30.salesforce.com/ with
https://yourDomain.my.salesforce.com/ in the bookmark’s URL.
b. To remind users to use your domain name, select Redirected with a warning to the same page within the domain. After
reading the warning, users are redirected to the page. Select this option for a few days or weeks to help users transition to a new
domain name.
c. To require users to use your domain name when viewing your pages, select Not redirected.
5. Click Save.
13
Add Identity Providers on a Login PageMy Domain
My Domain URL Changes
EDITIONS
Available in: both Salesforce
Classic and Lightning
Experience
Available in: Performance,
Unlimited, Enterprise,
Developer, Professional,
and Group Editions.
When you set up a subdomain name for your org with My Domain, all your application URLs,
including Visualforce pages, also change. Make sure that you update all application URLs before
you deploy a domain name. For example, the Email Notification URL field in Chatter
Answers continues to send notifications with the old URLs to internal users unless you update it.
This table shows you the differences.
New URLOld URLURL Type
https://<subdomain>.my.
salesforce.com
https://login.salesforce.comLogin
https://<subdomain>.my.
salesforce.com/<pageID>
https://<instance>.salesforce.com/<pageID>Application
page or tab
https://<subdomain>--c.
<instance>.visual.
force.com/apex/<pagename>
https://c.<instance>visual.force.com/apex/<pagename>Visualforce
page with no
namespace
https://<subdomain>--
<yournamespace>.
https://<yournamespace101>.
<instance>.visual.
force.com/apex/<pagename>
Visualforce
page with
namespace <instance>.visual.force.com
/apex/
Note: If you implement My Domain in a sandbox environment, the URL format is
https://<subdomain>--<sandboxname>.<instance>.my.salesforce.com. Because you can’t have
namespaces in a sandbox environment, the format of all Visualforce page URLs in a sandbox is
https://<subdomain>--<sandboxname>--c.<instance>.visual.force.com/apex/<pagename>.
Test and Deploy Your New My Domain Subdomain
EDITIONS
Available in: both Salesforce
Classic and Lightning
Experience
Available in: Performance,
Unlimited, Enterprise,
Developer, Professional,
and Group Editions.
USER PERMISSIONS
To set up a domain name:
•“Customize Application”
After you set up your subdomain with My Domain, test it and then roll it out to your users. Testing
gives you the chance to explore your subdomain. It also helps you verify URLs for pages before
rolling out the subdomain to your users.
Important: After you deploy your domain, it’s activated immediately, and requests with the
original URL are redirected to your new domain. Only Salesforce Customer Support can disable
or change your domain name after it’s deployed.
1. Test your domain login. From Setup, enter My Domain in the Quick Find box, then
select My Domain. Or, log out of your DE org and log in to Salesforce using your new subdomain
name. Or, click the login link in the activation email you received.
You can customize your domain login page and add authentication services (like social sign-on)
before you deploy the domain to your users. You can also test the domain in a sandbox
environment.
2. Test the new domain name by clicking tabs and links. All pages now show your new domain
name.
14
My Domain URL ChangesMy Domain

If you’ve customized your Salesforce UI with features, such as custom buttons or Visualforce pages, make sure that you test your
customizations thoroughly before deploying your domain name. Look for broken links due to hard-coded references (instance-based
URLs), and use your subdomain URLs instead. For more information, enter “hard-coded references” in Salesforce Help
3. To roll out the new domain name to your org, from Setup, enter My Domain in the Quick Find box, then select My
Domain.Then click Deploy to Users and OK.
When you deploy your domain, it’s activated immediately, and all users are redirected to pages with new domain addresses. You can
now set login policies in the Domain Settings section that appears after you deploy your domain. For example, you can prevent users
from logging in from login.salesforce.com.
Guidelines and Best Practices for Implementing My Domain
EDITIONS
Available in: both Salesforce
Classic and Lightning
Experience
Available in: Performance,
Unlimited, Enterprise,
Developer, Professional,
and Group Editions.
These tips smooth the transition to using the subdomain that you created with My Domain.
•Communicate the upcoming change to your users before deploying it.
•Deploy your new subdomain when your org receives minimal traffic, like during a weekend, so
you can troubleshoot while traffic is low.
•If you’ve customized your Salesforce UI with features, such as custom buttons or Visualforce
pages, make sure that you test your customizations thoroughly before deploying your domain
name. Look for broken links due to hard-coded references (instance-based URLs), and use your
subdomain URLs instead. For more information, enter “hard-coded references” in Salesforce
Help Test them in a sandbox environment first.
•Make sure that you update all application URLs before you deploy a domain name. For example,
the Email Notification URL field in Chatter Answers continues to send notifications
with the old URLs to internal users unless you update it.
•If your domain is registered but has not yet been deployed, URLs contain your subdomain name when you log in from the My
Domain login page. However, links that originate from merge fields that are embedded in emails sent asynchronously, such as
workflow emails, still use the old URLs. After your domain is deployed, those links show the new My Domain URLs.
•Help your users get started using your new subdomain by providing links to pages they use frequently, such as your login page. Let
your users know if you changed the login policy, and encourage them to update their bookmarks the first time they’re redirected.
•Choose the Redirect Policy option Redirected with a warning to the same page within the domain to give users time to update
their bookmarks with the new subdomain name. After a few days or weeks, change the policy to Not redirected. This option requires
users to use your subdomain name when viewing your pages. It provides the greatest level of security.
•Only use Prevent login from https://login.salesforce.com if you’re concerned that users who aren’t aware of your subdomain
try to use it. Otherwise, leave the option available to your users while they get used to the new domain name.
•Bookmarks don’t work when the Redirect to the same page within the domain option is selected for partner portals. Manually
change the existing bookmarks to point to the new domain URL by replacing the Salesforce instance name with your custom domain
name. For example, replace https://na30.salesforce.com/ with
https://yourDomain.my.salesforce.com/ in the bookmark’s URL.
•If you block application page requests that don’t use the new Salesforce subdomain URLs, let your users know that they must either
update old bookmarks or create new ones for the login page. They must also update tabs or links within the app. If you change your
login redirect policy to Not Redirected, users must use the new subdomain URLs immediately.
•If you are using My Domain, you can identify which users are logging in with the new login URL and when. From Setup, enter Login
History in the Quick Find box, then select Login History and view the Username and Login URL columns.
•On the login.salesforce.com page, users can click Log in to a custom domain to enter your subdomain name and log
in. In this case, they must know the subdomain name. As a safeguard, give them a direct link to your subdomain’s login page as well.
15
Guidelines and Best Practices for Implementing My DomainMy Domain
Do the FollowingIf You Have the Following
Check to see if the API client is directly referencing the server
endpoint. The API client should use the LoginResult.serverURL
API integrations into your org
value returned by the login request, instead of using a hard-coded
server URL.
After your subdomain is deployed, Salesforce returns the server
URL containing your domain. Redirect policy settings have no effect
on API calls. That is, old calls to instance URLs continue to work.
However, the best practice is to use the value returned by
Salesforce.
Replace references to the org’s instance URL with your subdomain.Email templates
Replace references to the org’s instance URL with your subdomain.
See How to find hard-coded references with the Force.com IDE.
Custom Visualforce pages or custom Force.com apps
Tell your users to update any bookmarks in the left navigation of
their Chatter groups.
Chatter
Manually update the email notification URL.
Zones for Communities (Ideas/Answers/Chatter Answers)
To update the URL, clear the existing URL so that the field is blank
and save the page. Then the system populates the field with your
new My Domain URL.
Get System Performance and Maintenance Information with My
Domain
EDITIONS
Available in: both Salesforce
Classic and Lightning
Experience
Available in: Performance,
Unlimited, Enterprise,
Developer, Professional,
and Group Editions.
USER PERMISSIONS
To set up a domain name:
•“Customize Application”
You can get information about system performance and availability from
trust.salesforce.com. Trust reports status information based on your org instance. If
you’re using My Domain and don’t know your org instance, you can look it up.
Here’s how to get status information using your domain name.
1. Go to trust.salesforce.com.
2. Under System Status, click Learn More.
3. Under status.salesforce.com, click Status.
The Status & Maintenance page shows the status for each org instance.
4. At the top right of the page, click My Domain.
5. Enter your domain name in the search bar to get your org instance.
Don’t enter the complete URL. For example, use yourDomain, not
https://yourDomain.my.salesforce.com/.
6. Under Status & Maintenance, select All, and look for your instance.
16
Get System Performance and Maintenance Information with
My Domain
My Domain

CHAPTER 5 Configure and Use the App Launcher
Users are presented with tiles that link to their connected apps, Salesforce apps, and on-premise
applications. Salesforce admins can set the default app order for an org and determine which apps are
available to which users. They can make the App Launcher the default landing page when users first
open Salesforce.
In this chapter ...
•Enable the App
Launcher with a
Profile in Salesforce
Classic All Lightning Experience users get the App Launcher.
Salesforce Classic users need the “Use Identity Features” permission and the App Launcher option in
their profile set to Visible. Users see only the apps that they are authorized to see according to their
profile or permission sets.
•Enable the App
Launcher with a
Permission Set in
Salesforce Classic In Salesforce Classic, Salesforce admins using the System Administrator profile have access to the App
Launcher. Admins using profiles cloned from the System Administrator profile don’t.
•Set the Default Sort
Order for Apps
Note: Setting up the App Launcher (5:39 minutes)
See how to set up, use, and manage the App Launcher.
•Make the App
Launcher the Default
Landing Page
The App Launcher is particularly useful for managing access to connected apps, as shown in Quick Start:
Set up your own domain, add a Connected App and use the App Launcher. And, you can use the
AppMenuItem API for programmatic control over the apps in the App Launcher.
17
Enable the App Launcher with a Profile in Salesforce Classic
EDITIONS
Available in: Salesforce
Classic
Available in: Enterprise,
Performance, Unlimited,
and Developer Editions
Create a profile and assign it to users, so they can access the App Launcher.
Note: These steps work in Salesforce Classic. If you see the App Launcher icon ( ) on the
left side of the navigation bar at the top of your screen, you're in Lightning Experience. If not,
you're in Salesforce Classic.
In Salesforce Classic, Salesforce admins using the System Administrator profile have access to the
App Launcher. Admins using profiles cloned from the System Administrator profile don’t.
1. From Setup, enter Profiles in the Quick Find box, then select Profiles.
2. Click New Profile.
3. Select an Existing Profile as a basis for the new profile.
For example, select Standard User.
4. Enter the name of the new profile.
For example, Standard User Identity.
5. Click Save.
6. In the detail page for the new profile, click Edit.
7. In Custom App Settings, set the App Launcher to Visible, if it isn’t already.
Under Tab Settings, verify that the App Launcher tab is set to Default On.
8. Under Administrative Permissions, select Use Identity Features.
9. Click Save.
10. From Setup, enter Users in the Quick Find box, then select Users.
11. Click Edit next to each user you want to access the App Launcher.
12. In the user’s Profile field, select the new profile that has “Use Identity Features” enabled.
For example, you might use the Standard User Identity profile.
13. Click Save.
When you log in as the selected user, the App Launcher appears in the drop-down app menu.
18
Enable the App Launcher with a Profile in Salesforce ClassicConfigure and Use the App Launcher
Enable the App Launcher with a Permission Set in Salesforce Classic
EDITIONS
Available in: Salesforce
Classic
Available in: Enterprise,
Performance, Unlimited,
and Developer Editions
Create a permission set and assign it to users, so they can access the App Launcher.
Note: These steps work in Salesforce Classic. If you see the App Launcher icon ( ) on the
left side of the navigation bar at the top of your screen, you're in Lightning Experience. If not,
you're in Salesforce Classic.
1. From Setup, enter Permission Sets in the Quick Find box, then select Permission
Sets.
2. Click New.
3. Enter a Label for the new permission set.
For example, Identity Features.
4. Optionally, restrict the use of this permission set to a specific User License.
5. Click Save.
6. Click System Permissions.
7. Click Edit.
8. Select Use Identity Features.
9. Click Save.
10. From Setup, enter Users in the Quick Find box, then select Users.
11. Click the name of an existing user to whom you want to give access to the App Launcher.
12. In the Permission Set Assignments related list, click Edit Assignments.
13. Add the new permission set you created for identity features to Enabled Permission Sets.
14. Click Save.
When you log in as the selected user, the App Launcher appears in the drop-down app menu.
Note: Still not seeing the App Launcher? In the profile associated with the user, select Visible for the App Launcher setting.
19
Enable the App Launcher with a Permission Set in Salesforce
Classic
Configure and Use the App Launcher

Set the Default Sort Order for Apps
EDITIONS
Available in: both Lightning
Experience and Salesforce
Classic
Available in: Contact
Manager, Group,
Professional, Enterprise,
Performance, Unlimited,
and Developer Editions
As a Salesforce admin, you control the default sort order of the Salesforce standard, custom, and
connected apps that your users see in your org. Users can then rearrange their apps on the App
Launcher to get their liking. You can also hide apps so that they don’t show in the App Launcher.
Apps include Salesforce standard apps, such as the Salesforce Marketing app, the Service app, and
any custom apps that you created for your org. Connected apps are third-party apps, such as Gmail,
Google Drive, and Microsoft Office 365, that you install to make it easy for your users to get their
work done.
IN THIS SECTION:
Reorder the App Menu and App Launcher in Salesforce Classic
You can change the order in which apps appear in the app menu and App Launcher. The app
menu is a drop-down list in the upper-right corner of every page in Salesforce Classic. If enabled, the App Launcher is listed in the
drop-down menu. Apps in the App Launcher appear as large tiles and link to Salesforce standard apps, custom apps, and connected
apps.
Reorder the App Launcher Apps in Lightning Experience
As a Salesforce admin, you can change your org’s default visibility and the order in which apps appear in the Lightning Experience
App Launcher. Users can then reorder their personal view of the App Launcher to their liking.
Reorder the App Menu and App Launcher in Salesforce Classic
EDITIONS
Available in: Salesforce
Classic
Available in: Contact
Manager, Group,
Professional, Enterprise,
Performance, Unlimited,
and Developer Editions
USER PERMISSIONS
To view apps:
•“View Setup and
Configuration”
To manage apps:
•“Customize Application”
You can change the order in which apps appear in the app menu and App Launcher. The app menu
is a drop-down list in the upper-right corner of every page in Salesforce Classic. If enabled, the App
Launcher is listed in the drop-down menu. Apps in the App Launcher appear as large tiles and link
to Salesforce standard apps, custom apps, and connected apps.
1. From Setup, enter App Menu in the Quick Find box, then select App Menu.
2. From the list of app menu items, drag the apps to change their order. Changes take effect
immediately.
3. Optionally, click Visible in App Launcher or Hidden in App Launcher to show or hide
individual apps from the App Launcher for all users in the org.
The app menu lists all apps installed in the org. However, the apps that users see in their App
Launcher vary. Salesforce admins control each app’s visibility settings and users’ permissions.
20
Set the Default Sort Order for AppsConfigure and Use the App Launcher
Reorder the App Launcher Apps in Lightning Experience
EDITIONS
Available in: Lightning
Experience
Available in: Contact
Manager, Group,
Professional, Enterprise,
Performance, Unlimited,
and Developer Editions
USER PERMISSIONS
To view apps:
•“View Setup and
Configuration”
To manage apps:
•“Customize Application”
As a Salesforce admin, you can change your org’s default visibility and the order in which apps
appear in the Lightning Experience App Launcher. Users can then reorder their personal view of
the App Launcher to their liking.
The App Launcher displays a user’s available Salesforce apps and the connected apps that a Salesforce
admin installs for the org.
1. From Setup, enter App Menu in the Quick Find box, then select App Menu.
2. From the list of app menu items, drag the apps to change their order. Changes take effect
immediately.
3. Optionally, click Visible in App Launcher or Hidden in App Launcher to show or hide
individual apps from the App Launcher for all users in the org.
All apps installed in the org appear on the app menu items list. However, the apps that users see
in their app menu and App Launcher vary depending on each app’s visibility settings and the user’s
permissions. Users see only the apps that they are authorized to see according to their profile or
permission sets.
For connected apps and service providers to appear in the App Launcher, specify their start URL in
the App Manager.
Make the App Launcher the Default Landing Page
EDITIONS
Available in: both Salesforce
Classic and Lightning
Experience
Available in: Enterprise,
Performance, Unlimited,
and Developer Editions
Make it easy for your Salesforce Identity users to access what they need by presenting the redesigned
App Launcher as the default landing page when they log in to Salesforce.
Note: These steps work in Lightning Experience. If you see the App Launcher icon ( ) on
the left side of the navigation bar at the top of your screen, you're in Lightning Experience. If
not, you're in Salesforce Classic.
1. From Setup, enter App Manager in the Quick Find box, then select App Manager.
2. Click New Lightning App and walk through the New Lightning App wizard.
Add only the App Launcher tab to Selected Items.
3. Make the App Launcher the default when users log in for the first time.
a. From Setup, enter Profiles in the Quick Find box, then select Profiles.
b. Select a profile and scroll to the Custom App Settings section.
c. Select Default next to the Lightning app.
4. Log out and log in again.
The new Lightning app appears in the navigation bar and App Launcher.
21
Reorder the App Launcher Apps in Lightning ExperienceConfigure and Use the App Launcher
CHAPTER 6 Set Up Single Sign-On to Google Apps
Give your Salesforce organization users single sign-on access to Google Apps, such as Google Drive,
GMail, and GCal.
In this chapter ...
•Get a Salesforce
Identity Provider
Certificate
Since Google Apps uses SAML for single sign-on, you can set up your organization to launch Google
Apps from your Salesforce App Launcher without having to log in, separately, to Google. This process
is similar to the one in the quick start, and can give your Salesforce organization users single sign-on
•Set Google
Administrator Single
Sign-On Options
access to Google apps like Google Drive, GMail, and GCal. To set up Google Apps in your organization,
you need:
1. A custom domain (My Domain).
•Create a Connected
App for GMail 2. Google Apps administrator account with access to your Google Admin console.
3. A profile or permission set with “Use Identity Features” enabled.
For steps to set up your own custom domain, see Quick Start: Set up your own domain, add a Connected
App and use the App Launcher. For steps to set up a profile or permission set with “Use Identity Features”
enabled, see Configure and Use the App Launcher.
Note: Salesforce as a SSO Provider (4:14 minutes)
Learn how to use SAML and single sign-on to launch Google Apps from your Salesforce App
Launcher.
22

Get a Salesforce Identity Provider Certificate
EDITIONS
Available in: both Salesforce
Classic and Lightning
Experience
Available in: Developer,
Enterprise, Performance,
Unlimited, and
Database.com Editions
Download and save an identity provider certificate.
Follow these steps in your Salesforce organization.
1. From Setup, enter Identity Provider in the Quick Find box, then select Identity
Provider.
You get the certificate for signing SAML assertions in the Identity Provider Setup section.
Optionally, you can change the self-signed certificate to a production certificate issued by a
signing authority. For more information about certificates, see “Creating Certificates and Key
Pairs” in the online help.
2. Click Download Certificate.
The certificate validates signatures, and you need to upload it to your Google Administrator
account. Remember where you save it.
Set Google Administrator Single Sign-On Options
In your Google Administrator account, set the values for single sign-on.
You need to sign in as an Administrator to the Google Apps account at https://admin.google.com.
1. In your Google Administrator account, click More Controls > Security > Advanced Settings > Set up single sign-on (SSO)
2. Enter the following values.
a. Sign-in page URL: https://yourdomain.my.salesforce.com/idp/endpoint/HttpRedirect
Replace yourdomain with your custom domain name.
b. Sign-out page URL: https://yourdomain.my.salesforce.com
Replace yourdomain with your custom domain name.
c. Change password URL:
https://yourdomain.my.salesforce.com/_ui/system/security/ChangePassword
Replace yourdomain with your custom domain name.
d. Verification certificate: upload the identity provider certificate file you saved in Get a Salesforce Identity Provider Certificate.
e. Select Use a domain specific issuer.
23
Get a Salesforce Identity Provider CertificateSet Up Single Sign-On to Google Apps
3. Click Save changes.
Create a Connected App for GMail
EDITIONS
Available in: both Salesforce
Classic and Lightning
Experience
Available in: Developer,
Enterprise, Performance,
Unlimited, and
Database.com Editions
These steps show you how to set up a GMail connected app.
Follow these steps in your Salesforce organization.
1. From Setup, enter Apps in the Quick Find box, then select Apps.
2. In the Connected Apps section, click New.
3. In the Basic Information section, enter the following values.
a. Connected App Name: GMail.
b. Contact Email: your administrator Email address.
c. Logo Image URL: Select Choose one of our sample logos, find the logo you want, and
click on it. Then, copy the Logo URL. Paste the value back in the Logo Image URL field. Or,
enter your own URL.
4. In the Web App Settings section, enter the following values.
a. Start URL: https://gmail.google.com.
b. Select Enable SAML.
c. Entity Id: Enter google.com/a/yourGoogleAppDomainName.
Replace yourGoogleAppDomainName with your actual Google domain name.
d. ACS URL: The same as Entity Id with the “https” prefix and the “acs” suffix, such as
https://google.com/a/yourGoogleAppDomainName/acs
e. Subject Type: Select how the user is identified.
This field should contain the Google Apps Email address for the user.
Leave the other fields as is, unless you know you need to change the configuration.
24
Create a Connected App for GMailSet Up Single Sign-On to Google Apps
5. Click Save.
6. From Setup, enter “Connected Apps” in the Quick Find box, then select the option for managing connected apps.
7. Click on the name of the connected app, which is “GMail” in this case.
8. Copy the IdP-Initiated Login URL value.
9. Click Edit.
10. In the Start URL field, paste the the following string the value from the IdP-Initiated Login URL field, and add the following:
The value copied from IdP-Initiated Login URL field +
&RelayState=http%3A%2F%2Fmail.google.com%2Fa%2FyourGoogleAppDomainName
Replace yourGoogleAppDomainName with your actual Google domain. You should have a value similar to this one:
https://identitydemo.my.salesforce.com/idp/login?app=0sp30000000000k
&RelayState=http%3A%2F%2Fmail.google.com%2Fa%2Fidentitydemo.com
11. Click Save.
Now you can add this connected app to a profile or permission set. When that profile or permission set is applied to a user, the user
will be able to use the GMail connected app. You can follow the same basic process to install other Google Apps.
25
Create a Connected App for GMailSet Up Single Sign-On to Google Apps
CHAPTER 7 Set Two-Factor Authentication Login
Requirements
EDITIONS
Available in: Both Salesforce
Classic and Lightning
Experience
Available in: Contact
Manager, Group,
Professional, Enterprise,
Performance, Unlimited,
and Developer Editions
USER PERMISSIONS
To edit profiles and
permission sets:
•“Manage Profiles and
Permission Sets”
As a Salesforce admin, you can require your users to use a second factor of authentication when
they log in.
You can require two-factor authentication each time a user logs in with a username and password
to Salesforce, including orgs with custom domains created using My Domain. To set the requirement,
select the “Two-Factor Authentication for User Interface Logins” permission in the user profile (for
cloned profiles only) or permission set.
See how to set up a two-factor authentication requirement for your org and how your users can
use the Salesforce Authenticator app. Salesforce Authenticator: Set Up a Two-Factor
Authentication Requirement (Salesforce Classic)
Walk Through It: Secure Logins with Two-Factor Authentication
Users with the “Two-Factor Authentication for User Interface Logins” permission have to provide a
second factor, such as a mobile authenticator app or U2F security key, each time they log in to
Salesforce.
You can also use a profile-based policy to set a two-factor authentication requirement for users
assigned to a particular profile. Use the profile policy when you want to require two-factor
authentication for users of the following authentication methods:
•SAML for single sign-on
•Social sign-on in to Salesforce orgs or Communities
•Username and password authentication into Communities
All Salesforce user interface authentication methods, including username and password, delegated authentication, SAML single sign-on,
and social sign-on through an authentication provider, are supported. In the user profile, set the Session security level
required at login field to High Assurance. Then set session security levels in your org’s session settings to apply the policy
for particular login methods. Also in your org’s session settings, check the session security levels to make sure that Two-Factor
Authentication is in the High Assurance column.
Warning: If Two-Factor Authentication is in the Standard column, users get an error when they log in with a method that grants
standard-level security.
IN THIS SECTION:
Verify Your Identity with a One-Time Password Generator App or Device
Connect a one-time password generator app, such as Salesforce Authenticator or Google Authenticator, to verify your identity. The
app generates a verification code, sometimes called a “time-based one-time password”.
26
Verify Your Identity with a One-Time Password Generator App or Device
EDITIONS
Available in: Both Salesforce
Classic and Lightning
Experience
Available in all editions
Connect a one-time password generator app, such as Salesforce Authenticator or Google
Authenticator, to verify your identity. The app generates a verification code, sometimes called a
“time-based one-time password”.
If your company requires two-factor authentication for increased security when you log in, access
connected apps, reports, or dashboards, use a code from the app. If you’re required to use two-factor
authentication before you have an app connected, you’re prompted to connect one the next time
you log in to Salesforce.
1. Download the supported authenticator app for your device type. You can use any authenticator
app that supports the time-based one-time password (TOTP) algorithm (IETF RFC 6238), such as Salesforce Authenticator for iOS,
Salesforce Authenticator for Android, or Google Authenticator.
2. From your personal settings, enter Advanced User Details in the Quick Find box, then select Advanced User Details.
No results? Enter Personal Information in the Quick Find box, then select Personal Information.
3. Find App Registration: One-Time Password Generator and click Connect.
If you’re connecting an authenticator app other than Salesforce Authenticator, use this setting. If you’re connecting Salesforce
Authenticator, use this setting if you’re only using its one-time password generator feature (not the push notifications available in
version 2 or later).
Note: If you’re connecting Salesforce Authenticator so that you can use push notifications, use the App Registration:
Salesforce Authenticator setting instead. That setting enables both push notifications and one-time password
generation.
You can connect up to two authenticator apps to your Salesforce account for one-time password generation: Salesforce Authenticator
and one other authenticator app.
4. For security purposes, you’re prompted to log in to your account.
5. Using the authenticator app on your mobile device, scan the QR code.
Alternatively, click I Can’t Scan the QR Code in your browser. The browser displays a security key. In the authenticator app, enter
your username and the key displayed.
6. In Salesforce, enter the code generated by the authenticator app in the Verification Code field.
The authenticator app generates a new verification code periodically. Enter the current code.
7. Click Connect.
To help keep your account secure, we send you an email notification whenever a new identity verification method is added to your
Salesforce account. You get the email whether you add the method or your Salesforce admin adds it on your behalf.
SEE ALSO:
Salesforce Help: Personalize Your Salesforce Experience
27
Verify Your Identity with a One-Time Password Generator
App or Device
Set Two-Factor Authentication Login Requirements
CHAPTER 8 Customize Your Login Page with Your Own
Branding
EDITIONS
Available in: both Salesforce
Classic and Lightning
Experience
Available in: Performance,
Unlimited, Enterprise,
Developer, Professional,
and Group Editions.
Change the look and feel of your custom domain login page by adding a background color, logo,
and right-side iFrame content.
Before you can change the appearance of your login page, you must set up a domain using My
Domain. For more information, see Quick Start: Set up your own domain, add a Connected App
and use the App Launcher on page 5.
A custom login page can match your company’s branding, give users extra information, and identify
your organization.
Note: Setting Up a My Domain (5:10 minutes. Login page branding starts at 2:43.)
See how to use My Domain to customize your users’ login experience.
1. From Setup, enter My Domain in the Quick Find box, then select My Domain.
2. Under Authentication Configuration, click Edit.
3. To customize your logo, upload an image.
Images can be .jpg, .gif, or .png files up to 100 KB. Maximum image size is 250px by 125px.
4. To customize your login page background, click the or enter a valid hexadecimal color code.
5. To support advanced authentication methods for iOS users, select Use the native browser for user authentication on iOS.
This iOS user authentication option is for users of Salesforce1 and Mobile SDK applications on iOS devices. It enables support of
authentication methods, such as Kerberos, Windows NT LAN Manager (NTLM), or certificate-based authentication. When you select
this option, users on iOS devices are redirected to their native browser when using single sign-on authentication into your custom
domain. For other operating systems, Salesforce1 and applications using Mobile SDK version 3.1 or later can support certificate-based
authentication when the applications are integrated with Mobile Device Management (MDM) software.
6. Enter the URL of the file to be included in the right-side iFrame on the login page.
The content in the right-side iFrame can resize to fill about 50% of the page. Your content must be hosted at a URL that uses SSL
encryption and the https:// prefix. To build your own custom right-side iFrame content page using responsive web design, use the
My Domain Sample template.
Example: https://c.salesforce.com/login-messages/promos.html
7. Optionally, select authentication services as identity providers on the login page, such as social sign-on providers like Google and
Facebook. Users can then log in with their social account credentials. Configure authentication services as Auth. Providers in Setup.
8. Click Save.
Example: For example, you can add https://sfdclogin.herokuapp.com/news.jsp as the Right Frame URL.
28
CHAPTER 9 Synchronize your Salesforce and Active
Directory Users with Identity Connect
Use Identity Connect to upload and synchronize user data from Active Directory to your Salesforce
organization.
In this chapter ...
•Identity Connect Once installed and set up, Identity Connect provides an administration console for managing and
synchronizing users. You can set up single sign-on using Integrated Windows Authentication (IWA) and
•Installing Identity
Connect Kerberos so users who sign into their desktop environment can use Salesforce without having to log in,
separately.
To test Identity Connect, sign up for a Force.com trial organization. For information on the differences
between a Developer Edition organization and the Force.com trial organization, see this FAQ.
Example:
Note: Integrating Active Directory with Salesforce using Identity Connect (6:43 minutes)
Learn how to download and install Identity Connect to synchronize your Active Directory
users with your Salesforce users.
29
Identity Connect
EDITIONS
Available in: both Salesforce
Classic and Lightning
Experience
Available for an additional
cost in: Enterprise,
Performance, and
Unlimited Editions.
Developer Edition includes
10 Identity Connect
permission set licenses.
Identity Connect integrates Microsoft Active Directory with Salesforce via a service that runs on
either Windows or Linux platforms. It gives AD users single sign-on access to Salesforce. When
syncing AD users, the identity service provider can be either Salesforce or Identity Connect.
Installing Identity Connect
EDITIONS
Available in: both Salesforce
Classic and Lightning
Experience
Available for an additional
cost in: Enterprise,
Performance, and
Unlimited Editions.
Developer Edition includes
10 Identity Connect
permission set licenses.
USER PERMISSIONS
To install Identity Connect:
•“Manage Users”
Your organization must have at least one Identity Connect license. To obtain Identity Connect,
contact Salesforce.
The Identity Connect software will typically be installed on a server by your IT department. Each
user does not need to install Identity Connect individually.
1. From Setup, enter Identity Connect in the Quick Find box, then select Identity
Connect.
Note: Identity Connect doesn’t appear in Setup until Salesforce adds the feature to
your organization.
2. Click the download link that corresponds to your operating system.
3. Install the software according to the Salesforce Identity Connect Implementation Guide.
30
Identity ConnectSynchronize your Salesforce and Active Directory Users with
Identity Connect

CHAPTER 10 Tutorial: Test Single Sign-On from an
External Identity Provider
This tutorial introduces single sign-on (SSO) implementation from a third-party identity provider and
shows you how to troubleshoot SAML assertions from that provider.
In this chapter ...
•Establish a
Federation ID Salesforce supports SSO from third-party identity providers. For SSO to work, you need an identity provider
and a service provider to coordinate authentication and authorization information using SAML assertions.
•Set up your identity
provider Follow these steps to test setting up SSO from an external identity provider and troubleshooting SAML
assertions. At the end of this tutorial, you’ll able to log in to your Salesforce org from an external app.
•Generate SAML
Note: Setting Up Single Sign-On (23:31 minutes)
See how to authenticate users using an external service.
•Troubleshoot SAML
assertions
31

Establish a Federation ID
For this single sign-on implementation, we’ll set a user attribute that links the user between their Salesforce organization and an external
application.
1. From Setup, enter Users in the Quick Find box, then select Users.
2. Click Edit next to your current user.
3. In the Single Sign On Information section, enter the Federation ID: admin@universalcontainers.com.
For this example, we arbitrarily made up a Federation ID. The Federation ID is a unique username for each user that can be shared
across multiple applications. Sometimes this is the employee ID for that user. The important part of the Federation ID is that it is not
duplicated for more than one user within a single Salesforce organization (you can have the same Federation ID for the same user
in more than one Salesforce organization).
4. Click Save.
Set up your identity provider
You’ll use Axiom, a single sign-on testing app hosted on Heroku, to go through the steps of setting up an identity provider.
Get an identity provider certificate from the Axiom app and set it up in your Salesforce organization.
Tip: Keep the Axiom app open in one browser window, and your DE organization open in another browser window so you can
cut-and-paste between the two, easily.
1. In a new browser window, go to http://axiomsso.herokuapp.com.
2. Click SAML Identity Provider & Tester.
3. Click Download the Identity Provider Certificate.
The certificate validates signatures, and you need to upload it to your Salesforce organization. Remember where you save it.
4. In your Salesforce organization, from Setup, enter Single Sign-On Settings in the Quick Find box, then select
Single Sign-On Settings.
5. Click Edit.
6. Select SAML Enabled.
7. Click Save.
8. In SAML Single Sign-On Settings, click New.
9. Enter the following values.
a. Name: Axiom Test App
b. Issuer: http://axiomsso.herokuapp.com
c. Identity Provider Certificate: Choose the file you downloaded in step 3.
d. Request Signing Certificate: Select a certificate. If no certificate is available, leave as Generate self-signed
certificate.
e. SAML Identity Type: Select Assertion contains the Federation ID from the User object.
f. SAML Identity Location: Select Identity is in the NameIdentifier element of the Subject statement.
g. Service Provider Initiated Request Binding: Select HTTP Redirect.
32
Establish a Federation IDTutorial: Test Single Sign-On from an External Identity Provider
h. Entity Id: Enter your My Domain name including “https”, such as
https://universalcontainers.my.salesforce.com
10. Click Save and leave the browser page open.
Generate SAML
Axiom generates a SAML assertion to log in to your Salesforce organization with the assigned Federation ID.
Tip: Keep the Axiom app open in one browser window, and your DE organization open in another browser window so you can
cut-and-paste between the two, easily.
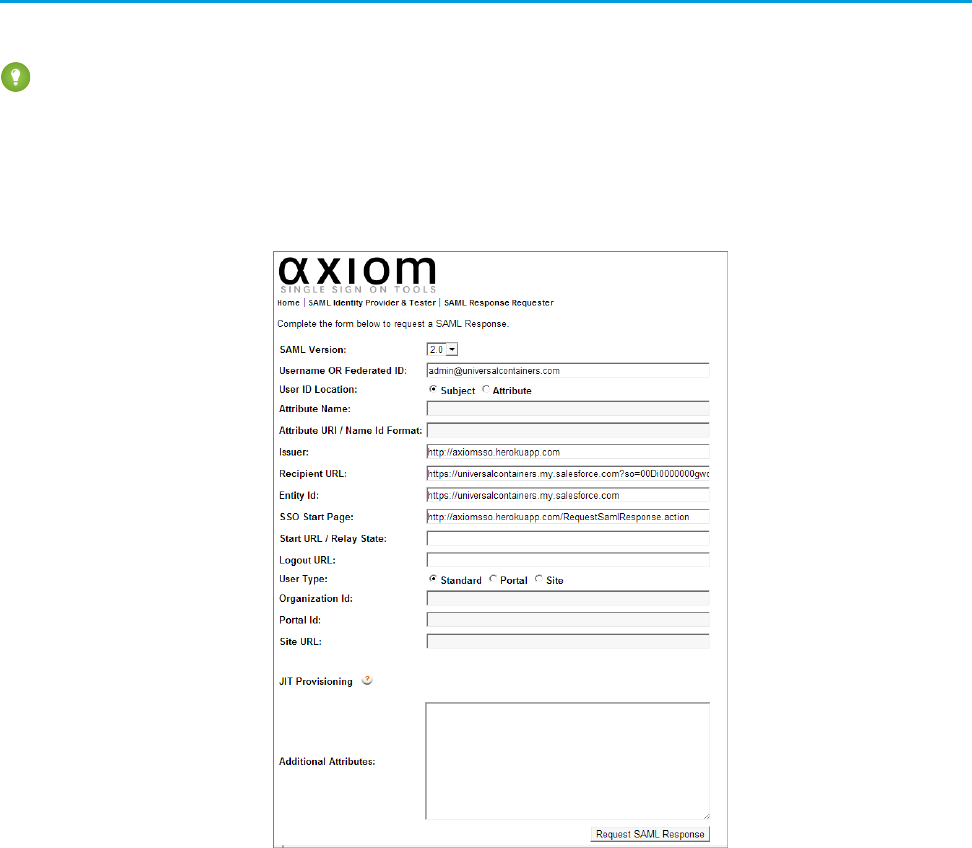
1. Return to Axiom at http://axiomsso.herokuapp.com.
2. Click generate a SAML response.
3. Enter the following values (other fields can be left blank).
a. SAML 2.0
b. Username or Federated ID: admin@universalcontainers.com
c. Issuer: http://axiomsso.herokuapp.com
d. Recipient URL: Get that from the Salesforce SAML Single Sign-On Setting page. (If you didn’t keep that page open, from Setup,
enter Single Sign-On Settings in the Quick Find box, then select Single Sign-On Settings, and then click
Axiom Test App.) Use the Salesforce Login URL value.
33
Generate SAMLTutorial: Test Single Sign-On from an External Identity Provider
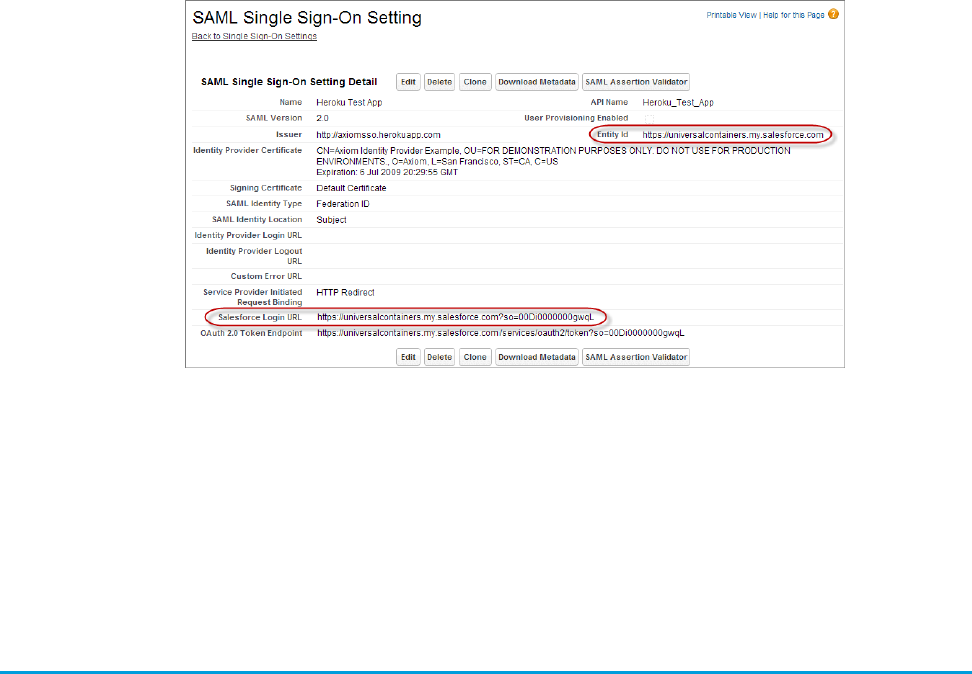
e. Entity ID: Get that from the Salesforce SAML Single Sign on Setting page, too.
4. Back in Axiom, click Request SAMLResponse.
Axiom generates the SAML assertion.
5. Click Login.
The Axiom application logs in to your Salesforce organization as the user with the assigned Federation ID.
Troubleshoot SAML assertions
Use the Salesforce SAML Validator to test and fix a SAML assertion.
If you follow the quick start steps, and do not log in to your organization through the Axiom app, you can use the Salesforce SAML
Validator to troubleshoot the SAML assertion. Keep the Axiom app open in a browser window while you troubleshoot the SAML assertion.
If you need to reopen Axiom, go to http://axiomsso.herokuapp.com.
1. In your Salesforce organization, from Setup, enter Single Sign-On Settings in the Quick Find box, then select
Single Sign-On Settings.
2. Click SAML Assertion Validator.
The SAML Validator shows the last recorded SAML login failure with some details as to why it failed.
3. To test the SAML assertion from the Axiom app, copy the Formatted SAML Response from the Axiom app.
4. In the Salesforce SAML Validator, paste the SAML assertion in the SAML Response box at the bottom of the page.
5. Click Validate.
The page displays some results to help you troubleshoot the assertion. For example, if the assertion was generated a while before
it was used to log in, the timestamp expires and the login isn’t valid. In that case, regenerate the SAML assertion and try again.
34
Troubleshoot SAML assertionsTutorial: Test Single Sign-On from an External Identity Provider

CHAPTER 11 Monitor Applications and Run Reports
Monitor connected apps and set up reports to keep track of app usage by user, app, time, or other values.
In this chapter ...
Once you’ve set up connected apps for your Identity users, you can monitor the usage of connected
apps throughout your organization, find out how often the apps are used, drill-down into the app details
•Monitor Usage for
Connected Apps to make changes to the connected app settings, and block or unblock specific apps as your security
needs change.
•Create an Identity
Users Report
35

Monitor Usage for Connected Apps
EDITIONS
Available in: Salesforce
Classic
Available in: Enterprise,
Performance, Unlimited,
Developer, and
Database.com Editions
Administrators can monitor installed connected app usage in the Connected Apps OAuth Usage
page of their organization.
To view information about OAuth connected apps, from Setup, enter OAuth in the Quick
Find box, then select Connected Apps OAuth Usage. The resulting list of apps can be long
because it contains all Salesforce and custom OAuth apps available to your users, not just the ones
installed in your org. For example, it lists apps from AppExchange, Salesforce partners and other
developers.
Connected App
Name of the connected app. The list contains only the apps that anyone in the org is using.
Description
Description of the connected app.
Manage App Policies
Click Manage App Policies to open the detail page for the connected app. From the detail page, you can click Edit Policies to
manage the app’s access and security policies.
User Count
Number of users who are using the app. Click a User Count number to open the Connected App User’s Usage page to see information
about users, including:
•When they first used the app
•Most recent time they used the app
•Total number of times they used the app
From this page, you can end a user’s access to the current session by clicking Revoke. Or, you can click Revoke All at the top of the
page to log out everyone currently using the app.
Action
You can perform one of the following actions.
•Install—Make the OAuth connected app available for access and security policy management. When you click install, the
Manage App Policies link appears next to the app. Click the link to open the app’s detail page where you can set policies. Install
appears next to apps that were created in another org but not made available by Salesforce or a managed package. Install these
apps to manage their security policies in your org.
•Uninstall—Remove the local copy of the OAuth connected app. Click uninstall only when the original developer deletes the
app in the other Salesforce org. Uninstall doesn’t remove the connected app. It just removes the local copy that you installed to
set the app’s OAuth policies in your org. By uninstalling the app, you’re only removing the OAuth policies that you set for the
app in your org. You’re actually loosening your security measures.
•Block—Make the OAuth connected app inaccessible to your org’s users. Blocking an app ends all current user sessions and
blocks all new sessions.
•Unblock—Stop preventing new connections from being established. It allows users to log in and access the app at another
time.
Example:
36
Monitor Usage for Connected AppsMonitor Applications and Run Reports
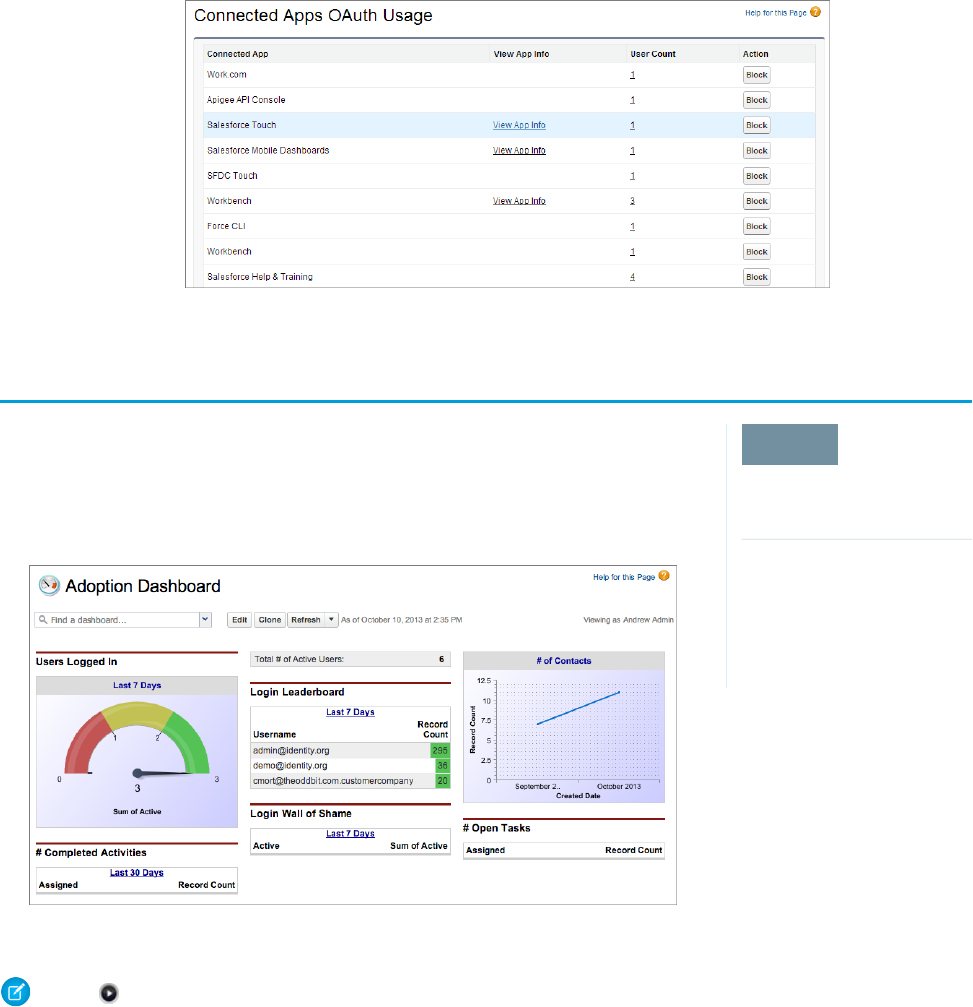
Create an Identity Users Report
EDITIONS
Available in: Salesforce
Classic
Available in: Enterprise,
Performance, Unlimited,
Developer, and
Database.com Editions
Salesforce maintains Identity Event Logs administrators can use to create reports and dashboards
that drill-down into specific information about single sign-on and connected app usage.
The following steps set up a report for Identity users. Use the same steps to set up more than one
variation of the same report type, or even create a dashboard for the report.
For more information on dashboards, see “Get Started with Dashboards” in the Salesforce online help.
Note: Single Sign-On and Access Management for Mobile Applications (13:17 minutes)
Learn how to create reports for monitoring mobile Identity users and usage. First, this video covers creating and deploying mobile
connected apps. Then, it shows how to set up reporting for connected apps usage.
Establish a new report type
1. From Setup, enter Report Types in the Quick Find box, then select Report Types.
2. Click New Custom Report Type.
3. Enter the following values.
a. Primary Object: Users
b. Report Type Label: A unique label, such as Identity Users
37
Create an Identity Users ReportMonitor Applications and Run Reports
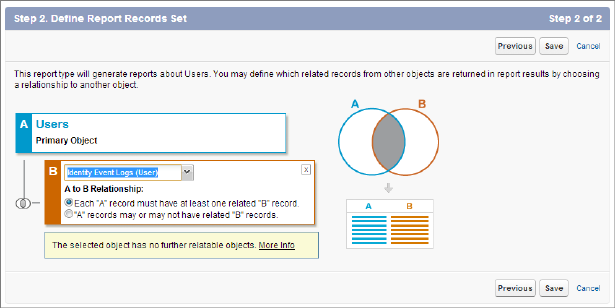
c. Report Type Name: This field automatically uses the label; change it if you want a different name.
d. Description: Give it a useful description others might see.
e. Store in Category: Pick a category for this report, such as Administrative Reports.
f. Deployment Status: Keep as In Development until you’re ready to deploy this report for other users to see.
4. Click Next.
5. Select Click to relate to another object.
6. Select Identity Event Logs (Users).
7. Click Save.
Create the report
1. Click the Reports tab.
2. Click New Report....
3. In Administrative Reports, select Identity Users.
4. Click Create.
5. Drag-and-drop fields onto the report, as desired.
For example, some useful fields for this report are Username, User ID, App: Connected App Name, Timestamp
and Usage Type.
6. Click Save.
7. Give the report a name, such as Identity Connected App Usage.
8. Click Save (or Save and Run Report to see the results, immediately).
38
Create an Identity Users ReportMonitor Applications and Run Reports
CHAPTER 12 Use External Identities to Extend Your
Organization to New Users
EDITIONS
Available in: Salesforce
Classic
External Identity licenses are
available in: Enterprise,
Performance, Unlimited,
and Developer Editions
USER PERMISSIONS
To assign and manage
External Identity users:
•“Manage Users”
To enable Communities:
•“Customize Application”
External Identity is a type of Salesforce license that provides Identity and Access Management
service for customers and partners. This license can be upgraded to Customer Community or Partner
Community licenses.
The External Identity license gives you the flexibility to add users to your community site without
using Customer Community licenses. The External Identity license adds users at a lower cost than
the Customer Community license, but without access to community critical features like Cases or
Knowledge. Store and manage these users, authenticate them through username and password,
single sign-on, and social sign-on (using identities from Facebook, Google+, LinkedIn, and other
authentication providers). Allow user self-registration for efficient provisioning of new users. These
users are typically consumers for your business, partners, dealers, patients, and other customers.
This table shows which features are available to users with an External Identity license and a Customer
Community license.
Customer CommunityExternal IdentityFeature
Read and EditRead and Edit
Accounts
Read, Create, EditRead, Create, Edit
Assets
Chatter
Read, Create, Edit
Contacts
Identity
Can create and manage their
own cases
Cases
Read only
Products
Orders
Files
Chatter Answers
Ideas
39
Customer CommunityExternal IdentityFeature
Read only
Knowledge
Read only
Tasks
10 custom objects per license (custom
objects in managed packages don’t count
toward this limit)
2 custom objects per license (custom
objects in managed packages don’t count
toward this limit)
Custom Objects
Notes and Attachments
Note: The Notes and Attachments
related list is not available on
accounts and contacts.
150 MB (25,000 active users license)
Additional Storage
2 GB (250,000 active users license)
10 GB (1,000,000 active users license)
60 GB (5,000,000 active users license)
We recommend that the number of External Identity license users in your community not exceed ten million unique users per month.
If you require additional user licenses beyond this limit, contact your Salesforce account executive. Exceeding this limit may result in an
extra charge and decrease expected functionality.
For more information on setting up your community to support External Identity license users, see the Salesforce Help and Using
Templates to Build Communities.
40
Use External Identities to Extend Your Organization to New
Users

CHAPTER 13 Get More Information about Salesforce
Identity, Single Sign-On and Security
Links to more sources of information about Salesforce Identity.
Salesforce Identity also supports external identities for portal access, and you can enable partners and customers as Identity users. For
information on using external identities, see
Use the following links for other useful resources.
•Salesforce Identity Web page
•Salesforce Identity “How To” videos
•Security Single Sign-On Implementation Guide [PDF]
•Understanding Authentication in the Force.com REST API Developer Guide
•Salesforce Identity Connect User Guide
•The developer.salesforce.com Identity home page
•Salesforce Security cheatsheets
41
INDEX
A
Active Directory 29–30
App Launcher
configure 17
permission set 19
profile 18, 21
Apps
opening 20
D
Domain name
define a domain name 11
getting system performance information 16
login page branding 12
login policy 13
overview 9
URL changes 14
E
external identity provider 31
F
Force.com app menu
reordering 20–21
G
Google Apps 22
Google connected app 24
Google Single Sign-On 23
I
Identity
links to more information 41
monitor 36
overview 1
quick start
5–7, 32–34
App Launcher 7
Federation ID 32
Generate SAML 33
My Domain 6
Troubleshoot SAML 34
reports 35, 37
Identity (continued)
scenario 4
Identity Connect 29
Identity provider
adding on login page 13
identity provider certificate 23
L
Login page 28, 39
M
My Domain
See: Domain name 9
P
Password
change user 26
identity confirmation 26
identity verification 26
login verification 26
two-factor authentication 26
Passwords
changing by user 27
identity confirmation 27
login verification 27
two-factor authentication 27
permission set licenses 30
Permission set licenses 30
S
Security
adding identity providers on login page 13
Subdomain name
deploying 14
implementation guidelines 15
setup overview 11
testing 14
U
User setup
activate device 26
change password 26
changing passwords 27
verifying identity 27
42
