Nextera™ DNA Flex Library Prep Reference Guide (1000000025416) Illumina Nextera 1000000025416 01 20180523
User Manual:
Open the PDF directly: View PDF ![]() .
.
Page Count: 30

Nextera™ DNA Flex Library Prep
Reference Guide
Document # 1000000025416 v01
April 2018
ILLUMINA PROPRIETARY
For Research Use Only. Not for use in diagnostic procedures.
This document and its contents are proprietary to Illumina, Inc. and its affiliates ("Illumina"), and are intended solely for
the contractual use of its customer in connection with the use of the product(s) described herein and for no other
purpose. This document and its contents shall not be used or distributed for any other purpose and/or otherwise
communicated, disclosed, or reproduced in any way whatsoever without the prior written consent of Illumina. Illumina
does not convey any license under its patent, trademark, copyright, or common-law rights nor similar rights of any third
parties by this document.
The instructions in this document must be strictly and explicitly followed by qualified and properly trained personnel in
order to ensure the proper and safe use of the product(s) described herein. All of the contents of this document must be
fully read and understood prior to using such product(s).
FAILURE TO COMPLETELY READ AND EXPLICITLY FOLLOW ALL OF THE INSTRUCTIONS CONTAINED HEREIN MAY
RESULT IN DAMAGE TO THE PRODUCT(S), INJURY TO PERSONS, INCLUDING TO USERS OR OTHERS, AND DAMAGE
TO OTHER PROPERTY, AND WILL VOID ANY WARRANTY APPLICABLE TO THE PRODUCT(S).
ILLUMINA DOES NOT ASSUME ANY LIABILITY ARISING OUT OF THE IMPROPER USE OF THE PRODUCT(S)
DESCRIBED HEREIN (INCLUDING PARTS THEREOF OR SOFTWARE).
© 2018 Illumina, Inc. All rights reserved.
All trademarks are the property of Illumina, Inc. or their respective owners. For specific trademark information, see
www.illumina.com/company/legal.html.
Document # 1000000025416 v01
For Research Use Only. Not for use in diagnostic procedures.
ii
Nextera™ DNA Flex Library Prep Reference Guide

Revision History
Document Date Description of Change
Document #
1000000025416 v01
April
2018
Replaced references to the
Nextera DNA Flex Pooling Guide (document
# 1000000031471)
with the
Index Adapters Pooling Guide (document #
1000000041074)
. Pooling information is consolidated into the
Index
Adapters Pooling Guide.
Document #
1000000025416 v00
October
2017
Initial release.
Document # 1000000025416 v01
For Research Use Only. Not for use in diagnostic procedures.
iii
Nextera™ DNA Flex Library Prep Reference Guide

Table of Contents
Revision History iii
Chapter 1 Overview 1
Introduction 1
Genomic DNA Input Recommendations 1
Additional Resources 2
Chapter 2 Protocol 3
Introduction 3
Nextera DNA Flex Library Prep Workflow 4
Tips and Techniques 4
Tagment Genomic DNA 5
Post Tagmentation Cleanup 6
Amplify Tagmented DNA 7
Clean up Libraries 9
Pooling Libraries 11
Chapter 3 Sequencing 14
Appendix A Supporting Information 15
Introduction 15
How the Nextera DNA Flex Assay Works 16
Acronyms 17
Product Contents 17
Consumables and Equipment 19
Blood Lysis (Optional) 21
Saliva Lysis (Optional) 23
Technical Assistance 25
Document # 1000000025416 v01
For Research Use Only. Not for use in diagnostic procedures.
iv

Chapter 1 Overview
Introduction 1
Genomic DNA Input Recommendations 1
Additional Resources 2
Introduction
This protocol explains how to prepare up to 96 indexed paired-end libraries from genomic DNA for
subsequent sequencing on an Illumina sequencing system.
The Nextera™ DNAFlex Library Prep protocol:
uUses an enzymatic reaction, called tagmentation, to fragment DNA and add adapter sequences in only
15 minutes
uInnovative sample normalization at inputs > 100 ng
uStreamlines sample pooling and sequencing
uReduces excessive pipetting and overall hands-on time, while optimizing use of consumables by using
master mix reagents
uGenerates libraries from as little as 1 ng input
uPrepares libraries directly from blood or saliva samples
Genomic DNA Input Recommendations
The Nextera DNA Flex Library Prep protocol is compatible with DNA inputs ranging from 1–500 ng, or higher.
For human DNA samples and other large complex genomes, the recommended DNA input is between 100–
500 ng. For small genomes, the DNA input amount can be reduced to as low as 1ng (modifying the PCR
cycling conditions accordingly).
For DNA inputs between 100–500 ng, accurate quantification of the initial DNA sample is not required, and
normalization of the final yield is expected.
If you are using less than 100 ng DNA input, we recommend quantification of the initial DNA sample to
determine the number of PCR cycles required. In this case, because final libraries yields from low inputs are
not normalized by this library prep method, quantification and normalization of libraries before sequencing is
recommended.
Total DNA Input
(ng)
Quantification of Input DNA
Recommended
Recommended # of PCR
Cycles
Normalized Library
Yield
1–9
Yes
12
No
10–24 8
25–49 6
50–99 5
100–500 No 5 Yes
Blood/Saliva No 5 Yes
Table 1 DNA Input Recommendations
Document # 1000000025416 v01
For Research Use Only. Not for use in diagnostic procedures.
1

NOTE
Protocols specific to blood and saliva are included in the
Supporting Information
section of this guide. The
blood protocol requires the Flex Lysis Reagent Kit, which is not provided with the Nextera DNA Flex Library
Prep Kit. This kit is sold separately—refer to Illumina catalog #20015884.
Input DNA Quantification (less than 100 ng)
When input is less than 100 ng, use a fluorometric-based method to quantify input DNA. Avoid methods that
measure total nucleic acid, such as NanoDrop or other UV absorbance methods.
If you use the Qubit dsDNA BR Assay Kit and/or HSKit, use 2 µl of each DNA sample with 198 µl of the Qubit
Working Solution.
Assess DNA Quality
UV absorbance is a common method used for assessing the quality of a DNA sample. The ratio of
absorbance at 260 nm to absorbance at 280 nm provides an indication of sample purity. This protocol is
optimized for DNA with absorbance ratio values of 1.8–2.0, which indicates a pure DNA sample. Target a
260/280 ratio of 2.0–2.2. Values outside this range indicate the presence of contaminants that may cause
incomplete tagmentation and adversely impact the final library yield. For a complete list of contaminants,
including sources, avoidance, and effects on the library, see the
Nextera XT Troubleshooting Technical Note
.
NOTE
Incomplete tagmentation caused by contaminants may result in library preparation failure, poor clustering, or
an unexpectedly high scaffold number.
Additional Resources
The Nextera DNA Flex Library Prep support pages on the Illumina website provide additional resources.
These resources include software, training, compatible products, best practices, and the following
documentation. Always check the support pages for the latest versions.
Resource Description
Custom Protocol Selector
A wizard for generating customized end-to-end documentation that is tailored
to the library prep method, run parameters, and analysis method used for the
sequencing run.
Index Adapter Pooling Guide (document #
1000000041074)
Provides pooling guidelines and dual indexing strategies for using the Nextera
DNA Flex Library Prep kit.
Nextera™ DNA Flex Library Prep Checklist
(document # 1000000033561)
Provides a checklist of the protocol steps. The checklist is intended for
experienced users.
Nextera™ DNA Flex Library Prep
Consumables and Equipment List
(document # 1000000033564)
Provides an interactive checklist of user-provided consumables and equipment.
Document # 1000000025416 v01
For Research Use Only. Not for use in diagnostic procedures.
2
Nextera™ DNA Flex Library Prep Reference Guide
Chapter 2 Protocol
Introduction 3
Nextera DNA Flex Library Prep Workflow 4
Tips and Techniques 4
Tagment Genomic DNA 5
Post Tagmentation Cleanup 6
Amplify Tagmented DNA 7
Clean up Libraries 9
Pooling Libraries 11
Introduction
This chapter describes the Nextera DNA Flex Library Prep protocol.
uReview Best Practices before proceeding. See
Additional Resources
on page 2 for information on how to
access Nextera DNA Flex Library Prep Best Practices on the Illumina website.
uBefore proceeding, confirm kit contents and make sure that you have the required equipment and
consumables. See
Supporting Information
on page 15.
uFollow the protocols in the order shown, using the specified volumes and incubation parameters.
Prepare for Pooling
If you plan to pool libraries, record information about your samples before beginning library prep. For more
information, see the Nextera DNA Flex Library Prep support page.
Document # 1000000025416 v01
For Research Use Only. Not for use in diagnostic procedures.
3
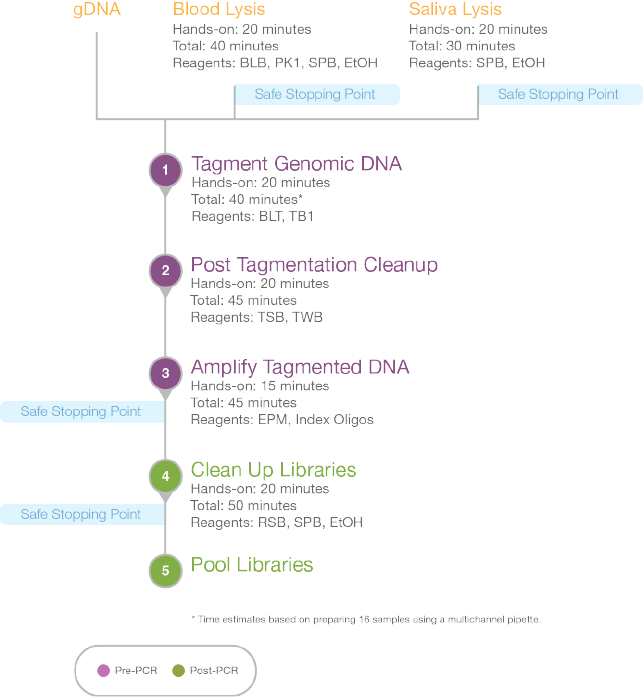
Nextera DNA Flex Library Prep Workflow
Figure 1 Nextera DNA Flex Library Prep Workflow
Tips and Techniques
Unless a safe stopping point is specified in the protocol, proceed immediately to the next step.
Avoiding Cross-Contamination
uWhen adding or transferring samples or reagent master mixes, change tips between
each sample
.
uWhen adding index adapters, change tips between
each row
and
each column
.
uRemove unused index adapter tubes from the working area.
uOpen only one index adapter tube at a time, to prevent misplacing caps.
Sealing the Plate
uAlways seal the 96-well plate before any thermal cycling steps in the protocol.
uApply the adhesive seal to cover the plate and seal with a rubber roller.
Document # 1000000025416 v01
For Research Use Only. Not for use in diagnostic procedures.
4
Nextera™ DNA Flex Library Prep Reference Guide
uMicroseal ‘F’ adhesive foils are effective at temperatures down to -70°C and are recommended for long-
term storage of the 96-well plates containing the final libraries.
uMicroseal 'B' adhesive seals are effective at -40°C to 110°C, and suitable for skirted or semiskirted PCR
plates. Microseal 'B' seals can be for thermal cycling or short-term storage.
uMicroseal 'A' adhesive film is effective for thermal cycling.
Handling Bead-Linked Transposomes (BLT)
uStore the BLT stock tube upright in the refrigerator to make sure that the beads are always submerged in
the buffer.
uVortex the BLT stock tube thoroughly to make sure that the beads remain in suspension while in aliquot.
Centrifugation before pipetting is not recommended.
uIf beads are adhered to the side or top of a 96-well plate, centrifugation is acceptable. Fully resuspend
the bead pellet by pipetting until thoroughly mixed.
uWhen performing wash steps:
uUse an appropriate magnet for the plate. See
Consumables and Equipment
on page 19.
uKeep the plate on the magnet, unless instructed otherwise.
uAvoid agitating the plate, or disturbing the bead pellet, while the plate is on the magnet.
uIf beads are accidentally aspirated into the pipette tip, dispense all liquid back into the well and leave
until clear to allow the beads to settle.
uDispense tagment wash buffer directly onto the beads.
uIf liquid becomes adhered to the side or top of the tube or well, pulse centrifuge briefly to pull volume
into solution.
Handling Tagment Wash Buffer (TWB)
uMinimize the potential of TWB foaming during tagmentation with a deliberately gentle pipetting technique.
Tagment Genomic DNA
This step uses the Bead-Linked Transposomes BLT to tagment DNA. This process fragments and tags the
DNA with adapter sequences.
Consumables
uBLT(Bead-Linked Transposomes)
uTB1 (Tagmentation Buffer)
uNuclease-free water
u96-well PCR plate
uMicroseal 'B' adhesive seal
u1.7 ml microcentrifuge tubes
Preparation
1 Prepare the following consumables:
Document # 1000000025416 v01
For Research Use Only. Not for use in diagnostic procedures.
5
Nextera™ DNA Flex Library Prep Reference Guide
Item Storage Instructions
BLT 2°C to 8°C
NOTE:Storing at temperatures below 2°C renders the BLT unusable.
Bring to room temperature. Vortex to
mix.
TB1 -25°C to -15°C Bring to room temperature. Vortex to
mix.
2 Save the TAG program on the thermal cycler:
uChoose the preheat lid option and set to 100°C
u55°C for 15 minutes
u10°C hold
uEach well or tube contains 50 µl
See
Genomic DNA Input Recommendations
on page 1 for recommended DNA input amounts and sample
types.
Procedure
1 Transfer between 2 µl and 30 µl of DNA into the wells of a 96-well PCR plate, so that the total input
amount (ng) is within the desired range.
2 Add nuclease-free water to the DNA samples to bring the total volume to 30 µl.
3 Vortex the BLT vigorously for 10 seconds, then visually check the beads for complete resuspension.
Repeat as necessary.
4 Prepare tagmentation master mix. For each reaction use:
Reagent Volume per reaction (µl)
BLT 11µl
TB1 11 µl
5 Vortex the tagmentation master mix thoroughly to make sure the BLT beads are evenly resuspended BLT
in the buffer.
NOTE
Make sure that the tagmentation master mix is vortexed well and the beads remain evenly resuspended
in the mix while it is being aliquoted into the 96-well plate.
6 Using fresh tips, transfer 20 µl of tagmentation master mix to each well containing a sample.
7 Pipette mix the 50 µl reaction mix to resuspend.
8 Seal the plate with Microseal 'B', place on the preprogrammed thermal cycler and run the TAG program.
Post Tagmentation Cleanup
This step washes the adapter-tagged DNA on the BLT before PCR amplification.
Consumables
uTSB (Tagment Stop Buffer)
uTWB (Tagment Wash Buffer)
u96-well plate magnet
uMicroseal 'B' adhesive seal
Document # 1000000025416 v01
For Research Use Only. Not for use in diagnostic procedures.
6
Nextera™ DNA Flex Library Prep Reference Guide
Preparation
Prepare the following consumables:
Item Storage Instructions
ST2 15°C to 30°C Check for any precipitates. If present, heat the buffer at 37°C for 10 minutes, and
vortex until they dissolve. Use at room temperature.
TWB 15°C to 30°C Use at room temperature.
Procedure
1 Add 10 µl of TSBto the tagmentation reaction.
2 Gently pipette mix the entire volume to resuspend the beads.
3 Seal the plate and incubate at 37°C for 15 minutes on a thermal cycler with heated lid set at 100° C and
volume reaction of 60 µl. Then hold at 10° C.
4 Place the plate on the magnet for 3 minutes or until solution is clear.
5 Using a multichannel pipette, remove supernatant and discard.
NOTE
If beads became disturbed during aspiration, redisperse solution into the wells. Keep plate on the
magnet to let beads settle.
6 Remove the plate from the magnet and add 100 µl TWB. Gently pipette mix until beads are fully
resuspended.
7 Place the plate on the magnet for 3 minutes or until solution is clear.
8 Remove supernatant with a multichannel pipette and discard.
9 Repeat steps 6through 8for a total of 2 washes.
10 Remove the plate from the magnet and add 100 μl TWB. Gently pipette mix until beads are fully
resuspended.
11 Seal the plate and place the plate with TWBon the magnet and allow it to incubate until step 3in the
Amplify Tagmented DNA
. The plate should incubate for at least 3 minutes or until clear.
NOTE
Keep the pellet in TWB to help prevent any chance of over drying the beads.
12 While the samples are incubating, continue with the protocol.
Amplify Tagmented DNA
This step amplifies the tagmented DNA using a limited-cycle PCR program. The PCR step adds Index 1 (i7)
adapters, Index 2 (i5) adapters, and sequences required for sequencing cluster formation.
Consumables
uEPM (Enhanced PCR Mix)
uNextera DNA Flex index adapters
uNuclease-free water
Document # 1000000025416 v01
For Research Use Only. Not for use in diagnostic procedures.
7
Nextera™ DNA Flex Library Prep Reference Guide
uMicroseal 'A' adhesive seal
uMicroseal 'B' adhesive seal
u1.7 ml microcentrifuge tubes
uP20 multichannel pipette
uP200 multichannel pipette
Preparation
Prepare the following consumables:
Item Storage Instructions
EPM -25°C to
-15°C
Thaw on ice. Invert to mix, then briefly centrifuge.
Nextera DNA Flex
Indexes
-25°C to
-15°C
Thaw at room temperature.For index tubes: Vortex to mix, then centrifuge
briefly.
For plates: Spin briefly before use.
To yield robust libraries, use this number of PCR cycles, depending on expected initial DNA input amount:
DNAInput (ng) Number of PCRCycles
1–9 12
10–24 8
25–49 6
50–100 5
>100 5
Blood/Saliva 5
Procedure
1 Prepare the PCR master mix.
Reagent Volume per reaction
EPM 22 µl
Nuclease-free water 22 µl
2 Vortex and spin down the PCR master mix.
3 Remove the third TWB wash from thesamples while on the magnet. Use a P20 multichannel pipette to
remove any excess liquid from the plate.
Any remaining foam on the well walls does not adversely affect the library.
4 Remove the plate from the magnet. Proceed
immediately
to the next step to prevent excessive drying of
the beads.
5 Add 40 µl of the PCR master mix to each sample well. Pipette mix to make sure that the beads are
thoroughly resuspended.
Document # 1000000025416 v01
For Research Use Only. Not for use in diagnostic procedures.
8
Nextera™ DNA Flex Library Prep Reference Guide
6 Add index adapters to each sample. Check volumes in the following table. For low-plexity conditions,
refer to the
Index Adapters Pooling Guide (document # 1000000041074)
.
Index Kit Type Kit Configuration Volume of Index Adapter
per Sample
24 plex (dual index) Individual tubes 5 µl i5 adapter
5 µl i7 adapter
96 plex (dual index) 96-well plate 10 µl of primer mix
NOTE
For tubes,open only one index adapter tube at a time to prevent misplacing caps; alternatively, use
fresh caps after opening each tube.
For plates, each well of the index plate is for a single use only.
7 Using a pipette set to 40 µl, pipette mix a minimum of 10 times to mix the entire reaction volume.
8 Seal the plate, place in the thermal cycler and run the program.
u68°C, 3 min
u98°C, 3 min
uRepeat cycling conditions below for the total number of cycles listed in
DNA Volume-Based
Recommendations
:
u98°C, 45 sec
u62°C, 30 sec
u68°C, 2 min
u68°C, 1 min
u10°C hold
9 Remove the plate from the thermal cycler when the PCR program completes.
10 Centrifuge for 1 minute at 280 × g to make sure all the liquid is at the bottom of the well.
SAFE STOPPING POINT
If you are stopping, seal the plate with a Microseal 'B' adhesive seal, and store at 2°Cto8°C for up to 3 days.
Clean up Libraries
This step purifies the amplified libraries through a double-sided bead purification procedure.
Consumables
uPurification Beads
uFreshly prepared 80% ethanol (EtOH)
uRSB (Resuspension Buffer)
uMidi plates (2)
u96-well PCR plate
uMicroseal 'B' adhesive seal
uMicroseal 'F' foil seals
u1.7 ml microcentrifuge tubes
u96-well plate magnet
Document # 1000000025416 v01
For Research Use Only. Not for use in diagnostic procedures.
9
Nextera™ DNA Flex Library Prep Reference Guide
uNuclease-free water
Preparation
1 Prepare the following consumables:
Item Storage Instructions
PB 2°C to 8°C Let stand at room temperature for 30 minutes. Vortex and invert to mix.
RSB -25°C to -15°C Thaw and bring to room temperature. Vortex to mix.
Procedure
1 Place the plate on the magnet for 5 minutes or until the supernatant is clear.
2 Transfer 45 µl of the PCR supernatant into a fresh midi plate.
3 Vortex and invert PB multiple times to ensure full resuspension.
4 Prepare a master mix of diluted SPB:
Reagent Volume per reaction (µl)
PB 45 µl
Nuclease-free water 40 µl
5 Vortex the diluted PB master mix thoroughly and add 85 µl mix to each PCR product.
6 Pipette mix a minimum of 10 times or until thoroughly mixed.
WARNING
Complete mixing is critical to proper size distribution of libraries.
7 Seal the plate and incubate at room temperature for 5 minutes.
8 Place the midi plate on a plate magnet for 5 minutes or until supernatant is clear.
9 During incubation, vortex the PB (
undiluted
stock tube) thoroughly, and then add 15 µl to each well in a
new
midi plate.
10 Transfer 125 µl of supernatant from the first midi plate into the second midi plate (containing the 15 µl of
PB).
11 Pipette mix 10 times.
NOTE
Mixing is critical for proper size distribution of libraries.
12 Seal the second midi plate and incubate at room temperature for 5 minutes.
13 Place midi plate on a magnet for 5 minutes or until clear.
14 Remove and discard supernatant without disrupting the beads.
15 With the plate on the magnet, add 200 µl of fresh 80% ethanol without mixing and incubate for 30
seconds.
16 Pipette to remove the ethanol.
17 Repeat steps 15 and 16 for a total of 2 washes.
18 Use a P20 pipette to remove any excess liquid from the midi plate.
Document # 1000000025416 v01
For Research Use Only. Not for use in diagnostic procedures.
10
Nextera™ DNA Flex Library Prep Reference Guide
19 Air-dry on the magnetic stand until dry (~5 minutes).
20 Remove the midi plate from the magnet and add 32 µl of RSB to the beads.
21 Pipette mix until thoroughly resuspended.
22 Incubate at room temperature on the bench for 2 minutes.
23 Place the midi plate back on the magnet for 2 minutes or until clear.
24 Transfer 30 µl of the supernatant into a new 96-well PCR plate.
SAFE STOPPING POINT
If you are stopping, seal the plate with a Microseal 'F' foil seal and store at -25°Cto-15°C for up to 30 days.
Pooling Libraries
When using DNA inputs of 100–500 ng, the normalization features of this library protocol mean that
quantification and normalization of individual libraries, generated within a single experiment, is not necessary.
There may, however, be slight variations in final yields between different library preparation events, so to
achieve optimal cluster density we advise you to pool your libraries with equal volume and quantify the pool
prior to sequencing.
HiSeqX and HiSeq 3000/4000 users
The wider range in acceptable clustering concentrations on these instruments means that if the
Qubit/PicoGreen quantification for the library pool (as described in the section below) is between 9.5 ng/µl
and 12.5 ng/µl, a 1:11 dilution (10 µl pooled library + 100 µl RSB) can be made to take the pool to the
concentration required for sequencing (ie, 2–3 nM).
For DNA inputs of 100–500 ng
1 Pool 5 µl per sample of up to 96 libraries into a single 1.5 ml microcentrifuge tube. Mix by vortexing then
spin down in a microfuge.
2 Quantify the single pooled library using a dsDNA specific fluorescent dye method such as Qubit or
PicoGreen.
For DNA inputs of <100 ng
1 Quantify each library individually using Qubit or PicoGreen.
For Libraries generated from blood or saliva
The volumes of blood and saliva used in this protocol were developed to provide normalization for most
samples; however, it should be noted that blood and saliva are heterogeneous sample types. The ability of
Nextera DNA Flex to generate normalized libraries depends on the total amount of DNA obtained from the
lysed sample, and this can be adversely affected by numerous factors independent of kit performance.
These factors include, but are not limited to:
uviscosity of the saliva samples
ublood sample age
ustorage conditions
uunderlying medical conditions affecting white blood cell counts
Document # 1000000025416 v01
For Research Use Only. Not for use in diagnostic procedures.
11
Nextera™ DNA Flex Library Prep Reference Guide
Assuming you start with adequate DNA input (>100 ng), expect normalization of the libraries equal to that
observed in 100–500 ng gDNA input. For improved confidence, you can quantify each library individually prior
to pooling using Qubit or PicoGreen.
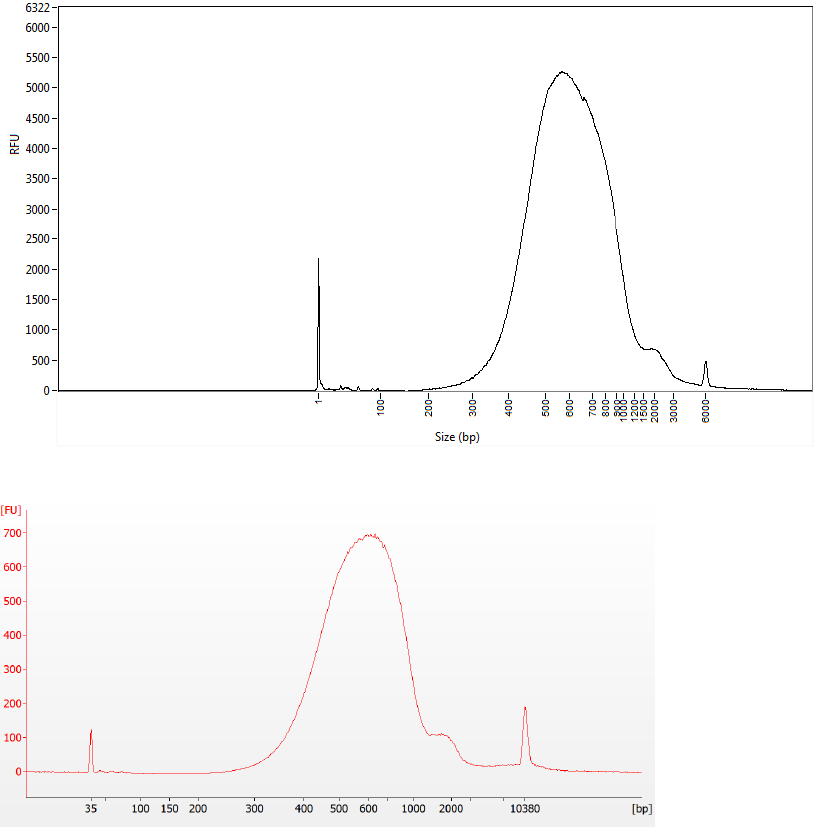
Check Library Quality (Optional)
Run 1 µl of either the pooled library, or the individual libraries, on an Advanced Analytical Fragment Analyzer
with the HS-NGS High Sensitivity 474 kit or an Agilent Technology 2100 Bioanalyzer using a High Sensitivity
DNA kit. Typical library size profiles are shown below with the average fragment size expected to be around
600 bp (when analyzed using a size range of 150–1500 bp).
Figure 2 Final Library Run on Fragment Analyzer Using High Sensitivity NGS Kit
Figure 3 Final Library Run on Bioanalyzer Using High Sensitivity DNA Kit
Document # 1000000025416 v01
For Research Use Only. Not for use in diagnostic procedures.
12
Nextera™ DNA Flex Library Prep Reference Guide

Calculate Molarity
1 Calculate the molarity of the individual, or pooled library, using the following formula:
NOTE
If the individual, or pooled libraries, were run on a Bioanalyzer or Fragment Analyzer, use the average
size obtained for the sample, otherwise use 600 bp as the average fragment length in the calculation.
2 After the molarity has been calculated:
aFor libraries that were pooled prior to quantification
uDilute the pool with RSB to .
bFor libraries that have been quantified individually
uDilute the individual samples with RSB to , then pool 10 µl of each diluted sample in a single tube.
Sequencer Dilute To Template Loading
Concentration
Denaturation
Instructions
Document Number
NovaSeq See document #
1000000019358
See document #
1000000019358
1000000019358
HiSeqX 2–3 nM 200–300 pM 15006165
HiSeq 3000/ 4000 2–3 nM 200–300 pM 15006165
HiSeq 2000/ 2500 High Output
Mode
2 nM 12 pM 15006165
HiSeq 2500 Rapid Run Mode 2 nM 8.5 pM 15050107
NextSeq 2 nM 1.2–1.3 pM 15048776
MiSeq 4 nM 12 pM 15039740
MiniSeq 2 nM 1.2–1.3 pM 1000000002697
Table 2 Recommended Loading Concentrations
NOTE
Use these recommended loading concentrations only as a general guideline.
Optimize the loading concentrations for your workflow and quantification method.
Document # 1000000025416 v01
For Research Use Only. Not for use in diagnostic procedures.
13
Nextera™ DNA Flex Library Prep Reference Guide

Chapter 3 Sequencing
Nextera DNA Flex supports read lengths up to 2 x 151 cycles..
Sequencer Read Length
NovaSeq, HiSeq X, HiSeq 3000/4000, NextSeq, MiSeq, MiniSeq, iSeq 2 x 151
HiSeq 2000, HiSeq 2500 High Output 2 x 126
HiSeq Rapid Run 2 x 101
Table 3 Recommended Read Length on Illumina Sequencers
Document # 1000000025416 v01
For Research Use Only. Not for use in diagnostic procedures.
14

Appendix A Supporting Information
Supporting Information
Introduction 15
How the Nextera DNA Flex Assay Works 16
Acronyms 17
Product Contents 17
Consumables and Equipment 19
Blood Lysis (Optional) 21
Saliva Lysis (Optional) 23
Introduction
The protocol described in this guide assumes that you have reviewed the contents of this section, confirmed
workflow contents, and obtained all required consumables and equipment.
Document # 1000000025416 v01
For Research Use Only. Not for use in diagnostic procedures.
15
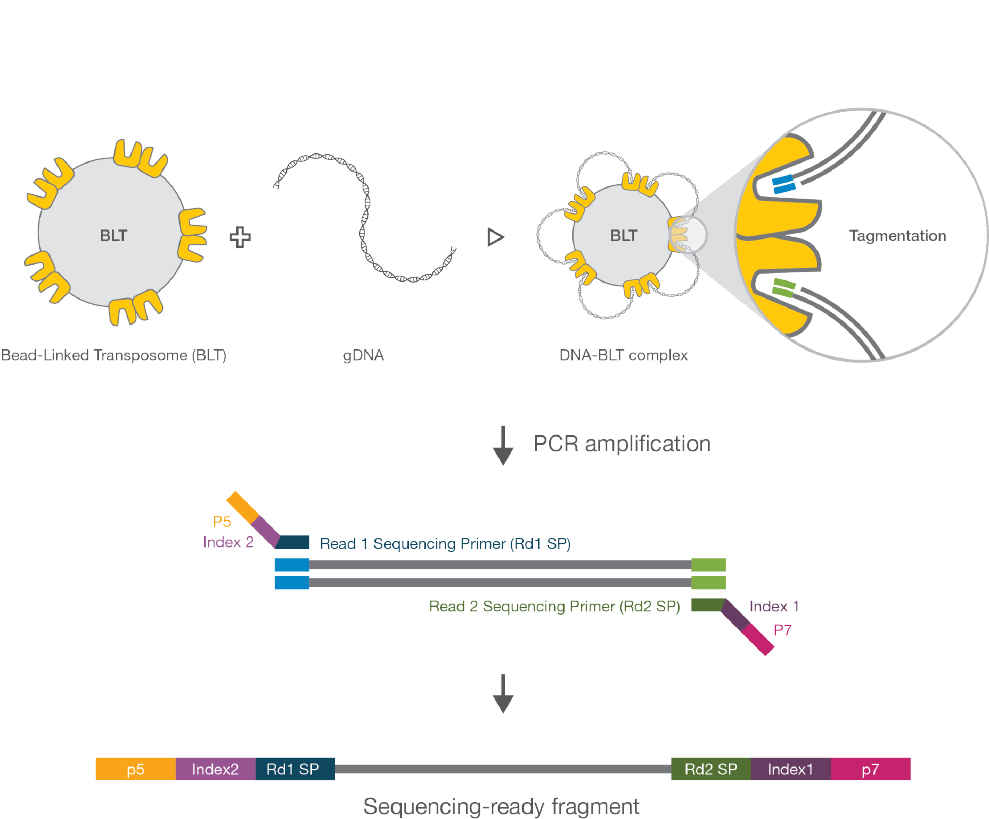
How the Nextera DNA Flex Assay Works
The Nextera DNA Flex library prep kit uses an innovative, bead-based transposome complex to tagment
genomic DNA by fragmenting and adding adapter tag sequences in a single reaction step. Once saturated
with input DNA, the bead-based transposome complex fragments a set number of DNA molecules, providing
flexibility to use a wide DNAinput range, consistent tight fragment size distribution, and normalized libraries
Following the tagmentation step, a limited-cycle PCR step adds Nextera DNA Flex-specific index adapter
sequences to the ends of a DNA fragment, enabling capability across all Illumina sequencing platforms. A
subsequent Sample Purification Bead (SPB) cleanup step then purifies libraries for use on an Illumina
sequencer.
Figure 4 Nextera DNA Flex Workflow
Document # 1000000025416 v01
For Research Use Only. Not for use in diagnostic procedures.
16
Nextera™ DNA Flex Library Prep Reference Guide
Acronyms
Acronym Definition
BLB Blood Lysis Buffer
BLT Bead Linked Transposome
EPM Enhanced PCRMix
EtOH Ethanol
PK1 Proteinase K
RSB Resuspension Buffer
SPB Sample Purification Beads
TB1 Tagmentation Buffer 1
TSB Tagment Stop Buffer
TWB Tagment Wash Buffer
Product Contents
Nextera DNA Flex Library Prep Kit Configurations
NOTE
Certain components of the kit are stored at a temperature that differs from the shipping temperature. Store
kit components at the temperature specified.
Nextera DNA Flex Library Prep - 24 Samples
Box 1 of 3
Quantity Acronym Description Storage Temperature
1 SPB Sample Purification Beads 2°C to 8°C
1 TSB Tagment Stop Buffer Room temperature
1 TWB Tagment Wash Buffer Room temperature
Box 2 of 3
Quantity Acronym Description Storage Temperature
1 RSB Resuspension Buffer -25°C to -15°C
1 TB1 Tagmentation Buffer 1 -25°C to -15°C
1 EPM Enhanced PCR Mix -25°C to -15°C
Box 3 of 3
Quantity Acronym Description Storage Temperature
1 BLT Bead-Linked Transposomes 2°C to 8°C
Document # 1000000025416 v01
For Research Use Only. Not for use in diagnostic procedures.
17
Nextera™ DNA Flex Library Prep Reference Guide
Nextera DNA Flex Library Prep - 96 Samples
Box 1 of 3
Quantity Acronym Description Storage Temperature
1 SPB Sample Purification Beads 2°C to 8°C
4 TSB Tagment Stop Buffer Room temperature
1 TWB Tagment Wash Buffer Room temperature
Box 2 of 3
Quantity Acronym Description Storage Temperature
1 RSB Resuspension Buffer -25°C to -15°C
4 TB1 Tagmentation Buffer 1 -25°C to -15°C
4 EPM Enhanced PCR Mix -25°C to -15°C
Box 3 of 3
Quantity Acronym Description Storage Temperature
4 BLT Bead-Linked Transposomes 2°C to 8°C
Index Kit Contents
Make sure that you have all the reagents identified in this section before proceeding to the library preparation
procedures. Kits are available in the following configurations.
Consumable Catalog #
Nextera™ DNACD Indexes (24Indexes, 24 Samples) 20018707
Nextera™ DNA CDIndexes (96Indexes, 96 Samples) 20018708
NOTE
Certain components of the kit are stored at a temperature that differs from the shipping temperature. Store
kit components at the temperature specified in this protocol.
Document # 1000000025416 v01
For Research Use Only. Not for use in diagnostic procedures.
18
Nextera™ DNA Flex Library Prep Reference Guide
24 Dual Index (Tube Format) - 24 Samples
Quantity Index Name Description Storage Temperature
1 H503 DNAAdapter -25°C to -15°C
1 H505 DNAAdapter -25°C to -15°C
1 H506 DNAAdapter -25°C to -15°C
1 H517 DNAAdapter -25°C to -15°C
1 H710 DNAAdapter -25°C to -15°C
1 H705 DNAAdapter -25°C to -15°C
1 H706 DNAAdapter -25°C to -15°C
1 H707 DNAAdapter -25°C to -15°C
1 H711 DNAAdapter -25°C to -15°C
1 H714 DNAAdapter -25°C to -15°C
96Dual Index (Plate Format) - 96 Samples
Quantity Description Storage Temperature
1 96 Dual Adapter Index Plate -25°C to -15°C
Blood Lysis Kit Contents
Confirm that all reagents identified in this section are available before proceeding to the library preparation
procedures.
Consumable Catalog #
Nextera DNA Flex Library Prep—FlexLysis Reagent Kit 20018706
Flex Lysis Reagent Kit
Quantity Acronym Description Storage Temperature
4 BLB Blood Lysis Buffer Room temperature
4 PK1 Proteinase K -25°C to -15°C
NOTE
Purification Beads are not included in this kit, however sufficient SPB to run the blood lysis workflow are
included in the 24-plex and 96-plex library kits.
Consumables and Equipment
Confirm that all required user-supplied consumables and equipment are present and available before starting
the protocol.
The protocol has been optimized and validated using the items listed. Comparable performance is not
guaranteed when using alternate consumables and equipment.
Document # 1000000025416 v01
For Research Use Only. Not for use in diagnostic procedures.
19
Nextera™ DNA Flex Library Prep Reference Guide

Consumables
Consumable Supplier
10 µl pipette tips General lab supplier
10 µl multichannel pipettes General lab supplier
10 µl single channel pipettes General lab supplier
20 µl pipette tips General lab supplier
20 µl multichannel pipettes General lab supplier
20 µl single channel pipettes General lab supplier
200 µl pipette tips General lab supplier
200 µl pipette tips General lab supplier
200 µl single channel pipettes General lab supplier
1000 µl pipette tips General lab supplier
1000 µl single channel pipettes General lab supplier
96-well storage plates, round well, 0.8 ml (midi plate) xs Fisher Scientific, catalog #AB-0859
Hard-Shell 96-well PCR plates Bio-Rad, catalog # HSP-9601
Microseal 'A' film Bio-Rad, catalog #MSA-5001
Microseal 'B' adhesive seals Bio-Rad, catalog #MSB-1001
Microseal 'F' foil seals Bio-Rad, catalog #MSF-1001
RNase/DNase-free multichannel reagent reservoirs, disposable VWR, catalog # 89094-658
Ethanol 200proof (absolute) for molecular biology (500ml) Sigma-Aldrich, product # E7023
Nuclease-free water General lab supplier
[Optional]Agilent High Sensitivity DNAKit Agilent, catalog # 5067-4626
Qubit dsDNA HSAssay Kit ThermoFisher Scientific, catalog # Q32851 or Q32854
Quant-iT™PicoGreen® dsDNAAssay Kit ThermoFisher Scientific, catalog # P11496
[Optional] High Sensitivity NGS Fragment Analysis Kit Advanced Analytical, catalog # DNF-474
FlexLysis Reagent Kit Illumina, catalog # 20015884
EDTA Blood Collection tubes Becton Dickinson
Oragene DNA Collection Kitfor Saliva DNAGenotek, catalog # OGR-500 or OGD-510
Equipment
Equipment Supplier
Magnetic Stand-96 Thermo Fisher Scientific, catalog #AM10027
Microplate centrifuge General lab supplier
Microcentrifuge General lab supplier
Vortexer General lab supplier
[Optional] 2100 Bioanalyzer System Agilent, catalog # G2940CA
Qubit® Fluorometer 3.0 ThermoFisher Scientific, catalog # Q33216, Q33217 or Q33218
[Optional]Fragment Analyzer™ Analytical Advanced Analytical
Document # 1000000025416 v01
For Research Use Only. Not for use in diagnostic procedures.
20
Nextera™ DNA Flex Library Prep Reference Guide
Thermal Cyclers
Use the recommended settings for the selected thermal cycler models listed. Before performing library prep,
validate any thermal cyclers not listed.
Thermal Cycler Temp Mode Lid Temp Vessel Type
Bio-Rad C-1000 Touch thermal cycler Calculated Heated Plate
Bio-Rad DNA Engine Tetrad 2 Calculated Heated Polypropylene
plates and
tubes
MJ Research DNA Engine Tetrad Calculated Heated Plate
Eppendorf Mastercycler Pro S Gradient S, Simulated Tube Heated Plate
Blood Lysis (Optional)
This protocol has been validated using fresh whole blood collected in EDTA collection tubes. Following
collection, store the blood at 4°C and process it within 3 days.
NOTE
The use of frozen blood has not been validated, therefore cannot be recommended.
CAUTION
Blood is a potential source of infectious diseases. Follow site specific procedures to ensure the safe handling
of blood samples. During the lysis protocol, ensure that the entire blood sample is fully lysed (ie, brown in
color following the heat incubation step) before proceeding to subsequent steps.
Consumables
uBlood samples collected into EDTA collection tubes
uSPB(Sample Purification Beads)
uBLB(Blood Lysis Buffer)
uPK1 (Proteinase K)
uNuclease-free water
uFreshly prepared 80% ethanol (EtOH)
u96-well PCR plate
u96-well plate magnet
Preparation
1 Prepare the following consumables:
Item Storage Instructions
BLB 15°C to
30°C*
BLB must be at room temperature for optimal use. Check for any precipitates. If present, heat at
37°C for 10 minutes and vortex until resuspended.
SPB 2°C to
8°C**
Let stand for 30 minutes to bring to room temperature. Keep at room temperature for later use in the
protocol.
PK1 -25°C
to -
15°C
Place on ice until needed.
Document # 1000000025416 v01
For Research Use Only. Not for use in diagnostic procedures.
21
Nextera™ DNA Flex Library Prep Reference Guide

*BLB is shipped frozen but should be stored at room temperature.
**SPB is included in the Nextera DNA Flex Library Prep Kit.
Procedure
1 Create a lysis master mix containing the following volumes for each prep:
Reagent Volume per reaction (µl)
BLB 7 µl
PK1 2 µl
Nuclease-free water 31 µl
2 Make sure that the EDTA blood tube is thoroughly mixed by inverting the tube.
3 Transfer 10 µl of blood into the well of a 96-well PCRplate.
4 Vortex and spin down the lysis master mix.
5 Add 40 µl of the master mix to each sample.
6 Vortex and invert SPB multiple times to ensure full resuspension.
7 Add 20 µl of SPB to the sample well.
8 Use a pipette set to 50 µl and gently mix 10 times to ensure that the beads are thoroughly mixed with the
sample.
9 Seal the plate and incubate at 56°C for 10 minutes at on a thermal cycler with heated lid to 100°C.
10 Place the plate on a magnet for 5 minutes.
NOTE
The beads are not visible at this point due to the darker brown color of the blood from the lysis reaction.
Allow the sample to sit on the magnet for 5 minutes to make sure that the beads fully migrate to the
magnet.
11 Carefully pipette off supernatant without disturbing the beads. Check for the presence of the bead pellet
within the sample well before discarding the supernatant.
NOTE
If the beads are accidentally aspirated, the sample can be dispensed back in the well and allowed to
settle again before the supernatant is removed.
12 Add 150 µl of 80% ethanol (EtOH)and incubate for 30 seconds on the magnet.
13 Remove and discard all of the EtOH.
14 Use a P20 pipette to remove any residual EtOH.
15 Remove the plate from magnet.
16 Resuspend the beads in 30 µl of water and pipette mix until resuspended.
17 Proceed directly to step 3to add the tagmentation master mix directly to the sample well containing 30 µl
of water and the beads.
SAFE STOPPING POINT
If you are stopping, seal the plate with a Microseal 'B' adhesive seal, and store at 2°Cto8°C for up to 3 days.
Document # 1000000025416 v01
For Research Use Only. Not for use in diagnostic procedures.
22
Nextera™ DNA Flex Library Prep Reference Guide

Saliva Lysis (Optional)
This protocol is validated for saliva collected only in Oragene DNA Saliva collection tubes. Following collection,
the saliva is mixed with the Oragene DX Solution contained in the collection tube, making it stable at room
temperature.
NOTE
Prior to performing the saliva lysis, the Oragene tubes containing the samples need to be incubated for at
least 1 hour at 50°C in water or an air incubator (as recommended by DNA Genotek) to lyse the cells. This
incubation step can be performed at any time after the sample is collected. Once heat treated, the samples
can be stored at room temperature.
This protocol is expected to generate >100 ng of DNAoutput at the end of the saliva lysis step.
CAUTION
Saliva is a potential source of infectious diseases. Follow site specific procedures to ensure the safe handling
of saliva samples.
Consumables
uSaliva samples (collected in Oragene DNA collection tubes and heat treated)
uSPB (Sample Purification Beads)
uNuclease-free water
uFreshly prepared 80% ethanol (EtOH)
u96-well PCR plate
u96-well plate magnet
Preparation
1 Prepare the following consumable:
Item Storage Instructions
SPB 2°C to
8°C*
Let stand for 30 minutes to bring to room temperature. Keep at room temperature for later use in the
protocol.
*SPB is included in the Nextera DNA Flex Library Prep Kit.
Procedure
1 Transfer 20 µl of water into a 96-well PCR plate (1 well per sample).
2 Vortex the heat treatedOragene DNAcollection tube to make sure that sample is thoroughly mixed.
3 Transfer 30 µl of the sample into a 96-well plate containing water and slowly pipette mix.
NOTE
Some saliva samples can be viscous so using wide-bored pipette tips can allow more accurate
pipetting.
4 Vortex and invert SPB multiple times to ensure full resuspension.
5 Add 20 µl of SPB to the sample well.
Document # 1000000025416 v01
For Research Use Only. Not for use in diagnostic procedures.
23
Nextera™ DNA Flex Library Prep Reference Guide

6 Use a pipette set to 50 µl and gently mix 10 times to ensure the beads are thoroughly mixed with the
sample.
7 Leave the plate at room temperature for 5 minutes.
8 Place the plate on the magnet for 5 minutes.
9 Carefully pipette off supernatant without disturbing the beads. Check for the presence of the bead pellet
within the sample well before discarding the supernatant.
NOTE
If the beads are accidentally aspirated, the sample can be dispensed back in the well and allowed to
settle again before the supernatant is removed.
10 Add 150 µl of 80% ethanol (EtOH)to the SPB pellet and leave for 30 seconds on the magnet.
11 Remove and discard all the EtOH.
12 Use a P20 pipette to remove any residual EtOH.
13 Remove the plate from the magnet.
14 Resuspend the beads in 30 µl water and pipette mix until fully resuspended.
15 Proceed directly to step 3of the
Tagment Genomic DNA Procedure
on page 6 to add the tagmentation
master mix directly to the sample well containing 30 µl of water and the beads.
SAFE STOPPING POINT
If you are stopping, seal the plate with a Microseal 'B' adhesive seal, and store at 2°Cto8°C for up to 3 days.
Document # 1000000025416 v01
For Research Use Only. Not for use in diagnostic procedures.
24
Nextera™ DNA Flex Library Prep Reference Guide

Technical Assistance
For technical assistance, contact Illumina Technical Support.
Website: www.illumina.com
Email: techsupport@illumina.com
Illumina Customer Support Telephone Numbers
Region Toll Free Regional
North America +1.800.809.4566
Australia +1.800.775.688
Austria +43 800006249 +43 19286540
Belgium +32 80077160 +32 34002973
China 400.066.5835
Denmark +45 80820183 +45 89871156
Finland +358 800918363 +358 974790110
France +33 805102193 +33 170770446
Germany +49 8001014940 +49 8938035677
Hong Kong 800960230
Ireland +353 1800936608 +353016950506
Italy +39 800985513 +39 236003759
Japan 0800.111.5011
Netherlands +31 8000222493 +31 207132960
New Zealand 0800.451.650
Norway +47 800 16836 +47 21939693
Singapore +1.800.579.2745
Spain +34 911899417 +34 800300143
Sweden +46 850619671 +46 200883979
Switzerland +41 565800000 +41 800200442
Taiwan 00806651752
United Kingdom +44 8000126019 +44 2073057197
Other countries +44.1799.534000
Safety data sheets (SDSs)—Available on the Illumina website at support.illumina.com/sds.html.
Product documentation—Available for download in PDF from the Illumina website. Go to
support.illumina.com, select a product, then select Documentation & Literature.
Document # 1000000025416 v01
For Research Use Only. Not for use in diagnostic procedures.
25

Illumina
5200 Illumina Way
San Diego, California 92122 U.S.A.
+1.800.809.ILMN (4566)
+1.858.202.4566 (outside North America)
techsupport@illumina.com
www.illumina.com
For Research Use Only. Not for use in diagnostic procedures.
© 2018 Illumina, Inc. All rights reserved.
Document # 1000000025416 v01
