Im Spector Imaging Spectrograph User Manual
User Manual:
Open the PDF directly: View PDF ![]() .
.
Page Count: 31

User manual
Standard and Enhanced OEM models
Spectral Imaging Ltd
(September 2008)
IMSPECTOR
I
maging spectrographs

2
Spectral Imaging Ltd.
POB 110
Teknologiantie 18 A
FIN–90571 Oulu, Finland
Tel. +358 (0)10 4244 400
Fax +358 (0)8 388 580
Email info@specim.fi
www.specim.fi
Contents
Imaging spectroscopy ................................................................................................................................................ 3
Advantages offered by spectral imaging ............................................................................................................... 4
ImSpector dispersing optics .................................................................................................................................. 5
Optical properties of the ImSpector Standard and Enhanced version ................................................................... 6
Order blocking filter ......................................................................................................................................... 7
Principles for camera selection ............................................................................................................................. 7
Principles for objective lens selection ................................................................................................................... 9
Multipoint fiber optics .................................................................................................................................... 10
Guidelines for suitable illumination .................................................................................................................... 10
Spectral flattening filters ..................................................................................................................................... 12
Shutter................................................................................................................................................................. 12
Camera Integration................................................................................................................................................... 12
General ............................................................................................................................................................... 12
Standard version ................................................................................................................................................. 13
Camera attaching procedure ........................................................................................................................... 13
Enhanced model ................................................................................................................................................. 15
Camera attaching procedure ........................................................................................................................... 15
Camera removal .................................................................................................................................................. 17
Objective lens ..................................................................................................................................................... 17
Disassembling the ImSpector -optics .................................................................................................................. 17
Axis alignment procedure ................................................................................................................................... 18
Back focal length adjustment .............................................................................................................................. 20
BFL adjustment procedure with Imspector Enhanced model ......................................................................... 21
Calibration ............................................................................................................................................................... 23
Spectral axis calibration ...................................................................................................................................... 23
Spectral Calibration Procedure ....................................................................................................................... 24
Spatial axis calibration ........................................................................................................................................ 26
Field of view and focus .................................................................................................................................. 26
Focusing and alignment procedure ................................................................................................................. 27
Offset created by dark current ........................................................................................................................ 28
More complete offset compensation ............................................................................................................... 29
Responsivity calibration ..................................................................................................................................... 29
Radiometric calibration ....................................................................................................................................... 29
Application calibration ....................................................................................................................................... 29
ImSpector Specifications ......................................................................................................................................... 30

3
Spectral Imaging Ltd.
POB 110
Teknologiantie 18 A
FIN–90571 Oulu, Finland
Tel. +358 (0)10 4244 400
Fax +358 (0)8 388 580
Email info@specim.fi
www.specim.fi
Imaging spectroscopy
Spectrometers or spectrophotometers are usually able to measure optical spectrum
from a surface area as one point. This is done either with one detector scanning the
spectrum in narrow wavelength bands or with an array detector, in which case all the
spectral components are acquired at once. If one desires to measure the spectrum at
several spatial locations of a surface, the target under examination or the measuring
instrument has to be mechanically scanned.
An imaging spectrometer instrument (or spectral imaging instrument), based on an
imaging spectrograph like the ImSpector can be defined here as:
'an instrument capable of simultaneously measuring the optical spectrum
components AND the spatial location of an object surface'.
Technically it is not possible to measure simultaneously spectral information across a
2 -dimensional surface matrix, because this would lead to a four dimensional
information space (X,Y -coordinates, wavelength and intensity). This is obviously
impossible to realize with standard two dimensional detectors which can register only
position and intensity of radiation at a time. This leads to the idea of measuring the
spatial information across a line only (X-axis with specified length and small but
finite width) and the spectral information (wavelength and intensity) for each point
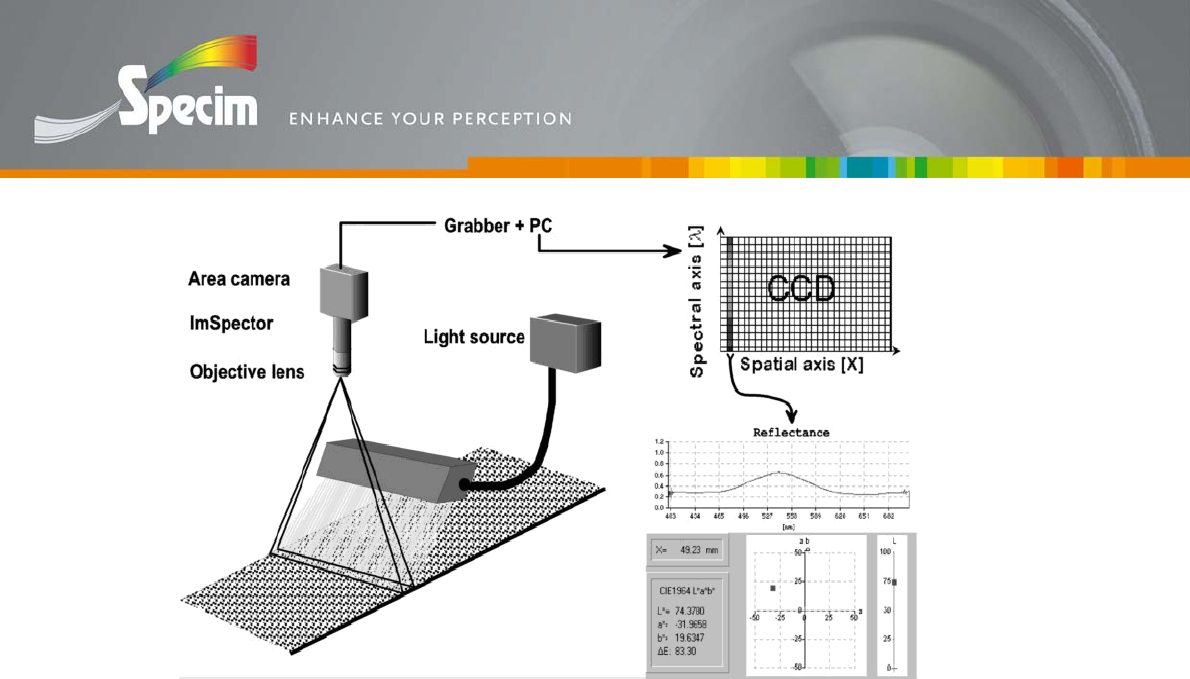
(pixel) in this line (Fig. 1.1.). A 3 -dimensional information space results that can be
measured with an area (matrix) detector array connected to a dispersive, stationary
spectrograph module. One dimension of the detector now constitutes a spatial line
image and the other dimension measures the spectrum for each line pixel. This is the
operating principle of the ImSpector imaging spectrograph. In other words, the
ImSpector converts an area monochrome detector (camera) to a spectral line
imaging system.
There still remains the task of scanning the surface in Y -axis dimension as a function
of time, but this is much easier to accomplish than XY-scanning and is not always
even necessary. In some applications the movement of the object (process stream,
web...) automatically forms the other spatial dimension.
4
Spectral Imaging Ltd.
POB 110
Teknologiantie 18 A
FIN–90571 Oulu, Finland
Tel. +358 (0)10 4244 400
Fax +358 (0)8 388 580
Email info@specim.fi
www.specim.fi
Figure. Spectral imaging across a two dimensional plane. An area detector is able to
register position in the X -coordinate axis, wavelength and intensity. The Y -axis of
the plate is measured by acquiring line images while moving the plane in Y-direction.
Advantages offered by spectral imaging
Some advantages of spectral imaging are obvious: reduced measurement time and
simultaneous measurement across a line area without need for scanning mechanics. In
many applications several single point instruments can be replaced by one
multichannel imaging spectrometer using objective or multilegged fibers, thereby
saving both in the instrumentation cost and in the amount of mechanics and required
space. The small size of the spectrograph and commercially available CCD cameras
can make many measurements practical for the first time. Multipoint measurement
with a single instrument eliminates the problem of calibration mismatch between
separate sensors.
On the other hand, spectral imaging produces a large amount of data, and therefore,
particularly process applications may require sophisticated data readout and
processing, like on-chip binning and addressable line (=wavelength) readout for
minimizing the amount of data and DSP circuits for fast on line processing.
The ImSpector is designed both for industrial and research use. It offers specific
advantages in cases where
The user needs to upgrade an existing industrial or research monochrome
camera system for detection of color or other spectral features. The ImSpector
makes it possible to utilize all the existing system components.
The user needs to precisely determine color or color difference across a line
with a good spatial resolution and with a standard method, like color
coordinates.
5
Spectral Imaging Ltd.
POB 110
Teknologiantie 18 A
FIN–90571 Oulu, Finland
Tel. +358 (0)10 4244 400
Fax +358 (0)8 388 580
Email info@specim.fi
www.specim.fi
In comparison to point color spectrophotometers the ImSpector provides far
better spatial resolution and simultaneous measurement across a large number
of points.
In comparison to RGB color camera the ImSpector provides better color
resolution, full compensation for light source color temperature changes and
full spectral information with flexible wavelength selection by software.
The application requires broader than visible (color) wavelength range, like
400-1000 nm. RGB camera is limited to three fixed wavelength bands in 400-
700 nm.
The user needs to measure color or other spectral features simultaneously
across several points by means of fiber optics.
ImSpector dispersing optics
Reflection and transmission gratings are currently used in various dispersive
spectrometers worldwide. In the practical realization of imaging spectrographs for
two dimensional CCD there was difficulties due to the off-axis construction of typical
instruments (Littrow or Czerny-Turner configurations). These inherently have some
amount of geometrical aberrations, like keystone and smiling, which result in reduced
imaging quality.
Therefore ImSpector employs a new direct sight optical configuration and a
transmission grating. It is based totally on transmissive optics.
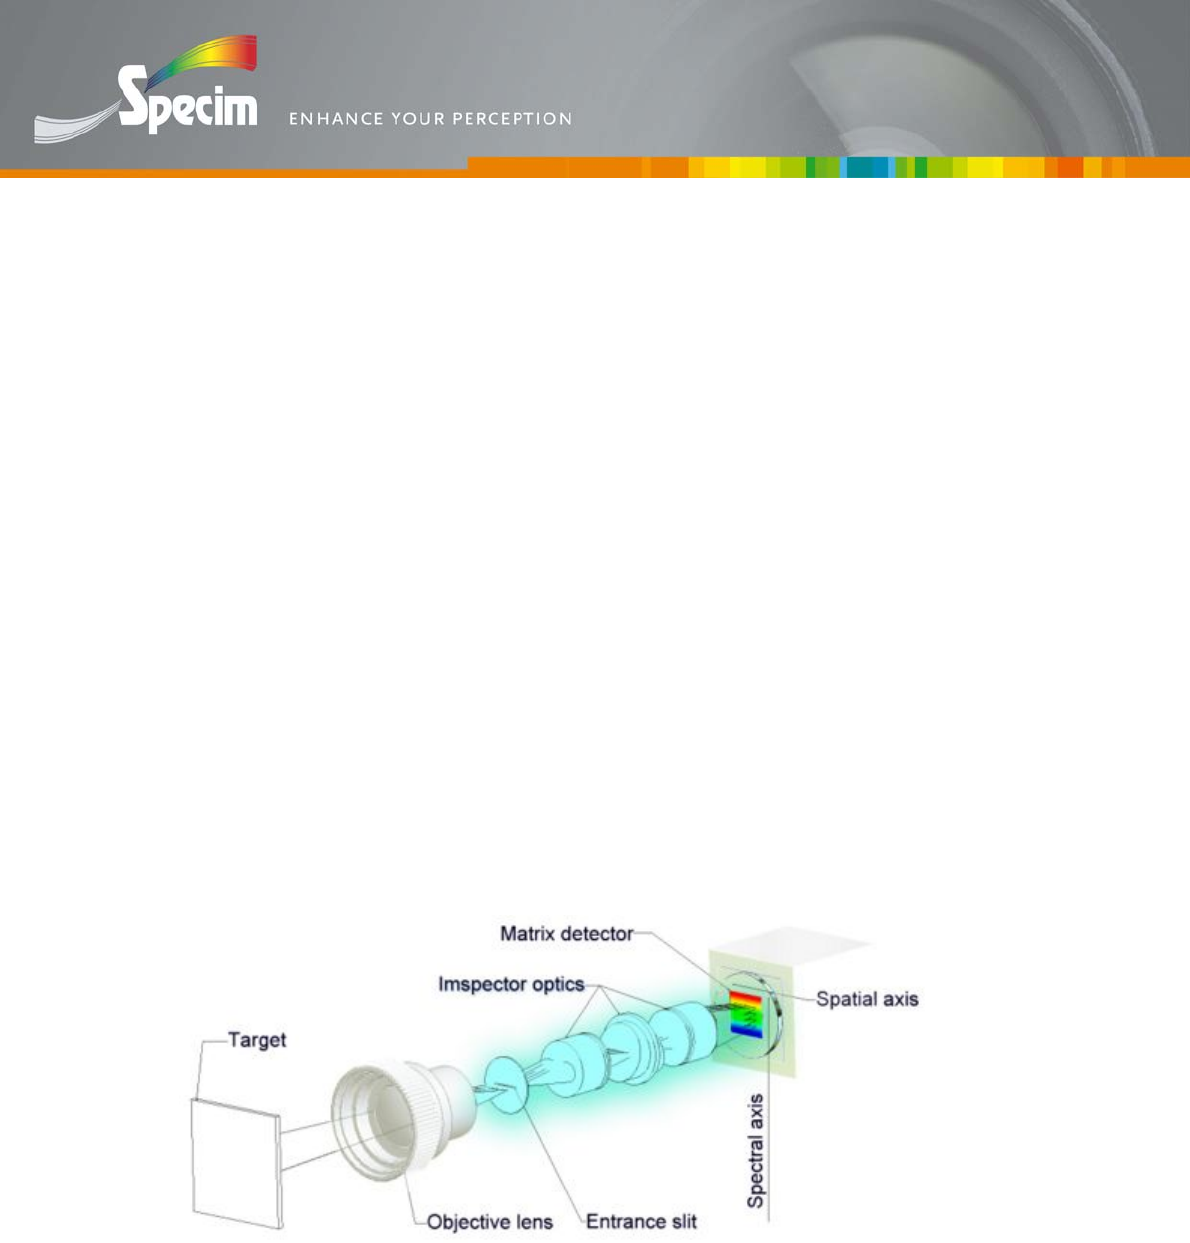
Figure. Schematic of the ImSpector imaging spectrograph showing also the
simultaneous spatial (line) and spectral mapping with an area detector.

6
Spectral Imaging Ltd.
POB 110
Teknologiantie 18 A
FIN–90571 Oulu, Finland
Tel. +358 (0)10 4244 400
Fax +358 (0)8 388 580
Email info@specim.fi
www.specim.fi
Optical properties of the ImSpector Standard and
Enhanced version
Generally the quality of a spectrograph can be described in terms of its spectral range,
resolution, nonlinearity, S/N ratio (straylight), diffraction efficiency and stability. An
imaging spectrograph has also the spatial axis to consider. The parameters needed in
characterising spectral imaging system are:
1. Spectral resolution (also at different spatial locations across the detector
plane),
2. Spectral linearity (and it’s variation at different spatial locations),
3. Absolute efficiency of the optics (throughput) and diffraction efficiency of the
grating,
4. Smiling or curvature of the slit image on the detector plane,
5. Vignetting across the detector plane (spatial flatness of throughput),
6. Astigmatism (especially in fiberoptic systems),
7. Straylight (S/N), ghost line and ghost image properties.
8. Wavelength stability.
General ImSpector optical specifications are shown in ImSpector Specifications.
The main difference between Standard and Enhanced series spectrograph are:
Standard series spectrograph should be used with CCD detector having smaller
than 9 mm long spatial axis (slit length). Enhanced series spectrograph has 14
mm slit therefore making it possible to use longer spatial axis detector.
Standard series spectrograph has small amount of smiling (curvature of
spectral line) and keystone (difference in magnification in different
wavelengths)
Mechanically Standard series spectrograph's have straight optical axis,
Enhanced models have small angle after the grating.
The ImSpector imaging spectrograph can be implemented to cover a spectral range in
the UV, visible and in the near infrared region up to 2500 nm. Standard versions are:
UV4 (200 - 500nm), V8 (380 - 800 nm), V10 (400 - 1000nm), N17 (900 - 1750 nm)
and N25 (1000 – 2500nm).
The spectral resolution of the spectrograph depends on the width of the entrance slit
and linear dispersion produced by the spectrograph optics. Minimum limit for the
spectral resolution is set by the imaging capability of the optics (point spread size).
The slit dimensions also define, together with lens focal length and distance from lens
to object, the length and width of the imaged scene line. The input slit is
lithographically manufactured on a glass substrate. Thus, there is no physical hole to
the inner parts of the spectrograph and the glass prevents dust particles from entering
the actual slit surface. Special process is used to make both sides of the slit optically
“black”. This prevents reflections and reduces straylight both in front the slit
(objective side) and inside the spectrograph.

7
Spectral Imaging Ltd.
POB 110
Teknologiantie 18 A
FIN–90571 Oulu, Finland
Tel. +358 (0)10 4244 400
Fax +358 (0)8 388 580
Email info@specim.fi
www.specim.fi
The ImSpector has two high quality lenses that are used to collimate light to the
dispersing PGP element and to focus light to the detector surface. These lenses are
specially designed for a wide field of view and a low f-number, and they provide
excellent image quality by reducing several common aberrations. There is no
vignetting and the field curvature is minimized.
There are no adjustable or moving parts inside the spectrograph but spectrograph
components are locked permanently.
Order blocking filter
Some of ImSpector models (e.g. V10, V10E and N25E) produce a wavelength range
larger than one octave. Order blocking filter is needed to prevent the second order
spectrum from overlapping with the end of the first order spectrum.
Principles for camera selection
Many of the ImSpector Enhanced spectrograph performance characteristics exceed
those of standard CCD cameras. Therefore in many measurement applications the
limiting component will be the camera. Camera selection depends on application
requirements, but the following list shows basic criteria for the selection of a proper
camera for imaging spectroscopy.
ImSpector Standard models are designed for the 2/3" (6.6 x 8.8 mm) detector.
The shorter axis is defined to be the spectral axis. It is also possible to turn the
spectrograph 90° for a broader spectrum. If a ½” (4.6 x 6.4 mm) camera is
used, the longer axis should be used as the spectral axis. This reduces the size
of the available spatial image. Larger than 2/3” cameras can of course be used,
but the image does not cover the whole detector.
ImSpector Enhanced models are designed for detectors having 14 mm spatial
axis. However, the spectral axis is still only 6.6 mm in length.
The camera should have a sensitive detector either with a proper window
material or without a window. Especially in the blue part of the spectrum, the
combination of low output from halogen lamp and the poor detector response
can result in unsatisfactory S/N ratio. If a NIR spectrograph is used the NIR
blocking filter sometimes present in many CCD cameras should be removed.
A cooled or temperature stabilized detector is recommended to allow long
integration times in a low light level application and to minimize temperature
induced offset variations in variable industrial environment.
In demanding spectroscopic measurements, a digital camera with pixel
synchronized output gives better S/N than a camera with common CCIR
standard or other analog video output.
The camera should have sufficient amount of pixels to satisfy required spectral

8
Spectral Imaging Ltd.
POB 110
Teknologiantie 18 A
FIN–90571 Oulu, Finland
Tel. +358 (0)10 4244 400
Fax +358 (0)8 388 580
Email info@specim.fi
www.specim.fi
and spatial resolutions. One should always consider the discrete sampling
nature of the camera array while evaluating the true spectral and spatial
resolution achieved in measurements.
It is recommended to have as large a pixel size as possible to maximize signal
per pixel. However, this is sometimes in contradiction to resolution and price
requirements.
Sufficient dynamic range is essential particularly in precise color and
analytical measurements. As a rule of thumb 8 bit dynamic range allows color
difference resolution about 1 ΔE (typical capability of human eye), 10 and 12
bits lead to ΔE values of 0.3 and 0.1 … 0.05, respectively.
NOTE 1: There are some CCD detectors which have a thin coating on the
surface of the chip. In spectroscopic measurements, this coating can introduce
dim interference fringes that may be visible at the final image. These do not
have any effect on measurement.
NOTE 2: The ΔE (delta E) is a value that giver difference (or separation) of
two colors presented in L*a*b* color co-ordinates. The L*a*b* is calculated
from the spectrum in visible wavelength region and it simulates the human
perception of color..

9
Spectral Imaging Ltd.
POB 110
Teknologiantie 18 A
FIN–90571 Oulu, Finland
Tel. +358 (0)10 4244 400
Fax +358 (0)8 388 580
Email info@specim.fi
www.specim.fi
Principles for objective lens selection
The ImSpector has been designed to accept any standard C -mount objective lens. The
importance of the quality of the lens should not be underestimated. A number of lens
properties affect directly to the measurement result and must be considered when
evaluating lens: These are:
Modulation Transfer Function (MTF) and amount of straylight affects how
well the lens reproduces modulation (contrast) or brightness differences of the
original object.
Spectral transmission and suitability to near infrared range if NIR spectrograph
is used. Transmission may be reduced by absorption and reflections by the
optical materials that lenses are made of. Also the standard lenses have been
designed to use visible light, and the colour correction for infrared
wavelengths has been ignored.
Spatial uniformity of throughput: this may be deteriorated by the vignetting in
the image lens if the lens aperture is not large enough for the detector size
used.
Focal length of objective lens Angle of View at spatial axis
using 2/3” CCD Object size at 1 m distance
8 mm 58° 1.11 m
12.5 mm 39° 0.7 m
16 mm 31° 0.55 m
24 mm 20° 0.35 m
35 mm 13° 0.23 m
50 mm 10° 0.18 m
Table. The angle of view and the size of object at 1 m distance using different focal lengths.
Other parameters to consider are of course the focal length and the f-number of lens.
The focal length affects the image size and angle of view. See Table above.
The f-number of the ImSpector Standard series spectrograph is F/2.8m and
ImSpector Enhanced series spectrograph F/2.4. This is “slow” compared to the best
F-numbers for common lenses (F/1.2 … F/1.8). In practice this means that the actual
limiting factor of the system throughput is most often the spectrograph and no
advantage can be gained by using faster f-number objective than that of the
spectrograph. In fact, using a lower f-number just overfills the spectrograph numerical
aperture and can cause unwanted reflections and increased straylight inside the
spectrograph.
A CS-mount objective, although it shares the same thread pitch and diameter is
not directly compatible with C -mount. The flange-back length of a C -mount
is 17.53 mm which is 5 mm longer than that of CS -mount.
Many C -mount objectives are designed only for the smaller ½” detector size.
These should not be used with 2/3” or larger detectors.

10
Spectral Imaging Ltd.
POB 110
Teknologiantie 18 A
FIN–90571 Oulu, Finland
Tel. +358 (0)10 4244 400
Fax +358 (0)8 388 580
Email info@specim.fi
www.specim.fi
Multipoint fiber optics
There is an option to use multipoint fiber as input optics. Usually there is from ten to
hundred channel fibers used. With this kind of setup it is possible to have very large
or distant target area and get separate spectrum for each channel with one spectrograph
setup.
Guidelines for suitable illumination
In conventional B/W imaging all wavelengths are registed by one pixel, instead in
imaging spectroscopy each pixel registers only a small fraction of the spectrum
(commonly 1 – 5 nm). This causes the need for efficient light source.
Source spectral output should be right for wavelengths that will be acquired. The most
common light source type is Halogen lamp. There are several options of light sources
at market, with different forming, diffucing or focusing. Illumination has to be always
Some light source examples
Halogen (thermal sources, various sizes and shapes)
Deuterium (UV)
Black lights (UV-A and UV-B)
Gas discharge lamps (fluorescence lamps, Xenon lamps pulsed or continuous)
LED (white, RGB, limited usability)
Sun
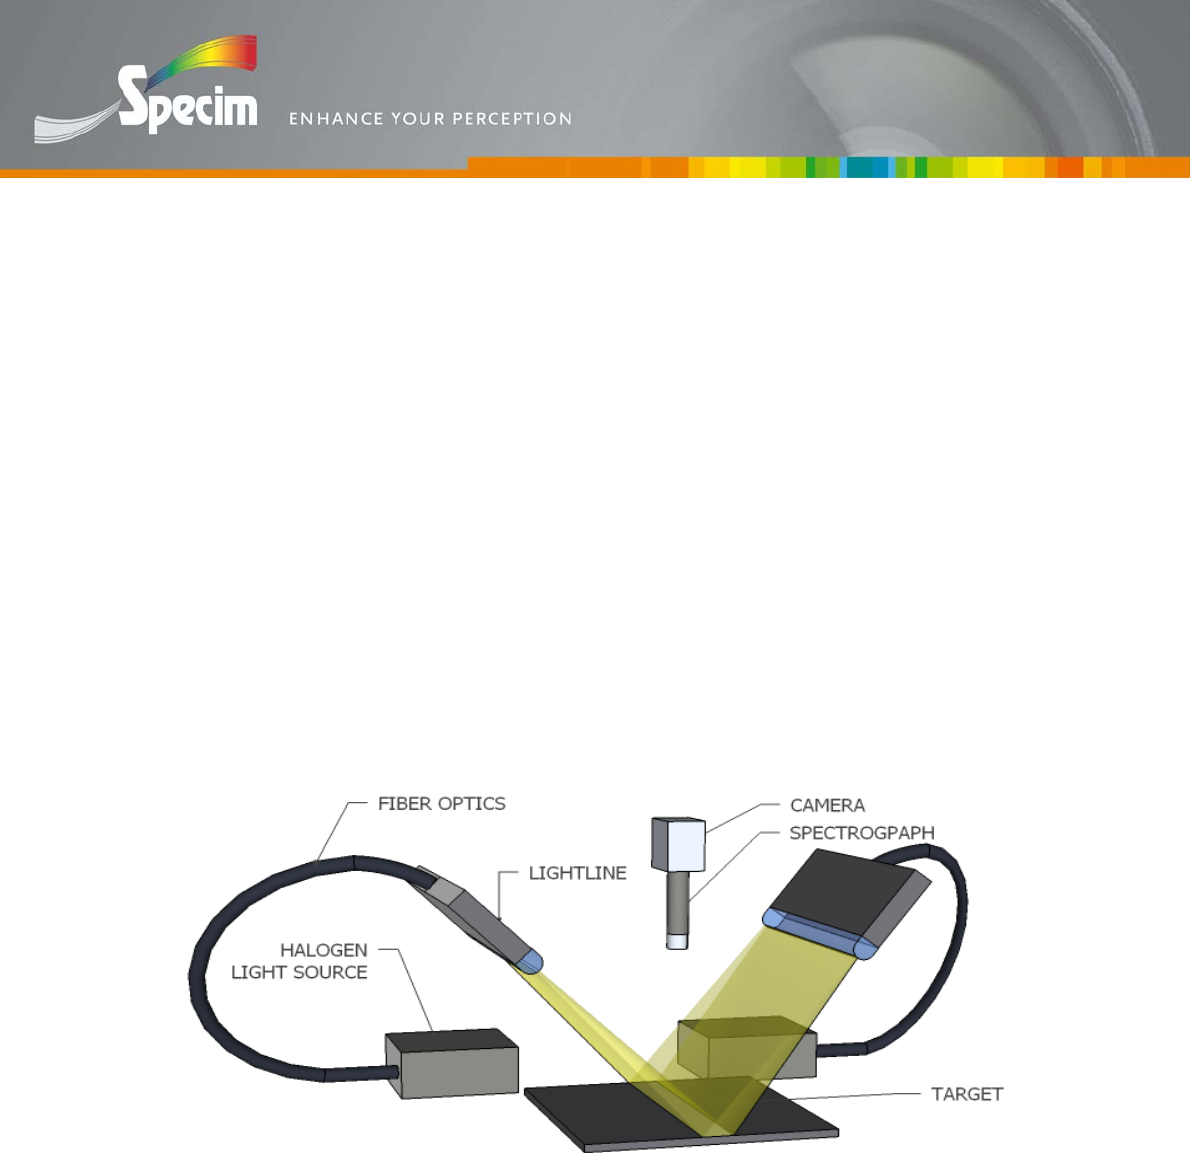
The ImSpector is basically a line imaging instrument, and thus a fiber optic lightline
is very well suited illumination source for such system. Lightlines and light sources
for these are available from several manufacturers.
The following notes provide a check list to achieve proper alignment and performance
with a system consisting of halogen light source with a fiber optic lightline and a
ImSpector/camera unit with a fore lens. Alignments and adjustments are easiest to do
when live image from the camera is available.
Check that the fore lens numerical aperture is set to the same numerical aperture than
the used ImSpector spectrograph has. This assures that the lens will not limit the
system throughput.
If the application is in the visible region, and the light source is equipped with a
standard EKE halogen lamp, adjust the light intensity knob in the light source to its
maximum for best signal in the blue region. If the application covers near infrared
(NIR) region too, and no NIR blocking filter is used in the light source, it is
recommended to set the light intensity knob to 75-80% of the maximum.
11
Spectral Imaging Ltd.
POB 110
Teknologiantie 18 A
FIN–90571 Oulu, Finland
Tel. +358 (0)10 4244 400
Fax +358 (0)8 388 580
Email info@specim.fi
www.specim.fi
Usually it is appropriate to illuminate at 45 degrees and image at 90 degrees with
respect the target surface (as shown in Figure 1).
If the target surface is 3-dimensional (has large passline variations), it is better to use
smaller angle between the illumination and imaging. However, care should be taken
that specularly reflected light does not get to the spectrograph.
The fiber optic lightline can be used without or with a cylindrical lens. If the lightline
can be placed close to the sample surface, light intensity will be usually sufficient and
very uniform without the lens. With the cylindrical lenses, the light becomes
collimated in a narrow line. The width of the line depends on the separation between
the lens and the fiber optic line.
Having a white calibration sample as a target, adjust the illuminated line width so that
the highest signals in the image are close to the maximum range in the system.
However, be sure that the signal is not saturating in any of the image pixels.
If there tends to be too much light, it is recommended to make the light to spread over
a larger area than e.g. reduce the lens numerical aperture. Spreading the light over a
larger area will make the illumination more uniform.
Figure. A typical spectral imaging setup with fiber optic lightline.

12
Spectral Imaging Ltd.
POB 110
Teknologiantie 18 A
FIN–90571 Oulu, Finland
Tel. +358 (0)10 4244 400
Fax +358 (0)8 388 580
Email info@specim.fi
www.specim.fi
Spectral flattening filters
When using spectrographs the usual behaviour of system is that it is working better at
certain part of the wavelength range and the SNR tend to decrease at some other
regions of the wavelength range. Due to the light source radiance, detector response
and systems instrument function it is sometimes worth of even necessary to use filters
to balance the system in order to increase the SNR at some wavelength bands and
improve the use of dynamic range of the detector.
Imspector Enhanced series model has an internal mount for 32mm diameter filters
between objective and spectrograph
Shutter
Imspector Enhanced series model can be equipped with a shutter. With shutter it is
easy and fast to acquire dark frames. See ‘Offset created by dark current’
Camera Integration
General
The ImSpector Standard and Enhanced spectrograph models*) can be connected to
any C -mount camera. The optics is factory adjusted to have the back focal length
(BFL) of 17.53 mm that standard requires. Mounting to the camera can be
accomplished by following the next procedures step by step. It is recommended to use
a common baseplate under spectrograph and camera to maintain alignment if used in
high vibration environment. With the E -series spectrograph one needs to take into
account the small angle between the front and back side of the spectrograph.
Due to difference in camera mechanical properties no universal solution exists and
following examples serve are guidelines only.
*) N25E can be mounted only with M42x1 thread.
13
Spectral Imaging Ltd.
POB 110
Teknologiantie 18 A
FIN–90571 Oulu, Finland
Tel. +358 (0)10 4244 400
Fax +358 (0)8 388 580
Email info@specim.fi
www.specim.fi
Standard version
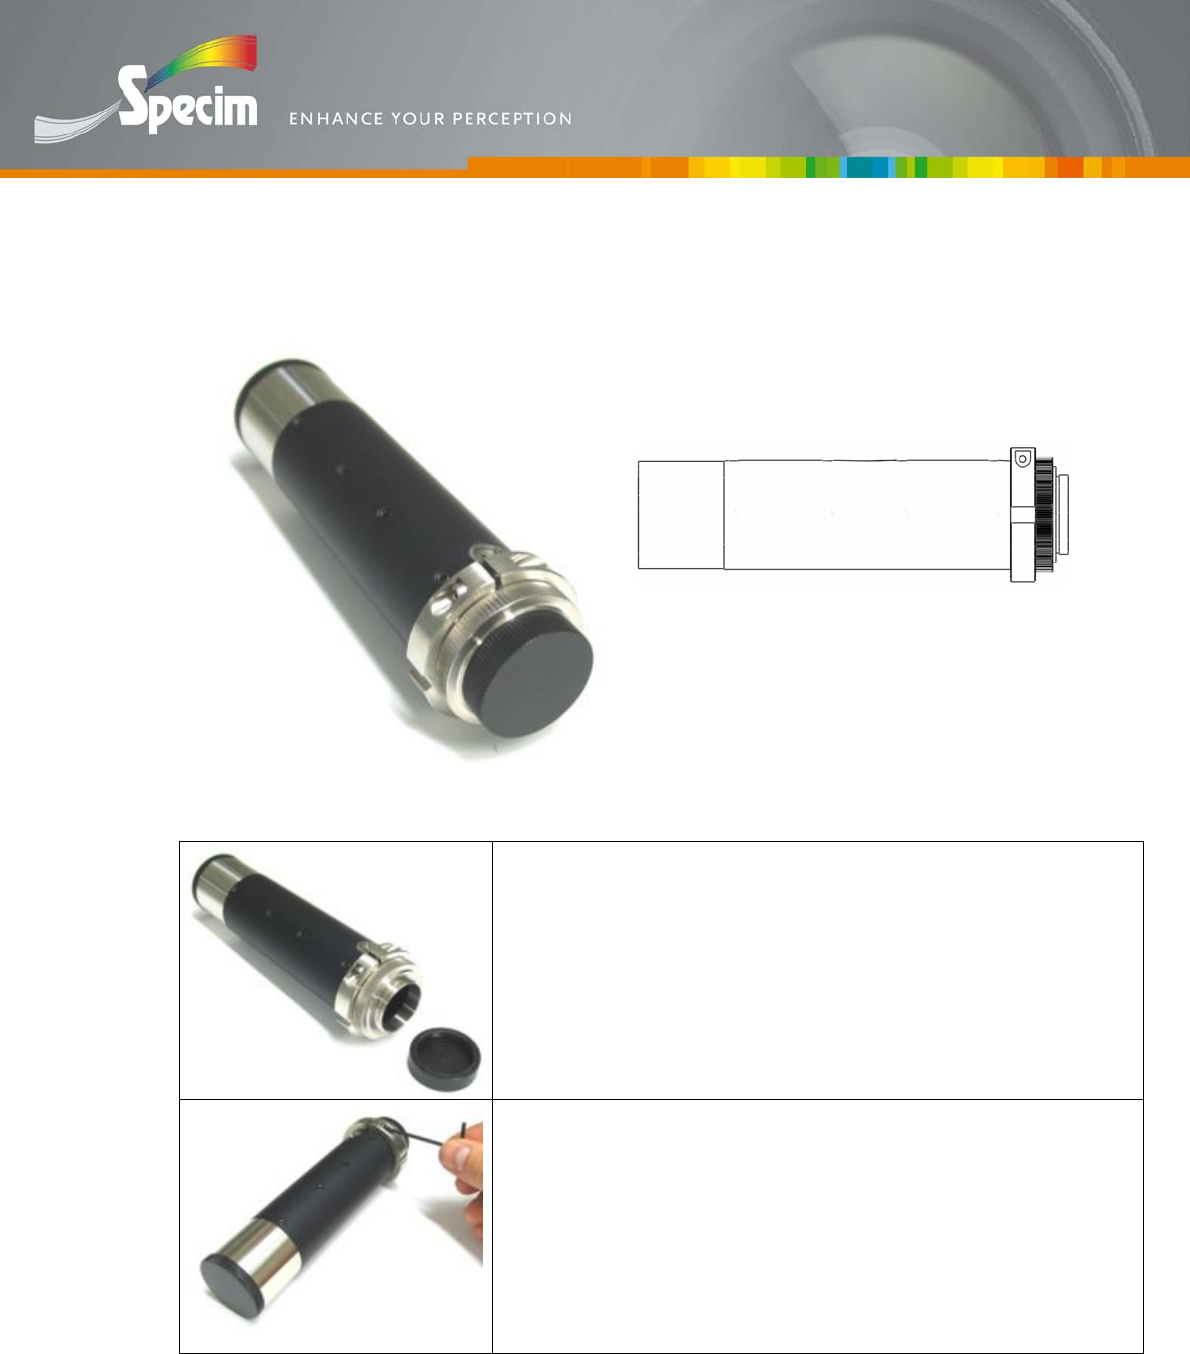
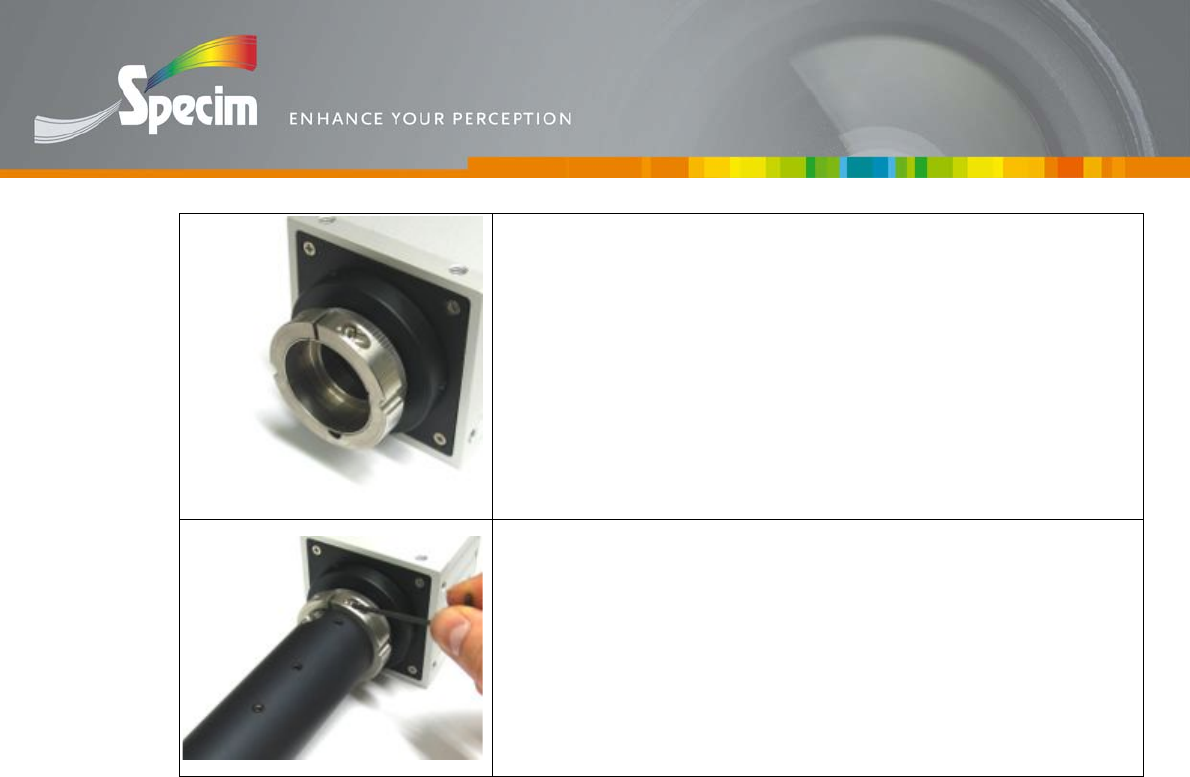
The Standard ImSpector model is tubular with removable C-mount.
Camera attaching procedure
Remove the protecting cap from the rear C -mount.
Remove the rear C -mount adapter plate from the ImSpector
spectrograph using Hex 2.0 screwdriver. Beware not to touch the
now exposed lens surface.
14
Spectral Imaging Ltd.
POB 110
Teknologiantie 18 A
FIN–90571 Oulu, Finland
Tel. +358 (0)10 4244 400
Fax +358 (0)8 388 580
Email info@specim.fi
www.specim.fi
Attach the adapter to the camera’s C -mount. Tighten the adapter
firmly to the camera.
Put the spectrograph to the adapter and tighten the locking screw
slightly.
After assembly, the camera and the ImSpector spatial axis should
be aligned to CCD rows. Hence, before tightening the locking ring
firmly, please check the paragraph “Axis alignment procedure” in
this manual.
15
Spectral Imaging Ltd.
POB 110
Teknologiantie 18 A
FIN–90571 Oulu, Finland
Tel. +358 (0)10 4244 400
Fax +358 (0)8 388 580
Email info@specim.fi
www.specim.fi
Enhanced model
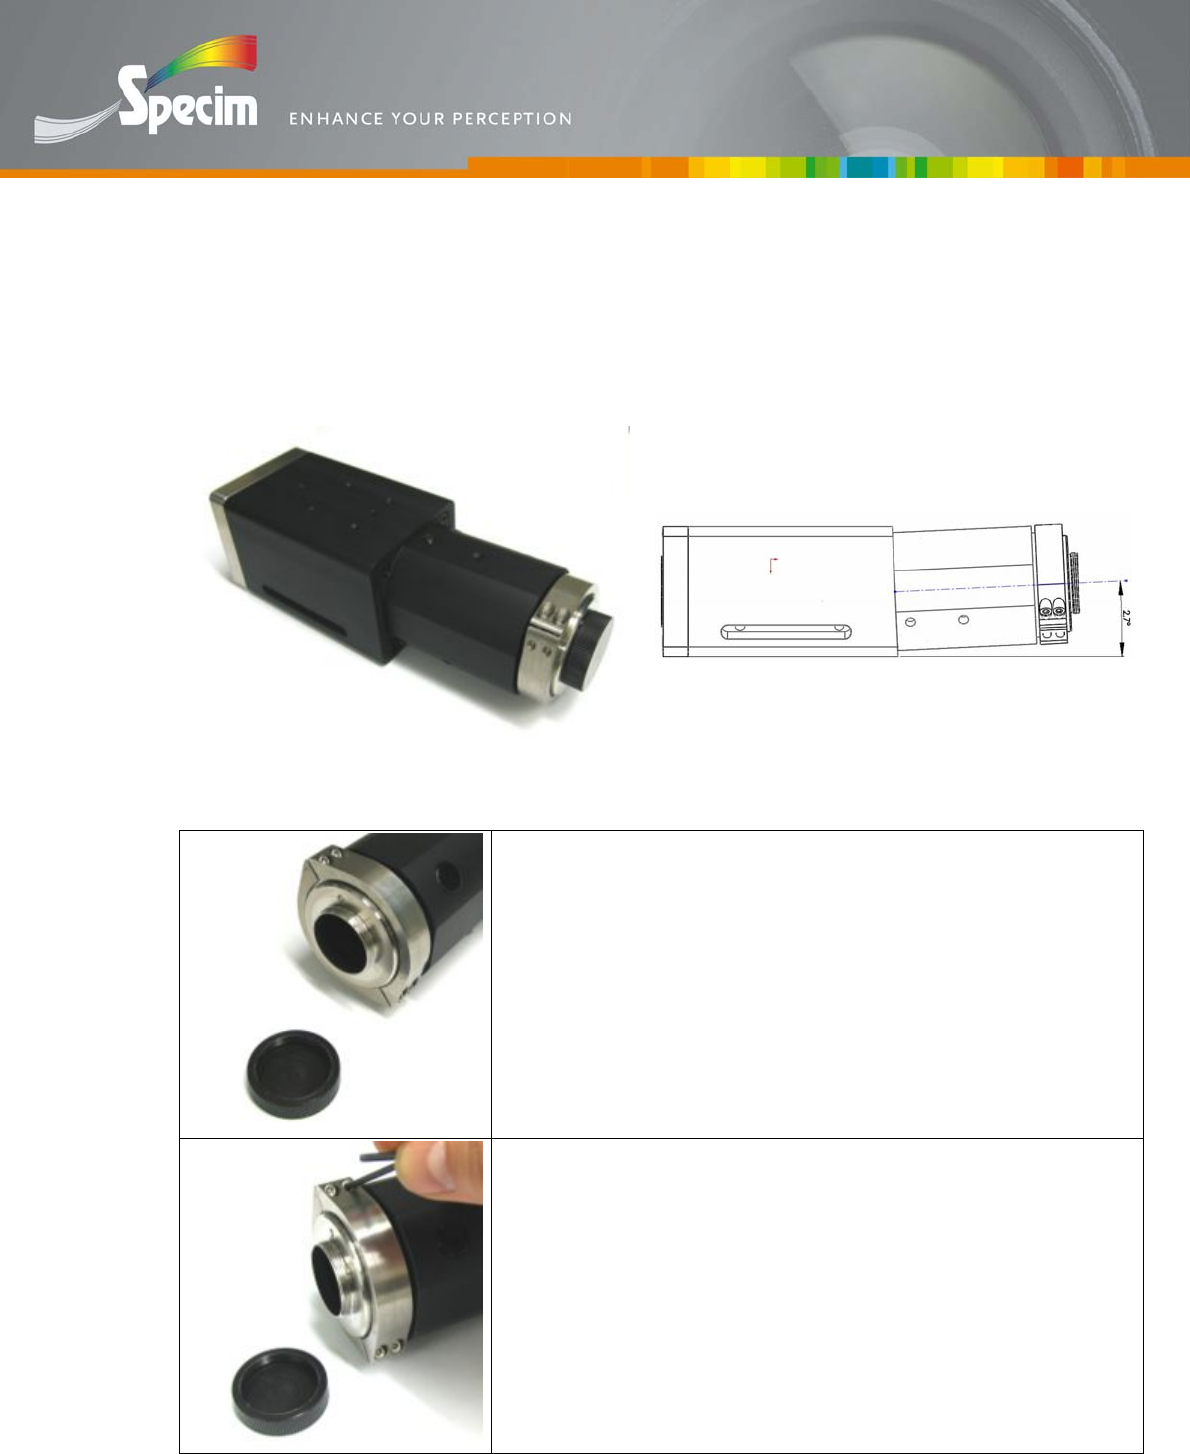
The Enhanced model has small angle between the front part and the back part of the
spectrograph. This angle is defined in the attached drawing. (V-series 2,7º, N-series
4,2º)
Camera attaching procedure
Remove the protecting cap from the rear C -mount.
Remove the rear C -mount adapter plate from the ImSpector
spectrograph by turning hex screws until locking ring parts are
loose. Beware not to touch the now exposed lens surface.
16
Spectral Imaging Ltd.
POB 110
Teknologiantie 18 A
FIN–90571 Oulu, Finland
Tel. +358 (0)10 4244 400
Fax +358 (0)8 388 580
Email info@specim.fi
www.specim.fi
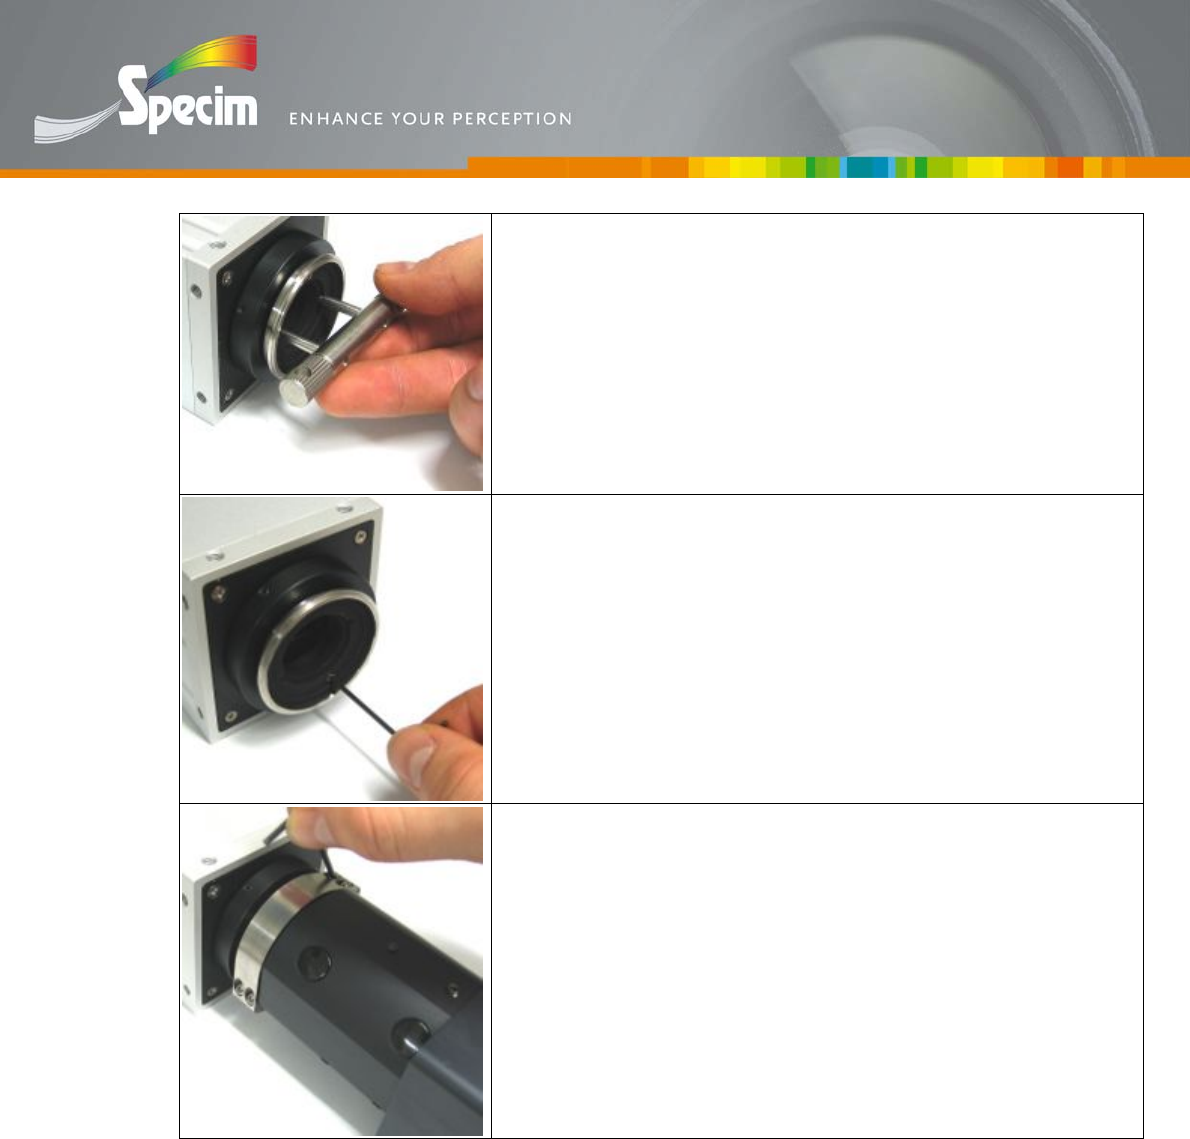
Attach the adapter to the camera’s C -mount. Use the special
wrench tool that is provided with the spectrograph to tighten the
adapter firmly to the camera.
If necessary, the C -mount can be locked to the camera using a
small hex screw (M3x3 mm). For this reason there is a M3 thread
in the C -mount adapter plate.
Connect ImSpector to the camera by placing locking ring parts and
tightening hex screws slightly.
After assembly, the camera and the ImSpector spatial axis should
be aligned to CCD rows. Hence, before tightening the locking ring
firmly, please check the paragraph “Axis alignment procedure” in
this manual.

17
Spectral Imaging Ltd.
POB 110
Teknologiantie 18 A
FIN–90571 Oulu, Finland
Tel. +358 (0)10 4244 400
Fax +358 (0)8 388 580
Email info@specim.fi
www.specim.fi
Camera removal
It should be emphasised that the C -mount does not return to the same angle after
removing and re-mounting the camera to the ImSpector.
NOTE:. The spectral and spatial re-calibration is required whenever the camera head
is removed from the ImSpector!
Objective lens
The ImSpector front objective adapter can accept any C -mount objective lens.
Mechanical back focal length of the objective should be 17.53 mm. With proper
adapters it is possible to use objectives with CS -mount, d -mount, T -mount or Nikon
bayonet.
The objective lens should be focused on the measurement surface using a test
plate (black and white stripes).
The F/number of the objective lens should not be set lower than that of the
spectrograph even if possible. There is a risk of excessive stray light caused by
overfilling the spectrograph NA.
Standard objective lenses are optimised for visible wavelength range. There
are also lenses which are designed for the NIR region. These guarantee the
best performance with spectrographs covering the spectral region above 700
nm. Please contact Specim for manufacturer information.
There is an input slit visible when the front optics is removed ! Be careful to
prevent dust, other foreign particles and drops of water from getting on the
input slit. Do not make finger prints on the input slit. It is best to put the
special protective cap (supplied with the ImSpector) in the C-mount
immediately after the objective lens is removed.
Disassembling the ImSpector -optics
There are expensive and delicate optical components inside the spectrograph. These
could be permanently damaged by improper handling. Please, do not open the
ImSpector spectrograph. Take all necessary precautions to prevent dust, liquid or
vapour penetrating the instrument while camera or objective port is open.
In case of need for any repair, please contact your local distributor or Spectral
Imaging Ltd. directly.

18
Spectral Imaging Ltd.
POB 110
Teknologiantie 18 A
FIN–90571 Oulu, Finland
Tel. +358 (0)10 4244 400
Fax +358 (0)8 388 580
Email info@specim.fi
www.specim.fi
ALIGNMENT AND CALIBRATION
Axis alignment procedure
After the assembling procedure, the camera and ImSpector should be aligned so that
the spatial axis of the spectrograph is parallel to horizontal pixel lines of the camera.
This can be done in several different ways but usually the following procedure gives
the best result. We presume here that the camera and monitor horizontal axis are
defined to be the spatial axis of the image, so that the spectrum is dispersed vertically.
1. Remove the front objective lens.
2. Point the spectrograph and camera to a light source giving narrow spectral
lines or place a light source in front of the spectrograph slit. Good sources for
this are neon lamps, Hg -lamps and common fluorescence lamps. An optional
integrating sphere (with the spectral lamp inside) could be also used to have
more uniform illumination across the slit.
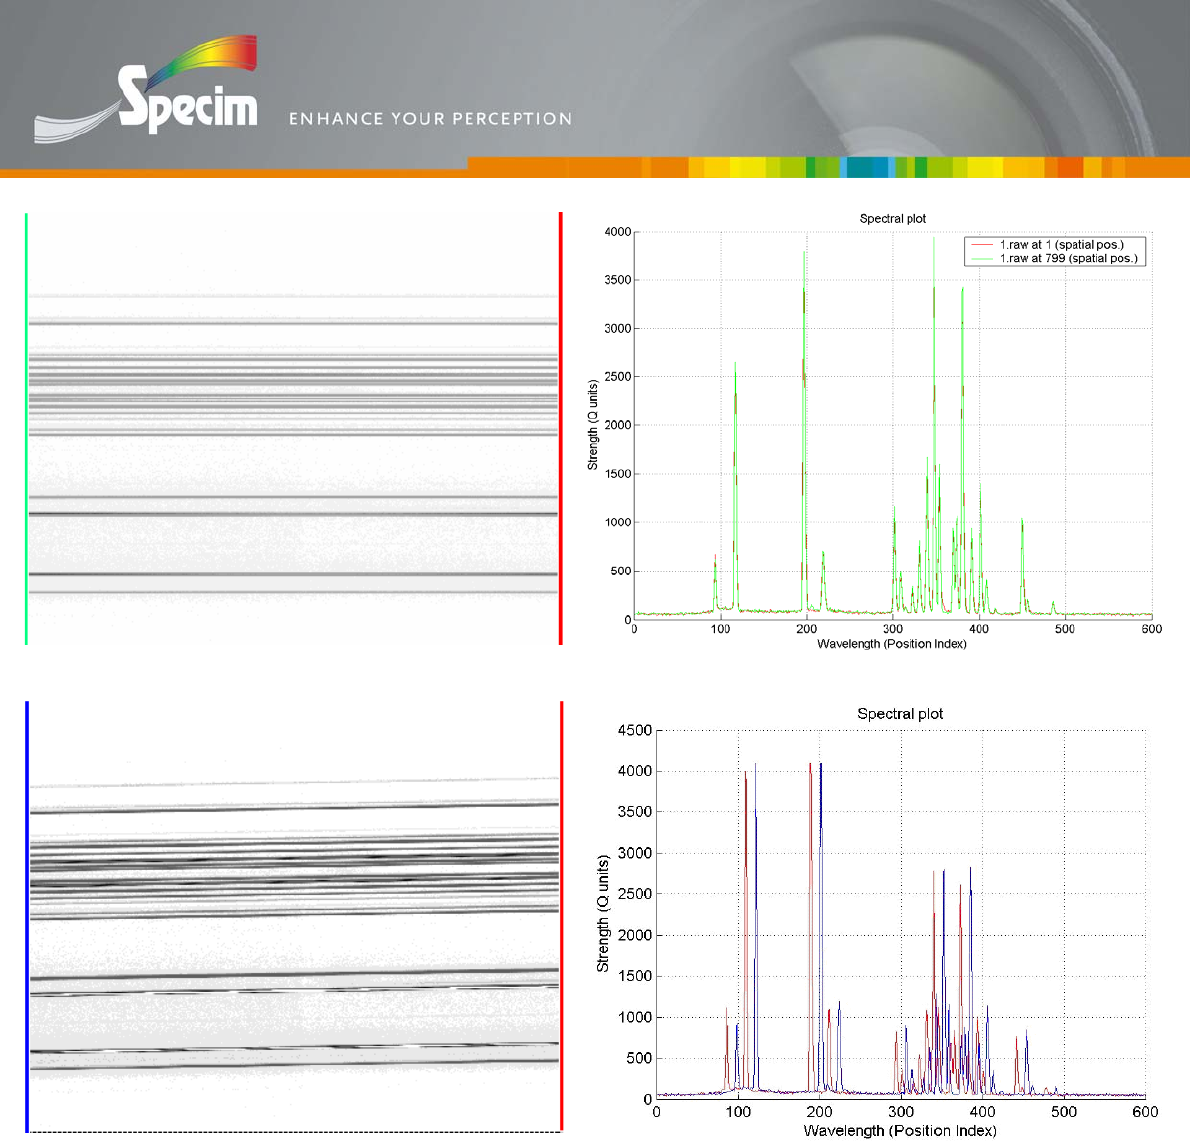
3. Look at the image at a video or PC screen. Narrow lines should be seen
crossing the screen from left to right (Figure below). These lines should be
aligned horizontally along the detector rows so that the lines are at same the
height at the left and right side of the detector. Note that the direction of
wavelength scale depends on how the spectrograph and camera are attached.
You can ch a n g e this by turning t h e c a me r a 180°.
4. The alignment is done turning the camera with respect to the spectrograph.
It is recommended to use a special software to look at two spectral profiles, one at the
left and one at the right side of the image. The alignment is perfect when the spectral
line so these two spectra overlap perfectly. (figure below)
19
Spectral Imaging Ltd.
POB 110
Teknologiantie 18 A
FIN–90571 Oulu, Finland
Tel. +358 (0)10 4244 400
Fax +358 (0)8 388 580
Email info@specim.fi
www.specim.fi
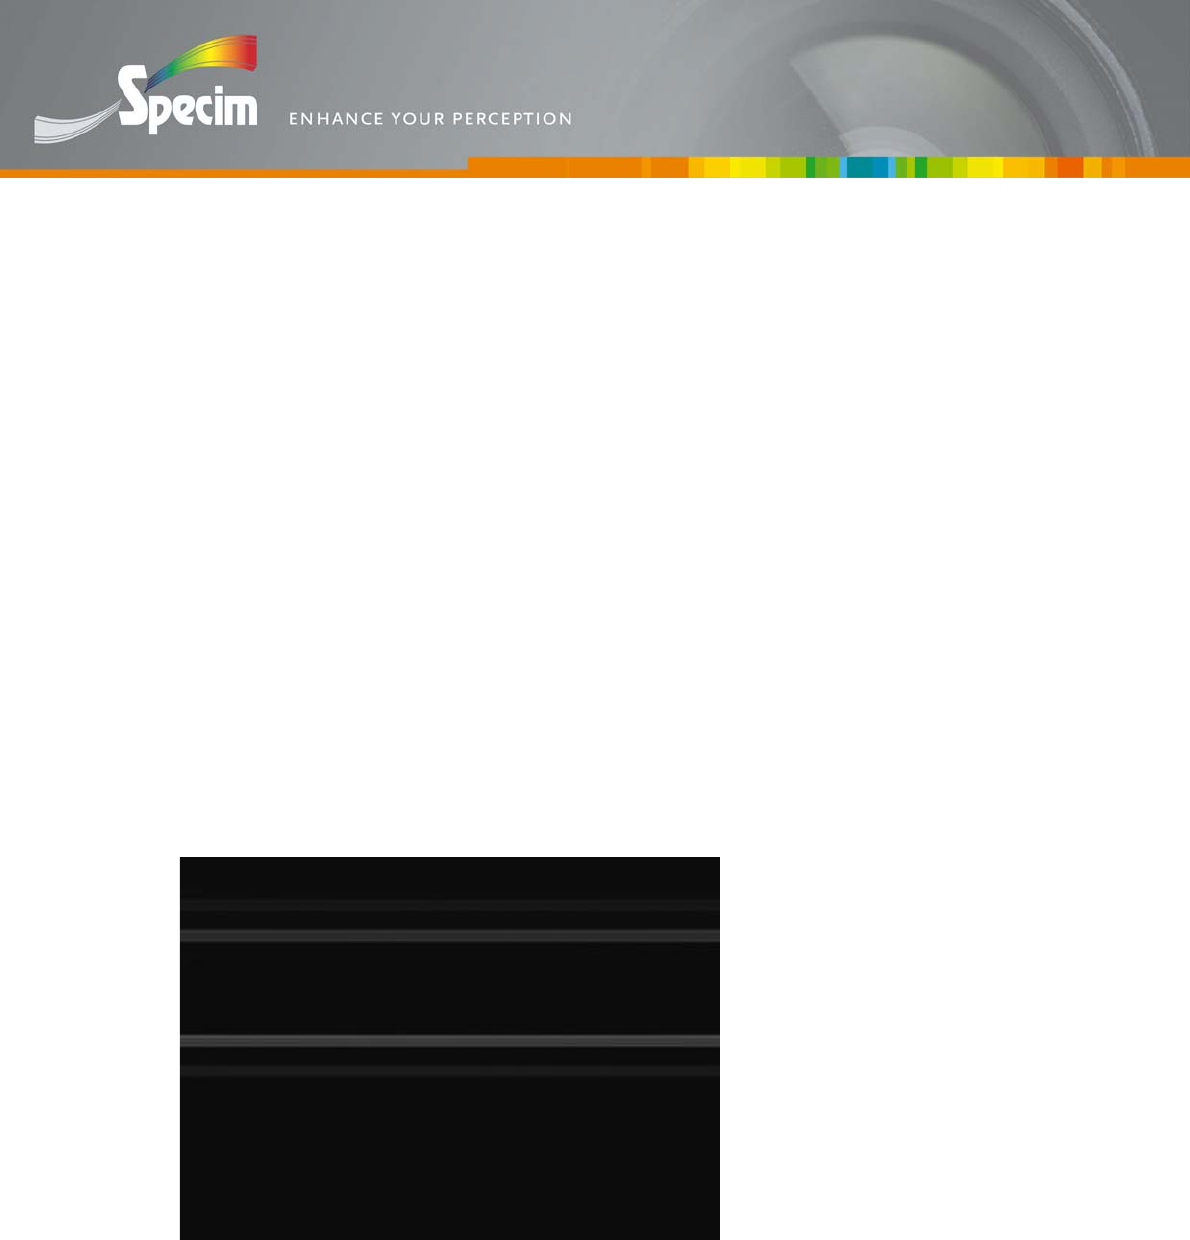
Axis alignment is good. Spectral profiles are overlapped.
Axis alignment is bad. Spectral lines are tilted and profiles are separate.
Figure. HgAr spectral lamp lines and spectral profiles at left and right edge.
Note: Images are inverted.
20
Spectral Imaging Ltd.
POB 110
Teknologiantie 18 A
FIN–90571 Oulu, Finland
Tel. +358 (0)10 4244 400
Fax +358 (0)8 388 580
Email info@specim.fi
www.specim.fi
Back focal length adjustment
The ImSpector spectrograph has been adjusted for standard C -mount back focal
length (BFL) which is 17.53 mm. If the camera CCD detector surface is not exactly at
this distance it is not possible to simultaneously achieve the best possible spectral and
spatial focus and resolution. The BFL can also change due to adding an order
blocking filter or adding or removing a NIR blocking filter. This results in a change in
optical path length between spectrograph and CCD. If the BFL is not within specified
tolerances it may cause a situation where spectral and spatial images are not properly
focused at the exactly same image plane.
Best way to verify that BFL is ok is to use a light source with narrow spectral peaks
like spectral calibration lamp or standard fluorescent lamp.
Place the lamp very close to the input slit and without the front objective
attached. The whole numerical aperture of the spectrograph should be filled. If
integrating sphere and spectral calibration lamp is available the adjustment can
also be done using a front objective looking inside the sphere.
If the BFL is correct the observed spectral line widths are within specified
spectral resolution values (refer to test report shipped with the spectrograph).
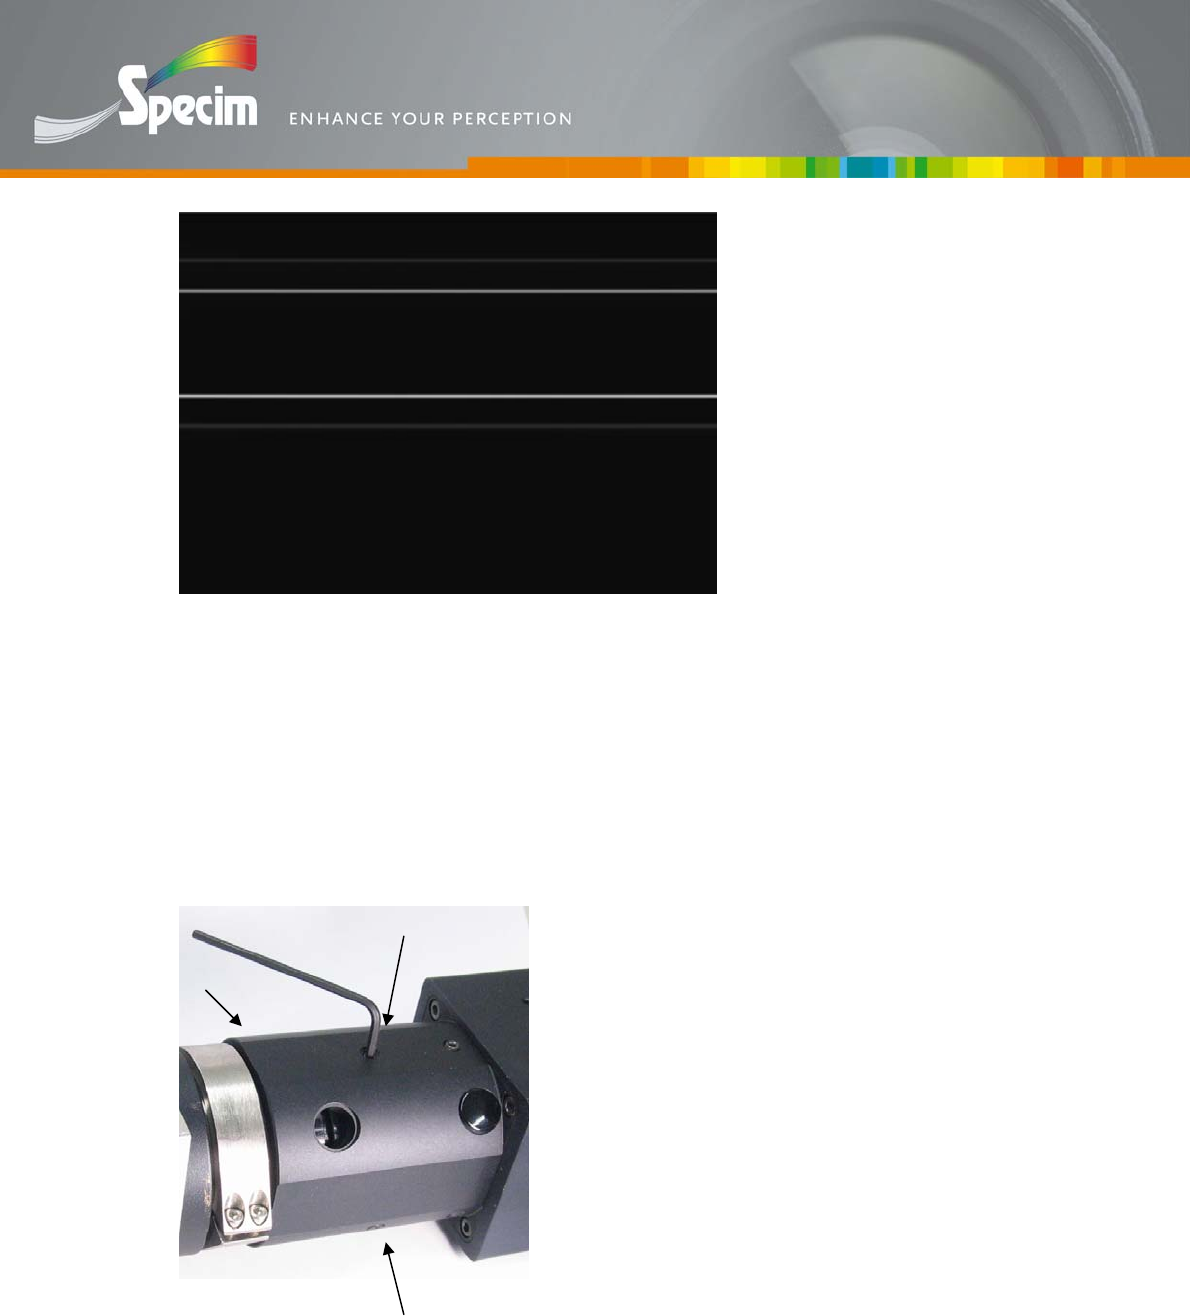
If the BFL is erroneous the line widths are much broader than specified values.
Wrong BFL
Spectral peaks are fuzzy
and low intensity.
(image captured with
Imspector model V8E and
Spectral lamp Hg)
21
Spectral Imaging Ltd.
POB 110
Teknologiantie 18 A
FIN–90571 Oulu, Finland
Tel. +358 (0)10 4244 400
Fax +358 (0)8 388 580
Email info@specim.fi
www.specim.fi
Right BFL.
Spectral peaks are sharp
and high intense.
Second indication of wrong BFL is that the front objective is not able to make a good
focus either to infinity or to the closest distance marked to the objective (or specified
by the objective manufacturer). However, this is not always a problem related to the
spectrograph but could also be a faulty objective. Therefore this method is not as
reliable as the first one.
BFL adjustment procedure with Imspector Enhanced model
Loose the hex locking screws (3 pcs) from
positions shown in image. Note: one screw not
seen in this photo. It is situated symmetrically
120° from the other two.
Tool required:
M2.0 hex screwdriver
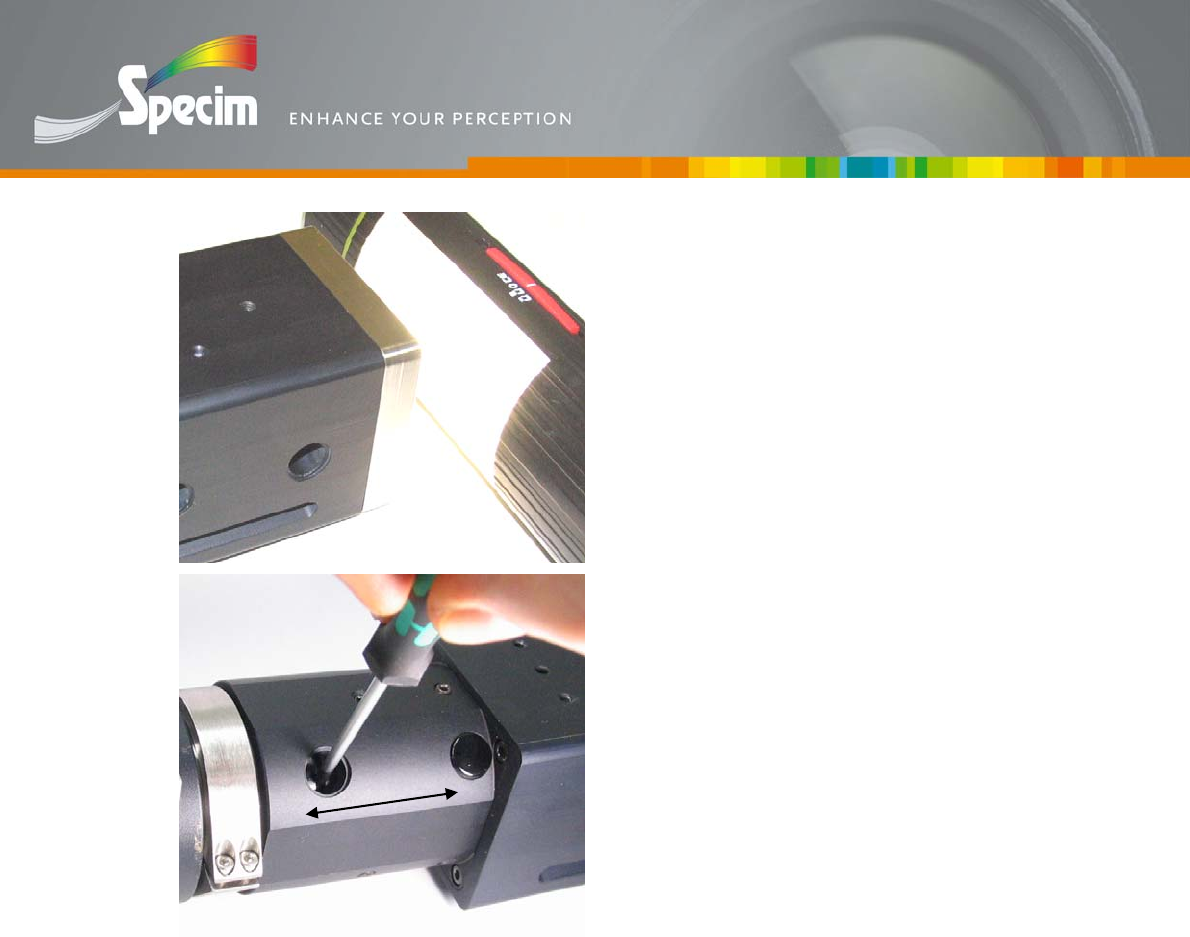
22
Spectral Imaging Ltd.
POB 110
Teknologiantie 18 A
FIN–90571 Oulu, Finland
Tel. +358 (0)10 4244 400
Fax +358 (0)8 388 580
Email info@specim.fi
www.specim.fi
Position the spectrograph in front of the
spectral source (or integrating sphere
illuminated using spectral lamp).
Fill the whole numerical aperture.
Lamp shown in the image is Osram Dulux
Mobile.
Spectrograph should be in horizontal position
for adjustment.
Adjust the spectral peaks to their narrowest
width / highest intensity value. Use a narrow
tool to move the focusing lens back or forth
from the focusing groove.
After adjustment tighten locking screws
carefully.
Note. Standard series models have simple
BFL-tool integrated, you need only a
screwdriver to adjust BFL.

23
Spectral Imaging Ltd.
POB 110
Teknologiantie 18 A
FIN–90571 Oulu, Finland
Tel. +358 (0)10 4244 400
Fax +358 (0)8 388 580
Email info@specim.fi
www.specim.fi
Calibration
Application requirements define what calibrations are needed in the system before
proper measurements are achieved. The calibrations may include:
Spectral axis calibration determines the exact wavelength range that the
system covers,
offset compensation either as a basic dark current subtraction or as a more
complete compensation,
responsivity calibration,
radiometric calibration,
spatial axis calibration, and
application calibration.
Spectral axis calibration
Spectral axis calibration defines the wavelength axis at the detector surface. It is done
with spectrally well known light sources. There are several good spectral calibrations
sources available both for VIS and NIR spectral range:
Neon lamp, several good peaks between 585.3 to 1206.6 nm some of which,
however, are difficult to use due to overlapping. Neon lamps are used in
commercial applications as signalling lamps, so these are widely available and
very cheap.
Fluorescent lamps are cheap (like Osram Dulux Mobil handheld lamp) and
provide quick way to check the calibration from time to time. All common
fluorescence lamps have easily resolvable peaks at 404.7, 435.1 and 546.1 nm.
This lamp can also be used above 1000 nm for the calibration of ImSpector
N17 versions. The clear lines are: 1014, 1129, 1357, 1395 and 1530 nm.
HeNe -laser, wavelength 632.8 nm, very stable and high intensity versions
available, may need a beam expander to fill the whole input slit. NOTE: lasers
could also be used with an integrating sphere to fill the whole input slit and
NA of the spectrograph.
Diode lasers, several wavelengths from 630 to 950 nm, stability is
questionable due to small changes in intensity and centre wavelength caused
by temperature or drive current variations. Wavelength should be checked
from time to time.
Xenon lamp, some peaks from 418.0 to 992.3 nm, outputs also a continuous
spectrum that can be a nuisance.
Mercury lamp, good peaks in visible region from 404.7 to 615.0 nm, may have
some low level continuous spectrum also.
Mercury-Xenon lamp, characteristics are as Xenon and Mercury lamps
combined.
Interference bandpass filters, these can be obtained to any part of the VIS or
NIR spectrum, can be used with ordinary halogen or tungsten lamps.
Temperature and filter angle variations should be taking into account.
24
Spectral Imaging Ltd.
POB 110
Teknologiantie 18 A
FIN–90571 Oulu, Finland
Tel. +358 (0)10 4244 400
Fax +358 (0)8 388 580
Email info@specim.fi
www.specim.fi
While calibrating the spectral axis also the effect of discrete sampling of the CCD
element should be taken into account. In practice it is quite difficult to separate CCD’s
effect.
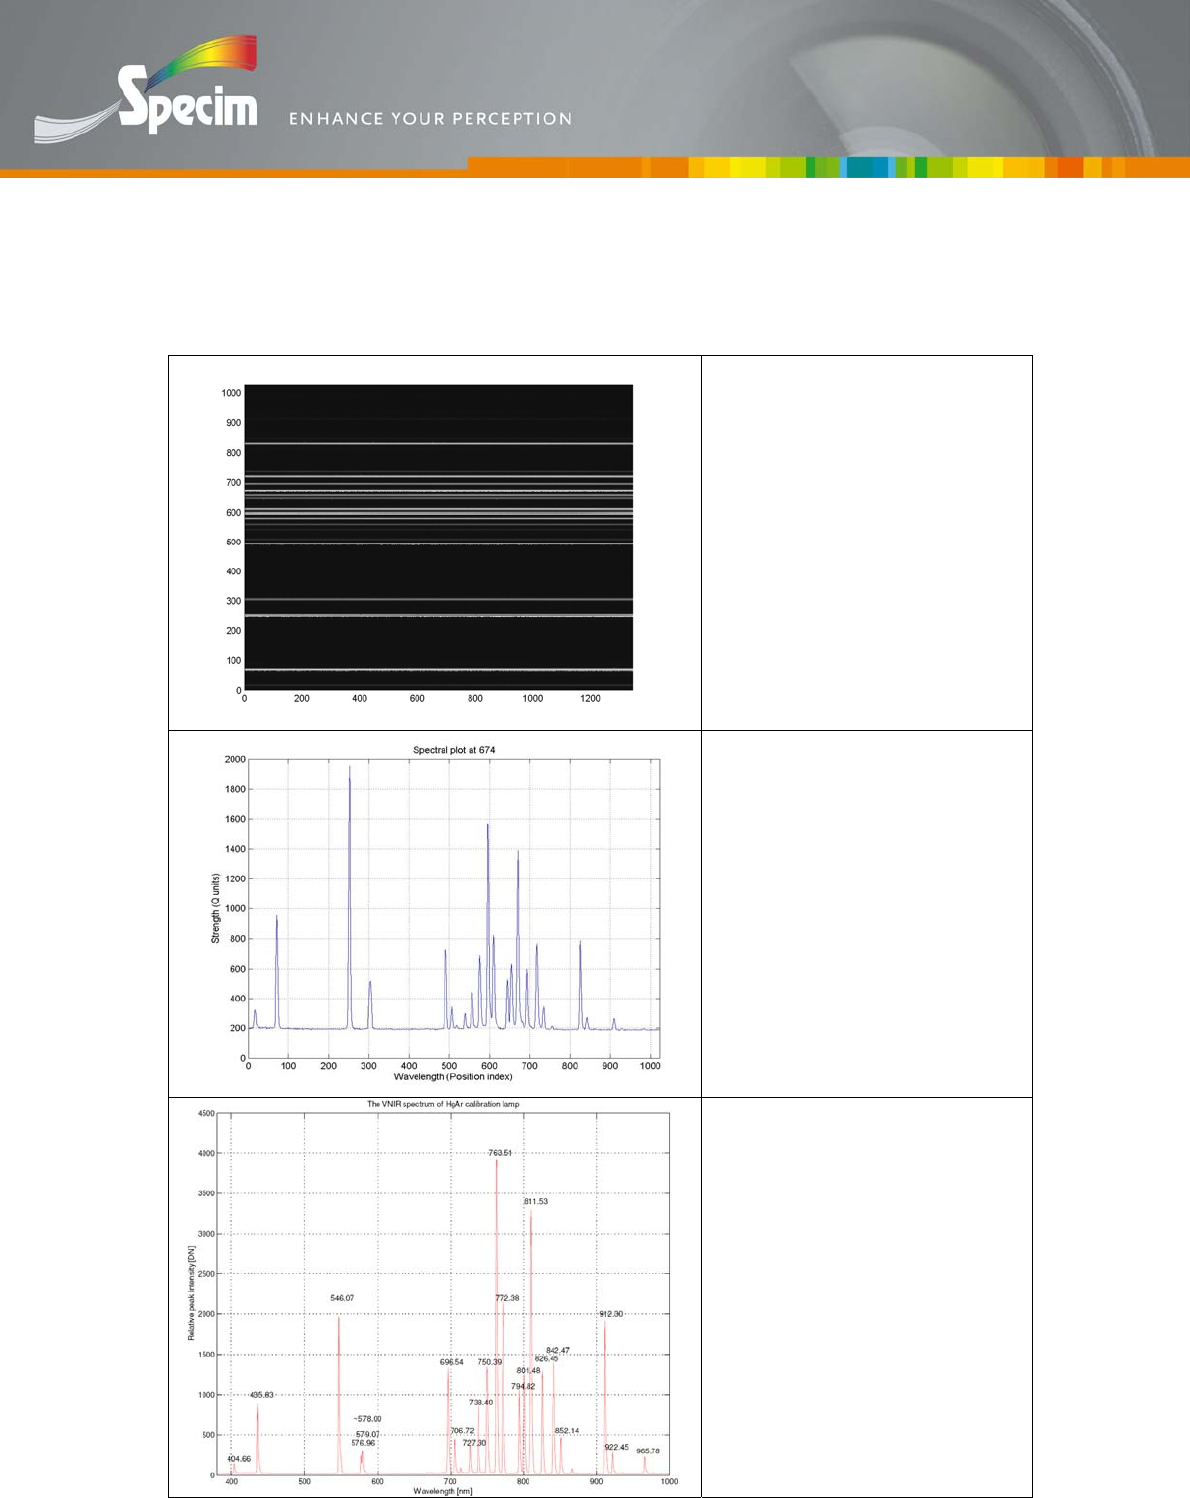
Spectral Calibration Procedure
This is a image with spectral
light source captured with
spectral lamp HgAr and
Imspector V10E. There are
1024 spectral pixels and 1344
spatial pixels.
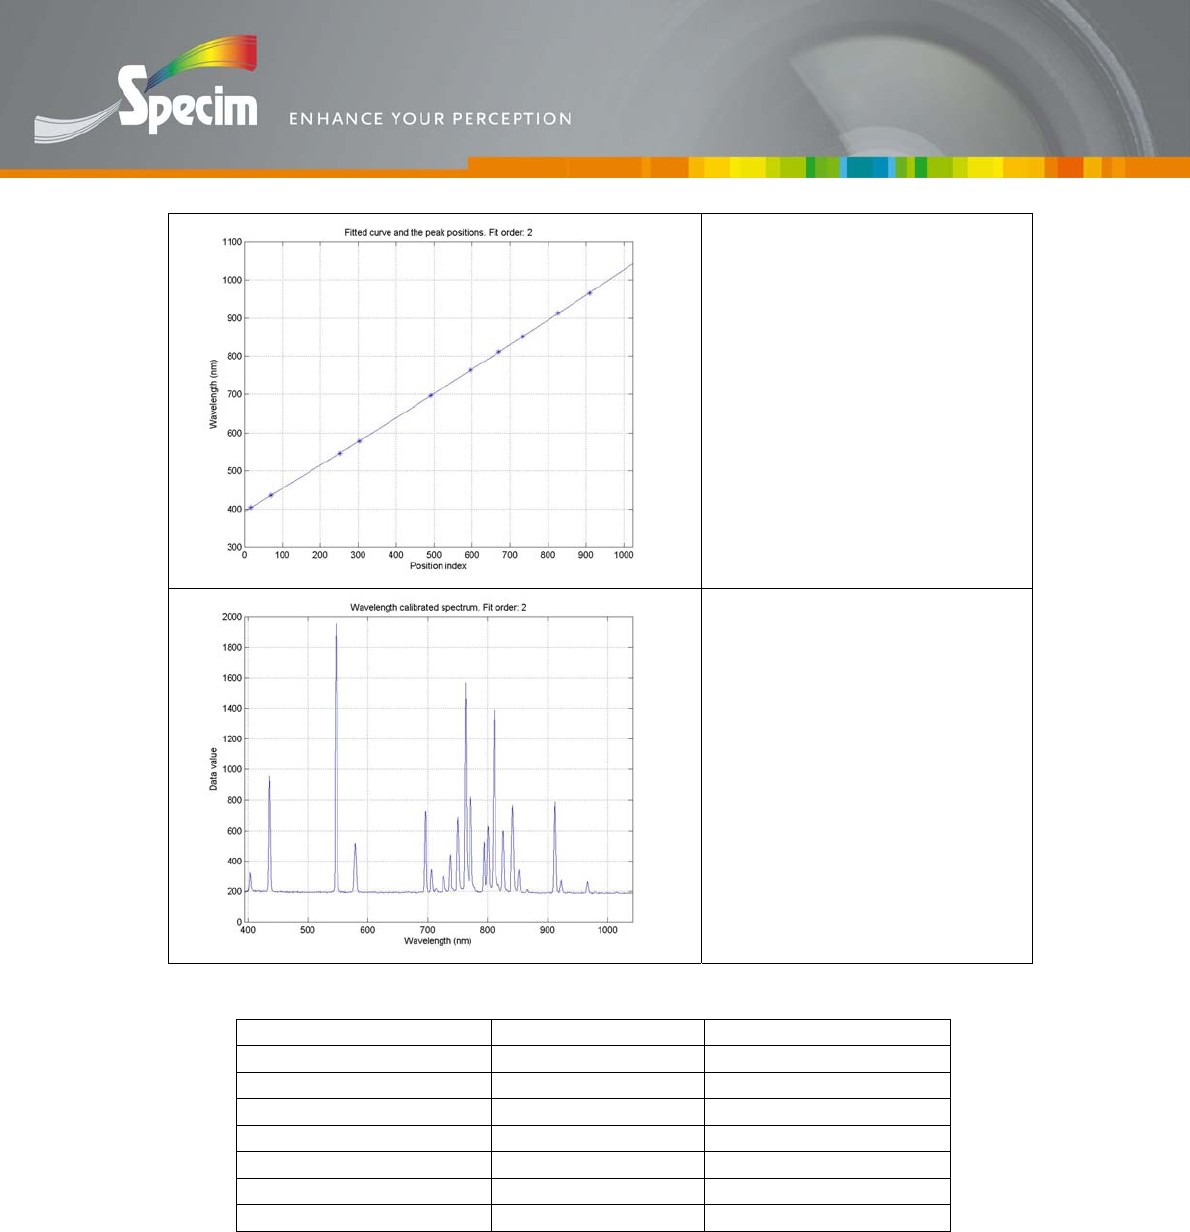
Here is the spectral profile of
image above.
We need reference wavelengths
of HgAr lamp for calibration.
In most cases you need at least
5 known wavelengths across
the wavelength range for proper
calibration.
In this case we have plenty of
known spectral peaks in range.
25
Spectral Imaging Ltd.
POB 110
Teknologiantie 18 A
FIN–90571 Oulu, Finland
Tel. +358 (0)10 4244 400
Fax +358 (0)8 388 580
Email info@specim.fi
www.specim.fi
Then you have to fit a curve
along data points in
wavelength/spectral pixel chart.
In this case equation for fitted curve is
WL = 0.0000315 X2
+ 0.60103X + 393.77 (nm)
X is spectral pixel position,
WL is wavelength
Wavelength calibrated
spectrum plot.
Spectral pixel Wavelength (nm) Pixel width (nm)
1 394.37 0.60
2 394.97 0.60
3 395.57 0.60
4 396.17 0.60
5 396.78 0.60
. . .
. . .
Table. Example of the wavelength calibration table for application use.

26
Spectral Imaging Ltd.
POB 110
Teknologiantie 18 A
FIN–90571 Oulu, Finland
Tel. +358 (0)10 4244 400
Fax +358 (0)8 388 580
Email info@specim.fi
www.specim.fi
Spatial axis calibration
Spatial axis calibration defines the position of the imaged scene line pixels on the
detector surface. If it is not possible to deduce it from the pattern on the target surface,
a special test target can be used on the real target, see ‘Offset compensation’.
Spatial axis calibration is also needed when multipoint fibre optics is used in the
spectrograph input. The position of each fiber in the spatial axis of the detector is
marked in order to create a look-up table for readout and integration of the data
channel by channel.
Field of view and focus
The ImSpector with an area (frame) camera is basically a “line scan” system, i.e., the
spectral measurement is done across a line at the target surface at a time. The purpose
of the ImSpector spectrograph alignment with respect the target is to ensure that :
the measurement line is across the desired position on the target surface,
light source illuminates exactly the right place and is evenly distributed, and,
lens focus is exactly on the sample surface.
These goals can be achieved by using a test target and the adjustment procedure
described here. The target is placed on the measurement surface for alignment and
removed after that.
The ImSpector produces spectral image where line pixels are in one dimension and
spectral pixels in the other dimension. Thus, when colored objects are observed, it
may be difficult to interpret the location of the line on the target due to both spatial
and spectral variation in the image. Hence the best result is achieved by using a black
and white test target, black being “black” throughout the whole spectral region and
white giving signal at all wavelengths. The test pattern can be easily produced,
enlarged, reduced etc. using a copy machine.
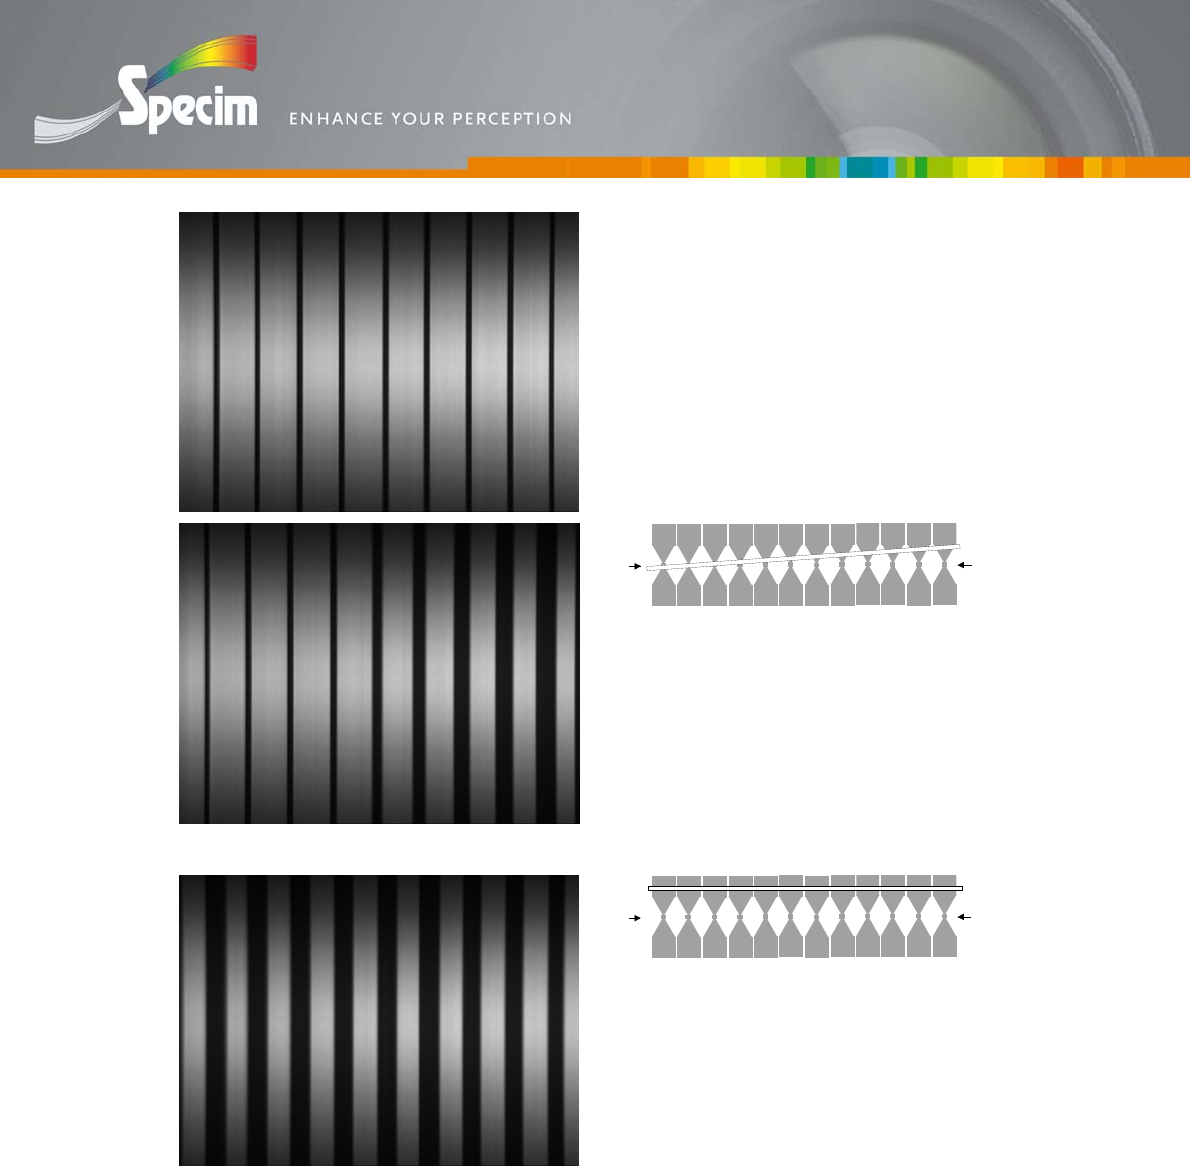
AB
Figure. Basic test target for alignment. The line A-B is the desired measurement line.

27
Spectral Imaging Ltd.
POB 110
Teknologiantie 18 A
FIN–90571 Oulu, Finland
Tel. +358 (0)10 4244 400
Fax +358 (0)8 388 580
Email info@specim.fi
www.specim.fi
AB
AB
AB
AB
UP
DOWN
SKEW
OK
Figure. Possible errors and proper alignment.
Focusing and alignment procedure
Following the ImSpector user manual, check that the ImSpector is properly aligned to
camera.
The test target is placed on the object surface so that the line A-B corresponds to the
desired measurement line.
First the light source should be visually aligned to give maximum intensity across the
line A-B. The alignment is particularly important if a narrow fiber optic line light
source is used.
Alignment of the position of the spectrograph/camera unit is easiest when live image
from the camera is available.
Out of focus
28
Spectral Imaging Ltd.
POB 110
Teknologiantie 18 A
FIN–90571 Oulu, Finland
Tel. +358 (0)10 4244 400
Fax +358 (0)8 388 580
Email info@specim.fi
www.specim.fi
Focus ok
AB
The spectrograph looks above or under
the line A-B move the
spectrograph/camera unit up or down so
that the width of the black columns in
the image becomes to its minimum.
AB
The spectrograph looks above or under
the line A-B move the
spectrograph/camera unit up or down so
that the width of the black columns in
the image becomes to its minimum.
Offset compensation
Offset created by dark current
CCD detector generates charges even though there is no light exposure on the
detector. These temperature generated charges cause small signal which is called dark
current and which typically varies from pixel to pixel. In precise measurements this
offset has to be measured by blocking the light path to the spectrograph and storing
the dark frame and subtracting it (pixel by pixel) from all further measurements. The
amount of dark current depends on integration time so if integration time is changed
also a new dark image should be measured.

29
Spectral Imaging Ltd.
POB 110
Teknologiantie 18 A
FIN–90571 Oulu, Finland
Tel. +358 (0)10 4244 400
Fax +358 (0)8 388 580
Email info@specim.fi
www.specim.fi
Dark current offset depends on temperature and integration time. Therefore, best
result is achieved with a temperature stabilised detector. Another way to compensate
for the dark current temperature drift is, with detectors having masked dark pixels, to
use the signal from these pixels to provide an average correction for all other pixels.
More complete offset compensation
There are usually also other small sources creating an offset in the image than the dark
current. They are CCD frame shift smear and optical stray light. The offset due to
these effects corresponds to the overall amount of light coming into the system. This
correction is essential particularly in applications requiring absolute spectral
information, like in absolute color measurement.
Responsivity calibration
The detector responsivity to light varies from pixel to pixel and the response is also
wavelength dependent. Also the throughput of lens and spectrograph depends on
wavelength. These variations can be calibrated by measuring a white surface, storing
this image and taking then the ratio of any sample image to this white image (after
dark current subtractions). This procedure in fact produces the reflectance of the
sample/target.
Light source color temperature drift and lighting spatial non-uniformity are also
compensated for.
Radiometric calibration
This is needed only when the absolute spectral radiance (W/m2 nm sr) of the target is
to be measured. Radiometric calibration is done with a calibrated radiance standard,
which typically consists a halogen lamp attached to an integrating sphere.
Application calibration
Application calibration means teaching the system to recognize certain spectral
features of the target and produce information about the specified target property to
which the spectral features correlate. The property can be color or some other physical
parameter or concentration of a chemical constituent. Teaching is done with a
representative set of known (characterized) samples that provide the basic set of
spectrum library.

30
Spectral Imaging Ltd.
POB 110
Teknologiantie 18 A
FIN–90571 Oulu, Finland
Tel. +358 (0)10 4244 400
Fax +358 (0)8 388 580
Email info@specim.fi
www.specim.fi
ImSpector Specifications
ImSpector Standard Series Specifications
ImSpector Standard V8 V10
Optical characteristics
Spectral range
380 - 780 nm
±10 nm
400 - 1000 nm
±10 nm
Dispersion 60.6 nm/mm 90.9 nm/mm
Spectral resolution
(with 80 µm slit) 6 nm 9 nm
Image size
6.6 (spectral) x 8.8 (spatial) mm, corresponding to standard 2/3” image sensor.
V8 is also available with 4.8 (spectral) x 6.4 (spatial) mm image size, corresponding to standard 1/2" image sensor.
Spatial resolution
15 line-pairs/mm, rms spot radius <40 μm within 1/2 “ image area
rms spot radius <60μm within 2/3 “ image area
Aberrations Insignificant astigmatism
Bending of spectral lines across spatial axis (smile) <50 μm (1/2 “ area), <80 μm (2/3 “ area)
Bending of spatial lines across spectral axis (keystone) <16 μm (1/2 “ area), <25 μm (2/3 “ area)
Numerical aperture F/2.8
Slit width 13, 25, 50, 80, 150 m readily available
Effective slit length 9.8 mm
Total efficiency (typical) > 50%, independent of polarization
Stray light <0.5 % (halogen lamp, 633 nm notch filter)
Mechanical characteristics
Size, cased (L) 135 x (W) 70 x (H) 60 mm
Size, OEM (D) 35 x (L) 139 mm
Body, cased Anodized aluminum with thread for standard camera tripod and M4
Body, OEM Anodized aluminum tube
Lens and camera mount Standard C-mount adapter
User adjustments Image axis relative to detector rows
Back focal length adjustable ±1mm
Environmental characteristics
Storage -20 … +85 °C
Operating +5 … +40 °C, non-condensing
NOTES
Dispersion and resolution are given for 2/3 “ image size, for 1/2 “ image size the dispersion is 27% lower.
System spectral and spatial resolutions also depend on the discrete imaging nature of detector and lens quality.
Order blocking filter is available for mounting on the detector window.

31
Spectral Imaging Ltd.
POB 110
Teknologiantie 18 A
FIN–90571 Oulu, Finland
Tel. +358 (0)10 4244 400
Fax +358 (0)8 388 580
Email info@specim.fi
www.specim.fi
ImSpector Enhanced Series Specifications
ImSpector V8E V10E N17E N25E
Optical characteristics
Spectral range
380 - 780 nm
±10 nm
400 - 1000 nm
±10 nm
900 - 1700 nm
±10 nm
1000 - 2500 nm
± 10 nm
Dispersion 65 nm/mm 97.5 nm/mm 110 nm/mm 208 nm/mm
Spectral resolution
(with 30 µm slit) 2 nm 2.8 nm 5 nm 8 nm
Image size
max. 7.15 (spectral) x 14.3 (spatial) or
max. 16 mm diagonally max. 7.7 (spectral) x 12.8 (spatial) mm
Spatial resolution rms spot radius <9 μm rms spot radius <15 μm
Aberrations No astigmatism No astigmatism
Bending of spectral lines across spatial axis (smile) <5μm
Bending of spatial lines across spectral axis (keystone) <5μm
Smile <10μm
Keystone <8μm
Numerical aperture F/2.4 F/2.0
Slit width 18 and 30 μm readily available, others on request
Input optics Telecentric
Effective slit length 14.3 mm
Total efficiency (typical) > 50%, independent of polarization
Mechanical characteristics
Size (OEM) (D) 55 x (L) 175 mm (D) 65 x (L) 200 mm
Body (OEM) Anodized aluminum tube
Lens mount Standard C-mount adapter
Camera mount Standard C-mount adapter Standard U- or C-mount adapter
User adjustments Image axis relative to detector rows
Back focal length adjustable ±1mm
Environmental characteristics
Storage -20 … +85 °C
Operating +5 … +40 °C, non-condensing
NOTES
System spectral and spatial resolutions also depend on the discrete imaging nature of detector and lens quality.
Order blocking filter is available for mounting on the detector window.