Informatica 10.1 Metadata Manager Administrator Guide (English) MM 101 En
User Manual:
Open the PDF directly: View PDF ![]() .
.
Page Count: 285 [warning: Documents this large are best viewed by clicking the View PDF Link!]
- Table of Contents
- Preface
- Chapter 1: Using Metadata Manager
- Chapter 2: Configuring Metadata Manager
- Chapter 3: Application Resources
- Chapter 4: Business Glossary Resources
- Chapter 5: Business Intelligence Resources
- Chapter 6: Custom Resources
- Chapter 7: Data Integration Resources
- Chapter 8: Data Modeling Resources
- Chapter 9: Database Management Resources
- Chapter 10: Universal Resources
- Chapter 11: Managing Resources
- Chapter 12: Loading and Monitoring Resources
- Chapter 13: Managing Permissions
- Chapter 14: Resource Migration
- Chapter 15: Repository Migration
- Appendix A: Metadata Manager Login
- Appendix B: Metadata Manager Properties Files
- Appendix C: Resource Configuration Files
- Appendix D: Glossary
- Index

Informatica® (Version 10.1)
Metadata Manager
Administrator Guide
Informatica Metadata Manager Administrator Guide
Version 10.1
June 2016
© Copyright Informatica LLC 1993, 2017
This software and documentation contain proprietary information of Informatica LLC and are provided under a license agreement containing restrictions on use and
disclosure and are also protected by copyright law. Reverse engineering of the software is prohibited. No part of this document may be reproduced or transmitted in any
form, by any means (electronic, photocopying, recording or otherwise) without prior consent of Informatica LLC. This Software may be protected by U.S. and/or
international Patents and other Patents Pending.
Use, duplication, or disclosure of the Software by the U.S. Government is subject to the restrictions set forth in the applicable software license agreement and as
provided in DFARS 227.7202-1(a) and 227.7702-3(a) (1995), DFARS 252.227-7013©(1)(ii) (OCT 1988), FAR 12.212(a) (1995), FAR 52.227-19, or FAR 52.227-14
(ALT III), as applicable.
The information in this product or documentation is subject to change without notice. If you find any problems in this product or documentation, please report them to us
in writing.
Informatica, Informatica Platform, Informatica Data Services, PowerCenter, PowerCenterRT, PowerCenter Connect, PowerCenter Data Analyzer, PowerExchange,
PowerMart, Metadata Manager, Informatica Data Quality, Informatica Data Explorer, Informatica B2B Data Transformation, Informatica B2B Data Exchange Informatica
On Demand, Informatica Identity Resolution, Informatica Application Information Lifecycle Management, Informatica Complex Event Processing, Ultra Messaging,
Informatica Master Data Management, and Live Data Map are trademarks or registered trademarks of Informatica LLC in the United States and in jurisdictions
throughout the world. All other company and product names may be trade names or trademarks of their respective owners.
Portions of this software and/or documentation are subject to copyright held by third parties, including without limitation: Copyright DataDirect Technologies. All rights
reserved. Copyright © Sun Microsystems. All rights reserved. Copyright © RSA Security Inc. All Rights Reserved. Copyright © Ordinal Technology Corp. All rights
reserved. Copyright © Aandacht c.v. All rights reserved. Copyright Genivia, Inc. All rights reserved. Copyright Isomorphic Software. All rights reserved. Copyright © Meta
Integration Technology, Inc. All rights reserved. Copyright © Intalio. All rights reserved. Copyright © Oracle. All rights reserved. Copyright © Adobe Systems
Incorporated. All rights reserved. Copyright © DataArt, Inc. All rights reserved. Copyright © ComponentSource. All rights reserved. Copyright © Microsoft Corporation. All
rights reserved. Copyright © Rogue Wave Software, Inc. All rights reserved. Copyright © Teradata Corporation. All rights reserved. Copyright © Yahoo! Inc. All rights
reserved. Copyright © Glyph & Cog, LLC. All rights reserved. Copyright © Thinkmap, Inc. All rights reserved. Copyright © Clearpace Software Limited. All rights
reserved. Copyright © Information Builders, Inc. All rights reserved. Copyright © OSS Nokalva, Inc. All rights reserved. Copyright Edifecs, Inc. All rights reserved.
Copyright Cleo Communications, Inc. All rights reserved. Copyright © International Organization for Standardization 1986. All rights reserved. Copyright © ej-
technologies GmbH. All rights reserved. Copyright © Jaspersoft Corporation. All rights reserved. Copyright © International Business Machines Corporation. All rights
reserved. Copyright © yWorks GmbH. All rights reserved. Copyright © Lucent Technologies. All rights reserved. Copyright (c) University of Toronto. All rights reserved.
Copyright © Daniel Veillard. All rights reserved. Copyright © Unicode, Inc. Copyright IBM Corp. All rights reserved. Copyright © MicroQuill Software Publishing, Inc. All
rights reserved. Copyright © PassMark Software Pty Ltd. All rights reserved. Copyright © LogiXML, Inc. All rights reserved. Copyright © 2003-2010 Lorenzi Davide, All
rights reserved. Copyright © Red Hat, Inc. All rights reserved. Copyright © The Board of Trustees of the Leland Stanford Junior University. All rights reserved. Copyright
© EMC Corporation. All rights reserved. Copyright © Flexera Software. All rights reserved. Copyright © Jinfonet Software. All rights reserved. Copyright © Apple Inc. All
rights reserved. Copyright © Telerik Inc. All rights reserved. Copyright © BEA Systems. All rights reserved. Copyright © PDFlib GmbH. All rights reserved. Copyright ©
Orientation in Objects GmbH. All rights reserved. Copyright © Tanuki Software, Ltd. All rights reserved. Copyright © Ricebridge. All rights reserved. Copyright © Sencha,
Inc. All rights reserved. Copyright © Scalable Systems, Inc. All rights reserved. Copyright © jQWidgets. All rights reserved. Copyright © Tableau Software, Inc. All rights
reserved. Copyright© MaxMind, Inc. All Rights Reserved. Copyright © TMate Software s.r.o. All rights reserved. Copyright © MapR Technologies Inc. All rights reserved.
Copyright © Amazon Corporate LLC. All rights reserved. Copyright © Highsoft. All rights reserved. Copyright © Python Software Foundation. All rights reserved.
Copyright © BeOpen.com. All rights reserved. Copyright © CNRI. All rights reserved.
This product includes software developed by the Apache Software Foundation (http://www.apache.org/), and/or other software which is licensed under various versions
of the Apache License (the "License"). You may obtain a copy of these Licenses at http://www.apache.org/licenses/. Unless required by applicable law or agreed to in
writing, software distributed under these Licenses is distributed on an "AS IS" BASIS, WITHOUT WARRANTIES OR CONDITIONS OF ANY KIND, either express or
implied. See the Licenses for the specific language governing permissions and limitations under the Licenses.
This product includes software which was developed by Mozilla (http://www.mozilla.org/), software copyright The JBoss Group, LLC, all rights reserved; software
copyright © 1999-2006 by Bruno Lowagie and Paulo Soares and other software which is licensed under various versions of the GNU Lesser General Public License
Agreement, which may be found at http:// www.gnu.org/licenses/lgpl.html. The materials are provided free of charge by Informatica, "as-is", without warranty of any
kind, either express or implied, including but not limited to the implied warranties of merchantability and fitness for a particular purpose.
The product includes ACE(TM) and TAO(TM) software copyrighted by Douglas C. Schmidt and his research group at Washington University, University of California,
Irvine, and Vanderbilt University, Copyright (©) 1993-2006, all rights reserved.
This product includes software developed by the OpenSSL Project for use in the OpenSSL Toolkit (copyright The OpenSSL Project. All Rights Reserved) and
redistribution of this software is subject to terms available at http://www.openssl.org and http://www.openssl.org/source/license.html.
This product includes Curl software which is Copyright 1996-2013, Daniel Stenberg, <daniel@haxx.se>. All Rights Reserved. Permissions and limitations regarding this
software are subject to terms available at http://curl.haxx.se/docs/copyright.html. Permission to use, copy, modify, and distribute this software for any purpose with or
without fee is hereby granted, provided that the above copyright notice and this permission notice appear in all copies.
The product includes software copyright 2001-2005 (©) MetaStuff, Ltd. All Rights Reserved. Permissions and limitations regarding this software are subject to terms
available at http://www.dom4j.org/ license.html.
The product includes software copyright © 2004-2007, The Dojo Foundation. All Rights Reserved. Permissions and limitations regarding this software are subject to
terms available at http://dojotoolkit.org/license.
This product includes ICU software which is copyright International Business Machines Corporation and others. All rights reserved. Permissions and limitations
regarding this software are subject to terms available at http://source.icu-project.org/repos/icu/icu/trunk/license.html.
This product includes software copyright © 1996-2006 Per Bothner. All rights reserved. Your right to use such materials is set forth in the license which may be found at
http:// www.gnu.org/software/ kawa/Software-License.html.
This product includes OSSP UUID software which is Copyright © 2002 Ralf S. Engelschall, Copyright © 2002 The OSSP Project Copyright © 2002 Cable & Wireless
Deutschland. Permissions and limitations regarding this software are subject to terms available at http://www.opensource.org/licenses/mit-license.php.
This product includes software developed by Boost (http://www.boost.org/) or under the Boost software license. Permissions and limitations regarding this software are
subject to terms available at http:/ /www.boost.org/LICENSE_1_0.txt.
This product includes software copyright © 1997-2007 University of Cambridge. Permissions and limitations regarding this software are subject to terms available at
http:// www.pcre.org/license.txt.
This product includes software copyright © 2007 The Eclipse Foundation. All Rights Reserved. Permissions and limitations regarding this software are subject to terms
available at http:// www.eclipse.org/org/documents/epl-v10.php and at http://www.eclipse.org/org/documents/edl-v10.php.

This product includes software licensed under the terms at http://www.tcl.tk/software/tcltk/license.html, http://www.bosrup.com/web/overlib/?License, http://
www.stlport.org/doc/ license.html, http://asm.ow2.org/license.html, http://www.cryptix.org/LICENSE.TXT, http://hsqldb.org/web/hsqlLicense.html, http://
httpunit.sourceforge.net/doc/ license.html, http://jung.sourceforge.net/license.txt , http://www.gzip.org/zlib/zlib_license.html, http://www.openldap.org/software/release/
license.html, http://www.libssh2.org, http://slf4j.org/license.html, http://www.sente.ch/software/OpenSourceLicense.html, http://fusesource.com/downloads/license-
agreements/fuse-message-broker-v-5-3- license-agreement; http://antlr.org/license.html; http://aopalliance.sourceforge.net/; http://www.bouncycastle.org/licence.html;
http://www.jgraph.com/jgraphdownload.html; http://www.jcraft.com/jsch/LICENSE.txt; http://jotm.objectweb.org/bsd_license.html; . http://www.w3.org/Consortium/Legal/
2002/copyright-software-20021231; http://www.slf4j.org/license.html; http://nanoxml.sourceforge.net/orig/copyright.html; http://www.json.org/license.html; http://
forge.ow2.org/projects/javaservice/, http://www.postgresql.org/about/licence.html, http://www.sqlite.org/copyright.html, http://www.tcl.tk/software/tcltk/license.html, http://
www.jaxen.org/faq.html, http://www.jdom.org/docs/faq.html, http://www.slf4j.org/license.html; http://www.iodbc.org/dataspace/iodbc/wiki/iODBC/License; http://
www.keplerproject.org/md5/license.html; http://www.toedter.com/en/jcalendar/license.html; http://www.edankert.com/bounce/index.html; http://www.net-snmp.org/about/
license.html; http://www.openmdx.org/#FAQ; http://www.php.net/license/3_01.txt; http://srp.stanford.edu/license.txt; http://www.schneier.com/blowfish.html; http://
www.jmock.org/license.html; http://xsom.java.net; http://benalman.com/about/license/; https://github.com/CreateJS/EaselJS/blob/master/src/easeljs/display/Bitmap.js;
http://www.h2database.com/html/license.html#summary; http://jsoncpp.sourceforge.net/LICENSE; http://jdbc.postgresql.org/license.html; http://
protobuf.googlecode.com/svn/trunk/src/google/protobuf/descriptor.proto; https://github.com/rantav/hector/blob/master/LICENSE; http://web.mit.edu/Kerberos/krb5-
current/doc/mitK5license.html; http://jibx.sourceforge.net/jibx-license.html; https://github.com/lyokato/libgeohash/blob/master/LICENSE; https://github.com/hjiang/jsonxx/
blob/master/LICENSE; https://code.google.com/p/lz4/; https://github.com/jedisct1/libsodium/blob/master/LICENSE; http://one-jar.sourceforge.net/index.php?
page=documents&file=license; https://github.com/EsotericSoftware/kryo/blob/master/license.txt; http://www.scala-lang.org/license.html; https://github.com/tinkerpop/
blueprints/blob/master/LICENSE.txt; http://gee.cs.oswego.edu/dl/classes/EDU/oswego/cs/dl/util/concurrent/intro.html; https://aws.amazon.com/asl/; https://github.com/
twbs/bootstrap/blob/master/LICENSE; https://sourceforge.net/p/xmlunit/code/HEAD/tree/trunk/LICENSE.txt; https://github.com/documentcloud/underscore-contrib/blob/
master/LICENSE, and https://github.com/apache/hbase/blob/master/LICENSE.txt.
This product includes software licensed under the Academic Free License (http://www.opensource.org/licenses/afl-3.0.php), the Common Development and Distribution
License (http://www.opensource.org/licenses/cddl1.php) the Common Public License (http://www.opensource.org/licenses/cpl1.0.php), the Sun Binary Code License
Agreement Supplemental License Terms, the BSD License (http:// www.opensource.org/licenses/bsd-license.php), the new BSD License (http://opensource.org/
licenses/BSD-3-Clause), the MIT License (http://www.opensource.org/licenses/mit-license.php), the Artistic License (http://www.opensource.org/licenses/artistic-
license-1.0) and the Initial Developer’s Public License Version 1.0 (http://www.firebirdsql.org/en/initial-developer-s-public-license-version-1-0/).
This product includes software copyright © 2003-2006 Joe WaInes, 2006-2007 XStream Committers. All rights reserved. Permissions and limitations regarding this
software are subject to terms available at http://xstream.codehaus.org/license.html. This product includes software developed by the Indiana University Extreme! Lab.
For further information please visit http://www.extreme.indiana.edu/.
This product includes software Copyright (c) 2013 Frank Balluffi and Markus Moeller. All rights reserved. Permissions and limitations regarding this software are subject
to terms of the MIT license.
See patents at https://www.informatica.com/legal/patents.html.
DISCLAIMER: Informatica LLC provides this documentation "as is" without warranty of any kind, either express or implied, including, but not limited to, the implied
warranties of noninfringement, merchantability, or use for a particular purpose. Informatica LLC does not warrant that this software or documentation is error free. The
information provided in this software or documentation may include technical inaccuracies or typographical errors. The information in this software and documentation is
subject to change at any time without notice.
NOTICES
This Informatica product (the "Software") includes certain drivers (the "DataDirect Drivers") from DataDirect Technologies, an operating company of Progress Software
Corporation ("DataDirect") which are subject to the following terms and conditions:
1.THE DATADIRECT DRIVERS ARE PROVIDED "AS IS" WITHOUT WARRANTY OF ANY KIND, EITHER EXPRESSED OR IMPLIED, INCLUDING BUT NOT
LIMITED TO, THE IMPLIED WARRANTIES OF MERCHANTABILITY, FITNESS FOR A PARTICULAR PURPOSE AND NON-INFRINGEMENT.
2.IN NO EVENT WILL DATADIRECT OR ITS THIRD PARTY SUPPLIERS BE LIABLE TO THE END-USER CUSTOMER FOR ANY DIRECT, INDIRECT,
INCIDENTAL, SPECIAL, CONSEQUENTIAL OR OTHER DAMAGES ARISING OUT OF THE USE OF THE ODBC DRIVERS, WHETHER OR NOT
INFORMED OF THE POSSIBILITIES OF DAMAGES IN ADVANCE. THESE LIMITATIONS APPLY TO ALL CAUSES OF ACTION, INCLUDING, WITHOUT
LIMITATION, BREACH OF CONTRACT, BREACH OF WARRANTY, NEGLIGENCE, STRICT LIABILITY, MISREPRESENTATION AND OTHER TORTS.
Publication Date: 2017-04-21
Table of Contents
Preface ..................................................................... 12
Informatica Resources.................................................. 12
Informatica Network................................................. 12
Informatica Knowledge Base........................................... 12
Informatica Documentation............................................ 12
Informatica Product Availability Matrixes.................................... 13
Informatica Velocity................................................. 13
Informatica Marketplace.............................................. 13
Informatica Global Customer Support...................................... 13
Chapter 1: Using Metadata Manager.......................................... 14
Using Metadata Manager Overview.......................................... 14
Resource Types................................................... 14
Metadata Manager Architecture............................................ 15
Metadata Manager Service............................................ 16
Metadata Manager Application.......................................... 16
Metadata Manager Agent............................................. 16
Metadata Manager Repository.......................................... 17
PowerCenter Repository.............................................. 17
PowerCenter Integration Service......................................... 17
PowerCenter Repository Service......................................... 17
Custom Metadata Configurator.......................................... 17
Metadata Integration Process.............................................. 18
Resources....................................................... 18
Metadata Sources.................................................. 18
Informatica Metadata Extraction Interface................................... 18
PowerCenter Workflows.............................................. 18
Metadata Exchanges................................................ 19
Working with Metadata Manager............................................ 19
Metadata Manager Interface.............................................. 20
Load Tab........................................................ 20
Permissions Tab................................................... 20
Chapter 2: Configuring Metadata Manager.................................... 21
Configuring Metadata Manager Overview...................................... 21
Step 1. Create and Configure the Metadata Manager Service......................... 21
Step 2. Install the Metadata Manager Agent.................................... 22
Rules and Guidelines for the Metadata Manager Agent.......................... 22
Minimum System Requirements......................................... 23
Before You Install.................................................. 23
4 Table of Contents
Installing the Metadata Manager Agent..................................... 23
After You Install.................................................... 24
Working with a Keystore File........................................... 26
Chapter 3: Application Resources............................................ 28
SAP R/3 Resource Overview.............................................. 28
Configuring SAP R/3................................................... 28
Install Transports................................................... 28
Configure a User Authorization Profile..................................... 29
Install the SAP JCo Libraries........................................... 29
Creating an SAP R/3 Resource............................................. 29
SAP R/3 Configuration Properties........................................ 31
Configuring the Component Inclusion List...................................... 31
Reference.......................................................... 31
Version......................................................... 31
Objects Extracted.................................................. 32
Data Lineage..................................................... 32
SAP R/3 Schema Class.............................................. 32
Chapter 4: Business Glossary Resources..................................... 33
Business Glossary Resources Overview....................................... 33
Application Services Verification............................................ 34
Creating a Business Glossary Resource....................................... 34
Business Glossary Connection Properties................................... 35
Business Glossary Objects Extracted......................................... 36
Business Glossary Objects Not Extracted...................................... 36
Chapter 5: Business Intelligence Resources.................................. 38
Business Objects...................................................... 38
Configuring Business Objects........................................... 38
Creating a Business Objects Resource..................................... 40
Reference....................................................... 43
Cognos............................................................ 46
Configuring Cognos................................................. 46
Creating a Cognos Resource........................................... 47
Reference....................................................... 51
Microsoft Analysis and Reporting Services..................................... 52
Configuring Microsoft Analysis and Reporting Services.......................... 53
Creating a Microsoft Analysis and Reporting Services Resource.................... 54
Reference....................................................... 56
Microstrategy........................................................ 58
Configuring Microstrategy............................................. 58
Creating a Microstrategy Resource....................................... 59
Table of Contents 5
Reference....................................................... 62
Oracle Business Intelligence Enterprise Edition.................................. 64
Configuring Oracle Business Intelligence Enterprise Edition....................... 64
Creating an Oracle Business Intelligence Enterprise Edition Resource................ 66
Reference....................................................... 68
SAP Business Warehouse................................................ 70
Configuring SAP Business Warehouse..................................... 71
Creating an SAP Business Warehouse Resource.............................. 72
Reference....................................................... 74
Tableau............................................................ 77
Configuring Tableau................................................. 77
Creating a Tableau Resource........................................... 78
Reference....................................................... 80
Incremental Metadata Load ............................................... 81
Adding or Removing Metadata Files for a Resource............................... 82
Chapter 6: Custom Resources................................................ 84
Configuring Custom Metadata Sources........................................ 84
Creating a Custom Resource.............................................. 84
Configuring the Template Name............................................ 85
Adding or Removing Metadata Files for a Resource............................... 85
Chapter 7: Data Integration Resources........................................ 87
Informatica Platform Resources............................................ 87
Configuring the Metadata Source........................................ 88
Creating an Informatica Platform Resource.................................. 88
Command Line Utilities Installation for Version 10.0 Applications.................... 91
Parameters in Informatica Platform 10.x Resources............................ 92
Parameters in Informatica Platform 9.5.1 - 9.6.x Resources....................... 93
Reference....................................................... 94
Microsoft SQL Server Integration Services Resources.............................. 99
Metadata Extraction from Protected Packages............................... 100
Configuring SQL Server Integration Services................................ 100
Creating an SQL Server Integration Services Resource......................... 102
Reference...................................................... 105
PowerCenter Resources................................................ 110
Configuring PowerCenter............................................. 110
Creating a PowerCenter Resource....................................... 112
Configuring the Folder Inclusion List...................................... 115
Configuring the Source Increment Extract Window............................ 116
PowerCenter Parameter Files.......................................... 116
Reference...................................................... 119
6 Table of Contents
Chapter 8: Data Modeling Resources........................................ 123
Embarcadero ERStudio................................................. 123
Configuring Embarcadero ERStudio...................................... 123
Creating an Embarcadero ERStudio Resource............................... 124
Reference...................................................... 126
ERwin............................................................ 129
Configuring ERwin................................................. 129
Creating an ERwin Resource.......................................... 130
Reference...................................................... 137
SAP PowerDesigner................................................... 140
Configuring SAP PowerDesigner........................................ 140
Creating an SAP PowerDesigner Resource................................. 140
Reference...................................................... 143
Adding or Removing Metadata Files for a Resource............................... 143
Reference for Data Modeling Resources...................................... 144
Datatypes....................................................... 144
Validation Rules.................................................. 145
Relationships.................................................... 145
View Associations................................................. 145
Schema and Owners............................................... 145
Name and Description Properties....................................... 145
Multiple Models in the Same Repository................................... 146
Objects Not Extracted............................................... 146
Domain-to-Validation Rule Association.................................... 146
Chapter 9: Database Management Resources................................ 147
Cloudera Navigator................................................... 147
Maximum Heap Size Configuration...................................... 148
Creating a Cloudera Navigator Resource................................... 148
Filtering for Hive and Impala Query Templates ............................... 150
Incremental Loading for Cloudera Navigator Resources......................... 151
Search Queries................................................... 151
Reference...................................................... 153
IBM DB2 for LUW..................................................... 158
Configuring IBM DB2 for LUW.......................................... 158
Creating an IBM DB2 for LUW Resource................................... 160
Reference...................................................... 163
IBM DB2 for z/OS.................................................... 164
Configuring IBM DB2 for z/OS......................................... 164
Creating an IBM DB2 for z/OS Resource................................... 166
Reference...................................................... 168
IBM Informix........................................................ 169
Table of Contents 7
Configuring IBM Informix............................................. 169
Creating an IBM Informix Resource...................................... 171
Reference...................................................... 172
JDBC............................................................ 174
Configuring the JDBC Metadata Source................................... 174
Creating a JDBC Resource........................................... 175
Objects Extracted and Not Extracted ..................................... 177
Microsoft SQL Server.................................................. 178
Configuring Microsoft SQL Server....................................... 178
Creating a Microsoft SQL Server Resource................................. 179
Reference...................................................... 181
Netezza........................................................... 183
Configuring Netezza................................................ 183
Creating a Netezza Resource.......................................... 184
Reference...................................................... 186
Oracle............................................................ 186
Configure Permissions.............................................. 187
Configure Oracle with the Advanced Security Option ........................... 188
Creating an Oracle Resource.......................................... 189
Incremental Loading for Oracle Resources................................. 192
Reference...................................................... 192
Sybase ASE........................................................ 193
Configuring Sybase ASE............................................. 194
Creating a Sybase ASE Resource....................................... 195
Reference...................................................... 196
Teradata.......................................................... 197
Configuring Teradata............................................... 197
Creating a Teradata Resource......................................... 198
Incremental Loading for Teradata Resources................................ 200
Reference...................................................... 200
Configuring the Schema Inclusion List....................................... 202
Data Lineage for Database Management Resources.............................. 203
Tables in Join Statements............................................ 203
SQL Inline Views.................................................. 203
Chapter 10: Universal Resources............................................ 204
Universal Resources Overview............................................ 204
Supported Metadata Sources............................................. 205
XConnect Creation.................................................... 206
Step 1. Get the Metadata Source Name................................... 207
Step 2. Create the Plug-in Definition File................................... 208
Step 3. Get the Image Mapping Information................................. 209
Step 4. Get the Icons............................................... 210
8 Table of Contents
Step 5. Generate the Plug-in.......................................... 211
Step 6. Create the Model from the Plug-in.................................. 212
Updating a Universal XConnect......................................... 213
Deleting a Universal XConnect......................................... 213
Resource Creation.................................................... 213
Step 1. Configure the Metadata Source.................................... 213
Step 2. Create the Resource.......................................... 215
Chapter 11: Managing Resources............................................ 217
Managing Resources Overview............................................ 217
Configure Connection Assignments......................................... 218
Automatic Connection Assignments...................................... 218
Manual Connection Assignments........................................ 219
Connection Assignments Example....................................... 219
Connection Assignment Properties...................................... 220
Automatically Configuring Connection Assignments............................ 220
Manually Configuring Connection Assignments............................... 221
Upload Rule Sets..................................................... 221
Linking Rules Files................................................. 222
Uploading a Rule Set............................................... 223
Purging Metadata..................................................... 223
Refreshing the Resources Panel........................................... 224
Updating the Search Index............................................... 224
Automatic Index Updates............................................. 225
Optimizing the Index................................................ 225
Manually Creating Indexes............................................ 225
Troubleshooting the Search Index....................................... 225
Customizing the List of Words to Ignore in Searches.............................. 226
Chapter 12: Loading and Monitoring Resources.............................. 228
Loading and Monitoring Resources Overview................................... 228
Loading Resources................................................... 229
Loading a Resource................................................ 229
Load Queue..................................................... 229
Resuming a Failed Resource Load...................................... 230
Linking Objects Across Resources.......................................... 230
Creating Links for a Resource.......................................... 230
Link Status...................................................... 231
Rules and Guidelines for Creating Links................................... 231
Monitoring Resources.................................................. 232
Viewing Load Details............................................... 232
Viewing Link Details................................................ 235
Load Details Log File............................................... 237
Table of Contents 9
Logs and Log Files.................................................... 237
Metadata Manager Agent Log File....................................... 238
Metadata Manager Service Log File...................................... 239
Activity Log...................................................... 240
Troubleshooting Resource Loads.......................................... 240
Scheduling Resource Loads.............................................. 241
Creating a Schedule................................................ 242
Editing a Schedule................................................. 243
Attaching a Schedule to a Resource...................................... 243
Chapter 13: Managing Permissions.......................................... 244
Managing Permissions Overview........................................... 244
Users and Groups................................................. 245
Permissions..................................................... 245
Rules and Guidelines for Permissions..................................... 245
Configuring Permissions for Users and Groups.................................. 246
Configuring Permissions on the Metadata Catalog................................ 246
Chapter 14: Resource Migration............................................. 248
Resource Migration Overview............................................. 248
Resource Migration Steps............................................... 248
Step 1. Copy the Plug-in for a Universal XConnect............................... 250
Step 2. Migrate the Model............................................... 250
Exporting a Packaged or Universal Model.................................. 251
Importing a Packaged or Universal Model.................................. 251
Step 3. Migrate the Resource Configuration.................................... 251
Exporting a Resource Configuration...................................... 252
Importing a Resource Configuration...................................... 252
Step 4. Load the Resource............................................... 253
Step 5. Migrate Resource Metadata......................................... 253
Exporting Resource Metadata.......................................... 254
Importing Resource Metadata.......................................... 254
Chapter 15: Repository Migration............................................ 255
Repository Migration Overview............................................ 255
Migrating the Repository when Domain Names and Encryption Keys are the Same.......... 255
Migrating the Repository when Domain Names or Encryption Keys Differ................. 256
Appendix A: Metadata Manager Login....................................... 258
Metadata Manager Login Overview......................................... 258
Cookies........................................................... 258
Logging in to Metadata Manager........................................... 259
Changing a Password.................................................. 259
10 Table of Contents
Appendix B: Metadata Manager Properties Files.............................. 260
imm.properties...................................................... 260
Metadata Manager Application Properties.................................. 260
Data Lineage Properties............................................. 263
searchpriorities.xml................................................... 264
Search Result Configuration........................................... 265
Sample searchpriorities.xml File........................................ 265
Appendix C: Resource Configuration Files................................... 267
Resource Configuration Files Overview....................................... 267
Resource Configuration File Format......................................... 268
Passwords in Resource Configuration Files.................................... 268
Secure JDBC Parameters in Resource Configuration Files.......................... 269
Sample Resource Configuration File........................................ 270
Appendix D: Glossary....................................................... 272
Index........................................................... 278
Table of Contents 11

Preface
The Metadata Manager Administrator Guide provides information about how to configure Metadata Manager,
create and load resources, and perform other Metadata Manager administration functions.
Informatica Resources
Informatica Network
Informatica Network hosts Informatica Global Customer Support, the Informatica Knowledge Base, and other
product resources. To access Informatica Network, visit https://network.informatica.com.
As a member, you can:
•Access all of your Informatica resources in one place.
•Search the Knowledge Base for product resources, including documentation, FAQs, and best practices.
•View product availability information.
•Review your support cases.
•Find your local Informatica User Group Network and collaborate with your peers.
Informatica Knowledge Base
Use the Informatica Knowledge Base to search Informatica Network for product resources such as
documentation, how-to articles, best practices, and PAMs.
To access the Knowledge Base, visit https://kb.informatica.com. If you have questions, comments, or ideas
about the Knowledge Base, contact the Informatica Knowledge Base team at
KB_Feedback@informatica.com.
Informatica Documentation
To get the latest documentation for your product, browse the Informatica Knowledge Base at
https://kb.informatica.com/_layouts/ProductDocumentation/Page/ProductDocumentSearch.aspx.
If you have questions, comments, or ideas about this documentation, contact the Informatica Documentation
team through email at infa_documentation@informatica.com.
12

Informatica Product Availability Matrixes
Product Availability Matrixes (PAMs) indicate the versions of operating systems, databases, and other types
of data sources and targets that a product release supports. If you are an Informatica Network member, you
can access PAMs at
https://network.informatica.com/community/informatica-network/product-availability-matrices.
Informatica Velocity
Informatica Velocity is a collection of tips and best practices developed by Informatica Professional Services.
Developed from the real-world experience of hundreds of data management projects, Informatica Velocity
represents the collective knowledge of our consultants who have worked with organizations from around the
world to plan, develop, deploy, and maintain successful data management solutions.
If you are an Informatica Network member, you can access Informatica Velocity resources at
http://velocity.informatica.com.
If you have questions, comments, or ideas about Informatica Velocity, contact Informatica Professional
Services at ips@informatica.com.
Informatica Marketplace
The Informatica Marketplace is a forum where you can find solutions that augment, extend, or enhance your
Informatica implementations. By leveraging any of the hundreds of solutions from Informatica developers and
partners, you can improve your productivity and speed up time to implementation on your projects. You can
access Informatica Marketplace at https://marketplace.informatica.com.
Informatica Global Customer Support
You can contact a Global Support Center by telephone or through Online Support on Informatica Network.
To find your local Informatica Global Customer Support telephone number, visit the Informatica website at the
following link: http://www.informatica.com/us/services-and-training/support-services/global-support-centers.
If you are an Informatica Network member, you can use Online Support at http://network.informatica.com.
Preface 13

CHAPTER 1
Using Metadata Manager
This chapter includes the following topics:
•Using Metadata Manager Overview, 14
•Metadata Manager Architecture, 15
•Metadata Integration Process, 18
•Working with Metadata Manager, 19
•Metadata Manager Interface, 20
Using Metadata Manager Overview
Informatica Metadata Manager is a web-based metadata management tool that you can use to browse and
analyze metadata from disparate metadata repositories. Metadata Manager helps you understand and
manage how information and processes are derived. It also helps you understand the fundamental
relationships between information and processes, and how they are used.
Metadata Manager extracts metadata from application, business glossary, business intelligence, custom,
data integration, data modeling, and relational metadata sources. It uses PowerCenter workflows to extract
metadata from metadata sources and load it into a centralized metadata warehouse called the Metadata
Manager warehouse.
Use Metadata Manager to browse and search the Metadata Manager warehouse and run data lineage
analysis for the metadata in the Metadata Manager warehouse.
Metadata Manager runs as a service in an Informatica domain. Create a Metadata Manager Service in
Informatica Administrator to configure and run the Metadata Manager application.
Resource Types
You can use Metadata Manager to extract and analyze metadata for different types of resources.
The following table lists the resource types and the associated metadata source types for which you can
extract and analyze metadata:
Metadata Source Type Resource Type
Application SAP R/3
Business Glossary Business Glossary
14

Metadata Source Type Resource Type
Business Intelligence Business Objects
Cognos
Microsoft Analysis and Reporting Services
Microstrategy
Oracle Business Intelligence Enterprise Edition (OBIEE)
SAP Business Warehouse
Tableau
Custom Custom
Data Integration Informatica Platform
Microsoft SQL Server Integration Services
PowerCenter
Data Modeling Embarcadero ERStudio
ERwin
SAP PowerDesigner
Database Management Cloudera Navigator
IBM DB2 for Linux, UNIX, and Windows
IBM DB2 for z/OS
IBM Informix
JDBC
Microsoft SQL Server
Netezza
Oracle
Sybase ASE
Teradata
Other (non-custom) business intelligence, data integration, data
modeling, or database management metadata sources
Universal
For more information about supported metadata source versions, see the PCAE Metadata Manager
XConnect Support Product Availability Matrix on Informatica Network:
https://network.informatica.com/community/informatica-network/product-availability-matrices/overview
Metadata Manager Architecture
Metadata Manager runs as an application service in an Informatica domain. The Metadata Manager
architecture includes the following components:
•Metadata Manager Service
•Metadata Manager application
•Metadata Manager Agent
•Metadata Manager repository
Metadata Manager Architecture 15
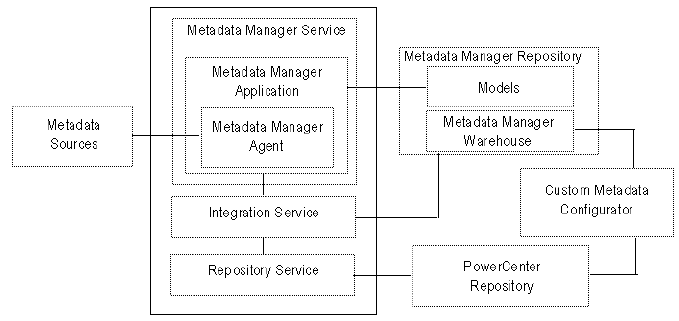
•PowerCenter repository
•PowerCenter Integration Service
•PowerCenter Repository Service
•Custom Metadata Configurator
The following figure shows the Metadata Manager components:
Metadata Manager Service
An application service in an Informatica domain that runs the Metadata Manager application and manages
connections between the Metadata Manager components. Create and configure the Metadata Manager
Service in Informatica Administrator. The Metadata Manager Service manages the configuration information
for Metadata Manager, including application properties and PowerCenter Integration Service, PowerCenter
Repository Service, and Metadata Manager repository configuration information.
Start and stop the Metadata Manager application by enabling and disabling the Metadata Manager Service in
Informatica Administrator. When you enable a Metadata Manager Service, the Service Manager on the node
where the Metadata Manager Service runs starts the Metadata Manager application.
Metadata Manager Application
A web-based application that manages the metadata in the Metadata Manager warehouse. Use the Metadata
Manager application to create and load resources in Metadata Manager. After you load metadata for a
resource, you can use the Metadata Manager application to browse and analyze metadata for the resource.
You can also use the Metadata Manager application to create custom models and manage security on the
metadata in the Metadata Manager warehouse. You must create a Metadata Manager Service to access the
Metadata Manager application.
Metadata Manager Agent
The Metadata Manager Agent extracts metadata from metadata sources and converts it to the Informatica
Metadata Extraction (IME) interface format. The Metadata Manager Agent runs on Windows either within the
Metadata Manager application or separately.
By default, the Metadata Manager Agent runs on the Windows machines where the Metadata Manager
Service runs. You can also install the Metadata Manager Agent separately.
You must install the Metadata Manager Agent separately in the following circumstances:
16 Chapter 1: Using Metadata Manager
When you extract metadata from some business intelligence, data integration, data modeling, or JDBC metadata sources.
To extract metadata from some business intelligence, data integration, data modeling, or JDBC
metadata sources, you must install the Metadata Manager Agent on the machine that runs the vendor
supplied software. For example, to extract metadata from Microstrategy, the Metadata Manager Agent
and the Microstrategy client must be on the same machine. For information about extracting metadata
from business intelligence and data modeling resources, see the documentation for the resource type
that you want to create.
When the domain uses Kerberos authentication.
When the domain uses Kerberos authentication and the Metadata Manager Service runs on Windows,
you must install the Metadata Manager Agent separately. You can install the Metadata Manager Agent
separately on the same machine where the Metadata Manager Service runs, or you can install it on
another Windows machine.
When the Metadata Manager Service runs on UNIX.
You must install the Metadata Manager Agent on a Windows machine. The Metadata Manager Agent
does not run on UNIX.
Metadata Manager Repository
A centralized location in a relational database that stores metadata from disparate metadata sources. It also
stores the Metadata Manager warehouse and the models for each metadata source type. Each Metadata
Manager application is configured to run with one Metadata Manager repository. You create the Metadata
Manager repository when you create the Metadata Manager Service.
When you load metadata for a resource, Metadata Manager loads the metadata into the Metadata Manager
warehouse. When you browse or analyze metadata in Metadata Manager, Metadata Manager queries the
warehouse to display the metadata.
PowerCenter Repository
Stores the PowerCenter workflows, which extract source metadata from IME-based files and load it into the
Metadata Manager warehouse. You create the PowerCenter repository when you create the Metadata
Manager Service. You can use an existing PowerCenter repository in an Informatica domain to store the
workflows, or you can create a PowerCenter repository specifically for use with Metadata Manager.
PowerCenter Integration Service
Runs the workflows that extract the metadata from IME-based files and load it into the Metadata Manager
warehouse. You configure the PowerCenter Integration Service that you want to use with Metadata Manager
when you create the Metadata Manager Service.
PowerCenter Repository Service
Manages connections to the PowerCenter repository that stores the workflows that extract metadata from
IME interface-based files. Metadata Manager uses the PowerCenter Repository Service associated with the
PowerCenter Integration Service that you configure for the Metadata Manager Service.
Custom Metadata Configurator
Creates custom resource templates and PowerCenter workflows to extract metadata from metadata sources
for which Metadata Manager does not package a resource type.
Metadata Manager Architecture 17
Metadata Manager packages resource types that extract metadata from metadata sources. You can also
extract metadata from a metadata source for which Metadata Manager does not package a resource type.
You create a model for the metadata source in Metadata Manager and use the Custom Metadata
Configurator to create a custom template and PowerCenter workflows to load the metadata into the Metadata
Manager warehouse.
Metadata Integration Process
Metadata Manager uses Metadata Exchanges to load metadata from different metadata sources into the
Metadata Manager warehouse. To run a Metadata Exchange, you create a resource in Metadata Manager
that represents the metadata source. When you load the resource, Metadata Manager uses the Metadata
Exchange for the resource to extract and load the metadata.
The Metadata Exchanges use the Metadata Manager Agent to extract the source metadata and reformat it
into a usable format, the IME interface format. The Metadata Exchanges then use the PowerCenter
workflows, consisting of worklets, sessions, and mappings, to extract, transform, and load metadata from the
IME-formatted files to the Metadata Manager warehouse.
This entire process is known as the metadata integration process. The PowerCenter repository contains the
workflows that extract and load the source repository metadata.
Resources
Resources represent metadata sources in Metadata Manager. Each resource contains the properties
required to connect to a metadata source, extract metadata from the source, and load the extracted metadata
into the Metadata Manager warehouse. Metadata Manager stores the resources you create in the Metadata
Manager repository.
Metadata Sources
Metadata sources contain the source metadata that you want to browse and analyze using Metadata
Manager. For example, an RDBMS repository is a relational database catalog source repository that contains
metadata, such as schemas, tables, views, and columns.
Create resources to extract metadata from a metadata source and load it into the Metadata Manager
warehouse.
Informatica Metadata Extraction Interface
Metadata Manager uses a preliminary process to restructure the source metadata into a format required by
the mappings within each PowerCenter workflow. The method used to restructure the metadata can vary. For
example, if the source repository is a database repository, Metadata Manager uses database views to
restructure the metadata into the required IME format.
Metadata Manager uses PowerExchange to access metadata in an IBM DB2 for z/OS subsystem.
PowerCenter Workflows
After the source metadata is converted into the IME format, the PowerCenter Integration Service uses
PowerCenter workflows to extract the metadata from the IME-based files and load it into the Metadata
Manager warehouse.
18 Chapter 1: Using Metadata Manager
Metadata Exchanges
Metadata Manager uses Metadata Exchanges to extract source metadata and load it into the Metadata
Manager warehouse.
Each Metadata Exchange contains the following components:
•IME-based transformation component. The PowerCenter workflows require the source metadata to be
in a particular format. Metadata Manager packages a transformation process for each Metadata Exchange
to transform the source metadata based on the required IME format. The transformation process stores
the transformed metadata in files or database views that are prefixed with IME. The files are called IME
files and the views are called IME views.
•Load component. The load component consists of PowerCenter workflows that extract the source
metadata in the required IME format and load it into the Metadata Manager warehouse. The PowerCenter
repository contains all the PowerCenter workflows required to extract, transform, and load the source
metadata.
When you load source metadata into the Metadata Manager warehouse, Metadata Manager performs the
IME-based transformation on the source metadata. Metadata Manager then issues a command to the
PowerCenter Integration Service to run the applicable workflows. The workflows load the IME-formatted
source metadata into the Metadata Manager warehouse.
Metadata Manager provides Metadata Exchanges that are configured to extract metadata from particular
types of metadata sources.
You can develop custom resources to load metadata from a metadata source for which Metadata Manager
does not package a resource type. For example, Metadata Manager does not provide a resource type for
Microsoft Access databases. To extract metadata from an Access database, you must create a custom model
and resource.
Working with Metadata Manager
Before you can browse and search metadata in the Metadata Manager warehouse, you must configure
Metadata Manager and create and load resources.
Complete the following steps to load metadata from a metadata source into the Metadata Manager
warehouse:
1. Set up Metadata Manager. Create a Metadata Manager Service and install the Metadata Manager
Agent.
2. Create and configure resources. Create resources that represent the metadata sources from which
you want to extract metadata. Configure parameters and connection assignments for the resources.
3. Manage resources. Purge metadata for a previously loaded resource and update the index for
resources.
4. Load and monitor resources. Load a resource to load the metadata for the resource into the Metadata
Manager warehouse. When you load a resource, Metadata Manager extracts and loads the metadata for
the resource. If you modify connection assignments after loading a resource, create links between
objects in connected resources. You can monitor the status of all resources and the status of individual
resources. You can also schedule resource loads.
5. Manage resource and object permissions for Metadata Manager users. You can configure the
resources and metadata objects in the warehouse for which Metadata Manager users have access.
You can use Metadata Manager command line programs to load resources, monitor the status of resource
loads, and back up and restore the Metadata Manager repository.
Working with Metadata Manager 19

Related Topics:
•“Configuring Metadata Manager Overview” on page 21
•“Managing Resources” on page 217
•“Loading and Monitoring Resources” on page 228
•“Managing Permissions” on page 244
Metadata Manager Interface
The Metadata Manager interface consists of the following tabs:
Browse
Browse and search the metadata catalog, view business glossaries, and run data lineage analysis. For
more information about the Browse tab, see the Metadata Manager User Guide.
Model
View models, add custom attributes to models, and create, edit, import, and export custom models. For
more information about the Model tab, see the Metadata Manager Custom Metadata Integration Guide.
Load
Create and load resources to load metadata into the Metadata Manager warehouse. Use the Load tab to
monitor and schedule resource loads, purge metadata from the Metadata Manager warehouse, and
manage the search index.
Permissions
Manage permissions on resources and metadata objects in the Metadata Manager warehouse.
Load Tab
The Load tab has the following components:
•Actions menu. Use the Actions menu to create, edit, and delete resources, load resources, create
schedules and add schedules to resources, view the Metadata Manager activity log, create links between
resources, index resources, and download the Metadata Manager Agent installer.
•Resources panel. Shows the list of configured resources in the Metadata Manager repository. Use this
panel to create and delete resources, refresh the resource list, load, resume, and cancel resource loads,
create links between resources, purge metadata for a resource, and monitor resource loads.
•Resource Properties panel. View the configuration properties for resources and configure name and
description, connection information, parameters, schedules, and connection assignments for resources.
Permissions Tab
The Permissions tab has the following components:
•Navigator. Navigate the resources, metadata objects, groups and users that you can configure
permissions for.
•Permissions panel. Configure permissions for groups and users, and configure permissions for
resources and metadata objects in the metadata catalog.
20 Chapter 1: Using Metadata Manager

CHAPTER 2
Configuring Metadata Manager
This chapter includes the following topics:
•Configuring Metadata Manager Overview, 21
•Step 1. Create and Configure the Metadata Manager Service, 21
•Step 2. Install the Metadata Manager Agent, 22
Configuring Metadata Manager Overview
Before you log in to Metadata Manager and load metadata into the Metadata Manager warehouse, you must
configure Metadata Manager.
Complete the following tasks to configure Metadata Manager:
1. Create and configure the Metadata Manager Service. Create and configure the Metadata Manager
Service in Informatica Administrator.
2. Install the Metadata Manager Agent. Download the Metadata Manager Agent installer and install the
agent. Install the agent on machines where the source files or source repositories for certain metadata
sources are located.
After you configure Metadata Manager, you can log in to the application, create resources, and load
metadata into the Metadata Manager warehouse. You must also log in to Metadata Manager to download the
Metadata Manager Agent installer.
Step 1. Create and Configure the Metadata Manager
Service
The Metadata Manager Service runs the Metadata Manager application and manages the Metadata Manager
application properties. Create and manage the Metadata Manager Service in Informatica Administrator. You
create the service and the repositories required by Metadata Manager. You configure properties such as the
node and port number where Metadata Manager runs.
You also create users and groups for Metadata Manager in Informatica Administrator. After you create and
enable the Metadata Manager Service, you can manage users and groups in Informatica Administrator.
21
Step 2. Install the Metadata Manager Agent
The Metadata Manager Agent is a program that Metadata Manager uses to access metadata sources and
extract source metadata.
By default, the Metadata Manager Agent runs on the Windows node where the Metadata Manager Service
runs. It uses one port number higher than the Metadata Manager Service. You can configure the port number
in the Administrator tool. A separate instance of the Metadata Manager Agent runs for each Metadata
Manager Service on a node. The agent runs in the following directory:
<Informatica installation directory>\services\MetadataManagerService\mmagentapps\mmagent\
You can also install the Metadata Manager Agent separately on the same machine where the Metadata
Manager service runs or on another Windows machine.
You must install the Metadata Manager Agent separately in the following circumstances:
When you extract metadata from some business intelligence, data integration, data modeling, or JDBC metadata sources.
To extract metadata from some business intelligence, data integration, data modeling, or JDBC
metadata sources, you must install the Metadata Manager Agent on the machine that runs the vendor
supplied software. For example, to extract metadata from Microstrategy, the Metadata Manager Agent
and the Microstrategy client must be on the same machine. For information about extracting metadata
from business intelligence and data modeling resources, see the documentation for the resource type
that you want to create.
When the domain uses Kerberos authentication.
When the domain uses Kerberos authentication and the Metadata Manager Service runs on Windows,
you must install the Metadata Manager Agent separately. You can install the Metadata Manager Agent
separately on the same machine where the Metadata Manager Service runs, or you can install it on
another Windows machine.
When the Metadata Manager Service runs on UNIX.
You must install the Metadata Manager Agent on a Windows machine. The Metadata Manager Agent
does not run on UNIX.
Rules and Guidelines for the Metadata Manager Agent
Use the following rules and guidelines when you install the Metadata Manager Agent:
Install the Metadata Manager Agent on a Windows machine if the Metadata Manager Service runs on UNIX.
The Metadata Manager Agent runs on Windows. If the Metadata Manager Service runs on UNIX, you
must install the Metadata Manager Agent on a separate Windows machine. If the Metadata Manager
Service runs on Windows, the Metadata Manager Agent is installed as part of the Metadata Manager
Service installation.
Configure the Metadata Manager Agent to run in HTTP or HTTPS.
Configure the Metadata Manager Agent to run in HTTP or HTTPS (HTTP security mode). The mode of
the Metadata Manager Agent that you install must be the same security mode as the Metadata Manager
Service. You must generate the keystore file to use with HTTPS.
If the Oracle Business Intelligence Enterprise Edition (OBIEE) Presentation Server runs in HTTPS mode,
configure HTTPS mode for the Metadata Manager Agent.
You can stop and start the Metadata Manager Agent.
The Metadata Manager Agent starts as a Windows service after you install it. You can stop or start the
Metadata Manager Agent from the Windows Start menu or from the Windows Services panel.
22 Chapter 2: Configuring Metadata Manager

Alternately, you can run the Metadata Manager Agent from the command prompt. The batch files that
start and stop the Metadata Manager Agent are in the Metadata Manager Agent installation directory.
You can install the Metadata Manager Agent on 32-bit and 64-bit Windows machines.
The Metadata Manager Agent can run on 32-bit and 64-bit Windows machines. By default, the Metadata
Manager Agent configures a 1 GB maximum Java Virtual Machine (JVM) heap size on a 32-bit machine.
It configures a 4 GB maximum JVM heap size on a 64-bit machine.
Minimum System Requirements
The following table describes the minimum system requirements to run the Metadata Manager Agent:
Processor RAM Disk Space
1 CPU 512 MB 220 MB
For information about the operating systems on which you can install the Metadata Manager Agent, see the
Product Availability Matrix on Informatica Network:
https://network.informatica.com/community/informatica-network/product-availability-matrices/overview .
Before You Install
Before you install the Metadata Manager Agent, verify that the user account you use to install the agent is a
member of the Windows administrator group on the machine where you install the agent. The user account
must have the Log on as a service and Act as operating system permissions.
Installing the Metadata Manager Agent
To install the Metadata Manager Agent:
1. Log in to Metadata Manager.
2. On the Load tab, click Actions > Download Agent Installer.
The browser prompts you to download MMAgentInstaller.exe.
3. Save the file to your hard drive.
4. Copy the installer to the machine where you want to install the Metadata Manager Agent.
5. Double-click MMAgentInstaller.exe to begin the installation.
The Introduction window appears.
6. Click Next.
The Agent Configuration page appears.
Step 2. Install the Metadata Manager Agent 23

7. Configure the following options:
Option Description
HTTP port Port number used by Metadata Manager to communicate with the Metadata Manager Agent.
Default is 19983.
Agent home Directory where you want to install the Metadata Manager Agent. Default is c:\informatica
\<current version>\MetadataManagerAgent.
You can use the default installation directory or click Browse to select a directory.
8. Click Next.
The HTTPS Configuration window appears.
9. Clear the HTTPS option if you do not want to use HTTPS. Skip to step 11.
10. Enter the following information to use HTTPS:
Option Description
HTTPS Port Number Port used by the node to communicate between the Metadata Manager Agent and the
Metadata Manager application.
Keystore Password A plain-text password for the keystore file.
Keystore File Location A file that includes private or public key pairs and associated certificates. You can use a
self-signed certificate or a certificate signed by a certificate authority. If you use a different
keystore file than the Metadata Manager Service, you must import the Metadata Manager
Agent keystore certificate with the Metadata Manager Service keystore file.
11. Click Next.
The Pre-Installation Summary window appears.
12. Verify the installation options and click Install.
The installer completes the installation and installs the Metadata Manager Agent as a Windows service
named Metadata Manager Agent <version>.
13. Click Done.
Related Topics:
•“Merging Certificates” on page 26
After You Install
After you install the Metadata Manager Agent, you must complete some post-installation tasks.
Complete the following tasks:
•Verify the Metadata Manager Agent connectivity with the Metadata Manager Service.
•Enable the Metadata Manager Agent to interact with the desktop for Business Objects, Microstrategy,
ERwin 7.x, ERwin 8.x, or ERwin 9.x.
•Optionally increase the Java Virtual Manager (JVM) memory.
24 Chapter 2: Configuring Metadata Manager
Verify Metadata Manager Agent Connectivity
The Metadata Manager Agent uses HTTP to communicate with the Metadata Manager Service when you
load a resource.
Metadata Manager Agent connects to the Metadata Manager Service using the default port 19983 or any port
you specify in the Tomcat configuration file, server.xml. You can verify or update the port number in the
Tomcat configuration file that is available in the following location:
<INFA_HOME>\MetadataManagerAgent\tomcat\conf\
After you install the Metadata Manager Agent, verify that the agent and the Metadata Manager Service can
communicate.
You can use one of the following options to verify that the agent and the Metadata Manager Service can
communicate:
•Run the following command on the machine where the Metadata Manager Service runs:
telnet <Metadata Manager Agent machine name> <Metadata Manager Agent port>
•Connect to the Metadata Manager Agent from a web browser using the following URL:
http://server:port/MIMBWebServices
If the Metadata Manager Agent is running, the home page of the agent appears.
If the commands fails, make sure that the Metadata Manager Service and the Metadata Manager Agent
service are available. If the machines are separated by a firewall, contact the administrator to make the port
numbers available.
Enable the Metadata Manager Agent to Interact with the Desktop
If you run the Metadata Manager Agent as a service, you must enable the Metadata Manager Agent to
interact with the desktop.
You must enable the Metadata Manager Agent to interact with the desktop for the following metadata
sources:
•Business Objects
•Microstrategy
•ERwin 7.x, 8.x, and 9.x
1. From the Windows Start menu, click Administrative Tools > Services.
2. Double-click Metadata Manager Agent.
The Metadata Manager Agent <Version> Properties dialog box appears.
3. Click the Log On tab.
4. Under Local System Account, click Allow service to interact with desktop.
5. Click OK.
Increase Java Virtual Machine Memory
If you want to load a large amount of metadata for a resource type that uses the Metadata Manager Agent,
you can increase the Java Virtual Machine (JVM) heap size to increase scalability. By default, the Metadata
Step 2. Install the Metadata Manager Agent 25

Manager Agent configures a 1 GB maximum heap size on a 32-bit machine, and it configures a 4 GB
maximum heap size on a 64-bit machine.
You may need to increase the JVM heap size when you extract from a large or complex source environment
and receive an error message that says there is not enough available storage to process the command.
Increase the heap size in the MIRSetup.xml file.
1. Use a text editor to open MIRSetup.xml from the following location:
<Metadata Manager Agent installation directory>\conf
2. Edit the -Xmx option in the <RunTime> section.
3. Save MIRSetup.xml.
4. Restart the Metadata Manager Agent.
Working with a Keystore File
You must create the keystore file to configure the Metadata Manager Agent for HTTPS. You can create a
keystore file with keytool. keytool is a utility that generates and stores private or public key pairs and
associated certificates in a file called a “keystore.” When you generate a public or private key pair, keytool
wraps the public key into a self-signed certificate. You can use the self-signed certificate or use a certificate
signed by a certificate authority.
Complete the following tasks to work with the keystore file for the Metadata Manager Agent:
•Create a keystore file.
•Merge certificates with the Metadata Manager Service keystore file.
Creating a Keystore File
Use keytool in one of the following locations to create a keystore file:
•%JAVA_HOME%\jre\bin
•java/bin directory of the Informatica installation directory.
For example, to create a keystore file for the Metadata Manager Agent with an alias of mmagent and
keystore name of mmagent.keystore, use the following command:
keytool -genkey -alias mmagent -keystore mmagent.keystore
For more information about using keytool, see the documentation on the Sun web site:
http://java.sun.com/j2se/1.3/docs/tooldocs/win32/keytool.html
Merging Certificates
If you do not use the Metadata Manager Service keystore file when you install the Metadata Manager Agent,
you must merge the certificate in the Metadata Manager Agent keystore to the Metadata Manager Service
keystore.
To merge the certificate, complete the following steps:
1. Export the certificate from the Metadata Manager Agent keystore file.
For example, to export a certificate from a Metadata Manager Agent keystore with an alias of mmagent
and keystore name of mmagent.keystore, issue the following command:
keytool -export -alias mmagent -keystore mmagent.keystore -file mmagent.cer
2. Import the certificate into the Metadata Manager Service keystore file.
26 Chapter 2: Configuring Metadata Manager
For example, to import a certificate to a Metadata Manager Service keystore with an alias of mmservice
and keystore name of mmservice.keystore, issue the following command:
keytool -import -trustcacerts -keystore mmservice.keystore -file mmagent.cer
Step 2. Install the Metadata Manager Agent 27

CHAPTER 3
Application Resources
This chapter includes the following topics:
•SAP R/3 Resource Overview, 28
•Configuring SAP R/3, 28
•Creating an SAP R/3 Resource, 29
•Configuring the Component Inclusion List, 31
•Reference, 31
SAP R/3 Resource Overview
SAP R/3 is an application platform that integrates multiple business applications and solutions. You can
create and configure an SAP R/3 resource to extract metadata from SAP R/3.
Configuring SAP R/3
Before you create an SAP R/3 resource, you must configure the metadata source. If you do not correctly
configure the metadata source, the metadata load can fail or the metadata can be incorrectly loaded in the
Metadata Manager warehouse.
To configure SAP R/3, complete the following tasks:
•Install PowerCenter transports.
•Configure a user authorization profile.
•Install SAP SDK libraries.
Install Transports
To extract metadata from SAP R/3, you must install the PowerCenter transports that Metadata Manager uses
to extract metadata from SAP R/3. The transports are located in the following folder in the location where you
downloaded PowerCenter:
<download location>\saptrans\mySAP
For more information about installing the transports, see the PowerExchange for SAP NetWeaver Transport
Versions Installation Notice.
28

Configure a User Authorization Profile
The SAP R/3 administrator needs to create the product and development user authorization profile.
The following table describes the user authorization profile:
Authorization
Object
Description Class Field Values
S_RFC Authorization check for
RFC access.
Cross Application
Authorization objects
Activity: 16 (Execute)
Name of RFC to be protected: *.
Type of RFC object to be protected: FUGR
Install the SAP JCo Libraries
Before you create an SAP R/3 resource, download and install SAP JCo 3 for the operating system where the
Metadata Manager Service runs. The SAP JCo installation package includes a library file and a JAR file.
Copy the files to the appropriate directories on the machine where the Metadata Manager Service runs.
If you have problems downloading the files, contact Informatica Global Customer Support.
1. Go to the SAP Service Marketplace: http://service.sap.com
Note: You must have user ID for the SAP Service Marketplace.
2. Download the SAP JCo installation package for the operating system where the Metadata Manager
Service runs.
The installation package contains the following files:
•A library file, either sapjco3.dll for Windows or libsapjco3.dll for UNIX
•A JAR file, sapjco3.jar
3. Copy the library file to the following directory on the machine where the Metadata Manager Service runs:
<Informatica Installation Directory>\server\bin
4. Copy the JAR file to the following directory on the machine where the Metadata Manager Service runs:
<Informatica Installation Directory>\services\shared\jars\thirdparty
5. Set the following permissions for the library file and the JAR file:
•Read, write, and execute permissions for the current user
•Read and execute permissions for all other users
Creating an SAP R/3 Resource
Before you create an SAP R/3 resource, configure the SAP R/3 source.
1. On the Load tab, click Actions > New Resource.
The Resource Selection window appears.
2. Click Application > SAP.
3. Click Next.
The Properties page appears.
Creating an SAP R/3 Resource 29

4. Enter the following information:
Property Description
Name Name for the resource. The resource appears in the Resources panel with this name. The name
must be unique and have from one through 256 characters. It cannot include the following characters:
/ \ : * ' ? " < > | [ ]
Description Description for the resource. Description cannot exceed 4000 characters.
Hide in Summary
Lineage
Hides the resource in the summary view of data lineage diagrams.
Enable this option to hide the resource and its child objects in the summary view. Disable this option
to display the resource and its child objects in the summary view.
Default is disabled.
5. Click Next.
The Configuration page appears.
6. Enter the configuration properties.
7. Click Test Connection to test the connection to the source system.
If Metadata Manager cannot connect to the source system, an error message appears. Correct any error
and test the connection again.
8. Click Next.
The Parameters page appears.
9. To search for SAP R/3 tables included in SAP Application Components, enter the table name in the
Search for tables field and click Go.
The tables appear in the Available Components list.
10. To add application components, packages, or tables to the Selected Components list, select the object
in the Available Components list and click Add.
When you select a table, Metadata Manager also includes the SAP Application Component and SAP
package in the hierarchy. If you select any application component, package, or table, Metadata Manager
also extracts all child objects of the object.
11. To add all application components, packages, or tables, click Add All.
12. To remove application components, packages, or tables from the Selected Components list, select the
object in the Selected Components list and click Remove.
13. To remove all components, packages, and tables from the Selected Components list, click Remove
All.
14. Click Next.
The Schedules window appears.
15. To add a schedule, select Attach a Schedule and select a schedule in the Schedule list.
If you have not created a schedule, you can assign a schedule to a resource after you create the
resource.
16. Click Finish.
The resource appears in the Resources panel on the Load tab.
30 Chapter 3: Application Resources

SAP R/3 Configuration Properties
Update the configuration properties when you create or edit an SAP R/3 resource.
The following table describes the SAP R/3 configuration properties:
Property Description
User name SAP R/3 source system connection user name.
Password Password for the user name.
Application server host Host name of the machine where the SAP R/3 application is running.
System number SAP R/3 system number.
Client SAP R/3 client number.
Language Language code of the SAP R/3 system.
Encoding Code page for the application connection for SAP R/3.
Configuring the Component Inclusion List
You can configure the Component Inclusion List parameter for an SAP R/3 resource. To edit the parameter,
select the resource in the Resources panel of the Load tab, click Edit Resource, and click the Parameters tab
in the Edit Resource window.
Use the Component Inclusion List to select the SAP R/3 tables to extract. You can browse for tables included
in SAP Application Components, or you can search for tables. To select a table, move the table from the
Available Components list to the Selected Components list.
When you select a table, Metadata Manager also includes the SAP Application Component and SAP package
in the hierarchy. If you select any application component, package, or table, Metadata Manager also extracts
all child objects of the object.
Reference
After you create and load an SAP R/3 resource, you can view and run data lineage on the metadata objects
that Metadata Manager extracted.
Version
Metadata Manager extracts metadata from SAP R/3, but not from SAP NetWeaver BI.
Configuring the Component Inclusion List 31
Objects Extracted
Metadata Manager extracts the following object types from SAP R/3:
•Application components
•Packages
•Tables
•Columns
•Primary and foreign keys
Data Lineage
You can perform data lineage analysis between SAP R/3 tables and PowerCenter mappings in Metadata
Manager. Metadata Manager does not extract the data lineage information between SAP R/3 variables and
functions.
In addition, if you manually edit an ABAP program for an Application Source Qualifier in a PowerCenter
mapping, data lineage analysis does not include any tables manually included in the Application Source
Qualifier. For example, if you override an ABAP program to include an SAP R/3 table not included as a
source in a PowerCenter mapping, Metadata Manager does not display the lineage between the
PowerCenter mapping and the SAP R/3 table.
SAP R/3 Schema Class
The SAP R/3 model includes a class named SAP Schema. Metadata Manager uses this class to display data
lineage between SAP R/3 and PowerCenter repository objects. It is not displayed in the metadata catalog
when you load an SAP R/3 resource.
32 Chapter 3: Application Resources

CHAPTER 4
Business Glossary Resources
This chapter includes the following topics:
•Business Glossary Resources Overview, 33
•Application Services Verification, 34
•Creating a Business Glossary Resource, 34
•Business Glossary Objects Extracted, 36
•Business Glossary Objects Not Extracted, 36
Business Glossary Resources Overview
You can create and configure Business Glossary resources to extract metadata from Informatica Analyst
(Analyst tool) business glossaries. Extract metadata from an Analyst tool business glossary so that you can
relate categories and business terms to other metadata objects.
In the Analyst tool, you define business glossaries in the Glossary workspace. The Glossary workspace can
contain multiple business glossaries. Each business glossary contains assets such as business terms,
categories, and policies. Metadata Manager can extract business terms and categories from a business
glossary.
You create one Business Glossary resource for each Analyst tool business glossary from which you want to
extract metadata. You can create multiple Business Glossary resources, however, the business glossaries
must be managed by the same Analyst Service.
When you create a Business Glossary resource, you specify the following information:
•Analyst tool connection information
•Name of the business glossary from which you want to extract metadata
•Optional enumerated links files that contain linking information for business terms
•Optional schedule that specifies the time and frequency of the resource loads
You can use enumerated links files to associate individual business terms with metadata objects in other
resources. For example, you might want to link different business terms with different columns in an Oracle
table. Enumerated links files are CSV files that contain individual pairs of objects that you want to link. You
can upload one or more enumerated links files when you create or edit a Business Glossary resource. For
more information about enumerated links, see the Metadata Manager Custom Metadata Integration Guide.
You can use a schedule to periodically load business glossary resources. Analyst tool users update business
glossary content in the Analyst tool. To ensure that Metadata Manager users always have access to the most
recent business glossary content, schedule regular resource loads.
33

Application Services Verification
Before you create a Business Glossary resource, check the status of the Analyst Service and the associated
services. If the required services are not available, you might not be able to create the resource, or the
metadata load can fail.
Verify that the following services are available:
•Analyst Service
•Model Repository Service that is associated with the Analyst Service
•Data Integration Service that is associated with the Analyst Service
Creating a Business Glossary Resource
Create a Business Glossary resource to extract metadata from an Analyst tool business glossary.
Before you create a Business Glossary resource, verify that the Analyst Service and the associated services
are available.
1. On the Load tab, click Actions > New Resource.
The Resource Selection window appears.
2. Click Business Glossary > Business Glossary.
3. Click Next.
The Properties page appears.
4. Enter the following information:
Property Description
Name Name for the resource. The resource appears in the Resources panel with this name. The name
must be unique and have from one through 256 characters. It cannot include the following characters:
/ \ : * ' ? " < > | [ ]
Description Description for the resource. Description cannot exceed 4000 characters.
Hide in Summary
Lineage
Hides the resource in the summary view of data lineage diagrams.
Enable this option to hide the resource and its child objects in the summary view. Disable this option
to display the resource and its child objects in the summary view.
Default is disabled.
Note: The business glossary resource name should match the Analyst tool glossary name. If the names
do not match, the related terms for a business term do not appear in the Metadata Manager business
glossary.
5. Click Next.
The Configuration page appears.
6. Enter the connection properties.
7. Click Test Connection to test the connection to the source system.
34 Chapter 4: Business Glossary Resources

If Metadata Manager cannot connect to the source system, an error message appears. Correct any error
and test the connection again.
8. Click Next.
The Enumerated Links window appears.
9. Optionally, add or upload the files that contain enumerated links information:
•Add enumerated links files when you store the files in a directory that the Metadata Manager web
application can access and the files change.
•Upload enumerated links files when the files do not change. Metadata Manager uploads the files into
the Metadata Manager repository.
10. Update the file properties for each enumerated links file, if required.
11. Click Next.
The Schedules window appears.
12. To add a schedule, select Attach a Schedule and select a schedule in the Schedule list.
If you have not created a schedule, you can assign a schedule to a resource after you create the
resource.
13. Click Finish.
The resource appears in the Resources panel on the Load tab.
Business Glossary Connection Properties
Update the connection properties when you create or edit a Business Glossary resource.
The following table describes the connection properties:
Property Description
User name Name of the user account used to connect to the Analyst tool.
Password Password for the user account used to connect to the Analyst tool.
Security domain Name of the security domain to which the Analyst tool user belongs.
If the domain uses LDAP authentication or Kerberos authentication, enter the security domain name.
Otherwise, enter
Native
.
Host Fully qualified host name of the machine where the Analyst tool runs.
Port Analyst tool port number.
Business glossary Name of the Analyst tool business glossary from which you want to extract metadata. Each resource can
extract metadata from one business glossary.
Creating a Business Glossary Resource 35
Business Glossary Objects Extracted
Metadata Manager extracts published business terms and categories from an Analyst tool business glossary.
Metadata Manager extracts published business terms even when the categories to which the terms belong
are unpublished. If an unpublished category includes published business terms, Metadata Manager lists the
terms under the glossary to which the terms belong.
Metadata Manager extracts the following attributes for business terms:
•Name
•Description
•Data steward
•Owner
•Reference table URL
•Status
•Phase
•Usage context
•Custom attributes defined in the Analyst tool
•Relationships between the business term and other business terms
•Relationships between the business term and categories
Metadata Manager extracts the following attributes for categories:
•Name
•Description
•Data steward
•Owner
•Usage context
•Relationships between the category and business terms
Business Glossary Objects Not Extracted
Metadata Manager does not extract policies or unpublished objects from an Analyst tool business glossary.
Additionally, Metadata Manager does not extract custom properties with names that contain special
characters.
Metadata Manager does not extract the following objects:
•Unpublished business terms
•Unpublished categories
•Policies
•Business initiatives
Metadata Manager does not extract custom properties with names that contain any of the following special
characters:
~ ' & * ( ) [ ] | \ : ; " ' < > , ? /
36 Chapter 4: Business Glossary Resources
However, Metadata Manager does extract custom properties with names that contain the following
characters:
! @ # $ % ^ _ - + = { } . ´
Business Glossary Objects Not Extracted 37

CHAPTER 5
Business Intelligence Resources
This chapter includes the following topics:
•Business Objects, 38
•Cognos, 46
•Microsoft Analysis and Reporting Services, 52
•Microstrategy, 58
•Oracle Business Intelligence Enterprise Edition, 64
•SAP Business Warehouse, 70
•Tableau, 77
•Incremental Metadata Load , 81
•Adding or Removing Metadata Files for a Resource, 82
Business Objects
Business Objects is a business intelligence tool that includes components for performance management,
planning, reporting, query and analysis, and enterprise information management.
You can create and configure a Business Objects resource to extract metadata from Business Objects.
Metadata Manager extracts metadata objects for Business Objects reports, universes, and repositories.
Configuring Business Objects
Before you create a Business Objects resource, you must configure the metadata source. If you do not
correctly configure the metadata source, the metadata load can fail or the metadata can be incorrectly loaded
in the Metadata Manager warehouse.
To configure Business Objects, complete the following tasks:
•Install the Metadata Manager Agent.
•Enable the Metadata Manager Agent to interact with the desktop.
•Configure permissions.
•Export objects to a repository.
•Verify that the required Business Objects clients and servers are running.
•Exit the Universe Designer.
38

Install the Metadata Manager Agent
The Metadata Manager Agent is a program that Metadata Manager uses to access metadata sources and
extract source metadata. By default, the Metadata Manager Agent runs on the nodes where the Metadata
Manager Service runs.
To extract metadata from Business Objects, you must install the Metadata Manager Agent separately on a
Windows machine. The Metadata Manager Agent and a single version of the Business Objects client must be
on the same machine. If multiple versions of the Business Objects client are on the same machine as the
Metadata Manager Agent, the agent cannot extract the Business Objects metadata.
The Business Objects client must be able to connect to the source repository. If the client is not on the same
machine as the Metadata Manager Service, install the Metadata Manager Agent on the same machine as the
client. Ensure that you run the Metadata Manager Agent as a desktop application and not as a Windows
service. In addition, ensure that you do not install the Metadata Manager Agent on the same machine as the
Business Objects server.
Related Topics:
•“Step 2. Install the Metadata Manager Agent” on page 22
Enable the Metadata Manager Agent to Interact with the Desktop
If you run the Metadata Manager Agent as a service, you must enable the Metadata Manager Agent to
interact with the desktop.
You must enable the Metadata Manager Agent to interact with the desktop for the following metadata
sources:
•Business Objects
•Microstrategy
•ERwin 7.x, 8.x, and 9.x
1. From the Windows Start menu, click Administrative Tools > Services.
2. Double-click Metadata Manager Agent.
The Metadata Manager Agent <Version> Properties dialog box appears.
3. Click the Log On tab.
4. Under Local System Account, click Allow service to interact with desktop.
5. Click OK.
Configure Permissions
Remove permissions from any Business Object universe that you want to export. You cannot extract a write-
protected universe. For more information about removing Business Object permissions, see the Business
Objects documentation.
Make sure that the user who logs in to the Business Objects repository belongs to the Universe Designer
Users group and has read access to all the Business Objects metadata. If the Business Objects repository
contains web intelligence reports in the Favorites or Personal folders, the user should also belong to the
Administrators group. You must create a custom security group giving permission to the user to view Web
intelligence reports.
Business Objects 39
Export Objects to a Repository
Export the Business Objects artifacts such as universes, Webi documents, Desktop Intelligence documents,
and Crystal Reports in the Business Objects source repository. Metadata Manager cannot access the
artifacts that are available the Business Objects cache, but not available in the source repository. Before you
load a Business Object resource, export all artifacts to the source repository to ensure that the metadata in
the Metadata Manager warehouse is consistent with the metadata that is available to Business Objects
users.
Use Business Objects Designer to export a universe to the Business Objects source repository. For example,
to begin the export process in Business Objects Designer, click File > Export. You must secure a connection
type to export a universe to a Business Objects source repository.
Use Business Objects to export a document to the Business Objects repository. For example, to begin the
export process in Business Objects, click File > Publish To > Corporate Documents.
Use the Business Objects Central Manager Console to export Crystal Reports to the Business Objects
repository.
Verify Business Objects Clients and Servers
To extract metadata from Crystal reports and Webi reports, you must verify that the required Business
Objects clients and servers are running. If the required clients and servers are not running, the Metadata
Manager Agent cannot extract metadata from Business Objects reports.
The required clients and servers vary based on the Business Objects version:
SAP Business Objects Repository XI R4.x
To extract metadata from Crystal reports, the Crystal Reports client must be installed on the machine
where the Business Objects client runs.
To extract metadata from Webi reports, the Web Application Container Server (WACS) must be running
and RESTful web services must be installed.
SAP Business Objects Repository XI R3.x and previous versions
To extract metadata from Webi reports, a Web Intelligence Processing Server must be running.
Use the Business Objects Central Management Console to verify the status of Business Objects servers. For
more information about Business Objects clients and servers, see the Business Objects documentation.
Exit the Universe Designer
To extract metadata from a locked Business Objects universe, exit the Universe Designer. If you do not exit
the Universe Designer, the universe becomes unlocked during metadata extraction.
For more information about the Business Objects Universe Designer, see the Business Objects
documentation.
Creating a Business Objects Resource
Before you create a Business Objects resource, configure the Business Objects source.
1. On the Load tab, click Actions > New Resource.
The Resource Selection window appears.
2. Click Business Intelligence > Business Objects.
3. Click Next.
40 Chapter 5: Business Intelligence Resources

The Properties page appears.
4. Enter the following information:
Property Description
Name Name for the resource. The resource appears in the Resources panel with this name. The name
must be unique and have from one through 256 characters. It cannot include the following characters:
/ \ : * ' ? " < > | [ ]
Description Description for the resource. Description cannot exceed 4000 characters.
Hide in Summary
Lineage
Hides the resource in the summary view of data lineage diagrams.
Enable this option to hide the resource and its child objects in the summary view. Disable this option
to display the resource and its child objects in the summary view.
Default is disabled.
5. Click Next.
The Configuration page appears.
6. Enter the configuration properties.
7. Click Test Connection to test the connection to the source system and validate the Metadata Manager
Agent URL.
If Metadata Manager cannot connect to the data source or validate the Metadata Manager Agent URL,
an error message appears. Correct any error and test the connection again.
8. Click Next.
The Schedules page appears.
9. To add a schedule, select Attach a Schedule and select a schedule in the Schedule list.
If you have not created a schedule, you can assign a schedule to a resource after you create the
resource.
10. Click Finish.
The resource appears in the Resources panel on the Load tab.
Business Objects Configuration Properties
Update the configuration properties when you create or edit a Business Objects resource.
The following table describes the Business Objects configuration properties:
Property Description
Agent URL Host name and port number of the Metadata Manager Agent. You can use the Metadata Manager Agent
installed on any machine.
Source system
version
Name and version of the resource.
Version Version of the SAP Business Objects repository. Select a version or configure the Metadata Manager
Agent to detect the version.
Default is auto-detect.
Business Objects 41

Property Description
System Name of the Business Objects repository. For Business Objects 11.x and 12.x, specify the name of the
Business Objects Central Management Server. Specify the server name in the following format:
<server name>:<port number>
If the Central Management Server is configured on a cluster, specify the cluster name in the following
format:
<host name>:<port>@<cluster name>
Default port is 6400.
Note: If the version of the Business Objects repository is 14.0.6, do not specify a port number in the
repository name. If you specify the port number, Metadata Manager cannot extract the Web Intelligence
reports.
Authentication
mode
The authentication mode for the user account that logs in to the Business Objects repository.
Specify one of the following values:
-Enterprise. Log in using the Business Objects Enterprise authentication mode.
-LDAP. Log in using LDAP authentication configured to Business Objects.
Default is enterprise.
User name User name to log in to the Business Objects repository.
Password Password of the user account for the Business Objects repository.
Repository
browsing mode
Specifies the objects that are extracted while browsing for objects in the Business Objects repository. You
can specify one of the following values:
-All. The tree of universes, folders, and documents is extracted.
-Universes only. The tree of universes and folders is extracted. Documents are not extracted.
-Connections only. The list of connections is extracted.
Default is all.
Incremental
import
Load changes since the previous resource load or load complete metadata. Specify one of the following
values:
-True. Load recent changes only.
-False. Perform a complete load of the metadata.
Add dependent
objects
Choose the documents that depend on the universe you selected. Specify one of the following values:
-True. Imports the documents that depend on the specified universe.
-False. Ignores the documents that depend on the specified universe.
Note: Dependency information is retrieved from the Business Objects repository metadata cache. If
modified or moved reports are not reflected in the Metadata Manager load, refresh the cache by loading
these reports and refreshing the queries.
Add specific
objects
Specifies additional objects to the universe. Specify one of the following values:
-None. Ignores all objects.
-Universe independent Documents. Imports documents that do not depend on any universe.
Default is none.
Crystal CORBA
port
Specifies the client port number on which the Crystal SDK communicates with the report application
server (RAS).
The RAS server uses the port to send metadata to the local client computer. If you do not specify a port,
the server randomly selects a port for each execution.
Note: Verify that the local Windows firewall is disabled, or enables communication on the port.
42 Chapter 5: Business Intelligence Resources

Property Description
Class
representation
Controls how the tree structure of classes and sub classes are imported.
Metadata Manager Agent imports each class containing objects as a dimension or as a tree of packages.
Specify one of the following values:
-As a flat structure. Creates no packages.
-As a simplified flat structure. Creates a package for each class with a sub class.
-As a full tree structure. Creates a package for each class.
Default is as a flat structure.
Worker threads Number of worker threads that the Metadata Manager Agent uses to extract metadata asynchronously.
Leave blank or enter a positive integer value.
If blank, the Metadata Manager Agent calculates the number of worker threads. It uses the JVM
architecture and the number of available CPU cores on the machine that runs the Metadata Manager
Agent to calculate the number of threads. If you specify value that is not valid, the Metadata Manager
Agent uses one worker thread.
Reduce the number of worker threads if the Metadata Manger Agent generates out of memory errors
when it extracts metadata. You can increase the number of worker threads if the machine that runs the
Metadata Manager Agent has a large amount of available memory, for example, 10 GB or more. However,
if you specify too many worker threads, performance can decrease.
Default is blank.
Auto assign
connections
Metadata Manager configures connection assignments to relational database resource types during the
resource load. If you disable this option, configure connection assignments in the resource properties after
you create the resource.
Repository subset Accesses objects stored in a remote Business Objects repository. Specify the IDs of universes, reports,
and folders. Separate multiple values with a semicolon.
Reference
After you create and load a Business Objects resource, you can view and run data lineage on the metadata
objects that Metadata Manager extracted.
Data Lineage
Data lineage does not display synthetic universe objects for a non-universe data provider, such as metrics,
attributes, or schema tables.
Datatypes
Metadata Manager does not extract the actual datatype of a column or dimension object.
The following table lists the actual datatypes and the datatypes that Metadata Manager uses:
Datatype Representation Actual Datatype
Character char
Date datetime
Business Objects 43

Datatype Representation Actual Datatype
Long Text binary
Number number
Objects Extracted
Metadata Manager extracts the following metadata object types:
•Alias
•Body
•Cell
•Char Column
•Char Logical Column
•Class
•Classes Folder
•Column
•Combined Query
•Condition
•Context
•Crystal Report
•Crystal Report Model
•Custom Hierarchies Folder
•Data Providers
•Data Providers DesignPackage
•DataAttribute Column
•DataAttribute Detail
•DataAttribute Dimension
•DataAttribute Measure
•Date Column
•Date Logical Column
•Derived Table
•Desktop Intelligence Document
•DimensionAttribute Dimension
•Document Report
•EnterpriseFolder
•Field
•Filter
•Folder
•Footer
•Header
44 Chapter 5: Business Intelligence Resources
•Hierarchy
•Join
•Key
•Key Column
•Measure
•Number Column
•Number Logical Column
•ObjectPackage
•Page
•Prompt Stored Procedure Parameter
•Query
•Rectangle
•Report Axis
•Report Chart
•Report List
•Report Matrix
•ReportField Cell
•ReportTable Table
•Schema
•Stored Procedure Parameter
•String Column
•Table
•Universe
•Universe Query
•UniverseFolder
•Web Intelligence Document
•Web Intelligence Model
•Webi Report
Desktop Intelligence Reports
The Business Objects Desktop Intelligence application shows the reports from the personal folder for the
current user. As a result, Metadata Manager extracts Business Objects Desktop Intelligence reports from a
personal user folder only, even if the user is an administrator. Metadata Manager extracts reports from the
personal folder for the user account that you configure for the resource.
In addition, Metadata Manager does not extract Desktop Intelligence reports from the Favorites folder.
Business Objects 45
Cognos
Cognos is a business intelligence tool that includes applications for reporting, dashboards, scorecarding, and
analysis. You can create and configure a Cognos resource to extract schema and reports metadata from
Cognos.
Configuring Cognos
Before you create a Cognos resource, you must configure the metadata source. If you do not correctly
configure the metadata source, the metadata load can fail or the metadata can be incorrectly loaded in the
Metadata Manager warehouse.
To configure Cognos, complete the following tasks:
•Get the external dispatcher URI.
•Test the connection.
•Verify authentication.
•Configure permissions.
•Configure resources for the Cognos service.
Get the External Dispatcher URI
To extract metadata from Cognos Content Manager, get the external dispatcher URI. The URI is required to
configure the Cognos Content Manager resource in Metadata Manager. The value corresponds to one of the
dispatchers in the Cognos Content Manager installation. Verify the URI in the Cognos Content Manager
configuration\cogstartup.xml file.
The URI is similar to the following URL:
http://localhost:9300/p2pd/servlet/dispatch
The following example shows an excerpt from cogstartup.xml:
<crn:parameter name=”sdk”>
<crn:value xsi:type=”xsd”anyURI”>http://localhost:9300/p2pd/servlet/dispatch</crn:value>
</crn:parameter>
Use the following rules and guidelines for the external dispatcher URI:
•You can also find the dispatcher URL under Environment in the Cognos client.
•Use the actual machine name or an IP address for the server name, not localhost.
•The https:// prefix for the URI indicates SSL is required.
•The Cognos server must support chunking and attachments for large volumes of data. To verify this
requirement, contact the Cognos administrator.
•If Metadata Manager and Cognos Content Manager are separated by an intermediary server like a load
balancer or proxy, use the host and port number of the intermediary in the external dispatcher URI.
Test the Connection
You can test the connection by accessing the URI in a web browser. If the URI is correct, Cognos displays a
status message with the current state of the server. Before you load a Cognos resource, the current status of
the server must be “running.”
46 Chapter 5: Business Intelligence Resources
Verify Authentication
If the Cognos server is set up for LDAP authentication, use the web-based Cognos client tool to verify the
connection and authentication properties. Use the following URL to test the authentication:
http://localhost:8080/c8/cm_tester.htm
Use the login namespace, user name, and password you configured in Cognos under Security >
Authentication.
Configure Permissions
Before you configure a Cognos resource, configure the permissions for the user account that you use to
connect to Cognos.
The Cognos user account requires Read, Execute, and Traverse permissions on all objects that Metadata
Manager extracts, including folders, reports, queries, analysis, packages, and connections.
You can secure Cognos data sources against multiple namespaces. The namespace used to secure the data
source may not be the primary namespace used to log in to Cognos. When Metadata Manager extracts a
Cognos object that is associated with a data source secured against multiple namespaces, the Cognos user
account must have the required permissions for the primary namespace.
Configure Resources for the Cognos Service
By default, the Cognos service is configured to use minimal memory resources to optimize startup time. To
increase performance, you can change the number of resources that the Cognos service uses by choosing a
configuration template.
If you load a large number of Cognos models and the load fails with a null pointer exception, set the resource
configuration template to the large configuration. For more information, see the Cognos documentation.
Creating a Cognos Resource
Before you create a Cognos resource, configure the Cognos source.
1. On the Load tab, click Actions > New Resource.
The Resource Selection window appears.
2. Click Business Intelligence > Cognos Report.
3. Click Next.
The Properties page appears.
Cognos 47

4. Enter the following information:
Property Description
Name Name for the resource. The resource appears in the Resources panel with this name. The name
must be unique and have from one through 256 characters. It cannot include the following characters:
/ \ : * ' ? " < > | [ ]
Description Description for the resource. Description cannot exceed 4000 characters.
Hide in Summary
Lineage
Hides the resource in the summary view of data lineage diagrams.
Enable this option to hide the resource and its child objects in the summary view. Disable this option
to display the resource and its child objects in the summary view.
Default is disabled.
5. Click Next.
The Configuration page appears.
6. Enter the configuration properties.
7. Click Test Connection to test the connection to the source system and validate the Metadata Manager
Agent URL.
If Metadata Manager cannot connect to the source system or validate the agent URL, an error message
appears. Correct any error and test the connection again.
8. Click Next.
The Schedules page appears.
9. To add a schedule, select Attach a Schedule and select a schedule in the Schedule list.
If you have not created a schedule, you can assign a schedule to a resource after you create the
resource.
10. Click Finish.
The resource appears in the Resources panel on the Load tab.
Cognos Configuration Properties
Update the configuration properties when you create or edit a Cognos resource.
The following table describes the Cognos configuration properties:
Property Description
Agent URL Host name and port number of the Metadata Manager Agent. You can use the Metadata Manager Agent
installed on any machine.
Source system
version
Version of the data source to which you want to connect.
Version Version of the Cognos server to which you want to connect.
Dispatcher URL URL of the Cognos Content Manager external dispatcher URL.
Namespace Namespace that defines a collection of Cognos user accounts from an authentication provider. If you did
not configure authentication for Cognos, do not configure this option.
48 Chapter 5: Business Intelligence Resources

Property Description
User User name to log in to the Cognos repository database. Required if the Cognos repository database has
been set up to require a user name and password. If you did not configure authentication for Cognos, do
not configure this option.
Password Password to log in to the Cognos repository. Required if the Cognos repository database has been set up
to require a user name and password. If you did not configure authentication for Cognos, do not configure
this option.
Content browsing
mode
The objects that can be retrieved from the Cognos repository. You can select one of the following options:
-Packages only. A tree of packages and folders in the Cognos repository is retrieved. Reports are not
retrieved from the repository.
-Connections only. The list of connections in the Cognos repository is retrieved.
-All. A tree of packages, folders, queries, and reports is retrieved.
Default is All.
Add dependent
objects
Add dependent objects to the initial selection of Cognos objects defined in Content. You can specify one
of the following values:
-True. The first level of dependent objects are added. When a report is specified, the source model
associated with the report is also imported. However, any other reports depending on the source model
are not imported.
-False. Dependent objects are not added to the Cognos object.
Incremental import Load changes since the previous resource load or load complete metadata. Specify one of the following
values:
-True. Load recent changes only.
-False. Perform a complete load of the metadata.
Folder
representation
The representation of folders from Cognos Framework Manager in the catalog. You can specify one of the
following values:
-Ignore. The folders are ignored in the catalog.
-Hierarchical. The folders are represented as diagrams and their hierarchy is preserved in the catalog.
-Flat. The folders are represented as diagrams, but their hierarchy is not preserved in the catalog.
Transformer
import
configuration
Optional XML file that describes the mappings between Cognos Content Manager data sources and the
PowerPlay Transformer models.
Worker threads Number of worker threads that the Metadata Manager Agent uses to extract metadata asynchronously.
Leave blank or enter a positive integer value.
If blank, the Metadata Manager Agent calculates the number of worker threads. It uses the JVM
architecture and the number of available CPU cores on the machine that runs the Metadata Manager
Agent to calculate the number of threads. If you specify value that is not valid, the Metadata Manager
Agent uses one worker thread.
Reduce the number of worker threads if the Metadata Manger Agent generates out of memory errors
when it extracts metadata. You can increase the number of worker threads if the machine that runs the
Metadata Manager Agent has a large amount of available memory, for example, 10 GB or more.
However, if you specify too many worker threads, performance can decrease.
Default is blank.
Cognos 49

Property Description
Auto assign
connections
Metadata Manager configures connection assignments to relational database resource types during the
resource load. If you disable this option, you must configure connection assignments in the resource
properties after you create the resource.
Content Path of models or reports to extract from Cognos. To extract models, use the path to the package
containing the model. To extract packages and reports, select the object or enter the complete search
path to the package or report appended with the following characters: //*. Separate multiple values with a
semicolon (;).
Use Cognos to find the search path for packages or reports. In the Cognos Administration Console, select
the package or report and click Set Properties > View the Search Path, ID, and URL.
If the search path contains multiple reports, Metadata Manager extracts the last report. If the search path
contains published versions of a package, Metadata Manager extracts the latest version and any previous
version used as a data source for current reports.
For example, to extract all content, use the following syntax:
/content//*
To extract packages at the root level, use the following syntax:
/content/package[@name='GO Sales and Retailers']//*
To extract packages within a folder, use the following syntax:
/content/folder[@name='Cognos - Folder']/package[@name='GO Sales and
Retailers']//*
To extract a single report, use the following syntax:
/content/folder[@name='Cognos - Folder']/package[@name='GO Sales and
Retailers']/folder[@name='User Reports']/report[@name='Cascading prompt
report']//*
Note: To extract the latest version of a package, select a single package and set the Add dependent
objects parameter to false.
For more information about the search path syntax, see the Cognos documentation.
Transformer Import Configuration File
When you configure a Cognos resource, you can specify a Transformer import configuration file. The
Transformer import configuration file is an XML file that describes the mappings between Cognos Content
Manager data sources and PowerPlay Transformer models. You create the Transformer import configuration
file.
Multiple Content Manager data sources can refer to the same PowerCube generated from a single
Transformer model. Each Model element in the XML file corresponds to a single Transformer model (.mdl or
pyj) file and lists all the Content Manager data sources that refer to the model's PowerCube. Optionally, the
Model element can list the Impromptu Query Definition data sources (<iqd> child elements) that require
specific database type other than the default database type. The Transformer import configuration file can
have multiple Model elements.
The following code shows a sample Transformer import configuration file:
<ImportConfiguration database="Teradata" dbVersion="1.0.0">
<!-- database: specifies default database for Impromptu Query Definition (IQD) SQL
statements-->
<!-- dbVersion format: major version.minor version.release-->
<Model path="some directory\some model.mdl">
<!--Transformer model (.mdl or .pyj) -->
<cmDataSource name="some Cognos datasource name" />
<!-- List IQD data sources for databases other than default -->
<iqd name="Customers" database="Oracle" dbVersion="11.1.0"/>
50 Chapter 5: Business Intelligence Resources
<iqd name="Products" database="Microsoft SQL Server" dbVersion="8.0.0"/>
</Model>
</ImportConfiguration>
Reference
After you create and load a Cognos resource, you can view and run data lineage on the metadata objects
that Metadata Manager extracted.
Objects Extracted
Metadata Manager extracts the following metadata object types:
•Alias Feature
•Axis
•Body
•Calculation
•Chart
•Chart Node
•Chart Node Member
•Crosstab
•Crosstab Columns
•Crosstab Node
•Crosstab Node Member
•Crosstab Rows
•Data Source
•Data Sources
•DataAttribute
•Database Query
•Dimension
•Field
•Filter
•Folder
•Footer
•Header
•Hierarchy
•Level
•List
•Measure
•Measure Dimension
•Model
•Model Query
•Namespace
Cognos 51
•Package
•Page
•Prompt
•PromptAnswer
•Queries
•Query
•Query Item
•Query Package
•Rectangle
•Relationship
•Report
•Table
•Text
•Variables
Metadata Catalog
Metadata Manager displays objects differently than they appear in the Cognos client.
You may notice the following differences:
•Cognos client displays different icons for namespaces and folders. Metadata Manager displays the
Namespace icon for namespaces and folders.
•Cognos shows display labels for Querysubjects that are created from dbQueries. Metadata Manager does
not show the display labels. Instead, it shows the technical names such as the table from which the
Querysubject is built.
•Certain objects in Cognos may have multiple instances in Metadata Manager. For example, if a
Querysubject formed from a modelQuery has hierarchies and levels in Cognos, Metadata Manager
displays it under the CognosFMDimension and CognosFMHierarchy classes. Since Metadata Manager
models hierarchies as separate types of objects than dimensions, the same Querysubject appears
multiple times in Metadata Manager.
•Metadata Manager may not load all hierarchies. For example, certain Querysubjects in Cognos are built
from dbQueries (database table sources) instead of modelQueries, but still contain hierarchies. Metadata
Manager assumes only dimensional objects can be included in hierarchies. Metadata Manager loads
these Querysubjects as objects of CognosFMSchemaTable class, not the CognosFMHierarchy class.
Microsoft Analysis and Reporting Services
You can create and configure a Microsoft Analysis and Reporting Services resource to extract metadata from
the following sources:
•Microsoft SQL Server Reporting Services. Metadata Manager extracts reporting metadata from
Reporting Services.
52 Chapter 5: Business Intelligence Resources

•Microsoft SQL Server Analysis Services. If Analysis Services is the data source for the Reporting
Services reports, Metadata Manager can extract the analysis schema from Analysis Services. During the
resource load, Metadata Manager links the Reporting Services and Analysis Services sources. You can
view data lineage across the sources.
You can also configure connection assignments from the Microsoft Analysis and Reporting Services resource
to relational database resources to display data lineage across these sources.
Configuring Microsoft Analysis and Reporting Services
Before you create a Microsoft Analysis and Reporting Services resource, you must configure the metadata
source. If you do not correctly configure the metadata source, the metadata load can fail or the metadata can
be incorrectly loaded in the Metadata Manager warehouse.
To configure Microsoft Analysis and Reporting Services, complete the following tasks:
•Install the Metadata Manager Agent.
•Install Internet Information Services.
•Configure permissions.
Install the Metadata Manager Agent
The Metadata Manager Agent is a program that Metadata Manager uses to access metadata sources and
extract source metadata. By default, the Metadata Manager Agent runs on the nodes where the Metadata
Manager Service runs.
To extract metadata from Microsoft Analysis and Reporting Services, you must install the Metadata Manager
Agent separately on a Windows machine. The Metadata Manager Agent and Reporting Services must be on
the same machine. If Reporting Services is not on the same machine as the Metadata Manager Service,
install the Metadata Manager Agent on the same machine as Reporting Services.
Related Topics:
•“Step 2. Install the Metadata Manager Agent” on page 22
Install Microsoft Internet Information Services
If you are using Reporting Services version 2005, you must install Microsoft Internet Information Services 5.0
or later on the machine running Reporting Services.
Configure Permissions
Before you configure a Microsoft Analysis and Reporting Services resource, configure the permissions for the
user account that you use to connect to Analysis and Reporting Services.
The Metadata Manager Agent uses Windows authentication to connect to Analysis and Reporting Services.
The Windows user who starts the Metadata Manager Agent must have read permission on the objects that
the Metadata Manager Agent extracts.
Microsoft Analysis and Reporting Services 53

Creating a Microsoft Analysis and Reporting Services Resource
Before you create a Microsoft Analysis and Reporting Services resource, configure the Microsoft Analysis
and Reporting Services sources.
1. On the Load tab, click Actions > New Resource.
The Resource Selection window appears.
2. Click Business Intelligence > Microsoft Analysis and Reporting Services.
3. Click Next.
The Properties page appears.
4. Enter the following information:
Property Description
Name Name for the resource. The resource appears in the Resources panel with this name. The name
must be unique and have from one through 256 characters. It cannot include the following characters:
/ \ : * ' ? " < > | [ ]
Description Description for the resource. Description cannot exceed 4000 characters.
Hide in Summary
Lineage
Hides the resource in the summary view of data lineage diagrams.
Enable this option to hide the resource and its child objects in the summary view. Disable this option
to display the resource and its child objects in the summary view.
Default is disabled.
5. Click Next.
The Configuration page appears.
6. Enter the configuration properties.
7. Click Test Connection to test the connection to the source system and validate the Metadata Manager
Agent URL.
If Metadata Manager cannot connect to the source system or validate the agent URL, an error message
appears. Correct any error and test the connection again.
8. Click Next.
The Schedules window appears.
9. To add a schedule, select Attach a Schedule, and select a schedule in the Schedule list.
If you have not created a schedule, you can assign a schedule to a resource after you create the
resource.
10. Click Finish.
The resource appears in the Resources panel on the Load tab.
54 Chapter 5: Business Intelligence Resources

Microsoft Analysis and Reporting Services Configuration Properties
Update the configuration properties when you create or edit a Microsoft Analysis and Reporting Services
resource.
The following table describes the Microsoft Analysis and Reporting Services configuration properties:
Property Description
Agent URL Host name and port number of the Metadata Manager Agent. The Metadata Manager Agent must be on the
same machine as Reporting Services.
Source system
version
Name and version of the resource. You cannot edit this field.
SQL Server
version
Version of Microsoft SQL Server Reporting Services.
Report server
URL
URL of the Report Server. For a Report Server running in native mode, enter the URL to the Report Server
using the following format:
http://<host_name>:<portnumber>/<web_service_virtual_directory>
For example:
http://cas12307:80/ReportServer
For a Report Server running in the SharePoint integrated mode, enter the URL to the site containing the
deployed reports. Use the following format:
http://<host_name>
Analysis server
instance
Host name or IP address of the machine running Analysis Services if Analysis Services is the data source
for the Reporting Service reports. During the resource load, Metadata Manager extracts the analysis
schema from Analysis Services. If the Analysis Services instance was named during installation, enter the
host name using the following syntax:
<host_name>\<instance_name>
If you do not want to extract from Analysis Services, do not enter a value.
Auto assign
connections
Metadata Manager configures connection assignments to relational database resource types during the
resource load. If you disable this option, you must configure connection assignments in the resource
properties after you create the resource.
Report server
content
Folder path in Reporting Services that contains the reports that you want to extract. Use "
/
" to indicate the
root repository path, or use
/<folder_name>/<folder_name>
to indicate a single folder path.
To indicate multiple folder paths, use a semicolon to separate the paths. For example,
/<folder_name>/
<folder_name>;/<folder_name>
.
To extract all reports in a folder and its subfolders, specify a folder path. To extract all reports that use a
shared data source, specify the data source path.
Microsoft Analysis and Reporting Services 55
Reference
After you create and load a Microsoft Analysis and Reporting Services resource, you can view and run data
lineage on the metadata objects that Metadata Manager extracted.
Objects Extracted from Reporting Services
Metadata Manager extracts the following objects from Reporting Services:
•Report server
•Report database
•Report project
•SSRS report
•Data source
•Cube
•Dimension
•Dimension attribute
•Measure
•Data set
•Column
•Filter
•Report
•Report attribute
•Report parameter
Objects Extracted from Analysis Services
Metadata Manager extracts the following objects from Analysis Services:
•Analysis server
•Analysis database
•Dimension
•Dimension attribute
•Hierarchy
•Level
•Level attribute
•Database catalog cube
•Measure group
•Measure
•Key performance indicator (KPI)
•Calculated measure
•Data source view
•Table
•Column
56 Chapter 5: Business Intelligence Resources
•Logical table
•Logical column
•Join
Metadata Manager does not extract the following objects from Microsoft Analysis Services:
•Data mining structure
•Cube perspective
•Report attribute
Data Lineage
You can view data lineage for the following Reporting Services and Analysis Services object types:
•Calculated measure
•Column
•Condition
•Cube
•Data set
•Dimension
•Dimension attribute
•Key performance indicator (KPI)
•Level
•Logical table
•Logical column
•Measure
•Report
•SSRS report
•Table
•View
You can view data lineage between the following objects within Reporting Services:
•Data set column to data source measure
•Data set column to data source dimension
•Filter to data set column
•Report attribute to data set column
You can view data lineage between the following objects within Analysis Services:
•Dimension to data source view logical table
•Dimension attribute to data source view logical column
•Measure to data source view logical column
•Key performance indicator (KPI) to measure and dimension attribute
•Calculated measure to measure and dimension attribute
•Logical table to table
•Logical column to column
Microsoft Analysis and Reporting Services 57
If Metadata Manager extracts from Reporting Services and Analysis Services, you can run data lineage
across these sources for reports that use an Analysis Services cube as a data source. You can view data
lineage between the following objects in Reporting Services and Analysis Services:
•Report data source measure to Analysis Services measure
•Report data source dimension to Analysis Services dimension
•Report data source dimension attribute to Analysis Services dimension attribute
You can configure connection assignments between a Microsoft Analysis and Reporting Services resource
and a relational database resource. When you create the links between the resources, you can run data
lineage analysis across the sources. You can view data lineage between the following objects in Reporting
Services and a relational database source:
•Report data source column to database column
•Report data source table to database table
•Report data source table to database view
You can view data lineage between the following objects in Analysis Services and a relational database
source:
•Analysis Services data source table to database table
•Analysis Services data source column to database column
•Analysis Services data source view to database view
•Analysis Services data source view column to database view column
Microstrategy
Microstrategy is a business intelligence tool that includes performance management, dashboards, analysis,
and reporting capabilities.
You can create and configure a Microstrategy resource to extract metadata from Microstrategy. Metadata
Manager extracts schema and reporting metadata from Microstrategy.
Configuring Microstrategy
Before you create a Microstrategy resource, you must configure the metadata source. If you do not correctly
configure the metadata source, the metadata load can fail or the metadata can be incorrectly loaded in the
Metadata Manager warehouse.
To configure Microstrategy, complete the following tasks:
•Install the Metadata Manager Agent.
•Enable the Metadata Manager Agent to interact with the desktop.
•Configure privileges.
•Configure multiple projects (optional).
58 Chapter 5: Business Intelligence Resources

Install the Metadata Manager Agent
The Metadata Manager Agent is a program that Metadata Manager uses to access metadata sources and
extract source metadata. By default, the Metadata Manager Agent runs on the nodes where the Metadata
Manager Service runs.
To extract metadata from Microstrategy, you must install the Metadata Manager Agent separately on a
Windows machine. The Metadata Manager Agent and the Microstrategy client must be on the same machine.
The client must be able to connect to the source repository. If the Microstrategy client is not on the same
machine as the Metadata Manager Service, install the Metadata Manager Agent on the same machine as the
client.
Related Topics:
•“Step 2. Install the Metadata Manager Agent” on page 22
Enable the Metadata Manager Agent to Interact with the Desktop
If you run the Metadata Manager Agent as a service, you must enable the Metadata Manager Agent to
interact with the desktop.
You must enable the Metadata Manager Agent to interact with the desktop for the following metadata
sources:
•Business Objects
•Microstrategy
•ERwin 7.x, 8.x, and 9.x
1. From the Windows Start menu, click Administrative Tools > Services.
2. Double-click Metadata Manager Agent.
The Metadata Manager Agent <Version> Properties dialog box appears.
3. Click the Log On tab.
4. Under Local System Account, click Allow service to interact with desktop.
5. Click OK.
Configure Privileges
The Microstrategy project user account for which you provide the user name and password must have the
Bypass All Object Security Access Checks administration privilege. Set this privilege in the Microstrategy
Desktop client tool.
Note: Although Microstrategy allows you to connect to a project source using database or network
authentication, Metadata Manager uses project source authentication.
Creating a Microstrategy Resource
Before you create a Microstrategy resource, configure the Microstrategy source.
1. On the Load tab, click Actions > New Resource.
The Resource Selection window appears.
2. Click Business Intelligence > Microstrategy.
3. Click Next.
The Properties page appears.
Microstrategy 59

4. Enter the following information:
Property Description
Name Name for the resource. The resource appears in the Resources panel with this name. The name
must be unique and have from one through 256 characters. It cannot include the following characters:
/ \ : * ' ? " < > | [ ]
Description Description for the resource. Description cannot exceed 4000 characters.
Hide in Summary
Lineage
Hides the resource in the summary view of data lineage diagrams.
Enable this option to hide the resource and its child objects in the summary view. Disable this option
to display the resource and its child objects in the summary view.
Default is disabled.
5. Click Next.
The Configuration page appears.
6. Enter the configuration properties.
7. Click Test Connection to test the connection to the source system and validate the Metadata Manager
Agent URL.
If Metadata Manager cannot connect to the source system or validate the agent URL, an error message
appears. Correct any error and test the connection again.
8. Click Next.
The Schedules window appears.
9. To add a schedule, select Attach a Schedule and select a schedule in the Schedule list.
If you have not created a schedule, you can assign a schedule to a resource after you create the
resource.
10. Click Finish.
The resource appears in the Resources panel on the Load tab.
Microstrategy Configuration Properties
Update the configuration properties when you create or edit a Microstrategy resource.
The following table describes the Microstrategy configuration properties:
Property Description
Agent URL Host name and port number of the Metadata Manager Agent. You can use the Metadata Manager Agent
installed on any machine.
Source system
version
Version of the data source to which you want to connect.
Some Microstrategy source versions are deprecated and will become obsolete. Use the supported
versions to load metadata from Microstrategy. You can still create, edit, and load resources from the
deprecated versions. However, Informatica cannot help you resolve an issue encountered on a
deprecated version.
Version Version of Microstrategy. Select a version or configure the Metadata Manager Agent to detect the
version.
Default is auto-detect.
60 Chapter 5: Business Intelligence Resources

Property Description
Project source Name of the project source to which you want to connect.
A project source is a connection to a repository that is located on a local or remote Intelligence Server.
The Intelligence Server connects to a data warehouse and contains a number of metadata projects that
operate on the data warehouse.
Login user The user name to connect to the project source.
Login password The password used to connect to the project source.
Default language The language that you want to use. Microstrategy 9.x supports multiple languages. Select one of the
following values:
-Chinese (Simplified)
-Chinese (Traditional)
-English (United States)
-French (France)
-German (Germany)
-Italian (Italy)
-Japanese
-Korean
-Portuguese (Brazil)
-Spanish (Spain)
-Swedish (Sweden)
Default is English (United States).
Import schema
only
Imports the schemas for the selected projects without the reports and documents. Specify one of the
following values:
-True. Import the schemas only.
-False. Import the schemas, reports, and documents.
Default is false.
Data model tables
design level
The design level of the imported tables. Specify one of the following values:
-Physical. A table appears in the physical view of the model.
-Logical and Physical. A table appears in the logical view and in the physical view of the model.
Incremental import Load changes since the previous resource load or load complete metadata. Specify one of the following
values:
-True. Load recent changes only.
-False. Perform a complete load of the metadata.
Auto assign
connections
Metadata Manager configures connection assignments to relational database resource types during the
resource load. If you disable this option, you must configure connection assignments in the resource
properties after you create the resource.
Projects The name of the projects to which you want connect in the selected project source. Separate multiple
project names with a semicolon (;).
Microstrategy 61
Reference
After you create and load a Microstrategy resource, you can view and run data lineage on the metadata
objects that Metadata Manager extracted.
Objects Extracted
Metadata Manager extracts schema and reporting metadata. In Microstrategy Desktop, you can hide objects,
such as folders, attributes, facts, and logical tables. By default, Metadata Manager extracts hidden objects
stored in Microstrategy.
Metadata Manager extracts the following reporting metadata object types:
•Column
•Consolidation
•Consolidation Element
•Custom Group
•DesignPackage Folder
•Dimension Attribute
•Dimension Fact
•Dimension Metric
•Dimension Sub Total
•Dimension Attribute Attribute Form
•Filter
•Folder Folder
•Folder Project
•Hidden DesignPackage Folder
•Hidden Folder
•Hierarchy
•Logical Table
•Lookup
•Measure Fact
•Measure Metric
•Project Metric
•Project Metrics
•Prompt
•Prompt Answer
•Report Document
•Report Field2
•Report Graph
•Report HTML Document
•Report Page
•Report Page Body
•Report Page Footer
62 Chapter 5: Business Intelligence Resources
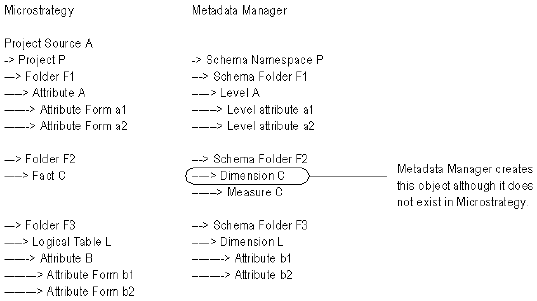
•Report Page Header
•Report Rectangle
•Report Text
•ReportAttribute Attribute Form
•ReportDataSet Attribute
•Security Filter
•StoreContent Document
•StoreContent HTML Document
•StoreContent Project
•StoreContent Report
•StoreModel Project
•Warehouse Table
Creation and Modification Date of Classes
Metadata Manager displays the source creation date and the source modified date for most Microstrategy
classes. Metadata Manager does not display these dates for the following classes:
•MicrostrategyDataType
•MicrostrategyReportField
•MicrostrategyGraph
•MicrostrategySchemaJoin
•MicrostrategyGrid
•MicrostrategyReportObjectDetail
•MicrostrategyReportObject
Metadata Catalog
The metadata catalog does not display attributes and facts the same way Microstrategy does. Microstrategy
contains a classifier object for attributes, but not for facts. Metadata Manager displays a classifier for
Microstrategy facts to remain consistent with the display of attributes.
The following figure shows how Microstrategy and Metadata Manager display attributes and facts:
Microstrategy 63
Expressions
If you define multiple expressions for the same metric or attribute, Metadata Manager may not display the
metric or attribute expression in the metadata catalog.
The following example shows a metric with multiple expressions, where col1 can be found in table T1 and T2:
m = col1
Report Hierarchies
If you include a hierarchy object in a Microstrategy report, Metadata Manager does not load the hierarchy
object.
Oracle Business Intelligence Enterprise Edition
Oracle Business Intelligence Enterprise Edition (OBIEE) is a business intelligence tool that includes analysis
and reporting capabilities.
You can create and configure an OBIEE resource to extract metadata from OBIEE. Metadata Manager
extracts schema and reporting metadata from OBIEE. The schema metadata includes the presentation,
business, and physical models.
Configuring Oracle Business Intelligence Enterprise Edition
Before you create an OBIEE resource, you must configure the metadata source. If you do not correctly
configure the metadata source, the metadata load can fail or the metadata can be incorrectly loaded in the
Metadata Manager warehouse.
To configure OBIEE, complete the following tasks:
•Convert the Repository RPD file to an UDML file.
•Convert the Repository RPD file to an XML file.
•Configure permissions.
•Enable OBIEE web services.
•Export and import the keystore certificate.
Convert the Repository RPD File to a UDML File
When you load an OBIEE 10g resource, Metadata Manager connects to the Presentation Server to extract
the metadata for the reports. However, Metadata Manager cannot extract the schema metadata directly from
the repository. The OBIEE schema metadata is stored in an RPD file. Because Metadata Manager cannot
read RPD files, you must convert the RPD file to a UDML file.
Metadata Manager extracts the schema metadata from the UDML file, extracts the reports from the
Presentation Server, and links the reporting metadata to the presentation model when you load the resource.
OBIEE has a utility program to convert an RPD file to a UDML file. This utility is part of the OBIEE server
installation.
Use the following command to convert the repository RPD file to a UDML file:
<OBIEE home directory>\server\Bin\nQUDMLGen.exe -U <user name> -P <password> -R <RPD
file>.rpd -O <UDML file>.udml -N -Q -8
64 Chapter 5: Business Intelligence Resources
Convert a Repository RPD File to an XML File
When you load an OBIEE 11g resource, Metadata Manager connects to the Presentation Server to extract
the metadata for the reports. However, Metadata Manager cannot extract the schema metadata directly from
the repository. The OBIEE schema metadata is stored in a RPD file. Because Metadata Manager cannot read
RPD files, you must convert the RPD file to an XML file.
Metadata Manager extracts the schema metadata from the XML file, extracts the reports from the
Presentation Server, and links the reporting metadata to the presentation model when you load the resource.
You can use the biserverxmlgen command line utility to convert a RPD file to an XML file. This utility is part of
the OBIEE server installation. Before you run the utility, you must run the run bi-init script to launch the
prompt window that is initialized to the Oracle instance. The script file is available in the following location:
ORACLE_INSTANCE/bifoundation/OracleBIApplication/coreapplication/setup
.
Use the following command to convert the repository RPD file to an XML file:
biserverxmlgen -R repository_pathname [-P password] -O output_file_pathname -n - Q -8
where,
repository_pathname is the name and location of the repository file from which you want to generate XML.
password is the repository password.
output_file_pathname is the name and location of the XML output file you want to generate.
Specify -8 to use UTF-8 encoding in the generated XML file. By default, the generated XML file uses ANSI
ISO-8859-1 encoding.
Configure Permissions
Metadata Manager connects to the OBIEE Presentation Server to extract the report metadata. The OBIEE
user account for which you provide the user name and password must have read permission on the metadata
that Metadata Manager extracts from OBIEE. The metadata includes subject areas, report folders, and
reports.
Metadata Manager extracts the schema metadata from the UDML or XML file. The OBIEE user account does
not require permissions on the schema metadata. The OBIEE utility program extracts all schema metadata
from the RPD file and writes the metadata to the UDML or XML file. Metadata Manager extracts all metadata
from the UDML or XML file.
Enable OBIEE Web Services
Metadata Manager uses OBIEE web services to extract metadata from OBIEE. As a result, you must enable
OBIEE web services. OBIEE web services is available to licensed users of OBIEE. The OBIEE installer
generates the appropriate licensing entries in the analyticsweblicense.xml file based on the installation key.
To verify that OBIEE web services are enabled, check that the kmsgLicenseSOAPAccess entry exists in the
following file:
<OBIEE home directory>\web\config\analyticsweblicense.xml
Export and Import the Keystore Certificate
Before you extract metadata from an OBIEE Presentation Server in HTTPS mode, you must export the
keystore certificate from OBIEE and import it into the Metadata Manager Agent Java Runtime Environment
(JRE). When you export the certificate, you create a self-signed certificate that you can import into the
Metadata Manager Agent JRE.
Use the keytool utility to export and import the certificate.
Oracle Business Intelligence Enterprise Edition 65

To export and import the certificate:
1. To export the OBIEE keystore certificate and create a self-signed keystore certificate, use the following
command:
keytool -export -alias <alias name> -keystore <keystore file name> -rfc -file
<certificate file name>
2. Copy the certificate file to the following directory:
<Metadata Manager Agent installation directory>\java\jre\lib\security
3. Navigate to the following directory:
<Metadata Manager Agent installation directory>\java\jre\lib\security
4. To import the OBIEE keystore certificate into the Metadata Manager Agent JRE, use the following
command:
keytool -import -alias -ca -file <certificate file name> -keystore <certificate file
name> -storepass <keystore password>
Note: The default keystore password is “changeit.”
Creating an Oracle Business Intelligence Enterprise Edition
Resource
Before you create an OBIEE resource, configure the OBIEE source.
1. On the Load tab, click Actions > New Resource.
The Resource Selection window appears.
2. Click Business Intelligence > Oracle Business Intelligence.
3. Click Next.
The Properties page appears.
4. Enter the following information:
Property Description
Name Name for the resource. The resource appears in the Resources panel with this name. The name
must be unique and have from one through 256 characters. It cannot include the following characters:
/ \ : * ' ? " < > | [ ]
Description Description for the resource. Description cannot exceed 4000 characters.
Hide in Summary
Lineage
Hides the resource in the summary view of data lineage diagrams.
Enable this option to hide the resource and its child objects in the summary view. Disable this option
to display the resource and its child objects in the summary view.
Default is disabled.
5. Click Next.
The Configuration page appears.
6. Enter the configuration properties.
7. To add a metadata source file, click Select.
If you configure Metadata Manager to use the latest source files, include the absolute path to the files
that are accessible from the Metadata Manager Agent machine.
If you did not configure Metadata Manager to use the latest source files, upload all the files to the
Metadata Manager machine.
66 Chapter 5: Business Intelligence Resources

8. Click Test Connection to validate the source file configuration.
Metadata Manager validates the Metadata Manager Agent URL. If you configured Metadata Manager to
use the latest source file, Metadata Manager also validates that the source file exists in the specified
path. If the source file is uploaded to Metadata Manager, Metadata Manager validates that the file is
compatible with the resource type and version.
If Metadata Manager cannot validate the source file configuration, an error message appears. Correct
any error and test the connection again.
9. Click Next.
The Schedules window appears.
10. To add a schedule, select Attach a Schedule, and select a schedule in the Schedule list.
If you have not created a schedule, you can assign a schedule to a resource after you create the
resource.
11. Click Finish.
The resource appears in the Resources panel on the Load tab.
Oracle Business Intelligence Enterprise Edition Configuration Properties
Update the configuration properties when you create or edit an OBIEE resource.
The following table describes the OBIEE configuration properties:
Property Description
Agent URL Host name and port number of the Metadata Manager Agent. You can use the Metadata Manager Agent
installed on any machine.
Source system
version
Name of the metadata source. You cannot edit this field.
Always use latest
source files
Uses the metadata source file in the location you provide each time you load the resource. If you enable
this option, the path to the file must include an absolute path that is accessible from the Metadata Manager
Agent machine. If you disable this option, Metadata Manager copies the metadata source file to the
Metadata Manager application directory when you finish configuring the resource. Each time you load the
resource, Metadata Manager uses the copied metadata source file in the Metadata Manager application
directory.
Version Version of OBIEE. Select a version or configure Metadata Manager to detect the version.
Default is auto detect.
Server URL URL of the Presentation Server. Use the following format:
http://<server name>:<port>/analytics/saw.dll
Login user User name for the Presentation Server.
Note: Verify that the user has the appropriate permissions to access the objects you want to import.
Login password Password for the Presentation Server user name.
Variable values
file
Path to the file that contains the variable values used in a repository RPD file.
A repository RPD file might use variables to parameterize SQL statements. The variables values file
contains the variable name and values used in the repository file.
Variable names are not case sensitive and are trimmed of all leading and trailing spaces.
Oracle Business Intelligence Enterprise Edition 67

Property Description
Optimize for
large models
Specifies whether to import a subset of metadata or all metadata when you load the resource. You might
want to import a subset of metadata when the metadata source file is large, for example, when the file size
exceeds 600 MB.
Specify one of the following values:
-True. Ignores foreign keys, joins, relationships, and logical foreign keys when you load the resource.
Does not store expression tree objects with lineage links.
-False. Imports all metadata when you load the resource.
Default is true.
Incremental
import
Load changes since the previous resource load or load complete metadata. Specify one of the following
values:
-True. Load recent changes only.
-False. Perform a complete load of the metadata.
Worker threads Number of worker threads that the Metadata Manager Agent uses to extract metadata asynchronously.
Leave blank or enter a positive integer value.
If blank, the Metadata Manager Agent calculates the number of worker threads. It uses the JVM
architecture and the number of available CPU cores on the machine that runs the Metadata Manager Agent
to calculate the number of threads. If you specify value that is not valid, the Metadata Manager Agent uses
one worker thread.
Reduce the number of worker threads if the Metadata Manger Agent generates out of memory errors when
it extracts metadata. You can increase the number of worker threads if the machine that runs the Metadata
Manager Agent has a large amount of available memory, for example, 10 GB or more. However, if you
specify too many worker threads, performance can decrease.
Default is blank.
Auto assign
connections
Metadata Manager configures connection assignments to relational database resource types during the
resource load. If you disable this option, you must configure connection assignments in the resource
properties after you create the resource.
File The OBIEE repository file in XML or UDML format.
You export the repository from the Oracle BI Administration tool to an RPD file. For OBIEE 10g resources,
convert the RPD file as an UDML file. For OBIEE 11g resource, convert the RPD file as an XML file.
Repository
subset
Folder path in the Presentation Server that contains the reports that you want to extract. Separate multiple
values with a semicolon (;).
Use "
/
" to indicate the root repository path, use
/shared
to indicate the shared repository path, or use
/
users/<user_name>/<folder_name>
to indicate the user's folder path.
For example:
/shared/Financials;/shared/Human Resources;/shared/Procurement
and Spend
Default is “
/
”.
Reference
After you create and load an OBIEE resource, you can view and run data lineage on the metadata objects
that Metadata Manager extracted.
Objects Extracted
Metadata Manager extracts the following metadata object types:
•Alias Column
68 Chapter 5: Business Intelligence Resources
•AliasPhysicalTable
•AnswersReport
•Axis
•BusinessModel
•Business Model and Mapping
•Catalog
•Condition
•Criteria
•Data Attribute Column
•Database
•Derived Presentation Column
•Design Package Subject Area
•Dimension Logical Column
•DynamicVariable
•FactLogicalTable
•Field
•Folder
•Gauge
•Graphic Chart
•Hierarchy
•Key Logical Column
•LogicalColumn
•LogicalDimension
•LogicalJoin
•LogicalKeyColumn
•LogicalLevel
•LogicalTable
•Measure
•Model Content
•Page
•Physical
•PhysicalColumn
•PhysicalForeignKey
•PhysicalJoin
•PhysicalSelectTable
•PhysicalTable
•PivotTable
•Presentation
•PresentationColumn
Oracle Business Intelligence Enterprise Edition 69
•PresentationTable
•Primary Key Column
•Report
•RepositoryInitializationBlock
•RepositoryInitializationBlocks
•RepositoryVariables
•Schema
•SessionInitBlock
•Session Initialization Blocks
•SessionVariable
•SessionVariables
•StaticVariable
•StaticVariables
•TableView
•TitleView
•Top View
•Variables
•View
Alias Physical Table
An alias physical table is a synonym object of a physical table. When Metadata Manager loads an OBIEE
resource, it extracts physical table columns and copies them to the corresponding alias physical table.
Metadata Manager sets the class type for a copied column as a physical column, even if the original column
is a key column or a normal column.
Number of Child Nodes in the Load Details
When you load an OBIEE resource, Metadata Manager displays the nodes from which it extracts metadata
on the Load Details tab. Metadata Manager displays 300 child nodes for any parent node in the load details.
To see a complete list of all nodes extracted, save the contents of the Load Details tab to a Microsoft Excel
file.
SAP Business Warehouse
SAP Business Warehouse is a enterprise data warehouse platform that captures, stores, and consolidates
enterprise data.
You can create and configure an SAP Business Warehouse resource to extract metadata from SAP Business
Warehouse.
70 Chapter 5: Business Intelligence Resources

Configuring SAP Business Warehouse
Before you create an SAP Business Warehouse resource, you must configure the metadata source. If you do
not correctly configure the metadata source, the metadata load can fail or the metadata can be incorrectly
loaded in the Metadata Manager warehouse.
To configure SAP Business Warehouse, complete the following tasks:
•Install the Metadata Manager Agent.
•Configure the mapping transformation file.
•Install the SAP JCo libraries.
Install the Metadata Manager Agent
The Metadata Manager Agent is a program that Metadata Manager uses to access metadata sources and
extract source metadata. By default, the Metadata Manager Agent runs on the nodes where the Metadata
Manager Service runs.
To extract metadata from SAP Business Warehouse, you must install the Metadata Manager Agent
separately on a Windows machine. The Metadata Manager Agent and the SAP JCo libraries must be on the
same machine.
Related Topics:
•“Step 2. Install the Metadata Manager Agent” on page 22
Configure the Mapping Transformation File
SAP Business Warehouse transformations are sometimes represented in ABAP code. Save these
transformations in a mapping configuration file.
Use the following format to specify the transformations in the mapping, and save the file as an XML file:
<Functions>
<Function id="[TransformationId]" objType="TRFN">
<Target id="RESULT_FIELDS-[dstFieldName]" description="RESULT_FIELDS-[dstFieldName]
= SOURCE_FIELDS-[srcFieldName] * [externalObjectId]-[externalField].">
<Source id="SOURCE_FIELDS-[srcFieldName]"/>
<Source id="[externalObjectId]-[externalField]"/>
</Target>
</Function>
</Functions>
When you configure the SAP Business Objects resource, you must specify the file name and file path for the
mapping transformation file.
Install the SAP JCo Libraries
Before you create an SAP Business Warehouse resource, download and install SAP JCo 3 for Windows. The
SAP JCo installation package includes a library file and a JAR file. Copy the files to a directory on the
machine that runs the Metadata Manager Agent.
If you have problems downloading the files, contact Informatica Global Customer Support.
1. Stop the Metadata Manager Agent.
2. Go to the SAP Service Marketplace: http://service.sap.com
Note: You must have user ID for the SAP Service Marketplace.
3. Download the SAP JCo installation package for Windows.
SAP Business Warehouse 71

The installation package contains the following files:
•A library file, sapjco3.dll
•A JAR file, sapjco3.jar
4. Copy the library file and the JAR file to the following directory or to a different directory on the machine
that runs the Metadata Manager Agent:
<Metadata Manager Agent home directory>\bin
5. If you copy the files to a directory other than
<Metadata Manager Agent home directory>\bin
, update
the classpath on the machine that runs the Metadata Manager Agent. The classpath must include the
directory where you copied the files.
6. Set the following permissions for the library file and the JAR file:
•Read, write, and execute permissions for the current user
•Read and execute permissions for all other users
7. Restart the Metadata Manager Agent.
Creating an SAP Business Warehouse Resource
Before you create an SAP Business Warehouse resource, configure the SAP Business Warehouse source.
1. On the Load tab, click Actions > New Resource.
The Resource Selection window appears.
2. Click Business Intelligence > SAP Business Warehouse.
3. Click Next.
The Properties page appears.
4. Enter the following information:
Property Description
Name Name for the resource. The resource appears in the Resources panel with this name. The name
must be unique and have from one through 256 characters. It cannot include the following characters:
/ \ : * ' ? " < > | [ ]
Description Description for the resource. Description cannot exceed 4000 characters.
Hide in Summary
Lineage
Hides the resource in the summary view of data lineage diagrams.
Enable this option to hide the resource and its child objects in the summary view. Disable this option
to display the resource and its child objects in the summary view.
Default is disabled.
5. Click Next.
The Configuration page appears.
6. Enter the configuration properties.
7. Click Test Connection to test the connection to the source system and validate the Metadata Manager
Agent URL.
If Metadata Manager cannot connect to the source system or validate the agent URL, an error message
appears. Correct any error and test the connection again.
8. Click Next.
72 Chapter 5: Business Intelligence Resources

The Schedules window appears.
9. To add a schedule, select Attach a Schedule and select a schedule in the Schedule list.
If you have not created a schedule, you can assign a schedule to a resource after you create the
resource.
10. Click Finish.
The resource appears in the Resources panel on the Load tab.
SAP Business Warehouse Configuration Properties
Update the configuration properties when you create or edit an SAP Business Warehouse resource.
The following table describes the SAP Business Warehouse configuration properties:
Property Description
Agent URL Host name and port number of the Metadata Manager Agent. You can use the Metadata Manager Agent
installed on any machine.
Source system
version
Version of the data source to which you want to connect.
Application server Host name or IP address of the SAP application server to which you want to connect.
Router string Router string to use when the system is protected by a firewall.
System number SAP system number, which is the instance ID of the ABAP instance. This value is a 2-digit number from
00 through 99.
Client SAP system client ID. This value is a 3-digit number from 000 through 999.
User name The user name to connect to SAP Business Warehouse.
Password The password for the SAP Business Warehouse user.
Default language The language that you want to use. Select one of the following values:
-Chinese (Simplified)
-Chinese (Traditional)
-Czech
-Danish
-Dutch
-English
-Finnish
-French
-German
-Hungarian
-Italian
-Japanese
-Korean
-Norwegian
-Polish
-Portuguese
-Russian
-Spanish
-Slovak
-Swedish
-Turkish
SAP Business Warehouse 73

Property Description
JCo library path Location of the SAP JCo library file and sapjco3.jar file on the machine that runs the Metadata Manager
Agent.
The files must be in the following directory or in a directory that is in the classpath of the machine that
runs the Metadata Manager Agent:
<Metadata Manager Agent home directory>\bin
Mapping
configuration file
File name and file path for the mapping configuration file. The mapping configuration file contains the
SAP Business Warehouse transformations that are represented in ABAP code.
Naming convention The format used to represent the SAP system number. Specify one of the following values:
-[technical name]Description
-Description[Technical Name]
-Description_TechnicalName
-[TechnicalName]
Incremental import Load changes since the previous resource load or load complete metadata. Specify one of the following
values:
-True. Load recent changes only.
-False. Perform a complete load of the metadata.
Path to offline
metadata
Directory that contains metadata when the SAP Business Warehouse metadata environment is not
installed locally. If you specify an offline metadata directory, the Metadata Manager Agent uses the files
in the directory as the metadata source. Metadata Manager ignores the connection properties for the
SAP application server because it does not need to establish a connection to the server.
You can run a utility to generate a directory of files that contain the metadata from the SAP Business
Warehouse environment. You might copy metadata from the SAP Business Warehouse environment to a
directory for testing purposes.
Default is not set.
Auto assign
connections
Metadata Manager configures connection assignments to relational database resource types during the
resource load. If you disable this option, you must configure connection assignments in the resource
properties after you create the resource.
Reference
After you create and load an SAP Business Warehouse resource, you can view and run data lineage on the
metadata objects that Metadata Manager extracted.
Objects Extracted
Metadata Manager extracts the following metadata object types:
•Application
•Attribute Field
•BEx Web Template
•Bex Web Template StoreModel
•Bex Web Templates
•Characteristic
•Class Data Source
•Class Data Source3x
74 Chapter 5: Business Intelligence Resources
•Condition
•Data Packet Characteristic
•DataMappingModel Transfer Rules
•DataMappingModel Transformations
•DataProvider
•DataSource Application
•DataSource3x
•DiDataMappingContent Transfer Rules
•DiDataMappingContent Transformations
•DiDataMappingContent Update Rules
•Dimension
•Dimension Aggregate
•Dimension DataStore Object
•Dimension InfoCube
•Dimension InfoSet
•Dimension InfoSource
•Dimension InfoSource3x
•Dimension Open Hub Destination
•Dimension Query
•Dimension QueryView
•DimensionAttribute Characteristic
•Excel Workbook
•Folder InfoObjects
•Folder InfoSources
•Folder Transfer Rules
•Folder Transformations
•InfoArea
•InfoObject
•InfoObject Catalog
•Key Figure
•MultiProvider
•Navigation Attribute
•Queries
•QueryView
•QueryViews
•Role
•Source System
•StoreContent Aggregate
•StoreContent Bex Web Template
SAP Business Warehouse 75
•StoreContent Characteristic
•StoreContent DataSource
•StoreContent DataSource3x
•StoreContent DataStore Object
•StoreContent InfoCube
•StoreContent InfoSet
•StoreContent InfoSource
•StoreContent InfoSource3x
•StoreContent MultiProvider
•StoreContent Open Hub Destination
•StoreContent Query
•StoreContent QueryView
•StoreContent Web Template
•StoreContent Workbook
•StoreModel Aggregate
•StoreModel Characteristic
•StoreModel DataSource
•StoreModel DataStore Object
•StoreModel InfoCube
•StoreModel InfoSet
•StoreModel InfoSource
•StoreModel InfoSource3x
•StoreModel MultiProvider
•StoreModel Open Hub Destination
•StoreModel Query
•Time Characteristic
•Time Dimension
•Unit of Measurement
•Update Rules
•Web Template
•Web Template (Format SAP BW 3.x)
•Web Templates
•Workbook
•Workbooks
76 Chapter 5: Business Intelligence Resources

Tableau
Tableau is a business intelligence tool that allows you to connect to data and create sharable dashboards.
Tableau has a desktop component and a server component. Metadata Manager can extract metadata from
the server component of Tableau, Tableau Server.
Metadata Manager extracts metadata from Tableau Server through the Metadata Manager Agent. The
Metadata Manager Agent uses the HTTP or HTTPS protocol to log in to the server, send requests about
workbooks and data sources, and extract metadata. The Metadata Manager Agent can extract objects such
as projects, workbooks, and dashboards from Tableau. The Metadata Manager Agent extracts both published
and unpublished worksheets in workbooks. The Metadata Manager Agent also extracts dependent data
sources for workbooks.
Data sources in Tableau represent connections to data. The data can be located as a Tableau extract (.tde
file) or in a live relational database. The Metadata Manager Agent imports both Tableau extracts and live
data sources into Metadata Manager.
Configuring Tableau
Before you create a Tableau resource, you must configure the metadata source. If you do not correctly
configure the metadata source, the metadata load can fail or the metadata can be incorrectly loaded in the
Metadata Manager warehouse.
To configure Tableau, perform the following tasks:
•Install the Metadata Manager Agent.
•Verify permissions.
•Verify that Tableau Server is running.
Install the Metadata Manager Agent
The Metadata Manager Agent is a program that Metadata Manager uses to access metadata sources and
extract source metadata. By default, the Metadata Manager Agent runs on the nodes where the Metadata
Manager Service runs. To extract metadata from Tableau, you can use the Metadata Manager Agent that is
installed on any Windows machine.
You must install the Metadata Manager Agent separately on a Windows machine when the domain uses
Kerberos authentication or when the Metadata Manager Service runs on UNIX.
Related Topics:
•“Step 2. Install the Metadata Manager Agent” on page 22
Verify Permissions
To connect to Tableau Server, the Metadata Manager Agent uses the credentials of a user created on the
Tableau server. The user account must have certain license levels and permissions.
The account that the Metadata Manager Agent uses to access Tableau Server must have at least the
following license levels and permissions:
•Interactor license level
•View and Download permissions for all projects, workbooks, and data sources for which you want to
extract metadata
Tableau 77

Verify that the Server is Running
The Metadata Manager Agent connects to Tableau Server through the internet. To verify that Tableau Server
is running, ensure that you can connect to Tableau Server from a web browser.
Creating a Tableau Resource
Before you create a Tableau resource, configure the Tableau metadata source.
1. On the Load tab, click Actions > New Resource.
The Resource Selection window appears.
2. Click Business Intelligence > Tableau.
3. Click Next.
The Properties page appears.
4. Enter the following information:
Property Description
Name Name for the resource. The resource appears in the Resources panel with this name. The name
must be unique and have from one through 256 characters. It cannot include the following characters:
/ \ : * ' ? " < > | [ ]
Description Description for the resource. Description cannot exceed 4000 characters.
Hide in Summary
Lineage
Hides the resource in the summary view of data lineage diagrams.
Enable this option to hide the resource and its child objects in the summary view. Disable this option
to display the resource and its child objects in the summary view.
Default is disabled.
5. Click Next.
The Configuration page appears.
6. Enter the configuration properties.
7. Click Test Connection to test the connection to the source system and validate the Metadata Manager
Agent URL.
If Metadata Manager cannot connect to the data source or validate the Metadata Manager Agent URL,
an error message appears. Correct any error and test the connection again.
8. Click Next.
The Schedules page appears.
9. To add a schedule, select Attach a Schedule and select a schedule in the Schedule list.
If you have not created a schedule, you can assign a schedule to a resource after you create the
resource.
10. Click Finish.
The resource appears in the Resources panel on the Load tab.
78 Chapter 5: Business Intelligence Resources

Tableau Configuration Properties
Update the configuration properties when you create or edit a Tableau resource.
The following table describes the Tableau configuration properties:
Property Description
Agent URL Host name and port number of the Metadata Manager Agent. You can use the Metadata Manager Agent
installed on any machine.
Source system
version
Name and version of the resource. You cannot edit this field.
Server URL or IP address where Tableau Server runs. For example:
http://<Tableau host>:<port>
Default is http://localhost:80.
Site Site name when you extract metadata from a multi-site server. The site name is case sensitive.
User name User name used to log in to Tableau Server.
Password Password for the Tableau Server user account.
Group by Category used to group the workbooks that you want to extract from Tableau. When you click Select next
to the Repository Objects property, the Metadata Manager Agent groups workbooks in the dialog box by
the category that you select.
You can group workbooks by the following categories:
-Tags
-Publisher
-Project
-My workbooks
-All workbooks
Default is project.
Incremental
import
Load changes since the previous resource load or load complete metadata.
Specify one of the following values:
-True. Load recent changes only.
-False. Perform a complete load of the metadata.
Default is true.
Worker threads Number of worker threads that the Metadata Manager Agent uses to extract metadata asynchronously.
Leave blank or enter a positive integer value.
If blank, the Metadata Manager Agent calculates the number of worker threads. It uses the JVM
architecture and the number of available CPU cores on the machine that runs the Metadata Manager Agent
to calculate the number of threads. If you specify value that is not valid, the Metadata Manager Agent uses
one worker thread.
Reduce the number of worker threads if the Metadata Manger Agent generates out of memory errors when
it extracts metadata. You can increase the number of worker threads if the machine that runs the Metadata
Manager Agent has a large amount of available memory, for example, 10 GB or more. However, if you
specify too many worker threads, performance can decrease.
Default is blank.
Tableau 79

Property Description
Auto assign
connections
Metadata Manager configures connection assignments to relational database resource types during the
resource load. If you disable this option, configure connection assignments in the resource properties after
you create the resource.
Repository
objects
The workbooks that you want to extract from Tableau. Click Select to select individual workbooks or
groups of workbooks. In the selection dialog box, Metadata Manager groups workbooks according to the
category you choose in the Group by property.
When you select one or more workbooks, this field displays the Tableau workbook ID for each selected
workbook.
The Metadata Manager Agent extracts the dependent data sources for all selected workbooks.
Reference
After you create and load a Tableau resource, you can view and run data lineage on the metadata objects
that Metadata Manager extracted.
Objects Extracted
Metadata Manager extracts the following metadata object types:
•Bins
•Calculation dimensions
•Calculation measures
•Columns
•Conditions
•Connections
•Dashboards
•Data sources
•Dimensions
•Dimension tables
•Fact tables
•Fields
•Filters
•Groups
•Joins
•Marks
•Measures
•Namespaces
•Pages
•Parameter dimensions
•Parameter measures
•Parameters
•Projects
80 Chapter 5: Business Intelligence Resources
•Proxy fields
•Proxy tables
•Published data sources
•Queries
•Relationships
•Rows
•Schemas
•Sets
•Shared filters
•Tables
•Tableau servers
•Unpublished worksheets
•Workbook data sources
•Workbooks
•Worksheets
Data Lineage Restrictions
Metadata Manager makes most Tableau object types available for data lineage. However, there are some
data lineage restrictions on Tableau objects.
The following Tableau objects have data lineage restrictions:
Dashboards
Metadata Manager does not display data lineage for dashboards. However, you can run data lineage
analysis on the worksheets that are included in the dashboard.
Data sources
Data sources in Tableau can be either live data sources or extracts. A live data source represents a
connection to a physical data source such as a relational database. An extract is a snapshot of a data
source that is saved to a .tde file.
When you view a data lineage diagram that includes a live data source, Metadata Manager displays the
physical data source in the data lineage diagram. For example, if you run data lineage analysis on a
Tableau live data source that is based on an Oracle table, Metadata Manager displays the Oracle table
in the data lineage diagram. Metadata Manager displays a link between the Oracle table and the Tableau
live data source.
When you view a data lineage diagram that includes an extract, Metadata Manager displays the extract
as the source for data lineage. Metadata Manager does not display a link between the physical data
source and the extract. Metadata Manager does not display the link because it cannot determine which
physical data source an extract is based on.
Incremental Metadata Load
When you configure any business intelligence resource except a Microsoft Analysis and Reporting Services
resource, you can choose to incrementally load recent changes to the metadata instead of loading complete
Incremental Metadata Load 81
metadata. After the first successful load, the Metadata Manager Agent incrementally loads metadata that
changed after the last successful load.
Data Source Changes
New metadata is incrementally loaded when any data source change occurs after the last successful load.
The following list describes some examples of data source changes:
•A report is added in a report folder.
•A report is linked to a different package or universe.
•A report metric is deleted.
•A report is deleted or renamed.
•A report is moved to another folder.
•A report folder is renamed.
•An attribute object in a package or universe is renamed.
•A folder is moved to another folder.
Note: If the source data did not change since the last successful load, the load is complete.
Exception Scenarios
Even if you specify incremental extraction for a resource, complete metadata load occurs in the following
scenarios:
•You purge the resource.
•You update the source configuration details of the resource.
•You cancel the first load of the resource or the first load of the resource fails.
Adding or Removing Metadata Files for a Resource
Add a metadata file to a resource to configure the source from which Metadata Manager extracts metadata.
Remove a metadata file from a resource if you want to remove the metadata from the Metadata Manager
warehouse or load a different metadata source file.
You can add one metadata file for each resource. After you remove a metadata file, you can purge the
metadata from the Metadata Manager warehouse.
You can add or remove the following metadata files:
•Metadata source files. Add or remove a metadata source file for packaged resource types.
•Attribute and association files. Add or remove attribute and association files for a custom resource. You
must also add a metadata source file if the contents of an existing attribute and association file changes.
Note: To change the metadata in the source file that Metadata Manager loads into the Metadata Manager
warehouse, change the contents of the metadata source file and add the file again. You can also upload the
file to the following directory on the node that runs the Metadata Manager Service:
<Informatica installation directory>\services\MetadataManagerService\mm_files\<Metadata
Manager Service name>\mm_load\data_files\<resource ID>
1. On the Load tab, select the resource for which you want to add or remove files.
2. In the Resources panel, click the Configuration tab, and then click Edit.
The Edit Resources window appears.
82 Chapter 5: Business Intelligence Resources
3. To add a metadata source file, click Add and select the file.
If you configured Metadata Manager to use the latest source files, include an absolute path to the file
that is accessible from the Metadata Manager Service machine.
4. Optionally, direct Metadata Manager to update the metadata in the warehouse with the metadata in the
source file.
5. To remove a metadata source file, select the file and click Remove.
6. Click OK.
Adding or Removing Metadata Files for a Resource 83

CHAPTER 6
Custom Resources
This chapter includes the following topics:
•Configuring Custom Metadata Sources, 84
•Creating a Custom Resource, 84
•Configuring the Template Name, 85
•Adding or Removing Metadata Files for a Resource, 85
Configuring Custom Metadata Sources
If you create a custom resource and use a metadata source file, you must export the metadata to a metadata
file with a .csv or .txt file extension. When you configure the custom resource, you specify the metadata file.
Creating a Custom Resource
When you create a custom resource, you configure the name and description. You add metadata source files
and schedules after you create the resource.
1. On the Load tab, click Actions > New Resource.
The Resource Selection window appears. The list of custom models you created in the Model page
appears under Others.
2. Under Others, select the custom model you want to base the resource on.
3. Click Next.
The Properties page appears.
84

4. Enter the following information:
Property Description
Name Name for the resource. The resource appears in the Resources panel with this name. The name
must be unique and have from one through 256 characters. It cannot include the following characters:
/ \ : * ' ? " < > | [ ]
Description Description for the resource. Description cannot exceed 4000 characters.
Hide in Summary
Lineage
Hides the resource in the summary view of data lineage diagrams.
Enable this option to hide the resource and its child objects in the summary view. Disable this option
to display the resource and its child objects in the summary view.
Default is disabled.
5. Click Finish.
The resource appears in the Resources panel on the Load tab. You can configure the template, source files
and schedules in the Resources panel after you create the template in the Custom Metadata Configurator.
Configuring the Template Name
You can configure the Template Name property for a custom resource. To edit the property, select the
custom resource in the Resources panel of the Load tab, click Edit Resource, and click the Configuration tab
in the Edit Resource window.
Enter the name of the custom resource template that stores information about how to map the metadata
object attributes to the class attributes. The template can also store the class associations between metadata
objects.
Adding or Removing Metadata Files for a Resource
Add a metadata file to a resource to configure the source from which Metadata Manager extracts metadata.
Remove a metadata file from a resource if you want to remove the metadata from the Metadata Manager
warehouse or load a different metadata source file.
You can add one metadata file for each resource. After you remove a metadata file, you can purge the
metadata from the Metadata Manager warehouse.
You can add or remove the following metadata files:
•Metadata source files. Add or remove a metadata source file for packaged resource types.
•Attribute and association files. Add or remove attribute and association files for a custom resource. You
must also add a metadata source file if the contents of an existing attribute and association file changes.
Configuring the Template Name 85
Note: To change the metadata in the source file that Metadata Manager loads into the Metadata Manager
warehouse, change the contents of the metadata source file and add the file again. You can also upload the
file to the following directory on the node that runs the Metadata Manager Service:
<Informatica installation directory>\services\MetadataManagerService\mm_files\<Metadata
Manager Service name>\mm_load\data_files\<resource ID>
1. On the Load tab, select the resource for which you want to add or remove files.
2. In the Resources panel, click the Configuration tab, and then click Edit.
The Edit Resources window appears.
3. To add a metadata source file, click Add and select the file.
If you configured Metadata Manager to use the latest source files, include an absolute path to the file
that is accessible from the Metadata Manager Service machine.
4. Optionally, direct Metadata Manager to update the metadata in the warehouse with the metadata in the
source file.
5. To remove a metadata source file, select the file and click Remove.
6. Click OK.
86 Chapter 6: Custom Resources

CHAPTER 7
Data Integration Resources
This chapter includes the following topics:
•Informatica Platform Resources, 87
•Microsoft SQL Server Integration Services Resources, 99
•PowerCenter Resources, 110
Informatica Platform Resources
You can create and configure an Informatica Platform resource to extract metadata from applications and
resource files that you export from Informatica Developer (the Developer tool).
Developer tool users can make mappings, virtual databases, and scorecards available for data lineage in
Metadata Manager. To make mappings and virtual databases available for data lineage, Developer tool users
deploy the objects to an application. Developer tool users then deploy the application to a Data Integration
Service or to an application archive file. To make scorecards available for data lineage, Developer tool users
export the scorecards to a resource file for Metadata Manager. In Metadata Manager, you can create
Informatica Platform resources from an application or a resource file.
You can create an Informatica Platform resource from the following metadata sources:
Application deployed to a Data Integration Service
Multiple applications can run on a Data Integration Service. If you create an Informatica Platform
resource from applications that you deploy to a Data Integration Service, you can include metadata from
multiple applications in the resource.
Application archive file
An application archive file contains one application. If you create an Informatica Platform resource from
an application archive file, the resource contains metadata from the application that is deployed to the
application archive file.
Note: You can create Informatica Platform resources from version 9.5.1 - 9.6.x application archive files.
Metadata Manager cannot extract metadata from version 10.x application archive files.
Export resource file for Metadata Manager
An export resource file for Metadata Manager is an XML file that contains one or more scorecard
objects. If you create an Informatica Platform resource from an export resource file for Metadata
Manager, the resource contains metadata for all scorecards in the resource file.
87

Configuring the Metadata Source
Before you create an Informatica Platform resource, you might need to check the status of the Data
Integration Service or configure directory permissions. If you do not perform these tasks, the metadata load
can fail.
The tasks that you perform to configure the metadata source vary based on how you create the resource:
From an application that is deployed to a Data Integration Service
To ensure that Metadata Manager can extract and load metadata from the application, verify that the
Data Integration Service is available. When you create a resource, the application can be running or
stopped. When you load the resource, the application must be running.
From an application archive file
To ensure that Metadata Manager can extract and load metadata from the application, verify that the
Metadata Manager Service has read permission on the directory that contains the file.
From an export resource file for Metadata Manager
To ensure that Metadata Manager can extract and load metadata from the file, verify that the Metadata
Manager Service has read permission on the directory that contains the file.
Creating an Informatica Platform Resource
Create an Informatica Platform resource to extract metadata from an application or from an export resource
file for Metadata Manager.
1. On the Load tab, click Actions > New Resource.
The Resource Selection window appears.
2. Click Data Integration > Informatica Platform.
3. Click Next.
The Properties window appears.
4. Enter the following information:
Property Description
Name Name for the resource. The resource appears in the Resources panel with this name. The name must
be unique and have from one through 256 characters. It cannot include the following characters:
/ \ : * ' ? " < > | [ ]
Note: If you create a resource from a resource file, you must use the following naming convention for
the resource name:
<Model repository Service name>_<project name>
Description Description for the resource. Description cannot exceed 4000 characters.
Hide in
Summary
Lineage
Hides the resource in the summary view of data lineage diagrams.
Enable this option to hide the resource and its child objects in the summary view. Disable this option to
display the resource and its child objects in the summary view.
Default is disabled.
5. Click Next.
The Configuration window appears.
88 Chapter 7: Data Integration Resources

6. Select one of the following options for the source system version:
Option Description
Informatica Platform 10.1
(Repository)
Create the resource from a version 10.1 application that is deployed to a Data
Integration Service.
Informatica Platform 10.0
(Repository)
Create the resource from a version 10.0 application that is deployed to a Data
Integration Service.
Informatica Platform 9.5.1 - 9.6.x
(Repository)
Create the resource from a version 9.5.1 - 9.6.x application that is deployed to a
Data Integration Service.
Informatica Platform 9.5.1 - 9.6.x
(Archive File)
Create the resource from a version 9.5.1 - 9.6.x application archive file.
Informatica Platform 9.5.1 - 10.x
(Resource File)
Create the resource from a version 9.5.1 - 10.x resource file that you exported
from the Developer tool.
Note: If you extract metadata from an Informatica 10.x application, you must select source system
version Informatica Platform 10.1 (Repository) or Informatica Platform 10.0 (Repository). Metadata
Manager cannot extract metadata from version 10.x application archive files.
7. Configure the resource connection properties.
8. If you create a resource from an application that is deployed to a Data Integration Service, click Test
Connection to test the connection to the Data Integration Service.
If Metadata Manager cannot connect to the Data Integration Service, an error message appears. Correct
the error, and test the connection again.
9. Click Next.
10. If you create a resource from an application that is deployed to a Data Integration Service, the
Parameters window appears.
The Parameters window displays all of the applications that are deployed to the Data Integration
Service.
Select the applications that you want to include in the resource, and click Next.
11. If you create a resource from a version 10.x application that is deployed to a Data Integration Service,
the Parameter Set Assignment window appears.
The Parameter Set Assignment window displays the parameter sets in each selected application. You
can assign a parameter set to one or more mappings. If you assign a parameter set to a mapping,
Metadata Manager extracts metadata for the mapping based on the parameter values defined in the
parameter set. If you do not assign a parameter set and the mapping uses parameters, Metadata
Manager extracts metadata for the mapping based on the parameter default values.
To assign a parameter set:
a. In the Applications list, select the application that contains the parameter set that you want to
assign to one or more mappings.
b. In the Parameter Set list, select the parameter set.
Informatica Platform Resources 89

c. In the Mappings list, select the mappings to which you want to assign the parameter set, and click
Assign. To assign the parameter set to all mappings, click Assign to all.
Metadata Manager lists the parameter set assignments at the bottom of the Parameter Set
Assignment window.
To remove a parameter set assignment, click X next to the parameter set assignment that you want
to remove.
When you finish the parameter set assignment, click Next.
12. The Schedules window appears. To add a schedule, select Attach a Schedule, and select a schedule
in the Schedule list.
If you have not created a schedule, you can assign a schedule to a resource after you create the
resource.
13. Click Finish.
The resource appears in the Resources panel on the Load tab.
Data Integration Service Connection Properties
If you create a resource from an application that is deployed to a Data Integration Service, you must provide
connection information for the Data Integration Service.
The following table describes the connection properties:
Property Description
Source system
version
Name and version of the metadata source. Select one of the following options based on the
application version:
-Informatica Platform 10.1 (Repository)
-Informatica Platform 10.0 (Repository)
-Informatica Platform 9.5.1 - 9.6.x (Repository)
Host Name of the gateway node in the Informatica domain.
Port Port number for the gateway node.
Security domain Security domain for the Administrator tool user.
If the domain uses LDAP authentication or Kerberos authentication, enter the security domain name.
Otherwise, enter
Native
.
User name Name of the Administrator tool user. The user must have the Manage Applications privilege on the
Data Integration Service.
Password Password for the Administrator tool user.
DIS service name Name of the Data Integration Service where the application is deployed.
10.0 Command Line
Utilities Directory
File path to the 10.0 Informatica Command Line Utilities installation directory. This property is
displayed when you select source system version Informatica Platform 10.0 (Repository).
Must be an absolute path that the 10.1 Metadata Manager Service can access, for example,
C:
\Informatica\100_CLU
.
Auto assign
connections
Metadata Manager configures connection assignments to relational database resource types during
the resource load. If you disable this option, configure connection assignments in the resource
properties after you create the resource.
90 Chapter 7: Data Integration Resources

Application Archive File Connection Properties
If you create an Informatica Platform resource from an application archive file, you must provide the file path
and file name.
The following table describes the connection properties:
Property Description
Source system
version
Name and version of the metadata source. Select Informatica Platform 9.5.1 - 9.6.x (Archive File).
Always use latest
source files
Uses the application archive file in the location you provide each time you load the resource. If you
enable this option, the path to the file must include an absolute path that the Metadata Manager Service
can access. If you disable this option, Metadata Manager copies the application archive file to the
Metadata Manager application directory when you finish configuring the resource. Each time you load
the resource, Metadata Manager uses the copied application archive file in the Metadata Manager
application directory.
Auto assign
connections
Metadata Manager configures connection assignments to relational database resource types during the
resource load. If you disable this option, configure connection assignments in the resource properties
after you create the resource.
Application archive File path and file name for the application archive file.
Resource File Connection Properties
If you create an Informatica Platform resource from a resource file, you must provide the file path and file
name.
The following table describes the connection properties:
Property Description
Source system
version
Name and version of the metadata source. Select Informatica Platform 9.5.1 - 10.x (Resource File).
Always use latest
source files
Uses the resource file in the location you provide each time you load the resource. If you enable this
option, the path to the file must include an absolute path that the Metadata Manager Service can
access. If you disable this option, Metadata Manager copies the resource file to the Metadata Manager
application directory when you finish configuring the resource. Each time you load the resource,
Metadata Manager uses the copied resource file in the Metadata Manager application directory.
Auto assign
connections
Metadata Manager configures connection assignments to relational database resource types during the
resource load. If you disable this option, configure connection assignments in the resource properties
after you create the resource.
Resource file File path and file name for the resource file.
Command Line Utilities Installation for Version 10.0 Applications
To extract metadata from an Informatica 10.0 application that is deployed to a Data Integration Service, you
must install the version 10.0 Command Line Utilities. Install the utilities in a directory that the 10.1 Metadata
Manager Service can access. If you don't install the utilities, the resource load can fail.
The 10.0 Command Line Utilities are included in the Command Line Utilities zip file. Contact Informatica
Global Customer Support to get the zip file.
Informatica Platform Resources 91
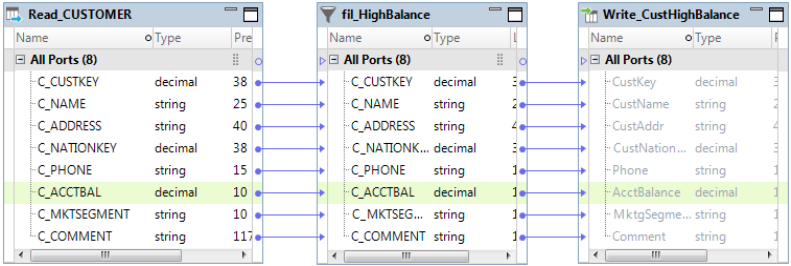
Extract the files to a directory that the 10.1 Metadata Manager Service can access. For best performance,
extract the files to a directory on the machine that runs the Metadata Manager Service. If you extract the files
to a different machine, the Metadata Manager Service can take several minutes to access the directory.
Note: After you install standalone command line utilities, you normally have to perform the following tasks:
•On Windows, install the Microsoft Visual Studio 2013 redistributable package.
•Configure the path and environment variables as required by the command line utilities.
•Create the domains.infa file.
When you install the version 10.0 Command Line Utilities for an Informatica Platform resource that extracts
metadata from a version 10.0 application, you do not have to perform these tasks.
Parameters in Informatica Platform 10.x Resources
If an Informatica Platform 10.x application includes a mapping that uses parameters, you can configure
Metadata Manager to use the parameter values when you load the resource. Metadata Manager can use
parameter values that are defined in a parameter set. Metadata Manager cannot use parameter values that
are defined a parameter file.
A parameter set is an object in the Model repository that contains mapping parameter values. These values
override the default parameter values that a Developer tool user configures for objects within a mapping.
Metadata Manager can use parameter values that represent the following objects:
•Connections, table owner names, and table names for relational sources, targets, and lookups
•Names and directories for flat files
You assign a parameter set to one or more mappings when you create an Informatica Platform resource.
Metadata Manager uses the parameter values defined in the parameter set to display the mapping objects
and to display data lineage. If a mapping uses parameters and you do not assign a parameter set to the
mapping, Metadata Manager uses the parameter default values.
Parameter Set Example
If you assign a parameter set to a mapping, Metadata Manager displays the mapping in the metadata catalog
and displays data lineage for the mapping based on the parameter values.
For example, an application contains the following mapping that reads data from an Oracle table, filters the
data, and writes data to a flat file:
To change the source database between mapping runs, the mapping designer creates a connection
parameter for the source connection and assigns it the default value Ora_DEV. The mapping designer
creates a parameter set, PRODUCTION, and sets the source connection to Ora_PROD.
92 Chapter 7: Data Integration Resources
In Metadata Manager, you want to view the mapping and display lineage links with the values defined in the
PRODUCTION parameter set. Assign the PRODUCTION parameter set to the mapping when you create the
resource.
When you load the resource, Metadata Manager extracts the mapping using the parameter values defined in
the parameter set. Therefore, when you view the resource on the Load tab, the Connection Assignment tab
shows the connection as Ora_PROD. If you run data lineage on the mapping and select the relational source,
Metadata Manager displays the connection name as Ora_PROD. Metadata Manager creates lineage links
based on the Ora_PROD connection.
Parameter Set Rules and Guidelines
Consider the following rules and guidelines when you assign a parameter set to one or more mappings in a
resource:
Parameter set assignment for a mapping is optional.
If you do not assign a parameter set to a mapping that uses parameters, Metadata Manager extracts the
mapping using the parameter default values.
You can assign one parameter set to each mapping in a resource.
Therefore, you cannot extract different versions of a mapping in the same resource. If you want to see
metadata for different mapping versions, create multiple resources and assign a different parameter set
to the mapping in each resource.
You can assign the same parameter set to multiple mappings.
If a parameter set is used in multiple mappings, you can assign the parameter set to multiple mappings.
The parameter set and the mappings must be in the same application.
Metadata Manager cannot use parameter values for parameters in transformation expressions or conditions.
Developer tool users can use parameters in expressions or conditions in transformations such as the
Aggregator, Filter, Expression, Joiner, or Lookup transformation. For example, a Developer tool user can
use a parameter in the join condition of a Joiner transformation. Metadata Manager cannot use
parameter values for parameters in transformation expressions or conditions. Metadata Manager uses
the default values for parameters in transformation expressions and conditions.
Metadata Manager cannot use parameter values for parameters in custom SQL queries.
Developer tool users can use parameters in custom SQL queries in customized data objects and Lookup
transformations. Metadata Manager cannot use parameter values for parameters in custom SQL queries.
Metadata Manager uses the default values for parameters in custom SQL queries.
You cannot use parameter sets with virtual table mappings.
If an application includes a virtual table mapping that uses parameters, Metadata Manager extracts the
virtual table mapping with the parameter default values.
Parameters in Informatica Platform 9.5.1 - 9.6.x Resources
If you create a resource from a version 9.5.1 - 9.6.x application that is deployed to a Data Integration Service,
Metadata Manager cannot read parameters that are associated with application objects.
Mappings in Informatica Developer applications can contain user-defined or system parameters. System
parameters define the directories where the Data Integration Service stores cache files, reject files, source
files, target files, and temporary files. User-defined parameters allow Developer tool users to define mapping
values and update those values each time the mapping runs. Metadata Manager cannot read mapping
parameters in version 9.5.1 - 9.6.x applications.
Informatica Platform Resources 93
For example, a Developer tool user assigns system parameter "SourceDir" as the source directory for a flat
file data object and includes the object in an application. The Informatica administrator sets the source
directory for the Data Integration Service process is to
<Informatica Services Installation Directory>/
tomcat/bin/source
. You create a resource that is based on the application and try to create links for the
resource. Metadata Manager cannot create links for the flat file data object because it reads the flat file
source directory as
SourceDir
instead of as
<Informatica Services Installation Directory>/
tomcat/bin/source
.
Reference
Informatica Platform resources have some restrictions on object types, data lineage, and object hierarchies.
Object Types Extracted and Not Extracted
Metadata Manager extracts most object types from Informatica Developer applications. However, it does not
extract some object types.
Metadata Manager can extract metadata for the following objects:
•Mappings
•SQL data services
•Objects that are deployed as an SQL data service
•Scorecards
Metadata Manager does not extract metadata for the following objects:
•Reference tables
•Sources and targets except for relational, customized, and flat-file data objects
•Virtual stored procedure
•Web services
•Workflows
Unsupported Transformations
Metadata Manager supports metadata extraction for most transformations. However, Metadata Manager does
not support metadata extraction for some transformations.
Metadata Manager does not support metadata extraction for the following transformations:
•Logical Data Object Lookup transformation
•Reference Table Lookup transformation
When you view a mapping or mapplet that contains a transformation for which Metadata Manager does not
support metadata extraction, it might differ from the Developer tool mapping or mapplet. The mapping or
mapplet in Metadata Manager might also differ from the run-time version of the mapping or mapplet.
Dynamic Mappings in Informatica Platform 10.x Resources
Metadata Manager does not support metadata extraction for dynamic mappings.
In Informatica 10.x, Developer tool users can create dynamic mappings. A dynamic mapping is a mapping in
which you can change sources, targets, and transformation logic at run time based on parameters and rules
that you define. In a dynamic mapping, the source, target, or lookup schemas can change at run time. A
94 Chapter 7: Data Integration Resources
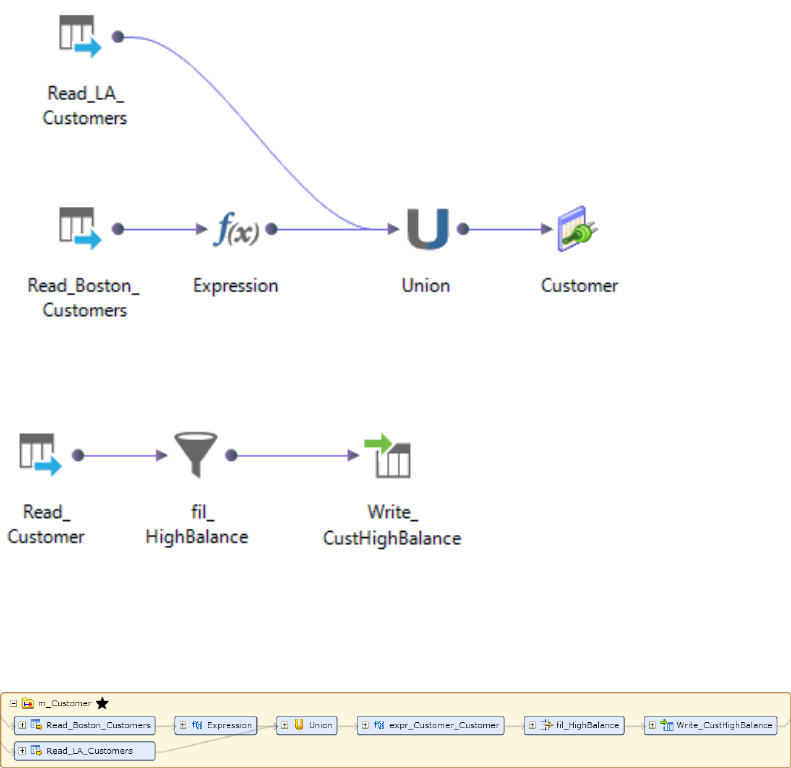
dynamic mapping can also contain ports that can receive new or changed columns based on the data flow in
a mapping.
Metadata Manager does not support metadata extraction for dynamic mappings. If an Informatica Platform
10.x application includes a dynamic mapping, you can create an Informatica Platform resource from the
application. However, when you view the dynamic mapping in Metadata Manager, the mapping might differ
from the corresponding Developer tool mapping and from the run-time version of the mapping.
Compiled Mappings in Informatica Platform 10.x Resources
Metadata Manager extracts the compiled version of mappings from Informatica Platform 10.x applications. In
the compiled version of a mapping, the mapplets, logical data objects, and parameters in the mapping are
expanded. Therefore, the mappings and logical data objects included in the mapping appear in the mapping
itself.
The compiled version of a mapping might differ from the corresponding mapping in the Developer tool.
For example, a Developer tool user creates the Customer logical data object. The following logical data
object mapping populates the Customer logical data object:
The Developer tool user uses the Customer logical data object as a source in mapping m_Customer.
The following image shows mapping m_Customer in the Developer tool:
If you create an Informatica Platform 10.x resource that includes mapping m_Customer, Metadata Manger
extracts the compiled version of the mapping. The compiled version of the mapping includes the
transformations in the logical data object mapping in addition to the transformations in mapping m_Customer.
The following image shows mapping m_Customer in the data lineage diagram:
Informatica Platform Resources 95
Data Quality Transformations in Informatica Platform 10.x Resources
When the Data Integration Service compiles a mapping, it expands some data quality transformations into
multiple transformations. Therefore, in Informatica Platform 10.x resources, Metadata Manager displays an
expanded form of some data quality transformations.
Metadata Manager displays an expanded form of the following data quality transformations:
Address Validator
Metadata Manager displays an Address Validator transformation and an Address Validator report.
Consolidation
Metadata Manager displays the following transformations:
•Consolidation
•Sorter
•Decision
Exception
Metadata Manager displays the following transformations:
•Exception
•Sorter
Key Generator
Metadata Manager displays the following transformations:
•Key Generator
•Sorter
Match
Metadata Manager displays the following transformations:
•Sorter
•Expression
•Pair Generator*
•Comparison
•Weighted Average
•Cluster*
* The Data Integration Service generates these transformations when it compiles the mapping. These
transformations do not appear in the Developer tool.
Metadata Manager might also display an additional mapplet.
Multi-Strategy transformations
Metadata Manager displays one instance of the transformation for each strategy.
96 Chapter 7: Data Integration Resources
Mappings that are not Valid in Informatica Platform 10.x Resources
Metadata Manager cannot extract metadata for a mapping that is not valid. If an Informatica Platform 10.x
application contains a mapping that is not valid after compilation, Metadata Manager does not load metadata
for the application.
For example, a Developer tool user creates a mapping with a Rank transformation where the Rank and
Group By ports are specified through parameters. The parameters that represent the Rank and Group By
ports are assigned the same value. A Rank transformation cannot use the same port for the Rank port and
the Group By port, so the mapping is not valid after compilation. Metadata Manager does not load metadata
for an application which contains a mapping that is not valid.
If the resource contains one application with a mapping that is not valid, Metadata Manager fails the
metadata load.
If the resource contains multiple applications, Metadata Manager does not load any application which
contains a mapping that is not valid. Metadata Manager logs an error in the load log for each application that
it cannot load. Metadata Manager continues to load the other applications in the resource.
Data Lineage Restrictions
Metadata Manager makes most Informatica Platform object types available for lineage. However, some
object types are not available for lineage.
The following object types are not available for lineage:
•Application
•Project
•Folder
•Key
•Key relationship
•Logical data object model
•Virtual schema
Port-to-Port Data Lineage
Some Informatica Platform transformations contain separate input and output ports. For most transformations
that have separate input and output ports, Metadata Manager can determine the data lineage links between
the input ports and the output ports.
Transformations such as Aggregator, Expression, Joiner, and Union transformations can contain separate
input and output ports. Metadata Manager can determine the data lineage links between the input and output
ports in these transformations. Data lineage links between input and output ports in the same transformation
are called port-to-port data lineage links.
Informatica Platform Resources 97
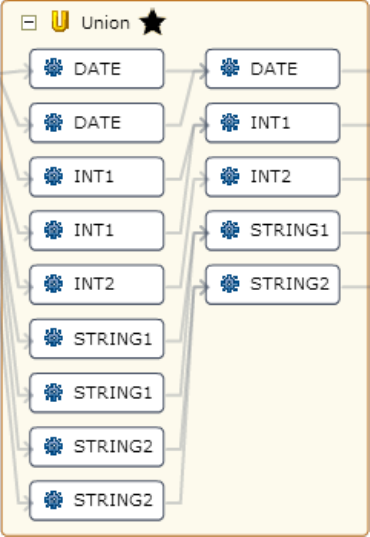
The following image shows port-to-port data lineage links within a Union transformation:
Metadata Manager can determine port-to-port data lineage for the following transformations that have
separate input and output ports:
•Address Validator
•Aggregator
•Association
•Case Converter
•Classifier
•Comparison
•Consolidation
•Decision
•Exception
•Expression
•Joiner
•Key Generator
•Labeler
•Match
•Merge
•Parser
•Rank
•Router
•Standardizer
•Union
98 Chapter 7: Data Integration Resources
•Weighted Average
Metadata Manager cannot determine port-to-port data lineage for other transformations that have separate
input and output ports. When Metadata Manager cannot determine port-to-port data lineage for a
transformation, it maps all input ports to all output ports within the transformation.
Physical Data Objects in Multiple Applications
If a resource includes multiple applications that contain the same physical data object, Metadata Manager
extracts one instance of the physical data object in each application.
Metadata Manager displays data lineage and impact summary analysis for each instance of the object based
on the application in which the instance exists.
Objects with the Same Name in Informatica Platform 10.x Resources
Metadata Manager does not extract folders from version 10.x applications. Metadata Manager extracts all
physical data objects from each folder into one logical group called Physical Data Objects. Similarly,
Metadata Manager extracts all mappings from each folder into one logical group called Mappings.
If an application contains multiple physical data objects or mappings with the same name, the Physical Data
Objects or Mappings logical group shows multiple objects with the same name. To view the differences
between the objects, open the objects in the metadata catalog or run data lineage analysis.
Microsoft SQL Server Integration Services
Resources
You can create and configure a Microsoft SQL Server Integration Services resource to extract metadata from
Microsoft SQL Server Integration Services packages. Metadata Manager can extract metadata from
packages in the Microsoft SQL Server repository or from a package in a package file.
A package is a collection of connections, control flow elements, data flow elements, event handlers,
variables, and configurations that represents a unit of work. You can create a package with SQL Server
Integration Services graphical design tools or build it programmatically. You can save a package to Microsoft
SQL Server, the SQL Server Integration Services Package Store, or a package file.
If you extract metadata from packages in the Microsoft SQL Server repository, you can create one resource
to extract metadata from one or more packages. If the packages are encrypted with a password, all packages
within the resource must use the same password.
If you extract metadata from a package in an SQL Server Integration Services package file, you can create
one resource for each package file. The package file must be a .dtsx file.
Microsoft SQL Server Integration Services Resources 99

Metadata Extraction from Protected Packages
Metadata Manager can extract metadata from encrypted packages. However, there might be restrictions
based on the package protection level. For example, when the whole package is protected, you might have to
supply the package password or run the Metadata Manager Agent from a specific user account.
The following table describes the restrictions for each package protection level:
Protection Level Restrictions
-Do not save sensitive
-Encrypt sensitive with password
-Encrypt sensitive with user key
-Rely on server storage for
encryption
None. Metadata Manager can extract metadata from the package.
Encrypt all with password Metadata Manager can extract metadata from the package if you specify the password
when you create the resource. If you extract metadata from a Microsoft SQL Server
repository, all packages within the resource must use the same password.
Encrypt all with user key Metadata Manager can extract metadata from the package if the user account that you
use to start the Metadata Manager Agent is the same as the user account used to
create the package.
Configuring SQL Server Integration Services
Before you create an SQL Server Integration Services resource, you must configure the metadata source. If
you do not correctly configure the metadata source, the metadata load can fail or the metadata can be
incorrectly loaded in the Metadata Manager warehouse.
To configure SQL Server Integration Services, perform the following tasks:
•Install the Metadata Manager Agent, if required.
•To extract metadata from packages in the repository, verify that the Microsoft SQL Server Database
Engine is running.
•Configure permissions.
•Prepare the variable values file, if required.
Install the Metadata Manager Agent
When SQL Server Integration Services is not on the same machine as the Metadata Manager Service, you
must install the Metadata Manager Agent separately. Install the Metadata Manager Agent on a Windows
100 Chapter 7: Data Integration Resources

machine. The Metadata Manager Agent installation requirements vary based on the SQL Server Integration
Services source type.
The following table describes the Metadata Manager Agent installation requirements based on the SQL
Server Integration Services source type:
Source Type Metadata Manager Agent Requirements
Package file You can use the Metadata Manager Agent installed on any machine. If you configure Metadata
Manager to use the latest source files, the location of the source files must be accessible from the
Metadata Manager Agent machine.
Package in a Microsoft
SQL Server repository
The Metadata Manager Agent and SQL Server Integration Services must be on the same machine.
Related Topics:
•“Step 2. Install the Metadata Manager Agent” on page 22
Verify Database Availability
To extract metadata from packages in a Microsoft SQL Server repository, verify that the Microsoft SQL
Server Database Engine is available and running.
Configure Permissions
You configure permissions differently based on whether you extract metadata from packages in the Microsoft
SQL Server repository or from a package in a package file.
If you extract metadata from packages in the repository, configure permissions for the Windows user who
starts the Metadata Manager Agent. The Metadata Manager Agent uses Windows authentication to connect
to SQL Server Integration Services. The Windows user who starts the Metadata Manager Agent must have
read permission on the objects that the Metadata Manager Agent extracts.
If you extract metadata from a package file and you configure Metadata Manager to use the latest source
files, the Windows user who starts the Metadata Manager Agent must have read permission on the file and
on the directory that contains the file.
Prepare the Variable Values File
If you extract metadata from packages that use variables, you can create a variable values file to define the
variables. Create a variable values file when the packages do not contain values for all variables or when you
want to override the values defined in the packages.
You specify the variable values file when you create the SQL Server Integration Services resource. Metadata
Manager uses the variable values file to resolve the variables. Metadata Manager can resolve variables that
specify the table or view name in an OLE DB source or destination. Metadata Manager can also resolve
variables that specify an SQL query in an OLE DB source. You cannot define SQL Server Integration
Services parameters in a variable values file.
To define variables in the variable values file, group the variables by scope, either package-level or task-
level. Define each variable on a separate line. You must also enter the namespace as a prefix.
Use the following syntax to define a variable that has a package-level scope:
[Package]
Namespace::Variable=Value
Microsoft SQL Server Integration Services Resources 101

Use the following syntax to define a variable that has a task-level scope:
[Package.Task]
Namespace::Variable=Value
Variable names are case sensitive.
If you define the same variable multiple times, Metadata Manager resolves the variables as follows:
•If you define the variable in a package and in a task within the package, Metadata Manager uses the
value that you define for the task.
•If you define the variable multiple times within a package or task, Metadata Manager uses the last value
that you define.
•If you define a variable in the variable values file and the variable has a default value in the package,
Metadata Manager uses the value in the variable values file.
The following example shows a variable values file that defines variables for two tasks within a package:
[SSIS_Package_Configuration.Data Flow Task]
User::TargetTableName=PERSON_OUT
User::TableName=Person
[SSIS_Package_Configuration.SQL_From_Variable]
User::MySQL_Target=PERSON_OUT
User::MySQL=SELECT Name as FirstName, Name as LastName, Name as MiddleName FROM
Purchasing.Vendor
Creating an SQL Server Integration Services Resource
Create an SQL Server Integration Services resource to extract metadata from Microsoft SQL Server
Integration Services.
Before you create an SQL Server Integration Services resource, configure the SQL Server Integration
Services source.
1. On the Load tab, click Actions > New Resource.
The Resource Selection window appears.
2. Click Data Integration > Microsoft SQL Server Integration Services.
3. Click Next.
The Properties window appears.
4. Enter the following information:
Property Description
Name Name for the resource. The resource appears in the Resources panel with this name. The name
must be unique and have from one through 256 characters. It cannot include the following characters:
/ \ : * ' ? " < > | [ ]
Description Description for the resource. Description cannot exceed 4000 characters.
Hide in Summary
Lineage
Hides the resource in the summary view of data lineage diagrams.
Enable this option to hide the resource and its child objects in the summary view. Disable this option
to display the resource and its child objects in the summary view.
Default is disabled.
5. Click Next.
The Configuration window appears.
102 Chapter 7: Data Integration Resources

6. Select one of the following options for the Source system version:
Option Description
Microsoft SQL Server Integration Services
(File)
Create the resource from a package (.dtsx) file.
Microsoft SQL Server Integration Services
(Repository)
Create the resource from one or more packages in a Microsoft SQL
Server repository.
7. Configure the resource connection properties.
8. Click Test Connection.
Metadata Manager validates the Metadata Manager Agent URL.
If you extract metadata from a package file, Metadata Manager also validates the file. If you configure
Metadata Manager to use the latest source files, Metadata Manager validates that the file exists in the
specified path. If you upload the file to Metadata Manager, Metadata Manager validates that the file is
compatible with the resource type and version.
If you extract metadata from packages in a Microsoft SQL Server repository, Metadata Manager also
validates the connection information for the source system.
If Metadata Manager cannot validate the Metadata Manager Agent URL, validate the source file, or
connect to the repository, an error message appears. Correct the error and test the connection again.
9. Click Next.
The Schedules window appears.
10. To add a schedule, select Attach a Schedule, and select a schedule in the Schedule list.
If you have not created a schedule, you can assign a schedule to a resource after you create the
resource.
11. Click Finish.
The resource appears in the Resources panel on the Load tab.
SQL Server Integration Services File Configuration Properties
Update the configuration properties when you create or edit an SQL Server Integration Services resource that
is based on a package file.
The following table describes the configuration properties:
Property Description
Agent URL Host name and port number of the Metadata Manager Agent.
You can use the Metadata Manager Agent installed on any machine.
Source system
version
Name and version of the metadata source. Select Microsoft SQL Server Integration Services (File).
Always use latest
source files
Uses the metadata source file in the location you provide each time you load the resource. If you enable
this option, the path to the file must include an absolute path that is accessible from the Metadata
Manager Agent machine. If you disable this option, Metadata Manager copies the metadata source file to
the Metadata Manager application directory when you finish configuring the resource. Each time you load
the resource, Metadata Manager uses the copied metadata source file in the Metadata Manager
application directory.
Microsoft SQL Server Integration Services Resources 103

Property Description
Variable values
file
File that defines the values for the user-defined variables in the package. Specify a variable values file
when variables in the package do not have values or when you want to override the variable values
defined in the package.
The location of the variable values file must be accessible from the machine where the Metadata Manager
Service runs. When SQL Server Integration Services is not on the same machine as the Metadata
Manager Service, ensure that the variable values file is in a location that both SQL Server Integration
Services and the Metadata Manager Service can access.
Encoding Code page for Execute SQL task source files. Default is Western European (Windows-1252).
If the package does not contain an Execute SQL task with a file source, Metadata Manager ignores this
property.
Password Password for the package.
Required if the package is encrypted with a password. If you do not enter the password, the Metadata
Manager Agent cannot extract metadata from the package.
Optional if the values of sensitive properties in the package are encrypted with a password. Metadata is
not a sensitive property. Therefore, the Metadata Manager Agent can extract metadata whether or not
you specify the password.
Hide
transformation
scripts
Controls how Metadata Manager displays lineage for Script components that are used as transformations.
If you set this property to true, Metadata Manager does not display input or output ports for any
transformation script. The data lineage diagram shows links between all columns in the source object and
all columns in the target object.
If you set this property to false, Metadata Manager creates a separate object in the lineage diagram for
each transformation script.
Default is true.
Auto assign
connections
Metadata Manager configures connection assignments to relational database resource types during the
resource load. If you disable this option, configure connection assignments in the resource properties
after you create the resource.
File File path and file name for the resource file. Must be a .dtsx file.
SQL Server Integration Services Repository Configuration Properties
Update the configuration properties when you create or edit an SQL Server Integration Services resource
from one or more packages in a Microsoft SQL Server repository.
The following table describes the configuration properties:
Property Description
Agent URL Host name and port number of the Metadata Manager Agent.
To extract metadata from the SQL Server repository, the Metadata Manager Agent must be on the same
machine as the SQL Server Client components.
Source system
version
Name and version of the metadata source. Select Microsoft SQL Server Integration Services
(Repository).
SQL Server
version
Microsoft SQL Server version.
104 Chapter 7: Data Integration Resources

Property Description
Host Host name or IP address of the machine where SQL Server Integration Services run.
Password Password for the package. If you include multiple packages in a resource, the packages must use the
same password.
Required if the packages are encrypted with a password. If you do not enter the password, the Metadata
Manager Agent cannot extract metadata from the packages.
Optional if the values of sensitive properties in the packages are encrypted with a password. Metadata is
not a sensitive property. Therefore, the Metadata Manager Agent can extract metadata whether or not
you specify the password.
Variable values file File that defines the values for the user-defined variables in the package. Specify a variable values file
when variables in the package do not have values or when you want to override the variable values
defined in the package.
The location of the variable values file must be accessible from the machine where the Metadata
Manager Service runs. When SQL Server Integration Services is not on the same machine as the
Metadata Manager Service, ensure that the variable values file is in a location that both SQL Server
Integration Services and the Metadata Manager Service can access.
Hide
transformation
scripts
Controls how Metadata Manager displays lineage for Script components that are used as
transformations.
If you set this property to true, Metadata Manager does not display input or output ports for any
transformation script. The data lineage diagram shows links between all columns in the source object and
all columns in the target object.
If you set this property to false, Metadata Manager creates a separate object in the lineage diagram for
each transformation script.
Default is true.
Auto assign
connections
Metadata Manager configures connection assignments to relational database resource types during the
resource load. If you disable this option, configure connection assignments in the resource properties
after you create the resource.
Package Names of the SQL Server Integration Services packages from which you want to extract metadata. Click
Select to select one or more packages.
Reference
After you create and load an SQL Server Integration Services resource, you can view and run data lineage
on the metadata objects that Metadata Manager extracted.
Objects Extracted
Metadata Manager extracts metadata for different SQL Server Integration Services objects.
Connection Manager Types
Metadata Manager extracts metadata for the following connection manager types:
•OLEDB
•FLATFILE
Control Flow Tasks
Metadata Manager extracts metadata for the following tasks in a control flow:
Microsoft SQL Server Integration Services Resources 105
Data Flow
Metadata Manager displays a summary of each data flow that a package contains.
Execute SQL
If the SQL statement creates or truncates a table, Metadata Manager displays the table structure.
However, Metadata Manager does not display data lineage for the table.
Transformations in a Data Flow
Metadata Manager can display a summary of the data flow when the data flow contains any of the following
transformations:
•Aggregate
•Audit
•Character Map
•Conditional Split
•Copy Column
•Data Conversion
•Derived Column
•Export Column
•Fuzzy Grouping
•Fuzzy Lookup
•Import Column
•Lookup
•Merge
•Merge Join
•Multicast
•Percentage Sampling
•Pivot
•Row Count
•Row Sampling
•Script Component
•Slowly Changing Dimension
•Sort
•Term Extraction
•Term Lookup
•Union All
•Unpivot
Note: Metadata Manager does not display individual transformations in the metadata catalog or in the data
lineage diagram.
106 Chapter 7: Data Integration Resources
Objects Not Extracted
Metadata Manager does not extract metadata for some SQL Server Integration Services objects that can
affect data movement.
Tasks Not Extracted
Metadata Manager does not extract metadata for the following tasks that can affect data movement:
•Bulk Insert Task
•Data Mining Query Task
•Data Profiling Task
•Execute Package Task
•Execute T-SQL Statement Task
•Any task that contains code written in T-SQL, Visual Basic, or C#
Transformations Not Extracted
Metadata Manager does not extract metadata for the following transformations that can affect data
movement:
•Cache Transform
•OLE DB Command
•Any transformation that contains code written in T-SQL, Visual Basic, or C#
Organization of Objects in the Metadata Catalog
When you load an SQL Server Integration Services resource, Metadata Manager organizes SQL Server
Integration Services objects in the metadata catalog according to the connections in which the objects are
used. To select an object such as a column in the metadata catalog, navigate to the object through the
source or target connection in which the object is used.
For example, package HypoStores_HR contains a data flow that reads data from the EMPLOYEE table in a
relational database. The OLE DB source connection object HR_DB contains the connection to the database
that contains the EMPLOYEE table. To navigate to the EMPLOYEE table in the metadata catalog, expand the
HR_DB source connection in the Connections group.
The following example shows the metadata catalog hierarchy for a data attribute such as a column:
<Packages>
Connections
<Source/Target>
<Package> (schema, directory, etc.)
<Data Set> (table, file, etc.)
<Data Attribute>
<Summary Content>
<Summary Model>
Connections
<Source/Target>
<Package>
<Data Set>
<Data Attribute>
Task Variables Store (Connection class)
…
Microsoft SQL Server Integration Services Resources 107
Package Summary
When you load an SQL Server Integration Services resource, Metadata Manager displays a summary of each
package in the metadata catalog and in the data lineage diagram. The package summary includes the source
and target data sources for each data flow in the package.
When you run data lineage on a summary, Metadata Manager displays the source and target data sources
and the lineage links between them. Metadata Manager does not display individual transformations in the
lineage diagram or in the metadata catalog. Metadata Manager also does not display columns that are added
by transformations in the data flow.
For example, a package contains one data flow with a Derived Column transformation followed by a
Conditional Split transformation. The data flow reads data from the PERSON table in a relational database. It
writes data to the EMAIL_PROMO and NO_EMAIL_PROMO tables in a different database.
When you expand the data flow summary in the data lineage diagram, the diagram displays the following
objects:
•The OLE DB source connection object that contains the PERSON table.
•The OLE DB destination connection object that contains the EMAIL_PROMO and NO_EMAIL_PROMO
tables.
You can expand the connection objects to display lineage links between the tables. Metadata Manager does
not display the two transformations in the lineage diagram.
Metadata Extraction Rules for Sources and Destinations
Metadata Manager extracts metadata from sources and destinations in the data flow according to different
metadata extraction rules.
Metadata Manager applies different metadata extraction rules for the following types of sources and
destinations in a data flow:
Destination
Metadata Manager applies the following metadata extraction rules for flat file and OLE DB destinations:
•Metadata Manager derives data type and length for target columns from the corresponding source
column, not from the corresponding column in the destination data store.
For example, a data flow writes data from a source column with data type CHAR[50] to a column in a
database with data type CHAR[100]. When you view the target column in Metadata Manager,
Metadata Manager displays the data type for the target column as CHAR[50].
•When multiple source columns load data to the same destination column and the source column
lengths differ, Metadata Manager determines the target column length from either source column.
Metadata Manager selects the source column that it encounters first in the metadata source.
For example, a data flow contains a Union All transformation that merges data in the NAME column
from two source columns with data types CHAR[255] and CHAR[100]. Metadata Manager displays
the NAME column length in the target object as either 255 or 100.
OLE DB Destination
If you use an SQL command to load data, Metadata Manager displays the SQL command in the SQL
property in the package summary.
Destination for error output
Metadata Manager displays the destination for error output as a target object.
108 Chapter 7: Data Integration Resources
Source
If there is a mismatch in length between an external column in a flat file or OLE DB source and the
corresponding output column, Metadata Manager derives the column length from the shorter of the two
columns.
OLE DB Source
If you use an SQL command to extract data, Metadata Manager displays the SQL command in the SQL
property in the package summary.
Metadata Extraction Rules for Transformations
Metadata Manager extracts different metadata from the data flow based on the types of transformations that
are present in the data flow.
Metadata Manager applies different metadata extraction rules when the following transformations are present
in the data flow:
Audit transformation
This transformation adds columns to the data flow. Metadata Manager displays columns that originate
from the source but not columns that are added by transformations in the data flow. Therefore, Metadata
Manager does not update the target object with any column that the Audit transformation adds to the
data flow.
Aggregate, Character Map, Data Conversion, Derived Column transformations
These transformations apply function expressions to columns values, for example,
AVG(SalesAmount)
or
UPPERCASE(LastName)
. Metadata Manager displays the function expressions in the Operation property
in the target column. If multiple expressions apply to a target column, Metadata Manager concatenates
the expressions.
Copy Column transformation
This transformation copies input columns and creates new columns in the transformation output.
Because the copied columns originate from the source, Metadata Manager displays the new columns in
the target.
Export Column transformation
This transformation inserts data into one or more flat files. Because the flat files originate from the
transformation, Metadata Manager does not display them in the metadata catalog or in the data lineage
diagram.
Fuzzy Lookup, Lookup, Term Lookup transformations
Metadata Manager displays the reference data set as a source object. Metadata Manager displays only
the return columns in the reference data set.
Pivot transformation
In the Pivot transformation, each input column has a unique lineage ID and each output column has a
source column. Metadata Manager creates a lineage link when the lineage ID value in an input column
matches the source column value in an output column.
Script component
The Script component can be used as a source, target, or transformation. Metadata Manager groups all
Script components under a connection called “_Scripts_” in the metadata catalog. Metadata Manager
displays each Script component input and output group as a data set. It also displays each input and
output column as a data attribute.
Microsoft SQL Server Integration Services Resources 109
When the Script component is used as a source or target, Metadata Manager displays it in the data
lineage diagram as a source or target object. When the Script component is used as a transformation,
Metadata Manager uses the Hide transformation scripts configuration property to determine how to
display the transformation logic.
Metadata Manager displays the transformation logic in the following ways based on the value of the Hide
transformation scripts configuration property:
•If the property is true, Metadata Manager does not display the transformation inputs or outputs. The
data lineage diagram shows links between all columns in the source object and all columns in the
target object.
•If the property is false, Metadata Manager creates a separate object in the lineage diagram to
represent each input or output group of a transformation script. The data lineage diagram displays
links between the source object and the transformation script inputs and between the transformation
script outputs and the target. However, it does not display links between the transformation script
inputs and outputs. To define the flow of metadata within a transformation script, use rule-based links
or enumerated links to link data attributes to each other. You can also use rule-based links or
enumerated links to link transformation scripts to other metadata objects.
Expressions in Multiple Data Flows
A control flow can contain multiple data flows. If the data flows apply different expressions to the same
destination column, Metadata Manager displays all of the expressions in the Operation property in the target
column. Metadata Manager separates the expressions with the semicolon character (;).
PowerCenter Resources
You can create and configure PowerCenter resources to extract metadata from Informatica PowerCenter.
Informatica PowerCenter allows you to load data into a centralized location, such as a data warehouse or
operational data store (ODS). You can extract data from multiple sources, transform the data according to
business logic, and load the transformed data into targets.
Configuring PowerCenter
Before you create a PowerCenter resource, you must configure the metadata source. If you do not correctly
configure the metadata source, the metadata load can fail or the metadata can be incorrectly loaded in the
Metadata Manager warehouse.
To configure PowerCenter, complete the following tasks:
•Configure permissions.
•Check in versioned repository objects.
•If the PowerCenter repository is on an IBM DB2 for LUW database, configure the database heap size.
•If the PowerCenter repository is on an Oracle 11.1 database, disable extended statistics.
110 Chapter 7: Data Integration Resources
Configure Permissions
To extract metadata from a PowerCenter repository, the login user that you specify in the resource
connection properties must be the PowerCenter repository database user.
The PowerCenter repository database user account requires the following permissions on the PowerCenter
repository database:
•Select table
•Select view
•Create view
Note: After you upgrade Metadata Manager, you need the create view permission on the PowerCenter
repository database only during the first load.
•Drop view
In addition, if the PowerCenter repository is on IBM DB2 for LUW, the user account also requires create and
drop function permissions.
Check in Versioned Repository Objects
To extract from a versioned PowerCenter repository, check in objects that you want Metadata Manager to
extract. Before loading PowerCenter resources, check out impacted objects, validate them and then check in
the objects.
Metadata Manager extracts the latest version of objects that are checked into a PowerCenter repository.
Metadata Manager does not extract objects that are checked out.
IBM DB2 for LUW Database Heap Size
When you load metadata from a PowerCenter repository that is on an IBM DB2 for LUW database, you must
modify the heap size. Otherwise, the S_M_ELEMNT_ATTR_EXTRACT session fails with the following error:
DBA2191E SQL execution error.
com.ibm.db.DataException: A database manager error occurred. :
[IBM][CLI Driver][DB2/NT] SQL0973N Not enough storage is available in
the "APP_CTL_HEAP_SZ" heap to process the statement. SQLSTATE=57011
This problem occurs when there is not enough storage available in the database application heap to process
the request.
Increasing the IBM DB2 for LUW Database Heap Size
To increase the IBM DB2 for LUW database heap size, complete the following steps:
1. Log out of Metadata Manager.
2. Stop the DB2 database server.
3. From a DB2 command prompt, connect to the DB2 database.
4. To determine the current value of the Application Heap Size configuration parameter
(APP_CTL_HEAP_SZ), run the following command:
db2 get db dfg for <database_name> | find "APP_CTL_HEAP_SZ"
5. To increase the size of APP_CTL_HEAP_SZ to 16384 or higher, run the following command:
db2 update db cfg for <database_name> using APP_CTL_HEAP_SZ <higher_value>
6. Restart the DB2 database server.
PowerCenter Resources 111

Disable Extended Statistics on Oracle 11.1
When you load metadata from a PowerCenter repository that is on an Oracle 11.1 database, you must
disable extended statistics on the database. Otherwise, the S_M_ELMNT_ATTR_FIRST_LOAD session
hangs during the load of the PowerCenter resource.
Extended statistics gathers object statistics and histograms on expressions or on a group of columns.
To disable extended statistics, set the Oracle system parameter
_optimizer_enable_extended_stats
to
FALSE. Run the following command on the Oracle database:
Alter system set "_optimizer_enable_extended_stats" = FALSE scope=spfile/both/memory;
For more information about this Oracle parameter, see the Oracle documentation.
Creating a PowerCenter Resource
Before you create a PowerCenter resource, configure the PowerCenter source.
1. On the Load tab, click Actions > New Resource.
The Resource Selection window appears.
2. Click Data Integration > PowerCenter.
3. Click Next.
The Properties window appears.
4. Enter the following information:
Property Description
Name Name for the resource. The resource appears in the Resources panel with this name. The name
must be unique and have from one through 256 characters. It cannot include the following characters:
/ \ : * ' ? " < > | [ ]
Description Description for the resource. Description cannot exceed 4000 characters.
Hide in Summary
Lineage
Hides the resource in the summary view of data lineage diagrams.
Enable this option to hide the resource and its child objects in the summary view. Disable this option
to display the resource and its child objects in the summary view.
Default is disabled.
5. Click Next.
The Configuration window appears.
6. Configure the connection properties.
7. Click Test Connection to test the connection to the source system.
If Metadata Manager cannot connect to the source system, an error message appears. Correct the error
and test the connection again.
8. Click Next.
The Parameters window appears.
9. Configure the folders to extract metadata from.
To add folders to the Selected Folders list, select the folder in the Available Folders list and click Add.
To add all available folders, click Add All.
112 Chapter 7: Data Integration Resources

To remove folders from the Selected Folders list, select the folder in the Selected Folders list and click
Remove. To remove all folders from the Selected Folders list, click Remove All.
10. Configure the number of days for the Source Increment Extract window.
11. Click Next.
The Parameter Files window appears.
12. To upload parameter files, click Upload.
13. To remove an uploaded parameter file, select the file and click Delete.
14. Click Auto-assign to direct Metadata Manager to analyze the PowerCenter repository and automatically
assign the uploaded parameter files to each workflow that specifies the parameter file name.
Or, select a parameter file in the Parameter Files list, select one or more folders or workflows in the
Workflow Folders list, and click Assign.
Or, select a parameter file and click Assign to All to assign the parameter file to all workflows.
Note: When you configure a PowerCenter workflow, if you use an absolute file name or the
$PMFolderName and $PMWorkflowName workflow variables to specify the parameter file name,
Metadata Manager uses this value to automatically assign the parameter file to the workflow. If you use
any other workflow variable for configuring the parameter file name, you must manually assign the
parameter file to the workflow.
15. To remove a parameter file from a workflow, click Remove for the parameter file in the bottom panel.
16. Click Next.
The Schedules window appears.
17. To add a schedule, select Attach a Schedule, and select a schedule in the Schedule list.
If you have not created a schedule, you can assign a schedule to a resource after you create the
resource.
18. Click Finish.
The resource appears in the Resources panel on the Load tab.
PowerCenter Connection Properties
If you create a PowerCenter resource, you must provide connection information for PowerCenter.
The following table describes the connection properties:
Property Description
Login user Database user name for the PowerCenter repository database.
Login password Database user password for the PowerCenter repository database.
Database type Type of database for the PowerCenter repository. Database type can be IBM DB2 for LUW, Microsoft SQL
Server, Oracle, or Sybase ASE.
Schema name Schema name for the PowerCenter repository database when the database type is IBM DB2 for LUW and
the schema name differs from the login user name. If you do not enter a value for this property, Metadata
Manager assumes that the schema name is the same as the login user name.
Metadata Manager does not display this property for database types other than IBM DB2 for LUW.
PowerCenter Resources 113

Property Description
Source JDBC
URL
JDBC URL for the PowerCenter repository database. Enter the database host name and the database
service name. Metadata Manager uses this URL to verify connection information to the source database.
For example, if the PowerCenter repository database is an Oracle database, use the following syntax:
jdbc:informatica:oracle://[host name]:[port];SID=[sid]
You can enter the SID or edit the string to use the full service name. For example:
jdbc:informatica:oracle://[host name]:[port];ServiceName=[service name]
If the Oracle database is clustered, use the following syntax:
jdbc:informatica:oracle://[host1]:[port];ServiceName=[service
name];AlternateServers = ([host2]:[port]);LoadBalancing=true
If the Oracle database uses the Advanced Security Option, use the following syntax:
jdbc:informatica:oracle://[host name]:
[port];SID=[SID];EncryptionLevel=[encryption
level];EncryptionTypes=[encryption types];DataIntegrityLevel=[data
integrity level];DataIntegrityTypes=[data integrity types]
Secure JDBC
parameters
Secure JDBC parameters that you want to append to the JDBC connection URL. Use this property to specify
secure connection parameters such as passwords. Metadata Manager does not display secure parameters
or parameter values in the resource configuration properties. Enter the parameters as name=value pairs
separated by the delimiter character that the database driver requires. For example:
param1=value1;param2=value2
If secure communication is enabled for the database, enter the secure JDBC parameters in this property.
Connect string Native connect string for the PowerCenter repository database. The Metadata Manager Service uses the
connect string to create a connection object to the Metadata Manager repository database in the
PowerCenter repository.
The connect string syntax varies based on the database type:
-IBM DB2 for LUW.
<database name>
-Microsoft SQL Server.
<server name>@<database name>
-Oracle.
<database name>.world
(same as the TNSNAMES entry)
-Sybase ASE.
<server name>@<database name>
Encoding Code page for the PowerCenter repository database.
The code page for the PowerCenter resource, the Metadata Manager repository, and the machine where the
associated Integration Service for Metadata Manager runs must be the same.
Auto assign
connections
Metadata Manager configures connection assignments to relational database resource types during the
resource load. If you disable this option, you must configure connection assignments in the resource
properties after you create the resource.
Use trusted
connection
Authenticates the user credentials using Windows authentication and establishes a trusted connection to a
Microsoft SQL Server PowerCenter repository database.
When you use a trusted connection to connect to Microsoft SQL Server database, the Metadata Manager
Service connects to the repository with the credentials of the user logged in to the machine on which the
service is running.
114 Chapter 7: Data Integration Resources
JDBC Parameters for Secure Databases
If secure communication is enabled for the PowerCenter repository database, you must append additional
parameters to the JDBC connection URL. To append the parameters, enter them in the Secure JDBC
Parameters property.
Append the following parameters to the URL:
;EncryptionMethod=SSL;TrustStore=<truststore
location>;TrustStorePassword=<password>;HostNameInCertificate=<host
name>;ValidateServerCertificate=<true|false>;KeyStore=<keystore
location>;keyStorePassword=<password>
Configure the parameters as follows:
EncryptionMethod
Encryption method for data transfer between Metadata Manager and the database server. Must be set to
SSL.
TrustStore
Path and file name of the truststore file that contains the security certificate of the database server.
TrustStorePassword
Password used to access the truststore file.
HostNameInCertificate
Host name of the machine that hosts the secure database. If you specify a host name, the Metadata
Manager Service validates the host name included in the connection string against the host name in the
security certificate.
ValidateServerCertificate
Indicates whether the Metadata Manager Service validates the certificate that the database server
presents. If you set this parameter to true, the Metadata Manager Service validates the certificate. If you
specify the HostNameInCertificate parameter, the Metadata Manager Service also validates the host
name in the certificate.
If you set this parameter to false, the Metadata Manager Service does not validate the certificate that the
database server presents. The Metadata Manager Service ignores any truststore information that you
specify.
KeyStore
Path and file name of the keystore file that contains the security certificates that the Metadata Manager
Service presents to the database server.
KeyStorePassword
Password used to access the keystore file.
Configuring the Folder Inclusion List
You can configure the Folder Inclusion List parameter for a PowerCenter resource. To edit the parameter,
select the resource in the Resources panel of the Load tab, click Edit Resource, and click the Parameters tab
in the Edit Resource window.
Use the Folder Inclusion List parameter to specify folders of PowerCenter objects that you want to load into
the Metadata Manager warehouse. You can load PowerCenter folders to limit the objects that Metadata
Manager extracts. Load the folders that Metadata Manager users need to analyze. The PowerCenter
resources load faster if they do not load all folders. You can configure up to 1,000 folders.
PowerCenter Resources 115
If you include a folder containing shortcuts to a source definition, target definition, reusable transformation,
mapping, or mapplet, you must also include the folder containing the original object. Otherwise, data lineage
might not display correctly.
By default, Metadata Manager excludes all PowerCenter folders. If you do not include any folder, Metadata
Manager extracts PowerCenter metadata not associated with a PowerCenter folder, such as metadata for
PowerCenter Integration Services.
If you change the folders for Metadata Manager to extract and remove previously loaded folders, Metadata
Manager does not delete any metadata object from the Metadata Manager warehouse. To delete metadata
objects in the Metadata Manager warehouse that no longer exist in the PowerCenter repository, purge the
metadata for the resource. You can then load the folders that you want in the Metadata Manager warehouse.
Configuring the Source Increment Extract Window
You can configure the Source Increment Extract Window (in Days) parameter for a PowerCenter resource.
To edit the parameter, select the resource in the Resources panel of the Load tab, click Edit Resource, and
click the Parameters tab in the Edit Resource window.
To verify a full extract during a resource load, the resource is configured to extract source records that have
been inserted or updated within the past 8,000 days of the extract. The default value for the parameter is
8,000.
After the initial extract completes, reset the parameter value based on the frequency at which you load the
metadata for the resource. As a guideline, set the parameter value to at least twice the number of days
between resource loads. For example, if you load the resource every two days, set the parameter value to
four. By doubling the amount of time, Metadata Manager extracts metadata for the current and previous time
period. If the previous load fails, Metadata Manager extracts information for the previous period and the
current period.
If you do not reset the default parameter value, Metadata Manager extracts metadata for the past 8,000 days
when you load the resource.
Note: The first time you load a PowerCenter resource, Metadata Manager may reject objects created before
the incremental extract period.
PowerCenter Parameter Files
If a PowerCenter source repository uses parameter files in sessions and workflows, you can configure
Metadata Manager to read the parameter files when you load the PowerCenter resource. PowerCenter
parameters can represent flat file sources, flat file lookups, flat file targets, relational connections, or objects
in SQL overrides. Metadata Manager can read the parameter files to extract metadata for the flat file sources,
flat file lookups, flat file targets, relational connections, and objects in SQL overrides.
Assign parameter files to PowerCenter workflows to perform data lineage analysis between the PowerCenter
repository and the metadata in the flat file sources, flat file lookups, flat file targets, relational connections, or
objects in SQL overrides. Metadata Manager uses the information in the parameter files to display data
lineage.
To assign the parameter files, you upload the parameter files to the node running the Metadata Manager
application. After you upload the parameter files, you assign the parameter files to individual workflows or to
all workflows in the PowerCenter repository. You can also direct Metadata Manager to automatically assign
the parameter files to the appropriate workflows in the PowerCenter repository.
After you upload modified parameter files or change parameter file assignments, you must reload the
PowerCenter resource. Metadata Manager can then use the updated parameter file assignments to display
data lineage.
116 Chapter 7: Data Integration Resources

Parameter File Requirements
To enable Metadata Manager to read parameter values from a parameter file, the file must have a .txt, .prm,
or .par extension.
You group parameters and variables in different sections of the parameter file. Each section is preceded by a
heading that identifies the folder, workflow, worklet, and session to which you want to pass parameter or
variable values. You define parameters and variables directly below the heading, entering each parameter or
variable on a new line.
The following table describes the headings that define each section in the parameter file and the scope of the
parameters and variables that you define in each section:
Heading Scope
[Global] All folders, workflows, worklets, and sessions.
[folder name.WF:workflow name] The named workflow and all sessions within the workflow.
[folder name.WF:workflow name.WT:worklet name] The named worklet and all sessions within the worklet.
[folder name.WF:workflow name.WT:worklet
name.WT:worklet name...]
The nested worklet and all sessions within the nested worklet.
[folder name.WF:workflow name.ST:session name]
-or-
[folder name.WF:workflow name.WT:worklet
name.ST:session name]
-or-
[folder name.WF:workflow name.WT:worklet
name.WT:worklet name.ST:session name]
-or-
[folder name.session name]
-or-
[session name]
The named session.
Ignored Information in Parameter Files
Metadata Manager ignores the following information in the parameter files:
•Service parameters. Metadata Manager does not extract service parameters.
•Sessions or workflows without parameters. Metadata Manager does not require all sessions or
workflows to use parameter files.
•Duplicate sessions. Metadata Manager extracts the parameter for the first occurrence of the session. If
you use a reusable session multiple times, the parameter file must identify each session instance.
•Duplicate headings. If the parameter file specifies the same heading multiple times, Metadata Manager
uses the information in the section below the first heading. Metadata Manager ignores the information in
the sections below subsequent identical headings.
•Invalid parameter and value pair format. The parameter and value must be entered on a single line in
the form name=value.
PowerCenter Resources 117
Rules and Guidelines for Parameter Files
Metadata Manager uses the following guidelines to read the parameter files:
•If you define the same parameter or variable in multiple sections in the parameter file, the parameter or
variable with the smallest scope takes precedence over parameters or variables with larger scope. For
example, a parameter file contains the following sections:
[HET_TGTS.WF:wf_TGTS_ASC_ORDR]
$DBConnection_ora=Ora2
[HET_TGTS.WF:wf_TGTS_ASC_ORDR.ST:s_TGTS_ASC_ORDR]
$DBConnection_ora=Ora3
In session s_TGTS_ASC_ORDR, the value for session parameter $DBConnection_ora is “Ora3.” In all
other sessions in the workflow, it is “Ora2.”
•If a mapping parameter is not assigned a value in the parameter file, Metadata Manager uses the default
value of the parameter in the mapping.
•If a parameter value that contains single-byte characters exceeds 4000 characters, Metadata Manager
truncates the value to 4000 characters. If a parameter value that contains multibyte characters exceeds
2000 characters, Metadata Manager truncates the value to 2000 characters.
•Metadata Manager cannot read a parameter file that is assigned to a PowerCenter folder with a name that
contains the following special characters:
. + - = ~ ` ! % ^ & * () [] {} ' \ " ; : / ? , < > \\ | \t \r \n
Sample Parameter File
The following example shows a sample connection parameter file entry:
[CustomerInformation.WF:WF_DB_CATALOG_ORCL.ST:S_M_ELMNT_ASSOC_EXTRACT]
$$WEIRD_CHAR=~!@#$%^&*()_+|{}[]=:";'<>?,./`
$DBConnection_source=customer_source_DB
$DBCONNECTION_SOURCE=hello
$DBConnection_target=customer_target_DB
$DBConnection_SARAH=sarah
$DBCONNECTION_WEED=weedy
$PMSessionLogFile=$PMRootDir/sessionname1.log
Uploading Parameter Files
Upload the PowerCenter parameter files to the node running the Metadata Manager application.
To upload parameter files:
1. On the Load tab, select the PowerCenter resource in the Resources panel.
2. In the Properties panel, click Edit.
The Edit Resources window appears.
3. Click the Parameter Files tab.
4. Click Upload.
The Upload dialog box appears.
5. Click Browse to select one or more parameter files.
6. Click Open.
If you select the same file multiple times, the most recently selected file overwrites the earlier version.
7. To remove any selected files, click Remove.
8. To upload the selected files, click Upload.
118 Chapter 7: Data Integration Resources
You can upload multiple parameter files at the same time. The Upload dialog box displays the upload
status of each file.
9. Click Close.
10. To remove an uploaded parameter file, select the file in the Parameter Files list and click Delete.
Assign the uploaded parameter files to PowerCenter workflows.
Assigning Parameter Files to PowerCenter Workflows
After you upload parameter files, assign the files to PowerCenter workflows. You cannot assign parameter
files to individual PowerCenter sources, targets, or lookups. You assign parameter files to the workflow that
contains the sources, targets, and lookups.
1. On the Load tab, select the PowerCenter resource in the Resources panel.
2. In the Properties panel, click Edit.
The Edit Resources window appears.
3. Click the Parameter Files tab.
4. Perform one of the following tasks to assign parameter files:
•To direct Metadata Manager to analyze the PowerCenter repository and assign the uploaded
parameter files to each workflow that specifies the parameter file name, click Auto-assign.
•To assign parameter files individually, select a parameter file in the Parameter Files list, select one
or more folders or workflows in the Workflow Folders list, and click Assign.
•To assign a parameter file to all workflows, select the parameter file and click Assign to All.
Note: When you configure a PowerCenter workflow, if you use an absolute file name or the
$PMFolderName and $PMWorkflowName workflow variables to specify the parameter file name,
Metadata Manager uses this value to automatically assign the parameter file to the workflow. If you use
any other workflow variable for configuring the parameter file name, you must assign the parameter file
to the workflow manually.
5. To remove a parameter file from a workflow, click Remove for the parameter file in the bottom panel.
6. Click OK.
After you change parameter file assignments, you must reload the PowerCenter resource. Metadata Manager
can then process the updated parameter file assignments to update links between resources to correctly
display data lineage.
Tip: When you save a PowerCenter resource, the Metadata Manager service log lists workflows that have no
assigned parameter file. To view the Metadata Manager service log, select Help > Export Service Log.
Reference
After you create and load a PowerCenter resource, you can view and run data lineage on the metadata
objects that PowerCenter extracted.
Incremental Extracts
Metadata Manager supports incremental extractions from the PowerCenter repositories.
By default, Metadata Manager can extract metadata incrementally. Metadata Manager initially extracts
metadata from the previous 8,000 days, which is longer than 20 years. After the first metadata load, decrease
the time period to extract metadata that has been added, modified, or deleted recently. You do not need to
reload unchanged metadata.
PowerCenter Resources 119

Metadata Object Properties
Metadata Manager extracts properties of PowerCenter metadata objects and stores their values in the
Metadata Manager warehouse.
Metadata Manager truncates the value of an object property if the value is stored in multiple records.
Metadata Manager extracts the value from the first record only. For example, a PowerCenter repository
resides on an IBM DB2 for LUW database. The PowerCenter repository contains an SQL override that is
5,000 characters long.
When you create the SQL override in PowerCenter, PowerCenter stores the SQL override metadata in three
records in an IBM DB2 for LUW database table. Since the IBM DB2 for LUW database can store up to 2,000
characters for each field, PowerCenter splits the 5,000-character SQL override metadata among three
records. The first record contains the first 2,000 characters, the second record contains the next 2,000
characters, and the third record contains 1,000 characters.
Since Metadata Manager only extracts the first record for any object property, Metadata Manager only
extracts the first 2,000 characters of SQL override metadata from the IBM DB2 for LUW database table.
The following table provides the maximum number of characters extracted for a PowerCenter metadata
object property contained in the given database:
Database Maximum Characters Extracted
IBM DB2 for LUW 2,000 characters
Microsoft SQL Server 4,000 characters
Oracle 2,000 characters
Sybase 4,000 characters
Record Filters and Rejects
While loading PowerCenter sessions into the Metadata Manager warehouse, Metadata Manager rejects or
filters the records if it cannot resolve their corresponding database columns.
Metadata Manager filters records that meet any of the following conditions:
•The session instance connection is not assigned to a database schema.
•The connection assignment is valid, Metadata Manager cannot resolve the database column, and an SQL
override exists on the reader transformation, such as Lookup or Source Qualifier transformation.
Metadata Manager rejects records that meet any of the following conditions:
•The session instance connection is assigned to a schema, the Source Qualifier transformation does not
have an SQL override, and Metadata Manager cannot resolve the database columns.
•Metadata Manager cannot resolve the PowerCenter target structure and the corresponding database
columns.
Scope for Data Lineage
Metadata Manager supports data lineage for the following objects:
•Local shortcuts, not global shortcuts
•Relational connections, not application connections
•Lookup transformations and source instances
120 Chapter 7: Data Integration Resources
•Structure-level lineage for each transformation
•Connected and unconnected transformations
SQL Inline Views
An SQL inline view is a SELECT statement in the FROM clause of another SELECT statement. For example,
the following SQL includes an inline view:
SELECT ename
FROM (SELECT ename
FROM emp)
A PowerCenter Source Qualifier or Lookup transformation can include an SQL override that refers to a
database table, view, or synonym in an inline view. If you create connection assignments between the
relational database and PowerCenter resources, data lineage for the database table, view, or synonym
displays the links between the relational database objects and the PowerCenter transformations.
Note: SQL inline views are also referred to as Common Table Expressions.
Case Sensitivity
PowerCenter does not indicate if connections and databases are case sensitive. Metadata Manager assumes
that the database storing the PowerCenter metadata is not case sensitive. Metadata Manager stores the
structure name and property name in uppercase letters.
Flat Files
PowerCenter can use flat files as sources, targets, and lookups in mappings. Metadata Manager displays the
following types of flat files from a PowerCenter source repository in the metadata catalog:
•XML
•VSAM
•Delimited
•Fixed-width
In PowerCenter, you can assign an Integration Service to run the workflow. The metadata catalog displays
flat file sources and targets from a PowerCenter repository under the corresponding Integration Service. If the
flat file is located in a repository with no Integration Service configured, the metadata catalog displays the flat
file under the object called “Unknown Service.”
Metadata Manager displays field-level details in data lineage for columns in delimited and fixed-width flat
files. Metadata Manager determines the columns in the delimited and fixed-width flat files using source and
target definitions in PowerCenter. Since XML and VSAM flat files do not contain columns, Metadata Manager
does not display field-level details in data lineage for these flat file types.
Command Tasks
A PowerCenter Command task can include multiple commands. Each command can be named or unnamed.
The metadata catalog lists any unnamed command with the name "CommandLineTask<number>" where
<number> represents the order of the unnamed command in the Command task.
For example, a Command task includes one command named "FirstCommand" and two unnamed
commands. The metadata catalog lists the commands with the following names:
•FirstCommand
•CommandLineTask1
PowerCenter Resources 121
•CommandLineTask2
Unique Constraint Errors
When you load a PowerCenter resource, the S_M_ELMNT_ATTR_EXTRACT session can reject rows due to
unique key constraint errors. The PowerCenter SourceDefinition object contains duplicate attribute names.
For example, it contains duplicate Tree Name, Set ID, Effective Date, and Set Control Value attributes for the
SourceDefinition object. Metadata Manager extracts only one of the values.
Mapplets
If you launch data lineage on a mapplet port for a mapplet that does not have any instances in PowerCenter
mappings, Metadata Manager displays the mapplet and the mapplet ports in the data lineage diagram.
Metadata Manager does not display links from the mapplet ports to other PowerCenter objects. If you launch
lineage on a mapplet port, and the mapplet has instances in PowerCenter mappings, Metadata Manager
displays the links from the mapplet input and output ports to the other PowerCenter objects.
122 Chapter 7: Data Integration Resources

CHAPTER 8
Data Modeling Resources
This chapter includes the following topics:
•Embarcadero ERStudio, 123
•ERwin, 129
•SAP PowerDesigner, 140
•Adding or Removing Metadata Files for a Resource, 143
•Reference for Data Modeling Resources, 144
Embarcadero ERStudio
Embarcadero ERStudio is a data modeling tool used to create and maintain data models.
You can create and configure an Embarcadero ERStudio resource to extract Embarcadero ERStudio
metadata. Metadata Manager extracts Embarcadero ERStudio logical and physical models from a metadata
file. Before you create an Embarcadero ERStudio resource, you export Embarcadero ERStudio models to
metadata files. When you create the resource, you specify the metadata file.
Configuring Embarcadero ERStudio
Before you create an Embarcadero ERStudio resource, you must configure the metadata source. If you do
not correctly configure the metadata source, the metadata load can fail or the metadata can be incorrectly
loaded in the Metadata Manager warehouse.
To configure Embarcadero ERStudio, complete the following tasks:
•Install the Metadata Manager Agent.
•Export models to metadata files.
Install the Metadata Manager Agent
The Metadata Manager Agent is a Windows-based program that Metadata Manager uses to access metadata
sources and extract source metadata. By default, the Metadata Manager Agent runs on the Windows nodes
where the Metadata Manager Service runs.
To extract metadata from Embarcadero ERStudio, you must install the Metadata Manager Agent separately
on a Windows machine. The Metadata Manager Agent and Embarcadero ER/Studio Data Architect must be
on the same machine.
123

Related Topics:
•“Step 2. Install the Metadata Manager Agent” on page 22
Export Models to Metadata Files
To extract metadata from Embarcadero ERStudio, you export models from Embarcadero ERStudio to
metadata files. Metadata Manager extracts the models from the exported metadata files.
Metadata Manager extracts physical and logical models that are set to Relational notation. Before you export
metadata, use the ERStudio client tool to set the physical and logical models that you want to extract to
Relational notation.
Use the ERStudio client tool to export the metadata to a .dm1 file. The file can contain one logical model and
any number of physical models. Metadata Manager extracts the logical model and the physical model that is
created from the logical model. Metadata Manager displays all objects extracted from logical and physical
models under the logical model.
Creating an Embarcadero ERStudio Resource
Before you create an Embarcadero ERStudio resource, export the Embarcadero ERStudio models to
metadata files.
1. On the Load tab, click Actions > New Resource.
The Resource Selection window appears.
2. Click Data Modeling > Embarcadero ERStudio.
3. Click Next.
The Properties page appears.
4. Enter the following information:
Property Description
Name Name for the resource. The resource appears in the Resources panel with this name. The name
must be unique and have from one through 256 characters. It cannot include the following characters:
/ \ : * ' ? " < > | [ ]
Description Description for the resource. Description cannot exceed 4000 characters.
Hide in Summary
Lineage
Hides the resource in the summary view of data lineage diagrams.
Enable this option to hide the resource and its child objects in the summary view. Disable this option
to display the resource and its child objects in the summary view.
Default is disabled.
5. Click Next.
The Configuration page appears.
6. Enter the configuration properties.
7. Click Test Connection to validate the source file configuration.
Metadata Manager validates the Metadata Manager Agent URL. If you configured Metadata Manager to
use the latest source file, Metadata Manager also validates that the source file exists in the specified
path.
124 Chapter 8: Data Modeling Resources

If Metadata Manager cannot validate the source file configuration, an error message appears. Correct
any error and test the connection again.
8. Click Next.
The Schedules page appears.
9. To add a schedule, select Attach a Schedule and select a schedule in the Schedule list.
If you have not created a schedule, you can assign a schedule to a resource after you create the
resource.
10. Click Finish.
The resource appears in the Resources panel on the Load tab.
Embarcadero ERStudio Configuration Properties
Update the configuration properties when you create or edit an Embarcadero ERStudio resource.
The following table describes the configuration properties:
Property Description
Agent URL Host name and port number of the Metadata Manager Agent. You can use the Metadata Manager Agent
installed on any machine.
Source system
version
Name and version of the resource.
Always use latest
source files
Metadata Manager uses the metadata source file in the location you provide each time you load the
resource. If you enable this option, the path to the file must include an absolute path that is accessible
from the Metadata Manager Agent machine. If you disable this option, Metadata Manager copies the
metadata source file to the Metadata Manager application directory when you finish configuring the
resource. Each time you load the resource, Metadata Manager uses the copied metadata source file in the
Metadata Manager application directory.
Model selection Type of model from which metadata is extracted. DM1 files have multiple independent models.
Select one of the following options:
-Logical model. Select this option to extract metadata from logical models.
-Physical model. Select for physical models and when the DM1 file has a combination of physical and
logical models. You must specify the name of the model.
-All models. Select this option to extract metadata from logical and physical models.
Default is Logical model.
Physical model
name
Name of the physical model from which you want to extract metadata.
Skip UDP
extraction
Prevents Metadata Manager from importing attachments, also called user-defined properties (UDPs), from
ERStudio. If you enable this option, Metadata Manager does not import UDPs and does not display the
Import UDPs property. Default is disabled.
Embarcadero ERStudio 125

Property Description
Import UDPs Defines how Metadata Manager imports attachments, also called user-defined properties (UDPs), from
ERStudio. An attachment usually has a default value. The objects bound to the attachment can override it
with an explicit value or reuse the default value.
Select one of the following options to specify how to import property definitions and values:
-As metadata. Imports explicit values as Property Value objects. Default values are not imported. This
option keeps the default value on the Property Type.
-As metadata, migrate default values. Imports explicit and default values as Property Value objects.
-In description, migrate default values. Appends the property name and value to the object description
property for both explicit and implicit values.
-Both, migrate default values. Imports the UDP value as metadata and in the object description property.
Default is as metadata.
Import owner
schemas
Imports owner schemas. Select one of the following options:
-True. Imports owner schemas for tables, views, and other database objects. Select for physical models
and when the DM1 file has a combination of physical and logical models.
-False. Ignores owner schemas for tables, views, and other database objects. Select for logical models.
Default is true.
Auto assign
connections
Metadata Manager configures connection assignments to relational database resource types during the
resource load. If you disable this option, configure connection assignments in the resource properties after
you create the resource.
File The DM1 file that you want to import.
Reference
After you create and load an ERStudio resource, you can view and run data lineage on the metadata objects
that Metadata Manager extracted.
Objects Extracted
The following table lists the physical / logical objects that Metadata Manager extracts from Embarcadero
ERStudio:
•AliasClassifier
•Attachment
•AttachmentType
•Attribute
•BufferPool
•CandidateKey
•Categorization
•Column
•Connection
•ConnectionSchema
•Constraint
•Database
•DatabaseInstance
126 Chapter 8: Data Modeling Resources
•DataFlow
•DataMappingModel
•Default
•DiagramContent
•DiagramFolder
•Domain
•Entity
•ER_Studio
•FileDirectory
•FlatFileModel
•FlatFileSource
•Folder
•ForeignKey
•IdentifyingRelationship
•Identity
•Index
•IndexMember
•InputTable
•LogicalDataModel
•LogicalDiagram
•LogicalModel
•LogicalRule
•LogicalSource
•LogicalSubmodel
•MainLogicalModel
•MainPhysicalModel
•MappingDataAttribute
•NonIdentifyingRelationship
•NonSpecificRelationship
•Note
•OtherSource
•OutputTable
•Parameter
•Partition
•PhysicalDataModel
•PhysicalDiagram
•PhysicalExtension
•PhysicalModel
•PhysicalObject
Embarcadero ERStudio 127
•PhysicalRule
•PhysicalSource
•PhysicalSubmodel
•PrimaryKey
•PrimaryKeyAttribute
•PrimaryKeyColumn
•Project
•ReferenceValueList
•Reference Value Range
•RelationshipEnd1
•RelationshipEnd2
•Repository
•Schema
•Sequence
•Shape
•SourceTable
•StorageGroup
•StoredProcedure
•SuperTypeRelationship
•Synonym
•SynonymColumn
•Table
•TableSpace
•Transformation
•Trigger
•View
•TypeValue
•UserDatatype
•View
•ViewColumn
•ViewRelationship
•Volume
•XmlSchema
128 Chapter 8: Data Modeling Resources
ERwin
ERwin is a tool that you use to create and maintain logical or physical data models of relational databases. In
Metadata Manager, you can create and configure an ERwin resource to extract and represent metadata from
data models in ERwin.
Metadata Manager can extract ERwin metadata through the following sources:
Source repository
Metadata Manager connects to the ERwin Data Modeler repository to extract metadata.
Source file
Metadata Manager extracts ERwin metadata from a metadata file that was previously exported from
ERwin.
Configuring ERwin
Before you create an ERwin resource, you must configure the metadata source. If you do not correctly
configure the metadata source, the metadata load can fail or the metadata can be incorrectly loaded in the
Metadata Manager warehouse.
To configure ERwin, complete the following tasks:
•Install the Metadata Manager Agent.
•Enable the Metadata Manager Agent to interact with desktop for ERwin 7.x, 8.x, and 9.x.
•Export models to metadata files.
Install the Metadata Manager Agent
The Metadata Manager Agent is a Windows-based program that Metadata Manager uses to access metadata
sources and extract source metadata. By default, the Metadata Manager Agent runs on the Windows nodes
where the Metadata Manager Service runs.
Install the Metadata Manager Agent separately on a Windows machine when ERwin is not on the same
machine as the Metadata Manager Service.
The Metadata Manager Agent has the following installation requirements based on the ERwin source type:
ERwin repository format XML file or ERwin source file
You can use the Metadata Manager Agent installed on any machine. If you configure Metadata Manager
to use the latest source files, the location of the source files must be accessible from the Metadata
Manager Agent machine.
ERwin Model Manager repository
To extract metadata from ERwin, the Metadata Manager Agent connects to the ERwin Data Modeler
Workgroup Edition mart through the ERwin Data Modeler API. Therefore, the Metadata Manager Agent,
ERwin client, and ERwin repository database client must be on the same machine. The database client
version must match the version of the database server that hosts the ERwin Model Manager repository.
Additionally, the ERwin client must be able to connect to and open models in the ERwin Model Manager
repository with the configuration properties that you specify when you configure the ERwin resource.
ERwin 129

Related Topics:
•“Step 2. Install the Metadata Manager Agent” on page 22
Enable the Metadata Manager Agent to Interact with the Desktop
If you run the Metadata Manager Agent as a service, you must enable the Metadata Manager Agent to
interact with the desktop.
You must enable the Metadata Manager Agent to interact with the desktop for the following metadata
sources:
•Business Objects
•Microstrategy
•ERwin 7.x, 8.x, and 9.x
1. From the Windows Start menu, click Administrative Tools > Services.
2. Double-click Metadata Manager Agent.
The Metadata Manager Agent <Version> Properties dialog box appears.
3. Click the Log On tab.
4. Under Local System Account, click Allow service to interact with desktop.
5. Click OK.
Export Models to Metadata Files
You export models from ERwin to metadata files. Metadata Manager extracts ERwin metadata from the
metadata files that you export. When you configure the connection to the ERwin source repository in
Metadata Manager, you specify the metadata file.
For ERwin 7.x, 8.x, or 9.x Data Modeler (File), Metadata Manager can extract metadata from the following file
types:
•.erwin
•.xml
Note: Save the XML file in the repository standard format from ERwin Data Modeler.
Creating an ERwin Resource
Before you create an ERwin resource, configure the ERwin source.
Note: If you create an ERwin 9.0 (Single Model from Mart) resource, the Mart database must be a Microsoft
SQL Server database. You cannot create an ERwin 9.0 (Single Model from Mart) resource if the Mart
database is an Oracle database. Oracle Mart databases are supported with ERwin 9.1 and later.
1. On the Load tab, click Actions > New Resource.
The Resource Selection window appears.
2. Click Data Modeling > ERwin.
3. Click Next.
The Properties page appears.
130 Chapter 8: Data Modeling Resources

4. Enter the following information:
Property Description
Name Name for the resource. The resource appears in the Resources panel with this name. The name
must be unique and have from one through 256 characters. It cannot include the following characters:
/ \ : * ' ? " < > | [ ]
Description Description for the resource. Description cannot exceed 4000 characters.
Hide in Summary
Lineage
Hides the resource in the summary view of data lineage diagrams.
Enable this option to hide the resource and its child objects in the summary view. Disable this option
to display the resource and its child objects in the summary view.
Default is disabled.
5. Click Next.
The Configuration page appears.
6. Enter the configuration properties.
7. Click Test Connection.
If the source system version is ERwin 7.x Data Modeler (Model Manager), ERwin 7.3 Data Modeler
(Model Manager on Oracle), or ERwin 7.3 Data Modeler (Model Manager on SQL Server), Metadata
Manager tests the connection to ERwin Data Modeler and validates the Metadata Manager Agent URL.
If the source system version is any other ERwin version, Metadata Manager validates the Metadata
Manager Agent URL. If you configured Metadata Manager to use the latest source file, Metadata
Manager also validates that the source file exists in the specified path. If the XML source file is uploaded
to Metadata Manager, Metadata Manager validates that the file is compatible with the resource type and
version.
If Metadata Manager cannot validate the connection, an error message appears. Correct any error and
test the connection again.
8. Click Next.
The Schedules page appears.
9. To add a schedule, select Attach a Schedule and select a schedule in the Schedule list.
If you have not created a schedule, you can assign a schedule to a resource after you create the
resource.
10. Click Finish.
The resource appears in the Resources panel on the Load tab.
ERwin 131

ERwin 7.x, 8.x, and 9.x (File) Configuration Properties
Update the configuration properties when you create or edit an ERwin 7.x, 8.x, or 9.x (File) resource.
The following table describes the configuration properties:
Property Description
Agent URL Host name and port number of the Metadata Manager Agent.
Source system
version
Version of ERwin that you used to export the metadata source file or the version of the ERwin Data
Modeler to which you want to connect.
Always use latest
source files
The Metadata Manager Agent uses the metadata source file in the location you provide each time you load
the resource. If you enable this option, the path to the file must include an absolute path that is accessible
from the Metadata Manager Agent machine. If you disable this option, the Metadata Manager Agent copies
the metadata source file to the Metadata Manager application directory when you finish configuring the
resource. Each time you load the resource, the Metadata Manager Agent uses the copied metadata source
file in the Metadata Manager application directory.
Import UDPs Specifies how the Metadata Manager Agent imports property definitions and values for user-defined
properties (UDPs) from ERwin. In ERwin, a user-defined property is a property definition object that has a
default value. The object to which the UDP applies can have an explicit value or no assigned value. If it
has no assigned value, ERwin assigns the default value of the property definition to the UDP.
Select one of the following options to specify how to import property definitions and values:
-As metadata. Imports explicit values as Property Value objects. This option keeps the default value on
the Property Type. Implicit values are not imported.
-As metadata, migrate default values. Imports explicit and implicit values as Property Value objects.
-In description, migrate default values. Appends the property name and value to the object description
property, for explicit and implicit values.
-Both, migrate default values. Imports the UDP value as metadata and in the object description.
Import
relationship
name
Specifies how to import the relationship names from ERwin. Select one of the following options:
-From relationship name. Use the relationship name property.
-From relationship description. Use the relationship description property. Use this option to give more
descriptive names to relationships.
Default is from relationship name.
Import column
order from
Specifies how to import the order of columns in tables. Specify one of the following values:
-Column order. Imports based on the order of the columns displayed in the ERwin physical view.
-Physical order. Imports based on the order of the columns in the database, as generated in the SQL
DLL.
Default is physical order.
Import owner
schemas
Imports owner schemas. Specify one of the following values:
-True. Imports the owner schema for tables, views, and other database objects
-False. Ignores the owner schema for all database objects.
Default is true.
Import diagrams Specifies how the Metadata Manager Agent imports diagrams. Specify one of the following values:
-None. The Metadata Manager Agent imports no diagrams.
-Current view. The Metadata Manager Agent imports the current view of each diagram.
-All. The Metadata Manager Agent imports diagrams twice, once for the logical view and once for the
physical view.
Default is current view.
132 Chapter 8: Data Modeling Resources

Property Description
Move entities to
subject areas
Specifies whether to move entities to user-defined subject areas. Set this option to true if the ERwin
modeler uses subject areas as conventional (UML) design packages with their own namespace and if each
entity belongs to one subject area.
Specify one of the following values:
-True. The Metadata Manager Agent places the entities in the corresponding package. It places other
entities under the model.
-False. The Metadata Manager Agent does not move entities to subject areas.
Default is false.
Auto assign
connections
The Metadata Manager Agent configures connection assignments to relational database resource types
during the resource load. If you disable this option, you must configure connection assignments in the
resource properties after you create the resource.
File ERX, ER1, erwin, or XML source file you exported from ERwin.
Note: To parse the ER1 and erwin files, install ERwin on the same machine on which the Metadata
Manager Agent runs.
ERwin 9.x (Single Model from Mart) Configuration Properties
Update the configuration properties when you create or edit an ERwin 9.x (Single Model from Mart) resource.
The following table describes the configuration properties:
Property Description
Agent URL Host name and port number of the Metadata Manager Agent.
Source system
version
Version of ERwin that you used to export the metadata source file or the version of the ERwin Data
Modeler to which you want to connect.
Server name Name of the Mart server to which you want to connect, for example,
localhost
.
Server port Network port number for the Mart server.
Use IIS Type of connection to the Mart server if it uses Microsoft IIS web server. Specify one of the following
values:
-True. The Metadata Manager Agent uses IIS to connect to the Mart server.
-False. The Metadata Manager Agent uses the port number to connect to the Mart server.
Default is false.
Use SSL Type of connection to the Mart server. Specify one of the following values:
-True. The Metadata Manager Agent uses a secure connection to the Mart server.
-False. The Metadata Manager Agent uses a standard HTTP connection.
Default is false.
Application name Name of the application on the Mart server to which you want to connect.
ERwin 133

Property Description
Authentication Type of authentication to use for the ERwin Data Modeler user name and password. Select one of the
following options:
-Database authentication. Use native database authentication to authenticate the user name and
password.
-Windows authentication. Use Windows authentication for the database user name and password. Use
this option for Oracle and Microsoft SQL Server.
Default is database authentication.
User name Database user name for ERwin Data Modeler.
Leave this field blank if you use Windows authentication.
Password Password for the ERwin Data Modeler user name.
Leave this field blank if you use Windows authentication.
Model Model locator string for ERwin Data Modeler. Use the following format for Microsoft SQL Server:
mmart://<database name>/<path>/<model name>
Use the following format for Oracle:
mmart://<path>/<model name>
Note: The model path is case sensitive. Specify the correct value based on the model path used in CA
ERwin Data Modeler.
Import UDPs Specifies how the Metadata Manager Agent imports property definitions and values for user-defined
properties (UDPs) from ERwin. In ERwin, a user-defined property is a property definition object that has
a default value. The object to which the UDP applies can have an explicit value or no assigned value. If it
has no assigned value, ERwin assigns the default value of the property definition to the UDP.
Select one of the following options to specify how to import property definitions and values:
-As metadata. Imports explicit values as Property Value objects. This option keeps the default value on
the Property Type. Implicit values are not imported.
-As metadata, migrate default values. Imports explicit and implicit values as Property Value objects.
-In description, migrate default values. Appends the property name and value to the object description
property, for explicit and implicit values.
-Both, migrate default values. Imports the UDP value as metadata and in the object description.
Import relationship
name
Specifies how to import the relationship names from ERwin. Select one of the following options:
-From relationship name. Use the relationship name property.
-From relationship description. Use the relationship description property. Use this option to give more
descriptive names to relationships.
Default is from relationship name.
Import column
order from
Specifies how to import the order of columns in tables. Specify one of the following values:
-Column order. Imports based on the order of the columns displayed in the ERwin physical view.
-Physical order. Imports based on the order of the columns in the database, as generated in the SQL
DLL.
Default is physical order.
Import owner
schemas
Imports owner schemas. Specify one of the following values:
-True. Imports the owner schema for tables, views, and other database objects
-False. Ignores the owner schema for all database objects.
Default is true.
134 Chapter 8: Data Modeling Resources

Property Description
Import diagrams Specifies how the Metadata Manager Agent imports diagrams. Specify one of the following values:
-None. The Metadata Manager Agent imports no diagrams.
-Current view. The Metadata Manager Agent imports the current view of each diagram.
-All. The Metadata Manager Agent imports diagrams twice, once for the logical view and once for the
physical view.
Default is current view.
Move entities to
subject areas
Specifies whether to move entities to user-defined subject areas. Set this option to true if the ERwin
modeler uses subject areas as conventional (UML) design packages with their own namespace and if
each entity belongs to one subject area.
Specify one of the following values:
-True. The Metadata Manager Agent places the entities in the corresponding package. It places other
entities under the model.
-False. The Metadata Manager Agent does not move entities to subject areas.
Default is false.
Auto assign
connections
The Metadata Manager Agent configures connection assignments to relational database resource types
during the resource load. If you disable this option, you must configure connection assignments in the
resource properties after you create the resource.
ERwin 7.x (Model Manager) and 8.x (Single Model from Mart) Configuration
Properties
Update the configuration properties when you create or edit an ERwin 7.x (Model Manager) or ERwin 8.x
(Single Model from Mart) resource.
The following table describes the configuration properties:
Property Description
Agent URL Host name and port number of the Metadata Manager Agent.
Source system
version
Version of ERwin that you used to export the metadata source file or the version of the ERwin Data
Modeler to which you want to connect.
Database type Database connection type to connect to the Data Modeler.
Database can be Microsoft SQL Server (version 7, 2000, 2005, and 2008), Oracle, or Sybase ASE.
For more information about supported databases and libraries, see the ERwin documentation.
Database server Database server to which you want to connect.
For Microsoft SQL Server or Sybase ASE, specify the server DNS address. For example:
localhost
.
You can also specify a named Microsoft SQL Server instance like:
servername\namedinstance
For Oracle, specify the appropriate Oracle connection string you want to use. For example:
(DESCRIPTION = (ADDRESS_LIST = (ADDRESS = (PROTOCOL = TCP)(HOST =
127.0.0.1)(PORT = 1521)) ) (CONNECT_DATA = (SERVICE_NAME = ORA90) ) )
Database name Name of the database. Not required for Oracle.
ERwin 135

Property Description
Authentication Type of authentication to use for the ERwin Data Modeler user name and password. Select one of the
following options:
-Database authentication. Use native database authentication to authenticate the user name and
password.
-Windows authentication. Use Windows authentication for the database user name and password. Use
this option for Oracle and Microsoft SQL Server.
Default is database authentication.
User name Database user name for ERwin Data Modeler.
Leave this field blank if you use Windows authentication.
Password Password for the ERwin Data Modeler user name.
Leave this field blank if you use Windows authentication.
Model Model locator string for ERwin Data Modeler. Use the following format for Microsoft SQL Server:
mmart://<database name>/<path>/<model name>
Use the following format for Oracle:
mmart://<path>/<model name>
Note: The model path is case sensitive. Specify the correct value based on the model path used in CA
ERwin Data Modeler.
Import UDPs Specifies how the Metadata Manager Agent imports property definitions and values for user-defined
properties (UDPs) from ERwin. In ERwin, a user-defined property is a property definition object that has a
default value. The object to which the UDP applies can have an explicit value or no assigned value. If it
has no assigned value, ERwin assigns the default value of the property definition to the UDP.
Select one of the following options to specify how to import property definitions and values:
-As metadata. Imports explicit values as Property Value objects. This option keeps the default value on
the Property Type. Implicit values are not imported.
-As metadata, migrate default values. Imports explicit and implicit values as Property Value objects.
-In description, migrate default values. Appends the property name and value to the object description
property, for explicit and implicit values.
-Both, migrate default values. Imports the UDP value as metadata and in the object description.
Import relationship
name
Specifies how to import the relationship names from ERwin. Select one of the following options:
-From relationship name. Use the relationship name property.
-From relationship description. Use the relationship description property. Use this option to give more
descriptive names to relationships.
Default is from relationship name.
Import column
order from
Specifies how to import the order of columns in tables. Specify one of the following values:
-Column order. Imports based on the order of the columns displayed in the ERwin physical view.
-Physical order. Imports based on the order of the columns in the database, as generated in the SQL
DLL.
Default is physical order.
Import owner
schemas
Imports owner schemas. Specify one of the following values:
-True. Imports the owner schema for tables, views, and other database objects
-False. Ignores the owner schema for all database objects.
Default is true.
136 Chapter 8: Data Modeling Resources

Property Description
Import diagrams Specifies how the Metadata Manager Agent imports diagrams. Specify one of the following values:
-None. The Metadata Manager Agent imports no diagrams.
-Current view. The Metadata Manager Agent imports the current view of each diagram.
-All. The Metadata Manager Agent imports diagrams twice, once for the logical view and once for the
physical view.
Default is current view.
Move entities to
subject areas
Specifies whether to move entities to user-defined subject areas. Set this option to true if the ERwin
modeler uses subject areas as conventional (UML) design packages with their own namespace and if
each entity belongs to one subject area.
Specify one of the following values:
-True. The Metadata Manager Agent places the entities in the corresponding package. It places other
entities under the model.
-False. The Metadata Manager Agent does not move entities to subject areas.
Default is false.
Auto assign
connections
The Metadata Manager Agent configures connection assignments to relational database resource types
during the resource load. If you disable this option, you must configure connection assignments in the
resource properties after you create the resource.
Reference
After you create and load an ERwin resource, you can view and run data lineage on the metadata objects
that Metadata Manager extracted.
Related Topics:
•“Reference for Data Modeling Resources” on page 144
Domains
In ERwin, you can define domains or use system-defined domains. Each domain has properties that you can
apply to one or more columns. You can use domains to reuse a given set of properties for multiple columns.
In ERwin, domains have hierarchies. The system-defined domains are the top-level domains of the hierarchy.
You can create sub-levels in the domain hierarchy by creating user-defined domains.
You can also apply validation rules to domains in ERwin.
Related Topics:
•“Domain-to-Validation Rule Association” on page 146
System-Defined Domains
When you create a model in ERwin, ERwin creates the following system-defined domains:
•String
•BLOB
•Number
•Datetime
•Default
ERwin 137
Each of these domains are the top-level domains in the domain hierarchy. All top-level parent domains are
system-defined domains in ERwin.
Since Metadata Manager does not extract system-defined domains, the system-defined domains do not
appear in the domain hierarchy in the metadata catalog.
Domain Hierarchy
When you create a user-defined domain in ERwin, you must assign the user-defined domain to a parent
domain.
Metadata Manager displays the domain hierarchy for user-defined domains, since Metadata Manager does
not extract system-defined domains.
The ParentDomain association indicates that domains are associated.
To view the ParentDomain association:
1. In the metadata catalog on the Browse page, click the ERwin domain instance in the metadata catalog.
2. In the Details section, click the Relationships tab.
The Relationships tab displays all relationships attached to the selected domain.
For ParentDomain associations, each domain in the Relationships tab is the parent domain of the
domain selected in the metadata catalog.
Alternate and Inversion Keys
ERwin uses the term Alternate key for a unique index and Inversion key for a non-unique index.
If you do not select the Physical Only option when setting properties for an Inversion key in ERwin, Metadata
Manager treats the inversion key as a unique key or an alternate key.
Index UDP
Metadata Manager extracts user-defined properties (UDPs) for objects in the Primary Key or Unique Key
class that are associated with the index. Metadata Manager does not extract UDPs for objects of the Index
class.
Relationship Description
ERwin stores relationship definitions as notes in an XML file. Metadata Manager extracts these definitions
and loads them as a description element property ERwinElementDescription, not as the description class
attribute InfaDescription.
To retrieve a relationship description:
1. In the Catalog view on the Browse page, click a relationship instance for an ERwin resource.
2. In the Details section, click the Relationships tab.
3. If the full description does not appear in the Relationships tab, click the link in the Name column
corresponding to the object in the ERwinElementDescription class to display the full description of the
relationship.
138 Chapter 8: Data Modeling Resources

Objects Extracted
The following table lists the objects that Metadata Manager extracts:
Model Type Objects Extracted
Logical -Entity
-Column
-Subject area
-Relationship
-User-defined property (UDP)
Physical -Alias Column
-Argument
-Attribute / Column
-Candidate Key Group
-Database Schema
-Default Value
-ER Diagram
-Foreign Key Group
-Index
-Index Member
-Model
-Primary Key Attribute / Column
-Relationship
-Relationship End
-Sequence
-Stored Procedure
-Subject Area
-Synonym
-Table / Entity
-Trigger
-UDPs
-User-Defined
-View
-View Column
-View Relationship
Data Lineage
The following table describes the ERwin objects for which Metadata Manager displays data lineage:
Data Lineage Type Description
Column-level lineage Lineage from view columns to table and view columns.
Lineage between resources Lineage between the following ERwin objects and other resources:
-Table
-View
-Procedure
-Trigger
-Synonym
ERwin 139

SAP PowerDesigner
You can create and configure an SAP PowerDesigner resource to extract SAP PowerDesigner metadata.
SAP PowerDesigner is a data modeling tool used to create and maintain data models.
Before you create an SAP PowerDesigner resource, you export SAP PowerDesigner models to metadata
files. When you create the resource, you specify the metadata file. Metadata Manager extracts the SAP
PowerDesigner models from the metadata file.
Configuring SAP PowerDesigner
Before you create an SAP PowerDesigner resource, you must configure the metadata source. If you do not
correctly configure the metadata source, the metadata load can fail or the metadata can be incorrectly loaded
in the Metadata Manager warehouse.
To configure SAP PowerDesigner, export models to metadata files.
Export Models to Metadata Files
To extract metadata from SAP PowerDesigner, you export models from SAP PowerDesigner to metadata
files. Use the SAP PowerDesigner client tool to save the model to a .pdm file in XML format. Metadata
Manager extracts SAP PowerDesigner models from the exported metadata files.
Creating an SAP PowerDesigner Resource
Before you create an SAP PowerDesigner resource, export the SAP PowerDesigner models to metadata
files.
1. On the Load tab, click Actions > New Resource.
The Resource Selection window appears.
2. Click Data Modeling > SAP PowerDesigner.
3. Click Next.
The Properties page appears.
4. Enter the following information:
Property Description
Name Name for the resource. The resource appears in the Resources panel with this name. The name
must be unique and have from one through 256 characters. It cannot include the following characters:
/ \ : * ' ? " < > | [ ]
Description Description for the resource. Description cannot exceed 4000 characters.
Hide in Summary
Lineage
Hides the resource in the summary view of data lineage diagrams.
Enable this option to hide the resource and its child objects in the summary view. Disable this option
to display the resource and its child objects in the summary view.
Default is disabled.
5. Click Next.
The Configuration page appears.
6. Enter the configuration properties.
140 Chapter 8: Data Modeling Resources

7. Click Test Connection to validate the source file configuration.
Metadata Manager validates the Metadata Manager Agent URL. If you configured Metadata Manager to
use the latest source file, Metadata Manager also validates that the source file exists in the specified
path.
If Metadata Manager cannot validate the source file configuration, an error message appears. Correct
any error and test the connection again.
8. Click Next.
The Schedules page appears.
9. To add a schedule, select Attach a Schedule and select a schedule in the Schedule list.
If you have not created a schedule, you can assign a schedule to a resource after you create the
resource.
10. Click Finish.
The resource appears in the Resources panel on the Load tab.
SAP PowerDesigner Configuration Properties
Update the configuration properties when you create or edit an SAP PowerDesigner resource. The properties
vary based on the SAP PowerDesigner version.
The following table describes the configuration properties:
Property Version Description
Agent URL All Host name and port number of the Metadata Manager Agent. You can use the
Metadata Manager Agent installed on any machine.
Source system
version
All Version of SAP PowerDesigner to which you want to connect.
Always use latest
source files
All Metadata Manager uses the metadata source file in the location you provide each
time you load the resource. If you enable this option, the path to the file must
include an absolute path that is accessible from the Metadata Manager Agent
machine. If you disable this option, Metadata Manager copies the metadata
source file to the Metadata Manager application directory when you finish
configuring the resource. Each time you load the resource, Metadata Manager
uses the copied metadata source file in the Metadata Manager application
directory.
Apply binary
characters filter
SAP PowerDesigner
PDM 7.5 to 16.x
Removes binary characters that are not valid from the PDM XML import file. The
PowerDesigner tool might generate XML files with binary characters that cannot
be processed in an XML file. Select one of the following options:
-True. Remove binary characters that are not valid. Metadata Manager removes
the binary characters that are not valid before it extracts metadata from the
file.
-False. Do not remove the characters that are not valid.
Default is true.
SAP PowerDesigner 141

Property Version Description
Import UDPs SAP PowerDesigner
PDM 7.5 to 16.x
Defines how Metadata Manager imports property definitions and values for user-
defined properties (UDPs) from SAP PowerDesigner. A user-defined property is a
property definition object that has a default value. The object to which the UDP
applies can have an explicit value or no assigned value. If it has no assigned
value, SAP PowerDesigner assigns the default value of the property definition to
the UDP.
Select one of the following options to specify how to import property definitions
and values:
-As metadata. Imports explicit values as Property Value objects. This option
keeps the default value on the Property Type. Implicit values are not imported.
-As metadata, migrate default values. Imports explicit and implicit values as
Property Value objects.
-In description, migrate default values. Appends the property name and value to
the object description property for both explicit and implicit values.
-Both, migrate default values. Imports the UDP value as metadata and in the
object description property.
Append
volumetric
information to the
description field
SAP PowerDesigner
PDM 7.5 to 16.x
Imports volumetric information and appends it to the description property. Specify
one of the following values:
-True. Appends volumetric information to the description property.
-False. Ignores volumetric information.
Default is false.
Remove text
formatting
SAP PowerDesigner
PDM 7.5 to 16.x
Remove Rich Text Formatting (RTF) from annotations. SAP PowerDesigner
versions 7.0 to 7.5 store annotations as plain text, while versions 8 and later use
RTF. Specify one of the following values:
-True. Select for version 7.0 to 7.5.
-False. Select for version 8 and later.
Default is true.
Reverse role
names
SAP PowerDesigner
PDM 7.5 to 16.x
Reverses the role names for each relationship in the model. Specify one of the
following values:
-True. Swaps the role names.
-False. Does not swap the role names.
Default is false.
Import
disconnected
objects
SAP PowerDesigner
PDM 6.1.x
Imports disconnected objects in SAP PowerDesigner.
In SAP PowerDesigner, you can delete the symbol that represents an object in a
view without deleting the object. As a result, a model might contain invisible
objects that are inconsistent with other objects.
Specify one of the following values:
-True. Imports disconnected objects and places them in the main package.
-False. Ignores disconnected objects.
Default is false.
Encoding SAP PowerDesigner
PDM 6.1.x
Code page for the PDM file that you exported from SAP PowerDesigner.
Auto assign
connections
All Metadata Manager configures connection assignments to relational database
resource types during the resource load. If you disable this option, configure
connection assignments in the resource properties after you create the resource.
File All Imports the PDM XML file.
142 Chapter 8: Data Modeling Resources
Reference
After you create and load an SAP PowerDesigner resource, you can view and run data lineage on the
metadata objects that Metadata Manager extracted.
Objects Extracted
Metadata Manager extracts the following metadata object types:
•Business Rule
•Column
•Database Schema
•Diagram
•Extended Attribute
•Extended Attributes
•Foreign Key
•Index
•Index Member
•Key
•Model
•Package
•Reference
•Relationship End
•Stored Procedure
•Synonym
•Synonym Column
•Table
•Trigger
•View
•View Column
•View Relationship
Adding or Removing Metadata Files for a Resource
Add a metadata file to a resource to configure the source from which Metadata Manager extracts metadata.
Remove a metadata file from a resource if you want to remove the metadata from the Metadata Manager
warehouse or load a different metadata source file.
You can add one metadata file for each resource. After you remove a metadata file, you can purge the
metadata from the Metadata Manager warehouse.
You can add or remove the following metadata files:
•Metadata source files. Add or remove a metadata source file for packaged resource types.
Adding or Removing Metadata Files for a Resource 143
•Attribute and association files. Add or remove attribute and association files for a custom resource. You
must also add a metadata source file if the contents of an existing attribute and association file changes.
Note: To change the metadata in the source file that Metadata Manager loads into the Metadata Manager
warehouse, change the contents of the metadata source file and add the file again. You can also upload the
file to the following directory on the node that runs the Metadata Manager Service:
<Informatica installation directory>\services\MetadataManagerService\mm_files\<Metadata
Manager Service name>\mm_load\data_files\<resource ID>
1. On the Load tab, select the resource for which you want to add or remove files.
2. In the Resources panel, click the Configuration tab, and then click Edit.
The Edit Resources window appears.
3. To add a metadata source file, click Add and select the file.
If you configured Metadata Manager to use the latest source files, include an absolute path to the file
that is accessible from the Metadata Manager Service machine.
4. Optionally, direct Metadata Manager to update the metadata in the warehouse with the metadata in the
source file.
5. To remove a metadata source file, select the file and click Remove.
6. Click OK.
Reference for Data Modeling Resources
After you create and load a data modeling resource, you can view and run data lineage on the metadata
objects that Metadata Manager extracted.
The following information applies to all data modeling tool resources.
Datatypes
Metadata Manager extracts datatypes and change the names based on the datatypes used by Metadata
Manager. Metadata Manager stores the datatypes in the Metadata Manager warehouse.
Names of Datatypes
Metadata Manager extracts the datatypes for objects in the Domains and Column classes and stores them as
properties of the objects. While extracting the datatypes, Metadata Manager changes the names of the
datatypes to the names used by Metadata Manager.
For example, if Metadata Manager extracts a datatype named “integer” in the data modeling tool, Metadata
Manager converts this to name to “SQL_integer.” You may not see a match between the datatype name in
the data modeling tool and the corresponding name in the metadata catalog.
Datatypes for Columns Using Domains
Data modeling tools store datatypes for domains and most columns, all of which Metadata Manager extracts
and stores in the Metadata Manager warehouse.
Since data modeling tools do not store datatypes for columns using domains, Metadata Manager cannot
extract or store the datatypes for these columns. To help you determine the datatype of columns using
domains, Metadata Manager stores the datatypes of all domains and establishes an association between
144 Chapter 8: Data Modeling Resources

columns and their corresponding domains. To determine the datatype of a column using a domain, determine
the domain associated with the column, and then determine the datatype of the domain.
Validation Rules
You can define validation rules in data modeling tools and reuse the rules. Metadata Manager stores one
instance of the validation rule for each column or domain that uses the rule.
In data modeling tools, there is a one-to-many relationship between validation rules and columns or domains.
To identify each validation rule for each column or domain, Metadata Manager renames each validation rule
based on the column or domain name.
The following table shows a validation rule VR1 that is used by columns X and Y and the domain DOM:
Validation Rule in Data Modeling Tool Validation Rule in Metadata Manager
VR1 X
Y
DOM
Metadata Manager renames validation rule, VR1, to the column and domain names, X, Y, and DOM.
Metadata Manager extracts validation rules that are used in columns or domains.
Relationships
Metadata Manager does not extract relationships named “Subtype.”
View Associations
Metadata Manager does not parse the SQL to determine the associations between views and tables and
between views and columns. To load view-to-table and view-to-column associations, the data modeling tool
must provide this information to Metadata Manager.
Schema and Owners
You can specify an owner when you create an object in a data modeling tool. Metadata Manager extracts
distinct owners of objects, assigns the owners as the schema names in the Metadata Manager warehouse,
and creates the associations between the objects and the schema.
If you did not assign an owner to the object in the data modeling tool, Metadata Manager assigns “Undefined
schema” as the schema name and associates the object with this schema name.
Name and Description Properties
Metadata Manager maps the physical name of an object to the Name property and the logical name to the
Label property. If a logical name does not exist in the data modeling tool, Metadata Manager assigns the
physical name of the object to the Name and Label properties.
Metadata Manager maps comments about the object to the Usage property and descriptions or definitions to
the Description property.
Note: Name, Label, Usage, and Description are properties of model classes.
Reference for Data Modeling Resources 145
Multiple Models in the Same Repository
You can load multiple models into the same data modeling tool resource. The metadata catalog shows these
models under the same instance of a data modeling tool resource.
Objects Not Extracted
Metadata Manager does not extract the following object types:
•Tablespaces
•Rollback segments
•Synonyms
•Sequences
•Database packages
•Materialized views
Domain-to-Validation Rule Association
Data modeling tools can use the following validation rules:
•MinMax. Makes sure that each value of a column is not below a predefined minimum value or above a
predefined maximum value.
•ListConstraint. Makes sure that each value of a column is valid based on a predefined set of possible
values.
•RuleConstraint. Makes sure that each value of a column is valid using user-defined logic or expression.
Although domains can be associated with any of these rules, Metadata Manager extracts associations
between a domain and the MinMax or ListConstraint rule.
146 Chapter 8: Data Modeling Resources

CHAPTER 9
Database Management
Resources
This chapter includes the following topics:
•Cloudera Navigator, 147
•IBM DB2 for LUW, 158
•IBM DB2 for z/OS, 164
•IBM Informix, 169
•JDBC, 174
•Microsoft SQL Server, 178
•Netezza, 183
•Oracle, 186
•Sybase ASE, 193
•Teradata, 197
•Configuring the Schema Inclusion List, 202
•Data Lineage for Database Management Resources, 203
Cloudera Navigator
Cloudera Navigator is a data management tool for the Hadoop platform. It contains an auditing component
that allows users to track data access for entities in a Hadoop cluster and a metadata component that
manages metadata about the entities in a Hadoop cluster. Metadata Manager extracts metadata about
entities in the cluster through the metadata component of Cloudera Navigator.
When you create a Cloudera Navigator resource in Metadata Manager, you enter the user name, password,
and URL for the Cloudera Navigator Metadata Server. You can create one Cloudera Navigator resource for
each Hadoop cluster that is managed by Cloudera Manager. Metadata Manager extracts metadata about
entities in the cluster based on the entity type.
Metadata Manager extracts metadata for the following entity types:
•HDFS files and directories
•Hive tables, query templates, and query executions
•Impala query templates and executions
147

•Oozie job templates and executions
•Pig tables, scripts, and script executions
•Sqoop job templates and executions
•YARN job templates and executions
Metadata Manager does not extract metadata for MapReduce job templates or executions.
Metadata Manager can extract metadata from a Cloudera Hadoop cluster that uses Kerberos authentication.
However, authentication between Metadata Manager and Cloudera Navigator still occurs through a user
name and password.
Maximum Heap Size Configuration
Before you create a Cloudera Navigator resource, configure the maximum heap size for the Metadata
Manager Service. If the maximum heap size is not sufficient, the metadata load can fail.
Before you create a Cloudera Navigator resource, open the Administrator tool and check the value of the
Max Heap Size property for the Metadata Manager Service. The maximum heap size must be at least 4096
MB (4 GB).
Note: Some Cloudera distributions might require a maximum heap size larger than 4 GB. If the metadata load
fails with an out of memory error, increase the maximum heap size.
Creating a Cloudera Navigator Resource
Create a Cloudera Navigator resource to extract metadata from the metadata component of Cloudera
Navigator.
1. On the Load tab, click Actions > New Resource.
The Resource Selection window appears.
2. Click Database Management > Cloudera Navigator.
3. Click Next.
The Properties page appears.
4. Enter the following information:
Property Description
Name Name for the resource. The resource appears in the Resources panel with this name. The name
must be unique and have from one through 256 characters. It cannot include the following characters:
/ \ : * ' ? " < > | [ ]
Description Description for the resource. Description cannot exceed 4000 characters.
Hide in Summary
Lineage
Hides the resource in the summary view of data lineage diagrams.
Enable this option to hide the resource and its child objects in the summary view. Disable this option
to display the resource and its child objects in the summary view.
Default is disabled.
5. Click Next.
The Configuration page appears.
6. Enter the configuration properties.
148 Chapter 9: Database Management Resources

7. Click Test Connection to test the connection to the source system.
If Metadata Manager cannot connect to the source system, an error message appears. Correct any error
and test the connection again.
8. Click Next.
The Schedules window appears.
9. To add a schedule, select Attach a Schedule and select a schedule in the Schedule list.
If you have not created a schedule, you can assign a schedule to a resource after you create the
resource.
10. Click Finish.
The resource appears in the Resources panel on the Load tab.
Cloudera Navigator Connection Properties
Configure the connection properties when you create or edit a Cloudera Navigator resource.
The following table describes the connection properties:
Property Description
User name Name of the user account used to connect to Cloudera Navigator.
Password Password for the user account used to connect to Cloudera Navigator.
Cloudera
Navigator URL
URL of the Cloudera Navigator Metadata Server.
Enable filtering Enables filtering for Hive and Impala query templates that have no downstream data flow. By default,
Metadata Manager does not extract Hive or Impala query templates that read data but do not write data.
If you enable this option, Metadata Manager extracts only the query templates that create new entities or
write to existing entities. If you disable this option, Metadata Manager extracts all Hive and Impala query
templates. Default is enabled.
Cloudera Navigator 149

Property Description
Enable
incremental load
Enables incremental loading for Cloudera Navigator resources after the first successful resource load.
When you enable this option, Metadata Manager loads recent changes to the metadata instead of loading
complete metadata.
During an incremental load, Metadata Manager extracts only the following entities:
-HDFS entities that were created or changed after the previous resource load
-All Hive tables, views, and partitions
-Operation executions that were created after the previous resource load
-All templates related to the new operation executions
Default is enabled.
Search query Query that limits the HDFS entities that Metadata Manager extracts. By default, Metadata Manager does
not extract HDFS entities from certain directories that contain only canary files, log files, history files, or
deleted files.
To prevent Metadata Manager from extracting other HDFS entities, update the default search query. The
query that you enter must use valid Cloudera Navigator search syntax. To include all HDFS entities in the
metadata load, enter
*
, or delete the default query and leave this property blank.
Default is:
NOT ((fileSystemPath:*\/.cloudera_manager_hive_metastore_canary*) OR
(fileSystemPath:\/hbase\/oldWALs*) OR (fileSystemPath:\/hbase\/WALs*) OR
(fileSystemPath:\/tmp\/logs*) OR (fileSystemPath:\/user\/history\/done*) OR
(fileSystemPath:\/tmp\/hive-cloudera*) OR (fileSystemPath:\/tmp\/hive-
hive*) OR (fileSystemPath:*\/.Trash*))
Note: Use this property to exclude HDFS entities only. Do not use this property to prevent Metadata
Manager from extracting other types of entities from the Hadoop cluster.
Filtering for Hive and Impala Query Templates
To reduce the number of entities extracted from Cloudera Navigator, Metadata Manager filters Hive and
Impala query templates. By default, Metadata Manager extracts only the query templates that create new
entities or write to existing entities. Metadata Manager does not extract query templates that write data to
unknown entities.
When you load a Cloudera Navigator resource, Metadata Manager extracts all Hive and Impala query
templates that create new entities or insert data into existing entities.
For example, a Hive query template contains the following query:
INSERT OVERWRITE TABLE sales_sorted SELECT s_neighbor,price from sales ORDER BY price
This query writes data to the sales_sorted Hive table. Therefore, Metadata Manager extracts this Hive query
template.
By default, Metadata Manager does not extract Hive or Impala query templates that read data but do not
write data. Metadata Manager also does not extract query templates that write data to unknown entities. In
Cloudera Navigator, unknown entities are marked with the ellipsis (
...
) icon.
For example, a Hive query template contains the following query:
SELECT * FROM cust WHERE state = 'CA'
This query reads data from the cust Hive table, but it does not write data to any downstream table. Therefore,
Metadata Manager does not extract this Hive query template.
You can disable the filtering of Hive and Impala query templates. If you want Metadata Manager to extract all
Hive and Impala query templates, disable the Enable Filtering option when you create or edit a Cloudera
Navigator resource.
150 Chapter 9: Database Management Resources
Incremental Loading for Cloudera Navigator Resources
The first time you load a Cloudera Navigator resource, Metadata Manager performs a full metadata load. By
default, Metadata Manager performs subsequent loads incrementally.
By default, a full load extracts all entities except for filtered Hive and Impala query templates and HDFS
entities excluded by the search query. Incremental loading causes Metadata Manager to load recent changes
to the metadata instead of loading complete metadata.
Incremental loading reduces the amount of time it takes to load the resource because Metadata Manager
extracts fewer entities.
During an incremental load, Metadata Manager extracts only the following entities:
•HDFS entities that were created or changed since the previous resource load
•All Hive tables, views, and partitions
•Operation executions that were created after the previous resource load
•All templates related to the new operation executions
Use the Enable incremental load connection property to enable or disable incremental loading for Cloudera
Navigator resources.
Note: Even if you enable incremental loading, a complete metadata load occurs in the following
circumstances:
•You purge the resource.
•You cancel the first load of the resource before the ETL task starts.
•The first load of the resource fails.
Search Queries
Use a search query to reduce the number of HDFS entities that Metadata Manager extracts from the Hadoop
cluster. Limiting the number of HDFS entities that Metadata Manager extracts reduces the amount of time it
takes to load the Cloudera Navigator resource. By default, Metadata Manager does not extract HDFS entities
from certain directories that contain only canary files, log files, history files, or deleted files.
By default, Metadata Manager does not extract HDFS entities from the following directories or their
subdirectories:
•
*/.cloudera_manager_hive_metastore_canary
•
/hbase/oldWALs
•
/hbase/WALs
•
/tmp/logs
•
/user/history/done
•
/tmp/hive-cloudera
•
/tmp/hive-hive
•
*/.Trash
Metadata Manager uses the following default search query:
NOT ((fileSystemPath:*\/.cloudera_manager_hive_metastore_canary*) OR (fileSystemPath:\/hbase
\/oldWALs*) OR (fileSystemPath:\/hbase\/WALs*) OR (fileSystemPath:\/tmp\/logs*) OR
(fileSystemPath:\/user\/history\/done*) OR (fileSystemPath:\/tmp\/hive-cloudera*) OR
(fileSystemPath:\/tmp\/hive-hive*) OR (fileSystemPath:*\/.Trash*))
Cloudera Navigator 151
To prevent Metadata Manager from extracting other HDFS entities, update the default search query.
For example, your Cloudera distribution contains a temporary user named "test." When you view the HDFS
directory
/user/test
in Cloudera Navigator, you see that all of the files owned by the test user write to the
directory
/user/test/.Trash
. Therefore, you do not want Metadata Manager to extract HDFS entities in
directory
/user/test
or its subdirectories.
To prevent Metadata Manager from extracting the entities, append the
/user/test
file path to the search
query as follows:
NOT ((fileSystemPath:*\/.cloudera_manager_hive_metastore_canary*) OR (fileSystemPath:\/hbase
\/oldWALs*) OR (fileSystemPath:\/hbase\/WALs*) OR (fileSystemPath:\/tmp\/logs*) OR
(fileSystemPath:\/user\/history\/done*) OR (fileSystemPath:\/tmp\/hive-cloudera*) OR
(fileSystemPath:\/tmp\/hive-hive*) OR (fileSystemPath:*\/.Trash*)OR (fileSystemPath:*\/user
\/test*))
Search Query Rules and Guidelines
Use the following rules and guidelines when you update the search query:
Use the search query to exclude HDFS entities only.
Do not use a search query to prevent Metadata Manager from extracting other types of entities from the
Hadoop cluster.
The query that you enter must use valid Cloudera Navigator search syntax.
For information about Cloudera metadata search syntax, see the Cloudera documentation. Metadata
Manager does not validate the search syntax.
Tip: To validate the search syntax, click Test Connection. If the search query is not valid, an error
message appears. You can also run the search in Cloudera Navigator before you update the search
query in Metadata Manager.
Before you exclude an HDFS directory, verify that no files in the directory or its subdirectories are used in the data flow.
If you exclude any HDFS entity that is used in a data flow, lineage links can break. For example, your
Cloudera distribution contains a Pig script that writes temporary files to directory
/tmp
, and the
temporary files are used as inputs for another Pig script. When you run data lineage, Metadata Manager
shows lineage links between the upstream Pig script and the temporary files and between the temporary
files and the downstream Pig script. If you exclude directory
/tmp
from the metadata load, Metadata
Manager shows no lineage links between the two Pig scripts.
If you enable incremental loading, purge the resource after you update the search query.
To extract metadata from a Cloudera Hadoop cluster, the Metadata Manager Service creates temporary
files on the machine where the Metadata Manager Service runs. The Metadata Manager Service uses
the temporary files to create the IME files that extract metadata from the Hadoop cluster.
When you perform an incremental load, the Metadata Manager Service creates new temporary files,
overwrites some temporary files, and leaves some temporary files unchanged. Metadata Manager
extracts metadata based on the old and new temporary files. This can cause unpredictable search
results.
For example, you update the default search query to exclude HDFS directory
/user/test
. If you reload
the resource incrementally, some temporary files related to the default query remain on the server.
Metadata Manager still extracts entities from
/user/test
because the default query did not exclude this
directory from the metadata load.
To clear all temporary files, purge the resource. The next time you load the resource, Metadata Manager
creates new temporary files and extracts metadata based only on the updated search query.
152 Chapter 9: Database Management Resources

You can include all HDFS entities in the metadata load.
To include all HDFS entities in the metadata load, replace the default search query with
*
or delete the
default query and leave the Search query property blank.
Do not exclude all HDFS entities by entering a wildcard character for the file system path.
Do not enter a wildcard character for the file system path to exclude all HDFS entities. If you try to
exclude all HDFS entities by entering a wildcard character for the file system path, Metadata Manager
excludes all entities that have the fileSystemPath property.
For example, you enter the following search query to exclude all HDFS entities:
NOT (fileSystemPath:*)
If you enter this query, Metadata Manager excludes all HDFS entities. However, because Hive tables,
Hive partitions, and Pig tables have the fileSystemPath property, Metadata Manager also excludes these
entity types.
Reference
After you create and load a Cloudera Navigator resource, you can view and run data lineage on the metadata
objects that Metadata Manager extracted.
How Metadata Manager Organizes Entities
The Cloudera Navigator metadata component contains a search-based user interface. However, Metadata
Manager displays all objects in the metadata catalog in a hierarchy. Metadata Manager organizes entities in
groups based on the entity type.
When you create and load a Cloudera Navigator resource, Metadata Manager creates a parent group in the
metadata catalog for each entity type that it extracts from Cloudera Navigator. Metadata Manager places
each entity that it extracts in the appropriate group.
The following table describes the entity types that appear in each parent group in the metadata catalog:
Group Entity Types
ROOT All HDFS directories and files arranged in a hierarchy. Each HDFS file appears below the directory in
which it is located.
Hive Databases All Hive databases arranged alphanumerically. Each Hive table appears within the database to which it
belongs.
Hive Query
Executions
Hive query executions arranged alphanumerically.
Metadata Manager extracts the most recent instance of each Hive query execution. It does not extract
older instances.
Hive Query
Templates
Hive query templates arranged alphanumerically. Each template part appears below its parent template.
By default, Metadata Manager extracts only Hive query templates that write data to new or existing
tables. It does not extract Hive query templates that read data but do not write data.
Oozie Jobs All Oozie job executions arranged alphanumerically. Because Cloudera Navigator does not generate
unique names for Oozie job executions, Metadata Manager appends a time stamp to each Oozie job
execution name.
Cloudera Navigator 153

Group Entity Types
Impala Query
Executions
All Impala query executions arranged alphanumerically.
Metadata Manager extracts the most recent instance of each Impala query execution. It does not extract
older instances.
Impala Query
Templates
All Impala query templates arranged alphanumerically. Each template part appears below its parent
template.
By default, Metadata Manager extracts only Impala query templates that write data to new or existing
tables. It does not extract Impala query templates that read data but do not write data.
Oozie Templates All Oozie job templates arranged alphanumerically. Because Cloudera Navigator does not generate
unique names for Oozie job templates, Metadata Manager appends the Cloudera identity to each Oozie
job template name.
Pig Jobs All Pig script executions arranged alphanumerically. Because multiple Pig script executions can have the
same name, Metadata Manager appends a time stamp to each script execution name.
Each Pig table appears below the corresponding Pig script execution.
Pig Templates All Pig scripts arranged alphanumerically. Because multiple Pig scripts can have the same name,
Metadata Manager appends the Cloudera identity to each Pig script name.
Sqoop Jobs All Sqoop job executions arranged alphanumerically.
Sqoop Templates All Sqoop job templates arranged alphanumerically.
YARN Jobs All YARN job executions arranged alphanumerically.
YARN Templates All YARN job templates arranged alphanumerically.
If the cluster contains no entities of a certain type, Metadata Manager does not create a parent group for that
entity type. For example, if the cluster contains no Pig tables, Pig scripts, or Pig script executions, Metadata
Manager does not create the Pig Jobs group or the Pig Templates group.
Searching for an Entity in Metadata Manager
A Hadoop cluster can contain thousands of entities, and different entities can have similar names. To find a
Cloudera entity in Metadata Manager, you can navigate the metadata catalog or you can search for the
object by name or identity. The method that you select depends on the number of objects that are likely to
have similar names.
Use the following methods to find a Cloudera entity in Metadata Manager:
Navigate the metadata catalog.
Metadata Manager creates a parent group in the metadata catalog for each entity type that it extracts
from Cloudera Navigator. To find an entity, open its parent group, and scroll down to the entity.
Search by name.
Use the keyword or advanced search in Metadata Manager to search for the entity by name. Escape any
special character in the entity name with a backslash (
\
).
For example, to search for YARN job template
select * from emp_07 where salary > 50000(Stage
,
enter the following search string:
select \* from emp_07 where salary > 50000\(Stage
154 Chapter 9: Database Management Resources
Metadata Manager returns all objects that match the search string.
Search by identity.
Use the keyword search in Metadata Manager to search for an entity by its Cloudera identity. Search by
identity when many objects have similar names. When you search by identity, Metadata Manager returns
the one metadata object with the identity value you specify.
To find the identity for an entity in Cloudera Navigator, download the lineage JSON file. Open the file in a
text editor and find the entity. Copy the value of the identity property from the file and enter it in the
Search field in Metadata Manager.
Tip: In Metadata Manager, you can view the identity value for a Cloudera metadata object in the identity
property in the Details panel. To see all object properties, click More.
For more information about keyword and advanced searches, see the Metadata Manager User Guide.
How Metadata Manager Displays Entity Relationships
The metadata component of Cloudera Navigator displays different types of entity relationships in data lineage
diagrams. Metadata Manager does not display all of these relationships in data lineage diagrams. Metadata
Manager displays entity relationships differently based on the relationship type.
Metadata Manager displays the following Cloudera entity relationship types in different ways:
Data flow relationships
A data flow relationship defines how data flows between metadata objects. For example, a Hive query
uses an INSERT OVERWRITE TABLE statement to load data into a Hive table. Because data flows from
the Hive query to the Hive table, a data flow relationship exists between the query and the table.
Cloudera Navigator displays data flow relationships in data lineage diagrams as solid arrows. Metadata
Manager displays data flow relationships as lineage links in data lineage diagrams and as related
catalog objects in the metadata catalog.
Logical-physical relationships
A logical-physical relationship indicates that a logical object is based on an actual, physical entity. For
example, a Hive table is a logical view of a physical HDFS entity.
Cloudera Navigator displays logical-physical relationships in data lineage diagrams as solid lines without
arrow heads. Metadata Manager displays logical-physical relationships as related catalog objects in the
metadata catalog.
Instance relationships
An instance relationship defines a single occurrence of an operation. For example, an Oozie job
execution is an instance of an Oozie job template.
Cloudera Navigator displays instance relationships for query, job, and script templates on a separate tab
in the data lineage diagram. Metadata Manager displays instance relationships as related catalog
objects in the metadata catalog.
Control flow relationships
A control flow relationship places constraints or conditions on the flow of data. For example, a Hive
query can contain constraints in the WHERE clause. Or, the JOIN clause in a Hive query might include a
Hive table from which no data is extracted.
Cloudera Navigator displays control flow relationships in data lineage diagrams as dashed lines.
Metadata Manager ignores control flow relationships.
Cloudera Navigator 155
For example, your Hadoop cluster contains a Hive products table with price and cost columns. It also
contains a Hive query template with the following query:
SELECT AVG(price - cost) AS profit
FROM products
JOIN order_details
ON (order_details.prod_id = products.prod_id)
JOIN orders
ON (order_details.order_id = orders.order_id)
WHERE YEAR(order_date) = 2014
AND MONTH(order_date) = 12
AND price >= 500
In this query, the SELECT statement indicates that data flows from the products table to the Hive query.
The JOIN clauses include two Hive tables, order_details and orders, from which no data is extracted.
Cloudera Navigator shows data flow from the products table to the Hive query. It also shows control flow
relationships between the order_details table and the Hive query and between the orders table and the
Hive query.
Metadata Manager also shows data flow from the products table to the Hive query. However, Metadata
Manager does not show any relationship between the order_details or orders tables and the Hive query.
Tip: To view the relationship type between entities in a Cloudera Navigator data lineage diagram, download
and view the lineage JSON file.
Deleted Entities
When you load a Cloudera Navigator resource, Metadata Manager extracts entity metadata, including
metadata for deleted entities. Metadata Manager displays deleted entities in the metadata catalog and in data
lineage diagrams.
To determine whether an entity is a deleted entity, check the status of the deleted property in the Details
panel of the metadata catalog or the data lineage diagram. To see all object properties, click More. The
deleted property is set to true or false.
Differences between Cloudera Navigator and Metadata Manager Lineage
Diagrams
When you compare data lineage diagrams between Metadata Manager and Cloudera Navigator, the
diagrams might display different sequences of objects.
The Metadata Manager and Cloudera Navigator data lineage diagrams can contain different sequences of
objects in the following circumstances:
When an entity that you view has different relationships with other entities.
Cloudera Navigator displays data flow, logical-physical, and control flow relationships in data lineage
diagrams. Metadata Manager displays data flow relationships in data lineage diagrams. Metadata
Manager does not display logical-physical or control flow relationships in data lineage diagrams.
When you run data lineage on a template.
Generally, Cloudera Navigator shows data flow relationships at the template, or operation, level.
Operation executions might override or add data flow.
Metadata Manager generally shows data flow for physical objects, such as HDFS files and directories,
and for operation executions. Metadata Manager does not show data flow for most template types.
Therefore, when you run data lineage on Oozie, Pig, Sqoop, or YARN job templates, you do not see data
flow. To see the data flow, run data lineage on one of the template executions.
156 Chapter 9: Database Management Resources
Note that Metadata Manager does show data flow for Hive and Impala query templates instead of the
query executions. Metadata Manager shows lineage for the query templates because data lineage is
identical across all executions of the query.
When you run data lineage on a Hive or Impala query template.
When you run data lineage on a Hive or Impala query template that retrieves information from or creates
a Hive table, Cloudera Navigator does not display the HDFS entity that is linked to the Hive table.
Metadata Manager does display the HDFS entity in the data lineage diagram.
For example, a Hive query template contains a SELECT statement to retrieve information from a Hive
table. In the data lineage diagram, Metadata Manager displays the HDFS entity that is linked to the Hive
table upstream of the Hive table. If a Hive query template contains a CREATE statement to create a Hive
table, Metadata Manager displays the HDFS entity that is linked to the Hive table downstream of the
Hive table.
When you run data lineage on a YARN job execution.
Cloudera Navigator displays data flow relationships between YARN job executions and Hive query
templates. Because Hive queries and tables are relational views of HDFS files, Metadata Manager
shows data flow between the YARN job execution and the HDFS files.
Linking for Cloudera Entities
Metadata Manager can display data lineage links between entities in a Cloudera Navigator resource and data
objects in other resources. To link Hive tables with data objects in other packaged resources or in universal
resources, use connection assignments. To link HDFS files with data objects in other packaged resources, in
custom resources, or in universal resources, use a linking rules file.
Metadata Manager links Hive tables in a Cloudera Navigator resource with data objects in another resource
when you configure connection assignments between the metadata sources. For example, a PowerCenter
session loads data to a Hive target table that exists in your Cloudera distribution. Before you can view data
lineage between the PowerCenter target and the Hive table, you must configure a connection assignment
between the PowerCenter repository and the Cloudera distribution.
Metadata Manager does not use connection assignments to link HDFS files in a Cloudera Navigator resource
with data objects in other resources. To link HDFS files with data objects in other resources, use a linking
rules file.
For example, your Cloudera distribution contains the HDFS file big-customer.csv. You use the data in this file
to populate the CUST flat file data object in the Developer tool. The CUST flat file data object is used as a
source in an HDFS mapping.
Create a linking rules file to link the big-customer.csv HDFS file to the CUST flat file data object. Add a link
condition that creates links from the HDFS file to the columns in the output group of the flat file data object.
In Metadata Manager, the CUST flat file data object belongs to the HDFS Data Object class. The output
group belongs to the Data Object Read class. The columns in the output group belong to the Attribute class.
Use the following file to create the links:
<?xml version="1.0" encoding="UTF-8"?>
<ruleSet name="Link HDFS files to Informatica Platform FF Data Objects">
<sourceResource name="Cloudera01"/>
<targetResource name="InfaPlatform01"/>
<rule name="Link HDFS big-customer.csv to Informatica Platform CUST FF columns"
direction="SourceToTarget">
<sourceFilter >
Cloudera Navigator 157

<element class="HDFS File"/>
</sourceFilter>
<targetFilter>
<!-- We must link to features. If we link to structures only, Metadata Manager
will not find upstream links to the HDFS file. -->
<element class="HDFS Data Object">
<element class="Data Object Read">
<element class="Attribute"/>
</element>
</element>
</targetFilter>
<link condition="source.Name = 'big-customer.csv' AND target.parent.Name = 'output'
AND target.parent.parent.Name = 'CUST'"/>
</rule>
</ruleSet>
In this example, the
target.parent.Name = 'output'
clause in the link condition identifies the output group.
The
target.parent.parent.Name = 'CUST'
clause identifies the flat file data object.
To upload the linking rules file, edit the Cloudera Navigator resource. After you upload the linking rules file
and reload the resource, Metadata Manager creates the lineage links. Metadata Manager creates a link from
the big-customer.csv HDFS file to each column in the output group of the CUST flat file data object.
For more information about rule-based links, see the Metadata Manager Custom Metadata Integration Guide.
Related Topics:
•“Configure Connection Assignments” on page 218
IBM DB2 for LUW
You can create and configure an IBM DB2 for Linux, UNIX, and Windows (LUW) resource to extract metadata
from IBM DB2 for LUW. When you load the resource, Metadata Manager extracts schema details from an
IBM DB2 for LUW database.
Configuring IBM DB2 for LUW
Before you create an IBM DB2 for LUW resource, you must configure the metadata source. If you do not
correctly configure the metadata source, the metadata load can fail or the metadata can be incorrectly loaded
in the Metadata Manager warehouse.
To configure IBM DB2 for LUW, complete the following tasks:
•Increase the database heap size.
•Configure permissions and privileges.
Database Heap Size
When you load metadata from an IBM DB2 for LUW database, you must increase the heap size. Otherwise,
the S_M_ELEMNT_ATTR_EXTRACT session fails and returns the following error:
DBA2191E SQL execution error.
com.ibm.db.DataException: A database manager error occurred. :
158 Chapter 9: Database Management Resources
[IBM][CLI Driver][DB2/NT] SQL0973N Not enough storage is available in the
"APP_CTL_HEAP_SZ" heap to process the statement. SQLSTATE=57011
This failure occurs when there is not enough storage available in the database application heap to process
the request.
Increasing the IBM DB2 for LUW Database Heap Size
To increase the IBM DB2 for LUW database heap size, complete the following steps:
1. Log out of Metadata Manager.
2. Stop the DB2 database server.
3. From a DB2 command prompt, connect to the DB2 database.
4. To determine the current value of the Application Heap Size configuration parameter
(APP_CTL_HEAP_SZ), run the following command:
db2 get db dfg for <database_name> | find "APP_CTL_HEAP_SZ"
5. To increase the size of APP_CTL_HEAP_SZ to 16384 or higher, run the following command:
db2 update db cfg for <database_name> using APP_CTL_HEAP_SZ <higher_value>
6. Restart the DB2 database server.
Configure Permissions and Privileges
Configure the permissions and privileges for the IBM DB2 for LUW database user account for which you
provide the user name and password when you create the resource.
IBM DB2 for LUW 159

The following table lists the schema objects and system tables on which you must configure SELECT
permissions for the IBM DB2 for LUW database user account:
Schema Objects System Tables
Tables
Views
Indexes
Packages
Procedures
Functions
Sequences
Triggers
Synonyms
SYSCAT.SCHEMATA
SYSCAT.TRIGGERS
SYSCAT.INDEXES
SYSCAT.INDEXCOLUSE
SYSCAT.REFERENCES
SYSCAT.TABCONST
SYSCAT.KEYCOLUSE
SYSCAT.COLCHECKS
SYSCAT.DATATYPES
SYSCAT.COLUMNS
SYSCAT.TABLES
SYSCAT.FUNCTIONS
SYSCAT.PROCEDURES
SYSCAT.PACKAGES
SYSCAT.TRIGGERS
SYSCAT.SEQUENCES
SYSCAT.INDEXES
SYSCAT.CHECKS
SYSCAT.VIEWS
SYSCAT.PACKAGES
SYSCAT.FUNCDEP
SYSCAT.TRIGDEP
SYSCAT.VIEWDEP
In addition, the database user account must have CREATEIN, DROPIN, and ALTERIN privileges on the
NULLID schema. Optionally, you can grant the BINDADD privilege to the user account. If you do not add the
privileges, you cannot create the resource with the database user account.
Creating an IBM DB2 for LUW Resource
Before you create an IBM DB2 for LUW resource, configure the IBM DB2 for LUW source.
1. On the Load tab, click Actions > New Resource.
The Resource Selection window appears.
2. Click Database Management > DB2.
3. Click Next.
The Properties window appears.
160 Chapter 9: Database Management Resources

4. Enter the following information:
Property Description
Name Name for the resource. The resource appears in the Resources panel with this name. The name
must be unique and have from one through 256 characters. It cannot include the following characters:
/ \ : * ' ? " < > | [ ]
Description Description for the resource. Description cannot exceed 4000 characters.
Hide in Summary
Lineage
Hides the resource in the summary view of data lineage diagrams.
Enable this option to hide the resource and its child objects in the summary view. Disable this option
to display the resource and its child objects in the summary view.
Default is disabled.
5. Click Next.
The Configuration window appears.
6. Enter the configuration properties.
7. Click Test Connection to test the connection to the source system.
If Metadata Manager cannot connect to the source system, an error message appears. Correct any error
and test the connection again.
8. Click Next.
The Parameters window appears.
9. To add schemas to the Selected Schemas list, select the schema in the Available Schemas list and
click Add.
10. To add all available schemas, click Add All.
11. To remove schemas from the Selected Schemas list, select the schema in the Selected Schemas list
and click Remove.
12. To remove all schemas from the Selected Schemas list, click Remove All.
13. Click Next.
The Schedules window appears.
14. To add a schedule, select Attach a Schedule and select a schedule in the Schedule list.
If you have not created a schedule, you can assign a schedule to a resource after you create the
resource.
15. Click Finish.
The resource appears in the Resources panel on the Load tab.
IBM DB2 for LUW 161

IBM DB2 for LUW Configuration Properties
Update the configuration properties when you create or edit an IBM DB2 for LUW resource.
The following table describes the IBM DB2 for LUW configuration properties:
Property Description
User name Name of the user account used to connect to the IBM DB2 for LUW database.
Password Password for the user account used to connect to the IBM DB2 for LUW database.
JDBC
connection
URL
JDBC URL used to connect to the IBM DB2 for LUW database. Metadata Manager uses this URL to verify
connection information to the IBM DB2 for LUW database.
The JDBC connection URL uses the following syntax:
jdbc:informatica:db2://[host_name]:[port];DatabaseName=[database_name]
Secure JDBC
parameters
Secure JDBC parameters that you want to append to the JDBC connection URL. Use this property to specify
secure connection parameters such as passwords. Metadata Manager does not display secure parameters or
parameter values in the resource configuration properties. Enter the parameters as name=value pairs
separated by the delimiter character that the database driver requires. For example:
param1=value1;param2=value2
If secure communication is enabled for the database, enter the secure JDBC parameters in this property.
Connect string Native connect string used to create a source connection to the database in the PowerCenter repository. The
connect string is the name of the IBM DB2 for LUW database.
Encoding Code page for the IBM DB2 for LUW database.
Only code pages that are compatible with the code page of the Metadata Manager repository are displayed.
JDBC Parameters for Secure Databases
If secure communication is enabled for the IBM DB2 for LUW database, you must append additional
parameters to the JDBC connection URL. To append the parameters, enter them in the Secure JDBC
Parameters property.
Enter the following parameters in the Secure JDBC Parameters property:
EncryptionMethod=SSL;TrustStore=<truststore
location>;TrustStorePassword=<password>;HostNameInCertificate=<host
name>;ValidateServerCertificate=<true|false>;KeyStore=<keystore
location>;keyStorePassword=<password>
Configure the parameters as follows:
EncryptionMethod
Encryption method for data transfer between Metadata Manager and the database server. Must be set to
SSL.
TrustStore
Path and file name of the truststore file that contains the security certificate of the database server.
TrustStorePassword
Password used to access the truststore file.
162 Chapter 9: Database Management Resources
HostNameInCertificate
Host name of the machine that hosts the secure database. If you specify a host name, the Metadata
Manager Service validates the host name included in the connection string against the host name in the
security certificate.
ValidateServerCertificate
Indicates whether the Metadata Manager Service validates the certificate that the database server
presents. If you set this parameter to true, the Metadata Manager Service validates the certificate. If you
specify the HostNameInCertificate parameter, the Metadata Manager Service also validates the host
name in the certificate.
If you set this parameter to false, the Metadata Manager Service does not validate the certificate that the
database server presents. The Metadata Manager Service ignores any truststore information that you
specify.
KeyStore
Path and file name of the keystore file that contains the security certificates that the Metadata Manager
Service presents to the database server.
KeyStorePassword
Password used to access the keystore file.
Reference
After you create and load an IBM DB2 for LUW resource, you can view and run data lineage on the metadata
objects extracted by Metadata Manager.
Objects Extracted
Metadata Manager extracts the following object types from an IBM DB2 for LUW database:
•Schema
•Table
•Column
•Datatype
•Alias
•View
•Index
•IndexColumn
•PrimaryKeyConstraint
•ForeignKey
•UniqueConstraint
•CheckConstraint
•Sequence
•Function
•Package
•Procedure
•TableTrigger
IBM DB2 for LUW 163
Troubleshooting for IBM DB2 for LUW
A resource load from an IBM DB2 for LUW database fails when the associated Integration Service uses a
different version of the IBM DB2 client.
Ensure that the IBM DB2 for LUW client version used by the associated Integration Service is the same as
the IBM DB2 for LUW database version.
IBM DB2 for z/OS
DB2 for z/OS is a Relational Database Management System (RDBMS) that runs on z/OS.
You can create and configure an IBM DB2 for z/OS resource to extract metadata from IBM DB2 for z/OS.
When you load the resource, Metadata Manager uses PowerExchange for DB2 for z/OS to access metadata
from z/OS subsystems. Metadata Manager extracts the following types of IBM DB2 for z/OS functions:
•Built-in
•User-defined
•Scalar
•Column
•Table
Configuring IBM DB2 for z/OS
Before you create an IBM DB2 for z/OS resource, you must configure the metadata source. If you do not
correctly configure the metadata source, the metadata load can fail or the metadata can be incorrectly loaded
in the Metadata Manager warehouse.
To access metadata in an IBM DB2 for z/OS subsystem, complete the following tasks:
•Install PowerExchange.
•Configure PowerExchange.
•Configure DB2 for z/OS privileges.
•Verify DB2 for z/OS mode.
Install PowerExchange
Metadata Manager uses PowerExchange for DB2 for z/OS to extract metadata from an IBM DB2 for z/OS
subsystem. PowerExchange must be installed in the following locations:
•The machine where the Metadata Manager Service runs.
•The z/OS system hosting the DB2 for z/OS database subsystem.
Configure PowerExchange
To access metadata from a DB2 for z/OS subsystem, install PowerExchange on the machine where the
Metadata Manager Service runs. You must also install PowerExchange on the z/OS system where DB2 runs.
To configure PowerExchange, complete the following tasks:
•Configure PowerExchange to connect to z/OS on the machine where the Metadata Manager Service runs.
164 Chapter 9: Database Management Resources

•Configure dbmover.cfg on the machine where the Metadata Manager Service runs with a NODE
statement that points to the PowerExchange Listener on z/OS.
•Configure the following security setting in the DBMOVER configuration file on z/OS:
SECURITY=(2,N)
Optionally, configure the PowerExchange Listener on z/OS to recognize logins that are known to the
operating system.
The following information shows an example of dbmover.cfg:
/*********************************************************************/
/* PowerExchange Configuration File
/*********************************************************************/
LISTENER=(node1,TCPIP,2480)
LISTENER=(BGQALST,TCPIP,30080)
LISTENER=(BGQALST_new,TCPIP,448)
LISTENER=(DB2zOS_SPEDDUR,TCPIP,448)
/***********************************************************************/
NODE=(DB2zOS_SPEDDUR,TCPIP,mhz890-2,3156)
NODE=(local,TCPIP,000.0.0.1,2480)
NODE=(node1,TCPIP,000.0.0.1,2480)
NODE=(BGQALST,TCPIP,mhz890-2,30080)
By default, PowerExchange on z/OS uses the user ID of the PowerExchange Listener for DB2 access. To
use a user-specified user ID for DB2 access, configure PowerExchange to use operating system security.
Configure DB2 for z/OS Privileges
When you load a DB2 for z/OS resource, Metadata Manager extracts metadata from the DB2 for z/OS
subsystem. Metadata Manager selects the metadata from DB2 catalog tables. Configure SELECT privileges
on the following tables in the DB2 for z/OS user account that you use to connect to the metadata source:
System Tables Metadata Extracted
SYSIBM.SYSSYNONYMS
SYSIBM.SYSTABLES
SYSIBM.SYSROUTINES
SYSIBM.SYSSEQUENCES
SYSIBM.SYSDATATYPES
Schemas
SYSIBM.SYSTABLES
SYSIBM.SYSTABLESPACE
SYSIBM.SYSVIEWS
Tables
Views
Alias
SYSIBM.SYSTABLES
SYSIBM.SYSCOLUMNS
SYSIBM.SYSTABLESPACE
Columns
SYSIBM.SYSKEYS
SYSIBM.SYSINDEXES
Primary keys
SYSIBM.SYSRELS
SYSIBM.SYSFOREIGNKEYS
SYSIBM.SYSINDEXES
Foreign keys
SYSIBM.SYSCHECKS
SYSIBM.SYSCHECKDEP
Check constraints
IBM DB2 for z/OS 165

System Tables Metadata Extracted
SYSIBM.SYSINDEXES
SYSIBM.SYSKEYS
Indexes
SYSIBM.SYSSYNONYMS
SYSIBM.SYSTABLES
Synonyms
SYSIBM.SYSTRIGGERS Triggers
SYSIBM.SYSROUTINES Stored procedures
SYSIBM.SYSROUTINES Functions
SYSIBM.SYSSEQUENCES Sequences
SYSIBM.SYSSEQUENCESDEP
SYSIBM.SYSSEQUENCES
Identity
SYSIBM.SYSDATATYPES User-defined types
Note: If the PowerExchange Listener does not use DB2 security, configure SELECT privileges for the
PowerExchange Listener user ID instead of the DB2 for z/OS user account.
Verify DB2 for z/OS Mode
Run the DB2 for z/OS database in the new-function mode. You cannot extract metadata if DB2 for z/OS runs
in the compatibility mode or conversion mode.
Creating an IBM DB2 for z/OS Resource
Before you create an IBM DB2 for z/OS resource, configure the IBM DB2 for z/OS source.
1. On the Load tab, click Actions > New Resource.
The Resource Selection window appears.
2. Click Database Management > DB2 zOS.
3. Click Next.
The Properties window appears.
166 Chapter 9: Database Management Resources

4. Enter the following information:
Property Description
Name Name for the resource. The resource appears in the Resources panel with this name. The name
must be unique and have from one through 256 characters. It cannot include the following characters:
/ \ : * ' ? " < > | [ ]
Description Description for the resource. Description cannot exceed 4000 characters.
Hide in Summary
Lineage
Hides the resource in the summary view of data lineage diagrams.
Enable this option to hide the resource and its child objects in the summary view. Disable this option
to display the resource and its child objects in the summary view.
Default is disabled.
5. Click Next.
The Configuration window appears.
6. Enter the configuration properties.
7. Click Test Connection to test the connection to the source system.
If Metadata Manager cannot connect to the source system, an error message appears. Correct any error
and test the connection again.
8. Click Next.
The Parameters window appears.
9. To add schemas to the Selected Schemas list, select the schema in the Available Schemas list and
click Add.
10. To add all available schemas, click Add All.
11. To remove schemas from the Selected Schemas list, select the schema in the Selected Schemas list
and click Remove.
12. To remove all schemas from the Selected Schemas list, click Remove All.
13. Click Next.
The Schedules window appears.
14. To add a schedule, select Attach a Schedule and select a schedule in the Schedule list.
If you have not created a schedule, you can assign a schedule to a resource after you create the
resource.
15. Click Finish.
The resource appears in the Resources panel on the Load tab.
IBM DB2 for z/OS 167

IBM DB2 for z/OS Configuration Properties
Update the configuration properties when you create or edit an IBM DB2 for z/OS resource.
The following table describes the IBM DB2 for z/OS configuration properties:
Property Description
User name z/OS user ID.
Password Password for the z/OS user ID.
Location Node name in the dbmover.cfg file on the machine where the Metadata Manager Service runs that points to
the PowerExchange Listener on the z/OS system.
Subsystem ID Identifier for the IBM DB2 for z/OS subsystem.
Encoding Code page for the IBM DB2 for z/OS subsystem.
Only code pages that are compatible with the code page of the Metadata Manager repository are displayed.
Reference
After you create and load an IBM DB2 for z/OS resource, you can view and run data lineage on the metadata
objects that Metadata Manager extracted.
Related Topics:
•“Data Lineage for Database Management Resources” on page 203
Functions
Metadata Manager imports the following IBM DB2 for z/OS functions:
•Built-in
•User-defined
•Scalar
•Column
•Table
Metadata Manager does not import system-generated functions.
Object Names
Metadata Manager imports IBM DB2 for z/OS objects with names that do not exceed 255 characters. The
name of the object includes the following components: schema_name.table_name.object_name.
Schemas and Qualifiers
In IBM DB2 for z/OS, the term “schema” represents distinct types, functions, stored procedures, and
sequences. IBM uses “qualifier” to discuss tables, views, indexes, and aliases.
For Metadata Manager, “schema” represents the top level qualifier for all objects. The qualifier used for
tables, views, indexes, and aliases is the CREATOR of the object.
168 Chapter 9: Database Management Resources

IBM Informix
You can create and configure an IBM Informix resource to extract metadata from IBM Informix. When you
load the resource, Metadata Manager extracts schema details from an IBM Informix database.
Configuring IBM Informix
Before you create an Informix resource, you must configure the metadata source. If you do not correctly
configure the metadata source, the metadata load can fail or the metadata can be incorrectly loaded in the
Metadata Manager warehouse.
To configure Informix, complete the following tasks:
•Configure permissions.
•Configure an ODBC connection to the Informix database.
Configure Permissions
Before you create an Informix resource, configure the permissions for the Informix database user account
that you use to connect to Informix.
The following table lists the schema objects and system tables on which you must configure SELECT
permissions for the Informix database user account:
Schema Objects System Tables
Tables
Views
Indexes
Packages
Procedures
Functions
Sequences
Triggers
Synonyms
systables
sysviews
sysusers
sysdepend
syscolumns
sysdepend
sysfragments
sysmaster
sysxtdtypes
sysxtddesc
sysindices
sysobjstate
systriggers
sysconstraints
sysprocedures
sysindexes
syssyntable
syssynonyms
syscoldepend
sysreferences
sysxtdtypes
systrigbody
IBM Informix 169
Configure an ODBC Connection
When you load an Informix resource, the PowerCenter Integration Service uses an ODBC driver to connect to
the Informix database. Therefore, you must configure an ODBC connection to the Informix database on the
machine where the PowerCenter Integration Service runs. When you create the Informix resource in
Metadata Manager, use the ODBC data source name as the connect string.
For ODBC connectivity, use the DataDirect ODBC drivers installed with Informatica. To ensure compatibility
between Informatica and databases, use the appropriate database client libraries.
Note: If you use the DataDirect ODBC driver provided by Informatica, you do not need the database client.
The ODBC wire protocols do not require the database client software to connect to the database.
Configuring ODBC Connectivity on Windows
1. Create an ODBC data source using the DataDirect ODBC Wire Protocol driver for Informix provided by
Informatica.
2. Verify that you can connect to the Informix database using the ODBC data source. If the connection fails,
see the database documentation.
Configuring ODBC Connectivity on UNIX
1. Set the ODBCHOME environment variable to the ODBC installation directory. For example:
Using a Bourne shell:
$ ODBCHOME=<Informatica services installation directory>/ODBC7.1; export ODBCHOME
Using a C shell:
$ setenv ODBCHOME <Informatica services installation directory>/ODBC7.1
2. Set the ODBCINI environment variable to the location of the odbc.ini file. For example, if the odbc.ini file
is in the $ODBCHOME directory:
Using a Bourne shell:
ODBCINI=$ODBCHOME/odbc.ini; export ODBCINI
Using a C shell:
$ setenv ODBCINI $ODBCHOME/odbc.ini
3. Edit the existing odbc.ini file in the $ODBCHOME directory or copy this odbc.ini file to the UNIX home
directory and edit it.
$ cp $ODBCHOME/odbc.ini $HOME/.odbc.ini
4. Add an entry for the Informix data source under the section [ODBC Data Sources] and configure the data
source. For example:
[Informix11]
Driver=/data/mm10/Informatica/source/ODBC7.1/lib/DWifcl27.so
Description=DataDirect 7.1 Informix Wire Protocol
AlternateServers=
ApplicationUsingThreads=1
CancelDetectInterval=0
ConnectionRetryCount=0
ConnectionRetryDelay=3
Database=<database_name>
HostName=<Informix_host>
LoadBalancing=0
LogonID=
Password=
PortNumber=<Informix_server_port>
ServerName=<Informix_server>
TrimBlankFromIndexName=1
UseDelimitedIdentifiers=0
5. Set the PATH and shared library environment variables by executing the script odbc.sh or odbc.csh in
the $ODBCHOME directory.
170 Chapter 9: Database Management Resources

Using a Bourne shell:
sh odbc.sh
Using a C shell:
source odbc.csh
6. Verify that you can connect to the Informix database using the ODBC data source. If the connection fails,
see the database documentation.
Creating an IBM Informix Resource
Before you create an IBM Informix resource, configure the IBM Informix source.
1. On the Load tab, click Actions > New Resource.
The Resource Selection window appears.
2. Click Database Management > Informix.
3. Click Next.
The Properties window appears.
4. Enter the following information:
Property Description
Name Name for the resource. The resource appears in the Resources panel with this name. The name
must be unique and have from one through 256 characters. It cannot include the following characters:
/ \ : * ' ? " < > | [ ]
Description Description for the resource. Description cannot exceed 4000 characters.
Hide in Summary
Lineage
Hides the resource in the summary view of data lineage diagrams.
Enable this option to hide the resource and its child objects in the summary view. Disable this option
to display the resource and its child objects in the summary view.
Default is disabled.
5. Click Next.
The Configuration window appears.
6. Enter the configuration properties.
7. Click Test Connection to test the connection to the source system.
If Metadata Manager cannot connect to the source system, an error message appears. Correct any error
and test the connection again.
8. Click Next.
The Parameters window appears.
9. To add schemas to the Selected Schemas list, select the schema in the Available Schemas list and
click Add.
10. To add all available schemas, click Add All.
11. To remove schemas from the Selected Schemas list, select the schema in the Selected Schemas list
and click Remove.
12. To remove all schemas from the Selected Schemas list, click Remove All.
13. Click Next.
IBM Informix 171

The Schedules window appears.
14. To add a schedule, select Attach a Schedule, and select a schedule in the Schedule list.
If you have not created a schedule, you can assign a schedule to a resource after you create the
resource.
15. Click Finish.
The resource appears in the Resources panel on the Load tab.
IBM Informix Configuration Properties
Update the configuration properties when you create or edit an Informix resource.
The following table describes the Informix configuration properties:
Property Description
User name Name of the user account used to connect to the Informix database.
Password Password for the user account used to connect to the Informix database.
JDBC
connection
URL
JDBC URL used to connect to the Informix database. Metadata Manager uses this URL to verify connection
information to the Informix database.
The JDBC connection URL uses the following syntax:
jdbc:informatica:informix://[host_name]:
[port];InformixServer=[server_name];DatabaseName=[database_name]
Secure
JDBC
parameters
Secure JDBC parameters that you want to append to the JDBC connection URL. Use this property to specify
secure connection parameters such as passwords. Metadata Manager does not display secure parameters or
parameter values in the resource configuration properties. Enter the parameters as name=value pairs
separated by the delimiter character that the database driver requires. For example:
param1=value1;param2=value2
Connect
string
Informix DSN configured in the Microsoft ODBC Administrator or the odbc.ini file.
Encoding Code page for the Informix database.
Only code pages that are compatible with the code page of the Metadata Manager repository are displayed.
Reference
After you create and load an Informix resource, you can view and run data lineage on the metadata objects
that Metadata Manager extracted.
Related Topics:
•“Data Lineage for Database Management Resources” on page 203
Objects Extracted
Metadata Manager extracts the following object types from Informix:
•Schema
•Table
172 Chapter 9: Database Management Resources
•Column
•Datatype
•Synonym
•View
•Index
•IndexColumn
•PrimaryKeyConstraint
•ForeignKey
•UniqueConstraint
•CheckConstraint
•NotNullConstraint
•Function
•Procedure
•TableTrigger
Metadata Manager does not extract the following object types from Informix:
•Sequences
•External Table
Element ID
Metadata Manager determines the Element_ID of each Informix metadata object using the name of the
object, not the ID column defined in the Informix database. Metadata Manager uses the name because
Informix changes the ID column of an object whenever the object definition changes.
In Informix, you can use the same name for functions and procedures that have different parameters. To
establish a unique element ID, Metadata Manager creates element IDs for functions and procedures with a
combination of object name, number of arguments, and parameter types.
Table-to-Trigger Association
Informix stores the relationship between a table and triggers created on the table, but does not store the
relationship between a trigger and tables accessed by the trigger. Therefore, Metadata Manager uses the
TableOwningTrigger association, not the TriggerUsingColumnSet association.
View-to-Synonym Association
Although you can create a view on a synonym in Informix, the Informix system catalog does not store the
relationship. Since Informix does not store the relationship, Metadata Manager does not store associations
between views and synonyms.
Table-to-Constraint Association
Metadata Manager defines the association between a table and constraint using the
ModelElementDependency association. The com.informatica.cwmx.dependency package contains this
association.
IBM Informix 173
View Definitions
If an Informix view definition exceeds 64 characters, Informix splits the view definition into multiple records.
Each record holds up to 64 characters. By default, Metadata Manager extracts up to five records for each
description, which totals 320 characters for each view definition.
Trigger Definitions
Informix splits trigger definitions into header and body, storing each in a separate record. If the Informix
trigger definitions exceed 256 characters, Informix splits the trigger body into multiple records. Each record
holds up to 256 characters. By default, Metadata Manager extracts up to 256 characters for the header and
body combined.
JDBC
You can create and configure a JDBC resource to extract metadata from any relational database
management system that is accessible through JDBC.
For relational databases that support JDBC, you can create and configure a JDBC resource instead of
creating and configuring a custom resource. It is easier to manage linking between objects in connected
resources using JDBC resources.
You can create a JDBC resource for any relational database that supports JDBC. You cannot connect to
relational databases through ODBC. Where available, you should use the existing database resource types
specific to that relational database instead of the JDBC resource. The database-specific resource types
perform better and extract more metadata aspects. For example, to load metadata from an Oracle database,
create an Oracle resource instead of creating a JDBC resource.
Configuring the JDBC Metadata Source
Before you create a JDBC resource, you must configure the metadata source. If you do not correctly
configure the metadata source, the metadata load can fail or the metadata can be incorrectly loaded in the
Metadata Manager warehouse.
To configure the JDBC metadata source, complete the following steps:
•Install the Metadata Manager Agent.
•Configure the permissions for the database user account that you use to connect to the database. Verify
that the user has access to the system tables instead of the data tables.
•Install and configure required database drivers. For example, to configure a JDBC resource to use IBM
DB2/iSeries, you can use the data drivers that are available to you when you install PowerCenter.
The JDBC driver JAR files must be available on the same host as the Metadata Manager Agent.
To test the connection settings to the data source, use any available interface to connect to it through JDBC.
For example, you use the database development perspective in Eclipse to test the connection settings. After
connecting to the data source, verify that you can access the catalog, schema, or tables that you want to
import. Use these connection settings when you configure a JDBC resource for that data source.
When you load a JDBC resource, Metadata Manager imports database objects such as tables and views.
You can configure Metadata Manager to additionally import data structures such as keys, indexes, and stored
procedures.
174 Chapter 9: Database Management Resources

Related Topics:
•“Step 2. Install the Metadata Manager Agent” on page 22
Creating a JDBC Resource
Before you create a JDBC resource, configure the JDBC metadata source.
1. On the Load tab, click Actions > New Resource.
The Resource Selection window appears.
2. Click Database Management > JDBC.
3. Click Next.
The Properties page appears.
4. Enter the following information:
Property Description
Name Name for the resource. The resource appears in the Resources panel with this name. The name
must be unique and have from one through 256 characters. It cannot include the following characters:
/ \ : * ' ? " < > | [ ]
Description Description for the resource. Description cannot exceed 4000 characters.
Hide in Summary
Lineage
Hides the resource in the summary view of data lineage diagrams.
Enable this option to hide the resource and its child objects in the summary view. Disable this option
to display the resource and its child objects in the summary view.
Default is disabled.
5. Click Next.
The Configuration page appears.
6. Enter the configuration properties.
7. Click Test Connection to test the connection to the source system.
If Metadata Manager cannot connect to the source system, an error message appears. Correct any error
and test the connection again.
8. Click Next.
The Schedules window appears.
9. To add a schedule, select Attach a Schedule and select a schedule in the Schedule list.
If you have not created a schedule, you can assign a schedule to a resource after you create the
resource.
10. Click Finish.
The resource appears in the Resources panel on the Load tab.
JDBC 175

JDBC Configuration Properties
Update the configuration properties when you create or edit a JDBC resource.
The following table describes the JDBC configuration properties:
Property Description
Agent URL Host name and port number of the Metadata Manager Agent. You can use the Metadata Manager Agent
installed on any machine.
For example:
http://localhost:19980
Source
system
version
Name and version of the metadata source.
Driver
location
Path to the JDBC driver JAR file. Separate multiple values with a semicolon (;). If required, copy the JAR file to
the Windows machine on which the Metadata Manager Agent is installed.
The driver path is relative to the Metadata Manager Agent location. If you specify the file name without
specifying the path, verify that the JAR file is in the classpath of the machine that runs the Metadata Manager
Agent.
For example, the data driver for IBM DB2/iSeries is in the following directory:
<Informatica installation directory>\services\MetadataManagerService\utilities
\mmcmd\lib
Driver class Name of the Java class that implements the JDBC driver interface. Specify the full name including the package
name.
For example:
com.informatica.jdbc.db2.DB2Driver
URL JDBC URL to connect to the database. Metadata Manager uses this URL to verify connection information to
the database. The value that you specify depends on the database and the driver that you use.
For example:
jdbc:informatica:db2://host_name:port;LocationName=<location
name>;PackageCollection=<package collection>
The default port number of the IBM DB2/iSeries server is 446.
User Name of the user account used to connect to the database.
Password Password for the user account used to connect to the database.
Catalog Catalog name that Metadata Manager uses to filter metadata. The catalog is a container for schemas and
global objects.
The catalog is not relevant for all relational databases. For example, IBM DB2/iSeries does not use a catalog.
Schema Schema name that Metadata Manager uses to filter metadata. Separate multiple values with a semicolon (;).
If you do not specify a schema name, Metadata Manager loads the first schema in the list of available schemas
sorted in ascending alphabetic order.
176 Chapter 9: Database Management Resources

Property Description
Case
sensitivity
Case sensitivity setting for the metadata source database.
Select one of the following options:
-Auto. The Metadata Manager Agent uses the JDBC driver that you specify in the Driver path property to
determine whether the database is case sensitive. If the driver cannot check case sensitivity, the Metadata
Manager Agent assumes that the database is not case sensitive.
-Case sensitive
-Case insensitive
Default is Auto.
View
definition
extracting
SQL
Database-specific SQL query to extract the view definitions. The query must return results with a single column
that contains the view definition text.
If you do not enter a query, data lineage between views and their source tables is not built.
For example, you can enter the following query for IBM DB2/iSeries:
SELECT TABLE_SCHEMA, TABLE_NAME, VIEW_DEFINITION FROM QSYS2.SYSVIEWS WHERE
TABLE_SCHEMA IN (?)
Synonyms
lineage SQL
Database-specific SQL query to extract the synonym information for tables and views.
Note: This property is reserved for future use.
Optional
scope
Optional data structures to import such as keys, indexes, and stored procedures.
To import optional data structures, click Select and choose the data structures to import.
Note: You must specify the connection information for the JDBC source before you can select the optional data
structures to import.
Objects Extracted and Not Extracted
After you create and load a JDBC resource, you can view and run data lineage on the metadata objects that
Metadata Manager extracted.
To view lineage between views and tables, specify a database-specific SQL query to extract the view
definitions when you create or edit a JDBC resource. Metadata Manager uses the view definitions text to
build lineage between views and tables.
Objects Extracted
Metadata Manager extracts the following objects from a JDBC resource:
•Schema name
•Table name, Comments
•Column name, Nullable, Position, Length, Scale, Comments, Data type.
Data type is a generic equivalent of the proprietary datatype.
•View name, View definition.
View definitions are extracted when the view definition extraction SQL is specified during resource
configuration.
Objects Not Extracted
Metadata Manager does not extract the following objects from a JDBC resource:
•Catalog name
•Synonyms of tables and views
•Indexes
JDBC 177
•Stored procedures
•Triggers
•Primary key and foreign key information
•Profiling information
Microsoft SQL Server
You can create and configure a Microsoft SQL Server resource to extract metadata from Microsoft SQL
Server. When you load the resource, Metadata Manager extracts schema details from a Microsoft SQL
Server database.
Configuring Microsoft SQL Server
Before you create a Microsoft SQL Server resource, you must configure the metadata source. If you do not
correctly configure the metadata source, the metadata load can fail or the metadata can be incorrectly loaded
in the Metadata Manager warehouse.
To configure Microsoft SQL Server, complete the following tasks:
Configure permissions.
Configure permissions for the Microsoft SQL Server database user account that you use to connect to
Microsoft SQL Server.
Configure environment variables on UNIX.
The PowerCenter Integration Service uses ODBC to connect to the Microsoft SQL Server database.
When you create a Microsoft SQL Server resource, you enter the connect string in the format
<server_name>@<database_name>
. The PowerCenter Integration Service retrieves the server name and
the database name from the connect string and creates a data source using the installed ODBC driver.
You do not have to create the data source manually.
On Windows, the PowerCenter Integration Service can access the ODBC driver. On UNIX, you must set
the ODBCINST environment variable to the location of the odbcinst.ini file so that the PowerCenter
Integration Service can access the driver.
Configure Permissions
Before you create a Microsoft SQL Server resource, configure the permissions for the Microsoft SQL Server
database user account that you use to connect to Microsoft SQL Server.
The Metadata Manager Service uses SQL Server authentication to connect to the Microsoft SQL Server
database. The user account that you use to connect to Microsoft SQL Server must be an SQL Server login
account. Configure the VIEW DEFINITION permission for the user account. Configuring this permission lists
all the schemas from where the user can load metadata.
178 Chapter 9: Database Management Resources

Configure Environment Variables on UNIX
When you load a Microsoft SQL Server resource, the PowerCenter Integration Service uses ODBC to
connect to the Microsoft SQL Server database. You must set the ODBCINST environment variable to enable
the PowerCenter Integration Service to access the ODBC driver.
On the machine that runs the PowerCenter Integration Service, set the ODBCINST environment variable to
the location of the odbcinst.ini file. For example:
ODBCINST=<INFA_HOME>/ODBC7.1/odbcinst.ini
Restart the domain after you set the environment variable.
Creating a Microsoft SQL Server Resource
Before you create a Microsoft SQL Server resource, configure the Microsoft SQL Server source.
1. On the Load tab, click Actions > New Resource.
The Resource Selection window appears.
2. Click Database Management > SQLServer.
3. Click Next.
The Properties window appears.
4. Enter the following information:
Property Description
Name Name for the resource. The resource appears in the Resources panel with this name. The name
must be unique and have from one through 256 characters. It cannot include the following characters:
/ \ : * ' ? " < > | [ ]
Description Description for the resource. Description cannot exceed 4000 characters.
Hide in Summary
Lineage
Hides the resource in the summary view of data lineage diagrams.
Enable this option to hide the resource and its child objects in the summary view. Disable this option
to display the resource and its child objects in the summary view.
Default is disabled.
5. Click Next.
The Configuration window appears.
6. Enter the configuration properties.
7. Click Test Connection to test the connection to the source system.
If Metadata Manager cannot connect to the source system, an error message appears. Correct any error
and test the connection again.
8. Click Next.
The Parameters window appears.
9. To add schemas to the Selected Schemas list, select the schema in the Available Schemas list and
click Add.
10. To add all available schemas, click Add All.
11. To remove schemas from the Selected Schemas list, select the schema in the Selected Schemas list
and click Remove.
Microsoft SQL Server 179

12. To remove all schemas from the Selected Schemas list, click Remove All.
13. Click Next.
The Schedules window appears.
14. To add a schedule, select Attach a Schedule, and select a schedule in the Schedule list.
If you have not created a schedule, you can assign a schedule to a resource after you create the
resource.
15. Click Finish.
The resource appears in the Resources panel on the Load tab.
Microsoft SQL Server Configuration Properties
Update the configuration properties when you create or edit a Microsoft SQL Server resource.
The following table describes the Microsoft SQL Server configuration properties:
Property Description
User name Name of the SQL Server user account used to connect to the Microsoft SQL Server database. The Metadata
Manager Service uses SQL Server authentication to connect to the Microsoft SQL Server database.
Password Password for the user account used to connect to the Microsoft SQL Server database.
JDBC
connection
URL
JDBC URL used to connect to the Microsoft SQL Server database. Metadata Manager uses this URL to verify
connection information to the Microsoft SQL Server database.
The JDBC connection URL uses the following syntax:
jdbc:informatica:sqlserver://[host_name]:
[port];SelectMethod=cursor;DatabaseName=[database_name]
Connect
string
Connect string used to create a connection to the Microsoft SQL Server database in the PowerCenter
repository. Use the following syntax:
<server_name>@<database_name>
Alternatively, you can create an ODBC data source on the machine that runs the PowerCenter Integration
Service and specify the data source name (DSN) as the connect string.
Secure
JDBC
parameters
Secure JDBC parameters that you want to append to the JDBC connection URL. Use this property to specify
secure connection parameters such as passwords. Metadata Manager does not display secure parameters or
parameter values in the resource configuration properties. Enter the parameters as name=value pairs
separated by the delimiter character that the database driver requires. For example:
param1=value1;param2=value2
If secure communication is enabled for the database, enter the secure JDBC parameters in this property.
Encoding Code page for the Microsoft SQL Server database.
The code page for the resource, the Metadata Manager repository, and the machine where the associated
Integration Service for Metadata Manager runs must be the same.
Use Trusted
Connection
To authenticate the user credentials using Windows authentication and establish a trusted connection to a
Microsoft SQL Server database, select Use trusted connection.
When you use a trusted connection to connect to a Microsoft SQL Server database, the Metadata Manager
Service connects to the repository with the credentials of the user logged in to the machine on which the
service is running.
180 Chapter 9: Database Management Resources
JDBC Parameters for Secure Databases
If secure communication is enabled for the Microsoft SQL Server database, you must append additional
parameters to the JDBC connection URL. To append the parameters, enter them in the Secure JDBC
Parameters property.
Enter the following parameters in the Secure JDBC Parameters property:
EncryptionMethod=SSL;TrustStore=<truststore
location>;TrustStorePassword=<password>;HostNameInCertificate=<host
name>;ValidateServerCertificate=<true|false>;KeyStore=<keystore
location>;keyStorePassword=<password>
Configure the parameters as follows:
EncryptionMethod
Encryption method for data transfer between Metadata Manager and the database server. Must be set to
SSL.
TrustStore
Path and file name of the truststore file that contains the security certificate of the database server.
TrustStorePassword
Password used to access the truststore file.
HostNameInCertificate
Host name of the machine that hosts the secure database. If you specify a host name, the Metadata
Manager Service validates the host name included in the connection string against the host name in the
security certificate.
ValidateServerCertificate
Indicates whether the Metadata Manager Service validates the certificate that the database server
presents. If you set this parameter to true, the Metadata Manager Service validates the certificate. If you
specify the HostNameInCertificate parameter, the Metadata Manager Service also validates the host
name in the certificate.
If you set this parameter to false, the Metadata Manager Service does not validate the certificate that the
database server presents. The Metadata Manager Service ignores any truststore information that you
specify.
KeyStore
Path and file name of the keystore file that contains the security certificates that the Metadata Manager
Service presents to the database server.
KeyStorePassword
Password used to access the keystore file.
Reference
After you create and load a Microsoft SQL Server resource, you can view and run data lineage on the
metadata objects that Metadata Manager extracted.
Microsoft SQL Server 181

Related Topics:
•“Data Lineage for Database Management Resources” on page 203
Objects Extracted
Metadata Manager extracts the following object types from Microsoft SQL Server:
•Schema
•Table
•Column
•Datatype
•View
•Index
•IndexColumn
•PrimaryKeyConstraint
•ForeignKey
•UniqueConstraint
•CheckConstraint
•Scalar-valued function
•Procedure
•TableTrigger
•ViewTrigger
Objects Not Extracted
Metadata Manager does not extract the following object types from Microsoft SQL Server:
•Default or DEFAULT constraint
•Log
•Replication filter stored procedure
•Extended stored procedure
•System schema
•System view
•Table-valued function
Extended Properties
Metadata Manager extracts the value of the MS_Description extended property for Microsoft SQL Server
table and view columns. Metadata Manager displays the property value in the Description property when
you view the column details.
Metadata Manager does not extract extended properties for other Microsoft SQL Server objects. Metadata
Manager does not extract extended properties other than MS_Description.
182 Chapter 9: Database Management Resources
Netezza
You can create and configure a Netezza resource to extract metadata from Netezza. When you load the
resource, Metadata Manager extracts schema details from a Netezza database.
Configuring Netezza
Before you create a Netezza resource, you must configure the metadata source. If you do not correctly
configure the metadata source, the metadata load can fail or the metadata can be incorrectly loaded in the
Metadata Manager warehouse.
To configure Netezza, complete the following tasks:
•Configure permissions.
•Install and configure the Netezza JDBC driver.
•Install the Netezza ODBC driver and create a DSN.
Configure Permissions
The user account must have the LIST privilege to extract metadata from a Netezza database. The LIST
privilege grants the Netezza user access to all database objects in the Netezza database through Metadata
Manager. If necessary, assign database permissions to limit access to individual database objects. For more
information, see the Netezza documentation.
Configure SELECT permissions for the Netezza user account on the following system views:
•_V_TABLE_DIST_MAP
•_V_TABLE
•_V_DATABASE
•_v_relation_keydata
•_v_relation_column
•_v_view
•_v_synonym
•_v_datatype
•_v_sequence
Install and Configure the Netezza JDBC Driver
Install the Netezza JDBC driver on the machine where the Metadata Manager Service runs.
1. Download and install the Netezza JDBC driver from the IBM web site.
2. Disable the Metadata Manager Service.
3. Copy the JDBC driver JAR file, nzjdbc.jar, from the Netezza JDBC driver installation directory to the
following directory:
<Informatica installation directory>\services\shared\jars\thirdparty
4. Enable the Metadata Manager Service.
Netezza 183

Install the Netezza ODBC Driver and Create a DSN
To access a Netezza database, install the Netezza ODBC driver on the node where the PowerCenter
Integration Service runs, and then create a DSN.
1. Download and install the Netezza ODBC driver from the IBM web site.
2. From the Microsoft Windows Control Panel, click Administrative Tools > Data Sources (ODBC).
3. On the System DSN tab, Click Add.
The Create New Data Source window appears.
4. Select NetezzaSQL, and click Finish.
The NetezzaSQL ODBC Datasource Connection dialog box appears.
5. Enter the following information:
Field Description
Data Source Name for the data source. Metadata Manager uses the data source name as a connect string.
Description Optional description.
Database Name of the Netezza database.
Server Host name of the Netezza database server.
Port Port number of the Netezza database server.
User name Netezza database user name. Metadata Manager uses this user name to access metadata in the Netezza
database.
Password Password for the Netezza database user name.
6. Click OK.
Creating a Netezza Resource
Before you create a Netezza resource, configure the Netezza source.
1. On the Load tab, click Actions > New Resource.
The Resource Selection window appears.
2. Click Database Management > Netezza.
3. Click Next.
The Properties page appears.
184 Chapter 9: Database Management Resources

4. Enter the following information:
Property Description
Name Name for the resource. The resource appears in the Resources panel with this name. The name
must be unique and have from one through 256 characters. It cannot include the following characters:
/ \ : * ' ? " < > | [ ]
Description Description for the resource. Description cannot exceed 4000 characters.
Hide in Summary
Lineage
Hides the resource in the summary view of data lineage diagrams.
Enable this option to hide the resource and its child objects in the summary view. Disable this option
to display the resource and its child objects in the summary view.
Default is disabled.
5. Click Next.
The Configuration page appears.
6. Enter the configuration properties.
7. Click Test Connection to test the connection to the source system.
If Metadata Manager cannot connect to the source system, an error message appears. Correct any error
and test the connection again.
8. Click Next.
The Schedules window appears.
9. To add a schedule, select Attach a Schedule, and select a schedule in the Schedule list.
If you have not created a schedule, you can assign a schedule to a resource after you create the
resource.
10. Click Finish.
The resource appears in the Resources panel on the Load tab.
Netezza Configuration Properties
Update the configuration properties when you create or edit a Netezza resource.
The following table describes the Netezza configuration properties:
Property Description
User name Name of the user account used to connect to the Netezza database.
Password Password for the user account used to connect to the Netezza database.
JDBC
connection URL
JDBC URL used to connect to the Netezza database. Metadata Manager uses this URL to verify connection
information to the Netezza database.
The JDBC connection URL uses the following syntax:
jdbc:netezza://[host_name]:[port]/[database_name]
Netezza 185

Property Description
Secure JDBC
parameters
Secure JDBC parameters that you want to append to the JDBC connection URL. Use this property to
specify secure connection parameters such as passwords. Metadata Manager does not display secure
parameters or parameter values in the resource configuration properties. Enter the parameters as
name=value pairs separated by the delimiter character that the database driver requires. For example:
param1=value1;param2=value2
Connect string ODBC data source connect string for a Netezza database. Enter the data source name of the Netezza DSN
that you created.
Encoding Code page for the Netezza database.
The code page for the resource, the Metadata Manager repository, and the machine where the associated
Integration Service for Metadata Manager runs must be the same.
Reference
After you create and load a Netezza resource, you can view and run data lineage on the metadata objects
that Metadata Manager extracted.
Objects Extracted
Metadata Manager extracts the following object types from a Netezza database:
•Database
•Table
•ExternalTable
•Column
•Datatype
•Synonym
•View
•Materialized View
•DistributionKey
•PrimaryKeyConstraint
•ForeignKeyConstraint
•UniqueKeyConstraint
•Sequence
Oracle
You can create and configure an Oracle resource to extract metadata from Oracle. When you load the
resource, Metadata Manager extracts schema details from an Oracle database.
Before you create an Oracle resource, you must configure the metadata source. If you do not correctly
configure the metadata source, the metadata load can fail or the metadata can be incorrectly loaded in the
Metadata Manager warehouse.
186 Chapter 9: Database Management Resources
Configure Permissions
Configure the permissions for the Oracle database user account that you use to connect to the Oracle
database.
Configure CONNECT and SELECT_CATALOG_ROLE permissions for the user account.
If you cannot configure SELECT_CATALOG_ROLE permission for the user account, configure the following
permissions:
•SELECT permissions on the v$version and v$instance views.
•CONNECT and SELECT permissions on the required schema objects and corresponding system tables.
Configure SELECT permissions on the following schema objects:
•Tables
•Views
•Indexes
•Packages
•Procedures
•Functions
•Sequences
•Triggers
•Synonyms
Configure SELECT permissions on the following system tables:
•ALL_OBJECTS
•ALL_SOURCE
•ALL_USERS
•DBA_COL_COMMENTS
•DBA_CONS_COLUMNS
•DBA_CONSTRAINTS
•DBA_DEPENDENCIES
•DBA_IND_COLUMNS
•DBA_INDEXES
•DBA_MVIEWS
•DBA_OBJECTS
•DBA_RECYCLEBIN
•DBA_SEQUENCES
•DBA_SOURCE
•DBA_SYNONYMS
•DBA_TAB_COLUMNS
•DBA_TAB_COMMENTS
•DBA_TAB_PARTITIONS
•DBA_TABLES
•DBA_TRIGGERS
Oracle 187
•DBA_VIEWS
If schemas have a table with a cluster defined on some columns, you must configure SELECT permission on
the DBA_CLUSTER system table.
Configure Oracle with the Advanced Security Option
If you want to extract metadata from an Oracle database that uses the Advanced Security Option (ASO), you
must perform additional tasks so that Metadata Manager can communicate with the database.
To enable Metadata Manager to communicate with the Oracle database, perform the following tasks:
1. Configure the encryption type on the Oracle server.
2. Configure the sqlnet.ora and tnsnames.ora files on the Oracle client machines.
3. Download and extract the Java Cryptography Extension (JCE) policy files.
Step 1. Configure the Encryption Type on the Oracle Server
You must configure the encryption type on the Oracle server.
Set the Oracle ASO server-side encryption type to Required or Requested. If server-side encryption is set to
Accepted, Metadata Manager cannot communicate with the Oracle database.
Step 2. Configure sqlnet.ora and tnsnames.ora
You must configure the sqlnet.ora and tnsnames.ora files on the Oracle client machines so that Metadata
Manager can access the Oracle database.
In the sqlnet.ora file, configure the following parameters:
•SQLNET.AUTHENTICATION_SERVICES
•NAMES.DIRECTORY_PATH
•SQLNET.EXPIRE_TIME
•SQLNET.ENCRYPTION_TYPES_SERVER
•SQLNET.ENCRYPTION_SERVER
•SQLNET.CRYPTO_CHECKSUM_SERVER
•SQLNET.CRYPTO_CHECKSUM_TYPES_SERVER
•SQLNET.CRYPTO_SEED
For example, the following code shows possible sqlnet.ora settings when the encryption type is aes256:
SQLNET.AUTHENTICATION_SERVICES = (NTS)
NAMES.DIRECTORY_PATH = (tnsnames, ezconnect)
SQLNET.EXPIRE_TIME = 0
SQLNET.ENCRYPTION_TYPES_SERVER = (aes256)
SQLNET.ENCRYPTION_SERVER = required
SQLNET.CRYPTO_CHECKSUM_SERVER = required
SQLNET.CRYPTO_CHECKSUM_TYPES_SERVER = (md5)
SQLNET.CRYPTO_SEED = "abcd1234"
In the tsnames.ora file, add an entry for the Oracle server that uses ASO.
188 Chapter 9: Database Management Resources

Step 3. Download and Extract the JCE Policy Files
The DataDirect JDBC driver for Oracle requires Java Cryptography Extension (JCE) Policy files to support
256-bit strength encryption.
For all operating systems except AIX, download the Oracle JCE Unlimited Strength Jurisdiction Policy File 6,
jce_policy-6.zip, from the Oracle website to your local machine. For the AIX operating system, download the
IBM Unrestricted SDK JCE Policy File for older versions of the SDK, unrestricted.zip, from the IBM website to
your local machine.
Extract the local_policy.jar and US_export_policy.jar files to the following directory:
<Informatica installation directory>\java\jre\lib\security
Creating an Oracle Resource
Before you create an Oracle resource, configure the Oracle source.
1. On the Load tab, click Actions > New Resource.
The Resource Selection window appears.
2. Click Database Management > Oracle.
3. Click Next.
The Properties window appears.
4. Enter the following information:
Property Description
Name Name for the resource. The resource appears in the Resources panel with this name. The name
must be unique and have from one through 256 characters. It cannot include the following characters:
/ \ : * ' ? " < > | [ ]
Description Description for the resource. Description cannot exceed 4000 characters.
Hide in Summary
Lineage
Hides the resource in the summary view of data lineage diagrams.
Enable this option to hide the resource and its child objects in the summary view. Disable this option
to display the resource and its child objects in the summary view.
Default is disabled.
5. Click Next.
The Configuration window appears.
6. Enter the configuration properties.
7. Click Test Connection to test the connection to the source system.
If Metadata Manager cannot connect to the source system, an error message appears. Correct any error
and test the connection again.
8. Click Next.
The Parameters window appears.
9. To add schemas to the Selected Schemas list, select the schema in the Available Schemas list and
click Add.
10. To add all available schemas, click Add All.
Oracle 189

11. To remove schemas from the Selected Schemas list, select the schema in the Selected Schemas list
and click Remove.
12. To remove all schemas from the Selected Schemas list, click Remove All.
13. Click Next.
The Schedules window appears.
14. To add a schedule, select Attach a Schedule and select a schedule in the Schedule list.
If you have not created a schedule, you can assign a schedule to a resource after you create the
resource.
15. Click Finish.
The resource appears in the Resources panel on the Load tab.
Oracle Configuration Properties
Update the configuration properties when you create or edit an Oracle resource.
The following table describes the Oracle configuration properties:
Property Description
User name Name of the user account used to connect to the Oracle database.
Password Password for the user account used to connect to the Oracle database.
JDBC
connection
URL
JDBC URL used to connect to the Oracle database. Metadata Manager uses this URL to verify connection
information to the Oracle database.
If the Oracle database is not clustered, use the following syntax:
jdbc:informatica:oracle://[host name]:[port];SID=[sid]
You can enter the SID or edit the string to use the full service name. For example:
jdbc:informatica:oracle://[host name]:[port];ServiceName=[service name]
If the Oracle database is clustered, use the following syntax:
jdbc:informatica:oracle://[host1]:[port];ServiceName=[service
name];AlternateServers = ([host2]:[port]);LoadBalancing=true
If the Oracle database uses the Advanced Security Option, use the following syntax:
jdbc:informatica:oracle://[host name]:
[port];SID=[SID];EncryptionLevel=[encryption
level];EncryptionTypes=[encryption types];DataIntegrityLevel=[data
integrity level];DataIntegrityTypes=[data integrity types]
Secure JDBC
parameters
Secure JDBC parameters that you want to append to the JDBC connection URL. Use this property to specify
secure connection parameters such as passwords. Metadata Manager does not display secure parameters or
parameter values in the resource configuration properties. Enter the parameters as name=value pairs
separated by the delimiter character that the database driver requires. For example:
param1=value1;param2=value2
If secure communication is enabled for the database, enter the secure JDBC parameters in this property.
190 Chapter 9: Database Management Resources

Property Description
Connect string Native connect string used to create a source connection to the database in the PowerCenter repository. The
connect string is the same as the Oracle TNSNAMES entry on the machine where the associated Integration
Service for Metadata Manager runs.
Use the following syntax:
<database name>.world
Encoding Code page for the Oracle database.
Only code pages that are compatible with the code page of the Metadata Manager repository are displayed.
Incremental
load
Enables incremental loading for the resource after the first successful resource load.
When you enable this option, Metadata Manager loads recent changes to the metadata instead of loading
complete metadata. When you disable this option, Metadata Manager performs a full metadata load.
Default is disabled.
JDBC Parameters for Secure Databases
If secure communication is enabled for the Oracle database, you must append additional parameters to the
JDBC connection URL. To append the parameters, enter them in the Secure JDBC Parameters property.
Enter the following parameters in the Secure JDBC Parameters property:
EncryptionMethod=SSL;TrustStore=<truststore
location>;TrustStorePassword=<password>;HostNameInCertificate=<host
name>;ValidateServerCertificate=<true|false>;KeyStore=<keystore
location>;keyStorePassword=<password>
Configure the parameters as follows:
EncryptionMethod
Encryption method for data transfer between Metadata Manager and the database server. Must be set to
SSL.
TrustStore
Path and file name of the truststore file that contains the security certificate of the database server.
TrustStorePassword
Password used to access the truststore file.
HostNameInCertificate
Host name of the machine that hosts the secure database. If you specify a host name, the Metadata
Manager Service validates the host name included in the connection string against the host name in the
security certificate.
ValidateServerCertificate
Indicates whether the Metadata Manager Service validates the certificate that the database server
presents. If you set this parameter to true, the Metadata Manager Service validates the certificate. If you
specify the HostNameInCertificate parameter, the Metadata Manager Service also validates the host
name in the certificate.
If you set this parameter to false, the Metadata Manager Service does not validate the certificate that the
database server presents. The Metadata Manager Service ignores any truststore information that you
specify.
Oracle 191

KeyStore
Path and file name of the keystore file that contains the security certificates that the Metadata Manager
Service presents to the database server.
KeyStorePassword
Password used to access the keystore file.
Incremental Loading for Oracle Resources
When you load an Oracle resource, Metadata Manager performs a full metadata load by default. You can
configure Metadata Manager to perform loads incrementally after the first successful metadata load.
A full load extracts all metadata objects. An incremental load causes Metadata Manager to load recent
changes to the metadata instead of loading complete metadata. Recent changes include the addition of
objects, updates to objects, and the deletion of objects since the start of the last successful load. Incremental
loading reduces the load time because Metadata Manager extracts fewer objects in an incremental load than
it extracts in a full load.
Use the Incremental load configuration property to enable or disable incremental loading for an Oracle
resource.
Note: Even if you enable incremental loading, a complete metadata load occurs in the following
circumstances:
•You purge the resource.
•You cancel the first load of the resource before the ETL task starts.
•The first load of the resource fails.
Reference
After you create and load an Oracle resource, you can view and run data lineage on the metadata objects
that Metadata Manager extracted.
Related Topics:
•“Data Lineage for Database Management Resources” on page 203
Objects Extracted
Metadata Manager extracts the following database object types from Oracle:
•Database trigger
•Schema
•Schema trigger
Metadata Manager extracts the following object types from the Oracle schema:
•Function
•Index
-Index column
•Materialized view
-Check constraint
192 Chapter 9: Database Management Resources
-Column
-Foreign key
•Package
-Function
-Procedure
•Procedure
•Schema trigger
•Sequence
•Synonym
•Table trigger
•Table
-Check constraint
-Column
-Foreign key
-Primary key
-Unique key constraint
•View trigger
•View
-Column
Metadata Manager does not extract dropped tables, constraints, triggers, or indexes from the Oracle schema.
Snapshots
Oracle database snapshots do not display in the metadata catalog or data lineage.
Public Schema
Public schema is not a true Oracle schema. Metadata Manager creates a virtual schema, called PUBLIC
schema, to properly display the owner of Oracle public synonyms. The Public schema owns and classifies all
public synonyms created by any user. The Public schema appears as the owner name for all public
synonyms in Metadata Manager.
Public Synonym Handling
Metadata Manager does not extract Oracle internal public synonyms.
Metadata Manager extracts Oracle public synonyms for the schemas that you select to load. Public
synonyms appear for database tables included in the lineage diagram.
Sybase ASE
You can create and configure a Sybase ASE resource to extract metadata from Sybase ASE. When you load
the resource, Metadata Manager extracts schema details from a Sybase ASE database.
Sybase ASE 193
Configuring Sybase ASE
Before you create a Sybase ASE resource, you must configure the metadata source. If you do not correctly
configure the metadata source, the metadata load can fail or the metadata can be incorrectly loaded in the
Metadata Manager warehouse.
To configure Sybase ASE, complete the following tasks:
•Configure permissions.
•Rename library files for Sybase ASE version 15.0 and later.
Configure Permissions
Before you create a Sybase resource, configure the permissions for the Sybase ASE database user account
that you use to connect to the Sybase ASE database.
Configure SELECT permissions on the following schema objects:
•Tables
•Views
•Columns
•Procedures
Configure SELECT permissions on the following system tables:
•sysobjects
•syscomments
•sysdepends
•syscolumns
•sysindexes
•sysconstraints
•sysreferences
•sysusers
•systypes
•master.dbo.sysservers
•master.dbo.sysconfigures
•@@<servername>
Rename Library Files for Sybase ASE Version 15.0 and Later
Sybase ASE version 15.0 and later uses different library file names from earlier Sybase ASE versions. When
you load a Sybase ASE resource, Metadata Manager uses Sybase library file names from earlier versions.
As a result, Metadata Manager cannot load a Sybase ASE version 15.0 or later resource unless you rename
the library files in the Sybase ASE client.
The Sybase ASE client installation includes a backward compatibility script that renames library files to the
library file names used in earlier versions. Run one of the following scripts to rename the library files:
•copylibs.bat on Windows
•lnsybs on UNIX
The scripts are in the following directory:
<SybaseClientInstallation>sybase\OCS-15_0\scripts
194 Chapter 9: Database Management Resources

Creating a Sybase ASE Resource
Before you create a Sybase ASE resource, configure the Sybase ASE source.
1. On the Load tab, click Actions > New Resource.
The Resource Selection window appears.
2. Click Database Management > Sybase.
3. Click Next.
The Properties window appears.
4. Enter the following information:
Property Description
Name Name for the resource. The resource appears in the Resources panel with this name. The name
must be unique and have from one through 256 characters. It cannot include the following characters:
/ \ : * ' ? " < > | [ ]
Description Description for the resource. Description cannot exceed 4000 characters.
Hide in Summary
Lineage
Hides the resource in the summary view of data lineage diagrams.
Enable this option to hide the resource and its child objects in the summary view. Disable this option
to display the resource and its child objects in the summary view.
Default is disabled.
5. Click Next.
The Configuration window appears.
6. Enter the configuration properties.
7. Click Test Connection to test the connection to the source system.
If Metadata Manager cannot connect to the source system, an error message appears. Correct any error
and test the connection again.
8. Click Next.
The Parameters window appears.
9. To add schemas to the Selected Schemas list, select the schema in the Available Schemas list and
click Add.
10. To add all available schemas, click Add All.
11. To remove schemas from the Selected Schemas list, select the schema in the Selected Schemas list
and click Remove.
12. To remove all schemas from the Selected Schemas list, click Remove All.
13. Click Next.
The Schedules window appears.
14. To add a schedule, select Attach a Schedule, and select a schedule in the Schedule list.
If you have not created a schedule, you can assign a schedule to a resource after you create the
resource.
15. Click Finish.
The resource appears in the Resources panel on the Load tab.
Sybase ASE 195

Sybase ASE Configuration Properties
Update the configuration properties when you create or edit a Sybase ASE resource.
The following table describes the Sybase ASE configuration properties:
Property Description
User name Name of the user account used to connect to the Sybase database.
Password Password for the user account used to connect to the Sybase database.
JDBC
connection
URL
JDBC URL used to connect to the Sybase database. Metadata Manager uses this URL to verify connection
information to the Sybase database.
The JDBC connection URL uses the following syntax:
jdbc:informatica:sybase://[host_name]:[port];DatabaseName=[database_name]
Secure JDBC
parameters
Secure JDBC parameters that you want to append to the JDBC connection URL. Use this property to specify
secure connection parameters such as passwords. Metadata Manager does not display secure parameters
or parameter values in the resource configuration properties. Enter the parameters as name=value pairs
separated by the delimiter character that the database driver requires. For example:
param1=value1;param2=value2
Connect string Native connect string used to create a source connection to the database in the PowerCenter repository. The
connect string uses the following syntax:
<server_name>@<database_name>
Encoding Code page for the Sybase database.
The code page for the resource, the Metadata Manager repository, and the machine where the associated
Integration Service for Metadata Manager runs must be the same.
Reference
Metadata Manager extracts the following object types from Sybase ASE:
•Schema
•Table
•Column
•Datatype
•View
•Index
•IndexColumn
•PrimaryKeyConstraint
•ForeignKey
•UniqueConstraint
•CheckConstraint
•Function
•Procedure
•TableTrigger
196 Chapter 9: Database Management Resources

•ViewTrigger
Metadata Manager does not extract the following information from Sybase ASE:
•Default constraints
•Rules defined for users
Teradata
You can create and configure a Teradata resource to extract metadata from Teradata. When you load the
resource, Metadata Manager extracts schema details from a Teradata database.
Configuring Teradata
Before you create or load a Teradata resource, you must configure the metadata source. If you do not
correctly configure the metadata source, the metadata load can fail or the metadata can be incorrectly loaded
in the Metadata Manager warehouse.
To configure Teradata, complete the following tasks:
•Configure permissions for the Teradata database user.
•Install the Teradata JDBC driver.
Configuring Permissions
Configure the permissions for the Teradata database user account that you use to connect to the Teradata
database.
The following table lists the schema objects and system tables on which you must configure SELECT
permissions for the Teradata database user account:
Schema Objects System Tables
Tables
Views
Indexes
Packages
Procedures
Functions
Sequences
Triggers
Synonyms
DBC.DBCINFO
DBC.TABLETEXT
DBC.HOSTSINFO
DBC.DATABASES
DBC.TABLES
DBC.COLUMNS
DBC.ALL_RI_CHILDREN
DBC.INDICES
DBC.TRIGGERS
DBC.SHOWTBLCHECKS
Teradata 197

Installing the Teradata JDBC Driver
Before you can create or update a Teradata resource, you must install the Teradata JDBC driver and restart
the Metadata Manager Service.
1. Download the Teradata JDBC driver version 13.10.00.32 from the following URL:
http://downloads.teradata.com/download/connectivity/jdbc-driver
2. Copy the JAR files to the following directories:
•
<INFA_HOME>\services\shared\jars\thirdparty
•
<INFA_HOME>\services\MetadataManagerService\mmapps\mm\WEB-INF\lib
3. Restart the Metadata Manager Service.
Creating a Teradata Resource
Before you create a Teradata resource, configure the Teradata source.
1. On the Load tab, click Actions > New Resource.
The Resource Selection window appears.
2. Click Database Management > Teradata.
3. Click Next.
The Properties window appears.
4. Enter the following information:
Property Description
Name Name for the resource. The resource appears in the Resources panel with this name. The name
must be unique and have from one through 256 characters. It cannot include the following characters:
/ \ : * ' ? " < > | [ ]
Description Description for the resource. Description cannot exceed 4000 characters.
Hide in Summary
Lineage
Hides the resource in the summary view of data lineage diagrams.
Enable this option to hide the resource and its child objects in the summary view. Disable this option
to display the resource and its child objects in the summary view.
Default is disabled.
5. Click Next.
The Configuration window appears.
6. Enter the configuration properties.
7. Click Test Connection to test the connection to the source system.
If Metadata Manager cannot connect to the source system, an error message appears. Correct any error
and test the connection again.
8. Click Next.
The Parameters window appears.
9. To add schemas to the Selected Schemas list, select the schema in the Available Schemas list and
click Add.
10. To add all available schemas, click Add All.
198 Chapter 9: Database Management Resources

11. To remove schemas from the Selected Schemas list, select the schema in the Selected Schemas list
and click Remove.
12. To remove all schemas from the Selected Schemas list, click Remove All.
13. Click Next.
The Schedules window appears.
14. To add a schedule, select Attach a Schedule and select a schedule in the Schedule list.
If you have not created a schedule, you can assign a schedule to a resource after you create the
resource.
15. Click Finish.
The resource appears in the Resources panel on the Load tab.
Teradata Configuration Properties
Update the configuration properties when you create or edit a Teradata resource.
The following table describes the Teradata configuration properties:
Property Description
User name Name of the user account used to connect to the Teradata database.
Password Password for the user account used to connect to the Teradata database.
JDBC
connection
URL
JDBC URL used to connect to the Teradata database. Metadata Manager uses this URL to verify connection
information to the Teradata database.
The JDBC connection URL uses the following syntax:
jdbc:teradata://[database_server_name]/Database=[database_name]
For Teradata databases that contain multibyte data, add the CHARSET parameter to specify the Teradata
character set. For example:
jdbc:teradata://[database_server_name]/
Database=[database_name],CHARSET=[character_set_name]
For more information about the supported Teradata character sets, see the Teradata documentation.
Secure JDBC
parameters
Secure JDBC parameters that you want to append to the JDBC connection URL. Use this property to specify
secure connection parameters such as passwords. Metadata Manager does not display secure parameters or
parameter values in the resource configuration properties. Enter the parameters as name=value pairs
separated by the delimiter character that the database driver requires. For example:
param1=value1,param2=value2
Server data
source name
Name of the server data source for the Teradata database.
Encoding Code page for the Teradata database.
The code page for the resource, the Metadata Manager repository, and the machine where the associated
Integration Service for Metadata Manager runs must be the same.
Incremental
load
Enables incremental loading for the resource after the first successful resource load.
When you enable this option, Metadata Manager loads recent changes to the metadata instead of loading
complete metadata. When you disable this option, Metadata Manager performs a full metadata load.
Default is disabled.
Teradata 199

Incremental Loading for Teradata Resources
When you load a Teradata resource, Metadata Manager performs a full metadata load by default. You can
configure Metadata Manager to perform loads incrementally after the first successful metadata load.
A full load extracts all metadata objects. An incremental load causes Metadata Manager to load recent
changes to the metadata instead of loading complete metadata. Recent changes include the addition of
objects, updates to objects, and the deletion of objects since the start of the last successful load. Incremental
loading reduces the load time because Metadata Manager extracts fewer objects in an incremental load than
it extracts in a full load.
Use the Incremental load configuration property to enable or disable incremental loading for a Teradata
resource.
Note: Even if you enable incremental loading, a complete metadata load occurs in the following
circumstances:
•You purge the resource.
•You cancel the first load of the resource before the ETL task starts.
•The first load of the resource fails.
Reference
After you create and load a Teradata resource, you can view and run data lineage on the metadata objects
that Metadata Manager extracted.
Related Topics:
•“Data Lineage for Database Management Resources” on page 203
Objects Extracted
Metadata Manager extracts the following object types from a Teradata database:
•User
•Table
•Column
•Datatype
•View
•Index
•IndexColumn
•PrimaryKeyConstraint
•ForeignKey
•UniqueConstraint
•CheckConstraint
•Procedure
•TableTrigger
•Macro
Metadata Manager does not extract the following information from Teradata:
•Join Indexes
200 Chapter 9: Database Management Resources

•Body text of a procedure
Data lineage is not supported for Teradata procedures.
Databases and Users
To enable Metadata Manager database management reports to display Teradata databases and users,
TeradataDatabase and TeradataUser classes are mapped to the Schema class in the
cwm.resource.relational package. The Catalog class in the cwm.resource.relational package is mapped to the
Metadata Manager repository.
If you need to provide values for the Schema attribute for Teradata, use the user name or database name.
For example, to filter the results of a Teradata database catalog report based on the database name, create
a filter on the Schema attribute, not on the Database Name attribute.
The following table provides guidelines for the type of values to use for the DatabaseName and Schema
report attributes:
Report Attribute Valid Values for Teradata Valid Values for Other Database Platforms
DatabaseName Repository name Repository name
Schema Database name or user name User name
Trigger Properties
Trigger properties are sourced from the DBC.Triggers system view, which is not accessible to the public user.
Make sure that all users who load Teradata metadata have SELECT permission on this view.
Table-to-Trigger Association
Since tables included in the trigger SQL code are not available from the Teradata system metadata views or
tables, these tables and triggers are associated through the TableOwningTrigger association, not through the
TriggerUsingColumnSet association.
Note: This section refers to tables included in the SQL code for the trigger, not the tables that initiate the
trigger.
Host Name
Since the host names of servers containing Teradata database instances are not located in the
DBC.HostsInfo system view or DBC.Hosts system table, Metadata Manager retrieves the host name when
you set up the ODBC connection (DSN). The Database Server Name parameter stores the host name.
Note: Host name refers to the name of the server hosting the Teradata database instance.
View Column Datatypes
The Metadata Manager database management reports require the view column-to-datatype association.
Because Teradata does not provide values for the Datatype, Length, Precision, Scale, and IsNullable view
columns, Metadata Manager sets the default values to Unsupported.
Note: Teradata provides these values for the table columns, which Metadata Manager extracts and stores.
Teradata 201

Limited Metadata Load
Use the Schema Inclusion List parameter to exclude particular users and databases from the metadata load.
For example, you may want to exclude level 1 users, such as system users and databases. To exclude a
user or database at level 1 under “DBC,” do not add it to the Schema Inclusion List.
Related Topics:
•“Configuring the Schema Inclusion List” on page 202
Element IDs for Indexes and Constraints
Teradata allows null values for names of indexes, such as Primary Key, Unique, and Check Constraints.
Teradata identifies each index by a Unique Index Number, which is unique in the database and table on
which the index is created. The Unique Index Number is equivalent to a position. Metadata Manager uses
this number to generate a unique Element ID for all indexes that do not have names.
Metadata Manager also generates unique sequence numbers for constraints that do not have names to
create their Element IDs.
Configuring the Schema Inclusion List
You can configure the Schema Inclusion List parameter for the following resources:
•IBM DB2 for LUW
•IBM DB2 for z/OS
•IBM Informix
•Microsoft SQL Server
•Oracle
•Sybase ASE
•Teradata
To edit the parameter, select the resource in the Resources panel of the Load tab, click Edit Resource, and
click the Parameters tab in the Edit Resource window.
Use the Schema Inclusion List parameter to select the schemas that you want to load into the Metadata
Manager warehouse. When you load a relational database source, Metadata Manager loads metadata from
database schemas into the Metadata Manager warehouse.
Select Refresh for schemas that have changed since the last resource load or that you want to load for the
first time. Metadata Manager loads the schemas selected for refresh. By default, all previously loaded
schemas have Refresh selected. You can clear Refresh for a previously loaded schema that you do not want
to reload. You can also clear or select Refresh for all schemas in the Selected Schemas list.
If you modify the schemas for Metadata Manager to extract and remove previously loaded schemas,
Metadata Manager does not delete any metadata objects from the Metadata Manager warehouse. To delete
metadata objects in the Metadata Manager warehouse that no longer exist in the source database, you must
purge the metadata for the resource and load the schemas you want in the Metadata Manager warehouse.
Note: If you create a resource for Microsoft SQL Server 2000, the available schemas list contains a list of
users for the SQL Server database.
202 Chapter 9: Database Management Resources
Data Lineage for Database Management Resources
You can view data lineage for tables that are included in join statements and for objects used in an SQL
query with an inline view.
Tables in Join Statements
Data lineage includes a database table if data is extracted from or loaded to the table. If the table is included
in a join statement but no data is extracted from or loaded to it, the table does not appear in data lineage.
For example, an SQL view includes two tables, CUSTOMER and CITY as described in the following SQL:
CREATE VIEW SF_CUST_VIEW AS SELECT CUSTOMER.ID, CUSTOMER.NAME
FROM CUSTOMER, CITY
WHERE CUSTOMER.CITY_ID = CITY.ID AND CITY.NAME = ‘SFO’
Because the view only exposes data from the CUSTOMER table, the CITY table does not display in data
lineage for the view. Instead, data lineage displays the CITY table as a Related Catalog Object of the view.
SQL Inline Views
An SQL inline view is a SELECT statement in the FROM clause of another SELECT statement. For example,
the following SQL includes an inline view:
SELECT ename
FROM (SELECT ename
FROM emp)
You can view data lineage on a database table, view, or synonym used in an SQL query with an inline view.
The SQL query can exist in the following objects:
•SQL override in a PowerCenter Source Qualifier or Lookup transformation.
•Database views, stored procedures, functions, and triggers.
Note: SQL inline views are also referred to as Common Table Expressions.
Data Lineage for Database Management Resources 203

CHAPTER 1 0
Universal Resources
This chapter includes the following topics:
•Universal Resources Overview, 204
•Supported Metadata Sources, 205
•XConnect Creation, 206
•Resource Creation, 213
Universal Resources Overview
You can create and configure universal resources to extract metadata from metadata sources for which
Metadata Manager does not package a model. You can create universal resources to extract metadata from
certain business intelligence, data integration, data modeling, and database management metadata sources.
For example, you need to extract metadata from QlikView QVD or QVW files, but Metadata Manager does
not package a model for QlikView. You can create a universal resource to extract metadata from QlikView
Files.
The universal resources that you create behave in the same way as packaged resources. You configure
connection assignments for objects in universal resources in the same way that you do for objects in
packaged resources. You cannot change the classes in the model that is associated with a universal
resource. However, you can add custom attributes for the model classes, just as you do for packaged
resources.
To create a universal resource, perform the following tasks:
1. Create a universal XConnect that represents the metadata source type.
For example, you might create an XConnect for Apache Hadoop Hive Server, or QlikView Files. The
XConnect includes the model for the metadata source.
2. Create the resource that represents your metadata source.
You can create multiple resources for each XConnect that you create. So if you create an XConnect for
QlikView Files, you can create multiple resources that are based on the QlikView model.
You create universal XConnects through the Universal Connectivity Framework. The Universal Connectivity
Framework contains the software components that you use to develop universal XConnects. It includes all of
the tools and artifacts that you need to create universal XConnects, models, and resources.
Note: The Universal Connectivity Framework (UCF) is architected using an Informatica OEM partner solution
(the Meta Integration Model Bridge). See the Product Availability Matrix (PAM) to find the list of sources and
version specific details from which the Universal Connectivity Framework can extract metadata and the
204

"Statement of Support" document to understand the supportability aspects related to the usage of the
Universal Connectivity Framework. The universal models and resources that you create using the Universal
Connectivity Framework might have inconsistencies in appearance and behavior when compared with
packaged models and resources.
For more information about supported metadata source versions, see the PCAE Metadata Manager
XConnect Support Product Availability Matrix on Informatica Network:
https://network.informatica.com/community/informatica-network/product-availability-matrices/overview
Supported Metadata Sources
You can create a universal resource to extract metadata from different metadata sources.
Create a universal resource to extract metadata from any of the following metadata sources:
Amazon RedShift Database (via JDBC)
Apache Hadoop HDFS Java API
Apache Hadoop Hive Server
Apache Hadoop HiveQL DDL
Apache Hadoop Web HCatalog
Borland Together (via UML 1.x XMI)
Borland Together (via UML 2.x XMI)
CA Component Modeler 3.52 (ParadigmPlus)
CA Component Modeler 4.x (via UML 1.x XMI)
CA COOLBiz 5.1
CA COOLBusinessTeam (GroundWorks) 2.2.1
CA COOLEnterprise (ADW) 2.7
CA COOLXtras Mapper (TerrainMap for DB2)
CA Gen
CaRepositoryDsOdbc
CaRepositoryDsOdbcImport.ZOS
COBOL Copybook File
Gentleware Poseidon (via UML 1.x XMI)
Google BigQuery
Grandite Silverrun-RDM 2.4.4 to 2.8.6
Hl7XmlDtd
Hortonworks Hadoop Hive Server
Hortonworks Hadoop HiveQL DDL
IBM DB2 Cube Views
IBM InfoSphere Data Architect (IDA)
IBM InfoSphere Federation Server (via JDBC)
IBM InfoSphere Information Governance Catalog (IGC)
IBM InfoSphere Information Server (IIS) 11.x (Common Model)
IBM InfoSphere Information Server (IIS) 9.x (Common Model)
IBM InfoSphere Warehouse - InfoSphere Data Architect
IBM Lotus Notes (via JDBC-ODBC)
IBM Rational Rose 6.0(98i) to 6.5(2000)
IBM Rational Rose 7.x (2000e and newer)
IBM Rational Software Architect (RSA) (via UML 2.x XMI)
IBM Rational System Architect (SA) 10.4 to 11.x (Encyclopedia)
IBM Rational System Architect (SA) 7.1 to 11.x (File)
IBM Telelogic Tau (via UML 1.x XMI)
IbmRationalSoftwareArchitect
IDERA ERStudio Business Architect (via DM1)
IDERA ERStudio Repository
KalidoDiw
MapR Hadoop Hive Server
MapR Hadoop HiveQL DDL
Meta Integration Repository (MIR) Application Server
Meta Integration Repository (MIR) XMI file
Meta Integration Repository (MIR) XMI multimodel content
Metadata Excel Format
Micro Focus (Merant) AppMaster Builder
Microsoft Office Visio Database Diagram (via ERX)
Supported Metadata Sources 205

Microsoft Office Visio UML Class Diagram (via UML 1.x XMI)
Microsoft SQL Server XML Data Reduced (XDR) Schema
NoMagic MagicDraw (via UML 1.x XMI)
OMG CWM 1.x XMI 1.x
OMG CWM Pre-1.0 XMI 1.1
OMG UML 1.x XMI 1.x
OMG UML 2.x XMI 2.x
OmgCwmXmiImport.HyperionApplicationBuilder
OmgCwmXmiImport.IbmDb2WarehouseManager
OmgCwmXmiImport.IbmInfoSphereDiscovery
OmgCwmXmiImport.OracleWarehouseBuilder
OmgCwmXmiImport.SasDataIntegrationStudio
Oracle Data Modeler (ODM) 4.x
Oracle Data Warehouse Administration Console (DAC)
Oracle Designer
Oracle Hyperion Essbase Integration Services (EIS)
Pivotal Greenplum Database (via JDBC)
PopkinSa
PostgreSQL Database (via JDBC)
QlikView Files
QlikView Repository
SAS Information Map Studio (via MIR XMI)
SAS Management Console (via MIR XMI)
SAS Metadata Management (via MIR XMI)
SAS Metadata Server (via MIR XMI)
SAS OLAP Server (via ODBO)
Select SE
Sparx Enterprise Architect (EA) (via UML 1.x XMI)
Sparx Enterprise Architect (EA) (via UML 2.x XMI)
Talend Master Data Management (MDM)
Tigris ArgoUML (via UML 1.x XMI)
Visible IEAdvantage 6.1
W3C XML DTD 1.0
W3C XML Schema 1.0 (XSD)
For more information about supported metadata source versions, see the PCAE Metadata Manager
XConnect Support Product Availability Matrix on Informatica Network:
https://network.informatica.com/community/informatica-network/product-availability-matrices/overview
XConnect Creation
An XConnect is the code and artifacts that Metadata Manager uses to extract metadata from a metadata
source. It includes the model for the metadata source. To create a universal XConnect, you create a plug-in,
copy the plug-in to the Metadata Manager Service plug-ins directory, and recycle the Metadata Manager
Service.
Metadata Manager imports the model when the service is enabled.
206 Chapter 10: Universal Resources
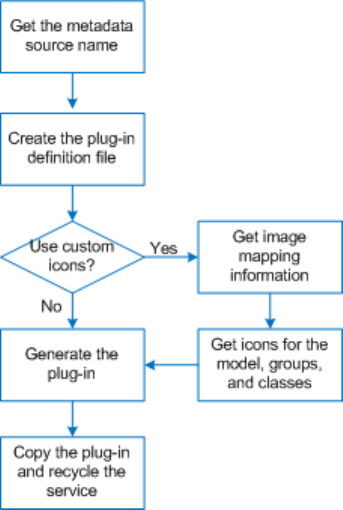
The following image shows the process to create a universal XConnect:
1. Get the metadata source name.
2. Create the plug-in definition file.
3. If you want to use custom icons, run the mmXConPluginUtil generateImageMapping command to get the
image mapping information for the groups and classes in the model.
4. If you want to use custom icons, get the icons for the model, groups, and classes.
5. Run the mmXConPluginUtil generatePlugin command to generate the plug-in.
6. Copy the plug-in to the Metadata Manager Service plug-ins directory, and then recycle the Metadata
Manager Service.
Step 1. Get the Metadata Source Name
Before you can create a universal XConnect, you must first get the metadata source name. The metadata
source name is a text string that uniquely identifies the metadata source, for example,
Apache Hadoop Hive
Server
,
QlikView Files
, or
W3C XML Schema 1.0 (XSD)
. You need the metadata source name to create the
plug-in definition file.
The metadata source names are listed in the “Supported Metadata Sources” topic. When you create the plug-
in definition file, you must enter the metadata source name in the sourcename element exactly as it appears
in the “Supported Metadata Sources” topic.
XConnect Creation 207

Related Topics:
•“Supported Metadata Sources” on page 205
Step 2. Create the Plug-in Definition File
The plug-in definition file is an XML file that you use to get image mapping information and to generate the
plug-in. The plug-in definition file contains elements that specify the properties of the XConnect and model.
The plug-in definition file contains required and optional elements. Required elements specify properties such
as the XConnect name, model owner, metadata source type, and metadata source name. Optional elements
specify properties such as the icon directory, model icon, and model description.
Informatica provides the following sample plug-in definition file that you can use as a template:
<Informatica services installation directory>\services\MetadataManagerService\utilities
\mmxconpluginutil\xconnect-definition-template.xml
The following code shows the sample plug-in definition file:
<?xml version="1.0" encoding="utf-8" ?>
<xconnect xmlns:xsi="http://www.w3.org/2001/XMLSchema-instance"
xsi:noNamespaceSchemaLocation='xconndef.xsd' xmlns="http://www.informatica.com/XCONDEF">
<name></name>
<owner></owner>
<domain></domain>
<sourcename></sourcename>
</xconnect>
To create the plug-in definition file, copy the sample file and update the elements and element values.
Plug-in Definition File Elements
The plug-in definition file contains elements that specify the XConnect and model properties. The plug-in
definition file must contain one of each required element. It can also contain one of each optional element.
The following table describes the elements in the plug-in definition file:
Element Description
name Required. Name of the XConnect, for example, Apache_Hadoop_Hive, or QlikView or Talend.
The name element cannot include the following characters:
/ \ : * ' ? " < > | [ ] &
Metadata Manager uses the name and owner elements to generate the model name. Metadata Manager names
the model
<owner>.<name>
, for example, HypoStores.QlikView.
owner Required. Name of the organization or department that creates the XConnect and model, for example,
HypoStores or HypoStores_Sales.
The owner element cannot include the following characters:
/ \ : * ' ? " < > | [ ] &
Metadata Manager uses the name and owner elements to generate the model name. Metadata Manager names
the model
<owner>.<name>
, for example, HypoStores.QlikView.
domain Required. Metadata source type. You must specify one of the following values:
-
Business Intelligence
-
Data Integration
-
Data Modeling
-
Database Management
208 Chapter 10: Universal Resources

Element Description
sourcename Required. Name of the metadata source from which you want to extract metadata, for example,
QlikView
Files
,
Apache Hadoop Hive Server
, or
W3C XML Schema 1.0 (XSD)
.
For a list of supported metadata sources, see the “Supported Metadata Sources” topic. You must enter the
metadata source name in this element exactly as it appears in the “Supported Metadata Sources” topic.
iconDir Optional. Directory that contains the icons for the model and the groups and classes in the model.
You can specify a complete file path or a relative path. If you specify a relative path, the file path is relative to
the following directory:
<Informatica services installation directory>\services\MetadataManagerService
\utilities\mmxconpluginutil
icon Optional. File name of the image file that Metadata Manager uses for the model icon, for example,
qlikview_model_icon.gif
.
The model icon must be in the icon directory that you specify in the iconDir element.
shortName Optional. Short name for the model.
description Optional. Description for the model.
Related Topics:
•“Supported Metadata Sources” on page 205
Plug-in Definition File Example
The following code shows an example of a plug-in definition file for an XConnect that you use to extract
metadata from QlikView Files:
<?xml version="1.0" encoding="utf-8" ?>
<xconnect xmlns:xsi="http://www.w3.org/2001/XMLSchema-instance"
xsi:noNamespaceSchemaLocation='xconndef.xsd' xmlns="http://www.informatica.com/XCONDEF">
<name>QlikView</name>
<owner>HypoStores</owner>
<domain>Business Intelligence</domain>
<sourcename>QlikView Files</sourcename>
<iconDir>\QlikView\Icons</iconDir>
<icon>qlikview_model_icon.gif</icon>
<description>QlikView model created for HypoStores, Inc.</description>
</xconnect>
Step 3. Get the Image Mapping Information
After you create the plug-in definition file, you can use it to get the image mapping information for each group
and class in the model. You need the image mapping information if you want to use custom icons for the
groups and classes in the model. The image mapping information associates each group and class with an
icon file.
If you do not want to use custom icons, you can skip this step. Metadata Manager uses the class icon ( )
for any group or class that does not have an icon file.
To get the image mapping information, run the mmXConPluginUtil generateImageMapping command with the
definition file (-x) option, for example:
mmXConPluginUtil generateImageMapping -x C:\MMPlugInDefs\HypoStores_QlikViewDef.xml
XConnect Creation 209
mmXConPluginUtil generates a CSV text file that lists each group and class in the model and the
corresponding icon file. It generates the image mapping file in the following directory, where the owner and
name are defined in the plug-in definition file:
<Informatica services installation directory>\services\MetadataManagerService\utilities
\mmxconpluginutil\<owner>.<name>
mmXConPluginUtil names the image mapping file
mm-<owner>.<name>-xconnect.txt
.
For example:
<Informatica services installation directory>\services\MetadataManagerService\utilities
\mmxconpluginutil\HypoStores.QlikView\mm-HypoStores.QlikView-xconnect.txt
The following example shows part of an image mapping file for an XConnect that you use to extract metadata
from QlikView Files:
Group,ReportAttribute.gif
StatisticsBox,Statistics Box.png
StraightTable,Table.gif
Variable,ReportAttribute.gif
Slider,Slider Calendar.png
SearchObject,Search Object.png
TableBox,Table Box.png
QVWModel,qvw.png
TextBox,Text Object.png
Document,Document.gif
…
In the previous example, the icon file for the Group class is
ReportAttribute.gif
. The icon for the
StatisticsBox class is
Statistics Box.png
.
Step 4. Get the Icons
After you have the image mapping information, you can get the icons for the model and the groups and
classes in the model. If you do not want to use custom icons, you can skip this step.
To use a custom icon for the model, find an image file, save it with the icon name you specified in the plug-in
definition file, and copy it to the icon directory that you specified in the plug-in definition file. The model icon
can be of any common image type such as BMP, GIF, JPG, or PNG.
To use a custom icon for a group or class, find an image file and save it with the name specified in the image
mapping file. Then copy the image file to the icon directory that you specified in the plug-in definition file. A
group or class icon must have the name and file type that is specified in the image mapping file.
For example, the model that you create contains a class called Conditions. In the image mapping file, the
Conditions class is mapped to Filter.gif.
To find an icon for the Conditions class, perform the following tasks:
1. Search the internet for "conditions icons" or "filter icons."
Alternatively, you can search for a similar icon in the Metadata Manager images directory:
<Informatica services installation directory>\services\MetadataManagerService\mmapps\mm
\images
2. Save the image as Filter.gif.
3. Copy the Filter.gif file to the icon directory that you specified in the plug-in definition file.
Repeat this process for all groups and classes in the model for which you want to use custom icons.
210 Chapter 10: Universal Resources

Rules and Guidelines for Icons
Use the following rules and guidelines when you create icons:
•All icons that you use must measure 16 x 16 pixels. Metadata Manager does not scale icons.
•You do not have to specify an icon for the model. If you do not specify an icon, Metadata Manager uses
the custom model icon ( ) for the model and for all resources that are based on the model.
•You cannot remap a group or class to a different image file or file type. For example, if the Dimension
class is mapped to dimension.gif, you cannot remap it to 3D_dimension.gif or to dimension.png.
•You do not have to add an image file for every group and class to the icon directory. If a group or class
has no image file, Metadata Manager uses the class icon ( ) for the group or class.
Step 5. Generate the Plug-in
After you have the definition file and icons, you can create the plug-in. Use the mmXConPluginUtil command
line program to create the plug-in.
To generate the plug-in, run the mmXConPluginUtil generatePlugin command with the definition file (-x)
option. mmXConPluginUtil generates the plug-in as an XConnect archive (XAR) file. It generates the plug-in
in the following directory, where the owner and name are defined in the plug-in definition file:
<Informatica services installation directory>\services\MetadataManagerService\utilities
\mmxconpluginutil\<owner>.<name>
mmXConPluginUtil names the plug-in
mm-<owner>.<name>-xconnect.xar
.
For example, in the plug-in definition file, you set the owner element to HypoStores and the name element to
QlikView. You run the following command to generate the plug-in:
mmXConPluginUtil generatePlugin -x C:\MMPlugInDefs\HypoStores_QlikViewDef.xml
mmXConPluginUtil generates the following plug-in:
<Informatica services installation directory>\services\MetadataManagerService\utilities
\mmxconpluginutil\HypoStores.QlikView\mm-HypoStores.QlikView-xconnect.xar
Plug-in Structure
The plug-in is an XAR file that defines the XConnect. You can use a file archive program to open the plug-in
file and verify the structure.
Warning: To prevent damage to the plug-in, do not edit any file or directory in the plug-in. To change the
plug-in, update the plug-in definition file or the icons, and then regenerate the plug-in.
The following hierarchy shows the structure of the plug-in:
META-INF
MANIFEST.MF
resources
artifacts
<owner>.<name>.bridges.xml
<owner>.<name>.endpoint.txt
<owner>.<name>.metamodel.xml
<owner>.<name>.<source ID>.Resources.properties
<owner>.<name>.<source ID>Options.xml
<owner>.<name>.WhereUsed.properties
mm-<owner>.<name>-xconnect.txt
images
<image files for the groups and classes in the model>
The plug-in contains the following directories:
XConnect Creation 211
META-INF
Contains the manifest file for the model, MANIFEST.MF. The manifest file specifies information such as
the XConnect owner, Metadata Manager version, and model name.
resources\artifacts
Contains the artifact files required to create the model. In the artifact file names, the owner and name are
defined in the plug-in definition file. The source ID is a shortened version of the sourcename that is
defined in the plug-in definition file.
resources\images
Contains the icons for the groups and classes in the model.
Plug-in Structure Example
The following example shows the structure of a plug-in that you use to extract metadata from QlikView Files:
META-INF
MANIFEST.MF
resources
artifacts
HypoStores.QlikView.bridges.xml
HypoStores.QlikView.endpoint.txt
HypoStores.QlikView.metamodel.xml
HypoStores.QlikView.QlikViewFiles.Resources.properties
HypoStores.QlikView.QlikViewFilesOptions.xml
HypoStores.QlikView.WhereUsed.properties
mm-HypoStores.QlikView-xconnect.txt
images
Button.png
Chart.gif
Column.gif
Connection.png
Document.gif
…
Step 6. Create the Model from the Plug-in
To create the model from the plug-in, copy the plug-in to the Metadata Manager Service plug-ins directory.
Metadata Manager imports the model when you enable the Metadata Manager Service.
1. Copy the plug-in to the Metadata Manager Service plug-ins directory:
<Informatica services installation directory>\services\MetadataManagerService\mm-plugins
\xconnect\<Metadata Manager Service name>
2. In the Administrator tool, recycle the Metadata Manager Service.
Recycling the service disables and enables the service.
Metadata Manager imports the model when the service is enabled.
After the Metadata Manager Service is enabled, open the Metadata Manager web application and verify that
the model appears on the Model tab. On the Load tab, click Actions > New Resource, and verify that the
resource type appears in the New Resource wizard.
212 Chapter 10: Universal Resources
Updating a Universal XConnect
To update a universal XConnect, regenerate the plug-in, copy it to the plug-ins directory, and recycle the
Metadata Manager Service. Metadata Manager detects changes to the plug-in. If the plug-in has changed,
Metadata Manager reloads the plug-in when the Metadata Manager Service is enabled.
After you update a universal XConnect, open the Metadata Manager web application and verify the model
changes.
Deleting a Universal XConnect
You can delete any universal XConnect that you create. To delete the XConnect, delete the model from the
Model tab, and then delete the plug-in from the plug-ins directory.
Before you delete a universal XConnect, you must delete all resources that are based on the model.
1. On the Model tab, select the model that you want to delete in the Model navigator.
2. Click Actions > Delete.
3. Click OK.
Metadata Manager deletes the model and all classes for the model from the Model navigator and the
Metadata Manager repository. Metadata Manager also deletes all associations for the model.
4. Delete the plug-in from the Metadata Manager Service plug-ins directory:
<Informatica services installation directory>\services\MetadataManagerService\mm-plugins
\xconnect\<Metadata Manager Service name>
Resource Creation
After you create a universal XConnect, you can create resources based on the model. You can create
multiple resources that are based on the same model.
To create a universal resource, perform the following tasks:
1. Configure the metadata source, if required.
2. Create the resource on the Load tab.
Step 1. Configure the Metadata Source
Before you create a universal resource, you might have to configure the metadata source. If you do not
correctly configure the metadata source, the metadata load can fail. The configuration requirements for a
metadata source vary based on the metadata source.
For example, to configure the metadata source, you might have to complete some of the following tasks:
Verify that the source system is available and running.
When you extract metadata from a source system such as a business intelligence tool or a relational
database, the source system usually needs to be available and running. When you extract metadata
from a file, the source system does not usually need to be running.
Install the Metadata Manager Agent on the machine that runs the vendor supplied software.
To extract metadata from some business intelligence, data integration, or data modeling metadata
sources, you must install the Metadata Manager Agent on the machine that runs the vendor supplied
Resource Creation 213

software. This is required when the Metadata Manager Agent uses COM APIs to extract metadata. For
example, to extract metadata from QlikView Files, the Metadata Manager Agent and the QlikView
software must be on the same machine. However, to extract metadata from Cognos, the Metadata
Manager Agent does not have to be on the same machine as the Cognos Content Manager.
To verify the metadata source configuration requirements, see the website of Informatica's OEM partner,
Meta Integration Technology Inc.:
http://www.metaintegration.net/Products/MIMB/SupportedTools.html
The Supported Tools page for the metadata source shows the configuration requirements. The Metadata
Manager Agent metadata source configuration requirements are identical to the Meta Integration Model
Bridge (MIMB) metadata source configuration requirements.
The following image shows an example of the Supported Tools page for the QlikView Files bridge:
1. The Bridge Specifications section shows the configuration requirements for the metadata source.
2. If the Metadata Manager Agent uses COM APIs to extract metadata, the Metadata Manager Agent and the vendor supplied
software for the metadata source must be on the same machine.
Note: The referenced website belongs to a third party or third parties, not Informatica LLC. The site is subject
to the possibility of errors, omissions or change. Informatica assumes no responsibility for the website,
disclaims all warranties, either express or implied, including but not limited to, implied warranties of
merchantability, fitness for a particular purpose, title and non-infringement, and disclaims all liability relating
thereto.
214 Chapter 10: Universal Resources

Step 2. Create the Resource
After you configure the metadata source, you can create the resource. Create a universal resource to extract
metadata from the metadata source.
1. On the Load tab, click Actions > New Resource.
The Resource Selection window appears.
2. Select the resource type.
3. Click Next.
The Properties page appears.
4. Enter the following information:
Property Description
Name Name for the resource. The resource appears in the Resources panel with this name. The name
must be unique and have from one through 256 characters. It cannot include the following characters:
/ \ : * ' ? " < > | [ ]
Description Description for the resource. Description cannot exceed 4000 characters.
Hide in Summary
Lineage
Hides the resource in the summary view of data lineage diagrams.
Enable this option to hide the resource and its child objects in the summary view. Disable this option
to display the resource and its child objects in the summary view.
Default is disabled.
5. Click Next.
The Configuration page appears.
6. Enter the configuration properties:
Property Description
Agent URL Host name and port number of the Metadata Manager Agent.
Source system
version
Name and version of the resource. You cannot edit this field.
Always use latest
source files
Uses the metadata source file in the location you provide each time you load the resource. If you
enable this option, the path to the file must include an absolute path that is accessible from the
Metadata Manager Agent machine. If you disable this option, Metadata Manager copies the
metadata source file to the Metadata Manager application directory when you finish configuring the
resource. Each time you load the resource, Metadata Manager uses the copied metadata source
file in the Metadata Manager application directory.
This property is displayed when the metadata source is a file.
Auto assign
connections
Metadata Manager configures connection assignments to relational database resource types during
the resource load. If you disable this option, configure connection assignments in the resource
properties after you create the resource.
This property is displayed for data integration, business intelligence, and data modeling resources.
The other configuration properties vary based on the metadata source type. To get information about a
property, hover the pointer over the property to display the tooltip.
Resource Creation 215
7. If the metadata source is a file, click Select to add the metadata source file.
If you configure Metadata Manager to use the latest source files, include the absolute path to the files
that are accessible from the Metadata Manager Agent machine.
If you do not configure Metadata Manager to use the latest source files, upload all the files to the
Metadata Manager machine.
8. Click Test Connection.
If the metadata source is a file, Metadata Manager validates the Metadata Manager Agent URL and the
source file configuration. If you configured Metadata Manager to use the latest source file, Metadata
Manager also validates that the source file exists in the specified path. If the source file is uploaded to
Metadata Manager, Metadata Manager validates that the file is compatible with the resource type and
version.
If the metadata source is a source system, Metadata Manager validates the Metadata Manager Agent
URL and tests the connection to the source system.
If Metadata Manager cannot validate the Agent URL, validate the source file, or connect to the source
system, an error message appears. Correct any error and test the connection again.
9. Click Next.
The Schedules window appears.
10. To add a schedule, select Attach a Schedule and select a schedule in the Schedule list.
If you have not created a schedule, you can assign a schedule to a resource after you create the
resource.
11. Click Finish.
The resource appears in the Resources panel on the Load tab.
Metadata Extraction from a Source File
If you create a universal resource to extract metadata from a source file, you need to decide whether to
extract metadata from the latest source file or from the source file in the Metadata Manager application
directory. You specify whether to use the latest source file when you create the resource.
Extract metadata from the latest source file when the source changes frequently. To extract metadata from
the latest source file, enable the Always use latest source files option when you create the resource. When
you enable this option, the Metadata Manager Agent uses the metadata source file in the location you
provide each time you load the resource. If you enable this option, you must specify an absolute path to the
file that is accessible from the Metadata Manager Agent machine.
Extract metadata from a source file in the Metadata Manager application directory when the source does not
change frequently, and you want to decrease the time it takes to load the resource. To use a source file in the
Metadata Manager application directory, disable the Always use latest source files option. Metadata
Manager copies the metadata source file to the Metadata Manager application directory when you finish
configuring the resource. Each time you load the resource, the Metadata Manager Agent extracts metadata
from the file in the application directory.
The Metadata Manager application directory is the following directory:
<Informatica services installation directory>\services\MetadataManagerService\mm_files
\<Metadata Manager Service name>\mm_load\data_files\<resource ID>
If you use a source file in the Metadata Manager application directory and the metadata source changes, you
might need to upload the file again. To re-upload the file, edit the resource and select a new metadata source
file on the Configuration tab.
216 Chapter 10: Universal Resources

CHAPTER 1 1
Managing Resources
This chapter includes the following topics:
•Managing Resources Overview, 217
•Configure Connection Assignments, 218
•Upload Rule Sets, 221
•Purging Metadata, 223
•Refreshing the Resources Panel, 224
•Updating the Search Index, 224
•Customizing the List of Words to Ignore in Searches, 226
Managing Resources Overview
After you create resources, you can configure resources and manage metadata for a resource. To edit a
resource, select the resource in the Resources panel of the Load tab and click Edit.
You can perform the following tasks for resources:
Configure connection assignments.
Configure connection assignments so that you can run data lineage analysis across metadata sources.
You can configure connections from one packaged or universal resource to another packaged or
universal resource.
Upload rule sets.
Upload rule sets so that you can run data lineage analysis across metadata sources that include a
custom or business glossary resource. Metadata Manager uses the rule sets to link a custom resource or
business glossary resource to another resource.
Purge metadata for a resource.
Delete resource metadata from the Metadata Manager warehouse.
Refresh the resource list.
Update the list of resources in the Load page.
Update a search index.
Manually update the search index if indexing fails during a resource load, if you change the Metadata
Manager file location in the Administrator tool, or if you update the list of words to ignore in searches.
217
Configure Connection Assignments
Connection assignments specify how linkable objects in a packaged or universal resource can be related to
matching objects in another packaged or universal resource. Metadata Manager can create links to
corresponding objects in the resources on either side of the connection assignment. These cross-resource
links allow to you run data lineage analysis across metadata sources.
To run data lineage analysis across metadata sources, assign a connection from one packaged or universal
resource to another packaged or universal resource. Then, instruct Metadata Manager to create links
between matching objects in the connected resources.
Use relational database, application, or Informatica Platform resources to connect other types of metadata
sources. You can establish connections from the following resource types:
Business Intelligence
Establish connections to relational database or Informatica Platform resource types.
Data Modeling
Establish connections to relational database or Informatica Platform resource types.
Data Integration
Establish connections from Informatica Platform resources to relational database or other Informatica
Platform resource types. Establish connections from Microsoft SQL Server Integration Services
resources to relational database resource types. Establish connections from PowerCenter resources to
SAP R/3, relational database, or Informatica Platform resource types.
You cannot establish connections from custom or business glossary resource types.
Automatic Connection Assignments
When you create or edit a resource, you can direct Metadata Manager to automatically configure connection
assignments to relational database or Informatica Platform resource types. You might want to automatically
configure connection assignments if a data integration, business intelligence, or data modeling resource
contains many connections.
If you select Auto Assign Connections when you configure the connection assignment properties of a data
modeling resource, Metadata Manager assigns one relational schema to each connection. You can edit a
data modeling resource to manually assign multiple relational schemas to one connection.
When Metadata Manager automatically configures connection assignments, Metadata Manager does not
override any manually assigned connections.
After you direct Metadata Manager to automatically configure connection assignments, complete one of the
following tasks:
Load the resources.
The load process automatically establishes the connection assignments and then creates the links
between objects in the connected resources. You must load the relational database resource types for
the connection first.
Use the Resource Link Administration window to create the links.
If you have loaded the resources, direct Metadata Manager to create the links between objects in
connected resources. The link process automatically configures the connection assignments and then
creates the links.
Metadata Manager automatically configures connection assignments based on the best possible match.
Metadata Manager obtains the list of connections for which it can assign automatic connections. It then
218 Chapter 11: Managing Resources
groups the connections based on connection subtype and the associated repository to ensure that resources
are filtered based on the connection objects. For example, if a connection type is Oracle, Metadata Manager
considers only Oracle resources and schemas for automatic connection assignment. After grouping the
connections, Metadata Manager calculates the link count completeness score of the filtered connection
objects for each connection assignment. It uses the connection object with the maximum link count for the
automatic connection assignment.
Use the Links view in the Load Details tab to review the automatic connection assignments. Update any
incorrect connection assignments and then create the links again.
Manual Connection Assignments
You can manually configure connection assignments to relational database or Informatica Platform resource
types when you edit a resource. For data modeling resource types, you can configure multiple relational
schemas to one connection. For business intelligence and data integration resource types, you can configure
one relational schema to one connection.
Before you can manually configure connection assignments, you must load the relational database or
Informatica Platform resource types for the connection.
After you configure connection assignments, complete one of the following tasks:
Load the resource.
The load process creates the links between objects in the connected resources.
Use the Resource Link Administration window to create the links.
If Metadata Manager has loaded the resource, direct Metadata Manager to create the links between
objects in the connected resources.
Connection Assignments Example
You use PowerCenter to extract customer information from Web_Cust and load it into Customers. Customers
is a table in an Oracle database. Business Objects uses the information in Customers to populate the
Customer Retention report. To view lineage among all source repositories, establish a connection
assignment between the PowerCenter repository and the Oracle database and another connection
assignment between the Business Objects repository and the Oracle database.
Metadata Manager has loaded the resources for these metadata sources. Use the Resource Link
Administration window to direct Metadata Manager to create the links for the Oracle resource. Metadata
Manager uses Connection_Assignment_1 to link objects in the Oracle database to objects in the
PowerCenter repository. Metadata Manager uses Connection_Assignment_2 to link objects in the Oracle
database to objects in the Business Objects repository.
Configure Connection Assignments 219
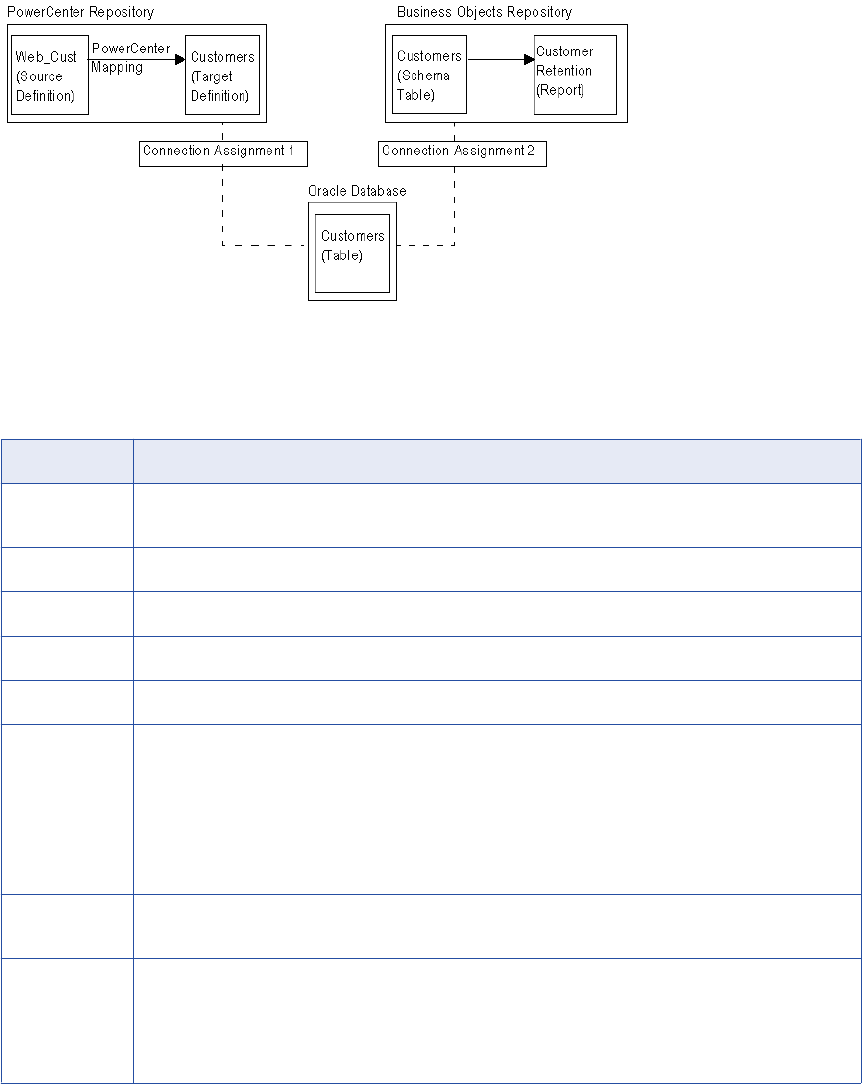
The following figure shows an example of connection assignments:
Connection Assignment Properties
The following table describes the connection assignment properties:
Property Description
Connection Name of the connection in the data integration, business intelligence, or data modeling repository to the
metadata source. You cannot edit this field.
Type Metadata source type. You cannot edit this field.
User User name used to connect to the metadata source. You cannot edit this field.
Catalog Resource name in the metadata catalog.
Schema Schema name for the resource.
Schema Status Displays one of the following statuses for the source schema:
-Active. The metadata for the schema exists in the Metadata Manager warehouse.
-Purged. The metadata for the schema does not exist in the Metadata Manager warehouse. The metadata
for the resource was purged, or the schema was removed during a resource load. If you reload the
metadata from this source, Metadata Manager changes the status to active if the schema still exists in
the source.
You cannot edit this field.
Auto Assigned Indicates whether Metadata Manager automatically configured the connection assignment. You cannot edit
this field.
Use schema
prefix
Metadata Manager uses the schema name in the model to link objects in connected resources. If you
disable this option, Metadata Manager does not use the schema name to link objects. Metadata Manager
can link objects to any source schema that contains all of the tables used by the business intelligence
model. Disable this option if you did not extract the actual source schemas, but extracted other schemas
that contain the same content.
Automatically Configuring Connection Assignments
1. On the Load tab, select a resource in the Resources panel.
2. In the Properties panel, click Edit.
220 Chapter 11: Managing Resources
The Edit Resource window appears.
3. Click the Configuration tab.
4. Select Auto Assign Connections.
5. Click OK.
To link objects in connected resources, load the resource or use the Resource Link Administration window.
During the link process, Metadata Manager configures the connection assignments and then creates the links
between objects in the connected resources. You must load the relational database or Informatica Platform
resource types for the connection first.
Use the Links view in the Load Details tab to review the automatic connection assignments. Modify any
incorrect assignments and then create the links again.
Manually Configuring Connection Assignments
You can remove any connection assignment that Metadata Manager automatically configured. You can also
add additional connection assignments.
Before you can configure connection assignments, you must load the relational database or Informatica
Platform resource types for the connection.
1. On the Load tab, select a resource in the Resources panel.
2. In the Properties panel, click Edit.
The Edit Resource window appears.
3. Click the Connection Assignment tab.
4. Click Refresh to update the list of connections.
5. Select a connection, select the catalog and schema that you want to assign the connection to, and click
Assign.
6. To remove a connection from a catalog and schema, click Remove for the connection.
For example, you might want to remove a connection if the source schema was purged from the
Metadata Manager warehouse.
7. Click OK.
To link objects or to remove links for removed connections, load the resource or use the Resource Link
Administration window to create the links.
Upload Rule Sets
Linking rules are expressions that Metadata Manager uses to link matching objects across different
resources. To run data lineage across metadata sources, you can define linking rule sets in linking rules files.
Then, upload the files to the source or target resource configured in the file to create the rule sets in the
Metadata Manager repository.
When you upload a rule set to a resource, Metadata Manager associates the rule set with the source and
target resources identified in the file. If either the source or target resource does not exist, Metadata Manager
still creates the rule set, but it is not valid. When you create the source or target resource, Metadata Manager
associates the saved rule set with the resource and validates the rule set.
Upload Rule Sets 221
When you create or update a rule set, Metadata Manager does not create the links between the resources.
To use the rules to link metadata objects between resources, you must load the resources or create the links
in the Resource Link Administration window.
Use linking rules to create links between the following resource types:
•Custom resource to another custom resource
•Custom resource to a packaged resource
•Custom resource to a universal resource
•Custom resource to a business glossary resource
•Business glossary resource to a packaged resource
•Business glossary resource to a universal resource
Note: To link matching objects between different packaged or universal resources, configure connection
assignments in the Load tab. If connection assignments do not create all of the required links, you can also
use linking rules to create links between the resources.
For more information about configuring linking rules and linking rules files, see the Metadata Manager
Custom Metadata Integration Guide.
Linking Rules Files
You define a linking rule set in a linking rules file. You create different types of linking rules files based on
how you want to apply the linking rule set.
To apply a linking rule set to a pair of models, you create the following types of linking rules files:
Rule Set Definition File
An XML file that defines a linking rule set for a pair of models. You upload a rule set definition in the
Model tab, and Metadata Manager associates it with the source and target model identified in the file. A
rule set definition file takes a parameter file that identifies the pair of resources to which to apply the
linking rules.
Rule Set Parameter File
An XML file that specifies the pair of resources to which to apply a rule set definition. It also contains
parameter values for resource-specific attributes such as connection names and table names. You
upload a rule set parameter file to the source or target resource identified in the file. When you upload
the file, Metadata Manager creates the rule set for the resources. To create the rule set, Metadata
Manager substitutes the parameters defined in the rule set definition file with the parameter values
defined in the rule set parameter file.
To apply a linking rule set to a pair of resources, you create the following type of linking rules file:
Rule Set File
An XML file that defines a linking rule set for pair of resources. You upload a rule set file to the source or
target resource identified in the file. When you upload the file, Metadata Manager creates the rule set for
the resources.
222 Chapter 11: Managing Resources
Uploading a Rule Set
Upload a rule set file or a rule set parameter file to the source resource or the target resource. Upload the file
to create the rule set or update an existing rule set in the Metadata Manager repository.
Before you upload a rule set parameter file to a resource, create and upload the rule set definition file to the
source or target model.
1. On the Load tab, select a resource in the Resources panel.
2. In the Properties panel, click Edit.
The Edit Resource window appears.
3. Click the Linking Rules tab.
4. Click Upload.
The Upload dialog box appears.
5. Click Browse, select the rule set file or the rule set parameter file, and click Open.
6. Click OK.
Metadata Manager uploads the files and creates or updates the rule set.
The Linking Rules tab in the Properties panel displays the rule set information for the resource.
Purging Metadata
You can delete metadata for a resource from the Metadata Manager warehouse. For example, if you no
longer want to analyze metadata from an obsolete metadata source for a resource, delete metadata from the
Metadata Manager warehouse. You cannot recover the purged metadata. Back up the Metadata Manager
repository database before you purge metadata.
To delete the metadata, purge the metadata for the resource from the Metadata Manager warehouse.
Metadata Manager purges all metadata from the warehouse. Purging metadata may take some time, based
on the amount of metadata loaded for the resource. After you purge a resource, you can optimize the index to
free up disk space used by the indexing files.
Note: If you added custom metadata to the metadata catalog on the Browse tab, you can delete the
metadata from the catalog using the metadata catalog or by purging it.
1. On the Load tab, select the resource for which you want to purge metadata from the Metadata Manager
warehouse.
2. Click Actions > Purge Resource Metadata.
Metadata Manager purges the metadata from the Metadata Manager warehouse and displays the result
of the purge operation in the Resources panel.
3. Optionally, click Actions > Delete Resource to delete the resource.
Metadata Manager deletes the resource and all metadata for the resource from the Metadata Manager
warehouse.
Purging Metadata 223
Refreshing the Resources Panel
The Resources panel on the Load tab contains a list of configured resources. When you add, update, or load
a resource, the updated information for the resource appears in the list. When another user modifies the
resource list, the updated information does not appear immediately in the Resources panel.
You can manually refresh the Resources panel to get updated information on the resources. Refresh the
Resources panel to get the following updated information:
Added resources
Resources created by other users.
Description
Resource descriptions updated by other users.
Last status date
The date of the most recent load for a resource.
Last status
The most recent status for load and indexing operations for a resource.
Schedule status
Status updated for any resource schedule.
To refresh the Resources panel:
uOn the Load tab, click the Refresh Resources icon.
Metadata Manager updates the Resources panel with the resource information stored in the Metadata
Manager warehouse.
Updating the Search Index
Metadata Manager creates index files used to search for metadata objects in the Metadata Manager
warehouse. When you perform a search, Metadata Manager searches the index files instead of the Metadata
Manager warehouse.
The index files are binary files. Metadata Manager stores them in the location that you configured for
Metadata Manager files when you created the Metadata Manager Service. By default, Metadata Manager
stores the index files in the following location:
<Informatica installation directory>\services\MetadataManagerService\mm_files\<service name>
When you make a change in Metadata Manager that changes the metadata in the warehouse, Metadata
Manager creates or updates index files. You can also update the index files manually through the Configure
Search Index window.
You can perform the following tasks in the Configure Search Index window:
Optimize the index.
Optimize the index when search performance is degraded. When you optimize the index, Metadata
Manager creates a single index file for each resource, which increases search performance.
224 Chapter 11: Managing Resources
Manually create indexes.
Manually create indexes if the indexing operation fails during a resource load, if you change the
Metadata Manager file location in the Administrator tool, or if you update the list of words to ignore in
searches.
Automatic Index Updates
Metadata Manager updates the index when you complete the following tasks:
•Load a resource.
•Purge a resource.
•Edit metadata objects.
•Make changes in the Shortcuts view. Changes include adding or editing saved searches, adding or
modifying shortcuts, or adding or modifying folders.
Optimizing the Index
Metadata Manager incrementally updates an index for a resource when you make a change to the resource.
The method that Metadata Manager uses to index the warehouse can create multiple index files for a single
resource. As a result, searching through multiple files decreases search performance.
When you optimize the index, Metadata Manager creates a single index file for each resource, which
increases search performance.
To optimize the search index:
1. On the Load tab, click Actions > Configure Search Index.
The Configure Search Index window appears.
2. Click Optimize Entire Index.
Metadata Manager optimizes the index for each resource.
Manually Creating Indexes
If indexing fails for a resource, if you change the Metadata Manager file location in the Administrator tool, or if
you update the list of words to ignore in searches, you must manually update the index.
1. On the Load tab, click Actions > Configure Search Index.
The Configure Search Index window appears.
2. Select the resource that you want to index. You can select individual resources or shortcuts.
3. Click Index Selected Resources.
Metadata Manager updates the index files for the selected resources.
Troubleshooting the Search Index
I manually updated the search index for a resource, but the indexing operation failed due to insufficient
disk space. When I updated the index again, Metadata Manager displayed the following error:
Cannot overwrite: <Informatica installation directory>\services\MetadataManagerService
\mm_files\<service name>\mm_index\<file name>.tmp
Updating the Search Index 225
If the indexing process fails, the index files can become inconsistent. To successfully update the search
index, stop the Metadata Manager Service, delete the index files indicated by the error message, and start
the Metadata Manager Service. Then reindex the resource manually.
To re-create the entire search index, stop the Metadata Manager Service, delete all index files, and start the
Metadata Manager Service. When the index directory is empty, the Metadata Manager Service reindexes all
resources during startup.
Customizing the List of Words to Ignore in Searches
When you perform a keyword or advanced search, Metadata Manager ignores special characters and
common words. You can use the default list of common words to ignore in a search or you can customize the
list.
By default, Metadata Manager ignores the following common words:
a
an
and
are
as
at
be
but
by
for
if
in
into
is
it
no
not
of
on
or
such
that
the
their
then
there
these
they
this
to
was
will
with
To customize the list of words and phrases to ignore in a search, update the stopwords.txt file. The
stopwords.txt file is located in the following directory:
<Informatica installation directory>\services\shared\jars\pc\classes\
Open the stopwords.txt file with a text editor and add or remove words and phrases. Enter each word or
phrase to ignore on a single line in the file. Entries must be in lowercase characters and cannot contain the
apostrophe character (
'
).
226 Chapter 11: Managing Resources
After you update the stopwords.txt file, perform the following actions so that Metadata Manager uses the
stopwords.txt file instead of the default word list:
1. Set the UseCustomStopWords property in the imm.properties file to true.
2. Disable and enable the Metadata Manager Service.
3. Manually update the search index for all resources.
Note: Although entries in the file must be in lowercase characters, searches are not case sensitive. For
example, if you enter the word
for
in the stopwords.txt file, Metadata Manger ignores
for
,
For
, and
FOR
.
Customizing the List of Words to Ignore in Searches 227

CHAPTER 1 2
Loading and Monitoring
Resources
This chapter includes the following topics:
•Loading and Monitoring Resources Overview, 228
•Loading Resources, 229
•Linking Objects Across Resources, 230
•Monitoring Resources, 232
•Logs and Log Files, 237
•Troubleshooting Resource Loads, 240
•Scheduling Resource Loads, 241
Loading and Monitoring Resources Overview
After you configure the metadata source and create a resource, you can load the resource. When you load a
resource, Metadata Manager uses the connection information for the resource to extract the metadata from
the metadata source. Metadata Manager converts the extracted metadata into IME-format files and runs
PowerCenter workflows to load the metadata into the Metadata Manager warehouse.
Use the Load tab to perform the following resource tasks:
Load a resource.
Load the source metadata for a resource into the Metadata Manager warehouse. Metadata Manager
extracts metadata, indexes the metadata, and creates links between objects in resources that have
connection assignments or linking rules.
Link objects across resources.
If you modify connection assignments or linking rules after loading a resource, create links between
objects in the resources.
Monitor a resource.
View load and link details to monitor the load and link processes and get summary and error information
after a resource load.
Troubleshoot the resource load
Use the log files generated by Metadata Manager and the PowerCenter Workflow Monitor to
troubleshoot resource loads.
228
Schedule subsequent resource loads.
Create a schedule to select the time and frequency that Metadata Manager loads a resource. You can
attach the schedule to a resource.
Loading Resources
You can start a resource load for Metadata Manager from the Load tab. Metadata Manager loads the
resource and displays the results in the Resources panel.
When Metadata Manager loads a resource, it completes the following tasks:
Loads metadata.
Loads the metadata for the resource into the Metadata Manager warehouse.
Indexes the resource.
Creates or updates the index files for the resource.
Links objects across resources.
Creates links between objects in resources that share connection assignments or resources that have
associated linking rules. If you configured automatic connection assignment, Metadata Manager
configures the connection assignments and then creates the links.
Loading a Resource
To load a resource:
1. On the Load tab, select the resource that you want to load in the Resources panel.
2. Click Actions > Start Load.
Metadata Manager adds the resource to the load queue, and then starts the load process.
Note: You cannot change the resource properties if the status of the resource is Load
Failed_Resumable. To edit the resource properties, cancel the load.
3. To cancel the load, click Actions > Cancel.
4. To view the load progress, click Actions > View Load Details.
When the resource load completes, Metadata Manager updates the Last Status Date and Last Status for the
resource. You can view load details to view more information about the resource load.
Load Queue
When you load a resource, Metadata Manager places the resource in a load queue. The load queue controls
the order in which Metadata Manager loads resources. Metadata Manager places resources in the load
queue when you start the resource load from the Load tab or when a scheduled resource load begins.
If a resource load fails, Metadata Manager determines if the resource load can be resumed. If the resource
load can be resumed, Metadata Manager keeps the resource in the load queue until the timeout interval for
the resource load is exceeded. When the timeout interval is exceeded, Metadata Manager removes the
resource from the load queue.
You can configure the number of resources that Metadata Manager loads simultaneously and the timeout
interval for resource loads when you configure the Metadata Manager Service in Informatica Administrator.
Loading Resources 229
Resuming a Failed Resource Load
You can resume the resource load if a resource load fails. Use the load details in Metadata Manager and the
workflow and session logs in the PowerCenter Workflow Manager to troubleshoot the error and resume the
resource load.
You can resume the resource load in the following situations:
The path building task fails.
You can resume the failed load at any time, until the Metadata Manager Service is disabled or until the
load is cancelled.
PowerCenter runs the workflows, and the workflows can be resumed.
You must resume the failed load within the timeout period configured for the Metadata Manager Service.
After the timeout period expires, Metadata Manager removes the resource from the load queue.
1. On the Load tab, select the resource in the Resources panel for which you want to resume the resource
load.
2. Click Actions > Resume Load.
Metadata Manager continues loading the resource from the previous point of failure and completes the
indexing and linking operations.
Linking Objects Across Resources
If you configure connection assignments or linking rules after loading a resource, create the links between
objects in the resources to run data lineage analysis across metadata sources.
When Metadata Manager links objects between resources that share connection assignments, Metadata
Manager determines if the object is used in other resources using a name-based matching method. The
name-based matching method is not case sensitive. For example, a Source Qualifier transformation
references “infa_customers,” and the database table name is “INFA_CUSTOMERS.” The name-based
matching method creates a link between the Source Qualifier and the database table.
When Metadata Manager links objects between resources that have associated linking rules, Metadata
Manager evaluates the expressions defined in the linking rules to link matching objects.
Creating Links for a Resource
To create links for a resource:
1. On the Load tab, click Actions > Resource Link Administration.
The Resource Link Administration window appears.
2. Select the resources that you want to link, and click Create Links.
Metadata Manager adds the resource to the link queue, and then starts the link process.
3. To cancel a link process, click Actions > Cancel in the Load tab.
When the linking completes, Metadata Manager updates the Last Status Date and Last Status for the
resource.
230 Chapter 12: Loading and Monitoring Resources

Link Status
The Resource Link Administration window displays the link status for each resource.
The following table describes the statuses for links:
Status Name Description
Link Request in Queue Metadata Manager is creating links for another resource. This resource is in the link queue until
Metadata Manager can process the request.
Linking Cancel
Requested
You requested that Metadata Manager cancel the link process.
Linking Canceled Metadata Manager canceled the link process.
Linking Failed Metadata Manager could not successfully create links for this resource.
Linking in Progress Metadata Manager is creating links for this resource.
Linking Skipped Metadata Manager already created links for this resource using connection assignments. Metadata
Manager did not have to modify the links because the connection assignments did not change or
because the resource was not reloaded.
Linking Successful Metadata Manager created the links for this resource.
Linking Successful
(Some Linking
Deferred)
Metadata Manager created the links for this resource. Metadata Manager deferred creating some
links because another resource with connection assignments that involve this resource is
concurrently being loaded or linked. Metadata Manager creates the deferred links after it finishes
loading or creating links for the other resource.
Note: You can load resources in any order. Metadata Manager re-creates the links when required.
Not Linked Metadata Manager did not create links for this resource because the resource does not have any
connection assignments or linking rules.
Rules and Guidelines for Creating Links
Use the following rules and guidelines when you create links for a resource:
•You cannot create links for a resource that Metadata Manager has not loaded or that is being loaded.
•You can create links for a resource that has failed to load.
•Metadata Manager can concurrently link resources that share connection assignments or linking rules.
Metadata Manager uses the following rules and guidelines when it concurrently links resources:
-When Metadata Manager is loading, updating, refreshing connections, purging, or deleting a resource,
you cannot create links for the resource or for a resource that shares connection assignments or linking
rules.
-When Metadata Manager is creating links for a resource, you cannot load, update, refresh connections,
purge, or delete the resource or a resource that shares connection assignments or linking rules.
-If Metadata Manager is creating links for a resource and you load a resource that shares connection
assignments or linking rules, the second resource waits in the load queue until the first resource
completes linking.
Linking Objects Across Resources 231

-If Metadata Manager is creating links for a resource and you request link creation for a resource that
shares connection assignments or linking rules, the second resource waits in the link queue until the first
resource finishes linking.
-If Metadata Manager is loading a resource and you request link creation for a resource that shares
connection assignments or linking rules, Metadata Manager defers creating links to the resource being
loaded. Metadata Manager create the links when it finishes loading the first resource.
-If you request link creation for resources that share connection assignments or linking rules at the same
time, Metadata Manager randomly chooses one resource to link first. Metadata Manager defers creating
links to the resource in the link queue. When Metadata Manager creates links for the second resource, it
creates the links to the first resource.
Monitoring Resources
You can monitor resource loads and monitor link details for resources. Monitor a resource load on the Load
Details tab. Monitor the link process for resources that share connection assignments on the Link Details
tab.
The Load Details tab displays the load progress and the results of the most recent resource load for a
resource. The Load Details tab displays load events, a summary of objects, warnings, and errors, and
session statistics for PowerCenter workflows.
The Link Details tab displays the link summary for resources that share connection assignments. The link
summary displays the resource, connection, assigned database, assigned schema, links, missing links, and
percentage of link completeness details.
Note: The Link Details tab does not display the link summary for resources that Metadata Manager linked
using linking rules.
Related Topics:
•“Logs and Log Files” on page 237
Viewing Load Details
View load details for a resource on the Load tab.
1. On the Load tab, select the resource in the Resources panel.
2. Click Actions > View Load Details.
The Load Details tab for the resource appears.
3. To enable automatic refresh of the log details, click the Auto Refresh On icon.
4. To disable automatic refresh of the log details, click the Auto Refresh Off icon.
5. To save the contents of the Load Details tab to a Microsoft Excel file, click Actions > Save As.
By default, Metadata Manager names the file with the resource name and the start time of the resource
load.
232 Chapter 12: Loading and Monitoring Resources

Load Details Tab
The Load Details tab includes the following views:
•Log view. Contains resource load events. Metadata Manager updates the Log view as it loads a
resource. You can view warnings and errors on the Log view.
•Objects view. Contains summary information for metadata objects.
•Errors view. Contains summary information for errors.
•Sessions view. Contains session statistics for each session in the PowerCenter workflows that Metadata
Manager uses to load metadata.
You can save the contents of the Load Details tab to a Microsoft Excel file. The Excel file contains a
worksheet for each view in the Load Details tab.
Metadata Manager also creates a log file that contains the information displayed in the Load Details tab.
Log View
The Log view contains load events that are generated by Metadata Manager when it loads a resource. During
a resource load, Metadata Manager updates the Log view as the load events occur. The events appear in a
tree format. You can expand and collapse the tree to browse the load events. Each load event includes the
date and time that the event occurred.
Use the Log view to view information about load operations, PowerCenter workflows and worklets, and errors
that occur during the resource load. If an error occurs, the top-level event in the tree view becomes red.
The Log view contains load events for the following operations and tasks:
Operation Description
Load Metadata load tasks. Includes the following tasks:
-Parameter file generation task. Metadata Manager uses parameter files to run PowerCenter workflows.
-ETL task. Includes events for each PowerCenter worklet and workflow.
-Metadata Manager Agent task. Includes events for the Metadata Manager Agent when it extracts and
processes source metadata.
-Path building task. Metadata Manager creates a unique access path for all extracted metadata objects.
Load events may also include parser, file transfer, incremental load, and parameter file parser events, based on
the type of resource you load.
Linking Linking tasks to create links between objects in resources that share connection assignments or resources that
have associated linking rules. If you configured automatic connection assignments, Metadata Manager configures
the connection assignments and then creates the links.
Indexing Metadata Manager creates index files used when you search for metadata objects.
To filter the events that appear in the Log view, select the level of events that you want to appear on the Log
view in the Severity list. You can choose Information, Warning, and Error event types.
Objects View
The Objects view contains metadata objects added, deleted, and updated in the metadata catalog for each
object class type.
Monitoring Resources 233

The following table describes the columns in the Objects view:
Column Description
Object Type Class type of the source object extracted.
Preload Object Count Number of metadata objects in the metadata catalog after the previous resource load.
Objects Added Number of objects loaded into the metadata catalog.
Objects Deleted Number of objects deleted from the metadata catalog.
Objects Updated Number of objects updated in the metadata catalog.
Object Count Total number of objects in the metadata catalog for the resource after the current resource
load.
Errors View
The Errors view contains the number of read, write, and transformation errors for the PowerCenter workflows
that load metadata into the Metadata Manager warehouse. You can get more information about the specific
errors on the Log and Sessions views.
The following table describes the columns in the Errors view:
Column Description
Type Workflow type, organized by the type of object loaded into the Metadata Manager
warehouse and staging tables. Includes the following workflow types:
-Staging
-Objects
-Object Properties
-Object Associations
-Lineage Links
-Expressions
-Others
Read Errors Number of errors encountered by the PowerCenter Integration Service while reading the
source database or source files.
Write Errors Number of errors encountered by the PowerCenter Integration Service when writing
metadata to the Metadata Manager warehouse.
Transformation Errors Number of errors encountered by the PowerCenter Integration Service while transforming
metadata.
Sessions View
The Sessions view contains details about each PowerCenter workflow used to stage and load metadata and
the sessions for each workflow. The Sessions view contains a separate section for each workflow. Use the
session statistics to get more information about the workflow runs and any error encountered during a
workflow or session run.
234 Chapter 12: Loading and Monitoring Resources

The following table describes the details included for each workflow in the Sessions view:
Column Description
Session Name Name of the session in the workflow.
Parent Name Name of the workflow or worklet that includes the session.
Source Success Number of rows that the PowerCenter Integration Service successfully read from the
metadata source or metadata source file.
Source Fail Number of rows that the PowerCenter Integration Service failed to read from the source.
Target Success Number of rows that the PowerCenter Integration Service wrote to the Metadata Manager
warehouse.
Target Fail Number of rows that the PowerCenter Integration Service failed to write to the Metadata
Manager warehouse.
Transformation Errors Number of transformation errors in the session.
First Error Message Text of the first error encountered in the session.
Start Time Date and time the session started.
End Time Date and time the session ended.
Viewing Link Details
You can view link details for resources that Metadata Manager linked using connection assignments. When
you view the links details of a resource, you can export them to a Microsoft Excel file.
You cannot view link details for resources that Metadata Manager linked using linking rules.
1. On the Load tab, select the resource in the Resources panel.
2. Click Actions > View Link Details.
The Link Details tab displays the actual and missing links for the resource.
3. To export the link details to a Microsoft Excel file, click Actions > Export Details to Excel.
The File Download dialog box appears.
4. Click Save and specify the location to save the file.
By default, Metadata Manager names the file with the resource name and the start time of the resource
load.
Link Details Tab
The Link Details tab includes the link summary, which contains the following information:
•Name of resource associated with the connection
•Name of the connection in the source database
•Name of the resource that contains the assigned schema
•Schema name for the source database resource that the connection is assigned to
•Number of links associated with the connection and schema
Monitoring Resources 235

•Number of missing links
•Percentage of links that are correctly associated with the schema
You can save the contents of the Link Details tab to a Microsoft Excel file. You can set the value of the
Missing_Links_Report_Limit property in the IMM.properties file to limit the maximum number of missing links
you want to export.
Links View
The Links view contains information about links created between objects in resources that share a
connection assignment. Metadata Manager creates links during a resource load or when you direct Metadata
Manager to create the links. Metadata Manager uses the links between objects in different resources to
display data lineage across sources.
Metadata Manager updates the Links view during each resource load or link process.
The following table describes the columns in the Links view:
Column Description
Resource Name of the resource that owns the connection.
Connection Name of the connection in the data integration, business intelligence, or data modeling repository to the
metadata source.
Assigned Database Name of the resource that contains the assigned schema.
Assigned Schema Schema name for the resource that the connection is assigned to.
Links Number of created links associated with the connection and schema.
Missing Links Number of links associated with the connection and schema that Metadata Manager could not create.
Missing links can occur because of incorrect connection assignments, outdated metadata for the
resources, or a counterpart object that does not exist in the metadata source.
Link Completeness Percentage of links in the connection that are correctly associated with the schema.
Exported Missing Link Details
You can export the details of objects that are not linked to an Excel file. Export the missing link details by
selecting a row in the Links view of the Link Details tab and clicking Actions > Export Details to Excel.
The exported Microsoft Excel file contains the following worksheets:
Links
The Links view and worksheet display the results of the most recent resource load or link process.
Missing Link Details
Contains information about each linkable object that Metadata Manager did not create a link for. The
Missing Link Details worksheet displays the current information in the Metadata Manager warehouse,
and might not match the summary information on the Links view and worksheet. For example, if you
purge a connected resource, the Links view and worksheet are not updated and still include missing
links to the purged resource. The Missing Link Details worksheet displays the current information in the
warehouse and does not include missing links to the purged resource.
236 Chapter 12: Loading and Monitoring Resources

The following table describes the columns in the Missing Link Details worksheet:
Column Description
Connection Name of the connection in the data integration, business intelligence, or data modeling repository to the
metadata source.
Assigned Schema Schema name for the resource that the connection is assigned to.
Expected Schema Name of the schema in the resource that Metadata Manager expects to link the objects.
Expected Table Name of the struct in the assigned schema in the connected resource that the referred struct can be
linked to.
Expected Column Name of the feature in the assigned schema in the connected resource that the referred feature can be
linked to.
Referring Struct
Location
Location of the linkable structure in the Metadata Manager catalog. A structure can be a table, view, or
procedure.
Referring Through
Feature
Name of the feature in the linkable structure. For example, a feature can be a column name in a table
structure. Empty if the linkable structure does not have a feature.
Task Name of the PowerCenter session that contains the linkable object. Used for PowerCenter resources
only.
Load Details Log File
After a resource load completes, Metadata Manager creates a log file that contains details about the resource
load. The log file contains all information displayed in the Load Details tab when you load a resource.
Metadata Manager names the file in the following format:
<resource name>_<day><month><date><time><time zone><year>
Metadata Manager creates the file in the following directory:
<Informatica installation directory>\logs\<node name>\services\MetadataManagerService
\<Metadata Manager service name>
Logs and Log Files
You can monitor resource load runs to determine whether they are successful. Use Metadata Manager logs
and log files to view details about resource loads. You can also use the mmcmd command line program to
get information about the status of a resource load.
Use the following logs in Metadata Manager to view details about resource loads and troubleshoot errors:
Load Details Tab
Contains resource load tasks, workflow information, worklet information, and load errors.
Metadata Manager Agent Log File
Contains information about a resource load generated by the Metadata Manager Agent.
Logs and Log Files 237

Metadata Manager Service Log File
Contains log events generated by the Metadata Manager Service and log events generated by the
Metadata Manager application.
Activity Log
Contains the status of resource load operations for all resources.
You can also use the PowerCenter Workflow Monitor to view PowerCenter workflows as they load the
metadata. Use the session and workflow logs to troubleshoot errors. If you load multiple resources of the
same resource type concurrently, the Integration Service runs multiple instances of the workflow that
corresponds to the resource type. Each workflow instance includes separate workflow and session logs.
Note: Log events may appear in different languages based on the browser locale. Log events from third-party
applications may display in a language other than the browser locale.
Metadata Manager Agent Log File
Metadata Manager uses the Metadata Manager Agent to extract metadata from business intelligence
resources and resources that use metadata source files. During the metadata extraction process, Metadata
Manager uses the Metadata Manager Agent to connect to metadata sources and extract metadata. Metadata
Manager writes any log events generated during the metadata extraction process to the Metadata Manager
Agent log file. The log events include calls to the Metadata Manager Agent from the Metadata Manager
application and log events generated by the Metadata Manager Agent.
You can use the Metadata Manager Agent log file to troubleshoot errors that occur when the Metadata
Manager Agent extracts metadata from a metadata source during a resource load. You can also use the file
to get more information about metadata objects not extracted from a metadata source.
Metadata Manager writes to mm_agent.log in the following directory:
<Informatica installation directory>\logs\<node name>\services\MetadataManagerService
\<Metadata Manager service name>
The following table describes the log event types in mm_agent.log:
Event Type Description
INFO Log events that include the following information:
-Calls to the Metadata Manager Agent from the Metadata Manager application
-Connection to metadata sources
-Metadata objects extracted from metadata sources
WARN Log events about metadata objects not extracted from a metadata source.
For example, if the Metadata Manager Agent could not extract documents or universes from Business
Objects, the names of the objects appear in the log file.
FATAL Log events that occur during the metadata extraction process that causes the extraction process to fail.
For example, if the Metadata Manager Agent could not connect to a metadata source system, the error
would appear in the log file.
By default, Metadata Manager truncates the log file when it reaches 10 MB. You can also manually truncate
the log file.
238 Chapter 12: Loading and Monitoring Resources

Metadata Manager Service Log File
The Metadata Manager Service log file contains log events that the Metadata Manager Service generates
and log events that the Metadata Manager application generates.
The Metadata Manager Service runs the Metadata Manager application in an Informatica domain. In addition
to the log events that appear in Informatica Administrator, the Metadata Manager Service also creates a log
file for events that occur when the Metadata Manager application runs.
Metadata Manager writes log events to mm.log in the following directory:
<Informatica installation directory>\logs\<node name>\services\MetadataManagerService
\<Metadata Manager service name>
You can use the Metadata Manager Service log file to troubleshoot errors that occur when you run the
Metadata Manager Service or perform tasks in the Metadata Manager application. The Metadata Manager
Service log file contains additional information about the log events, including the specific Metadata Manager
modules that generate errors.
The following table describes the log events that mm.log contains:
Event Type Description
Metadata Manager
Service
Log events that occur when you start and run the Metadata Manager Service. Also includes
configuration information for the Metadata Manager Service.
Metadata load Log events that occur during a resource load.
Lineage Log events that occur when you perform data lineage analysis on an object, navigate the data lineage
diagram, and view metadata objects in the diagram.
Metadata access Log events that occur when you use the Metadata Manager application to access metadata in the
Metadata Manager repository.
Custom metadata Log events that occur when you create, edit, delete, and import custom metadata.
By default, Metadata Manager truncates the log file when it reaches 10 MB. You can also manually truncate
the log file.
To export the service log file, click Help > Export Service Log.
Logs and Log Files 239

Activity Log
The activity log contains details about each resource load. Use the activity log to get more details about a
specific resource load.
The following table describes the contents of the activity log:
Property Description
Name Name of the resource.
Task Type Type of task performed by Metadata Manager. Metadata Manager performs the following tasks:
-Metadata Load. Loads metadata into the Metadata Manager warehouse.
-Link. Creates links between objects in resources that share connection assignments or that have associated
linking rules.
-Indexing. Creates or updates index files for the resource.
User Metadata Manager user that started the resource load.
Start Date Date and time the corresponding task started.
End Date Date and time the corresponding task completed.
Duration Length of time Metadata Manager spends completing the task.
Status Status of the metadata load and indexing operations.
To view the contents of the activity log:
1. On the Load tab, click Actions > View Activity Log.
The Activity Log tab appears.
2. To filter the contents of the Activity Log tab, select a time frame in the Time list.
3. To sort by column, click the column name.
4. To refresh the log to see recent changes, click Actions > Refresh Resources.
Troubleshooting Resource Loads
You can monitor a resource load run to determine whether it is successful. If a resource load fails,
troubleshoot the failure and load the resource again.
I am trying to load a business intelligence or a data modeling resource, but the load fails because of inconsistencies in the
model.
If the load fails because of inconsistencies in the model, perform one of the following actions:
•Fix the inconsistencies in the model and reload the resources.
•In the imm.properties file, change the MitiValidationLevel property value from basic to NONE. Restart
the Metadata Manager Service and reload the resources.
I am trying to load a resource, but the load fails because Metadata Manager cannot find an IME file.
Check the value of the PowerCenter Integration Service Process property $PMSourceFileDir. Metadata
Manager stores transformed metadata for packaged and universal resources in IME files in the
240 Chapter 12: Loading and Monitoring Resources
$PMRootDir/SrcFiles
directory. If the $PMSourceFileDir property is not set to
$PMRootDir/SrcFiles
,
Metadata Manager cannot find the IME files.
When I try to load a PowerCenter resource where the PowerCenter repository type is IBM DB2, the load fails. I get the
following error in the DB2CLI log file: "SQL0101N The statement is too long or complex."
Check the value of the DB2 statement heap size configuration parameter. Increase the STMTHEAP
value up to 16,384 pages.
When I try to load a PowerCenter resource where the PowerCenter repository type is IBM DB2, the load fails with deadlocks
on the DB2 database.
Check the values of the MAXLOCKS, LOCKLIST, and LOCKTIMEOUT DB2 configuration parameters.
Update the parameters as follows:
•MAXLOCKS = 10 per application
•LOCKLIST = 16,384 or greater
•LOCKTIMEOUT = 60 or greater
When I load a Business Objects, Cognos, or OBIEE resource, Metadata Manager returns an out of memory error.
The Metadata Manager Agent can return this error if you extract a large amount of metadata from the
metadata source. If you receive this error, perform either of the following actions:
•Reduce the number of worker threads that the Metadata Manager Agent uses to extract metadata
asynchronously from the metadata source. You can view and update the number of worker threads in
the configuration properties when you create or edit a resource. If the number of worker threads is
not set in the configuration properties, you can view the number of worker threads that the Metadata
Manager Agent uses in the following log file:
<Metadata Manager Agent installation directory>\data\logs\logService\mimb<number>.log
•Try to increase the maximum Java Virtual Machine (JVM) heap size that the Metadata Manger Agent
can allocate. On 64-bit Windows, the Metadata Manager Agent can run a 64-bit JVM with a virtually
unlimited maximum JVM heap size. On 32-bit Windows, configure multiple resources, each with a
subset of the total models that you want to extract from the metadata source.
I am assigned the Load Resources privilege for the Metadata Manager Service, but I get an "insufficient privileges" error
when I try to load Business Glossary resources.
To load Business Glossary resources, the Load Resource, Manage Resource, and View Model privileges
are required. You also need write permission on any business glossary resource that you want to load.
When I load a Cloudera Navigator resource, Metadata Manager returns an out of memory error.
To load Cloudera Navigator resources, the maximum heap size for the Metadata Manager Service must
be at least 4096 MB (4 GB). Some Cloudera distributions require an even larger heap size. To increase
the maximum heap size, open the Administrator tool, select the Metadata Manager Service, and
increase the value of the Max Heap Size property.
Scheduling Resource Loads
Create and edit schedules for resource loads in the Manage Schedules window. When you create a
schedule, you configure the schedule properties, including the start date, the frequency in which the resource
loads, and the end date. Attach a schedule to a resource in the Schedule tab for the resource.
Scheduling Resource Loads 241

You can complete the following tasks for resource schedules:
•Create a schedule and configure the schedule properties.
•Edit the properties of a schedule.
•Attach a schedule to a resource to load the resource according to the properties in the schedule.
•View the resources that use a schedule.
Creating a Schedule
Create a schedule to select the time and frequency in which a resource loads. You can use the built-in
schedules or create your own.
Metadata Manager includes the following built-in schedules:
•Daily schedule. Runs every day at midnight.
•Weekly schedule. Runs every Sunday at midnight.
•Monthly schedule. Runs on the first day of every month at midnight.
The following table describes the properties you configure when you create or edit a schedule:
Property Description
Name Name of the schedule. The schedule name appears in the Available Schedules list after you save the
schedule. The name must be unique. It cannot exceed 256 characters or include the following
characters:
/ \ : * ' ? " < > | [ ]
Description Description of the schedule. Description cannot exceed 4,000 characters.
Starts On Date and time the schedule starts. You can enter the month, day, and year, or you can use the
calendar to select a date.
Enter the time in the following format: HH:MM.
Repeats Time period the schedule repeats. You can select Daily, Weekly, Monthly, or Never. Use Never to
schedule a resource to load only once.
If you select a weekly schedule, you can select the day of the week on which the schedule repeats.
Repeats Every Number of times the schedule repeats for the chosen time period. You can select the number of days,
weeks, and months between repeats of the load. Required if you configure the schedule to repeat
daily, monthly, or yearly.
Repeats On Day on which a weekly schedule repeats. You can select multiple days. This option appears if you
select a weekly schedule for the time frame in which the schedule repeats.
No End Date Select this option if you want the schedule to repeat indefinitely.
Ends On Date and time the schedule stops. You can enter the month, day, and year, or use the calendar to
select a date.
Enter the time in the following format: HH:MM.
Required if you configure an end date for the schedule.
To create a schedule:
1. On the Load tab, click Actions > Manage Schedules.
The Manage Schedules window appears.
242 Chapter 12: Loading and Monitoring Resources
2. Click Add.
3. Enter the properties for the schedule.
4. Click Save.
5. To reset the configured properties, click Clear.
The properties are reset to the previously saved version.
6. Click Close.
The schedule appears in the Available Schedules list.
Editing a Schedule
You can edit a schedule to change the schedule time and frequency. Any resource assigned to the schedule
runs according to the updated schedule.
To edit a schedule:
1. On the Load tab, click Actions > Manage Schedules.
The Manage Schedules window appears.
2. In the Available Schedules list, select the schedule you want to edit.
3. Enter the properties for the schedule.
4. Click Save.
5. To reset the configured properties, click Clear.
The properties are reset to the previously saved version.
6. To see the resources assigned to the schedule, click Scheduled Jobs.
7. Click Close.
Attaching a Schedule to a Resource
To load a resource according to a schedule, attach the schedule to the resource. You can attach a schedule
to a resource when you create the resource, or after you create the resource.
To attach a schedule to a resource:
1. On the Load tab, select the resource to which you want to add the schedule in the Resources panel.
2. In the Properties panel, click the Schedule tab.
3. Click Edit.
The Edit Resource window appears.
4. Select Attach a schedule.
5. In the Schedule list, select a schedule.
The schedule details appear in the Schedule tab.
6. Click OK.
Scheduling Resource Loads 243

CHAPTER 1 3
Managing Permissions
This chapter includes the following topics:
•Managing Permissions Overview, 244
•Configuring Permissions for Users and Groups, 246
•Configuring Permissions on the Metadata Catalog, 246
Managing Permissions Overview
You can view and configure user and group permissions on resources and metadata objects. Permissions
determine which resources and metadata objects that Metadata Manager users can access on the Browse
tab and the Load tab. Permissions do not affect objects on the Model tab.
By default, only Metadata Manager administrator users have access to the resources and metadata objects
in the Metadata Manager warehouse. To grant access to these objects to other users, you must configure the
permissions for Metadata Manager users and groups.
Permissions work with the Metadata Manager Service privileges that you configure for users and groups in
the Administrator tool. To access a resource or metadata object, a user must have sufficient Metadata
Manager Service privileges and appropriate permissions on the object. For example:
•To view a metadata object in the metadata catalog, a user needs the View Catalog privilege, read
permission on the resource that contains the object, and read permission on the metadata object. To
prevent the user from accessing other metadata objects within the resource, set the permission on the
other objects to No Access.
•To view a business glossary in the Glossary view, a user needs the View Glossary privilege and read
permission on the business glossary.
•To view a resource in the Load tab, a user needs the View Resource privilege and read permission on the
resource.
•To load a resource, a user needs the Load Resource privilege and write permission on the resource.
For more information about Metadata Manager Service privileges, see the Informatica Security Guide.
Use the Permissions tab to configure permissions on resources and metadata objects.
You can complete the following tasks:
Configure permissions for users and groups.
Select a user or group, and then specify which resources and metadata objects that the user or group
can access.
244
Configure permissions on metadata objects.
Select a resource or metadata object, and then specify which users and groups can access the object.
Users and Groups
Create and manage Metadata Manager users and groups in the Administrator tool.
You can complete the following tasks in the Administrator tool for users and groups:
Create and configure users.
Create and configure Metadata Manager user accounts.
Create and configure groups.
Create and configure groups for Metadata Manager.
Configure privileges and roles.
Configure Metadata Manager privileges and roles. The tasks that users and groups can perform in
Metadata Manager depend on the privileges and roles that you assign to users and groups.
The Service Manager stores users and groups in the domain configuration database and copies the list of
users and groups to the Metadata Manager repository. The Service Manager periodically synchronizes the
list of users and groups in the repository with the users and groups in the domain configuration database.
For more information about configuring users and groups in the Administrator tool, see the Informatica
Security Guide.
Permissions
Permissions in Metadata Manager determine the level of access that users and groups have on resources
and metadata objects.
You can configure the following permissions:
Full control
Configure permissions on an object in the metadata catalog. Includes write and read permission.
Write
Write permission on a resource or metadata object. Includes read permission.
Read
Read permission on a resource or metadata object.
No access
User cannot access the resource or metadata object.
Permission not specified
User inherits permissions on the object from the parent object.
Rules and Guidelines for Permissions
Use the following rules and guidelines when you configure permissions:
•When you configure permissions on a resource or metadata object, child objects of the resource or
metadata object inherit the permissions of the parent object.
Managing Permissions Overview 245
•You cannot configure permissions on logical groups in the metadata catalog. For example, logical groups
for an Oracle resource include the Indexes, Procedures, Tables, and Views groups. Metadata Manager
groups all tables under the Tables logical group. You can configure permissions on the individual tables,
but not on the Tables logical group.
Configuring Permissions for Users and Groups
View and configure permissions for users and groups on the Permissions tab. You can view the permissions
on the resources and metadata objects for a user or group. You can also configure the permissions for the
user or group.
To configure permissions for specific child objects of a parent object, set permissions for all child objects to
No Access. Then configure the appropriate permissions for the child objects.
For example, user dave needs the Write permission only on the first two monthly revenue reports tables
among the 100 monthly revenue reports tables under the Tables logical group in an Oracle resource. To
configure permissions for dave, select the 100 monthly revenue reports tables, and set the permission to No
Access. Then select the first two monthly revenue reports tables, and set the permission on the tables to
Write.
1. On the Permissions tab, select the user or group in the Users/Groups pane.
The Permissions pane displays the user or group permissions for each resource and metadata object in
the metadata catalog.
Note: Permissions preceded by an asterisk (*) are inherited from permissions on a parent object.
2. Click Edit Permissions.
The Edit Permissions window appears.
3. Select the resource or metadata object for which you want to configure permissions.
4. Select the permission from the list and click Apply.
5. Click OK.
Configuring Permissions on the Metadata Catalog
View and configure permissions for resources and metadata objects on the Permissions tab. You can view
the user and group permissions on the resources and metadata objects and configure the permissions for the
objects.
When you select a resource or metadata object, Metadata Manager displays the users and groups for which
you configured permissions. To configure permissions for a user or group that is not displayed, you can add
the user or group when you configure permissions for the object.
246 Chapter 13: Managing Permissions
Note: You can also configure permissions for a resource or metadata object from the Browse tab. Select the
object and choose Actions > Set Permissions for this Object to switch to the Permissions tab.
1. On the Permissions tab, select a resource or metadata object.
The Permissions pane displays the configured permissions for users and groups on the resource or
metadata object.
Note: Permissions preceded by an asterisk (*) are inherited from permissions on a parent object.
2. Click Edit Permissions.
The Edit Permissions window appears.
3. To edit the permissions for a user or group, select the permission in the Permission list.
4. To remove the permissions for a user or group, click Remove for the corresponding user or group.
5. To add permissions for another user or group, select the user or group in the Add another User/Group
list, select the permission, and click Add.
6. Click OK.
Configuring Permissions on the Metadata Catalog 247

CHAPTER 1 4
Resource Migration
This chapter includes the following topics:
•Resource Migration Overview, 248
•Resource Migration Steps, 248
•Step 1. Copy the Plug-in for a Universal XConnect, 250
•Step 2. Migrate the Model, 250
•Step 3. Migrate the Resource Configuration, 251
•Step 4. Load the Resource, 253
•Step 5. Migrate Resource Metadata, 253
Resource Migration Overview
You can migrate packaged and universal resources between Metadata Manager instances. You might
migrate resources when you move from a development to a production environment. Migrate resources so
that you do not have to re-create them in the target environment.
The steps that you use to migrate resources vary based on whether you migrate a packaged resource or a
universal resource and whether the resource uses custom classes, rule sets, custom class attributes, or
business names.
Note: The information in this chapter applies to migrating packaged and universal resources within the
current Metadata Manager version. To migrate resources from a previous version of Metadata Manager to
the current version, use the rmu or rcfmu command line program. For information about migrating custom
resources, see the Metadata Manager Custom Metadata Integration Guide.
Resource Migration Steps
To migrate a packaged or universal resource between Metadata Manager instances of the same version, you
must migrate the resource configuration and custom attributes to the target environment. If you migrate a
248
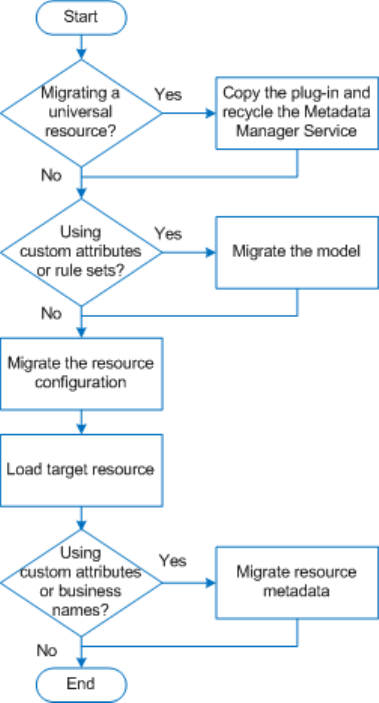
universal resource, you must also copy the plug-in to the target environment. To migrate objects, you export
them from the source repository and import them into the target repository.
The following image shows the process to migrate a packaged or universal resource:
1. If you migrate a universal resource, copy the plug-in to the Metadata Manager Service plug-ins directory
in the target environment, and then recycle the Metadata Manager Service.
Metadata Manager imports the universal XConnect and model in the target environment when the
Metadata Manager Service is enabled.
2. If you added custom class attributes to the model in the source environment or if the model has
associated rule set definitions, migrate the model:
a. Export the model from the source repository. On the Model tab, click Actions > Export Selected
Model. Include the rule set definitions in the export file.
b. Import the model into the target repository. On the Model tab, click Actions > Import Selected
Model.
3. Migrate the resource configuration:
a. Export the resource configuration from the source repository. On the Load tab, click Actions >
Export Resource Configuration. If the resource has associated rule sets or parameter files,
include them in the export file.
b. Import the resource configuration into the target repository. On the Load tab, click Actions > Import
Resource Configuration.
4. Load the resource in the target environment.
Resource Migration Steps 249
5. If you updated the values of custom attributes or the business names for objects in the source
environment, migrate the resource metadata:
a. Export the resource metadata from the source repository to a Microsoft Excel file. On the Browse
tab, click Actions > Export Metadata > Excel.
b. Import the resource metadata into the target repository. On the Browse tab, click Actions > Import
Metadata > Excel.
Step 1. Copy the Plug-in for a Universal XConnect
If you migrate a universal resource, you must copy the plug-in from the source environment to the target
environment. Recycle the Metadata Manager Service in the target environment to import the XConnect and
model.
If you are not migrating a universal resource, skip this step.
1. Copy the plug-in .xar file from the Metadata Manager Service plug-ins directory in the source
environment to the Metadata Manager plug-ins directory in the target environment.
The Metadata Manager Service plug-ins directory is the following directory:
<Informatica services installation directory>\services\MetadataManagerService\mm-plugins
\xconnect\<Metadata Manager Service name>
2. In the Administrator tool in the target environment, recycle the Metadata Manager Service.
Recycling the service disables and enables the service.
Metadata Manager imports the XConnect and model in the target environment when the service is
enabled.
After the Metadata Manager Service is enabled, open the Metadata Manager web application in the target
environment, and verify that the model appears on the Model tab.
Step 2. Migrate the Model
If you added custom class attributes to the model in the source environment or if the model has associated
rule set definitions, you must migrate the model. To migrate a model, you export the model from the source
repository and import it into the target repository.
If you did not add custom class attributes to the model in the source environment, skip this step.
When you migrate a model, you export the model from the source Metadata Manager repository to a file. The
model export file contains all the classes, attributes, and relationships for the model.
When you import a packaged or universal model into the target repository, Metadata Manager analyzes the
contents of the model export file and compares it to the existing models. Metadata Manager imports the new
and changed classes.
250 Chapter 14: Resource Migration
Exporting a Packaged or Universal Model
You can export one packaged or universal model to an export file.
Note: You cannot export the Business Glossary model from Metadata Manager. To export business glossary
assets and templates, use the Analyst tool.
1. On the Model tab, click Actions > Export Selected Model.
Metadata Manager prompts you to include rule set definitions in the export file.
2. If the model has associated rule set definitions, select Yes. Otherwise, select No.
If you do not include rule set definitions in the export file, Metadata Manager creates an XML file that
defines the model. If you include the rule set definitions, Metadata Manager creates a .zip file that
contains the model export XML file plus an XML file for each rule set definition. The options to save the
export file vary based on the browser.
Importing a Packaged or Universal Model
When you import a packaged or universal model, Metadata Manager imports the custom class attributes. If
you import a model export .zip file, Metadata Manager also imports the rule set definitions.
Note: You cannot import a Business Glossary model in Metadata Manager. To import business glossary
assets and templates, use the Analyst tool.
1. On the Model tab, click Actions > Import Model.
The Import Model window appears.
2. Select the .xml or .zip file that contains the model that you want to import.
3. Click Next.
4. Select the model that you want to import, and click Next.
The wizard analyzes the file and validates it against the models in the Metadata Manager repository. The
wizard lists the new and changed classes that Metadata Manager will create or update. The wizard also
lists the unchanged classes that Metadata Manager will not reimport.
5. Click Import to import the class attributes and rule set definitions.
Step 3. Migrate the Resource Configuration
To migrate the resource configuration for a packaged or universal resource, you export the resource
configuration from the source Metadata Manager repository to a file. You can include rule sets and parameter
definitions in the export file. You then import the file into the target Metadata Manager repository.
If you export the resource configuration without the rule sets and parameter definitions, Metadata Manager
creates a resource configuration file with the .rcf extension that defines the resource properties and values. If
you include rule sets and parameter definitions, Metadata Manager creates a compressed file with the .rcz
extension. The compressed file contains the resource configuration file, rule set files, rule set parameter files,
and all data and parameter files that are associated with the resource.
When you import the .rcf or .rcz file, Metadata Manager creates the resource if it does not exist. If the
resource exists, Metadata Manager updates the resource configuration.
Step 3. Migrate the Resource Configuration 251

Exporting a Resource Configuration
Export the resource configuration from the source repository so that you can import it into the target
repository. If the resource includes rule sets or parameter definitions, include them in the export file. You can
also include or exclude the resource password and secure JDBC parameters.
1. On the Load tab, select a resource.
2. Click Actions > Export Resource Configuration.
3. Metadata Manager prompts you to include rule sets and parameter definitions in the export file.
Select one of the following options:
Option Description
Yes Export all source files associated with the resource, including rule sets and parameter definitions.
No Export the resource configuration only.
4. Metadata Manager prompts you to include the resource password in the export file.
Select one of the following options:
Option Description
Yes Include the password and secure JDBC parameters in the resource configuration file.
The password and secure JDBC parameters are encrypted in the resource configuration file.
No Do not include the password or the secure JDBC parameters in the resource configuration file.
Note: If the resource uses a password or secure JDBC parameters and you do not include this information in
the export file, you must enter it when you import the resource configuration.
If the resource does not use a password, select No.
The options to save the export file vary based on the browser.
If you include rule sets and parameter definitions in the export file, Metadata Manager creates a file with
the .rcz extension in the location you specify. If you export the resource configuration only, Metadata
Manager creates a file with the .rcf extension in the location you specify.
Importing a Resource Configuration
Import the resource configuration into the target repository. If you included rule sets and parameter
definitions when you exported the resource from the source repository, Metadata Manager imports the
resource, rule set files, rule set parameter files, and all data and parameter files that are associated with the
resource.
If you import a resource configuration file with the .rcf extension, Metadata Manager imports the resource
configuration. If you import a resource configuration file with the .rcz extension, Metadata Manager imports
the resource configuration plus all rule sets and all parameter definitions associated with the resource.
1. On the Load tab, click Actions > Import Resource Configuration.
The Import Resource Configuration dialog box appears.
2. Select the import file.
3. If the resource uses a password and the resource configuration does not include the resource password,
enter the resource password in the Password property.
252 Chapter 14: Resource Migration
4. If the resource uses secure JDBC parameters and the resource configuration does not include them,
enter the parameters in the Secure JDBC Parameters property.
Enter the parameters as name=value pairs separated by the delimiter character that the database driver
requires.
Note: If you do not enter the parameters, the Metadata Manager Service might not be able to create the
resource.
5. Click OK.
If the resource does not exist, Metadata Manager creates it. If the resource already exists, Metadata
Manager updates the resource configuration.
Step 4. Load the Resource
After you import the resource configuration into the target repository, load the resource in the target
environment. When you load the resource, Metadata Manager imports the metadata from the metadata
source and creates the data lineage links.
If you updated the values of custom attributes or the business names for objects in the source environment,
you must also migrate the resource metadata after you load the resource. You cannot import custom attribute
values or business names for the resource in the target environment until you load the resource.
If you did not If you update the values of custom attributes or business names in the source environment, the
migration process is complete after you load the resource.
Step 5. Migrate Resource Metadata
If you updated the values of custom attributes or the business names for objects in the source environment,
you must migrate the resource metadata. To migrate resource metadata, export the resource metadata from
the source repository to a Microsoft Excel file. Then, import the Excel file into the target repository.
If you did not update the values of custom attributes or business names in the source environment, skip this
step.
When you import the Excel file into the target repository, Metadata Manager imports the custom attribute and
business name values. Custom attributes are also called custom properties.
For example, in a development environment, you updated the Business Name property for most objects in a
packaged resource. You want to migrate the business names to the production environment. Export the
resource metadata to an Excel file and include the custom attributes and business names. When you import
the Excel file in the target environment, Metadata Manager imports the business name values for the objects
in the resource.
Export and import resource metadata between Metadata Manager repositories with the same version. You
cannot import resource metadata from a different version.
For more information about exporting and importing custom properties and custom property values, see the
Metadata Manager Custom Metadata Integration Guide.
Step 4. Load the Resource 253
Exporting Resource Metadata
If you updated the values of custom attributes for a packaged or universal resource in the source
environment, export the resource metadata to a Microsoft Excel file.
1. On the Browse tab, select the resource for which you want to export custom attributes.
2. Click Actions > Export Metadata > Excel.
Metadata Manager prompts you to include the Business Name attribute and other custom attributes.
3. Click Yes to export the attribute values to the Excel file.
The options to save the export file vary based on the browser.
Importing Resource Metadata
If you updated the values of custom attributes for a packaged or universal resource in the source
environment, import the resource metadata into the target environment. You import resource metadata from a
Microsoft Excel file.
Before you import metadata for a resource, verify that the model and resource exist in the target environment
and that the resource is loaded successfully. You cannot import resource metadata from the Microsoft Excel
file if the resource is not loaded.
1. On the Browse tab, select the packaged or universal resource for which you want to import metadata.
2. Click Actions > Import Metadata > Excel.
The Import Catalog Metadata window appears.
3. Select the Microsoft Excel file that contains the resource metadata, and click Import.
Metadata Manager imports the attribute values and displays the number of metadata objects that were
updated, not changed, not found, or not valid.
254 Chapter 14: Resource Migration

CHAPTER 1 5
Repository Migration
This chapter includes the following topics:
•Repository Migration Overview, 255
•Migrating the Repository when Domain Names and Encryption Keys are the Same, 255
•Migrating the Repository when Domain Names or Encryption Keys Differ, 256
Repository Migration Overview
You can migrate the Metadata Manager repository between domains. You might want to migrate the
repository when you move from a development environment to a production environment.
When you migrate the repository, you back up the repository contents in the old domain and restore them to
the repository in the new domain. You use the mmRepoCmd command line program to back up and restore
the repository. The steps that you perform to migrate the repository differ based on whether the old domain
and the new domain use the same domain names and encryption keys.
Note: To ensure that you can recover the repository if you encounter problems during migration, back up the
old repository before you begin the migration process.
For more information about the mmRepoCmd command line program, see the Metadata Manager Command
Reference.
Migrating the Repository when Domain Names and
Encryption Keys are the Same
When the domain names and encryption keys are the same, back up the repository in the old domain, copy it
to the new domain, and restore it.
Before you migrate the repository, create the new Metadata Manager repository database. You must also
export users and groups from the old domain and import them into the new domain. You can use the infacmd
command line program to export and import users and groups. For more information about infacmd
commands, see the Informatica Command Reference.
1. In the old domain, use the mmRepoCmd backupRepository command to back up the repository contents
to a binary file.
255
2. In the new domain, create the Metadata Manager Service and associate it with the new repository
database.
3. Enable the Metadata Manager Service in the new domain.
Note: The PowerCenter Repository Service and PowerCenter Integration Service must be running to
enable the Metadata Manager Service.
4. Copy the repository back-up file from the back-up directory in the old domain to the back-up directory in
the new domain.
The back-up directory for repository back-up files is the following directory:
<Informatica services installation directory>\services\MetadataManagerService\mm_files
\<Metadata Manager Service name>\backup
5. In the new domain, use the mmRepoCmd restoreRepository command to restore the repository contents
from the binary file.
6. In the new domain, recycle the Metadata Manager Service.
The Metadata Manager Service drops and recreates the caches that store model and resource
information.
7. In the new domain, manually create the search index for all resources.
On the Load tab, click Actions > Configure Search Index and select all of the resources.
Migrating the Repository when Domain Names or
Encryption Keys Differ
When the domain names or encryption keys differ, you must copy the encryption key file from the old domain,
rename it, and upgrade the Metadata Manager Service. The upgrade process updates the domain name and
encryption key in the new repository.
Before you migrate the repository, create the new Metadata Manager repository database. You must also
export users and groups from the old domain and import them into the new domain. You can use the infacmd
command line program to export and import users and groups. For more information about infacmd
commands, see the Informatica Command Reference.
1. In the old domain, use the mmRepoCmd backupRepository command to back up the repository contents
to a binary file.
2. In the new domain, create the Metadata Manager Service and associate it with the new repository
database.
3. Enable the Metadata Manager Service in the new domain.
Note: The PowerCenter Repository Service and PowerCenter Integration Service must be running to
enable the Metadata Manager Service.
4. Copy the repository back-up file from the back-up directory in the old domain to the back-up directory in
the new domain.
The back-up directory for repository back-up files is the following directory:
<Informatica services installation directory>\services\MetadataManagerService\mm_files
\<Metadata Manager Service name>\backup
5. Copy the domain encryption key file, siteKey, from the old domain to the encryption key directory in the
new domain and rename the copied file siteKey_old.
256 Chapter 15: Repository Migration
Warning: Do not overwrite the siteKey file in the new domain.
The encryption key directory in the new domain will contain two encryption key files, siteKey and
siteKey_old.
6. In the new domain, use the mmRepoCmd restoreRepository command to restore the repository contents
from the binary file that you copied from the old domain.
7. In the new domain, recycle the Metadata Manager Service.
The Metadata Manager Service drops and recreates the caches that store model and resource
information.
8. In the new domain, manually create the search index for all resources.
On the Load tab, click Actions > Configure Search Index and select all of the resources.
Migrating the Repository when Domain Names or Encryption Keys Differ 257

APPENDIX A
Metadata Manager Login
This appendix includes the following topics:
•Metadata Manager Login Overview, 258
•Cookies, 258
•Logging in to Metadata Manager, 259
•Changing a Password, 259
Metadata Manager Login Overview
Log in to Metadata Manager through your web browser. You must have a user account to log in to Metadata
Manager.
If the domain does not use Kerberos authentication, the Informatica Service Manager creates a cookie that it
uses to authenticate your user name in Metadata Manager. The Service Manager deletes the cookie after 12
hours or when you log out of Metadata Manager. You can change the cookie timeout value.
Session timeout is the duration of inactivity after which the session information is destroyed. By default, the
session timeout is 30 minutes. You can change the session timeout for Tomcat by updating the session-
timeout element in the following file:
<INFA HOME>\tomcat\temp\<Metadata Manager Service name>\conf\web.xml
You can change your password after you log in.
Cookies
If the domain does not use Kerberos authentication, the Informatica Service Manager creates a cookie that it
uses to authenticate your user name in Metadata Manager. The Service Manager creates the cookie when
you log in to Metadata Manager.
If you access Metadata Manager again before the cookie expires, the Service Manager uses the
authentication information in the cookie to log you in to Metadata Manager. You must have cookies enabled
in your browser for the Service Manager to create the cookie.
If the browser session is inactive for 12 hours or you log out of Metadata Manager, the Service Manager
deletes the cookie. You can change the timeout for the cookie. To change the timeout value, update the
Session.timeOut property in the Metadata Manager imm.properties file.
258

Related Topics:
•“imm.properties” on page 260
Logging in to Metadata Manager
Log in to Metadata Manager through your web browser. The information that you enter to log in to Metadata
Manager varies based on the domain security configuration. If you are already authenticated within the
Informatica domain, Metadata Manager bypasses the login page.
1. Open the web browser.
2. In the address field, enter the following URL for the Metadata Manager login page:
http(s)://<host>:<port>/mm
In the URL, <host>:<port> represents the host name and port number of the machine that runs the
Metadata Manager Service.
If the node is configured for HTTPS with a keystore that uses a self-signed certificate, a warning
message appears. To enter the site, accept the certificate.
The login page appears.
3. Enter the login information.
The information on the login page varies based on the domain security configuration. You might have to
enter a user name, password, security domain, or namespace. If you do not know the security domain or
the namespace that your user account belongs to, contact the Informatica domain administrator.
4. Click Login.
The first time that you log in with the user name and password provided by the Informatica domain
administrator, change your password to maintain security.
Changing a Password
Change a password through the Manage menu.
1. Click Manage > Account Settings.
The Account Settings window appears.
2. Enter the old password.
Passwords can be up to 80 characters.
3. Enter a new password and confirm the new password.
4. Click OK.
Logging in to Metadata Manager 259

APPENDIX B
Metadata Manager Properties
Files
This appendix includes the following topics:
•imm.properties, 260
•searchpriorities.xml, 264
imm.properties
Use imm.properties to configure the following properties for Metadata Manager:
•Metadata Manager application properties
•Data lineage properties
After you configure properties in imm.properties, disable and enable the Metadata Manager Service for the
changes to take effect.
By default, imm.properties is located in the following directory:
<Informatica installation directory>\services\shared\jars\pc\classes
Metadata Manager Application Properties
Use imm.properties to configure Metadata Manager application properties such as indexing performance and
JDBC connection timeout interval.
The following table describes the Metadata Manager application properties in imm.properties:
Property Description
Catalog_Import_Batch_Size Number of elements that Metadata Manager processes in one batch when you
import metadata for a custom resource from an XML file. Increase this value if
errors occur during XML import. Specify any positive integer value. Default is
5000.
ElementFetch.ParamSize Number of elements that Metadata Manager processes to calculate the impact
summary. You can specify any value greater than zero. Decrease the value if
errors occur during impact summary calculation. Default is 10,000.
260

Property Description
ETL_Task_Run_Status_Poll_Interval Interval, in seconds, in which the Metadata Manager Service writes ETL task run
statistics to the mm.log file. Increase this value to write fewer messages to the log
file. Specify any positive integer value. Default is 5.
GatherStatistics Gathers statistics after loading resources if set to yes. You can gather statistics
when the Metadata Manager repository is on any relational database.
Gathering statistics improves performance of linking and catalog operations such
as browse and lineage. However, there might be an increase in the time taken to
load resources.
Default is Yes.
Note: If the Metadata Manager repository is on IBM DB2 and GatherStatistics is
set to yes, ensure that the IBM DB2 user has execute permissions on
SYSPROC.ADMIN_CMD and SYSPROC.REBIND_ROUTINE_PACKAGE.
Hide_Empty_Uneditable_Properties Hides empty and uneditable property values in all Metadata Manager perspectives
when set to the default value. Default is Y.
ImpactSummary.MaxObjects The maximum number of objects to appear in the impact summary user interface.
You can specify any non-negative integer value. If you specify zero, all objects
appear in the impact summary user interface. Default is 150.
Note: When you export the impact summary results, the value of the
ImpactSummary.MaxObjects property does not apply and all objects are exported.
indexing.mergeFactor Controls the number of metadata objects to store in memory before merging them
into the index. Increase the default value to improve indexing performance for
Metadata Manager. Default is 100.
Note: If you set the value too high for your environment, a Java exception might
occur due to too many open files.
indexing.ramBufferSize Determines the amount of memory used to buffer metadata objects before they are
merged into the index. Increase the default value to improve indexing performance
for Metadata Manager. Default is 256 MB.
Note: If you set the value too high for your environment, the following error might
occur:
java.lang.OutOfMemoryError
Load.OracleOptimizerDynamicSampling Sets the Oracle session parameter OPTIMIZER_DYNAMIC_SAMPLING on the
PowerCenter sessions that load to a Metadata Manager repository on Oracle.
Enter one of the following values:
--1. Does not override the Oracle database setting.
-0. Disables dynamic sampling.
-1-10. Overrides the Oracle database setting for the PowerCenter load sessions.
Improves Metadata Manager performance during a resource load.
Contact your Oracle database administrator to get the appropriate value for your
environment.
Default is -1.
Note: To use this option, Cost Based Optimization (CBO) must be enabled on the
Oracle instance.
mail.from.defaultEmailId Email address used as the default sender address when a user does not have an
email address in the system. If you do not set this property, and the user profile
does not contain an email address, the user cannot send email from Metadata
Manager.
Missing_Links_Report_Limit Limits the maximum number of missing links you want to export. Default is 64000.
imm.properties 261

Property Description
Miti_Client_Version Current version of the Metadata Manager Agent client used by Metadata Manager.
The Metadata Manager Agent that you use to load resources must match this
version.
MitiValidationLevel Specifies the level of consistency check to perform while loading business
intelligence and data modeling resources.
Enter one of the following values:
-basic
-NONE
-ADVANCED
Default is NONE.
Publish.MaxObjects Maximum number of objects to include in the export file when you export custom
and business name properties for a resource, logical group, or metadata object.
Default is 200.
Note: When you increase this limit, the Metadata Manager Service consumes
additional memory in direct proportion to the value that you specify. Therefore,
Metadata Manager performance can decrease.
SAP_MAX_TABLES Maximum number of tables Metadata Manager retrieves from SAP R/3 when you
configure the components to extract from SAP R/3. SAP R/3 sources contain many
tables. Use this setting to increase Metadata Manager performance when it
retrieves application components, packages, and tables from SAP R/3.
search.allow.constant.score Enables Metadata Manager to rewrite wildcard search queries in a more efficient
form if required. If you enable this property, Metadata Manager does not rank
some wildcard searches correctly. Enable this property if you run wildcard
searches that can match large numbers of search terms, you have increased
search.max.clause.count, and the machine does not have enough memory to
further increase search.max.clause.count. Default is false.
search.max.clause.count Maximum number of search terms that Metadata Manager can use in a contains,
starts with, or wildcard search. For example, if you search for "cat*," Metadata
Manager might create a query to find the terms "category" or "catalog" or "cat." If
the number of search terms exceeds this limit, Metadata Manager cannot run the
search. Default is 1024.
Increase this limit if you run wildcard searches that can produce large numbers of
search terms. If you increase this limit, the Metadata Manager service might
consume large amounts of memory when you run a search.
search.max.docs Maximum number of search results that Metadata Manager displays for a catalog
search. Decrease the default value to improve search performance for Metadata
Manager. Default is 1000.
Note: If you set the value too high for your environment, the following error might
occur:
java.lang.OutOfMemoryError
Session.timeOut Duration after which the cookie expires.
When you log in to Metadata Manager, the Informatica Service Manager creates a
cookie that it uses to authenticate your user name in Metadata Manager. If you
access Metadata Manager again before the cookie expires, the Service Manager
uses the authentication information in the cookie to log you in to Metadata
Manager.
You can set a value from 30 through 43,200 minutes.
262 Appendix B: Metadata Manager Properties Files

Property Description
shortcut.classes Lists the classes that are shortcuts. When you add a shortcut class to this list of
classes, children of that shortcut appear in the Catalog tree.
Show_Synthetic_Dates_In_Basic_Section Displays the synthetic dates in the Basic or Advanced section of the class
properties, in all Metadata Manager perspectives.
Enter one of the following values:
-Y. Displays the synthetic dates in the Basic section.
-N. Displays the synthetic dates in the Advanced section.
After you set this value, you cannot change the display location of these properties
in the user interface.
For a class, Source Creation Date, Source Update Date, MM Creation Date, and
MM Update Date properties are referred as the synthetic date properties.
Default is N.
UseCustomStopWords Determines which list of common words that Metadata Manager ignores in a
search. If you set this property to true, Metadata Manager uses the custom list in
the stopwords.txt file. If you set this property to false, Metadata Manager uses the
default list of common words to ignore in a search. Default is false.
xconnect.custom.failLoadOnErrorCount Maximum number of errors that the Metadata Manager Service can encounter
before the custom resource load fails. Specify any positive integer value.
Default is 18,000.
xconnect.io.print.batch.errors Number of errors that the Metadata Manager Service writes to the in memory
cache and to the mm.log file in one batch when you load a custom resource.
Increase this value to reduce the time it takes for the Metadata Manager Service to
log the errors. Specify any positive integer value.
Default is 100.
Data Lineage Properties
The following table describes the data lineage properties in imm.properties:
Property Description
Lineage.Debug.ShowPerformanceDebugMessages Writes the data lineage performance information to the
mm.log file.
If set to true, writes the following information to the log file:
-Time taken to display the data lineage diagram.
-Number of features and structures with connections in the
diagram.
-Number of objects displayed in the diagram.
Metadata Manager prefixes the name of the object for which
you ran the data lineage analysis to each performance
message.
Default is false.
Lineage.Flow.DefaultDownstreamGenerationLimit Number of generations to display downstream from the
source object in a data lineage diagram.
Lineage.Flow.DefaultNumberOfGenerationsToContinueLineage Number of generations that appear when you use the arrow
buttons to navigate the data lineage diagram.
imm.properties 263

Property Description
Lineage.Flow.DefaultUpstreamGenerationLimit Number of generations to display upstream from the source
object in a data lineage diagram.
Lineage.PreCompute.ElementsInSingleTransaction Maximum number of graph elements, including edges and
vertices, that the Metadata Manager Service can process in a
single transaction during lineage graph creation. When the
number of elements reaches this limit, the Metadata Manager
Service pages some information to disk instead of storing it
in physical memory.
Increase this value to reduce paging for large, complex data
lineage diagrams. If you increase this value, verify that the
machine that stores the graph database files has enough
physical memory to support the increased transaction size.
Default is 50,000.
Lineage.PreCompute.FetchBlockSize Number of records that the Metadata Manager Service
processes in one block when it retrieves data lineage linking
information from the Metadata Manager warehouse to
populate the graph database.
If you increase this value, you might also need to increase
the value of the
Lineage.PreCompute.ElementsInSingleTransaction property
because each block of records will contain additional graph
elements.
Default is 5000.
Lineage.showSynonym Show synonyms for all Oracle resource database tables in
data lineage. You can set this value to true or false. Default
is true.
searchpriorities.xml
You can use the searchpriorities.xml file to specify the priority of the search results.
You can use the elements in the searchpriorities.xml file to create groups of class_ids, class_types, or
favorite_types and assign a priority value to the group. You can assign a priority value to a group, where one
indicates a low priority and ten indicates a high priority. The search results appear based on the priority
assigned to the group.
By default, searchpriorities.xml is in the following directory:
<Informatica installation directory>\services\shared\jars\pc\classes
After you update the searchpriorities.xml file, you must complete the following tasks:
•Restart the Metadata Manager Service.
•Update the index for all resources.
264 Appendix B: Metadata Manager Properties Files

Search Result Configuration
Set the priority of the search results in the searchpriorities.xml file.
The following table describes the elements and attributes in the searchpriorities.xml file:
Elements Attributes Description
search-label Groups related entities. For example, you can specify a search label Table that could include
entities like database tables, views and so on.
You can specify any number of search labels.
name Provides a meaningful and unique name to a group of entities.
priority Assigns a priority between one and ten for a group. One indicates lowest priority and ten
indicates highest priority. The search results appear based on the priority assigned to a group.
entry Provides details of the entities in a search label group.
type Specifies the type of entity. Type can be Class_ID, Class_Type, or Favorite. You can use any
combination of types when you define a group.
value Specifies the value of the search label entry type.
You can specify the class_ID from IMW_Class, Class_Type from IMW_Class, and Favorite from
MM_Favorite tables. You can also include custom classes in any group.
If the searchpriorities.xml file becomes invalid because of your changes, the Metadata Manager Service uses
the default priorities to configure the search results and logs an error message.
Sample searchpriorities.xml File
The following example shows sample entries in a searchpriorities.xml file:
<?xml version="1.0" encoding="UTF-8"?>
<tns:search-labels xmlns:tns="http://www.example.org/searchlabels"
xmlns:xsi="http://www.w3.org/2001/XMLSchema-instance"
xsi:schemaLocation="http://www.example.org/searchlabels searchlabels.xsd ">
<search-label name="FAVORITES" priority="9">
<entry type="FAVORITE" value="Folder" />
<entry type="FAVORITE" value="Shortcut" />
<entry type="FAVORITE" value="SavedSearch" />
</search-label>
<search-label name="BG_TERMS" priority="8">
<entry type="CLASS_ID"
value="com.informatica.businessglossary.BusinessTerm" />
</search-label>
<search-label name="COLUMNS" priority="8">
<entry type="CLASS_ID" value="com.informatica.db2.db2database.DB2Column" />
<entry type="CLASS_ID"
value="com.informatica.netezza.netezzadatabase.NetezzaColumn" />
<entry type="CLASS_ID"
value="com.informatica.oracle.oracledatabase.OracleColumn" />
<entry type="CLASS_TYPE" value="Column" />
</search-label>
<search-label name="TABLES" priority="5">
<entry type="CLASS_ID"
value="com.informatica.db2.db2database.DB2Table" />
searchpriorities.xml 265
<entry type="CLASS_ID" value="com.informatica.erstudio.ERStudioTable" />
<entry type="CLASS_ID" value="com.informatica.erwin.ERwinTable" />
<entry type="CLASS_ID" value="com.Custom_Model.custom.View" />
</search-label>
</tns:search-labels>
Entry Type Examples
You can use a combination of Class_ID, Class_Type, or Favorite entry types to define a group and assign a
priority.
You can search for class IDs associated with PowerCenter that you want to include in a group. For example:
select class_uid from IMW_class where class_id like '%powercenter%'
You can search for columns associated with a database such as Oracle or DB2 that you want to include in a
group. For example:
select class_type from IMW_class where class_type like '%Column%'
You can search for favorite types that you want to include in a group. For example:
select favorite_type from MM_Favorites
You can search for class IDs associated with custom classes. For example:
select * from imw_class where class_id like '%<custom class name>%'
266 Appendix B: Metadata Manager Properties Files

APPENDIX C
Resource Configuration Files
This appendix includes the following topics:
•Resource Configuration Files Overview, 267
•Resource Configuration File Format, 268
•Passwords in Resource Configuration Files, 268
•Secure JDBC Parameters in Resource Configuration Files, 269
•Sample Resource Configuration File, 270
Resource Configuration Files Overview
A resource configuration file is an XML file that contains all configuration properties and values for a
resource. A resource configuration file has the .rcf file name extension.
Note: The information in this appendix applies to resource configurations for packaged and universal
resources. For information about resource configurations for custom resources, see the Metadata Manager
Custom Metadata Integration Guide.
You can export resource configuration files, import resource configuration files, and change resource
properties on the Load tab.
You can also export resource configuration files, import resource configuration files, and change resource
properties through the following mmcmd commands:
getResource
Writes properties for the specified resource to a resource configuration file.
createResource
Creates a resource based on the properties in the specified resource configuration file.
updateResource
Updates a resource based on the properties in the specified resource configuration file.
assignConnection
Assigns connections to other metadata sources based on the properties in the specified resource
configuration file.
assignParameterFile
For a PowerCenter resource, assigns parameter files to PowerCenter workflows based on the properties
in the specified resource configuration file.
267
For more information about the mmcmd command line program, see the Metadata Manager Command
Reference.
Resource Configuration File Format
A resource configuration file is an XML file that contains elements that define the properties and values for a
resource. Not all elements are applicable for all resource types.
A resource configuration file can contain the following elements:
Parameters
Defines configuration properties.
Filters
Defines the components, folders, models, schemas, or universes that you want to load into the Metadata
Manager warehouse.
For PowerCenter resources, you can set the refresh attribute to true to refresh the folders during reload.
Set this attribute value to false if you do not want to refresh the folders during reload. Default is true.
MetadataInfo
Defines the metadata source files or the Microstrategy project source that you want to load into the
Metadata Manager warehouse.
ConnectionAssignment
Defines the connections assigned to other metadata sources to run data lineage analysis across the
metadata sources.
ParameterFileAssignment
For a PowerCenter resource, defines the parameter files to assign to PowerCenter workflows. Includes
the name and fully qualified path for each parameter file. The parameter file must be in this directory. If
the configuration file does not include a path, mmcmd looks for the parameter files in the mmcmd
directory.
You can use a text editor to change values in a resource configuration file. For example, you might need to
change the connect string, user name, and password parameters when you move a file to the production
environment.
Values in the resource configuration file are case-sensitive according to the metadata source system.
Passwords in Resource Configuration Files
Resource configuration information for some resource types includes the resource password. For example,
an Oracle resource configuration includes the password for the user account used to connect to the Oracle
database. You can include or exclude the password in the resource configuration file.
Use the password parameter to determine how to store the password. The password parameter takes an
optional argument, encrypted, that indicates whether the password is encrypted.
Use the password parameter to store the password in the following ways:
268 Appendix C: Resource Configuration Files
Exclude the password from the file.
Omit the password parameter from the file. Alternatively, you can include the password parameter but
omit the parameter value. For example:
<parameter name="password"></parameter>
If you exclude the resource password and the resource type uses a password, Metadata Manager
prompts you for the password when you import the resource configuration.
Include an encrypted password.
Use the mmcmd encrypt command to encrypt the password, and enter the encrypted string as the
parameter value. For example:
<parameter name="password">WP+qtfYwB2KYLXID9jgC+6WHbMOg/94AO8R1nOC1vd0=</parameter>
The encrypt command uses the Informatica default encryption key to encrypt the password. For
maximum security, store the resource configuration file in a secure location.
Include a plain text password.
Enter the plain text password as the parameter value, and set the encrypted attribute to false. For
example:
<parameter name="password" encrypted="false">my_password</parameter>
If you include a plain text password, store the resource configuration file in a secure location.
When you import a resource configuration, you can specify the resource password. The Metadata Manager
Service determines the password value as follows:
•If the resource configuration file includes the password, the Metadata Manager Service creates the
resource with the password from the resource configuration file. If you specify a password during import,
the Metadata Manager Service ignores it.
•If the resource configuration file does not include the password and the resource type requires a
password, you must specify the password during import. If you do not specify the password, the Metadata
Manager Service cannot create the resource.
•If the resource type does not use a password and you specify one during import, the Metadata Manager
Service ignores the password that you specify.
Secure JDBC Parameters in Resource Configuration
Files
Resource configuration information for some database management resource types includes secure JDBC
parameters. You can include or exclude secure JDBC parameters in the resource configuration file.
Resource configuration information for the following database management resource types can include
secure JDBC parameters:
•IBM DB2 for LUW
•IBM Informix
•Microsoft SQL Server
•Netezza
•Oracle
Secure JDBC Parameters in Resource Configuration Files 269
•Sybase ASE
•Teradata
For example, if secure communication is enabled for a Microsoft SQL Server metadata source, you might
specify the truststore and keystore passwords as secure JDBC parameters.
When you export a resource configuration, you can include or exclude resource passwords and secure JDBC
parameters in the resource configuration file. During export, Metadata Manager prompts you to include the
resource password in the resource configuration file.
You have the following choices:
Include the password.
If you include the resource password and the resource uses secure JDBC parameters, Metadata
Manager includes the secure JDBC parameters in the resource configuration file. In the resource
configuration file, the advancedJDBCParameters parameter specifies the secure JDBC parameters. The
parameters appear as an encrypted string.
Exclude the password.
If you exclude the resource password, Metadata Manager also excludes the secure JDBC parameters
from the resource configuration file.
When you import a resource configuration, you can specify secure JDBC parameters. The Metadata Manager
Service determines the values for secure JDBC parameters as follows:
•If the resource configuration file includes secure JDBC parameters, the Metadata Manager Service
creates the resource with the parameter values from the resource configuration file. If you specify secure
JDBC parameters during import, the Metadata Manager Service ignores them.
•If the resource configuration file does not include secure JDBC parameters and the resource requires
them, you must specify the parameters during import. If you do not specify the secure JDBC parameters,
the Metadata Manager Service might not be able to create the resource.
•If the resource configuration file does not include secure JDBC parameters and the resource type can
include them, you can specify secure JDBC parameters during import. The Metadata Manager Service
creates the resource with the parameters that you specify.
•If the resource type does not use JDBC parameters and you specify secure JDBC parameters during
import, the Metadata Manager Service ignores the parameters that you specify.
Sample Resource Configuration File
The following example shows a sample resource configuration file for an Oracle resource:
<?xml version="1.0" encoding="UTF-8"?>
<resource name="Oracle_Sample" resourcetype="Oracle">
<parameters>
<parameter name="databaseType">Oracle</parameter>
<parameter name="jdbcURL">jdbc:informatica:oracle://[host name]:
[port];SID=[sid];EncryptionMethod=SSL;HostNameInCertificate=[host
name];TrustStore=[truststore location];KeyStore=[keystore
location];ValidateServerCertificate=true</parameter>
<parameter name="encoding">MS1252</parameter>
<parameter name="userName">MyUser</parameter>
<parameter name="connectString">MyDBName</parameter>
<parameter name="password">bYXZZ0Ed008mELOEmKjKIg==</parameter>
<parameter
name="advancedJDBCParameters">bxN41kMUjZIzQpKYn5Nempqs2QxrqaPOxuNAa7uEMmhUycRaCuxOFCev3a
p8CHpvNeWQsCpmROuOXyiF8zSzQ==</parameter>
270 Appendix C: Resource Configuration Files
</parameters>
<filters>
<filter>FLOWS_FILES</filter>
</filters>
</resource>
Sample Resource Configuration File 271
APPENDIX D
Glossary
attribute
Characteristic of a metadata object. An attribute is a property defined for a class that applies to all metadata
objects of the class. For example, in a PowerCenter repository, the Session class contains attributes such as
description, last run time, and creation date. An object property is a characteristic about a specific metadata
object.
business glossary
Set of business term definitions. Each term can correspond to metadata objects in the metadata catalog.
business name
Property used to identify a metadata object according to the object's business usage. All classes in
packaged, universal, and custom models have a business name. You can edit the business name property in
Metadata Manager. You cannot edit any other properties of packaged or universal model classes.
business term
Metadata object that represents the business usage of metadata in the metadata catalog. A business term
can include a description, a data steward, an owner, a rule that defines how the object is derived, a status,
the business usage context, and a link to a reference table.
category
A group of related business terms. A business term can be part of zero or more categories. You can create
nested categories. Grouping business terms in categories is optional.
class
Type of object a source repository can contain. Each class contains a set of attributes that describe the
characteristics of objects of the class. Each class can have zero or more relationships to other classes.
Related classes can be within the same model or in a different model. Each class has one related parent
class in the same model. Each class can have zero or more related child classes in the same model.
connection assignment
Part of a resource configuration that specifies how linkable objects in a packaged or universal resource can
be related to matching objects in another packaged or universal resource. Metadata Manager can create
links to corresponding objects in the resources on either side of the connection assignment. These cross-
resource links allow to you run data lineage analysis across metadata sources.
custom resource template
Contains the mapping rules between source custom metadata and the target model classes for a custom
resource. The rules define how to create the custom objects and define the relationships between custom
metadata objects and objects in other resources.
data lineage diagram
Diagram representing the conceptual flow of data from sources to targets. Data lineage analysis includes all
possible paths for the data flow, and it may span multiple resources of different resource types. In data
lineage analysis, boxes or nodes represent objects. Arrows represent flow relationships.
data steward
User or group in an organization who is responsible for the definition of a business term.
data structure
Object that contains fields with data. Examples of data structures include a PowerCenter source instance,
PowerCenter target instance, PowerCenter source qualifier, database table, and database view. See also
field.
deprecated resource
A resource that was valid in a previous version of Metadata Manager, but is not valid in the current version
because the model has changed. You can delete, index, purge metadata for, and view configuration
properties for a deprecated resource. You cannot create, configure, edit, load, or add schedules for a
deprecated resource. To create, configure, edit, load, or add schedules for a deprecated resource, you must
migrate the resource to the current version of Metadata Manager.
endpoint
Object in a metadata source that has a connection to another object in an external metadata source.
Business Intelligence, Data Integration, and Data Modeling resource types contain endpoints.
field
Subset of a data structure that represents a single data item. Examples of fields include database table
columns and view columns, PowerCenter transformation instance ports, and business intelligence report
metrics and attributes.
link
Hyperlink to a document or web page. Any Metadata Manager object can have links. Use links to extend the
information available about a metadata object, category, or business term.
A link can also be a relationship between objects from different resources. To run data lineage analysis
across resources, assign connections from one resource to another or configure linking rules for the
resources. Then, instruct Metadata Manager to create links between matching objects using the connection
assignments or using the linking rules.
linking rule
Expression that Metadata Manager uses to create link relationships between matching objects across
different resources. A linking rule defines the set of possible objects in a source resource, the set of possible
objects in a target resource, and an expression that defines which source and target objects match. Matching
objects should be linked.
Appendix D: Glossary 273
linking rule set
A group of rules that links objects between two resources.
linking rules file
An XML file that contains linking rules, linking rule definitions, or linking rules parameters. Rule set files, rule
set definition files, and rule set parameter files are all types of linking rules files.
logical group
Group of metadata objects of the same class and with the same parent object. Metadata Manager groups
metadata objects into logical groups in the metadata catalog.
metadata catalog
Hierarchical view of the metadata in the Metadata Manager warehouse.
Metadata Exchange
Process that defines how to extract metadata from metadata sources and load the metadata into the
Metadata Manager warehouse. Metadata Manager packages Metadata Exchanges for each of the supported
metadata source types.
Metadata Manager Agent
Windows executable program or service that Metadata Manager uses to access metadata sources and
extract source metadata for data modeling, business intelligence, and JDBC source types.
The Metadata Manager Agent must run on the same machine as the client of the metadata source. Based on
the metadata source client location, you can use the Metadata Manager Agent located on the Metadata
Manager application machine, or you can install the agent on another machine. During Metadata Exchange, a
remote Metadata Manager Agent uses the TCP/IP network protocol to communicate with the Metadata
Manager application.
Metadata Manager application
Web-based application that manages the metadata in the Metadata Manager warehouse. In Informatica
Administrator, create a Metadata Manager Service to access the Metadata Manager application.
Metadata Manager repository
Contains the Metadata Manager warehouse and models. Metadata Manager uses models to define the
classes and relationships that represent the metadata in metadata sources. The models include packaged
models, optional universal models, and optional custom models. The Metadata Manager repository is stored
as a set of tables and views in a relational database.
Metadata Manager Service
An application service that runs the Metadata Manager application in an Informatica domain. It manages
access to metadata in the Metadata Manager warehouse.
Metadata Manager warehouse
Central warehouse repository that stores metadata from different metadata sources.
274 Glossary

metadata source type
Source type from which Metadata Manager can extract metadata. Metadata Manager packages a model and
a Metadata Exchange for each source type. Examples of metadata source types include Business Objects,
PowerCenter, and Oracle databases. Each metadata source has one of the following source domains:
application, business intelligence, data integration, data modeling, or relational.
model
Group of classes, relationships, and attributes that define the metadata that Metadata Manager can extract
from a metadata source. Metadata Manager packages models for supported metadata sources. In addition to
the packaged models, you can create universal models to define metadata sources for some business
intelligence, data integration, data modeling, and database management metadata sources for which
Metadata Manager does not package a model. You can also create custom models to define custom
metadata.
object
Metadata element from a source repository. An instance of a class. Examples of objects include a
PowerCenter mapping, a business intelligence report, or a database column.
Object Relationships Wizard
Creates associations between matching objects in a custom resource and objects in another resource. You
define the classes and attributes to match.
owner (of a business term)
User or group in an organization who owns the definition of data and metadata.
permission
The level of access a user has to a metadata object. Even if a user has the privilege to perform certain
actions, the user may also require permission to perform the action on a particular object. You define object
permissions in Metadata Manager. An object can inherit permissions from the containing folder or resource.
PowerCenter Integration Service
A PowerCenter application service that runs the Metadata Exchange processes. The processes are data
integration workflows that load source metadata into the Metadata Manager warehouse. The workflows are
stored in the PowerCenter repository associated with the PowerCenter Integration Service. When you create
a Metadata Manager Service, you configure the associated PowerCenter Integration Service.
PowerCenter repository
Contains the PowerCenter definitions of the Metadata Exchanges, including sources, targets, sessions, and
workflows. The associated PowerCenter Integration Service uses the definitions to load source metadata into
the Metadata Manager warehouse.
PowerCenter Repository Service
An application service in an Informatica domain that manages the PowerCenter repository. The PowerCenter
repository contains the metadata objects for the Metadata Exchange processes used by Metadata Manager.
privilege
Determines the actions that users can perform in Metadata Manager. Use Informatica Administrator to assign
privileges to users and groups for the Metadata Manager Service. See also permission on page 275.
Appendix D: Glossary 275

relationship
Association between two classes or two specific metadata objects.
repository folder
Metadata object that contains other metadata objects. Folders appear under a resource or under another
folder in the metadata catalog.
resource
Object that represents a source repository in Metadata Manager. Each resource configuration contains
properties required to connect to the source repository, extract metadata from the source repository, and load
the extracted metadata into the resource. A resource configuration also contains the connection assignments
used to link objects in the resource to objects in other resources.
resource load
Process of extracting metadata from a metadata source system or source file and writing the metadata to the
Metadata Manager warehouse. A resource load can include linking and indexing tasks. You can schedule a
resource load to run at predefined intervals.
rule-based links
Links that Metadata Manager creates between matching objects across metadata sources based on rules
that you configure to link the resources. You can configure rule-based links between a custom resource and
another custom, packaged, universal, or business glossary resource. You can also configure rule-based links
between a business glossary resource and a packaged or universal resource.
rule set definition file
An XML file that defines a linking rule set for a pair of models. A rule set definition file takes at least one rule
set parameter file. The parameter file specifies the pair of resources to which to apply the rule set.
rule set file
An XML file that defines a linking rule set for a pair of resources.
rule set parameter file
An XML file that specifies the resources to which to apply a rule set definition. The parameter file also
contains parameter values for resource-specific attributes such as connection names and table names.
shortcut
Pointer to a metadata object in the metadata catalog. You can create and organize shortcuts to commonly
accessed objects in Metadata Manager.
source repository
Contains metadata objects that Metadata Manager extracts and loads into the Metadata Manager warehouse.
Examples of source repositories include PowerCenter repositories, Business Objects repositories, and Oracle
databases. See also metadata source type on page 275.
task
An object that moves data from one data structure to another. Examples of tasks include PowerCenter
session instances and database views.
276 Glossary

template
See custom resource template on page 273.
transformation
Object that determines how data flows between data structures. Transformations can be reusable or non-
reusable. An example of a reusable transformation is a PowerCenter mapping. An example of a non-reusable
transformation is a database view.
XConnect
The code and artifacts that Metadata Manager uses to extract metadata from a metadata source. The
XConnect includes a model that represents the metadata source. Metadata Manager packages an XConnect
and model for many types of application, business glossary, business intelligence, data integration, data
modeling, and database management sources. You can create custom or universal XConnects to extract
metadata from other metadata source types.
Appendix D: Glossary 277

Index
A
activity log
resource loads 240
alias physical table
for Oracle Business Intelligence Enterprise Edition 70
alternate keys
definition for ERwin 138
associations
for data modeling tool views 145
for Informix tables and constraints 173
for Informix tables and triggers 173
for Informix views and synonyms 173
for Teradata tables and triggers 201
B
Business Glossary resources
configuring metadata source 34
configuring source connection 34
connection properties 35
creating 34
objects extracted 36
objects not extracted 36
overview 33
business intelligence resources
incremental loading 81
Business Objects
configuring 38
connection assignments 218
creating resource 40
exporting universes and documents 38
extracted objects 44
extracting from locked universes 40
extracting from reports 40
Metadata Manager Agent requirement 39
overview 38
reference information 43
required clients and servers 40
C
case sensitivity
for PowerCenter resources 121
source repository metadata 230
Cloudera Navigator
configuring source connection 148
connection properties 149
creating resource 148
deleted entities 156
entity relationships 155
entity types extracted 147
entity types not extracted 147
filtering query templates 150
Cloudera Navigator (continued)
finding Cloudera identity 154
heap size configuration 148
incremental loading 151
lineage diagram differences 156
linking for entities 157
organization of entities 153
overview 147
reference information 153
search queries 151
search query rules and guidelines 152
searching for entities 154
Cognos
configuring 46
configuring source connection 47
connection assignments 218
creating resource 47
deprecated source versions 47
displaying metadata 52
extracted objects 51
large configuration 47
overview 46
permissions 47
reference information 51
Repository Subset property 47
Command tasks
PowerCenter resource 121
CommandLineTask
PowerCenter resource 121
Component Inclusion List
configuring for SAP 31
configuring search results
searchpriorities.xml 265
CONNECT role
Oracle 187
connection assignments
automatic 218, 220
business intelligence resource types 218
configuring 218
data integration resource types 218
data modeling resource types 218
example 219
manual 219, 221
properties 220
rules and guidelines 231
cookie
configuring timeout 258
created during login 258
CSV file
updating 82, 85, 143
custom metadata
exporting metadata source files 84
log file event type 239
purging 223
Custom Metadata Configurator
description 17
278

custom resource
adding metadata files 82, 85, 143
creating 84
template name 84
updating metadata source files 82, 85, 143
custom resources
template name 85
custom source
configuring metadata files 84
D
data lineage
configuring properties 263
for database management resources 203
inline views 121, 203
number of generations to display 263
performance messages 263
SAP 32
scope for PowerCenter 120
data modeling tools
datatypes 144
extracted objects 146
multiple models 146
name and description properties 145
reference information 144
relationships 145
specifying owners of objects 145
validation rules 145, 146
database heap size
IBM DB2 for LUW 158
Database Instance Name
parameter for Teradata 201
database management resources
data lineage 203
databases
loading schemas 202
Schema Inclusion list 202
datatypes
for columns using domains 144
for data modeling tools 144
for Teradata view columns 201
domains
datatypes for columns 144
for ERwin 137
drivers
installing Netezza JDBC 183
E
element IDs
for Informix 173
email
configuring default sender address 260
configuring non-reply address 260
Embarcadero ERStudio
exporting models 123
metadata files 123
Metadata Manager Agent requirement 123
overview 123
reference information 144
Errors view
Load Details 234
ERStudio
configuring metadata files 124
connection assignments 218
ERStudio (continued)
creating resource 124
objects extracted 126
reference information 126
ERwin
alternate keys 138
configuring 130
configuring metadata files 130
connection assignments 218
creating resource 130
data lineage 139
deprecated source versions 130
domain hierarchies 138
domains 137
Index UDPs 138
inversion keys 138
metadata file requirements 130
objects extracted 139
overview 129
reference information 137, 144
relationships 138
system-defined domains 137
event types
in Metadata Manager Agent log files 238
in Metadata Manager service log files 239
example
plug-in definition file 209
plug-in structure 212
expressions
for Microstrategy 64
extracted objects
name limitation for IBM DB2 z/OS 168
F
FATAL
log file event type 238
flat files
for PowerCenter resources 121
full control
permission 245
functions
extracted for IBM DB2 z/OS 168
G
groups
configuring 245
configuring permissions 246
H
hierarchies
for ERwin domains 138
host names
Teradata servers 201
I
IBM DB2 for LUW
configuring 158
configuring source connection 160
creating resource 160
database heap size 158
Index 279

IBM DB2 for LUW (continued)
overview 158
permissions 159
reference information 163
IBM DB2 z/OS
configuring 164
configuring source connection 166
creating resource 166
data lineage 203
definition of schemas and qualifiers 168
extracted functions 168
installing PowerExchange 164
object name limitation for extracted objects 168
overview 164
reference information 168
IBM Informix
configuring 169
ODBC connection 170
overview 169
permissions 169
IME files
description 19
IME views
description 19
imm.properties
data lineage properties 263
Metadata Manager application properties 260
Metadata Manager email properties 260
Metadata Manager properties file 260
incremenatl loading
data source changes 81
exception scenarios 81
overview 81
index
definition 224
during load process 229
optimizing 225
task details 233
Index UDPs
for ERwin 138
INFO
log file event type 238
Informatica Metadata Extraction interface
description 18
Metadata Exchanges 19
Informatica Platform resources
application archive file connection properties 91
Command Line Utilities installation 91
compiled mappings 95
connection assignments 218
creating 88
Data Integration Service connection properties 90
data lineage restrictions 97
Data Quality transformations 96
dynamic mappings 94
folders in version 10.x 99
mappings in version 10.x 95, 99
mappings that cannot be run 97
metadata source configuration 88
objects extracted 94
objects in multiple applications 99
objects not extracted 94
overview 87
parameter set example 92
parameter set rules 93
parameters in version 10.x 92
parameters in version 9.x 93
physical data objects in version 10.x 99
Informatica Platform resources (continued)
port-to-port lineage 97
reference information 94
resource file connection properties 91
unsupported transformations 94
Informix
configuring source connection 171
creating resource 171
data lineage 203
element IDs 173
objects extracted 172
reference information 172
table-to-constraint associations 173
table-to-trigger associations 173
trigger definitions 174
view definitions 174
view-to-synonym associations 173
inline views
data lineage 121, 203
Integration Service
use with Metadata Manager 17
inversion keys
definition for ERwin 138
J
JDBC
configuring 174
configuring source connection 175
creating resource 175
overview 174
reference information 177
JDBC drivers
installing Netezza 183
K
keys
ERwin alternate keys 138
ERwin inversion keys 138
keystore
generating for Metadata Manager Agent 26
L
library files
Sybase ASE 194
Lineage
log file event type 239
linking
concurrently 231
during load process 229
rules and guidelines 231
task details 233
linking resources
monitoring 232
linking rules
files 222
uploading to resources 221
linking rules files
description 222
links
creating 230
missing 236
status 231
280 Index

Links view
Load Details 236
Load details
log file 237
Load Details
Errors view 234
Links view 236
Log view 233
Objects view 233
Sessions view 234
Load Monitor
using 241
load queue
configuring 229
Load tab
components 20
configuring PowerCenter parameter files 116
connection assignments 218
loading resources 228, 229
overview 20
purging metadata 223
refreshing resource list 224
updating the search index 224
loading
PowerCenter folders 115
Teradata schemas 202
loading business intelligence resources
incrematal loading 81
loading resources
activity log 240
load queue 229
logs and log files 237
monitoring 232
overview 229
troubleshooting 240
log files
Metadata Manager Agent 238
Metadata Manager Agent event types 238
Metadata Manager Service 239
Metadata Manager Service event types 239
resource loads 237
Log view
Load Details 233
M
mapplets
data lineage display 122
Metadata access
log file event type 239
metadata catalog
configuring permissions 246
Metadata Exchanges
description 19
Informatica Metadata Extraction interface 19
metadata files
adding to a resource 82, 85, 143
requirements for custom sources 84
requirements for ERwin 130
universal resources 216
updating 82, 85, 143
metadata integration process
description 18
Metadata Manager
application description 16
architecture 15
configuration 21
Metadata Manager (continued)
configuring application properties 260
configuring email properties 260
interface 20
Load tab 20
Permissions tab 20
properties file 260, 264
working with resources 19
Metadata Manager Agent
description 16
generating keystore 26
installing 22, 71
log file 238
Metadata Manager repository
description 17
migration overview 255
migration steps 255, 256
Metadata Manager Service
configuring 21
description 16
log file 239
log file event type 239
Metadata Manager warehouse
loading metadata into 229
purging 223
metadata objects
configuring permissions 246
displaying for Microstrategy 63
purging 223
versioning for PowerCenter 111
metadata sources
description 18
list of 14
Microsoft Analysis and Reporting Services
configuring 53
creating resource 54
data lineage 57
Internet Information Services requirement 53
Metadata Manager Agent requirement 53
objects extracted 56
overview 52
permissions 53
reference information 56
Microsoft SQL Server
configuring 178
configuring source connection 179
creating resource 179
data lineage 203
extracting extended properties 182
objects extracted 182
objects not extracted 182
overview 178
permissions 178
UNIX environment variables 179
Microstrategy
connection assignments 218
creating resource 59
displaying objects 63
expressions 64
extracted objects 62
Metadata Manager Agent requirement 59
multiple projects 58
overview 58
project user account requirements 58
reference information 62
reporting metadata extracted 62
missing links
details 236
Index 281

mm_agent.log
Metadata Manager Agent 238
mm.log
Metadata Manager log file 239
models
exporting packaged models 251
exporting universal models 251
for data modeling tools 146
importing packaged models 251
importing universal models 251
migrating packaged models 250
migrating universal models 250
monitoring
linking resources 232
log files 237
resource loads 232
N
Netezza
configuring 183
configuring permissions 183
configuring source connection 184
creating resource 184
data lineage 203
installing the JDBC driver 183
installing the ODBC driver 184
objects extracted 186
overview 183
reference information 186
NLS_LENGTH_SEMANTICS parameter
Oracle 187
no access
permission 245
O
objects
extracted for Business Objects 44
extracted for Cognos 51
extracted for data modeling tools 146
extracted for Informix 172
extracted for Microsoft SQL Server 182
extracted for Microstrategy 62
extracted for Netezza 186
extracted for Oracle 192
extracted for Oracle Business Intelligence Enterprise Edition 68
extracted for Sybase ASE 196
extracted for Tableau 80
extracted for Teradata 200
owners for data modeling tools 145
Objects view
Load Details 233
ODBC connection
IBM Informix 170
ODBC driver
installing for Netezza 184
Oracle
configuration with Advanced Security Option 188
configuring source connection 189
creating resource 189
data lineage 203
incremental loading 192
objects extracted 192
overview 186
permissions 187
Oracle (continued)
Public schema 193
public synonyms 193
reference information 192
showing synonyms 263
snapshots 193
Oracle Business Intelligence Enterprise Edition
alias physical table 70
configuring metadata source file 66
converting RPD file 64
creating resource 66
enabling web services 64
objects extracted 68
overview 64
reference information 68
P
parameter files
assigning to PowerCenter workflows 119
uploading 118
parameters
Component Inclusion List 31
Folder Inclusion List 115
Schema Inclusion List 202
Source Incremental Extract Window (in Days) 116
passwords
changing 259
resource configuration files 268
permissions
configuring 246
configuring for Netezza 183
description 245
full control 245
IBM DB2 for LUW 159
IBM Informix 169
metadata objects 246
Microsoft SQL Server 178
no access 245
Oracle 187
overview 244
PowerCenter 111
read 245
resources 246
rules and guidelines 245
Sybase ASE 194
Teradata 197
users and groups 246
write 245
Permissions tab
components 20
overview 20
PowerCenter
assigning parameter files to workflows 119
case sensitivity 121
Command tasks 121
configuring 110
configuring source connection 112
connection assignments 218
connection properties 113
creating resource 112
data lineage display of mapplets 122
filtered and rejected records 120
flat files 121
IBM DB2 heap size 110
incremental extracts 119
loading folders 115
282 Index

PowerCenter (continued)
metadata object properties 120
object versions 111
Oracle extended statistics 110
overview 110
parameter file requirements 117
permissions 111
reference information 119
scope for data lineage 120
Source Incremental Extract Window (in Days) 116
unique constraint errors 122
uploading parameter files 118
versioned repository objects 110
PowerCenter parameter files
configuring 116
PowerCenter repository
use with Metadata Manager 17
PowerCenter Repository Service
use with Metadata Manager 17
PowerExchange
installing for IBM DB2 z/OS 164
privileges
configuring 245
projects
multiple for Microstrategy 58
properties
for PowerCenter metadata objects 120
names and descriptions for data modeling tools 145
properties file
imm.properties 260
searchpriorities.xml 264
Public schema
for Oracle database 193
public synonyms
for Oracle database 193
Q
qualifiers
definition for IBM DB2 z/OS 168
R
read
permission 245
records
rejected and filtered by PowerCenter resource 120
relationships
for data modeling tools 145
for ERwin 138
Repository Subset property
Cognos 47
requirements
for IBM DB2 z/OS 164
for Microstrategy project user account 58
for Netezza 183
resource
load task details 233
resource configuration files
exporting 252
importing 252
migrating for packaged resources 251
migrating for universal resources 251
overview 267
passwords 268
secure JDBC parameters 269
resource metadata
exporting for packaged resources 254
exporting for universal resources 254
importing for packaged resources 254
importing for universal resources 254
migrating for packaged resources 253
migrating for universal resources 253
resource migration
copying the plug-in 250
exporting a model 251
exporting a resource configuration 252
exporting resource metadata 254
importing a model 251
importing a resource configuration 252
importing resource metadata 254
loading the target resource 253
migrating resource metadata 253
migrating the model 250
migrating the resource configuration 251
overview 248
packaged resources 248
steps 249
universal resources 248
resources
adding metadata files 82, 85, 143
configuration files 267
configuring permissions 246
creating custom 84
creating for Business Glossary 34
creating for Business Objects 40
creating for Cloudera Navigator 148
creating for Cognos 47
creating for ERStudio 124
creating for ERwin 130
creating for IBM DB2 for LUW 160
creating for IBM DB2 z/OS 166
creating for Informatica Platform 88
creating for Informix 171
creating for JDBC 175
creating for Microsoft Analysis and Reporting Services 54
creating for Microsoft SQL Server 179
creating for Microstrategy 59
creating for Netezza 184
creating for Oracle 189
creating for PowerCenter 112
creating for SAP 29
creating for SAP Business Warehouse 72
creating for SAP PowerDesigner 140
creating for SQL Server Integration Services 102
creating for Sybase ASE 195
creating for Tableau 78
creating for Teradata 198
creating universal 215
description 18
linking 230
list of 14
loading 229
logs and log files 237
migrating packaged resources 248
migrating universal resources 248
monitoring loads 232
refreshing list on Load tab 224
resuming a failed load 230
scheduling loads 241
troubleshooting a failed load 240
roles
configuring 245
Index 283

RPD file
Oracle Business Intelligence Enterprise Edition 64
rule set
uploading to resources 221
rule-based linking
description 221
rules and guidelines 231
S
sample file
searchpriorities.xml 265
SAP
configuring 28
configuring Component Inclusion List 31
configuring maximum tables 260
creating resource 29
data lineage 32
extracted objects 32
installing transports 28
overview 28
reference information 31
user authorization profile 29
SAP Business Warehouse
creating resource 72
SAP PowerDesigner
connection assignments 218
creating resource 140
exporting models 140
metadata files 140
Metadata Manager Agent requirement 140
overview 140
reference information 143, 144
schedules
attaching to a resource 243
creating 242
editing 243
resource loads 241
schemas
definition for IBM DB2 z/OS 168
search
configuring index 224
stopwords.txt file 226
words to ignore 226
search results
configuring 265
searchpriorities.xml
configuring search results 265
Metadata Manager properties file 264
sample file 265
security
managing 244
SELECT_CATALOG_ROLE
Oracle 187
sessions
monitoring 241
statistics 234
Sessions view
Load Details 234
snapshots
for Oracle database 193
Source Incremental Extract Window (in Days)
PowerCenter 116
SQL Server Integration Services
configuring 100
configuring permissions 101
configuring source connection 102
SQL Server Integration Services (continued)
creating resources 102
database availability 101
expressions in multiple data flows 110
extracting from protected packages 100
extraction rules for destinations 108
extraction rules for sources 108
extraction rules for transformations 109
file configuration properties 103
Metadata Manager Agent 101
objects extracted 105
objects in the metadata catalog 107
objects not extracted 107
overview 99
package summary 108
repository configuration properties 104
Script component handling 109
variable values file 101
status
link 231
stopwords.txt file
customizing 226
UseCustomStopWords property 260
Sybase ASE
configuring source connection 195
creating resource 195
data lineage 203
library files 194
objects extracted 196
overview 193
permissions 194
reference information 196
system domains
for ERwin 137
T
Tableau
configuring 77
creating resource 78
data lineage restrictions 81
extracted objects 80
Metadata Manager Agent requirement 77
overview 77
permissions 77
reference information 80
verifying Tableau Server 78
Teradata
configuring 197
configuring source connection 198
creating resource 198
data lineage 203
databases and users 201
incremental loading 200
index and constraint IDs 202
installing the JDBC driver 198
JAR files 198
limited metadata load 202
objects extracted 200
overview 197
permissions 197
reference information 200
server host names 201
table-to-trigger associations 201
trigger properties 201
view column datatypes 201
284 Index

transports
installing 28
triggers
definitions for Informix 174
properties for Teradata 201
troubleshooting
links 231
resource loads 240
U
UDPs
for ERwin indexes 138
unique constraint errors
PowerCenter 122
Universal Connectivity Framework
overview 204
universal resources
creating 215
creating a model from a plug-in 212
deleting the XConnect 213
icon guidelines 211
icons 210
image mapping 209
metadata source configuration 213
metadata source files 216
metadata source name 207
migrating the plug-in 250
model creation steps 206
overview 204
plug-in definition file creation 208
plug-in definition file elements 208
plug-in definition file example 209
plug-in generation 211
plug-in structure 211
plug-in structure example 212
resource creation 213
sample plug-in definition file 208
supported metadata sources 205
Universal Connectivity Framework 204
universal resources (continued)
updating the XConnect 213
XConnectl creation steps 206
universes
exporting to Business Objects repository 38
users
configuring 245
configuring permissions 246
V
validation rules
for data modeling tools 145, 146
view associations
for data modeling tools 145
views
definitions for Informix 174
W
WARN
log file event type 238
web services
Oracle Business Intelligence Enterprise Edition 64
workflows
description 18
monitoring 241
statistics 234
use by Metadata Manager 18
write
permission 245
X
XML file
Oracle Business Intelligence Enterprise Edition 64
Index 285
