Inkscape Beginnerâs Guide Beginner's Hiitola, Bethany 4984
User Manual:
Open the PDF directly: View PDF ![]() .
.
Page Count: 298 [warning: Documents this large are best viewed by clicking the View PDF Link!]
- Cover
- Copyright
- Credits
- About the Author
- About the Reviewers
- www.PacktPub.com
- Table of Contents
- Preface
- Chapter 1: Getting Started with Vector Graphics
- Chapter 2: Installing and Opening Inkscape
- Chapter 3: How to Manage Files
- Creating new files
- Time for action – creating a new CD cover
- Custom document dimensions
- Time for action – creating a new custom file size for a postcard
- Saving Inkscape files
- Time for action – saving an Inkscape SVG
- Time for action – exporting to PNG
- Creating a customized default document
- Time for action – creating a new default document
- How to structure project files
- Time for action – exporting a batch of images
- Importing non-native Inkscape files
- Time for action – importing a PDF into Inkscape
- Embedding and linking image files
- Time for action – embedding a logo into your design
- Time for action – linking a photograph into a brochure design
- Summary
- Chapter 4: Creating your First Graphics
- Paths
- Creating your first vector graphic
- Time for action – opening a new document
- Time for action – creating a star
- Time for action – saving your graphic
- Time for action – creating the Ellipse
- Time for action – making an arc
- Time for action – combining shapes
- Time for action – creating a freehand object
- Using grids and guidelines
- Time for action – viewing the Grid
- Time for action – making guides
- Summary
- Chapter 5: How to Work with Layers
- Defining layers and how to create them
- Time for action – creating a layer
- Using Layers in an example drawing
- Time for action – using Layers in web design
- Locking layers
- Time for action – locking a layer
- Hiding layers
- Time for action – hiding layers
- Duplicating layers
- Time for action – duplicating layers
- Arranging layers
- Time for action – moving layers
- Time for action – nesting layers
- Renaming layers
- Time for action – renaming a layer
- Deleting layers
- Time for action – deleting a layer
- Blend mode
- Time for action – using Blend mode
- Summary
- Chapter 6: Building Objects
- Working with objects
- Time for action – creating a simple object
- Fill and Stroke
- Time for action – using the Fill and Stroke dialog
- Time for action – using the color palette
- Time for action – using the dropper tool
- Grouping
- Time for action – grouping objects
- Clipping and masking
- Time for action – clipping objects
- Time for action – masking objects
- Summary
- Chapter 7: Using Paths
- Chapter 8: How to Style Text
- Text and Font editor
- Time for action – opening and using the Text and Font editor
- Time for action – kerning text
- Using paths and text
- Time for action – using a path for text
- Time for action – placing text in a closed shape
- Spell check and find/replace
- Time for action – performing a find and replace
- Text effects
- Time for action – using text effects
- Creating text reflections
- Time for action – creating a reflection
- Summary
- Chapter 9: Using Filters
- Chapter 10: Extensions in Inkscape
- Chapter 11: Working with Images
- Importing from the Open Clip Art Library (Linux and Mac users)
- Time for action – using the Open Clip Art Library (Mac users only)
- Basics about photo manipulation
- Time for action – blurring the background of a photograph
- Converting raster logos to vector-based logos
- Time for action – converting a logo to a vector-based image
- Summary
- Chapter 12: Using the XML Editor
- Appendix A: Where to Find More Information
- Appendix B: Keyboard Shortcuts
- Appendix C: Glossary of Terms
- Appendix D: Pop Quiz Answers
- Index

Inkscape
Beginner's Guide
Create aracve layout designs, logos, brochures, icons,
and more using the Inkscape vector graphics editor
Bethany Hiitola
BIRMINGHAM - MUMBAI
Inkscape
Beginner's Guide
Copyright © 2012 Packt Publishing
All rights reserved. No part of this book may be reproduced, stored in a retrieval system,
or transmied in any form or by any means, without the prior wrien permission of the
publisher, except in the case of brief quotaons embedded in crical arcles or reviews.
Every eort has been made in the preparaon of this book to ensure the accuracy of the
informaon presented. However, the informaon contained in this book is sold without
warranty, either express or implied. Neither the author, nor Packt Publishing, and its dealers
and distributors will be held liable for any damages caused or alleged to be caused directly
or indirectly by this book.
Packt Publishing has endeavored to provide trademark informaon about all of the
companies and products menoned in this book by the appropriate use of capitals.
However, Packt Publishing cannot guarantee the accuracy of this informaon.
First published: May 2012
Producon Reference: 1170512
Published by Packt Publishing Ltd.
Livery Place
35 Livery Street
Birmingham B3 2PB, UK.
ISBN 978-1-84951-720-1
www.packtpub.com
Cover Image by Asher Wishkerman (a.wishkerman@mpic.de)

Credits
Author
Bethany Hiitola
Reviewers
Mark Bystry
Jose Olarte III
Richard Querin
Sylvia Slokker
Acquision Editor
Sarah Cullington
Lead Technical Editor
Hithesh Uchil
Technical Editors
Ankita Shashi
Manali Mehta
Manasi Poonthoam
Copy Editors
Leonard D'Silva
Laxmi Subramanian
Project Coordinator
Joel Goveya
Proofreader
Chris Brown
Indexer
Monica Ajmera Mehta
Graphics
Manu Joseph
Valenna D'Souza
Producon Coordinator
Melwyn D'Sa
Cover Work
Melwyn D'Sa

About the Author
Bethany Hiitola is a working writer. She has worked as a technical writer and mulmedia
developer for over 12 years. She spends the rest of her me as a wife, mother, and caretaker
to pets. She has wrien more user manuals than she can count, essays, short stories,
academic papers, press releases, and feature arcles. More details about her wring and life
are at her website: www.bethanyhiitola.com
Without you Ma, this book wouldn't have been possible. You are
my everything.

About the Reviewers
Mark Bystry is a design engineer by trade. He is also an open source soware enthusiast
with a penchant for graphic art. Drawing and illustraon, 3D modeling, desktop publishing,
photography, and videography are just a few of his many interests. Those things also spill
into his daily work dues. Mark has come to rely on Inkscape as well as several other leading
open source applicaons to achieve a full range of graphic tasks.
Several years ago Mark teamed up with his online pal, Richard Querin, when they recognized
a void within the Inkscape user community, specically the lack of educaonal informaon
dedicated to the use of Inkscape. Their vision was of a series of instruconal videos geared
towards beginners.
Since that me Richard and Mark have made over one hundred videos demonstrang various
funcons within the applicaon. Though their video series has tapered o, mainly due to their
insaable need to explore all that the technological world has to oer, they sll remain avid
users of Inkscape and connue to guide novice users in the achievement of their goals.
Jose Olarte III is a graphic designer and photographer from Baguio City, Philippines. He
specializes in: user interface design for web, mobile and desktop plaorms; print design for
magazines and other publicaons; logo and icon design. When he's not busy pushing pixels
and stretching ems, he gets his social x by tweeng away his thoughts: twitter.com/
brownspank
I would like to thank my wife Vanessa for pung up with my extended
hours and sharing my passion for work, without which I wouldn't have the
strength and movaon to move forward with my creave endeavors.

Richard Querin is a praccing structural engineer with a passion for graphic design,
photography, and other creave pursuits. He has contributed graphic design work to several
dierent free and open source projects including websites, mobile and desktop applicaons,
conference graphics, and print adversements. He has also done numerous Inkscape video
tutorials as a co-contributor to the screencasters.heathenx.org website.
I would like to thank my family for pung up with my creave ancs and
providing me the me and space to take on creave pursuits such as
these. Thanks also go to my friend and Inkscape compatriot Mark Bystry
for his help throughout the years and to Joel Goveya for his paence when
it came to geng my reviews back. And nally, a special thanks to my
wonderful daughter Emily for making fatherhood an absolute delight.
Sylvia Slokker is a graphics freelancer and IT professional. She started her career in web
design and development in 2001, abandoning the career path of process engineer aer
almost 10 years.
Sylvia moved connents to chase a dream and currently works as a web developer in
Australia. She has been creang vector designs since 1994, using both commercial as
well as open source soware. Nowadays, she uses Inkscape almost exclusively for all
her vector work. Sylvia writes tutorials for the web under the nickname Syllie and runs:
verysimpledesigns.com as a tutorial site for the novice Inkscape arst.

www.PacktPub.com
Support les, eBooks, discount offers and more
You might want to visit www.PacktPub.com for support les and downloads related to
your book.
Did you know that Packt oers eBook versions of every book published, with PDF and ePub
les available? You can upgrade to the eBook version at www.PacktPub.com and as a print
book customer, you are entled to a discount on the eBook copy. Get in touch with us at
service@packtpub.com for more details.
At www.PacktPub.com, you can also read a collecon of free technical arcles, sign up
for a range of free newsleers and receive exclusive discounts and oers on Packt books
and eBooks.
http://PacktLib.PacktPub.com
Do you need instant soluons to your IT quesons? PacktLib is Packt's online digital book
library. Here, you can access, read and search across Packt's enre library of books.
Why Subscribe?
Fully searchable across every book published by Packt
Copy and paste, print and bookmark content
On demand and accessible via web browser
Free Access for Packt account holders
If you have an account with Packt at www.PacktPub.com, you can use this to access
PacktLib today and view nine enrely free books. Simply use your login credenals for
immediate access.

Table of Contents
Preface 1
Chapter 1: Geng Started with Vector Graphics 7
What are vector graphics? 8
Programs that use vector graphics 8
Vector formats 9
Scalable Vector Graphics 9
Advantages of an open-standard vector format 10
Addional advantages of SVG vector images over proprietary formats 10
Disadvantages of vector graphics over non-vector formats 11
Determining when to use vector or rasterized graphics 11
Time for acon – basic design 12
Time for acon – vector versus rasterized images 13
Time for acon – building brochure les 14
Summary 16
Chapter 2: Installing and Opening Inkscape 17
Inkscape's features 17
Installing Inkscape 18
Time for acon – downloading Inkscape 19
Troubleshoong installaon 20
The basics of the soware 21
Time for acon – geng started with Inkscape 22
Understanding a new document 28
Time for acon – learning more about the main screen 28
Summary 34
Chapter 3: How to Manage Files 35
Creang new les 35
Using predened-sized document dimensions 36

Table of Contents
[ ii ]
Time for acon – creang a new CD cover 37
Custom document dimensions 39
Time for acon – creang a new custom le size for a postcard 39
Saving Inkscape les 44
Saving in Inkscape SVG 44
Time for acon – saving an Inkscape SVG 45
Exporng les 47
Time for acon – exporng to PNG 47
Creang a customized default document 49
Time for acon – creang a new default document 50
How to structure project les 51
Managing mulple le projects 52
Time for acon – exporng a batch of images 52
Renaming object IDs 54
Imporng non-nave Inkscape les 55
Time for acon – imporng a PDF into Inkscape 56
Embedding and linking image les 58
Embedding les in Inkscape 59
Time for acon – embedding a logo into your design 59
Linking external les in Inkscape 61
Time for acon – linking a photograph into a brochure design 61
Summary 63
Chapter 4: Creang your First Graphics 65
Paths 65
Creang your rst vector graphic 67
Creang a polygon 67
Time for acon – opening a new document 67
Time for acon – creang a star 69
Time for acon – saving your graphic 72
Creang ellipses and arcs 74
Time for acon – creang the Ellipse 74
Time for acon – making an arc 75
Complex Shapes 78
Time for acon – combining shapes 78
Freehand objects (Paths) 82
Time for acon – creang a freehand object 82
Using grids and guidelines 84
Time for acon – viewing the Grid 84
Time for acon – making guides 87
Summary 88

Table of Contents
[ iii ]
Chapter 5: How to Work with Layers 89
Dening layers and how to create them 90
Time for acon – creang a layer 91
Using Layers in an example drawing 93
Time for acon – using Layers in web design 93
Locking layers 98
Time for acon – locking a layer 98
Hiding layers 99
Time for acon – hiding layers 100
Duplicang layers 104
Time for acon – duplicang layers 104
Arranging layers 105
Time for acon – moving layers 105
Time for acon – nesng layers 108
Renaming layers 109
Time for acon – renaming a layer 109
Deleng layers 110
Time for acon – deleng a layer 110
Blend mode 112
Time for acon – using Blend mode 112
Summary 114
Chapter 6: Building Objects 115
Working with objects 115
Time for acon – creang a simple object 116
Fill and Stroke 121
Fill and Stroke dialog 121
Time for acon – using the Fill and Stroke dialog 121
Color palee bar 126
Time for acon – using the color palee 126
Dropper 127
Time for acon – using the dropper tool 128
Grouping 129
Time for acon – grouping objects 129
Clipping and masking 133
Time for acon – clipping objects 133
Time for acon – masking objects 142
Summary 144

Table of Contents
[ iv ]
Chapter 7: Using Paths 145
Working with paths 145
Time for acon – using the Bezier tool 146
Transforming objects into paths 155
Stroke to paths 155
Time for acon – creang spiros and swirls 155
Object to Path 163
Time for acon – Object to Path 164
Path opons 166
Time for acon – creang an icon 167
Summary 170
Chapter 8: How to Style Text 171
Text and Font editor 171
Time for acon – opening and using the Text and Font editor 172
Kerning 173
Time for acon – kerning text 174
Text styling keyboard shortcuts 176
Using paths and text 177
Time for acon – using a path for text 177
Placing text within a closed shape 179
Time for acon – placing text in a closed shape 180
Spell check and nd/replace 181
Time for acon – performing a nd and replace 182
Text eects 182
Time for acon – using text eects 183
Creang text reecons 184
Time for acon – creang a reecon 185
Summary 189
Chapter 9: Using Filters 191
What are lters? 191
Using the Filter editor 192
Time for acon – using lters 193
Using lters with text 197
Time for acon – using lters with text 197
Images and eects 198
Time for acon – using lters with images 199
Tracing images 201
Time for acon – using Potrace 202
Time for acon – using SIOX 205
Summary 207

Table of Contents
[ v ]
Chapter 10: Extensions in Inkscape 209
Templates 210
Installing and using new templates 210
Time for acon – installing Inkscape templates 211
Creang your own custom templates 212
Time for acon – modifying an exisng Inkscape template 212
Time for acon – creang a custom template 213
What are extensions? 213
Examples of extension tutorials 214
Installaon extensions 215
Summary 215
Chapter 11: Working with Images 217
Imporng from the Open Clip Art Library (Linux and Mac users) 217
Time for acon – using the Open Clip Art Library (Mac users only) 218
Basics about photo manipulaon 219
Time for acon – blurring the background of a photograph 220
Converng raster logos to vector-based logos 228
Time for acon – converng a logo to a vector-based image 228
Summary 229
Chapter 12: Using the XML Editor 231
Inkscape's XML Editor 231
Time for acon – accessing the XML Editor 232
XML Editor basics 234
SVG basics 237
Aribute types 237
Basic aributes 238
Paths 239
Shapes 239
Images 245
Text 245
Using the XML Editor to change characteriscs 246
Time for acon – using the XML Editor to change object characteriscs 246
Using XML and graphics with programmers 248
Summary 248
Appendix A: Where to Find More Informaon 249
Ocial sites 249
Arcles and tutorials 249
Community 250
Blogs 250
Twier 251

Preface
Are you ready to jump into the world of graphic design and illustraon? Or have you just begun
to explore new tools that can broaden your skill set in these speciales? Inkscape Beginner's
Guide is the perfect book to start this journey into the world of vector graphics. This book
starts at the very basics of a complex, open source tool on the market today – Inkscape 0.48
(current version as of the publicaon of this book). Learn everything you need to know from
seng up a document le to compleng your rst illustraon.
The Inkscape graphics editor can be daunng when just learning the tool. There are so many
features one may not know where to start. Inkscape Beginner's Guide can help to alleviate
these fears; it takes a simple step-by-step approach to learning the soware. It starts at the
very beginning, unlocking the secret to the soware's interface, explaining menus and the
overall areas of the user interface, and then jumps into real projects that illustrate some
simple graphic-building concepts.
Expect to learn everything from using paths, text styles, lters, and images—while building
a brochure, logo, icons, illustraon, and more—all in the context of real graphic design,
illustraon, or web projects. Using an informave but simple approach, learning Inkscape
becomes a fun and interacve process.
Welcome to the world of Inkscape 0.48 and vector graphics! This book is an informaonal
step-by-step beginner's book for someone just starng their journey in using Inkscape 0.48
in the creaon of vector graphics. No previous experience using Inkscape 0.48 or other
previous vector graphics programs are required. The book will be chalked full of real-world
examples, detailed step-by-step instrucons and associated screen captures to keep the
informaon approachable yet easy to digest—and don't forget fun!
What this book covers
Chapter 1, Geng Started with Vector Graphics, starts before Inkscape, at the beginning
of vector graphics. We begin by dening vector graphics and how they are used online and
within print projects. Then we start digging into Inkcape learning about how the program
began and how it ts in the world of vector graphics today.

Preface
[ 2 ]
Chapter 2, Installing and Opening Inkscape, discusses where to download Inkscape 0.48, the
most recent version of the soware and its unique features, as well as detailed descripons
about how to install the soware. Included in this are screen captures that dene the
main areas of the program and menu items—all of which is very helpful when opening the
soware for the rst me.
Chapter 3, How to Manage Files, is all about les and managing them. Inkscape can import
a number of le formats and then edit them. Then, aer compleng a project Inkscape has
the ability to save and export graphics in a number of formats. We will discuss all of these
opons as well as the nave Inkscape SVG format and the benets of using project folders.
Chapter 4, Creang your First Graphics, starts by dening paths and shapes, a basis for all
projects going forward in Inkscape. Then it focuses on creang your very rst Inkscape object
– a star. Also discussed in this chapter are ellipses, complex shapes, freehand object, grids,
and guidelines.
Chapter 5, How to Work with Layers, is all about layers in Inkscape. You will learn the basics
like how to create new layers, delete, arrange, and blend layers, as well as hiding and
duplicang layers, all the while working on a sample blog header project.
Chapter 6, Building Objects, helps you learn about objects and how Inkscape interprets
them, how to change object features, change ll and stroke, grouping objects, combining
objects, and how to best use the masking and clipping features.
Chapter 7, Using Paths focuses, on using paths. Again we start with the basics: dening
paths, how to work with them in Inkscape, transforming, combining, and placing paths. The
bulk of this chapter will focus on an illustraon project that will assist you in learning all you
need to know about paths.
Chapter 8, How to Style Text, teaches how you can manipulate and style text for any design.
It is a praccal chapter that covers using paths and text to create visual appeal, text and
frames, the basics like spellcheck and nd/replace, text eects, and a simple project to show
how to create a text reecon.
Chapter 9, Using Filters, focuses on using lters with text and images to give a further
dimension to your vector graphics. Projects will focus on using images and text—including
a detailed example with step-by-step instrucons on using lters with text.
Chapter 10, Extensions in Inkscape, is as expected, about extensions or templates and
plugins that can assist in the design process for vector graphics. You will learn how to
install templates, extensions, and about the availability of certain extension or scripts that
might be useful.
Chapter 11, Working with Images, is all about imporng photographs or images into
Inkscape and manipulang them. Specically, you will be working on a few sample projects
that deal with photographs and lters.

Preface
[ 3 ]
Chapter 12, Using the XML Editor, teaches you about the XML editor that is included within
Inkscape. It covers the basic XML structure tree, as well as how you can manipulate this code
to change objects in your projects.
Appendix A, Where to Find More Informaon, provides web links to people and places that
can help you learn even more about Inkscape.
Appendix B, Keyboard Shortcuts, menons the basic keyboard shortcuts for Inkscape 0.48.
Appendix C, Glossary of Terms, is a glossary of Inkscape and basic design terms used
throughout the book.
What you need for this book
You'll need the latest version of Inkscape 0.48 and Internet access (to download some
example clip art and projects).
If you are using a Mac, then you may also need the X11 app on your system to run Inkscape
(this typically comes pre-installed on Leopard OSX).
Who this book is for
This book is intended for novice graphic and web designers who want to expand their
graphic soware experse. General familiarity with a graphics program is recommended,
but not required.
Conventions
In this book, you will nd several headings appearing frequently.
To give clear instrucons of how to complete a procedure or task, we use:
Time for action – heading
1. Acon 1
2. Acon 2
3. Acon 3
Instrucons oen need some extra explanaon so that they make sense, so they are
followed with:
Preface
[ 4 ]
What just happened?
This heading explains the working of tasks or instrucons that you have just completed.
You will also nd some other learning aids in the book, including:
Pop quiz – heading
These are short mulple-choice quesons intended to help you test your own understanding.
Have a go hero – heading
This sets praccal challenges and gives you ideas for experimenng with what you
have learned.
You will also nd a number of styles of text that disnguish between dierent kinds of
informaon. Here are some examples of these styles, and an explanaon of their meaning.
Code words in text are shown as follows: "Find the Inkscape icon in the Application or
Programs folder"
New terms and important words are shown in bold. Words that you see on the screen, in
menus or dialog boxes for example, appear in the text like this: "Open Inkscape, and from
the main menu, select File | New | CD_cover_300dpi.".
Warnings or important notes appear in a box like this.
Tips and tricks appear like this.
Reader feedback
Feedback from our readers is always welcome. Let us know what you think about this
book—what you liked or may have disliked. Reader feedback is important for us to
develop tles that you really get the most out of.
To send us general feedback, simply send an e-mail to feedback@packtpub.com,
and menon the book tle in the subject of your message.
If there is a topic that you have experse in and you are interested in either wring
or contribung to a book, see our author guide on www.packtpub.com/authors.

Preface
[ 5 ]
Customer support
Now that you are the proud owner of a Packt book, we have a number of things to help
you to get the most from your purchase.
Downloading the color images of this book
We also provide you a PDF le that has color images of the screenshots used in this
book. The color images will help you beer understand the changes in the output. You
can download this le from http://www.packtpub.com/sites/default/files/
downloads/images.pdf
Errata
Although we have taken every care to ensure the accuracy of our content, mistakes do
happen. If you nd a mistake in one of our books—maybe a mistake in the text or the
code—we would be grateful if you would report this to us. By doing so, you can save other
readers from frustraon and help us improve subsequent versions of this book. If you
nd any errata, please report them by vising http://www.packtpub.com/support,
selecng your book, clicking on the errata submission form link, and entering the details
of your errata. Once your errata are veried, your submission will be accepted and the
errata will be uploaded to our website, or added to any list of exisng errata, under the
Errata secon of that tle.
Piracy
Piracy of copyright material on the Internet is an ongoing problem across all media. At Packt,
we take the protecon of our copyright and licenses very seriously. If you come across any
illegal copies of our works, in any form, on the Internet, please provide us with the locaon
address or website name immediately so that we can pursue a remedy.
Please contact us at copyright@packtpub.com with a link to the suspected
pirated material.
We appreciate your help in protecng our authors, and our ability to bring you
valuable content.
Questions
You can contact us at questions@packtpub.com if you are having a problem with any
aspect of the book, and we will do our best to address it.

1
Getting Started with Vector Graphics
Inkscape is an open source, free program that creates vector-based graphics
that can be used in web and print design, in interface and logo creaon, and
in material cung. Its capabilies are similar to those of commercial products
such as Adobe Illustrator, Macromedia Freehand, and CorelDraw and can be
used for any number of praccal purposes—creang vector graphics for use
in illustraons, business leerheads, computer and electronic wallpapers, and
designing web pages and the elements within them.
This is a beginner's guide to using Inkscape. This means you will learn all the ins
and outs of using this soware—including all the details about the interface,
menus, buons, as well as how to create graphics. We'll start with the very
basic parts of graphics and build up as we connue through the book to more
complex graphics projects poinng out how you would use these items in
everyday projects.
However, before learning the details on how to use Inkscape, let's take a step
back and dene vector graphics, how a computer displays them, how vector
graphics work together, and why we want to use them in design.
Specically, this chapter will teach you the following:
What vector graphics are
Scalable Vector Graphics and Inkscape
Reasons for using vector graphics over rasterized images
How vector graphics are used in design
Let's get started!
Geng Started with Vector Graphics
[ 8 ]
What are vector graphics?
A vector graphic is made up of points, lines, curves, and shapes or polygons, which are all
based on mathemacal equaons. Inkscape uses these objects and can convert them into
paths. A path is a line with a start and end, which are also calculated with a mathemacal
equaon. These paths are not limited to being straight—they can be of any shape, size, and
even encompass any number of curves. When you combine them, they create drawings,
diagrams, and can even help create certain fonts.
How does this all relate to vector-based graphics? Vector-based graphics aren't made up of
pixels. Since they are resoluon-independent, you can make them larger (by scaling) and
the image quality will stay the same, lines and edges stay clean, and the same images can be
used on items as small as leerheads or business cards, blown up to be billboards, or used
in high-denion animaon sequences. This exibility, oen accompanied by smaller le
sizes, makes vector graphics ideal—especially in the world of Internet, computer displays of
varying resoluon, and hosng services for web pages. Inkscape can help in the navigaon
of those waters of vector graphics and is a tool that can be invaluable when designing for the
digital world as well as print.
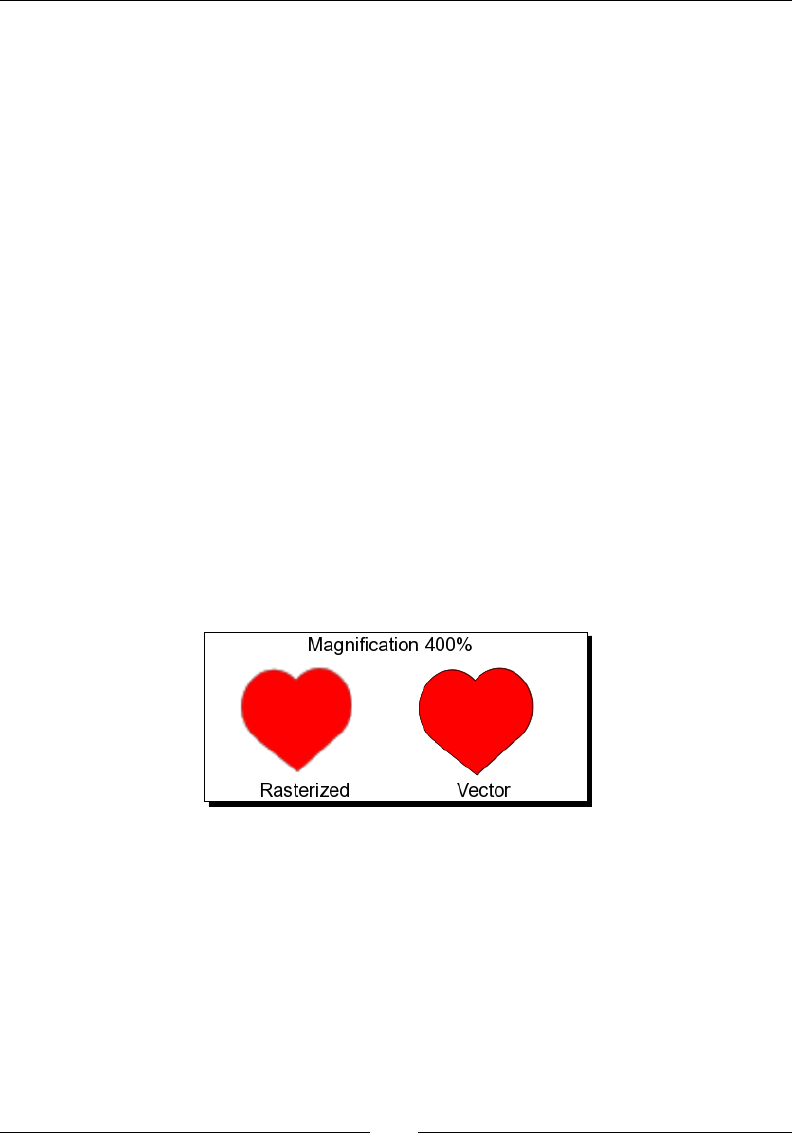
These characteriscs make vector graphics very dierent from JPEGs, GIFs, or BMP
images—all of which are considered raster or bitmap images, made up of ny squares
called pixels or bits. If you magnify these images, you will see that they are made up of
a grid (or bitmap), and if magnied further, they will become blurry and grainy as each
pixel with bitmap square's zoom level grows larger.
Programs that use vector graphics
As stated earlier in the chapter, many programs and applicaons are similar to Inkscape and
can open vector graphics. Some can only open these les for viewing purposes and others
can edit them.
Other applicaons typically used for page layout, but which can open and manipulate vector
graphics include Scribus, Quark Xpress, and Adobe InDesign. Scribus is unique in that it is also
open source (as Inkscape is) and can even import SVG les (the le type Inkscape uses) and
manipulate them. The other programs can open, import, place, scale, and distort .eps files,
a vector graphic le type, but unfortunately cannot create or otherwise modify vector graphics.

Chapter 1
[ 9 ]
To create vector graphics, you will use illustraon programs like Inkscape—which this book
is about—or other programs like Adobe Illustrator, Adobe Freehand Corel Draw, Freehand,
XARA Xtreme, or Serif DrawPlus. These programs all have nave le formats, but allow
you to export your graphics as .eps or .svg les, as needed. What is dierent about these
applicaons than those for page layout is that you start with a completely blank document
that allows you to fully design or draw what you would like, whereas the page layout
applicaon focuses on full page layouts.
Vector formats
In the previous secon, it was noted that .eps, an Encapsulated Post Script le, is a
common vector graphic format—or open format—that can be read by most applicaons
that open and/or create vector graphics. However, there are other le formats that are
also considered vector-graphic compable. These include Inkscape's .svg format, Adobe
Illustrator (.ai), Adobe Freehand (.Fhx), and Adobe Flash les, which are mostly vector
data and are considered proprietary formats, ed more directly to the prospecve soware
that can open them.
There are a number of other proprietary graphic le formats which can include vector
graphics within them as well as rasterized (or bitmap) graphics. These include:
Adobe Photoshop (.psd): This includes vector layers such as text, shapes, and paths
Adobe Acrobat Portable Document Format (.pdf): This contains vector data
and bitmap images in dierent forms
The Encapsulated Post Script le (.eps): This, again, can hold both vector data
and bitmap images
Also note that .eps les are basically the same les a Post Script laser printer uses. Both le
types are developed by Adobe and are the foundaon of the Adobe PDF format.
Scalable Vector Graphics
What does Inkscape use? A completely dierent le format—one that is fairly complex in
nature, but works well for the exible nature of vector graphics. They can be edited within
Inkscape and can be opened in a text editor and edited at an XML code level. Inkscape uses
Scalable Vector Graphics (SVG), a vector-based drawing format that incorporates some
basic principles:
A drawing can (and should) be scalable to any size without losing detail
A drawing can use an unlimited number of smaller drawings used in any number
of ways (and reused) and sll be a part of a larger whole

Geng Started with Vector Graphics
[ 10 ]
More specically, Scalable Vector Graphics (SVG) is an XML-based le format for describing
two-dimensional vector graphics. The specicaon denes an open standard that has been
in development with the World Wide Web Consorum (W3C) since 1999.
Inkscape was built with SVG and the W3C web standards in mind, which give it a number
of features, including a rich body of XML (Extensible Markup Language) with complete
descripons. Inkscape drawings can be reused in other SVG-compliant drawing programs and
can adapt to dierent presentaon methods. The .svg format has growing support across
most web browsers (Firefox, Chrome, Opera, Safari, Internet Explorer).
The SVG les then, which are inherently XML, can be searched, indexed, scripted, and
compressed within a text editor. In fact, they can be created and edited with a text editor if
required, but drawing programs like Inkscape can create the SVG les. In fact, Inkscape has an
XML editor feature which allows direct edits to the XML les; more informaon on this is in
Chapter 12, How you can use the XML Editor.
Advantages of an open-standard vector format
There are some slight dierences between tradional vector graphics and SVG. All vector
graphics are scalable, use smaller-sized les, and have the exibility to be resized when
needed. However, the vector graphic format of SVG has even more detailed advantages
than the vector graphic nave.
Additional advantages of SVG vector images over proprietary formats
SVG vector images, because they are based on XML, have some disnct advantages over
open standard vector formats. These are as follows:
They can be read and modied by a large range of tools (including browsers, text
editors, and other vector graphics soware, as described previously)
They are smaller and more compressible than JPEG and GIF images which are oen
used in web design
They are also scalable, like vector graphics
Text in SVG can be searched, edited, indexed, and more
SVG is an open-standard
SVG les are pure XML, which allows them to be opened in other programs (or even
a text editor) and edited in non-graphical UI ways (or by programmers directly)
Most modern browsers oer some support for SVG. Internet Explorer 8, however,
does not oer this support

Chapter 1
[ 11 ]
There are sll some limitaons in the Inkscape program, even though it aims to be fully
SVG-compliant. For example, as of version 0.48, it sll does not support animaon or use
SVG fonts within the soware for design—though there are plans to add these capabilies
into future versions.
Disadvantages of vector graphics over non-vector formats
The biggest drawback to vector graphic formats is that they are not ideally suited to working
with photographs. Sure, Inkscape and other vector graphic applicaons can open, import,
or place photographs into projects, but the colors and complexies of displaying the
photograph will essenally overwhelm the applicaon. Also, as stated earlier, as photographs
are very much rasterized images being imported into the vector-based applicaon, once you
re-size or scale the photograph, the integrity of the photograph can be lost.
This same complexity will appear for advanced coloring and lighng eects when using
vector graphics as well—the more you try to make it look like a photograph, the more
you might need to rasterize part of the vector graphic as well, essenally making it a
non-vector graphic.
Another known drawback for vector graphics is interoperability. If you want to share les
between vector graphic applicaons, you might run into some issues, even when you use .eps
les which are more universally accepted as a vector graphic format. Vector informaon can be
lost during the conversion. All fonts, elements, and objects need to be embedded (not linked)
and tested thoroughly—however, this sharing is not impossible and enrely depends on the
applicaons being used. Using Inkscape across teams as the development tool can help solve
this problem as the applicaon is open source and free to download.
If you are new to design, you might be surprised to learn that even when you are using a
word processing program, you are using vector graphics all the me—fonts! Fonts illustrate
two common properes of vector graphics:
An enre font, with all its leers, numbers, and symbols, has a very small le size
Fonts can be set to any size without losing quality
Some vector-based applicaons, including Inkscape, allow you to convert text to paths so
you can modify the shapes of the leers themselves.
Determining when to use vector or rasterized graphics
We've spent a lot of me discussing vector graphics and how they dier from rasterized
bitmap images. In doing so, it is also important to know when it is best to use each type,
because there are instances when it does make sense to use one over the other.
Geng Started with Vector Graphics
[ 12 ]
Let's say we're doing a project that will get printed; a brochure—and for best results, we'll
use both vector and bitmap graphics. We'll look at the most basic steps of how to put this
brochure together in the following secon.
Time for action – basic design
For this example, let's look at the design elements and determine how we would put them
together in a design:
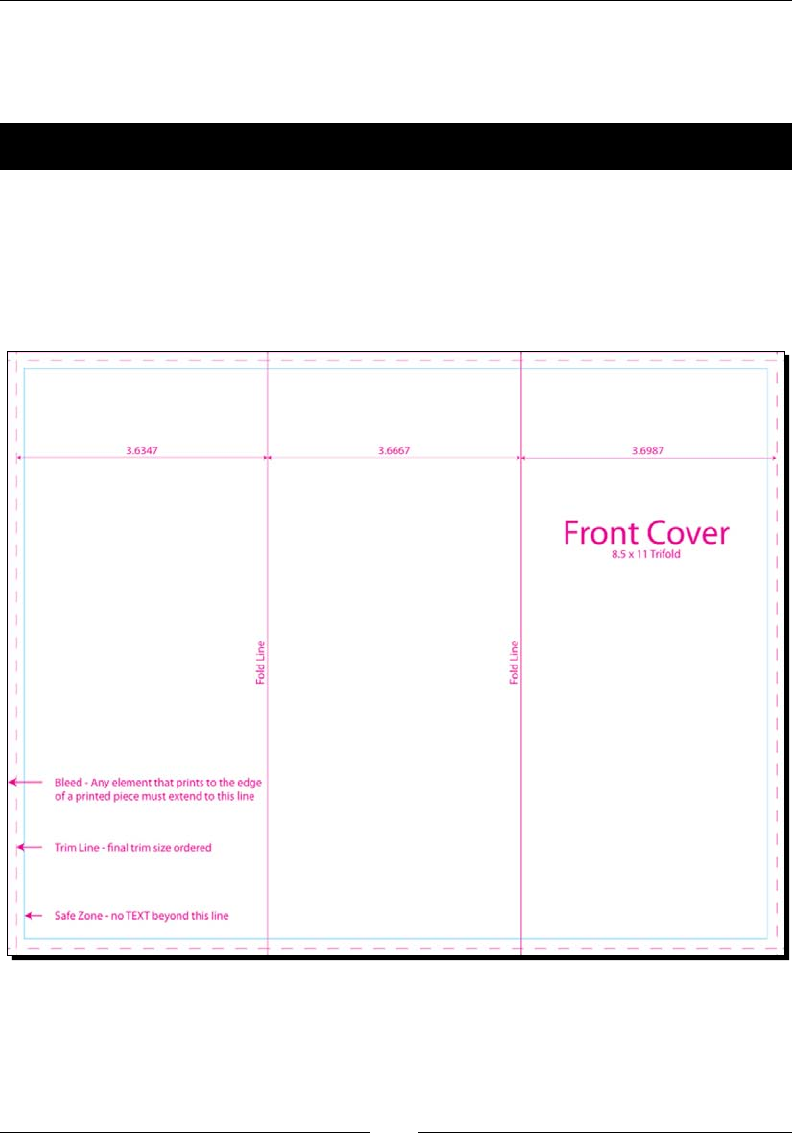
1. Determine the exact size of the brochure. For our example, we'll focus on creang
the outside of an 8.5 x 11 tri-fold brochure. Specically, the cover design of this
brochure is as follows:
Chapter 1
[ 13 ]
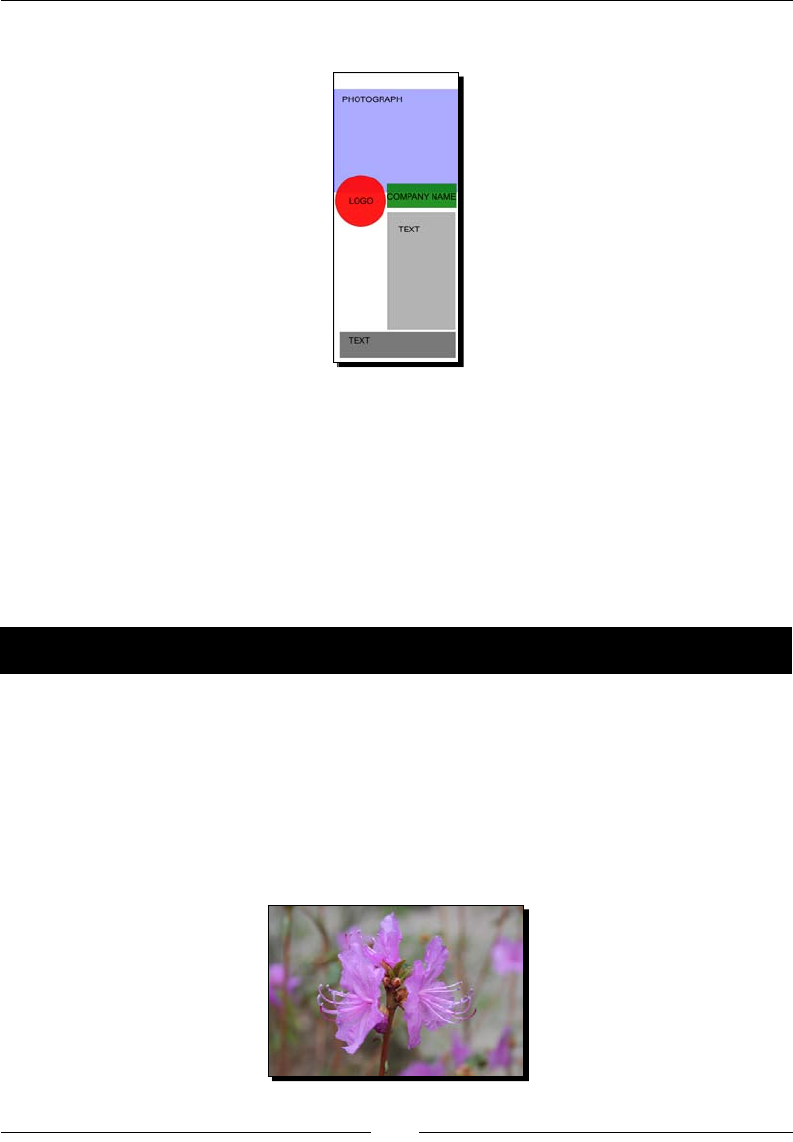
2. Design a basic front cover layout. We'll use the following one for the cover:
3. Decide on the elements we will use for the design. For ours, we'll have a
photograph, company logo, brochure tle, and some addional copy.
What just happened?
We just did the basic planning required to create a brochure in any graphics program.
We determined the physical size of the document, the basic layout, as well as the elements
we have available for use in the design.
Time for action – vector versus rasterized images
Now we need to gure out what elements go where and which graphic types will work best.
Determine what type of graphics each of our design elements should be to best suit our
needs (and the design) and make sure we have the les in that format.
1. Photographs naturally have a lot of colors and gradients, and are oen taken in a
xed size from a digital camera. That said, the les are rasterized bitmaps and can be
in any number of le formats—including .tif, .jpg, .gif, or .png, and are larger
in size. Photographs don't lend themselves to being vector graphics.
Geng Started with Vector Graphics
[ 14 ]
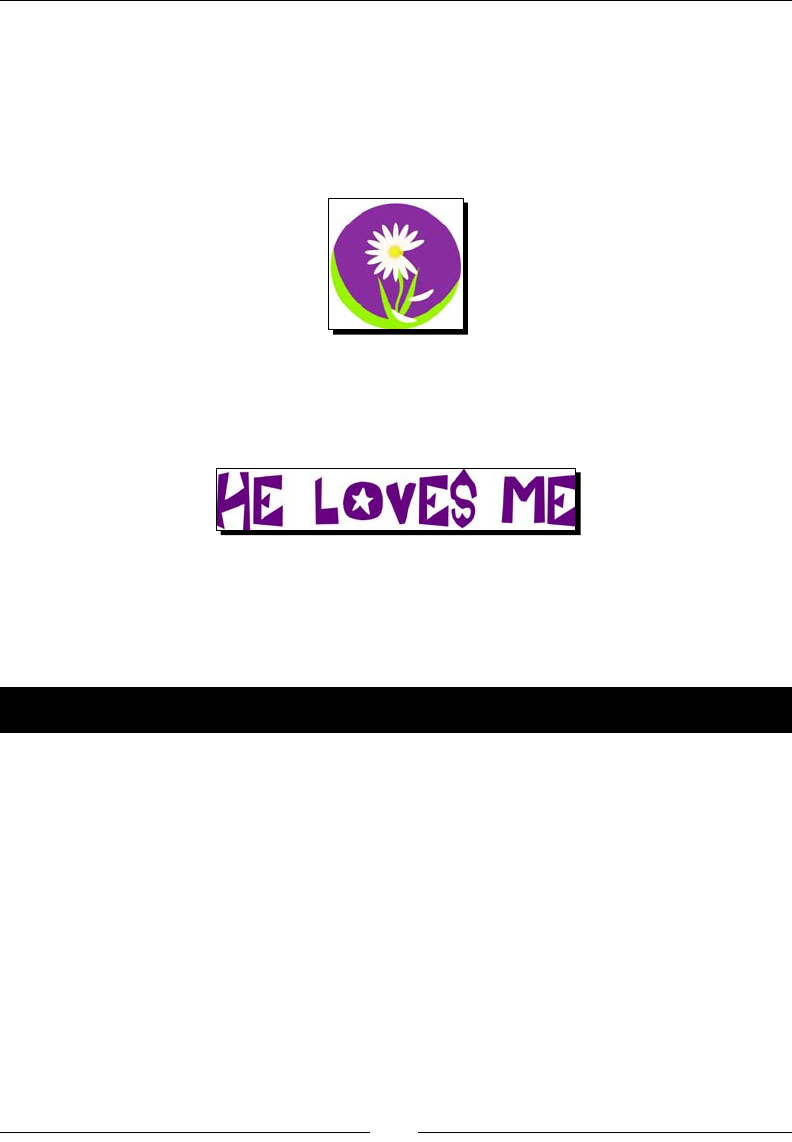
2. Logos should be portable, so that they can look clean at any size and resoluon.
The graphics themselves are oen simple with less color variaon and therefore
lend themselves to being vector graphics as opposed to bitmaps. We'll use a
graphic-based on one in the Openclipart.org collecon, which will be
explained later, as an example for a company logo. You can use les of the
SVG, AI, or EPS format.
3. The company name/tle and copy will be text, which is a font and vector graphic.
It can sll be scaled to accommodate both the boldness of the company name and
also be a body copy for the brochure:
What just happened?
We took each piece of the design puzzle and determined the best le types for each
element. We collected our les and got them ready for the design phase, which is up next.
Time for action – building brochure les
Take all of the elements we dened—both bitmaps and vector graphics—and create the
outside design of the brochure as follows:
Chapter 1
[ 15 ]
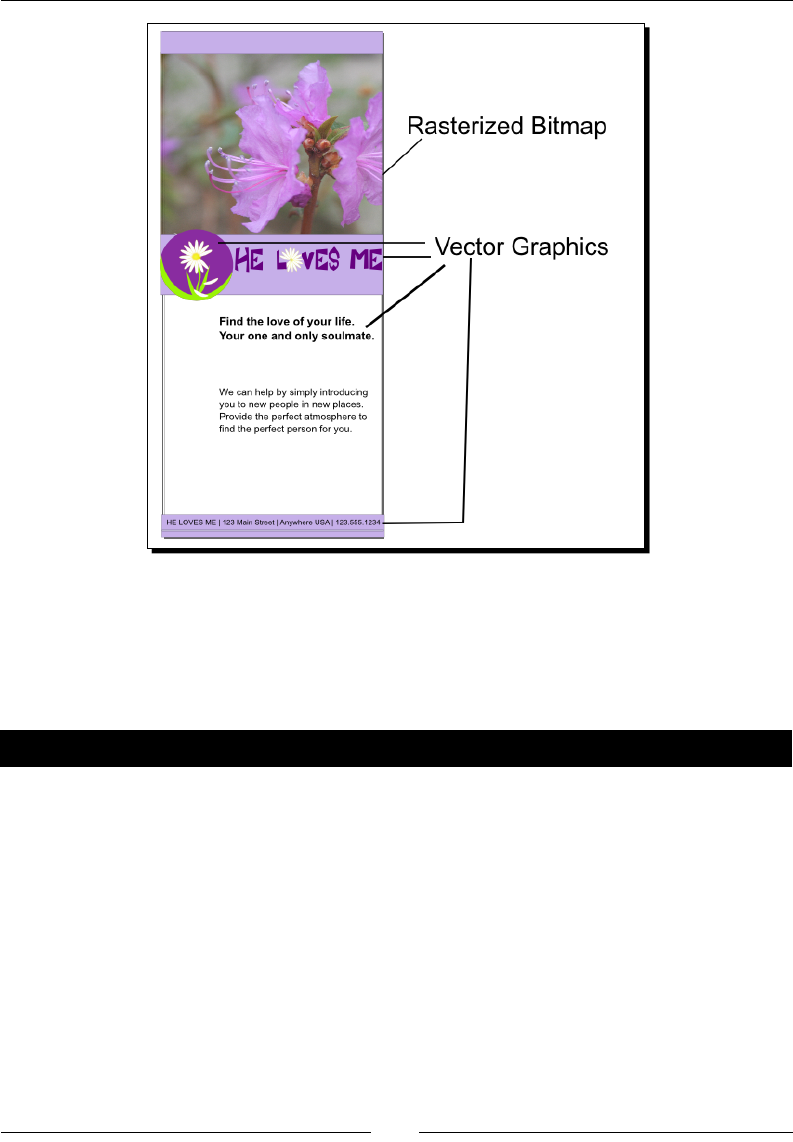
What just happened?
We looked at a full brochure design to determine which elements should be rasterized
bitmaps and which should be vector graphics. When done correctly, the graphics seamlessly
work together in a design.
Pop quiz – understanding vector graphics
What are the advantages of scalable vector graphics?
a. Smaller le sizes which can be compressed
b. Projects can be printed at any resoluon
c. Can be searched, edited, and indexed with a text editor
d. All of the above

Geng Started with Vector Graphics
[ 16 ]
Summary
This chapter was dedicated to teaching you the basics about vector graphics and how they
dier from bitmap images. We learned how vector graphics are resoluon-independent and
why we might want to use them in design, how Inkscape supports Scalable Vector Graphics
(SVG), which is an open format, and the advantages of using these types of open graphics
instead of proprietary. We also took some praccal me learning to disnguish when it is
best to use vector graphics and when raster images are needed.
Now it is me to learn how to install Inkscape 0.48 and begin creang vector graphics of
our own!
2
Installing and Opening Inkscape
To start using Inkscape, you must install it rst! This chapter starts by explaining
where to download Inkscape from, the most recent version and its features, as
well as detailed descripons about how to install the soware. It also includes
a brief rundown of the applicaon window and the main areas of where to nd
items when opening it for the rst me.
In this chapter, we will learn:
Inkscape 0.48's features
Where to download Inkscape
How to install Inkscape (Windows, Mac, Linux)
Potenal troubleshoong items when installing
Basics of the Inkscape soware
Opening your rst document
Let's get started and start downloading!
Inkscape's features
Inkscape is a free, open source program developed by a group of volunteers under the GNU
General Public License (GPL). You not only get a free download but can use the program to
create items with it and freely distribute them, modify the program itself, and share that
modied program with others.
Installing and Opening Inkscape
[ 18 ]
Inkscape uses Scalable Vector Graphics (SVG), a vector-based drawing language, as
described in Chapter 1, Geng Started with Vector Graphics. The basic principles that
apply to SVG graphics apply to Inkscape principles as well:
A drawing can (and should) be scalable to any size without losing detail
A drawing can use an unlimited number of smaller drawings that can be used
in any number of ways (and reused) and be a part of a larger whole
The current Inkscape version at the me of this book being printed is 0.48.2.1 and the 0.48.3
version will be available before Inkscape 0.49 is released.
Installing Inkscape
Inkscape is available for download for Windows, Macintosh, Linux, or Solaris operang
systems. Before you install Inkscape, you will need to check that you have all of the required
elements, listed as follows:
Operang system: Windows XP, Vista, 7, Mac OS X 10.4 Tiger, 10.5 Leopard or 10.6
Snow Leopard, or higher. Most Linux distribuons are supported. Note: Windows
98/ME and 2000 are no longer supported.
To run on the Mac OS X operang system, Inkscape typically runs under X11—an
implementaon of the X Window System soware that makes it possible to run
X11-based applicaons in Mac OS X. The X11 applicaon has shipped with the Mac
OS X since version 10.5. Snow Leopard requires Apple X11/XQuartz 2.3.4 or higher.
Leopard requires Apple X11 2.1.6 or XQuartz. Tiger requires Apple X11 1.1.3.
When you open Inkscape on a Mac, it will rst open X11 and run
Inkscape within that program. Loss of some shortcut key opons
will occur, but all funconality is present using menus and toolbars.
Disk space: A minimum of 190 MB free. More free space is required to store your
graphics projects. You can, however, run a portable version of Inkscape on some
operang systems (like Windows 7). These installaons can run on a portable USB
drive and only require 80 MB of space.
Inkscape requires an Internet connecon if you plan to use the Open Clip
Art Library.
Open Clip Art Library is only available on a Macintosh installaon.
Chapter 2
[ 19 ]
Time for action – downloading Inkscape
In a few simple steps, you will be able to download Inkscape 0.48 from the Internet and
install it on your computer:
1. Go to the ocial Inkscape website at http://www.inkscape.org/ and download
the appropriate version of the soware for your computer.
2. Double-click the downloaded Inkscape installaon package to start the installaon.
For the Mac OS, a DMG le is downloaded. Double-click it and then
drag-and-drop the Inkscape package to the Application folder. For
any Windows device, a .exe le is downloaded. Double-click that le
to start and and connue to complete the installaon. For Linux-based
computers, there are a number of distribuons available. Be sure to
download and install the correct installaon package for your system.
3. Find the Inkscape icon in the Application or Programs folder. It should look like
the following icon:
4. If you see this icon, you have a successful installaon. Now it is me to open
Inkscape for the rst me.
5. Double-click the Inkscape icon and the program will automacally open to the
main screen.
If you are using a Macintosh computer, Inkscape opens within
the X11 applicaon and may take slightly longer to load.
Installing and Opening Inkscape
[ 20 ]
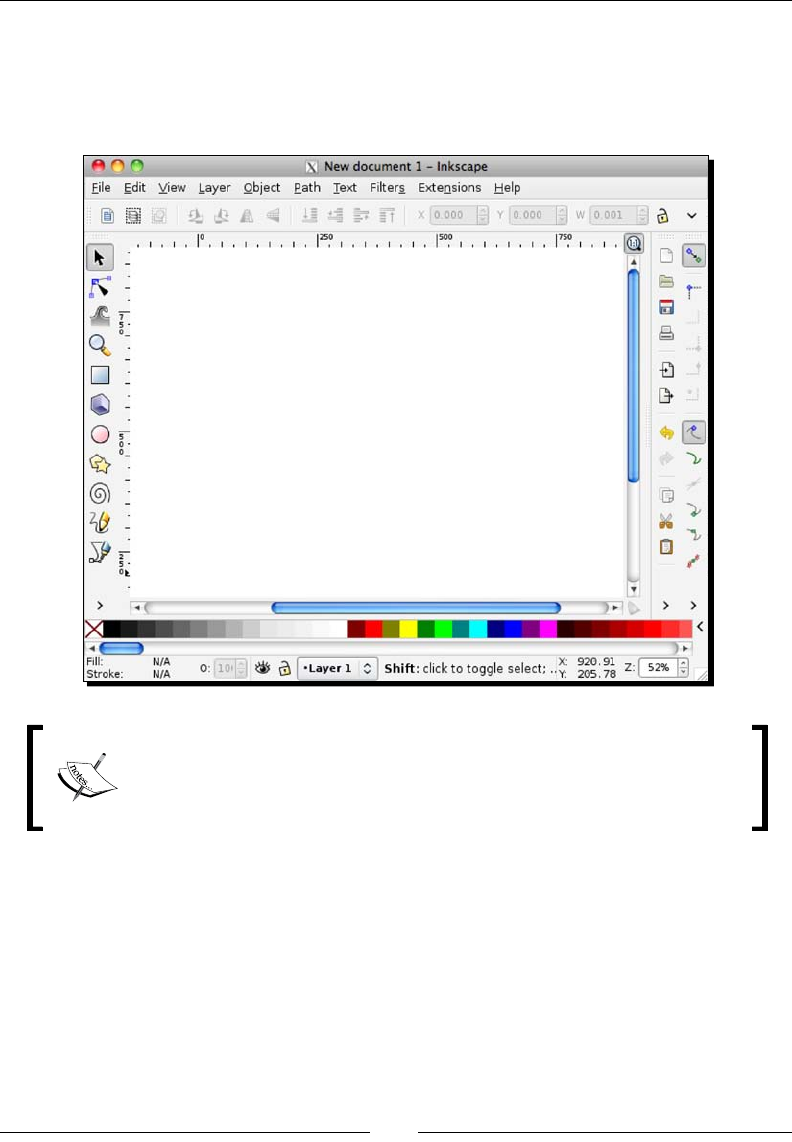
What just happened?
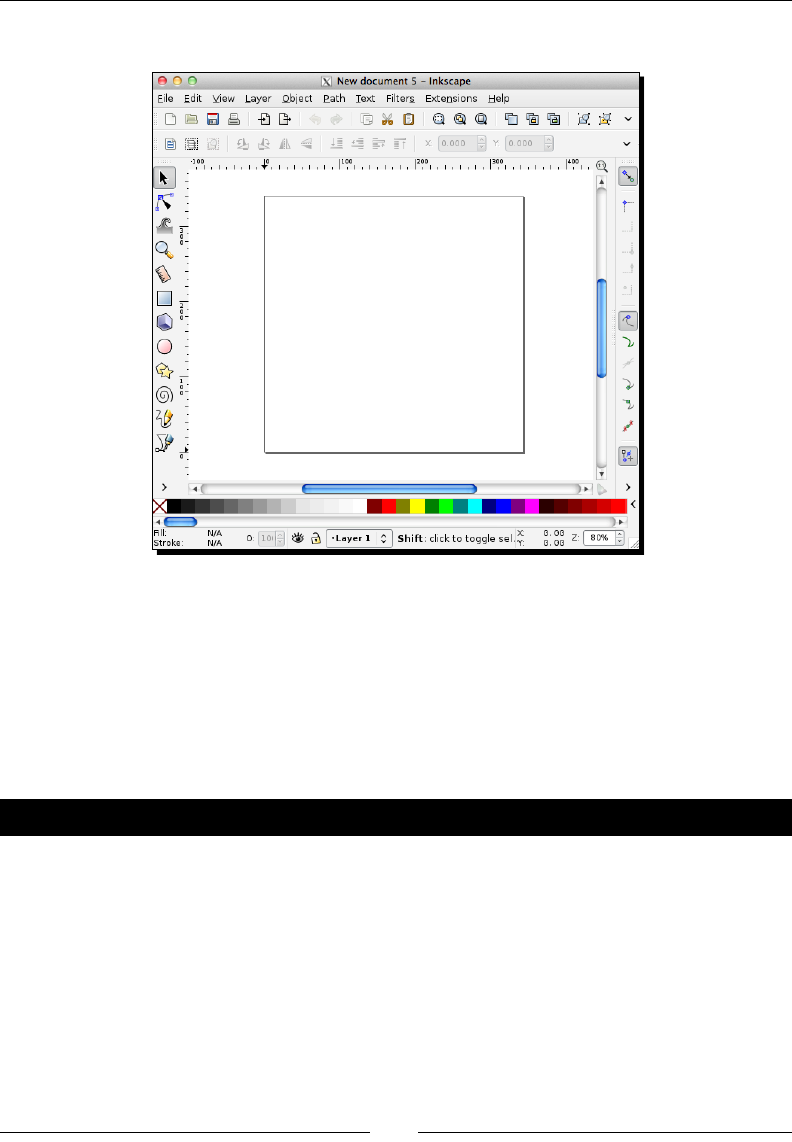
In a few simple steps, you downloaded the Inkscape installaon package and installed it on
your system. When Inkscape opens for the rst me, you will see the main screen, as shown
in the following screenshot, with a new blank document ready to go:
In this book, the screenshots will be specic to the Mac OS X soware. Don't
be concerned if this is not your computer operang system of choice; the
soware itself is very similar between them and notable dierences in the
Inkscape soware screens will be highlighted.
Troubleshooting installation
Installing Inkscape is generally prey simple to do. However, if you run into any issues, take
note of the following ps:
Make a note of your computer's manufacturer, operang system type, and version
and make sure you downloaded the appropriate installaon package.
Also remember once the installaon has occurred, the Inkscape icon to launch the
soware will be in the Application or Programs folder on your computer

Chapter 2
[ 21 ]
If you are sll having issues, there are a number of useful arcles, tutorials, forums, and
more that can help you in all maers of Inkscape—including installaon. Here's the most
common and useful one:
The ocial Inkscape Homepage: http://inkscape.org/. It will provide you with
all the manuals, current download release informaon, forums, and every bit of
informaon about Inkscape you want to know.
Other important links from the ocial homepage are as follows:
Manual and documentaon: http://tavmjong.free.fr/INKSCAPE/MANUAL/
html/index.html
Wiki: http://wiki.inkscape.org/
Forums: http://www.inkscapeforum.com/
Mailing list: http://inkscape.org
Blog: http://planet.inkscape.org/
For developers: https://launchpad.net/inkscape
Clip Art: http://www.openclipart.org/
Galleries: http://wiki.inkscape.org/wiki/index.php/Galleries
From forums to direct installaon instrucons, Inkscape.org is the
best place to nd informaon about Inkscape as it compiles all of the
latest informaon about Inkscape from the developers to the users. The
mailing lists provide detailed informaon as well as numerous resources for
troubleshoong.
The basics of the software
The Inkscape interface is based on the GNOME UI standard, which uses visual cues and
feedback for any icons. For example:
Hovering your mouse over any icon displays a pop-up descripon of the icon.
If an icon has a dark gray border, it is acve and can be used.
If an icon is grayed out, it is not currently available to use with the current selecon.
All icons that are in execuon mode (or busy) are covered by a dark shadow. This
signies that the applicaon is busy and won't respond to any edit request.
There is a Nocaon region in the status bar on the main screen that displays
dynamic help messages. These messages display key shortcuts and basic informaon
on how to use the Inkscape soware based on which objects and tools are selected.
Installing and Opening Inkscape
[ 22 ]
Time for action – getting started with Inkscape
In order to feel completely comfortable using the Inkscape soware, let's learn the basics of
the Inkscape interface. This will include menus, toolbars, and dialog boxes. Let's get started!
Find the Inkscape icon in the Application or Programs folder and double-click it to open
the program.
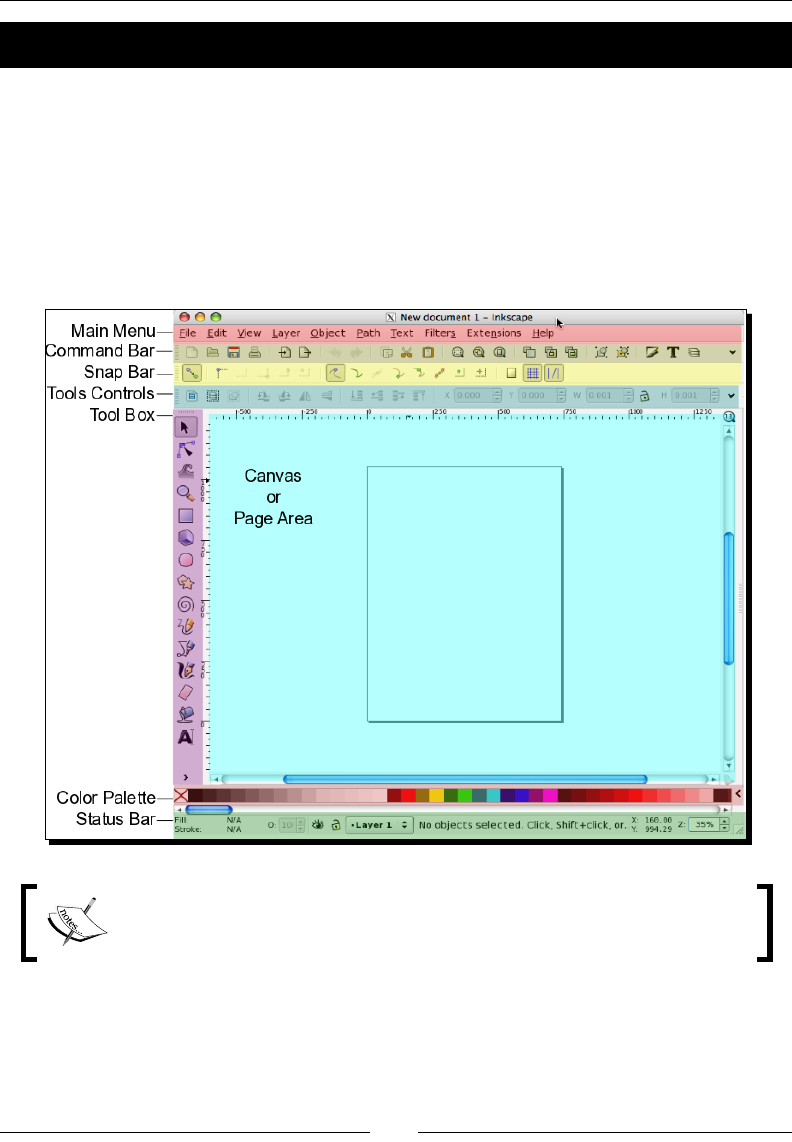
You will see the main window of the Inkscape soware, as follows, with dierent areas of
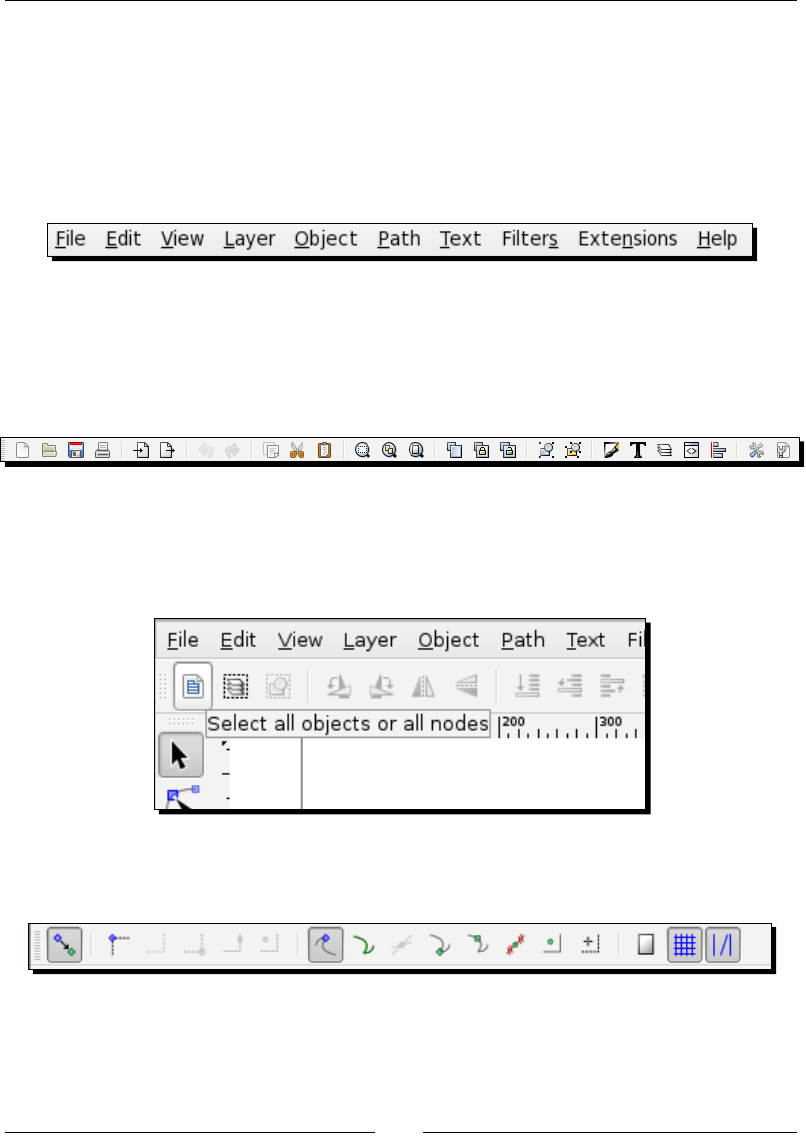
the screen highlighted. Within the main screen, there is the main menu, command, snap
and status bar, tool controls, and a color palee, as shown in the following screenshot:
On some external resources, canvas and page are used almost interchangeably
in terms of the Inkscape interface. Technically, however, a canvas is the enre
editable area, whereas the page area is the area within the page borders.
Chapter 2
[ 23 ]
1. You will use the main menu frequently when working on your projects. This is the
central locaon to nd every tool and menu item in the program—even those found
in the visual-based toolbars below it on the screen. When you select a main menu
item in Inkscape, you see a menu drop-down with a text descripon and shortcut
key combinaon for the feature. This can be helpful when rst learning the program
as it provides you with easier and oen faster ways to use the most commonly-used
funcons of the program.
Let's take a general tour of the toolbars seen on this main screen. We'll pay close
aenon to the tools we'll use most frequently.
2. The command bar toolbar contains the most frequently-used commands
in Inkscape.
As seen in the previous image, you can create a new document, open an exisng
one, save, print, cut, paste, zoom, add text, and much more. Hover your mouse over
each icon for details about its funcon. By default, when you open Inkscape, this
toolbar is on the top of the main screen:
3. Found vercally on the right-hand side of the main screen, the snap bar toolbar is
designed to help with the snap to features of Inkscape.
It lets you easily align items (snap to guides), force objects to align to paths
(snap to paths), or snap to bounding boxes and edges. More on alignment and
snap to bounding boxes will be explained in later chapters of the book when we
start building example projects.
Installing and Opening Inkscape
[ 24 ]
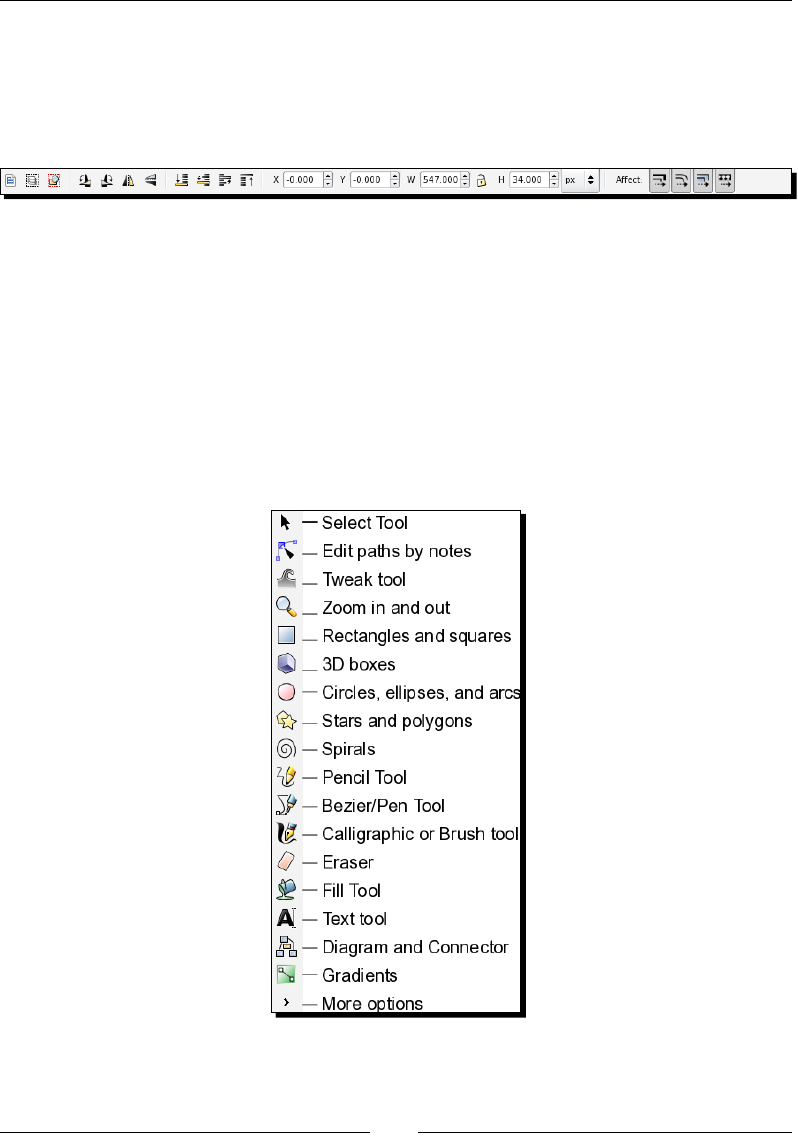
The tool controls opons change depending on which tool you have selected in the
toolbox (described in the next secon). When you are creang objects, it provides
you with all the detailed opons—size, posion, angles, and aributes—specic
to the tool you are currently using. With the Select tool acve, it looks like the
following image:
The tool controls bar is located on the top of the main window, just below the
command bar.
You have opons to select/deselect objects within a layer, rotate or mirror objects,
adjust object locaons on the canvas and scaling opons, and much more. Use it to
dene object properes when they are selected on the canvas.
4. You'll use the toolbox frequently. It is located on the le-hand side of the screen and
contains all of the main tools for creang objects, selecng and modifying objects,
and drawing. To select a tool, click the icon. If you double-click a tool, you can see
that tool's preferences (and change them).
Chapter 2
[ 25 ]
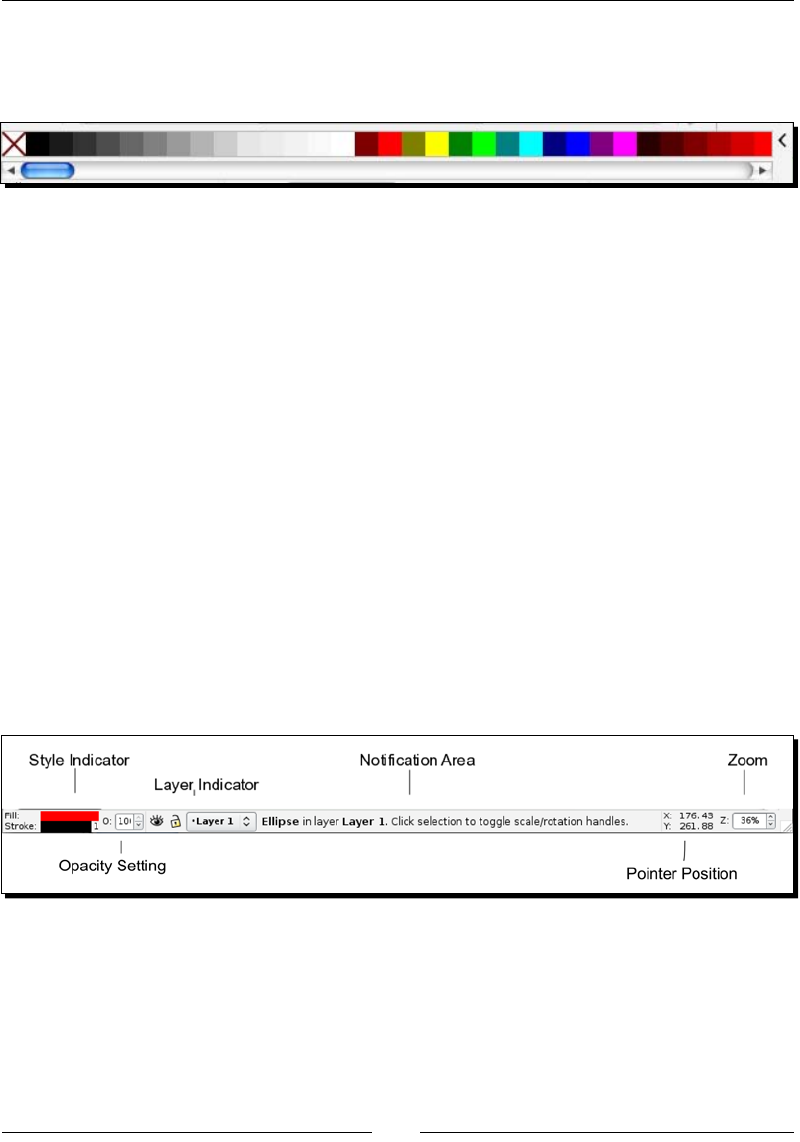
5. The palee bar of the Inkscape screen controls ll and stroke color opons. Fill is
the color that lls the object or shape. Alternavely, stroke is the outline around the
object or shape.
Using the palee bar, there are a few ways you can set the ll and stroke
in Inkscape:
From the palee bar, click a color and drag it from the palee onto objects
to change their ll. If you hold the Shi key and drag a color box onto an
object, it will set the stroke color.
Select an object on your canvas by clicking it and then right-click a color
box in the palee. A pop-up menu appears with opons to set the ll
and stroke.
Select an object on your canvas and then le-click a color box in the palee
to immediately set the ll of an object. Press Shi and le-click a color box
to immediately set the stroke color.
There are a large number of color boxes to choose from. Use the palee bar scroll
bar along the boom to see more choices to the right of those displaying on the
screen. You can also click the small caret at the right end of the toolbar to allow
for a greater selecon of colors—even customizable color palees as well.
6. The status bar contains informaon relang to a selected object within the canvas
or page of your document. You can also use it to modify canvas sengs:
Here are the details:
Style Indicator focuses a bit more on the selected object. If you select any
object on your canvas, you can change its ll (overall color of the object)
or stroke (border color). Drag a color from the palee to this secon for
easy color changes. Right-clicking the Style Indicators provides a pop-up
menu, leng you make quick and easy coloring edits. Double-clicking the
Installing and Opening Inkscape
[ 26 ]
Style Indicators will launch the Fill & Stroke dialog box. If you right-click the
number next to the Stroke Style Indicator, you will get a choice of Stroke
thicknesses to choose from.
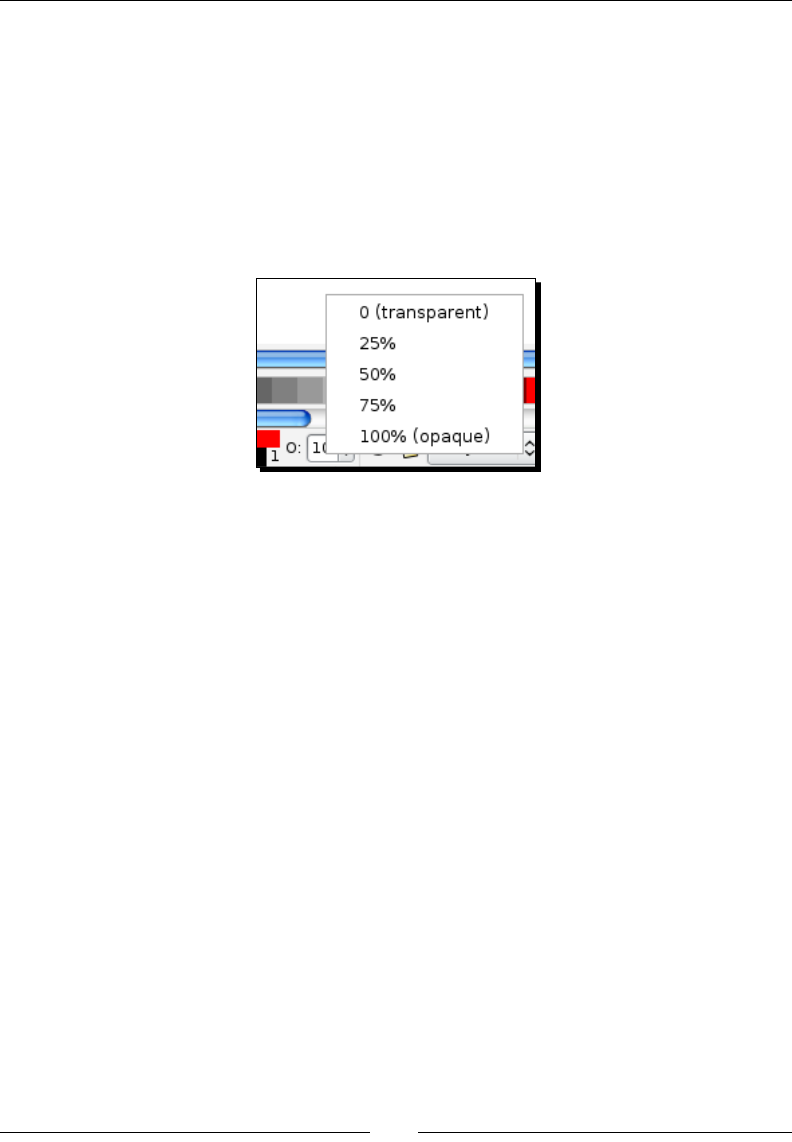
The Opacity Seng is the drop-down box near the Style Indicators.
Right-click the drop-down box to change the opacity (or transparency)
percentage (%) value (the default is 100%). A pop-up menu displays a
set of preset values to choose from. If you le-click the drop-down box,
it allows direct entry of a value or a change of the value with the
up/down arrows.
Layer informaon: Within Inkscape, when you create documents, you
can have many layers of objects. This gives great exibility when creang
graphics of any kind. You can move groups of objects at once (placing a
group of them on a layer) and separate objects by layer to manipulate and
aect how they interact with one another when stacked, re-ordered, or
hidden. You can also set certain sengs by layer. You can even create dras
or dierent versions of mockups and keep all of this in one le.
The layer informaon lets you choose which layer you are currently using
and placing objects to—this is called the drawing layer. You can then
set whether this layer is visible or locked. Somemes you can use your
documents as a working dra and decide to hide certain layers while
developing others. You might also lock layers when you have specied
the exact posioning that you require and you don't want it accidentally
changed while manipulang other layers. Changing the visibility of layers
can also speed up eding when working on large or very detailed objects.
Nocaon area: This contains hints or tricks about the objects or area you
currently have selected in your document. Keep an eye on this area because
it guides you with helpful informaon as you work within the layer. This
feature is unique to Inkscape and the help messages change and update as
you use the soware to reect your available opons.

Chapter 2
[ 27 ]
Pointer or cursor posion: When designing any space— either for print or
web—it is oen important to get the precise placement of objects. To help
do this, somemes you want to see when/where your cursor or pointer is
placed on the screen. This is the area on the Inkscape main screen where
you can always see the exact x (horizontal) and y (vercal) placement of
your cursor within the document. The given X and Y coordinates are relave
to the boom-le corner of the document area.
Zoom: Use the zoom tools to magnify your canvas for super close-up work
or to zoom out to see the whole canvas in one shot. If you right-click the
zoom eld, a pop-up menu with commonly-used preset zoom levels is
displayed from which you can select one to immediately adjust the canvas
to. This is parcularly useful with illustraons containing lots of details
because you can customize your viewable magnicaon at any me
and to whatever level you would like.
Window resize: By default, Inkscape opens to a default window size. With
this resize window opon in the lower-right side of this area, you can click,
hold, and drag the window to an appropriate size for your computer screen.
Alternavely, you can choose to make the window full-screen by going to
the main menu and choosing View and then Full Screen (press F11 on a
Windows or Linux-based system). When re-opening a .svg le, Inkscape
will resize itself to the size that the window was when the le was saved.
The window size informaon is stored in the Inkscape .svg le itself.
What just happened?
You opened the Inkscape applicaon and familiarized yourself with the main
applicaon window.
In Inkscape, we learned that the interface itself can be a tool to help us create beer designs.
We reviewed:
The main menu and what each opon allows us to do
Each of the toolbars: command, snap, tool controls, palee, and status bar and what
they oer us in Inkscape
Installing and Opening Inkscape
[ 28 ]
Pop quiz – using Tools
Which toolbar is the most used in Inkscape?
a. Palee bar
b. Snap to bar
c. Command bar
d. Toolbox toolbar
Understanding a new document
Now that we have learned all the menus and toolbars, let's dig into what you can do with
your rst open document.
Time for action – learning more about the main screen
When you open Inkscape for the rst me, it opens a blank document automacally and you
are ready to roll. However, you can just as easily open another new document by going to
the main menu and selecng File | New.
You will be oered a number of choices of canvas sizes. Let's discuss the details of the canvas
and some addional properes of the interface that you will use when opening documents.
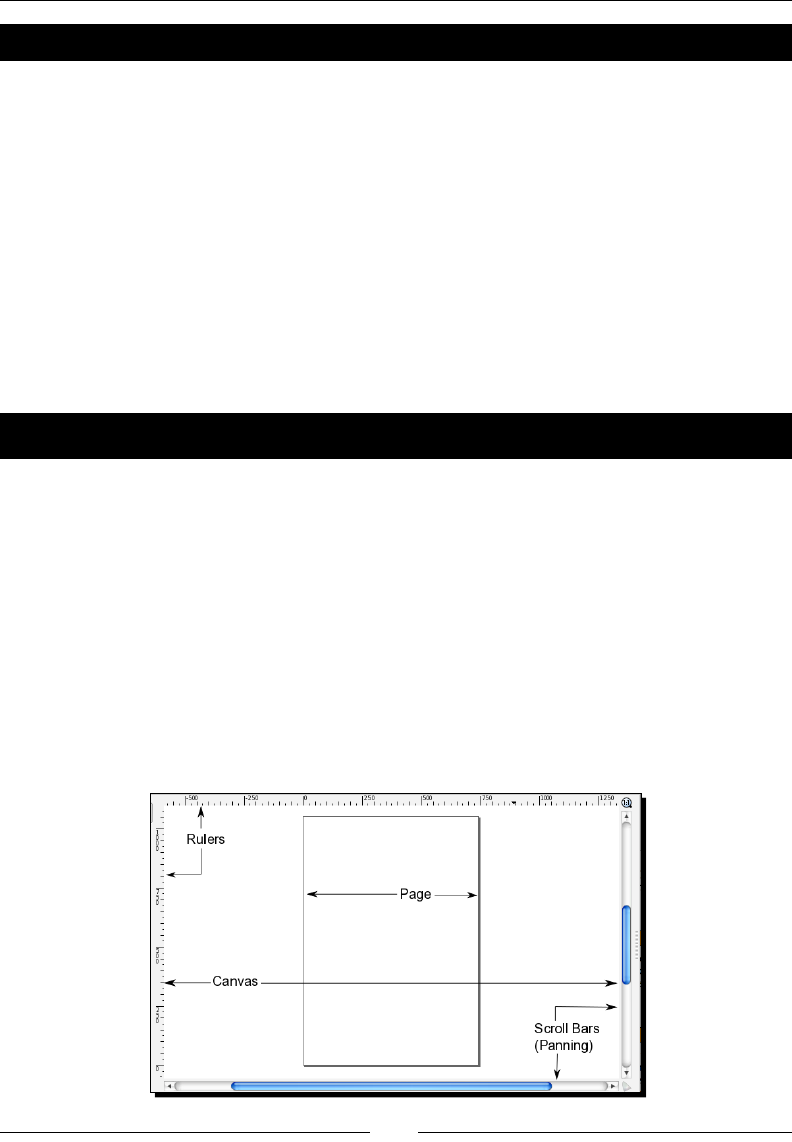
The terms 'canvas' and 'page' are used interchangeably within the Inkscape interface.
For simplicity, we'll refer to the canvas as the enre poron of the open document screen.
A page is the poron of the canvas that is contained within the printable area—seen as a
black-bordered box in the following screenshot:
With the main screen sll open in Inkscape, let's discuss this poron of the applicaon screen:

Chapter 2
[ 29 ]
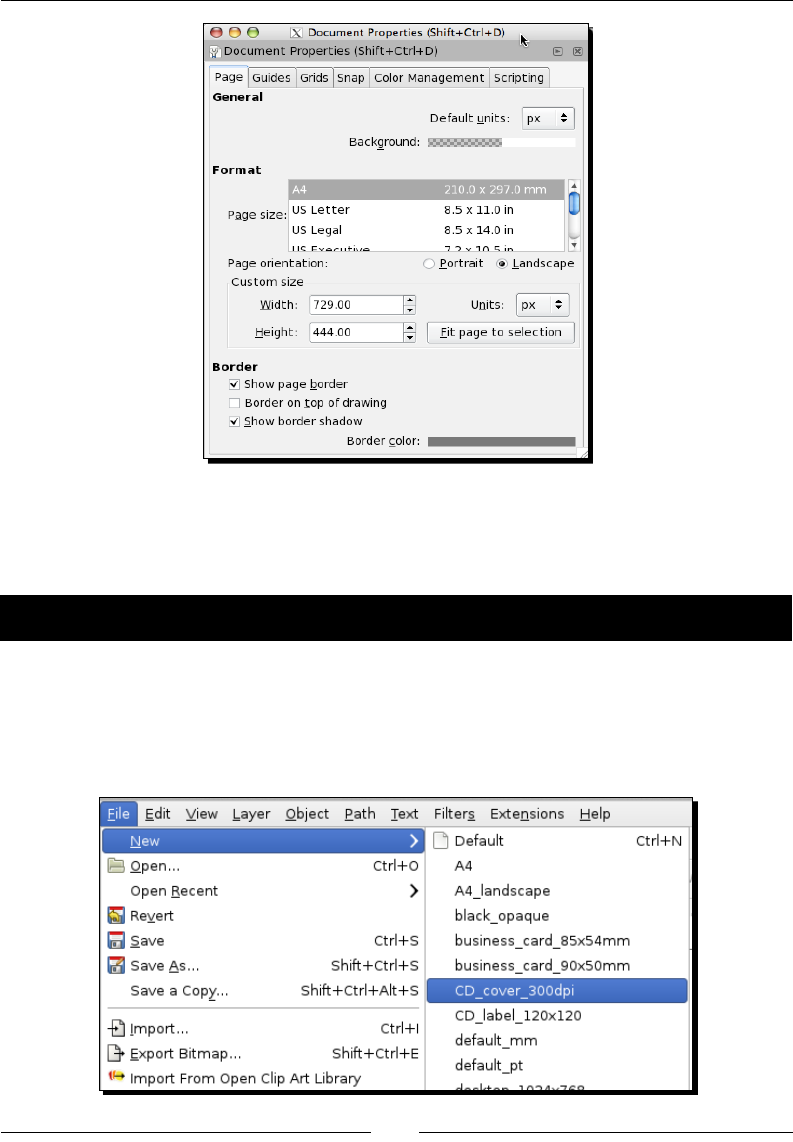
1. You can always adjust the page—or printable area—size. Go to the main menu,
select File, and then select Document Properes. In the Document Properes
window Page tab, look in the Format eld. You can select any number of
pre-dened sizes or change the Custom Size eld measurements to your liking.
The pre-dened sizes are specic to print media, while those found in
the main menu, File | New path, give common web design, logo, or web
banner-sized templates.
As soon as you make changes to these properes, you can see them reected
on your screen:
Installing and Opening Inkscape
[ 30 ]
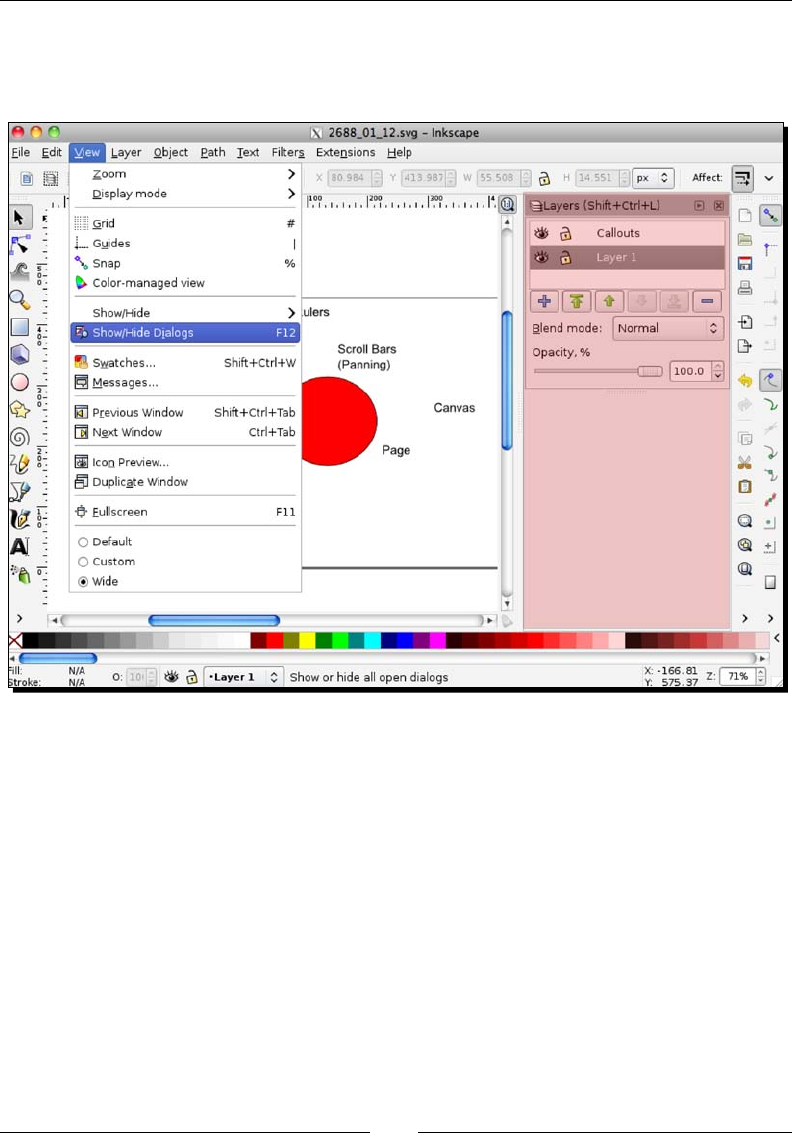
2. Dockable dialogs are a great feature in Inkscape 0.48. They give you more freedom
in your screen layout. You can show (or hide) dialog boxes on the right-hand side of
your screen:
Useful dialogs that can be docked on the right-hand side of the screen are:
Layers
Transform
Path Eect
SVG Font Editor
Filter Editor
Chapter 2
[ 31 ]
The docked dialogs can be minimized, rearranged, stacked, and undocked into a
separate window on your desktop. Here's how to do some of the basics:
Showing dialog boxes: To show these dialog boxes, on the main menu,
select View and select Show/Hide Dialogs. Then go to the Layer, Object,
Path, or Text menus and choose the Editor, Layer, or Property opons to
show the correlang dialog box.
Displaying more than one dialog box: If you open more than one dialog
box, they will stack in the order they were opened in the dialog area of the
main screen. Use the scroll bar to see those below the rst viewable dialog.
Minimizing dialog boxes: You can minimize a dialog so it appears as an icon.
To do this, press the right arrow buon, along the right-hand side of the
tle bar of each dialog box. This places a shortcut along the right side of
the Inkscape screen. To re-open it, just click the text/icon and the dialog
re-opens to the large state on the screen.
Floang dialog boxes: Dialogs can also be dragged o the main window
into their own window. Each dialog can have its own window or they can be
grouped in oang docks.
Closing dialog boxes: To close the dialog window, you can click the X on the
tle bar for that box. It immediately closes.
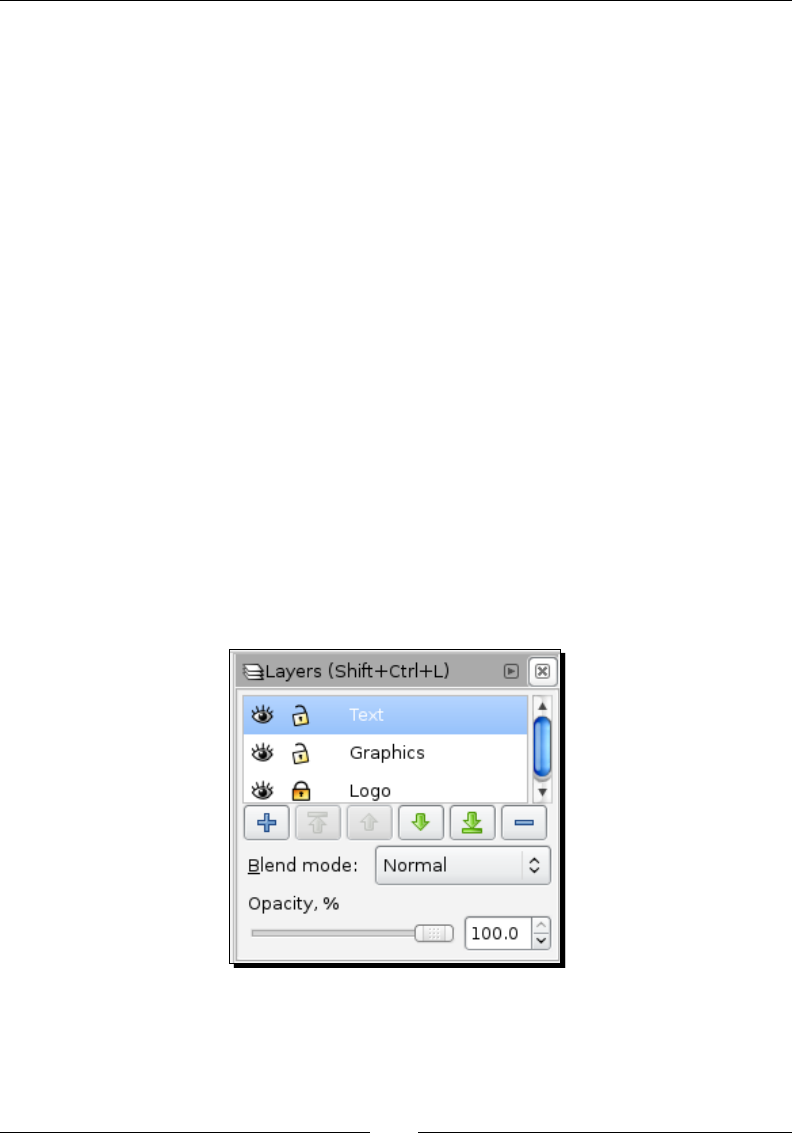
For inial designs of any kind, these Dockable dialogs can be extremely
useful. Having the Layers Dockable dialog visible is parcularly useful,
as it lets you select layers and re-order them quickly:
Installing and Opening Inkscape
[ 32 ]
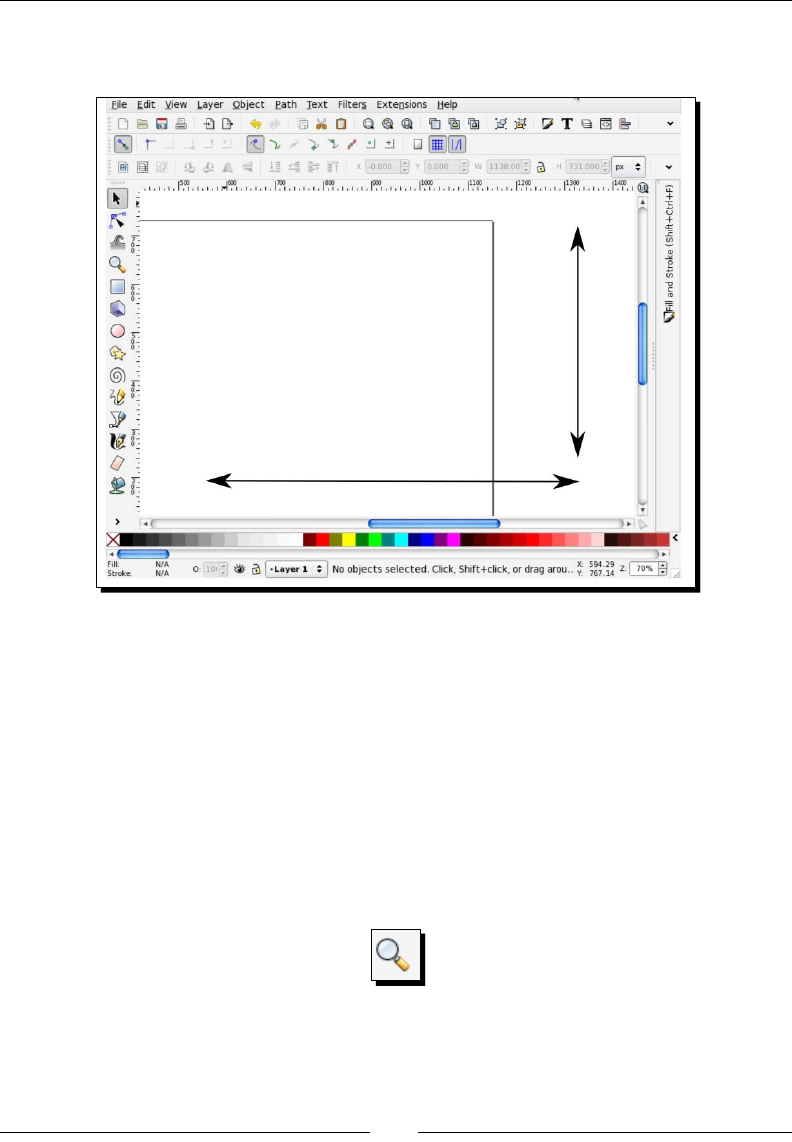
3. There are several ways to view your canvas or page in an open document.
Panning means moving le and right, or up and down on the main screen.
The easiest way to pan to the le or right is to use the horizontal scroll bar along the
boom of your Inkscape screen. Panning up and down can be done with the vercal
scroll bar on the right-hand side of the screen. If you have a mouse with a scroll
wheel you can use it to pan as well. Just scrolling with the wheel moves the canvas
up and down. Pressing Shi on the keyboard and then using the scroll wheel moves
it sideways.
As discussed in the status bar overview, you can use the zoom tool to magnify your
canvas, so that you can see a lot of detail (zoomed in) or the enre canvas at a
glance (zoomed out). By default, Inkscape will open documents at about 35%. You
can also use the zoom tool on the toolbox [inline graphic], a mouse with a scroll
wheel and the Ctrl key, or use your keypad (= or + zoom in and - zooms out).

Chapter 2
[ 33 ]
For easy access to the Zoom to t selecon, Zoom to t drawing, and Zoom to t
page in the window opons, see opons in the command bar. These opons can
also be set from the main menu by selecng View | Zoom.
What just happened?
The canvas or page in your Inkscape document can be a useful space, especially if you know
how to use it best. We learned that 'canvas' and 'page' are interchangeable terms, as well
as how to use scrollbars and all the intricacies of panning, zooming, and using Dockable
dialogs—which will be a common item that you will return to again and again as you work
on Inkscape projects.
Have a go hero – oating Dockable dialogs
Much like with the toolbars, you can move Dockable dialogs to be oang windows on your
screen as well:
To move any of the Dockable dialogs from their docking point on the le-hand side,
click-and-drag the tle bar out of the window
To close the Dockable dialog, click the close buon (outer-right) or click the dialog
close buon (on the tle bar, next to icon)
To re-dock the dialog, you must click-and-drag the tle bar into the Dockable area
Pop quiz – new documents
What is the easiest way to open a new document within Inkscape?
a. Close down the program and re-open it
b. There isn't a way to do this via Inkscape
c. Click the new document icon on the command bar
d. From the main menu, choose File | New
e. Open Document Properes from the File menu.

Installing and Opening Inkscape
[ 34 ]
Summary
We started this chapter by talking at a high level about Inkscape 0.48 and what you can do
with it. We then jumped right into learning how to download Inkscape, detailed descripons
about how to install the soware, and discussed all the main areas of the screen when
opening it for the rst me. We even talked a lile bit about how to troubleshoot the
Inkscape installaon and where to nd the best informaon about the soware—no maer
what your issue.
Aer opening our rst document, we talked about changing the document properes
and the value of scrolling, panning, and zooming. We even jumped into learning the basics
of the soware that will be key in starng our very own project. This is where we will start
with Chapter 3, How to Manage your Files. Get ready to learn how to set up a project and
get started!
3
How to Manage Files
This chapter is all about les and managing them. Inkscape can import a
number of le formats, edit them, and save them in a number of formats.
We will discuss all of that as well as the nave Inkscape SVG format, benets
of using projects folder, and embedding versus linking image les.
The following topics will be discussed in this chapter:
Creang new les
Saving Inkscape les
Creang a customized default document
How to structure project les
Imporng non-nave Inkscape les
Embedding and linking image les
Creating new les
As previously, stated when you rst open Inkscape, a new document is opened and ready to
start. However, it uses a default size of A4. You will likely need a whole array of other sizes for
print, web design, or even custom sizes. Here's how to access all of the predened document
dimensions Inkscape oers and details on how to adjust them manually for your needs.
How to Manage Files
[ 36 ]
Using predened-sized document dimensions
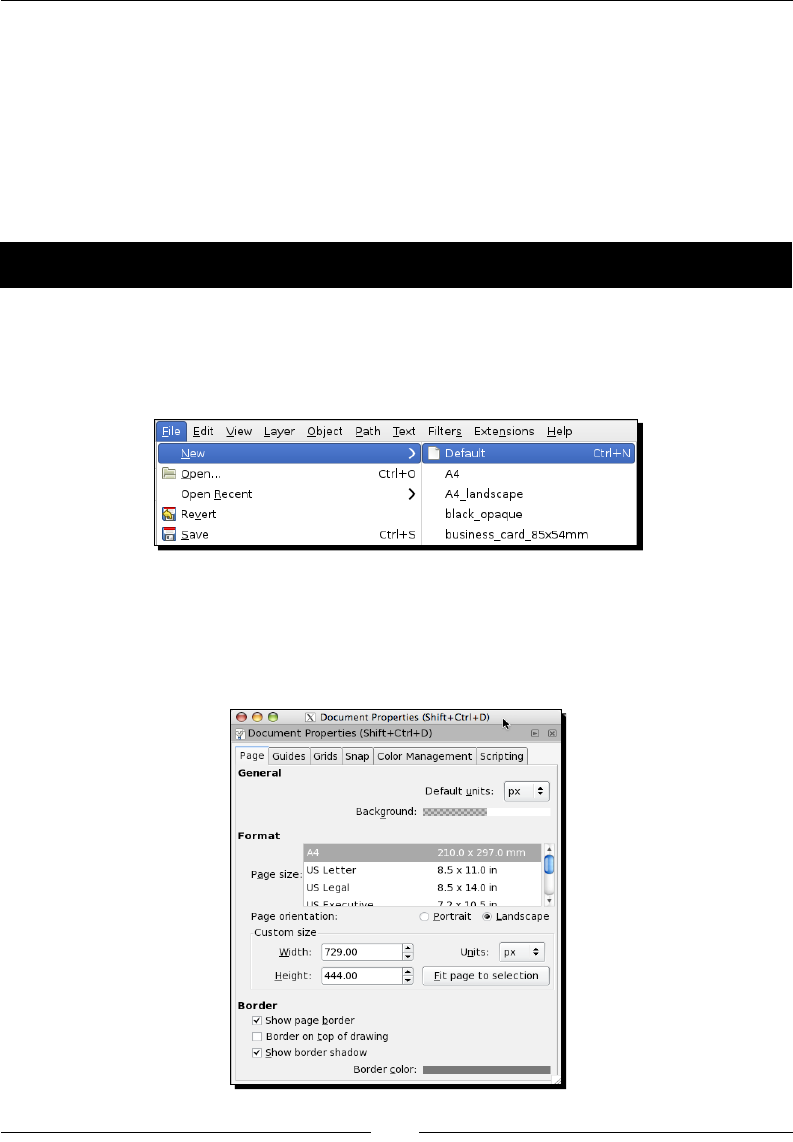
To see all predened document dimensions Inkscape has to oer, go the main menu and
choose File and then New.
Inkscape has many predened sizes already generated for you.
For web design, you can choose from the following:
Desktops with sizes 1024 x 768, 1600 x 1200, 640 x 480, or 800 x 600
Web banners with sizes 468 x 60 or 728 x 90
Icon sizes ranging from 16 x 16, 32 x 32, and 48 x 48
For print, there are many sizes you can choose from:
Leers: Standard US, A4
Business card sizes: 84 x 54mm, 90 X 50mm
CD Cover_300dpi: 343 X 340
CD label: 120x120
DVD covers: Regular, slim, super slim, and ultra slim
However, you can always change document dimensions to a custom size whenever you
like. Just go to the main menu and select File and then Document Properes. You'll see the
Document Properes window displayed with a number of opons for customizing your
canvas and printable page.
Chapter 3
[ 37 ]
As shown in the preceding screenshot, within the Format eld, you can choose any of the
predened values for Page size. Alternavely, you can use the Custom size eld to dene
the size directly.
Time for action – creating a new CD cover
Imagine that you would like to use Inkscape to design and create a simple CD cover for
a new music compilaon you created. Here's how to get started and open a predened
template in Inkscape:
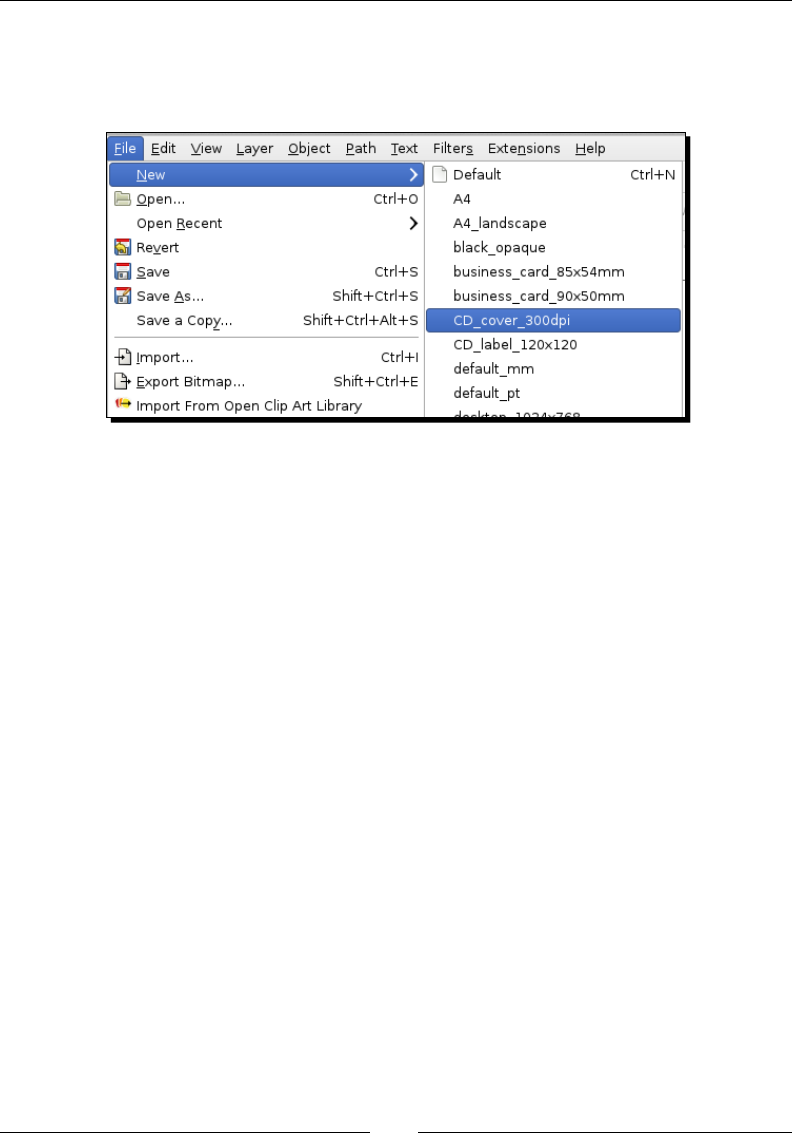
1. Open Inkscape, and from the main menu, select File | New | CD_cover_300dpi.
How to Manage Files
[ 38 ]
2. A new document opens to the correct dimensions.
What just happened?
Quite simply, these steps just opened up a new le in Inkscape to the exact dimensions
of a CD cover.
With the autodened templates, it takes the guesswork out of dimensions and lets you jump
right into the design. We'll get back to this CD cover and design in Chapter 4, How to build
your rst graphic.
Pop quiz – how do you change the dimensions of a predened graphic?
1. Once you open a predened template and start working, what do you do if you need
to change the dimensions?
a. Start the design all over in a new document (from the main menu,
select File | New).
b. Copy and paste the design into another le.
c. Go to the document properes (from the main menu, select File |
Document Properes) and adjust the dimensions and t the design.
Chapter 3
[ 39 ]
Custom document dimensions
In the last secon, we discussed creang a document that uses a predened size already
provided in Inkscape, but what if you need to create a le that is custom or not listed in the
template list?
It's easy. You start with the default page size in Inkscape and then use the Document
Properes window to adjust to the exact size you need.
Time for action – creating a new custom le size for a postcard
We're going to create a le that will be the exact size for a postcard.
1. From the Inkscape main menu, select File | New | Default. This opens a le with the
default dimensions of A4.
2. Now we want to customize those document dimensions. To do this, go to the main
menu and choose File | Document Properes. You'll see the Document Properes
window displayed with a number of opons for customizing your canvas and
printable page, as shown in the following screenshot:
How to Manage Files
[ 40 ]
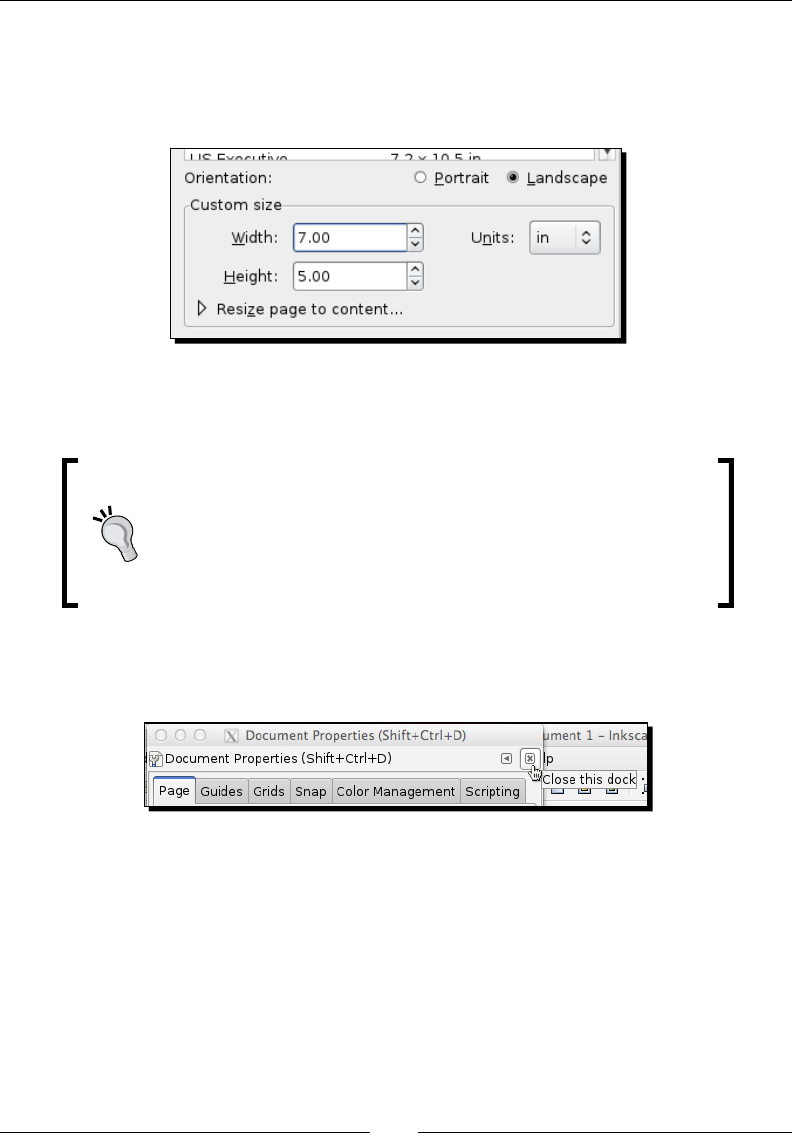
3. To change to the custom postcard size of 7 x 5 inches, we need to change the
following elds in the following order: Units to in (Inches), Width to 7, and Height
to 5. The changes on the Document Properes window should look similar to the
following screenshot:
Remember to change the Units rst; otherwise the Width and Height elds
will adjust to the new unit of measure and you will have to readjust them.
Changing page orientaon
Also note that you can change the Page Orientaon from Portrait
to Landscape (or vice versa) from the Document Properes screen.
Change the eld from below the Page Size selecon box. When
you do this, Inkscape automacally changes the Width and Height
values already entered in the Custom Size secon.
4. Close the Document Properes window/dock by clicking the X at the
upper-right corner.
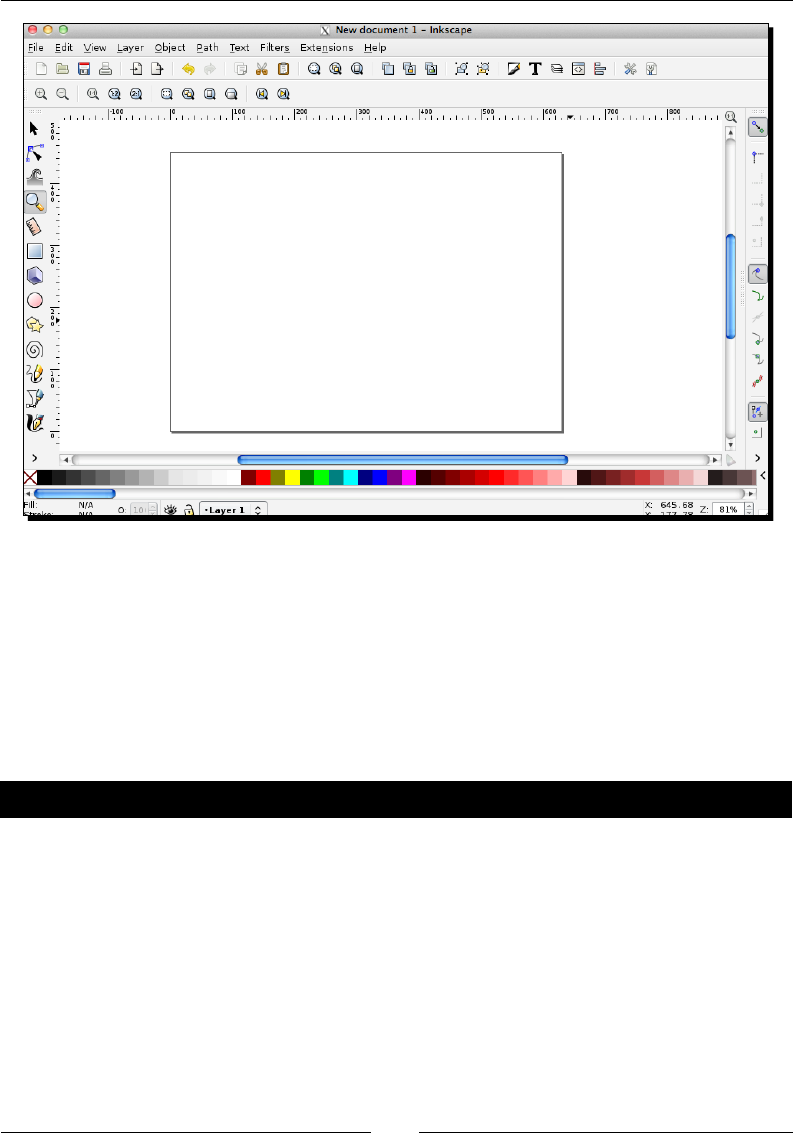
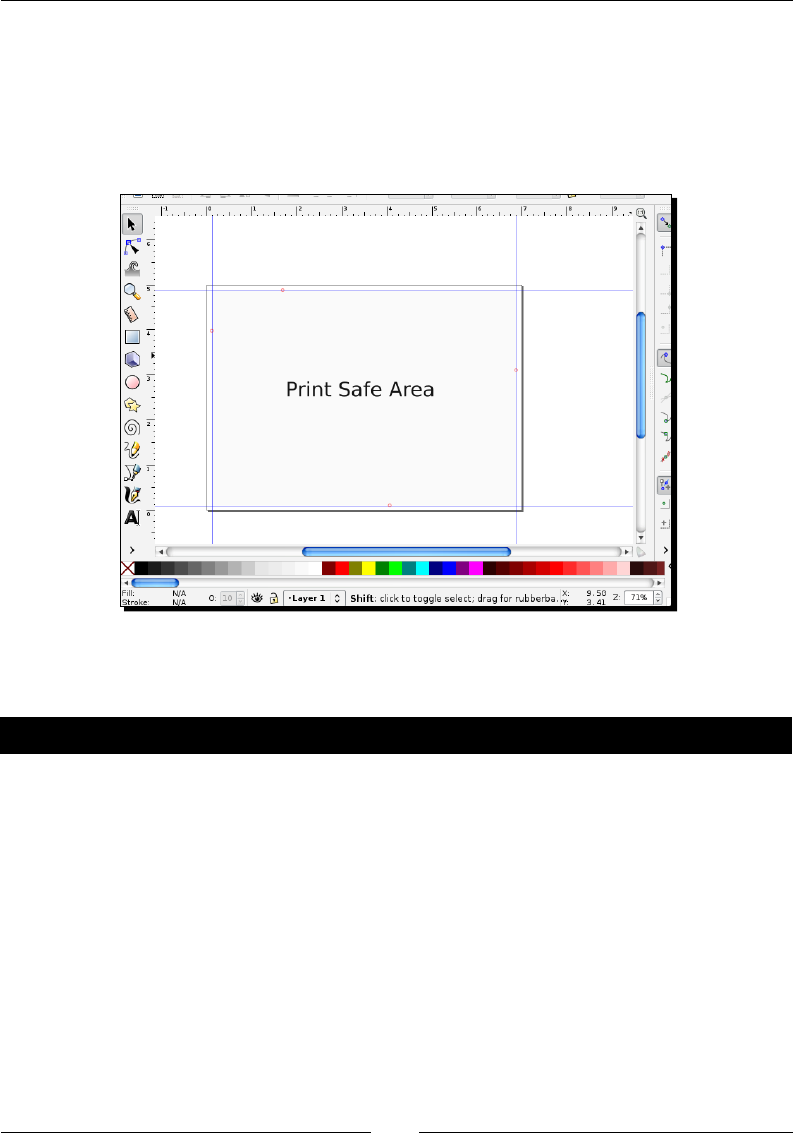
5. Your page will be resized to the new postcard custom dimensions, as shown in the
following screenshot:
Chapter 3
[ 41 ]
6. Keep this le open, as we will connue to manipulate it in the next secon, Have a
go hero – adding a print-safe border.
What just happened?
In a nutshell, we opened a new Inkscape le and then adjusted the document properes so
that the page dimensions were set for our 7 x 5 postcard project. Now we are ready to start
designing the layout of the postcard.
Have a go hero – adding a print-safe border
So now you have the page dimensions set accurately. What about seng up the le for
the design? You'll need to create guides around the page edges—about one-eighth of an
inch—to accommodate for prinng and then cung o the paper to size. Any and all design
would need to stay within that border to be considered print-safe.
Here's how to set this up:
1. Open your 7 X 5 postcard le again (if it is not already open from the last exercise).
2. From the main menu, choose File | Document Properes.
How to Manage Files
[ 42 ]
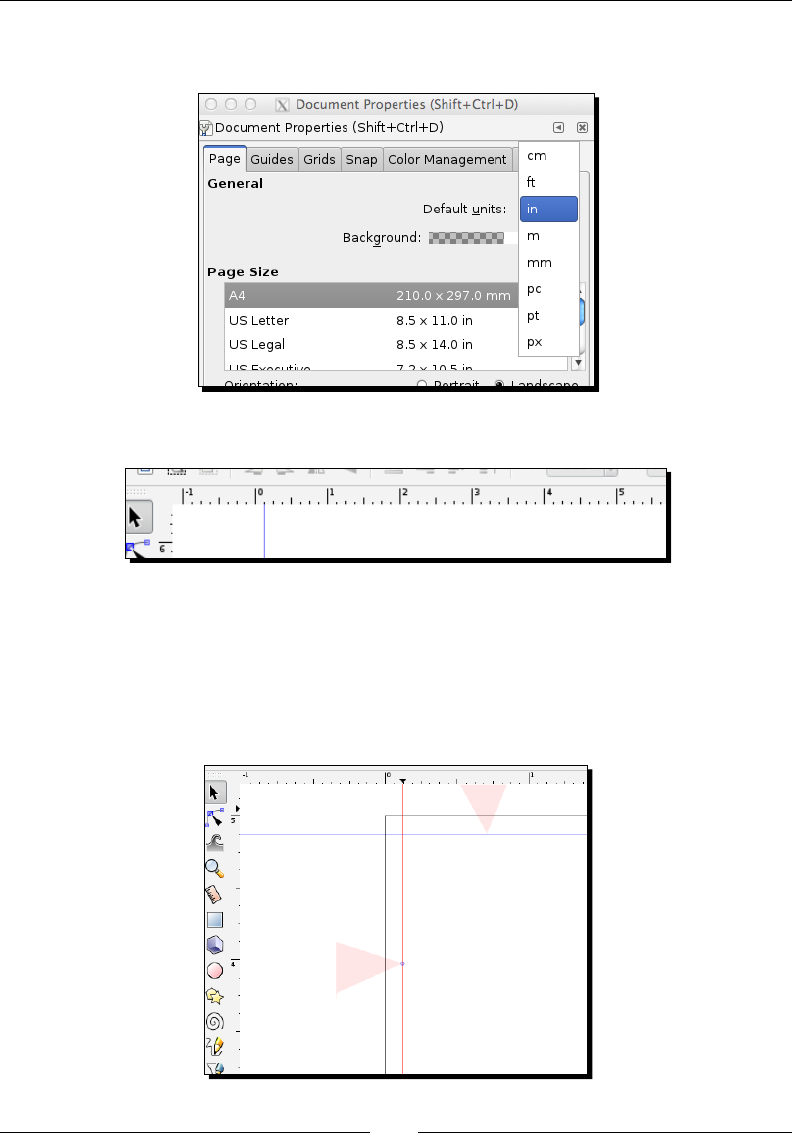
3. In the Document Properes window, in the General secon, change the Default
units to in (inches), as shown in the following screenshot:
4. Now the ruler on the Inkscape screen will display units of inches.
5. Now it's me to create guides. Guides are lines on the screen that you will use for
aligning, that is, guiding objects. These lines are only seen while you are working
in Inkscape. To create a guide, make sure the Select Tool is selected, click inside
the ruler area on your main screen and drag towards your page, as shown in the
following screenshot. A red line represents the guide unl you let go of the guide
and place it on the page. Then the line turns blue.
Chapter 3
[ 43 ]
6. To make sure you posion a right, le, top, and boom guide one-eighth of an inch
from each of the edges of the document, as shown in the following screenshot, you
can hover over the guide line; when it turns red, double-click to bring up the dialog
box to make sure the measurement is set at one-eighth of an inch. Now all of the
space in the box is considered safe for design and will not be cut o during the print
producon of the postcards.
Again, we will connue to work with this le in the following exercise. Keep it open and
ready for us to connue manipulang the le.
Have a go hero – adding a print bleed
What if you needed to adjust the postcard size to accommodate a bleed of the margins?
A bleed means when an image or element on a page touches the edge of the page, oen
extending beyond the trim edge so there is no margin. Bleeds can extend o one or more
sides of a page.
Let's begin with our print-ready postcard le from the previous secon.
1. Open our 7 X 5 postcard le with the guides in place (if it is not already open from
the last exercise).
2. From the main menu, choose Extensions | Render | Prinng Marks. This will add
crop and bleed marks with a specied bleed area to our canvas.
3. Create new guides (while leaving our previously created print-safe guides as is)
that match the distance of the bleed marks (doed marks).
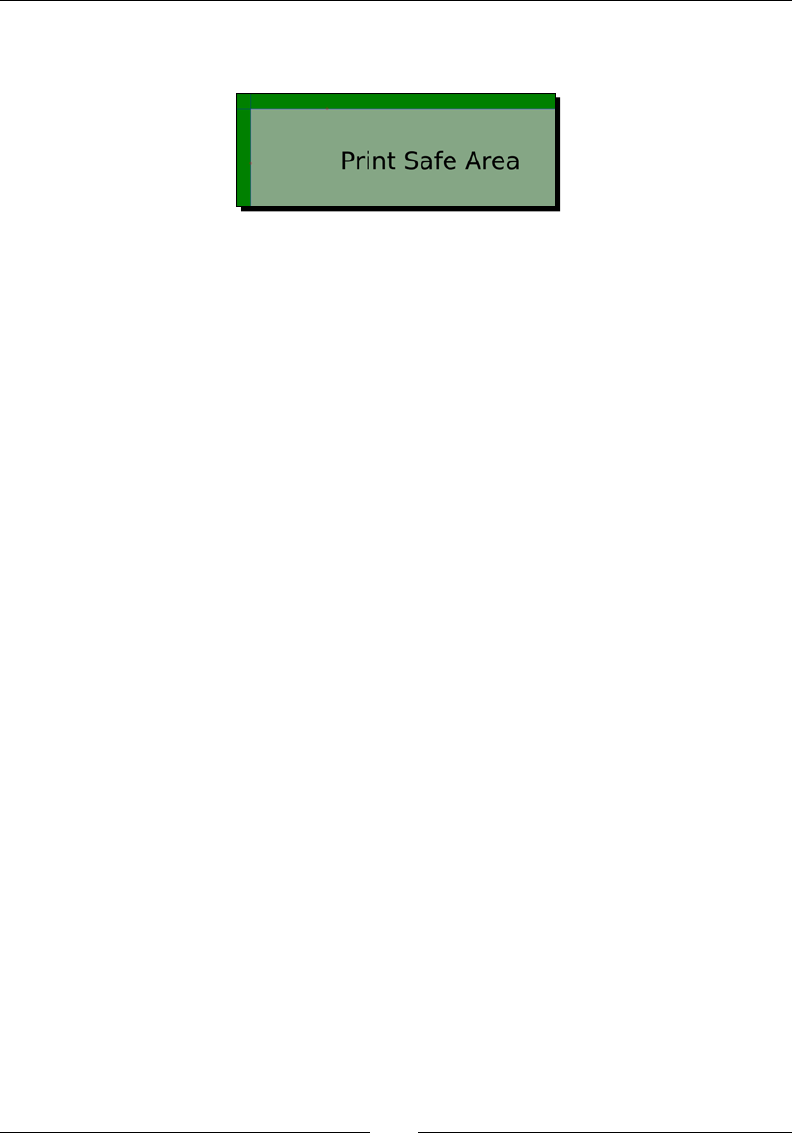
How to Manage Files
[ 44 ]
4. Now when you design, they can bleed past the Print Safe Area, so they bleed to the
edge of the paper when cut.
Saving Inkscape les
As you begin working on your projects, it is always good pracce to save les oen. Inkscape
has a number of save opons, in a number of formats, as well as ways to export into other
common le formats.
By default, Inkscape typically saves les to your main documents folder. However, you are
given an opon to change this during the saving process each and every me you save a le.
Saving in Inkscape SVG
By default, Inkscape les are saved as SVG les. The nave Inkscape SVG format allows
eding at a later me. If le size is a concern, you can also save in the Inkscape-compressed
format of SVGZ and you will have no issues eding the le and resaving it for future use.
Inkscape can save as SVG, SVGZ, PDF, PostScript/EPS/EPSi, Adobe Illustrator (*.ai), LaTex
(*.tex), POVRay (*.pov), HPGL, and others. This is important because you can share les
with others, which they are able to then open and manipulate.
If you work in web design, note that it is possible that you can use the SVG les directly in
the HTML/XML code. However, you should work with your programming team to conrm
that they can use the SVG format. (Not all browsers or plaorms support this).
Saving a le in any other non-Inkscape-SVG-format could potenally make it uneditable to
the extent of the original. So, always save the nave Inkscape document and then export
bitmaps and other graphics and/or use File | Save Copy As to save it in another format.
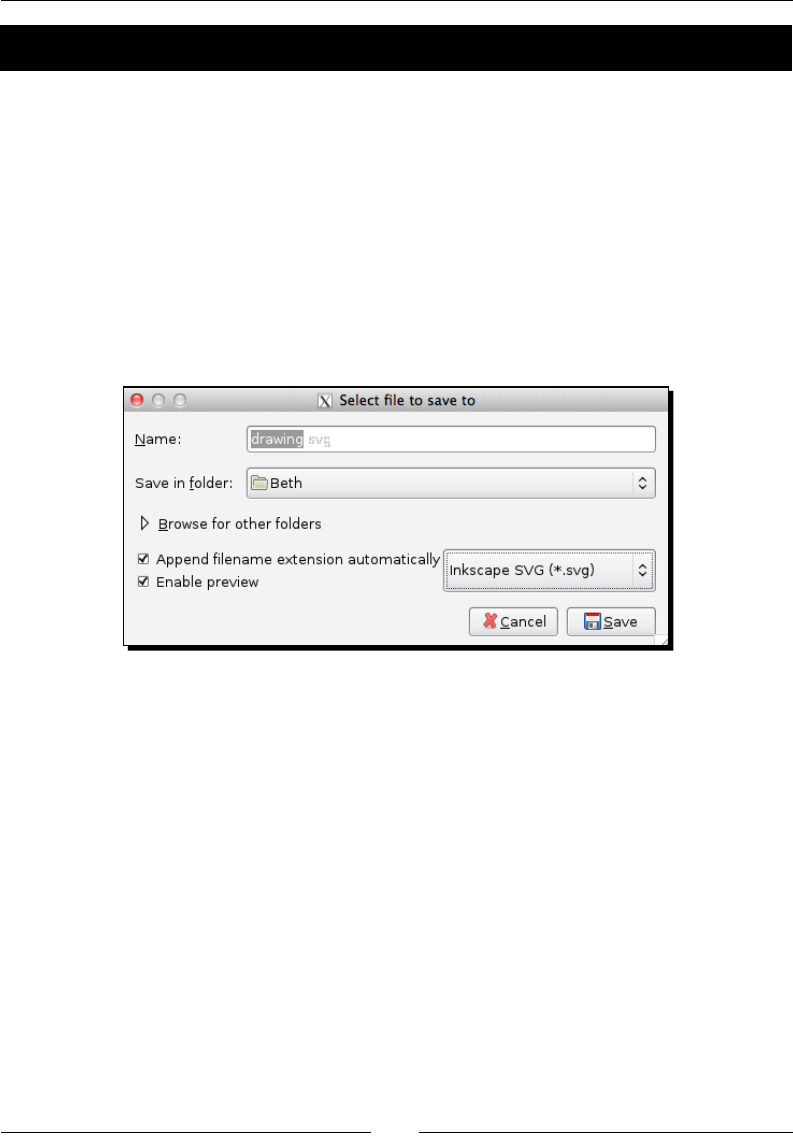
Chapter 3
[ 45 ]
Time for action – saving an Inkscape SVG
Since you have just started using Inkscape, let's use an example le to learn about the save
features of Inkscape. Open your browser and go to the following link:
http://www.openclipart.org/people/kuba/LGM_poster2.svg
Right-click on the image and select Save As. When prompted, save the le to a locaon on
your computer (for example, your desktop). We will use this OpenClip Art Inkscape le for
this exercise:
1. Open the example le in Inkscape.
2. Once open, from the main menu, select File | Save.
3. In the Select le to save to window, type a new name for your le (for example,
drawing.svg).
4. Choose a folder to save the le to—including choosing Browse for other folders
if you'd like to choose another locaon.
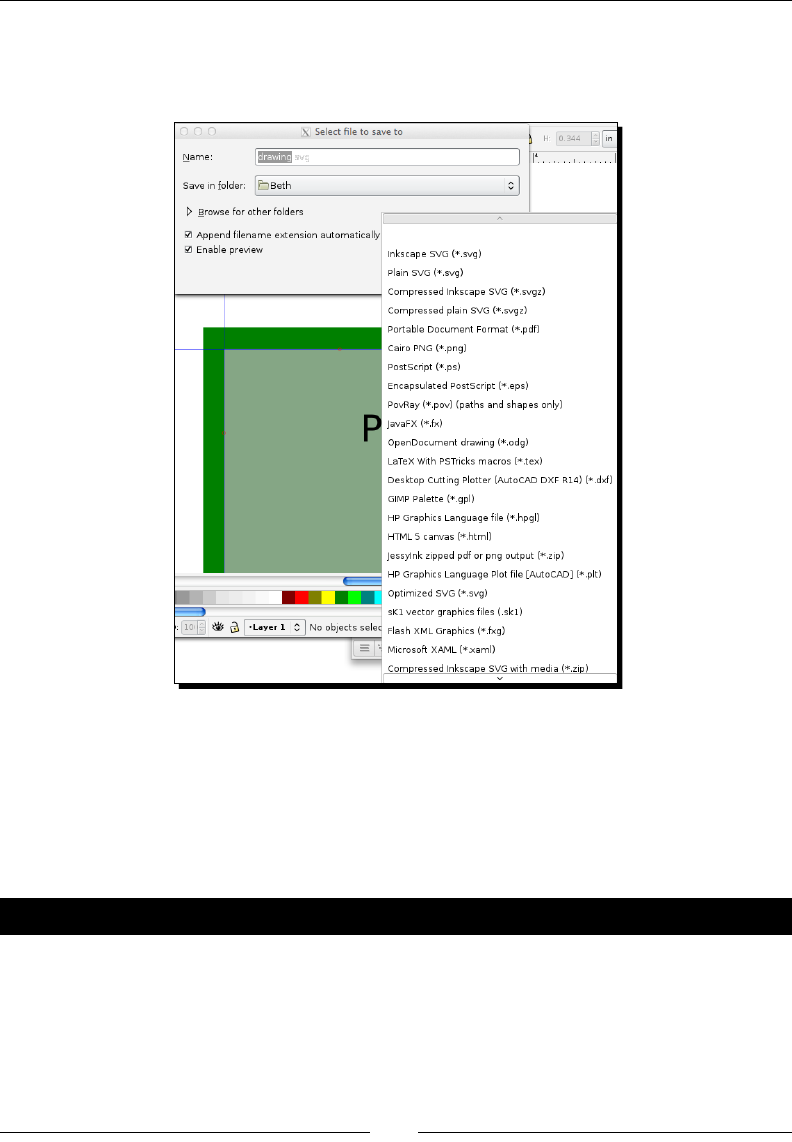
How to Manage Files
[ 46 ]
5. Again, note, by default the le will be saved as Inkscape SVG (*.svg), but there are a
number of other formats to choose from in this menu. However, as stated, you may
lose editability of the le once saved in another non-SVG format.
6. Click Save.
What just happened?
We just saved our current working le as an Inkscape (editable) SVG le—the nave le
format of Inkscape—to a specied locaon on our computer for future use.
Pop quiz – editable Inkscape le formats
1. What is the nave or default Inkscape le format?
a. VGS
b. SVG
c. PNG
d. PDF
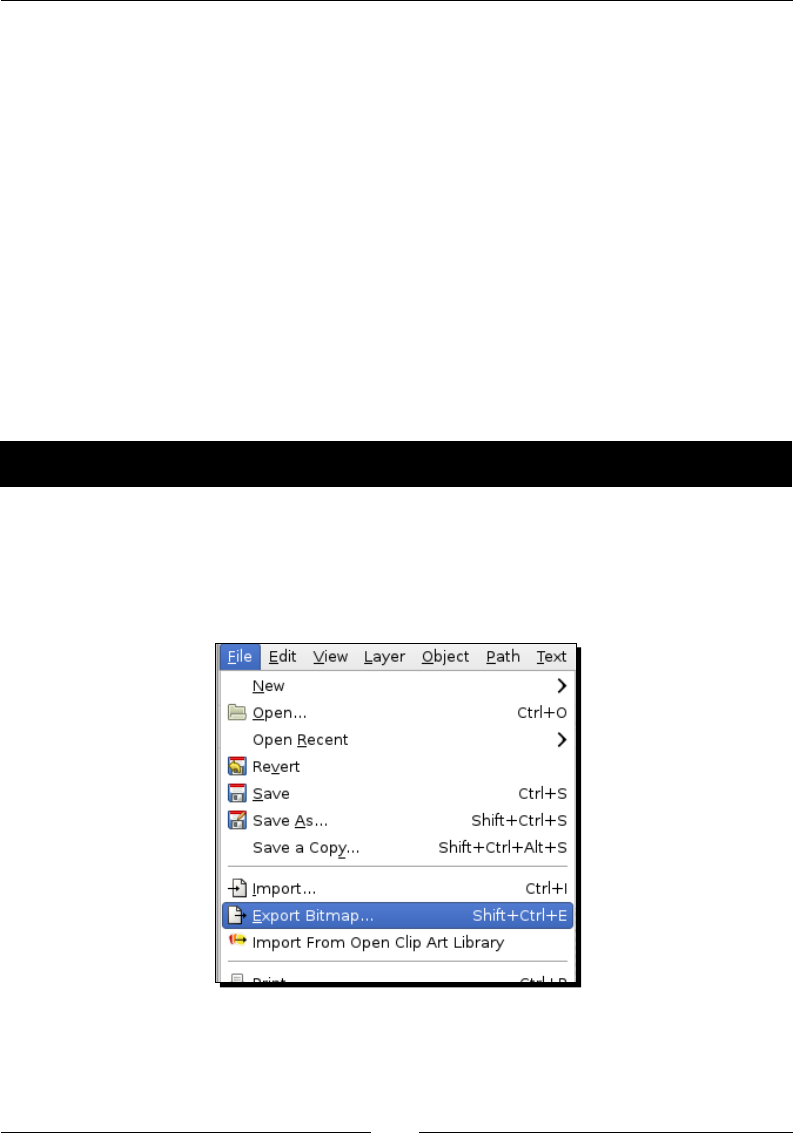
Chapter 3
[ 47 ]
Exporting les
Inkscape's Export Bitmap opon only allows you to export to Portable Network Graphics
(PNG). This is an image format that uses lossless data compression.
However, there are a number of exporng opons that are available.
Exporng a page: Exporng the page (the bordered area) in PNG format is useful
when the client wants to see a mockup of the nal design for review comments or
approvals—especially in web design. Mockups or wireframes allow someone to see
a layout without having a need to interact with a live website.
Exporng a drawing: This will export all objects in a drawing, including those placed
outside the page (bordered area).
Exporng a selecon: If you have an object selected on or o the canvas, and
choose this opon, it will be saved as a PNG le. This is most useful for elements
of a web design such as logos, wordmarks, and various other web graphics.
Time for action – exporting to PNG
Let's give this Export funconality a try. We'll use the postcard le we created in the previous
secon with a very simple design added to show how this is done.
1. With the postcard le open from the previous secon, from the main menu, select
File | Export Bitmap.
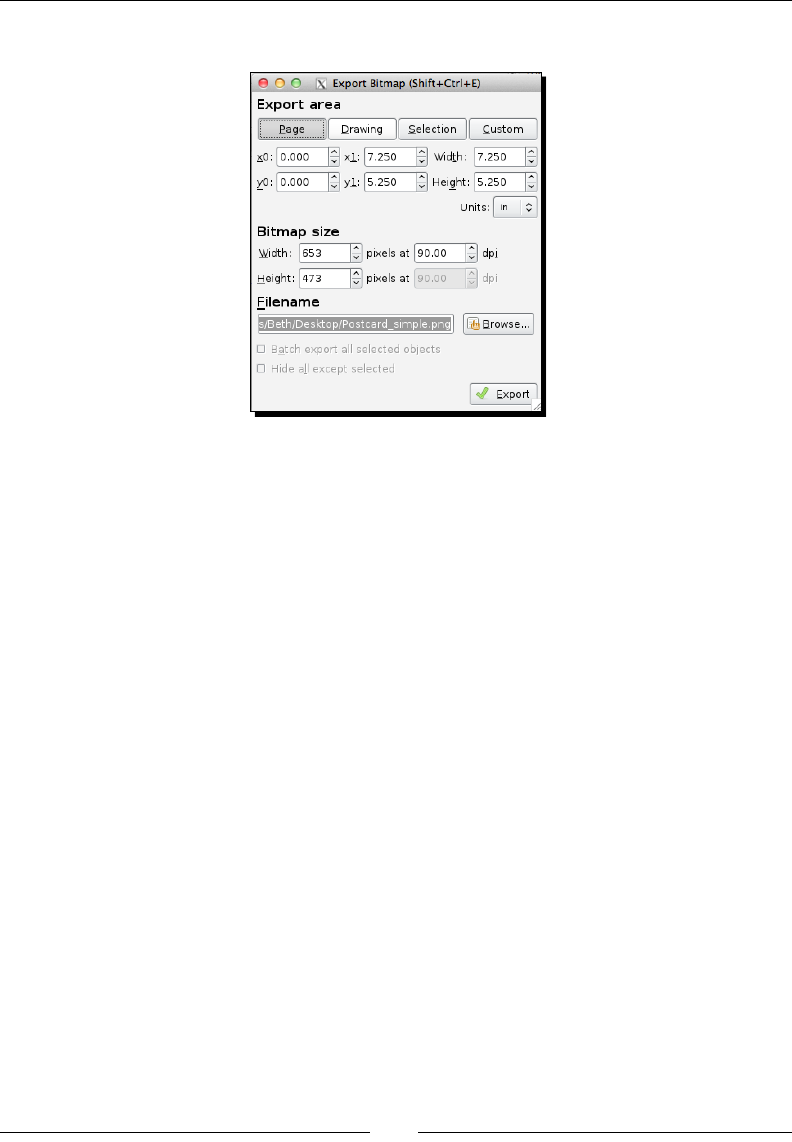
How to Manage Files
[ 48 ]
2. The Export Window is displayed, as shown in the following screenshot:
3. On this window, you will see a number of opons along the top that detail how you
might want to export the screen contents.
4. If you want to export the enre document, as shown in one bitmap image, then
select Page.
5. If you want to export all objects in a drawing, including those placed outside the
canvas/page, select Drawing.
6. If you want to export only a selected object (which you would see with an outline
and nodes on the screen), select Selecon. However, this opon is only available if
items are selected in the drawing before you start the export process.
7. Click Browse to change the default lename and/or the locaon where you want the
le to be saved.
8. Click Export.
Your new PNG le is saved. Remember the PNG you exported from these steps won't be
editable in Inkscape and the layers will not be intact, but you should be able to import it for
use in another SVG le.
What just happened?
You took a project le and exported it as a PNG le type. This le type is a bitmap or rasterized
graphic le type that is not editable in Inkscape, but can be imported into Inkscape to be used
as part of another project.
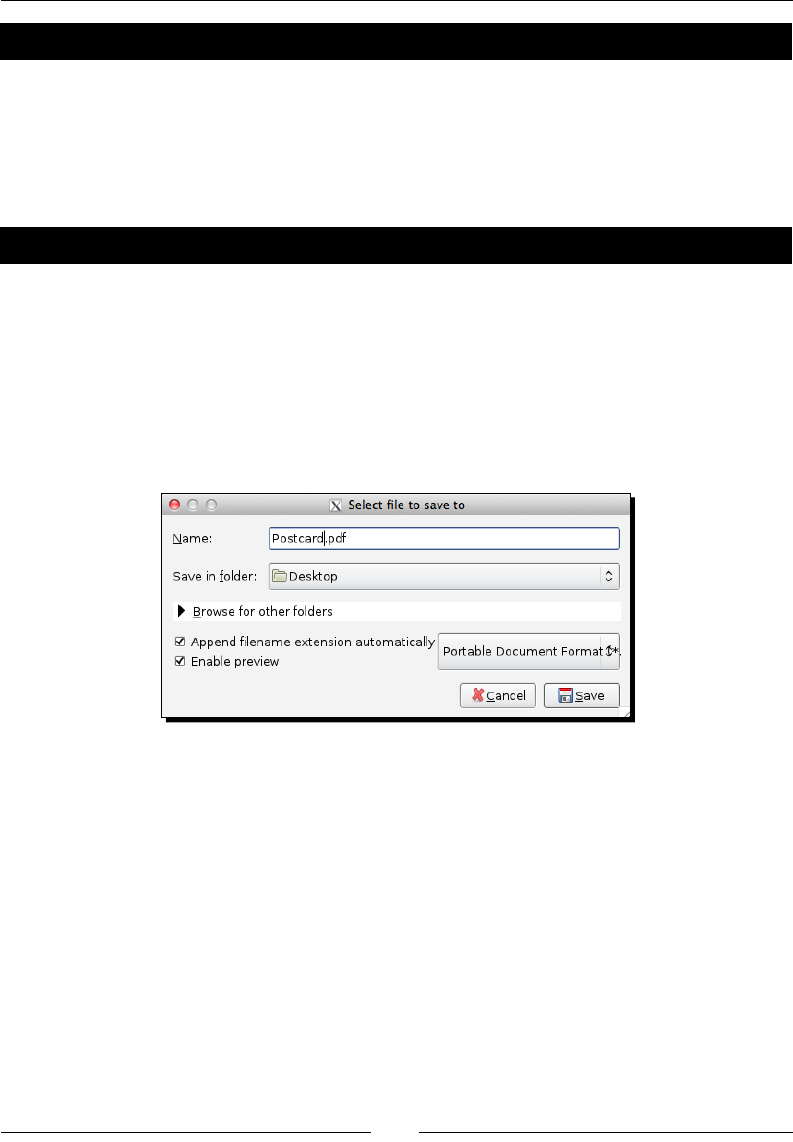
Chapter 3
[ 49 ]
Pop quiz – Export versus Save As
1. If you want to save a le as a PDF in Inkscape, what would you need to do?
a. Use the File | Export Bitmap feature.
b. Find another program that can open SVG les to do it for you.
c. Use File | Save or File| Save As.
Have a go hero – saving your Inkscape le as a PDF
Since we have discussed PDF les and their importance for mockups as well as transferability
between compable soware, let's learn how to save an Inkscape le as a PDF for this same
purpose. PDF le sizes can typically be small and they can be opened by many programs
(that are not graphics-based). In fact, you can even use PDFs for print projects or simple
review les.
1. With Inkscape open and the postcard le acve, from the main menu, select
File | Save.
2. In the Select le to save to window, choose Portable Document Format (*pdf)
as the le format.
3. In the Name eld, type a name for your le (for example, postcard.pdf).
4. Choose a folder to save the le to—including choosing Browse for other folders,
if you'd like to choose another locaon.
5. Click Save.
Creating a customized default document
When working in print design, oen you might need to create a parcular size document
again and again. Perhaps, Inkscape does not oer this as a default size. You can then create
a custom document and force Inkscape to use it as the default document size.
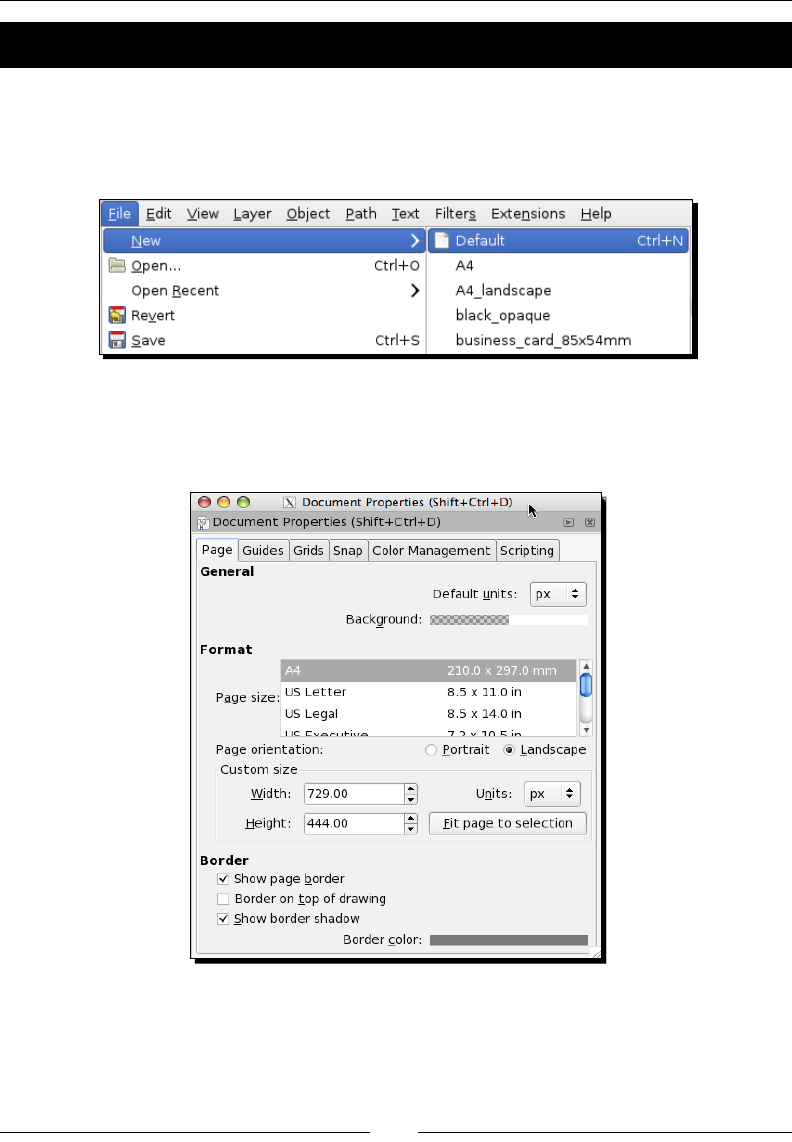
How to Manage Files
[ 50 ]
Time for action – creating a new default document
We're going to create a new default document with a custom size.
1. From the Inkscape main menu, select File | New | Default. This opens a le with the
default dimensions of A4, as shown in the following screenshot:
2. Now customize those document dimensions. From the main menu, choose File |
Document Properes. You'll see the Document Properes window displayed, as
shown in the following screenshot:
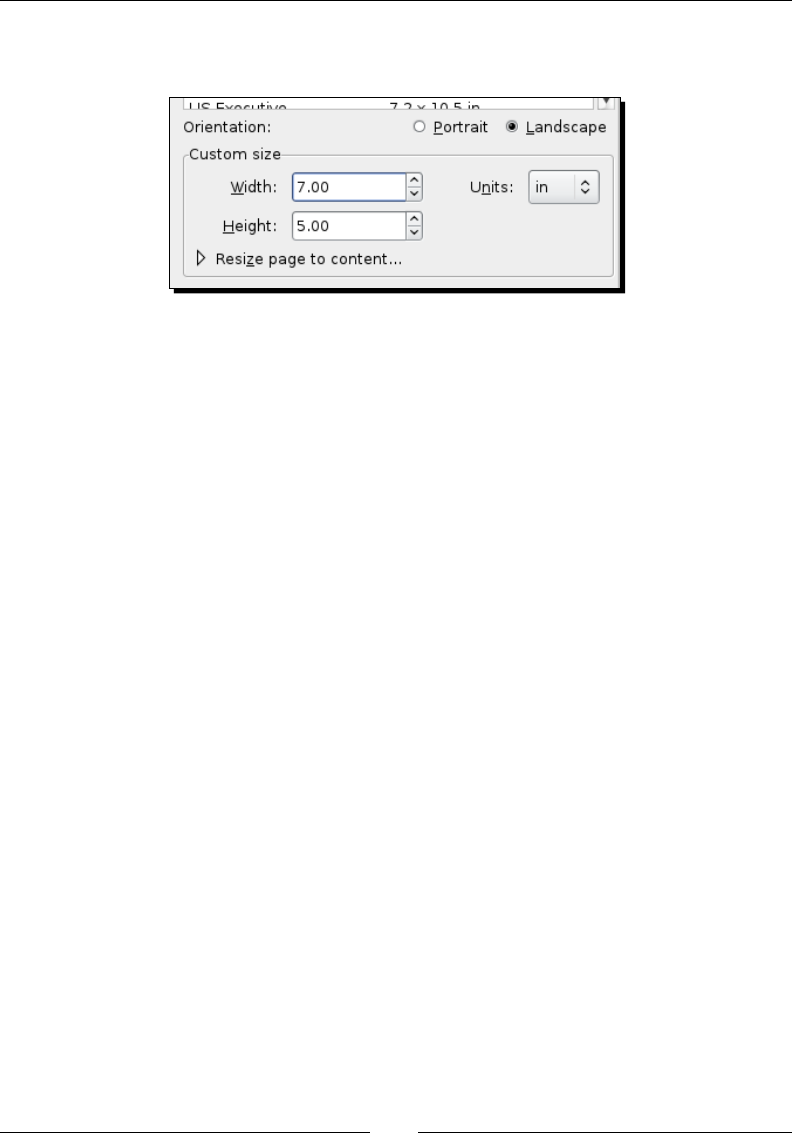
Chapter 3
[ 51 ]
3. Change the Units to in (Inches), Width to 7, and Height to 5. The changes on the
Document Properes window should look similar to the following screenshot:
Remember to change the Units rst; otherwise the Width and Height elds will
adjust to the new unit of measurement and you will have to readjust them.
4. Close the Document Properes window/dock by clicking the X at the
upper-right corner.
5. From the main menu, select File | Save As. Choose the following directories to save
as a new default:
For Windows, save to the share directory within the Inkscape directory.
C:\Program Files\Inkscape\share\default.svg
For Mac and Linux users, save the le to: /usr/share/inkscape/templates/
default.svg
6. Once saved, when you open a new Inkscape document and choose File | New |
Default, a document with your specic dimensions will be opened.
What just happened?
We created a new default document in Inkscape and then saved it so that it will
automacally open when you choose Default from the new le menu.
How to structure project les
The last secon was about saving individual les. However, you may nd yourself designing
enre web pages or large projects that require more than one Inkscape le. To do this, it
requires some basic organizaon of les within directories or folders to make nding (and
using) the Inkscape les easier to use—specically when saving enre pages of content as
individual graphic les. The following secon details how best to manage mulple le projects.
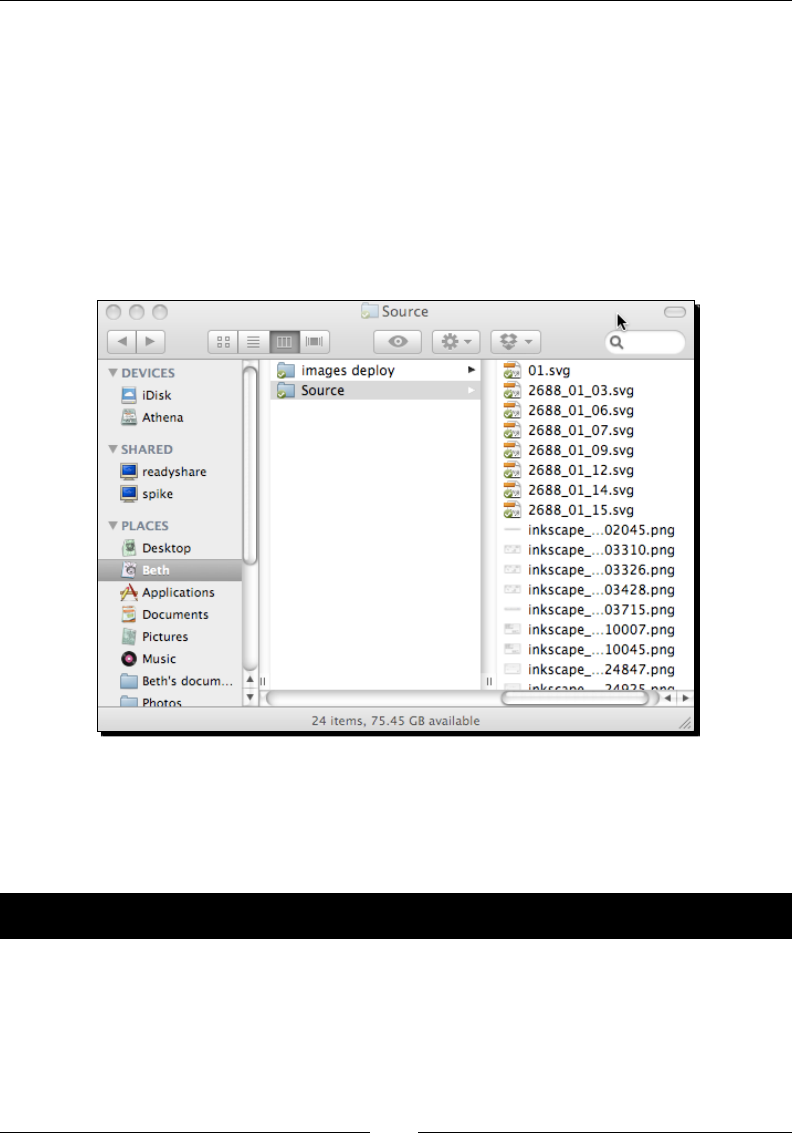
How to Manage Files
[ 52 ]
Managing multiple le projects
Simply put, if you create one directory or folder where you store all of the les for one
project, you can minimize mismanagement of les. Within that directory, you will have
more control over how you structure your les for revisions and dras for work.
As stated, it starts with a project folder placed on your computer in an easy-to-access
locaon. Whenever you create a new le in Inkscape for this project, you can save those
source Inkscape les in a folder named Source. Then you can also create a Deployment
folder (or another intuive name) where you export all the les in the various formats you
need to hand o to a developer for website integraon or as print-ready les for a printer.
This can get a bit complicated when you decide to save all selected les on a page as individual
images. Inkscape allows you to do what is called a batch save process. This means you save all
the les with just one buon press. Where it gets tricky is the save locaon and thus it is good
pracce to have directories in which to save les. Let's see how this is done.
Time for action – exporting a batch of images
We're going to look in detail at how to save an enre page or canvas of images as separate
graphic les. This pracce is common in web design when each image needs to be called to
acon in the HTML code. It can also be useful if you have developed a print design and want
to save a logo, a block of text, and some graphical elements for use in another piece of the
same client.
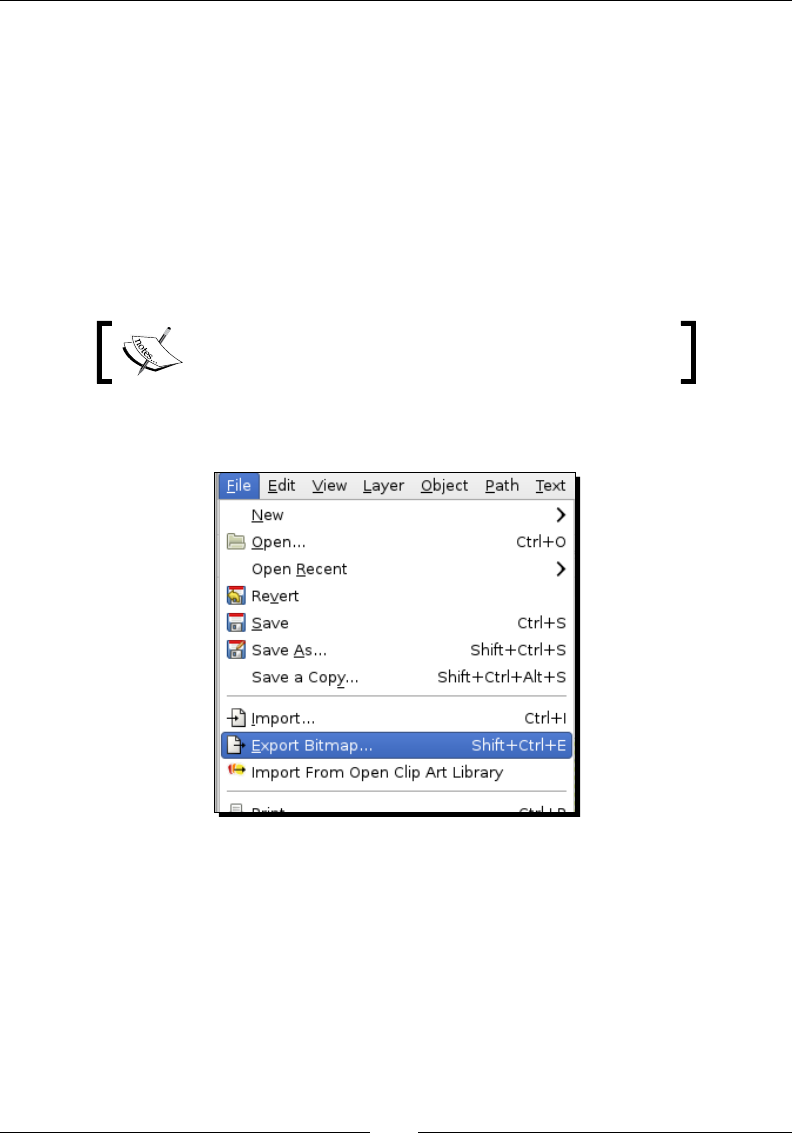
Chapter 3
[ 53 ]
1. We will use the sample le from the previous secon again for this exercise. If you
have not downloaded the le, open your browser and go to the following link:
http://www.openclipart.org/people/kuba/LGM_poster2.svg
Right-click the image and save to a locaon on your computer.
2. Open the example le in Inkscape.
3. On the main menu, select Edit | Select All in All Layers. Now all the objects
within this example le will be selected. You should see dashed borders around
each object.
We will discuss Layers in detail in Chapter 5, Working with
Layers.
4. It's me to export. From the main menu, select File | Export Bitmap.
The Export Bitmap window displays.
5. This me, we want to choose Selecon from the top bar.
6. In the Filename eld, type the directory folder that you want all object images to be
saved to. If you choose to browse to a directory, you may need to select a le for the
path to be accepted in this eld.
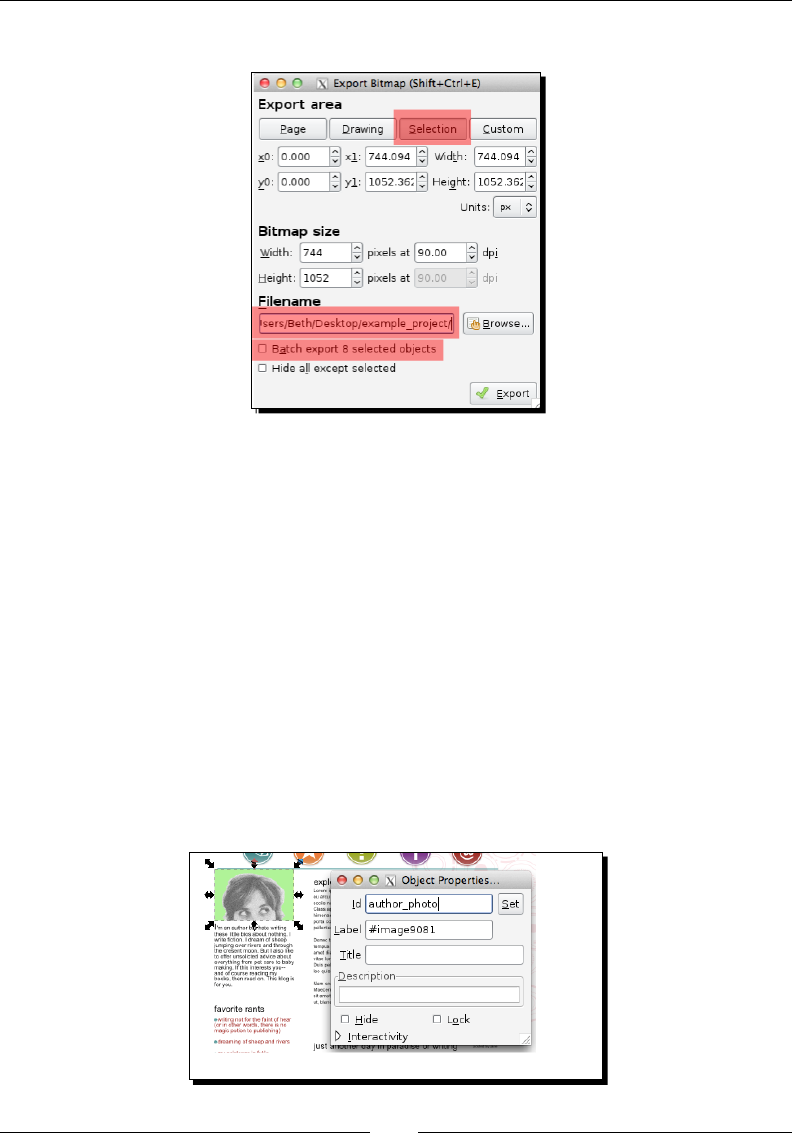
How to Manage Files
[ 54 ]
7. Enable the Batch export 8 selected objects checkbox.
8. Click Export.
What just happened?
With a few simple steps in the Export Bitmap window, you were able to save eight objects
as separate PNG les in a specied directory.
Inkscape uses object IDs when automacally assigning lenames during an export.
The object IDs, by default, aren't descripve and are oen a basic descripon of the
object with a number. However, you can rename the object ID on your canvas easily.
Renaming object IDs
In an open Inkscape document, select the object you want to rename. From the main menu,
select Object | Object Properes (or use the Shi + Ctrl + O keyboard shortcut key). The
Object Properes window is displayed. Change the Id eld to be a descripve lename.

Chapter 3
[ 55 ]
Now when you export, the lename will be pulled from this Id eld and thus be descripve
in nature for your project.
Importing non-native Inkscape les
In the previous secon, we imported a previously-created Inkscape SVG le into the program.
Inkscape supports a number of other graphic formats too. It can open or import SVG, SVGZ
(gzipped SVG), PDF, and AI (Adobe Illustrator) formats. In parcular, it can import bitmap-based
graphic formats such as JPEG, PNG, and GIF, but it can only export PNG bitmaps.
With the help of extensions and plugins, Inkscape can also open a number of other vector
formats. The following are some examples:
For imporng PostScript or EPS, install Ghostscript (http://pages.cs.wisc.
edu/~ghost/)
For formats of Dia, XFig, or Sketch, you need to have those programs installed on
your computer
For CorelDraw, CGM, and SK1 les, install Uniconverter (http://sk1project.
org/). For Windows users, Uniconvertor is pre-installed with Inkscape and no
addional installaon is needed.
See this version of the Inkscape manual for the fully-supported formats and the caveats of
imporng each: http://tavmjong.free.fr/INKSCAPE/MANUAL/html/File-Import.
html.
Remember, if you import and open a non-nave Inkscape le, you may not be able edit
all of the elements. Inkscape imports non-nave les as aened graphic les, so you
can't edit anything within the graphic, but you can manipulate or use the aened image
within Inkscape.
The recommended format for transferring non-nave Inkscape les is to use
the original source program and les to create a PDF. Then open the PDF in
Inkscape. PDF les, when imported into Inkscape, allow for editability to remain
with vector-based objects.
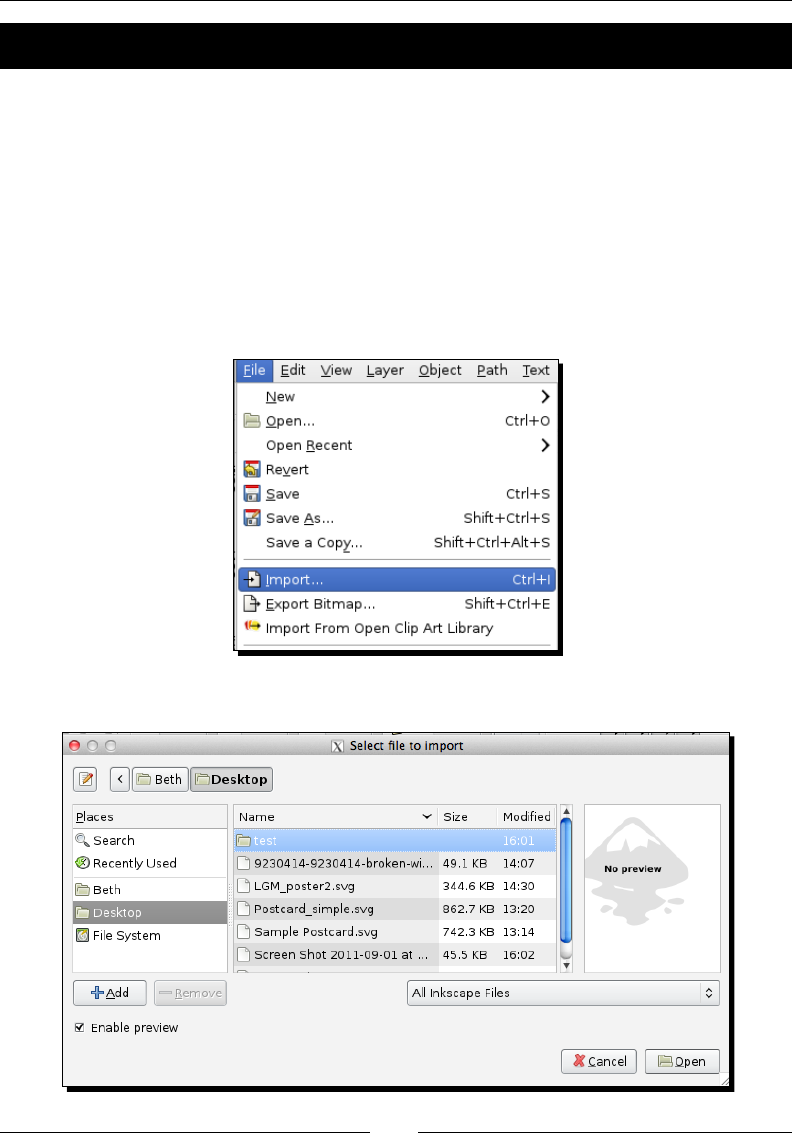
How to Manage Files
[ 56 ]
Time for action – importing a PDF into Inkscape
Let's import a non-nave Inkscape SVG le into Inkscape—as you may need to do this for
client logos, photographs, and any number of other real-world examples. Open a browser
and go to this link: http://db.tt/xR0ZlBRL
A PDF will be downloaded and saved to your computer. It will be our sample le to work
with during this exercise.
1. Open a document in Inkscape. This can be any in-progress le that we have used
previously in this chapter, or a new document.
2. From the main menu, select File | Import.
The Select le to import window displays, as shown in the following screenshot:
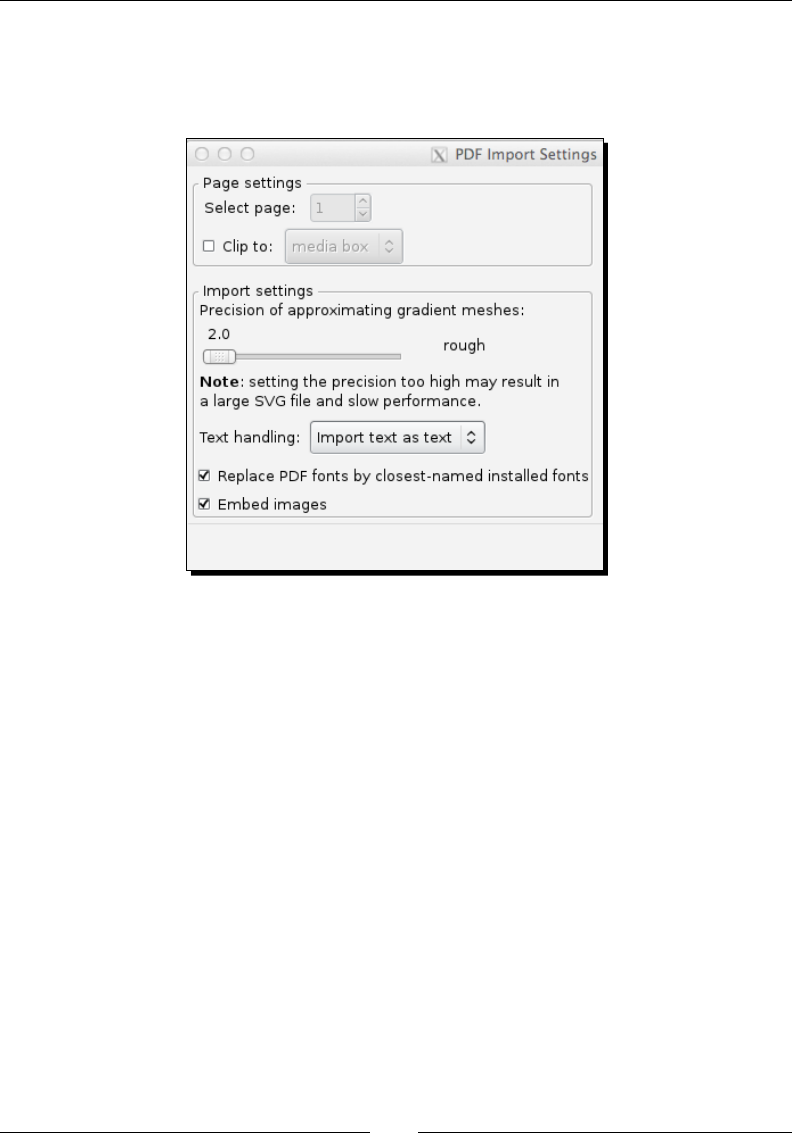
Chapter 3
[ 57 ]
3. Locate and select the sample PDF le you just downloaded and select Open.
4. When the PDF Import Sengs screen displays, adjust sengs as needed
and click OK.
5. Within Page sengs, you can choose whether you want all pages of the PDF to be
imported or just a specic page number. The Clip to eld has various opons (media
box, crop box, trim box, bleed box, art box, and so on), allowing you to determine
how the le is imported into your current canvas.
6. Within Import sengs, you can set the Precision of Gradient Meshes. Any gradients
seen on your objects are converted to ny boxes. The higher the precision, the more
boxes will be used to illustrate the gradient (also, the larger the le size, the slower
the load me in Inkscape).
7. Depending on the source applicaon that created the PDF, you can adjust Text
handling. If you choose Import text as text, all the text objects will be brought
in as such in Inkscape and then become editable.
8. The checkboxes on the screen allow for you to replace fonts to the closest match
(checked) and to embed images (checked).
9. In a few moments, the PDF le you selected will display within the page of your
Inkscape project.
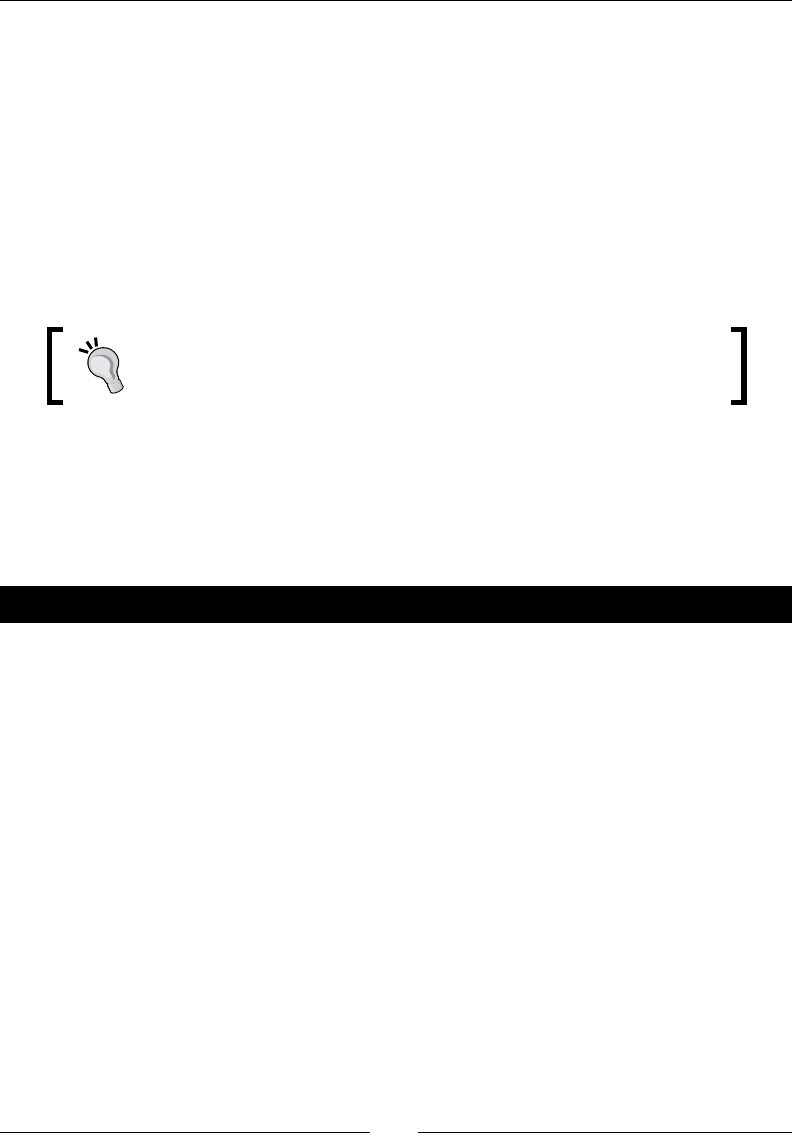
How to Manage Files
[ 58 ]
Note that this imported PDF is fully editable if the objects are vector-based. Rasterized
images are more limited to the following:
Moving the object: Click to select it and move it to where you want it to be on
the canvas.
Making the image smaller: Double-click the object to select and click-and-drag an
arrowed corner to shrink it.
Any detailed edits such as changing color or moving lines within the PDF are not permissible.
However, the object is fully usable within the Inkscape le for design purposes. Photographs
and similar rasterized images can all be used in this fashion.
Edit text blocks
To edit an imported block of text like a typewriter, select the text block
and Remove Manual Kerns from the Text Menu.
What just happened?
We imported a sample PDF le into Inkscape to demonstrate the exibility of this le format.
If objects are vector-based, they maintain editability. If rasterized images are included, then
they have more limited eding capabilies.
Pop quiz – le format portability
1. What is the ideal format for transferring non-nave Inkscape les to Inkscape?
a. SVG
b. JPG
c. GIF
d. PDF
Embedding and linking image les
When you import les into Inkscape, you are prompted about linking or embedding them.
Linking a le means that the le is essenally displayed within your Inkscape document and
there are associated properes (locaon, size, and so on) to that linked object. The original le
must remain in the exact locaon on your computer or you will not be able to view it in the
Inkscape le and any changes you make to the original le will be seen in the Inkscape le.

Chapter 3
[ 59 ]
Embedding a le means that the le itself is brought into the Inkscape document and it
resides there. All changes made to that le within your project stay within your project
and the original source le can be moved to any locaon on your computer.
The advantage to embedding images is that they are not ed to the original source.
You can move the source le or the Inkscape le anywhere on your computer or even
send a co-worker the Inkscape le and there is no need to worry about the linked le.
However, this also means your le sizes will be larger.
There are some limitaons to embedding images into the Inkscape SVG les. They are
as follows:
For SVG les used directly on the web, increasing the le size increases bandwidth
usage on the server or host.
Embedded images can't be shared across documents. For example, if you have one
PNG image as a background le, you can't share it across SVG les.
Sharing copyrighted fonts or images in a document could be illegal (depending on
how extensive the rights you have purchased to use these items are to begin with).
This is parcularly important when working on commercial or widely-used projects.
If there is extensive text eding within the SVG les themselves, this can be
complicated and me-intensive.
Linking keeps le sizes small, but you must remember to send all addional les along with
your Inkscape SVG les when you go to producon or create print-ready PDFs; otherwise all
linked objects will not display.
Embedding les in Inkscape
The best examples for embedding les in Inkscape are when you want one all-inclusive le
that can be sent or posted individually without worrying about addional source les or
directory structures. Another example could be when you know that you will change the
locaon of the linked or Inkscape le frequently, as you work with dierent versions.
Time for action – embedding a logo into your design
Let's learn how to embed a logo le into a design. We'll start by downloading a sample logo.
Open a browser and go to this Open Clipart sample logo at the following URL:
http://www.openclipart.org/image/800px/svg_to_png/vetlogo.png
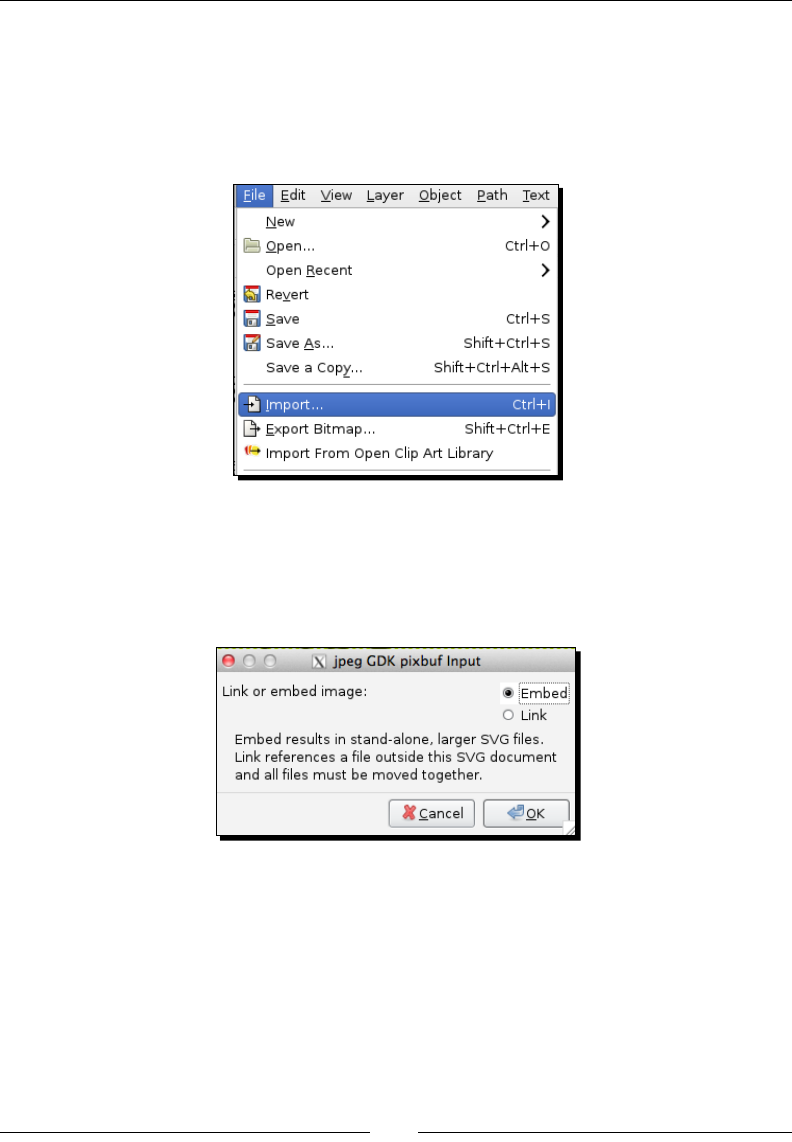
How to Manage Files
[ 60 ]
Right-click on the logo and save it to your computer.
1. Open a document in Inkscape.
2. From the main menu, select File | Import. Alternavely, you can drag-and-drop a le
from your desktop onto an open Inkscape le.
The Select le to import window displays.
3. Locate and select the Sample logo le you just downloaded and select Open.
4. When the input screen displays, select Embed.
5. Click OK.
6. In a few moments, the logo you selected displays and is embedded within the page
of your Inkscape project.
What just happened?
In the preceding steps, you embedded a logo image into your current Inkscape document.
Chapter 3
[ 61 ]
Linking external les in Inkscape
Linking certain les can be useful—parcularly if the source le you want to link to is a large,
high-resoluon photograph.
Time for action – linking a photograph into a brochure design
Now let's try to link external les into an Inkscape project. For this example, we will just use
the same logo as the previous example. If you did not download it yet, open a browser and
go to the following Open Clipart sample logo:
http://www.openclipart.org/image/800px/svg_to_png/vetlogo.png
Right-click on the logo and save it to your computer.
1. Open a document in Inkscape.
2. From the main menu, select File | Import.
The Select le to import window is displayed.
3. Locate and select the Sample logo le you just downloaded and select Open.
4. When the input screen displays, this me select Link.
5. Click OK.
6. In a few moments, the logo you selected displays and is embedded within the page
of your Inkscape project.
You moved your source le and now need to change the link path to
your le?
Right-click on your linked object in your Inkscape le and select Image
Properes. Change the URL eld to match the new path to the le.
What just happened?
You linked an image le into your current open Inkscape project and learned a special p for
xing a broken image link in any of your old les.
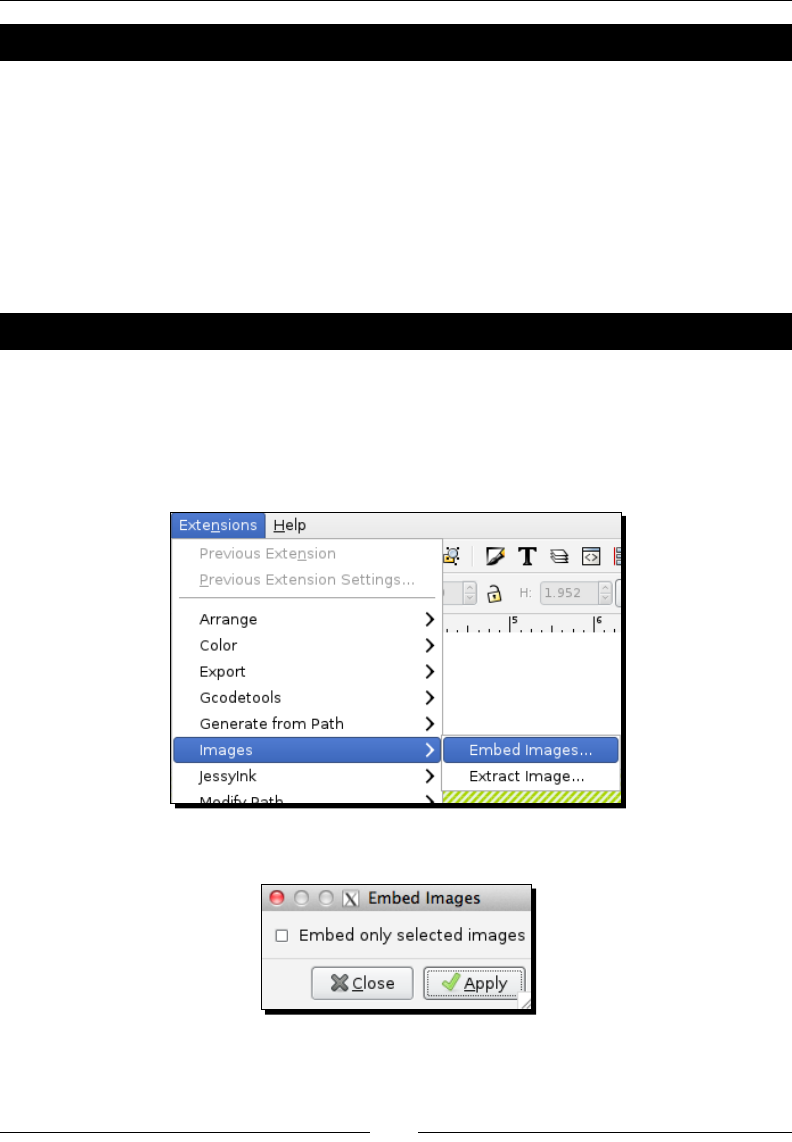
How to Manage Files
[ 62 ]
Pop quiz – linking versus embedding images
1. Why would you want to link an external le instead of an embedded one?
a. A large image size
b. The image will be constantly changing and you want the changes to be
reected instantly in your Inkscape le
c. Project le structure will remain the same and there are a limited number
of images
d. All of the above
Have a go hero – changing your mind, embedding les after the fact
What if you inially linked all les and then decide that you would rather embed them all?
The following are the steps to take to make this happen:
1. Open an Inkscape document.
2. From the main menu, select Extensions, then Images, and Embed Images....
3. Do not check the Embed only selected images box.

Chapter 3
[ 63 ]
If you want to embed only certain images in the document, then you
must select those images rst. You should then go to the main menu,
select Extensions | Images | Embed Images..., and check the Embed
only selected images box.
4. Click Apply.
Summary
We spent the majority of this chapter discussing how to create new les in Inkscape. You
learned how to use predened page/canvas sizes in Inkscape, how to customize the le size,
and even how to create print bleeds and the setup for print-safe space on your documents.
Then we jumped into saving Inkscape les—paying close aenon to discuss the advantages
of keeping a source version of all documents in Inkscape's nave le format of SVG, so you
can connue to edit your les. Along with that topic, we jumped into managing mulple
le projects and best pracces, the details regarding which formats in which Inkscape can
save, as well as imporng le types. Finally, we talked about embedding and linking les
and images in your Inkscape les. We detailed the advantages and disadvantages of each
approach as well as how to work with both in your les for the best experience.
All of this is leading up to the next chapter, which deals with starng your very rst Inkscape
project. We've done a lot of preparaon; now it is me to start designing!

4
Creating your First Graphics
We're now ready to create some graphics. We'll start with some basic shapes
and then move on to freehand objects, using grids and guidelines to help to
create beer graphics beer create graphics.
The following are the specics about what we will learn:
Paths and Shapes
Creang your rst vector graphic
Ellipses and Arcs
Complex Shapes
Freehand Objects
Using Grids and Guidelines
Paths
Vector graphics are made up of what are called geometrical primives such as points, lines,
curves, and shapes. These primives then have a start and end point, curves, angles, and
points that are calculated with a mathemacal equaon. These paths are not limited to being
straight—they can be of any shape, size, and even encompass any number of curves. When
you combine them, they create drawings, diagrams, and can even help create certain fonts.
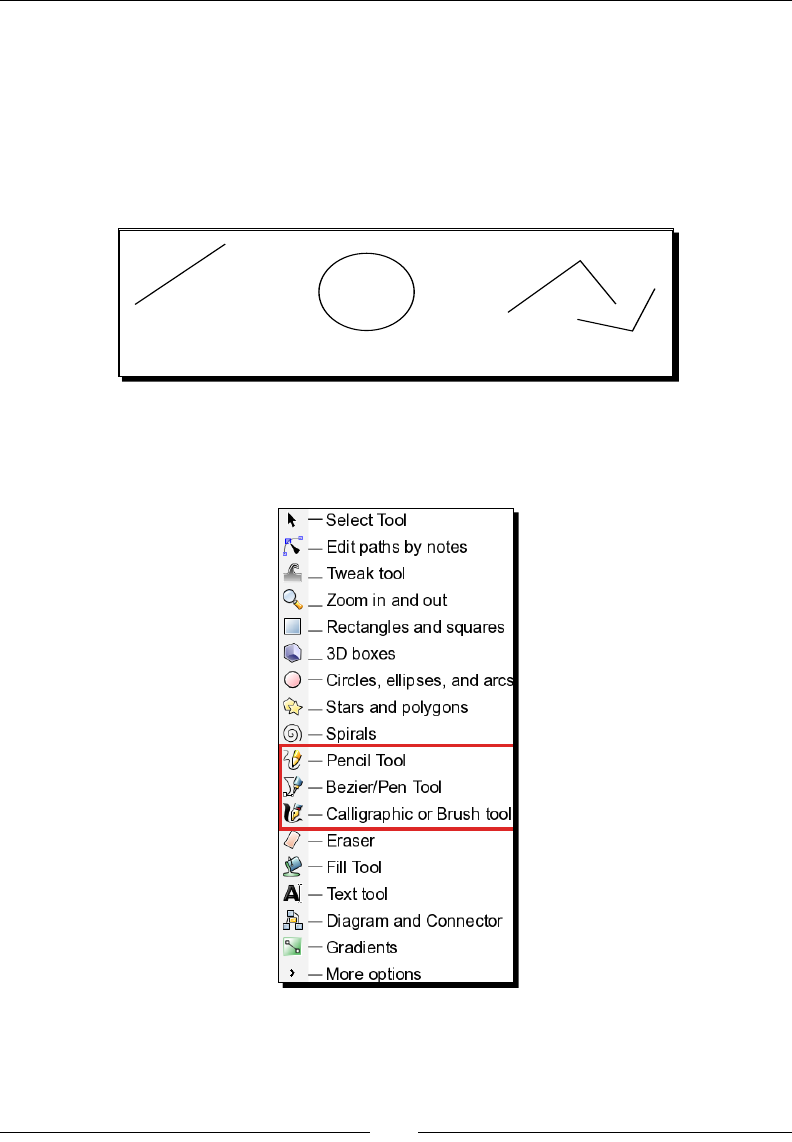
Creang your First Graphics
[ 66 ]
Inkscape uses both paths and a series of pre-determined shapes when creang graphics.
Paths have no predened lengths or widths. They are arbitrary in nature and come in three
basic types:
Open paths (have two ends)
Closed paths (have no ends, like a circle)
Compound paths (use a combinaon of two or more open and/or closed paths)
ClosedOpen Compound
In Inkscape, there are a few ways we can make paths such as with the Pencil (Freehand),
Bezier (Pen) , and Calligraphy tools—all of which are found in the toolbox located at the le
side of your screen.
You can also convert a regular shape or text object into a path.

Chapter 4
[ 67 ]
In general, we use paths to build unique objects that aren't part of the SVG standard shapes
in Inkscape. Since we can combine paths and make them closed objects—they again can be
resized, manipulated, and then exported in a number of formats.
Creating your rst vector graphic
In this secon, we will show you how to create some basic vector graphics with shapes and
paths in Inkscape (which thankfully doesn't require you to do any mathemacal equaons
when using it) and export them in a couple of dierent formats.
Here are the standard shapes that are part of the SVG standard:
Rectangles, squares, and 3D boxes
Circles, ellipses, and arcs
Stars and polygons
Spirals
Creating a polygon
Let's break down creang our rst graphic—a star—into many smaller substeps just to get
started. We will do the following:
Open a new document
Create the polygon object
Change the object properes
Save our graphic
Let's get started!
Time for action – opening a new document
When you rst open Inkscape, a new document is opened and you are ready to start.
However, it uses a default canvas size of A4 and you may need to change the orientaon
and size for the graphic you are creang, as follows:
1. Open Inkscape.
2. If you need to create a new document, go to File | New. A menu appears with the
predened sizes Inkscape has for you.
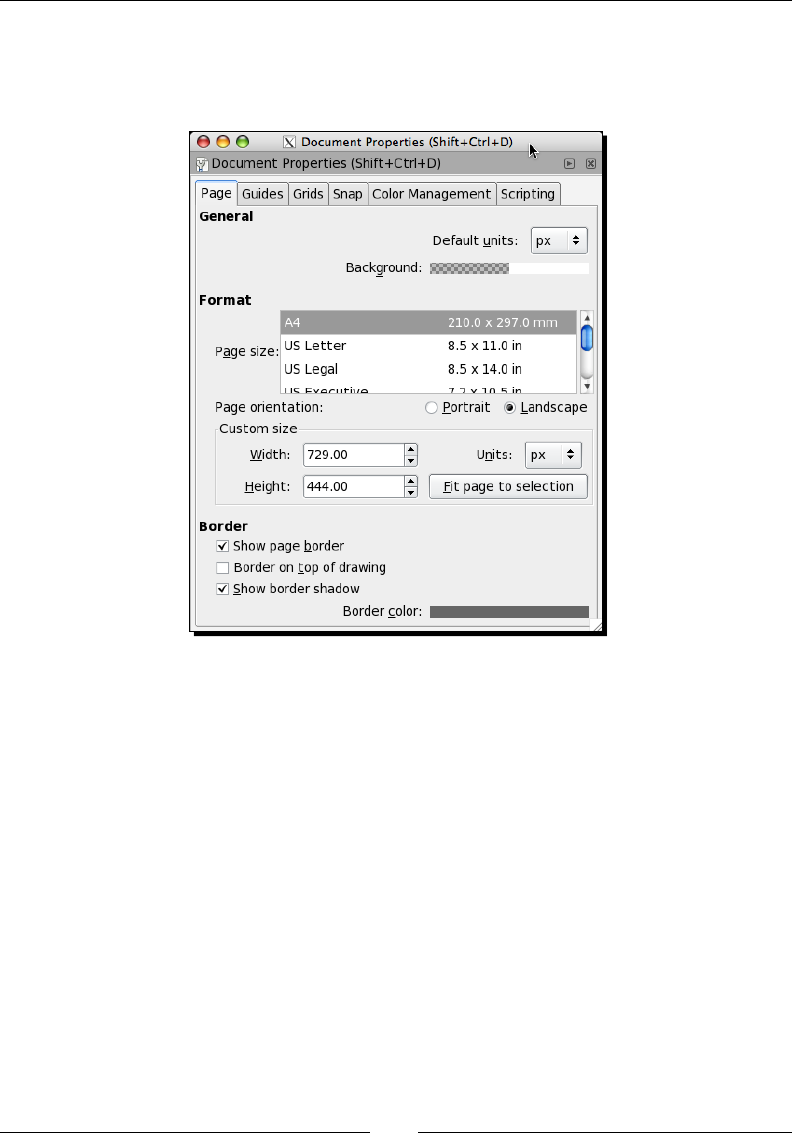
Creang your First Graphics
[ 68 ]
3. If you want to manually change your document properes, just go to the main
menu and select File | Document Properes. You will see the Document Properes
window displayed with a number of opons for customizing your canvas size.
4. If you want to change the default background color (default in Inkscape is a
transparent background), you change it in the General, Background secon.
Click the color swatch to change it.
5. If you want to adjust any Border sengs, check the appropriate checkboxes.
The opons include:
Showing a page border
Showing the border on top of any objects on the canvas
Showing a border shadow
6. When complete, close the Document Properes window by clicking the X in the
upper-le corner and your changes will be reected in the main window.
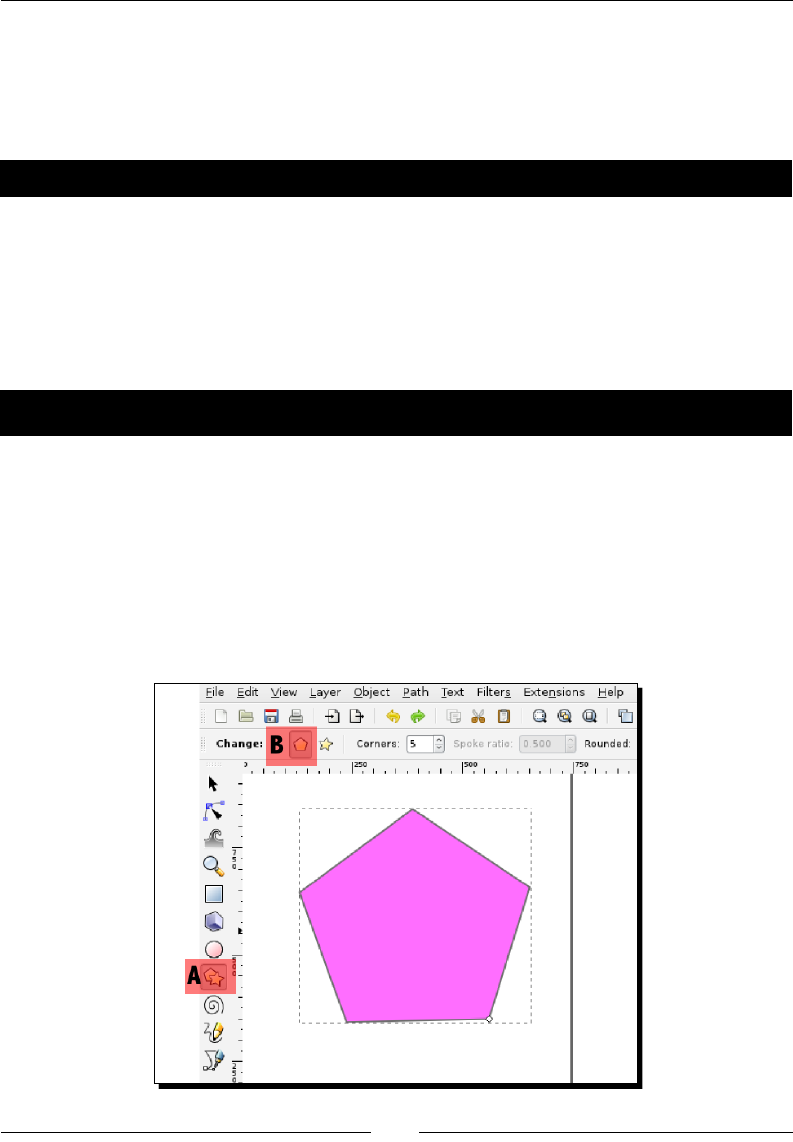
Chapter 4
[ 69 ]
What just happened?
We opened Inkscape and adjusted the canvas size for your graphic. We also discussed
addional document properes that can be changed such as background color, page
border opons, and border shadows.
Pop quiz – displaying borders
1. Why might it be important to have borders show on top of your drawing objects?
a. If you are using page borders as cropping/print guidelines, you know where
the nal paper will be cut
b. It isn't important at all
c. Gives great arsc are to the graphic
Time for action – creating a star
Now, we will create a shape that is a part of the SVG standard that is inherent in Inkscape.
These standard shapes include rectangles/squares, circles/ellipses/arcs, stars, polygons,
and spirals. We will create a star. Here's what you need to do:
1. Select (click) the shape tool icon (A) and the polygon icon (B) in the toolbox,
as highlighted in the following screenshot.
2. Then draw the shape on the canvas by clicking, holding, and then dragging the
shape to the size you want on the canvas:

Creang your First Graphics
[ 70 ]
3. To switch between creang stars and polygons, select the star/polygon icon in the
toolbox on the le-hand side of your screen, and then select either the polygon or
the star icon in the Tool controls (just above the canvas).
4. You can also change the number of corners this polygon has by changing the
number in the Corners eld in the Tool controls.
If you had wanted to draw a circle, square, or cube—you would have selected those icons on
the toolbox.
It is possible that your star doesn't match the one shown in the preceding screenshot.
Maybe your color or border is dierent. That is because, when you opened Inkscape, your
color palee sengs were set to the last used style. The Have a go Hero – changing the unit
of measure, secon explains how to change those sengs—Fill and Stroke—so your star can
look similar to the example.
What just happened?
You created a star object on your blank canvas.
Pop quiz – switching shapes
1. What if you decided instead of a star, you would like to draw a cube. In which screen
toolbar would you look for the correct tool?
a. Palee bar
b. Tool controls
c. Toolbox
d. Object dialog
Have a go hero – changing shape options
Shapes have a number of aributes or opons. By default those aributes will be the
last-used style (for example, color). In Inkscape, the user interface gives you easy-to-use
tools to change opons such as ll color, stroke color, size, and placement of the shape.
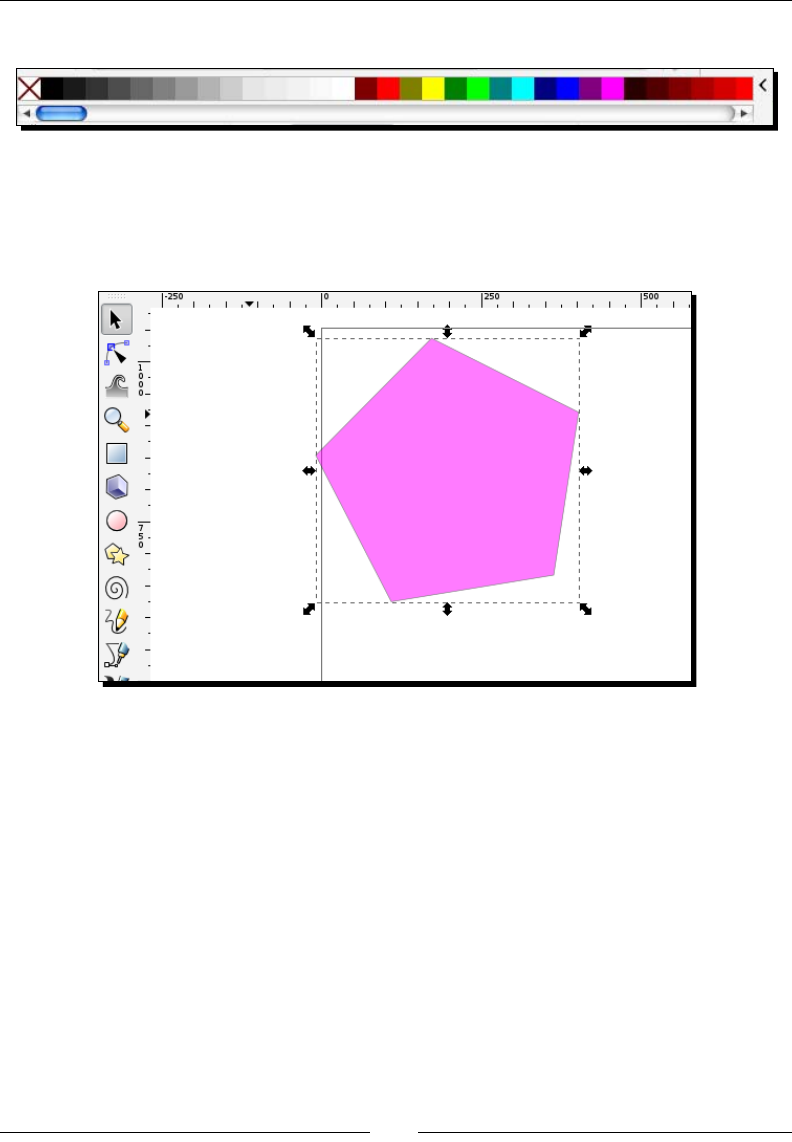
Chapter 4
[ 71 ]
1. Change the ll color of the shape by selecng a color in the color palee.
2. Change the stroke or border color by pressing and holding the Shi key and then
selecng that color from the color palee.
3. Change the posion of the shape on the canvas by choosing the Select tool in the
toolbox, clicking and holding the shape, and moving it to where you need it to be.
4. Change the size of the shape by also choosing the Select tool from the toolbox,
clicking and holding the edge of the shape at the handles (small black square or
circles at the edges), and dragging it outwards to make it larger or inwards to shrink
unl the shape is of the desired size.
The shape is sll fully editable and the number of ps in the star is adjusted through
the tool controls bar. You can also switch between polygon and stars.
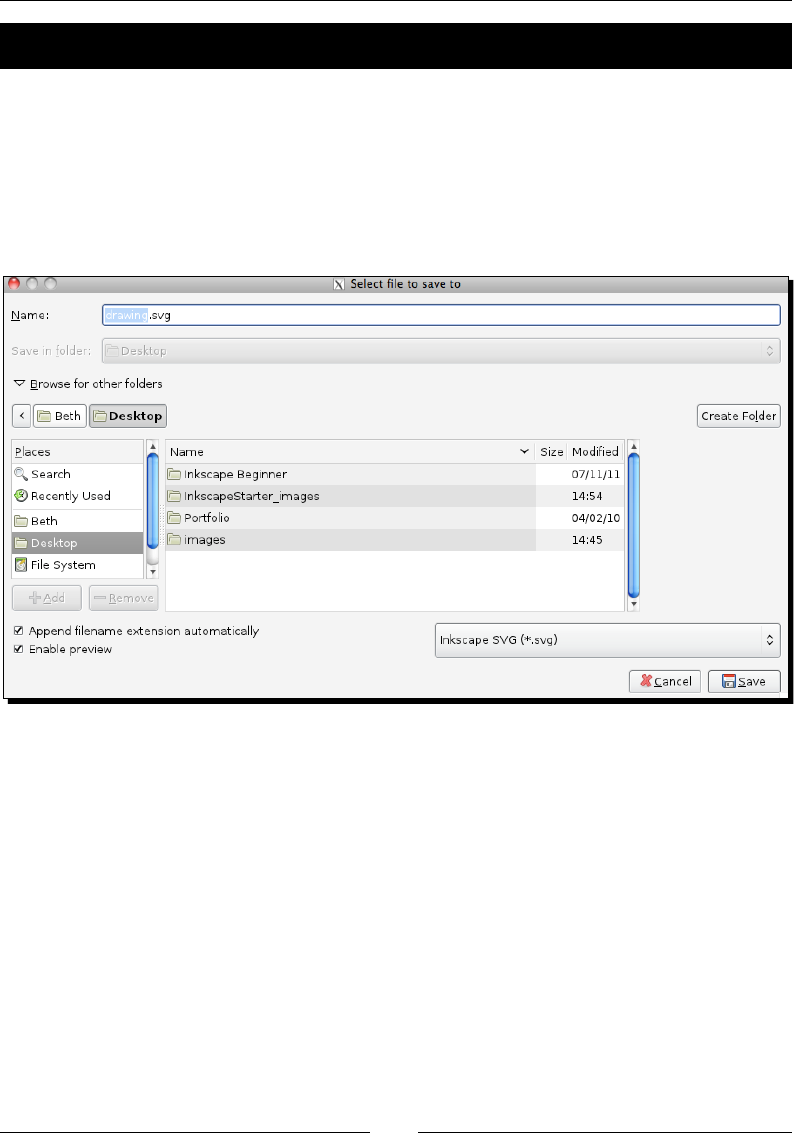
Creang your First Graphics
[ 72 ]
Time for action – saving your graphic
Aer you have created an inial version of your graphic, it is best pracce to save your le so
that you don't lose any work. This is a simple example graphic, so you may not want to save
the le, but for any future work, this step is crical.
1. With your latest project open, from the main menu select File | Save. Inkscape will,
by default, give opons to save projects in its default format, SVG. Choose a le
locaon and click Save.
2. However, you might also want to export in a bitmap graphic format such as PNG.
To do this, choose File | Export Bitmap.
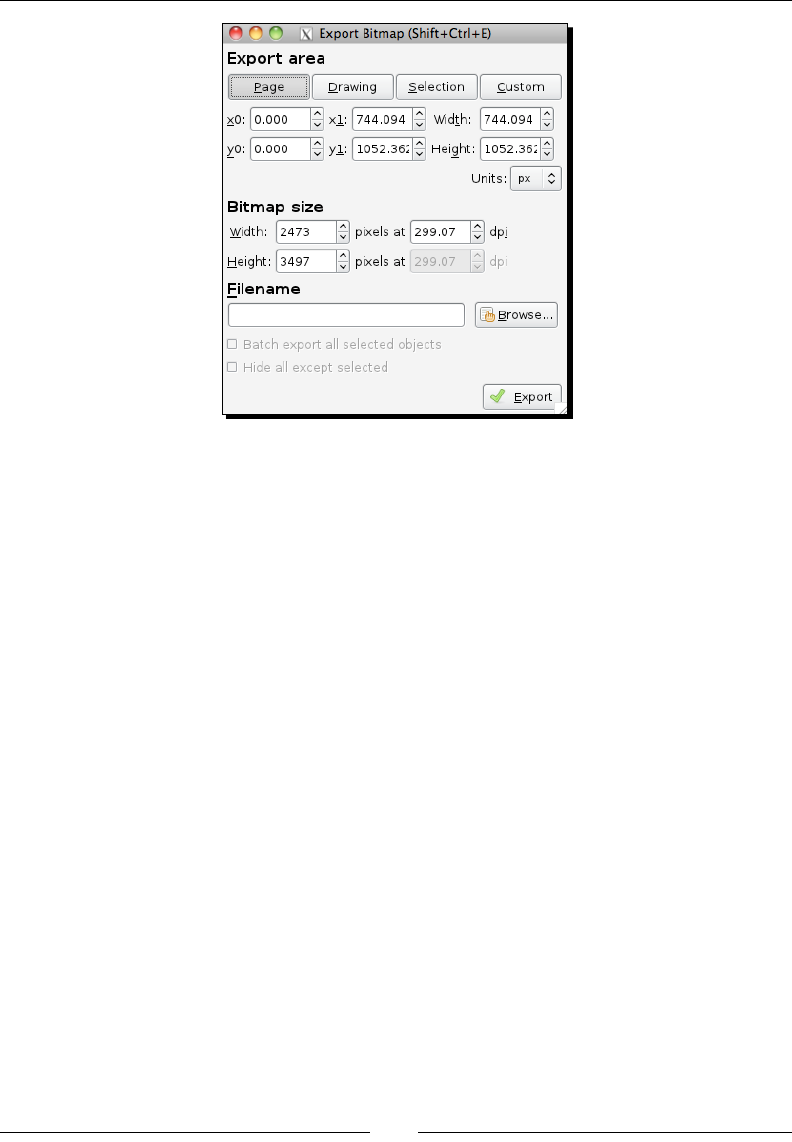
Chapter 4
[ 73 ]
3. In the Export Bitmap window, you can choose to save the Page (all objects within
the page/black border, the Drawing (all objects), the Selecon (only the object you
have selected), or customize it.
4. Choose the Export area, the graphic size you want (will select predened size by
default), and click Browse to choose the same locaon.
5. Verify the lename in the textbox and click Export.
6. To save in another format besides PNG, go to File | Save As and choose the le
format of your choice. Inkscape allows you to save in a number of formats such as
PDF, EPS, ODG, WMF, among others. However, remember that if you want to save
the le in a format that will allow you to edit in the future, you need to save it in
Inkscape SVG.
What just happened?
You saved your graphics le as a nave Inkscape SVG le so you can edit it later, and then
exported it into another format (as needed).
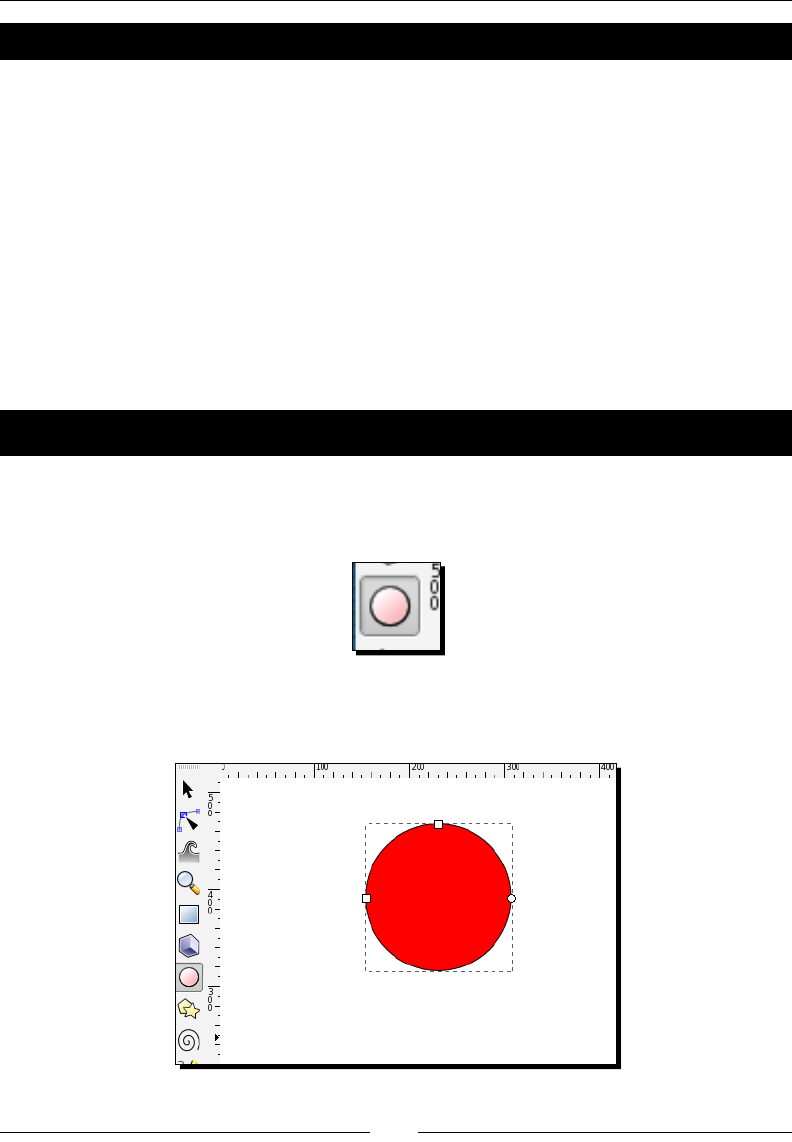
Creang your First Graphics
[ 74 ]
Pop quiz – image formats
1. What is the only bitmap format that Inkscape can export to?
a. JPG
b. GIF
c. BMP
d. PNG
Creating ellipses and arcs
Now, we're going to get a bit fancier and create ellipses and arcs. Ellipses are of oval shape.
To start, we will create an ellipse and explain how to make perfect circles and then details
about creang an arc.
Time for action – creating the Ellipse
Let's start by creang an ellipse.
1. With a new document open in Inkscape, select the circle tool or ellipse tool.
2. On the canvas, press the Ctrl key, click, hold, and drag the shape to the size you want
on the canvas.
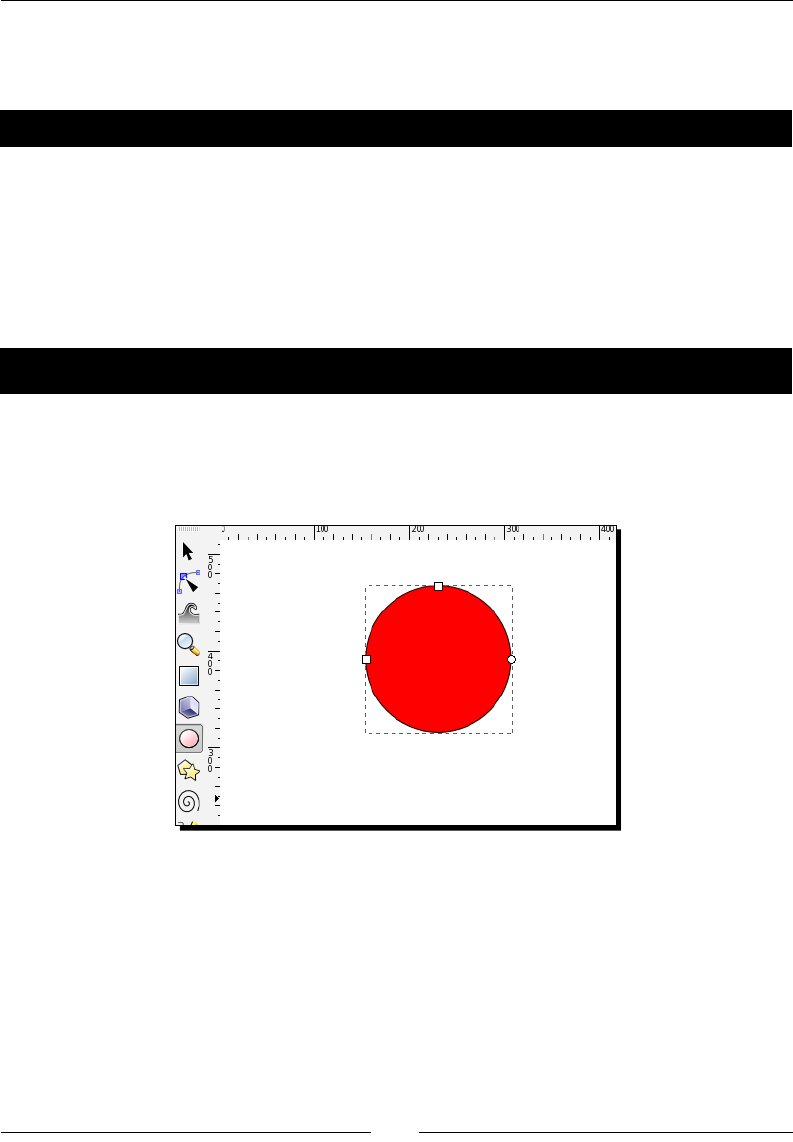
Chapter 4
[ 75 ]
What just happened?
You created a circle on your canvas.
Pop quiz – circles
1. How can you make a perfect circle in Inkscape?
a. Freehand it with the freehand tool.
b. Use a star and clipping masks.
c. Use the circle tool in the toolbox and press the Ctrl key while resizing it.
d. None of the above.
Time for action – making an arc
Now, we will take our circle and convert it into an arc.
1. Make sure that the Circle/Ellipse tool is sll selected and you can see the handles on
the shape on the canvas.
Noce, there are three handles which are top (square), le (square), and right
(circle). To control the horizontal and vercal dimensions, you use the top
(horizontal) and le (vercal) handles.
Dragging the right circle handle of a whole ellipse creates an arc or segment.
To switch between an arc or pie segment, drag the handle inside or outside of the
ellipse. Let's give it a try.
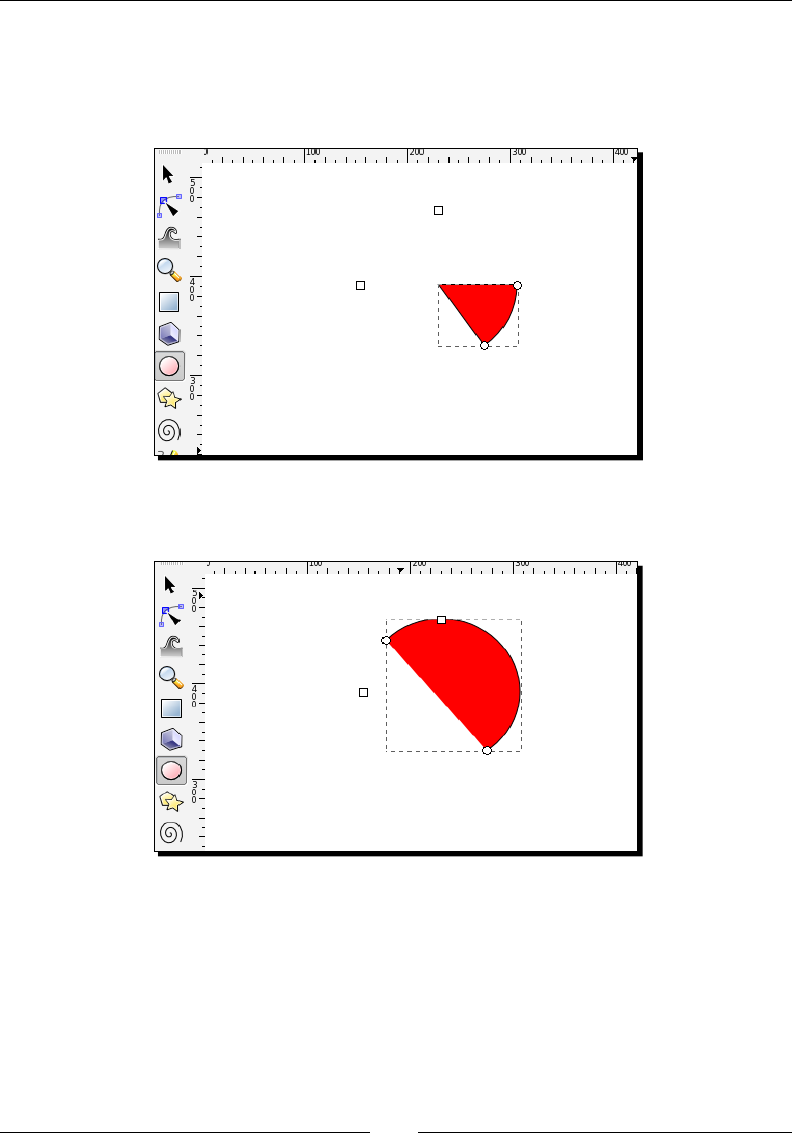
Creang your First Graphics
[ 76 ]
2. Drag an arc handle (the circle one) to set one end of the arc. Once you pull or drag
one of the arc handles, you will see that there are actually two overlapping arc
handles for you to manipulate. (as shown in the following screenshot, this is
now a closed path).
Drag the second arc handle (in the original posion) to the other end of the arc,
The arc will be closed and a pie shape will be created (an open path).
3. Hold the Ctrl key while dragging an arc handle to force the angle of the arc to begin
or end at a mulple of the rotaon snap angle (15 degrees by default). To precisely
place objects on the canvas, an object is made to snap to a target that is an object,
guide, grid, or in this case an angle. Drag one of the arc handles outside the curve
of the original ellipse (outside the dashed box); the arc handle icon turns blue and
a wedge is created at the center of the shape (again, a closed path).
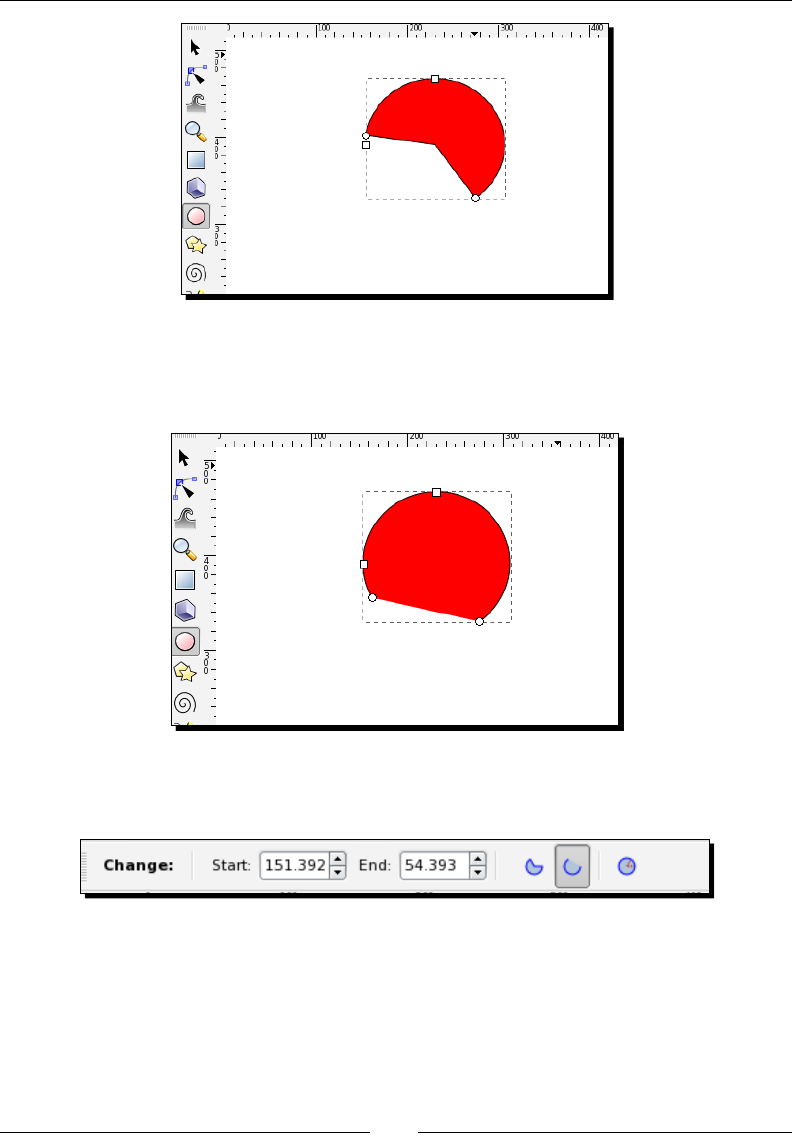
Chapter 4
[ 77 ]
4. If the arc handle is dragged with the cursor inside the curve, the segment dening
the arc starts and stops at the two arc handles, as shown in the following screenshot
(now an open path).
5. Once the arc is created and selected on the canvas, you can use the Tool controls
bar to set specic locaons (in degrees) for the start and stop arc handles.
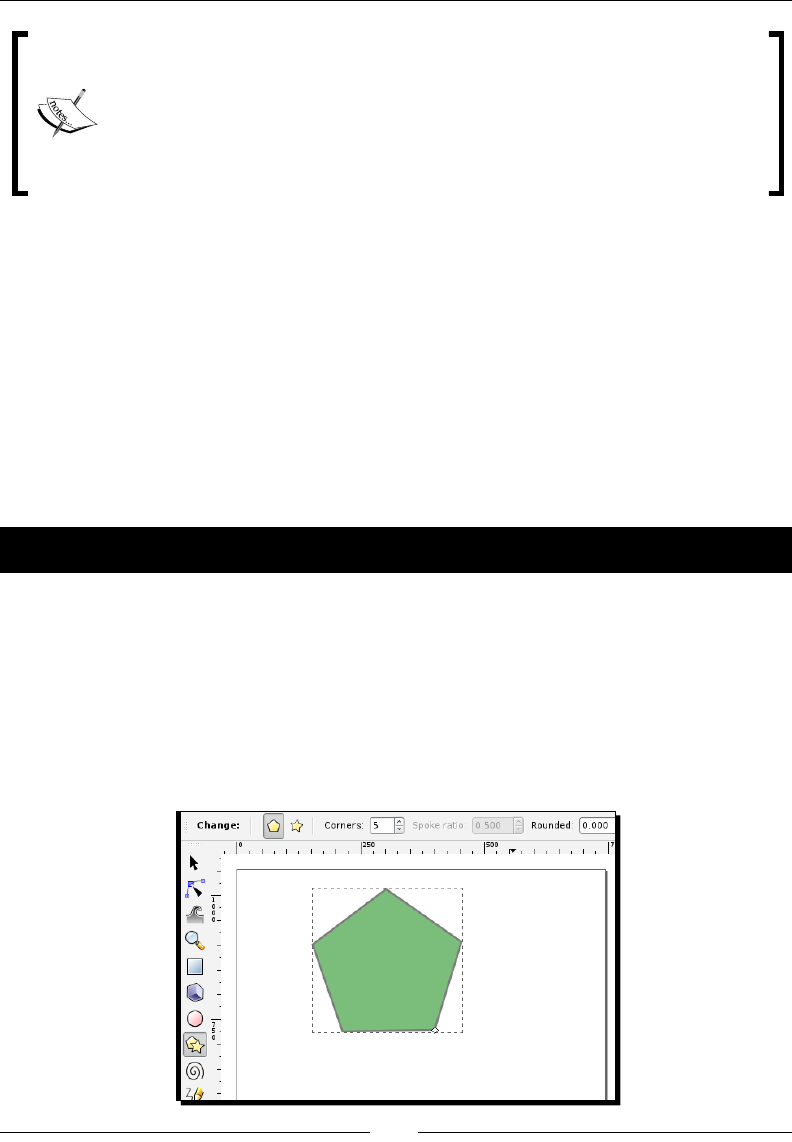
Creang your First Graphics
[ 78 ]
Also, note in the toolbar, the buons that can quickly change an ellipse into a
closed path or an open path. The one selected in the preceding screenshot is an
open path; whereas the one to the le is a closed path.
The full circle buon resets the ellipse to whole. When creang ellipses, the
next one you create will use the last used style (for example, aer this exercise it
would be an arc). The Reset ellipse buon will then become handy to start anew.
What just happened?
You took a simple circle and created a number of arcs—essenally learning the skills that you
need to manipulate arcs in Inkscape.
Complex Shapes
As a designer you will oen want to create logos or shapes that are outside the standard
ones provided in the soware. Since Inkscape is vector-based, you can combine simple
shapes, masking, hiding, and layering them to create more complex shapes. Let's perform
a simple example to see how this can be done.
Time for action – combining shapes
One of the simplest ways to create complex shapes in Inkscape is to combine other shapes
into one or merge the shapes. Let's learn how we can do this by creang an arrow with
a polygon and rectangle shape.
1. Open a new document (any size will do, since we are just praccing).
2. Select the Polygon tool from the toolbox.
3. Create a polygon shape.
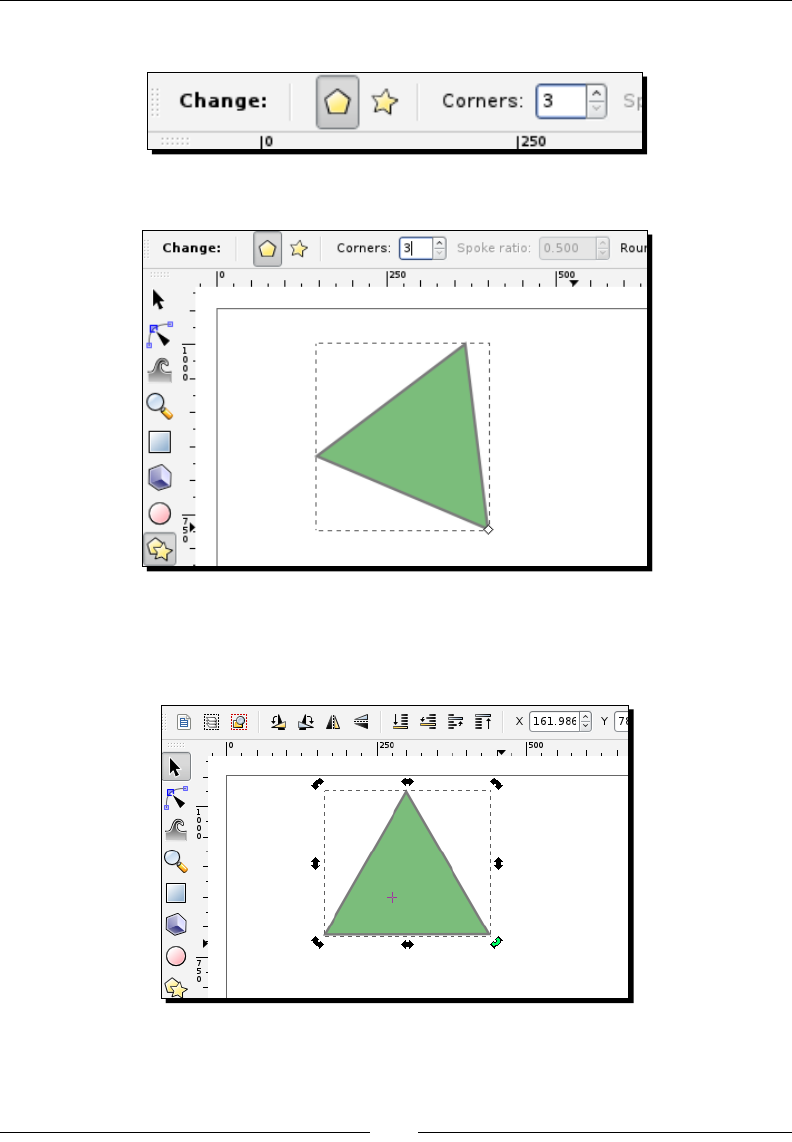
Chapter 4
[ 79 ]
4. From the Tool controls, change Corners to 3, as shown in the following screenshot:
The octagon polygon shape changes to a triangle.
5. From the toolbox, choose the Select tool and click the triangle object twice.
The handles turn to curved arrows so you can rotate the triangle as shown
in the following screenshot:
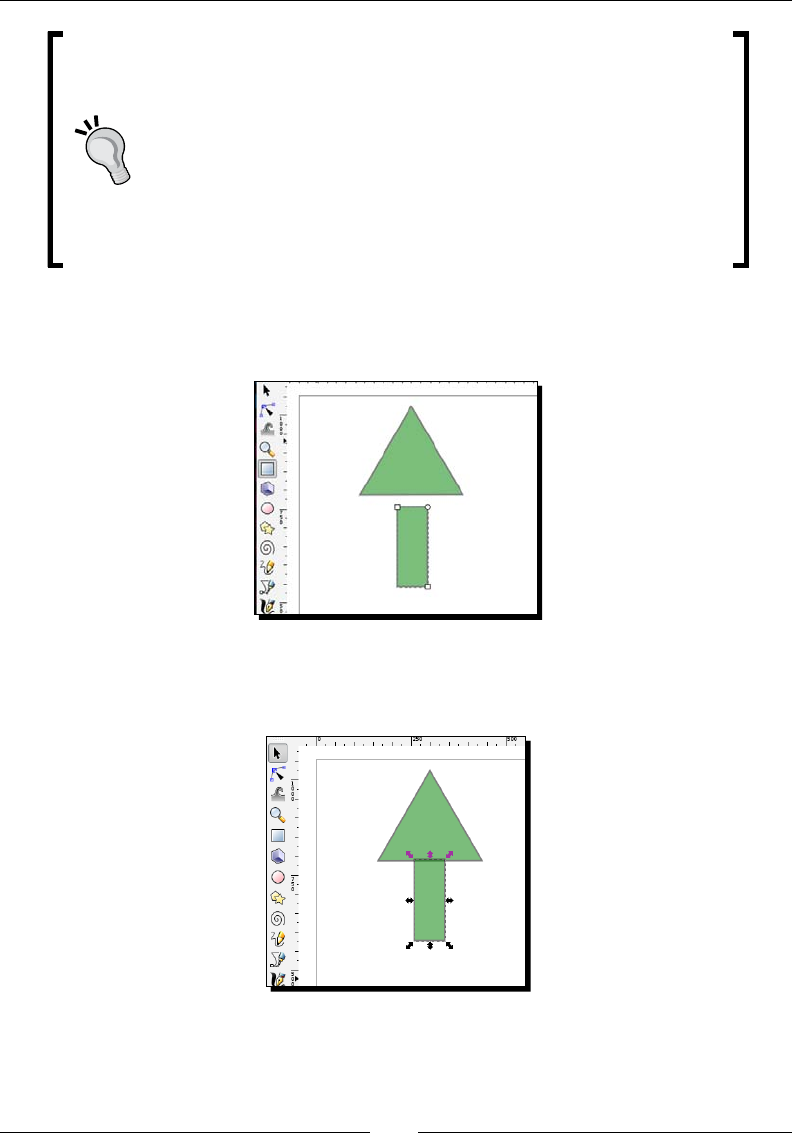
Creang your First Graphics
[ 80 ]
Rotang an object
While drawing the polygon on the canvas, you can swivel it up, down,
le, and right. Use the Ctrl key while performing the following acons
and it will make rotaons snap in 15 degree increments.
It is okay if you don't do this while drawing it inially, you can always
choose the Select tool from the toolbox, and click the polygon unl
the handles turn to arrows with curves (this might require you to click
the polygon object a couple of mes). When you see the curved arrow
handles, click-and-drag on a corner node to rotate the object unl it is
posioned correctly.
6. From the toolbox, select the rectangle tool and draw a rectangle just below the
triangle on the canvas.
7. Now, choose the Select tool from the toolbox, and drag the rectangle so it creates
the stem of the arrow as follows:
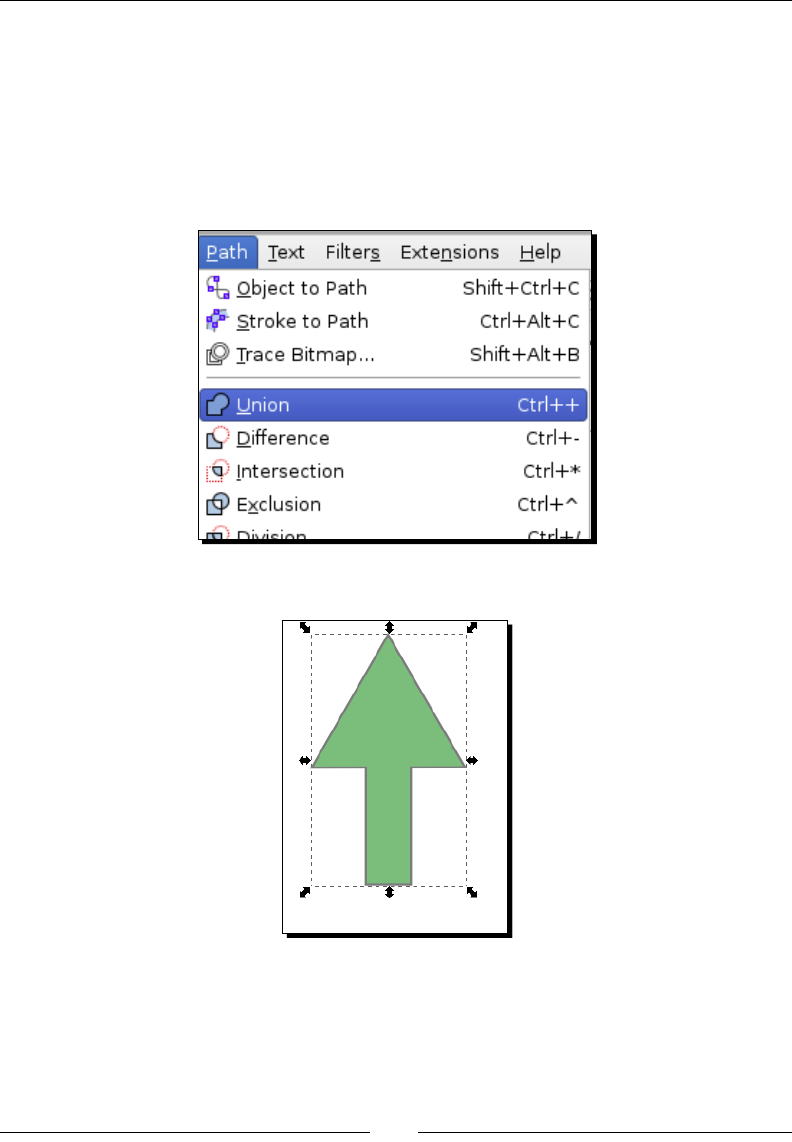
Chapter 4
[ 81 ]
8. To readjust the size of the rectangle, make sure the Select tool is acve, and click
the rectangle. The resize handles appear. Click the handle on a side that needs to be
adjusted and drag it to resize.
9. With the rectangle sll selected, press and hold the Shi key, and click the triangle
so that all objects are selected.
10. From the main menu select Path | Union:
This merges the two shapes into one... and voila, it's an arrow!
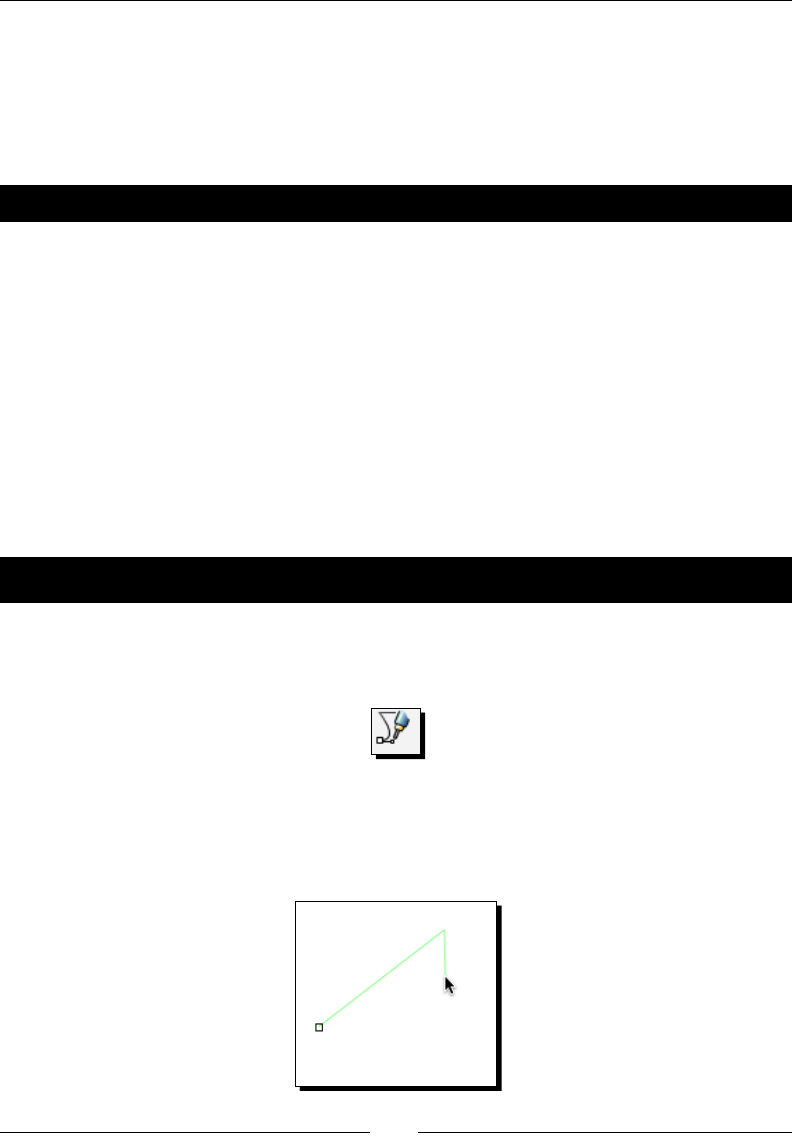
Creang your First Graphics
[ 82 ]
What just happened?
You created a polygon, changed the number of corners, created a rectangle and combined
them—or joined them—into a union to create an arrow object. Technically, the shapes were
transformed into a path. The shape tools no longer work on this object and it is its own
object in Inkscape that can be resized and manipulated like any other object.
Pop quiz – joining objects
1. How do you join more than one shape in Inkscape?
a. Select all the objects you want to join together and then on the main menu
select Path | Union.
b. You can't.
c. You have to draw an object freehand.
Freehand objects (Paths)
You can also use the Bezier (Pen) or Freehand Tool to create objects in a bit more freehand
form. This tool allows you to create straight lines and curves and connect them to create a
freehand object.
Time for action – creating a freehand object
Here's an example of how to create a lightning bolt.
1. From a new document, choose the Bezier tool from the Tool Box.
2. Click somewhere on the canvas to start drawing a straight line, click to establish a
node, click again to change direcon of the straight line to create an angle in our
lightning bolt, as shown in the following screenshots:
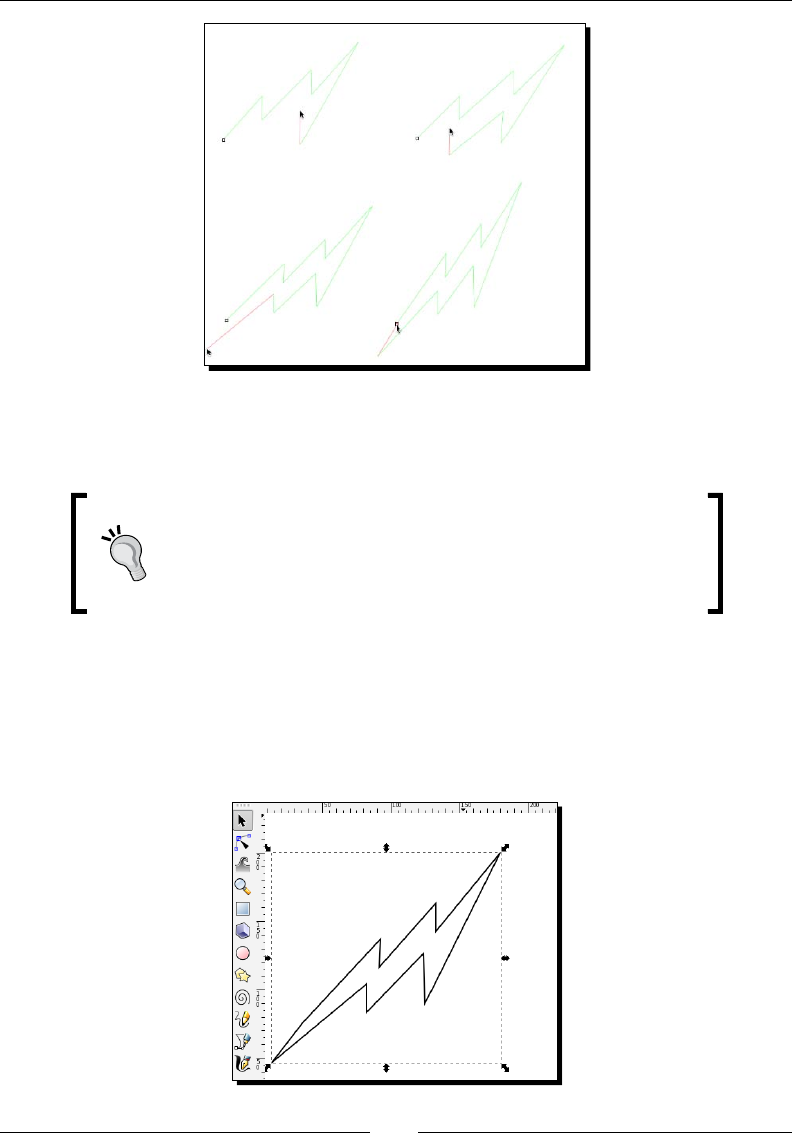
Chapter 4
[ 83 ]
3. Connue to create the lightning bolt object by creang the shape segment
by segment.
Don't worry if you stop a line and realize you need to extend its
length, just click and move a straight line to add on to the original
to make it as long as you need. Click again when you are ready to
change direcon. If you made a mistake, press the Backspace or
Delete key and it removes the last line segment.
4. To close the lightning bolt, just create a line segment and join it to the starng point
with a nal click. The start node will glow red in color when the mouse is hovered
over it for easy idencaon. This is helpful to make sure that the close of the object
is done correctly. You will see that all the lines are combined into one connuous
closed path—a lightning bolt.

Creang your First Graphics
[ 84 ]
When you select the lightning bolt, the enre object is selected. You can resize it, ll
it with a color (select it and choose a color from the color palee), and move it to
another locaon on the canvas. It has become a unique object for you to work with.
The Bezier tool also allows you to create controlled curves to create even more
complex and unique objects. Try creang objects on your own and experimenng.
These complex objects can be used for icons, banners, and for unique logo designs.
What just happened?
You used the Bezier tool and created, in mulple small steps, a lightning bolt.
Pop quiz – deleting
1. What are the important keys to remember if you want to delete the last line you
drew with the Bezier Tool?
a. D key
b. Shi key
c. Enter key
d. Backspace or Delete key
Using grids and guidelines
When designing, we oen need to align objects for a clean look. To do this, grids can be used
to help in alignment. We will start this secon by learning how to turn the canvas grid on, set
up snap to alignment, and then how to set up guidelines.
Time for action – viewing the Grid
We will start with the easiest task, turning the Grid on (or making it viewable).
1. With your new document sll open on your computer, on the Inkscape main menu
select View | Grid:
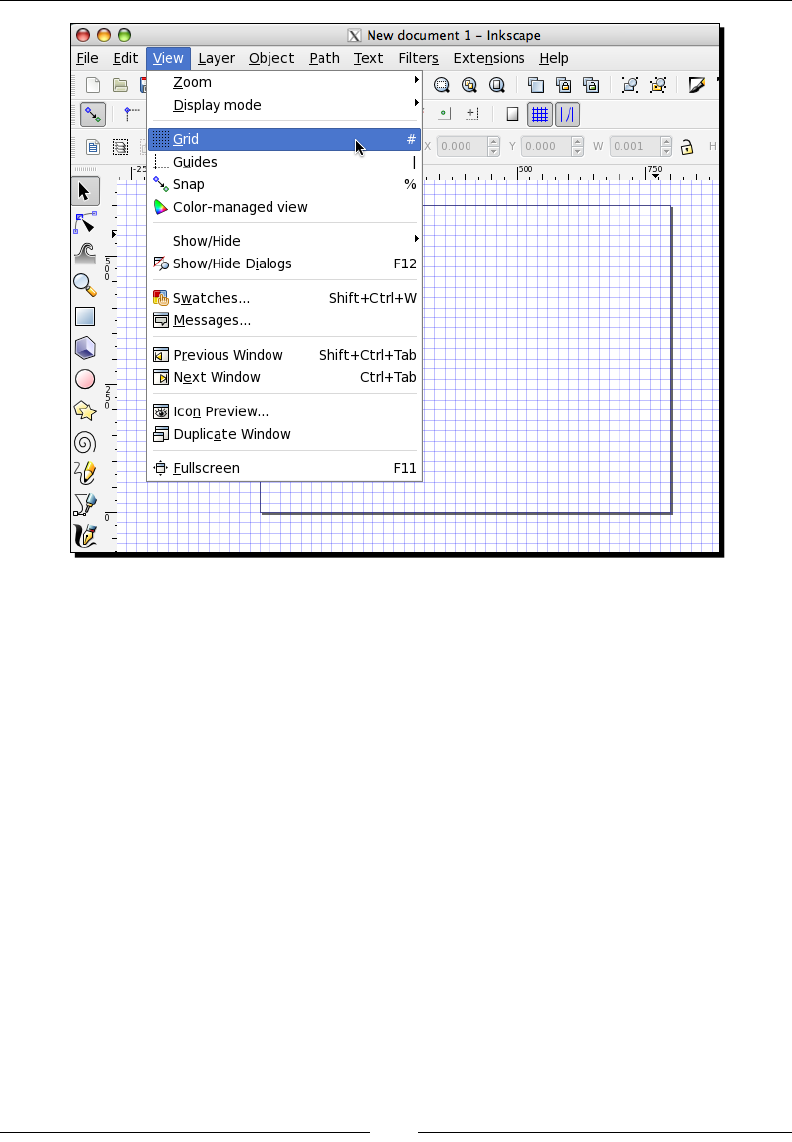
Chapter 4
[ 85 ]
What just happened?
You'll see that a blue grid will appear across the enre canvas area. We will use these
grids to create basic areas of our layout and then create guides to begin creang our
actual layout elements.
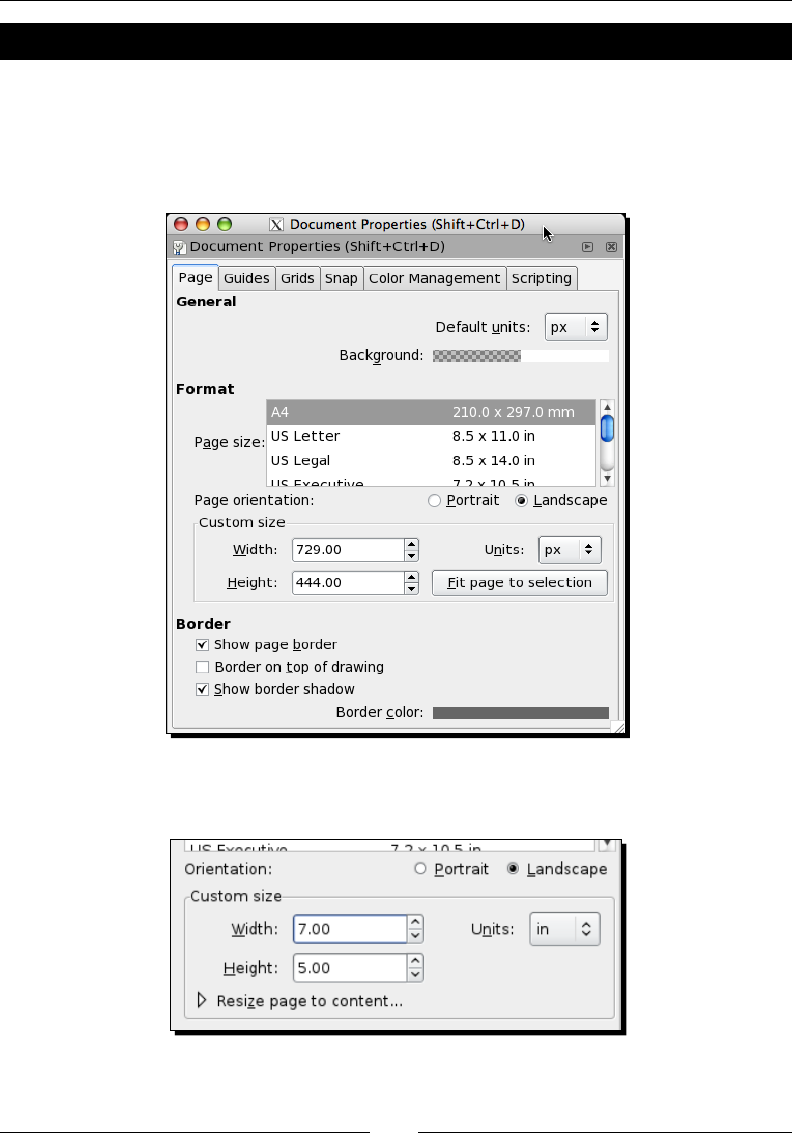
Creang your First Graphics
[ 86 ]
Have a go hero – changing the unit of measure
By default, Inkscape keeps all dimensions—even the unit of measure—in pixels. Do you want
your grid to be in inches? There is an easy way to do this.
1. Go to the main menu, choose File | Document Properes. You'll see the Document
Properes window displayed.
2. Change the Units eld to in (Inches). This will change the grid, the canvas
dimensions, and all units of measure to inches in this document.
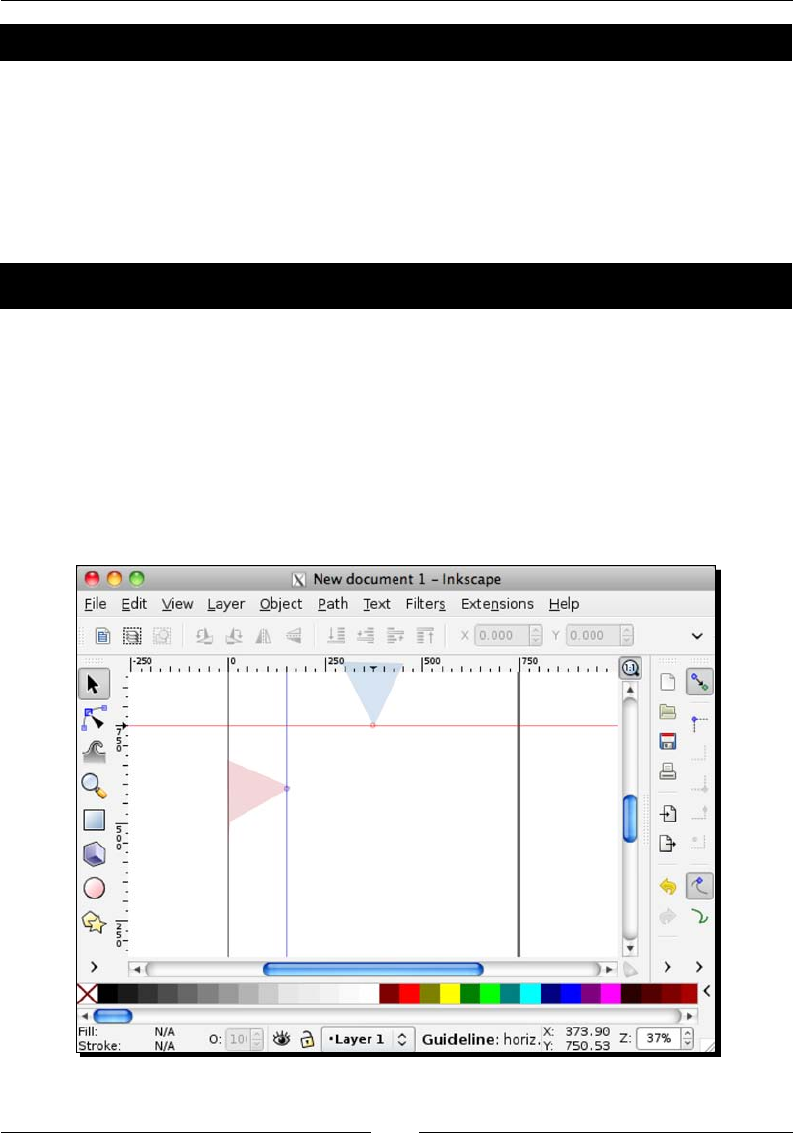
Chapter 4
[ 87 ]
Pop quiz – viewable grid
1. What is the shortcut key for making Grids viewable in Inkscape?
a. The G key
b. F1
c. #
d. Enter
Time for action – making guides
Now it's me to create guides. Guides are lines on the screen that you will use for aligning,
that is, guiding objects. These lines are only visible while you are working in Inkscape and we
can set objects to snap to them when we are designing. Both of these simple tools (guides
and the Snap to feature) will give you automac alignment for the basic areas of your web
page layout—which in turn will help make the design process much easier.
1. To create a guide in any open document, drag from the le or top ruler toward your
page as in the following screenshot. A red line represents the guide unl you let go
of the guide and place it on the page. Then the line turns blue.

Creang your First Graphics
[ 88 ]
You can move the guides aer placing them on the page by using the Select tool and
clicking-and-dragging the circle node on the guide. Also, double-clicking directly on a
guide will bring up a dialog box which lets you change the guide posions and angle
very accurately.
What just happened?
You created two guidelines on your current canvas: one from the right ruler and one from
the top.
One note here, if you want to make mulple guidelines, even on the right
side of the canvas, it is easy. Just drag from the le ruler onto the canvas
over other guidelines and all rulers currently placed on the page and
drop it where you need it on the page. There is no maximum number of
guidelines that you can create.
Summary
We created our very rst graphics from polygons, ellipses, circles, arcs, and even an arrow
by combining shapes. To do all of this, we used the basic shapes available to us through
Inkscape but also worked with the Bezier Tool to create freehand shapes (such as the
lightning bolt).
We also took some me to turn on grids and to learn how to create guides for beer aligning
and designing. Next up, we shall be learning all we can about layers.
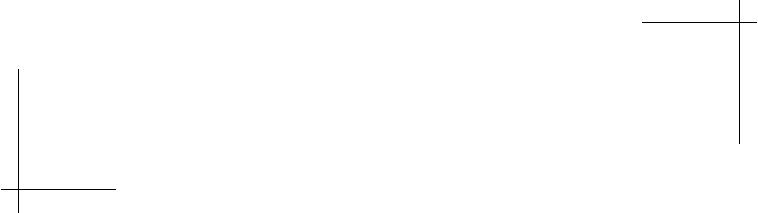
5
How to Work with Layers
If you have used any other graphics program, you are likely to be familiar with
layers. Layers are like stacks of transparent paper with drawings on them. Each
layer stacks, and thus objects on each of the layers also stack on top of one
another. Of course when using layers in Inkscape, you can manipulate all of the
objects in one layer the same way.
This chapter will cover:
Dening layers and how to create them
Using layers in an example drawing
Locking layers
Hiding layers
Dockable Layer dialog
Duplicang layers
Arranging layers
Renaming layers
Deleng layers
Blend mode
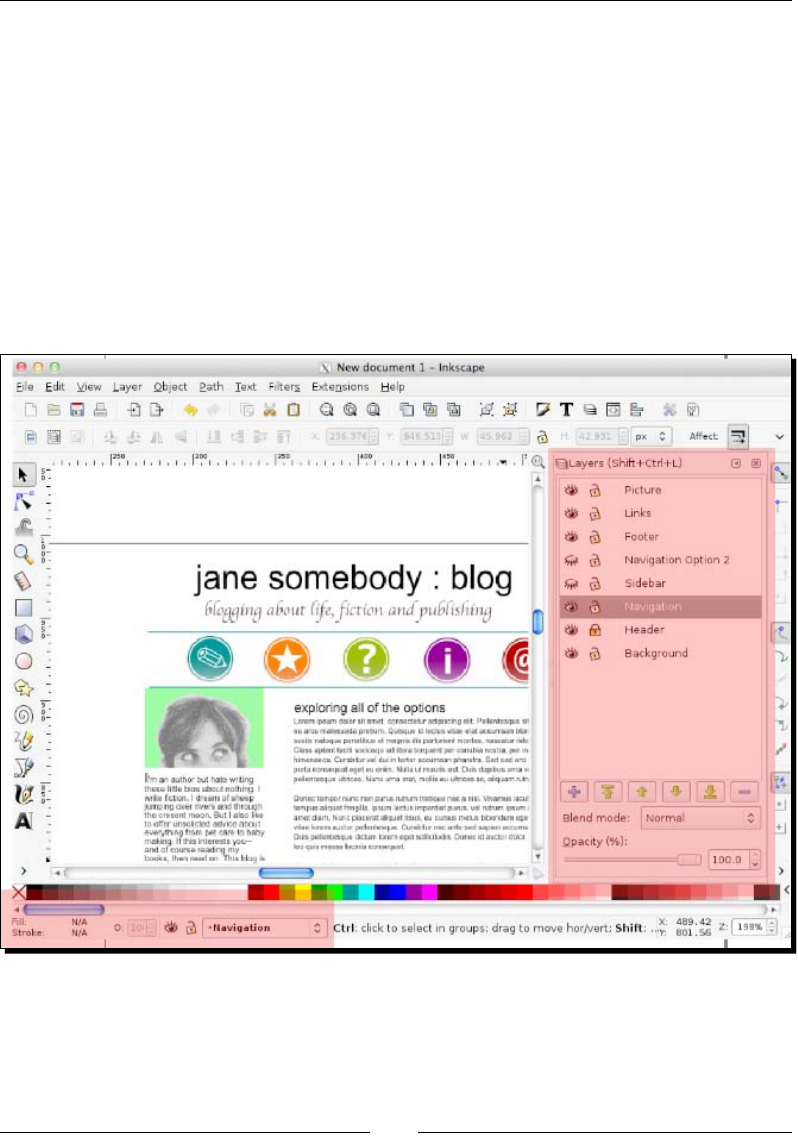
How to Work with Layers
[ 90 ]
Dening layers and how to create them
Within Inkscape when you create documents you can have layers of objects. This gives great
exibility when creang any Inkscape project. You can place groups of objects on a layer
based on funcon or placement on the design. Then you can separate the objects by layer,
and stack or reorder, or hide layers. A seng can be adjusted on each layer, so you can save
dras or dierent versions of mockups and keep all of this in one le.
The layer you are currently using is called the drawing layer. It is selected in the Layer dialog
and shown in a darker color.
Also note, you can view Inkscape layers in the Layer dialog or in a drop-down menu in the
status bar:
Chapter 5
[ 91 ]
Time for action – creating a layer
Let's start by creang a customized layer. We'll call it Basic Layout.
1. First, let's make the Layers dockable dialog viewable. From the main menu, select
Layer and then select Layers. The Layers dialog is displayed on the right-hand side
of your screen as follows:
You can also press Shi + Ctrl + L on your keyboard or click the Layers
icon in the command bar (as shown in the following screenshot) to
display the Layers dialog.
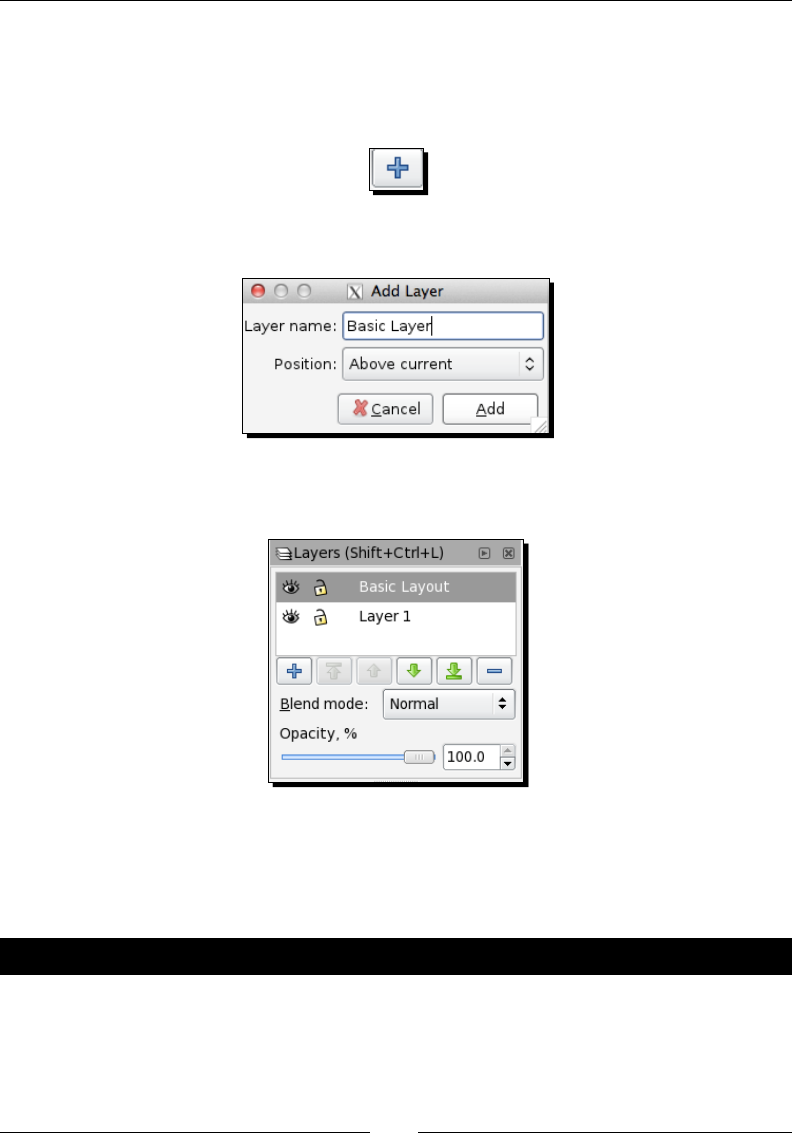
How to Work with Layers
[ 92 ]
2. In the Layers dialog, press the + buon to create a new layer or use the Shi + Ctrl
+ N shortcut keys. The default layer is called Layer 1. However, you can rename it,
move it up and down in the stack, and it is treated no dierent than any other layer
you create in your projects.
3. In the Layer name eld, type the name: Basic Layout and click Add:
You will noce the new layer is added above the exisng one in the Layers dialog
as follows:
What just happened?
You created a new layer in an open document in Inkscape called Basic Layout. You will need
to repeat the steps menoned earlier every me you want to create a new layer.
Pop quiz – Layers dialog
1. How do you close the Layers dialog?
a. From the main menu, select Layer and then select Layers.
b. Press the X on the upper-right side of the Layers dialog window.
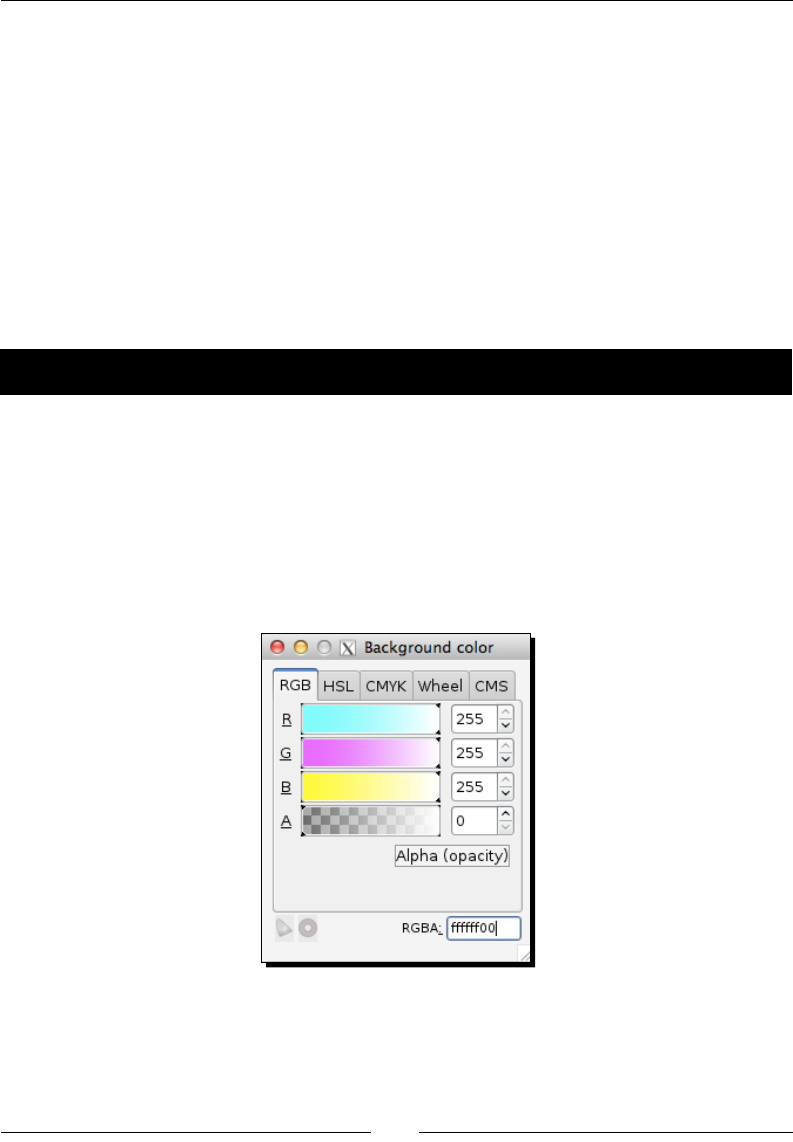
Chapter 5
[ 93 ]
c. Once it is open, you cannot close the Layers dialog window.
d. Close Inkscape all together and re-open it.
Using Layers in an example drawing
Let's create the basic links for a blog. Some common parts of many blog sites are the blog
header or banner, a sidebar with recent posts (or archives), an about secon, recent posts,
blog roll and/or a Links secon, and a main content secon that will contain all of the blog
posts. Of course, you can get as fancy as you like here, or as simple, but let's design a site
based on these simple secons so we can demonstrate how to use layers to create a design
layout mockup.
Time for action – using Layers in web design
To start, we will create the very start of a website, or more specically a blog, and create
three layers in the design:
1. Open Inkscape, and create a new document. From the le menu, select File | New |
Desktop_800x600.
2. From the main menu, choose File | Document Properes.
3. Click on Background. The Background color dialog will be displayed.
4. Change RGBA from 00 to . This will change the background color of this
screen mockup to white.
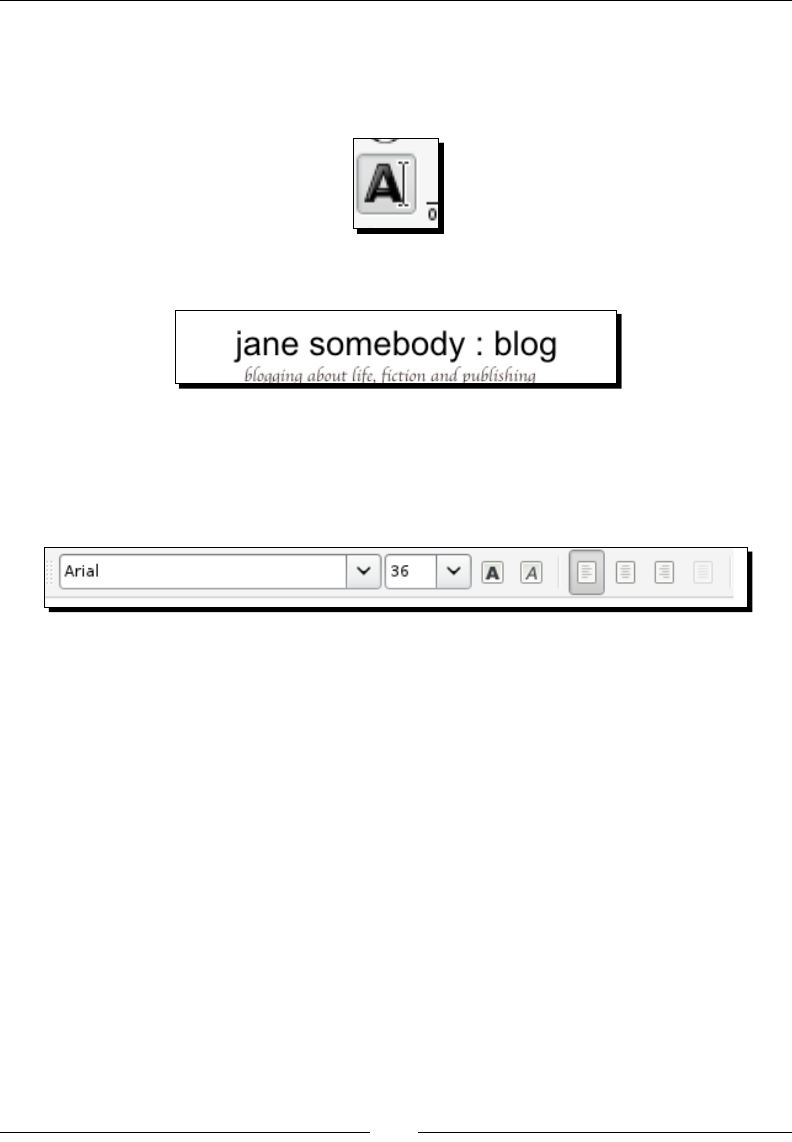
How to Work with Layers
[ 94 ]
5. In the Layer dialog, click the + sign to create a new layer (or use Shi + Ctrl + N)
and call it Header.
6. Click the Create and Edit Objects tool and enter the header tle for the blog.
You could try creang something similar to the following screenshot:
7. Highlight the text with the Create and Edit Objects tool and use the control
bar located above the canvas area and adjust the font type and size. In the
previous example, the font type is Arial and it is 36 points in size, as shown
in the following screemshot:
8. Then, sll using the Create and Edit tool, type the subtle as shown in the example.
Remember to use the control bar to adjust the font type and size. In the same
(previous) example, the font for the subtle is Apple Chancery with an 18 point font.
9. Next, we want to center both of these tles on the vercal axis of this document.
Use the Select tool, press the Shi key on the keyboard, and click both tles
(this will allow you to select both objects).
10. Click the Align and Distribute Objects icon on the command bar to display the
Align and Distribute dialog, as shown in the following screenshot:
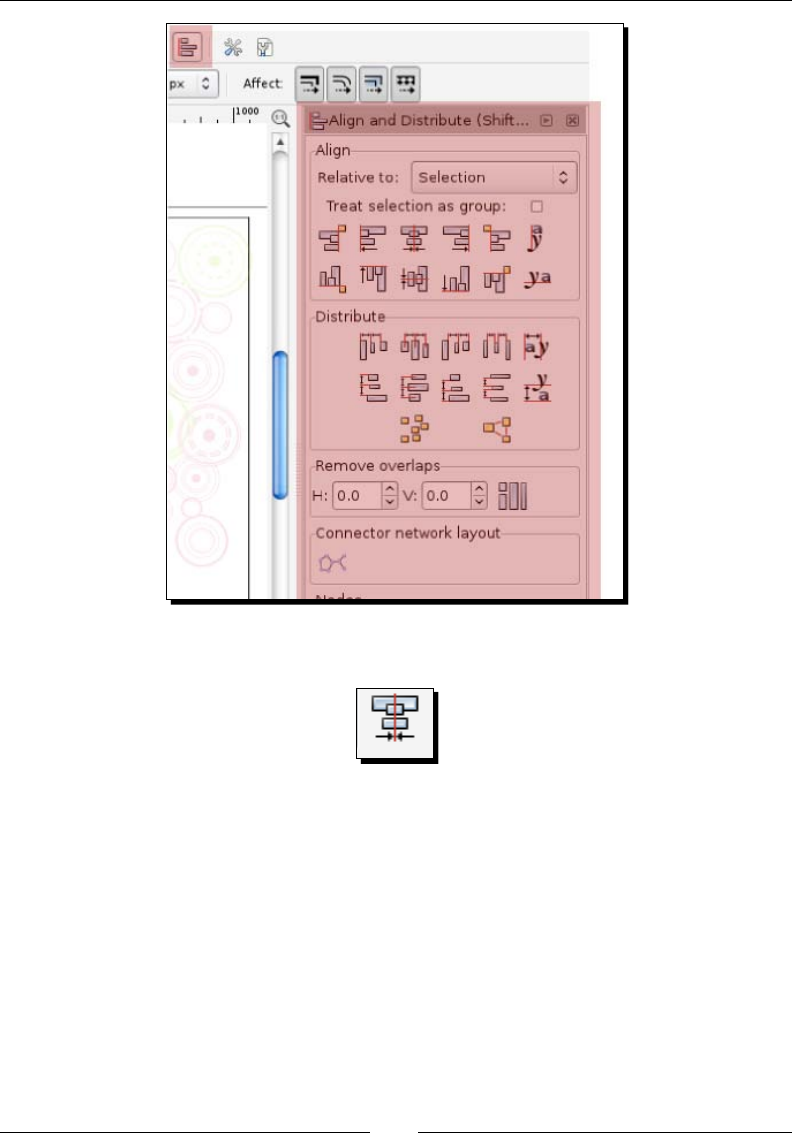
Chapter 5
[ 95 ]
11. Click the Center on Vercal Axis icon. This will center both tle objects on the page:
12. Now we will add a new layer yet again. Create the new layer by using the Layer
dialog, + sign, or the Shi + Ctrl + N shortcut keys. Let's call the layer Navigaon.
13. For the navigaonal elements, we will import some ready-made icons.
First download the icons to your hard drive from http://dl.dropbox.
com/u/565455/iconpack.zip.
How to Work with Layers
[ 96 ]
14. Unzip these icons to your hard drive, preferably on your desktop. From the desktop
then drag-and-drop your icon les onto the Inkscape canvas. Repeat this unl you
have all ve icons on the canvas. See the following sample screenshot:
15. To make sure you have everything evenly spaced, we need to align them. Click the
Align and Distribute Objects icon on the command bar to display the Align and
Distribute dialog if it is sll not displayed.
16. Choose the Select tool, press the Shi key and click on all icons.
17. In the Align and Distribute dialog, click the Distribute Centers Equidistantly
Horizontally buon.
This will make sure all of the icons are spaced equally apart from one another
to make a clean design.
What just happened?
In the small example menoned earlier, you created three layers: Background, Header,
and Navigaon, each with the object associated with them. If you connue this process,
you can build something similar to what is given in the following screenshot that has
addional layers side content, body content, and footer, for example. To see this project
in its complete form, you can download it from http://dl.dropbox.com/u/565455/
exampleprojectlayout.svg.
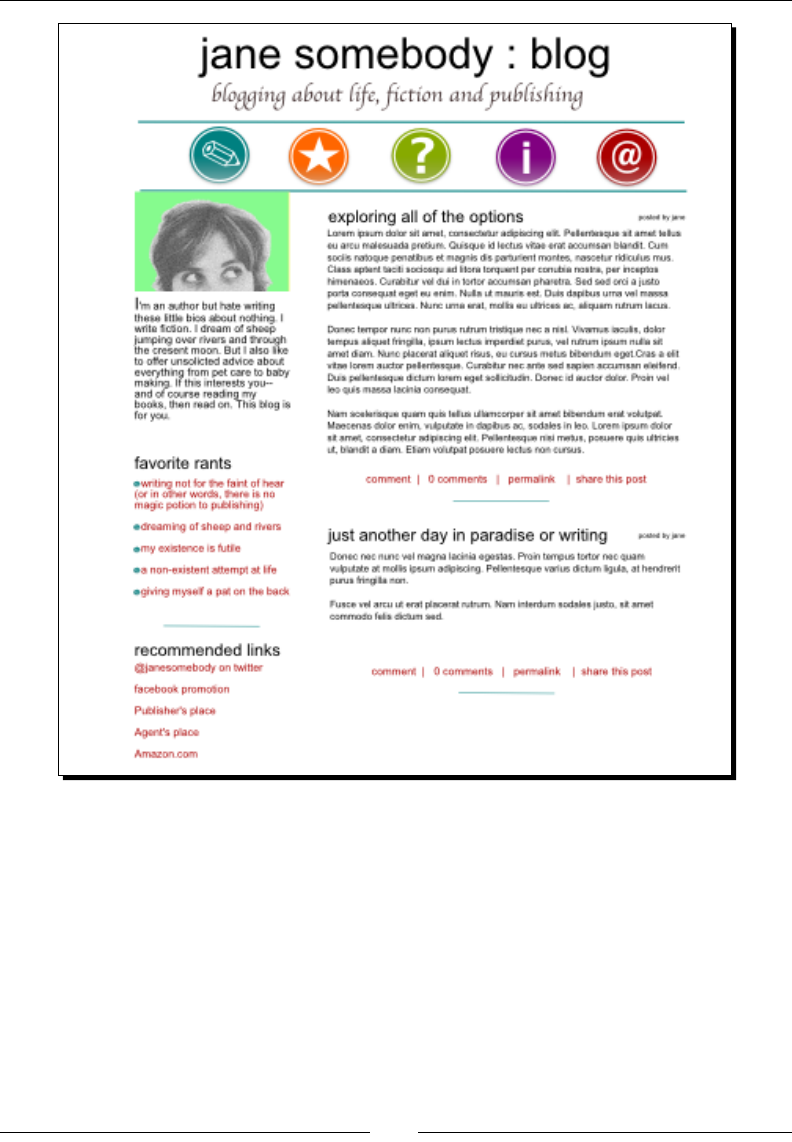
Chapter 5
[ 97 ]
Now, let's dig a bit deeper into how you can manipulate layers to help you design. Make each
layer behave independently of the others and therefore, manipulate what your nal design
will look like.
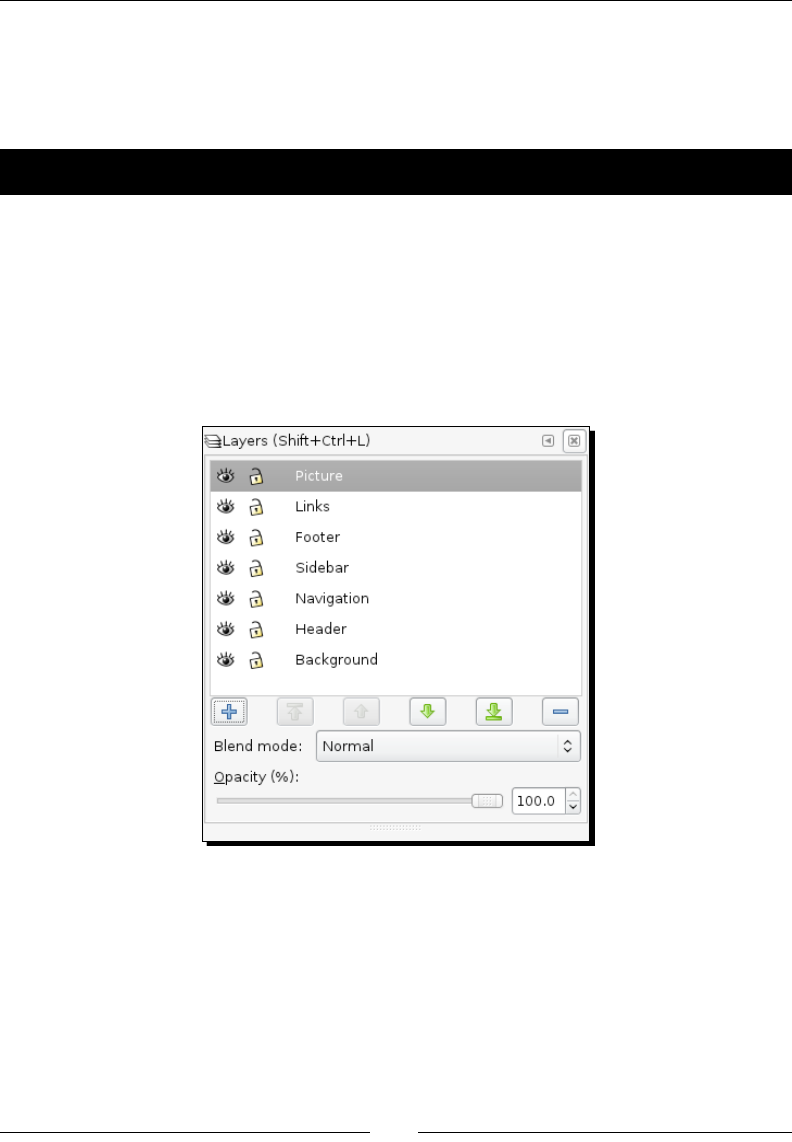
How to Work with Layers
[ 98 ]
Locking layers
The idea of locking a layer—making it not editable—can be valuable when designing
backgrounds, footers, or headers.
Time for action – locking a layer
Let's look at how you can lock a layer in Inkscape using the same design used previously.
You can download the full project from http://dl.dropbox.com/u/565455/
exampleprojectlayout.svg.
1. With the blog mockup from the pervious exercise open in Inkscape, open the Layer
dialog. From the main menu, select Layer and then Layers. On the right side of your
screen, the Layers dialog will be displayed and it will look something similar to the
following screenshot:
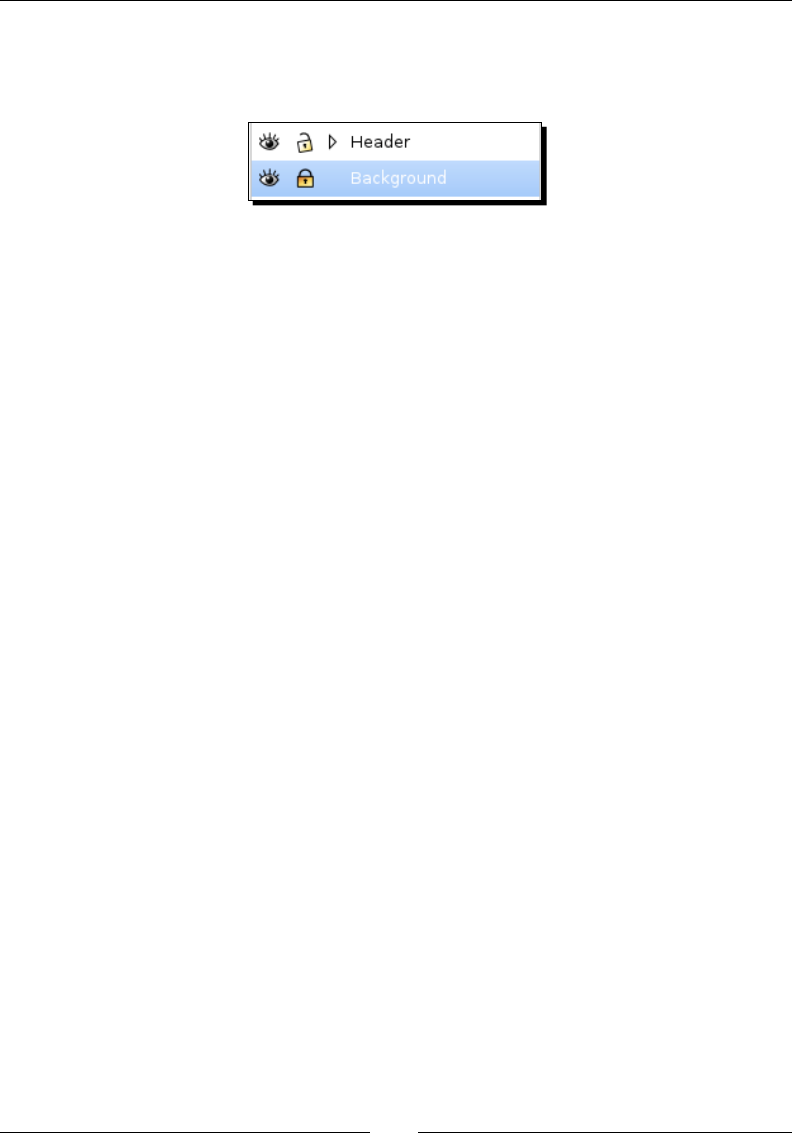
Chapter 5
[ 99 ]
2. You will noce that each layer has icons to the le of the layer name. Go to the
Background layer and click the Lock icon. You will see that once you click that icon,
the lock now looks closed or locked, shown as follows:
This means that the Background layer can no longer be selected from the canvas,
nor will any objects on this layer be able to be moved or edited.
3. For example, go to your canvas and try to select the Background objects. You will
not be able to move this layer unl you unlock it in the Layer dialog.
4. To unlock an item, click the Lock icon. Again, you will see the icon change to the
unlock state, opening the layer objects for manipulaon again.
What just happened?
In the previous example, we locked the header layer in the working document. This means
we can't edit any objects on that layer, or move them to a new locaon on the canvas.
Essenally, all items are locked into place.
This helps keep items that are "in place," stay in place while you work on the rest of the
design. This can be especially handy when working in a series of designs where certain
items will always stay in the same locaon.
Hiding layers
Another great feature when working with layers is to hide them. This means that while
working with interim dras of projects, you could create a layer for the rst dra, and then
another for the second—or you could even use layers for certain design elements that you
want to turn on or o. All these are benecial because the layer will hold objects' locaons,
but all you need to do is click a buon to turn them on or o.
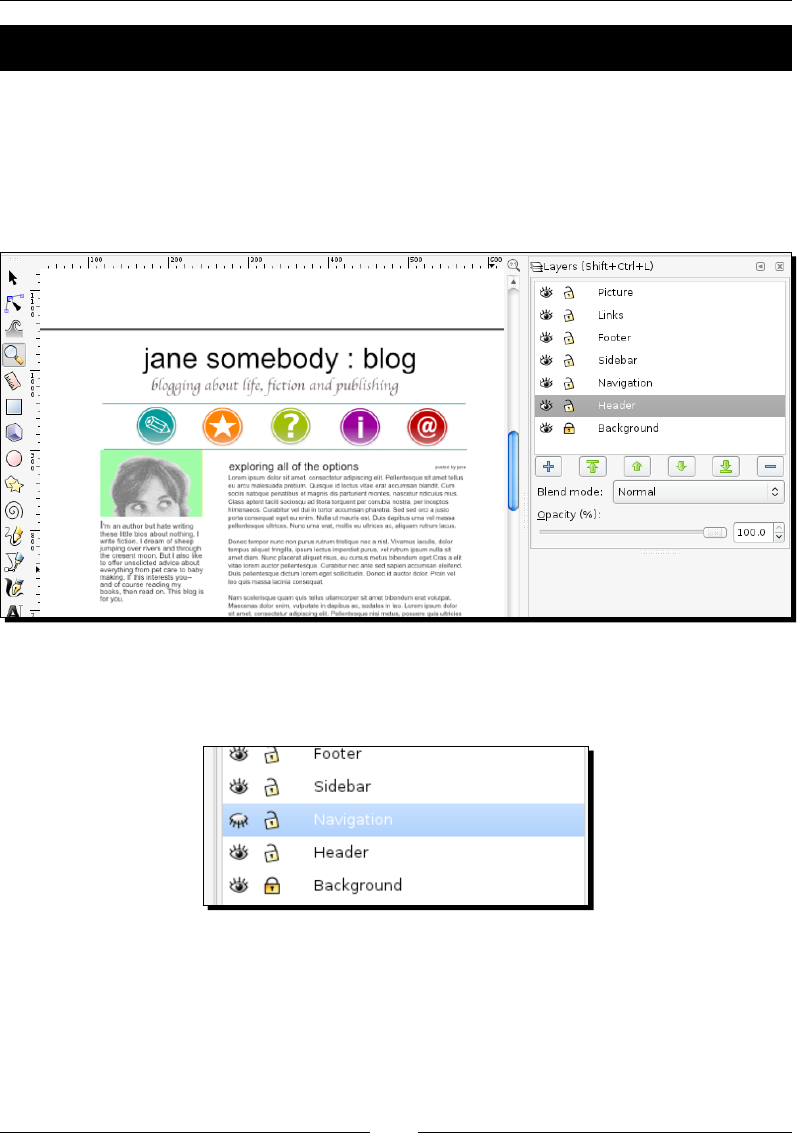
How to Work with Layers
[ 100 ]
Time for action – hiding layers
To really show how powerful a feature hiding layers can be, let's walk through this example.
We're going to change the design of the blog that we have been featuring in this enre chapter.
In fact, we will change the navigaon icons so that we can make two dierent designs:
1. With the blog mockup from the previous exercise open in Inkscape, reopen the
Layer dialog if it is not open.
2. Select the Navigaon layer.
3. Click the Eye icon to the le of the layer name.
4. The eye will close and essenally hide all objects on that layer—as shown in the
previous screenshot.
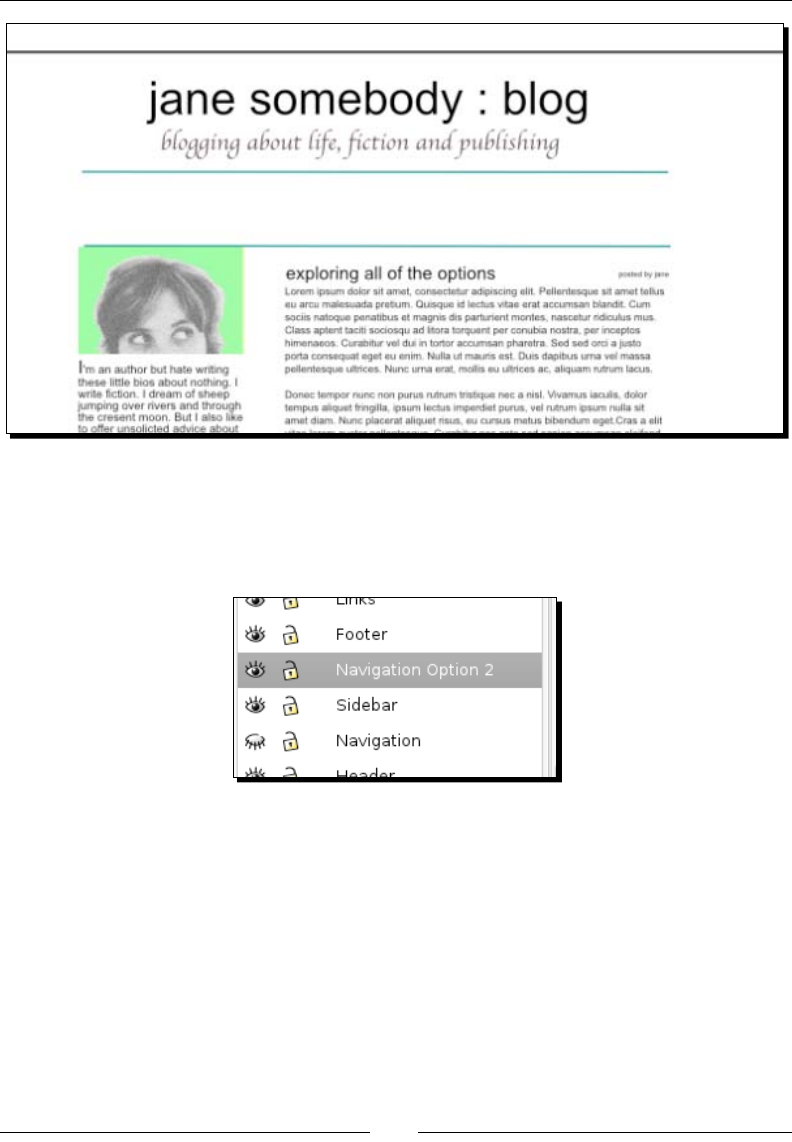
Chapter 5
[ 101 ]
5. Now, you can create a new layer with the dierent navigaon elements and make
that viewable. This creates another design opon to choose from. To do this, create
the new layer by using the Layer dialog and the + sign or the Shi + Ctrl + N shortcut
keys. Let's name the layer Navigaon Opon 2:
6. Make sure this layer remains selected and import some new navigaonal
elements. Download the new icons from http://dl.dropbox.com/u/565455/
Newnavbuttons.zip.
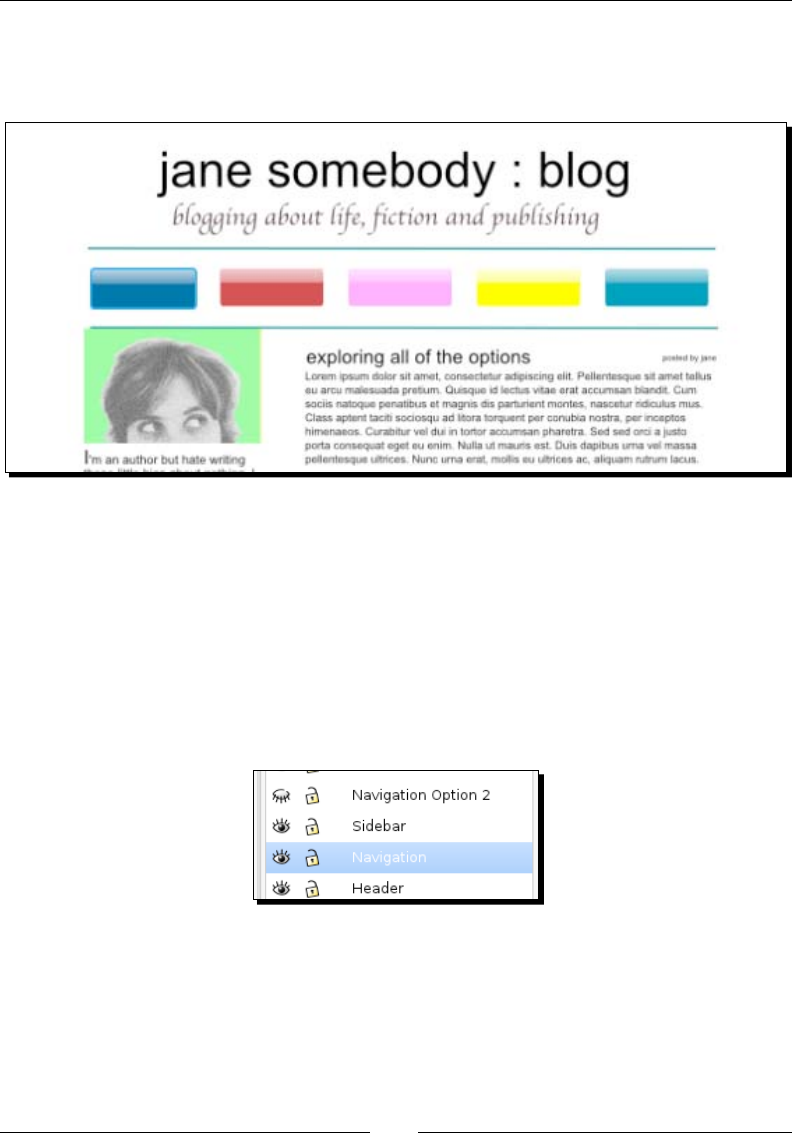
How to Work with Layers
[ 102 ]
7. Unzip the new icons to your desktop and drag-and-drop the les to your canvas
(again, making sure the Navigaon Opon 2 layer is acve). You'll noce that since
the original Navigaon is sll hidden, you don't see the icons:
This is an ideal way to give certain design opons to a client.
8. You can now save a PDF with the new navigaon design. From the main menu,
select File | Save As | *.Portable Document Format. You can leave all default values
on in the PDF dialog to save the le.
9. Hide the layer Navigaon Opon 2 (click the eye) and unhide the layer Navigaon
(click closed eye) to see the original design. Then save this version also as a PDF.
From the main menu, select File | Save As | *.Portable Document Format. Of
course, remember to give this new version a dierent PDF lename:
10. Also, saving this project as an Inkscsape SVG le would be benecial, so all objects
and this overall design can be edited later. From the main menu, select File and then
select Save.
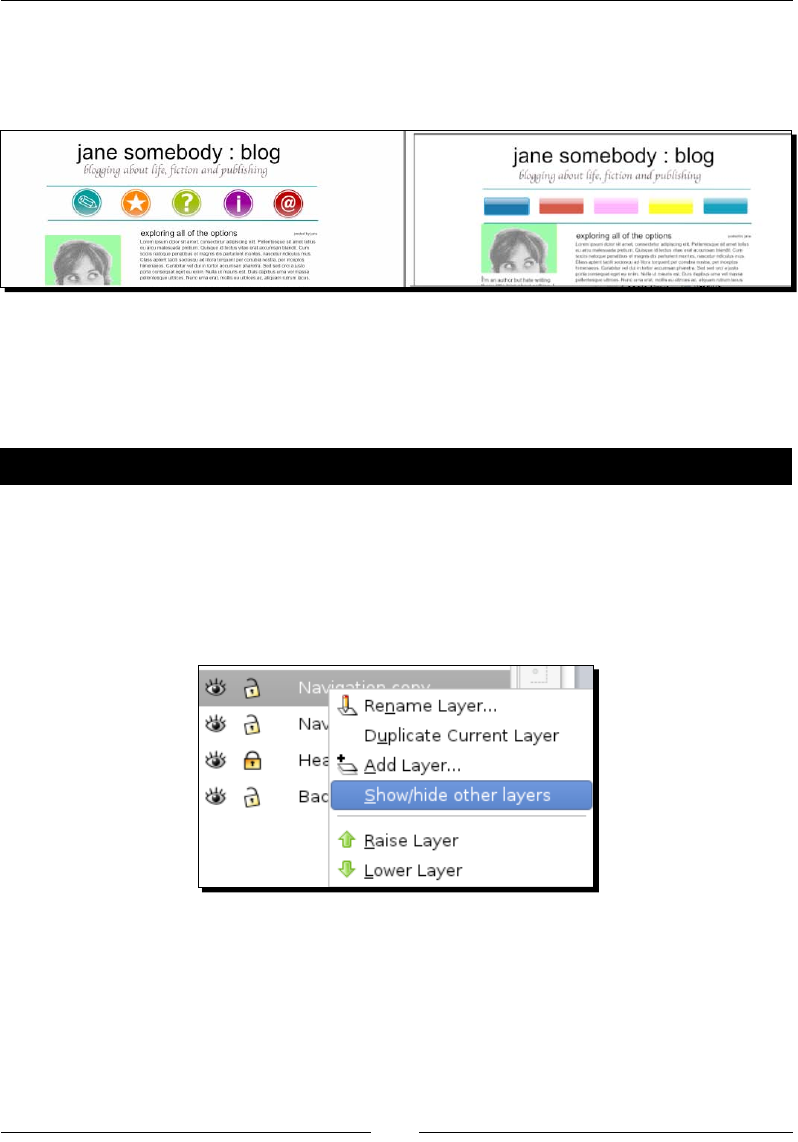
Chapter 5
[ 103 ]
What just happened?
You hid one layer, created another layer, made a new design element, and learned how to
switch between the two layers to show o two dierent designs.
In Inkscape, layer selecon happens automacally when you select an object. This is
dierent in comparison to many bitmap editors in the market, where you rst have to select
a layer to work on and then the object. With Inkscape, you can select any object and it will
be immediately set as the current layer by Inkscape.
Have a go hero – show all but current layer
You can also hide or show all layers other than the current.
The following points explain how it is done:
1. Open the sample le that we created previously.
2. In the Layer dialog, right-click the layer name and choose Show/hide other layers.
3. If the current layer is viewable (not hidden) it will hide all others except your
working layer giving you access to that layer's content in isolaon.
4. If the current layer is hidden, selecng the Show/hide other layers eld, will unhide
the current layer and then hide all others. Again, allowing you to work in only that
layer with no other layers and their objects viewable.
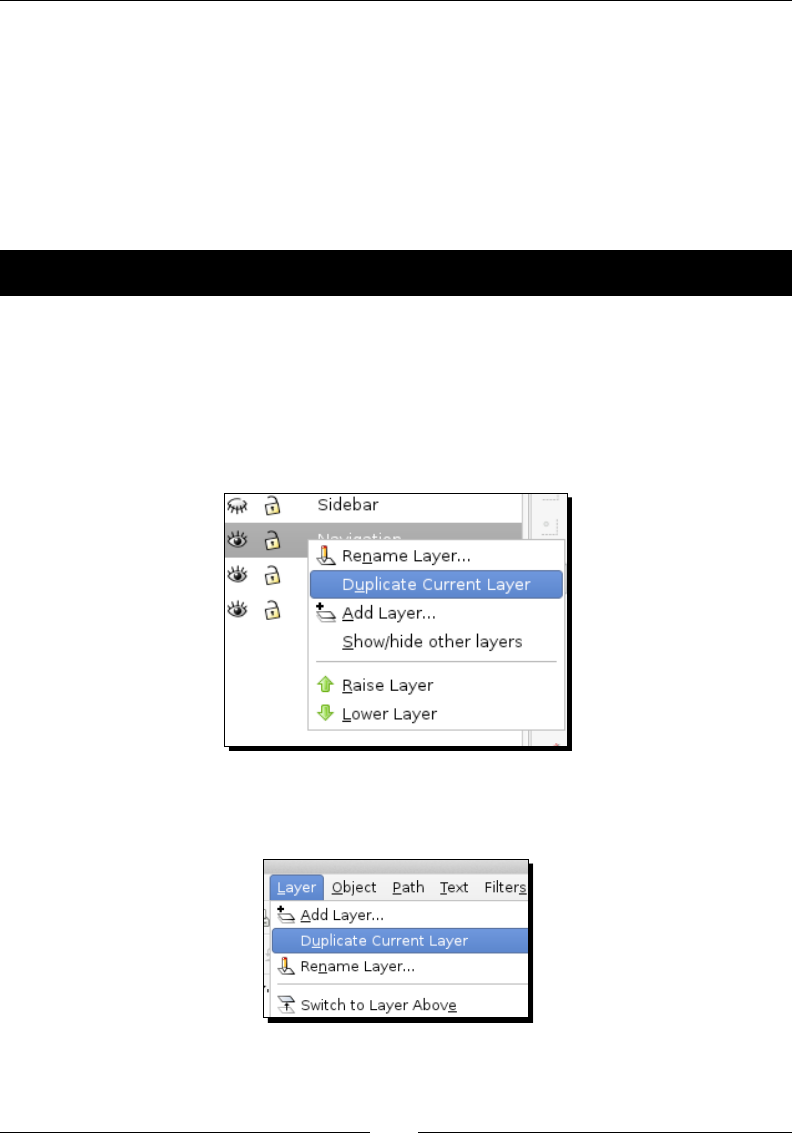
How to Work with Layers
[ 104 ]
Duplicating layers
Much like hiding layers, it can be very useful to duplicate certain layers so you can keep some
of the same object aributes as the original (for example, opacity) or for the use of creang
design mockups of mulple pages of a website, which have common elements. Also note
that when you duplicate a layer it will duplicate all objects, including hidden or locked ones
on any sub-layers as well. More informaon is given in the secon Time for acon—nesng
layers later in this chapter in regard to sub-layers.
Time for action – duplicating layers
Here are the simple steps for duplicang a layer. We'll use the same example blog page as we
have throughout this chapter.
1. Open the blog mockup from the previous exercises.
2. If your Layer dialog is open, you can right-click any layer and choose Duplicate
Current Layer.
3. Alternavely, make sure the layer you want to duplicate is selected and from the
main menu, choose Layer and then Duplicate Current Layer.
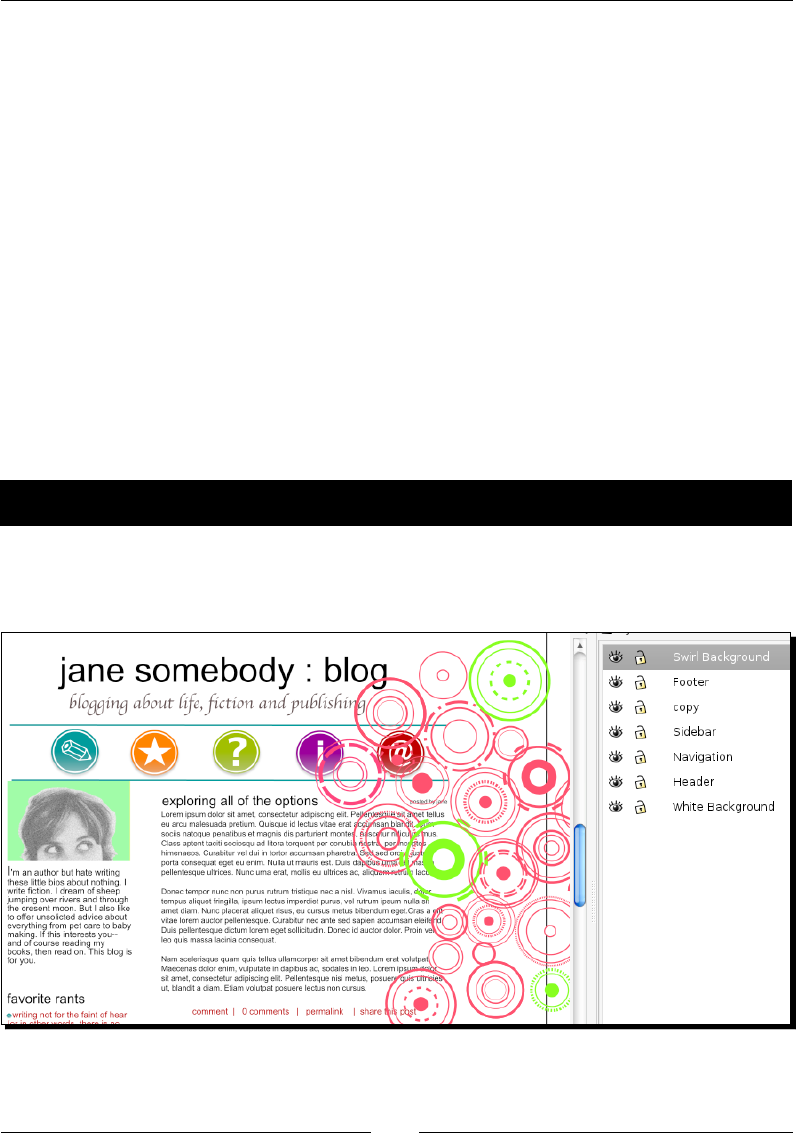
Chapter 5
[ 105 ]
What just happened?
You have just created a literal duplicate of the layer on your screen to edit.
Note, however, that the duplicate layer is also right above the exisng layer, so you may
not be able to see which is selected. Look at the Layer dialog. It renames the duplicate layer:
<original layer name> copy.
All objects on that layer are duplicated as well and will be placed on the canvas in the exact
locaon of the original. If you move an object, you will see the other one below it.
Now you can move and/or edit objects as needed on this new layer without disturbing
the original.
Arranging layers
You can also rearrange layers. Let's learn how to re-order the stack of layers, and move
a layer to the top or boom.
Time for action – moving layers
We're again going to use our blog design mockup le as an example. As the current screen
stands, the layers don't overlap much—as all objects have a place. However, if we add a layer
for a swirled background, it automacally places this layer on top, shown as follows:
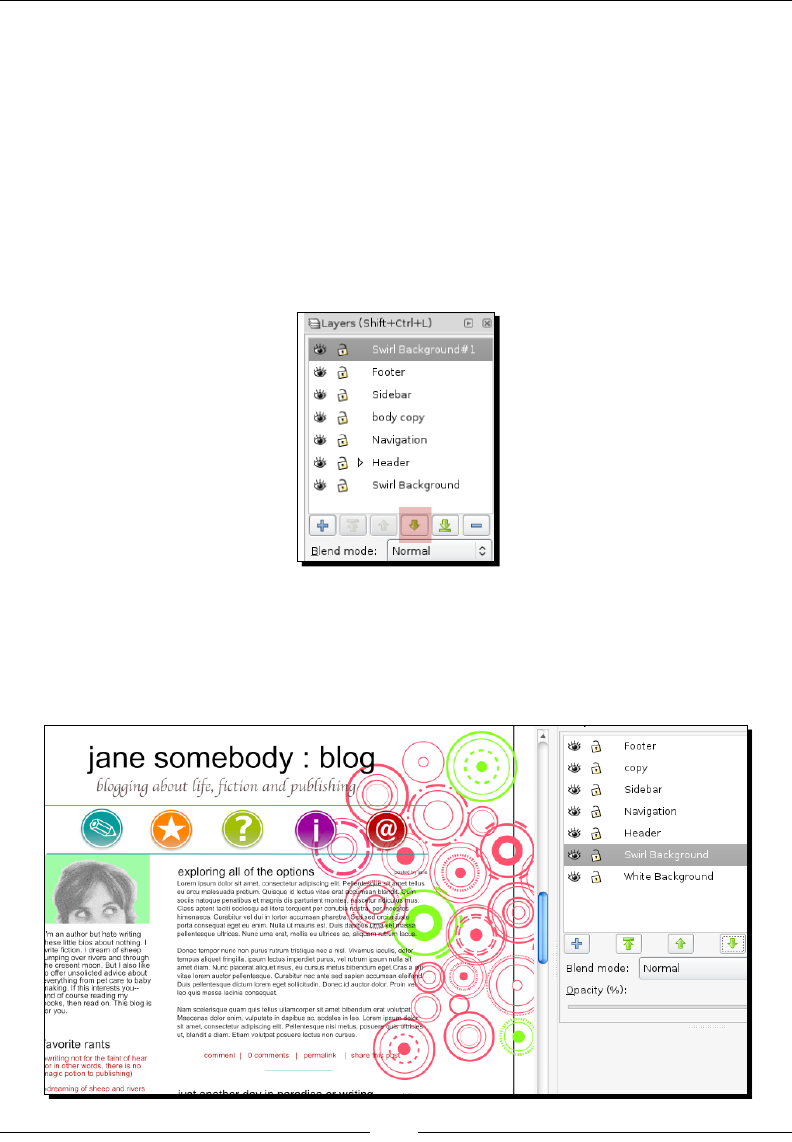
How to Work with Layers
[ 106 ]
The following steps explain how to move it down to place it behind the main design:
1. Download a sample of the swirl background here: hp://dl.dropbox.co/u/565455/
swirlbackground.svg.zip
2. In inkscape, in the layer dialog, add a new layer called Swirl Background.
3. Select the Swirl Background layer, and from the main menu choose File | Import.
Select the Swirl Background SVG le.
4. Once the image is imported, select Swirl Background in the Layer dialog and use the
arrow icon to move this layer just above the Background layer.
5. You could also use the move to boom icon (just to the right of the move down
icon)—since our background was set to white in the document properes.
Now your canvas should look something similar to the following screenshot.
Note, how the swirls are now behind the navigaonal buons:
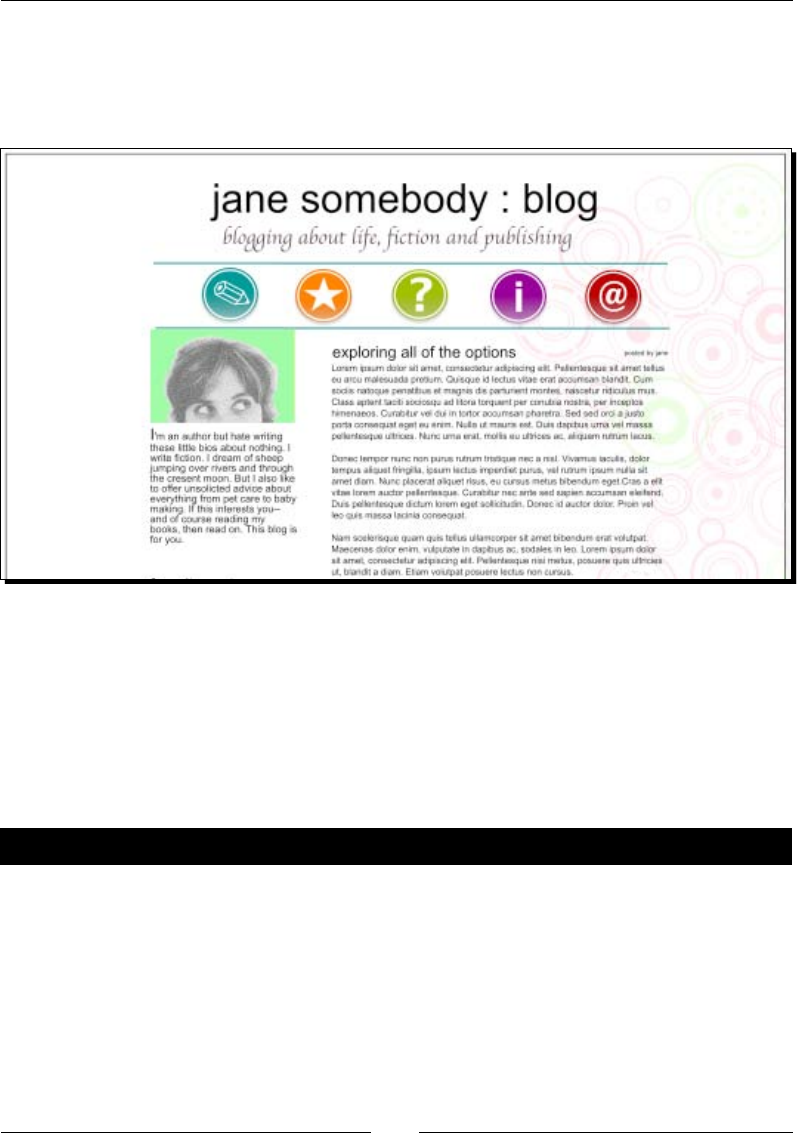
Chapter 5
[ 107 ]
6. Make sure the Swirl Background layer is selected and move the Opacity bar at
the boom of the Layer dialog to 15% (or type 15 in the Opacity eld box). The
opacity of the Swirl Background will change and you will now have a paern-type
background for this blog:
What just happened?
We took an addional design element, swirl objects, and made them part of the background
in our blog design. We did this by creang a new Swirl Background layer and then moving
that layer lower in the layer stack.
Then we decreased the opacity of that layer to 15 percent, so that it could be subtler in
the design.
Pop quiz – background colors
1. What is the default background color of an Inkscape le?
a. White
b. Red
c. Transparent
d. Black

How to Work with Layers
[ 108 ]
Time for action – nesting layers
You also have the opon of nesng layers in Inkscape. Nesng is the idea of creang
sublayers in Inkscape. You might want to do this if you want all sublayers to be virtually
grouped with a parent layer and carry some of the parent layer's aributes.
Here's how we can create sublayers within the Header layer in our current project:
1. With the example project open, go to the Layer dialog (from the main menu,
select Layer and then Layers or use the Shi + Ctrl + L keyboard shortcut to open it).
2. Right-click the Header layer and choose Add Layer....
The Add Layer dialog is displayed.
3. Type a new layer name into the Layer name eld and then select Posion:
As sublayer of current.
4. Click on Add.
5. The new sublayer displays as a nested layer beneath Header.

Chapter 5
[ 109 ]
Unfortunately, at this me, there is no way to convert an exisng Inkscape
layer into a sublayer in the graphical interface. You can, however, go into the
XML editor and make this change directly if needed. More informaon about
sublayers can be seen in this online tutorial at http://tavmjong.free.
fr/INKSCAPE/MANUAL/html/XML.html.
Also note, a sublayer cannot be moved outside of the parent layer it is under.
Again, advanced use of the XML editor is needed to do this funconality.
What just happened?
We learned how to create nested sublayers in Inkscape.
Have a go hero – moving objects from one layer to another
Now that you have layers created—and objects on each layer—what if you want to move an
object from one layer to another? Here's how it is done:
1. In an open Inkscape document with mulple layers, select an object.
2. If you want to move this object to the layer above the current layer, use Layer |
Move Selecon to Layer Above or the Shi + PageUp keyboard shortcut
(for Macintosh users the keyboard shortcut is Shi + Fn + Arrow up).
3. If you want to move this object to the layer below the current layer, use Layer |
Move Selecon to Layer Below or the Shi + PageDown keyboard shortcut
(for Macintosh users the keyboard shortcut is Shi + Fn + Arrow down).
Renaming layers
Somemes while working within a document, you might nd the need to rename a layer to a
more descripve name to the layer's contents.
Time for action – renaming a layer
The following steps explain how you would rename an exisng layer in Inkscape:
1. Open an Inkscape document from previous exercises.
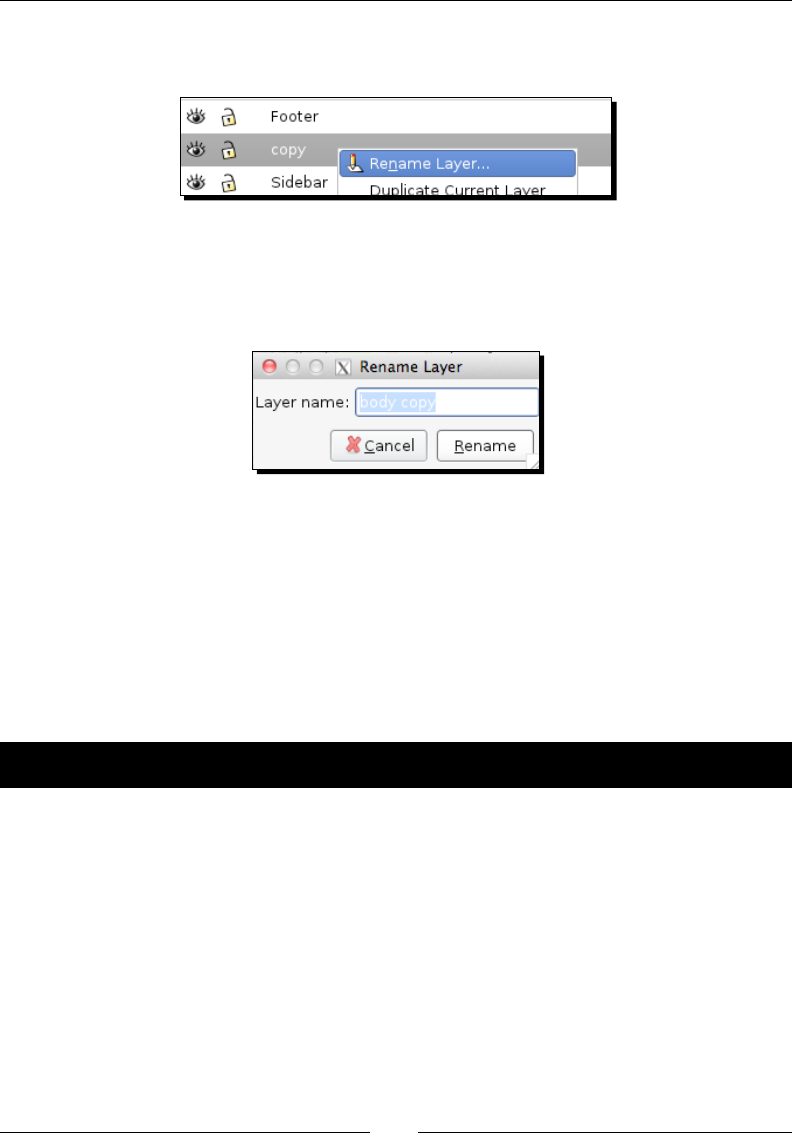
How to Work with Layers
[ 110 ]
2. If your Layer dialog is open, you can right-click any layer and choose Rename Layer.
Alternavely, from the main menu, select Layer | Rename Layer....
The Rename Layer dialog is displayed.
3. Type a new name for the layer and click Rename, as shown in the
following screenshot:
What just happened?
We renamed an exisng layer in Inkscape to the new name body copy.
Deleting layers
There are also mes you might want to delete a layer. Just note that when you delete a layer
if there are any objects on that layer, they will also be deleted.
Time for action – deleting a layer
1. Open an Inkscape document from a previous exercise.
2. If your Layer dialog is open, select the Swirl Background layer.
3. Then click the – icon as follows:
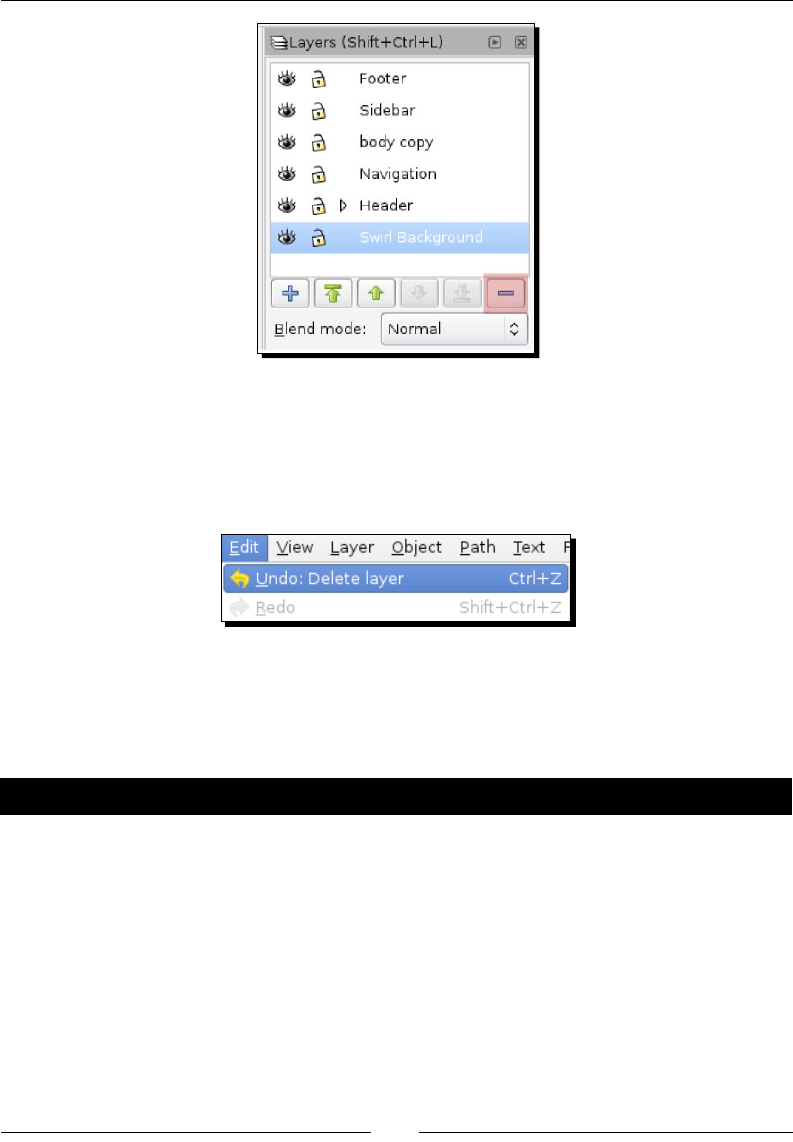
Chapter 5
[ 111 ]
The selected layer is deleted.
4. If you decide you don't want to delete that layer, go to the main menu and
select Edit | Undo: Delete Layer or use the Ctrl + Z keyboard shortcut to undo
the last acon:
What just happened?
We deleted the layer named Swirl Background in our Inkscape document. We also learned
that if we want to undo any acon, we can use the Undo funconality in Inkscape.
Pop quiz – undo last action
1. What is the shortcut key combinaon to undo the last acon in Inkscape?
a. Ctrl + Z
b. Shi + Z
c. Fn + Z
d. None of the above
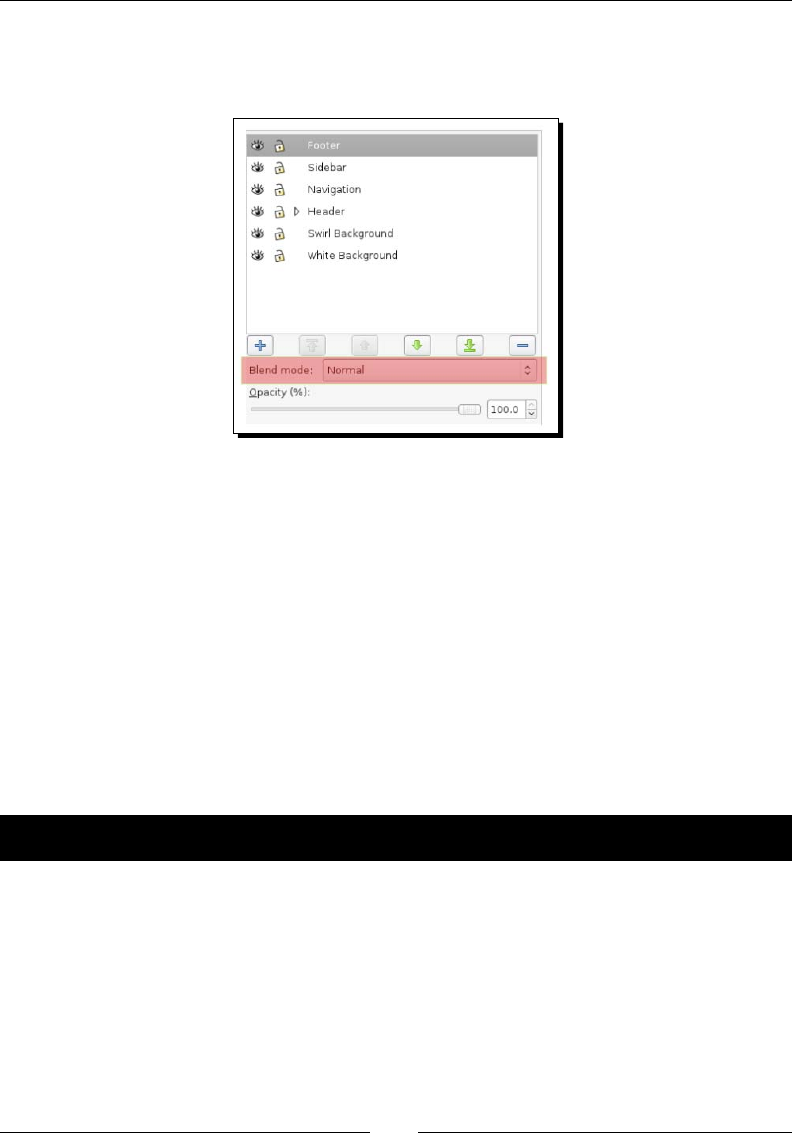
How to Work with Layers
[ 112 ]
Blend mode
In the Layers dialog, you may have noced the Blend mode eld, shown as follows:
This eld is a shortcut to apply the Blend lter to an enre layer. This means that if any
objects overlap on the selected layers, Inkscape will do a pixel-by-pixel blend of the two
objects. Here's what each Blend mode opon means:
Normal: No lter added to the layer
Mulply: Objects on the top layer lter the light from the objects on the
boom-most layer. (or from the background if a boom object does not exist)
Screen: The top objects add light to the boom object
Darken: The objects on top darken the boom objects
Lighten: The top objects lighten the boom objects
If at any me you return the Blend mode back to Normal, the blend lter disappears.
Time for action – using Blend mode
Let's add in a Mulply blend lter to two simple objects as an example:
1. Open a new document in Inkscape.
2. Use the Circle/Ellipse tool and create one red circle and one yellow circle,
shown as follows:

Chapter 5
[ 113 ]
3. Now move the yellow circle so it overlaps the red circle:
4. Open the Layers dialog and go to the Blend mode drop-down menu. Select Mulply
as follows:
The two objects combine as if light were shining through both. The red and yellow
objects—where they overlap—display orange, shown as follows:
5. If you now change the Blend mode back to Normal, the two objects now go back to
being normal, or just simply overlapping.

How to Work with Layers
[ 114 ]
What just happened?
We learned how to adjust the Blend mode between layers. We took two example objects
(circles in this case) and gave them the Mulply blend. Then we learned how to turn the
blend back to Normal mode.
Summary
We learned essenally everything there is to know about Layers in this chapter. We
discussed how to create new layers, lock them, hide them, nest sublayers, and even how to
duplicate and arrange layers. We even spent a bit of me discussing the Blend mode feature
when using layers—which can be a helpful tool to get text or object eects. Up next, we are
going to learn about building objects.
6
Building Objects
This chapter is all about objects. We'll learn about what objects are and how
Inkscape interprets them, how to change object features, change ll and stroke,
grouping objects, combining objects, and how to best use the masking and
clipping features.
Details in this chapter include:
Working with objects
Fill and Stroke
Grouping
Clipping and masking
Working with objects
Objects in Inkscape are any shapes that make up your overall drawing. This means that any
text, path, or shape that you create is essenally an object.
Let's start by making a simple object and then changing some of its aributes.
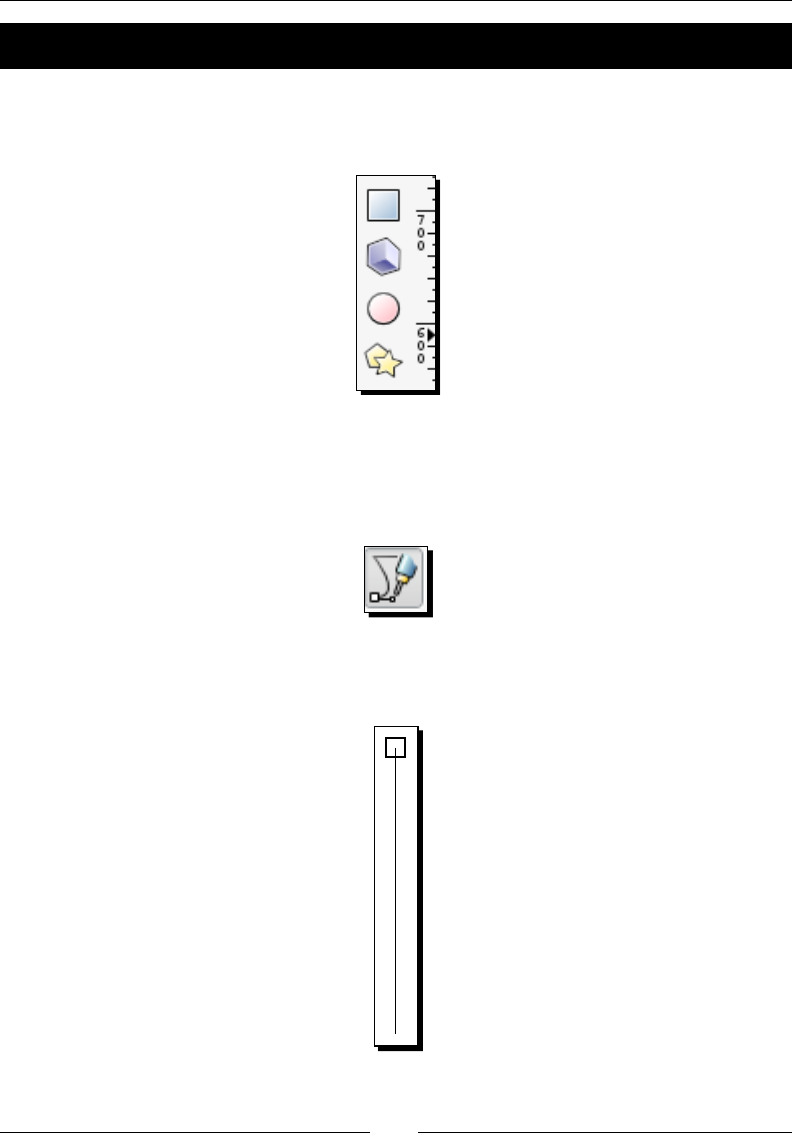
Building Objects
[ 116 ]
Time for action – creating a simple object
Inkscape can create predened shapes that are part of the SVG standard. These include
rectangles/squares, circles/ellipses/arcs, stars, polygons, and spirals. To create any of these
shapes, you can select items from the toolbar:
However, you can also create more freehand-based objects as well. Let's look at how we can
create a simple freehand triangle:
1. Select the Bezier tool:
2. Click once where you want the rst corner and then move the mouse/pointer to the
next corner. A node appears with the click and then a freehand line:
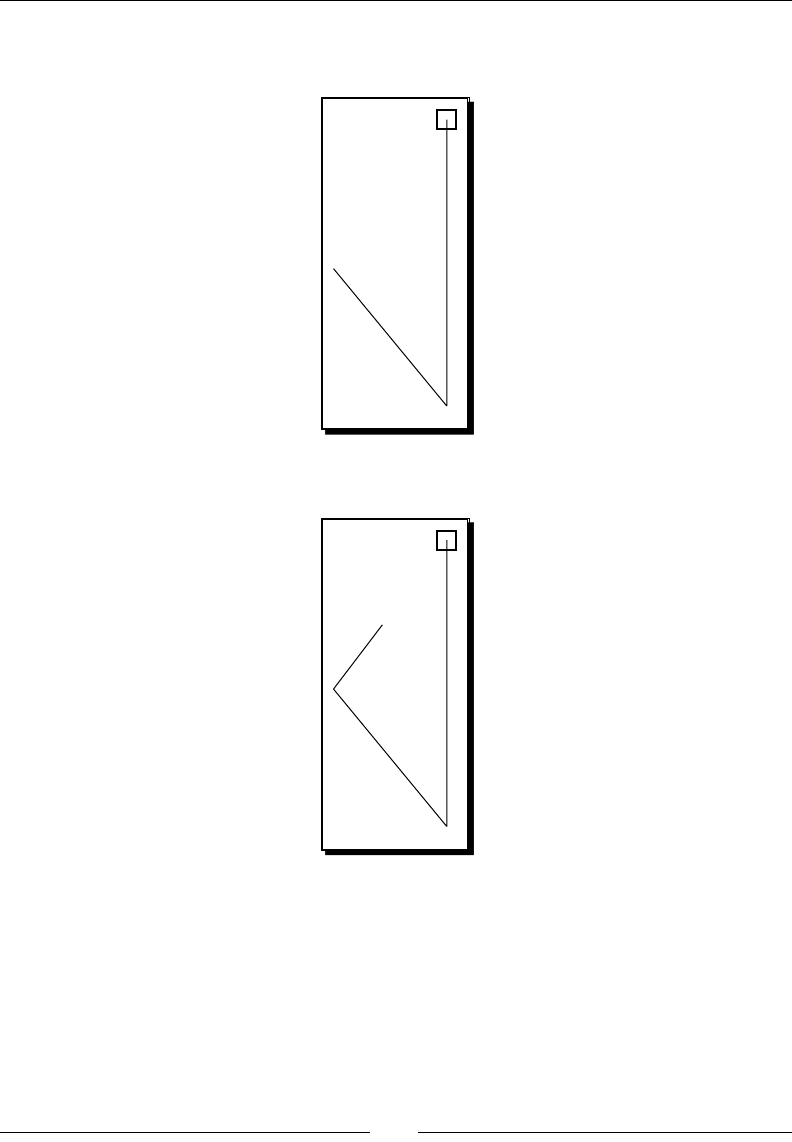
Chapter 6
[ 117 ]
3. When you have the length of the rst side of the triangle esmated, click for the
second corner:
4. Move the mouse to form the second side and click for the third corner:
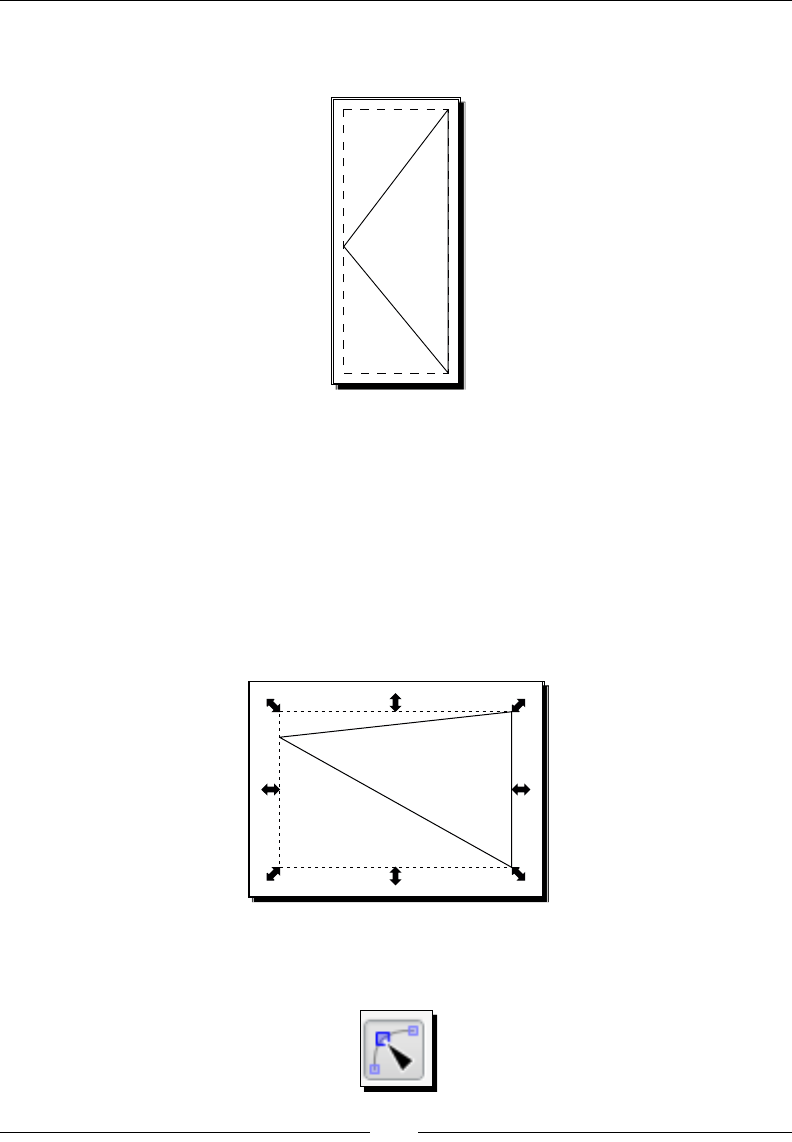
Building Objects
[ 118 ]
5. Move the mouse back to the rst corner node and click it to form the triangle,
shown as follows:
6. Now save the le. From the main menu, select File and then Save. We will use this
triangle to build a graphic later in this book, so choose a locaon to save so that you
will know where to nd the le.
7. Now that the basic triangle is saved, let's also experiment with how we can
manipulate the shape itself and/or the shape's posion on the canvas. Let's start
with manipulang the triangle.
8. Select the triangle and drag a handle to a new locaon. You have essenally skewed
the triangle, as shown in the following diagram:
9. To change the overall shape of the triangle, select the triangle, then click the Edit
path by Nodes tool (or press F2):
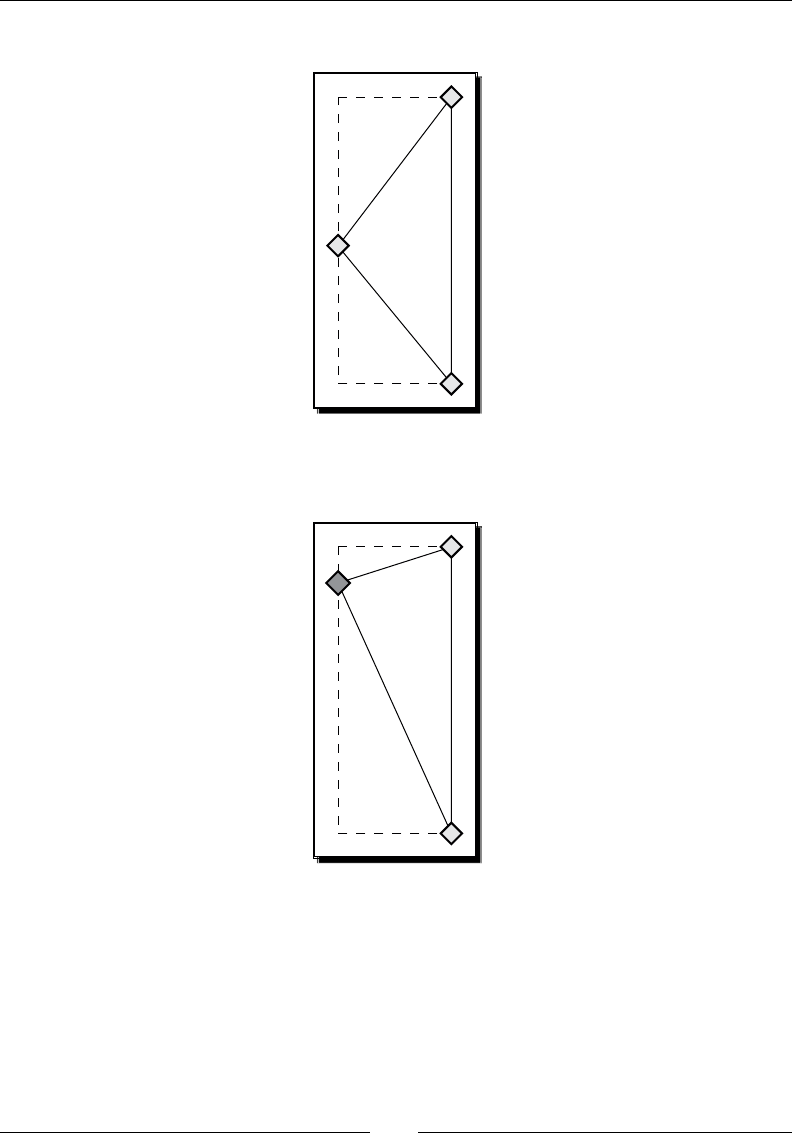
Chapter 6
[ 119 ]
10. Now the nodes of the triangle are displayed as follows:
11. Nodes are points on a path that dene the path's shape. Click a node and you can
drag it to another locaon to manipulate the triangle's overall shape as follows:
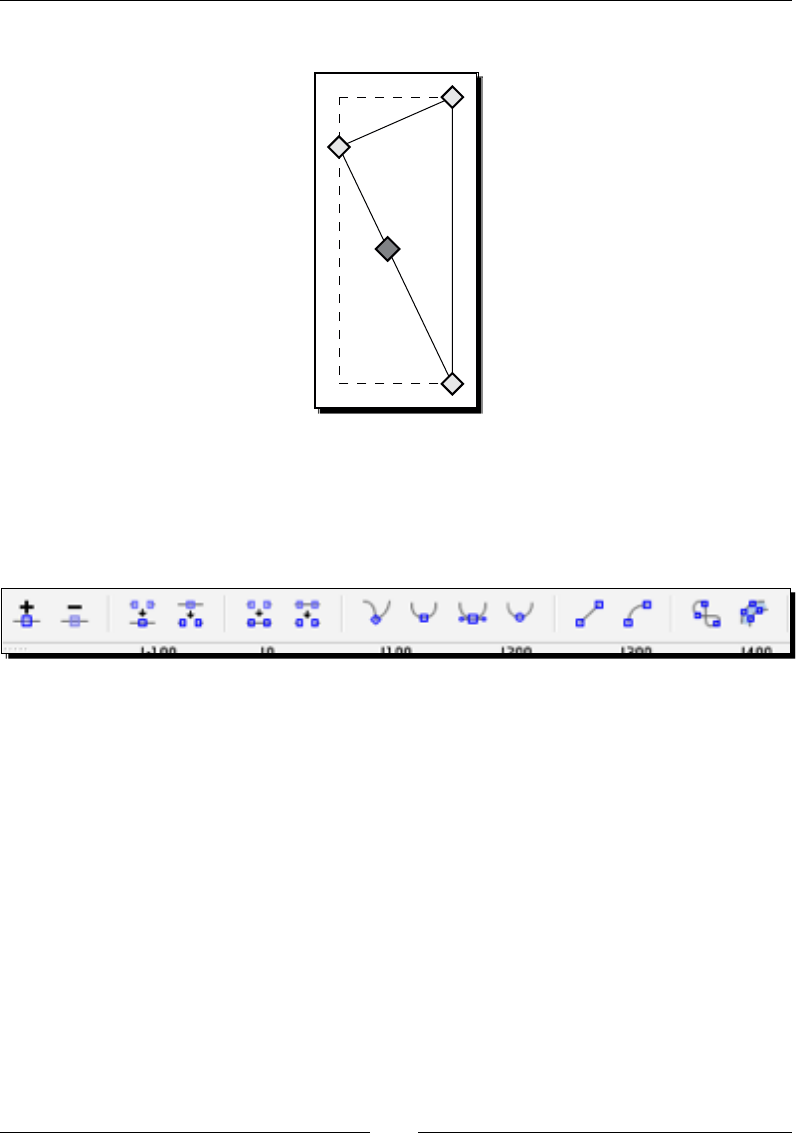
Building Objects
[ 120 ]
12. Double-click between two nodes to add another node and change the shape:
13. If you decide that you don't want the extra node, click it (the node turns red),
press Delete on your keyboard and it disappears.
14. You can also use the control bar to add, delete, or manipulate the path/shape
and nodes:
15. If you want to change the posion of the shape on the canvas by choosing the Select
tool in the toolbox, click and drag the shape and move it where you need it to be.
16. Change the size of the shape by also choosing the Select tool from the toolbox,
clicking and holding the edge of the shape at the handle (small square or circles at
edges), and dragging it outward to grow larger or inward to shrink unl the shape is
of the desired size.
17. You can also rotate an object. Choose the Select tool from the toolbox and
single-click the shape unl the nodes turn to arrows with curves (this might
require you to click the object a couple of mes). When you see the curved
arrow nodes, click-and-drag on a corner node to rotate the object unl it is
rotated and posioned correctly.
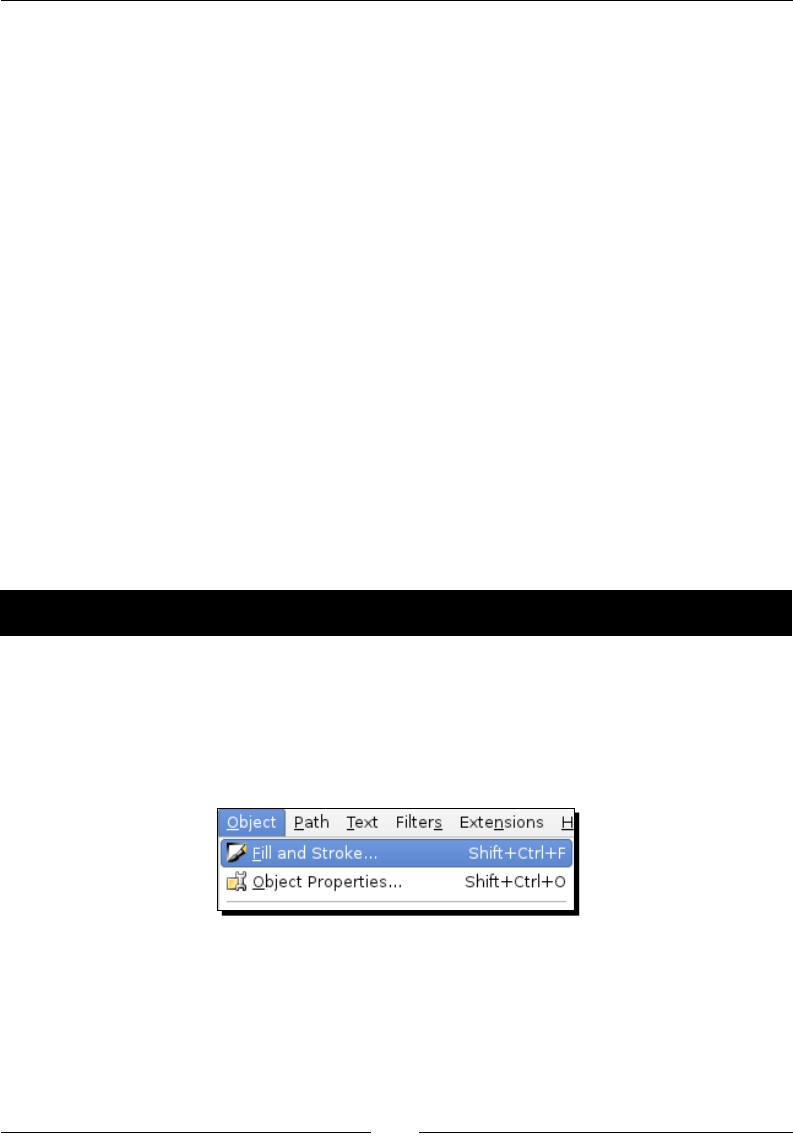
Chapter 6
[ 121 ]
18. No need to save this le again aer we have manipulated it—unless you want to
reference this new version of the triangle for future projects. But we will revisit the
original triangle shape in Chapter 7, Using Paths.
What just happened?
We created a free-form triangle and saved it for a future project. We also manipulated
the shape in a number of ways—used the nodes to change the skew of the overall shape,
added nodes to change the shape completely, and also how to move the shape around on
the canvas.
Fill and Stroke
As you've already noced, when creang objects in Inkscape they have color associated with
them. You can ll an object with a color as well as give the object an outline or stroke. This
secon will explain how to change these characteriscs of an object in Inkscape.
Fill and Stroke dialog
You can use the Fill and Stroke dialog from the main menu to change the ll colors of
an object.
Time for action – using the Fill and Stroke dialog
Let's open the dialog and get started:
1. Open your triangle Inkscape le again and select the triangle.
2. From the main menu, choose Object | Fill and Stroke (or use the Shi + Ctrl + F
keyboard shortcut).
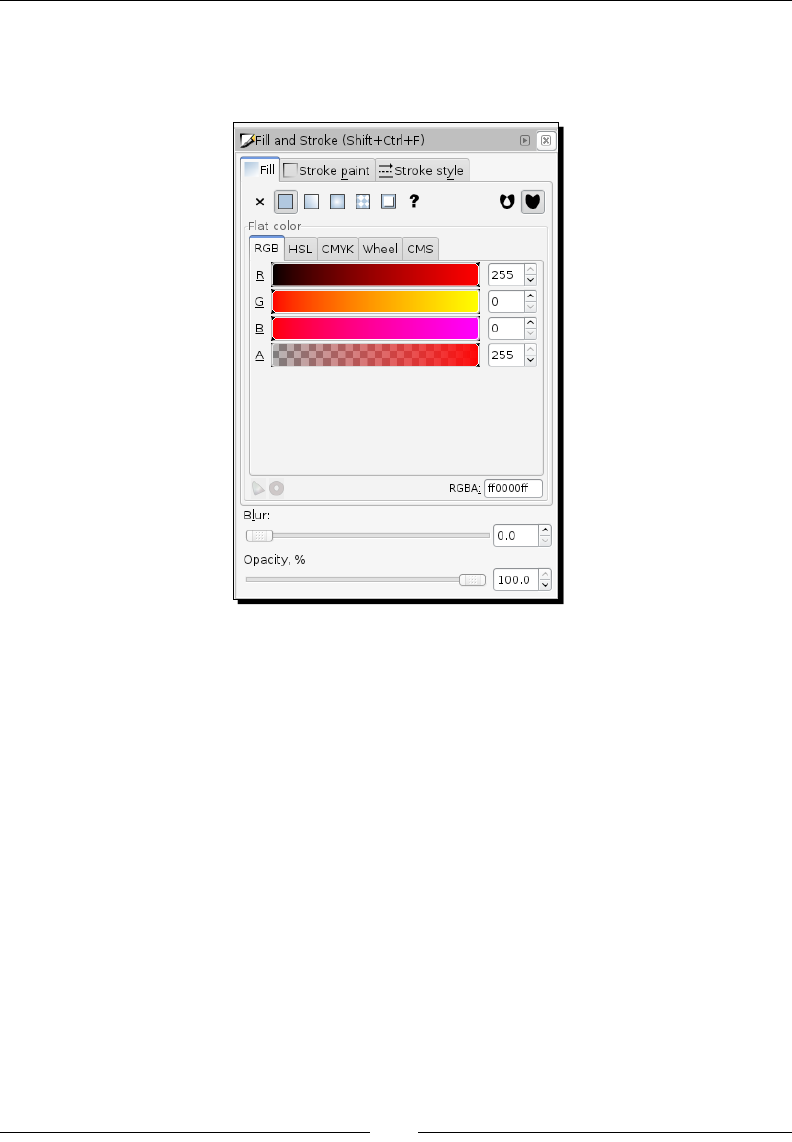
Building Objects
[ 122 ]
3. The Fill and Stroke dialog appears on the right-hand side of your screen.
Noce it has three tabs: Fill, Stroke paint, and Stroke style, as shown in
the following screenshot:
4. Select the Fill tab (if not already selected). Here are the opons for ll:
Type of ll: The buons below the Fill tab allow you to select the type of
ll you would like to use. No ll (the buon with the X), at color, linear or
radial gradients. In the previous example screenshot, the at ll buon
is selected.
Color picker: Another set of tabs below the type of the ll area are
presented; RGB, CMYK, HSL, and Wheel. You can use any of these to choose
a color. The most intuive opon is Wheel as it allows you to visually see all
the colors and rotate a triangle to the color of your choice, as shown in the
following screenshot:
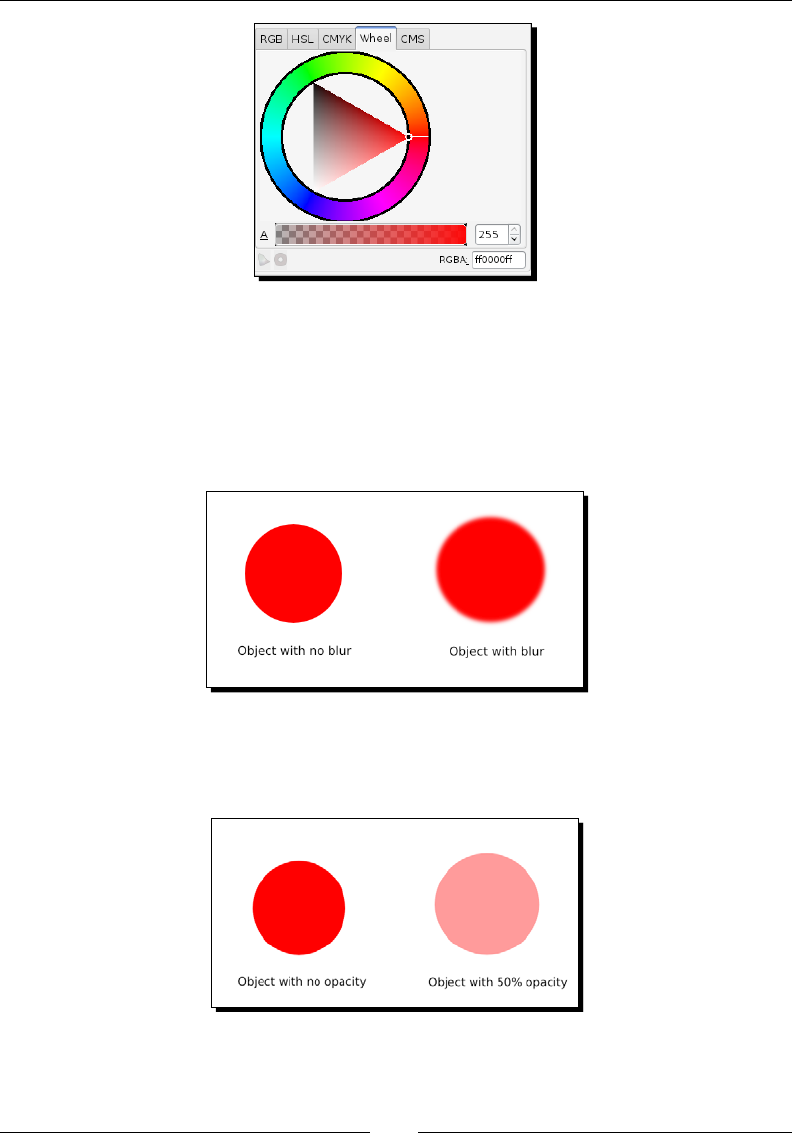
Chapter 6
[ 123 ]
'
Once a color is chosen, then the exact color can be seen in various values on
the other color picker tabs.
Blur: Below the color area, you also have an opon to blur the object's ll.
This means that if you move the sliding lever to the right, the blur of the
ll will move outward. See the following diagram for examples of an object
without and with blur:
Opacity: Lastly, there is the opacity slider. By moving this slider to the right
you will give the object an alpha of opacity seng making it a bit more
transparent. The following diagram demonstrates opacity:
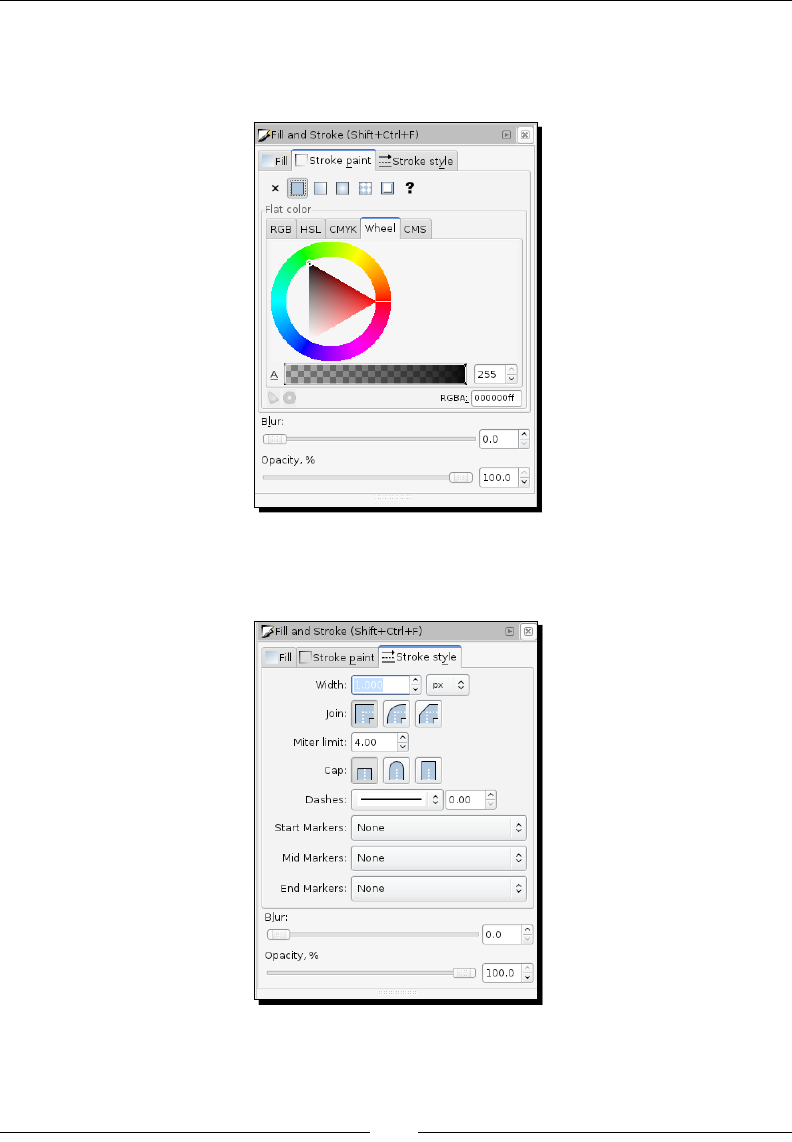
Building Objects
[ 124 ]
5. In the Fill and Stroke dialog, if you select the Stroke paint tab, you will noce it
looks very much like the Fill tab. You can remove the stroke (outline) of the object,
set the color, and determine if it is a at color or gradient:
6. In the last tab, Stroke style is where you can most notably set the width
of the stroke:
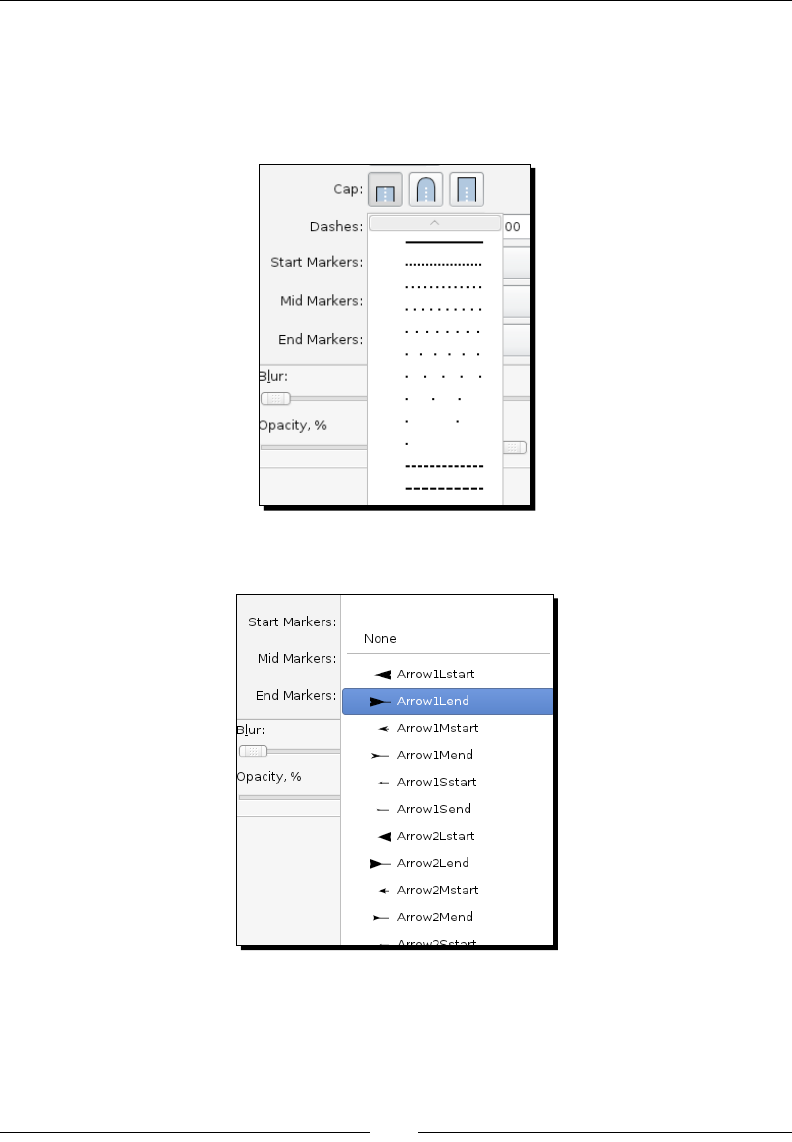
Chapter 6
[ 125 ]
7. You can also use this tab to determine what types of corners or joins an object
has (round or square corners) and how the end caps of the border look like.
8. The Dashes eld gives opons for the stroke line type, as shown in the
following screenshot:
9. Start, Mid, and End Markers allow you to add end points to your strokes, as follows:
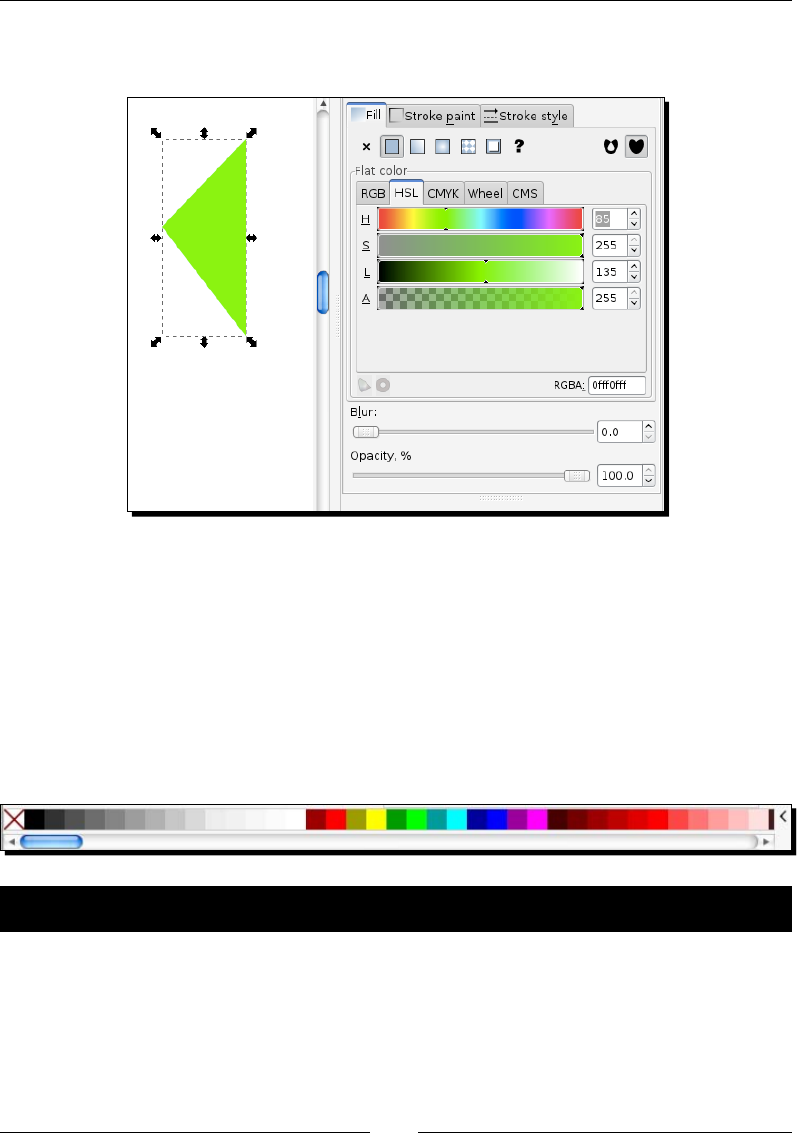
Building Objects
[ 126 ]
10. For our triangle object, use the Fill tab and choose a green color, no stroke, and 100
percent opacity:
What just happened?
You learned where to open the Fill and Stroke dialog, adjust the ll of an object, use blur
and opacity, and how to change the stroke color and weights of the stroke line.
Next, let's learn other ways to change the ll and stroke opons.
Color palette bar
You can also use the color palee bar to change ll color:
Time for action – using the color palette
Let's learn all the ps and tricks for using the color palee bar:
1. From the palee bar, click a color and drag it from the palee onto the object to
change its ll, as shown in the following diagram:
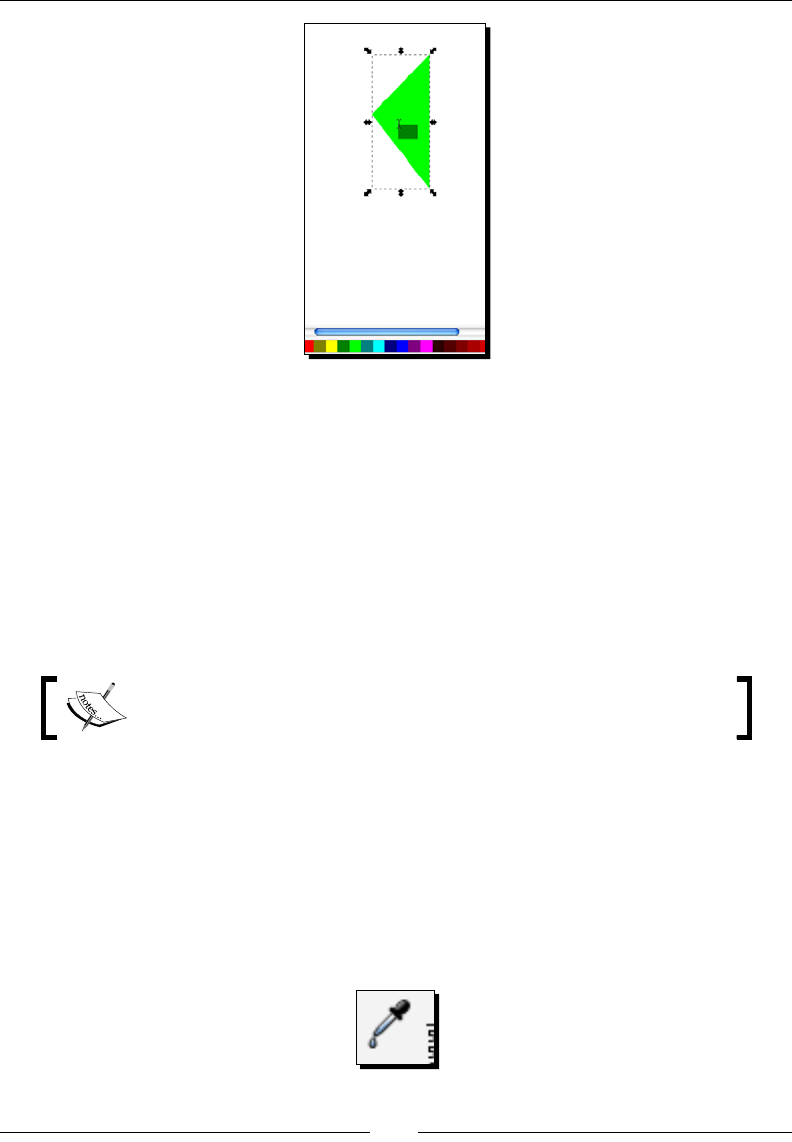
Chapter 6
[ 127 ]
2. You can also change an object and the stroke color in a number of other ways:
Select an object on the canvas and then click a color box in the palee to
immediately set the ll of an object.
Select an object on the canvas and then right-click a color box in the palee.
A popup menu appears with opons to set the ll (and stroke).
If you hold the Shi key and drag a color box onto an object, it changes the
stroke color.
Shi + le-click a color box to immediately set the stroke color.
Note, you can use the scroll bar just below the viewable color swatches
on the color palee to scroll right to see even more color choices.
What just happened?
You learned how to change the ll and stroke color of an object by using the color swatches
on the color palee bar on the main screen of Inkscape.
Dropper
Yet another way to change the ll or stroke of an object is to use the dropper:
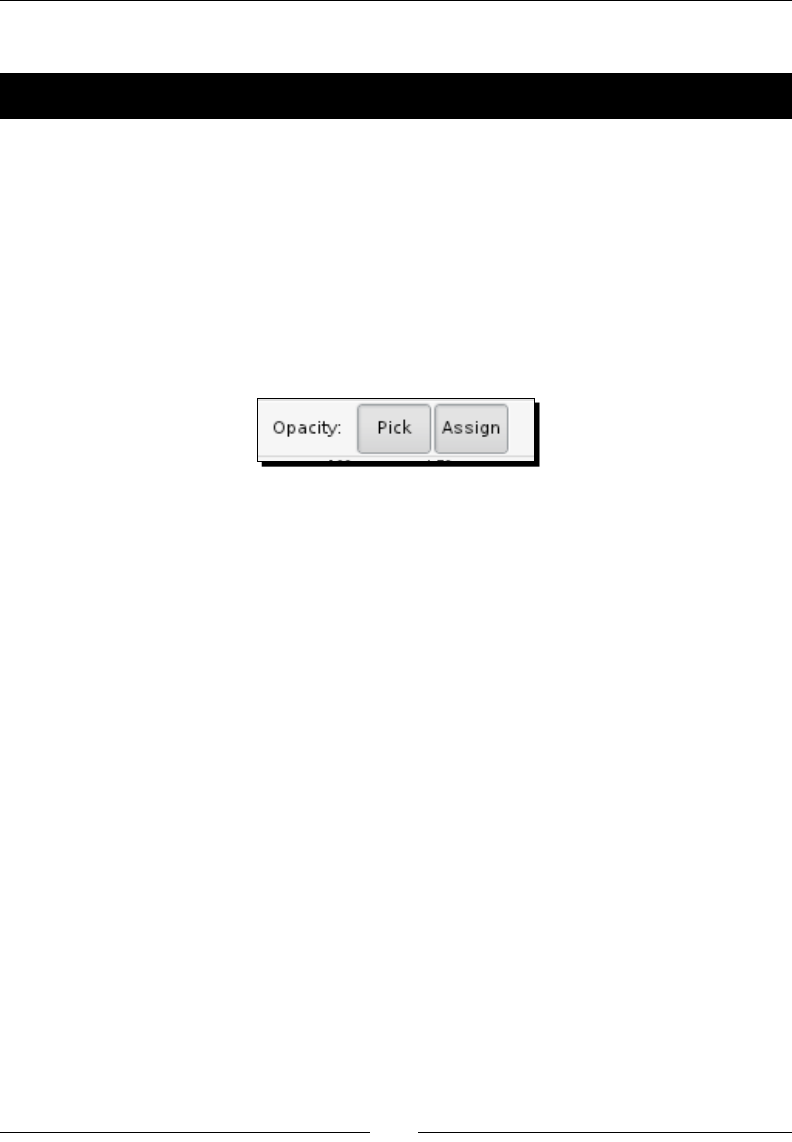
Building Objects
[ 128 ]
Let's learn how to use it.
Time for action – using the dropper tool
Open an Inkscape le with objects on the canvas or create a quick object to try this out:
1. Select an object on the canvas.
2. Select the dropper tool from the toolbar or use the shortcut key F7.
3. Then click anywhere in the drawing with that tool that has the color you want to
choose. The chosen color will be assigned to the selected object's ll. Alternavely,
use Shi + click to set the stroke color.
4. Be aware of the tool control bar and the dropper tool controls, shown as follows:
5. The two buons aect the opacity of the object, especially if it is dierent than the
100% seng.
If Pick is disabled, then the color as chosen by the dropper looks exactly like
it is on screen
If Pick is enabled and Assign is disabled, then the color picked by the
dropper is one that the object would have if its opacity was 100%
If Pick is enabled and Assign is enabled, then the color and opacity
are both copied from the picked object
What just happened?
By using the dropper tool, you learned how to change a color of another object
on the screen.
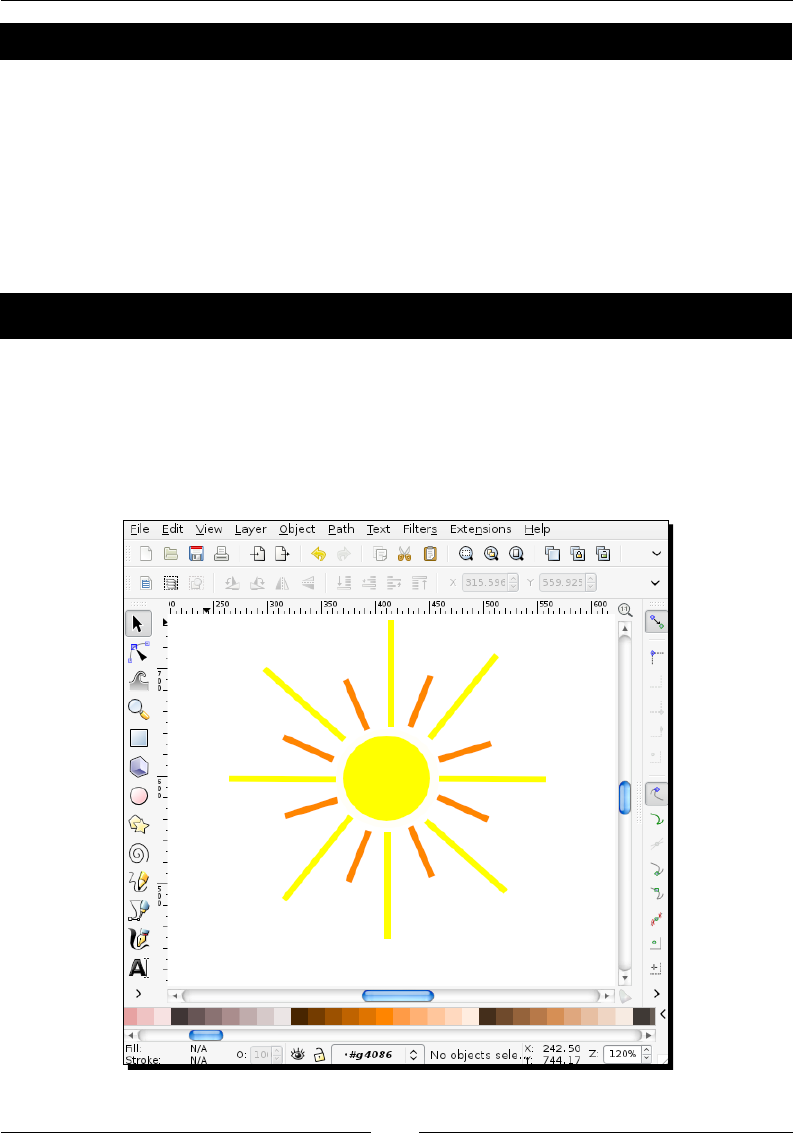
Chapter 6
[ 129 ]
Pop quiz – changing Fill and Stroke
TRUE OR FALSE: No maer what way you use to change ll and stroke of an object in
Inkscape, it all has the same outcome for the object on your canvas.
Grouping
You can combine several objects into what we call a group. The group then, can be moved or
transformed (made larger/smaller) as if it were one object.
Time for action – grouping objects
When grouping objects, there is no limit to the number of objects that can be grouped
together. You can also take mulple groups and group them together as well. Let's start with
a simple example of how to group objects:
1. Open an Inkscape document and draw separate objects to create the shape of a sun
as follows:
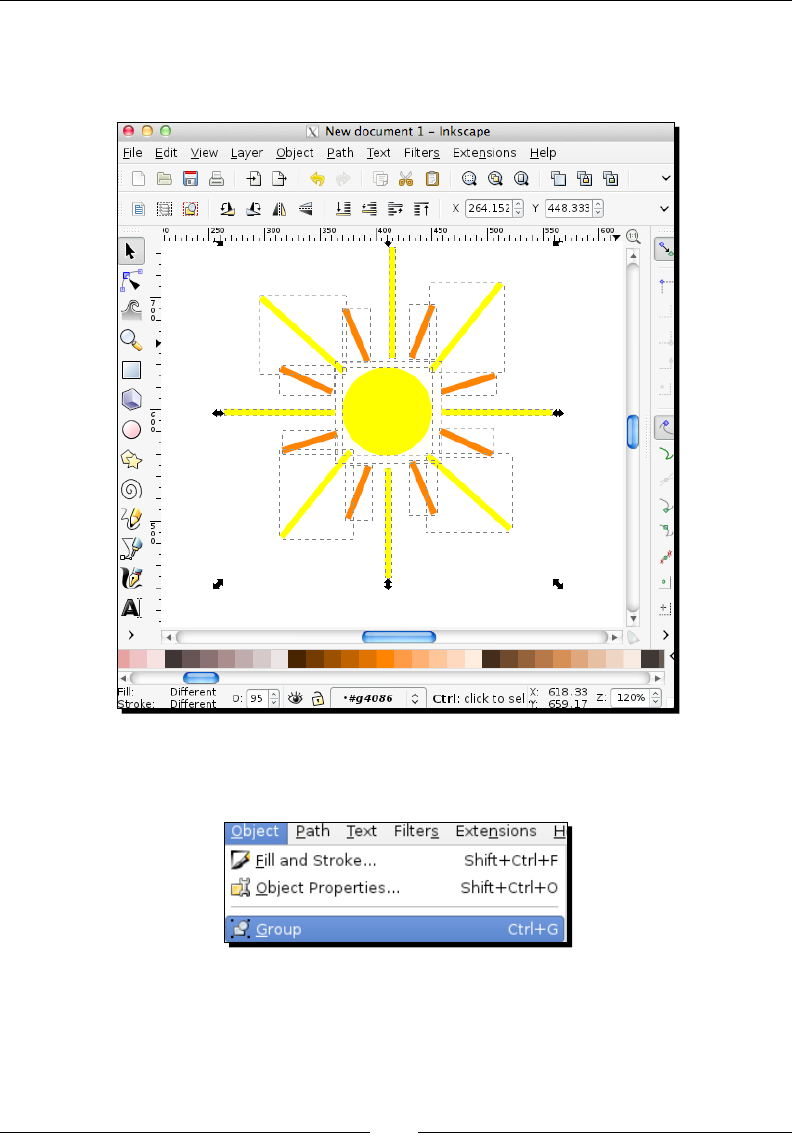
Building Objects
[ 130 ]
2. Now select all the objects on your screen. Click the select tool and then click and
drag a bounding box around all objects that you want in the group or press the
Ctrl + A key and select all objects on the canvas:
3. Once all the objects are selected, from the main menu select Object | Group or use
the Ctrl + G shortcut keys, as shown in the following screenshot:
You'll noce the bounding box that was once around each individual object has now
bound around the enre group of objects. You'll also noce in the status bar that a
group is selected and the number of objects it contains (group of <x> objects in layer
<layer name>).
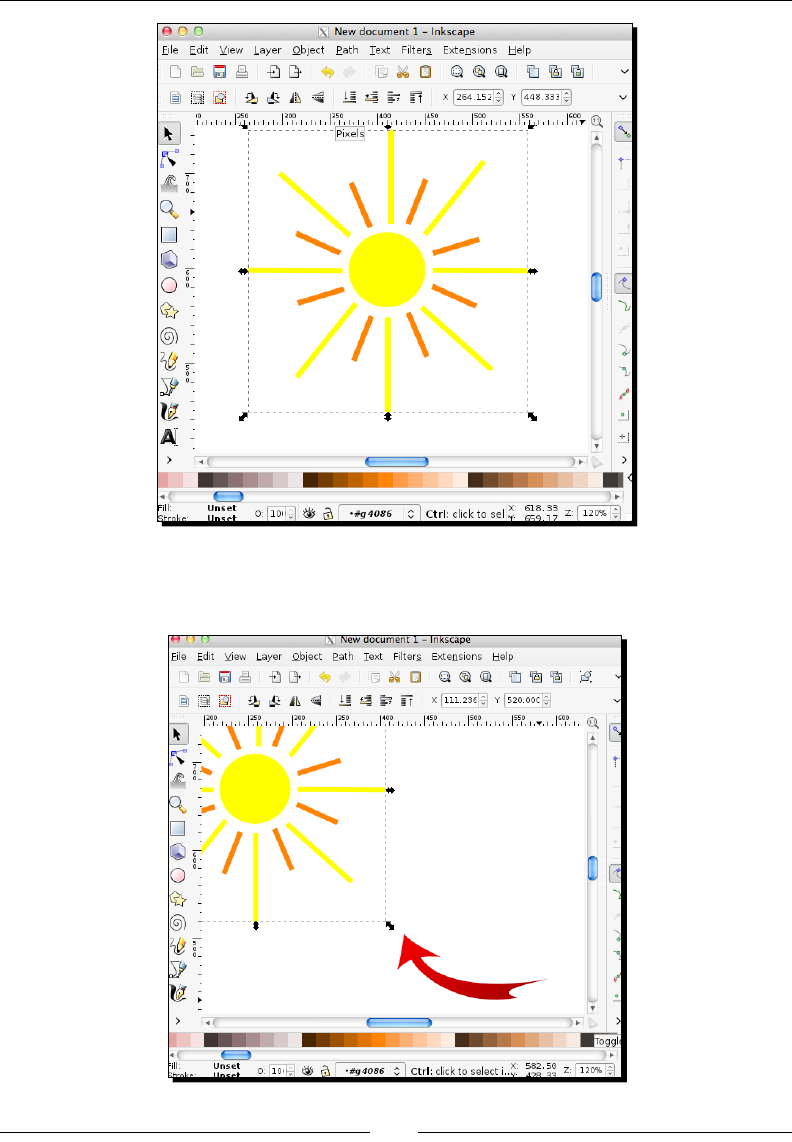
Chapter 6
[ 131 ]
4. Now you can select the group and move it on the canvas. Noce, all of the objects
move as one:
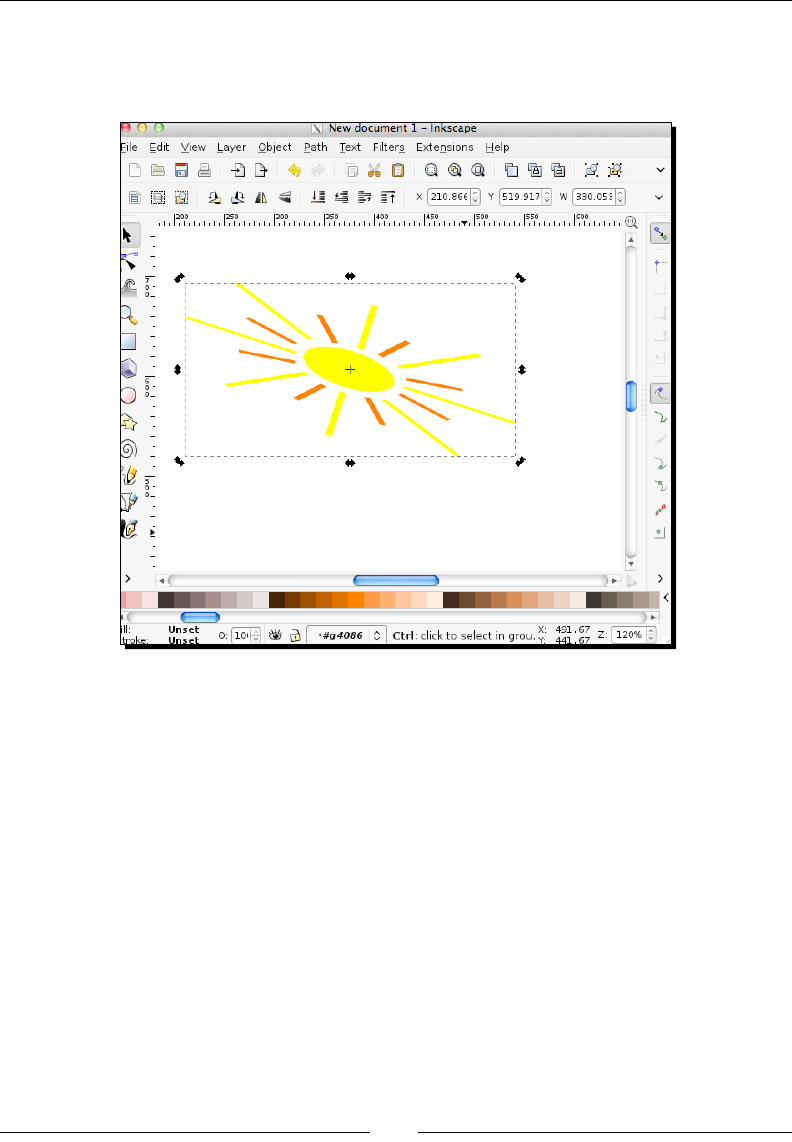
Building Objects
[ 132 ]
5. You can also transform the object by dragging any corner node to make the group of
objects smaller or bigger. You can even drag those handles and skew and rotate the
group of objects as follows:
6. To add addional objects to this group, double-click the group itself then draw
or paste the new object to be included.
To ungroup, select the group and then from the main menu select Object | Ungroup
(or use the shortcut keys Ctrl + U). If you have grouped more than one group,
ungrouping will only "disconnect" the topmost level of grouping; you'll need to
ungroup repeatedly to keep ungrouping objects.
7. If you want to edit an object within a group, you don't have to ungroup it. Just press
the Ctrl key and click that object and it will be selected and editable. Alternavely,
select the node tool and click the individual object within a group for eding.
What just happened?
You were able to group several objects and then manipulate that group of objects as
one—moving, transforming, and eding it. We even discussed a lile trick about eding
individual objects within a group.

Chapter 6
[ 133 ]
Pop quiz – shortcut keys to quickly ungroup items
1. What is the shortcut key combinaon for quickly ungrouping items?
a. Shi + G + U
b. Ctrl + G
c. Shi + G
d. Ctrl + U
Clipping and masking
Another way of joining objects is to use clips and masks. These features are used to
determine which parts of an object are visible. Clips dene what areas of another object
are fully visible. Technically speaking, Inkscape takes the top object's path in and clips all
the paths below it (in the selecon) to the shape of the top path.
When you use a mask it visually crops objects with transparent areas to become fully
transparent in the masked object, white areas become fully opaque, and all other colors
translate into dierent levels of opacity in the masked object. To make sure this is clear,
we'll do a few exercises.
Time for action – clipping objects
Let's build out our triangle object and create a tree that has a paern of leaves in it:
1. Open your triangle Inkscape le.
2. Use the Bezier tool and create a rectangular shape below your triangle, as shown
in the following diagram:
3. Remember if you don't get the lines exactly right the rst me, select the Edit Paths
by Nodes tool and adjust by dragging the nodes to the appropriate locaons.
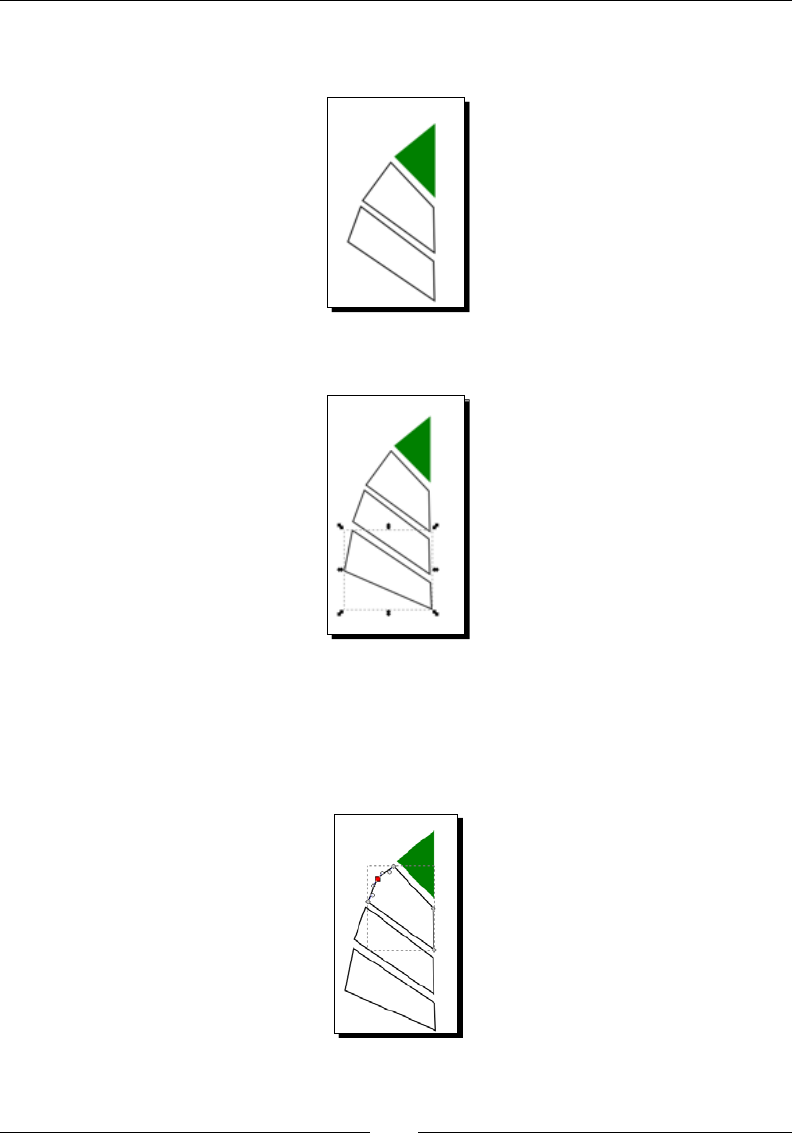
Building Objects
[ 134 ]
4. Draw another rectangular object below the previous one, as shown in the
following diagram:
5. And draw the nal rectangle below the last one as follows:
6. Now we are going to focus on making the le sides of the three rectangular objects
more rounded and smooth. Select the rst rectangle and choose the Edit Paths by
Nodes tool.
7. Add a node on the le side of that rectangular object:
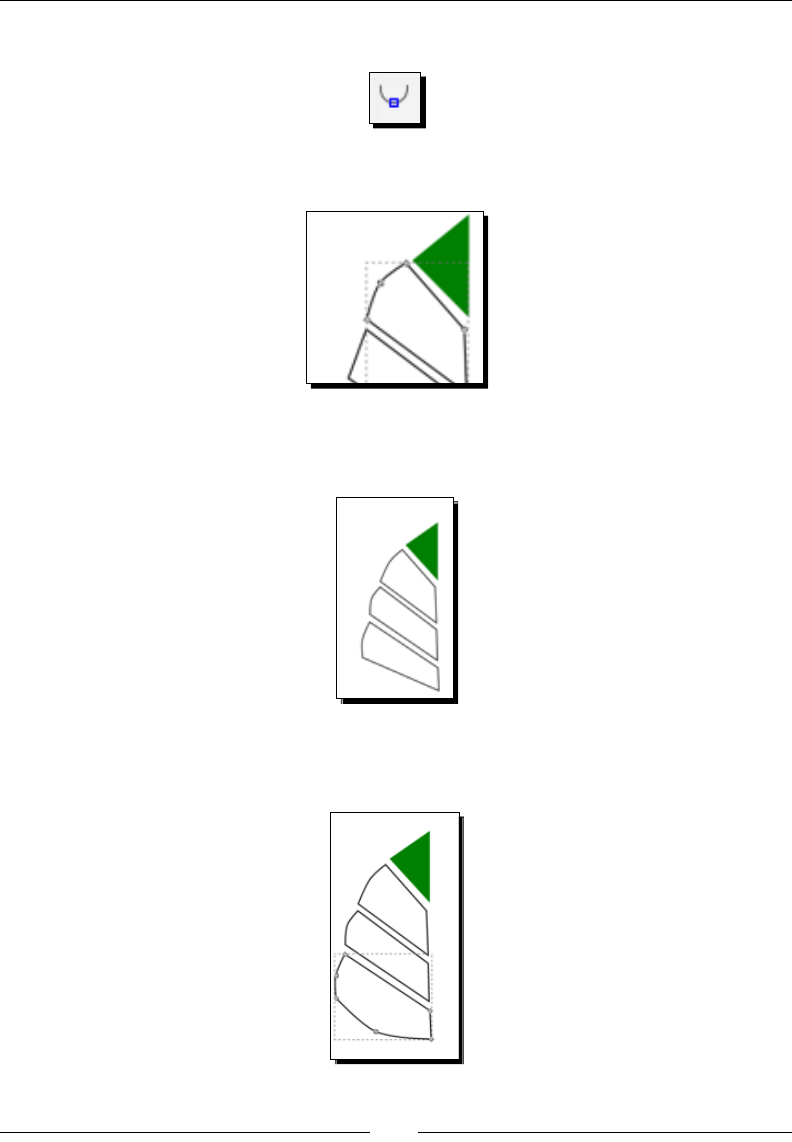
Chapter 6
[ 135 ]
8. Select the smooth node opon from the control bar:
9. Your le side will now become a curve, as shown in the following diagram:
10. Repeat, adding a node and smoothing the le side of each of the remaining two
rectangles as follows:
11. On the boom rectangle, add another node in the middle of the boom side and
smooth it so it has a more rounded side to it, as shown in the following diagram:
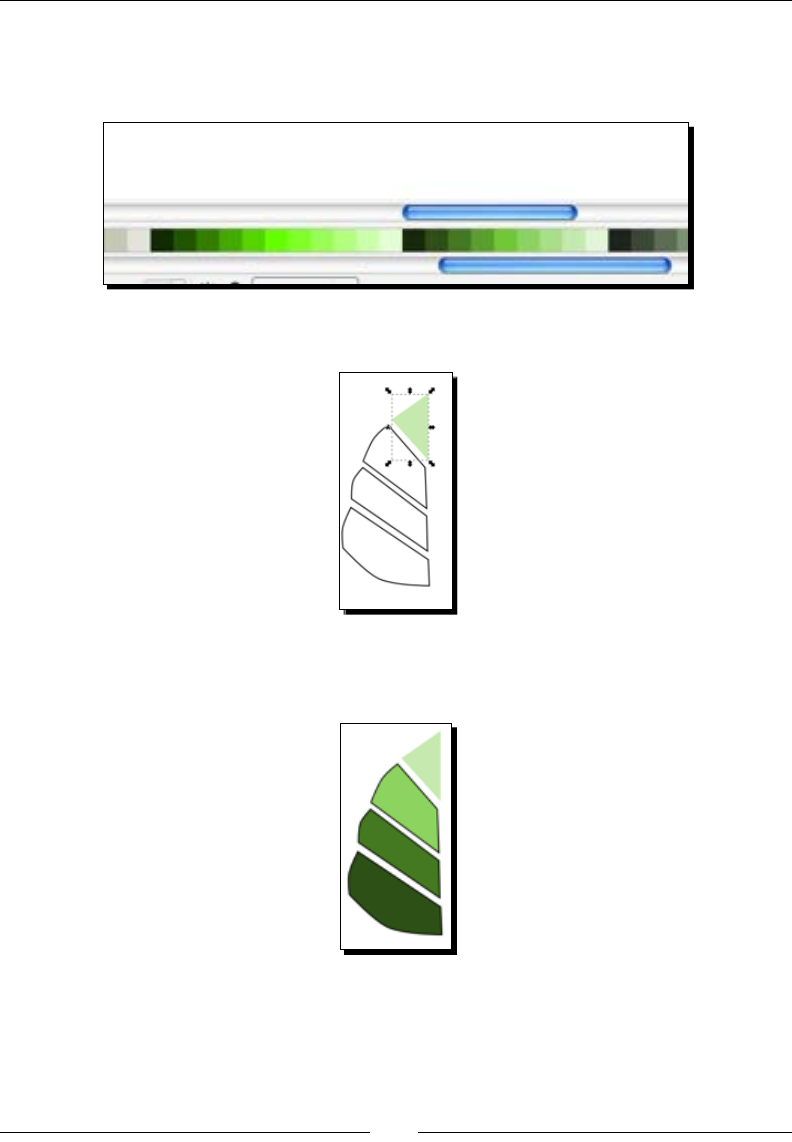
Building Objects
[ 136 ]
12. Now it is me to adjust the color and stroke of each of the objects on the
canvas. Move the color palee bar scroll bar to the right to get to a set of
green colors as follows:
13. Select the top triangle and choose a light color green for it:
14. Select each of the rectangles and give an increasingly darker green color to
them as follows:
15. Now select all objects on the canvas (Ctrl + A) and remove the stroke:
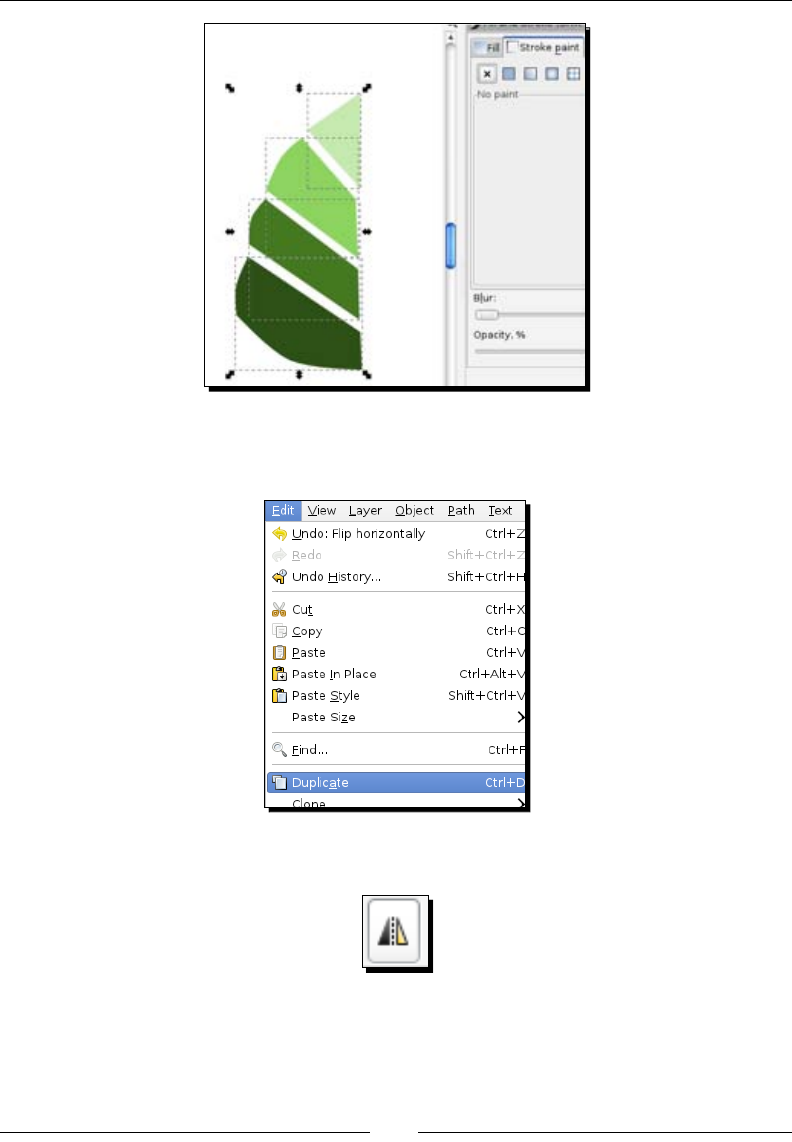
Chapter 6
[ 137 ]
16. With all of the objects sll selected on the canvas, create a duplicate of them.
From the main menu select File | Duplicate (or use the Ctrl + D shortcut keys).
17. Click the ip horizontally buon:
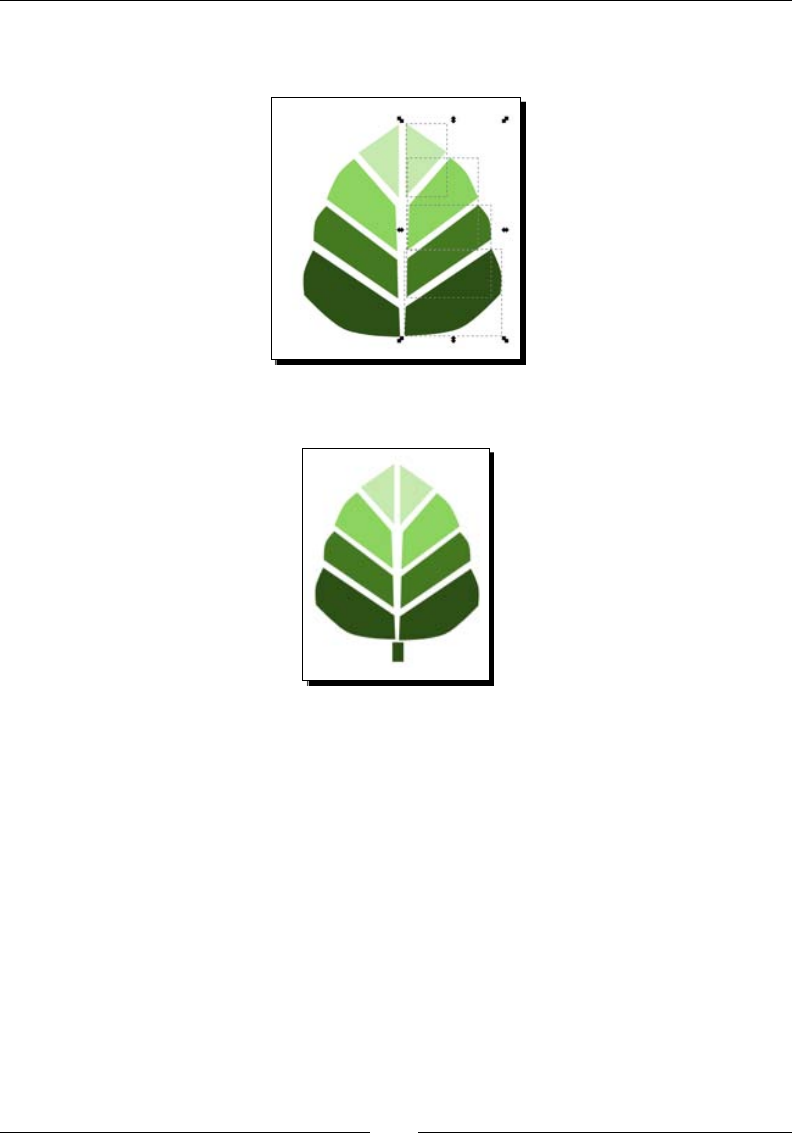
Building Objects
[ 138 ]
18. Move the objects so they mirror the original shapes, as shown in the
following diagram:
19. Add a long vercal rectangle at the boom for the leaf stem:
20. Again, select all objects on the screen by pressing Ctrl + A and group them so they
become one object. From the main menu select Object | Group or use the Ctrl + G
shortcut keys. You have created one leaf!
21. Select your leaf, press the Shi key, and then drag the handle of the bounding box
inward to scale your leaf smaller.
22. With the leaf sll selected, from the main menu choose, Edit | Clone | Create Tiled
Clones... as shown in the following screenshot:
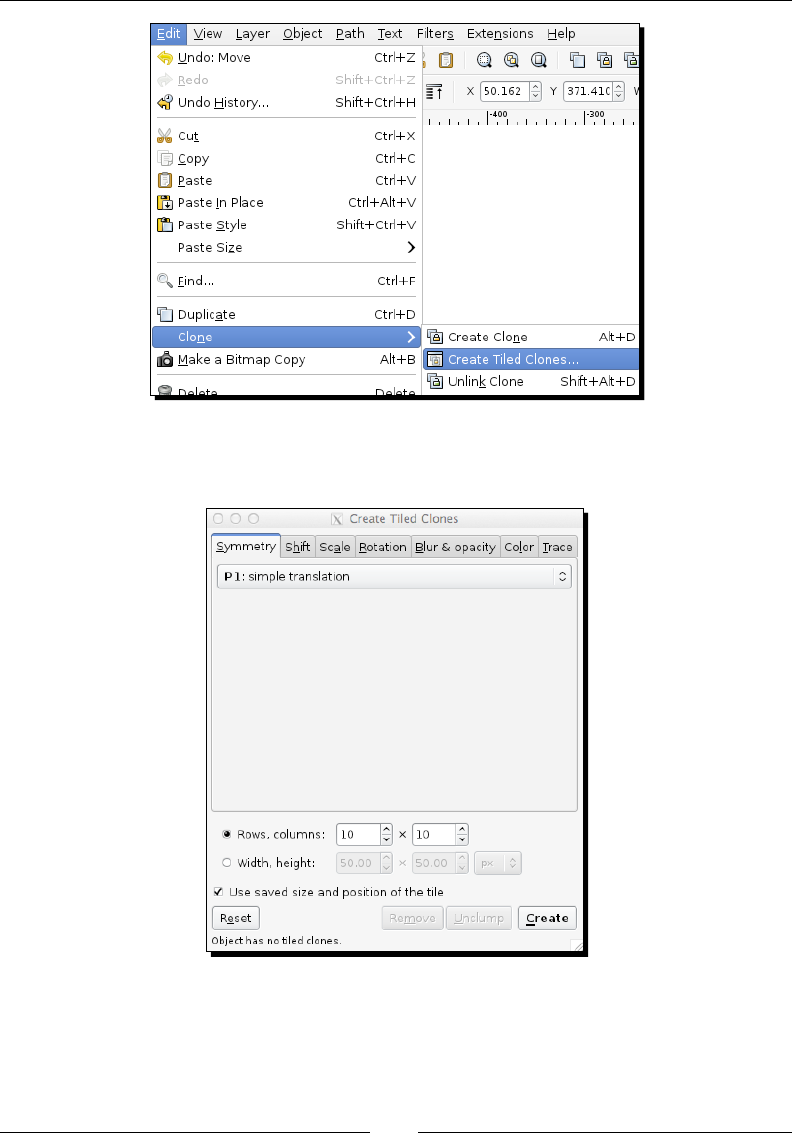
Chapter 6
[ 139 ]
23. From the Clone dialog, for Rows, columns: adjust to 10 x 10 and click Create,
as shown in the following screenshot:
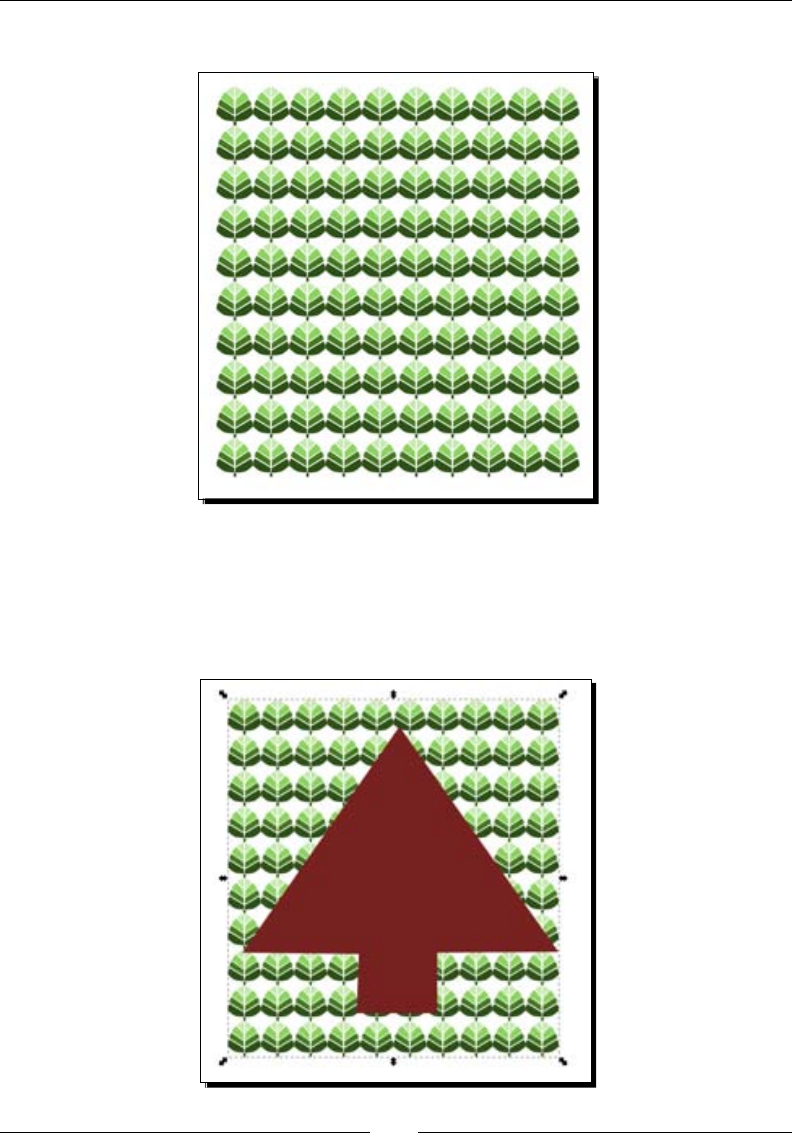
Building Objects
[ 140 ]
24. Your canvas will now have a paern/grid of leaves on it:
25. Press Ctrl + A to select all of the leaves and then use the Ctrl + G shortcut keys
to group them.
26. Use the Bezier tool and create a simple triangle tree shape, as shown in the
following diagram:
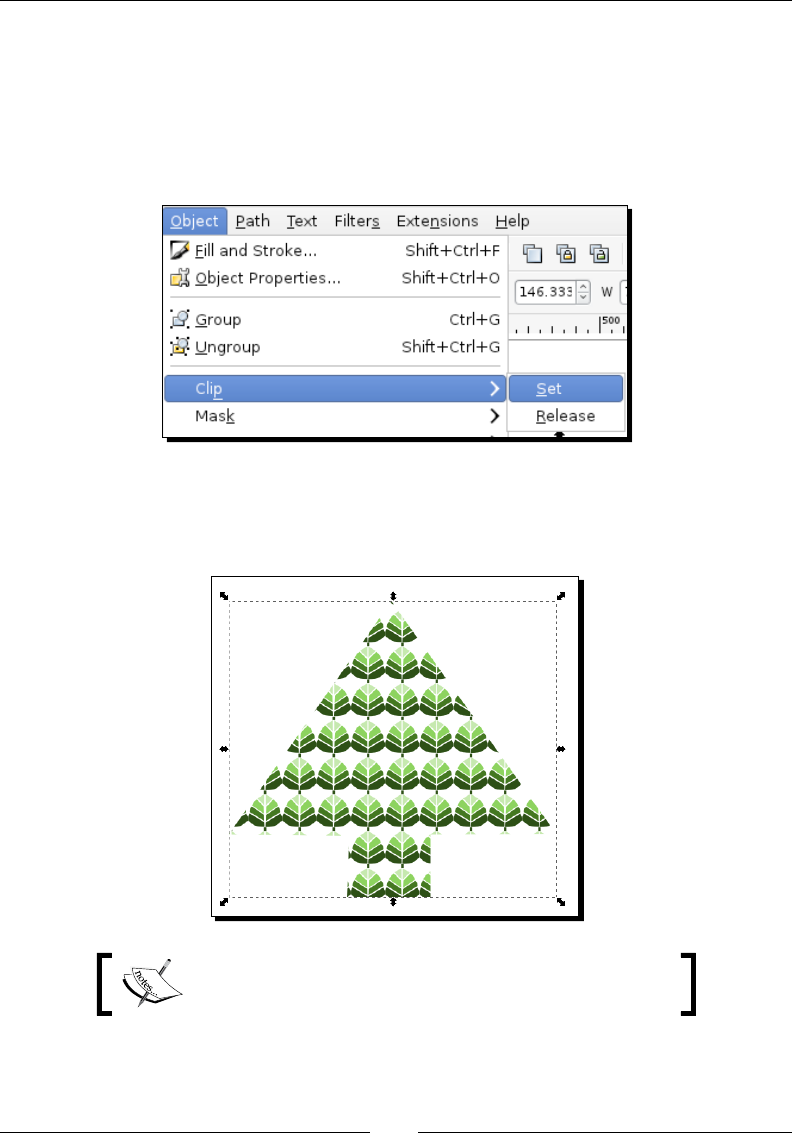
Chapter 6
[ 141 ]
27. Make sure that the basic tree you just created (that will be used as a clip or mask)
overlaps the others. You can use the Ctrl + Page Up keys to ensure an object is the
topmost object.
28. Press Ctrl + A to select all objects on your canvas.
29. In the main menu select Object | Clip | Set, as shown in the following screenshot:
30. You can see how the top object becomes the shape of the object with the boom
object peeking through. Note, if you select three objects (instead of grouping) and
perform a clip, you'll end up with two separate clipped objects:
Just like in a group, if you double-click a clip, you will be
able to select and edit the objects within it.
31. To edit the actual clip (or mask), you will have to release it rst. From the main menu
select Object | Clip | Release.
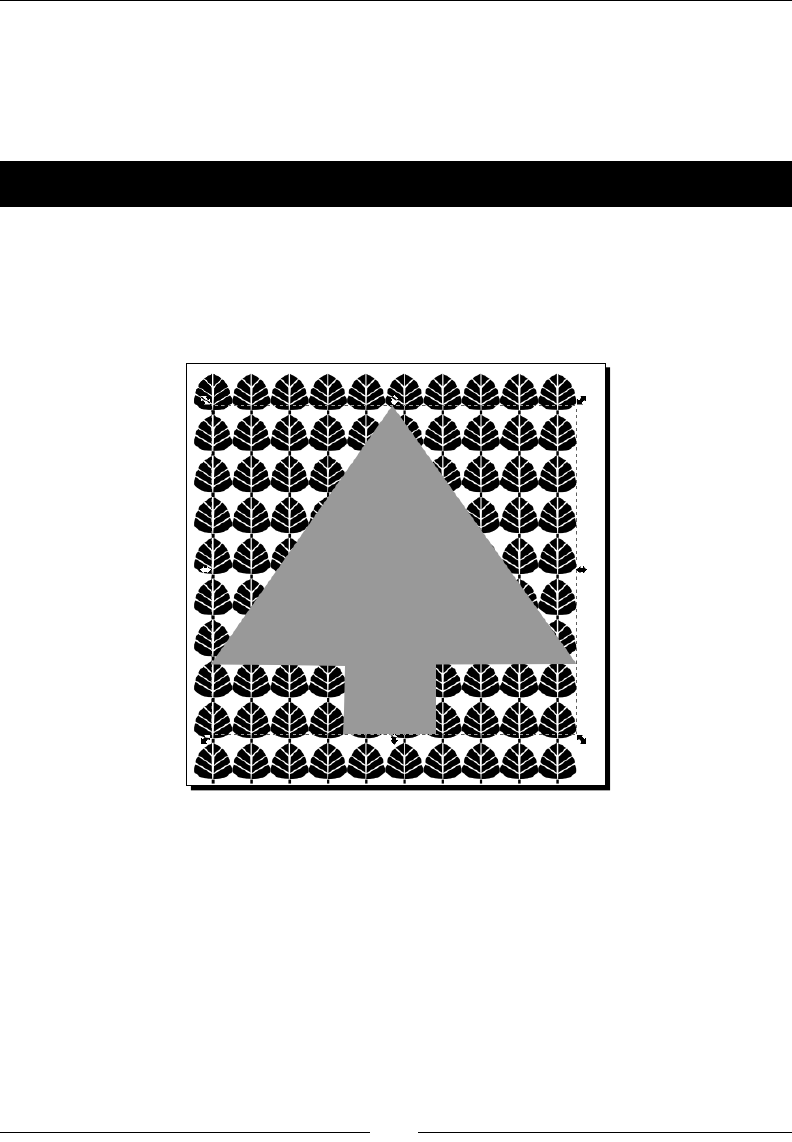
Building Objects
[ 142 ]
What just happened?
We took some objects, built a leaf object, cloned it to make a paern, and used that to
create a clipping mask. We even learned a few details about how to edit objects within the
clip as well as releasing.
Time for action – masking objects
Here are some quick steps to see what a mask will look like:
1. Use the same objects in an open Inkscape document as in the previous example.
This me, however, let's make the background leaves black and the tree in front
a grayscale color as follows:
2. Press Ctrl + A to select all objects on your canvas.
3. In the main menu select Object | Mask | Set.
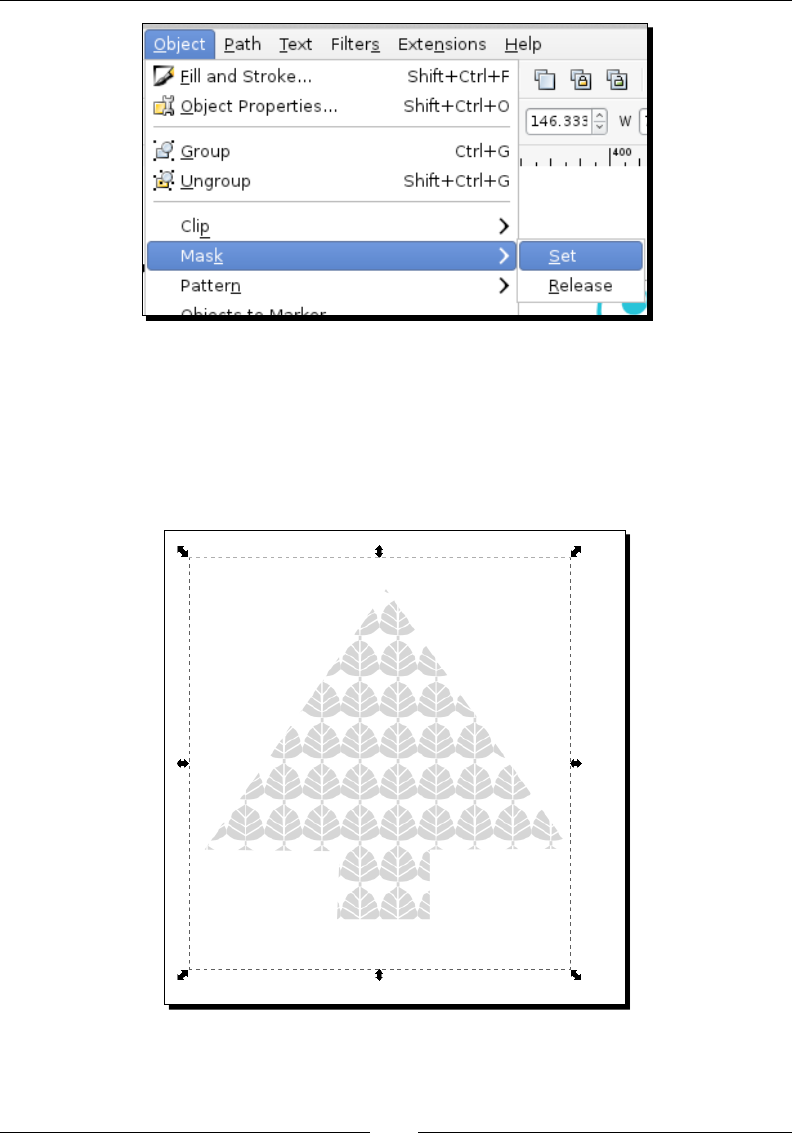
Chapter 6
[ 143 ]
4. In this result, the top object also becomes the overall shape, while the boom
peeks through. However, you will noce the degrees of grayscale seng over
the enre object now. Masking depends only on grayscale. Thus, when using white,
the objects below will be fully visible; when using black, the objects below will be
fully blocked; and any gray level in between, the objects will be parally masked as
in our example:

Building Objects
[ 144 ]
Just like in a group, if you double-click a clip, you will be able
to select and edit the objects within it.
5. One other item to note here is that the resulng masked object will have a bounding
box that will be as large as the largest object, which will make it hard to scale and
align in some design situaons.
6. To edit the actual clip (or mask), you will have to release it rst. From the main
menu, select Object | Mask | Release.
What just happened?
This me we created a mask and learned how to edit and release it in Inkscape.
Summary
You should be ready to move forward and learn even more about creang paths into
complex shapes. We spent most of this chapter learning about the nuances of objects in
Inkscape; how to build the predened shapes and then how to combine and alter them
using lls, strokes, clips, masks, and more. Now, we will learn about paths and how to
manipulate them.
7
Using Paths
This chapter will focus on using paths. Paths are a crical element to Inkscape.
We will focus on learning what paths are, working with them in Inkscape, and
transforming, combining, and placing paths.
The following will be covered in the chapter:
Working with paths
Transforming objects into paths
Using stroke to paths
Path opons
Combining and breaking paths
Path placement
Working with paths
As stated previously, vector graphics themselves are made up of paths. Paths can be used to
create unique text styling when tracing other images like photographs, and when building
icons, buons, and logos. By adding and manipulang nodes, you can transform simple paths
into elaborate illustraons.
The most common tool used to create paths in Inkscape is the Bezier tool and this is
what will be used in most of the examples seen throughout this chapter. You can also
use the Pencil (Freehand) and Calligraphy tools to create paths. All of these tools are
found in the toolbox.
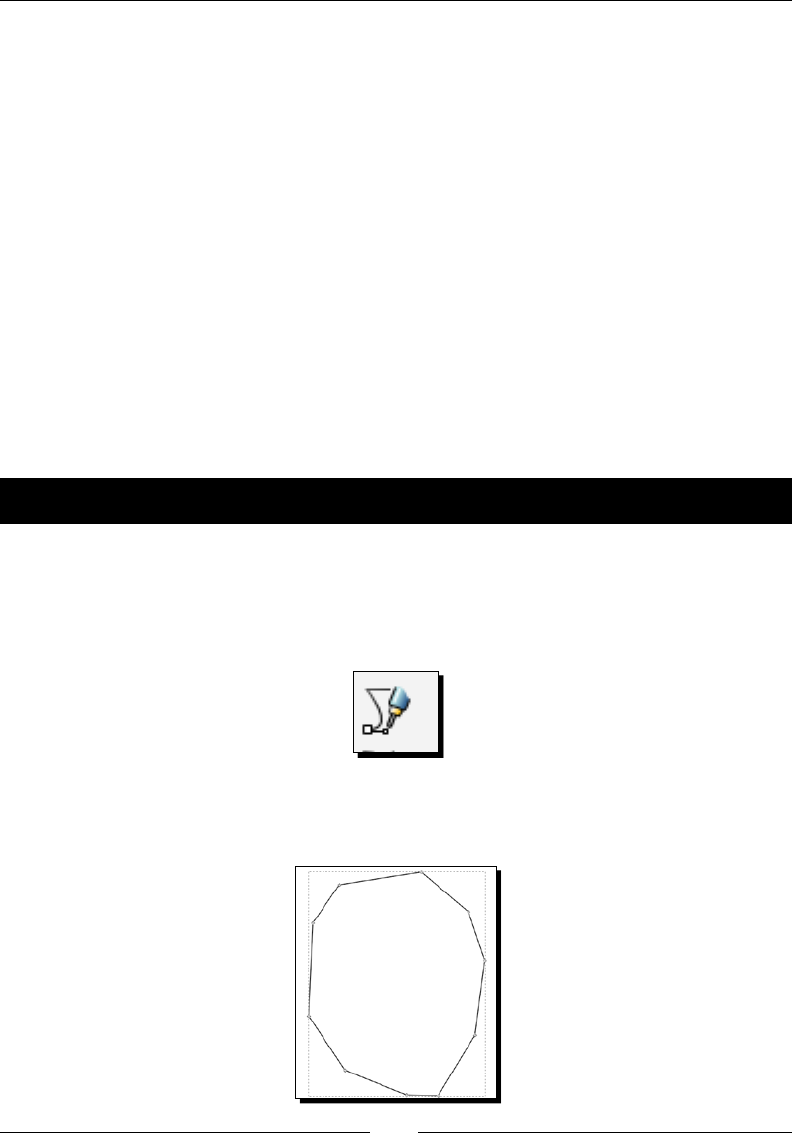
Using Paths
[ 146 ]
Before we get started, here are some key items to remember when using the Bezier tool
when creang paths:
To start creang a path with the Bezier tool, click each spot you want a node to
appear in
A single click creates a straight line and a sharp node creates a "corner"
To create a smooth node or a curve--click, hold and drag your cursor to create
the curved/smooth node
Double-click to nish the path (for an open object)
To "close" a path, double-click on the starng node
Also, when you are drawing lines, the green lines are the completed segments and
the red lines are those that you are sll making
Let's jump in and start by learning how to build mulple paths into an interesng object. In
the following examples, we will build a caricature of a woman's face. Each exercise will build
on the next unl we have a full image.
Time for action – using the Bezier tool
To begin, we will use the Bezier tool to create a woman's face shape:
1. Open a new document in Inkscape.
2. Now select the Bezier tool from the toolbox bar:
3. Using a series of straight paths, using single-clicks to create nodes, create a head
shape, similar to the one shown in the following image:
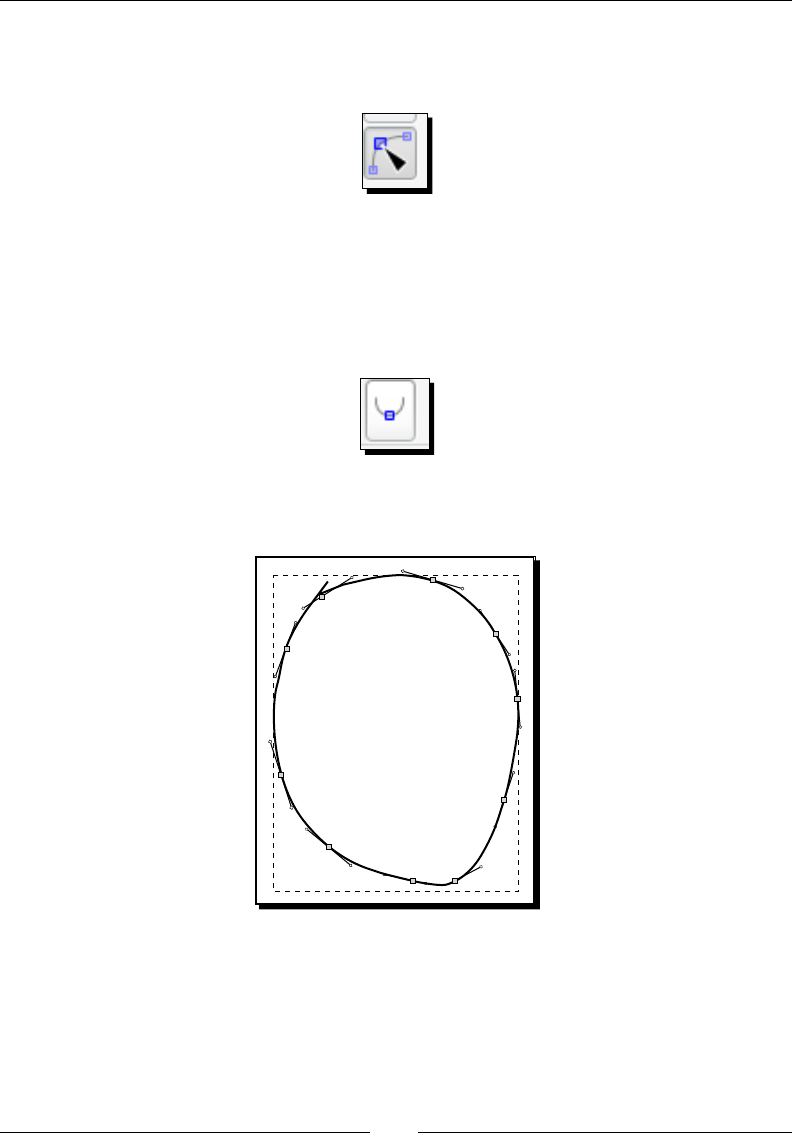
Chapter 7
[ 147 ]
4. Make sure to close the path by double-clicking on the rst node when complete.
5. Select the head object and choose the Edit Paths by Nodes tool:
All nodes on the object appear in a gray color.
From the main menu, choose Edit | Select All or use the Ctrl + A keyboard shortcut
to select all nodes.
6. From the control bar, select the make selected nodes smooth icon:
All of the "angles" on your head shape will become smooth and have
rounded corners:
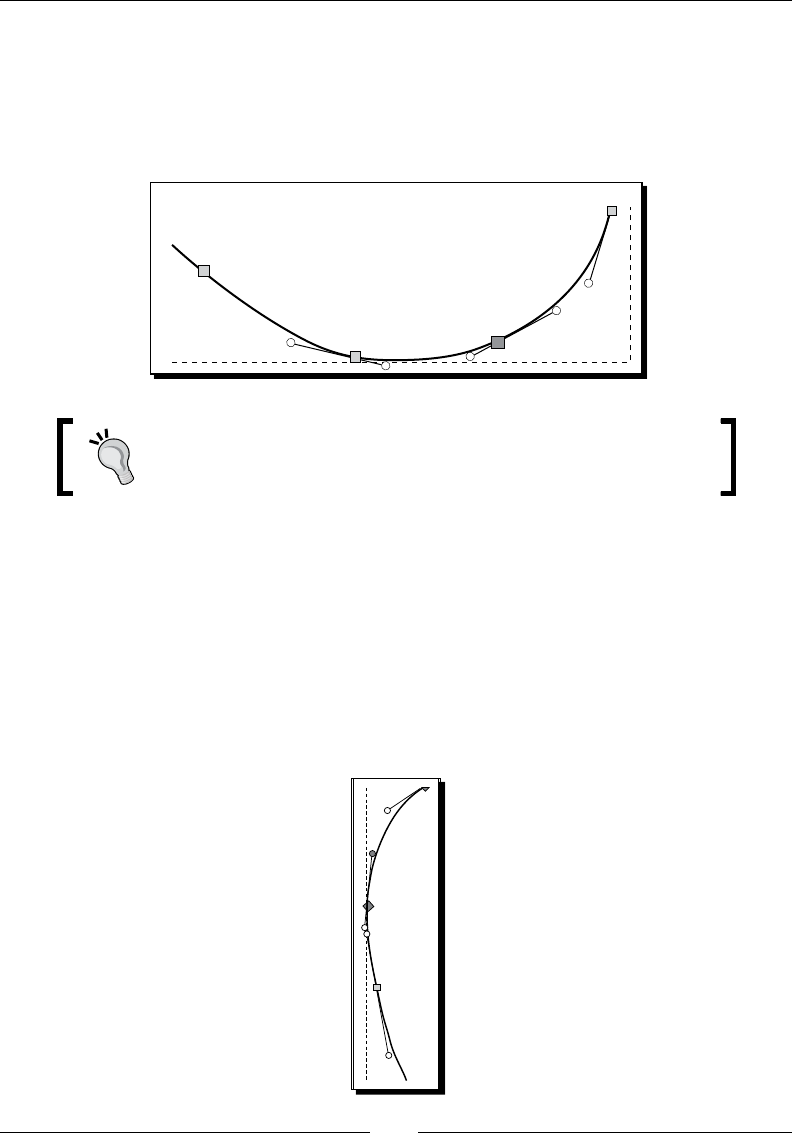
Using Paths
[ 148 ]
7. Double-click a node to adjust its posion (if needed). The node turns into a red square
when it is "acve" for you to edit its locaon. Now click-and-drag it to a new locaon.
As shown in the following image, the lower or chin poron of the head was adjusted
to make it a bit more rounded. All of this is done by double-clicking the lower two
nodes and moving their posions:
If, for any reason, you move a node and an undesired eect results,
you can always undo the last node movement by using the keyboard
shortcut Ctrl + Z or from the main menu, select Edit | Undo.
8. You can also adjust the curves of each node/path by moving the circular
handles on each node. Select the node you would like to adjust, and instead
of clicking-and-dragging the node, click-and-drag a handle (it will also turn red
when acve) to a new locaon.
You can also adjust the curve placement by moving the node along the path
in either direcon.
On the example, the node and its respecve handles on the le side of the face
were adjusted to make the face shape a bit more round:
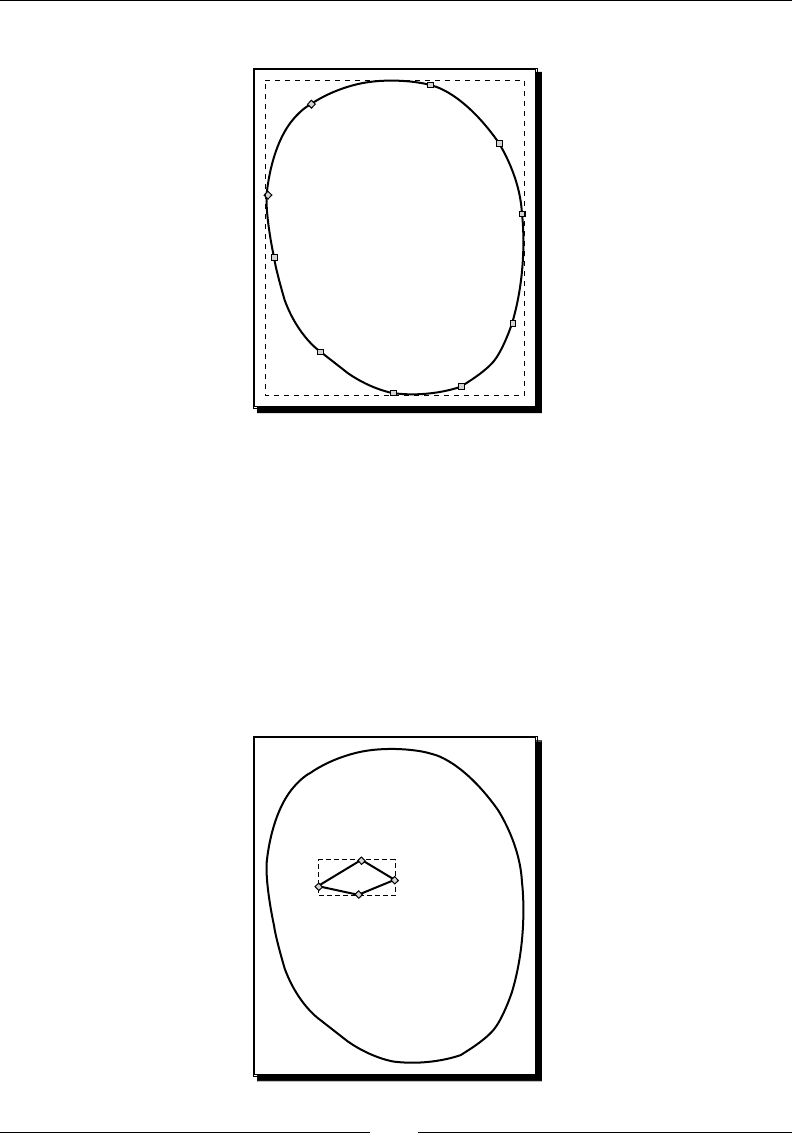
Chapter 7
[ 149 ]
The shape of the face should now look similar to the following image:
9. Select the face object and choose a white ll from the color palee.
10. To work more easily with the facial features, let's lock this layer and create a new
one. Press the shortcut keys: Shi + Ctrl + L to open the Layers dialog.
11. Press the lock key for Layer 1.
12. Create a new layer for the eyes. Press the + buon in the Layers dialog. Name the
layer Features and click Add.
13. Within the new layer, select the Bezier tool and create a diamond-like eye shape
to start. In the following example, use four nodes (four clicks) to create this shape:
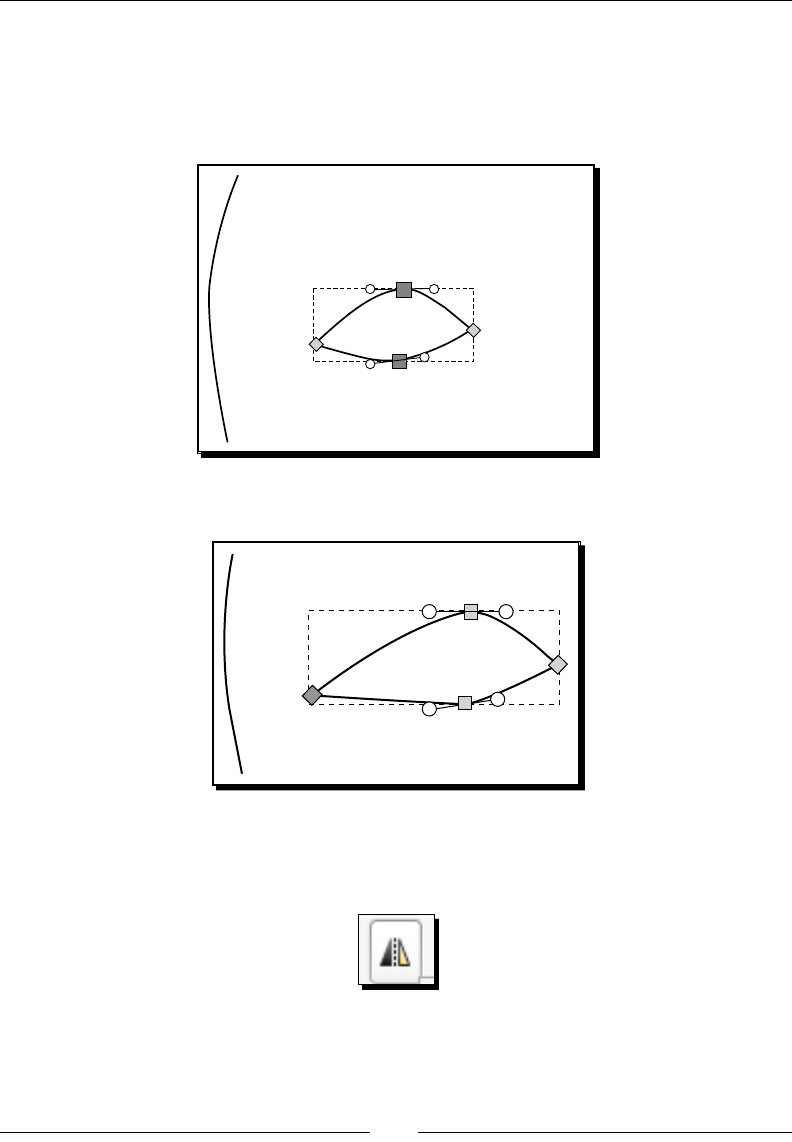
Using Paths
[ 150 ]
14. Again, click the Edit Paths by Nodes tool to edit the nodes of the eye object.
15. Select the top and boom nodes of the eye object (use the Shi + click to
select both nodes) and click the make selected nodes smooth icon to smooth
the node angles:
16. To stylize the eye, let's pull the le node out to create a point as follows:
17. From the main menu, select Edit | Duplicate (or use the Ctrl + D keyboard shortcut).
18. Click the ip object horizontally buon on the control bar:
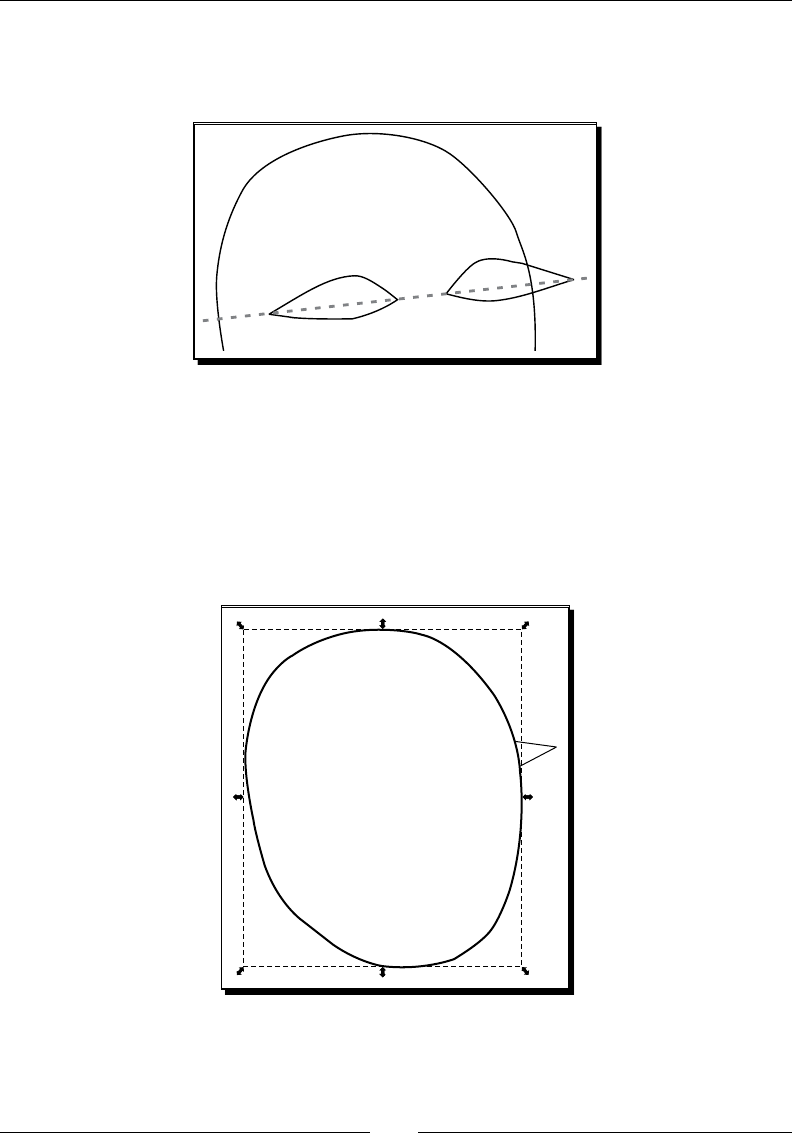
Chapter 7
[ 151 ]
19. Place the right eye so that the middle edges are along the same horizontal plane.
However, note, this horizontal line will be at a slight angle to accommodate for the
lng of the face:
20. Select the face object from Layer 1 (if you locked Layer 1, remember to unlock it rst
from the Layers dialog).
21. From the main menu, select Edit | Duplicate (or use the Ctrl + D keyboard shortcut).
22. Press Shi + Page Up (for Mac computers, press Shi + Fn + up arrow) to move
the face object to the Features layer. Your screen should look similar to the
following image:
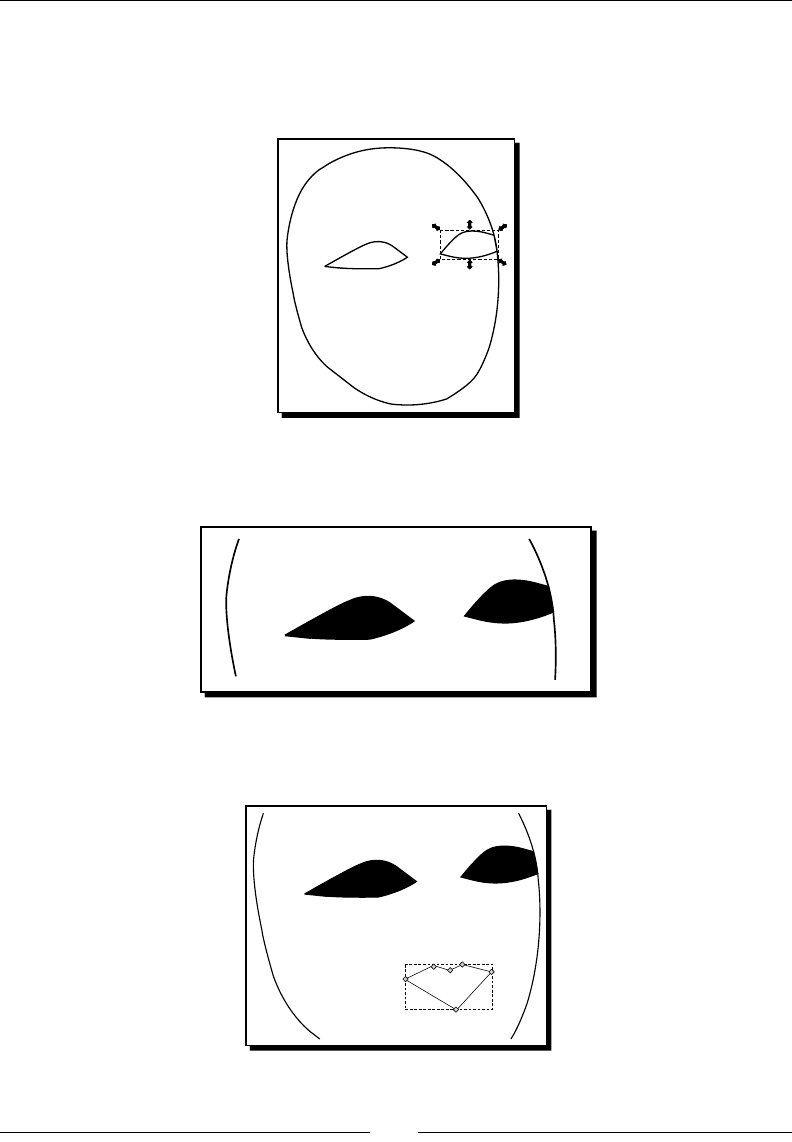
Using Paths
[ 152 ]
23. Hold the Shi key and also select the "tail" of the eye that is seen from underneath
the duplicate face object.
24. From the main menu, select Object | Clip | Set:
25. Hold the Shi key and select the other eye object. From the color palee, click black
to ll both objects' color to black:
26. Click the Bezier tool and create a diamond shape, similar to what is shown in the
following image, for the lips:
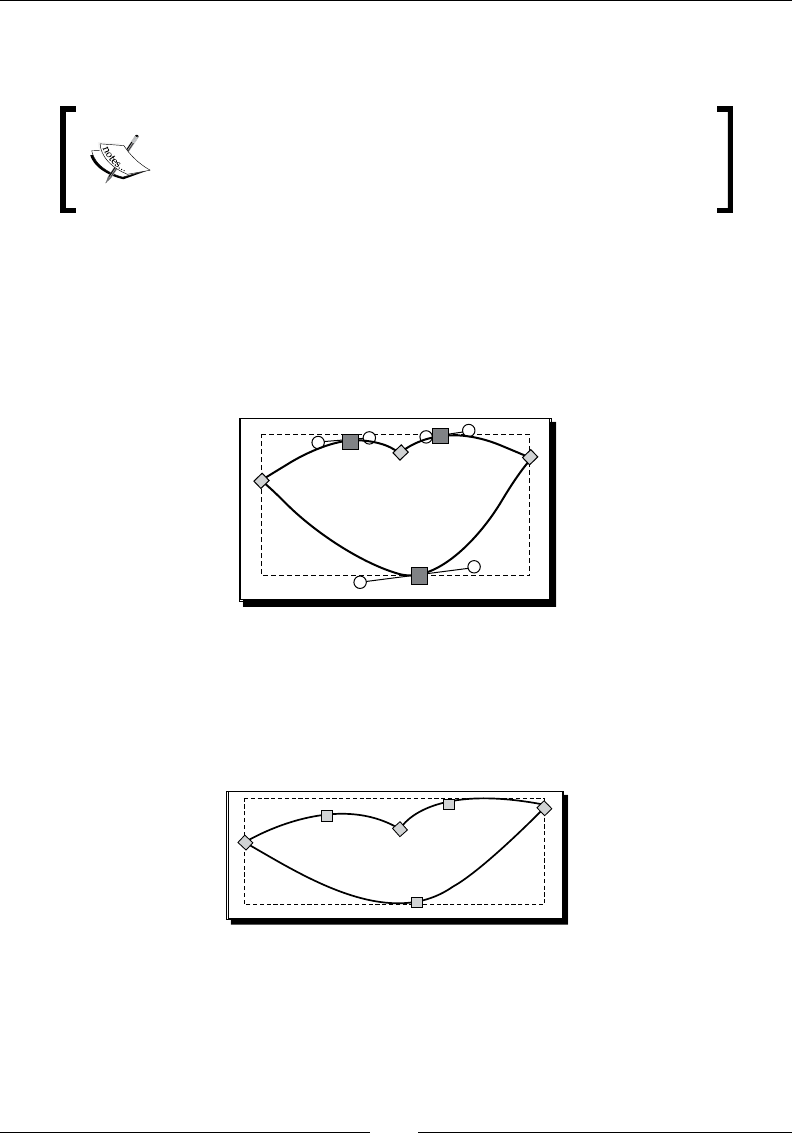
Chapter 7
[ 153 ]
Noce, this shape has six nodes. These were created with six clicks (double-click at
the end to close the object).
If you had missed adding a node to form the lips, there is no need to
delete the object and start over. You can double-click on any path to
add a new node. Also, if you added too many nodes, you can always
select the extra nodes and press the Delete key to erase them.
27. Select the lips and click the Edit Paths by Nodes tool to edit the nodes of the
lip object.
28. Select the top two nodes and boom node of the lip object (use Shi + click to
select all three nodes) and click the make selected nodes smooth icon to smooth
the node angles as follows:
29. Now move the nodes accordingly to adjust the lips to the right size and proporon.
Noce, in the following example, the le and right nodes were pulled outward
to broaden the lips. Also the two top rounded nodes were pulled le and right
respecvely to move the curve of the lips outward and the handles of both curves
were used to get the appropriate curves of the lips:
30. Select red color from the color palee to ll the lip objects with color.
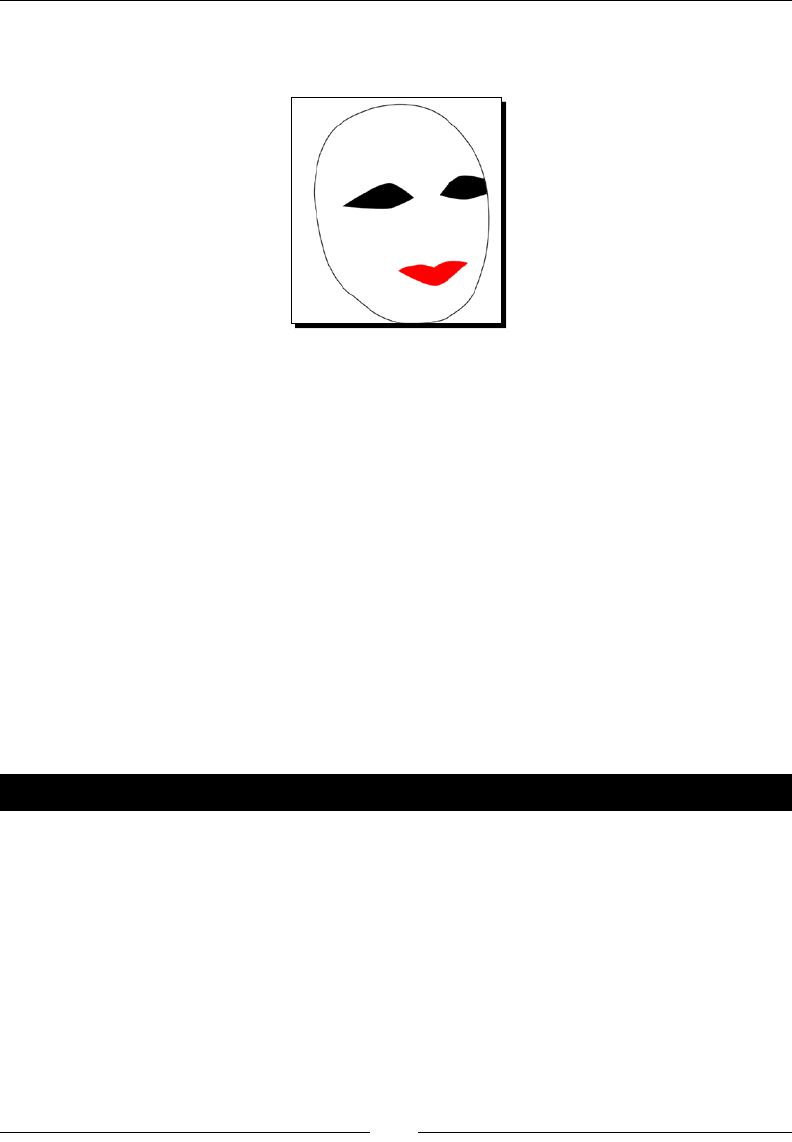
Using Paths
[ 154 ]
31. Right-click the stroke color from the status bar and choose none to remove the
stroke from the lip object as well:
32. If you made it this far, save your le so we can move on to the next step in the
process—creang the hair. From the main menu, select File | Save.
What just happened?
We started a new project: a stylized image of a woman's face. This project, so far, was
created mostly using the Bezier tool. In fact, we used that as the base tool for creang
every object on this canvas so far.
We learned the Bezier tool basics—what a single-click versus a double-click accomplishes
(creang nodes on a path versus closing/ending a path), how to make a straight versus
curved node, how to adjust node placements, add new nodes, and how to delete nodes.
We created the very basics of a face at this point in the project. Now we will move into
the second part of the project where we will add hair to this project. In doing so, we will
connue to use the Bezier tool, but also add in the use of spiros and swirls.
Pop quiz – remove the last node movement
1. If, for any reason, you move a node and an undesired eect results—what can you
do to "undo" it?
a. Use the keyboard shortcut Ctrl + Z
b. From the main menu select Edit and Undo
c. Delete the enre path
d. Both a and b
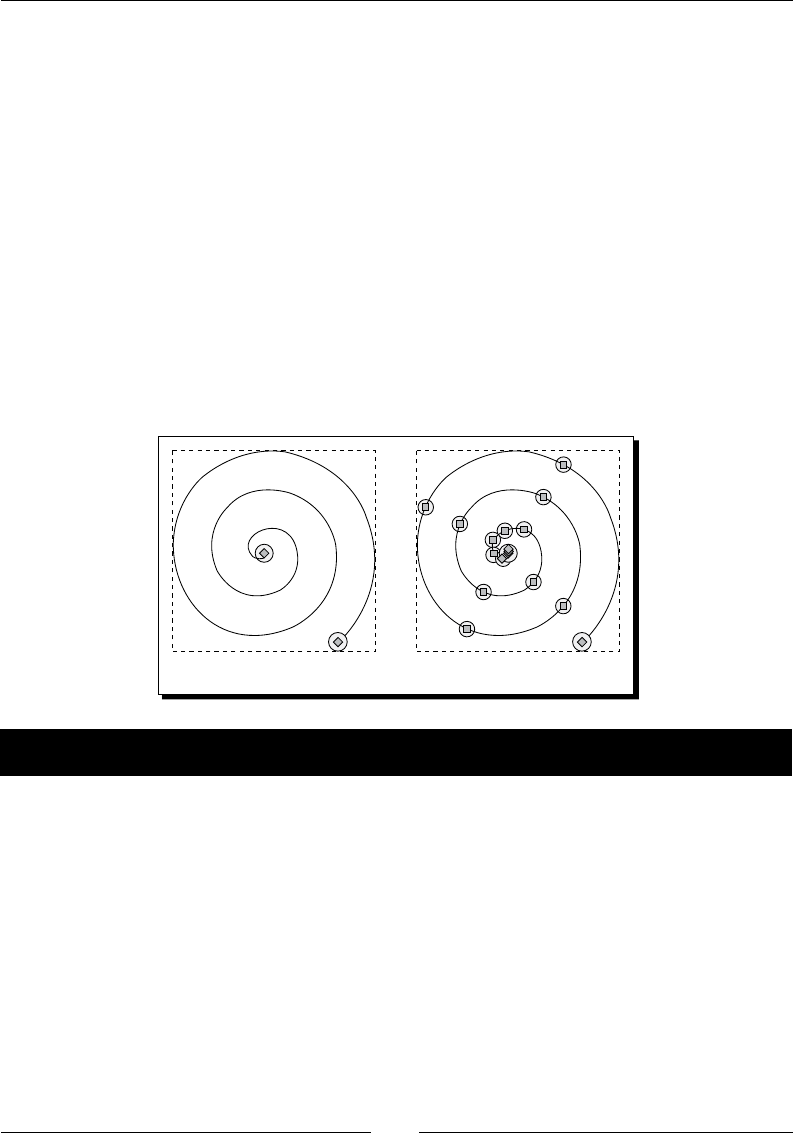
Chapter 7
[ 155 ]
Transforming objects into paths
In Inkscape, any shape, text, or object that you created can be converted to a shape. Don't
be fooled when it doesn't look like anything has happened because any capabilies that you
had before (dragging corner nodes to scale larger, eding text, rounding corners on a square)
can be lost, but now, you would be able to edit the object's nodes just like any other path
(such as in our previous example).
Stroke to paths
You can convert the outline or stroke of any object and convert that to a path. Select an
object with a stroke set—then from the main menu, select Path | Stroke to Path.
Again, the overall appearance on the canvas does not change, but how you can manipulate
the object. Take a look at the number of nodes before this spiro was converted into a path,
versus aer:
After
Before
Time for action – creating spiros and swirls
Let's open our previous project of the woman's face and give her some hair. In doing so, we
will use the Bezier tool and the spiral object in Inkscape (as shown previously), convert it to
a path, and manipulate it to create curls as follows:
1. Open the woman's face project we've been working on.
2. Press the shortcut keys: Shi + Ctrl + L to open the Layers dialog.
3. Create a new layer for the hair object(s). Press the + buon in the Layers dialog.
Name the layer Hair and click Add.
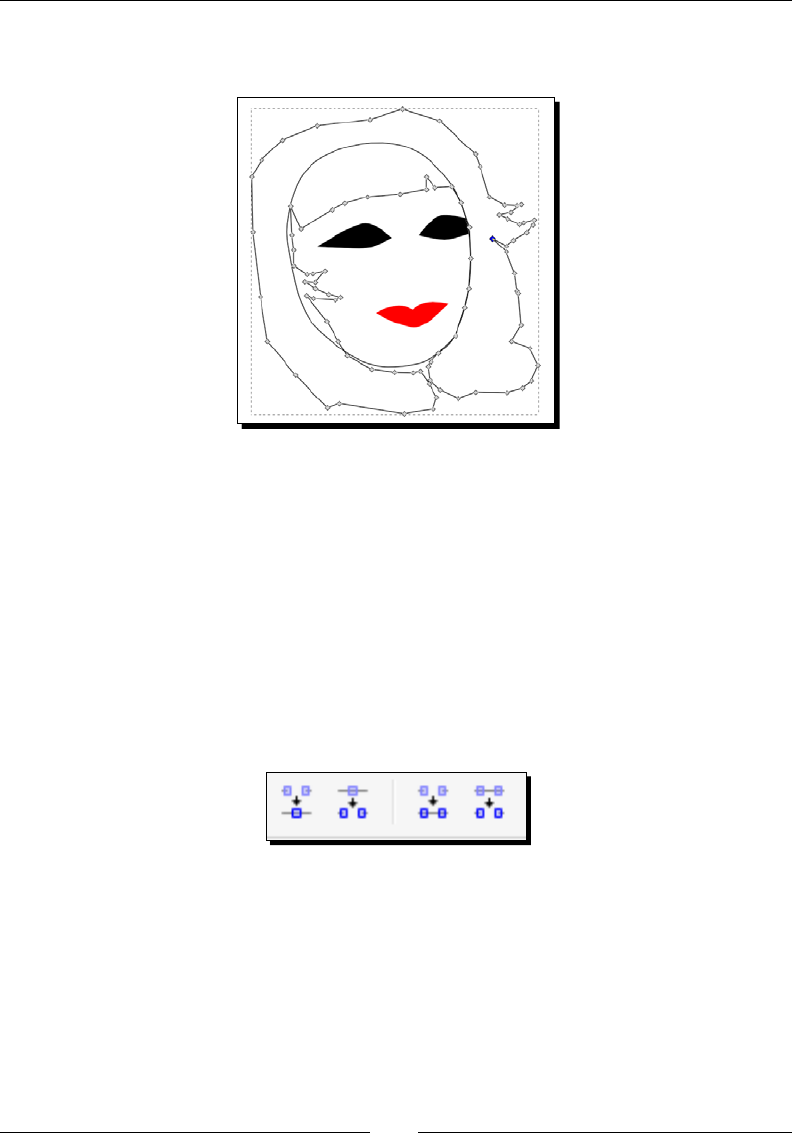
Using Paths
[ 156 ]
4. Select the Bezier tool and create a general shape for her hair, as shown in the
following image:
A few items to remember here are that you can add nodes, delete them, move
and adjust them, so that you get a general hair shape that you like.
5. Now let's work some more with the nodes on the hair. You can select specic nodes
(use Shi + click to select mulple nodes at the same me) and click the make
selected nodes smooth icon to smooth the node angles. Also, just as in the previous
exercise, feel free to move nodes and handles as needed for your desired eect.
6. You can also work with a number of smaller paths and then combine them as you
need to. Important tools to remember are the join selected nodes, break path at
selected nodes, join selected end nodes with segment, and delete segment between
two non-endpoint nodes tools—all found on the control bar:
These buons allow you to connect (or disconnect) two separate paths you have
created with the Bezier tool.
7. For example let's break apart nodes near the neckline area and combine them so
it looks like she has full owing hair across her neck. Use Shi + click to select the
nodes you want to break apart and then click the break paths and selected node
buon on the control bar as follows:
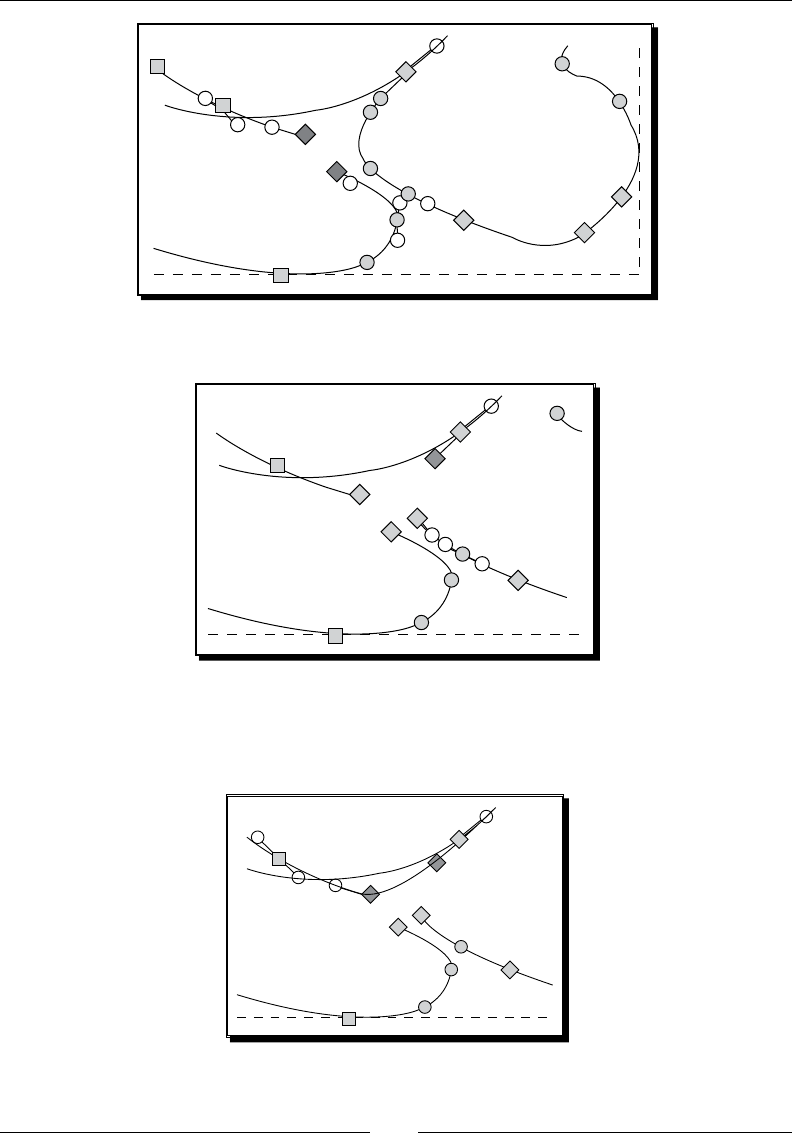
Chapter 7
[ 157 ]
8. Perform the same steps for two nodes on the right-hand side hair as well:
9. Now select the top node from the le-hand side and the top node from the right
and click the join selected end nodes with segment buon. The nodes are joined,
as shown in the following image:
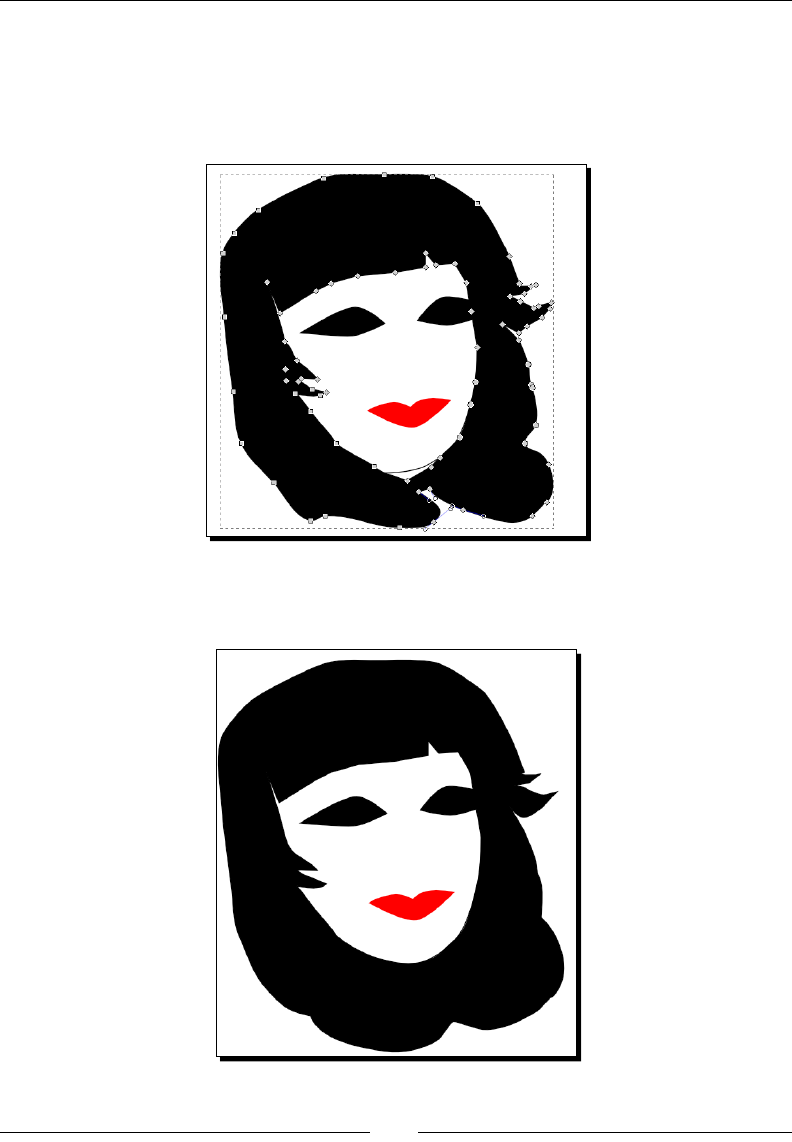
Using Paths
[ 158 ]
10. Repeat the process for the remaining two "open" nodes.
11. Give the hair some color as we work the shape a bit more. From the boom color
palee, choose black to ll this object with color and to give a more realisc view
of the nal project, as shown in the following image:
12. Connue to delete, move, and adjust nodes again to get a look of full hair at the
neck because next we will be adding in some curls:

Chapter 7
[ 159 ]
13. Select the spiral tool icon from the toolbox bar:
14. In the control bar, change the Turns, Divergence, and Inner radius sengs to your
liking. For our purposes, we'll change them, as shown in the following screenshot,
to create a smooth curve:
15. Now, draw the spiral on your canvas outside of your face objects for now:
16. If you want to adjust the spiral, select the end nodes tool and start changing it to
your liking:
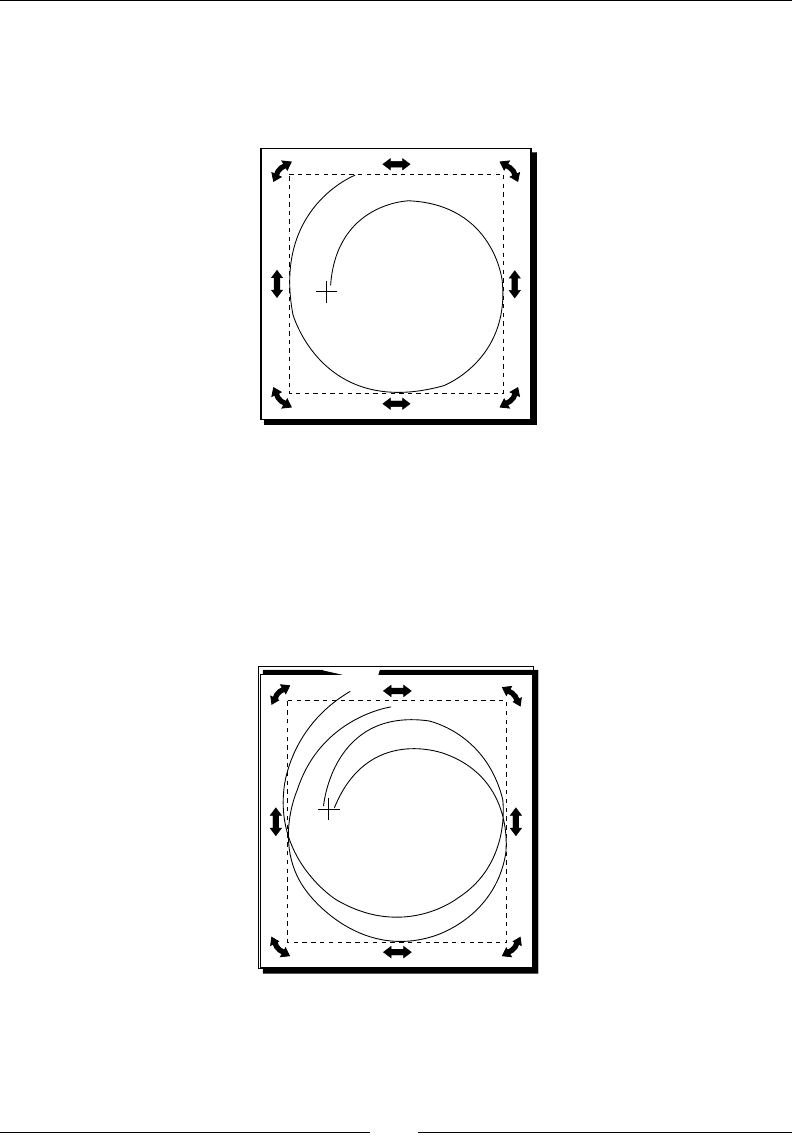
Using Paths
[ 160 ]
17. Click twice unl you see the rotaon handles. Float your mouse pointer over the ny
cross hair (center of rotaon) in the center of the object. Now use Shi + drag to
place the center of rotaon above the locaon where the inner path ends, as shown
in the following image:
18. Now we need to change the spiral object to a path. From the main menu, select
Path and then Object to Path.
19. Next, from the main menu, select Edit and then Duplicate. We now have two spirals
(one on top of another).
20. Choose the selector tool and then double-click the top duplicated spiral so the
rotaon handles appear, and rotate it just a bit as follows:
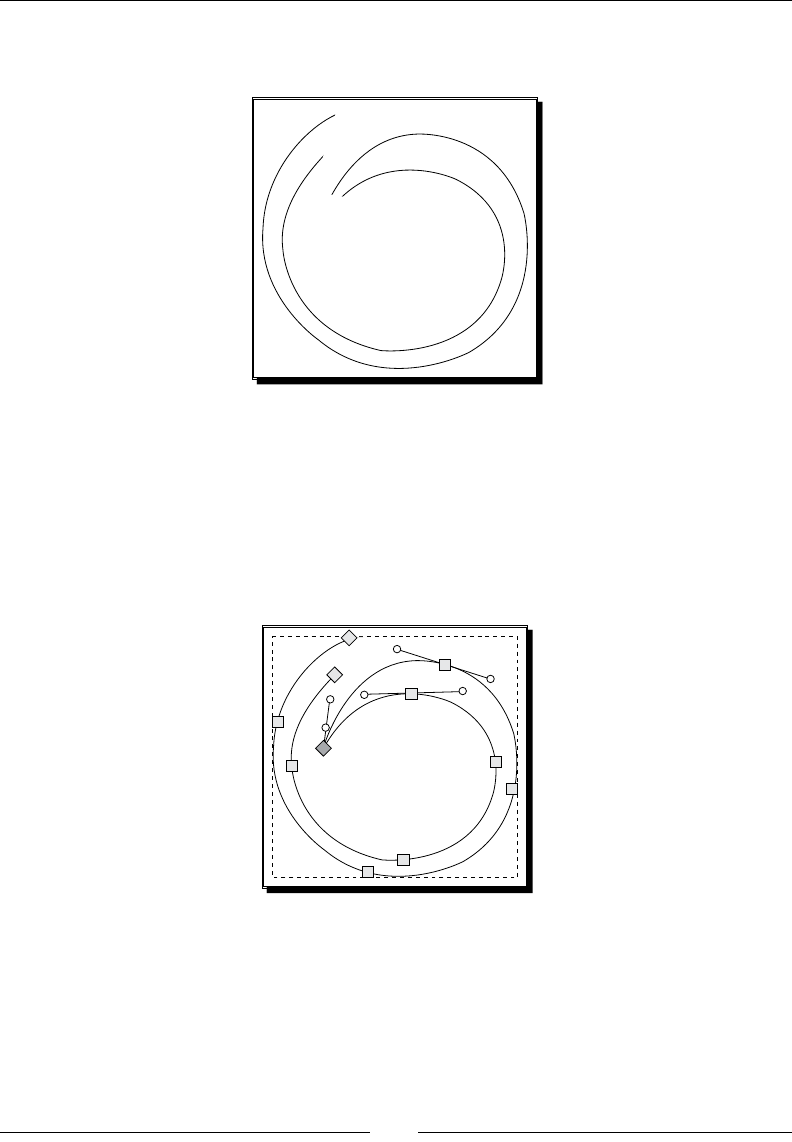
Chapter 7
[ 161 ]
21. Now click the original spiral, so that it is selected and scale it to a size that makes the
swirl interesng. It might look something like the following image:
22. Now sll with the selector tool, select both spirals (hold the Shi key and
click-and-drag a bounding box over both spirals).
23. From the main menu, select Path and then combine.
24. Press the F2 key to switch to the Edit Path by Nodes tool and then select both
outer end nodes and click the join selected end nodes with a new segment buon
as follows:
This joins the two nodes.
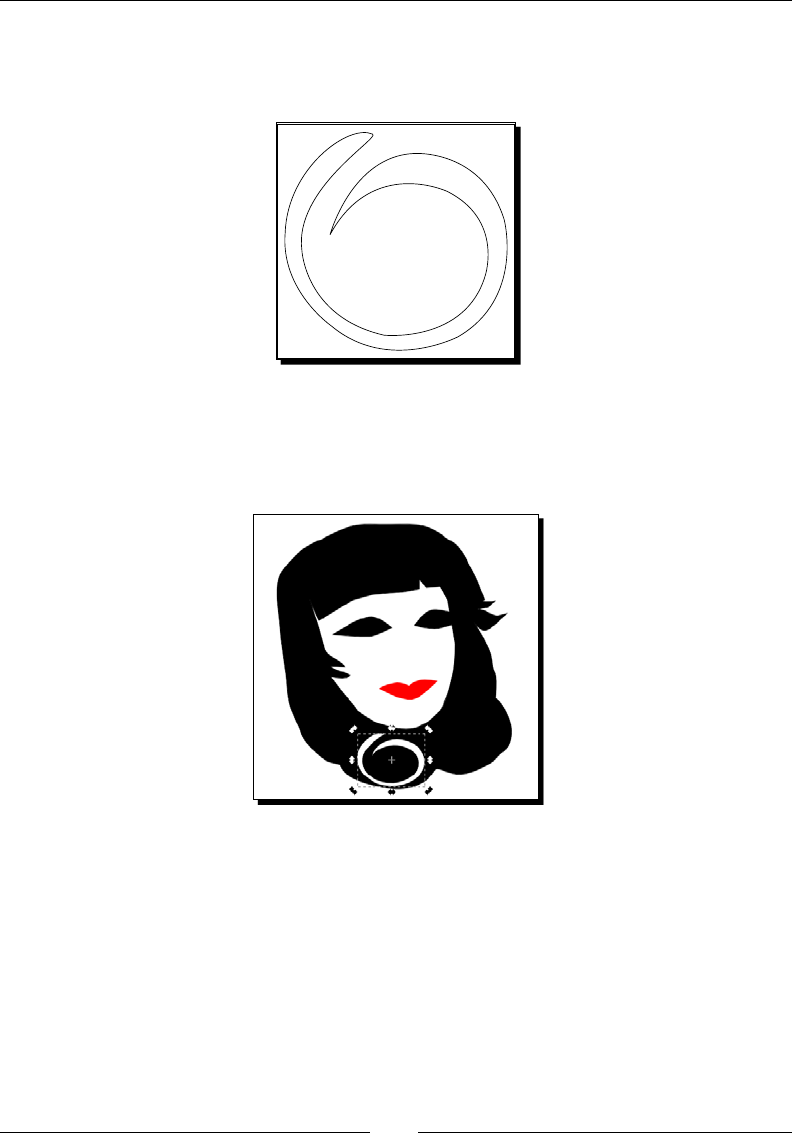
Using Paths
[ 162 ]
25. Do this with any other end nodes that aren't joined, smooth out any areas of the
spiral to make it look more appealing, and delete any overlapping or crossovers of
the lines:
26. Click white on the color palee bar to add a ll color to this spiral and remove
the stroke.
27. Now drag it onto the hair of your image as follows:
28. Scale, rotate, skew, mode/delete nodes, and/or duplicate the swirls or other similar
objects to use them as other "curls" and "highlights" in the hair object.
29. Again, adjust nodes in the hair as needed to achieve a pleasing eect for your image.
See the following image for a version of this project. Note, all highlights and curls in
the hair were adjusted, duplicated versions of the rst. Nodes were deleted, added,
and moved to create the others:

Chapter 7
[ 163 ]
30. From the main menu, select File | Save to save this project for future use
and reference.
What just happened?
We spent even more me using paths. This me we started again with a Bezier tool and
created a shape for the hair, but we then joined nodes with addional segments. Then we
used a spiral object and converted it into a path to manipulate it and use it as curls within
our project's hair.
Next up, we will work with text and convert it to a path.
Object to Path
To convert an object, we just select it and then from the main menu, choose Path | Object
to Path or the Shi + Ctrl + C keyboard shortcut.
Note the following when you convert any text to a path:
The text becomes non-editable as a normal object.
The result will be a group of paths (one path for each leer). Then you
can manipulate each leer by dragging nodes and eding the shape of each
one individually.
You can always ungroup the leers. On the main menu, select Object | Ungroup.
Let's convert an object to a path and then demonstrate how we can edit it dierently now
that it is a path.

Using Paths
[ 164 ]
Time for action – Object to Path
We'll add stylized text to our current project of the woman's face to illustrate how to use
the Object to Path funconality and how we can further manipulate the text when we
use this feature:
1. Open your previous Inkscape project.
2. Press the shortcut keys: Shi + Ctrl + L to open the Layers dialog if it is not
already open.
3. Create a new layer for the hair object(s). Press the + buon in the Layers dialog.
Name the layer: Text and click Add.
Locking layers
To prevent accidentally selecng other objects, lock all other layers
except the one you are currently working on. In this case, lock all
layers except the Text layer.
4. In the Add Layer, select the create and edit text buon from the toolbox:
5. Click on the canvas and type the word: SMILE:
SMILE
6. Now we are going to convert the text to a path. From the main menu, choose
Path | Object to path.
Now when you select the word, the bounding box has changed and you can only
select individual leers as follows:
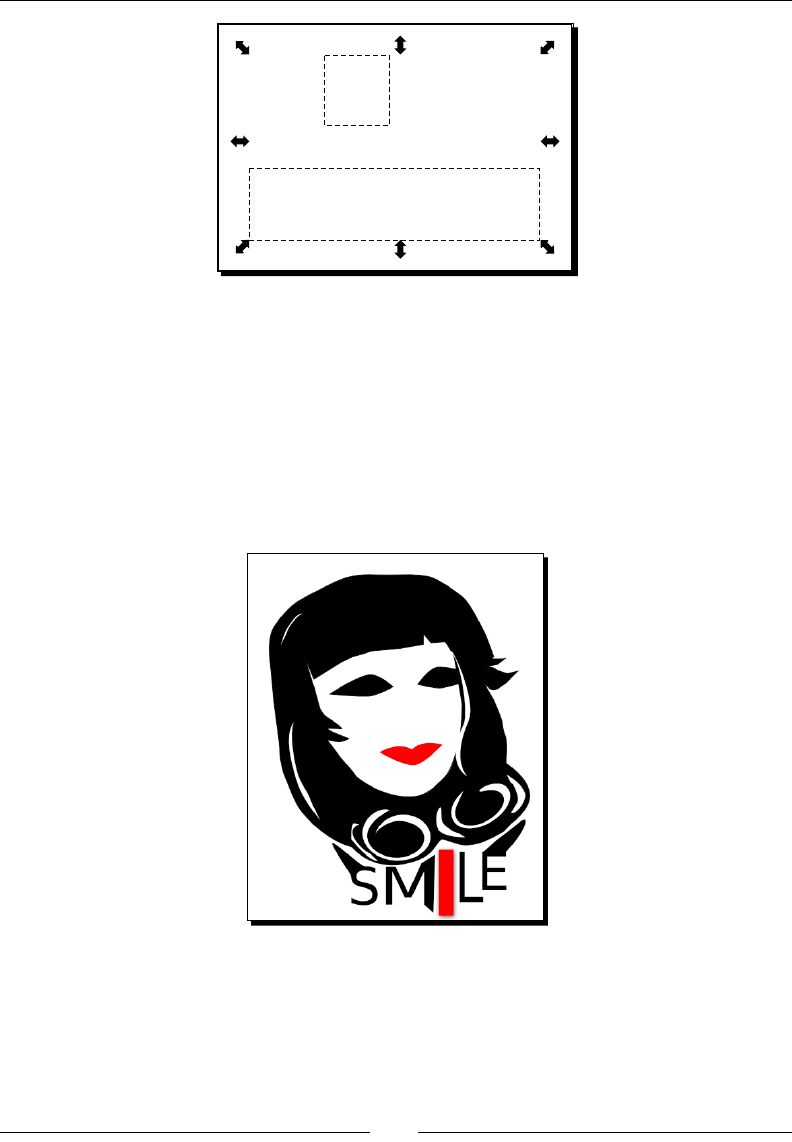
Chapter 7
[ 165 ]
SMILE
SMILE
7. You can manipulate or add eects to individual leers, or scale and transform each
leer dierently.
In the following example for the S and E, the outside nodes were "pulled" into
a smile.
The leers MIL were stretched to larger sizes based on the placement. For the M
and I, we also moved the outside nodes to make the leers wider. The leer I also
had its ll color changed to red and a drop shadow added (Filters | Shadows and
Glows | Drop Shadow):
8. From the main menu, select File | Save to save this project for future use
and reference.
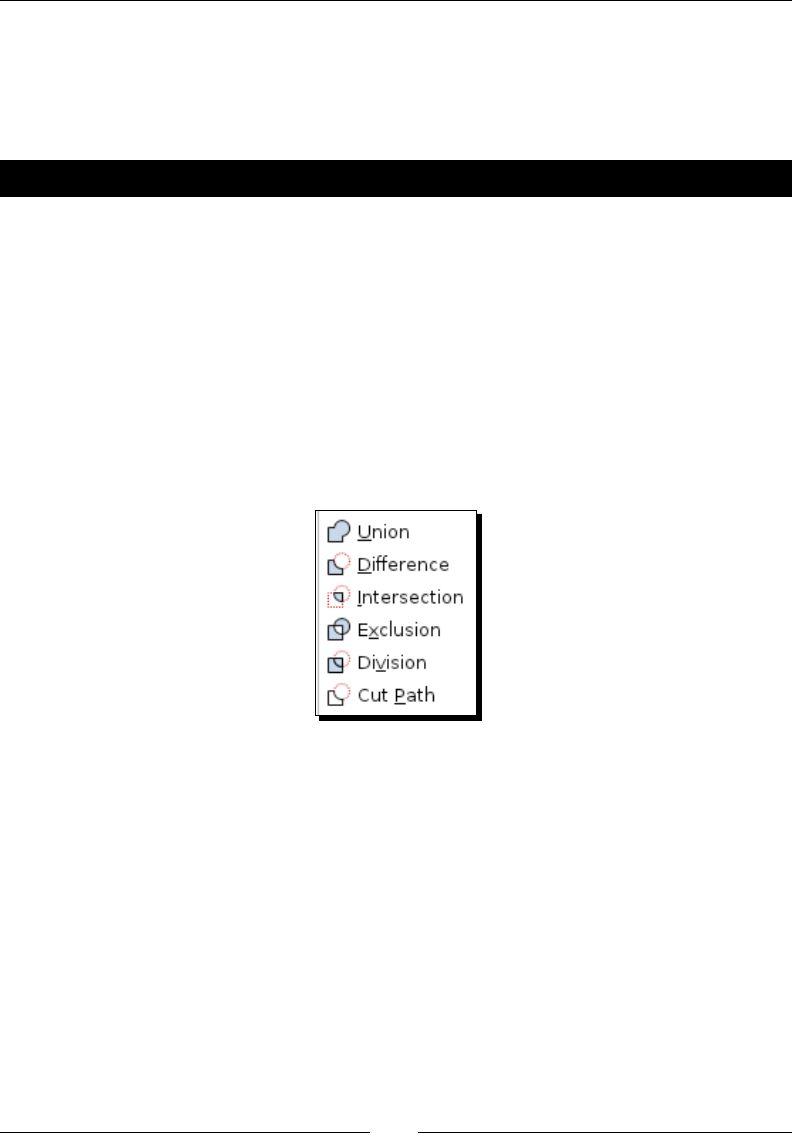
Using Paths
[ 166 ]
What just happened?
We created some sample text within our current project and then converted the text
into paths. Once converted into paths, there were examples given on what you can do
to each leer.
Pop quiz – paths
1. What can you convert to paths?
a. Text
b. Shapes
c. Objects
d. All of the above
Path options
Paths can be combined in a number of ways:
Here's what each of these joining opons mean:
Union: When you make a union of one or more paths, a new path is created that
contains all areas of other parts. For example, the arrow we created earlier in this
book joined all paths into one object.
Dierence: When you complete the dierence between two paths or objects—the
top path is removed from that of the boom one.
Intersecon: When you perform an intersecon of two paths, all that will remain is
the area that was overlapping in both paths.
Exclusion: When two paths are combined using the exclusion funcon, the resulng
path keeps everything except the porons of the paths that were shared.
Division: The rst path as "drawn" will be split by the second and the outcome will
be two or more paths.
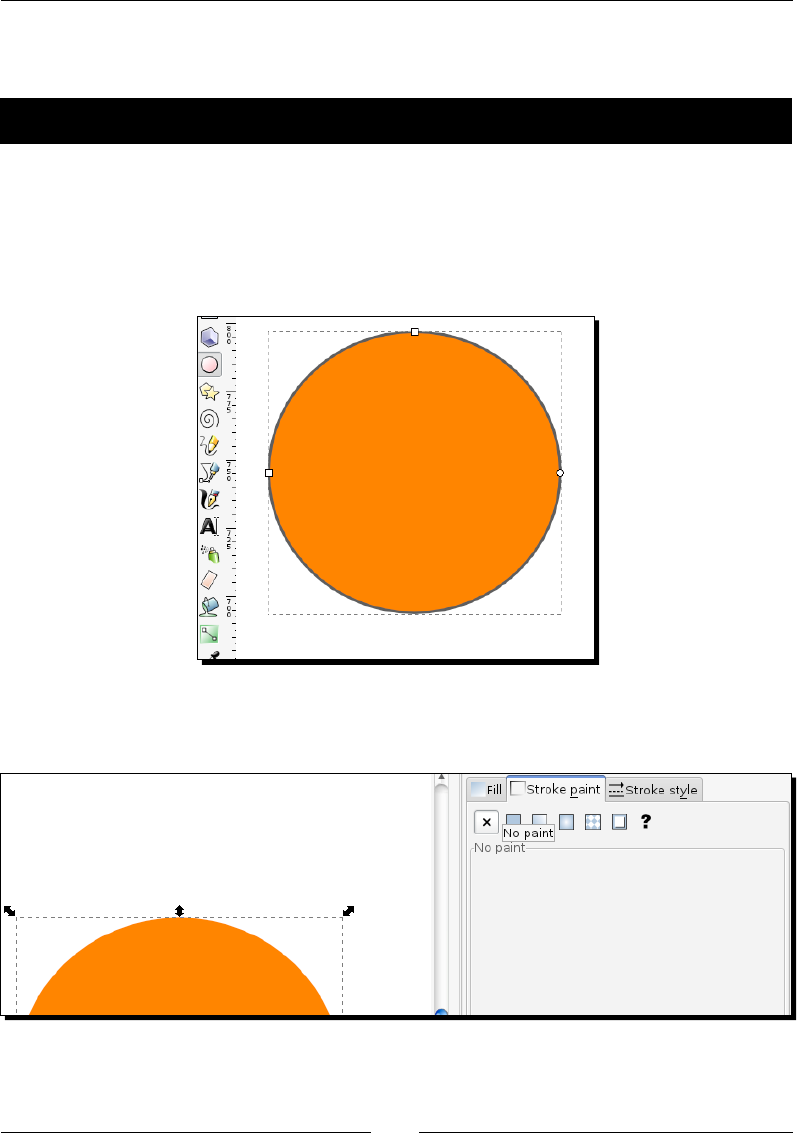
Chapter 7
[ 167 ]
Cut Path: The rst path is cut by the second drawn path, but the new paths have no
ll, so the second path is a "cut out" of the rst.
Time for action – creating an icon
We'll create an icon that has a border and star cut out. Let's get started:
1. Open a new document in Inkscape.
2. Select the create circles, ellipses, and arcs tool and draw a simple circle on the
canvas. Hold the Ctrl key as you draw the circle to make it a perfect circle as follows:
3. Use the Fill and Stroke dialog to remove the stroke and add an orange ll, as shown
in the following image:
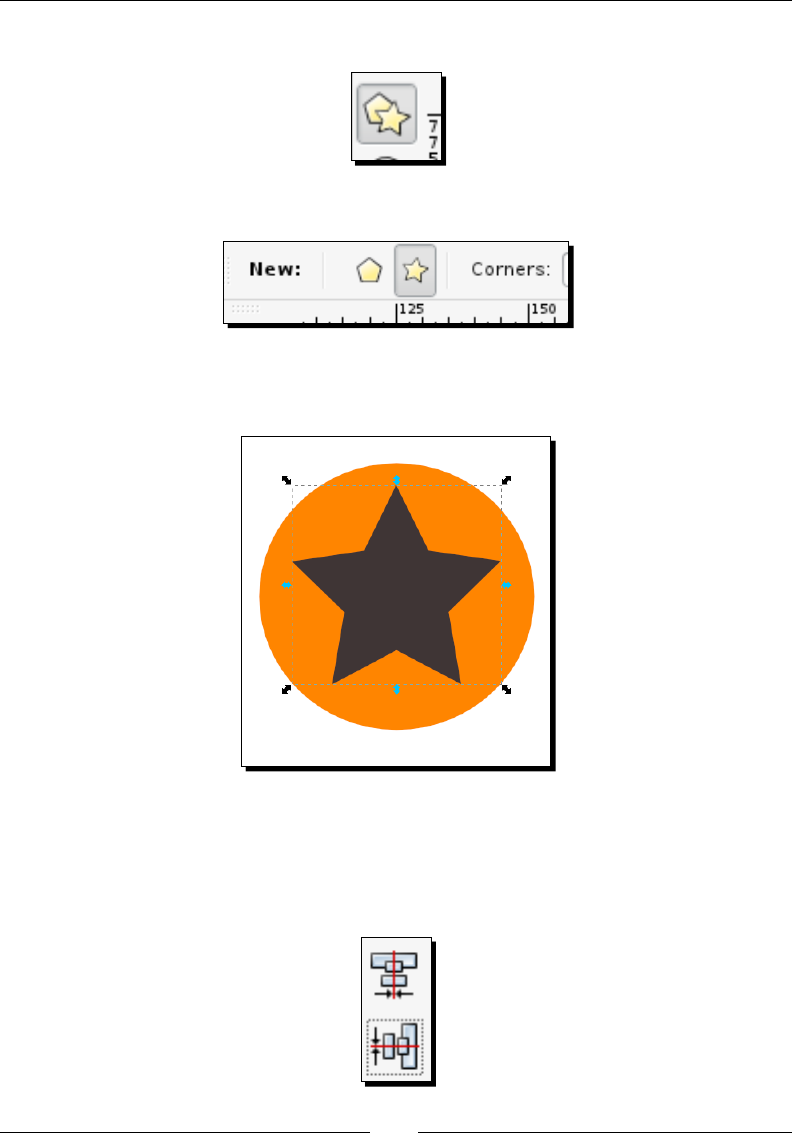
Using Paths
[ 168 ]
4. Select the star tool from the toolbox:
Make sure that you have the star opon selected in the control bar as well:
5. Draw a star in the middle of the circle. This star can have any color ll and stroke,
as shown in the following image:
6. Select the circle and the star. From the main menu, select Object | Align
and Distribute.
In the Align and Distribute dialog, click center on the vercal axis and then click
on the horizontal axis as follows:
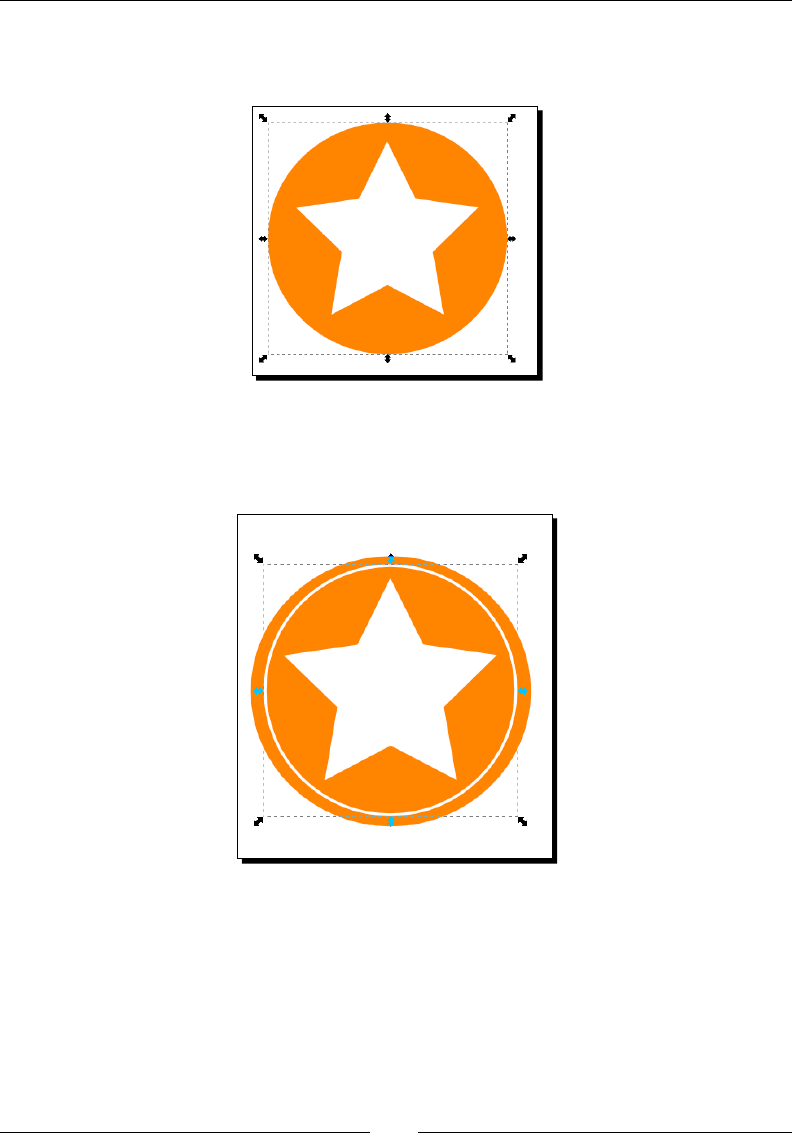
Chapter 7
[ 169 ]
7. From the main menu, select Path | Exclusion.
You should then see that the circle has a "cut out" of a star in the middle as follows:
8. Select the create circles, ellipses, and arcs tool again and draw a simple circle just
smaller than the rst and overlap it on the circle/star icon. Make this circle have no
ll, but a white stroke that is 1px in weight:
9. From the main menu, choose File | Save to save this project for future use.

Using Paths
[ 170 ]
What just happened?
We created a simple icon that used the exclusion feature for paths.
There is also an Icon View opon in Inkscape. If you want to see how your project would
look as an icon, select all objects on all layers (Ctrl + Alt + A keyboard shortcut), and from
the menu, choose View | Icon Preview. Check the selecon box. A preview of your icon is
displayed in the most common size.
Summary
We learned a lot about paths in this chapter. We rst just learned the basics about using
them and the Bezier tool. Then we learned about transforming paths and how to convert
shapes and strokes into paths so we could adjust them using nodes. We explored all path
opons, combining and breaking paths, as well as path placement and how it transforms
shapes. Next up is styling text.

8
How to Style Text
The idea of text styling is to manipulate text so that it creates a certain feel
when seen in an overall design. In the graphic design world, text styling is called
typography and is a form of typeseng. Compare the look and feel (or design)
of your local newspaper with that of children's magazines or start comparing
web designs of the same—a newspaper site or a children's television network
and compare it to a sports website. As seen, text is an important element
in design.
Let's use this chapter to learn more about how we can manipulate and style text for any
design. Here's what we will cover:
Text and font editor
Using paths and text
Text and frames
Spell check and nd/replace
Text eects
Using text reecons
Text and Font editor
The Text and Font editor allows you to create text on your canvas and format it with the
right font, size, and even kern. Let's open the editor and get started.
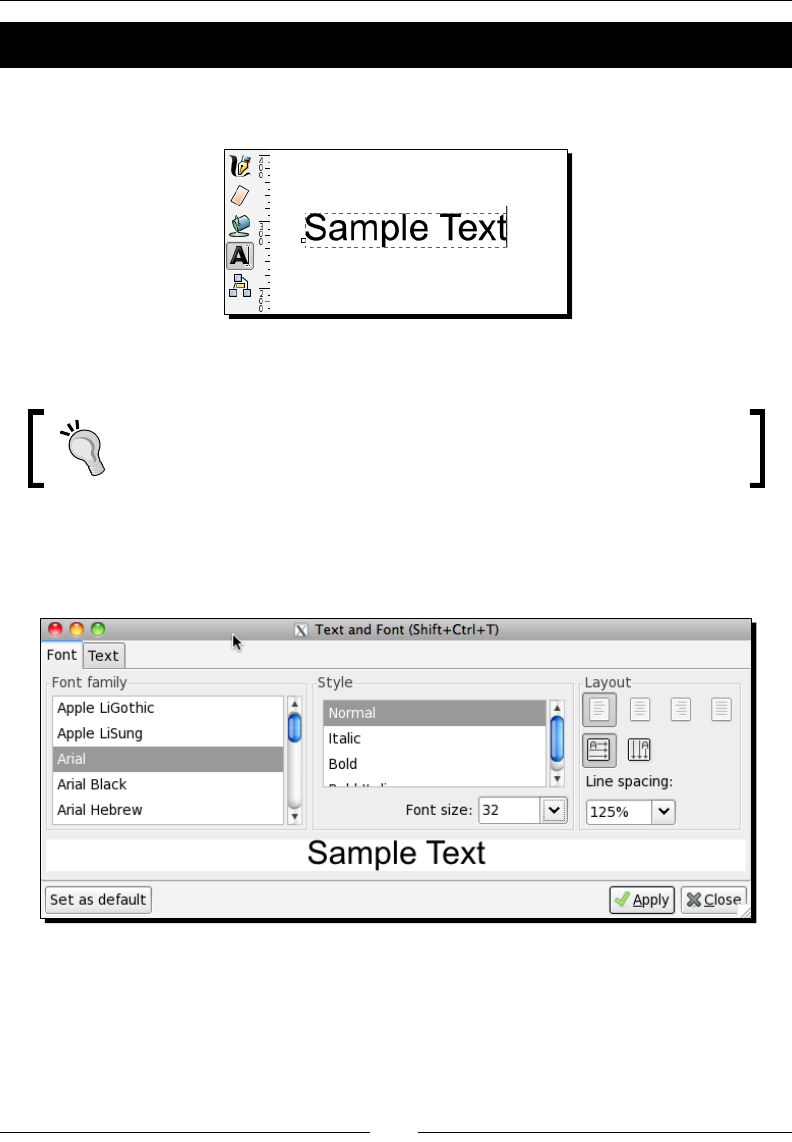
How to Style Text
[ 172 ]
Time for action – opening and using the Text and Font editor
Creang text in a project is simple—select the Create and Edit Text tool in the toolbox, click
at the inseron point within an open project, and start typing.
The text is immediately displayed on the canvas.
The text tool (A icon) in the toolbox is the only way of creang new text on
the canvas. The T icon shown in the command bar is used only when eding
text that already exists on the canvas.
Then you can use the Text and Font menu to change everything from the font, style, size,
and juscaon. To open this window, from the main menu, select Text and then Text and
Font (or use the shortcut keys and press Shi+Ctrl+T, or the T icon in the command bar).
This window dialog also has a useful feature where you can edit your text directly. Click the
Text tab and select the text you want to change or add/delete.
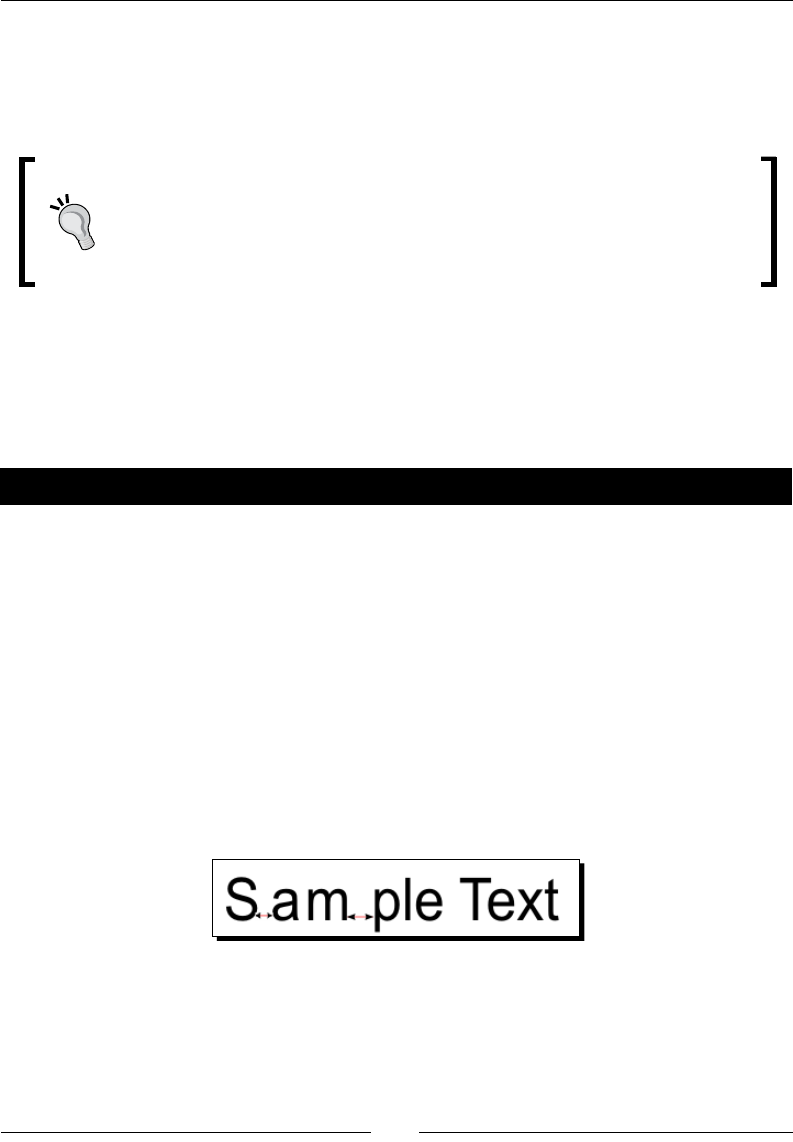
Chapter 8
[ 173 ]
Back in the Font tab, you can change the font itself, the point size, alignment, line spacing,
and even change from a horizontal to vercal text layout. But note, even though there are
opons for Bold, Italics, and Bold Italics, there is no opon for underline. You can, however,
use the Bezier or line tool to give you the same eect as the underline feature.
Spacing shortcut keys
You can also change the spacing of selected text by using shortcut keys. Use
the Alt + > or Alt + < keys to try it out. For more informaon about keyboard
shortcuts, see Appendix A, Keyboard Shortcuts.
What just happened?
You opened the Text and Font editor and added some text to your canvas. We also saw
how you can change the font, point size, alignment, line spacing, and even how to adjust
horizontal and vercal text layout.
Pop quiz – font options
1. What font opons do you have available in Inkscape?
a. Bold
b. Bold Italics
c. Underline
d. Italics
e. A, B, and D
Kerning
One of the more important items in typography and working with text that you will want to
learn about is kerning—or the ability to adjust the spacing between leers.
There is no menu path to perform this in Inkscape. Instead, you can use handy shortcut keys.
For more informaon about keyboard shortcuts, see Appendix A, Keyboard Shortcuts.
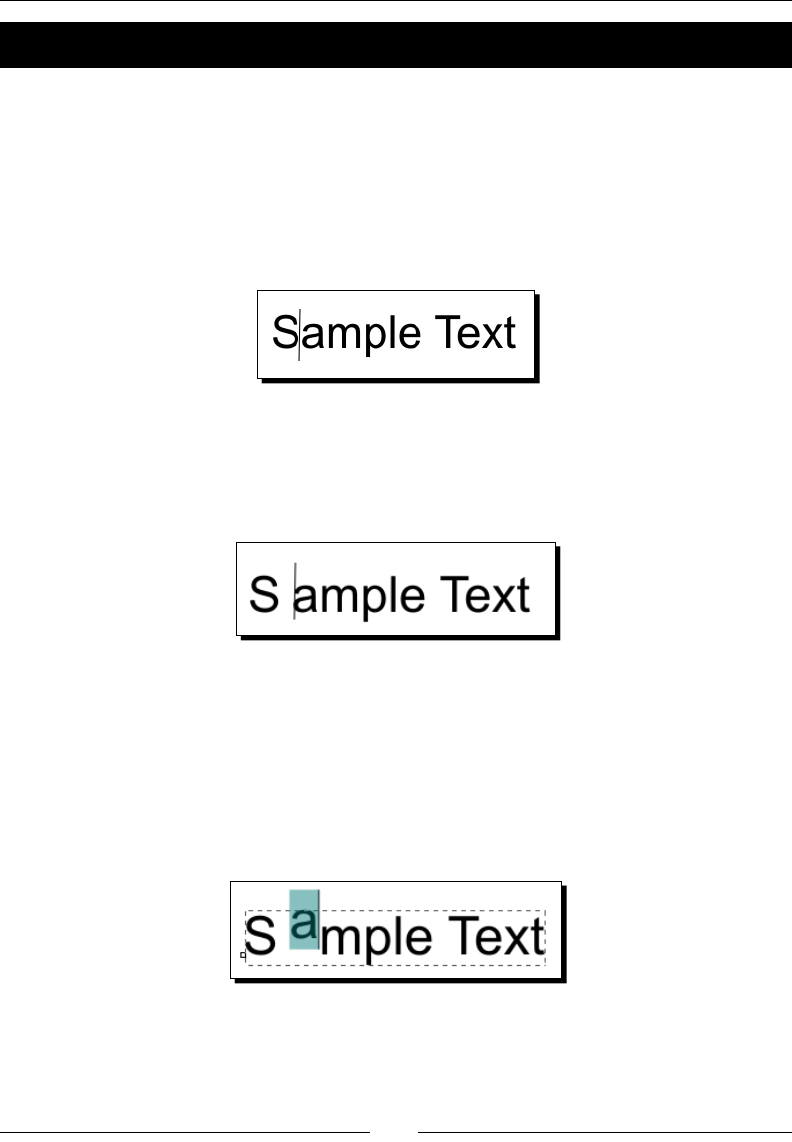
How to Style Text
[ 174 ]
Time for action – kerning text
Here's how to kern text that already exists on your canvas:
1. First, double-click some text you have already entered in an open project.
This will take you into the Create and Edit Text tool, allowing you to edit the
text leer-by-leer.
2. Using the arrow keys, move the cursor between the two leers you want to add
or diminish space between.
3. Then, press the Alt + right arrow key to add space between the leers. Alternavely,
press the Alt + le arrow key to lessen the space between those two leers. Keep an
eye on the kerning value in the Tool control bar A | A. It is set in pixels and displays
fracons of the value of space between the leers.
4. Alternavely, if you want to move individual (or mulple) characters up and
down—just move your cursor near the leer (or leers) you want to move vercally.
5. Select the leer(s) by using the Shi key and the right/le arrows or drag your
mouse over the character(s) you want to edit.
6. Then press Alt + up key to move the leer(s) up from the horizontal baseline.
Again, see the Tools control bar seng A|A for the specic spacing.
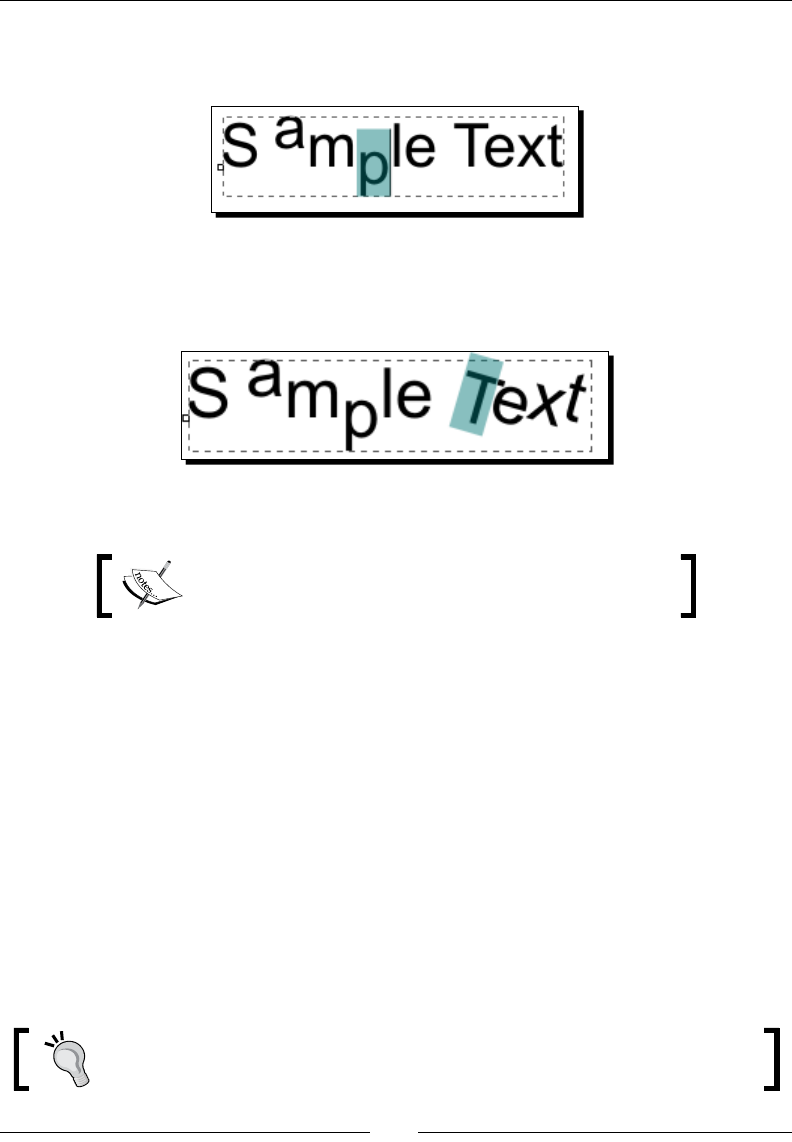
Chapter 8
[ 175 ]
7. Alternavely, you can use the Alt + down key combinaon to move a leer down
from the horizontal baseline.
8. You can even rotate leers. Select a leer you want to rotate le or right and then
use the Alt + [ or ] key to start moving it. The Tools control bar can, again, help you
with exact spacing informaon.
9. Feel free to save the le now if you think you might want to use this going forward.
Baseline shi and leer rotaon funcons are only
available to text that is not inside a owed text frame.
What just happened?
You created some text on your canvas and then adjusted the kerning (or spacing) of
leers. We even rotated and dropped lengs below (and above) the horizontal baseline
for a dierent sort of text styling technique.
When adjusng kerning in Inkscape, it is convenient to leave the leers as text—instead
of the alternave of converng the text to paths—as the text remains editable. You can
easily switch fonts, change font sizes and styles, all without removing the kerning and
spacing informaon that you have already set. One small disadvantage to this approach is
that when you reopen (or deliver) an SVG le, you must have the original font used in this
le's creaon on the computer. Just remember when providing and saving the SVG le to
keep all graphics and fonts used in the creaon of the web design or graphic together and
available for any future use.
You can also create a duplicate layer (File | Layer | Duplicate) and then hide it to
preserve text styling for future rework of the document and text informaon.

How to Style Text
[ 176 ]
Text styling keyboard shortcuts
Since not all text styling opons are available via a menu item, here's an overview of most
text opons available via keyboard shortcuts. Also refer to Appendix A, Keyboard Shortcuts
for all key combinaon shortcuts available for Inkscape.
Text Selecon Shortcut Keys
Ctrl + le/right arrows Cursor moves word-by-word
Shi + le/right arrows Selects/deselects leer-by-leer
Ctrl + Shi + le/right arrows Selects/deselects word-by-word
Double-click on leers Selects the word
Triple-click Selects the enre line of text
Shi + Home
For Mac OS: Shi + Fn + le arrow
Selects from the beginning of the line up to the cursor
posion
Shi + End
For Mac OS: Shi + Fn + right arrow
Selects from the cursor to the end of the line
Ctrl + Shi + Home
For Mac OS: Ctrl + Shi + Fn + le arrow
Selects from the beginning of the text up to the cursor
posion
Ctrl + Shi + End
For Mac OS: Ctrl + Shi + Fn + right arrow
Selects from the cursor posion up to the end of the text
Hot Keys
Ctrl + BApplies bold style to the selected text
Ctrl + IApplies italic style to the selected text
Alt + right or le arrows Increase or decrease the space between characters
(kerning)
Alt + > or < keys Changes the overall leer spacing within a text box
Alt + [ or ] keys Rotates leers
Alt + up or down arrows Changes the vercal posion of the selected text,
relave to the baseline
Alt + Shi + arrows Moves posion by 10 pixel steps
Ctrl + [ or ] Rotates 90°
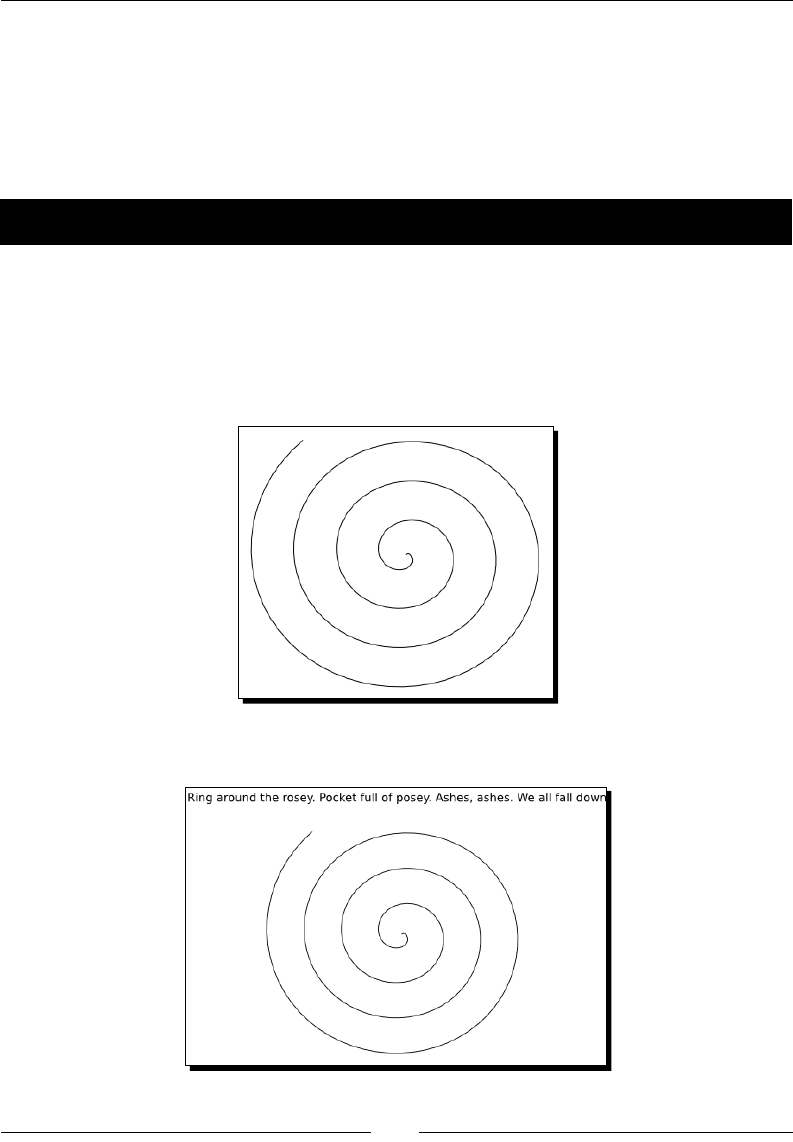
Chapter 8
[ 177 ]
Using paths and text
Using paths with text is a great combinaon to make unique designs for banners, logos, and
headings or footers, on various business documents. They work together and allow you to
have complete control over how the text will look. Let's review how we can make them
work together.
Time for action – using a path for text
In Inkscape, you can put text onto a path and have it follow its shape—and when you do this,
the text and the path remain editable, which means you can sll change the text, the shape
of the path, kerning, and spacing elements in the text. Let's look at an example:
1. To start, draw a path with the Bezier tool or in the case of the following example,
the spiral tool.
2. Then use the text tool and type the text that you would like to place on the path.
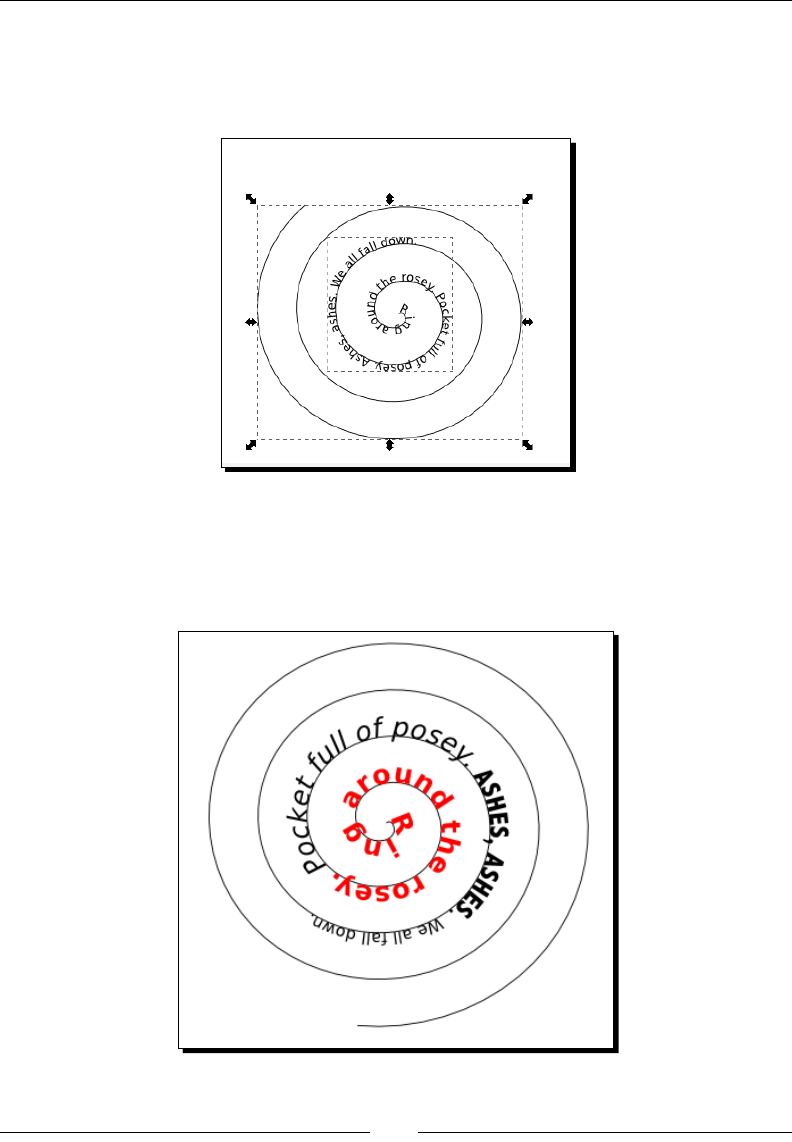
How to Style Text
[ 178 ]
3. Select both the text and path.
4. Then, from the main menu, select Text and then Put on Path. You'll see that the text
then is literally placed on the path of the line you had drawn.
5. You can now move the original path and the text moves along with it. Alternavely,
you can move the text away from the path, edit the text, or transform the text using
kerning, text size, rotang leers, or moving them from the baseline—but it will sll
hold the shape of the path.
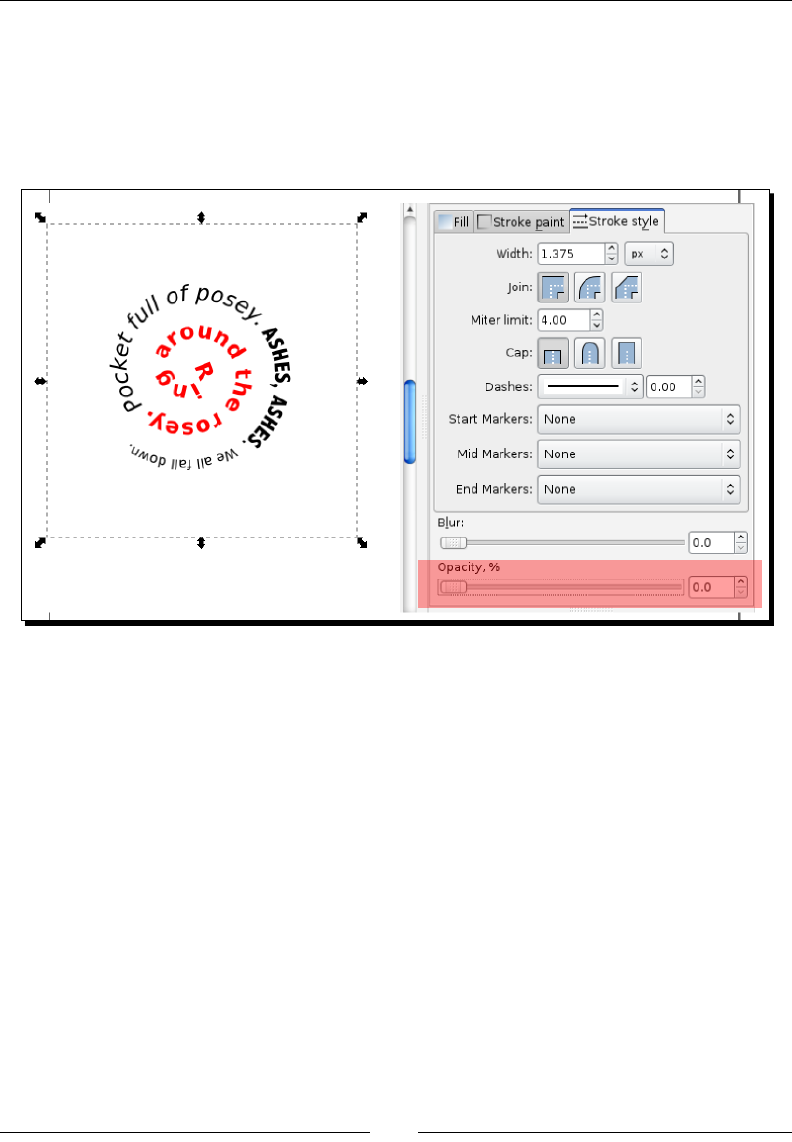
Chapter 8
[ 179 ]
6. If you need to remove the shape from the text, from the main menu, select
Text and then Remove from Path. You'll see that the text will turn back to
a regular text object.
7. If you want the text to maintain the shape of the path, but hide the actual shape,
select the path and change its opacity to 0, in essence, hiding the path.
What just happened?
You placed some text on a path of an object or shape. You also learned how to manipulate
the text while it is placed on the page, as well as how to remove the text from the shape and
hide the path itself so that you keep the text shape.
Placing text within a closed shape
Another unique form of text styling can be done by placing text within a shape. Words will
automacally wrap so that the text ts as best as possible within the shape. You can, of
course, sll edit the text aer this, and even change some of its features.
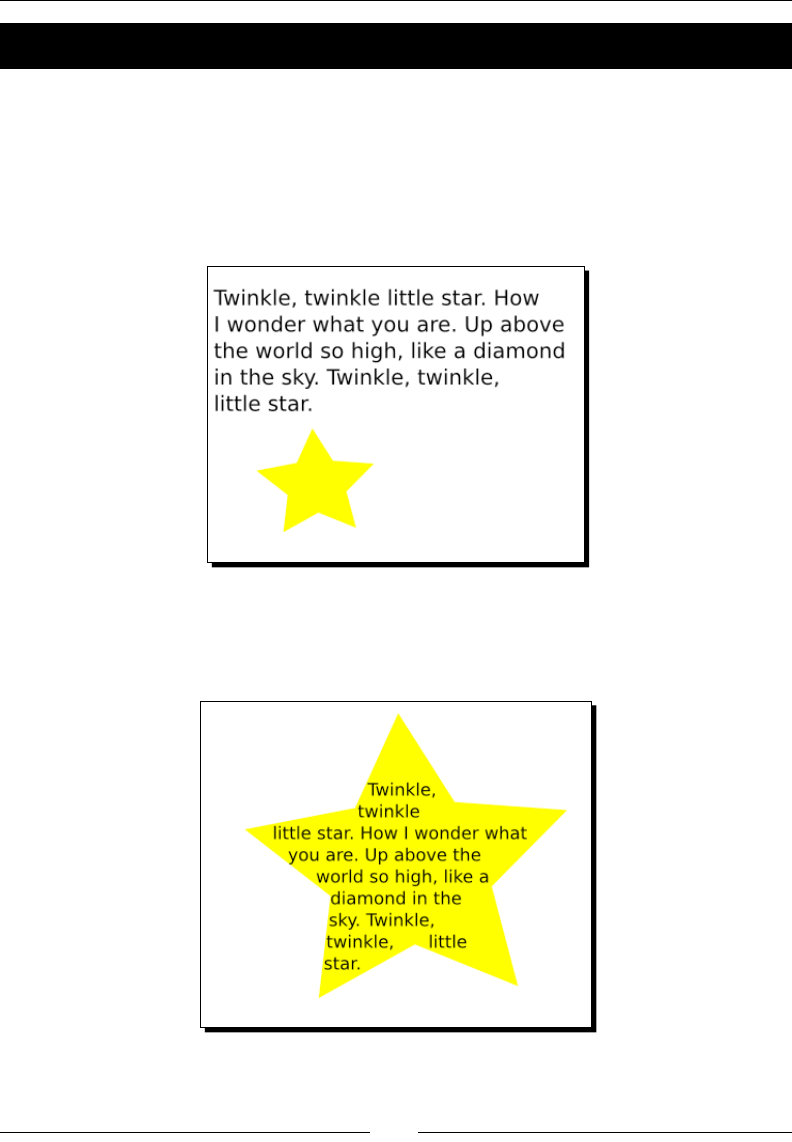
How to Style Text
[ 180 ]
Time for action – placing text in a closed shape
Let's walk through an example of how to place the words "Twinkle, twinkle lile star" into
a star object:
1. First create a star in a new Inkscape document.
2. Select the Create and Edit Text tool from the toolbox and type the text onto
the canvas.
3. Select both the text and the star. Then from the main menu, choose Text and then
Flow into Frame. Instantly, you'll see that the text is placed, as best as it can be,
within the connes of the shape.
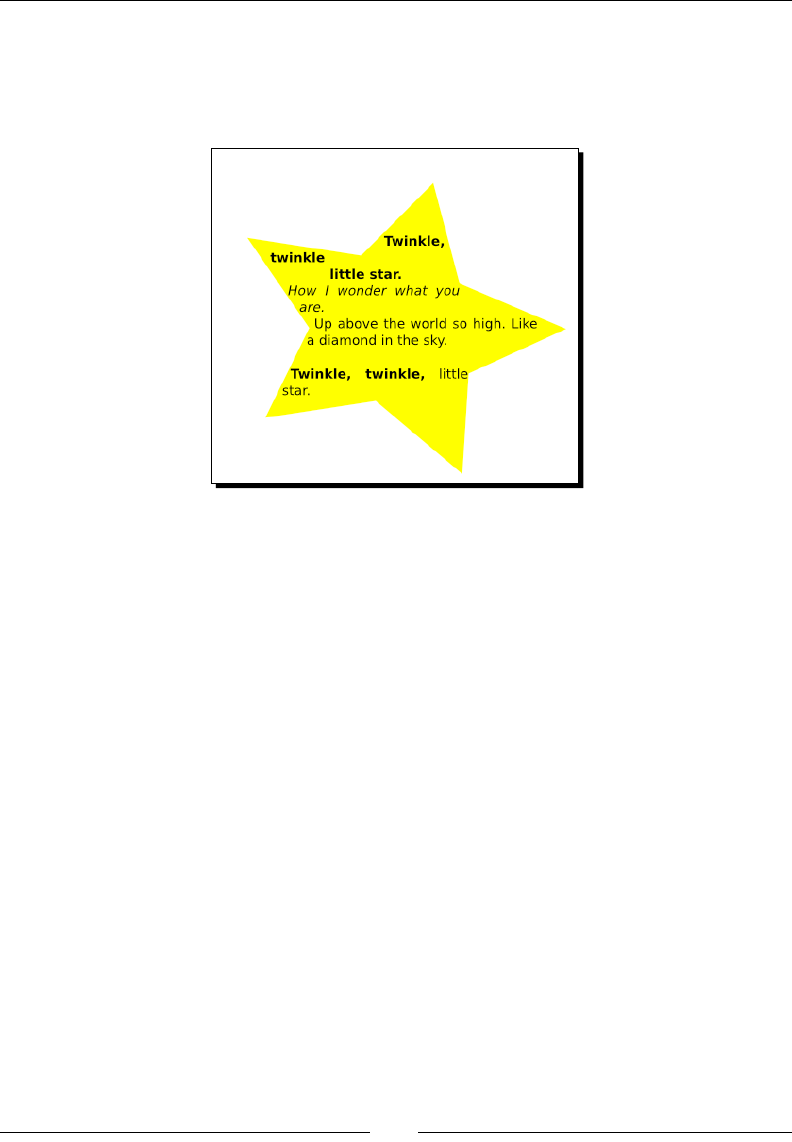
Chapter 8
[ 181 ]
4. Feel free to manipulate the text to make it look just right, even changing color,
kerning, and spacing if needed. Similarly you can change the color, stroke, and
posion of the shape to see how the text reacts as well as the impact on the
overall design.
5. If you ever want to remove the text from the shape, from the main menu,
choose Text and then Unow.
6. Save the le in the Inkscape SVG format if you plan to use this le in any
future projects!
What just happened?
We took some simple text and then placed it within a shape. Then we took that text and
manipulated it so that it would take the shape of another object. Lastly, we rotated and
manipulated the container shape to have the best impact on the design.
Spell check and nd/replace
Just like in a word processing program, you can nd and replace a word (or term) in the text
box of an Inkscape document.
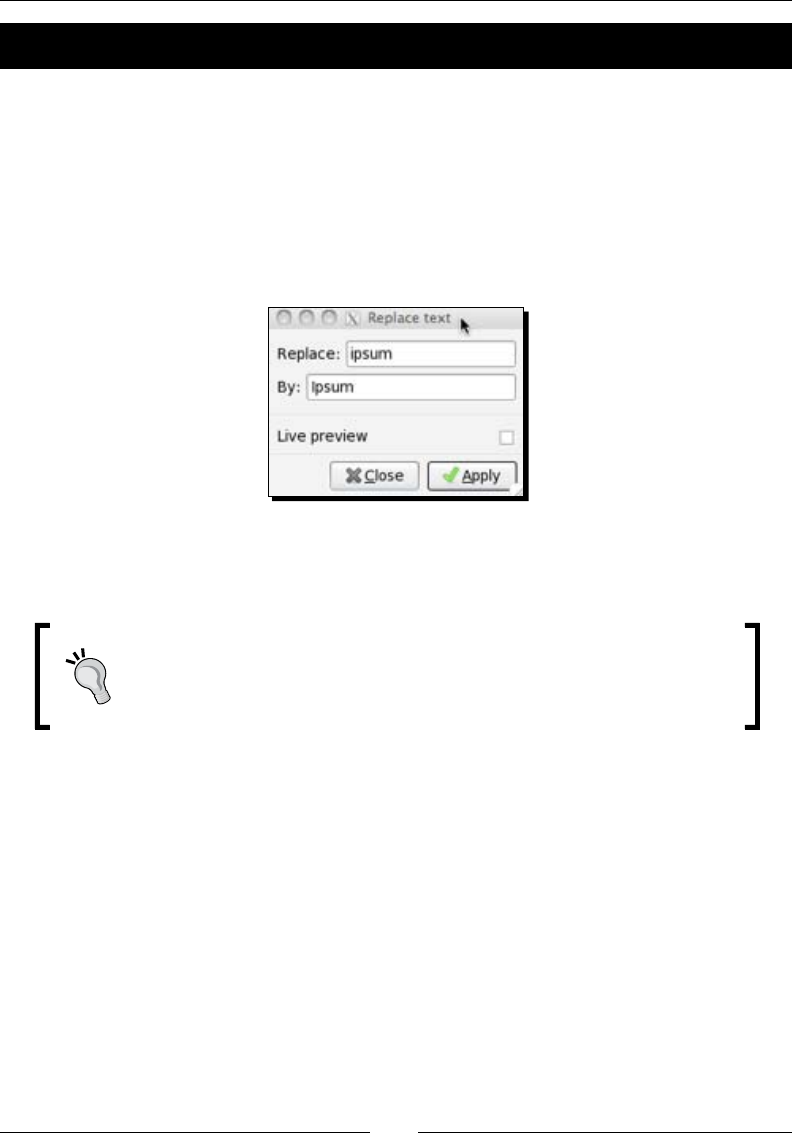
How to Style Text
[ 182 ]
Time for action – performing a nd and replace
We will perform a simple nd and replace in the following example. To do this:
1. In an open project, choose the Create and Edit Text tool and select an
already-created text box with content residing in it.
2. From the main menu, select Extensions and then Text and Replace Text.
3. In the Replace text dialog box, place the word you want to replace in the rst
eld and the new word in the second eld.
4. Click Apply and every instance of the old word will be replaced within the selected
text box.
Remember, using this process will replace every single instance of a word
in the selected text. If you only want to replace certain instances of the
word, this process might be superseded by some careful proofreading of
the content.
What just happened?
We found the menu opons in order to perform a search and replace for words within a text
frame in Inkscape.
Text effects
Inkscape gives a variety of opons for manipulang text within its extensions. Let's go
through a few examples.
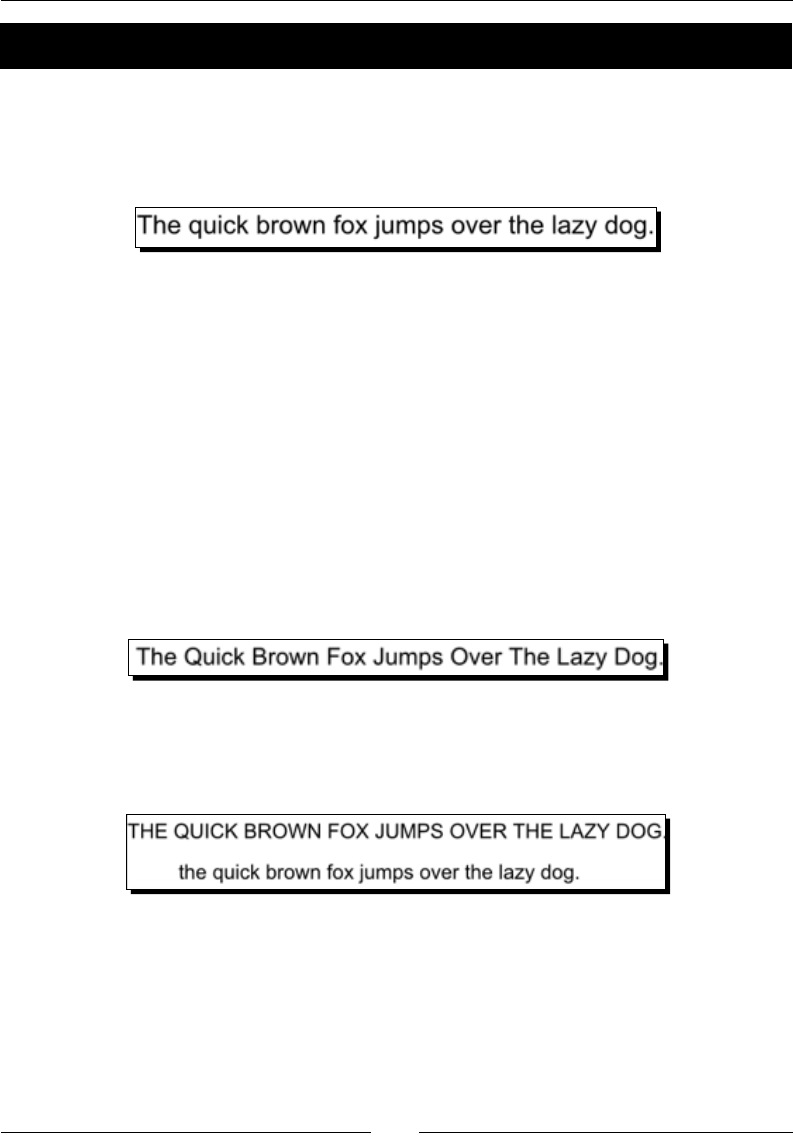
Chapter 8
[ 183 ]
Time for action – using text effects
We will perform a number of text eects that are available in Inkscape. Let's get started:
1. Sentence case: This simply means using capital leers as you would in sentences—it
replaces lowercase characters with capitals at the beginning of every sentence.
To use this in Inkscape:
In an open project, choose the Create and Edit Text tool and select an
already-created text box with content residing in it.
From the main menu, select Extensions and then Text and Sentence Case.
All capitalizaon rules will change to sentence case.
2. Title case: Instead of capitalizing the rst word in every sentence like the previous
example, this text eect capitalizes the rst leer of every word in the text box.
In an open project, choose the Create and Edit Text tool and select an
already-created text box with content residing in it.
From the main menu, select Extensions, Text, and Title Case. All
capitalizaon rules will change to be tle case.
3. Uppercase and lowercase: These eects simply change the case of each leer in the
text box. The uppercase eect makes each leer a capital, whereas the lowercase
eect changes all leers to their lowercase form.
As with the other eects you do this as follows:
In an open project, choose the text tool and select an already-created text
box with content residing in it.
From the main menu, select Extensions, Text and then Uppercase
or Lowercase. All capitalizaon rules will change as specied.
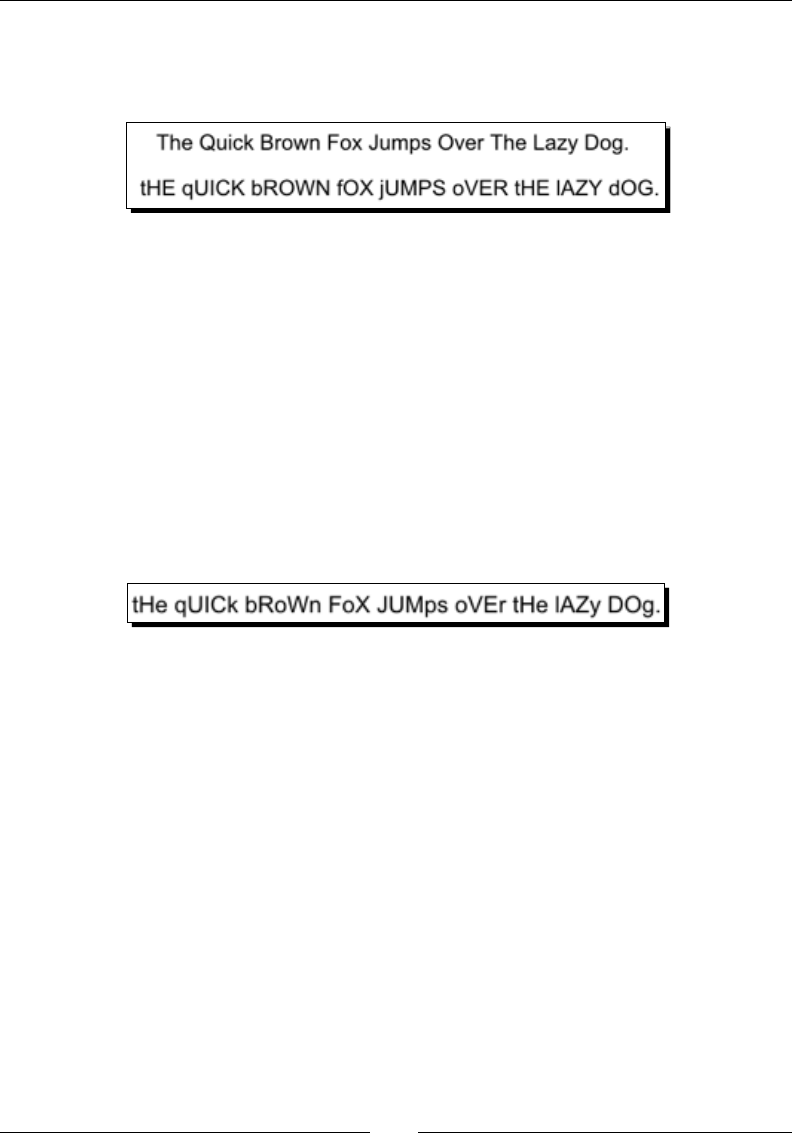
How to Style Text
[ 184 ]
4. Flipcase: This is a fun eect for text. It reverses the wrien leer case, so all capitals
will become lowercase, and all lowercase leers become uppercase leers. It looks
like this:
Again, this is accessed from the Eect menu:
In an open project, choose the text tool and select an already-created text
box with content residing in it.
From the main menu, select Extensions and then Text and fLIP cASE.
5. Random case: This is also a fun text eect; it takes the text contained in a text box
and arbitrarily toggles the leer case throughout. To use it:
In an open project, choose the text tool and select an already-created text
box with content residing in it.
From the main menu, select Extensions and then Text and rANdOm CasE.
The result looks something like this:
What just happened?
We learned the basics of creang text and manipulang it in Inkscape with extensions.
Specically, we dived into text eects, learning the dierences between tle case, sentence
case, upper and lowercase, ip case, and random case in Inkscape. We even worked on
examples of each type for reference.
Creating text reections
One common eect seen with text elements is creang a reecon or shadow of the
leers in the word. This eect gives the words more presence without much addional
work (and doesn't overdo the text). We'll learn how to do both with some example text.
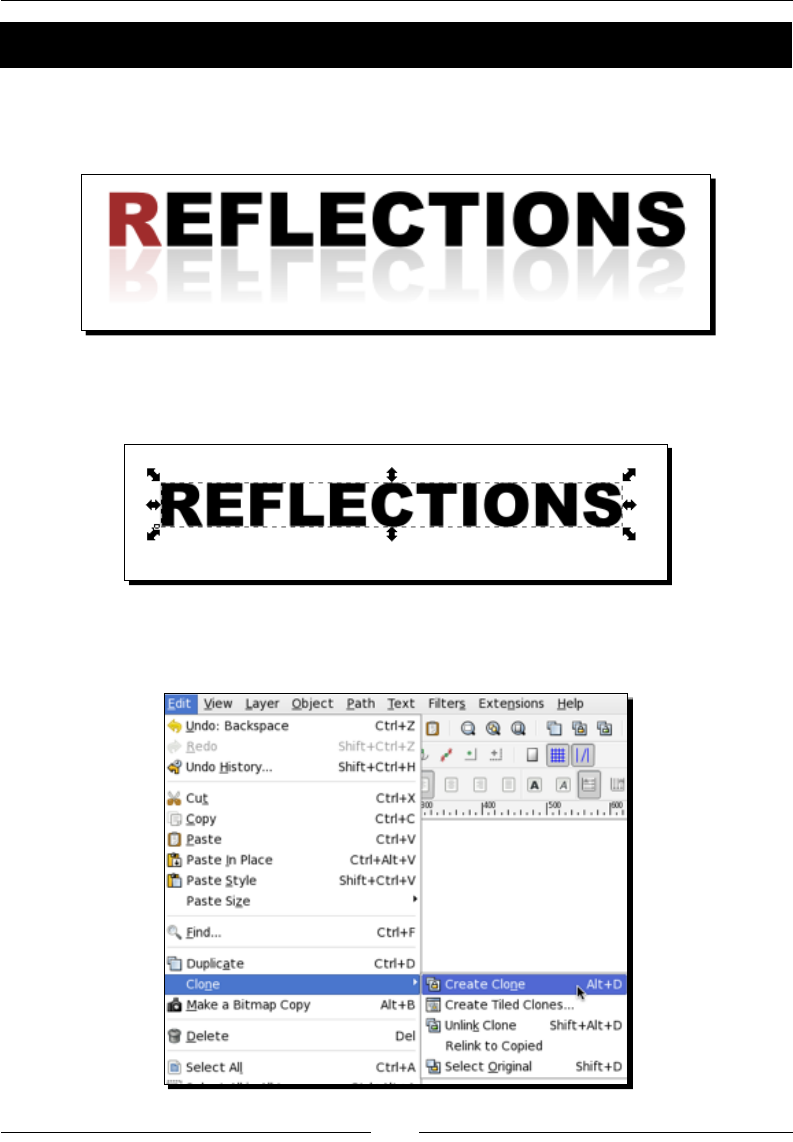
Chapter 8
[ 185 ]
Time for action – creating a reection
In this example, we're aiming to create a simple text heading that has a reecon below it
and then to add a lile something special (but very simple) to the text to make it stand apart
with very few addional eects. Here's what we'll create:
1. Open a new document in Inkscape, create a text box, and enter some text. In our
example, we'll use the word: REFLECTIONS.
2. Next, we are going to clone the image. From the main menu, select Edit, Clone,
and then Create Clone.

How to Style Text
[ 186 ]
3. Now we need to ip the cloned image vercally to create the basics for our
reecon. An easy way to do this is to press the V key (or from the main menu,
select Object and then Flip Vercally).
4. Move the ipped image below the original text.
5. From the toolbox, select the rectangle tool and create a rectangle that covers the
reected (or cloned) image.
6. Now we need to set a gradient on this rectangle. To start, make sure to set the
ll to black.
7. Click the gradient tool near the boom of the toolbox.
8. Click near the middle of the rectangle and drag upward to set gradient
(from dark on the boom to light on the top).
9. By default the Inkscape gradient applies an alpha seng of 0 to the stop gradient,
which will be fully transparent. This means, in the preceding image, the top side of
the rectangle and the gradient would be transparent. Click Edit in the control bar to
change this seng.
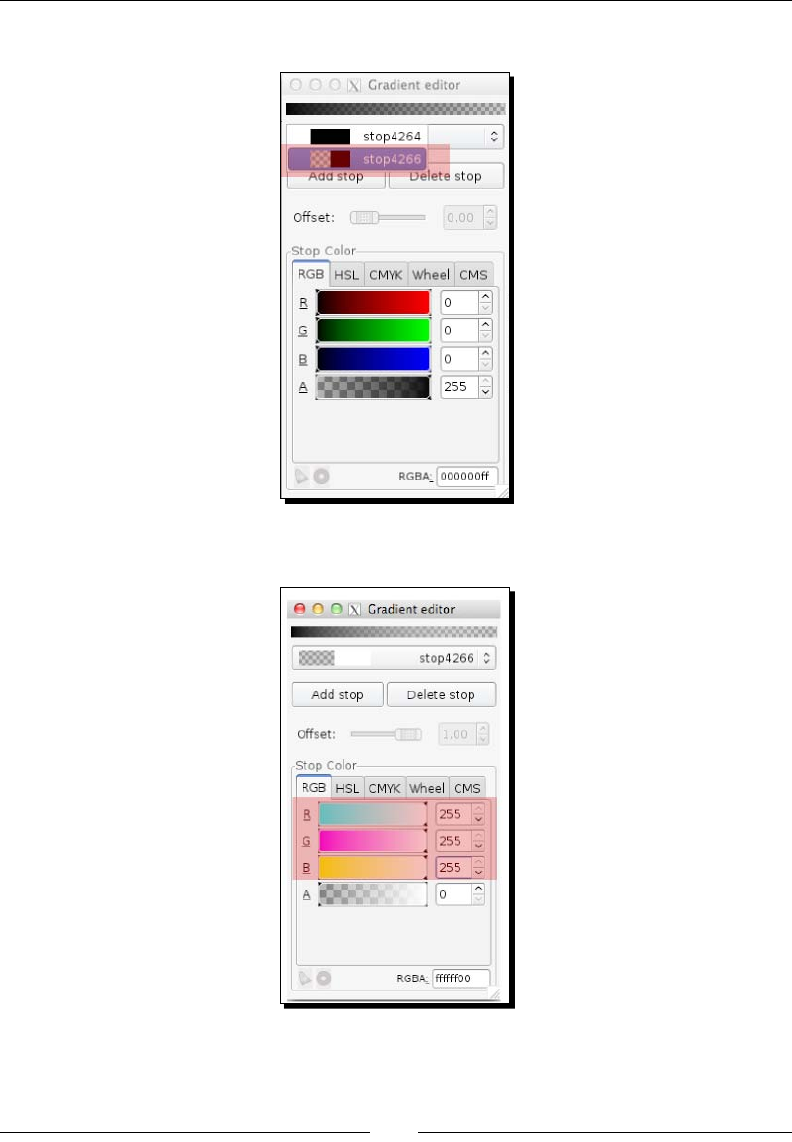
Chapter 8
[ 187 ]
10. Choose the transparent stop to edit.
11. Now change the R, G, and B values to 255, so that it is white.
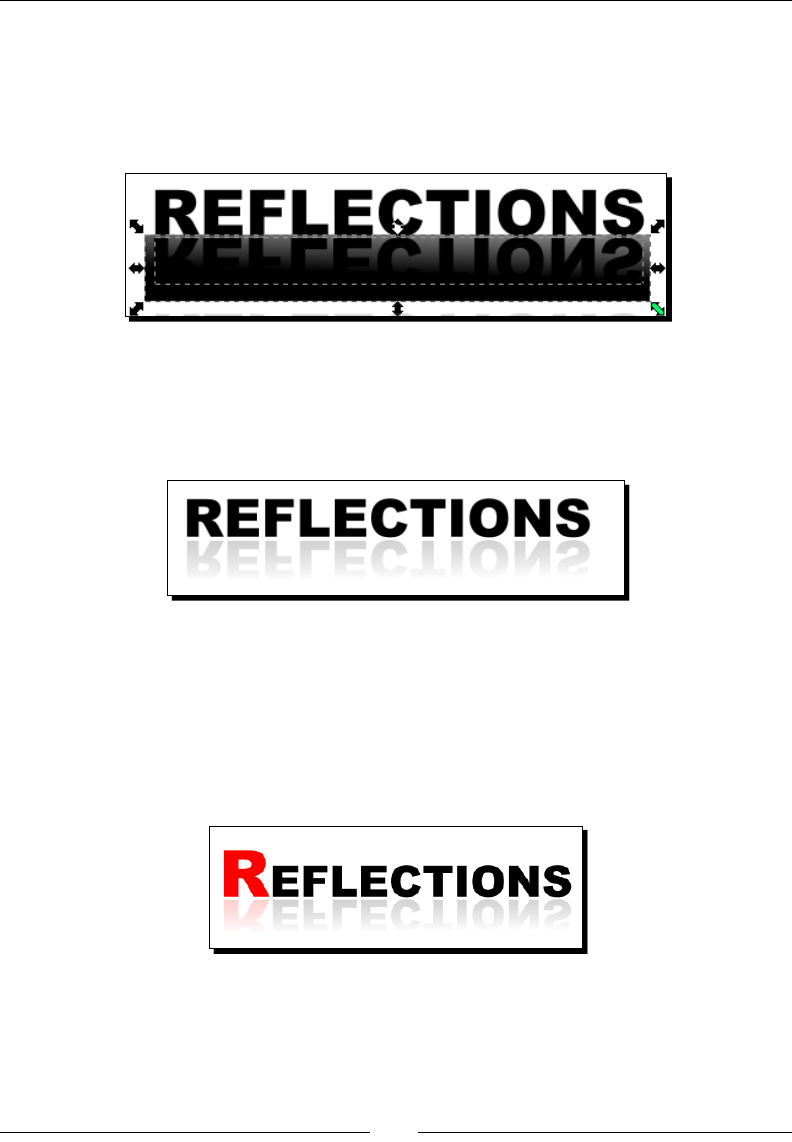
How to Style Text
[ 188 ]
12. Select both the rectangle and the reected text behind. Use the select tool, and
drag a bounding box around the rectangle. You should see a doed line around
the rectangle and the text behind it. Alternavely, you can select the text below by
using Alt and clicking the text's approximate locaon and then pressing Shi and
clicking on the rectangle.
13. From the main menu, select Object, then Mask, and then Set. Essenally you are
masking the reecon (cloned) text with the gradient box. Thus the reecon text
takes on the levels of gray of the object in front of it. That is why it looks very much
like a reecon.
14. If the reecon sll seems a bit dark for your taste, change the opacity from the
Fill and Stroke dialog box.
15. But let's spice up this text just a lile bit more. Select the rst leer and let's change
the color and also increase the point size of that leer by at least 8 points—voila!
Since you cloned the image, any change you make to original text will also be
changed in the reecon automacally.
16. Feel free to save this le for future reference or to use in your current projects.

Chapter 8
[ 189 ]
What just happened?
We created a reecon of text in Inkscape. We did this by creang text, using a clone, and
then using a mask in order to create the actual reecon text. There are a number of other
ways to create a reecon—that involve just creang a gradient on the cloned/ipped text
itself. However, the process described in the preceding secon allows you to sll edit the text
directly and the reecon will update as well.
Pop Quiz – transparency
1. In Inkscape, by default, the Alpha seng or Stop of gradients is white.
a. True
b. False
Summary
You've learned a lot about text eding and styling in this chapter. Specically, there were details
about the text editor, methods of using and manipulang text such as kerning, rotang, and
moving leers from the baseline. You even learned how to have text follow a path and create
text frames for larger blocks of text and nally create a reecon with the text. We will expand
upon what we have learned and do more of this in the next chapter, Using Filters.
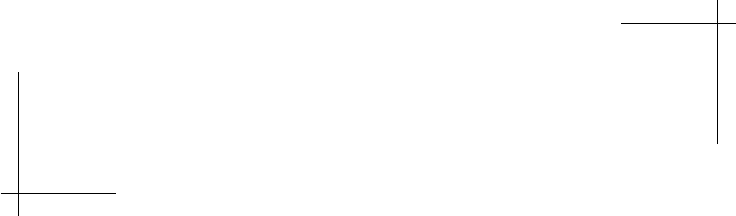
9
Using Filters
This chapter will focus on using lters with text and images to give a further
dimension to your vector graphics. We will start by explaining what lters
are, how to nd them in Inkscape, and then dive into specic lter examples
with both images and texext, including a detailed example of step-by-step
instrucons on using lters with text.
Here are the details of what we will discuss in the chapter:
What are lters?
Using the lter editor
Using lters with text
Images and eects
What are lters?
In Inkscape, think of a lter as something superimposed on top of a vector object giving
it features that are much like a raster-based image. Examples of lters or lter eects are
blurring, shadows, and glows. These eects are only an overlay—so can be turned on/o
at any me and modied whenever needed, in essence, giving the vector-object properes
most commonly seen on other graphic types.
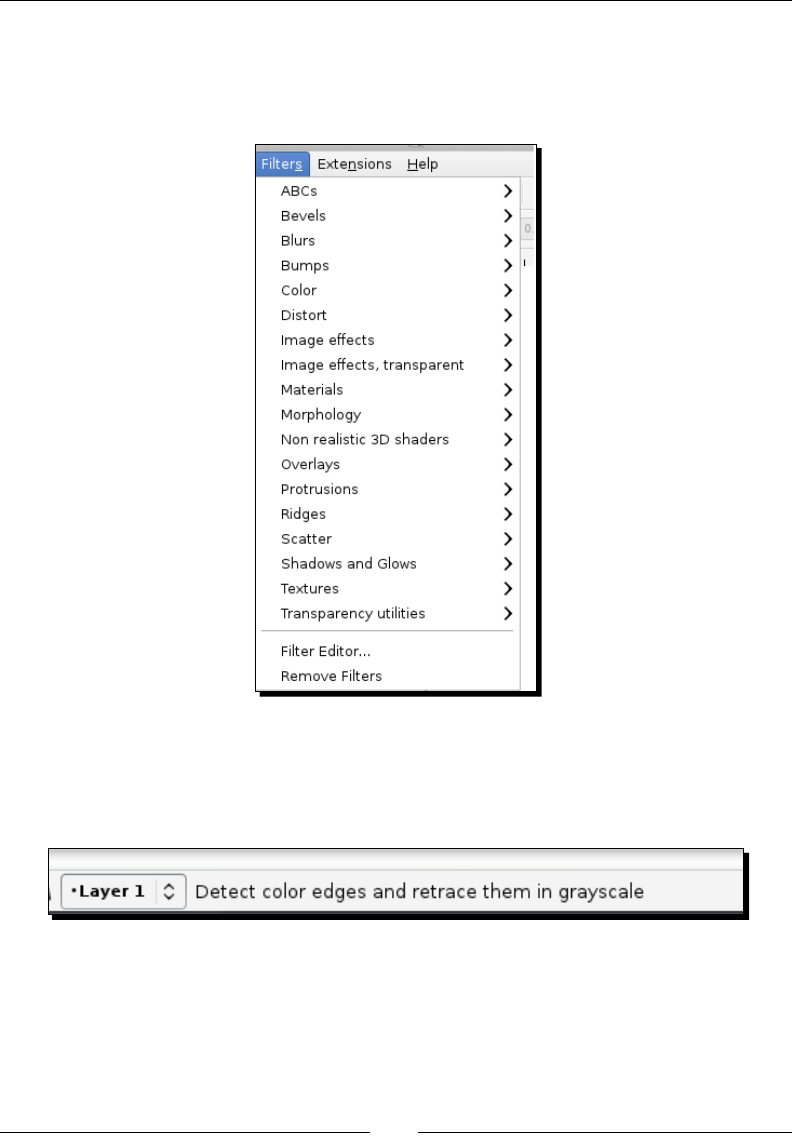
Using Filters
[ 192 ]
Using the Filter editor
To view all the lters that Inkscape has to oer (there are hundreds of them installed
by default), on the main menu, select Filters:
There are two categories of lters: the ones that work with normal objects (such as a created
vector object in Inkscape) and the others that work with bitmaps (such as images or PNG les
you have imported into Inkscape). Watch the nocaon area along the boom of the screen
when you use the lter menu for which lters will work on your selected objects as follows:
Since there are many lters to use with Inkscape, it may seem overwhelming to know
which one to use. You should explore and test to see which ones work best for your
design or drawing.
Let's work through an example about how to use one of the lters in Inkscape.
Chapter 9
[ 193 ]
Time for action – using lters
In this example, let's create an icon, such as the example shown as follows:
Let's give it a drop shadow, which is one of the more common lter eects used in Inkscape
and almost all image eding soware as it is an essenal lter for creang a sense of realism:
1. Open a new Inkscape document.
2. From the main menu, select File, New, and then icon_64x64.
Icon sizes can vary depending on your design (or what operang
system you might be creang them for), so feel free to change
your canvas sizes accordingly.
3. From the main menu, select View and then Grid. Having the grid viewable will help
us with the spacing of all the objects.
4. Let's again set the grid properes. From the main menu, select File and then
Document Properes.
5. Select the Grid tab and verify that Spacing X and Spacing Y are both set to 1.0
and that Major Grid Lines is set to every 4 pixels.
6. Close the Document Properes dialog by clicking the red X in the upper-le corner.
7. Make sure the snap bounding box corners icon is selected.
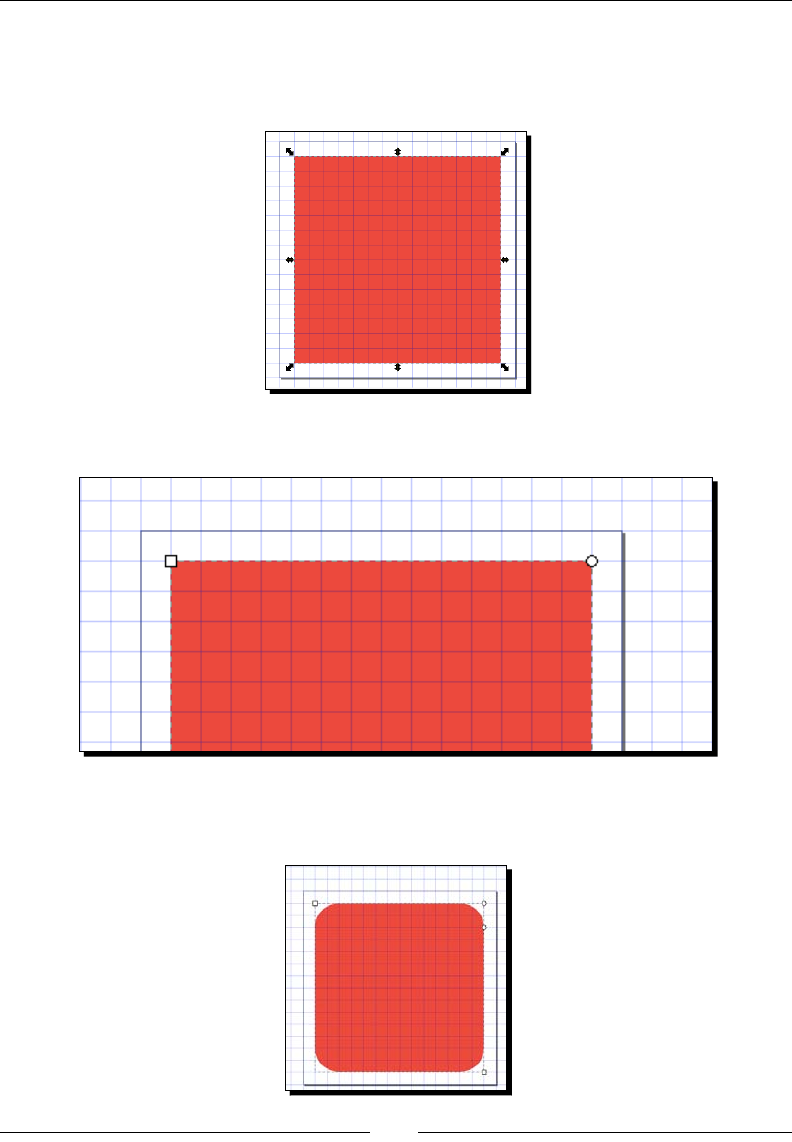
Using Filters
[ 194 ]
8. Let's start by creang the main part of the icon. Use the rectangle tool to draw
a rectangle in the center of the canvas (there will be one box grid around the
rectangle) as follows:
9. Double-click the square, so the handles change to corner nodes:
10. Drag the upper-right circle handle inward. You will see that the corners of the
rectangle now become rounded, as shown in the following image:

Chapter 9
[ 195 ]
11. Use the Fill and Stroke dialog to give the rectangle a bright ll color.
This will keep the edges of the icon clean and crisp.
12. Next we'll add our rst lter. Select the rectangle object and select
Filter | Blur | Evanescent:
13. Select the star tool and draw one within the rectangle, as shown in the
following image:
14. Select all of the icon elements using the keyboard shortcut Ctrl + A, then use the
keyboard shortcut Shi + Ctrl + A to open the Alignment menu. Choose the Page in
the Relave to: drop-down menu and then click the center of the vercal axis icon.
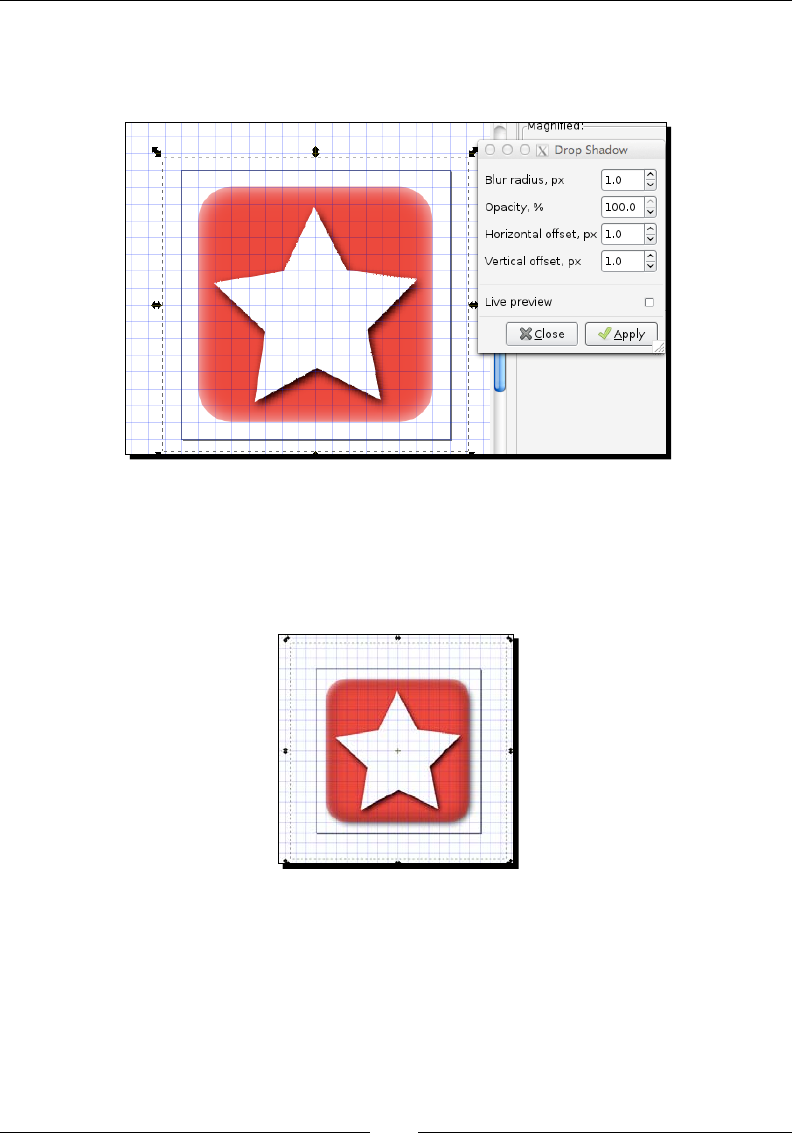
Using Filters
[ 196 ]
15. Now let's give the star a drop shadow. Select the star and then from the main menu,
select Filters, Shadows and Glows, and then Drop Shadow. Use sengs similar to
that shown in the following screenshot:
16. Let's give our overall rectangle object a drop shadow as well. Keeping the
Drop Shadow window displayed, select the rectangle.
17. Click Apply in the Drop Shadow window (to keep the same Drop Shadow sengs
as the star):
18. Save your le using a nomenclature that represents a collecon of icons that you
can create with these same document properes, color characteriscs, and similar
styles for future project use.
What just happened?
We created a simple icon, used an image lter, and the drop shadow lter eect—a complex
lter – to give the icon some depth.

Chapter 9
[ 197 ]
To preview this as an icon, select all objects on all layers (Ctrl + Alt + A is the keyboard
shortcut), and from the menu, choose View | Icon Preview. Check the selecon box.
A preview of your icon is displayed in the most common size.
Pop quiz – common icon sizes
1. What icon size below is NOT found in the icon preview opon in Inkscape?
a. 16 x 16
b. 40 x 40
c. 48 x 48
d. 32 x 32
e. 24 x 24
f. 128 x 128
Using lters with text
We created a reecon in Chapter 8 that used lters in Inkscape and you can use the same
principles for creang text shadows as well. Let's work through an example and see whether
other lters work well with text.
Time for action – using lters with text
We will create one example of how we can use lters with text to create a mood or feeling
with text in design:
1. Open a new document in Inkscape, create a text box, and enter some text. In our
example, we'll use the word: BOO!.
2. With the text selected, from the main menu, select Filters, Textures, and then
choose Ink Paint:
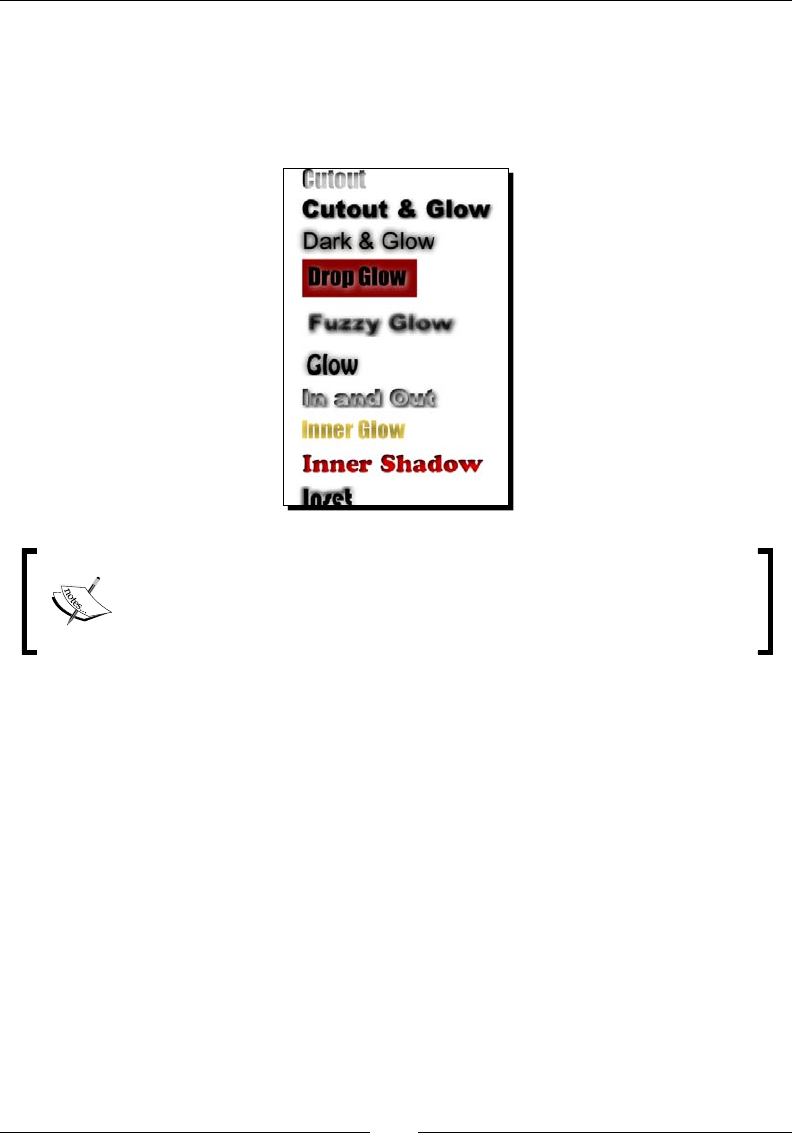
Using Filters
[ 198 ]
There are a lot more lters here that you can use that will give neat eects for your
text. These include Cutout, Cutout & Glow, Dark & Glow, Drop Glow, Fuzzy Glow,
Glow, In and Out, Inner Glow, Inner Shadow, and Inset. See the following graphic for
what each of these lters looks like when applied to our text examples. You can nd
these specic text lters on the main menu under Filters | Shadows and Glows:
The eects strongly depend on the objects and their colors in the background.
The examples were only rendered without objects in the background and thus
some of the lters may require some tweaking in the Filter editor for a more
rened look.
What just happened?
We added a simple Ink Paint lter to a set of words to add to the visual feeling we wanted
to achieve in a design. Then we learned about other lters that might work well with text.
Images and effects
Inkscape doesn't allow for extensive photo manipulaon. However, here are some basic
eects to use with photographic images:
Blurs
Bumps
Color
Distort
Image Eects
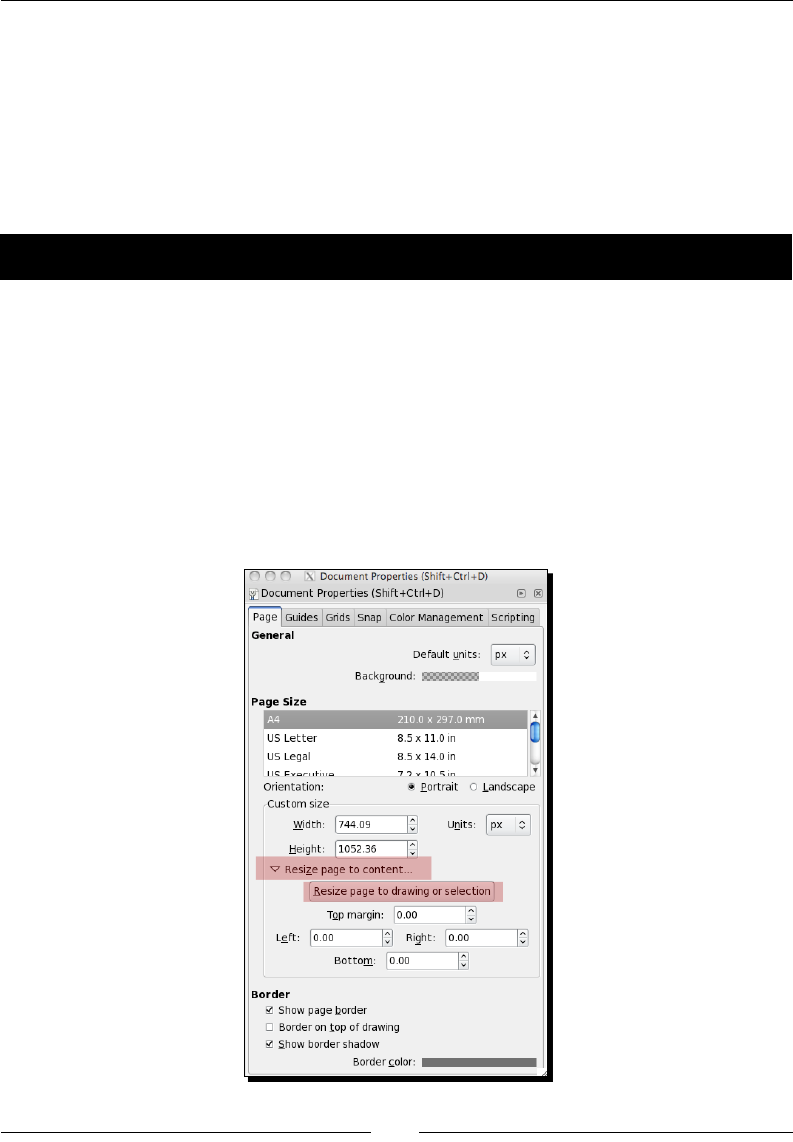
Chapter 9
[ 199 ]
Image Eects, Transparent
Transparency Ulies
Overlay lters
For some fun, try Scaer and Texture lters and Clip with photographs as well.
Let's walk through using one of these lters as an example.
Time for action – using lters with images
Let's work with a photograph of a couple and see if we can enchance it for use on
a cooking website:
1. Open a new Inkscape document and import a bitmap image. From the main menu,
select File and then Import.
2. Select the correct bitmap le and click Open. Make sure your imported bitmap le
is selected and then select File and then Document Properes. In the Custom Size
secon, click Resize page to content.
3. Click Resize page to drawing or selecon.
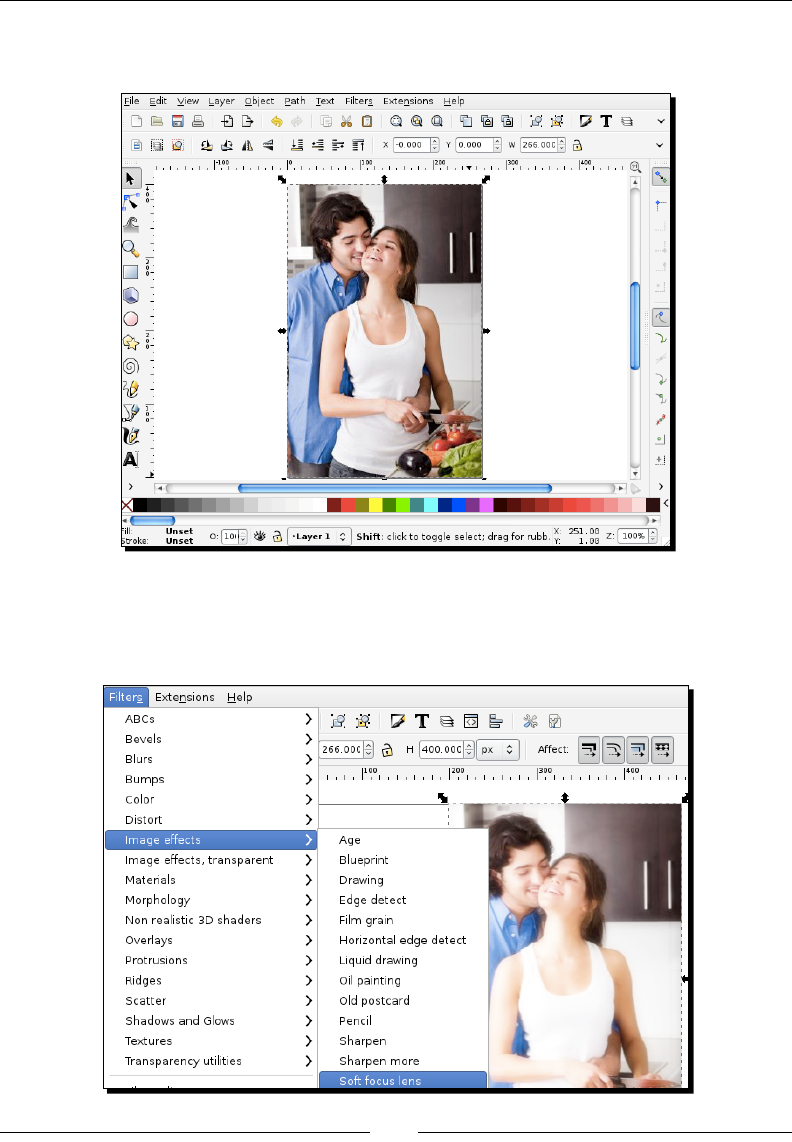
Using Filters
[ 200 ]
Your document page size will now be adjusted to match that of your imported
bitmap image, as shown in the following screenshot:
4. Select the image and then from the main menu, select Filters and then Image
Eects and So Focus Lens. This will create a "so" image and give a dreamy
eect as follows:
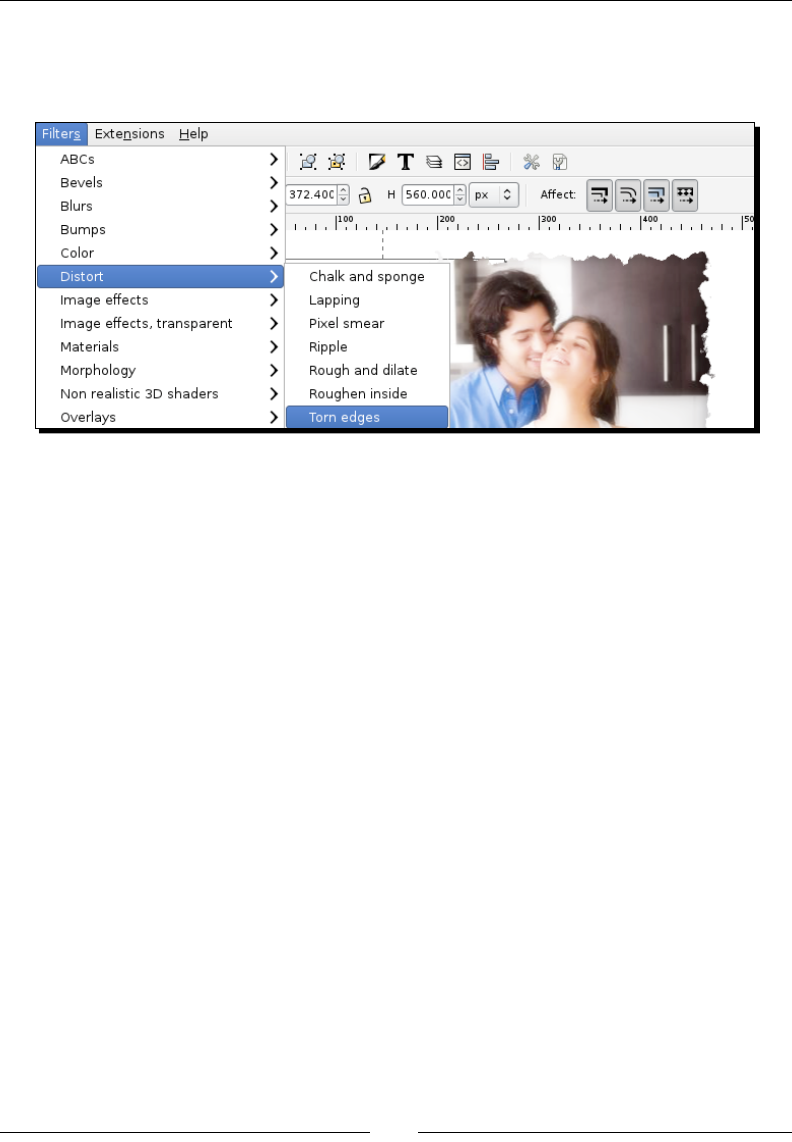
Chapter 9
[ 201 ]
5. Next, we will create a "torn edge" eect around the photo by making sure the photo
is selected and then from the main menu, choosing Filters and then Distort and
Torn edges as follows:
6. Now the photo can be saved as a PNG and placed in an overall design. To save this
le, from the main menu, select File and then Export. Give it a lename and save it
within the project le folders.
What just happened?
We imported a bitmap image (a photograph) and then added two lters to it—a blur and
distoron lter of torn edges.
Tracing images
Tracing essenally creates the paths (and nodes) it idenes within a bitmap image and then
uses those paths to create a vector-based image from the bitmap. Rendering in Inkscape
is always done using Potrace, but there is an extra opon called Simple Interacve Object
Extracon (SIOX) that allows separaon of an object from the background bitmap image.
The results of this tracing process depend heavily on the quality of the original images.
Potrace works best for black-and-white line drawings or black-and-white pictures with
high contrast. It can be used for screened color prints and color photography as well,
but it can require a bit more careful detail and work to make it happen. Let's go through
a couple of examples.
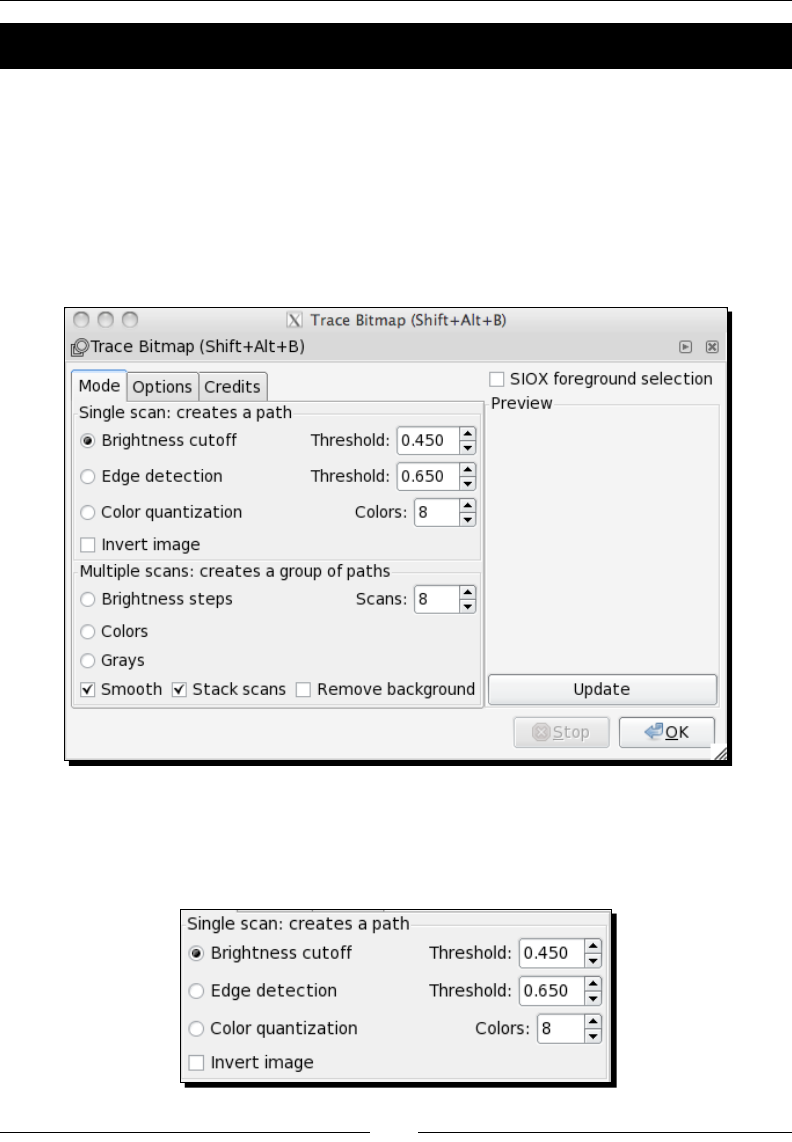
Using Filters
[ 202 ]
Time for action – using Potrace
We will start by imporng another photograph bitmap image and then using Potrace:
1. Open up the bitmap image you want to trace in Inkscape. You can drag-and-drop
an image onto the Inkscape window to import it.
2. Make sure the image is selected and then from the main menu, choose Path
and then Trace Bitmap. The Trace Bitmap dialog box appears.
3. The Mode tab denes characteriscs of the tracing mode as follows:
For this picture, we will set the following:
Single scan
Brightness cuto: Threshold 0.450
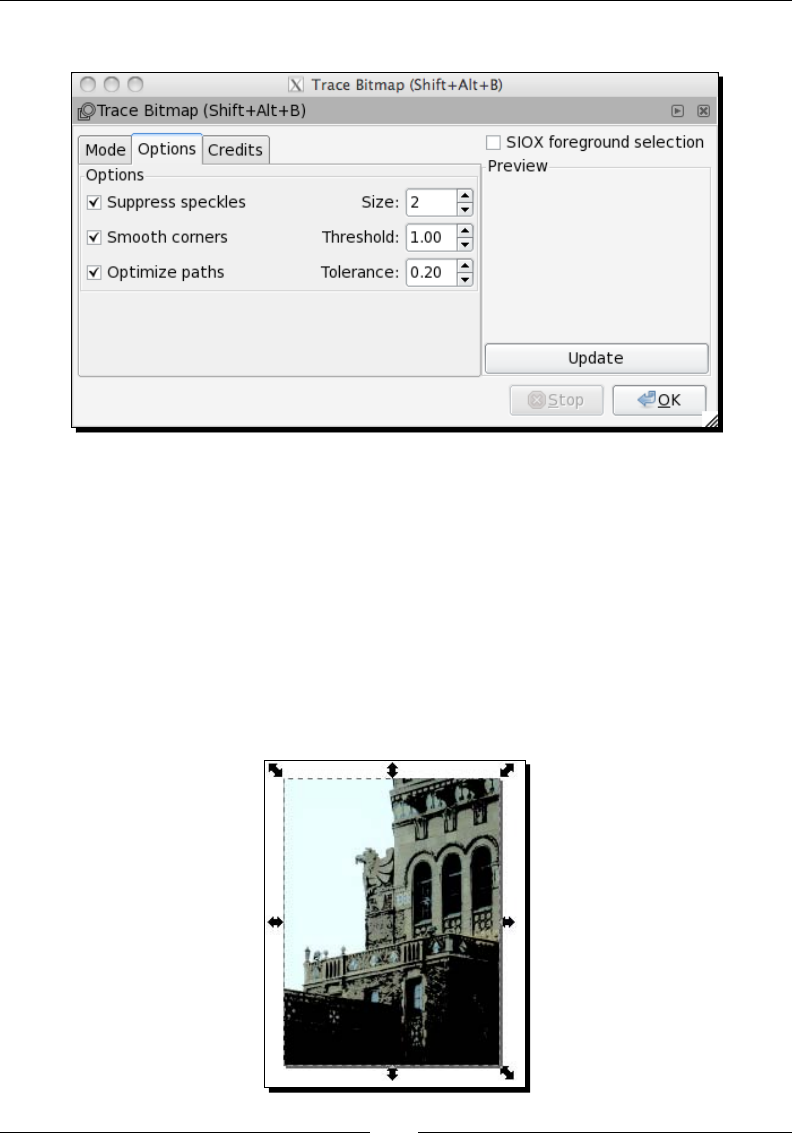
Chapter 9
[ 203 ]
4. Click the Opons tab to set some addional opons as follows:
These opons are used across either the single or mulple scan mode.
For this sample, we'll select the checkboxes for all opons (essenally turning them
on) with these sengs:
Suppress speckles: Size 2
Smooth corners: Threshold 1.00
Opmize paths: Tolerance 0.20
5. When all sengs are in place, click OK to perform the conversion.
6. Within a few moments, you will be able to see the results.

Using Filters
[ 204 ]
You'll noce your original image will sll be viewable on the canvas. Click to select
the traced paths and then drag it o of the original image (which is underneath).
Alternavely, from the main menu, select Object and then Lower—to lower the
new image below the original:
7. Select the original image and hide it in the Layers dialog. Your new vector image
should be viewable.
8. Save this new le (choose File and then Save As…) with a new descripve lename
and be sure that the le type in the boom-right is Inkscape SVG:
What just happened?
In this example, we kept the background in place and created a vector image from
a photograph.
However, another scenario is that you want to take one object from the picture and create
a vector object from that one object. That is where using the opon SIOX comes into play.
Let's learn how to use it in the next secon.
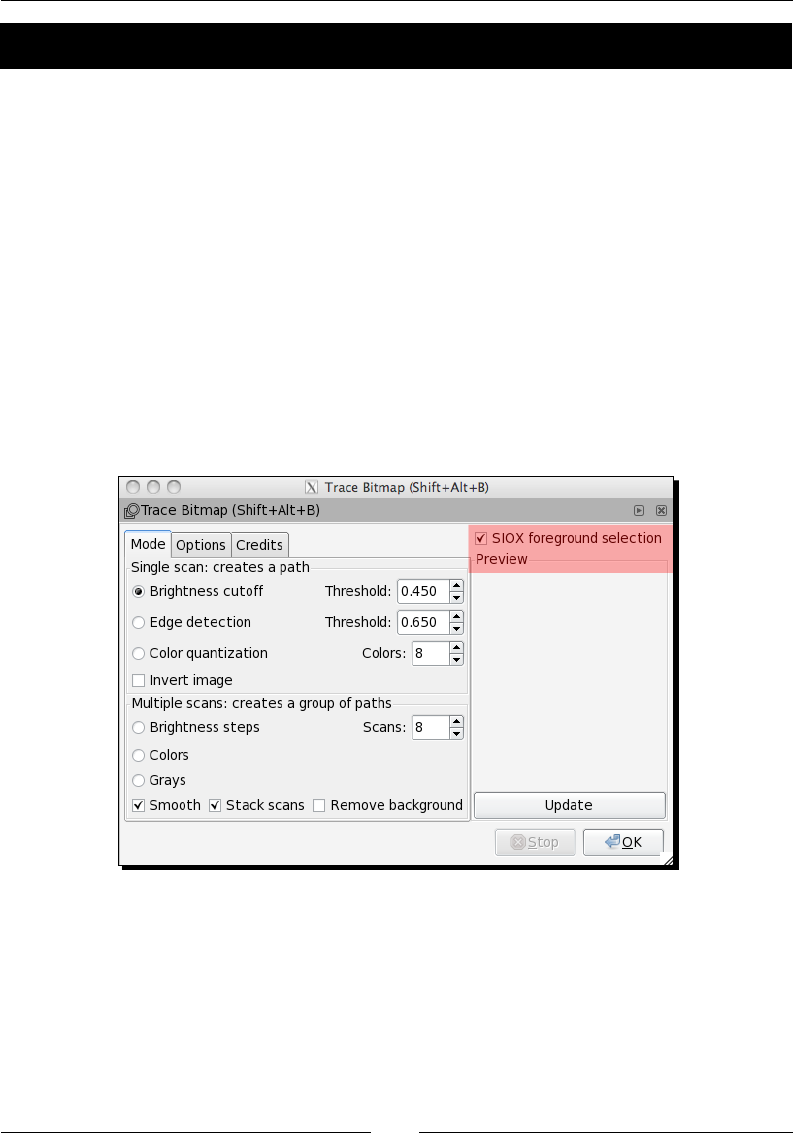
Chapter 9
[ 205 ]
Time for action – using SIOX
SIOX means Simple Interacve Object Extracon. It lets you separate an object from the
background in a bitmap image. If you paid close aenon to the steps performed to do a
trace in the previous secon, you'll noce that the opon to use this feature is within the
Tracing Bitmap dialog box.
Using SIOX depends on the characteriscs of the bitmap image. If you have a photograph
where an object is clearly disnguished in color from the background—you have a great
chance for success in recreang it with a trace using this feature. Here's how it's done:
1. Open up the bitmap image you want to trace in Inkscape.
2. Make sure the image is selected and then from the main menu, choose Path
and then Trace Bitmap. The Trace Bitmap dialog box appears.
3. Check the SIOX foreground selecon box to turn it on, as shown in the
following screenshot:
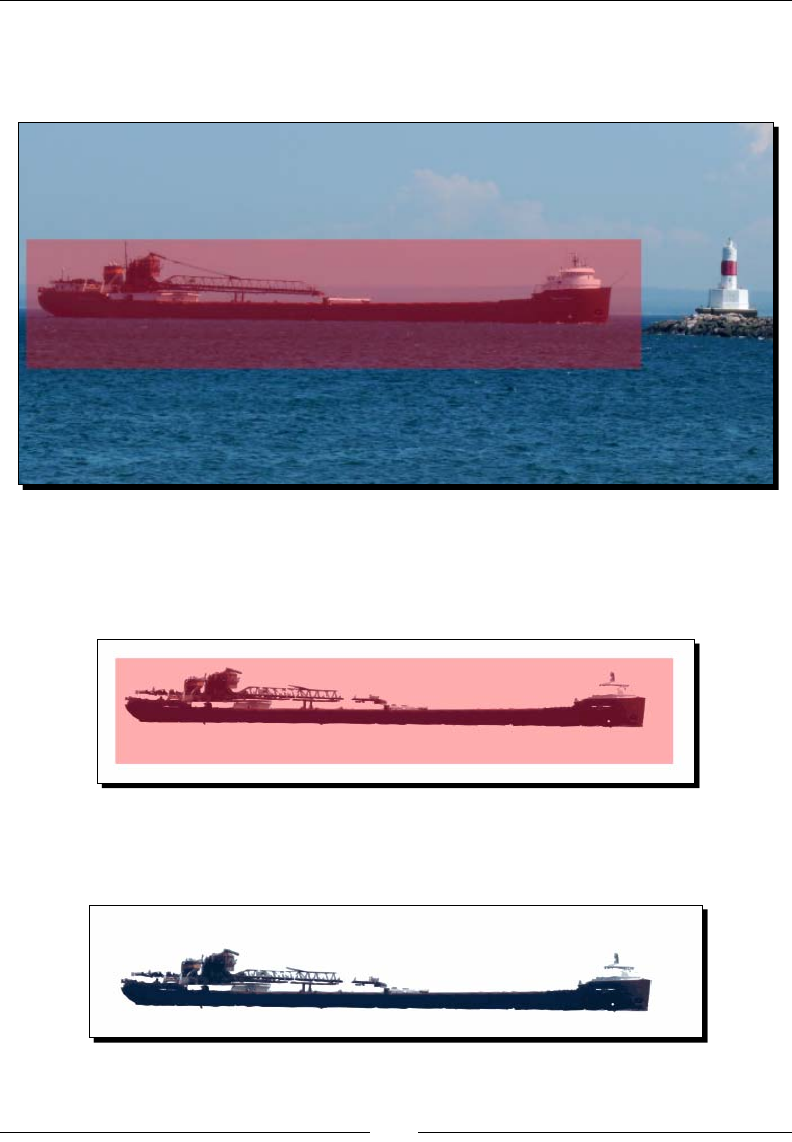
Using Filters
[ 206 ]
4. Now, use the freehand tool or a box, circle, or another object, and select an area
of the image that includes the enre object you want to extract, and some of the
background, as follows:
5. Give the path an opaque ll if it doesn't already have one.
6. Select both the bitmap image and the path and then perform a trace by clicking
OK in the Trace Bitmap dialog box:
7. Within a few moments, you'll see the background disappear from the canvas.
Select the opaque object used in the process and delete it to show your nal image:

Chapter 9
[ 207 ]
8. Save your new image in SVG format – it's now a vector graphic!
In the example, we used a rectangle object to select the main point of
interest and some of the background. However, you can use the freehand
Bezier tool as well to draw around irregular objects and do the same process.
What just happened?
We took a full photograph image and then essenally pulled an object from that photograph
and made it a vector graphic via the tracing eect.
Ulmately, tracing bitmap images so that they can be turned into vector graphics takes some
pracce and trial-and-error. However, if you can do this well, you will use it in a variety of
projects—anywhere from web design to helping to create and clean up logos and more.
Summary
We spent this enre chapter discussing lters and lter eects, learning where they
are used in Inkscape, and then how to create a lter eect for a vector object.
The last half of the chapter was dedicated to examples of using Potrace and SIOX.
The next chapter will be dedicated to extensions in Inkscape.
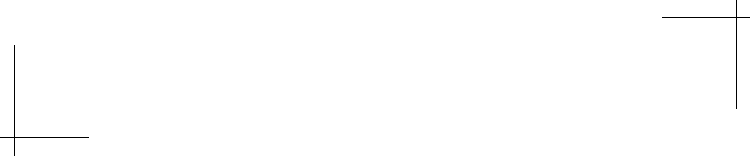
10
Extensions in Inkscape
In Inkscape there are a number of extensions—templates and plugins that can
assist in the design process for vector graphics. At the very least, they decrease
preparaon me when starng a new mockup.
This chapter will discuss templates in detail, and then plugins and scripts. Specically:
What templates are
Installing and using new templates
What extensions are
Available extensions and scripts
Installing and using extensions

Extensions in Inkscape
[ 210 ]
Templates
Inkscape has some pre-dened templates you can use to start your development.
To access these templates, go to the main menu and select File and then New. A pop-up
menu appears showing a number of default page (or canvas) sizes to choose from, as shown
in the following screenshot:
Installing and using new templates
Most templates are pre-loaded into the Inkscape release and installaon. However,
if you nd addional Inkscape templates you want to use, they can be easily installed.
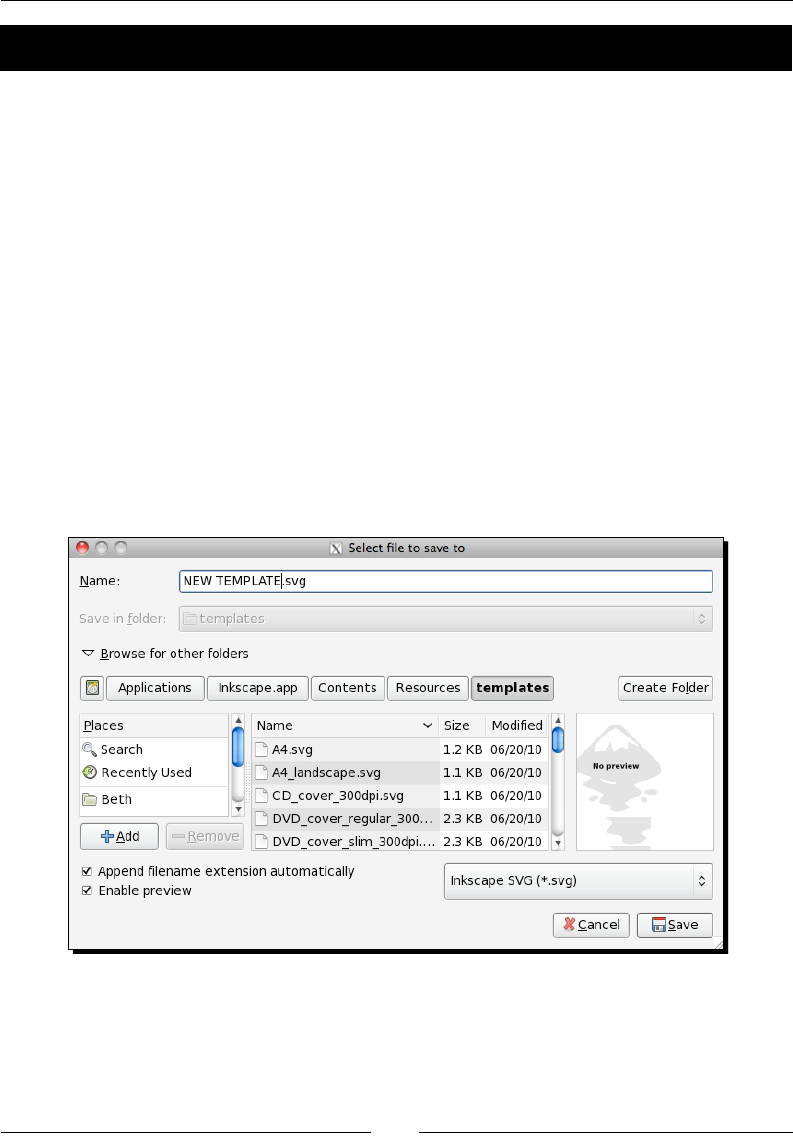
Chapter 10
[ 211 ]
Time for action – installing Inkscape templates
To install a template in Inkscape, do the following:
1. Download the new template le. If it is in a compressed format (ZIP, RAR, and so
on), uncompress or extract the SVG template le. You can use applicaons such as
WinZip, WinRAR, or 7-Zip to extract les such as these.
2. Open the SVG le itself in Inkscape to view the template to make sure it ts
your needs.
3. From the main menu, select File and then Save As. Choose a save locaon in your
computer operang system's Inkscape template directory:
For Windows, that directory is the C:\Program Files\Inkscape\
share\templates folder
For Mac OS, the directory is /Applications/Inkscape/Contents/
Resources/Templates/
For Linux, the directory is typically /usr/local/share/inkscape/
templates or /home/user/.config/inkscape/templates
4. Click Save.
5. If you restart Inkscape and go to the main menu and select File and then New,
the new custom template should be in the submenu.
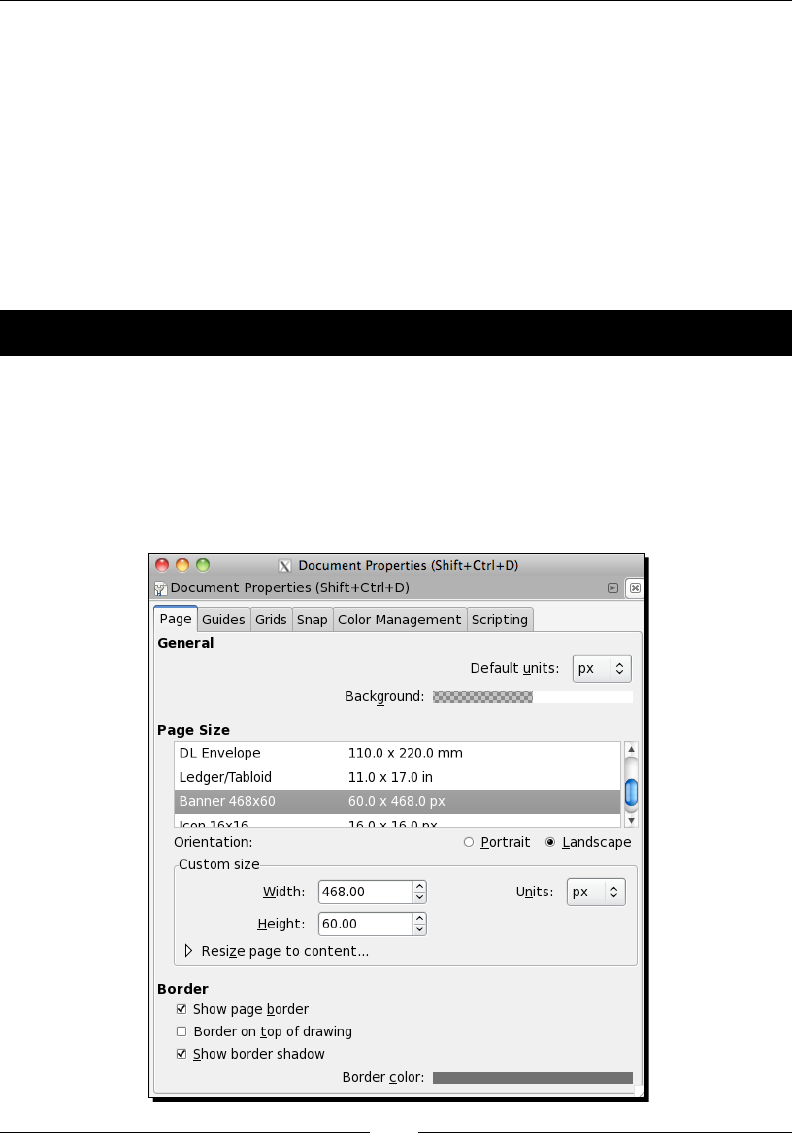
Extensions in Inkscape
[ 212 ]
What just happened?
With a few simple steps, you downloaded new templates for Inkscape, uncompressed those
les, and saved them to your hard drive. Then, aer restarng Inkscape, the new templates
were installed and available for use.
Creating your own custom templates
If you need to create your own template, or modify one of these exisng opons, there
are a few ways you can then save it for use in future projects. Let's see how to start a
custom template.
Time for action – modifying an existing Inkscape template
To modify an exisng template:
1. Open the template that most resembles the new one you would like to create.
2. Modify the Document Properes (choose File and then Document Properes
or use the Shi + Ctrl/Opon + D keyboard shortcut) or other sengs applicable
to the template you want to create, as shown in the following screenshot:

Chapter 10
[ 213 ]
3. From the main menu, choose File and then Save As, choosing to save the le to your
computer operang system's Inkscape template directory.
4. Once saved, restart Inkscape and go to the main menu. Select File and then
New—and the new custom template should be in the submenu.
What just happened?
We modied an exisng template in Inkscape to use as a base for others. We then saved the
template so we can use it for other projects.
Time for action – creating a custom template
If you want to create a new template from scratch, this is almost as easy:
1. Open a new Inkscape le.
2. From the main menu, choose File and then Document Properes or use the Shi +
Ctrl/Opon + D keyboard shortcut.
3. Adjust all sengs applicable to the template you want to create and save the le to
your computer operang system's Inkscape template directory.
4. Once saved, restart Inkscape and go to the main menu. Select File and then
New—and the new custom template should be in the submenu.
What just happened?
A template le of any kind (used from default, created for your use only, or modied
templates) contains the document sengs and normally does not contain SVG objects.
When saved in the template folder, you can select the template from the drop-down menu
for new documents.
In the previous steps, we created a custom template for Inkscape.
What are extensions?
Let's rst understand what extensions are in Inkscape. Extensions add new capabilies
to soware programs—thus customizing what you want them to do for you.
When you use scripts with Inkscape, you essenally add new features to the exisng
soware. A script takes control of the Inkscape soware to perform a certain feature.
Scripts themselves dier from extensions in that they are usually wrien in a dierent
programming language from the main program (Inkscape in this case) and can be modied
at any me—mostly by Inkscape developers.

Extensions in Inkscape
[ 214 ]
Extensions "extend" Inkscape's features or funconality .If you used an extension outside
of inkscape, it wouldn't work correctly. An example of an extension for Inkscape is one that
allows imporng and exporng of non-SVG le types into the program. Most extensions
require external programs, usually wrien in Perl or Python.
You can nd common extensions here: http://wiki.inkscape.org/wiki/index.php/
ExtensionsRepository#Extensions. Although they are not all-inclusive lists of what is
available, they give you a healthy start in your search for customizing Inkscape.
Inkscape also comes with some pre-installed extensions. You nd these in the main menu.
Click Extensions and the submenu appears as follows:
Examples of extension tutorials
There are many valuable extensions in Inkscape such as interpolate, scaer, and render.
Here's a quick look at some tutorials online that can help you understand some of
these extensions:
Inkscape tutorial: Interpolate
http://inkscape.org/doc/interpolate/tutorial-interpolate.
en.html
Inkscape 'Paern along Path and 'Scaer' scripts:
http://math.univ-lille1.fr/~barraud/Inkscape/pathdeform/

Chapter 10
[ 215 ]
Inkscape: Generate from path
http://tavmjong.free.fr/INKSCAPE/MANUAL/html/Extensions-
GenerateFromPath.html
Inkscape tutorial: Fancy Borders
http://verysimpledesigns.com/vectors/inkscape-tutorial-fancy-
borders.html
Installation extensions
The procedures for installing plugins vary because there are some dependencies on your
computer's operang system and on what soware you already have installed on your
computer. The best rule of thumb is to read the plugin installaon instrucons.
Script installaon is a bit easier—it requires the script code le itself and an INX le. It is as
simple as copying both les and placing them into the extension folder directly. In Windows,
this directory is C:\Program Files\Inkscape\share\extensions. In the Mac OS and
Linux, this is typically in the home/.inkscape/extensions directory.
You should always be sure to read script installaon instrucons because they oen have
dependencies. For example, they may require addional programs to be installed before
they can work. If you don't know these dependencies up front, you can try an install and
then read the error message aer you run the script from a command-line interface.
Pop quiz – what are extensions?
True or false: Extensions add new capabilies to Inkscape and thus extend its features or
funconality and on their own, outside of their use in Inkscape, wouldn't work correctly.
Summary
We dug right in at the start of this chapter and reviewed how to access the pre-installed
templates in Inkscape. Then we took a look at how to install new templates that we might nd
online. We discussed in detail how to modify a standard template, save it as a custom one, and
how to start from scratch and save a custom template. We also jumped into learning about
extensions. Some sample tutorial links were also given to provide examples of how to use
extensions in Inkscape as well as installing addional ones in Inkscape.

11
Working with Images
We talked a lot in the rst chapter about rasterized versus vectorized images
and how Inkscape is best used for vector graphics. But what if you only have
rasterized images? Can you import them into Inkscape, manipulate them, or even
save them as vector images? Of course you can. There are some minor limitaons
on how you export rasterized images, but this feature is oen used to import the
image and then manipulate it a bit for the vector use you need.
This chapter will focus on:
Rendering a bitmap image
Working with photographs and lters
Importing from the Open Clip Art Library (Linux and Mac users)
The Open Clip Art Library is an open source, free clip art image library that you can search
directly from Inkscape.
Unfortunately, the Open Clip Art Library menu opons do not exist for Windows
users. However, you can always go to www.openclipart.org in a web browser to
view all available clip art, download, and then import into your projects.
This clip art library is searchable and most of its graphics can be used in your designs
as needed (and as seen throughout this book). Let's see how we can use it.

Working with Images
[ 218 ]
Time for action – using the Open Clip Art Library (Mac users only)
Here's how it works:
1. In an open Inkscape project, from the main menu, choose File and then Import
From Open Clip Art Library.
2. In the Import From Open Clip Art Library dialog box, in the Search for: eld, enter a
keyword to describe the clip art you want to place in the document and click Search,
as shown in the following screenshot:
Inkscape then connects to the Open Clip Art Library website. Previews of les
are shown in a window on the right-hand side of the dialog.
3. Try other keyword searches unl you nd one you like and then double-click
the name of the image to place it in the document.
What just happened?
You opened the Open Clip Art Library via Inkscape, searched for a clip art image, and placed
it on an Inkscape canvas.
The clip art library can be useful in a number of ways:
It allows for free use of a number of images that you may like to use in a web design
mockup, for placement or for end use.
You can also ungroup the pieces of the image and adjust colors, remove items,
edit the overall image, and use it in your own design:
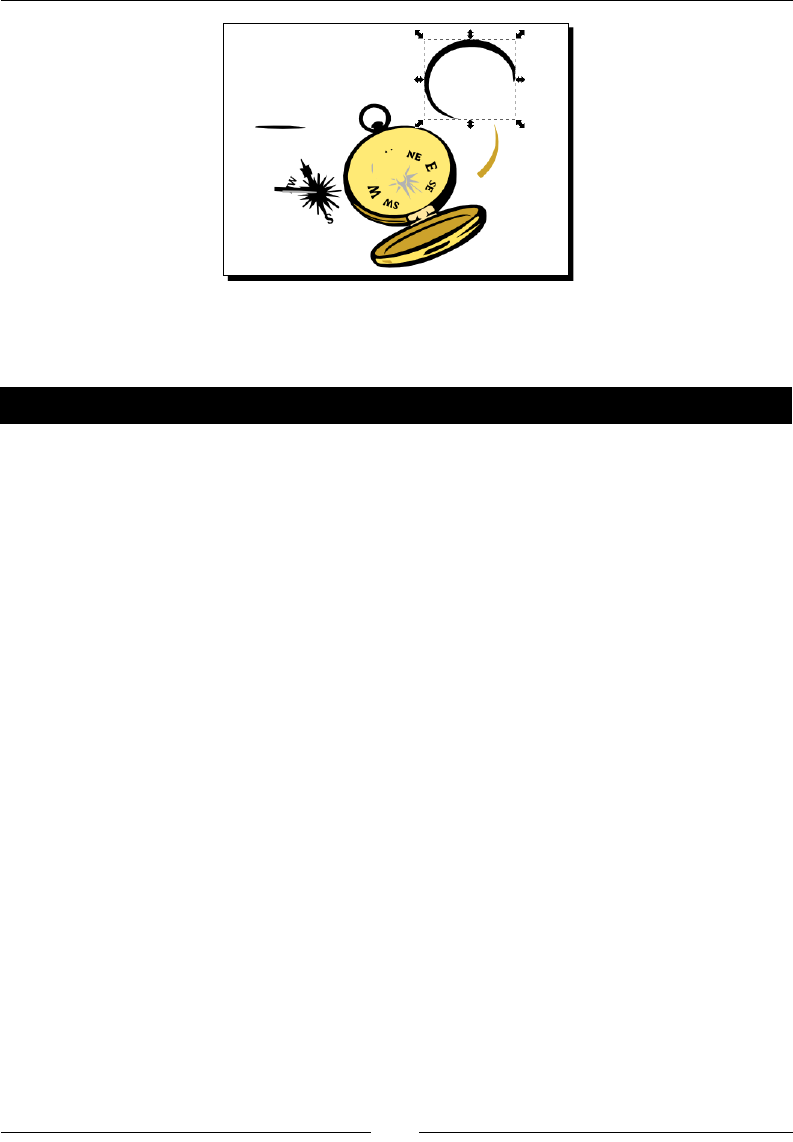
Chapter 11
[ 219 ]
Imporng clip art images can give you a starng point for your own designs—as well as give
great layout perspecve when creang website mockups.
Pop quiz – Open Clip Art
1. Graphics downloaded from the Open Clip Art Library are:
a. Free to use
b. Editable (ungroup, adjust colors, remove items, edit the overall image)
c. Downloadable in SVG format
d. All of the above
Basics about photo manipulation
Inkscape doesn't allow for extensive photo manipulaon, but these lters will work
with photographs or non-vector based images. These are basic and fun eects for your
photographic images. Filters that are photo (and bitmap) friendly are:
Blurs
Bumps
Color
Distort
Image Eects
Image Eects, Transparent
Transparency Ulies
Overlay
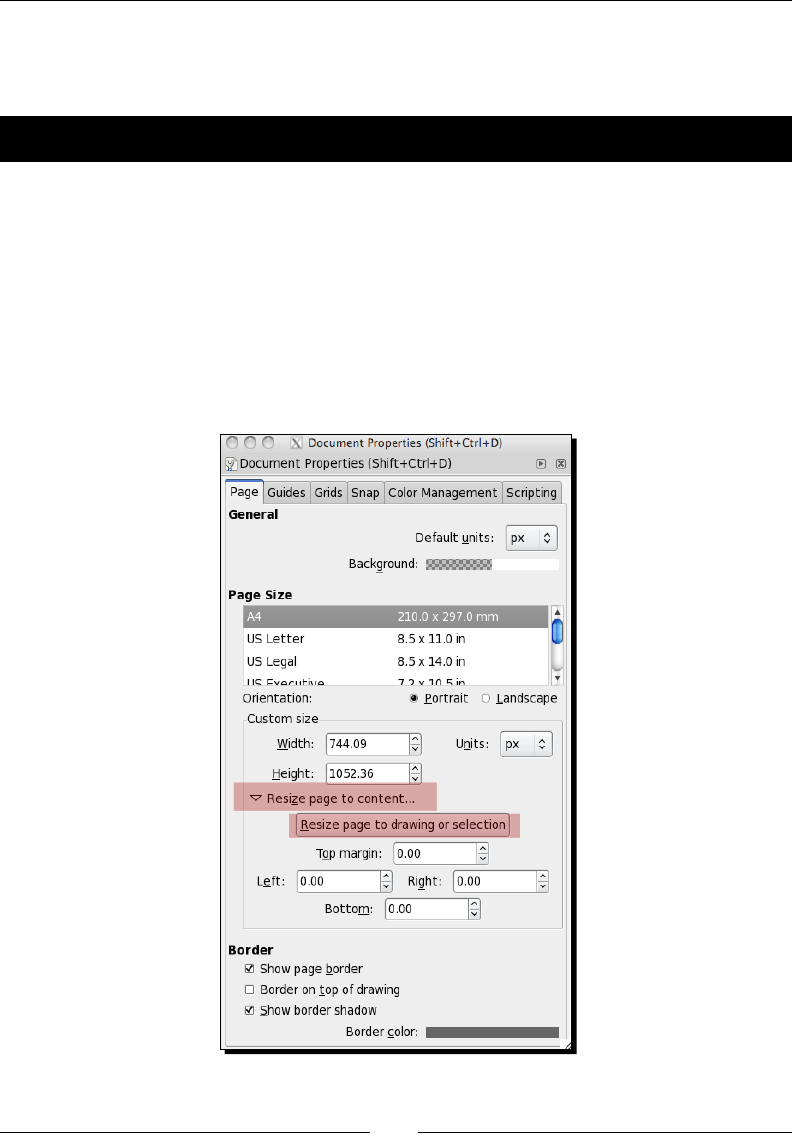
Working with Images
[ 220 ]
For some fun, try Scaer and Texture lters and Clip with photographs as well.
Let's walk through using one of these lters in a praccal example.
Time for action – blurring the background of a photograph
We will take the same photograph we used from a previous exercise and manipulate it
dierently here. We will select the foreground that we want to keep crisp, and clear and
then blur the background. Here are the steps on how this is done:
1. Open a new Inkscape document and import a bitmap/photograph you want to use
for this exercise. From the main menu, select File and then Import.
2. Select the correct bitmap le and click Open. Make sure your imported bitmap is
selected, and then select File and then Document Properes. In the Custom Size
secon, click Resize page to content, as shown in the following screenshot:
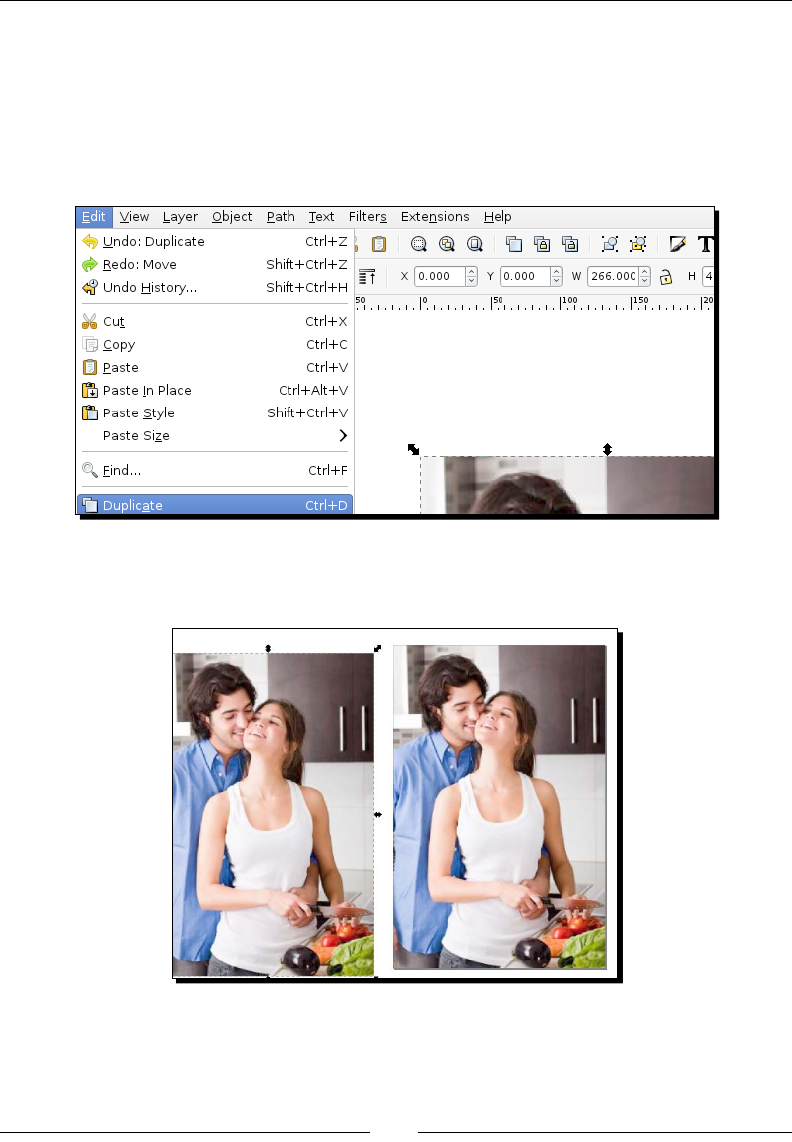
Chapter 11
[ 221 ]
3. Click Resize page to drawing or selecon.
Your document page size will now be adjusted to match that of your imported
bitmap image, as shown in the following screenshot.
4. Select your photograph objects in the window and now choose Edit and Duplicate
as follows:
5. Select and then drag the top duplicate photograph o to the side of the canvas
as follows:
Image credit Photostock at Freedigitalphotos.net
We will need to adjust that one later. It will be our "background" image.
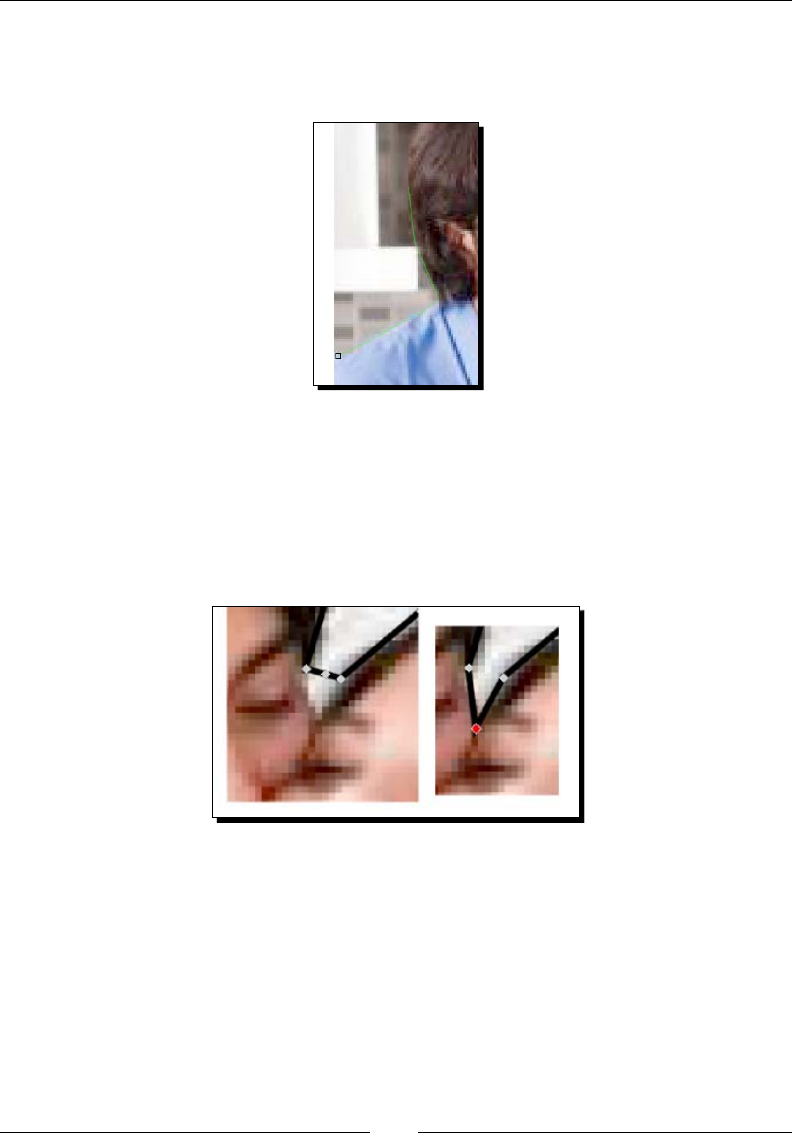
Working with Images
[ 222 ]
6. Now we will need to create a clipping mask of the poron of the people we want to
remain in the foreground of our picture. Select the Bezier tool and trace around the
people's faces as follows:
7. You may need to zoom in to the photo to get a more detailed view to work with.
8. Note, when you use the Bezier tool, every me you click-and-drag, a new curve
node is created.
9. You can also create rough shapes and then click between nodes to add new nodes
and adjust as necessary. An example is shown as follows:
10. Once you "connect" the last node to the beginning one, it will "close" the tool
and make a selecon:

Chapter 11
[ 223 ]
11. Now with the traced object and the original photo selected, from the main menu,
select Object | Clip | Set as follows:
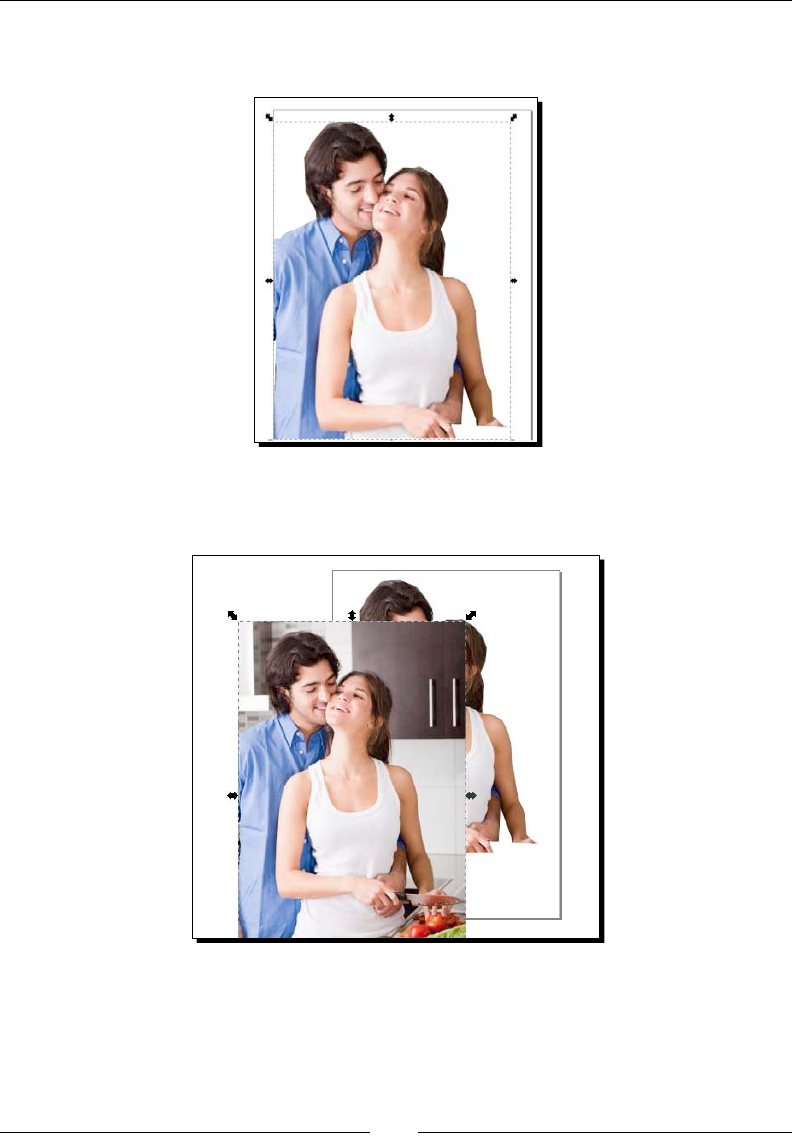
Working with Images
[ 224 ]
12. You will now see a clip of just the selected porons of the couple that you
outlined previously:
13. Select and move the duplicate/background image back into place above the
clipped image:
14. To make sure it all aligns properly, click the Align and distribute objects icon in
the toolbar. The Align and Distribute dialog will appear on the right-hand side of
your screen as follows:
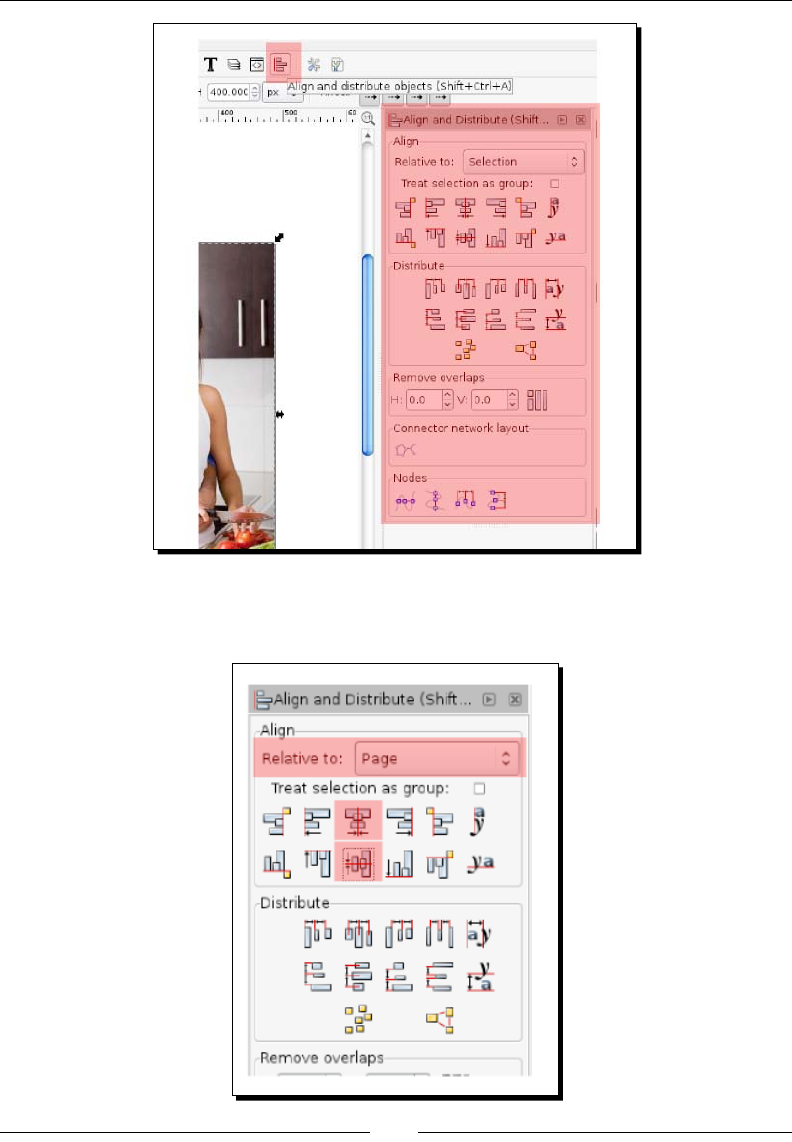
Chapter 11
[ 225 ]
15. Make sure the Relave to: eld is set to Page and click the align vercally and align
horizontally icons as follows:
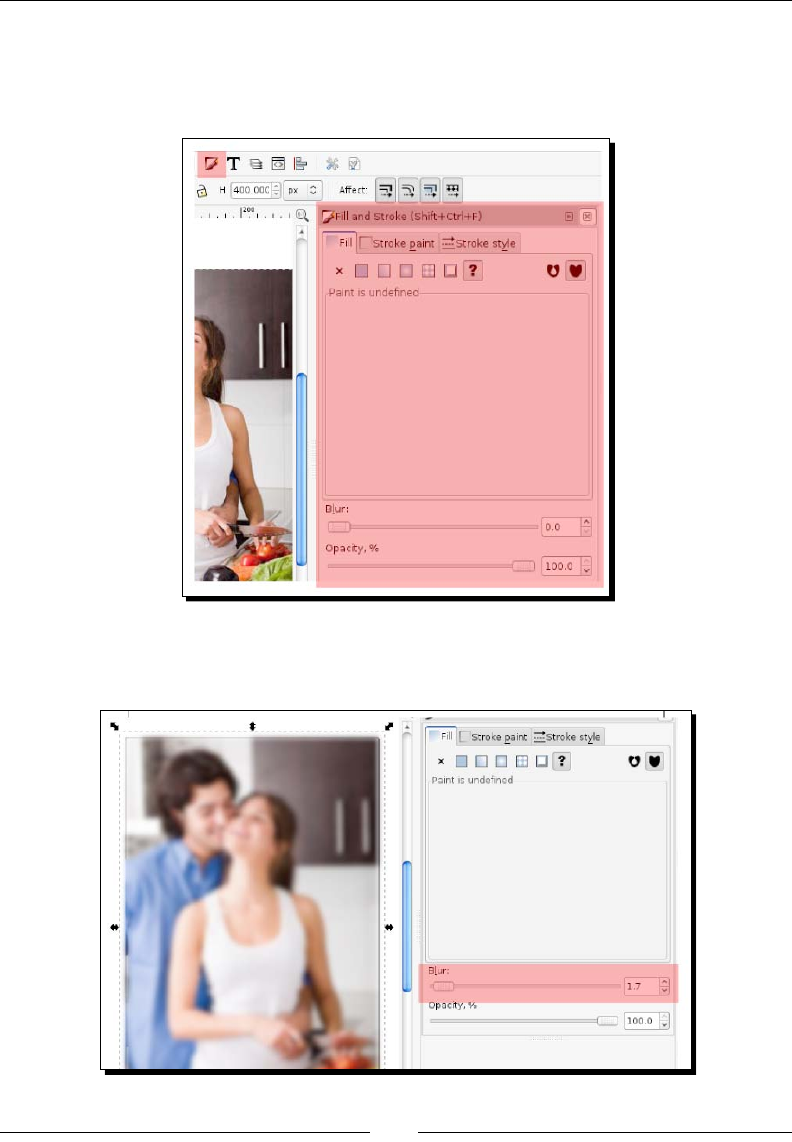
Working with Images
[ 226 ]
16. Click the X icon in the upper-right corner to close this dialog box.
17. Choose the Fill and Stroke icon on the toolbar. The Fill and Stroke dialog
will now also appear on the right-hand side of the screen as follows:
18. Make sure the full photograph duplicate is sll selected on your canvas and move
the Blur slider bar to the right unl you like the blur amount:
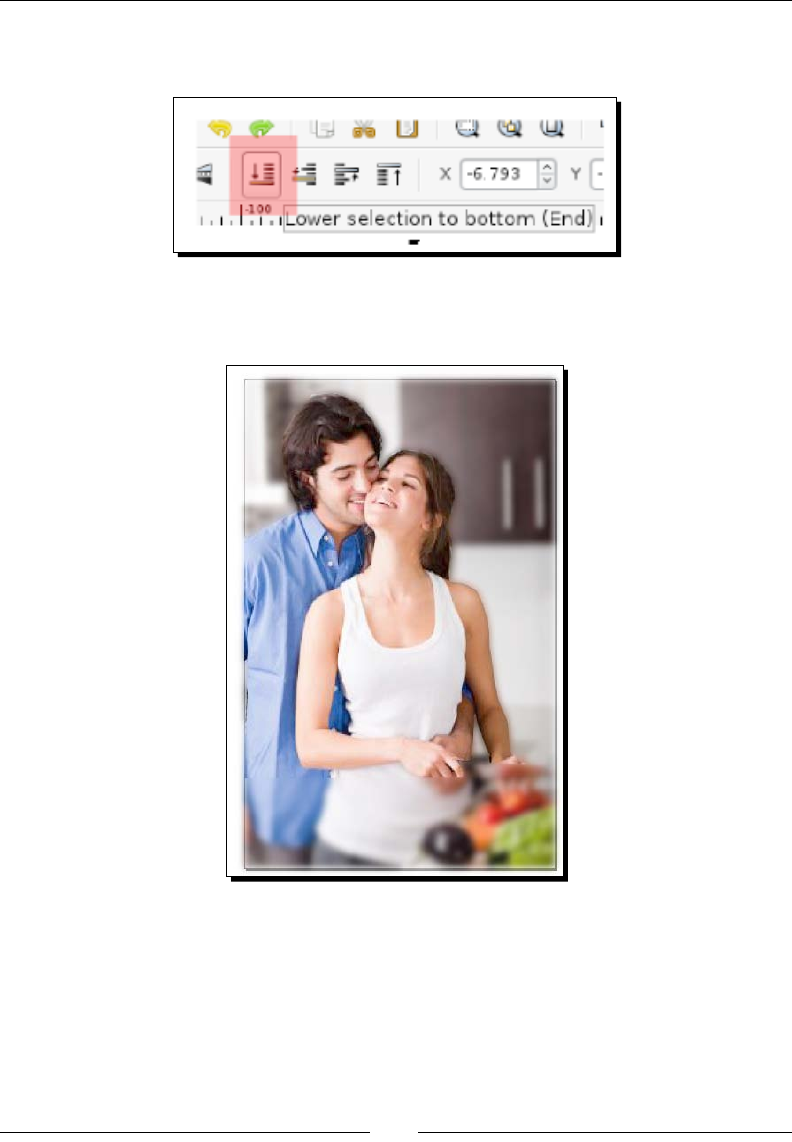
Chapter 11
[ 227 ]
19. Again, with the image sll selected, choose the Lower selecon to boom icon in
the top toolbar as follows:
20. You will see that this duplicate photograph will now drop behind the clipped image
and we have a "blurred" background in our photograph!
21. Now the photo can be saved in a nave Inkscape format for future eding or as a
PNG le and placed in another design. To save this le, from the main menu, select
File and then Export. Give it a lename and save it within the project le folders.

Working with Images
[ 228 ]
What just happened?
You took a standard photograph, brought it into Inkscape, and edited it so that the
background was more blurred than the foreground.
We applied some non-destrucve clipping and ltering to a photograph. That said, the image
itself is untouched, and if you want to see the full eects of the background blurring, don't
forget to export the image as a PNG le (File | Export Bitmap).
To edit the images directly, use the image extensions. Import the photograph and use the
extensions found in the main menu opon: Extensions | Raster.
Converting raster logos to vector-based logos
Many clients might only have their logo images in raster or bitmap formats—JPG, GIF, PNG,
or BMP, which as we dened in Chapter 1, Geng Started with Vector Graphics, are a grid
of pixels that are set to certain colors. When these logos are made larger, there's a loss of
quality (remember the boxey, pixelated look?). Oen, you might need to scale a logo larger
so it ts in your new design and want to maintain smooth edges. You do this by converng it
to a vector-based image.
Time for action – converting a logo to a vector-based image
Here's how you use Inkscape to convert a raster image logo into an SVG image in vector
graphic format (that will be scalable!):
1. Open the logo you want to convert in Inkscape. Whenever possible use an image
that is of as high resoluon as possible. This will ensure the best possible recreaon
of the logo. You can see from the enlarged screenshot that the edges are not
smooth, as shown in the following image:
2. Select the enre image (Edit and then Select All) and then perform a trace by
choosing Path and then Trace Bitmap.
3. In the Trace Bitmap dialog box, select Mulscan Colors as the mode and be sure
that Smooth is unchecked. The Scans can be set to 15.
Chapter 11
[ 229 ]
4. Click OK to start the conversion.
5. (Oponal step) As needed, adjust the new vector conversion of the image.
Add, move, and adjust the nodes to match the original raster more closely.
6. Next you need to delete your original image. From the main menu, select Object
and then Lower—you will now see that your new vector image was "lowered"
beneath the original jagged-edged image.
7. Select the original image and then press the Delete key on your keyboard.
Your new vector image should be viewable as follows:
8. Tracing the image may not be enough to fully recreate the logo. Further
clean-up and coloring of the image may sll be required to obtain a
high-quality logo.
9. Save this new le (choose File and then Save As… ) with a new descripve lename
and be sure that the le type in the boom-right is Inkscape SVG.
What just happened?
You took a logo le in JPG format and converted it into an Inkscape vector image that can be
scaled larger (or smaller) and used like all vector graphics.
Summary
In this chapter, we learned a lot about working with images—raster and vector—in Inkscape.
We looked at imporng bitmap images, embedding images, rendering bitmap images,
working a bit with photographs and lters, imporng clip art, and all the ps and tricks for
"tracing" bitmap images to convert them into full vector graphics for both photographs and
logos. Now we can recreate all of those non-editable images and make them resizable and
thus enhance our current design projects.
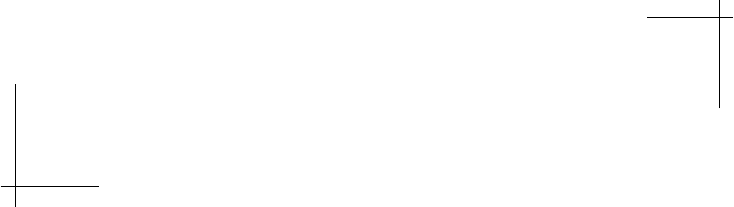
12
Using the XML Editor
Now we're ready to dig, just a lile bit, into some code. We're going to learn
about the XML Editor that is included within Inkscape. This feature helps us
perform cool tricks that can help with global changes in web development
and when working with a programming team that can also create scripts to
automacally make some changes.
The goals of this chapter are to:
Learn how to access the XML Editor
Understand the basics of the SVG coding language Inkscape uses (which is an
iteraon of XML)
Learn how to edit some of the object XML code
Review the essenals for handing o les to make sure the XML/SVG code can be
fully-funconal and usable for any backend programming that needs to be done.
Let's rst learn a bit about the editor.
Inkscape's XML Editor
One of the features that sets Inkscape apart from other vector graphics programs is the
XML Editor. The XML Editor is a code-based version of your canvas, all objects, properes,
and more. Within the XML Editor, you can change any aspect of the document and see it
immediately reected on your canvas.
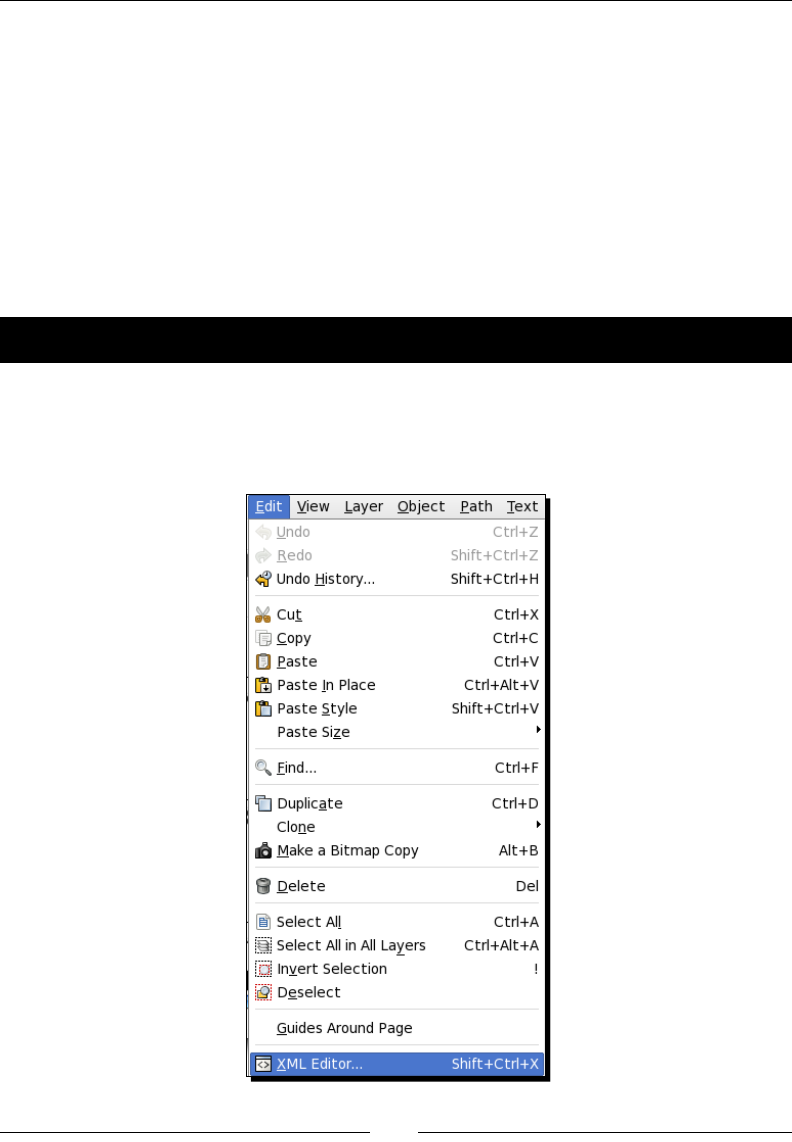
Using the XML Editor
[ 232 ]
The catch here is you need to learn a bit of SVG code in order to be able to do this fun
eding. And, if you learn it, you can do even more within the XML interface than you can
through the main Inkscape interface as it stands today. But, again, it takes a bit of learning on
your part to learn SVG aributes and how best to edit them for your needs. To start, you can
view the W3C web site (http://www.w3.org/) directly from Inkscape at any me to see
the SVG specicaons. From the main menu, select Help and then SVG 1.1 Specicaon.
Understanding and using the SVG code allows you to create consistent shadows for objects
in your web page design without having to ddle with a number of menus and sengs, or
create rectangles that always have the same rounded corners—again, without menus, elds
and sengs. However, let's just start at the beginning and open the XML Editor.
Time for action – accessing the XML Editor
To begin we will open the XML editor in Inkscape:
1. Accessing the XML Editor is the easy part. From any open Inkscape document,
on the main menu, select Edit and then XML Editor.
Chapter 12
[ 233 ]
You can also open the XML Editor using the keyboard
shortcut Shi+Ctrl+X.
What just happened?
The XML window opened, and if your Inkscape canvas is blank, it will look something like the
following screenshot:
On the le-hand side of this screen is the SVG code and on the right-hand side of the screen
you see the aributes and values associated with the selected line of code. You can also
select line items on the right-hand side of the screen and reset the values—in essence,
eding the code directly.
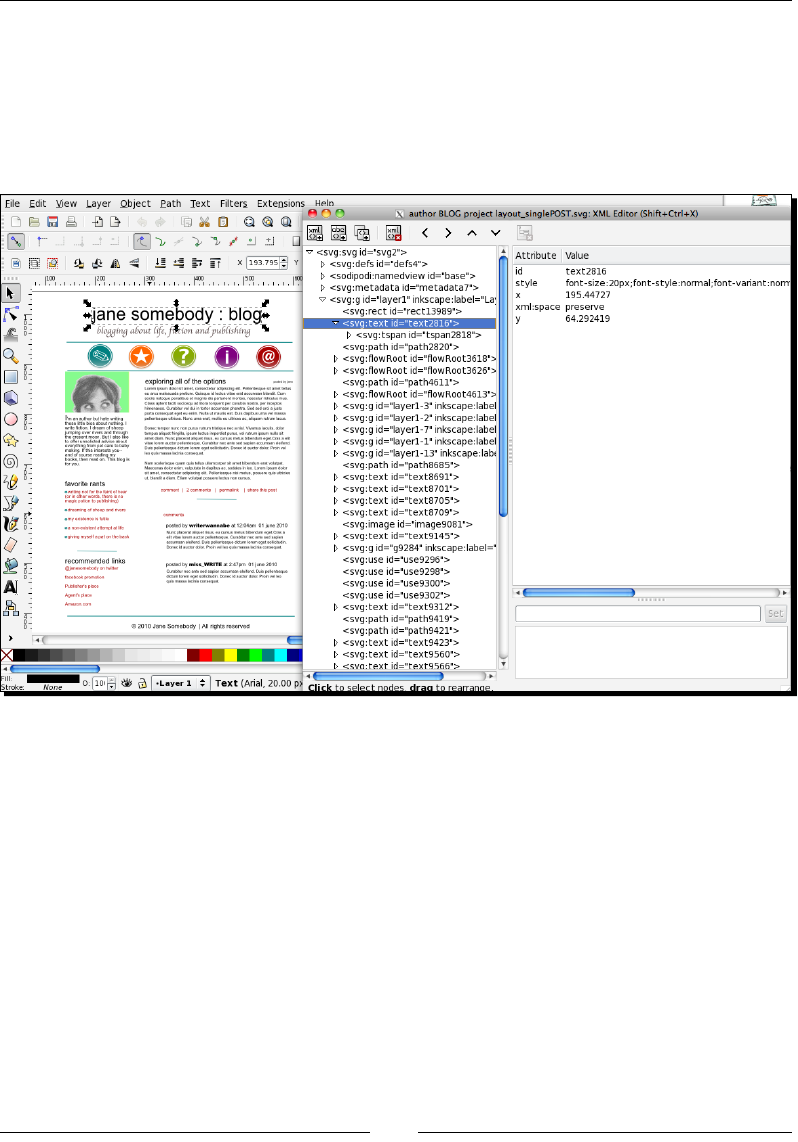
Using the XML Editor
[ 234 ]
XML Editor basics
Let's look at a more complicated Inkscape document that is populated with a web design.
Then we can discuss the screen basics, the SVG code, and understand how we might be able
to edit it for our use. The following screenshot shows the open Inkscape document and the
associated SVG code, side-by-side.
As you select items in the SVG code, you will see that Inkscape selects the items in the design
(and vice versa). Also, if you were to edit any of the object properes, all changes would
happen in real me on the canvas. But let's not get ahead of ourselves. First we need to
understand the basics of the XML Editor screen:
The structure or tree of the XML is shown on the le-hand side of the screen
(see the following screenshot). This XML tree is the enre canvas shown in
SVG code.
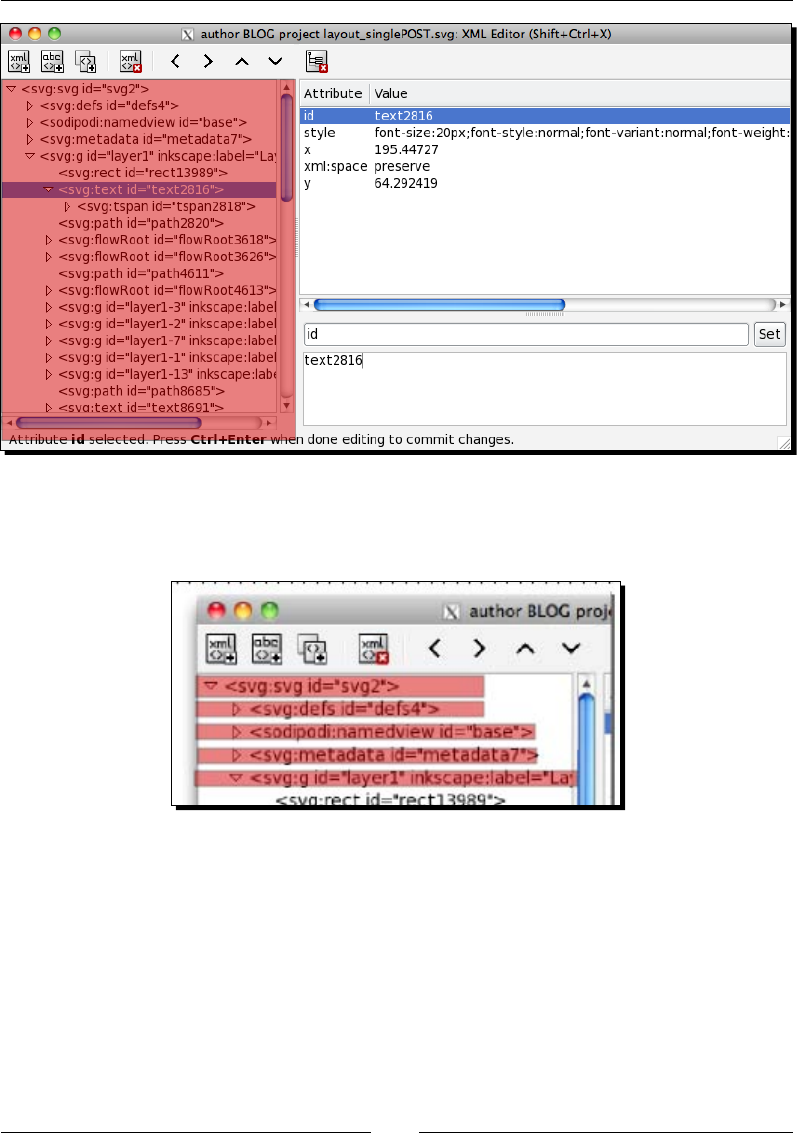
Chapter 12
[ 235 ]
A layer is essenally a node in the tree. If the layer contained drawn objects, there
would be addional nodes embedded beneath the layer node. Each node represents
an object on that layer.
These nodes are expandable by clicking the arrow on the le-hand side. When
poinng down, all objects are viewable (and editable). When the arrow is sideways,
the objects are hidden.
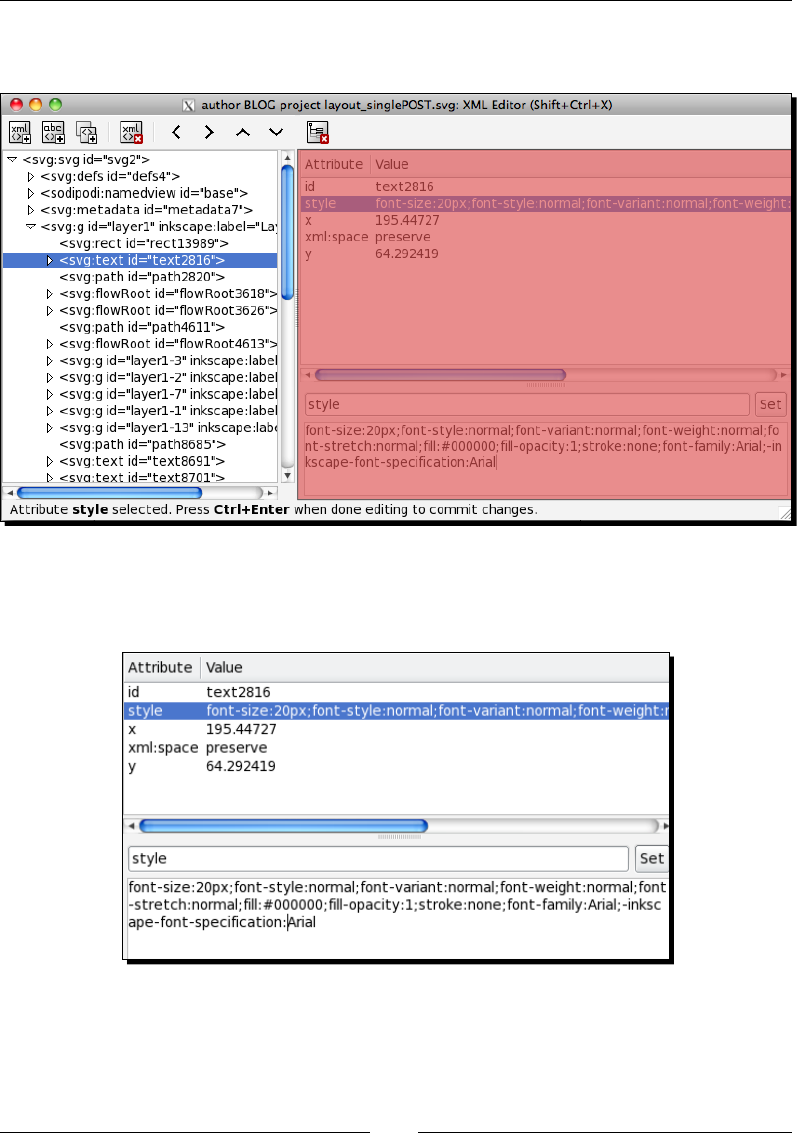
Using the XML Editor
[ 236 ]
The aributes or properes of a selected object are on the right-hand side of the
screen. This is where you would edit the properes.
You select an aribute of the object to edit, and then in the boom poron of the
screen, you make your changes and click the Set buon to commit to the change,
as seen in the following screenshot:
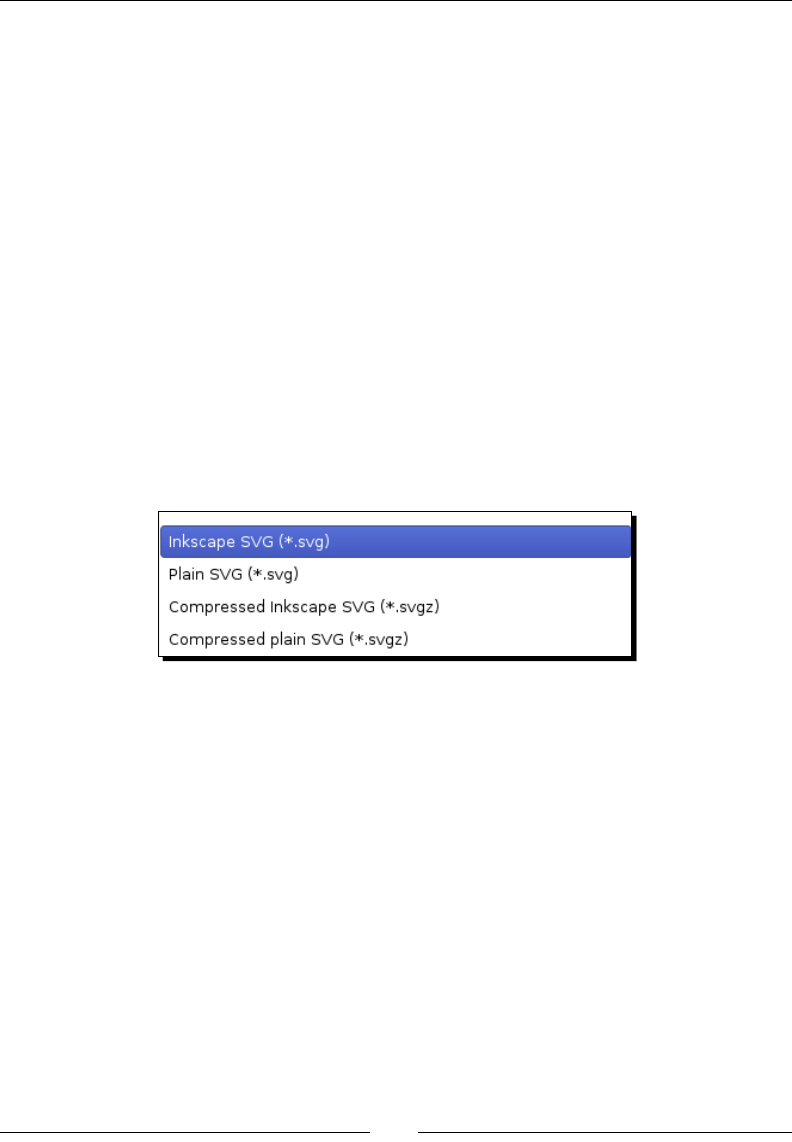
Chapter 12
[ 237 ]
SVG basics
Let's take a step back for a moment and understand the aributes—or the SVG code—found
in the XML Editor. We'll sll keep it in the context of the Inkscape XML Editor window, so you
won't have to know all of the SVG syntax code, but sll enough to understand the common
aributes and what they mean to your web designs.
Attribute types
First, aributes fall into two categories: those that are SVG standard aributes and then
those that can only be found in Inkscape. For those that fall within the SVG standards, they
will be recognized by other SVG-rendering programs, and thus can be edited by them as well.
However the others—the Inkscape only aributes—are only recognized in Inkscape. What
does this mean if you export and use them in other SVG-rendering programs? Not much,
they'll just be ignored. Alternavely, you can export the drawing in a way that will not even
include these elements.
Thus, when you are saving a document in Inkscape, you are given the opon to save as
Inkscape SVG or Plain SVG.
To maintain editability, we recommend saving in Inkscape SVG.
How can you can tell which aributes are Inkscape only and which are SVG standard? The
sodipodi tagis found only on aributes that are Inkscape only. The sodipodi tag comes from
the roots of the Inkscape applicaon. It was branched from the Sodipodi program and thus
the sodipodi tag in the SVG editor.
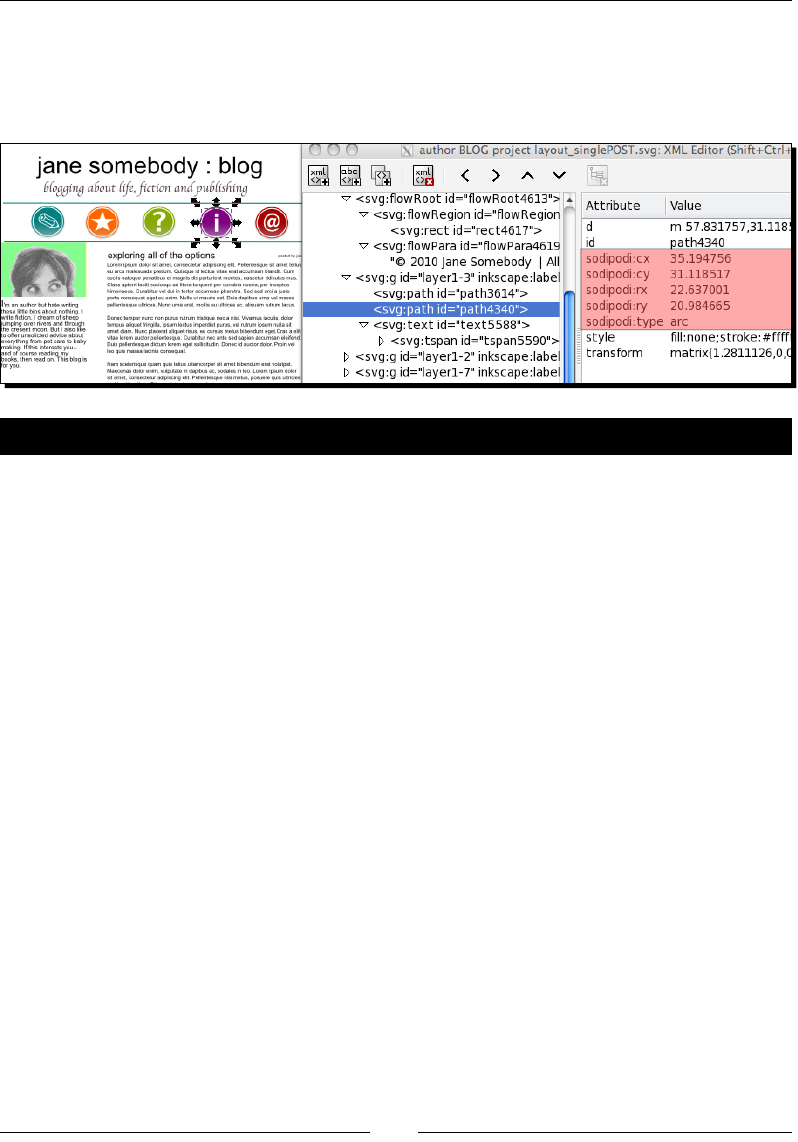
Using the XML Editor
[ 238 ]
In the following example, you can see that the icon's width (sodipodi: rx) and height
(sodipodi: ry) are both Inkscape-nave SVG code. The circle aribute cx gives the exact
locaon of the Circle's Height Transformaon node and cy gives the posion of the Circle's
Width Transformaon node.
Pop quiz – sodipodi tag
1. How can you can tell which aributes are Inkscape only and which are
SVG standard?
a. The sodipodi tag
b. The rx and ry values
c. Locaon on the XML tree
d. None of the above
Basic attributes
There are books that can explain how best to code and script using SVG. Here, we
will aim to give you a very brief overview of the code and how you can read it, and the
aribute properes.
This isn't intended to show you how to hand-code the SVG data, as it is rarely done that
way. As with Inkscape, you would use an SVG-authoring environment with a graphical
interface that creates most of the code and then you would go in later and edit the aribute
informaon. But even with this, it helps to understand the very basics of the aribute
properes and how they are structured.
To start, we will discuss objects. SVG oers four data types to work with; namely, paths,
shapes, images, and text. For each of these objects, you have a number of aributes you
dene to actually create, dene, and posion the images you see on the canvas.

Chapter 12
[ 239 ]
Paths
In SVG (and Inkscape), paths are outlines of shapes. These paths can be lled (add color)
and/or have a stroke associated with them—and thus paths are crical objects to create
shapes and other items in Inkscape.
Shapes
How does SVG allow you to create all these pictures? Well, each object is made up of
a number of shapes. And thus, SVG also uses six predened shape elements within its
code for you to manipulate. These basic shape elements are:
rectangle (rect)
circle
ellipse
line
polyline
polygon
Each SVG shape has a number of aributes associated with it and once those aributes
are dened, the code can be made into an actual shape. Let's go through each of these
as an example.
Rectangles have four aributes—x, y, width, and height—which dene the placement
and dimensions of the rectangle. The x aribute is the distance from the le-hand side of
the canvas, the y aribute is the distance from the top of the canvas. Using x and y together,
you are dening the top-le corner of the rectangle. This leaves the width and height
aributes—and, they dene exactly what you would assume: the dimensions of the two
dimensional object.
Here's how you would see the code in the XML Editor:
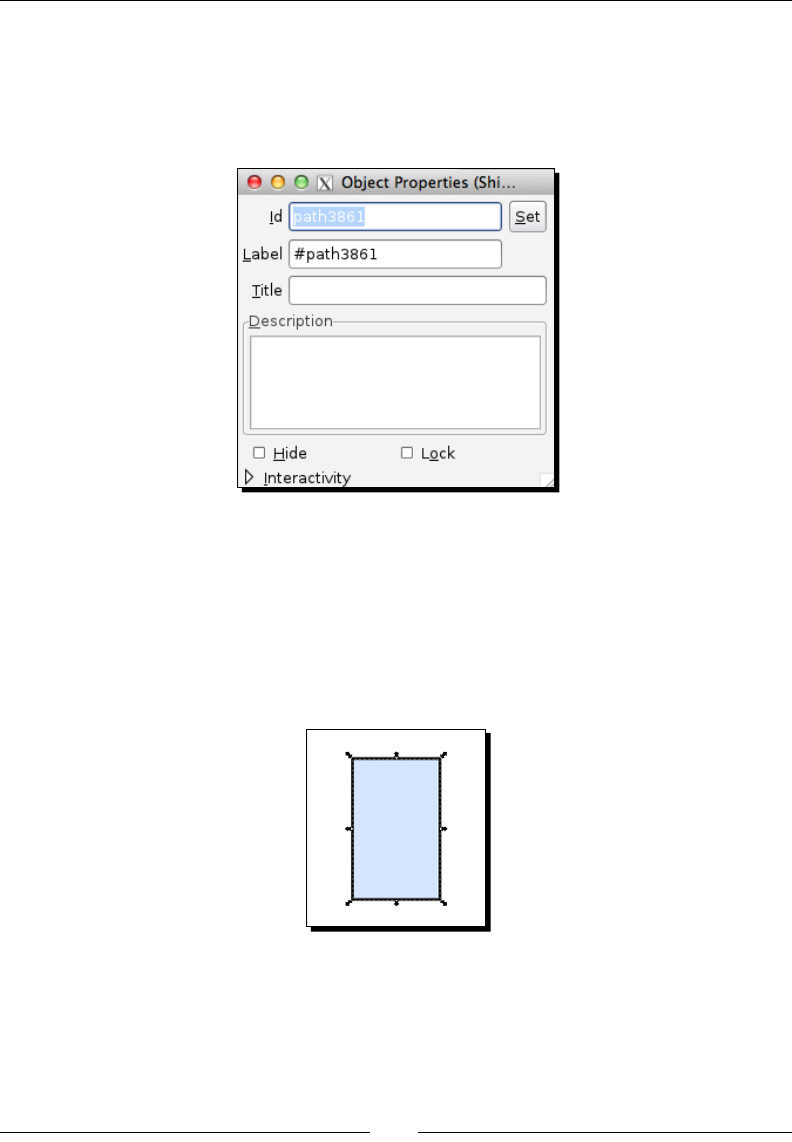
Using the XML Editor
[ 240 ]
Noce the rect ID <svg:rect id=rect2816> is the object informaon, and is shown on
the le-hand side, whereas all of the aributes (x, y, height, and width) are shown on the
right-hand side. There is also an id and style aribute which is common to all objects. The
id aribute is either automacally assigned in Inkscape or set when making the object in the
graphical interface (from the main menu, choose Object | Object Properes).
The Id eld (highlighted above) can be changed and thus reected in the SVG code.
Back in the XML Editor, the style aribute captures all of the color, stroke, opacity,
ll informaon, and more. As you select any aribute, you can see all the details in the
boom of the screen (this is where you would edit that informaon, too).
What would the rectangle, as seen in this SVG code example, look like? See the
following screenshot:
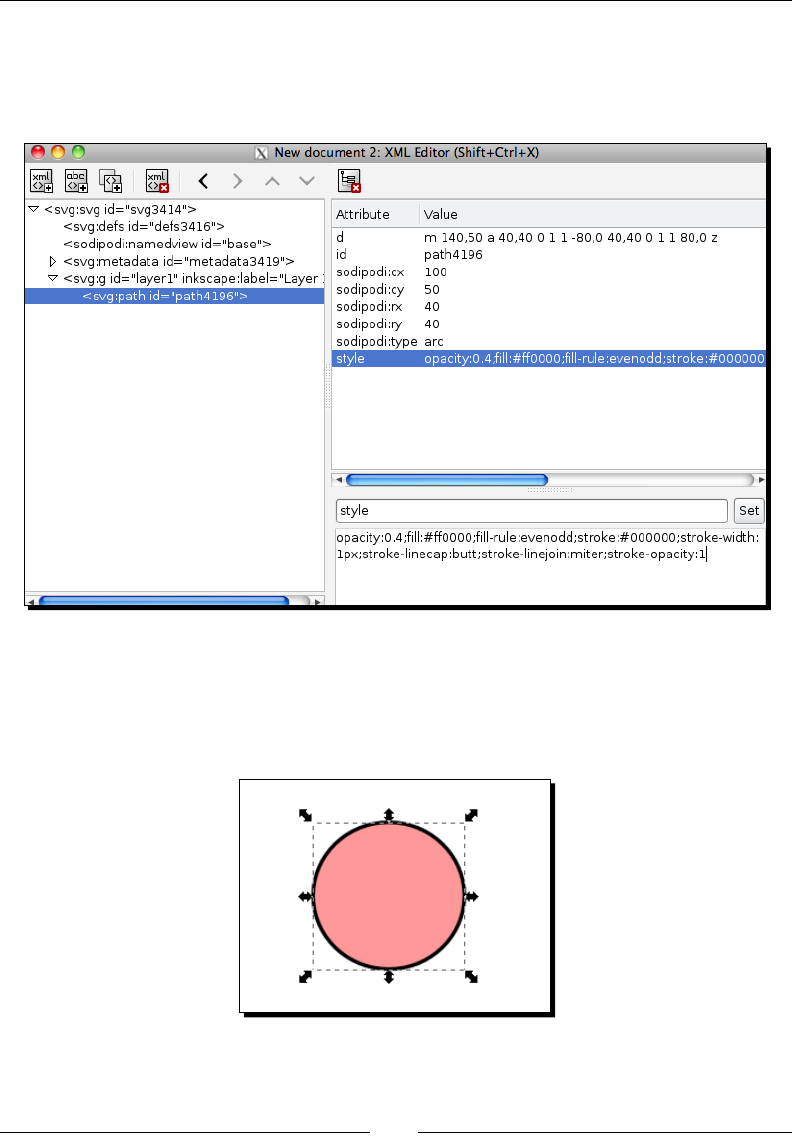
Chapter 12
[ 241 ]
Next let's discuss a circle. It uses the pathid to create it and has four aributes: cx, cy, rx
and ry. The cx and cy aributes dene the exact center of the circle (placement), while the
rx and ry values are the radii of the circle. An example of the SVG code in the XML Editor
would look similar to the following screenshot:
From this code, we see that the center of the circle is at 100, 50 and the circle would have a
radius of 40. We can also see from the style aribute that there is color in the circle, but it
is at 40 percent capacity and has a stroke outline that is 2 pixels thick.
On the canvas, this all translates into a circle looking similar to the following screenshot:
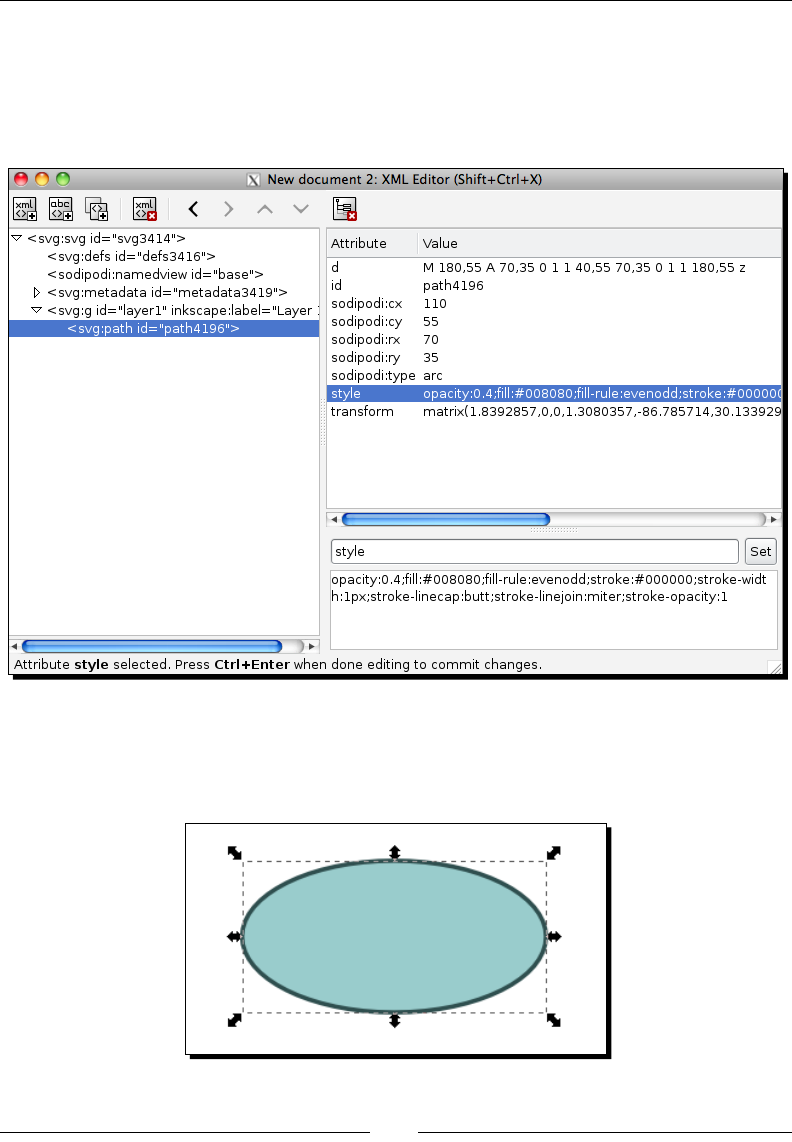
Using the XML Editor
[ 242 ]
The ellipse is similar to the circle, except that it has four path id aributes in Inkscape: cx,
cy, rx, and ry. Again, cx and cy specify the center of the ellipse. The r aributes—rx
and ry—give the x-axis and y-axis radii of the ellipse. Again, unless geometry is a favorite
pasme, typically you would create this object using the graphical interface and then rene
it in the XML Editor code. So, let's see what the code would look like:
We see here, for this example, the center of the circle is at 110, 55 and it has an x-axis radius
of 70 and y-axis radius of 35.
The ellipse would look similar to the following on the canvas:
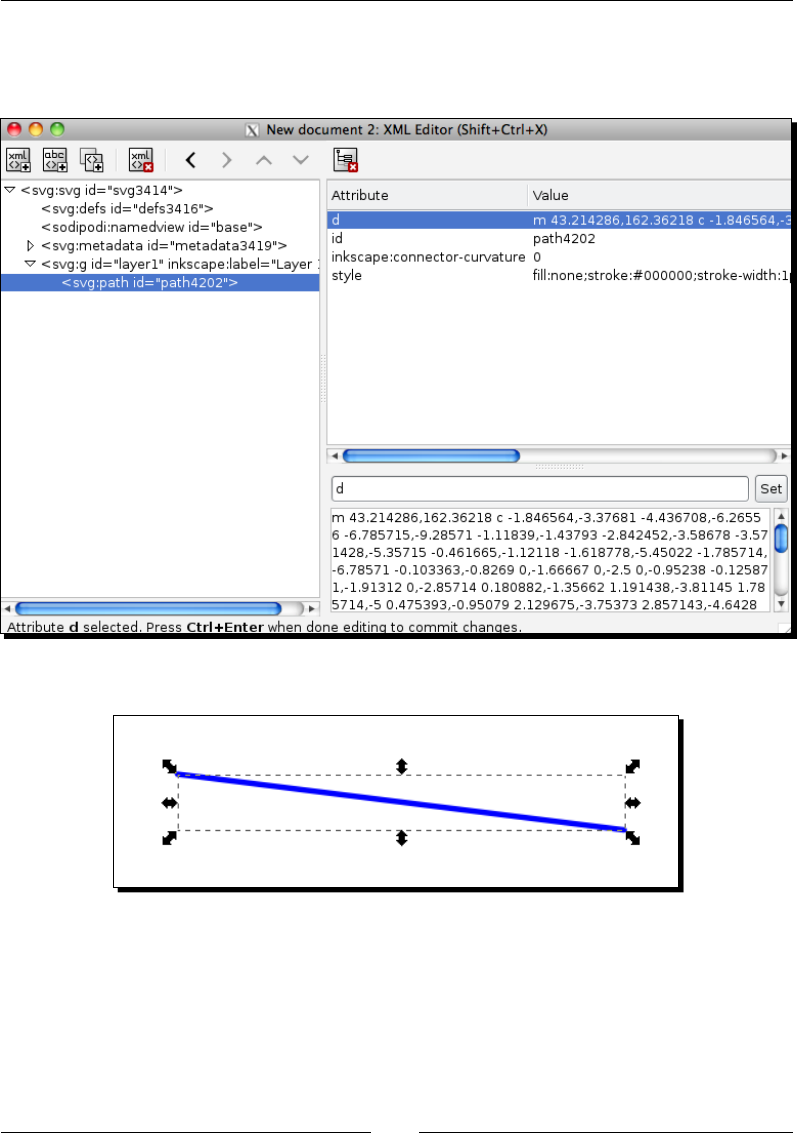
Chapter 12
[ 243 ]
Next up, we will learn about the path object. Essenally, you will map every "point" or node
on the object. That means you will have many x and y coordinate pairs in the code for these
types of objects. Here's a sample of the code in the XML Editor:
And here is the corresponding line on the canvas:
Now for the details about polylines and polygons. The aributes are the same as those of
the path object. Every point or node on the object is mapped with x and y coordinate pairs
in the code for these types of objects.
But what is the dierence between polygons and polylines if the aributes are the same
(an x and y value for every node of the shape)? It's the stroke outline—for polylines, it
doesn't automacally close the shape as the polygon element automacally does.
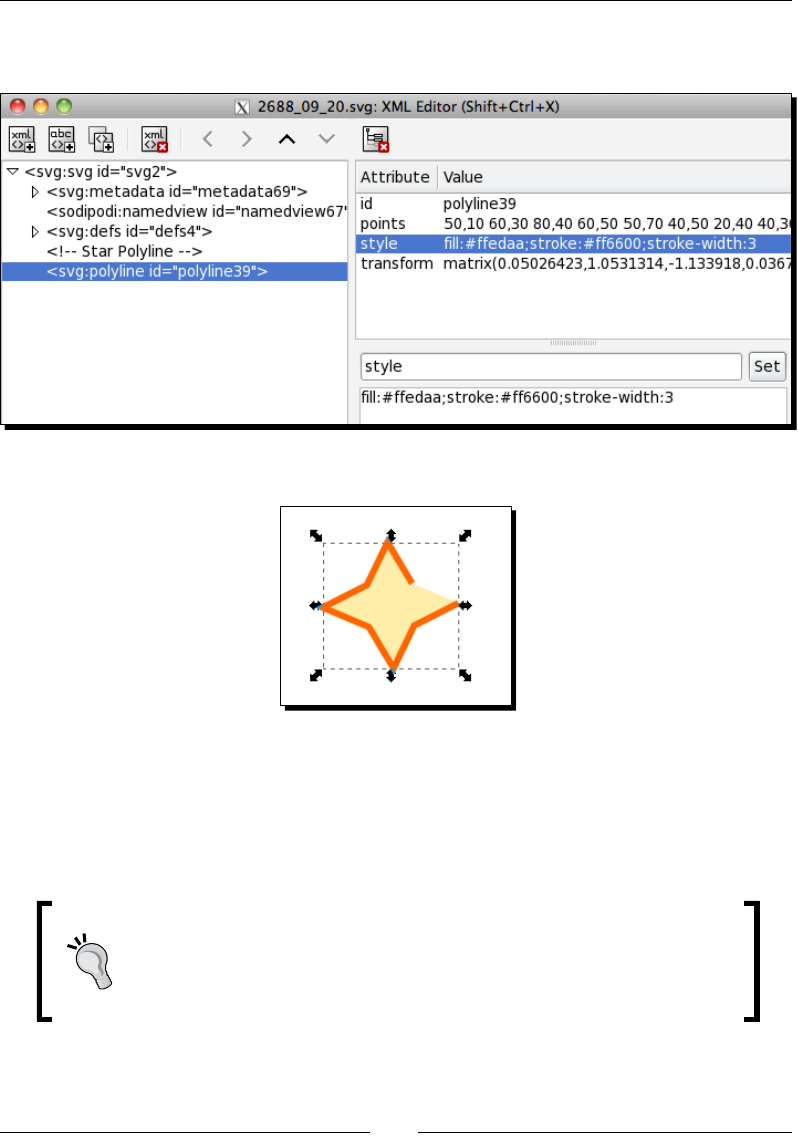
Using the XML Editor
[ 244 ]
Here's a simple code example for a polyline (again, this would be the same for a polygon,
except the stroke would close the shape:
This is how it would look on the canvas:
With this example, you can see how dicult it would be to hand-code all of the nodes of
the star to make the image. In fact, you would be likely to spend more me trying to nd
coordinates and mapping them instead of actually drawing the shapes. This is why Inkscape's
interface is best for drawing and using the XML Editor to edit or manage some sengs which
we'll talk about next.
You always have to make sure you have an even number of coordinate
values, meaning, for every x value you have, you must specify a
corresponding y coordinate. SVG coding programs will prompt you for
this and in Inkscape, it is recommended you draw the graphics using the
interface and then go into the XML Editor to change any specic sengs.
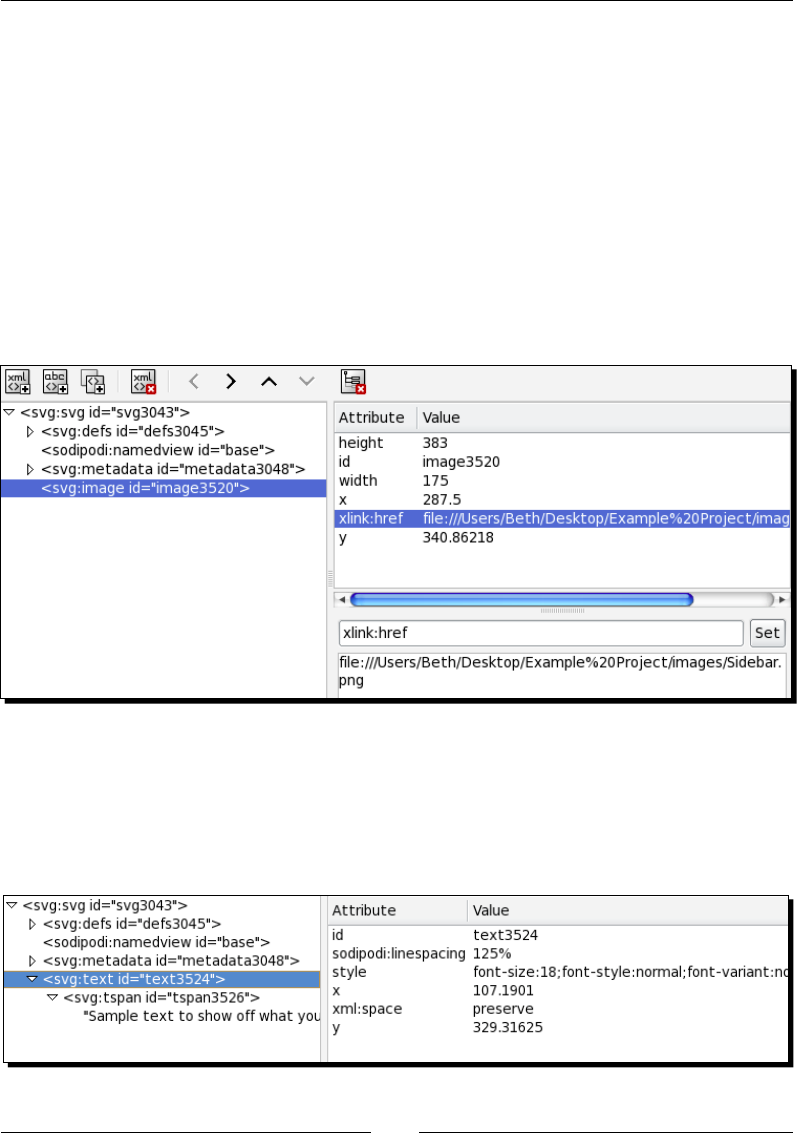
Chapter 12
[ 245 ]
Images
As you have seen, SVG les are considered the source les for Inkscape. They are graphic
images themselves, but they can also contain other graphic formats (such as PNG, JPG, or
other SVG les). You can even transform and animate those graphics as well (and even use
some scripng to work with them).
In order to do all of that, there is an image object in Inkscape. The aributes for it
are: x and y, which again dene the top-le corner of the image; width, and height
aributes that give measurements; and the xlink:href aribute which denes the
actual path or locaon of the original image. Think of it as the link to the original image
le, as in HTML code.
A code sample in the XML Editor will look similar to the following screenshot:
Text
Lastly, as you know from the many examples we have created so far, you can create text in
your drawings. Much like the image aribute, there are x and y values that set the top-le/
starng point for your text and then the actual text that is displayed. Here's a sample of what
that looks like in the XML Editor:
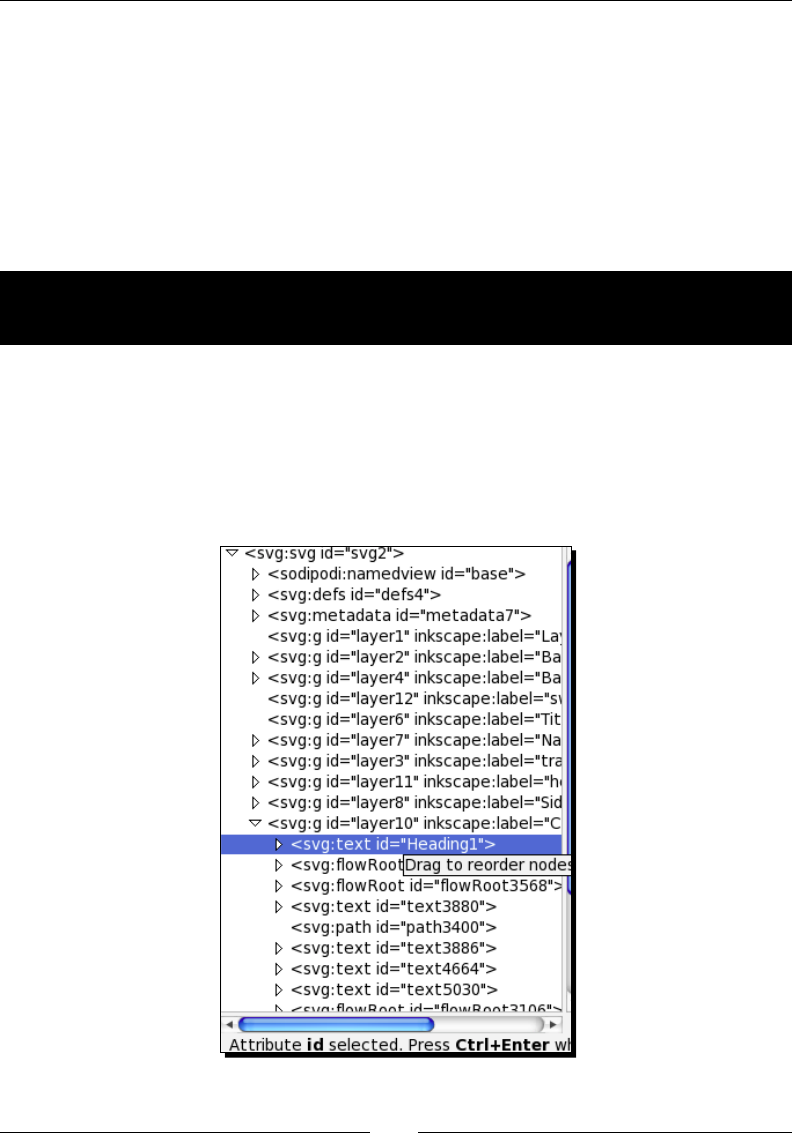
Using the XML Editor
[ 246 ]
Using the XML Editor to change characteristics
Now, suppose you have created a mock website using the graphical interface of Inkscape and
you have handed o all of your les to the programming team. Suddenly, your client decides
that they want all heading text to be a specic color of gray (4d4d4d).
Do you have to open each graphic le and make this change? Maybe. But you can also
change it right in the XML Editor (and if your programmers are using your SVG les directly,
they might even be able to make the change).
Time for action – using the XML Editor to change object
characteristics
Here's how you would use the XML Editor to change heading text to a specic web color:
1. Open up the XML Editor (or an SVG authoring tool) and open your website le.
2. Find the headings you want to change. To do this, nd text objects that match what
you are looking for. Programmers may have named all of these HeadingXX, where
XX is a number to idenfy each of them.
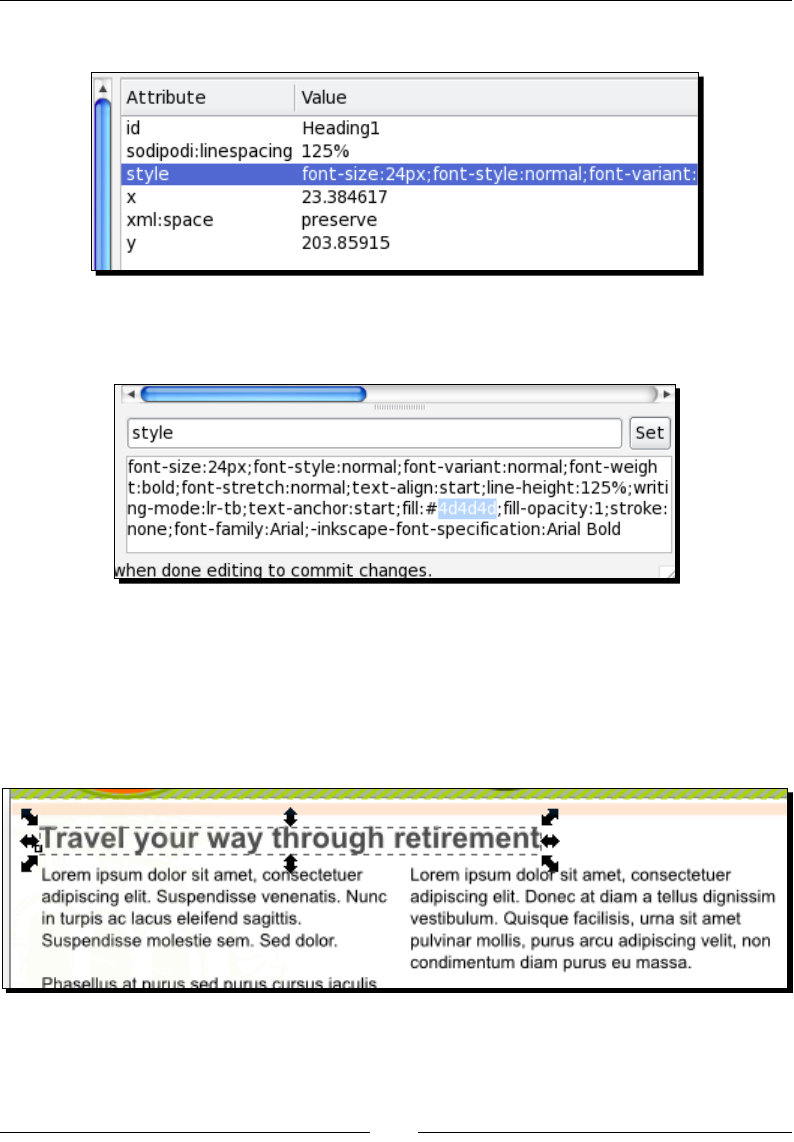
Chapter 12
[ 247 ]
3. Expand the object and nd the style aribute.
4. Then look for the ll informaon and change that web color to the new gray one:
4d4d4d.
5. Click on Set.
What just happened?
You changed the heading text characteriscs so that it is now gray in color, as seen in the
following screenshot:

Using the XML Editor
[ 248 ]
You can even write scripts that are able to automacally search and nd all heading IDs
(as described in step number 2) and change them! Work with your programming team if you
want to learn how to do this. Lots of tools can help you learn the XML/SVG code side of this.
The main use for the XML Editor is to correct aws that cannot be corrected through the
interface or through advanced features (which do not have a menu item). An example of this
is applying a lter and having the boundaries chopping o a part of the visual output due to
the oset. For more examples, see some online tutorials here: http://tavmjong.free.
fr/INKSCAPE/MANUAL/html/XML-Examples.html
Using XML and graphics with programmers
XML, SVG code, and scripng typically land in the laps of those who actually code the web
page. Somemes they can all be the same person—but in larger corporate or consulng
groups, it is a split responsibility. And the one major point to remember is that when you
hand o your design mockup les, you include everything!
All SVG source les, all output PNG les, every graphic you used to create the mockup, and
more. And in fact, if you created object properes (names) for your layers and objects—give
the programming team a cheat sheet of that informaon as well. All of this will make the
transion from web design mockup to real web page easier, cleaner, and more ecient.
Summary
This chapter was full of the technical—XML and SVG code, objects, aributes, x and y values,
and more. First we learned how to open the XML Editor. Then we took a step back and
learned a bit about SVG coding; all about the shape, image, and text aributes. We even dug
further into the code a bit to edit some text. Of course, there is a lot more that can be done
with the code version of your graphics—but we le most of that to a programming team, or
for more invesgave work on your part.

Where to Find More Information
If you need help with Inkscape, here are some links to people and places, which will prove
invaluable. You can also use the tutorials that are within Inkscape itself. You can nd these in
the main menu, Help | Tutorials.
Ofcial sites
The site that you will nd most valuable of all is, of course, the Inkscape homepage at
http://inkscape.org/. It will provide you with all the manuals, current download
release informaon, forums, and all the informaon about Inkscape that you might want.
Other important links from the ocial homepage are as follows:
Manual and documentaon: http://tavmjong.free.fr/INKSCAPE/MANUAL/
html/index.html
Wiki: http://wiki.inkscape.org/wiki/index.php/Inkscape
For developers: https://launchpad.net/inkscape
Clip Art: http://www.openclipart.org/
Galleries: http://wiki.inkscape.org/wiki/index.php/Galleries
Articles and tutorials
Inkscape has a number of ocial tutorials, which the developers helped create, which teach
you about the soware. You can nd these here: http://inkscape.org/doc/index.
php?lang=en

Where to Find More Informaon
[ 250 ]
However, you might like some other self-guided tutorials. You can nd some in
these locaons:
Inkscape Tutorials weblog: http://inkscapetutorials.wordpress.com/
Floss Manuals: http://en.flossmanuals.net/Inkscape/
35 Tutorials to create amazing Vector Graphics using Inkscape: http://
speckyboy.com/2009/04/28/35-tutorials-to-create-amazing-vector-
graphics-using-inkscape/
Community
As with many open source programs, there are a number of mailing lists and forums you can
join as a user, for more resources. You can nd key ones here:
Ocial mailing lists: http://inkscape.org/mailing_lists.php?lang=en
Ocial forums: http://www.inkscapeforum.com/
Inkscape Development Online Discussion: http://inkscape.org/discussion.
php?lang=en
User FAQ: http://wiki.inkscape.org/wiki/index.php/FAQ
Blogs
There are also a number of blogs and screencasts (video blogs) that teach you how to use
Inkscape. You can nd my favorites here:
How-to category: Screencasters.Heathenx.org: http://screencasters.
heathenx.org/. HeathenX screencasters is a video collecon on Inkscape tutorials.
He uses an older version of Inkscape, but the tutorials are sll useful in learning the
basics and some advanced techniques.
Informaonal/How-to category: Tavmjong Bah's Blog: http://tavmjong.free.
fr/blog/
Tavmjong Bah is a developer for Inkscape and he represents Inkscape in the SVG
working group. The blog talks a lot about Inkscape features as well as the SVG
applicaons of the program.
Design/Graphic category: 365 Sketches: http://365sketches.org/
365 sketches from John LeMasney was a project that started in 2010. The mission
was to create a small sketch using Inkscape each day. The site is the result of that
project. Through a poron of 2011, he used primarily Inkscape, but more current
work is done using GIMP. He used two of my tutorials for response.

Appendix A
[ 251 ]
Twitter
Here are some of the best Inkscape resources on Twier:
For educaon and tutorials:
The ocial Inkscape twier feed: http://twitter.com/inkscape
Inkscape Tutorials: http://twitter.com/inkscapetuts
For design examples:
FossGras.com: http://twitter.com/fossgrafis
Linux Arst: http://twitter.com/linuxartist
For fun:
Inkscape Mag: http://twitter.com/inkscapemag
John Lemasney: http://twitter.com/lemasney
For Open Source informaon: http://twitter.com/PacktOpenSource
Keyboard Shortcuts
Following are the basic keyboard shortcuts for Inkscape .48 release of the soware. For a full
list of keyboard shortcuts from the Inkscape developers directly, see http://inkscape.
org/doc/keys048.html
If you are using a Macintosh computer, all instances of (Ctrl) should
be replaced with the Command (Cmd) key.
You can also download and use a graphical version of the Inkscape Keyboard Layout from
http://Ctrl.openclipart.org/detail/81331
The list of keyboard shortcuts is given as follows:
Keyboard shortcut Feature funcon
File menu shortcuts
Ctrl + NCreate new document
Ctrl + OOpen an SVG document
Shi + Ctrl + E Export to PNG
Ctrl + IImport bitmap or SVG
Ctrl + PPrint document
Ctrl + SSave document
Shi + Ctrl + SSave under a new name
Shi + Ctrl + Alt + SSave a copy
Ctrl + QExit Inkscape

Keyboard Shortcuts
[ 254 ]
Keyboard shortcut Feature funcon
Tools shortcuts
F1, sSelector
Space Switch to the Selector tool temporarily;
another Space switches back
Shi + F2, Ctrl Tweak tool
F3, zZoom tool
F4, rRectangle tool
Shi + F4, x3D box tool
F5, eEllipse/arc tool
F6, pFreehand (Pencil) tool
Shi + F6, bBezier (Pen) tool
Ctrl + F6, cCalligraphy tool
Shi + F7, uPaint Bucket tool
Ctrl + F1, gGradient tool
F7, dDropper tool
F8, tText tool
F9, iSpiral tool
Shi + F9 Star tool
Ctrl + F2, oConnector tool
Dialog windows
Shi + Ctrl + FFill and Stroke
Shi + Ctrl + WSwatches
Shi + Ctrl + TText and Font
Shi + Ctrl + MTransform
Shi + Ctrl + LLayers
Shi + Ctrl + AAlign and Distribute
Shi + Ctrl + OObject Properes
Shi + Ctrl + HUndo History
Shi + Ctrl + XXML Editor
Shi + Ctrl + DDocument Preferences

Appendix B
[ 255 ]
Keyboard shortcut Feature funcon
Dialog windows
Shi + Ctrl + PInkscape Preferences
Shi + Ctrl + EExport to PNG
Ctrl + FFind
Shi + Alt + BTrace Bitmap
Shi + Ctrl + 7Path Eects
Basic object shortcuts
Shi + Ctrl + Y, Ctrl + ZUndo
Shi + Ctrl + Z, Ctrl + YRedo
Ctrl + CCopy selecon
Ctrl + XCut selecon
Ctrl + VPaste clipboard
Ctrl + Alt + VPaste in place
Shi + Ctrl + VPaste style
Ctrl + 7Paste path eect
Ctrl + DDuplicate selecon
Alt + DClone object
Shi + Alt + DUnlink clone
Shi + DSelect original
Alt + BCreate a bitmap copy
Shi + Alt + BTrace bitmap
Alt + IObject(s) to paern
Shi + Alt + IPaern to object(s)
Shi + Ctrl + U, Ctrl + GGroup selected objects
Shi + Ctrl + G, Ctrl + UUngroup selected group(s)
Home Raise selecon to top
End Lower selecon to boom
PageUp Raise selecon one step
PageDown Lower selecon one step

Glossary of Terms
Alignment makes sure all of the elements line up on the screen. Use natural alignments
within an enre web space when you use more than one graphical element such as photos,
graphics, and/or text.
Aributes are the properes of an object, as seen in the Inkscape XML editor. Selecng an
aribute (such as stroke or ll) will then let you see the detailed properes (such as color
codes and line thicknesses).
Backgrounds are "behind" the overall design of a web page. They can be any design, shape,
size, or color, but as a rule of thumb, should not distract from the overall design of a web page.
Blogs, now commonplace on the web, are websites or porons of websites that
oer commentary on personal events, polics, videos, pictures, and anything
else that can be "posted" online. The structure of blogs is around posts that are
published in reverse-chronological order and allow readers to provide comments
and somemes rangs.
Buons are used on forms found in web pages where a user needs to "submit" informaon
that will be stored.
Canvas is the page or document in Inkscape where your objects and shapes are created.
Cascading Style Sheet (CSS) is used with the HTML/XML coding to dene the look
and formang of an enre website. One style sheet determines fonts, colors,
spacing, placement, and more, reducing complexity and repeon in the coding
of the pages themselves.
Contrast is a state of being dierent from something else, for example, abstractly dierent
sizes, colors, direcons, shapes and fonts (for example mixing modern with old style), font
weights, and more.

Glossary of Terms
[ 258 ]
Diagram is a graphical representaon of informaon that uses shapes, images, and more
to create a cohesive thought. There are a number of diagram types like Venn, Acvity, Tree,
Network, and more.
Dialogs are vernacularly used in Inkscape to describe specic windows or porons of
the screens.
Extensions in the world of Inkscape are like scripts. They are created, installed, and
then incorporated into the Inkscape soware itself to "extend" the soware's features
or funconality.
Fill is the terminology to describe the color of an object or shape.
Font when using text, it species a certain size and style of type.
Flow Chart is one of the most common types of diagrams. It shows the general process
for compleng a task or decision. It shows each step, decision, and opon as a parcular
box/opon/connector. In general, it represents a step-by-step soluon to a given problem.
GIMP (GNU Image Manipulaon Program) is an open source photo manipulaon soware
program. This is used in this book for the process of creang an animated GIF. More
informaon can be found at: http://www.gimp.org.
Grid is a tool in Inkscape to help alignment and exact measurements. It can be parcularly
useful in creang web page designs because there are "snap to grid" opons to help with
exact alignment.
Guides are also tools in Inkscape in Inkscape that can be user-generated. You can create
guides on your canvas to help with alignment and object placement.
Handle is a term used to describe small squares or circles at edges of an object in Inkscape.
Handles are oen used to change the size of an object or change the shape of a path.
Icons is a graphical representaon of text, usually smaller objects that represent a certain
feature or funcon on a web page. They can be completely graphical or a combinaon of
graphics and text.
Layers in the Inkscape soware allow stacking of objects on a canvas for easier creaon.
Each layer can be locked, viewed, moved, and more. You must select a layer before you
can start manipulang objects within that layer. This selected layer is then termed the
drawing layer.
Lock is used to lock objects, shapes, text, and layers in Inkscape. Once this seng is in place,
these objects become un-editable unl unlocked.
Logo is a visual representaon of a company or brand.

Appendix C
[ 259 ]
Lorem Ipsum is a text eect that displays a pseudo-Lan form of text that is used as a
"placeholder" in the larger context of the web page design. It allows visual correlaon
of text content, without having to create actual text for that space in the design.
Open Clip Art Library is an open source, free clip art image library that you can search
directly from Inkscape.
Organizaonal Chart or "org chart" shows the structure of an organizaon. It also details
roles, job tles, and somemes the relaonships between the jobs.
Panning is moving le, right, or up and down on the Inkscape main screen.
Paths in general terms, are lines that have a start and end point, curves, angles, and points
that are calculated by a mathemacal equaon. However, paths are not limited to being
straight—they can be of any shape, size, and can even encompass any number of curves.
When you combine them, they create drawings, diagrams, and can even help create
certain fonts.
Plugins are addional soware that you install to add new capabilies to Inkscape.
Properes dene details regarding an object created in Inkscape. These are typically
editable and can be changed with the soware interface or within the XML editor.
Proximity is a design term used to describe grouping of similar informaon together
on a web page.
Rasterized images are images that are created by ny rectangular dots, which we call pixels.
File types like JPG, FIG, and BMP are all rasterized images.
Repeon the idea of repeang elements like buons, shapes (graphical or just placement),
or colors in a design to make a pleasing impact.
RSS (Really Simple Syndicaon) feeds is a basic way to connually broadcast (or publish)
blog entries. These feeds are in a standardized XML format and pull the metadata tags
you assigned when publishing your blog post and display them in "readers" for others to
automacally receive.
Scalable Vector Graphics or SVG is a vector-based drawing language that uses some basic
principles: it can be scalable to any size without losing detail, and a drawing can use an
unlimited number of smaller drawings used in any number of ways (and reused) and sll
be a part of a larger whole.
Scan is a process Inkscape uses to describe a "pass" over a bitmap image in order to create
a trace of the image. Single scans are done with a single pass (or scan) to create the paths.
Mulple scans, in turn, use mulple passes using dierent sengs each me to create
dierent paths that are then stored and displayed in a group to create the trace.

Glossary of Terms
[ 260 ]
Scripts add new features to Inkscape. They must be installed aer the inial Inkscape
installaon and are typically wrien in a dierent programming language from the main
program (Inkscape, in this case) and can be modied at any me.
Shapes in Inkcape and SVG, are basic shape elements; these include rectangles, circles,
ellipses, straight lines, polylines, and polygons. They have dierent aributes from paths, and
can have ll and stroke informaon edited via the soware interface as well as with the XML
editor directly.
SIOX (Simple Interacve Object Extracon) is a process of separang an object from the
background in a bitmap image.
Site tree/Site Map is a list of all the individual pages of a website. Typically, the site map
outlines how each page is linked to the others. It can be used for website creaon and,
planning, but also as a user interface aide to help website users nd where they need
to be on the site.
Storefronts are any websites that sell a commodity. They oen allow you to search through
products and then purchase a product through a "shopping cart".
Stroke is the term in Inkscape to describe an object or shape border. You can oen change
the stroke color and thickness.
Template is a base document that has been created to simplify the design process. Basic
sengs like canvas size, fonts, colors, and placement are pre-dened and set in the document.
Text styling is the term used to describe manipulang text, so that it creates a certain feel
when seen in an overall design. Somemes it is also called typography or typeseng.
Tracing is the process of creang paths (and nodes) to represent an underlying bitmap image
and then using those paths to create a vector-based image.
Vector graphics is the use of points, lines, curves, and shapes or polygons, which are all
based on mathemacal equaons to represent images in computer graphics.
Wallpapers are images used as desktop backgrounds. These are also commonly used
(and downloaded) for use with cell phones and other electronic devices.
XML Editor is the code-based version of objects and drawings on your Inkscape canvas.
Within the XML Editor, you can change any aspect of the document and see it immediately
reected on your canvas.
Zoom describes magnifying your canvas to see more detail (zoomed in) or the enre canvas
at a glance (zoomed out).
Pop Quiz Answers
Chapter 1, Getting Started with Vector Graphics
Pop quiz – understanding vector graphics
1d
Chapter 2, Installing and Opening Inkscape
Pop quiz – using Tools
1 d
This is the most used toolbar in
Inkscape because it gives you the
tools to create shapes, paths, and
more. All you have to do is select
(click) a tool and then use it on the
open document page.
Pop Quiz Answers
[ 262 ]
Pop quiz – new documents
1 c
Click the new document icon on the command bar.
It just takes one click!
Chapter 3, How to Manage Files
Pop quiz – how do you change the dimensions of a predened graphic
1 c
Just adjust the document dimensions of
the current document to t your needs.
Remember, you’ll likely also need to
move objects on your page to reect the
new dimensions.
However, for any of the objects that you
have drawn, there will be no stretching
or manipulaon.
The page dimensions just change (the
black borders).
Pop quiz – editable Inkscape le formats
1 b
You can also save in the Inkscape compressed
format of SVGZ if minimizing the le size is
important.
Pop quiz – Export versus Save As
1 c
Inkscape only supports exporng PNG les.
However, the File | Save/Save As funcon will allow
you to save les as PDFs.
Appendix D
[ 263 ]
Pop quiz – le format portability
1 d
PDF les, when imported into Inkscape, allow for
editability to remain with vector-based objects.
Pop quiz – linking versus embedding images
1 d
Chapter 4, Creating your First Graphics
Pop quiz – displaying borders
1a
Since a border is essenally the end of your graphic
you can use it for a number of purposes—most
importantly to show the boundary for where you
can create graphics that will be printed or exported
when your le is saved.
Pop quiz – switching shapes
1 c
You would use the toolbox and select the cube
icon (6th icon from the top).
Pop quiz – image formats
1 d
Pop Quiz Answers
[ 264 ]
Pop quiz – circles
1 c
Use the circle tool in the toolbox and press the Ctrl
key while resizing it.
Pop quiz – joining objects
1a
Make sure all of the objects are selected on your
canvas that you want to join together in a union
rst and then select Path | Union. More details
about this, grouping, and combining paths will be
discussed in Chapter 7, Creang paths into complex
shapes" to "Using Paths"
Pop quiz – deleting
1 d
Pop quiz – viewable grid
1 c
Chapter 5, How to Work with Layers
Pop quiz – Layers dialog
1b
Appendix D
[ 265 ]
Pop quiz – background colors
1 c
All Inkscape les are transparent by
default. We had set the document
properes to have a white solid
background for our web design mockup
so that it would be consistent with how
the web page would be coded.
Pop quiz – undo last action
1a
Chapter 6, Building Objects
Pop quiz – changing Fill and Stroke
TRUE or FALSE: No maer what
way you use to change ll and
stroke of an object in Inkscape, it
all has the same outcome for the
object on your canvas.
TRUE.
By using the Fill and Stroke dialog,
the dropper tool, or the color
palee you are changing the same
aributes on the object.
Pop quiz – shortcut keys to quickly ungroup items
1 d
Pop Quiz Answers
[ 266 ]
Chapter 7, Using Paths
Pop quiz – remove the last node movement
1 d
Either using the keyboard shortcut Ctrl + Z
or Edit | Undo works!
Pop quiz – paths
1 d
Almost any object you create in Inkscape can be
converted to a path so you can add eects or
move nodes to get the desired eect
Chapter 8, How to Style Text
Pop quiz – font options
1e
There is no opon to underline in Inkscape.
Instead you can use other tools to draw a line
under any text you wish to have underlined.
Pop Quiz – transparency
1 b
It is actually transparent. For a mask to work,
like in the example in this chapter, you need to
change the Alpha seng to white. Masking takes
the shades of gray onto the “boom” object. If
the Alpha seng was set at transparent then the
reecon would also be transparent.
Appendix D
[ 267 ]
Chapter 9, Using Filters
Pop quiz – common icon sizes
1 b
All the others listed can be seen in the icon
preview opon in Inkscape (View | Icon
Preview).
Chapter 10, Extensions in Inkscape
Pop quiz – what are extensions?
TRUE OR FALSE: Extensions add
new capabilies to Inkscape
and thus extend its features or
funconality and on their own,
outside of their use in Inkscape,
wouldn’t work correctly.
TRUE.
Most Inkscape extensions are
created using Python or Perl
programming languages.
Chapter 11, Working with Images
Pop quiz – Open Clip Art
1 d
You can indeed use any image from the Open Clip
Art Library in your work—all are downloadable in
SVG format, editable, and you can adjust them as
necessary for your own designs.

Pop Quiz Answers
[ 268 ]
Chapter 12, Using the XML Editor
Pop quiz – sodipodi tag
1 a
The sodipodi tag is the only one aribute that
is Inkscape-only. It comes from the roots of the
Inkscape applicaon which was branched from
the Sodipodi program, and thus the sodipodi tag
in the SVG editor.
Index
Symbols
3D box tool 254
365 Sketches blog, Design/Graphic Category 250
.ai. See Adobe Illustrator
.eps. See Encapsulated Post Script le
.Fhx. See Adobe Freehand
.pdf. See Adobe Acrobat Portable Document
Format
.psd. See Adobe Photoshop
.svg le 9
.svg format 9, 10
A
Add Layer dialog 108
Adobe Acrobat Portable Document Format 9
Adobe Freehand 9
Adobe Illustrator 9
Adobe Photoshop 9
Align and Distribute dialog 94, 96, 168, 224, 254
Align and Distribute Objects icon 94, 224
alignment 257
Alt + B 255
Alt + D 255
Alt + I 255
Alt + [ or ] keys, hot keys 176
Alt + > or < keys, hot keys 176
Alt + right or le arrows, hot keys 176
Alt + Shi + arrows, hot keys 176
arc
creang, steps 75-78
aributes
about 257
types 237
aributes, XML editor screen 236
B
b 254
Background layer 99
backgrounds 257
basic object shortcuts, keyboard shortcuts
Alt + B 255
Alt + D 255
Alt + I 255
Ctrl + 7 255
Ctrl + Alt + V 255
Ctrl + C 255
Ctrl + D 255
Ctrl + V 255
Ctrl + X 255
End 255
Home 255
PageDown 255
PageUp 255
Shi + Alt + B 255
Shi + Alt + D 255
Shi + Alt + I 255
Shi + Ctrl + CTRL, Ctrl + Z 255
Shi + Ctrl + G, Ctrl + U 255
Shi + Ctrl + U, Ctrl + G 255
Shi + Ctrl + V 255
Shi + D 255

[ 270 ]
batch images
exporng 52-54
Bezier (Pen) 66, 82
Bezier tool
about 84, 254
womans face shape, creang 146
bitmap
tracing 255
bitmap copy
creang 255
blend mode
about 112
using, steps 112, 113
Blend mode drop-down menu 113
Blend mode opon 112
blogs, InkScape
365 Sketches, Design/Graphic Category 250
about 257
Screencasters.Heathenx.org, How-To category
250
Tavmjong Bah’s Blog, Informaonal/How-to
Category 250
URL 21
blur 123
Blur slider 226
borders
displaying, pop quiz answers 263
brochure les
building 14, 15
buons 257
C
c 254
Calligraphy tool 66, 254
canvas 257
Cascading Style Sheet. See CSS
CD cover
creang 37, 38
Center on Vercal Axis icon 95
circle tool
about 112
pop quiz answers 264
clip art
URL 21, 249
clipboard
pasng 255
clipping
about 133
objects 133-141
clone
object 255
unlink 255
closed paths 66
color palee bar
about 126
pop quiz answers 265
using, steps 126, 127
community, InkScape
Inkscape Development Online Discussion, URL
250
ocial forums, URL 250
ocial mailing lists, URL 250
User FAQ, URL 250
compound paths 66
connector tool 254
contrast 257
Create and Edit Objects tool 94
Create and Edit tool 94
CSS 257
Ctrl 254
Ctrl + 7 255
Ctrl + Alt + V 255
Ctrl + B, hot keys 176
Ctrl + C 255
Ctrl + D 255
Ctrl + F 255
Ctrl + F1 254
Ctrl + F2 254
Ctrl + F6 254
Ctrl + I 253
Ctrl + I, hot keys 176
Ctrl + le/right arrows, keyboard shortcuts 176
Ctrl + N 253
Ctrl + O 253
Ctrl + [ or ], hot keys 176
Ctrl + P 253
Ctrl + Q 253
Ctrl + S 253
Ctrl + Shi + Home, keyboard shortcuts
about 176
for Mac OS 176

[ 271 ]
Ctrl + Shi + le/right arrows, keyboard
shortcuts 176
Ctrl + V 255
Ctrl + X 255
current layer 103
cut path, path opon 167
D
d 254
Dashes eld 125
deleng
pop quiz answers 264
diagram 258
dialog boxes
closing 31
displaying 31
oang 31
minimizing 31
mulple dialog boxes, displaying 31
dialogs 258
dialog windows, keyboard shortcuts
Ctrl + F 255
Shi + Alt + B 255
Shi + Ctrl + 7 255
Shi + Ctrl + A 254
Shi + Ctrl + D 254
Shi + Ctrl + E 255
Shi + Ctrl + F 254
Shi + Ctrl + L 254
Shi + Ctrl + M 254
Shi + Ctrl + O 254
Shi + Ctrl + P 255
Shi + Ctrl + T 254
Shi + Ctrl + X 254
dierence, path opon 166
Distribute Centers Equidistantly Horizontally
buon 96
division, path opon 166
DMG le 19
Dockable dialogs
about 30, 31
oang 33
document
customizd default document, creang 51
customized default document, creang 50
prinng 253
saving 253
documentaon
URL 249
document dimensions
custom le size, creang for postcard 39-41
customizing 39
print bleed, adding 43
print-safe border, adding 41-43
Document Preferences 254
Document Properes window 68
Double-click on leers, keyboard shortcuts 176
drawing
exporng 47
drawing layer 26, 90
dropper
about 127
using, steps 128
Dropper tool 254
E
e 254
Edit Paths by Nodes tool 147, 150, 153, 161
ellipse
about 74, 112
creang 74
Ellipse/arc tool 254
embedding
about 59
logo, into design 59, 60
embedding images
versus linking 62
Encapsulated Post Script le 9
End 255
exclusion, path opon 166
Export Bitmap opon 47
exporng
drawing 47
page 47
selecon 47
to PNG 47, 48
versus save as 49
versus save as, pop quiz answers 262
extensions
about 213, 214, 258
installaon 215

[ 272 ]
pop quiz answers 267
tutorials, examples 214, 215
URL 214
F
F1 254
F3 254
F4 254
F5, e 254
F6 254
F7 254
F8 254
F9 254
le formats
pop quiz, answers 262
portability, pop quiz answers 263
le menu shortcuts, keyboard shortcuts
Ctrl + I 253
Ctrl + N 253
Ctrl + O 253
Ctrl + P 253
Ctrl + Q 253
Ctrl + S 253
Shi + Ctrl + Alt + S 253
Shi + Ctrl + E 253
Shi + Ctrl + S 253
les
creang 35
embedding 59
embedding, in Inkscape 59
linking 58
pop quiz, answers 262
predened-sized document dimensions, using
36, 37
ll 258
Fill and Stroke dialog
about 121-124, 167, 195, 226, 254
blur 123
color picker 122, 123
opacity 123
pop quiz answers 265
type of ll 122
using, steps 121
Fill tab 122, 126
lter editor 192
lters
about 191
pop quiz answers 267
using 193-196
using, with images 199-201
using, with text 197, 198
nd 255
nd and replace
performing, steps 182
ipcase, text eects 184
Floss Manuals
URL 250
ow chart 258
font 258
font opons
pop quiz answers 266
for developers
URL 21
forums
URL 21
freehand object
lightening bolt, closing 83
lightening bolt, creang 82, 83
freehand tool 82, 254
G
g 254
galleries
URL 21, 249
geometrical primives 65
GIMP 258
GNU General Public License. See GPL
GNU Image Manipulaon Program. See GIMP
GPL 17
Gradient tool 254
grid
about 258
pop quiz answers 264
viewing 84
Group selected objects 255
guides
about 258
creang 87, 88

[ 273 ]
H
handle 258
height aribute 239
Help | Tutorials 249
Home 255
homepage, InkScape
clip art, URL 249
for developers, URL 249
galleries, URL 249
manual and documentaon, URL 249
wiki, URL 249
hot keys
Alt + [ or ] keys 176
Alt + > or < keys 176
Alt + right or le arrows 176
Alt + Shi + arrows 176
Alt + Up or down arrows 176
Ctrl + B 176
Ctrl + I 176
Ctrl + [ or ] 176
I
i 254
icon
about 258
creang 167-169
icon sizes
pop quiz answers 267
Icon View opon 170
id aribute 240
image les
embedding 59
image embedding, limitaons 59
linking 58
image formats
pop quiz answers 263
image object 245
images
about 245
lters, using 199-201
tracing 201
tracing, potrace used 202-204
Import From Open Clip Art Library dialog box
218
Inkscape
about 7
arc, creang 75-78
blogs 250
community 250
dialog box, closing 31
dialog boxes, displaying 31
dialog box, oang 31
dialog box, minimizing 31
dockable dialogs 30, 31
document, opening 67, 68
downloading 19, 20
drawing layer 26
ellipse, creang 74
extensions 213
external les, linking 61
exing 253
features 17, 18
les, embedding 59
lters 191
geng started 22-25
grid, viewing 84, 85
guides, creang 87, 88
Help | Tutorials 249
homepage 249
homepage, URL 21, 249
installaon, troubleshoong 20, 21
installing 18
keyboard shortcuts 253
layout informaon 26
logo, embedding in design 59, 60
main screen 28
mulple dialog box, displaying 31
nocaon area 26
objects 115
opacity seng 26
PDF, imporng 56-58
pointer or cursor posion 27
pop quiz, answers 261
pre-requisites 18
running on Mac OS X, requisite 18
shape opons, changing 70, 71
shapes, combining 78- 81
soware basics 21
star, creang 69, 70
style Indicator 25

[ 274 ]
SVG, les saving in 44
SVG, saving 45, 46
templates 210
tutorials 249
tutorials, examples 214, 215
twier, resources on 251
unit of measure, changing 86
vector graphic, creang 67
vector graphic, saving 72, 73
website, URL 19
window resize 27
XML editor 231, 232
zoom tool 27
Inkscape Development Online Discussion
URL 250
Inkscape, external les linking
photograph, linking into brochure design 61, 62
Inkscape le
non-nave Inkscape les, imporng 55
saving 44
saving, as PDF 49
saving, in Inkscape SVG 44
Inkscape Preferences 255
Inkscape SVG
about 237
les, saving in 44
saving 45, 46
Inkscape Tutorials weblog
URL 250
intersecon, path opon 166
K
kerning
about 173
text 174, 175
keyboard shortcuts
basic object shortcuts 255
Ctrl + le/right arrows 176
Ctrl + Shi + End 176
for Mac OS 176
Ctrl + Shi + Home 176
Ctrl + Shi + le/right arrows 176
dialog windows 254, 255
Double-click on leers 176
le menu shortcuts 253
from developers, URL 253
graphical version, URL 253
Shi + End 176
Shi + Home 176
Shi + le/right arrows 176
tools shortcuts 254
Triple-click 176
L
last node movement
pop quiz answers 266
Layer 1 92
Layer name eld 92, 108
layers
about 89, 90, 254, 258
arranging 105
creang, steps 91, 92
deleng 110
deleng, steps 110, 111
dialog 92
drawing layer 90
duplicang 104
duplicang, steps 104
hiding 99
hiding, steps 100-103
locking, steps 98, 99
moving 105-107
nested 108
objects, moving from one layer to another 109
pop quiz answers 264
renaming 109
renaming, steps 109
using, in example drawing 93
using, in web design 93-96
Layers dialog 91
Layers icon 91
layout informaon 26
lightening bolt example, freehand object
closing 83
creang 82, 83
linking
about 58
versus embedding images 62
versus embedding images, pop quiz answers
263
lock 258
logo 258

[ 275 ]
Lorem Ipsum 259
Lower selecon one step 255
Lower selecon to boom 255
M
mailing list
URL 21
manual
URL 249
manual and documentaon
URL 21
masking
about 133
objects 142, 143
Mulply blend 114
N
non-vector formats
vector graphics, disadvantages 11
nocaon area 26
O
o 254
object characteriscs
changing, XML Editor used 246-248
Object Properes 254
objects
about 115
converng, to paths 163-165
creang 116
creang, steps 116-120
grouping, steps 129-132
masking 142, 143
pop quiz answers 264
rotang 80
transforming, into paths 155
Object(s) to paern 255
object to path 163-165
ocial forums
URL 250
ocial mailing lists
URL 250
opacity
about 123
seng 26
Open Clip Art Library
about 18, 217, 259
pop quiz answers 267
uses 218
using (Mac users only) 218, 219
open paths 66
open-standard vector format
advantages 10
SVG vector images, advantages 10
org chart. See organizaonal chart
organizaonal chart 259
original
selecng 255
P
p 254
page
exporng 47
PageDown 255
PageUp 255
Paint Bucket tool 254
panning 259
pasng
in place 255
path eect 255
style 255
path eects 255
pathid aributes 242
path opons
about 166
cut path 167
dierence 166
division 166
exclusion 166
intersecon 166
union 166
paths
about 66, 239, 259
Bezier (Pen) 66
Bezier tool, using 146
Calligraphy tool 66
closed paths 66
compound paths 66
creang, ways 66
open paths 66

[ 276 ]
Pencil (Freehand) 66
pop quiz answers 266
using, for text 177-179
working with 145, 146
Paern to object(s) 255
PDF
imporng, into Inkscape 56-58
Pencil (Freehand) 66
Pencil tool 254
Pen tool 254
photo manipulaon
about 219
background, blurring 220-227
photograph, blurring 220-227
Plain SVG 237
plugins 259
PNG
exporng to 47, 48, 253, 255
pointer or cursor posion 27
polygons
and polylines, dierences 243
creang, steps for 67
polylines
and polygons, dierences 243
pop quiz
answers 261-268
postcard
new custom le size, creang 39-41
potrace
about 201
used, for tracing images 202-204
predened-sized document dimensions
using 36, 37
print bleed
adding 43
print-safe border
adding 41- 43
project les
batch images, exporng 52-54
mulple le projects, managing 52
structuring 51
properes 259
properes, XML editor screen 236
proximity 259
R
r 254
Raise selecon one step 255
Raise selecon to top 255
random case, text eects 184
rasterized graphics
usage determining 11-13
rasterized images
about 259
versus vector 13, 14
raster logos
converng, to vector-based image 228
converng, to vector-based logos 228
Really Simple Syndicaon. See RSS feed
rectangle tool 254
redo 255
reecon
creang 185-188
Rename Layer dialog 110
repeon 259
RSS feed 259
S
s 254
save as
versus export 49
Scalable Vector Graphics. See SVG
scans 259
Screencasters.Heathenx.org blog, How-To cat-
egory
URL 250
Scribus 8
scripts 260
Search for
eld 218
selecon
copying 255
cung 255
duplicate 255
exporng 47
selector 254
sentence case, text eects 183

[ 277 ]
shapes
about 78, 239, 260
circle 239
closed shape, text placing within 179, 180
combining 78-81
ellipse 239
line 239
opons, changing 70, 71
polygon 239
polyline 239
pop quiz answers 263
rectangle 239
switching 69, 70
Shi + Alt + B 255
Shi + Alt + D 255
Shi + Alt + I 255
Shi + Ctrl + 7 255
Shi + Ctrl + A 254
Shi + Ctrl + Alt + S 253
Shi + Ctrl + CTRL, Ctrl + Z 255
Shi + Ctrl + D 254
Shi + Ctrl + E 253, 255
Shi + Ctrl + F 254
Shi + Ctrl + G, Ctrl + U 255
Shi + Ctrl + L 254
Shi + Ctrl + M 254
Shi + Ctrl + O 254
Shi + Ctrl + P 255
Shi + Ctrl + S 253
Shi + Ctrl + T 254
Shi + Ctrl + U, Ctrl + G 255
Shi + Ctrl + V 255
Shi + Ctrl + X 254
Shi + D 255
Shi + End, keyboard shortcuts
about 176
for Mac OS 176
Shi + F2 254
Shi + F4 254
Shi + F6 254
Shi + F7 254
Shi + F9 254
Shi + Home, keyboard shortcuts
about 176
for MAC OS 176
Shi + le/right arrows, keyboard shortcuts 176
Simple Interacve Object Extracon. See SIOX
SIOX 201, 205, 206, 260
site map 260
site tree 260
sodipodi tag
pop quiz answers 268
space 254
spiral tool 254
star
creang 69, 70
star tool 254
storefronts 260
stroke
about 260
to paths 155
Stroke paint tab 124
stroke to paths
about 155
spiros and swirls, creang 155-162
structure, XML editor screen 234
style aribute 241
style Indicator 25
SVG
about 9, 18, 259
exporng to 253
open-standard vector format, advantages 10
SVG basics
about 237
aribute types 237, 238
basic aributes 238
SVG document
opening 253
SVG vector images
advantages, over open standard vector formats
10
swatches 254
T
t 254
Tavmjong Bah’s Blog, Informaonal/How-to
Category 250
templates
about 210, 260
custom template, creang 213
custom templates, creang 212

[ 278 ]
exisng template, modifying 212, 213
installing 210
installing, steps 211
text
about 245
lters, using with 197, 198
path, using for 177-179
placing, within closed shape 179, 180
Text and Font 254
text and font editor
about 171
opening 172
using 172, 173
text eects
about 182
ipcase 184
random case 184
sentence case 183
tle case 183
uppercase and lowercase 183
using, steps 183
text styling 260
text tool (A icon) 172, 254
T icon 172
tle case, text eect 183
tools shortcuts, keyboard shortcuts
b 254
c 254
Ctrl 254
Ctrl + F1 254
Ctrl + F2 254
Ctrl + F6 254
d 254
e 254
F1 254
F3 254
F4 254
F5 254
F6 254
F7 254
F8 254
F9 254
g 254
i 254
o 254
p 254
r 254
s 254
Shi + F2 254
Shi + F4 254
Shi + F6 254
Shi + F7 254
Shi + F9 254
space 254
t 254
u 254
x 254
z 254
Trace Bitmap dialog box 228
tracing 260
transform 254
transparency
pop quiz answers 266
tree, XML editor screen 234
Triple-click, keyboard 176
tutorials, InkScape
Floss Manuals, URL 250
Inkscape Tutorials weblog, URL 250
Vector Graphics, 35 tutorials for creang 250
tweak tool 254
twier resources, InkScape
for design examples 251
for educaon and tutorials 251
for fun 251
for open source informaon 251
U
u 254
undo 255
Undo History 254
undo last acon
pop quiz answers 265
Ungroup selected group(s) 255
union, path opon 166
unit of measure, changing 86
uppercase and lowercase, text eect 183
User FAQ
URL 250
V
vector-based logos
raster logos, converng to 228
vector formats 9

[ 279 ]
vector graphics
about 8, 260
Adobe InDesign 8
brochure les, building 14, 15
characteriscs 8
creang 9, 67
disadvantages over non-vector formats 11
new document, opening 67, 68
polygon, creang 67
pop quiz, answers 261
Quark Xpress 8
saving 72, 73
Scribus 8
shape opons, changing 70, 71
star, creang 69, 70
usage determining 11, 13
used, by programs 8
versus rasterized images 13, 14
W
wallpapers 260
web design
layers, using 93-96
width aribute 239
wiki
URL 21, 249
window resize 27
X
x 254
xlink:href aribute 245
XML editor
about 231, 232, 254, 260
accessing, steps for 232, 233
basics 234
pop quiz answers 268
screen 234
using, to change object characteriscs 246,
247, 248
XML editor screen
aributes 236
layer 235
properes 236
structure 234
tree 234
Z
z 254
zoom tool 27, 254, 260

Thank you for buying
Inkscape
Beginner's Guide
About Packt Publishing
Packt, pronounced 'packed', published its rst book "Mastering phpMyAdmin for Eecve
MySQL Management" in April 2004 and subsequently connued to specialize in publishing
highly focused books on specic technologies and soluons.
Our books and publicaons share the experiences of your fellow IT professionals in adapng
and customizing today's systems, applicaons, and frameworks. Our soluon based books
give you the knowledge and power to customize the soware and technologies you're
using to get the job done. Packt books are more specic and less general than the IT books
you have seen in the past. Our unique business model allows us to bring you more focused
informaon, giving you more of what you need to know, and less of what you don't.
Packt is a modern, yet unique publishing company, which focuses on producing quality,
cung-edge books for communies of developers, administrators, and newbies alike. For
more informaon, please visit our website: www.packtpub.com.
About Packt Open Source
In 2010, Packt launched two new brands, Packt Open Source and Packt Enterprise, in order
to connue its focus on specializaon. This book is part of the Packt Open Source brand,
home to books published on soware built around Open Source licences, and oering
informaon to anybody from advanced developers to budding web designers. The Open
Source brand also runs Packt's Open Source Royalty Scheme, by which Packt gives a royalty
to each Open Source project about whose soware a book is sold.
Writing for Packt
We welcome all inquiries from people who are interested in authoring. Book proposals
should be sent to author@packtpub.com. If your book idea is sll at an early stage and you
would like to discuss it rst before wring a formal book proposal, contact us; one of our
commissioning editors will get in touch with you.
We're not just looking for published authors; if you have strong technical skills but no wring
experience, our experienced editors can help you develop a wring career, or simply get
some addional reward for your experse.
Inkscape 0.48 Illustrator's Cookbook
ISBN: 978-1-84951-266-4 Paperback: 340 pages
109 recipes to create scalable vector graphics with
Inkscape
1. Create interesng illustraons and common web
design elements that can be used in real-life
projects
2. Gain a thorough understanding of all common
Inkscape tools and advanced features of Inkscape
0.48
3. Tips and tricks to speed up your drawing workow
Inkscape 0.48 Essentials for Web Designers
ISBN: 978-1-84951-268-8 Paperback: 316 pages
Use the fascinang Inkscape graphics editor to create
aracve layout designs, images, and icons for your
website
1. The rst book on the newly released Inkscape
version 0.48, with an exclusive focus on web design
2. Comprehensive coverage of all aspects of Inkscape
required for web design
3. Incorporate eye-catching designs, paerns, and
other visual elements to spice up your web pages
Please check www.PacktPub.com for information on our titles
GIMP 2.6 cookbook
ISBN: 978-1-84951-202-2 Paperback: 408 pages
Over 50 recipes to produce amazing graphics with
the GIMP
1. Recipes for working with the GIMP, the most
powerful open source graphics package in the world
2. Straighorward instrucons guide you through the
tasks to unleash your true creavity without being
hindered by the system
3. Part of Packt's cookbook series – praccal and
ecient
LaTeX Beginner's Guide
ISBN: 978-1-84719-986-7 Paperback: 336 pages
Create high-quality and professional-looking texts,
arcles, and books for business and science using
LaTeX
1. Use LaTeX's powerful features to produce
professionally designed texts
2. Install LaTeX; download, set up, and use addional
styles, templates, and tools
3. Typeset math formulas and scienc expressions to
the highest standards
4. Include graphics and work with gures and tables
Please check www.PacktPub.com for information on our titles
