Luna SA Installation Guide Installation
User Manual:
Open the PDF directly: View PDF ![]() .
.
Page Count: 108 [warning: Documents this large are best viewed by clicking the View PDF Link!]
- PREFACE About the Installation Guide
- 1 SafeNet Network HSM Hardware Installation
- 2 SafeNet PCIe HSM Hardware Installation
- 3 SafeNet USB HSM Hardware Installation
- 4 SafeNet Remote PED Installation and Configuration
- 5 SafeNet HSM Client Software Installation
- AIX SafeNet HSM Client Installation
- HP-UX SafeNet HSM Client Installation
- Linux SafeNet HSM Client Installation
- Solaris SafeNet HSM Client Installation
- Windows SafeNet HSM Client Installation
- Required Client Software
- Installing the SafeNet HSM Client Software
- Using msiexec for scripted or unattended installation of the SafeNet Client
- Java
- CSP and KSP
- Using 32-bit Applications With the SafeNet Client
- Uninstalling, Modifying, or Repairing the SafeNet Client Software
- After Installation
- Troubleshooting
- Windows 2012 SafeNet HSM Client Supplemental Configuration
- Scripted / Unattended Installation on Windows
- Using 32-bit Utilities in Windows 64-bit Environment

SafeNet Network HSM 6.2.2
Installation Guide

Document Information
Product Version 6.2.2
Document Part Number 007-011136-012
Release Date 01 December 2016
Revision History
Revision Date Reason
A 01 December 2016 Initial release.
Trademarks, Copyrights, and Third-Party Software
Copyright 2001-2016 Gemalto. All rights reserved. Gemaltoand the Gemalto logo are trademarks and service marks of
Gemaltoand/or its subsidiaries and are registered in certain countries. All other trademarks and service marks, whether
registered or not in specific countries, are the property of their respective owners.
Acknowledgements
This product includes software developed by the OpenSSL Project for use in the OpenSSL Toolkit.
(http://www.openssl.org)
This product includes cryptographic software written by Eric Young (eay@cryptsoft.com). This product includes
software written by Tim Hudson (tjh@cryptsoft.com).
This product includes software developed by the University of California, Berkeley and its contributors.
This product uses Brian Gladman’s AES implementation.
Refer to the End User License Agreement for more information.
Disclaimer
All information herein is either public information or is the property of and owned solely by Gemalto and/or its
subsidiaries who shall have and keep the sole right to file patent applications or any other kind of intellectual property
protection in connection with such information.
Nothing herein shall be construed as implying or granting to you any rights, by license, grant or otherwise, under any
intellectual and/or industrial property rights of or concerning any of Gemalto’s information.
This document can be used for informational, non-commercial, internal, and personal use only provided that:
•The copyright notice, the confidentiality and proprietary legend and this full warning notice appear in all copies.
•This document shall not be posted on any publicly accessible network computer or broadcast in any media, and no
modification of any part of this document shall be made.
Use for any other purpose is expressly prohibited and may result in severe civil and criminal liabilities.
The information contained in this document is provided “AS IS” without any warranty of any kind. Unless otherwise
expressly agreed in writing, Gemaltomakes no warranty as to the value or accuracy of information contained herein.
SafeNet Network HSM Installation Guide
Rellease 6.2.2 007-011136-012 Rev. A December 2016 Copyright 2001-2016 GemaltoAll rights reserved. 2

The document could include technical inaccuracies or typographical errors. Changes are periodically added to the
information herein. Furthermore, Gemaltoreserves the right to make any change or improvement in the specifications
data, information, and the like described herein, at any time.
Gemalto hereby disclaims all warranties and conditions with regard to the information contained herein, including all
implied warranties of merchantability, fitness for a particular purpose, title and non-infringement. In no event shall
Gemalto be liable, whether in contract, tort or otherwise, for any indirect, special or consequential damages or any
damages whatsoever including but not limited to damages resulting from loss of use, data, profits, revenues, or
customers, arising out of or in connection with the use or performance of information contained in this document.
Gemalto does not and shall not warrant that this product will be resistant to all possible attacks and shall not incur, and
disclaims, any liability in this respect. Even if each product is compliant with current security standards in force on the
date of their design, security mechanisms' resistance necessarily evolves according to the state of the art in security
and notably under the emergence of new attacks. Under no circumstances, shall Gemaltobe held liable for any third
party actions and in particular in case of any successful attack against systems or equipment incorporating Gemalto
products. Gemaltodisclaims any liability with respect to security for direct, indirect, incidental or consequential
damages that result from any use of its products. It is further stressed that independent testing and verification by the
person using the product is particularly encouraged, especially in any application in which defective, incorrect or
insecure functioning could result in damage to persons or property, denial of service, or loss of privacy.
Regulatory Compliance
This product complies with the following regulatory regulations. To ensure compliancy, ensure that you install the
products as specified in the installation instructions and use only Gemalto-supplied or approved accessories.
USA, FCC
This device complies with Part 15 of the FCC rules. Operation is subject to the following two conditions:
(1) This device may not cause harmful interference, and
(2) This device must accept any interference received, including interference that may cause undesired operation.
This equipment has been tested and found to comply with the limits for a “Class B” digital device, pursuant to part 15 of
the FCC rules. These limits are designed to provide reasonable protection against harmful interference in a residential
installation. This equipment generates, uses and can radiate radio frequency energy and, if not installed and used in
accordance with the instructions, may cause harmful interference to radio communications. However, there is no
guarantee that interference will not occur in a particular installation.
If this equipment does cause harmful interference to radio or television reception, which can be determined by turning
the equipment off and on, the user is encouraged to try to correct the interference by one or more of the following
measures:
•Reorient or relocate the receiving antenna
•Increase the separation between the equipment and receiver
•Connect the equipment into an outlet on a circuit different from that to which the receiver is connected
•Consult the dealer or an experienced radio/TV technician for help
•Changes or modifications not expressly approved by Gemalto could void the user’s authority to operate the
equipment.
Canada
This class B digital apparatus meets all requirements of the Canadian interference- causing equipment regulations.
SafeNet Network HSM Installation Guide
Rellease 6.2.2 007-011136-012 Rev. A December 2016 Copyright 2001-2016 GemaltoAll rights reserved. 3

Europe
This product is in conformity with the protection requirements of EC Council Directive 2004/108/EC. Conformity is
declared to the following applicable standards for electro-magnetic compatibility immunity and susceptibility; CISPR22
and IEC801. This product satisfies the CLASS B limits of EN 55022.
SafeNet Network HSM Installation Guide
Rellease 6.2.2 007-011136-012 Rev. A December 2016 Copyright 2001-2016 GemaltoAll rights reserved. 4

CONTENTS
PREFACE About the Installation Guide 8
Customer Release Notes 8
Gemalto Rebranding 8
Audience 9
Document Conventions 9
Notes 9
Cautions 10
Warnings 10
Command Syntax and Typeface Conventions 10
Support Contacts 11
1 SafeNet Network HSM Hardware Installation 12
SafeNet Network HSM Required Items 13
SafeNet PED? 15
Additional Options? 17
Installing the SafeNet Network HSM Hardware 19
Installation Notes 19
Installing the SafeNet Network HSM Hardware 19
2 SafeNet PCIe HSM Hardware Installation 23
Will SafeNet PCIe HSM work with host computer/server XYZ ? 23
SafeNet PCIe HSM Required Items 24
Password-Authenticated SafeNet PCIe HSM 24
PED-Authenticated SafeNet PCIe HSM 25
Backup Device 28
Installing the SafeNet PCIe HSM Hardware 29
Installing the SafeNet PCIe HSM Card Into the Host Computer 29
Connecting a Local PED 31
Connecting a Remote PED 32
3 SafeNet USB HSM Hardware Installation 33
SafeNet USB HSM Required Items 34
Password-Authenticated SafeNet USB HSM 34
PED-Authenticated SafeNet USB HSM 35
Installing the Battery in the SafeNet USB HSM or Backup HSM 39
Installing the SafeNet USB HSM Hardware 41
4 SafeNet Remote PED Installation and Configuration 46
Installing and Configuring a SafeNet Remote PED 47
Required Items 47
Remote PED Setup 49
SafeNet Network HSM Installation Guide
Release 6.2.2 007-011136-012Rev. A December 2016 Copyright 2001-2016 GemaltoAll rights reserved. 5

5 SafeNet HSM Client Software Installation 56
AIX SafeNet HSM Client Installation 57
Prerequisites 57
Installing the Client Software 58
Uninstalling the SafeNet Client Software 60
Java Component Installation 60
Interrupting the Installation 62
After Installation 62
HP-UX SafeNet HSM Client Installation 63
Prerequisites 63
Installing the SafeNet HSMClient Software 64
Uninstalling the SafeNet HSMClient Software 66
Java Component Installation 66
Interrupting the Installation 67
After Installation 68
Linux SafeNet HSMClient Installation 69
Prerequisites 69
Installing the Client Software 70
Uninstalling the SafeNet HSM Client Software 73
Java 73
Removing components 74
[Ctrl] [C] - If you interrupt the installation 74
Scripted or Unattended Installation 75
SUSE Linux on IBM PPC 76
32-bit Client on 64-bit RedHat 6 76
After Installation 78
Solaris SafeNet HSM Client Installation 79
Prerequisites 79
Installing the Client Software 80
Uninstalling the SafeNet HSM Client Software 82
Java 82
Removing components 83
[Ctrl] [C] - If you interrupt the installation 83
After Installation 83
Windows SafeNet HSM Client Installation 84
Required Client Software 84
Installing the SafeNet HSM Client Software 84
Using msiexec for scripted or unattended installation of the SafeNet Client 88
Java 89
CSP and KSP 90
Using 32-bit Applications With the SafeNet Client 91
Uninstalling, Modifying, or Repairing the SafeNet Client Software 93
After Installation 94
Troubleshooting 94
Windows 2012 SafeNet HSMClient Supplemental Configuration 98
Scripted / Unattended Installation on Windows 102
Installing the SafeNet Client For All SafeNet Products 102
Installing the SafeNet Client For SafeNet Network HSM 102
Installing the Luna Client for SafeNet PCIe HSM 103
SafeNet Network HSM Installation Guide
Release 6.2.2 Rev. A December 2016 Copyright 2001-2016 GemaltoAll rights reserved. 6

Installing the Luna Client For SafeNet USB HSM 103
Installing the Luna Client for SafeNet Remote Backup HSM 104
Installing the Luna Client for Remote PED 104
Using 32-bit Utilities in Windows 64-bit Environment 105
SafeNet Network HSM Installation Guide
Release 6.2.2 Rev. A December 2016 Copyright 2001-2016 GemaltoAll rights reserved. 7

PREFACE
About the Installation Guide
This document describes how to install the SafeNet HSMhardware and the SafeNet Client software. Refer to the
following chapters to install the hardware and software components applicable to you:
SafeNet HSM hardware installation
•"SafeNet Network HSM Hardware Installation"on page 12
•"SafeNet PCIe HSM Hardware Installation"on page 23
•"SafeNet USB HSM Hardware Installation"on page 33
SafeNet Remote PED installation and configuration
•"SafeNet Remote PED Installation and Configuration"on page 46
SafeNet Client software installation
•"SafeNet HSM Client Software Installation "on page 56
Document information
This preface also includes the following information about this document:
•"Customer Release Notes"below
•"Gemalto Rebranding"below
•"Audience"on the next page
•"Document Conventions"on the next page
•"Support Contacts"on page 11
For information regarding the document status and revision history, see "Document Information"on page 2
Customer Release Notes
The customer release notes (CRN) provide important information about this release that is not included in the customer
documentation. It is strongly recommended that you read the CRN to fully understand the capabilities, limitations, and
known issues for this release. You can view or download the latest version of the CRN for this release at the following
location:
•http://www.securedbysafenet.com/releasenotes/luna/crn_luna_hsm_6-2-2.pdf
Gemalto Rebranding
In early 2015, Gemalto completed its acquisition of SafeNet, Inc. As part of the process of rationalizing the product
portfolios between the two organizations, the Luna name has been removed from the SafeNet HSM product line, with
the SafeNet name being retained. As a result, the product names for SafeNet HSMs have changed as follows:
SafeNet Network HSM Installation Guide
Release 6.2.2 007-011136-012Rev. A December 2016 Copyright 2001-2016 GemaltoAll rights reserved. 8
PREFACE About the Installation Guide
Old product name New product name
Luna SA HSM SafeNet Network HSM
Luna PCI-E HSM SafeNet PCIe HSM
Luna G5 HSM SafeNet USB HSM
Luna PED SafeNet PED
Luna Client SafeNet HSM Client
Luna Dock SafeNet Dock
Luna Backup HSM SafeNet Backup HSM
Luna CSP SafeNet CSP
Luna JSP SafeNet JSP
Luna KSP SafeNet KSP
Note: These branding changes apply to the documentation only. The SafeNet HSMsoftware
and utilities continue to use the old names.
Audience
This document is intended for personnel responsible for maintaining your organization's security infrastructure. This
includes SafeNet HSM users and security officers, key manager administrators, and network administrators.
All products manufactured and distributed by Gemalto are designed to be installed, operated, and maintained by
personnel who have the knowledge, training, and qualifications required to safely perform the tasks assigned to them.
The information, processes, and procedures contained in this document are intended for use by trained and qualified
personnel only.
It is assumed that the users of this document are proficient with security concepts.
Document Conventions
This document uses standard conventions for describing the user interface and for alerting you to important information.
Notes
Notes are used to alert you to important or helpful information. They use the following format:
Note: Take note. Contains important or helpful information.
SafeNet Network HSM Installation Guide
Release 6.2.2 Rev. A December 2016 Copyright 2001-2016 GemaltoAll rights reserved. 9
PREFACE About the Installation Guide
Cautions
Cautions are used to alert you to important information that may help prevent unexpected results or data loss. They use
the following format:
CAUTION: Exercise caution. Contains important information that may help prevent
unexpected results or data loss.
Warnings
Warnings are used to alert you to the potential for catastrophic data loss or personal injury. They use the following
format:
WARNING! Be extremely careful and obey all safety and security measures. In this
situation you might do something that could result in catastrophic data loss or
personal injury.
Command Syntax and Typeface Conventions
Format Convention
bold The bold attribute is used to indicate the following:
•Command-line commands and options (Type dir /p.)
•Button names (Click Save As.)
•Check box and radio button names (Select the Print Duplex check box.)
•Dialog box titles (On the Protect Document dialog box, click Yes.)
•Field names (User Name: Enter the name of the user.)
•Menu names (On the File menu, click Save.) (Click Menu > Go To > Folders.)
•User input (In the Date box, type April 1.)
italics In type, the italic attribute is used for emphasis or to indicate a related document. (See the
Installation Guide for more information.)
<variable> In command descriptions, angle brackets represent variables. You must substitute a value for
command line arguments that are enclosed in angle brackets.
[optional]
[<optional>]
Represent optional keywords or <variables> in a command line description. Optionally enter the
keyword or <variable> that is enclosed in square brackets, if it is necessary or desirable to
complete the task.
{a|b|c}
{<a>|<b>|<c>}
Represent required alternate keywords or <variables> in a command line description. You must
choose one command line argument enclosed within the braces. Choices are separated by vertical
(OR) bars.
[a|b|c]
[<a>|<b>|<c>]
Represent optional alternate keywords or variables in a command line description. Choose one
command line argument enclosed within the braces, if desired. Choices are separated by vertical
(OR) bars.
SafeNet Network HSM Installation Guide
Release 6.2.2 Rev. A December 2016 Copyright 2001-2016 GemaltoAll rights reserved. 10
PREFACE About the Installation Guide
Support Contacts
Contact method Contact
Address Gemalto
4690 Millennium Drive
Belcamp, Maryland 21017
USA
Phone Global +1 410-931-7520
Australia 1800.020.183
China (86) 10 8851 9191
France 0825 341000
Germany 01803 7246269
India 000.800.100.4290
Netherlands 0800.022.2996
New Zealand 0800.440.359
Portugal 800.1302.029
Singapore 800.863.499
Spain 900.938.717
Sweden 020.791.028
Switzerland 0800.564.849
United Kingdom 0800.056.3158
United States (800) 545-6608
Web www.safenet-inc.com
Support and Downloads www.safenet-inc.com/support
Provides access to the Gemalto Knowledge Base and quick downloads for
various products.
Technical Support Customer
Portal
https://serviceportal.safenet-inc.com
Existing customers with a Technical Support Customer Portal account can log in
to manage incidents, get the latest software upgrades, and access the Gemalto
Knowledge Base.
SafeNet Network HSM Installation Guide
Release 6.2.2 Rev. A December 2016 Copyright 2001-2016 GemaltoAll rights reserved. 11

1
SafeNet Network HSM Hardware Installation
This chapter describes how to install and connect a SafeNet Network HSM. To ensure a successful installation,
perform the following tasks in the order indicated:
1. Ensure that you have all of the required components, as listed in "SafeNet Network HSM Required Items"on the
next page
2. Install and connect the hardware, as described in "Installing the SafeNet Network HSM Hardware"on page 19
SafeNet Network HSM Installation Guide
Release 6.2.2 007-011136-012Rev. A December 2016 Copyright 2001-2016 GemaltoAll rights reserved. 12
1 SafeNet Network HSM Hardware Installation
SafeNet Network HSM Required Items
Follow this checklist to verify that you have all of items required for the installation.
Qty Item
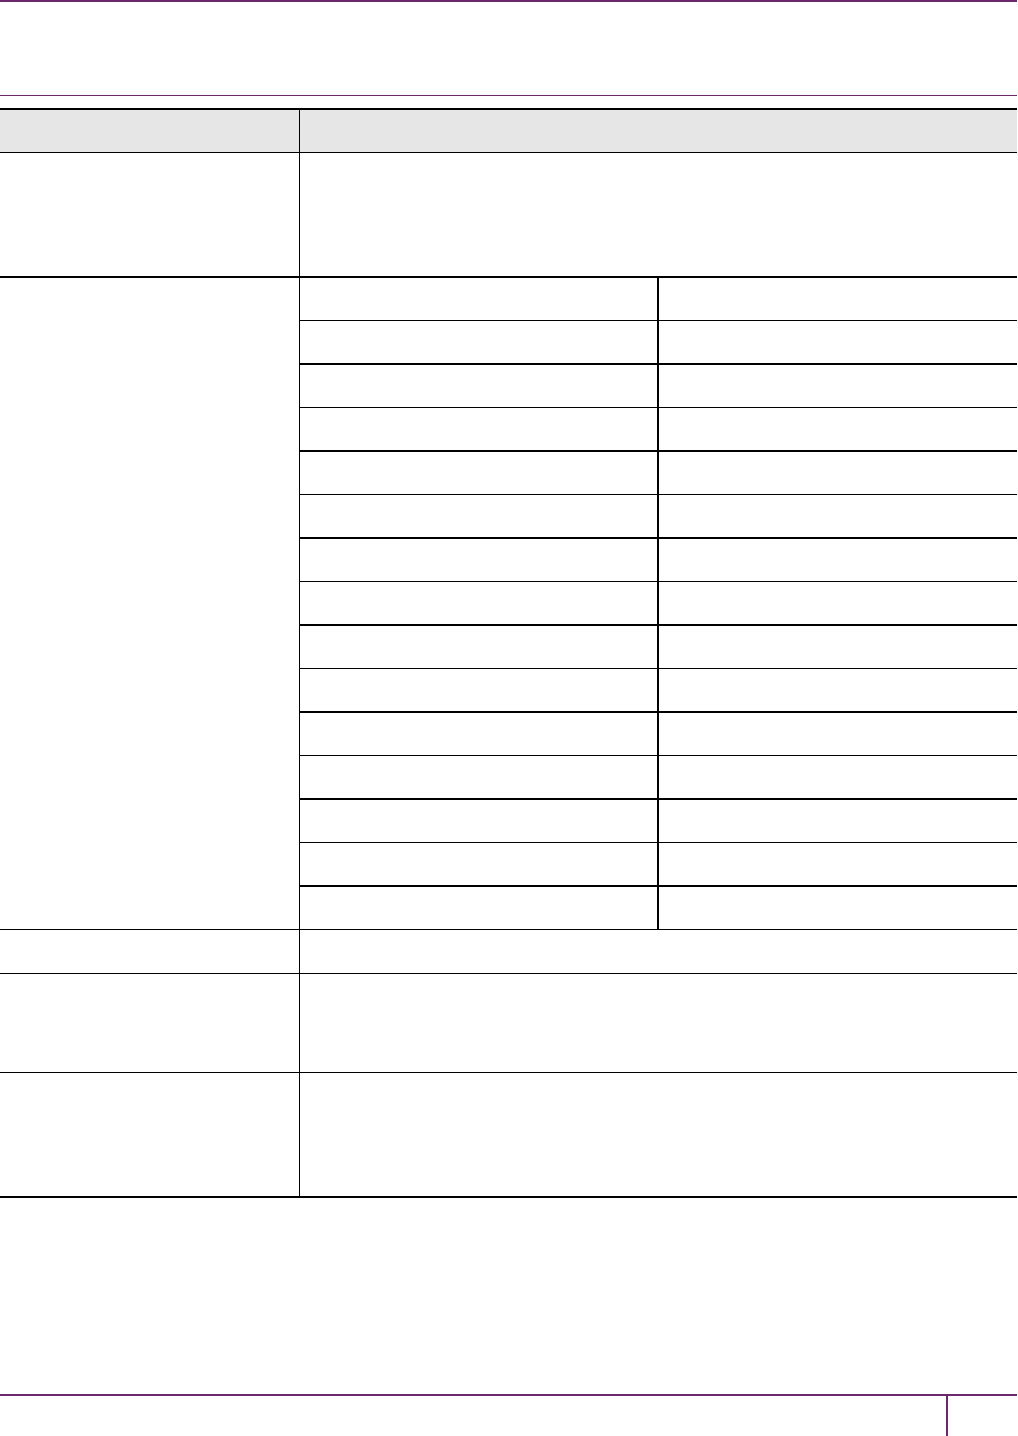
1
SafeNet Network HSM Appliance
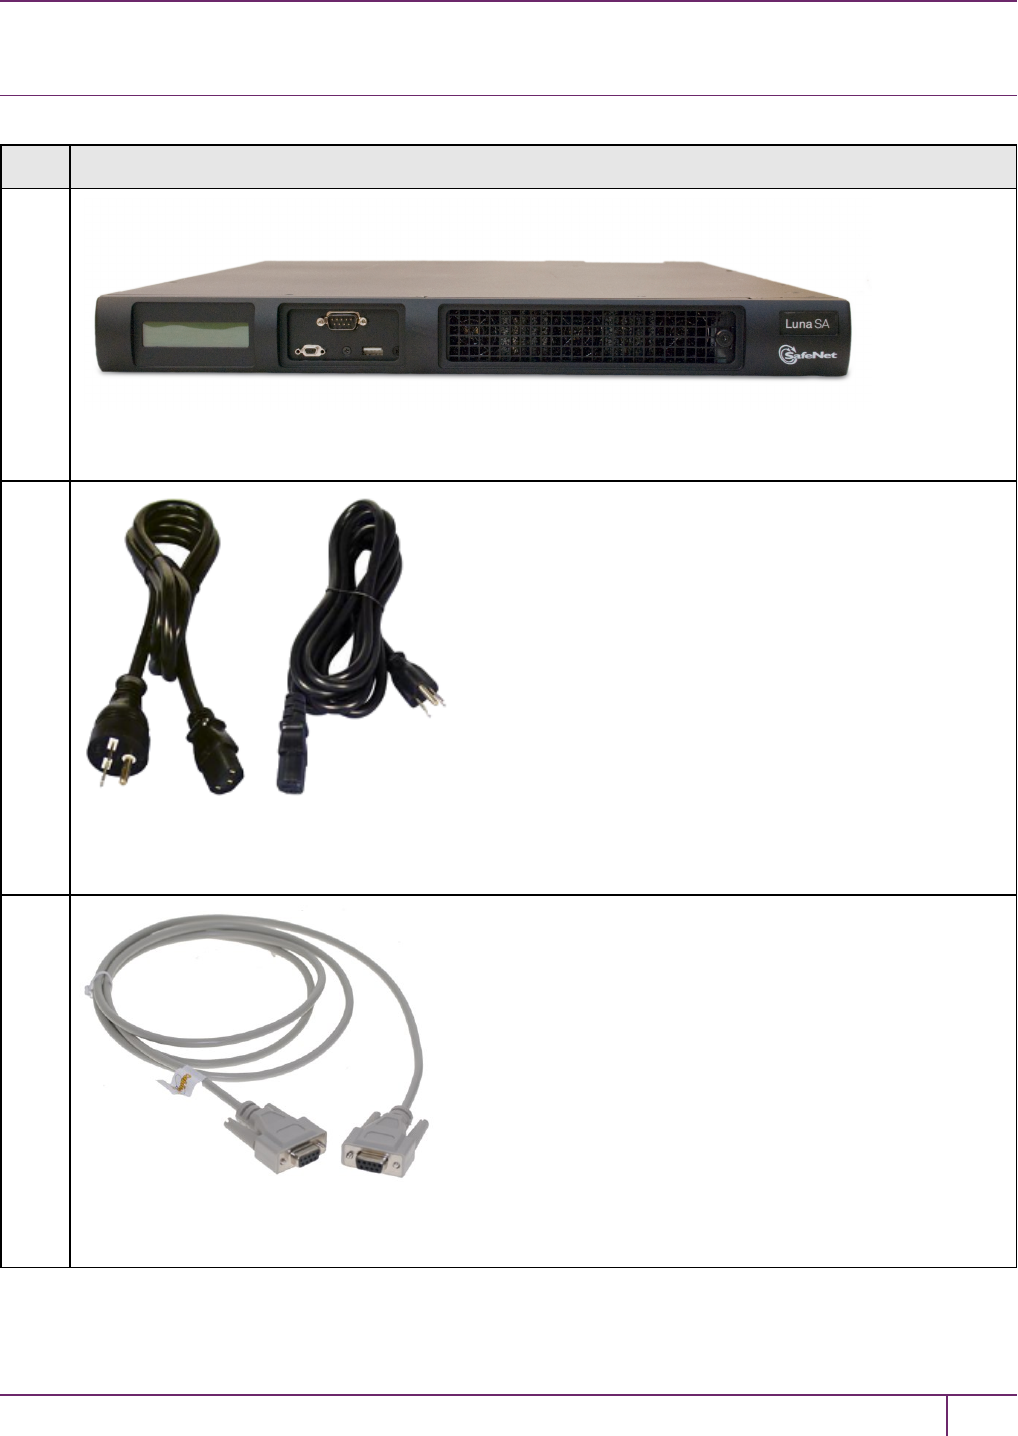
2
Power Supply Cord (one for each power supply; style to suit country for which you ordered) (*)
1
Null-Modem Serial Cable
SafeNet Network HSM Installation Guide
Release 6.2.2 Rev. A December 2016 Copyright 2001-2016 GemaltoAll rights reserved. 13
1 SafeNet Network HSM Hardware Installation
Qty Item
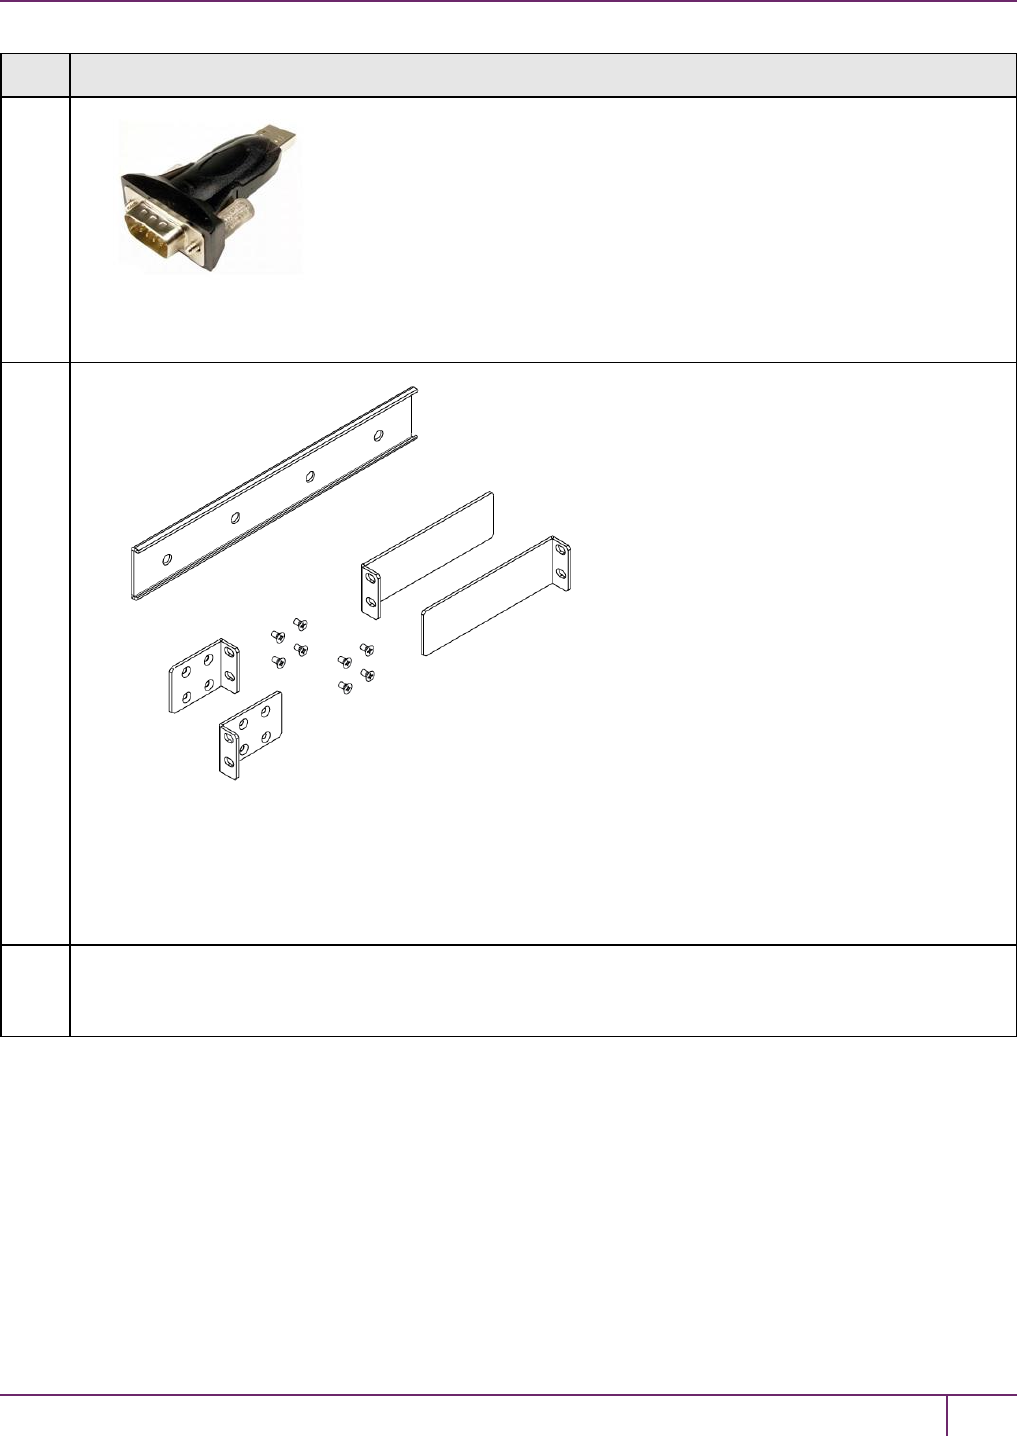
1
USB 2.0 to RS232 Serial Adapter
1
Set of:
- 2 front Mounting Brackets with Screws,
- 2 Side Bracket Guides, and
- 2 Sliding Rear Brackets (fit into the guides for rear support adjustable positioning).
1Client / SDK Software (**)
(*We mention power cords, because you need them, but they are no longer included with the shipment from our
factory. Many customers are buying HSMs from one country, but shipping them for final deployment to different
countries, which has resulted in many wasted power cords that are incorrect format for destination countries. So,
please source your power cords locally for the deployment destination.)
(**Software is available by download from Gemalto. Physical media for software and documentation are special-
request items. )
SafeNet Network HSM Installation Guide
Release 6.2.2 Rev. A December 2016 Copyright 2001-2016 GemaltoAll rights reserved. 14

1 SafeNet Network HSM Hardware Installation
SafeNet PED?
Additionally, if your SafeNet Network HSM is the PED-authenticated version, then you might also have ordered the
following items (next page).
Note that you can use SafeNet PEDs and PED Keys that you already own and use with other HSMs, if they have
firmware 2.4.0 or later – PEDs of the same type are interchangeable, and PED Keys can be used with multiple HSMs if
that is appropriate in your context. You should purchase the number you need for your own convenient operation, and
for backup/standby units as your security policies might require.
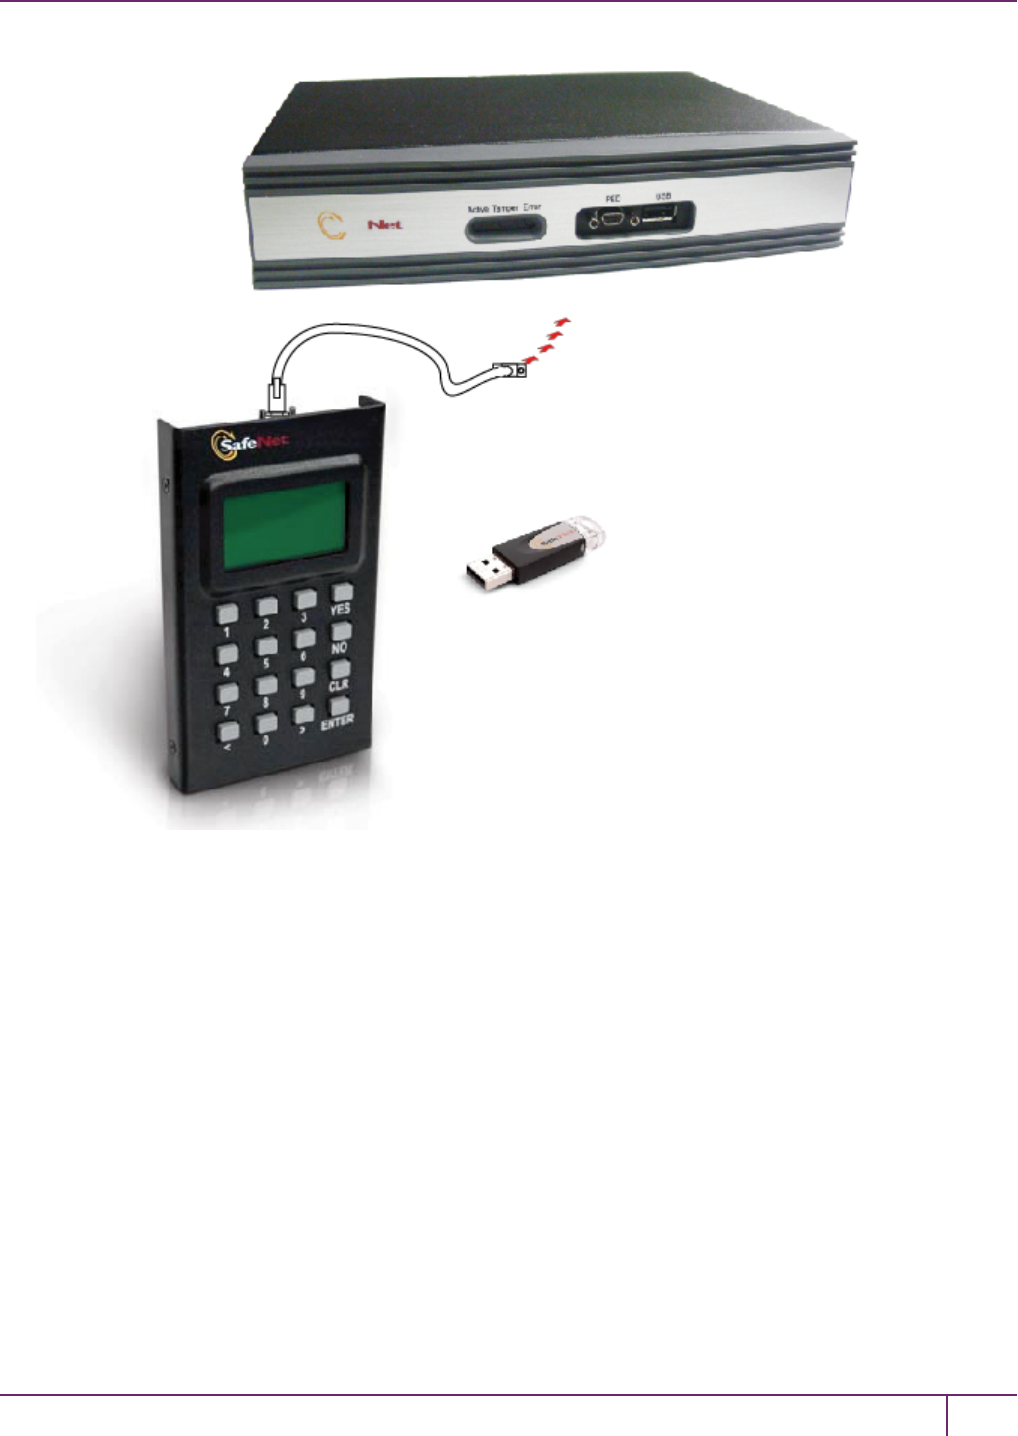
If you intend to use Remote PED functions, you will need a SafeNet PED 2 Remote version.
The standard SafeNet PED 2 is capable of local operation only.
Your order should include a PED 2 device. To use PED-authenticated SafeNet HSM with Remote PED function
requires a Remote Capable PED – the standard PED does not have the Remote capability. They appear almost
identical except for a label “PED Remote” on the front, and the availability of the “Remote” menu when powered on.
SafeNet Local PED cable
Your order should include a 9-pin, Micro-D to Micro-D cable for local PED operation.
SafeNet Network HSM Installation Guide
Release 6.2.2 Rev. A December 2016 Copyright 2001-2016 GemaltoAll rights reserved. 15
1 SafeNet Network HSM Hardware Installation
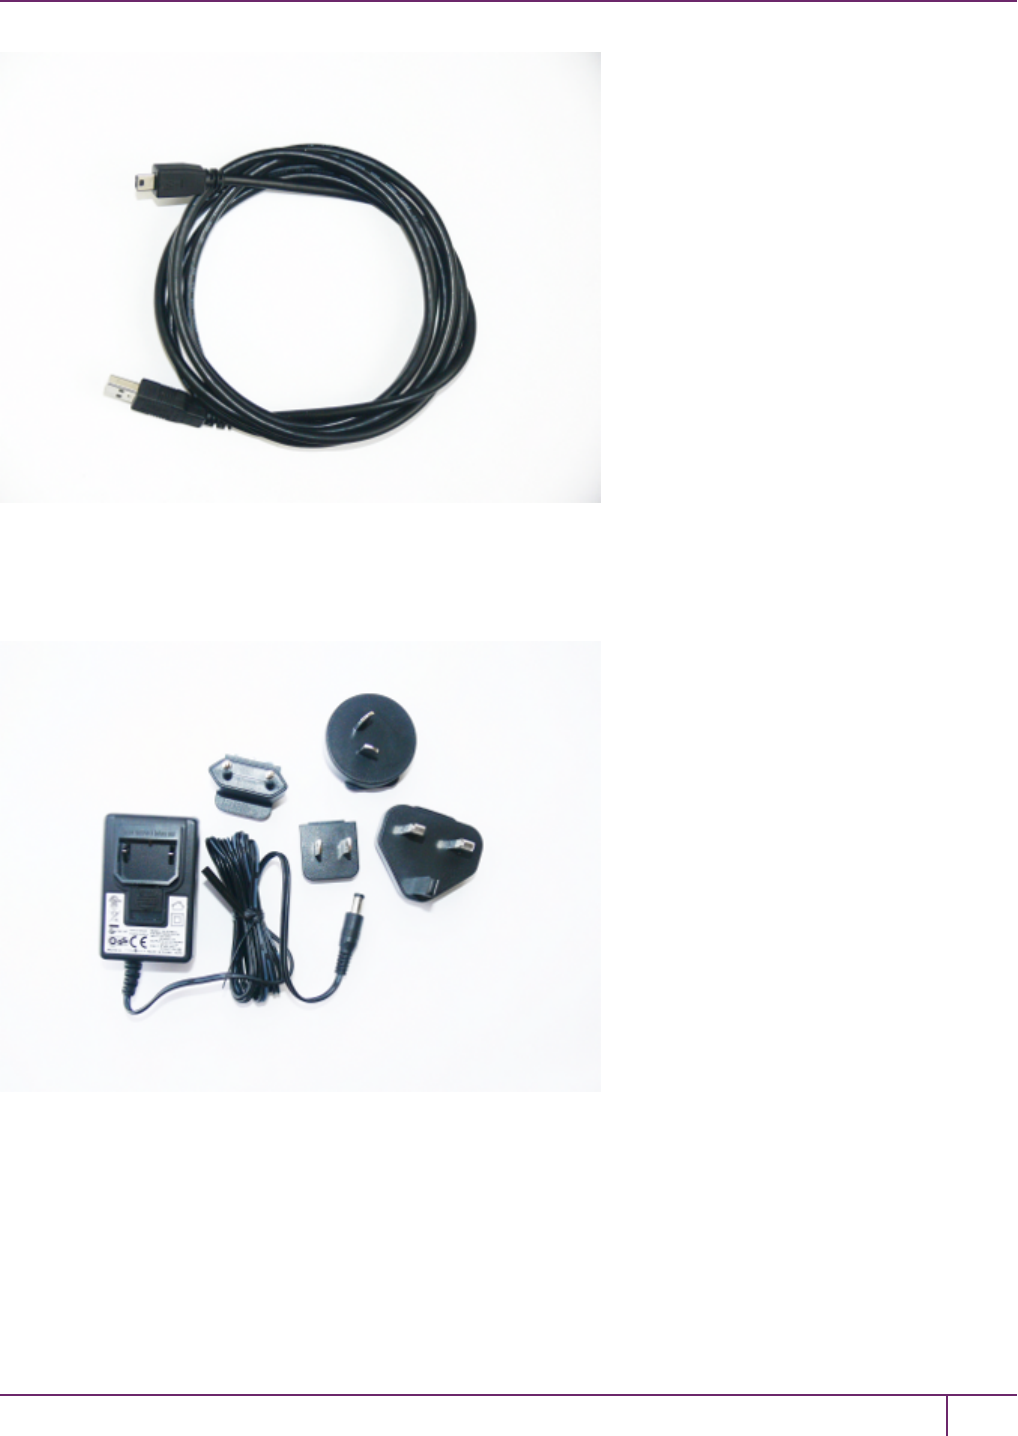
SafeNet Remote PED cable (Remote PED only)
If you ordered a SafeNet remote PED, your order should include a Type A to Mini B USB cable for remote PED
operation.
SafeNet Remote PED Power Supply Kit (Remote PED only)
If you ordered a SafeNet Remote PED, your order should include a SafeNet Remote PED power supply kit. The power
supply is auto-sensing and includes replaceable mains plug modules for international use.
PED Keys and Labels
Your order should include a set of iKey PED Keys and peel-and-stick labels.
SafeNet Network HSM Installation Guide
Release 6.2.2 Rev. A December 2016 Copyright 2001-2016 GemaltoAll rights reserved. 16

1 SafeNet Network HSM Hardware Installation
(* Standard PED 2 is shown. To use SafeNet Network HSM with Remote PED function requires a Remote Capable
PED – the standard PED does not have the Remote capability. They appear identical except for the availability of the
“Remote” menu when powered on.)
Additional Options?
[Optionally]
You can back up your selected SafeNet Network HSM partition contents (root keys, certificates, other items) to a
SafeNet Remote Backup HSM.
Qty Item
1
SafeNet Backup HSM(*)
(* The SafeNet SafeNet Backup HSM is a backup-storage option, suitable for off-site storage, and for backing up
multiple HSM partitions. Its contents are automatically secured at the same level of authentication security (Password
versus PED) as the HSM it is backing up. The SafeNet Backup HSM can be connected directly [locally] to an HSM, or
it can be connected to a computer to backup remotely located HSMs, in conjunction with Remote PED.)
SafeNet Network HSM Installation Guide
Release 6.2.2 Rev. A December 2016 Copyright 2001-2016 GemaltoAll rights reserved. 17
1 SafeNet Network HSM Hardware Installation
[Optionally]
You can use your SafeNet Network HSM appliance to expand the functionality and reach of applications that you might
previously have conducted with SafeNet PCMCIA tokens (SafeNet PCM and SafeNet PCM CA4), such as
Registration Authority for Smart Card issuance, or Key Escrow for managed PKI implementations, or root-key
management in the production of encrypted removable storage devices, among other possibilities. This function makes
use of the SafeNet USB HSM (very similar in appearance to the Backup HSM).
Qty Item
1
SafeNet USB HSM (for PKI)
The authentication method for external HSMs must match the authentication method for any appliance HSM with which
they are used.
SafeNet Network HSM Installation Guide
Release 6.2.2 Rev. A December 2016 Copyright 2001-2016 GemaltoAll rights reserved. 18
1 SafeNet Network HSM Hardware Installation
Installing the SafeNet Network HSM Hardware
This section provides basic SafeNet Network HSM hardware installation instructions (mounting in a rack, connecting
cables, etc.). The SafeNet Network HSM appliance comes with front brackets and side-rails and sliders for the rear
brackets, packed separately in the carton.
Installation Notes
1. Any computer that is to act as a client to the SafeNet Network HSM appliance must have the Client software
installed. Windows users should log in to your computer as a user with Administrator privileges.
2. A computer that is to be used only for administering the SafeNet Network HSM does not need the Client software –
only an SSH client such as the PuTTY program that we have provided for Windows, or the SSH utilities that come
standard with most Linux and UNIX platforms.
3. A computer that is to be used for Remote PED workstation operation against a SafeNet Network HSM must have
the PEDServer software and PED 2 USB driver installed. Applies to select Windows platforms only.
4. All three tasks (Client, administration, and Remote PED) can be performed on a single computer, but in normal
practice they are often separate tasks for separate computers.
5. See the Remote PED section if you will be using Remote PED.
Installing the SafeNet Network HSM Hardware
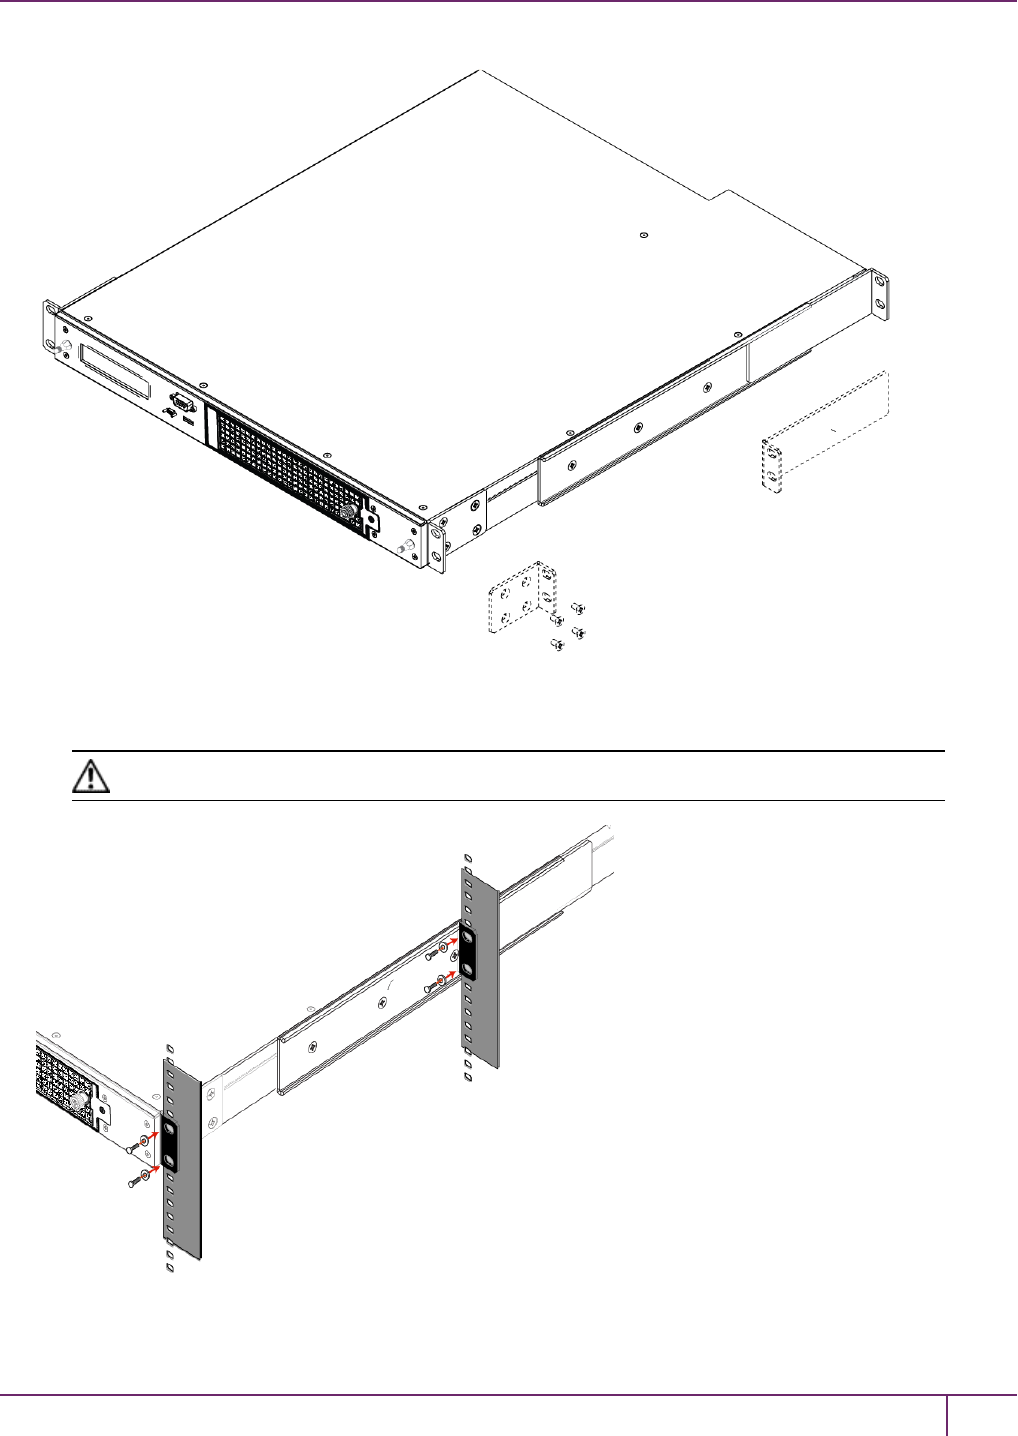
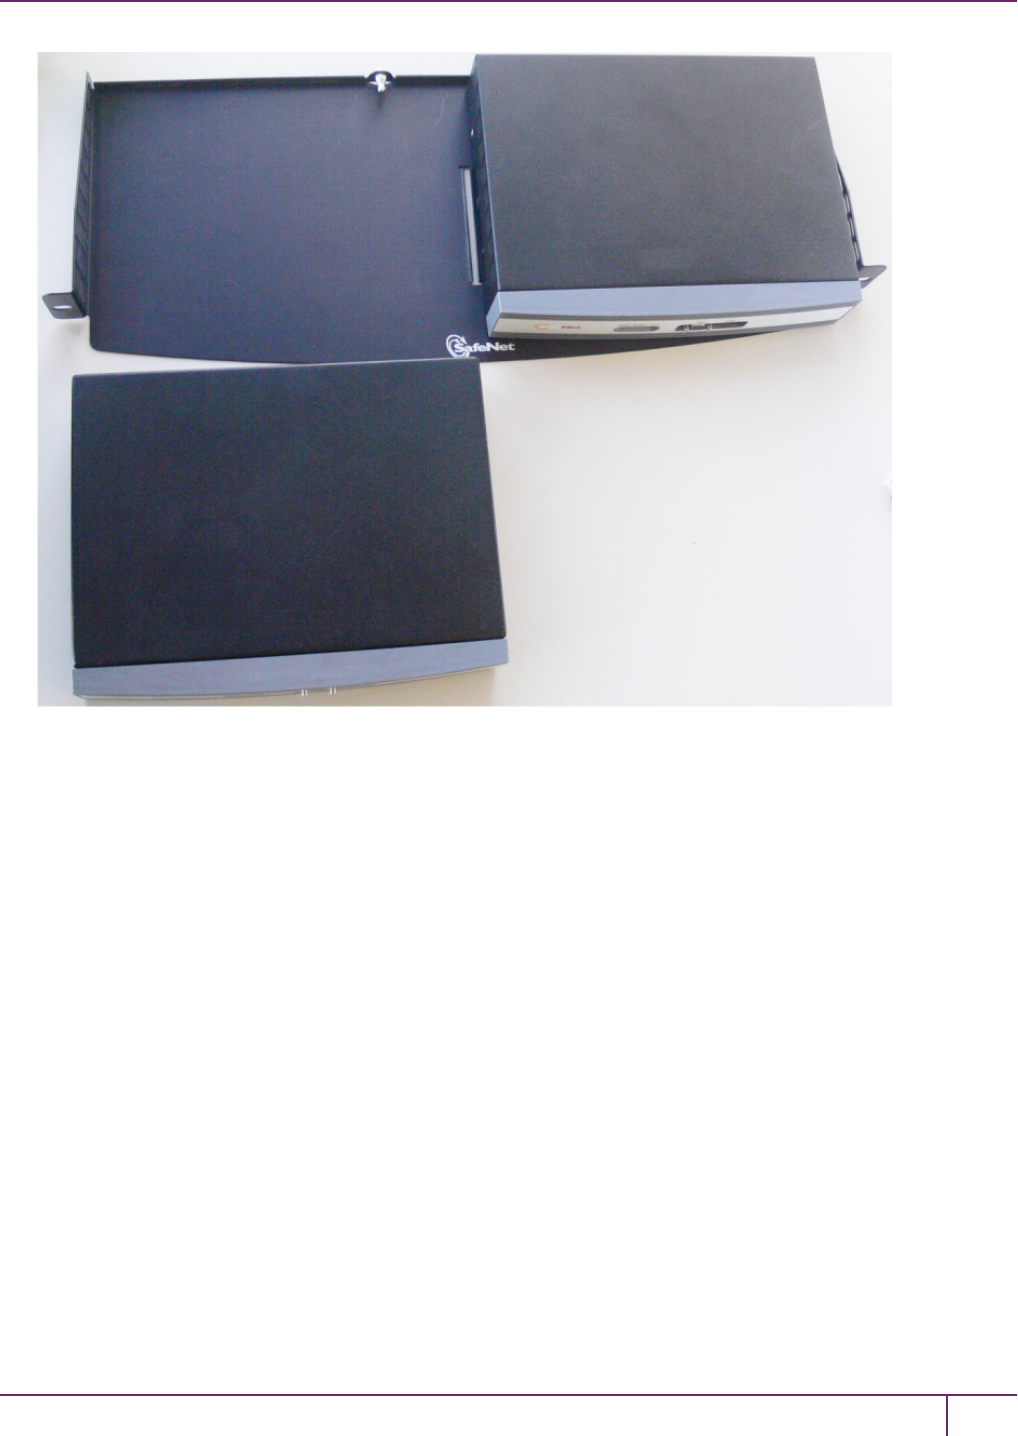
You can optionally install the brackets if they suit your equipment rack. The front brackets can be installed with their
tabs forward (for flush-mount of the appliance) or reversed, to allow the front of the appliance to stand out from the rack.
The rear brackets install in either direction – as appropriate for your rack post spacing – with the brackets simply sliding
into the rails on each side of the appliance.
The supplied brackets are designed and intended for 4-point support of the appliance, in racks with rear-post depth up to
22 inches.
CAUTION: Do not attempt to mount the appliance using only the front brackets – damage can
occur.
Note: The standard SafeNet PED 2 is capable of local operation only.
To install the SafeNet Network HSM hardware
1. Install and adjust rails and brackets to suit your equipment rack.
SafeNet Network HSM Installation Guide
Release 6.2.2 Rev. A December 2016 Copyright 2001-2016 GemaltoAll rights reserved. 19
1 SafeNet Network HSM Hardware Installation
2. Mount the appliance in your equipment rack. Alternatively, ignore the rails and mounting tabs, and rest the SafeNet
Network HSM appliance on a mounting tray or shelf suitable for your specific style and brand of equipment rack.
CAUTION: Support the weight of the appliance until all four brackets are secured.
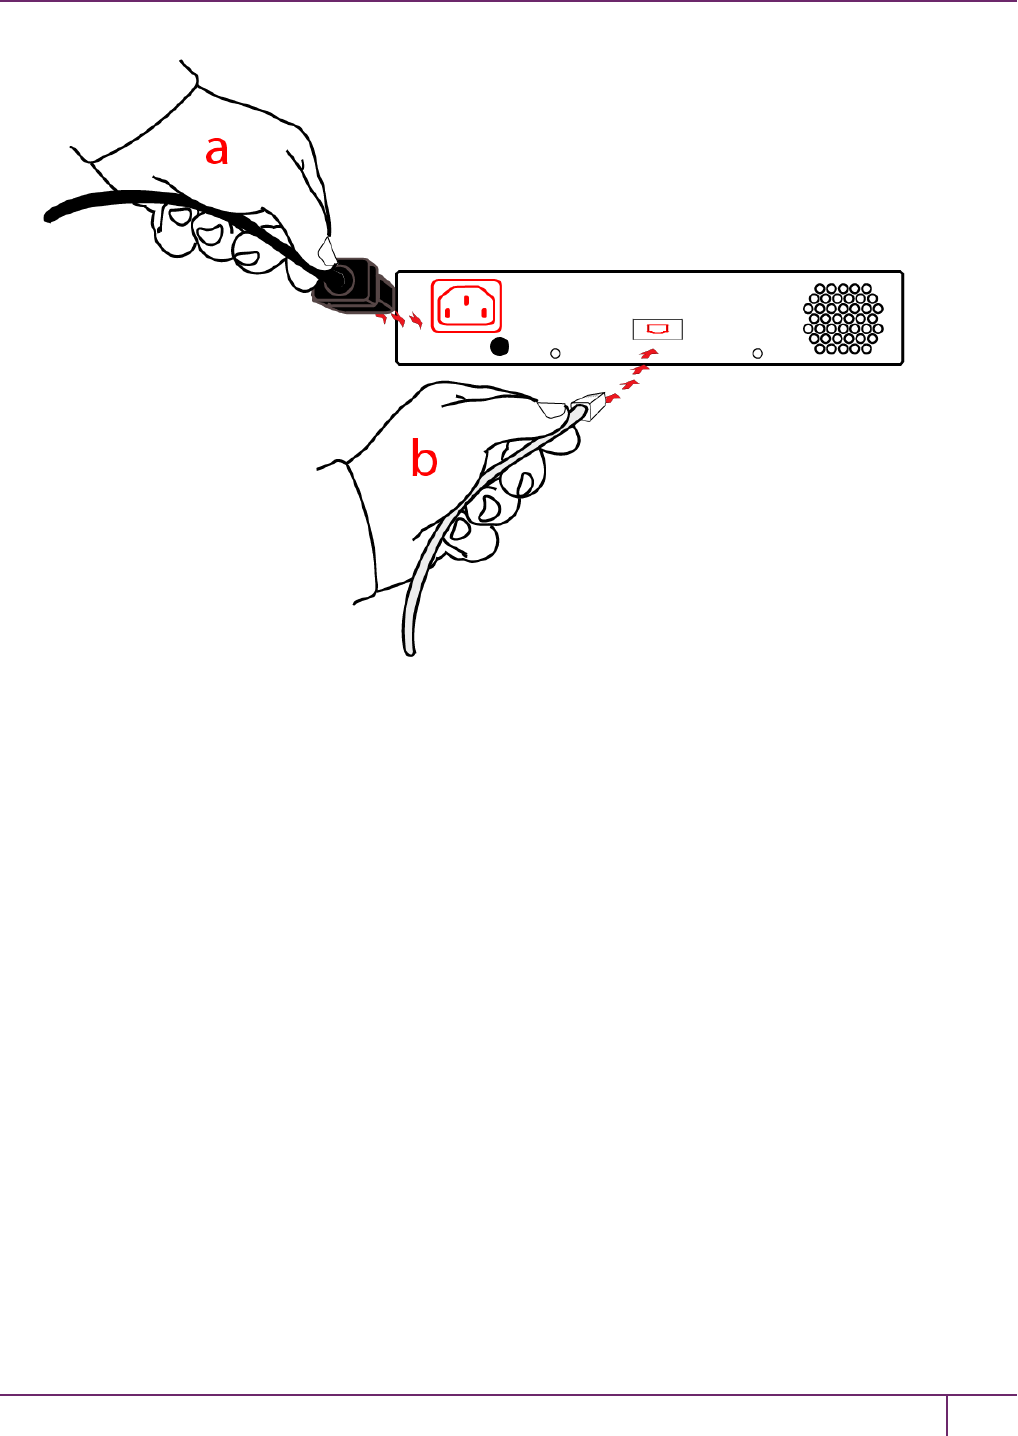
3. Insert the power (a) and network (b) cables at the rear panel.
SafeNet Network HSM Installation Guide
Release 6.2.2 Rev. A December 2016 Copyright 2001-2016 GemaltoAll rights reserved. 20

1 SafeNet Network HSM Hardware Installation
For proper redundancy and best reliability, the power cables should connect to two completely independent power
sources.
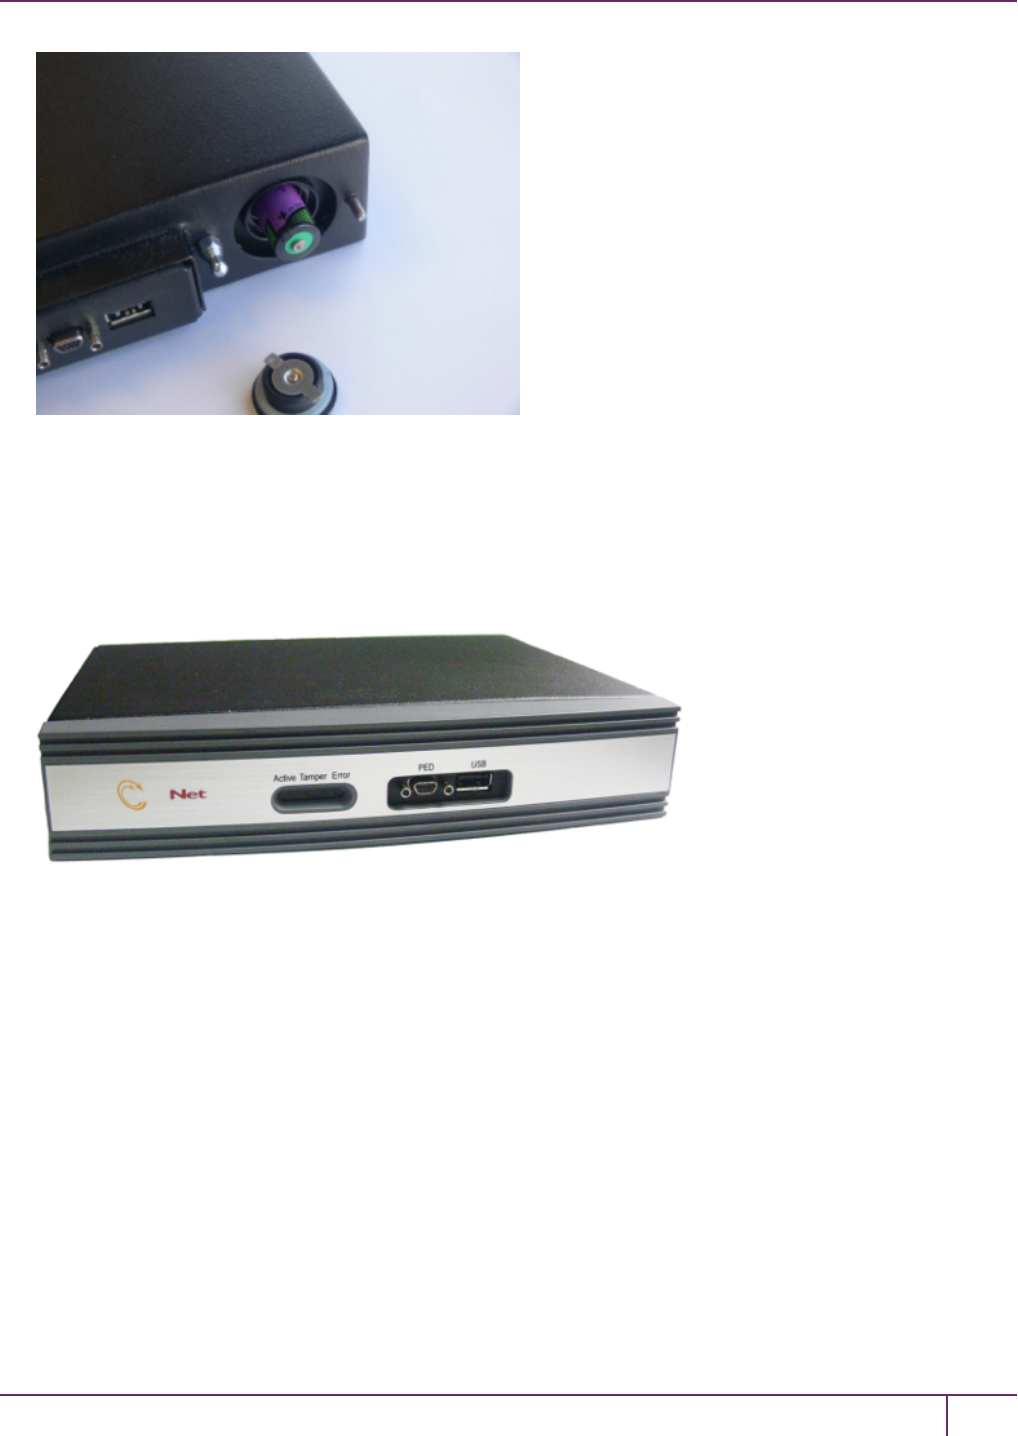
4. Connect the PED at the front panel, using the provided local PED cable – applies only for PED-authenticated HSM,
otherwise skip to the next step.
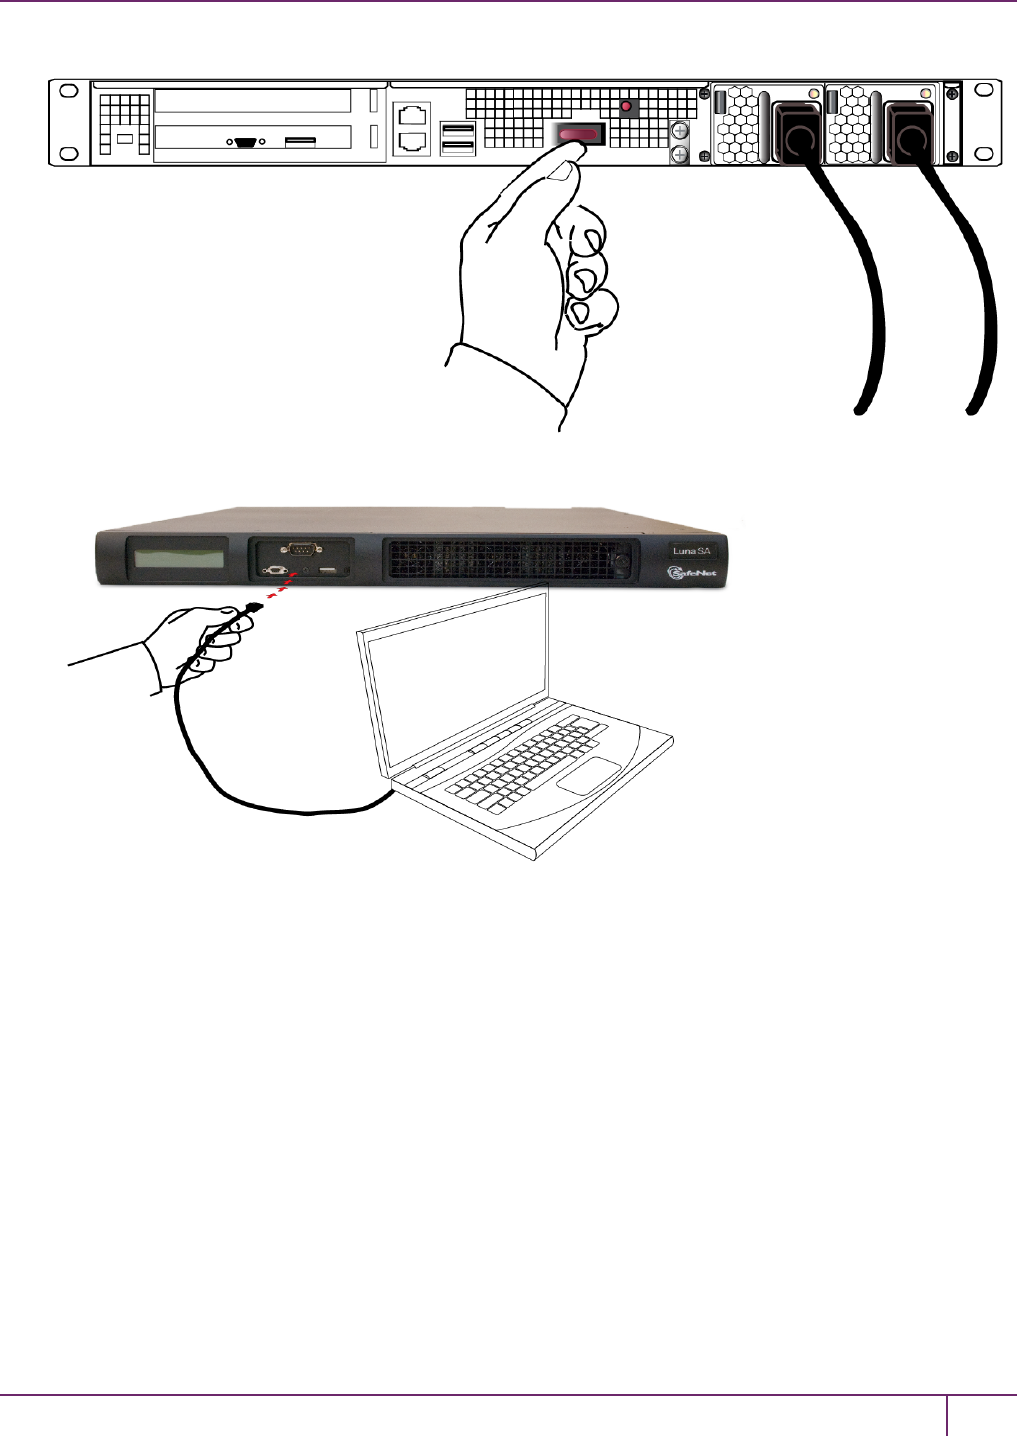
5. Press and release the Start/Stop switch, on the rear panel.
SafeNet Network HSM Installation Guide
Release 6.2.2 Rev. A December 2016 Copyright 2001-2016 GemaltoAll rights reserved. 21
1 SafeNet Network HSM Hardware Installation
6. Connect a terminal to the serial connector on the front panel.
7. If you have already installed SafeNet Client software, go to the Configuration Guide, to configure your SafeNet
HSM and peripheral devices, if appropriate.
SafeNet Network HSM Installation Guide
Release 6.2.2 Rev. A December 2016 Copyright 2001-2016 GemaltoAll rights reserved. 22

2
SafeNet PCIe HSM Hardware Installation
This chapter describes how to install and connect a SafeNet PCIe HSM. To ensure a successful installation, perform
the following tasks in the order indicated:
1. Ensure that you have all of the required components, as listed in "SafeNet PCIe HSM Required Items"on the next
page
2. Install and connect the hardware, as described in "Installing the SafeNet PCIe HSM Hardware"on page 29
Will SafeNet PCIe HSM work with host computer/server XYZ ?
The SafeNet PCIe HSM has been tested with a variety of representative systems/servers with compliant PCI express
slots. When a compatibility problem with a current brand and model computer arises, that information is made available
via our Technical Support organization.
If you encounter any issues when installing the SafeNet PCIe HSM into a new server/host computer, first try a different
PCI express slot. The design of certain motherboards or the associated BIOS may prevent proper communication with
a SafeNet PCIe HSM. For example, certain PCI express physical slots are intended for use only with a video card or
another specific type of hardware, and the SafeNet PCIe HSM may not work correctly in these slots.
If you encounter further issues, please contact SafeNet Technical Support.
SafeNet Network HSM Installation Guide
Release 6.2.2 007-011136-012Rev. A December 2016 Copyright 2001-2016 GemaltoAll rights reserved. 23
2 SafeNet PCIe HSM Hardware Installation
SafeNet PCIe HSM Required Items
This section provides a list of the components you should have received with your SafeNet PCIe HSM order. The list of
items you should have received depends on whether you ordered a password-authenticated SafeNet PCIe HSM or a
PED-authenticated SafeNet PCIe HSM, and whether you order included a backup device, as described in the following
sections:
Password-Authenticated SafeNet PCIe HSM
The following are the standard items that you should have received as your basic order for a password-authenticated
SafeNet PCIe HSM:
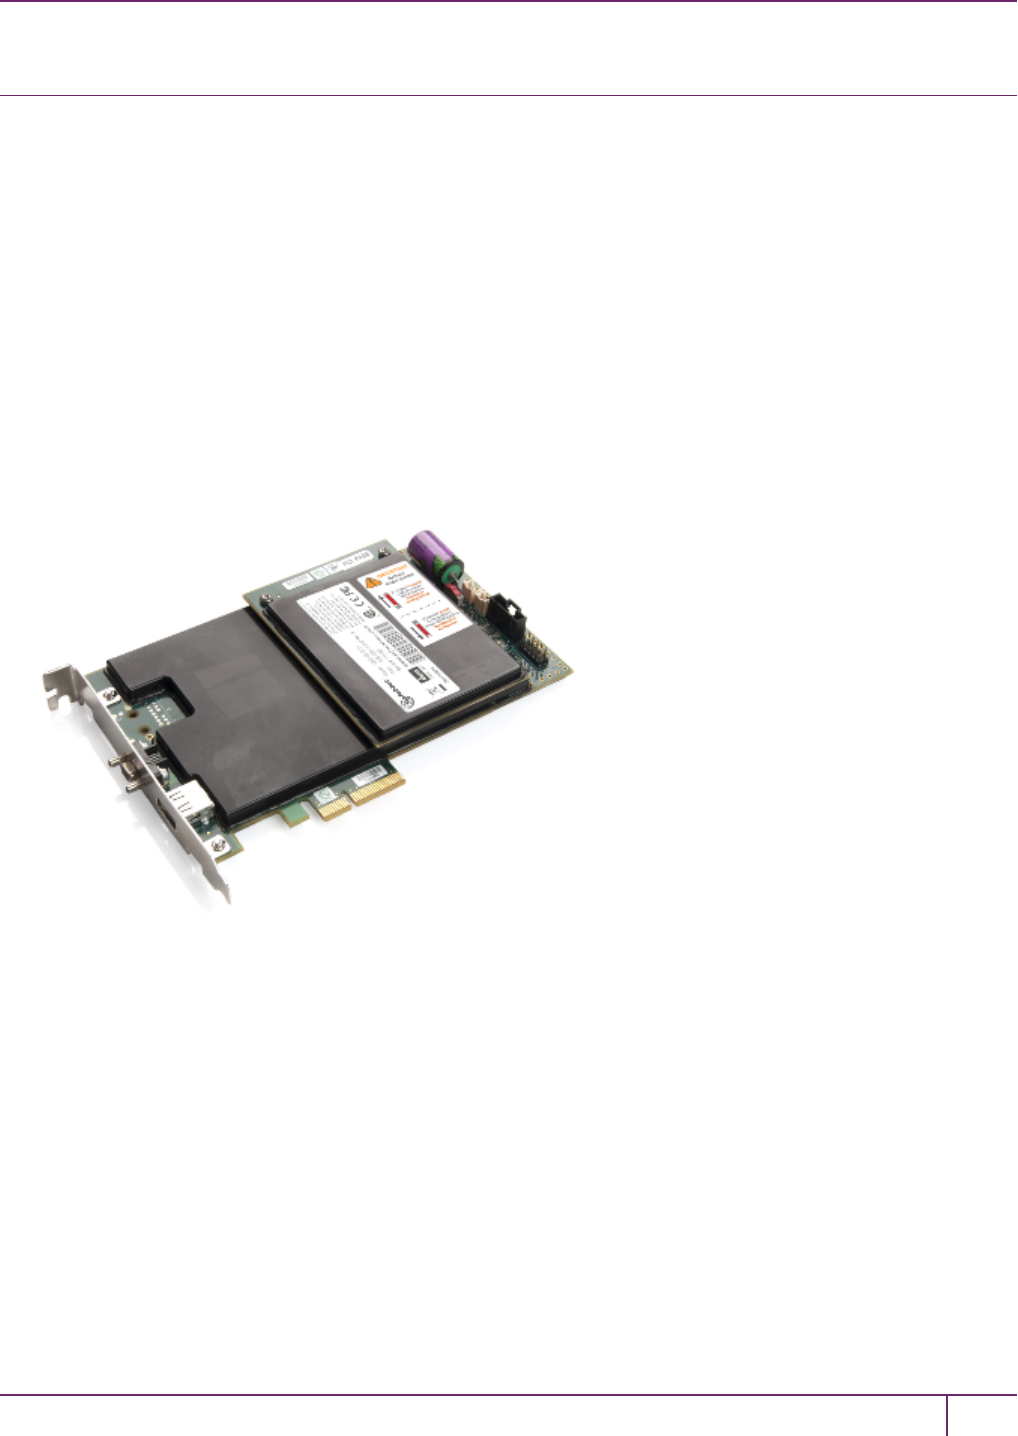
SafeNet PCIe HSM
You order should include one SafeNet PCIe HSM 7000 or SafeNet PCIe HSM 1700 HSM. Both HSM models are
physically identical.
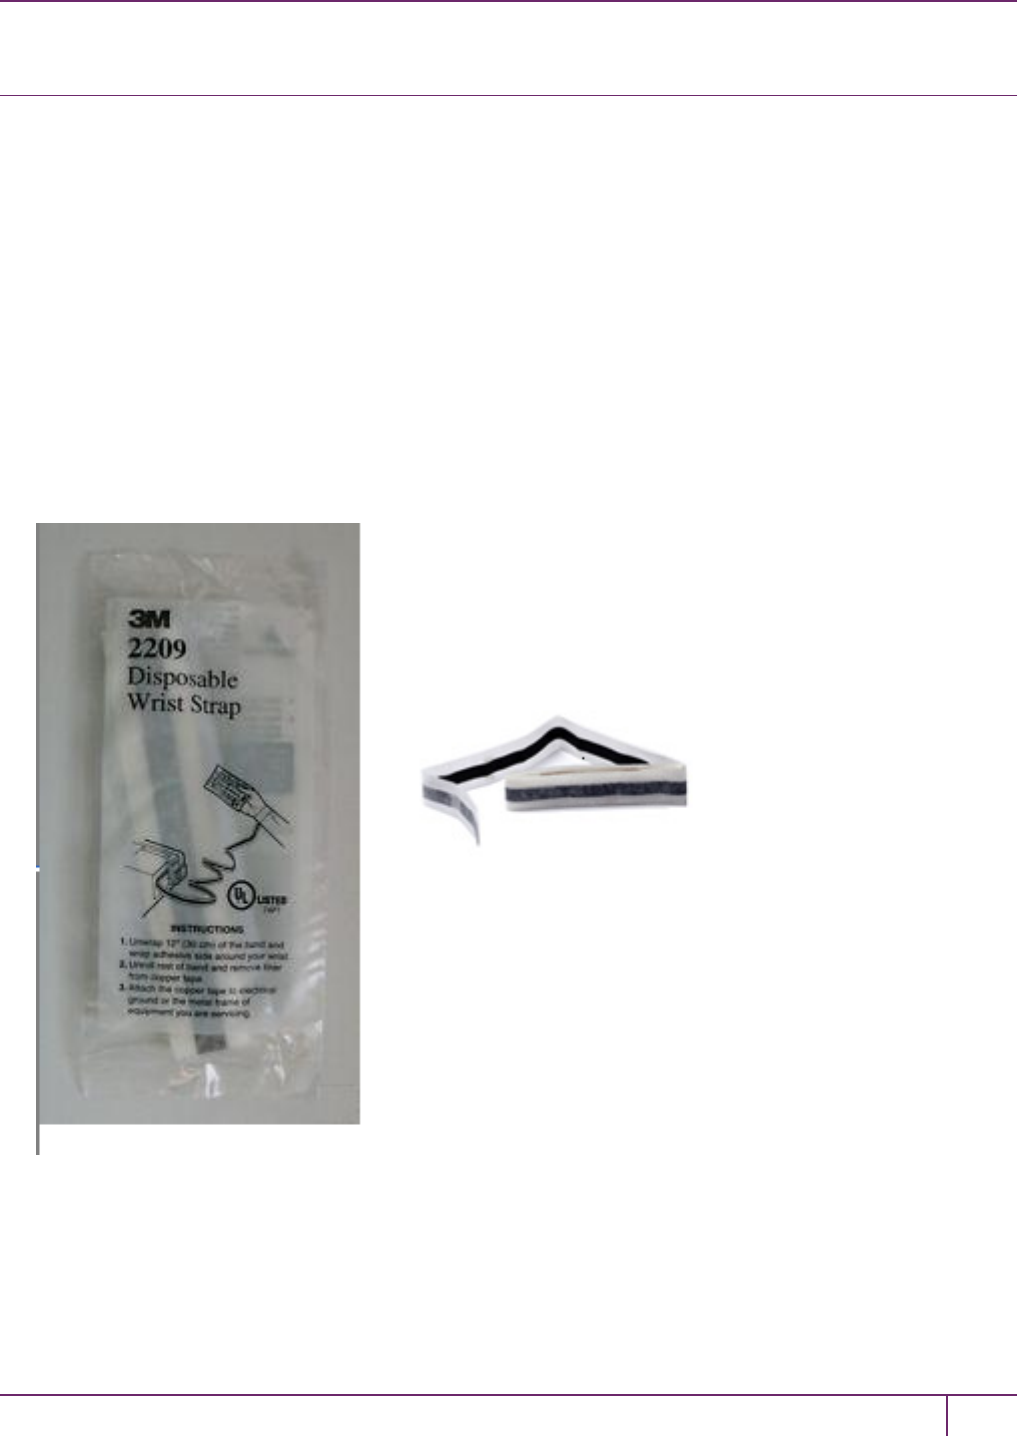
Anti-Static Wrist Strap
You order should include one anti-static wrist strap.
SafeNet Network HSM Installation Guide
Release 6.2.2 Rev. A December 2016 Copyright 2001-2016 GemaltoAll rights reserved. 24

2 SafeNet PCIe HSM Hardware Installation
Software and Documentation *
*Software is available by download from Gemalto. Physical media for software and documentation are special-
request items.
PED-Authenticated SafeNet PCIe HSM
For local-only operation, where you work at the same computer that contains your PED-Authenticated SafeNet PCIe
HSM, you require at least a single, local-only SafeNet PED2. The standard SafeNet PED 2 is capable of local operation
only.
If you intend to use Remote PED functions, you will need a SafeNet PED2 (capable of remote or local PED operation).
If you intend to backup your SafeNet PCIe HSM to a Backup HSM, then you require a SafeNet PED2 to connect to that
Backup HSM.
If you intend to combine remote operation and backup, then you should have at least one remote-capable SafeNet
PED2 (for remote connection to the SafeNet PCIe HSM). For convenience you might prefer to have a second PED
(which can be local-only for the Backup HSM). It is possible to use a single Remote-capable SafeNet PED2 for both
connections, and to simply change modes (local or remote mode) as needed.
The following are the items that you receive when you purchase a standard SafeNet PED2 (local-only capable).
SafeNet Network HSM Installation Guide
Release 6.2.2 Rev. A December 2016 Copyright 2001-2016 GemaltoAll rights reserved. 25
2 SafeNet PCIe HSM Hardware Installation
Note: You can use SafeNet PEDs and PED Keys that you already own and use with other
HSMs – PEDs of the same type and version (v2.3.0 and later) are interchangeable, and PED
Keys can be imprinted for use with multiple HSMs if that is appropriate in your context (the only
exception is the SRK, which is specific to a single SafeNet PCIe HSM). You should purchase
the number you need for your own convenient operation, and for backup/standby units as your
security policies might require.
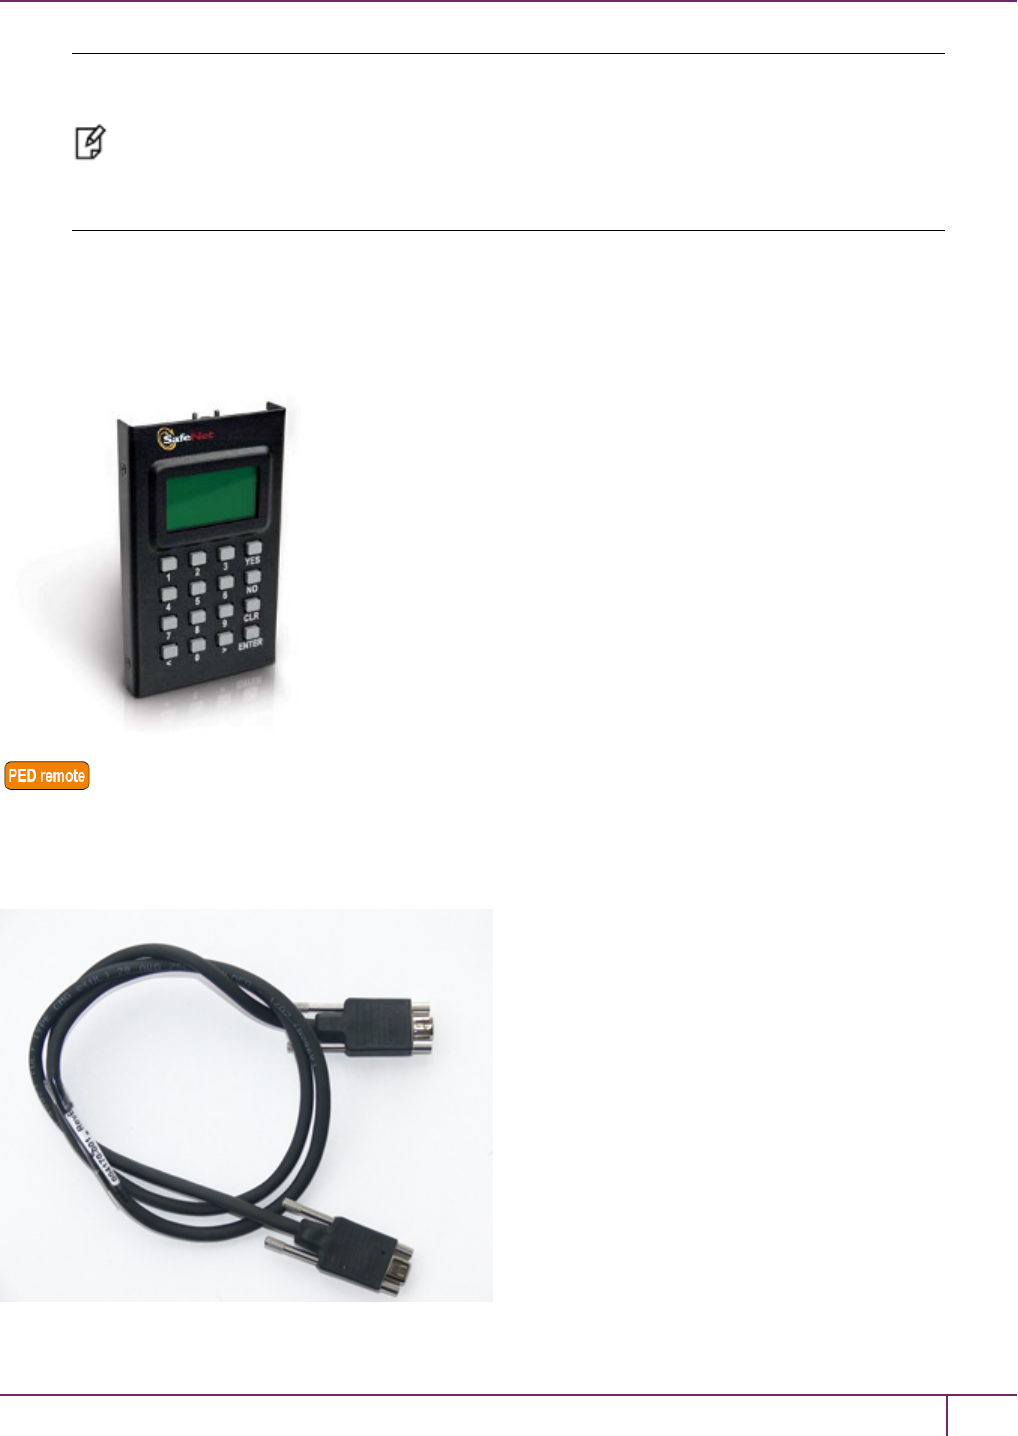
SafeNet PED
Your order should include a PED 2 device. To use PED-authenticated SafeNet HSM with Remote PED function
requires a Remote Capable PED – the standard PED does not have the Remote capability. They appear almost
identical except for a label “PED Remote” on the front, and the availability of the “Remote” menu when powered on.
SafeNet Local PED cable
Your order should include a 9-pin, Micro-D to Micro-D cable for local PED operation.
SafeNet Network HSM Installation Guide
Release 6.2.2 Rev. A December 2016 Copyright 2001-2016 GemaltoAll rights reserved. 26

2 SafeNet PCIe HSM Hardware Installation
SafeNet Remote PED cable (Remote PED only)
If you ordered a SafeNet remote PED, your order should include a Type A to Mini B USB cable for remote PED
operation.
SafeNet Remote PED Power Supply Kit (Remote PED only)
If you ordered a SafeNet Remote PED, your order should include a SafeNet Remote PED power supply kit. The power
supply is auto-sensing and includes replaceable mains plug modules for international use.
PED Keys and Labels
Your order should include a set of iKey PED Keys and peel-and-stick labels.
SafeNet Network HSM Installation Guide
Release 6.2.2 Rev. A December 2016 Copyright 2001-2016 GemaltoAll rights reserved. 27

2 SafeNet PCIe HSM Hardware Installation
Backup Device
You can back up your selected SafeNet PCIe HSM partition contents (root keys, certificates, other items) to a SafeNet
Remote Backup HSM. The SafeNet Remote Backup HSM is a backup-storage option, suitable for off-site storage, and
for backing up multiple HSM partitions. The Backup HSM can backup contents of Password authenticated or of PED
authenticated HSMs. It must be initialized as one or the other type before the backup operation starts.
The SafeNet Remote Backup HSM can be connected directly to an HSM, or it can be connected to a separate
computer to backup remotely located HSMs, in conjunction with Remote PED.
The authentication method for external HSMs must match the authentication method for any internally installed HSM
with which they are used (password or PED).
SafeNet Remote Backup HSM
You order may include a SafeNet Remote Backup HSM.
SafeNet Network HSM Installation Guide
Release 6.2.2 Rev. A December 2016 Copyright 2001-2016 GemaltoAll rights reserved. 28
2 SafeNet PCIe HSM Hardware Installation
Installing the SafeNet PCIe HSM Hardware
This section describes how to perform the following tasks:
•install the SafeNet PCIe HSM card into the host computer. See "Installing the SafeNet PCIe HSM Card Into the
Host Computer"below.
•connect a local PED, if necessary. See "Connecting a Local PED"on page 31
•connect a remote PED, if necessary. See "Connecting a Remote PED"on page 32
Installing the SafeNet PCIe HSM Card Into the Host Computer
You install the SafeNet PCIe HSM card into an open PCIe slot on the host computer.
To install the SafeNet PCIe HSM hardware
1. Open your computer, and remove the slot-cover bracket from an available PCIe slot. If the bracket is secured by a
screw, retain that screw.
2. Use the provided anti-static wrist-strap to ground yourself to an exposed metal part of the computer chassis.
3. Remove the SafeNet PCIe HSM 7000 or SafeNet PCIe HSM 1700 from its anti-static packaging and prepare to
insert the card into your computer.
SafeNet Network HSM Installation Guide
Release 6.2.2 Rev. A December 2016 Copyright 2001-2016 GemaltoAll rights reserved. 29
2 SafeNet PCIe HSM Hardware Installation
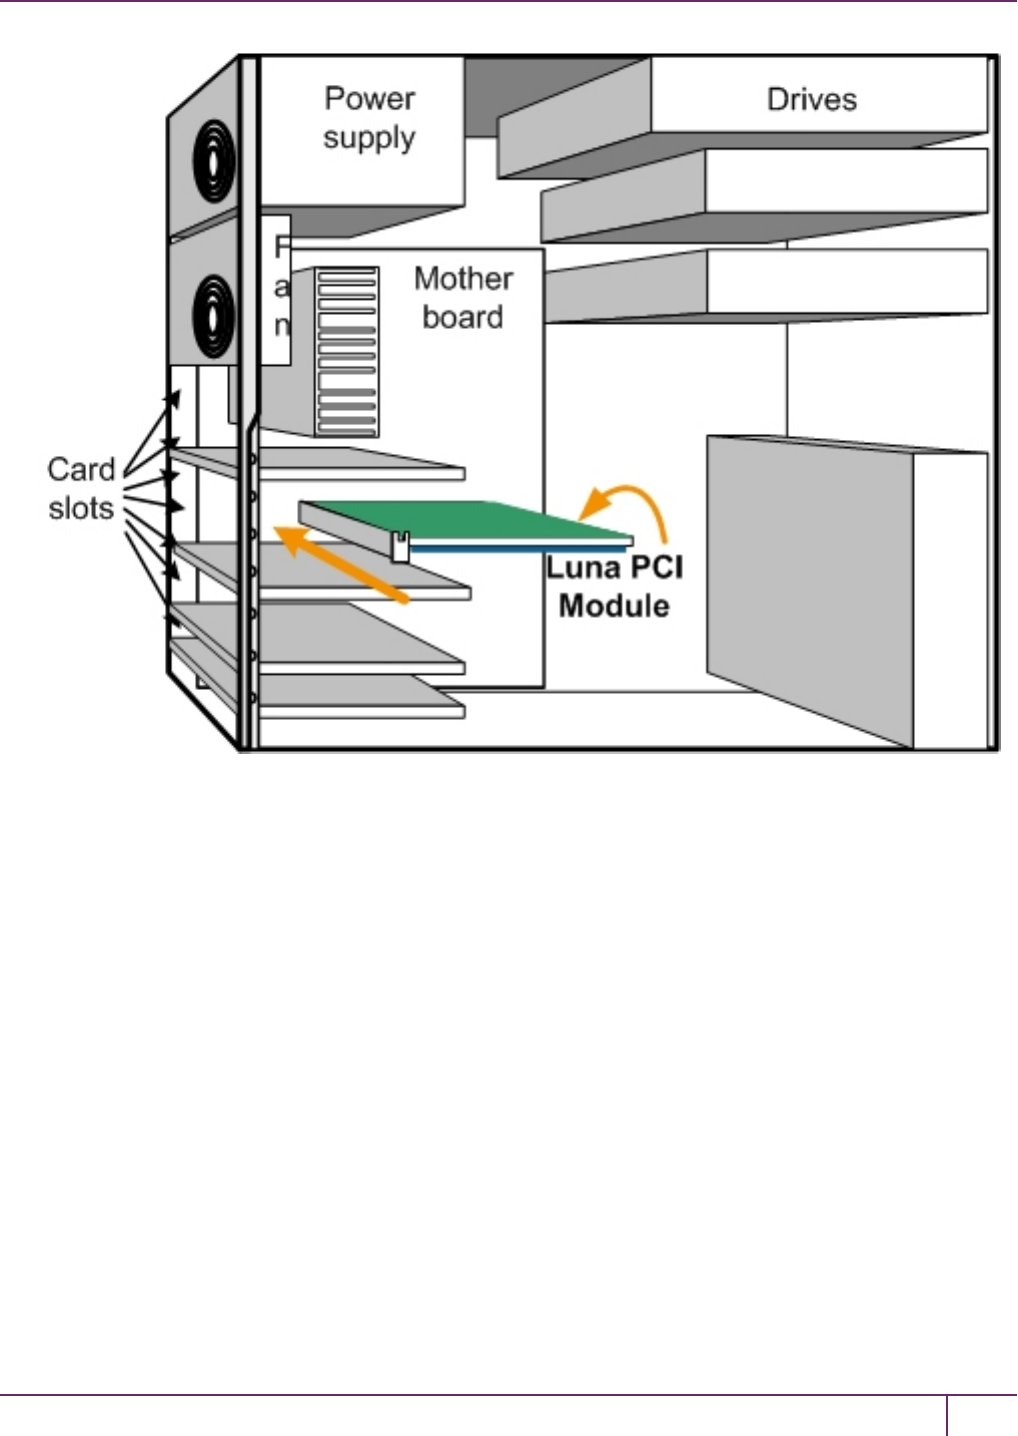
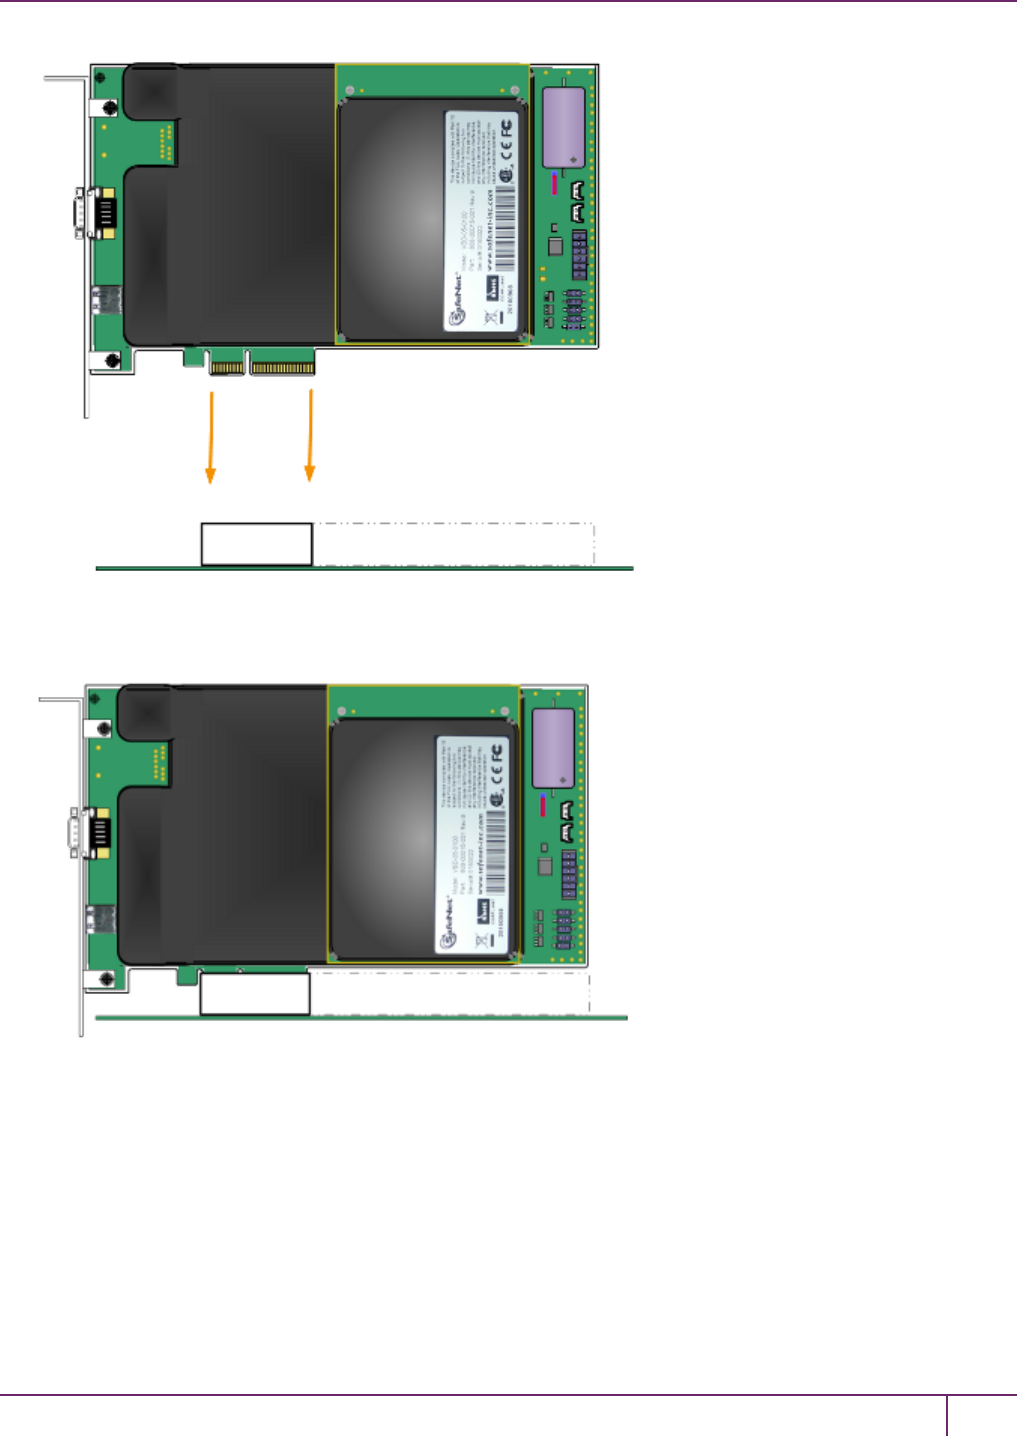
4. Align the SafeNet PCIe HSM card with the vacant slot. You might need to introduce the tip of the card-hold-down
bracket first (the silver-metal part along the back edge of the card), in order to properly align the card with the
connector. You can use a PCIe X4 or larger slot, as long as it is wired for at least four PCI express channels, and
not reserved for a dedicated function. For example, we do not recommend that you use your SafeNet PCIe HSM
card in a designated PCI-express video slot - different models of computer and their BIOS firmware can differ in
how faithfully they support the PCIe standard.
SafeNet Network HSM Installation Guide
Release 6.2.2 Rev. A December 2016 Copyright 2001-2016 GemaltoAll rights reserved. 30
2 SafeNet PCIe HSM Hardware Installation
5. Insert the SafeNet PCIe HSM card, gently but firmly, into the connector. It should go straight in – angling the card
might cause it to bind. The card is properly seated when no portion of the gold-colored contacts of the card
protrudes above the connector socket.
6. Secure the card-hold-down bracket with a screw.
7. Close the computer.
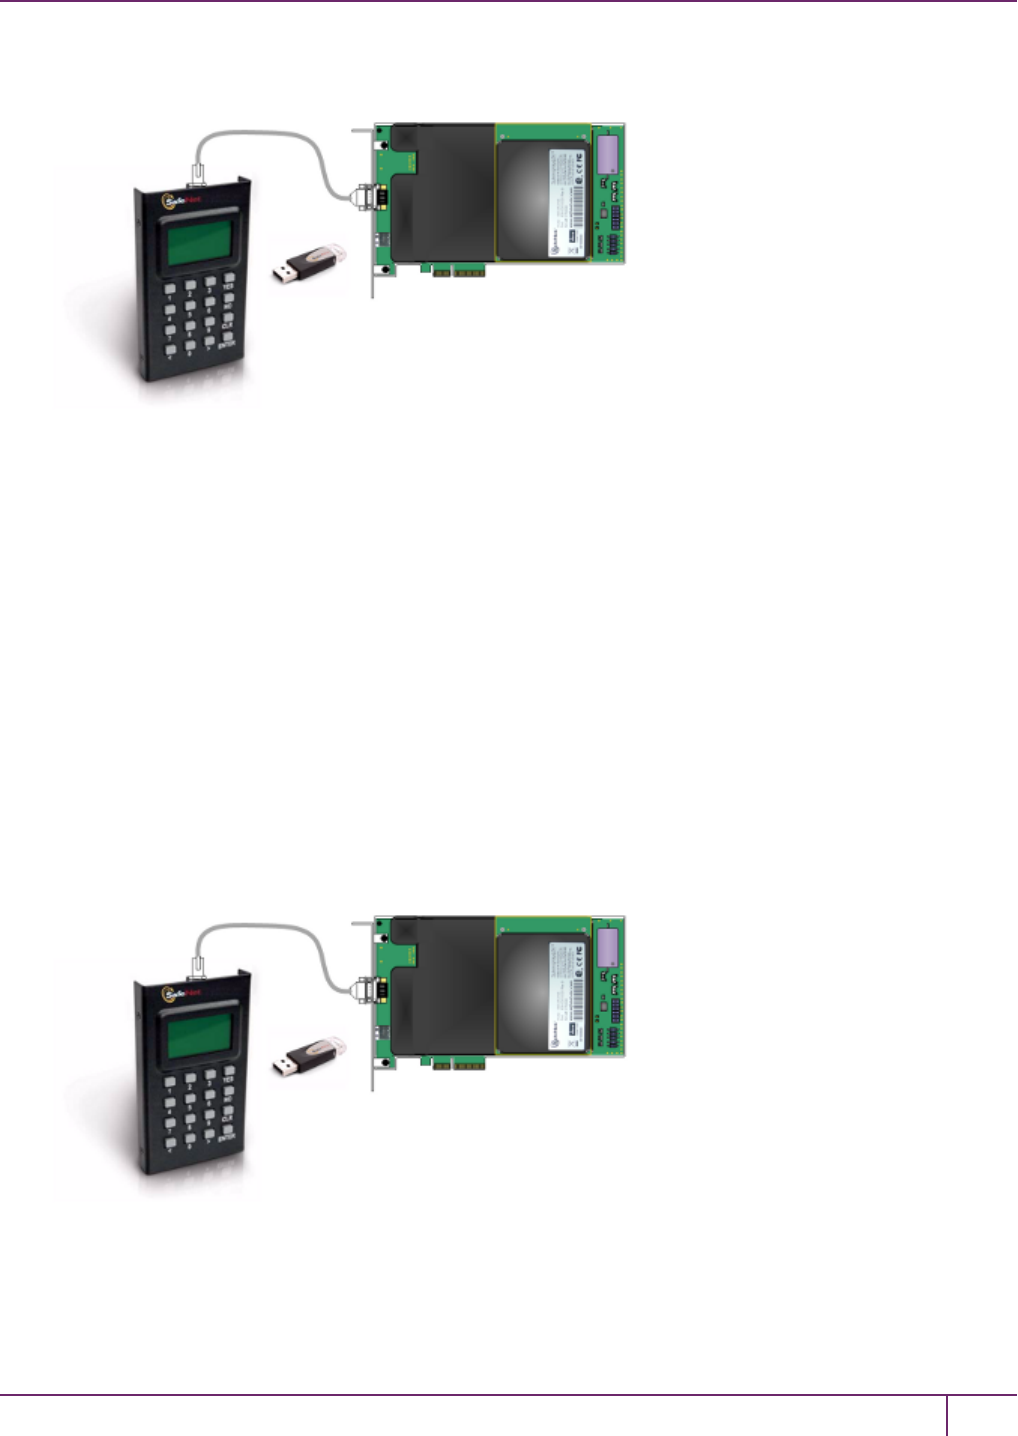
Connecting a Local PED
The local SafeNet PED (or a SafeNet PED Remote used locally) connects directly to the 9-pin Micro-D connector on
the SafeNet PCIe HSM card.
To connect a local PED to the SafeNet PCIe HSM
1. Use the SafeNet PED local cable (mini-D-shell 9-pin connectors at both ends) to connect the SafeNet PED to the
SafeNet Network HSM Installation Guide
Release 6.2.2 Rev. A December 2016 Copyright 2001-2016 GemaltoAll rights reserved. 31
2 SafeNet PCIe HSM Hardware Installation
SafeNet PCIe HSM card.
Connecting a Remote PED
The Remote-Capable PED can be used either locally, connected directly to a SafeNet HSM (exactly as for the
standard PED), or remotely when connected to a suitable workstation and to the electrical main power supply. The
normal local use of a PEDwith Remote PED capability is to use it in local mode to prepare an HSM (imprint an RPK –
the orange key with a Remote PED Vector) before shipping it to its remote location. Then you would switch to Remote
PED mode.
To prepare an HSM for Remote PED operation you need to connect it locally and imprint the HSM with a Remote PED
Key (orange). Once the HSM can be reached via remote desktop connection, and the HSM is associated with an
orange PED Key, all further configuration and administration can be performed remotely.
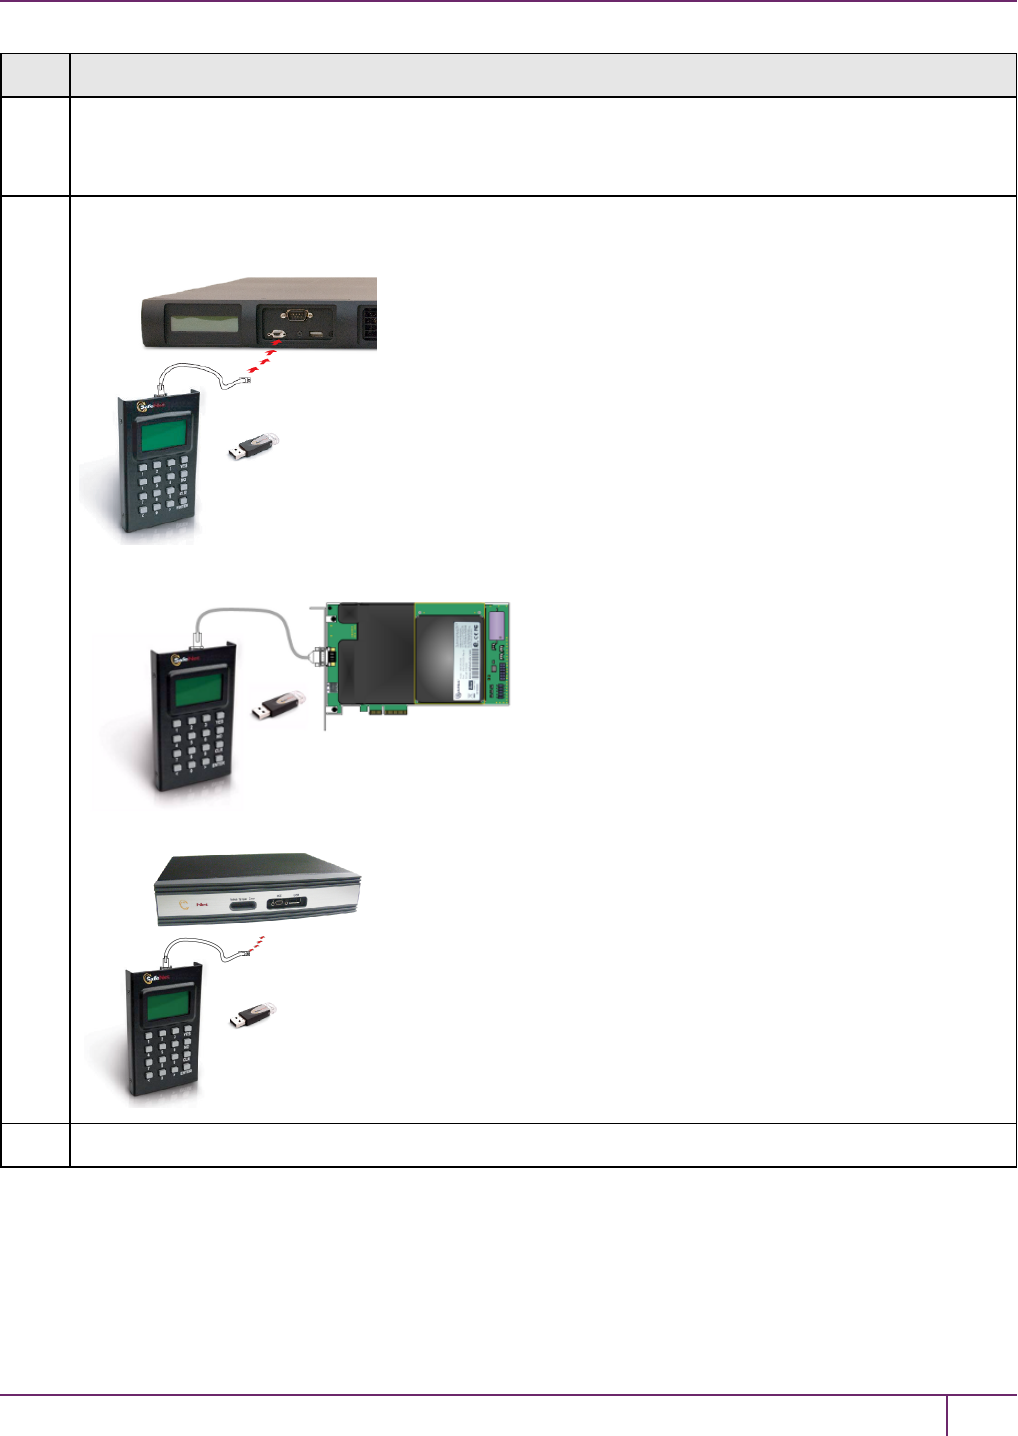
To connect a remote PED to the SafeNet PCIe HSM
1. Use the SafeNet PED local cable to connect the SafeNet PED to the SafeNet PCIe HSM card. This step is
required to imprint the HSM with a Remote PED Vector (RPV) using the orange PED key (RPK). This should be
the only time you need to connect a PED locally to the HSM. Once the orange PED Key is imprinted with the same
RPV as the HSM, all future PED operations can be performed remotely.
2. Follow the instructions in the Administration Guide to configure the remote PED. Note that you must install at least
the Remote PED optional component of the SafeNet Client software before you can configure the remote PED.
See "SafeNet HSM Client Software Installation "on page 56.
SafeNet Network HSM Installation Guide
Release 6.2.2 Rev. A December 2016 Copyright 2001-2016 GemaltoAll rights reserved. 32

3
SafeNet USB HSM Hardware Installation
This chapter describes how to install and connect a SafeNet USB HSM. To ensure a successful installation, perform
the following tasks in the order indicated:
1. Ensure that you have all of the required components, as listed in "SafeNet USB HSM Required Items"on the next
page
2. Install the included removable battery, as described in "Installing the Battery in the SafeNet USB HSM or Backup
HSM"on page 39. The SafeNet USB HSM requires the battery to operate.
3. Install and connect the hardware, as described in "Installing the SafeNet USB HSM Hardware"on page 41
SafeNet Network HSM Installation Guide
Release 6.2.2 007-011136-012Rev. A December 2016 Copyright 2001-2016 GemaltoAll rights reserved. 33

3 SafeNet USB HSM Hardware Installation
SafeNet USB HSM Required Items
This section provides a list of the components you should have received with your SafeNet USB HSM order. The list of
items you should have received depends on whether you ordered a password-authenticated SafeNet USB HSM or a
PED-authenticated SafeNet USB HSM, as described in the following sections:
Password-Authenticated SafeNet USB HSM
The following are the standard items that you should have received as your basic order for a password-authenticated
SafeNet USB HSM:
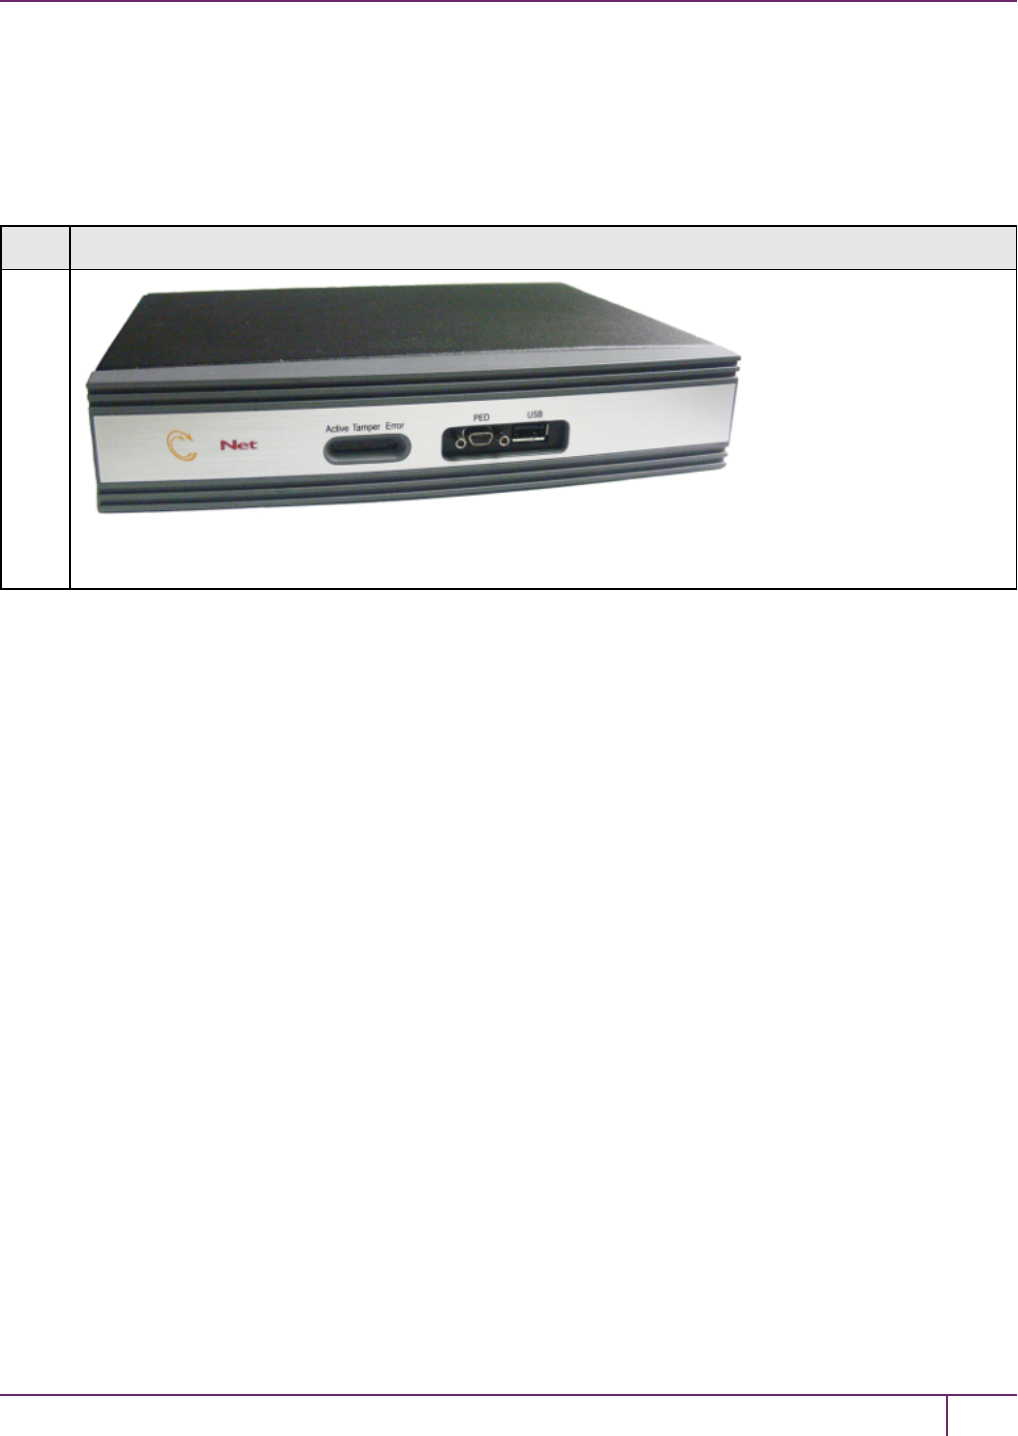
SafeNet USB HSM
You order should include one SafeNet USB HSM.
Power Cord *
*We no longer ship power cords with the SafeNet HSM products. Please source locally the appropriate standard
IT/commercial equipment power cord. We found that many customers order and receive product in one country and
then deploy in other countries and regions - too many original-equipment power cords were being discarded as
inappropriate for the eventual destination.
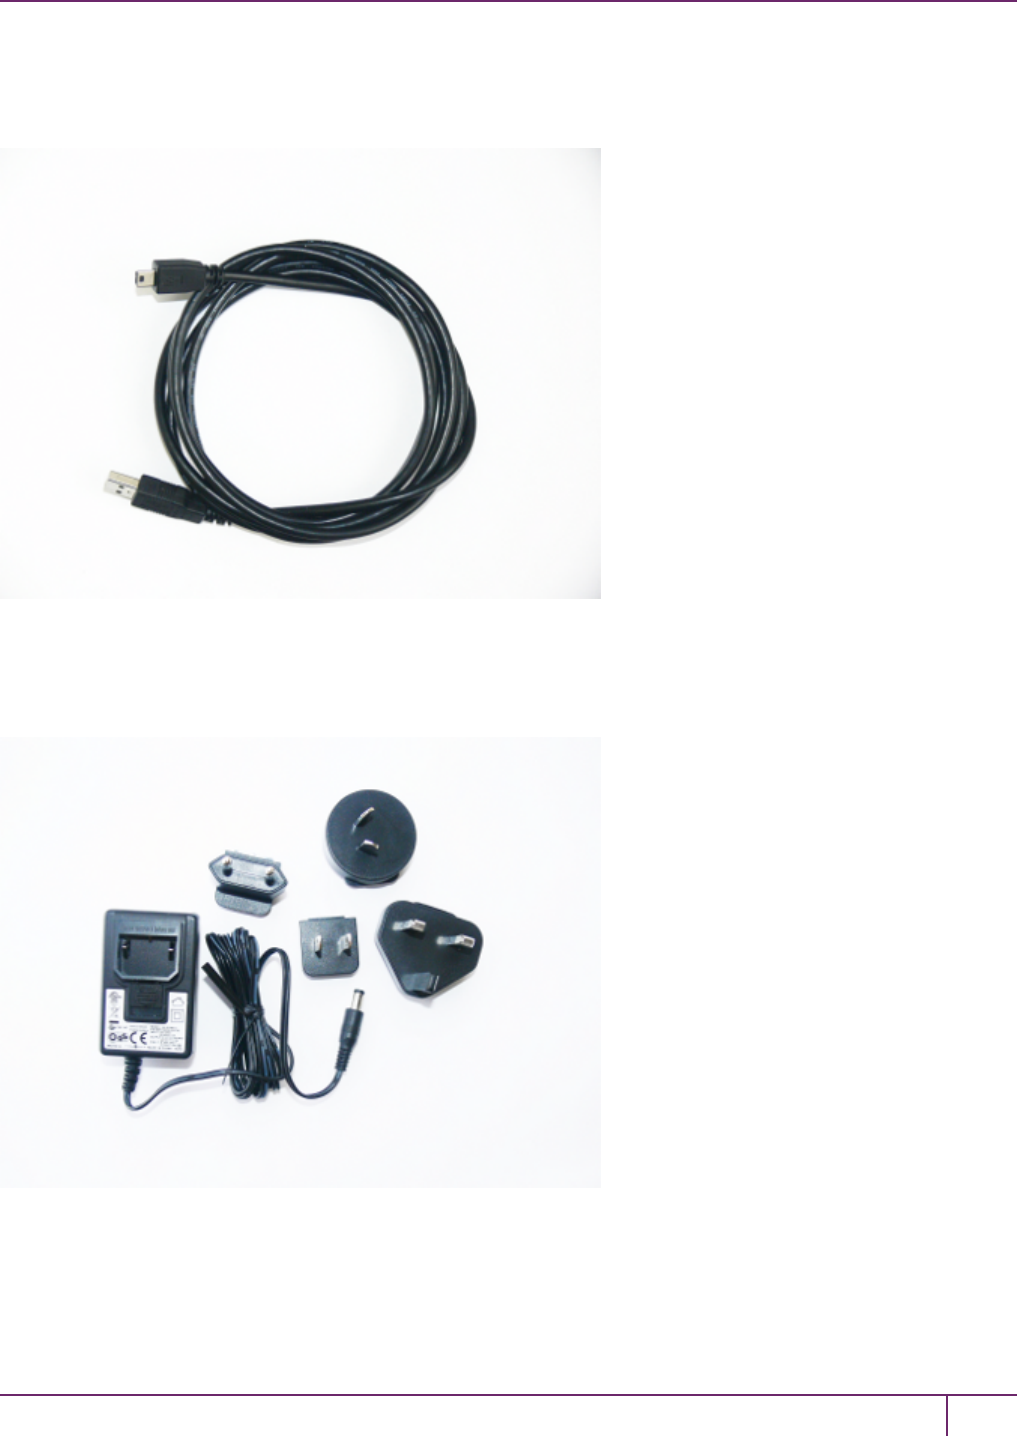
USB cable (USB A to USB mini B)
Your order should include one USB A to 5-pin (Mini-B) cable.
SafeNet Network HSM Installation Guide
Release 6.2.2 Rev. A December 2016 Copyright 2001-2016 GemaltoAll rights reserved. 34

3 SafeNet USB HSM Hardware Installation
Software and Documentation *
*Software is available by download from Gemalto. Physical media for software and documentation are special-
request items.
PED-Authenticated SafeNet USB HSM
Depending on your ordering options, the SafeNet USB HSM ships either in secure transport mode or with secure
transport mode enabled, but turned off:
•If your SafeNet USB HSM was shipped in secure transport mode, you require the SRK PED Key (purple label) that
was shipped separately from your SafeNet USB HSM to unlock your SafeNet USB HSM. Note that each SRK
PED keys is specific to a certain SafeNet USB HSM.
•If your SafeNet USB HSM was shipped with secure transport mode enabled, but turned off, no purple key is
required initially.
Note that you can use SafeNet PEDs and PED Keys that you already own and use with other HSMs – PEDs of the
same type and version (v2.3.0 and later) are interchangeable, and PED Keys can be used with multiple HSMs if that is
appropriate in your context (the only exception is the SRK, which is specific to a single SafeNet USB HSM). You
should purchase the number you need for your own convenient operation, and for backup/standby units as your security
policies might require.
If your SafeNet USB HSM is the PED-authenticated version, then you might also have ordered the items listed below.
SafeNet PED
Your order should include a PED 2 device. To use PED-authenticated SafeNet HSM with Remote PED function
requires a Remote Capable PED – the standard PED does not have the Remote capability. They appear almost
identical except for a label “PED Remote” on the front, and the availability of the “Remote” menu when powered on.
SafeNet Network HSM Installation Guide
Release 6.2.2 Rev. A December 2016 Copyright 2001-2016 GemaltoAll rights reserved. 35

3 SafeNet USB HSM Hardware Installation
SafeNet Local PED cable
Your order should include a 9-pin, Micro-D to Micro-D cable for local PED operation.
SafeNet Remote PED cable (Remote PED only)
If you ordered a SafeNet remote PED, your order should include a Type A to Mini B USB cable for remote PED
operation.
SafeNet Network HSM Installation Guide
Release 6.2.2 Rev. A December 2016 Copyright 2001-2016 GemaltoAll rights reserved. 36
3 SafeNet USB HSM Hardware Installation
SafeNet Remote PED Power Supply Kit (Remote PED only)
If you ordered a SafeNet Remote PED, your order should include a SafeNet Remote PED power supply kit. The power
supply is auto-sensing and includes replaceable mains plug modules for international use.
PED Keys and Labels
Your order should include a set of iKey PED Keys and peel-and-stick labels.
SafeNet Network HSM Installation Guide
Release 6.2.2 Rev. A December 2016 Copyright 2001-2016 GemaltoAll rights reserved. 37

3 SafeNet USB HSM Hardware Installation
Your order might also include the following optional item.
SafeNet USB HSM Rack-Mount Shelf
The SafeNet SafeNet USB HSM rack-mount shelf (available by separate order) fits a standard 19-inch equipment rack,
allowing you to install up to two SafeNet USB HSM units side-by side in server-room racks. For office use, without rack
mounting, SafeNet USB HSM units can be placed on a desktop and are stackable.
SafeNet Network HSM Installation Guide
Release 6.2.2 Rev. A December 2016 Copyright 2001-2016 GemaltoAll rights reserved. 38

3 SafeNet USB HSM Hardware Installation
Installing the Battery in the SafeNet USB HSM or Backup
HSM
The battery is shipped with the SafeNet USB HSM device, but is not installed. You must install the battery before
beginning to configure and use the SafeNet USB HSM device.
To install the battery in the SafeNet USB HSM or SafeNet Backup HSM
1. Remove the front faceplate. The faceplate is held in place by two spring clips. Grasp the faceplate firmly and pull to
disengage the clips. Set the faceplate aside.
2. The battery compartment is to the right as you face the unit. The compartment cover is circular and has both raised
dots and a recessed slot. Use finger-pressure against the dots, or use the edge of a coin in the slot, to twist the
battery compartment cover ¼ turn in a counter-clockwise direction. The cover should fall out easily.
3. Remove the battery from its packaging and align it at the opening of the SafeNet USB HSM (or SafeNet Backup
HSM) battery compartment. The battery should have a “+” sign near the end with the raised nub/bump. The flat end
of the battery is the negative pole (-).
4. Insert the battery into the battery compartment, negative end first. The positive end (+) should protrude. The
compartment is spring-loaded.
SafeNet Network HSM Installation Guide
Release 6.2.2 Rev. A December 2016 Copyright 2001-2016 GemaltoAll rights reserved. 39
3 SafeNet USB HSM Hardware Installation
5. Use the battery compartment cover to push the battery into the compartment, against the spring tension.
Maintaining the pressure, align the two tabs on the inside of the cover with the two recessed indentations at the top
and bottom of the compartment opening. With a little jiggling and a few trial pushes, the tabs should settle into
those recesses, allowing the cover to seat flush with the front of the SafeNet USB HSM (or SafeNet Backup
HSM). Maintain the inward pressure and twist the cover ¼ turn clockwise to lock it in place. The battery is installed.
6. Replace the SafeNet USB HSM (or SafeNet Backup HSM) front-panel by aligning the clips with their respective
posts and pushing until the clips grab the posts and the cover snaps in place.
7. The SafeNet USB HSMor SafeNet Backup HSM is ready to connect to your host system.
SafeNet Network HSM Installation Guide
Release 6.2.2 Rev. A December 2016 Copyright 2001-2016 GemaltoAll rights reserved. 40

3 SafeNet USB HSM Hardware Installation
Installing the SafeNet USB HSM Hardware
This section describes how to mount the SafeNet USB HSM and connect the cables and peripheral devices.
To install the SafeNet USB HSM hardware
1. If you are using the SafeNet SafeNet USB HSM rack-mount shelf, mount the shelf in a suitable equipment rack.
Use fasteners appropriate to your brand of equipment rack. The shelf and the SafeNet USB HSM units are light-
weight and therefore are adequately secured at the front only. Do not mount more than two SafeNet USB HSM
devices, or any non-SafeNet USB HSM equipment, on the shelf.
2. Place your SafeNet USB HSM unit(s) on the shelf and push back until one of the index posts at the back edge of
the shelf engages the index hole on the back panel of each SafeNet USB HSM.
SafeNet Network HSM Installation Guide
Release 6.2.2 Rev. A December 2016 Copyright 2001-2016 GemaltoAll rights reserved. 41
3 SafeNet USB HSM Hardware Installation
3. Insert the power (a) and USB (b) cables at the rear panel.
SafeNet Network HSM Installation Guide
Release 6.2.2 Rev. A December 2016 Copyright 2001-2016 GemaltoAll rights reserved. 42
3 SafeNet USB HSM Hardware Installation
4. If you are installing a PED-authenticated SafeNet USB HSM, connect the PED at the front panel, using the
provided local PED cable.
SafeNet Network HSM Installation Guide
Release 6.2.2 Rev. A December 2016 Copyright 2001-2016 GemaltoAll rights reserved. 43
3 SafeNet USB HSM Hardware Installation
5. Using the USBcable, connect the SafeNet USB HSM to a USB port on the SafeNet HSM client computer.
SafeNet Network HSM Installation Guide
Release 6.2.2 Rev. A December 2016 Copyright 2001-2016 GemaltoAll rights reserved. 44
3 SafeNet USB HSM Hardware Installation
SafeNet Network HSM Installation Guide
Release 6.2.2 Rev. A December 2016 Copyright 2001-2016 GemaltoAll rights reserved. 45

4
SafeNet Remote PED Installation and
Configuration
This chapter describes how to install, connect, and configure a SafeNet Remote PED. It contains the following
sections:
•"Installing and Configuring a SafeNet Remote PED"on the next page
SafeNet Network HSM Installation Guide
Release 6.2.2 007-011136-012Rev. A December 2016 Copyright 2001-2016 GemaltoAll rights reserved. 46
4 SafeNet Remote PED Installation and Configuration
Installing and Configuring a SafeNet Remote PED
The standard SafeNet PED is intended to connect directly to the HSM, and receives its power, as well as instructions
and data via that connection. The Remote PED can act as a local PED, when needed, and connects as described
above. When used in Remote PED mode, the SafeNet PED 2 connects to a computer via USB, and therefore requires
some additional hardware.
Remote PED can be distinguished from local PED by:
•an orange label PED Remoteto the right of the SafeNet logo
•availability of menu item [7] Remote PED from the PED's main menu.
Required Items
The following items are included with your Remote PED. All are required for a successful installation.
Quantity Item
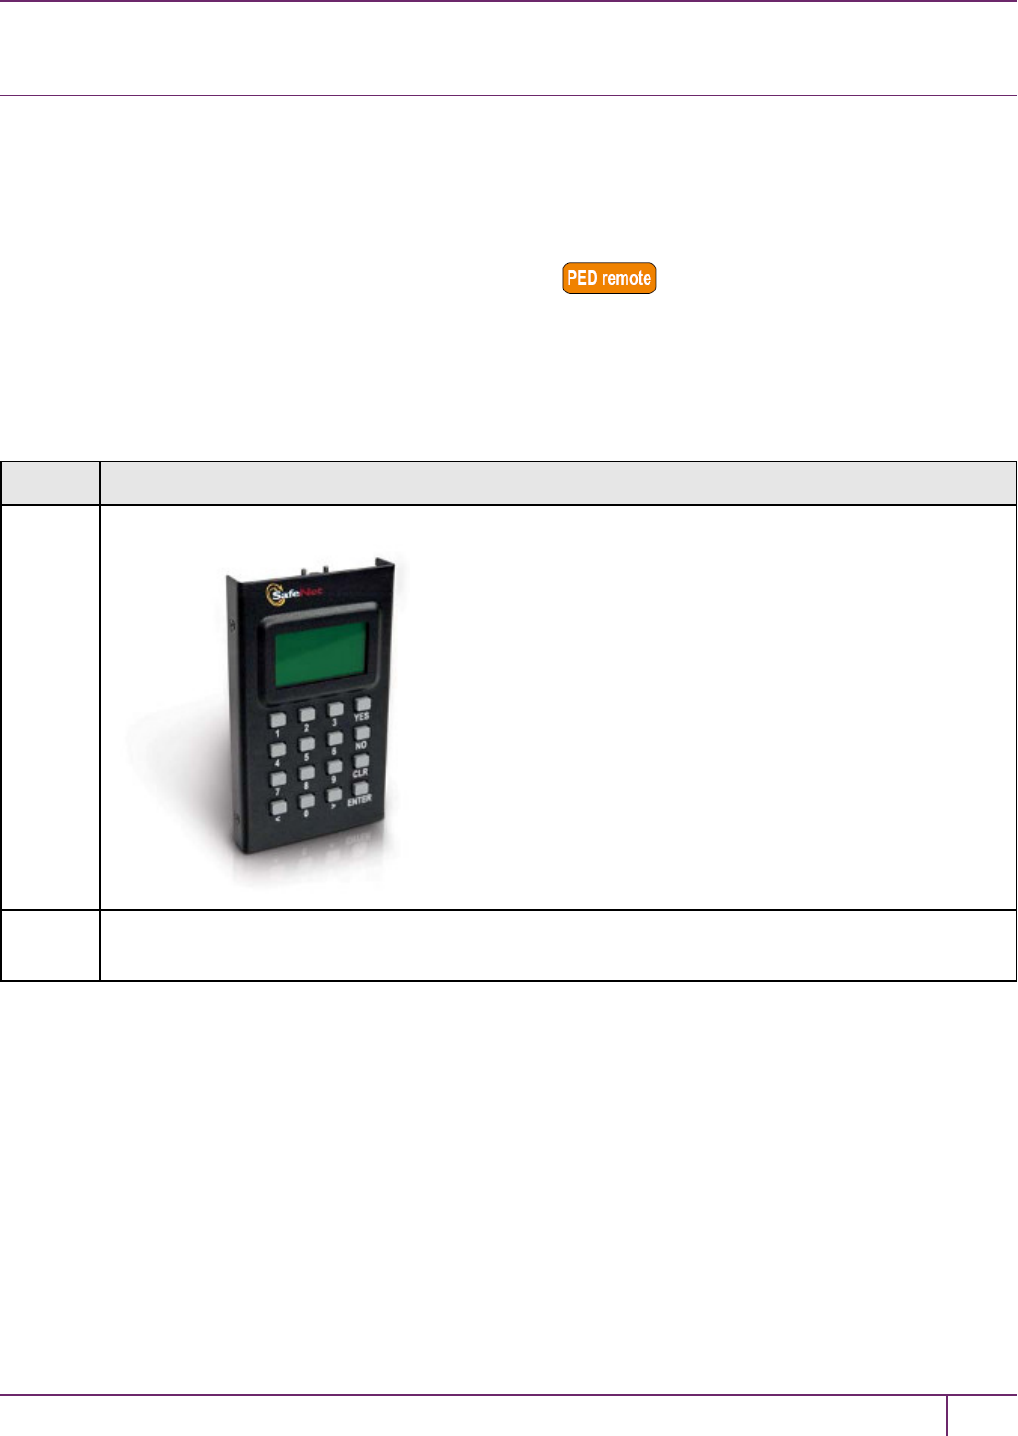
1 SafeNet PED 2 (Remote PED Capable and with firmware 2.4.0-3 or greater)
1SafeNet PED Power Supply kit with replaceable mains plug modules for international use (required when
the PED is operated in Remote PED mode)
SafeNet Network HSM Installation Guide
Release 6.2.2 Rev. A December 2016 Copyright 2001-2016 GemaltoAll rights reserved. 47
4 SafeNet Remote PED Installation and Configuration
Quantity Item
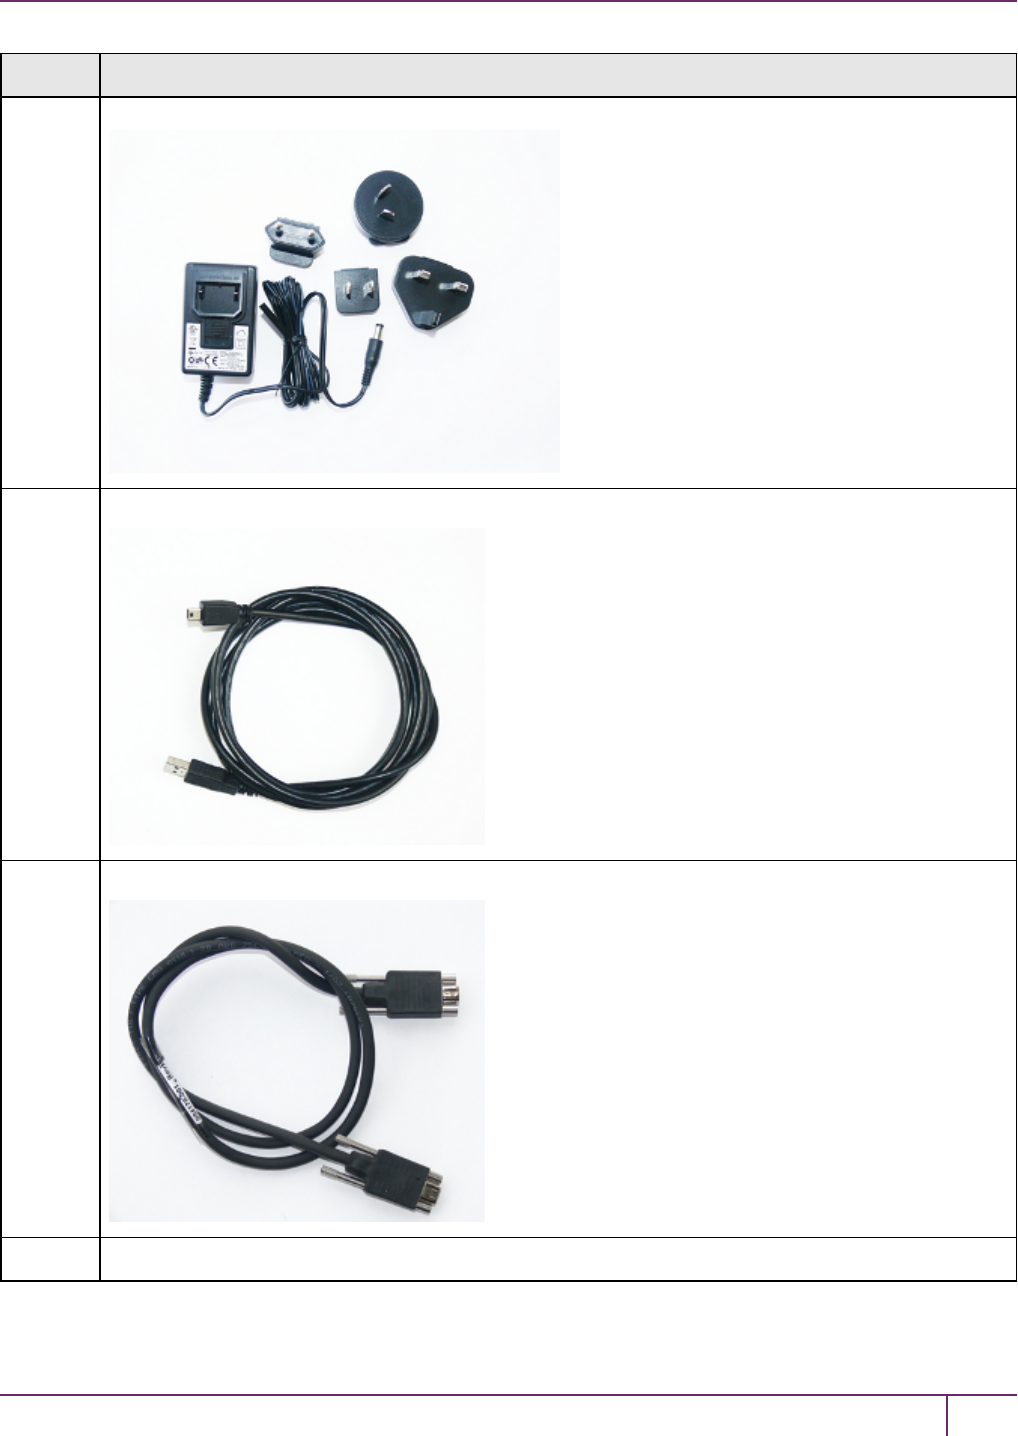
1Cable, USB 2.0, Type A to Mini B connectors (for Remote PED operation).
1Cable, Data, 9-pin, Micro-D to Micro-D connectors (for local PED operation).
1Ten-pack of iKey 1000 PED Keys, and sheets of peel-and-stick labels
SafeNet Network HSM Installation Guide
Release 6.2.2 Rev. A December 2016 Copyright 2001-2016 GemaltoAll rights reserved. 48

4 SafeNet Remote PED Installation and Configuration
Quantity Item
Remote PED Setup
The Remote-Capable PED can be used either locally, connected directly to a SafeNet HSM (exactly as for the
standard PED), or remotely when connected to a suitable workstation and to the electrical main power supply.
The normal local use of a PED with Remote PED capability is to use it in local mode to prepare an HSM. This is done
by imprinting an RPV (remote PED vector) onto the HSM and also onto an RPK (the orange Remote PED Key) before
shipping the HSM to its remote location. Then the PED can be switched to Remote PED mode, to serve any HSM that
has an appropriate RPV.
To configure the remote PED
Step Action
1 Local OPERATION [Ongoing]
To use your HSM appliance and PED for local operation only, refer to the instructions in the Configuration
Guide and the HSM Administration Guide.
2Local OPERATION [Preparing for Remote Use]
To prepare an HSM for Remote PED operation, it needs a minimum of preparation as described in this
section, below.
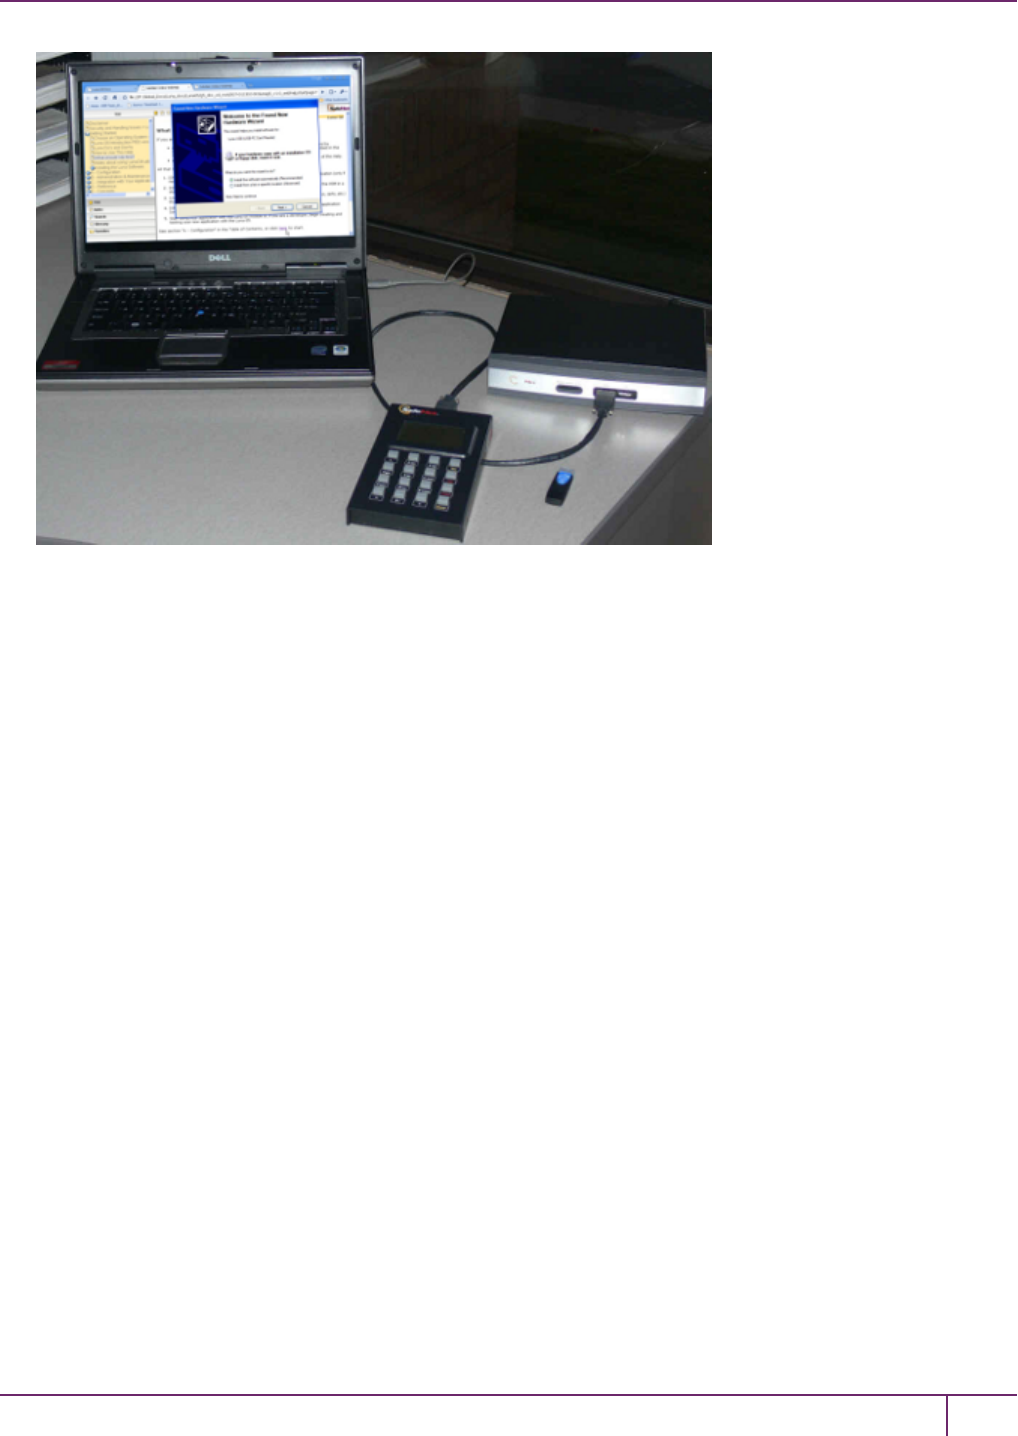
3[Preliminary] From the software media (DVD or downloaded, un-tarred archive file), install the SafeNet HSM
Client software, ensuring that Remote PED option is selected, onto the selected Windows computer that will
act as the PED server to your remotely located SafeNet HSM, and let the Windows “Found New Hardware”
dialog install it. The PedServer.exe and PedClient.exe applications are installed in the SafeNet HSM Client
folder along with any other SafeNet tools.
4[Preliminary]
For SafeNet Network HSM, configure your HSM appliance for your network. Refer to the relevant
Configuration Guide sections.
SafeNet Network HSM Installation Guide
Release 6.2.2 Rev. A December 2016 Copyright 2001-2016 GemaltoAll rights reserved. 49
4 SafeNet Remote PED Installation and Configuration
Step Action
Imprint the HSM with a Remote PED Key (orange); see below.
Once the HSM is associated with an orange PED Key, all further configuration and administration can be
performed remotely.
5To use the PED locally (for first orange PED Key imprint), connect the PED directly to the PED port of the
HSM that you will later be using remotely.
OR
OR
6On power-up, the PED defaults to local mode.
SafeNet Network HSM Installation Guide
Release 6.2.2 Rev. A December 2016 Copyright 2001-2016 GemaltoAll rights reserved. 50
4 SafeNet Remote PED Installation and Configuration
Step Action
Follow the instructions in the SafeNet HSM documentation to:
•[for SafeNet Network HSM only] log in as “admin” to the appliance (SSH session or local serial
connection)
•[for SafeNet Network HSM] issue the LunaSH command hsm ped vector init, or
[for SafeNet PCIe HSMor SafeNet USB HSM] issue the lunacm command ped vector init,
inserting a blank (orange-labeled) PED Key into the PED, when prompted OR inserting an already-
imprinted orange PED Key and select “re-use” at the PED prompt
•bring the imprinted (orange) Remote PED Key to your workstation, along with a Remote-capable PED
•the HSM can now be shipped to its remote locale
You can perform other maintenance at this time, if convenient, but only the foregoing steps were required to
be done locally - all future configuration and administration can be performed remotely.
To use the Remote PED
Once an HSM has been imprinted with a Remote PED Key (RPK) vector, you can begin administering remotely, while
also authenticating remotely from any workstation that has PEDServer software and driver, a remote-capable PED,
and an orange PED Key with the correct RPK (that you just imprinted in the previous steps).
Step Action
1 REMOTE OPERATION Perform the following steps to begin using your computer as a PED Server
Workstation, connecting remotely to the distant HSM appliance.
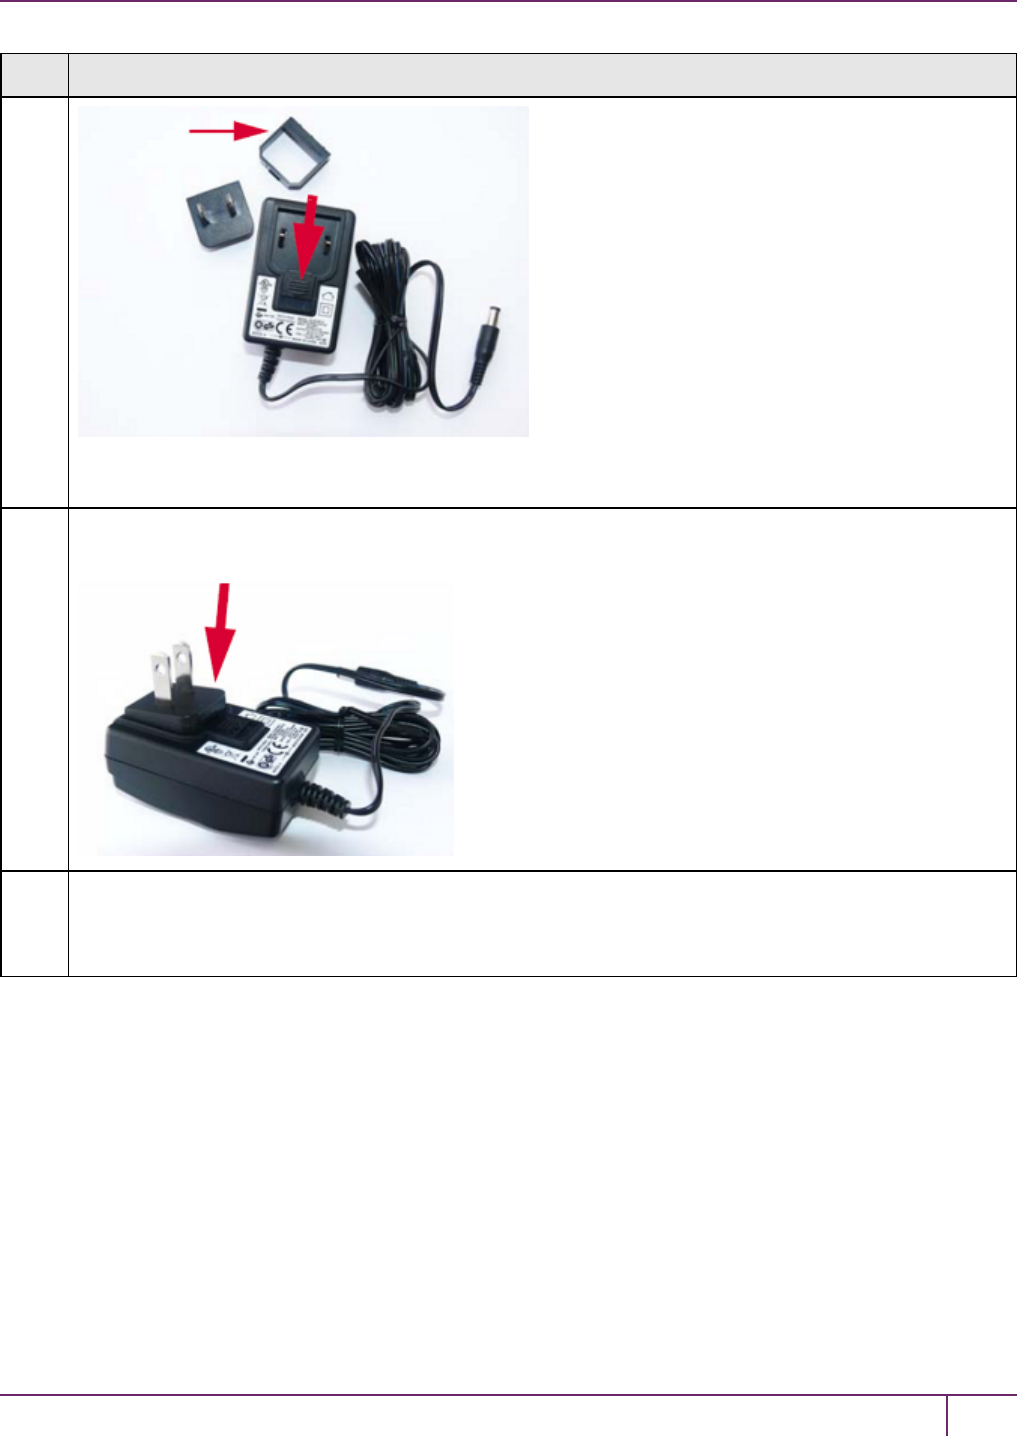
2[Prepare the PED Power Supply]
On the PED power supply, slide the release catch as shown by the heavy arrow, and lift the pin protector
(thinner arrow) from the power supply.
SafeNet Network HSM Installation Guide
Release 6.2.2 Rev. A December 2016 Copyright 2001-2016 GemaltoAll rights reserved. 51
4 SafeNet Remote PED Installation and Configuration
Step Action
The pin protector was used during shipment only.
3Choose a plug style that is appropriate for your country and place it in the power supply, top end first, then
snap the bottom end in the direction indicated by the arrow.
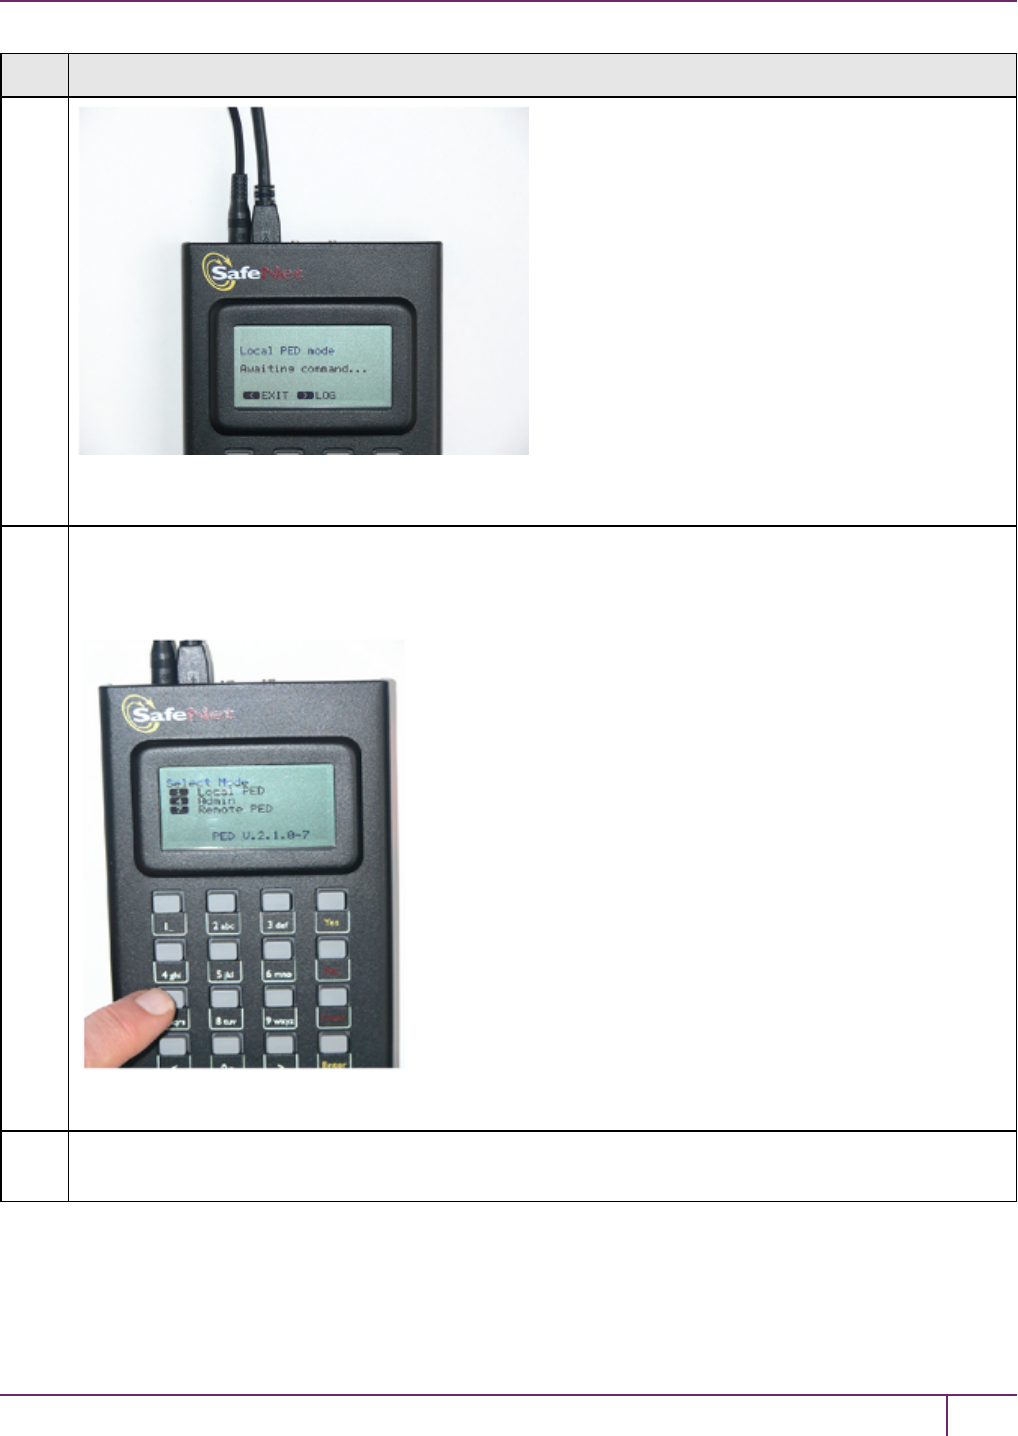
4For Remote PED operation:
•connect the power supply to the AC mains,
•connect the DC power plug of the power supply to the DC power receptacle on the top of the PED,
SafeNet Network HSM Installation Guide
Release 6.2.2 Rev. A December 2016 Copyright 2001-2016 GemaltoAll rights reserved. 52
4 SafeNet Remote PED Installation and Configuration
Step Action
•connect the USB cable between the USB micro connector on the PED and a USB socket on your
computer.
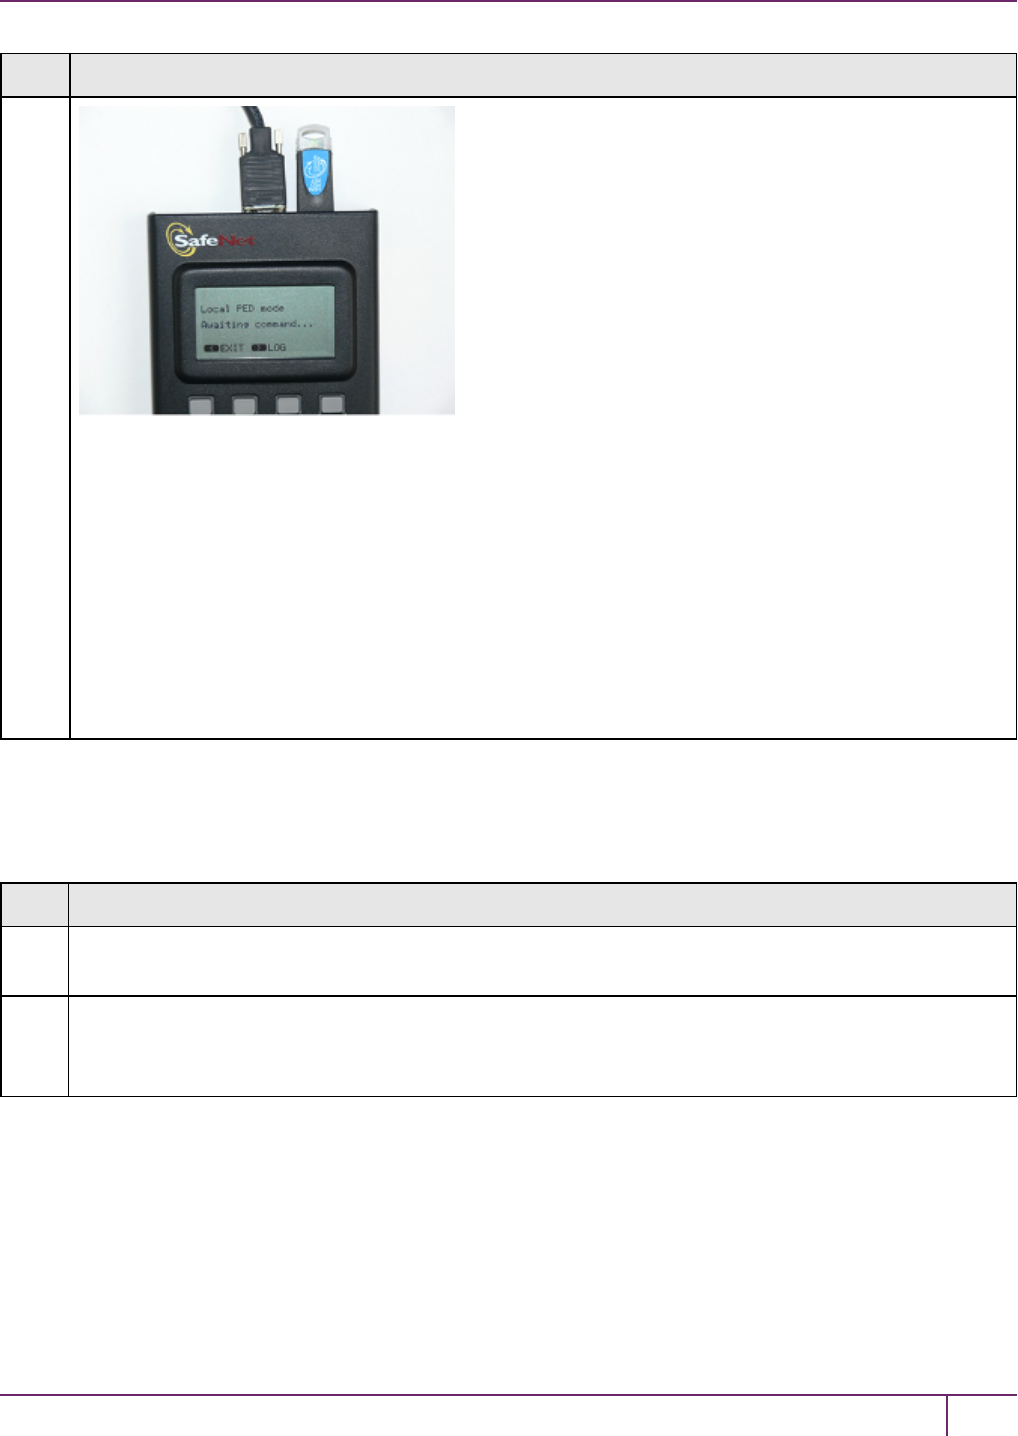
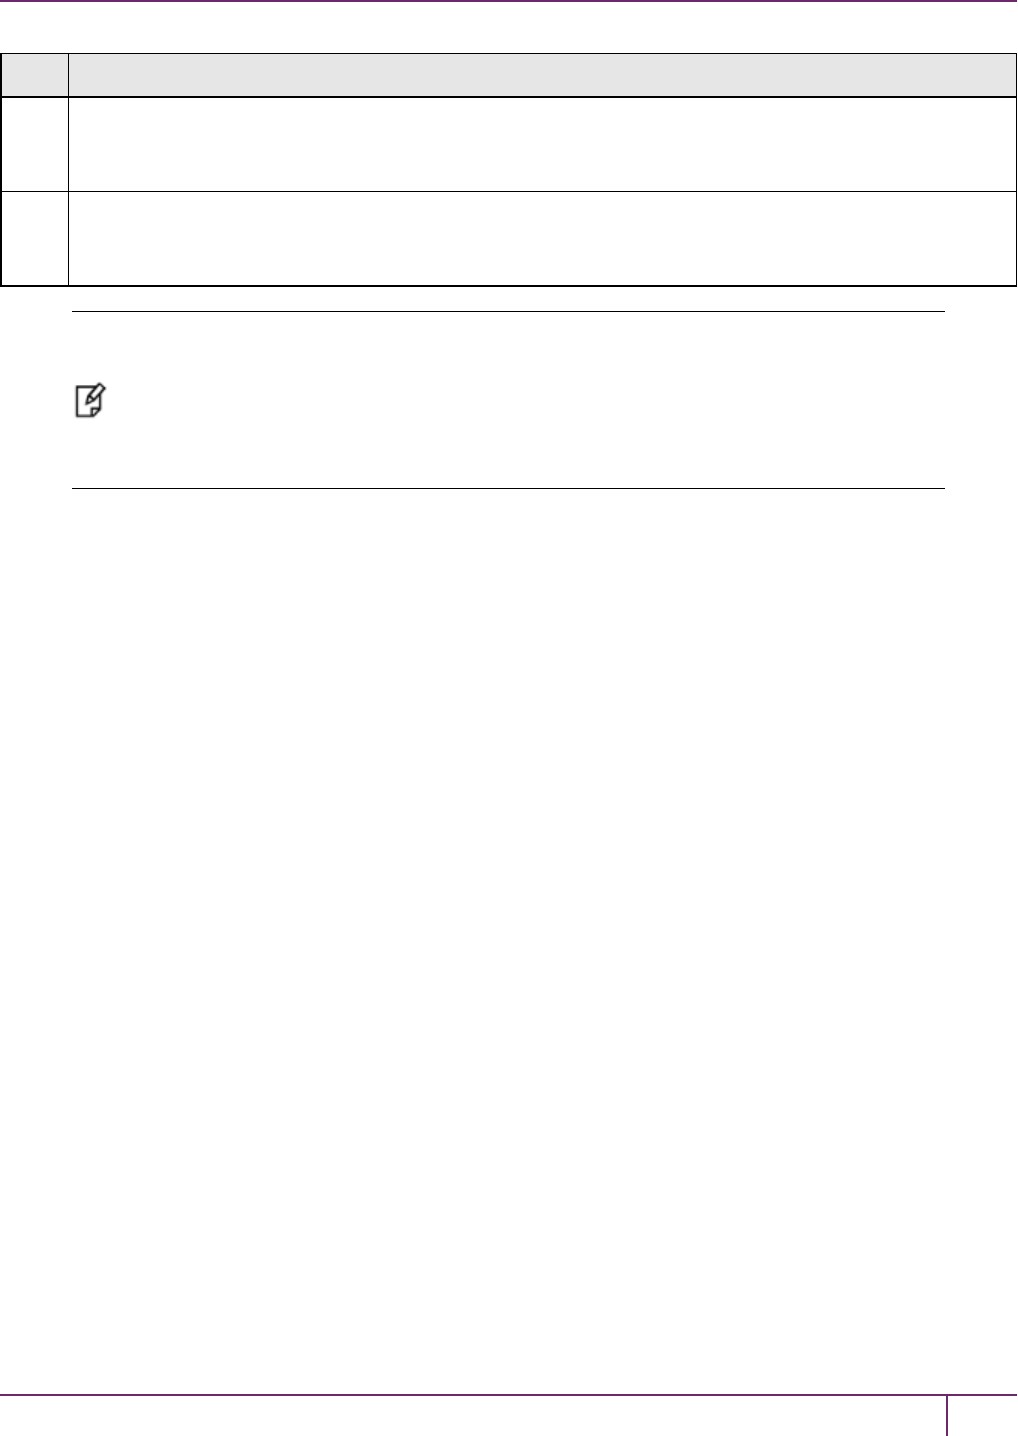
5At the workstation-connected PED:
•press [< ] on the PED keypad to exit Local mode,
•press [7 ] to enter Remote PED mode.
6In a command-prompt window on the workstation start the PEDserver program in its listening mode
c:\<yourRemotePED-dir>\pedserver -m start
SafeNet Network HSM Installation Guide
Release 6.2.2 Rev. A December 2016 Copyright 2001-2016 GemaltoAll rights reserved. 53
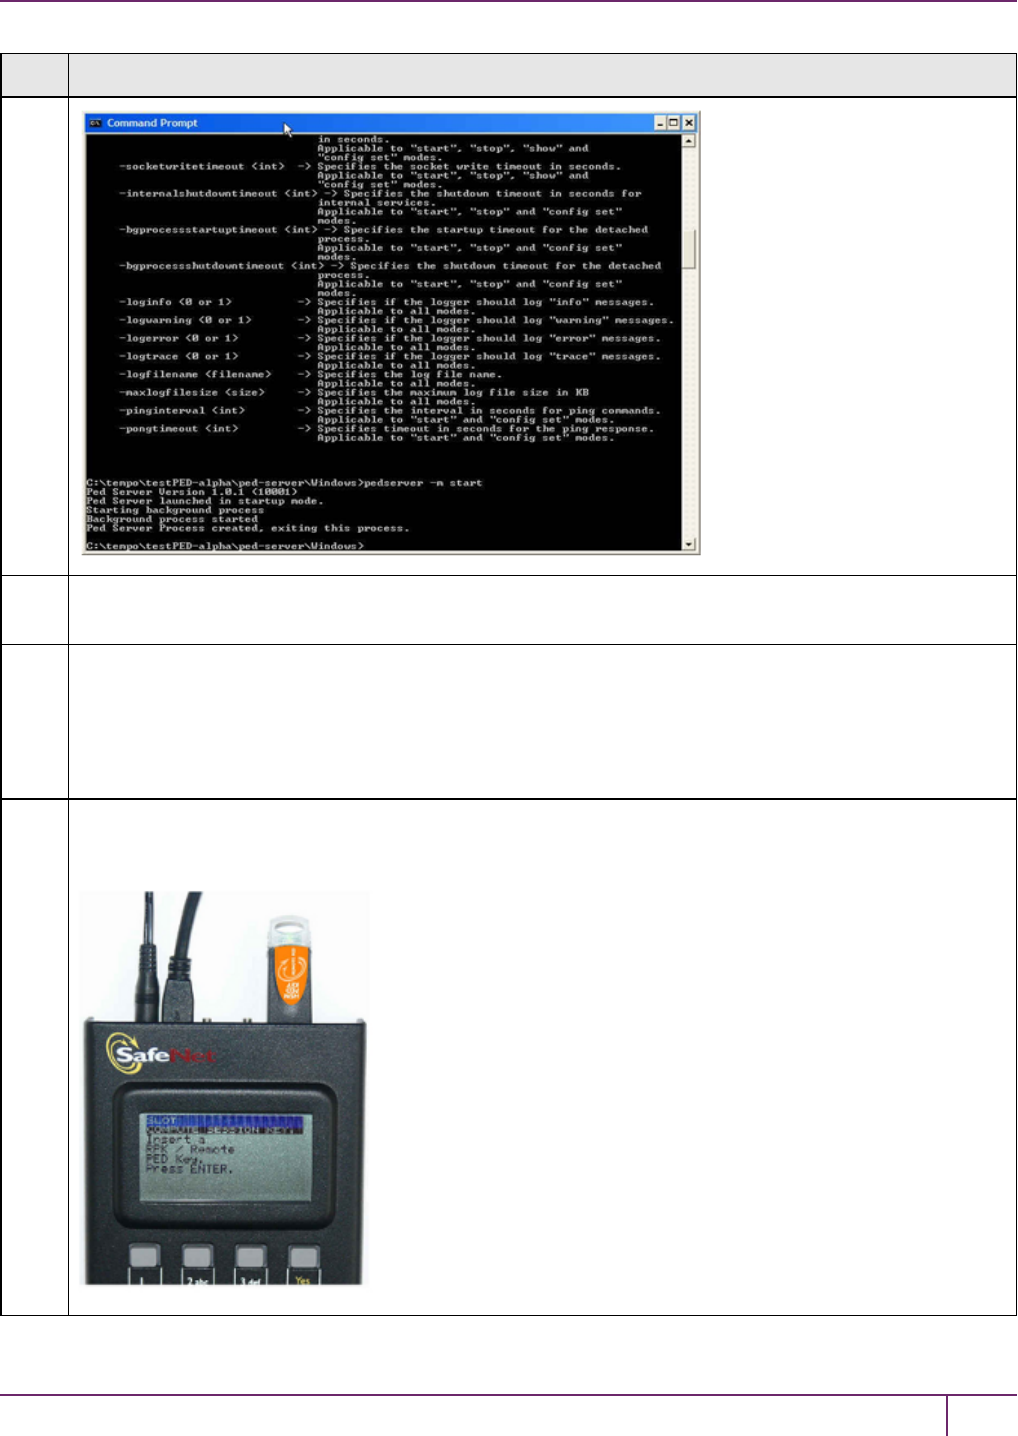
4 SafeNet Remote PED Installation and Configuration
Step Action
7 Run the command pedserver –m show to verify that the PED is detected, and the system is ready for remote
connection.
8Start the PED Client - the Remote PED enabling process on the HSM host(for example):
lunash:> hsm ped connect -ip 192.2.12.16 - port 1503
or
lunacm:> ped connect -ip 192.2.12.16 - port 1503
The Remote PED Client in the HSM appliance connects with the listening PEDserver (your workstation).
9Perform an hsm login or role login -name SO (as appropriate. The PED prompts first for the Remote PED
Key. Insert the imprinted Remote PED Key associated with the connecting HSM appliance, and press
[Enter].
SafeNet Network HSM Installation Guide
Release 6.2.2 Rev. A December 2016 Copyright 2001-2016 GemaltoAll rights reserved. 54
4 SafeNet Remote PED Installation and Configuration
Step Action
Then the PED prompts for the HSM SO's blue PED Key. Insert that and press [Enter].
A successful login confirms that the Remote PED connection is running properly.
10 Begin using and administering the remotely located SafeNet HSM appliance via ssh session, and providing
PED Key authentication via the workstation-connected Remote PED, whenever requested. Review the
SafeNet Network HSM Help for information about timeouts with respect to Remote PED.
Note: Remote PED is served from a host computer running LunaClient PEDServer software.
A Remote PED session is called by an instance of PEDClient running on the computer hosting
the SafeNet HSM. In some cases, such as SafeNet Network HSMs behind strict firewalls, the
HSM host is not allowed to initiate the connection. In that case, you can initiate a Remote PED
session from the PEDServer side, providing that the computer hosting the PED has obtained
and registered the SafeNet Network HSM's server.pem certificate.
SafeNet Network HSM Installation Guide
Release 6.2.2 Rev. A December 2016 Copyright 2001-2016 GemaltoAll rights reserved. 55
5
SafeNet HSM Client Software Installation
This chapter describes how to install the SafeNet HSMClient software. After installing the hardware, you need to
install the SafeNet Client software, as follows, before you can begin configuring your SafeNet HSM(s):
•For SafeNet Network HSM, install the SafeNet Client on any computer that must connect to the appliance as a
client.
•For SafeNet PCIe HSM, install the SafeNet Client on the workstation into which the SafeNet PCIe HSM is
installed.
•For SafeNet USB HSM, install the SafeNet Client on the workstation to which the SafeNet USB HSM is
connected.
•Install the SafeNet Client on any computer that is to have a SafeNet Remote PED connected.
Choose the instructions for your operating system:
•For AIX, see "AIX SafeNet HSM Client Installation"on the next page.
•For HP-UX, see "HP-UX SafeNet HSM Client Installation"on page 63.
•For Linux, see "Linux SafeNet HSMClient Installation "on page 69.
•For Solaris, see "Solaris SafeNet HSM Client Installation"on page 79
•For Windows, see "Windows SafeNet HSM Client Installation"on page 84 The following supplemental topics also
apply to Windows:
–"Windows 2012 SafeNet HSMClient Supplemental Configuration"on page 98
–"Scripted / Unattended Installation on Windows"on page 102
Note: Not all operating systems are supported for each SafeNet HSM type. Refer to the
Customer Release Notes (see "Customer Release Notes"on page 8) for the most current
information on supported platforms.
SafeNet Network HSM Installation Guide
Release 6.2.2 007-011136-012Rev. A December 2016 Copyright 2001-2016 GemaltoAll rights reserved. 56

5 SafeNet HSM Client Software Installation
AIX SafeNet HSM Client Installation
These instructions assume that you have already acquired the SafeNet Client software, either on DVD or in the form of
a downloaded .tar archive. Applicability to specific versions of AIX is summarized in the Customer Release Notes for
the current release.
Note: Before installing a SafeNet system, you should confirm that the product you have
received is in factory condition and has not been tampered with in transit. Refer to the Content
Sheet included with your product shipment. If you have any questions about the condition of
the product that you have received, please contact SafeNet Support.
Each computer that connects to the SafeNet HSM appliance as a Client must have the cryptoki library, the vtl client
shell and other utilities and supporting files installed. Each computer that contains, or is connected to a SafeNet USB
HSM or a SafeNet PCIe HSM must have the cryptoki library and other utilities and supporting files installed.
Note: This example shows all the SafeNet Client products and components. Some items are
not supported on all operating systems and therefore do not appear as you proceed through the
installation script.
Do not install SafeNet client software on the same system as legacy SafeNet CA3, SafeNet CA4, SafeNet PCM, or
SafeNet PCI software. The software is intended for modern/current SafeNet HSMs, SafeNet Network HSM, SafeNet
PCIe HSM, SafeNet USB HSM, SafeNet (Remote) Backup HSM.
Prerequisites
Before starting the installation, ensure that you have a Random Number Generator (RNG) or Entropy Gathering
Daemon (EGD) on your system in one of the following locations:
•/dev/egd-pool
•/etc/egd-pool
•/etc/entropy
•/var/run/egd-pool
RNG/EGD
Cryptographic algorithms, including those that assure the security of communication – such as in OpenSSL and other
protocols – depend upon random numbers for the creation of strong keys and certificates. A readily available source of
random data is the entropy that exists in complex computer processes. Utilities exist for every operating system, to
gather bits of system entropy into a pool, which can then be used by other processes.
Windows and Linux have these installed by default. Other systems might or might not. See your system administrator.
You Need an Entropy Pool
In the case of SafeNet Network HSM, the SafeNet Client administration tool (vtl) expects to find a source of
randomness at /dev/random. If one is not found, vtl fails, because the link cannot be secured from the Client end.
If your system does have an entropy pool, but the random number generator (RNG) is not in the expected place, then
you can create a symbolic link between the actual location and one of the following:
SafeNet Network HSM Installation Guide
Release 6.2.2 Rev. A December 2016 Copyright 2001-2016 GemaltoAll rights reserved. 57
5 SafeNet HSM Client Software Installation
•/dev/random
•/dev/egd-pool
•/etc/egd-pool
•/etc/entropy
•/var/run/egd-pool
If your system does not have an entropy gathering daemon or random number generator, please direct your system
administrator to install one, and point it to one of the named devices.
Packages Required to Build the Driver on G5, PCIe, and Remote Backup HSM Clients
If you are installing the SafeNet PCIe HSM, or SafeNet USB HSM, or SafeNet Remote Backup HSM clients, ensure
that the following items are installed:
•Kernel headers for build
•rpm-build package
•C and C++ compilers
•make command
These items are required because the driver module is built on Linux before it is installed. If one of these items is
missing, the driver build will fail and the module will not get installed.
Installing the Client Software
Check the SafeNet HSM Customer Release Notes for any installation-related issues or instructions before you begin
the following software installation process.
CAUTION: You must be logged in as root when you run the installation script.
To install the SafeNet Client software on AIX
1. Log on to the client system, open a console or terminal window, and use su to gain administrative permissions for
the installation.
2. If you have downloaded the SafeNet Client software as a .tar archive, skip to step 6.
3. Insert the DVD (mount it if you do not have automount).
4. Go to the DVD (/cdrom or whatever devicename your system uses) and the install directory:
32-bit OS cd /cdrom/AIX/32
64-bit OS cd /cdrom/AIX/64
Note: Not all platforms are supported with each release, so the available install options might
not match the list above.
5. Skip to step 9.
6. If you downloaded the software, copy or move the .tar archive (which usually has a name like "Luna Client_6.x.y-
nn.tar") to a suitable directory where you can untar the archive and launch the installation script.
SafeNet Network HSM Installation Guide
Release 6.2.2 Rev. A December 2016 Copyright 2001-2016 GemaltoAll rights reserved. 58

5 SafeNet HSM Client Software Installation
7. Enter the following command to extract the contents from the archive:
tar xvf SafeNet Client<version>.tar
8. Change directory to the software version suitable for your system (for example, under the "aix" subdirectory,
choose 32-bit or 64-bit according to your system requirement).
9. Install the client software as follows:
–To see the 'help', or a list of available installer options, type:
sh install.sh -? or ./sh install.sh --help
–To install all available products and optional components, type:
sh install.sh all
–To selectively install individual products and optional components, type the command without arguments:
sh install.sh
10. Type "y" if you agree to be bound by the license agreement:
[mylunaclient-1 32]$ sh install.sh
IMPORTANT: The terms and conditions of use outlined in the software
license agreement (Document #008-010005-001_053110) shipped with the product
("License") constitute a legal agreement between you and SafeNet Incorporated.
Please read the License contained in the packaging of this
product in its entirety before installing this product.
Do you agree to the License contained in the product packaging?
If you select 'yes' or 'y' you agree to be bound by all the terms
and conditions set out in the License.
If you select 'no' or 'n', this product will not be installed.
(y/n)
11. A list of installable SafeNet products appears (might be different, depending on your platform). Select as many as
you require, by typing the number of each (in any order) and pressing Enter. As each item is selected, the list
updates, with a "*" in front of any item that has been selected. This example shows item 1 has been selected.
Products
Choose Luna Products to be installed
*[1]: SafeNet Network HSM
[2]: SafeNet PCIe HSM
[N|n]: Next
[Q|q]: Quit
Enter selection: 2
Note: When the above was captured, AIX supported only SafeNet Network HSM and SafeNet
PCIe HSM among SafeNet HSM products. To install SafeNet USB HSM or the SafeNet
Remote Backup HSM, you will need one of the other supported host platforms.
12. When selection is complete, type "N" or "n" for "Next", and press Enter. If you wish to make a change, simply type
a number again and press Enter to de-select a single item.
SafeNet Network HSM Installation Guide
Release 6.2.2 Rev. A December 2016 Copyright 2001-2016 GemaltoAll rights reserved. 59
5 SafeNet HSM Client Software Installation
13. The next list is called "Advanced" and includes additional items to install. Some items might be pre-selected to
provide the optimum SafeNet HSM experience for the majority of customers, but you can change any selection in
the list.
Products
Choose Luna Products to be installed
*[1]: SafeNet Network HSM
[2]: SafeNet PCIe HSM
[N|n]: Next
[Q|q]: Quit
Enter selection: n
If you wish to make a change, simply type a number again and press Enter to de-select a single item.
If the script detects an existing cryptoki library, it stops and suggests that you uninstall your previous SafeNet
software before starting the SafeNet Client installation again.
14. The system installs all packages related to the products and any optional components that you selected. By
default, the Client programs are installed in the /usr/safenet/lunaclient directory.
Note: When installing, ensure that the full path of a package does not contain any space
characters. (The IBM examples do not show any spaces, implying that this might be a system
requirement.)
As a general rule, do not modify the Chrystoki.conf/crystoki.ini file, unless directed to do so by SafeNet Customer
Support. If you do modify the file, never insert TAB characters - use individual space characters. Avoid modifying the
PED timeout settings. These are now hardcoded in the appliance, but the numbers in the Chrystoki.conf file must
match.
Uninstalling the SafeNet Client Software
You may need to uninstall the SafeNet Client software prior to upgrading to a new release, or if the software is no longer
required. You must be logged in as root.
To uninstall the SafeNet HSM client software
1. Log in as root.
2. Go to the client installation directory:
cd /usr/safenet/lunaclient/bin
3. Run the uninstall script:
sh uninstall.sh
Java Component Installation
During the installation, the script provides the opportunity to install SafeNet Java components. If you select Java
components, the SafeNet Java files are installed in the /usr/safenet/lunaclient/jsp/ directory. In order to use Java, you
must have separately installed Java (JDKor run-time environment from the vendor of your choice) onto your system.
Copy the SafeNet Java library and jar files from their default location under /usr/safenet/lunaclient/jsp/lib to the Java
environment directory, for example /usr/jre/lib/ext. The exact directory might differ depending on where you obtained
your Java system, the version, and any choices that you made while installing and configuring it.
SafeNet Network HSM Installation Guide
Release 6.2.2 Rev. A December 2016 Copyright 2001-2016 GemaltoAll rights reserved. 60
5 SafeNet HSM Client Software Installation
CAUTION: Copy libLunaAPI.so to system lib (/usr/lib) in order to make either java5 or java6
work on AIX 6.1 64-bit client.
For additional Java-related information, see "Java Interfaces" on page 1 in the SDK Reference Guide.
JSP Static Registration
You would choose static registration of providers if you want all applications to default to our (SafeNet) provider.
Once your client has externally logged in using salogin (see ) in the Reference section of this document) or your own
HSM-aware utility, any application would be able to use SafeNet product without being designed to login to the HSM
Partition.
Edit the java.security file located in the \jre\lib\security directory of your Java SDK/JRE 1.6.x or 1.7.x installation to
read as follows:
security.provider.1=sun.security.provider.Sun
security.provider.2=com.sun.net.ssl.internal.ssl.Provider
security.provider.3=com.safenetinc.luna.provider.LunaProvider
security.provider.4=com.sun.rsajca.Provider
security.provider.5=com.sun.crypto.provider.SunJCE
security.provider.6=sun.security.jgss.SunProvider
You can set our provider in first position for efficiency if SafeNet HSM operations are your primary mode. However, if
your application needs to perform operations not supported by the LunaProvider (secure random generation or random
publickey verification, for example) then it would receive error messages from the HSM and would need to handle those
gracefully before resorting to providers further down the list. We have found that having our provider in third position
works well for most applications.
The modifications in the "java.security" file are global, and they might result in the breaking of another application that
uses the default KeyPairGenerator without logging into the SafeNet Network HSM first. This consideration might argue
for using dynamic registration, instead.
JSP Dynamic Registration
For your situation, you may prefer to employ dynamic registration of Providers, in order to avoid possible negative
impacts on other applications running on the same machine. As well, the use of dynamic registration allows you to keep
installation as straightforward as possible for your customers.
Compatibility
We formally test SafeNet HSMs and our Java provider with SUN JDK for all platforms except AIX, and with IBM JDK
for the AIX platform. We have not had problems with OpenJDK, although it has not been part of our formal test suite.
The SafeNet JCE provider is compliant with the JCE specification, and should work with any JVM that implements the
Java language specification.
Occasional problems have been encountered with respect to IBM JSSE.
GNU JDK shipped with most Linux systems has historically been incomplete and not suitable.
SafeNet Network HSM Installation Guide
Release 6.2.2 Rev. A December 2016 Copyright 2001-2016 GemaltoAll rights reserved. 61

5 SafeNet HSM Client Software Installation
Remove components
To uninstall the JSP component or the SDK component, you must uninstall SafeNet Client completely (see
"Uninstalling the SafeNet Client Software"on page 60, then re-run the installation script without selecting the unwanted
component(s).
Interrupting the Installation
Do not interrupt the installation script in progress, and ensure that your host computer is served by an uninterruptible
power supply (UPS). If you press [Ctrl] [C], or otherwise interrupt the installation (OS problem, power outage, other),
some components will not be installed. It is not possible to resume an interrupted install process. The result of an
interruption depends on where, in the process, the interruption occurred (what remained to install before the process
was stopped).
As long as the cryptoki RPM package is installed, any subsequent installation attempt results in refusal with the
message "A version of Luna Client is already installed."
If components are missing or are not working properly after an interrupted installation, or if you wish to install any
additional components at a later date (following an interrupted installation, as described), you would need to uninstall
everything first. If ‘sh uninstall.sh’ is unable to do it, then you must uninstall all packages manually.
Because interruption of the install.sh script is not recommended, and mitigation is possible, this is considered a low-
likelihood corner case, fully addressed by these comments.
After Installation
When you have installed the software onto a Client, the next task is to configure the SafeNet HSM, as described in the
Configuration Guide.
SafeNet Network HSM Installation Guide
Release 6.2.2 Rev. A December 2016 Copyright 2001-2016 GemaltoAll rights reserved. 62

5 SafeNet HSM Client Software Installation
HP-UX SafeNet HSM Client Installation
These instructions assume that you have already acquired the SafeNet HSM Client software, either on CD/DVD or in
the form of a downloaded .tar archive. Applicability to specific versions of HP-UX is summarized in the Customer
Release Notes for the current release. See "Customer Release Notes"on page 8 for more information.
Note: Before installing a SafeNet system, you should confirm that the product you have
received is in factory condition and has not been tampered with in transit. Refer to the Content
Sheet included with your product shipment. If you have any questions about the condition of
the product that you have received, please contact SafeNet Support.
Each computer that connects to the SafeNet HSM appliance as a Client must have the cryptoki library, the vtl client
shell and other utilities and supporting files installed. Each computer that contains, or is connected to, a SafeNet USB
HSM or a SafeNet PCIe HSM must have the cryptoki library and other utilities and supporting files installed.
Note: This example shows all the SafeNet Client products and components. Some items are
not supported on all operating systems and therefore do not appear as you proceed through the
installation script.
Do not install SafeNet client software on the same system as legacy SafeNet CA3, SafeNet CA4, SafeNet PCM, or
SafeNet PCI software. The software is intended for modern/current SafeNet HSMs, SafeNet Network HSM, SafeNet
PCIe HSM, SafeNet USB HSM, SafeNet (Remote) Backup HSM.
Prerequisites
Before starting the installation, ensure that you have a Random Number Generator (RNG) or Entropy Gathering
Daemon (EGD) on your system in one of the following locations:
•/dev/egd-pool
•/etc/egd-pool
•/etc/entropy
•/var/run/egd-pool
RNG/EGD
Cryptographic algorithms, including those that assure the security of communication – such as in OpenSSL and other
protocols – depend upon random numbers for the creation of strong keys and certificates. A readily available source of
random data is the entropy that exists in complex computer processes. Utilities exist for every operating system, to
gather bits of system entropy into a pool, which can then be used by other processes.
Windows and Linux have these installed by default. Other systems might or might not. See your system administrator.
You Need an Entropy Pool
In the case of SafeNet Network HSM, the SafeNet Client administration tool (vtl) expects to find a source of
randomness at /dev/random. If one is not found, vtl fails, because the link cannot be secured from the Client end.
SafeNet Network HSM Installation Guide
Release 6.2.2 Rev. A December 2016 Copyright 2001-2016 GemaltoAll rights reserved. 63
5 SafeNet HSM Client Software Installation
If your system does have an entropy pool, but the random number generator (RNG) is not in the expected place, then
you can create a symbolic link between the actual location and one of the following:
•/dev/random
•/dev/egd-pool
•/etc/egd-pool
•/etc/entropy
•/var/run/egd-pool
If your system does not have an entropy gathering daemon or random number generator, please direct your system
administrator to install one, and point it to one of the named devices.
Installing the SafeNet HSMClient Software
Check the SafeNet HSM Customer Release Notes for any installation-related issues or instructions before you begin
the following software installation process.
CAUTION: You must be logged in as root when you run the installation script.
To install the SafeNet HSM Client software on HP-UX
1. Log on to the client system, open a console or terminal window, and use su to gain administrative permissions for
the installation.
2. If you have downloaded the SafeNet Client software as a .tar archive, skip to step 6.
3. Insert the SafeNet Client software DVD (mount it if you do not have automount).
4. Go to the DVD (/cdrom or whatever device name your system uses) and the install directory for your architecture,
for example:
32-bit OS cd /cdrom/hpux/IA/32
64-bit OS cd /cdrom/hpux/IA/64
5. Skip to step 9.
6. If you downloaded the software, copy or move the .tar archive (which usually has a name like "Luna Client_5.x.y-
nn.tar") to a suitable directory where you can untar the archive and launch the installation script.
7. Enter the following command to extract the contents from the archive:
tar xvf SafeNet Client<version>.tar
8. Change directory to the software version suitable for your system (for example, under the "hpux" subdirectory, in
the "x86" directory, choose 32-bit or 64-bit according to your system requirement).
9. Install the client software as follows:
–To see the help, or a list of available installer options, type:
sh install.sh -? or sh install.sh --help
–To install all available products and optional components, type:
sh install.sh all
SafeNet Network HSM Installation Guide
Release 6.2.2 Rev. A December 2016 Copyright 2001-2016 GemaltoAll rights reserved. 64
5 SafeNet HSM Client Software Installation
–To selectively install individual products and optional components, type the command without arguments:
sh install.sh
10. Type yif you agree to be bound by the license agreement:
[mylunaclient-1 32]$ sh install.sh
IMPORTANT: The terms and conditions of use outlined in the software
license agreement (Document #008-010005-001_053110) shipped with the product
("License") constitute a legal agreement between you and SafeNet Incorporated.
Please read the License contained in the packaging of this
product in its entirety before installing this product.
Do you agree to the License contained in the product packaging?
If you select 'yes' or 'y' you agree to be bound by all the terms
and conditions set out in the License.
If you select 'no' or 'n', this product will not be installed.
(y/n)
11. A list of installable SafeNet products appears (might be different, depending on your platform). Select as many as
you require, by typing the number of each (in any order) and pressing [Enter]. As each item is selected, the list
updates, with a "*" in front of any item that has been selected. This example shows item 1 has been selected, and
item 2 is about to be selected:
Products
Choose Luna Products to be installed
*[1]: SafeNet Network HSM
[2]: SafeNet PCIe HSM
[N|n]: Next
[Q|q]: Quit
Enter selection: 2
Note: When the above was captured, HP-UX supported only SafeNet Network HSM and
SafeNet PCIe HSM among SafeNet HSM products. To install SafeNet USB HSM or the
SafeNet Remote Backup HSM, you will need one of the other supported host platforms.
12. When selection is complete, type "N" or "n" for "Next", and press Enter. If you wish to make a change, simply type
a number again and press Enter to de-select a single item.
13. The next list is called Advanced and includes additional items to install. Some items might be pre-selected to
provide the optimum SafeNet HSM experience for the majority of customers, but you can change any selection in
the list.
Products
Choose Luna Components to be installed
[1]: Luna Software Development Kit (SDK)
*[2]: Luna JSP (Java)
*[3]: Luna JCProv (Java)
*[4]: Crypto Command Center Provisioning Client
*[5]: Luna SNMP subagent
[B|b]: Back to Products Selection
[I|i]: Install
[Q|q]: Quit
Enter selection: n
SafeNet Network HSM Installation Guide
Release 6.2.2 Rev. A December 2016 Copyright 2001-2016 GemaltoAll rights reserved. 65
5 SafeNet HSM Client Software Installation
When the Components list is adjusted to your satisfaction, press Enter.
Note: The installer includes the SafeNet SNMP Subagent as an option. After installation is
complete, you will need to move the SafeNet MIB files to the appropriate directory for your
SNMP application, and you will need to start the SafeNet subagent and configure for use with
your agent. See the Administration Guide for more information.
If the script detects an existing cryptoki library, it stops and suggests that you uninstall your previous SafeNet
software before starting the SafeNet Client installation again.
14. The system installs all packages related to the products and any optional components that you selected. By
default, the Client programs are installed in the /opt/safenet/lunaclient directory.
As a general rule, do not modify the Chrystoki.conf/crystoki.ini file, unless directed to do so by SafeNet Customer
Support. If you do modify the file, never insert TAB characters - use individual space characters. Avoid modifying the
PED timeout settings. These are now hardcoded in the appliance, but the numbers in the Chrystoki.conf file must
match.
Uninstalling the SafeNet HSMClient Software
You may need to uninstall the SafeNet Client software prior to upgrading to a new release, or if the software is no longer
required. You must be logged in as root.
To uninstall the SafeNet HSM client software
1. Log in as root.
2. Go to the client installation directory:
cd /opt/safenet/lunaclient/bin
3. Run the uninstall script:
sh uninstall.sh
Java Component Installation
During the installation, the script provides the opportunity to install SafeNet Java components. If you select Java
components, the SafeNet Java files are installed in the /opt/safenet/lunaclient/jsp/ directory. In order to use Java, you
must have separately installed Java (JDKor run-time environment from the vendor of your choice) onto your system.
Copy the SafeNet Java library and jar files from their default location under /opt/safenet/lunaclient/jsp/lib to the Java
environment directory, for example /opt/jre/lib/ext. The exact directory might differ depending on where you obtained
your Java system, the version, and any choices that you made while installing and configuring it.
For additional Java-related information, see "Java Interfaces" on page 1 in the SDK Reference Guide
JSP Static Registration
You would choose static registration of providers if you want all applications to default to our (SafeNet) provider.
Once your client has externally logged in using salogin (see ) in the Reference section of this document) or your own
HSM-aware utility, any application would be able to use SafeNet product without being designed to login to the HSM
Partition.
SafeNet Network HSM Installation Guide
Release 6.2.2 Rev. A December 2016 Copyright 2001-2016 GemaltoAll rights reserved. 66

5 SafeNet HSM Client Software Installation
Edit the java.security file located in the \jre\lib\security directory of your Java SDK/JRE 1.6.x or 1.7.x installation to
read as follows:
security.provider.1=sun.security.provider.Sun
security.provider.2=com.sun.net.ssl.internal.ssl.Provider
security.provider.3=com.safenetinc.luna.provider.LunaProvider
security.provider.4=com.sun.rsajca.Provider
security.provider.5=com.sun.crypto.provider.SunJCE
security.provider.6=sun.security.jgss.SunProvider
You can set our provider in first position for efficiency if SafeNet HSM operations are your primary mode. However, if
your application needs to perform operations not supported by the LunaProvider (secure random generation or random
publickey verification, for example) then it would receive error messages from the HSM and would need to handle those
gracefully before resorting to providers further down the list. We have found that having our provider in third position
works well for most applications.
The modifications in the "java.security" file are global, and they might result in the breaking of another application that
uses the default KeyPairGenerator without logging into the SafeNet Network HSM first. This consideration might argue
for using dynamic registration, instead.
JSP Dynamic Registration
For your situation, you may prefer to employ dynamic registration of Providers, in order to avoid possible negative
impacts on other applications running on the same machine. As well, the use of dynamic registration allows you to keep
installation as straightforward as possible for your customers.
Compatibility
We formally test SafeNet HSMs and our Java provider with SUN JDK for all platforms except AIX, and with IBM JDK
for the AIX platform. We have not had problems with OpenJDK, although it has not been part of our formal test suite.
The SafeNet JCE provider is compliant with the JCE specification, and should work with any JVM that implements the
Java language specification.
Occasional problems have been encountered with respect to IBM JSSE.
GNU JDK shipped with most Linux systems has historically been incomplete and not suitable.
Remove components
To uninstall the JSP component or the SDK component, you must uninstall SafeNet Client completely (see "HP-UX
SafeNet HSM Client Installation"on page 63, then re-run the installation script without selecting the unwanted
component(s).
Interrupting the Installation
Do not interrupt the installation script in progress, and ensure that your host computer is served by an uninterruptible
power supply (UPS). If you press [Ctrl] [C], or otherwise interrupt the installation (OS problem, power outage, other),
some components will not be installed. It is not possible to resume an interrupted install process. The result of an
interruption depends on where, in the process, the interruption occurred (what remained to install before the process
was stopped).
SafeNet Network HSM Installation Guide
Release 6.2.2 Rev. A December 2016 Copyright 2001-2016 GemaltoAll rights reserved. 67

5 SafeNet HSM Client Software Installation
As long as the cryptoki RPM package is installed, any subsequent installation attempt results in refusal with the
message "A version of SafeNet Client is already installed."
If components are missing or are not working properly after an interrupted installation, or if you wish to install any
additional components at a later date (following an interrupted installation, as described), you would need to uninstall
everything first. If ‘sh uninstall.sh’ is unable to do it, then you must uninstall all packages manually.
Because interruption of the install.sh script is not recommended, and mitigation is possible, this is considered a low-
likelihood corner case, fully addressed by these comments.
After Installation
When you have installed the software onto a Client, the next task is to configure the SafeNet HSM, as described in the
Configuration Guide.
SafeNet Network HSM Installation Guide
Release 6.2.2 Rev. A December 2016 Copyright 2001-2016 GemaltoAll rights reserved. 68

5 SafeNet HSM Client Software Installation
Linux SafeNet HSMClient Installation
These instructions are tested for the Linux versions listed in the Customer Release Notes.
These instructions assume that you have already acquired the SafeNet Client software, either on CD/DVD or in the
form of a downloaded .tar archive.
Applicability to specific versions of Linux is summarized in the Customer Release Notes for the current release.
Note: Before installing a Luna® system, confirm that the product you have received is in
factory condition and has not been tampered with in transit. Refer to the Startup Guide included
with your product shipment. If you have any questions about the condition of the product that
you have received, please contact SafeNet Support (800)545 6608 or support@safenet-
inc.com immediately
Each computer that connects to the SafeNet HSM appliance as a Client must have the cryptoki library, the vtl client
shell and other utilities and supporting files installed.
Each computer that contains, or is connected to a SafeNet USB HSM or a SafeNet PCIe HSM must have the cryptoki
library and other utilities and supporting files installed.
Note: This example shows all the SafeNet Client products and components. Some items are
not supported on all operating systems and therefore do not appear as you proceed through the
installation script.
Do not install SafeNet client software on the same system as legacy SafeNet CA3, SafeNet CA4, SafeNet PCM, or
SafeNet PCI software. The software is intended for modern/current SafeNet HSMs, SafeNet Network HSM, SafeNet
PCIe HSM, SafeNet USB HSM, SafeNet (Remote) Backup HSM.
Prerequisites
Before starting the installation, ensure that you have satisfied the following prerequisites:
Random Number Generator (RNG) or Entropy Gathering Daemon (EGD)
Ensure that you have a Random Number Generator (RNG) or Entropy Gathering Daemon (EGD) on your system in one
of the following locations:
•/dev/egd-pool
•/etc/egd-pool,
•/etc/entropy
•/var/run/egd-pool
RNG/EGD
Cryptographic algorithms, including those that assure the security of communication – such as in OpenSSL and other
protocols – depend upon random numbers for the creation of strong keys and certificates. A readily available source of
random data is the entropy that exists in complex computer processes. Utilities exist for every operating system, to
gather bits of system entropy into a pool, which can then be used by other processes.
Windows and Linux have these installed by default. Other systems may or may not. See your system administrator.
SafeNet Network HSM Installation Guide
Release 6.2.2 Rev. A December 2016 Copyright 2001-2016 GemaltoAll rights reserved. 69

5 SafeNet HSM Client Software Installation
You Need an Entropy Pool
In the case of SafeNet Network HSM, the SafeNet Client administration tool (vtl) expects to find a source of
randomness at /dev/random. If one is not found, vtl fails, because the link cannot be secured from the Client end.
If your system does have an entropy pool, but the random number generator (RNG) is not in the expected place, then
you can create a symbolic link between the actual location and one of the following:
•/dev/random
•/dev/egd-pool
•/etc/egd-pool
•/etc/entropy
•/var/run/egd-pool
If your system does not have an entropy gathering daemon or random number generator, please direct your system
administrator to install one, and point it to one of the named devices.
Alien with Debian
The SafeNet Client software is provided as RPM packages. If you are installing on a Debian system, you must have
"alien" installed before beginning the SafeNet Client installation. The SafeNet Client installation script invokes the alien
conversion of RPMs to DEB packages. The install script will stop with a message if you attempt to install on a Debian
system without the alien package already installed.
Components Used to Build the Driver (SafeNet USB HSM, PCIe, and Remote Backup
HSM)
If you are installing the SafeNet PCIe HSM, or SafeNet USB HSM, or SafeNet Remote Backup HSM clients, ensure
that the following items are installed:
•Kernel headers for build
•rpm-build package
•C and C++ compilers
•make command
These items are required because the driver module is built on Linux before it is installed. If one of these items is
missing, the driver build will fail and the module will not be installed..
Installing the Client Software
It is recommended that you refer to the SafeNet HSM Customer Release Notes for any installation-related issues or
instructions before you begin the following software installation process.
CAUTION: You must be logged in as root when you run the installation script.
By default, the Client programs are installed in the “/usr/safenet/lunaclient” directory.
To install the SafeNet HSM client software on a Linux workstation
1. Log on to the client system, open a console or terminal window, and use sudo to gain administrative permissions
for the installation.
2. If you have downloaded the SafeNet Client software as a .tar archive, skip to step 6.
SafeNet Network HSM Installation Guide
Release 6.2.2 Rev. A December 2016 Copyright 2001-2016 GemaltoAll rights reserved. 70
5 SafeNet HSM Client Software Installation
3. Insert the DVD (mount it if you do not have automount).
4. Go to the DVD (/cdrom or whatever devicename your system uses) and the install directory for your architecture:
cd /cdrom/linux/32
or
cd /cdrom/linux/64
Note: Not all platforms are supported with each release, so the available install options might
not match the list above.
5. Skip to step 9.
6. If you downloaded the software, copy or move the .tar archive (which usually has a name like "Luna Client_5.x.y-
nn.tar") to a suitable directory where you can untar the archive and launch the installation script.
7. Extract the contents from the archive:
tar xvf <filename>.tar
8. Change directory to the software version suitable for your system (for example, under the linux subdirectory, in the
x86 directory, choose 32-bit or 64-bit according to your system requirement).
SafeNet Network HSM Installation Guide
Release 6.2.2 Rev. A December 2016 Copyright 2001-2016 GemaltoAll rights reserved. 71
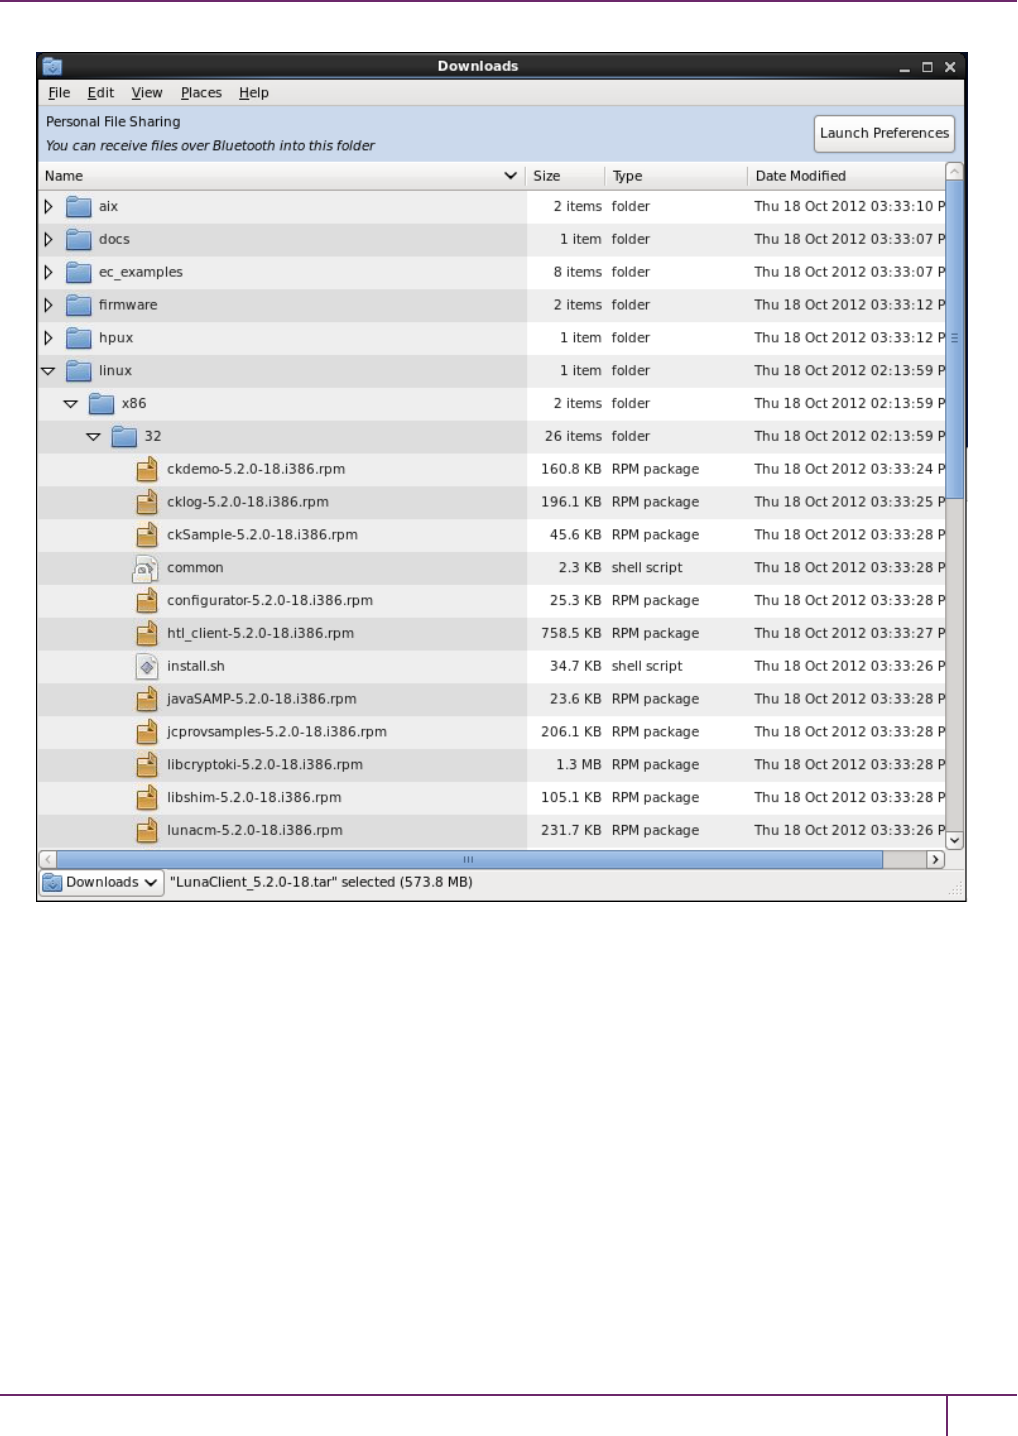
5 SafeNet HSM Client Software Installation
9. To see the help, or a list of available installer options, type:
./sh install.sh -?or ./sh install.sh --help
To install all available products and optional components, type:
./sh install.sh all
To selectively install individual products and optional components, type the command without arguments:
./sh install.sh
10. Type yif you agree to be bound by the license agreement.
11. A list of installable SafeNet products appears (might be different, depending on your platform). Select as many as
you require, by typing the number of each (in any order) and pressing [Enter]. As each item is selected, the list
updates, with a "*" in front of any item that has been selected. This example shows items 1 and 3 have been
selected, and item 4 is about to be selected.
SafeNet Network HSM Installation Guide
Release 6.2.2 Rev. A December 2016 Copyright 2001-2016 GemaltoAll rights reserved. 72
5 SafeNet HSM Client Software Installation
Products
Choose Luna Products to be installed
*[1]: SafeNet Network HSM
[2]: SafeNet PCIe HSM
*[3]: SafeNet USB HSM
[4]: SafeNet Remote Backup HSM
[N|n]: Next
[Q|q]: Quit
Enter selection: 4
12. When selection is complete, type "N" or "n" for "Next", and press [Enter]. If you wish to make a change, simply
type a number again and press [Enter] to de-select a single item.
13. The next list is called "Advanced" and includes additional items to install. Some items might be pre-selected to
provide the optimum SafeNet HSM experience for the majority of customers, but you can change any selection in
the list. When the Components list is adjusted to your satisfaction, press [Enter].
Note: The installer includes the SafeNet SNMP Subagent as an option. If you select this
option, you will need to move the SafeNet MIB files to the appropriate directory for your SNMP
application after installation is complete, and you will need to start the SafeNet subagent and
configure for use with your agent. See the Administration Guide for more information.
14. If the script detects an existing cryptoki library, it stops and suggests that you uninstall your previous SafeNet
software before starting the SafeNet Client installation again.
15. The system installs all packages related to the products and any optional components that you selected.
As a general rule, do not modify the Chrystoki.conf/crystoki.ini file, unless directed to do so by SafeNet Customer
Support. If you do modify the file, never insert TAB characters - use individual space characters. Avoid modifying the
PED timeout settings. These are now hardcoded in the appliance, but the numbers in the Chrystoki.conf file must
match.
Uninstalling the SafeNet HSM Client Software
cd /usr/safenet/lunaclient/bin
./sh uninstall.sh
Java
During the installation, the script provides the opportunity to install SafeNet Java components. If you select Java
components, the SafeNet Java files are installed below /usr/safenet/lunaclient/jsp/. In order to use Java, you must
have separately installed Java (JDKor run-time environment from the vendor of your choice) onto your system.
Copy the SafeNet Java library and jar files from their default location under /usr/safenet/lunaclient/jsp/lib to the Java
environment directory, for example /usr/jre/lib/ext.
The exact directory might differ depending on where you obtained your Java system, the version, and any choices that
you made while installing and configuring it.
For additional Java-related information, see "Java Interfaces" on page 1 in the SDK Reference Guide.
JSP Static Registration
You would choose static registration of providers if you want all applications to default to our (SafeNet) provider.
SafeNet Network HSM Installation Guide
Release 6.2.2 Rev. A December 2016 Copyright 2001-2016 GemaltoAll rights reserved. 73

5 SafeNet HSM Client Software Installation
Once your client has externally logged in using salogin (see ) in the Reference section of this document) or your own
HSM-aware utility, any application would be able to use SafeNet product without being designed to login to the HSM
Partition.
Edit the java.security file located in the \jre\lib\security directory of your Java SDK/JRE 1.6.x or 1.7.x installation to
read as follows:
security.provider.1=sun.security.provider.Sun
security.provider.2=com.sun.net.ssl.internal.ssl.Provider
security.provider.3=com.safenetinc.luna.provider.LunaProvider
security.provider.4=com.sun.rsajca.Provider
security.provider.5=com.sun.crypto.provider.SunJCE
security.provider.6=sun.security.jgss.SunProvider
You can set our provider in first position for efficiency if SafeNet HSM operations are your primary mode. However, if
your application needs to perform operations not supported by the LunaProvider (secure random generation or random
publickey verification, for example) then it would receive error messages from the HSM and would need to handle those
gracefully before resorting to providers further down the list. We have found that having our provider in third position
works well for most applications.
The modifications in the "java.security" file are global, and they might result in the breaking of another application that
uses the default KeyPairGenerator without logging into the SafeNet Network HSM first. This consideration might argue
for using dynamic registration, instead.
JSP Dynamic Registration
For your situation, you may prefer to employ dynamic registration of Providers, in order to avoid possible negative
impacts on other applications running on the same machine. As well, the use of dynamic registration allows you to keep
installation as straightforward as possible for your customers.
Compatibility
We formally test SafeNet HSMs and our Java provider with SUN JDK for all platforms except AIX, and with IBM JDK
for the AIX platform. We have not had problems with OpenJDK, although it has not been part of our formal test suite.
The SafeNet JCE provider is compliant with the JCE specification, and should work with any JVM that implements the
Java language specification.
Occasional problems have been encountered with respect to IBM JSSE.
GNU JDK shipped with most Linux systems has historically been incomplete and not suitable.
Removing components
To uninstall the JSP component or the SDK component, you must uninstall SafeNet Client completely, then re-run the
installation script without selecting the unwanted component(s).
sh uninstall.sh
[Ctrl] [C] - If you interrupt the installation
Do not interrupt the installation script in progress, and ensure that your host computer is served by an uninterruptible
power supply (UPS). If you press [Ctrl] [C], or otherwise interrupt the installation (OS problem, power outage, other),
SafeNet Network HSM Installation Guide
Release 6.2.2 Rev. A December 2016 Copyright 2001-2016 GemaltoAll rights reserved. 74

5 SafeNet HSM Client Software Installation
some components will not be installed. It is not possible to resume an interrupted install process. The result of an
interruption depends on where, in the process, the interruption occurred (what remained to install before the process
was stopped).
As long as the cryptoki RPM package is installed, any subsequent installation attempt results in refusal with the
message "A version of SafeNet Client is already installed."
If components are missing or are not working properly after an interrupted installation, or if you wish to install any
additional components at a later date (following an interrupted installation, as described), you would need to uninstall
everything first. If ‘sh uninstall.sh’ is unable to do it, then you must uninstall all packages manually.
Because interruption of the install.sh script is not recommended, and mitigation is possible, this is considered a low-
likelihood corner case, fully addressed by these comments.
Scripted or Unattended Installation
If you prefer to run the installation from a script, rather than interactively, run the command with the options -p<list of
SafeNet products> and -c<list of SafeNet components>. To see the syntax, run the command with --help like this:
[myhost]$ sh .../Luna Client_5.3.0-5x/linux/64/install.sh --help
Installing from .../Luna Client_5.3.0-x/linux/64
At least one product should be specified.
usage:
install.sh - Luna Client install through menu
install.sh help - Display scriptable install options
install.sh all - Complete Luna Client install
install.sh -p [sa|pci|g5|rb] [-c sdk|jsp|jcprov|ldpc|snmp]
-p <list of Luna products>
-c <list of Luna components> - Optional. All components are installed if not provided
Luna products options
sa - SafeNet Network HSM
pci - SafeNet PCIe HSM
g5 - SafeNet USB HSM
rb - SafeNet Remote Backup HSM
Luna components options
sdk - Luna SDK
jsp - Luna JSP (Java)
jcprov - Luna JCPROV (Java)
snmp - Luna SNMP subagent
[myhost]$
For scripted/automated installation, your script will need to capture and respond to the License Agreement prompt, and
to the confirmation prompt. For example:
[myhost]$ ./install.sh all
Installing from /home/me/Downloads/Luna Client_5.3.0/linux/64
IMPORTANT: The terms and conditions of use outlined in the software
license agreement (Document #008-010005-001_053110) shipped with the product
("License") constitute a legal agreement between you and SafeNet Inc.
SafeNet Network HSM Installation Guide
Release 6.2.2 Rev. A December 2016 Copyright 2001-2016 GemaltoAll rights reserved. 75

5 SafeNet HSM Client Software Installation
Please read the License contained in the packaging of this
product in its entirety before installing this product.
Do you agree to the License contained in the product packaging?
If you select 'yes' or 'y' you agree to be bound by all the terms
and conditions se out in the License.
If you select 'no' or 'n', this product will not be installed.
(y/n) y
Complete Luna Client will be installed. This includes SafeNet Network HSM,
SafeNet PCIe HSM, SafeNet USB HSM AND SafeNet Remote Backup HSM.
Select 'yes' or 'y' to proceed with the install.
Select 'no' or 'n', to cancel this install.
Continue (y/n)? y
For example, to automate installation for our testing, we use:
if product == 'all':
cmd ='/bin/bash %s %s'%(install_cmd, product) # install.sh all
SUSE Linux on IBM PPC
JCE un-restriction files must be downloaded from IBM, not from SUN, for this platform. Attempting to use SUN JCE
un-restriction files on IBM PowerPC systems with SUSE Linux causes signing errors with Java 5 and Java6.
32-bit Client on 64-bit RedHat 6
While no errors normally appear when installing 64-bit client on 64-bit RedHat 6, some preparation is required to avoid
installation errors when installing 32-bit Client on 64-bit OS. Do the following:
•yum install glibc.i686
•yum upgrade libstdc++
•yum install libstdc++.i686
•yum install libgcc.i686
Then run the 32-bit installer
./install.sh
Failure to perform those steps before launching the installer can result in output like the following:
Installing the Luna Client 5.3.0-5...
Adding new version of configurator
/home/builds/Luna Client/CLT_SDK/5.3.0/Luna Client_5.3.0-5/Luna Client_5.3.0-5/linux/32
Preparing... ########################################### [100%]
1:configurator ########################################### [100%]
Adding new version of libcryptoki
/home/builds/Luna Client/CLT_SDK/5.3.0/Luna Client_5.3.0-5/Luna Client_5.3.0-5/linux/32
Preparing... ########################################### [100%]
1:libcryptoki ########################################### [100%]
SafeNet Network HSM Installation Guide
Release 6.2.2 Rev. A December 2016 Copyright 2001-2016 GemaltoAll rights reserved. 76

5 SafeNet HSM Client Software Installation
Checking for /etc/Chrystoki.conf.rpmsave
Using new /etc/Chrystoki.conf
/var/tmp/rpm-tmp.ndfBQQ: /usr/safenet/lunaclient/bin/configurator: /lib/ld-linux.so.2: bad ELF
interpreter: No such file or directory
/var/tmp/rpm-tmp.ndfBQQ: /usr/safenet/lunaclient/bin/configurator: /lib/ld-linux.so.2: bad ELF
interpreter: No such file or directory
/var/tmp/rpm-tmp.ndfBQQ: /usr/safenet/lunaclient/bin/configurator: /lib/ld-linux.so.2: bad ELF
interpreter: No such file or directory
/var/tmp/rpm-tmp.ndfBQQ: /usr/safenet/lunaclient/bin/configurator: /lib/ld-linux.so.2: bad ELF
interpreter: No such file or directory
/var/tmp/rpm-tmp.ndfBQQ: /usr/safenet/lunaclient/bin/configurator: /lib/ld-linux.so.2: bad ELF
interpreter: No such file or directory
/var/tmp/rpm-tmp.ndfBQQ: /usr/safenet/lunaclient/bin/configurator: /lib/ld-linux.so.2: bad ELF
interpreter: No such file or directory
/var/tmp/rpm-tmp.ndfBQQ: /usr/safenet/lunaclient/bin/configurator: /lib/ld-linux.so.2: bad ELF
interpreter: No such file or directory
/var/tmp/rpm-tmp.ndfBQQ: /usr/safenet/lunaclient/bin/configurator: /lib/ld-linux.so.2: bad ELF
interpreter: No such file or directory
/var/tmp/rpm-tmp.ndfBQQ: /usr/safenet/lunaclient/bin/configurator: /lib/ld-linux.so.2: bad ELF
interpreter: No such file or directory
/var/tmp/rpm-tmp.ndfBQQ: /usr/safenet/lunaclient/bin/configurator: /lib/ld-linux.so.2: bad ELF
interpreter: No such file or directory
/var/tmp/rpm-tmp.ndfBQQ: /usr/safenet/lunaclient/bin/configurator: /lib/ld-linux.so.2: bad ELF
interpreter: No such file or directory
/var/tmp/rpm-tmp.ndfBQQ: /usr/safenet/lunaclient/bin/configurator: /lib/ld-linux.so.2: bad ELF
interpreter: No such file or directory
Adding new version of libshim
/home/builds/Luna Client/CLT_SDK/5.3.0/Luna Client_5.3.0-5/Luna Client_5.3.0-5/linux/32
Preparing... ########################################### [100%]
1:libshim ########################################### [100%]
Adding new version of lunacm
/home/builds/Luna Client/CLT_SDK/5.3.0/Luna Client_5.3.0-5/Luna Client_5.3.0-5/linux/32
Preparing... ########################################### [100%]
1:lunacm ########################################### [100%]
Adding new version of lunacmu
/home/builds/Luna Client/CLT_SDK/5.3.0/Luna Client_5.3.0-5/Luna Client_5.3.0-5/linux/32
Preparing... ########################################### [100%]
1:lunacmu ########################################### [100%]
Adding new version of ckdemo
/home/builds/Luna Client/CLT_SDK/5.3.0/Luna Client_5.3.0-5/Luna Client_5.3.0-5/linux/32
Preparing... ########################################### [100%]
1:ckdemo ########################################### [100%]
Adding new version of multitoken
/home/builds/Luna Client/CLT_SDK/5.3.0/Luna Client_5.3.0-5/Luna Client_5.3.0-5/linux/32
Preparing... ########################################### [100%]
1:multitoken ########################################### [100%]
Adding new version of cklog
/home/builds/Luna Client/CLT_SDK/5.3.0/Luna Client_5.3.0-5/Luna Client_5.3.0-5/linux/32
Preparing... ########################################### [100%]
1:cklog ########################################### [100%]
Adding new version of salogin
/home/builds/Luna Client/CLT_SDK/5.3.0/Luna Client_5.3.0-5/Luna Client_5.3.0-5/linux/32
Preparing... ########################################### [100%]
1:salogin ########################################### [100%]
Adding new version of vtl
/home/builds/Luna Client/CLT_SDK/5.3.0/Luna Client_5.3.0-5/Luna Client_5.3.0-5/linux/32
Preparing... ########################################### [100%]
SafeNet Network HSM Installation Guide
Release 6.2.2 Rev. A December 2016 Copyright 2001-2016 GemaltoAll rights reserved. 77

5 SafeNet HSM Client Software Installation
1:vtl ########################################### [100%]
Adding new version of htl_client
/home/builds/Luna Client/CLT_SDK/5.3.0/Luna Client_5.3.0-5/Luna Client_5.3.0-5/linux/32
Preparing... ########################################### [100%]
1:htl_client ########################################### [100%]
/var/tmp/rpm-tmp.bLgG1F: /usr/safenet/lunaclient/bin/configurator: /lib/ld-linux.so.2: bad ELF
interpreter: No such file or directory
Starting htl_client:/etc/init.d/htlc_service: /usr/safenet/lunaclient/htl/htl_client: /lib/ld-
linux.so.2: bad ELF interpreter: No such file or directory
FAILED
warning: %post(htl_client-5.3.0-5.i386) scriptlet failed, exit status 1
Adding new version of javaSAMP
/home/builds/Luna Client/CLT_SDK/5.3.0/Luna Client_5.3.0-5/Luna Client_5.3.0-5/linux/32
Preparing... ########################################### [100%]
1:javaSAMP ########################################### [100%]
Adding new version of ckSample
/home/builds/Luna Client/CLT_SDK/5.3.0/Luna Client_5.3.0-5/Luna Client_5.3.0-5/linux/32
Preparing... ########################################### [100%]
1:ckSample ########################################### [100%]
If the installation script proceeds to the end, with the above errors, the installation appears successful, but you are
unable to create certs. Re-do.
After Installation
When you have installed the software onto a Client, the next task is to configure the SafeNet HSM, as described in the
Configuration Guide.
SafeNet Network HSM Installation Guide
Release 6.2.2 Rev. A December 2016 Copyright 2001-2016 GemaltoAll rights reserved. 78
5 SafeNet HSM Client Software Installation
Solaris SafeNet HSM Client Installation
These instructions assume that you have already acquired the SafeNet HSM client software, either on CD/DVD or in
the form of a downloaded .tar archive.
Applicability to specific versions of Solaris is summarized in the Customer Release Notes for the current release.
Note: Before installing a SafeNet system, you should confirm that the product you have
received is in factory condition and has not been tampered with in transit. Refer to the Startup
Guide included with your product shipment. If you have any questions about the condition of
the product that you have received, contact SafeNet Support.
Each computer that connects to the SafeNet HSM appliance as a client must have the cryptoki library, the vtl client
shell and other utilities and supporting files installed.
Each computer that contains, or is connected to a SafeNet USB HSM or a SafeNet PCIe HSM must have the cryptoki
library and other utilities and supporting files installed.
Note: This example shows all the SafeNet HSM client products and components. Some items
are not supported on all operating systems and therefore do not appear as you proceed through
the installation script.
Do not install SafeNet client software on the same system as legacy SafeNet CA3, SafeNet CA4, SafeNet PCM, or
SafeNet PCI software. The software is intended for modern/current SafeNet HSMs, SafeNet Network HSM, SafeNet
PCIe HSM, SafeNet USB HSM, SafeNet (Remote) Backup HSM.
Prerequisites
Before starting the installation, ensure that you have satisfied the following prerequisites:
Random Number Generator (RNG) or Entropy Gathering Daemon (EGD)
Ensure that you have a Random Number Generator (RNG) or Entropy Gathering Daemon (EGD) on your system in one
of the following locations:
•/dev/egd-pool
•/etc/egd-pool,
•/etc/entropy
•/var/run/egd-pool
RNG/EGD
Cryptographic algorithms, including those that assure the security of communication – such as in OpenSSL and other
protocols – depend upon random numbers for the creation of strong keys and certificates. A readily available source of
random data is the entropy that exists in complex computer processes. Utilities exist for every operating system, to
gather bits of system entropy into a pool, which can then be used by other processes.
Windows and Linux have these installed by default. Other systems may or may not. See your system administrator.
SafeNet Network HSM Installation Guide
Release 6.2.2 Rev. A December 2016 Copyright 2001-2016 GemaltoAll rights reserved. 79
5 SafeNet HSM Client Software Installation
You Need an Entropy Pool
In the case of SafeNet Network HSM, the SafeNet Client administration tool (vtl) expects to find a source of
randomness at /dev/random. If one is not found, vtl fails, because the link cannot be secured from the Client end.
If your system does have an entropy pool, but the random number generator (RNG) is not in the expected place, then
you can create a symbolic link between the actual location and one of the following:
•/dev/random
•/dev/egd-pool
•/etc/egd-pool
•/etc/entropy
•/var/run/egd-pool
If your system does not have an entropy gathering daemon or random number generator, please direct your system
administrator to install one, and point it to one of the named devices.
Installing the Client Software
It is recommended that you refer to the SafeNet HSM Customer Release Notes for any installation-related issues or
instructions before you begin the following software installation process.
CAUTION: You must be logged in as root when you run the installation script.
By default, the Client programs are installed in the /opt/safenet/lunaclient/bin directory.
To install the SafeNet HSM client software on a Linux workstation
1. Log on to the client system, open a console or terminal window, and use su to gain administrative permissions for
the installation.
2. Access the SafeNet HSM client software:
DVD 1. Insert the DVD (mount it if you do not have automount).
2. Go to the DVD (/cdrom or whatever device name your system uses)
Tar
archive
1. Copy or move the .tar archive to a suitable directory where you can untar the archive and launch
the installation script.
2. Extract the contents from the archive:
tar xvf <filename>.tar
3. Go to the install directory for your architecture:
Architecture Path
Solaris Sparc 32-bit <dvd_or_tarball_path>/solaris/sparc/32
Solaris Sparc 64-bit <dvd_or_tarball_path>/solaris/sparc/64
Solaris x86 32-bit <dvd_or_tarball_path>/solaris/x86/32
Solaris x86 64-bit <dvd_or_tarball_path>/solaris/x86/64
SafeNet Network HSM Installation Guide
Release 6.2.2 Rev. A December 2016 Copyright 2001-2016 GemaltoAll rights reserved. 80
5 SafeNet HSM Client Software Installation
Note: Not all platforms are supported with each release, so the available install options might
not match the list above. Refer to the Customer Release Notes for more information.
4. To see the help, or a list of available installer options, type:
sh install.sh -?or sh install.sh --help
To install all available products and optional components, type:
sh install.sh all
To selectively install individual products and optional components, type the command without arguments:
sh install.sh
5. Type yif you agree to be bound by the license agreement.
6. A list of installable SafeNet products is displayed (might be different, depending on your platform). Select as many
as you require, by typing the number of each (in any order) and pressing [Enter]. As each item is selected, the list
updates, with a "*" in front of any item that has been selected. The following example shows that items 1 and 3
have been selected, and item 4 is about to be selected.
Products
Choose Luna Products to be installed
*[1]: SafeNet Network HSM
[2]: SafeNet PCIe HSM
*[3]: SafeNet USB HSM
[4]: SafeNet Remote Backup HSM
[N|n]: Next
[Q|q]: Quit
Enter selection: 4
7. When the selection is complete, type "N" or "n" for "Next", and press [Enter]. If you wish to make a change, simply
type a number again and press [Enter] to de-select a single item.
8. The next list is called "Advanced" and includes additional items to install. Some items might be pre-selected to
provide the optimum SafeNet HSM experience for the majority of customers, but you can change any selection in
the list. When the Components list is adjusted to your satisfaction, press [Enter].
Note: The installer includes the SafeNet SNMP Subagent as an option. If you select this
option, you will need to move the SafeNet MIB files to the appropriate directory for your SNMP
application after installation is complete, and you will need to start the SafeNet subagent and
configure for use with your agent. See the Administration Guide for more information.
9. If the script detects an existing cryptoki library, it stops and suggests that you uninstall your previous SafeNet
software before starting the SafeNet Client installation again.
10. The system installs all packages related to the products and any optional components that you selected.
As a general rule, do not modify the Chrystoki.conf/crystoki.ini file, unless directed to do so by SafeNet Customer
Support. If you do modify the file, never insert TAB characters - use individual space characters. Avoid modifying the
PED timeout settings. These are now hardcoded in the appliance, but the numbers in the Chrystoki.conf file must
match.
SafeNet Network HSM Installation Guide
Release 6.2.2 Rev. A December 2016 Copyright 2001-2016 GemaltoAll rights reserved. 81

5 SafeNet HSM Client Software Installation
Uninstalling the SafeNet HSM Client Software
cd /opt/safenet/lunaclient/bin
sh uninstall.sh
Java
During the installation, the script provides the opportunity to install SafeNet Java components. If you select Java
components, the SafeNet Java files are installed below /opt/safenet/lunaclient/jsp/. In order to use Java, you must
have separately installed Java (JDKor run-time environment from the vendor of your choice) onto your system.
Copy the SafeNet Java library and jar files from their default location under /opt/safenet/lunaclient/jsp/lib to the Java
environment directory, for example /opt/jre/lib/ext.
The exact directory might differ depending on where you obtained your Java system, the version, and any choices that
you made while installing and configuring it.
For additional Java-related information, see "Java Interfaces" on page 1 in the SDK Reference Guide.
JSP Static Registration
You would choose static registration of providers if you want all applications to default to our (SafeNet) provider.
Once your client has externally logged in using salogin (see ) in the Reference section of this document) or your own
HSM-aware utility, any application would be able to use SafeNet product without being designed to login to the HSM
Partition.
Edit the java.security file located in the \jre\lib\security directory of your Java SDK/JRE 1.6.x or 1.7.x installation to
read as follows:
security.provider.1=sun.security.provider.Sun
security.provider.2=com.sun.net.ssl.internal.ssl.Provider
security.provider.3=com.safenetinc.luna.provider.LunaProvider
security.provider.4=com.sun.rsajca.Provider
security.provider.5=com.sun.crypto.provider.SunJCE
security.provider.6=sun.security.jgss.SunProvider
You can set our provider in first position for efficiency if SafeNet HSM operations are your primary mode. However, if
your application needs to perform operations not supported by the LunaProvider (secure random generation or random
publickey verification, for example) then it would receive error messages from the HSM and would need to handle those
gracefully before resorting to providers further down the list. We have found that having our provider in third position
works well for most applications.
The modifications in the "java.security" file are global, and they might result in the breaking of another application that
uses the default KeyPairGenerator without logging into the SafeNet Network HSM first. This consideration might argue
for using dynamic registration, instead.
JSP Dynamic Registration
For your situation, you may prefer to employ dynamic registration of Providers, in order to avoid possible negative
impacts on other applications running on the same machine. As well, the use of dynamic registration allows you to keep
installation as straightforward as possible for your customers.
SafeNet Network HSM Installation Guide
Release 6.2.2 Rev. A December 2016 Copyright 2001-2016 GemaltoAll rights reserved. 82

5 SafeNet HSM Client Software Installation
Compatibility
We formally test SafeNet HSMs and our Java provider with SUN JDK for all platforms except AIX, and with IBM JDK
for the AIX platform. We have not had problems with OpenJDK, although it has not been part of our formal test suite.
The SafeNet JCE provider is compliant with the JCE specification, and should work with any JVM that implements the
Java language specification.
Occasional problems have been encountered with respect to IBM JSSE.
GNU JDK shipped with most Linux systems has historically been incomplete and not suitable.
Removing components
To uninstall the JSP component or the SDK component, you must uninstall SafeNet Client completely, then re-run the
installation script without selecting the unwanted component(s).
sh uninstall.sh
[Ctrl] [C] - If you interrupt the installation
Do not interrupt the installation script in progress, and ensure that your host computer is served by an uninterruptible
power supply (UPS). If you press [Ctrl] [C], or otherwise interrupt the installation (OS problem, power outage, other),
some components will not be installed. It is not possible to resume an interrupted install process. The result of an
interruption depends on where, in the process, the interruption occurred (what remained to install before the process
was stopped).
As long as the cryptoki RPM package is installed, any subsequent installation attempt results in refusal with the
message "A version of Luna Client is already installed."
If components are missing or are not working properly after an interrupted installation, or if you wish to install any
additional components at a later date (following an interrupted installation, as described), you would need to uninstall
everything first. If ‘sh uninstall.sh’ is unable to do it, then you must uninstall all packages manually.
Because interruption of the install.sh script is not recommended, and mitigation is possible, this is considered a low-
likelihood corner case, fully addressed by these comments.
After Installation
When you have installed the software onto a Client, the next task is to configure the SafeNet HSM, as described in the
Configuration Guide.
SafeNet Network HSM Installation Guide
Release 6.2.2 Rev. A December 2016 Copyright 2001-2016 GemaltoAll rights reserved. 83
5 SafeNet HSM Client Software Installation
Windows SafeNet HSM Client Installation
Applicability to specific versions of Windows is summarized in the Customer Release Notes for this release.
Note: Before installing a SafeNet HSM system, you should confirm that the product you have
received is in factory condition and has not been tampered with in transit. Refer to the Startup
Guide included with your product shipment. If you have any questions about the condition of
the product that you have received, please contact SafeNet Support immediately.
Required Client Software
Each computer that connects to the SafeNet Network HSM as a Client must have the cryptoki library, the vtl client
shell and other utilities and supporting files installed.
Each computer that contains, or is connected to a SafeNet PCIe HSM or a SafeNet USB HSM must have the cryptoki
library and other utilities and supporting files installed.
Note: .NET framework - before installing SafeNet Client on Windows 2012 platform, install
Microsoft .NET framework version 3.5,first. You can have other versions of .NET on your
system (there is no conflict), but 3.5 is needed for SafeNet Client to launch HTL on Windows
2012.
For additional information see "Windows 2012 SafeNet HSMClient Supplemental
Configuration"on page 98. On Windows Server 2008, SafeNet Client installs and HTL works
without additional Windows components.
Installing the SafeNet HSM Client Software
The supported Windows servers are 64-bit. They allow running of 32-bit or 64-bit applications.
For compatibility of our HSMs with Windows in general, we provide both 32-bit and 64-bit libraries for use with your
applications as appropriate, but our supplied tools (lunacm, cmu, multitoken, etc.) are 64-bit versions only. This is
because 64-bit tools are all that is needed on a 64-bit OS, but we mention it in case you were looking for 32-bit
equivalents - there aren't any because none are needed.
For compatibility of our HSMs with Windows CAPI we have SafeNet CSP, and for the newer Windows CNG we have
SafeNet KSP. If you are using either, then a section near the end of this chapter has additional specific instructions.
Interactive (prompted) and non-interactive (no prompts) installation options are available.
To install the SafeNet HSM client software
1. Log into Windows as “Administrator”, or as a user with administrator privileges (see Troubleshooting tips, below).
2. Insert the SafeNet Client Software DVD into your optical drive.
3. Click Start > Run and then type:
d:\windows\64\Luna Client.msi
where “d” is your CDROM drive
or use Explorer to navigate the CD directories and double click the appropriate Luna Client.msi.
SafeNet Network HSM Installation Guide
Release 6.2.2 Rev. A December 2016 Copyright 2001-2016 GemaltoAll rights reserved. 84
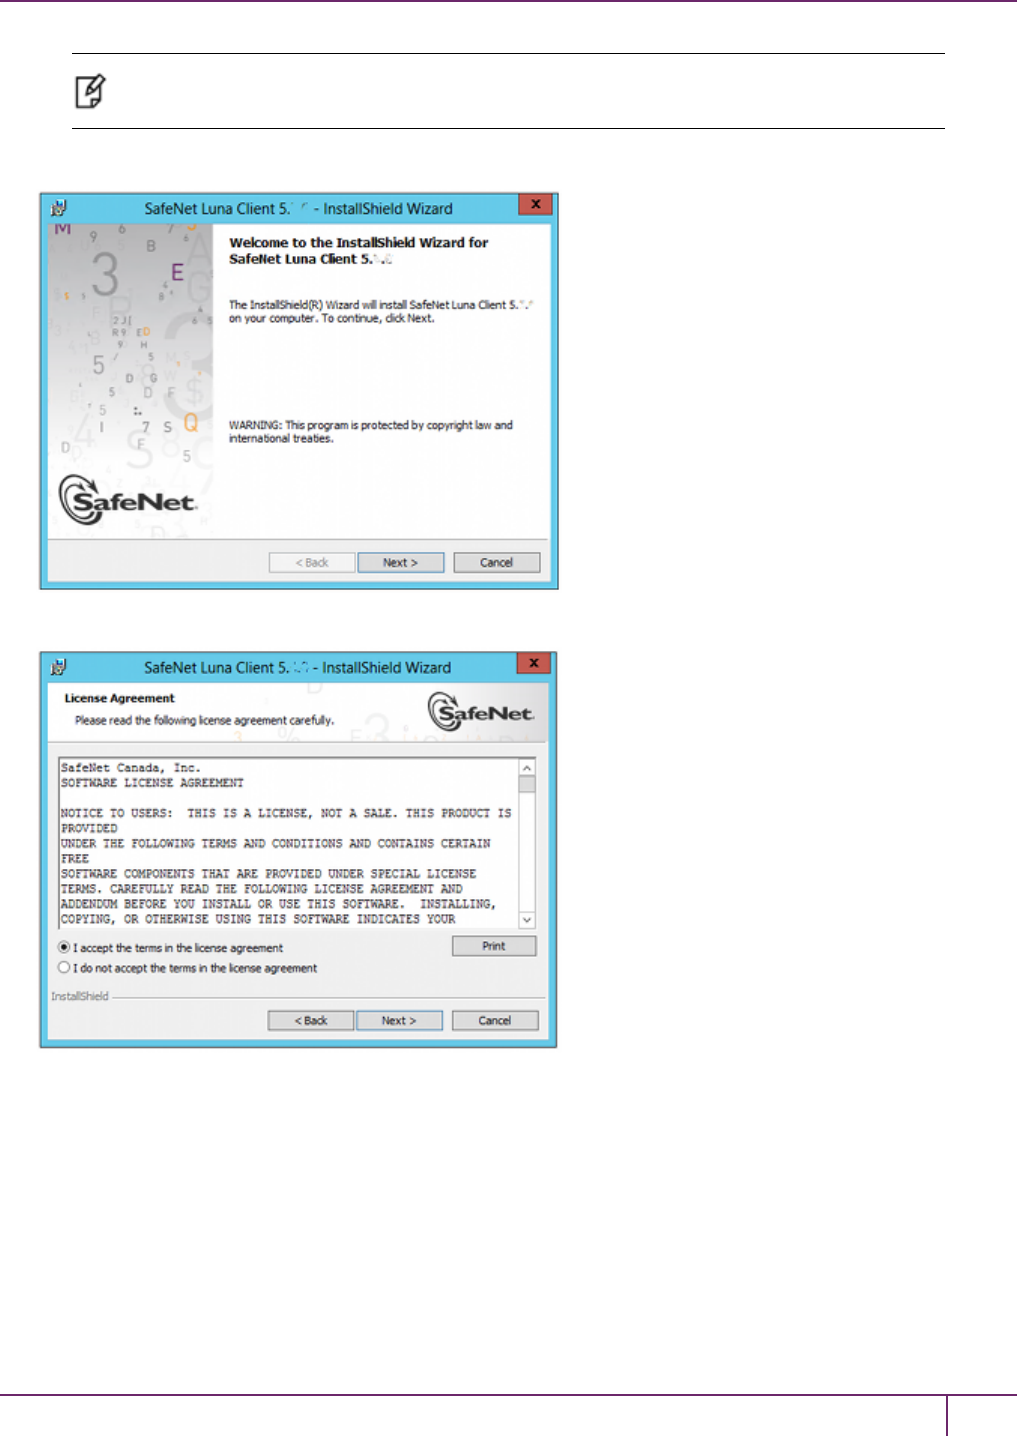
5 SafeNet HSM Client Software Installation
Note: The installer is 64-bit only. If you have 32-bit applications, proceed with the 64-bit
installation, then see "Using 32-bit Applications With the SafeNet Client "on page 91.
4. At the Welcome screen, click Next.
5. Accept the software license agreement.
6. In the Choose Destination Location dialog, accept the default that is offered, or make a change if you prefer.
SafeNet Network HSM Installation Guide
Release 6.2.2 Rev. A December 2016 Copyright 2001-2016 GemaltoAll rights reserved. 85
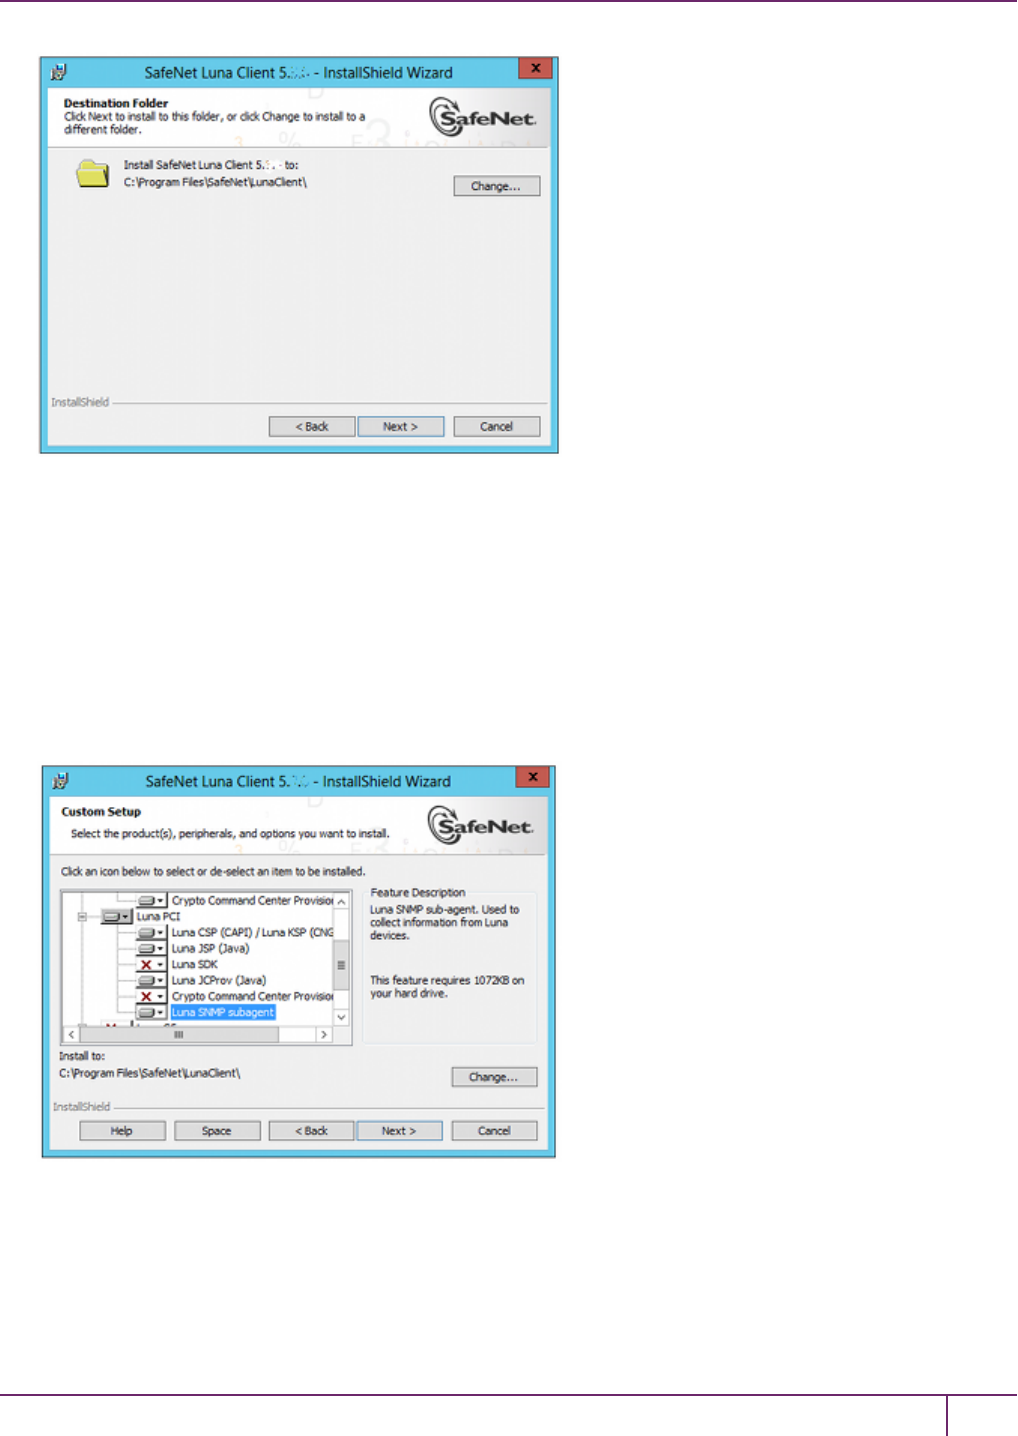
5 SafeNet HSM Client Software Installation
7. Click to select any of the SafeNet Product software options that you wish to install. Any that are marked with a red
"X" are currently de-selected and will not be installed when you proceed. You must accept at least the major feature
for your HSM. You can select all, if you wish - there is no conflict.
The installer includes the SafeNet SNMP Subagent as an option with any of the SafeNet HSMs, except SafeNet
Network HSM (which has agent and subagent built in). For any of SafeNet PCIe HSM, SafeNet USB HSM, or
SafeNet Backup HSMs, include the subagent with any of the products, if desired - it doesn't matter which; it's the
same subagent, and it goes to the same location on your hard disk.
After installation is complete, you will need to move the SafeNet MIB files to the appropriate directory for your
SNMP application, and you will need to start the SafeNet subagent and configure for use with your agent, as
described in the Administration Guide.
8. On the Ready to Installpage click Install.
If you wish to modify any of your previous selections, you can still click Back to see previous pages. Once you
click Install, you are committed to the installation.
SafeNet Network HSM Installation Guide
Release 6.2.2 Rev. A December 2016 Copyright 2001-2016 GemaltoAll rights reserved. 86

5 SafeNet HSM Client Software Installation
9. If Windows presents a security notice asking if you wish to install the device driver from SafeNet, click Install to
accept.
Note: If you choose not to install the driver, your SafeNet Client cannot function with any
locally connected SafeNet hardware (which includes SafeNet PCIe HSM, SafeNet USB HSM,
or SafeNet Remote Backup HSMs).
10. When the installation completes, click Finish.
SafeNet Network HSM Installation Guide
Release 6.2.2 Rev. A December 2016 Copyright 2001-2016 GemaltoAll rights reserved. 87
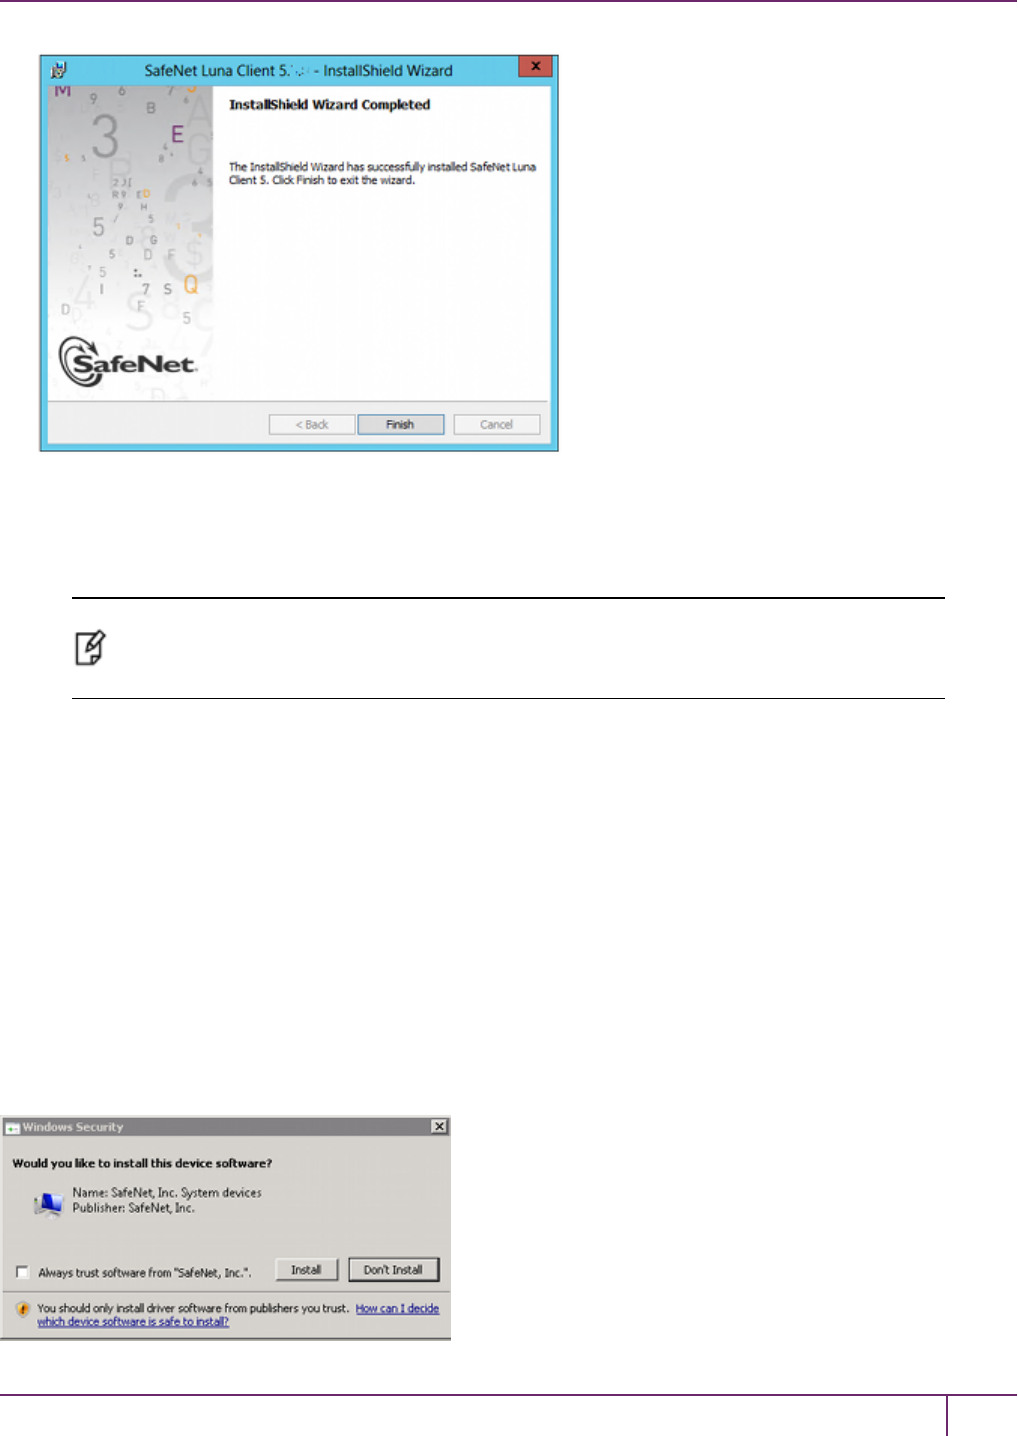
5 SafeNet HSM Client Software Installation
11. Ensure that every copy of PuTTY that you have on any Windows host, that connects via SSH to the SafeNet
Network HSM, is replaced by the version of PuTTY that accompanies the new client software.
Note: In some cases, use of older PuTTY versions can result in the appliance refusing to
accept SSH connection for security reasons. Newer PuTTY versions, however, are backward
compatible with older appliance versions.
As a general rule, do not modify the Chrystoki.conf/crystoki.ini file, unless directed to do so by SafeNet Customer
Support. If you do modify the file, never insert TAB characters - use individual space characters. Avoid modifying the
PED timeout settings. These are now hardcoded in the appliance, but the numbers in the Chrystoki.conf file must
match.
12. For SafeNet HSM Release 6.2.1, reboot the client computer after the client software installation finishes.
Using msiexec for scripted or unattended installation of the SafeNet Client
You can use the msiexec command to install the SafeNet HSM client from the command line, or from a script. The
msiexec command includes various command line switches (see the Microsoft documentation for details) that allow
you to install the SafeNet HSM client with varying levels of user interaction, including a quiet mode (/qn) that requires
no user interaction.
However, since the SafeNet HSM client includes a device driver, the following confirmation dialog is displayed when
you install the SafeNet HSM client using the msiexec command , regardless of the command line switches you use:
SafeNet Network HSM Installation Guide
Release 6.2.2 Rev. A December 2016 Copyright 2001-2016 GemaltoAll rights reserved. 88
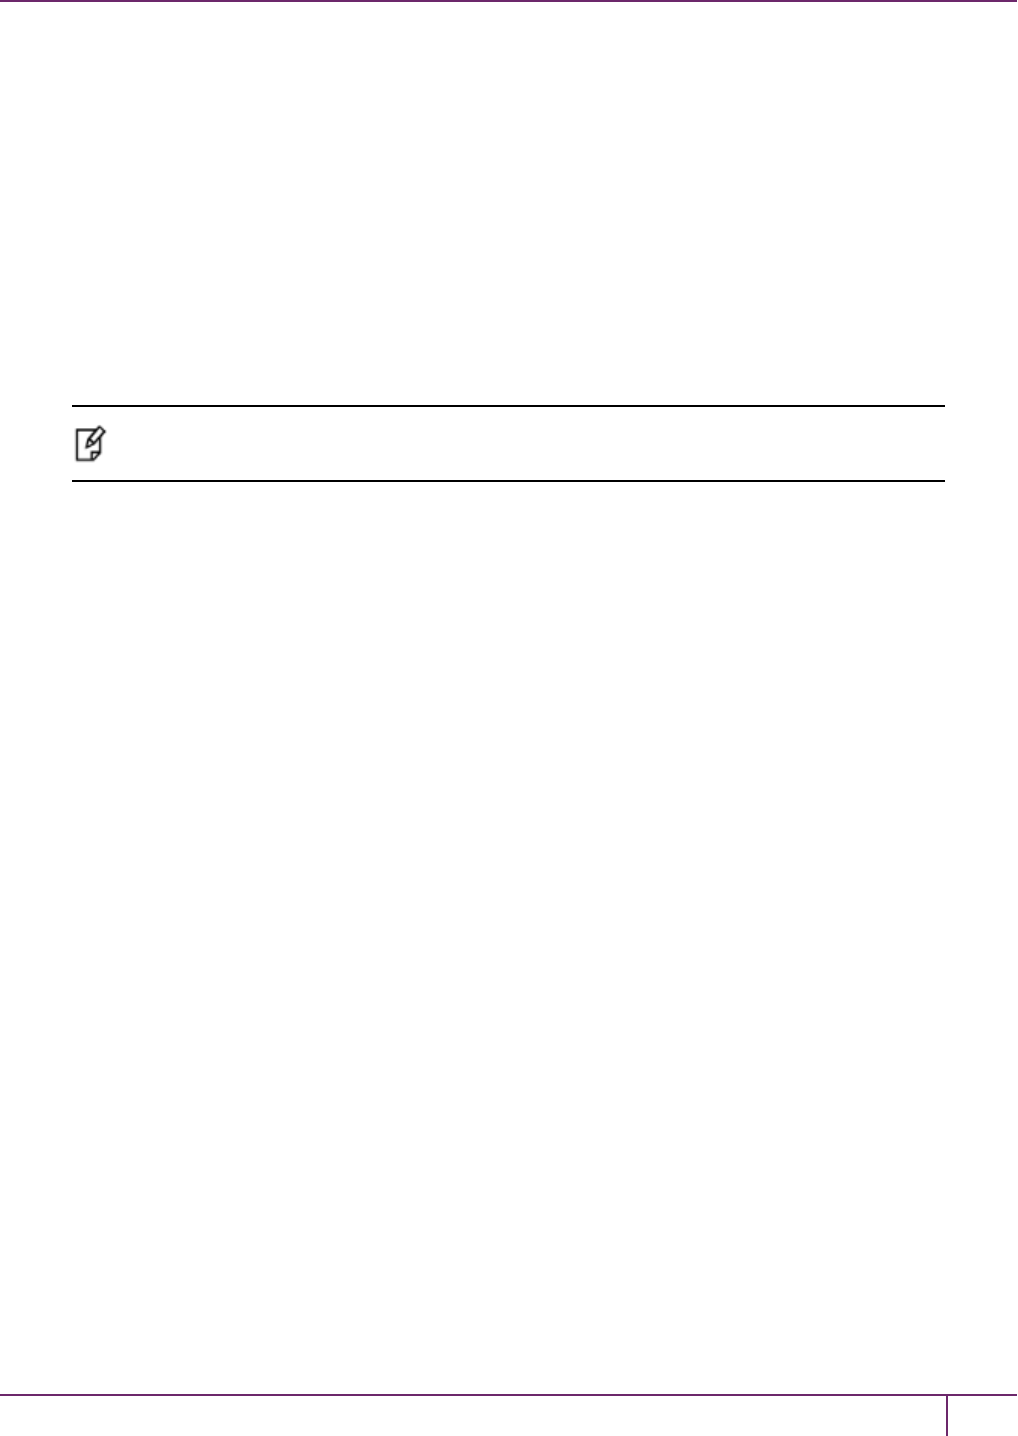
5 SafeNet HSM Client Software Installation
If you check the Always trust software from "SafeNet, Inc." checkbox, this dialog will not be displayed on
subsequent installs, allowing for a truly "silent" install that requires no user interaction. That option was introduced with
Windows 2008.
For more detailed information, see "Scripted / Unattended Installation on Windows"on page 102.
Java
During the installation, if you allow our Java Security Provider to be installed, the SafeNet Java files are installed below
C:\Program Files\Luna Client\JSP\lib. In order to use our JSP, you must have separately installed Java (JDKor run-
time environment from the vendor of your choice) onto your system.
Copy the SafeNet Java files from their default location under C:\Program Files\SafeNet\Luna Client\JSP\lib to the
Java environment directory, for example C:\Program Files\Java\jre6\lib\ext.
Note: The exact directory might differ depending on where you obtained your Java system, the
version, and any choices that you made while installing and configuring it.
Using a 32-bit JDK on a 64-bit OS
If you install a 32-bit JDK on a 64-bit OS, you must change your configuration.
To use a 32-bit JDK on a 64-bit OS
1. Edit the LibNT parameter in your crystoki.ini file (located in your SafeNet HSMclient folder) to point to the 32-bit
dll, as follows:
LibNT=C:\Program Files\SafeNet\LunaClient\win32\cryptoki.dll
2. Copy the LunaAPI.dll file to C:\Windows\SysWOW64 (instead of C:\Windows\System32)
Java 7 and Java 8 Library Path Issue
SafeNet has traditionally recommended that you put LunaAPI.dll in the <java install dir>/lib/ext folder.
However, Java 7 and Java 8 for Windows have removed that directory from the Java library path. As a result, when a
Java 7 or Java 8 application on Windows uses the SafeNet provider, it cannot find the LunaAPI.dll library, causing the
application to fail.
To address this problem, we suggest that you use one of the following methods to add LunaAPI.dll to the Java 7 or
Java 8 search path:
•Put LunaAPI.dll in an arbitrary folder and add that folder to the system path. Java 7 or Java 8 will search the
system path for LunaAPI.dll.
OR
•Put LunaAPI.dll in the Windows system folder: C:\Windows\System32
Use that destination for both 32-bit and 64-bit
Alternatively, at the command line, specify: "%JAVA_HOME%/jre/bin/java" -
Djava.library.path="C:\path\to\lunaapi.dll" -jar jMultitoken.jar
For additional Java-related information,see "Java Interfaces" on page 1 in the SDK Reference Guide.
SafeNet Network HSM Installation Guide
Release 6.2.2 Rev. A December 2016 Copyright 2001-2016 GemaltoAll rights reserved. 89

5 SafeNet HSM Client Software Installation
JSP Static Registration
You would choose static registration of providers if you want all applications to default to our (SafeNet) provider.
Once your client has externally logged in using salogin (see ) in the Reference section of this document) or your own
HSM-aware utility, any application would be able to use SafeNet product without being designed to login to the HSM
Partition.
Edit the java.security file located in the \jre\lib\security directory of your Java SDK/JRE 1.6.x or 1.7.x installation to
read as follows:
security.provider.1=sun.security.provider.Sun
security.provider.2=com.sun.net.ssl.internal.ssl.Provider
security.provider.3=com.safenetinc.luna.provider.LunaProvider
security.provider.4=com.sun.rsajca.Provider
security.provider.5=com.sun.crypto.provider.SunJCE
security.provider.6=sun.security.jgss.SunProvider
You can set our provider in first position for efficiency if SafeNet HSM operations are your primary mode. However, if
your application needs to perform operations not supported by the LunaProvider (secure random generation or random
publickey verification, for example) then it would receive error messages from the HSM and would need to handle those
gracefully before resorting to providers further down the list. We have found that having our provider in third position
works well for most applications.
The modifications in the "java.security" file are global, and they might result in the breaking of another application that
uses the default KeyPairGenerator without logging into the SafeNet Network HSM first. This consideration might argue
for using dynamic registration, instead.
JSP Dynamic Registration
For your situation, you may prefer to employ dynamic registration of Providers, in order to avoid possible negative
impacts on other applications running on the same machine. As well, the use of dynamic registration allows you to keep
installation as straightforward as possible for your customers.
Compatibility
We formally test SafeNet HSMs and our Java provider with SUN JDK for all platforms except AIX, and with IBM JDK
for the AIX platform. We have not had problems with OpenJDK, although it has not been part of our formal test suite.
The SafeNet JCE provider is compliant with the JCE specification, and should work with any JVM that implements the
Java language specification.
Occasional problems have been encountered with respect to IBM JSSE.
GNU JDK shipped with most Linux systems has historically been incomplete and not suitable.
CSP and KSP
SafeNet CSP allows you to use the SafeNet HSM with Microsoft CAPI, which is supported on 32-bit and on 64-bit
Windows.
SafeNet KSP allows you to use the SafeNet HSM with Microsoft CNG, which is newer, has additional functions, and
supersedes CAPI.
Both of these require modifications to the Windows Registry.
SafeNet Network HSM Installation Guide
Release 6.2.2 Rev. A December 2016 Copyright 2001-2016 GemaltoAll rights reserved. 90
5 SafeNet HSM Client Software Installation
SafeNet CSP
For SafeNet CSP, the utility register.exe takes care of the registry.
Just remember to run the 64-bit version, the 32-bit version, or both, depending on the applications you are running.
•Register the csp dll:
# register.exe /library
•Register the partition:
# register <no arguments>
SafeNet KSP
For SafeNet KSP, the utility KspConfig.exe takes care of the registry. Follow instructions for the use of the graphical
KspConfig.exe as described in "KSP for CNG" on page 1 in the SDK Reference Guide. Just remember to run the 64-bit
version, the 32-bit version, or both, depending on the applications you are running.
Note: The cryptoki.ini file, which specifies many configuration settings for your HSM and
related software, includes a line that specifies the path to the appropriate libNT for use with your
application(s). Verify that the path is correct
Note: If SafeNet CSP (CAPI) / SafeNet KSP(CNG) is selected at installation time then the
SafeNetKSP.dll file is installed in these two locations:
- C:\Windows\System32 (used for 64-bit KSP)
-C:\Windows\SysWOW64 (used for 32-bit KSP)
Using 32-bit Applications With the SafeNet Client
Beginning with version 5.2, SafeNet discontinued SafeNet Client support for Windows 32-bit operating systems. We
continue to supply 32-bit libraries that can be used on 64-bit Windows OS to support your older 32-bit client
applications. However, our SafeNet Client tools (lunacm, vtl, etc.) are 64-bit binary files, only.
SafeNet Client 32-bit libraries (cryptoki.dll,cklog.dll, etc.) and versions of CSP and KSP libraries and tools are
installed in the C:\Program Files\SafeNet\Luna Client\win32 directory.
The win32 directory content is as follows:
•cklog201.dll
•cklog201.dll.sig
•cryptoki.dll
•cryptoki.dll.sig
•shim.dll
•shim.dll.sig
• jsp directory which contains:
–LunaAPI.dll
If the SafeNet CSP (CAPI) / SafeNet KSP(CNG) feature is installed, the following are also installed under win32:
•csp directory which contains:
–keymap
SafeNet Network HSM Installation Guide
Release 6.2.2 Rev. A December 2016 Copyright 2001-2016 GemaltoAll rights reserved. 91

5 SafeNet HSM Client Software Installation
–LunaCSP.dll
–LunaCSP.sig
–ms2Luna
–register
•KSP directory that contains:
–kspcmd
–KspConfig
–ksputil
–ms2Luna
In order to properly use the 32-bit library and tools on 64-bit systems there are two basic approaches:
Direct loading of library
Set your application to load the 32-bit library installed under the win32 directory, and run your application. For an
example on how to load the cryptoki library dynamically, please refer to the SafeNet SDK.
This should work for any application that directly points to the needed library, and represents the majority of customer
applications.
Loading the library via the configuration file
If you require your 32-bit Windows application to run on 64-bit Windows and your application uses the crystoki.ini to find
the location of the cryptoki library (such as applications that use ckbridge - no longer distributed - or that use CSP), we
recommend creating a new copy of the crystoki.ini file under the win32 directory to point to the 32-bit cryptoki library as
described below:
•Install SafeNet Client and configure the HSM or SA client as you would normally do.
•Create a copy of the crystoki.ini file and store it in the win32 directory.
•Modify the LibNT entry in the file (the copy in the win32 directory) to point to the cryptoki.dll library located in the
win32 directory
LibNT=C:\Program Files\SafeNet\Luna Client\win32\cryptoki.dll
•Open a new DOS prompt (to be used to run your application).
•Set the ChrystokiConfigurationPath environment variable to point to the win32 directory set
ChrystokiConfigurationPath= C:\Program Files\SafeNet\Luna Client\win32\
•Run your application.
It is very possible to run 64-bit SafeNet tools (such as lunacm, ckdemo, cmu, vtl) in a Command Prompt window, while
simultaneously running your 32-bit application in another Command Prompt window (using the 32-bit library by virtue of
the ChrystokiConfigurationPath environment variable and the crystoki.ini file described above), and the two do not
conflict, because the environments are independent. Where a problem might arise, however is if your use of the
SafeNet tools were to make alterations to the original crystoki.ini file; we will call it the primary. Your application would
be looking to the version of the crystoki.ini file in C:\Program Files\SafeNet\Luna Client\win32\ which would not contain
the changes resulting from the SafeNet tools; we will call that one the secondary. To correct this, you must reproduce
any changes from the primary crystoki.ini to the secondary, before relaunching your 32-bit application.
If a tool causes a change to the configuration file, it will be to the version of the file that exists in the directory where the
64-bit SafeNet tools are located. In order for the change to take effect for your 32-bit application(s), you must update the
SafeNet Network HSM Installation Guide
Release 6.2.2 Rev. A December 2016 Copyright 2001-2016 GemaltoAll rights reserved. 92
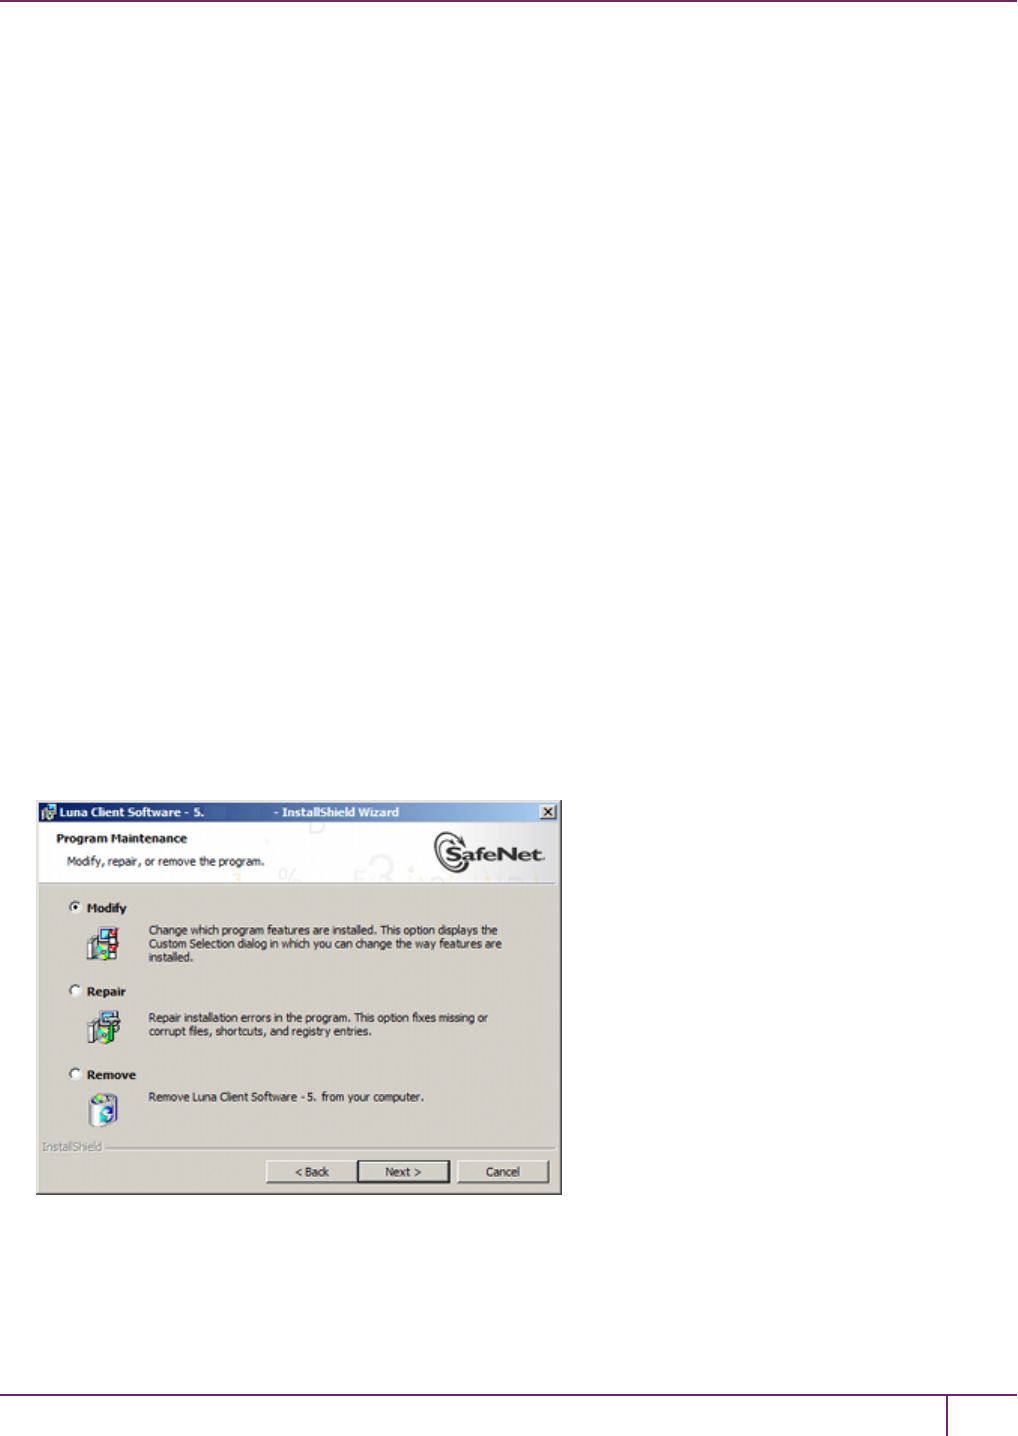
5 SafeNet HSM Client Software Installation
copy of the configuration file in the location pointed to by the ChrystokiConfigurationPath environment variable, with the
new or revised entries.
Examples
When setting up or modifying a network trust link (NTL) connection with a SafeNet Network HSM partition, the vtl
createcert,vtl addServer,vtl deleteServer,vtl replaceServer commands modify the Crystoki.ini file and make
changes to ...certs/server/CAFile.pem. These occur in the folders associated with the 64-bit tools, and must all be
replicated to the equivalent .ini file and folders for your 32-bit applications.
If you make any changes using vtl, check the file dates on crystoki.ini and the contents of the certs folders at the main
SafeNet HSM Client install location. If any of them have changed compared to the equivalent files at your 32-bit
location, make a backup of your 32-bit SafeNet files, and then replace the superseded files in your 32-bit folders with
the newer versions from the 64-bit folders.
Running the stc enable or stc disable commands in lunacm will change the crystoki.ini file. Update the copy that you
keep in your 32-bit location to match.
Running 32-bit tools
See "Using 32-bit Utilities in Windows 64-bit Environment"on page 105.
Uninstalling, Modifying, or Repairing the SafeNet Client Software
At any time, you might need to uninstall SafeNet Client, or to modify the installation (perhaps to add a component or
product that you did not previously install), or to repair the installed software.
To uninstall, modify, or repair the SafeNet HSM client software
1. Run the Luna Client.msi program again. Because the software is already installed on your computer, after you
click through the Welcome page, this dialog is displayed:
2. Choose the desired option, click Next, and follow the prompts. It is possible that you might see a message like this:
SafeNet Network HSM Installation Guide
Release 6.2.2 Rev. A December 2016 Copyright 2001-2016 GemaltoAll rights reserved. 93
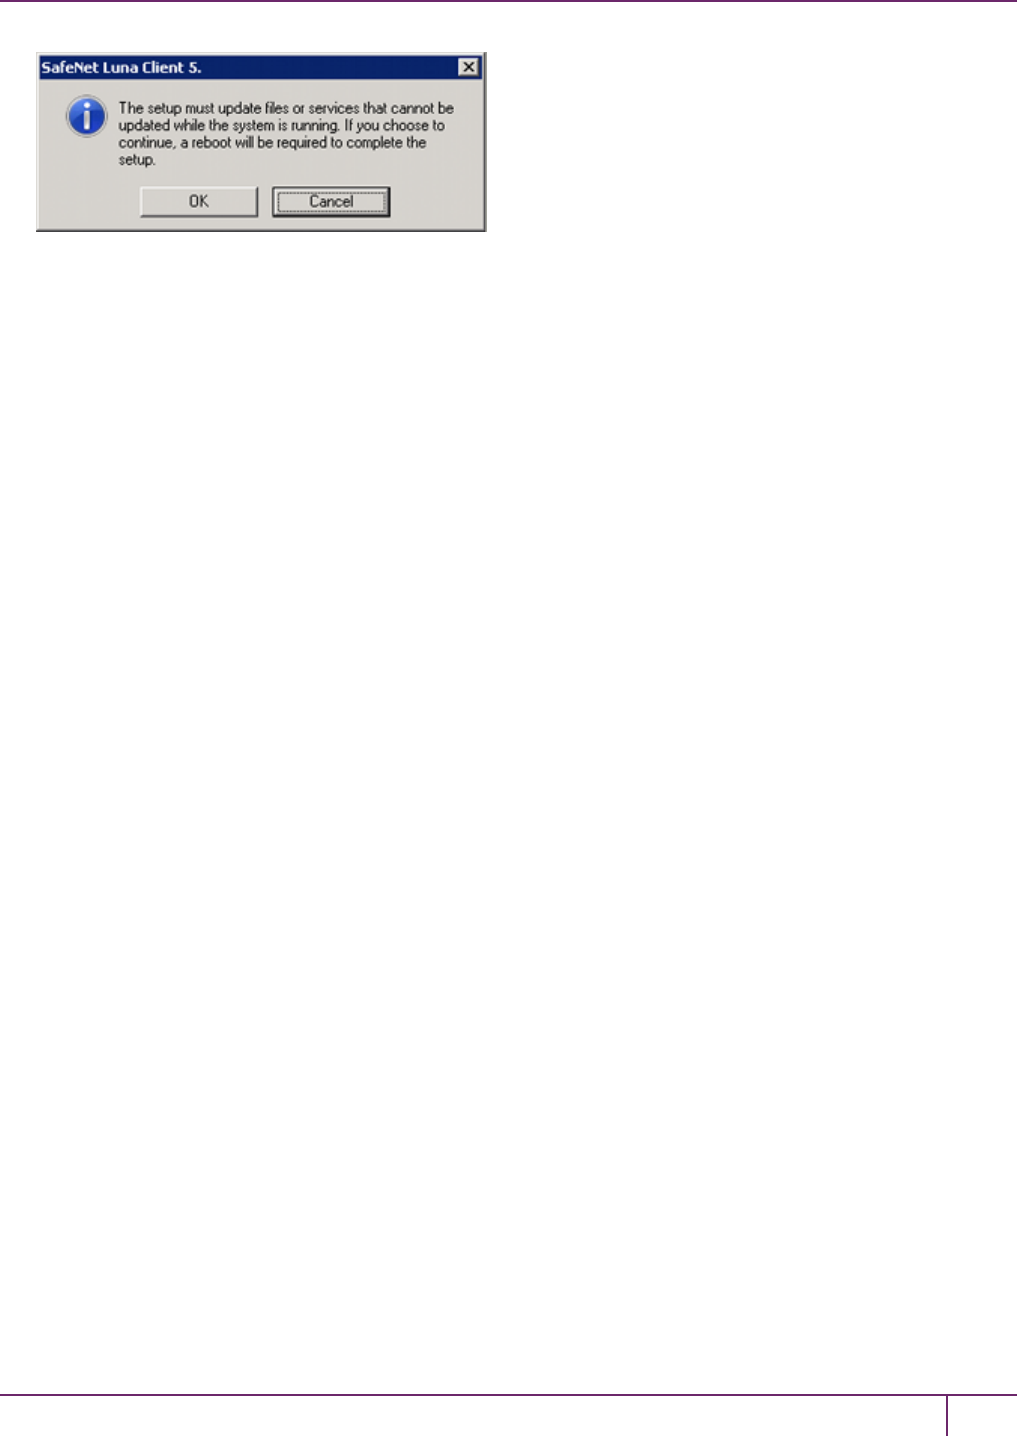
5 SafeNet HSM Client Software Installation
Ignore that message if you see it while uninstalling SafeNet Client. You do not need to restart your computer, and
you will not be prompted to do so.
After Installation
When you have installed the software onto a Client, the next task is to configure the SafeNet HSM, as described in the
Configuration Guide.
Open a new command-line/console window to allow the library path to be found before you run lunacm or other utilities
that require the library.
Troubleshooting
If you are not the Administrator of the computer on which SafeNet HSM Client is being installed, or if the bundle of
permissions in your user profile does not allow you to launch the installer with "Run as Administrator", then some
services might not install properly. One option is to have the Administrator perform the installation for you.
SafeNet Network HSM Installation Guide
Release 6.2.2 Rev. A December 2016 Copyright 2001-2016 GemaltoAll rights reserved. 94
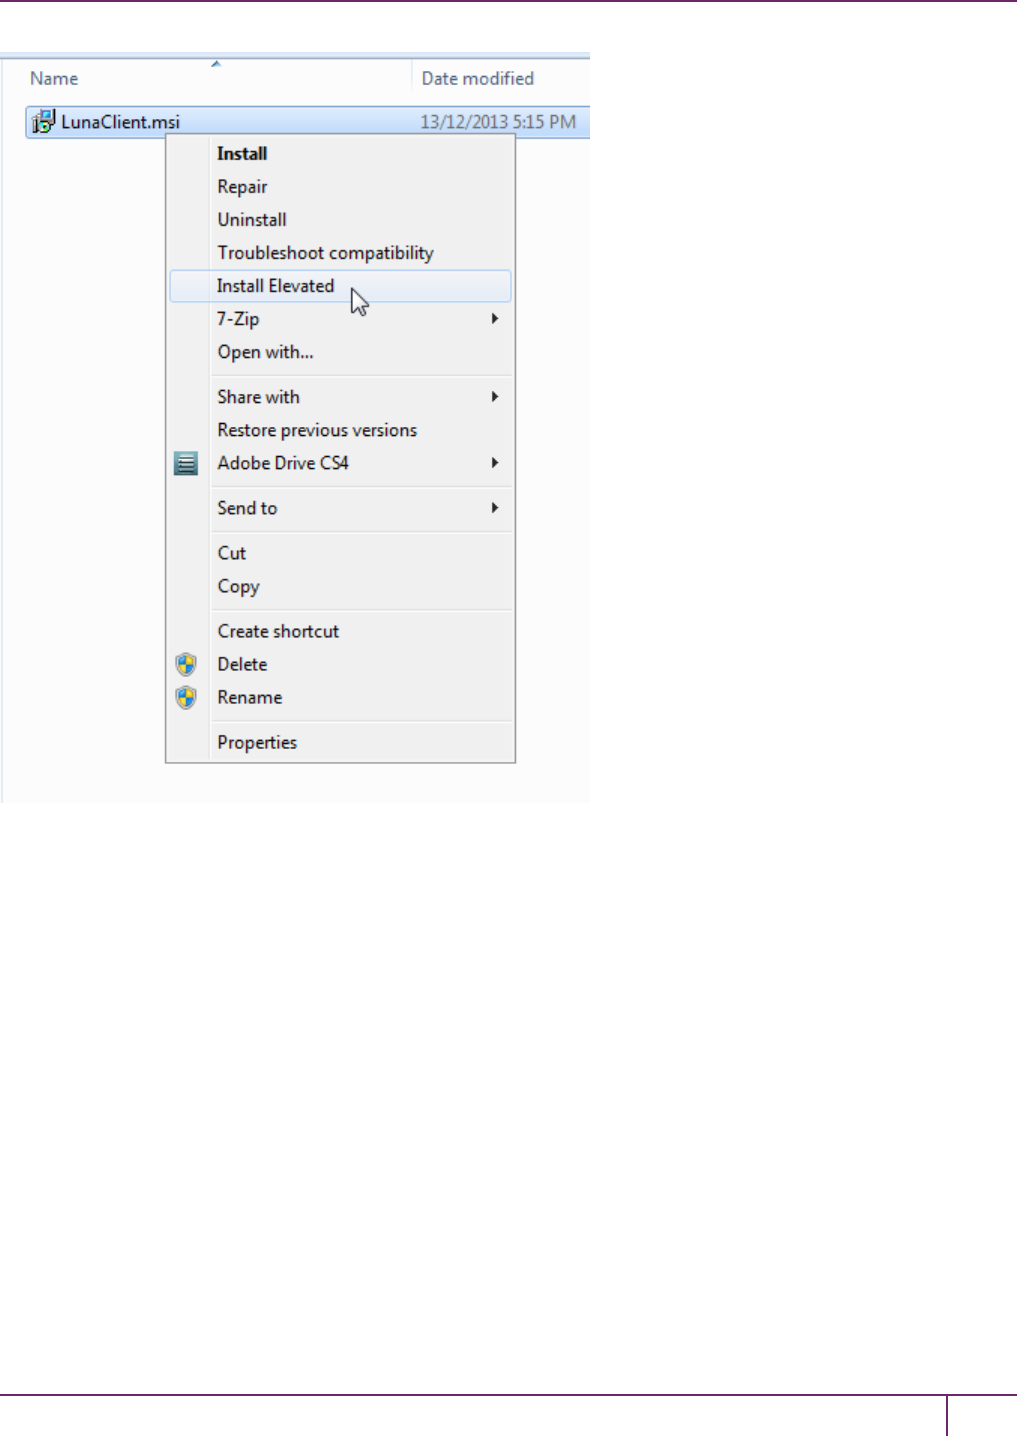
5 SafeNet HSM Client Software Installation
Another approach might be possible. If you have sufficient elevated permissions, you might be able to right-click and
open a Command Prompt window as Administrator.
SafeNet Network HSM Installation Guide
Release 6.2.2 Rev. A December 2016 Copyright 2001-2016 GemaltoAll rights reserved. 95

5 SafeNet HSM Client Software Installation
If that option is available, then you can use the command line to move to the location of the LunaClient.msi file and
launch it there, which permits the needed services to load for HTL, PedClient, and other SafeNet features.
SafeNet Network HSM Installation Guide
Release 6.2.2 Rev. A December 2016 Copyright 2001-2016 GemaltoAll rights reserved. 96
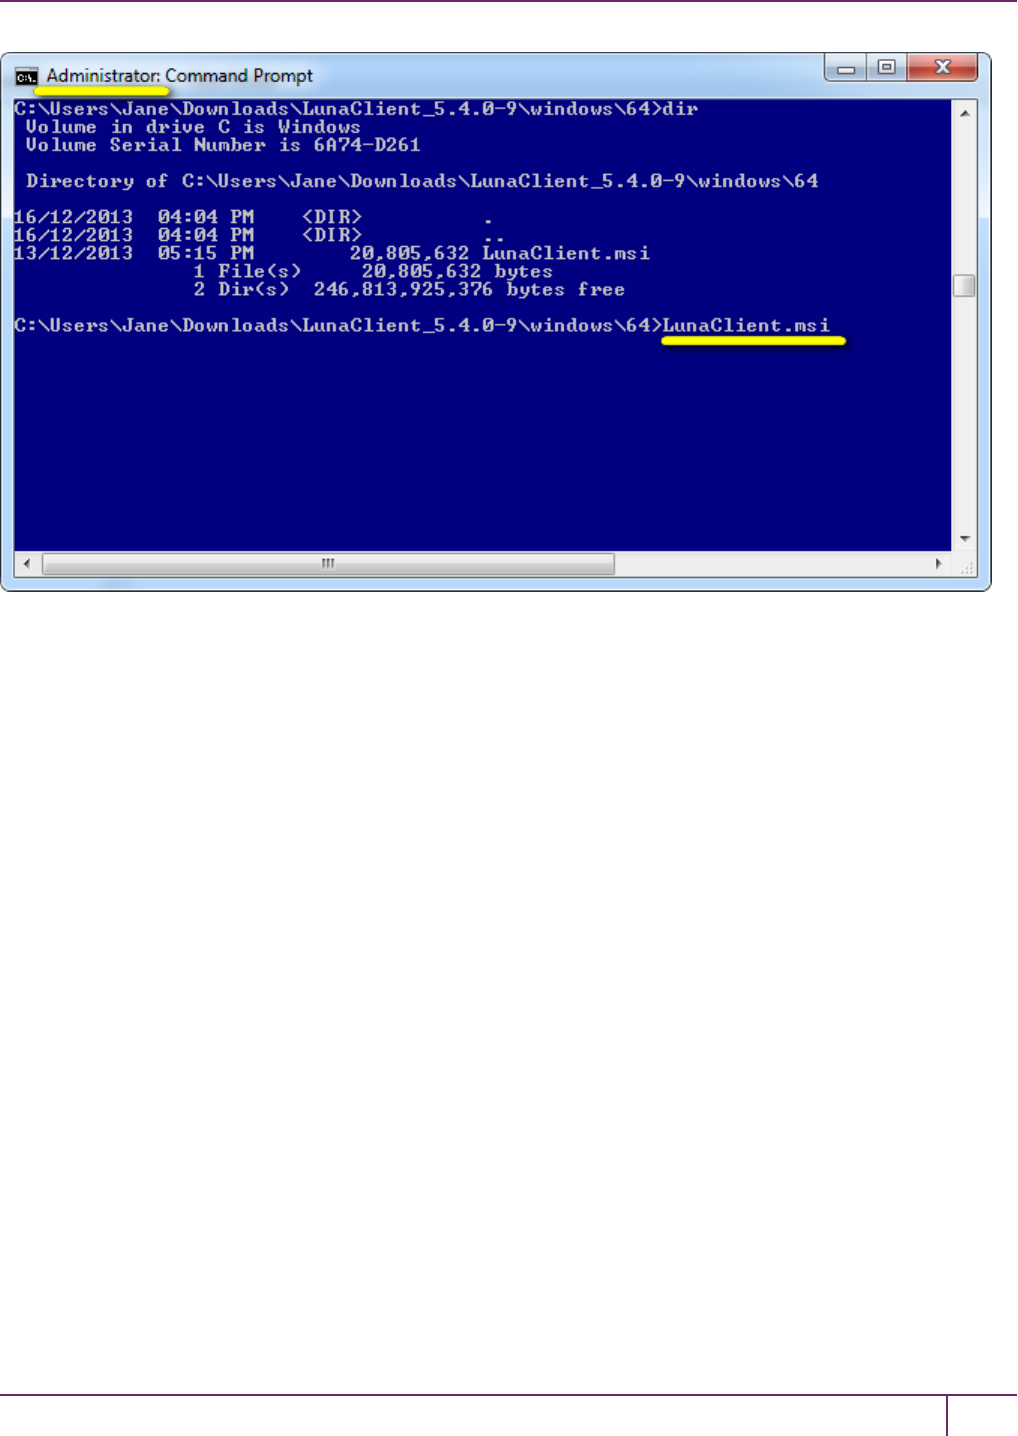
5 SafeNet HSM Client Software Installation
SafeNet Network HSM Installation Guide
Release 6.2.2 Rev. A December 2016 Copyright 2001-2016 GemaltoAll rights reserved. 97
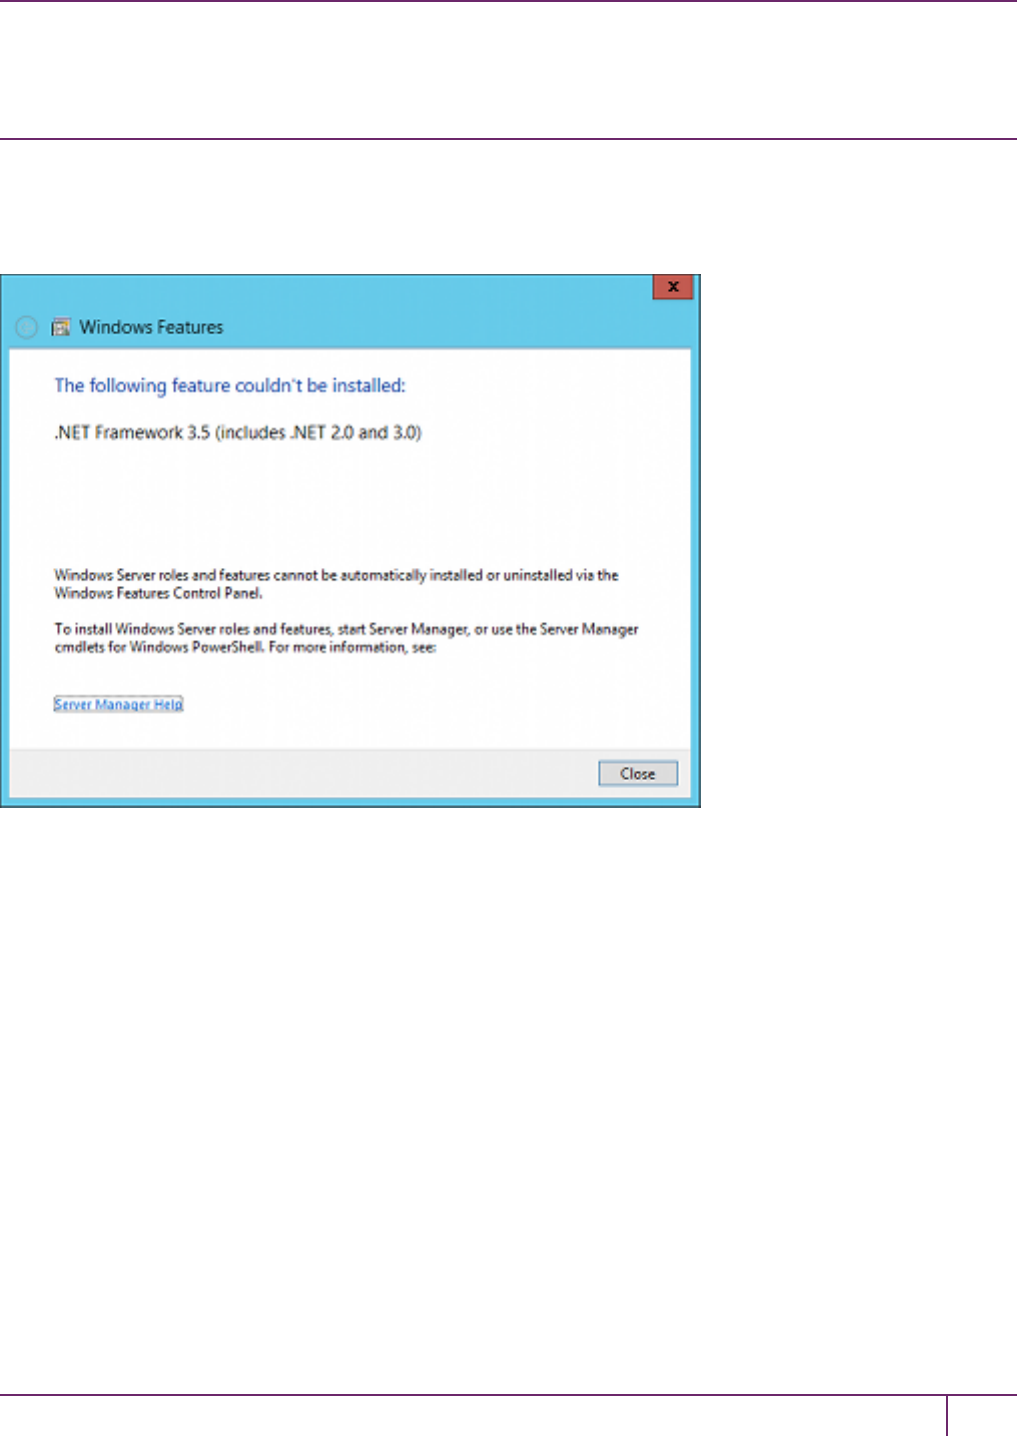
5 SafeNet HSM Client Software Installation
Windows 2012 SafeNet HSMClient Supplemental
Configuration
If you are installing the SafeNet HSM client on Windows 2012, some additional configuration is required to install the
.NET framework that is required for the HTLClient Service.
If your Windows Server 2012 instance is not properly configured with .NET Framework, the following alert message
appears during the SafeNet Client installation:
When you close the alert, a message about the HTL Client service appears.
SafeNet Network HSM Installation Guide
Release 6.2.2 Rev. A December 2016 Copyright 2001-2016 GemaltoAll rights reserved. 98

5 SafeNet HSM Client Software Installation
To avoid this issue, install Microsoft .NET Framework 3.5 on your Windows Server 2012 instance before you run the
SafeNet Client 6.x installer.
Installing the .NET Framework 3.5 on Windows Server 2012
The .NET Framework 3.5 is required by the HTL Client service.
To install the .NET Framework 3.5 on Windows Server 2012
1. On your Windows Server 2012, launch Server Manager.
2. In Server Manager, click the Manage button and select Add Roles and Features.
3. Configure the Add Roles and Features Wizard as follows:
a. Select Role-based or feature-based as the Installation type,
b. Select your server.
c. Check the Application Server role.
d. Click Next.
SafeNet Network HSM Installation Guide
Release 6.2.2 Rev. A December 2016 Copyright 2001-2016 GemaltoAll rights reserved. 99
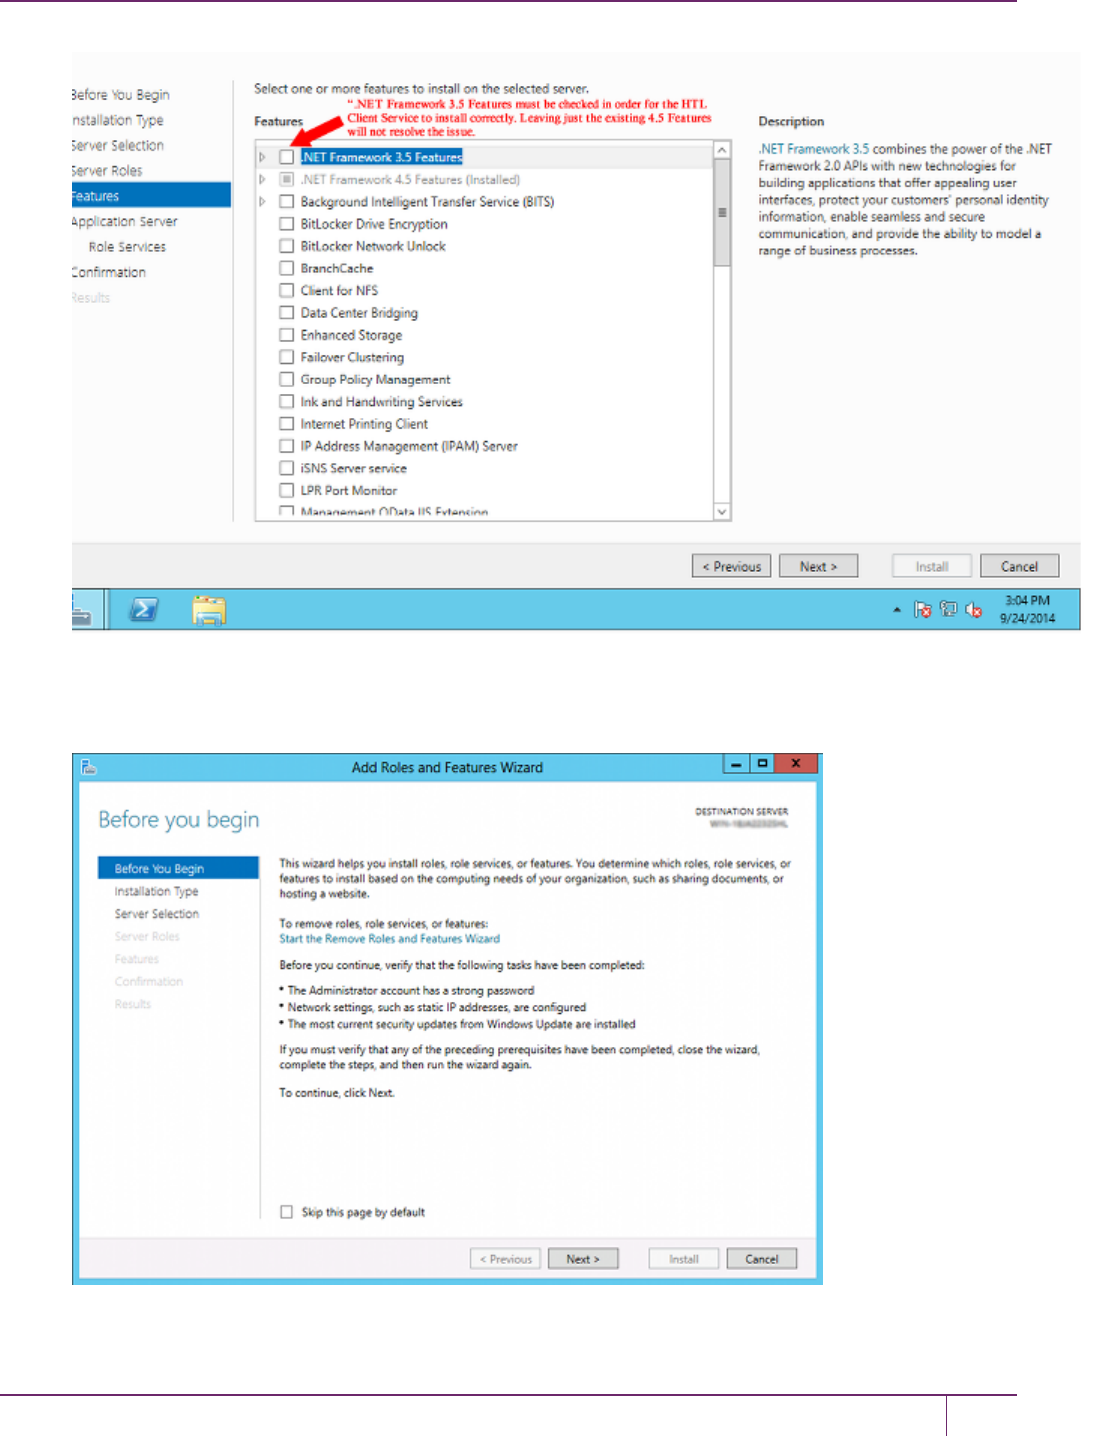
5 SafeNet HSM Client Software Installation
SafeNet Network HSM Installation Guide
Release 6.2.2 Rev. A December 2016 Copyright 2001-2016 GemaltoAll rights reserved. 100

5 SafeNet HSM Client Software Installation
4. Click through the remaining screens to confirm your installation source and then click Install.
After the installation has completed, you will be able to install the SafeNet Client on Windows Server 2012.
SafeNet Network HSM Installation Guide
Release 6.2.2 Rev. A December 2016 Copyright 2001-2016 GemaltoAll rights reserved. 101

5 SafeNet HSM Client Software Installation
Scripted / Unattended Installation on Windows
The Windows software installation section describes interactive installation on Windows systems, using the graphical,
interactive installer. This section describes how to perform unattended or scripted installations on Windows platforms.
Installing the SafeNet Client For All SafeNet Products
From the location of Luna Client.msi, run the following command:
msiexec.exe /i Luna Client.msi /l lunaclient_wininstall.log /quiet addlocal=all /qn
The setting /l lunaclient_wininstall.log is optional and will place the installation logs into the file lunaclient_
wininstall.log.
Windows security popup on each SafeNet product driver install
The windows security notice (below) appears because “SafeNet, Inc.” is not among the trusted publishers on your
computer:
•If you check the Always trust software from... checkbox and then click on the Install button the dialog will not
appear on future installations, on that computer.
•If you do not check the Always trust software from... checkbox then you might see the dialog three times, once
for each of the three SafeNet products (SafeNet PCIe HSM, SafeNet USB HSM and SafeNet Remote Backup
HSM) that install a driver on your computer.
This is a Windows security requirement, introduced with Windows 2008, and is not under our control. Installing marks
the publisher (in this case, SafeNet, Inc.) as trusted for future installations.
Installing the SafeNet Client For SafeNet Network HSM
From the location of Luna Client.msi run the following commands:
1. Install default SafeNet Client components for SafeNet Network HSM
msiexec.exe /i Luna Client.msi /l lunaclient_wininstall.log /quiet addlocal=SA /qn
2. Install all SafeNet Client components for SafeNet Network HSM
msiexec.exe /i Luna Client.msi /l lunaclient_wininstall.log /quiet addlocal=SA, SA_CSP_KSP, SA_JSP,
SA_SDK, SA_JCProv, SA_LDPC /qn
SafeNet Network HSM Installation Guide
Release 6.2.2 Rev. A December 2016 Copyright 2001-2016 GemaltoAll rights reserved. 102
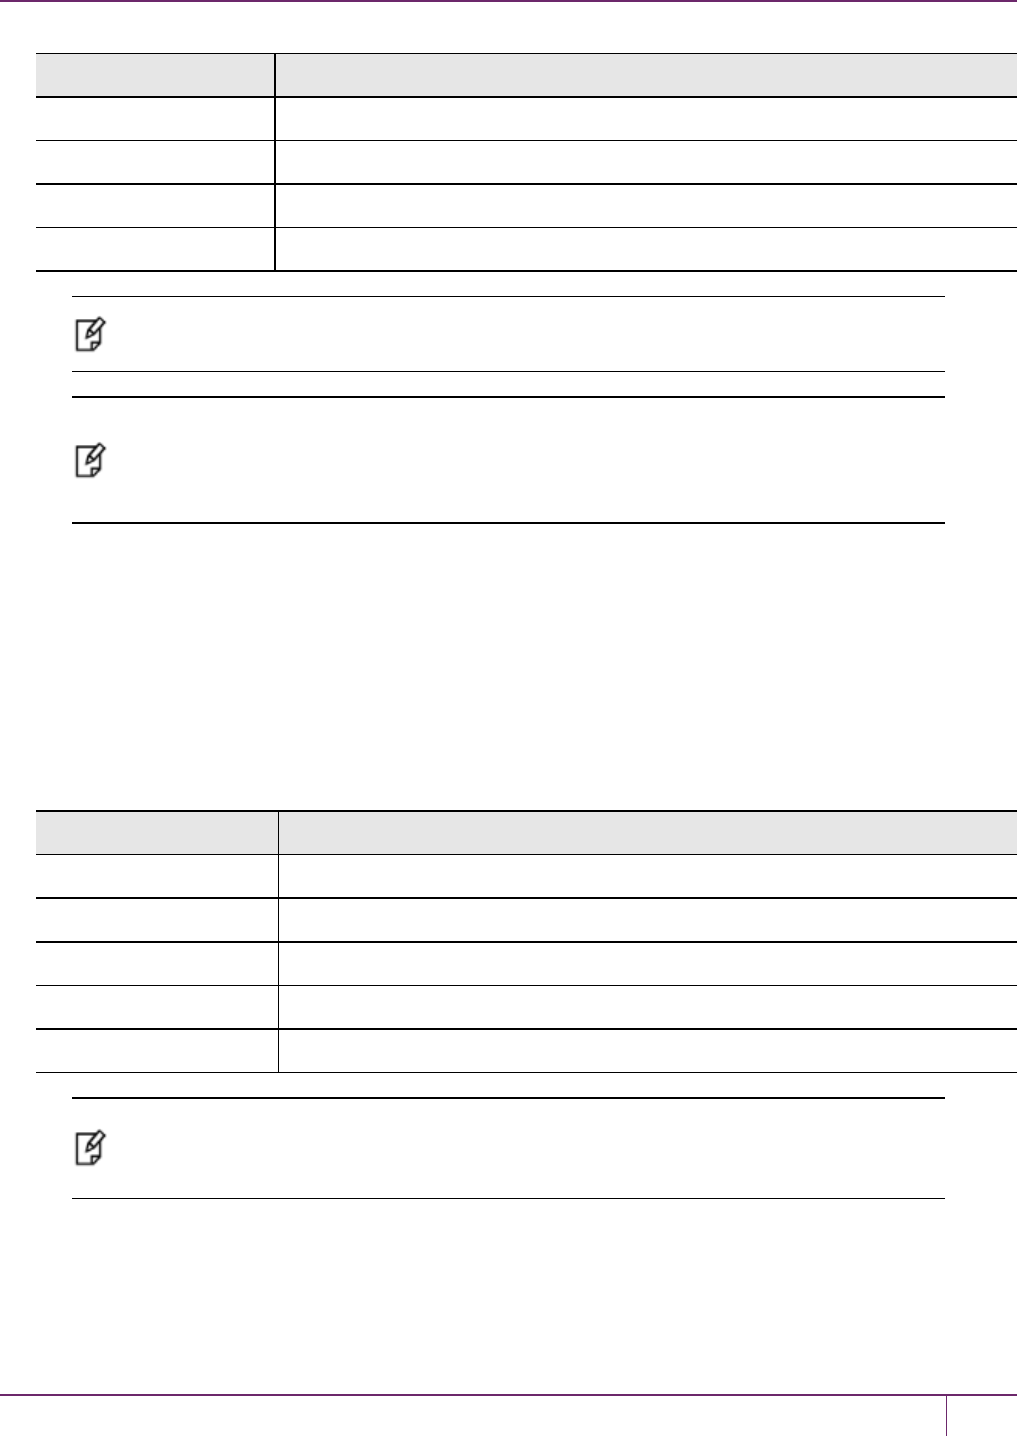
5 SafeNet HSM Client Software Installation
Product or component Description
SA_CSP_KSP Install SafeNet CSP and KSP components
SA_JSP Install SafeNet JSP component
SA_SDK Install SafeNet SDK component
SA_JCProv Install SafeNet JCPROV component
Note: If you wish to install only some of the components, just specify the ones you want after
the product name (SA in this example).
Note: The Windows security warning mentioned in section 1 (above) does not appear when
only SafeNet Network HSM is installed, because no driver is require. It appears only if you also
install SafeNet PCIe HSM, or SafeNet USB HSM, or SafeNet Backup HSM on the client
computer.
Installing the Luna Client for SafeNet PCIe HSM
From the location of Luna Client.msi run the following commands:
1. Install default Luna Client components for SafeNet PCIe HSM
msiexec.exe /i Luna Client.msi /l lunaclient_wininstall.log /quiet addlocal=PCI /qn
2. Install all Luna Client components for SafeNet PCIe HSM
msiexec.exe /i Luna Client.msi /l lunaclient_wininstall.log /quiet addlocal=PCI, PCI_CSP_KSP, PCI_JSP,
PCI_SDK, PCI_JCProv, PCI_SNMP /qn
Product or component Description
PCI_CSP_KSP Install Luna CSP and KSP components
PCI_JSP Install Luna JSP component
PCI_SDK Install Luna SDK component
PCI_JCProv Install Luna JCPROV component
PCI_SNMP Install Luna SNMP subagent component
Note: The Windows security warning mentioned in section 1 (above) also appears when you
install SafeNet PCIe HSM, unless you have already accepted a driver installation, and
therefore recognized SafeNet, Inc. as a trusted publisher.
Installing the Luna Client For SafeNet USB HSM
From the location of Luna Client.msi run the following command:
1. Install default Luna Client components for SafeNet USB HSM
SafeNet Network HSM Installation Guide
Release 6.2.2 Rev. A December 2016 Copyright 2001-2016 GemaltoAll rights reserved. 103

5 SafeNet HSM Client Software Installation
msiexec.exe /i Luna Client.msi /l lunaclient_wininstall.log /quiet addlocal=G5 /qn
2. Install all Luna Client components for SafeNet USB HSM
msiexec.exe /i Luna Client.msi /l lunaclient_wininstall.log /quiet addlocal=G5, G5_CSP_KSP, G5_JSP,
G5_SDK, G5_JCProv, G5_SNMP /qn
Product or component Description
G5_CSP_KSP Install Luna CSP and KSP components
G5_JSP Install Luna JSP component
G5_SDK Install Luna SDK component
G5_JCProv Install Luna JCPROV component
G5_SNMP Install Luna SNMP subagent component
Note: The Windows security warning mentioned in section 1 (above) also appears when you
install SafeNet USB HSM, unless you have already accepted a driver installation, and therefore
recognized SafeNet, Inc. as a trusted publisher.
Installing the Luna Client for SafeNet Remote Backup HSM
From the location of Luna Client.msi run the following command:
msiexec.exe /i Luna Client.msi /l lunaclient_wininstall.log /quiet addlocal=RB, RB_SNMP /qn
Product or component Description
RB_SNMP Install Luna SNMP subagent component
Note: The Windows security mentioned in section 1 (above) also appears when you install
SafeNet Remote Backup HSM, unless you have already accepted a driver installation, and
therefore recognized SafeNet, Inc. as a trusted publisher.
Installing the Luna Client for Remote PED
From the location of Luna Client.msi run the following command:
msiexec.exe /i Luna Client.msi /l lunaclient_wininstall.log /quiet addlocal=RP /qn
Note: When msiexec.exe is used to install Luna Client there is no message confirming that the
installation has completed. The msiexec.exe utility just returns to the command line when the
installation finishes.
SafeNet Network HSM Installation Guide
Release 6.2.2 Rev. A December 2016 Copyright 2001-2016 GemaltoAll rights reserved. 104

5 SafeNet HSM Client Software Installation
Using 32-bit Utilities in Windows 64-bit Environment
Some customers have 32-bit applications that they use within 64-bit Windows. In order to use a SafeNet HSM in that
environment along with 32-bit versions of our standard tools (lunacm, vtl, multitoken, etc.) follow these steps, below.
1. Perform a standard LunaClient software installation as instructed for Windows.
2. Two "windows 32" folders are involved.
One resides only in the LunaClient install medium (DVD or LunaClient_x.y.z.tar, and contains only the 32-bit
SafeNet Luna tool binary files and, after the contents are extracted, looks like this:
C:\Users\myname\Downloads\LunaClient_6.2.0-15\windows\32>dir
Volume in drive C has no label.
Volume Serial Number is 1216-4343
Directory of C:\Users\myname\Downloads\LunaClient_6.2.0-15\windows\32
12/17/2015 04:52 PM <DIR> .
12/17/2015 04:52 PM <DIR> ..
12/15/2015 02:28 PM 274,112 ckdemo.exe
12/15/2015 02:28 PM 650,944 cmu.exe
12/15/2015 02:28 PM 1,412,800 lunacm.exe
12/15/2015 02:28 PM 249,536 multitoken.exe
12/15/2015 02:28 PM 97,984 salogin.exe
12/15/2015 02:28 PM 1,728,192 vtl.exe
6 File(s) 4,413,568 bytes
2 Dir(s) 188,938,604,544 bytes free
And one is created by the 64-bit installer in the LunaClient folder; it contains the 32-bit libraries and related files, but
does not include the tool binary files.
C:\Program Files\SafeNet\LunaClient>dir
Volume in drive C has no label.
Volume Serial Number is 1216-4343
Directory of C:\Program Files\SafeNet\LunaClient
12/02/2015 11:04 AM <DIR> .
12/02/2015 11:04 AM <DIR> ..
11/09/2015 09:57 AM <DIR> cert
11/07/2015 04:58 AM 323,776 ckdemo.exe
11/07/2015 04:58 AM 896,704 cklog201.dll
11/07/2015 04:58 AM 128 cklog201.dll.sig
11/07/2015 04:58 AM 944,832 Cmu.exe
11/09/2015 09:57 AM <DIR> config
11/07/2015 04:58 AM 2,764,992 cryptoki.dll
11/07/2015 04:58 AM 128 cryptoki.dll.sig
11/09/2015 09:57 AM 1,613 crystoki.ini
11/09/2015 09:57 AM <DIR> CSP
11/09/2015 09:57 AM <DIR> data
11/09/2015 09:57 AM <DIR> G5Driver
11/09/2015 09:57 AM <DIR> htl
11/09/2015 09:57 AM <DIR> JCProv
11/09/2015 09:57 AM <DIR> JSP
11/09/2015 09:57 AM <DIR> KSP
SafeNet Network HSM Installation Guide
Release 6.2.2 Rev. A December 2016 Copyright 2001-2016 GemaltoAll rights reserved. 105

5 SafeNet HSM Client Software Installation
11/07/2015 04:58 AM 1,995,456 lunacm.exe
11/07/2015 04:58 AM 2,459,840 lunadiag.exe
12/02/2015 10:16 AM 16 lunasa_update-6.2.0-15.auth
12/02/2015 10:16 AM 130,904,834 lunasa_update-6.2.0-15.spkg
11/07/2015 04:58 AM 301,248 multitoken.exe
11/07/2015 04:44 AM 7,145 openssl.cnf
11/07/2015 04:58 AM 2,608,832 PedClient.exe
11/09/2015 09:57 AM <DIR> PedClient_service
11/07/2015 04:58 AM 216,256 PedServer.exe
11/07/2015 04:27 AM 315,392 PSCP.EXE
11/07/2015 04:27 AM 483,328 PUTTY.EXE
11/07/2015 04:27 AM 657,290 PUTTY.HLP
11/07/2015 04:58 AM 2,280,640 rbs.exe
11/07/2015 04:58 AM 2,673,856 rbs_processor2.dll
11/09/2015 09:57 AM <DIR> RemotePEDDriver
12/10/2015 11:53 PM 33,017 remotePedServerLog.log
11/07/2015 04:58 AM 99,520 salogin.exe
11/09/2015 09:57 AM <DIR> samples
11/07/2015 04:58 AM 220,864 shim.dll
11/07/2015 04:58 AM 128 shim.dll.sig
10/20/2015 12:11 PM <DIR> softtoken
11/07/2015 04:58 AM 1,575,616 softtoken.dll
11/07/2015 04:58 AM 81,600 ureset.exe
11/07/2015 04:58 AM 2,558,144 VTL.exe
11/09/2015 09:57 AM <DIR> win32
27 File(s) 154,405,195 bytes
16 Dir(s) 190,472,613,888 bytes free
C:\Program Files\SafeNet\LunaClient\win32>dir
Volume in drive C has no label.
Volume Serial Number is 1216-4343
Directory of C:\Program Files\SafeNet\LunaClient\win32
11/09/2015 09:57 AM <DIR> .
11/09/2015 09:57 AM <DIR> ..
11/07/2015 04:43 AM 413,376 cklog201.dll
11/07/2015 04:43 AM 128 cklog201.dll.sig
11/07/2015 04:43 AM 1,924,800 cryptoki.dll
11/07/2015 04:43 AM 128 cryptoki.dll.sig
11/09/2015 09:57 AM <DIR> csp
11/09/2015 09:57 AM <DIR> JCProv
11/09/2015 09:57 AM <DIR> jsp
11/09/2015 09:57 AM <DIR> KSP
11/07/2015 04:43 AM 175,808 shim.dll
11/07/2015 04:43 AM 128 shim.dll.sig
11/07/2015 04:43 AM 1,101,504 softtoken.dll
7 File(s) 3,615,872 bytes
6 Dir(s) 188,937,732,096 bytes free
C:\Program Files\SafeNet\LunaClient\win32>
3. From the \windows\32 folder of the unpacked archive, copy all the 32-bit utilities into the installed LunaClient
directory (C:\Program Files\SafeNet\LunaClient\win32).
SafeNet Network HSM Installation Guide
Release 6.2.2 Rev. A December 2016 Copyright 2001-2016 GemaltoAll rights reserved. 106

5 SafeNet HSM Client Software Installation
C:\Program Files\SafeNet\LunaClient\win32>dir
Volume in drive C has no label.
Volume Serial Number is 1216-4343
Directory of C:\Program Files\SafeNet\LunaClient\win32
12/17/2015 05:18 PM <DIR> .
12/17/2015 05:18 PM <DIR> ..
12/15/2015 02:28 PM 274,112 ckdemo.exe
11/07/2015 04:43 AM 413,376 cklog201.dll
11/07/2015 04:43 AM 128 cklog201.dll.sig
12/15/2015 02:28 PM 650,944 cmu.exe
11/07/2015 04:43 AM 1,924,800 cryptoki.dll
11/07/2015 04:43 AM 128 cryptoki.dll.sig
11/09/2015 09:57 AM <DIR> csp
11/09/2015 09:57 AM <DIR> JCProv
11/09/2015 09:57 AM <DIR> jsp
11/09/2015 09:57 AM <DIR> KSP
12/15/2015 02:28 PM 1,412,800 lunacm.exe
12/15/2015 02:28 PM 249,536 multitoken.exe
12/15/2015 02:28 PM 97,984 salogin.exe
11/07/2015 04:43 AM 175,808 shim.dll
11/07/2015 04:43 AM 128 shim.dll.sig
11/07/2015 04:43 AM 1,101,504 softtoken.dll
12/15/2015 02:28 PM 1,728,192 vtl.exe
13 File(s) 8,029,440 bytes
6 Dir(s) 188,933,582,848 bytes free
4. Go to the 64 bit LunaClient directory (C:\Program Files\SafeNet\LunaClient), copy the crystoki.ini file, and paste it
into the win32 folder (C:\Program Files\SafeNet\LunaClient\win32).
C:\Program Files\SafeNet\LunaClient\win32>dir
Volume in drive C has no label.
Volume Serial Number is 1216-4343
Directory of C:\Program Files\SafeNet\LunaClient\win32
12/17/2015 05:23 PM <DIR> .
12/17/2015 05:23 PM <DIR> ..
12/15/2015 02:28 PM 274,112 ckdemo.exe
11/07/2015 04:43 AM 413,376 cklog201.dll
11/07/2015 04:43 AM 128 cklog201.dll.sig
12/15/2015 02:28 PM 650,944 cmu.exe
11/07/2015 04:43 AM 1,924,800 cryptoki.dll
11/07/2015 04:43 AM 128 cryptoki.dll.sig
11/09/2015 09:57 AM 1,613 crystoki.ini
11/09/2015 09:57 AM <DIR> csp
11/09/2015 09:57 AM <DIR> JCProv
11/09/2015 09:57 AM <DIR> jsp
11/09/2015 09:57 AM <DIR> KSP
12/15/2015 02:28 PM 1,412,800 lunacm.exe
12/15/2015 02:28 PM 249,536 multitoken.exe
12/15/2015 02:28 PM 97,984 salogin.exe
11/07/2015 04:43 AM 175,808 shim.dll
11/07/2015 04:43 AM 128 shim.dll.sig
11/07/2015 04:43 AM 1,101,504 softtoken.dll
12/15/2015 02:28 PM 1,728,192 vtl.exe
SafeNet Network HSM Installation Guide
Release 6.2.2 Rev. A December 2016 Copyright 2001-2016 GemaltoAll rights reserved. 107

5 SafeNet HSM Client Software Installation
14 File(s) 8,031,053 bytes
6 Dir(s) 188,932,857,856 bytes free
5. Open the copied crystoki.ini file in a text editor.
[Chrystoki2]
LibNT=C:\Program Files\SafeNet\LunaClient\cryptoki.dll
[Luna]
PEDTimeout1=100000
PEDTimeout2=200000
CommandTimeoutPedSet=720000
KeypairGenTimeOut=2700000
CloningCommandTimeOut=300000
PEDTimeout3=10000
DefaultTimeOut=500000
[CardReader]....... etc.
6. Under the [Chrystoki2] section replace the old LibNT path with : LibNT=C:\Program
Files\SafeNet\LunaClient\win32\cryptoki.dll
[Chrystoki2]
LibNT=C:\Program Files\SafeNet\LunaClient\win32\cryptoki.dll
[Luna]
PEDTimeout1=100000
PEDTimeout2=200000
CommandTimeoutPedSet=720000
KeypairGenTimeOut=2700000
CloningCommandTimeOut=300000
PEDTimeout3=10000
DefaultTimeOut=500000
[CardReader]
....... etc.
7. In Windows, change make an Evironment Variables change as follows:
In Computer -> Properties -> Advanced Settings -> Environment Variables -> System Variables
Change ChrystokiConfigurationPath value to C:\Program Files\SafeNet\LunaClient\win32
You can now use your 32 bit utilities in a 64 bit Windows environment.
SafeNet Network HSM Installation Guide
Release 6.2.2 Rev. A December 2016 Copyright 2001-2016 GemaltoAll rights reserved. 108
