Installation Guide EASY
User Manual:
Open the PDF directly: View PDF ![]() .
.
Page Count: 12

ENTERPRISE
APPLICATION SOLUTION
FOR YIELD (EASY)
INSTALLATION GUIDE
OPEN-SOURCE SOLUTION FROM MARYVILLE UNIVERSITY
DEVELOPED IN PARTNERSHIP WITH HURON CONSULTING GROUP
FUNDED BY A SALESFORCE.ORG FORCE FOR CHANGE GRANT

2
Table of Contents
OVERVIEW ............................................................................................................................................. 3
Audience .............................................................................................................................. 3
INSTALLATION ...................................................................................................................................... 3
Unmanaged Package.......................................................................................................... 3
Ant/Force.com Migration Tool .......................................................................................... 4
POST INSTALLATION STEPS ............................................................................................................. 5
Community Setup ............................................................................................................... 5
Community Configuration ................................................................................................. 6
Application Setting Custom Setting ................................................................................. 7
Permission Sets .................................................................................................................. 9
Static Resources ................................................................................................................. 9
Page Layout Assignments................................................................................................. 9
Flow Definitions ................................................................................................................ 10
Interactions Mappings...................................................................................................... 12
UPDATED: OCTOBER 2018

3
OVERVIEW
AUDIENCE
This installation guide is intended for System Administrators to assist in installing and performing
the initial configuration steps for the EASY application. This installation guide assumes that you
already have read the EASY User Guide.
INSTALLATION
Installation either can be done via unmanaged package URLs or the Ant Force.com Migration Tool.
If EASY is being installed for the first time, either method can be used; however, if EASY is already
installed, the Ant method need to be used for updates. Otherwise, EASY has to be completely
uninstalled from the Installed Packages list in Setup and then re-installed via the URL to update it to
the latest version. This is a Salesforce limitation on unmanaged packages (versioning is not
supported).
UNMANAGED PACKAGE
1. Proceed to the installation url:
a. Sandbox:
https://test.salesforce.com/packaging/installPackage.apexp?p0=04t2E000002Dpz4
b. Production/Developer:
https://login.salesforce.com/packaging/installPackage.apexp?p0=04t2E000002Dpz4
2. If you are not logged into your Salesforce org, you will be prompted to log in
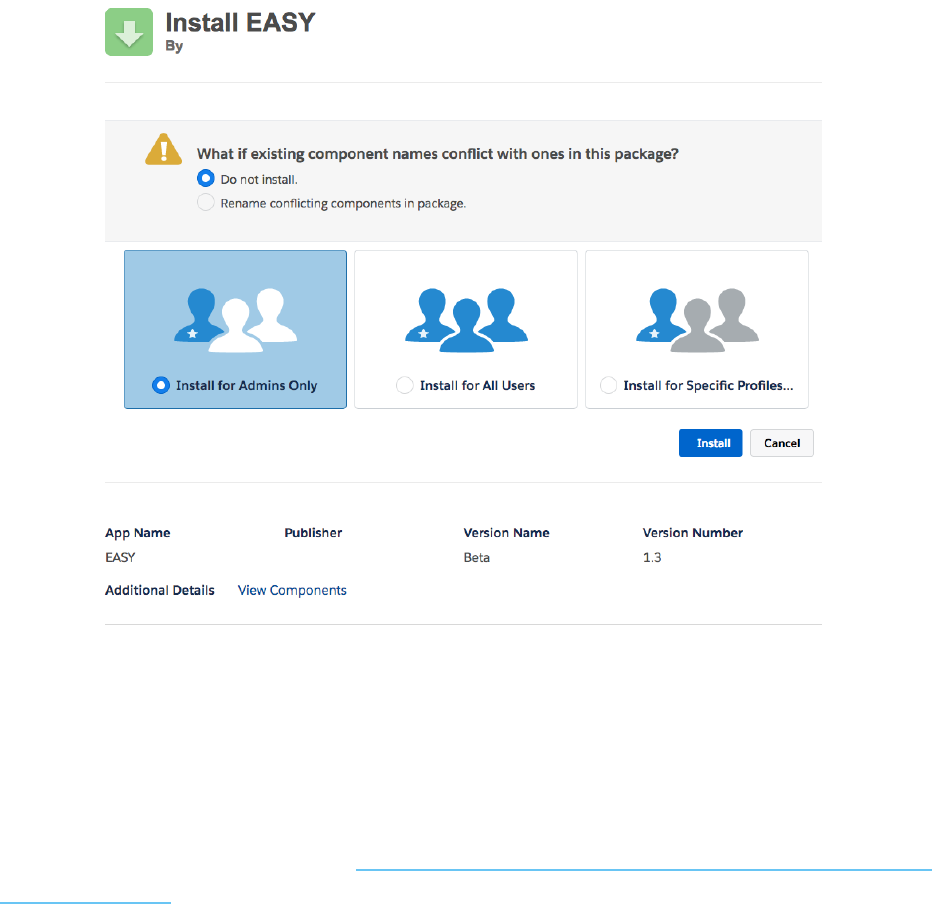
3. Once at the login screen, select the profile(s) that you want to give access to and click install
a. Note: Any profiles selected here will have full access to all EASY functionality. EASY
provides several permission sets that give administrators more fine-grained control of
who can do what. Details around these permission sets are included in the Technical
Guide. We recommend only granting access to the System Administrator profile
during installation and assigning permission sets to users that need access to EASY.
4
4. Once the installation completes, you will be able to begin the post installation steps
ANT/FORCE.COM MIGRATION TOOL
1. Go to the Github repository here: https://github.com/SalesforceFoundation/EASY-Open-
Source-Solution
2. Fork the repository by clicking on the “Fork” button in the upper-righthand corner. This
creates your own copy of EASY for your Github user.
3. Clone your fork to your local machine via the command line:
$ git clone https://github.com/YOUR-USERNAME/EASY-Open-Source-Solution.git

5
4. You now have a local copy on your machine. EASY has some built-in scripts to make
deploying it to your Salesforce org easier. Utilizing Ant and the Force.com Migration tool, you
can push your local copy of EASY to the org of your choice. You'll need to provide a
build.properties to tell Ant where to deploy it. An example file might look like:
5. Now deploy to your org utilizing ant:
POST INSTALLATION STEPS
COMMUNITY SETUP
Follow the steps below to create a basic community for use with EASY. If you already have a
community created, you can skip to the next section. Please see the documentation here for
additional information on creating communities.
1. Go to Setup>Community Settings
2. If the “Enable Communities” page shows up, check the “Enable communities” choose a
domain name, and click save. Otherwise, skip to step 3.
a. Note: After you select a domain name, it can’t be changed
3. Go to Setup>All Communities
4. Click the “New Community” button
5. Choose a Community Template
a. Customer Service, Help Center or Build Your Own is recommended
6. Click “Get Started”
7. Give you community a name and URL suffix (e.g. “Admissions,” “Employment,” etc.)
8. After saving, click on “Administration”
9. Navigate to the “Emails” part of the sidebar
10. Uncheck the “Send Welcome Email” checkbox and click “Save”
11. Navigate to the “Members” part of the sidebar
12. Under the “Select Profiles” section, change the “Search” dropdown to “Portal” and select a
portal profile to give access to the community
sf.username = YOUR_ORG_USERNAME
sf.password = YOUR_ORG_PASSWORD
sf.serverurl = https://login.salesforce.com ##or test.salesforce.com for sandbox
environments
sf.maxPoll = 20
$ cd EASY-Open-Source-Solution
$ ant deploy
6
13. Under the “Select Permission Sets” section, add the “Application Community” permission set
to the Selected Permission Sets
14. Click “Save”
15. Navigate to the “Settings” part of the sidebar
16. Click the “Activate Community” button
That’s it! You now have a Salesforce Community that can be configured for use with EASY.
COMMUNITY CONFIGURATION
Once you have a community created, follow the steps below to configure it to work with EASY.
1. Grant the community access to ApplicationRegistration; this will allow unauthenticated users
to access the registration page
a. Go to Setup>All Communities
b. Click on “Workspaces” for the community you’re using
c. Click on “Administration,” followed by “Pages,” “Go to Force.com”
d. Next to “Site Visualforce Pages,” click “Edit”
e. Add the “ApplicationRegistration” page to the “Enabled Visualforce Pages” section
f. Click “Save”
2. You will need to assign the community guest user the “Application Community Guest”
permission set. This permission set grants access to the registration page as well as the
application objects to a user that has not been authenticated (i.e., a net-new applicant).
a. Go to Setup>All Communities
b. Click on “Workspaces” for the community you’re using
a. Click on “Administration,” followed by “Pages,” “Go to Force.com”
b. Click “Public Access Settings”
c. Click “View Users”
d. Click on the full name of the guest user
e. Next to “Permission Set Assignments,” click “Edit Assignments”
f. Add the “Application Community Guest” to the “Enabled Permission Sets” section
g. Click “Save”
h. If you get a message saying that the permission set cannot be assigned because the
number of apps would be exceeded, follow these steps:
i. Click on the profile associated with the user
ii. Under the Assigned Apps section, change the default to “Enterprise
Application”
iii. Repeast steps C through G
iv. Go back to the profile associated with the user
7
v. Change the default app back to what it was before
3. Configure Login & Registration. This will allow a new applicant’s Contact, Account,
Application and Community User to be created.
a. Go to Setup>All Communities
b. Click on “Workspaces” for the community you’re using
c. Click on “Administration,” then click on “Login & Registration”
d. Ensure the “Allow external users to self-register” checkbox is checked
e. Select the self-registration page
i. You may choose a custom self-registration page if you have one; however, the
one that comes with the application is “ApplicationRegistration.”
ii. You will need to choose “Visualforce Page” from the dropdown in order to see
this page in the lookup.
iii. Please note that EASY includes a registaion page in order to give the applicant
a single place to create an account, start an application, and provide data that
will be used to filter Requirements/Requirement Items/Questions so the
application is personalized to the applicant.
f. Choose your community profile. The ID for this profile should have been added to the
Application Setting custom setting from the “Application Setting Custom Setting” step.
g. Choose your community Account. Here, you can choose any Account. This will be the
account with which any new applicant’s Contact record will be related. What is chosen
here is dependent on the account model of your organization. If you are using bucket
accounts, you can choose the bucket account here. If you are using the Higher-
Education Data Architechture (HEDA), you can leave this blank, and HEDA will create
the administrative account for you.
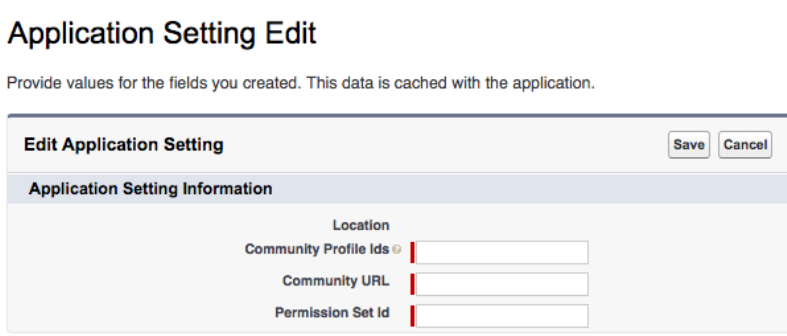
APPLICATION SETTING CUSTOM SETTING
In order to assign the correct permissions to new Community Users created by the EASY
registration page, you need to specify what permission sets are assigned upon user creation. EASY
does this based on a custom setting called “Application Setting.” Navigate to Setup>Custom
Settings>Application Setting>Manage>New (make sure you hit “New” at the top of the page and not
above the list).
8
Here, you will need to fill-in three fields:
1. Location: This should be blank
2. Community Profile Ids: This is a semi-colon delimited list of Salesforce Profile IDs. When a
user is created with one of the Profile IDs in this list, it will be assigned the permission set
stored in “Permission Set Id.” You’ll want to make sure the ID for the profile you selected as
the community profile is included here.
a. Go to Setup>Profiles
b. Click the profile you specified as the community profile earlier
c. Copy and paste the ID from the URL into this field
i. This will be between the “%2F” and “%3F” in Lightning or after the forward
slash in Classic
3. Community URL: This is the base URL for the community. To retrieve it:
a. Go to Setup>All Communities
b. Click on “Workspaces” for the community you’re using
c. Click on “Administration”
d. Copy and paste the URL from the “Settings” page into this field
4. Permission Set Id: This is the ID of the “Application Community” permission set that comes
with the EASY package.
a. Go to Setup>Permission Sets
b. Click on the “Application Community” permission set
c. Copy and paste the ID from the URL into this field
i. This will be between the “%2F” and “%3F” in Lightning or after the forward
slash in Classic
d. Note: If your community uses the “Customer Community Login” license type, you will
need to make sure this permission set does NOT have the Create permission on the
Account object
9
PERMISSION SETS
Unfortunately, standard object permissions can’t be included in packages. This means that you’ll
have to manually grant permissions for these.
1. Go to Setup>Permission Sets
2. Click on the “Application Community Guest” permission set
3. Go to Object Settings>Accounts>Edit
a. Under “Object Permissions,” select “Read” and “Create”
b. Give edit access to the “Billing Address” field
c. Click “Save”
4. Select “Contacts” from the dropdown at the top and click “Edit”
a. Under “Object Permissions,” select “Read” and “Create”
b. Give edit access to the “Email” and “Mailing Address” fields
c. Click “Save”
5. Go back to Setup>Permission Sets
6. Click on the “Application Community” permission set
7. Go to Object Settings>Accounts>Edit
a. Under “Object Permissions,” select “Read” and “Create”
b. Give edit access to the “Billing Address” field
c. Click “Save”
STATIC RESOURCES
In order to start to build applications, at least one Application Control record must be created
(details in the User Guide). This record requires the “Logo Static Resource” field that’s used to
reference the logo that’s displayed to applicants in the community. You will need to add a logo
image as a static resource to be used here:
1. Go to Setup>Static Resources
2. Click “New”
3. Give the resource a name (this is what needs to be put in the “Logo Static Resource” field on
the Application Control record)
4. Choose a file to upload
5. Set the “Cache Control” to “Public”
6. Click “Save”
PAGE LAYOUT ASSIGNMENTS
After installation, you will need to assign page layouts to the correct record types for all profiles:
10
Requirement Item Object:
• Master: Reqirement Item Layout
• Document Upload: Requirement Item Document Upload Layout
• Question Group: Requirement Item Question Group Layout
• Related Object: Requirement Item Related Object Layout
Question Object:
• Master: Question Layout
• Address: Question Layout
• Checkbox: Question Special Layout
• Currency: Question Layout
• Date: Question Special Layout
• Date/Time: Question Special Layout
• Email: Question Email Layout
• Number: Question Layout
• Percent: Question Layout
• Phone: Question Layout
• Picklist: Question Picklist Layout
• Picklist (Multi-Select): Question Picklist Layout
• Radio: Question Picklist Layout
• Reference: Question Reference Layout
• Static: Question Static Layout
• Text: Question Text Layout
• Text (Encrypted): Question Text Layout
• Text Area: Question Text Layout
• Text Area (Long): Question Text Layout
• URL: Question Layout
Question Dependency Object:
• Master: Question Dependency Layout
• Checkbox: Question Dependency Checkbox Layout
• Multi-Select Picklist: Question Dependency Layout
• Picklist: Question Dependency Layout
FLOW DEFINITIONS
If you installed EASY via the Ant, you’ll need to activate the Process Builder process that supports
11
external requirements (e.g., Letters of Recommendation, etc.). Go to Setup>Process Builder and
activate the “External Response Requested” process. You can skip this step if you installed via the
package URL.

12
INTERACTIONS MAPPINGS
The EASY solution leverages the University of Miami’s Interactions for Student Recruitment open-
source solution. The Interactions object is a staging table that uses matching rules with applicants to
create new or match to existing Contacts. Because of this, Interactions Mappings need to be setup.
This will map fields on the Interactions object to fields on the Contact, Opportunity, Campaign and
Lead Source objects. To do so, follow these steps:
1. Go to the “Interaction Mappings” tab
2. Upload the mappings spreadsheet provided by Interactions for Student Recruitment
a. At a minimum, first name, last name and email must be mapped. To do this manually,
create the following three mappings at a minimum:
b. First Name
i. Target Object API Name: Contact
ii. Target Field API Name: FirstName
iii. Interaction Source Field API Name: First_Name__c
c. Last Name
i. Target Object API Name: Contact
ii. Target Field API Name: LastName
iii. Interaction Source Field API Name: Last_Name__c
d. Email
i. Target Object API Name: Contact
ii. Target Field API Name: Email
iii. Interaction Source Field API Name: Email__c
The Interactions solution offers many different features and customization options. Check out the
Overview, User Guide, Configuration Guide, and Technical Implementation Guide here. Please note
that Interactions is installed as a part of EASY, so there is no need to install it separately.
