Presentation Installation And Configuration Guide Interactions For Student Recruitment
User Manual:
Open the PDF directly: View PDF ![]() .
.
Page Count: 102 [warning: Documents this large are best viewed by clicking the View PDF Link!]
- Slide Number 1
- Slide Number 2
- Slide Number 3
- Slide Number 4
- Slide Number 5
- Slide Number 6
- Slide Number 7
- Slide Number 8
- Slide Number 9
- Slide Number 10
- Slide Number 11
- Slide Number 12
- Slide Number 13
- Slide Number 14
- Slide Number 15
- Slide Number 16
- Slide Number 17
- Slide Number 18
- Slide Number 19
- Slide Number 20
- Slide Number 21
- Slide Number 22
- Slide Number 23
- Slide Number 24
- Slide Number 25
- Slide Number 26
- Slide Number 27
- Slide Number 28
- Slide Number 29
- Slide Number 30
- Slide Number 31
- Slide Number 32
- Slide Number 33
- Slide Number 34
- Slide Number 35
- Slide Number 36
- Slide Number 37
- Slide Number 38
- Slide Number 39
- Slide Number 40
- Slide Number 41
- Slide Number 42
- Slide Number 43
- Slide Number 44
- Slide Number 45
- Slide Number 46
- Slide Number 47
- Slide Number 48
- Slide Number 49
- Slide Number 50
- Slide Number 51
- Slide Number 52
- Slide Number 53
- Slide Number 54
- Slide Number 55
- Slide Number 56
- Slide Number 57
- Slide Number 58
- Slide Number 59
- Slide Number 60
- Slide Number 61
- Slide Number 62
- Slide Number 63
- Slide Number 64
- Slide Number 65
- Slide Number 66
- Slide Number 67
- Slide Number 68
- Slide Number 69
- Slide Number 70
- Slide Number 71
- Slide Number 72
- Slide Number 73
- Slide Number 74
- Slide Number 75
- Slide Number 76
- Slide Number 77
- Slide Number 78
- Slide Number 79
- Slide Number 80
- Slide Number 81
- Slide Number 82
- Slide Number 83
- Slide Number 84
- Slide Number 85
- Slide Number 86
- Slide Number 87
- Slide Number 88
- Slide Number 89
- Slide Number 90
- Slide Number 91
- Slide Number 92
- Slide Number 93
- Slide Number 94
- Slide Number 95
- Slide Number 96
- Slide Number 97
- Slide Number 98
- Slide Number 99
- Slide Number 100
- Slide Number 101
- Slide Number 102
Interactions
for Student Recruitment
INTERACTIONS INSTALLATION AND
CONFIGURATION GUIDE
Information
Interactions for Student Recruitment is a solution for recruiting top
prospects to your college or university.
Built on the Salesforce platform, Interactions allows you to track
prospective students through all stages of the application process.
Interactions also ties recruitment information to Contact and Lead
data, simplifying application pipeline management so you can focus
recruiting efforts on the most promising prospects.
Developed by the University of Miami with funding from
Salesforce.org, we are proud to offer this free, open-source solution
to the higher education community.

INTERACTIONS FOR STUDENT RECRUITMENT
INTERACTIONS INSTALLATION AND CONFIGURATION GUIDE 2
Contents
AUDIENCE 5
ABOUT THE LIGHTNING EXPERIENCE INTERFACE 6
OVERVIEW OF INTERACTIONS FOR STUDENT RECRUITMENT 7
Custom Fields on Standard Objects 8
Leads and Contacts
Opportunities
Campaigns and Campaign Members
The HEDA Component 11
How Interactions Function –The Interaction Models 12
Apex Classes and Other Metadata 13
REQUIREMENTS BEFORE INSTALLING 14
Salesforce Edition 14
Install the Higher Education Data Architecture (HEDA) 14
Installer Permissions for Interactions 15
Field Limits 16
Multiple Lookups to the Same Objects 17
Add Contact Role Value 19
Creating Opportunity Record Types, Stages, and Sales Processes 21
Add Opportunity Stage Values
Add Opportunity Inquiry Stage Process
Add Opportunity Applicant Stage Process
Add Opportunity Inquiry Record Type
Add Opportunity Applicant Record Type
Create an Opportunity Workflow Rule
INSTALLATION STEPS 31
Downloading the Unmanaged Package 31
Using the GitHub Open-Source Code 32
REQUIREMENTS AFTER INSTALLING 33
Load Interaction Mappings 33
Create New Fields and Mappings 35
Interaction Mapping Errors

INTERACTIONS FOR STUDENT RECRUITMENT
INTERACTIONS INSTALLATION AND CONFIGURATION GUIDE 3
Contents (Continued)
Configure Interaction Mapping Features 37
Update Picklist Values 38
Create Duplicate and Matching Rules 39
Create or Update Matching Rules
Create or Update Duplicate Rules
Update Lead to Contact Standard Field Mappings 44
Activate Workflow Rules 45
Update Object Page Layouts 46
Update Lead Layouts
Update Contact Layouts
Update Campaign Layouts
Update Campaign Member Layouts
NAVIGATING THE INTERACTIONS APP 56
Using a Different App 57
Add the Custom Global Action
BEST PRACTICES -CREATING INTERACTIONS VIA INTEGRATIONS 60
Interaction Sources 60
Using Interaction Source with Lead Source and Campaigns
Using Interaction Source with Interaction Mappings
Adding Interaction Source Values
Loading with an Integration Tool 64
BEST PRACTICES -CREATING INTERACTIONS MANUALLY 65
Overview of Custom Actions 65
Lead Interaction Action 67
Contact Interaction Action 68
Opportunity Interaction Action 70
Campaign Interaction Action 71
Global Interaction Action 72
Customizing Action Layouts 73
THE AFFILIATION KEY 77
The Affiliation Key Out-of-the-Box 77
Affiliation Key Formula Field and Workflow Rule
Updating Affiliation Key and Workflow

INTERACTIONS FOR STUDENT RECRUITMENT
INTERACTIONS INSTALLATION AND CONFIGURATION GUIDE 4
Contents (Continued)
THE OPPORTUNITY KEY 80
The Opportunity Key Out-of-the-Box 80
Opportunity Key Formula Field on Interactions
Activating Opportunity Key Update Workflow
Updating Opportunity Key and Workflow
CONNECT AN ADDITIONAL OBJECT 85
USER PERMISSIONS AND SECURITY MODELS 88
Delivered Permission Set 88
How Interactions Handles Your Security Models 89
REPORTS AND DASHBOARDS 90
Recruiter Dashboard 91
Administrator Dashboard 91
TEST YOUR CONFIGURATION 92
Create a New Contact Using an Interaction 92
Update a Contact Using an Interaction 93
Create an Opportunity Using an Interaction 94
Update an Opportunity Using an Interaction 95
Create an Affiliation Using an Interaction 96
Update an Affiliation Using an Interaction 97
Add a Campaign Member Using an Interaction 98
APPENDIX 99
Interactions for Student Recruitment ERD 99
Interaction Model –Flow Chart 100
Interaction Model –Swim Lane Diagram 101
Interactions Data Dictionary 102
Interactions for Student Recruitment Unmanaged Package 102
Interactions for Student Recruitment GitHub Repository 102
Other Resources 102

INTERACTIONS FOR STUDENT RECRUITMENT
INTERACTIONS INSTALLATION AND CONFIGURATION GUIDE
Audience
This document is intended for System Administrators and Developers to
successfully implement Interactions for Student Recruitment. Review the
list of basic administrator skills needed to install and configure the
package. If you are unsure of some of the tasks, consider completing the
Admin Beginner trail in Trailhead and reviewing Salesforce’s other
documentation.
List of skills needed:
•Install packages
•Manage applications
•Manage object fields and relationships
•Manage record types
•Understanding of Salesforce Duplicate Management
5

INTERACTIONS FOR STUDENT RECRUITMENT
INTERACTIONS INSTALLATION AND CONFIGURATION GUIDE
About the Lightning Experience Interface
Salesforce has two different user interfaces: Lightning Experience and
Salesforce Classic.
Interactions for Student Recruitment gives you Lightning Experience out-
of-the-box via the Interactions Lightning Console App and other
Lightning-specific customizations. Navigation tips for the Interactions App
is provided in the Navigating the Interactions App section.
This guide assumes that you are working in Lightning Experience. You can
learn more about this interface in the Lightning Experience Basics
Trailhead module.
6

INTERACTIONS FOR STUDENT RECRUITMENT
INTERACTIONS INSTALLATION AND CONFIGURATION GUIDE
Overview of Interactions for Student
Recruitment
Interactions for Student Recruitment helps you make the most of your
recruiting processes by utilizing the great standard technology Salesforce
provides along with some exciting new features.
No more tracking prospects on spreadsheets and post-it notes, or
wondering which marketing efforts are the most successful in recruiting
the best students. Interactions for Student Recruitment puts the power in
your hands with a complete recruitment solution for the recruiters and
marketing teams at your university!
The Interactions custom object, the centerpiece of this package, serves as
a staging table that automates the matching and creation of records
specifically built for student recruitment. Whether Interactions are
created through an integration or manually, the results are the same:
existing records are updated and new records are created by simply
logging a single Interaction!
We strongly recommend you review the User Guide if you haven’t already.
The User Guide shows how the standard and custom objects used in the
package work together and uses real-world examples to demonstrate how
automation can help recruiters at your university.
7
INTERACTIONS FOR STUDENT RECRUITMENT
INTERACTIONS INSTALLATION AND CONFIGURATION GUIDE
Custom Fields on Standard Objects
It is important to note the new fields on Salesforce Standard objects
before installing Interactions for Student Recruitment. Refer to the
“Overview of the Interactions Package” and “Standard Objects Used”
sections of the User Guide for information on each standard object with
notes on the new custom fields.
Note: This section will only touch on fields that are especially
important to understand as an administrator.
For a complete list of all the fields included in the package (for all
objects)including their help text, values for picklist fields and much
more, see the Data Dictionary.
Leads and Contacts
•“Constituent ID”
•Added to both the Lead and Contact objects
•An ID field for integration or manual data loading purposes
•It can also be used in Duplicate Matching rules (see Create
Duplicate and Matching Rules)
•Not delivered on either object as unique or as an external ID
field, but it can be configuredthat way after installing
8

INTERACTIONS FOR STUDENT RECRUITMENT
INTERACTIONS INSTALLATION AND CONFIGURATION GUIDE
Custom Fields on Standard Objects
(cont.)
Opportunities
•“Application Number”
•An ID field used for housing an identifying Application number
•Not delivered as unique or as an external ID field, but it can be
configured that way after installing
•“Application Submitted Date”
•A date field that displays the date the Opportunity went from the
Inquiry to Applicant record type, updated by a workflow rule
•This field may also be updated manually or via an integration
•“Opportunity Key”
•A calculated text field that is used to determine whether an
Interaction will create a new Opportunity or update an existing
Opportunity record
•Built out-of-the-box using the Contact’s 18-digit ID, Career,
Term’s 18-digit ID, and Plan’s 18-digit ID (if applicable) to ensure
it is unique and supports both a centralized and decentralized
business process
•Delivered as a unique external ID field
•Learn more about this field in The Opportunity Key
9

INTERACTIONS FOR STUDENT RECRUITMENT
INTERACTIONS INSTALLATION AND CONFIGURATION GUIDE
Custom Fields on Standard Objects
(cont.)
Campaigns and Campaign Members
•“Campaign Key”
•Added to the Campaign object
•Can be used to set a custom external ID field for integrations
•If it is populated, the Interaction Processor code will use it to
match to a Campaign and create Campaign Member records
instead of the standard Salesforce ID
•Delivered as a unique external ID field
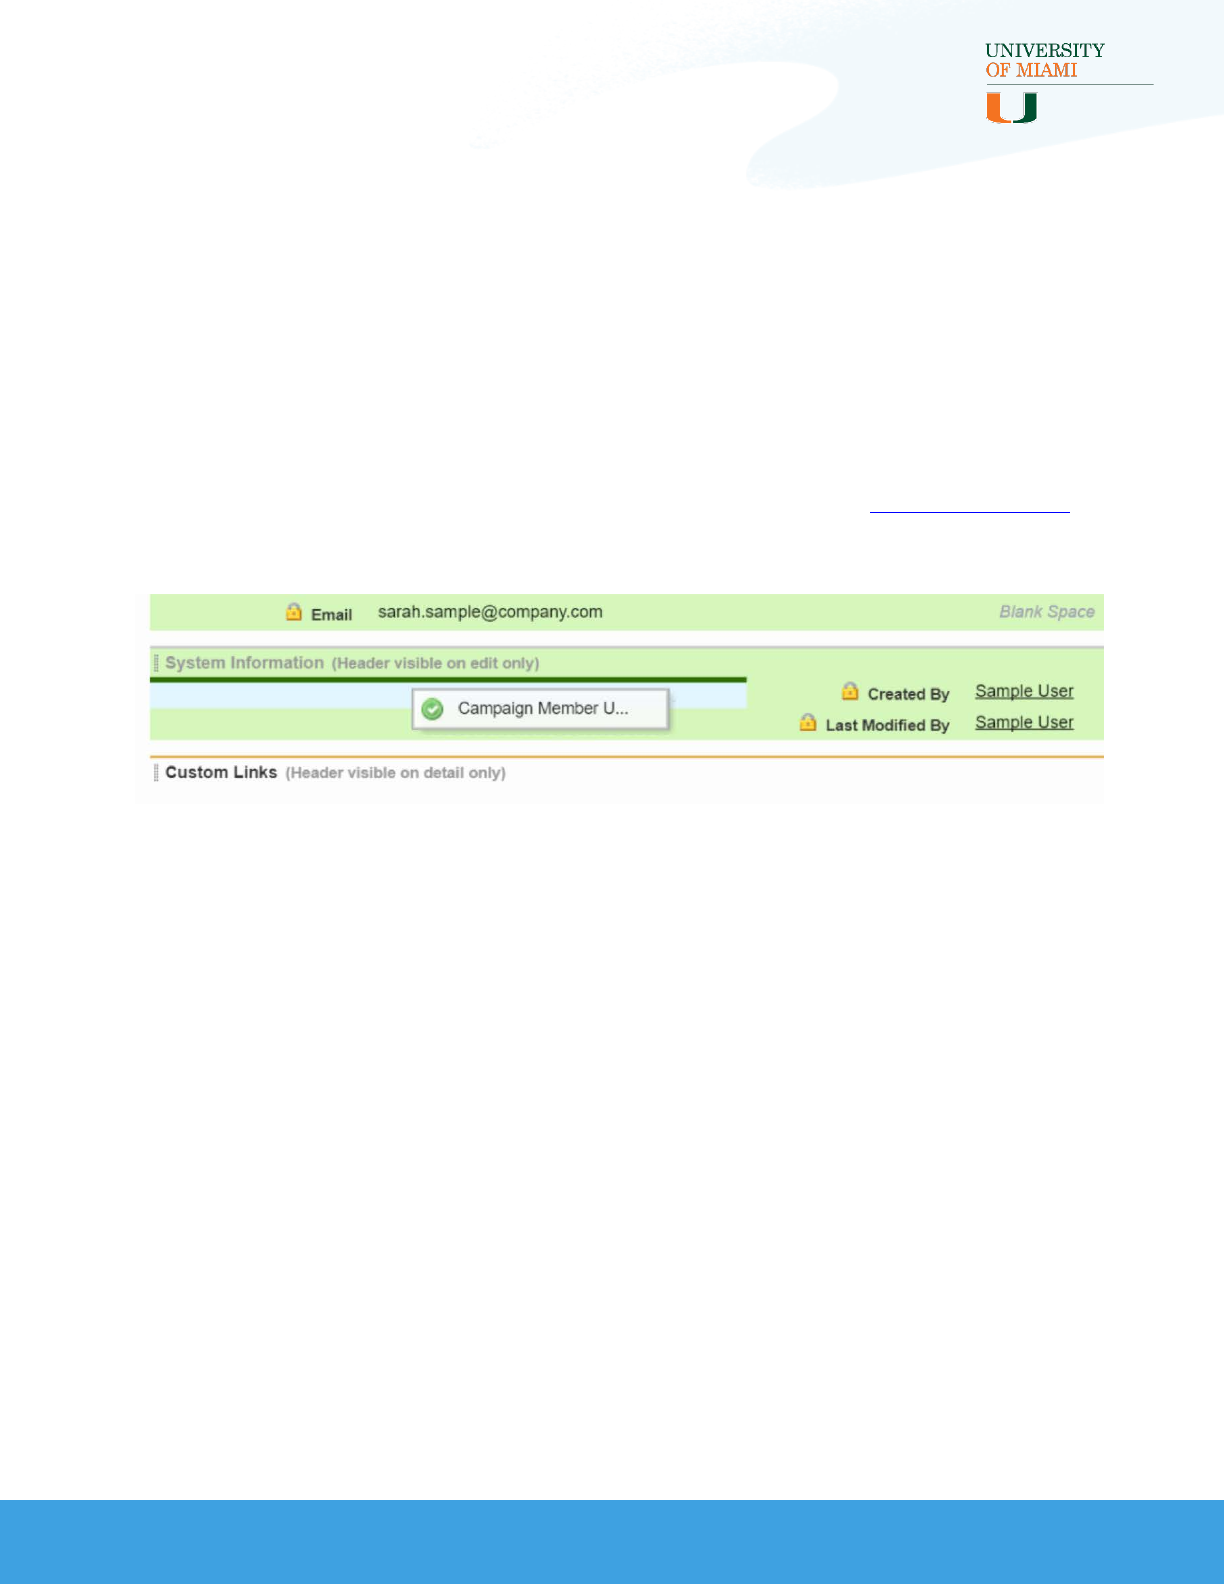
•“Campaign Member Key”
•Added to the Campaign Member object
•Set to Lead ID + Campaign ID and updated via workflow
•The Interaction Processor code will use it to update existing
Campaign Members instead of creating new records
•Delivered as a unique external ID field
10

INTERACTIONS FOR STUDENT RECRUITMENT
INTERACTIONS INSTALLATION AND CONFIGURATION GUIDE
The HEDA Component
Out-of-the-box, Interactions for Student Recruitment leverages standard
Salesforce functionality as well as parts of the Higher Education Data
Architecture (HEDA) including Affiliations, the HEDA Term object, and the
HEDA Account Record Type model.
Affiliations are junction object records between Contacts and Accounts
(for example, Educational Institutions or Business Organizations) that can
be created by logging an Interaction. The package uses the HEDA Term
object to segment Interactions and Opportunities (this can be setup in a
variety of ways). It also utilizes HEDA Account Record Types to create a
meaningful data model.
If you are not familiar with HEDA, complete the Manage Your Higher Ed
Data with HEDA trail in Trailhead and review other relevant HEDA
documentation to learn the basics.
11

INTERACTIONS FOR STUDENT RECRUITMENT
INTERACTIONS INSTALLATION AND CONFIGURATION GUIDE
How Interactions Function -The
Interaction Models
Each Interaction record that is created has the potential to:
•Convert an existing Lead record into a Contact
•Create or update up to two Campaign Members
•Create or update a Contact
•Create or update an Opportunity
•Create or update an Affiliation
But how does this auto-magic happen? By using the custom code in
Interactions for Student Recruitment called the Interaction Processor.
When an Interaction is logged, the Processor searches for any existing
Lead or Contact records via Lead and Contact Matching Rules. If existing
records are found, they are updated (as applicable), and new records are
created if no records exist.
Depending on other data provided on the Interaction (e.g. Recruitment
Interest and Term, Affiliated Account data, and/or Campaign and
Campaign Member Status), other related records may be created or
updated (e.g. an Opportunity, Affiliation, and/or Campaign Membership,
respectively).
12
INTERACTIONS FOR STUDENT RECRUITMENT
INTERACTIONS INSTALLATION AND CONFIGURATION GUIDE
How Interactions Function -The
Interaction Models (cont.)
We have included two Interaction models in the documentation to
demonstrate when and which records are being created or updated when
a new Interaction record is saved, including the other objects and
processes involved (such as Duplicate Management and Lead
Conversion).
These models can be found in the User Guide and in the Appendix of this
guide. Take a moment to review the models if you have not seen them
already.
Note: We discuss best practices for setting up Duplicate
Management and how it comes out-of-the-box in the Create
Duplicate and Matching Rules section later on.
Apex Classes and Other Metadata
A list of all Apex Classes and Triggers as well as all other metadata
components included in Interactions for Student Recruitment are
available in the Data Dictionary. Visit the Technical Implementation Guide
for additional information on how the code functions and tips on
customization.
13

INTERACTIONS FOR STUDENT RECRUITMENT
INTERACTIONS INSTALLATION AND CONFIGURATION GUIDE
Requirements Before Installing
Before installing Interactions for Student Recruitment, there are a few
steps you need to follow to ensure your org is ready to have the package
installed. Once you are ready, you can install the package from one of the
links in the GitHub Repository.
Salesforce Edition
Interactions for Student Recruitment requires an Enterprise or Unlimited
edition of Salesforce.
Install the Higher Education Data
Architecture (HEDA)
Interactions for Student Recruitment uses the Higher Education Data
Architecture (HEDA) and references it in the Interactions Processor code.
Therefore, to simply install the package from the link above, you must
have HEDA installed in your org first. See the Install and Configure the
Higher Education Data Architecture (HEDA) Knowledge Article for step-by-
step instructions on installing HEDA.
Although HEDA is required to install the package, the components of the
package are also available as open-source code through GitHub. The
repository for Interactions for Student Recruitment is here. You will need
a developer who is familiar with Apex code and implementing open-
source solutions to go this route. See the Technical Implementation
Guide for more information about the code.
14

INTERACTIONS FOR STUDENT RECRUITMENT
INTERACTIONS INSTALLATION AND CONFIGURATION GUIDE
Installer Permissions for Interactions
The user who installs Interactions for Student Recruitment must have
certain permissions, which are typically already part of the System
Administrator profile. If a non-administrator needs these permissions,
enable them using either profiles or permission sets.
Permissions needed:
•‘Create’permission for the Account object
•‘Create’permission for the Contact object
•‘Create’permission for the Campaign object
•‘Marketing User’selected on the User Detail page
•‘Download AppExchange Packages’permission
If you’re new to managing user permissions, we recommend reviewing
the Data Security module in Trailhead before continuing.
15
INTERACTIONS FOR STUDENT RECRUITMENT
INTERACTIONS INSTALLATION AND CONFIGURATION GUIDE
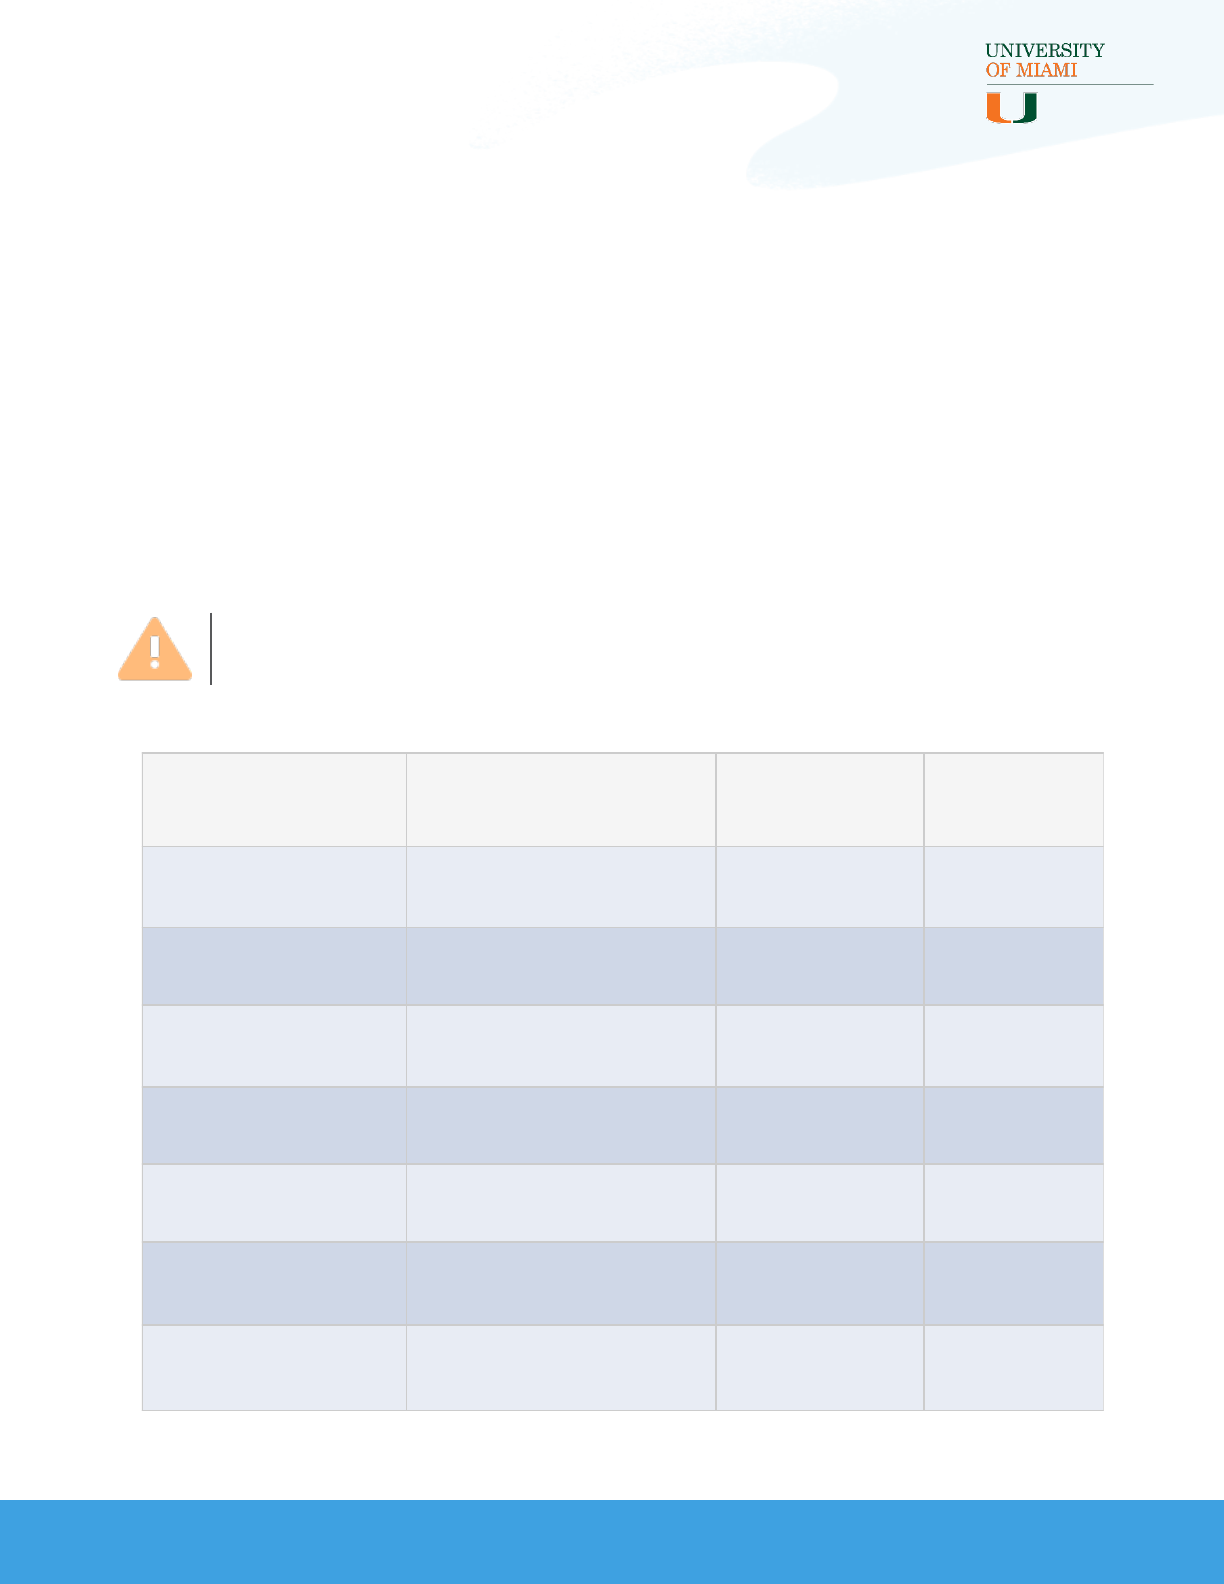
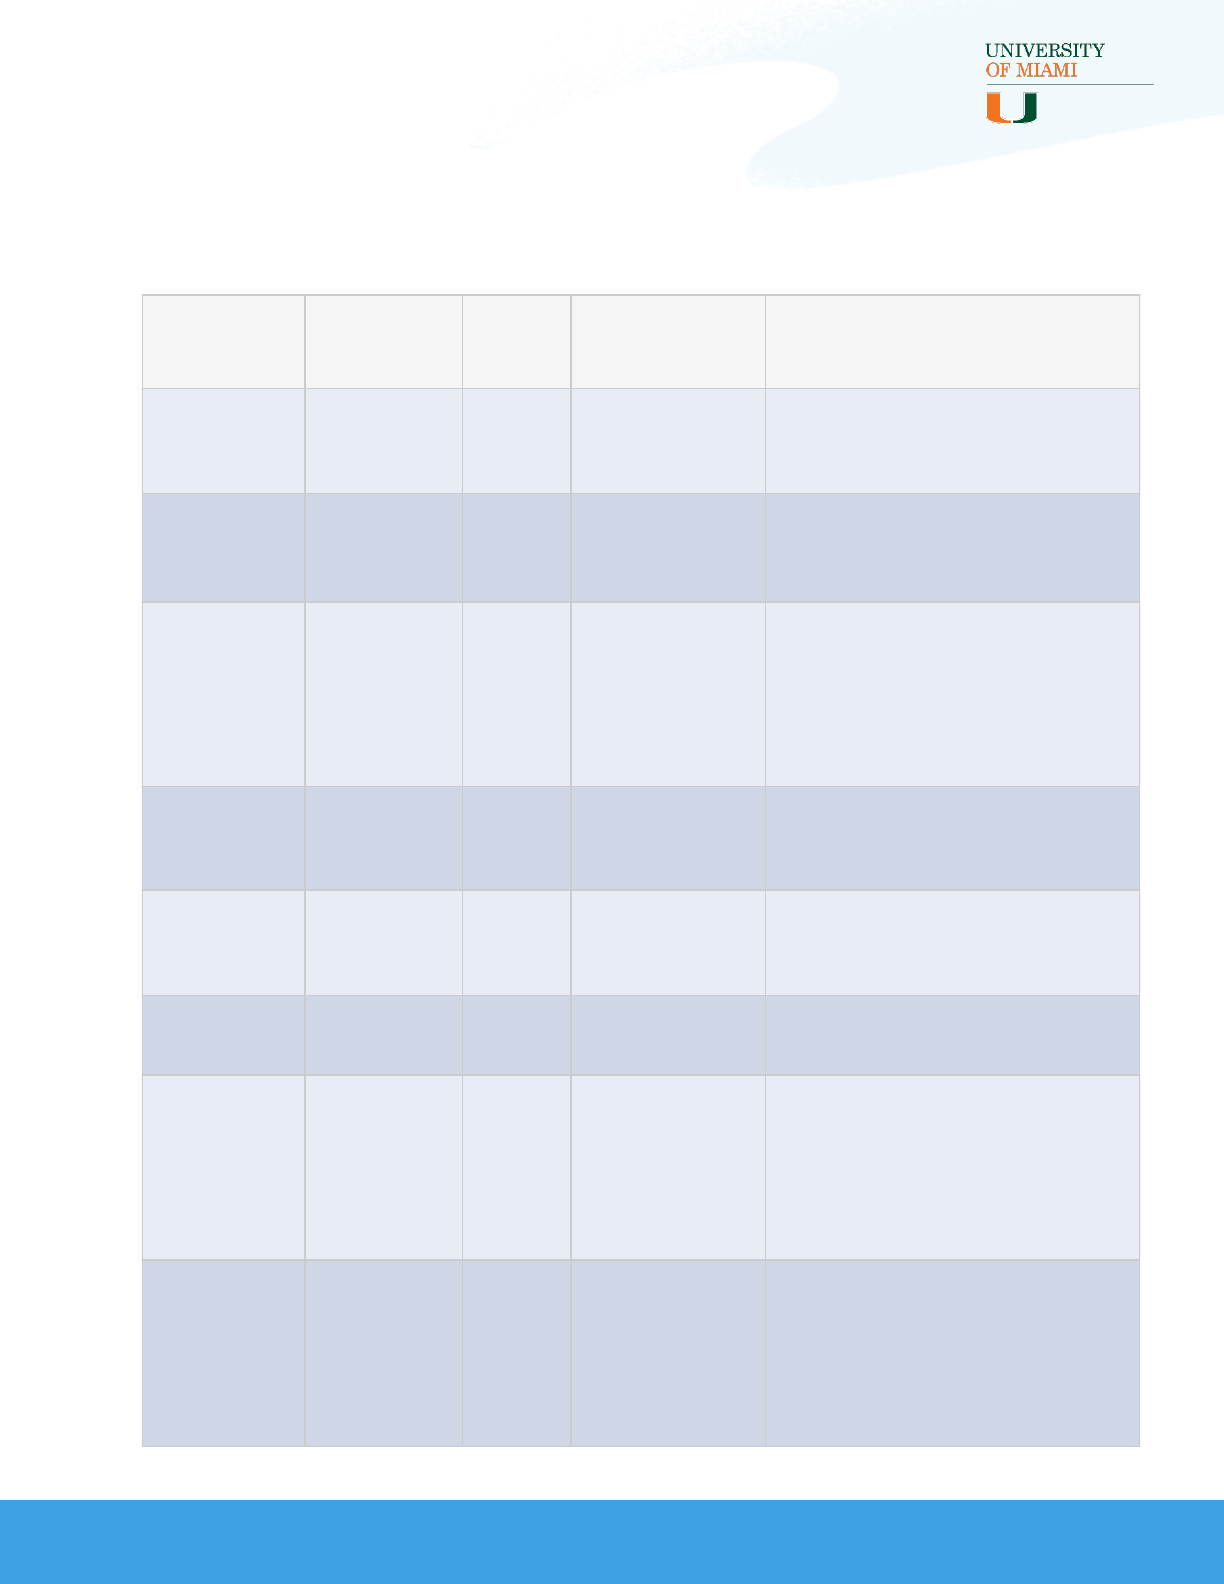
Field Limits
Interactions for Student Recruitment introduces several unique external
ID fields. Compare your org with the table below to ensure that installing
the package will not exceed per-object limits and prevent installation.
Note that only the fields that must be configured as unique external IDs
for Interactions to work come out of the box as such. We recommend the
other fields in this table be unique external ID’s as well but this is not a
requirement for Interactions to function as expected.
Note: Each object has a limit of 7 external IDs.
Object Field Name
Delivered as
an External
ID?
Delivered as
a Unique
Field?
Interaction Interaction Upsert Key X X
Opportunity Opportunity Key X X
Opportunity Application Number
Contact Constituent ID
Lead Constituent ID
Campaign Campaign Key X X
Campaign Member Campaign Member Key X X
16

INTERACTIONS FOR STUDENT RECRUITMENT
INTERACTIONS INSTALLATION AND CONFIGURATION GUIDE
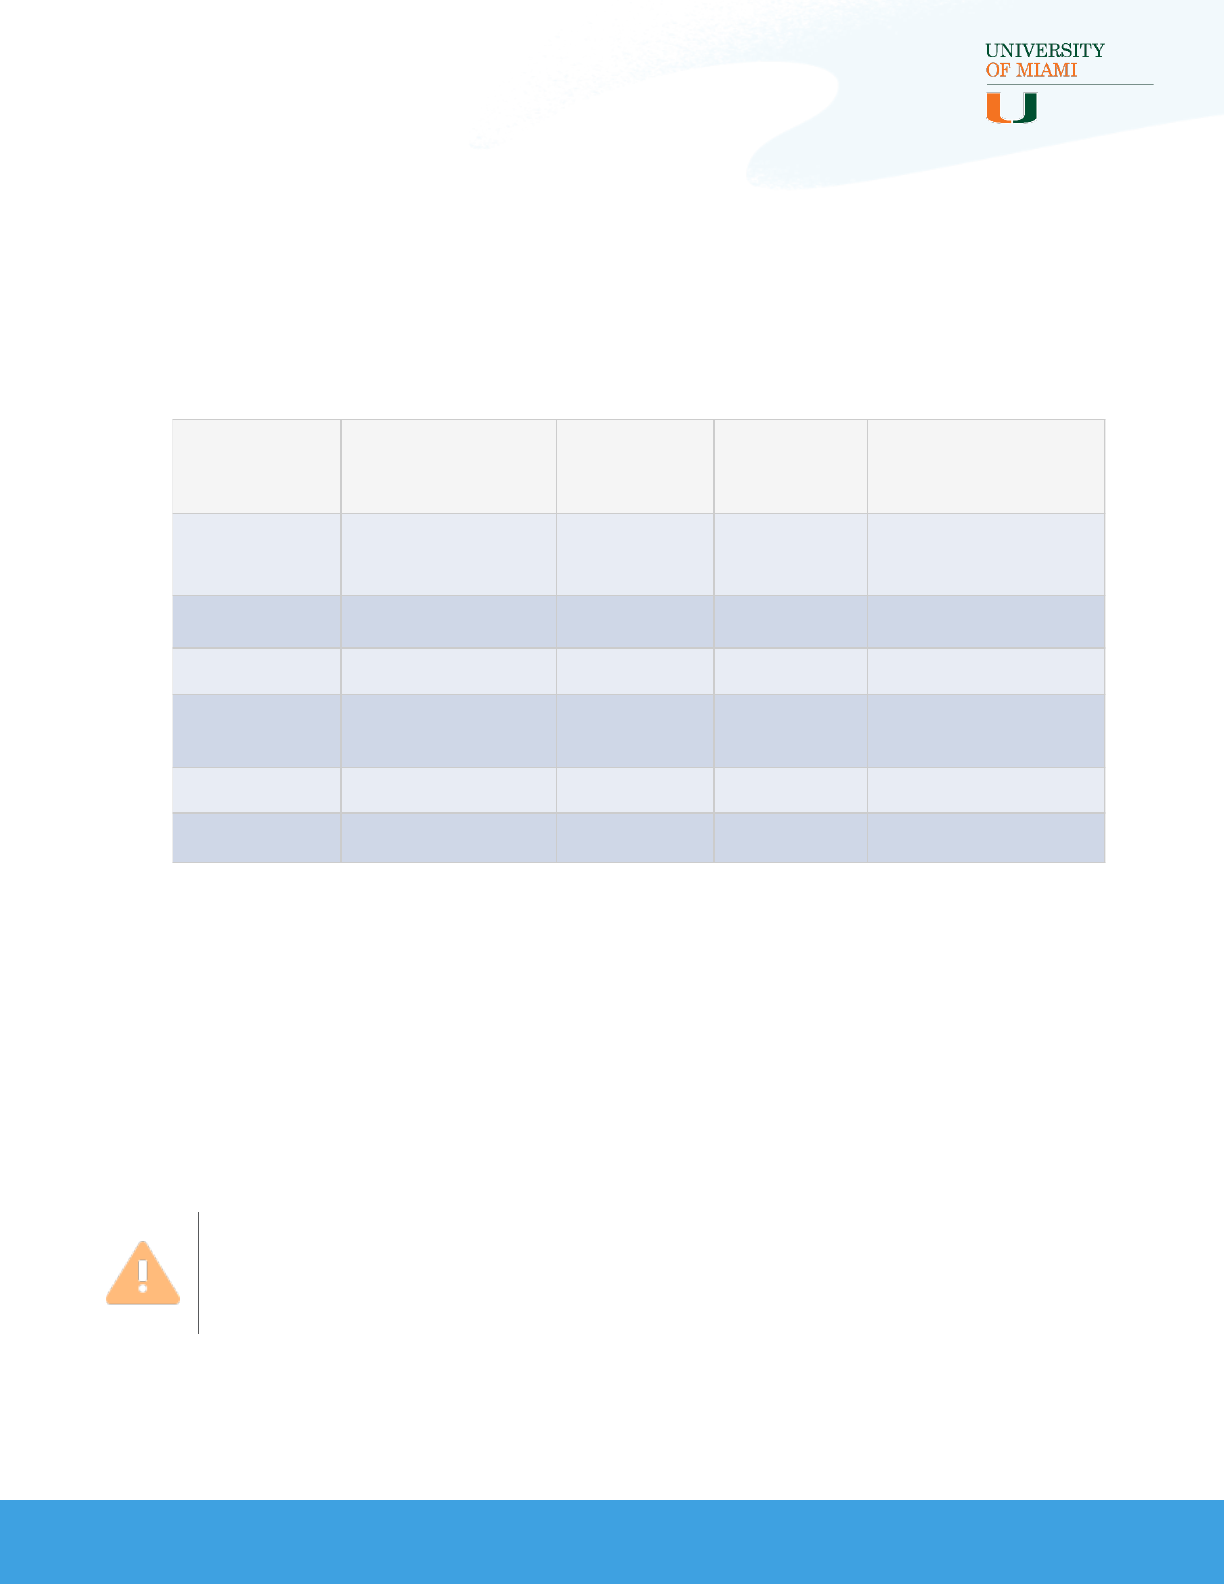
Multiple Lookups to the Same Objects
The package includes lookup fields that may create multiple relationships
between objects. See the notes column in the table on the next page for
more information about each field’s purpose so you understand the
difference between them and are able to identify them.
The Object column describes where the lookup field was built. The
Related Object is what the lookup field is connected to. The Related List
Label references the related list that appears on the Related Object. Most
of the table references Academic Interests vs Recruitment Interests,
which are both a type of record from the new Plan object.
See the User Guide for more information about this object.
Note: The ability to differentiate these fields and relationships will
be especially important for reporting as well as UI configuration,
such as editing page layouts.
17
INTERACTIONS FOR STUDENT RECRUITMENT
INTERACTIONS INSTALLATION AND CONFIGURATION GUIDE
Multiple Lookups to the Same Objects
(cont.)
Object Field
Name
Relate
d
Object
Related List
Label Notes
Interaction Academic
Interest Plan
Interactions with
Academic
Interest
Used in the Opportunity Key for
graduate plans. Includes lookup
filter Plan: Type = Academic.
Interaction Recruitment
Interest Plan
Interactions with
Recruitment
Interest
Used in the Opportunity Key for
graduate plans. Includes lookup
filter Plan: Type = Recruitment.
Plan Recruitment
Interest Plan Academic
Interests
Connects Academic Interests to a
parent Recruitment Interest.
Includes lookup filter Plan: Type =
Recruitment. The field appears on
the Academic Interest plan layout,
the related list is on the
Recruitment Interest layout.
Opportunity Academic
Interest Plan
Opportunities
with Academic
Interest
Used in the Opportunity Key for
graduate plans. Includes lookup
filter Plan: Type = Academic.
Opportunity Recruitment
Interest Plan
Opportunities
with
Recruitment
Interest
Used in the Opportunity Key for
graduate plans. Includes lookup
filter Plan: Type = Recruitment.
Lead Recruitment
Interest Plan
Leads with
Recruitment
Interest
Includes lookup filter Plan: Type =
Recruitment.
Opportunity Affiliated
Account Account
Opportunities
(Affiliated
Account)
Affiliated Account is used to
connect the Opportunity to an
Educational Institution or Business
Organization using Interaction
Mappings. The standard Account
lookup is set to the Administrative
Account of the Contact.
Opportunity Contact Contact Recruitment
Opportunities
There is a standard Related List on
Contact called “Opportunities”
that is based on the Contact Roles
junction object. This Contact
lookup field provides a more
direct connection between
Contacts and Opportunities.
18
INTERACTIONS FOR STUDENT RECRUITMENT
INTERACTIONS INSTALLATION AND CONFIGURATION GUIDE
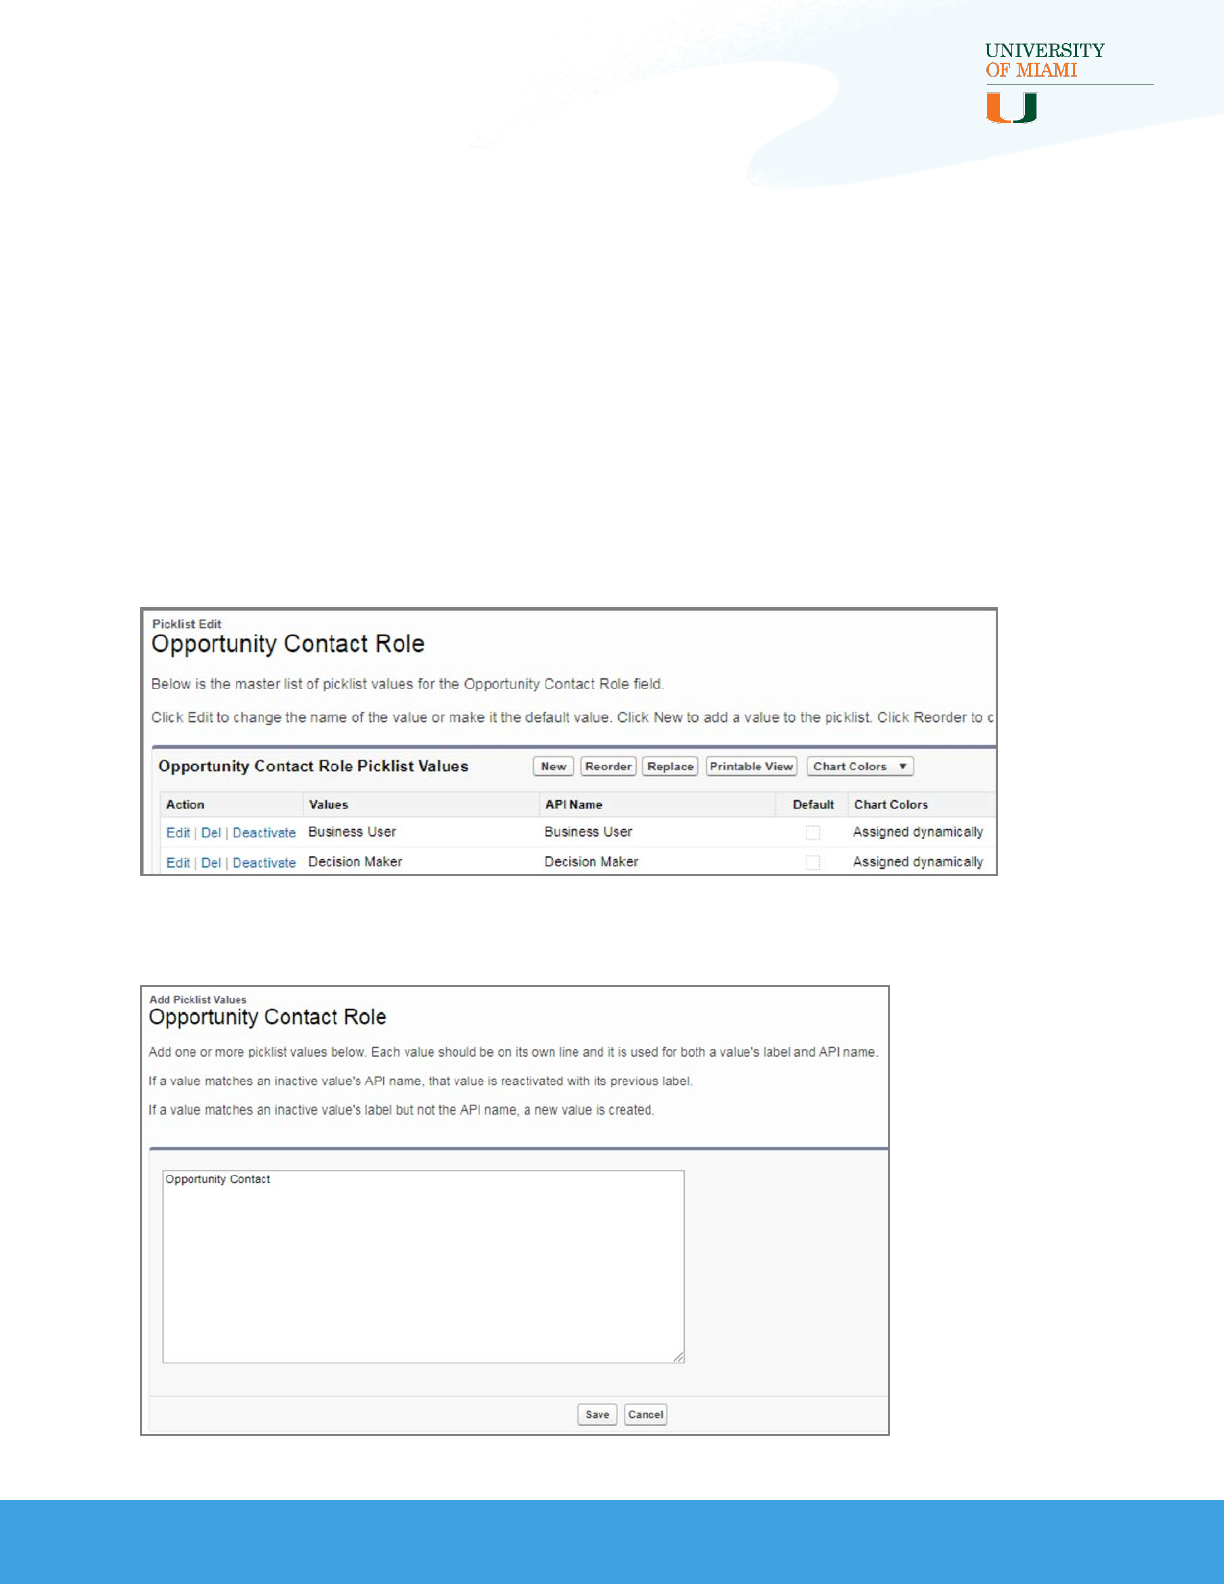
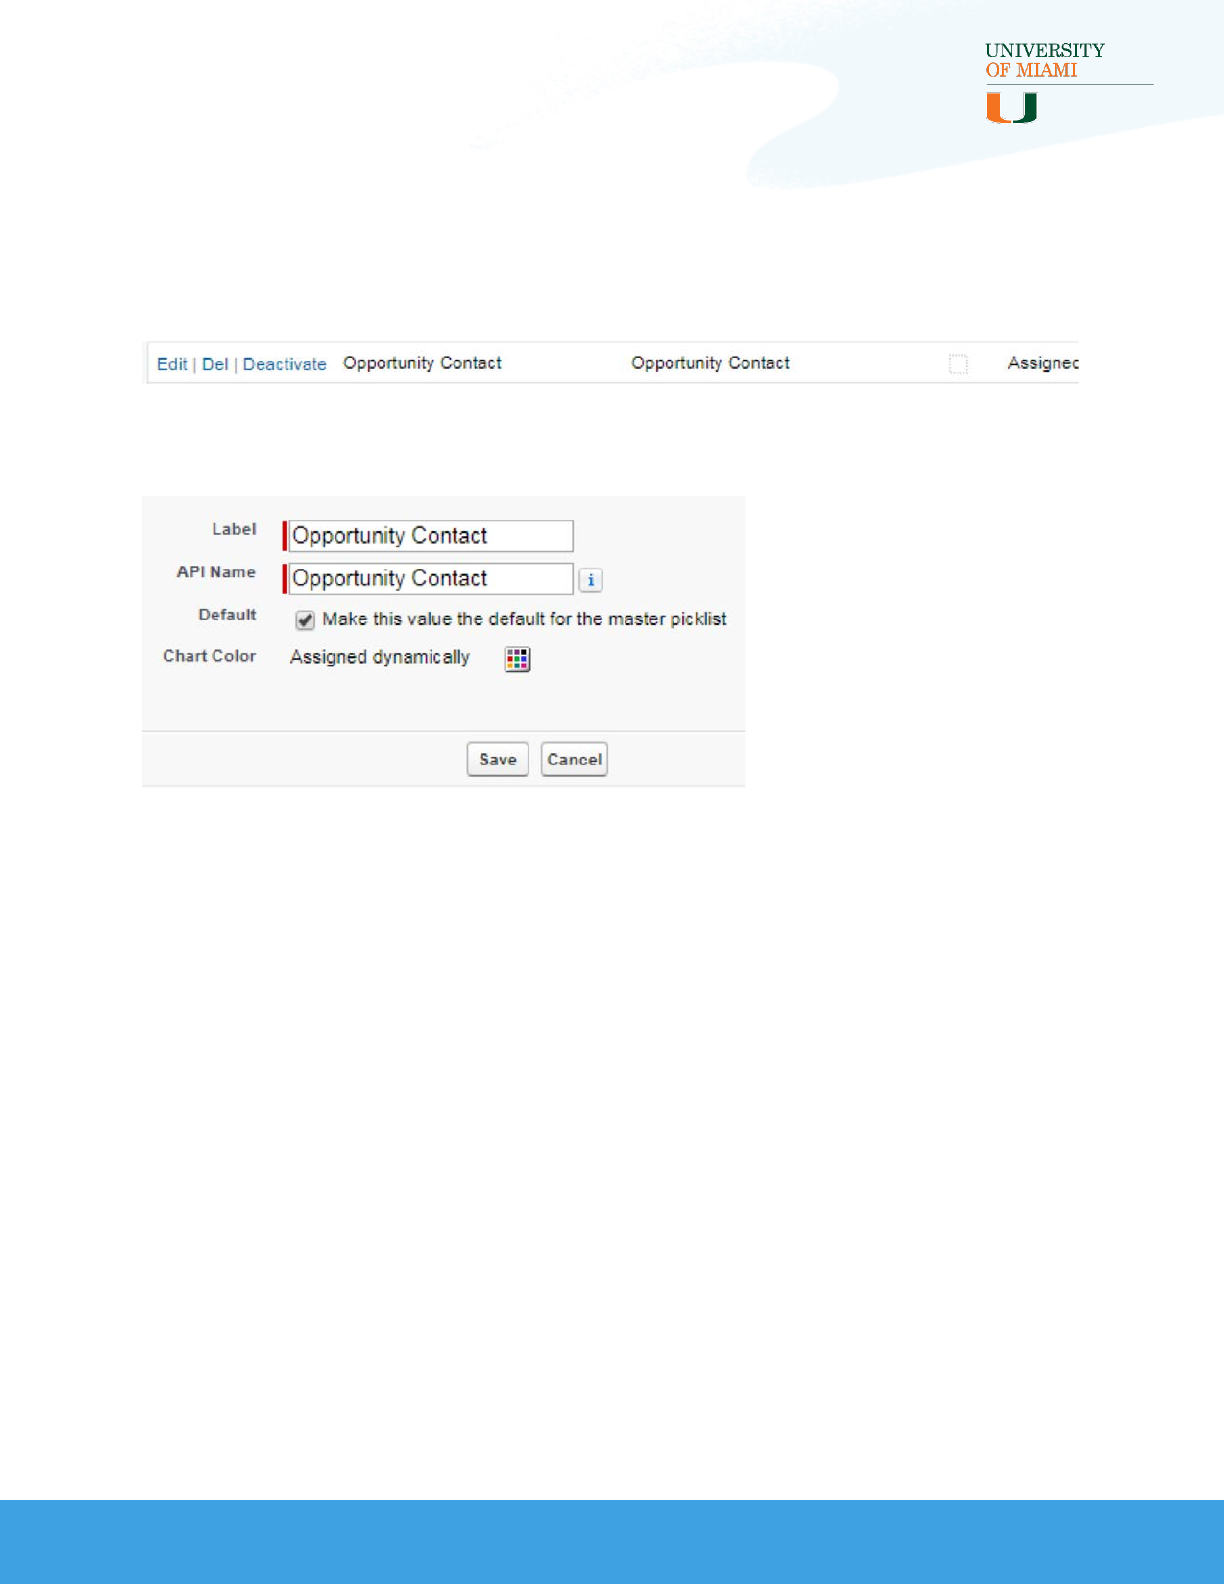
Add Contact Role Value
For Campaign Influence and other types of Campaign and Opportunity
reporting to work properly, you will need to add a value of “Opportunity
Contact” to Contact Roles on Opportunities.
Follow the steps below to add the new value:
1. Go to Setup > Feature Settings > Sales > Contact Roles on
Opportunities
2. Select the New button
3. Enter ‘Opportunity Contact’ and click Save
19

INTERACTIONS FOR STUDENT RECRUITMENT
INTERACTIONS INSTALLATION AND CONFIGURATION GUIDE
Creating Opportunity Record Types,
Stages, and Sales Processes
(recommended)
Interactions for Student Recruitment includes two Opportunity page layouts
to help you track separate recruitment and application processes and switch
between the two. These page layouts and business processes are meant to
be assigned to two record types, which are in turn related to two sales
processes.
The record types and sales processes are not included in the package nor
are they required, but they are recommended to help you make the most of
recruiting in Salesforce. The User Guide and other documentation assumes
you will complete these steps.
Follow the steps in the following sub-sections to configure these
customizations based on our best practices. Otherwise, skip to the
Installation Steps section.
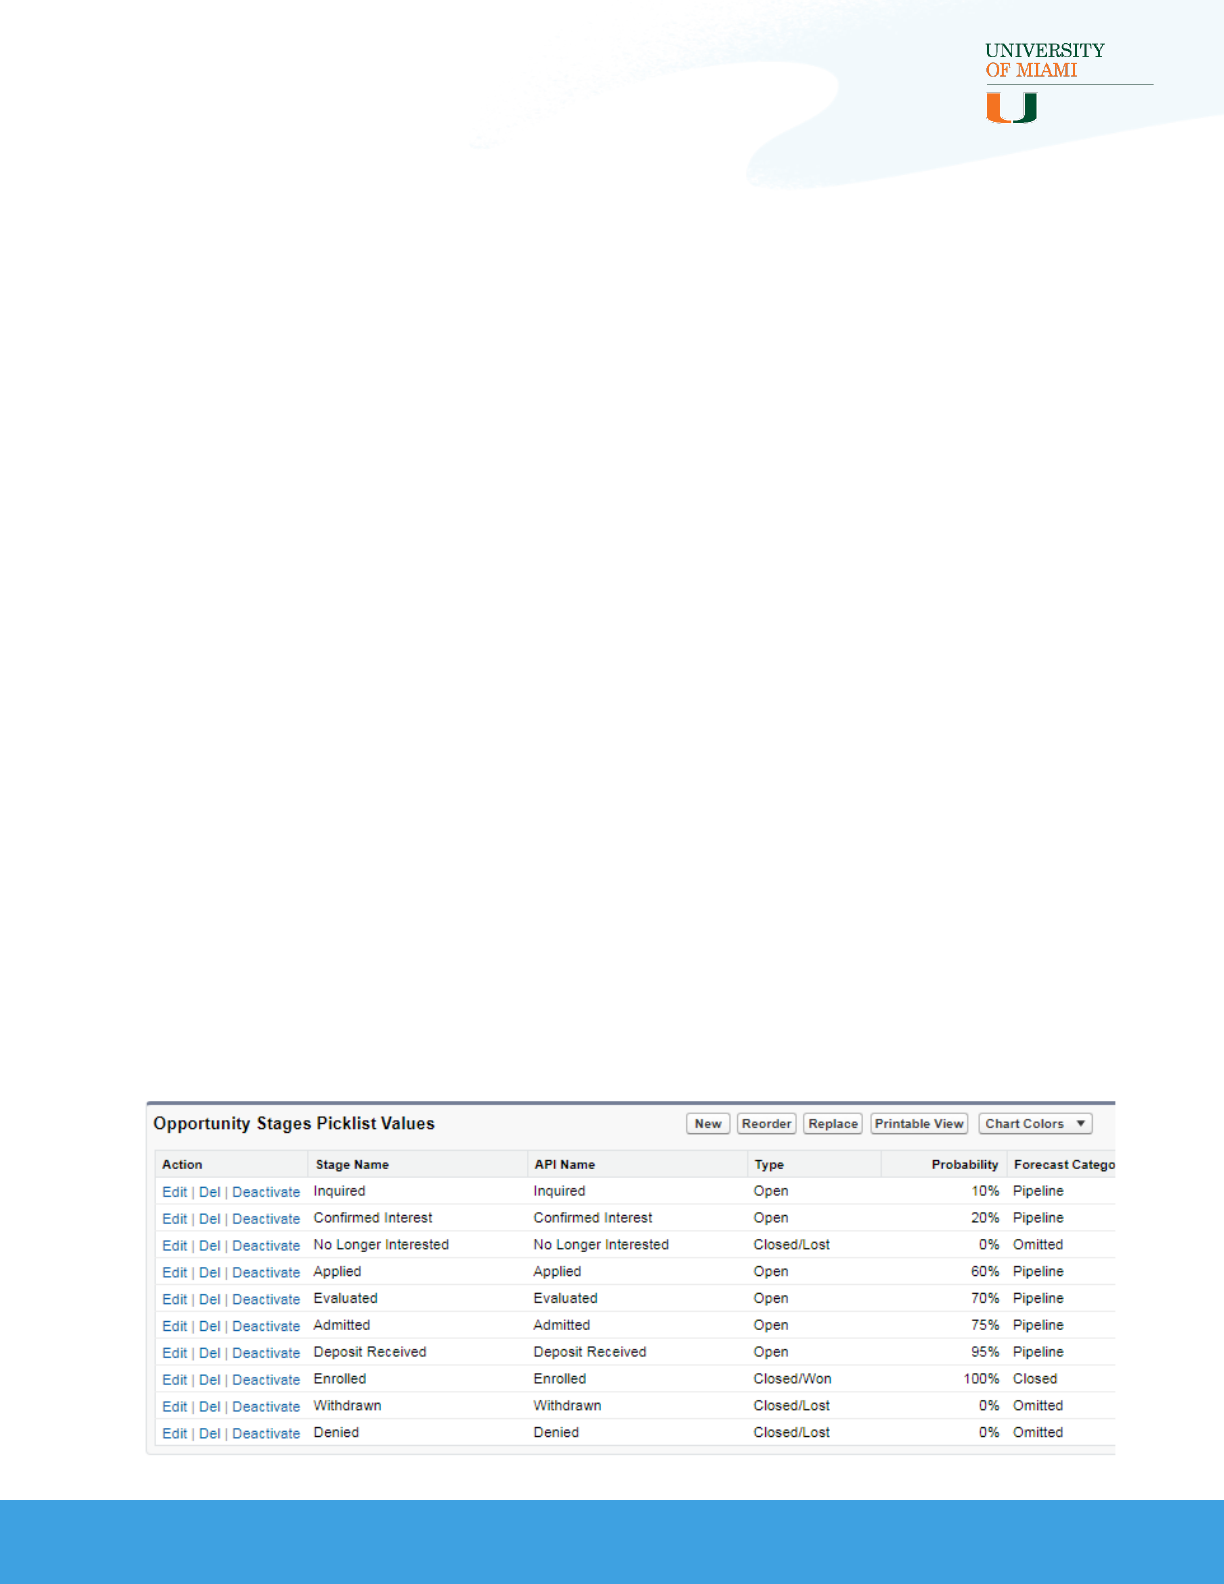
Add Opportunity Stage Values
The below Stage values are suggested as a starting point, but you can set
these to be any value to meet your own recruitment and application
processes. The important thing is to have Stage values for inquiries and
applicants so you can create the Sales Processes in the next step.
Add Stage values:
1. Go to Setup > Object Manager > Opportunity > Fields &
Relationships
2. Find the “Stage”field and click on the name (do not click Edit)
3. Click the New button in the Opportunity Stages Picklist Values section
21

INTERACTIONS FOR STUDENT RECRUITMENT
INTERACTIONS INSTALLATION AND CONFIGURATION GUIDE
Creating Opportunity Record Types,
Stages, and Sales Processes (cont.)
Add Opportunity Stage Values (cont.)
4. Add at least one ‘Open’ value for Inquiry Opportunities and click Save
(use the following as an example):
•“Stage Name” = Inquired
•“Probability” = 10 (or whatever value you believe is appropriate)
•“Type” = Open
•“Forecast Category” = Pipeline
5. Add at least one ‘Closed’ value for Inquiry Opportunities and click
Save:
•“Stage Name” = No Longer Interested
•“Probability” = 0
•“Type” = Closed/Lost
•“Forecast Category” = Omitted
6. Add at least one ‘Open’ value forApplicant Opportunities and click
Save:
•“Stage Name” = Applied
•“Probability” = 60 (or whatever value you believe is appropriate)
•“Type” = Open
•“Forecast Category” = Pipeline
7. Add at least one ‘Closed’ value for Applicant Opportunities and click
Save:
•“Stage Name” = Enrolled
•“Probability” = 100
•“Type” = Closed/Won
•“Forecast Category” = Closed
22
INTERACTIONS FOR STUDENT RECRUITMENT
INTERACTIONS INSTALLATION AND CONFIGURATION GUIDE
Creating Opportunity Record Types,
Stages, and Sales Processes (cont.)
Add Opportunity Stage Values (cont.)
8. Other examples of Stages that could be useful are shown in the
table below:
9. If you want to delete any Stage values that were included in your org
by default, you can do so on the Stage field’s page by clicking Delete
next to each Stage you want to remove and choosing what value to
replace the Stage with.
Note: Be careful when deleting stages you are using in your system.
This process will replace any values found on your Opportunities
with the value you choose.
Sales
Process Stage Name Probability Type Forecast
Category
Inquiry Confirmed
Interest 20 Open Pipeline
Applicant Evaluated 70 Open Pipeline
Applicant Admitted 90 Open Pipeline
Applicant Deposit Received 95 Open Pipeline
Applicant Withdrawn 0Closed/Lost Omitted
Applicant Denied 0 Closed/Lost Omitted
23
INTERACTIONS FOR STUDENT RECRUITMENT
INTERACTIONS INSTALLATION AND CONFIGURATION GUIDE
Creating Opportunity Record Types,
Stages, and Sales Processes (cont.)
Add Opportunity Stage Values (cont.)
10.To adjust the order the Stages will appear, go back to the Stage
field’s page and click Reorder next to the New button. The best way
to sort is from the earliest possible Stage at the top to the last
possible Stage at the bottom. Here is what the order should be if
you added all our suggested Stages:
•Inquired
•Confirmed Interest
•No Longer Interested
•Applied
•Evaluated
•Admitted
•Deposit Received
•Enrolled
•Withdrawn
•Denied
24
INTERACTIONS FOR STUDENT RECRUITMENT
INTERACTIONS INSTALLATION AND CONFIGURATION GUIDE
Creating Opportunity Record Types,
Stages, and Sales Processes (cont.)
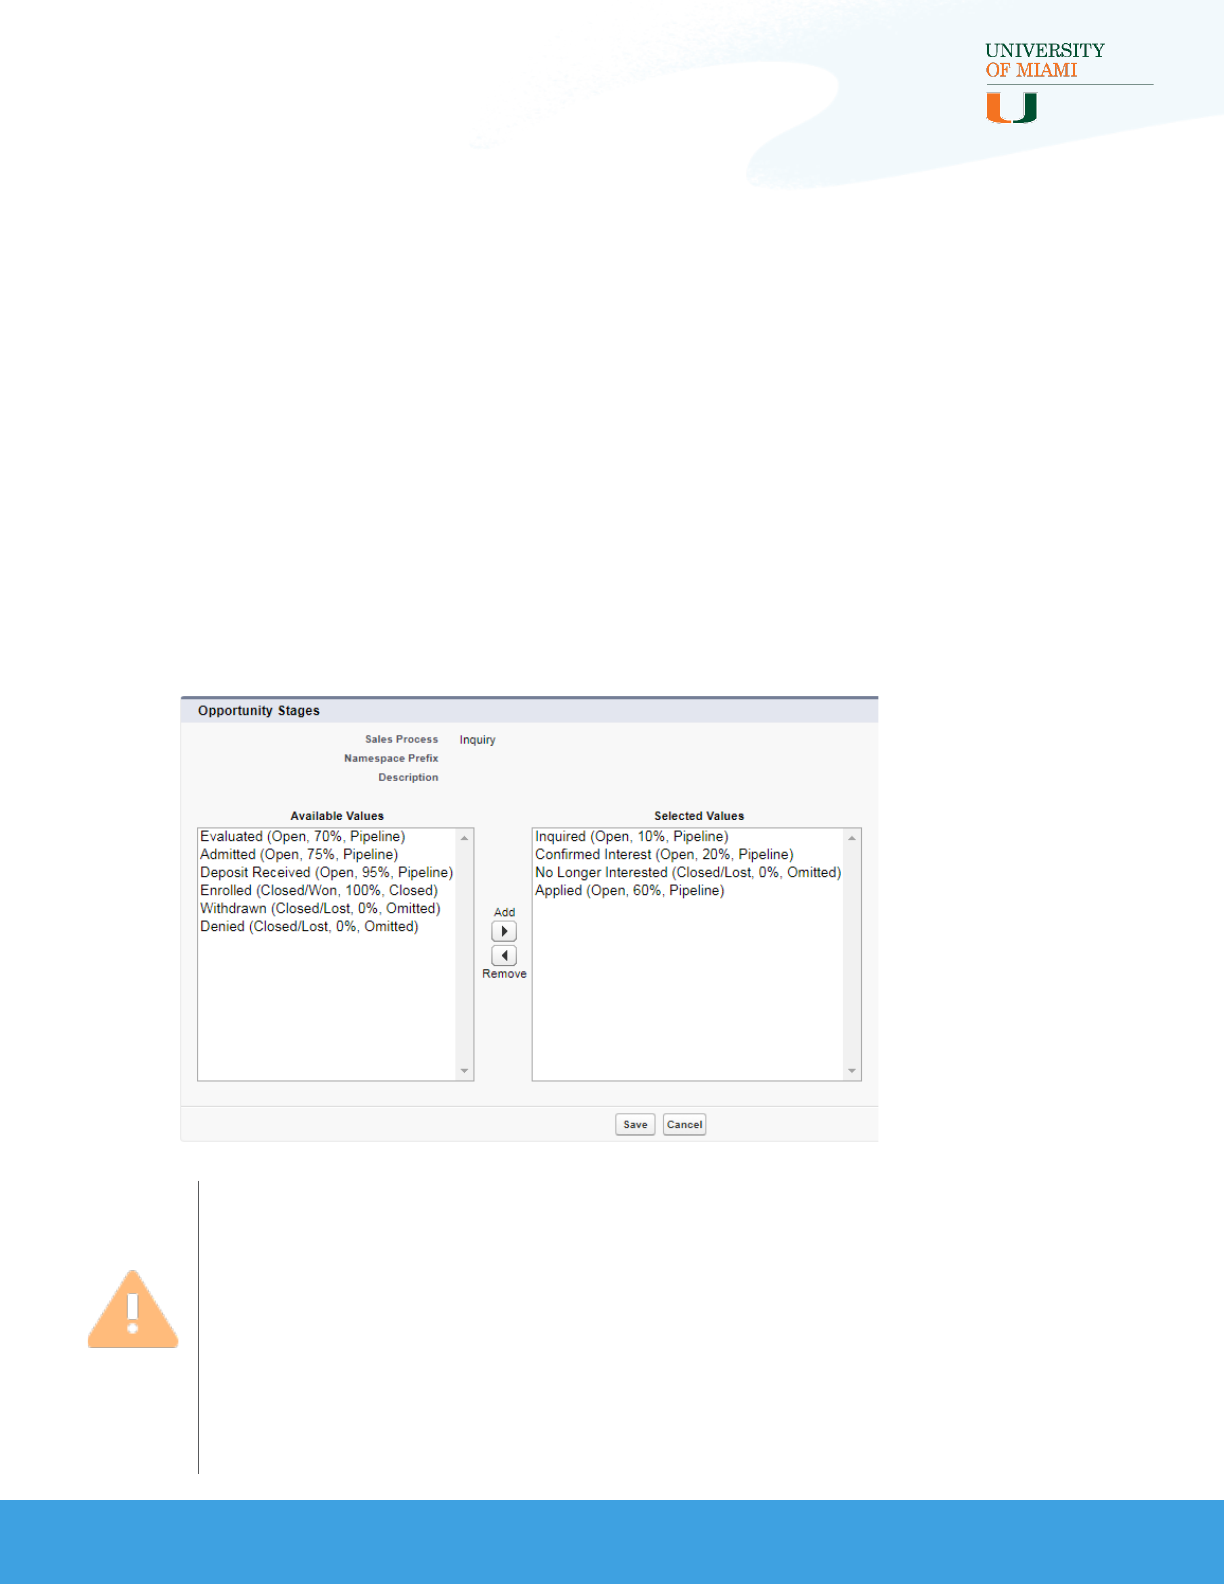
Add Opportunity Inquiry Stage Process
1. Go to Setup > Feature Settings > Sales > Sales Processes
2. Click New and set the following values:
•“Existing Sales Process” = --Master--
•“Sales Process Name” = Inquiry
3. Move your Inquiry stages from the left column to the right and click
Save. If you used the suggested values, it should look like this:
Note: The first value of the Applicant Sales Process (“Applied”) is
shown here as part of the Inquiry Sales Process. This is so staff
members can manually move Opportunity records from inquiry to
applicant. If only an integration tool or the Interaction Processor
should be able to make this transition, exclude “Applied” from this list.
This allows you to protect your stages if you are using a separate
database or process to collect applications.
25
INTERACTIONS FOR STUDENT RECRUITMENT
INTERACTIONS INSTALLATION AND CONFIGURATION GUIDE
Creating Opportunity Record Types,
Stages, and Sales Processes (cont.)
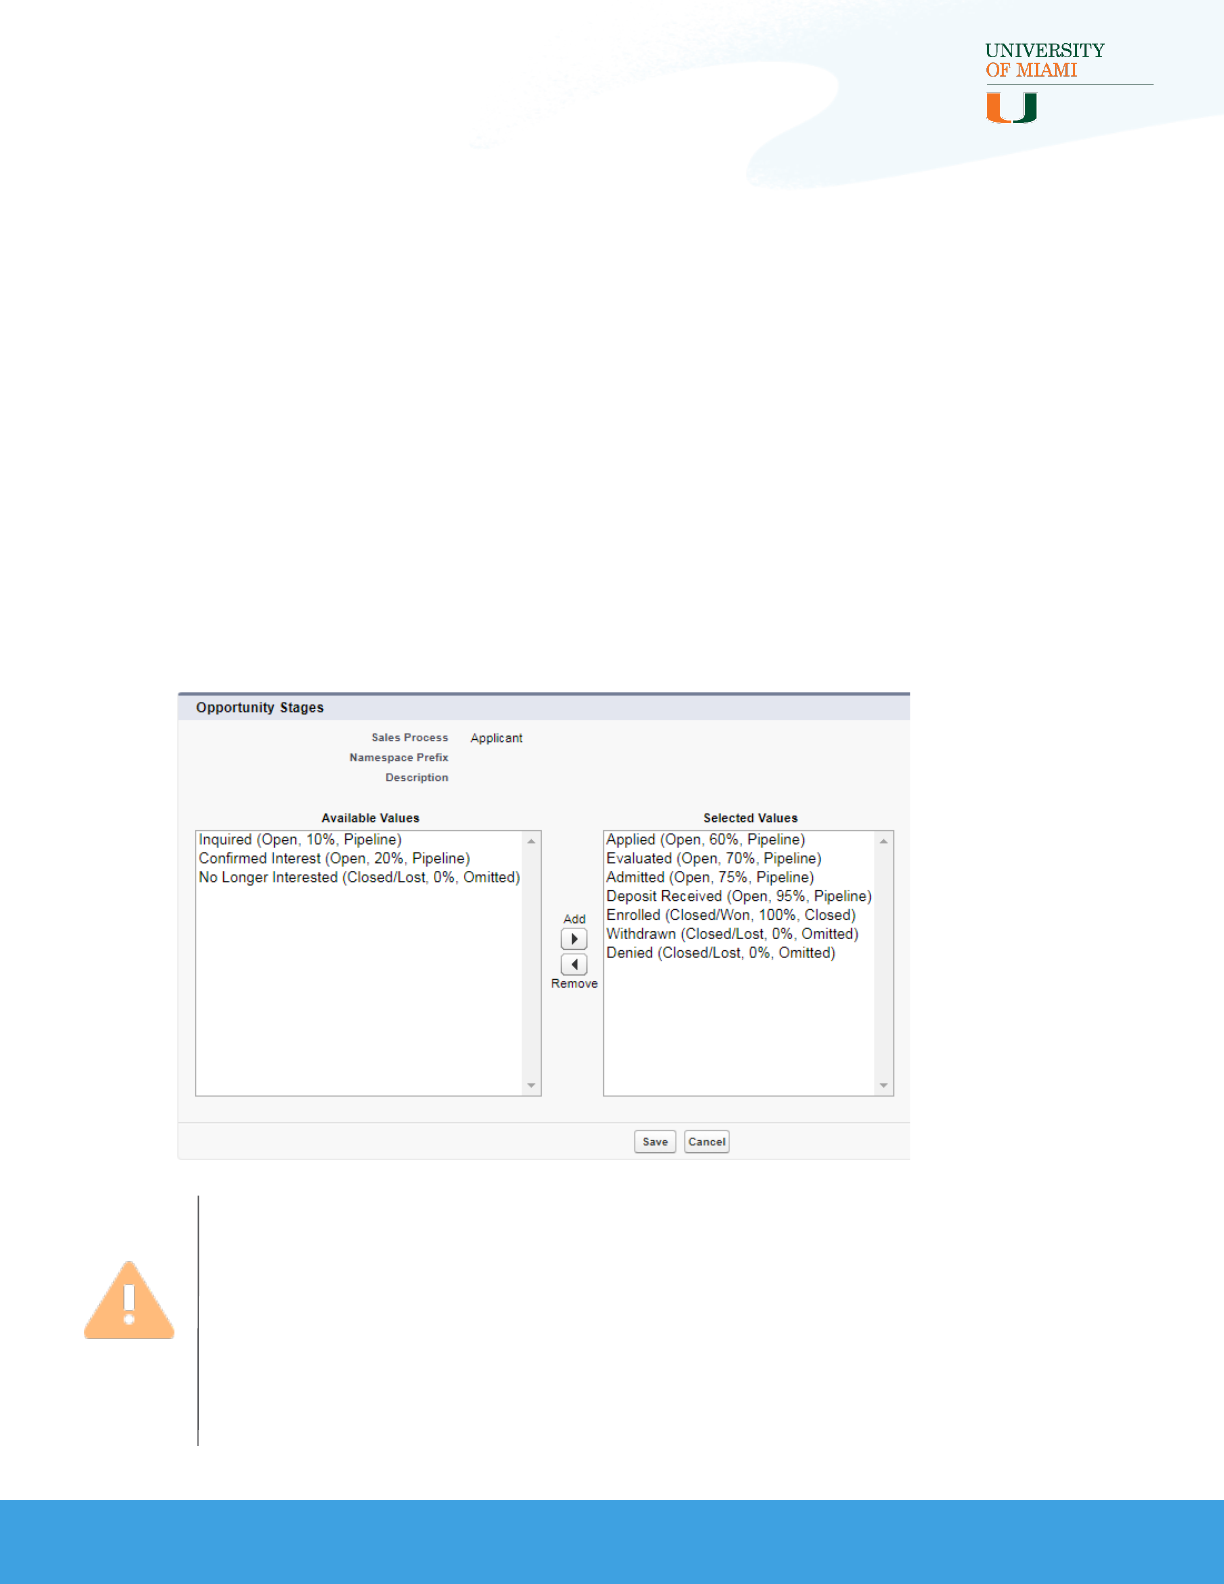
Add Opportunity Applicant Stage Process
1. Go to Setup > Feature Settings > Sales > Sales Processes
2. Click New and set the following values:
•“Existing Sales Process” = --Master--
•“Sales Process Name” = Applicant
3. Move your Applicant stages from the left column to the right and Save.
If you used the suggested values, it should look like this:
Note: Including only Applicant stages allows you to protect the stages
and prevent someone from accidentally moving an Opportunity back
to an Inquiry stage. You can also protect the stages by making Stage
‘Read Only’ on the Applicant Opportunity Page Layout, if the
application process is managed by another database or updated only
by the Interaction process.
26

INTERACTIONS FOR STUDENT RECRUITMENT
INTERACTIONS INSTALLATION AND CONFIGURATION GUIDE
Creating Opportunity Record Types,
Stages, and Sales Processes (cont.)
Add Opportunity Inquiry Record Type
1. Go to Setup > Object Manager > Opportunity > Record Types >
New
2. Set the following values:
•“Existing Record Type” = --Master--
•“Record Type Label” = Inquiry Opportunity
•“Record Type Name” = Inquiry_Opportunity (this value should
fill-in automatically)
•“Sales Process” = Inquiry
•“Active” = checked
•Select ‘Enable for Profile’ checkboxes for each Profile that will
have access to create Inquiry Opportunities
•Select ‘Make Default’ checkboxes for all enabled Profiles
3. Click the Next button and then click Save on the next page (you will
assign the “Inquiry Opportunity” page layout to the record type after
installing the package)
4. Once you save, you will be taken to the Inquiry Record Type page,
where you can edit picklists to include values specific to that record
type, if applicable.
27

INTERACTIONS FOR STUDENT RECRUITMENT
INTERACTIONS INSTALLATION AND CONFIGURATION GUIDE
Creating Opportunity Record Types,
Stages, and Sales Processes (cont.)
Add Opportunity Applicant Record Type
1. Go to Setup > Object Manager > Opportunity > Record Types >
New
2. Set the following values:
•“Existing Record Type” = --Master--
•“Record Type Label” = Applicant Opportunity
•“Record Type Name” = Applicant_Opportunity (this value
should fill-in automatically)
•“Sales Process” = Applicant
•“Active” = checked
•Select ‘Enable for Profile’ checkboxes for each Profile that will
have access to create Applicant Opportunities
•Leave all ‘Make Default’ checkboxes unchecked
3. Click the Next button and then click Save on the next page (you will
assign the “Applicant Opportunity” page layout to the record type
after installing the package)
4. Once you save, you will be taken to the Applicant Record Type page
where you can edit picklists to include values specific to that record
type, if applicable.
28

INTERACTIONS FOR STUDENT RECRUITMENT
INTERACTIONS INSTALLATION AND CONFIGURATION GUIDE
Creating Opportunity Record Types,
Stages, and Sales Processes (cont.)
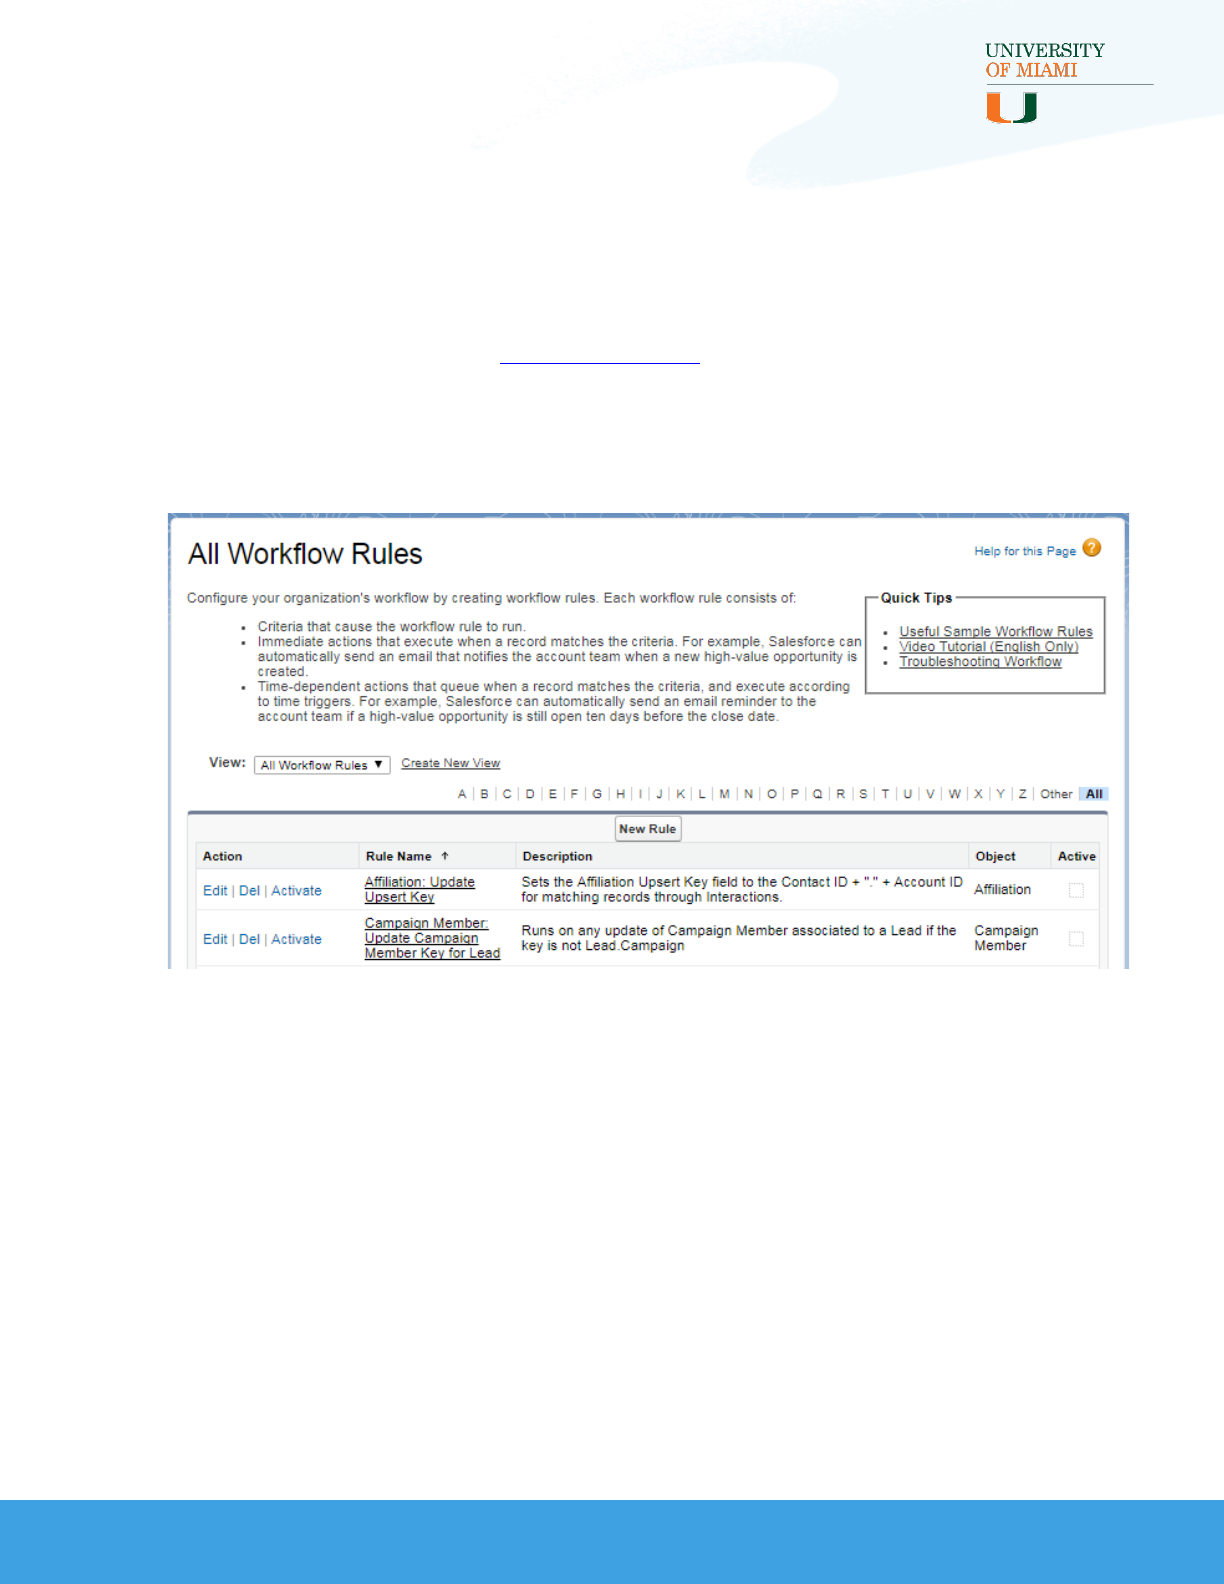
Create an Opportunity Workflow Rule
This recommended workflow rule ensures an Opportunity is set to the
correct record type based on the Stage. In this way, when a new Opportunity
is created with an ‘Applicant’ value or the Stage moves from an ‘Inquiry’
value to an ‘Applicant’ value, the record type is updated (since any Profiles
with access to create Opportunities should have their default record type set
to InquiryOpportunity).
Follow these steps:
1. Go to Setup > Process Automation > Workflow Rules
2. Click New Rule and select ‘Opportunity’ from the “Select Object”
picklist
3. Click Next, then set the following values:
•“Rule Name” = Opportunity: Set Applicant Record Type
•“Evaluate the rule when a record is” = created, and every time it’s
edited
•“Run this rule if the following” = criteria are met
1. Opportunity: Stage not equal toInquired, Confirmed
Interest, No Longer Interested
2. Opportunity: Opportunity Record Type not equal to
Applicant Opportunity
Note: In the above criteria, the “Opportunity: Stage” values listed
include all stages in the Inquiry Sales Process, except ‘Applied’ which
is technically an applicant stage. In this example, we are using our
suggested Inquiry stages, but you should use all values you have
added to the Inquiry Sales Process.
29

INTERACTIONS FOR STUDENT RECRUITMENT
INTERACTIONS INSTALLATION AND CONFIGURATION GUIDE
Creating Opportunity Record Types,
Stages, and Sales Processes (cont.)
Create an Opportunity Workflow Rule (cont.)
4. Click Save & Next, then select ‘New Field Update’ from the “Add
Workflow Action” picklist, and set the following values:
•“Name” = Record Type: Set to Applicant
•“Unique Name” = Record_Type_Set_to_Applicant (this value
should fill-in automatically)
•“Object” = Opportunity
•“Field to Update” = Opportunity Record Type
•“Re-evaluate Workflow Rules after Field Change” = unchecked
•“Opportunity Record Type” = Applicant Opportunity (or
whatever the name of your Applicant record type is)
5. Click Done, then click on the Workflow Rule (Opportunity: Set
Applicant Record Type) linked in the Rules Using this Field Update
section and click Activate to turn on the rule
30

INTERACTIONS FOR STUDENT RECRUITMENT
INTERACTIONS INSTALLATION AND CONFIGURATION GUIDE
Installation Steps
Downloading the Unmanaged Package
Interactions for Student Recruitment has been created as an unmanaged
package for easy installation. You can find the package links in the GitHub
Repository.
It is also listed in a GitHub repository,described in the next section.
Follow the steps below to download the package from one of the
URL’s:
1. Sign into the org where you want to install the package
2. Click on the installation URL above for the type of org you are
installing the package into
3. Select either ‘Install for Admins Only,’ ‘Install for All Users,’ or
‘Install for Specific Profiles,’ depending on which profiles you would
like to be granted security access to all the components included in
the package
4. Click the Install button and wait for the installation process to be
completed
5. If you see the message “This app is taking a long time to install,”
click the Done button and wait to receive an email letting you know
the process has been completed
6. You should now be able to see the package by going to Setup >
Apps > Installed Packages
31

INTERACTIONS FOR STUDENT RECRUITMENT
INTERACTIONS INSTALLATION AND CONFIGURATION GUIDE
Installation Steps (cont.)
Using the GitHub Open-Source Code
The components of the package can also be downloaded from the GitHub
repository here. If the package cannot be installed because you will not
be using HEDA or there is another issue preventing you from installing it
as-is, you can download the open-source files, make adjustments, and
install it using a deployment tool like the force.com IDE or the force.com
Migration Tool.
These are the minimum skills needed to install using this method:
•Programming experience
•Basic understanding of metadata and how to work with it
•Ability to understand and modify Apex code
•Experience using Eclipse (for the Force.com IDE) or ANT (for the
Force.com Migration Tool)
Note: Changing the source code before deploying it could break
certain functionality. Please read the Technical Implementation
Guide and any HEDA documentation to make sure you have a clear
understanding of what this package does and how your changes
could affect it.
32

INTERACTIONS FOR STUDENT RECRUITMENT
INTERACTIONS INSTALLATION AND CONFIGURATION GUIDE
Requirements After Installing
Once you have installed Interactions for Student Recruitment, you will need
to complete some manual updates and customizations for Interactions to
work as expected. You can also take this as an opportunity to customize
these aspects of the package to better fit your business processes.
Load Interaction Mappings
Interaction Mapping records determine how the code copies data from the
Interaction records to other records in Salesforce, on a field-by-field basis.
For more technical information about Interaction Mapping records, see the
Interaction Mappings section of the Technical Implementation Guide.
Interaction Mappings also supports mapping fields from Leads to
Interactions when an existing Lead is found for an Interaction. This prevents
information from being lost on converted Leads during the Interaction
process, and allows those fields to be mapped directly to other supported
objects, like Contacts, Opportunities, Affiliations, or Campaign Members.
An Interaction Mapping record must be created for every source-to-target
field mapping desired. An Excel file containing suggested Interaction
Mapping records (as well as other sample data) has been created for the
package based on the included fields.
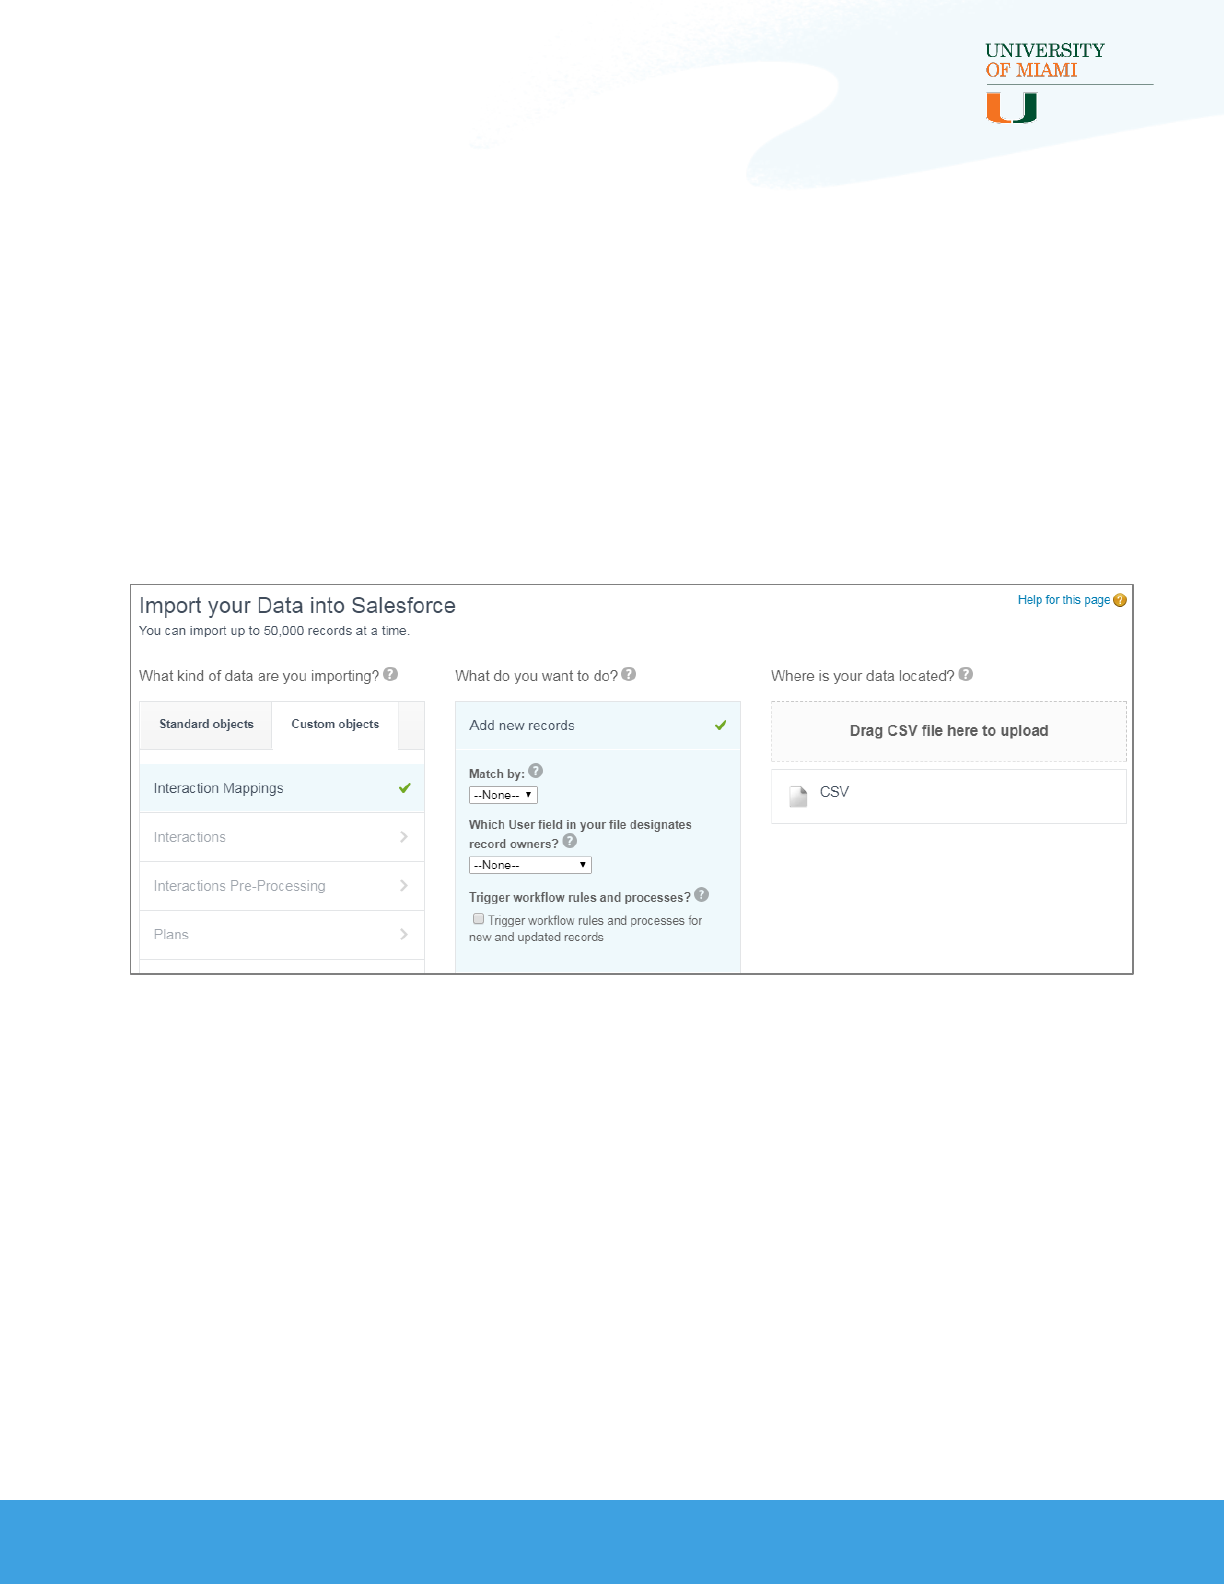
Follow these steps to import these records using the Data Import Wizard:
1. Download the Interactions Sample Data Excel file here
2. Open the file and create a separate CSV file with the Sample
Interaction Mappings sheet of the Excel file
3. Enable Middle Name or remove the Middle Name row from the file. To
turn on Middle Name, see Enable Customizable Person Names using
the Middle Name and Suffix fields
33
INTERACTIONS FOR STUDENT RECRUITMENT
INTERACTIONS INSTALLATION AND CONFIGURATION GUIDE
Load Interaction Mappings (cont.)
4. Go to Setup > Data > Data Import Wizard
5. Click the green Launch Wizard button
6. Choose ‘Custom objects’ for the “What kind of data are you
importing?” section and select the ‘Interaction Mappings’ object
7. In the “What do you want to do?” section, select Add new records
and leave all dropdowns and checkboxes blank
8. In the “Where is your data located?” section, select the CSV file
from your computer, or drag and drop the file into the window and
select Next
9. Map each column of the CSV file to its matching Interaction
Mappings field (some may auto-map)
10.Select Next and review your import information
11.When you are finished reviewing, select Start Import
12.A pop-up will appear, click OK to see your Bulk Data Load Jobs
34

INTERACTIONS FOR STUDENT RECRUITMENT
INTERACTIONS INSTALLATION AND CONFIGURATION GUIDE
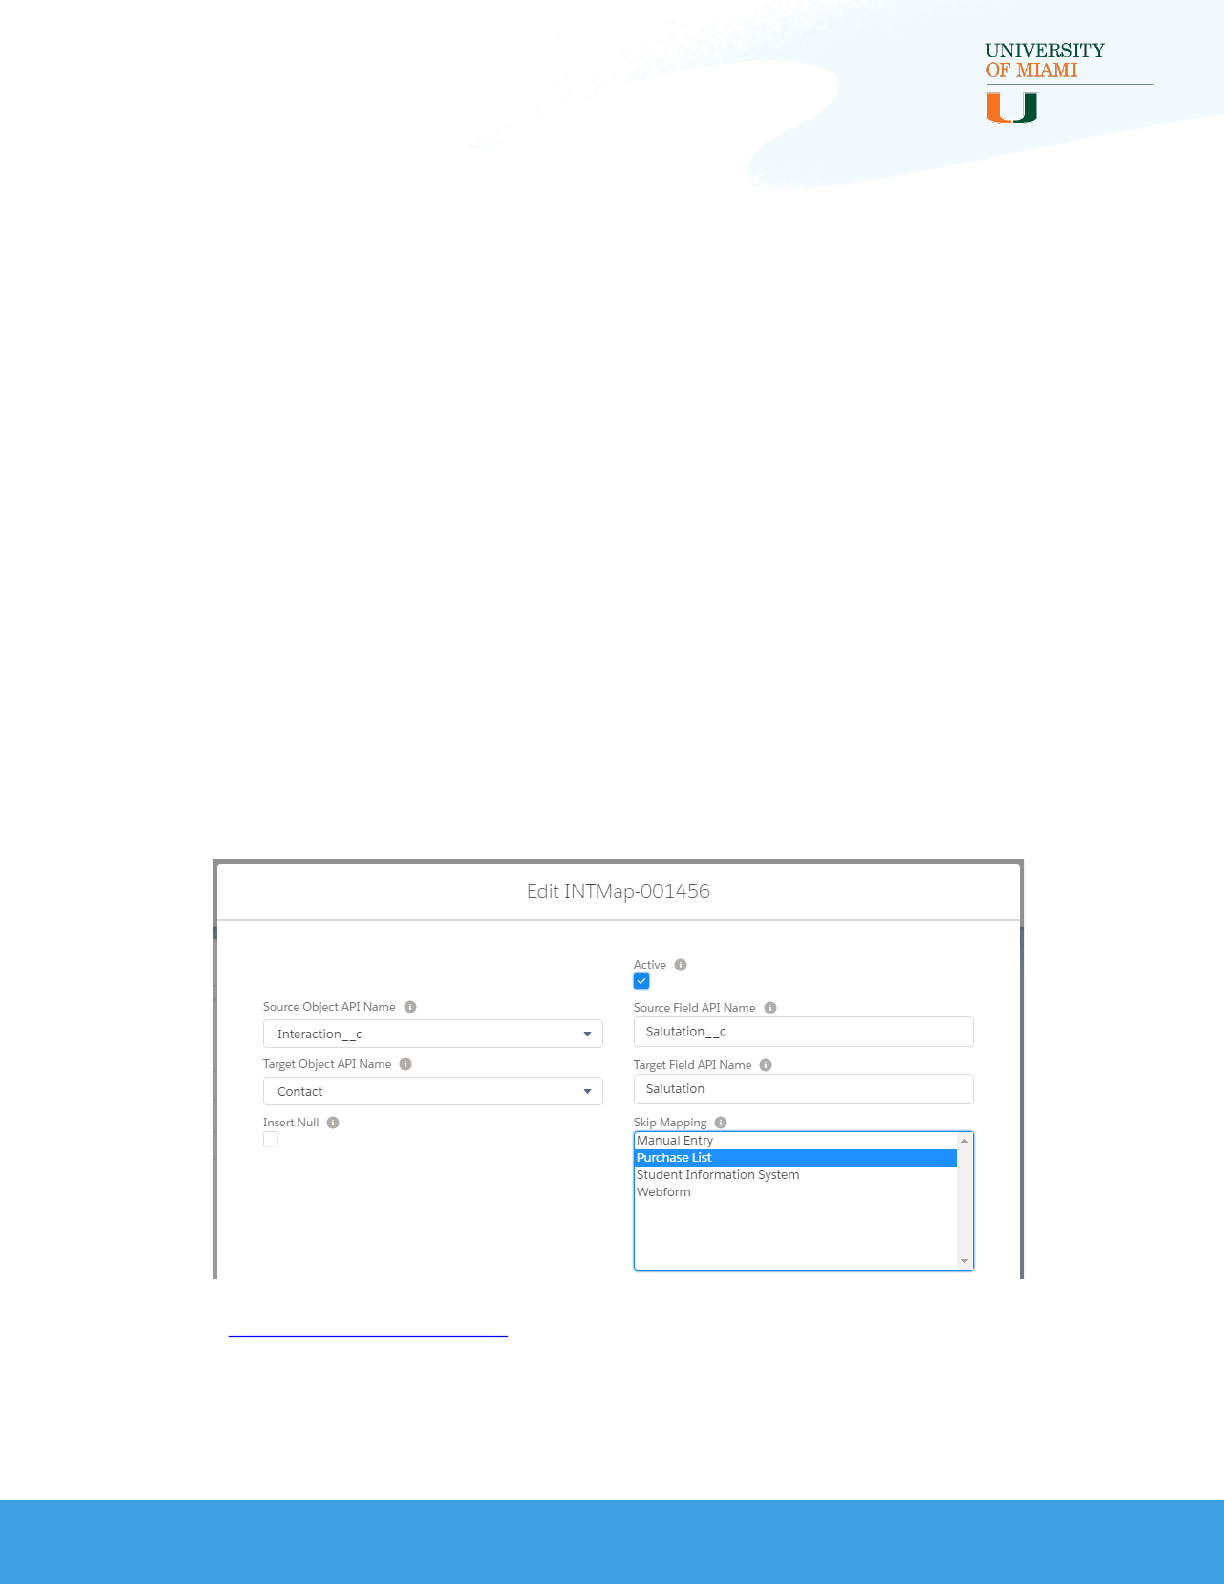
Create New Fields and Mappings
Interaction fields can be mapped to fields on Leads, Contacts, Accounts,
Affiliations, and Campaign Members. As mentioned previously, Lead
fields can also be mapped directly to Interactions.
To add a new field to Interactions, follow these steps:
1. Go to Setup > Object Manager > Interactions > Fields and
Relationships
2. Create your new field, taking note of the API Name
3. Go to Setup > Object Manager > [the object the field should map
to] > Fields and Relationships
4. Create your new field or identify the existing field you want to map
to, and take note of the API Name
5. Go to the Interaction Mappings tab and create a new record
6. Select the source object you are mapping from in the “Source
Object API Name” picklist (in this case, ‘Interaction__c’)
7. Set the “Source Field API Name” field to the API name of the
source object field you created or identified
8. Select the target object you are mapping to in the “Target Object
API Name” picklist
9. Set the “Target Field API Name” field to the API name of the target
object field you created or identified
10.Set the “Active” checkbox to checked
11.Include additional functionality like “Insert Nulls” or “Skip
Mapping” as applicable
For more on Interaction Mapping advanced functionality, see
Configure Interaction Mapping Features section of this guide and/or
see the Technical Implementation Guide)
35
INTERACTIONS FOR STUDENT RECRUITMENT
INTERACTIONS INSTALLATION AND CONFIGURATION GUIDE
Create New Fields and Mappings (cont.)
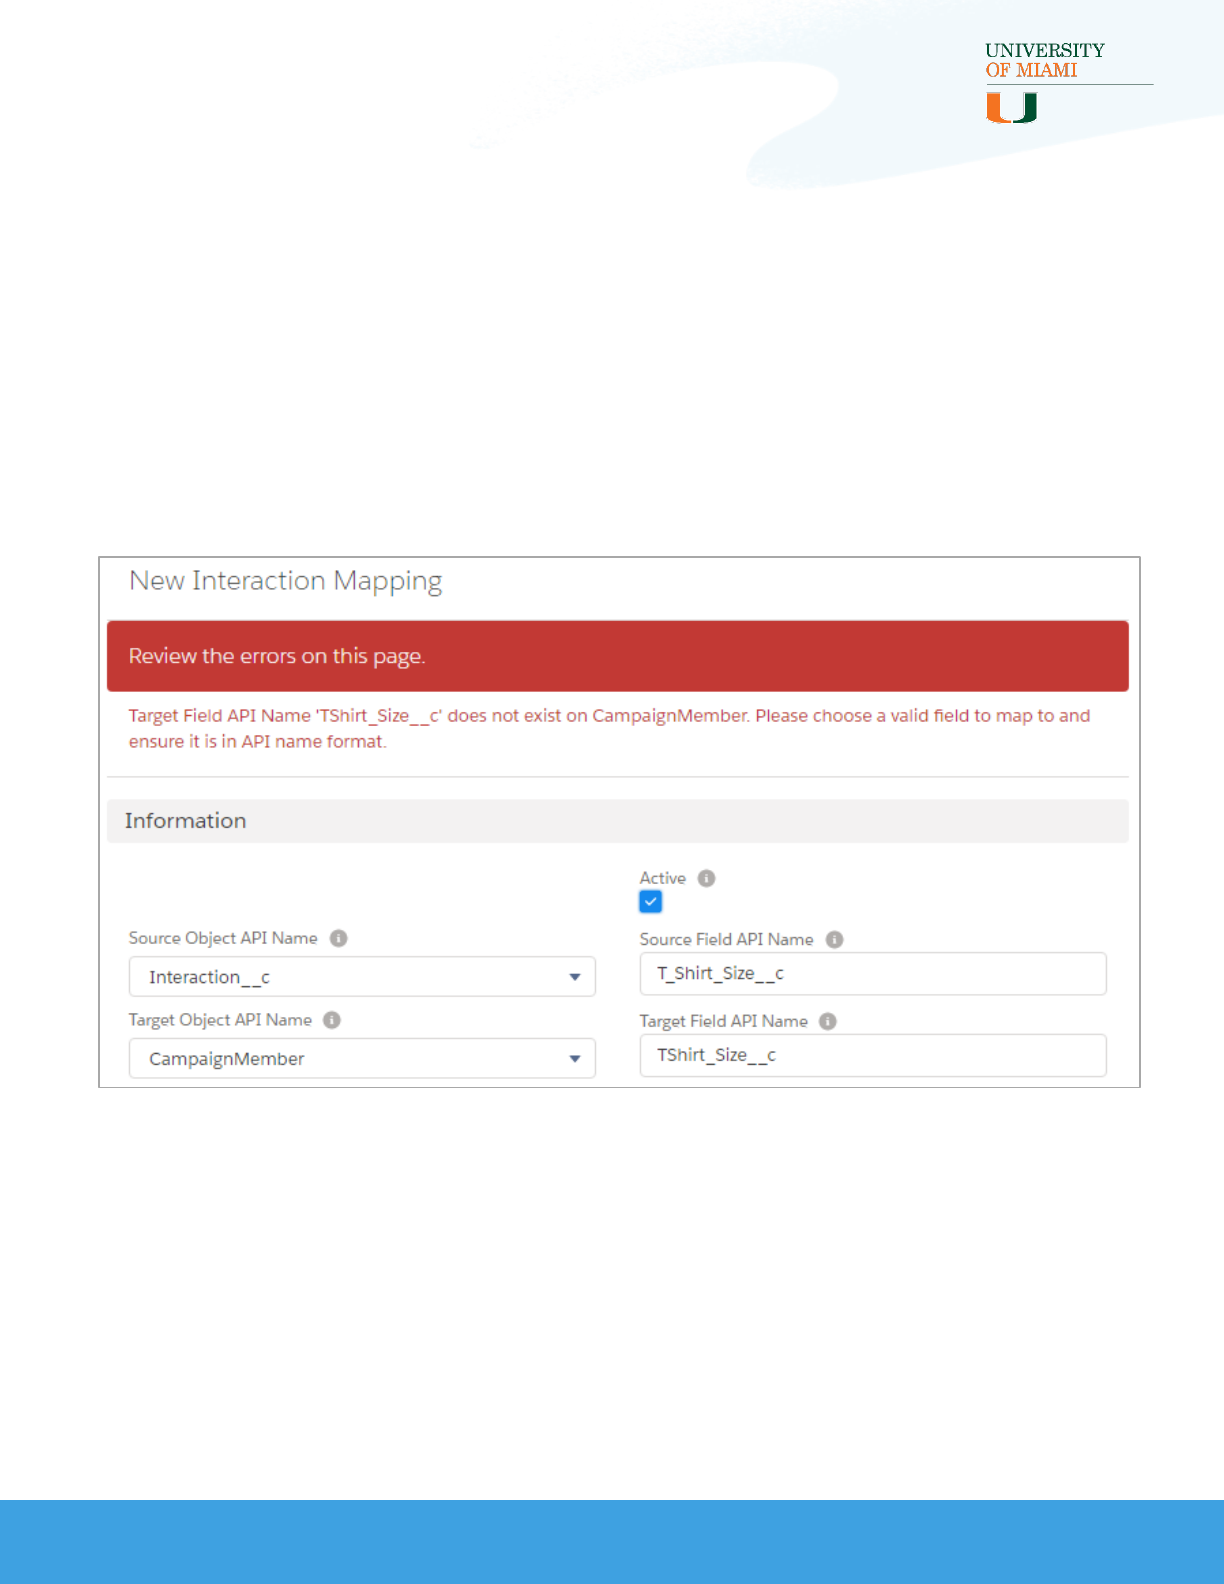
Interaction Mapping Errors
Each time an Interaction Mapping is created or edited, an Apex process
included in the package queries Salesforce to check if the values in the
“Source/Target Field API Name” are valid based on the “Source/Target
Object API Name” selected, respectively.
In the following example, the “Target Field API Name” is misspelled:
Additionally, if the API Name of a field included in an Interaction
Mapping is changed, the related Interaction Mapping will not work and
will cause the Interaction process to error. Interactions for Student
Recruitment does not include functionality preventing API Names from
being changed, but standard Salesforce functionality will warn a user that
the change could affect other processes. If the change is necessary, the
Interaction Mapping must be updated afterward to prevent any issues.
36

INTERACTIONS FOR STUDENT RECRUITMENT
INTERACTIONS INSTALLATION AND CONFIGURATION GUIDE
Configure Interaction Mapping Features
Interaction Mapping records contain two fields to enable additional
functionality. See the Advanced Functionality of Interaction Mapping
Records section of the Technical Implementation Guide for more
information.
Interaction Mapping Field Description
Insert Null
A checkbox indicating that if the source field listed on
the mapping record is blank, it should overwrite the
target field listed with a blank value. Primarily used for
Checkbox fields.
Skip Mapping
A multi-select picklist listing possible Interaction
Source values. If an Interaction record has an
Interaction Source matching any of the selected
values on the mapping record, the target field listed
on the mapping record will not be written over by the
value on the source field. For an example, see Using
Interaction Source with Interaction Mappings.
37

INTERACTIONS FOR STUDENT RECRUITMENT
INTERACTIONS INSTALLATION AND CONFIGURATION GUIDE
Update Picklist Values
The package includes new picklists, multi-select picklists and values
pushed into standard picklist fields. The values in those fields will need to
be added to any record types not included with the package. For
example, if your org has its own Opportunity record types and you want
to use the Admit Type field, you will need to add the values for Admit
Type to each of your record types.
Follow these steps:
1. Go to Setup > Object Manager > Opportunity > Record Types
2. Click on the name of the record type you want to update
3. Select Edit next to the “Admit Type” field
4. Add the values you want to move from the “Available” column to
the “Selected” column
5. Click Save
Note: Use these same steps to edit the picklist options for other
objects by going to Setup > Object Manager > [Object] > Record
Types
See the Data Dictionary for a complete list of the picklist fields added
with the package as well as the values added to existing picklists.
38

INTERACTIONS FOR STUDENT RECRUITMENT
INTERACTIONS INSTALLATION AND CONFIGURATION GUIDE
Create Duplicate and Matching Rules
The Interaction process finds matching records in Salesforce by relying on
system errors generated by Duplicate Rules and their Matching Rules.
These errors include the Salesforce ID of the record found, and the
Interaction process uses that ID to merge or update records. See the
Duplicate Matching section of the Technical Implementation Guide for
more information about the code.
Duplicate Rules and Matching Rules are difficult to move in a package,
especially if you are currently using Salesforce Duplicate Management, so
they must be manually created and configured. Follow the steps in the
following subsections to learn about the requirements for configuring
Duplicate Management with this package.
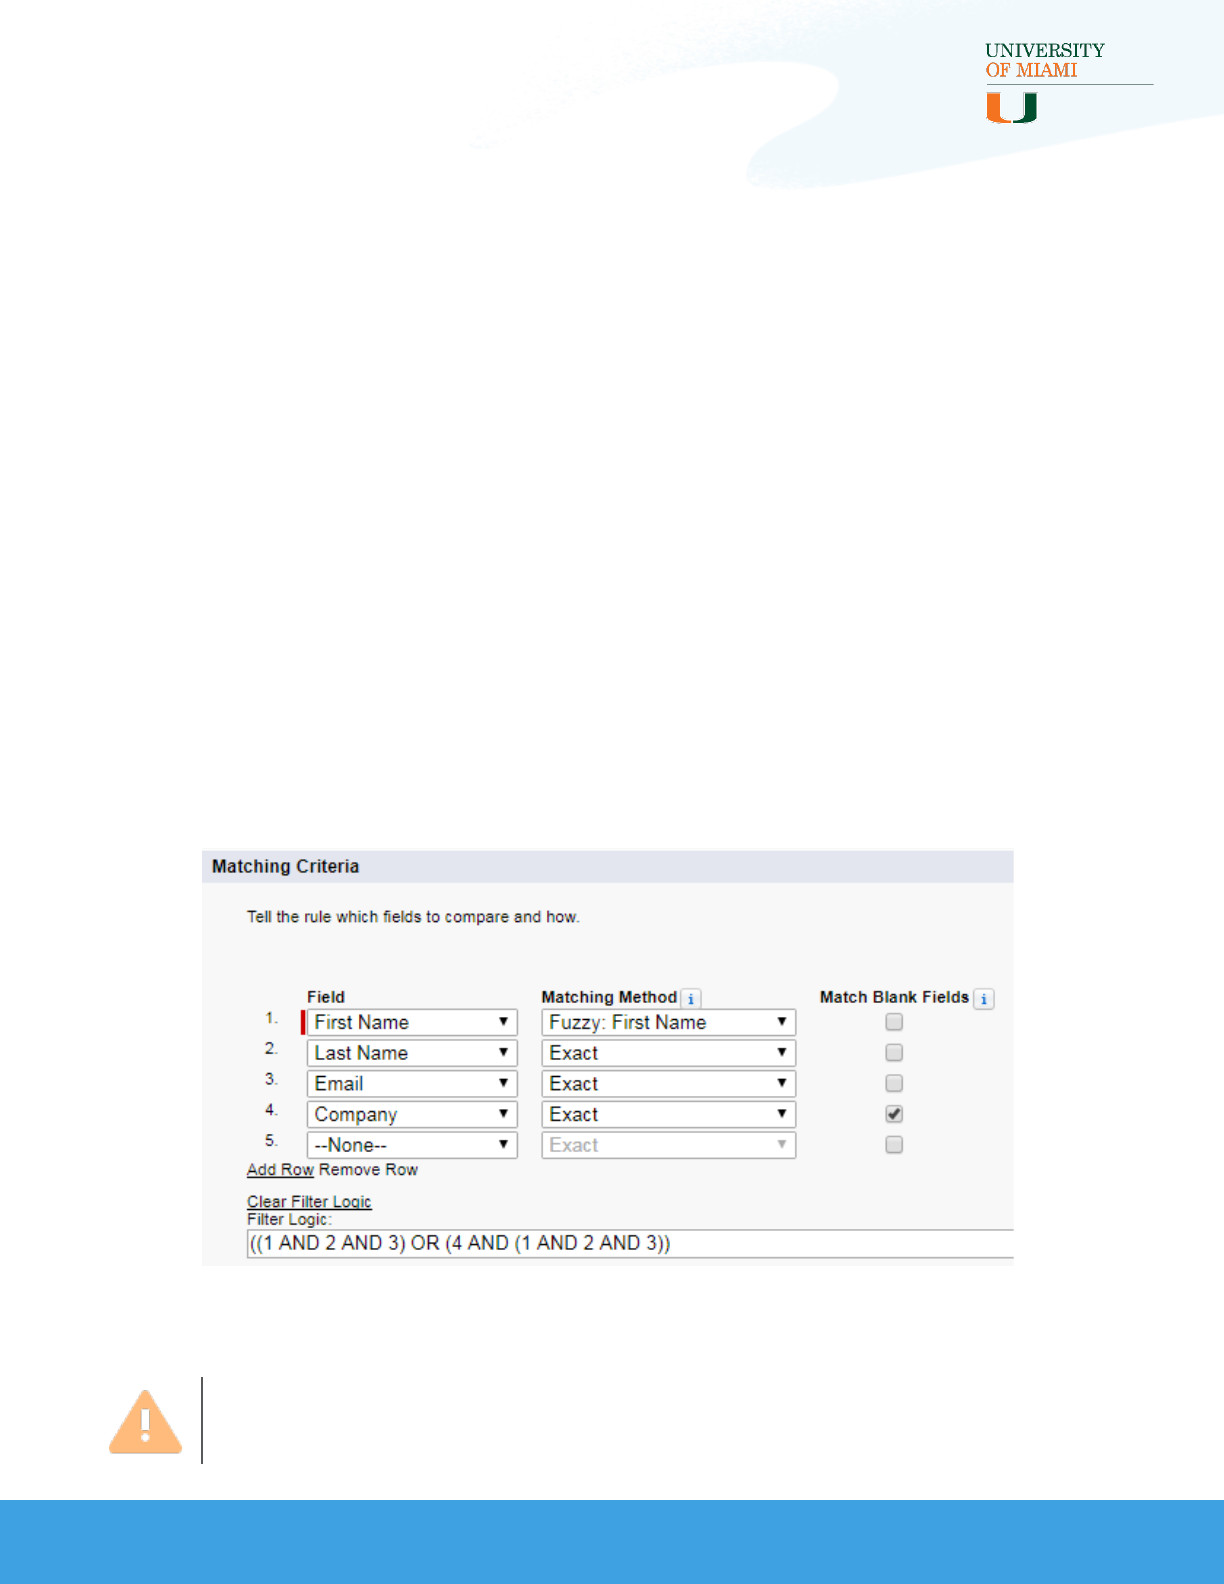
Create or Update Matching Rules
The Interaction Processor needs a Contact Matching Rule and a Lead
Matching Rule with some specific formatting to work. If you already have
Lead and/or Contact Matching Rules that are being used by a Duplicate
Rule setup to ‘Block’ on Create or Edit, you will need to update your
existing Matching Rules and Duplicate Rules to follow the format
described here.
Note: Any Block Duplicate Rule that is triggered by the Interactions
Processor could cause issues if the Duplicate Rule or Matching Rule
is not formatted correctly.
39
INTERACTIONS FOR STUDENT RECRUITMENT
INTERACTIONS INSTALLATION AND CONFIGURATION GUIDE
Create Duplicate and Matching Rules
(cont.)
Create or Update Matching Rules (cont.)
Create Lead Matching Rule:
1. Go to Setup > Data > Duplicate Management > Matching Rules
2. Click New Rule then select ‘Lead’ from the Object dropdown and
click Next or open and edit your existing Lead Matching Rule
3. Set the following values for Rule Details:
•“Rule Name” = Interaction Lead Matching
•“Description” = Leveraged by the Interaction process. The rule
must be formatted exactly like this: (Your Matching Criteria)
OR (Company, Exact, Match Blank TRUE AND (Your Matching
Criteria))
4. Matching Criteria and Filter Logic (recommended)
5. Click Save and then Activate the Matching Rule
Note: Overly-complicated criteria is not recommended and could be
flagged by Salesforce and prevent activation.
40
INTERACTIONS FOR STUDENT RECRUITMENT
INTERACTIONS INSTALLATION AND CONFIGURATION GUIDE
Create Duplicate and Matching Rules
(cont.)
Create or Update Matching Rules (cont.)
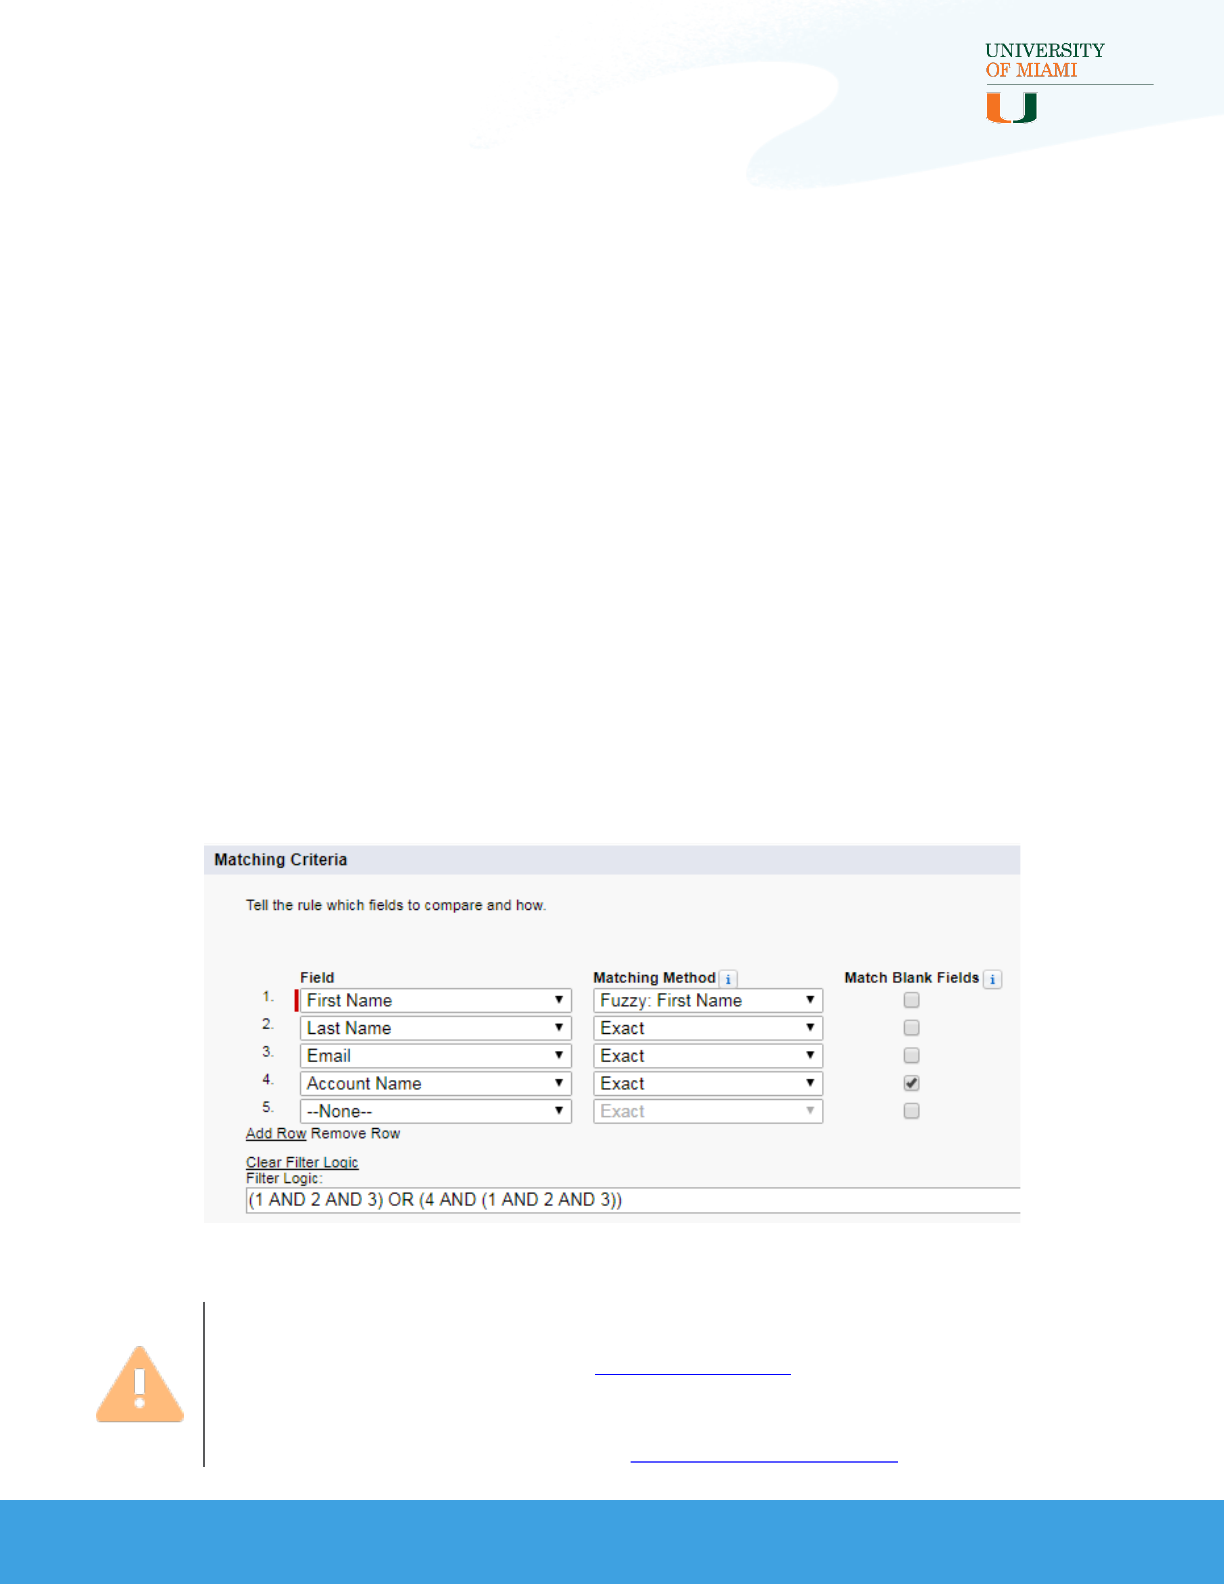
Create Contact Matching Rule:
1. Go to Setup > Data > Duplicate Management > Matching Rules
2. Click New Rule then select ‘Contact’ from the Object dropdown and
click Next or open and edit your existing Contact Matching Rule
3. Set the following values for Rule Details:
•“Rule Name” = Interaction Contact Matching
•“Description” = Leveraged by the Interaction process. The rule
must be formatted exactly like this: (Your Matching Criteria) OR
(Account Name, Exact, Match Blank TRUE AND (Your Matching
Criteria))
4. Matching Criteria and Filter Logic (recommended)
5. Click Save and then Activate the Matching Rule
Note: Any field included in the matching criteria must be mapped to
the Contact using Salesforce Lead Mappings in setup on Leads. Any
field included in the matching criteria must also be mapped from
Interaction to Contact using an Interaction Mapping record.
41

INTERACTIONS FOR STUDENT RECRUITMENT
INTERACTIONS INSTALLATION AND CONFIGURATION GUIDE
Create Duplicate and Matching Rules
(cont.)
Create or Update Duplicate Rules
If you already have a Lead Duplicate Rule or Contact Duplicate rule setup
to Block on Create or Edit, the Interactions Processor can trigger it and
cause errors if it is not formatted correctly. Instead of creating new rules
(by following the steps below), you will need to update your existing ones
to use the matching rules you just created/updated and the following
settings.
Create Lead Duplicate Rule:
1. Go to Setup > Data > Duplicate Management > Duplicate Rules
2. Click New Rule and select the ‘Lead’ object from the dropdown and
click Next or open and edit your existing Lead Duplicate Rule
3. Set the following values:
•“Rule Name” = Interaction Lead Duplicate Rule
•“Description” = This rule is leveraged by the Interaction Process.
Action on Create and Edit must be set to Block.
•“Record-Level Security” = Bypass sharing rules
•“Action on Create” = Block
•“Action on Edit” = Block
•“Alert Text” = (leave the standard message or create your own!)
•“Compare Leads with” = Leads
•“Matching Rule” = Interaction Lead Matching
•“Conditions” = None
4. Click Save and then Activate the Duplicate Rule
42

INTERACTIONS FOR STUDENT RECRUITMENT
INTERACTIONS INSTALLATION AND CONFIGURATION GUIDE
Create Duplicate and Matching Rules
(cont.)
Create or Update Duplicate Rules (cont.)
Contact Duplicate Rule
1. Go to Setup > Data > Duplicate Management > Duplicate Rules
2. Click New Rule and select the ‘Contact’ object from the dropdown and
click Next or open and edit your existing Contact Duplicate Rule.
3. Set the following values:
•“Rule Name” = Interaction Contact Duplicate Rule
•“Description” = This rule is leveraged by the Interaction Process.
Action on Create and Edit must be set to Block.
•“Record-Level Security” = Bypass sharing rules
•“Action on Create” = Block
•“Action on Edit” = Block
•“Alert Text” = (leave the standard message or create your own!)
•“Compare Contacts with” = Contacts
•“Matching Rule” = Interaction Contact Matching (the Contact
Matching Rule you created or updated earlier)
•“Conditions” = None
4. Click Save and then Activate the Duplicate Rule
Note: See the “Duplicate Matching” section of the Technical
Implementation Guide for more information about how the
Interactions Processor uses these matching and duplicate rules.
43
INTERACTIONS FOR STUDENT RECRUITMENT
INTERACTIONS INSTALLATION AND CONFIGURATION GUIDE
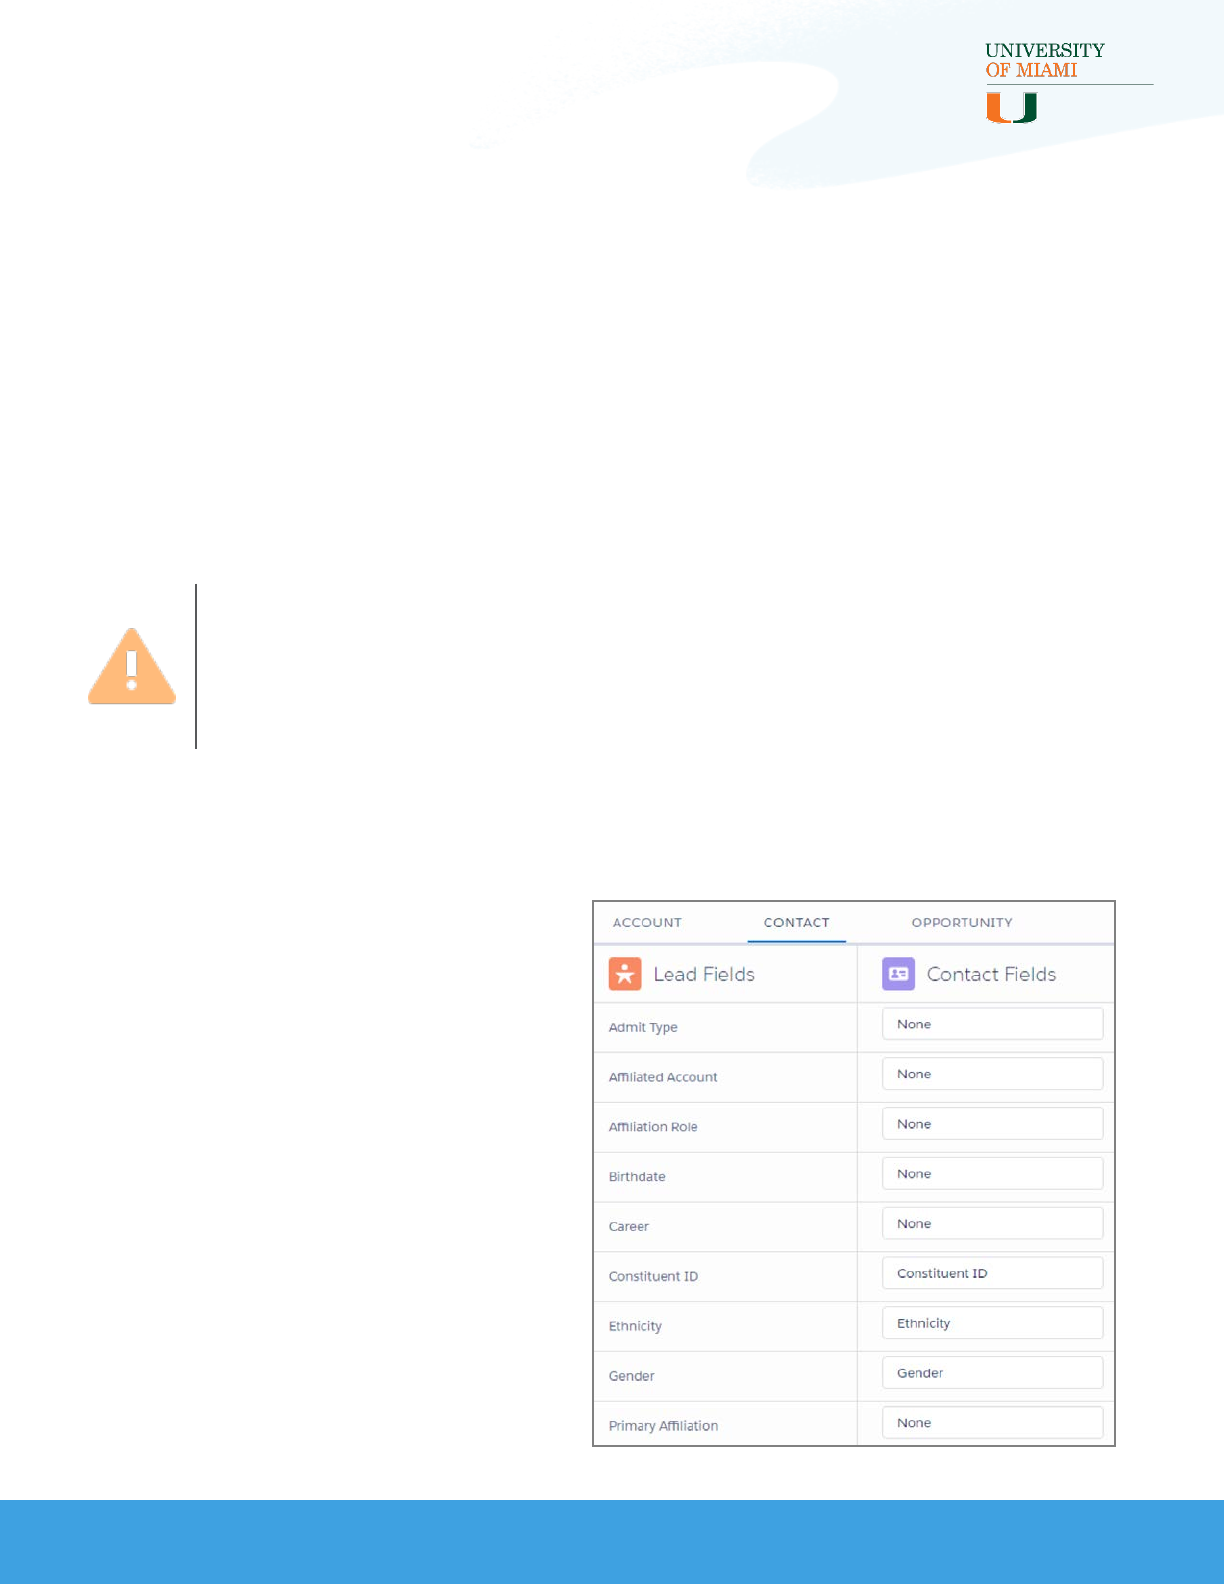
Update Lead to Contact Standard Field
Mapping
The Interactions Processor makes use of the standard Lead Conversion
process to convert Leads to Contacts. Through Interactions, Salesforce
Lead Mappings only work for mapping custom Lead fields to other
custom Account or Contact fields. Standard Lead fields are automatically
mapped. Custom Lead fields cannot be mapped to standard fields and
vice versa.
Note: Lead Mappings will not function from Leads to Opportunities.
To map fields from Leads to Opportunities, use Interaction
Mappings to map Lead fields directly to Interactions and from
Interactions to Opportunities.
To ensure the Duplicate Rules work as expected, any custom fields
included in Duplicate Matching Rules must be mapped from Leads to
Contacts.
44
Follow these steps:
1. Go to Setup > Object
Manager > Lead > Fields
& Relationships
2. Click on the Map Lead
Fields button in the upper
right
3. Map the Lead fields to
their counterpart Contact
fields:
INTERACTIONS FOR STUDENT RECRUITMENT
INTERACTIONS INSTALLATION AND CONFIGURATION GUIDE
Activate Workflow Rules
The Interactions package includes several Workflow Rules that should be
activated after installation. For a complete list of the delivered rules and
their field updates, see the Data Dictionary.
To activate a Workflow Rule, follow the steps below:
1. Go to Setup > Process Automation > Workflow Rules
2. Go through the list of Workflow Rules and select the Activate link
next to rule’s name to activate that rule
3. Each time you activate a rule, the page will refresh
45

INTERACTIONS FOR STUDENT RECRUITMENT
INTERACTIONS INSTALLATION AND CONFIGURATION GUIDE
Update Object Page Layouts
Interactions for Student Recruitment includes the following page
layouts:
•Interactions
•Interaction Mappings
•Academic Interests
•Recruitment Interests
•Inquiry Opportunities
•Applicant Opportunities
The package also includes new fields and related lists you will want to add
to your existing page layouts. The update steps are very similar for each
page layout, so feel free to jump around or complete one and try the rest
out on your own.
Additionally, the Interactions Package includes some new object-specific
custom Actions (in Classic and Lightning) for the following objects:
•Leads
•Contacts
•Opportunities
•Campaigns
To take full advantage of the new functionality, these Actions need to be
added to the page layouts of these objects (except for Opportunity layouts,
these come out-of-the-box with the custom Actions). For this reason, we
recommend at least completing the steps for adding the new custom
Actions to these page layouts.
We talk more about using these Actions in Best Practices -Creating
Interactions Manually.
46
INTERACTIONS FOR STUDENT RECRUITMENT
INTERACTIONS INSTALLATION AND CONFIGURATION GUIDE
Update Object Page Layouts (cont.)
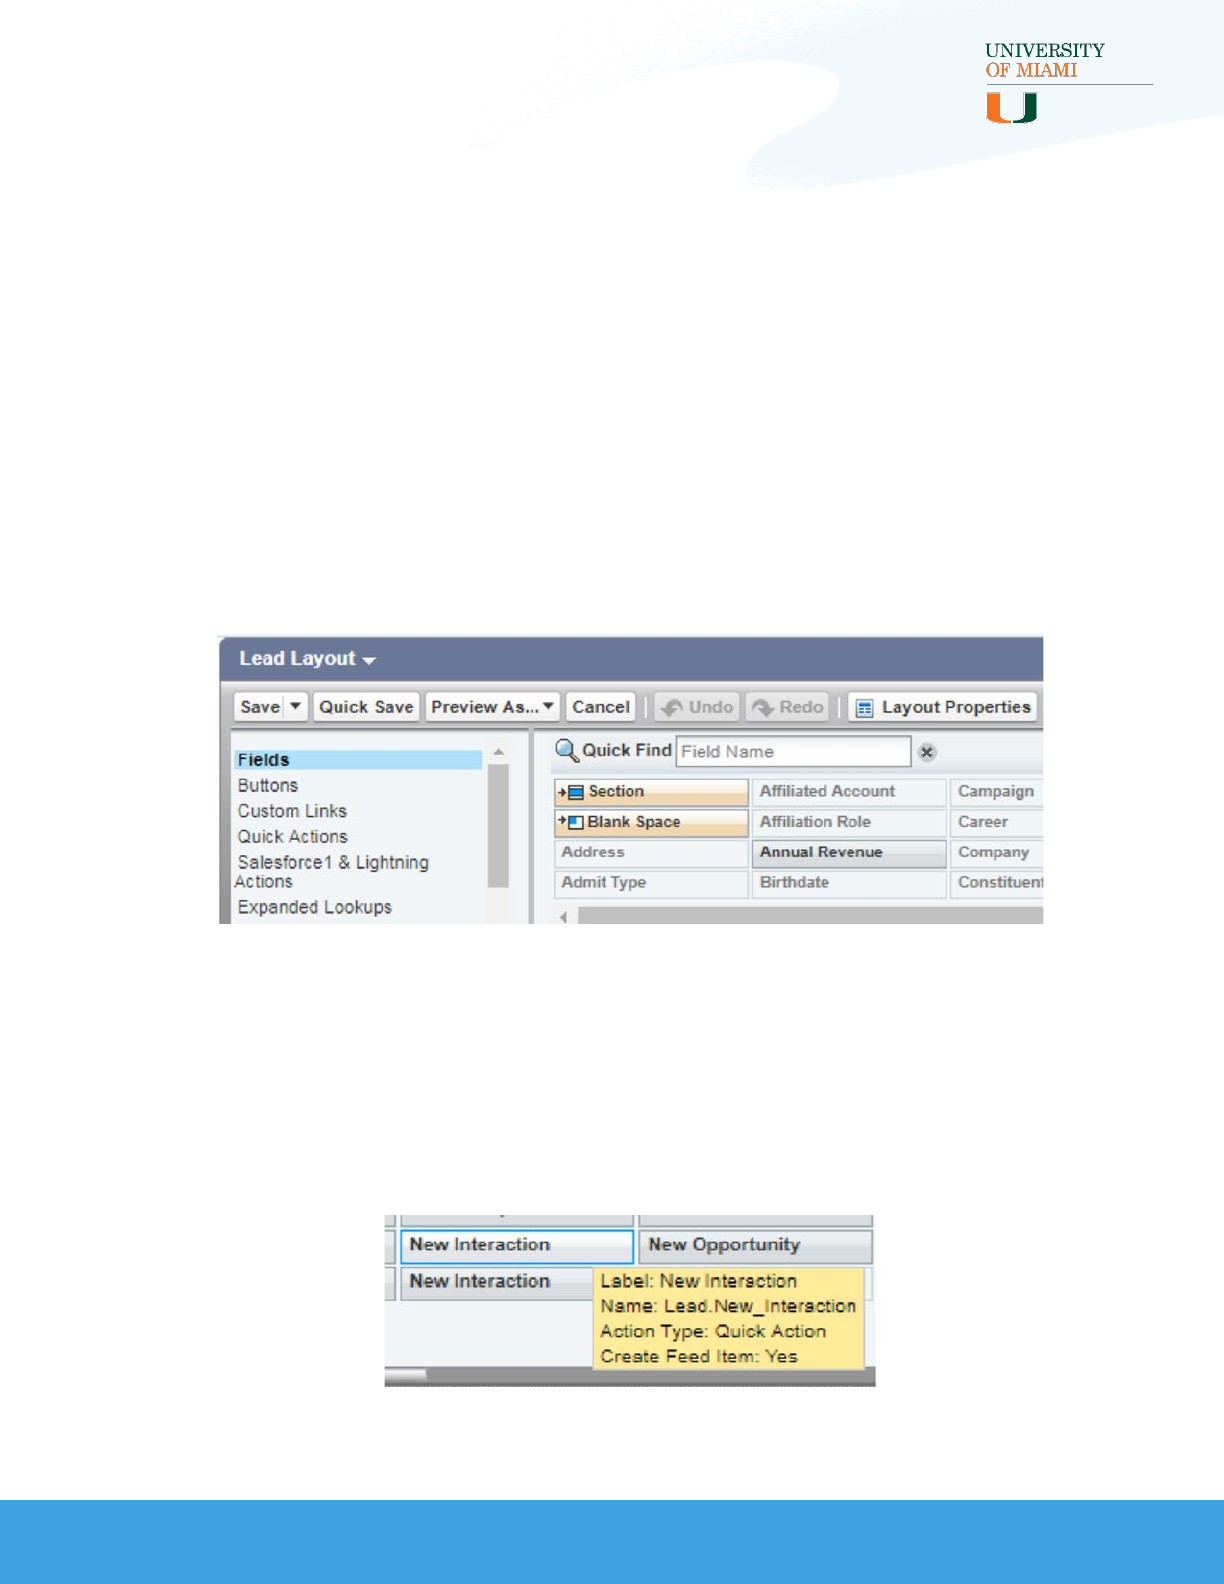
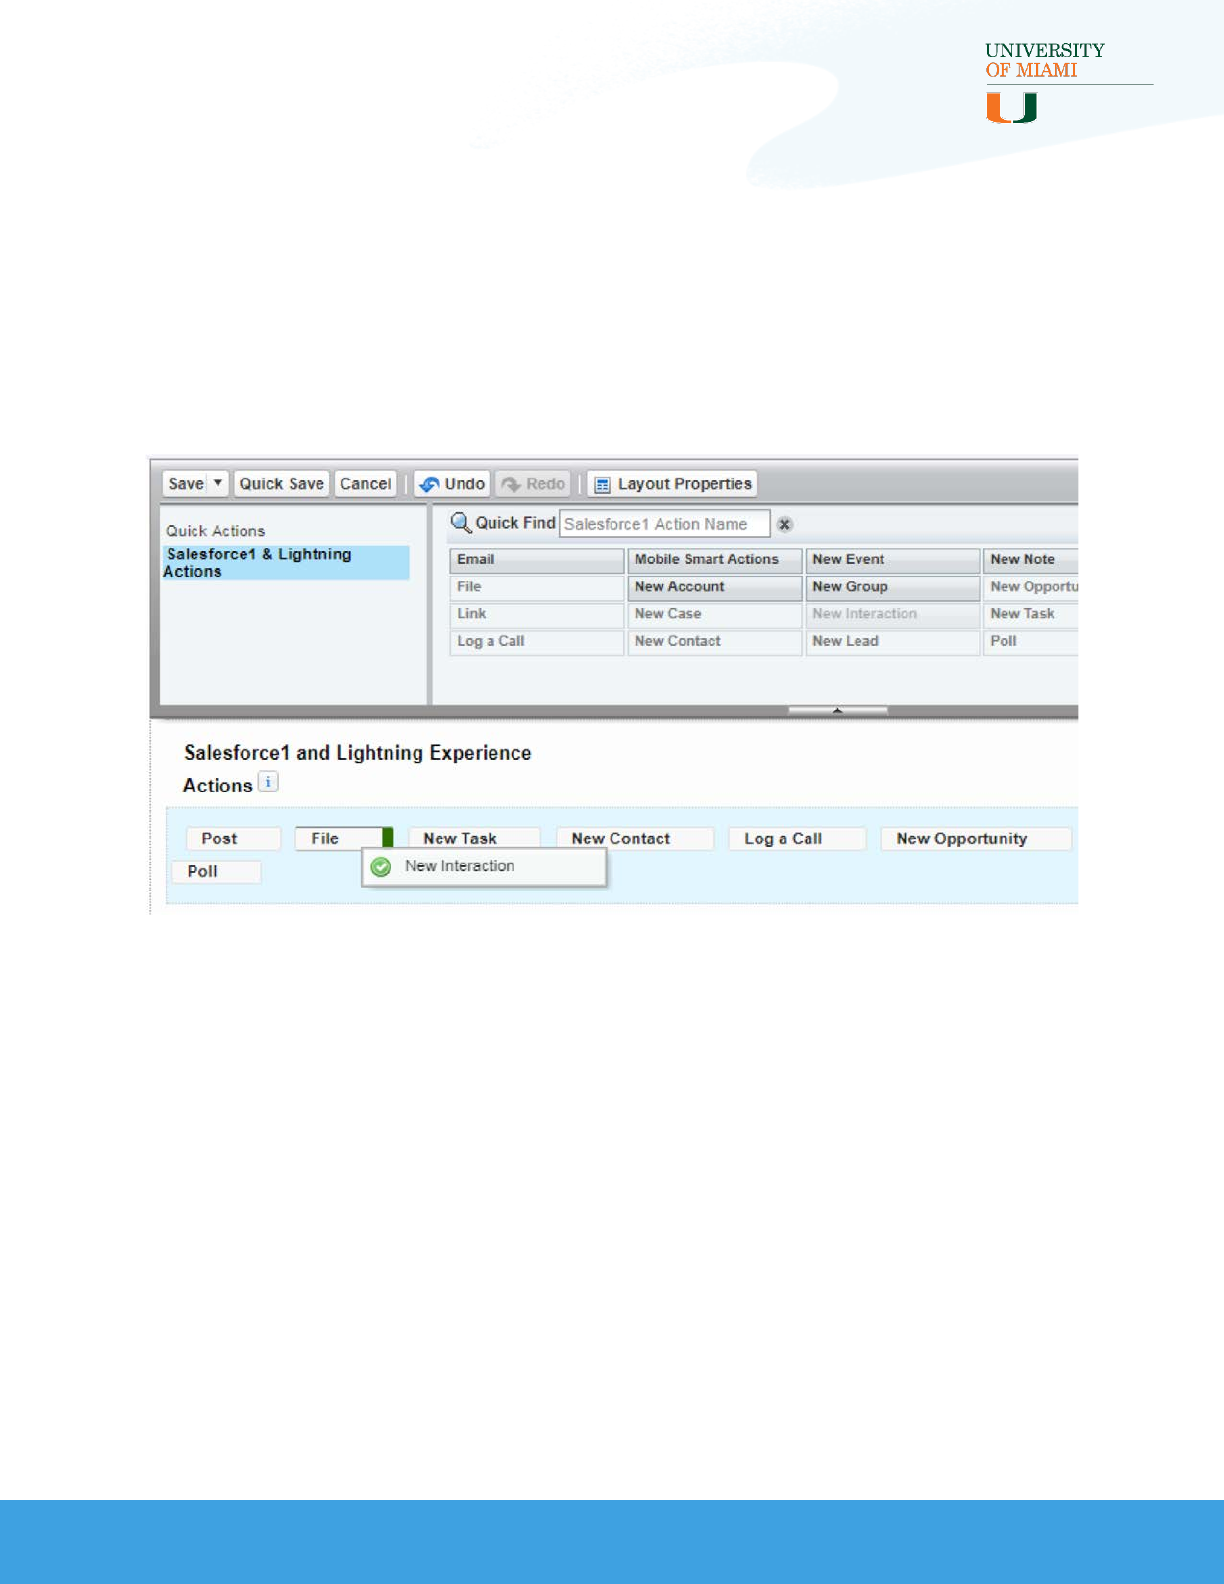
UpdateLead Layouts:
1. Go to Setup > Object Manager > Lead > Page Layouts
2. Open the page layout you want to update by clicking on the name
3. You will be adding Actions from two sections found in the left side of
the palette at the top of the Page Layout edit page:
•Quick Actions for Classic Apps
•Salesforce1 & Lightning Actions for Lightning Apps
4. In both the Quick Actions and Salesforce1 & Lightning Actions
sections, you will see two Actions named “New Interaction." Hover
over each to see the developer name. The Lead-specific action, which
you will add to your Lead Page Layouts, is named
“Lead.New_Interaction.”
47

INTERACTIONS FOR STUDENT RECRUITMENT
INTERACTIONS INSTALLATION AND CONFIGURATION GUIDE
Update Object Page Layouts (cont.)
Update Lead Layouts (cont.)
5. Drag the “Lead.New_Interaction” action to the Quick Actions in the
Salesforce Classic Publisher section for use in Classic…
…and to the Salesforce1 and Lightning Experience Actions section for
use in Lightning:
48
INTERACTIONS FOR STUDENT RECRUITMENT
INTERACTIONS INSTALLATION AND CONFIGURATION GUIDE
Update Object Page Layouts (cont.)
Update Lead Layouts (cont.)
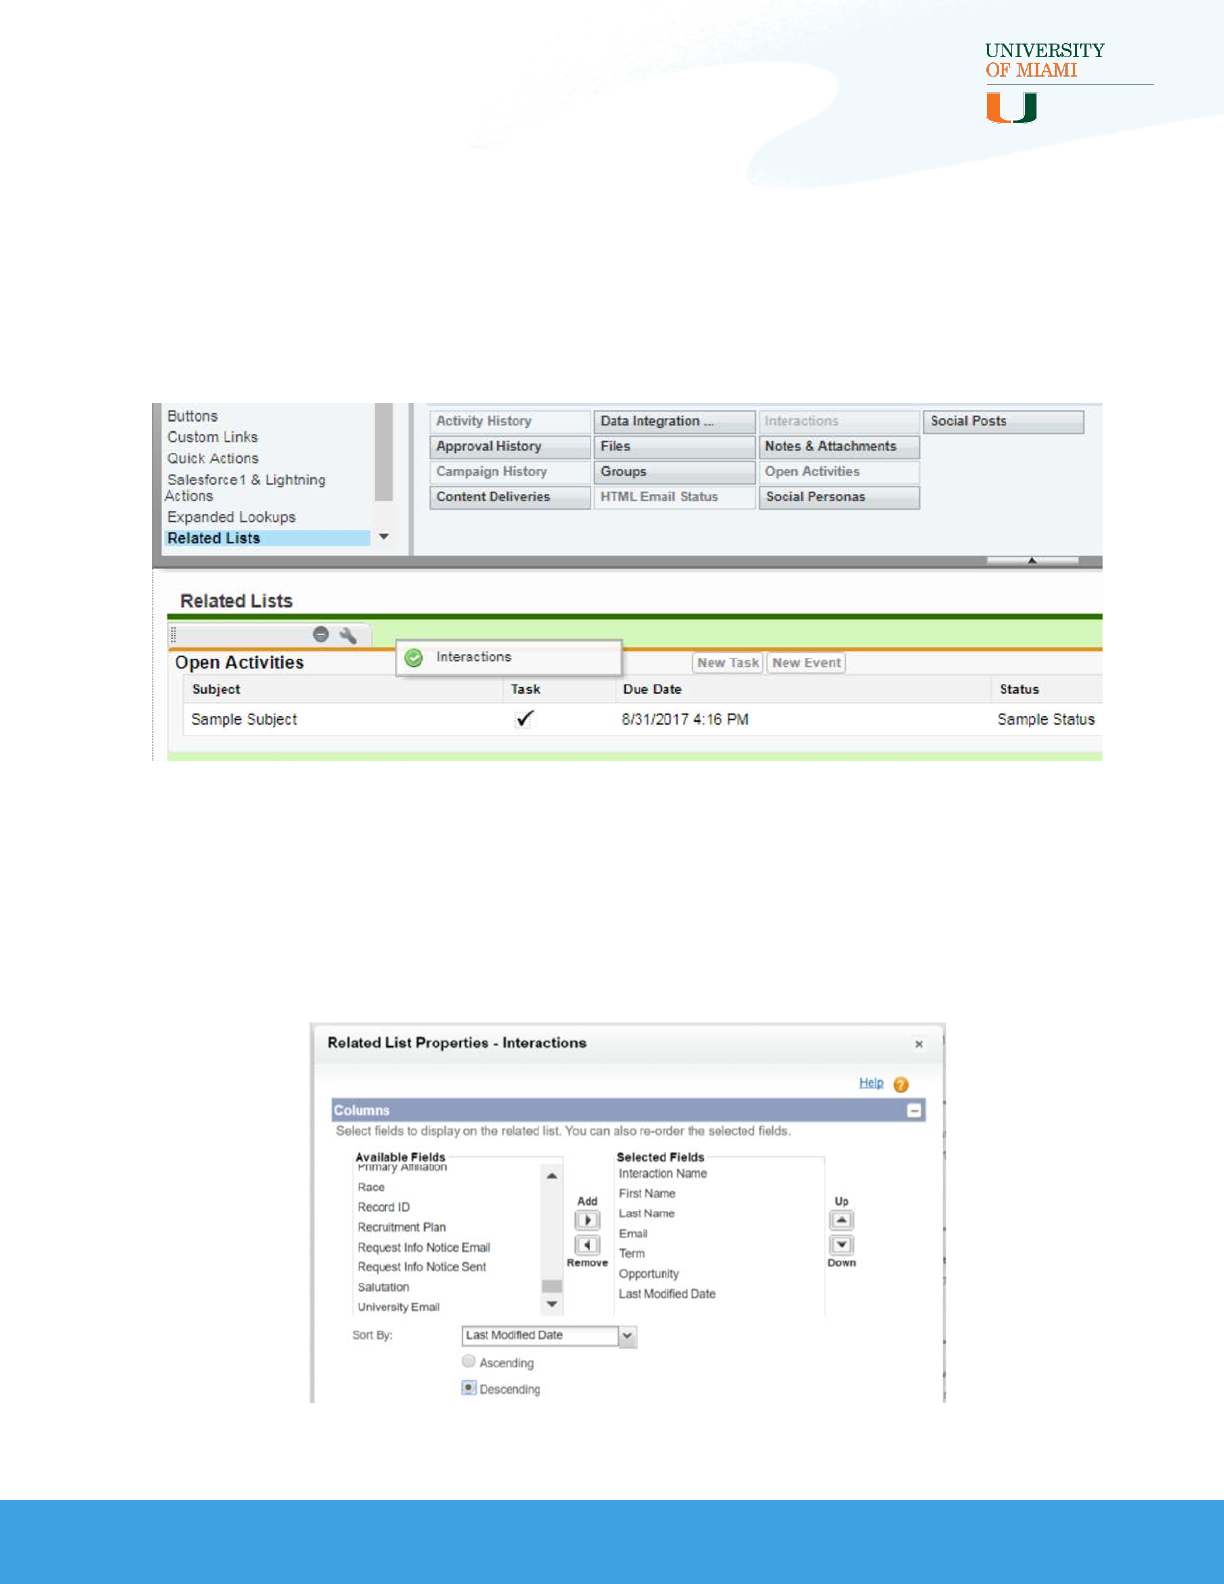
6. Select Related Lists in the left side of the palette and drag the
Interactions related list to the desired position in the related list section:
7. You can add, remove, or move the fields that display in the related list,
decide how to sort the records, and determine which buttons appear by
clicking the wrench icon. Choose a limit of ten fields to display in Classic
and the “View All” page for related lists in Lightning. The first four fields
will display in the related list on record pages in Lightning.
49
INTERACTIONS FOR STUDENT RECRUITMENT
INTERACTIONS INSTALLATION AND CONFIGURATION GUIDE
Update Object Page Layouts (cont.)
Updating Lead Layouts (cont.)
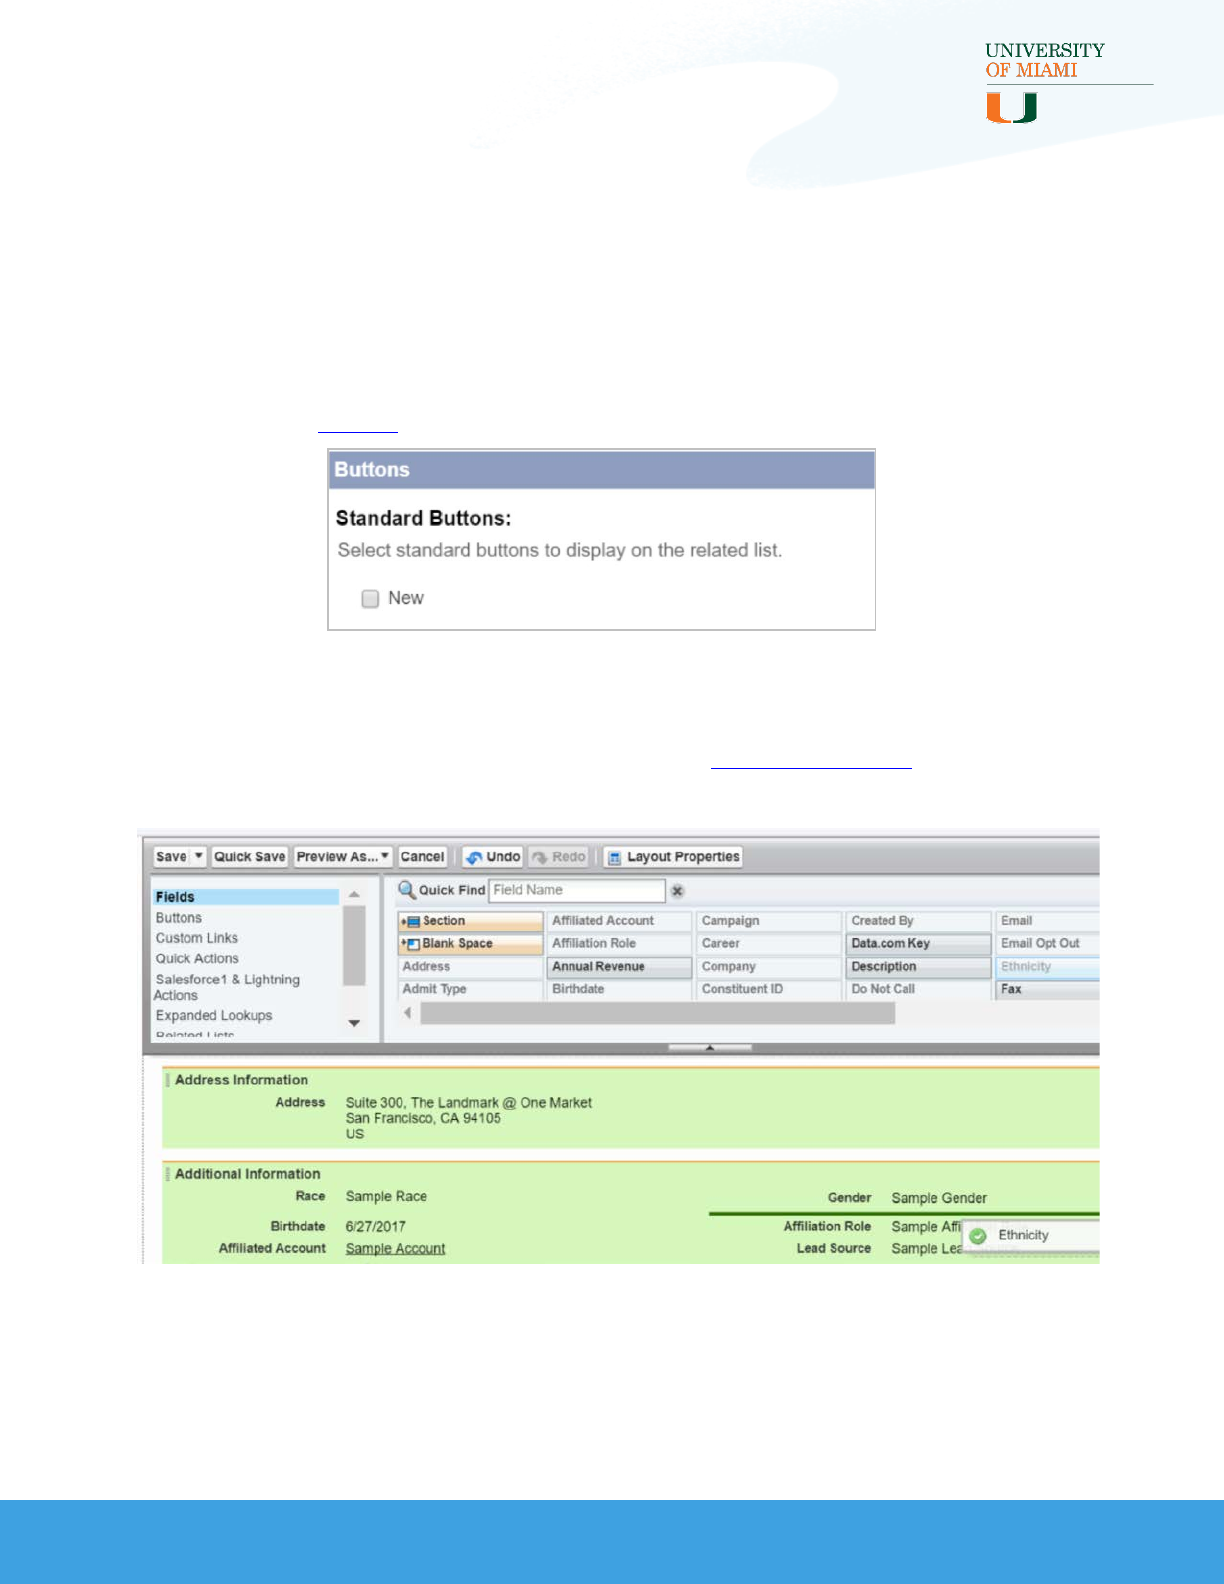
8. Consider removing the New button in the Interactions Related List
options to ensure users create Interactions with the Actions you
added in step 5.
9. Drag any new fields to their desired position on the Lead layout from
Fields in the left of the palette. See the Data Dictionary for a full list
of fields added through the package.
10.Click Save
50
INTERACTIONS FOR STUDENT RECRUITMENT
INTERACTIONS INSTALLATION AND CONFIGURATION GUIDE
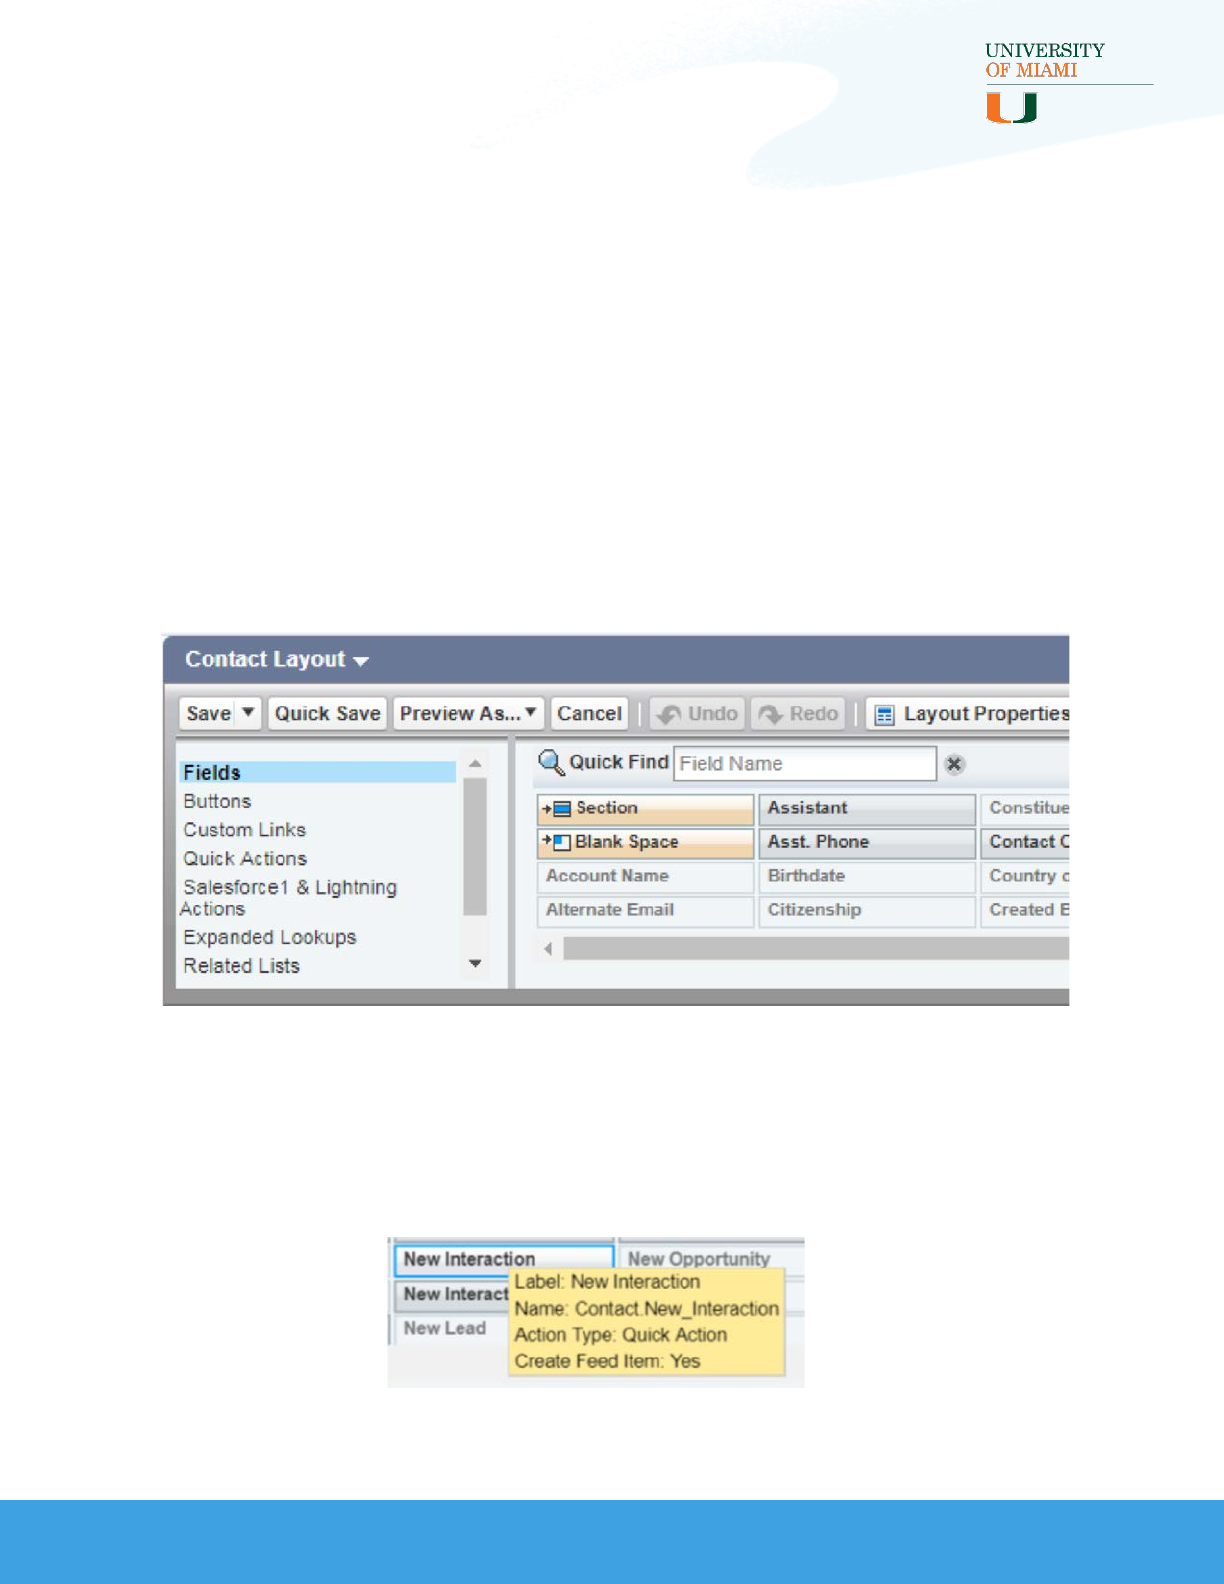
Update Object Page Layouts (cont.)
Update Contact Layouts:
1. Go to Setup > Object Manager > Contact > Page Layouts
2. Open the page layout you want to update by clicking on the name
3. You will be adding Actions from two sections found in the left side of
the palette at the top of the Page Layout edit page:
•Quick Actions for Classic Apps
•Salesforce1 & Lightning Actions for Lightning Apps
4. In both sections, you will see two actions named “New Interaction.”
Hover over each to see the developer name. The Contact-specific
action, which you will add to your Contact Page Layouts, is named
“Contact.New_Interaction.”
51
INTERACTIONS FOR STUDENT RECRUITMENT
INTERACTIONS INSTALLATION AND CONFIGURATION GUIDE
Update Object Page Layouts (cont.)
Update Contact Layouts (cont.)
5. Follow step 5 of Updating Lead Layouts to add the custom Actions to
the Quick Actions in the Salesforce Classic Publisher and Salesforce1
and Lightning Experience Actions sections of the Contact layout
6. Follow steps 6-8 of Updating Lead Layouts to add the Interactions
related list to the Contact layout and learn about some related list
options
7. Follow step 9 of Updating Lead Layouts to add, remove, and/or move
new and existing fields on the Contact layout
8. Click Save
Note: For a comprehensive list of the fields added in by the package,
please see the Data Dictionary.
52
INTERACTIONS FOR STUDENT RECRUITMENT
INTERACTIONS INSTALLATION AND CONFIGURATION GUIDE
Update Object Page Layouts (cont.)
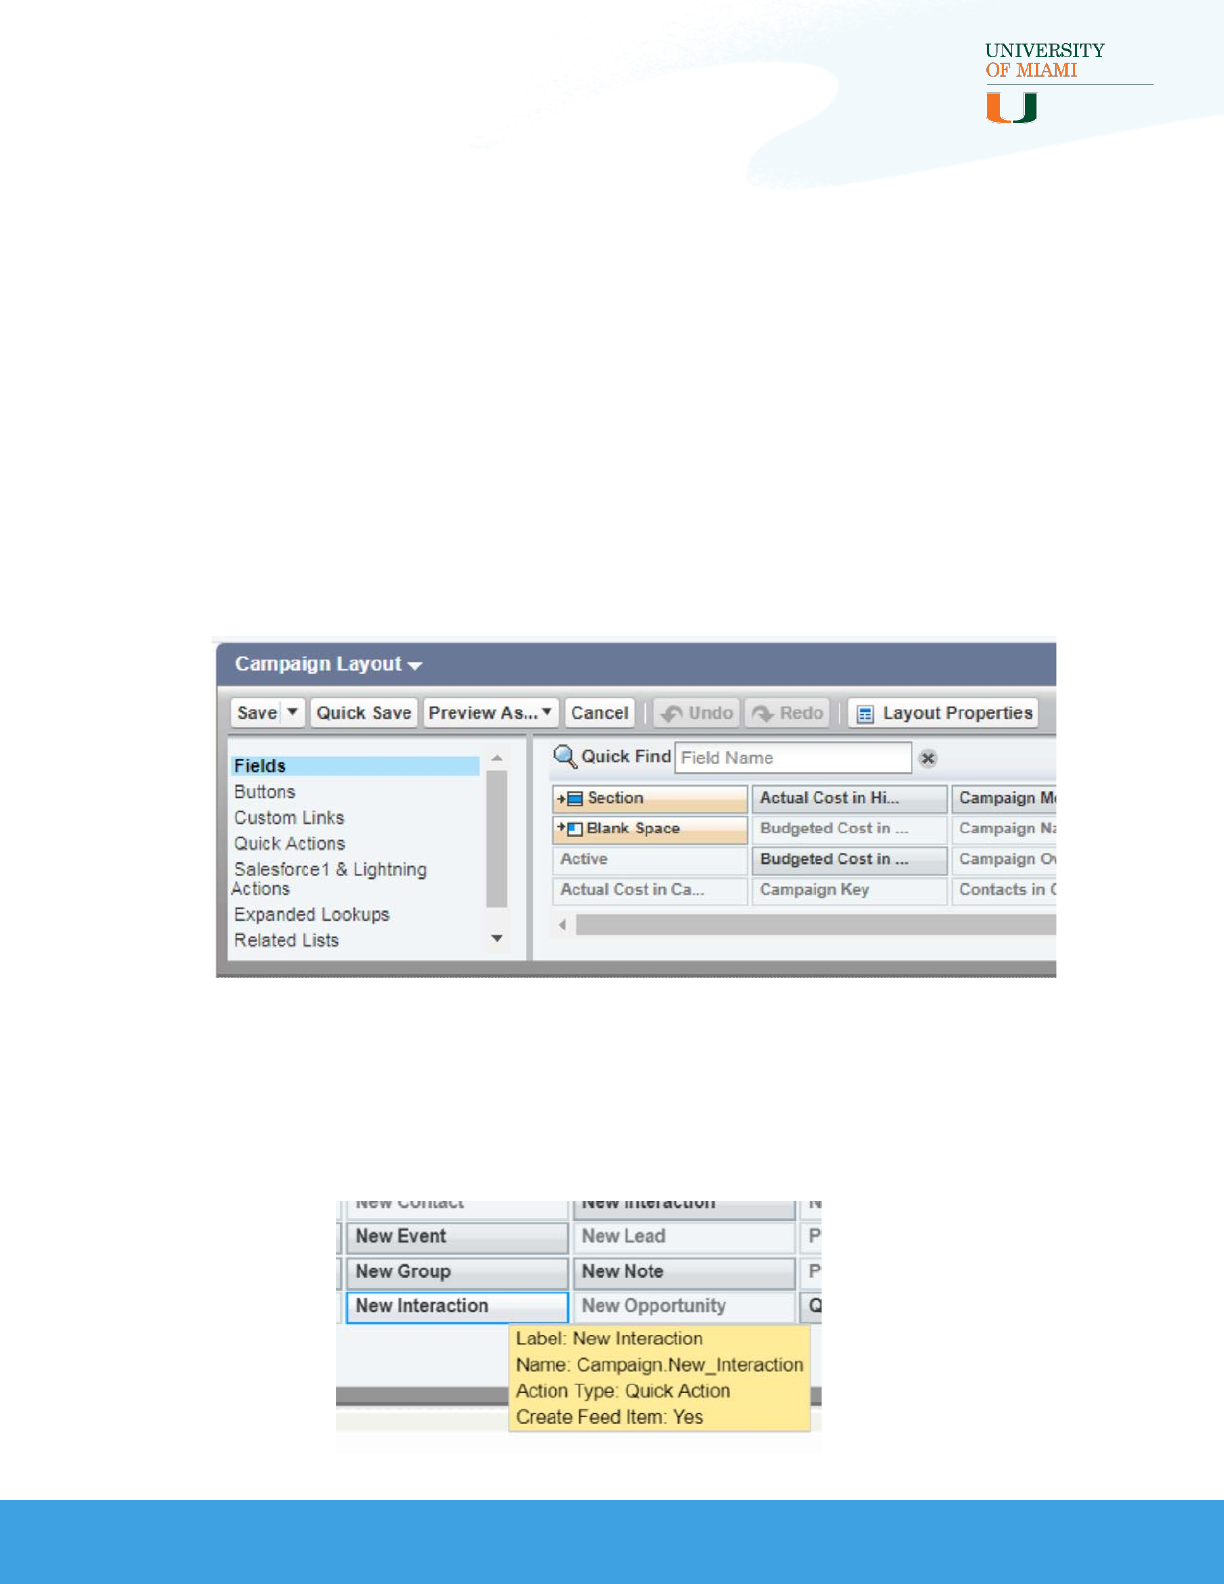
Update Campaign Layouts:
1. Go to Setup > Object Manager > Campaign > Page Layouts
2. Open the page layout you want to update by clicking on the name
3. You will be adding Actions from two sections found in the left side of
the palette at the top of the Page Layout edit page:
•Quick Actions for Classic Apps
•Salesforce1 & Lightning Actions for Lightning Apps
4. In both sections, you will see two actions named “New Interaction.”
Hover over each to see the developer name. The Campaign-specific
action, which you will add to your Campaign Page Layouts, is named
“Campaign.New_Interaction.”
53
INTERACTIONS FOR STUDENT RECRUITMENT
INTERACTIONS INSTALLATION AND CONFIGURATION GUIDE
Update Object Page Layouts (cont.)
Update Campaign Layouts (cont.)
5. Follow step 5 of Updating Lead Layouts to add the custom Actions to the
Quick Actions in the Salesforce Classic Publisher and Salesforce1 and
Lightning Experience Actions sections of the Campaign layout
6. Follow steps 6-8 of Updating Lead Layouts to add the Interactions related
list to the Campaign layout and learn about some related list options
7. Follow step 9 of Updating Lead Layouts to add, remove, and/or move
new and existing fields on the Campaign layout
8. Click Save
Note: For a comprehensive list of the fields added in by the package,
please see the Data Dictionary.
54
INTERACTIONS FOR STUDENT RECRUITMENT
INTERACTIONS INSTALLATION AND CONFIGURATION GUIDE
Update Object Page Layouts (cont.)
Update Campaign Member Layouts:
1. Go to Setup > Object Manager > Campaign Member > Page Layouts
2. Open the page layout(s) you want to update by clicking on the name
3. Drag any new fields to their desired position on the Campaign Member
layout from Fields in the left of the palette. See the Data Dictionary for a
full list of fields added through the package.
55
INTERACTIONS FOR STUDENT RECRUITMENT
INTERACTIONS INSTALLATION AND CONFIGURATION GUIDE
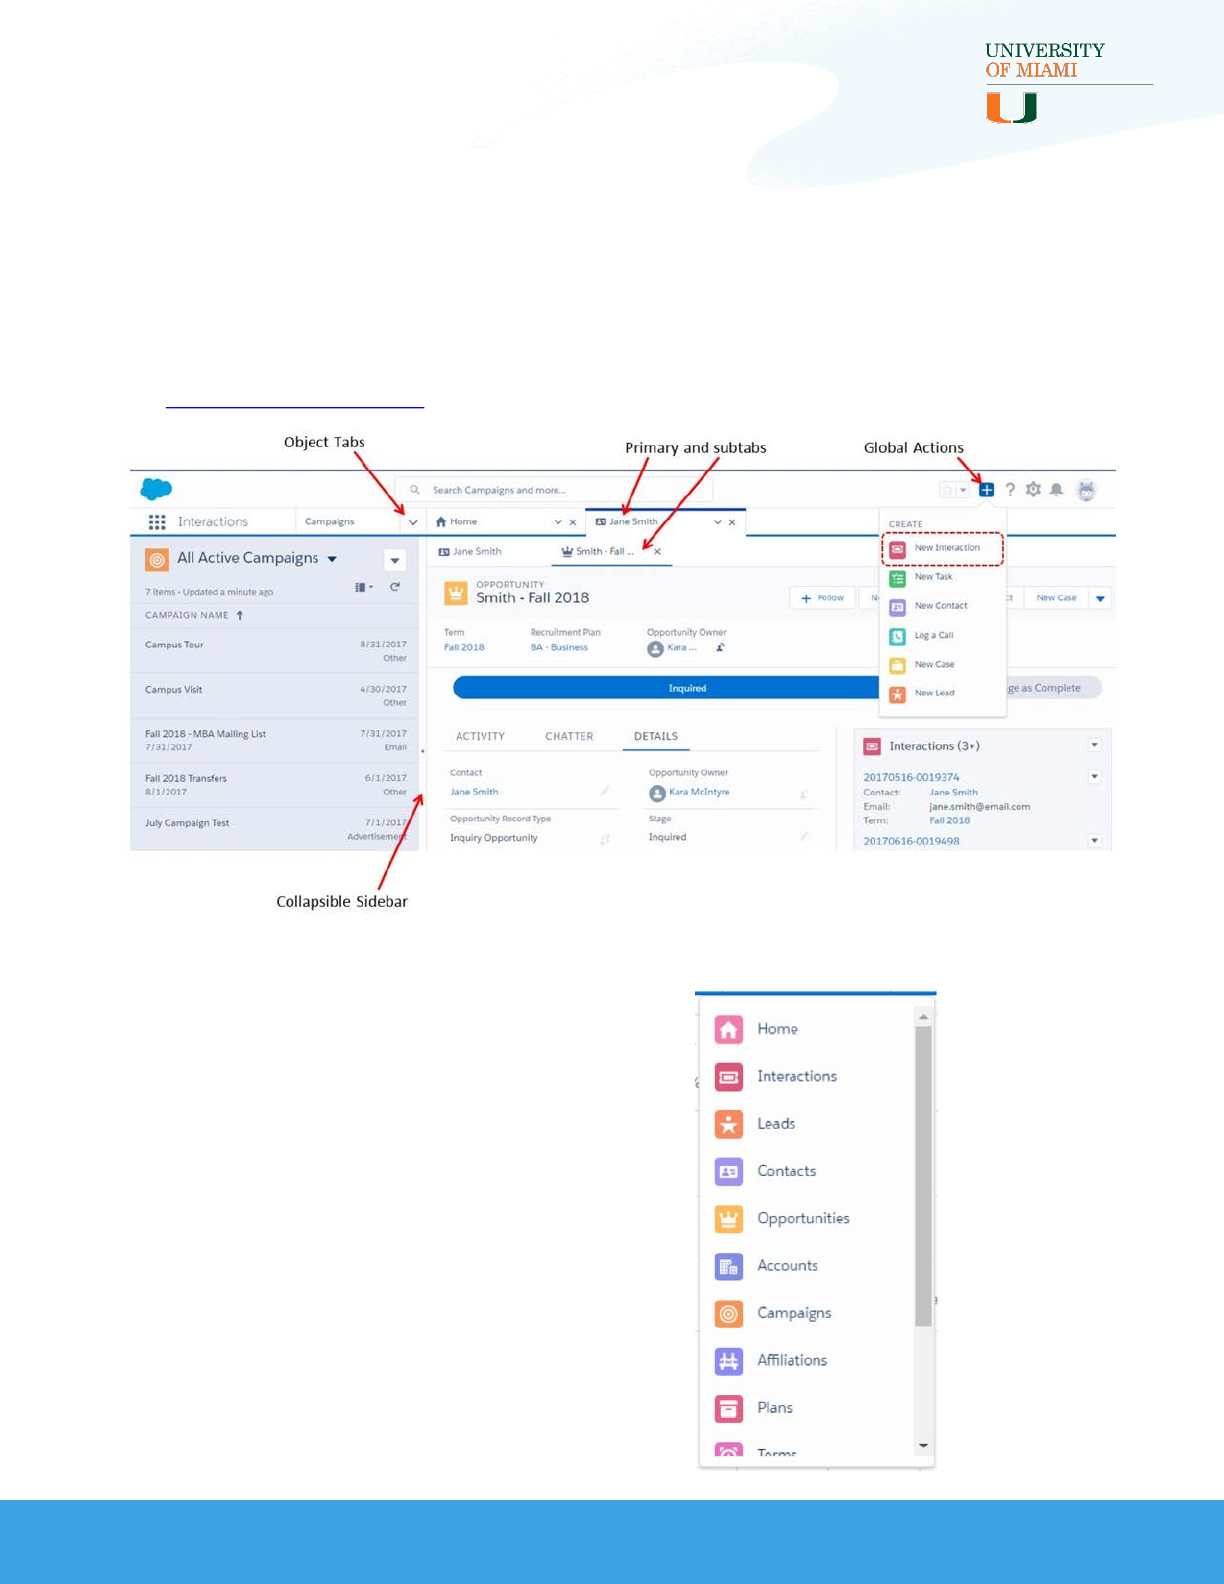
Navigating the Interactions App
The delivered Interactions App is a Lightning Console App. See the
screenshot below for a quick look at navigating this type of app. To learn
more about Lightning Consoles, visit the Salesforce Help documentation
for Salesforce Consoles.
The Interactions App has the following items (tabs) to select from:
•Home
•Interactions
•Leads
•Contacts
•Opportunities
•Accounts
•Campaigns
•Affiliations
•Plans
•Terms
•Interaction Mappings
•Reports
•Dashboards
56
INTERACTIONS FOR STUDENT RECRUITMENT
INTERACTIONS INSTALLATION AND CONFIGURATION GUIDE
Navigating the Interactions App (cont.)
You will also notice that several object List Views have been added. To view
the complete set of List Views delivered by Interactions for Student
Recruitment, see the Data Dictionary.
Note: The custom Global Action New Interaction is included in the
Interactions App. If you do not see this Action, follow the steps in the
next section to add it.
Using a Different App
Although Interactions for Student Recruitment comes with its own app, you
are not required to use it. You can create your own recruitment app or simply
add features of Interactions for Student Recruitment to an existing app.
If you choose to create your own or add to an existing app, we recommend
at least including the following tabs:
•Interactions
•Opportunities
•Accounts
•Campaigns
•Affiliations
•Plans
•Terms
•Interaction Mappings
You will also want to include the New Interaction custom Global Action to
the Global Publisher Layout. Follow the steps on the following pages to add
the Global Action.
57
INTERACTIONS FOR STUDENT RECRUITMENT
INTERACTIONS INSTALLATION AND CONFIGURATION GUIDE
Using a Different App (cont.)
Add the Custom Global Action:
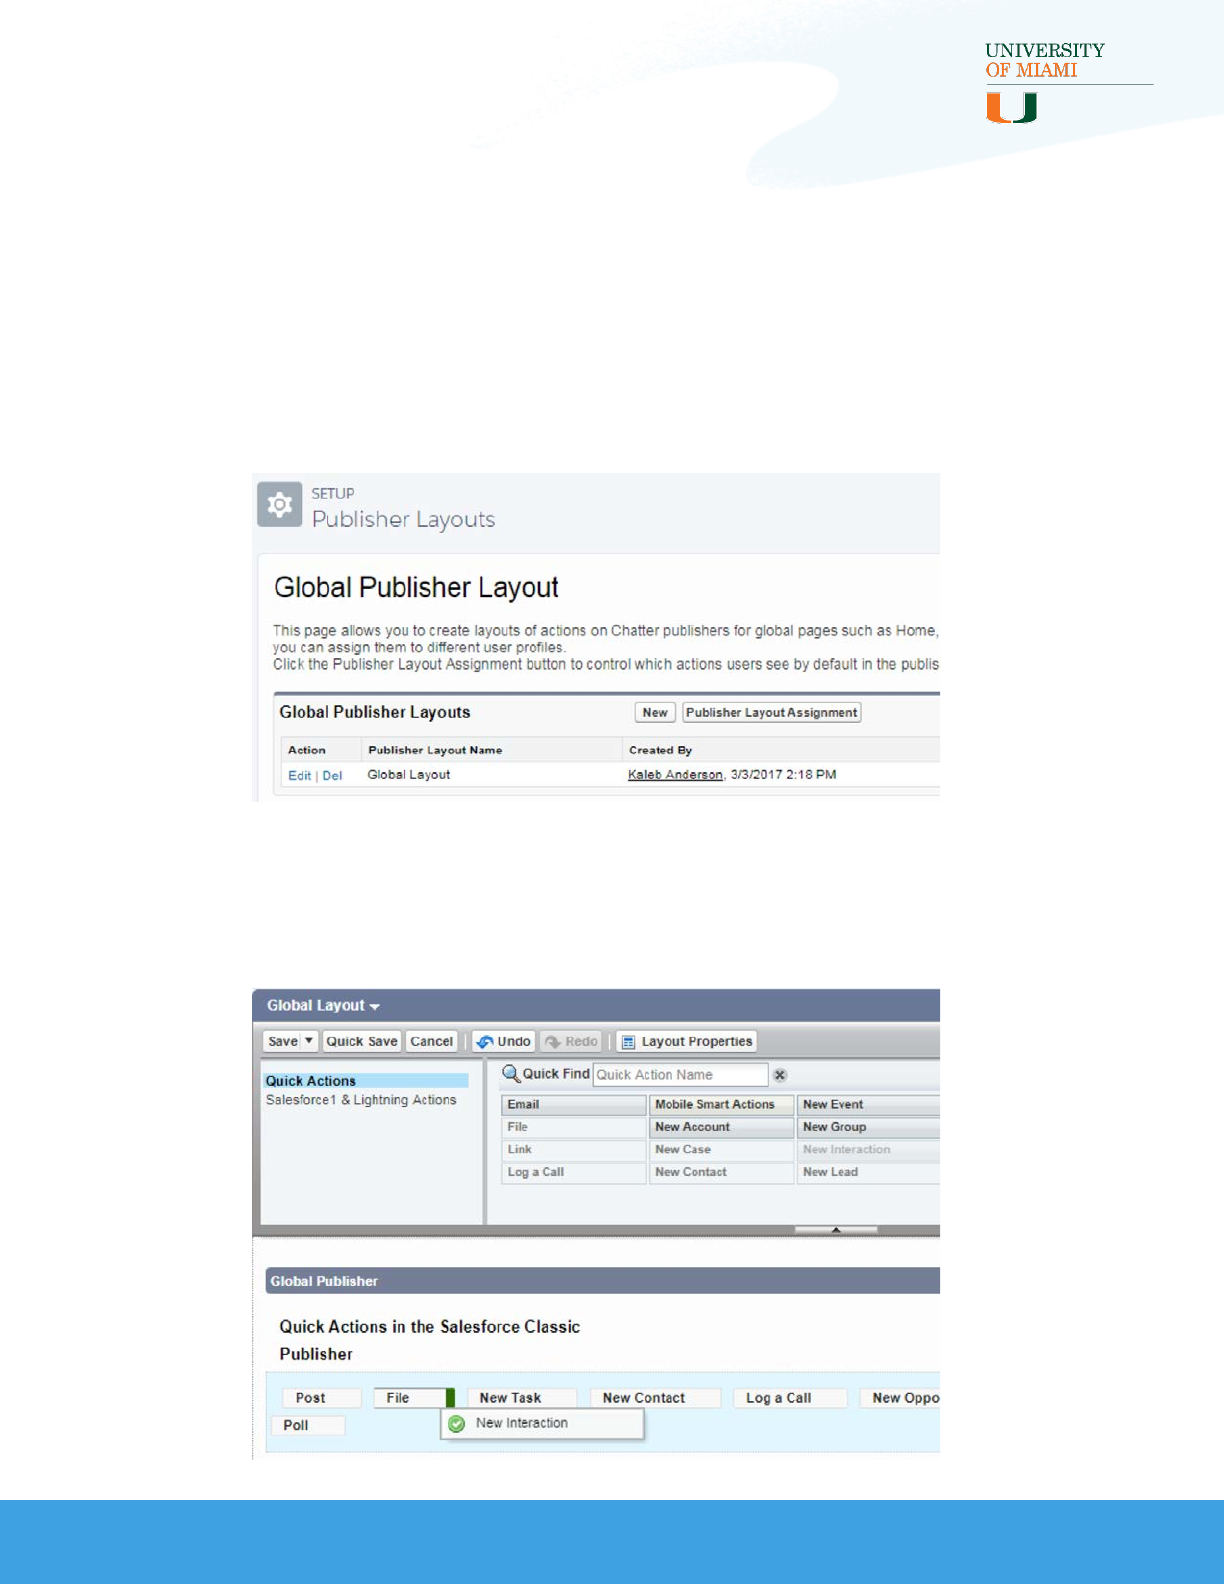
1. Go to Setup > User Interface > Global Actions > Publisher Layouts
2. Select the Edit link next to Global Layout (or whichever publisher
layout you wish to update)
3. In the Quick Actions section of the Global Layout editor palette, drag
the “New Interaction” action to a place in the Quick Actions in the
Salesforce Classic Publisher section
58
INTERACTIONS FOR STUDENT RECRUITMENT
INTERACTIONS INSTALLATION AND CONFIGURATION GUIDE
Using a Different App (cont.)
Add the Custom Global Action (cont.)
4. In the Salesforce1 & Lightning Actions section of the Global Layout
editor palette, drag the “New Interaction” action to a place in the
Salesforce1 & Lightning Experience Actions section:
5. Click the Save button to save your changes
6. Click Publisher Layout Assignment to update the assignment of
Publisher Layouts by user Profile
59
INTERACTIONS FOR STUDENT RECRUITMENT
INTERACTIONS INSTALLATION AND CONFIGURATION GUIDE
Best Practices -Creating Interactions via
Integrations
Interactions can be used to update a single record through the
Interactions Tab or through the delivered custom Actions. Interactions can
also be used to load multiple records at once using a data import or
integration tool. The following subsections reviews some of the best
practices administrators should keep in mind when creating Interactions in
mass either by manual data loading processes or integrations.
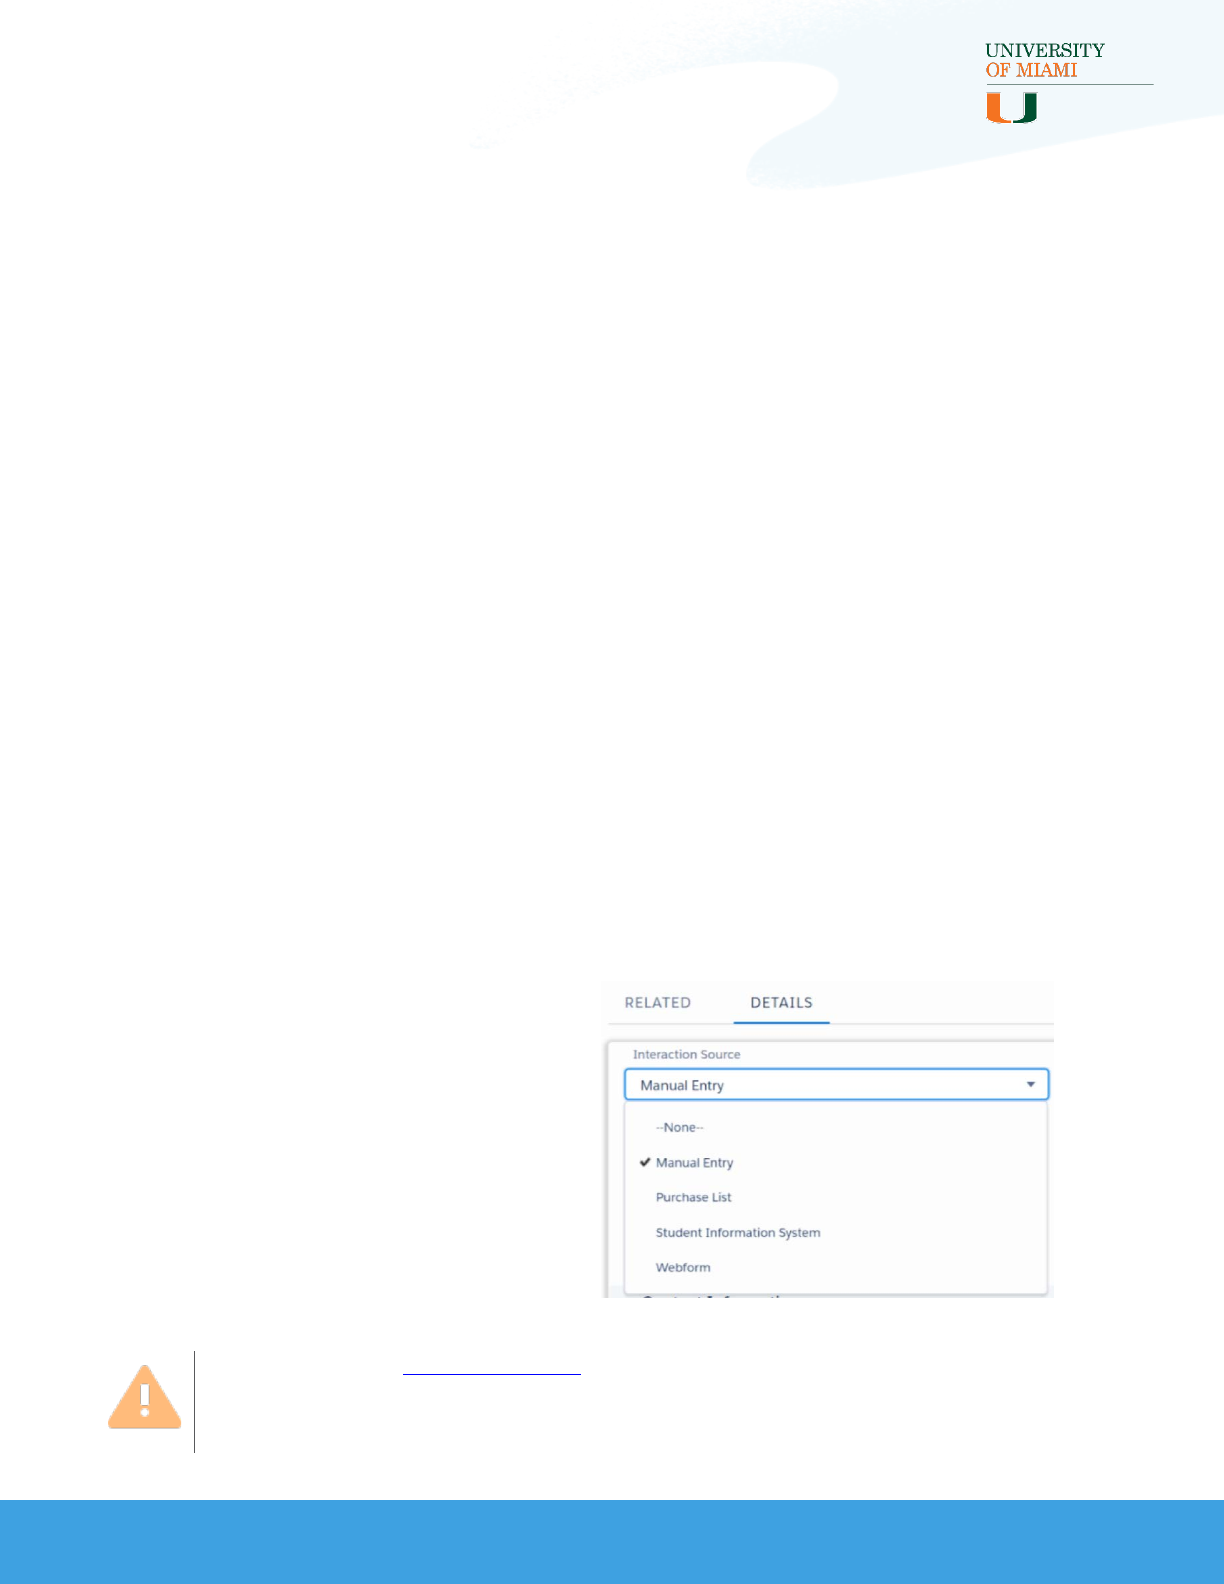
Interaction Sources
Interaction Source is a field on Interactions that tracks the method used to
create the record. The purpose of this field is different from Lead Source or
Campaigns because it tracks more technical information about the source
of the data and can be used to customize how Interaction fields are
mapped using the Skip Mapping feature of Interaction Mapping records.
Out-of-the-box, the fields (on both objects) contain the following
values:
•Manual Entry
•Purchase List
•Student Information System
•Webform
60
Note: You can add your own values to match your business
processes, but remember to add them to both Interaction Source
on Interactions and Skip Mapping on Interaction Mappings.

INTERACTIONS FOR STUDENT RECRUITMENT
INTERACTIONS INSTALLATION AND CONFIGURATION GUIDE
Interaction Sources(cont.)
Using Interaction Source with Lead Source and Campaigns
Interaction Source can be used to report on the types of Interactions being
created in the system for analysis or troubleshooting. For example, let’s say
you have a student information system (SIS) you want to integrate with
Salesforce that gathers data from a variety of different sources.
The various sources are tracked in that system. So, within the SIS, some
records were created because of a web form, others from applications, and
still others from event registrations. When you load this data into Salesforce,
you map these different source values to the Lead Source values and/or add
Contacts and Leads to the appropriate source Campaigns.
But what about recording that all of these records ultimately came from the
integration with the SIS?
This is where the Interaction Source field comes in with a value for ‘Student
Information System.’ Now, you can report on all Interactions created from
data in your SIS without losing the various sourcesof that data.
Using Interaction Source with Interaction Mappings
The Interaction Source field and values can also be used to control some
additional functionality provided through Interaction Mapping records. Each
Interaction Mapping record has a “Skip Mapping” multi-select picklist with the
same values as Interaction Source.
Any values you select in this picklist will allow the Interaction Processor (the
custom code) to treat that Interaction Mapping record as if it is inactive, when
an Interaction is created with the same value in Interaction Source. This is
most useful when dealing with unreliable data sources.
61
INTERACTIONS FOR STUDENT RECRUITMENT
INTERACTIONS INSTALLATION AND CONFIGURATION GUIDE
Interaction Sources (cont.)
Using Interaction Source with Interaction Mappings (cont.)
For example, many universities receive purchase lists containing not only
names but other data about potential students. These purchase lists can
contain great information, but sometimes the data is messy. Maybe you’ve
discovered the Salutation field is often wrong on a purchase list you routinely
load, and you don’t want it to overwrite the Contact’s Salutation field in
Salesforce every time the list is loaded.
However, you still want the data to write to the Interaction record so it can be
added later, if desired, or included in Interaction reports. To achieve this,
simply find the Salutation field’s Interaction Mapping record and update the
Skip Mapping field to include ‘Purchase List,’. The Salutation field can now be
included on the Interaction record, but the Contact‘s field will not be updated
from Interactions with an Interaction Source of ‘Purchase List.’
See the Interaction Mappings sections of this guide and visit the other
documentation for more information about Skip Mapping and other
Interaction Mapping functionality.
62

INTERACTIONS FOR STUDENT RECRUITMENT
INTERACTIONS INSTALLATION AND CONFIGURATION GUIDE
Interaction Sources (cont.)
Adding Interaction Source Values
Add or remove Interaction Source values as needed by using the following
steps:
1. Go to Setup > Object Manager > Interaction > Fields & Relationships
2. Find the “Interaction Source” field and click on the linked name to view
the current values
3. Select the New button in the Values section to add your values and Save
4. Click the Del link next to any value(s) you want to remove
5. Select the Reorder button to update the order of the values
6. Go to Setup > Object Manager > Interaction Mapping > Fields &
Relationships
7. Find the “Skip Mapping” field and click on the linked name to view the
current values
8. Click the New button in the Values section to add your values and Save
9. Click the Del link next to any values you want to remove
10.Select the Reorder button to update the order of the values (it is
recommended that the order for both fields be the same for
consistency)
63
Best Practice Nugget: Remember, if you are adding a value or values to
the “Interaction Source” field on Interactions, you should always also add
it to the “Skip Mapping” field on Interaction Mappings and vice versa.

INTERACTIONS FOR STUDENT RECRUITMENT
INTERACTIONS INSTALLATION AND CONFIGURATION GUIDE
Loading with an Integration Tool
Creating Interaction records with an integration tool is very similar to
creating them manually using the Salesforce API. First, you will need to
identify the tool you want to use.
Here are a few options:
•Salesforce Data Import Wizard
•Salesforce Data Loader
•Developer Console
•Other AppExchange apps for integration
Next, setup the tool you selected to create Interaction records and map
the fields from the source to Interaction fields. For tools like the Salesforce
Data Import Wizard or Salesforce Data Loader, this most likely means
mapping the columns from your CSV file to Interaction fields.
Confirm you have mapped all fields required to match to existing Leads
and Contacts and to create Contacts. By default, this means First Name,
Last Name and Email. If you have customized required fields or duplicate
management, those customizations should be considered.
And don’t forget about Interaction Source! Include a column or setting to
default Interaction Source to a value representing the data load to make it
easier to report on the records once they are created.
64

INTERACTIONS FOR STUDENT RECRUITMENT
INTERACTIONS INSTALLATION AND CONFIGURATION GUIDE
Best Practices -Creating Interactions
Manually
A new Interaction can be quickly created for an existing Lead, Contact, or
Opportunity using a custom Interaction creation Action on the Lead,
Contact, or Opportunity, respectively. Additionally, a custom Interaction
creation Action is included in the package for the Campaign object and as
a Global Action.
Overview of Custom Actions
The Interaction Package includes five Actions:
•Lead Interaction Action
•Contact Interaction Action
•Opportunity Interaction Action
•Campaign Interaction Action
•Global Interaction Action
The object-specific actions are extremely useful when the end user (e.g. a
recruiter) is speaking with a prospective student and has already found the
individual in the system and needs to update their data. In that moment,
the recruiter does not need to worry about determining which Opportunity
to update or whether there are duplicate Leads or Contact records in the
system.
When the Interaction is created, the full process will run and any duplicate
records found will be converted or merged automatically and any
Opportunity, Affiliation, or Campaign Members will be updated or created.
65
INTERACTIONS FOR STUDENT RECRUITMENT
INTERACTIONS INSTALLATION AND CONFIGURATION GUIDE
Overview of Custom Actions (cont.)
Each action has a different layout with fields tailored to the use case of the
object it lives on,as well as defaulted values for verifying or updating.
Other values can be defaulted without including them on the layout. All of
these custom action layouts can be customized to better match your
business processes.
There are several benefits to using actions and incorporating them into
your business processes:
•Displaying only fields that should be edited simplifies the record
creation process for the user
•Fields that can be prefilled and should not be edited can be
defaulted and hidden from the layout to further streamline the
experience
•Displayed fields can also be prefilled, resulting in less clicks and
giving users the opportunity to leave the defaulted values or update
them as applicable
•You can require fields that should be filled out for that action’s use
case that are not necessarily required every time an Interaction is
created
Best Practice Nugget: To take full advantage of actions, remove the New
button from the Interaction related lists on Lead, Contact, and
Opportunity. This will prevent users from creating Interactions from
records unless they use one of the actions. They would still be able to
create an Interaction from the Interactions Tab.
66
INTERACTIONS FOR STUDENT RECRUITMENT
INTERACTIONS INSTALLATION AND CONFIGURATION GUIDE
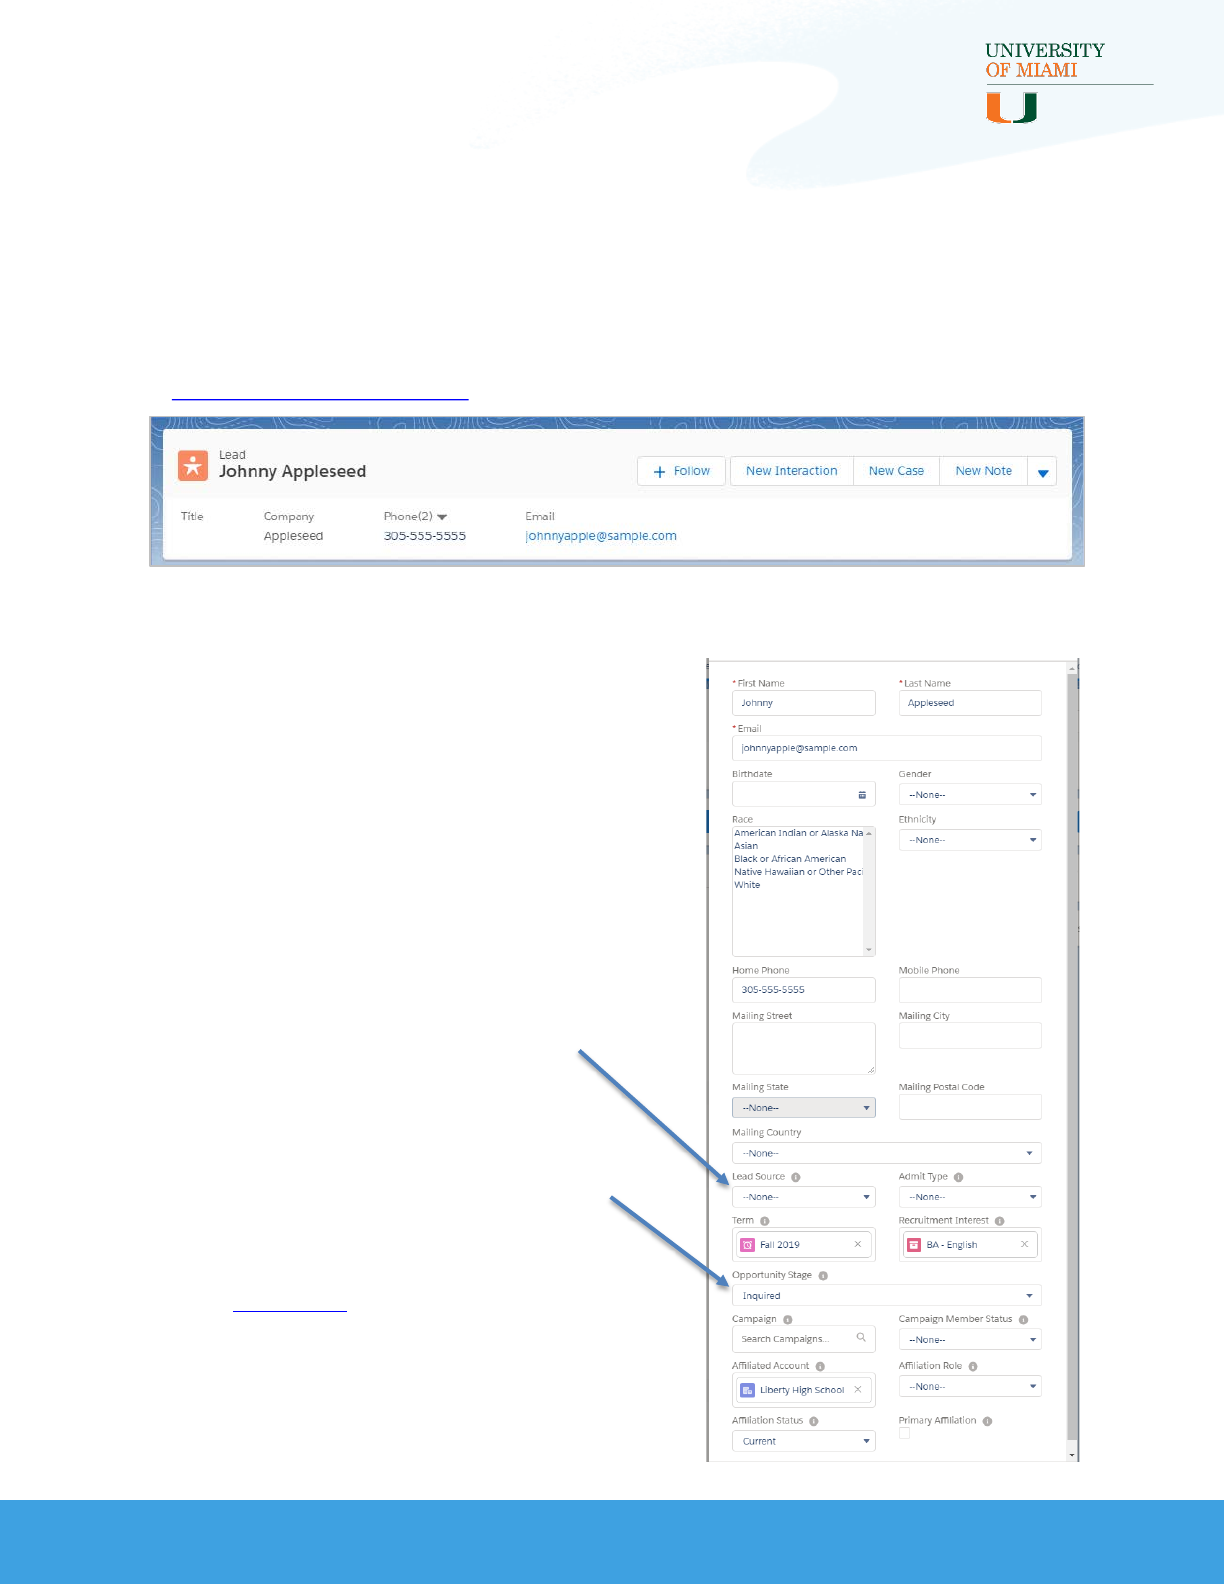
Lead Interaction Action
The Lead action defaults fields from the Lead that have values, except for
picklist fields, which are not supported. The Lead action can be launched from
the Lead using the “New Interaction” button in the top right of the record. See
the Updating Lead Layouts section if you do not see this button.
The Lead fields defaulted and displayed in the action for the out-of-the-box
package are shown in this example:
Note that picklist fields cannot be
predefined based on the existing
record’s value, as that is not currently
supported in Salesforce. Unless “Insert
Null” is selected on the corresponding
Interaction Mapping record, leaving
these fields blank (--None--) will not
push in blank values to the target
fields if they are already populated.
Picklist fields can only be defaulted to
a specific value. Be sure to take care
when predefining picklist fields.
Vote on this Idea to expand the
predefined field functionality in
custom actions to include picklists!
67
INTERACTIONS FOR STUDENT RECRUITMENT
INTERACTIONS INSTALLATION AND CONFIGURATION GUIDE
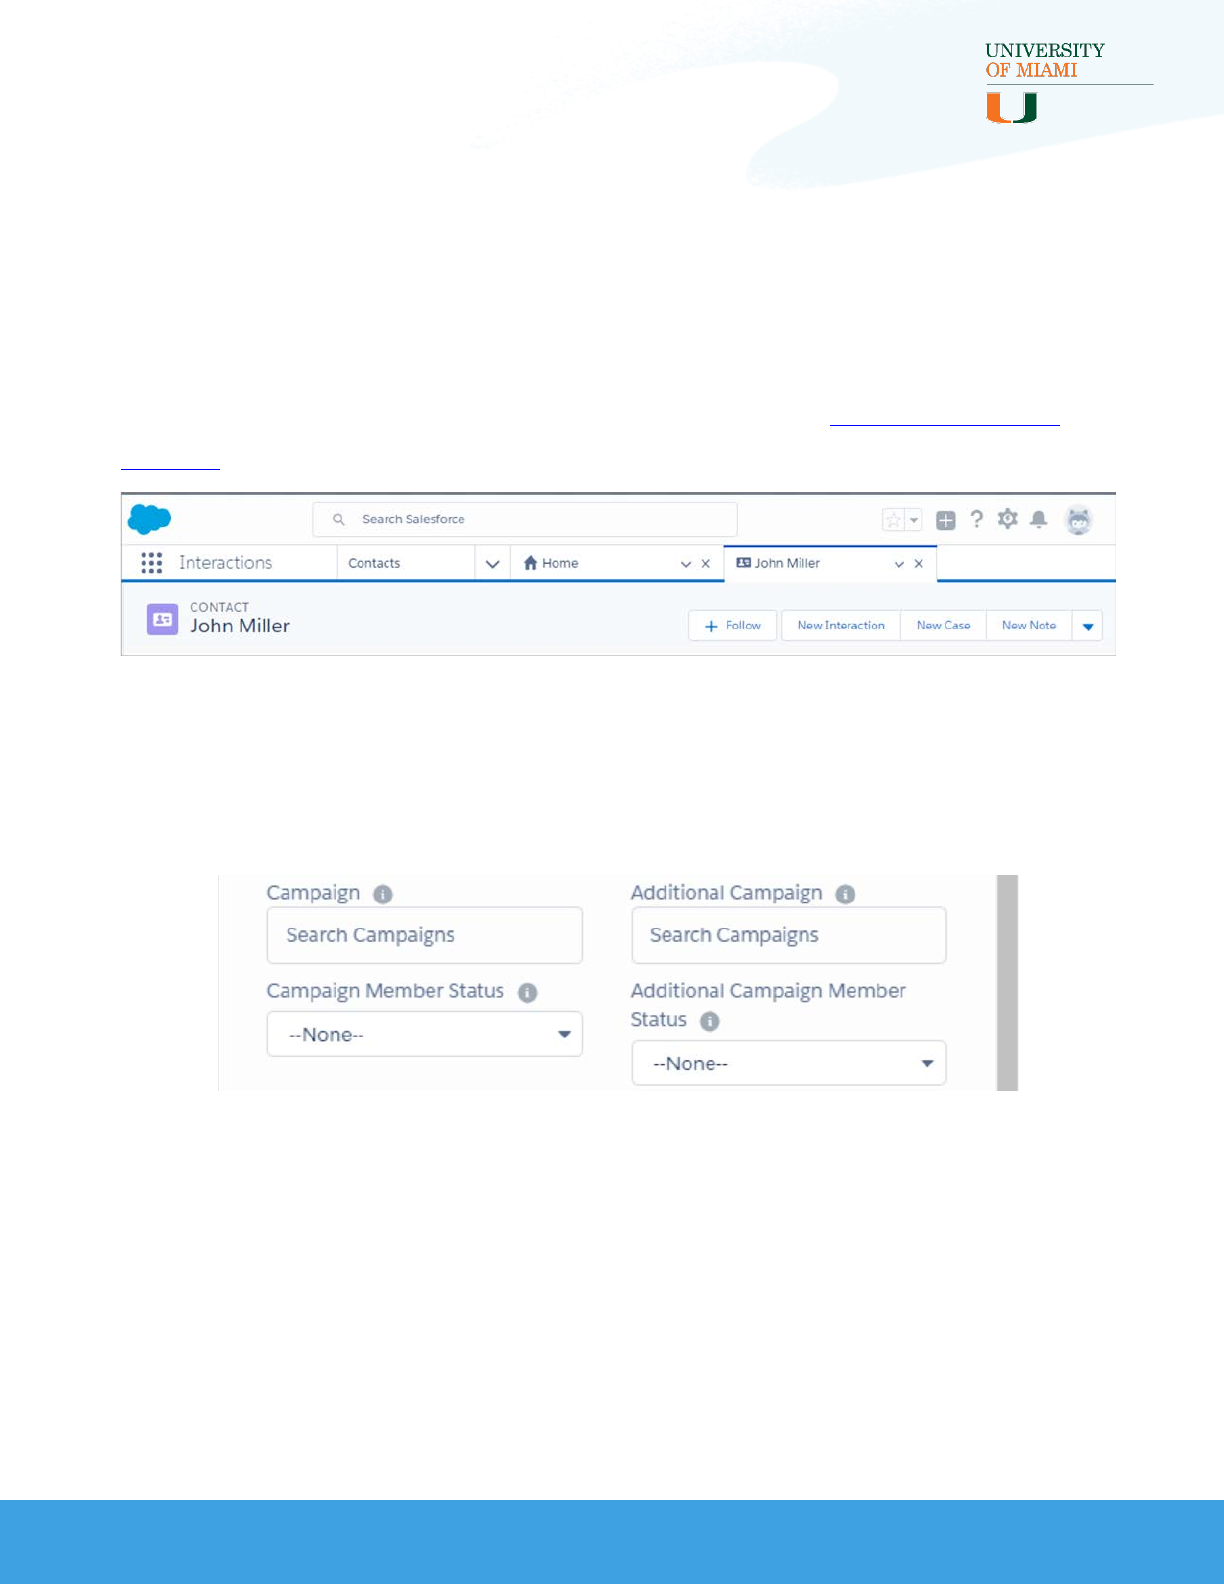
Contact Interaction Action
The Contact action defaults fields from the Contact that have values,
except for picklist fields, which are not supported.
The Contact action can be launched from the Contact using the New
Interaction button on the top right of the record. See Updating Contact
Layouts if you do not see this button.
The Contact fields defaulted and displayed in the action for the initial
package are the same as the Lead fields (seen on the previous page) with
the addition of two fields: “Additional Campaign” and “Additional
Campaign Member Status.”
68

INTERACTIONS FOR STUDENT RECRUITMENT
INTERACTIONS INSTALLATION AND CONFIGURATION GUIDE
Contact Interaction Action (cont.)
Best Practice Mega-Nugget: Note that, out-of-the-box, the Contact and
Lead action layouts house quite a few fields that collect very different
information, including bio/demo data, educational interest information
and fields for creating an Affiliation and Campaign Members.
This is because end users may use Interactions from the Lead or Contact
with the minimum data needed (e.g. Name and email) or they may need to
fill out multiple points of data and create related records (e.g. an
Opportunity via the educational interest information).
On the other hand, the Opportunity custom action (which you will see in
the next section) includes only the fields which are most important for
updating or creating new Opportunity, Affiliation, and Campaign Members
quickly.
The Campaign custom action includes the minimum bio/demo fields
needed to create a Campaign Member as well as the fields needed for
updating or creating a new Opportunity or Affiliation.
The Global custom action includes the same fields as the Lead and Contact
custom action layouts.
69

INTERACTIONS FOR STUDENT RECRUITMENT
INTERACTIONS INSTALLATION AND CONFIGURATION GUIDE
Opportunity Interaction Action
The Opportunity action defaults fields from the Opportunity and
associated Contact that have values, except for picklist fields, which are
not supported. Many of the Contact fields are defaulted and not displayed
to provide a more streamlined experience, as mentioned in the Best
Practice Mega-Nugget on the previous page. If users need to verify or
update Contact fields, the Contact-specific action should be used instead.
The Opportunity action can be launched from the Opportunity using the
New Interaction button on the top right of the record. See the Update
Object Page Layouts section if you are using an Opportunity page layout
that was not included in the package and do not see the button.
The Opportunity fields defaulted and displayed in the action for the initial
package are shown in this example:
70
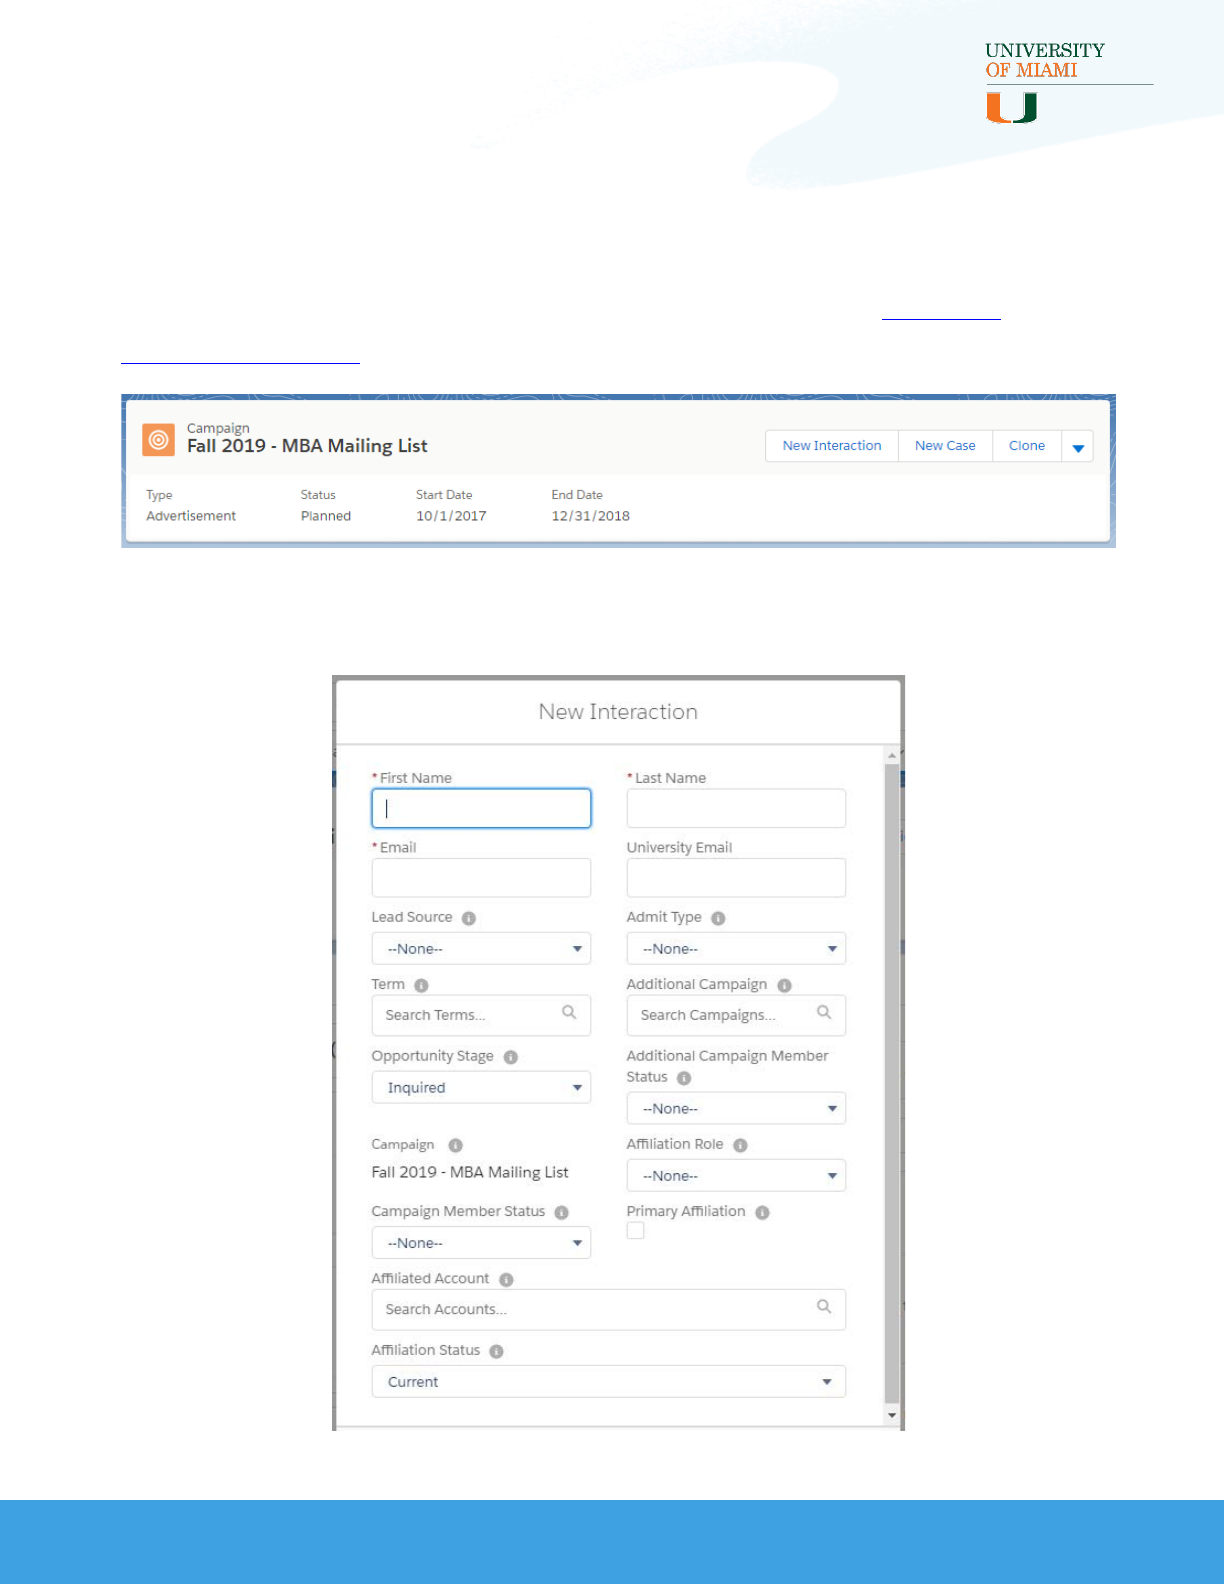
INTERACTIONS FOR STUDENT RECRUITMENT
INTERACTIONS INSTALLATION AND CONFIGURATION GUIDE
Campaign Interaction Action
The Campaign action can be launched from the Campaign using the New
Interaction button on the top right of the record. See the Updating
Campaign Layouts section if you do not see this button.
The Campaign action only defaults the Campaign from which the button
was clicked from and is shown in this example:
71
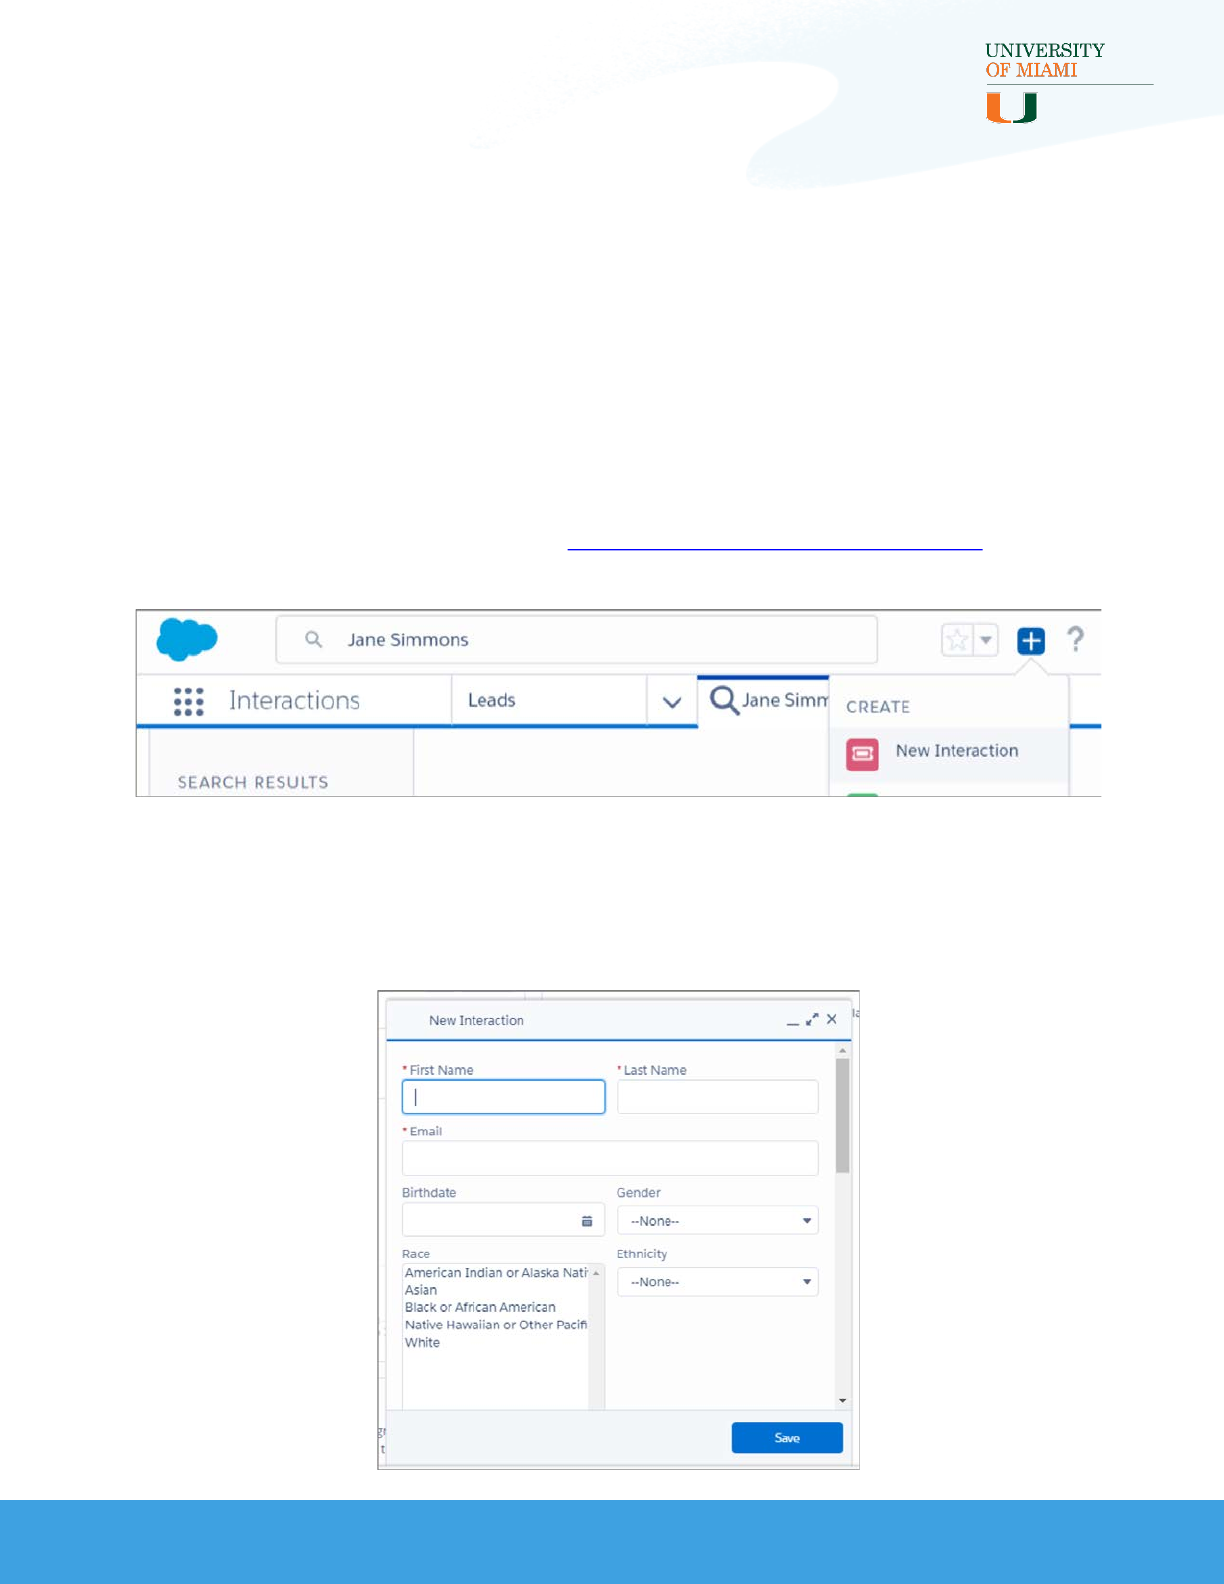
INTERACTIONS FOR STUDENT RECRUITMENT
INTERACTIONS INSTALLATION AND CONFIGURATION GUIDE
Global Interaction Action
The Global Interaction Action can be used to create an Interaction from
any screen. This is helpful when logging an Interaction for a new individual.
Users should complete the following steps to use this action:
1. Search for an existing Contact using the global search bar
2. If no existing Contact can be found, click the Global Action menu and
select New Interaction. See Navigating the Interactions App if you do
not see this button.
The action will appear in the bottom right corner of the user’s screen
where they can fill it out or view it as a pop-up, like the pop-ups on Lead,
Contact, Opportunity and Campaign that you have seen on previous pages:
72
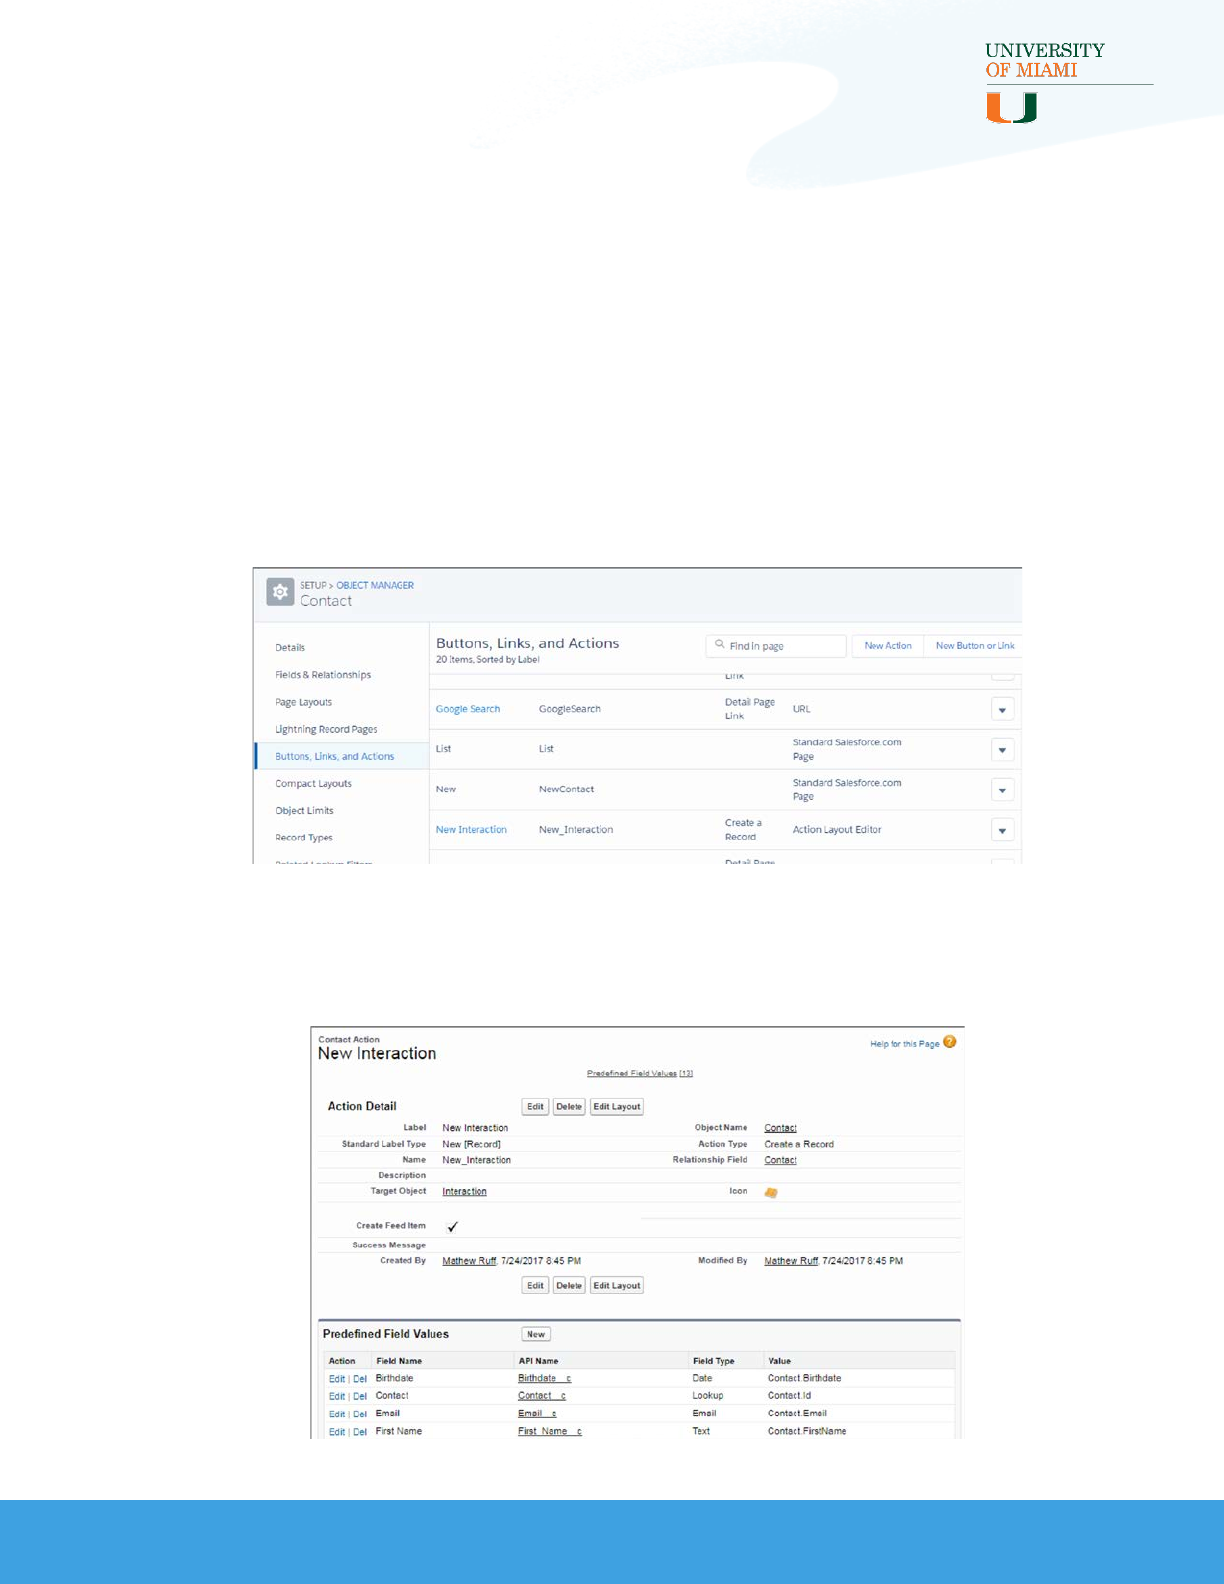
INTERACTIONS FOR STUDENT RECRUITMENT
INTERACTIONS INSTALLATION AND CONFIGURATION GUIDE
Customizing Action Layouts
You can add or remove fields from the layout and update default values on
actions to better meet your business processes.
These are the steps you would follow to customize the Contact Interaction
Action’s layout and predefined field options:
1. Go to Setup > Object Manager > Contact > Buttons, Links, and Actions
2. Find the New Interaction action and click on the linked name to open it
3. To add a default value for a field, click New in the Predefined Field
Values section, or edit an existing field’s predefined settings by clicking
the Edit link next to the field you want to update
73
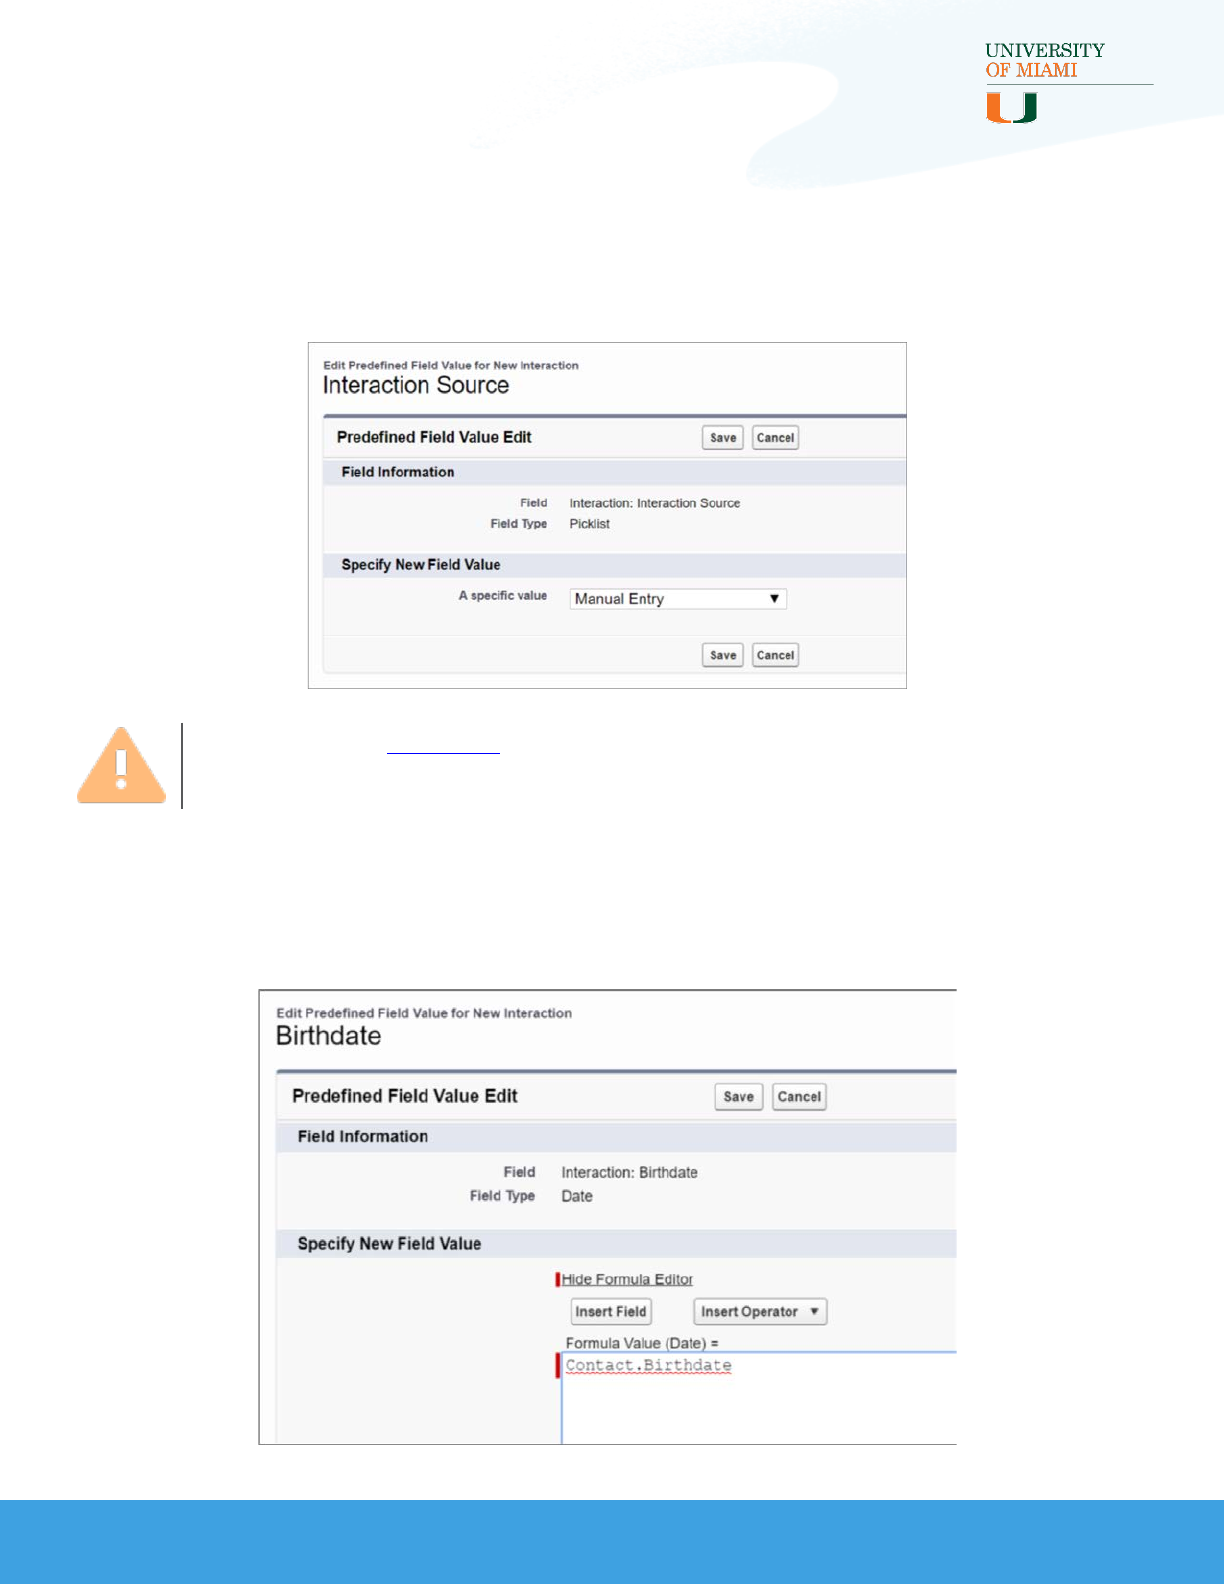
INTERACTIONS FOR STUDENT RECRUITMENT
INTERACTIONS INSTALLATION AND CONFIGURATION GUIDE
Customizing Action Layouts (cont.)
4. Picklist fields can only be defaulted to a specific value from that picklist.
Actions do not currently support using a formula to set the value
Note: Vote on this Idea to expand the predefined functionality in
custom actions to include picklists!
5. Text fields can be defaulted using a formula, such as the one below
where Interaction Birthdate is defaulted to whatever value is in the
Birthdate field on the Contact
74
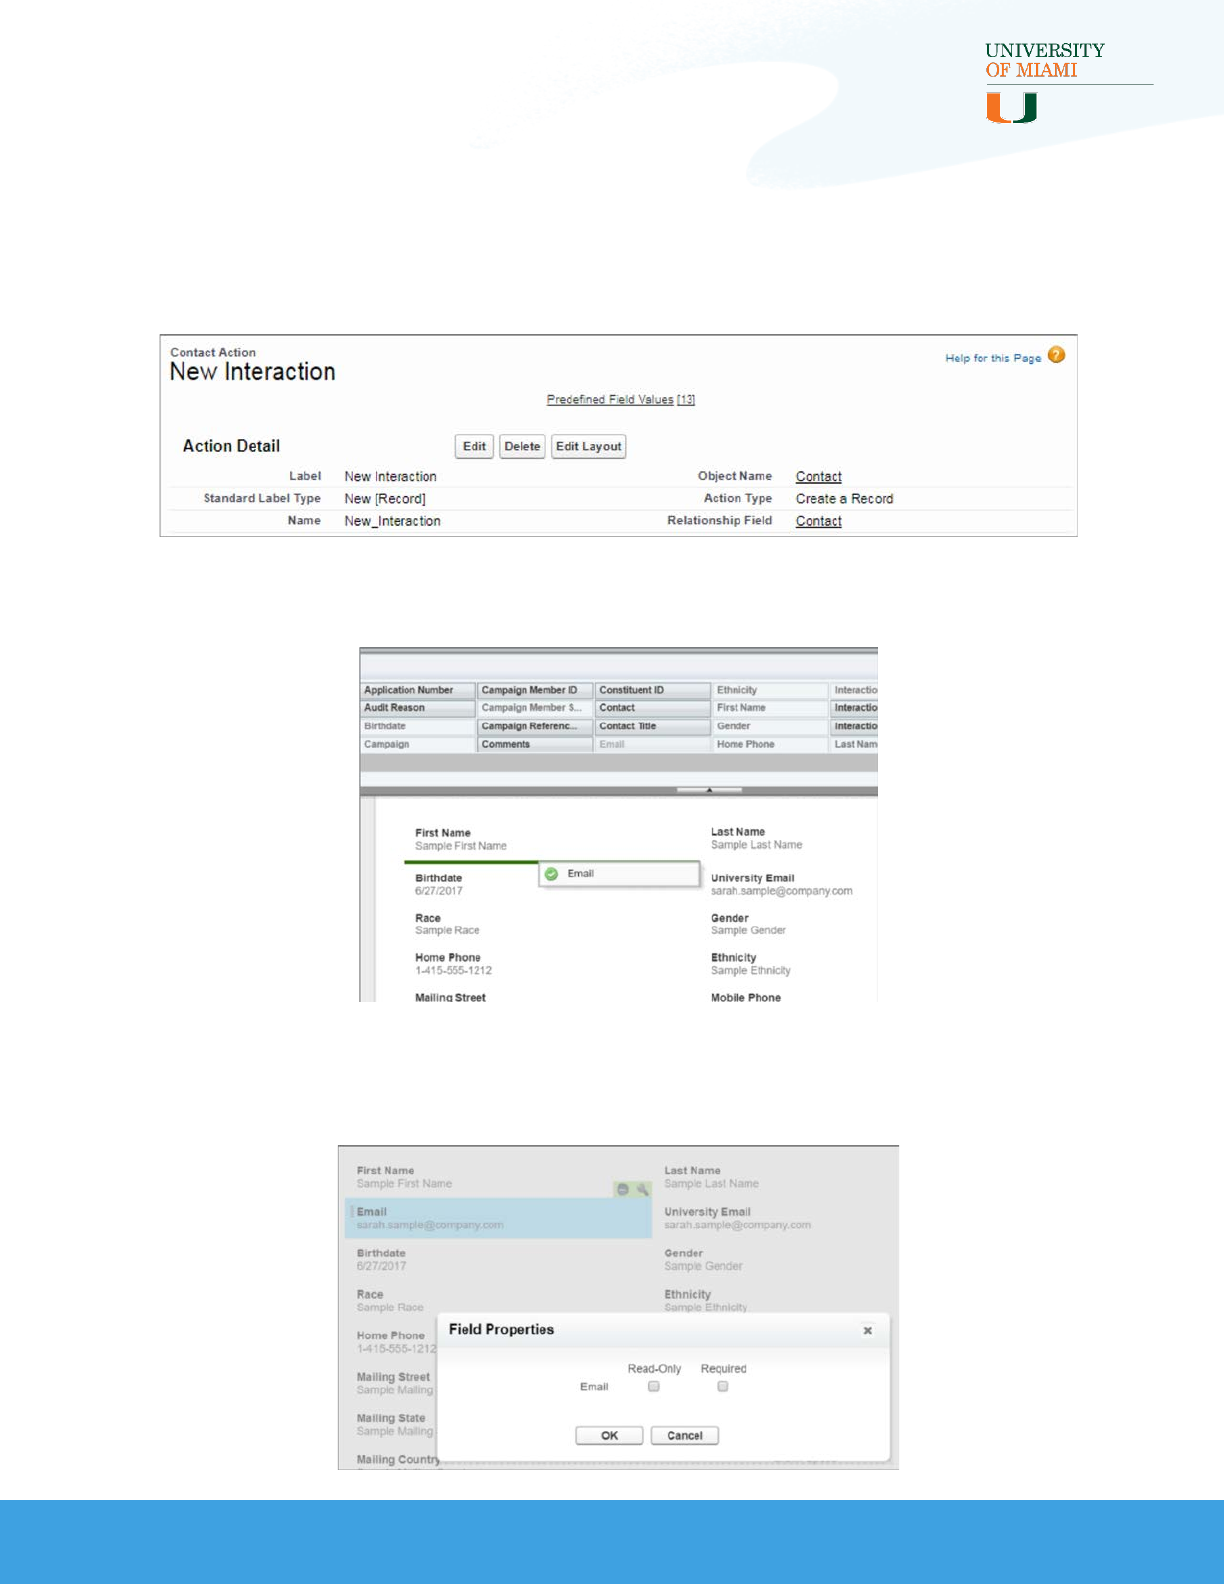
INTERACTIONS FOR STUDENT RECRUITMENT
INTERACTIONS INSTALLATION AND CONFIGURATION GUIDE
Customizing Action Layouts (cont.)
6. Update the custom action’s layout using the Edit Layout button on
the main action page
•Drag fields from the palette to the desired position, remove
fields by dragging them back to the palette
•Additionally, mark fields as “Read-Only” or “Required” by
hovering over the field and clicking the wrench icon to select
these options
75
INTERACTIONS FOR STUDENT RECRUITMENT
INTERACTIONS INSTALLATION AND CONFIGURATION GUIDE
Customizing Action Layouts (cont.)
7. Remember to always Save your changes!
Note: Use these same steps to edit the other object-specific actions
by going to Setup > Object Manager > [Object] > Buttons, Links,
and Actions, then editing the “New Interaction” action.
Use these same steps to edit the Global action by going to Setup >
User Interface > Global Actions > Global Actions, then editing the
“New Interaction” action.
76

INTERACTIONS FOR STUDENT RECRUITMENT
INTERACTIONS INSTALLATION AND CONFIGURATION GUIDE
The Affiliation Key
The Affiliation Key fields on both the Interactions and Affiliations objects
as well as the Affiliation: Update Upsert Key workflow rule work together to
determine when a new Affiliation is created or an existing Affiliation is
updated. The Affiliation Key and the corresponding workflow rule can also
be customized to better suit your business practices.
For a more technical explanation of how the Interaction’s code uses
Affiliation Keys, see “Affiliation Creation” and “Affiliation Update” in the
Technical Implementation Guide.
The Affiliation Key Out-of-the-Box
On the Interactions object, there is a formula field called Affiliation Key.
There is also a workflow rule and field update that sets the Upsert Key field
on the Affiliations object. The Affiliation Key formula field along with the
workflow rule allow the Interactions Processor to determine whether to
create new Affiliations or edit existing Affiliations.
Out-of-the-box, a new Affiliation is created for each Contact/Account
combination. This means that if a Contact has an Affiliation with a Status of
Current for a school and an Interaction is logged for the same school with
a different Status (e.g. Former), the existing Affiliation will be updated and
a new Affiliation will not be created.
77

INTERACTIONS FOR STUDENT RECRUITMENT
INTERACTIONS INSTALLATION AND CONFIGURATION GUIDE
The Affiliation Key Out-of-the-Box (cont.)
Affiliation Key Formula Field and Workflow Rule
When an Affiliation is created or edited, the “Affiliation: Update Upsert
Key” workflow rule runs that sets the Upsert Key field on the Affiliations
object to the Contact’s ID plus the Account’s ID that it is associated with
the Affiliation.
This is the formula used for the field update:
CASESAFEID(hed__Contact__r.Id)+"."+
CASESAFEID(hed__Account__r.ID)
The delivered Affiliation Key formula on Interactions is this:
Formula: IF(ISBLANK(Affiliated_Account__c), "",
"."+CASESAFEID(Affiliated_Account__r.Id))
If there is an Affiliated Account specified on an Interaction, this formula
returns the value of the Affiliated Account’s 18-digit ID. The Interaction
Processor then prepends Contact.Id once it finds or creates a Contact. If
the Affiliation Key field on the Interaction matches the Upsert Key on an
existing Affiliation, the Interaction Processor will update the matched
Affiliation. If the fields do not match, a new Affiliation record will be
created.
78

INTERACTIONS FOR STUDENT RECRUITMENT
INTERACTIONS INSTALLATION AND CONFIGURATION GUIDE
The Affiliation Key Out-of-the-Box (cont.)
Updating Affiliation Key and Workflow
You may want to update how Affiliations are matched to better fit your
business processes. For example, you may want to create separate
Affiliations for a Contact/Account combination if the Contact’s Role
changes (e.g. Student vs. Advisor).
To make this change, you need to:
1. Update the Affiliation Key formula field on Interactions by appending
Role (or another Affiliation field, depending on your business
process)
IF(ISBLANK(Affiliated_Account__c), "",
"."+CASESAFEID(Affiliated_Account__r.Id)
+"."+(Affiliation_Role__c) )
2. Update the Upsert Key: Set to Contact.Account field update by
appending Role (or another Affiliation field)
CASESAFEID(hed__Contact__r.Id)+"."+
CASESAFEID(hed__Account__r.ID) +”."+(hed__Role__c)
3. Click Activate to turn on the workflow rule
4. Test your new configuration
Note: After installing the package or making updates to the workflow
rule, remember to Activate the rule so it runs as expected. See the
Activate Workflow Rules section to learn how.
79

INTERACTIONS FOR STUDENT RECRUITMENT
INTERACTIONS INSTALLATION AND CONFIGURATION GUIDE
The Opportunity Key
Like Affiliation Key, the Opportunity Key field on Interactions and
Opportunities and the Opportunity Key Workflow Rule work together to
control how the Interactions code matches on and updates Opportunities.
For a full explanation of the Opportunity Key and how to fit it into your
recruitment model, see “Opportunities for Recruitment” in the User Guide.
For a more technical explanation of how the Interaction’s code uses
Opportunity Keys, see “Matching with Opportunity Key” in the Technical
Implementation Guide.
The Opportunity Key Out-of-the-Box
The Opportunity Key formula field on Interactions along with a workflow
rule and field update allow the Interactions process to match on
Opportunities for both a centralized (one Opportunity per Career and
Term) and decentralized (one Opportunity per Career, Interest, and Term)
recruitment model.
80

INTERACTIONS FOR STUDENT RECRUITMENT
INTERACTIONS INSTALLATION AND CONFIGURATION GUIDE
The Opportunity Key Out-of-the-Box
(cont.)
Opportunity Key Formula Field on Interactions
If the Career field on the associated Academic Interest (or Recruitment
Interest if Academic Interest is blank) is Undergraduate, the Opportunity
Key field will use the following information to match to an Opportunity
record:
Contact.Id + . + Undergraduate + . + Term.Id
If the Career field on the associated Academic Interest (or Recruitment
Interest if Academic Interest is blank) is Graduate, the Opportunity Key
field will use the following information:
Contact.Id + . + Undergraduate + . + Academic Interest.Id (or
Recruitment Interest.Id if Academic Interest is blank) + . + Term.Id
If this setup matches your recruitment business processes, there is no
need to make changes to the key.
81

INTERACTIONS FOR STUDENT RECRUITMENT
INTERACTIONS INSTALLATION AND CONFIGURATION GUIDE
The Opportunity Key Out-of-the-Box
(cont.)
Activating Opportunity Key Update Workflow
The Opportunity: Update Opportunity Key workflow rule runs every time an
Opportunity record is edited and the Opportunity Key field is not equal to the
expected value based on the Career field on the Academic Interest (or
Recruitment Interest if Academic Interest is blank). This is important if your
organization allowsusers to update or create Opportunities outside the
Interactions process.
You will need to activate this rule after installing the package:
1. Go to Setup > Process Automation > Workflow Actions > Workflow
Rules
2. Open the “Opportunity: Update Opportunity Key” workflow rule by
clicking on the name
3. Click the Activate button
82

INTERACTIONS FOR STUDENT RECRUITMENT
INTERACTIONS INSTALLATION AND CONFIGURATION GUIDE
The Opportunity Key Out-of-the-Box
(cont.)
Updating Opportunity Key and Workflow
If the keys provided out-of-the-box do not represent unique Opportunities
for your Undergraduate or Graduate recruitment processes, you will need
to update the Opportunity Key formula field on Interactions and the
Opportunity: Update Opportunity Key workflow rule and field update.
For example, if your university does not plan to recruit for Graduate
programs in Salesforce, you will need to update the key.
Follow these steps to use only the centralized process and ignore
Career:
1. Go to Setup > Object Manager > Interaction > Fields and
Relationships
2. Edit the “Opportunity Key” formula field
3. The new key should be as follows (comments are surrounded by /* */
and not necessary for the functionality of the formula)
/*The below formula allows for a decentralized recruitment
model.*/
/*If both Academic Interest and Recruitment Interest are blank,
the formula is blank, which means the record is missing
important information and no Opportunity will be created.*/
IF(Academic_Interest__c + Recruitment_Interest__c = "", "",
"."+CASESAFEID(Term__r.Id))
83

INTERACTIONS FOR STUDENT RECRUITMENT
INTERACTIONS INSTALLATION AND CONFIGURATION GUIDE
The Opportunity Key Out-of-the-Box
(cont.)
Updating Opportunity Key and Workflow (cont.)
4. After saving the formula changes, go to Setup > Process Automation
> Workflow Actions > Workflow Rules
5. Edit the Opportunity: Update Opportunity Key Workflow Rule to
match the 18-digit Contact ID followed by the Opportunity Key from
step 3
Opportunity_Key__c <> CASESAFEID(Contact__r.Id) + "."+
CASESAFEID(Term__r.Id)
6. After saving the workflow rule changes, go to Setup > Process
Automation > Workflow Actions > Field Updates
7. Edit the “Opportunity Key: Set Based on Career” Field Update
8. Change the name of the update rule if needed (example:
“Opportunity Key: Set to Contact + Term”)
9. Set the formula to match the 18-digit Contact ID followed by the
Opportunity Key from step 3
CASESAFEID(Contact__r.Id) + "."+ CASESAFEID(Term__r.Id)
10.Click Save and make sure the associated workflow rule is Active
84

INTERACTIONS FOR STUDENT RECRUITMENT
INTERACTIONS INSTALLATION AND CONFIGURATION GUIDE
Connect an Additional Object
It is possible to add functionality to the Interactions process by connecting
an additional object. While it involves click configuration, it also requires a
developer who understands the Apex code.
Please keep the following in mind when considering adding processes to
the Apex code:
•Additional processes add API Calls and could slow down processing
times when importing or manually creating Interactions. Always
follow Salesforce Best Practices to reduce the impact and avoid
hitting limits. See the Trigger and Bulk Request Best Practices and
Execution Governors and Limits Developer Guide articles for
additional information.
•Salesforce requires unit tests that cover a minimum of 75% of the
code before it can be deployed in Production, but a higher
percentage is preferred. Consider the best practices outlined in the
How to Write Good Unit Tests Apex Developer Guide article.
85

INTERACTIONS FOR STUDENT RECRUITMENT
INTERACTIONS INSTALLATION AND CONFIGURATION GUIDE
Connect an Additional Object (cont.)
Here are the required steps:
1. Log into a sandbox environment (Apex cannot be edited directly in
Production)
2. Create the new object or identify an existing object
3. Add fields to the object, if applicable
4. Add matching fields to the Interaction object
5. Update the Apex code with the additional processes
6. Update the Apex test code with additional tests
7. Update the Target Object API Name picklist on Interaction Mappings
to include the API Name for the new object
8. Create Interaction Mapping records for the fields added. See the
“Interaction Mappings” section of the Technical Implementation
Guide for more information
86

INTERACTIONS FOR STUDENT RECRUITMENT
INTERACTIONS INSTALLATION AND CONFIGURATION GUIDE
Connect an Additional Object (cont.)
For more information about developing in Apex, review the following
Salesforce resources:
Trailhead Modules:
•Apex Basics & Database
•Apex Triggers
•Apex Testing
•Asynchronous Apex
Developer Guides:
•Apex Quick Start
•Apex Developer Guide
•Trigger and Bulk Request Best Practices
•Execution Governors and Limits
•How to Write Good Unit Tests Apex
87

INTERACTIONS FOR STUDENT RECRUITMENT
INTERACTIONS INSTALLATION AND CONFIGURATION GUIDE
User Permissions and Security Models
Delivered Permission Set
Interactions for Student Recruitment comes with the permission set
“Create Interactions.” This permission set includes access to the app,
objects and fields a user needs to create Interaction records in a standard
way. The permission set also includes access to view (not edit or create)
Interaction Mapping records. Feel free to edit this permission set, assign it
to users on a case-by-case basis, or use it as a starting point for creating or
adding to a user profile.
Follow these steps to access the permission set:
1. Go to Setup > Users > Permission Sets
2. Select Create Interactions
3. Review or make updates and Save
88

INTERACTIONS FOR STUDENT RECRUITMENT
INTERACTIONS INSTALLATION AND CONFIGURATION GUIDE
How Interactions Handles Your Security
Models
Different universities have different needs when it comes to data security.
The way this package uses the Opportunity object, for example, could pose
security concerns for some universities because these records hold
information concerning the potential student’s recruitment interests and,
possibly, sensitive personal information. The departments within your
university may be open to sharing their Opportunity data or they may want
to keep it to themselves.
The Interaction Processor has full access to all records in Salesforce. This
means if an Interaction is created by a user that matches a Contact they
cannot see because of sharing settings, that Contact will still be updated.
The out-of-the-box design assumes if a person has access to edit an
Interaction field and that field is mapped to another field in the system, it
has permission to write to it.
If this design does not meet your security requirements, you will need to
update the way the Apex code is written to consider field-level security as
well as sharing rules for the user who kicks off the Interaction Process. You
may instead want to limit the users who have access to update
Interactions, or at least remove their edit access to Interaction fields that
are mapped to sensitive fields.
For more information on Security in Salesforce, see the Data Security
Trailhead Module.
89

INTERACTIONS FOR STUDENT RECRUITMENT
INTERACTIONS INSTALLATION AND CONFIGURATION GUIDE
Reports and Dashboards
Included with the package are some new report types, sample reports and
two dashboards.
The delivered report types are:
Report Type
Name
Objects (in order
of primary,
secondary,
tertiary)
Report
Type
Category
Sample Report Name(s) and
Use Case Example
Campaigns with
Contacts with
Opportunities
Campaign, Contacts,
Opportunities Campaign
This report type can be used to
bring in data from Campaigns,
Contacts and Opportunities. The
sample report “Campus Visit
Academic Info“ allows recruiters to
quickly see Campaign Member’s
academic interest information per
Campus Visit Campaign along with
Campaign Member’s Contact
information.
Contacts with
Opportunities
Contacts,
Opportunities
Accounts &
Contacts
This report type shows only
Contacts with Opportunities. The
sample report “Opportunities
Stage Pipeline"shows all
Opportunities and their stages. The
details of the report provide the
recruiter with the prospective
student’s Contact information.
90
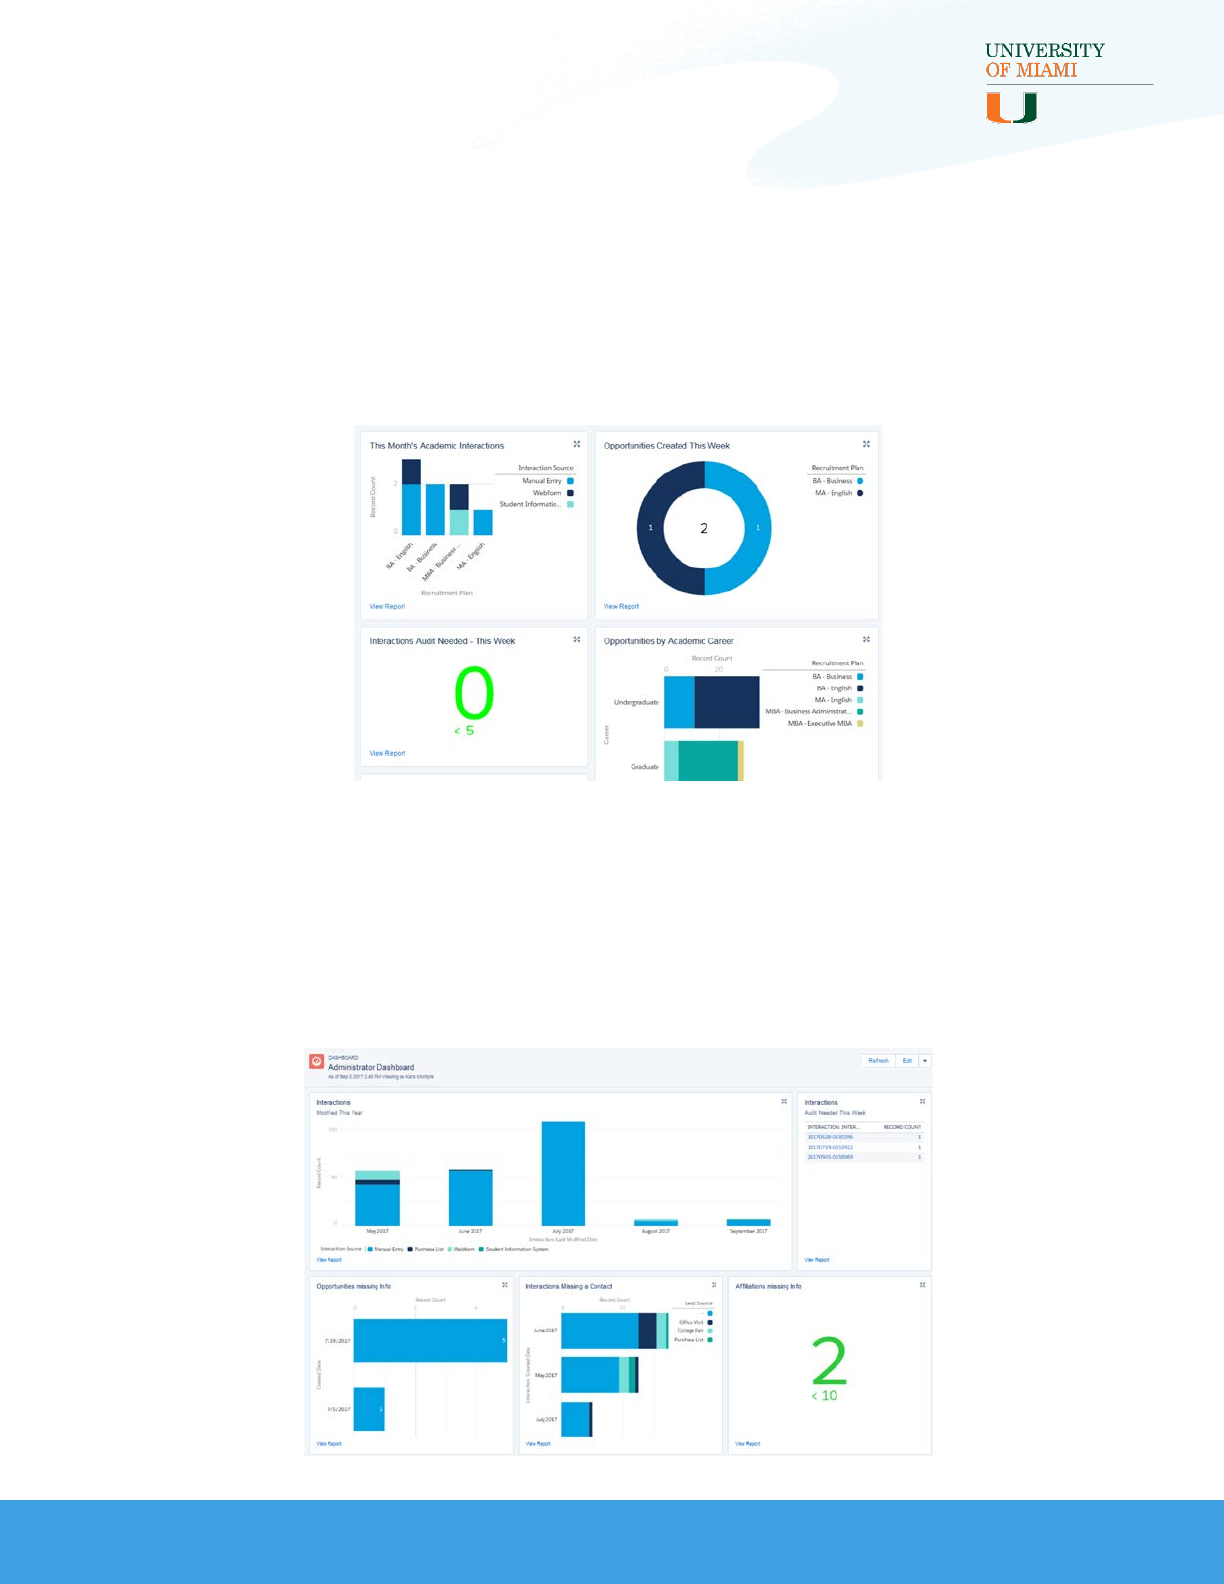
INTERACTIONS FOR STUDENT RECRUITMENT
INTERACTIONS INSTALLATION AND CONFIGURATION GUIDE
Recruiter Dashboard
The Recruiter Dashboard was designed with recruiters’ needs in mind. It
contains reports on incoming Interactions by Creation Date, Opportunities
by Creation Date and Interest, Opportunities by Academic Career,
Campaign reports, Lead Source reports, and more.
Administrator Dashboard
The Administrator Dashboard was designed to help administrators catch
problems with configuration, data loads, or manual entry of Interactions
after implementing Interactions for Student Recruitment.
91

INTERACTIONS FOR STUDENT RECRUITMENT
INTERACTIONS INSTALLATION AND CONFIGURATION GUIDE
Test Your Configuration
The following are the minimum tests you should complete to confirm your
configuration is working. Depending on the extent of your Interaction
Mappings and customizations, additional testing may be needed.
Create a New Contact Using an
Interaction
1. Click on the Global Actions dropdown and select ‘New Interaction’
2. Fill out any fields you want to test, making sure to enter values in the
fields required for your matching rules, and Save the record
3. A confirmation message should appear to show the record was
created, with the record name appearing as a green link. Click on
this link to open the Interaction record.
4. Confirm the Interaction Status is ‘Imported,’ all expected values
appear in the fields you filled out, and there is a link to the created
Contact in the bottom left of the record
5. Click on the linked Contact and confirm that all expected fields are
filled out there as well
Note: If the “Interaction Status” is not ‘Imported,’ confirm all
required fields on the records you plan to create are filled out. If any
values are missing on the Interaction record, confirm the Global
Action is configured correctly. If any values are missing on the
Contact, confirm there are Interaction Mapping records for the
missing fields. If any fields are missing from the Interaction or
Contact, confirm the Page Layouts are correct.
92

INTERACTIONS FOR STUDENT RECRUITMENT
INTERACTIONS INSTALLATION AND CONFIGURATION GUIDE
Update a Contact Using an Interaction
1. Click on the Global Actions dropdown and select ‘New Interaction’
2. Fill out any fields you want to test with slightly different information,
making sure to enter the same values from Create a new Contact
using an Interaction in the fields required for your matching rules,
and Save the record
3. A confirmation message should appear to show the record was
created, with the record name appearing as a green link. Click on
this link to open the Interaction record.
4. Confirm the Interaction Status is ‘Imported,’ all expected values
appear in the fields you filled out, and there is a link to the created
Contact in the bottom left of the record
5. Click on the linked Contact and review that all expected fields are
updated there as well
6. Click on the Relatedtab on the Contact and find the Interactions
Related List. There should be two Interactions Records, one from Test
1 and one from this current test
Note: If the Interaction creates a new Contact instead of updating
the existing Contact, confirm all fields required for your Lead and
Contact matching rules have values that match the existing Contact,
check the standard Lead Mappings on the Lead Object, make sure all
fields have Interaction Mappings, and review the matching rules to
confirm the Lead rule matches the Contact rule and they are set up
as outlined in this document.
93

INTERACTIONS FOR STUDENT RECRUITMENT
INTERACTIONS INSTALLATION AND CONFIGURATION GUIDE
Create an Opportunity Using an
Interaction
1. Go to a Contact record and click on the New Interaction Action
2. Fill out any fields you want to test, making sure to enter the values
required for the Opportunity Key
3. A confirmation message should appear to show the record was
created, with the record name appearing as a green link. Click on
this link to open the Interaction record.
4. Confirm the Interaction Status is ‘Imported,’ all expected values
appear in the fields you filled out, and there is a link to the created
Contact and Opportunity in the bottom left of the record.
5. Click on the linked Contact and review that all expected fields are
updated there as well
6. Click on the Related tab on the Contact, find the Opportunities
Related List, and click on the Opportunity that should be there
7. Review the fields on the Opportunity to confirm all expected fields
are updated there
8. Look at the related list section to the right of the record and confirm
the Contact is listed in the Contact Roles section
Note: If the Interaction is not at ‘Imported,’ confirm all required
fields for Opportunity have been filled out, and Opportunity key on
Interaction is the same as the Opportunity Key being set through the
workflow rule. If the Opportunity is missing values, confirm the fields
have Interaction Mappings, the Action is configured correctly, and all
values from the Interaction are acceptable. If the Opportunity is
missing fields, review the page layout.
94

INTERACTIONS FOR STUDENT RECRUITMENT
INTERACTIONS INSTALLATION AND CONFIGURATION GUIDE
Update an Opportunity Using an
Interaction
1. Go to a Contact record and click on the New Interaction Action
2. Fill out any fields you want to test, making sure to enter the same
values required for the Opportunity Key from Create an Opportunity
using an Interaction
3. A confirmation message should appear to show the record was
created, with the record name appearing as a green link. Click on
this link to open the Interaction record.
4. Confirm the Interaction Status is ‘Imported,’ all expected values
appear in the fields you filled out, and there is a link to the Contact
and Opportunity in the bottom left of the record
5. Click on the linked Contact and review that all expected fields are
updated there as well
6. Click on the Related tab on the Contact, find the Opportunities
Related List, and click on the Opportunity that should be there,
confirming there is no duplicate
7. Review the fields on the Opportunity to confirm all expected fields
are updated there
Note: If the Interaction created a new Opportunity instead of
updating an existing one, confirm the Opportunity key on Interaction
is the same as the Opportunity Key being set through the workflow
rule, and the formulas match the key on the existing Opportunity.
95

INTERACTIONS FOR STUDENT RECRUITMENT
INTERACTIONS INSTALLATION AND CONFIGURATION GUIDE
Create an Affiliation Using an Interaction
1. Go to the Opportunity record and click on the New Interaction
Action
2. Fill out any fields you want to test, making sure to enter the values
required for the Affiliation Key
3. A confirmation message should appear to show the record was
created, with the record name appearing as a green link. Click on
this link to open the Interaction record.
4. Confirm the Interaction Status is ‘Imported,’ all expected values
appear in the fields you filled out, and there is a link to the created
Contact in the bottom left of the record
5. Click on the linked Contact and review that all expected fields are
updated there as well. If you set the Affiliation as Primary, confirm
the Account you used is linked in the appropriate Primary Affiliation
field on the Contact.
6. Click on the Related tab on the Contact, find the Affiliations Related
List, and click on the Affiliation that should be there
7. Review the fields on the Affiliation to confirm all expected values are
there
Note: If the Affiliation was not created or values are missing, confirm
all required fields are filled out and have Interaction Mappings. If
Affiliation fields are missing, check the page layout. If values are
missing or not what is expected, confirm the Action on Opportunity is
configured correctly and all values from the Interaction are formatted
correctly.
96

INTERACTIONS FOR STUDENT RECRUITMENT
INTERACTIONS INSTALLATION AND CONFIGURATION GUIDE
Update an Affiliation Using an Interaction
1. Go to the Opportunity record and click on the New Interaction Action
2. Fill out any fields you want to test with slightly different values that are
not part of the key (example: Role), making sure to enter the same
values required for the Affiliation Key from Create an Affiliation Using an
Interaction
3. A confirmation message should appear to show the record was created,
with the record name appearing as a green link. Click on this link to
open the Interaction record.
4. Confirm the Interaction Status is ‘Imported,’ all expected values appear
in the fields you filled out, and there is a link to the created Contact in
the bottom left of the record
5. Click on the linked Contact and review that all expected fields are
updated there as well. If you set the Affiliation as Primary, confirm the
Account you used is linked in the appropriate Primary Affiliation field on
the Contact.
6. Click on the Related tab on the Contact, find the Affiliations Related
List, and click on the Affiliation that should be there, confirming there is
not a duplicate now
7. Review the fields on the Affiliation to confirm all expected values are
there
Note: If the Interaction Status is not at ‘Imported,’ confirm the
Affiliation Key field on the Interaction is built the same way as the
Affiliation Key Workflow Rule. If the Interaction created a new Affiliation
instead of updating an existing one, confirm the values entered from
the Affiliation Key match the original Affiliation.
97

INTERACTIONS FOR STUDENT RECRUITMENT
INTERACTIONS INSTALLATION AND CONFIGURATION GUIDE
Add a Campaign Member Using an
Interaction
1. Go to a Campaign record and click on the New Interaction Action
2. Fill out any fields you want to test. If you want to create a new Contact,
use new values, otherwise use the same values from Update a Contact
Using An Interaction. Make sure the Campaign is set, a Campaign
Member Status is set, and it is a value that is part of the Campaign.
3. A confirmation message should appear to show the record was created,
with the record name appearing as a green link. Click on this link to
open the Interaction record.
4. Confirm the Interaction Status is ‘Imported,’ all expected values appear
in the fields you filled out, and there is a link to the created Contact in
the bottom left of the record
5. Click on the linked Contact and review that all expected fields are
updated there as well
6. Click on the Related tab on the Contact, find the Campaign History
Related List, click on the down arrow at the far right of the Campaign
Member that should be there, and select Edit (this is the easiest way to
view the record)
7. Review the fields on the Campaign Member to confirm they are there,
and select Cancel to close the record
Note: If the Campaign Member was not created, confirm the Campaign
Member Upsert Key on Interactions is set the same way as the
Campaign Member Key Workflow rule. If the Campaign Member Status
is incorrect, go to the Campaign, click on the Related tab, and confirm
the status you chose is listed as an available status. If the Campaign
Member is missing values, confirm the fields have Interaction Mappings.
If the Campaign Member is missing fields, check the page layout.
98
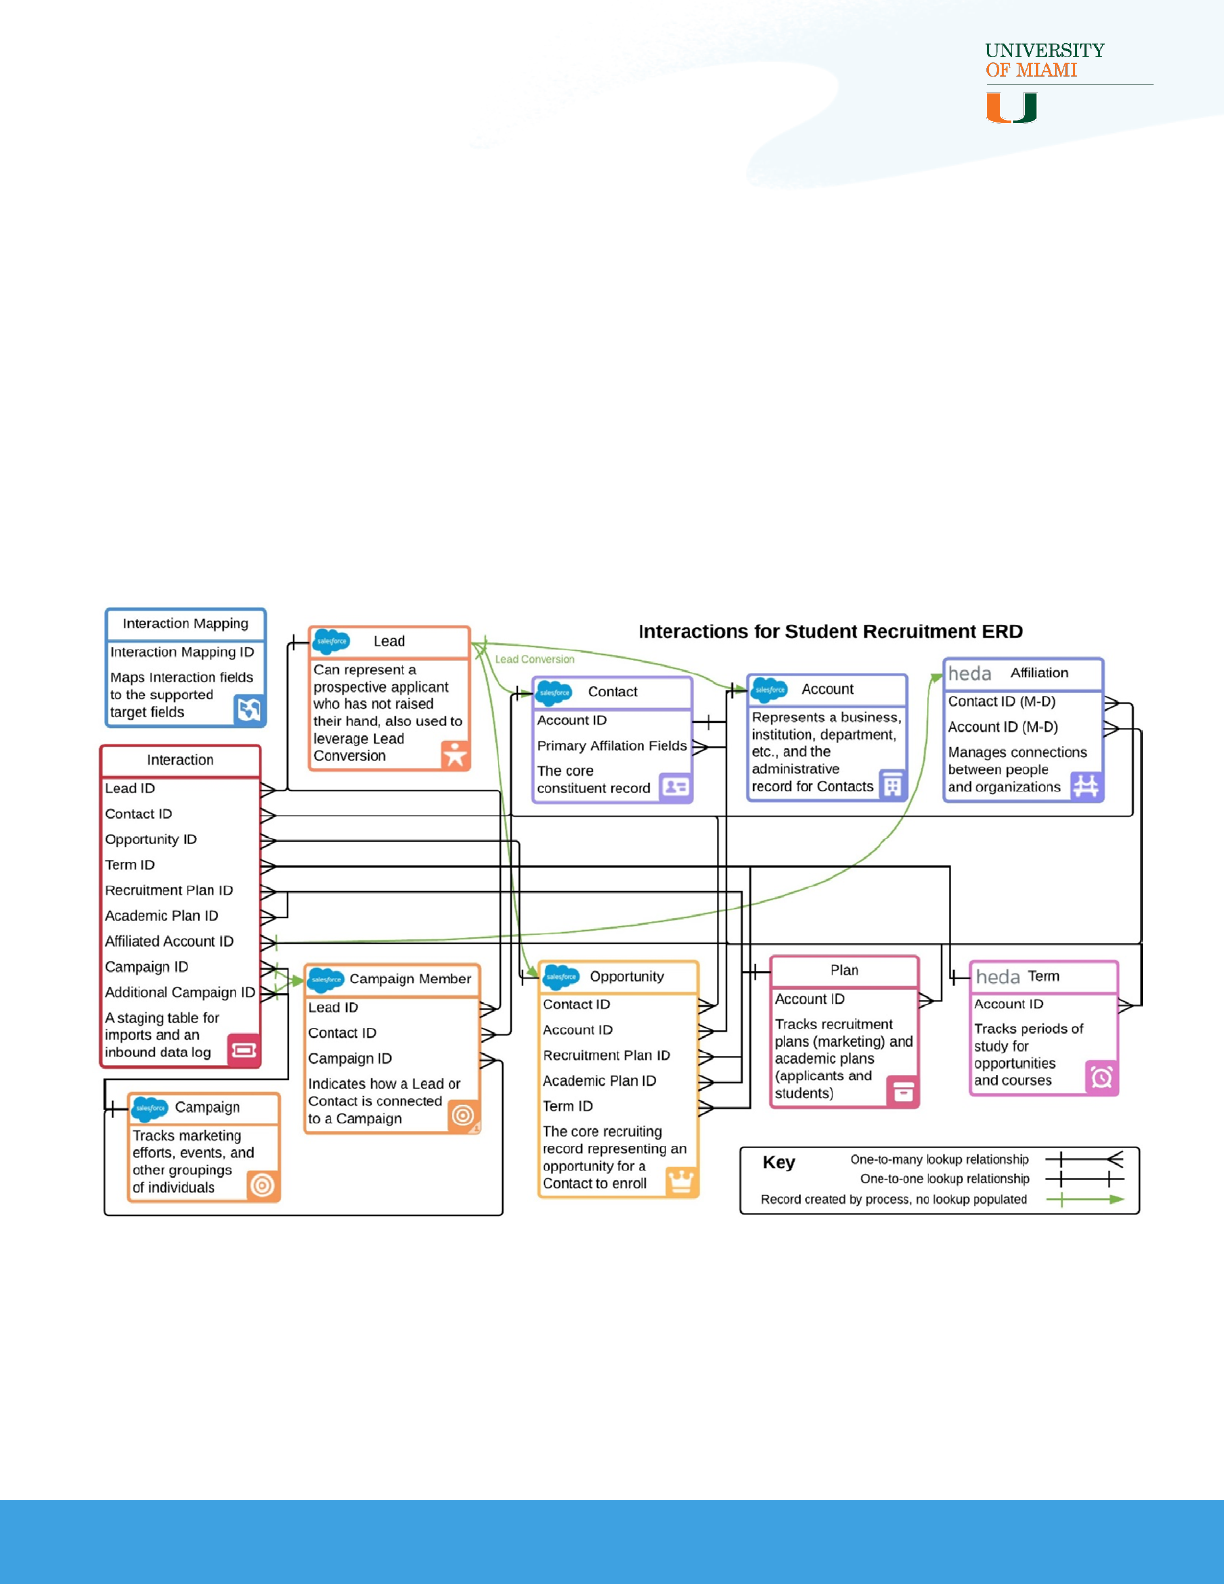
INTERACTIONS FOR STUDENT RECRUITMENT
INTERACTIONS INSTALLATION AND CONFIGURATION GUIDE
Appendix
Interactions for Student Recruitment ERD
The icon in the top left of each object box indicates whether the object is
a standard Salesforce object or a HEDA custom object. If there is no icon,
the object is a new custom Interactions for Student Recruitment object.
Additionally, green lines represent the a process of record creation.
99
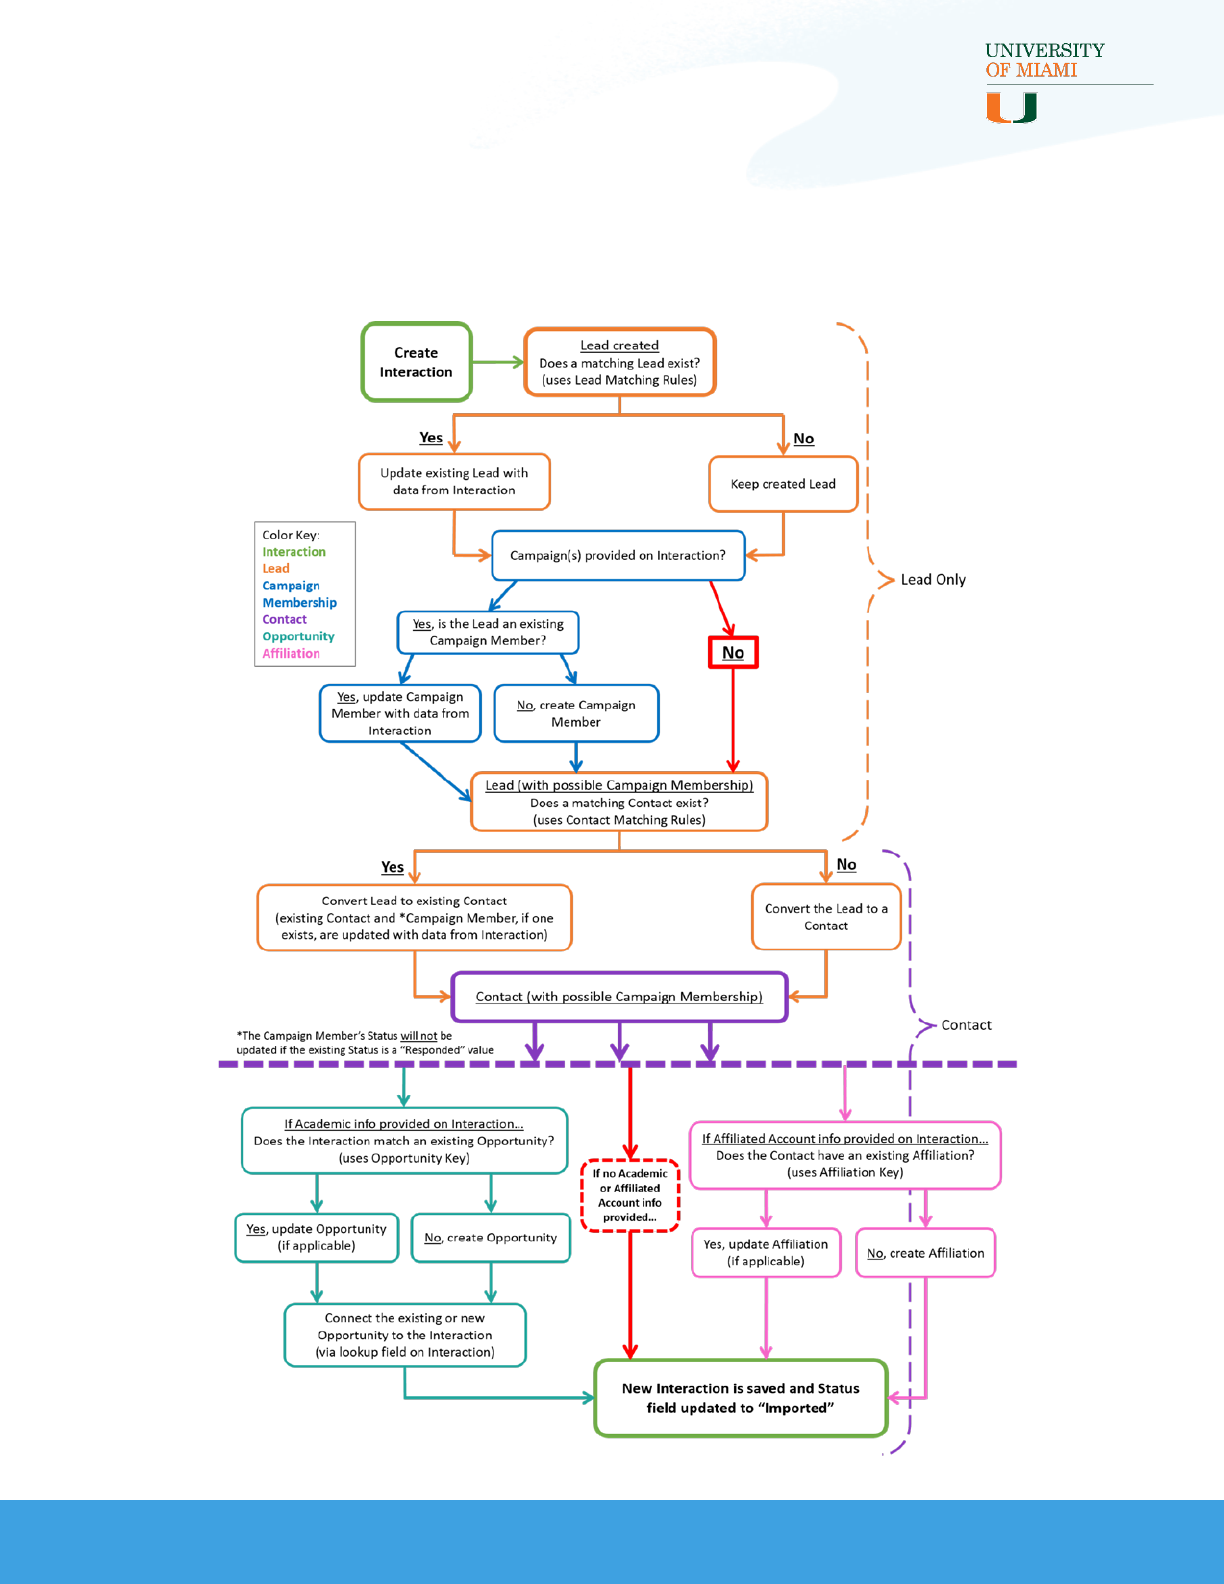


INTERACTIONS FOR STUDENT RECRUITMENT
INTERACTIONS INSTALLATION AND CONFIGURATION GUIDE
Interactions Data Dictionary
The Data Dictionary can be found here in the Interactions for Student
Recruitment GitHub repository.
Interactions for Student Recruitment
Unmanaged Package
The links for the downloadable, unmanaged package are located in the
GitHub Repository. There are two links, one for Sandbox Installation and
one for Installation in a Production or Developer Org.
Interactions for Student Recruitment
GitHub repository
The GitHub repository, containing all documentation and custom code
associated with Interactions for Student Recruitment, can be found here.
Other Resources
•User Guide
•Technical Implementation Guide
•HEDA Documentation
•Power of Us Hub Chatter Group
102
