ASCII Art Instructions
User Manual:
Open the PDF directly: View PDF ![]() .
.
Page Count: 24

ASCII Art


ASCII Art
ASCII (pronounced “askey”) art is art made with characters that
you type on a keyboard. It is popular on message boards because of
the ease of which it can be copy and pasted.
_
/\\
\ \\ \__/ \__/
\ \\ (oo) (oo)
\_\\/~~\_/~~\_
_.-~===========~-._
(___/_______________)
/ \_______/

ASCII Art
Every since the typewriter was created, people have enjoyed creating
art out of text.
________________________
< Hi Python Programmers! >
------------------------
\ ^__^
\ (oo)\_______
(__)\ )\/\
||----w |
|| ||

In this session
IWe are going to explore the Pillow library.
IThe Pillow library is used to open images.
I
If you are wondering how it got the name “Pillow”, it is because
the older version was called “PIL” (for “Python Image Library”).
IThe library in Python is still named “PIL”.

In this session
We are going to auto-generate ASCII art. Here’s the theory.
1. Take a color image.
2. Convert it to grayscale.
3. Chop it up into smaller blocks.
4. Compute the average color of each block.
5. Pick out an alphanumerical character with the same
black-to-white ratio as the grayscale image.
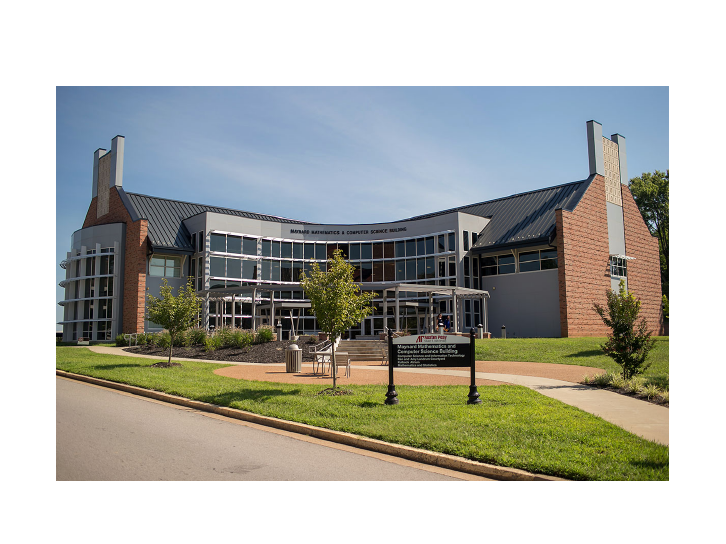
Color Image
Figure 1:
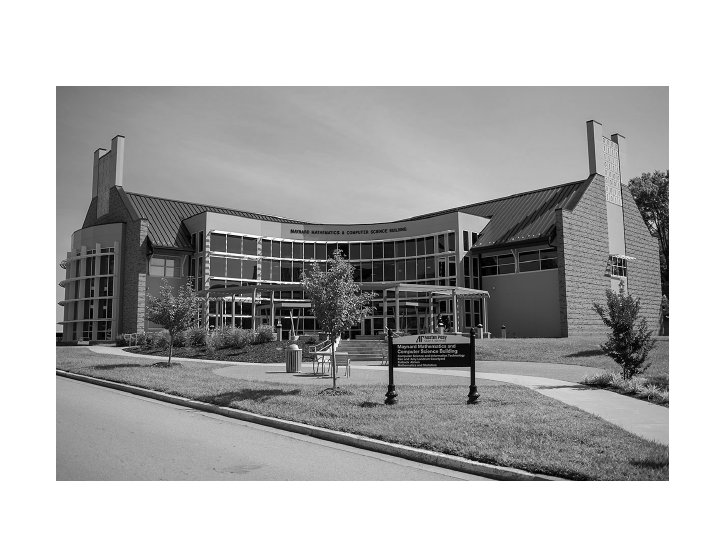
Grayscale Image
Figure 2:
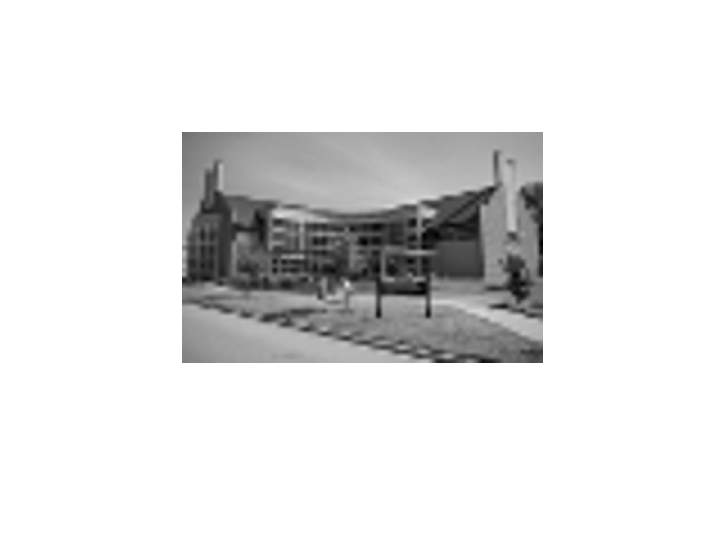
Chop into parts and compute average
Figure 3:

Select a alphanumerical character for each square.
+++++++==================-========================
+++++=================-------------==-----=+======
+++**=======-------------------------------+-----=
+++##++======------------------------===+**+=-=**#
==*#%%#***#*+=========-----===+++=+######*+==-+*#%
=*########%%+++++++***##########*+##%%%%%*===-=++%
+####%#***%%+**++*##**#*%%%%#%%##%@%%###%*===*+++%
+#%##%*****#####*######**#######*########*==+**++#
*#%%#%**####***###%#%%%###%##%##*%########==+#%*+#
**+++*********#*#****++++**%####%@*++++++++**#%%**
++++*++++++++=++++++=++====*=====++===----=+******
=====--====+*****++++++++++*++++++++++++===----==+
=========--------====++++**+++++++++++++++++++++==
+++=============-----------==+=+++*************###

Hopefully you get the idea.
(Not all images turn out great.)
(But several do!)

How do we select a character?
$@B&MokbdqwmO0QCJUXzcunxjft\|(1{}?+>lI:\"^`'.
ISome characters use more ink from a printer than others.
I
For example, you’ll need more ink to print the “$” than to print
the “.”.
IThe other characters exist somewhere in between.
IIf we rank these characters from “most ink” to “least ink”, we
can create ASCII art.
The above sequence is one such ranking of characters. The
characters on the left use more ink than the ones on the right.

Code
Let’s write some code. Here are the import statements and the
grayscale variable. Make sure that you get the grayscale characters
in order.
import numpy as np
from PIL import Image
gscale = "@%#*+=-:. "

Averaging Code
This code will compute the average of an image passed to it. We
will pass it tiny, cropped samples of the full image.
def computeAverage(image):
im = np.array(image)
w,h = im.shape
return np.average(im.reshape(w*h))

Converting code.
This code will open an image, convert it to grayscale, and then
determine how large we should make our ASCII art. The number of
columns on an image will typically be 80. Everything else is
computed based on that.
def convertImageToAscii(fileName, cols, scale):
image = Image.open(fileName).convert('L')
W, H = image.size
print("input image dims: %d x %d" % (W, H))
w = W // cols
h = w // scale
rows = int(H // h)

Converting code.
This is still inside of “convertImageToAscii”. This determines if our
image is big enough.
print("cols: %d, rows: %d" % (cols, rows))
print("tile dims: %d x %d" % (w, h))
if cols > W or rows > H:
print("Image too small for specified cols!")
exit(0)

Converting code.
Again, still inside of “convertImageToAscii”. This code will compute
how wide to create a crop slice. Why do we have that
if
statement?
asciiImg = []
for j in range(rows):
y1 = int(j*h)
y2 = int((j+1)*h)
if j == rows-1:
y2 = H
asciiImg.append("")

Converting code.
Again, still inside of “convertImageToAscii” and inside of our “for j
in range(rows)” loop. Now that we have the y’s figured out, time
for the x’s.
for i in range(cols):
x1=i*w
x2=(i+1)*w
if i == cols-1:
x2 = W

Converting code.
Again, still inside of “convertImageToAscii” and inside of our “for i
in range(cols)” loop (which is inside of another loop). Time to crop
the image and figure out a character.
img = image.crop((x1, y1, x2, y2))
avg = int(computeAverage(img))
asciiImg[j] += gscale[int((avg*len(gscale))/255)]

Converting code.
Again, still inside of “convertImageToAscii”. This is after all of the
loops. This code will return our image.
return asciiImg

The main function.
We begin by asking for an image filename and an output file name.
def main():
imgFile = input("Enter an filename to read: ")
outFile = input("Enter the output file to write: ")

The main function.
Still inside the main function. Here, we call “convertImageToAscii”
with our requested image.
scale = 0.43
cols = 50
print('generating ASCII art...')
asciiImg = convertImageToAscii(imgFile, cols, scale)

Open a file for writing.
Still inside the main function. Here, we open a file and write our
asciiImg list of strings to the file. Make sure that you close the
file!
f = open(outFile, 'w')
for row in asciiImg:
f.write(row + '\n')
f.close()
print("ASCII art written to %s" % outFile)

Last bit.
After main. You need this to call the main function.
main()
Try it out! Look for images on Google Image Search and run them
through the ASCII art generator.
