Instructions
User Manual:
Open the PDF directly: View PDF ![]() .
.
Page Count: 10
1
Creating Custom Trail Maps with QGIS,
Strava, and ArcGIS API for JavaScript 4
Prerequisite Software
Visual Studio Code Setup
Installation
1. Go to: https://code.visualstudio.com/
2. Click the green Download button.
3. Select the Windows installer.
4. Run through the defaults.
Add Live Server Extension
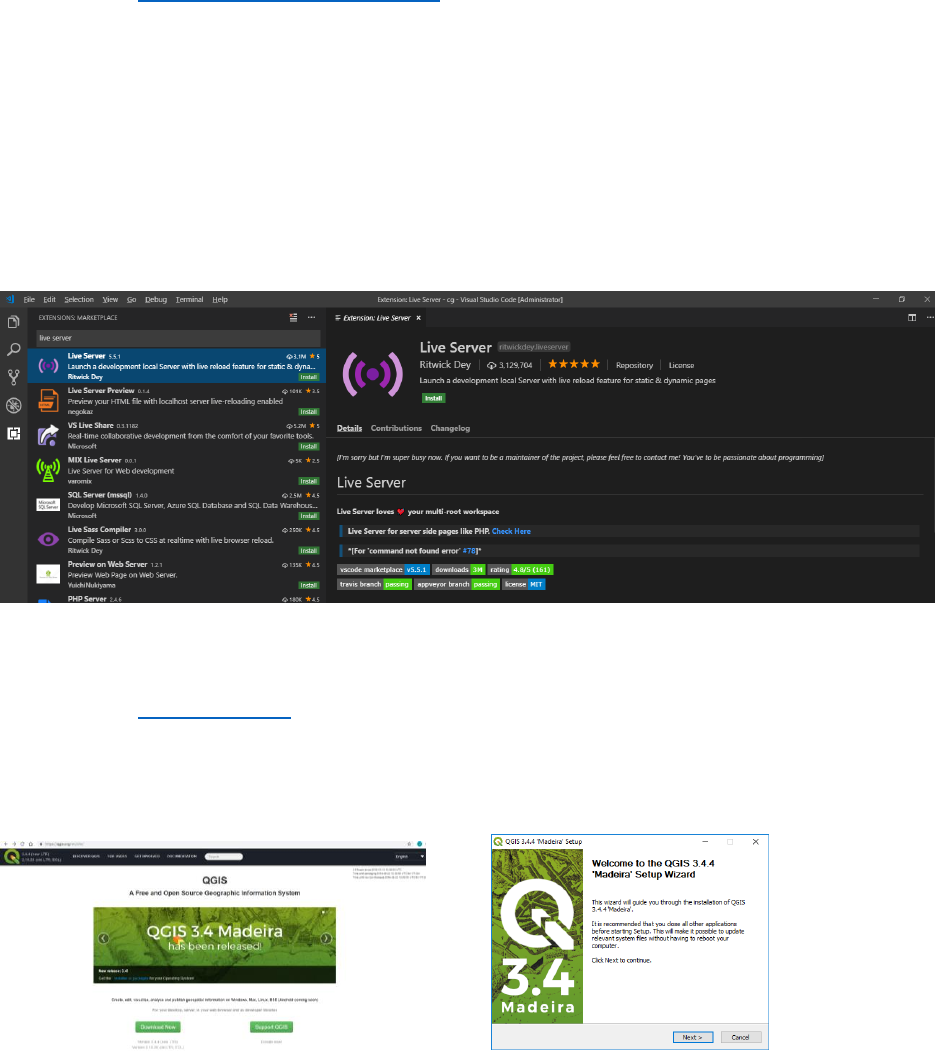
1. Open the VS Code.
2. On the left navigation bar, click the Extensions (box in a box) menu item.
3. Search for “live server.”
4. Click the green Install button.
QGIS Setup
Installation
1. Go to: https://qgis.org
2. Click the Download Now button.
3. Choose QGIS Standalone Installer Version 3.4. (64-bit)
4. Run the executable. Choose all the defaults.

2
Add QuickOSM Plugin
1. In the top menu, select Plugins, Manage and Install Plugins.
2. Search for OpenStreetMap to narrow the list of plugins.
3. Select and Install QuickOSM.
3
Collecting Trail Data
Boyd’s Big Tree Preserve
Query OpenStreetMap to get a GeoJSON file of the trails in Boyd’s Tree Preserve.
Query OpenStreetMap
1. Open QGIS Desktop
2. On the left browser navigation, expand XYZ Tiles and select OpenStreetMap
3. Use the mouse to zoom into the Boyd’s Big Tree Preserve area north of Harrisburg.
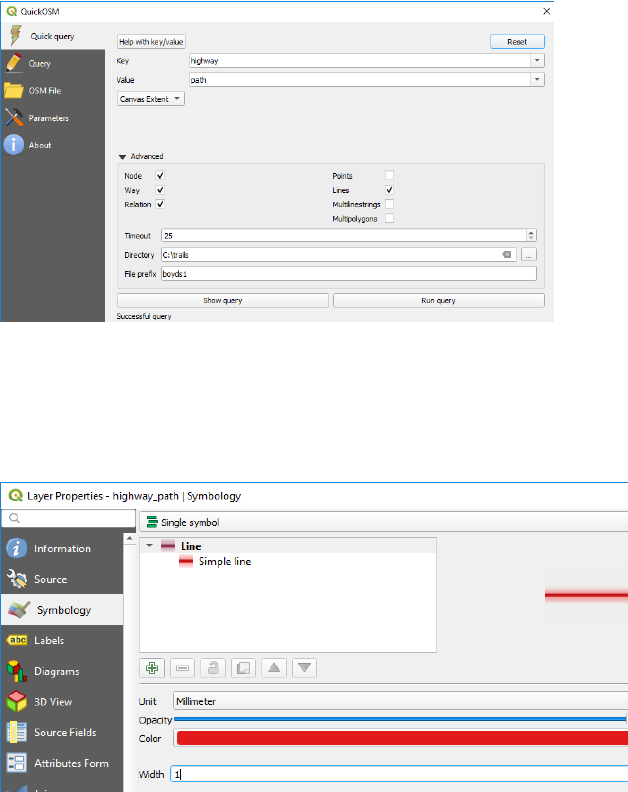
4. In the top menu, under Vector, select QuickOSM.
5. Enter the Key: highway
6. Enter the Value: path
7. Change the In to Canvas Extent.
8. Under Advanced, choose only lines on the right.
9. Select an output directory and a file prefix.
10. Click the Run query button.
11. Inspect in a text editor the .geojson file created in your output directory. Notice the
coordinates.
12. Close QuickOSM.
13. On the left in the layers section, click the line symbol to edit symbology.
14. Change the width to 1 and the color to red to make the layer more visible.
15. Click OK.

4
Greenbelt
Query OpenStreetMap to get a GeoJSON file of the Harrisburg Greenbelt. Add additional line
features to fill in the gaps.
Query OpenStreetMap
1. Open QGIS Desktop
2. On the left browser navigation, expand XYZ Tiles and select OpenStreetMap
3. Use the mouse to zoom into Harrisburg.
4. In the top menu, under Vector, select QuickOSM…
5. Enter the Key: name
6. Enter the Value: Capital Area Greenbelt.
7. Change the In to Canvas Extent.
8. Under Advanced, choose only lines on the right.
9. Select an output directory
10. Enter a file prefix.
11. Click the Run query button.
12. Close QuickOSM.
13. On the left in the layers section, click the line symbol to edit symbology.
14. Change the width to 1 and the color to green to make the layer more visible.
15. Click OK.
Adding and Editing Features
1. Zoom into an area where you want to add features.
5
2. Select the layer in the Layers list.
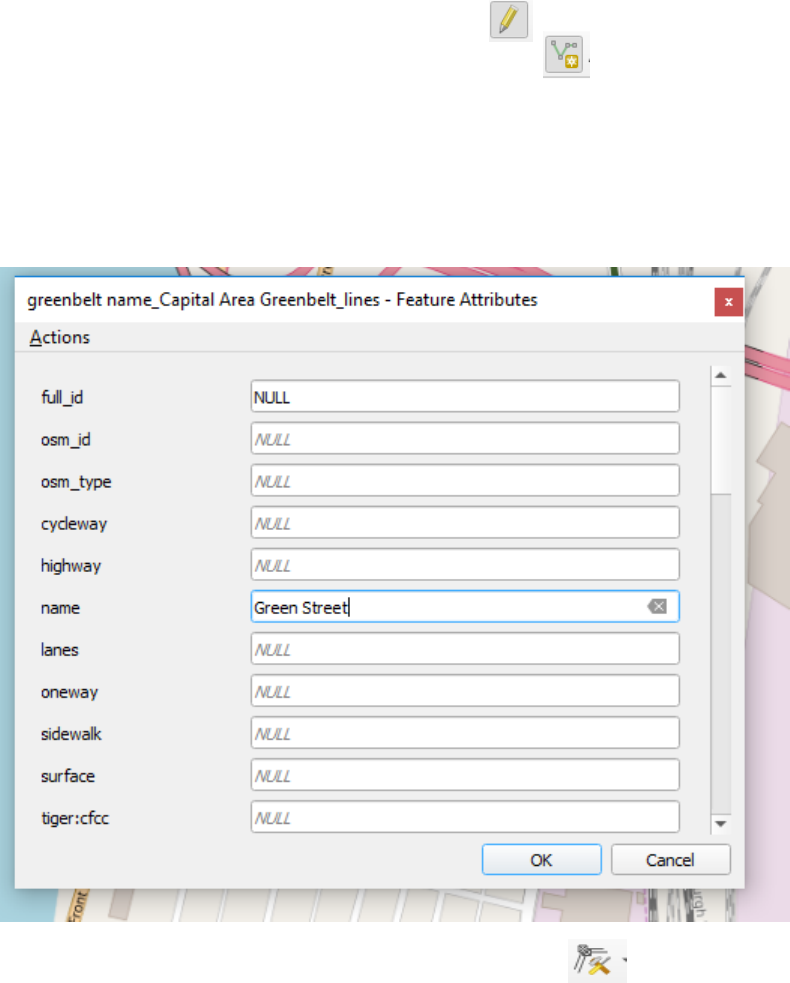
3. Click on the Pencil to Toggle into editing mode.
4. Click the Add Line Feature button.
5. Click on the map to start drawing a line feature.
6. Keep clicking points to add segments to the feature.
7. Right click to finish a feature.
8. Enter any feature attribute data as desired.
9. Click Ok.
10. Click on the Vertex tool to edit the lines as needed
11. Click the Pencil button to toggle out of edit mode.
12. When asked if you want to save changes, click Save.
13. Notice the geojson file has been updated.
6
Trails from Strava
Export trail data from Strava and convert the data to GeoJSON format. This assumes you have a
Strava account with previous activities recorded.
Export GPX File from Strava
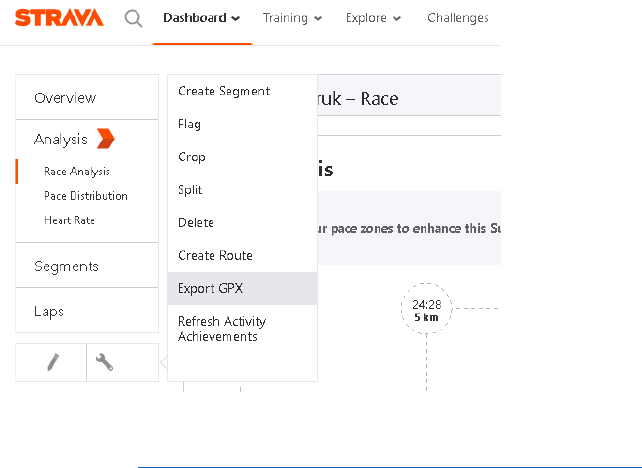
1. Login to Strava.
2. Select your training log.
3. Pick an activity from the calendar.
4. Under Overview, click on the Actions (Wrench) button.
5. Select Export GPX. The GPX file should then download to your computer.
6. Open the GPX file in a text editor. Notice the datestamp, coordinates, and elevation.
Convert the GPX file to GeoJSON
1. Go to: https://mygeodata.cloud/converter/gpx-to-geojson
2. Upload your GPX file to convert.
3. When asked what input layers, select only tracks.
4. Click Convert Now.
5. Get the downloaded tracks.geojson file.
6. Inspect the tracks.geojson file in a text editor. Notice all the coordinates in one feature.

7
Displaying Trail Data on an ArcGIS Map
Download Demo files from Github Repository
1. Go to the Url: https://github.com/jimlawruk/geodev2019
2. Clone or download the Repository into a geodev2019 folder on your desktop.
3. Copy the 0-blankMap.html to a new file called demo.html.
Blank Map
Create a simple map using the ESRI ArcGIS JS API.
1. Open Visual Studio Code.
2. In the top menu, select File, Open Folder. Select the geodev2019 folder.
3. In the explorer on the left, select the demo.html file.
4. Review the code responsible for a simple map.
5. In the bottom of the editor, click the Go Live link to launch the html page in a browser.
require([
"esri/Map",
"esri/views/MapView"
], function(Map, MapView) {
var map = new Map({
basemap: "streets"
});
var view = new MapView({
container: "viewDiv",
map: map,
zoom: 14,
center: [-76.87, 40.26]
});
});
Add Basemap Toggle
Allows the user to switch from a streets map to a satellite imagery map.
1. In the explorer on the left, select the 1-basemapToggleSnippet.txt file.
2. Follow the steps copying the code snippets to the demo.html
"esri/widgets/BasemapToggle",
], function(Map, MapView, BasemapToggle) {
var toggle = new BasemapToggle({
titleVisible: true,
view: view
});
view.ui.add(toggle, "bottom-right");

8
Add Layer List
Add a layer list to the map which allows the user to turn on/off the layers
1. In the explorer on the left, select the 2-layerListSnippet.txt file.
2. Follow the steps copying the code snippets to the demo.html
"esri/widgets/LayerList",
var layerList = new LayerList({
view: view
});
view.ui.add(layerList, "top-right");
Add Graphics Layer Setup Code
Adds several modules to process GeoJSON files and convert the contents to graphics layers.
1. In the explorer on the left, select the 3-geoJsonLayerSetupSnippet.txt file.
2. Follow the steps copying the code snippets to the demo.html
3. Examine the code contents.
4. Notice the addGeoJSONLayer method accepts 3 parameters… filename, title, colorArray
5. Notice the code does the following:
a. Requests the contents of a GeoJSON filename.
b. Converts the GeoJSON features to ESRI Polyline Graphics with the color
specified.
c. Adds the graphics to a new GraphicsLayer with the specified title.
d. Adds the new graphics layer to a map.
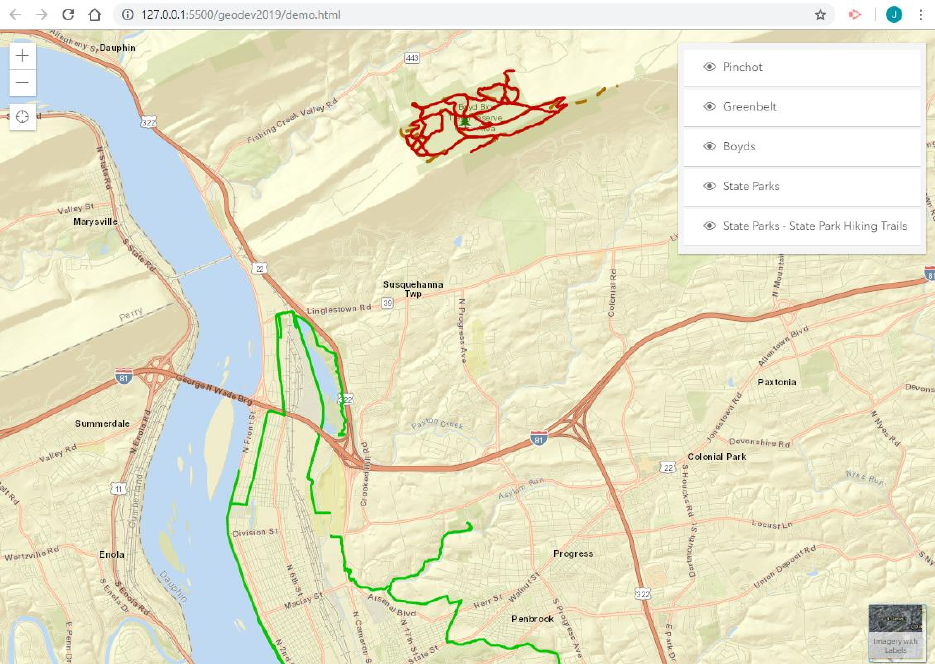
Add the GeoJSON Layers
Add a layer for each of the GeoJSON files created previously.
addGeoJSONLayer("boyds.geojson", "Boyds", [200, 0, 0, 1]);
addGeoJSONLayer("greenbelt.geojson", "Greenbelt", [0, 200, 0, 1]);
addGeoJSONLayer("pinchot.geojson", "Pinchot", [0, 0, 200, 1]);

9
Add a DCNR Trails Feature Layer
Add a DCNR trails FeatureLayer to the map.
1. Go to the DCNR ArcServer: https://www.gis.dcnr.state.pa.us/agsprod/rest/services/
Notice the various layers available.
2. Navigate to Parks/State_Parks/MapServer/4
Parks/State_Parks/MapServer/4
https://www.gis.dcnr.state.pa.us/agsprod/rest/services/Parks/State_Parks/MapServer/4
3. In the explorer on the left, select the 5-DCNRLayerSnippet.txt file.
4. Follow the steps copying the code snippets to the demo.html
Adding Locate Indicator
Add a locate indicator to the map.
1. In the explorer on the left, select the 6-locateSnippet.txt file.
2. Follow the steps copying the code snippets to the demo.html
"esri/widgets/Locate",
var locateBtn = new Locate({
view: view
});
view.ui.add(locateBtn, "top-left");
10
Finished Demo Map
Your finished map should contain a basemap toggle, a layer list, three GeoJSON layers, two
feature layers from DCNR, and a locate button.
