InteractiveDataScience_Byte3_MobileInstallGuide Interactive Data Science Byte4 Mobile Install Guide
User Manual:
Open the PDF directly: View PDF ![]() .
.
Page Count: 19
Byte 4: Mobile Data
Description:
Your final product will be a web page that tells a story about your mobile data (e.g., common
locations you visit and the activities that you perform at those locations) using visualizations.
Learning Goals:
Collecting your own data
Working with a data about a familiar topic
Working with mobile data
Visualizing Data
Contents
1 Set up for Mobile Byte
1.1 Installing AWARE on your phone
1.2 Setting up a Cloud Database for your Byte's Data
1.3 Connecting Aware to your cloud database
1.4 Joining the Study
1.4.1 Finding a phone's ID [optional]
1.5 Increasing Availability (Android Users Only)
1.5.1 Samsung Bug (Android Users Only)
1.6 Testing your setup
Set up for Mobile Byte
Setting up for Byte 4 is a multi step process that depends on what platform you are
using (iphone versus android). You will need to do the following tasks:
Set up a sample byte, named [uniqueid]-mobile.appspot.com
1. Install AWARE on your phone
2. Set up a cloud database for your byte's data
3. Make sure you have the data. There are two possibilities here:
- Connect AWARE to your cloud database and test your set-up (data will be
automatically moved there for you)
- Upload your data to your google Cloud Storage (not until Mobile byte is
assigned)
Step1: Installing AWARE on your phone
AWARE (http://www.awareframework.com/) is open source and you might find it interesting to
expand the set of sensors and capabilities of this application as part of a final project. Many off
the shelf sensors are included that require no programming. Additional things can be done with
programming. However since mobile application development is not a major focus of this class,
our tutorial will not include further information about AWARE development.
For Android user: If you are an Android user, you should download an app file and install the
default aware android client. Note that the client may use battery, but it will not cost you any of
your data plan because it will only upload data when you have Wi-Fi access, by default.
Here is the download link: http://jenkins.awareframework.com/view/Development/job/android-
aware-phone-dev/lastSuccessfulBuild/artifact/aware-phone/build/outputs/apk/release/aware-
phone-release.apk
For iPhone user: If you are an iPhone user, you can download and install AWARE using
iTunes.
Here is the download link: https://itunes.apple.com/fi/app/aware-client-ios/id1065978412?mt=8
Step 2: Setting up a Cloud Database for your Byte's Data
You will need to create a Cloud SQL database for your application in order to collect data from
the aware framework in a format that you can compute over. Also note that once the data
collection is over, you can just change the study status to closed and your client will stop
uploading/collecting information. The data stays in the database unless you delete it. You may
want to refer Google documentation about it.
For now, you need to do the following steps to complete the setting.
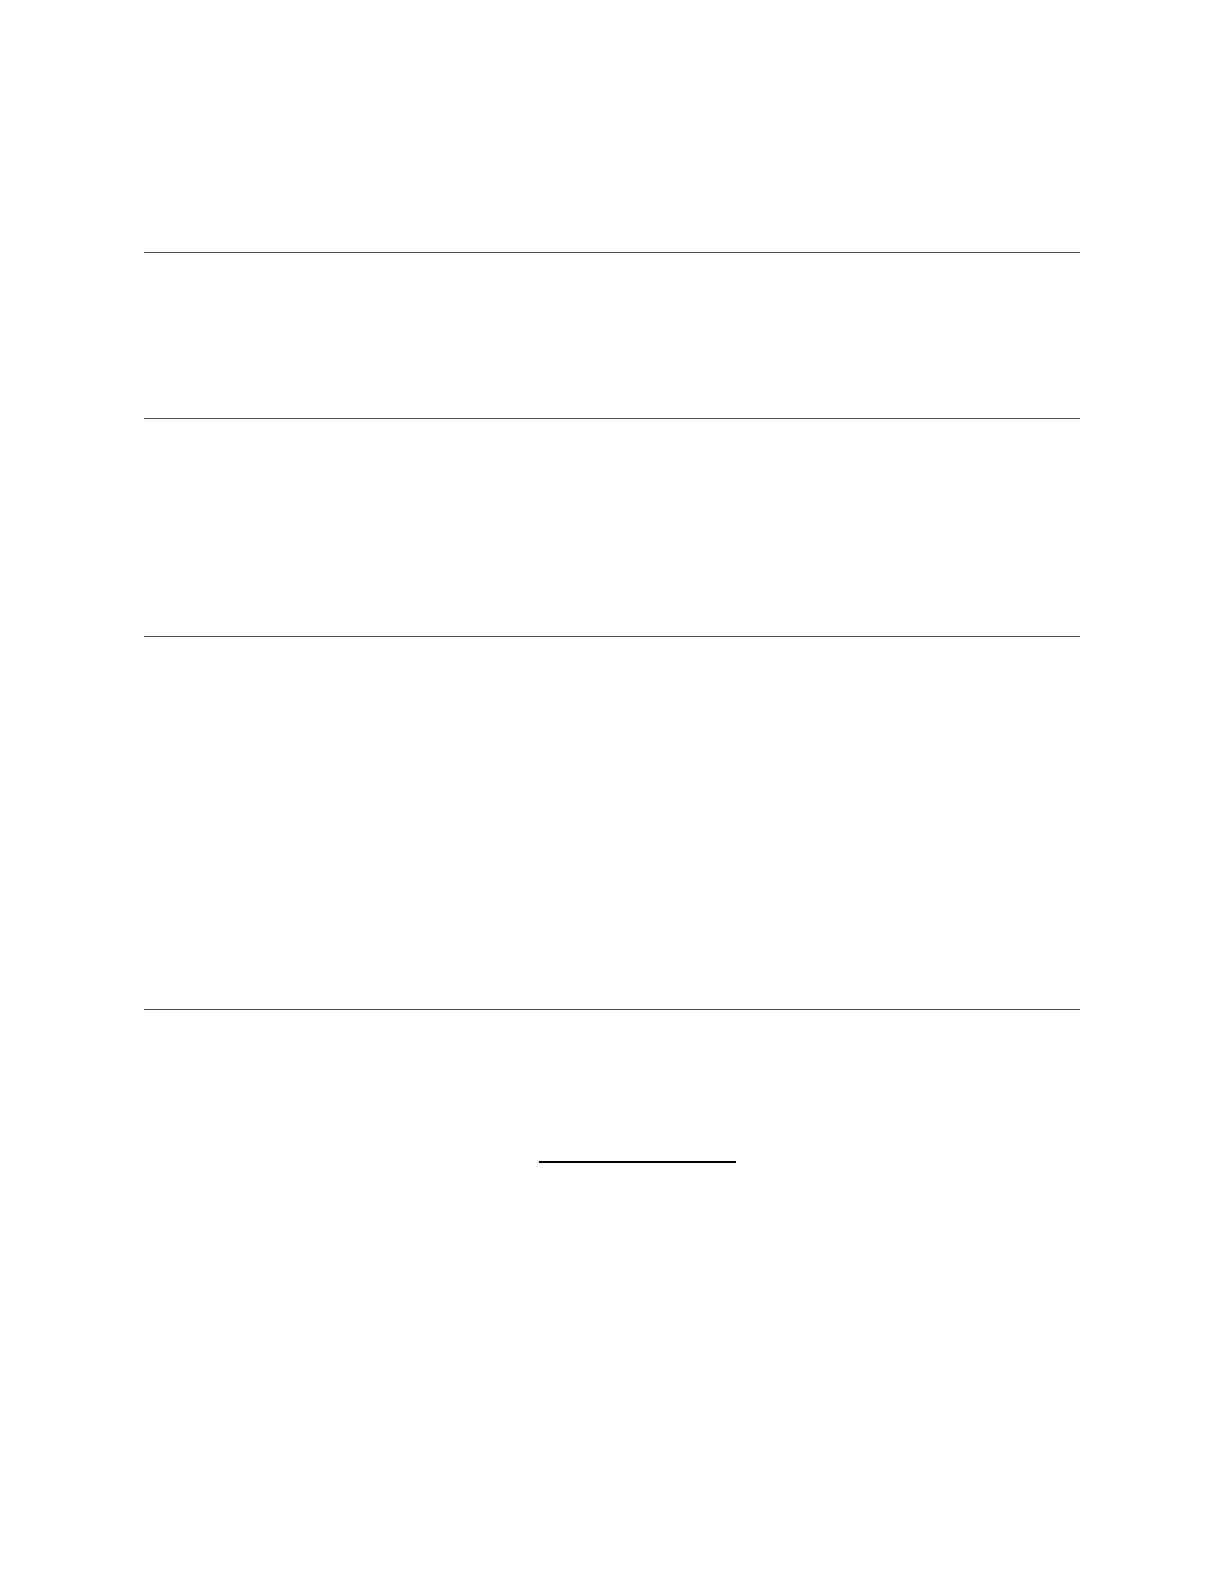
1. Create a project on Google cloud console for your mobile byte. First, Click “Select a project”
on your google cloud platform main page. Then, click the “+” button on the pop up window.
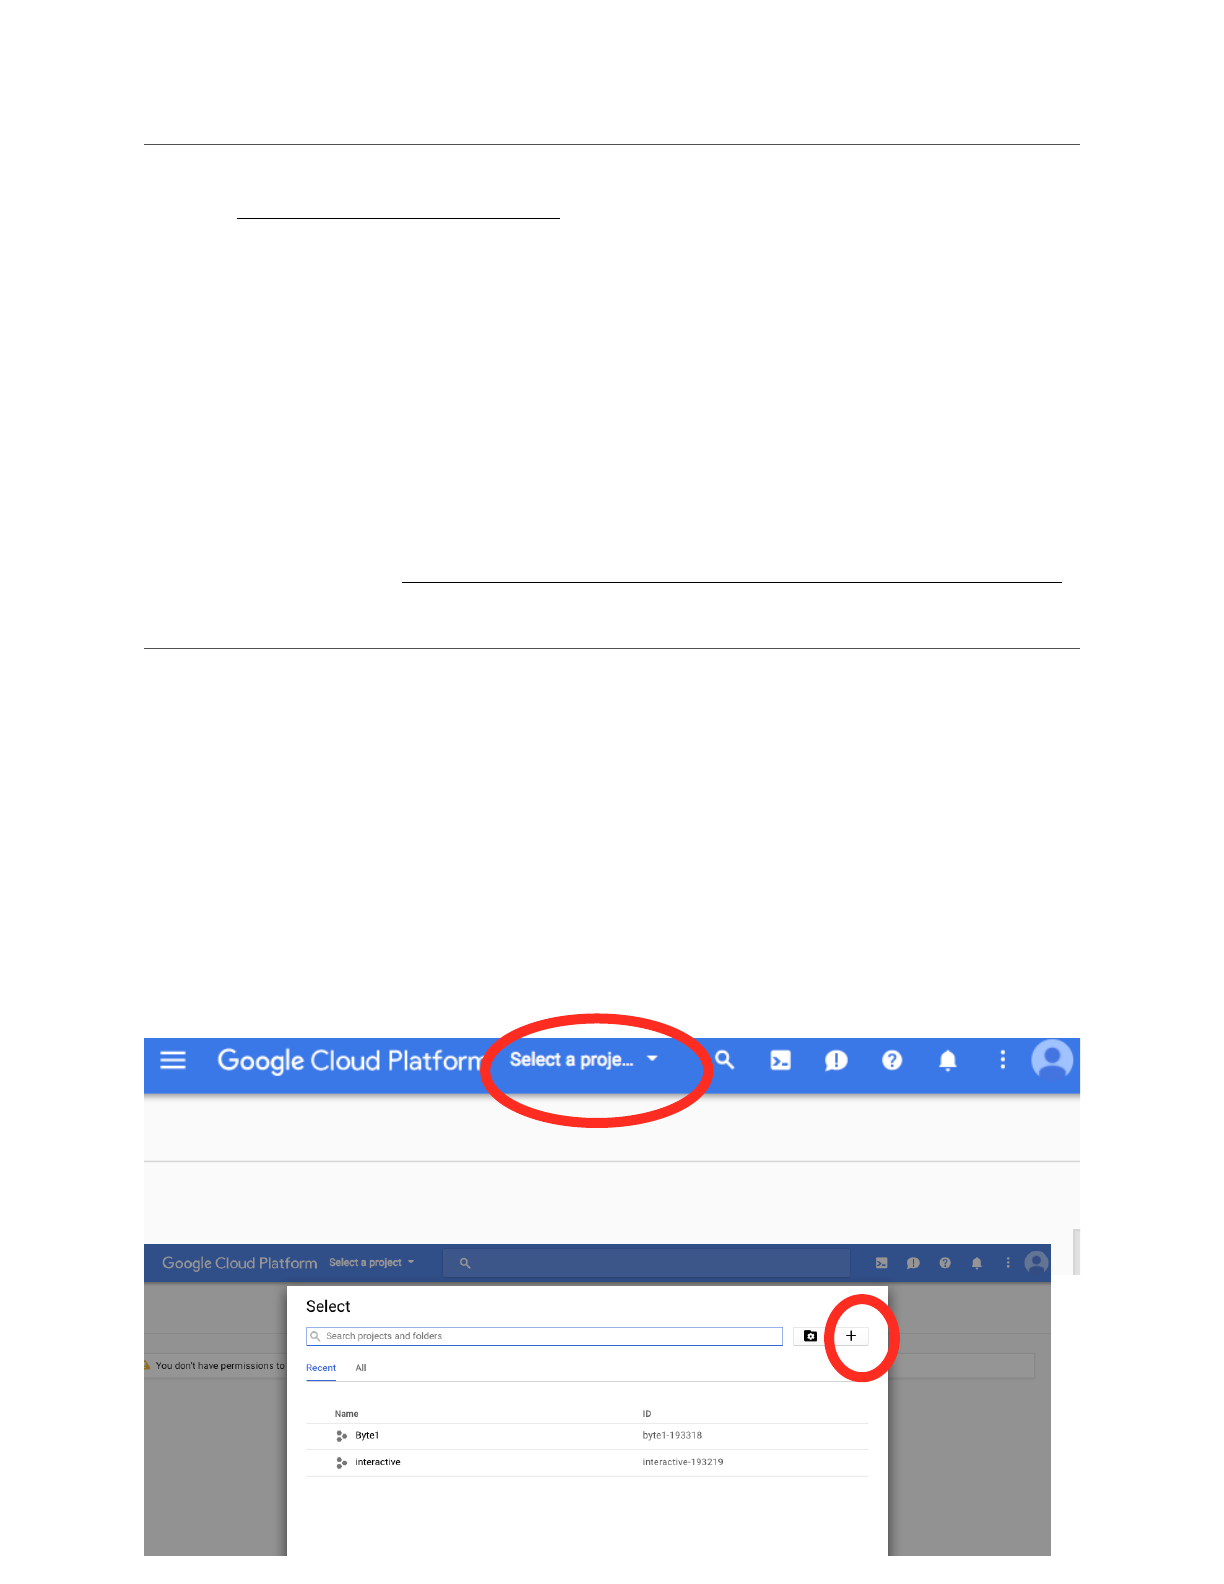
Then it will show a page for you to type in your project name and create a project.
Click here
Click here
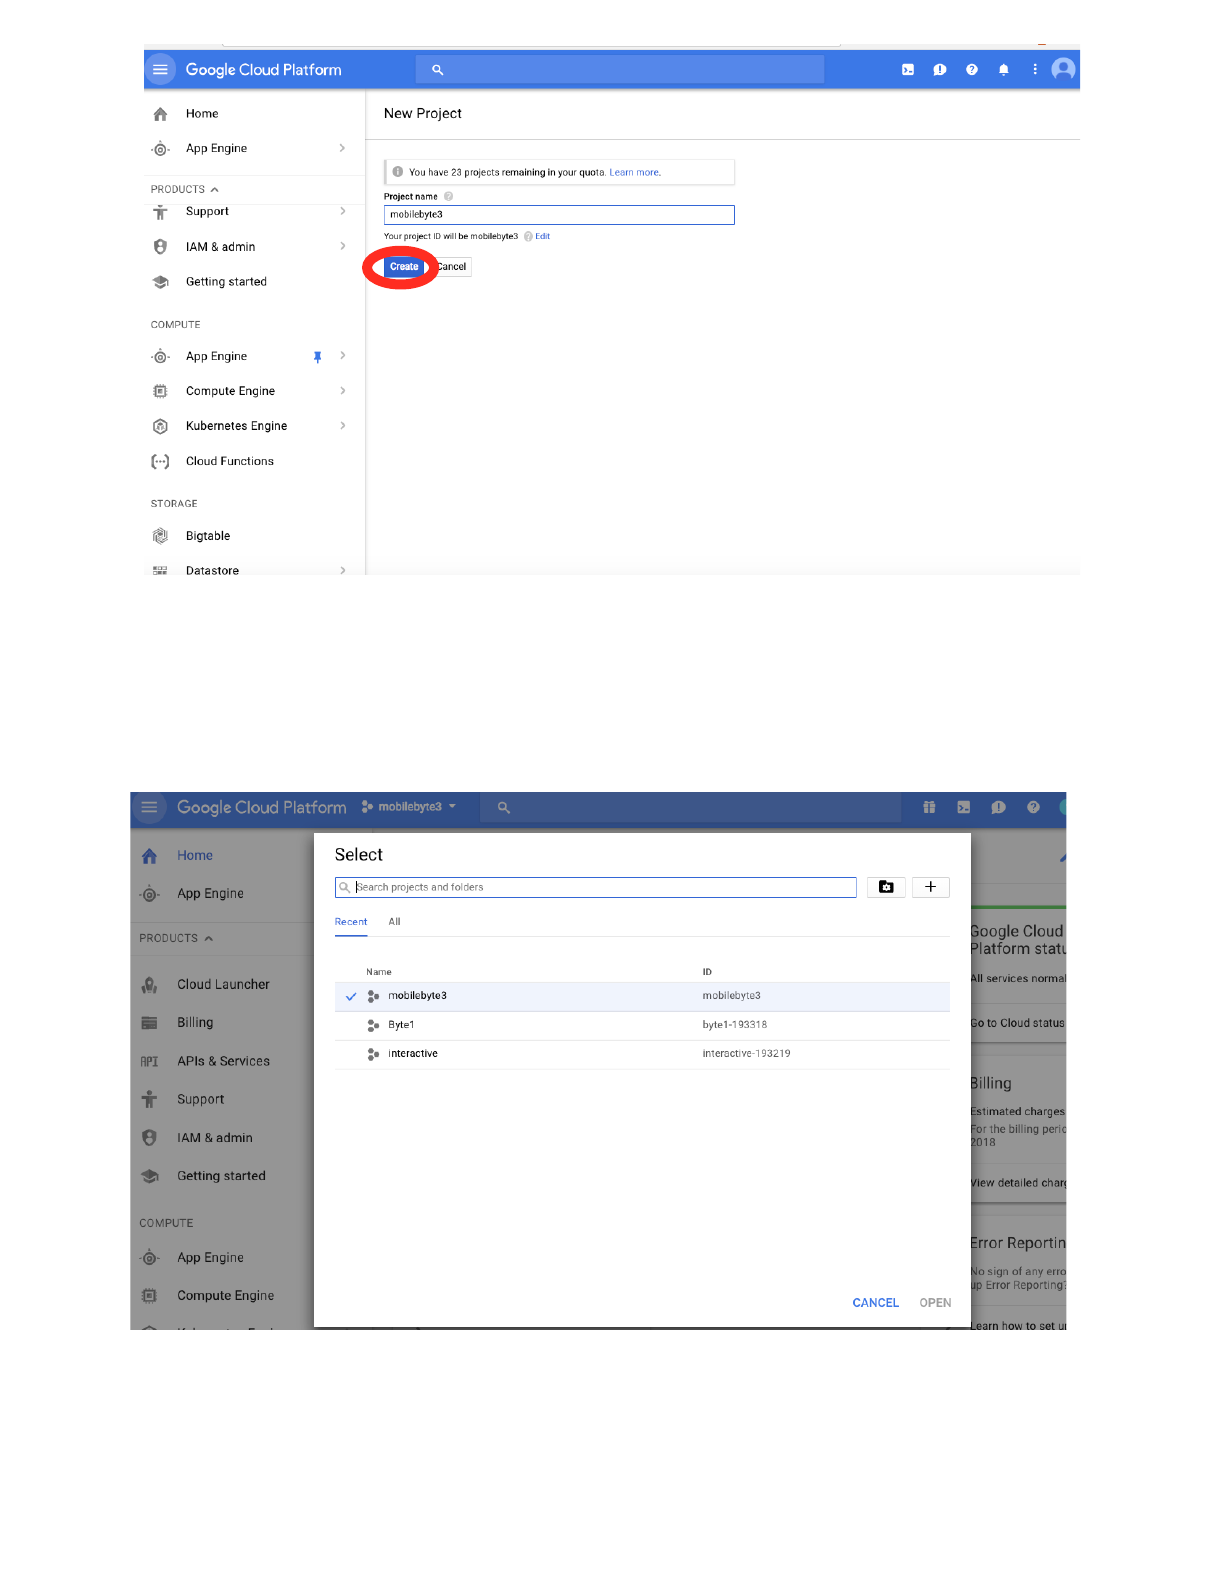
2. Select the project you just created for mobile data. Use the menu at the top left of your cloud
console for your byte (https://console.cloud.google.com/home/dashboard?project=[uniqueid]-
mobile) to create a Cloud SQL database (select SQL, shown at bottom left, and then create
instance, using the First Generation option).
type in your project name and
create your project. Remember
your project ID.
<= This is your project ID
Select your project here, click
open.
Click SQL
Create new
instance.
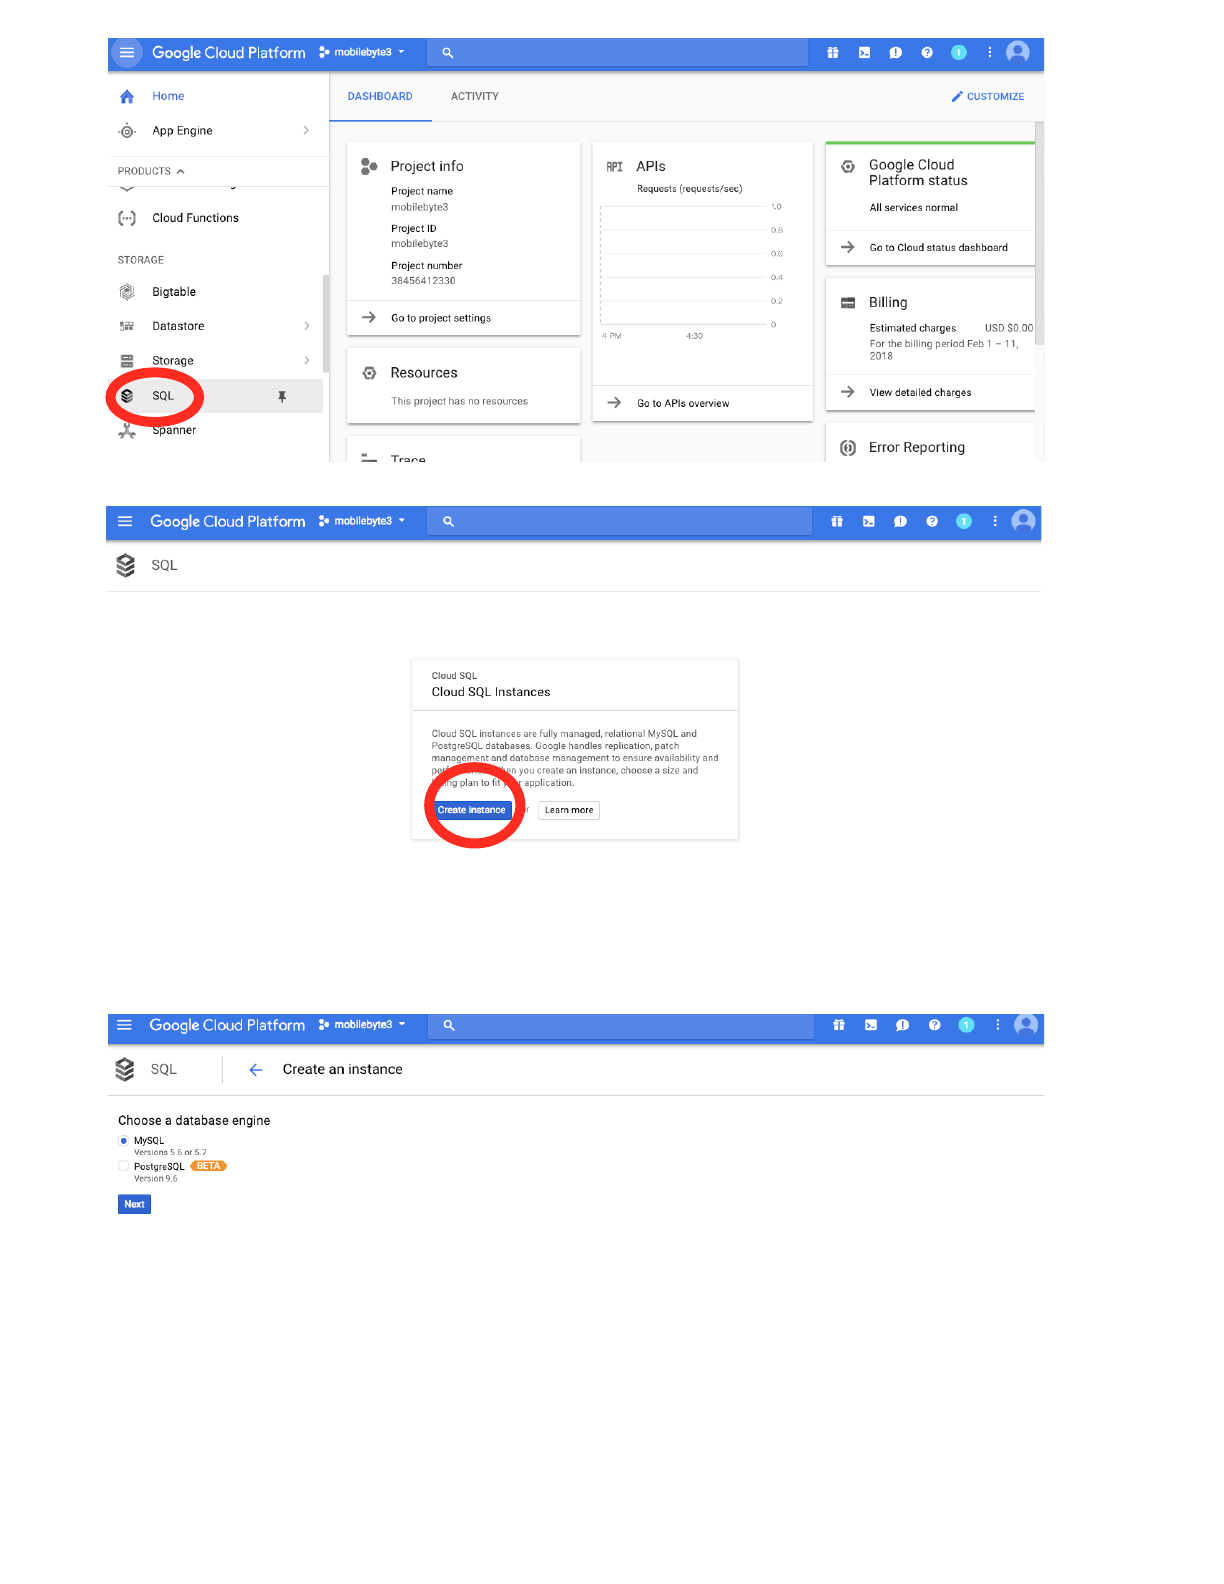
Select “MySQL”
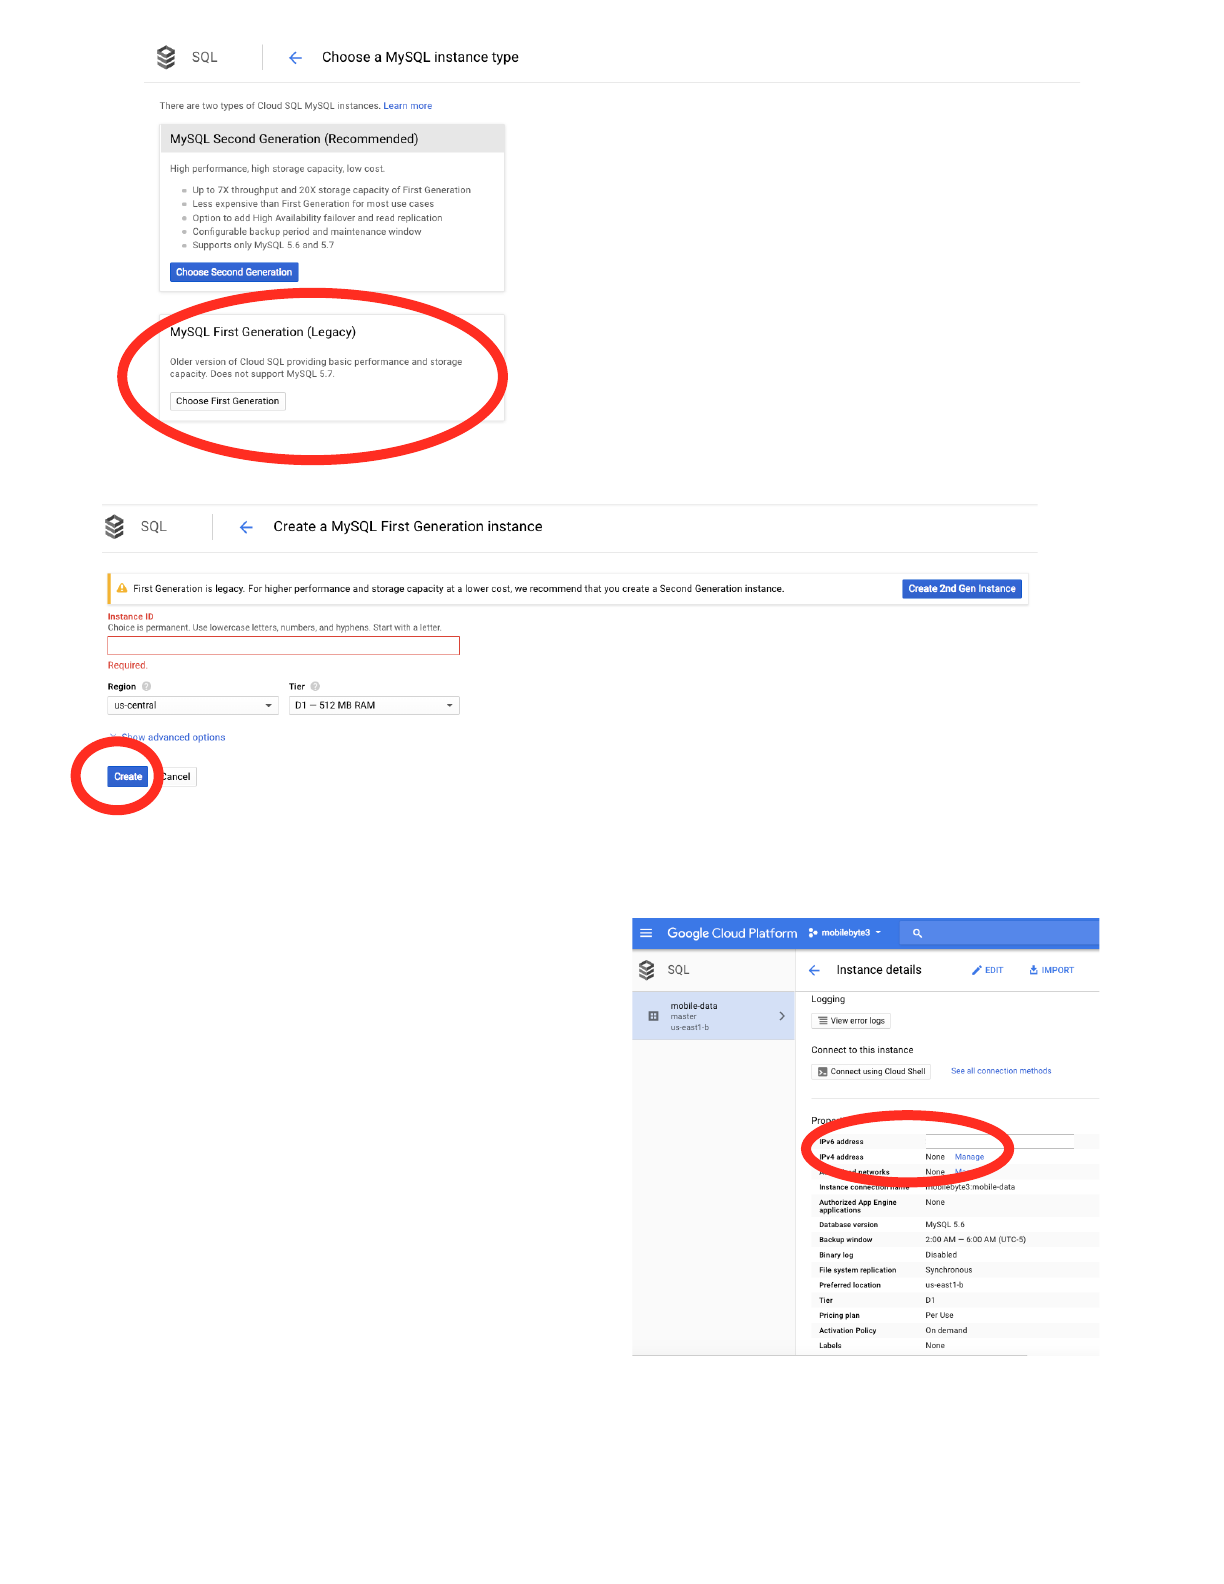
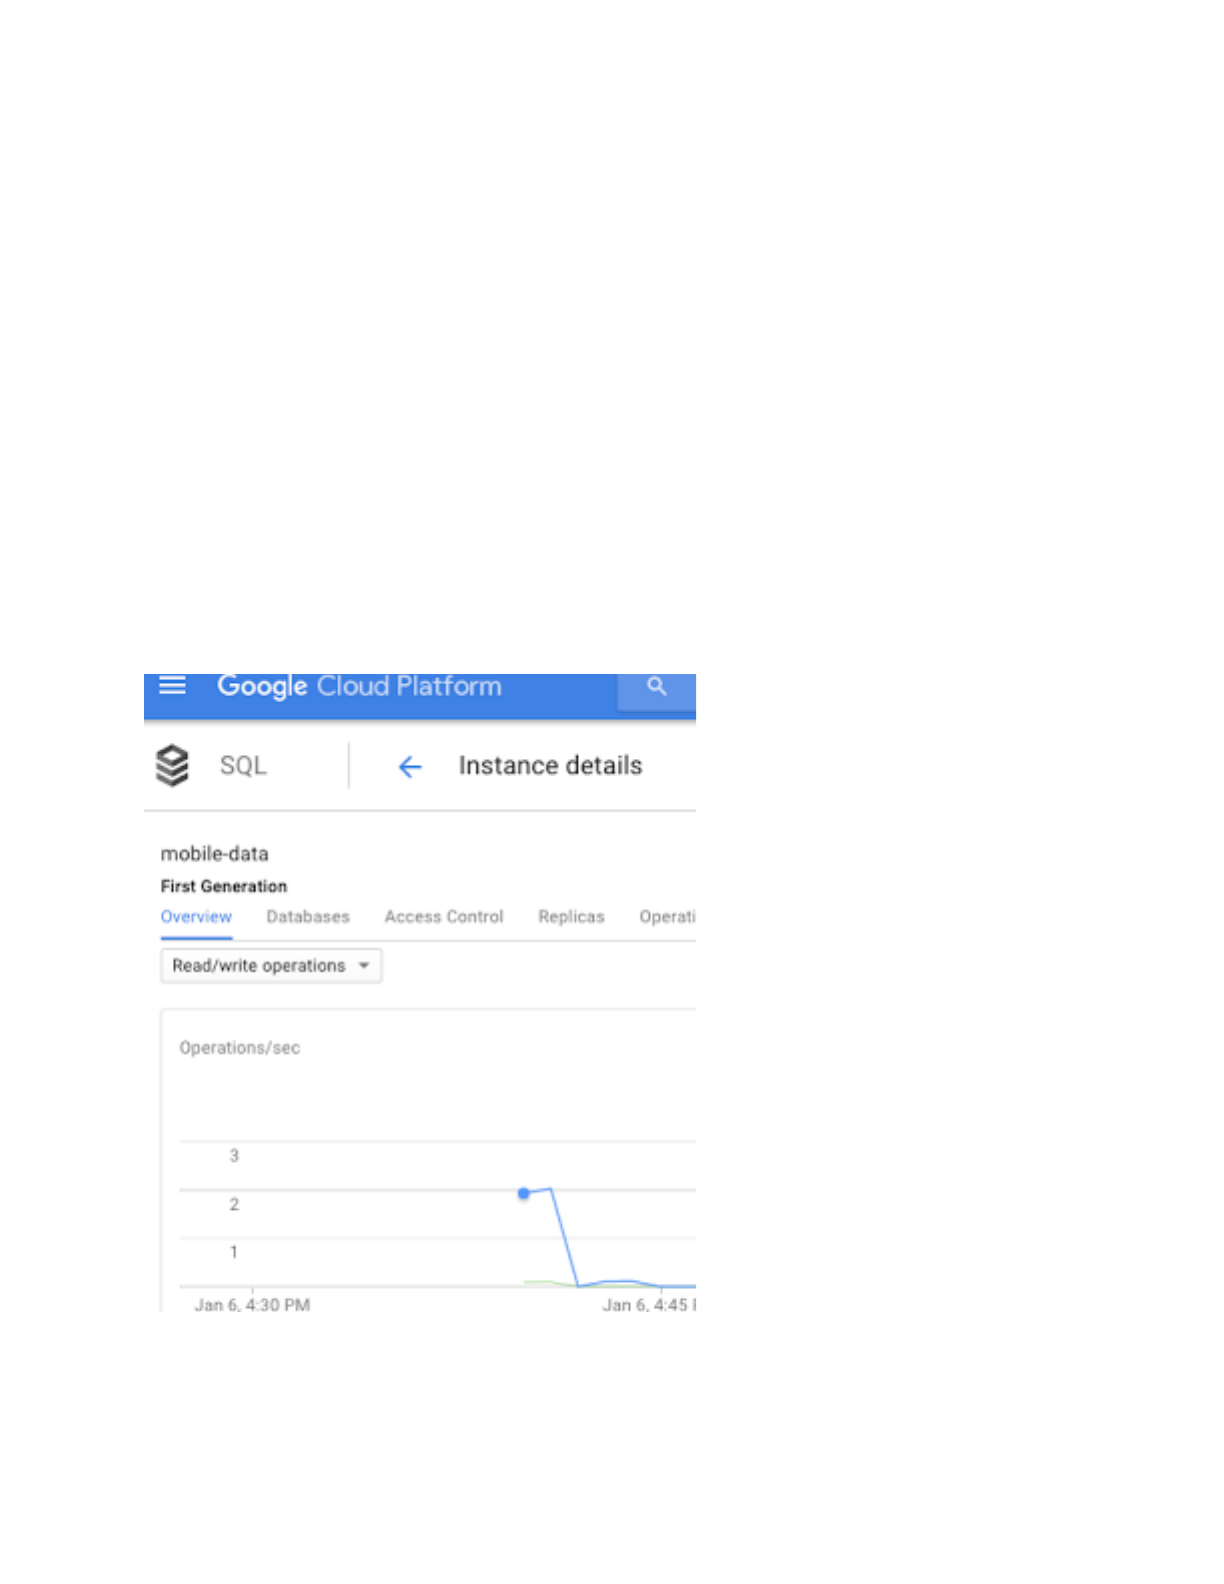
3. After create a MySQL instance, you need to
config the instance. First, go to the main page
of the instance you just created, you will see
information as picture:
First, you will need to set a IPv4 address.
Go to the IPv4 address column, click “Manage.”
Choose 1st generation
Name your instance, for example:
mobile-data Use default Tier setting and
select your region(us-east1b). Click
create.
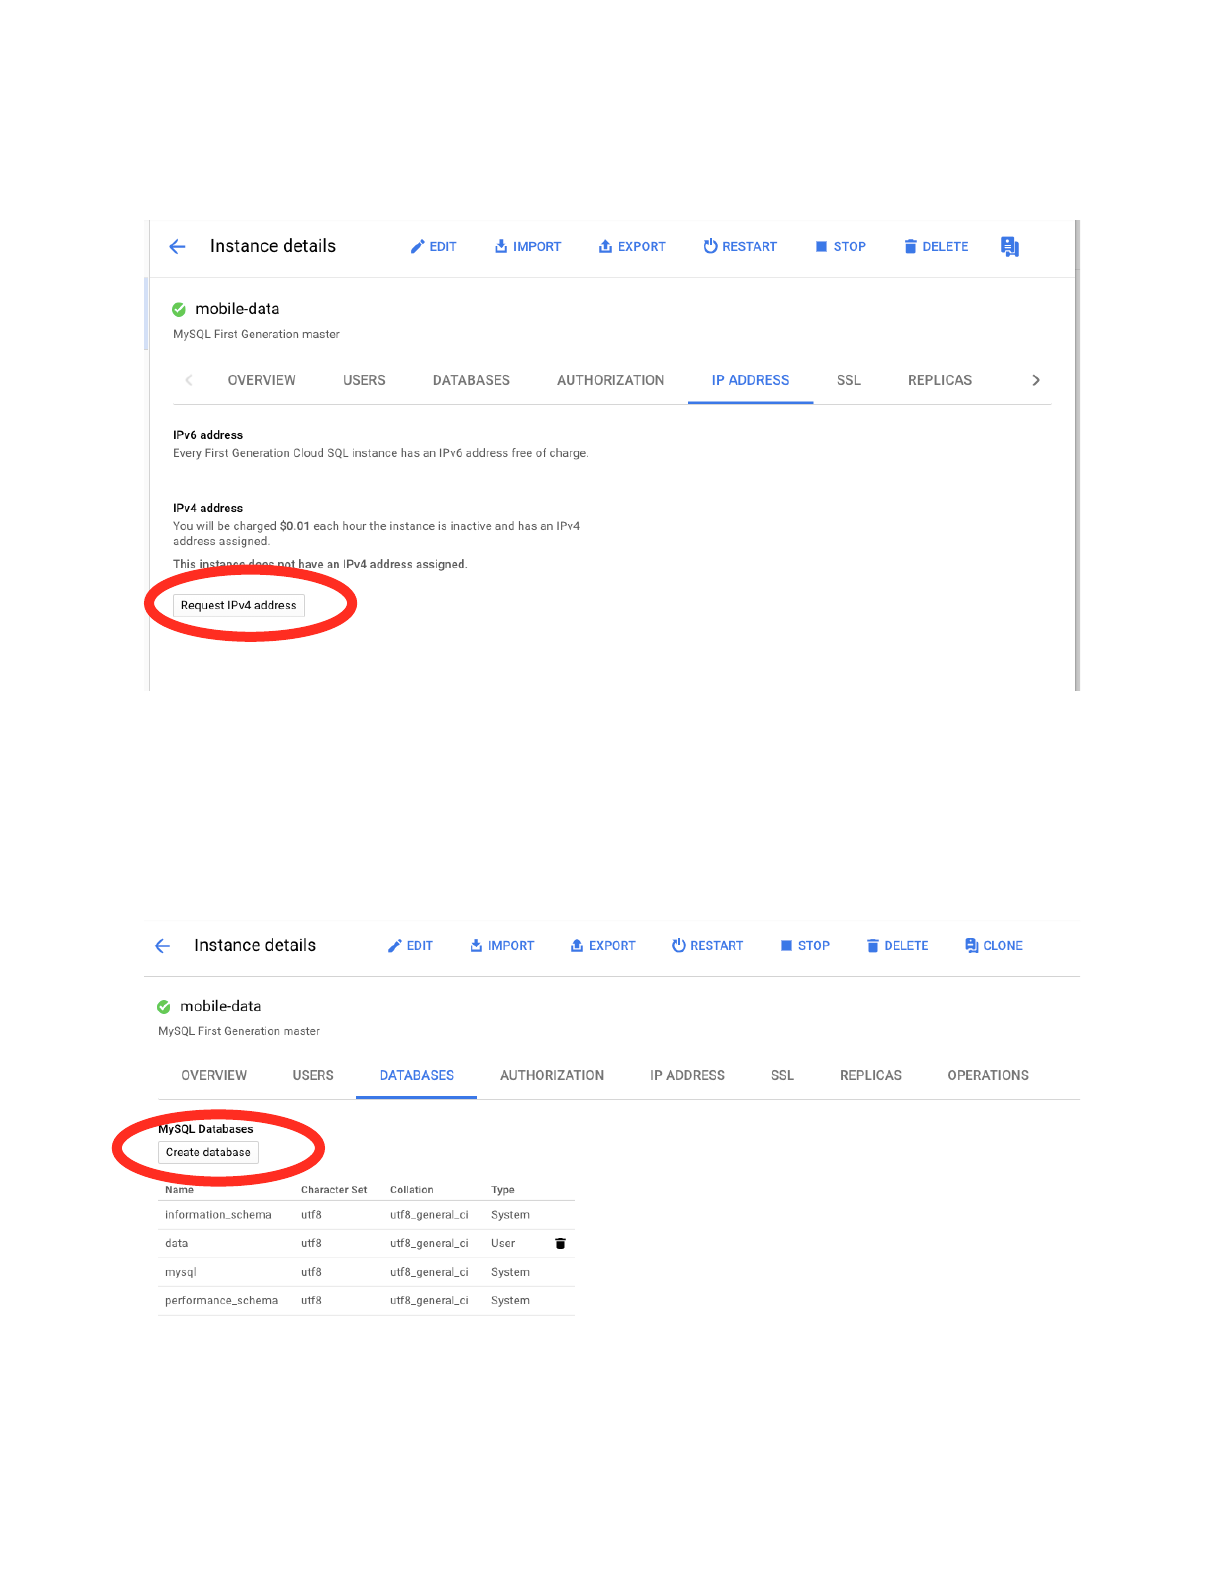
Choose “request IPv4 address”.
You will see a set of number like 128.245.189.239 after you request a IPv4 address. That’s your
unique IP address, please note it and don’t release to public.
Go to the tab “DATABASES”, click create to create a Cloud SQL database. You can name it
“data”.
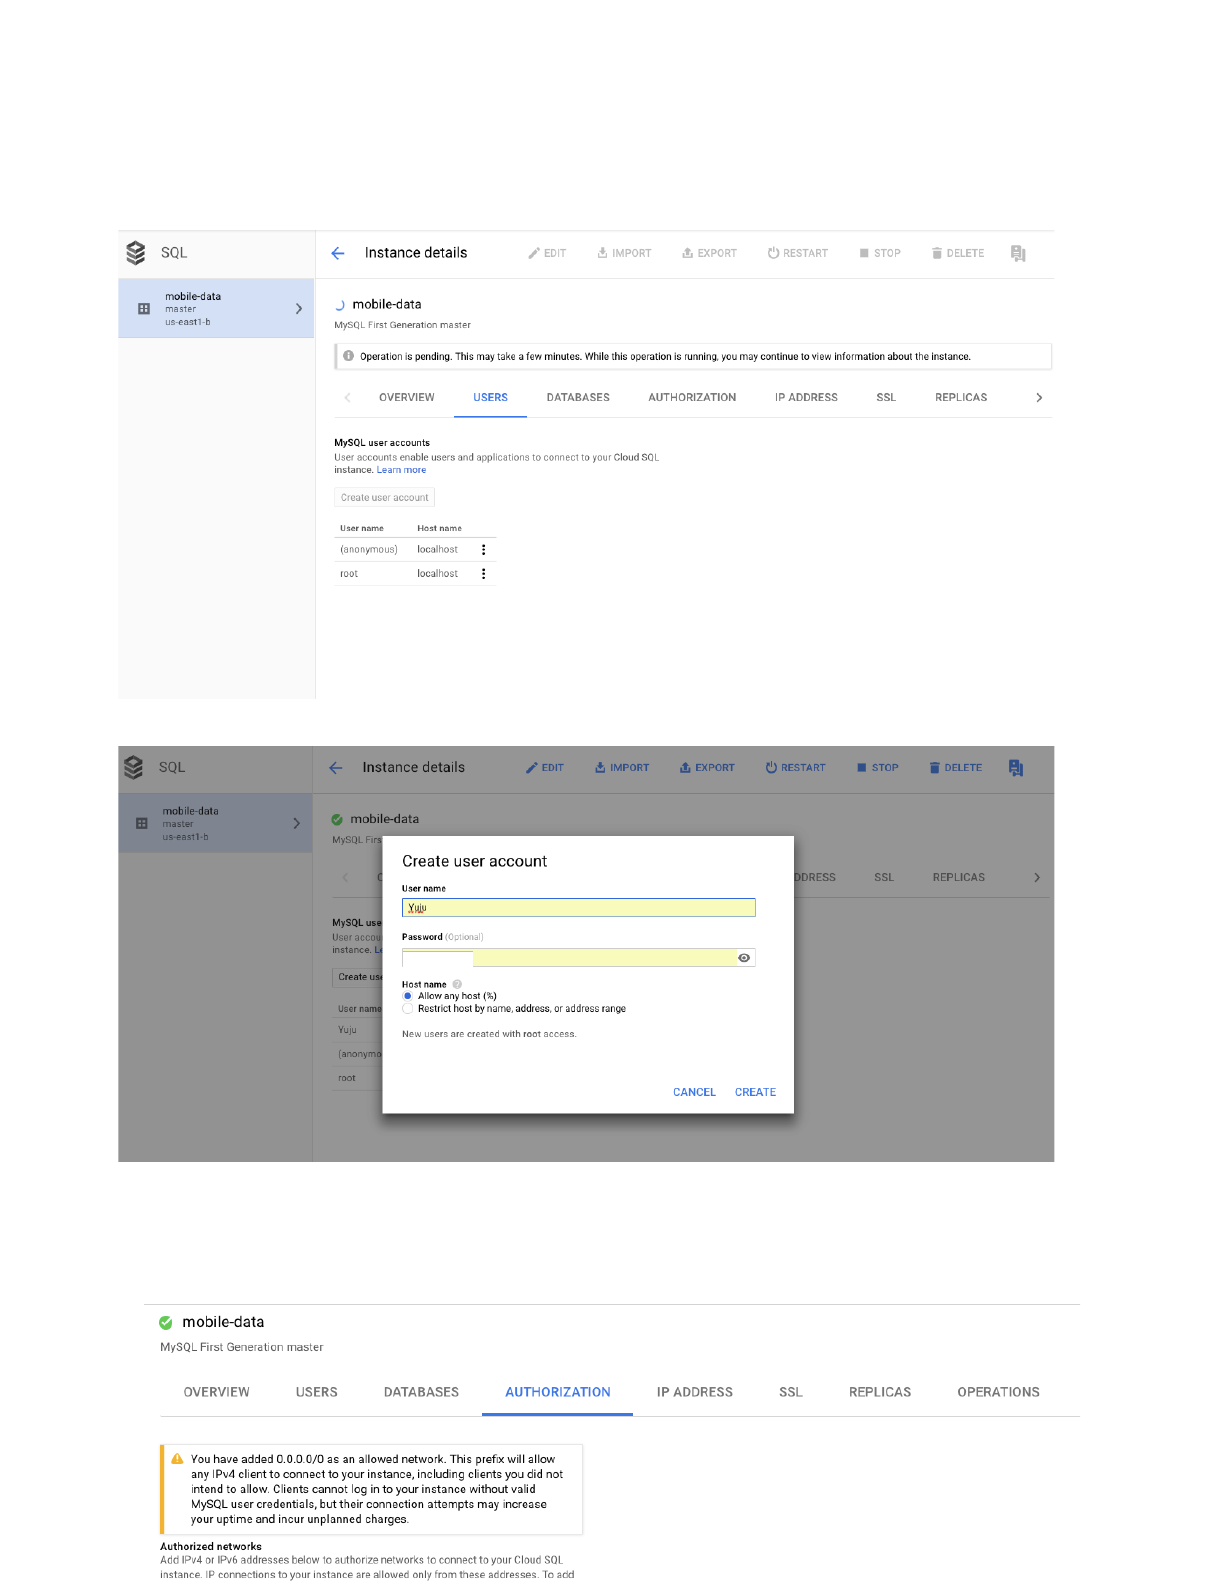
Then go to the “USERS” tab, to create a new user. Set your own user id and password.
Go to “Authorized Networks” tab. To have a easier setting, in “Edit network” section, add
0.0.0.0/0 as the authorized IP so that it allows request from any IP address to request your
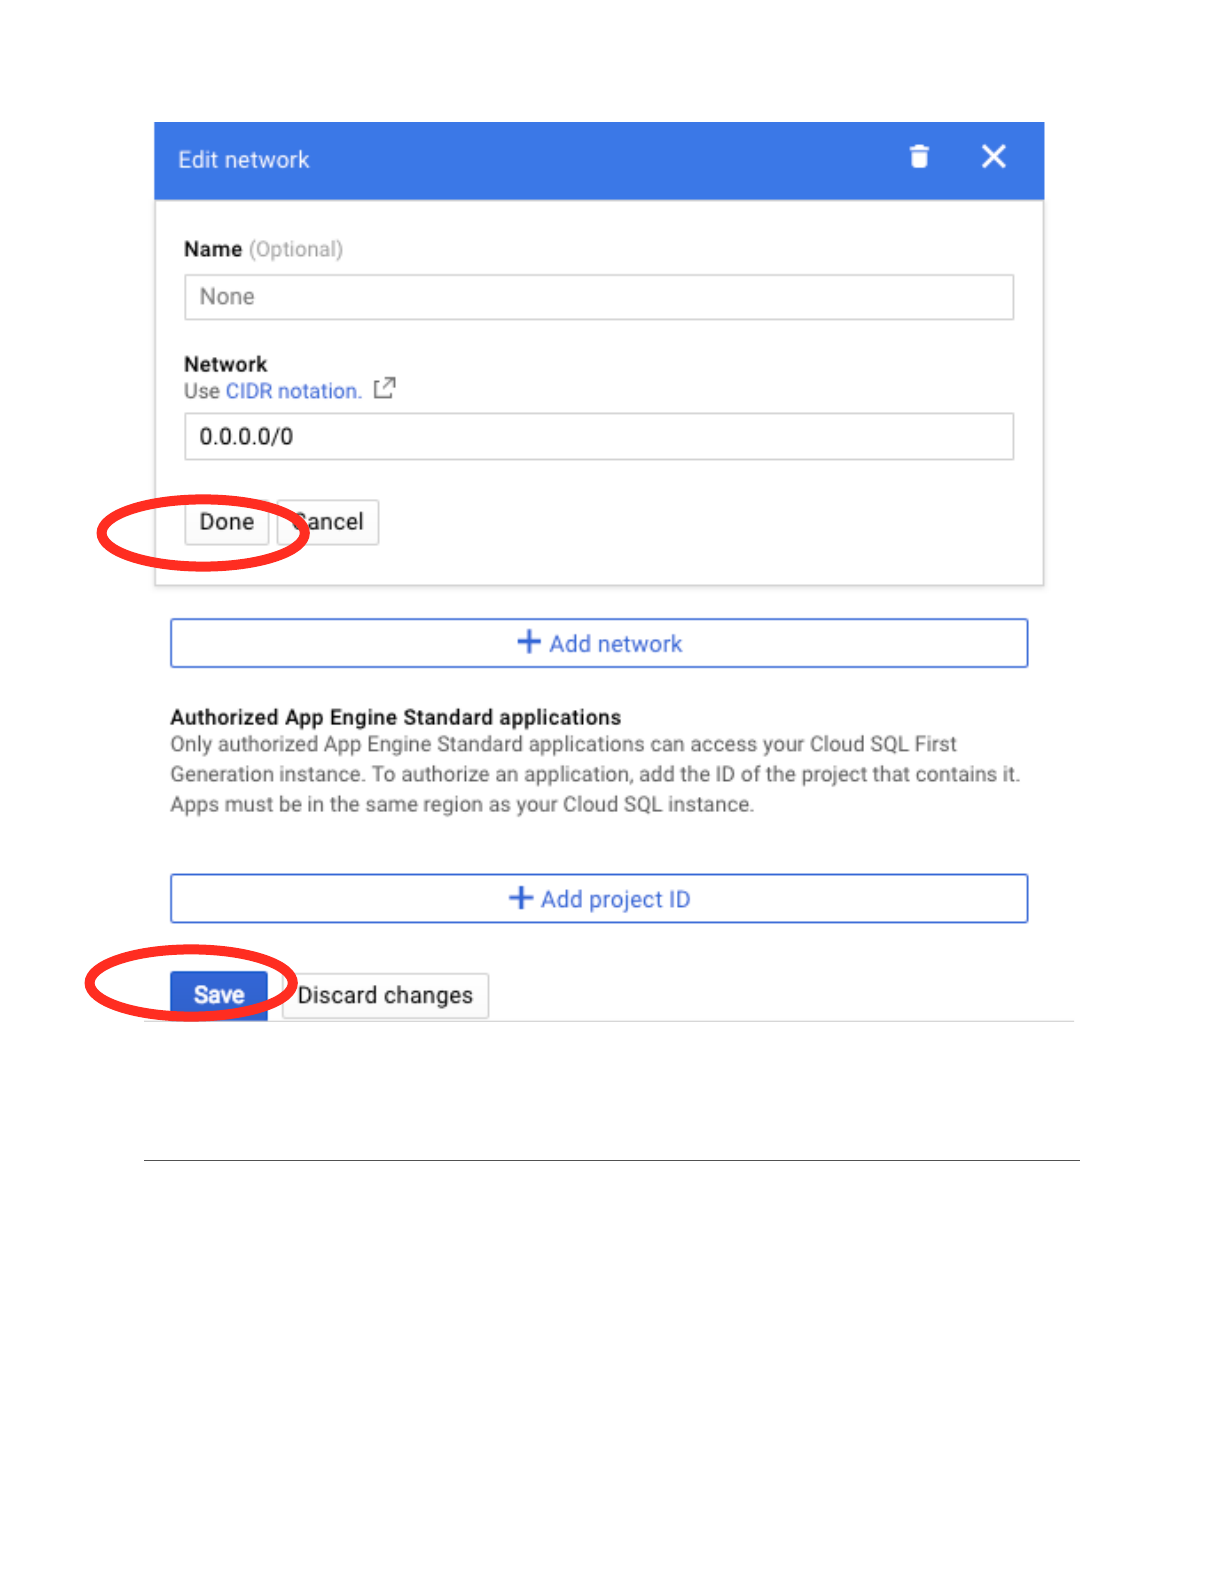
database. It will allow the AWARE server connects to the google SQL server. Make sure to click
“Done” and “Save” to save the changes.
Step 3: Test if you can connect to your database.
Test your connection from your local machine. If you have a mac(and assuming you have mysql
installed), you can use terminal. Otherwise, you could You can also use MySQLClient. Or you
can use your google cloud shell to type the following command:
mysql --host=instance-IP --user=userId --password

Please replace “instance-IP” and “userId” with your own IP address (The IPv4 address you just
requested)and the user id(the user id you just set).
For example, if my IP is 128.245.189.239, and my user id is Yuju, I will type the following
command:
mysql --host=128.245.189.239 --user=Yuju --password
Press Enter, type in your password.
The result should look something like this:
Step 4: Connecting Aware to your cloud database
Once you have AWARE installed on your phone and you've set up a database, it is time to
connect the two of them together. To do so, will need to create a 'study' (of yourself) and
specifies what you wish AWARE to sense. To do this, you need to go to the website for study
creation.
Go to this link: https://api.awareframework.com/index.php/auth
To access this website, you will need to accept a security certificate. In my mac, this caused the
browser to try to stop me from proceeding:
I clicked on advanced and
chose to proceed. This led
me to a 'sign in with
google' button. Once you
do that you will be able to
see the dashboard.
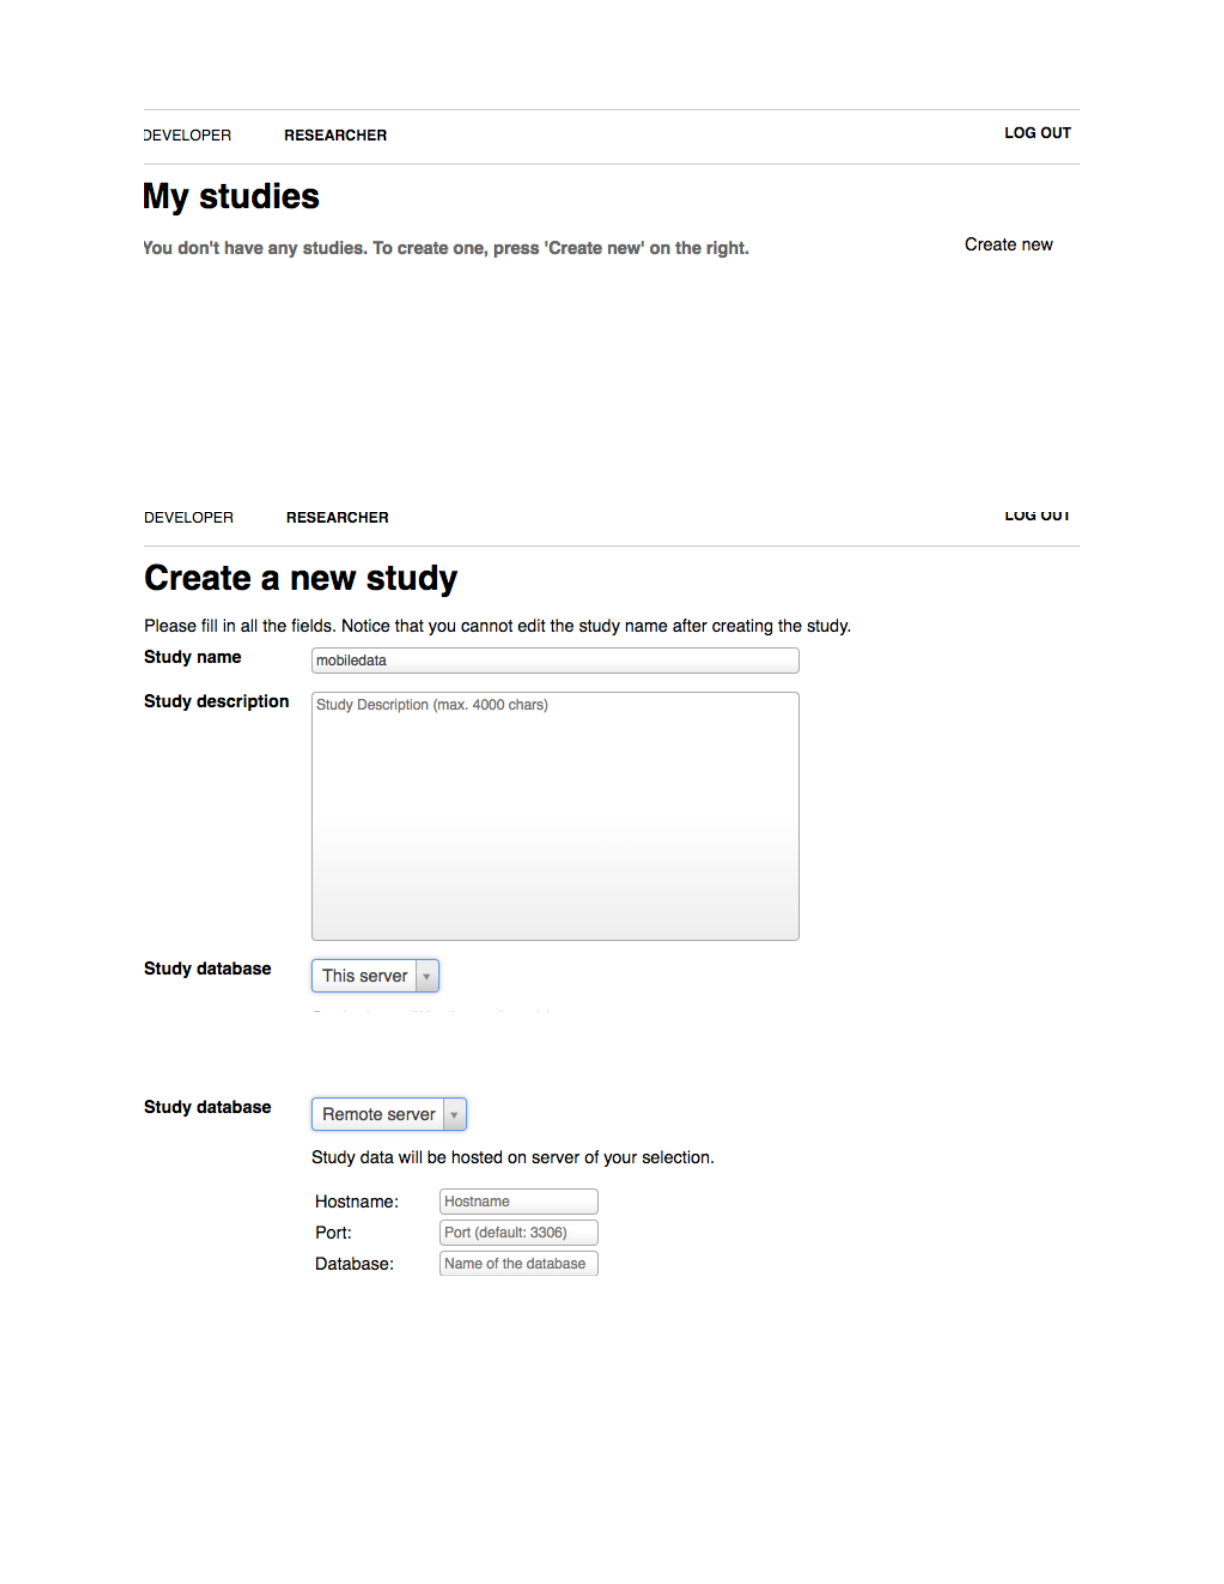
Click on 'Create new' at right. Give it whatever name and description you would like.
Then select 'Remote Server'. You will need to provide the details of your google data store in
order to complete this task (as described above, hostname, port, database, username and
password). The hostname is the IP address for your cloud database (which you used to test
things out above). The port is always 3306 (the default for MySQL). The database will be
whatever you named your database (as mentioned above. For example, in the example, my
database named “data”) and the username and password are specified under access control as
described above. The username and the password is what you set.
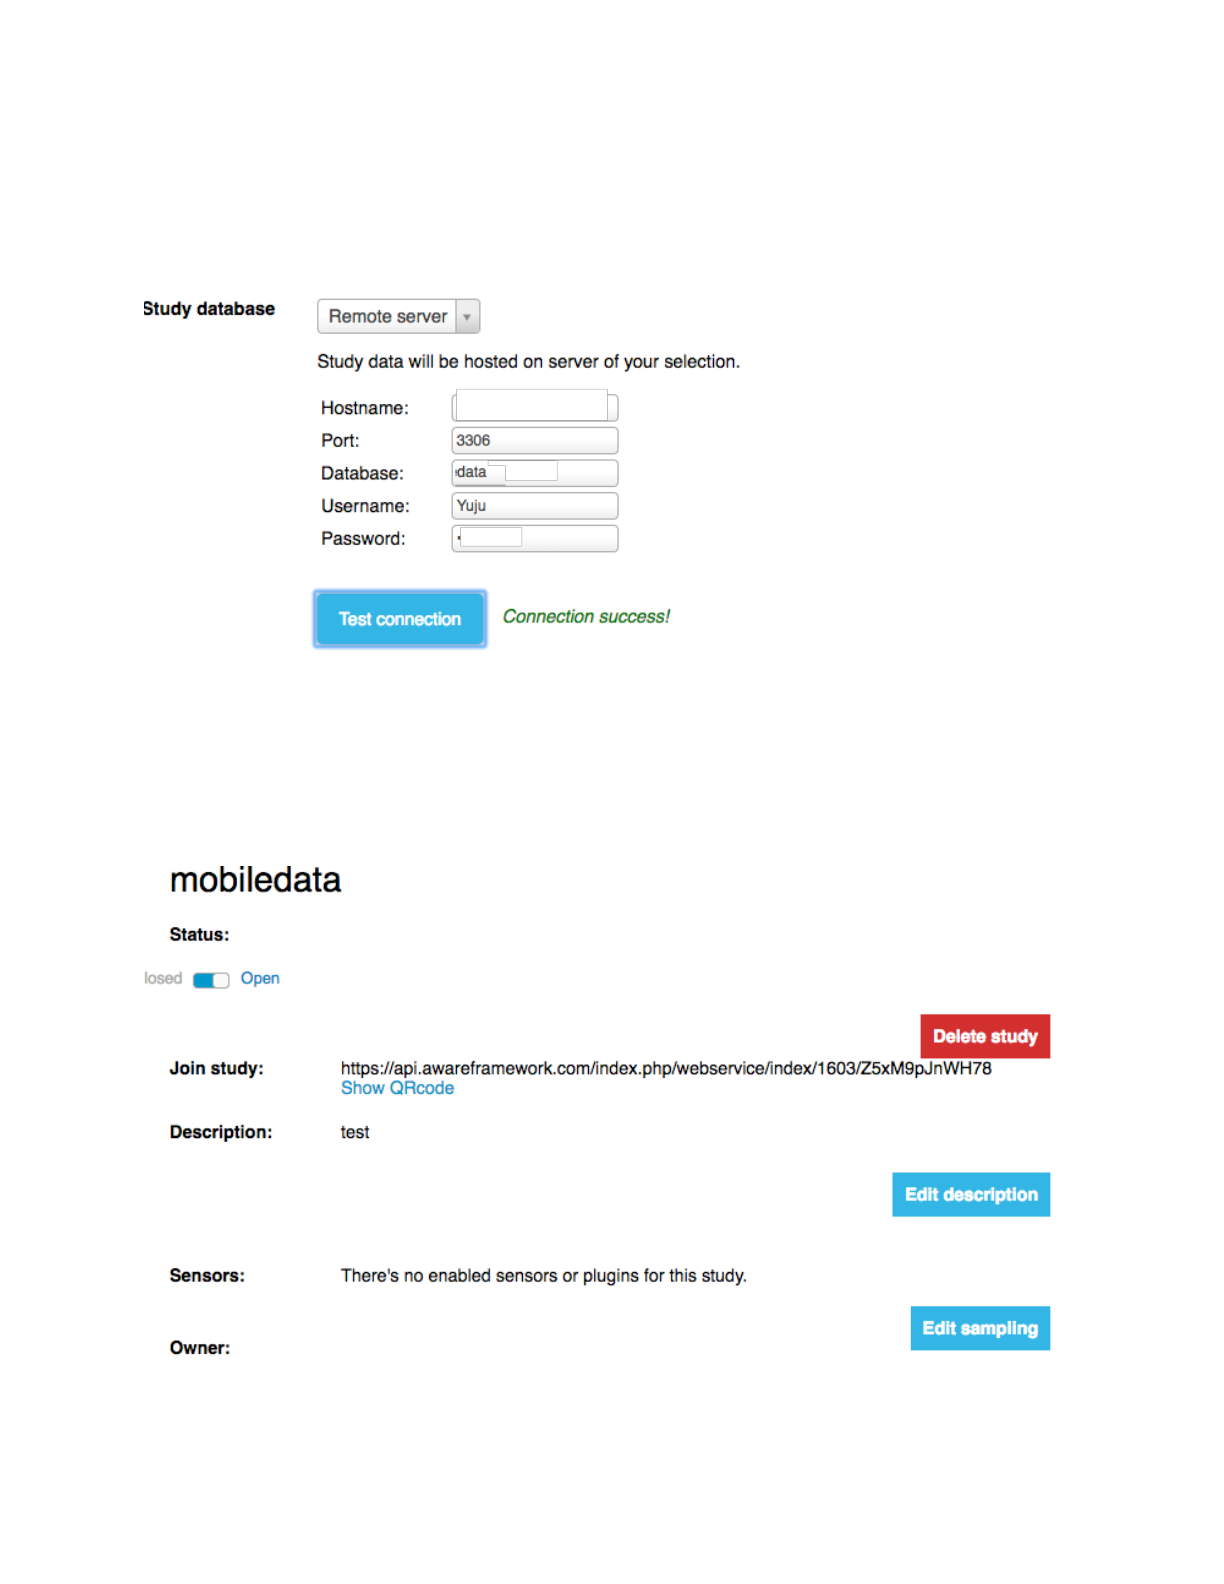
Choose to “Test connection” to test it. You should see the green “Connection success!”.
Otherwise you need to check your setting.
The next page that you see summarizes the study and also gives you the opportunity to set
parameters.
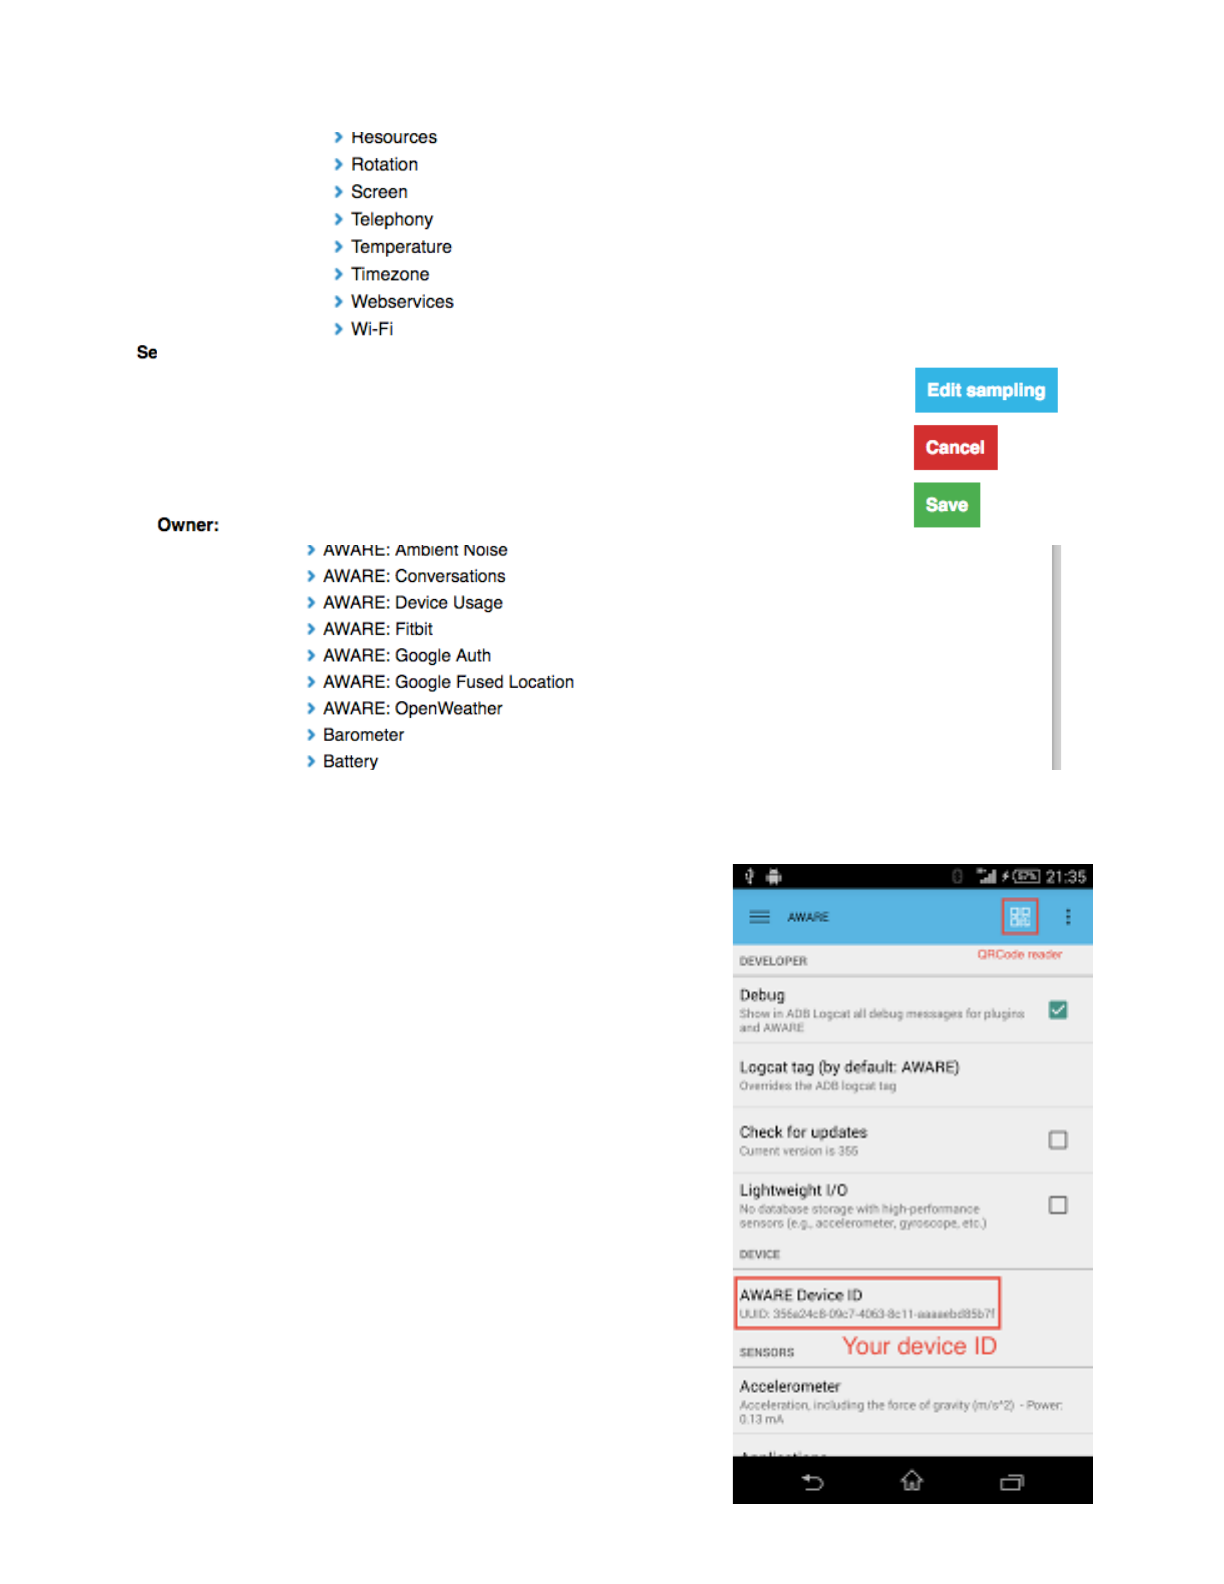
You should click “Edit sampling” to the far right of 'Sensors'
and customize what data you would like to collect. For
examine, you can choose ‘Accelerometer’, ’google activity
recognition' and location (GPS or google fused location).
Be sure to check the box for what you want and click on
the green “Save” button at the far right to save.
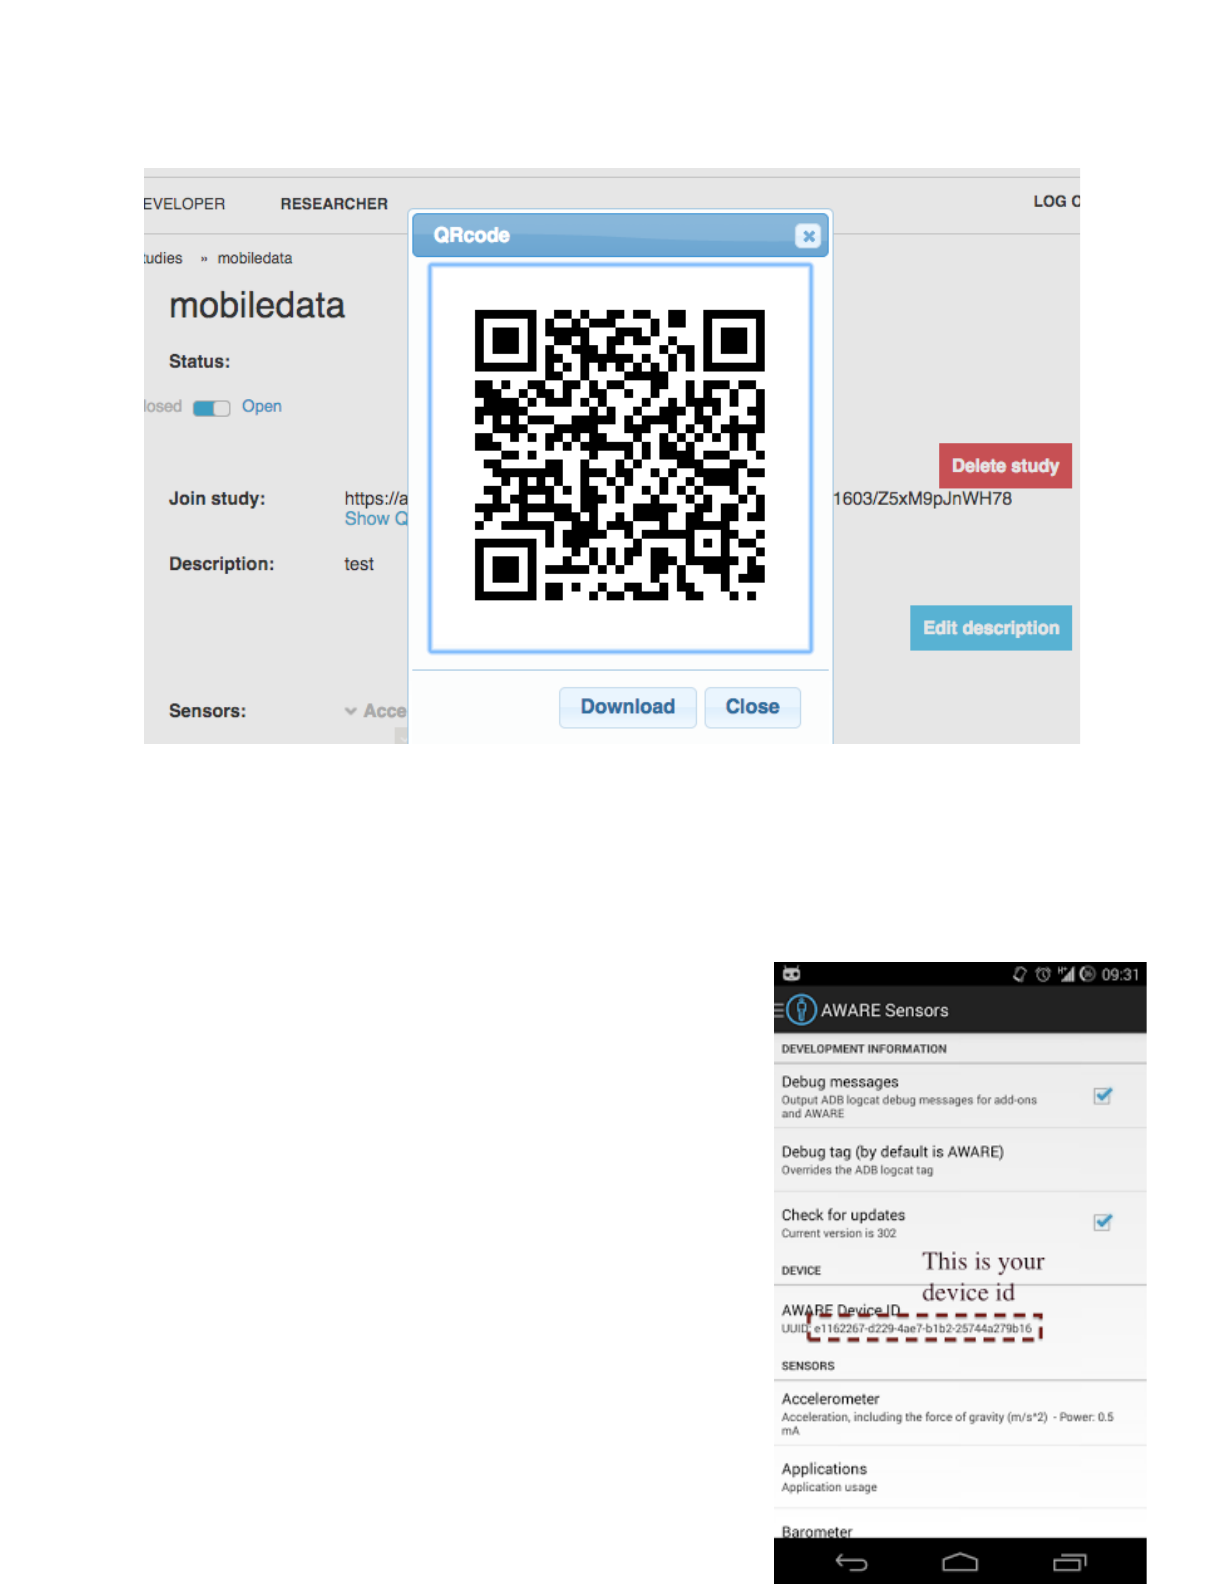
Joining the Study
Once you have finished creating the study, you will need
to join it. Open the aware client on your phone and press
the menu button. Choose QR code button on the upper
right. This will launch a QR code reader.
Meanwhile, on your screen, you should press 'Show
QRcode' (it's just above edit, as shown in the screen shot
above). Note that you can get to this screen anytime by
logging into the website for study creation and clicking on
your study.
Scan the code with your phone to add it to the study.
Once you scan the QRCode on your phone, follow any
instructions it may provide: install a plugin, activate the accessibility services (See Increasing
Availability). If you are connected over Wi-Fi, you should see your phone on the list of Devices.
Finding a phone's ID [optional]
If you end up collecting data from multiple people (say as a final project) you may need to
separate them from each other. The ID for a phone is found as
follows:
Open the AWARE Sensors icon from the mobile phone’s
launcher and you should be able to see your device ID as
AWARE Device ID, a UUID (Unique Universal ID)
alphanumeric value that is assigned to their client when they
installed the AARE Client.
Increasing Availability (Android Users Only)
Once you install the application, it should start logging data to
the server. However, if you have an Android phone, be aware
that Android kills "non-essential" services that are running in
the background when there is an issue with memory, battery,
and so on. If you want to ensure that your application is
running at all times, you must activate the AWARE framework
in the Accessibility services (in your phone settings). This is
not required, but will increase the reliability of your data. Note this will cause your phone to talk
to you on Samsung devices only due to an accessibility bug.
Samsung Bug (Android Users Only)
- Go to Settings -> Accessibility -> Talkback « ON »
- Select « Settings » from the bottom of the page
- Uncheck all Talkback options
- Switch Talkback « Off » again
- Go back to Settings -> Application manager -> All
- Disable Google TTS (text to speech)
- Disable Samsung TTS (text to speech)
If you’re experiencing the same issue on another phone, try this :
- Go to Settings -> App Manager -> Select GoogleTTS -> Disable
- Go to Settings -> App Manager -> Select SamsungTTS (on a Samsung phone) -> Disable
Finally, you should double check that there is actually data in your google cloud database. You
can do this by logging into the mysql server remotely mysql --host=instance-IP --user=root --
password or by checking the cloud console's log of read write operations, as here:
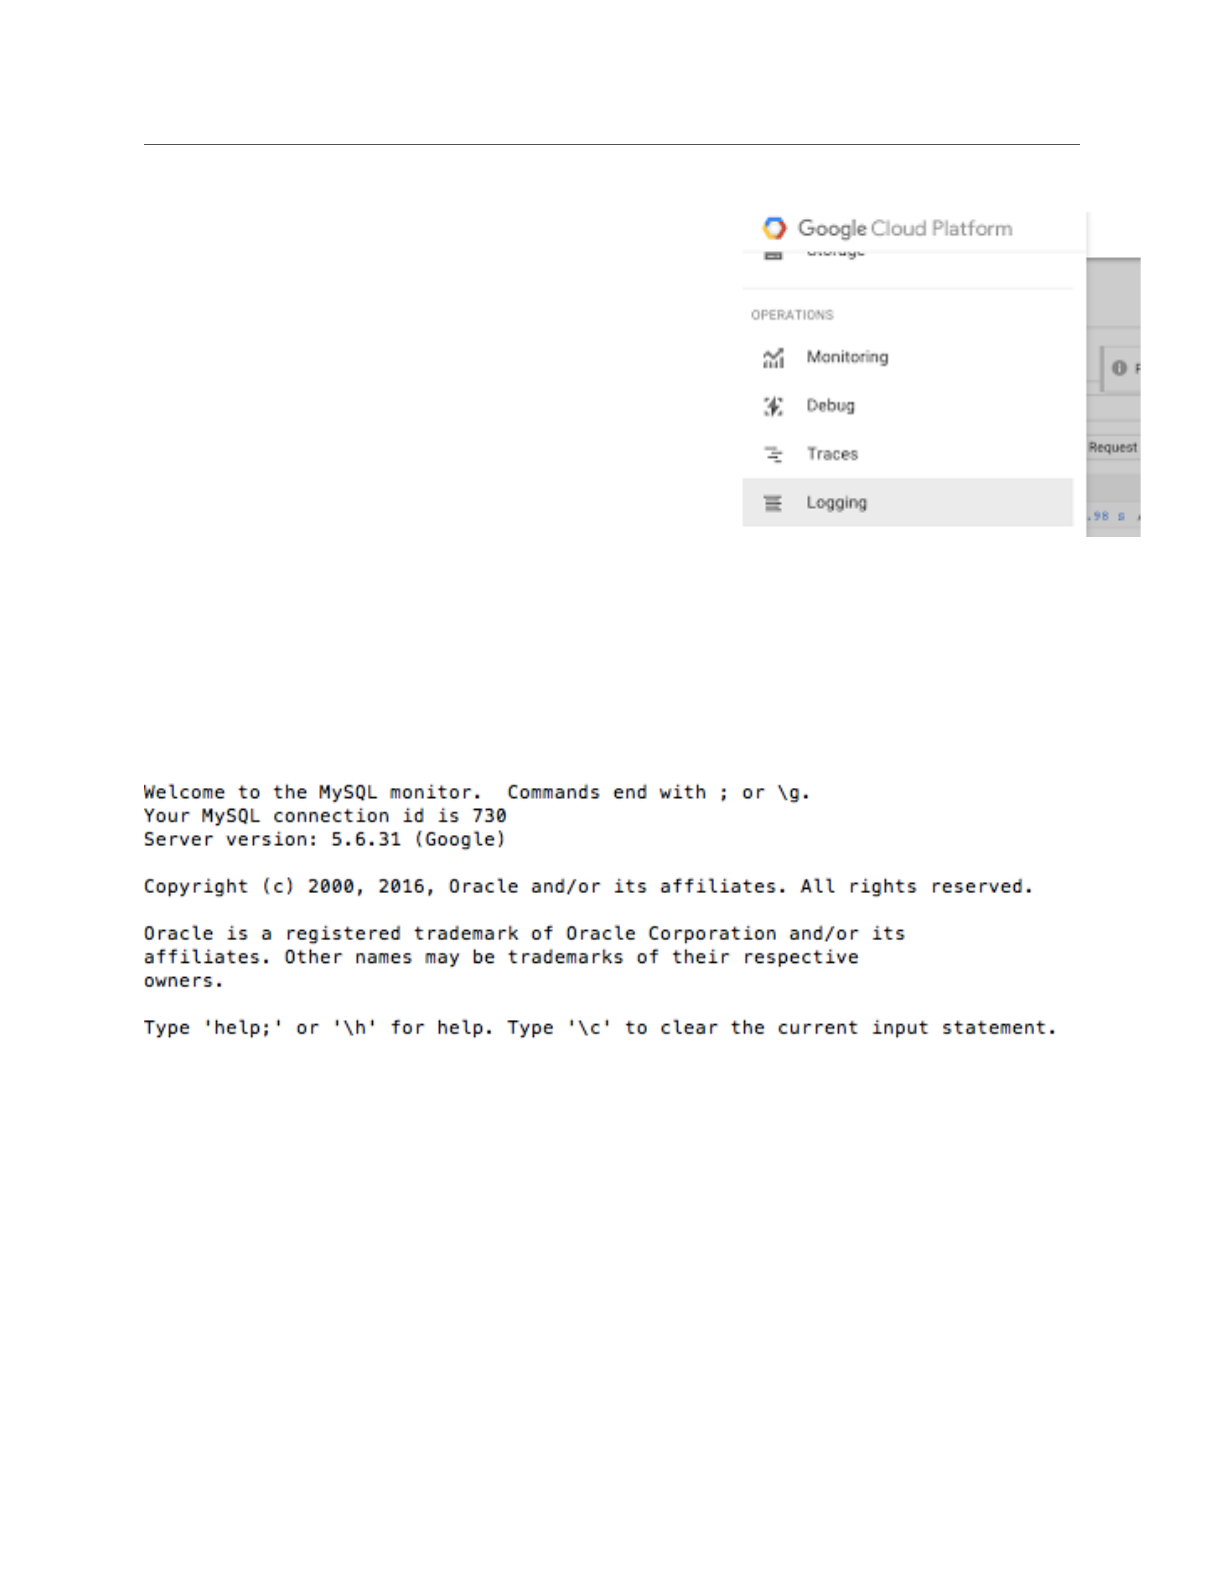
Step 5: Check your data!
Data from your phone will be in the google Cloud Storage
database you created. When developing on the Google
Cloud Shell you will always need to 'deploy' your code and
then test it online at [uniqueid]-mobile.appspot.com. When
testing online, you can take advantage of Google's cloud
logging service to see a trace of what happens, which is
very useful for debugging. Access it using the same left
hand menu that got you to SQL.
Next, you can choose to access your MySQL database
either with your computer as we tested before(use mysql --host=instance-IP --user=userId --
password), or you can access it on your google cloud shell by type int “gcloud beta sql connect
mobile-data --user=Youruserid”.
You will see this again:
Next, you will need to check the table names and pick one. This is standard mysql, and here is
a way to do that (with images showing applied examples). words capitalized in my examples are
SQL commands. Sometimes you will see these in lowercase in the images, SQL doesn't really
care. However when you name a database or table, you have to always keep the case exactly
the same, so SQL does care for those.
SHOW DATABASES;
In this student's case, data contains the aware data. We'll call that [database] in example text
instead so you know to use your database name there.

USE [database];
SHOW tables;
You can use SQL queries to explore and check the data.
Once you have listed your tables, you should choose one to export, which we will call [table] (an
example might be locations or battery).
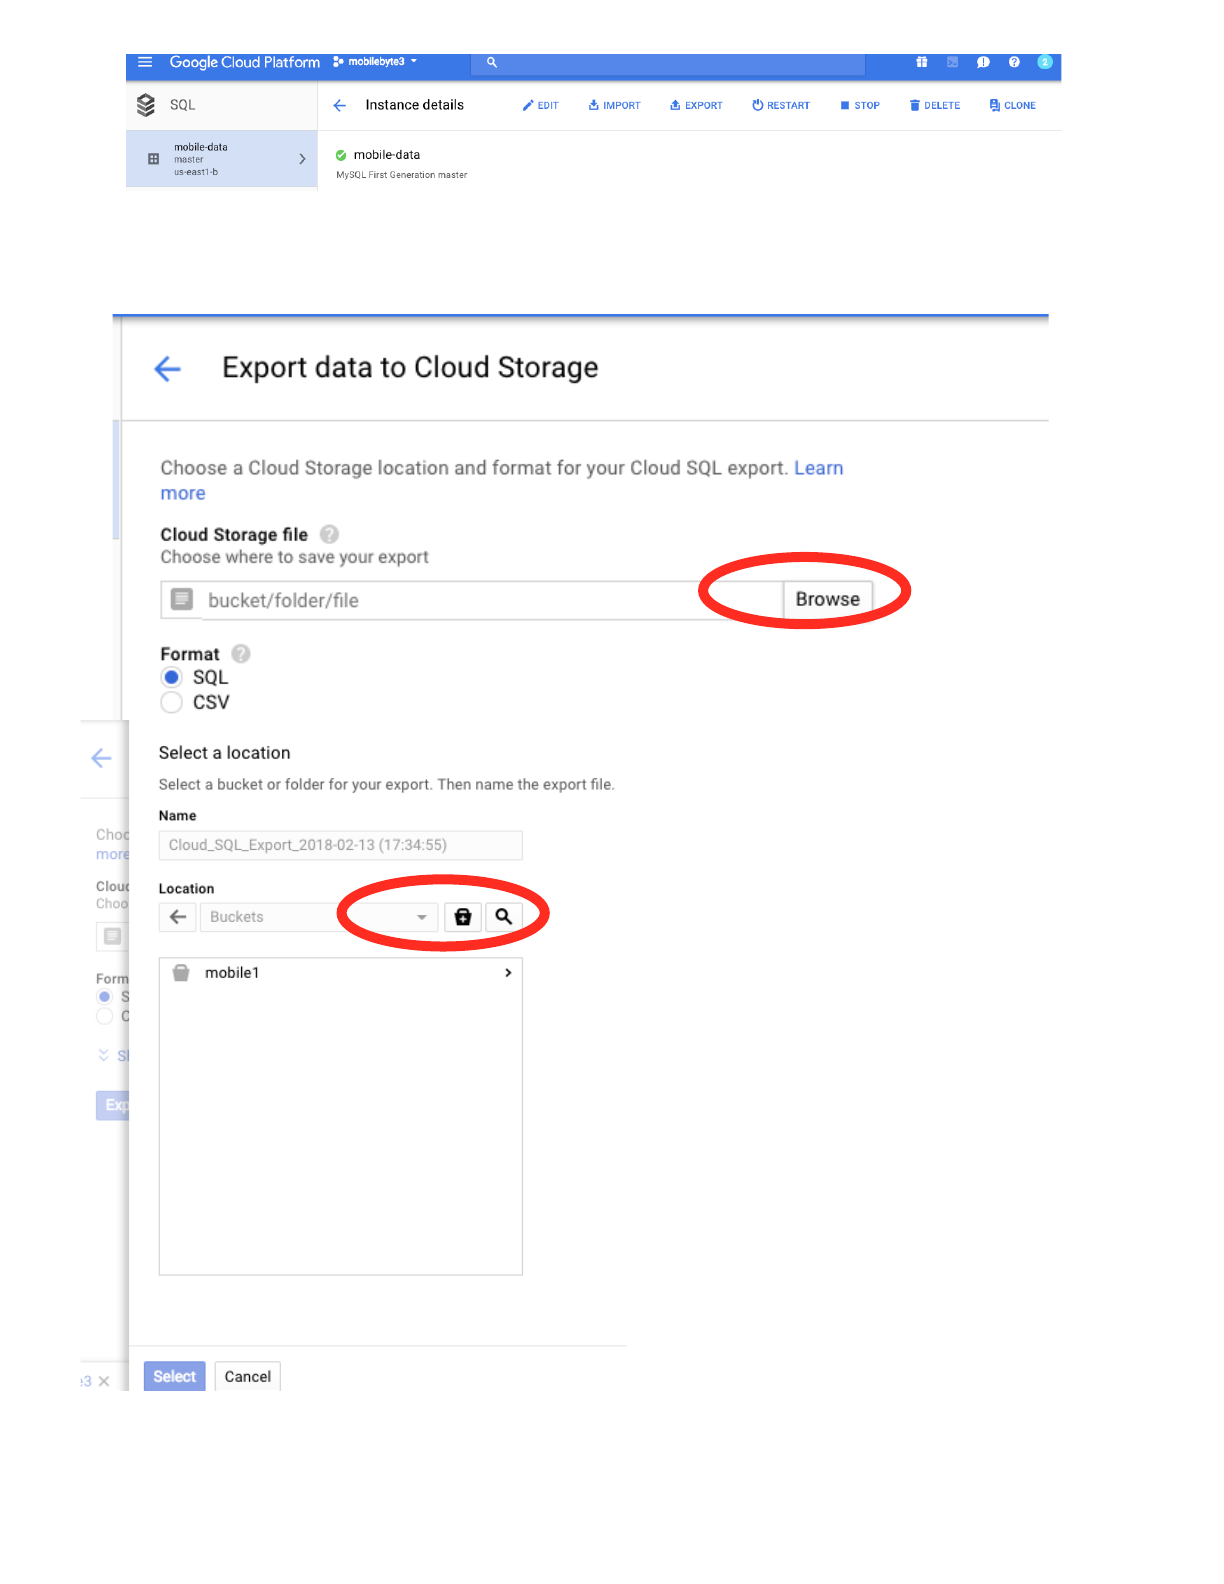
Finally, you need to go to your cloud console and export the data, as described here: https://
cloud.google.com/sql/docs/mysql/import-export/exporting
You should first click Export and then click “Browse” and then click “+” to create a new bucket.
Then select the bucket.
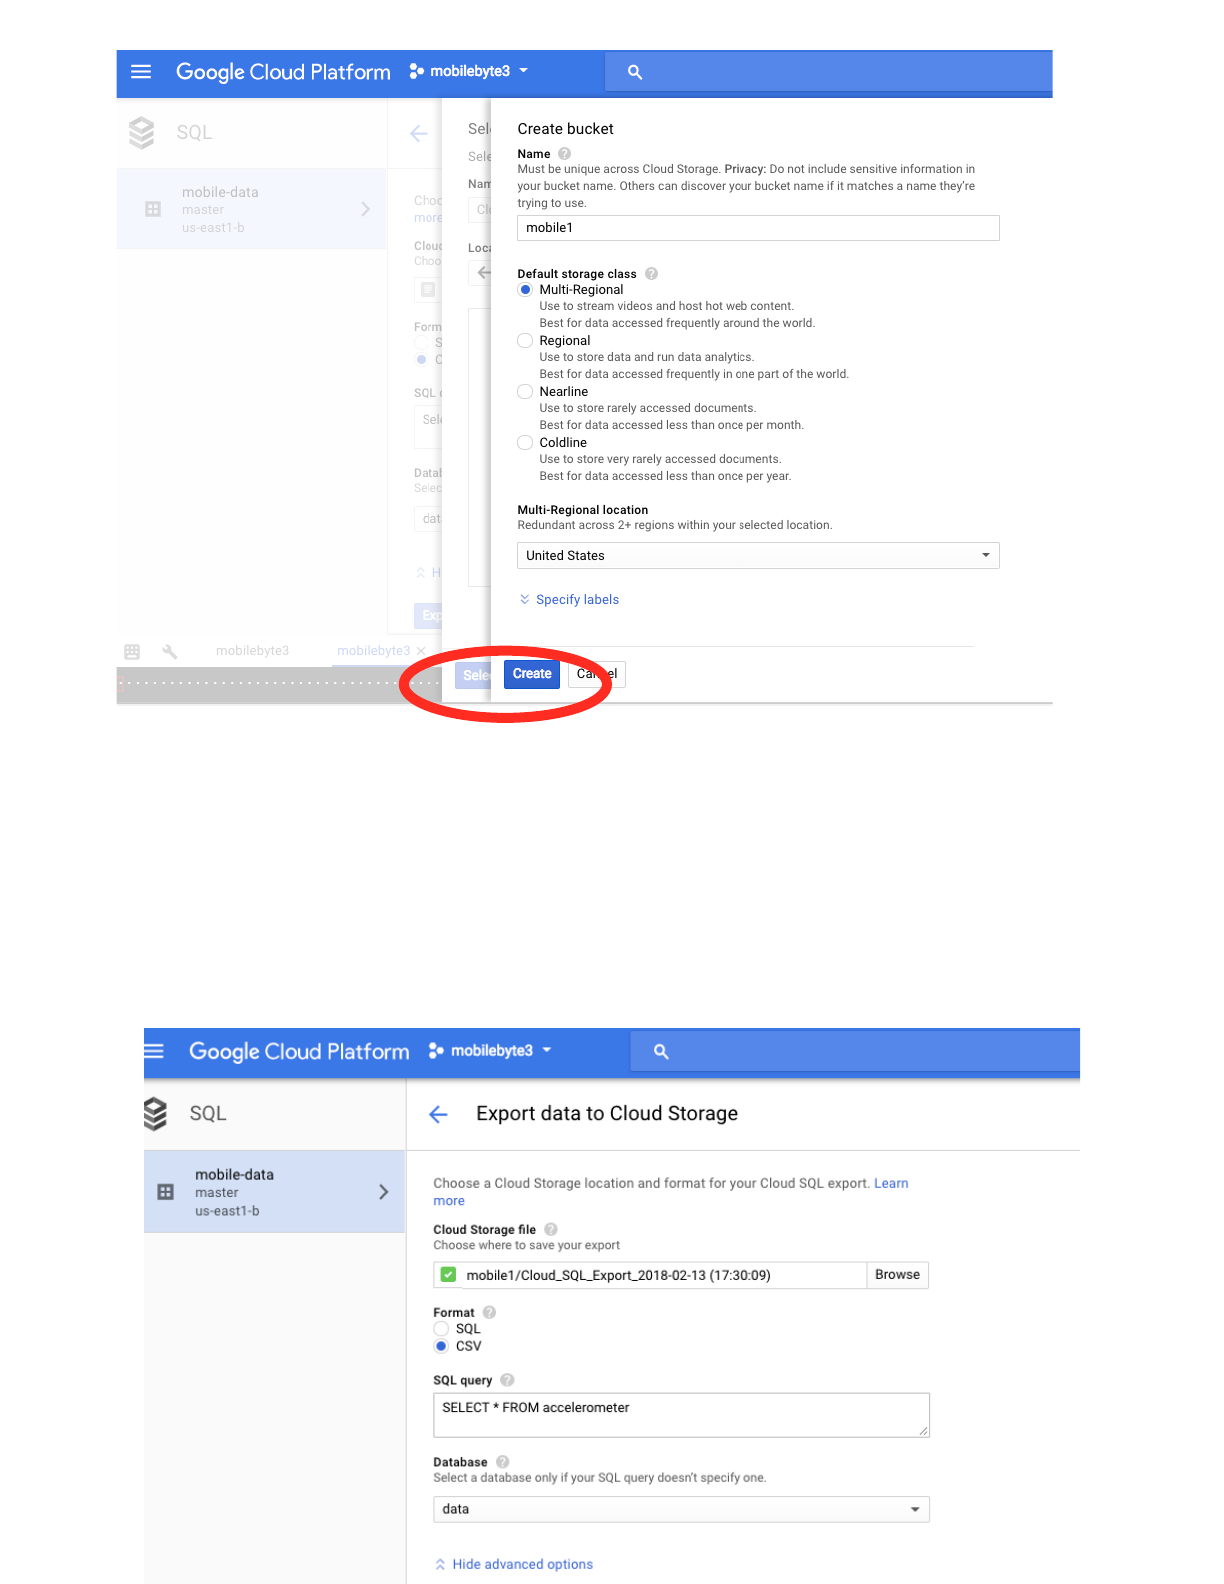
Here is a picture of what that would look like once set up properly to export the locations table
as a csv file. Note that you have to click on 'advanced options' to enter the database name. Also
note that you can write other more complex SQL queries if you wish.
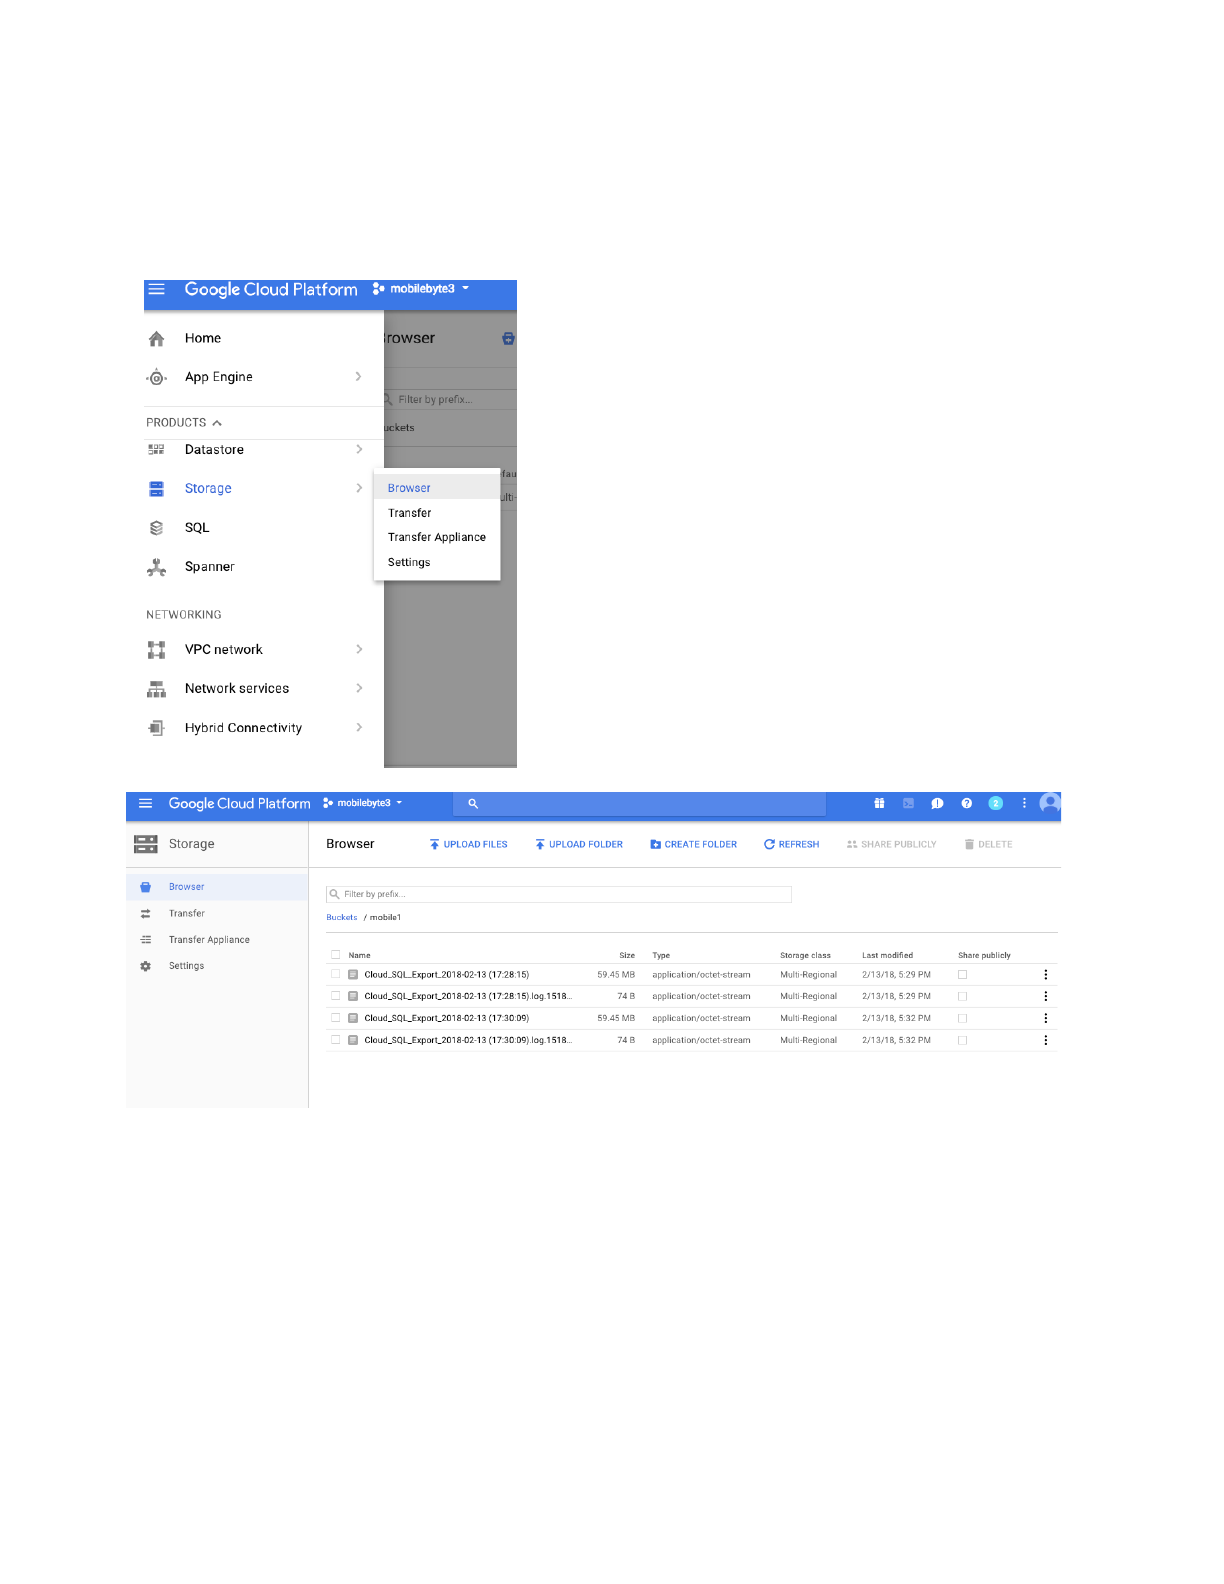
Once the export is complete, you will get a browser notification. You have to go to a completely
different part of the cloud console to download the exported file (sorry, folks!). To get to it you
have to go to the storage area, and select the bucket for your database.
You'll see either one file (a log), if your export failed, or
two files (a log and a csv file) if your export succeeded.
You can download the log file to find out why the export
failed, or share it with us on piazza, if you run into
trouble.
Once you have downloaded your CSV file, you can
import it into wrangler to clean it, to Excel if you want to
play around with different ways to visualize it, or
tableau to begin designing your visualization.
