Cisco Jabber For Windows 10.5 Advanced Features Guide JABW BK JC3E1CF9 00 10 5
User Manual: 10.5
Open the PDF directly: View PDF ![]() .
.
Page Count: 32

Cisco Jabber for Windows 10.5 Advanced Features Guide
First Published: August 14, 2014
Last Modified: August 26, 2014
Americas Headquarters
Cisco Systems, Inc.
170 West Tasman Drive
San Jose, CA 95134-1706
USA
http://www.cisco.com
Tel: 408 526-4000
800 553-NETS (6387)
Fax: 408 527-0883
THE SPECIFICATIONS AND INFORMATION REGARDING THE PRODUCTS IN THIS MANUAL ARE SUBJECT TO CHANGE WITHOUT NOTICE. ALL STATEMENTS,
INFORMATION, AND RECOMMENDATIONS IN THIS MANUAL ARE BELIEVED TO BE ACCURATE BUT ARE PRESENTED WITHOUT WARRANTY OF ANY KIND,
EXPRESS OR IMPLIED. USERS MUST TAKE FULL RESPONSIBILITY FOR THEIR APPLICATION OF ANY PRODUCTS.
THE SOFTWARE LICENSE AND LIMITED WARRANTY FOR THE ACCOMPANYING PRODUCT ARE SET FORTH IN THE INFORMATION PACKET THAT SHIPPED WITH
THE PRODUCT AND ARE INCORPORATED HEREIN BY THIS REFERENCE. IF YOU ARE UNABLE TO LOCATE THE SOFTWARE LICENSE OR LIMITED WARRANTY,
CONTACT YOUR CISCO REPRESENTATIVE FOR A COPY.
The Cisco implementation of TCP header compression is an adaptation of a program developed by the University of California, Berkeley (UCB) as part of UCB's public domain version
of the UNIX operating system. All rights reserved. Copyright ©1981, Regents of the University of California.
NOTWITHSTANDING ANY OTHER WARRANTY HEREIN, ALL DOCUMENT FILES AND SOFTWARE OF THESE SUPPLIERS ARE PROVIDED “AS IS" WITH ALL FAULTS.
CISCO AND THE ABOVE-NAMED SUPPLIERS DISCLAIM ALL WARRANTIES, EXPRESSED OR IMPLIED, INCLUDING, WITHOUT LIMITATION, THOSE OF
MERCHANTABILITY, FITNESS FOR A PARTICULAR PURPOSE AND NONINFRINGEMENT OR ARISING FROM A COURSE OF DEALING, USAGE, OR TRADE PRACTICE.
IN NO EVENT SHALL CISCO OR ITS SUPPLIERS BE LIABLE FOR ANY INDIRECT, SPECIAL, CONSEQUENTIAL, OR INCIDENTAL DAMAGES, INCLUDING, WITHOUT
LIMITATION, LOST PROFITS OR LOSS OR DAMAGE TO DATA ARISING OUT OF THE USE OR INABILITY TO USE THIS MANUAL, EVEN IF CISCO OR ITS SUPPLIERS
HAVE BEEN ADVISED OF THE POSSIBILITY OF SUCH DAMAGES.
Any Internet Protocol (IP) addresses and phone numbers used in this document are not intended to be actual addresses and phone numbers. Any examples, command display output, network
topology diagrams, and other figures included in the document are shown for illustrative purposes only. Any use of actual IP addresses or phone numbers in illustrative content is unintentional
and coincidental.
Cisco and the Cisco logo are trademarks or registered trademarks of Cisco and/or its affiliates in the U.S. and other countries. To view a list of Cisco trademarks, go to this URL: http://
www.cisco.com/go/trademarks. Third-party trademarks mentioned are the property of their respective owners. The use of the word partner does not imply a partnership
relationship between Cisco and any other company. (1110R)
Google, Google Play, Android and certain other marks are trademarks of Google Inc.
©2014 Cisco Systems, Inc. All rights reserved.

CONTENTS
CHAPTER 1
Introduction 1
CHAPTER 2
Availability 3
Create Personal Status Messages 3
Use Grayscale Status Icons 4
CHAPTER 3
Contacts 5
Adjust Contact Lists 5
Add External Contacts 5
Import Contact Lists 6
Contact List Definitions 6
Example Contact List 7
CHAPTER 4
Chats 9
Search from Chat Windows 9
Start Group Chats 10
Transfer Files 10
Block Specific Contacts and Domains 11
Allow Specific Contacts and Domains 11
Control Who Can Interact with You 12
Manage Status Requests 14
Chat Rooms 15
Join a Room 16
Participate in a Room 16
Filter Rooms 16
Search Rooms 17
Chat Room Permission Levels 17
Cisco Jabber for Windows 10.5 Advanced Features Guide
iii

CHAPTER 5
Calls 19
Send Call Icons To Contacts 19
Adjust Audio Volume 19
Arrange Video Devices 20
Forward Calls 20
CHAPTER 6
Meetings 21
Add Meeting Accounts 21
Integrate Your Calendar 21
Integrate with Google Calendar 22
Allow Access to Google Calendar 22
Remove Google Calendar Integration 23
CHAPTER 7
Other Features 25
Show the Docked Window 25
Create Custom Tabs 25
CHAPTER 8
Further Reading 27
Cisco Jabber for Windows 10.5 Advanced Features Guide
iv
Contents

CHAPTER 1
Introduction
Welcome to the Advanced Features Guide for Cisco Jabber for Windows.
Cisco has designed Jabber for Windows to be intuitive and easy to use. The purpose of this guide is not to
describe every feature that Cisco Jabber offers. This guide provides task-based help for some features for
which you might need some help or explanation.
If you are new to Cisco Jabber for Windows, you should do the following before you get started with this
guide:
1Learn about instant messaging and availability features. Watch the video at:
http://www.cisco.com/en/US/prod/ps10265/jabber_windows.html
2Learn about making voice calls with Cisco Jabber. Watch the video at:
http://www.cisco.com/en/US/prod/ps10265/jabber_windows_uc.html
3Review and understand the following:
•How to use chat and call controls.
•How to use sharing features such as taking screen captures or transferring files.
Review the Quick Start Guide at:
http://www.cisco.com/en/US/products/ps12511/products_user_guide_list.html
Objectives
This guide helps you learn how to:
Share Your Status with Others
Let your contacts know if you are available to chat, in a meeting, or too busy to talk.
Organize and Add Contacts
Adjust your contact list and add your friends and family.
Cisco Jabber for Windows 10.5 Advanced Features Guide
1

Use Chats to Communicate
Learn how to quickly create group chats and control your privacy settings.
Make Calls and Adjust Your Settings
Forward calls and use other numbers. Change the volume on calls and organize your video cameras.
Use Meetings and Calendars
Add a meetings account to instantly start and join conferences. View your calendar to stay on top of
meetings and events.
Cisco Jabber for Windows 10.5 Advanced Features Guide
2
Introduction

CHAPTER 2
Availability
•Create Personal Status Messages, page 3
•Use Grayscale Status Icons, page 4
Create Personal Status Messages
Cisco Jabber has three default messages to show availability status:
•Available
•Away
•Do not disturb
You can create personal status messages to replace the default messages and tell your contacts what you are
doing at a glance.
Cisco Jabber saves the three most recent personal status messages for each state. You can select your
status messages from the drop-down list on the main window.
Note
Procedure
Step 1 Insert your cursor in the status message field on the main window.
Step 2 Enter your personal status message.
Step 3 Press the Enter key on your keyboard.
Cisco Jabber displays your personal status message.
Cisco Jabber for Windows 10.5 Advanced Features Guide
3
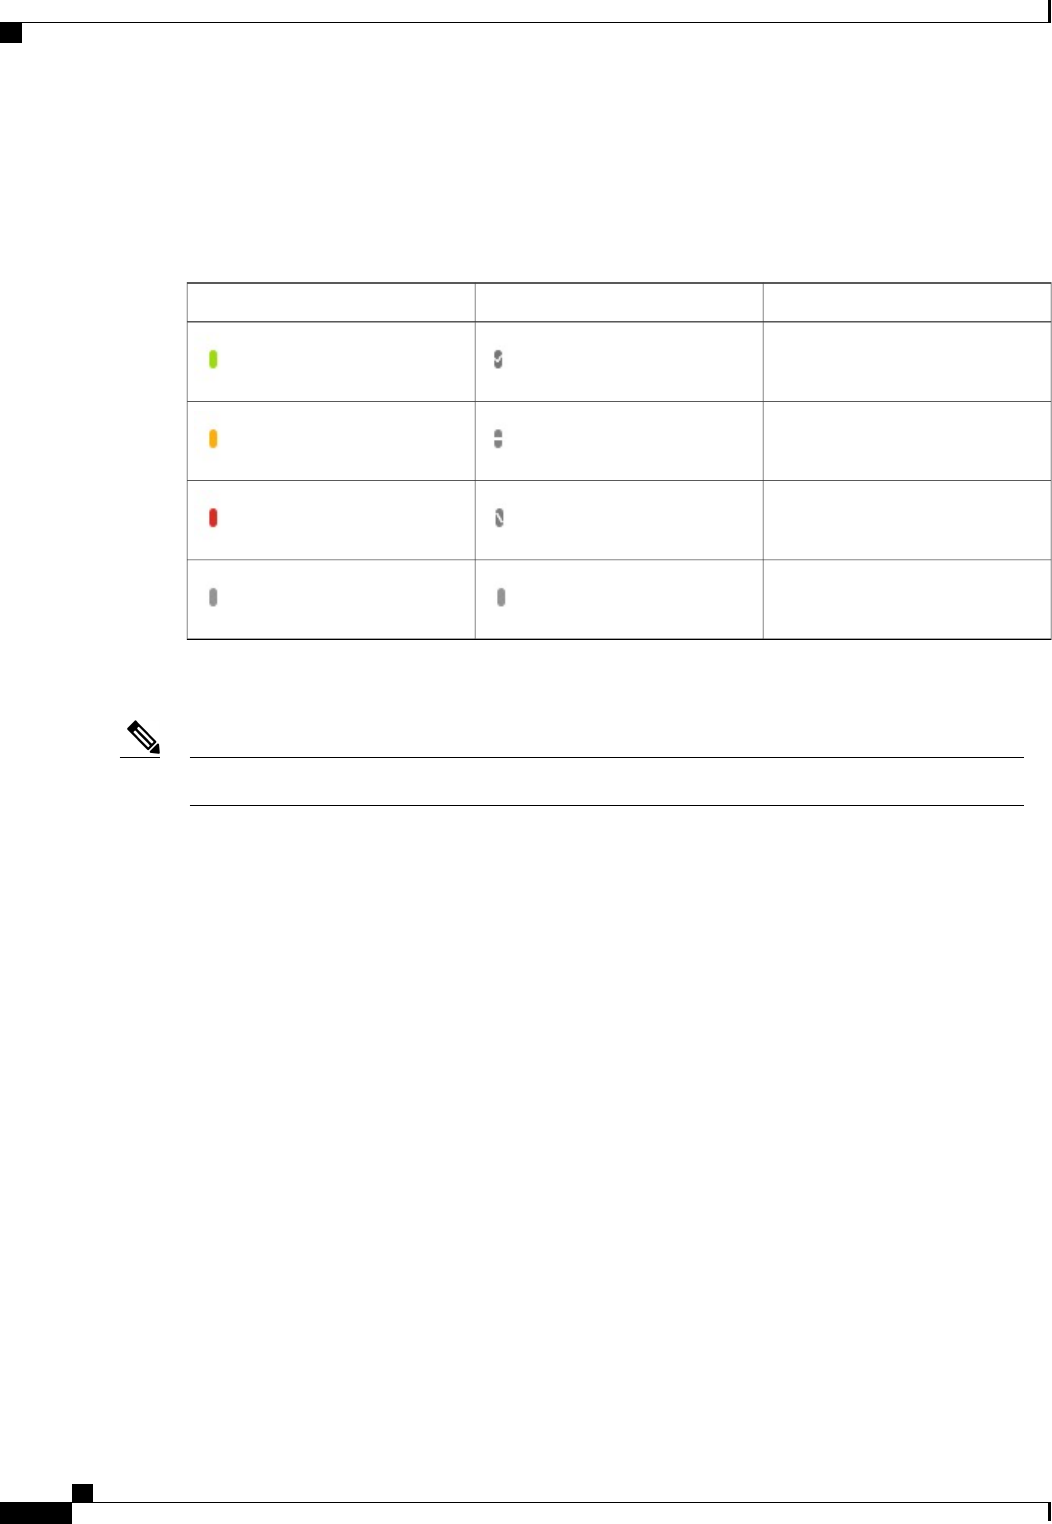
Use Grayscale Status Icons
Grayscale status icons are monochrome and use symbols to show availability status.
The following table shows standard and grayscale status icons:
Default Availability StateGrayscale Status IconStandard Status Icon
Available
Away
Do Not Disturb
Unavailable
To show grayscale status icons, select View >Show status in grayscale.
In some versions of Cisco Jabber, you select View >Accessible presence.Note
Cisco Jabber displays grayscale status icons.
Cisco Jabber for Windows 10.5 Advanced Features Guide
4
Availability
Use Grayscale Status Icons

CHAPTER 3
Contacts
•Adjust Contact Lists, page 5
•Add External Contacts, page 5
•Import Contact Lists, page 6
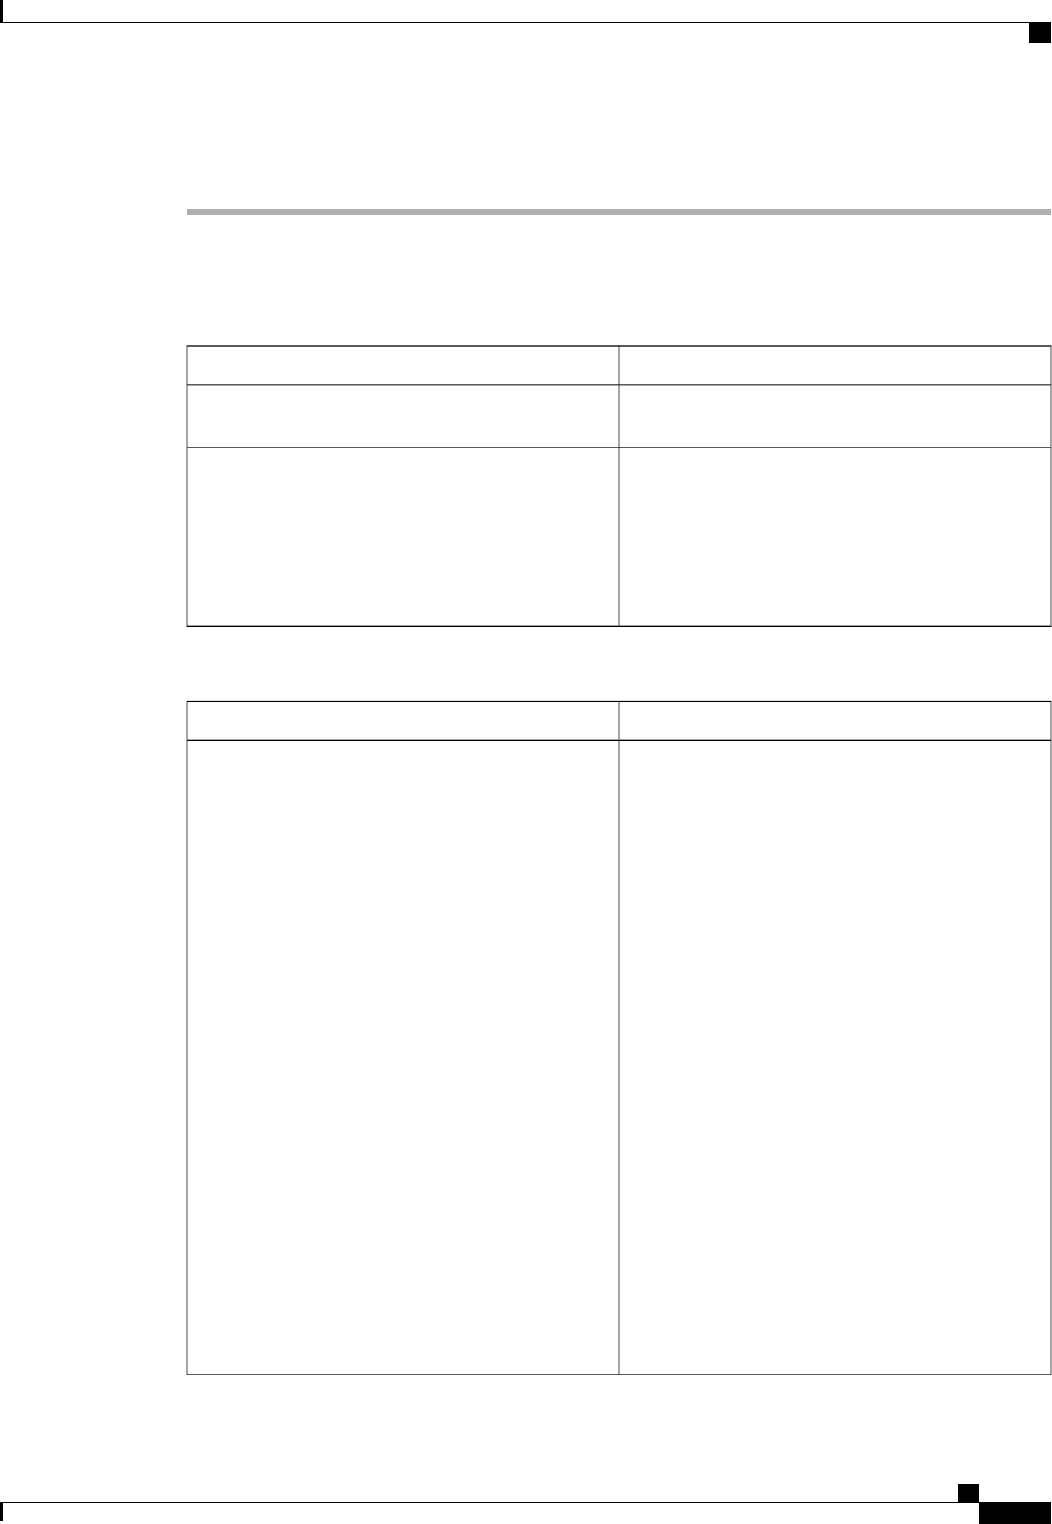
Adjust Contact Lists
You can arrange and organize your contacts by name or status.
Procedure
Select View and then choose from the following options:
DescriptionOption
Select this option to show contact pictures.
Deselect this option to hide contact pictures.
Show contact pictures
Select this option to show all contacts.
Deselect this option to show only contacts who are logged
in.
Show offline contacts
Select this option to arrange contacts alphabetically by name.Sort contact by name
Select this option to arrange contacts by their availability
states.
Sort contact by status
Add External Contacts
Cisco Jabber lets you add contacts from chat applications such as Google Talk or Microsoft Lync. You can
also add custom contacts for people without an IM address.
Cisco Jabber for Windows 10.5 Advanced Features Guide
5

Your system administrator must enable this feature. If you cannot add external contacts, ask your system
administrator for help.
Procedure
Step 1 Select File >New and select the type of contact that you want to add.
Step 2 Enter the email address of your contact. For custom contacts without an IM address, enter the contact details
that you want to use.
Step 3 Select a contact group.
Step 4 Select Add.
Import Contact Lists
You can create contact lists in XML format and then import them into Cisco Jabber.
To import a contact list, do the following:
Procedure
Step 1 Open the main Cisco Jabber window.
Step 2 Select File >Import contacts....
Step 3 Browse to the location of the contact list definitions XML file.
Step 4 Select the contact list definitions file and then select Open.
Cisco Jabber imports the contacts from the definitions file. The contacts are available in your contact list.
Contact List Definitions
The following XML snippet shows the structure of a contact list definitions file:
<?xml version="1.0" encoding="utf-8"?>
<buddylist>
<group>
<gname>Group Name</gname>
<user>
<uname>IM Address</uname>
<fname>Display Name</fname>
</user>
</group>
</buddylist>
The following table describes the elements in a contact list definitions file:
Cisco Jabber for Windows 10.5 Advanced Features Guide
6
Contacts
Import Contact Lists

DescriptionElement
XML declaration.
Your definitions file must contain an XML declaration
with the following attributes:
version
Specifies the version of the XML file.
encoding
Specifies the encoding. You must use utf-8.
<?xml version="1.0"
encoding="utf-8"?>
Root element of the contact list definition.buddylist
Parent element of a contact group.
One group can contain multiple users.
There is no limit to the number of users a group can
contain. There is also no limit to the number of groups
you can include in a contact list definitions file.
However, your server sets a restriction to the number
of contacts that you can add to Cisco Jabber. You
must ensure you do not exceed that limit in your
contact list definitions file.
group
Specifies the name of the group.gname
Parent element that holds details for a single user.user
Specifies the instant messaging (IM) address of a
user.
uname
Specifies the name that displays in the client user
interface.
fname
Example Contact List
The following is an example XML definition of a contact list that you can import into Cisco Jabber:
<?xml version="1.0" encoding="utf-8"?>
<buddylist>
<group>
<gname>Sales</gname>
<user>
<uname>amckenzi@example.com</uname>
<fname>Adam McKenzie</fname>
</user>
<user>
<uname>aperez@example.com</uname>
<fname>Anita Perez</fname>
</user>
</group>
<group>
<gname>Marketing</gname>
<user>
<uname>nfox@example.com</uname>
Cisco Jabber for Windows 10.5 Advanced Features Guide
7
Contacts
Contact List Definitions

<fname>Nancy Fox</fname>
</user>
</group>
</buddylist>
Cisco Jabber for Windows 10.5 Advanced Features Guide
8
Contacts
Contact List Definitions

CHAPTER 4
Chats
•Search from Chat Windows, page 9
•Start Group Chats, page 10
•Transfer Files, page 10
•Block Specific Contacts and Domains, page 11
•Allow Specific Contacts and Domains, page 11
•Control Who Can Interact with You, page 12
•Manage Status Requests, page 14
•Chat Rooms, page 15
Search from Chat Windows
You can find, add, and call contacts from the search bar in chat windows.
Procedure
Step 1 Enter the name of a contact in the search bar of the chat window.
Step 2 Do one of the following:
•Hover your cursor over the contact to add that contact to a list or to call that contact.
•Double-click the contact to start a chat session.
You can enter phone numbers in the search bar to call directly from the chat window.Tip
Cisco Jabber for Windows 10.5 Advanced Features Guide
9

Start Group Chats
You can use group chats to send instant messages to two or more contacts at the same time. Group chats are
not persistent, meaning that you can use them to create a chat with two or more people but no history is stored.
Procedure
Start group chats with any of the following options:
ProcedureOption
1Press and hold the Ctrl key on your keyboard.
2Select several contacts from your contact list.
3Right-click and then select Start group chat.
Select multiple contacts from your
contact list
1Select a contact from your contact list.
2Drag and drop the contact into a chat window.
Drag and drop contacts into the chat
window
1Select Add participants in the bottom right corner of a chat
window.
2Enter the name of the contact you want to add to the chat.
3Select Add.
Use the Add participants icon on the
chat window
Transfer Files
You can transfer files between Cisco Jabber client to quickly and easily share information.
Procedure
Use the following options to transfer files:
ProcedureOption
1Select a file on your computer.
2Drag and drop the file into a chat window.
Drag and drop files into the chat window
Cisco Jabber for Windows 10.5 Advanced Features Guide
10
Chats
Start Group Chats

ProcedureOption
1Select Send file in the bottom right corner of a chat window.
2Select a file on your computer.
3Select Open.
Use the Send file icon on the chat window
Block Specific Contacts and Domains
You can block specific contacts or domains. When you block a contact, that person cannot view your availability
status or send you instant messages.
If you add a contact to your block list, and that contact has you in their contact list, that person cannot
view your availability status or send you instant messages.
Note
The following are examples of how the block list works:
Example 1: Block specific contacts inside your organization
You add an IM address to your block list. That contact cannot view your availability status or send you
instant messages.
Example 2: Block specific domains
You add a specific domain, such as cisco.com, to your block list. No contacts who have IM accounts
at that domain can view your availability status or send you instant messages.
Procedure
Step 1 Select File >Options.
The Options window opens.
Step 2 Select the Privacy tab and then select Advanced.
Step 3 Enter specific contact addresses or domains in the Block list.
Step 4 Select Apply and then OK.
Allow Specific Contacts and Domains
Some deployments of Cisco Jabber include an allow list that adds exceptions to the block list. You can enter
specific contacts or domains in your allow list to ensure those contacts can view your availability status and
send you messages.
Cisco Jabber for Windows 10.5 Advanced Features Guide
11
Chats
Block Specific Contacts and Domains

Cisco Jabber uses your contact list as an allow list. You do not need to add contacts in your contact list
to your allow list.
Note
The following are examples of how the allow list works:
Example 1: Allow specific contacts inside your organization
1You set your basic privacy settings to block everyone inside your company.
2You then add specific IM addresses for contacts inside your company to your allow list.
Cisco Jabber blocks all contacts inside your company, except for those specific people in your allow
list.
Example 2: Allow specific domains
1You set your basic privacy settings to block everyone outside your company.
2You then add a specific domain, such as cisco.com, to your allow list.
Cisco Jabber blocks everyone outside your company, except for people who have IM accounts at
cisco.com.
Example 3: Allow specific contacts from blocked domains
1You add a specific domain, such as cisco.com, to your block list.
2You then add an IM address, such as anitaperez@cisco.com, to your allow list.
Cisco Jabber blocks all people who have IM accounts at cisco.com, except for anitaperez@cisco.com.
Procedure
Step 1 Select File >Options.
The Options window opens.
Step 2 Select the Privacy tab and then select Advanced.
Step 3 Enter specific contact addresses or domains in the Allow list.
Step 4 Select Apply and then OK.
Control Who Can Interact with You
Some deployments of Cisco Jabber let you control who interacts with you inside your company and outside
your company.
Cisco Jabber for Windows 10.5 Advanced Features Guide
12
Chats
Control Who Can Interact with You
Procedure
Step 1 Select File >Options.
The Options window opens.
Step 2 Select the Privacy tab.
Step 3 Select one of the following options in the Inside my company section:
DescriptionOption
All contacts in your company can view your
availability status and send you instant messages.
Allow everyone
No contacts in your company can view your
availability status or send you instant messages.
You can choose to block everyone and then add
exceptions for specific contacts in your allow list.
This option does not block contacts in your contact
list.
Block everyone
Step 4 Select one of the following options in the Outside my company section:
DescriptionOption
Cisco Jabber notifies you when people outside your
company add you as a contact. When Cisco Jabber
notifies you, you can select the following options:
Allow
Let the person view your availability status and
send you instant messages.
Block
Do not let the person view your availability
status or send you instant messages.
Add the person to your block list.
Add to my contact list
Let the person view your availability status and
send you instant messages.
Add the person to your contact list.
Close the notification window
Ignore the notification temporarily.
Cisco Jabber notifies you again the next time
you sign in.
Prompt me every time
Cisco Jabber for Windows 10.5 Advanced Features Guide
13
Chats
Control Who Can Interact with You

DescriptionOption
No contacts outside your company can view your
availability status or send you instant messages.
You can choose to block everyone and then add
exceptions for specific contacts in your allow list.
This option does not block contacts in your contact
list.
Block everyone
Step 5 Select Apply and then OK.
Manage Status Requests
Some deployments of Cisco Jabber let you manage notifications when people request to view your availability
status.
Procedure
Step 1 Select File >Options.
The Options window opens.
Step 2 Select the Privacy tab.
Step 3 Select one of the following options:
DescriptionOption
Cisco Jabber does not notify you when someone
inside your company adds you as a contact.
Cisco Jabber notifies you when people outside your
company add you as a contact.
Auto-accept requests from contacts inside my
company
Cisco Jabber does not notify you when anyone adds
you as a contact.
Auto-accept requests from all contacts
Cisco Jabber for Windows 10.5 Advanced Features Guide
14
Chats
Manage Status Requests

DescriptionOption
Cisco Jabber notifies you when people add you as a
contact. When Cisco Jabber notifies you, you can
select the following options:
Allow
Let the person view your availability status and
send you instant messages.
Block
Do not let the person view your availability
status or send you instant messages.
Add the person to your block list.
Add to contacts
Let the person view your availability status and
send you instant messages.
Add the person to your contact list.
Close the notification window
Ignore the notification temporarily.
Cisco Jabber notifies you again the next time
you sign in.
Prompt me for each request
Step 4 Select Apply and then OK.
Chat Rooms
You can use chat rooms if they are enabled by your administrator. Chat rooms are enabled if there is a Chat
Rooms icon on your hub window under your Contacts tab.
You use chat rooms to join or read discussions on the theme of the room with the other chat room members.
For example, an administrator in the banking industry may create a themed chat room such as "Foreign
Exchange Rates", where any users joining this room can discuss the foreign currency exchange rates and view
all previous messages sent to the room since its creation.
You can browse all rooms by viewing a list of room names, join open rooms, or be added to a room by an
administrator. You can be a member of multiple rooms. You can filter room content by keywords or senders.
Cisco Jabber for Windows 10.5 Advanced Features Guide
15
Chats
Chat Rooms

Join a Room
You join a chat room to participate in the conversation or read what is being said, where multiple members
share information in a common chat window. All of the rooms that you are a member of are listed in your
My rooms tab. If an administrator adds you to a chat room, it is displayed immediately in your My rooms
tab.
Procedure
Step 1 Click the Chat Room icon in the Hub window, and select the All Rooms tab.
Step 2 Browse for a room, which are listed alphabetically.
If a room is closed you cannot join the room unless you are added by an administrator.
Step 3 Click Join beside the room that you want to join. The rooms where you are already a member have a checkmark
beside them.
Participate in a Room
After you join a room, you can participate in the chat room and view the discussion history. Some chat rooms
may be used to only distribute information, where some members are entitled to publish information and
others have read-only access.
Select the Chat Room icon on the hub window, and click on My Rooms to view the rooms where you are a
member. Double-click on the room that you want to enter.
When you enter a chat room, the history of conversation is persistent. Even if you exit a chat room and close
the client, you can return to the conversation in that room. When you return to the chat room, you can view
the messages that were sent by other members while you were not logged in. In a room, select Show More
to view older messages.
View the current participant list on the right side of the chat window. You can show or hide the participant
list.
Filter Rooms
Filters
Filters search chat room using the criteria that you define for the search. You see a red badge, which displays
the number of new matches found for your filter. Filters can include mentions when your username is used
in a chat room, or custom filters that search by keyword or sender.
In the Filters tab, select Create Filter. You can filter chat rooms using up to three keywords or by username.
Give the filter a label and then define the filter criteria. You must define at least one keyword or the username
of the sender, but you can specify the sender and up to three keywords. When you are done, select Create.
Results are listed on the Filter tab, with a number to indicate how many results were found that you have not
read. Results are updated automatically each time a new match for your filter is made. When you have matches
Cisco Jabber for Windows 10.5 Advanced Features Guide
16
Chats
Join a Room

on your filter, you can click on the filter match to open the chat history in the rooms where the matches were
found.
My mentions
When other users mention your username, it creates a notification in the My mentions section of your chat
room filters. Mentioning users creates a notification that they were mentioned in a chat room.
To create a mention for another user, in the text box of the chat window, type the @ symbol followed by the
person's user name to search the directory for the user. The client will display user names that match what
you are typing. Select the username that you want to mention. You can mention a username that does not
have a Jabber ID associated with it. After you send the message, a notification is created for the mentioned
user in their My mentions, with a link to the conversation in the room where the mention is. You can use the
@ symbol as part of your text entry, just tap the Esc key to exit the mention field. Users only receive a
notification if the chat room is public and they are a user in the organization, or if they are a member of the
chat room.
Search Rooms
You can search the persistent chat rooms by keywords, and further refine your keyword search with criteria
such as participants, room name, and date range. You search persistent chat rooms by entering search criteria
in a search box, just like you search for contacts in your Jabber hub window.
After you specify search criteria, the search results appear as tabs within the integrated session window, much
like a chat room filter. Results are sorted chronologically and grouped by room. The maximum number of
results displayed is 200, although you can show more messages to display more results. You double click on
a result to open the persistent chat room where the search got a match.
Chat Room Permission Levels
Administrators can restrict your participation in chat rooms by changing your permission level, which define
how you can participate in a room.
You may have one of the following levels of access to a chat room:
•You have read and write access to a room.
•You have read-only access to a room.
•You are removed from a room temporarily but can re-enter the room.
•You are removed from a room permanently and cannot re-enter the room.
Cisco Jabber for Windows 10.5 Advanced Features Guide
17
Chats
Search Rooms

Cisco Jabber for Windows 10.5 Advanced Features Guide
18
Chats
Chat Room Permission Levels

CHAPTER 5
Calls
•Send Call Icons To Contacts, page 19
•Adjust Audio Volume, page 19
•Arrange Video Devices, page 20
•Forward Calls, page 20
Send Call Icons To Contacts
You can send a call icon to another user in a chat window that they can simply click on to call you. These call
icons, or "communicons", give you an easy way to request calls from contacts. When someone receives a call
icon, they can simply click on the icon to start a phone call with you.
Procedure
Enter either of the following commands in a chat window to sends the person or people in your chat window
an icon of a telephone. Your contacts can click on the telephone icon to start a call with you.
:callme or :telephone
Adjust Audio Volume
You can set the volume level for your speakers, microphone, ringer, and alerts.
Procedure
Step 1 Select File >Options.
The Options window opens.
Step 2 Select the Audio tab.
Step 3 Select the audio device from the drop-down list.
Step 4 Adjust the volume for the audio device with the slider control.
Cisco Jabber for Windows 10.5 Advanced Features Guide
19

Arrange Video Devices
If you have more than one video camera or device, you can arrange them in order of preference.
Procedure
Step 1 Select File >Options.
The Options window opens.
Step 2 Select the Video tab and then select Advanced.
Step 3 Select your camera and use the up and down arrows to set the order.
Forward Calls
You can forward all calls from Cisco Jabber to voicemail or a different phone.
Procedure
Step 1 Select the phone control menu on the main window.
Step 2 Select Forward calls to and then select the appropriate option.
Cisco Jabber for Windows 10.5 Advanced Features Guide
20
Calls
Arrange Video Devices

CHAPTER 6
Meetings
•Add Meeting Accounts, page 21
•Integrate Your Calendar, page 21
Add Meeting Accounts
You can add Cisco WebEx sites to Cisco Jabber to quickly start, join, and manage online conferences.
Procedure
Step 1 Select File >Options.
The Options window opens.
Step 2 Select the Meetings tab and then select Edit account.
Step 3 Select New Site from the WebEx Site drop-down list.
Step 4 Enter the required settings in the following fields:
WebEx site
The name of the Cisco WebEx site, for example, cisco.webex.com
Username
Your username
Password
Your password
Integrate Your Calendar
Set up calendar integration to view your meetings and calendar events directly from Cisco Jabber.
Cisco Jabber for Windows 10.5 Advanced Features Guide
21

Procedure
Step 1 Select File >Options.
The Options window opens.
Step 2 Select the Integration tab.
Step 3 Select the application you use to organize your calendar.
Step 4 Select File >Exit to close Cisco Jabber.
Step 5 Restart Cisco Jabber.
What to Do Next
If you integrate with Google Calendar, you must allow access.
Integrate with Google Calendar
Complete the additional steps to integrate with Google Calendar.
Integration with Google Calendar is currently an experimental feature.Note
Allow Access to Google Calendar
When Cisco Jabber restarts, a Google Calendar Sign In window opens. You must enter your account details
so that Cisco Jabber can access events in Google Calendar.
Before You Begin
Select Google Calendar on the Integration tab and restart Cisco Jabber.
Procedure
Step 1 Enter your Google account username and password and then select Sign in.
A prompt displays to notify you that Cisco Jabber is requesting permission to manage your calendar.
Step 2 Select Allow access.
Step 3 If prompted, select Yes to continue running scripts on the page.
The first time you allow access to your Google Calendar, you might notice an error message that indicates an
error occurs with scripts on the page.
The Google Calendar Sign In window closes.
Step 4 On the main Cisco Jabber window, select the Meetings tab on the left side navigation.
Cisco Jabber displays calendar events from your Google Calendar account.
Cisco Jabber for Windows 10.5 Advanced Features Guide
22
Meetings
Integrate with Google Calendar

Remove Google Calendar Integration
You can remove Google Calendar integration with Cisco Jabber. To completely remove Google Calendar
integration, you should also revoke access from your Google account.
Procedure
Step 1 Open the main Cisco Jabber window.
Step 2 Select File >Options and then select the Integration tab.
Step 3 Select None and then select OK.
Step 4 Restart Cisco Jabber.
Cisco Jabber no longer displays events from Google Calendar.
What to Do Next
Open your Google Accounts page and revoke access for Cisco Jabber in the Authorized Access to your
Google Account section.
Cisco Jabber for Windows 10.5 Advanced Features Guide
23
Meetings
Integrate with Google Calendar

Cisco Jabber for Windows 10.5 Advanced Features Guide
24
Meetings
Integrate with Google Calendar
CHAPTER 7
Other Features
•Show the Docked Window, page 25
•Create Custom Tabs, page 25
Show the Docked Window
You can optionally show the docked window at the top of your screen to quickly access common functions.
Procedure
Step 1 Open the main window.
Step 2 Select View >Show docked window.
Deselect this option to hide the docked window.
Use global keyboard shortcuts to quickly search for contacts and start conversations.
FunctionKeyboard shortcut
Tip
Access the search or call menu in the
docked window.
You can use this shortcut to access the
docked window from other applications.
CTRL + Shift + ?
Toggle between menus on the docked
window.
Tab
Create Custom Tabs
You can create custom tabs to show HTML content in the main window.
Cisco Jabber for Windows 10.5 Advanced Features Guide
25

Procedure
Step 1 Select File >New >Custom Tab.
The Create new custom tab dialog window opens.
Step 2 Add details for your custom tab in the following fields:
Tab name
Enter an optional name for your custom tab. The name displays when you hover your cursor over the
tab.
Page URL
Enter the URL of the content for your custom tab. You can enter one of the following:
•Hosted content, for example, www.cisco.com
•Local content, for example, file://C:\workspace\page.html
Step 3 Select Create.
The custom tab is added to the main window.
What to Do Next
To remove custom tabs, select the tab in the main window and then select File >Remove custom tab.
You can remove only the custom tabs that you create.Note
Cisco Jabber for Windows 10.5 Advanced Features Guide
26
Other Features
Create Custom Tabs


Cisco Jabber for Windows 10.5 Advanced Features Guide
28
Further Reading
